
Signature Reference Manual
72
REFERENCE MANUAL
-
Upload
khangminh22 -
Category
Documents
-
view
0 -
download
0
Transcript of Signature Reference Manual

REFER
EN
CE M
AN
UA
L

English
GETTING STARTED . . . . . . . . . . . . . . . 1REGISTER YOUR VERTU PHONE . . . . . . . . . . . . . . . 1
VERTU PACKAGE CONTENTS . . . . . . . . . . . . . . . . . 1
CD-ROM . . . . . . . . . . . . . . . . . . . . . . . . . . . . . . . . 1
NETWORKS . . . . . . . . . . . . . . . . . . . . . . . . . . . . . . 1
CONVENTIONS USED IN THIS GUIDE . . . . . . . . . . . . 1
GLOSSARY . . . . . . . . . . . . . . . . . . . . . . . . . . . . . . 1
YOUR VERTU PHONE - FRONT VIEW . . . . . . . . . . . . 2
YOUR VERTU PHONE - BACK VIEW . . . . . . . . . . . . . 2
YOUR VERTU PHONE - S IDE V IEW 1 . . . . . . . . . . . . 3
YOUR VERTU PHONE - S IDE V IEW 2 . . . . . . . . . . . . 3
INSERTING THE BATTERY . . . . . . . . . . . . . . . . . . . 4
DISPLAY ICONS AND INDICATORS . . . . . . . . . . . . . 5
THE GLOWING EARPIECE . . . . . . . . . . . . . . . . . . . . 5
USING YOUR VERTU PHONE . . . . . . . . . . . . . . . . . . 5
PROTECTING YOUR VERTU PHONE . . . . . . . . . . . . . 7
THE MAIN MENU . . . . . . . . . . . . . . . . . . . . . . . . . . 7
PERSONALIS ING YOUR VERTU PHONE . . . . . . . . . . 9
CD-ROM . . . . . . . . . . . . . . . . . . . . . . . . . . . . . . . . 11
CARE AND MAINTENANCE . . . . . . . . . . . . . . . . . . . 11
SPECIFICATIONS . . . . . . . . . . . . . . . . . . . . . . . . . . 12
SECURITY . . . . . . . . . . . . . . . . . . . . . . 13PIN CODE . . . . . . . . . . . . . . . . . . . . . . . . . . . . . . . 13
PIN2 CODE . . . . . . . . . . . . . . . . . . . . . . . . . . . . . . 13
SECURITY CODE . . . . . . . . . . . . . . . . . . . . . . . . . . 13
SECURITY LEVEL . . . . . . . . . . . . . . . . . . . . . . . . . . 14
SECURITY MODULE . . . . . . . . . . . . . . . . . . . . . . . . 14
CALL BARRING . . . . . . . . . . . . . . . . . . . . . . . . . . . 14
BARRING PASSWORD . . . . . . . . . . . . . . . . . . . . . . 14
FIXED DIALLING . . . . . . . . . . . . . . . . . . . . . . . . . . 14
CLOSED USER GROUP . . . . . . . . . . . . . . . . . . . . . . 15
AUTHORITY CERTIF ICATES AND USER CERTIF ICATES 15
MESSAGES . . . . . . . . . . . . . . . . . . . . . 16TEXT MESSAGES . . . . . . . . . . . . . . . . . . . . . . . . . . 18
MULTIMEDIA MESSAGES . . . . . . . . . . . . . . . . . . . . 20
AUDIO MESSAGES . . . . . . . . . . . . . . . . . . . . . . . . . 23
E-MAIL . . . . . . . . . . . . . . . . . . . . . . . . . . . . . . . . . 23
WIRELESS VILLAGE CHAT . . . . . . . . . . . . . . . . . . . 24
VOICE MESSAGES . . . . . . . . . . . . . . . . . . . . . . . . . 24
INFO MESSAGES . . . . . . . . . . . . . . . . . . . . . . . . . . 24
SERVICE MESSAGES . . . . . . . . . . . . . . . . . . . . . . . 24
BLUETOOTH MESSAGES . . . . . . . . . . . . . . . . . . . . 25
SERVICE COMMANDS . . . . . . . . . . . . . . . . . . . . . . . 25
CONTACTS . . . . . . . . . . . . . . . . . . . . . 26CONTACTS MEMORY . . . . . . . . . . . . . . . . . . . . . . . 26
ADDING CONTACTS . . . . . . . . . . . . . . . . . . . . . . . . 27
ACCESSING CONTACTS . . . . . . . . . . . . . . . . . . . . . 27
ADDING INTERNET PHONE CONTACTS . . . . . . . . . . 27
CONTACT NUMBER AND TEXT TYPES . . . . . . . . . . . 28
CONTACTS MENU . . . . . . . . . . . . . . . . . . . . . . . . . 29
GROUPS . . . . . . . . . . . . . . . . . . . . . . . . . . . . . . . . 30
EDIT ING CONTACT NUMBERS . . . . . . . . . . . . . . . . . 31
EDIT ING CONTACT NAMES . . . . . . . . . . . . . . . . . . . 32
CALL HISTORY . . . . . . . . . . . . . . . . . . .33THE CALL HISTORY . . . . . . . . . . . . . . . . . . . . . . . . 33
VIEWING THE CALL HISTORY . . . . . . . . . . . . . . . . . 33
VIEWING MISSED CALLS . . . . . . . . . . . . . . . . . . . . 33
VIEWING RECEIVED CALLS . . . . . . . . . . . . . . . . . . 33
VIEWING DIALLED NUMBERS . . . . . . . . . . . . . . . . . 33
VIEWING MESSAGE RECIPIENTS . . . . . . . . . . . . . . 33
CLEARING LOG L ISTS . . . . . . . . . . . . . . . . . . . . . . 33
VIEWING CALL DURATION . . . . . . . . . . . . . . . . . . . 33
VIEWING THE PACKET DATA COUNTER . . . . . . . . . 34
VIEWING THE DATA TIMER . . . . . . . . . . . . . . . . . . 34
VIEWING THE MESSAGE LOG . . . . . . . . . . . . . . . . . 34
VIEWING THE SYNC LOG . . . . . . . . . . . . . . . . . . . . 34
VIEWING INTERNET CALL DURATION . . . . . . . . . . . 34
SETTINGS . . . . . . . . . . . . . . . . . . . . . . .35DATE AND TIME . . . . . . . . . . . . . . . . . . . . . . . . . . 35
PROFILES . . . . . . . . . . . . . . . . . . . . . . . . . . . . . . 35
TONES . . . . . . . . . . . . . . . . . . . . . . . . . . . . . . . . . 36
DISPLAY . . . . . . . . . . . . . . . . . . . . . . . . . . . . . . . . 37
MY SHORTCUTS . . . . . . . . . . . . . . . . . . . . . . . . . . 37
CONNECTIVITY . . . . . . . . . . . . . . . . . . . . . . . . . . . 37
CALL SETTINGS . . . . . . . . . . . . . . . . . . . . . . . . . . 40
PHONE SETTINGS . . . . . . . . . . . . . . . . . . . . . . . . . 42
CONFIGURATION . . . . . . . . . . . . . . . . . . . . . . . . . 44
SECURITY . . . . . . . . . . . . . . . . . . . . . . . . . . . . . . 44
WORKSHOP RESET . . . . . . . . . . . . . . . . . . . . . . . . 44
SYNC AND BACKUP . . . . . . . . . . . . . . . . . . . . . . . . 45
DIGITAL RIGHTS MANAGEMENT . . . . . . . . . . . . . . . 45
SIM SERVICES . . . . . . . . . . . . . . . . . . . . . . . . . . . 45
ADDITIONS . . . . . . . . . . . . . . . . . . . . . .46GALLERY . . . . . . . . . . . . . . . . . . . . . . . . . . . . . . . 46
GAMES AND APPLICATIONS . . . . . . . . . . . . . . . . . . 47
CALCULATOR . . . . . . . . . . . . . . . . . . . . . . . . . . . . 47
MUSIC PLAYER . . . . . . . . . . . . . . . . . . . . . . . . . . . 47
VOICE RECORDER . . . . . . . . . . . . . . . . . . . . . . . . 48
NOTES . . . . . . . . . . . . . . . . . . . . . . . . . . . . . . . . . 49
CALENDAR . . . . . . . . . . . . . . . . . . . . . .50CALENDAR . . . . . . . . . . . . . . . . . . . . . . . . . . . . . . 50
CALENDAR NOTES . . . . . . . . . . . . . . . . . . . . . . . . 50
TO-DO L IST . . . . . . . . . . . . . . . . . . . . . . . . . . . . . 51
ALARM CLOCK . . . . . . . . . . . . . . . . . . .52SETTING THE ALARM . . . . . . . . . . . . . . . . . . . . . . 52
WEB . . . . . . . . . . . . . . . . . . . . . . . . . . . .53AUTOMATICALLY SETTING UP WEB BROWSING . . . 53
MANUALLY SETTING UP WEB BROWSING . . . . . . . . 53
WEB BROWSING USING WLAN . . . . . . . . . . . . . . . . 53
VERTU MOBILE . . . . . . . . . . . . . . . . . . . . . . . . . . . 53
HOME . . . . . . . . . . . . . . . . . . . . . . . . . . . . . . . . . 53
GO TO ADDRESS . . . . . . . . . . . . . . . . . . . . . . . . . 53
BROWSE PAGES . . . . . . . . . . . . . . . . . . . . . . . . . . 53
SETTINGS . . . . . . . . . . . . . . . . . . . . . . . . . . . . . . 54
CLEAR THE CACHE . . . . . . . . . . . . . . . . . . . . . . . . 54
VERTU SERVICES . . . . . . . . . . . . . . . .56

English
VERTU SELECT . . . . . . . . . . . . . . . . . . . . . . . . . . . 56
VERTU FORTRESS . . . . . . . . . . . . . . . . . . . . . . . . . 56
TRAVEL . . . . . . . . . . . . . . . . . . . . . . . . . . . . . . . . 56
SET UP MANUAL ROAMING . . . . . . . . . . . . . . . . . . . 57
VERTU CONCIERGE . . . . . . . . . . . . . . . . . . . . . . . . 57
ACCESSORIES . . . . . . . . . . . . . . . . . . 58WALL CHARGER . . . . . . . . . . . . . . . . . . . . . . . . . . 58
BATTERY . . . . . . . . . . . . . . . . . . . . . . . . . . . . . . . 59
DATA CABLE . . . . . . . . . . . . . . . . . . . . . . . . . . . . . 60
VEHICLE CHARGER . . . . . . . . . . . . . . . . . . . . . . . . 60
APPENDIX . . . . . . . . . . . . . . . . . . . . . . 62SAFETY . . . . . . . . . . . . . . . . . . . . . . . . . . . . . . . . 62
SAR NOTICE – RM-266V . . . . . . . . . . . . . . . . . . . . . 64
EU RECYCLING NOTICE . . . . . . . . . . . . . . . . . . . . . 64
WARRANTIES . . . . . . . . . . . . . . . . . . . . . . . . . . . . 65
VERTU CONCIERGE TERMS AND CONDITIONS . . . . . 68

GETTING STARTED
English
1
1 GETTING STARTED
Register your Vertu phone
Vertu aims to provide you with the very best service possible.
To enable us to do this, please register your Vertu phone by visiting www.verturegistration.com or by calling Vertu Concierge using the dedicated key on the side of your phone.
Vertu package contents
The package contents may vary slightly in accordance with regional regulations.
CD-ROM
The CD-ROM provided with your Vertu phone contains the following items:
> Vertu PC Suite (for PC only)
> iSync Plug-in (for Macintosh only)
> An electronic version of the Reference Manual
> Link to set up your Vertu phone for MMS, browsing and e-mail
> A link to register your Vertu phone.
For more information please see “CD-ROM” on page 11.
Networks
To use the phone you must have service from a wireless service provider. Many of the features require special network features. These features are not available on all networks; other networks may require that you make specific arrangements with your service provider before you can use the network services. Your service provider can give you instructions and explain what charges will apply.
The wireless device described in this guide is approved for use on the GSM 850/900/1800/1900 networks and 3G UMTS 850 and 2100 networks. Contact your service provider for more information about networks.
Conventions used in this guide
Glossary
1 Vertu Signature phone RM266V
1 Signature Guide
1 Certificate of authenticity
1 Warranty and safety information
1 CD-ROM
2 Battery
1 Wall charger
1 Car charger
1 Data cable
1 Microfibre polishing cloth
Menu Represents text that appears on your Vertu phone’s display, for example, “From the stand-by display, press Menu”.
SEND Represents a Vertu phone key, for example, “Press the SEND key to make the call”.
Important information relating to safety.
Represents useful information or a quick way to access or operate a feature.
Represents points to be aware of when using your Vertu phone.
NAVIGATION key
Move the cursor up, down, left and right by pressing on the key edges.
CENTRE
SELECT keyPress this key to select an item.
Stand-by screen The screen that displays when you repeatedly press the END key.
NUMBER keys The keys that are used to enter text or numbers.
Default Initial product setting as supplied by Vertu when the phone leaves our workshop.
SIM card Subscriber Identity Module. This is a small card supplied by your service provider to insert into your Vertu phone for a network connection.
Service provider The provider of your SIM card and all associated network services.
Network service A feature which is made available at the discretion of your service provider.
Stand-by display
The display that appears when your Vertu phone is switched on, with Menu displayed at the bottom.
PIN number A Personal Identification Number that allows only authorised access to your Vertu phone and SIM card. We strongly recommend that you set these up when you receive your new Vertu phone and SIM card.

GETTING STARTED
English
2
Your Vertu phone - front view
Your Vertu phone - back view
Glowing Earpiece
Selection key
End key
Selection key
Send key
Microphone Light sensor
Centre select
key
Navigation key
Battery cover
release d-ring
Antenna area
Speaker port
Speaker port
Battery cover
Serial number
Hallmarks
(precious metal
phones only)

GETTING STARTED
English
3
Your Vertu phone - side view 1
Your Vertu phone - side view 2
Concierge key
Micro-USB
Connector cover
Power keySIM drawer
SIM drawer
release lever
Volume keys

GETTING STARTED
English
4
Inserting the battery
Remove the battery cover
Insert the battery
Replace the battery cover
Insert the S I M card
The SIM card and its contacts are easily damaged.
Be careful when handling, inserting or removing the SIM card.
Always switch the phone off and disconnect the charger before touching the battery.
With the back of the Vertu phone facing you, lift the top half of the battery cover release D-ring with your finger nail.
Hold it between your thumb and forefinger and turn anticlockwise until the back cover pops open.
Raise the battery cover slightly (1) and then move the cover gently towards the top of the phone (2).
Insert the battery at an angle (1) so that the battery contacts align with the contacts in the battery compartment.
Lower the battery into the battery compartment (2) and ensure that the battery is seated correctly before replacing the battery cover.
1
2
1
2
To replace the battery cover, carefully insert the internal clip(1) on the inside of the battery cover into the slot below the battery (2).
Lower the battery cover into position (3) until it clicks into place. The cover should close tightly using only light pressure.
Keep SIM cards out of the reach of small children.
To open the SIM drawer, insert a finger nail under the SIM drawer release lever (1). Fully extend the lever until the SIM drawer (2) is half way out of the phone. Fully remove the SIM drawer from the phone.
Place the SIM in the SIM drawer, aligning the slanted corners and ensuring the SIM is seated properly in the drawer.
2 1
1
2

GETTING STARTED
English
5
Display icons and indicators
The display shows the current status of your Vertu phone.
Status icons are displayed below the battery charge and signal strength indicators. The most commonly displayed icons are:
The glowing earpiece
The light in the glowing earpiece flashes at different rates to indicate the status of your Vertu phone.
> In stand-by mode the light flashes slowly.
> If you have missed a call or received a message the light flashes quickly.
> When you are charging your Vertu phone from the mains or through your computer the light will be on permanently.
Using your Vertu phone
To help you start using your Vertu phone as quickly as possible, please read the following information carefully.
Switching your Vertu phone on and off
The battery may not be fully charged when you first receive your Vertu phone. If a Battery low message is displayed when you first switch on your Vertu phone please see “Charging the battery” on page 58 for more information.
Hold the SIM and SIM drawer between your thumb and forefinger to ensure the SIM does not get damaged. Insert the SIM drawer containing the SIM into the top of the phone. Push it gently all the way in, making sure it clicks into position and the SIM lever is set fully in on the side of the phone.
The GSM signal strength indicator appears at the top left of the display. If you are using a 3G connection you will see the 3G signal strength indicator.
This illustration shows a strong signal.
This illustration shows that the signal strength is weak. To obtain a stronger signal move to an area clear of obstructions that may block the signal.
The battery charge indicator appears at the top right of the display.
This illustration shows a fully charged battery.
This illustration shows that the battery charge level is low and you need to recharge your Vertu phone soon.
You have received one or more text messages.
You have missed a call.
You have a voice message waiting (may not be shown on all networks).
The Fl ight profile is selected. Alternative icons are displayed for other profiles.
Audible alerts are disabled. There is no ringing tone when you receive a call.
The keypad is locked.
An alarm is set.
Bluetooth is switched on.
A 3G UMTS connection is active.
A GPRS connection is active.
Press and hold the POWER key to switch your Vertu phone on or off.
GETTING STARTED
English
6
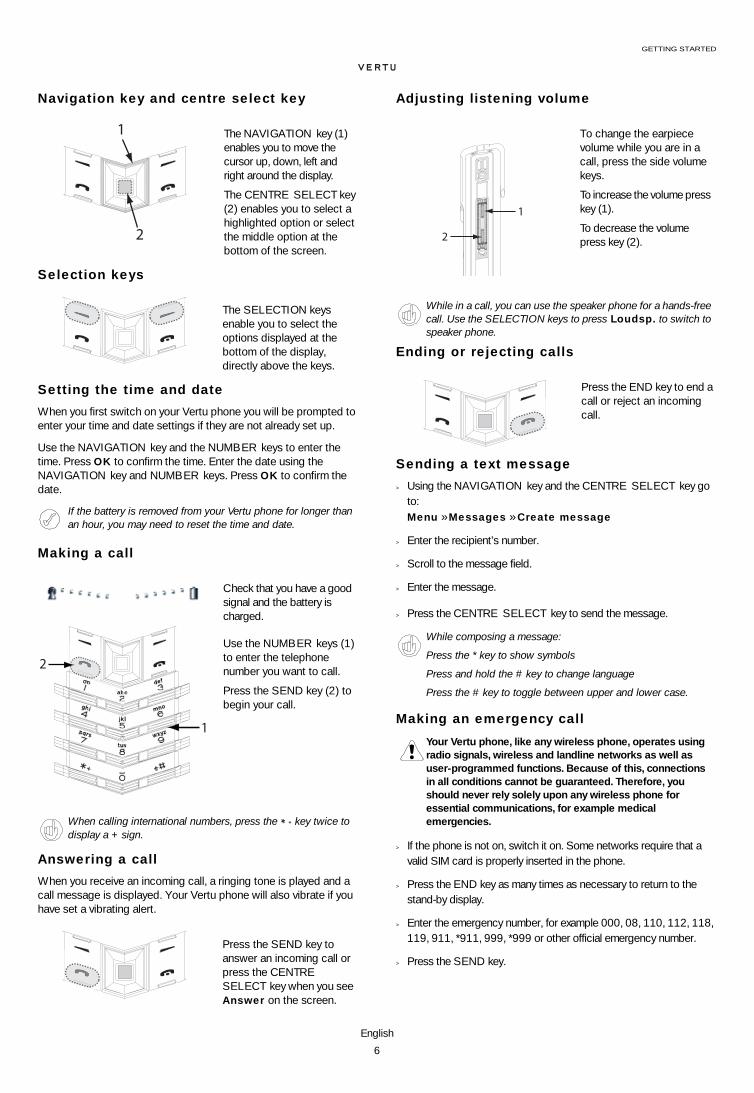
Navigat ion key and centre select key
Select ion keys
Sett ing the t ime and date
When you first switch on your Vertu phone you will be prompted to enter your time and date settings if they are not already set up.
Use the NAVIGATION key and the NUMBER keys to enter the time. Press OK to confirm the time. Enter the date using the NAVIGATION key and NUMBER keys. Press OK to confirm the date.
Making a cal l
Answering a cal l
When you receive an incoming call, a ringing tone is played and a call message is displayed. Your Vertu phone will also vibrate if you have set a vibrating alert.
Adjust ing l istening volume
Ending or reject ing cal ls
Sending a text message
> Using the NAVIGATION key and the CENTRE SELECT key go to: Menu » Messages » Create message
> Enter the recipient’s number.
> Scroll to the message field.
> Enter the message.
> Press the CENTRE SELECT key to send the message.
Making an emergency cal l
> If the phone is not on, switch it on. Some networks require that a valid SIM card is properly inserted in the phone.
> Press the END key as many times as necessary to return to the stand-by display.
> Enter the emergency number, for example 000, 08, 110, 112, 118, 119, 911, *911, 999, *999 or other official emergency number.
> Press the SEND key.
The NAVIGATION key (1) enables you to move the cursor up, down, left and right around the display.
The CENTRE SELECT key (2) enables you to select a highlighted option or select the middle option at the bottom of the screen.
The SELECTION keys enable you to select the options displayed at the bottom of the display, directly above the keys.
If the battery is removed from your Vertu phone for longer than an hour, you may need to reset the time and date.
Check that you have a good signal and the battery is charged.
Use the NUMBER keys (1) to enter the telephone number you want to call.
Press the SEND key (2) to begin your call.
When calling international numbers, press the key twice to display a + sign.
Press the SEND key to answer an incoming call or press the CENTRE
SELECT key when you see Answer on the screen.
1
2
1
2
To change the earpiece volume while you are in a call, press the side volume keys.
To increase the volume press key (1).
To decrease the volume press key (2).
While in a call, you can use the speaker phone for a hands-free call. Use the SELECTION keys to press Loudsp. to switch to speaker phone.
Press the END key to end a call or reject an incoming call.
While composing a message:
Press the * key to show symbols
Press and hold the # key to change language
Press the # key to toggle between upper and lower case.
Your Vertu phone, like any wireless phone, operates using radio signals, wireless and landline networks as well as user-programmed functions. Because of this, connections in all conditions cannot be guaranteed. Therefore, you should never rely solely upon any wireless phone for essential communications, for example medical emergencies.
1
2

GETTING STARTED
English
7
If certain features are in use, you may first need to turn those features off before you can make an emergency call. For more information consult your local service provider.
When making an emergency call, remember to give all the necessary information as accurately as possible.
Remember that your phone may be the only means of communication at the scene of an accident – do not end the call until given permission to do so.
Protecting your Vertu phone
Locking the keypad
You can lock the keypad on your Vertu phone to prevent accidentally dialling any numbers.
From the stand-by display, press Menu followed by the SPECIAL
FUNCTION key (at the bottom left of the keypad) within two seconds. A confirmation message is displayed.
When the keypad is locked, a key icon appears below the signal strength indicator.
When you receive an incoming call the keypad lock is automatically suspended. When the call is ended, the keypad returns to the locked state.
Unlocking the keypad
Press Unlock followed by the SPECIAL FUNCTION key within two seconds. A confirmation message is displayed.
Sett ing a P I N code
We recommend that you use a PIN code to prevent unauthorised use of your Vertu phone and SIM card.
> Using the NAVIGATION key and the CENTRE SELECT key go to: Menu » Sett ings » Securi ty » PI N code request
> Select On
The main menu
The main menu displays all the top level menu categories, from which you can access all the functions of your Vertu phone.
Opening the menu
From the stand-by display, press the CENTRE SELECT key to open the Menu and display the main categories. Use the NAVIGATION key to move through the menus.
Navigating through the menus
When navigating through the menus, press Back to return to the previous menu without saving changes. Press Exit to return to the stand-by display from the top-level menu.
Press the END key to return to the stand-by display from any menu without saving changes.
You can also use also voice commands to activate menu functions on your Vertu phone. Please see “Voice dialling” on page 10 for more information.
Changing how the menu is displayed
> Go to: Menu » Options » Main menu view
> Select one of the following options:
> List to display the main menu icons one at a time.
> Grid to display all the main menu icons on one screen. You can move the icons around the grid to have the options you use the most in your favourite positions.
> Tab to display the main menu icons along the top of the screen and the menu options below.
Emergency numbers vary by location and those listed above may not be supported by your current network.
Enter *#06# from the stand-by display to find the IMEI serial number. Make a note of your IMEI serial number and keep it in a safe place.
You can still make calls to the emergency numbers when the keypad is locked.
If you have set a PIN code, the next time you switch on your Vertu phone you will see this screen asking you to enter your PIN code.
Use the NUMBER keys to enter your PIN code (1).
Press OK (2).
The NAVIGATION key is pre-programmed with some popular menu options. When your Vertu phone leaves our workshop the options are:
Up - Lock keypad
Down - Names
Left - Create message
Right - Bluetooth on/off
To change these to your favourite menu options go to Menu » Sett ings » My shortcuts
1
2

GETTING STARTED
English
8
Messages
The Messages menu enables you to write, send, receive and read messages.
Your Vertu phone supports:
> text messages
> multimedia messages
> flash messages
> voice messages
> e-mail messages
> instant messages.
An interesting feature in this menu is Delivery reports that let you know if messages have been delivered.
> Create message
> Inbox
> E-mai l
> Drafts
> Outbox
> Sent i tems
> Saved i tems
> Delivery reports
> Voice messages
> Info messages
> WV chat
> Serv. commands
> Delete messages
> Message sett ings
Contacts
The Contacts menu enables you to add and delete contact numbers, select whether to store them on the phone or SIM memory, and set up speed dialling.
> Names
> Add new contact
> Sett ings
> Groups
> Speed dials
> Del. al l contacts
> Move contacts
> Copy contacts
Cal l history
The Call history menu enables you to view information about voice and data calls that you have made, received and missed.
You can also view information about messages received and sent, and the amount of data received and sent while web browsing.
> All cal ls
> Missed cal ls
> Received cal ls
> Dial led numbers
> Msg. recipients
> Clear log l ists
> Call durat ion
> Data counter
> Data t imer
> Message log
> Sync log
> Internet cal l dur.
Sett ings
The Sett ings menu enables you to change the way your Vertu phone is configured.
This covers a wide range of features from setting the clock, to ringing tones and configuring shortcut settings.
We recommend that you protect your Vertu phone and SIM card from unauthorised use by protecting them with passwords using the Securi ty option.
> Date and t ime
> Prof i les
> Themes
> Tones
> Display
> My shortcuts
> Connectiv i ty
> Call
> Phone
> Enhancements
> Configurat ion
> Securi ty
> Workshop reset
> Sync and backup
Addit ions
The Addit ions menu contains preloaded games, calculator and the voice recorder. Music and graphics files can also be stored here.
> Gallery
> Applicat ions
> Calculator
> Music player
> Voice recorder
> Notes

GETTING STARTED
English
9
Personalising your Vertu phone
Using Go to shortcuts
You can set up the Go to menu so that it automatically customises itself to your needs.
There are two ways to use the Go to shortcuts in your Vertu phone.
> Auto sort ing on dynamically displays the menu presenting the five most frequently used and the two last used functions
> Auto sort ing off allows you to pick and choose which menu options you want to see on the Go to list.
To turn on automatic sorting press Go to » Options » Auto sort ing on
To turn on manual sorting press Go to » Options » Auto sort ing off
Creating manual Go to shortcuts
To customise the options available on the Go to list, display the list as above and select Options » Select opt ions . Pick the options that you want to display on the Go to list.
You can also set up the NAVIGATION key to access shortcuts. On the idle screen press and hold one of the scroll keys and select an option to associate with the key.
Using the Go to menu
To use the Go to shortcuts, from the stand-by display press the Go to SELECTION key.
Use the NAVIGATION key and the CENTRE SELECT key to select the desired shortcut.
Some of the most useful Go to shortcuts are:
> Toggle WLAN on and off
> Toggle Bluetooth on and off
> Toggle between GSM only and 3G + GSM (Dual mode)
> Operator select (to select a network operator with a GPRS roaming agreement with your home network operator).
Changing backgrounds
Your Vertu phone comes with a number of images to use as display backgrounds.
Changing the background
> Select Menu » Sett ings » Themes or use the Go to shortcut.
> Select a background from those available.
> Select Apply to change the background.
Calendar
The Calendar menu enables you to view your calendar, make notes, set reminders for forthcoming events or dates, and create a to-do list.
Alarm clock
The Alarm clock menu gives you quick access to setting an alarm. Press the Options key to access Snooze and Repeat information.
Web
The Web menu enables you to access the internet and set a personal home page.
Web configuration settings can be found in the Sett ings » Configurat ion menu. > Vertu mobi le
> Home
> Bookmarks
> Go to address
> Last web addr.
> Web sett ings
> Clear the cache
Vertu services
Vertu Services contains software and services available only to Vertu owners:
Vertu Select gives you access to additional mobile content, games and applications specially selected for Vertu owners.
Vertu Fortress provides a secure back-up for your data.
Vertu Concierge provides an alternative way of calling the Vertu Concierge service.
Travel contains real-time information on flight, weather and exchange rates.
> Vertu Select
> Vertu Fortress
> Vertu Concierge
> Travel

GETTING STARTED
English
10
Changing prof i les
Your Vertu phone has several different profiles that enable you to change the ringing tone, ringing volume and vibrating alert all at once. Profiles can be timed, for example you can set the Silent profile while you attend a meeting and, if you have set it, the General profile will resume after the meeting.
Flight mode
Flight mode allows you to deactivate all radio frequency functions but still have access to offline games, the calendar and phone numbers.
> Select Menu » Sett ings » Prof i les » Fl ight
Use flight mode in radio sensitive environments, for example on board aircraft or in hospitals.
To deactivate flight mode, select any other profile.
Changing r inging tones
Your Vertu phone comes with various special ringing tones. You can also download ringing tones in AAC, MP3 and MIDI formats.
Changing the ringing tone
> Select Menu » Sett ings » Tones or use the Go to shortcut.
> Scroll slowly through the ringing tones list. When you hear a ringing tone that you would like to use, press Select .
Sett ing an alarm
Your Vertu phone has a useful alarm clock function.
> Select Menu » Alarm clock or use the Go to shortcut.
Enter the time on the screen, and press the Options SELECTION key to set snooze and repeat features.
When there is an alarm set, the alarm clock icon is displayed on the stand-by display.
If the clock is displayed in Analogue mode, a red alarm hand is displayed on the face of the clock in stand-by mode. The alarm hand shows at the time that the alarm is set for.
To turn the alarm clock off, press Menu » Alarm clock » Options » Alarm: » Off .
Using Bluetooth
Bluetooth technology enables you to easily share images and video clips, and take advantage of wireless connectivity by using a compatible Bluetooth headset. You first need to pair with the other device which should be within 10m of your Vertu phone.
The full Bluetooth menu is located in Menu » Sett ings » Connectiv i ty .
Using the options on these menus you can turn Bluetooth on, make your phone discoverable, search for active devices and pair your phone with other Bluetooth devices, for example your Bluetooth headset.
Use the Go to menu to toggle Bluetooth on and off.
Adding a new contact
To quickly add a new contact, enter the number on the stand-by display and then press the CENTRE SELECT key. Enter the contact name and Save the contact.
Voice dial l ing
Your Vertu phone can access menu options and dial contacts using voice commands.
> Press and hold the right SELECTION key on the stand-by display or press and hold the down volume key.
> Say clearly the name of the contact or menu option you want to access.
> Select the option you require from the displayed list. If you don’t make a selection within 5 seconds, the option at the top of the list will be automatically selected.
3G
Your Vertu phone is not automatically enabled for 3G. If you want to use 3G for faster downloads or when roaming in Japan, you need to enable 3G from the Go to menu. To do this, press the Go to SELECTION key » Network mode » Dual mode
Browsing the Web
You can access mobile Internet services with the Web browser on your Vertu phone. You can view pages that use wireless markup language (WML) or extensible hypertext markup language (XHTML).
Depending on which service provider you use, your Vertu phone might already have Internet settings installed so you might be able to browse the Internet straight away. If you cannot connect to the Internet, please contact Vertu Concierge or visit www.vertu.com and download your settings.
To open the Web browser select Menu » Web or press and hold the 0 key.
To make an emergency call in flight mode, make the call as normal and answer Yes when asked Exit f l ight prof i le?
To change profiles quickly, briefly press the POWER key.
Press and hold the # key to toggle between Silent and General profiles.
If the phone is switched off, it will switch itself on at the alarm time. Please remember this if you are in a restricted area.
Switch off Bluetooth if it’s not being used, to maximise battery performance.
Only download and use files from sources that offer adequate security and protection against harmful software.

GETTING STARTED
English
11
Using the music player
Your Vertu phone includes a music player for listening to music tracks, recordings or other MP3, MP4, AAC, eAAC+ or Windows Media Player sound files that you have transferred to your Vertu phone. Music files can be received via Bluetooth, MMS or using the File Manager in Vertu PC Suite.
To open the music player scroll to Menu » Addit ions » Music player .
Music files that you transfer to your Vertu phone are automatically added to the list of songs in the music player.
Using wireless LAN and Internet telephony
Your Vertu phone contains Wireless LAN technology, enabling you to connect to the Web using wireless LAN instead of a GPRS connection.
You can also make voice calls over the Internet using the WLAN, but you first have to set up an Internet telephony account with a provider.
Certain countries may have restrictions on the use of wireless LAN. Check with your local authorities for more information
CD-ROM
The Vertu CD-ROM works on a compatible computer with a CD-ROM drive, with Microsoft® Windows® 2000, Microsoft® Windows® XP or Microsoft® Vista® installed. You need at least 250 MB of free disk space and administrator rights to the PC.
Connect ing to a computer
To connect your Vertu phone to a computer you need either a Vertu USB data cable or Bluetooth wireless technology equipment and software.
Vertu PC Suite
Vertu PC Suite includes the following applications to extend the functionality of your Vertu phone:
Instal l ing Vertu PC Suite
> Insert your Vertu CD-ROM into the PC’s CD-ROM drive.
> Click on the install now button.
> Follow the on-screen instructions to complete the installation.
Viewing the electronic Reference Manual
> Start the CD-ROM as described above.
> Click on the Launch PDF button.
Sett ing up M M S, browsing and e-mail
> Start the CD-ROM as described above.
> Click on the order settings button.
> Your computer must be connected to the Internet to set up MMS, browsing and e-mail.
Registering your Vertu phone
> Start the CD-ROM as described above.
> Click on the register phone button.
> Your computer must be connected to the Internet to register your Vertu phone.
Care and maintenance
Your Vertu products have been crafted from some of the finest materials and care should be taken to keep them in good condition.
Ceramics and sapphire
Ceramics and sapphire are very hard materials but are also brittle and can be scratched by harder materials or objects. They can also be damaged if dropped.
Avoid the following:
> Contact with other hard materials such as diamond jewellery, nail files, abrasives, and mineral crystals.
> Dropping or knocking the product on hard surfaces.
> Repeated rubbing against hard surfaces.
Leather
All Vertu leather products are made by expert craftsmen. Each leather hide is unique and has natural markings which should be considered part of the individuality of fine leather. All leather can be damaged and should be treated with care.
Avoid the following:
> Exposure to water and high humidity.
> Dropping, rubbing or knocking on hard surfaces.
> Exposure to extreme temperatures.
> Contact with oily substances, make-up and solvents.
Metal
Vertu metals are finished to a high standard and care needs to be taken to maintain their appearance.
Avoid the following:
> Contact with chemicals such as solvents, alkaline and acid solutions, cola-based drinks and exposure to salt water. Wipe with a clean, soft cloth as soon as possible if contact occurs.
> Contact with sharp objects.
> Dropping or knocking against hard surfaces.
> Metal polishes.
Press and hold the END key to stop the music player.
> Backup > Contacts
> Synchronise > Messages
> Connect to the Internet > Image store
> Install applications > Multimedia player
> File manager
Damage caused to your Vertu phone by failing to observe these care instructions is not covered by the warranty.

GETTING STARTED
English
12
Hallmarks
If you have a gold or platinum Vertu phone, hallmarks are stamped as shown below to authenticate the precious metals used. Each precious metal is tested to ensure that the purity of the alloy conforms to the exacting standards of the European Convention Mark under the jurisdiction of the Swiss Assay Office.
The hallmark is made up of several stamps, which each have an individual meaning. It is located on the backplate underneath the serial number.
Diamonds
Diamonds are extremely hard and durable, but can be damaged if handled inappropriately. For example, they can be broken by a sharp impact on a hard surface and the settings could be damaged by dropping the phone onto a hard surface, causing the diamond to become loose or fall out.
Care should also be taken with contact with other jewellery such as diamond rings and diamond earrings as they can cause abrasion and chipping of the stone or the setting. Reasonable care should be taken not to catch the setting with threads, particularly synthetic threads which may bend the setting and loosen the stones.
We recommend that your Vertu phone is kept in the Vertu leather case when not being used, particularly when placed in hand bags and other luggage.
If the diamonds appear to become dull from use, the product can be lightly polished using the Vertu microfibre polishing cloth.
Specifications
B L-5CV Li- ion battery
1. Common control mark denoting the European Convention Mark – 750 (18 carat gold) or 950 (platinum) in scales.
2. St. Bernard dog’s head – Swiss Assay Office mark.
3. The fineness (purity) mark – AU 750 (18 carat gold) or PT950 (platinum).
4. Sponsor’s mark denoting the Vertu brand.
1 2 3 4
AU750
Volume 65 cc
Weight Stainless steel Gold Platinum
166 g218 g238 g
Length 130.3 mm
Width 42 mm
Thickness 13.1 mm
Talk time GSM up to 5 hours3G up to 3 hours
Stand-by time GSM up to 300 hours3G up to 300 hours

SECURITY
English
13
2 SECURITY
Your Vertu phone has a number of security features that help to prevent:
> Unauthorised use of your Vertu phone when your SIM card is inserted
> Unauthorised use of your Vertu phone if a different SIM card is inserted
> Unauthorised use of your SIM card in another phone.
PIN code
The (4 to 8 digit) PIN (Personal Identification Number) code helps protect your SIM card against unauthorised use. When the PIN code function is active, you need to key in the PIN code each time you switch on your Vertu phone. If you used your SIM card in another phone previously, the code will be the same.
The default setting for the PIN code function is defined by your service provider. Some service providers do not allow you to disable the PIN code request.
To turn the PIN code on and off:
1. From the stand-by display, press Menu » Sett ings » Securi ty » PI N code request .
2. Press Select to change the setting.
3. Scroll to On to enable the PIN code request or Off to disable it and then press Select .
4. Key in your PIN code and then press OK .
A confirmation message is displayed.
To change your PIN code:
1. From the stand-by display, press Menu » Sett ings » Securi ty » Access codes » Change PI N code .
2. When prompted, enter your current PIN code and then press OK .
3. When prompted, enter your new PIN code and then press OK .
4. Enter your new PIN code again to verify and then press OK .
A confirmation message is displayed.
PIN2 code
The PIN2 code is used to protect the advanced user functions of your SIM card for example fixed dialling lists. Your PIN2 code must not be the same as your PIN code.
To change your PIN2 code:
1. From the stand-by display, press Menu » Sett ings » Securi ty » Access codes » Change PI N2 code .
2. When prompted, enter your current PIN2 code and then press OK .
3. When prompted, enter your new PIN2 code and then press OK .
4. Enter your new PIN2 code again to verify and then press OK .
A confirmation message is displayed.
The PIN2 protected features of your SIM card will become blocked if you incorrectly enter your PIN2 code a number of times, normally after three consecutive attempts. You will need to contact your service provider to obtain a PIN2 Unblock (PUK2) code to unblock your PIN2 and restore your SIM card’s full functionality.
Security code
The security code helps protect your Vertu phone from unauthorised use. The first time you access this feature you will need to choose a code (between 5 - 10 digits long). You will need to key in this security code before you can do the following:
> Switch on the phone when a new SIM card is inserted (if you have set up security)
> Erase all entries in your contacts list
> Restore the default settings
> Change the security level.
To change the security code:
1. From the stand-by display, press Menu » Sett ings » Securi ty » Access codes » Change security code .
2. When prompted, enter your current security code and then press OK .
3. When prompted, enter your new security code and then press OK .
4. Enter your new security code again to verify and then press OK .
A confirmation message is displayed.
Make a careful note of your new security code, ensure you keep it secret and in a safe place.
The SIM card becomes blocked if you key in an incorrect PIN code three times in succession. You will need to contact your service provider for the PUK (PIN Unblocking) code.
Key in the PUK code if you have blocked your SIM card.
PUK codes cannot be changed. If you key in an incorrect PUK code 10 times in succession your SIM card becomes permanently blocked.
If you key in an incorrect security code five times in succession, your Vertu phone will not accept the correct security code for the next five minutes. Within that five minutes, your Vertu phone will show an error when you attempt to key in the security code, even if it is correct.

SECURITY
English
14
Security level
The security level function allows you to specify when you are required to key in the security code. The security code helps protect your Vertu phone against unauthorised use.
To change the security level:
1. From the stand-by display, press Menu » Sett ings » Securi ty » Security level .
2. Scroll to one of the following three options and then press Select :
Press None to disable the security code and allow any SIM to be used in the phone
Press Memory to allow any SIM to be used in the phone but you need to enter the security code when you try to access your Vertu phone’s directory after a different SIM card has been inserted
Press Phone to require that the security code is entered when you switch on the phone after another SIM card has been inserted
3. When prompted, enter your security code and then press OK .
If you change the security level, the numbers in your recent calls list are erased.
Security module
When available on your SIM, the security module improves security services for applications requiring a browser connection, and allows you to use a digital signature. The security module may contain certificates as well as private and public keys. The certificates are saved in the security module by the service provider. The security module is not supplied by Vertu.
To view or change the security module settings:
From the stand-by display, press Menu » Sett ings » Securi ty » Securi ty module sett .
Call barring
Call barring is a network service that allows you to restrict the incoming and outgoing calls that you make and receive. Contact your service provider for more information about using this function.
When outgoing calls are barred, calls may be possible to the emergency number programmed into your Vertu phone.
You need to key in the barring password to set up the call barring service. To obtain the barring password, contact your service provider.
To enable or disable call barring:
1. From the stand-by display, press Menu » Sett ings » Securi ty » Call barr ing service .
2. Scroll to one of the following five options and then press Select :
Press Outgoing cal ls to bar all outgoing calls
Press Internat ional cal ls to bar all international calls
Press Int l . except to home to bar all international calls with the exception of calls made to your home country (defined by your service provider) if abroad
Press Incoming cal ls to bar all incoming calls
Press Incoming i f abroad to bar all incoming calls when you are abroad
3. Scroll to Activate to enable the bar, Cancel to disable it, or Check status to view the status of the current bar and then press Select .
4. If you are enabling or disabling a bar, you must enter your barring password when prompted and then press OK .
A confirmation message is displayed.
To cancel all call barrings:
1. From the Call barr ing service menu, press Cancel al l barr ings to cancel all call bars.
2. Enter your barring password when prompted and then press OK .
Barring password
The call barring password is used to limit access to the call barring service. To obtain the barring password, contact your service provider.
To change your barring password:
1. From the stand-by display, press Menu » Sett ings » Securi ty » Access codes » Change barr ing pass.
2. When prompted, enter your current barring password and then press OK .
3. When prompted, enter your new barring password and then press OK .
4. Enter your new barring password again to verify and then press OK . A confirmation message is displayed.
Fixed dialling
Fixed dialling is a network service that allows you to restrict outgoing calls to only the numbers you specify in a fixed dialling list. Contact your service provider for more information about using this function.
When fixed dialling is enabled, it may still be possible to call the emergency number programmed into your Vertu phone, for example 000, 08, 110, 112, 118, 119, 911, *911, 999, *999 or other official emergency number.
You will need to key in the PIN2 code to save and edit numbers in the fixed dialling list or to call numbers not in the list. The PIN2 code is supplied with some SIM cards. For more information contact your service provider.

SECURITY
English
15
To enable or disable fixed dialling:
1. From the stand-by display, press Menu » Sett ings » Securi ty » Fixed dial l ing .
2. Scroll to On to restrict calls to the fixed dialling list, Off to disable fixed dialling, or Number l ist to view the numbers in your fixed dialling list and then press Select .
If you are using fixed dialling for the first time, it is recommended that your select Number list to add numbers to your list before enabling fixed dialling. You will receive two warning messages.
3. When prompted, enter your PIN2 code and then press OK .
4. Either enter your number manually and then press OK , or press Search to select a name from your contacts list and then press Select .
5. If you entered a number manually, enter a name for the number and then press OK .
6. A confirmation message is displayed and you are returned to the fixed dialling list. Add additional numbers to your list in the same way. Press Back when you have completed your list.
7. Scroll to On to enable fixed dialling.
To modify your fixed dialling list:
1. From the stand-by display, press Menu » Sett ings » Securi ty » Fixed dial l ing » Number l ist .
2. When prompted, enter your PIN2 code and then press OK .
3. Scroll to one of the following options and then press Select :
Press View number to view the number for an entry
Press Add to add a number to your fixed dialling list
Press Edit to edit the selected entry
Press Delete to delete the selected entry
Press Delete al l to delete entries in the list.
Closed user group
The closed user group is a network service that allows you to specify a group of people you can call and who can call you. Contact your service provider for more information about using this function.
When outgoing calls are limited to closed user groups, calls may be possible to the emergency number programmed into your Vertu phone, for example 000, 08, 110, 112, 118, 119, 911, *911, 999, *999 or other official emergency number.
To enable or disable a closed user group:
1. From the stand-by display, press Menu » Sett ings » Securi ty » Closed user group .
2. Scroll to On to enable the closed user group, Off to disable it, or Default to specify that the people included in the group, which you have agreed with the service provider, can call you and you can call them and then press Select .
3. If you are enabling a closed user group, enter the group number when prompted and then press OK . A confirmation message is displayed.
Authority certificates and user certificates
For information about Authority cert i f icates and User cert i f icates downloaded onto your Vertu phone. See “WEB” on page 53.
When fixed dialling is on, GPRS connections are not possible except while sending text messages over a GPRS connection. In this case, the recipient’s phone number and the message centre number must be included in the fixed dialling list. You cannot access SIM memory manually (view or copy numbers on the SIM card) while fixed dialling is active.

MESSAGES
English
16
3 MESSAGES
Your Vertu phone provides extensive messaging functionality to allow you to send and receive messages of many types, where supported by your service provider.
Text messages
Text messages (also known as SMS) are basic messages containing only text, of up to 160 characters. Your Vertu phone supports the sending of text messages beyond the limit for a single message. Longer messages are sent as two or more messages. Your service provider may charge accordingly. This is the most common form of messaging, is compatible with the widest range of phones and is available in most countries.
Multimedia messages
Multimedia messages allow pictures, videos and audio files to be sent in addition to text in the body of the message. MMS is supported by most modern phones however the recipient must have a correctly configured phone to be able to receive the message.
Flash Messages
Flash messages are text messages that are instantly displayed upon receipt. Flash messages are not automatically saved.
Audio messages
You can use the Multimedia message service to create and send an audio message. Multimedia messaging service must be activated before you can use audio messages.
E-mail messages
E-mail messages can be sent to and received from other devices, for example PCs. E-mail messages can be received by some mobile phones, provided the recipient has a correctly configured phone.
WV chat
With Wireless Village chat messaging (WV chat) you can send short, simple text messages to online users. You have to subscribe to a service and register with the IM service you want to use. You should check the availability of these services, pricing, and instructions with your service provider.
Voice messages
Voice messages are stored by your network operator. If your network operator provides a voice message service, people calling you may have the option to record a message for you if your Vertu phone is turned off, or if you do not answer your phone.
Info messages
You can receive messages on various topics from your service provider (network service). For more information, contact your service provider.
Text entry
You can enter text using traditional or predictive text input. When using traditional text input, press the NUMBER keys repeatedly until the desired character appears. In predictive text input you can enter a letter with a single keypress.
When you enter text, the icon will appear at the top of the display if predictive text input is turned on (see “Predictive text input” on page 16). If traditional text input is enabled the icon will be displayed.
One of the following icons will appear next to the text input icon to signify which character case is enabled:
Indicates upper case is used in editing
Indicates mixed case is used in editing
Indicates lower case is used in editing
To scroll through the character case options, press the # key repeatedly.
To change between letter mode and number mode, press and hold the # key and select the appropriate mode.
Traditional text input
Press a NUMBER key, 1 to 9, repeatedly until the desired character appears. Not all characters available under a number key are printed on the key. The characters available depend on the selected writing language. See “Language settings” on page 42.
If the next letter you want is located on the same key as the present one, wait until the cursor appears, or briefly press any of the navigation keys and enter the letter.
The most common punctuation marks and special characters are available under the 1 key. For more characters, press * .
Predictive text input
To turn predictive text on or to revert to traditional text input:
1. With the cursor in the Text: field, press Options .
2. Select Predict ion options » Predict ion .
3. Select On for predictive text or select Off to turn predictive text off.
Because delivery of messages can fail, you should not rely upon them for essential communications.
To quickly set predictive text input to On or Off when writing text, press and hold Options or press and hold # and select Predict ion on or Predict ion off .

MESSAGES
English
17
Using predictive text input
Predictive text input allows you to write text quickly using the phone NUMBER keys and a built-in dictionary.
Start writing a word using the NUMBER keys. Although the key has a number of letters associated with it, press each key only once for one letter. The phone displays * or the letter if it separately has a meaning as a word. The entered letters are displayed underlined.
To insert a special character or smiley, press and hold * , or press Options » Insert symbol » Character or Smiley . Scroll to a character or smiley, and press Use .
To accept the suggested word, press the zero NUMBER key to add a space.
If the ? character is displayed after the word, the word you intended to write is not in the dictionary. To add the word to the dictionary, press Spell . Complete the word (traditional text input is used), and press Save .
To write a compound word, enter the first part of the word, and scroll forward to confirm it. Write the next part of the word, and confirm the word.
Numeric input
Numeric input is the standard method used whenever number entry is required, for example, when dialling a phone number. Press the key with the corresponding number to enter it.
When using a text input feature, for example sending a text message, you can switch to numeric input (for entering telephone numbers for instance) using a single key press:
1. With the cursor in the Text: field, press and hold the # key until the menu is displayed.
2. With Number mode highlighted, press Select .
3. Use the NUMBER keys to enter the numbers you require.
4. Press and hold the # key again to return to the previous text entry
mode.
Special character input
Most common special characters, for example, punctuation marks, can be inserted by pressing the 1 NUMBER key. Other special characters can be inserted in your text at any time using the special characters input mode:
1. With the cursor in the Text: field, press the * key (or press and hold if predictive text input is On) until the special character menu is displayed.
2. Scroll to the required special character and press Use .
Special characters take up more space than basic characters and if there are special characters in your message, the indicator may not show the message length correctly. Before the message is sent, the device tells you if the message exceeds the maximum length allowed for one message. You can cancel sending by selecting Cancel or you can save the message in the inbox.
Font size
Your Vertu phone supports different font sizes for viewing your messages. Your font size setting affects both messages being composed and messages received, but does not affect how the recipient views the message.
To change the font size for your messages:
1. From the stand-by display, press Menu » Messages » Message sett ings » General sett ings » Font size .
2. Scroll to either Small font , Normal font or Large font and then press Select .
Groups
If you frequently send messages to a fixed group of recipients, you can define a group to simplify the process.
When you send a message to a group the phone automatically sends the message separately to each recipient in the list. Sending a message using a group will incur charges for each recipient in the list. See “Groups” on page 30.
Undel ivered messages
If you send a message and it fails to be delivered, your Vertu phone behaves in different ways depending on the type of message sent.
Single recipient messages
If a message you have sent to a single number fails, your screen will display Message sending fai led. Check detai ls .
1. Press OK .
2. The unsent message will appear in your Outbox .
3. With the message highlighted, either press Open to read the message or press Options , scroll to one of the options and then press Select :
Retry sending resends the message to the original recipient
Delete removes the message from the Outbox
Send copy sends the message to an alternative number
Edit enables you to modify the message or the recipient’s number
Move moves the message into an alternative folder
Use detai l makes use of any numbers, e-mail addresses or Web addresses from the current message when creating new messages or contacts
Copy as template saves the message as a template for use when composing future messages
Message detai ls displays message data for example the time and date when sent
New message opens a new message
Mark marks the message for future deletion
Mark al l marks all messages for future deletion if the Outbox contains more than one message.
If you only need to enter a single number, press and hold that number key and the single number will be entered into your message.
Some service providers do not allow international sending or receiving of text messages. For more information contact your service provider.
MESSAGES
English
18
Group messages
If a message cannot be sent to one or more of the recipients in a group, a new group will be added to the list with the name Undel ivered .
To view the undelivered message(s) options:
1. From the stand-by display, press Menu » Contacts » Groups » Undelivered » Options .
2. Scroll to one of the options and then press Select :
Resend to l ist resends the message to the recipients on the undelivered list
View l ist displays the list of recipients to whom the message sending failed
Delete l ist removes the undelivered list from your Vertu phone
View message displays the failed message.
Message folders
All text and Multimedia messages stored in your Vertu phone are organised in folders. In addition to the default folders, you can create new folders to organise your messages.
To browse your message folders:
1. From the stand-by display, press Menu » Messages .
2. Scroll to one of the following folders and then press Select :
Inbox - Messages are automatically stored in this folder when they arrive and, by default, after they have been read
Drafts - Contains messages created by you and saved for sending at a later date
Outbox - Messages that you have queued for sending but are yet to be sent are saved in this folder
Sent i tems - Messages that you have sent are automatically stored in this folder
Saved i tems - Default location for messages that have been read and saved. This is also where the Templates folder can be found (see below)
To create a new personal folder in Saved i tems :
1. Select Menu » Messages » Saved i tems » Options » Add folder .
2. Use the NUMBER keys to enter a name for the new folder.
3. Press OK .
To rename or delete a personal folder:
1. Select Menu » Messages » Saved i tems .
2. Scroll to the personal folder you want to rename or delete.
3. Press Options .
4. To rename the folder, scroll to Rename folder and then press Select .
5. Use the NUMBER keys to rename the folder and then press OK .
6. To delete the folder press Delete folder » Yes to confirm the action.
Erasing mult iple text and mult imedia messages
You can erase all of the text and Multimedia messages from any of the standard or personal folders, or from all of the folders at once.
To delete multiple messages:
1. From the stand-by display, press Menu » Messages » Delete messages .
2. Scroll to one of the options and then press Select :
By message enables you to navigate into folders and delete individual messages
By folder enables you to delete all messages in a selected folder
All messages deletes all messages currently stored on the phone. You will be given the opportunity to save unread messages before deleting.
3. Confirm the deletion when prompted. You cannot recover deleted messages.
Text messages
Standard text messages can be up to 160 basic characters in length. Linked messages can be used to create larger messages.
Linked messages
Your Vertu phone can send and receive long text messages (up to 1000 basic characters). Long text messages are automatically split into multiple messages and sent as a series. The series of messages is then linked by a compatible phone when received and displayed as a single SMS message. For this feature to work properly, the receiving phone must also support linked messages.
While you write a message, the number of available characters and the current part number of linked message (for example, 904/1) is shown in the top right corner of the display.
While receiving linked messages, you can start reading the first part before the phone has received the entire message. While viewing the message, you may see * some text missing * on the display. This is normal, and the message content will be updated as soon as the missing sequence arrives
Messages can be moved to this and other personal folders on your Vertu phone (see “Reading and replying to text messages” on page 20).

MESSAGES
English
19
Message sett ings
When you write or reply to a text message, your Vertu phone uses a sending profile that defines how the phone will handle the message sending interaction with your service provider. For most service providers you will not need to modify these settings as the necessary information will be obtained from your SIM card automatically. Depending on your SIM card, you may be able to store more than one set of message profiles.
To edit the message settings:
1. From the stand-by display, press Menu » Messages » Message sett ings » Text messages .
2. Scroll to one of the options and then press Select :
Delivery reports requests that the network sends you delivery reports for your messages. These are stored in Messages » Delivery reports
Message centres enables you to examine, modify and add the details of the message centre(s), used for sending text messages. You should obtain this number from your service provider
Msg. centre in use enables you to select which message centre should be used by your Vertu phone to send text messages
Message val idi ty enables you to define how long the network attempts to send your messages before it gives up
Messages sent via enables you to select the message type as Text , Paging or Fax . Your service provider may have limited support for different message types
Use packet data determines whether or not GPRS is the preferred SMS bearer (see “Packet data settings” on page 39)
Character support and then select Full ensures all characters are sent as viewed or select Reduced where characters with marks for example accents may be converted to other characters
Rep. v ia same centre allows the recipient of your message to send you a reply using your message centre (network service).
Message overwrite
When the message memory is full, your Vertu phone cannot send or receive any new messages. To avoid this, you can set your phone to automatically replace the oldest messages in the Sent items folder when new ones arrive or are sent.
To enable automatic overwrite in Sent items:
1. From the stand-by display, press Menu » Messages » Message sett ings » General sett ings » Save sent messages » Yes .
2. From the General sett ings menu, press Overwrite sent i tems » Allowed .
Writ ing and sending text messages
The Create message option allows you to write and send text messages.
To write a new message:
1. From the stand-by display, press Menu » Messages » Create message .
2. Use the NUMBER keys to enter the recipient’s phone number in the To: field.
3. Alternatively, to retrieve a phone number from Contacts select Add followed by:
Press <Favourite> to define easily available message recipients or groups when sending messages
Press Recently used to send a message to a recently used number
Press Call register to access contacts from the Call log
Press Contacts to send a message to number in your Contacts list
Press Contact groups to send a message to multiple recipients
saved as a group in your Contacts list. See “Groups” on page 30.
4. Scroll down and use the NUMBER keys to write the message in the Text: field.
5. While composing your message press Options to display the following options:
Send sends the message immediately
Insert to add multimedia content
Add recipient to add another contact to the To , Cc or Bcc fields
Add subject to add Subject : line to the message
Clear f ield deletes the text that has been entered into the message field
Insert contact detai l selects a name from your Contacts list and insert it into the message body
Insert symbol displays all the available symbols you can use in the message
Writ ing language selects one of the alternative languages stored on your Vertu phone to compose your message
Predict ion opt ions configures predictive text entry see “Predictive text input” on page 16 for more information about Predictive text
Change msg. type enables you to change the type of message being created to Message , E-mai l message , Flash message or Audio message
Change to mult im. to change text message to multimedia message
Save message saves the message in your Saved messages folder
A flashing icon on the stand-by display indicates that the message memory is full. Before you can receive or send any more text messages you must erase some of your existing text messages or move them to a personal folder.
This operation can be repeated to add a number of recipients for the text message.

MESSAGES
English
20
Sending options enables various settings when sending the message:
Message pr ior i ty can be set to Normal , High or Low
Delivery report enables you to request a delivery report for this and all other text messages
Save sent message enables you to save a copy of the message in the Sent items folder
Message val idity enables you to select the length of time that the network attempts to deliver your message
Message sent v ia enables you to send the message via Text , Paging or Fax
Exit editor leaves the text entry environment (you will be asked if you want to save any incomplete messages).
6. To add a file to the text message, scroll down and choose a file type from the icon list at the bottom of the screen. Choose from the
following file types:
7. Select Insert to browse to the required file.
8. Select Insert to add the file to the message.
9. Once the message is complete, press Send .
Reading and reply ing to text messages
When you receive a message, you will receive an information note, and an envelope icon will appear on the status line. By default there is also an audible message alert.
To read a new message as soon as it is received:
1. Press Show .
2. To ignore the message and view it later, press Exit .
To read a stored message:
1. From the stand-by display, press Menu » Messages » Inbox .
2. The most recently received message will be highlighted. Scroll to the message you want to read and press Open .
To view the list of available options while reading a message:
1. Press Options .
2. Scroll to the required option and then press Select :
Reply to reply to the message
Reply as to reply and change the type of message to be sent
Delete removes the message you are viewing from your Vertu phone
Call sender to call the sender of the message
Use detai l makes use of any numbers, e-mail addresses or Web addresses from the current message
Forward sends the message to another recipient of your choosing
Edit enables you to edit the message before sending or saving
Move enables you to move the message to another selected folder
Copy to Calendar creates a reminder note in the calendar
Copy as template saves the message as a template for use when composing future messages
Message detai ls displays the sender’s name and phone number, the message centre used, and the date and time sent.
To reply to a message being read:
1. With the message open, press Reply .
2. Scroll to the type of message you want to send and then press Select .
3. The To: field displays the sender’s number.
Refer to the Text message, Multimedia message, Flash message and Audio message sections of this guide to complete and send your reply.
Multimedia messages
A Multimedia message (MMS) can contain text, sound, video and pictures. Your Vertu phone supports Multimedia messages that are up to 296 KB. If the maximum size is exceeded, the phone may not be able to receive the message. Depending upon your network, you may receive a message that includes an Internet address where you can go to view the Multimedia message. Pictures are scaled to fit the display area of the phone. Your Vertu phone has a Multimedia message viewer for playing messages and an Inbox for storing all saved messages.
Copyright protections may prevent some images, ringing tones, and other content from being copied, modified, transferred, or forwarded.
Multimedia messaging supports a wide range of standards for each of the following formats:
> Picture: JPEG, GIF, animated GIF, WBMP, BMP, and PNG
> Sound: SP-MIDI, AMR audio, MP3 and AAC
> Video: clips in H.263 format with SubQCIF image size and AMR audio
If a received message contains unsupported attachments, these may be replaced with a message.
> Text field > Template
> Sound clip > Gallery file
> Calendar note > Business card
> Image
If your Vertu phone memory is full, you may have to delete messages from your Inbox or Outbox before you can send or receive further messages.
If you have unread messages in your Inbox, the icon will remain on the stand-by display.
Multimedia messaging functions can only be used if supported by your service provider. For availability and a subscription to the Multimedia messaging service, contact your service provider. Only compatible devices can receive and display Multimedia messages.

MESSAGES
English
21
You cannot receive Multimedia messages if you have a call in progress, a Java application running, or an active browsing session. If you are sent a Multimedia message while you are on a call of any type, receipt will be delayed until your Vertu phone becomes free.
M M S sett ings
Depending on which service provider you use, your Vertu phone might already have MMS settings installed. If you encounter any difficulties, please contact Vertu Concierge or visit www.vertu.com and download your settings.
MMS configuration settings
To update your configuration settings:
1. From the stand-by display, press Menu » Messages » Message sett ings » Mult imedia messages » Configurat ion sett . » Configurat ion .
2. Select one of the available options.
Message settings
In addition to your connection settings, there are several other settings that control your Multimedia messaging functions. To modify these settings:
1. From the stand-by display, press Menu » Messages » Message sett ings » Mult imedia messages .
2. Scroll to one of the options and then press Select :
Delivery reports will inform you of message delivery
M M S creat ion mode If you select Guided, the device informs you if you try to send a message that may not be supported by the recipient. If you select Restricted, the device prevents you from sending messages that may not be supported. To include content in your messages without notifications, select Free.
Image size in M M Senables you to define the maximum size of an image used in an MMS. Your Vertu phone automatically resizes the image if necessary
Default s l ide t iming will enable you to set the default time in mm:ss format that each slide (equivalent of a page) in an MMS is displayed on the screen
Allow M M S receptn. enables you to allow or disallow reception of Multimedia messages, or allow only messages in your home network.
Incoming M M S msgs. enables you to determine whether incoming Multimedia messages are retrieved or rejected automatically or if you retrieve them manually
Allow adverts enables or disables the automatic reception of Multimedia advertisements
Configurat ion sett . will enable you to define the MMS connection parameters. See “MMS configuration settings” on page 21.
Writ ing and sending mult imedia messages
You can create Multimedia messages with one or more attachments up to the maximum 296kb message size. When creating your Multimedia message, the current remaining space is shown on the top line just under the status line.
Unlike text messages, Multimedia messages can be formed of multiple pages, known as slides. You can control how long each slide is displayed. Each slide can contain up to 1000 basic text characters (less for complex languages) one image, and one sound clip.
To write and send a Multimedia message:
1. From the stand-by display, press Menu » Messages » Create message .
2. Press Options » Change to mult im. .
3. Scroll to one of the multimedia options at the bottom of the message screen and then press Select :
Text f ield creates another slide for you to add text in your message
Text template opens the template folder. Choose from a list of pre-set messages.
Image , Sound cl ip or Video cl ip enables you to browse your Multimedia files and insert a file into your message
Business card enables you to browse your Contacts list and insert contact details into your message
Calendar note enables you to browse your calendar and attach a previously created note from your calendar into your message
Theme , Streaming l ink and Gallery f i le inserts stored files into your message.
4. Press Options while creating a Multimedia message to display the following options:
Send enables you to send the completed message (see above)
Preview displays the message to examine how it will appear to the recipient. Press Play to run the attached files
Insert enables you to insert a file as an attachment
Add recipient to add another person to the recipient list
Add subject to add a subject field to the message
Remove removes files and slides from your message
Slide options
Sl ide t iming enables you to set the time interval between the slides. Use the NUMBER keys to enter the time interval and then press OK
Place text last makes sure that the text in your message appears after your Multimedia attachments
Change msg. type enables you to change the type of message being created
Save message saves the message in your Saved messages folder
MESSAGES
English
22
Sending options enables various settings when sending the message:
Message pr ior i ty can be set to Normal , High or Low
Delivery report enables you to request a delivery report for this and all other text messages
Save sent message enables you to save a copy of the message in the Sent items folder
Message val idity enables you to select the length of time that the network attempts to deliver your message
Message sent v ia enables you to send the message via Text , Paging or Fax
Exit editor leaves the text entry environment (you will be asked if you want to save any incomplete message)
5. Use the NUMBER keys to enter the recipient’s phone number in the To: field.
6. Alternatively, to retrieve a phone number from Contacts press Add followed by:
Press <Favouri te> to define easily available message recipients or groups when sending messages
Recently used to send a message to a recently used number
Call register to access contacts from the call log
Contacts to send a message to a number in your Contacts list
Contact groups to send a message to multiple recipients saved
as a group in your Contacts list.
7. Press the Send key.
The message is sent.
It takes the network longer to send a Multimedia message than to send a text message. While the Multimedia message is being sent, an animated indicator is displayed on the status line, but you can carry on using your Vertu phone as normal. If there is an interruption while the message is being sent, the network tries to resend it a few times. If this fails, the message remains in the Outbox folder and you can try to resend it later. Check your Outbox folder for unsent messages.
For more information about Multimedia messaging, contact your service provider.
Reading and replying to mult imedia messages
When you receive a Multimedia message, you will receive an information note and an envelope icon will appear on the status line. By default there is also an audible alert.
To read a new Multimedia message as soon as it is received press Show .
To ignore the message and view it later, press Exit .
To read a stored message:
1. From the stand-by display, press Menu » Messages » Inbox .
2. The most recently received message will be highlighted. Scroll to the message you want to read and then press Select .
3. To view the whole message, including any attachments, press Play .
4. To view just the files in the presentation or the attachments, press Options and select one of the following:
Objects enables you to examine files attached to the message
Reply sends a reply to the message sender
Reply to al l sends a reply to all recipients of the original message
Delete removes the message you are viewing from your Vertu phone
Use detai l enables you to use any numbers, e-mail addresses or Web addresses from the current message when you create a new message or contact
Forward sends the message to another recipient of your choosing
Edit enables you to edit the message before sending or saving
Move moves the message to another folder
Copy as template enables you to save the message as a template for future messages
Message detai ls displays the sender’s name and phone number, the message centre used, and the date and time sent.
5. Scroll to Objects and then press Select .
6. Scroll to the relevant object type and then press Select .
To reply to a Multimedia message:
1. With the message open, press Options .
2. Scroll to Reply to reply to the sender or Reply to al l to send a reply to all recipients of the original message and then press Select .
3. To send the message, press Send . See “Writing and sending text messages” on page 19 and “Writing and sending multimedia messages” on page 21 for more information.
This operation can be repeated to add a number of recipients for the Multimedia message.
After sending a message, your Vertu phone displays a confirmation message. This is an indication that the message has been sent by your Vertu phone to the message centre. This is not an indication that the message has been received at the intended destination.
If you have unread messages in your Inbox, the envelope icon will remain on the stand-by display.
MESSAGES
English
23
Audio messages
You can use the Multimedia message service to create and send an audio message. Multimedia messaging service must be activated before you can use audio messages. See “MMS settings” on page 21.
Creat ing and sending audio messages
1. From the stand-by display, press Menu » Messages » Create message .
2. Press Options » Change msg. type . » Audio message.
3. The recorder opens (see “Voice recorder” on page 48 for more information). Press Select to start recording the Audio message.
4. Press Select again to stop the recording.
5. Press Options while creating an audio message to select from the following features:
Send sends the completed message
Preview enables you to listen to how the message will sound to the recipient
Change msg. type enables you to change the type of message being created
Sending options enables you to select from the following options when sending the message:
Message pr ior i tydetermines the priority level. Choose from High , Normal or Low
Delivery report determines whether the network sends you delivery reports for your messages
Save sent message determines whether or not the phone saves the message in the Sent items folder once it is sent
Save message saves the message in your Saved messages folder
Add subject enables you to include a subject for your message
Exit editor closes the text entry environment (you will be asked if you want to save any incomplete message).
6. Use the NUMBER keys to enter the recipient’s phone number in the To: field.
7. Alternatively, to retrieve a phone number from Contacts select Add followed by one of the following:
Press <Favouri te> to define easily available message recipients or groups when sending messages
Recently used sends a message to a recently used number
Press Call register to access contacts from the Call log
Contacts enables you to send a message to a number in your Contacts list
Contact groups enables you to send a message to multiple recipients saved as a group in your Contacts list.
8. Scroll to the Message: field and press Play to preview the message.
9. Press Send .
Receiving and l istening to audio messages
When you receive an audio message, you will receive an information note, and the icon will appear on the status line. By default there is also an audible message alert.
To listen to a new audio message as soon as it is received press Play .
To ignore the message and view it later, press Exit .
To listen to a stored audio message:
From the stand-by display, press Menu » Messages » Inbox » Play .
You can write, send, and read e-mails with your Vertu phone. Your phone supports POP3 and IMAP4 e-mail servers.
Depending on which service provider you use, your Vertu phone might already have e-mail settings installed. If you encounter any difficulties, please contact Vertu Concierge or visit www.vertu.com and download your settings.
E-mai l sett ings
To manually enter your connection settings or to modify your current settings:
1. From the stand-by display, press Menu » Messages » Message sett ings » E-mail messages » Edit mai lboxes » Add .
2. Scroll to each of the options and modify the parameters with the
information supplied by your service provider and/or e-mail provider.
If you have unread messages in your Inbox, the envelope icon will remain on the stand-by display.
Due to the complexity of entering all of the settings manually, it is strongly recommended that you use the order settings link from your CD-ROM to take you directly to the appropriate page on the Vertu website to obtain the settings for your Vertu phone.

MESSAGES
English
24
Writ ing and sending e-mai l messages
You can create e-mail messages and also attach images and video clips. You can write your e-mail message before connecting to the e-mail service; or connect to the service first, then write and send your e-mail.
To write and send an e-mail message:
1. From the stand-by display, press Menu » Messages » Create message .
2. Press Options » Change msg. type . » E-mail message.
3. Enter the recipient’s e-mail address, write the subject, and enter the message. To attach a file from Gallery, business card, note, etc, select Insert .
4. To send the e-mail message, select Send .
5. If more than one e-mail account is defined, select the account from which you want to send the e-mail.
6. To edit or continue writing your e-mail later, select Exit » Yes . The e-mail is saved in Drafts .
Downloading and reading e-mai l
To download your e-mail messages:
1. From the stand-by display, press Menu » Messages » E-mai l .
2. If more than one e-mail account is defined, select the account from which you want to download the e-mail.
3. The e-mail application connects, synchronises and displays e-mails.
4. To open an e-mail, highlight a header and press Open .
Replying to e-mai l
To reply to e-mail:
1. To reply to an e-mail, open it as above, and then select Options » Reply .
2. Write the reply and then press Send .
Delet ing e-mai l messages
You can delete e-mails one-by-one or mark a group for deletion all at once.
To delete one e-mail message:
1. From the stand-by display, press Menu » Messages » E-mai l . The e-mail application is started.
2. Highlight an e-mail and press Options » Delete .
3. Select from From phone to delete e-mails from your Vertu phone only. Deleting an e-mail from your phone does not delete it from the e-mail server.
4. Select Also from server to delete e-mails from your Vertu phone and also from the e-mail server.
To delete more than one e-mail message:
1. From the stand-by display, press Menu » Messages » E-mai l . The e-mail application is started.
2. Press Options » Mark or Mark al l .
3. Mark the e-mail or e-mails for deletion.
Press Options » Delete marked . The marked messages will be deleted from your Vertu phone.
Wireless Village Chat
With Wireless Village Chat (instant messaging) you can send short, simple text messages to online users. You have to subscribe to a service and register with the IM service you want to use. For more information contact your service provider.
To log in to Wireless Village Chat:
1. From the stand-by display, press Menu » Messages » WV chat .
2. Select from the following options:
Login - to log in to the Wireless Village Chat feature
Saved conversat ions to access your stored message conversations.
Voice messages
The voice mailbox is a network service and you may need to subscribe to it. For more information and for your voice mailbox number, contact your service provider.
To call your voice mailbox:
From the stand-by display, press Menu » Messages » Voice messages » Listen to voice msgs. Or, press and hold the 1 key on the number keypad.
To enter, search for or edit your voice mailbox number:
From the stand-by display, press Menu » Messages » Voice messages » Voice mai lbox no.
Info messages
With the Info messages network service, you can receive messages on various topics from your service provider.
To check availability, topics, and the relevant topic numbers, contact your service provider.
Service messages
Your Vertu phone is able to receive service messages (pushed messages) sent by your service provider. Service messages are notifications (for example, news headlines), and they may contain a text message or an address of a service.
When you receive a service message:
1. Press Show to display the message.
2. Or, press Exit to save the message to your inbox.
After sending a message, your Vertu phone may display Message Sent. This is an indication that the message has been sent by your Vertu phone. This is not an indication that the message has been received at the intended destination.
Exercise caution when opening messages. E-mail messages may contain malicious software or otherwise be harmful to your Vertu phone or your computer.
Wireless Village Chat supports DRM2.
The first time you access your voice mailbox, you may be required to enter a voice mailbox number, depending on your operator.

MESSAGES
English
25
Service message sett ings
To update service message settings:
1. From the stand-by display, press Menu » Messages » Message sett ings » Service messages .
2. Scroll to one of the following options and then press Select :
Service messages » On or Off to set whether you want to receive service messages
Message f i l ter » On to set the phone to receive service messages only from content authors approved by the service provider
Autom. connect ion » On to set the phone to automatically activate the browser from the stand-by mode when the phone has received a service message. If you select Off , the phone activates the browser only after you select Retr ieve when the phone has received a service message.
Bluetooth messages
Messages sent via Bluetooth are available via the Messages inbox.
Service commands
Use the service commands editor to enter and send service requests (also known as USSD commands) to your service provider. Contact your service provider for information about service commands.
To send a service command:
1. From the stand-by display, press Menu » Messages » Serv. commands .
2. Use the NUMBER keys to enter a service request, for example an activation command for a specific network service and press Send .

CONTACTS
English
26
4 CONTACTS
Your Vertu phone Contacts list has capacity for up to 10,000 entries.
Contacts memory
Contact names and numbers can be stored in the phone memory or on the SIM card, or both.
Phone memory
Each contact can contain up to five numbers and five text items, for example a postal address, an e-mail address, an image and a specific ring tone.
If you use the phone memory you can store more data and access more functions, for example voice tags, than if you use the SIM card memory.
S I M card memory
Contacts stored on your SIM card have one associated number. The number of contacts and the length of names and numbers that you can store on your SIM card is determined by your service provider.
Select ing the memory type
Certain features, for example business cards and multiple numbers associated with a contact, are only available when using the phone memory. If you plan to make frequent use of these features, we recommend that you set your Vertu phone to use the phone memory. If you plan to transfer your SIM card from your Vertu phone to other phones, we recommend that you set your Vertu phone to use the SIM card memory.
To select a memory type:
1. From the stand-by display, press Menu » Contacts » Sett ings » Memory in use .
2. Scroll to one of the following options and then press Select :
Phone and S I M to save new contacts to the phone and display contacts from the phone and SIM
Phone to save and display phone contacts
S I M card to save and display SIM card contacts.
A message confirms which memory you have selected.
Copying between memories
The copying feature allows you to copy names and numbers between the phone memory and the SIM card memory.
1. From the stand-by display, press Menu » Contacts » Copy contacts .
2. Scroll to one of the following options and then press Select :
From S I M to phone to copy all information from the SIM card memory to your Vertu phone memory
From phone to S I M card to copy the name and the number from your Vertu phone memory to the SIM card memory.
3. Press Yes to confirm your action, or press No to cancel.
Move between memories
The move feature enables you to move contact names and numbers from the phone to the SIM card memory and vice versa.
1. From the stand-by display, press Menu » Contacts » Move contacts .
2. Scroll to one of the following options and then press Select :
From S I M to phone to move all information from the SIM card memory to your Vertu phone memory. The information is no longer held on your SIM card
From phone to S I M card to move the name and the number from your Vertu phone memory to the SIM card memory. The information is no longer held in your Vertu phone memory
3. Press Yes to confirm your action, or press No to cancel.
Copying individual numbers
You can also copy individual directory numbers between the phone memory and SIM card memory directly from the contacts list.
To copy individual numbers:
1. From the stand-by display, press Menu » Contacts » Names .
2. If the contact name is not visible, press the first letter of the contact name. The first name starting with that letter is highlighted. Scroll to the desired name and press Detai ls .
3. Press Options » Copy number .
4. Select Keep original and then press Select to keep the contacts in both memories.
5. Or select Move or iginal and then press Select to delete the original information.
A message confirms that the number has been copied.
If you change the SIM card in your Vertu phone, the memory type is automatically reset to phone.
If you are copying from phone memory to SIM card memory and your Vertu phone memory contains more entries than your SIM card can store, some of the entries will not be copied.
CONTACTS
English
27
Check memory status
You can check your Vertu phone's memory to see how much information is stored and how much free space is available.
To check the memory status:
1. From the stand-by display, press Menu » Contacts » Sett ings » Memory status .
2. Scroll to either Phone or S I M card and then press Select .
If Phone is selected the phone's contact free memory and used memory is displayed as a percentage of the available memory
If S I M card is selected the absolute number of free contacts and contacts in use for the SIM card is displayed.
3. Press Back to exit the screen.
Adding contacts
To add a contact:
1. From the stand-by display, press Menu » Contacts » Add new contact .
2. Press Select and then use the NUMBER keys to enter the contact’s first name. Scroll down to the next field.
3. Use the NUMBER keys to enter the contact’s last name. Scroll down to the next field.
4. Use the NUMBER keys to enter the mobile phone number. Scroll down to the next field.
5. Use the NUMBER keys to enter the home phone number. Scroll down to the next field.
6. Use the NUMBER keys to enter the email address. Scroll down to the next field.
7. Scroll right or left to open the image gallery and select an image to associate with this contact.
8. Select Save to confirm your entry, or press Cancel .
A message confirms which memory you have saved the contact details to.
Accessing contacts
There are several ways to access a contact, giving you flexibility to use your Vertu phone in the way that suits you best.
A: Fol low menupath
1. From the stand-by display, press Menu » Contacts » Names .
2. Key in the first letter of the contact name.
3. The first name starting with that letter is highlighted.
4. Scroll to the desired name.
B: Go to command
If your contacts is one of the most used functions on your phone, Names is displayed in the Go to shortcut menu (see “My shortcuts” on page 37). You can use the left SELECTION key to open the shortcut menu and display your contacts list:
1. From the stand-by display, press Go to » Names .
2. Key in the first letter of the contact name.
3. The first name starting with that letter is highlighted.
4. Scroll to the desired name.
C: Select ion key
If your right SELECTION key has been configured as Names (see “My shortcuts” on page 37) you can use the following method to display your contacts list:
1. From the stand-by display, press the right SELECTION key.
2. Key in the first letter of the contact name.
3. The first name starting with that letter is highlighted.
4. Scroll to the desired name.
Adding internet phone contacts
Before you can make an internet phone call, both you and your contact(s) must have created an account with one of the Voice Over IP (VoIP) providers listed in the Internet telephone setup wizard, for example, Gizmo5, Voipfone etc.
You can add Internet phone contact details to an existing contact enabling you to make free phone calls when using a WLAN connection.
To add Internet phone details to a contact:
1. Select your contact name as in “Accessing contacts” and press Detai ls .
2. Press Options » Add detai l » Internet telephone .
3. Enter the contacts internet phone user name and press Save .
The internet phone detail is displayed in the contact details.
Delet ing contacts
To delete a contact:
1. Select your contact name as in “Accessing contacts”.
2. Press Options and select Delete contact .
3. Press Yes to confirm deletion.
A message confirms which contact you have deleted.
SIM card memory capacity is defined by your SIM card, not by your Vertu phone. For more information contact your service provider.
The following instructions use Method A to access your contact name list however, the other methods can be used if your SELECTION keys have been configured correctly.

CONTACTS
English
28
Contact number and text types
The first number added to a contact is automatically set as the default number. When you select a contact to call or send a message to, this default number is always used.
You can store different numbers for each contact from the following types:
You can also store different text items from the following types:
Adding information to a contact
You can add phone numbers or text items to a contact.
To add a number to a contact:
1. Select your contact name as in “Accessing contacts”.
2. With the contact name highlighted, press Detai ls .
3. Press Options .
4. Scroll to Add detai l and press Select .
5. Scroll to Number and press Select .
6. Scroll to the type of number you want to add and then press Select .
7. Key in the phone number.
8. Press Next until the Save option appears. Press Save to confirm the number, or press Options and scroll to Save . Press Select to confirm.
A message confirms that the details have been saved to the phone memory.
Alternatively,
1. Enter the telephone number from the stand-by screen and press Save .
2. Press Options .
3. Press Add to contact .
4. Scroll to the required contact and press Add .
5. Scroll to the type of number you want to add and then press Select .
A message confirms that the details have been saved to the phone memory.
To add a text item to a contact:
1. Select your contact name as in “Accessing contacts”.
2. With the contact name highlighted, press Detai ls .
3. Press Options .
4. Scroll to Add detai l and then press Select .
5. Scroll to the type of text you want to add, for example, Web address or Nickname, and then press Select .
6. Key in the text and press Next until the Save option appears. Press Save to confirm the number, or press Options and scroll to Save . Press Select to confirm.
A message confirms that the details have been saved to the phone memory.
Changing the default number
The first number you add to a contact is automatically set as the default number. If more than one number is added to an entry, for example if the contact has a mobile phone number and an office number, you can change the default number.
To change the default number:
1. Select your contact name as in “Accessing contacts”.
2. Press Detai ls .
3. Scroll to the number to set as the default and press Options .
4. Scroll to Set as default and then press Select .
A message confirms that the default number has been set.
Sett ing the contacts v iew
Your Vertu phone can display your contacts in different ways:
Normal name l ist displays five contacts at a time
Name and number displays one contact with the default number
Name and image displays one contact with an associated image.
To set the type of view:
1. From the stand-by display, press Menu » Contacts » Sett ings » Contacts v iew .
2. Scroll to the required view and then press Select .
A message confirms that the contacts view has been selected.
Sett ing the name display
To select whether the contact’s first or last name is displayed first:
1. From the stand-by display, press Menu » Contacts » Sett ings » Name display .
2. Scroll to the required view and then press Select .
A message confirms that the contacts view has been updated.
Sett ing the font size
To set the font size for the list of contacts:
1. From the stand-by display, press Menu » Contacts » Sett ings » Font size .
2. Scroll to the required view and then press Select .
A message confirms that the contacts view has been updated.
> General > Office
> Mobile > Fax
> Home
> E-mail address > Nickname
> Web address > Postal address
> Company > User ID
> Job title > Birthday
> Formal name > Note
> > Image
A contact can have duplicate number and text types, for example two mobile numbers or two e-mail addresses.

CONTACTS
English
29
Viewing the memory status
To view the free and unused memory capacity:
1. From the stand-by display, press Menu » Contacts » Sett ings » Memory status .
2. Scroll to the required view and then press Select .
Contacts menu
You can use the options in the contacts menu to make a call, send a text message and send a business card to anyone whose contact information you have saved. Your phone automatically adds voice tags to your contacts, and you can also assign numbers to the speed dial list.
Searching and cal l ing
To search for an entry and call the default number:
1. Select your contact name as in “Accessing contacts”.
2. Scroll to the required name and press the SEND key.
To search for an entry and call a number other than the default number (using the phone memory only):
1. Select your contact name as in “Accessing contacts” and press Detai ls .
2. Scroll to the required number.
3. Press the SEND key or press Cal l to make the call.
Make an Internet Cal l
To make an internet call you must be connected to a WLAN. See “Wireless LAN” on page 38.
To call a contact using the WLAN Internet Call option:
1. Select your contact name as in “Accessing contacts”.
2. Scroll to the required number and press Options .
3. Scroll to Internet cal l and then press Select .
4. Scroll to the WLAN connection to be used and press Select .
Text messages
When you have a contact open, you can send them a text message without returning to the main menu.
Sending text messages
To send a text message:
1. Select your contact name as in “Accessing contacts” and press Detai ls .
2. Scroll to the required number and press Options .
3. Scroll to Send message and then press Select .
4. With Message highlighted, press Select .
5. Key in the message and press Send .
Business cards
The business card function allows you to send and receive contact information, via text message, multimedia or Bluetooth. This function can be used with both the phone memory and the SIM card memory, although the SIM card memory only allows you to send the default number.
Sending business cards
To send a business card:
1. Select your contact name as in “Accessing contacts” and press Detai ls .
2. Press Options » Send business card .
3. Select the transmission method you want to use:
To send by multimedia message:
1. Scroll to Via mult imedia and then press Select .
2. Refer to “Writing and sending multimedia messages” on page 21 to complete and send your multimedia message.
To send by text message:
1. Scroll to Via text message and then press Select .
2. Refer to “Writing and sending text messages” on page 19 to complete and send your text message.
To send by Bluetooth:
1. Scroll to Via Bluetooth and then press Select .
2. Scroll to the recipient’s device on the list and then press Select . A message confirms that the business card has been sent.
Receiving business cards
When you receive a business card a message appears on the display. An audible alert sounds if your Vertu phone is set up for audible alerts.
To display a received business card:
Press Show to display the business card.
To save a business card to your directory:
Press Save . A message confirms that you have saved the business card.
To discard a business card without saving it:
Press Exit then press Yes to confirm. A message confirms that you have discarded the business card.
Speed dial l ing
The Contacts menu enables you to compile a speed dial list very quickly. You can have up to eight numbers saved in your speed dial list. To dial a number, simply press and hold one of the NUMBER keys.
The phone memory can store additional contact information for example a person’s work and mobile phone numbers and an e-mail address.
Speed dialling key number 1 is reserved for the voice mailbox.

CONTACTS
English
30
Adding numbers to the speed dial list
To add a number to the speed dial list from within a contact:
1. Select your contact name as in “Accessing contacts” and press Detai ls .
2. Scroll to the required number and press Options .
3. Scroll to Speed dial and then press Select . 4. Scroll to an empty speed dial key, or one that you want to overwrite
(see below).
5. With the desired key highlighted, press Assign .
A message confirms which speed dial number key has been assigned.
To add a number to the speed dial list using the speed dial menu:
1. From the stand-by display, press Menu » Contacts » Speed dials .
2. Scroll to the desired speed dial key and press Assign .
3. Key in the Phone number: or press Search to select it from the Contacts list and then press OK .
4. Enter the First name: if creating a new contact.
5. Enter the Last name: of the contact.
6. Scroll to Save and press Select .
A message confirms which memory the contact has been saved to, followed by a message that confirms which speed dial number key has been assigned.
Changing speed dial numbers
To change speed dial numbers from within a contact:
1. Select your contact name as in “Accessing contacts” and press Detai ls .
2. Scroll to the required number and press Options .
3. Scroll to Speed dial and then press Select . 4. A message confirms that a speed dial already exists for the contact.
5. Scroll to the desired speed dial key and press Assign .
A message confirms which speed dial number key has been assigned.
To change speed dial numbers using the speed dial menu:
1. From the stand-by display, press Menu » Contacts » Speed dials .
2. Scroll to the desired speed dial and press Options .
3. Scroll to Change and then press Select .
4. Enter the new Phone number: by keying it in or pressing Select and then selecting an existing number.
5. Enter the First name: if creating a new contact and then press Next .
6. Enter the contact Last name: then press Next .
7. Scroll to Save and press Select .
A message confirms which memory the contact has been saved to, and which speed dial number key has been assigned.
Deleting speed dial numbers
To delete speed dial numbers using the speed dial menu:
1. From the stand-by display, press Menu » Contacts » Speed dials .
2. Scroll to the desired speed dial and press Options .
3. Scroll to Delete and then press Select .
4. Press Yes to confirm.
A message confirms which speed dial number key has been deleted.
Voice tags
Your Vertu phone can make a call to a contact using a voice tag. Voice tags are automatically added to all contacts.Your Vertu phone can store up to 1,500 voice tags.
Using voice tags
To make a voice tag call:
1. Press and hold the down the right SELECTION key.
2. Speak the voice tag clearly into the microphone.
3. A list of possible matches is displayed briefly giving you a chance to scroll to the correct one or Quit if it is not on the list.
4. After about 2 seconds your phone will automatically dial the number.
Playing voice tags
To play a voice tag from within a contact:
1. Select your contact name as in “Accessing contacts” and press Detai ls .
2. Scroll to the contact name within the details and press Options .
3. Scroll to Play voice tag and then press Select .
The voice tag is played.
Groups
Use groups to associate a contact name to a group. The group name appears on the display when a member of a group calls you. You can assign a different ringing tone to each group for easy recognition of incoming calls.
Viewing groups
To view groups:
From the stand-by display, press Menu » Contacts » Groups .
The Groups are displayed.
Creat ing a group
To create a contact group:
1. From the stand-by display, press Menu » Contacts » Groups .
2. Press Add . If you have existing groups listed, press Options and then Add new group .
3. Add a Group name.
4. Add a Group image and tone (if required).
5. Press Save .
A message confirms that the group has been added.
This method can add contact details and assign a speed dial number key at the same time. Very short names do not work well for voice tags. Use longer
unique names, for example “Vertu Concierge Service.”

CONTACTS
English
31
Adding contacts to a group
To open a group and link contacts to it:
1. From the stand-by display, press Menu » Contacts » Groups .
2. Scroll to the desired group and press View .
3. Press Add to display your contacts list.
4. Scroll to the desired name and then press Select . Repeat for each contact to be added to the group.
A message confirms that the contact has been added to the group.
Edit ing group names
To edit group names:
1. From the stand-by display, press Menu » Contacts » Groups .
2. With the group name to be edited highlighted, press Options .
3. With Group detai ls highlighted, press Select .
4. With Group name highlighted, press Select .
5. Key in the new name for the group and then press OK .
A message confirms that the group has been renamed.
Delet ing contacts from a group
To delete contacts from a group:
1. From the stand-by display, press Menu » Contacts » Groups .
2. Scroll to the desired group and press View .
3. Scroll through the group members to the desired contact and press Options .
4. With Remove member highlighted, press Select .
5. Press Yes to confirm.
A message confirms that the contact has been removed from the group.
Adding group detai ls to a contact
To open a contact and add group details:
1. Select your contact name as in “Accessing contacts” and press Detai ls .
2. Press Options .
3. Scroll to Add to group and then press Select .
4. Scroll to the desired group and then press Select .
A message confirms that the contact has been added to the group.
Delet ing group detai ls f rom a contact
To delete group details from a contact:
1. Select your contact name as in “Accessing contacts” and press Detai ls .
2. Scroll to the group name and press Options .
3. Scroll to Remove from group and then press Select .
4. Press Yes to confirm.
A message confirms that the contact has been removed from the group.
Sett ing group r inging tones
All groups initially have a default ringing tone. To set a distinctive ringing tone for each group:
1. From the stand-by display, press Menu » Contacts » Groups .
2. Scroll to the desired group and press Options » Group detai ls .
3. Scroll to Group tone: .
4. Press Options » Change tone and select your ringing tone from Default / Open Gal lery / Tone downloads .
5. Press Save .
A message confirms that the group ringing tone has been selected.
Editing contact numbers
To edit contact number details:
1. Select your contact name as in “Accessing contacts” and press Detai ls .
2. Press Options .
3. Select from the following functions:
Add detai l
Scroll to one of the following and then press Select to add more detail to a contact record:
Voice cal l
Press Select to call the contact.
Internet cal l
Press Select to call the contact using the Internet cal l function. See “Make an Internet Call” on page 29.
Send message
Select a type of message and then press Select . See the chapter “MESSAGES” on page 16 for further instructions on sending messages.
Add image
Press Select to open the Gallery and select an image. See “Adding contacts” on page 27.
Edit
1. Scroll to Edit number and then press Select .
2. Press Clear as many times as necessary to delete the number to the left of the cursor.
3. Key in the new number.
4. Press OK to save the new number.
The default ringing tone for the caller groups is the ringing tone set up in the profiles menu.
Number Nickname
E-mail address Postal address
Internet te lephone User I D
Web address Birthday
Company Note
Job t i t le Image
Formal name

CONTACTS
English
32
Delete
1. Scroll to Delete and then press Select .
2. Scroll to either Delete number to remove the number but retain the other contact details or Delete contact to remove all of the contact details and then press Select .
3. Press Yes to confirm the deletion.
View
Press Select to view the contact number.
Set as default
Press Set as default . A message confirms that number has been set as default.
Change type
Allows you to redefine the number type as General , Mobile , Home , Office or Fax . Press Select and a message will be displayed to confirm the change.
Copy number
1. Select Keep original or Move or iginal .
2. Press Select .
3. A message confirms that the number has been copied.
Send business card
Select a transmission method and then press Select . See “Business cards” on page 29 for further instructions on sending business cards.
Add to group
Press Select to add the contact to a group. “Adding contacts to a group” on page 31.
Use number
This makes a copy of the selected number allowing you to save it under a new contact record.
Press Save and then use the NUMBER keys to enter a name for the new contact.
Speed dial
Select a speed dial key and press Assign . A message confirms which speed dial key has been assigned.
Editing contact names
To edit contact name details:
1. Select your contact name as in “Accessing contacts” and press Detai ls .
2. Scroll to the contact name and press Options .
3. Select from the following functions:
Add detai l
Press Select to add more detail to a contact record. For more details, see “Adding information to a contact” on page 28.
Voice cal l
Press Select to call the contact.
Internet Cal l
Press Select to call the contact using the Internet cal l function. See “Make an Internet Call” on page 29.
Add image
Press Select to open the Gallery and select an image. See “Adding contacts” on page 27.
Edit
1. Press Clear as many times as necessary to delete the current name.
2. Use the NUMBER keys to enter the new.
3. Press OK to save the new name.
Delete contact
To remove the complete contact record press Yes to confirm the deletion.
Play voice tag
This will play the voice tag associated with the contact record.
Send business card
Select a transmission method and then press Select . See “Business cards” on page 29 for further instructions on sending business cards.
Add to group
Select the required group from those displayed and then press Select . A message will be displayed to confirm that the contact has been added to the group.

CALL HISTORY
English
33
5 CALL HISTORY
The Call history feature allows you to view information about calls that you have missed, received and made. You can also view information (volume of data / session duration) for packet data transfer and number of messages sent and received (both SMS and Multimedia).
The call history
The call history stores information about your most recent missed, received, and dialled calls. When the list is full, the most recent call replaces the oldest.
To ensure that the call history is able to store your received and missed call information, your service provider must support caller ID, and it must be enabled. If the caller’s number is not available, for example if the caller withheld their number or the network did not transmit the number, No number appears in the calls list.
The call history can only store information about calls that are actually received by your Vertu phone. If you do not have a signal or if your calls are blocked, any incoming calls will not be stored.
Viewing the call history
To view recent call information:
1. From the stand-by display, press Menu » Call history » All cal ls .
2. The calls will be listed in chronological order.
Viewing missed calls
To view details of calls that have been missed:
From the stand-by display, press Menu » Call history » Missed cal ls .
Viewing received calls
To view details of calls that have been successfully received by your Vertu phone:
From the stand-by display, press Menu » Call history » Received cal ls .
Viewing dialled numbers
To view details of numbers that have been dialled from your Vertu phone:
From the stand-by display, press Menu » Call history » Dial led numbers .
Viewing message recipients
To view details of contacts to whom messages have been sent:
From the stand-by display, press Menu » Call history » Msg. recipients .
Clearing log lists
To clear information from your Vertu phone’s Log:
1. From the stand-by display, press Menu » Call history » Clear log l ists .
2. Scroll to one of the options and then press Select :
All cal l l ists removes all information from your Vertu phone log
Missed cal ls removes details from the Missed calls log
Received cal ls removes details from the Received calls log
Dial led numbers removes details from the Dialled numbers log
Message recipients removes details from the Message recipients log.
Viewing call duration
To view information about the duration of calls made and received by your Vertu phone:
1. From the stand-by display, press Menu » Call history » Cal l durat ion .
2. The following information will be available for examination:
Last cal l shows the length of the last call regardless of type
Received cal ls shows the total combined duration of all received calls
Dial led cal ls shows the total combined duration of all dialled calls
All cal ls shows the total combined duration of all calls to and from your Vertu phone
3. Clear t imers it will be necessary to enter your security code to complete this operation. See “SECURITY” on page 13.
This operation will take immediate effect without requiring confirmation. Once log lists have been cleared the information cannot be recovered.

CALL HISTORY
English
34
Viewing the packet data counter
General packet radio service (GPRS) is a network service that allows mobile phones to send and receive data over an Internet protocol (IP)-based network. See “Packet data settings” on page 39 for more information.
To view approximate information about the volume of data sent and received via GPRS:
1. From the stand-by display, press Menu » Call history » Data counter .
2. The following information will be available for examination:
Sent in last session is the amount of data in bytes, sent in the last transmission
Received in last sess. is the amount of data in bytes, received in the last transmission
All sent data is the total amount of data in bytes, sent in all transmissions
All received data is the total amount of data in bytes, received in all transmissions
3. Clear counters resets all of the counters. It will be necessary to enter your security code to complete this operation. See “SECURITY” on page 13.
Viewing the data timer
To view approximate information about the duration of sessions over GPRS:
1. From the stand-by display, press Menu » Call history » Data t imer .
2. The following information will be available:
Durat ion of last sess. shows the length of time spent on the last session
Durat ion of al l sess. shows the combined length of time spent on all sessions
3. Clear t imers resets all of the timers. It will be necessary to enter your security code to complete this operation. See “SECURITY” on page 13.
Viewing the message log
To view details of messages that have been sent and received by your Vertu phone:
1. From the stand-by display, press Menu » Call history » Message log .
2. The following information will be available:
Sent text messages shows number of text messages and parts sent
Sent M M S msgs. shows number of multimedia messages sent
Sent e-mails shows number of email messages sent
Received text msgs. shows number of text messages and parts received
Received M M S msgs. shows number of multimedia messages received
Downloaded e-mai ls shows number of downloaded messages to My mailbox.
3. Clear al l counters it will be necessary to enter your security code to complete this operation. See “SECURITY” on page 13.
Viewing the sync log
Sync log shows statistics on data you have transferred while synchronising your Vertu phone.
To view the sync log, from the stand-by display, press Menu » Call history » Sync log .
Viewing internet call duration
To view information about the duration of internet calls made and received by your Vertu phone:
1. From the stand-by display, press Menu » Call history » Internet cal l dur. .
2. The following information will be available for examination:
Last cal l shows the length of the last internet call
Received cal ls shows the total combined duration of all received internet calls
Dial led cal ls shows the total combined duration of all internet calls from your Vertu phone
All cal ls shows the total combined duration of all internet calls to and from your Vertu phone
Clear t imers resets the internet call log details. It will be necessary to enter your security code to complete this operation. See “SECURITY” on page 13.

SETTINGS
English
35
6 SETTINGS
The Settings menu enables you to control the core functionality of your Vertu phone. Using this feature you can define personalised themes, configure the display, adjust the time and date settings, set up personal shortcuts, configure various connectivity preferences, modify call and phone settings, set up security features and restore your factory default settings.
Refer to “SECURITY” on page 13 for more information about the security settings.
Date and time
Allows you to change the date and time settings and to set the phone to show or hide the date and time in stand-by mode.
To adjust the date and time settings:
1. From the stand-by display, press Menu » Sett ings » Date and t ime » Date & t ime sett ings
2. Scroll to one of the following options and then press Select to customise the time settings:
Date: enables you to use the NUMBER keys to set the date on the phone
Time: enables you to use the NUMBER keys to set the time on the clock
Time zone: enables you to set the valid offset from GMT
Dayl ight saving: enables you to select between Wintertime or Summertime (+1 or +2 hours) daylight saving periods.
3. Scroll down and select Save to confirm your settings.
Change date format
To adjust the date format:
1. From the stand-by display, press Menu » Sett ings » Date and t ime » Date and t ime format » Date .
2. Scroll to one of the following options and then press Select to customise the time settings:
Date on standby scr. enables you to show or hide the date on the stand-by screen
Date format sets how the date will be displayed
Date separator sets whether spaces, dots or slashes are used.
Change clock format
To adjust the time and clock format:
1. From the stand-by display, press Menu » Sett ings » Date and t ime » Date and t ime format » Time .
2. Scroll to one of the following options and then press Select to customise the time settings:
Clock enables you to choose from Digita l , Analogue or Hide clock
Time format sets the time in 24-hour or 12-hour format
Automatic update of time
This is a network service. You can set your Vertu phone to update the time from the network when you make a GPRS connection, for example, when you browse the web. If the clock is 30 seconds or more off the network time, the time will be updated automatically to reflect the network time.
Automatic update of the time does not change the time you have set for the alarm clock, calendar, or alarm notes. These are in local time. Updating may cause some alarms that you have set to expire.
To use automatic time update:
1. From the stand-by display, press Menu » Sett ings » Date and t ime » Auto-update of date & t ime .
2. Scroll to one of the options and then press Select :
Off if you do not want the date and time automatically updated by your network provider
Confirm f irst requests confirmation before updating the time. You can accept or decline the update
Profiles
Profiles are an easy way to control the most common groups of settings, for example audible and vibrating alerts. Activating an alternative profile changes all the associated settings.
Profiles define how your Vertu phone reacts when you receive a call or a message, how your NUMBER keys sound when you press a key, and more.

SETTINGS
English
36
Activat ing a profi le
You can change your profile at any time to ensure that your Vertu phone’s alerts are appropriate to your surroundings.
Timed profiles can be used to prevent missed calls. For example, you attend an event that requires your Vertu phone be set to Silent before the event starts, but you forget to return it to General until long after the event. During this time, you might miss several calls because the ringing tone is silent. The Fl ight profile cannot be timed.
With the timed profile feature, you can set a profile to expire after any length of time up to 24 hours. When the timed profile expires, your Vertu phone automatically returns to the original profile.
To change your current profile from the stand-by display:
1. Press the power key once briefly.
2. Scroll to the desired profile and then press Select .
To change your current profile using the menus:
1. From the stand-by display, press Menu » Sett ings » Prof i les .
2. Scroll to the desired profile and then press Select .
3. With Activate highlighted, press Select .
To set a time limit for the selected profile:
1. From the stand-by display, press Menu » Sett ings » Prof i les .
2. Scroll to the desired profile and then press Select .
3. Scroll to Timed and then press Select .
4. Use the NUMBER keys or scroll to enter the time you want your new profile selection to end and then press OK .
Personal is ing a prof i le
You can customise the default profiles to adjust your Vertu phone’s characteristics so they best suit your own preferences and situation. For the silent profile, you can only change the vibrate setting.
To personalise a standard profile:
1. From the stand-by display, press Menu » Sett ings » Prof i les .
2. Scroll to the profile that you want to customise and then press Select .
3. Scroll to Personal ise and then press Select .
4. Scroll to one of the following options and then press Select to customise the profile:
Incoming cal l a lert : selects how the phone notifies you of an incoming call, the available options are:
Ringing plays the ringing tone
Ascending makes the volume of the ringing tone increase the longer the call is unanswered
Ring once plays only one cycle of the ringing tone
Beep once plays a single beep
Off causes no ringing tone for an incoming call
Ringing tone: enables you to select the ringing tone for incoming calls
Ringing volume: sets the volume of your ringing tone (use + and -)
Incoming cal l v ideo: selects the video shown for received calls
Vibrat ing alert : turns the vibrating alert On or Off
Message alert tone: selects the tone for received messages
E-mail alert tone: selects the tone for received e-mails
I M alert tone: selects the tone for received instant messages
Keypad tones: sets the volume of your keypad tones (use + and -)
End of l ist tone: turns the tone to indicate end of list On or Off
Other tones:sets other tones, for example, connecting accessories.
Applicat ion tones: turns the tones for applications On or Off
Alert for : to define which caller groups you want your Vertu phone to alert you for when you receive a call from someone belonging to a specified group
If you receive a call from someone who is not included in a specified caller group, an information note appears on the display, but your Vertu phone remains silent. See “Groups” on page 30 for more information.
Prof i le name: enables you to rename the selected profile (all of the preset profiles can be renamed except for General ). Use the NUMBER keys to enter the new name.
Press Save when you have made your changes.
Themes
A theme defines the image that is used as a background on all of your Vertu phone menus.
To select a theme:
1. From the stand-by display, press Menu » Sett ings » Themes .
2. Scroll to the desired theme and press Apply .
3. Press Options at any time while scrolling through the themes to display the following options:
Detai ls displays name, file size and creation date information
Type of v iew displays how the folders and files appear on the screen
Sort enables you to select the order in which files and folders are displayed (by name, date, format or size).
Tones
The tones settings menu allows you to personalise the tone settings of the selected active profile on your Vertu phone.
To personalise the tone settings:
1. From the stand-by display, press Menu » Sett ings » Tones .
2. Scroll to the tone type that you want to customise and then press Change .
3. Select a ringing tone from the list.
SETTINGS
English
37
Display
This allows you to receive cell information (network service) and to set display options.
To personalise your Vertu phone’s display view:
1. From the stand-by display, press Menu » Sett ings » Display .
2. Scroll to one of the following options and then press Select :
Glowing earpiece controls whether the breathing light in the phone pillow is activated (On ) when the phone is in standby mode:
When the phone is in stand-by mode, the glowing earpiece flashes slowly
When the phone is in stand-by mode with a missed call or text message, the glowing earpiece flashes quickly
When the phone is in stand-by mode and charging the glowing earpiece light remains on constantly
Wallpaper enables you to add a background image when your phone is in standby mode
Standby font colour lets you change the font colour of the date and time in the stand-by mode. This is displayed only if the Hide clock is selected. See “Change c lock format” on page 35
Font size lets you select the font size used in Messaging, Contacts and Web
Cell info display displays the local area code on the stand-by display
Notif icat ion detai ls lets you select to show or hide details, such as contact information in both missed call and message received notifications.
My shortcuts
With personal shortcuts you get quick access from the stand-by display to frequently used functions of your Vertu phone.
If the left SELECTION key is Go to , select Go to » Options and select from the following options to personalise your Go to menu:
Select opt ions - to add or to remove a function
Organise - to rearrange the functions on your personal shortcut list.
Auto sort ing on - dynamically displays the menu options you use most often at the top of the list
The auto sorting feature must be disabled for you to use the Select opt ions and Organise functions.
Left select ion key
To select a function for the left SELECTION key:
1. From the stand-by display, press Menu » Sett ings » My shortcuts » Left select ion key .
2. Scroll to the desired function and then press Select .
Right select ion key
To select a function for the right SELECTION key:
1. From the stand-by display, press Menu » Sett ings » My shortcuts » Right select ion key .
2. Scroll to the desired function and then press Select .
Navigation key
To select a function for the different directions on the navigat ion
key:
1. From the stand-by display, press Menu » Sett ings » My shortcuts » Navigat ion key .
2. Select the Up, Down, Left or Right functionality to be changed.
3. Press Change .
4. Scroll to the required shortcut from the list and press Select .
Connectivity
You can connect your Vertu phone to a compatible device using Wireless LAN, Bluetooth wireless technology, or a USB data cable (CA-101V) connection. You can also define the settings for GPRS dial-up connections.
Bluetooth wireless technology
Your Vertu phone is compliant with Bluetooth Specification 2.0. You can use Bluetooth car kits, perform data transfer and use your Vertu phone as a modem.
To ensure interoperability between other devices supporting Bluetooth technology, use Vertu approved enhancements for this model. Check with the manufacturers of other devices to determine their compatibility with this device.
There may be restrictions on using Bluetooth technology in some locations. Check with your local authorities or service provider.
Features using Bluetooth technology, or allowing such features to run in the background while using other features, increase the demand on battery power and reduce the battery life.
Bluetooth technology allows you to connect the phone to a compatible Bluetooth device within 10 meters (32 feet). Since devices using Bluetooth technology communicate using radio waves, your Vertu phone and the other devices do not need to be in direct line-of-sight, although the connection can be subject to interference from obstructions for example walls or from other electronic devices.
Bluetooth driver compatibility information is available in the Vertu PC Suite help.
SETTINGS
English
38
Bluetooth settings
To define how your Vertu phone is recognised by other Bluetooth devices:
1. From the stand-by display, press Menu » Sett ings » Connectiv i ty » Bluetooth .
2. Scroll to one of the options and then press Select :
Bluetooth enables you to switch your bluetooth connection on and off
Connect audio enhan. enables you to connect your phone with an audio enhancement and the device that you want to connect
Paired devices enables you to add a new Bluetooth device and view existing devices already paired with your phone
Active devices checks which Bluetooth connection is currently active
My phone’s v isibi l i ty enables you to operate the phone in hidden mode to avoid malicious software
My phone’s name enables you to define the name that you want
your Vertu phone to be recognised by on the network.
Bluetooth wireless connection
To make a Bluetooth wireless connection:
1. From the stand-by display, press Menu » Sett ings » Connectiv i ty » Bluetooth .
2. Scroll to Paired devices and press Select .
3. Select a device from the list of available devices or scroll to Add new device and press Select .
Your Vertu phone will automatically turn Bluetooth on if necessary and search for available devices.
4. Scroll to the device to connect to and press Add .
5. Enter a passcode if necessary and press OK .
A message is displayed when the device is connected successfully and the paired device is added to the Paired devices list.
To check which Bluetooth connection is currently active, scroll to Active devices and then press Select .
Select Options to access available options depending on the status of the device and the Bluetooth connection.
Wireless LAN
To use Wireless LAN (WLAN), you must obtain an unlicensed mobile access (UMA) subscription from your service provider. The correct settings may already be configured in your phone. For more information, contact your service provider.
The WLAN function allows a seamless hands-off connection from the mobile phone network to a WLAN. When your phone is connected to a WLAN access point and you move out of range of this access point, the roaming function tries to automatically connect your phone to another access point belonging to the same network. If the WLAN connection is lost, your phone connects automatically to the mobile phone network.
Find, save and connect to networks
To search for available WLANs:
From the stand-by display, press Menu » Sett ings » Connectiv i ty » WLAN » Available WLANs .
Your Vertu phone automatically detects hidden networks. You can only connect to a hidden network if you know the network’s service set identifier (SSID).
To connect to a known WLAN:
1. From the stand-by display, press Menu » Sett ings » Connectiv i ty » WLAN » Avai lable WLANs . You can also press Go to » WLAN .
2. Scroll to the required WLAN and press Connect .
3. Enter the SSID and/or network password if required.
Your phone connects to the WLAN and asks if you would like to save the network for future use.
4. Press Yes or No as required.
If you pressed Yes, the WLAN is saved to the Saved WLANs list.
Saved networks
Display, manage, connect to, and prioritise your saved networks.
Select Menu » Sett ings » Connectiv i ty » WLAN » Saved WLANs .
The networks are listed in order of priority. The network with the highest priority is the first one, to which an automatic connection attempt is made.
To connect manually, scroll to a network and select Connect .
Manage saved networks
Scroll to a network, press Options and select from the following:
Disconnect to set automatic or manual connection to the network when it becomes available.
Remove from l ist to remove the network from the Saved networks list.
Organise pr ior i ty to move a saved network in the order of priority.
Forward sett ings to forward the settings of the saved network. Enter a security code (preset code 12345), and the phone number, and select Send.
Add new network to add a new network and set its access data manually.
WLAN search
When switched On , the WLAN search option enables you to connect automatically to saved networks when you are within range. When set to Off , the phone does not automatically detect available networks.
To turn on the WLAN search option:
1. Press Menu » Sett ings » Connectiv i ty » WLAN » WLAN search .
2. Select Off or On as required.
Do not accept Bluetooth connectivity from sources you do not trust. Alternatively, switch off the Bluetooth function. This will not affect other functions of your Vertu phone.

SETTINGS
English
39
Internet telephony
Your Vertu phone supports voice calls over the internet (net calls).
To set up your phone to make and receive internet calls, you must:
> be connected to a WLAN.
> have a VoIP account with one of the VoIP service providers listed in the Internet telephone setup wizard, for example, Gizmo. Your contact must also have a VoIP account.
1. Press Menu » Sett ings » Connectiv ity » Internet telephone » Accounts » Add new .
The Internet telephone setup wizard is opened.
2. Press Connect .
3. Select the WLAN you are connected to.
4. Select your VoIP service provider.
5. Enter your Username and Password for this service.
6. Press Submit .
You can now make calls using the internet telephone feature.
To make a call using the Internet telephone function:
1. Press Menu » Contacts » Names .
2. Select the contact you are going to call.
3. Press Options » Internet cal l .
Micro-US B data cable
You can use the micro-USB data cable to transfer data between the phone and a compatible computer or a printer supporting PictBridge. You can also use the micro-USB data cable with Vertu PC suite.
To change the USB mode, select Menu » Sett ings » Connectiv i ty » US B data cable .
To connect your phone using the micro-USB data cable:
1. Connect the data cable. A message appears on the display Select US B mode:
2. Select from the following options:
PC Suite - to use the phone to interact with applications on a computer that has Vertu PC suite installed.
Print ing & media - to use the phone with a PictBridge compatible printer, or to connect the phone to a PC to synchronise it with Windows Media Player.
Data storage - to connect to a computer that does not have Vertu software and use the phone as data storage.
Packet data
Your Vertu phone can use general packet radio service (GPRS) for high-speed data connections. With GPRS, you can stay connected to the mobile Internet and perform faster downloads without completing a dial-up connection. GPRS connectivity can be used to enhance MMS messaging, Web browsing sessions, e-mail, and PC dial-up. GPRS is typically billed as an “always-on” function and you are only charged for the data you transfer.
Enhanced GPRS (EGPRS), also known as EDGE (enhanced data rates for GSM evolution) is similar to GPRS but the connection is much faster. Contact your service provider for more information about supported data connections and tariffs.
When you have selected GPRS as a data bearer, the phone automatically uses EGPRS (EDGE) instead of GPRS if it is available in the network.
Packet data connection
To define when a GPRS connection is established:
1. From the stand-by display, press Menu » Sett ings » Connectiv i ty » Packet data » Packet data conn. .
2. Scroll to one of the following options and then press Select .
When needed registers and establishes an (E)GPRS connection when an application using (E)GPRS needs it and closes the connection when the application finishes
Always onl ine sets your Vertu phone to automatically register to
an (E)GPRS network when you switch on your Vertu phone. The icon will appear to indicate that GPRS or EGPRS service is available
If you receive a call or a text message, or make a call during a GPRS
or EGPRS connection, the icon will appear to indicate that the GPRS or EGPRS connection is suspended.
Packet data settings
You can connect your Vertu phone to a compatible PC using Bluetooth wireless technology or a USB data cable connection. This allows you to use your Vertu phone as a modem to enable (E)GPRS connectivity from your PC.
To define the settings for (E)GPRS connections from your PC:
1. From the stand-by display, press Menu » Sett ings » Connectiv i ty » Packet data » Packet data sett ings » Active access point .
2. Scroll to the required access point and press Activate .
3. Scroll to Edit act ive access pt . and then press Select .
4. With Alias for access point highlighted, press Select .
5. Use the NUMBER keys to enter an alias for the active access point
and then press OK .
Your Vertu phone attempts emergency calls primarily over cellular networks. If an emergency call using cellular networks is not successful, your device attempts an emergency call through your net call provider. Due to the established nature of cellular telephony, you should use cellular networks for emergency calls if possible. If you have cellular network coverage available, make sure that your cellular phone is switched on and ready to make calls before you attempt an emergency call. The capability for an emergency call using internet telephony depends on the availability of a WLAN network and your net call provider's implementation of emergency call capabilities. Contact your net call provider to check the internet telephony emergency call capability.
You can also set the (E)GPRS dial-up service settings (access point name) on your PC using the One Touch Access application in Vertu PC Suite.

SETTINGS
English
40
Data transfer
Synchronise your calendar, contacts data, and notes with another compatible device, for example a compatible PC, or a remote Internet server (network service).
Your Vertu phone allows data transfer with a compatible PC or another compatible device when using the phone without a SIM card. Note that when you use the phone without a SIM card, some functions appear dimmed in the menus and cannot be used. Synchronising with a remote Internet server is not possible without a SIM card.
Partner list
To copy or synchronise data from your Vertu phone, the name of the device and the settings must be in the list of partners in transfer contacts. If you receive data from another device, the partner is automatically added to the list, using the contact data from the other device. Server sync and PC synchronisat ion are the original items in the list.
To add a new partner to the list (for example a new device):
1. From the stand-by display, press Menu » Sett ings » Connectiv i ty » Data transfer » Options » Add transfer contact » Phone copy » Data to be copied .
2. Mark the required settings according to the transfer type.
To edit the copy and synchronise settings:
1. Scroll to the required entry in the partner list and press Options » Edit .
2. Modify the settings accordingly.
To delete a partner from the list:
1. Scroll to the required entry in the partner list and press Options » Delete .
2. Confirm the Delete transfer contact? %U message.
Data transfer with a compatible device
Bluetooth wireless technology can be used for synchronisation. The other device should be in the stand-by mode.
To start data transfer:
1. From the stand-by display, press Menu » Sett ings » Connectiv i ty » Data transfer .
2. Scroll to the required entry in the Partner list (other than Server sync or PC synchronisat ion ) and then press Select .
According to the settings, the selected data is copied or synchronised. The other device also must be activated for receiving data.
Synchronise from a compatible PC
Before you synchronise data from calendar, notes, and contacts with a PC, you must install the Vertu PC Suite software on a compatible PC. Use Bluetooth wireless technology, or a USB data cable for the synchronisation, and start the synchronisation from the PC.
Synchronise from a server
To use a remote Internet server, you must subscribe to a synchronisation service, e.g. Vertu Fortress (see “Vertu Fortress” on page 56). For more information and the settings required for this service, contact your service provider. You may receive the settings as a configuration message.
If you have saved data on the remote Internet server, to synchronise your Vertu phone, start the synchronisation from your phone:
1. From the stand-by display, press Menu » Sett ings » Connectiv i ty » Data transfer » Server sync .
2. Depending on the settings, select In it ial is ing syn-chronisat ion or In i t ia l is ing copy .
Synchronising for the first time or after an interrupted synchronisation may take up to 30 minutes to complete, if the contacts or calendar are full.
Call settings
You can personalise the way your Vertu phone behaves during a call by using the call settings.
Call type sett ing
The call type setting enables you to set which call type you prefer when making a call:
Internet cal l only - only make calls using the internet telephone
Prefer internet cal l - always try making calls using the internet telephone option first
Voice cal l only - only make calls using your standard voice network
Prefer voice cal l - always try making calls using the standard voice network first.
You cannot delete Server synchronisation or PC synchronisation.
SETTINGS
English
41
Call divert
The call divert feature redirects your incoming calls to another number, for example your voice mailbox number.
When a call is diverted your Vertu phone does not give any indication of an incoming call. The call divert feature is managed by your service operator and is not phone specific. The call divert feature may remain active even if your SIM card is not currently in a phone.
To manage your call divert settings:
1. From the stand-by display, press Menu » Sett ings » Call » Cal l divert .
2. Scroll to one of the divert options:
All voice cal ls forwards all calls to the number you specify
I f busy forwards all calls when you are in a call
I f not answered forwards all calls to another number when you do not answer. You can also set a delay before forwarding takes place
I f out of reach forwards all calls when your Vertu phone is turned off or out of the coverage area
I f not avai lable forwards all calls when you do not answer, your Vertu phone is busy or turned off, or out of the coverage area. You can also set a delay before forwarding takes place
All fax cal ls redirects all fax calls to a fax number
All data cal ls forwards all data calls to a data mailbox.
3. Press Select :
Activate sets up the divert. Use the NUMBER keys to enter the divert number or select a contact and then press OK
Cancel cancels the divert
Check status displays the current status of the divert. A progress indicator appears, followed by an information note indicating whether the divert is active and to which number.
No cal l diverts cancels all call diversions.
Anykey answer
Anykey answer allows you to answer an incoming call by briefly pressing any key except the POWER key, SELECTION and END keys.
To change the anykey answer setting:
1. From the stand-by display, press Menu » Sett ings » Call » Anykey answer .
2. Scroll to On to enable Anykey answer, or Off to disable it and then press Select .
Automatic redial
Occasionally, your network may experience heavy traffic, or the called party is busy and you might not be able to make a call. With automatic redial activated, your Vertu phone redials the number up to 10 times, and notifies you once the network is available.
To change the automatic redial setting:
1. From the stand-by display, press Menu » Sett ings » Call » Automatic redial .
2. Scroll to On to enable automatic redial, or Off to disable it and then press Select .
Voice clar i ty
This feature enhances speech intelligibility especially in noisy environments.
To change the voice clarity setting:
1. From the stand-by display, press Menu » Sett ings » Call » Voice clari ty .
2. Scroll to Active to enable voice clarity, or Inact ive to disable it and then press Select .
Speed dial l ing
Single key speed dialling enables you to quickly dial a number by pressing and holding a single key.
To activate the speed dialling feature:
1. From the stand-by display, press Menu » Sett ings » Call » Speed dial l ing .
2. Scroll to On to enable speed dialling, or Off to disable it and then press Select .
To change the speed dial settings for your contacts, see “Speed dialling” on page 29.
Call wait ing
Call waiting notifies you of an incoming call while you are in another call. You can accept, reject, or ignore the incoming call. Contact your service provider for more details.
To change the call waiting setting:
1. From the stand-by display, press Menu » Sett ings » Call » Cal l wait ing .
2. Scroll to one of the options and then press Select :
Activate enables call waiting
Cancel cancels call waiting
Check status displays whether the option is active and for which type of call.
To use the call waiting feature:
1. When you have a call in progress and you receive an incoming call, you will hear an audible alert and the display indicates that another call is waiting. Press the SEND key to answer the call. The person you were speaking to is put on hold. Call waiting may not work correctly if I f busy is set.
2. Press the SEND key to swap between the calls. A confirmation message is displayed. The person on hold becomes the active call, and the other person is put on hold.
3. Press the END key to end the active call. A confirmation message is displayed and the other call becomes active.
4. Press Options then scroll to End al l cal ls and then press Select to end all calls.
Cancelling all call diversions may affect your ability to receive voice mail messages. Some service providers may not allow cancelling of all diversions. Contact your service provider for specific details.

SETTINGS
English
42
Summary after cal l
Your Vertu phone can display the time spent on a call.
To change the call summary setting:
1. From the stand-by display, press Menu » Sett ings » Call » Summary after cal l .
2. Scroll to On to enable summary after call, or Off to disable it and then press Select .
Send my cal ler I D
Shows your phone number to the person you are calling.
To change the caller ID setting:
1. From the stand-by display, press Menu » Sett ings » Call » Send my cal ler I D .
2. Scroll to Yes to enable caller ID, No to disable it, or Set by network to use the setting agreed with your service provider and then press Select .
Send net cal ler I D
Shows your internet telephone username to the person you are calling. Send net caller ID must be supported by your Internet Call provider for it to be displayed.
To change the caller ID setting:
1. From the stand-by display, press Menu » Sett ings » Call » Send net cal ler I D .
2. Scroll to Yes to enable caller net caller ID or No to disable it and then press Select .
Phone settings
You can personalise the following options on your Vertu phone using this menu.
Language sett ings
1. From the stand-by display, press Menu » Sett ings » Phone » Language sett ings .
2. Scroll to one of the options and then press Select .
Phone language enables you to set the display language of your Vertu phone. If you select Automatic , the phone selects the language according to the information on the SIM card
S I M language enables you to select the USIM card language
Recognit ion lang. enables you to set a language for the voice playback. See “Connectivity” on page 37.
Memory status
1. From the stand-by display, press Menu » Sett ings » Phone » Memory status .
2. Scroll through the options to see how much of your Vertu phone’s memory is being used to store media, messages and applications and how much free space is available.
Automatic keyguard
To set the keys of your Vertu phone to lock automatically after a preset time delay when the phone is in the stand-by mode and no function of the phone has been used:
1. From the stand-by display, press Menu » Sett ings » Phone » Automatic keyguard .
2. Select On , and use the NUMBER keys to enter the time delay.
Securi ty keyguard
To set your Vertu phone to ask for the security code when you unlock the keyguard:
1. From the stand-by display, press Menu » Sett ings » Phone » Securi ty keyguard .
2. Enter your Security code (see “Security code” on page 13) and select On .
Voice recognit ion
Call contacts and carry out phone functions by speaking a voice command.
Voice commands are language-dependent. Select Menu » Sett ings » Phone » Voice recognit ion » Recognit ion lang. and your language before using voice commands.
From the stand-by display, press Menu » Sett ings » Phone » Voice recognit ion » Voice recog. training to train the voice recognition of your phone to your voice.
To activate a voice command for a function:
1. From the stand-by display, press Menu » Sett ings » Phone » Voice recognit ion » Voice commands .
2. Select a feature and a subsequent function.
To activate a deactivated voice tag, select Add .
To play the activated voice command, select Play .
To manage the voice commands, scroll to a function, and select Options and from the following:
Edit to rename the voice command
Remove to deactivate the voice command
Add al l to activate all voice commands
Restore al l to deactivate voice commands for all functions in the voice commands list
To use voice commands, see “Voice dialling” on page 10.
When the keyguard is on, calls still may be possible to the official emergency number programmed into your device.

SETTINGS
English
43
Fl ight query
You can deactivate all radio frequency functionality and still have access to offline games, calendar and phone numbers. Use Flight mode in areas sensitive to radio emission, on board aircraft and in hospitals.
Your Vertu phone will ask if you wish to switch to Flight mode when you switch the phone on. To activate or deactivate Flight mode query:
1. From the stand-by display, press Menu » Sett ings » Phone » Fl ight query .
2. Scroll to On or Off and then press Select .
In Flight mode you can make an emergency call. Enter the emergency number, press the CALL key and select Yes when asked if you want to exit the Flight mode profile. The phone attempts to make the emergency call and then automatically reverts to General profile when the call has ended.
To manually activate or deactivate Flight mode profile:
1. From the stand-by display, press Menu » Sett ings » Profi les » Fl ight » Activate or Personalise .
To deactivate the Flight mode, select any other profile.
Phone updates
Enables you to update your phone’s software if there is an update available.
1. From the stand-by display, press Menu » Sett ings » Phone » Phone updates .
2. Select one of the following options:
Current softw. detai ls displays current phone software details
Downl . phone softw. enables new phone software to be downloaded
Instal l softw. update enables newly downloaded software to be installed on your phone
Software update provider displays your software update provider
Automatic SW update check enables your phone to automatically check for updates Every month , Every 3 months or Never .
Network mode
Enables you to switch between GSM networks and dual mode - 3G+GSM.
To change the network mode:
1. From the stand-by display, press Menu » Sett ings » Phone » Network mode .
2. Choose from 3G+GSM and GSM and press Select .
Operator selection
You can select your network operator manually or your Vertu phone will select one automatically. See “Set up manual roaming” on page 57.
To change your operator selection setting:
1. From the stand-by display, press Menu » Sett ings » Phone » Operator select ion.
2. Scroll to one of the options and then press Select :
Manual displays all the locally available networks. Select the one you want to use.
Automatic selects the default network for the area you are in.
Start-up tone
To select whether or not your Vertu phone plays a tone when the phone is switched on:
1. From the stand-by display, press Menu » Sett ings » Phone » Start-up tone .
2. Scroll to On or Off and then press Select .
Enhancements
This menu is shown only if the phone is or has been connected to a compatible mobile accessory, such as a charger or headset.
1. From the stand-by display, press Menu » Sett ings » Enhancements .
2. Scroll to one of the options and then press Select (available options will depend upon the enhancement selected):
Default prof i le enables you to select the profile that you want to be automatically activated when you connect to the selected enhancement
Automatic answer sets the phone to answer an incoming call automatically after 5 seconds. If Incoming call alert is set to Beep once or Off , automatic answer is off
Lights sets the lights permanently On or select Automatic to set the lights on for 15 seconds after a key press.
You can disable 3G from the Go to menu to maximise battery performance. 3G enables faster data downloading and is a necessity if you are roaming in Japan.

SETTINGS
English
44
Configuration
You can configure your Vertu phone with settings that are required for certain services to function correctly. These services include multimedia messaging, synchronisation, e-mail, streaming and browser. Use the Order Settings link from your CD-ROM to take you directly to the appropriate page on the Vertu web site to obtain the settings for your phone.
1. From the stand-by display, press Menu » Sett ings » Configurat ion .
2. Scroll to one of the options and then press Select :
Web config . sett ings only the configurations that support the browsing service are shown. Select a service provider, Default, or Personal configuration for browsing.Default config . sett . displays the service providers saved in the phone. Scroll to a service provider, and select Detai ls to view the applications that the configuration settings of this service provider support
> To set the configuration settings of that service provider as default settings, press Options » Set as default . To delete configuration settings, select Delete .
Activ. def . in al l apps. activates the default configuration settings for supported applications
Preferred access pt . displays the saved access points. Scroll to an access point and press Options . With Detai ls highlighted, press Select to view the name of the service provider, data bearer, and packet data access point or GSM dial-up number for that access point
Connect to support downloads the configuration settings from your service provider if this is supported by the service provider
Device manager sett . enables you to allow or disallow software and configuration updates
Personal config . sett . enables you to add new personal accounts for various services, and to activate or delete them
> To add a new personal account if you have not added any, select Add , otherwise, press Options and with Add new highlighted, press Select . Scroll to the required service type and then press Select . Use the NUMBER keys to enter each of the required parameters. The parameters differ according to the selected service type
> To delete or activate a personal account, scroll to it, press Options , scroll to either Delete or Activate and then press Select .
Security
Your Vertu phone includes security options for the phone, SIM card, memory and calls.
To configure your security settings:
1. From the stand-by display, press Menu » Sett ings » Securi ty .
2. Scroll to one of the following options and then press Select :
PI N code request lets you select whether a code is required when switching on your phone. The SIM card may require that the code is always asked for
Call barr ing service restricts incoming calls and outgoing calls. A barring password is required.
Closed user group specifies a group of people you can call and who can call you
Securi ty level sets the security code whenever a new SIM card is inserted into the phone
Access codes changes the security codes that protect the phone and memory. Change either the Create securi ty code , Change P I N code , Change P I N2 code or the Change barr ing pass.
Code in use selects whether the PIN code is active
PI N2 code request selects whether the PIN2 code is required when using a specific phone feature which is protected by the PIN2 code. Some SIM cards do not allow the code request to be turned off
Authori ty cert i f icates displays the list of authority certificates downloaded into your phone
User cert i f icates displays the list of user certificates downloaded into your phone
Security module sett. See “Security module” on page 14.
Workshop reset
To restore your Vertu phone’s original settings:
1. From the stand-by display, press Menu » Sett ings » Workshop reset » Restore sett ings only .
2. Use the NUMBER keys to enter the security code.
To restore all your Vertu phone’s original settings and delete user data, e.g. phonebook entries:
1. From the stand-by display, press Menu » Sett ings » Workshop reset » Restore al l .
Use the NUMBER keys to enter the security code
Due to the complexity of entering all of the settings manually, it is strongly recommended that you use the order settings link from your CD-ROM to take you directly to the appropriate page on the Vertu website to obtain the settings for your Vertu phone.
When security features that restrict calls are in use (such as call barring, closed user group, and fixed dialling) calls are still possible to the official emergency number programmed into your device.
Data you have entered or downloaded, for example names and phone numbers saved in Contacts, are not deleted.

SETTINGS
English
45
Sync and backup
To synchronise or back up your Vertu phone data with another device:
Select Menu » Sett ings » Sync and backup and from following options.
Phone switch to synchronise or copy selected data between your phone and another phone using Bluetooth
Create backup to create a backup of selected data
Restore backup to select a backup file and restore it to the phone. Select Options » Detai ls for information about the selected backup file
Server sync to synchronise or copy selected data between your phone and another device, PC or network server (network service).
Digital rights management
Digital rights management (DRM) is copyright protection, designed to prevent modification and to limit distribution of protected files. When you download protected files, such as sound, video, themes, or ringing tones to your phone, the files are free, but locked. You pay for the key to activate the file, and the activation key is automatically sent to your phone when you download the file.
To view the permissions for a protected file:
Scroll to the file, and select Options » Act ivat ion keys. For example, you can see how many times you can view a video or how many days you have left for listening to a song.
To extend the permissions for a file:
Scroll to the file, select Options , and the corresponding option for the file type, such as Activate theme .
You can send certain types of protected files to your friends, and they can buy their own activation keys.
If your device has OMA DRM protected content, the only way to back up both the activation keys and the content is to use PC suite. Other transfer methods may not transfer the activation keys which need to be restored with the content for you to be able to continue the use of OMA DRM protected content after the device memory is formatted. You may also need to restore the activation keys in case the files on your device get corrupted.
Copyright protections may prevent some images, music (including ringing tones), and other content from being copied, modified, transferred or forwarded.
This phone supports OMA DRM 1.0 and 2.0.
SIM services
Your SIM card may provide additional services. You can access this menu only if it is supported by your SIM card. The name and contents of the menu depend on the available services.
For availability and information on using SIM card services, contact your SIM card vendor. This may be the service provider, network operator, or other vendor.
To set the phone to show you the confirmation messages sent between your Vertu phone and the network when you are using the SIM services:
1. From the stand-by display, press Menu » Sett ings » Phone » Confirm S I M act ions .
2. With Yes highlighted, press Select .
(E)G PRS, H SCS D, 3G WCDMA and CS D
With your Vertu phone you can use the enhanced GPRS (EGPRS), general packet radio service (GPRS), high speed circuit switched data (HSCSD), wideband code division multiple access (3G WCDMA) network and circuit switched data (CSD, GSM data) data services.
For availability and subscription to data services, contact your network operator or service provider.
The use of HSCSD services consumes the phone battery faster than normal voice or data calls. You may need to connect the phone to a charger for the duration of data transfer.
See “Packet data settings” on page 39.
This option is shown only if supported by your SIM card.
Accessing these services may involve sending messages or making a phone call for which you may be charged.

ADDITIONS
English
46
7 ADDITIONS
Your Vertu phone has a multimedia player with which you can view, play, and download files, such as images, audio, video, and animated images. You can also view compatible streaming videos from a network server (network service).
Gallery
You can save images, video clips, graphics, ringing tones and recordings to folders in the gallery, and add new folders to the ones already there. You can download images and tones using MMS, mobile Internet sites, or Vertu PC Suite. The Gallery contains two types of memory: phone memory and Media memory. Files can be stored on either memory, but there is much more storage space available on the Media memory.
Your Vertu phone supports a digital rights management system to protect content that you have acquired. A piece of content, for example a ringing tone, can be protected and associated with certain usage rules, for example, the number of usage times or a certain usage period. The rules are defined in the content activation key that can be delivered with the content or separately, depending on the service provider. You may be able to update these activation keys. Always check the delivery terms of any content and activation key before acquiring them, as they may be subject to a fee.
Copyright protection may prevent some images, ringing tones, and other content from being copied, modified, transferred, or forwarded.
Your Vertu phone has a limited memory for storing files in the Gallery. This memory is not shared with other functions, for example contacts. If the phone displays a message that the memory is full, delete some existing files before proceeding.
Folders
To browse the folders in your Vertu phone:
1. From the stand-by display, press Menu » Addit ions » Gallery .
A list of folders is displayed:
These are preset in the phone. Other user-defined folders may also be shown.
2. Scroll to a folder, and press Open to view the folders and files it contains.
3. Or, press Options to see a list of the actions you can perform on the folder:
Downloads to view downloads stored on your Vertu phone. Choose from Graphic, Tone, Video, Theme or Music downloads.
Delete folder to delete a folder you have created. You cannot delete a preset folder
Move folder to move the selected folder into another folder
> After selecting Move folder , scroll to another folder, and then press Options . With Move folder highlighted, press Select . You cannot move a preset folder
Copy folder to copy your folder to another folder. You cannot copy a preset folder
Rename folder to rename a folder you have created. You cannot rename a preset folder
Detai ls to show the name, size and date of creation of the selected folder
Type of v iew to determine how the content of the folder will be displayed, either List with detai ls , List or Grid
Sort to sort the contents of the selected folder By name , By date , By format , or By size
Add folder to create a new sub folder for your files
Memory status to examine how the memory in your Vertu phone is being used and how much you have leftSearch to enter a filename or part of a filename to search for in this folder
Mark to select a folder
Mark al l to select all folders.
Images
Video cl ips
Music f i les
Graphics
Recordings
Received f i les

ADDITIONS
English
47
Fi les
To use the files in your folders:
1. From the stand-by display, press Menu » Addit ions » Gallery .
2. Scroll to the folder you require and then press Open .
3. Scroll through the sub folders to locate the file item you want to use, and press Open .
4. Or, press Options to see a list of actions that can be performed on the file (these will be dependent upon the type of file you have selected):
Downloads to view downloads stored on your Vertu phone. Choose from Graphic, Tone, Video, Theme or Music downloads.
Use or Apply to activate the file
Delete to remove the file from your Vertu phone
Send to send the selected file as a multimedia message. This option is unavailable if the selected file is copyrighted
Move to move the selected file into another folder
Copy to copy the selected file to another folder, while leaving a copy in its current folder also
Rename to rename the selected file
Print to print file. Send the file to a compatible printer via a data cable or Bluetooth connection
Detai ls to show the name, size, and date of creation of the selected file
Type of v iew to change the way the files are displayed. Choose from List with detai ls , List or Grid
Sort to change the order in which the files are displayed. Choose from By name , By date , By format or By size
Open in sequence to view a series of files in listed order.
Add folder to add a new folder
Memory status to view the current memory status. Choose from Phone memory or Media memory. The memory status details how much memory is being used by each application
Search to enter a filename or part of a filename to search for in this folder
Mark to select a file
Mark al l to select all files in the folder
Games and applications
Your Vertu phone may include one or more games and applications.
To launch a game:
1. From the stand-by menu, press Menu » Addit ions » Applicat ions .
2. Scroll to the desired game, and press Open .
To download an application:
Your phone supports J2ME Java applications. Make sure that the application is compatible with your phone before downloading it.
You can download new Java applications and games using the Vertu Application Installer from Vertu PC Suite. You can also download and install applications over-the-air.
Calculator
The calculator in your Vertu phone adds, subtracts, multiplies, divides, calculates the square and the square root.
To perform a calculation:
1. From the stand-by display, press Menu » Addit ions » Calculator .
2. When 0 is displayed, enter the first number in the calculation.
3. Press Options and select the function you want to perform.
4. Enter the second number.
5. Press the = sign to display the result on the bottom line of the screen.
To start a new calculation, select and hold Clear .
Music player
Your Vertu phone includes a music player for listening to music tracks, recordings or other MP3, MP4, AAC, eAAC+ or Windows Media.
With the music player you can download, view, and play compatible audio and video files in a variety of formats.
Your Vertu phone can play music tracks, recordings or other MP3 or AAC sound files that you have transferred to the phone with the Audio Manager application (part of Vertu PC Suite), BT or USB cable or web.
Music files stored in a folder in the phone memory or in a folder of the Media memory, will automatically be detected and added to the default track list.
Only install and use applications and other software from sources that offer adequate security and protection against harmful software.
For the availability of different services, pricing, and tariffs, contact your service provider.
Your device may have some bookmarks loaded for sites not affiliated with Vertu. Vertu does not warrant or endorse these sites. If you choose to access them, you should take the same precautions, for security or content, as you would with any Internet site.
Press # to enter a decimal point.
Press * to display more functions.

ADDITIONS
English
48
Playing the music tracks
To play the music tracks:
1. From the stand-by menu, press Menu » Addit ions » Music player .
2. Scroll to one of the following options to find the track you want to listen to:
All songs lists all songs stored on your phone
Playl ists shows all playlists you have created and stored on your phone
Art ists lists the songs by artist name
Albums lists the songs by album title
Genres lists the songs by genre type
Videos lists all video files stored on your phone.
3. Press Open to open the file. Press Play to start the track.
4. Use the following commands to control the Music player:
Press the centre select key to play or pause
Move the navigat ion key up to open the Music player menu and scroll up
Move the navigat ion key down to open the Music player menu and scroll down
Move the navigat ion key left to go to previous track
Move the navigat ion key right to go to next track
5. Press Options to access the Music player options (see “Music player settings” below).
6. Press the END key to close the music player.
To stop the music player, press the STOP key.
If music is still playing after you exit the music player, you can stop the music player by pressing and holding the END key.
When you open the Music player menu, the details of the first track on the default track list are shown.
Music player sett ings
To change the music player settings:
1. From the stand-by menu, press Menu » Addit ions » Music player .
2. Press Options from the Music player menu and scroll to one of the following:
Downloads to access tracks from the following options:
Bookmarks to open the web bookmarks
Go to address to enter the address of a mobile Internet service and then press OK
Streaming sett ings to set the connection settings for the media service. Contact your service provider for information about connection settings. You may receive the streaming settings as a connection settings message from the Vertu web site for your service provider.
Update l ibrary to update your music library with your latest downloads
Music l ibr. detai ls to view data on the number of songs stored on your phone, memory used and last updated date.
3. Press Options while a track is playing and select one of the following:
Go to Music menu to return to the main music player menu
Now playing to show details of the current track
Sett ings to access the following features:
Shuff le to play a random choice of your stored tracks
Repeat to repeat a track
Music player theme to select the format of your music player.
Downloads to access tracks via the web
Mute audio to mute the current track
Web page to access a Web page associated with the currently played track. Dimmed if no Web page is availablePlay v ia Bluetooth connects to a Bluetooth audio accessory
Voice recorder
You can record speech or an active call, and save the recordings in the gallery. This is useful, for example, when recording a name and phone number to write down later.
The recorder cannot be used when a data call or GPRS connection is active.
Record sound
To make a voice recording:
1. From the stand-by display, press Menu » Addit ions » Voice recorder .
2. To start the recording, with the RECORD button highlighted, press Select and then record your message.
3. To stop the recording, with the STOP button highlighted, press Select . The recording is saved in the Recordings folder of the Media memory by default.
Record a phone cal l
To record a phone call:
1. During a call, press Options .
2. Scroll to Record and then press Select . While the call is being recorded, all parties to the call can hear a beeping sound every five seconds.
3. To stop recording, with the STOP button highlighted, press Select . The recording is saved in the Recordings folder of the gallery.
When recording a call, hold the phone in the normal position near to your ear.
Voice recorder opt ions
Immediately before or after a recording, press Options to view the following:
Play last recorded to listen to the latest recording
Send last recorded to attach the recording to a Multimedia or Audio message or to send via Bluetooth
Recordings l ist to see the list of recordings in Gallery
Select memory to choose recording file destination. Choose from Media memory or Other folder .
Warning! Listen to music at a moderate level. Continuous exposure to high volume may damage your hearing.

ADDITIONS
English
49
Notes
You can write yourself notes as reminders, but these are not associated with the calendar and do not alert you with an alarm.
Creat ing notes
To create a note:
1. From the stand-by display, press Menu » Addit ions » Notes .
2. Press Add .
3. Use the NUMBER keys to write the note and press Save .
A message confirms that the note is saved.
Viewing notes
To view a note:
1. From the stand-by display, press Menu » Addit ions » Notes .
2. Scroll to the note you want to view and press View .
Edit ing notes
To edit a note:
1. From the stand-by display, press Menu » Addit ions » Notes .
2. Scroll to the note you want to edit and press View » Edit .
3. Use the NUMBER keys to make the required changes to the note and press Save .
Sending notes
You can send a note to another phone using Bluetooth or the messaging service or convert it to a message.
To send a note as a text message:
1. From the stand-by display, press Menu » Addit ions » Notes .
2. Scroll to the required note and press Options .
3. Press Send note » Send as message .
4. Press OK to send the note.
A message confirms that the note is being sent.
To send a note using Bluetooth:
1. From the stand-by display, press Menu » Addit ions » Notes .
2. Scroll to the required note and press Options .
3. Press Send note » Via Bluetooth .
4. Highlight the device you want to send the note to, and then press Select .
A message confirms that the note is being sent.
Delet ing notes
You can delete notes one at a time or all at once.
To delete one note:
1. From the stand-by display, press Menu » Addit ions » Notes .
2. Scroll to the required note and press Options » Delete .
3. Press Yes to confirm deletion.
4. A message confirms that the note has been deleted.
To delete all notes:
1. From the stand-by display, press Menu » Addit ions » Notes » Options » Delete al l notes .
2. Press Yes to confirm deletion.
A message confirms that all of the notes have been deleted.

CALENDAR
English
50
8 CALENDAR
Your Vertu phone Calendar has the following functions:
Calendar
Your Vertu phone has a calendar where you can add notes about meetings, calls, birthdays, memos and reminders.
Opening the calendar
To open the calendar:
1. From the stand-by display, press Menu » Calendar .
2. The current month is displayed, with today highlighted. Press the NAVIGATION key to move to different dates.
When there is a note associated with a date, the date will be highlighted.
Calendar sett ings
On the Sett ings menu you can change the following characteristics of the calendar:
> Date & t ime sett ings
> Select the Default v iew
> Select the day that Week starts on
> Select a Calendar tone
> Select how often to Auto-delete notes
Date and time settings
To adjust the date and time settings:
1. From the stand-by display, press Menu » Calendar
2. Press Options and scroll down to Sett ings .
3. Press Select and Date & t ime sett ings .
4. Scroll to one of the following options and then press Select to customise the time settings:
Date: enables you to use the NUMBER keys to set the date on the phone
Time: enables you to use the NUMBER keys to set the time on the clock
Time zone: enables you to set the valid offset from GMT
Dayl ight saving: enables you to select between Wintertime or Summertime (+1 or +2 hours) daylight saving periods.
5. Scroll down and select Save to confirm your settings.
Selecting the default view
You can configure the calendar on your Vertu phone to default to month view or week view.
To set the default view:
1. From the stand-by display, press Menu » Calendar » Options » Sett ings » Default v iew .
2. Highlight the required view and then press Select .
A message confirms which default view has been selected.
Selecting when the week starts
The calendar can display the week starting on Saturday, Sunday or Monday.
To select a day that the week starts on:
1. From the stand-by display, press Menu » Calendar » Options » Sett ings » Week starts on .
2. Highlight the required day and then press Select .
A message confirms which day the week starts on.
Selecting a calendar tone
To select a tone for the calendar:
1. From the stand-by display, press Menu » Calendar » Options » Sett ings » Calendar tone .
2. Select Standard for standard tone or Open Gal lery to choose from a tone stored in the Gallery folders.
3. Press Select to confirm the new settings.
Calendar Notes
Notes enables you to make a note associated to a date and time.
To make a note:
1. From the stand-by display, press Menu » Calendar .
2. Scroll to the date you want to make a note for.
3. Press Options » Make a note .
4. Select from the following options:
Reminder - enables you to use the NUMBER keys to enter a title for the reminder and set an alarm.
Meeting - enables you to use the NUMBER keys to enter details about a meeting: subject, location, start and finish date and times and set an alarm
Call - enables you to use the NUMBER keys to enter details about a phone call: phone number, name and time details and set an alarm
Birthday - enables you to use the NUMBER keys to enter details about a birthday: name, year of birth, and set an alarm
Anniversary - enables you to use the NUMBER keys to enter details about an anniversary: name, occasion, date, year and set an alarm
Memo - enables you to use the NUMBER keys to enter details about a memo: subject, start date, end date and set an alarm
> Calendar
> Notes
> To-do list

CALENDAR
English
51
Viewing notes
If there are notes for a day, the date will be highlighted. You can view notes for a particular day or for the whole week.
To view the notes for a day:
1. From the stand-by display, press Menu » Calendar .
2. With the required day highlighted, press View .
3. The notes for that day will be displayed.
Viewing notes for a week
To view notes for a week:
1. From the stand-by display, press Menu » Calendar .
2. Scroll to a day in the week of interest.
3. Press Options » Week view .
4. The week is displayed showing any notes.
Edit ing notes
To edit a note:
1. From the stand-by display, press Menu » Calendar .
2. With the required day highlighted, press View . The notes for that day will be displayed.
3. Press Options » Edit to open the note for editing.
4. Edit the details as required and press Save .
Moving notes
You can move a note to a different date and time.
To move a note:
1. From the stand-by display, press Menu » Calendar .
2. With the required day highlighted, press View .
3. Press Options » Move .
4. Enter a new date and time and then press OK .
5. Set an alarm if required and then press OK .
A message confirms that the note has been moved.
Sending a note
To send a note using the calendar:
1. From the stand-by display, press Menu » Calendar .
2. With the required day highlighted, press View .
3. Press Options » Send note » Via calendar .
4. Key in the phone number or press Search to use the Contacts list.
5. Press OK to send the note.
Copying notes
You can copy a note to another date and time.
To copy a note:
1. From the stand-by display, press Menu » Calendar .
2. With the required day highlighted, press View .
3. Press Options » Copy .
4. Key in the new date and then press OK .
5. Key in the new time and then press OK .
A message confirms that the note has been copied.
Auto-deleting notes
Your Vertu phone can delete notes automatically. Notes can be deleted after one day, one week or one month.
To auto-delete notes:
1. From the stand-by display, press Menu » Calendar » Options » Sett ings » Auto-delete notes .
2. Highlight the required frequency, or Never and then press Select .
A message confirms whether auto-delete is activated or not.
To-do list
The To-do list enables you to create notes for tasks you have to do.
You can send a to-do note to another phone as a text message, or as a multimedia message or by Bluetooth. You can also save a to-do note to the calendar.
Opening the to-do l ist
To open the to-do list:
From the stand-by display, press Menu » Calendar » Options » Go to to-do l ist .
Any to-do notes will be displayed.
Creat ing a to-do l ist
To create a to-do list:
1. From the stand-by display, press Menu » Calendar » Options » Go to to-do l ist .
2. Press Add .
3. Use the NUMBER keys to enter Subject : details.
4. Select High , Medium or Low priority using the left and right NAVIGATION keys. The priority determines where the to-do note will be displayed in your list of to-do notes. High priority notes are displayed at the top of the list, whilst low priority notes are displayed at the bottom of the list.
5. Use the NUMBER keys to enter the due date and time and set an alarm if required.
6. Then select Save .
A message confirms that the To-do note is saved.
To change the priority, view the to-do note and select the deadline option. You can also mark notes as done, edit and delete them.
Delet ing a to-do l ist
To delete a to-do list
1. From the stand-by display, press Menu » Calendar » Options » Go to to-do l ist .
2. Scroll to the desired to-do note and press Options .
3. Scroll to Delete or Delete al l notes and then press Select .
4. Press Yes to confirm.
A message confirms the deletion.
If you mark your to-do notes as completed when you have finished your tasks, you can select Delete done notes to delete all the completed to-do notes at once.

ALARM CLOCK
English
52
9 ALARM CLOCK
You can set your Vertu phone to sound an alarm at a desired time. The alarm will sound even if your Vertu phone is switched off.
See “Date and time” on page 35 to set the clock time and date.
Setting the alarm
To set the alarm:
1. From the stand-by display, press Menu » Alarm clock .
2. Use the NUMBER keys to enter the time you want the alarm to sound.
3. Press Options and use the up and down navigation keys to set the alarm details.
Alarm: use the left and right navigation keys to toggle the alarm on and off.
Alarm t ime: displays the time the alarm is set for and can only be changed as above
Repeat: use the left and right navigation keys to toggle the repeat feature on and off. Setting the repeat feature to On means that the alarm will sound every day at the specified time
Repeat days: press Options and Change to select the days on which you want the alarm to repeat. This option is only available if Repeat: is switched On
Alarm tone: use the left and right navigation keys to select an alarm tone
Standard is the default alarm tone
Open Gal lery enables you to select a tone from the gallery files on your Vertu phone
Tone downloads enables you to select and download a tone from website
Snooze t ime-out: use the NUMBER keys to enter the snooze time-out in minutes
4. Select Save when complete.
A message confirms that the alarm is on and a small bell icon is visible on the stand-by display.
If the clock is displayed in Analogue mode, a red alarm hand is displayed on the face of the clock in stand-by mode. The alarm hand shows at the time that the alarm is set for.
Cancel l ing the alarm
To cancel the alarm:
1. From the stand-by display, press Menu » Alarm clock » Options » Alarm: .
2. Use the left or right NAVIGATION keys to select Off and then press Save .
A message confirms that the alarm setting has been saved.
Turning off the alarm
To turn off a ringing alarm:
1. When the alarm sounds press Stop .
2. If your Vertu phone is switched off when the alarm sounds, a message asks if you want to switch the phone on. Press Yes to switch the phone on or press No to leave the phone switched off.
Activat ing the snooze funct ion
To activate the snooze function:
1. When the alarm sounds press Snooze .
2. The alarm will sound again after the Snooze time-out duration defined when setting the alarm.
3. If you leave the alarm ringing, it will ring for approximately one minute and then go into snooze mode.
Do not press Yes when wireless phone use is prohibited or when it may cause interference or danger.

WEB
English
53
10 WEB
You can access various Web services on your Vertu phone.
Check the availability of these services, pricing, tariffs, and instructions with your service provider.
Automatically setting up Web browsing
Depending on which service provider you use, your Vertu phone might already have Web settings installed so you might be able to browse the Web straight away. If you cannot connect to the Web, please contact Vertu Concierge or visit www.vertu.com on your computer and download your settings.
Manually setting up Web browsing
First, ensure that the correct configuration settings of the service that you want to use are activated.
To select the settings for connecting to the service:
1. From the stand-by display, press Menu » Web » Web sett ings » Configurat ion sett .
Only the configurations that support the browsing service are shown. Select a service provider, Default, or Personal configuration for browsing.
2. Scroll to Account and highlight a browsing service account contained in the active configuration settings and then press Select .
3. Scroll to Displ . term. window , highlight Yes and then press Select to perform manual user authentication for Internet connections.
Web browsing using WLAN
You can browse the internet using WLAN if you can connect to a WLAN.
1. Connect to a WLAN (see “Wireless LAN” on page 38).
2. Press Menu » Web » Home .
3. Select your WLAN connection when prompted to select internet connection.
Vertu mobile
Vertu Mobile is Vertu’s presence on the Mobile Internet, tailored for handsets and carefully designed for being accessed on the go.
To open Vertu mobile:
From the stand-by display, press Menu » Web » Vertu mobi le .
The following options can then be accessed:
> Discover contains the latest Vertu news
> Where to buy enables you to find an authorised Vertu retailer wherever you are in the world
> About Vertu contains information about Vertu
> Recommend us enables you to enter a friends mobile phone number and they will receive a text message providing a link to Vertu Mobile.
Home
By default, your home page is your network operator’s home page You can set your home page to be a web page of your choice.
To set your home page:
1. Press Menu » Web .
2. Open the web page to be set as your home page.
3. Press Options » Set as home page .
You can also set an existing bookmarked page as your home page. To do this:
1. Press Menu » Web » Bookmarks .
2. Highlight the required bookmark and then press Select to open the bookmarked page.
3. Press Options » Set as home page .
To make a connection to your home page, either press and hold the 0 key or:
From the stand-by display, press Menu » Web » Home .
Go to address
To enter a web page address:
1. From the stand-by display, press Menu » Web » Go to address .
2. Use the NUMBER keys to enter the service URL.
Browse pages
While you are browsing the Internet, the function of the phone keys may vary. Follow the text labels on the phone display and see below for more information.
is shown on the top left of the display during browsing. If you receive a call or a text message while browsing, indicates that the Internet connection is suspended while you receive the call or text message. When the call or text message ends, your Vertu phone reconnects the browsing session.
Important: Use only services that you trust and that offer adequate security and protection against harmful software.

WEB
English
54
Browse with phone keys
To browse through the page, scroll in any direction.
To select a highlighted item, press the CALL key, or press Select .
To enter letters and numbers, press the NUMBER keys. To enter special characters, press * .
Options whi le browsing
Press Options to open a new list of options for browsing:
Press Home to return to your start page
Press Bookmarks to access the list of bookmarks
Press Go to address to enter a specific web page address
Press Add bookmark to save the page as a bookmark
Press Navigat ion to view browsing history, downloads or to reload the current page
Press This page to show the list of options for the active page
Press Tools to show a list of other options
Press Sett ings to view or change browsing settings. See “Settings” on page 54.
Press Quit to disconnect from a service.
The service provider may also offer other options.
Receive a bookmark
When you have received an address that is sent as a bookmark, the message 1 bookmark received is displayed. The received bookmark is saved automatically to Received f i les . To view it, press Show and select Bookmarks .
Settings
Appearance sett ings
1. From the stand-by display, press Menu » Web » Web sett ings .
2. Scroll to Display and then press Select .
3. Scroll to one of the following options and then press Select :
Press Font size to set the font size
Press Show images and No to hide pictures on the page. This can speed up the browsing of pages that contain a lot of pictures
Press Text wrapping and On to set the text to continue on the next line on the display. If you select Off , the text is abbreviated
Press Screen size and Full or Small to set the screen layout
4. Scroll to General and press Select .
Press Auto-f i l l and Enable to enable your Vertu phone to complete fields for you
Press Unicode (UTF-8) addr. and On to set the phone to send a URL as a UTF-8 encoding. You may need this setting when you access a Web page created in foreign language
Press Content encoding to select the encoding for the browser page content
Press JavaScript and Enable to enable the Java scripts.
Securi ty sett ings
Cookies
Cookies are parcels of information used by Web servers to differentiate a user and their preferences when navigating a website or services such as online shopping. Cookies are saved in the cache memory of your Vertu phone. Cookies are saved until you clear the cache memory.
To allow or prevent the phone from receiving cookies, while browsing:
1. From the stand-by display, press Menu » Web » Web sett ings » Securi ty » Cookies .
2. Select Allow or Reject .
Unsecure content
To set an alert when a secure page contains an unsecure item.
1. From the stand-by display, press Menu » Web » Web sett ings » Securi ty » Alert for unsecure .
2. Press Yes to set the phone to alert when a secure page contains an unsecure item. These alerts do not guarantee a secure connection
These alerts do not guarantee a secure connection.
Scripts over secure connection
You can select whether to allow the running of scripts from a secure page. The phone supports WML scripts.
From the stand-by display, press Menu » Web » Web sett ings » Securi ty » WM Lscript » Allow or Reject .
Clear the cache
A cache is a memory location that is used to store data temporarily. If you have tried to access or have accessed confidential information requiring passwords, empty the cache after each use. The information or services you have accessed is stored in the cache.
To empty the cache:
From the stand-by display, press Menu » Web » Clear the cache .
Browser securi ty
Security features may be required for some services, for example online banking or shopping. For such connections you need security certificates and possibly a security module, which may be available on your SIM card. For more information, contact your service provider.
Security module
The security module improves security services for applications requiring a browser connection, and allows you to use a digital signature. The security module may contain certificates as well as private and public keys. The certificates are saved in the security module by the service provider.
To view or change the security module settings:
From the stand-by display, press Menu » Sett ings » Securi ty » Security module sett ings .

WEB
English
55
Certificates
The existence of a certificate does not offer any protection by itself; the certificate manager must contain correct, authentic, or trusted certificates for increased security to be available.
Before changing any certificate settings, you must make sure that you really trust the owner of the certificate and that the certificate really belongs to the listed owner.
There are two kinds of certificates:
> server certificates
> user certificates.
You may receive these certificates from your service provider. User certificates may also be saved in the security module by the service provider.
To view the list of the user certificates downloaded into your Vertu phone:
From the stand-by display, press Menu » Sett ings » Securi ty » User cert i f icates .
Digital signature
You can make digital signatures with your Vertu phone if your SIM card has a security module. Using the digital signature can be the same as signing your name to a paper bill, contract, or other document.
To make a digital signature:
1. Select a link on a page, for example, the title of the book you want to buy and its price. The text to sign, which may include the amount and date, is shown.
2. Check that the header text is Read and that the digital signature icon is shown.
3. If the digital signature icon does not appear, there is a security breach and you should not enter any personal data, for example your signing PIN.
4. To sign the text, read all of the text first, and press Sign .
5. The text may not fit within a single screen. Therefore, make sure to scroll through and read all of the text before signing.
6. Select the user certificate you want to use. Use the NUMBER keys to enter the signing PIN (see “PIN code” on page 21), and select OK . The digital signature icon disappears, and the service may display a confirmation of your purchase.
Important: Even if the use of certificates makes the risks involved in remote connections and software installation considerably smaller, they must be used correctly in order to benefit from increased security.
This icon is displayed during a secure browsing session
This icon is displayed during an unsecured browsing session

VERTU SERVICES
English
56
11 VERTU SERVICES
Vertu services contains software and services available only to Vertu owners.
To use Vertu services:
1. Go to www.verturegistration.com.
2. Register your Vertu phone or login (if you have previously registered).
3. Use the menu on the website to select your choice of services.
You must also have valid Internet settings on your Vertu phone and there must be GPRS network coverage in your current location.
Depending on which service provider you use, your Vertu phone might already have Internet settings installed. If you cannot connect to the Internet, please contact Vertu Concierge or visit www.vertu.com and download your settings.
Your service provider will charge you for the amount of data transferred by GPRS or 3G, so please check their tariff first.
Vertu select
An exclusive service available only to Vertu owners, you can access:
> Online information and exclusive downloads such as additional games, applications, Vertu themes and Vertu ringtones.
> Links to the best web pages available on the mobile internet.
Vertu Fortress
Vertu Fortress enables you to wirelessly transmit important information from your Vertu phone to a high security data storage facility. You can back up all contact information, calendar details and tasks in this way.
When you have synchronised your data with the secure server, you can update it from our website and, if necessary, transfer it to another phone you have registered.
Travel
The travel application WorldMate® provides access to the following information:
> Clocks for multiple cities worldwide, including time zone management and international daylight saving time.
> Global weather conditions, forecasts and updates for over 250 cities worldwide.
> World map with day and night display and interactive city locators.
> Currency conversion with online access to exchange rates for more than 160 currencies worldwide.
> Real-time flight information including delays, gate and terminal information for over 75 of the world’s leading airlines.
In order to download the latest flight, currency and weather information, you must be subscribed to the Travel application service.
Navigating the screens
Use the NAVIGATION key and the CENTRE SELECT key to move between screens and also move between fields on a screen.
Updating f l ight , weather and currency information
Press the Options SELECTION key to display a menu.
Select the Update . . . option to open a GPRS connection and download latest information to your Vertu phone.
Changing sett ings
Press the Options SELECTION key to update settings, change city, and change settings.
Sett ings include time format, date format, temperature scale and the space character (decimal point).
Clocks
This screen displays the time at three different locations. You can set one clock to display the time in your home city, and the other clocks to display the time in any other two cities. Press the Options SELECTION key to select a new city.
Weather
This screen displays five-day weather forecasts. If the weather information is no longer current and you want to update it, press the Options SELECTION key and select Update weather .
World map
This screen displays a map of the world, showing which regions are in day and night. You can select a city from the list and view its location and current time. Press the Options SELECTION key to select a new city.
Important: Use only services that you trust and that offer adequate security and protection against harmful software.

VERTU SERVICES
English
57
Currency
This screen displays three different currencies and enables you to convert sums of money between them. Press the Options SELECTION key to select a new currency.
Currency rates fluctuate daily. To obtain current currency rates, press the Options SELECTION key and select Update rates .
Fl ight status
This screen enables you to search for the latest flight information for over 75 leading airlines. You can see current information on schedules, gates, terminals, delays and aircraft type.
Select an Air l ine , Fl ight number and Date , and then press Get f l ight status .
Queries you have previously made are stored for reuse in the Recent Queries list.
WorldMate® is provided by MobiMate®.
Set up manual roaming
If you travel to a region covered by a different network operator, and you are unable to download the latest Vertu Select and Travel information, you need to select a network operator that has a GPRS roaming agreement with your home network.
To do this select Menu » Sett ings » Phone » Operator select ion » Manual .
Your Vertu phone will display all the locally available networks. For information on configuring the Vertu Select, Vertu Fortress and Travel applications, GPRS coverage and roaming agreements, please contact Vertu Concierge.
Vertu Concierge
Vertu Concierge is an exclusive service for people who believe that quality matters. Our aim is to bring you only the very best, whether it be music, art, travel or food.
Vertu Concierge provides you with a highly personalised range of services including:
> Lifestyle services such as restaurant recommendations and reservations, travel assistance, and tickets for theatre shows, concerts or sporting events.
> Solving everyday practical problems such as finding a reputable plumber or tracking down a gift.
> Assistance with using your Vertu phone.
When you connect to Vertu Concierge, you can speak directly to a team of Lifestyle Managers who are available 24 hours a day, 7 days a week to offer personalised assistance.
Call ing Vertu Concierge
Alternatively you can press Menu » Vertu Services » Vertu Concierge .
If you are unable to reach Vertu Concierge using the CONCIERGE key, call +448707375535.
Not all network operators have GPRS roaming agreements with other network operators.
The CONCIERGE key is located on the right side of your Vertu phone as shown in this illustration.
Press the CONCIERGE key to display the Concierge screen.
Press Call or the SEND key to call Vertu Concierge.
You must have network coverage to call Vertu Concierge.

ACCESSORIES
English
58
12 ACCESSORIES
The following accessories are provided with your Vertu phone:
> Wall charger
> Battery
> Data cable
> Vehicle charger
For more information about accessories approved for use with your Vertu phone, please contact Vertu Concierge or refer to www.vertu.com.
Wall charger
The wall charger supplied with your Vertu phone should be appropriate for your region. However, you should always check that the electrical rating of the AC outlet is appropriate for the charger before you attempt to plug it in.
Charging the battery
The battery for your Vertu phone is rechargeable and requires charging at regular intervals.
The charging time will vary with different power sources and we recommend the Vertu wall charger should always be used.
Always charge the battery until it is fully charged. When the battery is fully charged, the battery charge indicator stops animating and, if your Vertu phone is switched on, a Phone is ful ly charged, please unplug the charger confirmation message is briefly displayed.
If your Vertu phone is not charging, try the following:
> Disconnect the charger from the AC outlet.
> Check that the electrical rating of the AC outlet is compatible with your charger.
> Verify that the AC outlet has power and that it is switched on. For example, in many hotel rooms, AC outlets are used for lighting and may be switched on and off from remote locations in the room.
> Wait for at least 10 seconds and then reconnect the charger to the AC outlet.
> Use another nearby AC outlet that you know is providing power.
> If charging still fails, contact Vertu Concierge for further advice.
Keep all parts out of reach of small children.
Use only batteries, chargers and accessories approved by Vertu for use with this particular phone model. The use of any other types may invalidate any approval or warranty applying to the phone and may be dangerous.
Never attempt to use a damaged charger. Contact Vertu Concierge to obtain a replacement.
Only use the approved charger and battery designed specifically for your Vertu phone.
Insert the micro USB charger connector into your Vertu phone as shown. Please ensure that the connector is inserted correctly, with the connector symbol uppermost.
Connect the charger body to a powered AC outlet.
After a few seconds, the battery indicator animates and a confirmation message is displayed if your Vertu phone is switched on.
If the battery has not been used for some time, you may need to recondition it by charging it. Although the charging indicator appears on the display after a few seconds, it may take from several minutes to an hour before you can make a call.
ACCESSORIES
English
59
Battery
Your device is powered by a rechargeable battery. The battery intended for use with this device is BL-5CV. This device is intended for use when supplied with power from the following chargers: AC-7XV. The exact charger model number may vary depending on the type of plug. The plug variant is identified by one of the following: E, EB, X, AR, U, A, C, or UB.
The battery can be charged and discharged hundreds of times, but it will eventually wear out. When the talk and standby times are noticeably shorter than normal, replace the battery. Use only Vertu approved batteries, and recharge your battery only with Vertu approved chargers designated for this device. Use of an unapproved battery or charger may present a risk of fire, explosion, leakage, or other hazard.
Do not dismantle, cut, open, crush, bend, deform, puncture, or shred cells or batteries. In the event of a battery leak, do not allow the liquid to come in contact with the skin or eyes. In the event of such a leak, flush your skin or eyes immediately with water, or seek medical help.
Do not modify, remanufacture, attempt to insert foreign objects into the battery, or immerse or expose it to water or other liquids.
Improper battery use may result in a fire, explosion, or other hazard. If the device or battery is dropped, especially on a hard surface, and you believe the battery has been damaged, take it to a service centre for inspection before continuing to use it.
Use the battery only for its intended purpose. Never use any charger or battery that is damaged. Keep your battery out of the reach of small children.
The full performance of a new battery is achieved only after two or three complete charge and discharge cycles. The battery can be charged and discharged hundreds of times but it will eventually wear out. If you notice that the talk and stand-by times are much shorter than normal, you may need a new battery. Contact Vertu Concierge to obtain a Vertu approved battery.
Maximising battery performance
Certain functions in your Vertu phone can be switched off if not in use, to help maximise your battery performance, for example Bluetooth and 3G.
Charging and discharging
Unplug the charger from the AC outlet and your Vertu phone when not in use. Do not leave your Vertu phone connected to a charger. The battery does not have to be completely discharged before you can recharge it. Continuously charging the battery may shorten its lifetime. If left unused, a fully charged battery will lose its charge over time. Temperature extremes can affect the ability of your battery to charge.
Use chargers indoors.
Battery care and safety
Use the battery only for its intended purpose. Never use any charger or battery that is damaged.
Do not short-circuit the battery. Accidental short-circuiting can occur when a metallic object such as a coin, clip, or pen causes direct connection of the positive (+) and negative (-) terminals of the battery (the metal strips on the battery). This might happen, for example, when you carry a spare battery in your pocket, purse or bag. Short-circuiting the terminals may damage the battery and the connecting object.
Leaving the battery in hot or cold places, such as in a closed car in summer or winter conditions, will reduce the capacity and lifetime of the battery. Always try to keep the battery between 15°C and 25°C (59°F and 77°F). If your battery is very hot or extremely cold, your Vertu phone may not work temporarily, even if the battery is fully charged. Battery performance is particularly limited in temperatures well below freezing.
Never dispose of batteries in a fire.
Always dispose of batteries according to local regulations. Please recycle when possible. Do not dispose of batteries as household waste.
Important: Battery talk and standby times are estimates only and depend on signal strength, network conditions, features used, battery age and condition, temperatures to which battery is exposed, use in digital mode, and many other factors. The amount of time a device is used for calls will affect its standby time. Likewise, the amount of time that the device is turned on and in the standby mode will affect its talk time.
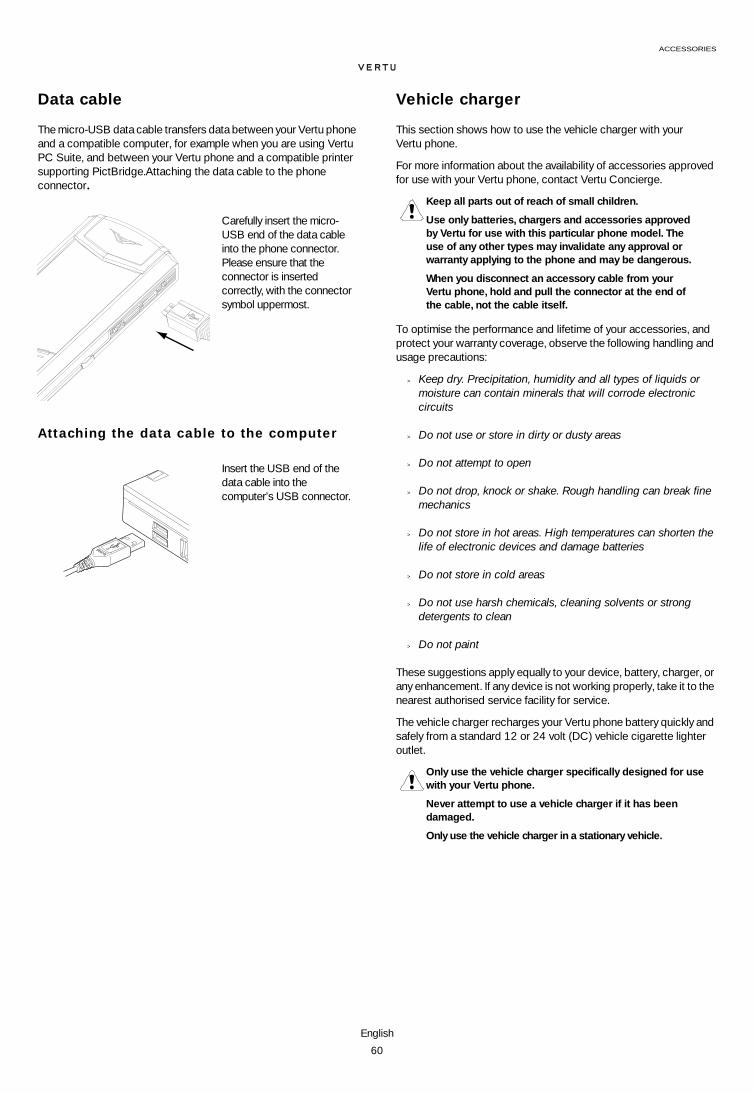
ACCESSORIES
English
60
Data cable
The micro-USB data cable transfers data between your Vertu phone and a compatible computer, for example when you are using Vertu PC Suite, and between your Vertu phone and a compatible printer supporting PictBridge.Attaching the data cable to the phone connector.
Attaching the data cable to the computer
Vehicle charger
This section shows how to use the vehicle charger with your Vertu phone.
For more information about the availability of accessories approved for use with your Vertu phone, contact Vertu Concierge.
To optimise the performance and lifetime of your accessories, and protect your warranty coverage, observe the following handling and usage precautions:
> Keep dry. Precipitation, humidity and all types of liquids or moisture can contain minerals that will corrode electronic circuits
> Do not use or store in dirty or dusty areas
> Do not attempt to open
> Do not drop, knock or shake. Rough handling can break fine mechanics
> Do not store in hot areas. High temperatures can shorten the life of electronic devices and damage batteries
> Do not store in cold areas
> Do not use harsh chemicals, cleaning solvents or strong detergents to clean
> Do not paint
These suggestions apply equally to your device, battery, charger, or any enhancement. If any device is not working properly, take it to the nearest authorised service facility for service.
The vehicle charger recharges your Vertu phone battery quickly and safely from a standard 12 or 24 volt (DC) vehicle cigarette lighter outlet.
Carefully insert the micro-USB end of the data cable into the phone connector. Please ensure that the connector is inserted correctly, with the connector symbol uppermost.
Insert the USB end of the data cable into the computer’s USB connector.
Keep all parts out of reach of small children.
Use only batteries, chargers and accessories approved by Vertu for use with this particular phone model. The use of any other types may invalidate any approval or warranty applying to the phone and may be dangerous.
When you disconnect an accessory cable from your Vertu phone, hold and pull the connector at the end of the cable, not the cable itself.
Only use the vehicle charger specifically designed for use with your Vertu phone.
Never attempt to use a vehicle charger if it has been damaged.
Only use the vehicle charger in a stationary vehicle.

ACCESSORIES
English
61
The time taken to charge your battery depends on its existing charge. You can use your phone normally during the charging process, although this will increase the time to charge.
Some cigarette lighter sockets are only powered when the vehicle ignition is switched on.
The vibrating alert is disabled while the charger is connected to your Vertu phone.
When the battery is fully charged, the battery charge indicator stops animating. Disconnect the car charger from the cigarette lighter outlet before you unplug it from your Vertu phone.
> Insert the micro USB charger connector into your Vertu phone as shown. Please ensure that the connector is inserted correctly, with the connector symbol uppermost.
> Connect the charger to the powered cigarette lighter outlet.
> The green indicator light will illuminate to show the charger is connected to the power outlet. A confirmation message is displayed if your Vertu phone is switched on.

APPENDIX
English
62
13 APPENDIX
Safety
Read the following simple guidelines. Not following them may be dangerous or illegal.
When using the features in this device, obey all laws and respect local customs, privacy and legitimate rights of others, including copyrights.
Traffic safety
Do not use a hand-held telephone while driving a vehicle. If using a hand-held phone, park the vehicle before using the phone in any way. Do not place the phone on the passenger seat or where it can break loose in a collision or sudden stop.
Operating environment
Remember to follow any special regulations in force in any area and always switch off your phone whenever it is forbidden to use it, or when it may cause interference or danger. As with other mobile radio transmitting equipment, users are advised that for the satisfactory operation of the equipment and for the safety of personnel, it is recommended that the equipment should only be used in the normal operating position.
This phone meets RF exposure guidelines when used either in the normal use position against the ear or when positioned at least 2.2cm (7/8 inch) away from the body. When a carry case, belt clip or holder is used for body-worn operation, it should not contain metal and should position the phone the above-stated distance away from your body.
Use only the supplied or approved parts. Unauthorised antennas, modifications or attachments could damage the phone and may violate regulations governing radio devices.
Electronic devices
Most modern electronic equipment is shielded from radio frequency (RF) signals. However, certain electronic equipment may not be shielded against the RF signals from your wireless phone.
Medical devices
Operation of any radio transmitting equipment, including wireless phones, may interfere with the functionality of inadequately protected medical devices. Consult a physician or the manufacturer of the medical device to determine if they are adequately shielded from external RF energy or if you have any questions. Switch off your device in health care facilities when any regulations posted in these areas instruct you to do so. Hospitals or health care facilities may be using equipment that could be sensitive to external RF energy.
Implanted medical devices
Manufacturers of medical devices recommend that a minimum separation of 15.3 centimetres (6 inches) should be maintained between a wireless device and an implanted medical device, such as a pacemaker or implanted cardioverter defibrillator, to avoid potential interference with the medical device.
Persons who have such devices should:
> Always keep the wireless device more than 15.3 centimetres (6 inches) from the medical device when the wireless device is turned on;
> Not carry the wireless device in a breast pocket;
> Hold the wireless device to the ear opposite the medical device to minimise the potential for interference;
> Turn the wireless device off immediately if there is any reason to suspect that interference is taking place;
> Read and follow the directions from the manufacturer of their implanted medical device.
If you have any questions about using your wireless device with an implanted medical device, consult your health care provider.
SWITCH ON SAFELYDo not switch the phone on when wireless phone use is prohibited or when it may cause interference or danger.
ROAD SAFETY COMES FIRSTObey all local laws. Always keep your hands free to operate the vehicle while driving. Your first consideration while driving should be road safety.
INTERFERENCEAll wireless phones may be susceptible to interference which could affect performance.
SWITCH OFF IN HOSPITALSFollow any restrictions. Switch phone off near medical equipment.
SWITCH OFF IN AIRCRAFTFollow any restrictions. Wireless devices can cause interference in aircraft.
SWITCH OFF WHEN REFUELLINGDo not use the phone at a refuelling point. Do not use near fuel or chemicals.
SWITCH OFF NEAR BLASTINGFollow any restrictions. Do not use the phone where blasting is in progress.
USE SENSIBLYUse only in normal position. Do not touch the antenna unnecessarily.
QUALIFIED SERVICEOnly qualified personnel may repair this phone.
ACCESSORIES AND BATTERIESUse only approved accessories and batteries. Do not connect incompatible products.
WATER RESISTANCEYour Vertu phone is not water resistant. Keep it dry.
BACK-UP COPIESRemember to make back-up copies or keep a written record of any important information stored in your phone.
CONNECTING TO OTHER DEVICESWhen connecting to any other device, read its user guide for detailed safety instructions. Do not connect incompatible devices.
EMERGENCY CALLSEnsure the phone is switched on and in service. Press the END key as many times as needed to clear the display and return to the stand-by display. Enter the emergency number, then press the SEND key. Give your location. Do not end the call until given permission to do so.
SOS

APPENDIX
English
63
Hearing aids
Some wireless phones may interfere with some hearing aids. In the event of such interference, consult your service provider.
Other medical devices
Operation of any radio transmitting equipment, including wireless phones, may interfere with the functionality of inadequately protected medical devices.
Switch off your phone in health care facilities when any regulations posted in these areas instruct you to do so.
Vehicles
RF signals may affect improperly installed or inadequately shielded electronic systems in motor vehicles (e.g. electronic fuel injection systems, electronic anti-skid (anti-lock) braking systems, electronic speed control systems, air bag systems).
Check with the manufacturer or its representative regarding your vehicle. You should also consult the manufacturer of any equipment that has been added to your vehicle.
Only qualified personnel should service the device or install the device in a vehicle. Faulty installation or service may be dangerous and may invalidate any warranty that may apply to the device. Check regularly that all wireless device equipment in your vehicle is mounted and operating properly.
Do not store or carry flammable liquids, gases or explosive materials in the same compartment as the phone, its parts or accessories.
For vehicles equipped with an air bag, remember that an air bag inflates with great force. Do not place objects, including both installed or portable wireless equipment in the area over the air bag or in the air bag deployment area.
Aircraft
Using your device while flying in aircraft is prohibited. Switch off your phone before boarding an aircraft. The use of wireless telephones in an aircraft may be dangerous to the operation of the aircraft, disrupt the wireless telephone network and may be illegal. In the United States, FCC regulations currently prohibit using your Vertu phone while in the air.
Failure to observe these instructions may lead to suspension or denial of telephone services to the offender, or legal action or both.
Potential ly explosive atmospheres
Switch off your phone when in any area with a potentially explosive atmosphere and obey all signs and instructions. Sparks in such areas could cause an explosion or fire resulting in bodily injury or even death.
You are advised to switch off the phone when at a refuelling point or service station. Observe restrictions on the use of radio equipment in fuel depots (fuel storage and distribution areas), chemical plants or where blasting operations are in progress.
Areas with a potentially explosive atmosphere are often but not always clearly marked. They include below deck on boats; chemical transfer or storage facilities; vehicles using liquified petroleum gas (such as propane or butane); areas where the air contains chemicals or particles, such as grain, dust or metal powders; and any other area where you would normally be advised to turn off your vehicle engine.
Water resistance
Your Vertu phone is not water resistant. Keep it dry.
If your Vertu phone is accidentally splashed with water, ensure you dry it completely before removing the back cover. Remove the battery and leave all parts to dry naturally. Do not apply heat.
Never charge your Vertu phone when the connector is damp or wet.
Chargers must only be used in dry conditions. They should never be used when damp or wet.
Make sure the interior of your Vertu phone and the back cover seals are dry, clean, and free of any foreign objects before you replace the back cover.
Don’t touch the antenna area
Avoid touching the antenna area (see CD for more information) of your Vertu phone unnecessarily when the phone is switched on. Contact with the antenna area affects call quality and may cause the phone to operate at a higher power level than otherwise needed and reduce the talk time of your Vertu phone.
Obey laws
When using your Vertu phone, obey all laws and respect local customs, privacy and legitimate rights of others, including copyrights.
Care and maintenance
Your Vertu phone has been crafted from some of the finest materials. Please see the CD for full care and maintenance instructions. Damage caused to your Vertu phone by failing to observe these care instructions is not covered by the warranty.
Charm attachment
The charm attachment point is designed for Vertu charms which should be fitted by your authorised Vertu dealer. The charm attachment point is not a lanyard loop fixing.

APPENDIX
English
64
SAR Notice – RM-266V
YOUR VERTU PHONE (MODEL: Signature, TYPE: RM-266V, FCC ID: P7QRM-266V) MEETS GUIDELINES FOR EXPOSURE TO RADIO WAVES
Your Vertu phone is a radio transmitter and receiver. It is designed not to exceed the limits for exposure to radio waves recommended by international guidelines. These guidelines were developed by the independent scientific organization ICNIRP and include safety margins designed to assure the protection of all persons, regardless of age and health.
The exposure guidelines for mobile devices employ a unit of measurement known as the Specific Absorption Rate or SAR. The SAR limit stated in the ICNIRP guidelines is 2.0 watts/kilogram (W/kg) averaged over ten grams of tissue. Tests for SAR are conducted using standard operating positions with the device transmitting at its highest certified power level in all tested frequency bands. The actual SAR level of an operating device can be below the maximum value because the device is designed to use only the power required to reach the network. That amount changes depending on a number of factors such as how close you are to a network base station. The highest SAR value under the ICNIRP guidelines for use of the device at the ear is 0.68 W/kg.
This phone meets RF exposure guidelines when used either in the normal use position against the ear or when positioned at least 2.2cm (7/8 inch) away from the body. When a carry case, belt clip or holder is used for body-worn operation, it should not contain metal and should position the phone the above-stated distance away from your body. In order to transmit data files or messages, this device requires a good quality connection to the network. In some cases, transmission of data files or messages may be delayed until such a connection is available. Ensure the above separation distance instructions are followed until the transmission is completed.
Use of device accessories and enhancements may result in different SAR values. SAR values may vary depending on national reporting and testing requirements and the network band. Additional SAR information may be provided under product information at www.vertu.com.
USA and Canada: Your mobile device is also designed to meet the requirements for exposure to radio waves established by the Federal Communications Commission (USA) and Industry Canada. These requirements set a SAR limit of 1.6 W/kg averaged over one gram of tissue. The highest SAR value reported under this standard during product certification for use at the ear is 0.76 W/kg and when properly worn on the body is 0.54 W/kg.
Declaration of conformity
We, Vertu declare under our sole responsibility that the product, Model Signature, type RM-266V is in conformity with the provision of the following Council Directive: 1999/5/EC.
A copy of the Declaration of Conformity can be found at http://www.vertu.com
Export controls
Your Vertu phone may contain commodities, technology, or software exported from the United States in accordance with the Export Administration regulations. Diversion contrary to U.S. law is prohibited.
FCC/ Industry Canada notice
Your Vertu phone may cause TV or radio interference (for example, when using a telephone in close proximity to receiving equipment). The FCC or Industry Canada can require you to stop using your phone if such interference cannot be eliminated. If you require assistance, contact Vertu Concierge. This device complies with Part 15 of the FCC rules. Operation is subject to the following two conditions: (1) this device may not cause harmful interference, and (2) this device must accept any interference received, including interference that may cause undesired operation.
Any changes or modifications not expressly approved by Vertu could void the user's authority to operate this equipment.
EU recycling notice
The crossed-out wheeled-bin symbol on your product, literature, or packaging reminds you that all electrical and electronic products, batteries, and accumulators must be taken to separate collection at the end of their working life. This requirement applies to the European Union and other locations where separate collection systems are available. Do not dispose of these products as unsorted municipal waste.
By returning the products to collection you help prevent uncontrolled waste disposal and promote the reuse of material resources. More detailed information is available from the product retailer, local waste authorities, national producer responsibility organizations, or your local Vertu representative. For the product Eco-Declaration or instructions for returning your obsolete product, go to country-specific information at www.vertu.com.
The symbol indicates that the product was put onto the market after the WEEE legislation was implemented and that the consumer should not dispose of the item in normal household waste, but that it should be appropriately recycled.
Should you wish Vertu to recycle your product at the end of its life, please either return it to the point from which you purchased your product (if known) or return it to Vertu’s headquarters.
Alternatively, should you purchase a replacement product from another supplier, the new supplier is obligated to take back the product that is being replaced and recycle it appropriately.
Background information on the European WEEE directive is available from www.europa.eu.int/
Copyright © Vertu 2008. All rights reserved.
Signature RM-266V

APPENDIX
English
65
Reproduction, transfer, distribution or storage of part or all of the contents in this document in any form without the prior written permission of Vertu is prohibited. Vertu operates a policy of continuous development. Vertu reserves the right to make changes and improvements to any of the products described in this document without prior notice.
TO THE MAXIMUM EXTENT PERMITTED BY APPLICABLE LAW, UNDER NO CIRCUMSTANCES SHALL NOKIA OR ANY OF ITS LICENSORS BE RESPONSIBLE FOR ANY LOSS OF DATA OR INCOME OR ANY SPECIAL, INCIDENTAL, CONSEQUENTIAL OR INDIRECT DAMAGES HOWSOEVER CAUSED.
THE CONTENTS OF THIS DOCUMENT ARE PROVIDED "AS IS". EXCEPT AS REQUIRED BY APPLICABLE LAW, NO WARRANTIES OF ANY KIND, EITHER EXPRESS OR IMPLIED, INCLUDING, BUT NOT LIMITED TO, THE IMPLIED WARRANTIES OF MERCHANTABILITY AND FITNESS FOR A PARTICULAR PURPOSE, ARE MADE IN RELATION TO THE ACCURACY, RELIABILITY OR CONTENTS OF THIS DOCUMENT. NOKIA RESERVES THE RIGHT TO REVISE THIS DOCUMENT OR WITHDRAW IT AT ANY TIME WITHOUT PRIOR NOTICE.
Vertu and the V logo are registered trademarks or trademarks. Other product and company names mentioned herein may be trademarks or registered trademarks of their respective owners.
Bluetooth is a registered trademark of Bluetooth SIG, Inc.
The third-party applications provided with your device may have been created and may be owned by persons or entities not affiliated with or related to Vertu. Vertu does not own the copyrights or intellectual property rights to the third-party applications. As such, Vertu does not take any responsibility for end-user support, functionality of the applications, or the information in the applications or these materials. Vertu does not provide any warranty for the third-party applications.
BY USING THE APPLICATIONS YOU ACKNOWLEDGE THAT THE APPLICATIONS ARE PROVIDED AS IS WITHOUT WARRANTY OF ANY KIND, EXPRESS OR IMPLIED, TO THE MAXIMUM EXTENT PERMITTED BY APPLICABLE LAW. YOU FURTHER ACKNOWLEDGE THAT NEITHER NOKIA NOR ITS AFFILIATES MAKE ANY REPRESENTATIONS OR WARRANTIES, EXPRESS OR IMPLIED, INCLUDING BUT NOT LIMITED TO WARRANTIES OF TITLE, MERCHANTABILITY OR FITNESS FOR A PARTICULAR PURPOSE, OR THAT THE APPLICATIONS WILL NOT INFRINGE ANY THIRD-PARTY PATENTS, COPYRIGHTS, TRADEMARKS, OR OTHER RIGHTS.
Warranties
Vertu two-year l imited international warranty for cellular phone
THIS LIMITED WARRANTY SHALL NEITHER EXCLUDE NOR LIMIT (I) ANY MANDATORY STATUTORY RIGHTS OF THE CLIENT OR (II) ANY OF THE CLIENT’S RIGHTS AGAINST THE SELLER/DEALER OF THE PRODUCT.
VERTU warrants that this cellular phone (“Product”) is free from defects in material and workmanship according to the following terms and conditions:
1. The Limited Warranty for the Product extends for TWO (2) years beginning on the date of original purchase or delivery of the Product, whichever is the later. In case of a change of owner/user, such warranty period shall continue for the remaining part of the twenty-four (24) month period and otherwise remain unaffected.
2. During the period of the Limited Warranty, Vertu will repair, modify or replace, at Vertu’s sole option, any defective parts, or any parts that will not properly operate for their intended use with new or refurbished replacement items if such repair or replacement is needed because of product malfunction or failure during normal usage. No charge will be made to the Client for the repair or replacement of any such parts. Vertu will also pay for the labour charges incurred by Vertu in repairing or replacing the defective parts. The repaired Product will be warranted for the balance of the original warranty period or for ninety (90) days from the date of repair, whichever is longer. This Limited Warranty does not cover damage to or defects in (other than manufacturing defects) appearance, cosmetic, decorative or structural items and any non-operative parts. Vertu’s limit of liability under the Limited Warranty shall be the price paid by the Client for the Product less a reasonable amount for usage. These remedies are the Client’s exclusive remedies for breach of this Limited Warranty.
3. Upon request from Vertu, the Client must prove the date of the original purchase or delivery of the Product by producing a legible and non-modified original certificate of authenticity which clearly indicates the name and address of an authorised retailer, the date and place of purchase/delivery, the product type and the IMEI or serial number of the Product, a bill of sale or a dated receipt which contains the same information.
4. Vertu shall bear the cost of shipping the Product to the location from which the Client handed over the Product to Vertu (or its representatives) after the completion of service under this Limited Warranty.
5. The Client shall have no coverage or benefits under this Limited Warranty if any of the following conditions are applicable:n) The Product has been subject to abnormal use, abnormal conditions, improper
storage, exposure to moisture or dampness, spillage of food or liquid, exposure to chemical agents, unauthorised modifications, unauthorised connections, unauthorised repair, rough handling, misuse, neglect, abuse, accident, alteration, improper installation, or other acts which are not the fault of Vertu, including without limitation damage caused by shipping, dropping the Product, deterioration of consumable parts, such as batteries which by their nature have a limited lifecycle, and breakage or damage to antennas.
o) The Product has been damaged from external causes such as collision with an object, or from fire, flooding, sand, dirt, windstorm, lightning, earthquake or damage from exposure to thermal, environmental or weather conditions, an Act of God, or battery leakage, theft, blown fuse, or improper use of any electrical source, damage caused by computer or internet viruses, bugs, worms, Trojan Horses, cancel bots or damage caused by the connection to other products not recommended for interconnection by Vertu.
p) The Customer Service Department at Vertu was not advised by the Client in writing of the alleged defect or malfunction of the Product within thirty (30) days after the expiration of the applicable warranty period.
q) The Product was not returned to Vertu or its authorised retailer within thirty (30) days after the appearance of the defect within the warranty period.
r) The Product serial number plate or the accessory data code has been removed, defaced, altered or is illegible.
s) The defect or damage was caused by the defective function of the cellular network system or by inadequate signal reception by the external antenna.
t) The defect was caused by the Product being used with or connected to an accessory not manufactured and supplied by Vertu or used other than for its intended use.
u) The battery was short-circuited or the seals of the battery enclosure or cells are broken or show evidence of tampering or the battery was used in equipment other than that for which it has been specified.
v) The Product software needs to be updated due to changes in cellular network parameters.
w) The defect or damage was as a result of general wear and tear incurred in normal usage of the Product.
6. If a problem develops during the period of the Limited Warranty, the following procedure will apply:x) The Client shall return the Product to the place of purchase for repair or
replacement processing or if this is not convenient because of distance (more than 50 miles/80 km) or for other good cause, the Client may contact Vertu Concierge.
y) The Client shall bear the costs of transporting the Product to the relevant Vertu service location, with transport and insurance charges prepaid.
Includes RSA BSAFE cryptographic or security protocol software from RSA Security.
Java and all Java-based marks are trademarks or registered trademarks of Sun Microsystems, Inc.
APPENDIX
English
66
z) Subject to Clause 6(e), the Client will be billed for any parts or labour charges not covered by this Limited Warranty.
aa) Vertu will repair or authorise the repair of the Product under the Limited Warranty within 30 days after receipt of the Product by Vertu or a Vertu authorised service centre, or within an extended period as may be notified by Vertu to Client due to the nature of the repair (“Timeframe”). If Vertu cannot repair within the Timeframe, or after a reasonable number of attempts to repair the same defect, Vertu at its sole option, will provide a replacement Product or refund the purchase price of the Product less a reasonable amount for usage.
ab) If the Product is returned to the Customer Service Department at Vertu during the period of the Limited Warranty, but the problem with the Product is not covered under the terms and conditions of this Limited Warranty, the Client will be notified and given an estimate of the charges the Client must pay to have the Product repaired, with all shipping charges billed to the Client. If the estimate is refused, the Product will be returned freight collect. If the Product is returned to the Customer Service Department at Vertu after the expiration of the warranty period, Vertu’s normal service policies shall apply and the Client will be responsible for all shipping charges.
7. TO THE FULLEST EXTENT PERMITTED BY LAW, THE WARRANTIES AND CONDITIONS STATED IN THIS LIMITED WARRANTY ARE IN LIEU OF ALL OTHER CONDITIONS, WARRANTIES OR OTHER TERMS CONCERNING THE SUPPLY OR PURPORTED SUPPLY OF, OR FAILURE TO SUPPLY OR DELAY IN SUPPLYING THE PRODUCT WHICH MIGHT, BUT FOR THE AFFECT OF THIS CLAUSE 7, HAVE EFFECT BETWEEN VERTU AND THE CLIENT OR WOULD OTHERWISE BE IMPLIED OR INCORPORATED INTO THIS LIMITED WARRANTY OR ANY COLLATERAL CONTRACT, WHETHER BY STATUTE, COMMON LAW OR OTHERWISE, ALL OF WHICH ARE HEREBY EXCLUDED (INCLUDING WITHOUT LIMITATION, THE IMPLIED CONDITIONS, WARRANTIES OR OTHER TERMS AS TO SATISFACTORY QUALITY OR FITNESS FOR PURPOSE).
8. VERTU SHALL NOT BE LIABLE FOR LOSS OR DAMAGE, WHETHER SPECIAL, INDIRECT, INCIDENTAL OR CONSEQUENTIAL, INCLUDING BUT NOT LIMITED TO ANY OF THE FOLLOWING LOSSES OR DAMAGE (WHETHER SUCH LOSSES OR DAMAGE WERE FORESEEN, FORESEEABLE, KNOWN OR OTHERWISE):ac) LOSS OF ANTICIPATED BENEFITS OR PROFITS.ad)LOSS OF ACTUAL OR ANTICIPATED SAVINGS.ae) PUNITIVE, SPECIAL OR CONSEQUENTIAL DAMAGES.af) THIRD PARTY CLAIMS.ag)LOSS OF USE OF THE PRODUCT OR ANY ASSOCIATED EQUIPMENT
OR FACILITIES.ah) DOWNTIME OR LOSS OF BUSINESS.ai) LOSS OF OPPORTUNITY.aj) LOSS OF GOODWILL.ak) LOSS OF REPUTATION.al) LOSS OF OR DAMAGE TO OR CORRUPTION OF DATA.
9. Vertu does not warrant uninterrupted or error free internet or data connections.10. Vertu shall not be liable for any delay in rendering service under the Limited
Warranty, or loss of use during the period that the Product is being repaired.11. Vertu’s total liability in contract, tort (including negligence or breach of statutory
duty), misrepresentation or otherwise, arising in connection with the sale of the Product shall be the price paid by the Client for the Product less a reasonable amount for usage.
12. The invalidity or unenforceability of any term or any part of any term of, or any right arising pursuant to, this Limited Warranty shall not affect the validity or enforceability of any other terms or rights or the remainder of any such term or right, which shall continue in full force and effect except for any such invalid or unenforceable provision or part thereof.
13. Vertu neither assumes nor authorises any authorised service centre or any other person or entity to assume for it any other obligation or liability beyond that which is expressly provided for in this Limited Warranty, including the provider or seller of any extended warranty or service agreement. Any change or amendment to this Limited Warranty requires Vertu’s prior written consent.
14. This Limited Warranty represents the whole agreement between the parties relating to the subject matter hereof.
15. This Limited Warranty allocates the risk of failure of the Product between the Client and Vertu. The allocation is recognised by the Client and is reflected in the purchase price of the Product.
16. Any action or lawsuit for breach of warranty must be commenced within thirty (30) months following delivery of the Product.
17. All warranty information, product features and specifications are subject to change without notice.
Vertu operates a policy of continuous development. Vertu reserves the right to make changes and improvements to any of the products described in this document without prior notice.Questions concerning this Limited Warranty may be directed to the Customer Service Department at the following addresses.
If contacting us from Europe, Middle East and Africa:
Vertu Beacon Hill Road Church Crookham Hampshire GU52 8DY United Kingdom
If calling us from the Americas:
+1 914 368 0432
If contacting us from Asia Pacific:
Vertu 391B Orchard Road #24-02/05, Ngee Ann City, Tower B Singapore 23887

APPENDIX
English
67
Vertu one-year l imited international warranty for accessories
THIS LIMITED WARRANTY SHALL NEITHER EXCLUDE NOR LIMIT (I) ANY MANDATORY STATUTORY RIGHTS OF THE OWNER OR (II) ANY OF THE OWNER’S RIGHTS AGAINST THE SELLER/DEALER OF THE PRODUCT.
Vertu (“Vertu”) warrants that this accessory product (“Product”) is free from defects in material and workmanship, according to the following terms and conditions:
1. The Limited Warranty for the Product extends for ONE (1) year beginning on the date of original purchase or delivery of the Product whichever is the later. In case of a change of owner/user (“Owner”), such warranty period shall continue for the remaining part of the one (1) year period.
2. During the period of the Limited Warranty, Vertu will repair, modify or replace, at Vertu’s sole option, any defective parts, or any parts that will not properly operate for their intended use with new or refurbished replacement items if such repair or replacement is needed because of product malfunction or failure during normal usage. No charge will be made to the Owner for the repair or replacement of any such parts. Vertu will also pay for the labour charges incurred by Vertu in repairing or replacing the defective parts. The repaired Product will be warranted for the balance of the original warranty period. This Limited Warranty does not cover damage to or defects in (other than manufacturing defects) appearance, cosmetic, decorative or structural items and any non-operative parts. Vertu’s limit of liability under the Limited Warranty shall be the price paid by the Owner for the Product when the Owner purchased the Product as a stand alone product or, in the event that the Owner received the Product when purchasing a Vertu cellular phone, the then current sale price for the Product, in both cases less a reasonable amount for usage. These remedies are the Owner’s exclusive remedies for breach of this Limited Warranty.
3. Upon request from Vertu, the Owner must prove the date of the original purchase or delivery of the Product by producing a legible and non-modified original warranty card which clearly indicates the name and address of an authorised retailer, the date and place of purchase/delivery, the product type and the IMEI or serial number of the Product, a bill of sale or a dated receipt which contains the same information.
4. Vertu shall bear the cost of shipping the Product to the location from which the Owner handed over the Product to Vertu (or its representatives) after the completion of service under this Limited Warranty.
5. The Owner shall have no coverage or benefits under this Limited Warranty if any of the following conditions are applicable:a) The Product has been subject to abnormal use, abnormal conditions, improper
storage, spillage of liquid, misuse, neglect, exposure to cleaning agents not recommended, or other acts which are not the fault of Vertu, unauthorised repair, accident, alteration or other acts which are not the fault of Vertu.
b) Vertu was not advised by the Owner in writing of the alleged defect or malfunction of the Product within thirty (30) days after the expiration of the applicable warranty period; or
c) The Product was not returned to Vertu or its authorised retailer within thirty (30) days after the appearance of the defect within the warranty period.
d) The defect or damage was as a result of general wear and tear incurred in normal usage of the Product.
e) The Product is used with a product different to the one with which the Product was supplied with by Vertu, or the Product is used with any product whose use with the Product has not been expressly authorised by Vertu.
6. If a problem develops during the period of the Limited Warranty, the following procedure will apply:a) The Owner shall return the Product to the place of purchase for repair or
replacement processing or if this is not convenient because of distance (more than 50 miles/80 km) or for other good cause, the Owner may contact Vertu Concierge.
b) The Owner shall bear the costs of transporting the Product to the relevant Vertu service location, with transport and insurance charges prepaid.
c) Subject to clause 6(e), the Owner will be billed for any parts or labour charges not covered by this Limited Warranty.
d) Vertu will repair or authorise the repair of the Product under the Limited Warranty within 30 days of receipt of the Product by Vertu or a Vertu authorised service centre, or within an extended period as may be notified by Vertu to Owner due to the nature of the repair ("Timeframe"). If Vertu cannot repair within the Timeframe, or after a reasonable number of attempts to repair the same defect, Vertu at its sole option, will provide a replacement Product or refund the purchase price of the Product less a reasonable amount for usage.
e) If the Product is returned to the Vertu during the period of the Limited Warranty, but the problem with the Product is not covered under the terms and conditions of this Limited Warranty, the Owner will be notified and given an estimate of the charges the Owner must pay to have the Product repaired, with all shipping charges billed to the Owner. If the estimate is refused, the Product will be returned freight collect. If the Product is returned to Vertu after the expiration of the warranty period, Vertu's normal service policies shall apply and the Owner will be responsible for all shipping charges.
7. TO THE FULLEST EXTENT PERMITTED BY LAW, THE WARRANTIES AND CONDITIONS STATED IN THIS LIMITED WARRANTY ARE IN LIEU OF ALL OTHER CONDITIONS, WARRANTIES OR OTHER TERMS CONCERNING THE SUPPLY OR PURPORTED SUPPLY OF, OR FAILURE TO SUPPLY OR DELAY IN SUPPLYING THE PRODUCT WHICH MIGHT, BUT FOR THE AFFECT OF THIS CLAUSE 7, HAVE EFFECT BETWEEN VERTU AND THE
OWNER OR WOULD OTHERWISE BE IMPLIED OR INCORPORATED INTO THIS LIMITED WARRANTY OR ANY COLLATERAL CONTRACT, WHETHER BY STATUTE, COMMON LAW OR OTHERWISE, ALL OF WHICH ARE HEREBY EXCLUDED (INCLUDING WITHOUT LIMITATION, THE IMPLIED CONDITIONS, WARRANTIES OR OTHER TERMS AS TO SATISFACTORY QUALITY OR FITNESS FOR PURPOSE).
8. VERTU SHALL NOT BE LIABLE FOR LOSS OR DAMAGE, WHETHER SPECIAL, INDIRECT, INCIDENTAL OR CONSEQUENTIAL, INCLUDING BUT NOT LIMITED TO ANY OF THE FOLLOWING LOSSES OR DAMAGE (WHETHER SUCH LOSSES OR DAMAGE WERE FORESEEN, FORESEEABLE, KNOWN OR OTHERWISE):a) LOSS OF ACTUAL OR ANTICIPATED BENEFITS OR PROFITSb) LOSS OF ACTUAL OR ANTICIPATED SAVINGSc) PUNITIVE, SPECIAL OR CONSEQUENTIAL DAMAGES.d) THIRD PARTY CLAIMSe) LOSS OF USE OF THE PRODUCT OR ANY ASSOCIATED EQUIPMENT
OR FACILITIESf) DOWNTIME OR LOSS OF BUSINESSg) LOSS OF OPPORTUNITYh) LOSS OF GOODWILLi) LOSS OF REPUTATIONj) LOSS OF OR DAMAGE TO OR CORRUPTION OF DATA.
9. Vertu shall not be liable for any delay in rendering service under the Limited Warranty, or loss of use during the period that the Product is being repaired.
10. Vertu's total liability in contract, tort (including negligence or breach of statutory duty), misrepresentation or otherwise, arising in connection with the sale of the Product shall be the price paid by the Owner for the Product less a reasonable amount for usage.
11. The invalidity or unenforceability of any term or any part of any term of, or any right arising pursuant to, this Limited Warranty shall not affect the validity or enforceability of any other terms or rights or the remainder of any such term or right, which shall continue in full force and effect except for any such invalid or unenforceable provision or part thereof.
12. Vertu neither assumes nor authorises any authorised service centre or any other person or entity to assume for it any other obligation or liability beyond that which is expressly provided for in this Limited Warranty including the provider or seller of any extended warranty or service agreement. Any change or amendment to this Limited Warranty requires Vertu's prior written consent.
13. This Limited Warranty represents the whole agreement between the parties relating to the subject matter hereof.
14. This Limited Warranty allocates the risk of failure of the Product between the Owner and Vertu. The allocation is recognised by the Owner and is reflected in the purchase price of the Product.
15. Any action or lawsuit for breach of warranty must be commenced within eighteen (18) months following delivery of the Product.
16. All warranty information, product features and specifications are subject to change without notice.
Vertu operates a policy of continuous development. Vertu reserves the right to make changes and improvements to any of the products described in this document without prior notice.Questions concerning this Limited Warranty may be directed to the Customer Service Department at the following addresses. If contacting us from Europe, Middle East and Africa:Vertu Beacon Hill Road Church Crookham Hampshire GU52 8DY United KingdomIf calling us from the Americas:+1 914 368 0432If contacting us from Asia Pacific:Vertu 391B Orchard Road #24-02/05, Ngee Ann City, Tower B Singapore 23887

APPENDIX
English
68
Vertu Concierge Terms and Conditions
These terms and conditions apply to Nokia Corporation, a company validly organised and existing under the laws of Finland, with business identity code 0112038-9, having registered address at Keilalahdentie 4, 02150 Espoo, Finland, only when trading as Vertu ("Vertu").
1. Vertu ConciergeAs a registered member of Vertu Concierge (“VC”) provided by Vertu and its associated companies (“Vertu”), you (“you”) agree to abide by these Terms and Conditions (the “Terms and Conditions”), and when ordering anything through VC from a supplier of products and services (a “Supplier”) you agree that the Terms and Conditions shall apply to your order.
2. Membership Information You are obliged to provide correct details when you register for membership of VC and your failure to do so may invalidate your membership and any subsequent transaction. Your responsibility to provide accurate information is a continuing obligation and you must notify Vertu in the event that any information provided by you in the course of registration changes.
3. SubscriptionInitial and ongoing subscription fees, if applicable, are due at the time of initial subscription and annually thereafter (the “Renewal Date”) unless you notify Vertu of your intention not to renew. Payment must be made annually in advance and may be made using any major credit/debit and charge cards. Any subscription fee is non refundable, however, Vertu may at its sole discretion elect to refund any subscription fee in whole or in part depending on the circumstances relating to the cancellation of any subscription. You authorise Vertu to deduct renewal subscription fees from your credit card up to 28 days prior to your Renewal Date. If Vertu does not hold your payment details you will be contacted directly to renew your subscription. Subscription fee rates will be notified to you from time to time and the subscription fee payable will be the subscription fee in force at the time of the Renewal Date.
You agree that you will only use your VC membership for the purposes for which it is issued.
4. VC ServicesAs a member of VC, you are entitled to all of the products and services as advised by us from time to time as approved by the relevant product/service Supplier.
5. Services Subject to ChangeAs a member, note that:
> Services are subject to availability and may change from time to time;
> Suppliers may change from time to time;
> Suppliers may impose their own terms and conditions and you are required to comply with these at all times.
6. Payment for ServicesPlease note that some Suppliers may charge you a deposit, entry fee or other sum for the services they provide. You will be solely liable for payment of any such sums. At your request Vertu will authorise Suppliers to debit your nominated credit/debit or charge card in order for you to take advantage of their services.
7. Availability of ServicesVertu aims to ensure that the services remain available at all times and will use reasonable endeavours to ensure that you receive the most from your membership. If any of the services become unavailable, we will do all we can to ensure that prior commitments are honoured to the fullest extent possible, but shall not be responsible for any actions of Suppliers outside Vertu’s reasonable control. From time to time the procurement or provision of certain services may incur a VC handling charge of which you will be notified - in these cases you hereby authorise Vertu to debit your nominated credit/debit or charge card with any such handling charges. Unless otherwise agreed by the Supplier, you shall not be entitled to cancel any services requested where, on your instructions, performance has already begun.
8. Right of WithdrawalVertu reserves the right to withdraw any service that may be offered and/or to refuse to supply any service requested.
9. RequestsIf Vertu is unable to deal with any request, it will inform you as soon as reasonably practicable.
10. Dealing with VC Suppliers Suppliers are responsible for providing you with the goods and services you select. Vertu will assist you in any way it can in all of your dealings with Suppliers.
11. Personal MembershipVC membership is personal to the registered Vertu phone user. You are responsible for ensuring that no one (other than your personal assistant, where applicable) uses your membership to access membership services and benefits.
12. Cancellation of MembershipVertu reserves the absolute right to cancel or suspend your membership (at its sole discretion) for any reason whatsoever. If Vertu cancels your membership it shall refund
the balance of the annual subscription fee, if any, on a time apportionment basis in respect of the unexpired period to which the annual subscription fee applies.
13. Changes to Terms and ConditionsVertu may vary these Terms and Conditions from time to time. Vertu will notify you of any changes in a timely manner. Notification will be by some or all of the following media:
> newsletter;
> mail;
> e-mail or other personal delivery service.
14. Payment DetailsIf we do not have your credit/debit or charge card details we may not be able to provide or procure those benefits, goods or services that require payment.
You may only make transactions using VC during your period of membership. When ordering a product or service you will be required to provide your credit/debit or charge card details. You undertake that all details you provide to us for the purpose of booking, ordering or purchasing goods or services are correct, that the credit/debit or charge card you are using is your own and that there are sufficient funds to cover the cost of the product or the service.
15. Supply of DetailsVertu may pass on your credit/debit or charge card and any other essential booking details to its agents, employees, subcontractors and Suppliers, and you consent to us passing on such details to deal with your orders. You must inform Vertu as soon as possible of any changes to the details supplied by you.
16. Payments DueThe purchase price of all products and services obtained through VC is due for payment on acceptance of your order by Vertu and/or a Supplier, as applicable.
17. DeliveryBy placing your order for a product or service through VC you agree that the time taken for delivery or performance shall be as stipulated when the purchase is made. We want you to get your order as soon as possible. If delivery or performance will take longer than the time set out (or the product or services are unavailable), the Supplier (or Vertu acting for the Supplier) will notify you of this at the earliest opportunity and you will have the unequivocal right to withdraw your order and receive a full refund.
18. Limited WarrantyVertu warrants to you that Vertu shall use its reasonable endeavours to provide the VC services with reasonable care and skill and, as far as reasonably possible, in accordance with your request and instructions from time to time. Where Vertu supplies you with any goods or services supplied by a third party, then Vertu is acting as your agent in sourcing the goods or services. Vertu will use reasonable care in selecting the Supplier and ensuring the order is placed in accordance with your wishes. For the avoidance of doubt, Vertu does not and will not provide any representations or recommendations in relation to any of the information and suggestions comprised within the VC services. You are deemed to be responsible for, and shall use your own skill and judgement as to, the quality, value and suitability of such information and suggestions in relation to deciding whether to enter into any contract with any third party for the supply of services or sale of goods.
19. Vertu as AgentYour contract for the purchase of products or services is made with the relevant Supplier only. Vertu acts as an agent for the Supplier and, unless expressly provided otherwise, all your rights and remedies are against the Supplier.
20. DisclaimersVertu will not be responsible for products and services offered by Vertu as agents for the Suppliers or for any aspect of the relationship between you and any particular Supplier. Vertu will however do everything it reasonably can to assist you in any dealings you have with the Supplier.
You agree that any contract entered into by you with any of the Suppliers is an independent contract. Vertu hereby disclaims any and all liability for any act or omission of any Supplier or any loss incurred by you as a result of any act or omission of a Supplier whether or not arranged through VC.
21. Limitation of LiabilityVertu accepts no liability for any losses or claims arising from any inability to contact VC or any failure to complete a transaction.
Save in respect of death and personal injury caused by the negligence of Vertu or as expressly provided for in these Terms and Conditions, Vertu shall not be liable for any loss, cost, expense or damage of any nature whatever (whether direct or indirect) resulting from the provision of the Services or your reliance upon the information and suggestions provided by Vertu hereunder and the resulting supply of goods and services to you by any third party.
Vertu shall have no liability to you for any loss, damage, costs, expenses or other claims for compensation arising from requests or instructions supplied by you which are incomplete, incorrect or inaccurate or arising from their late arrival or non-arrival, or any other fault of you.
Vertu shall not be liable to you or be deemed to be in breach of these Terms and Conditions by reason of any delay in performing, or any failure to perform, any of Vertu ’s obligations in relation to the VC services, if the delay or failure was due to any cause beyond Vertu ’s reasonable control.
Except in respect of death and personal injury caused by the negligence of Vertu and subject to the provisions of these Terms and Conditions, Vertu’s maximum liability to you for breach of any of its obligations hereunder shall be limited to the value of the annual subscription fee, if any, and the relevant charge for the VC services to be provided.

APPENDIX
English
69
The limitations of liabilities set out herein apply only to the maximum extent permitted by law.
22. Governing Law and Arbitration of DisputesAny and all claims, except claims for monies due to Vertu, arising out of or relating to the use of VC must be commenced within one (1) year after the date either you or Vertu knew or should have known of the facts giving rise to such claim, after which such actions shall be barred. If acceptance of your membership request or a particular service request takes place within Europe, Middle East or Africa, the governing law shall be Finnish law. All disputes arising out of or in connection with these Terms and Conditions shall be finally settled under the Rules of Arbitration of the International Chamber of Commerce by one arbitrator appointed in accordance with the said Rules. The arbitration proceedings shall be conducted in London, England in the English language. The arbitration decision shall be final and binding. Provided that the parties shall have the right to take proceedings in any other jurisdiction for the purposes of enforcing a judgment or order obtained from the courts of England and Wales.
If acceptance of your membership request or a particular service request takes place within Asia Pacific, the governing law of these Terms and Conditions shall be Singapore law. All disputes arising from or connected to these Terms and Conditions shall be settled finally and exclusively in Singapore under the Rules of the Singapore International Arbitration Centre (SIAC Rules). The arbitration shall be conducted in English in Singapore. The award shall be final and binding on both parties. Provided that the parties shall have the right to take proceedings in any other jurisdiction for the purposes of enforcing the arbitral award.
If acceptance of your membership request or a particular service request takes place within the Americas region, all disputes and matters relating to arbitration shall be governed by the Federal Arbitration Act (9 U.S.C. §§1 et. seq.). Except to the extent governed by applicable U.S. federal law, any transactions with VC and its Suppliers shall be governed by the laws of the State of Texas, excluding its conflict of law rules. Any and all claims, except claims for monies due to Vertu, arising out of or relating to your membership and use of VC shall be barred unless an action or legal proceeding is commenced within eighteen (18) months after the date you or Vertu knew or should have known of the facts giving rise to such claim. Any dispute relating in any way to your membership and use of VC and any orders placed through VC, shall be submitted (together with any counterclaims and disputes under or in connection with other transactions and/or agreements between you and Vertu) to final and binding, confidential arbitration to the Dallas, Texas office of the American Arbitration Association (the “AAA”), with such arbitration to be held in Dallas County, Texas, except that, to the extent you have in any manner violated or threatened to violate any Vertu or Vertu affiliates’ or licensors’ intellectual property rights, Vertu may seek injunctive or other appropriate relief in any state or federal court in the state of Texas or, at Vertu’s option, any other appropriate state or country, and you consent to exclusive jurisdiction and venue of such court. Arbitration under these Terms and Conditions shall be conducted under the then prevailing Wireless Industry Arbitration Rules of the AAA (except as such rules may be modified by the terms of these Terms and Conditions), unless otherwise agreed in writing by the parties and shall be heard by a single arbitrator. Subject to any terms contained in these Terms and Conditions limiting or excluding damages, the arbitrator may award any relief that the arbitrator deems proper, including without limitation equitable relief, provided that no award of exemplary, special, consequential or punitive damages shall be permitted. The prevailing party, as determined by the arbitrator, shall pay the AAA arbitration fees and the arbitrator’s fees and expenses, as applicable. The arbitrator’s award shall be binding and may be entered as a judgment and enforceable in any court of competent jurisdiction. To the fullest extent permitted by applicable law, the arbitration shall be conducted on an individual, not a class-wide basis, and no arbitration under these Terms and Conditions shall be consolidated with or joined to an arbitration involving any other person or entity, whether through class arbitration proceedings or otherwise, without the prior written consent of you and Vertu.
Copyright © Vertu 2008. All rights reserved.
July 2008