Service Dispatch - Solomon Cloud Solutions
554
Service Dispatch Release 2015
-
Upload
khangminh22 -
Category
Documents
-
view
1 -
download
0
Transcript of Service Dispatch - Solomon Cloud Solutions

Service Dispatch Release 2015

Disclaimer
This document is provided “as-is”. Information and views expressed in this document, including URL
and other Internet Web site references, may change without notice. You bear the risk of using it.
Some examples are for illustration only and are fictitious. No real association is intended or inferred.
This document does not provide you with any legal rights to any intellectual property in any Microsoft
product. You may copy and use this document for your internal, reference purposes only.
Sample Code Warranty disclaimer
Microsoft Corporation disclaims any warranty regarding the sample code contained in this
documentation, including the warranties of merchantability and fitness for a particular purpose.
License agreement
Use of this software is covered by a license agreement provided with it. If you have any questions,
please call the Customer Assistance Department at 800-456-0025 (in the United States or Canada) or
+1-701-281-6500.
Copyright
© 2014 Microsoft Corporation. All rights reserved.
Publication Date
September 2014

Contents iii
Contents
Introduction 1
User Guide Overview ....................................................................................................................... 1 What is Covered in the User Guide? ................................................................................ 1 Who Should Use the User Guide? .................................................................................... 1 How to Use the User Guide .............................................................................................. 1
Service Dispatch Overview ............................................................................................................. 2 Service Dispatch Interaction .......................................................................................................... 4
Implementation Hints and Tips 5
Auto Numbering Key Identifier Codes.............................................................................. 5 Developing Geographic Zones ......................................................................................... 5 Developing Branches ........................................................................................................ 6 Developing Call Statuses .................................................................................................. 7 Developing Call Types ....................................................................................................... 8 Developing Problem Codes .............................................................................................. 8 Differences Between Customers and Customer Sites ................................................... 9 Site Subaccount versus Call Type Subaccount ............................................................. 11 Time & Material versus Flat Rate Pricing ...................................................................... 15 Dispatch Board versus Graphical Dispatch Board ........................................................ 16 Developing Special Pricing ............................................................................................. 16 Implementation Check List ............................................................................................ 18
Service Dispatch Concepts 25
Service Call Life Cycle Overview ................................................................................................... 25 Dispatching .................................................................................................................................... 25
Using Dispatch (SD.201.00) .......................................................................................... 26 Using Graphical Dispatch Board (SD.900.00) .............................................................. 27
Technicians ................................................................................................................................... 28 Skills ............................................................................................................................................... 28 Licensing ........................................................................................................................................ 28 Tools ............................................................................................................................................... 29 Service Dispatch Reference and ID Codes .................................................................................. 30
Service Call ID ................................................................................................................. 30 Customer ID .................................................................................................................... 30 Customer Site ID ............................................................................................................. 31 Customer Site Group ID .................................................................................................. 31 Service Contract ID ......................................................................................................... 31 Equipment ID .................................................................................................................. 32 Invoice Number ............................................................................................................... 32 Geographic Zone ID ........................................................................................................ 32 Branch ID ......................................................................................................................... 33 Zip Codes ......................................................................................................................... 33 Call Type ID ...................................................................................................................... 33 Call Status ID................................................................................................................... 33 Problem Code ID ............................................................................................................. 34 Cause Code ID................................................................................................................. 34 Resolution Code ID ......................................................................................................... 34 Technicians ..................................................................................................................... 34 Employee Class ............................................................................................................... 35 Dispatch - Call View ID .................................................................................................... 35 Dwelling ID ...................................................................................................................... 35 Inventory Mark-Up ID ...................................................................................................... 35 License ID ........................................................................................................................ 35

iv Service Dispatch
Media Buy ID ................................................................................................................... 36 Media Groups .................................................................................................................. 36 Skill ID .............................................................................................................................. 36 Tools ................................................................................................................................. 36 Tools Usage ..................................................................................................................... 37 Vehicle ID ......................................................................................................................... 37 Pager Template ID ........................................................................................................... 37 Note Template ID ............................................................................................................ 37 Earnings Type ID ............................................................................................................. 37 Work Location ID ............................................................................................................. 37
Task Guidelines 39
Quick Reference Task List ............................................................................................................ 39 How Do I...?...................................................................................................................... 39 Why...? ............................................................................................................................. 40 How Do I Define...? .......................................................................................................... 40 What...? ............................................................................................................................ 40 What Is the Difference Between...?................................................................................ 40
Setup and Maintenance 41
Introduction to Setup and Maintenance ...................................................................................... 41 Setting up Other Microsoft Dynamics SL Modules ...................................................................... 41
Shared Information Module ........................................................................................... 41 General Ledger Module .................................................................................................. 41 System Manager Module ................................................................................................ 42 Accounts Receivable Module ......................................................................................... 42 Inventory Module ............................................................................................................ 42 Purchasing Module (Optional) ........................................................................................ 43 Accounts Payable Module (Optional) ............................................................................. 43 Payroll Module (Optional) ............................................................................................... 44 Advanced Payroll Module (Optional) .............................................................................. 44 Project Controller (Optional) ........................................................................................... 44 Customization Manager .................................................................................................. 45 Crystal Reports ................................................................................................................ 45 Application Server ........................................................................................................... 45
Setting up Service Dispatch .......................................................................................................... 46 Overview .......................................................................................................................... 46 Define Call Statuses (SD.002.00) .................................................................................. 49 Set up General Information Using Service Series Setup Maintenance (SD.000.00) .. 50 Set up Licenses (SD.010.00) (Optional) ........................................................................ 54 Set up Postal Codes (SD.021.00) (Optional) ................................................................. 56 Attach Licenses to Zip Codes (SD.011.00) (Optional) .................................................. 59 Set up Geographic Zones (SD.009.00) .......................................................................... 60 Set up Branches (SD.001.00) ........................................................................................ 62 Define Call Types (SD.003.00) ....................................................................................... 64 Create Pager Templates (SD.031.00) (Optional) .......................................................... 65 Define Vehicles (SD.020.00) (Optional) ........................................................................ 66 Define Skills (SD.017.00) (Optional) .............................................................................. 68 Define Tools (SD.018.00) (Optional) .............................................................................. 69 Define Tool Usage Maintenance (SD.019.00) (Optional) ............................................. 71 Define Employee Classes (SD.006.00).......................................................................... 72 Define Employees (SD.007.00) ...................................................................................... 73 Define Dispatch View Templates (SD.004.00) .............................................................. 81 Set up Templates and Queues with User Configuration (SD.000.01) ......................... 85 Define Problem Codes (SD.008.00) .............................................................................. 87 Define Cause Codes (SD.014.00) (Optional)................................................................. 91 Define Resolution Codes (SD.015.00) (Optional) ......................................................... 92

Table of Contents v
Define Media Groups (SD.013.00) (Optional) ............................................................... 93 Define Media Sources (SD.012.00) (Optional) ............................................................. 94 Define Advertising Partners in Cooperative Advertising Information (SD.012.01)
(Optional) ......................................................................................................................... 96 Define Product Classes (SD.016.00) (Optional) ........................................................... 98 Define Dwelling Types (SD.005.00) (Optional) ........................................................... 100 Define Inventory Mark-Ups (SD.026.00) (Optional) .................................................... 101 Define New Customer Sites (SD.025.00) .................................................................... 102 Define Customer Site Groups (SD.041.00) ................................................................. 110 Define Special Pricing (SD.037.00) (Optional) ............................................................ 111 Create Note Templates (SD.410.00) (Optional).......................................................... 113
Service Call Entry 115
Creating and Processing Service Calls....................................................................................... 115 Entering a Service Call ................................................................................................................ 117
Entering Header Information ........................................................................................ 117 Entering Line Items, Service Call Info Tab ................................................................... 122 Entering Other Information, Other Info Tab ................................................................. 125
Saving the Service Call ............................................................................................................... 128 Entering a New Customer during Service Call Entry ................................................................. 129 Creating a New Service Call Using Duplicate Call ..................................................................... 134 Canceling a Service Call ............................................................................................................. 137 Creating a Service Call Quote ..................................................................................................... 139
Entering Header Information ........................................................................................ 139 Entering Line Items, Service Call Info Tab ................................................................... 144 Entering Other Information, Other Info Tab ................................................................. 147
Viewing Service Calls Not Completed ........................................................................................ 149 Viewing Completed Service Calls ............................................................................................... 149
Dispatching 151
Introduction to Dispatching ........................................................................................................ 151 Viewing All Open Service Calls.................................................................................................... 152
Creating a Call View Template ..................................................................................... 152 Viewing All Open Service Calls, Dispatch (SD.201.00) ............................................... 153 Viewing All Open Service Calls, Graphical Dispatch Board (SD.900.00) ................... 154
Viewing All Open Service Calls for a Specific Priority ................................................................ 155 Creating a Call View Template for a Specific Priority .................................................. 155 Viewing Open Service Calls for a Specific Priority, Dispatch (SD.201.00) ................ 156
Viewing All Open Service Calls for a Specific Branch ................................................................ 157 Creating a Call View Template for a Specific Branch .................................................. 157 Viewing All Open Service Calls for A Specific Branch, Dispatch (SD.201.00) ........... 159
Viewing All Open Service Calls for a Specific Technician .......................................................... 160 Viewing a Technician’s Open Service Calls, Dispatch (SD.201.00) .......................... 161 Viewing a Technician’s Open Service Calls, Graphical Dispatch Board (SD.900.00)162
Viewing All Open Service Calls for a Call Type ........................................................................... 165 Creating a Call View Template for a Call Type ............................................................. 165 Viewing All Open Service Calls for a Specific Call Type, Dispatch (SD.201.00) ........ 167
Viewing All Open Service Calls for a Call Status ........................................................................ 168 Viewing All Open Service Calls for a Specific Call Status, Dispatch (SD.201.00) ..... 170
Viewing All Open Service Calls for a Geographic Zone ............................................................. 171 Creating a Call View Template for a Geographic Zone ............................................... 171 Viewing Open Service Calls for a Specific Geographic Zone, Dispatch (SD.201.00) 173 Viewing Open Service Calls for a Specific Geographic Zone, Graphical Dispatch Board
(SD.900.00) .................................................................................................................. 174 Changing Sort Order in Dispatch (SD.201.00) .......................................................................... 175 Search Problem Codes of Open Service Calls in Graphical Dispatch Board (SD.900.00) ..... 176 Assigning a Technician to a Problem Code from Graphical Dispatch Board (SD.900.00) ..... 179

vi Service Dispatch
Adding a New Problem Code to a Service Call from Graphical Dispatch Board (SD.900.00) 181
Special Pricing Revisions 183
Create Special Pricing Revisions (SD.042.00) (Optional) .........................................................183 Update Special Pricing with Revisions (SD.043.00) (Optional) ................................................186
Paging 189
Paging with Dispatch (SD.201.00) .............................................................................................189 Paging with Graphical Dispatch Board (SD.900.00) .................................................................193
Sending Email Messages to Customers and Technicians 195
Sending Email Messages to Customers .....................................................................................195 Sending Email Messages to Technicians ...................................................................................198
Printing Service Call Work Orders 207
Printing a Service Call Work Order from the Reports Menu ......................................................207 Printing Service Call Work Orders from Service Call Entry (SD.200.00) ..................................209 Printing a Service Call Work Order from the Graphical Dispatch Board (SD.900.00) .............210
Processing Independent of Call Completion 211
Generate Payroll Process ............................................................................................................212 Generate Inventory ......................................................................................................................214
Invoicing 217
Invoicing Overview .......................................................................................................................217 Entering Invoice Information .......................................................................................................219
Creating a New Invoice .................................................................................................220 Entering Time and Material Details ............................................................................................225
Entering Time and Material Invoice Detail Information ..............................................225 Entering Billable Labor Inventory Line Items ...............................................................230 Entering In-House Warranty Material Inventory Line Items ........................................234 Entering In-House Warranty Labor Inventory Line Items ............................................237 Entering Manufacturer Warranty Material Inventory Line Items ................................240 Entering Manufacturer Warranty Labor Inventory Line Items ....................................243 Entering Non-Billable Material Inventory Line Items ...................................................245 Entering Non-Billable Labor Inventory Line Items .......................................................249 Entering Project Material Inventory Line Items ...........................................................251 Entering Project Labor Inventory Line Items................................................................255 Entering Service Contract Material Inventory Line Items ...........................................257 Entering Service Contract Labor Inventory Line Items ................................................261
Flat Rate Price Invoicing..............................................................................................................264 Entering a Flat Rate Price Invoice ................................................................................264 Invoicing a Flat Rate Order ...........................................................................................267 Modifying Details of a Flat Rate Order .........................................................................269 Entering Material Inventory Line Items ........................................................................270 Entering Labor Inventory Line Items ............................................................................273 Entering Technician Information on an Invoice ...........................................................277
Sending Invoices Electronically ..................................................................................................279 Viewing Details for Invoices Sent Electronically ........................................................................284 Selecting Service Calls to be Invoiced ........................................................................................285
Approving Service Call Invoices ....................................................................................285 Selecting a Service Call to Invoice ...............................................................................286 Printing a Service Invoice .............................................................................................289
Data Entry Screens 291
Data Entry Screens Overview ......................................................................................................291

Table of Contents vii
Invoice - Technician Information (SD.028.00) .......................................................................... 292 Service Call Entry (SD.200.00) ................................................................................................... 294
Service Call Entry, Service Call Info Tab ...................................................................... 299 Service Call Entry, New Customer Tab......................................................................... 302 Service Call Entry, Other Info Tab ................................................................................ 305 Service Call Entry, Tech Available Tab ......................................................................... 308
Dispatch (SD.201.00) ................................................................................................................. 313 Invoice Entry (SD.202.00) .......................................................................................................... 315
Invoice Entry, Invoice Info Tab ..................................................................................... 317 Invoice Entry, Other Info Tab ........................................................................................ 321 Invoice Entry, Invoice History Tab ................................................................................ 324
Invoice - T & M Details (SD.203.00) .......................................................................................... 327 Service Call - Problem Code Entry (SD.407.00) ........................................................................ 334 Graphical Dispatch Board (SD.900.00) ..................................................................................... 336
Graphical Dispatch Board (SD.900.00), Options Tab ................................................. 336 Graphical Dispatch Board, Dispatch Board Tab ......................................................... 338 Screens That Interact with Graphical Dispatch Board (SD.900.00) .......................... 349 Service Contract Summary (SD.900.01) ..................................................................... 350 Service Call Search (SD.900.02) ................................................................................. 351
Graphical Dispatch - Assign Technician (SD.901.00) ............................................................... 354
Inquiry Screens 357
Inquiry Screens Overview............................................................................................................ 357 Service Call Status Log (SD.027.00) ......................................................................................... 357 Open Service Call (SD.200.02) .................................................................................................. 359 Customer Equipment (SD.200.03) ............................................................................................ 361 Customer Information (SD.202.01) ........................................................................................... 363 Service Call History (SD.301.00) ................................................................................................ 365 Service Call Lookup (SD.303.00) ............................................................................................... 367 Customer Lookup (SD.305.00) .................................................................................................. 371 Customer Site Location (SD.905.00) ......................................................................................... 374
Maintenance Screens 375
Maintenance Screens Overview ................................................................................................. 375 Branch Maintenance (SD.001.00) ............................................................................................. 375 Call Status Maintenance (SD.002.00) ....................................................................................... 378 Call Type Maintenance (SD.003.00) .......................................................................................... 379 Dispatch - View Maintenance (SD.004.00) ............................................................................... 381
Geography (SD.004.01) ............................................................................................... 382 Dispatch Sort Order (SD.004.02) ................................................................................ 383 Call Type (SD.004.05) .................................................................................................. 384 Call Status (SD.004.06) ............................................................................................... 384
Dwelling Maintenance (SD.005.00)........................................................................................... 385 Employee Class Maintenance (SD.006.00) .............................................................................. 386 Employee Maintenance (SD.007.00) ........................................................................................ 387
Employee Personal Information (SD.007.01) ............................................................. 391 Employee Other Phone (SD.007.02) ........................................................................... 393 Employee Skills Information (SD.007.03) ................................................................... 394 Employee License Information (SD.007.04) ............................................................... 395 Employee Tool (SD.007.05) ......................................................................................... 396
Problem Code Maintenance (SD.008.00) ................................................................................. 397 Possible Tasks/Prices (SD.008.01) ............................................................................. 399 Problem Code Skills Information (SD.008.02) ............................................................ 399 Problem Code Licenses Information (SD.008.03) ...................................................... 400 Problem Code - Call Type (SD.030.00) ........................................................................ 400 Problem Code Tool Usage (SD.008.05) ....................................................................... 401
Geographic Zone Maintenance (SD.009.00) ............................................................................ 402

viii Service Dispatch
License Maintenance (SD.010.00) ............................................................................................404 License - ZIP Code Maintenance (SD.011.00) ..........................................................................406 Media Buy Maintenance (SD.012.00) .......................................................................................408
Coop Advertising Information (SD.012.01) .................................................................409 Media Group Maintenance (SD.013.00) ...................................................................................411 Cause Code Maintenance (SD.014.00) .....................................................................................412 Resolution Code Maintenance (SD.015.00)..............................................................................413 Product Class Maintenance (SD.016.00) ..................................................................................414 Skills Maintenance (SD.017.00) ................................................................................................415 Tool Maintenance (SD.018.00) ..................................................................................................416 Tool Usage Maintenance (SD.019.00) .......................................................................................418 Vehicle Maintenance (SD.020.00) .............................................................................................419 Zip Code Maintenance (SD.021.00) ..........................................................................................421 Earnings Type Maintenance (SD.022.00) ..................................................................................423 Work Location Maintenance (SD.023.00) .................................................................................424 Site Maintenance (SD.025.00) ..................................................................................................425
Site Maintenance, Customer Info Tab .........................................................................425 Site Maintenance, Serv Call Info Tab ...........................................................................428 Site Maintenance, Form View .......................................................................................431
Inventory Mark-Up Maintenance (SD.026.00) ..........................................................................432 Pager Template (SD.031.00) ......................................................................................................433 Site - Special Pricing Maintenance (SD.037.00) .......................................................................435 Geographic Zone - Employees (SD.038.00) ..............................................................................438 Employees - Geographic Zones (SD.039.00) .............................................................................439 Customer Site Group (SD.041.00) .............................................................................................440 Site – Special Pricing Revisions (SD.042.00) ............................................................................441
View Pending Special Pricing Revisions (SD.042.01) .................................................444 Update Special Pricing with Revisions (SD.043.00) .................................................................446 Notes Template (SD.410.00) .....................................................................................................448 Employee Schedule (SD.904.00) ...............................................................................................449
Processing Screens 451
Processing Screens Overview .....................................................................................................451 Dispatch - Service Call Page (SD.024.00) .................................................................................451 Service Call Invoice Approval (SD.204.00) ................................................................................453
Invoice – Notes Entry (SD.408.00) ..............................................................................458 Generate Payroll Process (SD.302.00) ......................................................................................459 Generate Inventory (SD.306.00) ................................................................................................460 Service Invoice Printing - Keep/Delete (SD.642.00) .................................................................462 Technicians Page (SD.903.00) ...................................................................................................463
Setup Screens 465
Setup Screens Overview .............................................................................................................465 Service Series Setup Maintenance (SD.000.00) ......................................................................465
User Configuration (SD.000.01) ...................................................................................471 Graphical Dispatch Setup Maintenance (SD.902.00) ..............................................................472
Graphical Dispatch Setup Maintenance, Customer E-mail Options Tab ...................474 Graphical Dispatch Setup Maintenance, Technician E-mail Options Tab ..................476
Other Screens Associated with Service Dispatch 479
Invoice - Flat Rate Order (SP.200.00) ........................................................................................479 Flat Rate Order - Modify Detail (SP.202.00) ..............................................................................481 Service Call Information ..............................................................................................................486
Time Entry - Service Call Information (02.010.01) .....................................................486 Time and Dollar Entry, Service Call Information (02.020.01) ....................................488 Manual Check Entry, Service Call Information (02.040.01).......................................490 Net Check Entry - Service Call Information (02.080.02) ............................................492

Table of Contents ix
Advanced Timesheet Entry, Service Call Information (58.010.01) ........................... 494 Customer Maintenance (08.260.00) ......................................................................................... 496
Reports 499
Advertising Media Performance Report (SD.630.00) ............................................................... 499 Billable - Completed Calls (SD.623.00) ..................................................................................... 500 Branch List (SD.600.00) ............................................................................................................. 501 Call Status List (SD.601.00) ....................................................................................................... 501 Call Type List (SD.602.00) .......................................................................................................... 502 Customer Site Groups (SSRS) (SD.644.00) .............................................................................. 502 Dwelling List (SD.603.00) ........................................................................................................... 503 Employee Class List (SD.605.00) .............................................................................................. 503 Employee Information (SD.604.00) ........................................................................................... 504 Geographic Zone List (SD.606.00) ............................................................................................ 506 Inventory Mark-Up (SD.619.00) ................................................................................................. 506 License List (SD.607.00) ............................................................................................................ 507 License - Zip Code List (SD.608.00) .......................................................................................... 507 Media Group List (SD.609.00) ................................................................................................... 508 Media Buy List (SD.610.00) ....................................................................................................... 508 Open Service Call List (SD.620.00) ........................................................................................... 509 Problem Code List (SD.634.00) ................................................................................................. 509 Product Class List (SD.611.00) .................................................................................................. 509 Reprint Service Call Invoice (SD.650.00) .................................................................................. 510 Sales Analysis Report (SD.626.00) ............................................................................................ 512 Service Call Audit (SD.627.00) ................................................................................................... 513 Service Call History (SD.622.00) ................................................................................................ 514 Service Call Invoice (SD.640.00) ............................................................................................... 515
Service Call Invoice, Report Tab .................................................................................. 516 Service Call Invoice, Options Tab ................................................................................. 517
Service Invoice Selection (SD.641.00) ...................................................................................... 518 Service Calls Selected for Invoicing (SD.641.01) ....................................................... 520 One-time Receiver (SD.641.03) ................................................................................... 522
Service Call Invoice (SSRS) (SD.643.00) ................................................................................... 527 Service Call Invoice (SSRS), Report Tab ...................................................................... 528 Service Call Invoice (SSRS), Options Tab .................................................................... 529
Service Call Workorder (SD.625.00) .......................................................................................... 530 Service Location Code List (SD.621.00) .................................................................................... 530 Site List (SD.612.00) .................................................................................................................. 531 Skills List (SD.613.00) ................................................................................................................ 531 Special Pricing (SSRS) (SD.645.00) ........................................................................................... 532 T&M Quote (SD.633.00) ............................................................................................................. 533 Timesheet Report (SD.400.00) .................................................................................................. 534 Tool List (SD.614.00) .................................................................................................................. 536 Tool Usage List (SD.615.00) ...................................................................................................... 536 Usage Code List (SD.616.00) ..................................................................................................... 537 Use Taxes List (SD.628.00) ........................................................................................................ 537 Vehicle List (SD.617.00) ............................................................................................................. 538 Zip Code List (SD.618.00) .......................................................................................................... 538
Index 539

x Service Dispatch

Introduction 1
Introduction
User Guide Overview This user guide provides information regarding the set up and use of the Service Dispatch module.
Reviewing the user guide can help you make informed decisions regarding the implementation in the
Service Dispatch module in your business.
What is Covered in the User Guide?
The user guide consists primarily of procedures and checklists that describe how to perform the
various tasks featured in the Service Dispatch module. The user guide also contains topics that help
you become better acquainted with the capabilities of the module. Topics are arranged in a logical
order that builds on information previously presented in other user guides.
Who Should Use the User Guide?
The user guide is designed for readers who are new to Service Dispatch. The guide provides the
information necessary for making decisions regarding how to use the Service Dispatch module in
order to get the most from your system.
How to Use the User Guide
Read the appropriate section of the user guide before proceeding with any system customizations. The
user guide presents the procedures and steps required for completing the various customization
processes. To assist you in locating information, the user guide contains:
A “Table of Contents” of logically organized activities and tasks
A “Quick Reference Task List” of commonly performed tasks
An alphabetized “Index” of the information provided in the user guide

2 Service Dispatch
Service Dispatch Overview The Service Dispatch module in Microsoft Dynamics® SL is designed to track every detail of a service
organization by providing complete automation of service call processing, dispatching, and service call
completion or invoicing. This comprehensive service business module streamlines the processing
tasks for service organizations and allows dispatching departments to efficiently manage field
technicians. Service Dispatch also accurately maintains customer information including account
status, equipment, and service history.
Service calls are the heart in the Service Dispatch module. The life cycle of a service call is a
straightforward three-step process. Entering a service call in Service Call Entry (SD.200.00) is the first
step of the service call process. Service Call Entry (SD.200.00) has been designed to allow customer
service representatives to enter a service call into the system in the most simple and time saving
manner. To begin the service call entry process, a customer and site must be selected. The fastest
and most efficient way of processing a service call is to use the powerful search engine. The system
allows users to search for customer site information based on site ID, site name, site attention, site
description, site address, site phone, site city, site zip and various equipment information such as
equipment ID and serial number.
Once the customer and site have been selected, values attached to the customer site default to the
service call. Customer service representatives can override the default values such as scheduling
information, call status, priority, start date, time promised, and primary technician. Several problem
codes or reasons for the service call, along with notes or source documents specific to the issues can
be attached to the service call. When all the needed information is entered and the service call is
saved, the system automatically assigns a Service Call ID if this feature is enabled in Service Series
Setup Maintenance (SD.000.00).
Depending on several setup options, this screen can default proactive messages to assist customer
service representatives in the service call entry process. The PO Required message alerts users that a
purchase order is mandatory and that a service call cannot be saved unless a purchase order number
is entered. Tenant Not Auth to Call in Site Maintenance (SD.025.00) notifies users that tenants are
not allowed to place a service call by displaying Authorization Req to the right of Attention in Service
Call Entry (SD200.00). The Open Service Calls message appears when a specific site has existing
open service calls when placing the call and allows users to stack calls. The Active Service Contract
message notifies users that a site has an existing service contract where the service call may be
covered.
Credit related messages also assist customer service representatives in the service call entry process.
Many of the credit checking features of the Accounts Receivable module are present, such as verifying
the customer’s past due open invoices and verifying that the customer’s credit limit has not been
exceeded.
After a service call is entered into the system, the service call can be displayed in Dispatch
(SD.201.00). Dispatching technicians to the service call is the second step of the service call process.
While viewing the service calls in the dispatching screens, users can assign the appropriate
technicians to perform the work. Dispatch (SD.201.00) is used to manage all open, in progress, and
completed service calls by service call ID.
Call view templates allow users to view service calls in a variety of ways. Users can set up an unlimited
number of call view templates in Dispatch - View Maintenance (SD.004.00) to display service calls in
Dispatch (SD.201.00).
Example: A view can be set up to display only open service calls that have a premium or high priority.
After the service call has been dispatched and the technicians have performed the required work, the
service call is invoiced or completed, which is the third step of the service call process. The service call
invoicing process, which allows users to enter billable line items for material and labor used on a job,
creates a batch of invoices in Invoice and Memo (08.010.00) of the Accounts Receivable module and
a COGS batch in Issues (10.020.00). Service Call Invoice (SD.640.00) and Service Call Invoice (SSRS)
(SD.643.00) also allow billable and non-billable material and labor inventory items to be charged to
projects and service contracts. Once a service call invoice has been printed and processed, the service
call is considered complete, and no further detail lines can be added to the service call invoice.

Introduction 3
Generate Payroll Process (SD.302.00) allows users to initiate Time and Dollar (02.020.00) batches in
the Payroll module for labor Work Hours entered in Invoice - T & M Details (SD.203.00). Generate
Inventory (SD.306.00) allows users to produce quantity and cost information for material and labor
used on a job in Issues (10.020.00) and to generate purchase orders in Purchase Order (04.250.00)
and purchase order receipts in Receipt/Invoice Entry (04.010.00) of the Purchasing module.
Therefore, Generate Payroll Process (SD.302.00) and Generate Inventory (SD.306.00) do not
complete, additional material and labor inventory items can be added to the service call for invoicing.

4 Service Dispatch
Service Dispatch Interaction The figure below illustrates the interaction between the Service Dispatch module and other modules of
the system.
Figure 1: Service Dispatch Interaction

Implementation Hints and Tips 5
Implementation Hints and Tips
Auto Numbering Key Identifier Codes
In Microsoft Dynamics SL, most data records require unique identifying codes that distinguish a record
from all other data records in the database. To ensure efficient data storage and easy record retrieval
for reporting purposes, it is recommended that you establish standardized record coding formats.
Depending on the data record type, these codes are either assigned automatically or manually
assigned by users during data entry. These codes can be numeric, alphabetic, or alphanumeric.
Field Service Management gives you the option to have the ID of new customers, service calls, and
service contracts manually assigned by users or automatically assigned by the system. These coding
schemes are maintained in Service Series Setup Maintenance (SD.000.00).
Field Service Management also provides you with the option to add a corresponding branch
abbreviation to the first three characters of Customer ID, Service Call ID, and Service Contract ID. If
Auto-Number Branch Prefix is selected in Service Series Setup Maintenance (SD.000.00), then the
abbreviation specified for the branch entered in Branch Maintenance (SD.001.00) is added to the ID
when the record is saved.
Example: When entering a service call, the three-character branch prefix is added to Service Call ID
when the service call is saved.
Developing Geographic Zones
Geographic zones are used to represent work zones or regions where a company performs jobs or
services. These user-defined areas are designed to help dispatching departments be efficient when
assigning a service technician to a service call. Since a geographic zone can consist of one or an
unlimited number of zip codes, predetermined areas defined by organizations allow dispatchers to
decrease the travel time of service technicians and reduce the waiting period of customers to receive
service.
Since geographic zones can be associated with a branch, users can easily verify which branch is
responsible for a service call. Unlike zip codes, only one branch can be assigned to a geographic zone.
Therefore, management has the ability to collect sales and other reporting information by region and
branch.
Geographic zone IDs are user-defined and can be any combination of numbers and letters up to 10
characters. The ID of geographic zones should be set up in a consistent and easy to identify manner.
Examples:
Divide the areas of the city into regions:
Alphabetic Geographic Zone ID Description
NORTH North Akron
SOUTH South Akron
EAST East Akron
WEST West Akron
Numeric Geographic Zone ID Description
01 North Akron
02 South Akron
03 East Akron
04 West Akron

6 Service Dispatch
Use a branch number and region name combination:
Branch ID Branch Name Geographic Zone ID Description
01 Akron 01NORTH Akron North
02 Columbus 01SOUTH Akron South
01EAST Akron East
01WEST Akron West
02NORTH Columbus North
02SOUTH Columbus South
02EAST Columbus East
02WEST Columbus West
Use an alphabetic branch ID and region name combination:
Branch ID Branch Name Geographic Zone ID Description
AKR Akron AKRNORTH Akron North
COL Columbus AKRSOUTH Akron South
AKREAST Akron East
AKRWEST Akron West
COLNORTH Columbus North
COLSOUTH Columbus South
COLEAST Columbus East
COLWEST Columbus West
Note: You can run a report that lists the geographic zones and their zip codes. For more information,
see “Geographic Zone List (SD.606.00)” on page 506.
Developing Branches
Branches are used to represent the different divisions or locations in an organization.
Example 1: An organization that has locations in Columbus, Cincinnati, and Cleveland may create a
branch for each city.
Example 2: A company that has heating and air conditioning divisions may set up a separate branch
for each division.
Organizations typically choose to separate locations or divisions by branch for reporting purposes. For
example, Open Service Call List prints open service calls for each branch in an organization.
Geographic zones are attached to branches in order to separate the work areas or routes by location
or division. For example, a company with branches in Columbus and Cincinnati may create four work
zones for the Cincinnati branch and three work zones for the Columbus branch. Geographic zones can
only be assigned with one branch. However, a branch may be associated with an unlimited number of
geographic zones, thus forming a one-to-many relationship. If a geographic zone exists in multiple
branches, the geographic zone should not be attached to a branch. The geographic zone associated
with the customer site is used to default the branch responsible for the service call when entered into
Service Call Entry (SD.200.00). Therefore, the service call could be assigned to the wrong branch.
Users have the ability to view open service calls by branch using Dispatch (SD.201.00). Dispatch -
View Maintenance (SD.004.00) is used to set up templates to display service calls for one branch or
all branches. Viewing open service calls for one branch eliminates the problem of dispatching
technicians located in one branch to open service calls of other branches.

Implementation Hints and Tips 7
Branch IDs are user-defined and can be any combination of numbers and letters up to 10 characters.
For example:
Branch ID Description
001 Columbus, Ohio
002 Cincinnati, Ohio
003 Cleveland, Ohio
Note: The Branch List Report (SD600) lists all of the branches and the information associated with
them. For more information, see “Branch List (SD.600.00)” on page 501.
Developing Call Statuses
Call statuses are used to define the life cycle of a service call. The call status provides dispatchers and
other users with information that tracks the progress of a service call. The system allows an unlimited
number of user-defined call statuses that can be any combination of numbers and letters up to 10
characters.
Examples:
QUOTE: The customer has requested a quote for services needed but has not approved the
service call.
APPROVED: The service call has been approved by the customer but not by your organization. For
example, credit checking may be required before a service call can be opened.
OPEN: The service call has been approved by your organization, but no technician has been
assigned to complete the work.
ASSIGNED: The service call has been assigned to a technician to complete the work.
ONSITE: Technicians are at the customer site performing the work specified on the service call.
HOLD: The service call is on hold.
HOLDPARTS: The service call is on hold pending parts to finish the work.
PARTSIN: The service call is on hold but the parts are arriving that were previously back ordered.
PARTSOUT: The service call is on hold because the parts needed to complete the work have been
back ordered.
INVOICED: The customer has been invoiced for the work performed.
COMPLETED: All work on the service call has been performed, and the customer has been
invoiced.
CANCELLED: The service call was cancelled by the customer.
Note: One call status must be used to represent a completed service call. A service call is considered
complete when the service call invoice has been printed and processed. Once a service call is
complete, no changes can be made to the service call, and the service call no longer displays on the
dispatching boards. Call Status on Completion in Service Series Setup Maintenance (SD.000.00) is
used to define the call status automatically assigned by the invoicing process to complete a service
call.
Each time the call status of a service call is changed, the system creates a log and records the date
and time the change was made, as well as the user who made the change. Using the Note feature,
users can attach notes as to why the status of a service call was changed.
Example: A service call was cancelled due to a snowstorm.
Note: You can run a report that lists call statuses and the information associated with them. For more
information, see “Call Status List (SD.601.00)” on page 502.

8 Service Dispatch
Developing Call Types
Call types are extremely important to the Service Dispatch system. Call types give organizations the
ability to separate service calls or jobs by different divisions or lines of business. If organizations want
to track the revenue and costs of each line of business in the company, subaccounts associated to the
line of business can be attached to the call types for general ledger purposes. For example, if Heating,
Plumbing, Electrical and Air Conditioning profit and loss statements need to be generated separately,
develop a call type for each line of business and attach the appropriate subaccount.
Call type IDs are user-defined and can be any combination of numbers and letters up to 10
characters. Typically, call types are alphabetical for easy recognition during data entry and reporting.
Call Type ID Call Type Description
HEAT Heating Line of Business
PLUMB Plumbing Line of Business
AIR Air Conditioning Line of Business
ELECT Electrical Line of Business
PM Preventive Maintenance
Note: You can run a report of all call types. For more information, see “Call Type List (SD.602.00)” on
page 502.
Developing Problem Codes
Problem codes are used to define the reason why a service call is generated. Unlike call types that can
have a one-to-one relationship with a line of business, multiple problem codes may exist for each call
type.
Example: A HEATING call type can have HEAT01-Emergency No Heat and HEAT02 – Change Air Filter.
Although problem codes are optional, setting up at least one problem code for each call type is
recommended. When attaching a call type to a service call, only the problem codes associated to the
call type are displayed and can be assigned to the service call. If problem codes are not used in the
system, only the call type must be entered when generating a service call.
An estimated time to complete a repair can be attached to problem codes. This time is used by the
system to calculate the duration of time needed to complete a service call. This estimated time is also
useful for users during the dispatching process by estimating the total amount of time needed to
complete a service.
To reduce the amount of time needed to train Customer Service Representatives for service call
processing, questions and notes can be attached to problem codes to assist in collecting valuable
information from customers. Questions for CSRs to ask when entering a service call can be designed
to provide technicians that perform the work with valuable information.
Example: When completing a HEATING call type and a HEAT02 – Change Air Filter problem code,
specifying the location of a furnace in a house may be important. After a problem code is assigned to a
service call in Service Call Entry (SD.200.00), the notes associated to the problem code displays. In
order to activate the note feature when entering a problem code for a service call, the Prompt
Operator check box must be selected.
If problem codes are not used, the note feature cannot be implemented.

Implementation Hints and Tips 9
Problem code IDs are user-defined and can be any combination of numbers and letters up to 10
characters. Typically, problem codes are alphanumeric for reporting purposes.
Problem Code ID Description
HEAT01 Emergency No Heat
HEAT02 Change Air Filter
AIR01 Emergency No Air
AIR02 No Power
PLUMBING01 Emergency No Water
PLUMBING02 Emergency Flooding
PM Routine Preventive Maintenance
Note: You can run a report that lists all of the problem codes and their associated information. For
more information, see “Problem Code List (SD.634.00)” on page 509.
Differences Between Customers and Customer Sites
To process transactions for consumers that purchase items or services from your organization,
information about each customer must be set up in Customer Maintenance (08.260.00) of the
Accounts Receivable module. Every customer has a unique ID that distinguishes that customer from
all other customers in the database. All customers can have an unlimited number of locations where
items can be shipped or where services can be performed. In the Service Dispatch module, these
locations are considered sites.
Although customers may have one central address for billing, multiple locations may exist where work
is performed. There is a one-to-one relationship with a Customer ID and a billing address. There is a
one-to-many relationship with a Customer ID and Customer Sites. Therefore, when setting up
customers and customer sites, the billing address is the determining factor when setting up one
Customer ID or multiple Customer IDs for a consumer.
Example: If a customer in Cleveland also has locations in Columbus, Cincinnati, and Detroit, and the
company wants all of the invoices for each location sent to the central office in Cleveland for payment,
then one Customer ID and four customer sites must be created. One customer site must be created
for each city or location. If the customer wants each location to pay its own invoices, then four
Customer IDs must be set up, one for each city or location.
Each customer site has a unique identifier that distinguishes one site from another site of the
customer. Although a customer can only have one 001 site, every customer can have a 001 site. A site
ID is only unique to the customer, not to the system. Site Maintenance (SD.025.00) is used to set up
an unlimited number of sites per customer as an extension of the shipping address from Shipping
Addresses (08.262.00). This screen is also used to identify specific information that pertains to each
site of a customer as well as set up default values that allow customer service representatives to
quickly process a service call once a site is selected.
Example: Each site can have separate Company Name, Attention, Address, Phone Number, Fax
Number, Tax ID, and Special Pricing information as well as a default Geographic Zone, Branch ID, Call
Type, Salesperson, and Technician.
Note: In Service Call Entry (SD.200.00), if the customer has a site of DEFAULT, the site defaults to
service call entry when the customer is selected. If the customer does not have a DEFAULT site, the
customer site must be selected manually.
Customer IDs are unique identifying codes that must be manually assigned to customers in Customer
Maintenance (08.260.00) of Accounts Receivable or Service Call Entry (SD.200.00). If Auto Number
Customer ID in Service Series Setup Maintenance (SD.000.00) is enabled, the Customer IDs of new
customers can automatically be assigned by the system in Service Call Entry (SD.200.00). Customer
IDs can be any combination of numbers and letters up to 10 characters. If Auto-Number Branch Prefix

10 Service Dispatch
is enabled in Service Series Setup Maintenance (SD.000.00), the corresponding branch abbreviation
will default to the first three characters of the Customer ID.
Possible Customer ID formats include:
The initial series of letters in the customer name:
Customer ID Customer Name
BUSINE Business Interiors
FRONTZ Frontz Drilling
HAINES Haines & Company
LETTER The Letter Shop
Sequential numbers:
Customer ID Customer Name
0001 Business Interiors
0002 Frontz Drilling
0003 Haines & Company
0004 The Letter Shop
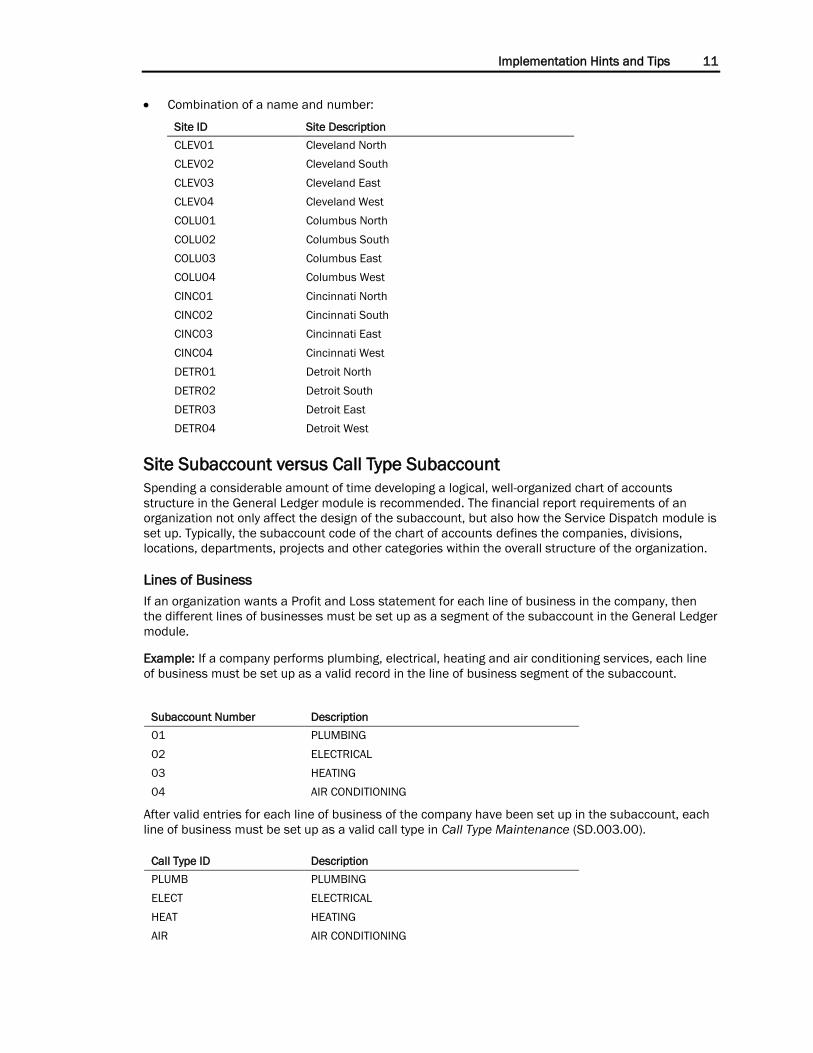
Combination of a name and number:
Customer ID Customer Name
BUSI01 Business Interiors Cleveland
BUSI02 Business Interiors Akron
FRON01 Frontz Drilling Wooster
FRON02 Frontz Drilling Canton
HAIN01 Haines & Company Akron
HAIN02 Haines & Company Canton
LETT01 The Letter Shop Akron
LETT02 The Letter Shop Canton
Site IDs are user-defined and can be any combination of numbers and letters up to 10 characters.
Possible site ID formats include:
A series of letters in the location name:
Site ID Site Description
CLEV Cleveland
COLU Columbus
CINC Cincinnati
DETR Detroit
Sequential numbers:
Site ID Site Description
001 Cleveland
002 Columbus
003 Cincinnati
004 Detroit
Implementation Hints and Tips 11
Combination of a name and number:
Site ID Site Description
CLEV01 Cleveland North
CLEV02 Cleveland South
CLEV03 Cleveland East
CLEV04 Cleveland West
COLU01 Columbus North
COLU02 Columbus South
COLU03 Columbus East
COLU04 Columbus West
CINC01 Cincinnati North
CINC02 Cincinnati South
CINC03 Cincinnati East
CINC04 Cincinnati West
DETR01 Detroit North
DETR02 Detroit South
DETR03 Detroit East
DETR04 Detroit West
Site Subaccount versus Call Type Subaccount
Spending a considerable amount of time developing a logical, well-organized chart of accounts
structure in the General Ledger module is recommended. The financial report requirements of an
organization not only affect the design of the subaccount, but also how the Service Dispatch module is
set up. Typically, the subaccount code of the chart of accounts defines the companies, divisions,
locations, departments, projects and other categories within the overall structure of the organization.
Lines of Business
If an organization wants a Profit and Loss statement for each line of business in the company, then
the different lines of businesses must be set up as a segment of the subaccount in the General Ledger
module.
Example: If a company performs plumbing, electrical, heating and air conditioning services, each line
of business must be set up as a valid record in the line of business segment of the subaccount.
Subaccount Number Description
01 PLUMBING
02 ELECTRICAL
03 HEATING
04 AIR CONDITIONING
After valid entries for each line of business of the company have been set up in the subaccount, each
line of business must be set up as a valid call type in Call Type Maintenance (SD.003.00).
Call Type ID Description
PLUMB PLUMBING
ELECT ELECTRICAL
HEAT HEATING
AIR AIR CONDITIONING

12 Service Dispatch
When setting up each call type, the appropriate subaccount that represents the line of business must
be associated with the call type.
Call Type ID Description Subaccount Number
PLUMB PLUMBING 01
ELECT ELECTRICAL 02
HEAT HEATING 03
AIR AIR CONDITIONING 04
Locations
If an organization wants an Income Statement for each location in the company, then location must be
a segment in the subaccount structure.
Example: If a company located in Cleveland, Ohio also has offices in Columbus, Cincinnati, and Detroit,
each city must be set up as a valid segment of the subaccount.
Subaccount Number Description
01 CLEVELAND
02 COLUMBUS
03 CINCINNATI
04 DETROIT
After valid entries for the different locations of the company have been established in the subaccount,
each location must be set up as a valid branch in Branch Maintenance (SD.001.00).
Branch Description
10 CLEVELAND
20 COLUMBUS
30 CINCINNATI
40 DETROIT

Implementation Hints and Tips 13
When creating a site for a customer in Site Maintenance (SD.025.00), the branch and the subaccount
that identifies the branch responsible for the site must be associated to the site.
Customer ID
Site ID
Site Description
Branch
ID
Subaccount
Number
C300 100 CLEVELAND-EAST 10 01
110 CLEVELAND-WEST 10 01
120 CLEVELAND-SOUTH 10 01
130 CLEVELAND-NORTH 10 01
200 COLUMBUS-EAST 20 02
210 COLUMBUS-WEST 20 02
220 COLUMBUS-SOUTH 20 02
230 COLUMBUS-NORTH 20 02
300 CINCINNATI-EAST 30 03
310 CINCINNATI-WEST 30 03
320 CINCINNATI-SOUTH 30 03
330 CINCINNATI-NORTH 30 03
400 DETROIT-EAST 40 04
410 DETROIT-WEST 40 04
420 DETROIT-SOUTH 40 04
430 DETROIT-NORTH 40 04
Although the line of business sales and costs are not be tracked in the General Ledger, each line of
business must be set up as a valid call type in Call Type Maintenance (SD.003.00).
Call Type ID Description
PLUMB PLUMBING
ELECT ELECTRICAL
HEAT HEATING
AIR AIR CONDITIONING
When setting up the call type for each line of business, Sub from Site must be selected in order to
have the system default the subaccount associated to the sales and costs of the service call based on
the value attached to the customer site.
If an organization wants to track the revenue and costs for each location and line of business in the
company, both characteristics must be built into the subaccount structure.
Line of Business
Segment Description
Location
Segment Number Description
10 PLUMBING 01 CLEVELAND
20 ELECTRICAL 02 COLUMBUS
30 HEATING 03 CINCINNATI
40 AIR CONDITIONING 04 DETROIT
After valid entries for location and line of business of the company have been established in the
subaccount, each location must be set up as a valid branch in Branch Maintenance (SD.001.00).
Branch Description
01 CLEVELAND
02 COLUMBUS
03 CINCINNATI
04 DETROIT
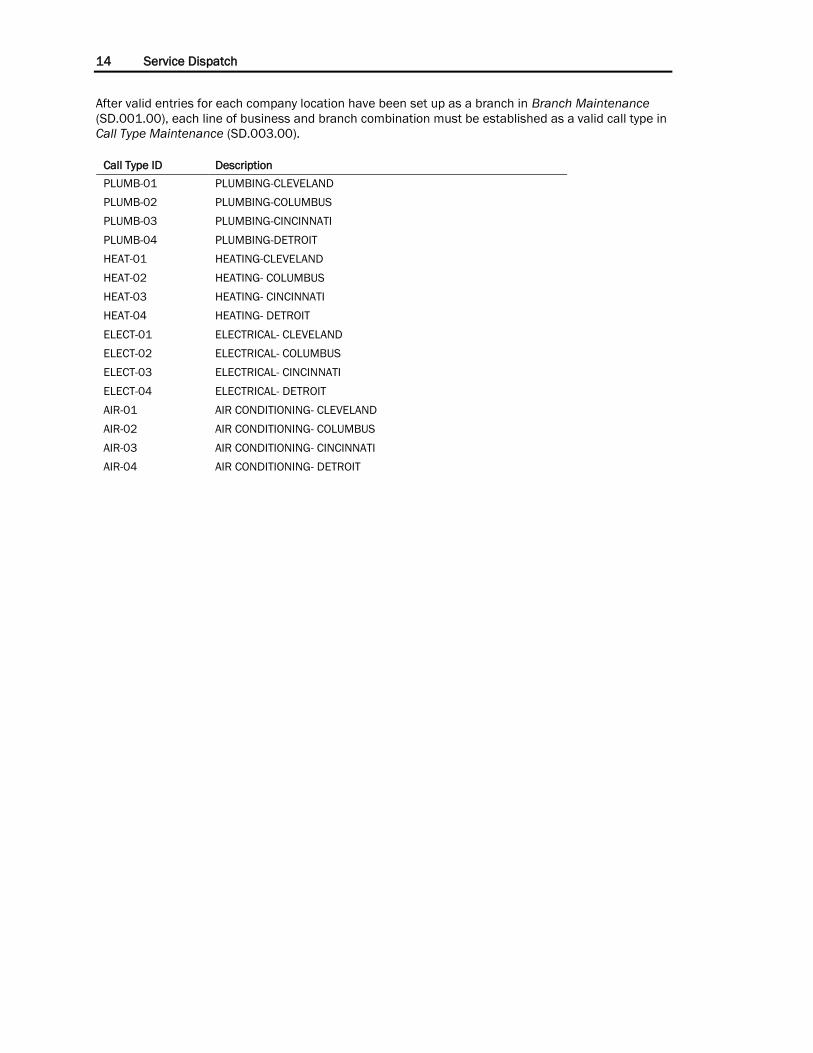
14 Service Dispatch
After valid entries for each company location have been set up as a branch in Branch Maintenance
(SD.001.00), each line of business and branch combination must be established as a valid call type in
Call Type Maintenance (SD.003.00).
Call Type ID Description
PLUMB-01 PLUMBING-CLEVELAND
PLUMB-02 PLUMBING-COLUMBUS
PLUMB-03 PLUMBING-CINCINNATI
PLUMB-04 PLUMBING-DETROIT
HEAT-01 HEATING-CLEVELAND
HEAT-02 HEATING- COLUMBUS
HEAT-03 HEATING- CINCINNATI
HEAT-04 HEATING- DETROIT
ELECT-01 ELECTRICAL- CLEVELAND
ELECT-02 ELECTRICAL- COLUMBUS
ELECT-03 ELECTRICAL- CINCINNATI
ELECT-04 ELECTRICAL- DETROIT
AIR-01 AIR CONDITIONING- CLEVELAND
AIR-02 AIR CONDITIONING- COLUMBUS
AIR-03 AIR CONDITIONING- CINCINNATI
AIR-04 AIR CONDITIONING- DETROIT

Implementation Hints and Tips 15
When setting up each call type, the appropriate subaccounts that represent the line of business and
location must be associated with the call type.
Call Type ID Description
Subaccount Number (Line
of Business-Location)
PLUMB-01 PLUMBING-CLEVELAND 10-01
PLUMB-02 PLUMBING-COLUMBUS 10-02
PLUMB-03 PLUMBING-CINCINNATI 10-03
PLUMB-04 PLUMBING-DETROIT 10-04
HEAT-01 HEATING-CLEVELAND 20-01
HEAT-02 HEATING- COLUMBUS 20-02
HEAT-03 HEATING- CINCINNATI 20-03
HEAT-04 HEATING- DETROIT 20-04
ELECT-01 ELECTRICAL- CLEVELAND 30-01
ELECT-02 ELECTRICAL- COLUMBUS 30-02
ELECT-03 ELECTRICAL- CINCINNATI 30-03
ELECT-04 ELECTRICAL- DETROIT 30-04
AIR-01 AIR CONDITIONING- CLEVELAND 40-01
AIR-02 AIR CONDITIONING- COLUMBUS 40-02
AIR-03 AIR CONDITIONING- CINCINNATI 40-03
AIR-04 AIR CONDITIONING-DETROIT 40-04
When creating a site for a customer in Site Maintenance (SD.025.00), only the branch that is
responsible for the site must be associated to the site.
Customer ID Site ID Site Description Branch ID
C300 100 CLEVELAND 01
200 COLUMBUS 02
300 CINCINNATI 03
400 DETROIT 04
Therefore, how an organization wants to track revenue and costs plays an important factor in
determining not only how to set up the subaccount structure, but also how to set up the Service
Dispatch module.
Time & Material versus Flat Rate Pricing
After the service call has been dispatched and the technicians have performed the necessary work,
the service call must be invoiced or completed. Invoice - T & M Details (SD.203.00) allows users to
enter the material and labor needed to complete the service call or job. The system provides two
Service Type options when invoicing: Time & Material and Flat Rate Pricing.
The Time & Material option allows users to enter an unlimited number of detail lines for labor and
material needed to carry out the work of a service call or job. Once all of the detail has been entered
and the invoice has been printed and processed, the Microsoft Dynamics SL modules are updated
based on the Line Type of each line item. Line Type in Invoice - T & M Details (SD.203.00) determines
whether to charge the line items to a customer, to a service contract, to a project, or to nothing in the
case of warranty or other non-billable charges. The different Line Type options include Billable, In-
House Warranty, Manufacturer Warranty, Non-Billable, Project, and Service Contracts.
Billable creates a batch in Invoice & Memo (08.010.00) of Accounts Receivable and an Issues
(10.020.00) batch in Inventory. In-house Warranty, Manufacturer’s Warranty, and Non-billable only
create a batch in Issues (10.020.00); no batch is created in Accounts Receivable. Project creates a
COGS batch in Issues (10.020.00) and updates a project based on Project ID associated to the service
call and Task ID associated with the detail line item. Service Contract creates a COGS batch in Issues

16 Service Dispatch
(10.020.00) and updates the profitability of a service contract based on the Contract ID associated
with the detail line item.
Flat Rate Pricing is a separate service management module in Field Service Management that allows
users to create an unlimited number of user-defined flat rates that include all of the material, labor,
and overhead costs needed to cover a job or service call. Since flat rate entries are always billable to
the customer, users do not have to enter all of the detail material and labor line items when invoicing.
However, if additional material and labor is required for a job, the additional resources can be added
in Flat Rate Order - Modify Detail (SP.202.00) without modifying the price. Flat Rate Pricing creates a
batch in Invoice & Memo (08.010.00) of Accounts Receivable and an Issues (10.020.00) batch in
Inventory.
Service Dispatch also provides three Invoice Type options when entering invoice information
into Invoice Entry (SD.202.00): Invoice, Manual, and Progress. The invoice number for Invoice
is assigned to the service call after the service call invoice is printed and saved to the system
through Service Invoice Printing - Keep/Delete (SD.642.00). Manual requires that a user-
specified invoice number be typed into Invoice/Memo Nbr before the invoice information can
be saved to the system in Invoice Entry (SD.202.00).
On occasion, although technicians may not be able to perform all of the work on a service call, an
invoice for the customer still must be generated. Service Dispatch has the capability to perform
progress invoices. Progress invoicing allows users to invoice customers for material and labor used to
perform the work without closing the service call. Therefore, additional work and detail lines items can
be added to the service call for invoicing. Progress disables Invoice/Memo Nbr in Invoice Entry
(SD.202.00) and assigns an invoice number to the printed invoices when generated using Service Call
Invoice (SD.640.00) or Service Call Invoice (SSRS) (SD.643.00).
Dispatch Board versus Graphical Dispatch Board
There are two dispatch boards available in Field Service Management. Use Dispatch (SD.201.00) to
manage open and in-progress service calls by Service Call ID. Use Graphical Dispatch Board
(SD.900.00) to manage service call information by Problem Code.
The Graphical Dispatch Board (SD.900.00) has limited compatibility with Customization Manager. You
should only use the Customization Manager to change text on the following tabs:
Options Dispatch Board Unassigned
Assigned In-route WIP
Completed P/U Parts Parts-out
Parts-in Hold Incomplete
Changing the order of the Graphical Dispatch Board (SD.900.00) columns in the service call details
pane grid is simple and does not require Customization Manager. Simply click and hold the left mouse
button in the title area of a column and drag the column to the desired position.
Sort data in the service call details pane grid by clicking in the title area of the column you wish to sort
by. Clicking once sorts the rows in ascending order using the data in the column; clicking a second
time causes the data to be sorted in descending order.
Developing Special Pricing
Use special pricing to set up special prices by customer ID, customer site ID, and inventory ID. These
special prices apply only to Service Series. Additionally, you can set up special pricing revisions and
perform revisions and updates in a global manner. The ability to group customer sites into a customer
site group ID is also available.
Example: North wind Traders is a servicer of industrial HVAC systems and sells replacement parts
directly to its customers during service appointments. North wind Traders has decided to reduce the
sales price of some of their replacement parts because of a decrease in costs. North wind Traders
currently services 135 customers, with an average of 75 sites per customer, totaling 10,000 customer
sites. They provide 500 unique replacement parts (inventory IDs). They use Site – Special Pricing
Revisions (SD.042.00) to perform a mass update to their revised price/disc%. Then, they use Update
Special Pricing with Revisions (SD.043.00) to move these revised price/disc% to the current

Implementation Hints and Tips 17
price/disc%. Last, they save an electronic copy of the Special Pricing (SD.645.00) report to a network
share for reference by their service technicians and salespeople
For more information about special pricing, see the following topics:
“Define Customer Site Groups (SD.041.00)” on page 110
“Define Special Pricing (SD.037.00) (Optional)” on page 111
“Create Special Pricing Revisions (SD.042.00) (Optional)” on page 183
“Update Special Pricing with Revisions (SD.043.00) (Optional)” on page 186

18 Service Dispatch
Implementation Check List
The checklist below may be used as a guide when completing a Service Dispatch implementation.
Description
Assigned
To
Date
Required
Date
Completed Comments
Call Status Maintenance (SD.002.00)
Define at least one call status
Service Series Setup Maintenance
(SD.000.00)
Define business hours
1. Define service lead time
2. Define service call range time
Define miscellaneous
defaults
1. Auto-number branch prefix
2. Determine how PO numbers
will be assigned
3. Create PO receipts on
purchase orders
4. Determine if vouchers will be
created on PO receipts
5. Is the Payroll module
interfaced with Field Service
Management?
Define paging information
Determine reference
numbering schema
1. Last service call ID
2. Last customer ID
3. Last contract ID
Determine how reference
number schemas will be
assigned
1. Auto-number service call ID
2. Auto-number customer ID
3. Auto-number contract ID
Determine alert systems to
activate
1. Active contract notification
2. Open service call alert
3. Technician skills and licenses
alert
Assigned call status for
completed service calls
Graphical Dispatch Setup Maintenance
(SD.902.00) (optional)
Determine if Employee Class
Labels will be displayed
Enter Average Travel Time if
desired
Determine when Average
Travel Time will be assigned

Implementation Hints and Tips 19
Description
Assigned
To
Date
Required
Date
Completed Comments
Select Conflicting Call Save
Option
Select text to display on task
bars
Determine if Time Conflict
Warning should be displayed
Set Customer Email options:
1. Determine if technicians
should be copied when
an email message is sent
to a customer
2. Determine the subject
text for email messages
sent to customers
3. Determine the body text
for email messages sent
to customers
Set Technician Email options:
1. Determine the subject
text for email messages
sent to technicians
2. Determine the body text
for email messages sent
to technicians
Set Problem Status colors
Set Technician Status colors
License Maintenance (SD.010.00)
(optional)
Set up employee licenses
Set up business licenses
Zip Code Maintenance (SD.021.00)
(optional)
Set up postal codes where
services are performed
License - ZIP Code Maintenance
(SD.011.00) (optional)
Associate business licenses
to postal codes
Associate employee licenses
to postal codes
Geographic Zone Maintenance
(SD.009.00)
Define work zones or regions
where services are performed
Associate postal codes to
each work zone or region
Branch Maintenance (SD.001.00)
Define divisions or locations
where services are performed
for dispatching and reporting

20 Service Dispatch
Description
Assigned
To
Date
Required
Date
Completed Comments
purposes
Associate geographic zones to
each branch
Call Type Maintenance (SD.003.00)
Define the types of services
performed for reporting
purposes
If profit and loss statements
are required for each division
or line of business, associate
a subaccount to each call
type
Pager Template (SD.031.00) (optional)
Define the data to be
extracted from a service call
and sent to technicians in the
field during the paging
process
Vehicle Maintenance (SD.020.00)
(optional)
Set up vehicles for tracking
manufacturer information and
odometer readings
If vehicle inventory tracking is
used, associate the
appropriate inventory site
location to each vehicle
Associate an employee to
each vehicle
Skills Maintenance (SD.017.00) (optional)
Define the skills or expertise
required by technicians to
complete the work of problem
codes
Tool Maintenance (SD.018.00) (optional)
Set up company-owned tools
and equipment technicians
use when performing services
Associate each tool with an
employee or inventory
location
Tool Usage Maintenance (SD.019.00)
(Optional)
Define how tools are used
Employee Class Maintenance (SD.006.00)
Define employee groups
Employee Maintenance (SD.007.00)
Set up employees, volunteers,
and subcontractors who
perform work on service calls.

Implementation Hints and Tips 21
Description
Assigned
To
Date
Required
Date
Completed Comments
When the Payroll module is
interfaced with Field Service
Management, a service
dispatch employee must be
associated with an employee
set up in Employee
Maintenance (02.250.00) in
the Payroll module. To
associate a service dispatch
employee to an employee in
the Payroll module, enter the
employee ID from the Payroll
module in Payroll ID. Click the
Copy Info button if you want
to copy the employee
information from the Payroll
module to Service Dispatch to
populate fields in this screen.
Associate an employee class
to each employee.
Enter the employee’s email
address if the Graphical
Dispatch Board is
implemented and email
messages are sent to
technicians (employees).
When paging, associate a
pager template and pager
number.
Select a default earnings
type.
Select a default work location.
Attach skills that apply to
each employee.
Attach licenses that apply to
each employee.
Attach tools that apply to
each employee.
Associate employees to
Geographic Zone(s) if the
Graphical Dispatch Board is
implemented.
Dispatch - View Maintenance (SD.004.00)
Set up call queues or views to
determine how service calls are displayed on dispatching boards
User Configuration (SD.000.01) (Optional)
Define a default call queue or
view for each dispatcher or
user
Problem Code Maintenance (SD.008.00)
Define the reason service

22 Service Dispatch
Description
Assigned
To
Date
Required
Date
Completed Comments
calls are generated
If Flat Rate Pricing module is
installed, associate Flat Rate
prices that apply to each
problem code
Associate all call types that
apply to each problem code
Associate tool usage that
apply to each problem code
Associate skills that apply to
each problem code
Associate licenses that apply
to each problem code
Cause Code Maintenance (SD.014.00)
(Optional)
Define why problem codes
occur or why a piece of
equipment is not working
Resolution Code Maintenance
(SD.015.00) (Optional)
Define how technicians solve
a problem or cause code
Media Group Maintenance (SD.013.00)
(Optional)
Define marketing resource
groups
Media Buy Maintenance (SD.012.00)
(Optional)
Set up each marketing or
advertising resource
Associate with a media group
Coop Advertising Information (SD.012.01)
(Optional)
Set up each cooperative
advertising partner and the
percentage share that each
partner contributes to
marketing resources
Product Class Maintenance (SD.016.00)
(Optional)
Define additional
informational to product
classes set up in the
Inventory module
Dwelling Maintenance (SD.005.00)
(Optional)
Define the different type of
building where services are
performed
Inventory Mark-Up Maintenance

Implementation Hints and Tips 23
Description
Assigned
To
Date
Required
Date
Completed Comments
(SD.026.00) (Optional)
If Flat Rate Pricing module is
installed, set up tables to
increase the price of inventory
items associated to flat rate
prices when the cost of the
inventory items increase
Site Maintenance (SD.025.00)
Set up all the locations of a
customer
If profit and loss statements
are required by division or
location, associated the
appropriate subaccount to
each site
Associate a media source to
each site
Associate a default
geographic zone for new
service calls created for the
customer site
Associate a branch for new
service calls created for the
customer site
Associate a tax or tax group to
each site
Attach a default call status for
new service calls created for
the customer site
Associate an employee that
primary performs the work for
the customer site
Associate a salesperson for
the customer site
Site - Special Pricing Maintenance
(SD.037.00) (Optional)
Create specific inventory item
special pricing for customer
sites
Create revisions for future
special prices
Notes Template (SD.410.00) (Optional)
Set up note templates that
can be attached to service
call invoices

24 Service Dispatch

Service Dispatch Concepts 25
Service Dispatch Concepts
Service Call Life Cycle Overview The Service Dispatch module is designed to track every detail of a service organization by providing
complete automation of service call processing, dispatching, and service call completion or invoicing.
When existing customers have issues and request services, customer service representatives can
enter a service call into Service Call Entry (SD.200.00). Problem codes or the reasons a customer is
requesting assistance can be attached to a service call. Users also have the option of setting up and
attaching cause and resolution codes to the service call. Cause codes define the source of problems
while resolution codes define what a technician did to resolve a problem.
Once the service call has been entered into the system, the service call can be viewed in the Dispatch
(SD.201.00) to assign the appropriate technicians to perform the work. Dispatch (SD.201.00) is used
to manage open and in-progress service calls by Service Call ID. Dispatch (SD.201.00) also allows
users to send alphanumeric pages to technicians in the field.
To assist the dispatching department in assigning proper technicians in an efficient manner,
geographic zones or work regions can be set up. These user-defined areas can be as broad or as
specific as needed because one or an unlimited number of zip codes can be associated with a
geographic zone. It is recommended that you define geographic zones because these work areas can
reduce the travel time of technicians and decrease the waiting time for service of customers.
After the service call has been dispatched and technicians have performed the necessary work, the
service call must be completed or invoiced. Invoice Entry (SD.202.00) allows users to enter billing
information while Invoice - T & M Details (SD.203.00) allows users to enter the material and labor
needed to complete the service call or job. The system provides two Service Type options when
invoicing: Time & Material and Flat Rate Pricing. If the invoice is billable to the customer, the service
call invoice process generates a batch of invoices in Invoice and Memo (08.010.00) in the Accounts
Receivable modules and a COGS batch in Issues (10.010.00) in the Inventory module.
Note: You can run a report to assist with service call audits. For more information, see “Service Call
Audit (SD.627.00)” on page 513.
Two other important processes in the Service Dispatch module are Generate Payroll Process
(SD.302.00) and Generate Inventory (SD.306.00). Generate Payroll Process (SD.302.00) allows the
hours worked by technicians on service calls to be integrated with Time and Dollar (02.020.00) of the
Payroll module. If progress billing is needed, Generate Inventory (SD.306.00) allows users to create
COGS batches for material and labor used to carry out a job in Issues (10.020.00) of the Inventory
module. Generate Inventory (SD.306.00) does not complete the service call, the procedure sets the
detail lines to processed and makes the line items inactive. Generate Inventory (SD.306.00) also gives
users the capability to create purchase orders and receipts in the Purchasing module without having
to complete service calls.
Dispatching After service calls are entered into the system, the service calls can be displayed in Dispatch
(SD.201.00) or Graphical Dispatch Board (SD.900.00). The dispatch board displays service calls
based on call view templates set up in Dispatch - View Maintenance (SD.004.00). Call view templates
can be created so that only service call records that meet specific criteria are included in a service call
queue.
Example: A view can be set up to display only open and in-progress service calls that have a premium
or high priority. Branch, Technician, Call Type, Call Status, and Geographic Zone are other criteria used
to create specialized service call views.

26 Service Dispatch
When multiple branches or locations exist in an organization, call view templates are typically set up
for each branch in the organization. The procedure of setting up a call view template for each branch
decreases the possibility of assigning technicians in one location to service clients in another location.
Example: A company with locations in Cleveland, Columbus, Cincinnati, and Detroit may want to set up
a call view queue for each location in order to eliminate the problem of sending Detroit service
technicians to Cincinnati to complete a service call. If the user or dispatcher in Detroit can only view
service calls for the Detroit location, the problem of assigning a technician for the Detroit location to a
Cincinnati service call is eliminated.
Using Dispatch (SD.201.00)
Dispatch (SD.201.00) is designed to give dispatching departments an efficient way to manage open
and in-progress service calls for a date range by Service Call ID.
Example: Entering 09/27/00 in To and 09/27/00 in From displays open and in-progress service calls
for September 27, 2000 by Service Call ID. While viewing the service calls in Dispatch (SD.201.00),
dispatchers can assign the appropriate technicians to perform the work or change the technician
already assigned to the service call.
Several predefined fields give dispatchers the ability to sort service call queues in ascending or
descending order. Some of these predefined fields include Branch ID, Call Status ID, Call Type ID,
Caller Name, Customer Name, Date Entered, Date Promised, Time Promised, Geographic Zone,
Priority, Service Call ID, and Service Technician. Multiple sort criteria can be used in a service call
queue.
Several other functions can be performed in Dispatch (SD.201.00), including:
Modifying the sort and select options for displaying service call records,
Accessing Service Call Entry (SD.200.00) to review the information of a selected service call.
Reviewing status changes during the life cycle of a service call.
Viewing, modifying, or entering problem codes for work to be performed on the service call.
Sending an alphanumeric page to a technician in the field.
Reviewing a list of the completed service calls associated with a selected customer.
Accessing Invoice Entry (SD.202.00) for invoicing the work performed on a service call.

Service Dispatch Concepts 27
Using Graphical Dispatch Board (SD.900.00)
Graphical Dispatch Board (SD.900.00) is designed to give dispatching departments an efficient way to
manage open and in-progress service calls by Technician or by Problem Code. Graphical Dispatch
Board (SD.900.00) provides visual feedback using a color-coded Gantt chart format in the schedule
pane. In addition, service call problem codes are organized by status using an easily-navigated tab
arrangement.
Figure 2: Graphical Dispatch Board (SD.900.00), Dispatch Board tab
The following features and functionality should be noted for Graphical Dispatch Board (SD.900.00):
Pager templates can be used to extract data from a service call to send to technicians in the field
from Graphical Dispatch Board (SD.900.00).
Dispatch call views created in Dispatch - View Maintenance (SD.004.00) are used to further filter
the service calls displayed on Graphical Dispatch Board (SD.900.00).
The following can be accessed directly from Graphical Dispatch Board (SD.900.00) by right-
clicking on a problem code task bar in the schedule pane and selecting the appropriate item:
– Service Call Entry (SD.200.00)
– Service Call Status Log (SD.027.00)
– Customer Site Location (SD.905.00)
– Invoice Entry (SD.202.00)
– Service Call History (SD.301.00)
– Service Contract Summary (SD.900.01)
– Service Call Search (SD.900.02)
– Service Call Workorder (SD.625.00)
– Technicians Page (SD.903.00)
– Microsoft® Office Outlook® to send an email message to a customer
28 Service Dispatch
– Outlook to send an email message to a technician
– Employee Maintenance (SD.007.00)
– Employee Schedule (SD.904.00)
Graphical Dispatch Board (SD.900.00) is problem code-oriented. Technicians are assigned to
problem codes. Work and travel times are specified on each problem code.
Users can drag and drop problem code task bars in Graphical Dispatch Board (SD.900.00). Start
and stop times and assigned technicians can be changed easily. Users may “Bring to Front” or
“Send to Back” stacked task bars.
Users also can customize the Graphical Dispatch Board (SD.900.00), Dispatch Board tab display
by dragging and dropping columns on the service call details pane to relocate them. The new
column positions are then saved on the user's workstation in the file ServCall.dte. If other changes
are needed later, the ServCall.dte file can be deleted and the columns repositioned.
Color-coded task bars quickly identify technicians not available for assignment on a given day.
Technicians Technicians are employees, volunteers, and subcontractors that complete the work on a service call.
Example: A heating and air conditioning company installing a central air system in a new house would
want to set up all employees assigned to the job in order to track the costs associated with the
installation. Employees, volunteers, and subcontractors are entered into the system in Employee
Maintenance (SD.007.00).
If the Payroll module is installed to process payroll for your employees, the employees also must be
set up in Employee Maintenance (02.250.00) of the Payroll module. Generate Payroll Process
(SD.302.00) creates a batch in Time & Dollar (02.020.00) of the Payroll module for all of the work
hours and hourly pay rates entered during Invoice Entry (SD.202.00) for technicians.
Employee ID in Employee Maintenance (SD.007.00) does not need to be the same as Employee ID in
Employee Maintenance (02.250.00) of the Payroll module. However, in order to have the Generate
Payroll Process work correctly, Payroll ID in the Employee Maintenance (SD.007.00) must be
populated with the Employee ID associated with the technician in the Employee Maintenance
(02.250.00) of the Payroll module.
Skills Skills are designed to track the expertise required by technicians to perform the work needed to
complete problem codes on a service call. Skills are entered into the system in Skills Maintenance
(SD.017.00) and attached to problem codes in Problem Code Maintenance (SD.008.00). Skills are
also attached to employees in Employee Maintenance (SD.007.00).
Using the Employee Skills feature enables warning messaging during service call entry when assigning
an employee who does not possess the necessary skills to perform the work on a service call.
Example: Assigning an electrician to a plumbing service call would display a warning message stating
that the technician does not have the required skills.
Licensing Licensing is designed to track business and employee licenses required by an organization to perform
the work needed to complete problem codes on a service call. Licenses are entered into the system in
License Maintenance (SD.010.00) and attached to problem codes in Problem Code Maintenance
(SD.008.00). Licenses are also attached to employees in Employee Maintenance (SD.007.00).
Using the Employee Licensing feature enables warning messaging during service call entry when
assigning an employee who does not possess the necessary license to perform the work on a service
call.

Service Dispatch Concepts 29
Example: Assigning an apprentice electrician to a job that requires a special license would display a
warning message stating that the technician does not have the required license to perform the work
on a service call.
Since a license may be specific to a zip code, License - Zip Code Maintenance (SD.011.00) allows
users to associate zip codes with licenses for informational purposes.
Tools Tool Maintenance (SD.018.00) is used to set up and maintain an inventory of company-owned tools
and equipment that technicians have on hand for completing work on a service call. Tools are
attached to technicians in Employee Tool (SD.007.05) of Employee Maintenance (SD.007.00). Setting
up tools also allows companies to track the availability of equipment and tools for each technician.
Equipment being installed or repaired for customers are not considered tools.
Note: Company- and customer-owned equipment for preventive maintenance is entered into the
system using Equipment Entry (SE.001.00), not Tool Maintenance (SD.018.00).
30 Service Dispatch
Service Dispatch Reference and ID Codes
Service Call ID
A service call is a document in the Service Dispatch module that is used to record information about
customers and services that customers are requesting from organizations.
Example: A customer having a problem with an air conditioner blowing hot air may call a heating and
air conditioning repair shop requesting an on-site visit from one of the service technicians. Service
calls are entered into the system through Service Call Entry (SD.200.00) and are associated with a
specific customer and site.
Once the customer and site have been selected, values attached to the customer site default to the
service call. Customer service representatives can override default values such as scheduling
information, call status, priority, start date, time promised, and primary technician. Several problem
codes or reasons for the service call, along with notes or source documents specific to the issues, can
be attached to the service call.
When all needed information is entered and the service call is saved, the system automatically
assigns a Service Call ID if Auto Number Service Call is enabled in Service Series Setup Maintenance
(SD.000.00). In addition, if Auto-Number Branch Prefix is selected in Service Series Setup
Maintenance (SD.000.00), the three-character Branch Abbreviation associated with the branch of the
customer is added to the beginning of the Service Call ID.
You can view open service calls on the Open Service Call List (SD.620.00) report. See “Open Service
Call List (SD.620.00)” on page 509 for more information.
Customer ID
To process transactions for consumers that purchase items or services from your organization,
information about each customer must be set up in Customer Maintenance (08.260.00) of the
Accounts Receivable module. Every customer has a unique ID that distinguishes that customer from
all other customers in the database. Setting up the customer in Customer Maintenance (08.260.00)
requires the Customer ID to be manually entered.
Possible customer ID formats include:
A series of letters in the customer name (SMITHBOB for Robert Smith)
Sequential numbers (234567, 234568, 234569, 234570, etc.)
A branch number-customer number combination (001234567 for branch 001 and customer
234567)
A branch number-customer name combination (001SMITH for branch 001 and SMITH for
customer name)
Note: The Flexkey feature gives users the ability to divide customer IDs into segments to allow the
production of more meaningful financial and management reports. The segments might represent a
variety of information.
Example: Segments may be established for the customer class, territory, and company. Segments are
defined in the Shared Information module using Flexkey Definition (21.320.00).
Service Dispatch gives users the ability to set up new customers in Service Call Entry (SD.200.00). By
clicking on the New Customer tab in Service Call Entry (SD.200.00) and typing in the necessary
information, new customers can be added to Accounts Receivable. When all of the needed information
is entered and Create is clicked, the system automatically assigns a Customer ID if Auto Number
Customer ID is enabled in Service Series Setup Maintenance (SD.000.00). In addition, if the Auto-
Number Branch Prefix is selected in Service Series Setup Maintenance (SD.000.00), the three-
character Branch Abbreviation associated with the branch of the customer is added to the beginning
of the Customer ID.

Service Dispatch Concepts 31
You can view customer IDs on the Accounts Receivable report Customers (08.650.00). For more
information, see the Accounts Receivable online help or user guide.
Customer Site ID
All customers can have an unlimited number of locations where items can be shipped or where
services can be performed. In the Service Dispatch module, these locations are considered sites.
Although customers may have one central address for billing, multiple locations may exist where work
is performed. There is a one-to-one relationship with a Customer ID and a billing address. There is a
one-to-many relationship with a Customer ID and customer sites. Sites for a customer are manually
entered in Site Maintenance (SD.025.00) and are an extension of shipping addresses in Accounts
Receivable.
Site ID is a 10-character user-defined unique identifier for each site of a customer, set up in Shipping
Addresses (08.262.00).
Customer Site Group ID
All customer sites can be linked in a customer site group ID so that you can process special pricing
revisions and updates by a Customer Site Group ID instead of one customer site ID at a time.
You may want to group customer sites by physical region, by industry, by company size, or by any other
descriptor. Each customer site can be in one or many customer site groups.
Customer Site Group ID is a 10-character user-defined unique identifier for each group of customer
sites.
Service Contract ID
A Service Contract is a document in the Service Contracts module that is used by organizations to
record information about customers, equipment, and types of service those organizations offer
customers to cover on-site and off-site service commitments.
Example: An organization that sells heating and air conditioning units may offer Full or Partial Service
Contracts to their customers to cover repairs or preventive maintenance on the pieces of equipment
over a specified length of time.
Service Contracts are entered into the system through Service Contract Entry (SN.001.00) and are
associated with a specific customer and site.
Once the customer and site have been selected, values attached to the customer site default to the
service contract. Customer service representatives can override default values such as contract
status, contract type, contract amount, contract start and expiration date, and renewal type.
Independent revenue and billing schedules can also be assigned to each service contract. Several
pieces of equipment can be associated with a service contract along with individual preventive
maintenance schedules for each piece of equipment.
When all the needed information is entered and the service contract is saved, the system
automatically assigns a Service Contract ID if Auto Number Contract ID is enabled in Service Series
Setup Maintenance (SD.000.00). In addition, if Auto-Number Branch Prefix is selected in Service
Series Setup Maintenance (SD.000.00), the three-character Branch Abbreviation associated with the
branch of the customer is added to the beginning of the Service Contract ID.
If Active Contract Notification in Service Series Setup Maintenance (SD.000.00) is activated, customer
service representatives are notified of any sites that have active service contracts at the time the
service call is entered into the system in Service Call Entry (SD.200.00). This feature allows
organizations to respond to customer issues in a proper time frame when problems occur for
customers covered by a service contract.
For a list of service contract IDs, use the Service Contract List (SN.601.00) report in the Service
Contracts module. For more information, see the Service Contracts online help or user guide.

32 Service Dispatch
Equipment ID
A piece of equipment has a record in the database used to track information about both company- and
customer-owned items.
Example: A heating and air conditioning organization may enter and associate heating and air
conditioning units as customer-owned equipment and enter the service trucks as company-owned
equipment. Equipment is entered into the system through Equipment Entry (SE.001.00).
Equipment Entry (SE.001.000) allows users to enter pertinent information about a piece of equipment
including the customer and site associated with the piece of equipment, the branch responsible for
servicing the piece of equipment, the type of equipment, the vendor ID, the purchase date, and the
purchase amount. Manufacturer information such as the manufacturer, model, serial number, and
other warranty information can also be entered for a piece of equipment.
Once equipment has been entered into the system, customer service representatives can attach the
equipment to a service call or service contract. Equipment ID in Service Call Entry (SD.200.00) allows
users to enter the equipment to be serviced on a service call.
For a list of equipment IDs, use the Equipment Information (SE.601.00) report in the Equipment
Maintenance module. For more information, see the Equipment Maintenance online help or user
guide.
Invoice Number
Service Dispatch gives users the ability to choose one of three options for creating an invoice number
in Invoice Entry (SD.202.00):
Invoice: The system automatically assigns the invoice number using Last Reference Number in AR
Setup (08.950.00) after the service call invoice is printed or sent electronically in Service Call
Invoice (SD.640.00) or Service Call Invoice (SSRS) (SD.643.00) and saved to the system in
Service Invoice Printing - Keep/Delete (SD.642.00).
Manual: Requires that a user-specified invoice number be typed into Invoice/Memo Nbr before
the invoice information can be saved to the system in Invoice Entry (SD.202.00).
Progress: Allows users to invoice customers for material and labor used to perform work without
closing the service call. Additional work and detail lines items can be added to the service call for
invoicing. Therefore, multiple invoices can be created for one service call. Progress disables
Invoice/Memo Nbr in Invoice Entry (SD.202.00) and assigns an invoice number to the printed
invoices when generated using Service Call Invoice (SD.640.00) or Service Call Invoice (SSRS)
(SD.643.00).
Note: After an Invoice or Manual service call invoice is printed or sent electronically in Service Call
Invoice (SD.640.00) or Service Call Invoice (SSRS) (SD.643.00) and saved to the system through
Service Invoice Printing - Keep/Delete (SD.642.00), the service call is considered completed. Once a
service call is completed, no further changes can be made to the service call.
Geographic Zone ID
Geographic zones are used to represent work zones or regions where a company performs jobs or
services. These user-defined areas are designed to help dispatching departments be efficient when
assigning service technicians to a service call. Since a geographic zone can consist of one or an
unlimited number of zip codes, geographic zones allow dispatchers to decrease the travel time of
service technicians and thus reduce the customer’s waiting period.
Geographic zone IDs are user-defined and can be any combination of numbers and letters up to 10
characters. Geographic zone IDs should be set up in a manner that is consistent and easy to identify.
Geographic zone IDs are set up in Geographic Zone Maintenance (SD.009.00).
Note: You can run a report that lists the geographic zones and their zip codes, and provides sales and
other information by region and branch. For more information, see “Geographic Zone List
(SD.606.00)” on page 506.

Service Dispatch Concepts 33
Branch ID
Branches are used to represent the different divisions or locations in an organization.
Example: An organization that has locations in Columbus, Cincinnati, and Cleveland may create a
branch for each city.
A company that has a heating and an air conditioning division may set up a separate branch for each
division. Organizations typically choose to separate locations or divisions by branch for reporting
purposes. Open Service Call List (SD.620.00) is used to print open service calls for each branch in an
organization.
Branch IDs are user-defined and can be any combination of numbers and letters up to 10 characters.
Branch IDs are set up in Branch Maintenance (SD.001.00). To view branch IDs, use the Branch List
(SD.600.00) report. See “Branch List (SD.600.00)” on page 501 for more information.
Zip Codes
Postal zip codes along with geographic zones are designed to help dispatching departments be
efficient when assigning service technicians to service calls. Although a geographic zone can consist of
an unlimited number of zip codes, zip codes cannot be associated with multiple geographic zones.
Associating zip codes to geographic zones allow dispatchers to decrease the travel time of service
technicians and thus reduce the customer’s waiting period.
Associating zip codes with geographic zones saves time and reduces data entry errors when creating
new customers in Service Call Entry (SD.200.00). When entering the zip code of the new customer,
the geographic zone ID is populated with the appropriate value. An unlimited number of zip codes can
be manually entered into Zip Code Maintenance (SD.021.00). Zip codes may also be downloaded
from the Internet and populated into the system using the Transaction Import (98.500.00) utility.
To view zip codes that have been set up for use in Service Dispatch, use the Zip Code List (SD.618.00)
report. See “Zip Code List (SD.618.00)” on page 538 for more information.
Call Type ID
Call Types are extremely important to the Service Dispatch system. Call types give organizations the
ability to separate service calls or jobs by different divisions or lines of business. If organizations want
to track the revenue and costs of each line of business in the company, subaccounts associated with
the lines of business can be attached to the call types for general ledger purposes.
Example: If Heating, Plumbing, Electrical and Air Conditioning profit and loss statements need to be
generated separately, developing a call type for each line of business and attaching the appropriate
subaccount is required.
Call type IDs are user-defined and can be any combination of numbers and letters up to 10
characters. Typically, call types are alphabetical for easy recognition during data entry and reporting.
Call type IDs are set up in Call Type Maintenance (SD.003.00) and can be viewed in the “Call Type List
(SD.602.00)” on page 502.
Call Status ID
Call statuses are used to define the life cycle of a service call. The call status provides dispatchers and
other users with information that tracks the progress of a service call. The system allows an unlimited
number of user-defined call statuses that can be any combination of numbers and letters up to 10
characters. However, call status IDs are typically alphabetical for easy recognition during data entry
and reporting.
Call statuses are set up in Call Status Maintenance (SD.002.00) and can be viewed in the “Call Status
List (SD.601.00)” on page 501.
34 Service Dispatch
Problem Code ID
Problem codes are used to define the reason why a service call is generated. Unlike call types that
have a one-to-one relationship with a line of business, multiple problem codes may exist for each call
type.
Problem code IDs are user-defined and can be any combination of numbers and letters up to 10
characters. Typically, problem codes are alphanumeric because multiple problem codes can exist for
one call type.
Example: A HEATING call type can have HEAT01-Emergency No Heat, HEAT02 –Change Air Filter, and
HEAT03 – Emergency Cool Air Blowing.
Problem code IDs are set up in Problem Code Maintenance (SD.008.00) and can be viewed in the
“Problem Code List (SD.634.00)” on page 509.
Cause Code ID
Cause codes are used to define why a Problem Code may occur or why a piece of equipment is not
working.
Example: The cause of an air conditioner blowing warm air may be a Thermostat Inoperative.
An unlimited number of cause codes can be set up in Cause Code Maintenance (SD.014.00). Cause
code IDs are user-defined and can be any combination of numbers and letters up to 10 characters.
Resolution Code ID
Resolution codes are used to define what a technician does to solve a problem or cause code.
Example: The resolution code for a Thermostat Inoperative cause code may be Replaced Thermostat.
An unlimited number of resolution codes can be set up in Resolution Code Maintenance (SD.015.00).
Resolution code IDs are user-defined and can be any combination of numbers and letters up to 10
characters.
Technicians
Technicians are employees, volunteers, and subcontractors that complete the work on a service call.
Example: A heating and air conditioning company installing a central air system in a new house would
want to set up all employees assigned to the job in order to track the costs associated with the
installation. Employees, volunteers, and subcontractors are entered into the system in Employee
Maintenance (SD.007.00).
Employee IDs are user-defined and can be any combination of numbers and letters up to 10
characters. It is recommended that you use the name of the employee as part of the Employee ID for
easy recognition during data entry and reporting.
To view technician information, use the Employee Information (SD.604.00) report. See “Employee
Information (SD.604.00)” on page 504 for more information.

Service Dispatch Concepts 35
Employee Class
Employee classes are typically designed to identify and group employees with similar characteristics
for reporting purposes.
Example: A heating, plumbing, electrical and air conditioning company may want to group all plumbers
into one class, electricians into another class, and heating and air specialists into another.
Employee classes are set up in Employee Class Maintenance (SD.006.00) and attached to employees
in Employee Maintenance (SD.007.00). They can be viewed in “Employee Class List (SD.605.00)” on
page 503. Employee class IDs are user-defined and can be any combination of numbers and letters
up to 10 characters.
Dispatch - Call View ID
Dispatch (SD.201.00) displays service calls based on call view templates set up in Dispatch - View
Maintenance (SD.004.00). Call view templates are created so that only service call records that meet
specific criteria are included in a service call queue.
Example: A view can be set up to display only open and in-progress service calls that have a premium
or high priority.
Call view IDs are user-defined and can be any combination of numbers and letters up to 10
characters. It is recommended that you create alpha character IDs that identify specialized service call
queues for easy recognition during dispatching.
Dwelling ID
Dwellings are used to represent the different type of buildings where organizations perform work.
Example: A heating and air conditioning company may want to track residential versus commercial
buildings for reporting purposes. Dwelling types may also be set up by size or square footage of the
building. For example, a company that sells swimming pools may want to mail a promotional brochure
to all single family homes and skip all multiple family houses.
Dwelling IDs are user-defined and can be any combination of numbers and letters up to 10 characters.
Dwelling IDs are set up in Dwelling Maintenance (SD.005.00).
Note: You can run a report of all dwelling types. For more information, see “Dwelling List (SD.603.00)”
on page 503.
Inventory Mark-Up ID
Inventory mark-up tables are used to increase the price of inventory items that are associated with a
flat rate price. When running Price Update Process (SP.203.00) in the Flat Rate Pricing module, the
system increases the price of individual inventory items associated with a flat rate by a cost multiplier
based on the cost of the item.
Inventory mark-up IDs are user-defined and can be any combination of numbers and letters up to 10
characters. Inventory mark-up IDs are set up in Inventory Mark-Up Maintenance (SD.026.00). You can
run a report of the existing mark-up IDs. For more information, see “Inventory Mark-Up (SD.619.00)”
on page 506.
License ID
Licensing is designed to track business and employee licenses required by an organization to perform
the work that is needed to complete problem codes on a service call. Licenses are entered into the
system in License Maintenance (SD.010.00) and attached to problem codes in Problem Code
Maintenance (SD.008.00). Licenses are also attached to employees in Employee Maintenance
(SD.007.00).

36 Service Dispatch
License IDs are user-defined and can be any combination of numbers and letters up to 10 characters.
Licenses are set up in License Maintenance (SD.010.00).
To view license ID information, use License List (SD.607.00) and License by Zip Code (SD.608.00).
See “License List (SD.607.00)” on page 507 and “Zip Code List (SD.618.00)” on page 538.
Media Buy ID
The media buy feature provides users with the ability to track information about the different
marketing programs that generate sales in an organization.
The Advertising Media Performance Report allows users to view the number of service calls and total
revenue associated with each media source. For more information, see “Advertising Media
Performance Report (SD.630.00)” on page 499. The different types of media are entered into the
system in Media Buy Maintenance (SD.012.00).
You can run a report that lists the media codes and their associated information. For more
information, see “Media Buy List (SD.610.00)” on page 508.
Media IDs are user-defined and can be any combination of numbers and letters up to 10 characters.
Although each customer is not really a media resource, setting up a media code for each referral is a
great way to track how a service call was received.
Media Groups
Media groups are typically used to identify or group media with similar characteristics. Placing media
resources into categories or groups can be beneficial to management because reports can be printed
to show the most effective means of advertising. The different types of media groups are entered into
the system in Media Group Maintenance (SD.013.00) and attached to media resources in Media Buy
Maintenance (SD.012.00). For a list of media groups, see “Media Group List (SD.609.00)” on page
508.
Media group IDs are user-defined and can be any combination of numbers and letters up to 10
characters.
Skill ID
Skills are designed to track the expertise required by technicians to perform the work needed to
complete problem codes for a service call. Skills are entered into the system in Skills Maintenance
(SD.017.00) and attached to problem codes in Problem Code Maintenance (SD.008.00). Skills are
also attached to employees in Employee Maintenance (SD.007.00).
The employee skills feature enables warning messaging in Service Call Entry (SD.200.00) when
assigning an employee that does not possess the necessary skills to perform the work on a service
call.
Skill IDs are user-defined and can be any combination of numbers and letters up to 10 characters.
You can run a report that lists all skill IDs. For more information, see “Skills List (SD.613.00)” on page
531.
Tools
Tool Maintenance (SD.018.00) is used to set up and maintain an inventory of company-owned tools
and equipment that technicians have on hand for completing service calls. Tools are assigned to
technicians in Employee Tool (SD.007.05) of Employee Maintenance (SD.007.00). Setting up tools
also allows companies to track the availability of equipment and tools for each technician. For a list of
tools, see “Tool List (SD.614.00)” on page 536.
Tool IDs are user-defined and can be any combination of numbers and letters up to 10 characters.

Service Dispatch Concepts 37
Tools Usage
Tool usage is designed to give dispatching departments the ability to confirm that technicians have the
appropriate tools to perform the work of problem codes during Service Call Entry (SD.200.00). Usage
codes are set up in Tool Usage Maintenance (SD.019.00) and attached to problem codes in Problem
Code Maintenance (SD.008.00). For a list of tool usage codes, see “Tool Usage List (SD.615.00)” on
page 536.
Tool usage IDs are user-defined and can be any combination of numbers and letters up to 10
characters.
Note: Tool usage is for informational purposes only.
Vehicle ID
Vehicle records are set up in the system to track valuable information such as make, model, year, date
purchased, and odometer readings of all vehicles used to provide service to customers.
Vehicle IDs are user-defined and can be any combination of numbers and letters up to 10 characters.
Vehicle IDs are set up in Vehicle Maintenance (SD.020.00).
Note: You can run a report that lists vehicle IDs and their associated information. For more
information, see “Vehicle List (SD.617.00)” on page 538.
Pager Template ID
Pager templates are used to extract data from a service call to send to technicians in the field from
Dispatch (SD.201.00).
Pager template IDs are user-defined and can be any combination of numbers and letters up to 10
characters. Pager templates are set up in Pager Template (SD.031.00). Open Pager Template
(SD.031.00) by clicking Pager Configuration in Service Series Setup Maintenance (SD.000.00).
Note Template ID
Note templates are user-defined text that can be attached to an invoice in Invoice Entry (SD.202.00).
Information in the note template appears on the bottom of a service call invoice. Note templates can
also be attached to pieces of equipment in the Service Contract module.
Note template IDs are user-defined and can be any combination of numbers and letters up to 10
characters.
Earnings Type ID
Earnings Type ID, defined in Earnings Type Maintenance (SD.022.00), is important because it is
associated with an earnings multiplier. Labor cost on a service call is computed using the following
formula:
Work Hours * Pay Rate * Earnings Multiplier = Labor Cost
By setting up different earnings types with different earnings multipliers, you can control the labor cost
calculation.
Work Location ID
Work Location ID is a unique alphanumeric code that identifies a service technician’s default job site
(for example, a city abbreviation or warehouse name). You define work location IDs in Work Location
Maintenance (SD.023.00). This screen is not available if the Payroll module is installed.

38 Service Dispatch

Task Guidelines 39
Task Guidelines
Quick Reference Task List This list contains tasks that are commonly performed with the Service Dispatch module. Each task is
cross-referenced to a specific page in the user guide.
How Do I...?
Set up the Service Dispatch module? See “Setting up Service Dispatch” on page 46.
Enter a service call? See “Entering a Service Call” on page 117.
Process an invoice? See “Invoicing” on page 217.
Send or resend an invoice electronically? See “Sending Invoices Electronically” on page 279.
Create a new customer? See “Entering a New Customer during Service Call Entry” on page 129.
Create a new customer site? See “Define New Customer Sites (SD.025.00)” on page 102.
Cancel a service call? See “Canceling a Service Call” on page 137.
Complete a service call? See “Printing a Service Invoice” on page 289.
Charge a service call to a service contract? See “Entering Service Contract Material Inventory Line
Items” on page 257 and “Entering Service Contract Labor Inventory Line Items” on page 261.
Charge a service call to a project? See “Entering Project Material Inventory Line Items” on page
251 and “Entering Project Labor Inventory Line Items” on page 255.
Record non-billable time and materials on a service call? See “Entering Non-Billable Labor
Inventory Line Items” on page 249 and “Entering Non-Billable Material Inventory Line Items” on
page 245.
Record billable time and materials on a service call? See “Entering Billable Labor Inventory Line
Items” on page 230.
Track warranty repairs on a service call? See “Entering Manufacturer Warranty Material Inventory
Line Items” on page 240 and “Entering Manufacturer Warranty Labor Inventory Line Items” on
page 243.
Create a new dispatch view? See “Define Dispatch View Templates (SD.004.00)” on page 81.
View completed calls? See “Viewing Completed Service Calls” on page 149.
Assign one or more technicians to a service call? See “Entering Technician Information on an
Invoice” on page 277.
View the history of status changes to a service call? See “Service Call Status Log (SD.027.00)” on
page 357.
View history for a site’s completed service calls? See “Service Call History (SD.301.00)” on page
365.
View details of the Quick Send request created when an invoice is sent electronically? See
“Viewing Details for Invoices Sent Electronically” on page 284.
View open calls for this customer site? See “Viewing All Open Service Calls for a Specific Priority”
on page 155.
Search problem codes of open service calls? See “Search Problem Codes of Open Service Calls in
Graphical Dispatch Board (SD.900.00)” on page 176.
Page a technician? See “Paging with Graphical Dispatch Board (SD.900.00)” on page 193.
Send email messages to customers? See “Sending Email Messages to Customers” on page 195.

40 Service Dispatch
Send email messages to technicians? See “Sending Email Messages to Technicians” on page
198.
Create an invoice for a service call without closing the call? See “Processing Independent of Call
Completion” on page 211.
Enter a time and materials invoice for a service call? See “Entering Time and Material Details” on
page 225.
Enter or modify a flat rate pricing invoice for a service call? See “Flat Rate Price Invoicing” on page
264.
Assign a vehicle to a technician? See “Define Employees (SD.007.00)” on page 73.
Associate an inventory site to a vehicle? See “Define Vehicles (SD.020.00) (Optional)” on page 66.
Select service calls to be invoiced? See “Selecting Service Calls to be Invoiced” on page 285.
Send or Resend Invoices Electronically. See “Sending Invoices Electronically” on page 279.
Create item-specific special prices by customer site. See “Define Special Pricing (SD.037.00)
(Optional)” on page 111.
Why...?
Are problem codes not included in the possible values list on the service call entry screen? See
“Problem Code Maintenance (SD.008.00)” on page 397.
Is my service call not appearing on the Service Call Entry screen? See “Viewing Completed Service
Calls” on page 149.
Is a service call not appearing in the Dispatch Board screen? See “Dispatching” on page 25.
How Do I Define...?
A branch? See “Set up Branches (SD.001.00)” on page 62.
A geographic zone? See “Set up Geographic Zones (SD.009.00)” on page 60.
A technician? See “Define Employees (SD.007.00)” on page 73.
A call status? See “Define Call Statuses (SD.002.00)” on page 49.
A problem code? “Define Problem Codes (SD.008.00)” on page 87.
A call type? See “Define Call Types (SD.003.00)” on page 64.
A special price? See “Define Special Pricing (SD.037.00) (Optional)” on page 111.
What...?
Does the Handling field on Service Call Entry do? See “Handling” on page 296.
Does the Handling field on Invoice Entry do? See “Handling” on page 316.
What Is the Difference Between...?
A customer and a customer site? See “Differences Between Customers and Customer Sites” on
page 9.
A site subaccount and a call type subaccount? See “Site Subaccount versus Call Type
Subaccount” on page 11.
Time and Materials and Flat Rate invoices? See “Time & Material versus Flat Rate Pricing” on
page 15.
Manual, Invoice, and Progress invoicing selections? See “Entering Invoice Information” on page
219.

Setup and Maintenance 41
Setup and Maintenance
Introduction to Setup and Maintenance Setting up Service Dispatch involves two areas of module setup.
Setting up the modules that integrate with Service Dispatch
Setting up Service Dispatch – Overview
Setting up Other Microsoft Dynamics SL Modules The first steps in setting up the Service Dispatch module are to perform the setup tasks for the other
modules that interface with Service Dispatch.
Shared Information
General Ledger
System Manager
Accounts Receivable
Inventory
Purchasing
Accounts Payable
Payroll
Project Controller
Customization Manager
Crystal Reports
Application Server
Shared Information Module
The following screens must be completed before the Field Service Management modules can be
set up.
1. Tax Maintenance (21.280.00) (Required)
Any Tax IDs used in Invoice Entry (SD.202.00) must have a Calculation Type of Document.
Note: Sales tax is critical for Invoice Entry (SD.202.00) and is required when creating a new site
for customers in Site Maintenance (SD.025.00). You can run a report that shows the taxable
service calls for each tax ID. For more information, see “Use Taxes List (SD.628.00)” on page 537.
2. Tax Group Maintenance (21.340.00) (Optional)
3. Terms Maintenance (21.270.00) (Required)
4. Quick Send Setup (21.951.00) (Optional)
General Ledger Module
1. Chart of Accounts Maintenance (01.260.00) (Required)
2. General Ledger Setup (01.950.00) (Required)
3. Subaccounts Maintenance (01.270.00) (Required)

42 Service Dispatch
System Manager Module
1. Users (95.260.00) and Groups (95.280.00) (Optional)
Define all users in Users (95.260.00) and groups in Groups (95.280.00) along with
passwords for all users.
2. Access Rights (95.270.00) (Optional)
Set the appropriate access rights for all Service Dispatch users and groups in Access Rights
(95.270.00) for the Service Dispatch module.
Click Preload to open Preload Screens (95.270.01) and select Service Dispatch from the list
to view the screens for the Service Dispatch module.
Specify the appropriate level of rights for each screen for each Service Dispatch user or
group.
Accounts Receivable Module
1. Statement Cycle (08.280.00) (Required)
2. Customer Class (08.290.00) (Required)
3. AR Setup (08.950.00) (Required)
Select Auto Reference Numbering to have the system generate sequential invoice numbers
during Invoice Entry (SD.202.00).
Set Credit Checking Type to Warning Only.
4. Customer Maintenance (08.260.00) (Required)
When converting customers from a legacy system, if the legacy system did not have a one-to-
many relationship between customers and sites, the data may require modification before the
conversion process. (Required)
Define customer Quick Send preferences, including designating additional contacts who will
receive documents (Optional).
5. Salesperson Maintenance (08.310.00) (Required)
Define at least one salesperson such as “House.”
Inventory Module
1. IN Setup (10.950.00) (Required)
The COGS Subaccount Source drop-down list must be set to the Sales Transaction
Subaccount option.
The AR Clearing Subaccount on the Miscellaneous Accounts tab is used by Service Dispatch
when creating the customer accounts receivable side of a credit entry.
2. Product Classes (10.280.00) (Required)
If the Flat Rate Pricing module is installed, defining the product class IDs in a way that
corresponds easily with the flat rate pricing scheme is suggested.
3. Warehouse Bin Locations (10.340.00) (Required)
4. Unit Conversions (10.650.00) (Required)
5. Sites (10.310.00) (Required)
If you want to track the inventory on service vehicles, set up an inventory site for each service
vehicle.
The accounts defined on the IN Accounts tab are used by Service Dispatch.
The subaccounts defined on the IN Accounts tab are not used by Service Dispatch.

Setup and Maintenance 43
6. Inventory Items (10.250.00) (Required)
Type all labor hourly rates as non-stock inventory items. For any item entered as labor, the
inventory account is actually an accrued wages payable account.
Stock Base Price defaults the unit price during flat rate entry and during invoicing.
Create one miscellaneous inventory item as taxable, such as Miscellaneous Materials -
Taxable. This item is non-stock with a valuation method of user-specified.
Create one miscellaneous inventory item as non-taxable, such as Miscellaneous Materials -
Non-taxable. This item is non-stock with a valuation method of user-specified. For example,
when invoicing for equipment rented, you probably will not pay sales tax.
Note: For all labor inventory items, the labels for the fields Inventory Account and Sub should be
modified to Invt/Wages Acct and Sub using Customization Manager, as labor items are charged to
the Accrued Wages Payable account.
Note: Costing for labor items is determined as follows:
Inventory ID valuation method is Standard Cost: Labor will be costed at the standard cost.
Inventory ID valuation method is User-Specified, and Payroll Interface setting in Service Series
Setup Maintenance (SD.000.00) is set to either Payroll or Advanced Payroll, and labor record
was entered directly into Invoice - T&M Details (SD.203.00): Labor will be costed based on the
Pay Rate value on the Employee Personal Information (SD.007.01) subscreen of Employee
Maintenance (SD.007.00).
Inventory ID valuation method is User-Specified, and Payroll Interface setting in Service Series
Setup Maintenance (SD.000.00) is set to either Payroll or Advanced Payroll, and labor record
was originally entered in one of the Payroll time entry screens: Labor will be costed based on
the payroll rate in the appropriate payroll module.
Inventory ID valuation method is User-Specified, and Payroll Interface setting in Service Series
Setup Maintenance (SD.000.00) is set to either None or Other: Labor will be costed based on
the Pay Rate value on the Employee Personal Information (SD.007.01) subscreen of
Employee Maintenance (SD.007.00).
Purchasing Module (Optional)
1. Purchase Order Setup (04.950.00)
The following Purchasing screens integrate with Field Service Management modules.
Receipt/Invoice Entry (04.010.00)
— The Create Voucher for Receipt check box is associated with Service Series Setup
Maintenance (SD.000.00), Voucher Receipts Option.
Purchase Orders (04.250.00)
Accounts Payable Module (Optional)
1. Accounts Payable Setup (03.950.00)
Vouchers depend on the setup option in Service Dispatch.
2. Vendor Maintenance (03.270.00)
Associate with detail line items to create purchase orders, receipts, and vouchers.

44 Service Dispatch
Payroll Module (Optional)
1. Payroll Setup (02.950.00)
2. Employee Maintenance (02.250.00).
Work Location on the Defaults tab.
Earnings Type on the Defaults tab.
Pay Type on the Pay Info tab must be set to Hourly.
Std Unit Rate on the Pay Info tab is used for the default hourly pay rate. During Invoice Entry
(SD.202.00), the hourly pay rate defaults from Employee Maintenance (SD.007.00).
3. Earnings Type Maintenance (02.270.00)
Pay Rate Multiplier should be associated with the employee’s normal and overtime work
hours.
Advanced Payroll Module (Optional)
1. Advanced Payroll Setup (58.950.00)
2. Union Rate Maintenance (58.270.00)
3. Shift Maintenance (58.260.00)
4. Labor Class Maintenance (58.250.00)
5. Prevailing Wage Rate Maintenance (58.280.00)
6. Employee Position/Rate Maintenance (58.290.00)
Project Controller (Optional)
Project Controller integration begins with the association of a service call with a project ID. When the
service call is completed or being invoiced, a task ID must be associated with each line item that has a
Line Type of Project. When labor and materials detail records are entered into Invoice Entry
(SD.202.00), the values entered in Work Hours for labor records are pushed into Payroll Time and
Dollar Entry (02.020.00) using Generate Payroll Process (SD.302.00). Material records are pushed
into Issues (10.020.00) in Inventory. All records pushed from the detail screens of Invoice Entry
(SD.202.00) that are associated with a project include the project and task IDs. In order to set up
Project Controller, first set up revenue recognition, tasks, budgets, and integration with other modules.
The Project Controller screen, Flexible Key Maintenance (PA.FKM.00) integrates with the Field Service
Management modules.
1. Project Setup
Set up revenue recognition
Set up tasks
Set up budgets
Set up integration with other modules
2. Employee Maintenance (02.250.00), Project Controller
3. Code File Maintenance
4. Flexible Key Maintenance (PA.FKM.00)

Setup and Maintenance 45
Customization Manager
Customization Manager gives users the ability to modify Service Dispatch screens to meet the
accounting requirements of an organization. For example, new fields and controls can be added, data
fields and objects can be hidden, and defaults values for data fields can be set. To make data entry
more efficient, objects can be moved to other positions on a screen and the tab order of data fields
can be modified.
Although there are no setup procedures required for the customization manager, the module must be
purchased and installed separately in order to make modifications to Service Dispatch screens.
Crystal Reports
Crystal Reports gives users the ability to modify Service Dispatch reports to meet the accounting
requirements of an organization. For example, new labels and fields can be added while data fields
and objects can be removed.
Although there are no setup procedures required for Crystal Reports, the module must be installed in
order to make modifications to Service Dispatch reports.
Application Server
Application Server gives users the ability to send Service Dispatch invoices to customers and
additional receivers electronically via email or fax. Default Quick Send preferences for purchase orders
and invoices created in Accounts Receivable, Order Management, Flexible Billings, Service Dispatch,
and Service Contracts are defined on Quick Send Setup (21.951.00). Customer Quick Send
preferences for each document type are defined on the Customer Maintenance (08.260.00), Quick
Send tab. When invoices are printed on Service Call Invoice (SD.640.00) or Service Call Invoice (SSRS)
(SD.643.00), or reprinted on Reprint Service Call Invoice (SD.650.00), the customer’s and additional
receivers’ Quick Send preferences for the Service Dispatch Invoice are reviewed to determine whether
the invoice is to be printed or sent electronically via Application Server. For more information about
setting up Quick Send, see “Setting up Quick Send” in the Shared Information online help or user
guide.

46 Service Dispatch
Setting up Service Dispatch
Overview
The “Setting Up Service Dispatch” section provides an overview and detailed procedures explaining
how to adapt the Service Dispatch module to your business needs and practices. Use the following
general procedures to set up the Service Dispatch module. More detailed directions are provided for
the following steps.
1. Define call statuses using Call Status Maintenance (SD.002.00)
Call Status Maintenance (SD.002.00) is used to enter an unlimited number of call statuses and
descriptions that define the life cycle of a service call.
2. Set up general service information using Service Series Setup Maintenance (SD.000.00)
Service Series Setup Maintenance (SD.000.00) is used to set up regular business hours as well
as determine the sequencing of key identifier codes, such as Customer ID, Service Call ID, Service
Contract ID, and Equipment ID.
3. Set up licenses using License Maintenance (SD.010.00) (Optional)
License Maintenance (SD.010.00) allows users to set up an unlimited number of licenses in the
system that can be linked to technicians, problem codes, and zip codes.
4. Set up postal codes using Zip Code Maintenance (SD.021.00) (Optional)
Zip Code Maintenance (SD.021.00) is used to set up an unlimited number of Postal Zip Codes to
help dispatching departments be efficient when assigning service technicians to a service call in
the dispatching screens.
5. Attach licenses to zip codes using License - ZIP Code Maintenance (SD.011.00) (Optional)
License - ZIP Code Maintenance (SD.011.00) is used to associate licenses to zip codes in order to
have the system display warning messages when a company no longer has a valid or active
license to perform work in the zip code.
6. Set up geographic zones using Geographic Zone Maintenance (SD.009.00)
Geographic Zone Maintenance (SD.009.00) is used to create an unlimited number of work zones
or regions where a company performs jobs or services. These predetermined areas are designed
to help dispatching departments be more efficient when assigning service technicians to a service
call.
7. Set up branches using Branch Maintenance (SD.001.00)
Branch Maintenance (SD.001.00) is used to set up an unlimited number of branches in the
system. Branches are used to represent the different divisions or locations in an organization. For
example, an organization that has locations in Columbus, Cincinnati, and Cleveland may create a
branch for each city.
8. Define call types using Call Type Maintenance (SD.003.00)
Call Type Maintenance (SD.003.00) is used to set up an unlimited number of call types that give
users the ability to separate service calls or jobs for each division or line of business in an
organization.
9. Create pager templates using Pager Template (SD.031.00) (Optional)
Pager Template (SD.031.00) is used to define an unlimited number of paging templates used to
extract data from a service call to send to technicians in the field from Dispatch (SD.201.00).
10. Define vehicles using Vehicle Maintenance (SD.020.00) (Optional)
Vehicle Maintenance (SD.020.00) is used to create an unlimited number of vehicles in the system
for tracking valuable information such as make, model, year, date purchased, and odometer
readings.

Setup and Maintenance 47
11. Define skills using Skills Maintenance (SD.017.00) (Optional)
Skills Maintenance (SD.017.00) is used to create an unlimited number of skills that are designed
to track the expertise required by technicians to perform the work needed to complete a service
call.
12. Define tools using Tool Maintenance (SD.018.00) (Optional)
Tool Maintenance (SD.018.00) is used to set up and maintain an inventory of company-owned
tools and equipment that technicians have on hand for completing service calls.
13. Define tool usage using Tool Usage Maintenance (SD.019.00)
Tool Usage Maintenance (SD.019.00) is used to set up an unlimited number of tools usage to give
dispatching departments the ability to confirm that technicians have the appropriate tools to
perform the work of problem codes during Service Call Entry (SD.200.00).
14. Define employee classes using Employee Class Maintenance (SD.006.00)
Employee Class Maintenance (SD.006.00) is designed to identify and set up groups of employees
with similar characteristics for reporting purposes.
15. Define employees using Employee Maintenance (SD.007.00)
Employee Maintenance (SD.007.00) is used to set up and maintain all employees, volunteers,
and subcontractors who perform work on service calls.
16. Define dispatch view templates using Dispatch - View Maintenance (SD.004.00)
Dispatch - View Maintenance (SD.004.00) is used to set up an unlimited number of call view
templates in order to display service calls in Dispatch - View Maintenance (SD.004.00).
17. Set up templates and queues for users with User Configuration (SD.000.01) (Optional)
User Configuration (SD.000.01) is used to define default dispatching view templates or service
call queues for each user.
18. Define problem codes using Problem Code Maintenance (SD.008.00) (Optional)
Problem Code Maintenance (SD.008.00) is used to set up an unlimited number of problem codes
that define the reasons service calls are generated.
19. Define cause codes using Cause Code Maintenance (SD.014.00) (Optional)
Cause Code Maintenance (SD.014.00) is used to set up an unlimited number of cause codes that
define why a problem code may occur or why a piece of equipment is not working.
20. Define resolution codes using Resolution Code Maintenance (SD.015.00) (Optional)
Resolution Code Maintenance (SD.015.00) is used to create an unlimited number of resolution
codes that define what a technician does to solve a problem or cause code.
21. Define media groups using Media Group Maintenance (SD.013.00) (Optional)
Media Group Maintenance (SD.013.00) is used to group similar marketing resources for reporting
purposes to track the most effective means of advertising.
22. Define media sources using Media Buy Maintenance (SD.012.00) (Optional)
Media Buy Maintenance (SD.012.00) is used to set up an unlimited number of marketing sources
in order to track the most effective source of advertising.
23. Define advertising partners using Coop Advertising Information (SD.012.01)
Coop Advertising Information (SD.012.01) is used to set up cooperative advertising partners and
the percentage share amounts that the cooperative partners contribute to the marketing
resources.
24. Define product classes using Product Class Maintenance (SD.016.00)
Product Class Maintenance (SD.016.00) allows users to add Field Service Management-related
information to the product classes created in the Inventory module.

48 Service Dispatch
25. Define dwellings using Dwelling Maintenance (SD.005.00) (Optional)
Dwelling Maintenance (SD.005.00) is used to create an unlimited number of dwelling types or
building characteristics types in the system for reporting purposes. Dwellings are used to
represent the different type of buildings where organizations perform work.
26. Define mark-up tables using Inventory Mark-Up Maintenance (SD.026.00) (Optional)
Inventory Mark-Up Maintenance (SD.026.00) is used to set up an unlimited number of inventory
mark-up tables that increase the price of inventory items associated with a flat rate price. When
running Price Update Process (SP.203.00) in the Flat Rate Pricing module, the system increases
the price of individual inventory items of a flat rate price by a cost multiplier based on the cost of
the item.
27. Define customer sites using Site Maintenance (SD.025.00)
Site Maintenance (SD.025.00) is used to set up an unlimited number of locations for customers.
Service call defaults are entered into this screen so that customer service representatives can
quickly enter a service call once a customer and site are selected.
28. Define special pricing parameters using Site - Special Pricing Maintenance (SD.037.00) (Optional)
Site - Special Pricing Maintenance (SD.037.00) allows users to create special pricing for specific
inventory items for customer sites, including the ability to create revisions for future special prices.
29. Create note templates using Notes Template (SD.410.00) (Optional)
Notes Template (SD.410.00) allows users to set up an unlimited number of note templates to be
attached to a service call for invoicing. These templates can also be attached to equipment in the
Service Contracts module.

Setup and Maintenance 49
Define Call Statuses (SD.002.00)
Call Status Maintenance (SD.002.00) is used to define IDs and descriptions that specify the life cycle
of a service call. Call statuses provide dispatchers and other users with a monitoring system that
tracks the progress of a service call. For example, OPEN, ASSIGNED, and COMPLETED are three
common call statuses.
The following data is required for all call statuses:
Call Status ID (Step 2)
Description (Step 3: recommended)
Use the following procedure to define call statuses:
1. Choose Module | Service Dispatch | Call Status Maintenance from the menu. Call Status
Maintenance (SD.002.00) displays.
Figure 3: Call Status Maintenance (SD.002.00)
2. Type the unique 10-character identifier for the call status in Call Status ID.
3. Type a 30-character explanation of the call status in Description.
4. If technicians are currently working on a service call for a call status, select the Work in Progress
check box. Work in Progress is for reporting purposes only.
5. Click Save on the toolbar.
6. Click Close on the toolbar.
Note: To view a list of call statuses, use “Call Status List (SD.601.00)” on page 501.

50 Service Dispatch
Set up General Information Using Service Series Setup Maintenance
(SD.000.00)
Service Series Setup Maintenance (SD.000.00) is used to define general information and set default
values used during data entry and invoicing. The information entered on this screen is designed to
make data entry more efficient by reducing the amount of time needed to create transactions and
reduce the number of data entry errors. This screen must be completed before Service Dispatch is
used to enter a service call and print an invoice.
The following frames are required to complete Service Series Setup Maintenance (SD.000.00):
Business Hours (Step 2)
General (Steps 3 – 8)
Paging Service Information (Step 9; Steps 10 – 11 if Step 9 is set to Wireless Office)
Service Call (Steps 12 – 22)
Service Contract (Steps 23 – 25)
Use the following procedure to set up general service series information:
1. Choose Module | Service Dispatch | Service Series Setup Maintenance from the menu. Service
Series Setup Maintenance (SD.000.00) displays.
Figure 4: Service Series Setup Maintenance (SD.000.00)
The Business Hours frame is used to define the range of hours an organization provides service to
customers. These business hours are used in Service Call Entry (SD.200.00) in conjunction with
the Service Call Lead Time and Service Call Range Time to calculate the Promised Date, the
Promised Time From and the Promised Time To of a service call.
Setup and Maintenance 51
2. Type the Hours of Operation From, Hours of Operation To, Service Call Lead Time, and Service Call
Range Time.
The Promised Date of a service call is set to the date of the system when entered into Service
Call Entry (SD.200.00).
The Promised Time From of a service call is calculated by adding the Service Call Lead Time
to the time of the system.
The Promised Time To of a service call is calculated by adding the Promised Time From of a
service call to the Service Call Range Time.
If a service call is entered after the indicated business hours, the Promised Date defaults to
the next business day and the Promised Time defaults to the beginning of the next business
day.
If a service call is entered before the indicated closing time, and the specified lead time
creates a Promised Time after business hours, the system sets the Promised Date of the
service call to the next business day and the Promised Time to the beginning of the next
business day.
The General frame is used to define miscellaneous default information such as an option to
add the branch abbreviations to the first three characters of reference codes used throughout
the system. Other fields in this portion of the screen are used to determine interface options
to Purchasing, Accounts Payable and Payroll.
Example:
How purchase order numbers are assigned.
If purchasing receipts are created when purchase orders are entered and released in Invoice
Entry (SD.202.00).
If accounts payable vouchers are created when purchase orders are created in Invoice Entry
(SD.202.00).
If the Payroll module is installed.
3. If your organization wants to add a corresponding branch abbreviation to the first three characters
of the ID of new customers, service calls, equipment and service contracts, select Auto-Number
Branch Prefix.
4. Establish how purchase order numbers are assigned when completing a service call in PO Number
Option.
Automatic
Manual
5. Establish if a purchase order receipt will be created when a purchase order receipt from Invoice
Entry (SD.202.00) is created in Create Receipts on Purchase Orders.
Yes
No
6. If your organization wants non-billable labor items and non-billable material line items to be
calculated in the profitability and gross margin of service calls, select Include Non-Billable Labor in
Costs and Include Non-Billable T&M in Costs.
7. Establish if an accounts payable voucher is created when a purchase order receipt from Invoice
Entry (SD.202.00) is created in Voucher Receipts Option.
Always Voucher
Never Voucher

52 Service Dispatch
8. If Field Service Management is interfaced to Payroll, determine the type of payroll system in
Payroll Interface.
None
Payroll
Advanced Payroll
Other
The Paging Service Information frame specifies the type of paging software and subscriber
information used if the company is sending alphanumeric pages from the dispatching screens.
9. If your organization intends to page technicians in the field, select the type of paging software that
sends the alphanumeric pages in Service Type.
Wireless Office
None
10. If your organization intends to page technicians, select the type of subscriber information used by
the paging software in Pager ID Info.
Employee ID
Pager PIN#
11. If your organization intends to page technicians, specify the path or directory that stores alpha
numeric pages when creating text fields in Path.
The Service Call frame defines default information for reference numbering schemes used
throughout the system, such as how the IDs of customers and service calls are assigned and
maintained.
Other fields in this section indicate whether the alert system is activated during Service Call Entry
(SD.200.00). If it is, customer service representatives are notified of any sites that have service
contracts and any open service calls at the time a new service call is entered into the system.
12. If your company wants to use the same service call ID numbering sequence as the legacy system,
type the last service call ID used in Last Service Call ID.
13. If your company wants to use the same customer ID numbering sequence as the legacy system,
type the last customer ID used in Last Customer ID.
14. If your organization wants the system to automatically assign a customer ID once the Create
button is clicked from the New Customer tab in Service Call Entry (SD.200.00), select Auto
Number Customer ID.
15. Establish whether commissions must equal 100% of the Total Invoice amount when commissions
are split over two or more technicians during Invoice Entry (SD.202.00) in if Split Commission
Equal 100% is selected.
Split Commission Equal 100% is for reporting purposes only.
16. If your organization wants the system to notify customer service representatives of any customer
sites that have active service contracts when entering a service call in Service Call Entry
(SD.200.00), select Active Contract Notification.
17. If your organization wants the system to display all open service calls for a customer site when
entering service calls in Service Call Entry (SD.200.00), select Enable Open Calls Alert.
18. Select Check Technician's Skills and Licenses to be alerted if a technician who is listed in the
detail area of Service Call Entry (SD.200.00) does not have the skills or licenses needed for the
call.

Setup and Maintenance 53
19. Type the call status assigned to the completed service call in Call Status on Completion.
If the call status ID is unknown, press F3 or double-click the right mouse button. A list of all
call statuses set up in Call Status Maintenance (SD.002.00) displays.
— To select a call status, highlight the ID and click OK, or double-click the ID.
— Clicking Edit on the Call Status Maintenance PV List accesses Call Status Maintenance
(SD.002.00), enabling you to modify information for an existing call status.
— Clicking Insert on the Call Status Maintenance PV List accesses Call Status Maintenance
(SD.002.00), enabling you to add new call statuses to the system.
20. Define the primary use of Service Dispatch in Primary Use Option.
Service Calls: this is the standard setting.
Work Orders: this setting will modify the behavior of the system when service calls are
generated from a PM schedule.
21. Determine how the unit price is calculated for material in Material Markup Price On.
All Cost Types
Standard Cost Only
LIFO Cost Only
FIFO Cost Only
User Specified
Average
22. Determine how the unit price is calculated for labor in Labor Markup Price On.
All Cost Types
Standard Cost Only
LIFO Cost Only
FIFO Cost Only
User Specified
Average
The Service Contract frame is used to define how the IDs of service contracts are assigned and
maintained.
23. If your company wants to use the same service contract ID numbering sequence as the legacy
system, type the last service contract ID used in Last Contract ID.
24. If your organization wants the system to automatically assign a service contract ID once a service
contract is saved in Service Contract Entry (SN.001.00), select Auto Number Contract ID.
25. If your organization wants the price of new service contracts to be automatically calculated by the
system, select Auto Contract Price Calculation.
26. Click User Configuration. User Configuration (SD.000.01) displays.
User Configuration (SD.000.01) is used to define default dispatching view templates or service
call queues for each user. For example, if an organization has locations in Cleveland, Akron, and
Columbus, a dispatching template can be set up to only show open service calls for each city or
dispatcher for that city. Therefore, a dispatcher in Cleveland cannot view open service calls for
Columbus and accidentally assign a technician located in Cleveland to complete the work for a
customer in Columbus.
Note: Completing User Configuration (SD.000.01) is an optional function in Service Dispatch. User
Configuration (SD.000.01) cannot be set up until call view templates have been created in
Dispatch - View Maintenance (SD.004.00).
27. Click OK.

54 Service Dispatch
28. Click Pager Configuration. Pager Template (SD.031.00) displays.
Note: Completing Pager Configuration (SD.031.00) is an optional function in Service Dispatch.
Pager Template (SD.031.00) is used to define the data that is extracted from the service call and
sent to technicians in the field from Dispatch (SD.201.00) when the paging process is executed.
29. Click OK to close Pager Template (SD.031.00).
30. Click Save on the toolbar.
31. Click Close on the toolbar to close Service Series Setup Maintenance (SD.000.00).
Set up Licenses (SD.010.00) (Optional)
License Maintenance (SD.010.00) allows users to set up an unlimited number of licenses required to
complete a service call. Licenses can be linked to technicians, problem codes, and zip codes. When a
license is attached to a problem, and the assigned technician does not have the license needed to
complete the work, the system warns dispatchers during Service Call Entry (SD.200.00) and Dispatch
(SD.201.00).
The following fields are required to complete License Maintenance (SD.010.00):
License ID (Step 2)
Description (Step 3: recommended)
License Type (Step 4)
Use the following procedure to set up licenses:
1. Choose Module | Service Dispatch | License Maintenance from the menu.
License Maintenance (SD.010.00) displays.
Figure 5: License Maintenance (SD.010.00)
2. Type a unique 10-character ID for the license in License ID.
3. Type a 30-character explanation of the license in Description.
4. Establish the type of license in License Type.
Business
Employee
5. If the license type is business, type the date the license becomes valid in Effective Date.

Setup and Maintenance 55
6. If the license type is business, type the date the license expires or becomes invalid in Expiration
Date.
7. Type the vendor number of the bureau that issues the license in Issuing Agency.
If the vendor number is unknown, press F3 or double-click the right mouse button. A list of all
vendors set up in Vendor Maintenance (03.270.00) displays.
— To select a vendor, highlight the ID and click OK, or double-click the ID.
— Clicking Edit on the Vendor List accesses Vendor Maintenance (03.270.00), enabling you
to modify information for an existing vendor.
— Clicking Insert on the Vendor List accesses Vendor Maintenance (03.270.00), enabling
you to add new vendors to the system.
After a valid vendor from accounts payable is entered, the name of the vendor displays in
Name.
8. Type the name of the bureau that issues the license in Agency Description.
9. Specify if a certificate is required for the license in Certificate Required.
Yes
No
10. Type the initial cost of the license in Initial Amount.
11. Type the numeric length of time the license is valid in Initial Term.
12. Establish the length of time the license is valid in the field to the right of Initial Term.
Days
Months
Years
13. Type the cost for renewing the license in Renewal Amount.
14. Type the numeric length of time for renewal of a license in Renewal Term.
15. Establish the length of time type in the field to the right of Renewal Term.
Days
Months
Years
16. Click Save on the toolbar.
17. Click Close on the toolbar.
Note: To view a list of license IDs, use “License List (SD.607.00)” on page 507.

56 Service Dispatch
Set up Postal Codes (SD.021.00) (Optional)
Zip Code Maintenance (SD.021.00) is used to enter postal zip codes. Postal zip codes along with
geographic zones are designed to help dispatching departments be more efficient when assigning
service technicians to a service call.
The following fields are required to complete Zip Code Maintenance (SD.021.00):
Zip Code (Step 2)
Description (Step 3: recommended)
Use the following procedure to set up postal codes:
1. Choose Module | Service Dispatch | Zip Code Maintenance from the menu. The Information tab
of Zip Code Maintenance (SD.021.00) displays.
Figure 6: Zip Code Maintenance (SD.021.00), Information tab
2. Type the zip code in Zip Code.
3. Type a 30-character explanation of the zip code in Description.
4. Type the city of the zip code in City.
5. Type the county associated with the zip code in County.
6. Type the state associated with the zip code in State.
If the state is unknown, press F3 or double-click the right mouse button. A list of all states set
up in State/Province Maintenance (21.290.00) displays.
— To select a state or province, highlight the ID and click OK, or double-click the ID.
— Clicking Edit on the State List accesses State/Province Maintenance (21.290.00),
enabling you to modify information for an existing state or province.
— Clicking Insert on the State List accesses State/Province Maintenance (21.290.00),
enabling you to add new states/provinces to the system.
7. Type the map page associated with the zip code in Map.
8. Type the map page coordinates associated with the zip code in Coordinates.

Setup and Maintenance 57
9. Click the Phones tab. The Phones tab of Zip Code Maintenance (SD.021.00) displays.
Figure 7: Zip Code Maintenance (SD.021.00), Phones tab
10. Type the contact type for the phone number in Type.
11. Type the name of the contact associated with the phone number in Contact.
12. Type the phone number associated with the contact in Phone Number.
13. Click the Business tab. The Business tab of Zip Code Maintenance (SD.021.00) displays.
Figure 8: Zip Code Maintenance (SD.021.00), Business tab
14. If a business license is required for the zip code, type the license ID in License ID.
Active defaults to Enabled when selecting a license ID.

58 Service Dispatch
15. Click the Employee tab. The Employee tab of Zip Code Maintenance (SD.021.00) displays.
Figure 9: Zip Code Maintenance (SD.021.00), Employee tab
16. If technicians that perform work in the zip code require a license, type the license ID in License ID.
17. Click Save on the toolbar.
18. Click Close on the toolbar.
Note: To view a list of postal zip codes, see “Zip Code List (SD.618.00)” on page 538.

Setup and Maintenance 59
Attach Licenses to Zip Codes (SD.011.00) (Optional)
License - Zip Code Maintenance (SD.011.00) is used to associate licenses to zip codes in order to
have the system display warning messages when a company no longer has a valid or active license to
perform work in the zip code.
If licenses are attached to zip codes, you can run a report that shows licenses, by zip code. For more
information, see “License - Zip Code List (SD.608.00)” on page 507 and “Zip Code List (SD.618.00)”
on page 538.
The following fields are required to complete License - Zip Code Maintenance (SD.011.00):
License ID (Step 2)
Zip Codes (Step 6)
Use the following procedure to attach licenses to zip codes:
1. Choose Module | Service Dispatch | License - Zip Code Maintenance from the menu.
License - ZIP Code Maintenance (SD.011.00) displays.
Figure 10: License - ZIP Code Maintenance (SD.011.00)
2. Type the license ID that zip codes are associated with in License ID.
A list of available zip codes displays in Zip Code Available.
3. To restrict the available list of zip codes to a city, type a city name in City.
4. To restrict the available list of zip codes to a county, type a county name in County.
5. To restrict the available list of zip codes to a state/province, type a state or province in State.
If the state is unknown, press F3 or double-click the right mouse button. A list of all
states/provinces set up in State/Province Maintenance (21.290.00) displays.
— To select a state or province, highlight the ID and click OK, or double-click the ID.
— Clicking Edit on the State List accesses State/Province Maintenance (21.290.00),
enabling you to modify information for an existing state or province.
— Clicking Insert on the State List accesses State/Province Maintenance (21.290.00),
enabling you to add new states/provinces to the system.
6. Select all the zip codes associated with this license and click Add.
7. Click Save on the toolbar.
8. Click Close on the toolbar.

60 Service Dispatch
Set up Geographic Zones (SD.009.00)
Geographic Zone Maintenance (SD.009.00) is used to create an unlimited number of geographic
zones that is used to represent work zones or regions where a company performs jobs or services.
These user-defined areas are designed to help dispatching departments be more efficient when
assigning service technicians to a service call.
The following fields are required to complete Geographic Zone Maintenance (SD.009.00):
Geographic Zone ID (Step 2)
Description (Step 3: recommended)
Branch ID (Step 6: recommended)
Use the following procedure to set up geographic zones:
1. Choose Module | Service Dispatch | Geographic Zone Maintenance from the menu.
Geographic Zone Maintenance (SD.009.00) displays.
Figure 11: Geographic Zone Maintenance (SD.009.00)
2. Type a unique 10-character ID for the geographic zone in Geographic Zone ID.
3. Type a 30-character name of the geographic zone in Description.
4. If a geographic zone has a technician that is primarily responsible for completing the work on a
service call, then type a technician ID in Technician Assigned.
If the technician ID is unknown, press F3 or double-click the right mouse button. A list of all
technicians set up in Employee Maintenance (SD.007.00) displays.
— To select a technician, highlight the ID and click OK, or double-click the ID.
— Clicking Edit on the Employee PV Maintenance List accesses Employee Maintenance
(SD.007.00), enabling you to modify information for an existing technician.
— Clicking Insert on the Employee PV Maintenance List accesses Employee Maintenance
(SD.007.00), enabling you to add new technicians to the system.
Note: Number of Calls, Total Revenue, and Avg. Revenue/Call are optional; they are for
informational purposes only.

Setup and Maintenance 61
5. Type the Branch ID to create a one- to-one relationship between a geographic zone and branch.
If the branch ID is unknown, press F3 or double-click the right mouse button. A list of all
branches set up in Branch Maintenance (SD.001.00) displays.
— To select a branch, highlight the ID and click OK, or double-click the ID.
— Clicking Edit on the Branch Maintenance PV List accesses Branch Maintenance
(SD.001.00), enabling you to modify information for an existing branch.
— Clicking Insert on the Branch Maintenance PV List accesses Branch Maintenance
(SD.001.00), enabling you to add new branches to the system.
6. Select all the zip codes that exist in the geographic zone in Zip Code.
If the zip code is unknown, press F3 or double-click the right mouse button. A list of all zip
codes set up in Zip Code Maintenance (SD.021.00) displays.
— To select a zip code, highlight the ID and click OK, or double-click the ID.
— Clicking Edit on the Possible Zip Code Assign to Zone PV List accesses Zip Code
Maintenance (SD.021.00), enabling you to modify information for an existing zip
code.
— Clicking Insert on the Possible Zip Code Assign to Zone PV List accesses Zip Code
Maintenance (SD.021.00), enabling you to add new zip codes to the system.
7. Click Save on the toolbar.
8. Click Close on the toolbar.
Note: To view a list of geographic zone IDs, use “Geographic Zone List (SD.606.00)” on page 506.

62 Service Dispatch
Set up Branches (SD.001.00)
Branch Maintenance (SD.001.00) is used to set up an unlimited number of branches in the system.
Branches are used to represent the different divisions or locations in an organization. At least one
branch must be set up; it is recommended that you use branches for dispatching and reporting
purposes.
The following fields are required to complete Branch Maintenance (SD.002.00):
Branch ID (Step 2)
Branch Abbreviation (Step 3)
Branch Name (Step 4)
Company ID (Step 5)
Use the following procedure to set up branches:
1. Choose Module | Service Dispatch | Branch Maintenance from the menu.
Branch Maintenance (SD.001.00) displays.
Figure 12: Branch Maintenance (SD.001.00)
2. Type a unique 10-character ID for the location or division in Branch ID.
3. Type a three-character abbreviation for the branch in Branch Abbreviation.
If Auto-Number Branch Prefix is selected in Service Series Setup Maintenance (SD.000.00),
the branch abbreviation is added to the beginning of the ID for service calls, service contracts,
and new customers.
4. Type the name of the location or division in Branch Name.
5. Type a company identifier to associate with the branch in Company ID.
If the company ID is unknown, press F3 or double-click the right mouse button. A list of all
companies set up in Company List displays.
— To select a company, highlight the ID and click OK, or double-click the ID.
6. Type the name of the branch manager or contact person for the branch in Attention.

Setup and Maintenance 63
7. Type the address for the branch in Address.
8. Type the city where the branch is located in City.
9. Type a two-character state abbreviation where the branch is located in State.
If the state is unknown, press F3 or double-click the right mouse button. A list of all states set
up in State/Province Maintenance (21.290.00) displays.
— To select a state or province, highlight the ID and click OK, or double-click the ID.
— Clicking Edit on the State List accesses State/Province Maintenance (21.290.00),
enabling you to modify information for an existing state or province.
— Clicking Insert on the State List accesses State/Province Maintenance (21.290.00),
enabling you to add new states/provinces to the system.
10. Type the zip code where the branch is located in Zip.
11. Type the country or region where the branch is located in Country/Region.
If the country or region is unknown, press F3 or double-click the right mouse button. A list of
all countries or regions set up in Country/Region Maintenance (21.300.00) displays.
— To select a country or region, highlight the ID and click OK, or double-click the ID.
— Clicking Edit on the Country/Region List accesses Country/Region Maintenance
(21.300.00), enabling you to modify information for an existing country or region.
— Clicking Insert on the Country/Region List accesses Country/Region Maintenance
(21.300.00), enabling you to add new countries or regions to the system.
12. Type the phone number for the branch in Phone.
13. Type the fax number for the branch in Fax Number.
14. Select all the geographic zones associated with the branch in Geographic Zone ID.
Geographic zones can only be associated with one branch.
If the geographic zone is unknown, press F3 or double-click the right mouse button. A list of
all geographic zones set up in Branch/Zone Maintenance PV List displays.
— To select a geographic zone, highlight the ID and click OK, or double-click the ID.
Note: Once you associate a geographic zone to a branch, the geographic zone no longer appears
in the Branch/Zone Maintenance PV List.
15. Click Save on the toolbar.
16. Click Close on the toolbar.
Note: You can report on the branches you have defined. For more information, see “Branch List
(SD.600.00)” on page 501.

64 Service Dispatch
Define Call Types (SD.003.00)
Call Type Maintenance (SD.003.00) is used to set up an unlimited number of call types that give users
the ability to separate service calls or jobs for each division or line of business in an organization. For
example, a heating and air conditioning company can set up a different call type for the heating and
air conditioning divisions.
The following fields are required to complete Call Type Maintenance (SD.003.00):
Call Type ID (Step 2)
Description (Step 3)
Subaccount (Step 5)
Use the following procedure to define call types:
1. Choose Module | Service Dispatch | Call Type Maintenance from the menu.
Call Type Maintenance (SD.003.00) displays.
Figure 13: Call Type Maintenance (SD.003.00)
2. Type a unique 10-character ID for the call type in Call Type ID.
3. Type a 30-character explanation of the call type in Description.
4. If the subaccount associated with the customer site is to be used for the sales and costs of
service calls, select Use Sub from Site.
5. If profit and loss statements are needed for each division or line of business, type a Subaccount
for the sales and costs of a service call.
If the subaccount number is unknown, press F3 or double-click the right mouse button. A list
of all subaccounts set up in Subaccount Maintenance (01.270.00) displays.
— To select a subaccount, highlight the ID and click OK, or double-click the ID.
— Clicking Edit on the Active Subaccount List accesses Subaccount Maintenance
(01.270.00), enabling you to modify information for an existing subaccount.
— Clicking Insert on the Active Subaccount List accesses Subaccount Maintenance
(01.270.00), enabling you to add new subaccounts to the system.
6. Click Save on the toolbar.
7. Click Close on the toolbar.
Note: To view a list of call type IDs, use “Call Type List (SD.602.00)” on page 502.

Setup and Maintenance 65
Create Pager Templates (SD.031.00) (Optional)
Pager Configuration (SD.031.00) is used to define the data extracted from a service call and sent to
technicians in the field from Dispatch (SD.201.00) when the paging process is executed.
The following fields are required to complete Pager Templates (SD.031.00):
Template ID (Step 3)
Description (Step 4: recommended)
Use the following procedure to create pager templates:
1. Choose Module | Service Dispatch | Service Series Setup Maintenance from the menu. Service
Series Setup Maintenance (SD.000.00) displays.
2. Click Pager Configuration. Pager Template (SD.031.00) displays.
Figure 14: Pager Template (SD.031.00)
3. Type a unique 10-character code that is referenced when sending an alphanumeric page to a
technician in Template ID.
4. Type a 30-character explanation of the template ID in Description.
5. Select all the fields from Available Fields that are transmitted to technicians for the template ID
and click Add.
Once fields are selected, clicking Add moves the fields to the Selected Fields column.
6. Click Save on the toolbar.
7. Click OK to close Pager Template (SD.031.00).
8. Click Save on the toolbar.
9. Click Close on the toolbar to close Service Series Setup Maintenance (SD.000.00).

66 Service Dispatch
Define Vehicles (SD.020.00) (Optional)
Vehicle Maintenance (SD.020.00) is used to create an unlimited number of vehicles in the system for
tracking valuable information such as make, model, year, date purchased, and odometer readings.
The following fields are required to complete Vehicle Maintenance (SD.020.00):
Vehicle ID (Step 2)
Description (Step 3: recommended)
Year (Step 7)
Use the following procedure to define vehicles:
1. Choose Module | Service Dispatch | Vehicle Maintenance from the menu.
Vehicle Maintenance (SD.020.00) displays.
Figure 15: Vehicle Maintenance (SD.020.00)
1. Type a unique 10-character ID for the vehicle in Vehicle ID.
2. Type a 30-character explanation of the vehicle in Description.
3. Type the manufacturer’s identification number of the vehicle in Manufacturer’s VIN.
4. Type the make of the manufacturer of the vehicle in Make.
5. Type the model of the manufacturer of the vehicle in Model.
6. Type the year the vehicle was manufactured in Year.
7. Type the date the vehicle was purchased in Date Purchased.
8. Type an inventory location to associate with the vehicle in Vehicle Inventory Location. If the
location is unknown, press F3 or double-click the right mouse button. A list of all vehicle inventory
locations set up in Sites (10.310.00) displays.
To select a vehicle inventory location, highlight the ID and click OK, or double-click the ID.
Clicking Edit on the Inventory Location List accesses Sites (10.310.00), enabling you to
modify information for an existing location.
Clicking Insert on the Inventory Location List accesses Sites (10.310.00), enabling you to add
new vehicle inventory locations to the system.
9. Type the date when the odometer reading or mileage of the vehicle was recorded in Date of
Reading.

Setup and Maintenance 67
10. Type the mileage of the vehicle to ensure proper maintenance of the vehicle in Vehicle Odometer.
11. Type the driver assigned to the vehicle at the time the mileage was recorded in Employee ID. If the
employee ID is unknown, press F3 or double-click the right mouse button. A list of all employee
IDs set up in Employee Maintenance (SD.007.00) displays.
To select a vehicle inventory location, highlight the ID and click OK, or double-click the ID.
Clicking Edit on the Employee PV Maintenance List accesses Employee Maintenance
(SD.007.00), enabling you to modify information for an existing employee ID.
Clicking Insert on the Employee PV Maintenance List accesses Employee Maintenance
(SD.007.00), enabling you to add new employee IDs to the system.
12. Click Save on the toolbar.
13. Click Close on the toolbar.
Note: To view a list of vehicle IDs, use “Vehicle List (SD.617.00)” on page 538.

68 Service Dispatch
Define Skills (SD.017.00) (Optional)
Skills Maintenance (SD.017.00) is used to create an unlimited number of skills that track
the expertise required by technicians to perform the work needed to complete problem
codes on a service call. Skills are associated with problem codes in Problem Code
Maintenance (SD.008.00) and technicians in Employee Maintenance (SD.007.00). If a
technician is assigned to complete the work of a problem code in Service Call Entry
(SD.200.00) and Dispatch (SD.201.00) and the technician does not have the appropriate
skills, a warning message appears.
The following fields are required to complete Skills Maintenance (SD.017.00):
Skill ID (Step 2)
Description (Step 3: recommended)
Use the following procedure to define skills:
1. Choose Module | Service Dispatch | Skills Maintenance from the menu.
Skills Maintenance (SD.017.00) displays.
Figure 16: Skills Maintenance (SD.017.00)
2. Type a unique 10-character ID for the skill in Skill ID.
3. Type a 30-character explanation of the skill in Description.
4. Type the cost amount for labor associated with the skill in Labor Cost.
Labor Cost is for informational purposes only.
5. Click Save on the toolbar.
6. Click Close on the toolbar.
Note: To view a list of skill IDs, use “Skills List (SD.613.00)” on page 531.

Setup and Maintenance 69
Define Tools (SD.018.00) (Optional)
Tool Maintenance (SD.018.00) is used to set up and maintain an inventory of company-owned tools
and equipment that technicians have on hand for completing work on service calls.
Note: You can print a listing of tools and the information associated with them. For more information,
see “Tool List (SD.614.00)” on page 536.
The following fields are required to complete Tool Maintenance (SD.018.00):
Tool ID (Step 2)
Description (Step 3: recommended)
Usage ID (Step 14)
Use the following procedure to define tools:
1. Choose Module | Service Dispatch | Tool Maintenance from the menu.
Tool Maintenance (SD.018.00) displays.
Figure 17: Tool Maintenance (SD.018.00)
2. Type a unique 10-character ID for the tool in Tool ID.
3. Type a 30-character explanation of the tool in Description.
4. Type the vendor’s identification number or serial number associated with the tool in VIN/Serial
Number.
5. Type the manufacturer associated with the tool in Make.
6. Type the model associated with the tool in Model.
7. Type the year the tool was manufactured in Year.
8. Type the date the tool was purchased in Date Purchased.
9. Select the condition of the tool in Condition.
Good
Fair
Poor
10. Type the date the tool was inspected in Condition Date.

70 Service Dispatch
11. Select the type of location for where the tool is located in Location Type.
Employee
Warehouse
12. If the Location Type of the tool is Warehouse, type the inventory site location of the tool in
Location.
If the inventory location must be changed or the ID is unknown, press F3 or double-click the
right mouse button. A list of all inventory locations set up in Sites (10.310.00) displays.
— To select an inventory location ID, highlight the ID and click OK, or double-click the ID.
— Clicking Edit on the Inventory Location List accesses Sites (10.310.00), enabling you to
modify information for an existing inventory location.
— Clicking Insert on the Inventory Location List accesses Sites (10.310.00), enabling you to
add new inventory location to the system.
13. If the Location Type of the tool is Employee, type the ID of the technician that has possession of
the tool in Employee ID.
If the employee ID is unknown, press F3 or double-click the right mouse button. A list of all
employee IDs set up in Employee Maintenance (SD.007.00) displays.
— To select a vehicle inventory location, highlight the ID and click OK, or double-click the ID.
— Clicking Edit on the Employee PV Maintenance List accesses Employee Maintenance
(SD.007.00), enabling you to modify information for an existing employee ID.
— Clicking Insert on the Employee PV Maintenance List accesses Employee Maintenance
(SD.007.00), enabling you to add new employee IDs to the system.
14. Associate a tool usage for the tool in Usage ID.
If the usage ID is unknown, press F3 or double-click the right mouse button. A list of all tool
usage IDs set up in Tool Usage Maintenance (SD.019.00) displays.
— To select a tool usage ID, highlight the ID and click OK, or double-click the ID.
— Clicking Edit on the Tool Usage Maintenance PV List accesses Tool Usage Maintenance
(SD.019.00), enabling you to modify information for an existing tool usage.
— Clicking Insert on the Tool Usage Maintenance PV List accesses Tool Usage Maintenance
(SD.019.00), enabling you to add new tool usages to the system.
15. Click Save then Close on the toolbar.
Note: To view a list of tool IDs, use “Tool List (SD.614.00)” on page 536.

Setup and Maintenance 71
Define Tool Usage Maintenance (SD.019.00) (Optional)
Tool Usage Maintenance (SD.019.00) is used to set up an unlimited number of usages of tools to give
dispatching departments the ability to confirm that technicians have the appropriate tools to perform
the work of problem codes during Service Call Entry (SD.200.00).
The following fields are required to complete Tool Usage Maintenance (SD.019.00):
Usage ID (Step 2)
Description (Step 3: recommended)
Use the following procedure to define tool usage:
1. Choose Module | Service Dispatch | Tool Usage Maintenance from the menu.
Tool Usage Maintenance (SD.019.00) displays.
Figure 18: Tool Usage Maintenance (SD.019.00)
2. Type a unique 10-character ID for the tool usage in Usage ID.
3. Type a 30-character explanation of the tool usage in Description.
4. Click Save on the toolbar.
5. Click Close on the toolbar.
Note: To view a list of tool usage IDs, use “Tool Usage List (SD.615.00)” on page 536.

72 Service Dispatch
Define Employee Classes (SD.006.00)
Employee Class Maintenance (SD.006.00) is designed to identify and set up groups of employees with
similar characteristics for reporting purposes. Each employee entered into Employee Maintenance
(SD.007.00) is assigned to one employee class.
The following fields are required in Employee Class Maintenance (SD.006.00):
Employee Class ID (Step 2)
Description (Step 3: recommended)
Use the following procedure to define employee classes:
1. Choose Module | Service Dispatch | Employee Class Maintenance from the menu.
Employee Class Maintenance (SD.006.00) displays.
Figure 19: Employee Class Maintenance (SD.006.00)
2. Type a unique 10-character ID for the employee class in Employee Class ID.
3. Type a 30-character explanation of the employee class in Description.
4. Type Yes if the employee class is eligible to be paid commission in Commission Paid.
Commission Paid is optional and is for informational purposes only.
5. Click Save on the toolbar.
6. Click Close on the toolbar.
Note: You can run a report that shows all employee classes with their descriptions and commissions
paid indicator. For more information, see “Employee Class List (SD.605.00)” on page 503.

Setup and Maintenance 73
Define Employees (SD.007.00)
Employee Maintenance (SD.007.00) is used to set up and maintain information about employees,
volunteers, and subcontractors that will perform work on service calls.
You must complete the following required fields:
Employee ID (Step 2)
Payroll ID (Step 3)
First Name (Step 4)
Last Name (Step 6)
Employee Class (Step 14)
To define employees:
1. Choose Module | Service Dispatch | Employee Maintenance from the menu.
Employee Maintenance (SD.007.00) appears.
Figure 20: Employee Maintenance (SD.007.00) -- Service Dispatch is not integrated with the Payroll module

74 Service Dispatch
Note: Payroll ID and the Copy Info button appear only if Service Dispatch is integrated with the
Payroll module.
Figure 21: Employee Maintenance (SD.007.00) -- Service Dispatch is integrated with the Payroll module
2. Type a unique 10-character ID for the employee in Employee ID.
3. If Payroll ID and the Copy Info button appear, perform the following steps, and then go to Step 14
to continue this procedure. Otherwise, proceed to Step 4 below.
a) In Payroll ID, type the employee ID found in Payroll Employee Maintenance (02.250.00).
b) (Optional) Click Copy Info. The employee's information from the Payroll module appears in
Employee Maintenance (SD.007.00).
Note: The payroll ID appears in Employee Personal Information (SD.007.01), which you can access by
clicking Personal Info in Employee Maintenance (SD.007.00).
4. Type the first name of the employee in First Name.
5. Type the middle initial of the employee in M.I.
6. Type the last name of the employee in Last Name.
7. Select the status for the new employee from Status list.
Inactive
Active
Vacation
Sick
Personal
8. Type the home address of the employee in Address Line 1.
Use the second line of Address if necessary; for example, add apartment number, post office
box information, etc.
9. Type the city for the home address of the employee in City.

Setup and Maintenance 75
10. Type the 2-character state code for the home address of the employee in State.
If the state is unknown, press F3 or double-click the right mouse button. A list of all states set
up in State/Province Maintenance (21.290.00) displays.
— To select a state or province, highlight the ID and click OK, or double-click the ID.
— Clicking Edit on the State List accesses State/Province Maintenance (21.290.00),
enabling you to modify information for an existing state or province.
— Clicking Insert on the State List accesses Zip Code Maintenance (SD.021.00), enabling
you to add new states/provinces to the system.
11. Type the zip code for the home address of the employee in Zip Code.
If the zip code is unknown, press F3 or double-click the right mouse button. A list of all zip
codes set up in Zip Code Maintenance (SD.021.00) displays.
— To select a zip code, highlight the ID and click OK, or double-click the ID.
— Clicking Edit on the Zip Code Maintenance PV List accesses Zip Code Maintenance
(SD.021.00), enabling you to modify information for an existing zip code.
— Clicking Insert on the Zip Code Maintenance PV List accesses Zip Code Maintenance
(SD.021.00), enabling you to add new zip codes to the system.
12. Type the social security number of the employee in Social Security No.
13. Type the birth date of the employee in Date of Birth.
14. Establish the default employee class for the employee in Employee Class.
If the employee class is unknown, press F3 or double-click the right mouse button. A list of all
employee classes set up in Employee Class Maintenance (SD.006.00) displays.
— To select an employee class, highlight the ID and click OK, or double-click the ID.
— Clicking Edit on the Employee Class Maintenance PV List accesses Employee Class
Maintenance (SD.006.00), enabling you to modify information for an existing
employee class.
— Clicking Insert on the Employee Class Maintenance PV List accesses Employee Class
Maintenance (SD.006.00), enabling you to add new employee classes to the
system.
15. Associate a default branch for the employee in Branch ID.
If the branch ID is unknown, press F3 or double-click the right mouse button. A list of all
branch IDs set up in Branch Maintenance (SD.001.00) displays.
— To select a branch ID, highlight the ID and click OK, or double-click the ID.
— Clicking Edit on the Branch Maintenance PV List accesses Branch Maintenance
(SD.001.00), enabling you to modify information for an existing branch ID.
— Clicking Insert on the Branch Maintenance PV List accesses Branch Maintenance
(SD.001.00), enabling you to add new Branch IDs to the system.
16. Type the home phone number of the employee in Home Phone No.
17. Type the pager number or PIN number of the employee in Pager No./PIN.
Pager No./PIN defaults when you page a technician.
18. Type the email address of the employee in E-mail Address if Service Dispatch is not integrated
with the Payroll module or the modules are integrated but the employee information was not
copied using the Copy Info button. Otherwise, the information found in Email Address on the
Payroll Employee Maintenance (02.250.00) screen appears
When you send an email message to a technician, the information in E-mail Address appears
on the message To line.

76 Service Dispatch
19. Associate a valid inventory site for the employee in Default Inventory Site.
If the inventory site is unknown, press F3 or double-click the right mouse button. A list of all
inventory sites set up in Site Maintenance (10.310.00) displays.
— To select an inventory site, highlight the ID and click OK, or double-click the ID.
— Clicking Edit on the Site List accesses Site Maintenance (10.310.00), enabling you to
modify information for an existing inventory site.
— Clicking Insert on the Site List accesses Site Maintenance (10.310.00), enabling you to
add new inventory sites to the system.
20. Type a pager template for the employee in Template ID.
If the pager template ID is unknown, press F3 or double-click the right mouse button. A list of
all pager templates set up in Pager Template PV List displays.
— To select a pager template, highlight the ID and click OK, or double-click the ID.
21. Type the supervisor for the employee in Supervisor.
If the employee ID is unknown, press F3 or double-click the right mouse button. A list of all
employee IDs set up in Employee Maintenance (SD.007.00) displays.
— To select a vehicle inventory location, highlight the ID and click OK, or double-click the ID.
— Clicking Edit on the Employee PV Maintenance List accesses Employee Maintenance
(SD.007.00), enabling you to modify information for an existing employee ID.
— Clicking Insert on the Employee PV Maintenance List accesses Employee Maintenance
(SD.007.00), enabling you to add new employee IDs to the system.
22. Click the Other Phone button. Employee Other Phone (SD.007.02) displays.
Figure 22: Employee Other Phone (SD.007.02)
23. Type the description for the additional phone numbers for the employee in Description.
24. Type additional phone numbers for contacting the employee in Phone Number.
25. Click OK to close Employee Other Phone (SD.007.02).
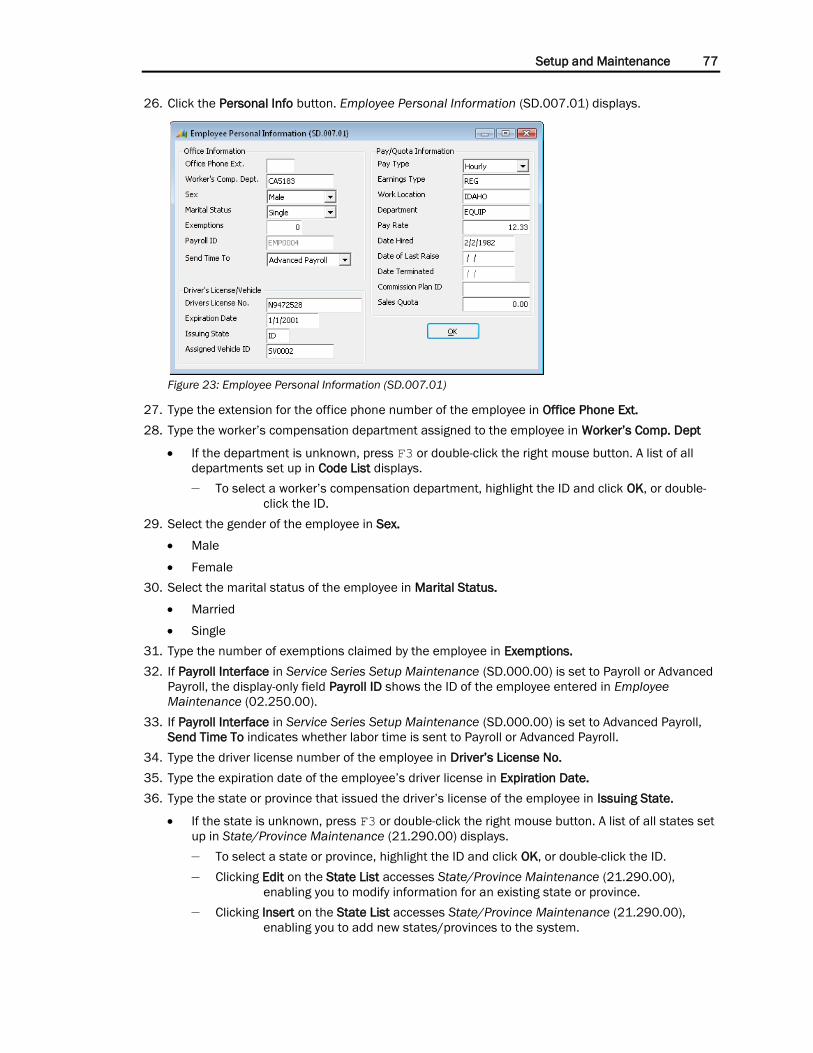
Setup and Maintenance 77
26. Click the Personal Info button. Employee Personal Information (SD.007.01) displays.
Figure 23: Employee Personal Information (SD.007.01)
27. Type the extension for the office phone number of the employee in Office Phone Ext.
28. Type the worker’s compensation department assigned to the employee in Worker’s Comp. Dept
If the department is unknown, press F3 or double-click the right mouse button. A list of all
departments set up in Code List displays.
— To select a worker’s compensation department, highlight the ID and click OK, or double-
click the ID.
29. Select the gender of the employee in Sex.
Male
Female
30. Select the marital status of the employee in Marital Status.
Married
Single
31. Type the number of exemptions claimed by the employee in Exemptions.
32. If Payroll Interface in Service Series Setup Maintenance (SD.000.00) is set to Payroll or Advanced
Payroll, the display-only field Payroll ID shows the ID of the employee entered in Employee
Maintenance (02.250.00).
33. If Payroll Interface in Service Series Setup Maintenance (SD.000.00) is set to Advanced Payroll,
Send Time To indicates whether labor time is sent to Payroll or Advanced Payroll.
34. Type the driver license number of the employee in Driver’s License No.
35. Type the expiration date of the employee’s driver license in Expiration Date.
36. Type the state or province that issued the driver’s license of the employee in Issuing State.
If the state is unknown, press F3 or double-click the right mouse button. A list of all states set
up in State/Province Maintenance (21.290.00) displays.
— To select a state or province, highlight the ID and click OK, or double-click the ID.
— Clicking Edit on the State List accesses State/Province Maintenance (21.290.00),
enabling you to modify information for an existing state or province.
— Clicking Insert on the State List accesses State/Province Maintenance (21.290.00),
enabling you to add new states/provinces to the system.

78 Service Dispatch
37. Type the ID of the vehicle assigned to the employee in Assigned Vehicle ID.
If the vehicle ID is unknown, press F3 or double-click the right mouse button. A list of all
vehicles set up in Vehicle Maintenance (SD.020.00) displays.
— To select a vehicle ID, highlight the ID and click OK, or double-click the ID.
— Clicking Edit on the Vehicle Maintenance PV List accesses Vehicle Maintenance
(SD.020.00), enabling you to modify information for an existing vehicle.
— Clicking Insert on the Vehicle Maintenance PV List accesses Vehicle Maintenance
(SD.020.00), enabling you to add new vehicles to the system.
38. Designate the pay type associated with the employee in Pay Type.
Commission
Hourly
Salaried
39. Select a default earnings type for the employee in Earnings Type.
Earnings Type defaults from Invoice - T & M Details (SD.203.00) when a technician is
associated with a labor line item.
If the earnings type ID is unknown, press F3 or double-click the right mouse button. A list of
all earning types set up in Earnings Type Maintenance (02.270.00) in the Payroll module
displays.
— To select an earnings type ID, highlight the ID and click OK, or double-click the ID.
— Clicking Edit on the Earnings Type List accesses Earnings Type Maintenance
(02.270.00), enabling you to modify information for an existing earnings type.
— Clicking Insert on the Earnings Type List accesses Employee Maintenance (SD.007.00),
enabling you to add new earning types to the system.
40. Type a default work location for the employee in Work Location.
Work Location defaults from Invoice - T & M Details (SD.203.00) when a technician is
associated with a labor line item.
If the work location ID must be changed or the ID is unknown, press F3 or double-click the
right mouse button. A list of all work location set up in Work Location Maintenance
(02.280.00) displays.
— To select a work location ID, highlight the ID and click OK, or double-click the ID.
— Clicking Edit on the Work Location Maintenance List accesses Work Location
Maintenance (02.280.00), enabling you to modify information for an existing
work location.
— Clicking Insert on the Work Location Maintenance List accesses Work Location
Maintenance (02.280.00), enabling you to add new work locations to the
system.
41. Type the department the employee is assigned to in Department.
42. Type a pay rate for the employee in Pay Rate.
Pay Rate defaults from Invoice - T & M Details (SD.203.00) when a technician is associated
with a labor line item.
43. Type a date the employee was hired in Date Hired.
44. Type the date the employee last received a raise in Date of Last Raise.
45. Type the total amount of sales to be generated by the employee in Sales Quota.
46. Click OK to close Employee Personal Information (SD.007.01)

Setup and Maintenance 79
47. Click the Skills button. Employee Skills Information (SD.007.03) displays
Figure 24: Employee Skills Information (SD.007.03)
48. Select all the skills the employee has in Skill ID.
If the skill ID is unknown, press F3 or double-click the right mouse button. A list of all skill IDs
set up in Skills Maintenance (SD.017.00) displays.
— To select a skill ID, highlight the ID and click OK, or double-click the ID.
— Clicking Edit on the Skills Maintenance PV List accesses Skills Maintenance (SD.017.00),
enabling you to modify information for an existing skill ID.
— Clicking Insert on the Skills Maintenance PV List accesses Skills Maintenance
(SD.017.00), enabling you to add new skill IDs to the system.
49. Type a numeric value to rate the proficiency the employee has in skills in Rating.
Rating is for informational purposes only.
50. Click OK to close Employee Skills Information (SD.007.03).
51. Click the Licenses button. Employee License Information (SD.007.04) displays.
Figure 25: Employee License Information (SD.007.04)
52. Select all the licenses the employee has in License ID.
If the license ID is unknown, press F3 or double-click the right mouse button. A list of all
license IDs set up in License Maintenance (SD.010.00) displays.
— To select a license ID, highlight the ID and click OK, or double-click the ID.
— Clicking Edit on the Employee License Maintenance PV List accesses License
Maintenance (SD.010.00), enabling you to modify information for an existing
license ID.
— Clicking Insert on the Employee License Maintenance PV List accesses License
Maintenance (SD.010.00), enabling you to add new license IDs to the system.
53. Type the date the license of the employee becomes valid in Effective Date.
A warning is displayed when a technician without the proper credentials is assigned to a
problem code that requires a particular skill or license.
54. Type the date the license of the employee becomes invalid in Expiration Date.
A warning is displayed when a technician without the proper credentials is assigned to a
problem code that requires a particular skill or license.

80 Service Dispatch
55. Click OK to close Employee License Information (SD.007.04).
56. Click the Tool button. Employee Tool (SD.007.05) displays.
Figure 26: Employee Tool (SD.007.05)
57. Select all of the company-owned tools given to the employee to perform work in Tool ID in the Tool
frame.
If the tool ID is unknown, press F3 or double-click the right mouse button. A list of all tool IDs
set up in Tool Maintenance (SD.018.00) displays.
— To select a tool ID, highlight the ID and click OK, or double-click the ID.
— Clicking Edit on the Tool Maintenance PV List accesses Tool Maintenance (SD.018.00),
enabling you to modify information for an existing tool ID.
— Clicking Insert on the Tool Maintenance PV List accesses Tool Maintenance (SD.018.00),
enabling you to add new tool IDs to the system.
58. Click Add to display the tool in the Add Tool frame.
59. Click OK to close Employee Tool (SD.007.05).
60. Click Save on the toolbar.
61. Click Close on the toolbar.
Note: To view a list of employee information, use “Employee Information (SD.604.00)” on page 504.

Setup and Maintenance 81
Define Dispatch View Templates (SD.004.00)
Dispatch (SD.201.00) enables users to perform the functions related to viewing open service calls
after the calls have been entered into Service Call Entry (SD.200.00). Service Dispatch allows
dispatching departments to manage open service calls efficiently because the system gives users the
flexibility to view open service calls in a variety of ways. For example, users can set up one call view
template to only display service calls for one branch, a second call view to display only service calls for
one technician, and another call queue to only display service calls with a high priority.
Dispatching a service call is a two-step process. First, users have to set up call view templates.
Dispatch - View Maintenance (SD.004.00) allows users to set up an unlimited number of call viewing
queues in order to display open service calls in a number of ways using Dispatch (SD.201.00), the
second step in the dispatching process.
The following fields are required to complete Dispatch - View Maintenance (SD.004.00):
Call View (Step 2)
Description (Step 3: recommended)
Use the following procedure to define dispatch view templates:
1. Choose Module | Service Dispatch | Dispatch - View Maintenance from the menu.
Dispatch - View Maintenance (SD.004.00) displays.
Figure 27: Dispatch - View Maintenance (SD.004.00)
2. Type a unique 10-character ID for the call view template or queue in Call View.
3. Type a 30-character explanation of the call view template or queue in Description.
Description allows users to enter a 30-character explanation of the service call view template.
4. In the Priority frame, choose the priority of the service calls viewed with the call view template.
Premium
High
Medium
Low
Note: Multiple priority values can be selected for a call view template.
5. Select the All check box to the right of Branch ID to view open service calls for all branches.
6. To restrict the call view template to display open service calls for a specific branch, type the
appropriate branch in Branch ID.

82 Service Dispatch
7. If the branch ID is unknown, press F3 or double-click the right mouse button. A list of all branches
set up in Branch Maintenance (SD.001.00) displays.
To select a branch ID, highlight the ID and click OK, or double-click the ID.
Clicking Edit on the Branch Maintenance PV List accesses Branch Maintenance (SD.001.00),
enabling you to modify information for an existing branch.
Clicking Insert on the Branch Maintenance PV List accesses Branch Maintenance
(SD.001.00), enabling you to add new branches to the system.
8. Select All to the right of Technician ID to view the open service calls for all technicians.
9. To restrict the call view template to display open service calls for a specific technician, type a
technician ID in Technician ID.
10. If the technician ID is unknown, press F3 or double-click the right mouse button. A list of all
technicians set up in Employee Maintenance (SD.007.00) displays.
To select a technician ID, highlight the ID and click OK, or double-click the ID.
11. To restrict the call view template to display open service calls for a specific call type, click Call
Type.
Call Type (SD.004.005) displays.
Figure 28: Call Type (SD.004.05)
12. Type a call type.
Multiple Call Types can be selected for a call view template.
If the call type ID is unknown, press F3 or double-click the right mouse button. A list of all call
types set up in Call Type Maintenance (SD.003.00) displays.
— To select a call type, highlight the ID and click OK, or double-click the ID.
— Clicking Edit on the Call Type Maintenance PV List accesses Call Type Maintenance
(SD.003.00), enabling you to modify information for an existing call type.
— Clicking Insert on the Call Type Maintenance PV List accesses Call Type Maintenance
(SD.003.00), enabling you to add new call types to the system.
13. Click OK.
14. To restrict a call view template to a specific call status, click Call Status.
Call Status (SD.004.06) displays.
Figure 29: Call Status (SD.004.06)

Setup and Maintenance 83
15. Type a call status.
Multiple call statuses can be selected for a call view template.
If the call status ID is unknown, the call status can be found by pressing the F3 key or by
double-clicking the right mouse button. A list of all call statuses set up in Call Status
Maintenance (SD.002.00) displays.
— To select a call status, highlight the ID and click OK, or double-click the ID.
— Clicking Edit on the Call Status Maintenance PV List accesses Call Status Maintenance
(SD.002.00) allowing users to modify information for an existing call status.
— Clicking Insert on the Call Status Maintenance PV List accesses Call Status Maintenance
(SD.002.00) and allows users to add new call statuses to the system.
16. Click OK.
17. To restrict a call view template to a specific geographic zone, click Geographic.
Geography (SD.004.01) displays.
Figure 30: Geography (SD.004.01)
18. Type a geographic ID.
Multiple Geographic IDs can be selected for a call view template.
If the geographic zone ID is unknown, press F3 or double-click the right mouse button. A list
of all geographic zones set up in Geographic Zone Maintenance (SD.009.00) displays.
— To select a geographic zone, highlight the ID and click OK, or double-click the ID.
— Clicking Edit on the Geographic Zone Maintenance PV List accesses Geographic Zone
Maintenance (SD.009.00), enabling you to modify information for an existing
geographic zone.
— Clicking Insert on the Geographic Zone Maintenance PV List accesses Geographic Zone
Maintenance (SD.009.00), enabling you to add new geographic zones to the
system.
19. Click OK.

84 Service Dispatch
20. To change how service calls are sorted in Dispatch (SD.201.00), click Sort Order.
Figure 31: Dispatch Sort Order (SD.004.02)
21. Choose the value that is used to create the dispatching sort from Available Fields and select Add.
The selected value shows in Sort Fields.
Multiple sorts can be used in a call view template.
22. Select the Sort Direction.
23. Click OK.
24. Click Save on the toolbar.
25. Click Close on the toolbar.

Setup and Maintenance 85
Set up Templates and Queues with User Configuration (SD.000.01)
(Optional)User Configuration (SD.000.01) is used to define default dispatching view templates or
service call queues for each user. For example, if an organization has locations in Cleveland, Akron
and Columbus, a dispatching template can be set up to only show open service calls for each city or
dispatcher for that city. Therefore, a dispatcher in Cleveland cannot view open service calls for
Columbus and accidentally assign a technician located in Cleveland to complete the work for a
customer in Columbus.
Note: Completing User Configuration (SD.000.01) is an optional function in Service Dispatch. User
Configuration (SD.000.01) cannot be set up until call view templates have been created in Dispatch -
View Maintenance (SD.004.00).
1. Choose Module | Service Dispatch | Service Series Setup Maintenance from the menu.
Service Series Setup Maintenance (SD.000.00) displays.
2. Click User Configuration. User Configuration (SD.000.01) displays.
Figure 32: User Configuration (SD.000.01)
3. Type a valid user in User ID.
If the user ID is unknown, press F3 or double-click the right mouse button. A list of all users
set up in User Maintenance (95.260.00) displays.
— To select a user, highlight the ID and click OK, or double-click the ID.
4. Type a call view template or Queue ID created in Dispatch - View Maintenance (SD.004.00) to
default for the user in Dispatch (SD.201.00) in Service Call Config.
If the call view template ID is unknown, press F3 or double-click the right mouse button. A list
of all call queue views set up in Dispatch - View Maintenance (SD.004.00) displays.
— To select a call queue view, highlight the ID and click OK, or double-click the ID.
— Clicking Edit on the Call Queue View PV List accesses Dispatch - View Maintenance
(SD.004.00), enabling you to modify information for an existing call view
template.
— Clicking Insert on the Call Queue View PV List accesses Dispatch - View Maintenance
(SD.004.00), enabling you to add new call view templates to the system.
5. If the user needs to view open service calls for all branches, select the All check box.

86 Service Dispatch
6. If the user must be restricted to only view service calls for a single branch, do not select the All
check box and type the branch ID in Branch ID.
If the branch ID is unknown, press F3 or double-click the right mouse button. A list of all
branches set up in Branch Maintenance (SD.001.00) displays.
— To select a branch ID, highlight the ID and click OK, or double-click the ID.
— Clicking Edit on the Branch Maintenance PV List accesses Branch Maintenance
(SD.001.00), enabling you to modify information for an existing branch.
— Clicking Insert on the Branch Maintenance PV List accesses Branch Maintenance
(SD.001.00), enabling you to add new branches to the system.
7. Click OK.
8. Click Save on the toolbar.
9. Click Close on the toolbar.

Setup and Maintenance 87
Define Problem Codes (SD.008.00)
Problem Code Maintenance (SD.008.00) is used to set up an unlimited number of problem codes that
are used to define the reason service calls are generated. Problem codes can be attached to a service
call in Service Call Entry (SD.200.00).
The following sections are required to complete Problem Code Maintenance (SD.008.00):
Problem Code (Step 2)
Description (Step 3: recommended)
Use the following procedure to define problem codes:
1. Choose Module | Service Dispatch | Problem Code Maintenance from the menu. Problem Code
Maintenance (SD.008.00) displays.
Figure 33: Problem Code Maintenance (SD.008.00)
2. Type a unique 10-character ID for the problem code in Problem Code.
3. Type the 30-character explanation of the problem code in Description.
4. Type the estimated time needed to repair the problem code in Estimate Time Duration.
5. Select the Prompt Operator check box to have the system display the information in Notes when
customer service representatives attach the problem code ID to a service call in Service Call Entry
(SD.200.00).
6. Type the information or questions that displays when the problem code ID is attached to a service
call in Service Call Entry (SD.200.00) in Notes.
7. If the Flat Rate Pricing module is installed, click Tasks/Prices. Possible Tasks/Prices (SD.008.01)
displays.
Figure 34: Possible Tasks/Prices (SD.008.01)

88 Service Dispatch
8. Type the ID of all flat rate prices that apply to the problem code in Flat Rate ID.
Flat Rate ID description displays.
If the flat rate ID is unknown, press F3 or double-click the right mouse button. A list of all flat
rate IDs set up in the Flat Rate Maintenance PV List displays.
— To select a flat rate ID, highlight the ID and click OK, or double-click the ID.
9. Click Close on the toolbar.
10. Click Call Type. Problem Code - Call Type (SD.030.00) displays.
Figure 35: Problem Code - Call Type (SD.030.00)
11. Type the ID of all call types that apply to the problem code in Call Type ID.
Call Type ID description when a call type is selected.
If the call type ID is unknown, press F3 or double-click the right mouse button. A list of all call
type IDs set up in Call Type Maintenance (SD.003.00) displays.
— To select a call type ID, highlight the ID and click OK, or double-click the ID.
— Clicking Edit on the Call Type Maintenance PV List accesses Call Type Maintenance
(SD.003.00), enabling you to modify information for an existing call type ID.
— Clicking Insert on the Call Type Maintenance PV List accesses Call Type Maintenance
(SD.003.00), enabling you to add new call type IDs to the system.
12. Click Save on the toolbar.
13. Click Close on the toolbar.
14. Click Tool Usage. Problem Code Tool Usage (SD.008.05) displays.
Figure 36: Problem Code Tool Usage (SD.008.05)

Setup and Maintenance 89
15. Type the ID of all tool usages that apply to the problem code in Usage ID.
Usage ID description displays.
If the usage ID is unknown, press F3 or double-click the right mouse button. A list of all tool
usage IDs set up in Tool Usage Maintenance (SD.019.00) displays.
— To select a usage ID, highlight the ID and click OK, or double-click the ID.
— Clicking Edit on the Tool Usage Maintenance PV List accesses Tool Usage Maintenance
(SD.019.00), enabling you to modify information for an existing usage ID.
— Clicking Insert on the Tool Usage Maintenance PV List accesses Tool Usage Maintenance
(SD.019.00), enabling you to add new usage IDs to the system.
16. Click Close on the toolbar.
17. Click Skills. Problem Code Skills Information (SD.008.02) displays.
Figure 37: Problem Code Skills Information (SD.008.02)
18. Type the ID of all skills that apply to the problem code in Skill ID.
Skill ID description displays.
If the skill ID is unknown, press F3 or double-click the right mouse button. A list of all skill IDs
set up in Skills Maintenance (SD.017.00) displays.
— To select a skill ID, highlight the ID and click OK, or double-click the ID.
— Clicking Edit on the Skills Maintenance PV List accesses Skills Maintenance (SD.017.00),
enabling you to modify information for an existing skill ID.
— Clicking Insert on the Skills Maintenance PV List accesses Skills Maintenance
(SD.017.00), enabling you to add new skill IDs to the system.
19. Click Close on the toolbar.
20. Click Licenses. Problem Code Licenses Information (SD.008.03) displays.
Figure 38: Problem Code License Information (SD.008.03)
21. Type the ID of all licenses that apply to the problem code in License ID.
License ID description displays.
If the license ID is unknown, press F3 or double-click the right mouse button. A list of all
license IDs set up in License Maintenance (SD.010.00) displays.
— To select a license ID, highlight the ID and click OK, or double-click the ID.
— Clicking Edit on the Employee License Maintenance PV List accesses License
Maintenance (SD.010.00), enabling you to modify information for an existing
license ID.
— Clicking Insert on the Employee License Maintenance PV List accesses License
Maintenance (SD.010.00), enabling you to add new license IDs to the system.

90 Service Dispatch
22. Click Close on the toolbar.
23. Click Save on the toolbar.
Note: To view a list of problem codes, use “Problem Code List (SD.634.00)” on page 509.

Setup and Maintenance 91
Define Cause Codes (SD.014.00) (Optional)
Cause Code Maintenance (SD.014.00) is used to set up an unlimited number of cause codes used to
define why a problem code may occur or why a piece of equipment is not working.
The following fields are required to complete Cause Code Maintenance (SD.014.00):
Cause ID (Step 2)
Description (Step 3: recommended)
Use the following procedure to define cause codes:
1. Choose Module | Service Dispatch | Cause Code Maintenance from the menu. Cause Code
Maintenance (SD.014.00) displays.
Figure 39: Cause Code Maintenance (SD.014.00)
2. Type a unique 10-character ID for the cause code in Cause ID.
3. Type the 30-character explanation of the cause code in Description.
4. Click Save on the toolbar.
5. Click Close on the toolbar.

92 Service Dispatch
Define Resolution Codes (SD.015.00) (Optional)
Resolution Code Maintenance (SD.015.00) is used to create an unlimited number of resolution codes
used to define how a technician solves a problem or cause code.
The following fields are required to complete Resolution Code Maintenance (SD.015.00):
Resolution ID (Step 2)
Description (Step 3: recommended)
Use the following procedure to define resolution codes:
1. Choose Module | Service Dispatch | Resolution Code Maintenance from the menu.
Resolution Code Maintenance (SD.015.00) displays.
Figure 40: Resolution Code Maintenance (SD015.00)
2. Type a unique 10-character ID for the resolution code in Resolution ID.
3. Type the 30-character explanation of the resolution code in Description.
4. Click Save on the toolbar.
5. Click Close on the toolbar.

Setup and Maintenance 93
Define Media Groups (SD.013.00) (Optional)
Media Group Maintenance (SD.013.00) is used for reporting purposes to group similar marketing
resources to track the most effective means of advertising. Media buy resources are attached to a
media group in Media Buy Maintenance (SD.012.00) so the number of calls and total revenue
generated by a media group can be viewed with the Advertising Media Performance Report
(SD.630.00). For more information, see “Advertising Media Performance Report (SD.630.00)” on page
499.
The following fields are required to complete Media Group Maintenance (SD.013.00):
Media Group ID (Step 2)
Description (Step 3: recommended)
Use the following procedure to define media groups:
1. Choose Module | Service Dispatch | Media Group Maintenance from the menu.
Media Group Maintenance (SD.013.00) displays.
Figure 41: Media Group Maintenance (SD.013.00)
2. Type a unique 10-character ID for the media group in Media Group ID.
3. Type the 30-character explanation of the media group in Description.
4. Click Save on the toolbar.
5. Click Close on the toolbar.
Note: To view a list of media group IDs, use “Media Group List (SD.609.00)” on page 508.
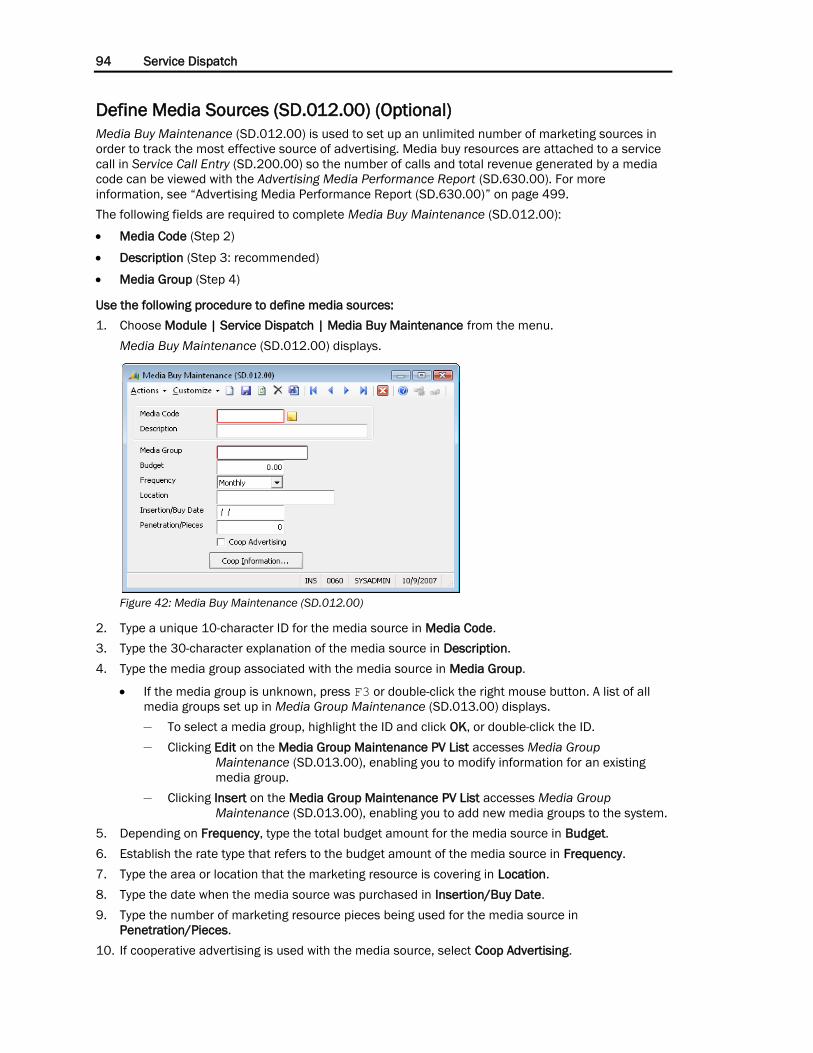
94 Service Dispatch
Define Media Sources (SD.012.00) (Optional)
Media Buy Maintenance (SD.012.00) is used to set up an unlimited number of marketing sources in
order to track the most effective source of advertising. Media buy resources are attached to a service
call in Service Call Entry (SD.200.00) so the number of calls and total revenue generated by a media
code can be viewed with the Advertising Media Performance Report (SD.630.00). For more
information, see “Advertising Media Performance Report (SD.630.00)” on page 499.
The following fields are required to complete Media Buy Maintenance (SD.012.00):
Media Code (Step 2)
Description (Step 3: recommended)
Media Group (Step 4)
Use the following procedure to define media sources:
1. Choose Module | Service Dispatch | Media Buy Maintenance from the menu.
Media Buy Maintenance (SD.012.00) displays.
Figure 42: Media Buy Maintenance (SD.012.00)
2. Type a unique 10-character ID for the media source in Media Code.
3. Type the 30-character explanation of the media source in Description.
4. Type the media group associated with the media source in Media Group.
If the media group is unknown, press F3 or double-click the right mouse button. A list of all
media groups set up in Media Group Maintenance (SD.013.00) displays.
— To select a media group, highlight the ID and click OK, or double-click the ID.
— Clicking Edit on the Media Group Maintenance PV List accesses Media Group
Maintenance (SD.013.00), enabling you to modify information for an existing
media group.
— Clicking Insert on the Media Group Maintenance PV List accesses Media Group
Maintenance (SD.013.00), enabling you to add new media groups to the system.
5. Depending on Frequency, type the total budget amount for the media source in Budget.
6. Establish the rate type that refers to the budget amount of the media source in Frequency.
7. Type the area or location that the marketing resource is covering in Location.
8. Type the date when the media source was purchased in Insertion/Buy Date.
9. Type the number of marketing resource pieces being used for the media source in
Penetration/Pieces.
10. If cooperative advertising is used with the media source, select Coop Advertising.

Setup and Maintenance 95
11. If cooperative advertising is used with the media source, click Coop Information and type the
needed cooperative advertising information.
12. Click Save on the toolbar.
13. Click Close on the toolbar.
Note: To view a list of media buys, use “Media Group List (SD.609.00)” on page 508.

96 Service Dispatch
Define Advertising Partners in Cooperative Advertising Information
(SD.012.01) (Optional)
Coop Advertising Information (SD.012.01) is used to set up cooperative advertising partners and the
percentage share amounts that the cooperative partners contribute to the marketing resources.
Cooperative advertising partner information is attached to media sources in Media Buy Maintenance
(SD.012.00).
Note: Data entered in Step 23 is used for informational purposes only.
1. Choose Module | Service Dispatch | Media Buy Maintenance from the menu.
Media Buy Maintenance (SD.012.00) displays.
2. Select the Media Code associated with the cooperative advertising partners.
3. Click Coop Information.
Coop Advertising Information (SD.012.01) displays.
Figure 43: Coop Advertising Information (SD.012.01)
4. Type a valid vendor from accounts payable for the cooperative advertising partner for the media
source in Coop/Vendor ID.
The name of the cooperative advertising partner displays.
If the coop/vendor ID is unknown, press F3 or double-click the right mouse button. A list of all
coop/vendor IDs set up in Vendor Maintenance (03.270.00) displays.
— To select a coop/vendor ID, highlight the ID and click OK, or double-click the ID.
— Clicking Edit on the Vendor List Vendor Maintenance (03.270.00), enabling you to modify
information for an existing coop/vendor ID.
— Clicking Insert on the Vendor List Vendor Maintenance (03.270.00), enabling you to add
new coop/vendor IDs to the system.
5. Type the address associated with the cooperative advertising partner in Address Line 1.
6. Type the address associated with the cooperative advertising partner in Address Line 2.
7. Type the city where the cooperative advertising partner is located in City.
8. Type the state where the cooperative advertising partner is located in State.
If the state is unknown, press F3 or double-click the right mouse button. A list of all states set
up in State/Province Maintenance (21.290.00) displays.
— To select a state or province, highlight the ID and click OK, or double-click the ID.
— Clicking Edit on the State List accesses State/Province Maintenance (21.290.00),
enabling you to modify information for an existing state or province.
— Clicking Insert on the State List accesses State/Province Maintenance (21.290.00),
enabling you to add new states/provinces to the system.
9. Type the postal code where the cooperative advertising partner is located in Zip Code.

Setup and Maintenance 97
10. Type the name of the contact associated with the cooperative advertising partner in Contact.
11. Type the phone number associated with the cooperative advertising partner in Phone Number.
12. Type the fax number associated with the cooperative advertising partner in Fax Number.
13. Type the percentage share the cooperative partner contributes to the marketing resources in
Share Percentage.
14. If the cooperative advertising partner has paid their portion of the media resource, select the Coop
Portion Paid check box.
15. Click Save on the toolbar.
16. Click Close on the toolbar.

98 Service Dispatch
Define Product Classes (SD.016.00) (Optional)
Product Class Maintenance (SD.016.00) allows users to add Field Service Management-related
information to the product classes created in the Inventory module.
Product classes are defined in the Inventory module. A list of product classes can be found on
Inventory’s Product Classes (10.700.00) report. Field Service Management extends product class
data. Extended product class data can be viewed on “Product Class List (SD.611.00)” on page 509.
The following fields are required to complete Product Class Maintenance (SD.016.00):
Class ID (Step 2)
Description (Step 3: recommended)
Use the following procedure to define product classes:
1. Choose Module | Service Dispatch | Product Class Maintenance from the menu. Product Class
Maintenance (SD.016.00) displays.
Figure 44: Product Class Maintenance (SD.016.00)
2. Type a unique 10-character identifier for the class in Class ID.
3. Type a 30-character explanation of the product class in Description.
4. Select the type of commission to be paid for the class ID in Comm Status.
Materials
Labor
None
Comm Status is for informational purposes only.
5. Select the type of mark-up pricing in Pricing Type to be used with the class ID when entering detail
lines in Invoice - T & M Details (SD.203.00).
Labor
Materials
None
6. Select the Sales Analysis Category for the class ID to be used when printing the Sales Analysis Report
(SD.626.00). For more information, see “Sales Analysis Report (SD.626.00)” on page 512.
Materials
Labor
Rental
Subcontract
Misc

Setup and Maintenance 99
7. If the Flat Rate module is installed, type the Flat Rate Markup ID that calculates the unit price
when entering detail records in Flat Rate Entry (SP.000.00).
If the ID is unknown, press F3 or double-click the right mouse button. A list of all flat rate
mark-up IDs set up in Inventory Mark-up Maintenance (SD.026.00) displays.
— To select a flat rate mark-up ID, highlight the ID and click OK, or double-click the ID.
— Clicking Edit on the Mark Up Maintenance PV List accesses Inventory Mark-up
Maintenance (SD.026.00), enabling you to modify information for an existing flat
rate mark-up ID.
— Clicking Insert on the Mark Up Maintenance PV List accesses Inventory Mark-up
Maintenance (SD.026.00), enabling you to add new flat rate mark-up IDs to the
system.
8. Click Save on the toolbar.
9. Click Close on the toolbar.

100 Service Dispatch
Define Dwelling Types (SD.005.00) (Optional)
Dwelling Maintenance (SD.005.00) is used to create an unlimited number of dwelling types in the
system for reporting purposes. Dwellings are used to represent the different type of buildings where
organizations perform work. For example, a customer report can be generated that shows residential
versus commercial buildings.
The following fields are required to complete Dwelling Maintenance (SD.005.00):
Dwelling ID (Step 2)
Description (Step 3: recommended)
Use the following procedure to define dwelling types:
1. Choose Module | Service Dispatch | Dwelling Maintenance from the menu.
Dwelling Maintenance (SD.005.00) displays.
Figure 45: Dwelling Maintenance (SD.005.00)
2. Type a unique 10-character ID for the dwelling type in Dwelling ID.
3. Type a 30-character explanation of the dwelling type in Description.
4. Click Save on the toolbar.
5. Click Close on the toolbar.
Note: To view a list of dwelling types, use “Dwelling List (SD.603.00)” on page 503.

Setup and Maintenance 101
Define Inventory Mark-Ups (SD.026.00) (Optional)
Inventory Mark-Up Maintenance (SD.026.00) is used to set up an unlimited number of inventory mark-
up tables that increase the price of inventory items that are associated with a flat rate price. When
running Price Update Process (SP.203.00) in the Flat Rate Pricing module, the system increases the
price of individual inventory items of a flat rate price by a cost multiplier based on the cost of the item.
Inventory mark-ups are attached to a customer site in Site Maintenance (SD.025.00). To view a list of
inventory mark-up IDs, use “Inventory Mark-Up (SD.619.00)” on page 506.
The following fields are required to complete Inventory Mark-Up Maintenance (SD.026.00):
Mark-Up ID (Step 2)
Description (Step 3: recommended)
Use the following procedure to define inventory mark-ups:
1. Choose Module | Service Dispatch | Inventory Mark-Up Maintenance from the menu.
Inventory Mark-Up Maintenance (SD.026.00) displays.
Figure 46: Inventory Mark-up Maintenance (SD.026.00)
2. Type a unique 10-character ID for the inventory mark-up in Mark-Up ID.
3. Type the 30-character explanation of the inventory mark-up in Description.
4. Type the cost ranges associated with the inventory mark-up in From and To.
5. Type the cost multiplier for the cost ranges in Cost Multiplier.
6. Click Save on the toolbar.
7. Click Close on the toolbar.

102 Service Dispatch
Define New Customer Sites (SD.025.00)
Site Maintenance (SD.025.00) is designed to enable you to set up an unlimited number of locations
for customers. Service call defaults are entered into this screen so that customer service
representatives can quickly enter a service call once a customer and site are selected. To view a list of
new customer sites, use “Site List (SD.612.00)” on page 531.
The following fields are required to complete Site Maintenance (SD.025.00):
Site ID (Step 3)
Description (Step 4: recommended)
Geographic Zone (Step 26)
Tax ID (Step 28)
Use the following procedure to define new customer sites:
1. Choose Module | Service Dispatch | Site Maintenance from the menu.
If the screen is in Form View, the Customer Info tab of Site Maintenance (SD.025.00) displays.
Figure 47: Site Maintenance (SD.025.00), Customer Info tab

Setup and Maintenance 103
2. Type the ID of the customer associated with the new site in Customer ID.
If the customer ID is unknown, press F3 or double-click the right mouse button. A list of all
active customers set up in Customer Maintenance (08.260.00) of Accounts Receivable
displays.
— To select a customer ID, highlight the ID and click OK, or double-click the ID.
— Clicking Edit on the Active Customer List accesses Customer Maintenance (08.260.00),
enabling you to modify information for an existing customer.
— Clicking Insert on the Active Customer List accesses Customer Maintenance (08.260.00),
enabling you to add new customer to Accounts Receivable.
3. Type a unique 10-character ID for the customer site in Site ID.
Note: Service Call Entry (SD.200.00) automatically populates Site ID with the default customer
site ID. If a default site ID does not exist, you must manually select site ID.
4. Type a 30-character explanation of the customer site in Description.
5. If a new customer letter is printed for all new customer sites, select the Print Letter check box.
6. Type the contact person associated with the customer site in Attention.
7. Type the address of the customer site in Address Line 1 and Address Line 2.
8. Type the city in which the customer site is located in City.
9. Type the two-letter state abbreviation in which the customer site is located in State.
If the state is unknown, press F3 or double-click the right mouse button. A list of all states set
up in State/Province Maintenance (21.290.00) displays.
— To select a state or province, highlight the ID and click OK, or double-click the ID.
— Clicking Edit on the State List accesses State/Province Maintenance (21.290.00),
enabling you to modify information for an existing state or province.
— Clicking Insert on the State List accesses State/Province Maintenance (21.290.00),
enabling you to add new states/provinces to the system.
10. Type the zip code in which the customer site is located in Postal Code.
If the zip code is unknown, press F3 or double-click the right mouse button. A list of all zip
codes set up in Zip Code Maintenance (SD.021.00) displays.
— To select a zip code, highlight the ID and click OK, or double-click the ID.
— Clicking Edit on the Zip Code Maintenance PV List accesses Zip Code Maintenance
(SD.021.00), enabling you to modify information for an existing zip code.
— Clicking Insert on the Zip Code Maintenance PV List accesses Zip Code Maintenance
(SD.021.00), enabling you to add new zip codes to the system.
11. Type the two or three-character country or region abbreviation in which the customer site is
located in Country/Region.
If the country or region is unknown, press F3 or double-click the right mouse button. A list of
all countries or regions set up in Country/Region Maintenance (21.300.00) displays.
— To select a country or region, highlight the ID and click OK, or double-click the ID.
— Clicking Edit on the Country/Region List Country/Region Maintenance (21.300.00),
enabling you to modify information for an existing country or region.
— Clicking Insert on the Country/Region List accesses Country/Region Maintenance
(21.300.00), enabling you to add new countries or regions to the system.
12. Type the phone number of the customer site in Phone/Ext.
13. Type the fax number of the customer site is Fax/Ext.

104 Service Dispatch
14. If your company needs to generate Profit and Loss statements for each customer site, type the
subaccount associated with the customer site in Sub Account.
Use Sub from Site in Call Type Maintenance (SD.003.00) must also be selected in order to
associate the customer site subaccount to the sales and costs of a service call.
If the subaccount number is unknown, press F3 or double-click the right mouse button. A list
of all subaccounts set up in Subaccount Maintenance (01.270.00) displays.
— To select a subaccount, highlight the ID and click OK, or double-click the ID.
— Clicking Edit on the Active Subaccount List accesses Subaccount Maintenance
(01.270.00), enabling you to modify information for an existing subaccount.
— Clicking Insert on the Active Subaccount List accesses Subaccount Maintenance
(01.270.00), enabling you to add new subaccounts to the system.
15. Type the tax information for the site in Tax ID 1, Tax ID 2, Tax ID 3, and Tax ID 4.
Although this tax data is not used by the invoicing functions in Field Service Management, the
information is used in Invoice and Memo (08.010.00) of Accounts Receivable.
If the tax ID is unknown, press F3 or double-click the right mouse button. A list of all taxes set
up in Tax Maintenance (21.280.00) displays.
— To select a tax ID, highlight the ID and click OK, or double-click the ID.
— Clicking Edit on the Sales Tax List accesses Tax Maintenance (21.280.00), enabling you
to modify information for existing sales taxes.
— Clicking Insert on the Sales Tax List accesses Tax Maintenance (21.280.00), enabling
you to add new sales taxes to the system.
16. Click Special Pricing to create special prices for specific inventory items for the customer site.
Site - Special Pricing Maintenance (SD.037.00) displays.
Special Pricing is optional and is not required to complete Site Maintenance (SD.025.00).
17. If the screen is in Form View, click the Serv Call Info tab.

Setup and Maintenance 105
The Serv Call Info tab of Site Maintenance (SD.025.00) displays.
Figure 48: Site Maintenance (SD.025.00), Serv Call Info tab
18. Type the date the customer site is entered into the system in Created Date.
Although the date defaults to the current system date, a new date can be entered.
19. Type a map page that corresponds to the site address of the customer in Map Page.
20. Type the map coordinates that is associated with the map page and site address of the customer
in Coordinates.
21. Type the maximum amount a service call can be without needing authorization in Max Service
Amount.
Max Service Amount is for informational purposes only.
Max Service Amount is only valid when Yes is selected in Tenant Auth To Call.
22. Establish if the system should warn customer service representatives during Service Call Entry
(SD.200.00) the caller has the authority to place a new service request in Tenant Auth To Call.
Yes
No
Note: Selecting Yes turns Authorization Req blue beside Attention in Service Call Entry
(SD.200.00).
23. Type the source used by the customer site to learn about your company in Media ID.

106 Service Dispatch
24. If the media ID is unknown, press F3 or double-click the right mouse button. A list of all media
sources set up in Media Buy Maintenance (SD.012.00) displays.
To select a media ID, highlight the ID and click OK, or double-click the ID.
Clicking Edit on the Media Buy Maintenance PV List accesses Media Buy Maintenance
(SD.012.00), enabling you to modify information for an existing media source.
Clicking Insert on the Media Buy Maintenance PV List accesses Media Buy Maintenance
(SD.012.00), enabling you to add new media sources to Service Dispatch.
25. Type the pricing mark-up table that calculates the unit price from the unit cost of material
inventory items when entering detail records in Invoice - T & M Details (SD.203.00) in Material
Markup ID.
26. If the mark-up ID is unknown, press F3 or double-click the right mouse button. A list of all mark-up
IDs set up in Inventory Mark-up Maintenance (SD.026.00) displays.
To select a mark-up ID, highlight the ID and click OK, or double-click the ID.
Clicking Edit on the Mark-up Maintenance PV List accesses Inventory Mark-up Maintenance
(SD.026.00), enabling you to modify information for an existing mark-up table.
Clicking Insert on the Mark-up Maintenance PV List accesses Inventory Mark-up Maintenance
(SD.026.00), enabling you to add new mark-up tables to Service Dispatch.
27. Type the pricing mark-up table that calculates the unit price from the unit cost of labor inventory
items when entering detail records in Invoice - T & M Details (SD.203.00) in Labor Markup ID.
28. If the mark-up ID is unknown, press F3 or double-click the right mouse button. A list of all mark-up
IDs set up in Inventory Mark-up Maintenance (SD.026.00) displays.
To select a mark-up ID, highlight the ID and click OK, or double-click the ID.
Clicking Edit on the Mark-up Maintenance PV List accesses Inventory Mark-up Maintenance
(SD.026.00), enabling you to modify information for an existing mark-up table.
Clicking Insert on the Mark-up Buy Maintenance PV List accesses Inventory Mark-up
Maintenance (SD.026.00), enabling you to add new mark-up tables to Service Dispatch.
29. Type the geographic ID associated with the customer site in Geographic Zone.
The Geographic Zone populates automatically if the zip code of the customer site has been
associated with a geographic zone in Geographic Zone Maintenance (SD.009.00) or Zip Code
Maintenance (SD.021.00).
If the geographic zone ID is unknown, press F3 or double-click the right mouse button. A list
of all geographic zones set up in Geographic Zone Maintenance (SD.009.00) displays.
— To select a geographic zone, highlight the ID and click OK, or double-click the ID.
— Clicking Edit on the Geographic Zone Maintenance PV List accesses Geographic Zone
Maintenance (SD.009.00), enabling you to modify information for an existing
geographic zone.
— Clicking Insert on the Geographic Zone Maintenance PV List accesses Geographic Zone
Maintenance (SD.009.00), enabling you to add new geographic zones to the
system.

Setup and Maintenance 107
30. Type the branch ID that is responsible for servicing the customer site in Branch ID.
The Branch ID populates automatically if the zip code of the customer site has been
associated with a geographic zone in Geographic Zone Maintenance (SD.009.00) or Zip Code
Maintenance (SD.021.00) and the geographic zone has been associated with a branch in
Branch Maintenance (SD.001.00) or Geographic Zone Maintenance (SD.009.00).
If the branch ID is unknown, press F3 or double-click the right mouse button. A list of all
branches set up in Branch Maintenance (SD.001.00) displays.
— To select a branch ID, highlight the ID and click OK, or double-click the ID.
— Clicking Edit on the Branch Maintenance PV List accesses Branch Maintenance
(SD.001.00), enabling you to modify information for an existing branch.
— Clicking Insert on the Branch Maintenance PV List accesses Branch Maintenance
(SD.001.00), enabling you to add new branches to the system.
31. Type the sales tax that will be used by the invoicing functions in Field Service Management for the
customer site in Tax ID.
If the tax ID is unknown, press F3 or double-click the right mouse button. A list of all sales
taxes set up in Tax Maintenance (21.280.00) displays.
— To select a tax ID, highlight the ID and click OK, or double-click the ID.
— Clicking Edit on the Sales Tax List accesses Tax Maintenance (21.280.00), enabling you
to modify information for an existing sales tax.
— Clicking Insert on the Sales Tax List accesses Tax Maintenance (21.280.00), enabling
you to add new sales taxes to the system.
32. Type the building type for the customer site in Dwelling Type.
33. If the dwelling ID is unknown, press F3 or double-click the right mouse button. A list of all dwelling
types set up in Dwelling Maintenance (SD.005.00) displays.
To select a dwelling ID, highlight the ID and click OK, or double-click the ID.
Clicking Edit on the Dwelling Maintenance PV List accesses Dwelling Maintenance
(SD.005.00), enabling you to modify information for an existing dwelling type.
Clicking Insert on the Dwelling Maintenance PV List accesses Dwelling Maintenance
(SD.005.00), enabling you to add new dwelling types to the system.
34. Choose if a purchase order is necessary to process and save a service call in Service Call Entry
(SD.200.00).
Required
Not Allowed
Optional
35. Type a security entry code for the customer site if the site has an alarm system in Sec. Entry Code.
36. Type a purchase order number that defaults to the service call in Service Call Entry (SD.200.00) in
Blanket PO Number.
37. Type a call type that is most frequently used by the customer site to default to Service Call Entry
(SD.200.00) in Call Type.
38. If the call type ID is unknown, press F3 or double-click the right mouse button. A list of all call
statuses set up in Call Status Maintenance (SD.002.00) displays.
To select a call type, highlight the ID and click OK, or double-click the ID.
Clicking Edit on the Call Status Maintenance PV List accesses Call Status Maintenance
(SD.002.00), enabling you to modify information for an existing call status.
Clicking Insert on the Call Status Maintenance PV List accesses Call Status Maintenance
(SD.002.00), enabling you to add new call statuses to the system.
39. Type a call status to default to Service Call Entry (SD.200.00) for the customer site in Status ID.

108 Service Dispatch
If the call status ID is unknown, press F3 key or double-click the right mouse button. A list of
all call statuses set up in Call Status Maintenance (SD.002.00) displays.
— To select a call status, highlight the ID and click OK, or double-click the ID.
— Clicking Edit on the Call Status Maintenance PV List accesses Call Status Maintenance
(SD.002.00), enabling you to modify information for an existing call status.
— Clicking Insert on the Call Status Maintenance PV List accesses Call Status Maintenance
(SD.002.00), enabling you to add new call statuses to the system.
40. Type the Project or Service Manager for the customer site in Proj. Manager.
If the employee ID is unknown, press F3 or double-click the right mouse button. A list of all
technicians set up in Employee Maintenance (SD.007.00) displays.
— To select an employee ID, highlight the ID and click OK, or double-click the ID.
— Clicking Edit on the Employee Maintenance PV List accesses Employee Maintenance
(SD.007.00), enabling you to modify information for an existing employee.
— Clicking Insert on the Employee Maintenance PV List accesses Employee Maintenance
(SD.007.00), enabling you to add new employees to the system.
41. Type the salesperson that is responsible for the customer site that defaults to Service Call Entry
(SD.200.00) in Salesperson.
If the salesperson ID is unknown, press F3 or double-click the right mouse button. A list of all
salespersons set up in Salesperson Maintenance (08.310.00) displays.
— To select a salesperson, highlight the ID and click OK, or double-click the ID.
— Clicking Edit on the Salesperson List accesses Salesperson Maintenance (08.310.00),
enabling you to modify information for an existing salesperson.
— Clicking Insert on the Salesperson List accesses Salesperson Maintenance (08.310.00),
enabling you to add new salespersons to the system.
42. Type the ID of the technician responsible for performing most of the work for the customer site to
default to Service Call Entry (SD.200.00) in Technician.
If the technician ID is unknown, press F3 or double-click the right mouse button. A list of all
technicians set up in Employee Maintenance (SD.007.00) displays.
— To select a technician, highlight the ID and click OK, or double-click ID.
— Clicking Edit on the Employee Maintenance PV List accesses Employee Maintenance
(SD.007.00), enabling you to modify information for an existing employee.
— Clicking Insert on the Employee Maintenance PV List accesses Employee Maintenance
(SD.007.00), enabling you to add new employees to the system.
43. If the Flat Rate Pricing module is installed, type a flat rate plan that will be associated with the
customer site in Prc Plan ID.
If the flat rate plan ID is unknown, press F3 or double-click the right mouse button. A list of all
flat rates set up in Flat Rate Pricing Plan Maintenance (SP.002.00) displays.
— To select a flat rate, highlight the ID and click OK, or double-click the ID.
— Clicking Edit on the Plan Maintenance PV List accesses Flat Rate Pricing Plan
Maintenance (SP.002.00), enabling you to modify information for an existing flat
rate plan.
— Clicking Insert on the Plan Maintenance PV List accesses Flat Rate Pricing Plan
Maintenance (SP.002.00), enabling you to add new flat rate plans to the system.
44. Select the payment method for the customer site in Pyt Method.
Cash
Check
Discover

Setup and Maintenance 109
Visa
Master Card
American Express
In House Charge
Pyt Method is for reporting purposes only.
45. Select the default call priority that defaults to Service Call Entry (SD.200.00) for the customer site
in Priority.
Premium
High
Medium
Low
None
46. Click Save then Close on the toolbar.

110 Service Dispatch
Define Customer Site Groups (SD.041.00)
Customer Site Group (SD.041.00) lets you set up groups into which you can organize customer sites.
This lets you apply special pricing in a more robust manner, updating current prices and revised prices
by group ID instead of by site ID.
To define new customer site groups, follow these steps:
1. Select Field Service | Service Dispatch | Customer Site Group Maintenance.
2. In Customer Site Group ID, type the identifier that you want to assign to the customer site group.
3. (Optional) In Description, specify a description of the customer site group.
4. In the Customer Site Group Members area, specify the following:
a) Customer ID – type, or press F3 to select, a customer ID.
b) Customer Site ID – type, or press F3 to select, a customer site ID.
Note: Only those customer IDs and customer site IDs that you previously set up in Site
Maintenance (SD.025.00) are available.
5. Repeat step 4 for each customer ID/customer site ID combination that you want to add to the
group.
Note: You can add each customer ID/customer site ID combination to as many groups as you
want. No limit exists.
6. Click Save, and then close the screen.

Setup and Maintenance 111
Define Special Pricing (SD.037.00) (Optional)
Site - Special Pricing Maintenance (SD.037.00) lets you create specific inventory item special pricing
for customer sites, including revisions for future special prices.
The following field is required to complete Site - Special Pricing Maintenance (SD.037.00):
Inventory ID (Step 5)
Use the following procedure to define special pricing parameters:
1. Select Field Service | Service Dispatch | Site Maintenance.
Site Maintenance (SD.025.00) displays.
2. Type the identifier of the customer in which inventory item special pricing will be associated with
in Customer ID.
If the customer ID is unknown, press F3 or double-click the right mouse button. A list of all
active customers set up in Customer Maintenance (08.260.00) of Accounts Receivable
displays.
— To select a customer ID, highlight the ID and click OK, or double-click the ID.
— Clicking Edit on the Active Customer List accesses Customer Maintenance (08.260.00),
enabling you to modify information for an existing customer.
— Clicking Insert on the Active Customer List accesses Customer Maintenance (08.260.00),
enabling you to add new customer to Accounts Receivable.
3. Choose the customer site where special inventory item pricing will be associated with in Site ID.
4. Click Special Pricing. Site - Special Pricing Maintenance (SD.037.00) displays.
Figure 49: Site - Special Pricing Maintenance (SD.037.00)
5. Type the ID for the item that a special price is associated with in Inventory ID, and then click
Refresh.
6. In the grid, specify the following settings for each special price that you want to create.
a) In Inventory ID, type the ID for the item to which you want to associate a special price.

112 Service Dispatch
b) If the inventory item ID is unknown, press F3 or double-click the right mouse button. A list of
all inventory items set up in Inventory Items (10.250.00) of Inventory displays.
To select an inventory ID, highlight the ID and click OK, or double-click the ID.
Clicking Edit on the Inventory Item List accesses Inventory Items (10.250.00), enabling
you to modify information for an existing inventory item.
Clicking Insert on the Inventory Item List accesses Inventory Items (10.250.00), enabling
you to add new inventory items to Inventory.
c) In Start Date, specify the date on which you want the special price to become effective. A
blank start date indicates that the price has always been in effect.
d) Specify the date on which you want the special price to expire in End Date. A blank end date
indicates that the price will never expire.
e) Select the pricing modification method associated with the inventory item in Price Option.
Amount
Discount %
In Price/Disc %, type the amount that overrides the Stock Base Price of the inventory item
when invoicing by using Invoice – T & M Details (SD.203.00) if you selected Amount in Price
Option.
If you selected Discount % in Price Option, type the percentage that reduces the Stock Base Price of
the inventory item when invoicing by using Invoice – T & M Details (SD.203.00) in Price/Disc.
f) In Revised Start Date, specify the future date on which you want the revised special price to
become effective. A blank start date indicates that you do not want to specify a start date.
g) Specify the future date on which you want the special price to expire in End Date. A blank end
date indicates that you do not want to specify an end date.
h) In Revised Price/Disc %, type the revised amount that overrides the Stock Base Price of the
inventory item when invoicing by using Invoice – T & M Details (SD.203.00) if you selected
Amount in Price Option.
If you selected Discount % in Price Option, type the revised percentage that reduces the Stock Base
Price of the inventory item when invoicing by using Invoice – T & M Details (SD.203.00) in Price/Disc.
i) (Optional) In Price Description, add a description of the special price. For example, “Summer
Sale” or “Midwest May Discount.”
7. Click OK.

Setup and Maintenance 113
Create Note Templates (SD.410.00) (Optional)
Notes Template (SD.410.00) allows users to set up an unlimited number of note templates to be
attached to the service call for invoicing. These templates can also be attached to equipment in the
Service Contracts module.
The following fields are required to complete Notes Template (SD.410.00):
Template ID (Step 2)
Description (Step 3: recommended)
Use the following procedure to create notes templates:
1. Choose Module | Service Dispatch | Notes Template from the menu.
Notes Template (SD.410.00) displays.
Figure 50: Notes Template (SD.410.00)
2. Type a unique 10-character ID for the note in Template ID.
3. Type the 30-character explanation of the note in Description.
4. Type the note in the free-form text box below Description.
5. Click Save on the toolbar.
6. Click Close on the toolbar.

114 Service Dispatch
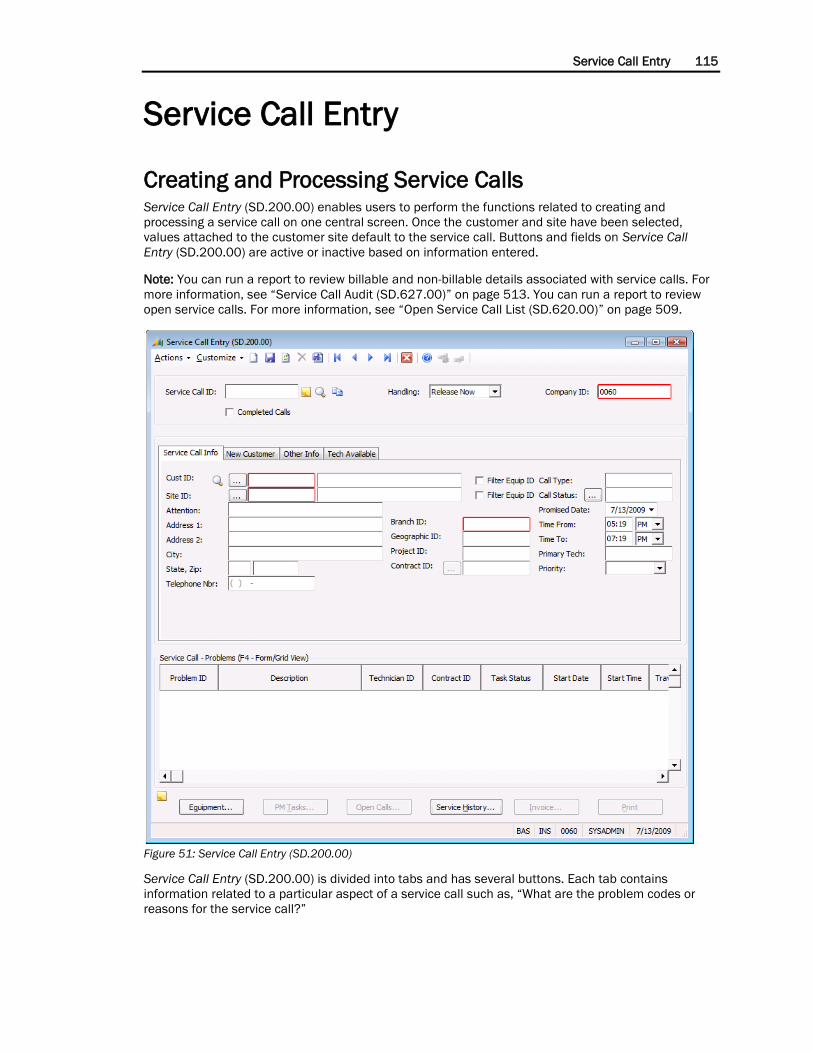
Service Call Entry 115
Service Call Entry
Creating and Processing Service Calls Service Call Entry (SD.200.00) enables users to perform the functions related to creating and
processing a service call on one central screen. Once the customer and site have been selected,
values attached to the customer site default to the service call. Buttons and fields on Service Call
Entry (SD.200.00) are active or inactive based on information entered.
Note: You can run a report to review billable and non-billable details associated with service calls. For
more information, see “Service Call Audit (SD.627.00)” on page 513. You can run a report to review
open service calls. For more information, see “Open Service Call List (SD.620.00)” on page 509.
Figure 51: Service Call Entry (SD.200.00)
Service Call Entry (SD.200.00) is divided into tabs and has several buttons. Each tab contains
information related to a particular aspect of a service call such as, “What are the problem codes or
reasons for the service call?”

116 Service Dispatch
The table displays an overview of the individual tabs in Service Call Entry (SD.200.00).
The tab... Enables you to...
Service Call Info Add or update Problem, Cause, and Resolution Codes for a
service call, and print service call work orders.
New Customer Quickly add new customer and site information without opening
Customer Maintenance (08.260.00) in Accounts Receivable.
Other Info Add or view miscellaneous information related to the service call
including aging information for the customer.
Tech Available View technicians’ assignments on the Graphical Dispatch Board
to determine the next available technician.
The button... Enables you to...
Equipment Access Customer Equipment (SD.200.03) and view pieces of
equipment associated with the customer site whether covered by
a service contract or not.
PM Tasks Access Service Contract - Equipment PM Tasks (SE.017.00) and
view the preventive maintenance line item detail associated to
the PM Codes of the service call.
Open Calls Access Open Service Call (SD.200.02) and review all open calls
associated with the company and customer site.
Service History Access Service Call History (SD.301.00) and review all completed
service calls associated with the customer site.
Invoice Access Invoice Entry (SD.202.00) and enter invoicing information
and detail for the service call.
Print Print a work order for the service call.

Service Call Entry 117
Entering a Service Call
Entering Header Information
Figure 52: Service Call Entry (SD.200.00)
To enter header information:
1. Open Service Call Entry (SD.200.00) by choosing Module | Service Dispatch | Service Call Entry
from the menu. Service Call Entry (SD.200.00) displays.
2. (Optional) The identification code assigned to the company you are currently working in appears in
Company ID. To enter a service call for another company, type that company’s ID.
3. Select how the system will process the service call in Handling.
No Action
Release Now
Release Later
Hold
Quote
Completed
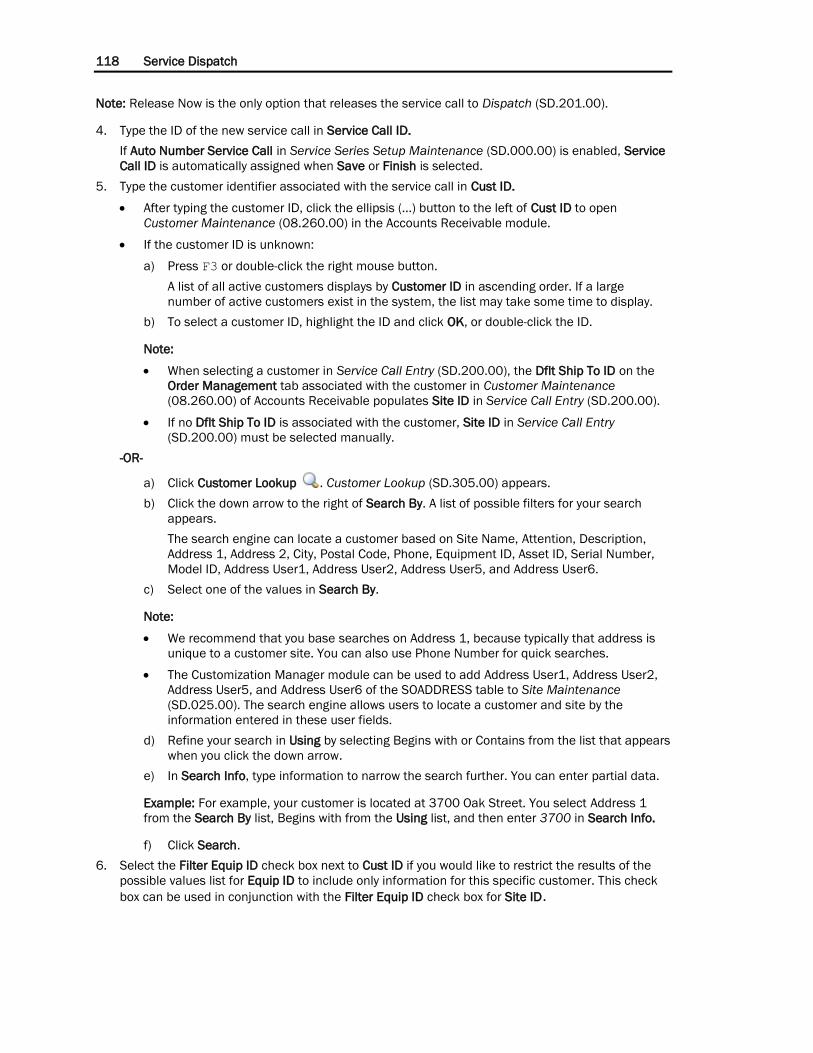
118 Service Dispatch
Note: Release Now is the only option that releases the service call to Dispatch (SD.201.00).
4. Type the ID of the new service call in Service Call ID.
If Auto Number Service Call in Service Series Setup Maintenance (SD.000.00) is enabled, Service
Call ID is automatically assigned when Save or Finish is selected.
5. Type the customer identifier associated with the service call in Cust ID.
After typing the customer ID, click the ellipsis (...) button to the left of Cust ID to open
Customer Maintenance (08.260.00) in the Accounts Receivable module.
If the customer ID is unknown:
a) Press F3 or double-click the right mouse button.
A list of all active customers displays by Customer ID in ascending order. If a large
number of active customers exist in the system, the list may take some time to display.
b) To select a customer ID, highlight the ID and click OK, or double-click the ID.
Note:
When selecting a customer in Service Call Entry (SD.200.00), the Dflt Ship To ID on the
Order Management tab associated with the customer in Customer Maintenance
(08.260.00) of Accounts Receivable populates Site ID in Service Call Entry (SD.200.00).
If no Dflt Ship To ID is associated with the customer, Site ID in Service Call Entry
(SD.200.00) must be selected manually.
-OR-
a) Click Customer Lookup . Customer Lookup (SD.305.00) appears.
b) Click the down arrow to the right of Search By. A list of possible filters for your search
appears.
The search engine can locate a customer based on Site Name, Attention, Description,
Address 1, Address 2, City, Postal Code, Phone, Equipment ID, Asset ID, Serial Number,
Model ID, Address User1, Address User2, Address User5, and Address User6.
c) Select one of the values in Search By.
Note:
We recommend that you base searches on Address 1, because typically that address is
unique to a customer site. You can also use Phone Number for quick searches.
The Customization Manager module can be used to add Address User1, Address User2,
Address User5, and Address User6 of the SOADDRESS table to Site Maintenance
(SD.025.00). The search engine allows users to locate a customer and site by the
information entered in these user fields.
d) Refine your search in Using by selecting Begins with or Contains from the list that appears
when you click the down arrow.
e) In Search Info, type information to narrow the search further. You can enter partial data.
Example: For example, your customer is located at 3700 Oak Street. You select Address 1
from the Search By list, Begins with from the Using list, and then enter 3700 in Search Info.
f) Click Search.
6. Select the Filter Equip ID check box next to Cust ID if you would like to restrict the results of the
possible values list for Equip ID to include only information for this specific customer. This check
box can be used in conjunction with the Filter Equip ID check box for Site ID.

Service Call Entry 119
7. Type the customer’s site identifier associated with the service call in Site ID. If the site must be
changed or the ID is unknown, press F3 or double-click the right mouse button. A list of all sites
for the customer displays.
To select a site ID, highlight the ID and click OK, or double-click the ID.
Note: Click the ellipsis (...) button to the left of Site ID to open Site Maintenance (SD.025.00).
— Once Site Maintenance (SD.025.00) has been accessed, existing sites associated with
the customer can be viewed and edited while new sites can be added.
— Once a Site ID has been selected, the Site Attention, Site Address 1, Site Address 2, Site
City, Site State, Site Zip, and Site Telephone Number associated with the
customer site are populated. When a Site ID is associated with a service call, the
following fields default from the customer site: Branch ID, Call Type, Call Status,
Primary Tech, and Priority.
Note: When selecting a customer in Service Call Entry (SD.200.00), the Dflt Ship To ID on the
Order Management tab associated with the customer in Customer Maintenance (08.260.00) of
Accounts Receivable populates Site ID in Service Call Entry (SD.200.00).
Note: If no Dflt Ship To ID is associated with the customer, Site ID in Service Call Entry
(SD.200.00) must be selected manually.
8. Select the Filter Equip ID check box next to Site ID if you would like to restrict the results of the
possible values list for Equip ID to include only information for this specific site. This check box
can be used in conjunction with the Filter Equip ID check box for Cust ID.
9. Type the identifier of the branch responsible for completing the work on the service call in
Branch ID.
After a site has been entered, the default Branch ID for the customer site displays.
If the branch must be changed or the ID is unknown, press F3 or double-click the right mouse
button. A list of all branches in the system displays.
— To select a branch ID, highlight the ID and click OK, or double-click the ID.
— Clicking Edit on the Branch Maintenance PV List accesses Branch Maintenance
(SD.001.00), enabling you to modify information for an existing branch.
— Clicking Insert on the Branch Maintenance PV List accesses Branch Maintenance
(SD.001.00), enabling you to add new branches to the system.
10. Type the project identifier of the project associated with the service call in Project ID.
If the project ID is unknown, press F3 or double-click the right mouse button. A list of all
active projects for the customer displays in Project Maintenance (PA.PRJ.00) in the Project
Controller module.
— To select a project ID, highlight the ID and click OK, or double-click the ID.
— Clicking Edit on the Active Projects in Login Company List accesses Project Maintenance
(PJ.PRJ.00), enabling you to modify information for an existing project.
— Clicking Insert on the Active Projects in Login Company List accesses Project
Maintenance (PJ.PRJ.00), enabling you to add new projects to the system.

120 Service Dispatch
11. Type the contract identifier of the contract entered in Service Contract Entry (SN.001.00) in the
Service Contracts module associated with the service call in Contract ID.
If the contract ID is unknown, press F3 or double-click the right mouse button. A list of all
service contracts in Service Contract Entry (SN.001.00) displays.
Clicking the ellipsis (...) button to the left of Contract ID displays a list of active service
contracts for the customer site.
When a service contract is associated with a service call, the following fields default from the
service contract: Call Type, Primary Tech, and Priority.
Attaching a service contract to a service call allows special pricing associated with the service
contract during invoicing.
If Active Contract Notification is selected in Service Series Setup Maintenance (SD.000.000)
and the customer site has active service contracts, a warning message displays.
12. Type the call type identifier of the call type, line of business, or division associated with the service
call in Call Type.
If the call type must be changed or the ID is unknown, press F3 or double-click the right
mouse button. A list of all call types in Call Type Maintenance (SD.003.00) displays.
— To select a call type ID, highlight the ID and click OK, or double-click the ID.
— Clicking Edit on the Call Type Maintenance PV List accesses Call Type Maintenance
(SD.003.00), enabling you to modify information for an existing call type.
— Clicking Insert on the Call Type Maintenance PV List accesses Call Type Maintenance
(SD.003.00), enabling you to add new call types to the system.
The call type associated with the customer site defaults.
If a service contract is attached to the service call, the call type associated with the service
contract overrides the default.
Note: Call Type determines the subaccount used during the invoice entry process. The subaccount
defaults from the call type unless Use Sub from Site is selected in Call Type Maintenance
(SD.003.00).
13. Type the call status identifier of the call status associated with the service call in Call Status.
If the call status must be changed or the ID is unknown, press F3 or double-click the right
mouse button. A list of all call statuses in Call Status Maintenance (SD.002.00) displays.
— To select a call status ID, highlight the ID and click OK, or double-click the ID.
— Clicking Edit on the Call Status Maintenance PV List accesses Call Status Maintenance
(SD.002.00), enabling you to modify information for an existing call status.
— Clicking Insert on the Call Status Maintenance PV List accesses Call Status Maintenance
(SD.002.00), enabling you to add new call statuses to the system.
The call status associated with the customer site defaults.
14. Type the requested start date for the service call in Promised Date.
Promised Date defaults to the current system date unless the call is outside normal business
hours set up in Service Series Setup Maintenance (SD.000.00).
If the service call is entered outside of normal business hours, the date defaults to the next
business date.
Promised Date may be overridden during entry of the service call.

Service Call Entry 121
15. Type the range of times that a service call is to be performed in Time From and Time To.
Time From is calculated using the time of the system plus the Service Call Lead Time entered
in Service Series Setup Maintenance (SD.000.00).
Time To is calculated by Time From plus the Service Call Range Time entered in Service
Series Setup Maintenance (SD.000.00).
The default values for Time From and Time To can be overridden during entry.
16. Type the ID of the technician responsible for completing the work on the service call in Primary
Tech.
Primary Tech is used to display service calls in Dispatch (SD.201.00).
If the technician must be changed or the ID is unknown, press F3 or double-click the right
mouse button. A list of all technicians in Employee Maintenance (SD.007.00) displays.
— To select a technician ID, highlight the ID and click OK, or double- click the ID.
— Clicking Edit on the Employee Maintenance PV List accesses Employee Maintenance
(SD.007.00), enabling you to modify information for an existing technician.
— Clicking Insert on the Employee Maintenance PV List accesses Employee Maintenance
(SD.007.00), enabling you to add new technicians to the system.
After the site has been entered, the default technician for the customer site displays.
If a service contract is attached to the service call, the primary technician associated with the
service contract defaults.
Note: Dispatch (SD.201.00) uses the primary technician entered here as the default technician.
17. Type the priority associated with the service call in Priority.
Clicking the down arrow to the right of Priority displays a predefined list set up: Premium,
High, Medium, and Low.
After the site has been entered, the default priority for the customer site displays.
If a service contract is attached to the service call, the priority associated with the service
contract defaults.
During the dispatching process, users can restrict service calls that display on dispatching
screens by priority of the service calls. For example, a dispatcher can view only open service
calls with a premium priority.

122 Service Dispatch
Entering Line Items, Service Call Info Tab
Figure 53: Service Call Entry (SD.200.00), Service Call Info tab
To enter line items:
1. Type the code that describes the reason for the service call in Problem Code.
If the problem code ID is unknown, press F3 or double-click the right mouse button. A list of
all problem codes in Problem Code Maintenance (SD.008.00) associated with Call Type in
Service Call Entry (SD.200.00) displays.
— To select a problem code ID, highlight the ID and click OK, or double-click the ID.
After a problem code has been selected, the problem code description defaults to
Description/Problem Name.
Multiple problem codes can be attached to the service call.
Using problem codes is optional when creating a service call.
If Prompt Operator is selected for the problem code in Problem Code Maintenance
(SD.008.00), a window showing the text entered in Notes for the problem code appears.
Note: This feature allows customer service representatives to give the best service by asking the
appropriate questions to get information needed to complete a service call without having to
spend large amounts of time and money for training.

Service Call Entry 123
2. Type the ID of the technician responsible for performing the work to complete the problem code in
Technician ID.
If the technician ID is unknown, press F3 or double-click the right mouse button. A list of all
technicians in Employee Maintenance (SD.007.00) displays.
— Select a technician ID, highlight the ID and click OK, or double-click the ID.
— Clicking Edit on the Employee Maintenance PV List accesses Employee Maintenance
(SD.007.00), enabling you to modify information for an existing technician.
— Clicking Insert on the Employee Maintenance PV List accesses Employee Maintenance
(SD.007.00), enabling you to add new technicians to the system.
Note: Normally, customer service representatives will not know the technicians responsible for
completing the work on a service call. The technicians are assigned to the service call during the
dispatching process.
3. Type the estimated amount of time for performing the work to complete the problem code in
Duration.
The value defaults from Estimated Time Duration entered in Problem Code Maintenance
(SD.008.00) for the problem code entered in Problem Code ID.
4. Type the ID of the service contract entered in Service Contract Entry (SN.001.00) associated with
the Problem Code of the service call in Contract ID.
If the contract ID is unknown, press F3 or double-click the right mouse button. A list of all
service contracts for the customer site displays in Service Contract Entry (SN.001.00).
— To select a contract ID, highlight the ID and click OK, or double-click the ID.
— Clicking Edit on the Contract Maintenance PV List accesses Service Contract Entry
(SN.001.00), enabling you to modify information for an existing service contract.
— Clicking Insert on the Contract Maintenance PV List accesses Service Contract Entry
(SN.001.00), enabling you to add new service contracts to the system.
5. Type the piece of equipment to be serviced on the service call in Equipment ID.
If the equipment ID is unknown, press F3 or double-click the right mouse button. A list of all
pieces of equipment in Equipment Entry (SE.001.00) of the Equipment Maintenance module
displays. To select an equipment ID, highlight the ID and click OK, or double-click on the ID.
To restrict the Service Equipment possible values list by the customer ID and/or site ID
entered in the screen header, select either or both of the Filter Equip ID check boxes.
Once a piece of equipment has been selected, the Warranty Start Date, Warranty End Date,
and the Serial Number for the piece of equipment display.
Note: Clicking Equipment on the bottom of Service Call Entry (SD.200.00) displays Customer
Equipment (SD.200.03). This subscreen displays all equipment associated with the customer site
whether under a service contract or not.
6. Type a preventive maintenance code for the piece of equipment to be serviced on the service call
in PM Code.
If the PM code is unknown, press F3 or double-click the right mouse button. A list of all
preventive maintenance types in PM Code Maintenance (SE.002.00) of the Equipment
Maintenance module displays.
— To select a PM code, highlight the ID and click OK, or double-click the ID.
— Clicking Edit on the PM Code Maintenance PV List accesses PM Code Maintenance
(SE.002.00), enabling you to modify information for an existing preventive
maintenance code.
— Clicking Insert on the PM Code Maintenance PV List accesses PM Code Maintenance
(SE.002.00), enabling you to add new preventive maintenance codes to the
system.

124 Service Dispatch
Note: PM Code in Service Call Entry (SD.200.00) is for informational purposes only.
Note: Clicking PM Tasks at the bottom of Service Call Entry (SD.200.00) accesses Service
Contract - Equipment PM Tasks (SE.001.00). This screen displays the line item tasks of the PM
Code for the service call.
7. If the piece of equipment has a warranty period, the Warranty Start Date and Warranty End Date
display.
These fields are display-only and cannot be changed.
8. If the piece of equipment has a serial number, the serial number displays in Serial Nbr.
Serial Nbr is display-only and cannot be changed.
9. Type miscellaneous notes for the problem code associated with the service call in Note.
The length of Note is 60 characters.
Longer notes can be recorded using the Notes/Attachments icon .
10. After the technician has been to the customer location, enter the cause of the problem in
Cause ID.
If the cause ID is unknown, press F3 or double-click the right mouse button. A list of all
problem causes in Cause Code Maintenance (SD.014.00) displays.
— To select a problem cause, highlight the ID and click OK, or double-click the ID.
— Clicking Edit on the Problem Cause List accesses Cause Code Maintenance (SD.014.00),
enabling you to modify information for an existing problem cause.
— Clicking Insert on the Problem Cause List accesses Cause Code Maintenance
(SD.014.00), enabling you to add new problem causes to the system.
Note: Typically, customer service representatives do not know the cause of problems when
entering the service call in Service Call Entry (SD.200.00). The cause of a problem is usually not
known until the technician has been to the customer site.
Note: Cause codes can be associated with the problem codes of a service call by dispatchers in
Dispatch (SD.201.00) and Service Call Entry (SD.200.00).
11. After the technician has been to the customer location, enter the problem Resolution ID.
If the resolution ID is unknown, press F3 or double-click the right mouse button. A list of all
resolutions in Resolution Code Maintenance (SD.015.00) displays.
To select a resolution ID, highlight the ID and click OK, or double-click the ID.
Clicking Edit on the Resolutions List accesses Resolution Code Maintenance (SD.015.00),
enabling you to modify information for an existing resolution.
Clicking Insert on the Resolutions List accesses Resolution Code Maintenance (SD.015.00),
enabling you to add new resolutions to the system.
Note: Typically, customer service representatives do not know the cause of problems when
entering the service call in Service Call Entry (SD.200.00). The cause of a problem is usually not
known until the technician has been to the customer site.
Note: Resolution codes can be associated with the problem codes of a service call by dispatchers
in Dispatch (SD.201.00) and Service Call Entry (SD.200.00).

Service Call Entry 125
Entering Other Information, Other Info Tab
Additional information may be entered into the Other Info tab; however, all the fields on this tab are
optional. They are for informational purposes only.
Figure 54: Service Call Entry (SD.200.00), Other Info tab
To enter additional information:
1. Click the Other Info tab or press ALT+O. The Other Info tab displays.
2. Type the contact name of the person calling in the service request in Caller Name.
If Attention for the customer site is populated in Site Maintenance (SD.025.00), its value
defaults.
3. Type the purchase order number of the customer for the service call request in Customer PO.
If P.O. Number for the customer site is set to Required in Site Maintenance (SD.025.00), then
a Purchase Order Number must be entered before the service call can be saved.
If a Blanket PO Number is entered for the customer site in Site Maintenance (SD.025.00),
then that Purchase Order number displays.
4. If the customer has a security system, type the security access code that may be needed by the
service technician(s) to obtain access into the building.
If a security code was entered in Sec. Entry Code for the customer site in Site Maintenance
(SD.025.00), the security code defaults.

126 Service Dispatch
5. If marketing programs are used to promote business, type the advertising method that influenced
the customer to request services in Media ID.
If the media must be changed or the ID is unknown, press F3 or double-click the right mouse
button. A list of all media resources in Media Buy Maintenance (SD.012.00) displays.
— To select a media ID, highlight the ID and click OK, or double-click the ID.
— Clicking Edit on the Media Buy Maintenance PV List accesses Media Buy Maintenance
(SD.012.00), enabling you to modify information for an existing media resource.
— Clicking Insert on the Media Buy Maintenance PV List accesses Media Buy Maintenance
(SD.012.00), enabling you to add new media resources to the system.
The Media ID associated with the customer site defaults.
Note: Advertising Media Performance Report (SD.630.00) is used to report the revenue and the
number of calls associated with media IDs. For more information, see “Advertising Media Performance
Report (SD.630.00)” on page 499.
Note: Referral from other customers can be tracked with media codes.
6. Type the terms for the service call in Terms ID.
If the terms must be changed or the ID is unknown, press F3 or double-click the right mouse
button. A list of all terms in Terms Maintenance (21.270.00) displays.
— To select a terms ID, highlight the ID and click OK, or double-click the ID.
— Clicking Edit on the Terms Maintenance List accesses Terms Maintenance (21.270.00),
enabling you to modify information for existing terms.
— Clicking Insert on the Terms Maintenance List accesses Terms Maintenance
(21.270.00), enabling you to add new terms to the system.
The Terms ID associated with the customer defaults to this field.
After the terms ID is selected, the description of the terms ID displays.
Note: Terms are used to create Due Date and Discount Date of an invoice in Invoice & Memo
(08.010.00) when the invoice is printed for a service call in Service Call Invoice (SD.640.00) or Service
Call Invoice (SSRS) (SD.643.00), and processed in Service Invoice Printing - Keep/Delete
(SD.642.00). Due Date and Discount Date of an invoice are based on Invoice Date and Terms ID of the
invoice.
Note: Multiple installment terms have no effect on Field Service Management modules. Multiple
installment terms are processed when the batch of invoices is released in Invoice & Memo
(08.010.00).
7. Type the payment method for the service call into Pymt Method.
If the payment method must be changed, click the down arrow to the right of Pymt Method to
display a list of predefined values: Cash, Check, Discover, Visa, Master Card, American
Express, or In House Charge.
Once the customer site is selected, the default payment method defaults from Site
Maintenance (SD.025.00).
Pymt Method is used for informational purposes only.
8. Invoice Status indicates if the service call is open or closed.
Invoice Status is managed by the system.

Service Call Entry 127
9. Invoice Handling is used during Invoice Entry (SD.202.00) to assist the approval process prior to
invoicing the service call.
Click the down arrow to the right of Invoice Handling to display the predefined list of options.
10. Once the Customer ID is selected for the service call and if the customer has credit card
information attached in Customer Maintenance (08.260.00), Credit Card Nbr, Card Type, and
Expiration Date are populated.
These fields are display-only.
11. Once the Customer ID is selected for the service call, Current Balance, other aging fields, and
Available Credit defaults from Customer Maintenance (08.260.00).
These fields are display-only.

128 Service Dispatch
Saving the Service Call When all the necessary information has been entered for the service call:
You can save and release the service call for processing. Click Finish on the toolbar. The system
saves and releases the service call while Service Call Entry (SD.200.00) is cleared for the next
service call to be entered. The system assigns the Service Call ID if Auto Number Service Call is
enabled in Service Series Setup Maintenance (SD.000.00).
Note: Handling must be set to Release Now in order to have the service call display on Dispatch
(SD.201.00).
Note: Click Close on the toolbar to process the service call and close Service Call Entry
(SD.200.00).
To save the service call without releasing the service call and without closing Service Call Entry
(SD.200.00), click Save on the toolbar. The system saves the service call and assigns the Service
Call ID if Auto Number Service Call is enabled in Service Series Setup Maintenance (SD.000.00).
Note: Handling can be set to any value.
To save the service call without releasing the service call while closing Service Call Entry
(SD.200.00), click Finish on the toolbar. The system saves the service call and assigns the Service
Call ID if Auto Number Service Call is enabled in Service Series Setup Maintenance (SD.000.00)
and closes Service Call Entry (SD.200.00).
Note: Handling must be set to Release Later or Hold.

Service Call Entry 129
Entering a New Customer during Service Call Entry
To add a new customer:
1. Open Service Call Entry (SD.200.00) by choosing Module | Service Dispatch | Service Call Entry
from the menu. Service Call Entry (SD.200.00) displays.
2. Click the New Customer tab. The New Customer tab displays.
Figure 55: Service Call Entry (SD.200.00), New Customer tab
3. Type the customer ID of the new customer in Customer ID.
If Auto Number Customer ID in Service Series Setup Maintenance (SD.000.00) is enabled,
Customer ID is automatically assigned when Create is selected.
If Auto Number Customer ID in Service Series Setup Maintenance (SD.000.00) is enabled,
Customer ID is display-only.
4. Type a default site identifier for the new customer in Site ID.
Note: Site ID updates Dflt Ship To ID of the customer on the Order Management tab of Customer
Maintenance (08.260.00). Dflt Ship To ID defaults to Site ID for new service calls in Service Call
Entry (SD.200.00) when the customer is selected.
5. Type the site name for the new site in Description.
6. Type the name of the new customer in Name.

130 Service Dispatch
7. Type a contact person for the new site in Attention.
8. Type a salutation for the contract person in Salutation.
9. Type the address of the site in the two address fields: Address 1 and Address 2.
10. Type the city where the site is located in City.
11. Type the state where the site is located in State.
12. Type the zip code of the site in Zip.
13. Type the country or region where the site is located in Cntry.
If the country or region ID is unknown, press F3 or double-click the right mouse button. A list
of all countries or regions in Country/Region Maintenance (21.300.00) displays.
— To select a country or region, highlight the ID and click OK, or double-click the ID.
— Clicking Edit on the Country/Region List accesses Country/Region Maintenance
(21.300.00), enabling you to modify information for existing countries or regions.
— Clicking Insert on the Country/Region List accesses Country/Region Maintenance
(21.300.00), enabling you to add new countries or regions to the system.
14. Type the class identifier for the new customer in the Class ID.
If the Class ID is unknown, press F3 or double-click the right mouse button. A list of all
Accounts Receivable customer classes in Customer Class (08.290.00) displays.
— To select a class, highlight the ID and click OK, or double-click the ID.
— Clicking Edit on the Customer Class List accesses Customer Class (08.290.00), enabling
you to modify information for existing customer classes.
— Clicking Insert on the Customer Class List accesses Customer Class (08.290.00),
enabling you to add new customer classes to the system.
15. Type the default salesperson identifier for the new site in Salesperson.
If the salesperson ID is unknown, press F3 or double-click the right mouse button. A list of all
salespersons in Salesperson Maintenance (08.310.00) displays.
— To select a salesperson ID, highlight the ID and click OK, or double-click the ID.
— Clicking Edit on the Salesperson List accesses Salesperson Maintenance (08.310.00),
enabling you to modify information for existing salespersons.
— Clicking Insert on the Salesperson List accesses Salesperson Maintenance (08.310.00),
enabling you to add new salespersons to the system.
16. Type the default terms identifier for the new customer in Terms ID.
If the terms ID is unknown, press F3 or double-click the right mouse button. A list of all terms
in Terms Maintenance (21.270.00) displays.
— To select a terms ID, highlight the ID and click OK, or double-click the ID.
— Clicking Edit on the Terms Maintenance List accesses Terms Maintenance (21.270.00),
enabling you to modify information for existing terms.
— Clicking Insert on the Terms Maintenance List accesses Terms Maintenance
(21.270.00), enabling you to add new terms to the system.
Note: Terms are used to create Due Date and Discount Date of an invoice in Invoice & Memo
(08.010.00) when the invoice is printed for a service call in Service Call Invoice (SD.640.00) or
Service Call Invoice (SSRS) (SD.643.00), and processed in Service Invoice Printing - Keep/Delete
(SD.642.00). Due Date and Discount Date of an invoice are based on Invoice Date and Terms ID
of the invoice.
Note: Multiple installment terms have no effect on Field Service Management modules. Multiple
installment terms are processed when the batch of invoices is released in Invoice & Memo
(08.010.00).

Service Call Entry 131
17. Type the default tax identifier for the new site in Tax ID.
If the tax ID is unknown, press F3 or double-click the right mouse button. A list of all taxes in
Tax Maintenance (21.280.00) displays.
— To select a tax ID, highlight the ID and click OK, or double-click the ID.
— Clicking Edit on the Sales Tax List accesses Tax Maintenance (21.280.00), enabling you
to modify information for existing sales taxes.
— Clicking Insert on the Sales Tax List accesses Tax Maintenance (21.280.00), enabling
you to add new sales taxes to the system.
18. Type the default credit card number for the new customer in Card Nbr.
19. Type the default name on the credit card for the new customer in Card Holder Name.
20. Type the default credit card type for the new customer in Type.
21. Type the expiration date of the credit card in Expiration Date.
22. Type the phone number for the new site in Phone/Ext.
Ext. can contain a maximum of four digits.
23. Type the fax number for the new site in Fax/Ext.
Ext. can contain a maximum of four digits.
24. Select Print Statements to print a statement for the customer each time you print statements for
the customer’s statement cycle.
Note: The Statement Cycle defaults to the code set up in the Customer Defaults tab of AR Setup
(08.950.00).
25. Type the default Branch identifier for the branch responsible for the new site in Branch ID.
If the branch ID is unknown, press F3 or double-click the right mouse button. A list of all
branches in Branch Maintenance (SD.001.00) displays.
— To select a branch ID, highlight the ID and click OK, or double-click the ID.
— Clicking Edit on the Branch Maintenance PV List accesses Branch Maintenance
(SD.001.00), enabling you to modify information for an existing branch.
— Clicking Insert on the Branch Maintenance PV List accesses Branch Maintenance
(SD.001.00), enabling you to add new branches to the system.
26. Type the default call type identifier of the call type, line of business, or division to associate with
the new customer in Call Type.
If the call type ID is unknown, press F3 or double-click the right mouse button. A list of all call
types set up in Call Type Maintenance (SD.003.00) displays.
— To select a call type ID, highlight the ID and click OK, or double-click the ID.
— Clicking Edit on the Call Type Maintenance PV List accesses Call Type Maintenance
(SD.003.00), enabling you to modify information for an existing call type.
— Clicking Insert on the Call Type Maintenance PV List accesses Call Type Maintenance
(SD.003.00), enabling you to add new call types to the system.

132 Service Dispatch
27. Type the default call status identifier of the call status to associate with the new customer in Call
Status.
If the call status ID is unknown, press F3 or double-click the right mouse button. A list of all
call statuses in Call Status Maintenance (SD.002.00) displays.
— To select a call status ID, highlight the ID and click OK, or double-click the ID.
— Clicking Edit on the Call Status Maintenance PV List accesses Call Status Maintenance
(SD.003.00), enabling you to modify information for an existing call status.
— Clicking Insert on the Call Status Maintenance PV List accesses Call Status Maintenance
(SD.003.00), enabling you to add new call statuses to the system.
28. Type the default dwelling identifier defining the dwelling to associate with the new site in Dwelling.
If the dwelling ID is unknown, press F3 or double-click the right mouse button. A list of all
dwelling types in Dwelling Maintenance (SD.005.00) displays.
— To select a dwelling ID, highlight the ID and click OK, or double-click the ID.
— Clicking Edit on the Dwelling Maintenance PV List accesses Dwelling Maintenance
(SD.005.00), enabling you to modify information for existing dwelling types.
— Clicking Insert on the Dwelling Maintenance PV List accesses Dwelling Maintenance
(SD.005.00), enabling you to add new dwelling types to the system.
29. Type the default geographic zone identifier to associate with the new site in Geo Zone ID.
If the geographic zone ID is unknown, press F3 or double-click the right mouse button. A list
of all geographic zones in Geographic Zone Maintenance (SD.009.00) displays.
— To select a geographic ID, highlight the ID and click OK, or double-click the ID.
— Clicking Edit on the Geographic Zone Maintenance PV List accesses Geographic Zone
Maintenance (SD.009.00), enabling you to modify information for existing
geographic zones.
— Clicking Insert on the Geographic Zone Maintenance PV List accesses Geographic Zone
Maintenance (SD.009.00), enabling you to add new geographic zones to the
system.
30. Select the default priority associated with a new service call in Priority.
Clicking the down arrow to the right of Priority displays a predefined list set up: Premium,
High, Medium, and Low.
Note: In Dispatch (SD.201.00), users can restrict service calls displayed by priority. For example,
the dispatcher can view all open service calls with a Premium priority.
31. Type the ID of the technician responsible for completing the work on the service calls for the new
site in Technician.
If the technician ID is unknown, press F3 or double-click the right mouse button. A list of all
technicians in Employee Maintenance (SD.007.00) displays.
— To select a technician ID, highlight the ID and click OK, or double-click the ID.
— Clicking Edit on the Employee Maintenance PV List accesses Employee Maintenance
(SD.007.00), enabling you to modify information for an existing technician.
— Clicking Insert on the Employee Maintenance PV List accesses Employee Maintenance
(SD.007.00), enabling you to add new technicians to the system.

Service Call Entry 133
32. Type the ID of the project manager who is responsible for the new site in Proj. Manager.
If the project manager ID is unknown, press F3 or double-click the right mouse button. A list
of all employees in Employee Maintenance (SD.007.00) displays.
— To select an employee ID, highlight the ID and click OK, or double-click the ID.
— Clicking Edit on the Employee Maintenance PV List accesses Employee Maintenance
(SD.007.00), enabling you to modify information for an existing employee.
— Clicking Insert on the Employee Maintenance PV List accesses Employee Maintenance
(SD.007.00), enabling you to add new employees to the system.
33. Click Create to have the system generate a customer record in Customer Maintenance
(08.260.00) of Account Receivable, a ship-to address record in Shipping Address (08.262.00) of
Account Receivable, and a customer site record in Site Maintenance (SD.025.00) of Service
Dispatch.
When the new customer is created, the system checks for duplicate Customer IDs.
Click OK to close Create Customer Record, the message that lists Created Customer ID and
Site ID.
Note: The Service Call Info tab of Service Call Entry (SD.200.00) displays.

134 Service Dispatch
Creating a New Service Call Using Duplicate Call To create a new service call by copying an existing one, use the Duplicate Call button to the right of
Service Call ID on Service Call Entry (SD.200.00).
To copy an existing service call:
1. Open Service Call Entry (SD.200.00).
2. Click Duplicate Call next to Service Call ID. Duplicate Service Call (SD.200.05) appears.
Figure 56: Duplicate Service Call (SD.200.05)
3. Enter the ID of the service call you want to copy.
To search for a service call ID, click Call Lookup . Service Call Lookup (SD.303.00) appears.
Figure 57: Service Call Lookup (SD.303.00)
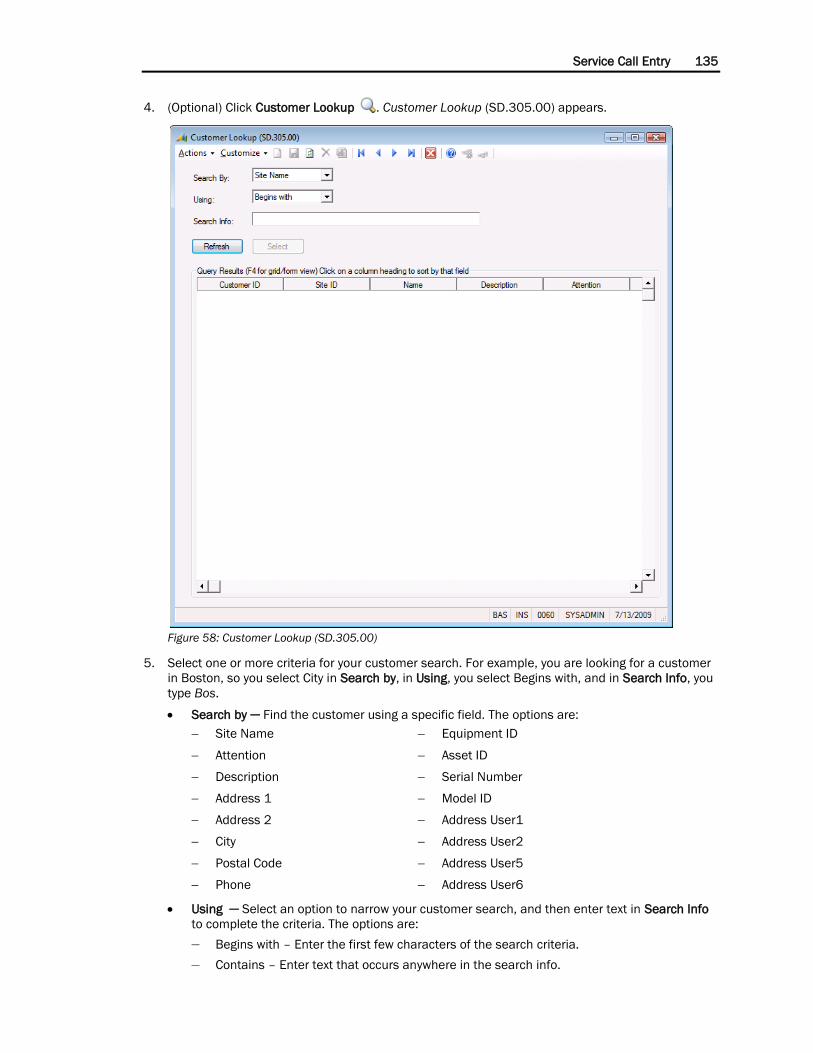
Service Call Entry 135
4. (Optional) Click Customer Lookup . Customer Lookup (SD.305.00) appears.
Figure 58: Customer Lookup (SD.305.00)
5. Select one or more criteria for your customer search. For example, you are looking for a customer
in Boston, so you select City in Search by, in Using, you select Begins with, and in Search Info, you
type Bos.
Search by ─ Find the customer using a specific field. The options are:
Site Name Equipment ID
Attention Asset ID
Description Serial Number
Address 1 Model ID
Address 2 Address User1
City Address User2
Postal Code Address User5
Phone Address User6
Using ─ Select an option to narrow your customer search, and then enter text in Search Info
to complete the criteria. The options are:
— Begins with – Enter the first few characters of the search criteria.
— Contains – Enter text that occurs anywhere in the search info.

136 Service Dispatch
Search Info ─ Enter text to complete the search criteria.
6. To view the search results, click Refresh.
7. Locate the correct customer, click the customer’s detail line, and then click Select. This returns
you to Service Call Lookup (SD.303.00). Note that the selected customer’s ID appears.
8. Click Refresh. The customer’s service calls appear in the grid.
9. Select the service call you want to copy, and then click Select. Duplicate Service Call (SD.200.05)
appears again with the service call ID you selected appearing in Service Call ID.
10. Click OK. Details from the service call you selected appear on Service Call Entry (SD.200.00).
To exit Duplicate Service Call (SD.200.05) without copying the service call, click Cancel.
11. Add any information that is still needed to complete your service call entry.
12. Click Save to create a new service call from a copy of the one you selected.

Service Call Entry 137
Canceling a Service Call
To cancel a service call:
1. Open Service Call Entry (SD.200.00) by choosing Module | Service Dispatch | Service Call Entry
from the menu.
Service Call Entry (SD.200.00) displays.
Figure 59: Service Call Entry (SD.200.00)
2. Type the identifier of the service call to be cancelled in the Service Call ID.
If the service call ID is unknown, press F3 or double-click the right mouse button. A list of all
service calls in Service Call Entry (SD.200.00) displays.
— To select a service call ID, highlight the ID and click OK, or double-click the ID.
3. Type the identifier of a cancelled service call in Call Status.
If the cancelled call status must be changed or the ID is unknown, press F3 or double-click
the right mouse button. A list of all call statuses in Call Status Maintenance (SD.002.00)
displays.
— To select the cancelled call status ID, highlight the ID and click OK, or double-left click
the ID.

138 Service Dispatch
— Clicking Edit on the Call Status Maintenance PV List accesses Call Status Maintenance
(SD.003.00), enabling you to modify information for an existing call status.
— Clicking Insert on the Call Status Maintenance PV List accesses Call Status Maintenance
(SD.003.00), enabling you to add new call statuses.
4. Choose Completed from the drop-down list in Handling.
Note: Because both completed and cancelled service calls will have a Handling of Completed, it is
recommended that you have one Call Status of COMPLETED and another Call Status of
CANCELLED. Two separate call statuses allow users to distinguish between service calls that had
all of the work performed and service calls that were cancelled by the customer.
5. Click Yes to cancel the service call when Call Handling Critical Warning appears, or click No to
cancel the outstanding changes to the service call record.
6. On the toolbar, click Save and then Close.
Note: Call Cancellation Error appears if time and material detail line items are entered for the
service call in Invoice - T & M Details (SD.203.00). If this message appears, you cannot cancel the
service call, and the system sets Handling back to the original value.
7. Click OK to close the Call Cancellation Error message.
8. Click Close on the toolbar.

Service Call Entry 139
Creating a Service Call Quote
Note: You can display and print a quote from the Service Dispatch module Reports menu. For more
information, see “T&M Quote (SD.633.00)” on page 533.
Entering Header Information
To create a service call quote:
1. Open Service Call Entry (SD.200.00) by choosing Module | Service Dispatch | Service Call Entry
from the menu.
Service Call Entry (SD.200.00) displays.
Figure 60: Service Call Entry (SD.200.00)
2. (Optional) The identification code assigned to the company you are currently working in appears in
Company ID. To enter a service call for another company, type that company’s ID.
3. Select Quote from the drop-down list in Handling.
4. Type the identifier of the new service call quote in Service Call ID.
If Auto Number Service Call ID in Service Series Setup Maintenance (SD.000.00) is enabled,
Service Call ID is automatically assigned when Save or Finish is clicked.

140 Service Dispatch
5. Type the customer identifier associated with the service call in Customer ID.
After typing the Customer ID, click the ellipsis (...) button to the left of Customer ID to open
Customer Maintenance (08.260.00) in the Accounts Receivable module.
If the customer ID is unknown, you can:
a) Press F3 or double-click the right mouse button.
A list of all active customers displays by Customer ID in ascending order. If a large
number of active customers exist in the system, the list may take some time to display.
b) To select a customer ID, highlight the ID and click OK, or double-click the ID.
Note:
When selecting a customer in Service Call Entry (SD.200.00), the Dflt Ship To ID on the
Order Management tab associated with the customer in Customer Maintenance
(08.260.00) of Accounts Receivable populates Site ID in Service Call Entry (SD.200.00).
If no Dflt Ship To ID is associated with the customer, Site ID in Service Call Entry
(SD.200.00) must be selected manually.
-OR-
a) Click Customer Lookup . Customer Lookup (SD.305.00) appears.
b) Click the down arrow to the right of Search By. A list of possible filters for your search
appears.
The search engine can locate a customer based on Site Name, Attention, Description,
Address 1, Address 2, City, Postal Code, Phone, Equipment ID, Asset ID, Serial Number,
Model ID, Address User1, Address User2, Address User5, and Address User6.
c) Select one of the values in Search By.
Note:
We recommend that you base searches on Address 1, because typically that address is
unique to a customer site. You can also use Phone Number for quick searches.
The Customization Manager module can be used to add Address User1, Address User2,
Address User5, and Address User6 of the SOADDRESS table to Site Maintenance
(SD.025.00). The search engine allows users to locate a customer and site by the
information entered in these user fields.
d) Refine your search in Using by selecting Begins with or Contains from the list that appears
when you click the down arrow.
e) In Search Info, type information to narrow the search further. You can enter partial data.
Example: For example, your customer is located at 3700 Oak Street. You select Address 1
from the Search By list, Begins with from the Using list, and then enter 3700 in Search Info.
f) Click Search.
6. Select the Filter Equip ID check box next to Cust ID if you would like to restrict the results of the
possible values list for Equip ID to include only information for this specific customer. This check
box can be used in conjunction with the Filter Equip ID check box for Site ID.

Service Call Entry 141
7. Type the customer’s site identifier associated with the service call in Site ID. If the site must be
changed or the ID is unknown, press F3 or double-click the right mouse button. A list of all sites
for the customer is displayed.
To select a site ID, highlight the ID and click OK, or double-click the ID.
Note: Click the ellipsis (...) button to the left of Site ID to open Site Maintenance (SD.025.00).
— Once Site Maintenance (SD.025.00) has been accessed, existing sites associated with
the customer can be viewed and edited while new sites can be added.
— Once a Site ID has been selected, the Site Attention, Site Address 1, Site Address 2, Site
City, Site State, Site Zip, and Site Telephone Number associated with the
customer site are populated. When a Site ID is associated with a service call, the
following fields default from the customer site: Branch ID, Call Type, Call Status,
Primary Tech, and Priority.
Note: When selecting a customer in Service Call Entry (SD.200.00), the Dflt Ship To ID on the
Order Management tab associated with the customer in Customer Maintenance (08.260.00) of
Accounts Receivable populates Site ID in Service Call Entry (SD.200.00).
Note: If no Dflt Ship To ID is associated with the customer, Site ID in Service Call Entry
(SD.200.00) must be selected manually.
8. Select the Filter Equip ID check box next to Site ID if you would like to restrict the results of the
possible values list for Equip ID to include only information for this specific site. This check box
can be used in conjunction with the Filter Equip ID check box for Cust ID.
9. Type the branch identifier of the branch responsible for completing the work on the service call in
Branch ID.
After entering a site, the default Branch ID for the customer site displays.
If the branch ID must be changed or the ID is unknown, press F3 or double-click the right
mouse button. A list of all branches in Branch Maintenance (SD.001.00) displays.
— To select a branch ID, highlight the ID and click OK, or double-click the ID.
— Clicking Edit on the Branch Maintenance PV List accesses Branch Maintenance
(SD.001.00), enabling you to modify information for an existing branch.
— Clicking Insert on the Branch Maintenance PV List accesses Branch Maintenance
(SD.001.00), enabling you to add new branches.
10. Type the project identifier of the project associated with the service call in Project ID.
If the project ID is unknown, press F3 or double-click the right mouse button. A list of all
projects in Project Maintenance (PA.PRJ.00) in the Project Controller module displays.
— To select a project ID, highlight the ID and click OK, or double-click the ID.
— Clicking Edit on the Active Projects in Login Company List accesses Project Maintenance
(PA.PRJ.00), enabling you to modify information for an existing project.
— Clicking Insert on the Active Projects in Login Company List accesses Project
Maintenance (PA.PRJ.00), enabling you to add new projects.

142 Service Dispatch
11. Type the contract identifier of the contract entered in Service Contract Entry (SN.001.00) and
associated with the service call in Contract ID.
If the contract ID is unknown, press F3 or double-click the right mouse button. A list of all
service contracts set up in Service Contract Entry (SN.001.00) displays.
Clicking on the ellipsis (...) button to the left of Contract ID displays a list of active service
contracts for the customer site.
When a service contract is associated with a service call, Call Type, Primary Tech, or Priority
default from the service contract.
Attaching a service contract to a service call allows special pricing associated with the service
contract during invoicing.
If Active Contract Notification is selected in Service Series Setup Maintenance (SD.000.000)
and the customer site has active service contracts, a warning message displays.
12. Type the call type identifier of the call type, line of business, or division associated with the service
call in Call Type.
If the call type must be changed or the ID is unknown, press F3 or double-click the right
mouse button. A list of all call types set up in Call Type Maintenance (SD.003.00) displays.
— To select a call type ID, highlight the ID and click OK, or double-click the ID.
— Clicking Edit on the Call Type Maintenance PV List accesses Call Type Maintenance
(SD.003.00), enabling you to modify information for an existing call type.
— Clicking Insert on the Call Type Maintenance PV List accesses Call Type Maintenance
(SD.003.00), enabling you to add new call types to the system.
The call type associated with the customer site defaults.
If a service contract is attached to the service call, the call type associated with the service
contract defaults.
Note: Call Type determines the subaccount to be used during the invoice entry process. The
subaccount defaults from the call type unless Use Sub from Site is selected in Call Type
Maintenance (SD.003.00).
13. Type the call status identifier of the call status associated with the service call in Call Status.
If the call status must be changed or the ID is unknown, press F3 or double-click the right
mouse button. A list of all call statuses set up in Call Status Maintenance (SD.002.00)
displays.
— To select a call status ID, highlight the ID and click OK, or double-click the ID.
— Clicking Edit on the Call Status Maintenance PV List accesses Call Status Maintenance
(SD.003.00), enabling you to modify information for an existing call status.
— Clicking Insert on the Call Status Maintenance PV List accesses Call Status Maintenance
(SD.003.00), enabling you to add new call statuses to the system.
The call status associated with the customer site defaults.
14. Type the requested start date for the service call in Promised Date.
Promised Date defaults to the current system date unless the call is outside normal business
hours.
If the service call is entered outside of normal business hours, the date defaults to the next
business date.
Promised Date may be overridden during entry of the service call.

Service Call Entry 143
15. Type the range of times that a service call is to be performed in the Time From and Time To.
Time From is calculated using the time of the system plus the Service Call Lead Time entered
in Service Series Setup Maintenance (SD.000.00).
Time To is calculated by Time From plus the Service Call Range Time entered in Service
Series Setup Maintenance (SD.000.00).
The default values for Time From and Time To can be overridden during entry.
16. Type the identifier of the technician responsible for completing the work on the service call in
Primary Tech.
If the technician ID must be changed or the ID is unknown, press F3 or double-click the right
mouse button. A list of all technicians set up in Employee Maintenance (SD.007.00) displays.
— To select a technician ID, highlight the ID and click OK, or double-click the ID.
— Clicking Edit on the Employee Maintenance PV List accesses Employee Maintenance
(SD.007.00), enabling you to modify information for an existing technician.
— Clicking Insert on the Employee Maintenance PV List accesses Employee Maintenance
(SD.007.00), enabling you to add new technicians to the system.
After the site is entered, the default technician for the customer site displays.
If a service contract is attached to the service call, the primary technician associated with the
service contract defaults.
17. Select the priority assigned to the service call in Priority.
Clicking the down arrow to the right of Priority displays a predefined list set up by: Premium,
High, Medium, or Low
After typing in the site, the default priority for the customer site displays.
If a service contract is attached to the service call, the priority associated with the service
contract defaults.
During the dispatching process, users can restrict service calls that display on dispatching
screens by service call priority. For example, a dispatcher can view only open or in-progress
service calls with a premium priority.

144 Service Dispatch
Entering Line Items, Service Call Info Tab
To enter line items:
1. Type the code that describes the reason for the service call in Problem Code.
If the problem code ID is unknown, press F3 or double-click the right mouse button. A list of
all problem codes associated with Call Type in Service Call Entry (SD.200.00) displays.
— To select a problem code ID, highlight the ID and click OK, or double-click the ID.
After a problem code has been selected, the problem code description defaults to
Description/Problem Name.
Multiple problem codes can be attached to the service call.
Using problem codes is optional when creating a service call.
If Prompt Operator is selected for the problem code in Problem Code Maintenance
(SD.008.00), a window showing the text entered in Notes for the problem code appears.
Note: This feature allows customer service representatives to give the best service by asking the
appropriate questions to get information needed to complete a service call without having to
spend large amounts of time and money for training.
2. Type the identifier of the technician responsible for performing the work to complete the problem
code in Technician ID.
If the technician ID is unknown, press F3 or double-click the right mouse button. A list of all
technicians set up in Employee Maintenance (SD.007.00) displays.
— To select a technician ID, highlight the ID and click OK, or double-click the ID.
— Clicking Edit on the Employee Maintenance List accesses Employee Maintenance
(SD.007.00), enabling you to modify information for an existing technician.
— Clicking Insert on the Employee Maintenance List accesses Employee Maintenance
(SD.007.00), enabling you to add new technicians to the system.
Note: Normally, customer service representatives do not know the technicians responsible for
completing the work on a service call. Technicians are assigned to the service call during the
dispatching process.
3. Type the estimated amount of time for performing the work to complete the problem code in
Duration.
Duration defaults from Estimated Time Duration in Problem Code Maintenance (SD.008.00)
for the problem code in Problem Code ID.
4. Type the contract ID of the contract entered in Service Contract Entry (SN.001.00) and associated
with the service call.
If the contract ID is unknown, press F3 or double-click the right mouse button. A list of all
service contracts in Service Contract Entry (SN.001.00) displays.
— To select a contract ID, highlight the ID and click OK, or double-click the ID.
— Clicking Edit on the Contract Maintenance PV List accesses Service Contract Entry
(SN.001.00), enabling you to modify information for an existing service contract.
— Clicking Insert on the Contract Maintenance PV List accesses Service Contract Entry
(SN.001.00), enabling you to add new service contracts to the system.

Service Call Entry 145
5. Type the piece of equipment that will be serviced on the service call in Equipment ID.
If the equipment ID is unknown, press F3 or double-click the right mouse button. A list of all
pieces of equipment set up in Equipment Entry (SE.001.00) of the Equipment Maintenance
module displays. To select an equipment ID, highlight the ID and click OK, or double-click
the ID.
To restrict the Service Equipment possible values list by the customer ID and/or site ID
entered in the screen header, select either or both of the Filter Equip ID check boxes as
needed.
Once a piece of equipment has been selected, the Warranty Start Date, Warranty End Date,
and the Serial Number for the piece of equipment display.
Note: Clicking Equipment on the bottom of Service Call Entry (SD.200.00) displays Customer
Equipment (SD.200.03). This subscreen displays all equipment associated with the customer site
whether under a service contract or not.
6. Type a preventive maintenance code for the piece of equipment to be serviced on the service call
in PM Code.
If the PM code ID is unknown, press F3 or double-click the right mouse button. A list of all
preventive maintenance records set up in PM Code Maintenance (SE.002.00) of the
Equipment Maintenance module displays.
— To select a PM code, highlight the ID and click OK, or double-click the ID.
— Clicking Edit on the PM Code Maintenance PV List accesses PM Code Maintenance
(SE.002.00), enabling you to modify information for an existing preventive
maintenance code.
— Clicking Insert on the PM Code Maintenance PV List accesses PM Code Maintenance
(SE.002.00), enabling you to add new preventive maintenance codes to the
system.
Note: Entering a PM code in the Service Call Entry (SD.200.00) is for informational purposes only.
Note: Clicking PM Tasks at the bottom of Service Call Entry (SD.200.00) accesses Service
Contract - Equipment PM Tasks (SE.001.00). This screen displays the line item tasks of the PM
code for the service call.
7. If the piece of equipment has a warranty period, the Warranty Start Date and Warranty End Date
display.
These fields are display-only and cannot be changed.
8. If the piece of equipment has a serial number, the serial number will display in Serial Nbr.
Serial Nbr is display-only and cannot be changed.
9. Type miscellaneous notes for the problem code associated with the service call in Note.
The length of Note is 60 characters.
Longer notes can be recorded using the Notes/Attachments icon .
10. After the technician has been to the customer location, the cause of the problem can be entered
into Cause ID.
Data is typically not entered in Cause ID during service call entry.
If the cause ID is unknown, press F3 or double-click the right mouse button. A list of all
problem causes in Cause Code Maintenance (SD.014.00) displays.
— To select a problem cause ID, highlight the ID and click OK, or double-click the ID.
— Clicking Edit on the Problem Cause List accesses Cause Code Maintenance (SD.014.00),
enabling you to modify information for an existing problem cause.

146 Service Dispatch
— Clicking Insert on the Problem Cause List accesses Cause Code Maintenance
(SD.014.00), enabling you to add new problem causes to the system.
Note: Typically, customer service representatives do not know the cause of problems when
entering the service call in Service Call Entry (SD.200.00). The cause of a problem is usually not
known until the technician has been to the customer site.
Note: Cause codes can be associated with the problem codes of a service call by dispatchers in
Dispatch (SD.201.00) and Service Call Entry (SD.200.00).
11. After the technician has been to the customer location, the resolution for the problems can be
entered into Resolution ID.
Data is typically not entered in Resolution ID during service call entry.
If the resolution ID is unknown, press F3 or double-click the right mouse button. A list of all
resolutions set up in Resolution Code Maintenance (SD.015.00) displays.
— To select a resolution ID, highlight the ID and click OK, or double-click the ID.
— Clicking Edit on the Resolutions List accesses Resolution Code Maintenance
(SD.015.00), enabling you to modify information for an existing resolution.
— Clicking Insert on the Resolutions List accesses Resolution Code Maintenance
(SD.015.00), enabling you to add new resolutions to the system.
Note: Typically, customer service representatives do not know the cause of problems when
entering the service call in Service Call Entry (SD.200.00). The cause of a problem is usually not
known until the technician has been to the customer site.
Note: Resolution codes can be associated with the problem codes of a service call by dispatchers
in Dispatch (SD.201.00) and Service Call Entry (SD.200.00).
12. Click Save on the toolbar.
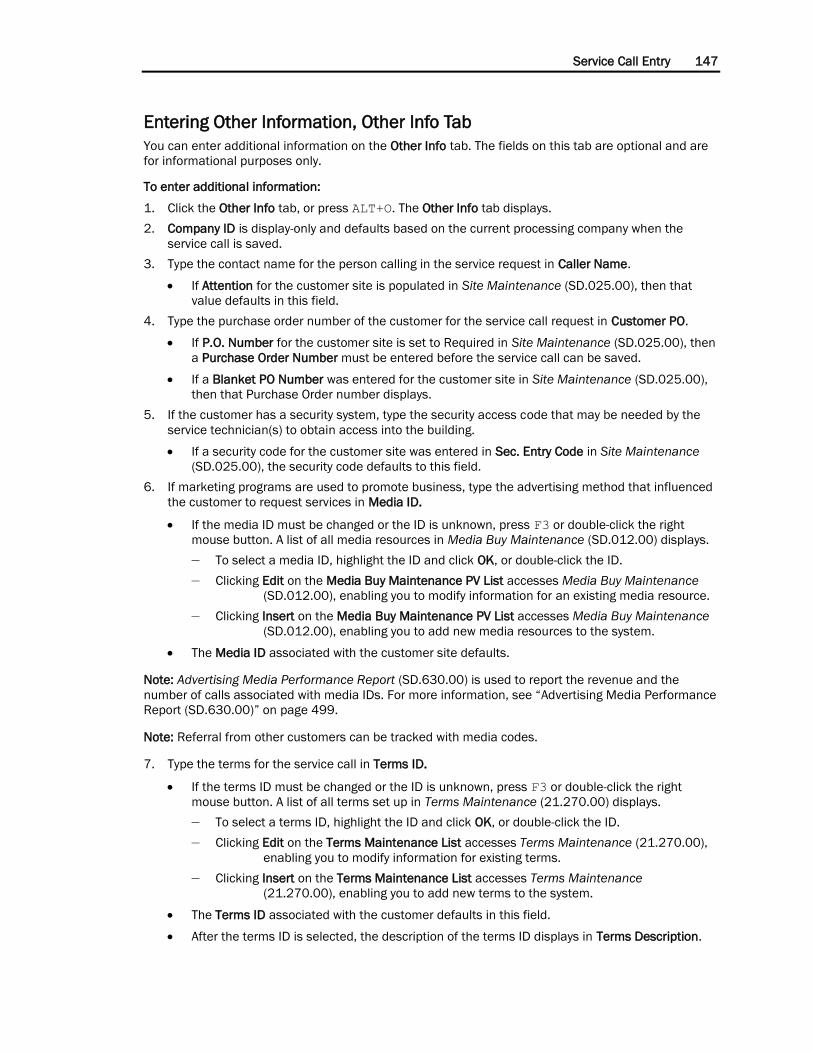
Service Call Entry 147
Entering Other Information, Other Info Tab
You can enter additional information on the Other Info tab. The fields on this tab are optional and are
for informational purposes only.
To enter additional information:
1. Click the Other Info tab, or press ALT+O. The Other Info tab displays.
2. Company ID is display-only and defaults based on the current processing company when the
service call is saved.
3. Type the contact name for the person calling in the service request in Caller Name.
If Attention for the customer site is populated in Site Maintenance (SD.025.00), then that
value defaults in this field.
4. Type the purchase order number of the customer for the service call request in Customer PO.
If P.O. Number for the customer site is set to Required in Site Maintenance (SD.025.00), then
a Purchase Order Number must be entered before the service call can be saved.
If a Blanket PO Number was entered for the customer site in Site Maintenance (SD.025.00),
then that Purchase Order number displays.
5. If the customer has a security system, type the security access code that may be needed by the
service technician(s) to obtain access into the building.
If a security code for the customer site was entered in Sec. Entry Code in Site Maintenance
(SD.025.00), the security code defaults to this field.
6. If marketing programs are used to promote business, type the advertising method that influenced
the customer to request services in Media ID.
If the media ID must be changed or the ID is unknown, press F3 or double-click the right
mouse button. A list of all media resources in Media Buy Maintenance (SD.012.00) displays.
— To select a media ID, highlight the ID and click OK, or double-click the ID.
— Clicking Edit on the Media Buy Maintenance PV List accesses Media Buy Maintenance
(SD.012.00), enabling you to modify information for an existing media resource.
— Clicking Insert on the Media Buy Maintenance PV List accesses Media Buy Maintenance
(SD.012.00), enabling you to add new media resources to the system.
The Media ID associated with the customer site defaults.
Note: Advertising Media Performance Report (SD.630.00) is used to report the revenue and the
number of calls associated with media IDs. For more information, see “Advertising Media Performance
Report (SD.630.00)” on page 499.
Note: Referral from other customers can be tracked with media codes.
7. Type the terms for the service call in Terms ID.
If the terms ID must be changed or the ID is unknown, press F3 or double-click the right
mouse button. A list of all terms set up in Terms Maintenance (21.270.00) displays.
— To select a terms ID, highlight the ID and click OK, or double-click the ID.
— Clicking Edit on the Terms Maintenance List accesses Terms Maintenance (21.270.00),
enabling you to modify information for existing terms.
— Clicking Insert on the Terms Maintenance List accesses Terms Maintenance
(21.270.00), enabling you to add new terms to the system.
The Terms ID associated with the customer defaults in this field.
After the terms ID is selected, the description of the terms ID displays in Terms Description.

148 Service Dispatch
Note: Terms are used to create Due Date and Discount Date of an invoice in Invoice & Memo
(08.010.00) when the invoice is printed for a service call in Service Call Invoice (SD.640.00) or
Service Call Invoice (SSRS) (SD.643.00), and processed in Service Invoice Printing - Keep/Delete
(SD.642.00). Due Date and Discount Date of an invoice are based on Invoice Date and Terms ID
of the invoice.
Note: Multiple installment terms have no effect on Field Service Management modules. Multiple
installment terms are processed when the batch of invoices is released in Invoice & Memo
(08.010.00).
8. Type the payment method for the service call into Pymt Method.
If the payment method is unknown, click the down arrow to the right of Pymt Method to
display a list of predefined values: Cash, Check, Discover, Visa, Master Card, American
Express, or In House Charge.
Once the customer site is selected, the default payment method defaults from Site
Maintenance (SD.025.00).
9. Invoice Status indicates if the service call is open or closed.
Invoice Status is managed by the system.
10. Invoice Handling is used during Invoice Entry (SD.202.00) to assist the approval process prior to
invoicing the service call.
Click the down arrow to the right of Invoice Handling to display the predefined list of options.
11. Note that Source Svc Call ID contains the identifier of the service call you duplicated to create the
current service call.
12. Once the Customer ID is selected for the service call and if the customer has credit card
information attached in Customer Maintenance (08.260.00), Credit Card Nbr, Credit Card Type,
and Expiration Date are populated.
These fields are display-only.
13. Once the Customer ID is selected for the service call, Current Balance, other aging fields, and
Available Credit defaults from Customer Maintenance (08.260.00).
These fields are display-only.
14. Click Save on the toolbar.
15. Click Close on the toolbar.

Service Call Entry 149
Viewing Service Calls Not Completed
To view a service call not completed:
1. Open Service Call Entry (SD.200.00) by choosing Module | Service Dispatch | Service Call Entry
from the menu.
Service Call Entry (SD.200.00) displays.
2. Type the identifier of the service call to be viewed in the Service Call ID.
If the service call ID is unknown, press F3 or double-click the right mouse button. A list of all
completed service calls set up in Service Call Entry (SD.200.00) displays.
— To select a service call ID, highlight the ID and click OK, or double-click the ID.
3. Click Close on the toolbar.
Note: To view a list of open service calls, use “Open Service Call List (SD.620.00)” on page 509.
Viewing Completed Service Calls
To view a completed service call:
1. Open Service Call Entry (SD.200.00) by choosing Module | Service Dispatch | Service Call Entry
from the menu.
Service Call Entry (SD.200.00) displays.
2. Select Completed Calls.
3. Type the identifier of the service call to be viewed in the Service Call ID.
If the service call ID is unknown, press F3 or double-click the right mouse button. A list of all
completed service calls set up in Service Call Entry (SD.200.00) displays.
— To select a service call ID, highlight the ID and click OK, or double-click the ID.
4. Click Close on the toolbar.
Note: To view a listing of completed service calls that are billable, use “Billable - Completed Calls
(SD.623.00)” on page 500.

150 Service Dispatch

Dispatching 151
Dispatching
Introduction to Dispatching Both Dispatch (SD.201.00) and Graphical Dispatch Board (SD.900.00) enable users to perform the
functions related to viewing open service calls after the calls have been entered in Service Call Entry
(SD.200.00). Service Dispatch allows dispatching departments to manage open service calls
efficiently because the system gives users the flexibility to view open service calls in a variety of ways.
For example, users can set up one call view template to display only service calls for one branch, a
second call view to display only service calls for one technician, and another call queue to display only
service calls with a high priority.
Note: You can also run a report of open service calls. For more information, see “Open Service Call List
(SD.620.00)” on page 509.
Dispatching service calls is a two-step process. First, users can set up call view templates in Dispatch -
View Maintenance (SD.004.00). Dispatch - View Maintenance (SD.004.00) allows users to set up an
unlimited number of call viewing queues. Second, users can display open service calls in a number of
ways using Dispatch (SD.201.00) and/or Graphical Dispatch Board (SD.900.00).

152 Service Dispatch
Viewing All Open Service Calls Creating a Call View Template
To create a call view template:
1. Choose Module | Service Dispatch | Dispatch - View Maintenance from the menu.
Dispatch - View Maintenance (SD.004.00) displays.
Figure 61: Dispatch - View Maintenance (SD.004.00)
2. Type a call view template identifier indicating that all open service calls display in Dispatch
(SD.201.00) in Call View.
For example, type ALL in Call View.
3. Type a call view template description indicating that all open service calls display in Dispatch
(SD.201.00) in Description.
For example, type All Open Service Calls in Description.
4. Verify that the check boxes to the left of Premium, High, Medium and Low in the Priority frame are
selected.
Premium, High, Medium, and Low Priority default to selected when creating new call view
templates in Dispatch - View Maintenance (SD.004.00).
5. Verify that the All check box to the right of Branch ID is selected.
Choosing All to the right of the Branch ID allows users to view all open service calls for every
branch simultaneously.
The All check box to the right of the Branch ID defaults to selected when creating new call
view templates in Dispatch - View Maintenance (SD.004.00).
6. Verify that the All check box to the right of Technician is selected.
Choosing All to the right of Technician allows users to view all of the open service calls for all
technicians simultaneously.
The All check box to the right of the Technician defaults to selected when creating new call
view templates in Dispatch - View Maintenance (SD.004.00).
7. Press the Call Type button and insure the grid is empty.
8. Press the Call Status button and insure the grid is empty.
9. Press the Geographic button and insure all geographic zones are listed in the grid.
Note: This step is required for the Graphical Dispatch Board (SD.900.00). For Dispatch
(SD.201.00), leaving the grid empty has the same effect as listing all geographic zones.
10. Click Save on the toolbar.
11. Click Close on the toolbar.

Dispatching 153
Viewing All Open Service Calls, Dispatch (SD.201.00)
To view all open service calls:
1. Choose Module | Service Dispatch | Dispatch from the menu.
Dispatch (SD.201.00) displays.
Figure 62: Dispatch (SD.201.00)
2. Type the ID of the call view template denoting all open service calls in Queue ID.
For example, type ALL.
If the call view template ID is unknown, press F3 or double-click the right mouse button. A list
of all call view templates in Dispatch - View Maintenance (SD.004.00) displays.
3. Type a range of dates to restrict the view of service calls displayed on Dispatch (SD.201.00) using
From and To.
From defaults to seven days prior to the current date.
To defaults to the current date.
All open service calls with a promised date between the specified date range displays.
Note: Customer service representatives typically view service calls for a single day.
4. Click Query Now to display all open service calls for the starting and ending date range specified in
From and To.
All open service calls with a promised date between the specified date range display.
5. Click Close on the toolbar.

154 Service Dispatch
Viewing All Open Service Calls, Graphical Dispatch Board (SD.900.00)
To view all open service calls:
Note:
If Queue ID is blank, the Graphical Dispatch Board (SD.900.00) displays all open service calls by
default.
If you choose to use a queue ID you will need a call queue view that lists all geographic zones, and
selects all priorities and all branch IDs
1. Choose Module | Service Dispatch | Graphical Dispatch Board from the menu. The Options tab of
Graphical Dispatch Board (SD.900.00) appears.
2. Type the identifier of the Call Queue View template denoting all open service calls for the company
in Queue ID. If the call view template ID is unknown, press F3 or double-click the right mouse
button. A list of all call view templates set up in Dispatch - View Maintenance (SD.004.00)
appears.
The General tab of Graphical Dispatch Board (SD.900.00) appears. Review the tab’s contents to
ensure all priority check boxes are selected, the All check box is selected for branch IDs, and all
geographic zones are listed in the grid.
3. Click the Dispatch Board tab. The Dispatch Board tab of Graphical Dispatch Board (SD.900.00)
appears. The schedule pane on the right side of the top section displays in Day View. You can
switch from Day View to Week View by right-clicking on the date bar and selecting Week View.
All open service calls are included in the service call details pane. Some service calls may appear
under more than one status tab. This occurs when a call has multiple problem codes and each
problem code status is different.
Figure 63: Graphical Dispatch Board (SD.900.00), Dispatch Board tab, Day View

Dispatching 155
Viewing All Open Service Calls for a Specific Priority
Note: The Graphical Dispatch Board (SD.900.00) does not filter the schedule pane portion of the
screen by priority.
Creating a Call View Template for a Specific Priority
To create a call view template for a specific priority:
1. Choose Module | Service Dispatch | Dispatch from the menu.
Dispatch - View Maintenance (SD.004.00) displays.
Figure 64: Dispatch - View Maintenance (SD.004.00)
2. Type a call view template identifier indicating that all premium priority open service calls display in
Dispatch (SD.201.00) in Call View.
For example, type PREMIUM in Call View.
3. Type a call view template description indicating that all Premium Priority open service calls in
Dispatch (SD.201.00) in Description.
For example, type Premium Priority Service Calls in Description.
4. Verify that the check box to the left of Premium in the Priority frame is selected.
Premium, High, Medium, and Low Priority are selected by default when creating new call view
templates in Dispatch - View Maintenance (SD.004.00).
5. Clear the check boxes to the left of High, Medium, and Low in the Priority frame.
Premium, High, Medium, and Low Priority are selected by default when creating new call view
templates in Dispatch - View Maintenance (SD.004.00).
6. Verify that the All check box to the right of Branch ID is selected.
The All check box to the right of the Branch ID allows users to view open service calls for every
branch simultaneously.
The All check box to the right of the Branch ID is selected by default when creating new call
view templates in Dispatch - View Maintenance (SD.004.00).
7. Verify that the All check box to the right of Technician is selected.
Choosing All to the right of Technician allows users to view all of the open service calls for all
technicians simultaneously.
The All check box to the right of Technician is selected by default when creating new call view
templates in Dispatch - View Maintenance (SD.004.00).
8. Click Save on the toolbar.
9. Click Close on the toolbar.

156 Service Dispatch
Viewing Open Service Calls for a Specific Priority, Dispatch (SD.201.00)
To view all premium priority service calls:
1. Choose Module | Service Dispatch | Dispatch from the menu.
Dispatch (SD.201.00) displays.
Figure 65: Dispatch (SD.201.00)
2. Type the ID of the call view template denoting all premium priority service calls in Queue ID.
For example, type PREMIUM.
If the call view template ID is unknown, press F3 or double-click the right mouse button. A list
of all call view templates in Dispatch - View Maintenance (SD.004.00) displays.
3. Type a range of dates to restrict the view of service calls displayed on Dispatch (SD.201.00) using
From and To.
From defaults to seven days prior to the current date.
To defaults to the current date.
All open service calls with a promised date between the specified date range display.
Note: Customer service representatives typically view service calls for a single day.
4. Click Query Now to display all open service calls for the starting and ending date range specified in
From and To.
All open service calls with a premium priority and a promised date between the specified date
range display.
5. Click Close on the toolbar.

Dispatching 157
Viewing All Open Service Calls for a Specific Branch
Note: The Graphical Dispatch Board (SD.900.00) does not filter the Gantt chart portion of the screen
by branch.
Creating a Call View Template for a Specific Branch
To create a call view template for a specific branch:
1. Choose Module | Service Dispatch | Dispatch - View Maintenance from the menu.
Dispatch - View Maintenance (SD.004.00) displays.
Figure 66: Dispatch - View Maintenance (SD.004.00)
2. Type a call view template identifier identifying that all open service calls for a specific branch
display in Dispatch (SD.201.00) in Call View.
For example, type AKRON.
3. Type a call view template description indicating that all open service calls for a specific branch
display in Dispatch (SD.201.00) in Description.
For example, type Akron Branch in Description.
4. Verify that the check boxes to the left of Premium, High, Medium and Low in the Priority frame are
selected.
Premium, High, Medium, and Low Priority are selected by default when creating new call view
templates in Dispatch - View Maintenance (SD.004.00).
5. Clear the All check box to the right of Branch ID.
The All check box to the right of the Branch ID is selected by default when creating new call
view templates in Dispatch - View Maintenance (SD.004.00).
6. To restrict the call view template to display open service calls for a specific branch, type the
appropriate branch in Branch ID.
For example, type AKRON.
If the branch ID is unknown, press F3 or double-click the right mouse button. A list of all
branches in Branch Maintenance (SD.001.00) displays.

158 Service Dispatch
7. Verify that the All check box to the right of Technician is selected.
Choosing the All check box to the right of Technician allows users to view all of the open
service calls for all technicians simultaneously.
All to the right of Technician is selected by default when creating new call view templates in
Dispatch - View Maintenance (SD.004.00).
8. Click Save on the toolbar.
9. Click Close on the toolbar.

Dispatching 159
Viewing All Open Service Calls for A Specific Branch, Dispatch
(SD.201.00)
To view all service calls for a specific branch:
1. Choose Module | Service Dispatch | Dispatch from the menu.
Dispatch (SD.201.00) displays.
Figure 67: Dispatch (SD.201.00)
2. Type the ID of the call view template denoting all open service calls for a specific branch in
Queue ID.
For example, type AKRON.
If the call view template ID is unknown, press F3 or double-click the right mouse button. A list
of all call view templates in Dispatch - View Maintenance (SD.004.00) displays.
3. Type a range of dates to restrict the view of service calls displayed in Dispatch (SD.201.00) using
From and To.
From defaults to seven days prior to the current date.
To defaults to the current date.
All open service calls for the specific branch with a promised date between the specified date
range displays.
Note: Customer service representatives typically view service calls for a single day.
4. Click Query Now to display all open service calls for the specified branch with a starting and
ending date range specified in From and To.
All open service calls for the specified branch with a promised date between the specified
date range displays.
5. Click Close on the toolbar.

160 Service Dispatch
Viewing All Open Service Calls for a Specific Technician Creating a Call View Template for a Specific Technician
To create a call view template for a specific technician:
1. Choose Module | Service Dispatch | Dispatch - View Maintenance from the menu.
Dispatch - View Maintenance (SD.004.00) displays.
Figure 68: Dispatch - View Maintenance (SD.004.00)
2. Type a call view template identifier indicating that all open service calls for a specific technician
display in Dispatch (SD.201.00) or Graphical Dispatch Board (SD.900.00) in Call View.
For example, type DSMITH in Call View.
3. Type a call view template description indicating that all open service calls for a specific technician
display in Dispatch (SD.201.00) or Graphical Dispatch Board (SD.900.00) in Description.
For example, type Don Smith in Description.
4. Verify that the check boxes to the left of Premium, High, Medium and Low in the Priority frame are
selected.
Premium, High, Medium, and Low Priority are selected by default when creating new call view
templates in Dispatch - View Maintenance (SD.004.00).
5. Verify that the All check box to the right of Branch ID is selected.
Choosing the All check box to the right of the Branch ID allows users to view open service calls
for every branch simultaneously.
All to the right of the Branch ID is selected by default when creating new call view templates in
Dispatch - View Maintenance (SD.004.00).
6. Clear the All check box to the right of Technician.
The All check box to the right of Technician is selected by default when creating new call view
templates in Dispatch - View Maintenance (SD.004.00).
7. To restrict the call view template to display open service calls for a specific technician, type the
appropriate ID of the technician in Technician.
If the technician ID is unknown, press F3 or double-click the right mouse button. A list of all
technicians set up in Employee Maintenance (SD.007.00) displays.
For example, type SMITH00.
8. Click Save on the toolbar.
9. Click Close on the toolbar.

Dispatching 161
Viewing a Technician’s Open Service Calls, Dispatch (SD.201.00)
To view all service calls for a specific technician:
1. Choose Module | Service Dispatch | Dispatch from the menu.
Dispatch (SD.201.00) displays.
Figure 69: Dispatch (SD.201.00)
2. Type the ID of the call view template denoting all open service calls for a specific technician in
Queue ID.
For example, type DSMITH.
If the call view template ID is unknown, press F3 or double-click the right mouse button. A list
of all call view templates in Dispatch - View Maintenance (SD.004.00) displays.
3. Type a range of dates to restrict the view of service calls displayed on Dispatch (SD.201.00) using
From and To.
From defaults to seven days prior to the current date.
To defaults to the current date.
All open service calls with a promised date between the specified date range displays.
Note: Customer service representatives typically view service calls for a single day.
4. Click Query Now to display all open service calls for the technician with a starting and ending date
range specified in From and To.
All open service calls for the technician with a promised date between the specified date
range displays.
5. Click Close on the toolbar.

162 Service Dispatch
Viewing a Technician’s Open Service Calls, Graphical Dispatch Board
(SD.900.00)
To view open service calls for a technician on the Graphical Dispatch Board (SD.900.00):
1. In the navigation pane of the Microsoft Dynamics SL window, click Field Service.
2. In the Service Dispatch application pane under Inquiries, click Graphical Dispatch Board. The
Graphical Dispatch Board (SD.900.00), Options tab appears.
Figure 70: Graphical Dispatch Board (SD.900.00), Options tab
3. (Optional) Enter the appropriate queue identification number in Queue ID.

Dispatching 163
4. Click the Dispatch Board tab. The Dispatch Board tab appears.
Figure 71: Graphical Dispatch Board (SD.900.00), Dispatch Board tab, Day View
5. Enter the technician identification number in Technician.
6. (Optional) Clear the Include Queue Filters check box.
Note:
The Include Queue Filters check box does not affect service call information that appears in
the schedule pane if you click the All tab or the class tab for a specific employee. It also does
not affect information that appears on the tabs of the service call details pane.
The Include Queue Filters check box does affect service call information that appears in the
schedule pane and on the tabs of the service call details pane if you click the Technician tab.
If you clear the Include Queue Filters check box and then click the Technician tab, open
service calls for the technician whose ID you specified in Technician appear in the schedule
pane and on the tabs of the service call details pane. If you entered filter criteria for a queue
on the Options tab, it is disregarded.
If you define filter criteria for the queue on the Options tab, and then on the Dispatch Board
tab, select Include Queue Filters check box and click the Technician tab, open service calls for
the technician that meet the selection criteria you specified appear in the schedule pane and
on the tabs of the service call details pane.
7. Click Refresh. The Technician tab appears as the last item in the technician class tabs.

164 Service Dispatch
8. Click the Technician tab.
Note:
All service calls that that are not assigned to a technician appear on the Unassigned tab of
the service call details pane. The technician filter does not affect the information that is
available on the tab.
Service call information appears on the schedule pane and on the tabs of the service call
details pane (except for the Unassigned tab) based on the technician filter and the status of
the Include Queue Filters check box. Only return to the Options tab if you need to change a
queue or select new settings for the current queue. Once you return to the Options tab, the
technician settings on the Dispatch Board tab are cleared. To view a new technician, you
must then repeat steps 5 through 8 above.
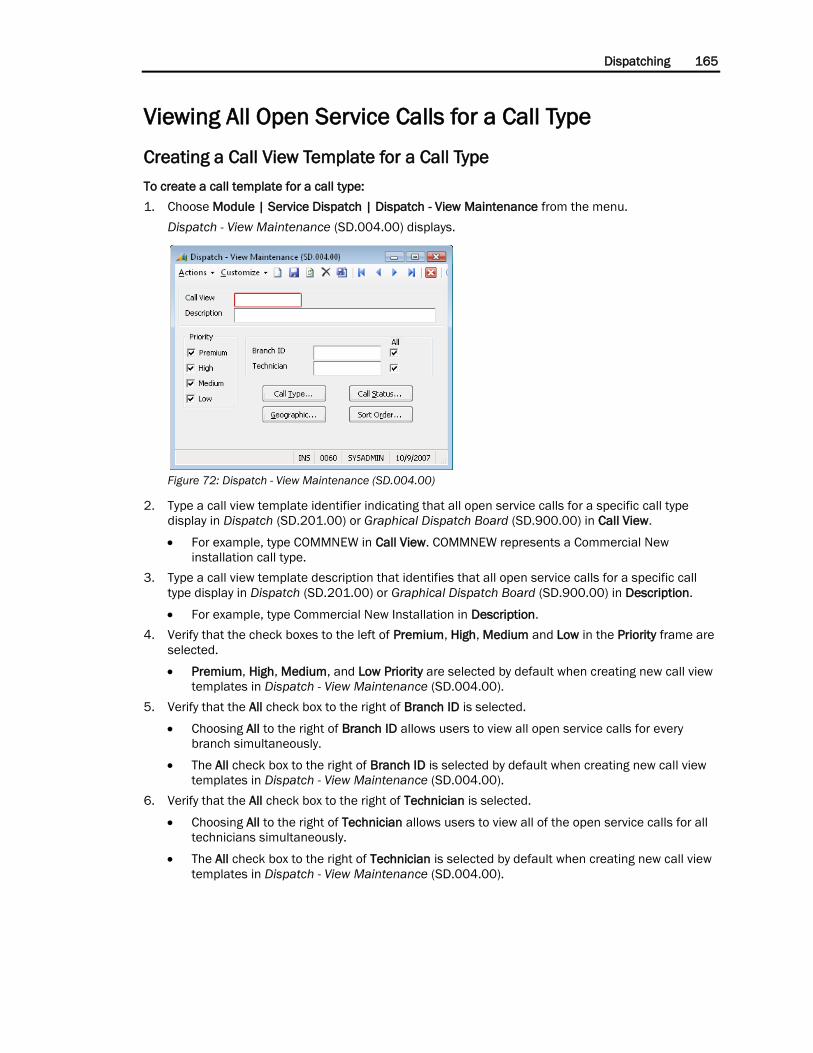
Dispatching 165
Viewing All Open Service Calls for a Call Type
Creating a Call View Template for a Call Type
To create a call template for a call type:
1. Choose Module | Service Dispatch | Dispatch - View Maintenance from the menu.
Dispatch - View Maintenance (SD.004.00) displays.
Figure 72: Dispatch - View Maintenance (SD.004.00)
2. Type a call view template identifier indicating that all open service calls for a specific call type
display in Dispatch (SD.201.00) or Graphical Dispatch Board (SD.900.00) in Call View.
For example, type COMMNEW in Call View. COMMNEW represents a Commercial New
installation call type.
3. Type a call view template description that identifies that all open service calls for a specific call
type display in Dispatch (SD.201.00) or Graphical Dispatch Board (SD.900.00) in Description.
For example, type Commercial New Installation in Description.
4. Verify that the check boxes to the left of Premium, High, Medium and Low in the Priority frame are
selected.
Premium, High, Medium, and Low Priority are selected by default when creating new call view
templates in Dispatch - View Maintenance (SD.004.00).
5. Verify that the All check box to the right of Branch ID is selected.
Choosing All to the right of Branch ID allows users to view all open service calls for every
branch simultaneously.
The All check box to the right of Branch ID is selected by default when creating new call view
templates in Dispatch - View Maintenance (SD.004.00).
6. Verify that the All check box to the right of Technician is selected.
Choosing All to the right of Technician allows users to view all of the open service calls for all
technicians simultaneously.
The All check box to the right of Technician is selected by default when creating new call view
templates in Dispatch - View Maintenance (SD.004.00).

166 Service Dispatch
7. Click Call Type. Call Type (SD.004.05) displays.
Figure 73: Call Type (SD.004.05)
8. To restrict the call view template to display open service calls for a specific call type, type the
appropriate ID of the call type in Call Type.
If the call type ID is unknown, press F3 or double-click the right mouse button. A list of all call
types in Call Type Maintenance (SD.003.00) displays.
For example, type COMMNEW in Call Type. COMMNEW represents a Commercial New
installation call type.
Note: A call view queue can be restricted to multiple call types.
9. Click OK.
10. Click Save on the toolbar.
11. Click Close on the toolbar.

Dispatching 167
Viewing All Open Service Calls for a Specific Call Type, Dispatch
(SD.201.00)
To view service calls for a specific call type:
1. Choose Module | Service Dispatch | Dispatch from the menu.
Dispatch (SD.201.00) displays.
Figure 74: Dispatch (SD.201.00)
2. Type the identifier of the call view template denoting all open service calls for a specific call type
in Queue ID.
For example, type COMMNEW in Queue ID. COMMNEW represents a Commercial New
installation call type.
If the call view template ID is unknown, press F3 or double-click the right mouse button. A list
of all call view templates set up in Dispatch - View Maintenance (SD.004.00) displays.
3. Type a range of dates to restrict the view of service calls displayed on Dispatch (SD.201.00) using
From and To.
From defaults to seven days prior to the current date.
To defaults to the current date
All open service calls with a specific call type and a promised date between the specified date
range display.
Note: Customer service representatives typically view service calls for a single day.
4. Click Query Now to display all open service calls for the specific call type with the starting and
ending date range specified in From and To.
All open service calls with a promised date between the specified date range display.
Note: Customer service representatives typically view service calls for a single day.
5. Click Close on the toolbar.

168 Service Dispatch
Viewing All Open Service Calls for a Call Status Creating a Call View Template for a Call Status
To create a call view template for a specific call status:
1. Choose Module | Service Dispatch | Dispatch - View Maintenance from the menu.
Dispatch - View Maintenance (SD.004.00) displays.
Figure 75: Dispatch - View Maintenance (SD.004.00)
2. Type a call view template identifier indicating that all open service calls for a specific call status
display in Dispatch (SD.201.00) or Graphical Dispatch Board (SD.900.00) in Call View.
For example, type ASSIGNED in Call View.
3. Type a call view template description identifying that all open service calls for a specific call status
display in Dispatch (SD.201.00) or Graphical Dispatch Board (SD.900.00) in Description.
For example, type Assigned Service Calls in Description.
4. Verify that the check boxes to the left of Premium, High, Medium and Low in the Priority frame are
selected.
Premium, High, Medium, and Low Priority are selected by default when creating new call view
templates in Dispatch - View Maintenance (SD.004.00).
5. Verify that the All check box to the right of Branch ID is selected.
Choosing All to the right of Branch ID allows users to view all open service calls for every
branch simultaneously.
The All check box to the right of Branch ID is selected by default when creating new call view
templates in Dispatch - View Maintenance (SD.004.00).
6. Verify that the All check box to the right of Technician is selected.
Choosing All to the right of Technician allows users to view all open service calls for all
technicians simultaneously.
The All check box to the right of Technician is selected by default when creating new call view
templates in Dispatch - View Maintenance (SD.004.00).

Dispatching 169
7. Click Call Status. Call Status (SD.004.06) displays.
Figure 76: Call Status (SD.004.06)
8. To restrict the call view template to display open service calls for a specific call status, type the
appropriate ID of the call status in Call Status.
If the call status ID is unknown, press F3 or double-click the right mouse button. A list of all
call statuses in Call Status Maintenance (SD.002.00) of Service Dispatch displays.
For example, type ASSIGNED.
Note: A call queue view can be restricted to multiple call statuses.
9. Click OK.
10. Click Save on the toolbar.
11. Click Close on the toolbar.
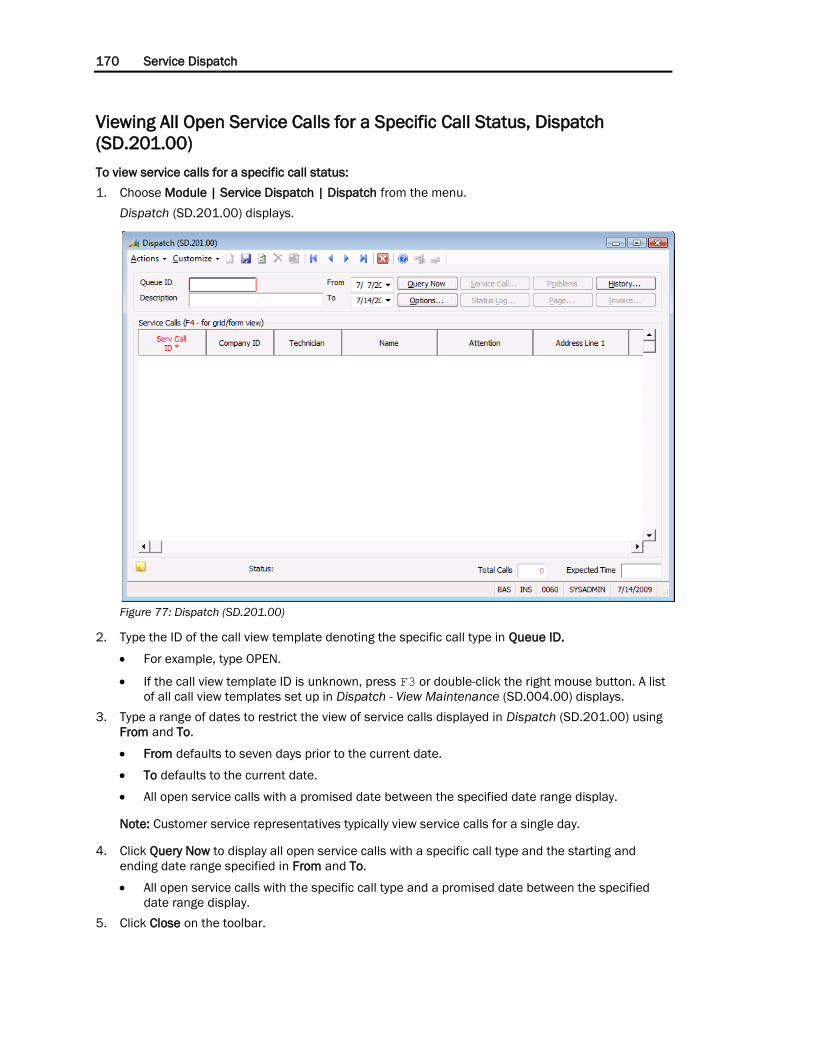
170 Service Dispatch
Viewing All Open Service Calls for a Specific Call Status, Dispatch
(SD.201.00)
To view service calls for a specific call status:
1. Choose Module | Service Dispatch | Dispatch from the menu.
Dispatch (SD.201.00) displays.
Figure 77: Dispatch (SD.201.00)
2. Type the ID of the call view template denoting the specific call type in Queue ID.
For example, type OPEN.
If the call view template ID is unknown, press F3 or double-click the right mouse button. A list
of all call view templates set up in Dispatch - View Maintenance (SD.004.00) displays.
3. Type a range of dates to restrict the view of service calls displayed in Dispatch (SD.201.00) using
From and To.
From defaults to seven days prior to the current date.
To defaults to the current date.
All open service calls with a promised date between the specified date range display.
Note: Customer service representatives typically view service calls for a single day.
4. Click Query Now to display all open service calls with a specific call type and the starting and
ending date range specified in From and To.
All open service calls with the specific call type and a promised date between the specified
date range display.
5. Click Close on the toolbar.
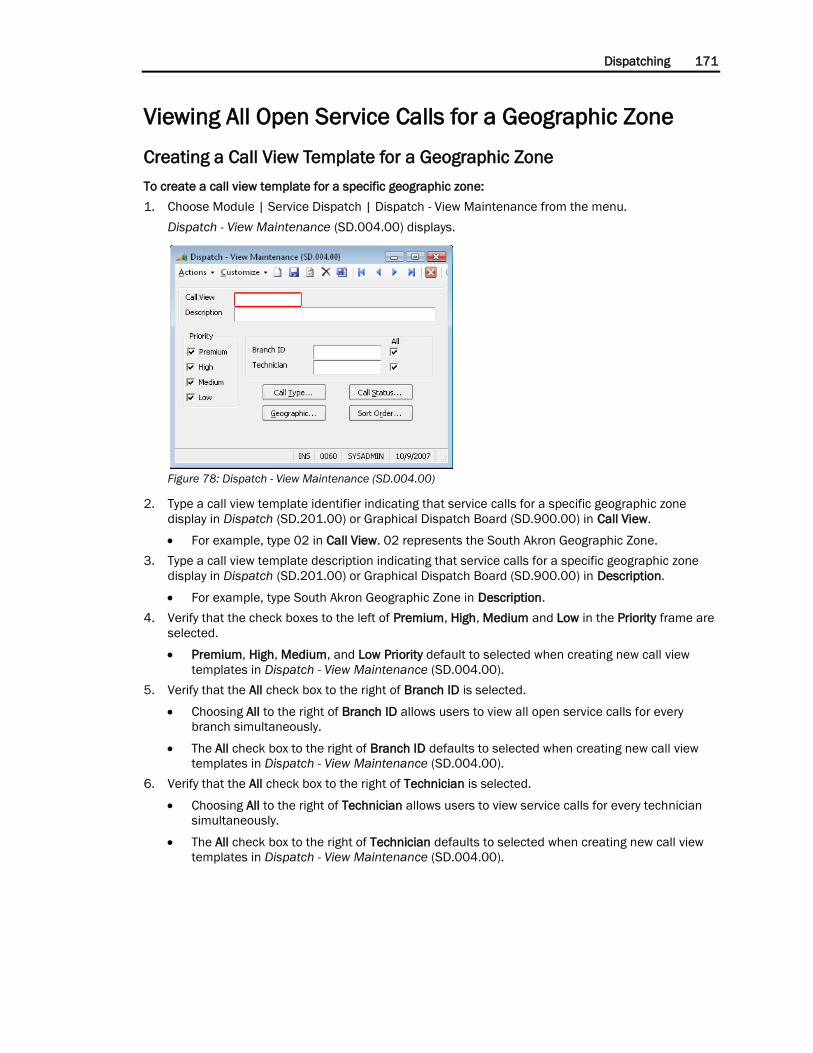
Dispatching 171
Viewing All Open Service Calls for a Geographic Zone
Creating a Call View Template for a Geographic Zone
To create a call view template for a specific geographic zone:
1. Choose Module | Service Dispatch | Dispatch - View Maintenance from the menu.
Dispatch - View Maintenance (SD.004.00) displays.
Figure 78: Dispatch - View Maintenance (SD.004.00)
2. Type a call view template identifier indicating that service calls for a specific geographic zone
display in Dispatch (SD.201.00) or Graphical Dispatch Board (SD.900.00) in Call View.
For example, type 02 in Call View. 02 represents the South Akron Geographic Zone.
3. Type a call view template description indicating that service calls for a specific geographic zone
display in Dispatch (SD.201.00) or Graphical Dispatch Board (SD.900.00) in Description.
For example, type South Akron Geographic Zone in Description.
4. Verify that the check boxes to the left of Premium, High, Medium and Low in the Priority frame are
selected.
Premium, High, Medium, and Low Priority default to selected when creating new call view
templates in Dispatch - View Maintenance (SD.004.00).
5. Verify that the All check box to the right of Branch ID is selected.
Choosing All to the right of Branch ID allows users to view all open service calls for every
branch simultaneously.
The All check box to the right of Branch ID defaults to selected when creating new call view
templates in Dispatch - View Maintenance (SD.004.00).
6. Verify that the All check box to the right of Technician is selected.
Choosing All to the right of Technician allows users to view service calls for every technician
simultaneously.
The All check box to the right of Technician defaults to selected when creating new call view
templates in Dispatch - View Maintenance (SD.004.00).

172 Service Dispatch
7. Click Geographic. Geography (SD.004.01) displays.
Figure 79: Geography (SD.004.01)
8. To restrict the call view template to display open service calls for a specific geographic zone, type
the appropriate ID of the geographic zone in Geographic ID.
If the geographic zone ID is unknown, press F3 or double-click the right mouse button. A list
of all call status set up in Geographic Zone Maintenance (SD.009.00) of Service Dispatch
displays.
For example, type 02. 02 represents the South Akron Geographic Zone.
9. Click OK.
10. Click Save on the toolbar.
11. Click Close on the toolbar.

Dispatching 173
Viewing Open Service Calls for a Specific Geographic Zone, Dispatch
(SD.201.00)
To create a call view template for a specific geographic zone:
1. Choose Module | Service Dispatch | Dispatch from the menu.
Dispatch (SD.201.00) displays.
Figure 80: Dispatch (SD.201.00)
2. Type the identifier of the call view template denoting service calls for a specific geographic zone in
Queue ID.
For example, type 02. 02 represents the South Akron Geographic Zone.
If the call view template ID is unknown, press F3 or double-click the right mouse button. A list
of all call view templates set up in Dispatch - View Maintenance (SD.004.00) displays.
3. Type a range of dates to restrict the view of service calls displayed on Dispatch (SD.201.00) using
From and To.
From defaults to seven days prior to the current date.
To defaults to the current date.
All open service calls associated with the geographic zone and a promised date between the
specified date range display.
Note: Customer service representatives typically view service calls for a single day.
4. Click Query Now to display service calls associated with the geographic zone with a starting and
ending date range specified in From and To.
All service calls associated with the geographic zone and a promised date between the
specified date range display.
5. Click Close on the toolbar.
174 Service Dispatch
Viewing Open Service Calls for a Specific Geographic Zone, Graphical
Dispatch Board (SD.900.00)
To create a call view template for a specific geographic zone:
1. Choose Module | Service Dispatch | Graphical Dispatch Board from the menu. The Options tab of
Graphical Dispatch Board (SD.900.00) appears.
2. Type the identifier of the Call Queue View template denoting all open service calls for the company
in Queue ID. If the call view template ID is unknown, press F3 or double-click the right mouse
button. A list of all call view templates set up in Dispatch - View Maintenance (SD.004.00)
appears. The General area of the Options tab appears. Review the contents to ensure all priority
check boxes are selected, the All Branch ID check box is selected, and only the Geographic Zone
you are interested in is listed in the grid.
3. Click the Dispatch Board tab. The Dispatch Board tab appears, showing only service calls
associated with the specified geographic zone.
Warning: Use of this filtering option can cause service calls that are assigned to a technician to not be
displayed when a technician works in multiple geographic zones. Caution must be taken to ensure
that conflicting service call assignments are not made when using this filtering option.

Dispatching 175
Changing Sort Order in Dispatch (SD.201.00) Dispatch Sort Order (SD.004.02) allows service calls to be sorted in a manner most efficient for an
organization in Dispatch (SD.201.00). For example, service calls can be displayed in ascending order
by Service Call ID in Dispatch (SD.201.00).
Note: The Graphical Dispatch Board (SD.900.00) is not affected by changing the sort order in
Dispatch - View Maintenance (SD.004.00).
To change the dispatch order:
1. Choose Module | Service Dispatch | Dispatch - View Maintenance from the menu.
Dispatch - View Maintenance (SD.004.00) displays.
Figure 81: Dispatch - View Maintenance (SD.004.00)
2. Type a call view template identifier with which to associate the new sort order in Call View.
3. Click Sort Order. Dispatch Sort Order (SD.004.02) displays.
Figure 82: Dispatch Sort Order (SD.004.02)
4. Select the values to base the sort for open service calls in Dispatch (SD.201.00) from Available
Fields and click Add.
Multiple sorts can exist for a call view template.
5. Choose the direction of the sort in Sort Direction.
Ascending
Descending
6. Click OK. Dispatch - View Maintenance (SD.004.00) displays.
7. Click Save on the toolbar.
8. Click Close on the toolbar.
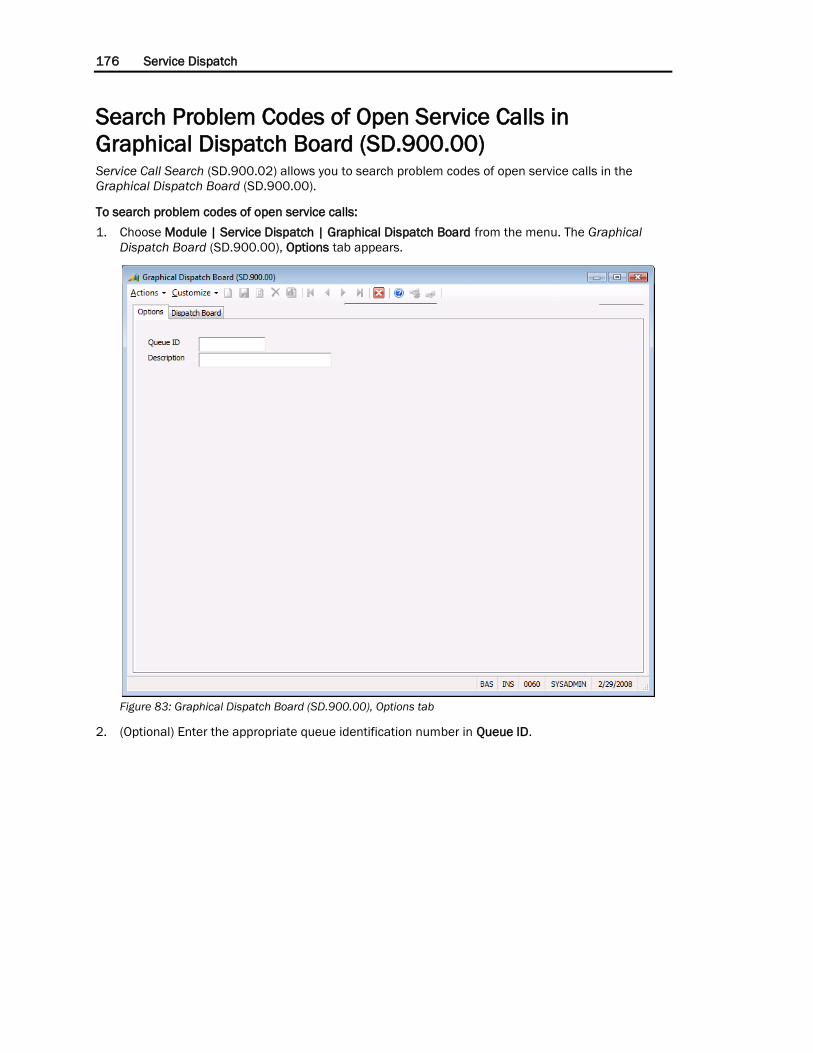
176 Service Dispatch
Search Problem Codes of Open Service Calls in
Graphical Dispatch Board (SD.900.00) Service Call Search (SD.900.02) allows you to search problem codes of open service calls in the
Graphical Dispatch Board (SD.900.00).
To search problem codes of open service calls:
1. Choose Module | Service Dispatch | Graphical Dispatch Board from the menu. The Graphical
Dispatch Board (SD.900.00), Options tab appears.
Figure 83: Graphical Dispatch Board (SD.900.00), Options tab
2. (Optional) Enter the appropriate queue identification number in Queue ID.

Dispatching 177
3. Click the Dispatch Board tab. The Dispatch Board tab appears.
Figure 84: Graphical Dispatch Board (SD.900.00), Dispatch Board tab, Day View

178 Service Dispatch
4. Click Search. Service Call Search (SD.900.02) appears.
Figure 85: Service Call Search (SD.900.02) – Accessed from the Graphical Dispatch Board (SD.900.00),
Dispatch Board tab
5. (Optional) Select any combination of Customer, Technician, Contract, or Priority. If selection
criteria is not entered, problem codes for all open service calls will display in the grid area when
Search is clicked.
6. Click Search. Problem codes for open service calls that match the selection criteria display in the
grid area.
7. Click the line in the grid area that contains the problem code you are looking for. The Graphical
Dispatch Board (SD.900.00) opens with the problem code displayed in the schedule pane and in
the service call details pane.

Dispatching 179
Assigning a Technician to a Problem Code from Graphical
Dispatch Board (SD.900.00) Graphical Dispatch - Assign Technician (SD.901.00) allows you to:
Assign technicians to problem codes
Indicate both when work will begin and the duration of the work on a problem code
Change the status of a problem code.
Figure 86: Graphical Dispatch - Assign Technician (SD.901.00) – Accessed from the Graphical Dispatch Board
(SD.900.00), Dispatch Board tab
To assign a technician to a problem code:
1. Choose Module | Service Dispatch | Graphical Dispatch Board from the menu.
The Options tab of Graphical Dispatch Board (SD.900.00) appears.
2. Enter the desired Queue ID.
3. Select the Dispatch Board tab.
4. Select the Unassigned tab.
5. Click in the Service Call ID column on the call you wish to make an assignment on.
6. Click the ellipsis (...) button to open Graphical Dispatch - Assign Technician (SD.901.00).
7. Click in Technician ID for the problem code you wish to make an assignment on and type in the
technician ID you want to assign to the problem code.
8. If the technician ID is unknown, press F3 or double-click the right mouse button to access a list of
active technicians.

180 Service Dispatch
9. After selecting a technician ID, the status automatically changes to Assigned and the mouse
pointer moves to the Status column. If you wish to change the status, select the desired status
from the list.
10. Press Tab to move to Start Date and enter the date when work on this problem code is expected
to begin.
11. Press Tab to move to Start Time and enter the time when work on this problem code is expected
to begin. Note that time must be typed in 24-hour, or military time, format. For example, 1:00PM
is entered as 13:00.
12. Press Tab to move to Travel Time and enter travel time, if desired. Note that Travel Time may
already be populated with a default value. The default is set in Graphical Dispatch Setup
Maintenance (SD.902.00).
13. Press Tab to move to Duration and enter the total time, including travel time that the task is
expected to take to complete. Note that Duration may already be populated with a default value.
The default is set in Problem Code Maintenance (SD.008.00).
14. End Date and End Time are calculated by the system based on the values entered in steps 7 – 10
above.
15. Review the entries in Equip ID, PM Code, and Contract ID and adjust as needed.

Dispatching 181
Adding a New Problem Code to a Service Call from
Graphical Dispatch Board (SD.900.00) Graphical Dispatch - Assign Technician (SD.901.00) allows you to add problem codes to a service call
directly from Graphical Dispatch Board (SD.900.00) without opening Service Call Entry (SD.200.00).
Figure 87: Graphical Dispatch – Assign Technician (SD.901.00) – Accessed from the Graphical Dispatch Board
(SD.900.00), Dispatch Board tab
To add a new problem to a service call:
1. Choose Module | Service Dispatch | Graphical Dispatch Board from the menu.
The Options tab of Graphical Dispatch Board (SD.900.00) appears.
2. Enter the desired queue ID.
3. Select the Dispatch Board tab.
4. Select the service call you want to add a new problem code to and open Graphical Dispatch -
Assign Technician (SD.901.00).
To select the service call from the schedule pane, double-click the task bar to open Graphical
Dispatch - Assign Technician (SD.901.00).
To select the service call from the service call details pane, click the service call ID in the
Service Call ID column and press the ellipsis (...) button to open Graphical Dispatch - Assign
Technician (SD.901.00).
5. Click in the Problem ID column of Graphical Dispatch - Assign Technician (SD.901.00) on the first
empty row.
6. Type the problem ID.

182 Service Dispatch
7. If the ID is unknown, press F3 or double-click the right mouse button to access a list of problem
code IDs.
8. If you do not wish to assign a technician at this time or change any of the values in the other
columns, you can close the screen by clicking OK.
9. Press Tab to move to Technician ID and assign a technician, if desired.
10. Type in the technician ID you want to assign to the problem code.
If the ID is unknown, press F3 or double-click the right mouse button to access a list of active
technicians.
11. After selecting the technician ID, the status automatically changes to Assigned. The mouse pointer
moves to the Status column. If you wish to change the status, press the arrow and select a new
status from the drop-down list.
12. Press Tab to move to Start Date and enter the date when work on this problem code is expected
to begin.
13. Press Tab to move to Start Time and enter the time when work on this problem code is expected
to begin. Note that time must be entered in 24-hour, or military time, format. For example,
1:00PM is entered as 13:00.
14. Press Tab to move to Travel Time and enter travel time if desired. Note that Travel Time may
already be populated with a default value. The default is set in Graphical Dispatch Setup
Maintenance (SD.902.00).
15. Press Tab to move to Duration and enter the total time, including travel time that the task is
expected to take to complete. Note that Duration may already be populated with a default value.
The default is set in Problem Code Maintenance (SD.008.00).
16. End Date and End Time are calculated by the system based on the values entered in steps 9 – 12
above.
17. Review the entries in Equip ID, PM Code, and Contract ID and adjust as needed.
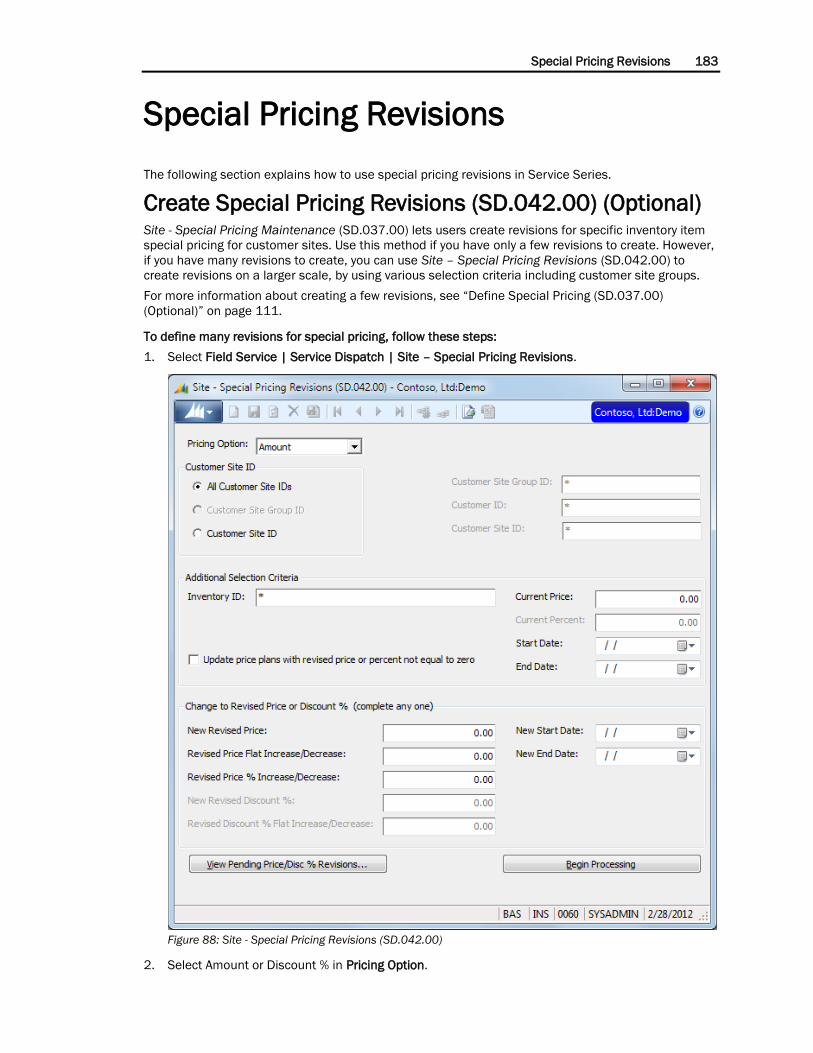
Special Pricing Revisions 183
Special Pricing Revisions
The following section explains how to use special pricing revisions in Service Series.
Create Special Pricing Revisions (SD.042.00) (Optional) Site - Special Pricing Maintenance (SD.037.00) lets users create revisions for specific inventory item
special pricing for customer sites. Use this method if you have only a few revisions to create. However,
if you have many revisions to create, you can use Site – Special Pricing Revisions (SD.042.00) to
create revisions on a larger scale, by using various selection criteria including customer site groups.
For more information about creating a few revisions, see “Define Special Pricing (SD.037.00)
(Optional)” on page 111.
To define many revisions for special pricing, follow these steps:
1. Select Field Service | Service Dispatch | Site – Special Pricing Revisions.
Figure 88: Site - Special Pricing Revisions (SD.042.00)
2. Select Amount or Discount % in Pricing Option.

184 Service Dispatch
3. In the Customer Site ID area, select one of the following:
All Customer Site IDs – select this option if you want to create revised price/disc% for all
customer site IDs. On the right side, Customer Site Group ID, Customer ID, and Customer Site
ID are disabled.
Customer Site Group ID –select this option if you want to create revised price/disc% for one
or more customer site group IDs. On the right side, you can also decide to refine your
selection by specifying values in Customer Site Group ID, Customer ID, and Customer Site ID.
The default in these boxes is an asterisk (*) that represents all values. You can also use the
asterisk(*) as a wildcard or you can use the question mark (?) as a mask. For more
information about this functionality, see “Site – Special Pricing Revisions (SD.042.00)” on
page 441.
Note: This option is disabled if you have not yet created and customer site group IDs. To
create a customer site group ID, see “Define Customer Site Groups (SD.041.00)” on page
110.
Customer Site ID – select this option if you want to create revised price/disc% for one or more
customer site IDs. On the right side, you can also decide to refine your selection by specifying
values in Customer ID and Customer Site ID. Customer Site Group ID is disabled. The default
in these boxes is an asterisk (*) that represents all values. You can also use the asterisk(*) as
a wildcard or you can use the question mark (?) as a mask. For more information about this
functionality, see “Site – Special Pricing Revisions (SD.042.00)” on page 441.
4. In the Additional Selection Criteria area, optionally specify any other selection criteria that you
want to use.
Inventory ID – select this option if you want to refine the search results by the inventory ID. An
asterisk (*) functions as a placeholder and a question mark (?) functions as a mask.
Current Price –select this option if you want to refine the search results by a specific price.
This box is enabled if the Pricing Option is Amount.
Current Percent - select this option if you want to refine the search results by a specific
percent. This box is enabled if the Pricing Option is Discount %.
Start Date – select this option if you want to refine the search results by the start date.
End Date – select this option if you want to refine the search results by the end date.
Update price plans with revised price or percent not equal to zero – click to select this check
box if you want to include only special pricing plans that contain nonzero values and exclude
any special pricing plans with a revised price/disc % equal to zero.
5. In the Change to Revised Price or Discount % area, specify one new price/disc% and dates.
New Revised Price –specify the new revised price that will be placed into Revised Price/Disc
% in Site – Special Pricing Maintenance (SD.037.00). This value will replace the existing
value. This box is enabled if the Pricing Option is Amount.
Revised Price Flat Increase/Decrease –specify the flat amount by which you want to increase
(type a positive number) or decrease (type a negative number) the existing current price. This
box is enabled if the Pricing Option is Amount. For example, if the current price is $10.00, and
you type $-1.50 in this box, the new revised price will be $8.50.
Note: The new revised price cannot be less than zero. If the calculation results in the new
revised price being less than zero, the process will set the price to exactly zero.
Revised Price % Increase/Decrease –specify the percentage by which you want to
increase (type a positive number) or decrease (type a negative number) the existing
current price. This box is enabled if the Pricing Option is Amount. For example, if the
current price is $10.00, and you type 1.5 in this box, the new revised price will be
$10.15.

Special Pricing Revisions 185
Note: The new revised price cannot be less than zero. If the calculation results in the new
revised price being less than zero, the process will set the price to exactly zero.
New Revised Discount % - specify the new revised discount % that will be placed into Revised
Price/Disc % in Site – Special Pricing Maintenance (SD.037.00). This value will replace the
existing value. This box is enabled if the Pricing Option is Discount %. For example, if the
current discount % is 5.00%, and you type 2.25% in this box, the new revised discount % will
be 7.75%.
Revised Discount % Flat Increase/Decrease - specify the percentage by which you want to
increase (type a positive number) or decrease (type a negative number) the existing current
discount %. This box is enabled if the Pricing Option is Discount %. For example, if the current
discount % is 5.00%, and you type 2.00% in this box, the new revised discount % will be
5.10%.
New Start Date – specify the start date that you want to use to replace the existing start date.
New End Date – specify the end date that you want to use to replace the existing end date.
6. (Optional) Click View Pending Price/Disc% Revisions to review all special prices that match the
criteria in the screen (except Update price plans with revised price or percent not equal to zero) in
View Pending Special Pricing Revisions (SD.042.01). Close the subscreen when you are finished.
7. Click Begin Processing to update the Revised Price/Disc% in Site – Special Pricing Maintenance
(SD.041.00).
8. When the process is complete, you are ready to move the revised price/disc% to the current
price/disc%, if you have no other revised pricing changes that you must make. For more
information, see “Update Special Pricing with Revisions (SD.043.00) (Optional)” on page 186.

186 Service Dispatch
Update Special Pricing with Revisions (SD.043.00)
(Optional) Update Special Pricing with Revisions (SD.043.00) lets you update the price/disc% with the revised
price/disc% value. Additionally, you can update the start date and end date from the revised start date
and revised end date. When the process is complete, it zeros the revised price/disc% and clears the
revised start date and revised end date.
You can decide to update all special prices that contain nonzero revised price/disc% or you can decide
to update a subset of those, based on customer site group ID, customer ID, customer site ID, and
inventory ID.
To update special prices with the revised prices, follow these steps:
1. Select Field Service | Service Dispatch | Update Special Pricing with Revisions.
Figure 89: Update Special Pricing with Revisions (SD.043.00)
2. In Revise Special Pricing with Start Dates on or prior to, specify the date that you want to use to
select the special prices to update. The default date is the current business date.
3. In Categories, select one of the following:
All Special Prices – select this option to update all special prices that have a revised
price/disc%. All additional selection is disabled. This selection is the default.
Customer Site Group ID – select this option if you want to select a customer site group ID to
narrow your selection. This option is disabled if you have not previously created a customer
site group ID. The Customer Site Group ID, Customer ID, Customer Site ID, and Inventory ID
text boxes are enabled. The defaults are asterisks (*) which represent all values. You can
specify a value in one or more text box.
Customer ID – select this option if you want to select a customer ID to narrow your selection.
The Customer ID and Inventory ID text boxes are enabled. The defaults are asterisks (*) which
represent all values. You can specify a value in one or both text boxes.

Special Pricing Revisions 187
Customer Site ID – select this option if you want to select a customer site ID to narrow your
selection. The Customer Site Group ID text box is disabled and all other text boxes are
enabled. The default is an asterisk (*) which represents all values.
Inventory ID - select this option if you want to select only an inventory ID to narrow your
selection. The Inventory ID text box is enabled and all other text boxes are disabled. The
default is an asterisk (*) which represents all values.
4. Depending on your choice in the Categories area, you may want to specify a value in one or more
of the following to refine your selection: Customer Site Group ID, Customer ID, Customer Site ID,
or Inventory ID. You can use an asterisk (*) wildcard, a question mark (?) placeholder,
alphanumeric characters, or a combination of the three.
5. Click Begin Processing to update the Price/Disc% with the Revised Price/Disc%, Start Date with
Revised Start Date, and End Date with Revised End Date. This process also clears the values from
the selected Revised Price/Disc%, Revised Start Date, and Revised End Date.

188 Service Dispatch

Paging 189
Paging
The following section explains how to page a technician using Dispatch (SD.201.00) or Graphical
Dispatch Board (SD.900.00).
Paging with Dispatch (SD.201.00) Dispatch (SD.201.00) enables users to perform the functions related to viewing open service calls
after the calls have been entered into Service Call Entry (SD.200.00). These functions include
assigning technicians to perform the work and sending alphanumeric pages to these technicians in
the field. Service technicians can be paged through Dispatch - Service Call Page (SD.024.00) in
Dispatch (SD.201.00).
After service calls have been entered and released in Service Call Entry (SD.200.00), technicians can
be assigned to perform the work and alphanumeric pages can be sent to these technicians in the field
through Dispatch - Service Call Page (SD.024.00).
To page a technician:
1. Open Dispatch (SD.201.00) by choosing Module | Service Dispatch | Dispatch Board from the
menu.
Dispatch (SD.201.00) displays.
2. Type a call view template in Queue ID.
If the call view template ID is unknown, press F3 or double-click the right mouse button. A list
of all call view templates set up in Dispatch - View Maintenance (SD.004.00) displays.
Note: The call view template defaults to the Queue ID associated with the current user set up in
User Configuration (SD.000.01).
3. Type a range of dates to restrict the view of service calls displayed on Dispatch (SD.201.00) using
From and To.
From defaults to seven days prior to the current date.
To defaults to the current date.
Note: Customer service representatives typically view service calls for a single day.
4. Click Query Now to display all service calls for the starting and ending date range specified in
From and To.
All service calls with a promised date between the specified date range display.
5. Click any field of the service call record to activate Page.

190 Service Dispatch
6. Click Page. Dispatch - Service Call Page (SD.024.00) displays.
Figure 90: Dispatch - Service Call Page (SD.024.00)
7. Type a different Service Call ID if the selected service call is not correct.
Service Call ID displays if selected in Dispatch (SD.201.00).
If the service call ID must be changed or the ID is unknown, press F3 or double-click the right
mouse button. A list of all service calls set up in Service Call Entry (SD.200.00) displays.
— To select a service call ID, highlight the ID and click OK, or double-click the ID.
8. Type the ID of the technician who will perform the work on the service call and receive the
alphanumeric page in Technician ID.
If the technician must be changed or the ID is unknown, press F3 or double-click the right
mouse button. A list of all technicians set up in Employee Maintenance (SD.007.00) displays.
— To select a technician ID, highlight the ID and click OK, or double-click the ID.
— Clicking Edit on the Employee Maintenance PV List accesses Employee Maintenance
(SD.007.00), enabling you to modify information for an existing employee.
— Clicking Insert on the Employee Maintenance PV List accesses Employee Maintenance
(SD.007.00), enabling you to add new employees to the system.
If the technician has already been assigned to the call, the technician ID defaults.
If a pager number is attached to the technician in Employee Maintenance (SD.007.00), then
the pager number defaults in Number.
To assign a technician to a service call without paging the technician, type the technician ID
and click Assign To Call.
Note: Assign To Call updates the service calls with any changes made in Dispatch - Service Call
Page (SD.024.00) without paging the technician. For example, changing the Call Status of the
service call or assigning a technician to perform the work of the service call.

Paging 191
9. Type the call status indicating that a technician has been paged for the service call in Call Status
ID.
If the call status ID must be changed or the ID is unknown, press F3 or double-click the right
mouse button. A list of all call statuses set up in Call Status Maintenance (SD.002.00)
displays.
For example, type ASSIGNED.
— To select a call status ID, highlight the ID and click OK, or double-click the ID.
— Clicking Edit on the Call Status PV List accesses Call Status Maintenance (SD.002.00),
enabling you to modify information for an existing call status.
— Clicking Insert on the Call Status PV List accesses Call Status Maintenance (SD.002.00),
enabling you to add new call statuses to the system.
The Call Status is used to update the status of the service call at the same time a user
assigns the technician to be paged.
Note: Assign To Call updates the service calls with any changes made in Dispatch - Service Call
Page (SD.024.00) without paging the technician. For example, changing the Call Status of the
service call or assigning a technician to perform the work of the service call.
10. Type a paging template in Template ID.
If the template must be changed or the ID is unknown, press F3 or double-click the right
mouse button. A list of all paging templates set up in Pager Maintenance (SD.031.00)
displays.
— To select a template ID, highlight the ID and click OK, or double-click the ID.
— Clicking Edit on the Pager Template PV List accesses Pager Template (SD.031.00),
enabling you to modify information for an existing pager template.
— Clicking Insert on the Pager Template PV List accesses Pager Template (SD.031.00),
enabling you to add new pager templates to the system.
When selecting a template ID, an alphanumeric message displays in the message box
depending on the criteria chosen in Pager Template (SD.031.00).
Note: Template ID defaults from Template ID in Employee Maintenance (SD.007.00).
11. Type a pager number in Number.
If a pager number is attached to the technician in Employee Maintenance (SD.007.00), then
the pager number defaults.
12. Type the message being sent to the technician in the message box.
Note: While Template ID is required, users can edit or delete the default message and type a new
message in the message box.
13. Check Auto-Retry to continue to send the page if the initial try failed.
14. Choose Page to initiate the page process.
The alphanumeric text information is sent to a technician based on the template ID selected.
Note: During the page process, the system creates an ASCII file. Wireless Office checks
periodically for a file and sends them whenever a file is detected.
15. Click OK to close the Page Sent Notification message, which indicates that the page was
transmitted to the paging server.
16. Click OK to close the Service Call Updated, a message that confirms changes you made in the
service call.

192 Service Dispatch
17. Click Close on the toolbar to close Dispatch - Service Call Page (SD.024.00).
Dispatch (SD.201.00) displays.
-OR-
Click Assign to Call to automatically save any changes made to the service call in Dispatch -
Service Call Page (SD.024.00).
Note: Assign To Call updates the service calls with any changes made in Dispatch - Service Call
Page (SD.024.00) without paging the technician. For example, changing the Call Status of the
service call or assigning a technician to perform the work of the service call.
18. Click Close on the toolbar.

Paging 193
Paging with Graphical Dispatch Board (SD.900.00) Technicians Page (SD.903.00) allows technicians to be paged directly from the Graphical Dispatch
Board (SD.900.00).
Figure 91: Technicians Page (SD.903.00) – Accessed from the Graphical Dispatch Board (SD.900.00), Dispatch
Board tab
To page a technician:
1. Choose Module | Service Dispatch | Technicians Page from the menu. Technicians Page
(SD.903.00) appears.
Note: Technicians Page (SD.903.00) can also be accessed by right-clicking on either a problem
code task bar in the schedule pane or a service call in the service call details pane, and then
selecting Page from the task bar menu.
2. Type a different Service Call ID if the service call displayed on the screen is incorrect. (The service
call ID appears if Technicians Page (SD.903.00) was accessed from Graphical Dispatch Board
(SD.900.00).) If the service call must be changed or the ID is unknown, press F3 or double-click
the right mouse button. A list of all service calls set up in Service Call Entry (SD.200.00) appears.
To select a service call ID, highlight the ID and click OK, or double-click the ID.
3. Type the call status that indicates a technician has been assigned to the service call in Call Status
ID. If the call status must be changed or the ID is unknown, press F3 or double-click the right
mouse button. A list of all call statuses set up in Call Status Maintenance (SD.002.00) appears.
To select a call status ID, highlight the ID and click OK, or double-click the ID.

194 Service Dispatch
Note: Clicking Edit on the Call Status PV List accesses Call Status Maintenance (SD.002.00),
enabling you to modify information for an existing call status. Clicking Insert on the Call Status PV
List accesses Call Status Maintenance (SD.002.00), enabling you to add new call statuses to the
system. Call Status is used to update the status of the service call at the same time that a user
assigns the technician to be paged. The status of the problem code is not changed by the page.
Typically, a call status of Assigned is chosen.
4. All technicians currently associated with the service call will be displayed in the grid if the screen
was accessed from Graphical Dispatch Board (SD.900.00). Select the check box to the left of
Technician to indicate which of the technicians should be paged with the service call information.
Multiple technicians can be paged at the same time.
5. If the technician you wish to page is not listed in the grid, type the ID of the technician who will
perform the work on the service call and receive the alphanumeric page in Technician ID. If the
technician must be changed or the ID is unknown, press F3 or double-click the right mouse
button. A list of technicians set up in Employee Maintenance (SD.007.00) appears. To select a
technician ID, highlight the ID and click OK, or double-click the ID.
Note: Clicking Edit on the Employee Maintenance PV List accesses Employee Maintenance
(SD.007.00), enabling you to modify information for an existing employee. Clicking Insert on the
Employee Maintenance PV List accesses Employee Maintenance (SD.007.00), enabling you to
add new employees to the system.
6. If a pager number is attached to the technician in Employee Maintenance (SD.007.00), then the
pager number will default in Number.
7. Type a paging template in Template ID. If the template ID must be changed or the ID is unknown,
press F3 or double-click the right mouse button. A list of all paging templates set up in Pager
Maintenance (SD.031.00) appears. To select a template ID, highlight the ID and click OK, or
double-click the ID. When selecting a template ID, an alphanumeric message appears in the
message box depending on the criteria that was chosen in Pager Template (SD.031.00).
Note: Clicking Edit on the Pager Template PV List accesses Pager Template (SD.031.00), enabling
you to modify information for an existing pager template. Clicking Insert on the Pager Template PV
List accesses Pager Template (SD.031.00), enabling you to add new pager templates to the
system. While Template ID is required, you can erase the default message and type a new
message in the message box. The template ID defaults from the template assigned in Employee
Maintenance (SD.007.00).
8. The pager number in Number defaults from Employee Maintenance (SD.007.00).
9. Select Auto-Retry to continue to send the page if the initial try fails.
10. Choose Page to initiate the page process. Page Sent Notification appears, advising that the page
was transmitted to the paging server.
Note: The alphanumeric text information is sent to a technician based on the template ID
selected.
11. Click OK to close Page Sent Notification. Service Call Updated appears, confirming changes you
made in the service call.
12. Click OK to close Service Call Updated.
Note: If multiple technicians are being paged, the last technician in the list is the one assigned to
the service call though the message will appear for each technician.
13. Click Close on the toolbar to close Technicians Page (SD.903.00). Graphical Dispatch Board
(SD.900.00) appears if Technicians Page (SD.903.00) was accessed from Graphical Dispatch
Board (SD.900.00).

Sending Email Messages to Customers and Technicians 195
Sending Email Messages to Customers
and Technicians
The following topics explain how to send email messages to customers and technicians directly from
the Graphical Dispatch Board (SD.900.00) with Outlook.
Sending Email Messages to Customers Using Outlook, you can send email messages to customers to discuss service calls that appear on the
Graphical Dispatch Board (SD.900.00). You can also send copies of customer-related email messages
to technicians.
To send email messages to customers:
1. Choose Module | Service Dispatch | Graphical Dispatch Board from the menu. The Graphical
Dispatch Board (SD.900.00), Options tab appears.
Figure 92: Graphical Dispatch Board (SD.900.00), Options tab
2. (Optional) Enter the appropriate queue identification number in Queue ID.

196 Service Dispatch
3. Click the Dispatch Board tab. The Dispatch Board tab appears.
Figure 93: Graphical Dispatch Board (SD.900.00), Dispatch Board tab, Day View
4. Rest the mouse pointer on a problem code task bar.
Note: A problem code task bar lists the service call identification number that is associated with a
particular problem code.

Sending Email Messages to Customers and Technicians 197
5. Right-click to select the problem code task bar. The Problem Code Task Bar menu appears.
Figure 94: Problem code task bar menu – Accessed from a problem code task bar on the Graphical Dispatch
Board (SD.900.00), Dispatch Board tab
Note: The Invoice menu option is not available if the ID of the company you are currently working
in and the company ID of the service call you select are not the same.
6. Select Send Customer E-mail. Outlook opens and a new email message window appears. The
following fields in the window are populated for you:
To contains the customer’s email address specified in E-mail Address on the Address tab of
Accounts Receivable Customer Maintenance (08.260.00)
Cc contains the technician’s email address specified in E-mail Address in Employee
Maintenance (SD.007.00) if Customer E-mail Options in Graphical Dispatch Setup
Maintenance (SD.902.00) is set to Cc Technician
Bcc contains the technician’s email address specified in E-mail Address in Employee
Maintenance (SD.007.00) if Customer E-mail Options in Graphical Dispatch Setup
Maintenance (SD.902.00) is set to Bcc Technician
Subject contains Service Call: followed by the service call identification number associated
with the problem code
7. Complete the details of the email message.
8. Click Send to transmit the message.
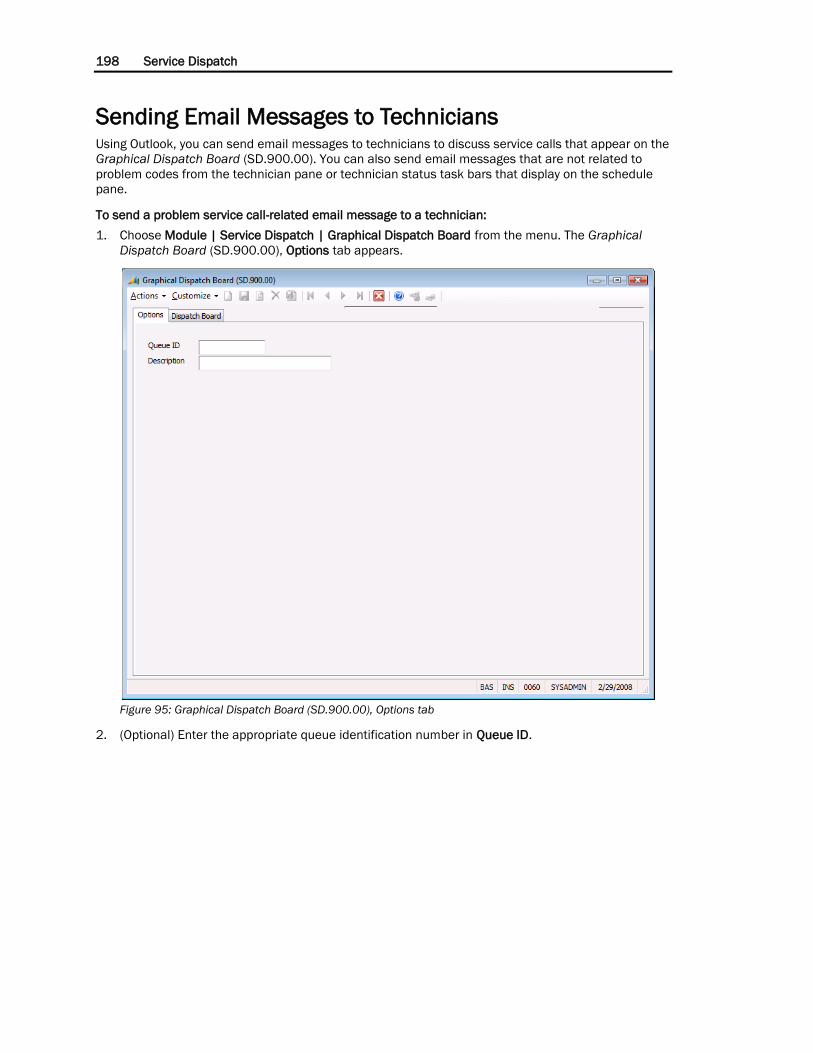
198 Service Dispatch
Sending Email Messages to Technicians Using Outlook, you can send email messages to technicians to discuss service calls that appear on the
Graphical Dispatch Board (SD.900.00). You can also send email messages that are not related to
problem codes from the technician pane or technician status task bars that display on the schedule
pane.
To send a problem service call-related email message to a technician:
1. Choose Module | Service Dispatch | Graphical Dispatch Board from the menu. The Graphical
Dispatch Board (SD.900.00), Options tab appears.
Figure 95: Graphical Dispatch Board (SD.900.00), Options tab
2. (Optional) Enter the appropriate queue identification number in Queue ID.

Sending Email Messages to Customers and Technicians 199
3. Click the Dispatch Board tab. The Dispatch Board tab appears.
Figure 96: Graphical Dispatch Board (SD.900.00), Dispatch Board tab, Day View
4. Rest the mouse pointer on a problem code task bar.
Note: A problem code task bar lists the service call identification number that is associated with a
particular problem code.

200 Service Dispatch
5. Right-click to select the problem code task bar. The Problem Code Task Bar menu appears.
Figure 97: Problem code task bar menu – Accessed from a problem code task bar on the Graphical Dispatch
Board (SD.900.00), Dispatch Board tab
Note: The Invoice menu option is not available if the ID of the company you are currently working
in and the company ID of the service call you select are not the same.
6. Select Send Technician E-mail. Outlook opens and a new email message window appears. The
following fields are populated for you:
To contains the technician’s email address specified in E-mail Address in Employee
Maintenance (SD.007.00)
Subject contains Service Call: followed by the service call identification number
7. Complete the details of the email message.
8. Click Send to transmit the message.

Sending Email Messages to Customers and Technicians 201
To send a technician an email message that is not related to a service call:
1. Choose Module | Service Dispatch | Graphical Dispatch Board from the menu. The Graphical
Dispatch Board (SD.900.00), Options tab appears.
Figure 98: Graphical Dispatch Board (SD.900.00), Options tab
2. (Optional) Enter the appropriate queue identification number in Queue ID.

202 Service Dispatch
3. Click the Dispatch Board tab. The Dispatch Board tab appears.
Figure 99: Graphical Dispatch Board (SD.900.00), Dispatch Board tab, Day View
4. Rest the mouse pointer on a line in the technician pane that contains the technician’s
identification number.

Sending Email Messages to Customers and Technicians 203
5. Right-click to select the technician. Send Technician E-mail appears.
Figure 100: Technician menu – Accessed from Technician on the Graphical Dispatch Board (SD.900.00),
Dispatch Board tab
6. Click Send Technician E-mail. Outlook opens and a new email message window appears.
Note: To is populated with the technician’s email address specified in E-mail Address in Employee
Maintenance (SD.007.00).
7. Complete the details of the email message.
8. Click Send to transmit the message.
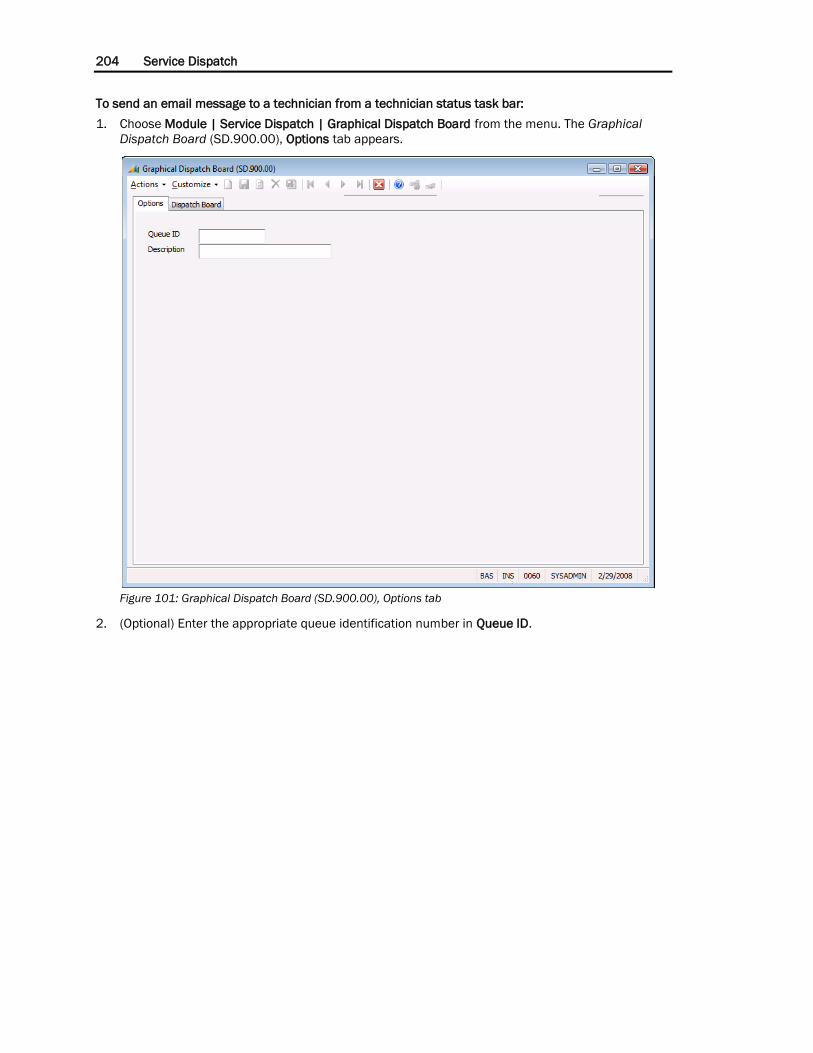
204 Service Dispatch
To send an email message to a technician from a technician status task bar:
1. Choose Module | Service Dispatch | Graphical Dispatch Board from the menu. The Graphical
Dispatch Board (SD.900.00), Options tab appears.
Figure 101: Graphical Dispatch Board (SD.900.00), Options tab
2. (Optional) Enter the appropriate queue identification number in Queue ID.

Sending Email Messages to Customers and Technicians 205
3. Click the Dispatch Board tab. The Dispatch Board tab appears.
Figure 102: Graphical Dispatch Board (SD.900.00), Dispatch Board tab, Day View
4. Rest the mouse pointer on a technician status task bar.
Note: The technician status task bar lists a technician’s employee identification number.

206 Service Dispatch
5. Right-click to select the technician status task bar. The Technician Status Task Bar menu appears.
Figure 103: Technician status task bar menu – Accessed from a technician status task bar on the Graphical
Dispatch Board (SD.900.00), Dispatch Board tab
6. Select Send Technician E-mail. Outlook opens and a new email message window appears.
Note: To is populated with the technician’s email address specified in E-mail Address in Employee
Maintenance (SD.007.00).
7. Complete the details of the email message.
8. Click Send to transmit the message.

Printing Service Call Work Orders 207
Printing Service Call Work Orders
Printing a Service Call Work Order from the Reports
Menu
To print a service call work order:
1. Open Service Call Workorder (SD.625.00) by choosing Module | Service Dispatch | Reports |
Service Call Workorder from the menu.
Service Call Workorder (SD.625.00) displays.
Figure 104: Service Call Workorder (SD.625.00), Report tab
2. Click the Select tab. The Select tab of Service Call Workorder (SD.625.00) displays.
3. Type smservcall.servicecallid in Field.
Press F3 or double-click the right mouse button to display a list of fields associated with the
service call work order report that can be used for record criteria selections.
4. Select Equal in Operator.
Click the down-arrow to the right of Operator to display a list of possible operators for record
criteria selections.
5. Enter a valid service call ID in Value.
6. Click Print.
Clicking Print sends the service call to a specified printer.

208 Service Dispatch
7. Click Close on the toolbar.
-OR-
Click Print Preview.
a) Note that clicking Print Preview prints the service call on the screen.
Figure 105: Service Call Workorder (SD.625.00) report
b) Click Close on the Crystal Report Writer toolbar.
c) Click Close on the toolbar.

Printing Service Call Work Orders 209
Printing Service Call Work Orders from Service Call Entry
(SD.200.00)
To print a service call work order:
1. Open Service Call Entry (SD.200.00) by choosing Module | Service Dispatch | Service Call Entry
from the menu.
Service Call Entry (SD.200.00) displays.
2. If the service call has been invoiced and completed, select Completed Calls.
3. Type the identifier of the service call to be printed in Service Call ID.
If the service call ID is unknown, press F3 or double-click the right mouse button. A list of all
completed service calls set up in Service Call Entry (SD.200.00) displays.
— To select a service call ID, highlight the ID and click OK, or double-click the ID.
4. Click Print.
5. Click Close on the toolbar.

210 Service Dispatch
Printing a Service Call Work Order from the Graphical
Dispatch Board (SD.900.00)
To print a service call work order:
1. Choose Module | Service Dispatch | Graphical Dispatch Board from the menu.
The Options tab of Graphical Dispatch Board (SD.900.00) appears.
2. Enter the desired queue ID.
3. Select the Dispatch Board tab.
4. Select the service call or problem code task bar you want to print the work order for.
5. Once the call is selected, right-click on the mouse and select Print Service Call Workorder.
Figure 106: Graphical Dispatch Board (SD.900.00), Print Service Call Workorder
Note: The Invoice menu option is not available if the ID of the company you are currently working
in and the company ID of the service call you select are not the same.

Processing Independent of Call Completion 211
Processing Independent of Call
Completion
After service calls have been dispatched and technicians have performed some or all of the work on
the job, labor and material used to complete the work can be entered into the system. Invoice Entry
(SD.202.00) allows users to enter billing information for a service call or job while Invoice - T & M
Details (SD.203.00) allows users to enter material and labor line item details for a service call or job.
Regardless of if line items are billable, labor and material can be entered and tracked for a service call
or job. If the Payroll module is interfaced to Service Dispatch, Generate Payroll Process (SD.302.00)
generates batches in Time and Dollar (02.020.00) for processing the labor Work Hours of technicians.
Generate Inventory (SD.306.00) creates batches in Issues (10.020.00) for updating quantity and cost
information for material inventory items used on a service call or job.
If the Purchasing module is interfaced to Service Dispatch, Generate Inventory (SD.306.00) can also
be used to create purchase orders and purchase order receipts where a Vendor ID is populated on
detail lines of Invoice - T & M Details (SD.203.00) or Flat Rate Order - Modify Details (SP.202.00).
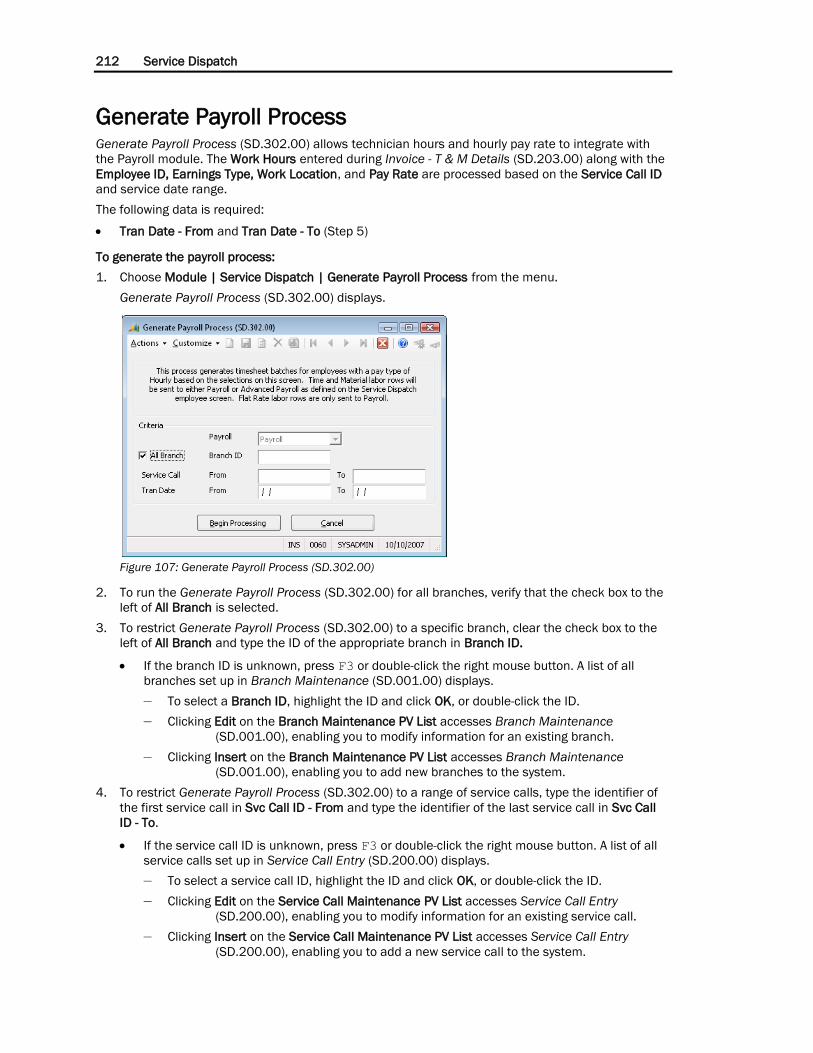
212 Service Dispatch
Generate Payroll Process Generate Payroll Process (SD.302.00) allows technician hours and hourly pay rate to integrate with
the Payroll module. The Work Hours entered during Invoice - T & M Details (SD.203.00) along with the
Employee ID, Earnings Type, Work Location, and Pay Rate are processed based on the Service Call ID
and service date range.
The following data is required:
Tran Date - From and Tran Date - To (Step 5)
To generate the payroll process:
1. Choose Module | Service Dispatch | Generate Payroll Process from the menu.
Generate Payroll Process (SD.302.00) displays.
Figure 107: Generate Payroll Process (SD.302.00)
2. To run the Generate Payroll Process (SD.302.00) for all branches, verify that the check box to the
left of All Branch is selected.
3. To restrict Generate Payroll Process (SD.302.00) to a specific branch, clear the check box to the
left of All Branch and type the ID of the appropriate branch in Branch ID.
If the branch ID is unknown, press F3 or double-click the right mouse button. A list of all
branches set up in Branch Maintenance (SD.001.00) displays.
— To select a Branch ID, highlight the ID and click OK, or double-click the ID.
— Clicking Edit on the Branch Maintenance PV List accesses Branch Maintenance
(SD.001.00), enabling you to modify information for an existing branch.
— Clicking Insert on the Branch Maintenance PV List accesses Branch Maintenance
(SD.001.00), enabling you to add new branches to the system.
4. To restrict Generate Payroll Process (SD.302.00) to a range of service calls, type the identifier of
the first service call in Svc Call ID - From and type the identifier of the last service call in Svc Call
ID - To.
If the service call ID is unknown, press F3 or double-click the right mouse button. A list of all
service calls set up in Service Call Entry (SD.200.00) displays.
— To select a service call ID, highlight the ID and click OK, or double-click the ID.
— Clicking Edit on the Service Call Maintenance PV List accesses Service Call Entry
(SD.200.00), enabling you to modify information for an existing service call.
— Clicking Insert on the Service Call Maintenance PV List accesses Service Call Entry
(SD.200.00), enabling you to add a new service call to the system.

Processing Independent of Call Completion 213
5. To restrict Generate Payroll Process (SD.302.00) to a range of transaction dates, type the first
date in Tran Date - From and type the last date in Tran Date - To.
All labor detail records with a Service Date in Invoice - T & M Details (SD.203.00) or Flat Rate
Order - Modify Details (SP.202.00) between Tran Date - From and Tran Date - To will be
included in the Time & Dollar (02.020.00) batch of Payroll.
Note: Tran Date - From and Tran Date - To generally coincide with the payroll period dates of an
organization.
6. Click Begin Processing. A batch is created in Time and Dollar (02.020.00) of the Payroll module.
7. When the payroll generation process is finished, click OK to close the Process Status message.
8. Click Close on the toolbar to close Generate Payroll Process (SD.302.00).
Clicking Cancel closes Generate Payroll Process (SD.302.00).

214 Service Dispatch
Generate Inventory Generate Inventory (SD.306.00) allows users to generate an Issues (10.020.00) batch in the
Inventory module for the quantity and costs of non-billable inventory items, create purchase orders in
Purchase Orders (04.250.00) and purchase order receipts in Receipts/Invoice Entry (04.010.00)
without completing service calls. In addition, Generate Inventory (SD.306.00) processes quantity and
costs of non-billable inventory items.
Note: All fields default from information entered previously. If you choose to clear check boxes, you
must type a value into the corresponding field.
To generate inventory:
1. Choose Module | Service Dispatch | Generate Inventory from the menu.
Generate Inventory (SD.306.00) displays.
Figure 108: Generate Inventory (SD.306.00)
2. To run Generate Inventory (SD.306.00) for all branches, verify the check box to the left of All
Branch is selected.
3. To restrict Generate Inventory (SD.306.00) to a specific branch, clear the check box to the left of
All Branch and type the identifier of the appropriate branch in Branch ID.
If the branch ID is unknown, press F3 or double-click the right mouse button. A list of all
branches set up in Branch Maintenance (SD.001.00) displays.
— To select a branch ID, highlight the ID and click OK, or double-click the ID.
— Clicking Edit on the Branch Maintenance PV List accesses Branch Maintenance
(SD.001.00), enabling you to modify information for an existing branch.
— Clicking Insert on the Branch Maintenance PV List accesses Branch Maintenance
(SD.001.00), enabling you to add new branches to the system.
4. If Generate Inventory (SD.306.00) is to be generated for all service calls, verify that the check box
to the left of All Service Calls is selected.

Processing Independent of Call Completion 215
5. To restrict Generate Inventory (SD.306.00) to a range of service calls, clear the check box to the
left of All Service Calls and type the ID of the first service call in Beginning Call ID and type the ID
of the last service call in Ending Call ID.
If the service call ID is unknown, press F3 or double-click the right mouse button. A list of all
service calls set up in Service Call Entry (SD.200.00) displays.
— To select a service call ID, highlight the ID and click OK, or double-click the ID.
— Clicking Edit on the Service Call Maintenance PV List accesses Service Call Entry
(SD.200.00), enabling you to modify information for an existing service call.
— Clicking Insert on the Service Call Maintenance PV List accesses Service Call Entry
(SD.200.00), enabling you to add a new service call to the system.
6. If Generate Inventory (SD.306.00) is to be generated for all service dates, verify the check box to
the left of All Service Dates is selected.
7. To restrict Generate Inventory (SD.306.00) to process all non-billable detail line items up to and
including a specific Service Date, type the date in Process Through.
8. To have Qty Used and Unit Price for non-billable material detail lines entered in Invoice Entry
(SD.202.00) update the quantities on hand and costs of inventory items, select the check box to
the left of Book Inventory Costs.
A batch is created in Issues (10.020.00) of the Inventory module.
Note: This option is used for Progress Billing.
9. To have purchase orders created for detail line records where a Vendor ID is populated in Invoice -
T & M Details (SD.203.00) or Flat Rate Order - Modify Details (SP.202.00), select the check box to
the left of Create Purchase Orders.
Note: Selecting the check box to the left of Create Purchase Orders has no effect on the
Purchasing module if there are no invoice detail line records with a vendor ID.
10. To have purchase orders and purchase order receipts created for detail line records where a
Vendor ID is populated in Invoice - T & M Details (SD.203.00) or Flat Rate Order - Modify Details
(SP.202.00), select the check box to the left of Create P.O. Receipts.
Note: If Voucher Receipts is set to Always Voucher, the system creates a voucher batch in Voucher
& Adjustment Entry (03.010.00) in the Accounts Payable module.
Note: Selecting the check box to the left of Create P.O. Receipts has no effect on the Purchasing
module if Create Receipts On Purchase Orders is not enabled in Service Series Setup
Maintenance (SD.000.00).
Note: A purchase order will be created for each Vendor ID associated to a detail line record in
Purchase Orders (04.250.00). If multiple detail line records of an invoice are associated with the
same Vendor ID, each invoice detail line record will create a purchase order line record.
Note: If Voucher Receipts Option in Service Series Setup Maintenance (SD.000.00) is set to
Always Voucher, a voucher is created for each receipt in Voucher & Adjustment Entry (03.010.00)
of Accounts Payable. A balanced batch is created each time Generate Inventory (SD.306.00) is
processed.
11. Specify what period to post the service calls you wish to process should have. Service calls with a
blank period to post will not process unless Include Service Calls having blank period to post is
checked.
12. Click Begin Processing.
13. When the generate inventory process is finished, click OK to close the Process Status message.
14. Click Close on the toolbar to close Generate Inventory (SD.306.00).
15. Clicking Cancel also closes Generate Inventory (SD.306.00).

216 Service Dispatch

Invoicing 217
Invoicing
Invoicing Overview After a service call has been dispatched and technicians have been at the customer site performing
work, the service call must be completed or invoiced. Invoice Entry (SD.202.00) allows users to enter
billing information for a service call or job while Invoice - T & M Details (SD.203.00) allows users to
enter material and labor line item details needed to complete the work on a service call or job. Other
important information can be associated with the service call invoice such as the vehicle and
odometer readings to track usages for preventive maintenance.
The system provides two Service Type options when invoicing: Time & Material and Flat Rate Pricing.
Time & Material allows users to enter an unlimited number of detail lines for labor and parts needed
to carry out the work of the service call. Flat Rate Pricing is a separate service management module in
Field Service Management that allows users to create an unlimited number of user-defined flat rates
that include all of the material, labor and overhead costs needed to cover a job or service call. Since
the Service Dispatch and the Flat Rate Pricing modules require inventory, material and labor are set
up as inventory items in Inventory Item (10.250.00) of the Inventory module.
The quantity entered on an invoice for a non-stock item is checked against the quantity available in
the Inventory module. For time and material invoices, this is done on Invoice – T & M Details
(SD.203.00). For Flat Rate Pricing invoices, this is done on Flat Rate Order – Modify Detail
(SP.202.00). When a quantity entered is greater than the quantity available, the message displayed
and options available are controlled by Allow Negative Quantities in IN Setup (10.950.00).
An inventory item that is not a non-stock item and is entered in a service invoice area allocated in the
Inventory module will be allocated in the Inventory module when the invoice is saved. This provides
control over the inventory by preventing the over-allocation of items by other transactions across all
modules.
The system also provides three Invoice Type options when entering invoice information into Invoice
Entry (SD.202.00): Invoice, Manual and Progress. The invoice number for Invoice is assigned to the
service call after the service call invoice is printed and saved to the system through Service Invoice
Printing - Keep/Delete (SD.642.00). Invoice requires Auto Reference Number in AR Setup (08.950.00)
to be checked because the invoice number is automatically generated from Last Reference Number of
AR Setup (08.950.00).
Manual requires that a user-specified invoice number be typed into Invoice/Memo Nbr before the
invoice information can be saved to the system in Invoice Entry (SD.202.00). After Invoice and Manual
invoices are printed and saved to the system through Service Invoice Printing - Keep/Delete
(SD.642.00), the service call is considered completed. Once the service call is completed, no further
changes can be made to the service call and no additional costs can be charged to the customer.
On occasions, technicians may not be able to perform all of the work on a service call and an invoice
for the customer still must be generated. Service Dispatch has the capability to perform progress
invoices. Progress invoicing allows users to invoice customers for material and labor used to perform
the work without closing the service call. Therefore, additional work and detail lines items can be
added to the service call for invoicing. Progress disables Invoice/Memo Nbr in Invoice Entry
(SD.202.00) and assigns an invoice number to the printed invoices when generated using Service Call
Invoice (SD.640.00) or Service Call Invoice (SSRS) (SD.643.00).
Note: If you are invoicing a customer for a service call for the final time, change Invoice Type to
Invoice.
Line Type in Invoice - T & M Details (SD.203.00) determines whether to charge the line items to a
customer, to a service contract, to a project, or to nothing in the case of warranty or other non-billable
charges. Billable creates a batch in Invoice & Memo (08.010.00) of Accounts Receivable and an
Issues (10.020.00) COGS batch in Inventory. In-house Warranty and Manufacturer’s Warranty do not
create an invoice batch in Accounts Receivable, but does create a COGS transaction in Issues
(10.020.00). Non-billable does not create an Accounts Receivable invoice batch, but does create a

218 Service Dispatch
COGS transaction in Issues (10.020.00). Project creates a COGS batch in Issues (10.020.00) and
updates a project based on Project ID associated with the service call and the Task ID associated with
the detail line item. Service Contract creates a COGS transaction in Issues (10.020.00) and updates
the profitability of a service contract based on the Contract ID associated with the invoice detail line
item.
After all of the billing information is entered into Invoice Entry (SD.202.00) and Invoice - T & M Details
(SD.203.00), invoices are printed or sent electronically using Service Call Invoice (SD.640.00) or
Service Call Invoice (SSRS) (SD.643.00). In these screens, you select service calls for invoicing that
have an Approved Handling in Invoice Entry (SD.202.00).

Invoicing 219
Entering Invoice Information Invoice Entry (SD.202.00) is divided into tabs and includes several buttons. Each tab contains
information related to a particular aspect of a service call invoice such as the service type, invoice type
and invoice date. The table on the following page displays an overview of the individual tabs and
buttons in Invoice Entry (SD.202.00).
Figure 109: Invoice Entry (SD.202.00), Invoice Info tab
The tab... Enables you to...
Invoice Info Enter invoice information such as the service type, invoice type,
invoice date, salesperson, and period to post for the invoice.
Other Info Enter or view additional information such as the caller’s name, the
customer’s purchase order number, and media source associated
with the service call.
Invoice History View all invoice transactions processed against the service call.
The button... Enables you to...
Technician Access Invoice - Technician Information (SD.028.00) and split
commission for two or more technicians.
Details Access Invoice - T & M Details (SD.203.00) or Invoice - Flat Rate
Order (SP.200.00) depending on the invoice type selected. Time &
Material invoices allows billable, non-billable, contract, project and
warranty detail line items for material and labor. Flat rate invoices
are billable line items that are not associated with service contracts
or projects.
Invoice Notes Access Invoice - Note Entry (SD.408.00) allowing you to enter notes
to be included on service call invoices.
Billing Address Access Customer Information (SD.202.01) allowing you to view
customer billing address information associated with the service call
invoice.
OK Close Invoice Entry (SD.202.00) and save any changes.

220 Service Dispatch
Creating a New Invoice
The following data is required for Invoice Entry (SD.202.00):
Service Call ID (Step 2)
Service Type (Step 3)
Invoice Type (Step 4)
Invoice Date (Step 5)
Invoice/Memo Nbr (Step 7 if Service Type is Manual)
Salesperson ID (Step 9)
Period to Post (Step 11: recommended)
Terms ID (Step 12)
Handling (Step 31)
To create a new invoice:
1. Open Invoice Entry (SD.202.00) by choosing Module | Service Dispatch | Invoice Entry from the
menu.
Invoice Entry (SD.202.00) displays.
Note: Access Invoice Entry (SD.202.00) by clicking Invoice in Service Call Entry (SD.200.00), by
clicking Invoice in Dispatch (SD.201.00).
2. Type the ID of the service call in Service Call ID to be invoiced.
If the service call ID must be changed or the ID is unknown, press F3 or double-click the right
mouse button. A list of all service calls set up in Service Call Entry (SD.200.00) displays.
— To select a service call ID, highlight the ID and click OK, or double-click the ID.
Once the Service Call ID is entered, the Customer ID, Customer Site, Branch ID, Project ID,
and Contract ID associated with the service call is populated.
3. Choose the type of invoice detail for the service call in Service Type.
Time & Material
Flat Rate
Note: Time & Material allows users to enter an unlimited number of detail lines for labor and parts
needed to carry out the work of a service call. Flat Rate Pricing is a separate service management
module in Field Service Management that allows users to create an unlimited number of user-
defined flat rates that include all of the material, labor and overhead costs needed to complete a
job or service call.
4. Choose how the invoice number is assigned for the invoice in Invoice Type.
Invoice: Assigned to a service call after the service call invoices are printed and saved to the
system through Service Invoice Printing - Keep/Delete (SD.642.00).
Manual: Requires that a user-specified invoice number be typed into Invoice/Memo Nbr
before the invoice information can be saved to the system in Invoice Entry (SD.202.00).
Progress: Allows users to invoice customers for material and labor used to perform the work
without closing the service call. Therefore, additional work and detail lines items can be
added to the service call for invoicing.
5. If the Invoice Type is Manual, type a date the work on the service call is complete in Completed
Date.
Note: If the Invoice Type is Invoice, the date the invoice is printed and processed in the system
defaults to Completed Date. If the Invoice Type is Progress, no value is entered in Completed Date
because the service call is not closed during the invoice printing process.

Invoicing 221
6. Type the accounts receivable aging date for the invoice in Invoice Date.
7. If the Invoice Type is Manual, type an invoice number for the invoice in Invoice/Memo Nbr.
Note: If the Invoice Type is Invoice or Progress, Invoice/Memo Nbr is inactive.
8. Type a work order number associated with the service call in Workorder Nbr.
Workorder Nbr may be printed on the customer invoice.
9. Type the salesperson associated with the customer site of the service call in Salesperson ID.
Salesperson ID defaults from Site Maintenance (SD.025.00).
If the salesperson must be changed or the ID is unknown, press F3 or double-click the right
mouse button. A list of all salespersons set up in Salesperson Maintenance (08.310.00)
displays.
— To select a salesperson ID, highlight the ID and click OK, or double-click the ID.
— Clicking Edit on the Salesperson List accesses Salesperson Maintenance (08.310.00),
enabling you to modify information for existing salespersons.
— Clicking Insert on the Salesperson List accesses Salesperson Maintenance (08.310.00),
enabling you to add new salespersons to the database.
10. Type the technician who performed the work of the service call in Primary Tech.
Primary Tech defaults from Service Call Entry (SD.200.00) or Dispatch (SD.201.00).
If the technician must be changed or the ID is unknown, press F3 or double-click the right
mouse button. A list of all technicians set up in Employee Maintenance (SD.007.00) displays.
— To select a technician ID, highlight the ID and click OK, or double-click the ID.
— Clicking Edit on the Employee Maintenance PV List accesses Employee Maintenance
(SD.007.00), enabling you to modify information for an existing technician.
— Clicking Insert on the Employee Maintenance PV List accesses Employee Maintenance
(SD.007.00), enabling you to add new technicians to the system.
11. Type the period you want the invoice to update in the Accounts Receivable and General Ledger
modules in Period to Post.
Note: Period to Post is important when selecting service calls to be invoiced in Service Invoice
Selection (SD.641.00). Only invoices that have a Period to Post in Invoice Entry (SD.202.00) that
matches the Period to Post in Service Invoice Selection (SD.641.00) are selected for invoicing.
12. Type a term to associate with the invoice in Terms ID.
Terms ID defaults from Customer Maintenance (08.260.00).
If the terms ID is unknown, press F3 or double-click the right mouse button. A list of all terms
set up in Terms Maintenance (21.270.00) displays.
— To select a terms ID, highlight the ID and click OK, or double-click the ID.
— Clicking Edit on the Terms Maintenance List accesses Terms Maintenance (21.270.00),
enabling you to modify information for existing terms.
— Clicking Insert on the Terms Maintenance List accesses Terms Maintenance
(21.270.00), enabling you to add new terms to the system.
Terms ID is for informational purposes only.
Note: Terms are used to create Due Date and Discount Date of an invoice in Invoice & Memo
(08.010.00) when a service call invoice is printed in Service Call Invoice (SD.640.00) or Service
Call Invoice (SSRS) (SD.643.00) and processed in Service Invoice Printing - Keep/Delete
(SD.642.00). Due Date and Discount Date of an invoice are based on Invoice Date and Terms ID
of the invoice.

222 Service Dispatch
Note: Multiple installment terms have no effect on Field Service Management modules. Multiple
installment terms are processed when the batch of invoices is released in Invoice & Memo
(08.010.00).
13. If the work of a service call is covered under a manufacturer or in-house warranty, and the
manufacturer must be invoiced for the material and labor costs, enter the customer ID of the
manufacturer in Alt Cust ID.
If the customer ID is unknown, press F3 or double-click the right mouse button. A list of all
active customers set up in Customer Maintenance (08.260.00) displays.
— To select a customer ID, highlight the ID and click OK, or double-click the ID.
— Clicking Edit on the Customer Maintenance List accesses Customer Maintenance
(08.260.00), enabling you to modify information for existing customer.
— Clicking Insert on the Customer Maintenance List accesses Customer Maintenance
(08.260.00), enabling you to add new customers to the system.
14. If the service call is a “call back,” type the identifier of the original service call in Orig Call Nbr.
15. Type a 30-character explanation of the service call invoice in Description.
Description is for informational purposes only.
16. Click the Other Info tab or press ALT+O. The Other Info tab displays.
Figure 110: Invoice Entry (SD.202.00), Other Info tab
Additional information may be entered into the Other Info tab; however, all the fields on this tab
are optional. They are for informational purposes only.

Invoicing 223
17. Type a different call status associated with the service call in Call Status.
If the call status must be changed or the ID is unknown, press F3 or double-click the right
mouse button. A list of all call statuses set up in Call Status Maintenance (SD.002.00)
displays.
— To select a branch ID, highlight the ID and click the OK call status, or double-click the ID.
— Clicking Edit on the Call Status Maintenance PV List accesses Call Status Maintenance
(SD.003.00), enabling you to modify information for an existing call status.
— Clicking Insert on the Call Status Maintenance PV List accesses Call Status Maintenance
(SD.003.00), enabling you to add new call statuses to the system.
Call Status defaults from Service Call Entry (SD.200.00).
18. Type a different call type associated with a service call in Call Type.
Call Type defaults from Service Call Entry (SD.200.00).
If the call type ID must be changed or the ID is unknown, press F3 or double-click the right
mouse button. A list of all call types set up in Call Type Maintenance (SD.003.00) displays.
— To select a call type ID, highlight the ID and click OK, or double-click the ID.
— Clicking Edit on the Call Type Maintenance PV List accesses Call Type Maintenance
(SD.003.00), enabling you to modify information for an existing call type.
— Clicking Insert on the Call Type Maintenance PV List accesses Call Type Maintenance
(SD.003.00), enabling you to add new call types to the system.
19. Type a different name for the person who requested the service call in Caller Name.
Caller Name defaults from Service Call Entry (SD.200.00).
20. Type a different purchase order number associated with the service call Customer PO.
Customer PO defaults from Service Call Entry (SD.200.00).
21. Choose a payment method for the service invoice in Payment Method.
American Express
Cash
Check
Discover
In-house Charge
MasterCard
Visa
Note: Payment Method is for informational purposes only.
22. If the Payment Method is check or a credit card, type the check or credit card number in
Check/Card Nbr.
Note: Check/Card Nbr is for informational purposes only.
23. If the Payment Method is credit card, type the credit card expiration number in Exp Date.
Note: Exp Date is for informational purposes only.
24. Type the name of the user entering the invoice in Processed By.
25. Type the date the invoice is being entered into the system in Processed Date.
26. Type the name of the user who reviewed the invoice for accuracy in Reviewed By.
27. Type the date the invoice was reviewed for accuracy in Reviewed Date.
28. Click Save on the toolbar.

224 Service Dispatch
29. Enter specific invoice details into Invoice - T & M Details (SD.203.00). The following invoice detail
types are available:
Billable material inventory line items
Billable labor inventory line items
In-house warranty material inventory line items
In-house warranty labor inventory line items
Manufacturer warranty material inventory line items
Manufacturer warranty labor inventory line items
Non-billable material inventory line items
Non-billable labor inventory line items
Project material inventory line items
Project labor inventory line items
Service contract material inventory line items
Service contract labor inventory line items
See the following sections for more information.
Note: Quantities on inventory line items that are not non-stock are checked against the quantity
available in the Inventory module as each line is entered to verify that sufficient stock is available
to allocate to the invoice.
30. When you are finished entering specific invoice details, click OK to close Invoice - T & M Details
(SD.203.00).
Invoice Entry (SD.202.00) displays.
31. Choose Approved for Handling.
Note: Handling must be set to Approved in order to select the service call to be invoiced in Service
Invoice Selection (SD.641.00).
32. Click Save to save changes to the current invoice; click Finish to enter the next invoice.
Note: Inventory line items that are not non-stock items are allocated in the Inventory module to
prevent over-allocation of items by other transactions.

Invoicing 225
Entering Time and Material Details
Entering Time and Material Invoice Detail Information
Invoice - T & M Details (SD.203.00) allows users to enter labor and material line item details needed
to complete the work on a service call or job. To enter specific line item details for work performed on
a service call or job, select Time and Material in Service Type in Invoice Entry (SD.202.00).
To enter billable material inventory line items:
1. After entering basic invoice information (see “Entering Invoice Information” on page 219), click
Details.
Invoice - T & M Details (SD.203.00) displays.
Figure 111: Invoice - T & M Details (SD.203.00)
2. Select the type of detail for the line item in Line Types.
Select Billable from the drop-down list.

226 Service Dispatch
3. Type the material inventory items used to complete the work of a service call in Line Item ID.
If the inventory ID is unknown, press F3 or double-click the right mouse button. A list of all
inventory items set up in Inventory Items (10.250.00) displays.
— To select an inventory ID, highlight the ID and click OK, or double-click the ID.
— Clicking Edit on the Inventory Item List accesses Inventory Items (10.250.00), enabling
you to modify information for an existing inventory item.
— Clicking Insert on the Inventory Item List accesses Inventory Items (10.250.00), enabling
you to add new inventory items to the system.
Once Line Item ID is populated, the description of the inventory item to the right of Line Item
ID, Detail Type, Class, Base Price, Unit Price, Tax ID, Unit Cost, Rev Acct, and COGS Acct are
populated.
The quantity available of the inventory item is reduced by the value in Qty Used when the
invoice is saved. This allocation remains until the invoice is cancelled or until the resulting
inventory transaction is processed to reduce quantity on hand.
4. Type a different description for the material inventory item in the field to the right of Line Item ID.
5. Type the site of the inventory item where the quantity on hand is reduced by Qty Used in Invt
Location ID.
If the inventory location must be changed or the ID is unknown, press F3 or double-click the
right mouse button. A list of all inventory locations set up in Sites (10.310.00) displays.
— To select an inventory location ID, highlight the ID and click OK, or double-click the ID.
— Clicking Edit on the Inventory Location List accesses Sites (10.310.00), enabling you to
modify information for an existing inventory location.
— Clicking Insert on the Inventory Location List accesses Sites (10.310.00), enabling you to
add new inventory locations to the system.
The quantity available of the inventory item is reduced by the value in Qty Used when the
invoice is saved. This allocation remains until the invoice is cancelled or until the resulting
inventory transaction is processed to reduce quantity on hand.
6. Type the warehouse location of the inventory item where the quantity on hand is reduced by Qty
Used in Whse Loc.
If the warehouse location ID is unknown, press F3 or double-click the right mouse button. A
list of all warehouse locations set up in Warehouse Bin Locations (10.340.00) displays.
— To select a warehouse location ID, highlight the ID and click OK, or double-click the ID.
The quantity available of the inventory item is reduced by the value in Qty Used when the
invoice is saved. This allocation remains until the invoice is cancelled or until the resulting
inventory transaction is processed to reduce quantity on hand.
7. Type the quantity of the inventory item used to perform the work on a service call in Qty Used.
Qty Used is compared to the quantity available in the Inventory module. When a quantity
greater than the quantity available is entered, Allow Negative Quantities in IN Setup
(10.950.00) controls the message displayed and options available.
Invoicing 227
8. If the inventory item used to complete the work on a service call is serialized, type the serial
number of the inventory item in Lot/Ser Nbr.
If the lot/serial number ID is unknown, press F3 or double-click the right mouse button. A list
of all lot/serial numbers received for the inventory item displays.
— To select a lot/serial number, highlight the ID and click OK, or double-click the ID.
— Quantity available must be greater than zero to select a lot/serial number.
— For serial number-controlled items, Qty Used must be 1 (an issue from inventory) or -1 (a
return to inventory).
— For serial number-controlled items issued from inventory, each instance of the item on
the grid must have a unique serial number.
— For serial number-controlled items returned to inventory, the serial number must not
already exist.
9. Type the unit price for the inventory item in Unit Price.
Unit Price may differ from Stock Base Price of the inventory item if any special pricing is
applicable.
10. Type a tax identifier associated with the detail line item in Tax ID.
If the tax ID is unknown, press F3 or double-click the right mouse button. A list of all taxes set
up in Tax Maintenance (21.280.00) displays.
— To select a tax ID, highlight the ID and click OK, or double-click the ID.
— Clicking Edit on the Sales Tax List accesses Tax Maintenance (21.280.00), enabling you
to modify information for existing sales taxes.
— Clicking Insert on the Sales Tax List accesses Tax Maintenance (21.280.00), enabling
you to add new sales taxes to the system.
11. Type the date material inventory item associated with the line item was used in Service Date.
If Equipment ID is associated with the line item, then Service Date determines when the
period in Equipment History (SE.012.00) in the Equipment Maintenance module is updated.
For billable inventory items, Equipment History (SE.012.00) is updated in Service Invoice
Printing - Keep/Delete (SD.642.00).
12. If a purchase order is required for the inventory item, type the vendor identifier associated with
the line item record in Vendor ID.
If the vendor ID is unknown, press F3 or double-click the right mouse button. A list of all
active vendors set up in Vendor Maintenance (03.270.00) displays.
— To select a vendor ID, highlight the ID and click OK, or double-click the ID.
— Clicking Edit on the Vendor List accesses Vendor Maintenance (03.270.00), enabling you
to modify information for existing vendors.
— Clicking Insert on the Vendor List accesses Vendor Maintenance (03.270.00), enabling
you to add new vendors to the system.
Note: A purchase order will be created in Generate Inventory (SD.306.00) for each Vendor ID
associated with a detail line record in Purchase Orders (04.250.00). If multiple detail line records
of an invoice are associated with the same Vendor ID, each invoice detail line record will create a
purchase order line record.
13. If a purchase order is required for the inventory item, type the purchase order date associated
with the line item record in PO Date.
PO Date is inactive until Vendor ID is populated.
14. If a purchase order is required for the inventory item, type the quantity ordered for a specific item
that was purchased on a purchase order in Qty Ordered.
Qty Ordered is inactive until Vendor ID is populated.

228 Service Dispatch
15. If a purchase order receipt is required for the inventory item, type the quantity received for a
specific item that was used in Qty Received.
Qty Received is inactive until Vendor ID is populated.
Note: A purchase order receipt will be created in Generate Inventory (SD.306.00) when Create
P.O. Receipts is selected in Generate Inventory (SD.306.00) and Create Receipts On Purchase
Orders is set to Yes in Service Series Setup Maintenance (SD.000.00).
16. If PO Number Option in Service Series Setup Maintenance (SD.000.00) is Manual, type the
purchase order number in PO Number.
If PO Number Option in Service Series Setup Maintenance (SD.000.00) is Automatic, PO
Number is populated by the system from Generate Inventory (SD.306.00).
17. If a purchase order is required for the inventory item, type the cost of the inventory item
associated with the line item record in Unit Cost.
Unit Cost defaults according to the costing method of the inventory item in Inventory Items
(10.250.00).
Unit Cost becomes active when Vendor ID is associated with the inventory line item.
18. If the work for the service call is associated with a piece of equipment, type the equipment
identifier in Equipment ID.
If the equipment ID is unknown, press F3 or double-click the right mouse button. A list of all
equipment set up in Equipment Entry (SE.001.00) of the Equipment Maintenance module
displays.
— To select a piece of equipment, highlight the ID and click OK, or double-click the ID.
19. Type the revenue account associated with the inventory line item in Rev Acct.
If the account number must be changed or the ID is unknown, press F3 or double-click the
right mouse button. A list of all active account number set up in Account Maintenance
(01.260.00) displays.
— To select an account number, highlight the ID and click OK, or double-click the ID.
— Clicking Edit on the Active Account List accesses Account Maintenance (01.260.00),
enabling you to modify information for an existing account number.
— Clicking Insert on the Active Account List accesses Account Maintenance (01.260.00),
enabling you to add new account numbers to the system.
Rev Acct defaults from the inventory item in Inventory Items (10.250.00).
20. Type the revenue subaccount associated with the inventory line item in Rev Sub.
If the subaccount number must be changed or the ID is unknown, press F3 or double-click the
right mouse button. A list of all active subaccount number set up in Subaccount Maintenance
(01.270.00) displays.
— To select a subaccount number, highlight the ID and click OK, or double-click the ID.
— Clicking Edit on the Active Subaccount List accesses Subaccount Maintenance
(01.270.00), enabling you to modify information for an existing subaccount
number.
— Clicking Insert on the Active Subaccount List accesses Subaccount Maintenance
(01.270.00), enabling you to add new subaccount numbers to the system.

Invoicing 229
Rev Sub defaults from several places:
— If Use Sub From Site is selected in Call Type Maintenance (SD.003.00), then Rev Sub
defaults from Sub Account in Site Maintenance (SD.025.00).
— If Use Sub From Site is not selected in Call Type Maintenance (SD.003.00), then Rev Sub
defaults from Subaccount in Call Type Maintenance (SD.003.00).
— If a contract ID is associated with the detail line item, then Rev Sub defaults from
Deferred Revenue Subaccount in Contract Type Maintenance (SN.003.00)
unless Use Subaccount From Site is selected in Contract Type Maintenance
(SN.003.00). If Use Subaccount From Site is selected in Contract Type
Maintenance (SN.003.00), then Rev Sub defaults from Sub Account in Site
Maintenance (SD.025.00).
21. Type the cost of goods account associated with the inventory line item in COGS Acct.
If the account number must be changed or the ID is unknown, press F3 or double-click the
right mouse button. A list of all active account number set up in Account Maintenance
(01.260.00) displays.
— To select an account number, highlight the ID and click OK, or double-click the ID.
— Clicking Edit on the Active Account List accesses Account Maintenance (01.260.00),
enabling you to modify information for an existing account number.
— Clicking Insert on the Active Account List accesses Account Maintenance (01.260.00),
enabling you to add new account numbers to the system.
COGS Acct defaults from the inventory item in Inventory Items (10.250.00).
22. Type the cost of goods subaccount associated with the inventory line item in COGS Sub.
If the subaccount number must be changed or the ID is unknown, press F3 or double-click the
right mouse button. A list of all active subaccount number set up in Subaccount Maintenance
(01.270.00) displays.
— To select a subaccount number, highlight the ID and click OK, or double-click the ID.
— Clicking Edit on the Active Subaccount List accesses Subaccount Maintenance
(01.270.00), enabling you to modify information for an existing subaccount
number.
— Clicking Insert on the Active Subaccount List accesses Subaccount Maintenance
(01.270.00), enabling you to add new subaccount numbers to the system.
COGS Sub defaults from several places:
— If Use Sub From Site is selected in Call Type Maintenance (SD.003.00), then COGS Sub
defaults from Sub Account in Site Maintenance (SD.025.00).
— If Use Sub From Site is not selected in Call Type Maintenance (SD.003.00), then COGS
Sub defaults from Subaccount in Call Type Maintenance (SD.003.00).
— If a contract ID is associated with the detail line item, then COGS Sub defaults from
Deferred COGS Subaccount in Contract Type Maintenance (SN.003.00) unless
Use Subaccount From Site is selected in Contract Type Maintenance
(SN.003.00). If Use Subaccount From Site is selected in Contract Type
Maintenance (SN.003.00), then Deferred COGS Subaccount defaults from Sub
Account in Site Maintenance (SD.025.00).
23. Click Save on the toolbar.
24. Click Close on the toolbar.

230 Service Dispatch
Entering Billable Labor Inventory Line Items
To enter billable labor inventory line items:
1. After entering basic invoice information (see “Entering Invoice Information” on page 219), click
Details.
Invoice - T & M Details (SD.203.00) displays.
2. Select the type of detail for the line item in Line Types.
Select Billable from the drop-down list.
3. Type the labor inventory items used to complete the work on a service call in Line Item ID.
If the inventory ID is unknown, press F3 or double-click the right mouse button. A list of all
inventory items set up in Inventory Items (10.250.00) displays.
— To select an inventory ID, highlight the ID and click OK, or double-click the ID.
— Clicking Edit on the Inventory Item List accesses Inventory Items (10.250.00), enabling
you to modify information for an existing inventory item.
— Clicking Insert on the Inventory Item List accesses Inventory Items (10.250.00), enabling
you to add new inventory items to the system.
Once Line Item ID is populated, the description of the inventory item to the right of Line Item
ID, Detail Type, Class, Base Price, Unit Price, Tax ID, Unit Cost, Rev Acct, and COGS Acct are
populated.
4. Type a different description for the inventory item in the field to the right of Line Item ID.
5. Type the site associated with the labor inventory item in Invt Location ID.
Setting up labor as a non-stock inventory item is recommended.
If the inventory location ID must be changed or the ID is unknown, press F3 or double-click
the right mouse button. A list of all inventory locations set up in Sites (10.310.00) displays.
— To select an inventory location ID, highlight the ID and click OK, or double-click the ID.
— Clicking Edit on the Inventory Location List accesses Sites (10.310.00), enabling you to
modify information for an existing inventory location.
— Clicking Insert on the Inventory Location List accesses Sites (10.310.00), enabling you to
add new inventory location to the system.
6. Type the warehouse location associated with the labor in Whse Loc.
Setting up labor as a non-stock inventory item is recommended.
If the warehouse location ID must be changed or the ID is unknown, press F3 or double-click
the right mouse button. A list of all warehouse locations set up in Warehouse Bin Locations
(10.340.00) displays.
— To select a warehouse location ID, highlight the ID and click OK, or double-click the ID.
7. Type the number of hours to be paid to technicians for the work completed on a service call in
Worked Hours.
Generate Payroll Process (SD.302.00) is used to create a timesheet in Payroll Time and
Dollar Entry (02.020.00).
8. Type the number of hours to be charged to the customer in Billed Hrs.
When service call invoices are processed in Service Invoice Printing - Keep/Delete
(SD.642.00), a batch is created in Invoice and Memo (08.010.00) in the Accounts Receivable
module.
9. Type the unit price for the labor inventory item in Unit Price.
Unit Price defaults from Stock Base Price associated with the labor item in Inventory Items
(10.250.00).

Invoicing 231
10. Type the employee identifier associated with the technician that performed the work on the
service call in Employee ID.
If the technician ID is unknown, press F3 or double-click the right mouse button. A list of all
technicians set up in Employee Maintenance (SD.007.00) displays.
— To select a technician ID, highlight the ID and click OK, or double-click the ID.
— Clicking Edit on the Employee Maintenance PV List accesses Employee Maintenance
(SD.007.00), enabling you to modify information for an existing technician.
— Clicking Insert on the Employee Maintenance PV List accesses Employee Maintenance
(SD.007.00), enabling you to add new technicians to the system.
Employee ID is populated from the primary technician associated with the service call.
11. Type the earnings type associated with the line item record in Earnings Type ID.
If the earnings type ID must be changed or the ID is unknown, press F3 or double-click the
right mouse button. A list of all earning types set up in Earnings Type Maintenance
(02.270.00) in the Payroll module displays.
— To select an earnings type ID, highlight the ID and click OK, or double-click the ID.
— Clicking Edit on the Earnings Type List accesses Earnings Type Maintenance
(02.270.00), enabling you to modify information for an existing earnings type.
— Clicking Insert on the Earnings Type List accesses Employee Maintenance (SD.007.00),
enabling you to add new earning types to the system.
Earnings Type ID defaults from Employee Maintenance (SD.007.00) for the Employee ID
associated with the detail line.
12. Type the work location associated with the line item in Work Location.
If the work location ID must be changed or the ID is unknown, press F3 or double-click the
right mouse button. A list of all work location set up in Work Location Maintenance
(02.280.00) displays.
— To select a work location ID, highlight the ID and click OK, or double-click the ID.
— Clicking Edit on the Work Location Maintenance List accesses Work Location
Maintenance (02.280.00), enabling you to modify information for an existing
work location.
— Clicking Insert on the Work Location Maintenance List accesses Work Location
Maintenance (02.280.00), enabling you to add new work locations to the
system.
Work Location defaults from Employee Maintenance (SD.007.00) for the Employee ID
associated with the detail line.
13. Type a tax identifier associated with the line item in Tax ID.
If the tax ID must be changed or the ID is unknown, press F3 or double-click the right mouse
button. A list of all taxes set up in Tax Maintenance (21.280.00) displays.
— To select a tax ID, highlight the ID and click OK, or double-click the ID.
— Clicking Edit on the Sales Tax List accesses Tax Maintenance (21.280.00), enabling you
to modify information for existing sales taxes.
— Clicking Insert on the Sales Tax List accesses Tax Maintenance (21.280.00), enabling
you to add new sales taxes to the system.
Tax ID defaults from Tax ID associated with the customer site in Site Maintenance
(SD.025.00).
Tax ID is only enabled for Billable Line Types.
Note: If the inventory item is tax-exempt, Taxable Amount is $0.00.

232 Service Dispatch
14. Type the date the work was performed associated with the line item in Service Date.
If Equipment ID is associated with the line item, then Service Date determines when the
period in Equipment History (SE.012.00) in the Equipment Maintenance module is updated.
For billable inventory items, Equipment History (SE.012.00) is updated in Service Invoice
Printing - Keep/Delete (SD.642.00).
15. If the work performed is associated with a piece of equipment, type the equipment identifier
associated with the line item in Equipment ID.
If the equipment ID must be changed or the ID is unknown, press F3 or double-click the right
mouse button. A list of all equipment set up in Equipment Entry (SE.001.00) of the Equipment
Maintenance module displays.
— To select a piece of equipment, highlight the ID and click OK, or double-click the ID.
16. Type the revenue account associated with the inventory line item in Rev Acct.
If the account number must be changed or the ID is unknown, press F3 or double-click the
right mouse button. A list of all active account numbers set up in Account Maintenance
(01.260.00) displays.
— To select an account number, highlight the ID and click OK, or double-click the ID.
— Clicking Edit on the Active Account List accesses Account Maintenance (01.260.00),
enabling you to modify information for an existing account number.
— Clicking Insert on the Active Account List accesses Account Maintenance (01.260.00),
enabling you to add new account numbers to the system.
Rev Acct defaults from the inventory item in Inventory Items (10.250.00).
17. Type the revenue subaccount associated with the inventory line item in Rev Sub.
If the subaccount number must be changed or the ID is unknown, press F3 or double-click the
right mouse button. A list of all active subaccount numbers set up in Subaccount
Maintenance (01.270.00) displays.
— To select a subaccount number, highlight the ID and click OK, or double-click the ID.
— Clicking Edit on the Active Subaccount List accesses Subaccount Maintenance
(01.270.00), enabling you to modify information for an existing subaccount
number.
— Clicking Insert on the Active Subaccount List accesses Subaccount Maintenance
(01.270.00), enabling you to add new subaccount numbers to the system.
Rev Sub defaults from several places:
— If Use Sub From Site is selected in Call Type Maintenance (SD.003.00), then Rev Sub
defaults from Sub Account in Site Maintenance (SD.025.00).
— If Use Sub From Site is not selected in Call Type Maintenance (SD.003.00), then Rev Sub
defaults from Subaccount in Call Type Maintenance (SD.003.00).
— If a contract ID is associated with the detail line item, then Rev Sub defaults from
Deferred Revenue Subaccount in Contract Type Maintenance (SN.003.00)
unless Use Subaccount From Site is selected in Contract Type Maintenance
(SN.003.00). If Use Subaccount From Site is selected in Contract Type
Maintenance (SN.003.00), then Deferred Revenue Subaccount defaults from
Sub Account in Site Maintenance (SD.025.00).

Invoicing 233
18. Type the cost of goods account associated with the inventory line item in COGS Acct.
If the account number must be changed or the ID is unknown, press F3 or double-click the
right mouse button. A list of all active account numbers set up in Account Maintenance
(01.260.00) displays.
— To select an account number, highlight the ID and click OK, or double-click the ID.
— Clicking Edit on the Active Account List accesses Account Maintenance (01.260.00),
enabling you to modify information for an existing account number.
— Clicking Insert on the Active Account List accesses Account Maintenance (01.260.00),
enabling you to add new account numbers to the system.
COGS Acct defaults from the inventory item in Inventory Items (10.250.00).
19. Type the cost of goods subaccount associated with the inventory line item in COGS Sub.
If the subaccount number must be changed or the ID is unknown, press F3 or double-click the
right mouse button. A list of all active subaccount numbers set up in Subaccount
Maintenance (01.270.00) displays.
— To select a subaccount number, highlight the ID and click OK, or double-click the ID.
— Clicking Edit on the Active Subaccount List accesses Subaccount Maintenance
(01.270.00), enabling you to modify information for an existing subaccount
number.
— Clicking Insert on the Active Subaccount List accesses Subaccount Maintenance
(01.270.00), enabling you to add new subaccount numbers to the system.
COGS Sub defaults from several places:
— If Use Sub From Site is selected in Call Type Maintenance (SD.003.00), then COGS Sub
defaults from Sub Account in Site Maintenance (SD.025.00).
— If Use Sub From Site is not selected in Call Type Maintenance (SD.003.00), then COGS
Sub defaults from Subaccount in Call Type Maintenance (SD.003.00).
— If a contract ID is associated with the detail line item, then COGS Sub defaults from
Deferred COGS Subaccount in Contract Type Maintenance (SN.003.00) unless
Use Subaccount From Site is selected in Contract Type Maintenance
(SN.003.00). If Use Subaccount From Site is selected in Contract Type
Maintenance (SN.003.00), then COGS Sub defaults from Sub Account in Site
Maintenance (SD.025.00).
20. Click Save on the toolbar.
21. Click Close on the toolbar.

234 Service Dispatch
Entering In-House Warranty Material Inventory Line Items
Note: Information completed in this section populates the In-House Warranty Report.
To enter in-house warranty material inventory line items:
1. After entering basic invoice information (see “Entering Invoice Information” on page 219), click
Details.
Invoice - T & M Details (SD.203.00) displays.
2. Select the type of detail for the line item in Line Types.
Select In-House Warranty from the drop-down list.
3. Type the material inventory item used to complete the work of a service call in Line Item ID.
If the inventory ID is unknown, press F3 or double-click the right mouse button. A list of all
inventory items set up in Inventory Items (10.250.00) displays.
— To select an inventory ID, highlight the ID and click OK, or double-click the ID.
— Clicking Edit on the Inventory Item List accesses Inventory Items (10.250.00), enabling
you to modify information for an existing inventory item.
— Clicking Insert on the Inventory Item List accesses Inventory Items (10.250.00), enabling
you to add new inventory items to the system.
Once Line Item ID is populated, the description of the inventory item to the right of Line Item
ID, Detail Type, Class, Base Price, Unit Price, Tax ID, Unit Cost, Rev Acct, and COGS Acct are
populated.
The quantity available of the inventory item is reduced by the value in Qty Used when the
invoice is saved. This allocation remains until the invoice is cancelled or until the resulting
inventory transaction is processed to reduce quantity on hand.
4. Type a different description for the inventory item in the field to the right of Line Item ID.
5. Type the site of the inventory item where the quantity on hand is reduced by Qty Used in Invt
Location ID.
If the inventory location ID must be changed or the ID is unknown, press F3 or double-click
the right mouse button. A list of all inventory locations set up in Sites (10.310.00) displays.
— To select an inventory location ID, highlight the ID and click OK, or double-click the ID.
— Clicking Edit on the Inventory Location List accesses Sites (10.310.00), enabling you to
modify information for an existing inventory location.
— Clicking Insert on the Inventory Location List accesses Sites (10.310.00), enabling you to
add new inventory locations to the system.
The quantity available of the inventory item is reduced by the value in Qty Used when the
invoice is saved. This allocation remains until the invoice is cancelled or until the resulting
inventory transaction is processed to reduce quantity on hand.
6. Type the warehouse location of the inventory item where the quantity on hand is reduced by Qty
Used in Whse Loc.
If the warehouse location ID must be changed or the ID is unknown, press F3 or double-click
the right mouse button. A list of all warehouse locations set up in Warehouse Bin Locations
(10.340.00) displays.
To select a warehouse location ID, highlight the ID and click OK, or double-click the ID.
The quantity available of the inventory item is reduced by the value in Qty Used when the
invoice is saved. This allocation remains until the invoice is cancelled or until the resulting
inventory transaction is processed to reduce quantity on hand.

Invoicing 235
7. Type the quantity of the inventory item used to perform the work on a service call in Qty Used.
Qty Used is compared to the quantity available in the Inventory module. When a quantity
greater than the quantity available is entered, Allow Negative Quantities on IN Setup
(10.950.00) controls the message displayed and options available.
8. If the inventory item used to complete the work on a service call is serialized, type the serial
number of the inventory item in Lot/Ser Nbr.
If the lot/serial number must be changed or the ID is unknown, press F3 or double-click the
right mouse button. A list of all lot/serial numbers received for the inventory item displays.
— To select a lot/serial number, highlight the ID and click OK, or double-click the ID.
— Quantity available must be greater than zero to select a lot/serial number.
— For serial number-controlled items, Qty Used must be 1 (an issue from inventory) or -1 (a
return to inventory).
— For serial number-controlled items issued from inventory, each instance of the item on
the grid must have a unique serial number.
— For serial number-controlled items returned to inventory, the serial number must not
already exist.
9. Type a tax ID associated with the detail line item in Tax ID.
If the tax ID must be changed or the ID is unknown, press F3 or double-click the right mouse
button. A list of all taxes set up in Tax Maintenance (21.280.00) displays.
— To select a tax ID, highlight the ID and click OK, or double-click the ID.
— Clicking Edit on the Sales Tax List accesses Tax Maintenance (21.280.00), enabling you
to modify information for existing sales taxes.
— Clicking Insert on the Sales Tax List accesses Tax Maintenance (21.280.00), enabling
you to add new sales taxes to the system.
Tax ID defaults from Tax ID associated with the customer site in Site Maintenance
(SD.025.00).
Tax ID is only enabled for Billable Line Types.
Note: If the inventory item is tax-exempt, Taxable Amount is $0.00.
10. Type the date the work associated with the line item was performed in Service Date.
11. If a purchase order is required for the inventory item, type the vendor ID associated with the line
item record in Vendor ID.
If the vendor ID is unknown, press F3 or double-click the right mouse button. A list of all
active vendors set up in Vendor Maintenance (03.270.00) displays.
— To select a vendor ID, highlight the ID and click OK, or double-click the ID.
— Clicking Edit on the Vendor List accesses Vendor Maintenance (03.270.00), enabling you
to modify information for an existing vendor.
— Clicking Insert on the Vendor List accesses Vendor Maintenance (03.270.00), enabling
you to add new vendors to the system.
12. If a purchase order is required for the inventory item, type the purchase order date associated
with the line item record in PO Date.
PO Date is inactive until Vendor ID is populated.
13. If a purchase order is required for the inventory item, type the quantity ordered for a specific item
that was purchased on a purchase order in Qty Ordered.
Qty Ordered is inactive until Vendor ID is populated.
236 Service Dispatch
14. If a purchase order receipt is required for the inventory item, type the quantity received for a
specific item that was used in Qty Received.
Qty Received is inactive until Vendor ID is populated.
15. If PO Number Option in Service Series Setup Maintenance (SD.000.00) is Manual, type the
purchase order number in PO Number.
If PO Number Option in Service Series Setup Maintenance (SD.000.00) is Automatic, PO
Number is populated by the system from Generate Inventory (SD.306.00).
16. If a purchase order is required for the inventory item, type the cost of the inventory item
associated with the line item record in Unit Cost.
Unit Cost defaults according to the costing method of the inventory item in Inventory Items
(10.250.00).
Unit Cost becomes active when Vendor ID is associated with the inventory line item.
17. If the inventory material item is associated with a piece of equipment, type the equipment
identifier in Equipment ID.
If the equipment ID must be changed or the ID is unknown, press F3 or double-click the right
mouse button. A list of all the equipment set up in Equipment Entry (SE.001.00) of the
Equipment Maintenance module displays.
— To select a piece of equipment, highlight the ID and click OK, or double-click the ID.
18. Type the cost of goods account associated with the inventory line item in COGS Acct.
If the account number must be changed or the ID is unknown, press F3 or double-click the
right mouse button. A list of all active account numbers set up in Account Maintenance
(01.260.00) displays.
— To select an account number, highlight the ID and click OK, or double-click the ID.
— Clicking Edit on the Active Account List accesses Account Maintenance (01.260.00),
enabling you to modify information for an existing account number.
— Clicking Insert on the Active Account List accesses Account Maintenance (01.260.00),
enabling you to add new account numbers to the system.
COGS Acct defaults from the inventory item in Inventory Items (10.250.00).
19. Type the cost of goods subaccount associated with the inventory line item in COGS Sub.
If the subaccount number must be changed or the ID is unknown, press F3 or double-click the
right mouse button. A list of all active subaccount numbers set up in Subaccount
Maintenance (01.270.00) displays.
— To select a subaccount number, highlight the ID and click OK, or double-click the ID.
— Clicking Edit on the Active Subaccount List accesses Subaccount Maintenance
(01.270.00), enabling you to modify information for an existing subaccount
number.
— Clicking Insert on the Active Subaccount List accesses Subaccount Maintenance
(01.270.00), enabling you to add new subaccount numbers to the system.

Invoicing 237
COGS Sub defaults from several places:
— If Use Sub From Site is selected in Call Type Maintenance (SD.003.00), then COGS Sub
defaults from Sub Account in Site Maintenance (SD.025.00).
— If Use Sub From Site is not selected in Call Type Maintenance (SD.003.00), then COGS
Sub defaults from Subaccount in Call Type Maintenance (SD.003.00).
— If a contract ID is associated with the detail line item, then COGS Sub defaults from
Deferred COGS Subaccount in Contract Type Maintenance (SN.003.00) unless
Use Subaccount From Site is selected in Contract Type Maintenance
(SN.003.00). If Use Subaccount From Site is selected in Contract Type
Maintenance (SN.003.00), then COGS Sub defaults from Sub Account in Site
Maintenance (SD.025.00).
Note: A revenue account/subaccount is not necessary; a batch is not created in the Accounts
Receivable module.
20. Click Save on the toolbar.
21. Click Close on the toolbar.
Entering In-House Warranty Labor Inventory Line Items
To enter in-house warranty labor inventory line items:
1. After entering basic invoice information (see ““Entering Invoice Information” on page 219), click
Details.
Invoice - T & M Details (SD.203.00) displays.
2. Select the type of detail for the line item in Line Types.
Select In-House Warranty from the drop-down list.
3. Type the labor inventory item used to complete the work of a service call in Line Item ID.
If the inventory ID is unknown, press F3 or double-click the right mouse button. A list of all
inventory items set up in Inventory Items (10.250.00) displays.
— To select an inventory ID, highlight the ID and click OK, or double-click the ID.
— Clicking Edit on the Inventory Item List accesses Inventory Items (10.250.00), enabling
you to modify information for an existing inventory item.
— Clicking Insert on the Inventory Item List accesses Inventory Items (10.250.00), enabling
you to add new inventory items to the system.
Once Line Item ID is populated, the description of the inventory item to the right of Line Item
ID, Detail Type, Class, Base Price, Unit Price, Tax ID, Unit Cost, Rev Acct, and COGS Acct are
populated.
4. Type a different description for the inventory item in the field to the right of Line Item ID.
5. Type the site associated with the in-house labor inventory in Invt Location ID.
If the inventory location ID must be changed or the ID is unknown, press F3 or double-click
the right mouse button. A list of all inventory locations set up in Sites (10.310.00) displays.
— To select an inventory location ID, highlight the ID and click OK, or double-click the ID.
— Clicking Edit on the Inventory Location List accesses Sites (10.310.00), enabling you to
modify information for an existing inventory location.
— Clicking Insert on the Inventory Location List accesses Sites (10.310.00), enabling you to
add new inventory locations to the system.
6. Type the site associated with the in-house labor inventory in Whse Loc.
If the warehouse location ID must be changed or the ID is unknown, press F3 or double-click
the right mouse button. A list of all warehouse locations set up in Warehouse Bin Locations
(10.340.00) displays.

238 Service Dispatch
— To select a warehouse location ID, highlight the ID and click OK, or double-click the ID.
7. Type the number of hours to be paid to technicians for the work completed on a service call in
Worked Hours.
Generate Payroll Process (SD.302.00) is used to create a timesheet in Payroll Time and
Dollar Entry (02.020.00).
8. Type the employee identifier associated with the technician that performed the work on the
service call in Employee ID.
If the technician ID must be changed or the ID is unknown, press F3 or double-click the right
mouse button. A list of all technicians set up in Employee Maintenance (SD.007.00) displays.
— To select a technician ID, highlight the ID and click OK, or double-click the ID.
— Clicking Edit on the Employee Maintenance PV List accesses Employee Maintenance
(SD.007.00), enabling you to modify information for an existing technician.
— Clicking Insert on the Employee Maintenance PV List accesses Employee Maintenance
(SD.007.00), enabling you to add new technicians to the system.
9. Type the earnings type associated with the line item record in Earnings Type ID.
If the earnings type must be changed or the ID is unknown, press F3 or double-click the right
mouse button. A list of all earning types set up in Earnings Type Maintenance (02.270.00) in
the Payroll module displays.
— To select an earnings type ID, highlight the ID and click OK, or double-click the ID.
— Clicking Edit on the Earnings Type List accesses Earnings Type Maintenance
(02.270.00), enabling you to modify information for an existing earnings type.
— Clicking Insert on the Earnings Type List accesses Employee Maintenance (SD.007.00),
enabling you to add new earnings types to the system.
Earnings Type ID defaults from Employee Maintenance (SD.007.00) for the Employee ID
associated with the detail line.
10. Type the work location associated with the line item in Work Location.
If the work location must be changed or the ID is unknown, press F3 or double-click the right
mouse button. A list of all work locations set up in Work Location Maintenance (SD.007.00)
displays.
— To select a work location ID, highlight the ID and click OK, or double-click the ID.
— Clicking Edit on the Work Location Maintenance List accesses Work Location
Maintenance (02.280.00), enabling you to modify information for an existing
work location.
— Clicking Insert on the Work Location Maintenance List accesses Work Location
Maintenance (02.280.00), enabling you to add new work locations to the
system.
Work Location defaults from Employee Maintenance (SD.007.00) for the Employee ID
associated with the detail line.
11. Type a tax identifier associated with the line item in Tax ID.
If the tax ID must be changed or the ID is unknown, press F3 or double-click the right mouse
button. A list of all taxes set up in Tax Maintenance (21.280.00) displays.
— To select a tax ID, highlight the ID and click OK, or double-click the ID.
— Clicking Edit on the Sales Tax List accesses Tax Maintenance (21.280.00), enabling you
to modify information for existing sales taxes.
— Clicking Insert on the Sales Tax List accesses Tax Maintenance (21.280.00), enabling
you to add new sales taxes to the system.

Invoicing 239
Tax ID defaults from Tax ID associated with the customer site in Site Maintenance
(SD.025.00).
Tax ID is only enabled for Billable Line Types.
Note: If the inventory item is tax-exempt, Taxable Amount is $0.00.
12. Type the date the work was performed associated with the line item in Service Date.
13. If the work performed is associated with a piece of equipment, type the equipment identifier in
Equipment ID.
If the equipment ID must be changed or the ID is unknown, press F3 or double-click the right
mouse button. A list of all the equipment set up in Equipment Entry (SE.001.00) of the
Equipment Maintenance module displays.
— To select a piece of equipment, highlight the ID and click OK, or double-click the ID.
14. Type the cost of goods account associated with the inventory line item in COGS Acct.
If the account number must be changed or the ID is unknown, press F3 or double-click the
right mouse button. A list of all active account numbers set up in Account Maintenance
(01.260.00) displays.
— To select an account number, highlight the ID and click OK, or double-click the ID.
— Clicking Edit on the Active Account List accesses Account Maintenance (01.260.00),
enabling you to modify information for an existing account number.
— Clicking Insert on the Active Account List accesses Account Maintenance (01.260.00),
enabling you to add new account numbers to the system.
COGS Acct defaults from the inventory item in Inventory Items (10.250.00).
15. Type the cost of goods subaccount associated with the inventory line item in COGS Sub.
If the subaccount number must be changed or the ID is unknown, press F3 or double-click the
right mouse button. A list of all active subaccount numbers set up in Subaccount
Maintenance (01.270.00) displays.
— To select a subaccount number, highlight the ID and click OK, or double-click the ID.
— Clicking Edit on the Active Subaccount List accesses Subaccount Maintenance
(01.270.00), enabling you to modify information for an existing subaccount
number.
— Clicking Insert on the Active Subaccount List accesses Subaccount Maintenance
(01.270.00), enabling you to add new subaccount numbers to the system.
COGS Sub defaults from several places:
— If Use Sub From Site is selected in Call Type Maintenance (SD.003.00), then COGS Sub
defaults from Sub Account in Site Maintenance (SD.025.00).
— If Use Sub From Site is not selected in Call Type Maintenance (SD.003.00), then COGS
Sub defaults from Subaccount in Call Type Maintenance (SD.003.00).
— If a contract ID is associated with the detail line item, then COGS Sub defaults from
Deferred COGS Subaccount in Contract Type Maintenance (SN.003.00) unless
Use Subaccount From Site is selected in Contract Type Maintenance
(SN.003.00). If Use Subaccount From Site is selected in Contract Type
Maintenance (SN.003.00), then COGS Sub defaults from Sub Account in Site
Maintenance (SD.025.00).
16. Click Save on the toolbar.
17. Click Close on the toolbar.

240 Service Dispatch
Entering Manufacturer Warranty Material Inventory Line Items
To enter manufacturer warranty material inventory line items:
1. After entering basic invoice information (see “Entering Invoice Information” on page 219), click
Details.
Invoice - T & M Details (SD.203.00) displays.
2. Select the type of detail for the line item in Line Types.
Select Mfr Warranty from the drop-down list.
3. Type the material inventory item used to complete the work of a service call in Line Item ID.
If the inventory ID must be changed or the ID is unknown, press F3 or double-click the right
mouse button. A list of all inventory items set up in Inventory Items (10.250.00) displays.
— To select an inventory ID, highlight the ID and click OK, or double-click the ID.
— Clicking Edit on the Inventory Item List accesses Inventory Items (10.250.00), enabling
you to modify information for an existing inventory item.
— Clicking Insert on the Inventory Item List accesses Inventory Items (10.250.00), enabling
you to add new inventory items to the system.
Once Line Item ID is populated, the description of the inventory item to the right of Line Item
ID, Detail Type, Class, Base Price, Unit Price, Tax ID, Unit Cost, Rev Acct, and COGS Acct are
populated.
The quantity available of the inventory item is reduced by the value in Qty Used when the
invoice is saved. This allocation remains until the invoice is cancelled or until the resulting
inventory transaction is processed to reduce quantity on hand.
4. Type a different description for the inventory item in the field to the right of Line Item ID.
5. Type the site of the manufacturer warranty material inventory item in Invt Location ID.
If the inventory location ID is unknown, press F3 or double-click the right mouse button. A list
of all inventory locations set up in Sites (10.310.00) displays.
— To select an inventory location ID, highlight the ID and click OK, or double-click the ID.
— Clicking Edit on the Inventory Location List accesses Sites (10.310.00), enabling you to
modify information for an existing inventory location.
— Clicking Insert on the Inventory Location List accesses Sites (10.310.00), enabling you to
add new inventory locations to the system.
The quantity available of the inventory item is reduced by the value in Qty Used when the
invoice is saved. This allocation remains until the invoice is cancelled or until the resulting
inventory transaction is processed to reduce quantity on hand.
6. Type the warehouse location of the manufacturer warranty material inventory item in Whse Loc.
If the warehouse location ID is unknown, press F3 or double-click the right mouse button. A
list of all warehouse locations set up in Warehouse Bin Locations (10.340.00) displays.
— To select a warehouse location ID, highlight the ID and click OK, or double-click the ID.
The quantity available of the inventory item is reduced by the value in Qty Used when the
invoice is saved. This allocation remains until the invoice is cancelled or until the resulting
inventory transaction is processed to reduce quantity on hand.
7. Type the quantity of the inventory item used to perform the work on a service call in Qty Used.
Qty Used is compared to the quantity available in the Inventory module. When a quantity
greater than the quantity available is entered, Allow Negative Quantities on IN Setup
(10.950.00) controls the message displayed and options available.

Invoicing 241
8. If the inventory item used to complete the work on a service call is serialized, type the serial
number of the inventory item in Lot/Ser Nbr.
If the lot/serial number must be changed or the ID is unknown, press F3 or double-click the
right mouse button. A list of all lot/serial numbers received for the inventory item displays.
— To select a lot/serial number, highlight the ID and click OK, or double-click the ID.
— Quantity available must be greater than zero to select a lot/serial number.
— For serial number-controlled items, Qty Used must be 1 (an issue from inventory) or -1 (a
return to inventory).
— For serial number-controlled items issued from inventory, each instance of the item on
the grid must have a unique serial number.
— For serial number-controlled items returned to inventory, the serial number must not
already exist.
9. Type the tax identifier associated with the detail line item in Tax ID.
If the tax ID is unknown, press F3 or double-click the right mouse button. A list of all taxes set
up in Tax Maintenance (21.280.00) displays.
— To select a tax ID, highlight the ID and click OK, or double-click the ID.
— Clicking Edit on the Sales Tax List accesses Tax Maintenance (21.280.00), enabling you
to modify information for existing sales taxes.
— Clicking Insert on the Sales Tax List accesses Tax Maintenance (21.280.00), enabling
you to add new sales taxes to the system.
Tax ID defaults from Tax ID associated with the customer site in Site Maintenance
(SD.025.00).
Tax ID is only enabled for Billable Line Types.
Note: If the inventory item is tax-exempt, Taxable Amount is $0.00.
10. Type the date the work associated with the line item was performed in Service Date.
11. If a purchase order is required for the inventory item, type the vendor identifier associated with
the line item record in Vendor ID.
If the vendor ID is unknown, press F3 or double-click the right mouse button. A list of all
active vendors set up in Vendor Maintenance (03.270.00) displays.
— To select a vendor ID, highlight the ID and click OK, or double-click the ID.
— Clicking Edit on the Vendor List accesses Vendor Maintenance (03.270.00), enabling you
to modify information for an existing vendor.
— Clicking Insert on the Vendor List accesses Vendor Maintenance (03.270.00), enabling
you to add new vendors to the system.
12. If a purchase order is required for the inventory item, type the purchase order date associated
with the line item record in PO Date.
PO Date is inactive until Vendor ID is populated.
13. If a purchase order is required for the inventory item, type the quantity ordered for a specific item
that was purchased on a purchase order in Qty Ordered.
Qty Ordered is inactive until Vendor ID is populated.
14. If a purchase order receipt is required for the inventory item, type the quantity received for a
specific item that was used in Qty Received.
Qty Received is inactive until Vendor ID is populated.

242 Service Dispatch
15. If PO Number Option in Service Series Setup Maintenance (SD.000.00) is Manual, type the
purchase order number in PO Number.
If PO Number Option in Service Series Setup Maintenance (SD.000.00) is Automatic, PO
Number is populated by the system from Generate Inventory (SD.306.00).
16. If a purchase order is required for the inventory item, type the cost of the inventory item
associated with the line item record in Unit Cost.
Unit Cost defaults according to the costing method of the inventory item in Inventory Items
(10.250.00).
Unit Cost becomes active when Vendor ID is associated with the inventory line item.
17. Type a piece of equipment associated with the line item in Equipment ID.
If the equipment ID must be changed or the ID is unknown, press F3 or double-click the right
mouse button. A list of all the equipment set up in Equipment Entry (SE.001.00) of the
Equipment Maintenance module displays.
— To select a piece of equipment, highlight the ID and click OK, or double-click the ID.
18. Type the cost of goods account associated with the inventory line item in COGS Acct.
If the account number must be changed or the ID is unknown, press F3 or double-click the
right mouse button. A list of all active account numbers set up in Account Maintenance
(01.260.00) displays.
— To select an account number, highlight the ID and click OK, or double-click the ID.
— Clicking Edit on the Active Account List accesses Account Maintenance (01.260.00),
enabling you to modify information for an existing account number.
— Clicking Insert on the Active Account List accesses Account Maintenance (01.260.00),
enabling you to add new account numbers to the system.
COGS Acct defaults from the inventory item in Inventory Items (10.250.00).
19. Type the cost of goods subaccount associated with the inventory line item in COGS Sub.
If the subaccount number must be changed or the ID is unknown, press F3 or double-click the
right mouse button. A list of all active subaccount numbers set up in Subaccount
Maintenance (01.270.00) displays.
— To select a subaccount number, highlight the ID and click OK, or double-click the ID.
— Clicking Edit on the Active Subaccount List accesses Subaccount Maintenance
(01.270.00), enabling you to modify information for an existing subaccount
number.
— Clicking Insert on the Active Subaccount List accesses Subaccount Maintenance
(01.270.00), enabling you to add new subaccount numbers to the system.
COGS Sub defaults from several places:
— If Use Sub From Site is selected in Call Type Maintenance (SD.003.00), then COGS Sub
defaults from Sub Account in Site Maintenance (SD.025.00).
— If Use Sub From Site is not selected in Call Type Maintenance (SD.003.00), then COGS
Sub defaults from Subaccount in Call Type Maintenance (SD.003.00).
— If a contract ID is associated with the detail line item, then COGS Sub defaults from
Deferred COGS Subaccount in Contract Type Maintenance (SN.003.00) unless
Use Subaccount From Site is selected in Contract Type Maintenance
(SN.003.00). If Use Subaccount From Site is selected in Contract Type
Maintenance (SN.003.00), then COGS Sub defaults from Sub Account in Site
Maintenance (SD.025.00).
20. Click Save on the toolbar.
21. Click Close on the toolbar.
Invoicing 243
Entering Manufacturer Warranty Labor Inventory Line Items
Note: This section is used for informational purposes only. The Manufacturer Warranty Report
(SE.400.00) in the Equipment Maintenance module uses the data entered into this section.
To enter manufacturer warranty labor inventory line items:
1. After entering basic invoice information (see “Entering Invoice Information” on page 219), click
Details.
Invoice - T & M Details (SD.203.00) displays.
2. Select the type of detail for the line item in Line Types.
Select Mfr Warranty from the drop-down list.
3. Type the labor inventory item used to complete the work of a service call in Line Item ID.
If the inventory is unknown, press F3 or double-click the right mouse button. A list of all
inventory items set up in Inventory Items (10.250.00) displays.
— To select an inventory ID, highlight the ID and click OK, or double-click the ID.
— Clicking Edit on the Inventory Item List accesses Inventory Items (10.250.00), enabling
you to modify information for an existing inventory item.
— Clicking Insert on the Inventory Item List accesses Inventory Items (10.250.00), enabling
you to add new inventory items to the system.
Once Line Item ID is populated, the description of the inventory item to the right of Line Item
ID, Detail Type, Class, Base Price, Unit Price, Tax ID, Unit Cost, Rev Acct, and COGS Acct are
populated.
4. Type a different description for the inventory item in the field to the right of Line Item ID.
5. Type the location of the manufacturer warranty labor inventory item in Invt Location ID.
If the inventory location ID must be changed or the ID is unknown, press F3 or double-click
the right mouse button. A list of all inventory locations set up in Sites (10.310.00) displays.
— To select an inventory location ID, highlight the ID and click OK, or double-click the ID.
— Clicking Edit on the Inventory Location List accesses Sites (10.310.00), enabling you to
modify information for an existing inventory location.
— Clicking Insert on the Inventory Location List accesses Sites (10.310.00), enabling you to
add new inventory locations to the system.
Note: Labor is considered a non-stock, non-inventory item. When processing a labor detail line
item, quantity on hand is not reduced.
6. Type the warehouse location of the manufacturer warranty labor inventory item in Whse Loc.
If the warehouse location ID must be changed or the ID is unknown, press F3 or double-click
the right mouse button. A list of all warehouse locations set up in Warehouse Bin Locations
(10.340.00) displays.
— To select a warehouse location ID, highlight the ID and click OK, or double-click the ID.
7. Type the number of hours to be paid to technicians for the work completed on a service call in
Worked Hours.
Generate Payroll Process (SD.302.00) is used to create a timesheet in Payroll Time and
Dollar Entry (02.020.00).

244 Service Dispatch
8. Type the employee identifier associated with the technician that performed the work on the
service call in Employee ID.
If the technician ID must be changed or the ID is unknown, press F3 or double-click the right
mouse button. A list of all technicians set up in Employee Maintenance (SD.007.00) displays.
— To select a technician ID, highlight the ID and click OK, or double-click the ID.
— Clicking Edit on the Employee Maintenance PV List accesses Employee Maintenance
(SD.007.00), enabling you to modify information for an existing technician.
— Clicking Insert on the Employee Maintenance PV List accesses Employee Maintenance
(SD.007.00), enabling you to add new technicians to the system.
9. Type the earnings type associated with the line item record in Earnings Type ID.
If the earnings type ID is unknown, press F3 or double-click the right mouse button. A list of
all earning types set up in Earnings Type Maintenance (02.270.00) in the Payroll module
displays.
— To select an earnings type ID, highlight the ID and click OK, or double-click the ID.
— Clicking Edit on the Earnings Type List accesses Earnings Type Maintenance
(02.270.00), enabling you to modify information for an existing earnings type.
— Clicking Insert on the Earnings Type List accesses Employee Maintenance (SD.007.00),
enabling you to add new earnings types to the system.
Earnings Type ID defaults from Employee Maintenance (SD.007.00) for the Employee ID
associated with the detail line.
10. Type the work location associated with the line item in Work Location.
If the work location ID is unknown, press F3 or double-click the right mouse button. A list of all
work locations set up in Work Location Maintenance (02.280.00) displays.
— To select a work location ID, highlight the ID and click OK, or double-click the ID.
— Clicking Edit on the Work Location Maintenance List accesses Work Location
Maintenance (02.280.00), enabling you to modify information for an existing
work location.
— Clicking Insert on the Work Location Maintenance List accesses Work Location
Maintenance (02.280.00), enabling you to add new work locations to the
system.
Work Location defaults from Employee Maintenance (SD.007.00) for the Employee ID
associated with the detail line.
11. Type a tax identifier associated with the line item in Tax ID.
If the tax ID must be changed or the ID is unknown, press F3 or double-click the right mouse
button. A list of all taxes set up in Tax Maintenance (21.280.00) displays.
— To select a tax ID, highlight the ID and click OK, or double-click the ID.
— Clicking Edit on the Sales Tax List accesses Tax Maintenance (21.280.00), enabling you
to modify information for existing sales taxes.
— Clicking Insert on the Sales Tax List accesses Tax Maintenance (21.280.00), enabling
you to add new sales taxes to the system.
Tax ID defaults from Tax ID associated with the customer site in Site Maintenance
(SD.025.00).
Tax ID is only enabled for Billable Line Types.
Note: If the inventory item is tax-exempt, Taxable Amount is $0.00.
12. Type the date the work was performed associated with the line item in Service Date.

Invoicing 245
13. Type a piece of equipment to associate with the line item in Equipment ID.
If the equipment ID must be changed or the ID is unknown, press F3 or double-click the right
mouse button. A list of all the equipment set up in Equipment Entry (SE.001.00) of the
Equipment Maintenance module displays.
— To select a piece of equipment, highlight the ID and click OK, or double-click the ID.
14. Type the cost of goods account associated with the inventory line item in COGS Acct.
If the account number must be changed or the ID is unknown, press F3 or double-click the
right mouse button. A list of all active account numbers set up in Account Maintenance
(01.260.00) displays.
— To select an account number, highlight the ID and click OK, or double-click the ID.
— Clicking Edit on the Active Account List accesses Account Maintenance (01.260.00),
enabling you to modify information for an existing account number.
— Clicking Insert on the Active Account List accesses Account Maintenance (01.260.00),
enabling you to add new account numbers to the system.
COGS Acct defaults from the inventory item in Inventory Items (10.250.00).
15. Type the cost of goods subaccount associated with the inventory line item in COGS Sub.
If the subaccount number must be changed or the ID is unknown, press F3 or double-click the
right mouse button. A list of all active subaccount numbers set up in Subaccount
Maintenance (01.270.00) displays.
— To select a subaccount number, highlight the ID and click OK, or double-click the ID.
— Clicking Edit on the Active Subaccount List accesses Subaccount Maintenance
(01.270.00), enabling you to modify information for an existing subaccount
number.
— Clicking Insert on the Active Subaccount List accesses Subaccount Maintenance
(01.270.00), enabling you to add new subaccount numbers to the system.
COGS Sub defaults from several places:
— If Use Sub From Site is selected in Call Type Maintenance (SD.003.00), then COGS Sub
defaults from Sub Account in Site Maintenance (SD.025.00).
— If Use Sub From Site is not selected in Call Type Maintenance (SD.003.00), then COGS
Sub defaults from Subaccount in Call Type Maintenance (SD.003.00).
— If a contract ID is associated with the detail line item, then COGS Sub defaults from
Deferred COGS Subaccount in Contract Type Maintenance (SN.003.00) unless
Use Subaccount From Site is selected in Contract Type Maintenance
(SN.003.00). If Use Subaccount From Site is selected in Contract Type
Maintenance (SN.003.00), then COGS Sub defaults from Sub Account in Site
Maintenance (SD.025.00).
16. Click Save on the toolbar.
17. Click Close on the toolbar.
Entering Non-Billable Material Inventory Line Items
To enter non-billable material inventory line items:
1. After entering basic invoice information (see “Entering Invoice Information” on page 219), click
Details.
Invoice - T & M Details (SD.203.00) displays.
2. Select the type of detail for the line item in Line Types.
Select Non-Billable from the drop-down list.

246 Service Dispatch
3. Type the material inventory item used to complete the work of a service call in Line Item ID.
If the inventory ID must be changed or the ID is unknown, press F3 or double-click the right
mouse button. A list of all inventory items set up in Inventory Items (10.250.00) displays.
— To select an inventory ID, highlight the ID and click OK, or double-click the ID.
— Clicking Edit on the Inventory Item List accesses Inventory Items (10.250.00), enabling
you to modify information for an existing inventory item.
— Clicking Insert on the Inventory Item List accesses Inventory Items (10.250.00), enabling
you to add new inventory items to the system.
Once Line Item ID is populated, the description of the inventory item to the right of Line Item
ID, Detail Type, Class, Base Price, Unit Price, Tax ID, Unit Cost, Rev Acct, and COGS Acct are
populated.
The quantity available of the inventory item is reduced by the value in Qty Used when the
invoice is saved. This allocation remains until the invoice is cancelled or until the resulting
inventory transaction is processed to reduce quantity on hand.
4. Type a different description for the inventory item in the field to the right of Line Item ID.
5. Type the site of the inventory item where the quantity on hand is reduced by Qty Used in Invt
Location ID.
If the inventory location ID must be changed or the ID is unknown, press F3 or double-click
the right mouse button. A list of all inventory locations set up in Sites (10.310.00) displays.
— To select an inventory location ID, highlight the ID and click OK, or double-click the ID.
— Clicking Edit on the Inventory Location List accesses Sites (10.310.00), enabling you to
modify information for an existing inventory location.
— Clicking Insert on the Inventory Location List accesses Sites (10.310.00), enabling you to
add new inventory locations to the system.
The quantity available of the inventory item is reduced by the value in Qty Used when the
invoice is saved. This allocation remains until the invoice is cancelled or until the resulting
inventory transaction is processed to reduce quantity on hand.
6. Type the warehouse location of the inventory item where the quantity on hand l is reduced by Qty
Used in Whse Loc.
If the warehouse location ID must be changed or the ID is unknown, press F3 or double-click
the right mouse button. A list of all warehouse locations set up in Warehouse Bin Locations
(10.340.00) displays.
— To select a warehouse location ID, highlight the ID and click OK, or double-click the ID.
The quantity available of the inventory item is reduced by the value in Qty Used when the
invoice is saved. This allocation remains until the invoice is cancelled or until the resulting
inventory transaction is processed to reduce quantity on hand.
7. Type the quantity of the inventory item used to perform the work on a service call in Qty Used.
Qty Used is compared to the quantity available in the Inventory module. When a quantity
greater than the quantity available is entered, Allow Negative Quantities on IN Setup
(10.950.00 controls the message displayed and options available.

Invoicing 247
8. If the inventory item used to complete the work on a service call is serialized, type the serial
number of the inventory item in Lot/Ser Nbr.
If the lot/serial number ID is unknown, press F3 or double-click the right mouse button. A list
of all lot/serial numbers received for the inventory item displays.
— To select a lot/serial number, highlight the ID and click OK, or double-click the ID.
— Quantity available must be greater than zero to select a lot/serial number.
— For serial number-controlled items, Qty Used must be 1 (an issue from inventory) or -1 (a
return to inventory).
— For serial number-controlled items issued from inventory, each instance of the item on
the grid must have a unique serial number.
— For serial number-controlled items returned to inventory, the serial number must not
already exist.
9. Type a tax identifier associated with the detail line item in Tax ID.
If the tax ID must be changed or the ID is unknown, press F3 or double-click the right mouse
button. A list of all taxes set up in Tax Maintenance (21.280.00) displays.
— To select a tax ID, highlight the ID and click OK, or double-click the ID.
— Clicking Edit on the Sales Tax List accesses Tax Maintenance (21.280.00), enabling you
to modify information for existing sales taxes.
— Clicking Insert on the Sales Tax List accesses Tax Maintenance (21.280.00), enabling
you to add new sales taxes to the system.
Tax ID defaults from Tax ID associated with the customer site in Site Maintenance
(SD.025.00).
Tax ID is only enabled for Billable Line Types.
Note: If the inventory item is tax-exempt, Taxable Amount is $0.00.
10. Type the date the work associated with the line item was performed in Service Date.
11. If a purchase order is required for the inventory item, type the vendor ID associated with the line
item record in Vendor ID.
If the vendor ID is unknown, press F3 or double-click the right mouse button. A list of all
active vendors set up in Vendor Maintenance (03.270.00) displays.
— To select a vendor ID, highlight the ID and click OK, or double-click the ID.
— Clicking Edit on the Vendor List accesses Vendor Maintenance (03.270.00), enabling you
to modify information for an existing vendor.
— Clicking Insert on the Vendor List accesses Vendor Maintenance (03.270.00), enabling
you to add new vendors to the system.
12. If a purchase order is required for the inventory item, type the purchase order date associated
with the line item record in PO Date.
PO Date is inactive until Vendor ID is populated.
13. If a purchase order is required for the inventory item, type the quantity ordered for a specific item
that was purchased on a purchase order in Qty Ordered.
Qty Ordered is inactive until Vendor ID is populated.
14. If a purchase order receipt is required for the inventory item, type the quantity received for a
specific item that was used in Qty Received.
Qty Received is inactive until Vendor ID is populated.

248 Service Dispatch
15. If PO Number Option in Service Series Setup Maintenance (SD.000.00) is Manual, type the
purchase order number in PO Number.
If PO Number Option in Service Series Setup Maintenance (SD.000.00) is Automatic, PO
Number is populated by the system from Generate Inventory (SD.306.00).
16. If a purchase order is required for the inventory item, type the cost of the inventory item
associated with the line item record in Unit Cost.
Unit Cost defaults according to the costing method of the inventory item in Inventory Items
(10.250.00).
Unit Cost becomes active when Vendor ID is associated with the inventory line item.
17. Type a piece of equipment associated with the line item in Equipment ID.
If the equipment ID must be changed or the ID is unknown, press F3 or double-click the right
mouse button. A list of all the equipment set up in Equipment Entry (SE.001.00) of the
Equipment Maintenance module displays.
— To select a piece of equipment, highlight the ID and click OK, or double-click the ID.
18. Type the cost of goods account associated with the inventory line item in COGS Acct.
If the account number must be changed or the ID is unknown, press F3 or double-click the
right mouse button. A list of all active account numbers set up in Account Maintenance
(01.260.00) displays.
— To select an account number, highlight the ID and click OK, or double-click the ID.
— Clicking Edit on the Active Account List accesses Account Maintenance (01.260.00),
enabling you to modify information for an existing account number.
— Clicking Insert on the Active Account List accesses Account Maintenance (01.260.00),
enabling you to add new account numbers to the system.
COGS Acct defaults Rev Acct defaults from the inventory item in Inventory Items (10.250.00).
19. Type the cost of goods subaccount associated with the inventory line item in COGS Sub.
If the subaccount number must be changed or the ID is unknown, press F3 or double-click the
right mouse button. A list of all active subaccount numbers set up in Subaccount
Maintenance (01.270.00) displays.
— To select a subaccount number, highlight the ID and click OK, or double-click the ID.
— Clicking Edit on the Active Subaccount List accesses Subaccount Maintenance
(01.270.00), enabling you to modify information for an existing subaccount
number.
— Clicking Insert on the Active Subaccount List accesses Subaccount Maintenance
(01.270.00), enabling you to add new subaccount numbers to the system.
COGS Sub defaults from several places:
— If Use Sub From Site is selected in Call Type Maintenance (SD.003.00), then COGS Sub
defaults from Sub Account in Site Maintenance (SD.025.00).
— If Use Sub From Site is not selected in Call Type Maintenance (SD.003.00), then COGS
Sub defaults from Subaccount in Call Type Maintenance (SD.003.00).
— If a contract ID is associated with the detail line item, then COGS Sub defaults from
Deferred COGS Subaccount in Contract Type Maintenance (SN.003.00) unless
Use Subaccount From Site is selected in Contract Type Maintenance
(SN.003.00). If Use Subaccount From Site is selected in Contract Type
Maintenance (SN.003.00), then COGS Sub defaults from Sub Account in Site
Maintenance (SD.025.00).
20. Click Save then Close on the toolbar.

Invoicing 249
Entering Non-Billable Labor Inventory Line Items
To enter non-billable labor inventory line items:
1. After entering basic invoice information (see “Entering Invoice Information” on page 219), click
Details.
Invoice - T & M Details (SD.203.00) displays.
2. Select the type of detail for the line item in Line Types.
Select Non-Billable from the drop-down list.
3. Type the labor inventory item used to complete the work of a service call in Line Item ID.
If the inventory ID is unknown, press F3 or double-click the right mouse button. A list of all
inventory items set up in Inventory Items (10.250.00) displays.
— To select an inventory ID, highlight the ID and click OK, or double-click the ID.
— Clicking Edit on the Inventory Item List accesses Inventory Items (10.250.00), enabling
you to modify information for an existing inventory item.
— Clicking Insert on the Inventory Item List accesses Inventory Items (10.250.00), enabling
you to add new inventory items to the system.
Once Line Item ID is populated, the description of the inventory item to the right of Line Item
ID, Detail Type, Class, Base Price, Unit Price, Tax ID, Unit Cost, Rev Acct, and COGS Acct are
populated.
4. Type a different description for the inventory item in the field to the right of Line Item ID.
5. Type the location of the labor inventory item in Invt Location ID.
If the inventory location ID must be changed or the ID is unknown, press F3 or double-click
the right mouse button. A list of all inventory locations set up in Sites (10.310.00) displays.
— To select an inventory location ID, highlight the ID and click OK, or double-click the ID.
— Clicking Edit on the Inventory Location List accesses Sites (10.310.00), enabling you to
modify information for an existing inventory location.
— Clicking Insert on the Inventory Location List accesses Sites (10.310.00), enabling you to
add new inventory locations to the system.
6. Type the warehouse location of the labor inventory item in Whse Loc.
If the warehouse location ID must be changed or the ID is unknown, press F3 or double-click
the right mouse button. A list of all warehouse locations set up in Warehouse Bin Locations
(10.340.00) displays.
— To select a warehouse location ID, highlight the ID and click OK, or double-click the ID.
7. Type the number of hours to be paid to technicians for the work completed on a service call in
Worked Hours.
Generate Payroll Process (SD.302.00) is used to create a timesheet in Payroll Time and
Dollar Entry (02.020.00).
8. Type the employee identifier associated with the technician that performed the work on the
service call in Employee ID.
If the technician ID must be changed or the ID is unknown, press F3 or double-click the right
mouse button. A list of all technicians set up in Employee Maintenance (SD.007.00) displays.
— To select a technician ID, highlight the ID and click OK, or double-click the ID.
— Clicking Edit on the Employee Maintenance PV List accesses Employee Maintenance
(SD.007.00), enabling you to modify information for an existing technician.
— Clicking Insert on the Employee Maintenance PV List accesses Employee Maintenance
(SD.007.00), enabling you to add new technicians to the system.

250 Service Dispatch
9. Type the earnings type associated with the line item record in Earnings Type ID.
If the earnings type ID must be changed or the ID is unknown, press F3 or double-click the
right mouse button. A list of all earning types set up in Earnings Type Maintenance
(02.270.00) in the Payroll module displays.
— To select an earnings type ID, highlight the ID and click OK, or double-click the ID.
— Clicking Edit on the Earnings Type List accesses Earnings Type Maintenance
(02.270.00), enabling you to modify information for an existing earnings type.
— Clicking Insert on the Earnings Type List accesses Earnings Type Maintenance
(02.270.00), enabling you to add new earnings types to the system.
Earnings Type ID defaults from Employee Maintenance (SD.007.00) for the Employee ID
associated with the detail line.
10. Type the work location associated with the line item in Work Location.
If the work location ID must be changed or the ID is unknown, press F3 or double-click the
right mouse button. A list of all work locations set up in Work Location Maintenance
(02.280.00) displays.
— To select a work location ID, highlight the ID and click OK, or double-click the ID.
— Clicking Edit on the Work Location Maintenance List accesses Work Location
Maintenance (02.280.00), enabling you to modify information for an existing
work location.
— Clicking Insert on the Work Location Maintenance List accesses Work Location
Maintenance (02.280.00), enabling you to add new work locations to the
system.
Work Location defaults from Employee Maintenance (SD.007.00) for the Employee ID
associated with the detail line.
11. Type a tax identifier associated with the line item in Tax ID.
If the tax ID must be changed or the ID is unknown, press F3 or double-click the right mouse
button. A list of all taxes set up in Tax Maintenance (21.280.00) displays.
— To select a tax ID, highlight the ID and click OK, or double-click the ID.
— Clicking Edit on the Sales Tax List accesses Tax Maintenance (21.280.00), enabling you
to modify information for existing sales taxes.
— Clicking Insert on the Sales Tax List accesses Tax Maintenance (21.280.00), enabling
you to add new sales taxes to the system.
Tax ID defaults from Tax ID associated with the customer site in Site Maintenance
(SD.025.00).
Tax ID is only enabled for Billable Line Types.
Note: If the inventory item is tax-exempt, Taxable Amount is $0.00.
12. Type the date the work was performed associated with the line item in Service Date.
13. Type the piece of equipment associated with the line item in Equipment ID.
If the equipment ID must be changed or the ID is unknown, press F3 or double-click the right
mouse button. A list of all the equipment set up in Equipment Entry (SE.001.00) of the
Equipment Maintenance module displays.
— To select a piece of equipment, highlight the ID and click OK, or double-click the ID.

Invoicing 251
14. Type the cost of goods account associated with the inventory line item in COGS Acct.
If the account number must be changed or the ID is unknown, press F3 or double-click the
right mouse button. A list of all active account numbers set up in Account Maintenance
(01.260.00) displays.
— To select an account number, highlight the ID and click OK, or double-click the ID.
— Clicking Edit on the Active Account List accesses Account Maintenance (01.260.00),
enabling you to modify information for an existing account number.
— Clicking Insert on the Active Account List accesses Account Maintenance (01.260.00),
enabling you to add new account numbers to the system.
COGS Acct defaults from the inventory item in Inventory Items (10.250.00).
15. Type the cost of goods subaccount associated with the inventory line item in COGS Sub.
If the subaccount number must be changed or the ID is unknown, press F3 or double-click the
right mouse button. A list of all active subaccount numbers set up in Subaccount
Maintenance (01.270.00) displays.
— To select a subaccount number, highlight the ID and click OK, or double-click the ID.
— Clicking Edit on the Active Subaccount List accesses Subaccount Maintenance
(01.270.00), enabling you to modify information for an existing subaccount
number.
— Clicking Insert on the Active Subaccount List accesses Subaccount Maintenance
(01.270.00), enabling you to add new subaccount numbers to the system.
COGS Sub defaults from several places:
— If Use Sub From Site is selected in Call Type Maintenance (SD.003.00), then COGS Sub
defaults from Sub Account in Site Maintenance (SD.025.00).
— If Use Sub From Site is not selected in Call Type Maintenance (SD.003.00), then COGS
Sub defaults from Subaccount in Call Type Maintenance (SD.003.00).
— If a contract ID is associated with the detail line item, then COGS Sub defaults from
Deferred COGS Subaccount in Contract Type Maintenance (SN.003.00) unless
Use Subaccount From Site is selected in Contract Type Maintenance
(SN.003.00). If Use Subaccount From Site is selected in Contract Type
Maintenance (SN.003.00), then COGS Sub defaults from Sub Account in Site
Maintenance (SD.025.00).
16. Click Save and then Close on the toolbar.
Entering Project Material Inventory Line Items
To enter project material inventory line items:
1. After entering basic invoice information (see “Entering Invoice Information” on page 219), click
Details.
Invoice - T & M Details (SD.203.00) displays.
2. Select the type of detail for the line item in Line Types.
Select Project from the drop-down list.
Project ID in the Service Contracts module must be populated before selecting Project.

252 Service Dispatch
3. Type the material inventory item used to complete the work of a service call in Line Item ID.
If the inventory ID must be changed or the ID is unknown, press F3 or double-click the right
mouse button. A list of all inventory items set up in Inventory Items (10.250.00) displays.
— To select an inventory ID, highlight the ID and click OK, or double-click the ID.
— Clicking Edit on the Inventory Item List accesses Inventory Items (10.250.00), enabling
you to modify information for an existing inventory item.
— Clicking Insert on the Inventory Item List accesses Inventory Items (10.250.00), enabling
you to add new inventory items to the system.
Once Line Item ID is populated, the description of the inventory item to the right of Line Item
ID, Detail Type, Class, Base Price, Unit Price, Tax ID, Unit Cost, Rev Acct, and COGS Acct are
populated.
The quantity available of the inventory item is reduced by the value in Qty Used when the
invoice is saved. This allocation remains until the invoice is cancelled or until the resulting
inventory transaction is processed to reduce quantity on hand.
4. Type a different description for the inventory item in the field to the right of Line Item ID.
5. Type the site of the inventory item where the quantity on hand is reduced by Qty Used in Invt
Location ID.
If the inventory location ID must be changed or the ID is unknown, press F3 or double-click
the right mouse button. A list of all inventory locations set up in Sites (10.310.00) displays.
— To select an inventory location ID, highlight the ID and click OK, or double-click the ID.
— Clicking Edit on the Inventory Location List accesses Sites (10.310.00), enabling you to
modify information for an existing inventory location.
— Clicking Insert on the Inventory Location List accesses Sites (10.310.00), enabling you to
add new inventory locations to the system.
The quantity available of the inventory item is reduced by the value in Qty Used when the
invoice is saved. This allocation remains until the invoice is cancelled or until the resulting
inventory transaction is processed to reduce quantity on hand.
6. Type the warehouse location of the inventory item where the quantity on hand is reduced by Qty
Used in Whse Loc.
If the warehouse location ID must be changed or the ID is unknown, press F3 or double-click
the right mouse button. A list of all warehouse locations set up in Warehouse Bin Locations
(10.340.00) displays.
— To select a warehouse location ID, highlight the ID and click OK, or double-click the ID.
The quantity available of the inventory item is reduced by the value in Qty Used when the
invoice is saved. This allocation remains until the invoice is cancelled or until the resulting
inventory transaction is processed to reduce quantity on hand.
7. Type the quantity of the inventory item used to perform the work on a service call in Qty Used.
Qty Used is compared to the quantity available in the Inventory module. When a quantity
greater than the quantity available is entered, Allow Negative Quantities on IN Setup
(10.950.00) controls the message displayed and options available.

Invoicing 253
8. If the inventory item used to complete the work on a service call is serialized, type the serial
number of the inventory item in Lot/Ser Nbr.
If the lot/serial number must be changed or the ID is unknown, press F3 or double-click the
right mouse button. A list of all lot/serial numbers received for the inventory item displays.
— To select a lot/serial number, highlight the ID and click OK, or double-click the ID.
— Quantity available must be greater than zero to select a lot/serial number.
— For serial number-controlled items, Qty Used must be 1 (an issue from inventory) or -1 (a
return to inventory).
— For serial number-controlled items issued from inventory, each instance of the item on
the grid must have a unique serial number.
— For serial number-controlled items returned to inventory, the serial number must not
already exist.
9. Type a tax identifier associated with the detail line item in Tax ID.
If the tax ID must be changed or the ID is unknown, press F3 or double-click the right mouse
button. A list of all taxes set up in Tax Maintenance (21.280.00) displays.
— To select a tax ID, highlight the ID and click OK, or double-click the ID.
— Clicking Edit on the Sales Tax List accesses Tax Maintenance (21.280.00), enabling you
to modify information for existing sales taxes.
— Clicking Insert on the Sales Tax List accesses Tax Maintenance (21.280.00), enabling
you to add new sales taxes to the system.
Tax ID defaults from Tax ID associated with the customer site in Site Maintenance
(SD.025.00).
Tax ID is only enabled for Billable Line Types.
Note: If the inventory item is tax-exempt, Taxable Amount is $0.00.
10. Type the date the work associated with the line item was performed in Service Date.
11. If a purchase order is required for the inventory item, type the vendor ID associated with the line
item record in Vendor ID.
If the vendor ID must be changed or the ID is unknown, press F3 or double-click the right
mouse button. A list of all active vendors set up in Vendor Maintenance (03.270.00) displays.
— To select a vendor ID, highlight the ID and click OK, or double-click the ID.
— Clicking Edit on the Vendor List accesses Vendor Maintenance (03.270.00), enabling you
to modify information for an existing vendor.
— Clicking Insert on the Vendor List accesses Vendor Maintenance (03.270.00), enabling
you to add new vendors to the system.
12. If a purchase order is required for the inventory item, type the purchase order date associated
with the line item record in PO Date.
PO Date is inactive until Vendor ID is populated.
13. If a purchase order is required for the inventory item, type the quantity ordered for a specific item
that was purchased on a purchase order in Qty Ordered.
Qty Ordered is inactive until Vendor ID is populated.
14. If a purchase order receipt is required for the inventory item, type the quantity received for a
specific item that was used in Qty Received.
Qty Received is inactive until Vendor ID is populated.

254 Service Dispatch
15. If PO Number Option in Service Series Setup Maintenance (SD.000.00) is Manual, type the
purchase order number in PO Number.
If PO Number Option in Service Series Setup Maintenance (SD.000.00) is Automatic, PO
Number is populated by the system from Generate Inventory (SD.306.00).
16. If a purchase order is required for the inventory item, type the cost of the inventory item
associated with the line item record in Unit Cost.
Unit Cost defaults according to the costing method of the inventory item in Inventory Items
(10.250.00).
Unit Cost becomes active when Vendor ID is associated with the inventory line item.
17. Type a task to associate with the line item in Task.
If the task ID must be changed or the ID is unknown, press F3 or double-click the right mouse
button. A list of all tasks set up for the project in Tasks (PA.PRJ.02) of Project Maintenance
(PA.PRJ.00) displays.
— To select a task ID, highlight the ID and click OK, or double-click the ID.
18. Type the piece of equipment associated with the line item in Equipment ID.
If the equipment ID must be changed or the ID is unknown, press F3 or double-click the right
mouse button. A list of all the equipment set up in Equipment Entry (SE.001.00) of the
Equipment Maintenance module displays.
— To select a piece of equipment, highlight the ID and click OK, or double-click the ID.
19. Type the cost of goods account associated with the inventory line item in COGS Acct.
If the account number must be changed or the ID is unknown, press F3 or double-click the
right mouse button. A list of all active account numbers set up in Account Maintenance
(01.260.00) displays.
— To select an account number, highlight the ID and click OK, or double-click the ID.
— Clicking Edit on the Active Account List accesses Account Maintenance (01.260.00),
enabling you to modify information for an existing account number.
— Clicking Insert on the Active Account List accesses Account Maintenance (01.260.00),
enabling you to add new account numbers to the system.
COGS Acct defaults from the inventory item in Inventory Items (10.250.00).
20. Type the cost of goods subaccount associated with the inventory line item in COGS Sub.
If the subaccount number must be changed or the ID is unknown, press F3 or double-click the
right mouse button. A list of all active subaccount numbers set up in Subaccount
Maintenance (01.270.00) displays.
— To select a subaccount number, highlight the ID and click OK, or double-click the ID.
— Clicking Edit on the Active Subaccount List accesses Subaccount Maintenance
(01.270.00), enabling you to modify information for an existing subaccount
number.
— Clicking Insert on the Active Subaccount List accesses Subaccount Maintenance
(01.270.00), enabling you to add new subaccount numbers to the system.
COGS Sub defaults from several places:
— If Use Sub From Site is selected in Call Type Maintenance (SD.003.00), then COGS Sub
defaults from Sub Account in Site Maintenance (SD.025.00).
— If Use Sub From Site is not selected in Call Type Maintenance (SD.003.00), then COGS
Sub defaults from Subaccount in Call Type Maintenance (SD.003.00).
— If a contract ID is associated with the detail line item, then COGS Sub defaults from
Deferred COGS Subaccount in Contract Type Maintenance (SN.003.00) unless
Use Subaccount From Site is selected in Contract Type Maintenance
(SN.003.00). If Use Subaccount From Site is selected in Contract Type

Invoicing 255
Maintenance (SN.003.00), then COGS Sub defaults from Sub Account in Site
Maintenance (SD.025.00).
21. Click Save on the toolbar.
22. Click Close on the toolbar.
Entering Project Labor Inventory Line Items
To enter project labor inventory line items:
1. After entering basic invoice information (see “Entering Invoice Information” on page 219), click
Details.
Invoice - T & M Details (SD.203.00) displays.
2. Select the type of detail for the line item in Line Types.
Select Project from the drop-down list.
3. Type the labor inventory items that complete the work of a service call in Line Item ID.
If the inventory ID must be changed or the ID is unknown, press F3 or double-click the right
mouse button. A list of all inventory items set up in Inventory Items (10.250.00) displays.
— To select an inventory ID, highlight the ID and click OK, or double-click the ID.
— Clicking Edit on the Inventory Item List accesses Inventory Items (10.250.00), enabling
you to modify information for an existing inventory item.
— Clicking Insert on the Inventory Item List accesses Inventory Items (10.250.00), enabling
you to add new inventory items to the system.
Once Line Item ID is populated, the description of the inventory item to the right of Line Item
ID, Detail Type, Class, Base Price, Unit Price, Tax ID, Unit Cost, Rev Acct, and COGS Acct are
populated.
4. Type a different description for the inventory item in the field to the right of Line Item ID.
5. Type the site of the labor inventory item in Invt Location ID.
If the inventory location ID is unknown, press F3 or double-click the right mouse button. A list
of all inventory locations set up in Sites (10.310.00) displays.
— To select an inventory location ID, highlight the ID and click OK, or double-click the ID.
— Clicking Edit on the Inventory Location List accesses Sites (10.310.00), enabling you to
modify information for an existing inventory location.
— Clicking Insert on the Inventory Location List accesses Sites (10.310.00), enabling you to
add new inventory locations to the system.
6. Type the warehouse location of the labor inventory item in Whse Loc.
If the warehouse location ID is unknown, press F3 or double-click the right mouse button. A
list of all warehouse locations set up in Warehouse Bin Locations (10.340.00) displays.
— To select a warehouse location ID, highlight the ID and click OK, or double-click the ID.
7. Type the number of hours to be paid to technicians for the work completed on a service call in
Worked Hours.
Generate Payroll Process (SD.302.00) is used to create a timesheet in Payroll Time and
Dollar Entry (02.020.00).
8. Type the employee identifier associated with the technician that performed the work on the
service call in Employee ID.
If the technician ID must be changed or the ID is unknown, press F3 or double-click the right
mouse button. A list of all technicians set up in Employee Maintenance (SD.007.00) displays.
— To select a technician ID, highlight the ID and click OK, or double-click the ID.
— Clicking Edit on the Employee Maintenance PV List accesses Employee Maintenance
(SD.007.00), enabling you to modify information for an existing technician.

256 Service Dispatch
— Clicking Insert on the Employee Maintenance PV List accesses Employee Maintenance
(SD.007.00), enabling you to add new technicians to the system.
9. Type the earnings type associated with the line item record in Earnings Type ID.
If the earnings type ID must be changed or the ID is unknown, press F3 or double-click the
right mouse button. A list of all earning types set up in Earnings Type Maintenance
(02.270.00) in the Payroll module displays.
— To select an earnings type ID, highlight the ID and click OK, or double-click the ID.
— Clicking Edit on the Earnings Type List accesses Earnings Type Maintenance
(02.270.00), enabling you to modify information for an existing earnings type.
— Clicking Insert on the Earnings Type List accesses Earnings Type Maintenance
(02.270.00), enabling you to add new earnings types to the system.
Earnings Type ID defaults from Employee Maintenance (SD.007.00) for the Employee ID
associated with the detail line.
10. Type the work location associated with the line item in Work Location.
If the work location ID must be changed or the ID is unknown, press F3 or double-click the
right mouse button. A list of all work locations set up in Work Location Maintenance
(02.280.00) displays.
— To select a work location ID, highlight the ID and click OK, or double-click the ID.
— Clicking Edit on the Work Location Maintenance List accesses Work Location
Maintenance (02.280.00), enabling you to modify information for an existing
work location.
— Clicking Insert on the Work Location Maintenance List accesses Work Location
Maintenance (02.280.00), enabling you to add new work locations to the
system.
Work Location defaults from Employee Maintenance (SD.007.00) for the Employee ID
associated with the detail line.
11. Type a tax identifier associated with the line item in Tax ID.
If the tax ID must be changed or the ID is unknown, press F3 or double-click the right mouse
button. A list of all taxes set up in Tax Maintenance (21.280.00) displays.
— To select a tax ID, highlight the ID and click OK, or double-click the ID.
— Clicking Edit on the Sales Tax List accesses Tax Maintenance (21.280.00), enabling you
to modify information for existing sales taxes.
— Clicking Insert on the Sales Tax List accesses Tax Maintenance (21.280.00), enabling
you to add new sales taxes to the system.
Tax ID defaults from Tax ID associated with the customer site in Site Maintenance
(SD.025.00).
Tax ID is only enabled for Billable Line Types.
Note: If the inventory item is tax-exempt, Taxable Amount is $0.00.
12. Type the date the work associated with the line item was performed in Service Date.
13. Type a task to associate with the line item in Task.
If the task ID must be changed or the ID is unknown, press F3 or double-click the right mouse
button. A list of all tasks set up for the project in Tasks (PA.PRJ.02) of Project Maintenance
(PA.PRJ.00) displays.
— To select a task ID, highlight the ID and click OK, or double-click the ID.

Invoicing 257
14. Type a piece of equipment to associate with the line item in Equipment ID.
If the equipment ID must be changed or the ID is unknown, press F3 or double-click the right
mouse button. A list of all the equipment set up in Equipment Entry (SE.001.00) of the
Equipment Maintenance module displays.
To select a piece of equipment, highlight the ID and click OK, or double-click the ID.
Note: The project is associated with the Service Contracts module.
15. Type the cost of goods account associated with the inventory line item in COGS Acct.
If the account number must be changed or the ID is unknown, press F3 or double-click the
right mouse button. A list of all active account numbers set up in Account Maintenance
(01.260.00) displays.
— To select an account number, highlight the ID and click OK, or double-click the ID.
— Clicking Edit on the Active Account List accesses Account Maintenance (01.260.00),
enabling you to modify information for an existing account number.
— Clicking Insert on the Active Account List accesses Account Maintenance (01.260.00),
enabling you to add new account numbers to the system.
COGS Acct defaults from the inventory item in Inventory Items (10.250.00).
16. Type the cost of goods subaccount associated with the inventory line item in COGS Sub.
If the subaccount number must be changed or the ID is unknown, press F3 or double-click the
right mouse button. A list of all active subaccount numbers set up in Subaccount
Maintenance (01.270.00) displays.
— To select a subaccount number, highlight the ID and click OK, or double-click the ID.
— Clicking Edit on the Active Subaccount List accesses Subaccount Maintenance
(01.270.00), enabling you to modify information for an existing subaccount
number.
— Clicking Insert on the Active Subaccount List accesses Subaccount Maintenance
(01.270.00), enabling you to add new subaccount numbers to the system.
COGS Sub defaults from several places:
— If Use Sub From Site is selected in Call Type Maintenance (SD.003.00), then COGS Sub
defaults from Sub Account in Site Maintenance (SD.025.00).
— If Use Sub From Site is not selected in Call Type Maintenance (SD.003.00), then COGS
Sub defaults from Subaccount in Call Type Maintenance (SD.003.00).
— If a contract ID is associated with the detail line item, then COGS Sub defaults from
Deferred COGS Subaccount in Contract Type Maintenance (SN.003.00) unless
Use Subaccount From Site is selected in Contract Type Maintenance
(SN.003.00). If Use Subaccount From Site is selected in Contract Type
Maintenance (SN.003.00), then COGS Sub defaults from Sub Account in Site
Maintenance (SD.025.00).
17. Click Save on the toolbar.
18. Click Close on the toolbar.
Entering Service Contract Material Inventory Line Items
To enter service contract material inventory line items:
1. After entering basic invoice information (see “Entering Invoice Information” on page 219), click
Details. Invoice - T & M Details (SD.203.00) displays.

258 Service Dispatch
2. Select the type of detail for the line item in Line Types.
Select Svc Contract from the drop-down list.
Note: Unlike Project, Contract ID does not need to be populated. For example, a technician may
complete the service call without realizing that the work is covered under a service contract.
3. Type the material inventory item used to complete the work of a service call in Line Item ID.
If the inventory ID is unknown, press F3 or double-click the right mouse button. A list of all
inventory items set up in Inventory Items (10.250.00) displays.
— To select an inventory ID, highlight the ID and click OK, or double-click the ID.
— Clicking Edit on the Inventory Item List accesses Inventory Items (10.250.00), enabling
you to modify information for an existing inventory item.
— Clicking Insert on the Inventory Item List accesses Inventory Items (10.250.00), enabling
you to add new inventory items to the system.
Once Line Item ID is populated, the description of the inventory item to the right of Line Item
ID, Detail Type, Class, Base Price, Unit Price, Tax ID, Unit Cost, Rev Acct, and COGS Acct are
populated.
The quantity available of the inventory item is reduced by the value in Qty Used when the
invoice is saved. This allocation remains until the invoice is cancelled or until the resulting
inventory transaction is processed to reduce quantity on hand.
4. Type a different description for the inventory item in the field to the right of Line Item ID.
5. Type the site of the inventory item where the quantity on hand is reduced by Quantity Used in Invt
Location ID.
If the inventory location ID is unknown, press F3 or double-click the right mouse button. A list
of all inventory locations set up in Sites (10.310.00) displays.
— To select an inventory location ID, highlight the ID and click OK, or double-click the ID.
— Clicking Edit on the Inventory Location List accesses Sites (10.310.00), enabling you to
modify information for an existing inventory location.
— Clicking Insert on the Inventory Location List accesses Sites (10.310.00), enabling you to
add new inventory locations to the system.
The quantity available of the inventory item is reduced by the value in Qty Used when the
invoice is saved. This allocation remains until the invoice is cancelled or until the resulting
inventory transaction is processed to reduce quantity on hand.
6. Type the warehouse location of the inventory item where the quantity on hand is reduced by Qty
Used in Whse Loc.
If the warehouse location ID must be changed or the ID is unknown, press F3 or double-click
the right mouse button. A list of all warehouse locations set up in Warehouse Bin Locations
(10.340.00) displays.
— To select a warehouse location ID, highlight the ID and click OK, or double-click the ID.
The quantity available of the inventory item is reduced by the value in Qty Used when the
invoice is saved. This allocation remains until the invoice is cancelled or until the resulting
inventory transaction is processed to reduce quantity on hand.
7. Type the quantity of the inventory item used to perform the work on a service call in Qty Used.
Qty Used is compared to the quantity available in the Inventory module. When a quantity
greater than the quantity available is entered, Allow Negative Quantities on IN Setup
(10.950.00) controls the message displayed and options available.
Invoicing 259
8. If the inventory item used to complete the work on a service call is serialized, type the serial
number of the inventory item in Lot/Ser Nbr.
If the lot/serial number must be changed or the ID is unknown, press F3 or double-click the
right mouse button. A list of all lot/serial numbers received for the inventory item displays.
— To select a lot/serial number, highlight the ID and click OK, or double-click the ID.
— Quantity available must be greater than zero to select a lot/serial number.
— For serial number-controlled items, Qty Used must be 1 (an issue from inventory) or -1 (a
return to inventory).
— For serial number-controlled items issued from inventory, each instance of the item on
the grid must have a unique serial number.
— For serial number-controlled items returned to inventory, the serial number must not
already exist.
9. Type a tax identifier associated with the detail line item in Tax ID.
If the tax ID must be changed or the ID is unknown, press F3 or double-click the right mouse
button. A list of all taxes set up in Tax Maintenance (21.280.00) displays.
— To select a tax ID, highlight the ID and click OK, or double-click the ID.
— Clicking Edit on the Sales Tax List accesses Tax Maintenance (21.280.00), enabling you
to modify information for existing sales taxes.
— Clicking Insert on the Sales Tax List accesses Tax Maintenance (21.280.00), enabling
you to add new sales taxes to the system.
Tax ID defaults from Tax ID associated with the customer site in Site Maintenance
(SD.025.00).
Tax ID is only enabled for Billable Line Types.
Note: If the inventory item is tax-exempt, Taxable Amount is $0.00.
10. Type the date the work associated with the line item was performed in Service Date.
11. If a purchase order is required for the inventory item, type the vendor identifier associated with
the line item record in Vendor ID.
If the vendor ID is unknown, press F3 or double-click the right mouse button. A list of all
active vendors set up in Vendor Maintenance (03.270.00) displays.
— To select a vendor ID, highlight the ID and click OK, or double-click the ID.
— Clicking Edit on the Vendor List accesses Vendor Maintenance (03.270.00), enabling you
to modify information for an existing vendor.
— Clicking Insert on the Vendor List accesses Vendor Maintenance (03.270.00), enabling
you to add new vendors to the system.
12. If a purchase order is required for the inventory item, type the purchase order date associated
with the line item record in PO Date.
PO Date is inactive until Vendor ID is populated.
13. If a purchase order is required for the inventory item, type the quantity ordered for a specific item
that was purchased on a purchase order in Qty Ordered.
Qty Ordered is inactive until Vendor ID is populated.
14. If a purchase order receipt is required for the inventory item, type the quantity received for a
specific item that was used in Qty Received.
Qty Received is inactive until Vendor ID is populated.

260 Service Dispatch
15. If PO Number Option in Service Series Setup Maintenance (SD.000.00) is Manual, type the
purchase order number in PO Number.
If PO Number Option in Service Series Setup Maintenance (SD.000.00) is Automatic, PO
Number is populated by the system from Generate Inventory (SD.306.00).
16. If a purchase order is required for the inventory item, type the cost of the inventory item
associated with the line item record in Unit Cost.
Unit Cost defaults according to the costing method of the inventory item in Inventory Items
(10.250.00).
Unit Cost becomes active when Vendor ID is associated with the inventory line item.
17. Type a service contract to associate with the line item in Contract ID.
If the service contract ID is unknown, press F3 or double-click the right mouse button. A list of
all service contracts set up in Service Call Entry (SN.001.00) of the Service Contract module
displays.
— To select a service call ID, highlight the ID and click OK, or double-click the ID.
18. Type the piece of equipment identifier associated with the line item in Equipment ID.
If the equipment ID is unknown, press F3 or double-click the right mouse button. A list of all
equipment set up in Equipment Entry (SE.001.00) of the Equipment Maintenance module
displays.
— To select a piece of equipment, highlight the ID and click OK, or double-click the ID.
19. Type the cost of goods account associated with the inventory line item in COGS Acct.
If the account number must be changed or the ID is unknown, press F3 or double-click the
right mouse button. A list of all active account numbers set up in Account Maintenance
(01.260.00) displays.
— To select an account number, highlight the ID and click OK, or double-click the ID.
— Clicking Edit on the Active Account List accesses Account Maintenance (01.260.00),
enabling you to modify information for an existing account number.
— Clicking Insert on the Active Account List accesses Account Maintenance (01.260.00),
enabling you to add new account numbers to the system.
COGS Acct defaults from the inventory item in Inventory Items (10.250.00).
20. Type the cost of goods subaccount associated with the inventory line item in COGS Sub.
If the subaccount number must be changed or the ID is unknown, press F3 or double-click the
right mouse button. A list of all active subaccount numbers set up in Subaccount
Maintenance (01.270.00) displays.
— To select a subaccount number, highlight the ID and click OK, or double-click the ID.
— Clicking Edit on the Active Subaccount List accesses Subaccount Maintenance
(01.270.00), enabling you to modify information for an existing subaccount
number.
— Clicking Insert on the Active Subaccount List accesses Subaccount Maintenance
(01.270.00), enabling you to add new subaccount numbers to the system.
COGS Sub defaults from several places:
— If Use Sub From Site is selected in Call Type Maintenance (SD.003.00), then COGS Sub
defaults from Sub Account in Site Maintenance (SD.025.00).
— If Use Sub From Site is not selected in Call Type Maintenance (SD.003.00), then COGS
Sub defaults from Subaccount in Call Type Maintenance (SD.003.00).
— If a contract ID is associated with the detail line item, then COGS Sub defaults from
Deferred COGS Subaccount in Contract Type Maintenance (SN.003.00) unless
Use Subaccount From Site is selected in Contract Type Maintenance
(SN.003.00). If Use Subaccount From Site is selected in Contract Type

Invoicing 261
Maintenance (SN.003.00), then COGS Sub defaults from Sub Account in Site
Maintenance (SD.025.00).
21. Click Save on the toolbar.
22. Click Close on the toolbar.
Entering Service Contract Labor Inventory Line Items
To enter service contract labor inventory line items:
1. After entering basic invoice information (see “Entering Invoice Information” on page 219), click
Details.
Invoice - T & M Details (SD.203.00) displays.
2. Select the type of detail for the line item in Line Types.
Select Svc Contract from the drop-down list.
Note: Unlike Project, Contract ID does not need to be populated. For example, a technician may
complete the service call without realizing that the work is covered under a service contract.
3. Type the labor inventory item used to complete the service call in Line Item ID.
If the inventory ID is unknown, press F3 or double-click the right mouse button. A list of all
inventory items set up in Inventory Items (10.250.00) displays.
— To select an inventory ID, highlight the ID and click OK, or double-click the ID.
— Clicking Edit on the Inventory Item List accesses Inventory Items (10.250.00), enabling
you to modify information for an existing inventory item.
— Clicking Insert on the Inventory Item List accesses Inventory Items (10.250.00), enabling
you to add new inventory items to the system.
Once Line Item ID is populated, the description of the inventory item to the right of Line Item
ID, Detail Type, Class, Base Price, Unit Price, Tax ID, Unit Cost, Rev Acct, and COGS Acct are
populated.
4. Type a different description for the inventory item in the field to the right of Line Item ID.
5. Type the site of the labor inventory item in Invt Location ID.
If the inventory location ID must be changed or the ID is unknown, press F3 or double-click
the right mouse button. A list of all inventory locations set up in Sites (10.310.00) displays.
— To select an inventory location ID, highlight the ID and click OK, or double-click the ID.
— Clicking Edit on the Inventory Location List accesses Sites (10.310.00), enabling you to
modify information for an existing inventory location.
— Clicking Insert on the Inventory Location List accesses Sites (10.310.00), enabling you to
add new inventory locations to the system.
6. Type the warehouse location of the labor inventory item in Whse Loc.
If the warehouse location ID must be changed or the ID is unknown, press F3 or double-click
the right mouse button. A list of all warehouse locations set up in Warehouse Bin Locations
(10.340.00) displays.
— To select a warehouse location ID, highlight the ID and click OK, or double-click the ID.
7. Type the number of hours to be paid to technicians for the work completed on a service call in
Worked Hours.
Generate Payroll Process (SD.302.00) is used to create a timesheet in Payroll Time and
Dollar Entry (02.020.00).

262 Service Dispatch
8. Type the employee identifier associated with the technician that performed the work on the
service call in Employee ID.
If the technician ID must be changed or the ID is unknown, press F3 or double-click the right
mouse button. A list of all technicians set up in Employee Maintenance (SD.007.00) displays.
— To select a technician ID, highlight the ID and click OK, or double-click the ID.
— Clicking Edit on the Employee Maintenance PV List accesses Employee Maintenance
(SD.007.00), enabling you to modify information for an existing technician.
— Clicking Insert on the Employee Maintenance PV List accesses Employee Maintenance
(SD.007.00), enabling you to add new technicians to the system.
9. Type the earnings type associated with the line item record in Earnings Type ID.
If the earnings type ID must be changed or the ID is unknown, press F3 or double-click the
right mouse button. A list of all earning types set up in Earnings Type Maintenance
(02.270.00) in the Payroll module displays.
— To select an earnings type ID, highlight the ID and click OK, or double-click the ID.
— Clicking Edit on the Earnings Type List accesses Earnings Type Maintenance
(02.270.00), enabling you to modify information for an existing earnings type.
— Clicking Insert on the Earnings Type List accesses Earnings Type Maintenance
(02.270.00), enabling you to add new earnings types to the system.
Earnings Type ID defaults from Employee Maintenance (SD.007.00) for the Employee ID
associated with the detail line.
10. Type the work location associated with the line item in Work Location.
If the work location ID must be changed or the ID is unknown, press F3 or double-click the
right mouse button. A list of all work locations set up in Work Location Maintenance
(02.280.00) displays.
— To select a work location ID, highlight the ID and click OK, or double-click the ID.
— Clicking Edit on the Work Location Maintenance List accesses Work Location
Maintenance (02.280.00), enabling you to modify information for an existing
work location.
— Clicking Insert on the Work Location Maintenance List accesses Work Location
Maintenance (02.280.00), enabling you to add new work locations to the
system.
Work Location defaults from Employee Maintenance (SD.007.00) for the Employee ID
associated with the detail line.
11. Type a tax identifier associated with the line item in Tax ID.
If the tax ID must be changed or the ID is unknown, press F3 or double-click the right mouse
button. A list of all taxes set up in Tax Maintenance (21.280.00) displays.
— To select a tax ID, highlight the ID and click OK, or double-click the ID.
— Clicking Edit on the Sales Tax List accesses Tax Maintenance (21.280.00), enabling you
to modify information for existing sales taxes.
— Clicking Insert on the Sales Tax List accesses Tax Maintenance (21.280.00), enabling
you to add new sales taxes to the system.
Tax ID defaults from Tax ID associated with the customer site in Site Maintenance
(SD.025.00).
Tax ID is only enabled for Billable Line Types.
Note: If the inventory item is tax-exempt, Taxable Amount is $0.00.
12. Type the date the work associated with the line item was performed in Service Date.

Invoicing 263
13. Type a service contract to associate with the line item in Contract ID.
If the service contract ID is unknown, press F3 or double-click the right mouse button. A list of
all service contracts set up in Service Call Entry (SN.001.00) of the Service Contract module
displays.
— To select a service call ID, highlight the ID and click OK, or double-click the ID.
14. Type the piece of equipment associated with the line item in Equipment ID.
If the equipment ID must be changed or the ID is unknown, press F3 or double-click the right
mouse button. A list of all the equipment set up in Equipment Entry (SE.001.00) of the
Equipment Maintenance module displays.
— To select a piece of equipment, highlight the ID and click OK, or double-click the ID.
15. Type the cost of goods account associated with the inventory line item in COGS Acct.
If the account number must be changed or the ID is unknown, press F3 or double-click the
right mouse button. A list of all active account numbers set up in Account Maintenance
(01.260.00) displays.
— To select an account number, highlight the ID and click OK, or double-click the ID.
— Clicking Edit on the Active Account List accesses Account Maintenance (01.260.00),
enabling you to modify information for an existing account number.
— Clicking Insert on the Active Account List accesses Account Maintenance (01.260.00),
enabling you to add new account numbers to the system.
COGS Acct defaults from the inventory item in Inventory Items (10.250.00).
16. Type the cost of goods subaccount associated with the inventory line item in COGS Sub.
If the subaccount number must be changed or the ID is unknown, press F3 or double-click the
right mouse button. A list of all active subaccount numbers set up in Subaccount
Maintenance (01.270.00) displays.
— To select a subaccount number, highlight the ID and click OK, or double-click the ID.
— Clicking Edit on the Active Subaccount List accesses Subaccount Maintenance
(01.270.00), enabling you to modify information for an existing subaccount
number.
— Clicking Insert on the Active Subaccount List accesses Subaccount Maintenance
(01.270.00), enabling you to add new subaccount numbers to the system.
COGS Sub defaults from several places:
— If Use Sub From Site is selected in Call Type Maintenance (SD.003.00), then COGS Sub
defaults from Sub Account in Site Maintenance (SD.025.00).
— If Use Sub From Site is not selected in Call Type Maintenance (SD.003.00), then COGS
Sub defaults from Subaccount in Call Type Maintenance (SD.003.00).
— If a contract ID is associated with the detail line item, then COGS Sub defaults from
Deferred COGS Subaccount in Contract Type Maintenance (SN.003.00) unless
Use Subaccount From Site is selected in Contract Type Maintenance
(SN.003.00). If Use Subaccount From Site is selected in Contract Type
Maintenance (SN.003.00), then COGS Sub defaults from Sub Account in Site
Maintenance (SD.025.00).
17. Click Save on the toolbar.
18. Click Close on the toolbar.
Note: Service Contract Profitability (SN.013.00) is not updated until you run the service call invoice.

264 Service Dispatch
Flat Rate Price Invoicing Flat rates are used to combine both material and labor detail line items that are billable to customers
at one price. Therefore detail line items are not required when creating invoices.
Entering a Flat Rate Price Invoice
To enter a flat rate price invoice:
1. Open Invoice Entry (SD.202.00) by choosing Module | Service Dispatch | Invoice Entry from the
menu.
Invoice Entry (SD.202.00) displays.
Note: Invoice Entry (SD.202.00) can be accessed by clicking Invoice in Service Call Entry
(SD.200.00), by clicking Invoice in Dispatch (SD.201.00).
2. Type the identifier of the service call in Service Call ID to be invoiced.
If the service call ID is unknown, press F3 or double-click the right mouse button. A list of all
service calls set up in Service Call Entry (SD.200.00) displays.
— To select a service call ID, highlight the ID and click OK, or double-click the ID.
Note: Service Call ID is already populated if you access Invoice Entry (SD.202.00) via an
alternative method.
Note: Once the Service Call ID is entered, the Customer ID, Customer Site and Branch ID
associated with the service call will be populated.
3. Choose the type of invoice detail for the service call in Service Type.
Select Flat Rate from the drop-down list.
Note: Flat Rate Pricing is a separate service management module in Field Service Management
that allows users to create an unlimited number of user-defined flat rates that include all of the
material, labor and overhead costs needed to complete a job or service call.
4. Choose how the invoice number will be assigned for the invoice in Invoice Type.
Invoice: Assigned to a service call after the service call invoices are printed and saved to the
system through Service Invoice Printing - Keep/Delete (SD.642.00).
Manual: Requires that a user-specified invoice number be typed into Invoice/Memo Nbr
before the invoice information can be saved to the system in Invoice Entry (SD.202.00).
Progress: Allows users to invoice customers for material and labor used to perform the work
without closing the service call. Therefore, additional work and detail lines items can be
added to the service call for invoicing.
5. If the Invoice Type is Manual, type a date the work on the service call is complete in Completed
Date.
Note: If the Invoice Type is Invoice, the date the invoice is printed and processed in the system
defaults to Completed Date. If the Invoice Type is Progress, no value is entered in Completed Date
because the service call is not closed during the invoice printing process.
6. Type the accounts receivable aging date for the invoice in Invoice Date.
7. If the Invoice Type is Manual, type an invoice number for the invoice in Invoice/Memo Nbr.
Note: If the Invoice Type is Invoice or Progress, Invoice/Memo Nbr is inactive.
8. Type a work order number associated with the service call in Workorder Nbr.
Workorder Nbr may be printed on the customer invoice.
Invoicing 265
9. Type the salesperson associated with the customer site of the service call in Salesperson ID.
Salesperson ID defaults from Site Maintenance (SD.025.00).
If the salesperson must be changed or the ID is unknown, press F3 or double-click the right
mouse button. A list of all salespersons set up in Salesperson Maintenance (08.310.00)
displays.
— To select a salesperson ID, highlight the ID and click OK, or double-click the ID.
— Clicking Edit on the Salesperson List accesses Salesperson Maintenance (08.310.00),
enabling you to modify information for existing salespersons.
— Clicking Insert on the Salesperson List accesses Salesperson Maintenance (08.310.00),
enabling you to add new salespersons to the system.
10. Type the technician that performed the work of the service call in Primary Tech.
Primary Tech defaults from Dispatch (SD.201.00).
If the technician ID must be changed or the ID is unknown, press F3 or double-click the right
mouse button. A list of all technicians set up in Employee Maintenance (SD.007.00) displays.
— To select a technician ID, highlight the ID and click OK, or double-click the ID.
— Clicking Edit on the Employee Maintenance PV List accesses Employee Maintenance
(SD.007.00) and allows users to modify information for a technician.
— Clicking Insert on the Employee Maintenance PV List accesses Employee Maintenance
(SD.007.00), enabling you to add new technicians to the system.
11. Type the period the invoice updates the Accounts Receivable and General Ledger modules in
Period to Post.
Note: Period to Post is important when selecting service calls to be invoiced in Service Invoice
Selection (SD.641.00). Only invoices that have a Period to Post in Invoice Entry (SD.202.00) that
matches the Period to Post in Service Invoice Selection (SD.641.00) are selected for invoicing.
12. Type a terms to associate with the invoice in Terms ID.
Terms ID defaults from Customer Maintenance (08.260.00).
If the terms ID must be changed or the ID is unknown, press F3 or double-click the right
mouse button. A list of all terms set up in Terms Maintenance (21.270.00) displays.
— To select a terms ID, highlight the ID and click OK, or double-click the ID.
— Clicking Edit on the Terms Maintenance List accesses Terms Maintenance (21.270.00),
enabling you to modify information for existing terms.
— Clicking Insert on the Terms Maintenance List accesses Terms Maintenance
(21.270.00), enabling you to add new terms to the system.
Terms ID is for informational purposes only.
Note: Terms are used to create Due Date and Discount Date of an invoice in Invoice & Memo
(08.010.00) when a service call invoice is printed in Service Call Invoice (SD.640.00) or Service
Call Invoice (SSRS) (SD.643.00) and processed in Service Invoice Printing - Keep/Delete
(SD.642.00). Due Date and Discount Date of an invoice are based on Invoice Date and Terms ID
of the invoice.
Note: Multiple installment terms have no effect on Field Service Management modules. Multiple
installment terms are processed when the batch of invoices is released in Invoice & Memo
(08.010.00).

266 Service Dispatch
13. If the work of a service call is covered under a manufacturer or in-house warranty, and the
manufacturer must be invoiced for the material and labor costs, type the customer ID of the
manufacturer in Alt Cust ID.
If the customer ID must be changed or the ID is unknown, press F3 or double-click the right
mouse button. A list of all active customers set up in Customer Maintenance (08.260.00)
displays.
— To select a customer ID, highlight the ID and click OK, or double-click the ID.
— Clicking Edit on the Customer Maintenance List accesses Customer Maintenance
(08.260.00), enabling you to modify information for existing customer.
— Clicking Insert on the Customer Maintenance List accesses Customer Maintenance
(08.260.00), enabling you to add new customers to the system.
14. If the service call is a “call back,” type the ID of the original service call in Orig Call Nbr.
15. Type a 30-character explanation of the service call invoice in Description.
Description is for informational purposes only.
Note: The remaining steps are optional; they are for informational purposes only.
16. Click the Other Info tab or press ALT+O.
The Other Info tab displays.
Additional information may be entered into the Other Info tab; however, all the fields on this tab
are optional. They are for informational purposes only.
17. Type a different call status associated with the service call in Call Status.
If the call status must be changed or the ID is unknown, press F3 or double-click the right
mouse button. A list of all call statuses set up in Call Status Maintenance (SD.002.00)
displays.
— To select a branch ID, highlight the ID and click OK, or double-click the ID.
— Clicking Edit on the Call Status Maintenance PV List accesses Call Status Maintenance
(SD.003.00), enabling you to modify information for an existing call status.
— Clicking Insert on the Call Status Maintenance PV List accesses Call Status Maintenance
(SD.003.00), enabling you to add new call statuses to the system.
Call Status defaults from Service Call Entry (SD.200.00).
18. Type a different call type associated with a service call in Call Type.
Call Type defaults from Service Call Entry (SD.200.00).
If the call type ID must be changed or the ID is unknown, press F3 or double-click the right
mouse button. A list of all call types set up in Call Type Maintenance (SD.003.00) displays.
— To select a call type ID, highlight the ID and click OK, or double-click the ID.
— Clicking Edit on the Call Type Maintenance PV List accesses Call Type Maintenance
(SD.003.00), enabling you to modify information for an existing call type.
— Clicking Insert on the Call Type Maintenance PV List accesses Call Type Maintenance
(SD.003.00), enabling you to add new call types to the system.
19. Type a different name for the person who requested the service call in Caller Name.
Caller Name defaults from Service Call Entry (SD.200.00).
20. Type a different purchase order number associated with the service call Customer PO.
Customer PO defaults from Service Call Entry (SD.200.00).
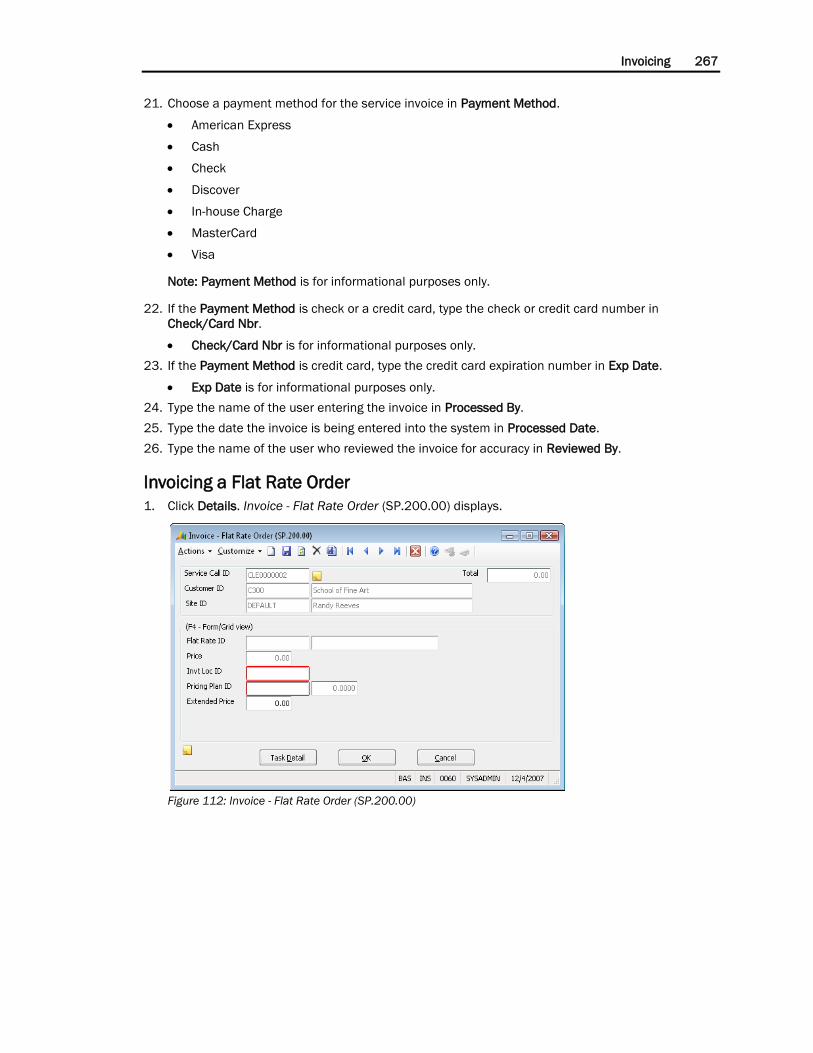
Invoicing 267
21. Choose a payment method for the service invoice in Payment Method.
American Express
Cash
Check
Discover
In-house Charge
MasterCard
Visa
Note: Payment Method is for informational purposes only.
22. If the Payment Method is check or a credit card, type the check or credit card number in
Check/Card Nbr.
Check/Card Nbr is for informational purposes only.
23. If the Payment Method is credit card, type the credit card expiration number in Exp Date.
Exp Date is for informational purposes only.
24. Type the name of the user entering the invoice in Processed By.
25. Type the date the invoice is being entered into the system in Processed Date.
26. Type the name of the user who reviewed the invoice for accuracy in Reviewed By.
Invoicing a Flat Rate Order
1. Click Details. Invoice - Flat Rate Order (SP.200.00) displays.
Figure 112: Invoice - Flat Rate Order (SP.200.00)

268 Service Dispatch
2. Type a flat rate identifier associated with the service call in Flat Rate ID.
Multiple Flat Rate Prices can be attached to a service call.
If the flat rate ID must be changed or the ID is unknown, press F3 or double-click the right
mouse button. A list of all flat rate prices set up in Flat Rate Entry (SP.000.00) displays.
— To select a flat rate ID, highlight the ID and click OK call status, or double-click the ID.
— Clicking Edit on the Flat Rate Maintenance PV List accesses Flat Rate Entry (SP.000.00),
enabling you to modify information for an existing flat rate.
— Clicking Insert on the Flat Rate Maintenance PV List accesses Flat Rate Entry
(SP.000.00), enabling you to add new flat rates to the system.
3. Type the site location of the inventory item where the quantity on hand is reduced in Invt Loc ID.
If the inventory location ID must be changed or the ID is unknown, press F3 or double-click
the right mouse button. A list of all inventory locations set up in Sites (10.310.00) displays.
— To select an inventory location ID, highlight the ID and click OK, or double-click the ID.
— Clicking Edit on the Inventory Location List accesses Sites (10.310.00), enabling you to
modify information for an inventory location.
— Clicking Insert on the Inventory Location List accesses Sites (10.310.00), enabling you to
add new inventory locations to the system.
4. Type the pricing plan identifier associated with the service call in Pricing Plan ID.
If the pricing plan ID must be changed or the ID is unknown, press F3 or double-click the right
mouse button. A list of all pricing plans set up in Flat Rate Pricing Plan Maintenance
(SP.000.00) displays.
— To select a pricing plan ID, highlight the ID and click OK, or double-click the ID.
— Clicking Edit on the Plan Maintenance PV List accesses Flat Rate Pricing Plan
Maintenance (SP.000.00), enabling you to modify information for an existing
pricing plan.
— Clicking Insert on the Plan Maintenance PV List accesses Flat Rate Pricing Plan
Maintenance (SP.000.00), enabling you to add new pricing plans to the system.

Invoicing 269
Modifying Details of a Flat Rate Order
Flat Rate Order - Modify Detail (SP.202.00) allows users to view and modify the line item details of a
flat rate without changing the price.
To view or add material inventory items for a flat rate price invoice:
Click Task Detail. Flat Rate Order - Modify Detail (SP.202.00) displays.
Figure 113: Flat Rate Order - Modify Detail (SP.202.00)

270 Service Dispatch
Entering Material Inventory Line Items
1. On Invoice – Flat Rate Order (SP.200.00), click Task Detail.
2. Type a different material inventory item used to complete the work of a service call in Item ID.
If the inventory ID must be changed or the ID is unknown, press F3 or double-click the right
mouse button. A list of all inventory items set up in Inventory Items (10.250.00) displays.
— To select an inventory ID, highlight the ID and click OK, or double-click the ID.
— Clicking Edit on the Inventory Item List accesses Inventory Items (10.250.00), enabling
you to modify information for an existing inventory item.
— Clicking Insert on the Inventory Item List accesses Inventory Items (10.250.00), enabling
you to add new inventory items to the system.
Once Item ID is populated, the description of the inventory item to the right of Item ID, Detail
Type, Class, Base Price, Unit Price, Tax ID, Unit Cost, Revenue Acct, and COGS Acct are
populated.
The quantity available of the inventory item is reduced by the value in Quantity when the
invoice is saved. This allocation remains until the invoice is cancelled or until the resulting
inventory transaction is processed to reduce quantity on hand.
3. Type a different description for the inventory item in the field to the right of Item ID.
4. Type a different site of the inventory item where the quantity on hand is reduced by Quantity in
Invt Location ID.
If the inventory location ID must be changed or the ID is unknown, press F3 or double-click
the right mouse button. A list of all inventory locations set up in Sites (10.310.00) displays.
— To select an inventory location ID, highlight the ID and click OK, or double-click the ID.
— Clicking Edit on the Inventory Location List accesses Sites (10.310.00), enabling you to
modify information for an existing inventory location.
— Clicking Insert on the Inventory Location List accesses Sites (10.310.00), enabling you to
add new inventory locations to the system.
The quantity available of the inventory item is reduced by the value in Quantity when the
invoice is saved. This allocation remains until the invoice is cancelled or until the resulting
inventory transaction is processed to reduce quantity on hand.
5. Type the warehouse location of the inventory item where the quantity on hand is reduced by
Quantity in Whse Loc.
If the warehouse location ID must be changed or the ID is unknown, press F3 or double-click
the right mouse button. A list of all warehouse locations set up in Warehouse Bin Locations
(10.340.00) is displayed.
To select a warehouse location ID, highlight the ID and click OK, or double-click the ID.
The quantity available of the inventory item is reduced by the value in Quantity when the
invoice is saved. This allocation remains until the invoice is cancelled or until the resulting
inventory transaction is processed to reduce quantity on hand.
6. Type a different quantity of the inventory item used to perform the work on a service call in
Quantity.
Quantity is compared to the quantity available in the Inventory module. When a quantity
greater than the quantity available is entered, Allow Negative Quantities on IN Setup
(10.950.00) controls the message displayed and options available.

Invoicing 271
7. If the inventory item used to complete the work on a service call is serialized, type the serial
number of the inventory item in Lot/Ser Nbr.
If the lot/serial number must be changed or the ID is unknown, press F3 or double-click the
right mouse button. A list of all lot/serial numbers received for the inventory item displays.
— To select a lot/serial number, highlight the ID and click OK, or double-click the ID.
— Quantity available must be greater than zero to select a lot/serial number.
— For serial number-controlled items, Quantity must be 1 (an issue from inventory) or -1 (a
return to inventory).
— For serial number-controlled items issued from inventory, each instance of the item on
the grid must have a unique serial number.
— For serial number-controlled items returned to inventory, the serial number must not
already exist.
8. Type a different price of the inventory item used to perform the work on a service call in Unit Price.
9. Select if the inventory item is taxable in Tax Exempt.
No
Yes
10. If the inventory item is taxable, type a tax identifier associated with the detail line item in Tax ID.
If the tax ID must be changed or the ID is unknown, press F3 or double-click the right mouse
button. A list of all taxes set up in Tax Maintenance (21.280.00) displays.
— To select a tax ID, highlight the ID and click OK, or double-click the ID.
— Clicking Edit on the Sales Tax List accesses Tax Maintenance (21.280.00), enabling you
to modify information for existing sales taxes.
— Clicking Insert on the Sales Tax List accesses Tax Maintenance (21.280.00), enabling
you to add new sales taxes to the system.
Tax ID defaults from Tax ID associated with the customer site in Site Maintenance
(SD.025.00).
Tax ID is only enabled for Billable Line Types.
Note: If the inventory item is tax-exempt, Txbl Amount is $0.00.
11. Type the date the work associated with the line item was performed in Service Date.
12. If a purchase order is required for the inventory item, type the vendor ID associated with the line
item record in Vendor ID.
If the vendor ID is unknown, press F3 or double-click the right mouse button. A list of all
active vendors set up in Vendor Maintenance (03.270.00) displays.
— To select a vendor ID, highlight the ID and click OK, or double-click the ID.
— Clicking Edit on the Vendor List accesses Vendor Maintenance (03.270.00), enabling you
to modify information for an existing vendor.
— Clicking Insert on the Vendor List accesses Vendor Maintenance (03.270.00), enabling
you to add new vendors to the system.
13. If a purchase order is required for the inventory item, type the purchase order date associated
with the line item record in PO Date.
PO Date is inactive until Vendor ID is populated.
14. If a purchase order is required for the inventory item, type the quantity ordered for a specific item
that was purchased on a purchase order in Qty Purch.
Qty Purch is inactive until Vendor ID is populated.

272 Service Dispatch
15. If a purchase order receipt is required for the inventory item, type the quantity received for a
specific item that was used in Qty Received.
Qty Received is inactive until Vendor ID is populated.
16. If a purchase order is required for the inventory item, type the cost of the inventory item
associated with the line item record in Unit Cost.
17. Type the revenue account associated with the inventory line item in Revenue Acct.
If the account number must be changed or the ID is unknown, press F3 or double-click the
right mouse button. A list of all active account number set up in Account Maintenance
(01.260.00) displays.
— To select an account number, highlight the ID and click OK, or double-click the ID.
— Clicking Edit on the Active Account List accesses Account Maintenance (01.260.00),
enabling you to modify information for an existing account number.
— Clicking Insert on the Active Account List accesses Account Maintenance (01.260.00),
enabling you to add new account numbers to the system.
Revenue Acct defaults from the inventory item in Inventory Items (10.250.00).
18. Type the revenue subaccount associated with the inventory line item in Revenue Sub.
If the subaccount number must be changed or the ID is unknown, press F3 or double-click the
right mouse button. A list of all active subaccount number set up in Subaccount Maintenance
(01.270.00) displays.
— To select a subaccount number, highlight the ID and click OK, or double-click the ID.
— Clicking Edit on the Active Subaccount List accesses Subaccount Maintenance
(01.270.00), enabling you to modify information for an existing subaccount
number.
— Clicking Insert on the Active Subaccount List accesses Subaccount Maintenance
(01.270.00), enabling you to add new subaccount numbers to the system.
Revenue Sub defaults from several places:
— If Use Sub From Site is selected in Call Type Maintenance (SD.003.00), then Revenue
Sub defaults from Sub Account in Site Maintenance (SD.025.00).
— If Use Sub From Site is not selected in Call Type Maintenance (SD.003.00), then Revenue
Sub defaults from Subaccount in Call Type Maintenance (SD.003.00).
— If a contract ID is associated with the detail line item, then Revenue Sub defaults from
Deferred Revenue Subaccount in Contract Type Maintenance (SN.003.00)
unless Use Subaccount From Site is selected in Contract Type Maintenance
(SN.003.00). If Use Subaccount From Site is selected in Contract Type
Maintenance (SN.003.00), then Revenue Sub defaults from Sub Account in Site
Maintenance (SD.025.00).
19. Type the cost of goods account associated with the inventory line item in COGS Acct.
If the account number must be changed or the ID is unknown, press F3 or double-click the
right mouse button. A list of all active account numbers set up in Account Maintenance
(01.260.00) displays.
— To select an account number, highlight the ID and click OK, or double-click the ID.
— Clicking Edit on the Active Account List accesses Account Maintenance (01.260.00),
enabling you to modify information for an existing account number.
— Clicking Insert on the Active Account List accesses Account Maintenance (01.260.00),
enabling you to add new account numbers to the system.
COGS Acct defaults from the inventory item in Inventory Items (10.250.00).

Invoicing 273
20. Type the cost of goods subaccount associated with the inventory line item in COGS Sub.
If the subaccount number must be changed or the ID is unknown, press F3 or double-click the
right mouse button. A list of all active subaccount numbers set up in Subaccount
Maintenance (01.270.00) displays.
— To select a subaccount number, highlight the ID and click OK, or double-click the ID.
— Clicking Edit on the Active Subaccount List accesses Subaccount Maintenance
(01.270.00), enabling you to modify information for an existing subaccount
number.
— Clicking Insert on the Active Subaccount List accesses Subaccount Maintenance
(01.270.00), enabling you to add new subaccount numbers to the system.
COGS Sub defaults from several places:
— If Use Sub From Site is selected in Call Type Maintenance (SD.003.00), then COGS Sub
defaults from Sub Account in Site Maintenance (SD.025.00).
— If Use Sub From Site is not selected in Call Type Maintenance (SD.003.00), then COGS
Sub defaults from Subaccount in Call Type Maintenance (SD.003.00).
— If a contract ID is associated with the detail line item, then COGS Sub defaults from
Deferred COGS Subaccount in Contract Type Maintenance (SN.003.00) unless
Use Subaccount From Site is selected in Contract Type Maintenance
(SN.003.00). If Use Subaccount From Site is selected in Contract Type
Maintenance (SN.003.00), then COGS Sub defaults from Sub Account in Site
Maintenance (SD.025.00).
21. When you are finished viewing or adding invoice details, click OK.
Invoice - Flat Rate Order (SP.200.00) displays.
22. Click OK to close Invoice - Flat Rate Order (SP.200.00).
Invoice Entry (SD.202.00) displays.
23. Choose Approved for Handling.
Note: Handling must be set to Approved in order to select the service call to be invoiced in Service
Invoice Selection (SD.641.00).
24. Click Save to save changes to the current invoice; click Finish to enter the next invoice.
Entering Labor Inventory Line Items
To enter labor inventory line items:
1. On Invoice – Flat Rate Order (SP.200.00), click Task Detail.
Flat Rate Order - Modify Detail (SP.202.00) displays.
2. Type a different labor inventory item used to complete the work of a service call in Item ID.
If the inventory ID must be changed or the ID is unknown, press F3 or double-click the right
mouse button. A list of all inventory items set up in Inventory Items (10.250.00) displays.
— To select an inventory ID, highlight the ID and click OK, or double-click the ID.
— Clicking Edit on the Inventory Item List accesses Inventory Items (10.250.00), enabling
you to modify information for an existing inventory item.
— Clicking Insert on the Inventory Item List accesses Inventory Items (10.250.00), enabling
you to add new inventory items to the system.
Once Item ID is populated, the description of the inventory item to the right of Item ID, Detail
Type, Class, Base Price, Unit Price, Tax ID, Unit Cost, Revenue Acct, and COGS Acct are
populated.
3. Type a different description for the inventory item in the field to the right of Line Item ID.

274 Service Dispatch
4. Type the site of the labor inventory item in Invt Location ID.
If the inventory location ID must be changed or the ID is unknown, press F3 or double-click
the right mouse button. A list of all inventory locations set up in Sites (10.310.00) displays.
— To select an inventory location ID, highlight the ID and click OK, or double-click the ID.
— Clicking Edit on the Inventory Location List accesses Sites (10.310.00), enabling you to
modify information for an existing inventory location.
— Clicking Insert on the Inventory Location List accesses Sites (10.310.00), enabling you to
add new inventory locations to the system.
5. Type a different number of hours to be paid to technicians for the work completed on a service
call in Worked Hours.
Generate Payroll Process (SD.302.00) is used to create a timesheet in Payroll Time and
Dollar Entry (02.020.00).
6. Type the number of hours to be charged to the customer in Billed Hrs.
Note: Flat Rate Pricing is always billable to the customer associated with the service call.
When service call invoices are processed in Service Invoice Printing - Keep/Delete
(SD.642.00), a batch is created in Invoice and Memo (08.010.00) in the Accounts Receivable
module.
7. Type a different price of the inventory item used to perform the work on a service call in Unit Price.
8. Type the employee identifier associated with the technician that performed the work on the
service call in Employee ID.
If the technician ID must be changed or the ID is unknown, press F3 or double-click the right
mouse button. A list of all technicians set up in Employee Maintenance (SD.007.00) displays.
— To select a technician ID, highlight the ID and click OK, or double-click the ID.
— Clicking Edit on the Employee Maintenance PV List accesses Employee Maintenance
(SD.007.00), enabling you to modify information for an existing technician.
— Clicking Insert on the Employee Maintenance PV List accesses Employee Maintenance
(SD.007.00), enabling you to add new technicians to the system.
9. Type the earnings type associated with the line item record in Earnings Type ID.
If the earnings type ID must be changed or the ID is unknown, press F3 or double-click the
right mouse button. A list of all earning types set up in Earnings Type Maintenance
(02.270.00) in the Payroll module displays.
— To select an earnings type ID, highlight the ID and click OK, or double-click the ID.
— Clicking Edit on the Earnings Type List accesses Earnings Type Maintenance
(02.270.00), enabling you to modify information for an existing earnings type.
— Clicking Insert on the Earnings Type List accesses Earnings Type Maintenance
(02.270.00), enabling you to add new earnings type to the system.
Earnings Type ID defaults from Employee Maintenance (SD.007.00) for the Employee ID
associated with the detail line.

Invoicing 275
10. Type the work location associated with the line item in Work Location.
If the work location ID must be changed or the ID is unknown, press F3 or double-click the
right mouse button. A list of all work locations set up in Work Location Maintenance
(02.280.00) displays.
— To select a work location ID, highlight the ID and click OK, or double-click the ID.
— Clicking Edit on the Work Location Maintenance List accesses Work Location
Maintenance (02.280.00), enabling you to modify information for an existing
work location.
— Clicking Insert on the Work Location Maintenance List accesses Work Location
Maintenance (02.280.00), enabling you to add new work locations to the
system.
Work Location defaults from Employee Maintenance (SD.007.00) for the Employee ID
associated with the detail line.
11. Select if the inventory item is taxable in Tax Exempt.
No
Yes
12. If the inventory item is taxable, type a tax identifier associated with the line item in Tax ID.
If the tax ID must be changed or the ID is unknown, press F3 or double-click the right mouse
button. A list of all taxes set up in Tax Maintenance (21.280.00) displays.
— To select a tax ID, highlight the ID and click OK, or double-click the ID.
— Clicking Edit on the Sales Tax List accesses Tax Maintenance (21.280.00), enabling you
to modify information for existing sales taxes.
— Clicking Insert on the Sales Tax List accesses Tax Maintenance (21.280.00), enabling
you to add new sales taxes to the system.
Tax ID defaults from Tax ID associated with the customer site in Site Maintenance
(SD.025.00).
Tax ID is only enabled for Billable Line Types.
Note: If the inventory item is tax-exempt, Txbl Amount is $0.00.
13. Type the date the work associated with the line item was performed in Service Date.
14. Type the revenue account associated with the inventory line item in Revenue Acct.
If the account number must be changed or the ID is unknown, press F3 or double-click the
right mouse button. A list of all active account number set up in Account Maintenance
(01.260.00) displays.
— To select an account number, highlight the ID and click OK, or double-click the ID.
— Clicking Edit on the Active Account List accesses Account Maintenance (01.260.00),
enabling you to modify information for an existing account number.
— Clicking Insert on the Active Account List accesses Account Maintenance (01.260.00),
enabling you to add new account numbers to the system.
Revenue Acct defaults from the inventory item in Inventory Items (10.250.00).

276 Service Dispatch
15. Type the revenue subaccount associated with the inventory line item in Revenue Sub.
If the subaccount number must be changed or the ID is unknown, press F3 or double-click the
right mouse button. A list of all active subaccount number set up in Subaccount Maintenance
(01.270.00) displays.
— To select a subaccount number, highlight the ID and click OK, or double-click the ID.
— Clicking Edit on the Active Subaccount List accesses Subaccount Maintenance
(01.270.00), enabling you to modify information for an existing subaccount
number.
— Clicking Insert on the Active Subaccount List accesses Subaccount Maintenance
(01.270.00), enabling you to add new subaccount numbers to the system.
Revenue Sub defaults from several places:
— If Use Sub From Site is selected in Call Type Maintenance (SD.003.00), then Revenue
Sub defaults from Sub Account in Site Maintenance (SD.025.00).
— If Use Sub From Site is not selected in Call Type Maintenance (SD.003.00), then Revenue
Sub defaults from Subaccount in Call Type Maintenance (SD.003.00).
— If a contract ID is associated with the detail line item, then Revenue Sub defaults from
Deferred Revenue Subaccount in Contract Type Maintenance (SN.003.00)
unless Use Subaccount From Site is selected in Contract Type Maintenance
(SN.003.00). If Use Subaccount From Site is selected in Contract Type
Maintenance (SN.003.00), then Revenue Sub defaults from Sub Account in Site
Maintenance (SD.025.00).
16. Type the cost of goods account associated with the inventory line item in COGS Acct.
If the account number must be changed or the ID is unknown, press F3 or double-click the
right mouse button. A list of all active account numbers set up in Account Maintenance
(01.260.00) displays.
— To select an account number, highlight the ID and click OK, or double-click the ID.
— Clicking Edit on the Active Account List accesses Account Maintenance (01.260.00),
enabling you to modify information for an existing account number.
— Clicking Insert on the Active Account List accesses Account Maintenance (01.260.00),
enabling you to add new account numbers to the system.
COGS Acct defaults from the inventory item in Inventory Items (10.250.00).
17. Type the cost of goods subaccount associated with the inventory line item in COGS Sub.
If the subaccount number must be changed or the ID is unknown, press F3 or double-click the
right mouse button. A list of all active subaccount numbers set up in Subaccount
Maintenance (01.270.00) displays.
— To select a subaccount number, highlight the ID and click OK, or double-click the ID.
— Clicking Edit on the Active Subaccount List accesses Subaccount Maintenance
(01.270.00), enabling you to modify information for an existing subaccount
number.
— Clicking Insert on the Active Subaccount List accesses Subaccount Maintenance
(01.270.00), enabling you to add new subaccount numbers to the system.
COGS Sub defaults from several places:
— If Use Sub From Site is selected in Call Type Maintenance (SD.003.00), then COGS Sub
defaults from Sub Account in Site Maintenance (SD.025.00).
— If Use Sub From Site is not selected in Call Type Maintenance (SD.003.00), then COGS
Sub defaults from Subaccount in Call Type Maintenance (SD.003.00).
— If a contract ID is associated with the detail line item, then COGS Sub defaults from
Deferred COGS Subaccount in Contract Type Maintenance (SN.003.00) unless
Use Subaccount From Site is selected in Contract Type Maintenance

Invoicing 277
(SN.003.00). If Use Subaccount From Site is selected in Contract Type
Maintenance (SN.003.00), then COGS Sub defaults from Sub Account in Site
Maintenance (SD.025.00).
18. Click OK to close Flat Rate Order - Modify Detail (SP.202.00).
Invoice - Flat Rate Order (SP.200.00) displays.
19. Click OK to close Invoice - Flat Rate Order (SP.200.00)
Invoice Entry (SD.202.00) displays.
20. Click OK to close Invoice Entry (SD.202.00).
Entering Technician Information on an Invoice
Invoice - Technician Information (SD.028.00) allows users to associate multiple technicians to an
invoice. This screen also allows users to enter vehicle information assigned to the technicians such as
the Vehicle ID and Ending Mileage to track usage for preventive maintenance.
To enter technician information:
1. Open Invoice Entry (SD.202.00) by choosing Module | Service Dispatch | Invoice Entry from the
menu.
Invoice Entry (SD.202.00) displays.
Note: Invoice Entry (SD.202.00) can be accessed by clicking Invoice in Service Call Entry
(SD.200.00), by clicking Invoice in Dispatch (SD.201.00).
2. Click Technician. Invoice - Technician Information (SD.028.00) displays.
Figure 114: Invoice - Technician Information (SD.028.00)
3. If other technicians besides the primary technician performed work on the service call, type the
additional technicians in Technician ID.
If the technician ID is unknown, press F3 or double-click the right mouse button. A list of all
technicians set up in Employee Maintenance (SD.007.00) displays.
— To select a technician ID, highlight the ID and click OK, or double-click the ID.
— Clicking Edit on the Employee Maintenance PV List accesses Employee Maintenance
(SD.007.00), enabling you to modify information for an existing technician.
— Clicking Insert on the Employee Maintenance PV List accesses Employee Maintenance
(SD.007.00), enabling you to add new technicians to the system.
278 Service Dispatch
4. Type the vehicle assigned to the technician that performed work on the service in Vehicle ID.
If the technician was assigned as the primary service technician, the vehicle assigned to the
technician in Employee Personal Information (SD.007.01) of Employee Maintenance
(SD.007.00) defaults automatically.
If the vehicle ID must be changed or the ID is unknown, press F3 or double-click the right
mouse button. A list of all vehicles set up in Vehicle Maintenance (SD.020.00) displays.
— To select a vehicle ID, highlight the ID and click OK, or double-click the ID.
— Clicking Edit on the Vehicle Maintenance PV List accesses Vehicle Maintenance
(SD.020.00), enabling you to modify information for an existing vehicle.
— Clicking Insert on the Vehicle Maintenance PV List accesses Vehicle Maintenance
(SD.020.00), enabling you to add new vehicles to the system.
5. Type the ending odometer mileage of the vehicle assigned to the technician in Ending Mileage.
Ending Mileage is for informational purposes only.
6. Type the commission percentage for the technicians on a service call in Commission %.
Commission % allows users to split commissions on a service call. Each technician is given a
commission based on the revenue generated from the service call.
Commission % is for informational purposes only.
7. Type the amount of revenue the technicians on a service call receive credit for in Revenue
Credited.
8. Click Save on the toolbar, then OK.

Invoicing 279
Sending Invoices Electronically Invoices created in Service Dispatch can be sent to customers and other contacts electronically using
Service Call Invoice (SD.640.00) or Service Call Invoice (SSRS) (SD.643.00). Invoices can be resent
using Reprint Service Call Invoice (SD.650.00). To transmit invoices electronically, you must first set
up Quick Send for the Service Call Invoice document type in Shared Information’s Quick Send Setup
(21.951.00). You must also assign Quick Send preferences to the customer and any additional
contacts on the Quick Send tab in Accounts Receivable’s Customer Maintenance (08.260.00).
Note: Shared Information’s Quick Send Inquiry (21.200.00) also provides you with the ability to resend
documents. For more information about resending documents using Quick Send Inquiry (21.200.00),
see “Resending Documents Delivered Electronically” in the Shared Information help or user guide.
To send invoices electronically:
1. Open Service Call Invoice (SD.640.00) or Service Call Invoice (SSRS) (SD.643.00).
Figure 115: Service Call Invoice (SD.640.00)

280 Service Dispatch
2. Click Print. Service Invoice Selection (SD.641.00) displays.
Figure 116: Service Invoice Selection (SD.641.00) — Service Call Invoice document type is defined in Quick
Send Setup (21.951.00)
3. Indicate the appropriate settings to select invoices.
4. Click Continue. Service Invoice Printing – Keep/Delete (SD.642.00) displays.
5. Verify Handling is set to Keep All Invoices.
6. Click Begin Processing. The invoice is printed, or it is transmitted electronically by means of Quick
Send.
Note: If the invoice has not been transmitted electronically, Quick Send requests are created
according to the Quick Send preferences defined for the Service Call Invoice document type on
the Quick Send tab of Account Receivable Customer Maintenance (08.260.00). Quick Send
requests are also created for each additional receiver defined on Accounts Receivable Additional
Receivers (08.260.08). If the invoice was transmitted electronically, the Quick Send preferences
indicated in the invoice’s Quick Send requests are used to resend the invoice to the initial
recipients. For more information about Quick Send requests, see “Quick Send Inquiry
(21.200.00)” in the Shared Information online help or user guide.

Invoicing 281
To resend invoices electronically:
2. Open Reprint Service Call Invoice (SD.650.00).
Figure 117: Reprint Service Call Invoice (SD.650.00)
2. Click Print. The invoice is printed, or it is transmitted electronically by means of Quick Send.
Note: If the invoice has not been transmitted electronically, Quick Send requests are created
according to the Quick Send preferences defined for the Service Call Invoice document type on
the Quick Send tab of Account Receivable Customer Maintenance (08.260.00). Quick Send
requests are also created for each additional receiver defined on Accounts Receivable Additional
Receivers (08.260.08). If the invoice was transmitted electronically, the Quick Send preferences
indicated in the invoice’s Quick Send requests are used to resend the invoice to the initial
recipients. For more information about Quick Send requests, see “Quick Send Inquiry
(21.200.00)” in the Shared Information online help or user guide.
To send invoices to one-time receivers:
Note: Invoices cannot be sent to one-time receivers using Reprint Service Call Invoice (SD.650.00).
For more information about sending invoices to a one-time receiver after the invoice has been kept,
see “To send a Quick Send request to a one-time receiver” in the Shared Information online help or
user guide.
1. Determine which service call associated with the invoice to send to the one-time recipient.
2. Open Service Call Invoice (SD.640.00).

282 Service Dispatch
3. Click Print. Service Invoice Selection (SD.641.00) displays.
Figure 118: Service Invoice Selection (SD.641.00) — Service Call Invoice document type is defined in Quick
Send Setup (21.951.00)
4. Clear the All Service Calls check box.
5. Enter the identification number of the service call determined in step 1 in Service Call ID.
6. Click Quick Send to One-time Receiver. One-time Receiver (SD.641.03) displays.
Figure 119: One-time Receiver (SD.641.03)
7. Select the appropriate manner to send the invoice to the one-time recipient in Delivery Method.
Invoicing 283
8. Enter the one-time receiver’s email address in Receiver Email Address when Delivery Method is
Email.
- OR -
9. Enter the one-time receiver’s fax number in Receiver Fax Number when Delivery Method is Fax.
10. Select the appropriate settings for the one-time recipient based on the delivery method.
11. Click Send Request to send the invoice to the one-time recipient.
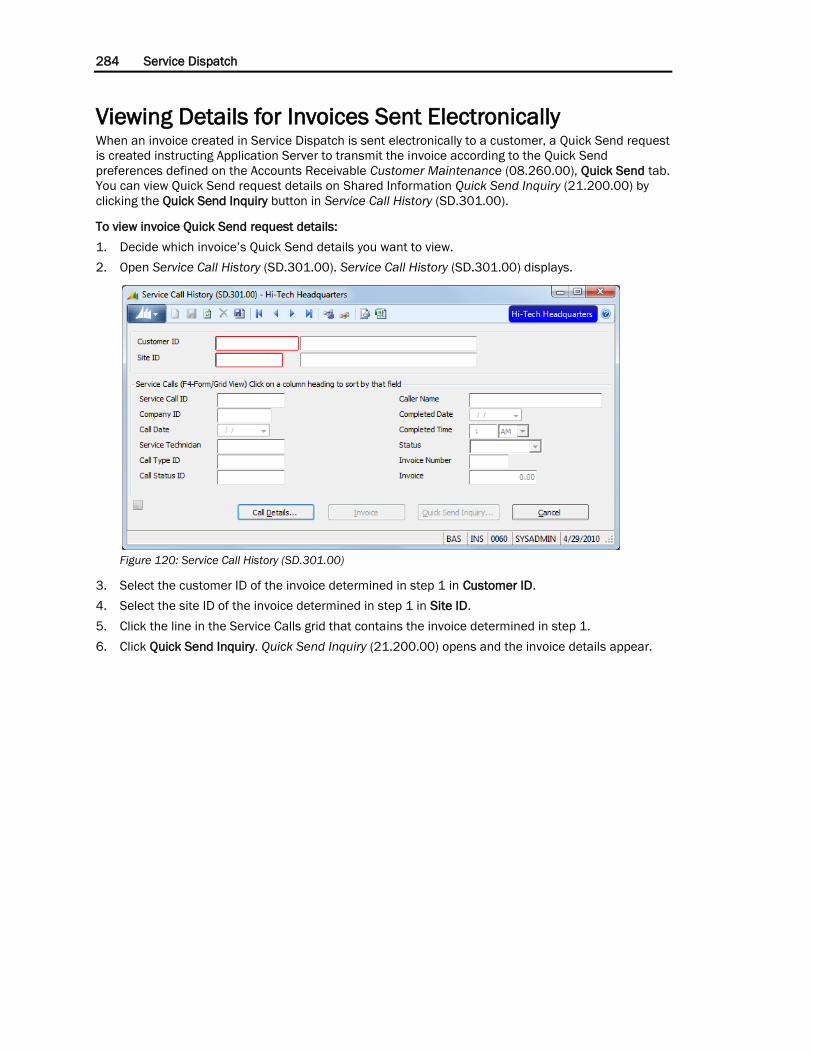
284 Service Dispatch
Viewing Details for Invoices Sent Electronically When an invoice created in Service Dispatch is sent electronically to a customer, a Quick Send request
is created instructing Application Server to transmit the invoice according to the Quick Send
preferences defined on the Accounts Receivable Customer Maintenance (08.260.00), Quick Send tab.
You can view Quick Send request details on Shared Information Quick Send Inquiry (21.200.00) by
clicking the Quick Send Inquiry button in Service Call History (SD.301.00).
To view invoice Quick Send request details:
1. Decide which invoice’s Quick Send details you want to view.
2. Open Service Call History (SD.301.00). Service Call History (SD.301.00) displays.
Figure 120: Service Call History (SD.301.00)
3. Select the customer ID of the invoice determined in step 1 in Customer ID.
4. Select the site ID of the invoice determined in step 1 in Site ID.
5. Click the line in the Service Calls grid that contains the invoice determined in step 1.
6. Click Quick Send Inquiry. Quick Send Inquiry (21.200.00) opens and the invoice details appear.

Invoicing 285
Selecting Service Calls to be Invoiced In Service Call Invoice (SD.640.00) or Service Call Invoice (SSRS) (SD.643.00) you select service calls
for invoicing that have an Approved Handling in Invoice Entry (SD.202.00).
There is a four-step process when invoicing a service call:
1. Service Call Invoice Approval (SD.204.00)
2. Service Call Invoice (SD.640.00) or Service Call Invoice (SSRS) (SD.643.00)
3. Service Invoice Selection (SD.641.00)
4. Service Invoice Printing - Keep/Delete (SD.642.00)
Approving Service Call Invoices
To select a service call to approve:
1. Choose Module | Service Dispatch | Service Call Invoice Approval from the menu. Service Call
Invoice Approval (SD.204.00) appears.
2. Select the check box next to any selection criteria you wish to have applied and then specify the
filter value. For example:
Select the box next to Invoice Handling if you want to review service calls with only a specific
invoice handling value.
Select Review from the drop-down list to view only service calls with an invoice handling value
of Review.
3. Click Refresh after you have specified all selection criteria.
4. Review the data in the grid.
5. Click Close on the toolbar.
6. Choose Module | Service Dispatch | Service Call Invoice Approval from the menu. Service Call
Invoice Approval (SD.204.00) appears.
7. Select the check box next to any selection criteria you wish to have applied and then specify the
filter value. For example:
Select the box next to Invoice Handling if you want to review service calls with only a specific
invoice handling value.
Select Review from the drop-down list to view only service calls with an invoice handling value
of Review.
8. Click Refresh after you have specified all selection criteria.
9. Review the data in the grid.
10. Change the value in Invoice Date of the service call you want to modify.
11. Click in Invoice Handling of the service call you want to modify.

286 Service Dispatch
12. Select a new status for the invoice in Invoice Handling.
Note: There are restrictions on setting Invoice Handling to Approved. When B is clicked, the
following criteria must be true before the Update process can change the value in Invoice
Handling to Approved.
The invoice must have at least one detail line.
The Handling value on Service Call Entry (SD.200.00) for the service call is not set to Quote.
The revenue account and subaccount combination is valid for each detail line in the invoice.
The Cost of Goods Sold account and subaccount combination is valid for each detail line in
the invoice.
The Tax IDs for the invoice are valid and the tax total for the invoice is the sum of the detail
tax by Tax ID.
Invoice Date is not blank.
13. Insure Selected is checked for all service calls you have modified.
14. Click Update to update the originating service calls with your changes.
15. Click Close on the toolbar.
Selecting a Service Call to Invoice
To select a service call to invoice:
1. Open Service Call Invoice (SD.640.00) by choosing Module | Service Dispatch | Service Call
Invoice from the menu.
Service Call Invoice (SD.640.00) displays.
Figure 121: Service Call Invoice (SD.640.00), Report tab
Note: You can use Quick Send to transmit invoices if you select Service Call Invoice (SSRS)
(SD.643.00) instead of Service Call Invoice (SD.640.00), and then follow the steps below.
2. To exclude invoices with total invoice amounts of zero, click the Options tab and select the
Suppress zero invoices printing check box.

Invoicing 287
3. Click Print or Print Preview. Service Invoice Selection (SD.641.00) displays.
Note: For any open service call to be invoiced, Handling in Invoice Entry (SD.202.00) must be set
to Approved.
Figure 122: Service Invoice Selection (SD.641.00) — Service Call Invoice document type is defined in Quick
Send Setup (21.951.00)
4. Type a Period to Post.
Period to Post determines which invoices are processed from Invoice Entry (SD.202.00).
Only invoices that have a Period to Post in Invoice Entry (SD.202.00) that matches the Period
to Post in Service Invoice Selection (SD.641.00) are selected for invoicing.
Note: The current period from the Accounts Receivable module is the default Period to Post in
Service Invoice Selection (SD.641.00). Period to Post in Service Invoice Selection (SD.641.00)
can be overridden.
5. Choose an Invoice Type. The Invoice Type determines which invoices to print from Invoice Entry
(SD.202.00).
Manual
Invoice
Progress
Manual/Invoice
Progress/Invoice
Progress/Manual
All
6. Choose a Detail Type. The Detail Type determines which invoices to print or send electronically
from Invoice Entry (SD.202.00).
Time and Material
Flat Rate
All

288 Service Dispatch
7. To generate invoices for all branches in the organization, select the All Branches check box to the
left of Branch ID.
8. To restrict generating invoices to a specific branch, clear the All Branches check box and type the
appropriate branch in Branch ID.
If the branch ID is unknown, press F3 or double-click the right mouse button. A list of all
branches set up in Branch Maintenance (SD.001.00) displays.
— To select a branch ID, highlight the ID and click OK, or double-click the ID.
— Clicking Edit on the Branch Maintenance PV List accesses Branch Maintenance
(SD.001.00), enabling you to modify information for an existing branch.
— Clicking Insert on the Branch Maintenance PV List accesses Branch Maintenance
(SD.001.00), enabling you to add new branches to the system.
9. To generate invoices for all call types in the system, select the All Call Types check box to the left
of Call Type ID.
10. To restrict generating invoices to a call type, clear the All Call Type check box and type the
appropriate call type in Call Type ID.
If the call type ID is unknown, press F3 or double-click the right mouse button. A list of all call
types set up in Call Type Maintenance (SD.003.00) displays.
— To select a call type, highlight the ID and click OK, or double-click the ID.
— Clicking Edit on the Call Type Maintenance PV List accesses Call Type Maintenance
(SD.003.00), enabling you to modify information for an existing call type.
— Clicking Insert on the Call Type Maintenance PV List accesses Call Type Maintenance
(SD.003.00), enabling you to add new call types to the system.
11. To generate invoices for all invoices with an Approved Handling, select the All Service Calls check
box to the left of Service Call ID.
12. To restrict generating invoices to a service call, clear the All Service Calls check box and type the
appropriate service call in Service Call ID.
If the service call ID is unknown, press F3 or double-click the right mouse button. A list of all
service calls set up in Service Call Entry (SD.200.00) displays.
— To select a service call ID, highlight the ID and click OK, or double-click the ID.
— Clicking Edit on the Service Call Maintenance PV List accesses Service Call Entry
(SD.200.00), enabling you to modify information for an existing service call.
— Clicking Insert on the Service Call Maintenance PV List accesses Service Call Entry
(SD.200.00), enabling you to add a new service call to the system.
13. To generate invoices for all customers that have invoices with an Approved Handling, select the All
Customers check box to the left of Customer ID.
14. To restrict generating invoices to a customer, clear the All Customers check box and type the
appropriate customer in Customer ID.
If the customer ID must be changed or the ID is unknown, press F3 or double-click the right
mouse button. A list of all active customers set up in Customer Maintenance (08.260.00)
displays.
— To select a customer ID, highlight the ID and click OK, or double-click the ID.
— Clicking Edit on the Customer List accesses Customer Maintenance (08.260.00),
enabling you to modify information for an existing customer.
— Clicking Insert on the Customer List accesses Customer Maintenance (08.260.00),
enabling you to add new customers to the system.
15. To generate invoices for all customer sites, select the All Service Sites check box to the left of
Site ID.
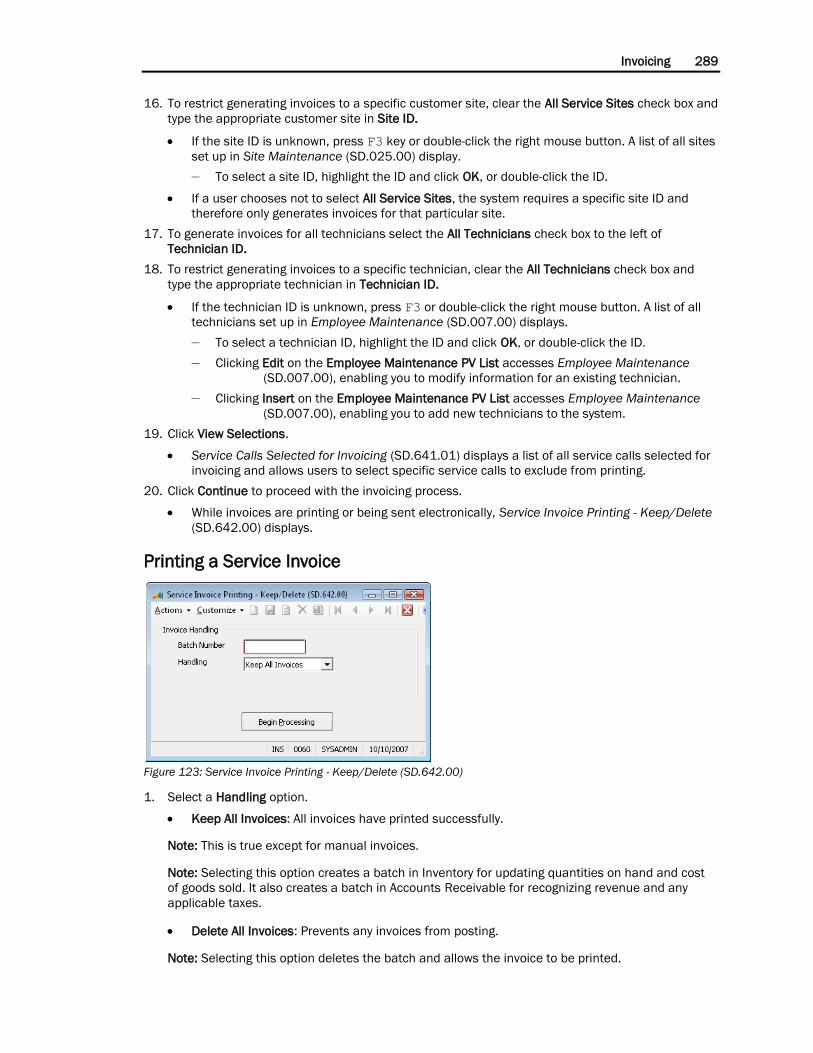
Invoicing 289
16. To restrict generating invoices to a specific customer site, clear the All Service Sites check box and
type the appropriate customer site in Site ID.
If the site ID is unknown, press F3 key or double-click the right mouse button. A list of all sites
set up in Site Maintenance (SD.025.00) display.
— To select a site ID, highlight the ID and click OK, or double-click the ID.
If a user chooses not to select All Service Sites, the system requires a specific site ID and
therefore only generates invoices for that particular site.
17. To generate invoices for all technicians select the All Technicians check box to the left of
Technician ID.
18. To restrict generating invoices to a specific technician, clear the All Technicians check box and
type the appropriate technician in Technician ID.
If the technician ID is unknown, press F3 or double-click the right mouse button. A list of all
technicians set up in Employee Maintenance (SD.007.00) displays.
— To select a technician ID, highlight the ID and click OK, or double-click the ID.
— Clicking Edit on the Employee Maintenance PV List accesses Employee Maintenance
(SD.007.00), enabling you to modify information for an existing technician.
— Clicking Insert on the Employee Maintenance PV List accesses Employee Maintenance
(SD.007.00), enabling you to add new technicians to the system.
19. Click View Selections.
Service Calls Selected for Invoicing (SD.641.01) displays a list of all service calls selected for
invoicing and allows users to select specific service calls to exclude from printing.
20. Click Continue to proceed with the invoicing process.
While invoices are printing or being sent electronically, Service Invoice Printing - Keep/Delete
(SD.642.00) displays.
Printing a Service Invoice
Figure 123: Service Invoice Printing - Keep/Delete (SD.642.00)
1. Select a Handling option.
Keep All Invoices: All invoices have printed successfully.
Note: This is true except for manual invoices.
Note: Selecting this option creates a batch in Inventory for updating quantities on hand and cost
of goods sold. It also creates a batch in Accounts Receivable for recognizing revenue and any
applicable taxes.
Delete All Invoices: Prevents any invoices from posting.
Note: Selecting this option deletes the batch and allows the invoice to be printed.

290 Service Dispatch
2. Click Begin Processing.
Clicking Begin Processing creates the Inventory and Accounts Receivable batches unless
Handling was set to Delete All Invoices.
Note: You can reprint an invoice. For more information, see “Reprint Service Call Invoice (SD.650.00)”
on page 510.

Data Entry Screens 291
Data Entry Screens
Data Entry Screens Overview Service calls are the heart in the Service Dispatch module. The life cycle of a service call is a
straightforward three-step process. Entering a service call in Service Call Entry (SD.200.00) is the first
step of the service call process. Service Call Entry (SD.200.00) has been designed to allow customer
service representatives to enter a service call into the system in the most simple and time saving
manner. To begin the Service Call Entry process, a customer and site must first be selected. The
fastest and most efficient way of processing a service call is to use the powerful search engine. The
system allows users to search for customer site information based on site ID, site name, site attention,
site description, site address, site phone, site city, site zip and various equipment information such as
equipment ID and serial number.
Once the customer and site have been selected, values attached to the customer site default to the
service call. Customer service representatives can override the default values and enter the other
needed data such as scheduling information, call status, priority, start date, time promised, and
primary technician. Several problem codes or reasons for the service call, along with notes or source
documents specific to the issues can be attached to the service call. When all of the needed
information is entered and the service call is saved, the system automatically assigns a Service Call ID
if this feature is enabled in the Service Series Setup Maintenance (SD.000.00).
Based on options chosen in Service Series Setup Maintenance (SD.000.00), alert messages will be
displayed to assist customer service representatives in the service call entry process. The PO Required
message alerts users that a purchase order is mandatory and that a service call cannot be saved
unless a purchase order number is entered. The Tenant Not Authorized to Call message notifies users
that tenants are not allowed to place service calls. Only the property manager can place a call. The
Open Service Calls message appears when a specific site has existing open service calls when placing
the call and allows users to stack calls. The Active Service Contract message notifies users that a site
has an existing service contract where the service call may be covered. An alert notifies you if a
technician lacks the skills and licenses required to handle the particular service call.

292 Service Dispatch
Invoice - Technician Information (SD.028.00) Invoice - Technician Information (SD.028.00) associates multiple technicians with a service call. This
screen displays the vehicle ID, ending mileage on the assigned vehicle to track travel mileage, the
commission percent to be paid to each individual technician, and the revenue generated by each
technician assigned to a service call.
Note: Access Invoice - Technician Information (SD.028.00) through Invoice Entry (SD.202.00) by
clicking Technician Info.
Figure 124: Invoice - Technician Information (SD.028.00)
Following are the field descriptions for Invoice - Technician Information (SD.028.00).
Service Call ID
Service Call ID displays the service call associated with this technician’s information. It is populated
with the service call ID entered in Invoice Entry (SD.202.00).
Customer ID
Customer ID displays the customer identifier and name associated with a service call selected in
Invoice Entry (SD.202.00).
Assigned Technician
Assigned Technician defaults to the primary service technician assigned to the service call. If no other
service technician is entered, the primary technician receives the entire commission amount or
percent.
Technician ID
Technician ID associates an unlimited number of technicians to a service call for the purposes of
splitting commissions over two or more technicians.
Tech Name
Tech Name displays the name of a technician for this customer. Additional technicians assigned to
this service call may be displayed.

Data Entry Screens 293
Vehicle ID
Vehicle ID contains the number of the vehicle assigned to the selected technician.
Note: Technician ID, Tech Name, and Vehicle ID are all related fields. When you view information
about a particular technician, all three fields are populated with information.
Ending Mileage
Ending Mileage contains the ending odometer mileage. Ending Mileage allows you to track and report
the average revenue generated per mile, the efficiency of the dispatching department, etc.
Commission %
Commission % handles split commissions on a service call. By typing the commission percent for the
technicians on a service call, each technician is given a commission based on the revenue generated
from the call. You can split commissions between an unlimited number of technicians by entering
each technician’s commission.
Revenue Credit
Revenue Credit credits any portion of the revenue generated from a service call to a technician. This
amount is added to the technician’s accumulated sales totals.
Note: More than one technician can receive revenue credit for a service call.
Commission Total
Commission Total displays the total commission percentage associated with all technicians for this
particular invoice. The amount displayed in Commission Total cannot exceed 100%.
OK (button)
OK saves the information typed into Invoice - Technician Information (SD.028.00).

294 Service Dispatch
Service Call Entry (SD.200.00) Service Call Entry (SD.200.00) allows you to complete the first step of the service call process. After a
service call is entered in the system, the call appears on the dispatch board. The dispatching
department views all the calls and assigns the proper technician to the call, which is the second step
of the service call process.
After the call has been dispatched and the technician has performed the necessary work, the call is
completed or invoiced, which is step three of the process. This step allows you to create invoices in the
Accounts Receivable module, multiple purchase orders in the Purchasing module, a payroll batch
through the Payroll module, and various other accounting transactions. After completion and invoicing,
all service calls are archived in the history tables.
Service Call Entry (SD.200.00) contains proactive messages that give you additional information about
the service call. For example, the “PO required” message displays when a purchase order is
mandatory and that the service call cannot be saved unless a purchase order number is entered. The
“Tenant Not Authorized to Call” message indicates that tenants are not allowed to place a service call;
therefore, the property manager must place the call. The “Open Service Calls” message appears when
a specific site has open service calls and enables you to stack calls. The “Active Service Contract”
message indicates that this site has a contract and describes how to attach the service contract to the
call.
Credit related messages also assist in the service call entry process. Many credit checking features
such as verifying a customer’s past-due open invoices, verifying that the customer’s credit limit has
not been exceeded, etc., alert you regarding the customer’s credit status.

Data Entry Screens 295
A quote can be produced in this screen. This indicates that the service call is a quote and has not
been released to the dispatch queues.
Figure 125: Service Call Entry (SD.200.00)
Following are the field descriptions for Service Call Entry (SD.200.00).
Service Call ID
If the Auto Number Service Call check box is selected in Service Series Setup Maintenance
(SD.000.00), the system assigns an identifier automatically when the service call is saved. In addition,
if the Auto-Number Branch Prefix is enabled in Service Series Setup Maintenance (SD.000.00), the
three-character abbreviation is added to the front of the service call ID.
Notes/Attachments (Icon)
Notes/Attachments allows the entry of or attaching a source document regarding the service call ID.
Click the Notes/Attachments icon to choose to enter either a note or attach source documents.
For more information, see to “Attaching Notes and Source Documents to Data Items” in the Quick
Reference user’s guide or help.

296 Service Dispatch
Call Lookup (icon button)
Click Call Lookup to open Service Call Lookup (SD.303.00), which gives you the ability to search
for a particular service call. For more information, see “Service Call Lookup (SD.303.00)” on page
367.
Duplicate Call (icon button)
Click Duplicate Call to open Duplicate Service Call (SD.200.05), and create a new service call by
copying an existing one. For more information, see “Creating a New Service Call Using Duplicate Call”
on page 134.
Handling
Handling controls the system status of the service call. For example, if this is not a service call, set
Handling to Quote. With this status, the call is not released to the dispatch board.
Note: Release Now is the only option that releases the record to the service call queue when the
service call record is saved.
Company ID
Company ID contains the unique code assigned to the company. To select a company, place the
cursor in Company ID, and then press F3 or double right-click. Company List appears. Select from the
list of companies.
In a multi-company environment, Company ID contains the ID code of the currently active company.
You can update Company ID only in a new, unsaved service call. After you save the service call, you
can view Company ID, but not change it.
Completed Calls
Completed Calls controls the filter on the Service Call Maintenance PV List in Service Call ID to include
only completed calls. If this check box is not selected, you view only those calls that are not complete
Service Call - Problems Area
Following are the field descriptions for the Service Call - Problems area of Service Call Entry
(SD.200.00).
Note: The tabs are described after this section.
Problem ID
Problem ID displays a code that describes the reason why the service call was issued.
Problem Name
Problem Name contains the explanation of the problem identifier entered for this call.
Technician ID
Technician ID contains the name of the technician assigned to this problem.
Contract ID
Contract ID contains the identifier of the service contract that applies to this problem.
Status
Status indicates where the problem stands in the service process; called Task Status in grid view.

Data Entry Screens 297
Start Date
Start Date is the month, day, and year when work on this problem will begin.
Start Time
Start Time is the specific time or day when work on this problem will begin. Enter the time in a 24-hour
(military) time format. For example, enter 1:00 PM as 13:00.
Travel Time
Travel Time is the amount of time it will take the technician assigned to the problem to go to the site
and return. Travel Time may already be populated with a default value. The default is set in Graphical
Dispatch Setup Maintenance (SD.902.00).
Duration
Duration contains the estimated amount of time required for the technician to travel to the problem,
resolve it, and return. You can set a default value for Duration and attach it to a problem code in
Problem Code Maintenance (SD.008.00). You can also override the value in this screen.
Equip ID
Equip ID contains the unique identifier of the equipment to be serviced on this service call.
PM Code
PM Code contains the preventive maintenance code for this equipment.
Warr Info Start Date
Warr Info Start Date contains the first day of the warranty.
Warr Info EndDate
Warr Info EndDate displays the last day of the warranty.
Serial Nbr
Serial Nbr displays the serial number of the equipment, if applicable.
Notes
Notes contains miscellaneous information about the call. Longer notes can be recorded using the
Notes/Attachments icon.
Cause ID
Cause ID displays the root cause of the problem.
Resolution ID
Resolution ID contains the resolution of the problem.
Equipment (button)
Equipment accesses Customer Equipment (SD.200.03), which displays equipment associated with the
site regardless of whether the customer is under a service contract. You can also view Equipment
Entry (SE.001.00) by selecting a piece of equipment and clicking Details.
PM Tasks (button)
PM Tasks accesses Service Contract-Equipment PM Tasks (SE.017.00) and displays the line item
detail of the PM code on this service call.

298 Service Dispatch
Open Calls (button)
Open Calls accesses Open Service Call (SD.200.02) and displays open calls for this customer or site
related to the specified company. Open Calls is enabled only if a site has an open service call record
for the specified company.
Service History (button)
Service History accesses Service Call History (SD.301.00) and displays a list of completed service calls
associated with the selected site and details of the service call and invoice information.
Invoice (button)
Invoice accesses Invoice Entry (SD.202.00) for invoicing. Invoice is disabled if the company ID
associated with the service call differs from the ID of the company you are currently accessing.
Print (button)
Print generates a service call work order which includes information related to the customer name and
address, service call status, nature of work (problem code), and preventive maintenance information
(if the call is a planned maintenance generated from a service contract).

Data Entry Screens 299
Service Call Entry, Service Call Info Tab
Figure 126: Service Call Entry (SD.200.00), Service Call Info tab
Following are the field descriptions for the Service Call Info tab of Service Call Entry (SD.200.00).
Cust ID
If a customer/site is not selected using Search, type the Customer identifier or select one from the
Customer List. When the identifier is entered, the customer name displays to the right of the field.
Click the ellipsis (...) to the left of Cust ID to access Customer Maintenance (08.260.00) PV list in the
Accounts Receivable module.
Customer Lookup (icon button)
To search for a customer, click Customer Lookup , which opens Customer Lookup (SD.305.00). For
more information, see “Customer Lookup (SD.305.00)” on page 371.
Filter Equip ID (check box)
If the Filter Equip ID check box next to Cust ID is selected, possible values for Equip ID in the Service
Call - Problems grid will include only information for the specific customer. This check box can be
selected along with the Filter Equip ID check box next to Site ID.

300 Service Dispatch
Site ID
Site ID selects the physical location of the work to be done for this service call. When the ID is entered,
the site name displays to the right of Site ID. Click the ellipsis (...) to the left of Site ID to access Site
Maintenance (SD.025.00).
Filter Equip ID (check box)
If the Filter Equip ID check box next to Site ID is selected, possible values for Equip ID in the Service
Call - Problems grid will include only information for the specific site. This check box can be selected
along with the Filter Equip ID check box next to Cust ID.
Attention, Address 1, Address 2, City, State, Zip, and Telephone Nbr
These fields display the customer’s address and telephone information in the database.
Branch ID
Branch ID contains the branch identifier assigned to the site for the service call. After a site has been
selected, the site branch identifier and service call defaults appear. You can override this data, if
desired.
Geographic ID
Geographic ID contains the geographic identifier assigned to the service call. After a site has been
selected, the site geographic identifier and service call defaults appear. You can override this data, if
desired.
Project ID
Project ID associates or links a service call and associated costs of performing the work to a project.
To select a project, press F3 to access the Active Projects in Login Company List.
Contract ID
Contract ID associates a service contract created in Service Contract Entry (SN.001.00) in the Service
Contracts module with a service call. The contract ID on a service call populates the screen with the
associated values and utilizes any special pricing associated with the contract ID during invoice entry.
Click the ellipsis (...) to the left of Contract ID to view active service contracts in the Active Customer
Contracts PV List. If you select a site record and the site has an active service contract, a soft warning
is displayed.
Call Type
Call Type defines the line of business, division, or profit center associated with a service call. A default
value populates from Site Maintenance (SD.025.00), which can be overridden. Call Type also
determines the subaccount used during the invoice entry process. It defaults to the subaccount on the
call type unless you selected the Use Sub from Site check box in Call Type Maintenance (SD.003.00).
Call Status
Call Status defines the status of a service call. A default value populates from Site Maintenance
(SD.025.00), which can be overridden. Click the ellipsis (...) to the left of Call Status to view the
Service Call Status Log (SD.027.00).
Promised Date
Promised Date contains the date the service call was requested. The promised date defaults to the
system date unless the call is outside normal working hours. This date may be overridden. If the
Primary Use Option in Service Series Setup Maintenance (SD.000.00) is set to Work Orders, then the
date does not default.

Data Entry Screens 301
Time From and Time To
Time From and Time To contain the time range in which a service call is to be performed. Time From is
calculated using the system clock plus the service call lead-time in Service Series Setup Maintenance
(SD.000.00). Time To is Time From plus the service call range time from Service Series Setup
Maintenance (SD.000.00). The default values may be overridden.
Primary Tech
Primary Tech identifies the primary technician on a service call although multiple technicians may be
assigned.
Priority
Priority assigns a priority to a service call. A default value populates from Site Maintenance
(SD.025.00). If a service contract ID exists for the service call, the priority defaults from the contract
type associated with the selected contract ID.

302 Service Dispatch
Service Call Entry, New Customer Tab
The New Customer tab allows you to add new customer and site information rapidly without opening
the Accounts Receivable module. Service Series Setup Maintenance (SD.000.00) includes the option
to auto-number customer identifiers. If enabled, the system assigns the value in Customer ID. If Auto
Number Customer ID is disabled, the system requires a customer ID prior to clicking Create. The
system checks for duplicate customer IDs whenever a new customer is created. Refer to Site
Maintenance (SD.025.00) in this manual and Customer Maintenance (08.260.00) in the Accounts
Receivable module for more information.
Figure 127: Service Call Entry (SD.200.00), New Customer tab
Following are the field descriptions for the New Customer tab of Service Call Entry (SD.200.00).
Cust ID
If a customer/site is not selected using Search, type the Customer identifier or select one from the
Customer List. When the ID is entered, the customer name displays to the right of the field. Click the
ellipsis (...) to the left of Cust ID to access Customer Maintenance (08.260.00) PV list in the Accounts
Receivable module.

Data Entry Screens 303
Site ID
Site ID selects the physical location of the work to be done for this service call. When the ID is entered,
the site name displays to the right of Site ID. Click the ellipsis (...) to the left of Site ID to access Site
Maintenance (SD.025.00).
Description
Description contains an explanation of the site.
Name
Name contains the contact person at this site.
Salutation
Salutation contains the first line of a letter used when corresponding with this customer.
Attention, Address 1, Address 2, City, Zip/Country/Region, Phone/Ext, and Fax/Ext
These display-only fields contain the customer’s address and telephone information from the Accounts
Receivable module.
Class ID
Class ID is a unique identifying code that distinguishes this product class from all other product
classes in the database. New product classes must be defined in the Inventory module.
Salesperson
Salesperson displays the salesperson associated with the completed service call. The salesperson
defaults from Site Maintenance (SD.025.00).
Terms ID
Terms ID displays the term for the service call. Terms ID defaults from the customer identifier
associated with the selected site.
Tax ID
Tax ID displays the tax identifier associated with the service call. Tax ID defaults from Site ID.
Card Nbr
Card Nbr displays the credit card number used to pay for the service call.
Card Holder Name
Card Holder Name displays the name of the person on the credit card.
Type
Type indicates the type of card used; for example, Visa, Master Card, etc.
Expiration Date
Expiration Date contains the expiration date of the credit card.
Phone/Ext
Phone/Ext contains the phone number and extension for the customer.
Fax/Ext
Fax/Ext displays the fax number and extension for the customer.

304 Service Dispatch
Print Statements (check box)
Select this check box to print a statement for the customer each time you print statements for the
customer's statement cycle. Clear the check box if the customer's statement should not be printed.
Statement Cycle
Statement Cycle displays the identification code of the customer’s statement cycle. The statement
cycle defaults to the code set up in the Customer Defaults tab of AR Setup (08.950.00).
Branch ID
Branch ID displays the branch identifier associated with the service call.
Call Type
Call Type ID contains the service call type identifier associated with a service call. Call Type ID defaults
from Service Call Entry (SD.200.00).
Call Status
Call Status associates the service call status identifier with a service call. Call Status defaults the
status identifier from Dispatch (SD.201.00).
Dwelling
Dwelling contains the unique dwelling identifier for each dwelling type in the system. The dwelling ID is
a default value from Site Maintenance (SD.025.00) which is associated with a service call record.
Geo Zone ID
Geo Zone ID contains the area of the country or region where the service call is located.
Priority
Priority contains the level of importance assigned to a service call. A default value populates from Site
Maintenance (SD.025.00). If a service contract ID exists for the service call, the priority defaults from
the contract type associated with the selected contract ID.
Technician
Technician contains the technician assigned to the service call.
Proj Manager
Proj Manager contains the name of the Project Manager or Service Manager assigned to the site.
Create (button)
Create saves the record.

Data Entry Screens 305
Service Call Entry, Other Info Tab
The Other Info tab allows you to enter or view miscellaneous information related to the service call,
including aging information on the customer.
Figure 128: Service Call Entry (SD.200.00), Other Info tab
Following are the field descriptions of the Other Info tab for Service Call Entry (SD.200.00).
Caller Name
Caller Name contains the contact name for the person calling in the service request. If a name was
entered in Attention in Site Maintenance (SD.025.00), the value is shown in Caller Name.
Customer PO
Customer PO displays the customer’s purchase order number for a service request. Some customers
require a purchase order number be typed in and printed on the billing invoice. If a blanket purchase
order number was typed in Site Maintenance (SD.025.00), it appears in Customer PO.
Sec Entry Code
Sec Entry Code contains the security access code that may be needed by the service technician(s) to
obtain access into a security building. Sec Entry Code defaults from Site Maintenance (SD.025.00).

306 Service Dispatch
Media ID
Media ID contains the media identifier for a service call. Media ID defaults from the site and may be
overridden.
Terms ID
Terms ID contains the term identifier for the service call. Terms ID defaults from the customer ID
associated with the selected site.
Pymt Method
Pymt Method selects a payment method for a service call. The default payment method populates
based on the selected value in Site Maintenance (SD.025.00).
Invoice Status
Invoice Status indicates whether the invoice is open or closed. Invoice Status is managed by the
system.
Invoice Handling
Invoice Handling indicates the invoice handling, which assists you during the approval process prior to
invoicing the service call. Usually, Invoice Handling is only changed during Invoice Entry (SD.202.00).
Source Svc Call ID
Source Svc Call ID shows the identification code assigned to the service call used to create the current
service call.
Bill to Customer
Bill To Customer contains the customer ID that will be invoiced for any billable items on the service
call. This field defaults to the customer ID on the Service Call Info tab, but can be overridden so that
the service call history can be maintained on a different customer than the one billed for the work.
Credit Card Nbr
Credit Card Nbr contains the credit card number used to pay for service calls.
Card Type
Card Type indicates the type of card used; such as, Visa, Master Card, etc.
Expiration Date
Expiration Date contains the expiration date of the credit card.
Current Balance
Current Balance contains the outstanding balance due as of the system date.
1 To 30
1 To 30 displays the outstanding balance from 1 to 30 days past due.
31 To 60
31 To 60 displays the outstanding balance from 31 to 60 days past due.
61 To 90
61 To 90 displays the outstanding balance from 61 to 90 days past due.

Data Entry Screens 307
Over 90
Over 90 displays the outstanding balance over 90 days past due.
Available Credit
Available Credit displays the remaining credit available to this customer.

308 Service Dispatch
Service Call Entry, Tech Available Tab
The Tech Available tab allows you to view technician workload on the promise date of the service call.
Options Tab
The Options tab allows you to enter parameters to filter the information displayed on the View tab.
Figure 129: Service Call Entry (SD.200.00), Tech Available Options tab
Following are the field descriptions of the Options tab on the Tech Available tab for Service Call Entry
(SD.200.00).
Emp Class All (check box)
The Emp Class All check box allows you to indicate whether the information on the View tab displays
information for all employees regardless of the employee class they are assigned to. Select the box to
indicate all employee classes should be displayed.
Emp Class
Emp Class allows you to filter the information on the View tab so that only employees assigned to the
employee class entered are displayed. The Emp Class All check box must be cleared in order to filter
on just one employee class.

Data Entry Screens 309
Branch ID All (check box)
The Branch ID All check box allows you to indicate whether the information on the View tab displays
information for all employees and service calls regardless of the branch ID they are assigned to. Select
the box to indicate all branch IDs should be displayed.
Branch ID
Branch ID allows you to filter the information on the View tab so that only employees and service calls
assigned to the branch ID entered are displayed. The Branch ID All check box must be cleared to filter
on just one branch ID.
Geographic All (check box)
The Geographic All check box allows you to indicate whether the information on the View tab displays
information for all employees and service calls regardless of the geographic zone they are assigned to.
Select the box to indicate all geographic zones should be displayed.
Geographic
Geographic allows you to filter the information on the View tab so that only employees and service
calls assigned to the geographic zone entered are displayed. The Geographic All check box must be
cleared to filter on just one geographic zone.

310 Service Dispatch
View Tab
The View tab allows you to view technician workload on the promise date of the service call.
Figure 130: Service Call Entry (SD.200.00), Tech Available View tab
Following are the field descriptions of the View tab on the Tech Available tab for Service Call Entry
(SD.200.00).
Technician
Technician contains the employee ID from Employee Maintenance (SD.007.00) for all technicians
assigned to the geographic zones included in Queue ID entered on the Options tab. Technicians are
assigned to geographic zones using either Geographic Zone - Employees (SD.038.00) or Employees -
Geographic Zones (SD.039.00).
Calls
Calls contains the total number of problem codes to which the technician has been assigned for the
day being viewed. A technician may be assigned to multiple problem codes on a single service call.
Duration
Duration contains the total amount of time for all problem codes assigned to the technician on the day
being viewed, including travel time.

Data Entry Screens 311
Zone
Zone contains the geographic zone where a technician is currently located. Zone is populated if the
technician has a call with a status of In-Route or WIP. A technician can only have one call In-Route or
WIP at a time. The geographic zone for a customer site is defined on Site Maintenance (SD.025.00).
Assigned Zone(s)
Assigned Zone(s) contains the geographic zones to which the technician is assigned. Geographic zone
assignments are made using either Employees - Geographic Zones (SD.039.00) or Geographic Zone -
Employees (SD.038.00).
Gantt Chart
The Gantt chart contains the start time, finish time, and duration of each problem code for which a
technician has been assigned in a graphical format. Problem codes are not displayed in the Gantt
chart if they are not associated with a technician or do not have a start time and a duration greater
than zero. Each problem code for a particular service call is assigned a line ID. The line ID corresponds
to the line number of the problem code in the problem code grid on Service Call Entry (SD.200.00).
The day you are currently viewing is displayed on the Gantt chart date bar. You can navigate to
different days by pressing the arrows on either side of the date bar or by right-clicking on the date bar.
The Gantt chart also displays task bars representing technician status when the technician is not
available for assignments. Use Status in Employee Maintenance (SD.007.00) or Employee Schedule
(SD.904.00) to indicate when a technician is not available for assignments.
The Gantt chart task bars have the following features:
Color-coded task bars allow quick determination of the status of a problem code. A problem code
appears on the Gantt chart only if the status of the problem is something other than Unassigned. The
color scheme for the task bars is determined in Graphical Dispatch Setup Maintenance (SD.902.00).
Color-coded task bars also allow the quick determination of the status of a technician. Technician
status can be set via Employee Maintenance (SD.007.00) for all dates or via Employee Schedule
(SD.904.00) for a limited date range. The color scheme for the task bars is determined in Graphical
Dispatch Setup Maintenance (SD.902.00). Technician status values that can be displayed as a bar in
the Gantt chart include:
Vacation
Sick
Personal
Training
Task bar text quickly provides basic information. If the task bar represents a technician’s status, the
text displayed on the task bar is the technician’s service employee ID and status. If the task bar
represents a problem code, the text displayed on the task bar is determined by the selection made
from the following options in Graphical Dispatch Setup Maintenance (SD.902.00):
ServiceCallID: Line ID
FaultCodeID: Line ID (Note: The FaultCodeID is the same as the Problem Code ID)
CallerName: Phone
CallerName: Addr1 (Note: Addr1 is Address Line 1 from the customer site)
Status: FaultCodeID: Line ID
Addr1

312 Service Dispatch
Allowing the mouse pointer to hover over a problem code task bar causes a tool tip to appear
displaying the following information:
Problem Code status
Zone ID
Caller Name
Customer Name
Address Line 1
City
Zip Code
Phone Number
Allowing the mouse pointer to hover over a task bar representing a technician’s status causes a tool
tip to appear displaying the technician’s service employee ID and the technician’s status.
Duplicate Service Call (SD.200.05) appears when you click the Duplicate Call icon button in Service
Call Entry (SD.200.00). Use this screen to create a new service call by copying an existing one.
Figure 131: Duplicate Service Call (SD.200.05)
Following are the field descriptions for Duplicate Service Call (SD.200.05).
Service Call ID
Service Call ID displays the identification code assigned to the service all you want to copy. Press F3
to see a list of service calls for the company you entered in Service Call Entry (SD.200.00).
Call Lookup (icon button)
Click Call Lookup .to open Service Call Lookup (SD.303.00), which gives you the ability to search
for a particular service call.
OK (button)
After you select the service call you want to duplicate, click OK to copy it. The details of the existing
service call appear in Service Call Entry (SD.200.00).
Cancel (button)
Click Cancel to close the screen without copying a service call.

Data Entry Screens 313
Dispatch (SD.201.00) Dispatch (SD.201.00) allows the dispatching department to manage open calls and calls that are in
progress. Service calls can be viewed in many ways. For example, you can set up Dispatch
(SD.201.00) to view only plumbing type calls or to view only high or premium priority calls.
The majority of Dispatch (SD.201.00) fields are display-only. Following are the descriptions for data
entry fields and buttons on Dispatch (SD.201.00).
Figure 132: Dispatch (SD.201.00)
The majority of Dispatch (SD.201.00) fields are display-only. Following are the descriptions for data-
entry fields and buttons on Dispatch (SD.201.00).
Queue ID
Queue ID contains the call queue identifier used to select how service calls are displayed. A default
queue ID for the user is populated based on the selected service call configuration in the User
Configuration subscreen of Service Series Setup Maintenance (SD.000.00). Type in a new queue
identifier, or select one from the Call Queue View PV List to override the default value.
Description
Description contains an explanation of the selected queue identifier.
From
From selects the starting date to view the service calls on Dispatch (SD.201.00). The default is seven
days prior to the system date. Service calls with a promised date between the user-specified date
ranges are displayed.
To
To selects the ending date to view the service calls. The default is the system date. Service calls with a
promised date between the user-specified date ranges are displayed.

314 Service Dispatch
Query Now (button)
Query Now refreshes and updates the records with changes to the service calls in the system.
Options (button)
Options accesses Dispatch - View Maintenance (SD.004.00), which allows you to enter or modify the
sort and select options for displaying records on Dispatch (SD.201.00).
Service Call (button)
Service Call accesses Service Call Entry (SD.200.00) and populates the screen with the record
selected on Dispatch (SD.201.00).
Status Log (button)
Status Log accesses Service Call Status Log (SD.027.00) to view the status changes during the life
cycle of the service call. Every time the call status is changed, the system updates Service Call Status
Log (SD.027.00). The status log appears only when a record is saved.
Problems (button)
Problems accesses Service Call - Problem Code Entry (SD.407.00), that is used to view/modify/enter
problem codes and other specific information related to the nature of the problem. If any changes are
made to Est Hours, Expected Time on Dispatch (SD.201.00) is updated accordingly.
Page (button)
Page accesses Dispatch - Service Call Page (SD.024.00), which sends an alphanumeric page to the
technician in the field and updates Dispatch (SD.201.00) with the assigned technician, start date, and
start time.
History (button)
History accesses Service Call History (SD.301.00), which lists the completed service calls associated
with the selected record as well as service call and invoice information.
Invoice (button)
Invoice accesses Invoice Entry (SD.202.00). Invoice is not available if the company ID associated with
the service call differs from the company you are currently accessing.
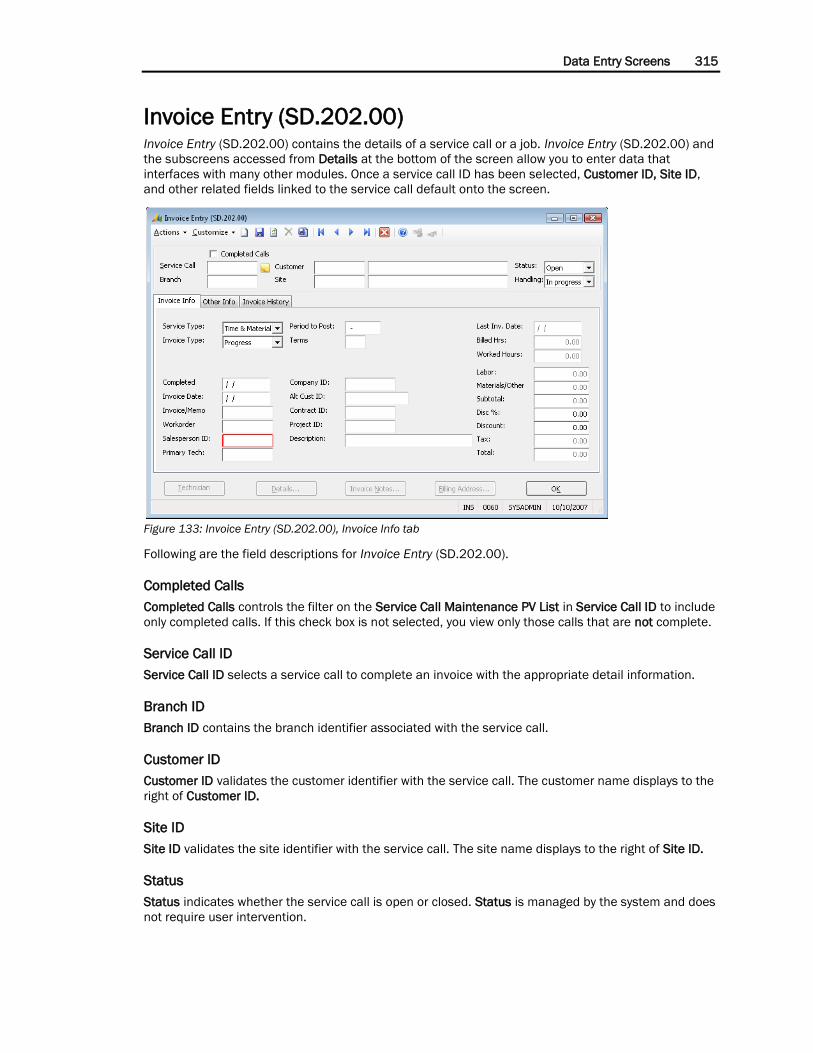
Data Entry Screens 315
Invoice Entry (SD.202.00) Invoice Entry (SD.202.00) contains the details of a service call or a job. Invoice Entry (SD.202.00) and
the subscreens accessed from Details at the bottom of the screen allow you to enter data that
interfaces with many other modules. Once a service call ID has been selected, Customer ID, Site ID,
and other related fields linked to the service call default onto the screen.
Figure 133: Invoice Entry (SD.202.00), Invoice Info tab
Following are the field descriptions for Invoice Entry (SD.202.00).
Completed Calls
Completed Calls controls the filter on the Service Call Maintenance PV List in Service Call ID to include
only completed calls. If this check box is not selected, you view only those calls that are not complete.
Service Call ID
Service Call ID selects a service call to complete an invoice with the appropriate detail information.
Branch ID
Branch ID contains the branch identifier associated with the service call.
Customer ID
Customer ID validates the customer identifier with the service call. The customer name displays to the
right of Customer ID.
Site ID
Site ID validates the site identifier with the service call. The site name displays to the right of Site ID.
Status
Status indicates whether the service call is open or closed. Status is managed by the system and does
not require user intervention.

316 Service Dispatch
Handling
Handling indicates the invoice handling used during the approval process prior to invoicing the service
call. In order to create an invoice, recognize revenue, and apply costs, Handling must be set to
Approved.

Data Entry Screens 317
Invoice Entry, Invoice Info Tab
Figure 134: Invoice Entry (SD.202.00), Invoice Info tab
Following are the field descriptions for the Invoice Info tab of Invoice Entry (SD.202.00).
Service Type
Service Type selects the type of detail desired for a service call in the Invoice Entry process. The two
options available are Flat Rate and Time & Material.
Invoice Type
Invoice Type allows the selection of one of the following options when creating an invoice number:
Invoice: Invoice/Memo Nbr is disabled. The system assigns the invoice number. Assigned to a
service call after the service call invoices are printed and saved to the system through Service
Invoice Printing - Keep/Delete (SD.642.00).
Manual: Requires that a user-specified invoice number be typed into Invoice/Memo Nbr before
the invoice information can be saved to the system in Invoice Entry (SD.202.00).
Progress: Allows users to invoice customers for material and labor used to perform the work
without closing the service call. Therefore, additional work and detail lines items can be added to
the service call for invoicing.
Completed Date
Completed Date contains the date the service call was completed.
Invoice Date
Invoice Date contains the accounts receivable aging date for the invoice.
Invoice/Memo Nbr
Invoice/Memo Nbr contains the invoice number if the Invoice Type is set to Manual.

318 Service Dispatch
Workorder Nbr
Workorder Nbr contains a work order number associated with the service call. The work order number
may be included on the customer’s invoice. This value displays in Reference in Accounts Receivable.
Salesperson ID
Salesperson ID contains the salesperson associated with the completed service call. The salesperson
defaults from Site Maintenance (SD.025.00).
Primary Tech
Primary Tech defaults from Dispatch (SD.201.00) and displays the primary technician assigned to the
service call.
Period to Post
Period to Post overrides the default post period. The current period from the Accounts Receivable
module is the default period and may be overridden by typing in the desired period.
Terms
Terms displays a term identifier for a service call. The terms default from the Customer Maintenance
table.
Company ID
Company ID defaults from Branch ID entered in Service Call Entry (SD.200.00).
Alt Cust ID
Alt Cust ID contains the valid customer identifier used as the billing customer account (for example,
manufacturer warranty). However, the service call history continues to be the actual customer and site
as designated during service call entry.
Orig Call Nbr
Orig Call Nbr displays a valid service call identifier used to associate the current service call to another
service call. For example, the current service call may be a “call back” to previously performed service
work.
Contract ID
Contract ID identifies whether the service call is associated with a service contract. If it is a contract
call, but not a preventive maintenance service call, then special pricing related to the service contract
is in effect. If a service contract is associated with the service call and the service call is a preventive
maintenance call, then special pricing at the preventive maintenance level is in effect. (See contract
pricing.)
Project ID
Project ID displays costs associated with the service call and updates the profitability of the project
through Issues (10.020.00) in the Inventory module.
Description
Description contains a short description. This is a free-form 30-character field.
Last Inv. Date
Last Inv. Date displays the date the service call was last invoiced.

Data Entry Screens 319
Billed Hrs
Billed Hrs displays the total billed hours entered in Invoice - T & M Details (SD.203.00) or Invoice - Flat
Rate Order (SP.200.00), depending on the invoice type.
Worked Hours
Worked Hours displays the total worked hours from Invoice - T & M Details (SD.203.00) or Invoice -
Flat Rate Order (SP.200.00), depending on the invoice type.
Labor
Labor displays the total labor dollar amount entered in Invoice - T & M Details (SD.203.00).
Materials/Other
Materials/Other displays the total material and other related dollar amounts entered in
Invoice - T & M Details (SD.203.00).
Subtotal
Subtotal displays the subtotal of the invoice.
Disc %
Disc % displays the total discount percentage of this invoice.
Discount
Discount displays the total discount amount of this invoice.
Tax
Tax displays the total tax amount entered in the detail lines.
Total
Total displays the total invoice amount from all detail lines, including the calculated sales tax totals.
Technician Info (button)
Technician Info accesses Invoice - Technician Information (SD.028.00), which accepts technician data
needed to calculate special commission handling for the selected service call. Split commission
information may be used, enabling the system to report commission for two or more technicians.
Details (button)
Details accesses one of two screens depending on the invoice type selected: Time & Materials or Flat
Rate. For flat rate type invoices, only billable lines are entered with no association to service contracts
or projects. For Time & Materials type invoices, you can enter billable, non-billable, contract, project,
and warranty detail line types for labor and materials.
Invoice Notes (button)
Invoice Notes allows notes to be included on a printed invoice.
Note: These notes are billable notes, not service call notes.
Billing Address (button)
Billing Address accesses Customer Information (SD.202.01), which allows the billing address
associated with the service call invoice to be viewed.

320 Service Dispatch
OK (button)
OK closes the screen and saves any changes.

Data Entry Screens 321
Invoice Entry, Other Info Tab
The Other Info tab contains additional information, such as the caller’s name (defaulted from Service
Call Entry (SD.200.00), the customer’s purchase order (if applicable), the media ID associated with
this specific service call, and a description of the media ID. Program/Coupon ID accepts a coupon
identifier that assists in the tracking of advertising resources. The Satisfied check box indicates that
the customer is pleased with the service provided from the service company.
Figure 135: Invoice Entry (SD.202.00), Other Info tab
Following are the field descriptions of the Other Info tab for Invoice Entry (SD.202.00).
Completed Calls (check box)
Completed Calls controls the filter on the Service Call Maintenance PV List in Service Call ID to include
only completed calls. If this check box is not selected, you view only those calls that are not complete.
Service Call ID
Service Call ID selects a service call to complete an invoice with the appropriate detail information.
Branch ID
Branch ID contains the branch identifier associated with the service call.
Customer ID
Customer ID validates the customer identifier with the service call. The customer name displays to the
right of Customer ID.
Site ID
Site ID validates the site identifier with the service call. The site name displays to the right of Site ID.
Status
Status indicates whether the service call is open or closed. Status is managed by the system and does
not require user intervention.

322 Service Dispatch
Handling
Handling indicates the invoice handling used during the approval process prior to invoicing the service
call. In order to create an invoice, recognize revenue, and apply costs, Handling must be set to
Approved.
Call Status
Call Status associates the service call status identifier with a service call. Call Status defaults the
status identifier from Dispatch (SD.201.00).
Call Type
Call Type displays the service call type identifier associated with a service call. Call Type defaults from
Service Call Entry (SD.200.00).
Media ID
Media ID associates a media identifier with a service call.
Program/Coupon ID
Program/Coupon ID allows a coupon reference number to be typed in if the service call is associated
with a coupon.
Satisfied
Satisfied indicates whether a customer is satisfied with the service provided. This allows Management
to generate reports on customer satisfaction.
Caller Name
Caller Name displays the contact name for the person calling in the service request. If a name was
entered in Attention in Site Maintenance (SD.025.00), the value is shown in Caller Name.
Customer PO
Customer PO displays the customer’s purchase order number or reference number. If a customer
purchase order is typed into Service Call Entry (SD.200.00), it defaults to Customer PO.
Payment Method
Payment Method selects the method used for payment of this invoice.
Check/Card Nbr
Check/Card Nbr contains the appropriate check or card number, if Check or Credit Card was selected
in Payment Method.
Exp Date
Exp Date contains the expiration date of the credit card.
Processed By
Processed By contains the name of the user who processed the invoice.
Processed Date
Processed Date contains the date the invoice was processed.
Reviewed By
Reviewed By displays the name of the user who reviewed the invoice.

Data Entry Screens 323
Reviewed Date
Reviewed Date displays the date the invoice was reviewed.
Technician Info (button)
Technician Info accesses Invoice - Technician Information (SD.028.00), which accepts technician data
needed to calculate special commission handling for the selected service call. Split commission
information may be used, enabling the system to report commission for two or more technicians.
Details (button)
Details accesses one of two screens depending on the invoice type selected: Time & Materials or Flat
Rate. For flat rate type invoices, only billable lines are entered with no association to service contracts
or projects. For Time & Materials type invoices, you can enter billable, non-billable, contract, project,
and warranty detail line types for labor and materials.
Invoice Notes (button)
Invoice Notes allows notes to be included on a printed invoice.
Note: These notes are billable notes, not service call notes.
Billing Address (button)
Billing Address accesses Customer Information (SD.202.01), which allows the billing address
associated with the service call invoice to be viewed.
OK (button)
OK closes the screen and saves any changes.

324 Service Dispatch
Invoice Entry, Invoice History Tab
The Invoice History tab displays all invoice transactions processed against the service call. For
example, a service call with an invoice type handling of Progress may generate two or more invoices
for the same service call. The information on this screen displays each invoice transaction created in
Accounts Receivable.
Figure 136: Invoice Entry (SD.202.00), Invoice History tab
Following are the field descriptions of the Invoice History tab for Invoice Entry (SD.202.00).
Completed Calls (check box)
Completed Calls controls the filter on the Service Call Maintenance PV List in Service Call ID to include
only completed calls. If this check box is not selected, you view only those calls that are not complete.
Service Call ID
Service Call ID displays the service call identifier associated with this invoice.
Branch ID
Branch ID displays the branch identifier associated with the service call.
Customer ID
Customer ID displays the customer identifier and customer name associated with the service call.
Site ID
Site ID displays the site identifier and site name associated with the service call.
Status
Status indicates whether the service call is open or closed. Status is managed by the system and does
not require user intervention.
Data Entry Screens 325
Handling
Handling indicates the invoice handling used during the approval process prior to invoicing the service
call.
Company ID
Company ID defaults from the branch identifier entered in Service Call Entry (SD.200.00).
Customer ID
Customer ID displays the customer identifier and customer name associated with the service call.
Service Call ID
Service Call ID displays the service call identifier associated with the selected service call.
Invoice Date
Invoice Date displays the accounts receivable aging date for the invoice.
Tran Date
Tran Date displays the payroll period date.
Invoice Nbr
Invoice Nbr displays the number of the invoice for this service call.
Invoice Amt
Invoice Amt displays the amount due on this invoice.
Tax Amt
Tax Amt contains the total sales tax amount for the order.
AR Batch Nbr
AR Batch Nbr displays the number assigned by the system for Accounts Receivable processing.
Technician Info (button)
Technician Info accesses Invoice - Technician Information (SD.028.00), which accepts technician data
needed to calculate special commission handling for the selected service call. Split commission
information may be used, enabling the system to report commission for two or more technicians.
Details (button)
Details accesses one of two screens depending on the invoice type selected: Time & Materials or Flat
Rate. For flat rate type invoices, only billable lines are entered with no association to service contracts
or projects. For Time & Materials type invoices, you can enter billable, non-billable, contract, project,
and warranty detail line types for labor and materials.
Invoice Notes (button)
Invoice Notes allows notes to be included on a printed invoice.
Note: These notes are billable notes, not service call notes.
Billing Address (button)
Billing Address accesses Customer Information (SD.202.01), which allows the billing address
associated with the service call invoice to be viewed.

326 Service Dispatch
OK (button)
OK closes the screen and saves any changes.

Data Entry Screens 327
Invoice - T & M Details (SD.203.00) Invoice - T & M Details (SD.203.00) accepts line item details for a service call. When the invoice is
saved, the quantities for inventory line items are reserved in the Inventory module. When all details
are complete and the invoice process has been run, the information from Invoice - T & M Details
(SD.203.00) is sent to the appropriate modules based on the line types selected for each line of
detail. A line type is the indicator for a line item, which tells the system whether to charge the line item
to a customer, to a service contract, to a job/project, or to no one in the case of warranty or other non-
billable charges. The Line Types options include: Billable, In-House Warranty, Manufacturer Warranty,
Non-Billable, Project, and Service Contracts.
Note: You can use Timesheet Report (SD.400.00) to generate the Time Sheet and Invoice Report
(SD.624.00). For more information, see “Timesheet Report (SD.400.00)” on page 534.
Figure 137: Invoice - T & M Details (SD.203.00)
Following are the field descriptions for Invoice - T & M Details (SD.203.00).
Service Call ID
Service Call ID displays the service call identifier associated with the selected service call.
Customer ID
Customer ID displays the customer identifier and customer name associated with the selected service
call.
Site ID
Site ID displays the site identifier and site name associated with the selected service call.

328 Service Dispatch
Project ID
Project ID displays the project identifier associated with the selected service call.
Contract ID
Contract ID displays the contract identifier associated with the selected service call.
Subtotal
Subtotal displays the subtotal for the order. This figure does not include sales tax or non-billable
amounts.
Tax
Tax displays the total sales tax amount for the order.
Total
Total displays the total dollar figure for the detail. This total is calculated by adding the subtotal and
the tax total.
Line Types
Line Types selects the appropriate behavior related to the specific line item record. A selection may be
made from the following line types:
Billable: This option creates a transaction in the Accounts Receivable module.
In-house Warranty: This option creates a non-billable COGS transaction in Issues (10.020.00) of
the Inventory module. The In-house Warranty option also enables you to create operation reports
for analysis.
Manufacturer’s Warranty: This option creates a non-billable COGS transaction in Issues
(10.020.00) of the Inventory module. The Manufacturer’s Warranty option also enables you to
create operation reports for analysis.
Non-billable: This option creates a non-billable COGS transaction in Issues (10.020.00) of the
Inventory module. If a negative quantity is used, then the detail record in Issues (10.020.00) of
Inventory is defined as a credit memo.
Project: This option creates a COGS transaction in Issues (10.020.00) of the Inventory module.
Using this line type requires a project ID present on the service call as well as a task ID associated
with the detail line item. Project line items sent from inventory updates the profitability of the
respective project.
Service Contract: This option creates a COGS transaction in Issues (10.020.00) of the Inventory
module. Using this line type requires a contract ID to be present on the service call as well as a
contract ID to be associated with the detail line item. Service contract line types update the
Contract History Profitability table.
Line Item ID
Line Item ID indicates inventory items from the Inventory module. These inventory items are the parts
and/or labor that are needed to complete a service call. An inventory item may be selected either by
typing in the desired inventory item or by accessing the Inventory Item List and selecting the desired
inventory item. The inventory description displays to the right of Line Item ID.
Note: Inventory items that are lot or serial tracked and have the assignment of When Used cannot be
used in Service Dispatch. Inventory items that use Specific Identification valuation also cannot be
used in Service Dispatch. These items will also not be seen in the possible values list for the Line Item
ID field.

Data Entry Screens 329
Detail Type
Detail Type contains the classification of the current record being entered as either labor or materials.
Detail Type populates based on Type in Inventory Items (10.250.00). Detail Type displays Material for
any selection other than Labor.
Class
Class contains the product class associated with a specific inventory item. Class defaults the product
class associated with the selected inventory item. In addition, Class may control the commission and
mark-up categories.
Invt Location ID
Invt Location ID associates the inventory item entered with a specific inventory storage or inventory
site (warehouse, truck, etc.). The quantity used is reserved in Inventory when the transaction is saved.
When the details are sent to the Inventory module and are processed, the transaction decrements the
quantity available for inventory location ID entered in the detail record.
Whse Loc
Whse Loc associates a warehouse location with the inventory item.
Worked Hours (Labor Only)
Worked Hours contains the number of work hours to be paid to the technician/employee and charged
to the service call.
Billed Hrs (Labor Only)
Billed Hrs contains the number of billable hours to charge to the customer as revenue. The billable
hours and worked hours do not have to be equal. Billed Hrs is enabled for billable line types only.
Qty Used (Material Only)
Qty Used contains the quantity of a specific inventory item used to complete a call. This number is
multiplied by the unit price to calculate the extended price for an item.
Serial Nbr
Serial Nbr contains the serial number for the inventory item.
Base Price
Base Price displays the stock base price default value from the inventory ID. Base Price assists in
identifying if any “special pricing” is in effect for the line item record.
Unit Price
Unit Price contains the unit price for a line item. The unit price may differ from the stock base price if
any special pricing is applicable (for example, site or contract pricing, mark-up ID, etc.). Unit Price is
enabled for billable line types only.
Extended Price
Extended Price contains the price of a detail line item. This value is calculated by multiplying the unit
price by the quantity used. This value may be overridden. Extended Price is enabled for billable line
types only.
Employee ID (Labor Only)
Employee ID contains the employee Base Price associated with the technician. The Employee ID
defaults to the technician assigned to the service call.

330 Service Dispatch
Earnings Type ID (Labor Only)
Earnings Type ID associates the earnings type with the line item record. The default value is based on
the value populated in Employee Maintenance (SD.007.00). The earnings type multiplier is included in
the calculation for extended cost.
Work Location (Labor Only)
Work Location associates a work location identifier with the line item record. The default value is
based on the value populated in Work Location ID from Employee Maintenance (02.250.00) in the
Payroll module.
Tax ID
Tax ID assigns a tax identifier (tax group) to a line item. The tax ID defaults from Tax ID in Site
Maintenance (SD.025.00). If the inventory is tax exempt, Taxable Amount is zero. Tax ID is enabled for
billable line types only.
Taxable Amount
Taxable Amount displays the amount of a line item that is taxable. The taxable amount value defaults
from Extended Price.
Tax Amount
Tax Amount displays the amount of sales tax for a specific line item. It is calculated by multiplying the
tax percentages associated with a tax identifier or tax group by the taxable amount.
Service Date
Service Date contains the work date associated with the line item record. The default value is based
on the start date of the service call. If the start date is not available, then the default value is based on
the date the service call was originally processed. Service Date is used for running Generate Payroll
Process (SD.302.00).
Vendor ID (Material Only)
Vendor ID contains the valid vendor identifier associated with the current record. If a vendor ID is
entered, a purchase order is created in the Purchasing module.
PO Date (Material Only)
PO Date displays the purchase order date. Once Vendor ID is populated, PO Date is populated with the
service call date.
Qty Ordered (Material Only)
Qty Ordered displays the quantity ordered for a specific item that was purchased on a purchase order.
Qty Received
Qty Received displays the quantity received for use when updating Receipts in the Purchasing module.
PO Number
PO Number displays the purchase order number for the items acquired with a purchase order. If
Manual on PO Number Option in Service Series Setup Maintenance (SD.000.00) is selected, the user
populates PO Number with a manual PO number. If Automatic is selected, the system populates PO
Number after the invoice entry process.

Data Entry Screens 331
Unit Cost
Unit Cost contains the unit cost of a line item. If an inventory item (material) with a valuation method
of user-specified cost is selected, enter a unit cost. If the inventory item entered has a valuation
method other than user-specified, the default cost is populated. For labor records, the default cost is
the hourly rate entered in Employee Maintenance (SD.007.00).
Extended Cost
Extended Cost displays the cost based on the quantity times the unit cost for material. For labor, the
extended cost is work hours times hourly rate times the earnings type multiplier.
Task
Task associates a line item to a specific task set up in the Project Controller module. Task is enabled
only when the line type is set to Project.
Contract ID (Line Item)
Contract ID associates a line item with a service contract in the Service Contracts module. Contract ID
is enabled only when the line type is set to Service Contract.
Equipment ID
Equipment ID links a piece of equipment to the line item. Equipment identifiers may be entered in any
line type. If populated, costs associated with the line item record update the Equipment History table.
Rev Acct
Rev Acct contains the default revenue account from the inventory item. If the line type is Billable, the
revenue account defaults.
Rev Sub
Rev Sub contains the subaccount for a line item. The default subaccount is based on the Use Sub
from Site setting in Call Type Maintenance (SD.003.00). If Use Sub from Site is checked, the
subaccount defaults from Site Maintenance (SD.025.00). If Use Sub from Site is not checked, the
subaccount defaults from the call type. If the line type is Service Contract, the subaccount defaults
from the accrued liability subaccount.
COGS Acct
COGS Acct contains the default COGS account from the inventory item.
COGS Sub
COGS Sub contains the subaccount for a line item. The default subaccount is based on the Use Sub
from Site setting in Call Type Maintenance (SD.003.00). If Use Sub from Site is checked, the
subaccount defaults from Site Maintenance (SD.025.00). If Use Sub from Site is not checked, the
subaccount defaults from the call type. If the line type is Service Contract, the subaccount defaults
from the accrued liability subaccount.
Profit
Profit displays the dollar profit earned on a single line item.
Profit %
Profit % displays the percent of profit earned on a single line item.

332 Service Dispatch
Labor Class (Labor Only)
Labor Class associates a labor class with the line item record. The default is the Labor Class input in
Employee Position/Rate Maintenance (58.290.00) with an effective date closest to, but not greater
than, the date entered for the project input. If a record is not found for the project input, (for example,
if Project is blank) the default labor class is used. Possible values for this required field may be viewed
and selected by pressing F3.
Note: This field is only visible if Payroll Integration in Service Series Setup Maintenance (SD.000.00) is
set to Advanced Payroll.
Union ID (Labor Only)
Union ID associates a union ID code with the line item record. It defaults to the union code input in
Employee Position/Rate Maintenance (58.290.00) with an effective date closest to, but not greater
than, the week-ending date. The default Employee Project Rate (PJEMPPJT) record (where Project is
blank) is always used to retrieve the default union but may be overwritten. Possible values for this
optional field may be viewed and selected by pressing F3.
Note: This field is only visible if Payroll Integration in Service Series Setup Maintenance (SD.000.00) is
set to Advanced Payroll.
Shift
Shift associates a shift code with the line item record. This is an optional field.
Note: This field is only visible if Payroll Integration in Service Series Setup Maintenance (SD.000.00) is
set to Advanced Payroll.
Cert PR
Cert PR is used to exempt a line item from prevailing wage rate consideration. No is the default if the
project does not have a prevailing wage ID associated with it and cannot be modified. For projects that
have a prevailing wage ID associated with them, this setting defaults to Yes but may be changed for a
particular line item that is not eligible for prevailing wage rates.
Note: This field is only visible if Payroll Integration in Service Series Setup Maintenance (SD.000.00) is
set to Advanced Payroll.
Group
Group is a modifier or subclass of a labor class for projects that contain a prevailing wage ID. The
default for this optional field is the group code input in Employee Position/Rate Maintenance
(58.290.00) with an effective date closest to, but not greater than, the week-ending date. The default
Employee Project Rate record (where Project is blank) is always used to retrieve the default group
code, but may be overwritten.
Note: This field is only visible if Payroll Integration in Service Series Setup Maintenance (SD.000.00) is
set to Advanced Payroll.
Prev Code
Prev Code identifies the prevailing wage that should be used to default the rate. Prevailing Wage is a
general heading for the government’s regulations and controls on the pay rates for certain laborers
(trades or crafts) performing work under contracts covered by federal and/or state regulations and
guidelines. The combination of prevailing wage code, labor class, and group (an optional subclass of
labor class) must be unique for Prevailing Wage Rate table (PJWAGEPR). Use Prevailing Wage Rate
Maintenance (58.280.00) to view and maintain prevailing wage codes. Each line item record must
contain a “Y” in Cert PR to be eligible for a prevailing wage rate. Prev Code is display-only when project
is entered, enabled if there is no project and line item record is eligible for prevailing wage (Cert PR =
Y).

Data Entry Screens 333
Note: This field is only visible if Payroll Integration in Service Series Setup Maintenance (SD.000.00) is
set to Advanced Payroll.
Work Comp
Work Comp identifies a particular worker’s compensation type for the wages to be paid and must first
be set up in Workers’ Compensation Maintenance (02.380.00).
Note: This field is only visible if Payroll Integration in Service Series Setup Maintenance (SD.000.00) is
set to Advanced Payroll.
Work Type
Work Type defines a work category within the labor class for union workers. The default for this
optional field is the Work Type input in Employee Position/Rate Maintenance (58.290.00) with an
effective date closest to, but not greater than, the week-ending date. The default Employee Project
Rate record (where Project is blank) is always used to retrieve the default work type but may be
overwritten.
Note: This field is only visible if Payroll Integration in Service Series Setup Maintenance (SD.000.00) is
set to Advanced Payroll.
Invoiced
Invoiced will appear in the left-most field when the cursor is positioned on a record that has been
processed through Service Call Invoice (SD.640.00) or Service Call Invoice (SSRS) (SD.643.00).
PO Created
PO Created will appear in the next field when the cursor is positioned on a record that has had a
purchase order created via the Generate Inventory (SD.306.00) process.
PR Created
PR Created will appear in the third field when the cursor is positioned on a record that has either:
Been processed by the Generate Payroll (SD.302.00) process, or
Been originally created in the Payroll or Advanced Payroll module
Note: This status is only applicable when Payroll Integration in Service Series Setup Maintenance
(SD.000.00) is set to either Payroll or Advanced Payroll.
Rcpt Created
Rcpt Created will appear in the fourth field, immediately to the right of the Cancel button, when a
receipt for a purchase order has been created via the Generate Inventory (SD.306.00) process.
Inventory Posted
Inventory Posted will appear in the right-most field when the record has had its inventory costs booked
by any of the following:
Service Call Invoice (SD.640.00
Service Call Invoice (SSRS) (SD.643.00)
Generate Inventory (SD.306.00)
OK (button)
OK closes the screen and saves any changes.
Cancel (button)
Cancel prompts you to save your changes and closes the screen.

334 Service Dispatch
Service Call - Problem Code Entry (SD.407.00) Service Call - Problem Code Entry (SD.407.00) assigns an unlimited number of problem codes to a
service call. Access Service Call - Problem Code Entry (SD.407.00) by clicking Problems in Dispatch
(SD.201.00).
Figure 138: Service Call - Problem Code Entry (SD.407.00)
Following are the field descriptions for Service Call - Problem Code Entry (SD.407.00).
Service Call ID
Service Call ID selects a service call identifier for assigning problem codes to a service call.
Problem ID
Problem ID contains the code that describes the reason a service call is issued. The description of
identifier displays to the right of Problem ID.
Technician ID
Technician ID contains the technician assigned to this problem. The technician’s first and last names
display to the right of Technician ID.
Duration
Duration contains the estimated time required to fix this problem.
Contract ID
Contract ID contains the contract that applies to the servicing of this problem.
Equip ID
Equip ID contains the equipment to be serviced on this service call.
Warranty Start
Warranty Start contains the start date of the warranty.

Data Entry Screens 335
Warranty End
Warrant End contains the end date of the warranty.
Serial Nbr
Serial Nbr displays the serial number of the equipment.
Notes
Notes contains miscellaneous information about the call. Longer notes can be recorded using the
Notes/Attachments icon.
Cause ID
Cause ID contains the root cause of the problem.
Resolution ID
Resolution ID contains the resolution of the problem.
OK (button)
OK closes the screen and saves the entry.

336 Service Dispatch
Graphical Dispatch Board (SD.900.00) Use the Graphical Dispatch Board (SD.900.00) to review dispatch information.
Graphical Dispatch Board (SD.900.00), Options Tab
Use the Graphical Dispatch Board (SD.900.00), Options tab to select the Call Queue ID from Dispatch
- View Maintenance (SD.004.00) that determines the data to display on the Graphical Dispatch Board
(SD.900.00). The General tab contains a display-only view of the filter parameters of the selected
Queue ID.
Figure 139: Graphical Dispatch Board (SD.900.00), Options tab
Following are the field descriptions for the Options tab of Graphical Dispatch Board (SD.900.00).
Queue ID
Queue ID contains the call queue identifier used to filter the service calls to be displayed. The queue
ID can be typed in directly, or can be selected from a list of all queue IDs set up in Dispatch - View
Maintenance (SD.004.00) by pressing F3 or double-clicking the right mouse button.
Note: If Queue ID is blank, Graphical Dispatch Board (SD.900.00) displays all open service calls by
default.
Description
Description contains an explanation of the selected queue identifier.
Priority
Priority contains the priority code selections of Queue ID.

Data Entry Screens 337
Branch ID
Branch ID contains the Branch ID filter of Queue ID.
All
All indicates whether Queue ID is selecting all Branch IDs. If it is marked with an ‘x’, then all Branch
IDs are selected.
Geographic ID
Geographic ID contains a list of geographic zone IDs included in the queue ID filter. Note that if no
geographic zone ID is included in Queue ID, no geographic zones are selected for display. This is
different than how the queue ID filter works for Dispatch (SD.201.00). If the queue ID has no
geographic zones listed, Dispatch (SD.201.00) displays all geographic zone IDs.
Note: To display service calls that have blank geographic zones, leave Queue ID blank. Graphical
Dispatch Board (SD.900.00) will displays all open service calls by default, including service calls with
blank geographic zones.
Description
Description contains an explanation of the Geographic ID.

338 Service Dispatch
Graphical Dispatch Board, Dispatch Board Tab
Graphical Dispatch Board (SD.900.00), Dispatch Board tab consists of two major areas. The top
section has tabs representing each employee class. This area is divided into two sections:
Technician pane — Located on the left side of the window, the technician pane lists the
technicians that are available to be assigned to problem codes on service calls that match the
filter criteria from Queue ID on the Options tab. The list is grouped by employee class. Graphical
Dispatch Setup Maintenance (SD.902.00) provides the option to turn off the display of the
employee class label.
Schedule pane — The color-coded schedule pane on the right side of the window has two view
formats, (1) Day View, and (2) Week View. You can switch from one view to the other by right-
clicking on the date bar and selecting the view you desire. Task bars representing either the time
commitment for a problem code or the unavailability of a technician appear in this area.
Technician class tabs at the bottom give you the ability to see the board for all technicians or
filtered for only the technicians within a specific employee class.
Service call details pane — The bottom section is the service call details pane. A service call
appears only once on each task status tab regardless of how many problem codes on the service
call have that status. If a service call has multiple problem codes with different status values, it
appears once on each task status tab for each problem code status. The task status tabs
represent the status codes available to problem codes and cannot be edited.
Note: Service calls without problem codes are displayed on the Unassigned tab.
Figure 140: Graphical Dispatch Board, (SD.900.00), Dispatch Board tab, Day View

Data Entry Screens 339
Graphical Dispatch Board (SD.900.00), Week View
Figure 141: Graphical Dispatch Board (SD.900.00), Dispatch Board tab, Week View
Following are the field descriptions for the Dispatch Board tab of Graphical Dispatch Board
(SD.900.00).
Technician
To view information about service calls that are assigned to a particular technician, type the
technician’s ID in Technician or press F3 to select the technician ID from the Employee Maintenance
PV List.
Note: If you select a technician ID and then refresh the Graphical Dispatch Board (SD.900.00), the
Technician tab appears in the technician class tabs.
Include Queue Filters (check box)
Include Queue Filters indicates whether the filter criteria defined for the queue identification number
in Queue ID on the Options tab is applied to service calls that display in the schedule pane and service
call details pane Queue filters do not affect the Unassigned tab.
Note:
The Unassigned tab displays all service calls that are not assigned to a technician.
The Technician tab displays as the last item in the technician class tabs when a technician
identification code is specified in Technician, which is located above the schedule pane and the
Graphical Dispatch Board (SD.900.00) is refreshed.

340 Service Dispatch
Refresh (button)
Clicking Refresh causes the system to refresh the schedule pane with any changes made to problem
code information.
Note: To refresh a tab in the service call detail pane of the Graphical Dispatch Board (SD.900.00),
click on a different tab and then back on the tab you want to refresh.
Search (button)
Clicking Search opens Service Call Search (SD.900.02).
Graphical Dispatch Board, Technician Pane
Technician
Technician contains the employee IDs from Employee Maintenance (SD.007.00) for all technicians
included in Queue ID entered in the Graphical Dispatch Board (SD.900.00), Options tab. Technician
class tabs appear below Technician for each employee class set up in Employee Class Maintenance
(SD.006.00), as well as a tab for all employee classes. When a technician identification code is
specified in the Technician box located above the schedule pane and the Graphical Dispatch Board
(SD.900.00) is refreshed, a Technician tab appears last. Selecting a tab causes problem codes
assigned to technicians for the employee class or for the technician to display in the schedule pane.
Note:
Technicians are grouped by employee class when employee class labels are displayed in
Graphical Dispatch Setup Maintenance (SD.902.00).
Right-clicking the technician causes the following Technician menu to open which allows you to
send an email message to the technician.
Figure 142: Technician menu
Calls
Calls contains the total number of problem codes to which the technician has been assigned for the
day being viewed. A technician may be assigned to multiple problem codes on a single service call.
Duration
Duration contains the total amount of time for all problem codes assigned to the technician on the day
being viewed, including travel time.
Zone
Zone contains the geographic zone where a technician is currently located. Zone is populated if the
technician has a call with a status of In-Route or WIP. A technician can only have one call In-Route or
WIP at a time. The geographic zone for a customer site is defined on Site Maintenance (SD.025.00).
Assigned Zone(s)
Assigned Zone(s) contains the geographic zones to which the technician is assigned. Geographic zone
assignments are made using either Employees - Geographic Zones (SD.039.00) or Geographic Zone -
Employees (SD.038.00).

Data Entry Screens 341
Graphical Dispatch Board, Schedule Pane
The schedule pane contains the start time, finish time, and duration of each problem code for which a
technician has been assigned in a graphical format. Problem codes do not appear in the schedule
pane if they are not associated with a technician or do not have a start time and a duration greater
than zero. Each problem code for a particular service call is assigned a line ID. The line ID corresponds
to the line number of the problem code in the Problem Code grid on Service Call Entry (SD.200.00).
The schedule pane has two view formats, (1) Day View, and (2) Week View. You can switch from one
view to the other by right-clicking on the date bar and selecting the view you desire:
Figure 143: Graphical Dispatch Board (SD.900.00), Dispatch Board tab, Date bar menu
The day you are currently viewing appears on the schedule pane date bar. You can navigate to
different days by pressing the arrows on either side of the date bar or by right-clicking on the date bar.
When you right-click the date bar, the Date bar menu appears listing the seven days prior and seven
days after the currently displayed date (if you are in Day View), a listing of the seven weeks prior to and
seven weeks after the current week (if in Week View), a Today option, a Go To option and options to
switch between the Day View and Week View. Selecting Go To displays a calendar from which you may
select any date to move to.
The schedule pane also displays task bars representing technician status when the technician is not
available for assignments. Use Status in Employee Maintenance (SD.007.00) or Employee Schedule
(SD.904.00) to indicate when a technician is not available for assignments.
The schedule pane task bars have the following features:
Color-coded task bars allow quick determination of the status of a problem code. A problem code
appears on the schedule pane if the status of the problem is something other than Unassigned.
The color scheme for the task bars is determined in Graphical Dispatch Setup Maintenance
(SD.902.00).

342 Service Dispatch
Color-coded task bars also allow the quick determination of the status of a technician. Technician
status can be set via Employee Maintenance (SD.007.00) for all dates or via Employee Schedule
(SD.904.00) for a limited date range. The color scheme for the task bars is determined in
Graphical Dispatch Setup Maintenance (SD.902.00). Technician status values that can be
displayed as a bar in the schedule pane include:
– Vacation
– Sick
– Personal
– Training
Task bar text quickly provides basic information. If the task bar represents a technician’s status,
the text displayed on the task bar is the technician’s service employee ID and status. If the task
bar represents a problem code, the text displayed on the task bar is determined by the selection
made from the following options in Graphical Dispatch Setup Maintenance (SD.902.00):
– ServiceCallID: Line ID
– FaultCodeID: Line ID (Note: The FaultCodeID is the same as the Problem Code ID)
– CallerName: Phone
– CallerName: Addr1 (Note: Addr1 is Address Line 1 from the customer site)
– Status: FaultCodeID: Line ID
– Addr1
Double left-clicking the task bar for a problem code causes Graphical Dispatch - Assign
Technician (SD.901.00) to open.
Allowing the mouse pointer to hover over a problem code task bar causes a tool tip to appear
displaying the following information:
– Problem Code status
– Zone ID
– Company ID
– Caller Name
– Customer Name
– Address Line 1
– City
– Zip Code
– Phone Number
Allowing the mouse pointer to hover over a task bar representing a technician’s status causes a
tool tip to appear displaying the technician’s service employee ID and the technician’s status.

Data Entry Screens 343
When you right-click over a problem code task bar, the task bar menu appears.
Figure 144: Problem code task bar menu
From this menu you can open the following:
– Service Call Entry (SD.200.00)
– Service Call Status Log (SD.027.00)
– Customer Site Location (SD.905.00)
– Invoice Entry (SD.202.00)
– Service Call History (SD.301.00)
– Service Contract Summary (SD.900.01)
– Service Call Search (SD.900.02)
– Service Call Workorder (SD.625.00)
– Technicians Page (SD.903.00)
– Outlook to send an email message to the customer
– Outlook to send an email message to the technician
– Employee Maintenance (SD.007.00)
– Employee Schedule (SD.904.00)
When you right-click over a task bar representing a technician’s status, the technician status task
bar menu appears.
Figure 145: Technician status task bar menu

344 Service Dispatch
From this menu you can open the following:
– Service Call Workorder (SD.625.00)
– Technicians Page (SD.903.00)
– Outlook to send an email message to the customer
– Outlook to send an email message to the technician
– Employee Maintenance (SD.007.00)
– Employee Schedule (SD.904.00)
In addition to the selections above, the menu also provides the capability to adjust the relative
“vertical” position of overlapping task bars. For example, if you believe a task bar is hiding another
task bar beneath, right-click on the task bar you can see and select Send to Back. Any task bars
hiding beneath the task bar you right-clicked on will now appear above it.
Use your mouse to adjust the start or end time of the problem code. This action also changes the
duration of the task. To adjust the start or end time, move the mouse pointer over the left or right end
of the bar until you see it change to a double-arrow. When the mouse pointer is a double-arrow, press
and hold the left mouse button, drag the bar to the desired location, and release the mouse button.
Use your mouse to move the entire task bar to another location. To perform this task, place the mouse
pointer on top of the task bar you wish to move, press and hold the left mouse button, drag the bar to
the new location, and release the mouse button.
Problem codes can be reassigned to another technician by dragging and dropping the task bar. Place
the mouse pointer on top of the task bar you wish to reassign, press and hold the left mouse button,
drag the bar to the new technician, date, and time, and release the mouse button.
Note: Problem codes with a status of WIP or Completed cannot be reassigned using drag-and-drop, nor
can the bar be moved to another position on the same technician. Use Graphical Dispatch - Assign
Technician (SD.901.00) to make these changes.
Graphical Dispatch Board, Service Call Details Pane
The service call details pane contains information about individual service calls regardless of status.
Right-click on a detail line to view the service call details pane menu.
Figure 146: Service call details pane menu
Use this menu to open:
Service Call Entry (SD.200.00)
Service Call Status Log (SD.027.00)
Customer Site Location (SD.905.00)
Invoice Entry (SD.202.00)
Service Call History (SD.301.00)
Service Contract Summary (SD.900.01)
Service Call Workorder (SD.625.00)
Technicians Page (SD.903.00)

Data Entry Screens 345
Additional information about the service call details pane:
All task status tabs of the service call details pane, except the Assigned tab, show service calls for
all dates. On the Assigned tab, you see only service calls with problem codes assigned on the date
currently on view in the schedule pane.
The Unassigned, Assigned, In-route, WIP, and Incomplete tab labels include the number of service
calls for each status.
All task status tabs show service calls for a technician except the Unassigned tab when a
technician identification code is specified in Technician and the Graphical Dispatch Board
(SD.900.00) is refreshed. The Unassigned tab shows service calls that have problem codes that
are not assigned to a technician.
Note: Consider using Customization Manager to change the User 1, User 2, User 3, and User 4 tab
names and the corresponding Task Status options in Service Call Entry (SD.200.00) to capture task
status indicators that are important to your organization. See your Microsoft Dynamics SL system
administrator if you need assistance.
Service Call ID
Service Call ID contains the service call identifier. An ellipsis button (...) appears in the next column
when a service call is displayed in the service call details pane grid. Pressing the ellipsis button opens
Graphical Dispatch - Assign Technician (SD.901.00).
Company ID
Company ID contains the identification code of the company associated with the service call.
Customer ID
Customer ID contains the customer ID of the service call. An ellipsis button (...) appears in the next
column when a service call is displayed in the service call details pane grid. Pressing the ellipsis
button opens Customer Maintenance (08.260.00).
Site ID
Site ID contains the site ID of the service call. An ellipsis button (...) appears in the next column when a
service call is displayed in the service call details pane grid. Pressing the ellipsis button opens Site
Maintenance (SD.025.00).
Promise Date
Promise Date contains the promise date of the service call.
From Time
From Time contains the promise from time of the service call.
To Time
To Time contains the promise to time of the service call.
Terms ID
Terms ID contains the terms identifier of the service call.
PM
PM contains a P if the service call was generated from a service contract PM schedule.
Call Type
Call Type contains the call type of the service call.

346 Service Dispatch
Priority
Priority contains the priority of the service call.
Caller Name
Caller Name contains the name of the person who called in the service call specified in Caller Name
on the Other Info tab of Service Call Entry (SD.200.00).
Name
Name contains the name of the customer for the service call displayed on the Service Call Info tab of
Service Call Entry (SD.200.00).
Addr 1
Addr 1 contains the first address line of the customer site associated with the service call.
Addr 2
Addr 2 contains the second address line of the customer site associated with the service call.
City
The city where the customer site associated with the service call is located. If you are unable to view
the City column, close Graphical Dispatch Board (SD.900.00), locate the file ServCall.dte on your
workstation, delete the file, and open Graphical Dispatch Board (SD.900.00) again. Refer to “Using
Graphical Dispatch Board (SD.900.00)” on page 27 for more information about customizing the
appearance of the service call details pane grid.
Zip
Zip contains the zip code of the customer site associated with the service call.
Phone
Phone contains the phone number of the customer site associated with the service call.
Geo Zone
Geo Zone contains the geographic zone of the customer site associated with the service call.
Default Technician
Default Technician contains the name of the technician assigned to the service call specified in
Primary Tech on the Service Call Info tab of Service Call Entry (SD.200.00).
Map Page
Map Page contains the map page of the customer site associated with the service call.
Map Coord
Map Coord contains the map coordinate of the customer site associated with the service call.
Contract ID
Contract ID contains the ID of the contract as entered in Service Call Entry (SD.200.00) for the service
call.
Contract Type
Contract Type contains the type of contract associated with the service call.
Data Entry Screens 347
Project ID
Project ID contains the project identifier as entered in Service Call Entry (SD.200.00) for the service
call.
Unassigned (Tab)
Unassigned contains service calls that have problem codes with a status of Unassigned or no problem
code at all. Note that a technician may be associated with a problem code and still have a status of
Unassigned.
Assigned (Tab)
Assigned contains service calls that have problem codes with a status of Assigned. Note that service
calls are only displayed on this tab if the problem code assignment date is for the current Gantt chart
date.
In-route (Tab)
In-route contains service calls that have problem codes with a status of In-route.
WIP (Tab)
WIP contains service calls that have problem codes with a status of WIP.
Completed (Tab)
Completed contains service calls that have problem codes with a status of Completed.
P/U Parts (Tab)
P/U Parts contains service calls that have problem codes with a status of P/U Parts.
Parts-out (Tab)
Parts-out contains service calls that have problem codes with a status of Parts-out.
Parts-in (Tab)
Parts-in contains service calls that have problem codes with a status of Parts-in.
Hold (Tab)
Hold contains service calls that have problem codes with a status of Hold.
Incomplete (Tab)
Incomplete contains service calls that have problem codes with a status of Incomplete.
User 1 (Tab)
User 1 contains service calls that have problem codes with a status of User 1.
Note: Consider using Customization Manager to change the User 1 tab name to reflect a task status
that is important to your organization. See your Microsoft Dynamics SL system administrator if you
need assistance.
User 2 (Tab)
User 2 contains service calls that have problem codes with a status of User 2.
Note: Consider using Customization Manager to change the User 2 tab name to reflect a task status
that is important to your organization. See your Microsoft Dynamics SL system administrator if you
need assistance.

348 Service Dispatch
User 3 (Tab)
User 3 contains service calls that have problem codes with a status of User 3.
Note: Consider using Customization Manager to change the User 3 tab name to reflect a task status
that is important to your organization. See your Microsoft Dynamics SL system administrator if you
need assistance.
User 4 (Tab)
User 4 contains service calls that have problem codes with a status of User 4.
Note: Consider using Customization Manager to change the User 4 tab name to reflect a task status
that is important to your organization. See your Microsoft Dynamics SL system administrator if you
need assistance.

Data Entry Screens 349
Screens That Interact with Graphical Dispatch Board (SD.900.00)
The following existing screens are used by Graphical Dispatch Board (SD.900.00):
Dispatch - View Maintenance (SD.004.00)
Service Call Entry (SD.200.00)
Employee Class Maintenance (SD.006.00)
Employee Maintenance (SD.007.00)
Dispatch - View Maintenance (SD.004.00)
Open Dispatch - View Maintenance from the Graphical Dispatch Board (SD.900.00) Options tab. You
must select at least one Geo Zone in the Queue ID. If the Queue ID in Geography (SD.004.01) is
empty, no data is selected for the Graphical Dispatch Board (SD.900.00). At least one Geo Zone is
REQUIRED by Graphical Dispatch Board (SD.900.00).
Note: An exception occurs when Queue ID on the Graphical Dispatch Board (SD.900.00) Options tab is
blank. Graphical Dispatch Board (SD.900.00) pulls in all open service calls and technicians regardless
of geographic zone.
The Graphical Dispatch Board (SD.900.00) does not use the following parameter from Dispatch - View
Maintenance (SD.004.00):
Sort Order
Service Call Entry (SD.200.00)
Graphical Dispatch Board (SD.900.00) operates at the problem code level rather than at the service
call level. Service Call Entry (SD.200.00) has an area in the lower portion of the screen labeled Service
Call - Problems where problem codes for a service call are entered. Information entered in this area is
available to Graphical Dispatch Board (SD.900.00).
Employee Class Maintenance (SD.006.00)
The values created in Employee Class Maintenance (SD.006.00) appear at the bottom of the schedule
pane. This allows you to only view technicians in a specific employee class. A maximum of 20
employee class entries can be displayed on Graphical Dispatch Board (SD.900.00). If more than 20
employee classes are set up, only the first 20 entries (determined alphabetically) are used by
Graphical Dispatch Board (SD.900.00).
Employee Maintenance (SD.007.00)
Status on Employee Maintenance (SD.007.00) controls how an employee is displayed in the Graphical
Dispatch Board (SD.900.00) schedule pane. If the employee’s status is Active, the employee is
available for assignments unless specific dates are blocked out via Employee Schedule (SD.904.00).
If an employee’s status in Employee Maintenance (SD.007.00) is Inactive, the employee does not
appear in Graphical Dispatch Board (SD.900.00). If the employee’s status is Vacation, Sick, or
Personal, a task bar appears across all days and times of the Graphical Dispatch Board (SD.900.00)
schedule pane indicating that the employee is not available for assignments.

350 Service Dispatch
Service Contract Summary (SD.900.01)
Service Contract Summary (SD.900.01) appears when you right-click in a service call details line on
the Graphical Dispatch Board (SD.900.00), and then select Service Contract Summary from the menu
that appears. This screen provides a condensed view of information about the service contract
associated with the service call task.
Figure 147: Service Contract Summary (SD.900.01)
Following are field descriptions for Service Contract Summary (SD.900.01).
Contract
Contract lists the identification code assigned to the service contract.
Branch ID
Brand ID contains the identification code assigned to the customer’s branch location.
Contract Type
Contract Type shows the category of the service contract.
Contract Amount
Contract Amount contains the total value of the service contract.
Priority
Priority lists the level of importance when service calls are received for work covered by the contract.
Start Date
Start Date shows the date the contract began.
End Date
End Date contains the last date of the contract.
Salesperson ID
Salesperson ID lists the identifier of the salesperson assigned to the service contract.
Primary Tech
Primary Tech shows the identification code assigned to the service technician who normally performs
works for the service contract.
Secondary Tech
Secondary Tech contains the identifier of the service technician who is the substitute for the primary
technician assigned to the service contract.

Data Entry Screens 351
Service Call Search (SD.900.02)
Use Service Call Search (SD.900.02) to look for problem codes of open service calls. You can perform
the search by customer, technician, service contract, and priority. Problem codes that match the
selection criteria are displayed in the Graphical Dispatch Board (SD.900.00) schedule pane and
service call details pane.
Figure 148: Service Call Search (SD.900.02)
Following are field descriptions for Service Call Search (SD.900.02).
Search Criteria Area
Use to select which problem codes of open service calls display on the Graphical Dispatch Board
(SD.900.00).
Specific Customer ID
Specific Customer ID indicates problem codes for the specified customer identification code are
included in the search.
All Customers
All Customers indicates problem codes for all customer identification codes are included in the search.
Enable Contract Based Search
Enable Contract Based Search indicates problem codes associated to a service contract are the only
problem codes included in the search.
Specific Contract ID
Specific Contract ID indicates problem codes for the specified service contract identification code are
included in the search.
Any Contract
Any Contract indicates problem codes for all service contract identification codes are included in the
search.

352 Service Dispatch
Specific Technician
Specific Technician indicates problem codes for the specified technician identification code are
included in the search.
All Technicians
All Technicians indicates problem codes for all technician identification codes are included in the
search.
Priority Area
Priority indicates problem codes for the selected level of importance are included in the search. Valid
priorities are:
All – problem codes for all priorities are included in the search
Premium – problem codes with the Premium priority are included in the search
High – problem codes with the High priority are included in the search
Medium – problem codes with the Medium priority are included in the search
Low – problem codes with the Low priority are included in the search
None – problem codes with no priority assigned are included in the search
Search (button)
Click Search to display problem codes for open service calls on the Graphical Dispatch Board
(SD.900.00) based on the selection criteria entered.
Select (button)
Click Select to choose a problem code displayed on the Graphical Dispatch Board (SD.900.00)
schedule pane and service call details pane.
Customer ID
Customer ID contains the customer identification code associated to the problem code.
Service Call ID
Service Call ID contains the service call identification code associated to the problem code.
Problem ID
Problem ID contains the problem code identification code assigned to the problem code.
Technician ID
Technician ID contains the technician identification code associated to the problem code.
Contract ID
Contract ID contains the service contract identification code associated to the problem code.
Start Date
Start Date contains the date the problem code is to begin.
Start Time
Start Time contains the time the problem code is to begin.

Data Entry Screens 353
Priority
Priority contains the level of importance assigned to the problem code. Valid priorities are:
Premium
High
Medium
Low
Blank

354 Service Dispatch
Graphical Dispatch - Assign Technician (SD.901.00) Use Graphical Dispatch - Assign Technician (SD.901.00) to assign a technician to a task. Technicians
are assigned to individual problem codes on a service call. It is the individual problem code
assignment that is managed on the Graphical Dispatch Board (SD.900.00), not the primary technician
assignment made at the service call level.
You can access the screen by either double-clicking while the mouse pointer is above a problem code
task bar in Graphical Dispatch Board (SD.900.00) or by clicking on the ellipsis (...) button in the
service call ID field in the Graphical Dispatch Board (SD.900.00) service call details pane.
You can add problem codes to a service call using Graphical Dispatch - Assign Technician
(SD.901.00). You can also use the screen to delete problem codes from a service call.
You can update the following fields on Graphical Dispatch - Assign Technician (SD.901.00):
Problem ID
Technician ID
Status
Start Date
Start Time
Travel Time
Duration
Equip ID
PM Code
Contract ID
Figure 149: Graphical Dispatch - Assign Technician (SD.901.00)
Following are field descriptions for Graphical Dispatch - Assign Technician (SD.901.00).
Service Call ID
Service Call ID contains the service call identifier associated with the problem code.
Promised Date
Promised Date contains the promise date of the service call.

Data Entry Screens 355
Problem ID
Problem ID contains the problem code ID. You can change an existing problem code or add a new one
to the grid by typing the desired problem code ID directly in the cell, by pressing F3, or by double-
clicking in Problem ID to access a list of problem code IDs.
Technician ID
Technician ID contains the employee ID from Employee Maintenance (SD.007.00) of the technician
assigned to work on the problem code. You may change an existing technician ID or add a new one to
the grid by typing the desired technician ID directly in the cell, by pressing F3, or by double-clicking in
the field to access a list of technician IDs.
Status
Status contains the status of the problem code, not the service call as a whole. Available status codes
are:
Unassigned
Assigned
In-route
WIP
Competed
P/U Parts
Parts-Out
Parts-In
Hold
Incomplete
Start Date
Start Date contains the date work started, or is expected to start. The date can be changed manually
or by using the mouse pointer to adjust the position of the task bar on the Graphical Dispatch Board
(SD.900.00) schedule pane representing this problem code.
Start Time
Start Time contains the time when work on this problem code is expected to begin. Note that time
must be typed in 24-hour, or military time, format. For example, 1:00PM is entered as 13:00. You can
also change Start Time using the mouse pointer to move either (1) the entire task bar on the Graphical
Dispatch Board (SD.900.00) schedule pane representing this problem code, or (2) the leading edge of
the task bar.
Travel Time
Travel Time contains the amount of time the technician needs for travel to the work location.
Graphical Dispatch Setup Maintenance (SD.902.00) provides a default value entered either for all
tasks or just for the first problem code on each service call for each technician.
Duration
Duration contains the total amount of time the technician will be spending on the problem code in one
continuous effort, including travel time. Note that if a problem code cannot be completed in one
continuous effort, enter multiple problem codes to allow the tracking of each instance when the
technician is working on the problem code.
End Date
End Date contains the calculated date work on the problem code is expected to be completed.
356 Service Dispatch
End Time
End Time contains the calculated time when work on the problem code is expected to complete. Note
that time must be typed in 24-hour, or military time, format. For example, 1:00PM is entered as 13:00.
Equip ID
Equip ID contains the equipment identifier from Equipment Entry (SE.001.00). Equip ID is an optional
field that allows the tracking of work by equipment ID for later reporting and analysis. This information
is also available for printing on the work order given to the technician. You may change an existing
equipment ID or enter one by typing the desired ID directly in the cell, by pressing F3, or by double-
clicking with the right mouse button in the field to access a list of equipment IDs.
PM Code
PM Code contains the preventive maintenance code from PM Code Maintenance (SE.002.00). PM
Code is an optional field that allows the linking of the work being completed to a specific preventive
maintenance requirement. This information is also available for printing on the work order given to the
technician. You may change an existing PM code or enter one by typing the desired PM code directly in
the cell, by pressing F3, or by double-clicking with the right mouse button in PM Code to access a list
of PM codes. Typically, this field is filled in automatically when a service call is generated from a
service contract PM schedule.
Contract ID
Contract ID contains the contract identifier from Service Contract Entry (SN.001.00). Contract ID is an
optional field that allows the linking of the work being done to a specific service contract. This
information is also available for printing on the work order given to the technician. You may change an
existing contract ID or enter one by typing the desired contract ID directly in the cell, by pressing F3, or
by double-clicking with the right mouse button in the field to access a list of contract IDs.
OK (button)
Clicking OK causes the changes to be saved. The screen is closed and you are returned to Graphical
Dispatch Board (SD.900.00).
Cancel (button)
Clicking Cancel causes any changes you have made to be canceled. The screen is closed and you are
returned to Graphical Dispatch Board (SD.900.00).

Inquiry Screens 357
Inquiry Screens
Inquiry Screens Overview The Service Dispatch module is designed to track every detail of a service organization. Several inquiry
screens exist in the system that enable users to effectively manage customers, equipment, and
technicians. Customer Information (SD.202.01) displays the customer address, credit card
information and accounts receivable aging balances during Invoice Entry (SD.202.00).
Service Dispatch gives customer service representatives the ability to view all open service calls for a
customer site while entering service calls in Open Service Call (SD.200.02) as well as see the
equipment associated with a customer site in Customer Equipment (SD.200.03). Service Call History
(SD.301.00) gives users the ability to view all completed service calls for a customer site while Service
Call Status Log (SD.027.00) gives users the ability to analyze the status changes of a service call.
Service Call Status Log (SD.027.00) Service Call Status Log (SD.027.00) shows the changes made to a call’s status from the time a
service call is created until it is completed. Open Service Call Status Log (SD.027.00) by clicking the
ellipsis (...) to the left of Call Status in Service Call Entry (SD.200.00), Status Log in Dispatch
(SD.201.00), or from the Service Dispatch menu.
Figure 150: Service Call Status Log (SD.027.00)
Following are the field descriptions for Service Call Status Log (SD.027.00).
Service Call ID
Service Call ID contains the service call identifier associated with the selected service call.
Customer ID
Customer ID contains the customer identifier and customer name associated with the service call.
Site ID
Site ID contains the site identifier and site name associated with the selected call.

358 Service Dispatch
Call Status
Call Status associates the service call status identifier with a service call. Call Status defaults the
status identifier from Dispatch (SD.201.00).
Date Changed
Date Changed contains the date information was changed on Service Call Status Log (SD.027.00).
Time Changed
Time Changed contains the time when information was changed on Service Call Status Log
(SD.027.00).
User ID
User ID identifies the person making the change.
OK (button)
OK closes the screen and saves the entry.

Inquiry Screens 359
Open Service Call (SD.200.02) Open Service Call (SD.200.02) displays open calls for a particular company and customer or site,
allowing you to stack calls. This button is only enabled if a site has a least one open service call
record. To access Open Service Call (SD.200.02), click Open Calls in Service Call Entry (SD.200.00).
Figure 151: Open Service Call (SD.200.02)
Following are the field descriptions for Open Service Call (SD.200.02).
Service Call ID
Service Call ID contains the service call identifier associated with the selected service call.
Company ID
Company ID defaults from the branch identifier entered in Service Call Entry (SD.200.00).
Status
Status indicates whether the service call is open or closed. Status is managed by the system and does
not require user intervention.
Date Promised
Date Promised contains the date the call is expected to be complete.
Promised Time From
Promised Time From contains the approximate time a technician is expected to be at the customer
site.
Call Status ID
Call Status ID contains the service call status identifier associated with a service call.
Call Type ID
Call Type ID displays the service call type identifier associated with a service call. Call Type ID defaults
from Service Call Entry (SD.200.00).
Caller Name
Caller Name contains the contact name for the person calling in the service request. If a name was
entered in Attention in Site Maintenance (SD.025.00), the value is shown in Caller Name.

360 Service Dispatch
Service Technician
Service Technician contains the technician assigned to the service call.
Select (button)
Select displays details about the open service call.
Cancel (button)
Cancel prompts you to save your changes and closes the screen.
Note: You can run a report that shows all open service calls. For more information, see “Open Service
Call List (SD.620.00)” on page 509.

Inquiry Screens 361
Customer Equipment (SD.200.03) Customer Equipment (SD.200.03) displays all the equipment associated with a customer site. Open
Customer Equipment (SD.200.03) by clicking Equipment in Service Call Entry (SD.200.00). Selecting a
piece of equipment and clicking Details accesses Equipment Entry (SE.001.00) in the Equipment
Maintenance module.
Figure 152: Customer Equipment (SD.200.03)
Following are the field descriptions for Customer Equipment (SD.200.03).
Equipment ID
Equipment ID contains the number assigned to this piece of equipment.
Description
Description contains the description of the equipment.
Location
Location indicates where the piece of equipment is located at the site.
Serial Number
Serial Number contains the unique manufacturer’s number assigned to this piece of equipment.
Status
Status indicates whether the service call is open or closed. Status is managed by the system and does
not require user intervention.
Manuf ID
Manuf ID identifies the manufacturer of this piece of equipment
Model ID
Model ID contains the manufacturer’s model identification assigned to this piece of equipment.
Equip Type
Equip Type describes whether the equipment is owned or leased by the site.
Warr Start Date
Warr Start Date contains the first day of the warranty.
362 Service Dispatch
Warr End Date
Warr End Date contains the last day of the warranty.
OK (button)
OK closes the screen and saves any changes.
Details (button)
Selecting a piece of equipment and clicking Details accesses Equipment Entry (SE.001.00) in the
Equipment Maintenance module.

Inquiry Screens 363
Customer Information (SD.202.01) Customer Information (SD.202.01) contains customer address, credit card, and aging information
from Accounts Receivable. Open Customer Information (SD.202.01) by clicking Billing Address in
Invoice Entry (SD.202.00).
Figure 153: Customer Information (SD.202.01)
Following are the field descriptions for Customer Information (SD.202.01).
Customer ID
Customer ID indicates the customer identifier.
Name
Name indicates the customer or site name.
Salutation
Salutation contains the first line of a letter used when corresponding with this customer.
Address
Address contains the street number and name of the customer.
City
City contains the city where the customer is located. The city name can be a maximum of 30
characters.
State/Zip/Cntry
State contains the two-character abbreviation for the state in which the customer is located: Zip is the
zip code for the customer: Cntry is the country or region where the customer is located.
Phone/Ext
Phone/Ext contains the phone number and extension for the customer.
Fax/Ext
Fax/Ext contains the fax number and extension for the customer.
Current Balance
Current Balance contains the total amount due for this customer.

364 Service Dispatch
Future Balance
Future Balance contains the total dollar amount of invoices posted to future periods.
Credit Limit
Credit Limit contains the total amount of credit granted to this customer.
Credit Available
Credit Available contains the remaining credit available to this customer.
Current
Current contains the outstanding balance due as of the system date.
1 To 30
1 To 30 contains the outstanding balance from 1 to 30 days past due.
31 To 60
31 To 60 contains the outstanding balance from 31 to 60 days past due.
61 To 90
61 To 90 contains the outstanding balance from 61 to 90 days past due.
Over 90
Over 90 contains the outstanding balance over 90 days past due.
Credit Card Nbr
Credit Card Nbr contains the credit card number used to pay for service calls.
Type
Type indicates the type of credit card used, such as Visa, Master Card, etc.
Expiration Date
Expiration Date contains the expiration date of the credit card.
OK (button)
OK closes the screen and saves any changes.

Inquiry Screens 365
Service Call History (SD.301.00) Service Call History (SD.301.00) displays the history of completed service calls for a specific customer
and site. You can drill down on a specific service call by selecting the desired call from the grid and
clicking Call Details. The related invoice information is displayed by clicking Invoice. Click the Quick
Send Inquiry button to view the details of the Quick Send requests created when an invoice is sent
electronically based on the customer’s and any additional receivers’ preferences defined on the
Accounts Receivable Customer Maintenance (08.260.00), Quick Send tab. Open Service Call History
(SD.301.00) by clicking Service History in Service Call Entry (SD.200.00), History in Dispatch
(SD.201.00) or from the Service Dispatch menu.
Note: You can run a report that shows service call history. For more information, see “Service Call
History (SD.622.00)” on page 514.
Figure 154: Service Call History (SD.301.00)
Following are the field descriptions for Service Call History (SD.301.00).
Cust ID
Customer ID contains the name of the customer.
Site ID
Site ID contains the site of the service call. When the identifier is entered, the site name appears to
the right of Site ID.
Service Call ID
Service Call ID contains the service call identifier associated with the selected service call.
Company ID
Company ID defaults from the branch identifier entered in Service Call Entry (SD.200.00).
Call Date
Call Date contains the date the service call was first placed.
Service Technician
Service Technician contains the primary technician assigned to the service call.

366 Service Dispatch
Call Type ID
Call Type ID displays the service call type identifier associated with a service call. Call Type ID field
defaults from Service Call Entry (SD.200.00).
Call Status ID
Call Status ID associates the service call status identifier with a service call.
Caller Name
Caller Name displays the contact name of the person calling in the service request.
Completed Date
Completed Date contains the date the service call was completed.
Completed Time
Completed Time contains the time the service call was completed.
Status
Status indicates whether the service call is open or closed. Status is managed by the system and does
not require user intervention.
Invoice Nbr
Invoice Nbr contains the number of the invoice for this service call.
Invoice Amount
Invoice Amount contains the amount due on this invoice.
Call Details (button)
Call Details accesses detailed information about a specific call.
Invoice (button)
Invoice accesses Invoice Entry (SD.202.00). Invoice is not available if the company ID associated with
the service call does not match that of the company you are currently accessing.
Quick Send Inquiry (button)
Quick Send Inquiry accesses Quick Send Inquiry (21.200.00) for viewing the details of Quick Send
requests created when the invoice was sent electronically.
Cancel (button)
Cancel prompts you to save your changes and closes the screen.
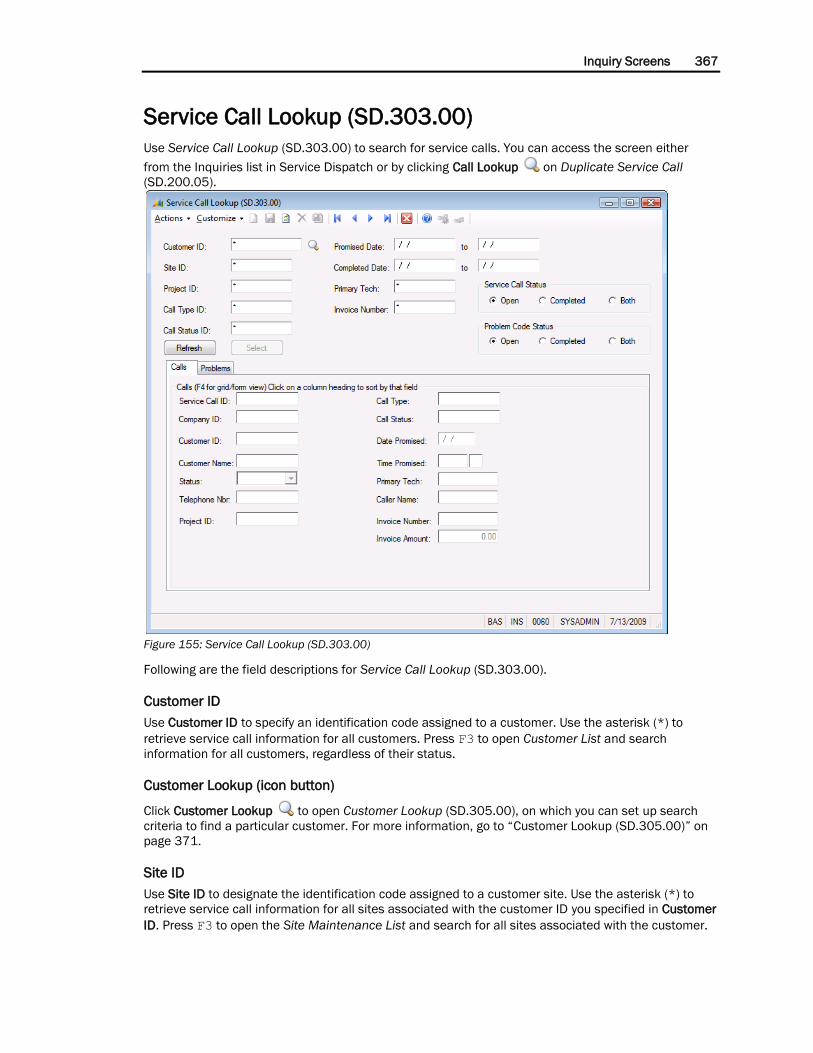
Inquiry Screens 367
Service Call Lookup (SD.303.00)
Use Service Call Lookup (SD.303.00) to search for service calls. You can access the screen either
from the Inquiries list in Service Dispatch or by clicking Call Lookup on Duplicate Service Call
(SD.200.05).
Figure 155: Service Call Lookup (SD.303.00)
Following are the field descriptions for Service Call Lookup (SD.303.00).
Customer ID
Use Customer ID to specify an identification code assigned to a customer. Use the asterisk (*) to
retrieve service call information for all customers. Press F3 to open Customer List and search
information for all customers, regardless of their status.
Customer Lookup (icon button)
Click Customer Lookup to open Customer Lookup (SD.305.00), on which you can set up search
criteria to find a particular customer. For more information, go to “Customer Lookup (SD.305.00)” on
page 371.
Site ID
Use Site ID to designate the identification code assigned to a customer site. Use the asterisk (*) to
retrieve service call information for all sites associated with the customer ID you specified in Customer
ID. Press F3 to open the Site Maintenance List and search for all sites associated with the customer.
368 Service Dispatch
Project ID Use Project ID to limit the service call information that appears in the grid. Use the asterisk (*) to
retrieve service call information for all projects, or press F3 to open Active Projects in Login Company
List and select a project.
Call Type ID
Use Call Type ID to specify the identification code assigned to the call type associated with a service
call. Use the asterisk (*) in Call type ID to retrieve service call information for all call types. Press F3 in
Call type ID to open the Call Type Maintenance PV List and search for call types associated with a
customer you specify in Customer ID or all projects if Customer ID contains an asterisk.
Call Status ID
Use Call Status ID to designate the identification code assigned to the status of a service call. Use the
asterisk (*) in Call Status ID to retrieve service call information for all call statuses. Press F3 to open
the Call Status Maintenance PV List and search for call statuses associated with a customer you
specify in Customer ID or all call statuses if Customer ID contains an asterisk.
Promised Date
Use Promised Date to specify a range that includes the planned completion date of the service call. To
search by a single date, enter the same beginning and ending date.
Completed Date
Use Completed Date to specify a range of dates during which the service call was finished. To search
by a single date, enter the same beginning and ending date.
Primary Tech
Use Primary Tech to select the employee ID of the technician who handled the service call. Use the
asterisk (*) to retrieve service calls assigned to all technicians. Press F3 to open the Employee
Maintenance PV List and select a specific technician’s employee ID.
Invoice Number
Use Invoice Number to designate a service call invoice. Use the asterisk (*) in Invoice Number to
retrieve information about all service calls that have been invoiced. Press F3 to open the Service Call
Invoice List and search for invoices that are associated with a customer you specify in Customer ID or
all service call invoices if Customer ID contains an asterisk.
Service Call Status
Click a Service Call Status option to select service calls based on call status. The options are:
Open (the default)
Completed
Both
Problem Code Status
Click a Problem Code Status option to select service calls based on the status of the associated
problem. The options are:
Open (the default)
Completed
Both

Inquiry Screens 369
Refresh (button)
Click Refresh to initiate the service call search. If you opened Service Call Lookup (SD.303.00) while in
Duplicate Service Call (SD.200.05), search results appear in the grid area based on the company you
selected in Company ID on Service Call Entry (SD.200.00) and other search criteria you specified in
Service Call Lookup (SD.303.00). If you accessed Service Call Lookup (SD.303.00) from the Inquiries
list, search results appear in the grid for the company to which you are currently logged on and based
on the search criteria you specified.
Select (button)
Click Select to select a service call line on the Calls tab grid. If you accessed Service Call Lookup
(SD.303.00) from Duplicate Service Call (SD.200.05), that screen appears again after you click Select,
and the ID of the service call you selected appears in Service Call ID. If you accessed Service Call
Lookup (SD.303.00) from the Inquiries list, Service Call Entry (SD.200.00) appears, and the service
call’s details appear.
Calls Tab
Information on the Calls tab is available for display and selection only. The fields are:
Service Call ID
Service Call ID contains the identification code assigned to the service call.
Company ID
Company ID contains the identification number of the company associated with the service call.
Customer ID
Customer ID contains the identification number of the customer that requested the service call.
Customer Name
Customer Name contains the name of the customer who requested the service call.
Status
Status indicates the current state of the service call.
Telephone Nbr
Telephone Nbr contains the phone number of the site receiving the service.
Project ID
Project ID contains the identifier of a project associated with the service call.
Call Type
Call Type contains the type of service call.
Call Status
Call Status indicates whether the service call is open or completed.
Date Promised
Date Promised contains the planned date of service.
Primary Tech
Primary Tech contains the identification code of the technician assigned to the service call.

370 Service Dispatch
Caller Name
Caller Name contains the name of the person who requested the service.
Invoice Number
Invoice Number is the number assigned to the service call invoice.
Invoice Amount
Invoice Amount is the total charges on the service call invoice.
Problems Tab
Information on the Problems tab is available for display and selection only. The fields are:
Service Call ID
Service Call ID contains the identification code assigned to the service call associated with the
problem.
Problem ID
Problem ID contains the identification code assigned to the problem the service call addresses.
Problem Name
Problem Name contains a brief description of the problem the service call addresses.
Technician
Technician contains the identification code of the technician assigned to the call.
Status
Status contains the state of the problem the service call addresses.
Start Date
Start Date contains the date service is expected to begin.
Start Time
Start Time contains the time of day service is expected to begin.
Cause ID
Cause ID contains the identification code assigned to the cause of the problem.
Resolution ID
Resolution ID contains the identification code assigned to the solution to the problem.

Inquiry Screens 371
Customer Lookup (SD.305.00) Use Customer Lookup (SD.305.00) to search for customers based on site information. For example, a
dispatcher selects the Site Name option in Search By, Contains in Using, and types 01 in Search Info
to find customer sites with names such as 010 and 98016. Search results appear in the Query
Results area.
You can access Customer Lookup (SD.305.00) either from the Inquiries list in Service Dispatch or by
clicking Customer Lookup on Service Call Lookup (SD.303.00).
Figure 156: Customer Lookup (SD.305.00)
Following are the field descriptions for Customer Lookup (SD.305.00).
Search By
Use Search By to select the field on which to base the search. The options are:
Site Name Equipment ID Postal Code
Attention Asset ID Phone
Description Serial Number Address User5
Address 1 Model ID Address User6
Address 2 Address User1
City Address User2

372 Service Dispatch
Using
In Using you can specify the beginning characters or any characters within the text you enter in
Search Info to narrow your search. The options are:
Begins with — Type the first few characters of the text.
Contains — Type characters that appear consecutively in the text.
Search Info
Use Search Info to enter text to complete search criteria.
Refresh (button)
Click Refresh to initiate the customer search. Search results appear in the Query Results area.
Select (button)
Click Select to select a customer detail line in the Query Results area. Click the detail line for the
appropriate customer, and then click Select.
If you opened Customer Lookup (SD.305.00) in Service Call Entry (SD.200.00), the customer’s
information appears on that screen’s Service Call Info tab. If you accessed Customer Lookup
(SD.305.00) from Service Call Lookup (SD.303.00), the customer’s identification code appears in
Customer ID on that screen. If you accessed Customer Lookup (SD.305.00) on the Inquiries list, Site
Maintenance (SD.025.00) opens and information for the site you selected appears.
Query Results area
Information in the Query Results area is available for display and selection only. Fields in the Query
Results area are:
Equip ID
Equip ID is visible if Equipment ID, Asset ID, Serial Nbr, or Model ID is selected in Search By. It
contains the identification code assigned to a piece of equipment associated with a customer site.
Asset ID
Asset ID is visible if Equipment ID, Asset ID, Serial Nbr, or Model ID is selected in Search By. It contains
the identification code assigned to a piece of equipment associated with a customer site.
Serial Nbr
Serial Nbr is visible if Equipment ID, Asset ID, Serial Nbr, or Model ID is selected in Search By. It
contains the serial number assigned to a piece of equipment associated with a customer site.
Manufacturer ID
Manufacturer ID is visible if Equipment ID, Asset ID, Serial Nbr, or Model ID is selected in Search By. It
contains the identification code assigned to the manufacturer of a piece of equipment associated with
a customer site.
Model ID
Model ID is visible if Equipment ID, Asset ID, Serial Nbr, or Model ID is selected in Search By. It
contains the model number assigned to a piece of equipment associated with a customer site.
Customer ID
Customer ID contains the customer identification code associated with a customer site.
Site ID
Site ID contains the customer site’s identification code.

Inquiry Screens 373
Name
Name contains the name of the customer site.
Description
Description contains brief details about the customer site.
Attention
Attention contains a contact name for the customer site.
Address Line 1
Address Line 1 contains the customer site’s first address line.
Address Line 2
Address Line 2 contains the customer site’s second address line.
City
City contains the name of the city in which the customer site is located.
State
State contains the name of the state in which the customer site is located.
Postal Code
Postal Code contains the postal code for the customer site.
Country/Region
Country/Region contains the name of the country or region in which the customer site is located.
Branch ID
Brand ID contains the identification code assigned to the customer site’s branch.
Phone/Ext
Phone/Ext contains the telephone number for the customer site.
Fax/Ext
Fax/Ext contains the fax telephone number for the customer site.
Geographic Zone
Geographic Zone contains the identification code assigned to the geographic zone in which the
customer site is located.
Dwelling Type
Dwelling Type contains the identification code assigned to the type of structure that houses the
customer site.

374 Service Dispatch
Customer Site Location (SD.905.00) Integrating with Microsoft MapPoint, Customer Site Location (SD.905.00) will display a map indicating
the location of a customer site (shipping address). Access the screen by selecting MapPoint
Integration from the Service Dispatch menu or by right-clicking on the task bar on Graphical Dispatch
Board (SD.900.00) and selecting Map from the menu.
Figure 157: Customer Site Location (SD.905.00)
Following are the field descriptions for Customer Site Location (SD.905.00).
Cust ID
Cust ID is the customer identifier. Type one in or select one from the Customer List. When the
identifier is entered, the customer name displays to the right of the field. Click the ellipsis (...) button to
the left of Cust ID to access the Customer Maintenance (08.260.00) PV list in the Accounts
Receivable module.
Site ID
Site ID selects the physical location address. When the ID is entered, the site name displays to the
right of Site ID. Click the ellipsis (...) button to the left of Site ID to access Site Maintenance
(SD.025.00).
Refresh (button)
Click Refresh to regenerate the map window.

Maintenance Screens 375
Maintenance Screens
Maintenance Screens Overview The Service Dispatch module is a comprehensive service business system that is designed to track
and manage every detail of a service organization. Several maintenance screens exist in the system
that enables users to completely automate service call processing, dispatching and invoicing
efficiently and accurately.
See “Setting up Service Dispatch” on page 46 for detailed procedures explaining how to adapt the
Service Dispatch module to your business needs and practices.
Branch Maintenance (SD.001.00) Branch Maintenance (SD.001.00) allows you to create an unlimited number of user-defined branches.
It links a user-specified number of geographic zones to a branch code, thus allowing a branch to be as
small or as large as necessary. This screen also creates a branch abbreviation. This abbreviation is
added to the beginning of service call IDs, equipment IDs and service contract IDs, if you select this
option in Service Series Setup Maintenance (SD.000.00). The identifiers created with abbreviations do
not allow each branch to have its own sequential ID numbering schema. However, you can quickly
identify a branch with a service contract, piece of equipment, or service call.
This screen also accepts general information regarding the branch, such as the contact, address,
phone, and fax number. Notes are also entered for the branch by clicking the Notes/Attachments icon.
Note: A geographic zone and a branch form a one-to-one relationship. Therefore, a geographic zone is
only associated with one branch. If a geographic zone exists over two or more branches, do not link
the geographic zone to a branch.
Figure 158: Branch Maintenance (SD.001.00)

376 Service Dispatch
Following are the field descriptions for Branch Maintenance (SD.001.00).
Branch ID
Branch ID creates a user-defined identifier code to identify a branch. The identifier is a 10-character
alphanumeric code.
Branch Abbreviation
Branch Abbreviation creates a three-character abbreviation for a branch. This abbreviation is added to
the beginning of the service call identifiers, equipment IDs, and service contract Ids, if you select this
option in Service Series Setup Maintenance (SD.000.00).
Branch Name
Branch Name contains the 30-character maximum branch name for a branch identifier.
Company ID
Company ID assigns a branch to a company.
Attention
Attention contains the name of the branch manager or other contact person at a particular branch.
Address
Address contains the address of the branch. It may be two lines of address up to 30 characters each.
City
City contains the city where the branch is located. The city name can be a maximum of 30 characters.
State
State contains the two-character abbreviation for the state in which the branch is located.
Zip
Zip contains the zip code where the particular branch is located.
Country/Region
Country/Region contains the country or region where the particular branch is located.
Phone
Phone contains the branch’s phone number along with a four-digit extension.
Fax Number
Fax Number contains the branch’s fax number along with a four-digit extension.
Zone Area
Geographic Zone ID
Geographic Zone ID associates a geographic zone with a branch code. A parent-to-child relationship
between a branch code and a geographic zone may be created.

Maintenance Screens 377
Description
Description displays the explanation of the geographic zone.
Note: The Branch/Zone Maintenance PV List filters and lists only those geographic zones that have
not been assigned to a branch. This association is made in Geographic Zone Maintenance
(SD.009.00).
Note: You can print a listing of the branches. For more information, see “Branch List (SD.600.00)” on
page 501.
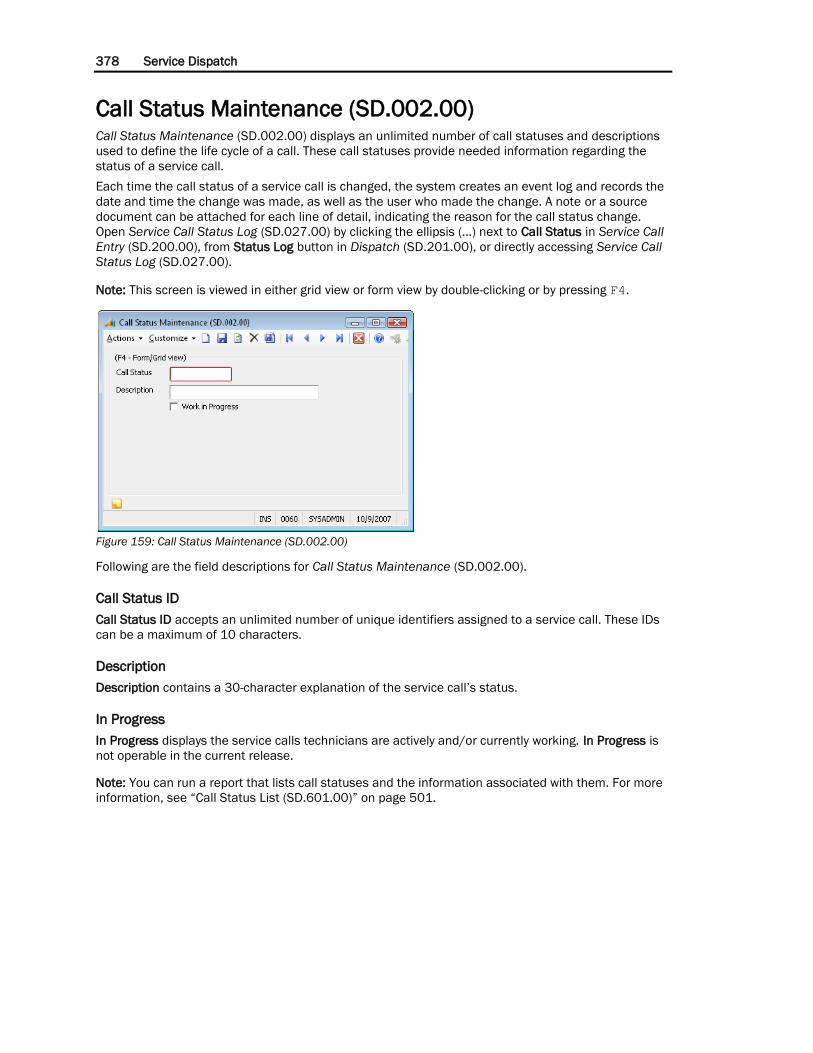
378 Service Dispatch
Call Status Maintenance (SD.002.00) Call Status Maintenance (SD.002.00) displays an unlimited number of call statuses and descriptions
used to define the life cycle of a call. These call statuses provide needed information regarding the
status of a service call.
Each time the call status of a service call is changed, the system creates an event log and records the
date and time the change was made, as well as the user who made the change. A note or a source
document can be attached for each line of detail, indicating the reason for the call status change.
Open Service Call Status Log (SD.027.00) by clicking the ellipsis (...) next to Call Status in Service Call
Entry (SD.200.00), from Status Log button in Dispatch (SD.201.00), or directly accessing Service Call
Status Log (SD.027.00).
Note: This screen is viewed in either grid view or form view by double-clicking or by pressing F4.
Figure 159: Call Status Maintenance (SD.002.00)
Following are the field descriptions for Call Status Maintenance (SD.002.00).
Call Status ID
Call Status ID accepts an unlimited number of unique identifiers assigned to a service call. These IDs
can be a maximum of 10 characters.
Description
Description contains a 30-character explanation of the service call’s status.
In Progress
In Progress displays the service calls technicians are actively and/or currently working. In Progress is
not operable in the current release.
Note: You can run a report that lists call statuses and the information associated with them. For more
information, see “Call Status List (SD.601.00)” on page 501.

Maintenance Screens 379
Call Type Maintenance (SD.003.00) Call Type Maintenance (SD.003.00) accepts an unlimited number of unique call types. It provides the
ability to separate service calls or jobs by divisions or lines of business. For example, a call may be
classified as an air conditioning call, heating call, plumbing call, or a preventive maintenance call.
In addition, this screen allows you to link a subaccount with a call type. For instance, you may want to
have the revenue from the heating division in a separate subaccount from the air conditioning division
in the General Ledger. This allows sales revenue to be recognized in a more detailed manner.
Note: This screen is viewed in both grid and form view by double-clicking or by pressing F4.
Figure 160: Call Type Maintenance (SD.003.00)
Following are the field descriptions for Call Type Maintenance (SD.003.00).
Call Type ID
Call Type ID accepts an unlimited number of unique call type identifiers. Call Type IDs allow the
creation and separation of the calls by line of business or business centers.
Description
Description contains a 30-character explanation of the service call type.
Use Sub from Site
Use Sub from Site permits the default of the subaccount associated with the sales and costs of the
service call to the value entered in Site Maintenance (SD.025.00). If this box is checked and no
subaccount information exists at the site level, the subaccount from the call type is used.
SubAccount
SubAccount associates or links a General Ledger subaccount to a call type. A subaccount is selected
by double-clicking or by pressing the F3 key that accesses the active subaccount list.
Note: It is recommended that you carefully think through your subaccounts relative to call types. Once
service calls have been created, you must update the database to recognize and clean up all call types
for various analysis reports if you desire to change subaccounts. In addition, it is recommended that
companies with three or more branches consider checking Use Sub from Site.

380 Service Dispatch
Default Service Type
Default Service Type provides an optional way of associating a call type to a specific invoice type. This
is optional and has no functional impact, but may be used for reporting purposes.
Note: You can run a report of all call types. For more information, see “Call Type List (SD.602.00)” on
page 502.

Maintenance Screens 381
Dispatch - View Maintenance (SD.004.00) Dispatch - View Maintenance (SD.004.00) sets up an unlimited number of call view templates to
display service calls in Dispatch (SD.201.00) in any manner.
Figure 161: Dispatch - View Maintenance (SD.004.00)
Following are the field descriptions for Dispatch - View Maintenance (SD.004.00).
Call View
Call View allows you to set up an unlimited number of unique template identifiers. These call view IDs
are associated with a user (for example, dispatcher) for defaulting the most popular set of records in
the service call queue.
Description
Description contains a 30-character explanation of the service call view.
Priority
Priority selects the desired priority of service calls to be viewed. To view premium priority service calls
only, select the Premium check box and clear the High, Medium, and Low check boxes.
Branch ID
Branch ID displays a list of service calls. Select the All check box to access all service calls for a
Branch ID. The list is determined by the related branch fields in the User Configuration subscreen of
Service Series Setup Maintenance (SD.000.00). If only one branch ID is allowed, the branch identifier
associated with the service call defaults to Branch ID and is display-only.
All (Branch ID)
All (Branch ID) displays all service calls for all branches. All (Branch ID) is restricted to those users who
have appropriate access rights. This prevents the dispatching departments of two different branches
from dispatching each other’s service calls.
Technician
Technician displays a selected list of service calls in the service call queue based on a single
Technician ID.
All (Technician)
All (Technician) displays all service calls. It does not filter/restrict calls by any particular service
technician.

382 Service Dispatch
Call Type (button)
Call Type accesses Call Type (SD.004.05), which provides a tool for restricting the service call queue
to view only the service calls with a desired call type.
Call Status (button)
Call Status accesses Call Status (SD.004.06), which provides a tool for restricting the service call
queue to view only the service calls with a desired call status.
Geographic (button)
Geographic accesses Geography (SD.004.01), which provides a tool for restricting the service call
queue to view only the service calls that reside in the selected geographic zones.
Sort Order (button)
Sort Order accesses Dispatch Sort Order (SD.004.02), which sorts service calls in the service call
queue, allowing calls to be viewed in the most desirable manner.
Note: It is recommended that you set up a user with at least one call queue view with no filters.
Geography (SD.004.01)
Geography (SD.004.01) restricts the service call queue to display only the calls that reside in selected
geographic zones. Open Geography (SD.004.01 from Dispatch - View Maintenance (SD.004.00) by
clicking Geographic.
Figure 162: Geography (SD.004.01)
Following are the field descriptions for Geography (SD.004.00).
Geographic ID
Geographic ID contains the identification given to a particular region.
Description
Description accepts a 30-character explanation of the geographic zone.
OK (button)
OK closes the screen and saves any changes.

Maintenance Screens 383
Dispatch Sort Order (SD.004.02)
Dispatch Sort Order (SD.004.02) sorts calls on the service call queue, allowing you to view the calls
many different ways. Open Dispatch Sort Order (SD.004.02) from Dispatch - View Maintenance
(SD.004.00) by clicking Sort Order.
Figure 163: Dispatch Sort Order (SD.004.02)
Following are the field descriptions for Dispatch Service Order (SD.204.02).
Available Fields
Available Fields is a listing of fields available for display.
Sort Fields
Sort Fields displays the fields selected from Available Fields.
Add (button)
Add transfers the highlighted field from Available Fields to Sort Fields.
Remove (button)
Remove transfers the highlighted field from Sort Fields to Available Fields.
Remove All (button)
Remove All transfers all entries from Sort Fields to Available Fields.
Sort Direction
Sort Direction determines whether highlighted fields appear in ascending or descending order.
OK (button)
OK closes the screen and saves any changes.
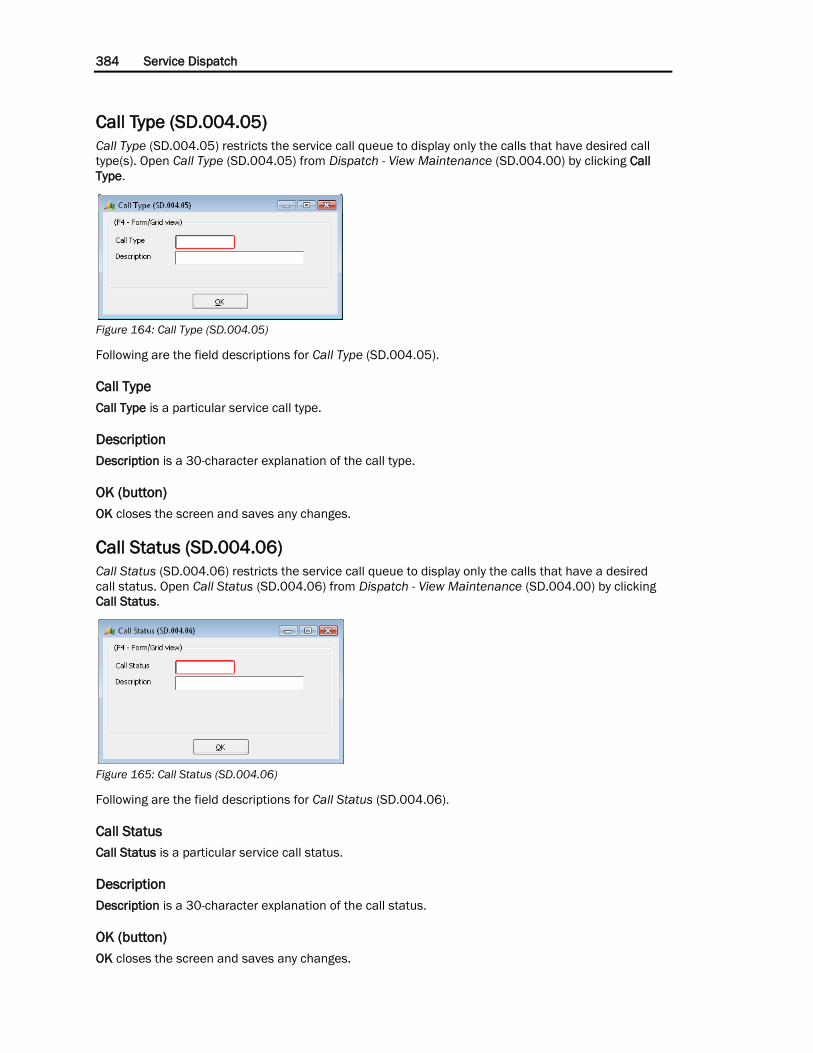
384 Service Dispatch
Call Type (SD.004.05)
Call Type (SD.004.05) restricts the service call queue to display only the calls that have desired call
type(s). Open Call Type (SD.004.05) from Dispatch - View Maintenance (SD.004.00) by clicking Call
Type.
Figure 164: Call Type (SD.004.05)
Following are the field descriptions for Call Type (SD.004.05).
Call Type
Call Type is a particular service call type.
Description
Description is a 30-character explanation of the call type.
OK (button)
OK closes the screen and saves any changes.
Call Status (SD.004.06)
Call Status (SD.004.06) restricts the service call queue to display only the calls that have a desired
call status. Open Call Status (SD.004.06) from Dispatch - View Maintenance (SD.004.00) by clicking
Call Status.
Figure 165: Call Status (SD.004.06)
Following are the field descriptions for Call Status (SD.004.06).
Call Status
Call Status is a particular service call status.
Description
Description is a 30-character explanation of the call status.
OK (button)
OK closes the screen and saves any changes.

Maintenance Screens 385
Dwelling Maintenance (SD.005.00) Dwelling Maintenance (SD.005.00) accepts an unlimited number of unique dwelling types. Dwelling
Maintenance (SD.005.00) creates dwelling types by size or square footage and by the type of building
(residential, single, or multiple family dwelling) on the particular site. This information is useful for
reporting purposes, such as marketing pieces created for a specific dwelling type. For example, the
marketing department might want to send a promotional piece to all single-family homes with pools.
Figure 166: Dwelling Maintenance (SD.005.00)
Following are the field descriptions for Dwelling Maintenance (SD.005.00).
Dwelling ID
Dwelling ID contains the unique dwelling identifier for each dwelling type in the database. The dwelling
ID is a default value from Site Maintenance (SD.025.00), which is associated with a service call
record.
Description
Description accepts a 30-character explanation of Dwelling ID.
Note: You can run a report of all dwelling types. For more information, see “Dwelling List (SD.603.00)”
on page 503.

386 Service Dispatch
Employee Class Maintenance (SD.006.00) Employee Class Maintenance (SD.006.00) creates an unlimited number of unique employee classes.
Each employee entered into the system using Employee Maintenance (SD.007.00) is assigned to one
of these user-defined classes. An employee is only assigned to one class. A description of the
employee class is also typed into this screen, along with information regarding eligibility for
commission.
Note: This screen is viewed in either form or grid view by double-clicking or pressing F4.
Figure 167: Employee Class Maintenance (SD.006.00)
Following are the field descriptions for Employee Class Maintenance (SD.006.00).
Employee Class ID
Employee Class ID contains the employee class using a unique user-defined identifying code. Each
identifier can be 10 characters in length. An unlimited number of user-defined classes can be entered
into the system.
Description
Description accepts a 30-character explanation of the employee class identifier.
Commission Paid
Commission Paid may be used for reporting purposes. There is no system functionality.
Note: You can run a report that shows all employee classes with their descriptions and commissions
paid indicator. For more information, see “Employee Class List (SD.605.00)” on page 503.

Maintenance Screens 387
Employee Maintenance (SD.007.00) Employee Maintenance (SD.007.00 adds and maintains employee information. Employee ID assigns a
unique ID to each employee. The General Information frame includes basic information needed for
each employee, such as address, social security number, date of birth, supervisor, home phone, and
pager number.
Clicking Personal Info accesses Employee Personal Information (SD.007.01), which contains
information regarding the employee’s pay, driver’s license information, and other general office
information. The system administrator may choose to deny employees the right to view this screen
because of its sensitive content. Denying access to selected screens is done via Customization
Manager, which allows you to make the Personal Info button invisible for specific users, thus
preventing access.
Note: You can run a report that shows the general and personal information for employees. For more
information, see “Employee Information (SD.604.00)” on page 504.
Skills accesses Employee Skills Information (SD.007.03), which associates an employee with needed
skills. It also rates each employee on the associated skills.
Licenses accesses Employee License Information (SD.007.04), which associates an employee with
the necessary licenses needed by a technician or other employee.
Tool accesses Employee Tool (SD.007.05), which manages company-owned tools loaned to
employees. Select tools from the Tool Maintenance PV List to be assigned to an employee. You also
have the ability to remove previously selected tools from an employee.
Figure 168: Employee Maintenance (SD.007.00) -- Service Dispatch is not integrated with the Payroll module

388 Service Dispatch
Employee Maintenance (SD.007.00)
Figure 169: Employee Maintenance (SD.007.00) -- Service Dispatch is integrated with the Payroll module
Following are the field descriptions for Employee Maintenance (SD.007.00).
Employee ID
Employee ID assigns a unique identification code to each employee. Employee ID allows you to input
and distinguish between two employees that may have the same or similar names.
Payroll ID
Payroll ID associates a Service Dispatch employee to a Payroll employee when Service Dispatch is
integrated with the Payroll module. Enter the Employee ID from Payroll Employee Maintenance
(02.250.00) in Payroll ID. Payroll ID must be populated to allow you to copy employee information
when using the Copy Info button.
Copy Info (button)
Click the Copy Info button to copy employee information from the Payroll module to Employee
Maintenance (SD.007.00) when Service Dispatch is integrated with the Payroll module.
First Name
First Name contains the first name of the person associated with Employee ID.
M.I.
M.I. contains the middle initial of the person associated with Employee ID.
Last Name
Last Name contains the last name of the person associated with Employee ID. The drop-down list to
the right of Last Name indicates whether the employee is currently on the payroll.

Maintenance Screens 389
Status
Status designates an employee as active or inactive. In addition, you can identify when an employee is
on vacation, out sick, or on personal time off. Only active employees can be assigned to service calls.
Note: When the status of an employee is set to vacation, sick or personal, a task bar will be displayed
across all dates on the Graphical Dispatch Board (SD.900.00) for the employee. If the status is set to
inactive, the employee will not appear on the Graphical Dispatch Board (SD.900.00).
Hint: Employee Schedule (SD.904.00) provides an alternative means of setting an employee’s status.
A benefit to using Employee Schedule (SD.904.00) instead of Employee Maintenance (SD.007.00) is
that you can indicate specific days the status should apply to.
Address Line 1
Address Line 1 accepts the home address for the employee. There are two lines of 30 characters each
for the address.
City
City contains the municipality in which the employee resides.
State
State contains the two or three character state abbreviation for the employee. This is a validated field;
therefore, only values entered in State/Province Maintenance (21.290.00) in the Shared Information
module are entered.
Zip Code
Zip Code contains the zip code for the employee.
Social Security No.
Social Security No. contains the social security number of the employee.
Date of Birth
Date of Birth contains the birth date of the employee.
Employee Class
Employee Class associates the employee with a user-specified employee class.
Branch ID
Branch ID associates the employee with a specific branch. Although this field is not required, you
should enter a Branch ID if Field Service Management will be integrated with either Payroll or
Advanced Payroll. The Branch ID used should be associated with the same company the employee is
associated with in Employee Maintenance (02.250.00).
Home Phone No.
Home Phone No. contains the home phone number of the employee.
Pager No./PIN
Pager No./PIN contains the pager number or PIN number of the employee. This number will be used
by the paging program to send pages to the employee.
E-mail Address
E-mail Address contains the email address of the employee. This address will be used in Graphical
Dispatch Board (SD.900.00) when an email message is sent to the employee.

390 Service Dispatch
Default Inventory Site
Default Inventory Site contains the valid inventory site (for example, truck) associated with the
employee. If the employee is the primary technician on a service call, this inventory site will be the
default value during invoice entry. Entering a valid inventory site identifier streamlines invoice
processing.
Template Id
Template Id associates a pager template with the employee. When an employee or technician is
assigned to a call, the appropriate fields are populated and included in the alphanumeric page. Pager
template default fields are set up in Service Series Setup Maintenance (SD.000.00).
Supervisor
Supervisor associates an employee with a supervisor. The supervisor’s name displays to the right of
Supervisor. Use Supervisor to group employees on reports.
Company ID
Company ID defaults to the company assigned to the branch ID.
Other Phone (button)
Other Phone accesses Employee Other Phone (SD.007.02) which accepts additional phone numbers
to use when trying to contact an employee.
Personal Info (button)
Personal Info accesses Employee Personal Information (SD.007.01) which associates additional
information about this employee; such as, the driver’s license and pay information.
Skills (button)
Skills accesses Employee Skills Information (SD.007.03), which associates an employee with possible
required skills for a service call. Using this feature incorporates messaging behavior when assigning
an employee to a service call.
Licenses (button)
Licenses accesses Employee License Information (SD.007.04), which associates an employee with
possible licensing requirements for a service call. Using this feature incorporates messaging behavior
when assigning an employee to a service call.
Tool (button)
Tool accesses Employee Tool (SD.007.05), which allows management of company-owned tools loaned
to employees.
Geo Zones (button)
Geo Zones accesses Employees - Geographic Zones (SD.039.00) where the employee can be
assigned to geographic zones.

Maintenance Screens 391
Employee Personal Information (SD.007.01)
Employee Personal Information (SD.007.01) allows you to enter the following types of information:
Office Information: Office phone extension, worker’s compensation department, gender, marital
status, and exemptions.
Driver’s License/Vehicle: Driver’s license number, expiration date, issuing state, and assigned
vehicle.
Pay/Quota Information: Pay type, department, pay rate, date hired, date of last raise, date
terminated, commission plan, and sales quota.
Access to this information can be controlled by making the button used to access this screen invisible.
This can be accomplished with Customization Manager.
Figure 170: Employee Personal Information (SD.007.01)
Following are the field descriptions for Employee Personal Information (SD.007.01).
Office Phone Ext.
Office Phone Ext. is an office extension for reference.
Worker’s Comp. Dept.
Worker’s Comp. Dept. contains the Worker’s Compensation department to which the employee is
assigned.
Sex
Sex selects Male or Female from a drop-down list.
Marital Status
Marital Status selects Married or Single from a drop-down list.
Exemptions
Exemptions contains the number of exemptions claimed by the employee.
Payroll ID
Payroll ID is only visible if Payroll Interface in Service Series Setup Maintenance (SD.000.00) is set to
Payroll or Advanced Payroll. Payroll ID allows linking employee ID in Field Service Management to the
employee identifier defined in the Payroll module.

392 Service Dispatch
Send Time To
If Payroll Interface in Service Series Setup Maintenance (SD.000.00) is set to Advanced Payroll, Send
Time To indicates whether labor time is sent to Payroll or Advanced Payroll.
Driver’s License No.
Driver’s License No. contains the driver’s license number of the employee.
Expiration Date
Expiration Date contains the date the driver’s license expires.
Issuing State
Issuing State contains the state or province that issued the driver’s license to the employee.
Assigned Vehicle ID
Assigned Vehicle ID displays the vehicle identifier associated with the employee. Vehicles are set up in
the system using Vehicle Maintenance (SD.020.00).
Pay Type
Pay Type designates the pay type associated with an employee. A designation of hourly enables the
system to calculate costs based on the employee’s hourly labor rate. If a salaried employee will be
dispatched on service calls and you wish to capture labor cost on the service call for the salaried
employee, you should set the employee up as hourly. This has no effect on how the employee is set up
in the Payroll module.
Earnings Type
Earnings Type contains a unique identifying code that distinguishes the earnings type from all other
earnings types in the database. An earnings type ID is any alphanumeric code you assign (for example,
REG for regular or OT for overtime). Earnings types are set up in Earnings Type Maintenance
(02.270.00) or in Earnings Type Maintenance (SD.022.00) if Payroll is not installed.
Note: Earnings types are important because they are associated with an “earnings multiplier”. Labor
cost on a service call is computed with the following formula: Work Hours * Pay Rate * Earnings
Multiplier = Labor Cost. By setting up different earnings types with different earnings multipliers you
can control the labor cost calculation.
Example: Two earnings types are created, “REG” with an earnings multiplier of “1.0” and “OT15” with
an earnings multiplier of “1.5”. A technician paid $20.00/hr works one hour of regular time. The time
would be entered with the REG earnings type:
1.0 hour * $20.00/hr * 1.0 = $20.00 Labor cost
A technician paid $20.00/hr works one hour of evening time when the technician’s pay is 1 ½ the
regular pay rate. The time would be entered with the OT15 earnings type:
1.0 hour * $20.00/hr * 1.5 = $30.00 Labor cost
Work Location
Work Location contains a unique identifying code that distinguishes the work location from all other
work locations in the database. A work location is any alphanumeric code assigned (for example, a city
abbreviation, a warehouse name, etc.). Work locations are set up in Work Location Maintenance
(02.280.00) or in Work Location Maintenance (SD.023.00) if Payroll is not installed.
Department
Department contains the department to which the employee is assigned.

Maintenance Screens 393
Pay Rate
Pay Rate is a user-specified hourly rate. The amount or value entered in Pay Rate is used during
invoice entry as the default for unit cost.
Note: Many organizations want to use a burdened rate for labor costing as opposed to the straight
hourly pay rate. The rate entered here is used strictly for labor costing on a service call and does not
impact the actual pay rate of an employee, so this rate can be a burdened rate.
Date Hired
Date Hired contains the date the employee was hired.
Date of Last Raise
Date of Last Raise contains the date of the employee’s last raise.
Date Terminated
Date Terminated is disabled unless the employee is an inactive employee.
Commission Plan ID
Commission Plan ID is not operable in the current release.
Sales Quota
Sales Quota contains the forecasted expected sales volume for the employee.
OK (button)
OK closes the screen and saves any changes.
Employee Other Phone (SD.007.02)
Employee Other Phone (SD.007.02) provides a screen where you can list any telephone numbers
associated with the employee. These may be emergency contact numbers or any other number you
may want to keep a record of that relates to the employee.
Figure 171 Employee Other Phone (SD.007.02)
Following are the field descriptions for Employee Other Phone (SD.007.02).
Description
Description is a free-form text field where a brief description or label for the telephone number can be
entered.
Phone Number
Phone Number is a telephone number formatted field where a contact telephone number is entered.

394 Service Dispatch
Employee Skills Information (SD.007.03)
Employee Skills Information (SD.007.03) associates an employee with skills possibly needed for a
service call. If a technician is assigned as the primary technician on a service call and a problem code
requires a skill that is not listed here for the technician, a message will display during service call entry
informing the user that the technician does not have the required skill(s).
Figure 172: Employee Skills Information (SD.007.03)
Following are the field descriptions for Employee Skills Information (SD.007.03).
Skill ID
Skill ID contains the skill identifier assigned to an employee.
Description
Description displays an explanation of the skill identifier.
Rating
Rating allows an evaluation of the employee’s proficiency in this skill.
OK (button)
OK closes the screen and saves any changes.

Maintenance Screens 395
Employee License Information (SD.007.04)
Employee License Information (SD.007.04) associates an employee with possible licensing
requirements for a service call. If a technician is assigned as the Primary Technician on a service call
and a problem code requires a license that is not listed here for the technician, a message will display
during service call entry informing the user that the technician does not have the required license(s).
Figure 173: Employee License Information (SD.007.04)
Following are the field descriptions for Employee License Information (SD.007.04).
License ID
License ID contains the license identifier for an employee’s license.
Active
Active displays whether the license is active.
Description
Description displays an explanation of License ID.
Effective Date
Effective Date contains the date when the license becomes effective.
Expiration Date
Expiration Date contains the expiration date of the license.
Certificate Sent
Certificate Sent is a Yes/No field that defaults to Certificate Required in License Maintenance
(SD.010.00).
OK (button)
OK closes the screen and saves any changes.
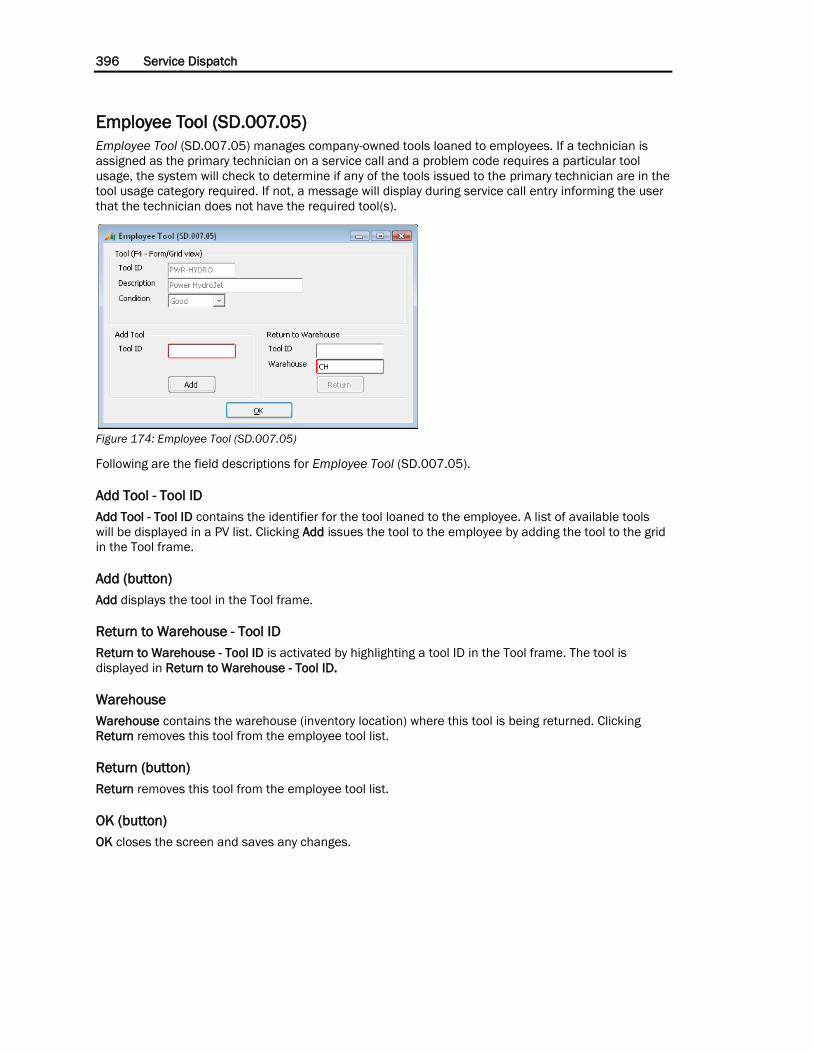
396 Service Dispatch
Employee Tool (SD.007.05)
Employee Tool (SD.007.05) manages company-owned tools loaned to employees. If a technician is
assigned as the primary technician on a service call and a problem code requires a particular tool
usage, the system will check to determine if any of the tools issued to the primary technician are in the
tool usage category required. If not, a message will display during service call entry informing the user
that the technician does not have the required tool(s).
Figure 174: Employee Tool (SD.007.05)
Following are the field descriptions for Employee Tool (SD.007.05).
Add Tool - Tool ID
Add Tool - Tool ID contains the identifier for the tool loaned to the employee. A list of available tools
will be displayed in a PV list. Clicking Add issues the tool to the employee by adding the tool to the grid
in the Tool frame.
Add (button)
Add displays the tool in the Tool frame.
Return to Warehouse - Tool ID
Return to Warehouse - Tool ID is activated by highlighting a tool ID in the Tool frame. The tool is
displayed in Return to Warehouse - Tool ID.
Warehouse
Warehouse contains the warehouse (inventory location) where this tool is being returned. Clicking
Return removes this tool from the employee tool list.
Return (button)
Return removes this tool from the employee tool list.
OK (button)
OK closes the screen and saves any changes.

Maintenance Screens 397
Problem Code Maintenance (SD.008.00) Problem Code Maintenance (SD.008.00) defines an unlimited number of unique problem or fault
codes. The estimated time needed to repair a problem code is also entered.
Note: You can run a report of the existing problem codes and their associated information. For more
information see “Problem Code List (SD.634.00)” on page 509.
Another feature of Problem Code Maintenance (SD.008.00) is the Prompt Operator check box. If this
check box is selected, the notes that are entered appear when a customer service representative
attaches the problem code ID to a service call. This feature allows you to give your customers superior
service by asking the appropriate questions to obtain the information necessary to complete a call
without spending large amounts of money and time in training.
In addition, the buttons on this screen give access to six subscreens that attaches:
Possible Tasks/Prices: Interacts with the Flat Rate Pricing module to assign flat rate prices to
problem codes. This allows a customer service representative to quote the price of the repair over
the phone.
Problem Code Call Type: Attaches call types to problem codes. The Problem Code Maintenance PV
List is filtered based on the call types. Therefore, if a service call’s call type is A/C and you attach
a problem code to the call when accessing the PV list, only the problem codes associated with the
A/C call type are displayed.
Problem Code Tool Usage: Attaches needed tool usage groups to a specific problem code.
Problem Code Skills: Attaches the skills needed for a problem code. This enables you to dispatch
the technicians with the skills necessary to repair a particular problem. If a technician is assigned
to a call without the proper skills, the system warns you.
Problem Code Licenses: Attaches the licenses required for a specific problem code. If a technician
without the proper license(s) is assigned to a call, the system warns you.
Note: We recommend that you enter at least one problem code for each call type.
Figure 175: Problem Code Maintenance (SD.008.00)
Following are the field descriptions for Problem Code Maintenance (SD.008.00).
Problem Code
Problem Code allows the creation of an unlimited number of user-defined problem codes. Problem
codes provide the technician with information regarding the “nature of the problem” in a rapid
manner.

398 Service Dispatch
Description
Description is a 30-character explanation of the service call problem code.
Estimated Time Duration
(Recommended) Estimated Time Duration allows the estimation of the approximate time required to
complete a repair. This assists CSRs and the dispatching department in the dispatching process by
estimating the time needed to complete a service. In addition, this time is used to calculate the total
duration of the service call.
Prompt Operator
Prompt Operator, if enabled, displays useful notes to the dispatcher or CSR when a problem code is
selected at the time a service call is entered. This assists CSRs in collecting the needed information
from the customers and provides them with relevant information to ask when processing the service
call.
Notes
Notes is a free-form field which allows the entry of prompts for the customer service representative to
ask the customer.
Tasks/Prices (button)
Click Tasks/Prices to open Possible Tasks/Prices (SD.008.01) and link flat rate IDs to a problem code.
Using this option enables the customer service representative to gain easy access to prices for work
performed on a flat rate basis. For more information, see “Possible Tasks/Prices (SD.008.01)” on
page 399.
Call Type (button)
(Recommended) Click Call Type to open Problem Code - Call Type (SD.030.00) and link call types to
problem codes. Adding call types to the problem codes filters the list of possible values to select when
entering problem codes in a service call. For more information, see “Problem Code - Call Type
(SD.030.00)” on page 400.
Tool Usage (button)
Click Tool Usage to open Problem Code Tool Usage (SD.008.05) and link tool usage groups to a
problem code. Using this option enables the customer service representative to gain easy access to
recommended tool groups for performing a particular service. For more information, see “Problem
Code Tool Usage (SD.008.05)” on page 401.
Skills (button)
Click Skills to open Problem Code Skills Information (SD.008.02) and link skills to problem codes.
Adding skills to problem codes incorporates new behavior in Service Call Entry (SD.200.00) by using
warning messages to inform the CSR that a technician may not have the skills required to perform the
service. For more information, see “Problem Code Skills Information (SD.008.02)” on page 399.
Licenses (button)
Click Licenses to open Problem Code Licenses Information (SD.008.03) and link license requirements
to problem codes. Adding licenses to problem codes incorporates new behavior in Service Call Entry
(SD.200.00) by using warning messages to inform the CSR a technician may not have the licenses
required to perform the service. For more information, see “Problem Code Licenses Information
(SD.008.03)” on page 400.

Maintenance Screens 399
Possible Tasks/Prices (SD.008.01)
If Flat Rate Pricing is installed, Possible Tasks/Prices (SD.008.01) appears when you click the
Tasks/Prices button in Problem Code Maintenance (SD.008.00).
Figure 176: Possible Tasks/Prices (SD.008.01)
Flat Rate ID
Identifier associated with a flat rate price. Type the ID. If you do not know the flat rate ID, press F3 in
the Flat Rate ID box or double-click the right mouse button. A list of all flat rate IDs set up in Flat Rate
Entry (SP.000.00) appears. Select an ID and click OK, or double-click the ID.
Description
Description is based on the flat rate ID you entered.
Price
Price is the flat rate price that is associated with the ID you entered.
Problem Code Skills Information (SD.008.02)
Problem Code Skills Information (SD.008.02) appears if you click the Skills button in Problem Code
Maintenance (SD.008.00). Use this screen to associate the problem code with skills that are needed
to resolve the problem. Add skills to problem codes to receive warning messages while working in
Service Call Entry (SD.200.00) if a technician does not have the skills required to perform the service.
Figure 177: Problem Code Skills Information (SD.008.02)
Skill ID
Skill ID contains the identification code assigned in Skills Maintenance (SD.017.00) to an expertise
needed by a technician when solving a particular problem. Press F3 or double-click the right mouse
button to open a list of all skill IDs. Select a skill ID from the list.
Click Edit or Insert on the Skills Maintenance PV List to open Skills Maintenance (SD.017.00) and
modify or add a skill ID.
Description
Description is an explanation of the skill ID.

400 Service Dispatch
Problem Code Licenses Information (SD.008.03)
Click Licenses to open Problem Code Licenses Information (SD.008.03) and link license requirements
to problem codes. Add license information to problem codes to receive warning messages while
working in Service Call Entry (SD.200.00) if a technician does not have the licenses required to
perform a service.
Figure 178: Problem Code Licenses Information (SD.008.03)
License ID
License ID contains the identification code assigned in License Maintenance (SD.010.00) to a license
needed by a technician when solving a particular problem. Press F3 or double-click the right mouse
button to open a list of all license IDs. Select a license ID from the list.
Click Edit or Insert on the Employee License Maintenance PV List to open License Maintenance
(SD.010.00) and modify or add a license ID.
Description
Description is an explanation of the license ID.
Problem Code - Call Type (SD.030.00)
Problem Code - Call Type (SD.030.00) appears if you click the Call Type button in Problem Code
Maintenance (SD.008.00).
Figure 179: Problem Code – Call Type (SD.030.00)
Problem Code
Problem Code displays the identification code of the problem code you select in Problem Code
Maintenance (SD.008.00).
Description
Description displays the brief explanation of the problem code you enter in Problem Code
Maintenance (SD.008.00).

Maintenance Screens 401
Call Type ID
In Call Type ID you can designate the identification code of a call type you want to link to the problem
code. Press F3 or double-click the right mouse button. A list of all call type IDs set up in Call Type
Maintenance (SD.003.00) appears. Select a call type ID from the list.
Click Edit or Insert on the Call Type Maintenance PV List to open Call Type Maintenance (SD.003.00)
and modify or add a call type ID.
Description
Description displays a brief explanation of the call type you select in Call Type ID.
Problem Code Tool Usage (SD.008.05)
Problem Code Tool Usage (SD.008.05) appears when you click on the Tool Usage button in Problem
Code Maintenance (SD.008.00). In this screen, you can assign all the tools that are needed by the
technician to fix the specific problem.
Figure 180: Problem Code Tool Usage (SD.008.05)
Usage ID
Identifier assigned to a particular tool. Type the ID. If you do not know the usage ID, press F3 in the
Usage ID box, or double-click the right mouse button. A list of all tool usage IDs set up in Tool Usage
Maintenance (SD.019.00) appears. Select an ID and click OK, or double-click the ID.
Description
Description is associated with the usage ID you entered.

402 Service Dispatch
Geographic Zone Maintenance (SD.009.00) Geographic Zone Maintenance (SD.009.00) creates an unlimited number of work zones or regions.
This assists the dispatching department in assigning proper technicians in the most efficient manner.
It also provides management with the ability to collect sales and other reporting information by region.
These geographic zones are user-defined areas and can be as broad or specific as needed. This allows
the dispatcher to decrease the travel time of the service technicians and, more importantly, cut the
waiting time for the customer. Geographic zones can be attached, or linked, to a branch code forming
a one-to-one relationship. Geographic zones may also be linked to one or more zip codes. To view a list
of geographic zone IDs, use “Geographic Zone List (SD.606.00)” on page 506.
Figure 181: Geographic Zone Maintenance (SD.009.00)
Following are the field descriptions for Geographic Zone Maintenance (SD.009.00).
Geographic Zone ID
Geographic Zone ID allows the creation of an unlimited number of user-defined geographic zones.
Zones are created by grouping zip codes together to form a single zone.
Description
Description is a 30-character explanation of the geographic zone.
Technician Assigned
Technician Assigned is an optional field that allows you to indicate the technician ID primarily
responsible for the geographic zone. This field does not default into the technician field anywhere else
within the system.
Number of Calls
Number of Calls is the number of service calls in a specific geographic zone that are complete.
Number of Calls is not operable in the current release.

Maintenance Screens 403
Total Revenue
Total Revenue is the total revenue generated from a geographic zone. Revenues are calculated when
the area revenue process is run. This information generates useful operational reports for
management. Total Revenue is not operable in the current release.
Avg Revenue/Call
Avg Revenue/Call is the average revenue generated from all the service calls in a specific zone. This
allows the dispatching department to assign service calls to areas where the average revenue per
service call is the highest. Avg Revenue/Call is not operable in the current release.
Branch ID
Branch ID associates a branch code with a geographic zone. This creates a one-to-one relationship
between a geographic zone and branch code identifier. If more zones are serviced by one branch, we
recommend leaving Branch ID blank.
Zip Codes Included Area
Zip Code
Zip Code defines the zip codes in a geographic zone. Access Possible Zip Code Assign to Zone PV List
and click Insert to add a zip code on the fly. This accesses Zip Code Maintenance (SD.021.00), where
a zip code can be added. Zip codes are optional. A geographic zone can be set up without referencing
a zip code.
Description
Description is a free-form area for a description of the zone.
Employees (button)
Employees opens Geographic Zone - Employee Maintenance (SD.038.00), which allows you to review
and/or change the employees assigned to the geographic zone.

404 Service Dispatch
License Maintenance (SD.010.00) License Maintenance (SD.010.00) accepts an unlimited number of licenses in the database. Both
employee and business licenses may be created. If the Employee type is selected, the business
license frame is disabled. This screen also accepts the issuing agency responsible for a particular
license, the cost of the initial license, the initial term, and renewal information.
Note: You can run a report that lists all employee and business licenses and their associated
information. For more information, see “License List (SD.607.00)” on page 507.
Licenses created in License Maintenance (SD.010.00) may be linked to problem codes,
employees, and zip codes.
When a problem code is entered on Service Call Entry (SD.200.00), a check will be made to determine
if the primary technician on the service call has the requisite licenses and skills. If not, a warning
message will appear. This check is only made on Service Call Entry (SD.200.00) and only for the
primary technician on the service call.
Figure 182: License Maintenance (SD.010.00)
Following are the field descriptions for License Maintenance (SD.010.00).
License ID
License ID accepts an unlimited number of licenses in the database by assigning a unique ID to a
license.
Description
Description accepts a 30-character explanation of License ID.
License Type
The type of license being entered: Employee or Business. The Employee type of license is used for
licenses that must be obtained by employees; many employees within a company may require the
same license. The Business type of license applies to the business as a whole; only one of these
licenses is required by an organization.
Maintenance Screens 405
Effective Date
Effective Date is used for business licenses only. If License Type is Business, type the date the license
becomes valid.
Expiration Date
Expiration Date is used for business licenses only. If License Type is Business, type in the date the
license becomes invalid or the expiration date.
Active
Active compares the system date to the effective/expiration dates; the system determines whether the
license is active based on this comparison and will check or uncheck the box accordingly.
Issuing Agency
Issuing Agency allows the selection of the agency that provides the needed licenses. This agency must
be an active vendor in Accounts Payable. When entered, the vendor name displays to the right of
Issuing Agency.
Agency Description
Agency Description accepts agency information when the agency is not on the vendor list.
Certificate Required
Certificate Required allows the selection of whether a certificate is required for this particular type of
license. For example, a City Business Tax license/permit may require that a worker’s compensation
certificate be presented before the license is issued. This is for reference purposes only.
Initial Amount
Initial Amount is used to enter the initial cost of the license.
Initial Term
Initial Term is used to enter the length of time that the initial license is valid. A drop-down list allows
you to choose Days, Months, or Years.
Renewal Amount
Renewal Amount contains the cost for renewing the license.
Renewal Term
Renewal Term contains the length of time for a renewal of a license. A drop-down list allows you to
choose Days, Months, or Years.

406 Service Dispatch
License - ZIP Code Maintenance (SD.011.00) License - ZIP Code Maintenance (SD.011.00) associates zip codes with licenses so the system can
issue a warning message if the company no longer has a valid or active license within a specific zip
code. You can run a report that shows licenses, by zip code. For more information, see “License - Zip
Code List (SD.608.00)” on page 507and “Zip Code List (SD.618.00)” on page 538.
Figure 183: License - ZIP Code Maintenance (SD.011.00)
Following are the field descriptions for License - ZIP Code Maintenance (SD.011.00).
License ID
License ID associates a license with a problem code, employee, and zip codes.
License ID (Description)
License ID (Description) accepts a three-character explanation of License ID.
License Type
License Type contains the description of the license identifier.
City
City indicates the location where the license is valid.
County
County indicates the county where the license is valid.
State
State indicates the two-character abbreviation for the state in which the license is valid.
ZIP Description
ZIP Description contains an explanation of the valid zip code for this license.
Add (button)
Add transfers the highlighted field from the left side to the right.

Maintenance Screens 407
Add All (button)
Add All transfers all entries from the left side to the right.
Remove (button)
Remove transfers the highlighted field from the right side to the left.
Remove All (button)
Remove All transfers all entries from the right side to the left.

408 Service Dispatch
Media Buy Maintenance (SD.012.00) Media Buy Maintenance (SD.012.00) tracks the marketing resources and referrals for a company.
When a service call is entered, the customer service representative selects one of the media IDs from
the system, linking the service call to a media code or a specific referral. A media ID is also linked
directly to a site, allowing the media ID or resource to default automatically to the service call. The
defaulted value can be overridden.
Note: To view the revenue and the number of calls associated with a media code, run the Advertising
Media Performance Report (SD.630.00) report. For more information, see “Advertising Media
Performance Report (SD.630.00)” on page 499. You can also run a report that lists the media codes
and their associated information. For more information, see “Media Group List (SD.609.00)” on page
508.
For each marketing resource used, a media code can be created. Media Buy Maintenance
(SD.012.00) links a media code to a media group, which allows you to group similar media codes into
a broad media group. You can also enter a budget for a specific media code, a frequency which refers
to the budget figure, the location /area which this marketing resource is penetrating, the date the
marketing resource was purchased, and the number of penetration pieces being released along with
the needed Coop information.
Note: Media code can track referrals from other customers. While this is not “media,” it is a good way
to track how a call was received.
Figure 184: Media Buy Maintenance (SD.012.00)
Following are the field descriptions for Media Buy Maintenance (SD.012.00).
Media Code
Media Code contains the identifier given to a type of marketing resource.
Description
Description is a 30-character explanation of the resource.
Media Group
Media Group is general type of resource.
Budget
Budget contains the amount of money allocated to the particular resource.

Maintenance Screens 409
Frequency
Frequency contains the number of times the resource is used.
Location
Location contains the physical location of the resource.
Insertion/Buy Date
Insertion/Buy Date contains the deadline for the resource.
Penetration Pieces
Penetration Pieces contains the number of collaterals in use by the resource.
Coop Advertising
Coop Advertising is selected when cooperative resource partners are involved.
Coop Information (button)
Coop Information accesses Coop Advertising Information (SD.012.01).
Coop Advertising Information (SD.012.01)
Coop Advertising Information (SD.012.01) defines the cooperative advertising partners and their
share percentage. A check box indicates whether the coop company has paid their portion of a
specific media piece. Access Coop Advertising Information (SD.012.01) by clicking the Coop
Information in Media Buy Maintenance (SD.012.00).
Select a valid vendor from the Accounts Payable module. The address and phone information may be
edited.
Note: If you wish to permanently change vendor information, access Vendor Maintenance (03.270.00)
in Accounts Payable.
Figure 185: Coop Advertising Information (SD.012.01)
Following are the field descriptions for Coop Advertising Information (SD.012.01).
Coop/Vendor ID
Coop/Vendor ID contains the unique identifier given to the vendor or coop.
Name
Name contains the legal name of the vendor or coop.
Address Line 1
Address Line 1 accepts the first line containing the street number and name of the vendor or coop.

410 Service Dispatch
Address Line 2
Address Line 2 accepts the second line containing the street number and name of the vendor or coop.
City
City contains the city where the vendor or coop is located. The city name can be a maximum of 30
characters.
State
State contains the two-character abbreviation for the state in which the vendor or coop is located.
Zip Code
Zip Code contains the zip code for the vendor or coop.
Contact
Contact contains the name of the primary contact for the vendor or coop.
Phone Number
Phone Number contains the phone number for the contact person.
Fax Number
Fax Number contains the fax number for the contact person.
Share Percentage
Share Percentage contains the percentage amount cooperative partners contribute to marketing
resources.
Coop Portion Paid
Coop Portion Paid is selected when the cooperative advertising partner is current with their portion of
the media resource.
OK (button)
OK closes the screen and saves any changes.

Maintenance Screens 411
Media Group Maintenance (SD.013.00) Media Group Maintenance (SD.013.00) defines a broad media group or category. For example, all the
Media Codes that are Yellow Pages advertisements may belong to a media group of YELPGS. This
provides management with the proper tools to view useful reports regarding the most effective means
of advertising.
Figure 186: Media Group Maintenance (SD.013.00)
Following are the field descriptions for Media Group Maintenance (SD.013.00).
Media Group ID
Media Group ID contains the identification for a broad media group.
Description
Description accepts the 30-character explanation of the media group.
Note: You can run a report that lists the media groups and their descriptions. For more information,
see “Media Group List (SD.609.00)” on page 508.

412 Service Dispatch
Cause Code Maintenance (SD.014.00) Cause Code Maintenance (SD.014.00) creates a cause ID defining what made a piece of equipment
fail. For example, the cause code may be Thermostat Inoperative for the problem code A/C Blowing
Warm Air.
Figure 187: Cause Code Maintenance (SD.014.00)
Following are the field descriptions for Cause Code Maintenance (SD.014.00).
Cause ID
Cause ID contains the root cause of the problem.
Description
Description indicates the 30-character explanation of the cause.

Maintenance Screens 413
Resolution Code Maintenance (SD.015.00) Resolution Code Maintenance (SD.015.00) creates a resolution code defining what a technician did to
solve a problem. For example, the resolution code may be Replaced Thermostat for the cause code
Thermostat Inoperative.
Figure 188: Resolution Code Maintenance (SD.015.00)
Following are the field descriptions for Resolution Code Maintenance (SD.015.00).
Resolution ID
Resolution ID contains the resolution of the problem.
Description
Description accepts a 30-character explanation of the resolution.

414 Service Dispatch
Product Class Maintenance (SD.016.00) Product Class Maintenance (SD.016.00) adds Field Service Management related information to the
product class data created in the Inventory module.
Note: You can run reports that list all of the product classes and just the extended Field Service
Management product class data. See Inventory’s Product Classes (10.700.00) and “Product Class List
(SD.611.00)” on page 509, respectively, for more information.
Figure 189: Product Class Maintenance (SD.016.00)
Following are the field descriptions for Product Class Maintenance (SD.016.00).
Class ID
Class ID is a unique identifying code that distinguishes the product class from all other product
classes in the database. New product classes must be defined in the Inventory module.
Description
Description displays a 30-character explanation of Class ID.
Comm Status
Comm Status manages the grouping of inventory items with respect to the type of commission being
paid when generating the commission report. Comm Status is not operable in the current release.
Pricing Type
Pricing Type manages the grouping of inventory items with respect to the type of mark-up pricing to be
calculated when entering detail lines in the Invoice - T & M Details (SD.203.00) of Invoice Entry
(SD.202.00). A class ID is associated with a detail line item record in the Invoice - T & M Details
(SD.203.00). Therefore, the relationship between the pricing type and class ID controls which mark-up
ID to use.
Sales Analysis Category
Sales Analysis Category manages the grouping of inventory items when generating the Sales Analysis
Report. For more information, see “Sales Analysis Report (SD.626.00)” on page 512.
Flat Rate Markup ID
(Optional use with Flat Rate Pricing module) Flat Rate Markup ID manages the grouping of inventory
items associated with the Inventory Mark-up table used to calculate the unit price when entering detail
records in Flat Rate Entry (SP.000.00).
Markup Descr
Markup Descr displays the Flat Rate Markup ID.

Maintenance Screens 415
Skills Maintenance (SD.017.00) Skills Maintenance (SD.017.00) creates an unlimited number of user-defined skills which must be
held by a technician in the organization. This screen assigns an ID, description, and labor cost to a
skill. This information is used in Problem Code Maintenance (SD.008.00) and Employee Maintenance
(SD.007.00) to create parent-to-child relationships. In both cases, Skill ID is the child. That is, many
possible skills can exist for every employee or problem code.
If a skill is associated with a problem code and an employee, the system checks in Service Call Entry
(SD.200.00) and Dispatch (SD.201.00) that the assigned technician has the proper skills to repair a
specific problem code.
Note: This screen is viewed in either form view or grid view by double-clicking or pressing the F4 key.
To view a list of skill IDs, use “Skills List (SD.613.00)” on page 531.
Figure 190: Skills Maintenance (SD.017.00)
Following are the field descriptions for Skills Maintenance (SD.017.00).
Skill ID
Skill ID accepts an unlimited number of unique user-defined skills. Skill ID links skills to employees
and to problem codes.
Description
Description accepts a 30-character explanation of the service call‘s skill identifier.
Labor Cost
Labor Cost contains the labor cost associated with Skill ID. This information is for reporting purposes
only.

416 Service Dispatch
Tool Maintenance (SD.018.00) Tool Maintenance (SD.018.00) adds tools and equipment into the system. This allows you to track the
availability of equipment and tools. It also allows you to maintain a record of the inventory of company-
owned tools that each technician carries. The information for each tool includes a unique tool ID with
a description, VIN/serial number, make, year and model, date purchased, the condition with a date,
the location with a description, and a usage ID with a description. To view a list of tool IDs, use “Tool
List (SD.614.00)” on page 536.
A tool is signed out to an employee using Employee Maintenance (SD.007.00). The assigned tool
appears in the Employee Tool Information subscreen for a specific employee.
Do not confuse this screen with Equipment Entry (SE.001.00). The Employee Tool Information
subscreen is used for company-owned equipment and tools used in-house. The equipment entered in
Equipment Entry (SE.001.00) is the customer’s equipment that is being installed and repaired.
Figure 191: Tool Maintenance (SD.018.00)
Following are the field descriptions for Tool Maintenance (SD.018.00).
Tool ID
Tool ID contains the unique identifier for a particular tool.
Description
Description accepts a 30-character explanation of the tool.
VIN/Serial No.
Vin/Serial No. contains the manufacturer’s unique number stamped or printed on the tool.
Make
Make contains the name of the tool’s manufacturer.
Model
Model contains the manufacturer’s designation for the tool.
Year
Year contains the purchase year of the tool.

Maintenance Screens 417
Date Purchased
Date Purchased contains the acquisition date of the tool.
Condition
Condition contains the physical state of the tool.
Condition Date
Condition Date contains the date when the tool’s condition was last evaluated.
Location Type
Location Type contains where the tool is stored.
Location
Location is the inventory site where the tool physically resides.
Location (Description)
Location (Description) contains an explanation of the inventory site.
Employee ID
Employee ID contains the identifier for the employee who has the tool.
Employee ID (Description)
Employee ID (Description) contains the name of the technician possessing the tool.
Usage ID
Usage ID accepts a 10-character identifier used to track tool usage.
Usage ID (Description)
Description ID contains a 30-character explanation of Usage ID.

418 Service Dispatch
Tool Usage Maintenance (SD.019.00) Tool Usage Maintenance (SD.019.00) creates an unlimited number of user-defined tool usage codes
which are then linked to employee hand tools. Tool usage codes are assigned to problem codes, giving
the dispatching department the ability to confirm that a technician has the proper tools to repair a
problem code.
Note: You can run a report that lists all of the usage codes and their descriptions. For more
information, see “Tool Usage List (SD.615.00)” on page 536.
Figure 192: Tool Usage Maintenance (SD.019.00)
Following are the field descriptions for Tool Usage Maintenance (SD.019.00).
Usage ID
Usage ID accepts a 10-character identifier used to track tool usage.
Description
Description ID accepts a 30-character explanation of Usage ID.

Maintenance Screens 419
Vehicle Maintenance (SD.020.00) Vehicle Maintenance (SD.020.00) creates an unlimited number of vehicle records in the database. It
contains useful information regarding the vehicle’s VIN (vehicle identification number), make, model,
year, date purchased, and the location of the vehicle. Vehicle Maintenance (SD.020.00) also tracks
odometer information. To view a list of vehicle IDs, use “Vehicle List (SD.617.00)” on page 538.
A vehicle entered in Vehicle Maintenance (SD.020.00) may be assigned to a service employee via
Employee Personal Information (SD.007.01).
Figure 193: Vehicle Maintenance (SD.020.00)
Following are the field descriptions for Vehicle Maintenance (SD.020.00).
Vehicle ID
Vehicle ID displays the vehicle identifier associated with a vehicle that has an inventory site in the
Inventory module.
Description
Description displays a 30-character explanation of the vehicle ID.
Manufacturer’s VIN
Manufacturer’s VIN displays the vehicle manufacturer’s identification number.
Make
Make displays the manufacturer of the vehicle.
Model
Model displays the model of the vehicle.
Year
Year displays the year the vehicle was manufactured.
Date Purchased
Date Purchased displays the date the vehicle was purchased.

420 Service Dispatch
Vehicle Inventory Location
Vehicle Inventory Location allows you to link the vehicle to an inventory site for information purposes
only.
Location Name
Location Name displays the location description from the inventory sites in the Inventory module.
Date of Reading
Date of Reading displays the date when an odometer reading or mileage of the vehicle was recorded.
Vehicle Odometer
Vehicle Odometer displays the mileage of the vehicle. Vehicle Odometer helps ensure the vehicle is
properly maintained.
Employee ID
Employee ID assigns a driver to the vehicle at the time the mileage was recorded.

Maintenance Screens 421
Zip Code Maintenance (SD.021.00) Zip Code Maintenance (SD.021.00) creates an unlimited number of zip codes into the system. The zip
codes play a significant role in tracking information. Geographic Zone Maintenance (SD.009.00) uses
zip codes to set up geographic zones. Zip codes are also important in tracking licensing because a zip
code may be specific for a license.
Zip Code Maintenance (SD.021.00) provides a description of the zip code including the city, county,
and state where it is located. It also gives the map page and coordinates for that zip code for national
or regional directories. In addition, it allows you to attach licenses (either business or employee) to a
zip code along with important phone numbers. To view a list of zip codes, see “Zip Code List
(SD.618.00)” on page 538.
Note: License - ZIP Code Maintenance (SD.011.00) is used to associate related zip codes for a
license. Entries here automatically appear on License - ZIP Code Maintenance (SD.011.00).
Figure 194: Zip Code Maintenance (SD.021.00)
Following are the field descriptions for Zip Code Maintenance (SD.021.00).
Zip Code
Zip Code accepts an unlimited number of unique zip codes into the system.
Description
Description is a 30-character explanation of the zip code.
City
City contains the city associated with the zip code. It is recommended that this information be typed in
if License - ZIP Code Maintenance (SD.011.00) is used.
County
County contains the county associated with the zip code. It is recommended this information be typed
in if License - ZIP Code Maintenance (SD.011.00) is used.
State
State contains the state associated with the zip code. It is recommended that this information be
typed in if License - ZIP Code Maintenance (SD.011.00) is used.

422 Service Dispatch
Map Page
Map Page contains the map page associated with this zip code. Entering the map page defaults into
the Site Maintenance (SD.025.00) record.
Coordinates
Coordinates contains the map page coordinates associated with this zip code. Entering the
coordinates defaults in the Site Maintenance (SD.025.00) record.
Phones Tab
Phone Tab associates related phone numbers to a zip code, such as local building department phones
numbers for different inspectors.
Business Tab
Business Tab adds necessary licenses to a zip code.
Employee Tab
Employee Tab adds necessary employee licenses to a zip code.

Maintenance Screens 423
Earnings Type Maintenance (SD.022.00) Use Earnings Type Maintenance (SD.022.00) to define employee earnings types (regular, overtime,
etc.) if the Payroll module is not installed.
Figure 195: Earnings Type Maintenance (SD.022.00)
Earnings Type ID
Earnings Type ID is a unique identifying code that distinguishes the earnings type from all other
earnings types in the database. An earnings type ID can be any alphanumeric code you assign (for
example, REG for regular and OT for overtime). When you are editing an existing earnings type, a
possible values lookup can be used to display a table of earnings types from which to choose. An
existing ID cannot be deleted if it is assigned to an employee ID in Employee Maintenance
(SD.007.00).
Description
Description is an explanation of Earnings Type ID.
Pay Rate Multiplier
Pay Rate Multiplier is used to compute earnings (cost). The default multiplier of 1.00 is automatically
assigned. To pay an employee time-and-one-half for overtime, enter 1.50 as the pay rate multiplier.

424 Service Dispatch
Work Location Maintenance (SD.023.00) Use Work Location Maintenance (SD.023.00) to define work locations if the Payroll module is not
installed.
Figure 196: Work Location Maintenance (SD.023.00)
Work Location ID
Work Location ID is a unique identifying code distinguishing the work location from all other work
locations in the database. A work location ID can be any alphanumeric code you assign (for example, a
city abbreviation or a warehouse name). Note that once work location information is set up in the
database, you cannot change the work location ID. The only way to change the ID is to delete and re-
enter the work location’s information, using a new work location ID. An existing ID cannot be deleted if
it is assigned to an employee ID in Employee Maintenance (SD.007.00).
Description
Description is an explanation of Work Location ID.
State/Prov
State/Prov typically uses a standard two-letter state abbreviation (see “State/Province Maintenance
(21.290.00)” in the Shared Information online help or user guide).

Maintenance Screens 425
Site Maintenance (SD.025.00) Site Maintenance (SD.025.00) creates an unlimited number of sites for a customer. Open Site
Maintenance (SD.025.00) by clicking the ellipsis (...) to the left of Site ID on Service Call Entry
(SD.200.00) or by using the site menu option in Service Dispatch.
You can print a detailed listing of the sites. For more information, see “Site List (SD.612.00)” on page
531.
Site Maintenance, Customer Info Tab
Site Maintenance (SD.025.00) contains site information for a customer. This means that a customer
has an unlimited number of sites, all with different profile information. Site ID is a user-defined unique
identifier for a site.
Figure 197: Site Maintenance (SD.025.00), Customer Info tab
Following are the field descriptions of the Customer Info tab for Site Maintenance (SD.025.00).
Customer ID
Customer ID validates the customer identifier with the service call. The customer name displays to the
right of Customer ID.
Site ID
Site ID associates a unique user-defined site identifier with a customer identifier. It allows you to
attach an unlimited number of sites to one customer. This identifier can be a maximum of 10
characters. It is recommended that you use a three-character identifying code, such as 001.
Print Letter
Print Letter flags this site for printing a “new customer” letter, using a mail merge function.

426 Service Dispatch
Description
Description accepts a 30-character explanation of Site ID.
Name
Name displays the person associated with the site. When a new customer is created in Customer
Maintenance (08.260.00), a default site record is created in the database. Many sites can use the
same name as long as they each have distinct identifying codes.
Attention
Attention identifies a contact person for a particular site. If a company has multiple sites, each site can
be managed by a different contact person in the organization.
Address Line 1-2
Address Line 1-2 are the street addresses for a site. This address information is the work location
where the requested service is performed.
City
City displays the municipality or city in which a site is located. City is populated by entering a valid
zip/postal code from Zip Code Maintenance (SD.021.00).
State
State contains the standard two-letter state abbreviation.
Postal Code
Postal Code contains a five-digit zip code plus a four-digit extension. Entering a valid postal (zip) code
populates the city, state, geographic zone, branch ID, map page, and map coordinates.
Country/Region
Country/Region is a standard two- to three-letter country or region code abbreviation.
Phone/Ext
Phone/Ext contains the phone number and extension for a specific site. This phone number can be
different from the customer phone number since the number corresponds to the site.
Fax/Ext
Fax/Ext contains the fax number for a specific site. This fax number can be different from the
customer fax number since the number corresponds to the site.
Sub Account
Sub Account is a validated field from the General Ledger Subaccounts Maintenance (01.270.00). The
subaccount entered here may be used to populate the subaccount in Invoice - T & M Details
(SD.203.00) and Flat Rate Order - Modify Details (SP.202.00) when completing service calls. In
addition, the subaccount entered here may be used when using the accrual process, generating
revenue process, and generating billing process in the Contracts module. It is recommended that you
use the subaccount from the site only if the organization has three or more branches. Otherwise, use
the subaccount from call types.

Maintenance Screens 427
Tax ID 1, Tax ID 2, Tax ID 3, Tax ID 4
The tax information entered here is used in Invoice and Memo (08.010.00) in Accounts Receivable.
This tax data is not used by the invoicing functions in Field Service Management.
Note: You can run a report that shows all taxable service calls, by tax ID. For more information, see
“Use Taxes List (SD.628.00)” on page 537.
Special Pricing (button)
Site-Special Pricing Maintenance (SD.037.00) contains pricing commitments by inventory item at the
site level. When an inventory item is entered in Invoice Entry (SD.202.00), the system checks the site
special pricing to see if any pricing commitments exist.

428 Service Dispatch
Site Maintenance, Serv Call Info Tab
The Serv Call Info tab allows you to select default values so that the customer service representative
can quickly process a service call once a site is selected.
Figure 198: Site Maintenance (SD.025.00), Serv Call Info tab
Following are the field descriptions of the Serv Call Info tab for Site Maintenance (SD.025.00).
Customer ID
Customer ID validates the customer identifier with the service call. The customer name displays to the
right of Customer ID.
Site ID
Site ID displays a unique user-defined site identifier associated with a customer identifier.
Created Date
Created Date contains the date the site record was created. The date defaults to the system date. It is
possible to override the default system date and enter a new date if desired.
Map Page
Map Page contains the map page that corresponds to the site address for assisting the dispatching
department and service technician in locating a site. Map Page populates when a zip/postal code is
entered.

Maintenance Screens 429
Coordinates
Coordinates are the map coordinates that correspond to the map page and to the site address for
assisting the dispatching department and service technician in locating a site. Coordinates populates
at the time a zip/postal code is entered.
Max Service Amount
Max Service Amount contains the maximum allowable amount for service call without the need for
authorization. Max Service Amount is valid only when the Yes option is selected in Tenant Auth To Call.
Tenant Auth to Call
Tenant Auth to Call alerts the customer service representative during the creation of a service call
whether the caller has the authority to place a new service request. If the No option is selected, a soft
warning message “Tenant Not Authorized to Call” defaults during service call entry.
Media ID
Media ID contains the source of media which this site used in order to find an organization. This is
used for tracking purposes. The media ID defaults into the service call at the time a new record is
being processed.
Materials Markup ID
Material Markup ID selects the pricing mark-up table, if desired, to automatically calculate the unit
price from the unit cost when entering records in Invoice - T & M Details (SD.203.00). For setting up
the actual mark-up tables, see Inventory Mark-up Maintenance (SD.026.00).
Labor Markup ID
Labor Markup ID selects the pricing mark-up table, if desired, to automatically calculate the unit price
from unit cost when entering labor records in Invoice - T & M Details (SD.203.00). For setting up the
actual mark-up tables, see Inventory Mark-up Maintenance (SD.026.00).
Geographic Zone
Geographic Zone contains the valid geographic zone associated with a site. The Geographic Zone may
populate automatically if a valid zip code is associated with a geographic zone ID.
Branch ID
Branch ID contains the valid branch identifier that identifies the branch to which this site belongs. In
addition, entering a branch ID combined with enabling the Auto Number Branch Prefix from Service
Series Setup Maintenance (SD.000.00) adds a prefix to the service call record. The branch ID
populates automatically by entering the zip code.
Tax ID
Tax ID contains the associated tax identifier (sales tax) for this site. Tax ID is a required field. Tax ID is
used by the invoicing functions in Field Service Management. When entering tax IDs in the Shared
Information module, select Item for Calculation Type.
Dwelling Type
Dwelling Type attaches a dwelling type to a site.
P.O. Number
P.O. Number selects whether a purchase order is necessary in order to process and save a service call
in Service Call Entry (SD.200.00). If the Required option is selected, a proactive message displays on
the Other Info tab in Service Call Entry (SD.200.00), and the call cannot be saved until missing data is
entered.

430 Service Dispatch
Sec. Entry Code
Sec. Entry Code populates a security entry code associated with the site record making it unnecessary
to request the same information from the customer for each new service request.
Blanket PO Number
Blanket PO Number contains the 15-character purchase order number used as a default for a new
service call.
Call Type
Call Type contains the call type that defaults to Service Call Entry (SD.200.00) when a specific site is
selected. This call type is the most frequent trade used by this site or customer class.
Status ID
Status ID contains the default call status identifier that populates Service Call Entry (SD.200.00). The
recommended Status ID is Open.
Proj. Manager
Proj. Manager selects a Project Manager or Service Manager for a site. Proj. Manager is for reporting
purposes only.
Salesperson
Salesperson contains the salesperson for a site. This required field populates onto Service Call Entry
(SD.200.00). If there is no salesperson, type in the default House as the salesperson.
Technician
Technician contains the default technician for a site. The entered technician populates into Service
Call Entry (SD.200.00). If technicians randomly change, do not enter a value in Technician.
Prc Plan ID
Prc Plan ID associates a site with a flat rate pricing plan. When a flat rate invoice is created, the
entered value defaults with the appropriate price calculation associated with the pricing plan ID. Prc
Plan ID is useful only when invoicing on a flat rate basis.
Pyt Method
Pyt Method displays the default payment method for a site. Pyt Method is for reporting purposes only.
Priority
Priority contains the default call priority value associated with the site.
Special Pricing (button)
Site-Special Pricing Maintenance (SD.037.00) contains pricing commitments by inventory item at the
site level. When an inventory item is entered in Invoice Entry (SD.202.00), the system checks the site
special pricing to see if any pricing commitments exist.

Maintenance Screens 431
Site Maintenance, Form View
Site Maintenance (SD.040.00) is the same as Site Maintenance (SD.025.00) except that it opens in
form view as opposed to grid view.
Figure 199: Site Maintenance (SD.040.00), form view

432 Service Dispatch
Inventory Mark-Up Maintenance (SD.026.00) Inventory Mark-Up Maintenance (SD.026.00) creates an unlimited number of user-defined inventory
mark-up tables. These tables are used to mark-up the price of inventory items associated with a flat
rate. For example, when recalculating detail for a flat rate using Price Update Process (SP.203.00) in
the Flat Rate Pricing module, if an inventory item and a mark-up ID are entered, the system looks at
the cost of the item and selects the proper cost multiplier. This marks up the price of the individual
inventory items.
Figure 200: Inventory Mark-Up Maintenance (SD.026.00)
Following are the field descriptions for Inventory Mark-Up Maintenance (SD.026.00).
Mark-Up ID
Mark-Up ID creates a user-defined alphanumeric mark-up identifier. It is recommended that you create
a mark-up ID for labor with a cost multiplier of 0. Generally, labor items are excluded when using Price
Update Process (SP.203.00) in the Flat Rate Pricing module, as labor rates are usually fixed amounts.
Description
Description is 30-character explanation of the mark-up identifier.
From/To
From/To creates a cost range. The cost multiplier is dependent on the ranges created in these two
fields.
Cost Multiplier
Cost Multiplier contains the amount that is multiplied to an inventory cost based on the applicable
cost range.
Above
Above contains the multiplier for the highest level of the mark-up table.
Note: You can run a report of the inventory mark-up IDs. For more information, see “Inventory Mark-Up
(SD.619.00)” on page 506.
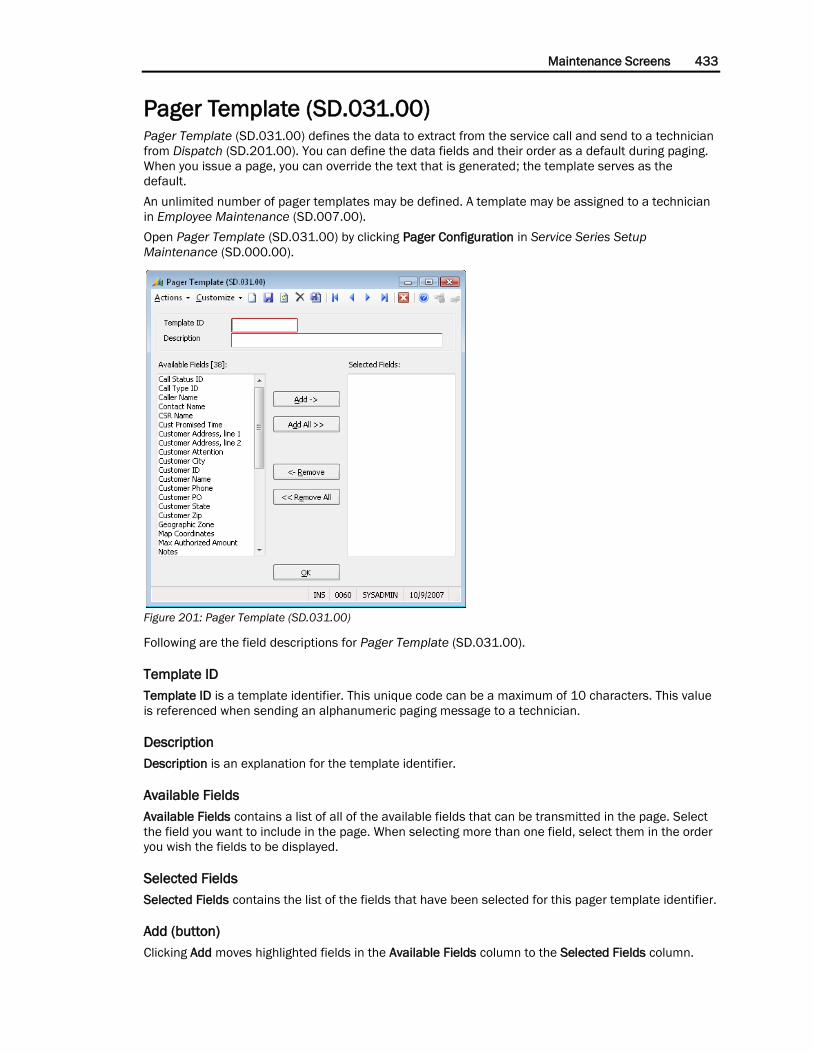
Maintenance Screens 433
Pager Template (SD.031.00) Pager Template (SD.031.00) defines the data to extract from the service call and send to a technician
from Dispatch (SD.201.00). You can define the data fields and their order as a default during paging.
When you issue a page, you can override the text that is generated; the template serves as the
default.
An unlimited number of pager templates may be defined. A template may be assigned to a technician
in Employee Maintenance (SD.007.00).
Open Pager Template (SD.031.00) by clicking Pager Configuration in Service Series Setup
Maintenance (SD.000.00).
Figure 201: Pager Template (SD.031.00)
Following are the field descriptions for Pager Template (SD.031.00).
Template ID
Template ID is a template identifier. This unique code can be a maximum of 10 characters. This value
is referenced when sending an alphanumeric paging message to a technician.
Description
Description is an explanation for the template identifier.
Available Fields
Available Fields contains a list of all of the available fields that can be transmitted in the page. Select
the field you want to include in the page. When selecting more than one field, select them in the order
you wish the fields to be displayed.
Selected Fields
Selected Fields contains the list of the fields that have been selected for this pager template identifier.
Add (button)
Clicking Add moves highlighted fields in the Available Fields column to the Selected Fields column.

434 Service Dispatch
Add All (button)
Add All adds all the fields in the Available Fields column to the Selected Fields column.
Remove (button)
Clicking Remove moves highlighted fields in the Selected Fields column to the Available Fields column.
Remove All (button)
Remove All moves all fields in the Selected Fields column back to the Available Fields column.
OK (button)
OK closes the screen and saves any changes.

Maintenance Screens 435
Site - Special Pricing Maintenance (SD.037.00) Site - Special Pricing Maintenance (SD.037.00) accepts special pricing and special pricing revisions by
inventory items for a selected site. Open Site - Special Pricing Maintenance (SD.037.00) by clicking
Special Pricing on Site Maintenance (SD.025.00). The values entered in Site - Special Pricing
Maintenance (SD.037.00) affect Unit Price and Extended Price in Invoice - T & M Details (SD.203.00).
Figure 202: Site - Special Pricing Maintenance (SD.037.00)
Following are the field descriptions for Site - Special Pricing Maintenance (SD.037.00).
Customer ID
Customer ID displays the customer identifier and name from Site Maintenance (SD.025.00).
Customer ID (Description)
Customer ID (Description) contains the name of the customer.
Site ID
Site ID displays the site identifier and name from Site Maintenance (SD.025.00).
Site ID (Description)
Site ID (Description) contains an explanation of the customer site.
Inventory ID (header)
Use Inventory ID to specify selection criteria to apply when you click Refresh. You can specify any of
the following values, or a combination of all three:
Asterisk (*) – This is the default value. An asterisk indicates that you want to display all inventory
IDs for which you have previously set up special pricing for the customer ID and site ID shown. Or,
you can use the asterisk as a wildcard. For example, if you type HON*, and then click Refresh, the
screen displays inventory IDs that begin with “HON” such as HON-672L-L and HON-673L-S. If you
type *L, and then click Refresh, the screen displays inventory IDs that end with “L” such as HON-

436 Service Dispatch
672L-L and HON-674L-L. Lastly, if you type HON*S, and then click Refresh, the screen displays
inventory IDs that both begin with “HON” and end with ”S” such as HON-673L-S and HON-674L-S.
Question mark (?) – Use one or more question marks as a wildcard placeholder. For example, if
you type HON-????-L, and then click Refresh, the screen displays inventory IDs that begin with
“HON-“ and end with “-L” that also have four characters in the middle. The screen displays both
HON-672L-L and HON-673L-L, but not HON-672L-P.
Alphanumeric characters – You can use alphabetic and numeric characters, within the restrictions
specified for the inventory ID flexible key in Flexkey Definition (21.320.00).
Refresh (button)
Click Refresh to display the special prices for the inventory IDs that meet the criteria that you
specified.
Note: Clicking refresh displays only those inventory IDs for which you have previously set up one or
more special prices for the customer ID/site ID combination displayed.
Inventory ID (grid/detail)
Inventory ID is a valid inventory ID from the Inventory module. Press F3 to display a list of possible
inventory ID values, and then select an inventory ID from the list to begin creating a new special price.
If you specify a special price, the special price overrides the stock base price found in Inventory Items
(10.250.00) during invoice entry.
Inventory Description
Inventory Description displays the explanation of the inventory identifier.
Start Date
Start Date displays the first date when the special price is active. A blank start date indicates that the
special price has no start, that is 01/01/1900.
End Date
End Date displays the last date when the special price is active. A blank end date indicates that the
special price has no end, that is 12/31/9999.
Pricing Option
Pricing Option contains the pricing modification associated with the inventory ID based on a fixed
amount or percent. The unit price amount in invoice entry is affected by Pricing Option, Price/Disc %,
Start Date, End Date, and also Stock Base Price in Inventory Items (10.250.00).
Price/Disc %
Price/Disc % overrides the stock base price on the invoice if Amount is selected in Pricing Option. If
Discount % is selected in Pricing Option, the stock base price is reduced or increased by the
percentage specified in Price/Disc %.
Revised Start Date
Revised Start Date displays the start date that will go into effect when you apply the revisions to the
special price.
Revised End Date
Revised End Date displays the end date that will go into effect when you apply the revisions to the
special price.
Maintenance Screens 437
Revised Price/Disc %
Revised Price/Disc % displays the amount or percentage that will go into effect when you apply the
revisions to the special price.
Price Description
Price Description displays a description of the special price. For example, you might use “March
Promotion” or “Seasonal Discount” to describe a particular special price.
OK (button)
OK closes the screen and saves any changes.

438 Service Dispatch
Geographic Zone - Employees (SD.038.00) Use Geographic Zone - Employees (SD.038.00) to assign one or more employees to a geographic
zone. Geographic Zone - Employees (SD.038.00) also allows you to quickly view the technicians
assigned to a particular geographic zone.
Note: The Graphical Dispatch Board (SD.900.00) filters on geographic zones. Employees must be
assigned to the geographic zone included in the Queue View selected on the Graphical Dispatch Board
(SD.900.00), Options tab to be included in the data selected for viewing. If Queue ID on the Graphical
Dispatch Board (SD.900.00), Options tab is blank, all technicians are included even if they are not
assigned to a geographic zone.
Refer to Employees - Geographic Zone (SD.039.00) to view all the geographic zones to which a
particular technician has been assigned.
Figure 203: Geographic Zone - Employees (SD.038.00)
Following are the field descriptions for Geographic Zone - Employees (SD.038.00).
Geo Zone ID
Geo Zone ID contains the geographic zone identifier from Geographic Zone Maintenance (SD.009.00).
Geo Zone ID may be typed directly, or may be selected from a list of available geographic zones by
pressing F3, or by double-clicking the right mouse button.
Employee ID
Employee ID contains the employee identifiers from Employee Maintenance (SD.007.00) of the
employees you wish to include in the geographic zone. The employee ID may be typed directly, or may
be selected from a list of available employees by pressing F3 or double-clicking the right mouse
button.
First Name
First Name contains the first name of the employee.
Last Name
Last Name contains the last name of the employee.

Maintenance Screens 439
Employees - Geographic Zones (SD.039.00) Use Employees - Geographic Zones (SD.039.00) to determine the geographic zone(s) linked to a
particular employee. Information from Employees - Geographic Zones (SD.039.00) is used by Queue
ID in Graphical Dispatch Board (SD.900.00).
Note: The Graphical Dispatch Board (SD.900.00) filters on geographic zones. Employees must be
assigned to the geographic zone included in the queue view selected on the Graphical Dispatch Board
(SD.900.00), Options tab to be included in the data selected for viewing. If Queue ID on the Graphical
Dispatch Board (SD.900.00), Options tab is blank, all technicians are included even if they are not
assigned to a geographic zone.
Refer to Geographic Zone - Employees (SD.038.00) to view all the employees assigned to a specific
geographic zone.
Figure 204: Employees - Geographic Zones (SD.039.00)
Following are the field definitions for Employees - Geographic Zones (SD.039.00).
Employee ID
Employee ID contains the employee identifiers from Employee Maintenance (SD.007.00) to which you
will assign geographic zones. The employee ID may be typed directly, selected from a list of available
employees by pressing F3, or selected by double-clicking the right mouse button.
First Name
First Name contains the first name of the employee.
Last Name
Last Name contains the last name of the employee.
Geo Zone ID
Geo Zone ID contains the geographic zone identifier from Geographic Zone Maintenance (SD.009.00)
to which the employee is being assigned. Geo Zone ID may be typed directly, selected from a list of
available geographic zones by pressing F3, or selected by double-clicking the right mouse button.
Description
Description contains the description of the geographic zone.

440 Service Dispatch
Customer Site Group (SD.041.00) Use Customer Site Group (SD.041.00) to link customer site IDs that you set up in Site Maintenance
(SD.025.00) into a group. This lets you revise special prices by a customer site group ID instead of by
a single customer site ID in Site – Special Pricing Revisions (SD.042.00).
Figure 205: Customer Site Group (SD.041.00)
The following are the field descriptions for Customer Site Group (SD.041.00).
Customer Site Group ID
Customer Site Group ID contains the identifier that you assign to a group of customer sites.
Customer ID
Customer ID contains the identifier for a customer from Customer Maintenance (08.260.00). The
possible values list contains only those customer IDs for which you previously set up one or more sites
in Site Maintenance (SD.025.00).
Customer Name
Customer Name displays the name of the customer from Customer Maintenance (08.260.00).
Customer Site ID
Customer Site ID contains the identifier for a customer site from Site Maintenance (SD.025.00).
Customer Site Name
Customer Site Name displays the name of the customer site from Site Maintenance (SD.025.00).

Maintenance Screens 441
Site – Special Pricing Revisions (SD.042.00) Use Site – Special Pricing Revisions (SD.042.00) to update multiple revised price/disc% at the same
time. You can select the price/disc% that you want to update by customer site ID, customer site group
ID, and customer site ID. Then, you can further refine your selection by inventory ID, current
price/disc%, start date, and end date. Customer Site Group ID, Customer ID, Customer Site ID, and
Inventory ID support the use of both an asterisk (*) as a wildcard and a question mark (?) as a mask.
After you specify the selection criteria that you want, input the new revised price, flat
increases/decreases, or percent increases/decreases. Also, you can specify the new start date and
end date. Then, you can review the proposed changes by clicking View Pending Price/Disc% Revisions
to open the View Pending Price Revisions (SD.042.01) screen.
When you click Begin Processing, the proposed revised special prices are placed into Revised
Price/Disc%, as seen in Site – Special Pricing Maintenance (SD.037.00) or in the Special Prices
(SSRS) (SD.645.00) report.
Figure 206: Site – Special Pricing Revisions (SD.042.00)
The following are the field descriptions for Site – Special Pricing Revisions (SD.042.00).

442 Service Dispatch
Pricing Option
Pricing Option contains the pricing modification associated with the inventory ID based on a fixed
amount or percent.
Customer Site ID (area)
The Customer Site ID area contains the following options:
All Customer Site IDs (option)
All Customer Site IDs lets you specify that you want to create revised prices for all customer site IDs.
When you select this option, all selection boxes in this area are disabled.
Customer Site Group ID (option)
Customer Site Group ID lets you specify that you want to create revised prices by Customer Site Group
ID. This option is disabled if you have not yet created a customer site group in Customer Site Group
(SD.041.00). When you select this option, all selection boxes in this area are enabled.
Customer Site ID (option)
Customer Site ID lets you specify that you want to create revised prices by customer site ID. When you
select this option, the Customer Site Group ID selection box is disabled and the Customer ID selection
box and the Customer Site ID selection box are enabled.
The Customer Site ID area contains the following boxes for selection:
Customer Site Group ID (box)
Customer Site Group ID lets you specify the customer site group ID(s) by which you want to refine the
search. You can specify any of the following values, or a combination of all three:
Asterisk (*) – This is the default value. An asterisk indicates that you want to display all inventory
IDs for which you have previously set up special pricing for the customer ID and site ID shown. Or,
you can use the asterisk as a wildcard. For example, if you type HON*, and then click Refresh, the
screen displays inventory IDs that begin with “HON” such as HON-672L-L and HON-673L-S. If you
type *L, and then click Refresh, the screen displays inventory IDs that end with “L” such as HON-
672L-L and HON-674L-L. Finally, if you type HON*S, and then click Refresh, the screen displays
inventory IDs that both begin with “HON” and end with ”S” such as HON-673L-S and HON-674L-S.
Question mark (?) – Use one or more question marks as a wildcard placeholder. For example, if
you type HON-????-L, and then click Refresh, the screen displays inventory IDs that begin with
“HON-“ and end with “-L” that also have four characters in the middle. The screen displays both
HON-672L-L and HON-673L-L, but not HON-672L-P.
Alphanumeric characters – You can use alphabetic and numeric characters, within the restrictions
specified for the inventory ID flexible key in Flexkey Definition (21.320.00).
Customer ID (box)
Customer ID lets you specify the customer ID(s) by which you want to refine the search. You can
specify an asterisk (*) wildcard, question mark (?) mask, alphanumeric characters, or a combination
of the three.
Customer Site ID (box)
Customer Site ID lets you specify the customer site ID(s) by which you want the refine the search. You
can specify an asterisk (*) wildcard, question mark (?) mask, alphanumeric characters, or a
combination of the three.
Additional Selection Criteria (area)
The Additional Selection Criteria area contains the following options:

Maintenance Screens 443
Inventory ID
Inventory ID lets you refine the search results by the inventory ID. An asterisk (*) functions as a
placeholder and a question mark (?) functions as a mask. You can specify an asterisk (*) wildcard,
question mark (?) mask, alphanumeric characters, or a combination of the three.
Current Price
Current Price lets you refine the search results by a specific price. This box is enabled if the Pricing
Option is Amount.
Current Percent
Current Percent lets you refine the search results by a specific percent. This box is enabled if the
Pricing Option is Discount %.
Start Date
Start Date lets you refine the search results by the start date.
End Date
End Date lets you refine the search results by the end date
Update price plans with revised price or percent not equal to zero (check box)
Select the Update price plans with revised price or percent not equal to zero check box to include only
special pricing plans that contain nonzero values and exclude any special pricing plans with a revised
price/disc % equal to zero.
Change to Revised Price or Discount % (area)
The Change to Revised Price or Discount % area contains the following options:
New Revised Price
New Revised Price contains the new revised price that is placed into Revised Price/Disc % in Site –
Special Pricing Maintenance (SD.037.00). This value replaces the existing value. This box is enabled if
the Pricing Option is Amount.
Revised Price Flat Increase/Decrease
Revised Price Flat Increase/Decrease contains the flat amount by which you want to increase
(positive) or decrease (negative) the existing current price. This box is enabled if the Pricing Option is
Amount.
Note: The new revised price cannot be less than zero. If the calculation results in the new revised price
being less than zero, the process sets the price to exactly zero.
Revised Price % Increase/Decrease
Revised Price % Increase/Decrease contains the percentage by which you want to increase (positive)
or decrease (negative) the existing current price. This box is enabled if the Pricing Option is Amount.
Note: The new revised price cannot be less than zero. If the calculation results in the new revised price
being less than zero, the process sets the price to exactly zero.
New Revised Discount %
New Revised Discount % contains the new revised discount % that will be placed into Revised
Price/Disc % in Site – Special Pricing Maintenance (SD.037.00). This value replaces the existing
value. This box is enabled if the Pricing Option is Discount %.

444 Service Dispatch
Revised Discount % Flat Increase/Decrease
Revised Discount % Flat Increase/Decrease contains the percentage by which you want to increase
(positive) or decrease (negative) the existing discount %. This box is enabled if the Pricing Option is
Discount %.
New Start Date
New Start Date contains the start date that you want to set for the revised price. A blank date
indicates that you do not want to override the existing revised start date.
New End Date
New End Date contains the end date that you want to set for the revised price. A blank date indicates
that you do not want to override the existing revised end date.
View Pending Price/Disc % Revisions (button)
Click View Pending Price/Disc% Revisions to review all special prices that match the criteria in the
screen (except Update price plans with revised price or percent not equal to zero) in View Pending
Special Pricing Revisions (SD.042.01). Close the subscreen when you are finished.
Begin Processing (button)
Click Begin Processing to update the Revised Price/Disc% in Site – Special Pricing Maintenance
(SD.041.00).
View Pending Special Pricing Revisions (SD.042.01)
View Special Pricing Revisions (SD.042.01) displays the special prices that fit the selection criteria
that you specified in Site – Special Pricing Revisions (SD.042.00).
Figure 207: View Special Pricing Revisions (SD.042.01)
The following are the field descriptions for View Special Pricing Revisions (SD.042.01).
Customer ID
Customer ID displays the customer ID to which the special price is related.

Maintenance Screens 445
Customer Site ID
Customer Site ID displays the customer site ID to which the special price is related.
Inventory ID
Inventory ID displays the inventory ID to which the special price is related.
Price Type
Price Type displays the kind of special price. The valid values are Amount and Discount %.
Price/Discount %
Price/Discount % displays the current Price/Disc% as seen in Site – Special Pricing Maintenance
(SD.037.00).
Revised Price/Discount %
Revised Price/Discount % displays the current Revised Price/Disc% as seen in Site – Special Pricing
Maintenance (SD.037.00).
Start Date
Start Date displays the current Start Date as seen in Site – Special Pricing Maintenance (SD.037.00).
New Start Date
New Start Date displays the current Revised Start Date as seen in Site – Special Pricing Maintenance
(SD.037.00).
End Date
End Date displays the current End Date as seen in Site – Special Pricing Maintenance (SD.037.00).
New End Date
New End Date displays the current Revised End Date as seen in Site – Special Pricing Maintenance
(SD.037.00).
OK (button)
Click OK to close View Special Price Revisions (SD.042.01).

446 Service Dispatch
Update Special Pricing with Revisions (SD.043.00) Use Update Special Pricing with Revisions (SD.043.00) to update the Price/Disc% in Site – Special
Pricing Maintenance (SD.037.00) with the Revised Price/Disc%.
Figure 208: Update Special Pricing with Revisions (SD.043.00)
The following are the field descriptions for Update Special Pricing with Revisions (SD.043.00).
Revise Special Pricing with Start Dates on or prior to
Use Revise Special Pricing with Start Dates on or prior to in order to specify the special prices that you
want to update, by restricting the up to only those special prices that contain a Start Date on or before
the date that you specify. The default value is the current business date.
Categories (area)
The Categories area contains the following options:
All Special Prices (option)
All Special Prices lets you update all special prices that have a revised price/disc%. All additional
selection is disabled. This selection is the default.
Customer Site Group ID (option)
Customer Site Group ID lets you select a customer site group ID to narrow your selection. This option is
disabled if you have not previously created a customer site group ID. The Customer Site Group ID,
Customer ID, Customer Site ID, and Inventory ID boxes are enabled. You can specify a value in one or
more boxes.
Customer ID (option)
Customer ID lets you select a customer ID to narrow your selection. The Customer ID and Inventory ID
boxes are enabled. You can specify a value in one or both boxes.

Maintenance Screens 447
Customer Site ID (option)
Customer Site ID lets you select a customer site ID to narrow your selection. The Customer Site Group
ID box is disabled and all other boxes are enabled.
Inventory ID (option)
Inventory ID lets you select only an inventory ID to narrow your selection. The Inventory ID box is
enabled and all other boxes are disabled. The default is an asterisk (*) which represents all values.
Customer Site Group ID (box)
Use Customer Site Group ID to specify a customer site group ID value to refine your selection. You can
use an asterisk (*) wildcard, a question mark (?) placeholder, alphanumeric characters, or a
combination of the three.
Customer ID (box)
Use Customer ID to specify a customer ID value to refine your selection. You can use an asterisk (*)
wildcard, a question mark (?) placeholder, alphanumeric characters, or a combination of the three.
Customer Site ID (box)
Use Customer Site ID to specify a customer site ID value to refine your selection. You can use an
asterisk (*) wildcard, a question mark (?) placeholder, alphanumeric characters, or a combination of
the three.
Inventory ID (box)
Use Inventory ID to specify an inventory ID value to refine your selection. You can use an asterisk (*)
wildcard, a question mark (?) placeholder, alphanumeric characters, or a combination of the three.
Begin Processing (button)
Click Begin Processing to update the Price/Disc% with the Revised Price/Disc%, Start Date with
Revised Start Date, and End Date with Revised End Date. This process also clears the values from the
Revised Price/Disc%, Revised Start Date, and Revised End Date for the selected special prices.

448 Service Dispatch
Notes Template (SD.410.00) Notes Template (SD.410.00) creates a template for notes to efficiently add boilerplate notes onto a
service call for invoicing. In addition, these templates are used in Contract Equipment (SN.001.05) in
the Service Contracts module.
Figure 209: Notes Template (SD.410.00)
Following are the field descriptions for Notes Template (SD.410.00).
Template ID
Template ID associates a pager template with the employee.
Description
Description contains the 30-character explanation of the Template ID.

Maintenance Screens 449
Employee Schedule (SD.904.00) Use Employee Schedule (SD.904.00) to define a date, or a range of dates, when a specific technician
is not available for service calls.
Note: An alternative to using Employee Schedule (SD.904.00) is to set the status of an employee to a
value other than Active using Employee Maintenance (SD.007.00). If an employee’s status is set to
Inactive, the employee will not display on the Graphical Dispatch Board (SD.900.00). If the status is
set to Vacation, Sick, or Personal, a bar appears across all days and times of the Graphical Dispatch
Board (SD.900.00) schedule pane indicating that the employee is not available for assignments. Use
Employee Schedule (SD.904.00) when you want to specify days that a technician is not available.
Dates entered in Employee Schedule (SD.904.00) are displayed in the Graphical Dispatch Board
(SD.900.00) as a task bar, providing a visual indication of when a technician is not available to
take service calls.
Graphical Dispatch Board (SD.900.00) task bars created in Employee Schedule (SD.904.00) are
color-coded based on settings in Graphical Dispatch Setup Maintenance (SD.902.00).
Indicating a technician is on vacation, sick, or otherwise not available does not prevent a
technician from being assigned to a task during the period of unavailability. The purpose is to
indicate the technician’s status, but if a dispatcher must assign the technician, the dispatcher will
be able to do so.
To absolutely prevent a dispatcher from assigning a technician to a task, you must change the
technician’s status using Employee Maintenance (SD.007.00). If the status is anything other than
Active at the time the assignment is being made, the technician cannot be assigned to service
calls.
Figure 210: Employee Schedule (SD.904.00)
Following are the field descriptions for Employee Schedule (SD.904.00).
Employee ID
Employee ID contains the technician’s employee ID from Employee Maintenance (SD.007.00). The
employee ID can be entered directly, or selected from a list of employee IDs by pressing F3 or by
double-clicking the right mouse button.
Employee Status (not labeled)
Employee Status contains the current status of the technician as shown in Employee Maintenance
(SD.007.00).

450 Service Dispatch
First, M.I., Last Name
The First, M.I., Last Name boxes contain the technician’s name as shown in Employee Maintenance
(SD.007.00).
Start Date
Start Date contains the first date the status is applicable.
End Date
End Date contains the last date the status will be applicable.
Status
Status contains the technician status during the dates entered. Status changes made via Employee
Schedule (SD.904.00) do not change the employee status recorded in Employee Maintenance
(SD.007.00). Options are:
Inactive
Vacation
Sick
Personal
OK (button)
Clicking OK saves the data and closes the screen.

Processing Screens 451
Processing Screens
Processing Screens Overview The Service Dispatch module is a comprehensive service business system that is designed to track
every detail of a service organization. Several processing screens exist in the system that enables
users to completely automate service call processing, dispatching and invoicing efficiently and
accurately.
Generate Inventory (SD.306.00) allows organizations to effectively manage inventory quantity and
costs by creating cost of goods sold batches in Issues (10.020.00). Purchase orders and purchase
order receipts can also be generated without completing service calls. Generate Payroll (SD.302.00)
integrates with the Payroll module by creating timesheet entries in Payroll Time & Dollar Entry
(02.020.00) for hours worked by technicians.
Dispatch - Service Call Page (SD.024.00) Dispatch - Service Call Page (SD.024.00) sends an alphanumeric page to an employee in the field and
assigns a technician to the related service call. Open Dispatch - Service Call Page (SD.024.00) by
clicking Page in Dispatch (SD.201.00).
Figure 211: Dispatch - Service Call Page (SD.024.00)
Following are the field descriptions for Dispatch - Service Call Page (SD.024.00).
Service Call ID
Service Call ID displays the currently selected service call. If you click Assign To Call, this is the service
call that is updated.
Technician ID
Technician ID contains the technician assigned to the call. However, a different technician may be
selected if you desire. If a new technician is selected, you can assign the technician ID to the service
call by clicking Assign To Call.
Call Status ID
Call Status ID updates the status of the service call when you assign the paged technician. Enter the
desired call status before clicking Assign To Call.

452 Service Dispatch
Template ID
Template ID automatically extracts data from the service call and places it in the alphanumeric
message area of Dispatch - Service Call Page (SD.024.00). Although Template ID is required, you can
completely erase the default message and enter your own message.
Number
Number contains the pager number or the PIN number of the technician.
Auto-Retry
Auto-Retry continues to try to send the page if the initial try is unsuccessful.
Page (button)
Page initiates the paging process. It sends alphanumeric text information to the technician base on
the paging service that has been set up in Service Series Setup Maintenance (SD.000.00).
Assign To Call (button)
Assign To Call automatically assigns the paged technician to the service call.

Processing Screens 453
Service Call Invoice Approval (SD.204.00) Service Call Invoice Approval (SD.204.00) allows you to review multiple service calls from one screen
prior to invoicing. You can use a variety of filters to control which service calls are loaded into the grid.
Once the calls are in the grid you can select one and click Detail to open Invoice Entry (SD.202.00).
From Invoice Entry (SD.202.00) you can review and/or modify invoicing information, including the
invoicing details for labor and material. From Service Call Invoice Approval (SD.204.00) you may also
click Invoice Notes to review and/or modify the invoice notes related to the service call.
You can change the values in Invoice Date and Invoice Handling, copy the new values to the clipboard,
and then paste your changes to any number of rows, saving you time when making mass changes.
After you complete your review of the service calls, you can indicate which changes should be
permanent by selecting the Selected check box. When you click Update, all service calls with Selected
marked are updated with the changes you have made. All indicated service calls will be updated at the
same time. This process allows you to easily review and make a large number of service calls ready for
invoicing at the same time from one screen.
Note: When you click Update, a validation is performed on all service calls marked with Invoice
Handling set to Approved. An invoice is updated to Approved only if:
The invoice has at least one detail line.
The Handling value on Service Call Entry (SD.200.00) for the service call is not set to Quote.
The revenue account and subaccount combination is valid for each detail line in the invoice.
The Cost of Goods Sold account and subaccount combination is valid for each detail line in the
invoice.
The tax IDs for the invoice are valid and the tax total for the invoice is the sum of the detail tax by
tax ID.
Invoice Date is not blank.
Figure 212: Service Call Invoice Approval (SD.204.00)

454 Service Dispatch
Following are the field descriptions for Service Call Invoice Approval (SD.204.00).
Note: You may select as many Select Criteria check boxes as required to filter your invoice approval
list, or you may leave all the boxes cleared. If no Select Criteria is selected, all service calls appear in
the grid.
Customer (check box)
Select Customer to filter the list based on a single customer ID.
Customer
Customer contains the customer ID and customer name you wish to use as a filter. Customer ID can
be entered directly into the cell, or selected from a list of available customer IDs by pressing F3 or by
double-clicking the right mouse button in the field.
Branch ID (check box)
Select Branch ID to filter the list based on a single branch ID.
Branch ID
Branch ID contains the 10-character code and description for the particular branch you wish to use as
a filter. Branch IDs are defined in Branch Maintenance (SD.001.00). Branch ID can be entered directly
into the field, or selected from a list of available Branch IDs by pressing F3 or by double-clicking the
right mouse button in the field.
Supervisor (check box)
Select Supervisor to filter the list based on a single supervisor employee ID.
Supervisor
Supervisor contains the employee ID from Employee Maintenance (SD.007.00) and the name of the
supervisor that you wish to use as a filter. You can enter the employee ID of the supervisor directly into
the field, or select from a list of all available employee IDs by pressing F3 or by double-clicking the
right mouse button in the field.
The supervisor for an employee is defined in Employee Maintenance (SD.007.00).
Technician (check box)
Select Technician to filter the list based on a single technician employee ID.
Technician
Technician contains the employee ID from Employee Maintenance (SD.007.00) and the name of the
technician you wish to use as a filter. Technician can be entered directly into the field, or selected from
a list of available technician employee IDs by pressing F3 or by double-clicking the right mouse button
in the field.
Invoice Handling (check box)
Select Invoice Handling to filter the list based on a specific invoice handling value. The invoice
handling value is found on Invoice Entry (SD.202.00).

Processing Screens 455
Invoice Handling (list box)
Select the type of invoiced handling you wish to approve. The following options are available:
In Progress
Review
Rejected
Approved
Completed (Note: Invoice Handling set to Completed should not be changed to any other value.)
Hold
Completed From (check box)
Select Completed From to filter the list based on a specific date range of when work on the service
calls had been completed. The completed date is found on Invoice Entry (SD.202.00).
Completed From
Completed From contains a date range that filters the selection of service calls so that only service
calls with a completed date falling within the date range specified are used to populate the grid.
Period (check box)
Select Period to filter the list based on a specific period to post value. The period to post value is found
on Invoice Entry (SD.202.00).
Period
Period contains the period to post that service calls brought into the grid must have if the Period check
box is selected.
Refresh (button)
Clicking Refresh causes the system to refresh the grid based on the current selection criteria.
Selected (check box)
Selected indicates that changes made to Invoice Date, Invoice Handling and/or Invoice Note values
update the source service call when Update is pressed. Note that you can copy and paste the “x” in
the box to any number of rows in sequence.
Service Call ID
Service Call ID contains the service call identifier of the service call being reviewed.
Customer ID
Customer ID contains the customer ID used on the service call. Note that the Bill To customer may or
may not be the same as this customer ID. To confirm that the correct bill to customer ID is being used,
click the Detail button and review the Bill To value on Invoice Entry (SD.202.00).
Invoice Date
Invoice Date contains the date you want the system to use as the date of the invoice. This date is used
for accounts receivable aging purposes. Invoice Date can be changed directly in the grid. Note that you
can copy and paste Invoice Date to any number of rows in sequence.
Note: You can use the copy and paste feature to perform a mass update to this field.

456 Service Dispatch
Invoice Handling
Invoice Handling contains the invoice handling status of the service call. The invoice handling value
can be changed directly in the grid. Setting Invoice Handling to Approved makes the service call
available for invoicing in Service Call Invoice (SD.640.00) or Service Call Invoice (SSRS) (SD.643.00).
Available options are:
In Progress
Review
Rejected
Approved
Completed (Note: Invoice Handling set to Completed should not be changed to any other value.)
Hold
Note: You can use the copy and paste feature to perform a mass update to this field.
When you click Update, a validation is performed on all service calls marked with Invoice Handling set
to Approved. An invoice is updated to Approved only if:
The invoice has at least one detail line.
The Handling value on Service Call Entry (SD.200.00) for the service call is not set to Quote.
The revenue account and subaccount combination is valid for each detail line in the invoice.
The Cost of Goods Sold account and subaccount combination is valid for each detail line in the
invoice.
The tax IDs for the invoice are valid and the tax total for the invoice is the sum of the detail tax by
tax ID.
Invoice Date is not blank.
Technician
Technician contains the employee ID of the primary technician assigned to the service call.
Call Type
Call Type contains the call type identifier of the service call.
Amount
Amount contains the total amount of the invoice, including labor, material, and taxes.
Salesperson ID
Salesperson ID contains the salesperson identifier of the service call.
Branch ID
Branch ID contains the branch identifier of the service call.
Select All (button)
Clicking Select All causes Selected to be marked for all service calls in the grid.
Unselect All (button)
Clicking Unselect All causes Selected to be cleared for all service calls in the grid.

Processing Screens 457
Detail (button)
Clicking Detail causes Invoice Entry (SD.202.00) to open for the highlighted service call in the grid.
Information on Invoice Entry (SD.202.00) can be edited and all the tabs and buttons on the screen
function. Click Details on Invoice Entry (SD.202.00) to access the supporting invoice details screen.
Invoice Notes (button)
Clicking Invoice Notes causes Invoice - Notes Entry (SD.408.00) to open for the highlighted service call
in the grid. The invoice note can be edited. For more information, see “Invoice – Notes Entry
(SD.408.00)” on page 458.
Update (button)
Clicking Update causes the changes made in the grid to be applied to those service calls with the
Selected check box marked.
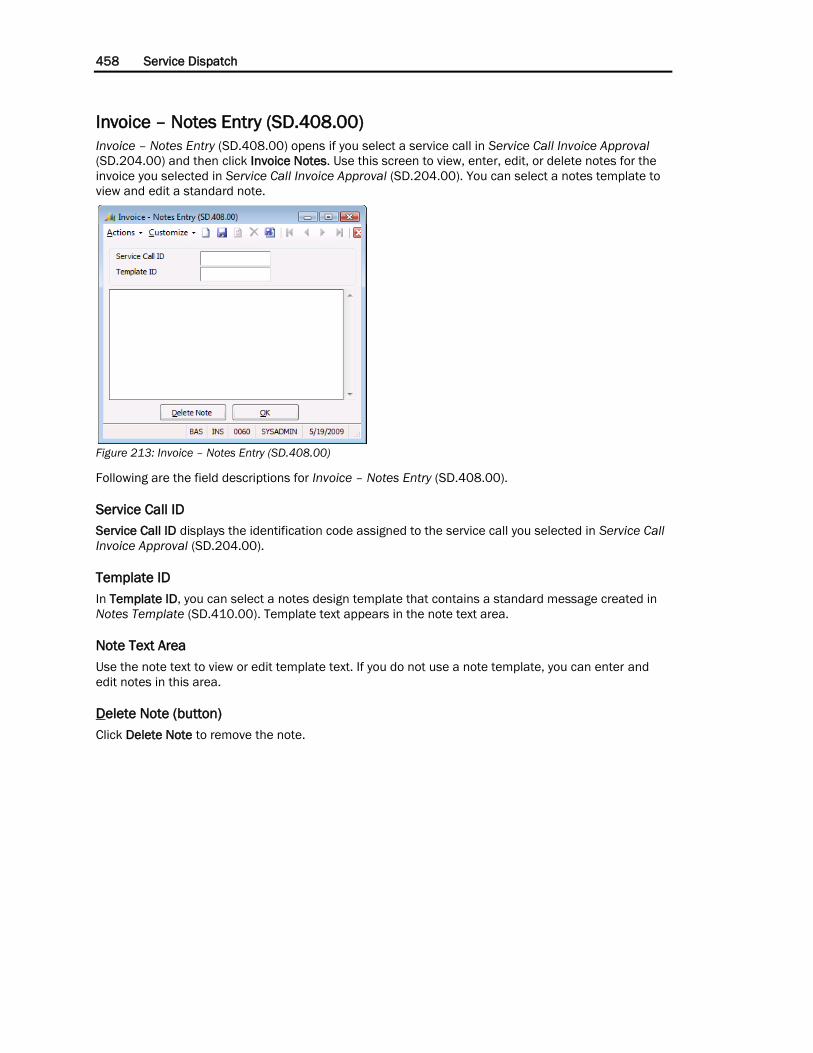
458 Service Dispatch
Invoice – Notes Entry (SD.408.00)
Invoice – Notes Entry (SD.408.00) opens if you select a service call in Service Call Invoice Approval
(SD.204.00) and then click Invoice Notes. Use this screen to view, enter, edit, or delete notes for the
invoice you selected in Service Call Invoice Approval (SD.204.00). You can select a notes template to
view and edit a standard note.
Figure 213: Invoice – Notes Entry (SD.408.00)
Following are the field descriptions for Invoice – Notes Entry (SD.408.00).
Service Call ID
Service Call ID displays the identification code assigned to the service call you selected in Service Call
Invoice Approval (SD.204.00).
Template ID
In Template ID, you can select a notes design template that contains a standard message created in
Notes Template (SD.410.00). Template text appears in the note text area.
Note Text Area
Use the note text to view or edit template text. If you do not use a note template, you can enter and
edit notes in this area.
Delete Note (button)
Click Delete Note to remove the note.

Processing Screens 459
Generate Payroll Process (SD.302.00) Generate Payroll Process (SD.302.00) integrates technician hours and hourly pay rate information
with the Payroll module. The work hours entered during invoice entry, including employee ID, earnings
type, work location and rate, are processed based on the service call ID by service date range.
Processing technician pay to payroll does not close the service call. The posting to Payroll creates the
offset debit entry to the Accrued Wages Payable account.
Figure 214: Generate Payroll Process (SD.302.00)
Following are the field descriptions for Generate Payroll Process (SD.302.00).
All Branches/Branch ID
All Branches/Branch ID processes payroll records for service calls for all branches or for a specific
branch.
Svc Call ID From/To
Svc Call ID From/To selects a range of service calls to include when generating payroll processing.
Tran Date From/To
Tran Date From/To is a payroll period date range. Records included in this date range are those
records where the Service Date in Invoice - T & M Details (SD.203.00) and/or Flat Rate Order - Modify
Details (SP.202.00) falls within the selected date range.
Begin Processing (button)
Begin Processing creates the timesheet in Payroll Time and Dollar (02.020.00).
Cancel (button)
Cancel prompts you to save your changes and closes the screen.
Note: The functionality of this process requires the user to set up inventory items with default settings
for the inventory account and subaccount as Wages Payable. It is recommended that you use
Customization Manager to change the label in Inventory Items (10.250.00), GL Accounts tab to
Invt/Wages Acct.

460 Service Dispatch
Generate Inventory (SD.306.00) Generate Inventory (SD.306.00) generates an issues batch in Inventory, creates purchase orders, and
creates receipts without completing the service call.
Figure 215: Generate Inventory (SD.306.00)
Following are the field descriptions for Generate Inventory (SD.306.00).
All Branches/Branch ID
If you select All Branches, the system does not exclude generating the inventory costs, purchase
orders, or receipts on invoices for any particular branch. However, if you do not select All Branches,
the system requires a specific branch ID and processes only transactions for the selected branch.
All Service Calls/Beginning/Ending Call ID
If you select All Service Calls, the system does not exclude generating the inventory costs, purchase
orders, or receipts on invoices for any particular service call. However, if you do not select All Service
Calls, the system requires a range of service call IDs and processes only transactions for the selected
calls.
All Service Dates/Process Through
If you select All Service Dates, the system does not exclude generating the inventory costs, purchase
orders, or receipts on invoices based on dates. The “Service Date” is the date held in Invoice - T & M
Details (SD.203.00) or Flat Rate Order - Details (SP.202.00). If you do not select All Service Dates, the
system processes only those transactions up to the date entered in this screen.
Book Inventory Costs
If you select Book Inventory Costs, the system creates a balanced batch in Inventory, viewable in
Issues (10.020.00). The system uses the Worked Hours for labor detail lines and Quantity for material
detail lines entered in Invoice Entry (SD.202.00) to update the quantities on hand in Inventory. Labor
items should be a non-stock item with Verify Quantities disabled on Inventory Items (10.250.00). The
COGS account and subaccount are from Invoice Entry (SD.202.00), and the Inventory account and
subaccount are from Inventory Items (10.250.00). For labor items, a Wages Payable account and
subaccount should be entered instead of an Inventory account in Inventory.

Processing Screens 461
Create Purchase Orders
If you select Create Purchase Orders, the system creates a purchase order where a vendor ID is
populated in the detail line record of Invoice Entry (SD.202.00), Invoice - T & M Details (SD.203.00), or
Flat Rate Order - Modify Details (SP.202.00). If the same vendor ID is entered two or more times, the
system generates only one purchase order for the vendor with multiple detail lines. However, if two or
more vendor IDs are entered, the system creates a purchase order for each vendor. The system uses
Qty Purch in Invoice - T & M Details (SD.203.00).
Create P.O. Receipts
If you select Create P.O. Receipts, the system creates a purchase order and receipt. The receipts must
be reviewed prior to posting to Inventory and creating an AP voucher.
Include Service Calls Having Blank Period to Post
Specify the period to post for the service calls you wish to process. Service calls with a blank period to
post will not be processed unless Include Service Calls having blank period to post is checked.
Begin Processing (button)
Begin Processing posts the transactions to Inventory and Accounts Receivable unless the Handling
option of Delete All Invoices is selected.
Cancel (button)
Cancel prompts you to save your changes and closes the screen.
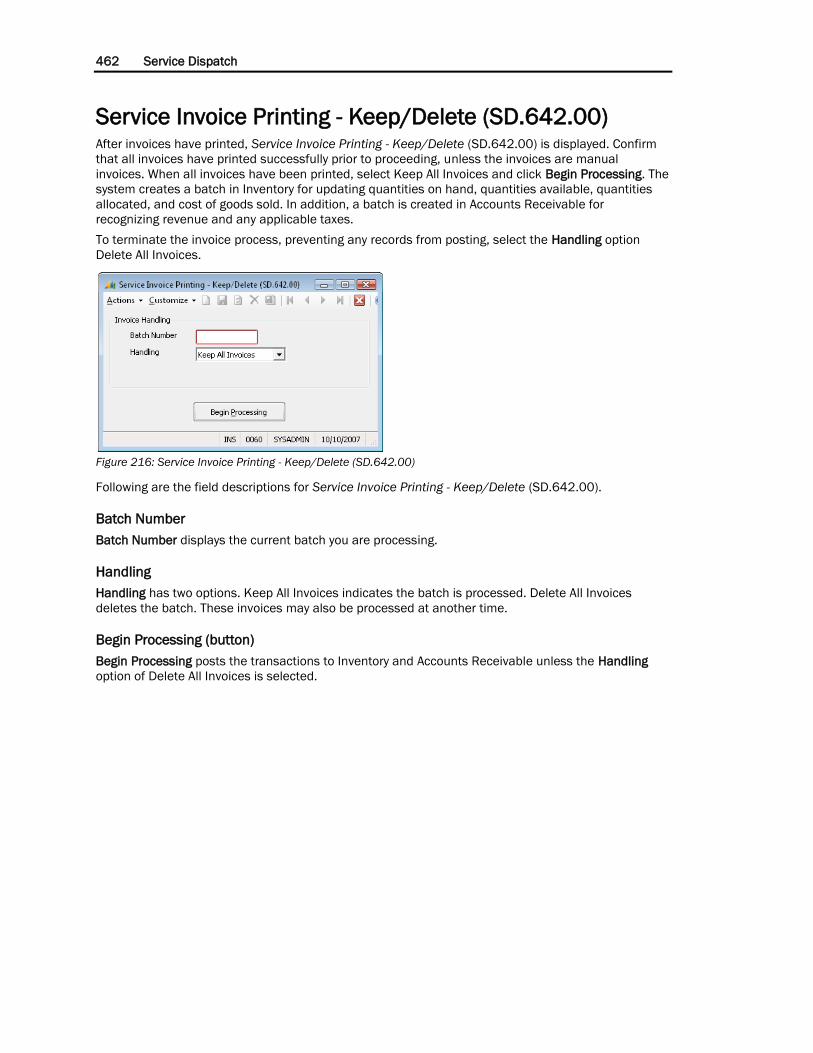
462 Service Dispatch
Service Invoice Printing - Keep/Delete (SD.642.00) After invoices have printed, Service Invoice Printing - Keep/Delete (SD.642.00) is displayed. Confirm
that all invoices have printed successfully prior to proceeding, unless the invoices are manual
invoices. When all invoices have been printed, select Keep All Invoices and click Begin Processing. The
system creates a batch in Inventory for updating quantities on hand, quantities available, quantities
allocated, and cost of goods sold. In addition, a batch is created in Accounts Receivable for
recognizing revenue and any applicable taxes.
To terminate the invoice process, preventing any records from posting, select the Handling option
Delete All Invoices.
Figure 216: Service Invoice Printing - Keep/Delete (SD.642.00)
Following are the field descriptions for Service Invoice Printing - Keep/Delete (SD.642.00).
Batch Number
Batch Number displays the current batch you are processing.
Handling
Handling has two options. Keep All Invoices indicates the batch is processed. Delete All Invoices
deletes the batch. These invoices may also be processed at another time.
Begin Processing (button)
Begin Processing posts the transactions to Inventory and Accounts Receivable unless the Handling
option of Delete All Invoices is selected.

Processing Screens 463
Technicians Page (SD.903.00)
Figure 217: Technicians Page (SD.903.00)
Following are the field definitions for the Technicians Page (SD.903.00).
Service Call ID
Service Call ID contains the service call identifier.
Call Status ID
Call Status ID contains the status assigned to the service call when the page is sent.
Note: The status of a problem code task is not changed by sending a page.
Selected
Selected indicates that a page should be sent to the technician.
Technician ID
Technician ID contains the employee ID from Employee Maintenance (SD.007.00) of the technician
being paged.
Number
Number contains the pager or PIN to be used to page the technician. The Pager/PIN defaults from
Employee Maintenance (SD.007.00) and cannot be edited in Technicians Page (SD.903.00).
Template ID
Template ID contains the ID of the paging template to be used when paging the technician. Paging
templates are created and maintained in Pager Template (SD.031.00). This is a required field.
Create Msg (button)
Clicking Create Msg causes the system to format the message in the message box based on the
Template ID. This is useful if you have modified the default message and then want to discard your
changes and return to the default format.

464 Service Dispatch
Auto-Retry
Auto-Retry indicates that the system should continue to try and send the page if previous attempts
have failed.
Page (button)
Clicking Page causes the system to format the page message into a text file saved in the folder
identified in Service Series Setup Maintenance (SD.000.00).

Setup Screens 465
Setup Screens
Setup Screens Overview Service Series Setup Maintenance (SD.000.00) is the first screen you should complete when setting
up the service management system.
Service Series Setup Maintenance (SD.000.00) Service Series Setup Maintenance (SD.000.00) sets the organization’s regular business hours, the
service call lead time, and the service call range time. Sequencing of key identifier codes is also
accomplished using Service Series Setup Maintenance (SD.000.00). Sequence the customer ID, the
service call ID, and the service contract ID, numbering system with the former IDs in your old system.
Once these key identifier codes are sequenced, you have the option to have the system automatically
assign IDs to customers, service calls, and service contracts. If the Auto-Number Branch Prefix check
box and the auto-numbering feature for the customer ID, service contracts ID, and service call ID are
selected, the corresponding beginning of the unique identifying codes are masked with the
appropriate three-character branch abbreviation.
The PO number option determines whether purchase order numbers in call completion are assigned
automatically or manually. The non-billable cost options determine whether costs for non-billable lines
are calculated in the profitability of service calls. In addition, you can select the type of paging service
being used. (If you are using a paging service not included in the drop-down list, please contact your
Microsoft Certified Partner.)
In User Configuration, assign a default call queue configuration for each user ID. When you open the
dispatch board, this defaulted code allows each user to view the queues in the most desired and
useful way. This screen also allows you to be associated with a particular branch.

466 Service Dispatch
In Pager Configuration, create an unlimited amount of pager templates. This is accomplished by
assigning a unique ID to a template and selecting the desired fields to be linked to a template. You
may select from a number of predefined fields to be attached to a template. This screen also allows
you to enter the necessary modem and paging information needed to use the pager functionality in
the software. Consult your local pager service for the correct settings.
Figure 218: Service Series Setup Maintenance (SD.000.00)
Following are the field descriptions for Service Series Setup Maintenance (SD.000.00).
Hours of Operation
Hours of Operation sets the service hours for the organization. This information may be modified at
any time. If a service call is entered after the indicated business hours, the system defaults the
promised time to the beginning of the next business day. If the service call is entered before the
indicated closing time but the specified lead time creates a promised time after business hours, the
system again defaults the promised time to the beginning of the next business day.
Service Call Lead Time
Service Call Lead Time assigns a promised time from and a promised time to for a new service call.
The promised time from is calculated by adding the service call lead time to the system time.
Service Call Range Time
Service Call Range Time adds service call range time to the service call lead time to calculate the
promised time.

Setup Screens 467
Auto-Number Branch Prefix (check box)
Auto-Number Branch Prefix adds a corresponding branch abbreviation to the first three characters of
the customer ID, service call ID, and service contract ID. The branch prefix default is based on the
branch ID linked with the associated record in each respective screen: Service Call Entry (SD.200.00),
including the New Customer tab, and Service Contract Entry (SN.001.00).
PO Number Option
PO Number Option provides two options for purchase order numbers when completing a service call:
Manual and Automatic. The Manual option allows you to enter a user-specified purchase order during
invoice entry. If the Manual option is selected, the Auto Numbering PO and Receipt should be disabled
in PO Setup (04.950.00). If the Automatic option is selected, the system automatically assigns a
purchase order number for each purchase order.
Create Receipts On Purchase Orders
Create Receipts On Purchase Orders permits the selection of whether to create a receipt when
creating a purchase order from Invoice Entry (SD.202.00). If Create Receipts on Purchase Orders is
set to Yes, a receipt is created when entering and releasing a purchase order from Invoice Entry
(SD.202.00). A receipt is not created if Create Receipts on Purchase Orders is set to No.
Include Non-Billable Labor in Costs (check box)
Include Non-Billable Labor in Cost permits the selection of whether non-billable labor items are
calculated in the profitability and gross margin of service calls. If the check box is selected, the non-
billable labor items are included in the calculation.
Include Non-Billable T&M in Costs (check box)
Include Non-Billable T&M in permits the selection of whether non-billable line items other than labor
are calculated in the profitability and gross margin for service calls. If the check box is selected, the
non-billable items are included in the calculation.
Voucher Receipts Option
Voucher Receipts Option provides three options for generating purchase orders from Invoice Entry
(SD.202.00): Always Voucher, Never Voucher, and Use Purchasing Option. The Always Voucher option
creates and prepares a voucher through Accounts Payable each time a purchase order is created from
Invoice Entry (SD.202.00). The Never Voucher option does not create a voucher when creating a
purchase order from Invoice Entry (SD.202.00). The Use Purchasing Option looks at the PO Setup
(04.950.00) when creating a purchase order from Invoice Entry (SD.202.00) and bases its
functionality accordingly.
Payroll Interface
Payroll Interface is set to None if there is no requirement to link the employee in Field Service
Management to a payroll system.
If the Payroll module is installed and there is a requirement to capture work hours in Service Dispatch
for payroll purposes and to use the Payroll hourly rate for costing, set Payroll Interface to Payroll or
Advanced Payroll (depending on the module being used). With this setting, employee information can
be copied from Payroll to Employee Maintenance (SD.007.00). Also, if Payroll ID in Employee Personal
Information (SD.007.01) is enabled, the Generate Payroll process can exchange work hour
information with the appropriate payroll module, and labor costing will be based on the pay rate in
Payroll.
If a third-party payroll application is being used and you wish to link the employee in Field Service
Management to the employee ID in the third-party application, set Payroll Interface to Other. This will
enable Other Employee ID in Employee Personal Information (SD.007.01).

468 Service Dispatch
Use Pay Rate from
Use Pay Rate from controls the pay rate that is used when Generate Payroll Process (SD.302.00) is
used to create timesheets in the Payroll or Advanced Payroll module. If Use Pay Rate from is Service,
then the cost used on the service invoice is used as the pay rate when the Payroll or Advanced Payroll
timesheet is created. If Use Pay Rate from is Payroll, then the pay rate is calculated based on the
Payroll or Advanced Payroll rules applicable to that employee when the timesheet is created.
Service Type
Service Type permits the selection of the type of paging software to be used when sending alpha-
pages from the service call queue. Currently, the options are Wireless Office and None (no paging
enabled).
Pager ID Info
Pager ID Info defines the type of subscriber information to be used with the paging software. If
Employee ID is used to page, that information must be entered in Pager No./PIN # in Employee
Maintenance (SD.007.00) and must match the subscriber name on the Wireless Office server. If you
page using Pager/Pin #, data must be entered in Employee Maintenance (SD.007.00) and match the
subscriber name on the Wireless Office server.
Path
Path permits specifying the path or directory to store alpha-pages. Click the ellipses (...) to the right of
Path to browse for the desired default path.
Last Service Call ID
Last Service Call ID permits the starting service call identifier relative to the last service call identifier
to be entered from the old system, allowing continuous numbering from the old system to the new.
After the initial use of the system, Last Service Call ID is used as a reference, allowing the last service
call ID created to be viewed. If Auto Number Service Call is enabled, the system automatically
increments this number.
Auto Number Service Call (check box)
Auto Number Service Call automatically assigns a service call ID once the record is saved. If the check
box is cleared, the service call ID must be entered manually. If Auto-Number Branch Prefix is enabled
in combination with the Auto Number Service Call check box, the appropriate prefix or abbreviation
entered in Branch Maintenance (SD.001.00) is added to the service call ID when the service call is
saved.
Last Customer ID
Last Customer ID enables the entering of the starting customer ID relative to the last customer ID from
the old system, allowing continuous numbering from the old system to the new. The customer ID
increments at the time new customers are created from the New Customer tab in Service Call Entry
(SD.200.00). After the initial use of the system, Last Customer ID is used as a reference, allowing the
last customer ID created to be viewed.
Auto Number Customer ID (check box)
Auto Number Customer ID automatically assigns a customer identifier when Create is clicked from the
New Customer tab in Service Call Entry (SD.200.00). If the check box is cleared, the customer ID must
be entered manually. If Auto-Number Branch Prefix is enabled in combination with the Auto Number
Customer ID check box, the appropriate prefix or abbreviation entered in Branch Maintenance
(SD.001.00) is added to the customer ID when the service call is saved.

Setup Screens 469
Split Commission Equal 100% (check box)
Split Commission Equal 100% forces commissions to equal 100% (one hundred percent) of the Total
Invoice amount, if a commission is split over two or more technicians during invoice entry. If the check
box is selected, the system does not allow allocation of a partial percentage of the commission. If Split
Commission Equal 100% is not selected, the total split of the commission can be less than or equal to
100%.
Active Contract Notification (check box)
Active Contract Notification allows active contract notification to be turned off when taking a service
call in Service Call Entry (SD.200.00) where a service contract may be associated with the respective
service site. If the check box is selected, the CSR is notified of any sites that have service contracts at
the time when a service call is entered. If it is not selected, the contract notification message is not
displayed, but a small message appears below Service Contract ID.
Enable Open Calls Alert (check box)
Enable Open Calls allows the open calls alert to be turned off when taking a service call in Service Call
Entry (SD.200.00). The alert displays any open service calls for the selected company, customer, or
site. If the check box is selected, the CSR is notified of any open service calls at the time a new service
call is entered. If it is not selected, Open Service Call (SD.200.02) is not displayed, but the Open Calls
button on Service Call Entry (SD.200.00) is activated.
Check Technician's Skills and Licenses (check box)
Select Check Technician's Skills and Licenses to be alerted if a technician who is listed in the detail
area of Service Call Entry (SD.200.00) does not have the skills and licenses required for the call.
Call Status on Completion
Call Status on Completion defines the call status that is assigned when a service call is completed.
Primary Use Option
Primary Use Option provides two options for defining the primary use of the system: Service Calls and
Work Orders. For field service related organizations, select Service Calls. For facility/equipment
maintenance organizations, select Work Orders.
Material Markup Price On
Material Markup Price On provides six options to automatically calculate the unit price by selecting a
costing method. For setting up the actual mark-up tables, see Inventory Mark-up Maintenance
(SD.026.00) in Service Dispatch. The User-Specified option is most popular.
Labor Markup Price On
Labor Markup Price On provides six options to automatically calculate the unit price by selecting a
costing method. For setting up the actual mark-up tables, see Inventory Mark-up Maintenance
(SD.026.00) in Service Dispatch. The User-Specified option is most popular.
Discount Account
Specify the discount account from the G/L Chart of Accounts that corresponds to the discount amount
entered on Invoice Entry (SD.202.00).
Last Contract ID
Last Contract ID enters a starting service contract identifier relative to the last contract ID in the old
system, allowing continuous numbering. After the initial use of the system, Last Contract ID is used as
a reference field which allows viewing of the last contract ID created. If Auto Number Contract ID is
enabled, the system automatically increments the number to the next service contract ID.

470 Service Dispatch
Auto Number Contract ID (check box)
Auto Number Contract ID automatically assigns a service contract identifier to a service contract once
it is saved. If the check box is cleared, the identifier must be entered manually. If the Auto-Number
Branch Prefix check box is selected, the system generates a number with the appropriate branch
abbreviation associated with the service contract.
Auto Contract Price Calculation (check box)
Auto Contract Price Calculation indicates to the system that a new service contract price is
automatically created. This new service contract price is calculated by multiplying the base price with
the renewal percentage.
User Configuration (button)
User Configuration button accesses User Configuration (SD.000.01). This screen provides the ability to
select a default configuration code for the service call queue by user.
Pager Configuration (button)
Pager Configuration accesses Pager Template (SD.031.00).

Setup Screens 471
User Configuration (SD.000.01)
User Configuration (SD.000.01) defines the default call view configuration to use when the user opens
Dispatch (SD.201.00). Call views are defined in Dispatch - View Maintenance (SD.004.00). Setting up
the default here saves the user time when opening the dispatch board as no input is required for
Queue ID. Open User Configuration (SD.000.01) by clicking User Configuration in Service Series Setup
Maintenance (SD.000.00).
Figure 219: User Configuration (SD.000.01)
Following are the field descriptions for User Configuration (SD.000.01).
User ID
User ID is a Microsoft Dynamics SL user login.
Service Call Config
Service Call Config selects a default call view (Queue ID) for Dispatch (SD.201.00).
All Branch
All Branch allows the login user to view service calls for all branches. If the login user can view calls
only for a single branch, do not select the All Branch check box.
Branch ID
If the login user can view calls only for a single branch, enter the Branch ID.
OK (button)
OK closes the screen and saves any changes.

472 Service Dispatch
Graphical Dispatch Setup Maintenance (SD.902.00) Use Graphical Dispatch Setup Maintenance (SD.902.00) to define the look, feel, and optional
behaviors of the Graphical Dispatch Board (SD.900.00). You can also define preferences for email
messages sent to customers and technicians in Graphical Dispatch Board (SD.900.00).
Figure 220: Graphical Dispatch Setup Maintenance (SD.902.00), Customer E-mail Options tab
Following are the field descriptions for Graphical Dispatch Setup Maintenance (SD.902.00).
Note: The tabs are described after this section.
Employee Class label
Employee Class label controls whether employee class labels display on Graphical Dispatch Board
(SD.900.00). Select Yes to see the labels, No to have the labels suppressed.
Average Travel Time
Average Travel Time contains the amount of travel time you want as the default travel time on a
problem code. Enter 00:00 if you do not want a default amount.
When Assign Travel Time
When Assign Travel Time allows you to designate when a default travel time, if one is entered in
Average Travel Time, should be entered by the system. The options are:
For all tasks: Each problem code task has Average Travel Time defaulted automatically.
For first task only: Average Travel Time defaults only for the first problem code on each service
call.
Setup Screens 473
Conflicting Call Save Option
Conflicting Call Save Option allows you to control how conflicts are handled when multiple users are
attempting to simultaneously update a problem code in Graphical Dispatch Board (SD.900.00). To
illustrate, assume User A and User B have each selected, at the same time, the same problem code to
update. How each option handles the situation is described below:
First Changes: If selected, changes made by the first person to save changes are retained. For
example: If User A moves the call from 9am to 8am at the same time that User B is moving the
call from 9am to 10am and User A saves first, then User B’s changes are not saved. Instead, User
B’s screen refreshes to display the call at 8am when the save is attempted.
Last Changes: If selected, changes made by the last person to save changes are retained. For
example: If User A moves the call from 9am to 8am at the same time that User B is moving the
call from 9am to 10am and User A saves first, then the 9am value is saved. When User B
subsequently saves changes, the call is updated to 10am. The call moves to 10am on User A’s
screen the next time User A refreshes.
Bar Text
Bar Text allows you to select the text displayed on a problem code task bar in the Graphical Dispatch
Board (SD.900.00) schedule pane. Available options are:
ServiceCallID: Line ID
FaultCodeID: Line ID (Note: The FaultCodeID is the same as the Problem Code ID)
CallerName: Phone
CallerName: Addr1 (Note: Addr1 is Address Line 1 from the customer site)
Status: FaultCodeID: Line ID
Addr1
Warning If Time Conflict
Warning If Time Conflict indicates whether a warning message appears if the user overlaps times on
two service calls for the same technician.
Problem Status Color
Problem code task bars in the Graphical Dispatch Board (SD.900.00) schedule pane can be color-
coded to represent the various available problem code status options. Each of these status options is
listed in the lower portion of Graphical Dispatch Setup Maintenance (SD.902.00) with an ellipsis (...)
button and a color display area. Click the ellipsis button to display a color selection screen. Once a
color is selected it appears in the color display area. Problem code task bars in the Graphical Dispatch
Board (SD.900.00) schedule pane correspond to the color selected here for each available status.
Note: Make sure that you select colors on which both black text and white text display clearly.
Technician Status Color
Task bars can be color-coded on Graphical Dispatch Board (SD.900.00) to represent technician
status. Each of the possible status options is listed in the lower portion of Graphical Dispatch Setup
Maintenance (SD.902.00) with an ellipsis (...) button and a color display area. Click the ellipsis (...)
button to display a color selection screen. Once a color is selected it appears in the color display area.
Technician status task bars in the Graphical Dispatch Board (SD.900.00) schedule pane correspond
to the color selected here for each available status.
Note:
The technician status of Training and the technician status of Shop are not active at this time.
Make sure that you select colors on which both black text and white text display clearly.

474 Service Dispatch
Graphical Dispatch Setup Maintenance, Customer E-mail Options Tab
The Customer E-mail Options tab allows you to indicate whether technicians receive copies of email
messages sent to customers in the Graphical Dispatch Board (SD.900.00). You can also specify the
subject and body text for email messages sent to customers in the Graphical Dispatch Board
(SD.900.00).
Figure 221: Graphical Dispatch Setup Maintenance (SD.902.00), Customer E-mail Options tab
Following are the field descriptions for the Customer E-mail Options tab of Graphical Dispatch Setup
Maintenance (SD.902.00).
Do not copy
Do not copy indicates technicians do not receive copies of email messages sent to customers.
Cc Technician
Cc Technician indicates technicians receive copies of email messages sent to customers. When an
email message is created for a customer, Cc contains the email address of the technician assigned to
the service call. The technician’s email address is specified in E-mail Address in Employee
Maintenance (SD.007.00).
Bcc Technician
Bcc Technician indicates technicians receive copies of email messages sent to customers. When an
email message is created for a customer, Bcc contains the email address of the technician assigned
to the service call. The technician’s email address is specified in E-mail Address in Employee
Maintenance (SD.007.00).
Setup Screens 475
E-mail Subject
E-mail Subject is the wording that will appear in the Subject line of an email message sent to a
customer.
You can specify the following variables within the email subject to personalize each email message:
<Service Call ID>
<Problem Code Desc>
<Promise Time>
<Site ID>
<Problem Code Notes>
Each variable must begin with a less-than symbol (<) and end with a greater-than symbol (>). Also, the
first letter of each word in the variable name must be capitalized and the rest of the word must be in
lowercase letters.
Example: You enter a variable to customize the default email subject: Service Call <Service Call ID> on
<Promise Time>. If the Service Call ID is ORC0000014, the Promised Date is 2/21/2008, Time From
is 08:00 AM, and Time To is 10:00 AM, the email subject for the email message reads, Service Call
ORC0000014 on 2/21/2008 08:00 AM – 10:00 AM.
E-mail Body Text
E-mail Body Text is the wording that will appear in the body of an email message sent to a customer.
You can specify the following variables within the email body text to personalize each email message:
<Service Call ID>
<Problem Code Desc>
<Promise Time>
<Site ID>
<Problem Code Notes>
<CR>
Each variable must begin with a less-than symbol (<) and end with a greater-than symbol (>). Also, the
first letter of each word in the variable name must be capitalized and the rest of the word must be in
lowercase letters.
Example:
You enter a variable to customize the email body text:
A technician will investigate the <Problem Code Desc>.<CR><CR>Amy<CR>Hi-Tech Headquarters.
If the Problem Code Description is furnace not working, the email message reads:
A technician will investigate the furnace not working.
Amy
Hi-Tech Headquarters

476 Service Dispatch
Graphical Dispatch Setup Maintenance, Technician E-mail Options Tab
The Technician E-mail Options tab allows you to specify the subject and body text for email messages
sent to technicians in the Graphical Dispatch Board (SD.900.00).
Figure 222: Graphical Dispatch Setup Maintenance (SD.902.00), Technician E-mail Options tab
Following are the field descriptions for the Technician E-mail Options tab of Graphical Dispatch Setup
Maintenance (SD.902.00).
E-mail Subject
E-mail Subject is the wording that will appear in the Subject line of an email message sent to a
technician.
You can specify the following variables within the email subject to personalize each email message:
<Service Call ID>
<Problem Code Desc>
<Promise Time>
<Site ID>
<Problem Code Notes>
Each variable must begin with a less-than symbol (<) and end with a greater-than symbol (>). Also, the
first letter of each word in the variable name must be capitalized and the rest of the word must be in
lowercase letters.
Example: You enter a variable to customize the default email subject: Service Call <Service Call ID> on
<Promise Time>. If the Service Call ID is ORC0000014, the Promised Date is 2/21/2008, Time From

Setup Screens 477
is 08:00 AM, and Time To is 10:00 AM, the email subject for the email message reads, Service Call
ORC0000014 on 2/21/2008 08:00 AM – 10:00 AM.
E-mail Body Text
E-mail Body Text is the wording that will appear in the body of an email message sent to a technician.
You can specify the following variables within the email body text to personalize each email message:
<Service Call ID>
<Problem Code Desc>
<Promise Time>
<Site ID>
<Problem Code Notes>
<CR>
Each variable must begin with a less-than symbol (<) and end with a greater-than symbol (>). Also, the
first letter of each word in the variable name must be capitalized and the rest of the word must be in
lowercase letters. This does not apply to “ID” as this abbreviation must be fully capitalized.
Example:
You enter a variable to customize the email body text:
Look at the following problem: <CR><Problem Code Desc><CR><CR>Amy.
If the Problem Code Description is furnace not working, the email message reads:
Look at the following problem:
furnace not working.
Amy

478 Service Dispatch

Other Screens Associated with Service Dispatch 479
Other Screens Associated with Service
Dispatch
Invoice - Flat Rate Order (SP.200.00) Invoice - Flat Rate Order (SP.200.00) creates an invoice using flat rate IDs. These flat rates can
consist of both materials and labor necessary for the flat rate detail. Flat rate entries are always
billable to the customer; therefore, line types are not required for the detail.
Figure 223: Invoice - Flat Rate Order (SP.200.00)
Following are the field descriptions for Invoice - Flat Rate Order (SP.200.00).
Service Call ID
Service Call ID displays the service call. It is populated with the service call ID entered in Invoice Entry
(SD.202.00).
Customer ID
Customer ID displays the customer identifier and name associated with a service call selected in
Invoice Entry (SD.202.00).
Site ID
Site ID displays the site identifier and name associated with the service call. Site ID is populated by
information entered in Service Call Entry (SD 200.00).
Total
Total calculates and displays the sum of extended price of all Flat Rate IDs.
Flat Rate ID
Flat Rate ID displays a flat rate identifier and description associated with the invoice. There may be
more than one flat rate ID per invoice.

480 Service Dispatch
Price
Price displays the total price associated with the flat rate identifier.
Invt Loc ID
Invt Loc ID associates an inventory location with the service call (warehouse, truck, etc.). The detail
quantities used decrement quantities on hand and quantities available for this inventory location.
Pricing Plan ID
Pricing Plan ID displays the pricing plan associated with the invoice. The pricing plan defaults from the
site associated with the service call. The display-only field to the right allows you to view the
percentage discount associated with the pricing plan ID. The pricing plan ID must be changed in order
to change the percentage or discount. Pricing Plan ID is used for discounting purposes; you cannot
change a percentage directly.
Extended Price
Extended Price displays the extended amount associated with the flat rate.
Task Detail (button)
Task Detail accesses the material and labor detail line items associated with the flat rate ID. The detail
line items may be modified.
OK (button)
OK closes the screen and saves the entry.
Cancel (button)
Cancel prompts you to save your changes and closes the screen.

Other Screens Associated with Service Dispatch 481
Flat Rate Order - Modify Detail (SP.202.00) Flat Rate Order - Modify Detail (SP.202.00) allows you to view and modify the details of a flat rate
without modifying the price. The flat rate created in the Flat Rate Pricing module defaults the inventory
item, a description, product class, inventory location identifier, quantity, unit price, and extended price.
Sales tax information also defaults, including the tax, the taxable amount, and the tax amount.
Inventory quantities for all items on the flat rate are automatically allocated in the Inventory module
when the invoice is saved. This prevents the items from being over-allocated by other transactions.
Purchase orders can be generated from this screen. Entering a vendor identifier triggers the system to
create a purchase order in the Purchasing module. The purchase order date defaults from the service
call date. If Automatic is selected from PO Number Option in Service Series Setup Maintenance
(SD.000.00), PO Nbr is disabled and the system assigns the purchase order number after the invoice
process has been completed.
This screen also allows you to modify the details of a service call without modifying the price.
Therefore, the variance amount, which is the difference between the extended price entered in Flat
Rate Entry (SP.000.00) and the detail total, must equal 0.00. You cannot exit or save data until the
total equals the extended price.
Figure 224: Flat Rate Order - Modify Detail (SP.202.00)
Following are the field descriptions for Flat Rate Order - Modify Detail (SP.202.00).
Service Call ID
Service Call ID displays the service call identifier associated with this invoice.
Plan ID
Plan ID displays the plan identifier associated with the flat rate identifier entered in Invoice - Flat Rate
Order (SP.200.00).
Flat Rate ID
Flat Rate ID displays the flat rate identifier associated with the selected service call.

482 Service Dispatch
Tax ID
Tax ID contains the tax identifier associated with the service call. The tax ID defaults from the site ID.
Sub Total
Sub Total contains the Extended Price total for all items in the flat rate.
Tax
Tax contains the total of the tax amount fields for all the items in the flat rate.
Total
Total contains the total dollar figure for the detail. It is calculated by adding Sub Total and Tax.
Item ID
Item ID contains inventory items from the Inventory module. These inventory items are the parts
and/or labor that were needed to complete a service call. If any inventory items were populated in Flat
Rate Entry (SP.000.00), they display in Flat Rate Order - Modify Detail (SP.202.00). The item
description displays to the right of Item ID.
Materials & Labor Area
Detail Type
Detail Type displays the classification of the current record being entered as either labor or materials.
Detail Type populates based on Type in Inventory Items (10.250.00). Detail Type displays Material for
any selection other than Labor.
Class
Class displays the product class associated with a specific inventory item. Class defaults to the
product class associated with the selected inventory item. In addition, Class controls the commission
handling of the line item record.
Invt Loc ID
Invt Loc ID associates a specific inventory location or inventory site (warehouse, truck, etc.) with the
inventory item. The quantity used is reserved in Inventory when the transaction is saved. When the
details are sent to the Inventory module and processed, the transaction decreases the inventory
quantities on hand.
Whse Loc
Whse Loc is the warehouse location of the inventory item where the quantity on hand is reduced by
the amount in Quantity
Worked Hours
Worked Hours contains the number of work hours to be paid to the technician/employee and charged
to the service call.
Billed Hours
Billed Hours contains the number of billable hours to charge to the customer as revenue. The billable
hours and worked hours do not have to be equal.
Quantity
Quantity displays the number of a specific inventory item used to complete a call. This figure is
multiplied by the unit price to calculate the extended price for an item.

Other Screens Associated with Service Dispatch 483
Unit Price
Unit Price displays the unit price for the line item.
Extended Price
Extended Price displays the extended price for a detail line item. This value is calculated by multiplying
the unit price by the quantity used. This value may be overridden.
Employee ID
Employee ID displays the employee identifier associated with the technician. The Employee ID defaults
to the technician assigned to the service call.
Earnings Type
Earning Type displays the earnings type associated with the line item record. The default value is
based on the value populated in Employee Maintenance (SD.007.00). The earnings type multiplier is
included in the calculation for extended cost.
Work Location
Work Location displays the work location identifier associated with the line item record. The default
value is based on the value populated in Work Location ID from Employee Maintenance (02.250.00)
in the Payroll module.
Tax Exempt
Tax Exempt indicates a line item is tax exempt. The value defaults from Flat Rate Entry (SP.000.00).
Tax ID
Tax ID assigns a tax group to a line item. Tax ID defaults from Tax ID in Site Maintenance (SD.025.00).
If the inventory is tax exempt, Txbl Amount is zero.
Txbl Amount
Txbl Amount contains the amount of a line item that is taxable. A taxable amount value defaults from
Extended Price. If the inventory is tax exempt, Txbl Amount is zero.
Tax Amount
Tax Amount displays the amount of sales tax for this line item. This is calculated by multiplying the tax
percentages associated with a tax ID or tax group by the taxable amount.
Service Date
Service Date displays the work date for the line item. The default value is based on the start date for
the service call. If the start date is not available, then the default value is based on the date the
service call was originally processed.
Vendor ID
Vendor ID contains the identifier used to create a purchase order for the detail line item. Vendor ID
triggers the system to create a purchase order once the call has been released.
PO Date
PO Date displays the purchase order date. Once a vendor identifier is entered, PO Date contains the
service call date.

484 Service Dispatch
Qty Purch
Qty Purch contains the quantity ordered for a specific item that was purchased on a purchase order.
Note: The quantity purchased may be different than the quantity used.
Qty Received
Qty Received displays the quantity received for use when updating Receipt/Invoice Entry (04.010.00)
in the Purchasing module.
PO Nbr
PO Nbr displays the purchase order number for items acquired with a purchase order. If Manual is
selected from PO Number Option in Service Series Setup Maintenance (SD.000.00), a manual
purchase order number may be typed in. If the Automatic option is selected, the system populates PO
Nbr after the invoice entry process.
Receipt Nbr
Receipt Nbr displays the receipt number created in the Purchasing module.
Unit Cost
Unit Cost displays the unit cost of a line item. If an inventory item is selected with a valuation method
of user-specified cost, the unit cost may be typed in. If the inventory item has a valuation method other
than user specified, the default cost is populated. If the detail type is labor, the unit cost is the hourly
labor rate.
Ext Cost
Ext Cost displays the calculated extended cost of a line item.
Revenue Acct
Revenue Acct displays the default sales account from the inventory item.
Revenue Sub
Revenue Sub displays the subaccount for a line item. The default subaccount is based on the Use Sub
from Site setting in Call Type Maintenance (SD.003.00). If Use Sub from Site is checked, the
subaccount defaults from Site Maintenance (SD.025.00). If Use Sub from Site is not checked, the
subaccount defaults from the call type.
COGS Acct
COGS Acct displays the default COGS account from the inventory item.
COGS Sub
COGS Sub displays the subaccount for a line item. The default subaccount is based on the Use Sub
from Site setting in Call Type Maintenance (SD.003.00). If Use Sub from Site is checked, the
subaccount defaults from Site Maintenance (SD.025.00). If Use Sub from Site is not checked, the
subaccount defaults from the call type. If the line type is Service Contract, the subaccount defaults
from the accrued liability subaccount.
Profit
Profit contains the dollar profit figure earned on a single line item.
Profit %
Profit % contains the percent of profit earned on a single line item.

Other Screens Associated with Service Dispatch 485
Variance Amount
Variance Amount contains the difference between the extended price total and any price changes you
have made. The variance must equal zero before you can save the record.
Ext Price
Ext Price contains the total of the flat rate.
OK (button)
OK closes the screen and saves any changes.
Cancel (button)
Cancel prompts you to save your changes and closes the screen.

486 Service Dispatch
Service Call Information There are a number of Service Call Information subscreens that are accessed via screens in other
modules.
Time Entry - Service Call Information (02.010.01)
T&M Detail (SD.203.00) labor records can be entered using Service Call Information (02.010.01),
which can be accessed via Payroll Time Entry (02.010.00). When the Time Entry batch is released,
T&M Detail (SD.203.00) records are created.
Figure 225: Service Call Information (02.010.01)
Following are field descriptions for Service Call Information (02.010.01).
Service Call ID
Service Call ID displays the service call identifier associated with the selected service call.
Line Types
Line Types selects the appropriate behavior related to the specific line item record. A selection may be
made from the following line types:
Billable: This option creates a transaction in the Accounts Receivable module.
In-house Warranty: This option creates a non-billable COGS transaction in Issues (10.020.00) of
the Inventory module. The In-house Warranty option also enables you to create operation reports
for analysis.
Manufacturer’s Warranty: This option creates a non-billable COGS transaction in Issues
(10.020.00) of the Inventory module. The Manufacturer’s Warranty option also enables you to
create operation reports for analysis.
Non-billable: This option creates a non-billable COGS transaction in Issues (10.020.00) of the
Inventory module. If a negative quantity is used, then the detail record in Issues (10.020.00) of
Inventory is defined as a credit memo.

Other Screens Associated with Service Dispatch 487
Project: This option creates a COGS transaction in Issues (10.020.00) of the Inventory module.
Using this line type requires a project ID be present in Time Entry (02.010.00) as well as a task ID
associated with the detail line item. In addition, the same Project needs to be in the Project field
of Service Call Entry (SD.200.00). Project line items sent from inventory updates the profitability
of the respective project.
Service Contract: This option creates a COGS transaction in Issues (10.020.00) of the Inventory
module. Using this line type requires a contract ID to be present on the service call as well as a
contract ID to be associated with the detail line item. Service contract line types update the
Contract History Profitability table.
Line Item ID
Line Item ID indicates inventory items from the Inventory module. These inventory items are the parts
and/or labor that are needed to complete a service call. An inventory item may be selected either by
typing in the desired inventory item or by accessing the Inventory Item List and selecting the desired
inventory item. The inventory description displays to the right of Line Item ID.
Contract ID
Contract ID displays the contract identifier associated with the selected service call.
Equip ID
Equipment ID links a piece of equipment to the line item. Equipment identifiers may be entered in any
line type. If populated, costs associated with the line item record update the Equipment History table.
Billable Hours
Billable Hours contains the number of billable hours to charge to the customer as revenue. The
billable hours and worked hours do not have to be equal. Billable Hours is enabled for billable line
types only.
Unit Price
Unit Price contains the unit price for a line item. The unit price may differ from the stock base price if
any special pricing is applicable (for example, site or contract pricing, mark-up ID, etc.). Unit Price is
enabled for billable line types only.
Extended Price
Extended Price contains the price of a detail line item. This value is calculated by multiplying the unit
price by the quantity used. This value may be overridden. Extended Price is enabled for billable line
types only.

488 Service Dispatch
Time and Dollar Entry, Service Call Information (02.020.01)
T&M Detail (SD.203.00) labor records can be entered using Service Call Information (02.010.01),
which can be accessed via Payroll’s Time and Dollar Entry (02.020.00). When the Time and Dollar
Entry batch is released, T&M Detail (SD.203.00) records are created.
Figure 226: Service Call Information (02.020.01)
Following are field definitions for Service Call Information (02.010.01).
Service Call ID
Service Call ID displays the service call identifier associated with the selected service call.
Line Types
Line Types selects the appropriate behavior related to the specific line item record. A selection may be
made from the following line types:
Billable: This option creates a transaction in the Accounts Receivable module.
In-house Warranty: This option creates a non-billable COGS transaction in Issues (10.020.00) of
the Inventory module. The In-house Warranty option also enables you to create operation reports
for analysis.
Manufacturer’s Warranty: This option creates a non-billable COGS transaction in Issues
(10.020.00) of the Inventory module. The Manufacturer’s Warranty option also enables you to
create operation reports for analysis.
Non-billable: This option creates a non-billable COGS transaction in Issues (10.020.00) of the
Inventory module. If a negative quantity is used, then the detail record in Issues (10.020.00) of
Inventory is defined as a credit memo.

Other Screens Associated with Service Dispatch 489
Project: This option creates a COGS transaction in Issues (10.020.00) of the Inventory module.
Using this line type requires a project ID be present in Time Entry (02.010.00) as well as a task ID
associated with the detail line item. In addition, the same Project needs to be in the Project field
of Service Call Entry (SD.200.00). Project line items sent from inventory updates the profitability
of the respective project.
Service Contract: This option creates a COGS transaction in Issues (10.020.00) of the Inventory
module. Using this line type requires a contract ID to be present on the service call as well as a
contract ID to be associated with the detail line item. Service contract line types update the
Contract History Profitability table.
Line Item ID
Line Item ID indicates inventory items from the Inventory module. These inventory items are the parts
and/or labor that are needed to complete a service call. An inventory item may be selected either by
typing in the desired inventory item or by accessing the Inventory Item List and selecting the desired
inventory item. The inventory description displays to the right of Line Item ID.
Contract ID
Contract ID displays the contract identifier associated with the selected service call.
Equip ID
Equipment ID links a piece of equipment to the line item. Equipment identifiers may be entered in any
line type. If populated, costs associated with the line item record update the Equipment History table.
Billable Hours
Billable Hours contains the number of billable hours to charge to the customer as revenue. The
billable hours and worked hours do not have to be equal. Billable Hours is enabled for billable line
types only.
Unit Price
Unit Price contains the unit price for a line item. The unit price may differ from the stock base price if
any special pricing is applicable (for example, site or contract pricing, mark-up ID, etc.). Unit Price is
enabled for billable line types only.
Extended Price
Extended Price contains the price of a detail line item. This value is calculated by multiplying the unit
price by the quantity used. This value may be overridden. Extended Price is enabled for billable line
types only.

490 Service Dispatch
Manual Check Entry, Service Call Information (02.040.01)
T&M Detail (SD.203.00) labor records can be entered using Service Call Information (02.040.01),
which can be accessed via Payroll’s Manual Check Entry (02.010.00). When the Time Entry batch is
released, T&M Detail (SD.203.00) records are created.
Figure 227: Service Call Information (02.040.01)
Following are field definitions for Service Call Information (02.040.01).
Service Call ID
Service Call ID displays the service call identifier associated with the selected service call.
Line Types
Line Types selects the appropriate behavior related to the specific line item record. A selection may be
made from the following line types:
Billable: This option creates a transaction in the Accounts Receivable module.
In-house Warranty: This option creates a non-billable COGS transaction in Issues (10.020.00) of
the Inventory module. The In-house Warranty option also enables you to create operation reports
for analysis.
Manufacturer’s Warranty: This option creates a non-billable COGS transaction in Issues
(10.020.00) of the Inventory module. The Manufacturer’s Warranty option also enables you to
create operation reports for analysis.
Non-billable: This option creates a non-billable COGS transaction in Issues (10.020.00) of the
Inventory module. If a negative quantity is used, then the detail record in Issues (10.020.00) of
Inventory is defined as a credit memo.

Other Screens Associated with Service Dispatch 491
Project: This option creates a COGS transaction in Issues (10.020.00) of the Inventory module.
Using this line type requires a project ID be present in Time Entry (02.010.00) as well as a task ID
associated with the detail line item. In addition, the same Project needs to be in the Project field
of Service Call Entry (SD.200.00). Project line items sent from inventory updates the profitability
of the respective project.
Service Contract: This option creates a COGS transaction in Issues (10.020.00) of the Inventory
module. Using this line type requires a contract ID to be present on the service call as well as a
contract ID to be associated with the detail line item. Service contract line types update the
Contract History Profitability table.
Line Item ID
Line Item ID indicates inventory items from the Inventory module. These inventory items are the parts
and/or labor that are needed to complete a service call. An inventory item may be selected either by
typing in the desired inventory item or by accessing the Inventory Item List and selecting the desired
inventory item. The inventory description displays to the right of Line Item ID.
Contract ID
Contract ID displays the contract identifier associated with the selected service call.
Equip ID
Equipment ID links a piece of equipment to the line item. Equipment identifiers may be entered in any
line type. If populated, costs associated with the line item record update the Equipment History table.
Billable Hours
Billable Hours contains the number of billable hours to charge to the customer as revenue. The
billable hours and worked hours do not have to be equal. Billable Hours is enabled for billable line
types only.
Unit Price
Unit Price contains the unit price for a line item. The unit price may differ from the stock base price if
any special pricing is applicable (for example, site or contract pricing, mark-up ID, etc.). Unit Price is
enabled for billable line types only.
Extended Price
Extended Price contains the price of a detail line item. This value is calculated by multiplying the unit
price by the quantity used. This value may be overridden. Extended Price is enabled for billable line
types only.

492 Service Dispatch
Net Check Entry - Service Call Information (02.080.02)
T&M Detail (SD.203.00) labor records can be entered using Service Call Information (02.080.02),
which can be accessed via Payroll’s Net Check Entry (02.080.00). When the Time Entry batch is
released, T&M Detail (SD.203.00) records are created.
Figure 228: Service Call Information (02.080.02)
Following are field definitions for Service Call Information (02.080.01).
Service Call ID
Service Call ID displays the service call identifier associated with the selected service call.
Line Types
Line Types selects the appropriate behavior related to the specific line item record. A selection may be
made from the following line types:
Billable: This option creates a transaction in the Accounts Receivable module.
In-house Warranty: This option creates a non-billable COGS transaction in Issues (10.020.00) of
the Inventory module. The In-house Warranty option also enables you to create operation reports
for analysis.
Manufacturer’s Warranty: This option creates a non-billable COGS transaction in Issues
(10.020.00) of the Inventory module. The Manufacturer’s Warranty option also enables you to
create operation reports for analysis.
Non-billable: This option creates a non-billable COGS transaction in Issues (10.020.00) of the
Inventory module. If a negative quantity is used, then the detail record in Issues (10.020.00) of
Inventory is defined as a credit memo.
Project: This option creates a COGS transaction in Issues (10.020.00) of the Inventory module.
Using this line type requires a project ID be present in Time Entry (02.010.00) as well as a task ID
associated with the detail line item. In addition, the same Project needs to be in the Project field
of Service Call Entry (SD.200.00). Project line items sent from inventory updates the profitability
of the respective project.

Other Screens Associated with Service Dispatch 493
Service Contract: This option creates a COGS transaction in Issues (10.020.00) of the Inventory
module. Using this line type requires a contract ID to be present on the service call as well as a
contract ID to be associated with the detail line item. Service contract line types update the
Contract History Profitability table.
Line Item ID
Line Item ID indicates inventory items from the Inventory module. These inventory items are the parts
and/or labor that are needed to complete a service call. An inventory item may be selected either by
typing in the desired inventory item or by accessing the Inventory Item List and selecting the desired
inventory item. The inventory description displays to the right of Line Item ID.
Contract ID
Contract ID displays the contract identifier associated with the selected service call.
Equip ID
Equipment ID links a piece of equipment to the line item. Equipment identifiers may be entered in any
line type. If populated, costs associated with the line item record update the Equipment History table.
Billable Hours
Billable Hours contains the number of billable hours to charge to the customer as revenue. The
billable hours and worked hours do not have to be equal. Billable Hours is enabled for billable line
types only.
Unit Price
Unit Price contains the unit price for a line item. The unit price may differ from the stock base price if
any special pricing is applicable (for example, site or contract pricing, mark-up ID, etc.). Unit Price is
enabled for billable line types only.
Extended Price
Extended Price contains the price of a detail line item. This value is calculated by multiplying the unit
price by the quantity used. This value may be overridden. Extended Price is enabled for billable line
types only.

494 Service Dispatch
Advanced Timesheet Entry, Service Call Information (58.010.01)
T&M Detail (SD.203.00) labor records can be entered using Service Call Information (58.010.01),
which can be accessed by clicking Service Call Info on Advanced Payroll’s Advanced Timesheet Entry
(50.010.00). When the time entry batch is released, T&M Detail (SD.203.00) records are created.
Note: The Service Call Info button appears if Payroll Interface in Service Series Setup Maintenance
(SD.200.00) is set to Adv Payroll.
Figure 229: Service Call Information (58.010.01)
Following are field definitions for Service Call Information (58.010.01).
Service Call ID
Service Call ID displays the service call identifier associated with the selected service call.
Line Types
Line Types selects the appropriate behavior related to the specific line item record. A selection may be
made from the following line types:
Billable: This option creates a transaction in the Accounts Receivable module.
In-house Warranty: This option creates a non-billable COGS transaction in Issues (10.020.00) of
the Inventory module. The In-house Warranty option also enables you to create operation reports
for analysis.
Manufacturer’s Warranty: This option creates a non-billable COGS transaction in Issues
(10.020.00) of the Inventory module. The Manufacturer’s Warranty option also enables you to
create operation reports for analysis.
Non-billable: This option creates a non-billable COGS transaction in Issues (10.020.00) of the
Inventory module. If a negative quantity is used, then the detail record in Issues (10.020.00) of
Inventory is defined as a credit memo.

Other Screens Associated with Service Dispatch 495
Project: This option creates a COGS transaction in Issues (10.020.00) of the Inventory module.
Using this line type requires a project ID be present in Time Entry (02.010.00) as well as a task ID
associated with the detail line item. In addition, the same Project needs to be in the Project field
of Service Call Entry (SD.200.00). Project line items sent from inventory updates the profitability
of the respective project.
Service Contract: This option creates a COGS transaction in Issues (10.020.00) of the Inventory
module. Using this line type requires a contract ID to be present on the service call as well as a
contract ID to be associated with the detail line item. Service contract line types update the
Contract History Profitability table.
Line Item ID
Line Item ID indicates inventory items from the Inventory module. These inventory items are the parts
and/or labor that are needed to complete a service call. An inventory item may be selected either by
typing in the desired inventory item or by accessing the Inventory Item List and selecting the desired
inventory item. The inventory description displays to the right of Line Item ID.
Contract ID
Contract ID displays the contract identifier associated with the selected service call.
Equip ID
Equipment ID links a piece of equipment to the line item. Equipment identifiers may be entered in any
line type. If populated, costs associated with the line item record update the Equipment History table.
Billable Hours
Billable Hours contains the number of billable hours to charge to the customer as revenue. The
billable hours and worked hours do not have to be equal. Billable Hours is enabled for billable line
types only.
Unit Price
Unit Price contains the unit price for a line item. The unit price may differ from the stock base price if
any special pricing is applicable (for example, site or contract pricing, mark-up ID, etc.). Unit Price is
enabled for billable line types only.
Extended Price
Extended Price contains the price of a detail line item. This value is calculated by multiplying the unit
price by the quantity used. This value may be overridden. Extended Price is enabled for billable line
types only.

496 Service Dispatch
Customer Maintenance (08.260.00) Customer Maintenance (08.260.00) is an Accounts Receivable screen. Fields should be used
according to normal implementation procedures for Accounts Receivable. See the Accounts
Receivable online help or user guide for more information.
Figure 230: Customer Maintenance (08.260.00), Customer Information tab
Following are the field descriptions for Customer Maintenance (08.260.00), Customer Information
tab.
Customer ID
Customer ID contains the customer identifier and the customer name associated with a service call
selected in Invoice Entry (SD.202.00).
Class ID
Class ID is a unique identifying code that distinguishes this product class from all other product
classes in the database. New product classes must be defined in the Inventory module.
Status
Status accepts the current condition of the customer.
Name
Name contains the name of the customer.

Other Screens Associated with Service Dispatch 497
Trade Discount %
Trade Discount % is any additional discount percentage, at a specific price level, that should be
deducted from the customer’s document amounts at payment time.
Price Class
Price Class contains the identification code of the customer’s price class.
Terms ID
Terms ID controls the discount, due dates, and discount amount of the document and explanation of
the discount percent and discount days associated with the terms ID.
History (button)
History accesses Customer History (08.261.00).
Activity (button)
Activity accesses Customer Activity (08.260.04).
Shipping Address (button)
Shipping Address accesses Shipping Address (08.262.00).
Credit Check
Credit Check contains the customer’s current credit status in the system, and is available only when
the Order Management module is installed.
Limit
Limit contains the maximum amount of goods or services the customer can purchase on terms; zero
specifies that the customer has unlimited credit.
Available
Available contains the amount of credit remaining.
Avg Days to Pay
Avg Days to Pay contains the number of days, on average, from the date when you invoice the
customer to the date when you receive the customer’s invoice payment for the current company.
Grace Period
Grace Period contains the number of “grace” days granted to a customer with past-due payments
before taking action, such as notification or assessment of finance charges. The figure must be
greater than 0.
Credit Manager ID
Credit Manager ID contains the identifier of the credit manager who performed the customer credit
check.
Current
Current contains the total of the customer’s Accounts Receivable documents as of the current fiscal
period.
Future
Future contains the total of the customer’s Accounts Receivable documents currently entered but
marked for posting to a future fiscal period.

498 Service Dispatch
Open Order
Open Order contains the total of the customer’s open sales orders.
Pre-Payments
Pre-Payments contains the total of all prepayments made for this customer.
Past Due
Past Due contains the total of all past-due invoices for this customer.
Last Invoice
Last Invoice contains the date of the customer’s most recent invoice.
Last Activity
Last Activity contains the date of the customer’s most recent account activity.
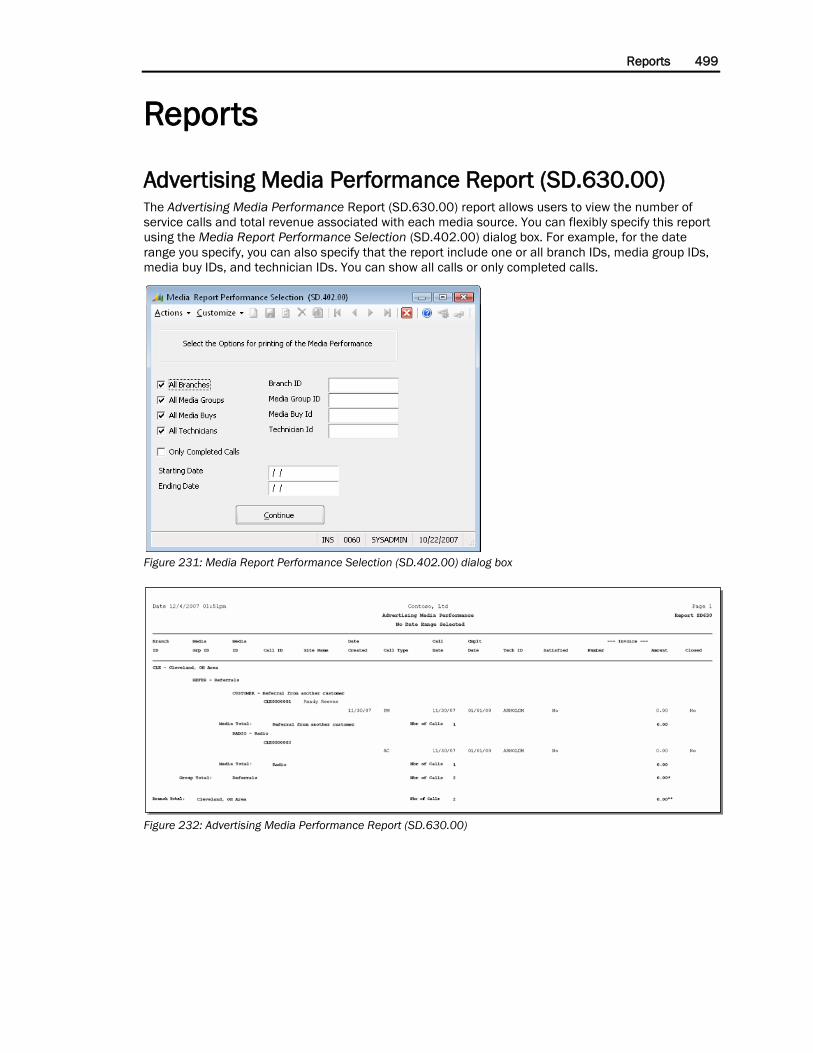
Reports 499
Reports
Advertising Media Performance Report (SD.630.00) The Advertising Media Performance Report (SD.630.00) report allows users to view the number of
service calls and total revenue associated with each media source. You can flexibly specify this report
using the Media Report Performance Selection (SD.402.00) dialog box. For example, for the date
range you specify, you can also specify that the report include one or all branch IDs, media group IDs,
media buy IDs, and technician IDs. You can show all calls or only completed calls.
Figure 231: Media Report Performance Selection (SD.402.00) dialog box
Figure 232: Advertising Media Performance Report (SD.630.00)

500 Service Dispatch
Billable - Completed Calls (SD.623.00) The Billable - Completed Calls (SD.623.00) report lists the billable service calls that have been
completed for a date range. For each service call it provides the taken and the completed dates,
customer name, call ID, the customer service representative (CSR) for the call, and the $ Spiff
(commission the CSR receives, based on the number of calls handled. It also indicates whether the
customer is an existing one (Old) or a new one.
Figure 233: Billable - Completed Calls (SD.623.00) report

Reports 501
Branch List (SD.600.00) The Branch List (SD.600.00) report lists the branches and information about them. For each branch it
provides the branch ID, name and short name, address, attention, phone and fax numbers, and the
geographic zone ID and its description.
Figure 234: Branch List (SD.600.00) report
Call Status List (SD.601.00) The Call Status List (SD.601.00) report lists all of the valid call statuses and their descriptions, sorted
by call status ID.
Figure 235: Call Status List (SD.601.00) report

502 Service Dispatch
Call Type List (SD.602.00) The Call Type List (SD.602.00) report lists all of the valid call types, and provides the subaccount and
expected duration for each call type.
Figure 236: Call Type List (SD.602.00) report
Customer Site Groups (SSRS) (SD.644.00) The Customer Site Groups (SSRS) (SD.644.00) report lists all of the customer site groups and their
descriptions, sorted alphabetically by customer site group ID. The report shows all customer ID and
customer site ID combinations included within each customer site group ID, along with their
descriptions. Customer Site Groups (SSRS) (SD.644.00) reports are created using SQL Server
Reporting Services (SSRS).
Figure 237: Customer Site Groups (SSRS) (SD.644.00) report

Reports 503
Dwelling List (SD.603.00) The Dwelling List (SD.603.00) report lists all of the valid dwellings and their descriptions, sorted
alphabetically by dwelling ID.
Figure 238: Dwelling List (SD.603.00) report
Employee Class List (SD.605.00) The Employee Class List (SD.605.00) report lists all of the valid employee classes, their descriptions,
and whether commission is paid.
Figure 239: Employee Class List (SD.605.00) report

504 Service Dispatch
Employee Information (SD.604.00) The Employee Information (SD.604.00) report provides detailed general and personal information for
each employee.
Figure 240: Employee Information (SD.60.00), Report tab
Unmask SSN and TIN Numbers
The Social Security Number (SSN) prints with an asterisk (*) mask for each digit except the last 4
digits. For example, an SSN of 123-45-6789 is now displayed as ***-**-6789. This occurs if the user
printing the report does not have access rights to the Employee Maintenance (02.250.00) screen.

Reports 505
If access rights exist for the user for the Employee Maintenance (02.250.00) screen, the Unmask SSN
and TIN Numbers check box appears on the Report tab when the user selects the applicable format of
the report. Selecting the check box lets the user print the report and display an unmasked SSN for
each employee.
Figure 241: Employee Information (SD.604.00) report

506 Service Dispatch
Geographic Zone List (SD.606.00) The Geographic Zone List (SD.606.00) report provides sales and other information, by region and
branch. For each zone (branch) listed, you can see which technician is assigned, the number of calls
received, the total revenue, and the average revenue per call.
Figure 242: Geographic Zone List (SD.606.00) report
Inventory Mark-Up (SD.619.00) The Inventory Mark-Up (SD.619.00) report lists the mark-up IDs and their descriptions and shows the
mark-up break information for each mark-up ID.
Figure 243: Inventory Mark-Up (SD.619.00) report

Reports 507
License List (SD.607.00) The License List (SD.607.00) report provides information about each employee and business license
held. You can see the license ID and description, License type, effective date, expiration date, whether
the license is active, the issuing organization and description. The report also includes dollar amount
charged for the initial and the renewal license and gives the initial and renewal terms.
Figure 244: License List (SD.607.00) report
To see a listing of licenses by zip code, use the License By Zip Code report; see “License - Zip Code List
(SD.608.00)” on page 507.
License - Zip Code List (SD.608.00) The License - Zip Code List (SD.608.00) report associates each business and employee license with
its zip code, to facilitate each branch in identifying its licensing information.
Figure 245: License - Zip Code List (SD.608.00) report

508 Service Dispatch
Media Group List (SD.609.00) The Media Group List (SD.609.00) report is a listing of all of the existing media groups and their
descriptions.
Figure 246: Media Group List (SD.609.00) report
Media Buy List (SD.610.00) The Media Buy List (SD.610.00) report provides information about the marketing resources and
referrals for a company. For each marketing resource it shows the media code and description, media
group, budget, frequency of use, location, buy date, and coop information.
Figure 247: Media Buy List (SD.610.00) report

Reports 509
Open Service Call List (SD.620.00) The Open Service Call List (SD.620.00) report provides information about every service call that is still
open. You can sort it by branch ID, call type, or service call ID. It shows the branch ID, call type, service
call ID, site name, address, site phone, date and time promised, and the technician assigned to each
call.
Figure 248: Open Service Call List (SD.620.00) report
Problem Code List (SD.634.00) The Problem Code List (SD.634.00) report identifies all of the problem codes available for use in
tracking service calls. For each problem code, the report identifies the problem description, number of
times it has been used, and the estimated time to repair the problem code.
Figure 249: Problem Code List (SD.634.00) report
Product Class List (SD.611.00) The Product Class List (SD.611.00) report lists all of the existing product classes. The information
includes class ID, description, commission status, flat-rate markup ID, and markup description.
Figure 250: Product Class List (SD.611.00) report

510 Service Dispatch
Reprint Service Call Invoice (SD.650.00) The Reprint Service Call Invoice report reprints service call invoices. A wide range of selection criteria
are available on the Select tab for specifying which invoices you want.
Note: An invoice for a customer set up for Quick Send for the Service Call Invoice document type on
Accounts Receivable Customer Maintenance (08.260.00), Quick Send tab is not printed. If the invoice
has not been transmitted electronically, Quick Send requests are created according to the Quick Send
preferences defined for the customer on the Accounts Receivable Customer Maintenance
(08.260.00), Quick Send tab. If the invoice was transmitted electronically, the Quick Send requests
indicated in the invoice’s Quick Send requests are used to resend the invoice to the initial recipients.
For more information about Quick Send requests, see “Quick Send Inquiry (21.200.00)” in the Shared
Information online help or user guide.
Figure 251: Reprint Service Invoice (SD.650.00)

Reports 511
Reprinted Service Call Invoice
Figure 252: Service Call Invoice report - reprinted

512 Service Dispatch
Sales Analysis Report (SD.626.00) The Sales Analysis Report (SD.626.00) provides detailed information for each call type, so that sales
effectiveness may be analyzed. For each call type, it shows the number of calls, hours spent, revenue,
gross margin, gross margin percent, as well as the averages of all of these. Using the Sales Analysis
Report (SD.404.00) dialog box, you can run the report for all branches or a single branch that you
specify. You can choose whether to run the report for a particular period to post date or for the
completion date.
Figure 253: Sales Analysis Report (SD.404.00) dialog box
Figure 254: Sales Analysis Report (SD.626.00), Period to Post format

Reports 513
Service Call Audit (SD.627.00) The Service Call Audit (SD.627.00) report provides information about invoice details, whether billable
or not billable, that have been entered on service calls. You have the following call-selection options:
All Calls, Open Calls, and Completed Calls. You may choose to report on all branches, or a single
branch that you specify. You also specify the date range for the report and the range of contract IDs to
include.
Figure 255: Service Call Audit Report (SD.406.00)
Figure 256: Service Call Audit (SD.627.00) report

514 Service Dispatch
Service Call History (SD.622.00) The Service Call History (SD.622.00) report provides a listing of closed service calls sorted by
customer. It includes site ID, customer ID, call ID, promise, start, and end dates, the call type, primary
technician, invoice number, and invoice amount.
Figure 257: Service Call History (SD.622.00) report

Reports 515
Service Call Invoice (SD.640.00) The Service Call Invoice (SD.640.00) report provides an invoice for one or many completed service
calls..
Note: An invoice is not printed for a customer set up for Quick Send for the Service Call Invoice
document type on the Quick Send tab in Accounts Receivable’s Customer Maintenance (08.260.00).
If the invoice has not been transmitted electronically, Quick Send requests are created according to
the Quick Send preferences defined for the customer on the Quick Send tab in Accounts Receivable’s
Customer Maintenance (08.260.00). If the invoice was transmitted electronically, the Quick Send
details indicated in the invoice’s Quick Send requests are used to resend the invoice to the initial
recipients. For more information about Quick Send requests, see “Quick Send Inquiry (21.200.00)” in
the Shared Information help or user guide.
Figure 258: Service Call Invoice (SD.640.00) report

516 Service Dispatch
Service Call Invoice, Report Tab
When you select Service Call Invoice (SD.640.00) from the Reports menu, the standard report screen
displays.
Figure 259: Service Call Invoice (SD.640.00), Report tab
Following are the only items to be used on Service Call Invoice (SD.640.00), Report tab.
Print (Button)
Print displays Service Invoice Selection (SD.641.00) where service call invoices can be selected to be
printed to a printer or sent electronically and processed to Accounts Receivable.
Print Preview (Button)
Print Preview displays Service Invoice Selection (SD.641.00) where service call invoices can be
selected to be printed to the screen and processed to Accounts Receivable.

Reports 517
Service Call Invoice, Options Tab
Figure 260: Service Call Invoice (SD.640.00), Options tab
Suppress zero invoices printing (check box)
Use Suppress zero invoices printing to allow or suppress the printing of invoices that have a total
invoice amount of zero. These invoices will not be printed if the check box is selected.
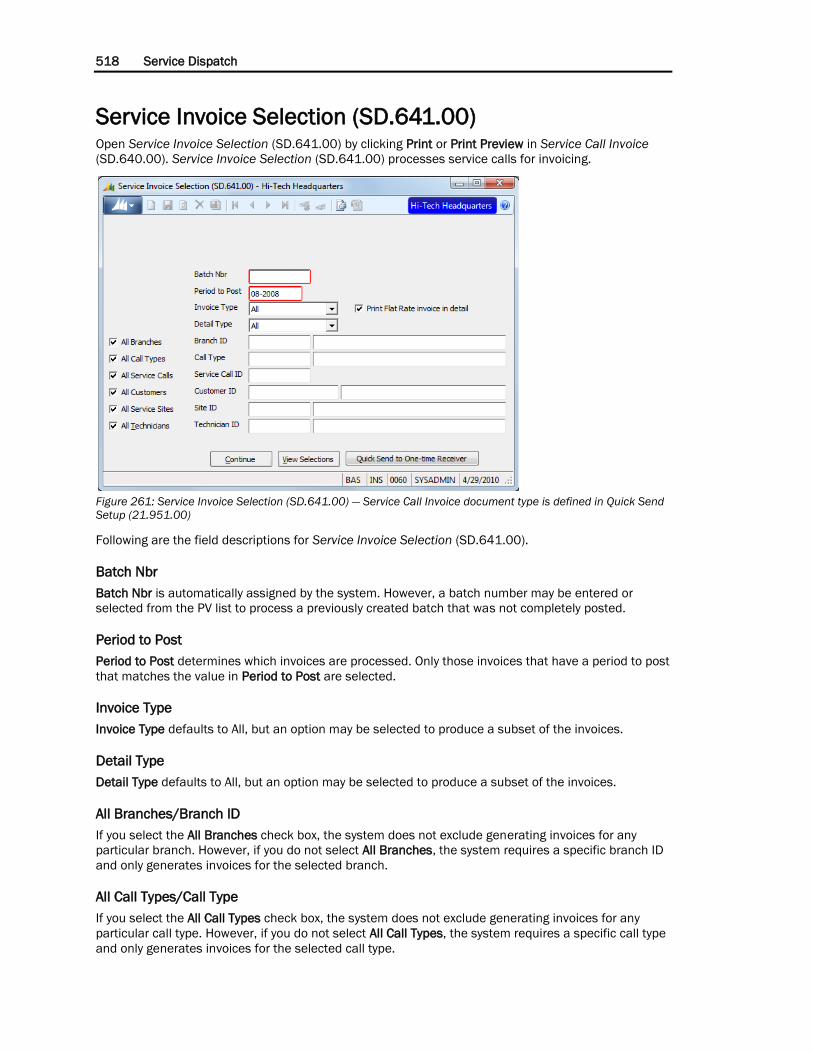
518 Service Dispatch
Service Invoice Selection (SD.641.00) Open Service Invoice Selection (SD.641.00) by clicking Print or Print Preview in Service Call Invoice
(SD.640.00). Service Invoice Selection (SD.641.00) processes service calls for invoicing.
Figure 261: Service Invoice Selection (SD.641.00) — Service Call Invoice document type is defined in Quick Send
Setup (21.951.00)
Following are the field descriptions for Service Invoice Selection (SD.641.00).
Batch Nbr
Batch Nbr is automatically assigned by the system. However, a batch number may be entered or
selected from the PV list to process a previously created batch that was not completely posted.
Period to Post
Period to Post determines which invoices are processed. Only those invoices that have a period to post
that matches the value in Period to Post are selected.
Invoice Type
Invoice Type defaults to All, but an option may be selected to produce a subset of the invoices.
Detail Type
Detail Type defaults to All, but an option may be selected to produce a subset of the invoices.
All Branches/Branch ID
If you select the All Branches check box, the system does not exclude generating invoices for any
particular branch. However, if you do not select All Branches, the system requires a specific branch ID
and only generates invoices for the selected branch.
All Call Types/Call Type
If you select the All Call Types check box, the system does not exclude generating invoices for any
particular call type. However, if you do not select All Call Types, the system requires a specific call type
and only generates invoices for the selected call type.

Reports 519
All Service Calls/Service Call ID
If you select the All Service Calls check box, the system does not exclude generating invoices for any
particular service call. However, if you do not select All Service Calls, the system requires a specific call
and only generates an invoice for that service call.
All Customers/Customer ID
If you select the All Customers check box, the system does not exclude generating invoices for any
particular customer. However, if you do not select All Customers, the system requires a specific
customer ID and only generates invoices for that particular customer.
All Service Sites/Site ID
If you select the All Service Sites check box, the system does not exclude generating invoices for any
particular site. However, if you do not select All Service Sites, the system requires a specific site ID and
only generates invoices for that particular site.
All Technicians/Technician ID
If you select the All Technicians check box, the system does not exclude generating invoices for any
particular technician. However, if you do not select All Technicians, the system requires a specific
technician ID and only generates invoices for that particular technician.
Continue (button)
Continue enables the system to proceed with the invoicing process.
View Selections (button)
View Selections enables the selection of specific service calls to exclude from processing. Any filters
added on Service Invoice Selection (SD.641.00) reduce the number of service calls selected.
Quick Send to One-time Receiver (button)
Quick Send to One-time Receiver enables an invoice to be transmitted electronically to a recipient that
is not defined as the primary recipient for the invoice’s customer on the Quick Send tab of Accounts
Receivable Customer Maintenance (08.260.00) or as an additional recipient for the customer on
Accounts Receivable Additional Receivers (08.260.08). The Quick Send to One-time Receiver button is
available when the Service Call Invoice document type is defined on Shared Information Quick Send
Setup (21.951.00) and the invoice is approved. The Quick Send preferences for the recipient are
defined on One-time Receiver (SD.641.03).

520 Service Dispatch
Service Calls Selected for Invoicing (SD.641.01)
Clicking View Selections in Service Invoice Selection (SD.641.00) causes Service Calls Selected for
Invoicing (SD.641.01) to display. If you want to exclude any invoices from the invoice run, do not select
the check box. Once the invoices have been reviewed, click Continue to start the invoice process.
Note: To cancel the invoice process, clear all records and click Continue. Once Service Invoice Printing
- Keep/Delete (SD.642.00) is displayed, change Handling to Delete All Invoices.
Figure 262: Service Calls Selected for Invoicing (SD.641.01)
Following are the field descriptions for Service Calls Selected for Invoicing (SD.641.01).
Selected
Selected specifies whether the invoice will print when Continue is clicked.
Service Call ID
Service Call ID contains the service call identifier associated with the selected service call.
Customer ID
Customer ID contains the customer identifier and customer name associated with the service call.
Site ID
Site ID contains the site identifier and site name associated with the service call.
Work Order Nbr
Work Order Nbr contains the number assigned to the work order.
Invoice Type
Invoice Type defaults to All, but an option may be selected to produce a subset of the invoices.
Detail Type
Detail Type defaults to All, but an option may be selected to produce a subset of the invoices.
Call Date
Call Date contains the date the service call was first placed.

Reports 521
Completed Date
Completed Date contains the date the technician closed the service call.
Technician ID
Technician ID contains the primary technician assigned to the service call.
Continue (button)
Continue causes selected invoices to be printed.

522 Service Dispatch
One-time Receiver (SD.641.03)
One-time Receiver (SD.641.03) allows you to identify the Quick Send preferences for a recipient and
transmit a selected invoice to the recipient electronically. One-time recipients are not defined as the
primary recipient for the customer on the Quick Send tab of Accounts Receivable Customer
Maintenance (08.260.00) or as an additional recipient for the customer defined on Accounts
Receivable Additional Receivers (08.260.08). The Quick Send preferences for the one-time recipient
are not retained for future use. A one-time recipient should be defined as an additional receiver for the
customer if future invoices will be sent to the recipient.
One-time Receiver (SD.641.03) opens when Quick Send to One-time Receiver is selected on Service
Invoice Selection (SD.641.00).
Figure 263: One-time Receiver (SD.641.03)
Following are the field descriptions for One-time Receiver (SD.641.03).
Customer ID
Customer ID displays the customer identification number associated with the invoice.
Document Type
Document Type displays the kind of document associated with the invoice.
Service Call ID
Service Call ID displays the unique code assigned to the service call associated with the invoice.
Delivery Method
Delivery Method is the manner in which the electronically-transmitted invoice will be received by the
one-time recipient. Delivery methods are Email and Fax. The method defaults from the Service Call
Invoice document type’s Delivery Method on the Quick Send tab of Accounts Receivable Customer
Maintenance (08.260.00). If the Service Call Invoice document type is not defined for the customer,
Reports 523
Delivery Method defaults from the Service Call Invoice document type’s Delivery Method on Shared
Information Quick Send Setup (21.951.00).
Request Priority
Request Priority is the precedence assigned to the processing of the Quick Send request by
Application Server. Request priorities are High, Low, and Normal. The priority defaults from the Service
Call Invoice document type’s Request Priority on the Quick Send tab of Accounts Receivable Customer
Maintenance (08.260.00). If the Service Call Invoice document type is not defined for the customer,
Request Priority defaults from the Service Call Invoice document type’s Request Priority on Shared
Information Quick Send Setup (21.951.00).
Receiver Email Address
Receiver Email Address identifies the email address of the one-time recipient to whom the invoice will
be sent. The email address defaults from E-mail Address (Main Address) on the Address Info tab of
Accounts Receivable Customer Maintenance (08.260.00).
Reply Email Address
Reply Email Address identifies the email address used when the one-time recipient replies to the email
message containing the invoice. The email address defaults from the Service Call Invoice document
type’s Reply Email Address on the Quick Send tab of Accounts Receivable Customer Maintenance
(08.260.00). If the Service Call Invoice document type is not defined for the customer, Reply Email
Address defaults from the Service Call Invoice document type’s Reply Email Address on Shared
Information Quick Send Setup (21.951.00).
Email Attachment File Type
Email Attachment File Type specifies the format of the file to be created to hold the invoice you send
to the one-time recipient. File types for documents sent electronically via email are Text, Word, Crystal
Reports, Excel, Adobe Acrobat, Rich Text, XML, and Comma-separated values. File types for
documents sent electronically via fax are Text, Word, Excel, and Rich Text. The file type defaults from
the Service Call Invoice document type’s Email Attachment File Type on the Quick Send tab of
Accounts Receivable Customer Maintenance (08.260.00). If the Service Call Invoice document type is
not defined for the customer, Email Attachment File Type defaults from the Service Call Invoice
document type’s Email Attachment File Type on Shared Information Quick Send Setup (21.950.00).
Fax Receiver Name
Fax Receiver Name designates the name to appear on the cover sheet accompanying the invoice
faxed to the one-time recipient. The name defaults from Attention (Bill To) on the Address Info tab of
Accounts Receivable Customer Maintenance (08.260.00).
Fax Prefix
Use Fax Prefix to specify a sequence of numbers, such as a country code (for example, 061 011), that
must be dialed prior to the Receiver Fax Number. The fax prefix defaults from the Service Call Invoice
document type’s Fax Prefix on the Quick Send tab of Accounts Receivable Customer Maintenance
(08.260.00). If the Service Call Invoice document type is not defined for the customer, Fax Prefix
defaults from the Service Call Invoice document type’s Fax Prefix on Shared Information Quick Send
Setup (21.950.00).
Dial Area Code (check box)
If you select Dial Area Code, the first three digits of Receiver Fax Number will be dialed as the area
code when the invoice is transmitted to the one-time recipient. Clear this check box if the fax phone
number is a local number for which dialing the area code is not required.
524 Service Dispatch
Receiver Fax Number
Receiver Fax Number designates the phone number that will receive the invoice faxed to the one-time
recipient. The fax number defaults from Fax/Ext (Main Address) on the Address Info tab of Accounts
Receivable Customer Maintenance (08.260.00).
Fax Sender Name
Fax Sender Name specifies the name of the individual who will send the invoice to the one-time
recipient. The name defaults from the Service Call Invoice document type’s Fax Sender Name on the
Quick Send tab of Accounts Receivable Customer Maintenance (08.260.00). If the Service Call Invoice
document type is not defined for the customer, Fax Sender Name defaults from the Service Call
Invoice document type’s Fax Sender Name on Shared Information Quick Send Setup (21.950.00).
Sender Fax Number
Sender Fax Number indicates the phone number that will be the source of the invoice faxed to the
one-time recipient. The fax number defaults from Sender Fax Number on the Quick Send tab of
Accounts Receivable Customer Maintenance (08.260.00). If the Service Call Invoice document type is
not defined for the customer, Sender Fax Number defaults from the Service Call Invoice document
type’s Sender Fax Number on Shared Information Quick Send Setup (21.950.00).
Include Fax Cover Sheet (check box)
Include Fax Cover Sheet indicates whether a cover sheet should precede the invoice sent to the one-
time recipient. The setting defaults from the Service Call Invoice document type’s Include Fax Cover
Sheet on the Quick Send tab of Accounts Receivable Customer Maintenance (08.260.00). If the
Service Call Invoice document type is not defined for the customer, Include Fax Cover Sheet defaults
from the Service Call Invoice document type’s Include Fax Cover Sheet on Shared Information Quick
Send Setup (21.950.00). For more information about the fax cover sheet, see “Using Application
Server” in the Application Server help or user guide.
Fax Response (check boxes)
Your selections in the Fax Response check boxes will appear in the Notes area of the fax cover sheet.
Select one or more check boxes to indicate how you want the one-time recipient to process the fax.
The Fax Response check boxes are:
Urgent — Defaults from the Service Call Invoice document type’s Fax Response – Urgent setting
on the Quick Send tab of Accounts Receivable Customer Maintenance (08.260.00). If the Service
Call Invoice document type is not defined for the customer, Fax Response – Urgent defaults from
the Service Call Invoice document type’s Fax Response – Urgent setting on Shared Information
Quick Send Setup (21.950.00).
For Review — Defaults from the Service Call Invoice document type’s Fax Response – For Review
setting on the Quick Send tab of Accounts Receivable Customer Maintenance (08.260.00). If the
Service Call Invoice document type is not defined for the customer, Fax Response – For Review
defaults from the Service Call Invoice document type’s Fax Response – For Review setting on
Shared Information Quick Send Setup (21.950.00).
Please Comment — Defaults from the Service Call Invoice document type’s Fax Response – Please
Comment setting on the Quick Send tab of Accounts Receivable Customer Maintenance
(08.260.00). If the Service Call Invoice document type is not defined for the customer, Fax
Response – Please Comment defaults from the Service Call Invoice document type’s Fax
Response – Please Comment setting on Shared Information Quick Send Setup (21.950.00).
Please Reply — Defaults from the Service Call Invoice document type’s Fax Response – Please
Reply setting on the Quick Send tab of Accounts Receivable Customer Maintenance (08.260.00).
If the Service Call Invoice document type is not defined for the customer, Fax Response – Please
Reply defaults from the Service Call Invoice document type’s Fax Response – Please Reply setting
on Shared Information Quick Send Setup (21.950.00).

Reports 525
Please Recycle — Defaults from the Service Call Invoice document type’s Fax Response – Please
Recycle setting on the Quick Send tab of Accounts Receivable Customer Maintenance
(08.260.00). If the Service Call Invoice document type is not defined for the customer, Fax
Response – Please Recycle defaults from the Service Call Invoice document type’s Fax Response
– Please Recycle setting on Shared Information Quick Send Setup (21.950.00).
Subject Text
Subject Text is the wording that appears in the Subject of the email message or in the Regarding area
on the fax cover sheet that accompanies the invoice sent to the one-time recipient. The text defaults
from the Service Call Invoice document type’s Subject Text on the Quick Send tab of Accounts
Receivable Customer Maintenance (08.260.00). If the Service Call Invoice document type is not
defined for the customer, Subject Text defaults from the Service Call Invoice document type’s Subject
Text on Shared Information Quick Send Setup (21.950.00).
You can specify the following variables within the subject text to personalize the email message or fax
to the one-time recipient:
<Customer Name>
<Reference Number>
<Document Amount>
<Company Name>
Each variable must begin with a less-than symbol (<) and end with a greater-than symbol (>). Also, the
first letter of each word in the variable name must be capitalized and the rest of each word must be in
lowercase letters.
Example: You enter a variable to customize the default subject text: “Current invoice from <Company
Name>”. If the company name is Contoso, Ltd, the subject text for the email message or fax cover
sheet reads, “Current invoice from Contoso, Ltd”.
Body Text
Body Text is the wording that appears in the body of an email message or in the Notes area on a fax
cover sheet that accompanies the invoice sent to the one-time recipient. The text defaults from the
Service Call Invoice document type’s Body Text on the Quick Send tab of Accounts Receivable
Customer Maintenance (08.260.00). If the Service Call Invoice document type is not defined for the
customer, Body Text defaults from the Service Call Invoice document type’s Body Text on Shared
Information Quick Send Setup (21.950.00).
You can specify the following variables within the body text to personalize the email message or fax to
the one-time recipient:
<Customer Name>
<Reference Number>
<Document Amount>
<Company Name>
Each variable must begin with a less-than symbol (<) and end with a greater-than symbol (>). Also, the
first letter of each word in the variable name must be capitalized and the rest of each word must be in
lowercase letters.
Example: You enter a variable to personalize the body text: “Here is an invoice for <Customer Name>”.
When you send the invoice electronically to the one-time recipient, the email message or fax cover
sheet body text reads, “Here is an invoice for Kim Abercrombie” since the one-time recipient is
associated with the customer, Kim Abercrombie.
Send Request (button) Click Send Request to transmit the invoice electronically to the one-time recipient.

526 Service Dispatch
Cancel (button)
Click Cancel to close this window without recording any changes to the database, returning to Service
Invoice Selection (SD.641.00).

Reports 527
Service Call Invoice (SSRS) (SD.643.00) Service Call Invoice (SSRS) (SD.643.00) reports are created using SQL Server Reporting Services
(SSRS). However, the report generation steps do not differ from what you experience with Service Call
Invoice (SD.640.00).
You can print invoices for one or several completed service calls. When you click Print or Print Preview,
Service Invoice Selection (SD.641.00) appears, providing several print options. For more information
about Service Invoice Selection (SD.641.00), see “Service Invoice Selection (SD.641.00)” on page
518.
Note: An invoice for a customer set up for Quick Send for the Service Call Invoice document type on
Accounts Receivable Customer Maintenance (08.260.00), Quick Send tab is not printed. If the invoice
has not been transmitted electronically, Quick Send requests are created according to the Quick Send
preferences defined for the customer on the Accounts Receivable Customer Maintenance
(08.260.00), Quick Send tab. If the invoice was transmitted electronically, the Quick Send requests
indicated in the invoice’s Quick Send requests are used to resend to the invoice to the initial
recipients. For more information about Quick Send requests, see “Quick Send Inquiry (21.200.00)” in
the Shared Information help or user guide.
Figure 264: Service Call Invoice (SSRS) (SD.643.00)

528 Service Dispatch
Service Call Invoice (SSRS), Report Tab
When you select Service Call Invoice (SSRS) (SD.643.00) from the Reports menu, the standard report
screen displays.
Figure 265: Service Call Invoice (SSRS) (SD.643.00), Report tab
Following are the only items to be used on Service Call Invoice (SSRS) (SD.643.00), Report tab.
Print (Button)
Print displays Service Invoice Selection (SD.641.00) where service call invoices can be selected to be
printed to a printer or sent electronically and processed to Accounts Receivable.
Print Preview (Button)
Print Preview displays Service Invoice Selection (SD.641.00) where service call invoices can be
selected to be printed to the screen and processed to Accounts Receivable.

Reports 529
Service Call Invoice (SSRS), Options Tab
Figure 266: Service Call Invoice (SSRS) (SD.643.00), Options tab
Suppress zero invoices printing (check box)
Use Suppress zero invoices printing to allow or suppress the printing of invoices that have a total
invoice amount of zero. These invoices will not be printed if the check box is selected.

530 Service Dispatch
Service Call Workorder (SD.625.00) The Service Call Workorder (SD.625.00) report contains the order for the work the technician receives
and refers to a work order. For more information, see “Printing Service Call Work Orders” on page 207.
Figure 267: Service Call Workorder (SD.625.00) report
Service Location Code List (SD.621.00) The Service Location Code List (SD.621.00) report lists all of the service location codes and provides
their descriptions and their pricing percent factors. Service Location Codes are created in Equipment
Location Maintenance (SE.004.00). For more information, see the Equipment Maintenance user’s
guide or help.
Figure 268: Service Location Code List (SD.621.00) report

Reports 531
Site List (SD.612.00) The Site List (SD.612.00) report provides information about each customer’s sites. For each customer
and each customer site, it includes the date created, map page and coordinates, the maximum
service amount, whether there is authorization to call, and media ID. Detailed site, service call, and
default information is also provided.
Figure 269: Site List (SD.612.00) report
Skills List (SD.613.00) The Skills List (SD.613.00) report identifies each skill, by skill ID, and includes a description and the
labor cost of each skill.
Figure 270: Skills List (SD.613.00) report

532 Service Dispatch
Special Pricing (SSRS) (SD.645.00) The Special Pricing (SSRS) (SD.645.00) report lists special pricing information as set up in Site –
Special Pricing Maintenance (SD.037.00). The report is sorted by customer ID, customer site ID, and
then inventory ID. The report includes the start date and end dates, price type (amount or discount %),
price/disc%, revised start and end dates, revised price/disc%, and their descriptions. Special Pricing
(SSRS) (SD.645.00) reports are created using SQL Server Reporting Services (SSRS).
Figure 271: Special Pricing (SSRS) (SD.645.00) report

Reports 533
T&M Quote (SD.633.00) The T&M Quote (SD.633.00) report automatically produces a time and materials quote from the
quotation information entered into Service Dispatch.
Figure 272: T&M Quote (SD.633.00) report

534 Service Dispatch
Timesheet Report (SD.400.00) Use Timesheet Report (SD.400.00) to produce the Time Sheet and Invoice Report (SD.624.00). The
report is available in three formats. The standard and summary reports list time technicians logged, as
well as information about the associated service calls, invoices, and the resulting profit margin. The
earnings summary report format includes earnings type and description, along with regular, premium,
and billable hours.
After selecting one or all of the report formats, you then specify a beginning and ending date range for
the reporting period. You can report on all branches or a single branch. You can also select Print
Preview to check your reports before printing them.
Figure 273: Timesheet Report (SD.400.00)
Figure 274: Time & Invoice Report (SD.624.00), standard format

Reports 535
Time & Invoice Report
Figure 275: Time and Invoice Report (SD.624.00), summary format
Figure 276: Time & Invoice Report (SD.624.00), earnings summary format

536 Service Dispatch
Tool List (SD.614.00) The Tool List (SD.614.00) report provides the Tool ID and description of each tool, with related vehicle
information. It shows the VIN/Serial #, make, model, year, purchase date, condition and date when
the condition was last recorded, the location type and ID, the ID of the employee who has the tool, and
the usage ID. For more about the information shown on this report, see “Tool Maintenance
(SD.018.00)” on page 416.
Figure 277: Tool List (SD.614.00) report
Tool Usage List (SD.615.00) The Tool Usage List (SD.615.00) report lists tool usage IDs and their descriptions.
Figure 278: Tool Usage List (SD.615.00) report

Reports 537
Usage Code List (SD.616.00) The Usage Code List (SD.616.00) report lists the user-defined usage codes that specify usage-based
(versus calendar-based) preventative maintenance intervals for equipment. Usage codes are entered
into Usage Code Maintenance (SE.009.00) and associated with a manufacturer’s model in
Manufacturer/Model Maintenance (SE.006.00), both in the Equipment Maintenance module.
Figure 279: Usage Code List (SD.616.00) report
Use Taxes List (SD.628.00) The Use Taxes List (SD.628.00) groups information by tax ID, gives the details about each taxable and
non-taxable service call.
Figure 280: Use Taxes List (SD.628.00)

538 Service Dispatch
Vehicle List (SD.617.00) The Vehicle List (SD.617.00) report provides information for each vehicle, by Vehicle ID. It shows the
vehicle description, VIN, make, model, year, date purchased, inventory location, odometer reading and
reading date, and the employee ID of the employee assigned to the vehicle.
Figure 281: Vehicle List (SD.617.00) report
Zip Code List (SD.618.00) The Zip Code List (SD.618.00) report provides location and map information for each zip code. Within
each zip code, the report lists employee or business licenses (based on the report format you select)
and their descriptions.
Figure 282: Zip Code List (SD.618.00) report, Business License format
Report Tab
Report Format
Specifies the type of report to print. The options are:
Zip Code – Employee License — Prints a list of zip codes that are associated with licenses that
may be held by your company’s service technicians.
Zip Code – Business License — Prints a list of zip codes that are associated with your company’s
business licenses. Information that will assist you with planning for license renewals is included.
Zip Code – Prints a list of zip codes that are associated with your business’s telephone contacts.

Index 539
Index
A Adding Field Service Management
information to product classes 414
Advertising Media Performance (SD.630.00)
Report 499
Approving service call invoices 285
Assigning technician to a problem code 179
B Billable - Completed Calls (SD.623.00)
report 500
Branch
Branch List Report (SD.600.00) 501
setting up 62
user-defined 375
Branch ID overview 33
Branch Maintenance (SD.001.00) 375
Business licenses 404
C Call Completion, processing before 211
Call status
creating 378
viewing open service calls 168, 170
Call status ID overview 33
Call Status List (SD.601.00) report 501
Call Status Maintenance (SD.002.00)
defining 49
Call Type
Call Type List (SD.602.00)
report 502
creating 379
defining 64
developing 8
linking subaccounts 379
viewing service calls 167
Call type ID overview 33
Call view templates, setting up 381
Cancel service call 137
Cause code ID overview 34
Cause Codes
defining 91
Cause codes (for equipment failure)
creating 412
Changing the Dispatch Sort Order 175
Coop advertising information
defining 96
Cooperative advertising tracking 409
Copying service calls 134
Creating
call statuses 378
call types 379
call view template 152, 165
cause codes for equipment
failure 412
Customer Site Groups 440
dwelling types 385
earnings types 423
employee classes 386
geographic zones 402
inventory markup IDs 432
invoices for flat rate orders 479
licenses 404
media groups 411
new invoice 220
notes template for service calls 448
pager template 433
problem codes 397
resolution codes for equipment
repair 413
service calls 294
service calls and adding new
customers 302
user-defined branches 375
work locations 424
Customer AR information, viewing 363
Customer ID overview 30
Customer site group ID overview 31
Customer Site Groups
Creating 440
Customer Site Groups (SSRS)
(SD.644.00) report 502
Defining 110
Customer site ID overview 31
Customer site information
entering 425
entering special pricing by inventory
item 435
D Data entry
screens 291
Developing
call types 8
Special Pricing 16
Dispatch - call view ID overview 35
Dispatch Board (SD.201.00)
View open service calls for a call
type 167
viewing all open service calls for a
specific technician 161
viewing open service calls for 159
viewing open service calls for a
specific call status 170
viewing open service calls for a
specific geographic zone 173
Dispatch sort order, changing 175
Dispatch View Templates
Defining 81
Dispatch, view all open service calls 153
Duplicating service calls 134
Dwelling ID overview 35
Dwelling types
creating 385
defining 100
Dwelling List (SD.603.00) report 503

540 Service Dispatch
E emailing 195
message to customers) 195
messages to technicians 198
Employee class overview 35
Employee classes
creating 386
Employee Class List (SD.605.00)
report 503
Employee Classes
Defining 72
Employee information
Employee Information (SD.604.00)
report 504
ensuring privacy 391
entering 387
Employee licenses 404
Zip Code - Employee License Report
(SD.618.00E) 538
Employee licensing information
entering 395
Employee skills, entering 394
Employees
Defining 73
Enter Other Information, Other Info tab 266
Entering
customer site information 425
default service call information for a
customer site 428
employee information 387
employee information and ensuring
privacy 391
employee license information 395
employee skills 394
In-house warranty labor inventory line
items 237
In-House Warranty Material Inventory
Line Items 234
labor inventory line items 273
Manufacturer warranty labor
inventory line items 243
Manufacturer warranty material
inventory line items 240
non-billable labor inventory line
items 249
non-billable material inventory line
items 245
Other Info tab 147, 222
project labor inventory line
items 255
project material inventory line
items 251
service call details 315
service call line item details 327
service call payment information 321
service contract labor inventory line
items 261
service contract material inventory
line items 257
special pricing information for
customer sites 435
technician information on an
invoice 277
tool information 416
vehicle information 419
zip code information 421
Entering Billable Labor Inventory Line
Items 230
Entering billable material inventory line
items 225
Entering in-house warranty labor inventory
line items 237
Entering manufacturer warranty labor
inventory line items 243
Entering manufacturer warranty material
inventory line items 240
Entering non-billable material inventory line
items 245
Entering technician information 277
Equipment
cause codes for equipment
failure 412
resolution codes for equipment
repair 413
viewing equipment associated with a
site 361
Equipment ID
overview 32
F Flat Rate Order - Modify Detail
(SP.202.00) 269
Flat rate orders
creating invoices 479
modifying nonprice detail 481
Flat rates
markup IDs for inventory items 432
G Generating
inventory issues batch 460
Geographic zone ID
overview 32
Geographic zones
creating 402
Geographic Zone List (SD.606.00)
report 506
setting up 60
viewing open service calls 173
Geography (SD.004.01) 382
Graphical Dispatch Board (SD.900.00) 179
adding new problem code 181
assigning technician 179
Viewing Open Service Calls for a
Specific Geographic Zone 174
I Implementation check list 18
In-House Warranty Material Inventory Line
Items 234
Integration
Project Controller 44

Index 541
Inventory
Generate 214
updating quantities after service call
invoicing 462
Inventory issues batch, generating 460
Inventory mark up ID
overview 35
Inventory Mark-Up (SD.619.00) report 506
Inventory Mark-Ups
Defining 101
Inventory product classes
adding Field Service Management
information 414
Invoice
creating 220
Flat rate price 264
Invoice - Flat Rate Order (SP.200.00) 267
Invoice - T & M Details (SD.203.00) 225
Invoice entry 217
Invoice information
entering 219
Invoice number
overview 32
Invoices
creating for flat rate orders 479
printing 462
processing services calls 518
suppressing printing 517, 529
viewing history 324
Invoicing
Selecting Service Calls 285
L Labor inventory line items
non-billable 249
License ID
overview 35
Licenses
associating zip codes 406
creating 404
License Information (SD.607.00)
report 507
Licenses by Zip Code (SD.608.00)
report 507
setting up 54
Licensing
background 28
M Maintenance
Service Series setup 50
Maintenance and setup 41
Managing tools loaned to employees 396
Markup IDs for flat rates 432
Material Inventory Line Items
Entering 270
Media
Advertising Media Performance
(SD.630.00 Report) 499
Media buy ID
overview 36
Media Buy List (SD.610.00) report 508
Media Groups
creating 411
Defining 93
Media Group List (SD.609.00)
report 508
overview 36
Media referrals
Tracking 408
Media sources
defining 94
Modifying
details of flat rate order 269
N New Customer Site
Defining 102
Non-billable labor inventory line items
entering 249
Note template ID
overview 37
O Open Service Calls
Open Service call List (SD.620.00)
report 509
viewing 152
Open service calls for a specific branch
viewing 157
Other Info tab
entering other information 125, 266
Other modules
setting up 41
P Pager template ID
overview 37
Pager template, creating 433
Pager Templates
Creating 65
Paging
Dispatch Board (SD.201.00) 189
Graphical Dispatch Board
(SD.900.00) 193
Paging an employee 451
Paging, identifying default data fields 433
Payroll Process
Generate 212
Payroll, processing technician hours and pay
rate 459
Postal codes
setting up 56
Premium priority service calls
viewing 156
Printing
service calls 207, 209, 210
work orders 207, 209, 210
Printing invoices 462, 517, 529
Priority open service calls

542 Service Dispatch
viewing 156
Problem code
assigning technician 179
Problem code ID
overview 34
Problem codes
creating 397
Problem Code List (SD.634.00)
report 509
Problem Codes
Defining 87
Problem codes, assigning to service
calls 334
Problems area
Service Call Entry (SD.200.00) 296,
476
Processing Before Call Completion 211
Processing technician payroll 459
Product Classes
adding Field Service Management
information 414
defining 98
Product Class List Report
(SD.611.00) 509
Profit margin reporting 534
Project Controller
integration 44
Project material inventory line items
Entering 251
Q Quick reference task list 39
Quick Send Request
one-time receiver 281
One-time Receiver 522
Quote
T&M Quote report 533
R Reports
Advertising Media Performance
(SD.630.00) Report 499
Branch List Report (SD.600.00) 501
Call Status List (SD.601.00) 501
Call Type List (SD.602.00) 502
Customer Site Groups (SSRS)
(SD.644.00) 502
Dwelling List (SD.603.00) 503
Employee Class List
(SD.605.00) 503
Employee Information Report
(SD.604.00) 504
Geographic Zone List
(SD.606.00) 506
Inventory Mark-Up (SD.619.00) 506
License Information
(SD.607.00) 507
Licenses by Zip Code
(SD.608.00) 507
Media Buy List (SD.610.00) 508
Media Group List (SD.609.00) 508
Open Service call List
(SD.620.00) 509
Problem Code List (SD.634.00) 509
Product Class List Report
(SD.611.00) 509
Reprint Service Call Invoice
Report 510
Sales Analysis Report
(SD.626.00) 512
Service Call Audit (SD.627.00) 513
Service Call History (SD.622.00) 514
Service Call Invoice (SD.640.00) 515
Service Call Workorder
(SD.625.00) 530
Service Location Code List
(SD.621.00) 530
Site Maintenance (SD.612.00) 531
Skills List (SD.613.00) 531
Special Pricing (SSRS)
(SD.645.00) 532
T&M Quote 533
Tool List (SD.614.00) 536
Tool Usage List (SD.615.00) 536
Usage Code List (SD.616.00) 537
Use Tax List (SD.628.00) 537
Vehicle List (SD.617.00) 538
Zip Code - Employee License
Report 538
Reprint Service Call Invoice Report 510
Resolution code ID
overview 34
Resolution Codes
Defining 92
Resolution codes (for equipment repair)
creating 413
Revising
Special Pricing 441
S Sales Analysis Report (SD.626.00) 512
Sales tax
Use Tax List (SD.628.00) 537
Saving service call 128
Sending a page to an employee 451
Service call 2
Service Call Entry (SD.200.00)
New Customer Tab 302
Other Info Tab 476
Service Call Info tab 294
Service Call Entry (SD.200.00), Service Call -
Problems Area 296, 476
Service Call Information (58.010.01) 494
Service Call Invoice (SD.640.00) 286
Service Call Invoice (SD.640.00) report 515
Service call invoices
approving 285
Reprint Service Call Invoice
Report 510
Service call queue
restricting view by call status 384
restricting view by call type 384
restricting view by geographic
zones 382

Index 543
sorting calls 383
Service calls 291
adding a new customer 302
aging information 305
assigning problem codes 334
assigning technicians 308
associating multiple technicians 292
Billable - Completed Calls
(SD.623.00) report 500
canceling 137
copying 134
creating 294
creating a notes template 448
default customer site
information 428
entering details for invoicing 315
entering line item details 327
entering payment information 321
entry 115
Invoicing 285
life cycle 2, 25, 291
managing 313
paging an employee 451
printing 207, 209, 210
processing for invoicing 518
saving 128
Service Call Audit (SD.627.00)
report 513
Service Call History (SD.622.00)
report 514
Service Call Workorder (SD.625.00)
report 530
setup information 465
specific branch 157
updating inventory quantities after
invoicing 462
viewing a specific branch 157
viewing all open for a specific
branch 157
viewing all open for a specific
priority 155
viewing branch 157
viewing call status 357
viewing call types 167
viewing completed 149
viewing history for customer and
site 365
viewing invoice history 324
viewing not completed 149
viewing open 152
viewing open calls 359
viewing premium priority 156
viewing priority 155
Service Calls Selected for Invoicing
(SD.641.01) 520
Service contract ID overview 31
Service Dispatch
concepts 25
setting up 46
Service Invoice Printing - Keep/Delete
(SD.642.00) 289
Service Invoice Selection (SD.641.00) 518
Service Location Code List (SD.621.00)
report 530
Service Series Setup Maintenance
(SD.000.00) 50
Setting up
call view templates 381
Setting up other modules 41
Setting up Service Dispatch
overview 46
Setting up the service management
system 465
Site information for customers 425
Site Maintenance (SD.612.00) report 531
Sites, default service call information 428
Skill ID
overview 36
Skills
defining 68
overview 28
Skills List (SD.613.00) report 531
Special Pricing
Defining 111
Developing 16
revise 183
Revisions 441
Special Pricing (SSRS) (SD.645.00)
report 532
Update 186
Updating 446
View Revisions 444
Special Pricing Revisions
create 183
Special Pricing with Revisions
Update 186
Specific branch
viewing open service calls 159
Specific call type
viewing open service calls - Dispatch
Board (SD.201.00) 167
T Task guidelines 39
Task list
quick reference 39
Tax
Use Tax Report (SD.628.00) 537
Technician
viewing open service calls 160
viewing open service calls-Dispatch
Board (SD.201.00) 161
Technicians
background 28
overview 34
Technicians, associating to service calls 292
Template
creating call view 152
Time and material
T&M Quote report 533
Time Sheet and Invoice Report
(SD.624.00) 327, 534
Tool information
entering 416
usage codes 37, 418
Tool List (SD.614.00) report 536
Tool Usage List (SD.615.00) report 536

544 Service Dispatch
Tool Usage Maintenance (SD.019.00) 37
Tools
background 29
defining 69
overview 36
Tools loaned to employees, managing 396
Tools usage
overview 37
Tracking
coop advertising information 409
Tracking media referrals 408
U Updating
Special Pricing 446
Usage Code List (SD.616.00) report 537
Usage codes for hand tools 37, 418
Use Tax List (SD.628.00) 537
User Configuration
Setting up 85
User guide overview 1
what is covered 1
who should use 1
V Vehicle ID
overview 37
Vehicle information
entering 419
Vehicle List (SD.617.00) report 538
Vehicles
Defining 66
Viewing
customer AR information 363
equipment associated with a
site 361
invoice history 324
open service calls 359
service call history for customer and
site 365
service call status 357
service calls 313
Special Pricing Revisions 444
Viewing all open service calls for a specific
branch, Dispatch (SD.201.00) 159
Viewing all open service calls for a specific
technician - Dispatch Board
(SD.201.00) 161
Viewing all premium priority open service
calls, Dispatch 156
Viewing open service calls 153
W Work orders
printing 207, 209, 210
Z Zip Code - Employee License Report
(SD.618.00E) 538
Zip code information
entering 421
Zip codes
associating licenses 406
attaching licenses 59
overview 33