SELECT CLEAN™ Self-Cleaning Gas Range - Owner's Manual
84
8273135A www.sears.com Super Capacity with ULTRABAKE™ System Capacidad extra con el Sistema ULTRABAKE™ Sears, Roebuck and Co., Hoffman Estates, IL 60179 U.S.A. ENGLISH ESPAÑOL SELECT CLEAN™ Self-Cleaning Gas Range Use & Care Guide Cocina de gas de auto limpieza SELECT CLEAN™ Guía para el uso y cuidado Models, Modelos 665.75822 665.75824 665.75829
-
Upload
khangminh22 -
Category
Documents
-
view
0 -
download
0
Transcript of SELECT CLEAN™ Self-Cleaning Gas Range - Owner's Manual

8273135A www.sears.com
Super Capacity with ULTRABAKE™ SystemCapacidad extra con el Sistema ULTRABAKE™
Sears, Roebuck and Co., Hoffman Estates, IL 60179 U.S.A.
ENG
LIS
HESPAÑO
L
SELECT CLEAN™ Self-Cleaning Gas RangeUse & Care Guide
Cocina de gas de auto limpieza SELECT CLEAN™Guía para el uso y cuidadoModels, Modelos 665.75822
665.75824665.75829

Table of ContentsA Note to You............................................................2Warranty.....................................................................3Range Safety.............................................................4Parts and Features...................................................6Using Your Range ....................................................7
Using the Surface Burners....................................7
Characteristics of Cookware Materials................8
Using the Oven......................................................9
Bakeware Choices ..............................................10
Using Aluminum Foil ...........................................10
The Electronic Oven Control...............................11Setting the Clock.............................................12Using the Oven Lockout.................................12Tones................................................................13Using the 12-Hour Shut-Off ...........................13Using the Electronic Kitchen Timer ...............14Starting/Canceling a Function........................15ULTRABAKE™ Baking/Roasting ...................15Readjusting the Oven Temperature Control...17Broiling .............................................................18Using the Timed Oven Control ......................21
The Storage Drawer....................................................25
The Oven Vent .....................................................25Using the SELECT CLEAN™ Self-Cleaning Cycle ...............................................26
Before You Start ..................................................26
How the Cycle Works .........................................27
Setting the Controls ............................................27Caring for Your Range...........................................30
Cleaning Chart.....................................................30
Sealed Surface Burners and Cooktop...............32
Removing the Oven Door ...................................33
The Oven Light ....................................................35Troubleshooting......................................................36
Range Does Not Work........................................36
Oven/Broiler Burner.............................................36
Surface Burners...................................................37
When Self-Cleaning Your Oven..........................37
Cooking Results ..................................................38
Display Messages ...............................................38Index.........................................................................39Service ....................................................Back Cover
2
A Note to YouThank you for buying a KENMORE appliance.Your KENMORE gas range takes on a new valuewhen you discover that Sears has service centersaround the country. Trained Sears ServiceProfessionals use fully-equipped trucks and Sears-approved methods for expert repairs backing up allSears guarantees.
Please record your model’s information.Whenever you call to request service for your appliance, you need to know your complete modelnumber and serial number. You can find this information on the model and serial number plate(see diagram in the “Parts and Features,” p. 6).
Please also record the purchase date of your appliance and your store’s name and telephone number.
Keep this book and the sales slip togetherin a safe place for future reference.
Model Number 665.
Serial Number R
Purchase Date

ENG
LIS
H
3
WARNING: If the information in this manual is not followed exactly, a fire or explosion may result causing property damage, personal injury or death.
– Do not store or use gasoline or other flammable vapors and liquids in the vicinity of this or any other appliance.
– WHAT TO DO IF YOU SMELL GAS
•Do not try to light any appliance.•Do not touch any electrical switch. •Do not use any phone in your building.• Immediately call your gas supplier from a neighbor’s phone. Follow the gas
supplier’s instructions.• If you cannot reach your gas supplier, call the fire department.
– Installation and service must be performed by a qualified installer, service agency or the gas supplier.
Free-Standing Range WarrantyFULL ONE YEAR WARRANTY ON ALL PARTSIf, within one year from the date of installation, any part fails to function properly due to a defect inmaterial or workmanship, Sears will repair or replace it, at our option, free of charge.
If this product is subjected to other than private family use, the above warranty is effective for only 90 days.
WARRANTY SERVICE IS AVAILABLE BY CONTACTING THE NEAREST SEARS SERVICE CENTER INTHE UNITED STATES.
This warranty gives you specific legal rights and you may also have other rights which vary from state to state.
Sears Roebuck and Co. Dept. 817WA Hoffman Estates, IL 60179
To Further Add To The Value Of Your Range, Buy a Sears Maintenance Agreement.
Years of Ownership Coverage 1st Year 2nd Year 3rdYear
1. Replacement of Defective Parts W MA MA
2. Annual Preventive Maintenance MA MA MACheck at Your Request
Your Kenmore appliance is designed, manufactured and tested to provide years of dependable operation. Yet any majorappliance may require service from time to time. The Sears Maintenance Agreement offers you an outstanding serviceprogram, affordably priced.
The table above shows the additional benefits a Sears Maintenance Agreement provides beyond the Sears Warranty.
Contact your Sears Sales Associate or call 1-800-827-6655 to purchase a Sears Maintenance Agreement.
W = Warranty MA = Maintenance Agreement

4
Range Safety
Tip Over HazardA child or adult can tip the range and be killed.Connect anti-tip bracket to rear range foot.Reconnect the anti-tip bracket, if the range is moved.See the installation instructions for details.Failure to follow these instructions can result in death or serious burns to children and adults.
wWARNING
Making sure the anti-tip bracket is installed:
•Slide range forward.
•Look for the anti-tip bracket securely attached to floor.
•Slide range back so rear range foot is under anti-tip bracket.
Anti-Tip Bracket
Range Foot
Anti-tip bracket locationThe illustration on the right shows the proper placement of the anti-tip floor bracket. To install correctly, see your installation instructions.
THE ANTI-TIP BRACKET
The range will not tip during normal use. However, the range can tip if you apply too much force or weight to the open door without the anti-tip bracket fastened down properly.
Your safety and the safety of others are very important.
wDANGER
wWARNING
You can be killed or seriously injured if you don'timmediately follow instructions.
You can be killed or seriously injured if you don'tfollow instructions.
All safety messages will tell you what the potential hazard is, tell you how to reduce the chance of injury, and tell you what can happen if the instructions are not followed.
We have provided many important safety messages in this manual and on your appliance. Always read and obey all safety messages.
This is the safety alert symbol.
This symbol alerts you to potential hazards that can kill or hurt you and others.
All safety messages will follow the safety alert symbol and either the word “DANGER” or“WARNING.” These words mean:

5
ENG
LIS
HRANGE SAFETY
SAVE THESE INSTRUCTIONS
WARNING: To reduce the risk of fire, electricalshock, injury to persons, or damage when using therange, follow basic precautions, including the following:• WARNING: To reduce the risk of tipping
of the range, the range must be secured byproperly installed anti-tip devices. To check ifthe devices are installed properly, slide rangeforward, look for anti-tip bracket securelyattached to floor, and slide range back so rearrange foot is under anti-tip bracket.
• CAUTION: Do not store items of interest tochildren in cabinets above a range or on the backguard of a range – children climbing on therange to reach items could be seriously injured.
• Proper Installation – The range, when installed,must be electrically grounded in accordance withlocal codes or, in the absence of local codes, withthe National Electrical Code, ANSI/NFPA 70. InCanada, the range must be electrically groundedin accordance with Canadian Electrical Code. Besure the range is properly installed and groundedby a qualified technician.
• This range is equipped with a three-prong ground-ing plug for your protection against shock hazardand should be plugged directly into a properlygrounded receptacle. Do not cut or remove thegrounding prong from this plug.
IMPORTANT SAFETY INSTRUCTIONS• Disconnect the electrical supply before servic-
ing the appliance.• Never Use the Range for Warming or Heating
the Room.• Injuries may result from the misuse of appliance
doors or drawers such as stepping, leaning, orsitting on the doors or drawers.
• Maintenance – Keep range area clear and freefrom combustible materials, gasoline, and other flammable vapors and liquids.
• Storage in or on the Range – Flammable materials should not be stored in an oven ornear surface units.
• Top burner flame size should be adjusted so itdoes not extend beyond the edge of the cook-ing utensil.
For self-cleaning ranges –• Before Self-Cleaning the Oven – Remove broiler
pan and other utensils. Wipe off all excessivespillage before initiating the cleaning cycle.
The California Safe Drinking Water and Toxic Enforcement Act requires the Governor of California to publish a list of substances known to the State of California to cause cancer, birth defects, or other reproductive harm, and requires businesses to warn of potential exposure to such substances.
WARNING: This product contains a chemical known to the State of California to cause cancer, birthdefects, or other reproductive harm.
This appliance can cause low-level exposure to some of the substances listed, including benzene,formaldehyde, carbon monoxide, toluene, and soot.

6
Parts and FeaturesLO
MED
HI
OFF
LITEH
I•
8•6•4•
2•
LO
OFF
LITEH
I•
8
•6•4•
2•
LO
SureSimmer
Oven vent (p. 25)
Sealed surface burners (pp. 7, 8, 32, 33)
Cooktop grates (p. 30)
Power Burner(p. 7)
Anti-tip bracket (p. 4)
Door stop clip(pp. 33-35)
Model and serial number plate (behind left side of storage drawer)
Storage drawer (p. 25)
Electronic ovencontrol
(pp. 11-24)
SURESIMMER™burner
(p. 7)
Control panel (pp. 6, 30)
Automatic ovenlight switch
(p. 35)
Gasket(p. 26)
STURDIGLIDE™HALF-RACK withremovable insert
(p. 9)
STURDIGLIDE™oven rack with
integrated handle
(p. 9)
OFF
LITEH
I•
8
•6•4•
2•
LO
OFF
LITEH
I•
8
•6•4•2
•LO
PowerBurner
Left front control knob(Power Burner) (p. 7)
Left rear control knob
Surface burner marker (shows which burner you are setting)
CONTROL PANEL
Right front control knob
Right rear control knob(SURESIMMER setting) (p. 7)
AVERAGELIGHT
HEAVY
SELECTCLEAN
ULTRABAKE™ electronic display (p. 11)
ELECTRONIC OVEN CONTROL

7
ENG
LIS
H
Using Your RangeUSING THE SURFACE BURNERS
NOTE: Do not leave empty cookware, or cookwarewhich has boiled dry, on a hot surface burner. The cookware could overheat, causing damage to thecookware or cooking product.
Using Power BurnerThe left front burner is designed to give ultra-highpower when it is fully on. It can be used to rapidlybring liquid to a boil and to cook large quantities offood.
Using SURESIMMER The right rear SURESIMMER burner is designed forlow temperature cooking. It allows accurate simmer control at the lowest setting.
Easy ways to save energy• To help shorten your cooking time, use the least
amount of liquid possible.
• Start your food on a higher heat setting, then turnthe control to a lower setting to finish cooking.
wWARNINGRECOMMENDED USE
• To light the burner.
• To provide highest heat setting.
• To start food cooking.
• To bring liquid to a boil.
• To hold a boil.
• To fry chicken or pancakes.
• To cook gravy, pudding, oricing.
• To cook large amounts of vegetables.
• To keep food warm.
• To simmer.
• To provide lowest simmer/heat setting.
• To melt chocolate or butter.
SETTINGLITE
Power Burner(left front burner)
HI
Mid-range(between HI andLO)
LO
SURESIMMER™setting (right rear burner)
Burner heat settingsUse the following chart as a guide.
Using the control knobsYour range comes with electric ignitors that lightthe burners each time you turn the control knobsto LITE.
• Place a filled pan on the burner grate beforeturning on the surface burner. Do not operate aburner for extended periods of time without having cookware on the grate.
• Push in the control knob and turn it counter-clockwise to the LITEposition. The clickingsound is the ignitorsparking. Make surethe burner has lit.
• Stop the clickingsound after the burnerlights by turning thecontrol knob anywhere between HI and LO.
NOTE: All four electric ignitors will click at the sametime. However, the burner with the control knobturned to LITE is the one that will ignite.
Fire HazardDo not let the burner flame extend beyond the edge of the pan.Turn off all controls when not cooking.Failure to follow these instructions can result in death or fire.
REMEMBER: When range is in use or during the Self-Cleaning cycle, the entire cooktop area may become hot.

8
USING YOUR RANGE
USING THE SURFACE BURNERS (contd.)
Home canning informationThe large diameter of most water-bath or pressurecanners combined with high heat settings for longperiods of time can cause damage to the cooktop.
To protect your range:
• Center the canner over the surface burner. Donot extend more than 1 inch outside the burnerarea.
• Do not place your canner on two surface burners at the same time.
• Start with hot water, cover with a lid and bring toa boil; then reduce heat to maintain a boil orrequired pressure levels in a pressure canner.
• Refer to your canner manual for specific instructions.
For up-to-date information on canning, contactyour local U.S. Government Agricultural Department Extension Office or companies whomanufacture home canning products.
Using the right cookware makes a big difference• The pan should have a flat bottom, straight sides,
and a well-fitting lid.
• Choose medium to heavy gauge (thickness) cookware.
• The pan material (metal or glass) affects how quickly and evenly the pan heats.
• When using glass or ceramic cookware, check tomake sure it is suitable for use on surface burners.
• To avoid tipping, make sure pots and pans are centered on the grates.
In case of a prolonged power failureYou can manually light surface burners. Hold a litmatch near a burner and turn the control knob to the LITE position. After the burner lights, turn thecontrol knob to the setting you want.
The pan material affects how fast heat transfers from the surface cooking area through the pan material and how evenly heat spreads over the pan bottom. Choose pans that provide the best cooking results.
Aluminum • Heats quickly and evenly.• Use for all types of cooking.• Medium or heavy thickness is best for most cooking.• Used as a core or base in cookware to provide even heating.
Cast iron • Heats slowly and evenly.• Good for browning and frying.• Maintains heat for slow cooking.• Can be coated with porcelain enamel.
Ceramic orceramic glass
• Heats slowly and unevenly.• Use on low to medium settings.• Follow manufacturer’s instructions.
Copper • Heats very quickly and evenly.• Used as a core or base in cookware to provide even heating.
Earthenware • Can be used for cooktop cooking if recommended by the manufacturer.• Use on low settings.
Porcelain enamel-on-steel or enamel-on-cast iron
• See cast iron and stainless steel.
Stainless steel • Heats quickly but unevenly.• A core or base of aluminum or copper on the cookware provides even heating.• Can be coated with porcelain enamel.
CHARACTERISTICS OF COOKWARE MATERIALS

9
ENG
LIS
HUSING YOUR RANGE
STURDIGLIDE™ oven rack with integrated handleThe integrated handle area makes pulling out theSTURDIGLIDE rack simple. The opening is largeenough for a potholder or oven mitt.
STURDIGLIDE™ HALF-RACK with removable insertThe STURDIGLIDE HALF-RACK with removableinsert is a space maximizer. When attached, theymake a full rack. The insert can also be used onthe counter for a cooling rack.
Position a full rack on guide 1 or 2 and the half-rackon guide 3 or 4. On the full rack place large items onright side and deeper, covered dishes on left side.Place shallow dishes on the half-rack. It may benecessary to increase cooking time. At the end ofcooking, carefully remove items from the oven.
Positioning racks and pansPlace the STURDIGLIDE racks where you needthem before turning on the oven.
• To move a rack, pull it out to the stop position, raise the front edge and lift it out.
• Be sure the rack(s) is level.
• Use pot holders or oven mitts to protect your handsif rack(s) must be moved while the oven is hot.
• For best performance, cook on one rack. Place the rack so the top of the food will be centered in the oven.
• When cooking with two racks, arrange the racks on the 2nd and 4th rack guides. Two sheets ofcookies may be baked if sheets are switched atapproximately three quarters of the total baketime. Increase baking time, if necessary.
USING THE OVEN
Where to place pans:
WHEN YOU HAVE
1 pan
2 pans
3 or 4 pans
PLACE
In center of the oven rack.
Side by side or slightlystaggered.
In opposite corners oneach oven rack. Staggerpans so no pan is directlyover another.
Rack placement for specific foods:
FOOD
Frozen pies, largeroasts, turkeys,angel food cakes
Bundt cakes, mostquick breads, yeastbreads, casseroles,meats
Cookies, biscuits,muffins, cakes, nonfrozen pies
RACK POSITION
1st or 2nd rack guidefrom bottom
2nd rack guide from bottom
2nd or 3rd rack guidefrom bottom
NOTE: For information on where to place your rackwhen broiling, see “Broiling guidelines,” pp. 19, 20.
• For best results, allow 2 inches of space aroundeach pan and between pans and oven walls. Hot air must circulate around the pans in the oven foreven heat to reach all parts of the oven. This results in better baking.
Extra oven rack position (roasting rack)Use this rack position when roasting food too large
to be placed on the firstrack position. For proper roasting, follow these guidelines:
• To avoid spillage,remove food before pulling out the rack.
• Tilt the rack up at thefront before pulling itover the door.
• Use an adequate amount of liquid in the pan (meat juices or water) so your food does not getoverdone.
Extra oven rack position

BAKEWARE CHOICESBaking performance is affected by the type of bakeware used. Use the bakeware size recommended in the recipe.
BAKEWARE TYPE
Light colored aluminum • Light golden crusts• Even browning
• Use temperature and time recommended in recipe.
Dark aluminum and otherbakeware with dark, dull,and/or non-stick finish
• Brown, crisp crusts • May reduce baking temperature 25°F.• Use suggested baking time.• Use temperature and time recommended in recipe for pies, breads, and casseroles.• Place rack in center of oven.
Ovenproof glassware,ceramic glass, or ceramic
• Brown, crisp crusts • May reduce baking temperature 25°F.
Insulated cookie sheets orbaking pans
• Little or no bottom browning • Place in the bottom third of oven.• May need to increase baking time.
Stainless steel • May need to increase baking time.
• Crisp crustsStoneware • Follow manufacturer's instructions.
• Light, golden crusts• Uneven browning
BEST USED FOR GUIDELINES
BAKEWARE CHOICES
USING ALUMINUM FOIL• Do not line the oven bottom with any type of
foil, liners, or cookware. Permanent damagewill occur to the oven bottom finish.
• Do not block the oven bottom vents.
• Do not cover the entire rack with aluminum foil.Doing so will reduce air circulation and overalloven performance.
• To catch spillovers from pies or casseroles placefoil on the oven rack below. Foil should be turnedup at edges and be at least 1 inch larger thandish.
• Place tent-shaped foil loosely over meat or poultry to slow down surface browning for longterm roasting. Remove foil for the last 30 minutes.
• Use narrow strips of foil to shield piecrustedges if browning too quickly.
10
USING YOUR RANGE
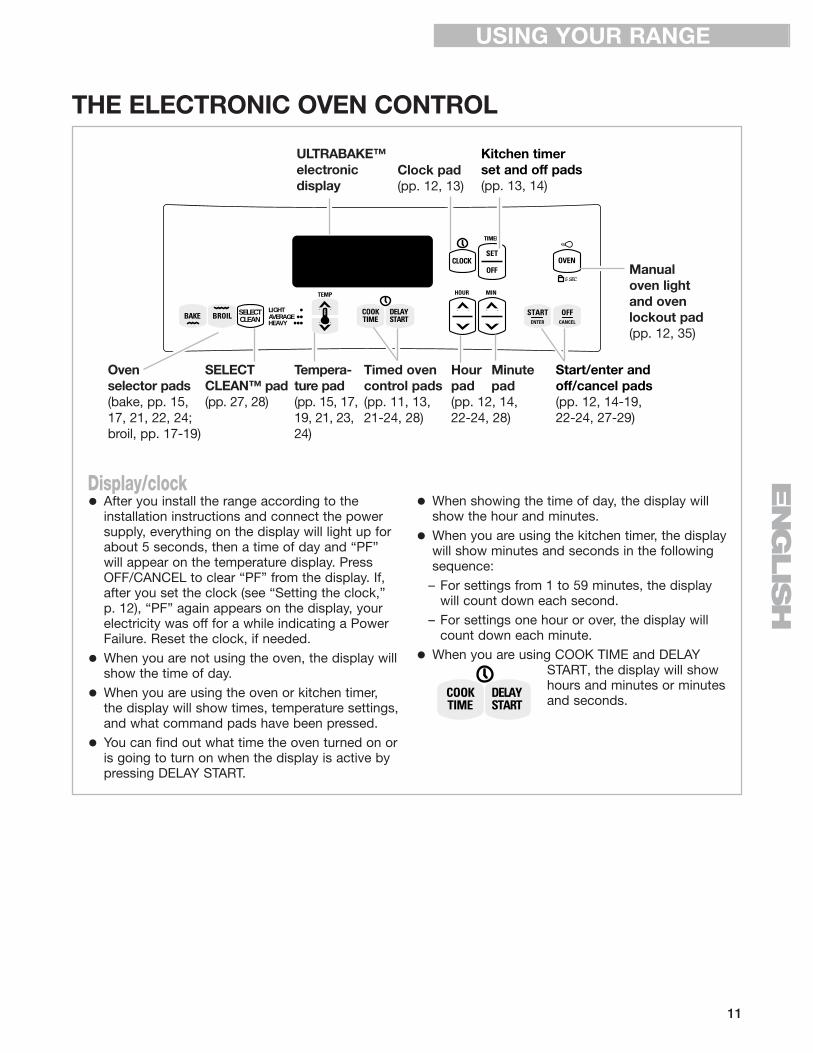
THE ELECTRONIC OVEN CONTROL
Display/clock• After you install the range according to the
installation instructions and connect the powersupply, everything on the display will light up forabout 5 seconds, then a time of day and “PF”will appear on the temperature display. PressOFF/CANCEL to clear “PF” from the display. If,after you set the clock (see “Setting the clock,”p. 12), “PF” again appears on the display, yourelectricity was off for a while indicating a PowerFailure. Reset the clock, if needed.
• When you are not using the oven, the display willshow the time of day.
• When you are using the oven or kitchen timer,the display will show times, temperature settings,and what command pads have been pressed.
• You can find out what time the oven turned on oris going to turn on when the display is active bypressing DELAY START.
• When showing the time of day, the display willshow the hour and minutes.
• When you are using the kitchen timer, the displaywill show minutes and seconds in the followingsequence:
– For settings from 1 to 59 minutes, the display will count down each second.
– For settings one hour or over, the display will count down each minute.
• When you are using COOK TIME and DELAYSTART, the display will showhours and minutes or minutesand seconds.
11
ENG
LIS
HUSING YOUR RANGE
AVERAGELIGHT
HEAVY
SELECTCLEAN
Start/enter andoff/cancel pads(pp. 12, 14-19,22-24, 27-29)
Minutepad
Hourpad(pp. 12, 14,22-24, 28)
Tempera-ture pad(pp. 15, 17,19, 21, 23,24)
Oven selector pads(bake, pp. 15,17, 21, 22, 24;broil, pp. 17-19)
Timed ovencontrol pads(pp. 11, 13,21-24, 28)
Manualoven lightand ovenlockout pad (pp. 12, 35)
ULTRABAKE™electronic display
Kitchen timerset and off pads(pp. 13, 14)
Clock pad(pp. 12, 13)
SELECTCLEAN™ pad(pp. 27, 28)

The oven lock lets you prevent use of the controlpanel command keypads. This feature comes inhandy when cleaning the control panel to avoidaccidentally turning on the oven.
NOTE: You can only lock the oven when the ovenis not in use or the control has not been set. Theoven will remain locked after a power failure if itwas locked before the power failure.
To lock the oven:Press and hold the OVEN keypad for 5 seconds.
You will hear a single tone and “Loc” andwill appear on the display. Three tones
will sound when the oven is locked andyou press any command pad other thanCLOCK, TIMER, START/ENTER,
OFF/CANCEL, TOP or OVEN.
To unlock the oven:Press and hold the OVEN keypad for 5 seconds.
You will hear a single tone and “Loc” andwill disappear from the temperature
display.
1. Press CLOCK.
2. Set the time.Press the HOUR/MIN (s) or (t) pad(s) until thecorrect time of day shows on the display.
3. Press START/ENTER or CLOCK.
NOTE: This is a 12-hour clock. It does not show a.m. or p.m.
SETTING THE CLOCK
PRESS YOU SEE
TIME
PRESS YOU SEE
(example for 5:30)TIME
PRESS YOU SEE
OR
(example for 12:00)
(denotes blinking)
USING THE OVEN LOCKOUT
12
USING YOUR RANGE
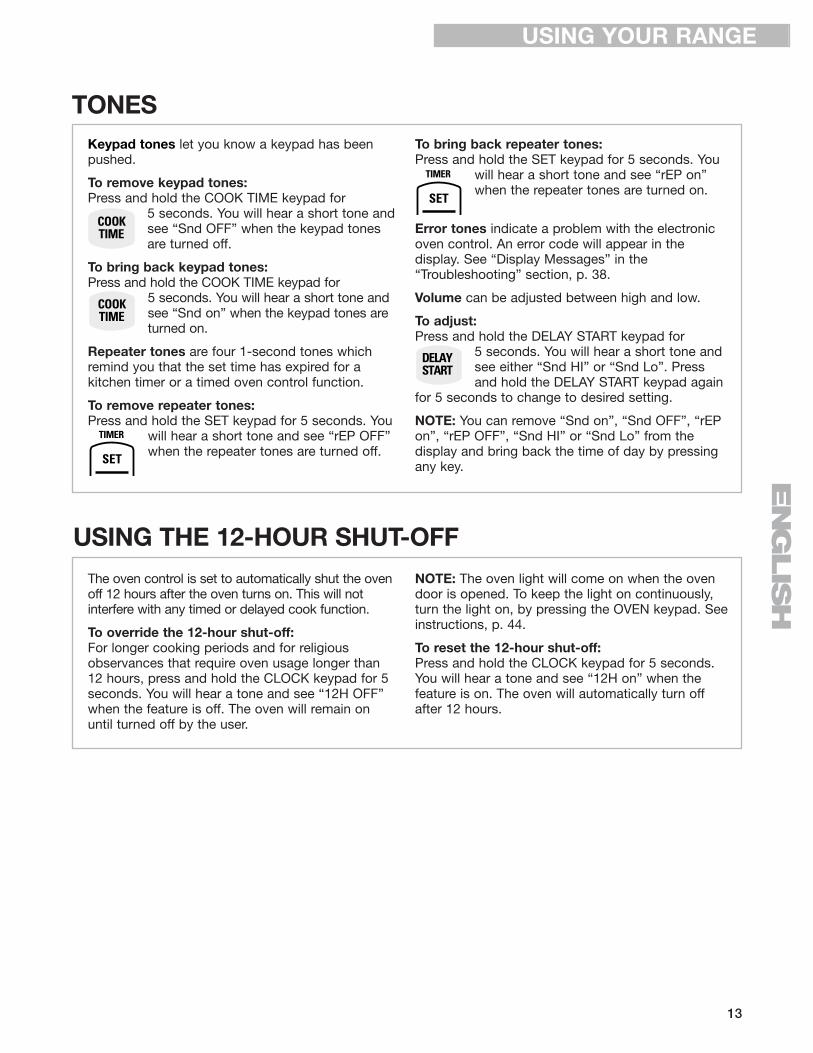
TONESKeypad tones let you know a keypad has beenpushed.
To remove keypad tones:Press and hold the COOK TIME keypad for
5 seconds. You will hear a short tone andsee “Snd OFF” when the keypad tonesare turned off.
To bring back keypad tones:Press and hold the COOK TIME keypad for
5 seconds. You will hear a short tone andsee “Snd on” when the keypad tones areturned on.
Repeater tones are four 1-second tones whichremind you that the set time has expired for akitchen timer or a timed oven control function.
To remove repeater tones:Press and hold the SET keypad for 5 seconds. You
will hear a short tone and see “rEP OFF”when the repeater tones are turned off.
To bring back repeater tones:Press and hold the SET keypad for 5 seconds. You
will hear a short tone and see “rEP on”when the repeater tones are turned on.
Error tones indicate a problem with the electronicoven control. An error code will appear in the display. See “Display Messages” in the“Troubleshooting” section, p. 38.
Volume can be adjusted between high and low.
To adjust:Press and hold the DELAY START keypad for
5 seconds. You will hear a short tone andsee either “Snd HI” or “Snd Lo”. Pressand hold the DELAY START keypad again
for 5 seconds to change to desired setting.
NOTE: You can remove “Snd on”, “Snd OFF”, “rEPon”, “rEP OFF”, “Snd HI” or “Snd Lo” from the display and bring back the time of day by pressingany key.
13
ENG
LIS
HUSING YOUR RANGE
The oven control is set to automatically shut the ovenoff 12 hours after the oven turns on. This will notinterfere with any timed or delayed cook function.
To override the 12-hour shut-off: For longer cooking periods and for religious observances that require oven usage longer than12 hours, press and hold the CLOCK keypad for 5seconds. You will hear a tone and see “12H OFF”when the feature is off. The oven will remain onuntil turned off by the user.
NOTE: The oven light will come on when the ovendoor is opened. To keep the light on continuously,turn the light on, by pressing the OVEN keypad. Seeinstructions, p. 44.
To reset the 12-hour shut-off: Press and hold the CLOCK keypad for 5 seconds.You will hear a tone and see “12H on” when the feature is on. The oven will automatically turn offafter 12 hours.
USING THE 12-HOUR SHUT-OFF
3. Press START/ENTER or TIMER SET.The kitchen timer will begin counting down immediately after the timer is started. The display will count down in hours and minutes (ifremaining time is one hour or more) and in minutes and seconds (if remaining time is lessthan one hour).
When the time is up:You will hear four 1-second tones, then four 1-second repeater tones every minute until youpress TIMER OFF.
To turn off or cancel the kitchen timer:1. Press TIMER OFF.
USING THE ELECTRONIC KITCHEN TIMER
PRESS YOU SEE
RTIME
(display counts down)
YOU SEE
RTIME
PRESS YOU SEE
(time of day)
The kitchen timer allows you to monitor time forcooking and other tasks. It does not start or stopthe oven. See the “Using the Timed Oven Control”section (p. 21) to start and stop the oven automati-cally. It can be set in hours and minutes up to 12 hours, 59 minutes. The kitchen timer will displayminutes and seconds for settings under 1 hour. You will hear four 1-second tones when the set time is up.
To set the kitchen timer:1. Press TIMER SET.
2. Set the time.Press the HOUR/MIN (s) or (t) pad(s) until thecorrect length of time shows on the display.
PRESS YOU SEE
RTIME
PRESS YOU SEE
RTIME
(example for 10 minutes)
or
14
USING YOUR RANGE

2. Press BAKE.
3. Set the temperature (optional).Do this step if you want to set a temperature other than 350°F. Press TEMP (▲) or (▼) pad(s) to raise or lower the temperature in 5°F amounts. Use these pads until the desired temperature shows on the small display.
Your oven is designed with the ULTRABAKE™ enhanced baking system to constantly monitoroven temperature. The bake burner will cycle, asneeded, to maintain the desired temperature. Thisfeature is automatically activated when the oven isin operation.
ULTRABAKE™ BAKING/ROASTING
PRESS YOU SEE
F
BAKE
PRESS YOU SEE
F
BAKE
(example for bake at 375°F)
1. Place the STURDIGLIDE™ rack(s) where youneed them in the oven. For more information, seethe “Positioning racks and pans” section, p. 9.
After setting a function, you must press START/ENTER to start the function. If you do notpress START/ENTER within 5 seconds ofsetting, “START?” will show on the
display as a reminder. If you do not pressSTART/ENTER within 5 minutes of setting, the timeof day will appear. You must reset the function andpress START/ENTER.
STARTING/CANCELING A FUNCTIONOFF/CANCEL will cancel any function except the
Clock, Timer, or Oven Lockout. When youpress OFF/CANCEL, the display will showthe time of day or, if the minute timer is also
being used, the time remaining.
IMPORTANT:
• When using the oven for the first time, it isnecessary to light the surface burners first topurge air from the gas lines.
• Do not try to light the oven burner during apower failure.
• Never place food or cookware directly on theoven door or the oven bottom.
15
ENG
LIS
HUSING YOUR RANGE
continued on next page

5. Press START/ENTER.A preheat mode is entered after the oven temperature has been set and START has beenpressed. Once the preheat conditioning ends,the selected oven temperature replaces “PrEHEAt” on the display. You will hear a 1-secondtone, indicating the oven is ready to use. The ULTRABAKE™ system electronically regulates the preheat and temperature to maintaina precise temperature range for the best cookingresults.
NOTES:• You can change the temperature setting any
time after pressing START/ENTER. You do not have to press START/ENTER again.
• While the oven is in the preheat mode, you can see the set temperature for 5 seconds by pressing BAKE.
ULTRABAKE™ BAKING/ROASTING (contd.)
PRESS YOU SEE
ONBAKEBROIL
HEAT
ON
F
BAKEBROIL
HEAT
YOU SEE
(example for set temperatureof 350°F)
6. When baking, put your food in the oven after the preheat conditioningends. During baking/roasting, the oven burnerwill turn on and off to keepthe oven temperature atthe setting.
7. After cooking, turn off the oven. PRESS YOU SEE
(time of day)
Saving energy• To avoid loss of heat, open the oven door as little
as possible.• Use the timer to keep track of cooking time.• Plan your meals for the most efficient use of the
oven by cooking more than one food at a time, orbaking while the oven is still hot after cooking ameal.
4. When roasting, preheating the oven is not necessary unless yourrecipe recommends it.NOTE: The oven will heatnormally even though “PrE HEAt” is displayedand then maintain theselected cooking temperature.
Roasting meats and poultry• For even cooking, place the meat on a rack in a
shallow pan. This keeps the meat out of the drippings and allows the heat to circulate better.
• Use a meat thermometer for the most accuratedoneness. Insert it so the tip is in the center of the largest muscle or thickest portion of the meator poultry. Make sure the thermometer is not touching bone, fat, or the bottom of the pan.
16
USING YOUR RANGE

Although your new oven is properly adjusted toprovide accurate temperatures, it may cookfaster or slower than your old oven.If you are not satisfied with the baking/roastingresults, you can change the temperature calibrationby following the steps below.
1. Press and hold BAKE for 5 seconds.The display will show the current temperaturecalibration, for example “0,” if you have notalready adjusted the temperature.
2. Set the new offset temperature.Press TEMP (s) or (t) pad(s) to raise or lowerthe temperature in 10°F amounts. You can setthe temperature change to as low as -30°F or ashigh as +30°F. A minus (-) sign will appear beforethe number when decreasing the temperaturesetting. The minus sign shows the oven will becooler by the displayed amount. There is no signin front of the number when increasing the temperature setting.
3. Enter the adjustment.
NOTE: You must press START/ENTER afteradjusting the calibration or your changes will notbe made.
How to determine the amount of adjustment neededThe chart at the right tells you how much to adjustthe temperature calibration to get the cookingresults you want. You can figure out cooking resultsby the amount of browning, moistness, and risingtimes for baked foods.
To display temperatures in °C instead of °F:Press and hold BROIL for 5 seconds. You will hear a
short tone and the temperatures displayed willswitch to °C. To switch back to °F, repeat theinstructions above. Whenever you switch, “°C”
or “°F” will be displayed until another key is pressed.
NOTE: DO NOT measure the oven temperature with a thermometer. Opening the oven door will lower the oven temperature and give you an incorrect reading. Also, the thermometer temperature readingwill change as your oven cycles.
PRESS YOU SEE
F
(factory setting of “0”)
PRESS YOU SEE
(time of day)
PRESS YOU SEE
F
(example when making oven10°F warmer)
ADJUST BY THIS NUMBER OF DEGREES (FAHRENHEIT)
+10+20+30-10-20-30
TO COOK FOOD ...
A little more Moderately more Much more A little less Moderately less Much less
READJUSTING THE OVEN TEMPERATURE CONTROL(OPTIONAL)
17
ENG
LIS
HUSING YOUR RANGE
18
USING YOUR RANGE
BROILING
USING YOUR RANGE
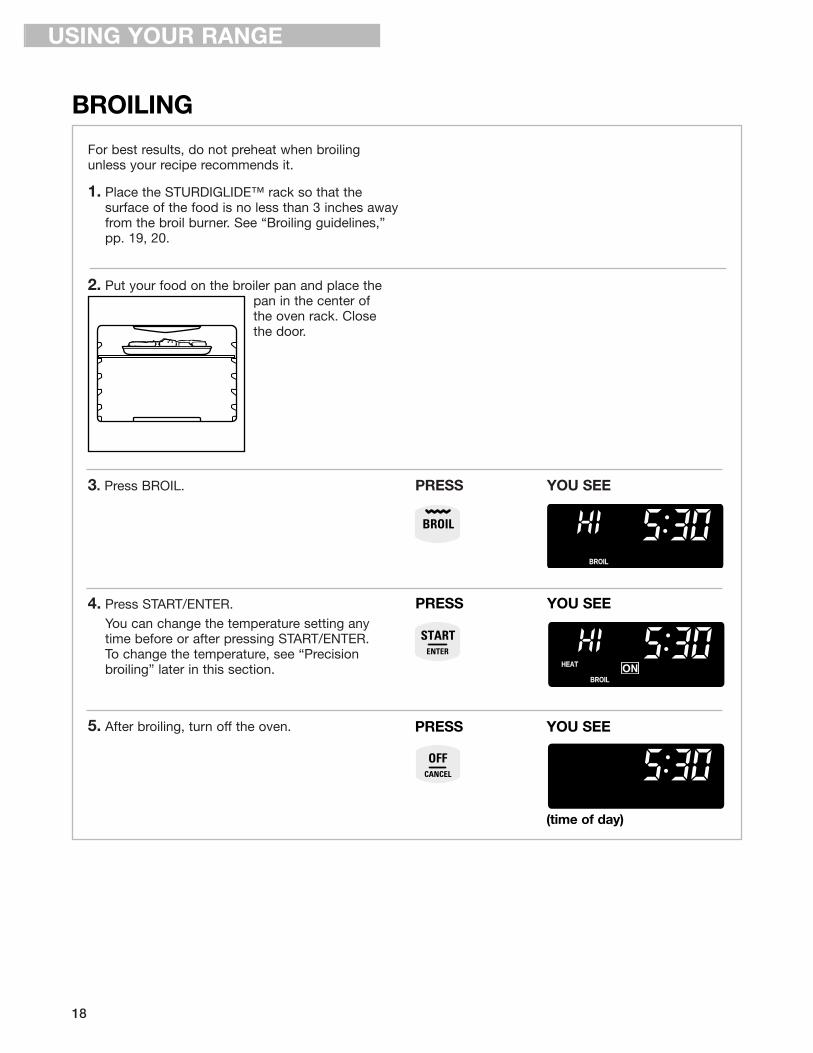
For best results, do not preheat when broilingunless your recipe recommends it.
1. Place the STURDIGLIDE™ rack so that the surface of the food is no less than 3 inches awayfrom the broil burner. See “Broiling guidelines,”pp. 19, 20.
2. Put your food on the broiler pan and place the pan in the center of the oven rack. Close the door.
3. Press BROIL.
4. Press START/ENTER.You can change the temperature setting any time before or after pressing START/ENTER. To change the temperature, see “Precision broiling” later in this section.
5. After broiling, turn off the oven.
PRESS YOU SEE
PRESS YOU SEE
ONBROIL
HEAT
PRESS YOU SEE
(time of day)
BROIL

Precision broilingUse precision broiling if your food is cooking toofast or if you want your food to broil slower from thestart. The lower the temperature, the slower thecooking. Thicker cuts and unevenly shaped piecesof meat, fish and poultry may cook better if you uselower broiling temperatures.
1. Press BROIL.
2. Press the TEMP (▼) keypad to lower the temperature in 5°F amounts. The broil range is range is 170°F - HI (525°F).
3. Press START/ENTER.
BROILING (contd.)
BROIL
(example shows broil at 400°F)
PRESS YOU SEE
ONBROIL
HEAT
PRESS YOU SEE
Broiling guidelines• Use only the broiler pan and grid provided. They
are designed to drain extra juices from the cooking surface. This drainage helps preventspatter and smoke.
• To make sure the juices drain well, do not coverthe grid with foil.
• Trim excess fat to reduce spattering. Slit the faton the edges to prevent curling.
• Use tongs to turn meat to avoid losing juices.
• Pull out oven rack to stop position before turningor removing food.
• After broiling, remove the pan from the ovenwhen removing the food. Drippings will bake onthe pan if left in the heated oven, making cleaning more difficult.
• For easier cleaning, line the bottom of the panwith aluminum foil. Clean the pan and grid assoon as possible after each use.
PRESS
19
ENG
LIS
HUSING YOUR RANGE
continued on next page

BROILING (contd.)
Broiling guidelines (contd)Recommended rack positions are numbered from thebottom (1) to the top (5). For best results, place food 3inches or more from the broil burner. Times are guidelines only and may need to be adjusted for individual tastes.
APPROXIMATE TIME(MINUTES)
SIDE 2
7-88-99-10
6-7
8-10
4-5
1-2
3-4
8-9
15-1811-16
4-510-13
MEAT
Steak, 1" thickmedium rare medium well done
Ground Meat Patties, 3⁄4" thick, well done
Pork Chops, 1" thick
Ham Slice, 1⁄2" thick precooked
Bacon, thick sliced
Frankfurters
Lamb Chops, 1" thick
Chickenbone-in pieces boneless breasts
Fishfillets 1⁄4-1⁄2" thick steaks 3⁄4-1" thick
RACK POSITION
4
4
4
4
4
4
4
34
4
SIDE 1
14-1515-1618-19
13-14
18-21
8-10
8-9
6-7
15-17
20-2412-16
8-1013-15
Conventional/Precision Broil
BROIL SETTING
HI
HI
HI
HI
500°F
HI
HI
HIHI
HI500°F
20
USING YOUR RANGE
USING THE TIMED OVEN CONTROL
Food Poisoning HazardDo not let food sit in oven more than one hour before or after cooking.Doing so can result in food poisoning orsickness.
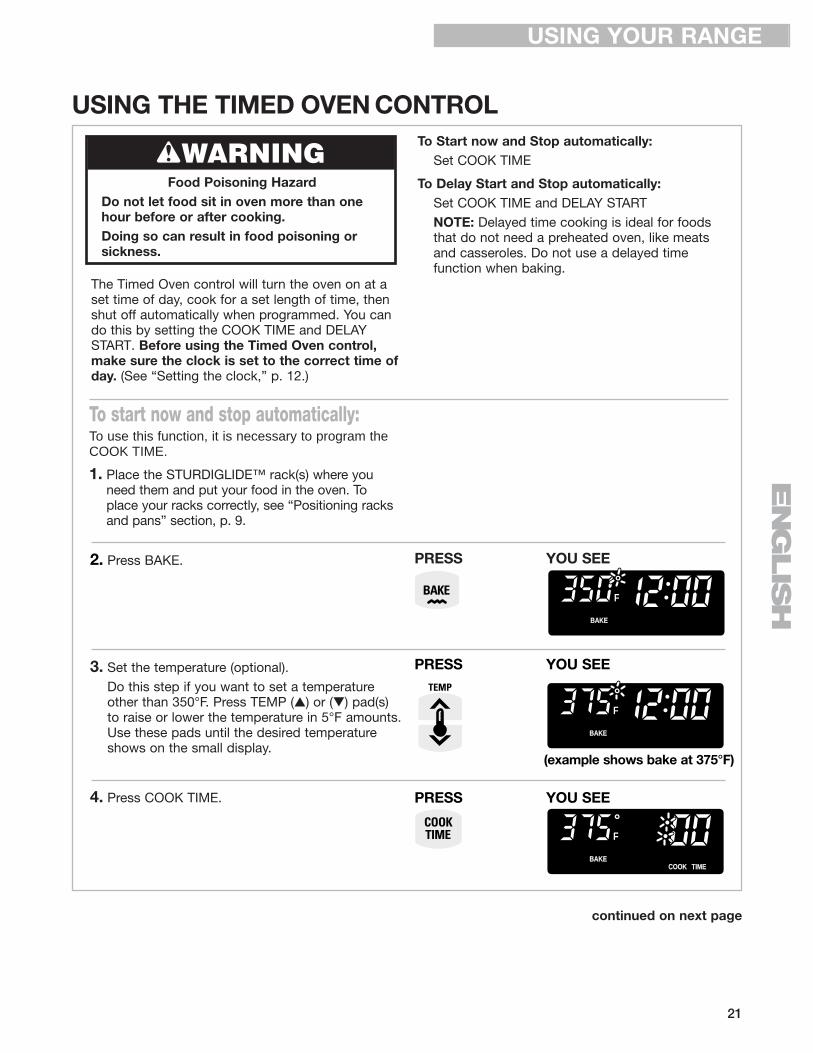
wWARNINGTo Start now and Stop automatically:
Set COOK TIME
To Delay Start and Stop automatically:Set COOK TIME and DELAY STARTNOTE: Delayed time cooking is ideal for foodsthat do not need a preheated oven, like meatsand casseroles. Do not use a delayed time function when baking.
The Timed Oven control will turn the oven on at aset time of day, cook for a set length of time, thenshut off automatically when programmed. You cando this by setting the COOK TIME and DELAYSTART. Before using the Timed Oven control,make sure the clock is set to the correct time ofday. (See “Setting the clock,” p. 12.)
21
ENG
LIS
HUSING YOUR RANGE
2. Press BAKE.
3. Set the temperature (optional).Do this step if you want to set a temperature other than 350°F. Press TEMP (▲) or (▼) pad(s) to raise or lower the temperature in 5°F amounts. Use these pads until the desired temperature shows on the small display.
4. Press COOK TIME.
PRESS YOU SEE
F
BAKE
F
BAKE
(example shows bake at 375°F)
PRESS YOU SEE
F
BAKETIMECOOK
PRESS YOU SEE
To start now and stop automatically: To use this function, it is necessary to program theCOOK TIME.
1. Place the STURDIGLIDE™ rack(s) where you need them and put your food in the oven. To place your racks correctly, see “Positioning racks and pans” section, p. 9.
continued on next page

PRESS YOU SEE
F
BAKE
TIMECOOK
(time of day)
PRESS YOU SEE
YOU SEE
USING THE TIMED OVEN CONTROL (contd.)
5. Set the cook time.Press the HOUR/MIN (s) or (t) pad(s) until thecorrect cook time shows on the display.
6. Press START/ENTER.
NOTES:
•You can change the temperature or time settings any time after pressing START/ENTERby repeating Steps 3 or 5. You do not have topress START/ENTER again.
•The display will count down the baking/roasting time in hours and minutes (if cooktime is more than 1 hour) or in minutes andseconds (if cook time is less than 1 hour).
7. When cook time ends the oven will automatically shut off. End and COOK TIME will show in the display. You will hear four tones then four 1-second repeater tones every minute.
8. Press OFF/CANCEL to stop repeater tones and remove End from display and bring back the time of day.
NOTE: You can do this step any time to cancelthe Timed Oven control setting.
To program COOK TIME and DELAY START:IMPORTANT: If you program DELAY START without programming COOK TIME, the oven will start at the programmed time, but will NOT stop until you press OFF/CANCEL.
1. Place the STURDIGLIDE™ rack(s) where youneed them and put your food in the oven. Toplace your racks correctly, see “Positioning racksand pans” section, p. 9.
2. Press BAKE.
PRESS YOU SEE
F
BAKETIMECOOK
(example shows 30-minute baking/roasting time)
PRESS YOU SEE
ON
F
BAKEBROIL
HEAT
DTIME TIMECOOK
(display counts down cooktime)
22
USING YOUR RANGE

3. Set the temperature (optional).Do this step if you want to set a temperatureother than 350°F. Press TEMP (▲) to raise the temperature or (▼) to lower the temperature in5°F amounts. Use these pads until the tempera-ture you want shows on the small display.
4. Press COOK TIME.
5. Set the cook time.Press the HOUR/MIN (s) or (t) pad(s) until thecorrect cook time shows on the display.
6. Press DELAY START.
7. Set the time of day to start.Press the HOUR/MIN (s) or (t) pad(s) until the correct time of day to start shows on thedisplay.The example at the right shows a chosen starttime of 1:00. The oven will shut off by itself at1:30 (the set start time plus the set cook time).
8. Press START/ENTER.
The stop time is calculated automatically.
NOTE: You can change the temperature andtime settings any time after pressingSTART/ENTER by repeating Steps 3 through 8unless the delay start time has been reached.
PRESS YOU SEE
F
BAKE
(example shows bake at 375°F)
PRESS YOU SEE
F
BAKETIMECOOK
PRESS YOU SEE
F
BAKETIMECOOK
(example shows 30-minutebaking/roasting time)
USING THE TIMED OVEN CONTROL (contd.)
23
ENG
LIS
H
PRESS YOU SEE
F
BAKESTART TIME
(example shows 1:00 start time)
ONBAKEDELAY
PRESS YOU SEE
PRESS YOU SEE
F
BAKETIME
USING YOUR RANGE
continued on next page

9. When the start time is reached:The display will count down the baking/roastingtime in hours and minutes (if the cook time ismore than one hour) or in minutes and seconds(if the cook time is less than one hour).
10. When cook time ends, the oven will automatically turn off. End and COOK TIME will show in the display. You will hear four tones then four 1-second repeater tones every minute.
11. Press OFF/CANCEL to stop repeater tones and remove End from display and bring back the time of day.
NOTE: You can do this step any time to cancelthe Timed Oven control setting.
YOU SEE
ON
F
BAKEBROIL
HEAT
DTIME TIMECOOK
(display counts down cook time)
YOU SEE
TIMECOOK
PRESS YOU SEE
(time of day)
USING THE TIMED OVEN CONTROL (contd.)
24
USING YOUR RANGE
To change the programmed timed settings:
To recall set:
Cook Time
Delay Start
Temperature
Press:
COOK TIME*
DELAY START
BAKE
You see for 5 seconds:
set length of cook time
set delay start time
set temperature
To recall the programmed timed settings: Press the desired pad. The information will be displayed for 5 seconds.
*If cook time has begun, when DELAY START is pressed, the display will show the time it started. WhenCOOK TIME is pressed, the display will remove the seconds from the remaining countdown time.
To change set:
Cook Time
Delay Start*
Temperature
1. Press:
COOK TIME
DELAY START
BAKE
2. While setting is displayed, press:
HOUR/MIN (▲) or (▼) keypads
HOUR/MIN (▲) or (▼) keypads
TEMP (▲) or (▼) keypads
3. Press:
START/ENTER
START/ENTER
START/ENTER
*You cannot change the set delay start time once it has been reached.

25
ENG
LIS
HUSING YOUR RANGE
Removing the storage drawer:
1. Empty drawer of any pots and pans before removing drawer. Pull drawer straight out to the first stop. Lift front and pull out to the second stop.
2. Lift back slightly and slide drawer all the wayout.
Replacing the storage drawer:
1. Position the drawer rollers under the rollers on therange. At the same time, fit the drawer guide railson top of the rollers on the range.
2. Lift drawer front enough to clear second stop and slide drawer closed.
Drawer guiderail
The storage drawer comes with a liner to make cleaning the storage drawer easier. You can remove thestorage drawer to make it easier to clean under the range and to check for installation of the anti-tipbracket. Use care when handling the drawer.
THE STORAGE DRAWER
THE OVEN VENT
Hot air and moisture escape from the oven through a vent that is near the middle of the backguard. Thevent lets air circulate properly. Be careful not toblock the vent, or you will get poor baking/roastingresults.
NOTE: Never store plastics, paper, or other itemsthat could melt or burn near the oven vent, or anyof the surface burners.
Oven vent

Using the SELECT CLEAN™ Self-Cleaning Cycle
BEFORE YOU START
NOTES:
• Heat and odors are normal during the Self-Cleaning cycle. Keep the kitchen well ventilated by opening a window or by turning ona vent hood or other kitchen vent during thecycle.
• DO NOT clean, move, or bend the gasket. Youmay get poor cleaning, baking, and roasting.
• The oven light will not work during the Self-Cleaning cycle.
Before you start the Self-Cleaning cycle, makesure you:
• Hand-clean the areas shown. They do not gethot enough during the Self-Cleaning cycle forsoil to burn away. Use hot water and detergentor a soapy, steel-wool pad for cleaning.
• Do not let water, cleaner, etc., enter slots ondoor and frame.
• Remove the broiler pan and grid and any cookware/bakeware being stored in the oven.
• Wipe out any loose soil or grease. This will helpreduce smoke during the Self-Cleaning cycle.
• Wipe up food spills containing sugar and/or milkas soon as possible after the oven cools down.When sugar is heated to a high temperature inthe Self-Cleaning cycle, the high temperaturecan cause the sugar to burn and react with theporcelain. This can cause staining and etching orpitting.
• Remove the oven racks from the oven if you wantthem to remain shiny. You can clean the ovenracks in the Self-Cleaning cycle, but they willbecome harder to slide. (See the “Cleaning chart”in the “Caring for Your Range” section, p. 31.) Ifyou clean the racks in the Self-Cleaning cycle,place them on the 2nd and 4th rack guides. (Theguides are counted from bottom to top.)
DO NOT hand-cleangasket
Hand-cleanframe
Hand-cleandoor aroundedge
IMPORTANT: The health of some birds is extremelysensitive to the fumes given off during the Self-Cleaning cycle. Exposure to the fumes may result indeath to certain birds. Always move birds to anotherclosed and well ventilated room.
TIPS:• Keep the kitchen well ventilated during the
Self-Cleaning cycle to help get rid of heat, odors,and smoke.
• Clean the oven before it gets heavily soiled.Cleaning a very soiled oven takes longer andresults in more smoke than usual.
• Do not block the vent during the Self-Cleaning cycle. Air must move freely for best cleaning results.
• Do not leave plastic utensils on the cooktop. They may melt.
• Do not leave any foil in the oven during the Self-Cleaning cycle. Foil could burn or melt and damage the oven surface.
Burn HazardDo not touch the oven during the Self-Cleaning cycle.Keep children away from oven during Self-Cleaning cycle.Do not use commercial oven cleaners in your oven.Failure to follow these instructions can result in burns, or illness from inhaling dangerous fumes.
wWARNING
26

27
ENG
LIS
HUSING THE SELECT CLEAN™ SELF-CLEANING CYCLE
continued on next page
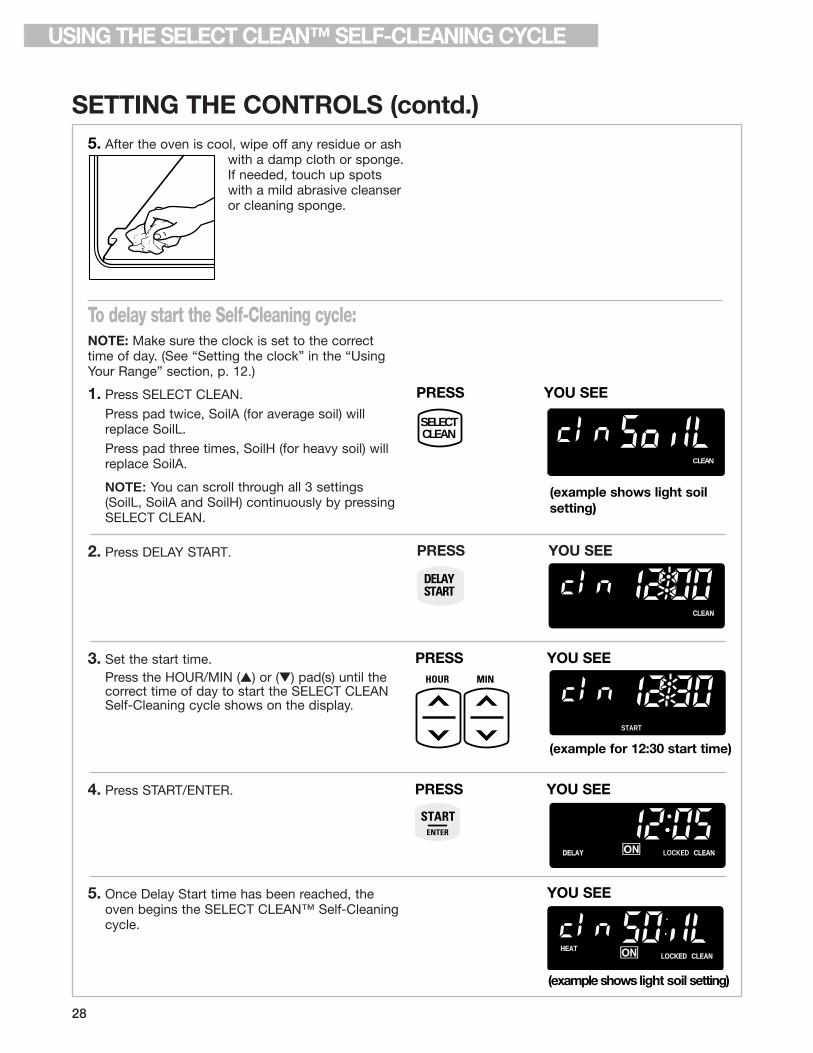
To start Self-Cleaning immediately:1. Press SELECT CLEAN.
Press pad twice, SoilA (for average soil) willreplace SoilL.Press pad three times, SoilH (for heavy soil) willreplace SoilA.
NOTE: You can scroll through all 3 settings (SoilL, SoilA and SoilH) continuously by pressing SELECT CLEAN.
2. Press START/ENTER.
3. After the SELECT CLEAN Self-Cleaning cycle ends:LOCKED goes off and the door unlocks.
4. Press any pad to remove “End” and bring back time of day; or open door, at which time “door” will be displayed. Then close door and time of day will appear in display window.
SETTING THE CONTROLS
PRESS YOU SEE
ONHEATCLEANLOCKED
CLEAN
YOU SEE
PRESS YOU SEE
SELECTCLEAN
CLEAN
(example shows light soilsetting)
The SELECT CLEAN™ Self-Cleaning cycle usestemperatures much hotter than normal oven use tobreak up and burn away soil and grease. SELECTCLEAN will set the clean time automatically, onceyou choose the soil level. You can choose SoilL(light soil), SoilA (average soil) or SoilH (heavy soil).SoilL will clean for approximately 2-21⁄2 hours, SoilAfor 3-31⁄2 hours and SoilH for 4-41⁄2 hours.
HOW THE CYCLE WORKSThe door must be closed completely for it to lock andthe cycle to begin. If properly closed, the door willlock approximately 6 seconds after START/ENTER ispressed. The cycle time includes an approximate 30minute cool down time. To see the time of day duringthe cycle, press CLOCK for 5 seconds.
YOU SEE
YOU SEE
(when pressing any pad)
(when opening the door)
28
USING THE SELECT CLEAN™ SELF-CLEANING CYCLE
5. After the oven is cool, wipe off any residue or ash with a damp cloth or sponge.If needed, touch up spots with a mild abrasive cleanser or cleaning sponge.
To delay start the Self-Cleaning cycle:NOTE: Make sure the clock is set to the correct time of day. (See “Setting the clock” in the “Using Your Range” section, p. 12.)
1. Press SELECT CLEAN.Press pad twice, SoilA (for average soil) willreplace SoilL.Press pad three times, SoilH (for heavy soil) willreplace SoilA.
NOTE: You can scroll through all 3 settings (SoilL, SoilA and SoilH) continuously by pressing SELECT CLEAN.
2. Press DELAY START.
3. Set the start time.Press the HOUR/MIN (s) or (t) pad(s) until thecorrect time of day to start the SELECT CLEANSelf-Cleaning cycle shows on the display.
4. Press START/ENTER.
5. Once Delay Start time has been reached, the oven begins the SELECT CLEAN™ Self-Cleaning cycle.
SETTING THE CONTROLS (contd.)
PRESS YOU SEE
CLEAN
START
(example for 12:30 start time)
PRESS YOU SEE
PRESS YOU SEE
SELECTCLEAN
CLEAN
(example shows light soilsetting)
PRESS YOU SEE
ONDELAY CLEANLOCKED
YOU SEE
ONHEATCLEANLOCKED
(example shows light soil setting)

29
ENG
LIS
HUSING THE SELECT CLEAN™ SELF-CLEANING CYCLE
SETTING THE CONTROLS (contd.)6. After the SELECT CLEAN Self-Cleaning cycle ends:
LOCKED goes off and the door unlocks.
7. Press any pad to remove “End” and bring back time of day; or open door, at which time “door” will be displayed. Then close door and time of day will appear in display window.
8. After the oven cools to room temperature, wipe off any residue or ash with a damp cloth or sponge. If needed, touch up spots with a mild abrasive cleanser or cleaning sponge.
To stop the SELECT CLEAN Self-Cleaning cycle at any time:Press OFF/CANCEL.
If the oven temperature is too high for you to immediately open the door when you pressOFF/CANCEL, “cln,” ON, “cool,” and LOCKED willappear on the display until the oven cools; then“End” will appear and the door will unlock.
PRESS YOU SEE
ON LOCKED
CLEAN
YOU SEE
CLEAN
YOU SEE
YOU SEE
(when pressing any pad)
(when opening the door)

CLEANING CHART
Explosion Hazard
Do not store flammable materials such as gasoline near this appliance.Doing so can result in death, explosion, or fire.
Caring for Your Range
PART CLEANING METHOD SPECIAL INSTRUCTIONS
Control knobs • Soap and water• Dishwasher
• DO NOT use steel wool or abrasive cleaners.• Pull knobs straight away from control panel.• Wash, rinse and dry with soft cloth.
Control panel • Soap and water • Wash, rinse and dry with soft cloth.
Exterior surfaces*(excluding control panel and oven door glass)
• Soap and water• Mild liquid cleaner• Spray glass cleaner
• DO NOT use abrasive or harsh cleaners like chlorine bleach, ammonia or oven cleaners.• Wash, rinse and dry with soft cloth.
• Spray glass cleaner • Apply spray cleaner to paper towel; do not spray directly on panel.
• Gently clean around the model and serial plate, too much scrubbing could remove the numbers.
• Non-abrasive plastic scrubbing pad
Porcelain-coated cooktopgrates and surface burnercaps* • Light to moderate soil • Soap and water
• Non-abrasive plastic scrubbing pad
• Sears Grate Cleaner
• Clean as soon as they become dirty.• Wash, rinse and dry well.
• Repeat steps of cleaning process (with items at left) as needed, until soil is completely removed.• Rinse thoroughly and dry.
• NOTE: Do not reassemble caps on burners while wet. Do not wash caps in dishwasher.
• Non-abrasive plastic scrubbing pad• Mild abrasive powdered cleanser and water
• Heavy burned-on soils
• Dishwasher (grates only)
• NOTE: To avoid product damage, do not remove the cooktop.
*When the cooktop is cool, remove all spills and clean. Food spills containing acids, such as vinegar and tomato, may affect the finish. To avoid porcelain grate chipping, do not bang grates and caps against each other or other hard surfaces such as cast iron cookware.
• Run dishwasher with only grates loaded on the lower rack using the most aggressive cycle.
wWARNING
Before cleaning, always make sure all controls are off and the range is cool. Refer to instructions on allcleaning products before using them to clean your range.
30

CLEANING CHART (contd.)PART CLEANING METHOD SPECIAL INSTRUCTIONS
Surface burners • See “Sealed surface burners and cooktop” in the “Caring for Your Range” section, pp. 32, 33.
Oven cavity• Food spills containing sugar and/or milk
• All other spills
• Soap and water
• Self-cleaning cycle
• When oven cools, wash, rinse and dry with soft cloth.
• See “Using the Self-Cleaning Cycle,” p. 26.
Broiler pan and grid • Soap and water• Steel wool pad
• Dishwasher
• Wash, rinse and dry.
Oven racks • Soap and water• Steel wool pad
• Wash, rinse and dry.
• Self-cleaning cycle • Place on 2nd and 4th rack guides. Racks will discolor and become harder to slide. After cleaning, apply vegetable oil to rack guides for easier sliding.
• Solution of 1/2 cup ammonia to 1 gallon water
• Mild abrasive cleanser or commercial oven cleaner
• Soak for 20 minutes, then scrub with plastic scrubbing pad.
Oven door glass • Soap and water• Non-abrasive plastic scrubbing pad
• Wash, rinse and dry with soft cloth.
• Spray glass cleaner • Wipe with paper towel.
• DO NOT clean the pan and grid in the self-cleaning cycle.
Storage drawer cavity• Food spills containing sugar and/or milk
• All other spills
• Soap and water
• Mild detergent
• When drawer cools, wash, rinse and dry with soft cloth.
• Wash, rinse and dry with soft cloth.
31
ENG
LIS
HCARING FOR YOUR RANGE

SEALED SURFACE BURNERS AND COOKTOP
Cleaning the surface burners• You should routinely remove and clean the burner
cap. Always clean the burner cap after a spill-over. Keeping the burner cap clean prevents poor ignition and an uneven flame.
• For the proper flow of gas and ignition of the burner, do not allow spills, food, cleaning agents, or any other material to enter the gas tube opening or burner ports.
• Gas must flow freely through the gas tube opening for the burner to light properly. Keep this area free of any soil and protect it from boilovers or spillovers. Always keep the burner cap in place whenever a surface burner is in use.
• Let the cooktop cool before cleaning.
• Do not use oven cleaners, bleach, or rust removers.
• Do not obstruct the flow of combustion and ventilation air around the burner grate edges.
• Occasionally check the burner flames for proper size and shape as shown. A good flame is blue in color not yellow. If the flames are not burning at all ports, you may need to clean the burner ports.
Burner ports
Cast-ironburner cap
Alignment pins
Gas tube opening
Burner base
Ignitor
1-11⁄2
32
CARING FOR YOUR RANGE

REMOVING THE OVEN DOOR
For normal use of your range, you do not need toremove the door. However, if you find it necessaryto remove the door, follow the instructions in thissection.
NOTE: The oven door is heavy.
Before removing the door:1. Use a putty knife or screwdriver and insert it at
the bottom corner of the door stop clip.2. Pry door stop clip free and remove from front
frame hinge slot. Take care not to scratch porcelain.
3. Repeat procedure for other door stop clip.
Door removal pin hole
Hinge hanger
Range
Front framehinge slot
Door stop clip
SEALED SURFACE BURNERS AND COOKTOP (contd.)
To clean the burners:1. Remove the burner cap from the
burner base.2. Clean the burner cap with warm, soapy water
and a sponge. You can also clean it with a mildly abrasive scrubbing pad or cleanser. Do not clean the burner cap in a dishwasher orself-cleaning oven.
3. If the gas tube opening has become soiled orclogged, use a damp cloth to clean the area.
4. If the burner ports are clogged, clean themwith a straight pin.Do not enlarge ordistort the port. Donot use a woodentoothpick. If theburner needs to beadjusted, call a qualified technicianfor service.
5. After cleaning the gas tube opening and ports,replace the burnercap. To replace theburner cap, makesure the alignmentpins on the cap areproperly aligned withthe burner base.
6. Turn on the burner to see if it will light. If the burner does not lightafter you have cleaned it,recheck cap alignment orcontact a Sears ServiceCenter. Do not servicethe sealed burner your-self.
Gas tube opening
INCORRECT
CORRECT
33
ENG
LIS
HCARING FOR YOUR RANGE
continued on next page

REMOVING THE OVEN DOOR (contd.)
To remove:1. Open the oven door. Insert door removal pins,
included with yourrange, into both hingehangers. Do notremove the pins whilethe door is removedfrom the range.
3. Grasp the door on the sides with your fingers on the front of the door and your thumbs on the inside surface.
2. Carefully close the door until it rests against thedoor removal pins.
To replace:NOTE: The door removal pins you inserted muststill be in both door hinges.
1. Grasp the door on the sides with your fingers on the front of the door and your thumbs on theinside surface.
4. Pull door straight up, then toward you. Hingehangers will slide out of front frame hinge slot.
34
CARING FOR YOUR RANGE

Range
Front frame hinge slot
2. Hold oven door so that the top edge of eachhinge hanger is horizontal. Insert hinge hangersinto the front frame hinge slots.
3. Tilt top of door toward range. Slide hinge hangers down onto front frame support pins.
NOTE: Make sure the hinge hangers are fully seated and engaged on the support pins.4. Insert the door stop clip with the angular surface
at the top of the frame hinge slot, then push inthe bottom of the clip until flanges are flush withthe front frame.
5. Open the door completely and remove the doorremoval pins. Save door removal pins for futureuse.
6. Close the door.7. Check for alignment to make sure door is
installed evenly.
Door removal pin hole
Hingehanger
Door stopclip
Angular surface ofdoor stopclipDoor removal
pin hole
Support pins
REMOVING THE OVEN DOOR (contd.)
35
ENG
LIS
HCARING FOR YOUR RANGE
THE OVEN LIGHTThe oven light will come on when you open theoven door. The oven light will not work during the Self-Cleaning cycle.
To turn the light on or off when the ovendoor is closed:•Press the OVEN pad.
To replace the oven light:1. Unplug range or disconnect power.2. Remove the glass bulb cover in the back of the
oven by turning it counterclockwise.
4. Replace the light bulb cover by turning it clockwise.
3. Remove the light bulb from its socket by turningit counterclockwise. Replace the bulb with a 40-watt appliance bulb.
5. Plug in range or reconnect power.
CAUSE/SOLUTION
• The range is not plugged into a properly grounded outlet (120v polarized).
• The range is not properly connected to the gas supply. Contact a SearsService Center to reconnect the range to the gas supply. (See the InstallationInstructions.)
• A household fuse has blown or a circuit breaker has been tripped.
• The Oven Lockout has been set.
Most cooking problems are caused by little things you can find and fix without tools of anykind. Check the lists below and on the next page before calling for assistance or service.
PROBLEM
Nothing works
OVEN/BROILER BURNERPROBLEM
The oven does not work
Burner makes muffledticking noise when in use
The burner fails to light
The burner flames liftaway from the ports, areyellow, or are noisy
CAUSE/SOLUTION
• When using the oven for the first time, it is necessary to light the surfaceburners first to purge air from the gas lines.
• The electronic control is not set correctly. Refer to setting the electronic oven control section. (See pp. 11-24.)
• A delay start has been set. Wait for the start time to be reached or canceland reset the control.
• The main or regulator gas shutoff valve is in the off position. (See the Installation Instructions.)
• The Oven Lockout has been set.
• This is normal. This sound occurs when the oven burner cycles on and off to hold the set oven temperature.
• The ignition system is broken. Contact a Sears Service Center to replace it.
• A household fuse has blown or a circuit breaker has been tripped.
• The air/gas mixture is incorrect. Contact a Sears Service Center to check theair/gas mixture or see the Installation Instructions.
Troubleshooting
RANGE DOES NOT WORK
36
WHEN SELF-CLEANING YOUR OVENPROBLEM
The Self-Cleaning cyclewill not work
CAUSE/SOLUTION
• START/ENTER has not been pressed.
• A delay start has been set. Wait for the start time to be reached or canceland reset the control.
• The door is not closed all the way.
PROBLEM
The burner fails to light
The burner flames areuneven
The burner flames lift offthe ports, are yellow, or are noisy when turned off
The burner makes a popping noise when on
SURFACE BURNERS CAUSE/SOLUTION
• The control knob is not set correctly. Push in the control knobs before turningthem. Make sure the control knob is turned to the LITE position. (See p. 7.)
• A household fuse has blown or a circuit breaker has been tripped.
• The burner ports may be clogged. Clean them with a straight pin. (See p. 33.)
• The burner ports may be clogged. Clean them with a straight pin. (See p. 33.)
• The burner caps may not be positioned properly. (See p. 33.)
• The burner needs cleaning. (See pp. 32, 33.)
• The burner may be damaged. Contact a Sears Service Center to check the burner.
• If propane gas is being used, the range may have been converted improperly. Contact a Sears Service Center.
• The burner is wet from washing. Let it dry.
37
ENG
LIS
HTROUBLESHOOTING

COOKING RESULTS
DISPLAY MESSAGESPROBLEM
The display is showing“PF”
“F” followed by anumber shows on the display
“EO F5” appears onthe display (The ovendoor will not closebecause the self-cleanlatch mechanism interferes.)
CAUSE/SOLUTION
• There has been a power failure. Press OFF/CANCEL to clear the display,then reset the clock. (See p. 12.)
• Press OFF/CANCEL to clear the display. If an “F” code appears again, callfor service.
• Press OFF/CANCEL to clear display.
• Depress and hold the door switch plunger (located on the oven frontframe). Latch mechanism will unlock in about 6 seconds.
PROBLEM CAUSE/SOLUTION
Cookware not level on cooktop
• Level the range. (See the Installation Instructions.)
• Use cookware with a flat bottom.
Excessive heat on cooktop in areas around cookware
• Choose cookware the same size or slightly larger than the burner flame.
The oven temperature seems too low or too high
• Adjust the oven temperature control. (See “Readjusting the oven temperature control,” p. 17.)
Slow baking or roasting
• Preheat oven to selected temperature before placing food in oven.
• Choose bakeware that will allow 2 inches of air space around all sides.
• Position rack higher in oven.
• Decrease oven temperature 15° to 25°F.
• Increase baking or roasting time.
• Increase temperature 25°F.
• Preheat to selected temperature before placing food in oven when preheating is recommended.
• Choose bakeware that will allow 2 inches of air space around all sides.
• Open oven door to check food when timer signals shortest time suggested in recipe.
• Oven peeking can make cooking times longer.
• Level the range.
• Bake in center of oven with 2 inches of space around each pan.
• Check to make sure batter is level in pan.
• Shield edge with foil.
Baked items too brown on bottom
Unevenly baked items
Crust edge browns before pie is done
(Check to see if liquids are level in cookware)
38
TROUBLESHOOTING

IndexTOPIC PAGE
ANTI-TIP BRACKET......................................................4
BROILINGGrid..........................................................................19Guidelines ........................................................19, 20Pan ....................................................................18-20Setting cycle............................................................18Oven rack positions ................................................20
CLEANINGBroiler pan and grid ................................................31Control knobs..........................................................30Control panel ..........................................................30Exterior surfaces ....................................................30Oven cavity ............................................................31Oven door glass ......................................................31Oven racks................................................................31Self-Cleaning ....................................................26-29Surface burners ................................................32, 33Cooktop grates and surface burner caps ................30Storage drawer cavity ..............................................31
CONTROL PANELBurner heat settings..................................................7Control knobs........................................................6, 7Surface burner markers ............................................6
COOKWARECanning ....................................................................8Materials....................................................................8
ELECTRONIC OVEN CONTROL12-hour shut-off ......................................................13Canceling ................................................................15Celsius/Fahrenheit ..................................................17Clock ......................................................................12Display/clock ..........................................................11Kitchen timer ..........................................................14Oven Lockout..........................................................12Starting....................................................................15Tones ......................................................................13
FEATURES ....................................................................6
MODEL AND SERIAL NUMBER ..................................2
OVEN DOOR ........................................................33-35
OVEN LIGHT ..............................................................35
OVEN TEMPERATUREReadjusting ............................................................17Setting ..............................................................15, 19
TOPIC PAGE
OVEN VENT ................................................................25
PANS ........................................................................8, 9
PARTS ..........................................................................6
ROASTINGPans ......................................................................8, 9Setting cycle............................................................15Oven rack positions ..................................................9Tips..........................................................................16
SAFETY ....................................................................4, 5
SELECT CLEAN™ SELF-CLEANING CYCLEBefore you start ......................................................26Delay start ..............................................................28How the cycle works ..............................................27Setting the controls ................................................27Starting immediately ..............................................27Stopping the cycle ..................................................29
SERVICE ......................................................Back Cover
STORAGE DRAWER ..................................................25
STURDIGLIDE™ HALF-RACK WITH REMOVABLE INSERT....9
STURDIGLIDE™ RACK WITH INTEGRATED HANDLE........9
SURFACE BURNERSControl knobs......................................................6, 30Control setting guide ................................................7Power Burner ............................................................7Power Failure ............................................................8SURESIMMER™ setting ..........................................7Surface burner markers ............................................6Tips............................................................................7
TIMED OVEN CONTROL ......................................21-24
TROUBLESHOOTING ..........................................36-38
ULTRABAKE™ BAKINGAluminum foil ..........................................................10Bakeware ................................................................10Pans ......................................................................8, 9Preheat conditioning ..............................................16Setting cycle............................................................15Oven rack positions ..................................................9Tips..........................................................................16ULTRABAKE system ..............................................15
WARRANTY ..................................................................3
39
ENG
LIS
H

NOTES
40

ESPAÑO
L
ContenidoUn mensaje para usted .................................................41Garantía ............................................................................42Seguridad de la cocina..................................................43Componentes y Características ..................................45Cómo usar su cocina.....................................................46
Cómo usar los quemadores exteriores ........................46Características de los materiales de los utensilios de cocina.............................................48Cómo usar el horno........................................................49Selección de utensilios para hornear............................50Cómo usar el papel de aluminio....................................50El control electrónico del horno.....................................51
Cómo poner el reloj a la hora....................................52Cómo usar el bloqueo del horno..............................52Señales audibles ........................................................53Cómo usar el interruptor de 12 horas......................54Cómo usar el temporizador electrónico de la cocina.................................................................54Cómo comenzar/cancelar una función ...................56Cómo hornear/asar con ULTRABAKE™.................56Cómo regular el control de temperatura del horno ..58Cómo asar a la parrilla...............................................59Cómo usar el control del horno con tiempo programado............................................62
Cómo usar la gaveta de almacenaje...................................67El conducto de ventilación del horno ...........................67
Cómo usar el ciclo de auto limpieza SELECT CLEAN™...........................................................68
Antes de comenzar.........................................................68Cómo funciona el ciclo...................................................69Cómo programar los controles......................................69
El cuidado de su cocina ................................................72Cuadro de limpieza.........................................................72Quemadores exteriores y la superficie de cocción sellados........................................................74Cómo quitar la puerta del horno ...................................75La luz del horno...............................................................77
Diagnóstico y solución de problemas.........................78La cocina no funciona ....................................................78El quemador para hornear/asar.....................................78Los quemadores exteriores ...........................................79Cuando se usa el ciclo de auto limpieza del horno ....79Resultados de cocción...................................................80Mensajes en la pantalla luminosa .................................80
Índice.................................................................................83Servicio..........................................................Forro trasero
Un mensaje paraustedLe agradecemos su compra de un artefactoelectrodoméstico KENMORE.Su cocina de gas KENMORE adquiere un nuevo valorcuando usted descubre que Sears tiene centros deservicio por todo el país. Los competentes profesionales de servicio técnico de Sears usancamiones totalmente equipados y métodos aprobadospor Sears para respaldar las garantías de Sears mediante reparaciones expertas.
Sírvase registrar la información de su modelo.Siempre que llame para solicitar servicio técnico parasu artefacto, tenga a la mano el número de modelo yde serie completos. Usted puede encontrar esta información en la placa de número de modelo y serie(vea el diagrama “Componentes y Características,” enla p. 45).
Sírvase asimismo registrar la fecha de compra de suartefacto electrodoméstico y el nombre y número tele-fónico de la tienda donde lo compró.
Guarde este manual y el comprobante de comprajuntos en un lugar seguro para referencia futura.
Modelo Número 665.
Número de Serie R
Fecha de Compra
41
42
Garantía de la cocina autónomaGARANTÍA TOTAL DE UN AÑO PARA TODOS LOS COMPONENTESSi, durante el transcurso de un año desde la fecha de instalación, cualquier componente no funcionaadecuadamente debido a un defecto en el material o la mano de obra, Sears la reparará o reemplazará,a su opción, sin costo alguno.
Si este producto se somete a otro uso que no sea el doméstico familiar privado, la garantía arriba citadaes válida por sólo 90 días.
EL SERVICIO DE GARANTÍA ESTÁ DISPONIBLE AL PONERSE EN CONTACTO CON EL CENTRO DESERVICIO DE SEARS MÁS CERCANO EN LOS ESTADOS UNIDOS.
Esta garantía le otorga derechos legales especiales y posiblemente tenga también otros derechos, loscuales varían de un estado a otro.
Sears Roebuck and Co. Dept. 817WA Hoffman Estates, IL 60179
Los artefactos electrodomésticos Kenmore están diseñados, fabricados y comprobados para años de operación confiable. Noobstante, cualquier artefacto moderno puede requerir servicio de vez en cuando. El Contrato de Mantenimiento de Sears leofrece un programa de servicio excepcional, a un precio muy razonable.
El cuadro de arriba le muestra a usted los beneficios adicionales que un Contrato de Mantenimiento de Sears le ofrece sobrela garantía de Sears.
Póngase en contacto con su vendedor de Sears o llame al 1-888-784-6427 y compre un Contrato de Mantenimiento de Sears
G = Garantía CM = Contrato de Mantenimiento
ADVERTENCIA: Para su seguridad, la información en este manual debe serobservada para minimizar el riesgo de incendio o explosión, o para prevenir daños a propiedades, heridas o la muerte.
– No almacene o use gasolina u otros líquidos y vapores inflamables cerca de esteu otro aparato electrodoméstico.
– PASOS QUE USTED DEBE SEGUIR SI HUELE A GAS:
• No trate encender ningún aparato electrodoméstico.
• No toque ningún enchufe eléctrico.
• No use ningún teléfono en su casa o edificio.
• Llame inmediatamente a su proveedor de gas desde el teléfono de un vecino.Siga las instrucciones de su proveedor de gas.
• Si usted no puede comunicarse con su proveedor de gas, llame al departamentode bomberos.
– La instalación y el servicio deben ser efectuados por un instalador calificado, unaagencia de servicio o por el proveedor de gas.
Para aumentar el valor de su cocina, compre un Contrato de Mantenimiento de Sears.
Cobertura según los años de propiedad 1er. Año 2do. Año 3er. Año
1. Reposición de piezas defectuosas G CM CM
2. Revisión anual de mantenimiento CM CM CMpreventivo a solicitud suya

43
ESPAÑO
L
Seguridad de la cocina
Ubicación del soporte de anti-vuelcoLa ilustración a la derecha muestra la ubicación correcta del soporte antivolteo en el piso. Para suinstalación apropiada, siga las instrucciones deinstalación.
EL SOPORTE DE ANTI-VUELCO
La cocina no se voltea durante el uso normal. No obstante pudiera voltearse si se aplica mucha fuerza opeso a la puerta del horno sin haber fijado apropiadamente el soporte de anti-vuelco.
wADVERTENCIAPeligro de Vuelco
Un niño o un adulto puede volcar accidentalmente la cocina y resultar muerto.Conecte el soporte anti-vuelco a la pata trasera de la cocina.Si traslada de lugar la cocina, vuelva a conectar el soporte anti-vuelco.Consulte las instrucciones de instalación para más detalles.No seguir estas instrucciones puede ocasionar la muerte o quemaduras graves en niños y adultos.
El soporte anti-vuelcoAsegúrese de que el soporte anti-vuelco haya sido instalado.• Deslice la cocina hacia adelante.• Verifique que el soporte anti-vuelco esté bien asegurado al piso.• Deslice la cocina para colocarla de nuevo en su lugar asegurándose de que la pata trasera quede debajo del soporte anti-vuelco. La pata trasera
Si no sigue las instrucciones de inmediato,
Si no sigue las instrucciones, usted puede morir o sufrir una lesión grave.
Todos los mensajes de seguridad le dirán el peligro potencial, le dirán cómo reducir las posibilidades de sufrir una lesión y lo que puede suceder si no se siguen las instrucciones.
Su seguridad y la seguridad de los demás es muy importante.Hemos incluido muchos mensajes importantes de seguridad en este manual y en su electrodoméstico.
Este es el símbolo de advertencia de seguridad.Este símbolo le llama la atención sobre peligros potenciales que pueden ocasionar la muerte
seguridad y de la palabra “PELIGRO” o “ADVERTENCIA”. Estas palabras significan:
PELIGROADVERTENCIA
Lea y obedezca siempre todos los mensajes de seguridad.
Todos los mensajes de seguridad irán a continuación del símbolo de advertencia de
usted puede morir o sufrir una lesión grave.
o una lesión a usted y a los demás.
continúa en la página siguiente

44
SEGURIDAD DE SU COCINA
GUARDE ESTAS INSTRUCCIONES
ADVERTENCIA: Para reducir el riesgo deincendio, electrocución, lesiones a personas odaños al usar la cocina de gas, siga precaucionesbásicas, incluyendo las siguientes:• ADVERTENCIA: Para reducir el riesgo
de volteo de la cocina de gas, ésta debe asegurarse en el piso mediante la instalaciónde dispositivos de anti-vuelco. Para verificar silos dispositivos están instalados adecuada-mente, deslice la cocina de gas hacia adelante,cerciórese que el soporte anti-vuelco esté bienfijo en el piso, y deslice la cocina de gas haciaatrás de manera que la pata trasera de la cocina de gas quede fija debajo del soporte deanti-vuelco.
• AVISO: No almacene artículos que interesen alos niños en los armarios que están encima de lacocina de gas o en el respaldo de protección deuna cocina de gas - cuando los niños suban encima de la cocina de gas para poder coger objetos pueden lastimarse seriamente.
• Instalación apropiada – al instalar la cocina de gasdebe hacer la conexión eléctrica a tierra de acuerdo con las normas locales o, en ausencia denormas locales, con el Código Eléctrico Nacional(National Electrical Code), ANSI/NFPA 70. EnCanadá, la cocina de gas debe tener su conexióneléctrica a tierra de conformidad con el CódigoEléctrico Canadiense. Cerciórese que la instalación y puesta a tierra de la cocina de gassean efectuadas adecuadamente por un técnicocompetente.
INSTRUCCIONES IMPORTANTES DE SEGURIDAD• Esta cocina de gas está equipada con un enchufe
de tres puntas con contacto a tierra para su protección contra riesgo de electrocución y deberíaenchufarse directamente a un tomacorriente quetiene conexión a tierra. No corte ni quite la puntapara conexión a tierra de este enchufe.
• Desconecte la energía eléctrica antes de haceruna revisión al artefacto.
• Nunca use la cocina de gas como calefaccióndel cuarto.
• El mal uso de las puertas o gavetas del artefacto,tales como pisar, recostarse o sentarse en laspuertas o gavetas, puede ocasionar heridas.
• Mantenimiento – Mantenga el área de la cocina degas despejada y libre de materiales combustibles,gasolina y otros vapores y líquidos inflamables.
• Almacenaje dentro o encima de la cocina de gas– No se debe almacenar materiales inflamablesen el horno o cerca de las unidades que estánen la superficie.
• El tamaño de la llama del quemador superiordebe ajustarse de manera que no se extiendamás allá de los bordes del utensilio de cocina.
Para cocinas de gas de limpieza automática –• Antes de efectuar la limpieza automática del horno
– quite la charola para asar y otros utensilios.Limpie con un trapo húmedo todo derrame excesivo antes de iniciar el ciclo de autolimpieza.
La California Safe Drinking Water and Toxic Enforcement Act (El reglamento de la protección de la potabilidad del agua y la eliminación de sustancias tóxicas de California) exige que el gobernador de California publique una lista de aquellas sustancias identificadas por el estado de California como causantes de cáncer, defectos congénitos o algún otro tipo de daños en la función reproductora y exige que los comerciantes adviertan de la exposición posible a tales sustancias.
ADVERTENCIA: Este producto contiene una sustancia química identificada como causante de cáncer, defectos congénitos o algún otro tipo de daños en la función reproductora por el estado de California.
Este utensilio pudiera producir una exposición de bajo nivel a alguna de las sustancias enumeradas, como sería benceno, formaldehído, monóxido de carbono, tolueno y hollín.

AVERAGELIGHT
HEAVY
SELECTCLEAN
ESPAÑO
L
OFF
LITEH
I•
8
•6•4•
2•
LO
OFF
LITEH
I•
8
•6•4•
2•
LO
SureSimmer
Conducto de ventilacióndel horno(p. 67)
Quemadores exterioressellados(pp. 46, 47, 74, 75)
Quemadores exterioresy parrillas(pp. 72, 73)
Quemador principal(Power Burner)(p. 46)
El soporte de anti-vuelco(p. 43)
Gancho de tope de la puerta(pp. 75-77)
Placa de número demodelo y serie (detrásdel lado izquierdo de lagaveta almacenaje)
La gaveta de almacenaje(p. 67)
Componentes y CaracterísticasControl electrónico
del horno(pp. 51-66)
Quemador a fuego lento
SURESIMMER™(p. 46)
Tablero de controles(pp. 45, 72
Interruptor automáti-co de luz del horno
(p. 77)
Junta de la puerta(p. 68)
MEDIA PARRILLASTURDIGLIDE™
con insertodesmontable
(p. 49)
Parrillas del hornoSTURDIGLIDE™con agarradera
integrada(p. 49)
OFF
LITEH
I•
8
•6•4•
2•
LO
OFF
LITEH
I•
8
•6•4•
2•
LO
PowerBurner
Perilla de control izquierdadelantera (quemador principal[Power Burner]) (p. 46)
Perilla de controlizquierda trasera
Indicador del quemador exterior(muestra cuál quemador estáusted seleccionando)
TABLERO DE CONTROLES
Perilla de controlderecha delantera
Perilla de control derechatrasera (regulación deSURESIMMER) (p. 46)
Pantalla electrónica ULTRABAKE™ (p. 51)
EL CONTROL ELECTRÓNICO DEL HORNO
45

46
Cómo usar su cocina CÓMO USAR LOS QUEMADORES EXTERIORES
NOTA: No deje utensilios de cocina vacíos o que sehayan secado, encima de un quemador caliente. Elutensilio podría recalentarse, ocasionando daño alutensilio o al producto en cocción.
Cómo usar el quemador principal (PowerBurner)El quemador izquierdo delantero está diseñado paraproporcionar una posición de calor sumamente alto.Puede usarse para hacer hervir líquidos rápidamentey para cocinar grandes cantidades de comida.
Cómo usar la función SURESIMMER El quemador derecho trasero SURESIMMER estádiseñado para la cocción a temperaturas bajas.Permite un control de cocción a fuego lento máspreciso en la posición mínima de calor.
Métodos fáciles para ahorrar energía• Para abreviar su tiempo de cocción, use la menor
cantidad posible de líquido.
• Comience a cocinar en una posición de calor másalta, luego gire el control a una posición más bajapara terminar de cocinar.
USO RECOMENDADO
• Para encender el quemador.
• Para proporcionar la intensidad más alta de calor.
• Para comenzar a cocinar lacomida.
• Para hacer hervir líquidos.
• Para mantener el hervor.• Para freír pollo o panqueques.• Para salsas, pudines o
glaseados.• Para cocinar grandes canti-
dades de verduras.
• Para mantener la comidacaliente.
• Para cocer a fuego lento.
• Para proporcionar una coc-ción a fuego bien lento/inten-sidad mínima de calor.
• Para derretir chocolate omantequilla.
POSICIÓNLITE
Quemador principal(Power Burner)(quemador delanteroizquierdo)
HI
Alcance medio(entre HI y LO)
LO
Posición SURESIMMER™(quemador posterior derecho)
Posiciones de intensidad de calor de losquemadoresUse la siguiente tabla como guía.
Cómo usar las perillas de controlSu cocina viene con encendedores eléctricos queprenden automáticamente los quemadores cadavez que usted gira las perillas de control a LITE.
• Coloque una cacerola llena encima de la parrilladel quemador antes de encender el quemadorexterior. No deje el quemador encendido porperíodos prolongados de tiempo sin colocar unacacerola encima de la parrilla.
• Presione la perilla de control hacia dentro ygírela en sentido contrario a lasmanecillas del relojhasta la posición LITE.El sonido de clicproviene de la chispadel encendedor.Asegúrese de que el quemador se haencendido.
• Después de que el quemador se haya encendido, detenga el sonidode clic girando la perilla de control a cualquier posición entre HI y LO.
NOTA: Todos los cuatro encendedores eléctricos harán un clic al mismo tiempo. Sinembargo, se encenderá sólo el quemador cuya perilla de control se haya colocado en LITE.
RECUERDE: Cuando se esté usando la cocinao durante el ciclo de auto limpieza, toda la superficie de cocción se calienta.
ADVERTENCIA
Peligro de IncendioNo permita que la llama del quemador extienda más allá que la orilla de la cacerola.Apague todas las perillas de los controles cuando no esté cocinando.No seguir estas instrucciones puede ocasionar la muerte o incendio.
ESPAÑO
LCÓMO USAR SU COCINA
CÓMO USAR LOS QUEMADORES EXTERIORES (contd.)
Información acerca de la preparacióndoméstica de conservasEl diámetro grande de la mayoría de las vaporeraspor baño María o a presión combinado con laintensidad alta de calor por períodos prolongadosde tiempo pueden averiar la superficie de cocción.
Para proteger su cocina:• Ubique la vaporera en el centro del quemador
exterior. No permita que se extienda más de unapulgada fuera del área del quemador.
• No coloque su vaporera sobre dos quemadoresexteriores a la vez.
• Comience con agua caliente, cubra con una tapay hágala hervir; luego reduzca el fuego lo sufi-ciente como para mantener el hervor o los nivelesrequeridos de presión en un envasador a presión.
• Lea su manual de la vaporera respecto a instrucciones específicas.
Para información actualizada respecto lapreparación de conservas, póngase en contactocon la agencia local de la Oficina de Extensión delDepartamento Agrícola del Gobierno de EE.UU. oempresas que fabrican productos para enlatadodoméstico.
El uso de utensilios de cocina apropiadosda excelentes resultados• La cacerola debe tener un asiento liso, lados
rectos y una tapa que encaje bien.
• Elija utensilios de cocina de un espesor mediano agrueso.
• El material de la cacerola (metal o vidrio) afecta larapidez y uniformidad con que se calienta lacacerola.
• Cuando use utensilios de cocina de vidrio ocerámica, cerciórese de que sean apropiados parauso en quemadores exteriores.
• Para evitar vuelcos, asegúrese que las ollas ycacerolas estén ubicadas en el centro de las parrillas.
En caso de apagón eléctrico prolongadoUsted puede encender los quemadores exteri-ores manualment. Coloque un fósforo encendidocerca del quemador y gire la perilla de control ala posición LITE. Tan pronto se encienda el que-mador, gire la perilla de control a la posición queusted desea.
47
48
El material de la cacerola afecta tanto la rapidez con que el calor se transfiere desde el área superficial de cocción a través del material de la cacerola y cómo el calor se extiende en todo el asiento de la cacerola. Elija cacerolas que proporcionen óptimos resultados de cocción.
Aluminio • Calienta con rapidez y uniformidad.• Use para todo tipo de cocción.• Espesor mediano o grueso es mejor para casi todo tipo de cocción.• Usado como núcleo o base en utensilios de cocina para proporcionar calor uniforme.
Hierro fundido • Calienta lenta y uniformemente.• Bueno para dorar y freir.• Mantiene el calor para cocción lenta.• Puede ser revestido con esmalte de porcelana.
Cerámica o cerámica vitrificada • Calienta lentamente y sin uniformidad.• Use en intensidades de fuego lento a mediano.• Siga las instrucciones del fabricante.
Cobre • Calienta muy rápida y uniformemente.• Usado como núcleo o base en utensilios de cocina para proporcionar calor uniforme.
Loza de barro • Puede usarse para cocción en la superficie de cocción si así lo recomienda el fabricante.• Use en intensidades de calor bajo.
Acero con esmalte de porcelana o hierro fundido con esmalte de porcelana
• Vea hierro fundido y acero inoxidable.
Acero inoxidable • Calienta rápidamente pero sin uniformidad.• Un núcleo o base de aluminio o cobre en el utensilio de cocina proporciona uniformidad del calor.• Puede revestirse con esmalte de porcelana.
CARACTERÍSTICAS DE LOS MATERIALES DE LOSUTENSILIOS DE COCINA
CÓMO USAR SU COCINA

ESPAÑO
LCÓMO USAR SU COCINA
Parrillas del horno STURDIGLIDE™ conagarradera integradaLa agarradera integrada facilita la extracción de laparrilla STURDIGLIDE. La abertura es lo suficiente-mente grande como para poder usar guantes dehornear o una agarradera de ollas.
MEDIA PARRILLA STURDIGLIDE™ con inserto desmontableLA MEDIA PARRILLA STURDIGLIDE con insertodesmontable maximiza el espacio. Cuando se añade, seconvierte en una parrilla completa. El inserto puedeusarse encima de un gabinete como parrilla para enfriar.
Coloque una parrilla completa en el riel 1 ó 2 y lamedia parrilla en el riel 3 ó 4. Coloque los artículospesados del lado derecho y los platos cubiertosmás hondos, del lado izquierdo. Coloque los platosplanos en la media parrilla. Puede ser necesarioaumentar el tiempo de cocción. Al concluir la coc-ción, quite cuidadosamente los artículos del horno.
Ubicación de las parrillas y cacerolasColoque las parrillas STURDIGLIDE en la posiciónque usted desea antes de encender el horno.
• Para mover una parrilla, jálela hacia fuera hasta quellegue a la posición de parada, levante el bordedelantero y jale hacia fuera.
• Asegúrese de que la(s) parrilla(s) estén niveladas.
• Use agarraderas de ollas o guantes de hornear paraproteger sus manos cada vez que tenga que moverla(s) parrilla(s) mientras el horno está caliente.
• Para un óptimo rendimiento, cocine en una parrilla.Coloque la parrilla de manera tal que la parte superiorde la comida esté en el centro del horno.
•Cuando cocine con dos parrillas, acomode las parrillasen el 2do. y 4to. riel. Dos charolas de galletas puedenhornearse si se cambian de posición las charolas aaproximadamente tres cuartos del tiempo total de horn-ear. Aumente el tiempo de hornear, si fuera necesario.
• Para mejores resultados, deje 2 pulgadas de espacioalrededor de cada molde y entre los moldes y lasparedes del horno. El aire caliente debe circularalrededor de los moldes en el horno para uniformizarel calor y permitir que llegue a todas las partes delhorno. Esto da como resultado un horneado óptimo.
CÓMO USAR EL HORNO
Dónde ubicar las cacerolas:
CUANDO USTEDTIENE
1 cacerola
2 cacerolas
3 ó 4 cacerolas
COLOQUE
En la parrilla del centro delhorno.
Lado a lado o ligeramentealternadas.
En esquinas opuestas en cadaparrilla del horno. Alterne en zigzag las cacerolas de maneraque ninguna de ellas estédirectamente encima de la otra.
Colocación de parrillas para comidas específicas:
POSICIÓN DE LA PARRILLA
1er. o 2do. riel comenzandopor el fondo
2do. riel comenzando por elfondo
2do. o 3er. riel comenzandopor el fondo
NOTA: Para información con respecto a dóndecolocar su parrilla cuando asa a la parrilla, vea“Instrucciones para asar a la parrilla”, pp. 60, 61.
Posición extra de la parrilla del horno (parrilla para asado)Use esta posición de la parrilla cuando ase comida
que por ser muy volumi-nosa no puede ser coloca-da en la primera posiciónde la parrilla. Para asar adecuada-mente, siga estasinstrucciones:• Para evitar salpica-duras, retire la comidaantes de quitar la parrilla.
• Incline la parrilla en laparte delantera antes de jalarla hacia la puerta.
• Use una cantidad adecuada de líquido en lacacerola (jugos de la carne o agua) para que sucomida no se recocine.
Posición extra de la parrilla del horno
COMIDA
Pasteles congelados,asados grandes,pavos, pasteles abase de claras dehuevo
Roscas Bundt, panesrápidos, panes delevadura, guisados,carnes
Galletas, pastelillos,panecillos, queques o pasteles, no congelados
49

50
CÓMO USAR SU COCINA
El tipo de utensilios para hornear que se usen afecta el rendimiento del horneado. Use el tamaño de utensilio para hornear recomendado en la receta de cocina.
TIPO DE UTENSILIO DE HORNEAR
Aluminio ligeramente coloreado
• Cortezas doradas claras• Dorado uniforme
• Use la temperatura y el tiempo recomendados en la receta.
Aluminio oscuro y otros utensilios para hornear con acabado oscuro, mate y/o antiadherente
• Cortezas bien doradas crujientes
• Puede reducir la temperatura para hornear 25°F.• Use el tiempo recomendado de horneado.• Use la temperatura y el tiempo recomendado en la receta para pasteles, panes y guisados.• Coloque la parrilla en el centro del horno.
Utensilios de vidrio resistente al horno, cerámica vitrificada, o cerámica
• Cortezas bien doradas crujientes
• Puede reducir la temperatura para hornear 25°F.
Moldes o bandejas de hornear termoaislados
• Poco o casi nada de dorado en el fondo
• Colóquelos en la 3ra parrilla parte inferior del horno.• Puede necesitar aumentar el tiempo de horneado.
Acero inoxidable • Puede necesitar aumentar el tiempo de horneado.
• Cortezas crujientesCerámica de gres • Siga las instrucciones del fabricante.
• Cortezas doradas, claras• Dorado no uniforme
MEJOR USADO PARA INSTRUCCIONES
SELECCIÓN DE UTENSILIOS PARA HORNEAR
CÓMO USAR EL PAPEL DE ALUMINIO• No forre, utensilios para hornear el fondo del
horno con papel de aluminio u otros forros.Podría afectar permanentemente el acabadodel fondo del horno.
• No bloquee los conductos de ventilación inferiores del horno.
• No cubra la parrilla entera con papel de aluminio. Esto reducirá la circulación de aire y ledará resultados insatisfactorios de cocción.
• Use papel de aluminio en la parrilla de abajopara capturar las salpicaduras de pasteles oguisados. El aluminio debe doblarse hacia arribaen los bordes y ser por lo menos 1 pulgada másgrande que la fuente de hornear.
• Coloque aluminio en forma de carpa bien flojaencima de la carne o ave para retrasar el doradode la superficie y obtener un asado con horneadoprolongado. Quite el aluminio en los últimos 30minutos.
• Use bandas angostas de aluminio para protegerlos bordes de la masa de los pasteles si se dorandemasiado rápido.

AVERAGELIGHT
HEAVY
SELECTCLEAN
ESPAÑO
LCÓMO USAR SU COCINA
EL CONTROL ELECTRÓNICO DEL HORNO
Botón de start/entery off/cancel (pp. 52, 55-60, 63,65, 66, 69-71)
Botón deminutos
Botón de hora (pp. 52, 54, 63,64, 66, 70)
Botón detemperatura (pp. 56, 58,60, 62, 64,66)
Botones selectoresdel horno (hornear, pp. 56, 58,62, 64, 66; asar, pp. 58-61)
Botones decontrol delhorno conprogramadorde tiempo (pp. 51, 53,62, 64, 66,70)
Botón manualde luz delhorno y bloqueo delhorno (pp. 52,77)
Pantalla electrónicaULTRABAKE™
Pantalla luminosa/reloj• Una vez que usted instale la cocina según las
instrucciones y la enchufe a la energía eléctricatodo se encenderá en la pantalla por unos 5segundos, luego aparecerá una hora del día y“PF” en la pantalla de temperatura. PresioneOFF/CANCEL para quitar “PF” de la pantalla. Siluego de haber puesto el reloj a la hora (vea“Cómo poner el reloj a la hora,” p. 52), “PF”aparece nuevamente en la pantalla, significa quepor un apagón no hubo electricidad por un buenrato. Vuelva a poner el reloj a la hora si fueranecesario.
• Cuando no está usando el horno, la pantallaluminosa le muestra la hora del día.
• Cuando está usando el horno o el temporizadorde la cocina, la pantalla mostrará horas, programaciones de temperatura y qué botonesde comando se han presionado.
• Cuando la pantalla esté activa y si presionaDELAY START, podrá saber a qué hora seprendió el horno o a qué hora se va a prender.
Botón set y off deltemporizador electrónico (pp. 53-55)
• Al indicar la hora del día, la pantalla mostrará lahora y los minutos.
• Cuando está usando el temporizador de la cocina de gas, la pantalla le mostrará minutos y segundos en la siguiente secuencia:
– Para programaciones de 1 a 59 minutos, lapantalla hará el conteo regresivo por segundo.
– Para programaciones de una hora o más, lapantalla hará el conteo regresivo por minuto.
• Cuando esté usando el tiempo de cocción(COOK TIME) y comienzodiferido (DELAY START), lapantalla mostrará horas yminutos o minutos y segundos.
Botón delreloj (pp. 52, 54)
Botón deautolimpiezaSELECTCLEAN™ (pp. 68-71)
51

52
El bloqueo del horno le permite prevenir el uso delos botones de comando del tablero de controles.Esta característica es muy útil cuando tenga quelimpiar el tablero de controles para evitar encenderel horno accidentalmente.
NOTA: Usted puede usar el bloqueo de controlsolamente cuando el horno no está en uso o cuan-do el control no ha sido programado. El bloqueodel horno permanecerá activo aún después de unapagón si se bloqueó antes del apagón.
Para bloquear el horno:Presione y sostenga el botón OVEN por 5 segundos.
Usted escuchará una sola señal audible y“Loc” y aparecerá en la pantalla.Cuando el horno esté bloqueado, seescucharán 3 señales audibles si ustedpresiona cualquier botón de comando que
no sea CLOCK, TIMER, START/ENTER, OFF/CANCEL, TOP u OVEN.
Para quitar el bloqueo del horno:Presione y sostenga el botón OVEN por 5 segun-
dos. Usted escuchará una sola señal audi-ble y “Loc” y desaparecerán de la pan-talla de temperatura.
CÓMO USAR SU COCINA
1. Presione CLOCK.
2. Ponga el reloj a la hora.Presione el(los) botón(es) HOUR/MIN (s) o (t)hasta que la hora correcta aparezca en la pantalla.
3. Presione START/ENTER o CLOCK.
NOTA: Este es un reloj de 12 horas. No indicaa.m. o p.m.
CÓMO PONER EL RELOJ A LA HORA
PRESIONE USTED VE
TIME
PRESIONE USTED VE
ejemplo para 5:30)TIME
PRESIONE USTED VE
O
(ejemplo para 12:00)
(indica un parpadeo)
CÓMO USAR EL BLOQUEO DEL HORNO
ESPAÑO
LCÓMO USAR SU COCINA
SEÑALES AUDIBLESLas señales audibles del teclado le permitensaber cuándo un botón ha sido presionado.
Para apagar todas las señales audibles delteclado de funciones:Presione y sostenga el botón COOK TIME por 5
segundos. Un sonido corto se escucharáy usted verá “Snd OFF” cuando lasseñales audibles se hayan apagado.
Para restituir las señales audibles:Presione y sostenga el botón COOK TIME por 5
segundos. Un sonido corto se escucharáy usted verá “Snd on” cuando lasseñales audibles se activen de nuevo.
Las señales audibles recordatorias son cuatrotonos de 1 segundo que le recuerdan que la horaprogramada para el temporizador de la cocina ouna función de control del horno con tiempo pro-gramado ha expirado.
Para quitar las señales audibles recordatorias:Presione y sostenga SET por 5 segundos. Un
sonido corto se escuchará y usted verá“rEP OFF” cuando las señales audiblesse apaguen.
Para restituir las señales audibles recordatorias:Presione y sostenga SET por 5 segundos. Un
sonido corto se escuchará y usted verá“rEP ON” cuando las señales audibles seenciendan.
Las señales audibles de error indican un problemacon el control electrónico del horno. Un código deerror aparecerá en la pantalla. Vea “Mensajes en lapantalla luminosa” en la sección “Diagnóstico ysolución de problemas”, p. 80.
El volumen puede graduarse entre alto y bajo.
Para ajustar:Presione y sostenga el botón comienzo diferido
(DELAY START) por 5 segundos. Un tonocorto sonará y verá, ya sea “Snd HI” o“Snd LO”. Presione y sostenga el botón
DELAY START por 5 segundos para cambiar alajuste deseado.
NOTA: Usted puede eliminar “Snd on”, “Snd OFF”,“rEP on”, “rEP OFF”, “Snd HI” o “Snd Lo” de lapantalla y restaurar la hora del día si presionacualquier botón.
53
54
El control del horno está ajustado de manera queapaga el horno automáticamente 12 horas despuésque el horno se encendió. Esto no interferirá conninguna función de cocción del temporizador o detiempo diferido.
Cómo pasar por alto el interruptor de 12 horas:Si usted desea períodos de cocción más prolongadoso por motivos religiosos que requieren un uso delhorno que se prolongue por más de 12 horas, presione y sostenga el botón CLOCK por 5 segundos.Usted escuchará una sola señal audible y verá “12HOFF” cuando la característica esté desactivada. Elhorno permanecerá encendido hasta que el usuario loapague.
NOTA: La luz del horno se encenderá en cuanto seabra la puerta del horno. Para mantener la luzencendida continuamente, enciéndala presionandoel botón OVEN. Vea las instrucciones, p. 77.
Para restaurar el interruptor de 12 horas:Presione y sostenga el botón CLOCK por 5 segundos.Usted escuchará una sola señal audible y verá “12Hon” cuándo la característica esté activada. El horno seapagará automáticamente después de 12 horas.
CÓMO USAR EL INTERRUPTOR DE 12 HORAS
CÓMO USAR SU COCINA
CÓMO USAR EL TEMPORIZADOR ELECTRÓNICO DELA COCINA
El temporizador de cocina le permite vigilar el tiempode cocción y de otras tareas. No pone en fucnion-amiento el horno ni lo detiene. Vea la sección “Cómousar el control del horno con tiempo programado” (p. 62) para encender y apagar el horno automática-mente. Puede ser programado en horas y minutoshasta 12 horas, 59 minutos. El temporizador de cocinamostrará en la pantalla minutos y segundos para programaciones de menos de 1 hora. Ustedescuchará cuatro señales audibles de 1 segundocuando el tiempo programado haya expirado.
Cómo programar el temporizador de cocina:1. Presione TIMER SET.
2. Ponga el reloj a la hora.Presione el(los) botón(es) HOUR/MIN (s) o (t)hasta que la hora correcta aparezca en la pantalla.
PRESIONE USTED VE
RTIME
PRESIONE USTED VE
RTIME
(ejemplo para 10 minutos)
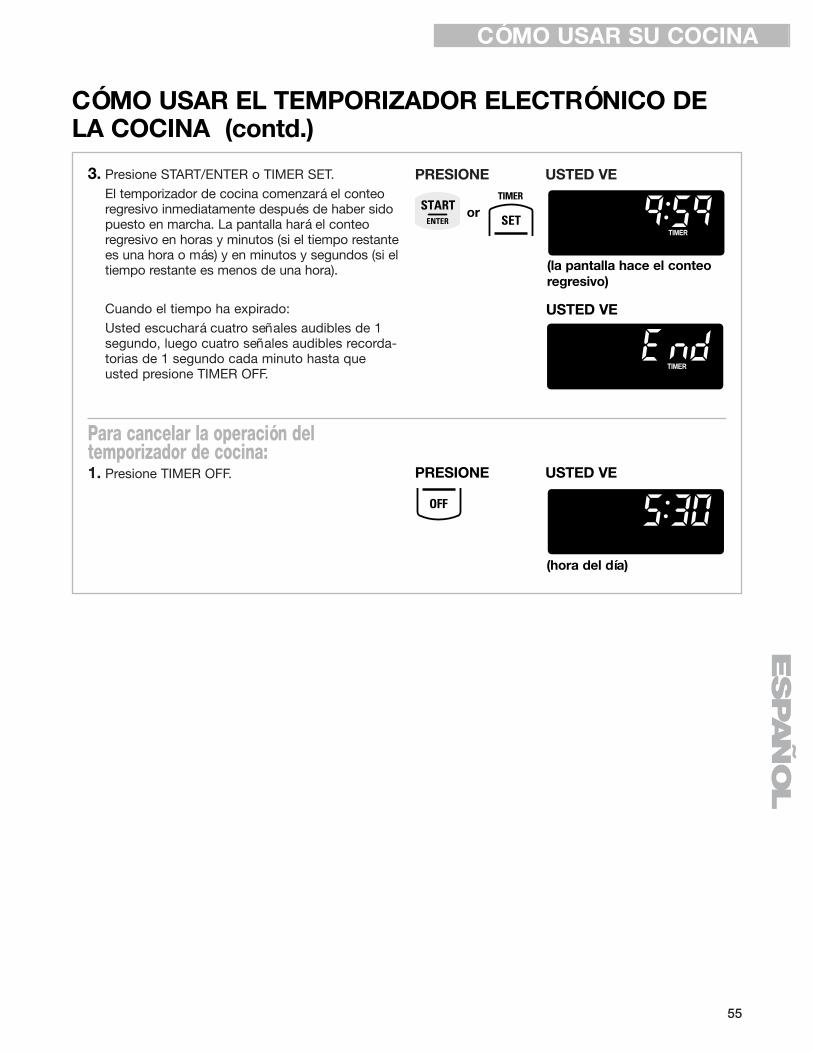
ESPAÑO
LCÓMO USAR SU COCINA
3. Presione START/ENTER o TIMER SET.El temporizador de cocina comenzará el conteoregresivo inmediatamente después de haber sidopuesto en marcha. La pantalla hará el conteoregresivo en horas y minutos (si el tiempo restantees una hora o más) y en minutos y segundos (si eltiempo restante es menos de una hora).
Cuando el tiempo ha expirado:Usted escuchará cuatro señales audibles de 1segundo, luego cuatro señales audibles recorda-torias de 1 segundo cada minuto hasta queusted presione TIMER OFF.
Para cancelar la operación del temporizador de cocina:1. Presione TIMER OFF.
PRESIONE USTED VE
RTIME
(la pantalla hace el conteoregresivo)
USTED VE
RTIME
PRESIONE USTED VE
(hora del día)
or
CÓMO USAR EL TEMPORIZADOR ELECTRÓNICO DELA COCINA (contd.)
55

56
2. Presione BAKE.
3. Programe la temperatura (opcional.)Siga este procedimiento si desea programar unatemperatura diferente a 350ºF. Presione el (los)botón(es) TEMP (▲) o (▼) para aumentar o parabajar la temperatura en cantidades de 5ºF. Useestos botones hasta que la temperatura deseadaaparezca en la pantalla pequeña.
Su horno está diseñado con el sistema de controlde temperatura mejorado ULTRABAKE para vigilarconstantemente la temperatura del horno. El quemador del horno funcionará en ciclos, segúnsea necesario, para mantener la temperaturadeseada. Esta función se activa automáticamentecuando el horno está en funcionamiento.
CÓMO HORNEAR/ASAR CON ULTRABAKE™
PRESIONE USTED VE
F
BAKE
PRESIONE USTED VE
F
BAKE
(ejemplo para hornear a 375ºF)
1. Coloque la(s) parrilla(s) STURDIGLIDE™ en laposición que usted necesite dentro del horno.Para mayor información, vea “Ubicación de las parrillas y cacerolas” en la sección “Cómo usarel horno”, p. 49.
Luego de programar una función, usted debe presionar START/ENTER para iniciar lafunción. Si usted no presiona START/ENTER dentro de 5 segundos de haber
programado, “START?” aparecerá en la pantallacomo recordatorio. Si usted no presionaSTART/ENTER dentro de 5 minutos de haber programado, la hora del día aparecerá en pantalla.Usted debe programar de nuevo la función y presionar START/ENTER.
CÓMO COMENZAR/CANCELAR UNA FUNCIÓN
OFF/CANCEL cancelará cualquier función excepto elreloj, temporizador o el bloqueo del hornoy de la superficie de cocción. Cuandousted presiona OFF/CANCEL, la pantalla
mostrará la hora del día o, si se está usando también el temporizador de minutos, el tiemporestante.
CÓMO USAR SU COCINA
IMPORTANTE:• Al usar el horno por prima vez, es necesario
encender los quemadores de superficieprimero con el fin de purgar el aire de lastuberías de gas.
• No trate de encender el quemador del hornodurante un apagón.
• Nunca coloque alimentos o utensilios de cocina encima de la puerta del horno o en elfondo del horno.

ESPAÑO
L
4. Para asar, no tiene que precalentar el horno, amenos que su receta lorecomiende.NOTA: El horno cocinaránormalmente aún cuando“PrE HEAt” aparezca en lapantalla, para luego man-tener la temperatura decocción seleccionada.
5. Presione START/ENTER.La función de precalentar comienza despuésque la temperatura del horno ha sido programa-da y se ha presionado START. Una vez que concluye el ciclo de preparación de precalen-tamiento, la temperatura del horno seleccionadareemplaza “PrE HEAt” en la pantalla. Ustedescuchará una señal audible de 1 segundo, indicando que el horno está listo para usarse.El sistema ULTRABAKE regula electrónicamenteel tiempo de precalentamiento y la temperaturapara mantener una gama precisa de temperat-uras para obtener óptimos resultados de coc-ción.
NOTAS:• Usted puede cambiar la programación de
temperatura en cualquier momento despuésde presionar START/ENTER. No necesita pre-sionar START/ENTER nuevamente.
• Mientras el horno esté en el modo de preca-lentamiento, usted puede ver la temperaturaprogramada de hornear/asar por 5 segundosal presionar BAKE.
CÓMO HORNEAR/ASAR CON ULTRABAKE™ (contd.)
PRESIONE USTED VE
ONBAKEBROIL
HEAT
ON
F
BAKEBROIL
HEAT
USTED VE
(ejemplo para temperaturafijada en 350ºF)
6. Para hornear, ponga su comida en el hornoluego que el tiempo depreparación de precalen-tamiento haya terminado.Mientras hornea/asa, elquemador del horno seencenderá y apagará paramantener la temperatura alnivel programado.
7. Luego de cocinar, apague el horno. PRESIONE USTED VE
(hora del día)
Para ahorrar energía• Para evitar la pérdida de calor, abra la puerta del
horno lo menos posible.• Use el temporizador para mantener mejor control
del tiempo de cocción.• Planifique sus comidas teniendo en mente el uso
más eficiente del horno, ya sea cocinando másde una comida a la vez, u horneando mientras elhorno está todavía caliente después de habercocinado una comida.
Cómo asar carnes y aves• Para una cocción uniforme, coloque la carne en
una parrilla en un molde de hornear poco profun-do. Esto mantiene la carne alejada de goteos degrasa y permite que el calor circule mejor.
• Use un termómetro para carne a fin de cercio-rarse de que el nivel de cocción sea exacto.Insértelo de manera que la punta del termómetroesté en el centro del músculo más grande o laporción más voluminosa de la carne o ave.Asegúrese de que el termómetro no toque elhueso, grasa o el fondo del molde de hornear.
CÓMO USAR SU COCINA
57
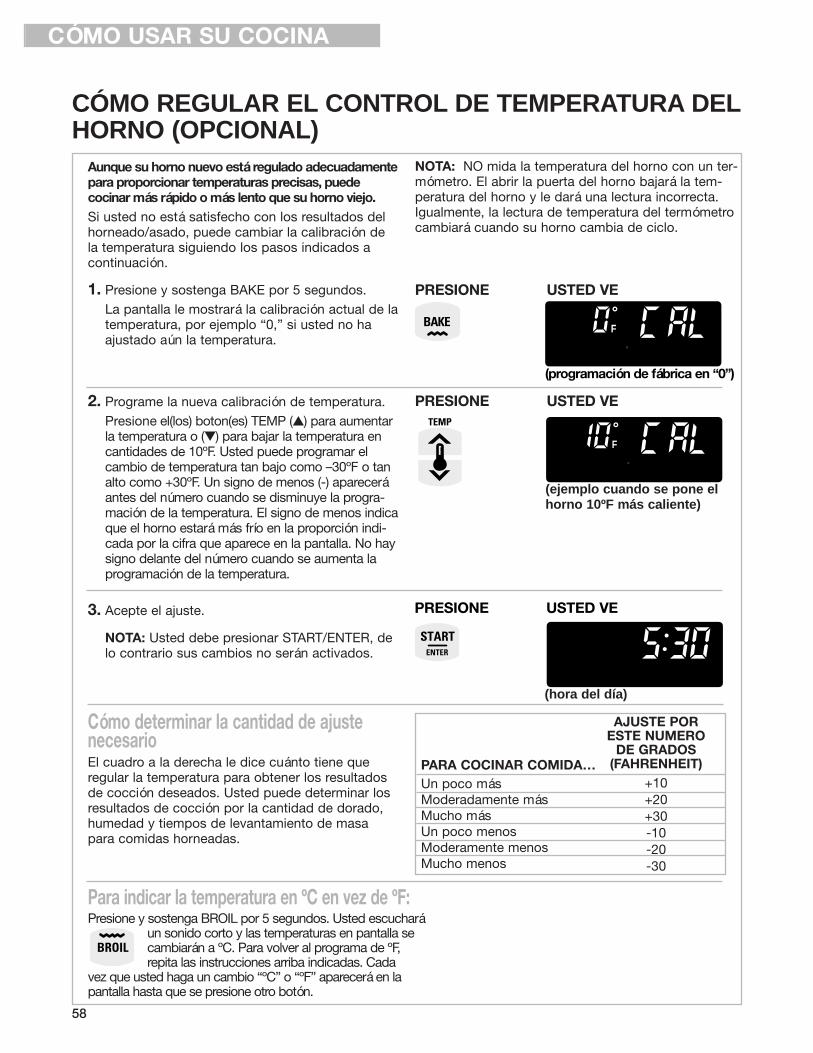
58
Aunque su horno nuevo está regulado adecuadamentepara proporcionar temperaturas precisas, puede cocinar más rápido o más lento que su horno viejo.Si usted no está satisfecho con los resultados delhorneado/asado, puede cambiar la calibración dela temperatura siguiendo los pasos indicados acontinuación.
1. Presione y sostenga BAKE por 5 segundos.La pantalla le mostrará la calibración actual de latemperatura, por ejemplo “0,” si usted no haajustado aún la temperatura.
2. Programe la nueva calibración de temperatura.Presione el(los) boton(es) TEMP (s) para aumentarla temperatura o (t) para bajar la temperatura encantidades de 10ºF. Usted puede programar elcambio de temperatura tan bajo como –30ºF o tanalto como +30ºF. Un signo de menos (-) apareceráantes del número cuando se disminuye la progra-mación de la temperatura. El signo de menos indicaque el horno estará más frío en la proporción indi-cada por la cifra que aparece en la pantalla. No haysigno delante del número cuando se aumenta laprogramación de la temperatura.
3. Acepte el ajuste.
NOTA: Usted debe presionar START/ENTER, delo contrario sus cambios no serán activados.
Cómo determinar la cantidad de ajustenecesarioEl cuadro a la derecha le dice cuánto tiene que regular la temperatura para obtener los resultadosde cocción deseados. Usted puede determinar losresultados de cocción por la cantidad de dorado,humedad y tiempos de levantamiento de masapara comidas horneadas.
Para indicar la temperatura en ºC en vez de ºF:Presione y sostenga BROIL por 5 segundos. Usted escuchará
un sonido corto y las temperaturas en pantalla se cambiarán a ºC. Para volver al programa de ºF, repita las instrucciones arriba indicadas. Cada
vez que usted haga un cambio “ºC” o “ºF” aparecerá en la pantalla hasta que se presione otro botón.
NOTA: NO mida la temperatura del horno con un ter-mómetro. El abrir la puerta del horno bajará la tem-peratura del horno y le dará una lectura incorrecta.Igualmente, la lectura de temperatura del termómetrocambiará cuando su horno cambia de ciclo.
PRESIONE USTED VE
F
(programación de fábrica en “0”)
PRESIONE USTED VE
(hora del día)
PRESIONE USTED VE
F
(ejemplo cuando se pone elhorno 10ºF más caliente)
AJUSTE PORESTE NUMERO
DE GRADOS(FAHRENHEIT)
+10+20+30-10-20-30
PARA COCINAR COMIDA…Un poco másModeradamente másMucho másUn poco menosModeramente menosMucho menos
CÓMO REGULAR EL CONTROL DE TEMPERATURA DELHORNO (OPCIONAL)
CÓMO USAR SU COCINA
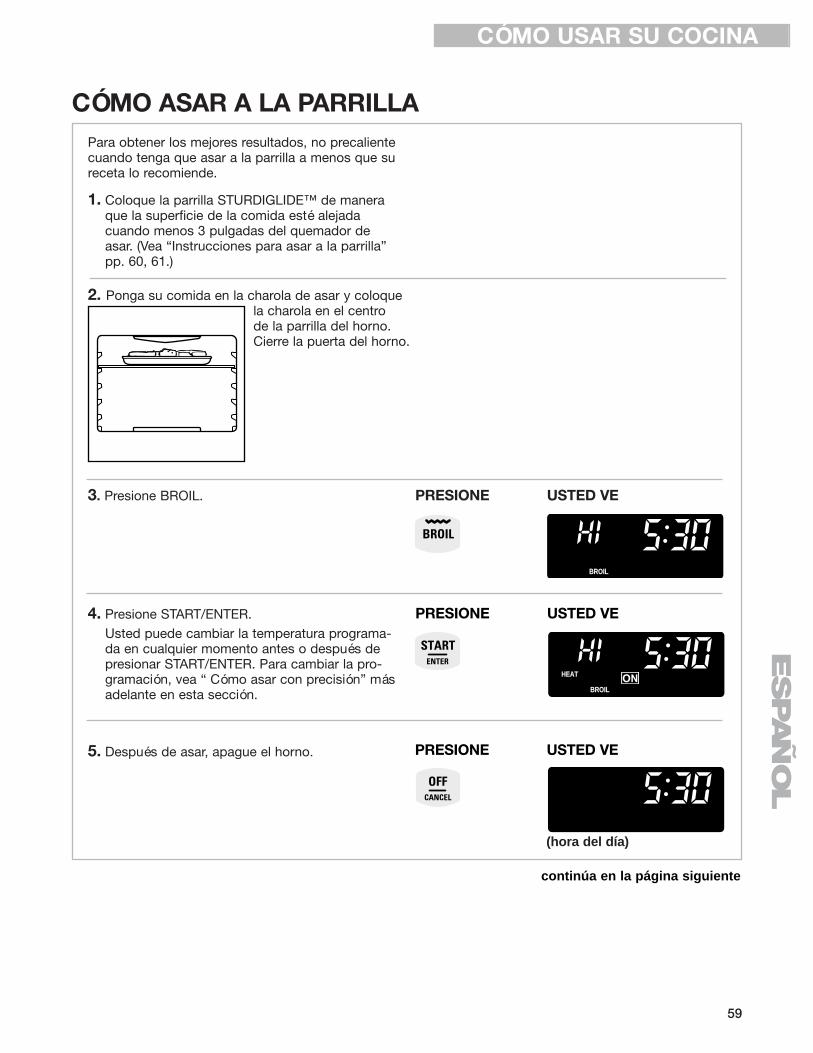
ESPAÑO
L
CÓMO ASAR A LA PARRILLAPara obtener los mejores resultados, no precalientecuando tenga que asar a la parrilla a menos que sureceta lo recomiende.
1. Coloque la parrilla STURDIGLIDE™ de maneraque la superficie de la comida esté alejada cuando menos 3 pulgadas del quemador deasar. (Vea “Instrucciones para asar a la parrilla”pp. 60, 61.)
2. Ponga su comida en la charola de asar y coloque la charola en el centro de la parrilla del horno. Cierre la puerta del horno.
3. Presione BROIL.
4. Presione START/ENTER.Usted puede cambiar la temperatura programa-da en cualquier momento antes o después depresionar START/ENTER. Para cambiar la pro-gramación, vea “ Cómo asar con precisión” másadelante en esta sección.
5. Después de asar, apague el horno.
PRESIONE USTED VE
PRESIONE USTED VE
ONBROIL
HEAT
PRESIONE USTED VE
(hora del día)
BROIL
continúa en la página siguiente
CÓMO USAR SU COCINA
59

60
Cómo asar con precisiónSi su comida se está cocinando demasiado rápido osi usted desea que su comida se ase más lentamentedesde el principio, use el asado de precisión. Cuantomás baja la temperatura, más lenta será la cocción.Los cortes gruesos y trozos de forma no uniforme decarne, pescado y aves se pueden cocinar mejor siusted usa temperaturas para asar más bajas.
1. Presione BROIL
2. Presione los botones TEMP (▼) para bajar la temperatura en cantidades de 5ºF. La gama de asado es de 170°F – HI (525°F)
3. Presione START/ENTER
CÓMO ASAR A LA PARRILLA (contd.)
BROIL
(el ejemplo muestra el asar a 400ºF)
PRESIONE USTED VE
ONBROIL
HEAT
PRESIONE USTED VE
Instrucciones para asar a la parrilla• Use únicamente la charola de asar y la parrilla
provistas. Éstas están diseñadas para drenar losjugos extras de la superficie de cocción. Estedrenaje ayuda a evitar salpicaduras y humo.
• Para asegurarse de que los jugos se drenen bien,no cubra la parrilla con aluminio.
• Quite el exceso de grasa para reducir las salpica-duras. Corte la grasa en los bordes para evitarque se ondulen.
• Use tenazas para voltear la carne a fin de evitarque se pierdan los jugos.
• Jale hacia fuera la parrilla del horno hasta laposición de parada antes de voltear o quitar lacomida.
• Luego de asar, retire la charola de asar del hornoen el momento en que esté retirando la comida.Los goteos se hornearán si se deja la charola enel horno caliente, dificultando más la limpieza.
• Para facilitar la limpieza, forre el fondo de lacharola con papel de aluminio. Limpie la charolay la parrilla lo más pronto posible luego que hayaacabado de usarlas.
CÓMO USAR SU COCINA
PRESIONE
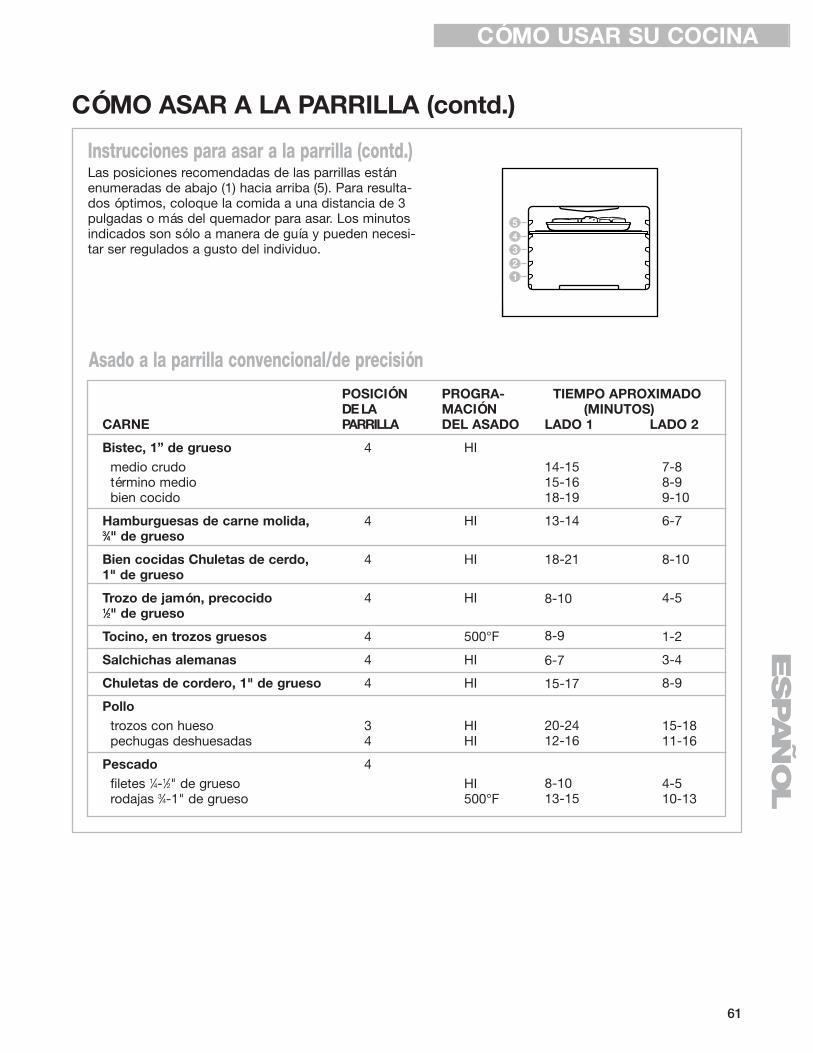
ESPAÑO
L
CARNE
Bistec, 1” de gruesomedio crudotérmino mediobien cocido
Hamburguesas de carne molida, 3⁄4" de grueso
Bien cocidas Chuletas de cerdo, 1" de grueso
Trozo de jamón, precocido 1⁄2" de grueso
Tocino, en trozos gruesos
Salchichas alemanas
Chuletas de cordero, 1" de grueso
Pollotrozos con huesopechugas deshuesadas
Pescadofiletes 1⁄4-1⁄2" de gruesorodajas 3⁄4-1" de grueso
CÓMO ASAR A LA PARRILLA (contd.)
Instrucciones para asar a la parrilla (contd.)Las posiciones recomendadas de las parrillas estánenumeradas de abajo (1) hacia arriba (5). Para resulta-dos óptimos, coloque la comida a una distancia de 3pulgadas o más del quemador para asar. Los minutosindicados son sólo a manera de guía y pueden necesi-tar ser regulados a gusto del individuo.
TIEMPO APROXIMADO(MINUTOS)
LADO 2
7-88-99-10
6-7
8-10
4-5
1-2
3-4
8-9
15-1811-16
4-510-13
POSICIÓNDE LA PARRILLA
4
4
4
4
4
4
4
34
4
LADO 1
14-1515-1618-19
13-14
18-21
8-10
8-9
6-7
15-17
20-2412-16
8-1013-15
Asado a la parrilla convencional/de precisiónPROGRA-MACIÓN DEL ASADO
HI
HI
HI
HI
500°F
HI
HI
HIHI
HI500°F
CÓMO USAR SU COCINA
61

62
CÓMO USAR EL CONTROL DEL HORNO CON TIEMPOPROGRAMADO
Antes de usar el control del horno con tiempoprogramado, asegúrese que el reloj tenga la horacorrecta del día. (Vea “Cómo poner el reloj a lahora,” p. 52.)
Para comenzar ahora y parar automáticamente:Programe COOK TIME
Para comienzo diferido y parar automáticamente:Programe COOK TIME y DELAY STARTNOTA: La función de cocción de tiempo diferidoes ideal para comidas que no necesitan un hornoprecalentado, como carnes y guisados. No use lafunción de tiempo diferido cuando hornea.
El control del horno con tiempo programado encen-derá y apagará el horno a una hora determinada,cocinará durante un período programado de tiempoy luego se apaga automáticamente según la programación. Usted puede hacerlo programandoCOOK TIME y DELAY START.
CÓMO USAR SU COCINA
2. Presione BAKE.
3. Programe la temperatura (opcional).Siga este paso si desea programar la temperatura diferente a 350ºF. Presione el(los)botón(es) TEMP (▲) o (▼) para aumentar o parabajar la temperatura en cantidades de 5ºF. Useestos botones hasta que la temperatura queusted desea aparezca en la pantalla pequeña.
4. Presione COOK TIME.
PRESIONE USTED VE
F
BAKE
F
BAKE
(el ejemplo muestra horneado a 375ºF)
PRESIONE USTED VE
F
BAKETIMECOOK
PRESIONE USTED VE
Para comenzar ahora y parar automáticamente:Para usar esta función, es necesario programar COOK TIME.
1. Coloque la(s) parrilla(s) STURDIGLIDE™ delhorno donde usted desee y ponga su comidaen el horno. Para ubicar sus parrillas correctamente, vea la sección “Ubicación de las parrillas y cacerolas”, p. 49.
ADVERTENCIAPeligro de Intoxicación Alimentaria
No deje sus alimentos en el horno por más de una hora antes o después de su cocción.
No seguir esta instrucción puede ocasionar intoxicación alimentaria o enfermedad.

ESPAÑO
L
CÓMO USAR EL CONTROL DEL HORNO CON TIEMPOPROGRAMADO (contd.)
5. Programe el tiempo de cocción.Presione el(los) botón(es) HOUR/MIN (s) o (t)hasta que la hora correcta de cocción aparezcaen la pantalla.
6. Presione START/ENTER.
NOTAS:
•Usted puede cambiar la programación de latemperatura o de la hora en cualquier momen-to después de presionar START/ENTER mediante la repetición de los pasos 3 ó 5. Notiene que presionar START/ENTER de nuevo.
•La pantalla mostrará el conteo regresivo deltiempo para hornear/asar en horas y minutos(si el tiempo de cocción es más de 1 hora) oen minutos y segundos (si el tiempo de coc-ción es menos de una 1 hora).
7. El horno se apagará automáticamente cuando se termine el tiempo de calentamiento. En la pantalla aparecerá End y COOK TIME. Usted escuchará cuatro señales audibles, luego cuatro señales audibles recordatorias de 1 segundo cada minuto.
8. Para detener las señales audibles recordatorias y eliminar End de la pantalla y que vuelva a aparecer la hora del día, presione OFF/CANCEL o abra la puerta del horno.
NOTA: Usted puede realizar este procedimientoen cualquier momento para cancelar la funciónde control del horno con tiempo programado.
Para programar COOK TIME y DELAY START:IMPORTANTE: Si usted programa DELAY STARTsin programar COOK TIME, el horno comenzará ala hora ya programada, pero NO se detendráhasta que usted presione OFF/CANCEL.
1. Coloque la(s) parrilla(s) STURDIGLIDE™ del hornodonde usted desee y ponga su comida en el horno.Para ubicar sus parrillas correctamente, vea la sección “Ubicación de las parrillas y cacerolas”, p. 49.
PRESIONE USTED VE
F
BAKETIMECOOK
(el ejemplo muestra un tiempo de 30 minutos parahornear/asar)
PRESIONE USTED VE
ON
F
BAKEBROIL
HEAT
DTIME TIMECOOK
(la pantalla muestra el conteoregresivo del tiempo de coc-ción)
CÓMO USAR SU COCINA
TIMECOOK
USTED VE
(hora del día)
PRESIONE USTED VE
63
continúa en la página siguiente

64
2. Presione BAKE.
3. Programe la temperatura (opcional).Siga este paso si desea programar la temperatura diferente a 350ºF. Presione TEMP(▲) para aumentar la temperatura o (▼) parabajar la temperatura en cantidades de 5ºF. Useestos botones hasta que la temperatura queusted desea aparezca en la pantalla pequeña.
4. Presione COOK TIME.
5. Programe el tiempo de cocción.Presione el(los) botón(es) HOUR/MIN (s) o (t)hasta que la hora correcta de cocción aparezcaen la pantalla.
6. Presione DELAY START.
7. Programe la hora de comienzo.Presione el(los) botón(es) HOUR/MIN (s) o (t)hasta que la hora correcta aparezca en la pantalla. El ejemplo dado a mano derecha muestra unahora de comienzo seleccionada de 1:00. Elhorno se apagará automáticamente a la 1:30 (eltiempo de inicio programado más el tiempo decocción programado)
PRESIONE USTED VE
F
BAKE
PRESIONE USTED VE
F
BAKE
(el ejemplo muestra horneado a 375ºF)
PRESIONE USTED VE
F
BAKETIMECOOK
CÓMO USAR SU COCINA
CÓMO USAR EL CONTROL DEL HORNO CON TIEMPOPROGRAMADO (contd.)
PRESIONE USTED VE
F
BAKETIMECOOK
(el ejemplo muestra un tiempode hornear/asar de 30 minutos)
PRESIONE USTED VE
F
BAKESTART TIME
(el ejemplo muestra 1:00 como la hora de comienzo)
PRESIONE USTED VE
F
BAKETIME

ESPAÑO
LENG
LIS
H
8. Presione START/ENTER.
La hora de parada se calcula automáticamente.
NOTA: Usted puede cambiar las programa-ciones de temperatura y hora en cualquiermomento después de presionar START/ENTERmediante la repetición de Pasos 3 hasta 8, a noser que la hora de comienzo diferido se hayaalcanzado.
9. Cuando se llega a la hora de comienzo:En la pantalla aparecerá el conteo regresivo deltiempo de hornear/asar en horas y minutos (siel tiempo de cocción es más de una hora) o enminutos y segundos (si el tiempo de cocción esmenos de una hora).
10. El horno se apagará automáticamente cuando setermine el tiempo de cocción. En la pantalla aparecerá End y COOK TIME. Usted escuchará cuatro señales audibles, luego cuatro señales audibles recordatorias de 1 segundo cada minuto.
11. Para detener las señales audibles recordatorias y eliminar End de la pantalla y que vuelva a aparecer la hora del día, presione OFF/CANCEL.
NOTA: Usted puede efectuar este paso encualquier momento para cancelar la función decontrol del horno con tiempo programado.
ONBAKEDELAY
PRESIONE USTED VE
USTED VE
ON
F
BAKEBROIL
HEAT
DTIME TIMECOOK
(en la pantalla aparece un conteo regresivo del tiempo de cocción)
USTED VE
TIMECOOK
PRESIONE USTED VE
(hora del día)
CÓMO USAR SU COCINA
CÓMO USAR EL CONTROL DEL HORNO CON TIEMPOPROGRAMADO (contd.)
65
continúa en la página siguiente
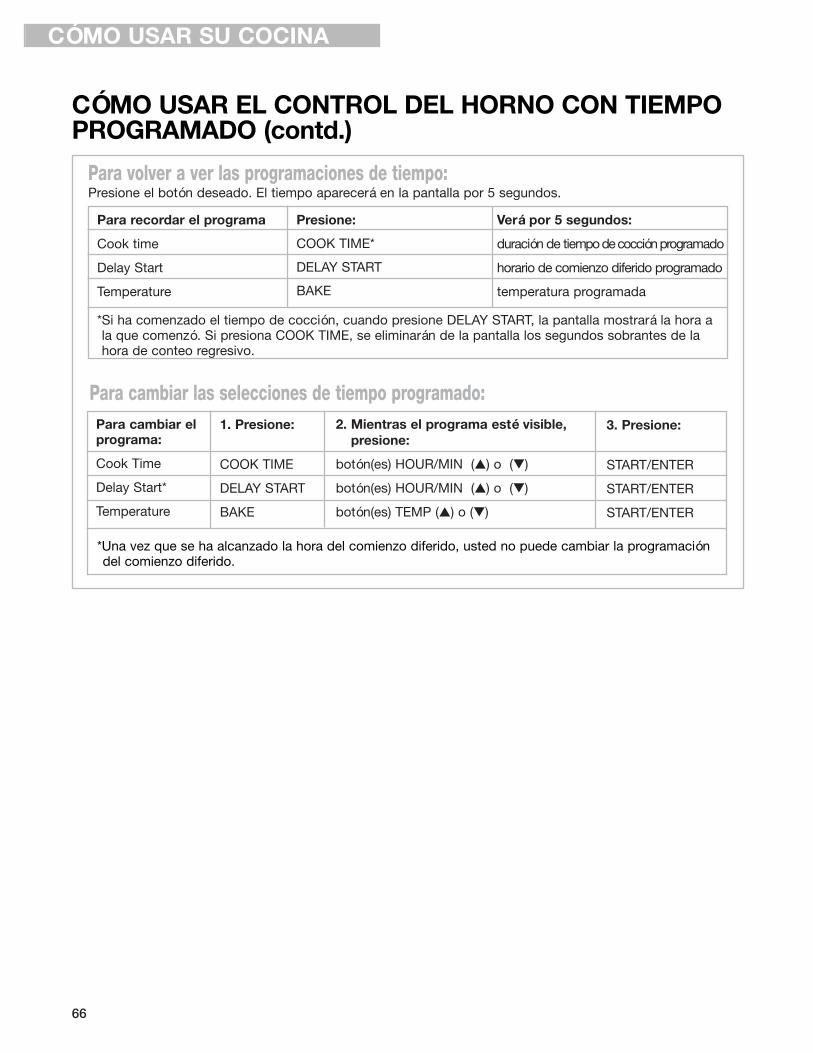
66
Para cambiar las selecciones de tiempo programado:
Para recordar el programa
Cook time
Delay Start
Temperature
Presione:
COOK TIME*
DELAY START
BAKE
Verá por 5 segundos:
duración de tiempo de cocción programado
horario de comienzo diferido programado
temperatura programada
Para volver a ver las programaciones de tiempo:Presione el botón deseado. El tiempo aparecerá en la pantalla por 5 segundos.
*Si ha comenzado el tiempo de cocción, cuando presione DELAY START, la pantalla mostrará la hora ala que comenzó. Si presiona COOK TIME, se eliminarán de la pantalla los segundos sobrantes de lahora de conteo regresivo.
Para cambiar elprograma:
Cook Time
Delay Start*
Temperature
1. Presione:
COOK TIME
DELAY START
BAKE
2. Mientras el programa esté visible,presione:
botón(es) HOUR/MIN (▲) o (▼)
botón(es) HOUR/MIN (▲) o (▼)
botón(es) TEMP (▲) o (▼)
3. Presione:
START/ENTER
START/ENTER
START/ENTER
*Una vez que se ha alcanzado la hora del comienzo diferido, usted no puede cambiar la programacióndel comienzo diferido.
CÓMO USAR SU COCINA
CÓMO USAR EL CONTROL DEL HORNO CON TIEMPOPROGRAMADO (contd.)
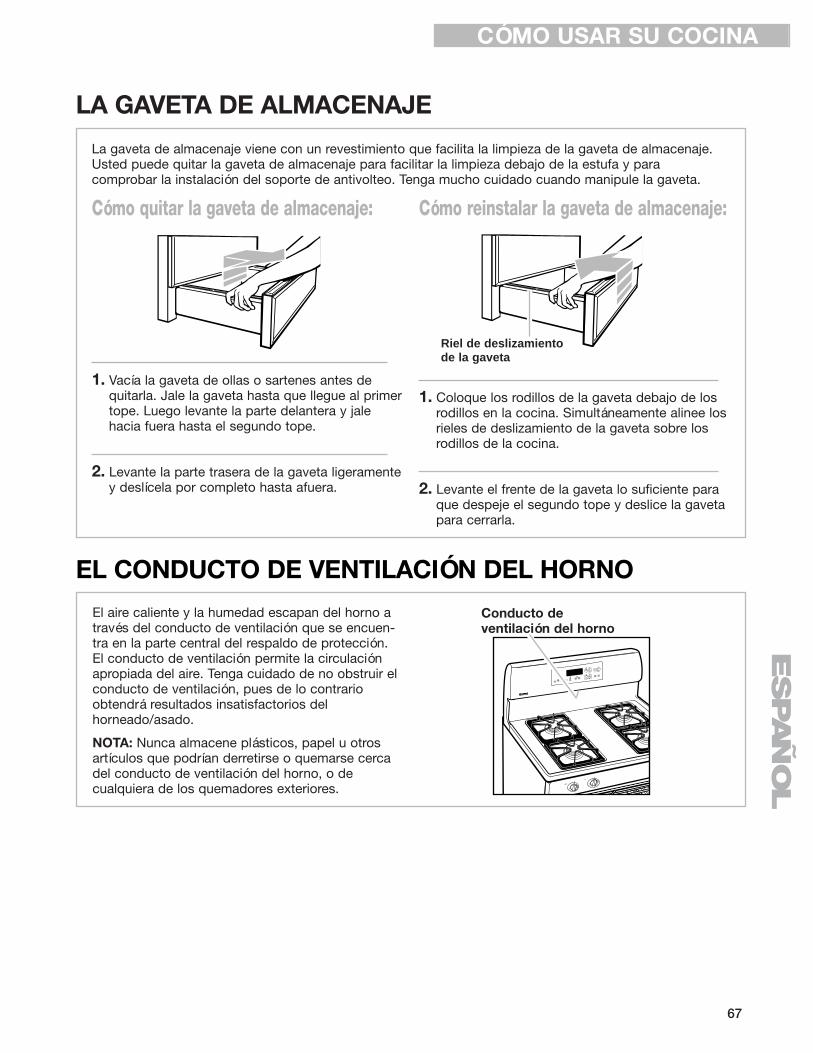
ESPAÑO
LCÓMO USAR SU COCINA
67
Cómo quitar la gaveta de almacenaje:
1. Vacía la gaveta de ollas o sartenes antes dequitarla. Jale la gaveta hasta que llegue al primertope. Luego levante la parte delantera y jalehacia fuera hasta el segundo tope.
2. Levante la parte trasera de la gaveta ligeramentey deslícela por completo hasta afuera.
Cómo reinstalar la gaveta de almacenaje:
1. Coloque los rodillos de la gaveta debajo de losrodillos en la cocina. Simultáneamente alinee losrieles de deslizamiento de la gaveta sobre losrodillos de la cocina.
2. Levante el frente de la gaveta lo suficiente paraque despeje el segundo tope y deslice la gavetapara cerrarla.
Riel de deslizamientode la gaveta
La gaveta de almacenaje viene con un revestimiento que facilita la limpieza de la gaveta de almacenaje.Usted puede quitar la gaveta de almacenaje para facilitar la limpieza debajo de la estufa y para comprobar la instalación del soporte de antivolteo. Tenga mucho cuidado cuando manipule la gaveta.
LA GAVETA DE ALMACENAJE
EL CONDUCTO DE VENTILACIÓN DEL HORNO
El aire caliente y la humedad escapan del horno através del conducto de ventilación que se encuen-tra en la parte central del respaldo de protección.El conducto de ventilación permite la circulaciónapropiada del aire. Tenga cuidado de no obstruir elconducto de ventilación, pues de lo contrarioobtendrá resultados insatisfactorios delhorneado/asado.
NOTA: Nunca almacene plásticos, papel u otrosartículos que podrían derretirse o quemarse cercadel conducto de ventilación del horno, o decualquiera de los quemadores exteriores.
Conducto de ventilación del horno
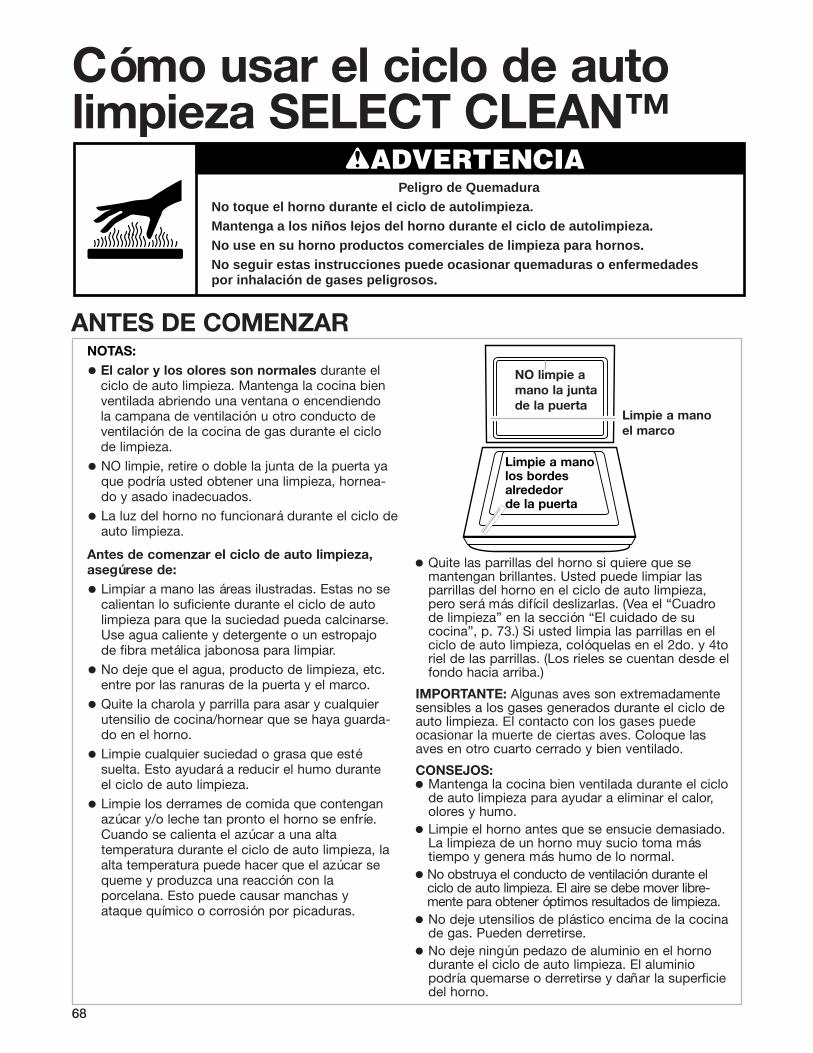
68
Cómo usar el ciclo de autolimpieza SELECT CLEAN™
ANTES DE COMENZARNOTAS:
• El calor y los olores son normales durante elciclo de auto limpieza. Mantenga la cocina bienventilada abriendo una ventana o encendiendola campana de ventilación u otro conducto deventilación de la cocina de gas durante el ciclode limpieza.
• NO limpie, retire o doble la junta de la puerta yaque podría usted obtener una limpieza, hornea-do y asado inadecuados.
• La luz del horno no funcionará durante el ciclo deauto limpieza.
Antes de comenzar el ciclo de auto limpieza,asegúrese de:
• Limpiar a mano las áreas ilustradas. Estas no secalientan lo suficiente durante el ciclo de autolimpieza para que la suciedad pueda calcinarse.Use agua caliente y detergente o un estropajode fibra metálica jabonosa para limpiar.
• No deje que el agua, producto de limpieza, etc.entre por las ranuras de la puerta y el marco.
• Quite la charola y parrilla para asar y cualquierutensilio de cocina/hornear que se haya guarda-do en el horno.
• Limpie cualquier suciedad o grasa que estésuelta. Esto ayudará a reducir el humo duranteel ciclo de auto limpieza.
• Limpie los derrames de comida que contenganazúcar y/o leche tan pronto el horno se enfríe.Cuando se calienta el azúcar a una alta temperatura durante el ciclo de auto limpieza, laalta temperatura puede hacer que el azúcar sequeme y produzca una reacción con la porcelana. Esto puede causar manchas y ataque químico o corrosión por picaduras.
NO limpie amano la junta de la puerta
Limpie a manoel marco
Limpie a manolos bordesalrededor de la puerta
• Quite las parrillas del horno si quiere que se mantengan brillantes. Usted puede limpiar las parrillas del horno en el ciclo de auto limpieza,pero será más difícil deslizarlas. (Vea el “Cuadrode limpieza” en la sección “El cuidado de su cocina”, p. 73.) Si usted limpia las parrillas en elciclo de auto limpieza, colóquelas en el 2do. y 4toriel de las parrillas. (Los rieles se cuentan desde elfondo hacia arriba.)
IMPORTANTE: Algunas aves son extremadamentesensibles a los gases generados durante el ciclo deauto limpieza. El contacto con los gases puede ocasionar la muerte de ciertas aves. Coloque lasaves en otro cuarto cerrado y bien ventilado.
CONSEJOS:• Mantenga la cocina bien ventilada durante el ciclo
de auto limpieza para ayudar a eliminar el calor,olores y humo.
• Limpie el horno antes que se ensucie demasiado.La limpieza de un horno muy sucio toma mástiempo y genera más humo de lo normal.
• No obstruya el conducto de ventilación durante elciclo de auto limpieza. El aire se debe mover libre-mente para obtener óptimos resultados de limpieza.
• No deje utensilios de plástico encima de la cocinade gas. Pueden derretirse.
• No deje ningún pedazo de aluminio en el hornodurante el ciclo de auto limpieza. El aluminiopodría quemarse o derretirse y dañar la superficiedel horno.
wADVERTENCIAPeligro de Quemadura
No toque el horno durante el ciclo de autolimpieza.Mantenga a los niños lejos del horno durante el ciclo de autolimpieza.No use en su horno productos comerciales de limpieza para hornos.No seguir estas instrucciones puede ocasionar quemaduras o enfermedades por inhalación de gases peligrosos.

ESPAÑO
LCÓMO USAR EL CICLO DE AUTO LIMPIEZA SELECT CLEAN
69continúa en la página siguiente
Para comenzar el ciclo de auto limpieza SELECT CLEAN inmediatamente:1. Presione SELECT CLEAN.
Presione el botón dos veces, SoilA (parasuciedad promedio) reemplazará a SoilL.Presione el botón tres veces, SoilH (parasuciedad profunda) reemplazará a SoilA.
NOTA: Usted podrá examinar las tres alternativas (SoiIL, SoilA y SoilH) si mantiene presionado continuamente el botón SELECT CLEAN.
2. Presione START/ENTER.
3. Luego que termine el ciclo de auto limpieza SELECT CLEAN: LOCKED se apaga y la puerta se destraba.
4. Para que aparezca la hora del día, oprima cualquier botón para borrar “End” o abra la puerta después de lo cual “door” aparecerá en la pantalla. Luego cierre la puerta y la hora del día aparecerá en la pantalla.
CÓMO PROGRAMAR LOS CONTROLES
PRESIONE USTED VE
ONHEATCLEANLOCKED
CLEAN
USTED VE
PRESIONE USTED VE
SELECTCLEAN
CLEAN
( el ejemplo muestra el pro-grama para poca suciedad)
El ciclo de auto limpieza SELECT CLEAN™ usauna temperatura mucho más alta que la normalpara quitar y calcinar la suciedad y la grasa.SELECT CLEAN fija el tiempo de limpiezaautomáticamente una vez que usted elige el nivelde suciedad. Usted podrá elegir SoiIL (para pocasuciedad), SoilA (para suciedad promedio) o SoilH(para suciedad profunda). SoilL limpiará aproxi-madamente durante 2-21⁄2 horas, SoilA durante 3-31⁄2 horas y SoilH durante 4-41⁄2 horas.
CÓMO FUNCIONA EL CICLOLa puerta deberá esta cerrada completamente paraque se trabe y el ciclo pueda comenzar. Si la puertaestá cerrada correctamente, se traba después deunos 6 segundos después de presionar START/ENTER. El ciclo incluye un período de enfriamientode aproximadamente 30 minutos. Si desea ver lahora del día durante el ciclo, presione CLOCKdurante 5 segundos.
USTED VE
(al abrir la puerta)
USTED VE
(al oprimir cualquier botón)

70
CÓMO USAR EL CICLO DE AUTO LIMPIEZA SELECT CLEAN™
5. Cuando el horno esté frío, limpie con una esponja o paño húmedo cualquier residuo o cenizas. Si fuera necesario, dé un retoque de limpieza a las manchas con un producto de limpieza abrasivo suave o una esponja de limpieza.
Para demorar el inicio del ciclo de auto limpieza usando el tiempo de comienzo diferido:NOTA: Asegúrese que el reloj tenga la hora correcta del día. (Vea “Cómo poner el reloj a la hora”, en la sección “Cómo usar su cocina”, p. 52.)
1. Presione SELECT CLEAN.Presione el botón dos veces, SoilA (parasuciedad promedio) reemplazará a SoilL.Presione el botón tres veces, SoilH (parasuciedad profunda) reemplazará a SoilA.
NOTA: Usted podrá examinar las tres alternativas (SoiIL, SoilA y SoilH) si mantiene presionado continuamente el botón SELECT CLEAN.
2. Presione DELAY START.
3. Programe la hora de comienzo.Presione el(los) botón(es) HOUR/MIN (s) o (t)hasta que la hora en que se desea iniciar el ciclode auto limpieza SELECT CLEAN aparezca en lapantalla.
4. Presione START/ENTER.
CÓMO PROGRAMAR LOS CONTROLES (contd.)
PRESIONE USTED VE
CLEAN
START
(el ejemplo para tiempo decomienzo a las 12:30)
PRESIONE USTED VE
PRESIONE USTED VE
SELECTCLEAN
CLEAN
(el ejemplo muestra el pro-grama para poca suciedad)
PRESIONE USTED VE
ONDELAY CLEANLOCKED
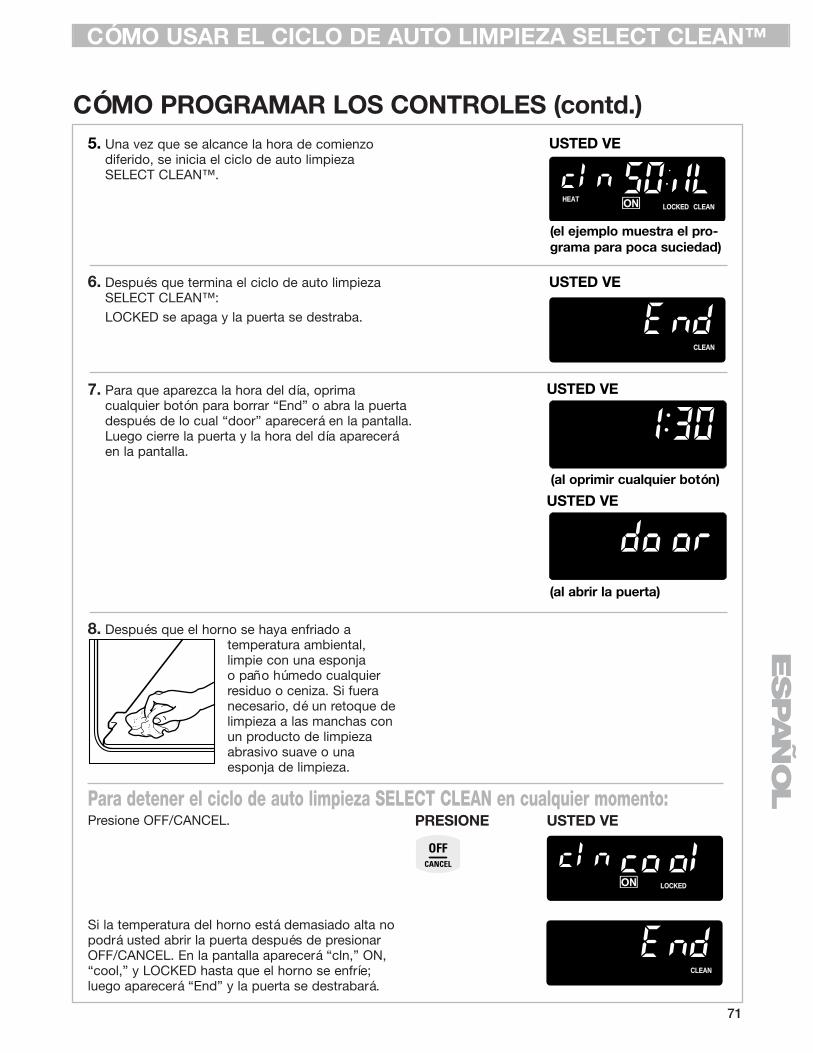
ESPAÑO
LCÓMO USAR EL CICLO DE AUTO LIMPIEZA SELECT CLEAN™
71
CÓMO PROGRAMAR LOS CONTROLES (contd.)5. Una vez que se alcance la hora de comienzo
diferido, se inicia el ciclo de auto limpieza SELECT CLEAN™.
6. Después que termina el ciclo de auto limpieza SELECT CLEAN™:LOCKED se apaga y la puerta se destraba.
7. Para que aparezca la hora del día, oprima cualquier botón para borrar “End” o abra la puerta después de lo cual “door” aparecerá en la pantalla. Luego cierre la puerta y la hora del día aparecerá en la pantalla.
8. Después que el horno se haya enfriado a temperatura ambiental, limpie con una esponja o paño húmedo cualquier residuo o ceniza. Si fuera necesario, dé un retoque de limpieza a las manchas con un producto de limpieza abrasivo suave o una esponja de limpieza.
Para detener el ciclo de auto limpieza SELECT CLEAN en cualquier momento:Presione OFF/CANCEL.
Si la temperatura del horno está demasiado alta nopodrá usted abrir la puerta después de presionarOFF/CANCEL. En la pantalla aparecerá “cln,” ON,“cool,” y LOCKED hasta que el horno se enfríe;luego aparecerá “End” y la puerta se destrabará.
PRESIONE USTED VE
ON LOCKED
CLEAN
USTED VE
CLEAN
USTED VE
ONHEATCLEANLOCKED
(el ejemplo muestra el pro-grama para poca suciedad)
USTED VE
(al abrir la puerta)
USTED VE
(al oprimir cualquier botón)
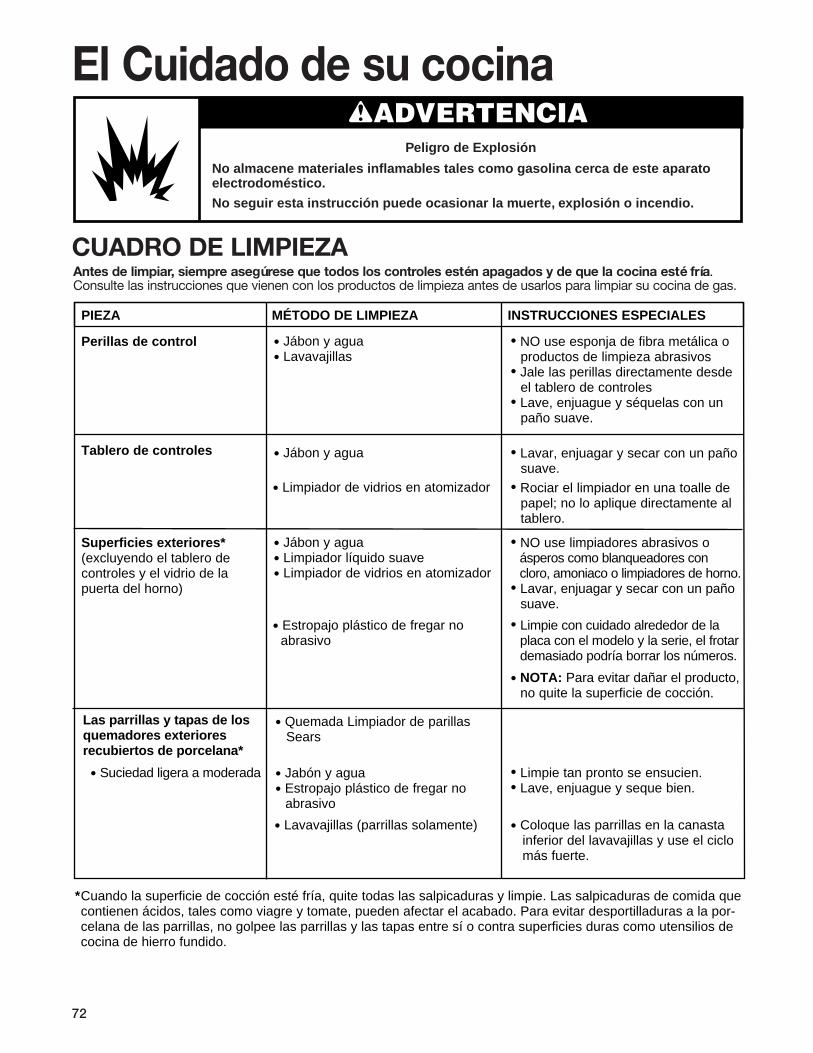
72
CUADRO DE LIMPIEZA
El Cuidado de su cocina
PIEZA MÉTODO DE LIMPIEZA INSTRUCCIONES ESPECIALES
Perillas de control • Jábon y agua• Lavavajillas
• NO use esponja de fibra metálica o productos de limpieza abrasivos• Jale las perillas directamente desde el tablero de controles• Lave, enjuague y séquelas con un paño suave.
Tablero de controles • Jábon y agua • Lavar, enjuagar y secar con un paño suave.
Superficies exteriores*(excluyendo el tablero de controles y el vidrio de la puerta del horno)
• Jábon y agua• Limpiador líquido suave• Limpiador de vidrios en atomizador
• NO use limpiadores abrasivos o ásperos como blanqueadores con cloro, amoniaco o limpiadores de horno.• Lavar, enjuagar y secar con un paño suave.
• Limpiador de vidrios en atomizador • Rociar el limpiador en una toalle de papel; no lo aplique directamente al tablero.
• Limpie con cuidado alrededor de la placa con el modelo y la serie, el frotar demasiado podría borrar los números.
• Estropajo plástico de fregar no abrasivo
Las parrillas y tapas de los quemadores exteriores recubiertos de porcelana*
• Suciedad ligera a moderada • Jabón y agua• Estropajo plástico de fregar no abrasivo
• Quemada Limpiador de parillas Sears
• Limpie tan pronto se ensucien.• Lave, enjuague y seque bien.
• Lavavajillas (parrillas solamente)
• NOTA: Para evitar dañar el producto, no quite la superficie de cocción.
Cuando la superficie de cocción esté fría, quite todas las salpicaduras y limpie. Las salpicaduras de comida que contienen ácidos, tales como viagre y tomate, pueden afectar el acabado. Para evitar desportilladuras a la por-celana de las parrillas, no golpee las parrillas y las tapas entre sí o contra superficies duras como utensilios decocina de hierro fundido.
• Coloque las parrillas en la canasta inferior del lavavajillas y use el ciclo más fuerte.
*
Antes de limpiar, siempre asegúrese que todos los controles estén apagados y de que la cocina esté fría.Consulte las instrucciones que vienen con los productos de limpieza antes de usarlos para limpiar su cocina de gas.
No almacene materiales inflamables tales como gasolina cerca de este aparato electrodoméstico.
No seguir esta instrucción puede ocasionar la muerte, explosión o incendio.
wADVERTENCIAPeligro de Explosión
ESPAÑO
L
PIEZA MÉTODO DE LIMPIEZA INSTRUCCIONES ESPECIALES
• Vea “Los quemadores exteriores y la superficie de cocción sellados” en la sec- ción “El cuidado de su cocina”, pp. 74, 75.
Cavidad del horno• Salpicaduras de comida que contienen azúcar y/o leche
• Todas las demás salpicaduras
• Jabón y agua
• Ciclo de auto limpieza
• Cuando el horno se enfríe, lave, enjuague y seque con un paño suave. • Vea “Cómo usar el ciclo de auto limpieza. (p. 68)
Charola y parrilla para asar • Jabón y agua• Estropajo de fibra metálica
• Lavavajillas
• Lave, enjuague y seque.
Parrillas del horno • Jabón y agua• Estropajo de fibra metálica
• Lave, enjuague y seque.
• Ciclo de auto limpieza • Colóquelas en el 2do. y 4to. riel de las parrillas. Las parrillas perderán su color y será más dificil deslizarlas. Después de la limpieza, aplique aceite vegetal a los rieles de las parrillas para facilitar su deslizamiento.
• Solution de 1/2 taza de amoniaco por 1 galón de agua
• Limpiador abrasivo suave o limpiador comercial para hornos.
• Romoje unos 20 minutos, luego refriegue con un estropajo plástico.
Vidrio de la puerta del horno • Jabón y agua• Estropajo plástico de fregar no abrasivo
• Lave, limpie y seque con un paño suave.
• Limpiador de vidrios en atomizador • Seque con una toalla de papel.
• NO limpie la charola y parrilla en el ciclo de auto limpieza.
Cavidad de la gaveta almacenaje• Derrames de comidas que contiene leche o azúcar
• Todos los otros derrames
• Jabón y agua
• Limpiador liquido suave
• Cuando la gaveta se enfríe, lave, enjuague y seque con un paño suave.
• Lave, enjuague y seque con un paño suave.
• NOTA: No coloque las tapas en los quemadores mientras estén húmedas. No lave las tapas en el lavavajillas.
• Estropajo plástico de fregar no abrasivo• Limpiador abrasivo suave en polvo y agua
• Repita los pasos del proceso de limpieza (con los artículos indicados a la izquierda) según se necesite, hasta eliminar completamente la suciedad.• Enjuague y seque meticulosamente.
Quemadores exteriores
Las parrillas y tapas de los quemadores exteriores recubiertos de porcelana* (contd.) • Suciedad profunda
*Cuando la superficie de cocción esté fría, quite todas las salpicaduras y limpie. Las salpicaduras de comida que contienen ácidos, tales como viagre y tomate, pueden afectar el acabado. Para evitar desportilladuras a la por- celana de las parrillas, no golpee las parrillas y las tapas entre sí o contra superficies duras como utensilios de cocina de hierro fundido.
CUADRO DE LIMPIEZA (contd.)
73
EL CUIDADO DE SU COCINA

74
QUEMADORES EXTERIORES Y LA SUPERFICIE DECOCCIÓN SELLADOS
Consejos para limpiar los quemadoresexteriores• Usted debe quitar y limpiar la tapa del quemador
rutinariamente. Siempre limpie la tapa del quemador luego de un derrame de comida. El mantener la tapa del quemador limpia evita elencendido inadecuado y una llama desigual.
• Para obtener un flujo de gas y encendido del quemador apropiados, no permita el ingreso de derrames o salpicaduras de comida, productos de limpieza, o cualquier otro material dentro de la abertura del tubo de gas o los orificios del quemador.
• El gas debe fluir libremente a través de la abertura del tubo de gas para que el quemador se encienda adecuadamente. Usted debe mantener esta árealibre de cualquier suciedad y protegerla de der-rames o salpicaduras de comidas. Siempre man-tenga la tapa del quemador en su lugar mientras elquemador exterior esté en uso.
• Deje que la superficie de cocción se enfríe antesde limpiarla.
• No use limpiadores de horno, blanqueadores oproductos para quitar óxido.
• No obstruya el flujo de aire de ventilación y combustión alrededor de las orillas de la parrilla del quemador.
• Ocasionalmente verifique que las llamas del quemador sean detamaño y forma apropiada como semuestra. Una llamabuena es de color azul,no amarillo. Si las llamasson desiguales, tendráque limpiar los orificiosdel quemador.Orificios del
quemador
Tapa de hierro fundido del quemador
Espigas dealineación
Abertura deltubo de gas
Base delquemador
Encendedor
1-11⁄2
EL CUIDADO DE SU COCINA

ESPAÑO
L
CÓMO QUITAR LA PUERTA DEL HORNOPara el uso normal de su cocina, usted no necesitaquitar la puerta. Sin embargo, si tiene necesidad dequitar la puerta, siga las instrucciones dadas en esta sección.
NOTA: La puerta del horno es pesada.
Antes de quitar la puerta:1. Use una espátula o un destornillador e
insértelo en la esquina inferior del gancho detope de la puerta.
2. Palanquée el gancho de tope de la puerta y quítelo de la ranura de la bisagra del marco delantero. Tenga cuidado de no arañar la porcelana.
3. Repita el procedimiento para el otro ganchode tope de la puerta.
Agujero delperno paraquitar la puerta
Gancho de la bisagra
Cocina
Ranura de la bisagradel marco delantero
Gancho de tope de la puerta
QUEMADORES EXTERIORES Y LA SUPERFICIE DECOCCIÓN SELLADOS (contd.)
Para limpiar los quemadores:1. Quite la tapa del quemador de la base del
quemador2. Limpie la tapa del quemador con agua jabonosa
tibia y una esponja. También puede limpiarlo conun estropajo o un producto de limpieza ligera-mente abrasivo. No limpie la tapa del quemador enun lavavajillas o en un horno de auto limpieza.
3. Si la abertura del tubo de gas se ensucia o seobstruye, use un paño húmedo para limpiar el área.
4. Si los orificios están obstruidos, límpielos conun alfiler recto. Noagrande ni distor-sione el orificio. Nouse un palillo dedientes de madera.Si el quemador necesita ser regula-do, llame a un técni-co competente paradarle servicio.
5. Luego de limpiar la abertura del tubo de gas ylos orificios, vuelva acolocar la tapa delquemador. Paravolver a colocar latapa del quemador,asegúrese que lasespigas de alineaciónen la tapa esténdebidamente alin-eadas con la basedel quemador.
6. Encienda el quemador para ver si funciona. Si elquemador no enciendeluego de haberlo limpia-do, vuelva a verificar laalineación de la tapa opóngase en contactocon un Centro deServicio Sears. Nointente reparar el que-mador sellado por ustedmismo.
Abertura del tubo de gas
INCORRECT
CORRECT
INCORRECTO
CORRECTO
EL CUIDADO DE SU COCINA
75
continúa en la página siguiente

76
CÓMO QUITAR LA PUERTA DEL HORNO (contd.)
Para quitarla:1. Abra la puerta del horno. Inserte los pernos
para quitar la puerta,que vienen con sucocina, en ambos gan-chos de las bisagras.No quite los pernosmientras está quitan-do la puerta de lacocina de gas.
3. Sujete la puerta por ambos lados con sus dedoshacia la parte delanterade la puerta y sus pul-gares en la superficieinterior.
2. Cierre la puerta cuidadosamente hasta que descanse sobre los pernos para quitar la puerta.
Para reinstalaria:NOTA: Los pernos para quitar la puerta que ustedinsertó todavía tienen que estar en ambas bisagrasde la puerta.
1. Sujete la puerta por ambos lados con sus dedoshacia la parte delantera de la puerta y sus pul-gares en superficie interior.
4. Tire de la puerta en sentido recto hacia arriba,luego hacia usted. Los ganchos de las bisagrasse deslizarán fuera de la ranura de la bisagra delmarco delantero.
EL CUIDADO DE SU COCINA
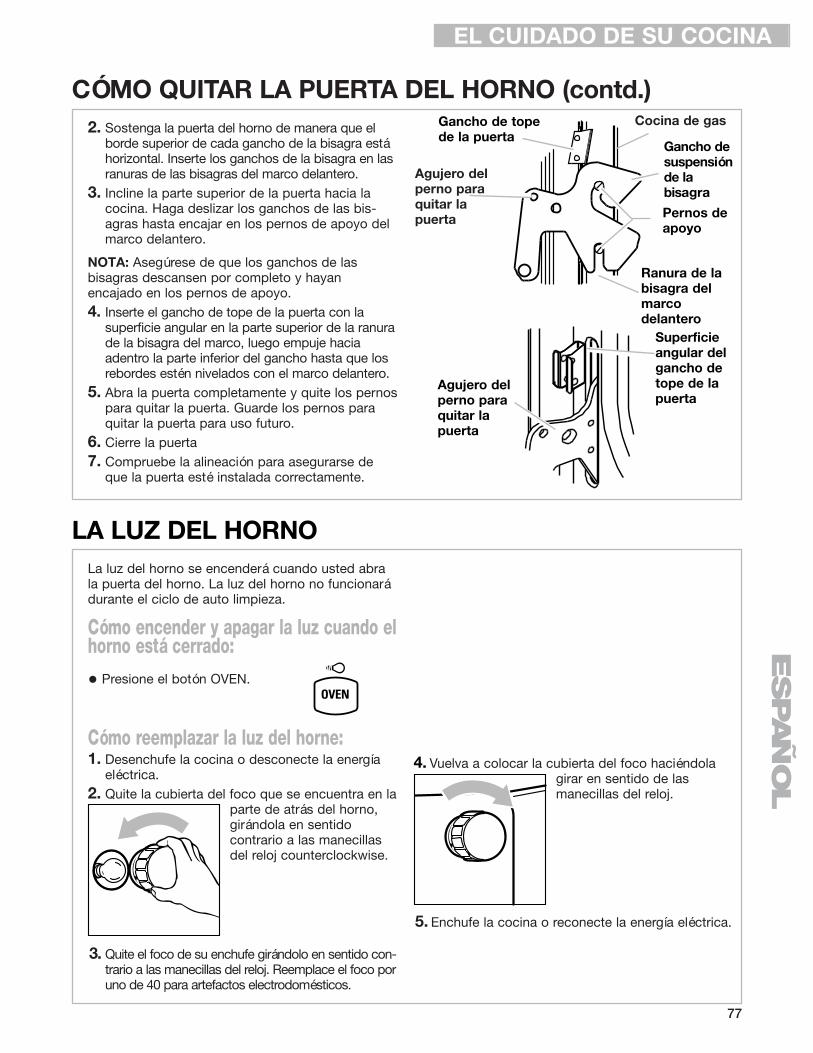
ESPAÑO
L
CÓMO QUITAR LA PUERTA DEL HORNO (contd.)
LA LUZ DEL HORNOLa luz del horno se encenderá cuando usted abrala puerta del horno. La luz del horno no funcionarádurante el ciclo de auto limpieza.
Cómo encender y apagar la luz cuando elhorno está cerrado:
• Presione el botón OVEN.
Cómo reemplazar la luz del horne:1. Desenchufe la cocina o desconecte la energía
eléctrica.2. Quite la cubierta del foco que se encuentra en la
parte de atrás del horno,girándola en sentido contrario a las manecillasdel reloj counterclockwise.
3. Quite el foco de su enchufe girándolo en sentido con-trario a las manecillas del reloj. Reemplace el foco poruno de 40 para artefactos electrodomésticos.
5. Enchufe la cocina o reconecte la energía eléctrica.
Cocina de gas
Ranura de labisagra delmarcodelantero
2. Sostenga la puerta del horno de manera que elborde superior de cada gancho de la bisagra estáhorizontal. Inserte los ganchos de la bisagra en lasranuras de las bisagras del marco delantero.
3. Incline la parte superior de la puerta hacia lacocina. Haga deslizar los ganchos de las bis-agras hasta encajar en los pernos de apoyo delmarco delantero.
NOTA: Asegúrese de que los ganchos de las bisagras descansen por completo y hayan encajado en los pernos de apoyo.4. Inserte el gancho de tope de la puerta con la
superficie angular en la parte superior de la ranurade la bisagra del marco, luego empuje hacia adentro la parte inferior del gancho hasta que losrebordes estén nivelados con el marco delantero.
5. Abra la puerta completamente y quite los pernospara quitar la puerta. Guarde los pernos paraquitar la puerta para uso futuro.
6. Cierre la puerta7. Compruebe la alineación para asegurarse de
que la puerta esté instalada correctamente.
Agujero delperno para quitar la puerta
Gancho desuspensiónde la bisagra
Gancho de topede la puerta
Superficieangular delgancho detope de lapuerta
Agujero delperno para quitar la puerta
Pernos deapoyo
EL CUIDADO DE SU COCINA
4. Vuelva a colocar la cubierta del foco haciéndolagirar en sentido de lasmanecillas del reloj.
77

78
LA COCINA NO FUNCIONACAUSA/SOLUCIÓN
• La cocina no está enchufada a un tomacorriente adecuadamente puesto atierra (polarizado de 120v).
• La cocina de gas no está apropiadamente conectada al suministro de gas.Póngase en contacto con un Centro de Servicio Sears para reconectar lacocina de gas al suministro de gas. (Vea las instrucciones para instalación.)
• Tiene un fusible quemado en casa o un disyuntor desconectado.
• Están activados los bloqueos del horno.
La mayoría de los problemas en la cocina son a menudo causados por pequeñas cosas que usted puedeencontrar y resolver sin herramientas de ninguna especie. Verifique las listas abajo indicadas y en lapágina siguiente antes de solicitar ayuda o servicio técnico.
PROBLEMA
Nada funciona
EL QUEMADOR PARA HORNEAR/ASARPROBLEMA
El horno no funciona
Cuando está en uso, el quemador produce unruido de tictac sordo
El quemador no seenciende
Las llamas del quemadordespegan de los orificiosy son amarillas o hacenruido
CAUSA/SOLUCIÓN
• Al usar el horno por primera vez, es necesario encender los quemadores desuperficie primero, con el fin de purgar el aire de las tuberías de gas.
• Usted no ha programado el control electrónico correctamente. Remítase a lasección de cómo programar el control electrónico del horno. (Vea pp. 51-66.)
• Usted ha programado un tiempo de comienzo diferido. Espere a que lleguela hora de comienzo o cancele y reprograme el control.
• La válvula principal o regulador del suministro de gas está en la posicióncerrado. (Vea las instrucciones para instalación.)
• Está activado el bloqueo del horno.
• Esto es normal. Este sonido se produce cuando el quemador del horno seenciende y se apaga para mantener la temperatura elegida para el horno.
• El encendedor está dañado. Póngase en contacto con un Centro de ServicioSears para reponerlo.
• Tiene un fusible quemado en casa o un disyuntor desconectado.
• La mezcla de aire/gas es incorrecta. Póngase en contacto con un Centro deServicio Sears para verificar la mezcla de aire/gas o vea las instruccionespara instalación.
Diagnóstico y solución de problemas

ESPAÑO
L
CUANDO SE USA EL CICLO DE AUTO LIMPIEZA DELHORNO
PROBLEMA
El ciclo de auto limpiezano funciona
CAUSA/SOLUCIÓN
• Usted no presionó START/ENTER.
• Usted ha programado un tiempo de comienzo diferido. Espere a que llegueel tiempo de comienzo o cancele y reprograme el control.
• La puerta no está cerrada completamente.
PROBLEMA
El quemador no seenciende
Las llamas de quemadorson desiguales
Las llamas del quemadordespegan de los orificiosy son amarillas o ruidosascuando se apagan
El quemador hace unruido seco cuandose enciende
LOS QUEMADORES EXTERIORESCAUSA/SOLUCIÓN
• La perilla de control no está en posición correcta. Empuje hacia dentro lasperillas de control antes de hacerlas girar. Asegúrese de que la perilla de control esté en la posición LITE. (Vea p. 46.)
• Tiene un fusible quemado en casa o un disyuntor desconectado.
• Los orificios del quemador pueden estar obstruidos. Límpielos con un alfilerrecto. (Vea p. 75.)
• Los orificios del quemador pueden estar obstruidos. Límpielos con un alfilerrecto. (Vea p. 75.)
• Las tapas del quemador pueden estar en posición incorrecta. (Vea p. 75.)
• El quemador necesita limpieza. (Vea pp. 74, 75.)
• El quemador puede haberse dañado. Póngase en contacto con un Centro deServicio Sears para que revise el quemador.
• Si se utiliza gas propano, la conversión de la cocina puede ser incorrecta.Póngase en contacto con un Centro de Servicio Sears.
• El quemador está mojado luego de haberlo lavado. Déjelo secar.
DIAGNÓSTICO Y SOLUCIÓN DE PROBLEMAS
79
continúa en la página siguiente
80
MENSAJES EN LA PANTALLA LUMINOSAPROBLEMA
La pantalla muestra “PF”
La pantalla muestra una “F”seguida de un número
La pantalla muestra “EO F5(La puerta del horno no cierraporque le estorba el mecanis-mo de traba del ciclo de autolimpieza).
CAUSA/SOLUCIÓN
• Hubo un apagón. Presione OFF/CANCEL para despejar la pantalla,luego vuelva a poner el reloj a la hora. (Vea p. 52.)
• Presione OFF/CANCEL para despejar la pantalla. Si el código “F”aparece nuevamente, llame al servicio técnico.
• Presione OFF/CANCEL para despejar la pantalla
• Presione y retenga el impulsor del interruptor de la puerta (ubicadoen el marco delantero del horno.) El mecanismo de traba se destra-bará en unos 6 segundos.
RESULTADOS DE COCCIÓNPROBLEMA CAUSA/SOLUCIÓN
Los utensilios de cocina no están nivelados en la superficie de cocción (Verifique si los líquidos están nivelados en la cacerola)
• Nivele la cocina de gas. (Vea las instrucciones para instalación.)
• Use utensilios de cocina con un asiento liso.
Calor excesivo de la superficie de cocción en áreas alrededor del utensilio
• Elija utensilios de cocina del mismo tamaño o ligeramente más grandes que la llama del quemador.
La temperatura del horno parece muy baja o muy alta
• Regule el control de temperatura del horno. (Vea “Cómo regular el control de temperatura del horno,” p. 58.)
Horneado o asado lento
• Precaliente el horno a la temperatura seleccionada antes de colocar la comida en el horno.
• Elija utensilios de hornear que permitan 2 pulgadas de espacio aéreo por todos los lados.
• Coloque la parrilla en posición más alta en el horno.
• Disminuya la temperatura del horno entre 15° a 25°F.
• Aumente el tiempo de horneado o de asado.
• Aumente la temperatura 25°F.
• Precaliente el horno a la temperatura seleccionada antes de colocar la comida dentro los en casos en que se recomienda recalentar.
• Elija utensilios de hornear que permitan 2 pulgadas de espacio aéreo por todos los lados.
• Abra la puerta del horno para controlar la comida cuando el temporizador indica el tiempo más corto sugerido en la receta.
• El ojear constantemente el horno prolonga más el tiempo de cocción.
• Nivele la cocina de gas.
• Hornee en el centro del horno con 2 pulgadas de espacio alrededor de cada molde de hornear.
• Cerciórese de que la masa esté nivelada en el molde de hornear.
• Cubra los bordes con papel de aluminio.
Los artículos horneados están muy oscuros en el fondo.
Artículos horneados desigualmente
Los bordes de la corteza se ponen de color oscuro antes que el pastel esté cocido
DIAGNÓSTICO Y SOLUCIÓN DE PROBLEMAS

81
ESPAÑO
LNOTAS

82
NOTAS

ESPAÑO
L
ASADOCacerolas ......................................................48, 49Consejos .............................................................57Posiciones de las parrillas del horno ..................49Programación del ciclo .......................................56
ASAR A LA PARRILLACharola...........................................................59-61Instrucciones.................................................60, 61Parrilla ...........................................................60, 61Posiciones recomendadas de las parrillas en el horno.............................................61Programación del ciclo .................................59, 60
CONTROL ELECTRÓNICO DEL HORNOBloqueo del horno...............................................52Cancelación.........................................................56Centígrados/Fahrenheit.......................................58Cómo comenzar..................................................56Interruptor de 12 horas .......................................54Pantalla luminosa/reloj ........................................51Reloj ....................................................................52Señales audibles .................................................53Temporizador electrónico..............................54, 55
CARACTERÍSTICAS ..................................................45
CONDUCTO DE VENTILACIÓN DEL HORNO ..........67
CACEROLAS .......................................................48, 49
COMPONENTES .......................................................45
CICLO DE AUTO LIMPIEZA SELECT CLEAN™Antes de comenzar .............................................68Comienzo diferido ...............................................70Comienzo inmediato ...........................................69Cómo funciona el ciclo .......................................69Cómo parar el ciclo.............................................71Programación de los controles ...........................69
CONTROL ELECTRÓNICO DEL HORNO ............62-66
DIAGNÓSTICO Y SOLUCIÓN DE PROBLEMAS...78-80
LA GAVETA DE ALMACENAJE..................................67
GARANTÍA .................................................................42
HORNEO CON ULTRABAKE™Cacerolas ......................................................48, 49Consejos .............................................................57Papel aluminio.....................................................50Posiciones recomendadas de las parrillas en el horno ..........................................................49Preparación de precalentamiento .......................57Programación del ciclo .......................................56Sistema ULTRABAKE....................................56, 57Utensilios para hornear .......................................50
ÍndiceTÓPICO PÁGINA TÓPICO PÁGINA
LIMPIEZAAuto limpieza SELECT CLEAN .....................68-71Cavidad de la gaveta almacenaje .......................73Cavidad del horno...............................................73Charola y parrilla para asar .................................73Parrillas del horno ...............................................73Perillas de control ...............................................72Quemadores de superficie............................74, 75Las parrillas y tapas de los quemadores exteriores recubiertos de porcelana .............72, 73Superficies exteriores..........................................72Tablero de controles............................................72Vidrio de la puerta del horno ..............................73
LUZ DEL HORNO ......................................................77
MEDIA PARRILLA STURDIGLIDE™ CON INSERTO DESMONTABLE ...............................49
MODELO Y NÚMERO DE SERIE ..............................41
PARRILLAS DEL HORNO STURDIGLIDE™ CON AGARRADERA INTEGRADA ............................49
PUERTA DEL HORNO..........................................75-77
QUEMADORES DE SUPERFICIEApagón eléctrico .................................................47Consejos .............................................................46Guía para programar los controles .....................46Indicadores de los quemadores exterior ............45Perillas de control ...................................45, 46, 72Programación de SURESIMMER™ ....................46Quemador principal.............................................46
SEGURIDAD ........................................................43, 44
SERVICIO..................................................Forro trasero
SOPORTE DE ANTI-VUELCO....................................43
TABLERO DE CONTROLAjustes del calor de los quemadores..................46Indicadores de los quemadores de superficie....45Perillas de control .........................................45, 46
TEMPERATURA DEL HORNOAjustes .....................................................56, 59-60Calibración ..........................................................58
UTENSILIOS DE COCINAConservas ...........................................................47Materiales............................................................48
83

© Sears, Roebuck and Co. ® Registered Trademark/TM Trademark of Sears, Roebuck and Co. Printed in the U.S.A.® Marca Registrada/TM marca de fábrica de Sears, Roebuck and Co. Impreso en EE.UU.
8273135A 1/00