Sega Crazy Taxi High Roller (Rev B) (GDX-0002B) - Progetto ...
115
420-6758-01UK REV 0 INSTALLATION & SERVICE MANUAL Before using this product, read this SERVICE MANUAL carefully to understand the contents stated herein. After reading this manual, be sure to keep it available nearby the product or somewhere convenient in order to be able to refer to it whenever necessary. Manufactured in the UK by: MANUFACTURING DIVISION (UK)
-
Upload
khangminh22 -
Category
Documents
-
view
3 -
download
0
Transcript of Sega Crazy Taxi High Roller (Rev B) (GDX-0002B) - Progetto ...

420-6758-01UK REV 0
INSTALLATION & SERVICE MANUAL
Before using this product, read this SERVICE MANUAL carefully to understand the contents stated herein. After reading this manual, be sure to keep it available nearby the product or somewhere convenient in order to be able to refer to it whenever necessary.
Manufactured in the UK by:
MANUFACTURING DIVISION (UK)

i
CONTENTS 1. BEFORE USING THIS PRODUCT........................................................................................................3
1.1. INSPECTIONS IMMEDIATELY AFTER TRANSPORTING THE PRODUCT TO THE LOCATION..4 2. INTRODUCTION TO THIS SERVICE MANUAL ...................................................................................6 3. INSTALLATION AND MAINTENANCE INSTRUCTIONS .....................................................................7
3.1. HANDLING AND INSTALLATION PRECAUTIONS ..........................................................................7 3.2. COIN HANDLING...............................................................................................................................7 3.3. NAME OF PARTS..............................................................................................................................8 3.4. ACCESSORIES .................................................................................................................................9 3.5. SHIPPING THE GAME BOARD.......................................................................................................10 3.6. SHIPPING THE MEDIA BOARD......................................................................................................12 3.7. ASSEMBLY INSTRUCTIONS..........................................................................................................13
3.7.1. INSTALLING THE BILLBOARD................................................................................................14 3.7.2. SECURING IN PLACE (LEG ADJUSTER ADJUSTMENT)......................................................17 3.7.3. FITTING THE SEAT .................................................................................................................19
3.7.3.1. Introduction: .......................................................................................................................19 3.7.3.2. Kit contents: .......................................................................................................................19 3.7.3.3. Installation instructions:......................................................................................................19
3.7.4. COIN HANDLING INSTALLATION...........................................................................................20 3.7.4.1. WIRING CONNECTIONS..................................................................................................21
3.7.5. CONNECTION TO THE POWER SUPPLY..............................................................................22 3.8. ASSEMBLY CHECK.........................................................................................................................23
3.8.1. MEMORY TEST........................................................................................................................23 3.8.2. C.R.T. TEST .............................................................................................................................24 3.8.3. INPUT TEST .............................................................................................................................25 3.8.4. OUTPUT TEST.........................................................................................................................26
3.9. MOVING THE MACHINE.................................................................................................................27 3.10. CONTROL PANEL (HANDLE MECHA.) - ‘HAPP’ TYPE ............................................................28
3.10.1. REPLACING VOLUME..........................................................................................................28 3.10.2. GREASING – SEGA and HAPP types ..................................................................................30 3.10.3. REPLACEMENT OF SPRING...............................................................................................30
3.11. SHIFT LEVER...............................................................................................................................31 3.11.1. REMOVING SHIFT LEVER...................................................................................................31 3.11.2. SWITCH REPLACEMENT ....................................................................................................32 3.11.3. GREASING............................................................................................................................32
3.12. ACCELERATOR AND BRAKE.....................................................................................................33 3.12.1. REMOVING THE ACCELERATOR AND BRAKE.................................................................33 3.12.2. ADJUSTING OR REPLACING THE VOLUME .....................................................................35 3.12.3. GREASING............................................................................................................................36
3.13. REPLACEMENT OF FLUORESCENT LAMPS............................................................................37 3.13.1. FRONT FLUORESCENT: .....................................................................................................37
3.14. GAME BOARD .............................................................................................................................39 3.14.1. TAKING OUT THE GAME BOARD.......................................................................................39 3.14.2. REMOVING THE GD-ROM DRIVE.......................................................................................41
3.15. COMPOSITION OF THE GAME BOARD ....................................................................................42 3.16. TROUBLESHOOTING .................................................................................................................43 3.17. FUSES..........................................................................................................................................44
4. PERIODIC CHECK AND INSPECTION ..............................................................................................45 4.1. CLEANING THE CABINET SURFACES..........................................................................................45
5. CONTENTS OF GAME .......................................................................................................................46 5.1. Playing the Game.............................................................................................................................47 5.2. Game Modes....................................................................................................................................50
6. EXPLANATION OF TEST DATA AND DISPLAY................................................................................51 6.1. INTERNAL SWITCHES AND COIN METERS.................................................................................52 6.2. SYSTEM TEST MODE.....................................................................................................................53
6.2.1. EXPLANATION OF TEST AND DATA DISPLAY .....................................................................53 6.2.2. SYSTEM TEST MENU MODE..................................................................................................54 6.2.3. MEDIA BOARD TEST...............................................................................................................55 6.2.4. SYSTEM INFORMATION .........................................................................................................56 6.2.5. JVS TEST .................................................................................................................................57 6.2.6. INPUT TEST Screen.................................................................................................................58

ii
6.2.7. SOUND TEST...........................................................................................................................59 6.2.8. C.R.T. TEST .............................................................................................................................60 6.2.9. COIN ASSIGNMENTS..............................................................................................................61 6.2.10. CLOCK SETTING .................................................................................................................64 6.2.11. NETWORK SETTING (CORE) .............................................................................................65 6.2.12. NETWORK SETTING (MEDIA) ............................................................................................66
6.3. GAME TEST MODE.........................................................................................................................70 6.3.1. INPUT TEST .............................................................................................................................71 6.3.2. OUTPUT TEST.........................................................................................................................72 6.3.3. GAME ASSIGNMENTS ............................................................................................................73 6.3.4. I/O RANGE SETTING...............................................................................................................74 6.3.5. SOUND VOLUME SETTING ....................................................................................................75 6.3.6. BOOKKEEPING........................................................................................................................76 6.3.7. BACKUP DATA CLEAR............................................................................................................81
7. COIN MECH INSTALLATION AND CREDIT BOARD SET UP...........................................................82 7.1. INTRODUCTION..............................................................................................................................82
7.1.1. PRICE OF PLAY SETTINGS UK .............................................................................................84 7.1.2. PRICE OF PLAY SETTINGS EURO ........................................................................................85 7.1.3. PRICE OF PLAY SETTINGS Austria-Czech-Denmark-Norway-Israel-France2 ......................86
8. DESIGN RELATED PARTS.................................................................................................................87 9. PARTS LIST ........................................................................................................................................88
9.1. CTH-0000UK TOP ASSY CRAZY TAXI 3 HR .................................................................................88 9.2. CTH-1000UK ASSY UR CABI..........................................................................................................89 9.3. NOB-1100UK ASSY FRAMEWORK UR..........................................................................................93 9.4. NOA-1200UK ASSY CRT COVER UK.............................................................................................94 9.5. CTA-1150UK ASSY CC BOX WW ..................................................................................................95 9.6. NOA-1300UK ASSY BILLBOARD...................................................................................................96 9.7. CTH-1400UK ASSY FRONT PANEL...............................................................................................97 9.8. CTH-1500UK ASSY FLOOR............................................................................................................98 9.9. NOB-1710UK ASSY AC UNIT NEW ................................................................................................99 9.10. NOA-1750UK ASSY SERVICE DOOR.......................................................................................100 9.11. NOB-1950UK ASSY SFMD WHITE (FLAT DOOR) ...................................................................101 9.12. CTH-2000UK ASSY CONTROL PANEL ....................................................................................102 9.13. CTH-2200UK ASSY WOOFER ..................................................................................................104 9.14. CTH-4000UK ASSY ELEC .........................................................................................................105 9.15. CTH-4100UK ASSY MAIN BD....................................................................................................106 9.16. CTA-4200UK ASSY XFMR.........................................................................................................107 9.17. CTH-5000UK ASSY SEAT CTH.................................................................................................108 9.18. CTA-6001UK ASSY WIRE L ......................................................................................................109 9.19. NOB-6001UK ASSY WIRE L......................................................................................................109 9.20. CTA-6002UK ASSY WIRE R......................................................................................................109 9.21. CTH-INST...................................................................................................................................110
10. APPENDIX A - ELECTRICAL SCHEMATIC......................................................................................111 10.1. WIRE COLOURS .......................................................................................................................111 10.2. ELECTRICAL SCHEMATIC .......................................................................................................111

3
1. BEFORE USING THIS PRODUCT To ensure the safe usage of the product, be sure to read the following before using the product. The following instructions are intended for the use of QUALIFIED SERVICE PERSONNEL ONLY. After carefully reading and sufficiently understanding the instructions should any activity be carried out on the product. Only qualified service personnel should carry out maintenance on the product. Terms such as WARNING!, CAUTION, and IMPORTANT! Are used where an explanation is given which requires special attention, depending on the potential risk. SEGA is not responsible for injury or damage caused by use in a manner contrary to the instructions stated in this document. In order to prevent accidents warning stickers and printed instructions are applied in the places where a potentially hazardous situation relating to the product could arise. Be sure to comply with these warnings.
Indicates that mishandling the product by disregarding this warning will cause a potentially hazardous situation, which can result in death or serious injury.
Indicates that mishandling the product by disregarding this caution will cause a potentially hazardous situation, which can result in personal injury and or material damage.
This is cautionary information that should be complied with when handling the product. Indicates that mishandling the product by disregarding this will cause a potentially hazardous situation that may not result in personal injury but could damage the product.
Be sure to turn off the power and disconnect from the mains supply before working on the machine. Ensure that the correct fuse(s) is fitted to the machine. Details of the correct fusing of the machine are enclosed in the Service Manual. Ensure that only qualified Service Engineers perform any maintenance work on the machine. Specification changes, removal of equipment, conversion and/or addition, not designated by SEGA are not permitted and will invalidate this product’s CE conformity. The parts of the product also include any warning labels or safety covers for personal protection etc. A potential hazard will be created if the machine is operated while any parts have been removed. Should any doors, lids or protective covers be damaged or lost, do not operate the product. SEGA is not liable in any whatsoever for any injury and/or damage caused by specification changes not designated by SEGA. Before installing the product, check for the Electrical Specification Sticker, SEGA products have a sticker on which the electrical specifications are detailed. Ensure that the product is compatible with the power supply voltage and frequency requirements of the location in which the machine is to be installed. Install and operate the machine only in places where appropriate lighting is available, allowing warning stickers to be clearly read. To ensure maximum safety for both customers and operators, stickers and printed instructions describing potentially hazardous situations are applied to places where accidents could occur. Ensure that where the product is operated has sufficient lighting to allow any warnings to be read. If any sticker or printed warning is removed or defaced, do not operate the machine, until it has been replaced by an identical item. When handling the monitor, be very careful. (Applies only to product with monitor)

4
Some of the monitor (TV) parts are subject to high tension voltage. Even after turning off the power some components are still occasionally subject to high tension voltage. Monitor repair and replacement should be performed by qualified service engineers only. In cases where commercially available monitors and printers are used only the contents relating to this product are stated in this manual. Some commercially available equipment has functions and reactions not stated in this manual. Read this manual in conjunction with the specific manual of such equipment. Descriptions contained herein may be subject to change without prior notification. The contents described herein are fully prepared with due care. However, should any question arise or errors be found please contact SEGA.
1.1. INSPECTIONS IMMEDIATELY AFTER TRANSPORTING THE PRODUCT TO THE LOCATION
�� Only QUALIFIED SERVICE PERSONNEL should carry out inspection.
Normally, at the time of shipment, SEGA products are in a state to allowing usage immediately after transporting to the location. Nevertheless, an irregular situation may arise during transportation preventing this. Before turning on the power, check the following points to ensure that the product has been transported safely. �� Are then any dented parts or defects (cuts, etc.) on the external surfaces of the product.? �� Are castors and leg adjusters present and undamaged? �� Do the power supply voltage and frequency requirements meet with the local supply? �� Are all wiring connectors correctly and securely connected? Unless connected in the correct direction,
connector connections cannot be made successfully. Do not insert connectors forcibly. �� Are all IC’s of each IC BD firmly inserted? �� Does the power cord have any cuts or dents? �� Do fuses meet the specified rating? �� Are such units such as monitors, control equipment, IC BD, etc. firmly secured? �� Are all earth wires connected? �� Are all accessories available? �� Can all doors and lids be opened with the accessory keys and/or tools?

5
CONCERNING THE STICKER DISPLAY CONCERNING WARNING STICKERS SEGA product has stickers describing the product manufacture number (Serial Number) and electrical specification. If you require service assistance you will require the Serial Number. Identical machines may have different parts fitted internally. Only by quoting the Serial Number will the correct parts be identified.
SEGA product has warning displays on stickers, labels or printed instructions adhered/attached to or incorporated in the places where hazardous situations can arise. The warning displays are intended for the accident prevention of customers and service personnel.
SPECIFICATIONS Installation Space (cm): 80 (W) x 150 (D)
Height (cm): 225 Weight (kg): Approx. 200, when assembled with seat
Rated Voltage (VAC): 230V AC
Rated Current (A): 2 A Operating Temperature Range 5 – 40º C
Note: Descriptions in this manual are subject to change without prior notice.

6
2. INTRODUCTION TO THIS SERVICE MANUAL SEGA ENTERPRISES LTD., supported by its experience in electronic high technology of VLSI’s, microprocessors etc. and with a wealth of experience, have for more than 30 years been supplying various innovative and popular games to the world market. This Service Manual is intended to provide detailed descriptions together with all the necessary information covering the general operation of electronic assemblies, electro-mechanicals, servicing controls, spare parts, etc. as regards this new SEGA product. This manual is intended for those who have knowledge of electricity and technical expertise especially in IC’s, CRT’s, microprocessors etc. Carefully read this manual to acquire sufficient knowledge before working on the machine. Should there be any malfunction, non-technical personnel should under no circumstances touch the internal systems. Should such a situation arise contact the nearest branch listed below, or our head office. SEGA AMUSEMENTS EUROPE LTD./ SEGA SERVICE CENTRE Suite 3a Oaks House 12 - 22 West Street Epsom Surrey United Kingdom KT18 7RG
Telephone: +44 (0) 1372 731820
Fax: +44 (0) 1372 731849

7
3. INSTALLATION AND MAINTENANCE INSTRUCTIONS
�� Only QUALIFIED SERVICE PERSONNEL should carry out installation and maintenance.
3.1. HANDLING AND INSTALLATION PRECAUTIONS When installing or inspecting the machine, be very careful of the following points and pay attention to ensure that the player can enjoy the game safely. The game must NOT be installed under the following conditions: �� Outside, the game is designed for indoor use only. �� In areas directly exposed to sunlight, high humidity, dust, excessive heat or extreme cold. �� In locations that would present an obstacle in the case of an emergency i.e. near fire equipment or
emergency exits. �� On unstable surfaces or surfaces subject to vibration. �� Where liquids, other than routine cleaning, may come into contact with the game. Important: �� Only Qualified Service Personnel should install this machine. �� Be sure to switch the supply power OFF and remove the mains supply plug from the machine before any
work is carried out on the machine. �� Do not attempt to repair the PCB’s (Printed Circuit Boards) yourself. This will void the warranty. The
PCB’s contain static sensitive devices that could be damaged. �� Always return a faulty part to your distributor with adequate packaging and protection. �� When removing the plug from the mains always grasp the plug not the cable. �� Do not use a fuse that does not meet the specified rating. �� Make sure all connections are secure before applying power.
�� Ensure that the mains lead is not damaged. If the mains lead is damaged in any way there could be a danger of electric shock or a fire hazard.
�� Ensure that the power supply is fitted with circuit protection. Using the power supply without circuit protection is a fire hazard.
3.2. COIN HANDLING Standard Sega machines are fitted with a SR3 coin mechanism, however, as a service to our customers Sega machines can be supplied with no coin mechanism or door allowing the customer to fit a coin handling option from the approved list. Fit only the coin handling arrangements detailed below and follow the instructions provided in section 4. Failure to fit the coin handling options detailed or failure to follow the installation instructions will render the machine, under the CE marking directive, void. Approved coin handling options: �� Coin controls SR3 �� Generic mechanical �� Mars (MS111B1 and ME115) �� SECI RM4-G20

8
3.3. NAME OF PARTS
Width (cm) Length (cm) Height (cm) Approx Weight (Kg)
MAIN CABINET 76 105 180 165 FLOOR 63 71 15 SEAT 77 46 89
35
BILLBOARD 76 17 31
WHEN ASSEMBLED 76 147 224 200

9
3.4. ACCESSORIES The machine is supplied with an installation kit. Please ensure the following parts are supplied:
Item Component Part Description Qty
1 NOA-1301X ASSY BILLBOARD 1 2 CTH-1500UK ASSY FLOOR 1 3 CTA-0001 JOINT BRKT L 1 4 CTA-0002 JOINT BRKT R 1 8 CTH-0001UK DISPLAY CARD 1 9 NOA-1302UK BILLBOARD SHEET 1 14 CTH-0002UK PLAY INSTR SH A MULTI 1 16 CTH-0004UK SUB INSTR SH MULTI 1 18 420-5827 SERVICE MANUAL SANWA 31K 1 19 SAECE-XXX DECLARATION OF CONFORMITY 1
101 514-5078-5000 FUSE 5X20 CERAMIC SB 5000mA 1 201 030-000820-SB M8X20 BLT W/S BLK 2 202 068-852216-0B M8 WSHR 22OD FLT BLK 2 203 008-T00412-0C M4X12 TMP PRF TH CRM 5 402 420-6758-01UK SERVICE MANUAL CTH 1 403 420-6620UK SERVICE MANUAL GDROM 1 406 OS1019 SELF SEAL BAG 9X12.3/4 1 407 PK0325 INST KIT BOX CTH 1 408 PK0061 BUBBLE WRAP LARGE 1.5M X 45M 0.025 409 220-5484-H VOL 5-K-OHM HAPP 50-8026-00 1 411 540-0006-01 WRENCH M4 TMP PRF 1 412 540-0007-01 WRENCH M5 TMP PRF 1 413 540-0009-01 WRENCH M8 TMP PRF 1 414 540-0015-01 WRENCH M6 TMP PRF 1
Items 101 & 102 - Tamperproof TORX wrench.

10
3.5. SHIPPING THE GAME BOARD
Replacement or repair of the Game Board (Chihiro) for this product should be undertaken at the appropriate repair centre. Be sure to follow the specifications below when requesting repairs/sending the board to the repair centre. Not following the specifications may result in the board not being accepted or in extra charges being made.
�� Put the game board in the carton box as is. Do not carry out any disassembly or part removal other than that specified.
�� Follow the procedure and instructions regarding direction below when placing the Game Board in the carton box.
�� When packing the game board with the Media Board attached, do not remove the Key Chip.
�� When packing the game board with the Media Board detached, be sure to include the AVIP Cable.
�� When packing, attach the accessory stickers in the specified places on the Game Board and carton box.
INSTRUCTIONS
1. Wrap the Chihiro Board in a plastic bag.
2. Place it on top of the bottom surface cushioning material. Turn the Filter Board to face the side with the three honeycomb buffers. Packing it in the opposite direction may cause damage to the Filter Board.
3. Insert corrugated cardboard into the space between the lateral honeycomb buffers of the bottom surface cushioning material and stow the AVIP cable inside.
4. Place the Chihiro Board wrapped in the bottom surface cushioning material into the carton box. Use the handles on the bottom surface cushioning material.
5. Place the upper surface cushioning material on top of the Chihiro Board. Be sure to align it in the right direction, as it will not fit otherwise.
6. Close the top of the carton box and seal it tightly with adhesive tape.

11

12
3.6. SHIPPING THE MEDIA BOARD
When sending the Media Board for repairs, follow the specifications below and request repairs or send the Board to your retailer/the repair centre.
Not following the specifications may result in the board not being accepted or in extra charges being made. Also, mistaken handling can damage or result in loss of parts.
�� Be sure to use the special purpose carton box included with this product.
�� Do not remove the Key Chip. Send the board with the Key Chip attached.
�� Undo the 10 screws holding the Media Board to the Main Board and pack the Media Board. Do not carry out any disassembly or part removal other than that specified in this manual.
�� Pack the Media Board in the special purpose carton box as shown in the explanatory diagram.
�� The packing material in the carton box has a shock absorbing function. Be sure to use it when packing. Do not bend or fold the material in a direction other than that shown on the diagram.
�� Do not pack any wires, cables, or screws together with the Board.
�� Be sure to attach the special purpose carton box accessory sticker "843-����B."

13
3.7. ASSEMBLY INSTRUCTIONS
�� Perform the assembly by following the procedure herein stated. Failure to comply with the instructions, for example, inserting the plug into an outlet at a stage not mentioned in this manual can cause an electric shock
�� Assembling should be performed as per this manual. Since this is a complex machine, erroneous assembling can cause damage to the machine, or malfunction to occur.
�� Do not attempt to complete this work alone, a minimum of 2 people are required.
�� Only QUALIFIED SERVICE PERSONNEL should carry out assembly.
When carrying out the assembly work, follow the procedure in the following sequence:
STEP 1 INSTALLING THE BILLBOARD STEP 2 INSTALLING THE FLOOR STEP 3 SECURING IN PLACE (LEG ADJUSTMENT) STEP 4 FITTING SEAT STEP 5 CONNECTION TO THE POWER SUPPLY STEP 6 ASSEMBLY CHECK
Note that the parts contained within the installation kit are required for the assembly work. The following tools will be required when installing this machine:

14
3.7.1. INSTALLING THE BILLBOARD
�� To perform work safely, use a secure and stable step to improve access to the top of the cabinet. Working without using a step may cause accidents.
�� Only QUALIFIED SERVICE PERSONNEL should carry out this operation.
1. Insert ASSY BILLBOARD to the top part of the cabinet 2. Secure with the two Tamperproof screws (Part No. 008-T00412-0B, supplied with Accessory kit)

15
INSTALLING THE FLOOR
�� Ensure all connections are secure - poor connections can cause electric shock or short circuit.
�� Take care not to damage wiring during installation, as this can cause electric shock or short circuit.

16
� Slightly lower the 2 Adjusters on the cabinet and install JOINT BRACKET L & R by inserting from the rear, and secure to ASSY FLOOR using hexagon bolts as shown.
� After lowering the Adjusters fully downward, tighten both Adjuster’s lock nuts fully upward.

17
3.7.2. SECURING IN PLACE (LEG ADJUSTER ADJUSTMENT)
�� Make sure all of the leg adjusters are in contact with the floor. If they are not the machine may move and cause injury. This operation requires 2 people.
�� Only QUALIFIED SERVICE PERSONNEL should carry out this operation.
This machine has four castors and two leg adjusters on the main cabinet, and a further two level adjusters on the rear of the floor. When the installation position is decided, unscrew the leg adjusters so that they raise both front castors 7mm from the floor. Make sure the machine is level. 1. Move the product into the installed position. 2. Unscrew the adjusters until they are in contact
the floor, and use a wrench to turn them further until the front castors are raised approximately 7mm above the floor.
3. Tighten the locknut on the leg adjusters upwards to lock the legs in position.

18
If this product is installed on irregular surfaces, use the two Level Adjusters on the bottom of the FLOOR to ensure the product is level.

19
3.7.3. FITTING THE SEAT
3.7.3.1. Introduction: This kit facilitates a lean-on REST for application to ROUTE 66 Standard. This REST allows pressure to be taken off the left leg, which increases the length of time that a player may play the game without suffering from fatigue.
3.7.3.2. Kit contents: PART NUMBER DESCRIPTION QTY
CTA-5001UK SEAT FRAME R 1 CTA-5002UK SEAT FRAME L 1 CTA-5003UK SEAT FRAME COVER R 1 CTA-5004UK SEAT FRAME COVER R 1 CTA-5005UK SEAT BENCH PTR (with CTH cushion) 1 008-T00416-0C M4X16 MSCR TMP PRF TH CRM 10 030-000820-SB M8X20 BLT W/S BNP 8 068-852216-0B M8 WSHR FORM C FLT BNP 8 030-000616-SB M6X16 BLT W/S BNP 8 068-651416-0B M6 WSHR FORM C FLT BNP 8
3.7.3.3. Installation instructions:
�� A condition of fitting this REST is that the machine is fully fitted with items CTA-0001 & CTA-0002 (JOINT BRKT L & R) as described in the 18 WHEELER Manual. Non-fitment of these brackets may lead to injury, as there will be nothing to secure the floor to the main cabinet. The REST relies on the floor being firmly secured to the main cabinet in order to support the weight of the player when resting against the machine.
�� The REST utilises the weight of the main cabinet to prevent tipping. It is important that this REST is used only to take the weight off the left leg. Sega accepts no responsibility for injury arising due to inappropriate usage of the REST.
1. Fix the CTA-5001UK & CTA-5002UK SEAT FRAMES to the FLOOR ASSEMBLY (CTH-1500UK) using the 8-off M8 bolts and washers provided as shown.
2. Fix the CTA-5003UK & CTA-5004UK SEAT FRAME COVERS to the SEAT FRAMES using the 10-off M4 tamperproof machine screws provided as shown.
3. Fix the CTA-5005UK SEAT BENCH PTR between the SEAT FRAMES using the 8-off M6 bolts and washers provided as shown. Loosely fit these bolts (top ones first) before tightening.

20
3.7.4. COIN HANDLING INSTALLATION
�� Only QUALIFIED SERVICE PERSONNEL should carry out this operation.
When fitting the coin mechanism to the door please refer to the specific manufacturers installation instructions for that coin mechanism. To fit the door to the machine follow the procedure below.
�� Loosen all of the bolts on the frame that secure the clips. �� Turn all clips in towards the door.
�� Position the door into the aperture in the machine. �� Turn the clips around so that they will hold the door in the
machine. �� Tighten all of the bolts.
NOTE: DOUBLE FRAMED MINI DOOR SHOWN. SINGLE FRAMED DOOR SIMILAR FITTMENT.

21
3.7.4.1. WIRING CONNECTIONS. COIN MECH LOOM INSTALLATION
C220B LM1006IDC LM1006LAMP-0.1
�� Attach the lamp holder to the bracket on the coin return button.
�� Attach one 15-way connector to the C220 coin mech. �� Attach the other 15-way connector to Validator A on the
credit board. �� Attach the 2-way connector to ‘LAMP’ on the VTS board.
GENERIC MECHANICALS
LM1008 LM1008-LAMP
�� Fit the two lamp holders behind the coin return buttons. �� Attach the blue cable and orange cable to one mech’s
microswitch switch. �� Attach the blue/green cable and orange/green cable to the
other mech’s microswitch. �� Attach the 2-way mate and lok plug to the 2-way mate and
lok cap provided. �� Attach one 15-way connector to Validator A and the other
to Validator B on the credit board
MARS MS111B1 MARS ME115
LM1007 LM1008-LAMP
�� Fit the lamp holder to the bracket behind the coin return button.
�� Fit one of the 13-way connectors to the coin mech. �� Fit the other 13-way connector to Validator A on the credit
board. Note the 13-way connector is keyed and this key must coincide with the key on the credit board.
SECI, C120, SR3 OWN LOOM AND LM1006LAMP-0.1
�� Attach the lamp holder to the bracket on the coin return button.
�� Attach the 2- connector to ‘LAMP’ on the VTS board. �� Attach the validator’s own loom to position A on the credit
board
VTS credit board assembly
22
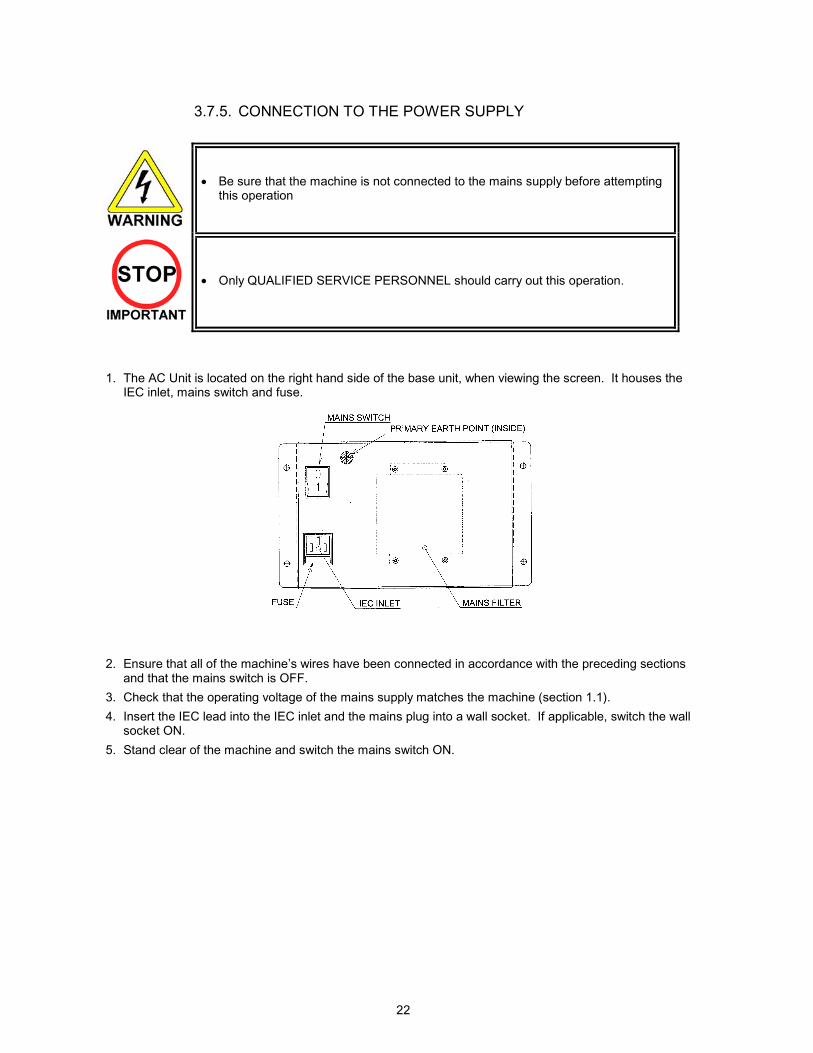
3.7.5. CONNECTION TO THE POWER SUPPLY
�� Be sure that the machine is not connected to the mains supply before attempting this operation
�� Only QUALIFIED SERVICE PERSONNEL should carry out this operation.
1. The AC Unit is located on the right hand side of the base unit, when viewing the screen. It houses the
IEC inlet, mains switch and fuse.
2. Ensure that all of the machine’s wires have been connected in accordance with the preceding sections and that the mains switch is OFF.
3. Check that the operating voltage of the mains supply matches the machine (section 1.1). 4. Insert the IEC lead into the IEC inlet and the mains plug into a wall socket. If applicable, switch the wall
socket ON. 5. Stand clear of the machine and switch the mains switch ON.

23
3.8. ASSEMBLY CHECK
�� Only QUALIFIED SERVICE PERSONNEL should carry out this operation.
In the TEST MODE, ensure that the assembly has been made correctly and IC Board is satisfactory (refer to Section ). In the test mode, perform the following test:
3.8.1. MEMORY TEST When "MEDIA BOARD TEST" is selected from the System Test Mode Menu Screen the Game Board memory is automatically tested. If the display beside each memory reads "GOOD", the Game Board is functioning correctly. Also, when "SYSTEM INFORMATION" is selected, Main Board and Media Board data for the Game Board are displayed. If data is displayed correctly, the Game Board is functioning correctly.
MEDIA BOARD TEST screen
SYSTEM INFORMATION screen

24
3.8.2. C.R.T. TEST In the TEST mode menu, selecting C.R.T. TEST allows the screen (on which the moniter is tested) to be displayed. Although the moniter adjustments have been made at the time of shipment from the factory, make judgment as to whether an adjustment is needed by watching the test mode screen. If it is necessary, adjust the moniter by referring to Monitor manual.

25
3.8.3. INPUT TEST Select INPUT TEST to display the following screen and check the status of input devices. This test should be used periodically to check that each input device is functioning correctly.
� ��Crazy Taxi HighRoller �
[GAME TEST MENU�-INPUT TEST] �
DRIVE GEAR OFF ������REVERSE GEAR OFF
JUMP OFF �START OFF SERVICE OFF
TEST OFF � WHEEL 7eH ACCEL 2fH BRAKE 2fH
� -PRESS TEST BUTTON AND SERVICE BUTTON TO EXIT-
� Operate the WHEEL (steering wheel), ACCEL (accelerator), and BRAKE (brake pedal) to check that the values change appropriately and smoothly. Input is normal if the display to the right of other each item changes from OFF to ON when each input device is operated. Press the SERVICE and TEST Buttons simultaneously to return to the Game Test Menu screen.

26
3.8.4. OUTPUT TEST Select OUTPUT TEST to display the following screen and check the status of each lamp. This test should be used periodically to check that the lamps are functioning correctly.
� Crazy Taxi HighRoller
[GAME TEST MENU�-OUTPUT TEST] � START BUTTON OFF LAMP NO.1 OFF NOT USED LAMP NO.2 OFF NOT USED LAMP NO.3 OFF NOT USED LAMP NO.4 OFF NOT USED EXIT��� � � � �
-SELECT WITH SERVICE BUTTON AND PRESS TEST BUTTON- �
Perform the tests as follows. START BUTTON: Select START BUTTON and press the TEST Button. The display to the right of the
item will change to ON and the Start Button will flash. Move the cursor to EXIT and press the TEST Button to return to the Game Test Menu screen.

27
3.9. MOVING THE MACHINE
�� When moving the machine, be sure to remove the plug from the power supply. Moving the machine with the plug inserted can cause the power cord to be damaged, resulting in a fire or electric shock.
�� When moving the machine, retract the leg adjusters fully and ensure the casters make contact with the floor. During movement pay careful attention so that the casters or leg adjusters do not damage any other cabling laid on the floor. Such damage could result in a fire or electric shock.
�� Do not push the upper part of the cabinet. Failure to observe this can cause the cabinet to fall forwards and result in accidents.
�� When transporting the machine, be sure to hold the catch portion on the rear of the cabinet with the castors making contact with the surface as shown below. Inclining the machine by holding portions other than the catch or moving the cabinet without retracting the adjusters can damage the cabinet and/or the floor surface.
�� Do not push the Billboard. Failure to observe this may damage the installation portions and may cause unexpected accidents.
�� Only QUALIFIED SERVICE PERSONNEL should carry out this operation.
(Remove SEAT ASSY before moving)

28
3.10. CONTROL PANEL (HANDLE MECHA.) - ‘HAPP’ TYPE
�� Before starting work, ensure that the cabinet is isolated from the mains by switching off and removing the IEC mains lead from the wall outlet.
�� Be careful not to damage wiring. Damaged wiring can cause electric shock and short circuits.
�� When closing the Control Panel be very careful to avoid trapping fingers or hands.
�� Only QUALIFIED SERVICE PERSONNEL should carry out this procedure.
3.10.1. REPLACING VOLUME If the steering operability becomes poor, and adjusting the VOLUME SETTING in the TEST MODE in ineffective, the cause may be the failure of the Volume Gear to mesh and/or the Volume Potentiometer malfunctioning. When the Steering Wheel is rotated fully left or right, if the Volume shaft is rotating within the movable range, the Volume is not feared to be damaged. Use the procedure described herein to position the steering VR such that the correct centre value (refer to Section 5.3.5) is displayed when the Steering Wheel is at rest. 1. Power OFF the machine and
remove the IEC lead from the wall outlet.
2. Remove the three tamperproof screws and open the Control Panel.

29
1. Loosen the two screws and adjust the gear mesh by moving the VR Bracket.
2. Adjust to an appropriate setting by securing the steering wheel in the straight ahead position.
3. After adjustment, check the volume setting as described in Section 5.3.5. If necessary, repeat steps 3 & 4 until the volume value is within allowable limits (±3H)
HOW TO REPLACE 1. Disconnect the Volume Connector. 2. Take out the two screws and remove the Volume together with the VR Bracket. 3. After replacing the Volume, engage the gears at the angle shown and fix the VR Bracket. Close the Control Panel and replace the three tamperproof screws before turning power ON and setting the Volume value in the TEST MODE.
30
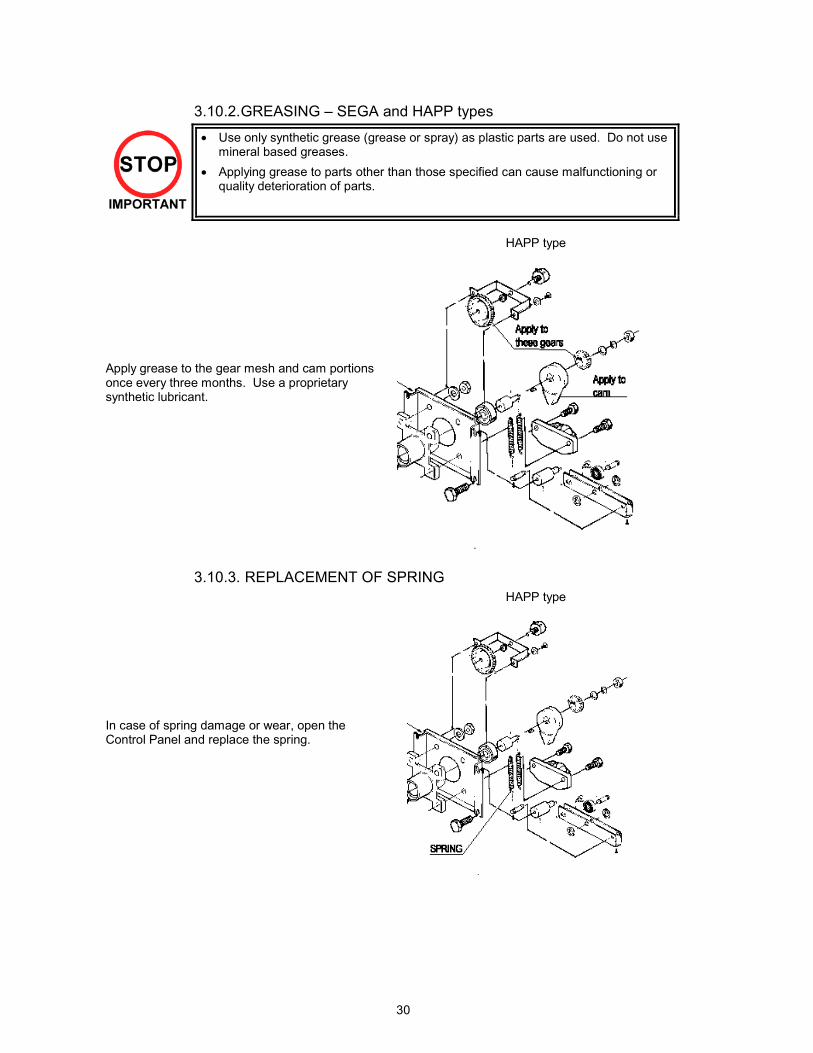
3.10.2. GREASING – SEGA and HAPP types
�� Use only synthetic grease (grease or spray) as plastic parts are used. Do not use mineral based greases.
�� Applying grease to parts other than those specified can cause malfunctioning or quality deterioration of parts.
HAPP type
Apply grease to the gear mesh and cam portions once every three months. Use a proprietary synthetic lubricant.
3.10.3. REPLACEMENT OF SPRING HAPP type
In case of spring damage or wear, open the Control Panel and replace the spring.
31
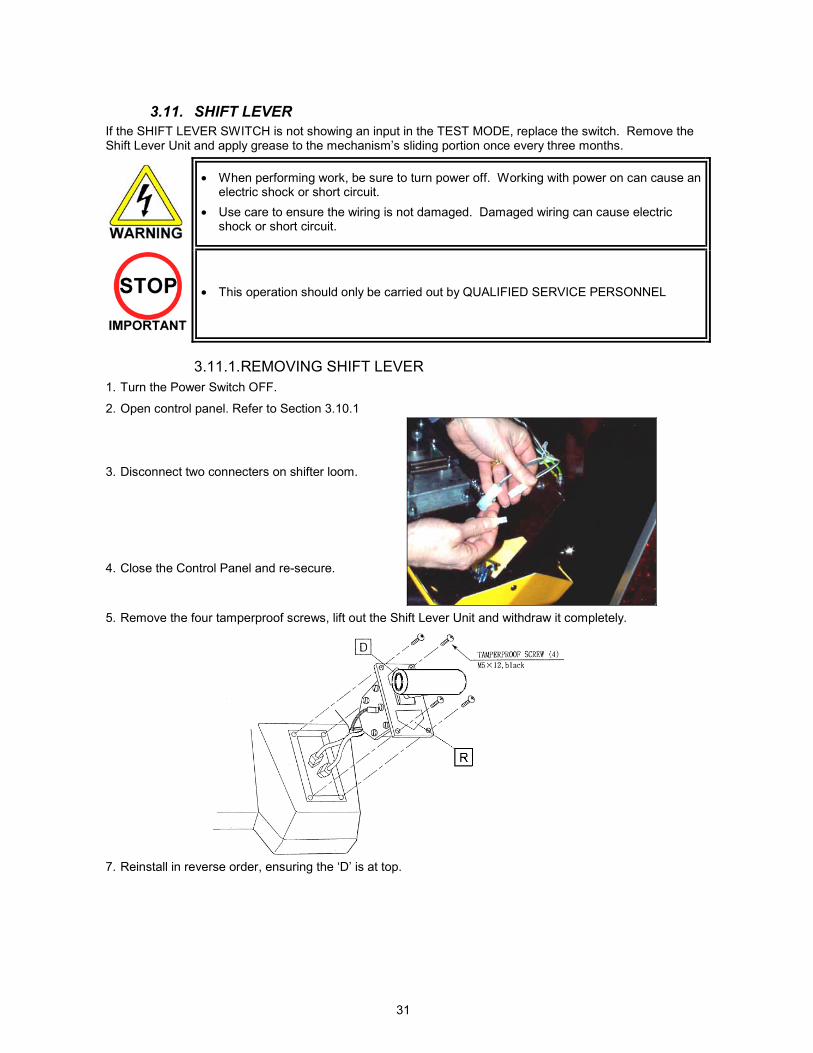
3.11. SHIFT LEVER If the SHIFT LEVER SWITCH is not showing an input in the TEST MODE, replace the switch. Remove the Shift Lever Unit and apply grease to the mechanism’s sliding portion once every three months.
�� When performing work, be sure to turn power off. Working with power on can cause an electric shock or short circuit.
�� Use care to ensure the wiring is not damaged. Damaged wiring can cause electric shock or short circuit.
�� This operation should only be carried out by QUALIFIED SERVICE PERSONNEL
3.11.1. REMOVING SHIFT LEVER 1. Turn the Power Switch OFF.
2. Open control panel. Refer to Section 3.10.1
3. Disconnect two connecters on shifter loom.
4. Close the Control Panel and re-secure.
5. Remove the four tamperproof screws, lift out the Shift Lever Unit and withdraw it completely.
7. Reinstall in reverse order, ensuring the ‘D’ is at top.

32
3.11.2. SWITCH REPLACEMENT 1. Disconnect the switch to be replaced.
2. Remove the two Tapping Screws (M3 x 16) to replace the microswitch.
3.11.3. GREASING Use a proprietary synthetic lubricant to grease the microswitch - shifter contact points once every three months.

33
3.12. ACCELERATOR AND BRAKE
�� Before performing work, be sure to turn power off. Working with power on can cause an electric shock or short circuit.
�� Use care to ensure the wiring is not damaged. Damaged wiring can cause electric shock or short circuit.
�� Touching parts of the machine other than those specified here can cause electric shock of short circuit.
�� This procedure to be carried out only by QUALIFIED SERVICE PERSONNEL.
If the operation of the Accelerator and Brake pedals is unsatisfactory and not remedied by adjustment of the VOLUME SETTING in the TEST MODE, the cause may be mesh failure of the Volume Gear or a faulty Volume potentiometer. Follow the procedure below to adjust the Volume Gear mesh or replace the Volume potentiometer. When the pedals are depressed fully, if the Volume shaft is rotating within the movable range, the Volume is not feared to be damaged. Use the procedure described herein to position the VR such that the correct values (refer to Section 5.3.5.) are displayed at both extremes of pedal travel.
3.12.1. REMOVING THE ACCELERATOR AND BRAKE 1. Turn the power switch OFF and remove the IEC cable. 2. Take out the four truss screws and remove the Floor Lid.

34
3. Take out the six hexagon nuts to remove the Accelerator (or Brake) Unit. 4. Disconnect the Connector and remove the Accelerator (or Brake) Unit.

35
3.12.2. ADJUSTING OR REPLACING THE VOLUME ADJUSTMENT:
1. Loosen the Hex Bolt shown, and adjust the angle for optimum gear mesh. 2. Check the setting in Section 5.3.
REPLACEMENT: 1. The Volume is panel mounted: remove by undoing the nut and withdrawing the shaft through the
panel hole. 2. After replacing the Volume, engage the gears at the angle shown, and replace the nut. 3. Install the Accelerator (or Brake) Unit and connect the connector. 4. Re-install in reverse order and replace the Floor Lid and IEC Cable before turning power ON. 5. Check the setting in Section 5.3.

36
3.12.3. GREASING
�� When performing work, be sure to turn power off. Working with power on can cause an electric shock or short circuit.
�� Use only synthetic grease (grease or spray) as plastic parts are used. Do not use mineral based greases.
�� Applying grease to parts other than those specified can cause malfunctioning or quality deterioration of parts.
Apply grease to the gear mesh portion and pedal shaft once every three months. Use a proprietary synthetic lubricant.

37
3.13. REPLACEMENT OF FLUORESCENT LAMPS
�� Never touch places other than those specified. Touching places other than those specified can cause electric shock and short circuit. Disconnect the machine from the supply before attempting the replacement of any lamp.
�� When performing work, be sure to turn power off. Working with power on can cause an electric shock or short circuit.
�� Hot fluorescent lamps can cause burns. Be very careful when replacing them. �� Use a secure step to improve access to the upper parts of the cabinet.
�� Only QUALIFIED SERVICE PERSONNEL should replace lamps.
3.13.1. FRONT FLUORESCENT: 1. Turn power OFF at the Main Switch and remove the IEC lead. 2. Open the Control Panel (see Section 3.7). 3. Remove the two truss screws and open the entry panel.

38
4. By using a flat bladed screwdriver, remove the four screw caps from the front panel.
5. Take out the four tamperproof screws and the two lower screws, and carefully take off the Front Panel. 6. Remove the Billboard assembly as detailed in Section 3.10.2. 7. Remove the four screws and the Earth Link to allow the Billboard Holder to be removed. 8. To remove the Fluorescent lamp disconnecting the two end caps and withdraw the Lamp upwards
through the two mounting clips. 9. After replacing the lamp, reassemble in reverse order, being sure to replace the Earth Link between the
Billboard Holder and frame.

39
3.14. GAME BOARD
�� When performing work, be sure to turn power off. Working with power on can cause an electric shock or short circuit.
�� Be careful not to damage wiring. Damaged wiring can cause an electric shock or short circuit.
�� The voltage/amperage ratings for the Game Board are 3.3V 12A, 5.0V 10A and 12V 2A. To avoid risk of fire, never use any board with supply requirements exceeding the above.
�� When replacing the Game Board with one not of JAMMA standard, be sure to use only the harness supplied by the manufacturer of the Game Board. Using other harnesses constitutes a fire risk.
�� Only QUALIFIED SERVICE PERSONNEL should carry out this operation.
3.14.1. TAKING OUT THE GAME BOARD To take out the Game Board (NAOMI SHIELD CASE), remove together with the wooden base on which the Game Board is mounted. If the Game Board is faulty, return to SEGA within the original packaging provided. There are no user-serviceable parts inside.
1. Turn off the power. 2. Unlock and remove the Service Door. 3. Disconnect all harnesses linking the
Game Board assembly to the cabinet. 4. Remove the two M4 wing bolts and
carefully withdraw the assembly upwards and out through the service opening (see following page).

40
4. Take out the four screws and remove the Shield Case.

41
3.14.2. REMOVING THE GD-ROM DRIVE Take out the ASSY MAIN BD from the cabinet and remove the GD-ROM Drive from the ASSY MAIN BD as follows: 1. Following the above procedure (steps 1 to 5), take out the ASSY MAIN BD. 2. Remove the GD cable connector and the power cord connector from the GD-ROM Drive.
2. To remove the GD-ROM Drive, undo the 3 screws shown.
3. Reassemble in reverse order.

42
3.15. COMPOSITION OF THE GAME BOARD

43
3.16. TROUBLESHOOTING
�� Only QUALIFIED SERVICE PERSONNEL should carry out these procedures.
If a problem occurs, first check the wiring connections. PROBLEMS CAUSE COUNTERMEASURES When the main switch is turned ON, the machine is not activated
The power is not ON. Firmly insert the plug into the outlet.
Incorrect power source/voltage. Make sure that the power supply/voltage are correct.
AC Unit CIRCUIT PROTECTION DEVICE (ie; fuse) was activated due to an instantaneous overcurrent.
First, remove the cause of overcurrent and reinstate the circuit protection device to its original status. Then identify the cause of the fault on the item which caused the overcurrent & fix.
The colour image on the screen is incorrect.
Incorrect monitor adjustment. Make appropriate adjustments. Refer to the Monitor Service Manual supplied with this product.
The on-screen image of the monitor sways and/or shrinks.
The power source and voltage are not correct.
Make sure that the power supply and voltage are correct.
Sound is not emitted. Sound volume adjustment is not correct. Adjust the volume setting - refer to Section 5 Malfunctioning BD and Amp.
Perform Sound Test to check it. Refer to the Service Manual supplied with the Game Board.
Connector connection is incorrect. Check connector connection from Base to Speaker/Woofer
The fluorescent lamp(s) does not light up.
Fluorescent lamp(s) needs replacement. Replace the fluorescent lamp(s). Refer to Section 3.10
The connector is disconnected.
Check connections - refer to Section 3.10.
Steering Wheel does not operate satisfactorily .
Steering Wheel deviation. Adjust Volume value in the TEST MODE.
Steering Wheel Volume malfunctioning. Replace the Volume (see Section 3.7). ADJUST GEAR’s engagement in not
correct. Adjust the engagement of ADJUST GEAR (see Section 3.7).
SHIFT LEVER doesn’t operate satisfactorily.
Switch malfunctioning. Replace the switch (see Section 3.8).
Operation of Accel & Brake Pedals is not satisfactory.
VR position deviated. Adjust the VR value in the TEST MODE.
VR malfunctioning. Replace the VR (see Section 3.9). ADJUST GEAR’s engagement is not
correct. Adjust the adjustment of ADJUST GEAR (see Section 3.9).

44
3.17. FUSES
�� Never touch places other than those specified. Touching places other than those specified can cause electric shock and short circuit. Disconnect the machine from the supply before attempting the replacement of any fuse.
�� Only QUALIFIED SERVICE PERSONNEL should replace FUSES. �� Only replace fuses with ones of the same value and type.
There are a number of fuses used on this machine to protect the user and the machine from damage. Only replace the fuse once you have removed the cause of its failure. Detailed below is a list of the fuses used, their location and if relevant PCB reference:
PART NUMBER LOCATION TYPE & DETAILS QTY 514-5078-3150 STEREO AMP REF. F1, F2 5x20mm CERAMIC SB 3.15A 2 514-5078-4000 SWITCH REG REF. F1 5x20mm CERAMIC SB 4A 1 514-5078-5000 IEC INLET REF. F1 5x20mm CERAMIC SB 5A 1 838-11856CE-02 CONN. BD. REF. F1 5x20mm CERAMIC SB 6.3A 1 There are also fuses located on the Monitor PCB. Refer to the relevant Monitor manual supplied to reference these fuses.

45
4. PERIODIC CHECK AND INSPECTION The items listed below require periodic check and maintenance to retain the performance of the machine and ensure safe operation:
�� Be sure to check annually to see if the power cords are damaged, the plug is securely inserted and that there is no dust in the interior of the machine or between the socket and the power cord. Using the product in an unclean condition may cause a fire or electric shock.
DESCRIPTION WHAT TO CHECK INTERVAL
CABINET Check Adjusters’ contact with surface Daily
Clean CRT face - (Do Not use water jet) Weekly MONITOR
Check settings Monthly
GAME BD Setting check Monthly
CONTROL PANEL Input test Monthly
Speaker, sound Sound test, check volume adjustment Monthly
Coin insertion test Monthly COIN SELECTOR
Cleaning Tri-Monthly
POWER SUPPLY CORD Check condition Annually
INTERIOR Clean (Do Not use water jet) Annually
CABINET SURFACE Clean (Do Not use water jet) As required
4.1. CLEANING THE CABINET SURFACES When the cabinet surfaces are badly soiled, remove stains with a soft cloth dipped in water or chemical detergent (diluted with water) and squeezed dry - DO NOT USE A WATER JET. To avoid damaging surface finish, do not use such solvents as thinner, benzene, etc. (other than ethyl alcohol), abrasives or bleaching agents.

46
5. CONTENTS OF GAME The following information assumes that the product is functioning satisfactorily. Should there be any discrepancies, a fault may have occurred. In this case, examine the machine to ascertain and eliminate the cause of the fault to ensure satisfactory operation.
The LED and fluorescent light behind the billboard are always lit when the unit is on. When advertising (waiting for customers), the unit displays the advertising screen and outputs sound through the two speakers and subwoofer. It is possible to disable sound output during advertising from Test Mode.
GAME OBJECTIVE: In Crazy Taxi High Roller, the player plays the role of taxi driver, picking up customers scattered around the game field and driving them to other destinations. Each customer has his or her own time limit (shown above the customer when cab is rented), and the customer pays the fare (points) only if delivered within that time limit. Otherwise, the customer jumps out of the car without paying. The player must do his best to transport as many customers and make as much money as possible before Game Time, shown in the upper left-hand corner, runs out. When Game Time reaches zero, the game is over. The object of the game is to deliver as many customers as possible before Game Time runs out and to earn as much money as possible.

47
HOW TO OPERATE: Start Button: Starts game after coin(s) have been inserted. During game: When held for less than one second when carrying passengers, shows destination. When held for more than one second when carrying passengers, changes arrow colour. *Blue: Points in direction of destination *Green: Points to roads leading to destination The Steering Wheel, Accelerator and Brake Pedal function as on a car. Shifter T-Handle: All cars have automatic transmissions.
“D”: Drive “R”: Reverse
The Gear Indicator in the lower right-hand corner of the game screen shows the gear currently selected. Jump Button: Side of the shift lever. Makes the taxi jump (CRAZY HOP).
5.1. Playing the Game 1. Pick Up a Customer Characters with dollar signs (“$”) over their heads are potential customers. To pick up a customer, bring the taxi to a complete stop inside the circle (stop zone) that surrounds the customer. Once the taxi comes a full stop inside the zone, the screen changes and the customer gets into the cab automatically. Once the customer has been picked up, the time necessary to take the customer to his or her destination is added to the Game Time.
● Game Time: Game time remaining
● Total Money: Total money earned
● Gear Indicator: Gear currently selected (D=Drive, R=Reverse)
● $ Icon: Stop the taxi inside the circle to pick up customers The colour of the $ icon indicates distance to the destination. From furthest to closest, the order of the colours is green, yellow-green, yellow, orange, and red. A number beneath the $ icon indicates a group of customers. The number, which ranges from two to four, indicates the number of people in the group.

48
2. Drive to the Destination Use the arrow as a guide to take your customer to his or her destination.
● Directional Arrow: Points to the customer’s destination. ● Fare: Fare owed by customer. Fares are settled when the customer gets out of the taxi.● Customer Time Limit: You must get the customer to his or her destination within this time limit. 3. Drop Off the Customer As in (1), you must bring the taxi to a complete stop within the destination stop zone. Once the taxi is brought to a stop, the screen switches to the evaluation screen and the customer exits the taxi automatically. The evaluation is based on the remaining customer time at the end of the ride. ● SPEEDY: Plenty of time left (large time bonus) ● NORMAL: Average amount of time left (regular time bonus) ● SLOW: Little time left (small time bonus) After the bonus is calculated, it is added to the fare and the fare is added to your Total Score. Player rankings are shown once the total has been calculated. Note: All customers in a group must make it to their destination for driver to receive fare.
● Destination Stop Zone: Bring the taxi to a complete stop inside this area to drop off your customers.
The object of the game is to earn CRAZY money by repeating the above 3 steps.

49
4. Running out of time If the customer doesn’t reach the destination in time, he or she will leap out of the cab without paying.
Boosting The Score Shortcuts to destinations have been placed throughout the game. Learn the course maps and take advantage of the Crazy Hop shortcuts to get your customers where they need to be as quickly as possible. Earning tips by entertaining your customers is a great way to boost your cash flow. There are three tricks that will put them in a tipping mood:
● Crazy Jump! Use the Crazy Hop, ramps, and other elevated obstacles to send your taxi airborne.
● Crazy Drift! Send your cab into a sliding drift when turning.
● Crazy Through! Get in close to other vehicles and squeeze past or fly over them. Performing tricks in COMBO is the way to earn the big bucks. But if you crash into another car, you’ll have to start over from scratch. NOTE: Having to deliver everyone to the destination makes group customers more difficult, but since everybody chips on tips, group passengers can also provide huge money-making opportunities!

50
Crazy Driving Crazy Taxi features dashes, drifts and other insane moves that can be unleashed with the right combination of gear shifts, jumps, steering, acceleration, and braking. ● CRAZY DASH: Send the cab screaming down the street. Shift into drive without touching either the accelerator or brake, and then slam on the gas. ● CRAZY DRIFT: Make the cab drift. While driving, shift into R, then immediately back to D, and then turn the steering wheel to the
right or left. ● LIMITER CUT: Accelerate to maximum speed. Following a CRAZY DASH, release the accelerator and brake, shift into R and immediately
back into D, and stamp on the gas. ● CRAZY STOP: Bring the cab to a screeching halt. Shift into R and slam on the brakes following a CRAZY DASH. ● CRAZY HOP DASH: Send your flying, CRAZY HOPPED taxi into reverse in midair. CRAZY HOP your stopped taxi and do a CRAZY DASH in midair. ● CRAZY BACK DASH: Send your taxi speeding in reverse. Shift into R without touching the accelerator and brake and stamp on the accelerator. ● CRAZY BACK DRIFT: Send the taxi into a 180° drift and drive in reverse. While driving, shift into D and back into R while turning the steering wheel to the right or left. ● JUMP STOP: Bring the cab to a screeching halt as it hits the ground. Execute a CRAZY STOP during a CRAZY HOP. ● DRIFT CANCEL: Stop drifting and accelerate out of a curve. Execute a CRAZY DASH during a CRAZY DRIFT. ● DRIFT HOP: Jump as the taxi turns for crazy speed when you hit the ground! Execute a CRAZY HOP during a CRAZY DRIFT.
5.2. Game Modes Crazy Taxi High Roller has two game modes.
● Single Mode: For beginners. All customers appear by themselves.
● Group Mode: For advanced players. Customers can appear in groups, with greater difficulty and bigger rewards.

51
6. EXPLANATION OF TEST DATA AND DISPLAY Use the switches inside the Control Panel to enter the TEST MODE. This will allow you to carry out post installation and periodic checks and adjustments. The following section details the function of each of the tests: Refer to the service manual supplied with the Monitor for detailed instructions.
ITEM DESCRIPTION INTERVAL INSTALLATION OF THE MACHINE
When the machine is installed perform the following checks: �� Check to see that each setting is as per the standard settings
input at the time of shipment. �� In the INPUT TEST mode, check each switch and V.R. �� In the OUTPUT TEST mode, check each of the lamps. �� In the MEMORY TEST mode check all of the IC’s on the IC BD.
Monthly
MEMORY �� On the TEST MENU screen choosing the MEMORY TEST allows self test to be performed. In this test RAM & ROM are tested.
Monthly
PERIODIC CHECKS Periodically perform the following �� MEMORY TEST. �� Ascertain each setting. �� In the INPUT TEST mode, test the control devices. �� In the OUTPUT TEST mode, check each of the lamps.
Monthly
CONTROL SYSTEM �� In the INPUT TEST mode, check each switch and V.R. �� Adjust or replace each switch and V.R.
Monthly
MONITOR �� In the C.R.T. TEST mode, check to ensure the monitor is adjusted correctly
�� Clean screen (switch off machine and remove the plug)
Monthly Weekly
IC BOARD MEMORY TEST �� In the SOUND TEST mode, check the sound related ROMs
Monthly
DATA CHECK �� Check such data as held in the bookkeeping screens, relating to number and length of plays
Monthly
EXTERIOR MAINTENANCE
�� Clean surfaces
Monthly
COIN MECHANISM �� Check switch operation (if fitted) Monthly

52
6.1. INTERNAL SWITCHES AND COIN METERS
�� Never touch places other than those specified. Touching places not specified can cause electric shock and short circuits
�� Be careful not to damage wiring. Damaged wiring can cause electric shock and short circuits.
�� Adjust to the optimum sound volume considering the environmental requirements of the installation location.
�� If the COIN METER and the game board are electrically disconnected, game play is not possible.
Open the Coin Chute door to access the VTS PCB. The function of each switch is as follows.
TEST BUTTON (TEST SW)
Used to enter TEST mode. Also has function during TEST mode. Refer to the later section detailing TEST mode.
SERVICE BUTTON (SERVICE SW)
Gives credits without registering on the coin counter. Also used during TEST mode.
DEMAG Eliminates colour unevenness from the monitor screen.
VOLUME CONTROL Adjusts the volume of the speakers.

53
6.2. SYSTEM TEST MODE
6.2.1. EXPLANATION OF TEST AND DATA DISPLAY Perform the tests and data check periodically when installing the machine initially or collecting cash, or when the machine does not function correctly. Perform checks in accordance with the explanations given in this section. The following shows tests and modes that should be utilized as applicable. This product's basic system consists of the Chihiro game board and the GD-ROM drive. The system enables you to play several games one after the other just by changing a GD-ROM disc that is to be set on the GD-ROM drive. Therefore the product supports, the following 2 test modes: (1) System test mode for an automatic self-diagnostic test (generally used by every product that contains the basic system) and a coin assignment (specifically used by this product) and (2) Game test mode for testing the input/output control devices and setting the difficulty level (specifically used by this product).
�� Any settings that are changed by users during TEST MODE are saved upon exiting TEST MODE with the EXIT command in the SYSTEM MENU. If the unit is powered off prior to exiting, changes to settings will not take effect.
�� You may not enter GAME TEST MODE while the unit is reading from or checking the GD-ROM. If error messages are displayed when exiting TEST MODE, you should power the unit off and on again.
�� In the manual for this product, "Media Board" and "DIMM" are one and the same.
�� Use with the specified settings. If settings other than those specified are used, inappropriate operations or malfunction may occur.

54
6.2.2. SYSTEM TEST MENU MODE System Test Mode can be used to check that the main circuit operations are correct, adjust Monitor colour, and perform coin/credit settings. However, this product can only be used with the settings shown below. SOUND TEST - OUTPUT TYPE: STEREO COIN ASSIGNMENTS - COIN CHUTE TYPE: COMMON - SERVICE TYPE: COMMON NETWORK SETTING (MEDIA) - NETWORK TYPE: NONE 1. Press the TEST Button after powering on the unit to display the following SYSTEM MENU.
2. Press the SERVICE Button to move the cursor to the desired test item.
3. Move the cursor to the desired item and press the TEST Button to display each test screen.
4. Move the cursor to ENTER GAME TEST and press the TEST Button to enter the individual test menus for each game. Refer to "9-3 GAME TEST MODE".
5. When testing is complete, move the cursor to EXIT and press the TEST Button. The game advertisement screen should be displayed.

55
6.2.3. MEDIA BOARD TEST
Powering off the system during the MEDIA BOARD TEST with a DIMM BOARD will erase the game programme data. It may be necessary to reload the data. Always wait for the test to complete before attempting to exit.
MEDIA BOARD TEST is used to check the memory and IC on the MEDIA BOARD connected to the Chihiro. Test screens and test times may differ depending on the type of MEDIA BOARD connected to the unit. �The following is the MEDIA BOARD TEST screen for a unit with a DIMM BOARD.
1. MEDIA BOARD TEST begins immediately upon entering this test mode.
2. If "GOOD" is displayed to the right of each item, the MEDIA BOARD components are functioning properly.
3. After the test is complete, move the cursor to EXIT and press the TEST Button to return to the SYSTEM MENU screen.

56
6.2.4. SYSTEM INFORMATION Use SYSTEM INFORMATION to check version and other information for system programmes. Screens may differ depending on the type of MEDIA BOARD connected to the unit. �The following is the SYSTEM INFORMATION screen for a unit with a DIMM BOARD.
Press the TEST Button to return to the SYSTEM MENU screen. (A) REGION The COUNTRY CODE of the MAIN BOARD. (B) BOOT VERSION, QC FIRM VERSION, SC FIRM VERSION Version information for the MAIN BOARD system programmes. (C) SERIAL NO. Serial number of the MAIN BOARD. (D) DIMM BOARD + GDROM Type of MEDIA BOARD. This example shows a DIMM BOARD with a GD-ROM DRIVE
connected. (E) MEMORY SIZE Capacity of DIMM memory installed on the DIMM BOARD. (F) FIRM VERSION Version information for the DIMM BOARD system programme. (G) SERIAL NO. Serial number of the DIMM BOARD.

57
6.2.5. JVS TEST JVS TEST is used to verify the specs of the I/O BOARD connected to the Chihiro and to run input tests. I/O BOARD specs are displayed initially. Screens may differ depending on the type of I/O BOARD connected to the unit.
(1) Use the SERVICE Button to move the cursor to the desired test item.
(2) Move the cursor to INPUT TEST and press the TEST Button to enter the INPUT TEST screen for the I/O BOARD currently displayed.
(3) When 2 or more I/O BOARDS are connected, move the cursor to NEXT NODE and press the TEST Button to enter the test screen for the next I/O BOARD. The lower the NODE number, the further away the node is from the Chihiro.
(4) Move the cursor to EXIT and press the TEST Button to return to the SYSTEM MENU screen.

58
6.2.6. INPUT TEST Screen
(5) On-screen values change according to the input from switches and the volume. (A) SYSTEM, PLAYER Values change with input from control panel/other switches. (B) COIN Increases with input from the COIN SWITCH. The count is cleared when exiting
TEST MODE. (C) ANALOG Displays analog values from "0000" to "FFFF". (6) Press the SERVICE and TEST Buttons simultaneously to return to the JVS TEST main
screen.

59
6.2.7. SOUND TEST Use SOUND TEST to test sound output and to select the stereo/mono/surround setting.
(1) Use the SERVICE Button to move the cursor to the desired test item. (2) Press the TEST Button to enter the selected item. (A) OUTPUT TYPE (STEREO, MONO, SURROUND) Select the sound output from the I/O PANEL audio output interface setting among
STEREO, MONO and SURROUND. (B) RIGHT/LEFT SPEAKER (ON, OFF) When set to "ON", the test sends a beep to each audio output interface. Only the
word "SPEAKER" is displayed when the OUTPUT TYPE is set to "MONO", and when set to "ON", the test sends the same beep to both the left/right audio output interfaces. To test surround output, it is necessary to use a separate Audio Amp, and receive signal from a terminal not in use at the time of shipping. Note: Not available with this product.
(3) Move the cursor to EXIT and press the TEST Button to return to the SYSTEM MENU
screen.

60
6.2.8. C.R.T. TEST Use the C.R.T. TEST to adjust monitor colours and verify screen size. COLOUR CHECK Screen (1) Monitor COLOUR CHECK screen is displayed initially.
Each of the colours (red, green and blue) is darkest at the far left and gets progressively lighter (32 steps) towards the right. Monitor brightness is set correctly if the white colour bar is black at the left edge and white at the right edge.
(2) Press the TEST Button to proceed to the next page SIZE CHECK Screen
(3) Adjust the CHECK GRID so that the entire GRID is displayed on the screen. (4) Press the TEST Button to return to the SYSTEM MENU screen.

61
6.2.9. COIN ASSIGNMENTS Use COIN ASSIGNMENTS to set the credit rate for each coin inserted. (1) Use the SERVICE Button to move the cursor to the desired test item. (2) Press the TEST Button to change the setting or to open the detailed settings. (3) Move the cursor to EXIT and press the TEST Button to return to the SYSTEM MENU
screen.
(A) COIN CHUTE TYPE (COMMON, INDIVIDUAL) Adjust settings according to the specs of the cabinet COIN CHUTE. COMMON This is for cabinets where a single COIN CHUTE is used by multiple players.
Coins inserted by each player are treated as common credits. Up to 2 COIN CHUTES (#1 and #2) may be used. The (C) COIN TO CREDIT RATE setting for COIN CHUTE #1 and #2 may be set differently.
INDIVIDUAL This is for cabinets with individual COIN CHUTES for each player.
Coins inserted by each player are treated as individual player credits. The (C) COIN TO CREDIT RATE setting is used by all COIN CHUTES.
(B) SERVICE TYPE (COMMON, INDIVIDUAL) Use this to set the function of each SERVICE Button when there is more than one
SERVICE Button. COMMON Pressing any SERVICE Button enters service credits for all players. INDIVIDUAL Pressing the SERVICE Button enters service credits only for the corresponding player.

62
(C) COIN TO CREDIT RATE Set the CREDIT RATE for each coin inserted. The "� COIN(S) COUNT AS � CREDIT(S)" setting indicates that "Inserting � coins
equals � credits". Set this to "FREE PLAY" to allow game play without credits.
When (A) COIN CHUTE TYPE is set to "COMMON", COIN CHUTE #2 settings are restricted to some extent by the settings for COIN CHUTE #1.
(D) DETAIL SETTING This mode allows for more detailed credit rate settings than the (C) COIN TO CREDIT
RATE setting. Changes made in DETAIL SETTING override any (C) COIN TO CREDIT RATE settings.
DETAIL SETTING Screen
(E) COIN CHUTE MULTIPLIER Use this to set how many coins will be counted for each coin inserted. The "1 COIN COUNT AS � COIN(S)" setting indicates that "Each coin will be counted as
� coins". When the (A) COIN CHUTE TYPE is set to "COMMON", the setting may be set individually for COIN CHUTE #1 and #2.
(F) BONUS ADDER Use this to set the number of coins calculated with the (E) COIN CHUTE MULTIPLIER
setting that need to be inserted to get 1 bonus coin. When the (A) COIN CHUTE TYPE is set to "COMMON", the sum of the coins for COIN CHUTE #1 and #2 is used for the calculation. The "� COINS GIVE 1 EXTRA COIN" setting indicates that "For every � coins, 1 bonus coin is given". Set this to "NO BONUS ADDER" to disable bonus coins entirely.
(G) COIN TO CREDIT Use this to set how many coins calculated with the (F) BONUS ADDER setting count as 1
credit. The "� COIN(S) 1 CREDIT" setting indicates that "Every � coins equals 1 credit."

63
(H) GAME COST SETTING Use this mode to set the number of credits required to start a game.
Screens may differ depending on the game.
(I) Set the number of credits required to start a game. (J) Set the number of credits required to continue a game.
64
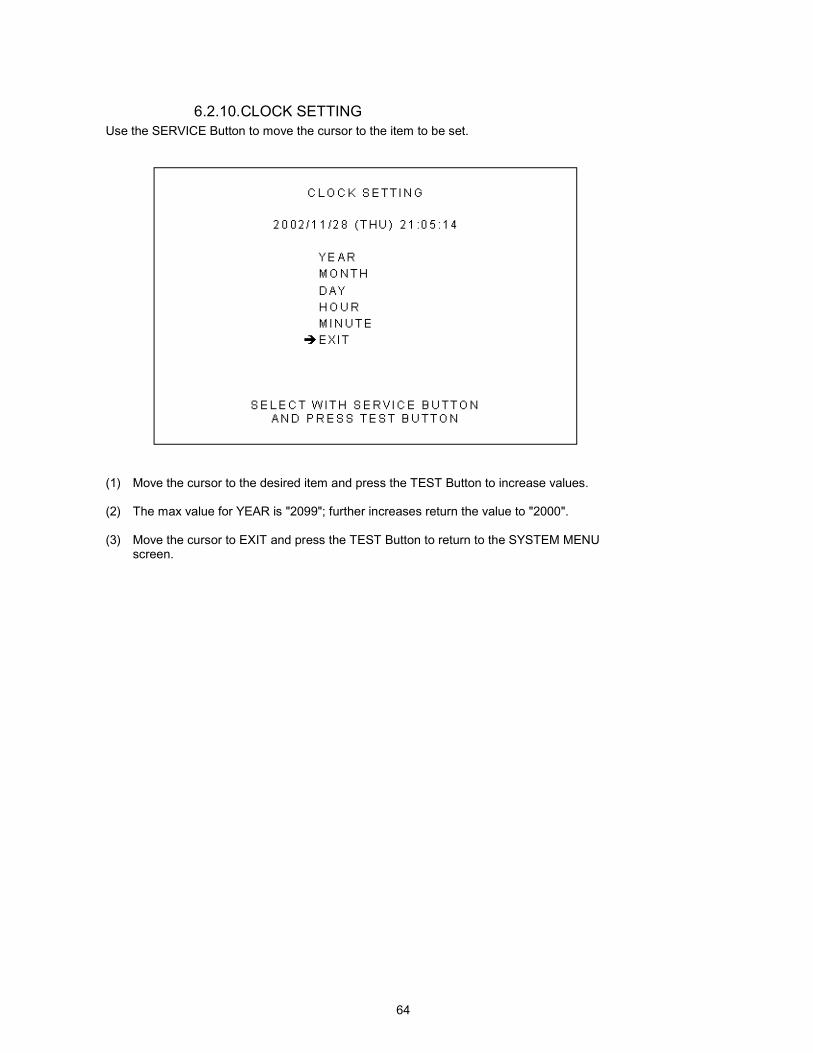
6.2.10. CLOCK SETTING Use the SERVICE Button to move the cursor to the item to be set.
(1) Move the cursor to the desired item and press the TEST Button to increase values. (2) The max value for YEAR is "2099"; further increases return the value to "2000". (3) Move the cursor to EXIT and press the TEST Button to return to the SYSTEM MENU
screen.

65
6.2.11. NETWORK SETTING (CORE) Use the LAN PORT attached to the Main Board, and carry out the settings necessary for network communication.
*This game does not support network communication connections. *
THIS OPTION IS FOR POSSIBLE FUTURE GAMES ONLY. SELECT EXIT AND GO DIRECTLY TO THE NEXT TEST MODE.
(1) Use the SERVICE Button to move the cursor to the desired test item.
(When setting IP ADDRESS, SUBNET MASK, GAME WAY or PRIMARY DNS, use the underline as a guide.)
(2) Press the TEST Button to change the setting. (3) Move the cursor to EXIT and press the TEST Button to return to the SYSTEM MENU screen. (A) REMOTE (C) This sets up whether a communication setting is automatic or manual.
ENABLE: Sets the communication setting automatically. DISABLE: Sets the communication setting manually.
(B) IP ADDRESS (C) This is one of the settings required for communication network. After setting the number, press TEST
Button on SET position to memorize the setting. If you set the REMOTE setting to ENABLE, you cannot select this.
(C) SUBNET MASK (C) This is one of the settings required for communication network. After setting the number, press TEST
Button on SET position to memorize the setting. If you set the REMOTE setting to ENABLE, you cannot select this.
(D) GATE WAY (C) This is one of the settings required for communication network. After setting the number, press TEST
Button on SET position to memorize the setting. If you set the REMOTE setting to ENABLE, you cannot select this.
(E) PRIMARY DNS (C) This is one of the settings required for communication network. After setting the number, press TEST
Button on SET position to memorize the setting. If you set the REMOTE setting to ENABLE, you cannot select this.
(F) CURRENT This displays the present setting value during a set-up of each item [(B), (C), (D), (E)]. Pressing TEST
Button on SET position, the settings are memorized and the screen is changed.
66
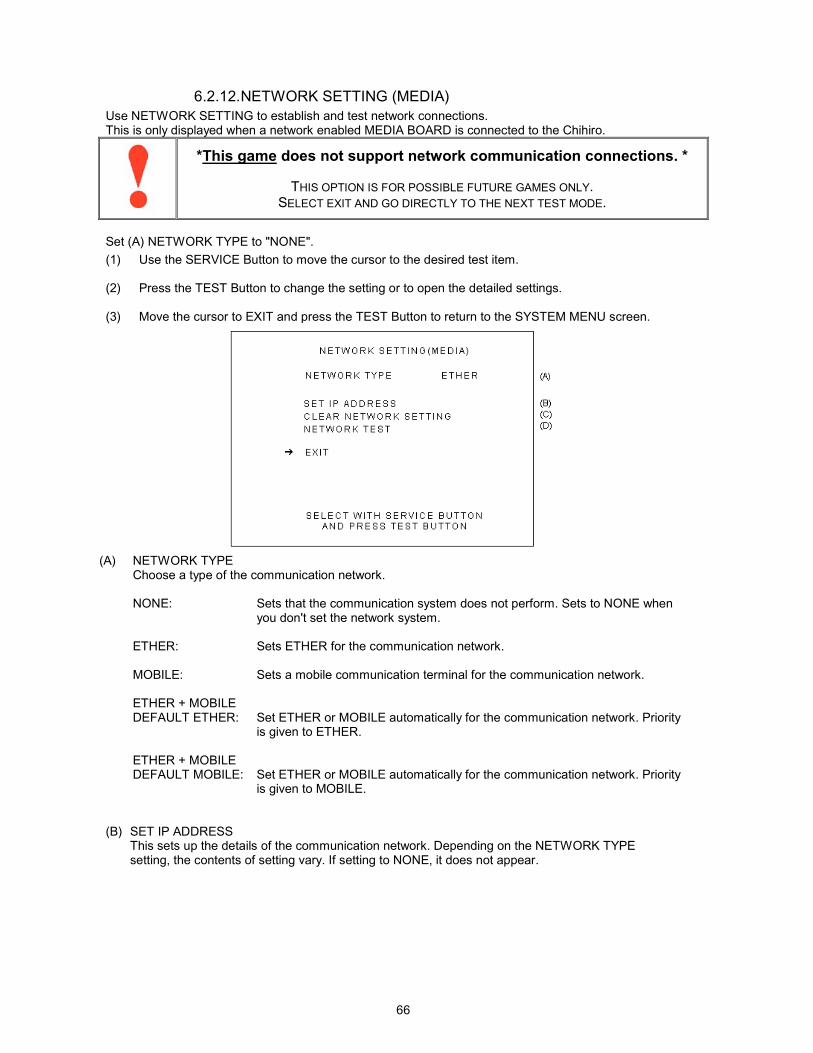
6.2.12. NETWORK SETTING (MEDIA) Use NETWORK SETTING to establish and test network connections. This is only displayed when a network enabled MEDIA BOARD is connected to the Chihiro.
*This game does not support network communication connections. *
THIS OPTION IS FOR POSSIBLE FUTURE GAMES ONLY. SELECT EXIT AND GO DIRECTLY TO THE NEXT TEST MODE.
Set (A) NETWORK TYPE to "NONE". (1) Use the SERVICE Button to move the cursor to the desired test item. (2) Press the TEST Button to change the setting or to open the detailed settings. (3) Move the cursor to EXIT and press the TEST Button to return to the SYSTEM MENU screen.
(A) NETWORK TYPE Choose a type of the communication network. NONE: Sets that the communication system does not perform. Sets to NONE when
you don't set the network system. ETHER: Sets ETHER for the communication network. MOBILE: Sets a mobile communication terminal for the communication network. ETHER + MOBILE DEFAULT ETHER: Set ETHER or MOBILE automatically for the communication network. Priority
is given to ETHER. ETHER + MOBILE DEFAULT MOBILE: Set ETHER or MOBILE automatically for the communication network. Priority
is given to MOBILE. (B) SET IP ADDRESS This sets up the details of the communication network. Depending on the NETWORK TYPE
setting, the contents of setting vary. If setting to NONE, it does not appear.

67
�ETHER Setting
�MOBILE Setting

68
� ETHER + MOBILE Settings
(1) Use the SERVICE Button to move the cursor to the desired test item.
(When setting IP ADDRESS or SUBNET MASK, use the underline as a guide.) (2) Press the TEST Button to change the setting. (3) Move the cursor to EXIT and press the TEST Button to return to the NETWORK
SETTING screen. (E) REMOTE This sets up whether a communication setting is automatic or manual. ENABLE: Sets the communication setting automatically. DISABLE: Sets the communication setting manually. (F) IP ADDRESS (E) This is one of the settings required for communication network. After setting the number,
press TEST Button on SET position to memorize the setting. If you set the REMOTE setting to ENABLE, you cannot select this.
(G) SUBNET MASK (E) This is one of the settings required for communication network. After setting the number,
press TEST Button on SET position to memorize the setting. If you set the REMOTE setting to ENABLE, you cannot select this.
(H) IP ADDRESS (M) This is one of the settings required for communication network. Set the number
according to the Game Soft manual. After setting the number, press TEST Button on SET position to memorize the setting.
(I) CURRENT This displays the present setting value during a set-up of each item [(F), (G), (H)].
Pressing TEST Button on SET position, the settings are memorized and the screen is changed.

69
(C) CLEAR NETWORK SETTING Use this to return all values in the NETWORK SETTING to the default values and turn off
network communication.
To clear data, use the SERVICE Button to move the cursor to YES (CLEAR) and press the TEST Button. When the data has been cleared, the message "COMPLETED" is displayed. Press the TEST Button again to return to the NETWORK SETTING main screen. Move the cursor to NO (CANCEL) and press the TEST Button to return to the NETWORK SETTING main screen without clearing the data. NETWORK TEST In this test, the checking for the communication network can be performed. Entering this test mode, checking starts immediately.
The display changes to "GOOD" when the checking is finished successfully, and changes to "BAD" when any problem is detected. If the connection is not permitted, the display will change to "N/A". If you perform this test immediately after the setting change, it may not display the correct result. In this case, be sure to turn the power off and on, and enter this test mode again.

70
6.3. GAME TEST MODE Select ENTER GAME TEST from the System Menu screen to display the Game Test Menu screen as follows. Use the SERVICE Button to move the cursor to the desired test item. Press the TEST Button to enter the selected item’s test.
� ��Crazy Taxi HighRoller �
[GAME TEST MENU] � INPUT TEST OUTPUT TEST GAME ASSIGNMENTS I/O VOLUME SETTING SOUND RANGE SETTING BOOKKEEPING BACKUP DATA CLEAR �EXIT���
� �
-SELECT WITH SERVICE BUTTON AND PRESS TEST BUTTON- �
Performs test, adjustments and settings for each of the Game Test Menu screen items below.
�� INPUT TEST: Tests each input device used in the game.
�� OUTPUT TEST: Tests each output device used in the game.
�� GAME ASSIGNMENTS: Adjusts game settings.
�� I/O RANGE SETTING: Adjust input/output range for each game control device.
�� SOUND VOLUME SETTING: Adjust sound volume.
�� BOOKKEEPING: View all recorded game data.
�� BACKUP DATA CLEAR: Erase all game records.
After selecting an item, read the explanations below regarding operation. After performing tests and adjustments, return to the Game Test Menu screen, select EXIT and press the TEST Button. You will return to the System Menu screen. Move the cursor to EXIT on System Menu screen and press the TEST Button to return to the Game Play screen.
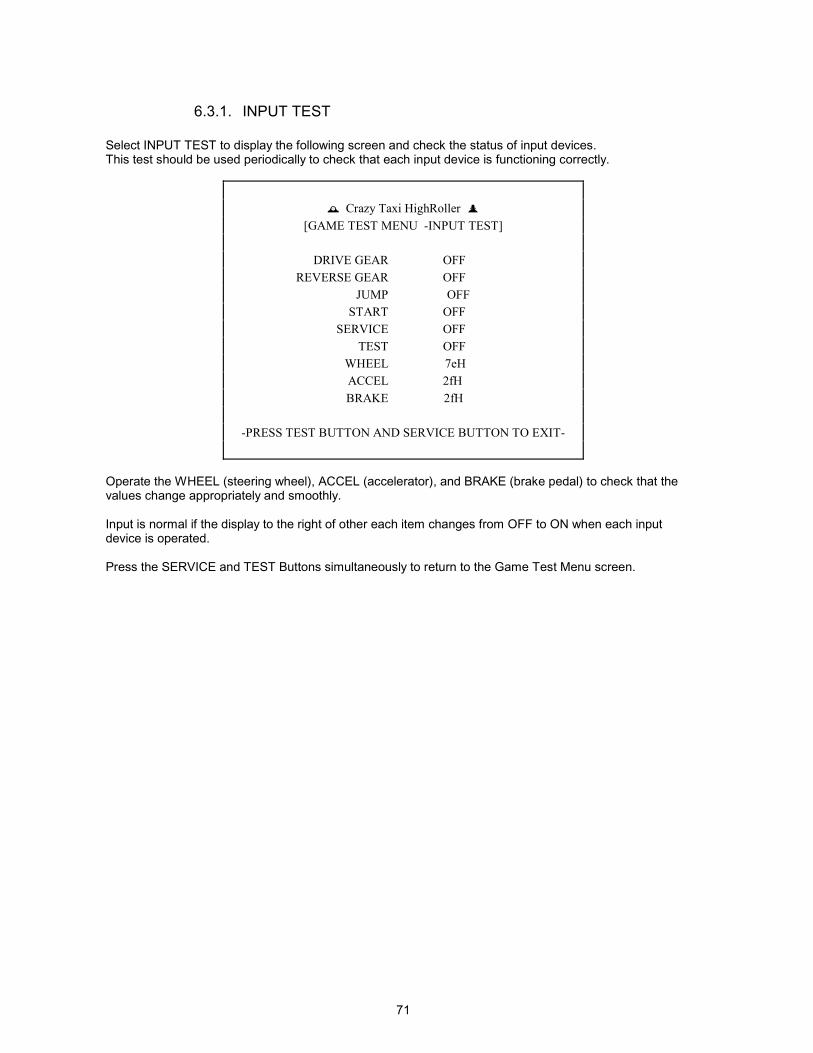
71
6.3.1. INPUT TEST Select INPUT TEST to display the following screen and check the status of input devices. This test should be used periodically to check that each input device is functioning correctly.
� ��Crazy Taxi HighRoller �
[GAME TEST MENU�-INPUT TEST] �
DRIVE GEAR OFF ������REVERSE GEAR OFF
JUMP OFF �START OFF SERVICE OFF
TEST OFF � WHEEL 7eH ACCEL 2fH BRAKE 2fH
� -PRESS TEST BUTTON AND SERVICE BUTTON TO EXIT-
� Operate the WHEEL (steering wheel), ACCEL (accelerator), and BRAKE (brake pedal) to check that the values change appropriately and smoothly. Input is normal if the display to the right of other each item changes from OFF to ON when each input device is operated. Press the SERVICE and TEST Buttons simultaneously to return to the Game Test Menu screen.

72
6.3.2. OUTPUT TEST Select OUTPUT TEST to display the following screen and check the status of each lamp. This test should be used periodically to check that the lamps are functioning correctly.
� Crazy Taxi HighRoller
[GAME TEST MENU�
-OUTPUT TEST] �
START BUTTON OFF LAMP NO.1 OFF NOT USED LAMP NO.2 OFF NOT USED LAMP NO.3 OFF NOT USED LAMP NO.4 OFF NOT USED EXIT
���
�
�
�
�
-SELECT WITH SERVICE BUTTON AND PRESS TEST BUTTON-
� Perform the tests as follows. START BUTTON: Select START BUTTON and press the TEST Button. The display to the right of the
item will change to ON and the Start Button will flash. Move the cursor to EXIT and press the TEST Button to return to the Game Test Menu screen.

73
6.3.3. GAME ASSIGNMENTS Select GAME ASSIGNMENTS to display the current game settings and make changes. Perform the following settings for each item. 1. START TIME: Change the initial game time limit (GAME TIME). From shortest to longest, there are 8 choices: 35, 40, 45, 50, 55, 60, 65, and 70. (Default setting: 50) 2. TIME DIFFICULTY: Set the amount of bonus time added when a customer gets into the cab. From most difficult to easiest, the eight settings range from 1/8 to 8/8. (Initial setting: 3/8) 3. GAME DIFFICULTY: Set the game difficulty based on traffic volume. From most difficult to easiest, the eight settings range from 1/8 to 8/8. (Initial setting: 4/8) 4. ADVERTISE SOUND: You can set the advertise sound to ON or OFF. Changes to settings are not enabled until Test Mode is exited. After changing settings, be sure to exit Test Mode. After changing the settings, select EXIT and press the TEST Button to return to the Game Test Menu screen.
� ��Crazy Taxi HighRoller �
[GAME TEST MENU�-GAME ASSIGNMENTS] � START TIME � 50 TIME DIFFICULTY � 3/8 GAME DIFFICULTY � 4/8 ADVERTISE SOUND � ON �EXIT � � � �
� -SELECT WITH SERVICE BUTTON AND PRESS TEST BUTTON-
�

74
6.3.4. I/O RANGE SETTING Select I/O RANGE SETTING to display the following screen. Perform the volume settings for the units to be used in the game. Use this mode when a control unit is not functioning properly or you want to change the parameters. The three configurable items are the STEER SETTING (steering wheel), ACCEL SETTING (accelerator), and BRAKE SETTING (brake).
� □�Crazy Taxi HighRoller ■
[GAME TEST MENU�-RANGE SETTING] �
WHEEL SETTING AD0 : **H LEFT MAX **H ←→RIGHT MAX **H
ACCEL SETTING AD1 : **H MIN **H ←--→ MAX **H
BRAKE SETTING AD1 : **H MIN **H ←--→ MAX **H
SETUP
→EXIT �
-SELECT WITH SERVICE BUTTON AND PRESS TEST BUTTON- �
Select SETUP with the SERVICE Button and press the TEST Button. The “SETUP EXIT” option will appear. Here you may set the maximum and minimum values for each range.
1. Turn the handle all the way to the right to set the RIGHT MAX value. 2. Turn the handle all the way to the left to set the LEFT MAX value. 3. Press the accelerator all the way down to set the ACCEL SETTING MAX. 4. Press the brake all the way down to set the BRAKE SETTING MAX.
<Recommended values>
● Steering Wheel: Centered (straight)… 80● Accelerator: When released …… 30● Brake: When released …… 30
The values adjust the volume position to within a range of ± 04H. After changing the settings, select “SETUP EXIT” and press the TEST Button to finish the I/O RANGE SETTING adjustments. Press the TEST Button when everything has been checked. You will return to the Game Test Menu screen.
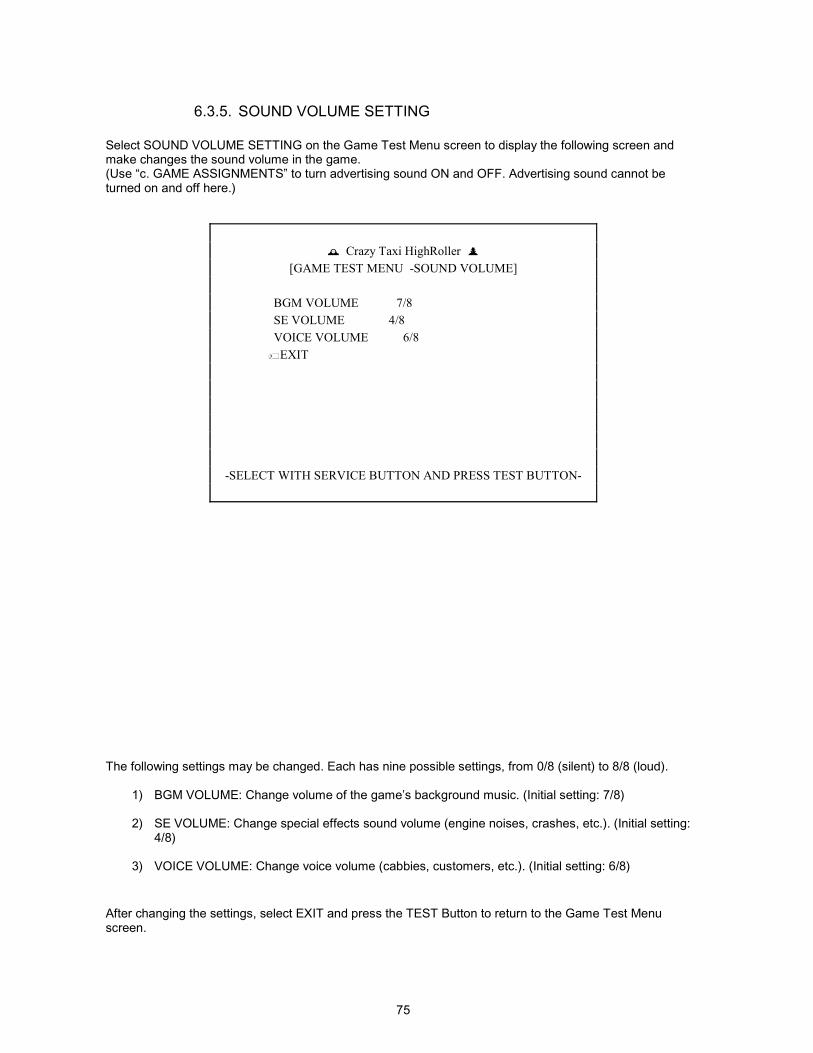
75
6.3.5. SOUND VOLUME SETTING Select SOUND VOLUME SETTING on the Game Test Menu screen to display the following screen and make changes the sound volume in the game. (Use “c. GAME ASSIGNMENTS” to turn advertising sound ON and OFF. Advertising sound cannot be turned on and off here.)
� ��Crazy Taxi HighRoller �
[GAME TEST MENU�-SOUND VOLUME] � BGM VOLUME 7/8 SE VOLUME 4/8 VOICE VOLUME 6/8 �EXIT � � � � �
� -SELECT WITH SERVICE BUTTON AND PRESS TEST BUTTON-
� The following settings may be changed. Each has nine possible settings, from 0/8 (silent) to 8/8 (loud).
1) BGM VOLUME: Change volume of the game’s background music. (Initial setting: 7/8)
2) SE VOLUME: Change special effects sound volume (engine noises, crashes, etc.). (Initial setting: 4/8)
3) VOICE VOLUME: Change voice volume (cabbies, customers, etc.). (Initial setting: 6/8)
After changing the settings, select EXIT and press the TEST Button to return to the Game Test Menu screen.

76
6.3.6. BOOKKEEPING Select BOOKKEEPING on the Game Test Menu screen to display the five screens of operating status data.
� ��Crazy Taxi HighRoller �
[GAME TEST MENU�-BOOKKEEPING 1/5] �
COIN1 0 �������� COIN2 0
TOTAL COINS 0 �
COIN CREDITS 0 � SERVICE CREDITS 0
TOTAL CREDITS 0 � �
� -PRESS TEST BUTTON TO CONTINUE-
� The display items for the screen (Page 1 of 5) are as follows. 1. COIN 1: The number of coins inserted into Coin Slot 1.
2. COIN 2: The number of coins inserted into Coin Slot 2.
3. TOTAL COINS: The total number of coins inserted into the coin slots.
4. COIN CREDITS: The number of credits for the coins inserted.
5. SERVICE CREDITS: The number of credits input by the SERVICE Button.
6. TOTAL CREDITS: The total number of all credits.

77
Press the TEST Button to display the next screen.
� ��Crazy Taxi HighRoller �
[GAME TEST MENU�-BOOKKEEPING 2/5] �
NUMBER OF GAMES 0 TOTAL TIME 0H00M00S PLAY TIME 0H00M00S
AVERRAGE PLAY TIME 0H00M00S LONGEST TIME 0H00M00S
SHORTEST TIME 0H00M00S � � �
� -PRESS TEST BUTTON TO CONTINUE-
� The display items for the screen (Page 2 of 5) are as follows. 1. NUMBER OF GAMES: The total number of games played.
2. TOTAL TIME: The amount of time the unit has been in operation.
3. PLAY TIME: The amount of time the game has been played.
4. AVERAGE PLAY TIME: The average play time for one game.
5. LONGEST PLAY TIME: The longest play time for one game.
6. SHORTEST PLAY TIME: The shortest play time for one game.

78
Press the TEST Button to display the next screen (Page 3 of 5). TIME HISTOGRAM shows the number of plays and the respective play times. This histogram should be referred to when setting the Game Difficulty. The TIME HISTOGRAM is shown on two screens.
��Crazy Taxi HighRoller � [GAME TEST MENU�-BOOKKEEPING 3/5]
-TIME HISTGRAM 1/2- 00M00S - 00M29S . . . . . . 0 00M30S - 00M59S . . . . . . 0 01M00S - 01M29S . . . . . . 0 01M30S - 01M59S . . . . . . 0 02M00S - 02M29S . . . . . . 0 02M30S - 02M59S . . . . . . 0 03M00S - 03M29S . . . . . . 0 03M30S - 03M59S . . . . . . 0 04M00S - 04M29S . . . . . . 0 04M30S - 04M59S . . . . . . 0 05M00S - 05M29S . . . . . . 0 05M30S - 05M59S . . . . . . 0 06M00S - 06M29S . . . . . . 0 06M30S - 06M59S . . . . . . 0 07M00S - 07M29S . . . . . . 0 07M30S - 07M59S . . . . . . 0 08M00S - 08M29S . . . . . . 0 08M30S - 08M59S . . . . . . 0 09M00S - 09M29S . . . . . . 0 09M30S - 09M59S . . . . . . 0
OVER 10M00S . . . . . . 0 -PRESS TEST BUTTON TO CONTINUE-
This displays play times on a scale from 0M00S to 9M59S with 30-second intervals. All play times over ten minutes are included in the item OVER 10M00S.

79
Press the TEST Button to display the next screen (Page 4 of 5).
��Crazy Taxi HighRoller � [GAME TEST MENU�-BOOKKEEPING 4/5]
-TIME HISTGRAM 2/2- 10M00S - 10M59S . . . . . . 0 11M00S - 11M59S . . . . . . 0 12M00S - 12M59S . . . . . . 0 13M00S - 13M59S . . . . . . 0 14M00S - 14M59S . . . . . . 0 15M00S - 15M59S . . . . . . 0 16M00S - 16M59S . . . . . . 0 17M00S - 17M59S . . . . . . 0 18M00S - 18M59S . . . . . . 0 19M00S - 19M59S . . . . . . 0 20M00S - 20M59S . . . . . . 0 21M00S - 21M59S . . . . . . 0 22M00S - 22M59S . . . . . . 0 23M00S - 23M59S . . . . . . 0 25M00S - 24M59S . . . . . . 0 26M00S - 26M59S . . . . . . 0 27M00S - 27M59S . . . . . . 0 28M00S - 28M59S . . . . . . 0 29M00S - 29M59S . . . . . . 0
�OVER 30M00S . . . . . . 0 -PRESS TEST BUTTON TO CONTINUE-
This displays play times on a scale from 10M00S to 29M59S with 1-minute intervals. All play times over thirty minutes are included in the item OVER 30M00S.

80
Press the TEST Button to display the next screen.
� ��Crazy Taxi HighRoller �
[GAME TEST MENU�-BOOKKEEPING 5/5] -FAVORITE CHARACTER-
AXEL . . . 0 ANGEL . . . 0 SLASH . . . 0 B.D.JOE . . . 0 BIXBITE . . . 0 ICEMAN . . . 0 GENA . . . 0 MRS.VENUS . . . 0 CINNAMON . . . 0
GUS . . . 0 ZAX . . . 0 HOT-D . . . 0 �
-FAVORITE CAR TYPE- NORMAL CAR . . . 0
BIKE . . . 0 STROLLER . . . 0 CARRIAGE . . . 0
� -PRESS TEST BUTTON TO EXIT-
The display items for the screen (Page 5 of 5) are as follows. 1. FAVOURITE CHARACTER: Shows number of times each character has been used.
2. FAVOURITE CAR: Shows number of times each vehicle has been used. The player can also unlock the Bike, Stroller and Carriage. Press the TEST Button after viewing/checking all of the pages. You will return to the Game Test Menu screen.

81
6.3.7. BACKUP DATA CLEAR Select BACKUP DATA CLEAR to clear the contents of BOOKKEEPING and Ranking Data.
� ��Crazy Taxi HighRoller �
[GAME TEST MENU�-BACKUP DATA CLEAR] � CLEAR BOOKKEEPING CLEAR RANKING DATA �EXIT � � � � � �
� -SELECT WITH SERVICE BUTTON AND PRESS TEST BUTTON-
� The following data may be cleared. 1. CLEAR BOOKKEEPING: Delete all BOOKKEEPING data.
2. CLEAR RANKING DATA: Delete all RANKING DATA.
Use the SERVICE Button to move to the data that you wish to clear and press the TEST Button. The options YES (CLEAR) or NO (CANCEL) will then appear. To clear data, use the SERVICE Button to move the cursor to YES (CLEAR) and then press the TEST Button. When the data has been cleared, the message “COMPLETED” will be displayed. Press the TEST Button again to return to the Game Test Menu screen. Move the cursor to NO (CANCEL) and press the TEST Button to return to the Game Test Menu screen without clearing the data.

82
7. COIN MECH INSTALLATION AND CREDIT BOARD SET UP
7.1. INTRODUCTION A VTS board controls game credits between the Coin Mechanism and the game board for this machine. This electronic circuit allows the price of play to be set for a range of different countries. These functions are set on Dual In Line (DIL) PCB mounted switches. SW1 is used to set the currency (or coin ratio) and SW3 the price of play. Refer to the Tables on the following pages for the correct settings for your environment. The VTS board pictured below is mounted in the Coin Chute Tower. The VTS board is connected to the coin validator and lamps via a dedicated wiring harness depending upon the coin validator used:
Wiring Harness Validator LM1006 Coin Controls (15 way connector) LM1007 Mars (13 way connector) LM1008 Mechanical See note 2
N/A NRI See note 1 Notes 1. If NRI mechanisms are to be used, these should be ordered with the highest denomination coin on coin
path #1 and the lowest denomination on coin path #4. The VTS board should be then be set up for either the UK or Switzerland settings. A minimum connecting lead length of 600mm is required.
2. Mechanical coin mechanisms may be connected in parallel allowing two identical mechanisms to be fitted.
The VTS Board

83
Credit Board Mode Settings Switch 3
Country Setting Switch 3 Setting Coin Validator Programming C120/SR3 Only SW1 SW2 SW3 SW4 SW5 SW6 COIN1 COIN2 COIN3 COIN4 COIN5 COIN6 COIN7 COIN8 COIN9 COIN10 COIN11 COIN12
UK Coin Controls C220 Parallel
OFF OFF OFF OFF £1 50p new 20p 10p - 50p old - -
UK Coin Controls C220 Binary
ON OFF OFF OFF £1 50p new 20p 10p - 50p old - £2
UK Coin Controls C220 Binary
OFF ON OFF OFF £1 50p new 20p 10p - £2 - 50p old
UK Coin Controls SR3 Parallel
ON ON OFF OFF £1 50p new 20p 10p - £2 - 50p old
- - - -
UK Euro
Coin Controls SR3 Parallel
OFF OFF ON OFF £2 €2
£1 €1
50p new 50¢
20p 20¢
10p 10¢
- - - 50p old - - -
UK Mars ME/MS 111 Parallel
ON OFF ON OFF £1 £2 20p 10p 50p new 50p old
UK NRI Parallel OFF ON ON OFF 10p 20p 50p £1 £2 - Belgium Parallel ON ON ON OFF - 50BFr 20BFr 5BFr Holland Parallel OFF OFF OFF ON - 5NLG 2.5NLG 1NLG Austria SR3 Parallel ON OFF OFF ON 20Sch 10Sch 5Sch 1Sch Spain Coin Controls
C220 Binary OFF ON OFF ON 500Pta 200Pta 100Pta 50Pta 25Pta 200Pt
old 50Pta
old 25Pta
old
Spain SR3/NRI Parallel
ON ON OFF ON 500Pta 200Pta 100Pta 50Pta 25Pta - - 200Pta - 50Pta old
25Pta old
-
Spain Coin Controls C220 Parallel
OFF OFF ON ON 100Pta 50Pta new
- 25Pta new
- 50Pta old
- 25Pta old
Portugal Euro
Parallel ON OFF ON ON 200Es €1
100Es 50¢
50Es - - - - -
TBA OFF TBA Please Note The credit board automatically sets the validator for parallel and binary
operation through an output on pin 8 of the 17 way pinstrip. For the feature to work it is necessary for the validator interconnecting cable to include at
wire at this position ON TBA Channels OFF Direct Mode ON 2 channel Mode Note: These switch settings are under constant review and may change due to world currency updates. �� Set SW 1 according to the option settings found in the relevant Price of Play Settings Table on the following pages. �� For Germany (DM), France (Fr) & Switzerland (SFr), use the appropriate existing setting shown above (from another country) that matches the coin ratios programmed into your coin mech. �� Set SW 3 on the VTS /Excel board as shown in the table above corresponding to the country required.

84
7.1.1. PRICE OF PLAY SETTINGS UK Price Bonus DIL Switch 1 Switch 1 Switch 2 Switch 3 Switch 4 Switch 5
1 10p No Bonus OFF OFF OFF OFF OFF 2 10p 6 = 50p ON OFF OFF OFF OFF 3 20p No Bonus OFF ON OFF OFF OFF 4 20p 3 = 50p 6 = £1 12 =£2 ON ON OFF OFF OFF 5 30p No Bonus OFF OFF ON OFF OFF 6 30p 1.66 = 50p 4 = £1 8 = £2 ON OFF ON OFF OFF 7 30p 2 = 50p 4 = £1 OFF ON ON OFF OFF 8 30p AMLD * 3 = £1 6 = £2 ON ON ON OFF OFF 9 40p No Bonus OFF OFF OFF ON OFF
10 40p 1.25 = 50p 3 = £1 6 = £2 ON OFF OFF ON OFF 11 50p No Bonus OFF ON OFF ON OFF 12 50p 3 = £1 6 = £2 ON ON OFF ON OFF 13 50p 2 = £1 5 = £2 OFF OFF ON ON OFF 14 60p No Bonus ON OFF ON ON OFF 15 60p 2 = £1 4 = £2 OFF ON ON ON OFF 16 80p No Bonus ON ON ON ON OFF 17 80p 1.25 = £1 2 = £1.50 2.5 = £2 OFF OFF OFF OFF ON 18 £1 No Bonus ON OFF OFF OFF ON 19 £1 3 = £2 OFF ON OFF OFF ON 20 £1 2 = £2 5 = £4 ON ON OFF OFF ON 21 £1.50 No Bonus OFF OFF ON OFF ON 22 £1.50 2 = £2 ON OFF ON OFF ON 23 £2 No Bonus OFF ON ON OFF ON 24 £2 3 = £5 ON ON ON OFF ON 25 £3 No Bonus OFF OFF OFF ON ON 26 £3 2 = £5 ON OFF OFF ON ON 27 £5 No Bonus OFF ON OFF ON ON 28 £5 3 = £10 ON ON OFF ON ON 29 £7.50 No Bonus OFF OFF ON ON ON 30 £7.50 2 = £10 ON OFF ON ON ON 31 £10 No Bonus OFF ON ON ON ON 32 Free Play ON ON ON ON ON

85
7.1.2. PRICE OF PLAY SETTINGS EURO Price Bonus DIL Switch 1 Switch 1 Switch 2 Switch 3 Switch 4 Switch 51 10¢ No Bonus OFF OFF OFF OFF OFF 2 10¢ 6 = 50¢ ON OFF OFF OFF OFF 3 20¢ No Bonus OFF ON OFF OFF OFF 4 20¢ 3 = 50¢ 6 = €1 12 =€2 ON ON OFF OFF OFF 5 30¢ No Bonus OFF OFF ON OFF OFF 6 30¢ 1.66 = 50¢ 4 = €1 8 = €2 ON OFF ON OFF OFF 7 30¢ 2 = 50¢ 4 = €1 OFF ON ON OFF OFF 8 30¢ AMLD * 3 = €1 6 = €2 ON ON ON OFF OFF 9 40¢ No Bonus OFF OFF OFF ON OFF
10 40¢ 1.25 = 50¢ 3 = €1 6 = €2 ON OFF OFF ON OFF 11 50¢ No Bonus OFF ON OFF ON OFF 12 50¢ 3 = €1 6 = €2 ON ON OFF ON OFF 13 50¢ 2 = €1 5 = €2 OFF OFF ON ON OFF 14 60¢ No Bonus ON OFF ON ON OFF 15 60¢ 2 = €1 4 = €2 OFF ON ON ON OFF 16 80¢ No Bonus ON ON ON ON OFF 17 80¢ 1.25 = £1 2 = €1.50 2.5 = €2 OFF OFF OFF OFF ON 18 €1 No Bonus ON OFF OFF OFF ON 19 €1 3 = €2 OFF ON OFF OFF ON 20 €1 2 = €2 5 = €4 ON ON OFF OFF ON 21 €1.50 No Bonus OFF OFF ON OFF ON 22 €1.50 2 = €2 ON OFF ON OFF ON 23 €2 No Bonus OFF ON ON OFF ON 24 €2 3 = €5 ON ON ON OFF ON 25 €3 No Bonus OFF OFF OFF ON ON 26 €3 2 = €5 ON OFF OFF ON ON 27 €5 No Bonus OFF ON OFF ON ON 28 €5 3 = €10 ON ON OFF ON ON 29 €7.50 No Bonus OFF OFF ON ON ON 30 €7.50 2 = €10 ON OFF ON ON ON 31 €10 No Bonus OFF ON ON ON ON 32 Free Play ON ON ON ON ON

86
7.1.3. PRICE OF PLAY SETTINGS Austria-Czech-Denmark-Norway-Israel-France2
Price Bonus Switch 1 Switch 1 Switch 2 Switch 3 Switch 4 Switch 5
1 1 No Bonus OFF OFF OFF OFF OFF 2 1 11 = 10 ON OFF OFF OFF OFF 3 1 6 = 5 OFF ON OFF OFF OFF 4 2 No Bonus ON ON OFF OFF OFF 5 2 6 = 10 OFF OFF ON OFF OFF 6 2 3 = 5 ON OFF ON OFF OFF 7 3 No Bonus OFF ON ON OFF OFF 8 3 4 = 10 ON ON ON OFF OFF 9 3 2 = 5 OFF OFF OFF ON OFF 10 4 No Bonus ON OFF OFF ON OFF 11 4 3 = 10 OFF ON OFF ON OFF 12 5 No Bonus ON ON OFF ON OFF 13 5 3 = 10 OFF OFF ON ON OFF 14 6 No Bonus ON OFF ON ON OFF 15 6 4 = 20 OFF ON ON ON OFF 16 8 No Bonus ON ON ON ON OFF 17 10 No Bonus OFF OFF OFF OFF ON 18 10 3 = 20 ON OFF OFF OFF ON 19 20 No Bonus OFF ON OFF OFF ON 20 20 3 = 50 ON ON OFF OFF ON 21 30 No Bonus OFF OFF ON OFF ON 22 30 2 = 50 ON OFF ON OFF ON 23 50 No Bonus OFF ON ON OFF ON 24 50 3 = 100 ON ON ON OFF ON 32 Free Play ON ON ON ON ON

87
8. DESIGN RELATED PARTS For the Warning stickers refer to Section 1.
No. PART No. DESCRIPTION 1 CTH-0004UK SUB INSTR SH MULTI 2 CTH-1009UK STICKER SIDE L 3 CTH-1010UK STICKER SIDE R 4 CTH-1401 EMBLEM CTH 5 CTH-0002UK PLAY INSTR SH A MULTI 6 CTH-0001UK DISPLAY CARD CTH STD 7 CTA-2004 STICKER SHIFT D 8 CTA-2005 STICKER SHIFT R 9 CTH-2001-BUK STICKER START CTH 10 CTH-1503UK FLOOR MAT CTH 11 CTH-2201UK WOOFER PLATE CTH 12 CTH-1007UK STICKER SIDE L BACK 13 CTH-1008UK STICKER SIDE R BACK 14 CTH-5007UK STICKER SEAT (NOT SHOWN)
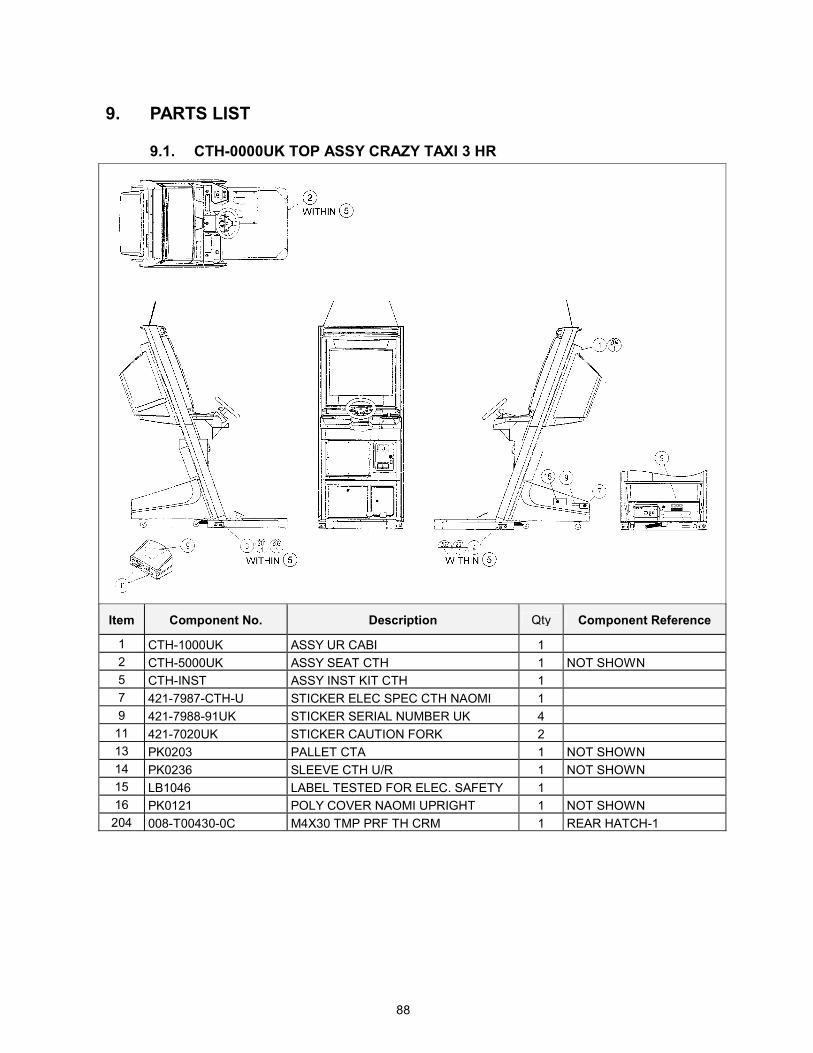
88
9. PARTS LIST
9.1. CTH-0000UK TOP ASSY CRAZY TAXI 3 HR
Item Component No. Description Qty Component Reference
1 CTH-1000UK ASSY UR CABI 1 2 CTH-5000UK ASSY SEAT CTH 1 NOT SHOWN 5 CTH-INST ASSY INST KIT CTH 1 7 421-7987-CTH-U STICKER ELEC SPEC CTH NAOMI 1 9 421-7988-91UK STICKER SERIAL NUMBER UK 4
11 421-7020UK STICKER CAUTION FORK 2 13 PK0203 PALLET CTA 1 NOT SHOWN 14 PK0236 SLEEVE CTH U/R 1 NOT SHOWN 15 LB1046 LABEL TESTED FOR ELEC. SAFETY 1 16 PK0121 POLY COVER NAOMI UPRIGHT 1 NOT SHOWN
204 008-T00430-0C M4X30 TMP PRF TH CRM 1 REAR HATCH-1

89
9.2. CTH-1000UK ASSY UR CABI

90
Item Component Part Description QTY Component Reference 1 NOB-1100UK ASSY FRAMEWORK UR 1 2 NOA-1200UK ASSY CRT COVER UK 1 4 CTH-1400UK ASSY FRONT PANEL 1 5 CTA-1150UK ASSY CC BOX WW 1 6 CTH-4000UK ASSY ELEC 1 7 NOA-1750UK ASSY SERVICE DOOR 1 8 NOA-1801UK REAR HATCH 1 9 NOB-1001UK FRAME COVER UR R 1 10 NOB-1002UK FRAME COVER UR L 1 11 NOA-1003 ENDCAP R 1 12 NOA-1004 ENDCAP L 1 13 NOA-1010UK BILLBD HOLDER 1 14 CTH-4100UK ASSY MAIN BRD 1 15 280-6617 BUSH FOR TV LONG 4 16 280-5113 COLLAR FOR NANAO MONITOR 4 (101)-4 18 CTA-1006 SCR CAP 4 19 NOB-1710UK ASSY AC UNIT NEW 1 20 NOA-1116 LID COMMUNI PORT 1 21 CTH-2000UK ASSY CONTROL PANEL 1 22 CTH-2200UK ASSY WOOFER 1 23 PTR-1001UK CONTROL BOX 1 24 CTA-1002 WIRE COVER 1 25 CTA-1003UK ENTRY COVER 1 26 421-7501-17 STICKER FL 20W 1 27 837-13661-92 I/O CONTROL BD W/O FOR JVS 1 28 LB1103 STICKER CAUTION 1 INSIDE CONTROL PANEL
(GEARS) 29 NOA-1005UK REAR COVER UPPER 1 30 NOA-1011 FL BRKT 1 33 CTH-1009UK STICKER SIDE L 1 34 CTH-1010UK STICKER SIDE R 1 35 RCR-1019 CHAIN HOLDER B 1 37 LB1102 STICKER DANGEROUS VOLTAGE 6 CRT, FL, HATCH, S/DOOR,
CP, R LOCK, TOP BASE BOX38 LB1104 STICKER CAUTION, HOT SURFACE 1 FL COVER 40 CTA-4200UK ASSY XFMR 1 41 CTA-2007UK DRAINAGE GUTTER CE 1 -41 42 OS1177 TAPE D/S PVC 50MM X 50M ROLL 5 -41 43 OS1239 SEALANT BLACK 1 -5 44 CTA-1011UK FOAM STRIP 8 X 6MM 0.75 -23 45 CTH-1007UK STICKER SIDE L BLACK 1 46 CTH-1008UK STICKER SIDE R BLACK 1

91
Cont.
Item Component Part Description QTY Component Reference 101 200-5949 ASSY CLR DSPL 29 TYPE 31K UK 1 102 390-5695-40-CUK FL TRAY 110V 40W (T12) 1 103 390-5695-40-DUK FL TUBE 40W 600L 1.5"DIA 1 104 280-A01200-A ROUTER TWIST D12 ADH 4 105 280-A01248-PM ROUTER TWIST D12 SO4.8 PAN MED 9 106 280-A02048-PM ROUTER TWIST D20 SO4.8 PAN LG 7 107 280-A02000-A ROUTER TWIST D20 ADH 5 110 601-6231-D100 EDGING NEW TYPE 1 ROUND HOLE TO WOOFER BOX111 280-N02310-0B SLIT HARN WRAP 23MM DIA 1M BLK 0.2 WIRES THRU LH FRAME 112 280-L00716-OS STANDOFF 7OD 4ID 16L 3 (REMOTE BD) - 3 113 OS1008 CABLE TIE, NYLON 150MM 2 114 NOB-1117UK WATER GUARD CE 1 AROUND MONITOR CHASSIS115 601-0460 CABLE TIE 100MM 10 116 OS1230 FOAM STRIP 2MM X 10MM 1.18 2 X 0.59m TO (8) 117 OS1220 FOAM STRIP 8MMSQ ADHESIVE 1 (21)-1 123 280-K00600-0W DRIVE FASTENER M6 WHITE 2 BASE BOX ABOVE COIN
DOOR 126 290093 CMS)TAPE,FOAM(BLK)-
3X6MMX25MTR 63 CM
201 008-T00625-0C M6X25 TMP PRF TH CRM 14 (2)-6, (29)-4, (4)-4 202 030-000620-S M6X20 BLT W/S PAS 12 (5)-4, (22)-4,(23)-4 203 068-651616 M6 WSHR 160D FLT PAS 12 (5)-4, (22)-4, (23)-4 204 010-P00408 M4X8 S-TITE PAN PAS 4 (6)-4 205 008-T00412-0C M4X12 TMP PRF TH CRM 40 (8) & (13)-4, (9) &(10)-10, (11) &
(12)-4, (19)-6, (20)-2 206 050-F00600 M6 NUT FLG SER PAS 4 (101)-4 208 050-F00300 M3 NUT FLG SER PAS 7 (27)-4, (REMOTE BD)-3 209 032-000425 M4X25 W/BLT PAS 2 (14)-2 210 068-441616-0C M4 WSHR 16OD FLT CRM 2 (14)-2 211 008-B00825-0B M8X25 TMP PRF BH BLK 3 (21)-3 212 068-852216-0B M8 WSHR 22OD FLT BLK 3 (21)-3 213 050-F00500 M5 NUT FLG SER PAS 10 (21)-4, (EARTH)-6 214 000-P00420-0B M4X20 MSCR PAN BLK 3 (24)-3 215 000-P00416-W M4X16 MSCR PAN W/FS PAS 2 (4)-2 217 000-P00408-W M4X8 MSCR PAN W/FS PAS 7 (30)-4, (EARTH)-6 221 000-P00512-W M5X12 MSCR PAN W/FS PAS 2 (35)-2 223 060-F00400 M4 WSHR FORM A FLT PAS 4 (6)-4 224 050-F00400 M4 NUT FLG SER PAS 5 (102)-2, (5E)-1, (29E)-1,
(31E)-1 225 068-652516 M6 WSHR 250D FLT PAS 8 (40)-4, (101)-4 226 000-P00625 M6X25 MSCR PAN PAS 4 (40)-4 227 000-P00408 M4X8 MSCR PAN PAS 2 (103)-2 229 008-T00412-0B M4X12 TMP PRF TH BLK 2 (25)-2 230 068-441616-0B M4 WSHR 16OD FLT BLK 2 (25)-2

92
Cont.
Item Component Part Description QTY Component Reference 301 CTA-6001UK ASSY WIRE L 1 302 CTA-6002UK ASSY WIRE R 1 311 600-7159-070 WIRE HARN JVS PWR 070CM 1 313 600-7009-2000 ASSY RGB CA D-SUB 15P 2000MM 1 321 CTA-60062 WIRE HARN I/O BOARD PWR 1 322 CTA-60066UK WIRE HARN SW UNIT EXT 1 323 CTA-60067UK WIRE HARN VOL EXT 1 324 CTA-60068UK WIRE HARN SPEAKER 1 325 CTA-60069 WIRE HARN WOOFER 1 326 NOB-60201UK WIRE HARN FL NOB 1 328 600-9070-45K WIRE HARN EARTH 700MM M4/M5 1 329 600-9060-45K WIRE HARN EARTH 600MM M4/M5 1 330 600-9090-45K WIRE HARN EARTH 900MM M4/M5 1 331 600-9010-44K WIRE HARN EARTH 100MM M4/M4 1 332 600-9080-45K WIRE HARN EARTH 800MM M4/M5 1
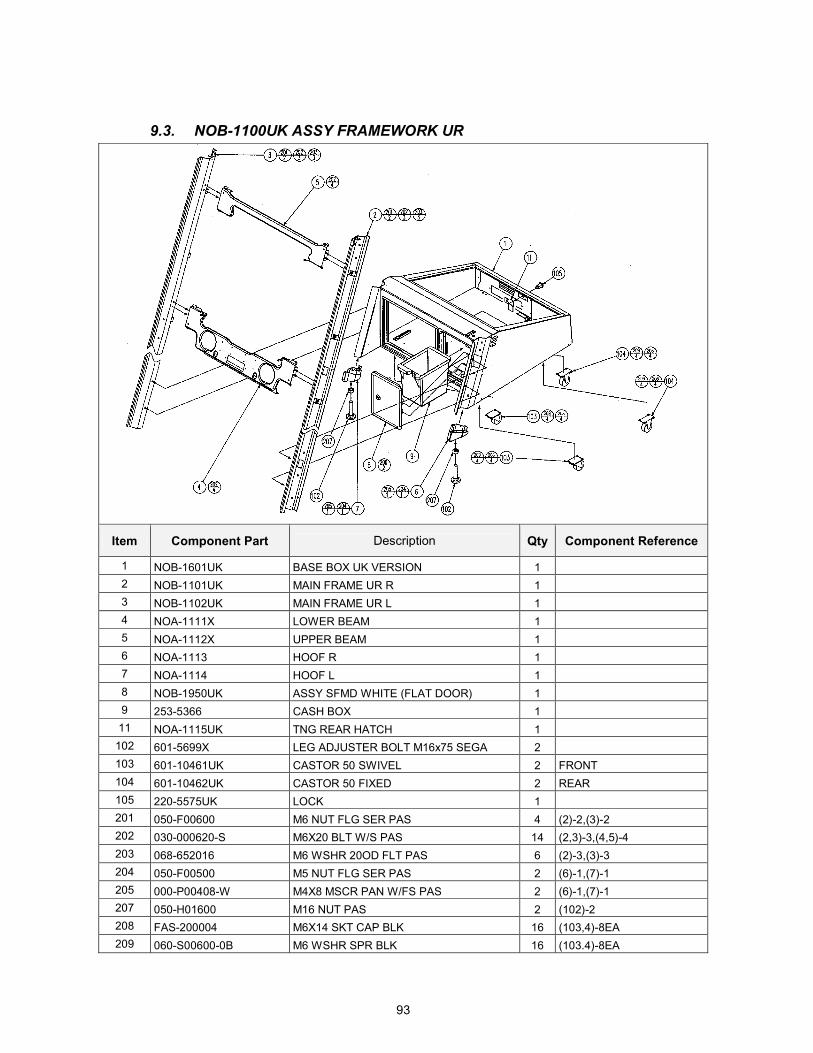
93
9.3. NOB-1100UK ASSY FRAMEWORK UR
Item Component Part Description Qty Component Reference
1 NOB-1601UK BASE BOX UK VERSION 1 2 NOB-1101UK MAIN FRAME UR R 1 3 NOB-1102UK MAIN FRAME UR L 1 4 NOA-1111X LOWER BEAM 1 5 NOA-1112X UPPER BEAM 1 6 NOA-1113 HOOF R 1 7 NOA-1114 HOOF L 1 8 NOB-1950UK ASSY SFMD WHITE (FLAT DOOR) 1 9 253-5366 CASH BOX 1 11 NOA-1115UK TNG REAR HATCH 1
102 601-5699X LEG ADJUSTER BOLT M16x75 SEGA 2 103 601-10461UK CASTOR 50 SWIVEL 2 FRONT 104 601-10462UK CASTOR 50 FIXED 2 REAR 105 220-5575UK LOCK 1 201 050-F00600 M6 NUT FLG SER PAS 4 (2)-2,(3)-2 202 030-000620-S M6X20 BLT W/S PAS 14 (2,3)-3,(4,5)-4 203 068-652016 M6 WSHR 20OD FLT PAS 6 (2)-3,(3)-3 204 050-F00500 M5 NUT FLG SER PAS 2 (6)-1,(7)-1 205 000-P00408-W M4X8 MSCR PAN W/FS PAS 2 (6)-1,(7)-1 207 050-H01600 M16 NUT PAS 2 (102)-2 208 FAS-200004 M6X14 SKT CAP BLK 16 (103,4)-8EA 209 060-S00600-0B M6 WSHR SPR BLK 16 (103.4)-8EA

94
9.4. NOA-1200UK ASSY CRT COVER UK
Item Component Part Description Qty Component Reference
1 NOA-1201UK CRT COVER 1 2 NOA-1202 SPEAKER BOX 1 3 RND-0037 TAPE SPEAKER BOX 2 SIDED 0.38 (2)-0.19
101 130-5205 SPEAKER 40HM 10W 100 W/SHIELD 2 102 000-P00410-W M4X10 MSCR PAN W/FS PAS 8 (101)-8 103 340042 RIVET BULBEX 3/16 BF01-0630 6 (2)-6 301 NOA-60031 WIRE HARN SPEAKER L 1 302 NOA-60032 WIRE HARN SPEAKER R 1

95
9.5. CTA-1150UK ASSY CC BOX WW
No. PART NUMBER QTY DESCRIPTION COMPONENT REFERENCE
1 CTA-1151UK 1 CC BOX WW 3 CTA-1155UK 1 CHUTE UNIV 4 VTS-STW-U 1 VTS BOARD UPRIGHT TYPE 9 LB1103 1 STICKER CAUTION
201 000-P00408-W 4 M4X8 MSCR POSI PAN W/FS (4)-4 202 000-F00408 3 M4X8 MSCR POSI CSK BZP (3)-3 301 CTA-60101UK 1 WIRE HARN VTS CTA

96
9.6. NOA-1300UK ASSY BILLBOARD
No. PART NUMBER QTY DESCRIPTION COMPONENT REFERENCE 1 NOA-1301 1 BILLBOARD PLATE 2 NOA-1302UK 1 BILLBOARD SHEET
201 008-T00408-OC 3 M4X8 MSCR TMP PRF TH CRM (2)-3

97
9.7. CTH-1400UK ASSY FRONT PANEL
Item Component Part Description QTY Component Reference
1 CTH-1400UK-S1 FRONT PANEL 1 3 NOA-1503 LIGHT COVER 1 4 NOA-1504UK PRISM PLATE 1 5 CTA-1402 LID GCS 1 6 CTA-1403 LID VMS 2 7 CTH-1401 EMBLEM CTH 1
201 000-P00412-W M4X12 MSCR PAN W/FS PAS 5 (5)-5 202 012-P03516 N6X5/8" S/TAP PAN PAS 4 (4)-4

98
9.8. CTH-1500UK ASSY FLOOR
Item Component Part Description Qty Component Reference
1 CTA-1501UK FLOOR BASE 1 2 CTA-1600UK ACCEL UNIT HAPP 1 3 CTA-1650UK BRAKE UNIT HAPP 1 4 CTA-1502 LEVEL ADJUSTER 2 5 CTH-1503UK FLOOR MAT CTH 1 6 CTA-1504UK CORNER PROTECTOR 2 7 CTA-1506UK SASH FRONT 1 8 CTA-1505 SASH SIDE 2 9 CTA-1507 SASH REAR 1 10 CTA-1508 FLOOR LID 1
101 280-A01200-A ROUTER TWIST D12 ADH 1 102 OS1177 TAPE D/S PVC 50mm X 50 M ROLL 1.5 (5)-1.5 201 000-T00408-0C M4X8 MSCR TH CRM 20 (6)-8, (7)-3, (8)-6, (9)-3 202 050-F00600 M6 NUT FLG SER PAS 10 (2)-5, (3)-5 203 050-H01000 M10 NUT PAS 2 (4)-2 205 000-T00620-0C M6X20 MSCR TH CRM 4 (10)-4 206 050-F00400 M4 NUT FLG SER PAS 1 (EARTH)-1 301 CTA-60030 WIRE HARN FLOOR TUBE 1

99
9.9. NOB-1710UK ASSY AC UNIT NEW
Item Component Part Description Qty Component Reference
1 NOB-1711UK AC BRKT NEW 1 3 LB1096 STICKER PROTECTIVE EARTH 1 NEXT TO EARTH STUD ON
INSIDE 4 421-6595-5000-T STICKER FUSE 5000mA TYPE T 1 NEXT TO IEC INLET ON
OUTSIDE 101 EP1381 FILTER IEC & SW 6A ROXBURGH 1 111 514-5078-5000 FUSE 5X20 CERAMIC SB 5000mA 1 (102)-1 201 000-F00316 M3X16 MSCR CSK PAS 2 (101)-2 202 050-F00400 M4 NUT FLG SER PAS 2 EARTH - 2 301 NOB-60004UK WIRE HARN AC OUT 1 303 600-9030-45K WIRE HARN EARTH 300mm M4/M5 K 1 AC BRKT TO XFMR 305 600-9025-44K WIRE HARN EARTH 250mm M4/M4 1 AC BRKT TO BASE 306 600-9015-4FK WIRE HARN EARTH 150mm 1 FILTER TO PRIMARY EARTH
POINT

100
9.10. NOA-1750UK ASSY SERVICE DOOR
Item Component Part Description Qty Component Reference
1 NOA-1751UK SERVICE DOOR 1 2 DP-1167UK TNG LKG UK 1
101 220-5575UK LOCK 1 201 008-T00430-0C M4X30 TMP PRF TH CRM 1 DO UP 1/2 WAY SO TNG OPENS

101
9.11. NOB-1950UK ASSY SFMD WHITE (FLAT DOOR)
Item Component Part Description Qty Component Reference
101 220-5725-03W FRAME SINGLE MINI WHITE 1
CLAMPS & SCREWS IN BAGS
102 220-5725-04W DOOR SINGLE MINI FLAT WHITE 1 104 220-5574UK LOCK KEYED DIFFERENT 1 (102)-1 105 PTR-1951UK CAM CRANKED 6mm, LENGTH 34mm 1 (104)-1 201 012-PB3506 N6X1/4" S/TAP PAN B 4

102
9.12. CTH-2000UK ASSY CONTROL PANEL
Item Component Part Description Qty Component Reference
1 CTA-2001-A CONTROL PANEL BLANK 1 2 CTH-2002 CONTROL PANEL BRKT 1 3 CTA-2003 HINGE 456 1 4 CTA-2100UK ASSY HANDLE MECHA W/ BOSS HAPP 1 5 610-0675 UP/DOWN SHIFTER W/BUTTON 1 6 JBA-2001UK STEERING WHEEL HAPP 1 8 CTH-2005UK CAP CENTRE 50-2715-00 1 10 CTA-2004 STICKER SHIFT D 1 11 CTA-2005 STICKER SHIFT R 1 12 360077 CHAIN 14 SWG (13mm LINK) 1 13 RCR-1019 CHAIN HOLDER B 1 14 CTH-2001-BUK STICKER START CTH 1 15 MGL-2003 DENOMINATION PLATE 1
101 509-5610-03YE SW PB 30M YELLOW W/L WH 5V 3W 1 102 280-A00900-A ROUTER TWIST D9 ADH 6 201 050-U00800 M8 NUT NYLOK PAS 4 (4)-4 202 060-F00800 M8 WSHR FORM A FLT PAS 4 (4)-4 203 008-T00512-0B M5X12 TMP PRF TH BLK 4 (5)-4 204 050-F00500 M5 NUT FLG SER PAS 5 (3)-4, (EARTH)-1 207 008-T00412-0B M4X12 TMP PRF TH BLK 11 (1)-9, (15)-2 208 000-P00512-W M5X12 MSCR PAN W/FS PAS 2 (13)-2 209 068-852216 M8 WSHR 22OD FLT PAS 3 (6)-3 210 029-B00516-0B M5 x 16 SKT BH BLK 6 (8)-6

103
Cont.
Item Component Part Description Qty Component Reference
304 CTH-60014UK WH CONTROL PANEL 1 305 CTA-60064 WIRE HARN START SW 1 306 CTA-60065 WIRE HARN HANDLE EXT 1 307 CTH-60008UK WH MECHA PEDALS 1 308 CTH-60100UK WIRE HARN SW CONTROL 1 311 600-9010-55K WIRE HARN EARTH 100mm M5/M5 1 CP BASE TO CONTROL PANEL

104
9.13. CTH-2200UK ASSY WOOFER
Item Component Part Description Qty Component Reference
1 CTH-2201UK WOOFER PLATE CTH 1 2 CTA-2202 WOOFER BRKT L 1 3 CTA-2203 WOOFER BRKT R 1 4 CTA-2204 WOOFER BRKT LOWER 1 5 CTA-2205 WOOFER BRKT LOWER 1 6 JBA-1151 WOOFER CUSHION H 2 7 JBA-1152 WOOFER CUSHION V 2
102 130-5208-91-G0 WOOFER BOX 4OHM 75W GOLD CONE 1 202 000-P00520-WB M5X20 MSCR PAN W/FS BLK 12 (2)-3,(3)-3,(4)-3,(5)-3 204 000-T00560-0B M5X60 MSCR TH BLK 8 (1)-8

105
9.14. CTH-4000UK ASSY ELEC
Item Component Part Description Qty. Component Reference 1 CTH-4001 ELEC BASE SHORT 1 2 NOM-4002 BRKT FOR PWR PROTECT UNIT 1 FIT WITH SW REG
101 400-5443 SW REGU FOR CHIHIRO 1 103 838-13616 AUDIO POWER AMP 2CH 1 107 280-A02048-PM ROUTER TWIST D20 SO4.8 PAN LG 4 108 601-6231-B095 EDGE TRIM NEW TYPE 0.91t 9,5 (1) BACK EDGE IN MIDDLE109 EP1317 FERRITE CORE ROUND CABLE CLAMP 1 SW REGU OUTLET WIRES110 280-A01248-PM ROUTER TWIST D12 SO4.8 PAN MED 2 111 280-A02000-A ROUTER TWIST D20 ADH 1 112 EP1364 FERRITE CORE ROUND CABLE CLAMP 1 SW REGU INLET WIRES 113 610-0674 POWER PROTECT UNIT FOR CHIHIRO 1 (2) 201 010-P00408 M4X8 S-TITE PAN PAS 4 (101)-4 202 010-P00308 M3X8 S-TITE PAN PAS 4 (103)-4 303 HDT-60013UK WIRE HARN SW REGU + CONDENSER 1 304 NOA-60014 WIRE HARN I/O BD PWR 1 305 NOB-60202UK WIRE HARN AUDIO POWER-IN 1 306 600-7159-039 WIRE HARN JVS PWR 039CM 1

106
9.15. CTH-4100UK ASSY MAIN BD
Item Component Part Description Qty Component Reference
1 CTH-4101UK WOODEN BASE MAIN 1 2 843-0001D-12 ASSY CASE BOX COM NAO DIMM EXP 1 3 610-0617 GD-ROM DRIVE UNIT NAOMI 1 SHIP BOX WITH MACHINE 4 105-5435 GD DRIVE BRKT STD 1 5 610-0652-0002 GD SOFT CTH 1 6 253-5508-0353 KEY CHIP 1 7 HDT-60100UK WH POWER GD ROM 1
101 838-13758 LOWPASS AMP CTA 1 102 838-13759 RECT BD CTA 1 103 LB1111 STICKER PLEASE RECYCLE 1 (2)-1 106 LB1101 STICKER WARNING BATTERY 1 (2)-1 107 280-A01264-WX ROUTER TWIST D12 SO6.4 WOOD X 5 201 000-P00416-W M4X16 MSCR PAN W/FS PAS 7 (2)-4, (4)-3 202 012-P00325 N4X1" S/TAP PAN PAS 8 (101)-4,(102)-4 203 012-P00410-F N8X3/8" S/TAP FLG PAS 4 (3)-4 302 CTA-60101 WIRE HARN VOL AND SOUND 1 303 CTA-60102 WIRE HARN WOOFER AND PWR 1 304 CTA-60103UK WIRE HARN AUDIO LP POWER IN 1 307 600-7247-500 CABLE SCSI ST-L TYPE2 500MM 1

107
9.16. CTA-4200UK ASSY XFMR
Item Component Part Description Qty Component Reference
1 CTA-4201UK WOODEN BASE XFMR CTA 1 3 838-11856CE-02 CONN BD W/FUSE 6.3A CE 1
101 560-5422-01UK XFMR CTA 1 201 000-P00416-W M4X16 MSCR PAN W/FS PAS 4 (101)-4 202 068-441616 M4 WSHR 16OD FLT PAS 4 (101)-4 203 012-P00325 N4X1" S/TAP PAN PAS 2 (3)-2
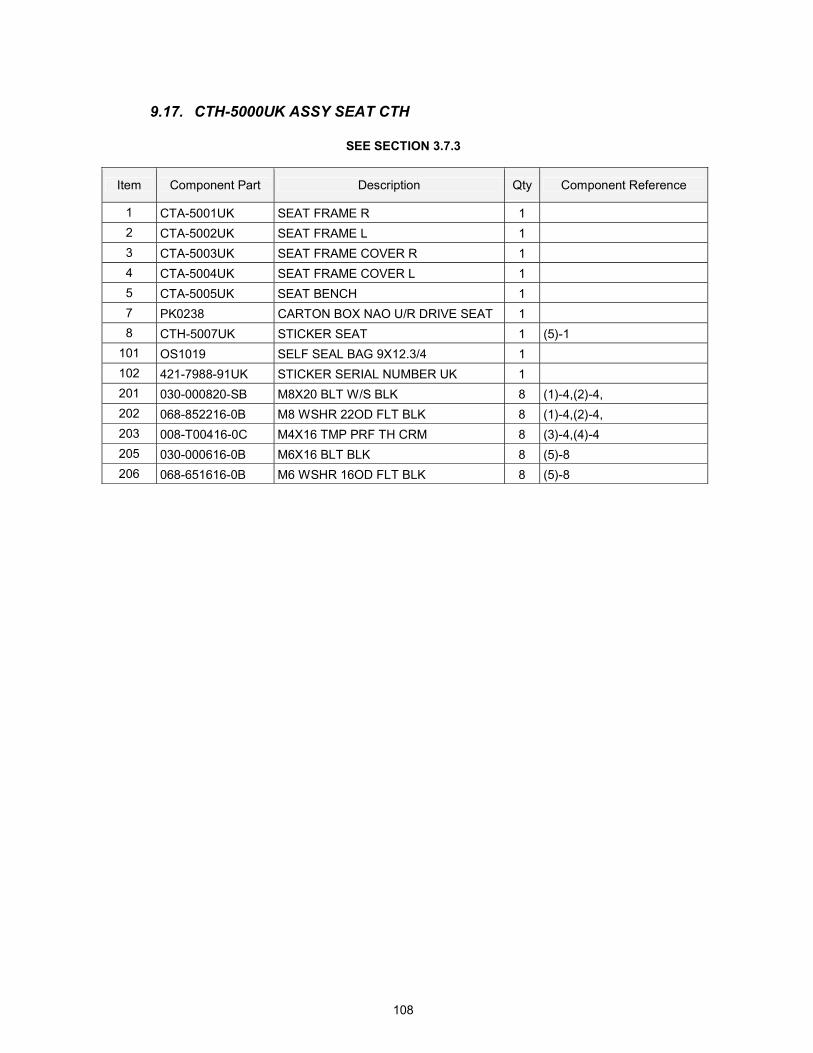
108
9.17. CTH-5000UK ASSY SEAT CTH
SEE SECTION 3.7.3
Item Component Part Description Qty Component Reference
1 CTA-5001UK SEAT FRAME R 1 2 CTA-5002UK SEAT FRAME L 1 3 CTA-5003UK SEAT FRAME COVER R 1 4 CTA-5004UK SEAT FRAME COVER L 1 5 CTA-5005UK SEAT BENCH 1 7 PK0238 CARTON BOX NAO U/R DRIVE SEAT 1 8 CTH-5007UK STICKER SEAT 1 (5)-1
101 OS1019 SELF SEAL BAG 9X12.3/4 1 102 421-7988-91UK STICKER SERIAL NUMBER UK 1 201 030-000820-SB M8X20 BLT W/S BLK 8 (1)-4,(2)-4, 202 068-852216-0B M8 WSHR 22OD FLT BLK 8 (1)-4,(2)-4, 203 008-T00416-0C M4X16 TMP PRF TH CRM 8 (3)-4,(4)-4 205 030-000616-0B M6X16 BLT BLK 8 (5)-8 206 068-651616-0B M6 WSHR 16OD FLT BLK 8 (5)-8

109
9.18. CTA-6001UK ASSY WIRE L ASSEMBLY NOT SHOWN
Item Component Part Description Qty Component Reference
101 601-0460 CABLE TIE 100mm 10 309 CTA-60002 WIRE HARN ACCEL BRAKE 1 310 CTA-60003 WIRE HARN WOOFER EXT 1 312 CTA-60004 WIRE HARN WOOFER VOL EXT 1 313 NOB-6001UK ASSY WIRE L 1
9.19. NOB-6001UK ASSY WIRE L ASSEMBLY NOT SHOWN
Item Component Part Description Qty Component Reference
101 601-0460 CABLE TIE 100mm 12 102 280-N01610-0B SLIT HARN WRAP 16mm DIA 1M BLK 0.4 301 NOB-60043 WIRE HARN PWR I/O BD 1 302 NOB-60044 WIRE HARN SOUND VOL 1 303 NOB-60045 WIRE HARN SPEAKER L 1 304 NOB-60046 WIRE HARN SPEAKER R 1 305 600-7158-0100 CA AUDIO RCA TO RCA 2CH 100CM 1 306 600-9075-45K WIRE HARN EARTH 750mm M4/M5 U 1 SEE TEXT 307 600-9055-45K WIRE HARN EARTH 550mm M4/M5 K 1 BASE TO LH FRAME (BOTTOM)308 600-7141-250 CABLE JVS TYPE A-B 250CM 1
9.20. CTA-6002UK ASSY WIRE R ASSEMBLY NOT SHOWN
Item Component Part Description Qty Component Reference
101 601-0460 CABLE TIE 100mm 10 301 CTA-60041UK WIRE HARN AC EXT 1 303 CTA-60001UK WIRE HARN AC EXT BB 1

110
9.21. CTH-INST ASSEMBLY NOT SHOWN
Item Component Part Description Qty Component Reference
1 NOA-1301X ASSY BILLBOARD 1 2 CTH-1500UK ASSY FLOOR 1 3 CTA-0001 JOINT BRKT L 1 4 CTA-0002 JOINT BRKT R 1 8 CTH-0001UK DISPLAY CARD 1 9 NOA-1302UK BILLBOARD SHEET 1 14 CTH-0002UK PLAY INSTR SH A MULTI 1 16 CTH-0004UK SUB INSTR SH MULTI 1 18 420-5827 SERVICE MANUAL SANWA 31K 1 19 SAECE-XXX DECLARATION OF CONFORMITY 1
101 514-5078-5000 FUSE 5X20 CERAMIC SB 5000mA 1 201 030-000820-SB M8X20 BLT W/S BLK 2 (3)-1,(4)-1 202 068-852216-0B M8 WSHR 22OD FLT BLK 2 (3)-1,(4)-1 203 008-T00412-0C M4X12 TMP PRF TH CRM 5 fixings for billboard 402 420-6758-01UK SERVICE MANUAL CTH 1 403 420-6620UK SERVICE MANUAL GDROM 1 406 OS1019 SELF SEAL BAG 9X12.3/4 1 407 PK0325 INST KIT BOX CTH 1 408 PK0061 BUBBLE WRAP LARGE 1.5M X 45M 0.025 409 220-5484-H VOL 5-K-OHM HAPP 50-8026-00 1 SPARE 411 540-0006-01 WRENCH M4 TMP PRF 1 412 540-0007-01 WRENCH M5 TMP PRF 1 413 540-0009-01 WRENCH M8 TMP PRF 1 414 540-0015-01 WRENCH M6 TMP PRF 1

111
10. APPENDIX A - ELECTRICAL SCHEMATIC
10.1. WIRE COLOURS THE WIRE COLOUR CODE IS AS FOLLOWS: A PINK B SKY BLUE C BROWN D PURPLE E LIGHT GREEN Wires other than those of any of the colours listed above will be displayed by 2 alphanumeric characters: 1 RED 2 BLUE 3 YELLOW 4 GREEN 5 WHITE 7 ORANGE 8 BLACK 9 GREY If the right hand side numeral of the code is 0, then the wire will be of a single colour shown by the left hand side numeral (see the list above). Note 1: If the right hand side alphanumeric is not 0, that particular wire has a spiral colour code. The left hand side character shows the base colour and the right hand side one, the spiral colour. [Example] 51------------- WHITE/RED = WHITE wire with RED stripes Note 2: The character following the wire colour code indicates the size of the wire. K: AWG18, UL1015 L: AWG20, UL1007 None AWG22, UL1007
10.2. ELECTRICAL SCHEMATIC The following pages contain the electrical schematics for this machine.

112
SCHEMATIC 1 HERE

113
SCHEMATIC 2HERE

SEGA AMUSEMENTS EUROPE LTD./ SEGA SERVICE CENTRE Suite 3a
Oaks House 12 - 22 West Street
Epsom Surrey
United Kingdom KT18 7RG
Telephone: +44 (0) 1372 731820
Fax: +44 (0) 1372 731849
� SEGA 2002