Scouting and Rope _A5 booklet_Dec2015.cdr
6
Harpenden and Wheathampstead Scout District Skills for Leadership Building the Ethos Scouting and Rope Rope without knowledge is passive and becomes troublesome when something must be secured. But with even a little knowledge rope comes alive as the enabler of a thousand tasks: structures are possible; we climb higher; we can build, sail and fish. And our play is suddenly extensive: bridges, towers and aerial runways are all possible through the medium of rope. Even a modest facility with rope makes us handy, useful, safer and enables a lot of fun. As our ambitions rise, dangers lurk: tension within ropes increase, heights get higher, rafts take us to deep water. If we would be adventurous, we must likewise be skilled. Be reliable in the basics – teach Scouts well so they may have fun and stay safe. Teach also the disciplines because how Scouts regard rope and the structures they build determines their safety and much else in their education. We teach rope-craft because projects are generally on a larger scale than Scouts are used to and so there is need for teamwork, practical problem solving and technical mastery. If we, their leaders, challenge them proportionally to their abilities, and see that they succeed, we will have given Scouts far more than the knowledge of a few knots. Skilled scouts have most fun 12 Glossary Anchorage Immovable object to which strain bearing rope is attached Bend A joining knot Bight A loop in a rope Flaking Rope laid out in wide folds but no bights touch Frapping Last turns of lashing to tighten all foundation turns Guys Ropes supporting vertical structure Halyard Line for raising/ lowering flags, sails, etc. Heel The butt or heavy end of a spar Hitch A knot to tie a rope to an object. Holdfast Another name for anchorage Lashing Knot used to bind two or more spars together Lay The direction that strands of rope are twisted together Make fast To secure a rope to take a strain Picket A pointed stake driven in the ground usually as an anchor Reeve To pass a rope through a block to make a tackle Seizing Binding of light cord to secure a rope end to the standing part Sheave A single pulley in a block Sling Rope (or similar) device to suspend or hoist an object Splice Join ropes by interweaving the strands. Strop A ring of rope. Sometimes a bound coil of thinner rope. Standing part The part of the rope not active in tying a knot. Toggle A wooden pin to hold a rope within a loop. (I.e. sheepshank) Trestle 4 spars in trapezium with 2 spars as diagonal braces. Whipping Twine binding the end of a rope to prevent strands unwinding Working end The active part of rope in tying a knot Parts of a rope WORKING END CROSSING LOOP STANDING END STANDING PART BIGHT RV 12 April 2012 Rev. Dec 2015
-
Upload
khangminh22 -
Category
Documents
-
view
1 -
download
0
Transcript of Scouting and Rope _A5 booklet_Dec2015.cdr

Harpenden and Wheathampstead Scout District
Skills for Leadership
Building the Ethos
Scouting and RopeRope without knowledge is passive and becomes troublesome when
something must be secured. But with even a little knowledge rope comes alive as the enabler of a thousand tasks: structures are
possible; we climb higher; we can build, sail and fish. And our play is suddenly extensive: bridges, towers and aerial runways are all
possible through the medium of rope. Even a modest facility with rope makes us handy, useful, safer and enables a lot of fun.
As our ambitions rise, dangers lurk: tension within ropes increase, heights get higher, rafts take us to deep water. If we would be
adventurous, we must likewise be skilled. Be reliable in the basics – teach Scouts well so they may have fun and stay safe. Teach also the disciplines because how Scouts regard rope and the structures they
build determines their safety and much else in their education.
We teach rope-craft because projects are generally on a larger scale than Scouts are used to and so there is need for teamwork, practical problem solving and technical mastery. If we, their leaders, challenge
them proportionally to their abilities, and see that they succeed, we will have given Scouts far more than the knowledge of a few knots.
Skilled scouts have most fun
12
GlossaryAnchorage Immovable object to which strain bearing rope is attachedBend A joining knotBight A loop in a ropeFlaking Rope laid out in wide folds but no bights touchFrapping Last turns of lashing to tighten all foundation turnsGuys Ropes supporting vertical structureHalyard Line for raising/ lowering flags, sails, etc.Heel The butt or heavy end of a sparHitch A knot to tie a rope to an object. Holdfast Another name for anchorageLashing Knot used to bind two or more spars togetherLay The direction that strands of rope are twisted togetherMake fast To secure a rope to take a strainPicket A pointed stake driven in the ground usually as an anchorReeve To pass a rope through a block to make a tackleSeizing Binding of light cord to secure a rope end to the standing partSheave A single pulley in a block Sling Rope (or similar) device to suspend or hoist an objectSplice Join ropes by interweaving the strands.Strop A ring of rope. Sometimes a bound coil of thinner rope.Standing part The part of the rope not active in tying a knot. Toggle A wooden pin to hold a rope within a loop. (I.e. sheepshank) Trestle 4 spars in trapezium with 2 spars as diagonal braces.Whipping Twine binding the end of a rope to prevent strands unwindingWorking end The active part of rope in tying a knot
Parts of a rope
WORKING END
CROSSING LOOP
STANDINGEND
STANDING PART
BIGHT
RV 12 April 2012Rev. Dec 2015
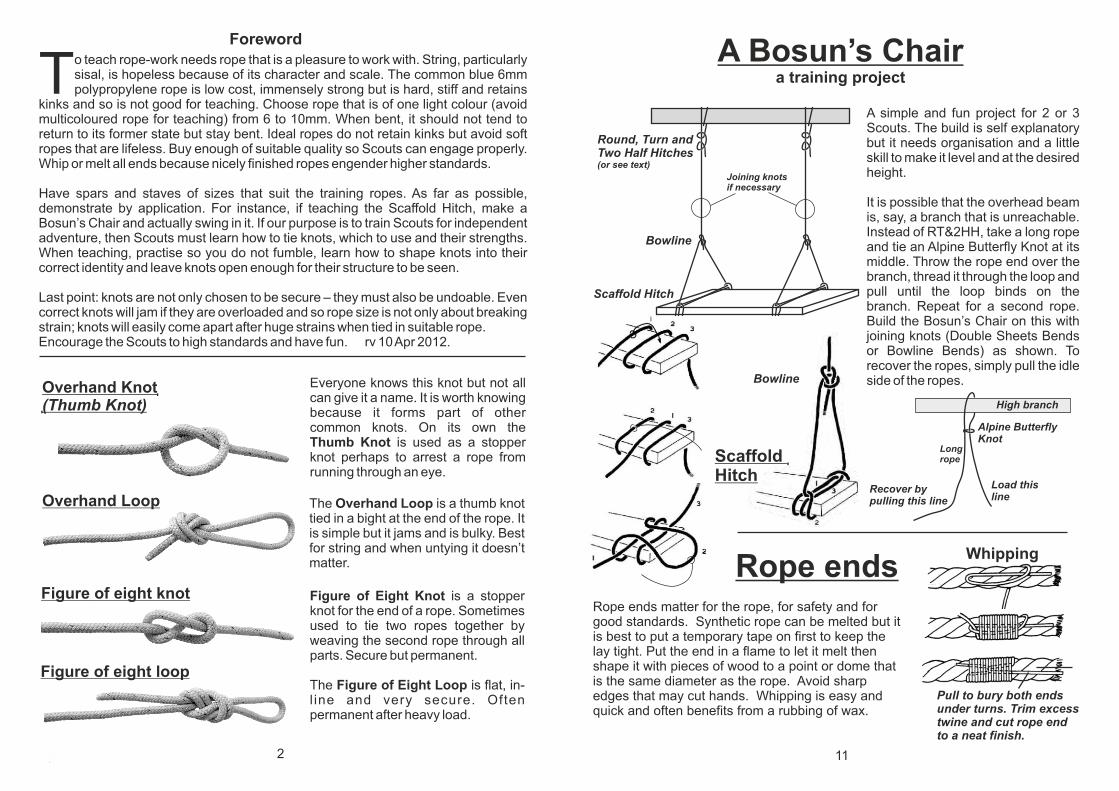
o teach rope-work needs rope that is a pleasure to work with. String, particularly
Tsisal, is hopeless because of its character and scale. The common blue 6mm polypropylene rope is low cost, immensely strong but is hard, stiff and retains
kinks and so is not good for teaching. Choose rope that is of one light colour (avoid multicoloured rope for teaching) from 6 to 10mm. When bent, it should not tend to return to its former state but stay bent. Ideal ropes do not retain kinks but avoid soft ropes that are lifeless. Buy enough of suitable quality so Scouts can engage properly. Whip or melt all ends because nicely finished ropes engender higher standards.
Have spars and staves of sizes that suit the training ropes. As far as possible, demonstrate by application. For instance, if teaching the Scaffold Hitch, make a Bosun’s Chair and actually swing in it. If our purpose is to train Scouts for independent adventure, then Scouts must learn how to tie knots, which to use and their strengths. When teaching, practise so you do not fumble, learn how to shape knots into their correct identity and leave knots open enough for their structure to be seen.
Last point: knots are not only chosen to be secure – they must also be undoable. Even correct knots will jam if they are overloaded and so rope size is not only about breaking strain; knots will easily come apart after huge strains when tied in suitable rope. Encourage the Scouts to high standards and have fun. rv 10 Apr 2012.
2 11
Overhand Knot(Thumb Knot)
Overhand Loop
Figure of eight knot
Figure of eight loop
Everyone knows this knot but not all can give it a name. It is worth knowing because it forms part of other common knots. On its own the Thumb Knot is used as a stopper knot perhaps to arrest a rope from running through an eye.
The Overhand Loop is a thumb knot tied in a bight at the end of the rope. It is simple but it jams and is bulky. Best for string and when untying it doesn’t matter.
Figure of Eight Knot is a stopper knot for the end of a rope. Sometimes used to tie two ropes together by weaving the second rope through all parts. Secure but permanent.
The Figure of Eight Loop is flat, in-l ine and very secure. Often permanent after heavy load.
Rope ends
ForewordA Bosun’s Chair
a training project
Scaffold Hitch
Bowline
Round, Turn and Two Half Hitches(or see text)
A simple and fun project for 2 or 3 Scouts. The build is self explanatory but it needs organisation and a little skill to make it level and at the desired height.
It is possible that the overhead beam is, say, a branch that is unreachable. Instead of RT&2HH, take a long rope and tie an Alpine Butterfly Knot at its middle. Throw the rope end over the branch, thread it through the loop and pull until the loop binds on the branch. Repeat for a second rope. Build the Bosun’s Chair on this with joining knots (Double Sheets Bends or Bowline Bends) as shown. To recover the ropes, simply pull the idle side of the ropes.
Joining knotsif necessary
Scaffold Hitch
Bowline
Pull to bury both endsunder turns. Trim excesstwine and cut rope endto a neat finish.
Whipping
Rope ends matter for the rope, for safety and for good standards. Synthetic rope can be melted but it is best to put a temporary tape on first to keep the lay tight. Put the end in a flame to let it melt then shape it with pieces of wood to a point or dome that is the same diameter as the rope. Avoid sharp edges that may cut hands. Whipping is easy and quick and often benefits from a rubbing of wax.
Long rope
High branch
Alpine Butterfly Knot
Load this line
Recover by pulling this line

Granny Knot
Sheet Bend
Fisherman’s Knot
Fisherman’s Knot(Pulled tight)
Double Sheet Bend
When tying parcels, the Reef Knot is unique in that it is tied in two stages: the first part gathers tension, the second part secures it. Shoe laces depend on the Reef Knot in the form of the Slippery Reef or Bow Knot). Also good for joining strings and light stuff but because it may jam when hauled very tight, the Reef Knot is not used for joining heavier ropes.
The Granny Knot has so little internal friction it cannot be trusted for any duty whatever! It is usually a reef knot tied wrongly. NEVER TO BE USED!
The Sheet Bend is the first knot of choice to tie (or bend) two ropes together. It is stable in all but hard slippery ropes. If ropes are unequal thickness, the foundation ‘staple’ must be the thicker. Under strain, the bight is deflected preventing the knot from binding. It can be undone by folding the knot back on itself to free the bight.
A Double Sheet Bend simply takes the end around the knot a second time to increase friction. Used where ropes are hard or when strains are greater.
A Fisherman’s Knot is often used to make a sling where the two ends must be tied very securely. Two thumb knots are tied as shown, tightened, and then drawn up snugly together as shown below. Once loaded this knot is permanent which is why it is often used where safety matters. The ends are usually seized to the standing part for greater security and neatness.
Deflected bight
!
Joining ropes
Reef Knot
10 3
Harvester’s Hitch
Toggled Sheepshank
Sheepshank
Sheepshanks
Half Sheepshank
The Sheepshank is a shortening knot or a way to overcome a weak point in a rope. It is rarely seen complete but useful to teach for it principle.
The Toggled Sheepshank increases the security. Strong wooden pegs are normally used.
The Half Sheepshank is a simple way to put a strain bearing loop in a working rope. The harvester’s hitch uses a half sheepshank.
The Harvester’s Hitchis used to gain twice as much pull on the rope to secure a load. Any loop will do but the half sheepshank is easy and will fall apart when dismantled no matter how much strain is put on it. The toggle is not always needed. Every Scout should know this hitch!
A fast and effective way to make a light tripod is to lay the 3 poles together (heels aligned) then start with a clove hitch on one pole and weave around each pole
in loose figure-of-eight turns and finish with a clove hitch. Take the centre pole and lift it right over which will tighten the lashing and bind all turns to the poles. If the structure is heavy as in the hourglass tower (p6) lay the poles as shown (see inset) and wind several turns around all 3 poles. Frap between to grip each pole then as the tripod is erected, the extra twist on opening binds the turns very tight. Start and finish with Clove Hitches or Constrictor Knots.
Tripods
Frapped tripod lashing(Place on a log or brick to create
clearance for the rope when tying)
Some kind of anchor
Twice as much
tensionon the
load
Pull
Thick rope (if unequal)
Thin rope (if unequal)

Start with a Timber Hitch (or Clove Hitch with free end wound around standing part) on any spar. Pass the rope around each spar laying the turns neatly. (Avoid piling the turns). Several turns are required. Keep tension on the rope so that the foundation turns remain taught. Add frapping turns and heave tight at each turn so that the foundation turns
are forced to extra tension. Keep the rope under tension throughout. To finish, tie off on the most stable spar (or around the frapping) with a Clove Hitch constructed of two Half Hitches. (Alternatively, use a Constrictor Knot.)
Note: the final Clove Hitch is rarely stable and so the free end should be tucked into the lashing to hold it. Even better, use the Constrictor Knot. Surplus rope can be ‘lost’ by adding additional Half Hitches to a convenient spar. The final lashing should have zero slack and look smart.
Short ropes can be joined to make a lashing rope: the joining knot rarely interferes with the lashing.
The BowlineThe purpose of a Bowline is to put a fixed, strain bearing loop in the end of a rope. Being possibly the most versatile knot, every scout should know the bowline if nothing else.
Use the rhyme: make a hole (the loop in the rope), then the rabbit (the rope end) comes out of the hole, goes around the tree (the standing part) and back down the hole.
Ask the Scout to suggest what the loop might be for and so tie it correctly for that application.
The French Bowline has two loops that are adjustable. To tie it, the rabbit makes two turns through the hole before going around the tree. Sometimes used as a rescue knot: one loop for legs, the other around the chest.
The Bowline Bend is useful when ropes are very different sizes. For instance, a light line may be thrown over a tree branch and a heavy rope drawn up after it; each joined with a Bowline Bend.
The StandardBowline
French Bowline
Bowline Bend
Deflected bight
Frictionsystem
Secure loopThe Bowlinestructure
Two standard bowlinesinterlinked. Illustratedhere with equal ropesbut the Bowline Bendis especially useful when the ropes are of very different thickness
4 9
Lashing
Sheer Lashing
Square Lashing
Sheer lashings look easy but they are deceptive. To join two poles so that the combined length is rigid requires the turns to be very tight. Frapping turns, if applied, enable tightness but must separate the two poles. Because even tight turns can not prevent rotation, frapped poles can move like scissors until the poles touch midway between lashings. The wider the gap due to frapping, the bigger the scissor angle. In normal situations with equal diameter poles, avoid frapping but lash every turn with high tension from start to finish.
This requires frequent tensioning throughout the tying with start and finish knots that will not slip. The start knot can be a Constrictor Knot tied around both poles with the knot bearing on the timber, not the gap. To prevent slip, make the first two turns cross over the Constrictor it to bind it to the poles. Haul on the rope to make it very tight. Keep this tension throughout (use the left thumb to nip the rope while the right hand manages the free length) laying enough turns to make up about one pole diameter. Haul tight every two turns or so; (i.e. two hands on the rope, foot on the lashing). Terminate with a Half Hitch and haul tight. Finally, tie a Constrictor Knot and again haul tight. There must be enough spare rope to grip for the final haul that must be tidied away by tucking it into the space between the poles. Two lashings required.
Frapping turns
Tail for hauling tidied in gapConstrictor Knots
Rear viewFirst crossing turns
Number of turns makes roughly one pole diameter
Same as standardbowline but with two loops

58
Round, Turn and Two Half Hitches
AnchorBend
TimberHitch
RollingHitch
Constrictor Knot
Tying a rope to a spar or postThe Round, Turn and Two Half Hitches is the first choice of securing a rope to a post; it is easy to tie, secure and easy to untie. Under load, the standing part is a tangent to the post and near ly a l l the s t ra in i s concentrated there. If it is a tree, the bark may be damaged. Always protect the bark.
The Anchor Bend is a useful variation where the first half hitch is taken through the round-turn. It is more secure though less easy to untie but better for trees because the strain is taken centrally on the knot and shared to all parts around the tree. Again, protect bark where the loads are heavy.
The Timber Hitch is very secure and very easy to untie but needs to be kept under tension: when loose it will undo itself! Excellent for starting lashings.
The Clove Hitch is two Half Hitches close together and is often tied this way. For instance, when finishing a lashing, the first Half Hitch nips the rope and the second Half Hitch secures it. The Clove Hitch needs tension on both sides of the knot to be secure and so it is common to add a third Half Hitch for extra security.
The Rolling Hitch is used whenever the knot must cling to the spar (or heavier rope) without slipping sideways when the strain is in the direction of the spar. Think of adding a thin line to a tug-of-war rope so as to assist the pull.
Prussik knot
Carrick Bend
A climbing knot with many uses.With no tension on the loop the knot slips along the rope. With tension, the knot binds tightlyand will not slip. Make a short sling in strong light line and turn it on to the main rope as shown. (Seeclimbing on prussiks in Projectssection.)
Guyline Hitch
Miscellaneous knots
To make an adjustable guyline, tie as shown and work the knot close and tight. (It is actually a rolling hitch tied on the standing part).
Highwayman’s Hitch
Always a favourite with Cubs – Dick Turpin’s get-away knot. Easy to tie and one tug on the release line and it collapses. DO NOT USE FOR CLIMBING!!!
Alpine Butterfly Knot
3 turns around theright palm.
Place the turn nearest thumb to the middle-as shown.
Pull out the turn nownearest thumb....
...and tuck itunder the tworemainingturns. Hold this loop with the left hand and pull the right hand away.
Shape into the Butterfly Knot. The rope should exit the knot in-line both sides.
This attractive knot has two identities as shown. It is tied in its flat form A and when hauled taut, it reforms to B. Though bulky, it has great security and remarkable undoability – the two deflected bights enable the Carrick Bend to release the knot even after heavy loading. It deserves to be better known.
One point to remember: unless the knot is purely decorative,the rope ends must fall on opposite sides of the knot.
A
B
Deflected bights
A strain bearing loop in the middle of a rope
CloveHitch
The Constrictor Knot is tied as a Clove Hitch but the rope end is tucked under the first turn. It binds tight and is excellent to end lashings.
(Knot to makea sling)
Ends on opposite sides
Ends on opposite sides
First half hitchgoes throughround-turn
Pull

6 7
Patrol projects using rope
The HourglassTower
Sink and drainer
Line to dry towels
Camp notice board The
Monkey Bridge
Camp patroldining table
Plate and mug rack
Camp gateway
Climbing a rope usingPrussik knots (Refer page 8)
The success of a structure is mostly bound up with the triangle. All the basic
components – the A frame, the tripod, the trestle – depend on triangles; even guylines are triangles. Encourage Scouts to build with strong structural triangles.
Safety points: check any structure that is to be climbed on or goes on water. Insist on
good construction standards. Test strengths with twice intended loads.
Inspect and test regularly. Keep all ropes in good condition; store
them dry.
Raft