SAS Intelligent Decisioning 5.3: User's Guide
90
SAS ® Intelligent Decisioning 5.3: User’s Guide SAS ® Documentation December 3, 2019
-
Upload
khangminh22 -
Category
Documents
-
view
2 -
download
0
Transcript of SAS Intelligent Decisioning 5.3: User's Guide

SAS® Intelligent Decisioning 5.3: User’s Guide
SAS® DocumentationDecember 3, 2019

The correct bibliographic citation for this manual is as follows: SAS Institute Inc. 2019. SAS® Intelligent Decisioning 5.3: User’s Guide. Cary, NC: SAS Institute Inc.
SAS® Intelligent Decisioning 5.3: User’s Guide
Copyright © 2019, SAS Institute Inc., Cary, NC, USA
All Rights Reserved. Produced in the United States of America.
For a hard copy book: No part of this publication may be reproduced, stored in a retrieval system, or transmitted, in any form or by any means, electronic, mechanical, photocopying, or otherwise, without the prior written permission of the publisher, SAS Institute Inc.
For a web download or e-book: Your use of this publication shall be governed by the terms established by the vendor at the time you acquire this publication.
The scanning, uploading, and distribution of this book via the Internet or any other means without the permission of the publisher is illegal and punishable by law. Please purchase only authorized electronic editions and do not participate in or encourage electronic piracy of copyrighted materials. Your support of others' rights is appreciated.
U.S. Government License Rights; Restricted Rights: The Software and its documentation is commercial computer software developed at private expense and is provided with RESTRICTED RIGHTS to the United States Government. Use, duplication, or disclosure of the Software by the United States Government is subject to the license terms of this Agreement pursuant to, as applicable, FAR 12.212, DFAR 227.7202-1(a), DFAR 227.7202-3(a), and DFAR 227.7202-4, and, to the extent required under U.S. federal law, the minimum restricted rights as set out in FAR 52.227-19 (DEC 2007). If FAR 52.227-19 is applicable, this provision serves as notice under clause (c) thereof and no other notice is required to be affixed to the Software or documentation. The Government’s rights in Software and documentation shall be only those set forth in this Agreement.
SAS Institute Inc., SAS Campus Drive, Cary, NC 27513-2414
December 2019
SAS® and all other SAS Institute Inc. product or service names are registered trademarks or trademarks of SAS Institute Inc. in the USA and other countries. ® indicates USA registration.
Other brand and product names are trademarks of their respective companies.
5.3-P1:edmug

Contents
Chapter 1 / Introduction to SAS Intelligent Decisioning . . . . . . . . . . . . . . . . . . . . . . . . . . . . . . . . . . . . . . . . . . . . . . . . 1Enterprise Decision Management Systems . . . . . . . . . . . . . . . . . . . . . . . . . . . . . . . . . . . . . . . . . 1About Business Rules . . . . . . . . . . . . . . . . . . . . . . . . . . . . . . . . . . . . . . . . . . . . . . . . . . . . . . . . . . . 1SAS Intelligent Decisioning Features . . . . . . . . . . . . . . . . . . . . . . . . . . . . . . . . . . . . . . . . . . . . . . 2Support for Models in Decisions . . . . . . . . . . . . . . . . . . . . . . . . . . . . . . . . . . . . . . . . . . . . . . . . . . . 2Workflow for Creating and Publishing Decisions . . . . . . . . . . . . . . . . . . . . . . . . . . . . . . . . . . . . . 3Sign in to SAS Intelligent Decisioning . . . . . . . . . . . . . . . . . . . . . . . . . . . . . . . . . . . . . . . . . . . . . . 3
Chapter 2 / Working with Business Rules . . . . . . . . . . . . . . . . . . . . . . . . . . . . . . . . . . . . . . . . . . . . . . . . . . . . . . . . . . . . 5About Rules, Assignment Rule Sets, and Filtering Rule Sets . . . . . . . . . . . . . . . . . . . . . . . . . . 6About Condition and Action Expressions . . . . . . . . . . . . . . . . . . . . . . . . . . . . . . . . . . . . . . . . . . . 7Create a New Rule Set . . . . . . . . . . . . . . . . . . . . . . . . . . . . . . . . . . . . . . . . . . . . . . . . . . . . . . . . . . 7Managing the Variables in a Rule Set . . . . . . . . . . . . . . . . . . . . . . . . . . . . . . . . . . . . . . . . . . . . . . 8Add a Stand-Alone Assignment Statement . . . . . . . . . . . . . . . . . . . . . . . . . . . . . . . . . . . . . . . . 11Defining New Rules in a Rule Set . . . . . . . . . . . . . . . . . . . . . . . . . . . . . . . . . . . . . . . . . . . . . . . . 12Defining Expressions in Rules and Assignment Statements . . . . . . . . . . . . . . . . . . . . . . . . . . 15Managing Rules . . . . . . . . . . . . . . . . . . . . . . . . . . . . . . . . . . . . . . . . . . . . . . . . . . . . . . . . . . . . . . . 21Copy a Rule Set URL . . . . . . . . . . . . . . . . . . . . . . . . . . . . . . . . . . . . . . . . . . . . . . . . . . . . . . . . . . . 22Managing Rule Sets . . . . . . . . . . . . . . . . . . . . . . . . . . . . . . . . . . . . . . . . . . . . . . . . . . . . . . . . . . . . 23Managing Versions of Rule Sets . . . . . . . . . . . . . . . . . . . . . . . . . . . . . . . . . . . . . . . . . . . . . . . . . 24Testing a Rule Set . . . . . . . . . . . . . . . . . . . . . . . . . . . . . . . . . . . . . . . . . . . . . . . . . . . . . . . . . . . . . 24Publishing and Validating a Rule Set . . . . . . . . . . . . . . . . . . . . . . . . . . . . . . . . . . . . . . . . . . . . . . 29Executing Published Content . . . . . . . . . . . . . . . . . . . . . . . . . . . . . . . . . . . . . . . . . . . . . . . . . . . . 32Importing and Exporting Rule Sets . . . . . . . . . . . . . . . . . . . . . . . . . . . . . . . . . . . . . . . . . . . . . . . 33
Chapter 3 / Working with Treatments and Treatment Groups . . . . . . . . . . . . . . . . . . . . . . . . . . . . . . . . . . . . . . . . . . 35About Treatments and Decisions . . . . . . . . . . . . . . . . . . . . . . . . . . . . . . . . . . . . . . . . . . . . . . . . . 36Example: A Decision that Includes a Treatment Group . . . . . . . . . . . . . . . . . . . . . . . . . . . . . . 36About Attributes, Eligibility Rules, and Effective Dates . . . . . . . . . . . . . . . . . . . . . . . . . . . . . . . 38Arbitrating Treatments . . . . . . . . . . . . . . . . . . . . . . . . . . . . . . . . . . . . . . . . . . . . . . . . . . . . . . . . . . 39About Channels . . . . . . . . . . . . . . . . . . . . . . . . . . . . . . . . . . . . . . . . . . . . . . . . . . . . . . . . . . . . . . . 39Define a Treatment . . . . . . . . . . . . . . . . . . . . . . . . . . . . . . . . . . . . . . . . . . . . . . . . . . . . . . . . . . . . . 40Define a Treatment Group . . . . . . . . . . . . . . . . . . . . . . . . . . . . . . . . . . . . . . . . . . . . . . . . . . . . . . . 41Activate a Treatment Group . . . . . . . . . . . . . . . . . . . . . . . . . . . . . . . . . . . . . . . . . . . . . . . . . . . . . 42Managing Attributes and Aliases . . . . . . . . . . . . . . . . . . . . . . . . . . . . . . . . . . . . . . . . . . . . . . . . . 42Delete Treatments from a Treatment Group . . . . . . . . . . . . . . . . . . . . . . . . . . . . . . . . . . . . . . . 43Managing Eligibility Rules for a Treatment . . . . . . . . . . . . . . . . . . . . . . . . . . . . . . . . . . . . . . . . . 43Managing Treatments and Treatment Groups . . . . . . . . . . . . . . . . . . . . . . . . . . . . . . . . . . . . . . 44Managing Versions of Treatments and Treatment Groups . . . . . . . . . . . . . . . . . . . . . . . . . . . 45
Chapter 4 / Using Lookup Tables and Functions . . . . . . . . . . . . . . . . . . . . . . . . . . . . . . . . . . . . . . . . . . . . . . . . . . . . 47About Lookup Tables and Functions . . . . . . . . . . . . . . . . . . . . . . . . . . . . . . . . . . . . . . . . . . . . . . 47Predefined Lookup Tables . . . . . . . . . . . . . . . . . . . . . . . . . . . . . . . . . . . . . . . . . . . . . . . . . . . . . . . 48Create a New Lookup Table . . . . . . . . . . . . . . . . . . . . . . . . . . . . . . . . . . . . . . . . . . . . . . . . . . . . . 48Importing And Exporting Lookup Tables . . . . . . . . . . . . . . . . . . . . . . . . . . . . . . . . . . . . . . . . . . . 49Add Lookup Table Entries . . . . . . . . . . . . . . . . . . . . . . . . . . . . . . . . . . . . . . . . . . . . . . . . . . . . . . . 49Edit Lookup Table Entries . . . . . . . . . . . . . . . . . . . . . . . . . . . . . . . . . . . . . . . . . . . . . . . . . . . . . . . 50Delete Lookup Table Entries . . . . . . . . . . . . . . . . . . . . . . . . . . . . . . . . . . . . . . . . . . . . . . . . . . . . . 50Copy a Lookup Table URL . . . . . . . . . . . . . . . . . . . . . . . . . . . . . . . . . . . . . . . . . . . . . . . . . . . . . . 50Managing Lookup Tables . . . . . . . . . . . . . . . . . . . . . . . . . . . . . . . . . . . . . . . . . . . . . . . . . . . . . . . 50
Managing Versions of Lookup Tables . . . . . . . . . . . . . . . . . . . . . . . . . . . . . . . . . . . . . . . . . . . . . 51Activate a Lookup Table . . . . . . . . . . . . . . . . . . . . . . . . . . . . . . . . . . . . . . . . . . . . . . . . . . . . . . . . 52LOOKUP Function . . . . . . . . . . . . . . . . . . . . . . . . . . . . . . . . . . . . . . . . . . . . . . . . . . . . . . . . . . . . . 52LOOKUPVALUE Function . . . . . . . . . . . . . . . . . . . . . . . . . . . . . . . . . . . . . . . . . . . . . . . . . . . . . . . 53
Chapter 5 / Using Custom Code Files . . . . . . . . . . . . . . . . . . . . . . . . . . . . . . . . . . . . . . . . . . . . . . . . . . . . . . . . . . . . . . 55Introduction to Custom Code Files . . . . . . . . . . . . . . . . . . . . . . . . . . . . . . . . . . . . . . . . . . . . . . . 55DS2 Code Files . . . . . . . . . . . . . . . . . . . . . . . . . . . . . . . . . . . . . . . . . . . . . . . . . . . . . . . . . . . . . . . . 55Python Code Files . . . . . . . . . . . . . . . . . . . . . . . . . . . . . . . . . . . . . . . . . . . . . . . . . . . . . . . . . . . . . 58SQL Query Files . . . . . . . . . . . . . . . . . . . . . . . . . . . . . . . . . . . . . . . . . . . . . . . . . . . . . . . . . . . . . . . 59
Chapter 6 / Working with Decisions . . . . . . . . . . . . . . . . . . . . . . . . . . . . . . . . . . . . . . . . . . . . . . . . . . . . . . . . . . . . . . . . 61About Decisions . . . . . . . . . . . . . . . . . . . . . . . . . . . . . . . . . . . . . . . . . . . . . . . . . . . . . . . . . . . . . . . 62Create a Decision . . . . . . . . . . . . . . . . . . . . . . . . . . . . . . . . . . . . . . . . . . . . . . . . . . . . . . . . . . . . . . 62Views for Editing a Decision . . . . . . . . . . . . . . . . . . . . . . . . . . . . . . . . . . . . . . . . . . . . . . . . . . . . . 62Managing the Variables in a Decision . . . . . . . . . . . . . . . . . . . . . . . . . . . . . . . . . . . . . . . . . . . . . 64Adding Objects to a Decision . . . . . . . . . . . . . . . . . . . . . . . . . . . . . . . . . . . . . . . . . . . . . . . . . . . . 67Mapping Variables within a Decision . . . . . . . . . . . . . . . . . . . . . . . . . . . . . . . . . . . . . . . . . . . . . . 71Edit the Properties of a Decision Node . . . . . . . . . . . . . . . . . . . . . . . . . . . . . . . . . . . . . . . . . . . . 73Reorder Objects in a Decision . . . . . . . . . . . . . . . . . . . . . . . . . . . . . . . . . . . . . . . . . . . . . . . . . . . 74Delete an Object from a Decision . . . . . . . . . . . . . . . . . . . . . . . . . . . . . . . . . . . . . . . . . . . . . . . . 74Open an Object from within a Decision . . . . . . . . . . . . . . . . . . . . . . . . . . . . . . . . . . . . . . . . . . . . 74Copy a Decision URL . . . . . . . . . . . . . . . . . . . . . . . . . . . . . . . . . . . . . . . . . . . . . . . . . . . . . . . . . . . 74Managing Decisions . . . . . . . . . . . . . . . . . . . . . . . . . . . . . . . . . . . . . . . . . . . . . . . . . . . . . . . . . . . . 75Managing Versions of Decisions . . . . . . . . . . . . . . . . . . . . . . . . . . . . . . . . . . . . . . . . . . . . . . . . . 76Testing a Decision . . . . . . . . . . . . . . . . . . . . . . . . . . . . . . . . . . . . . . . . . . . . . . . . . . . . . . . . . . . . . 76Publishing and Validating a Decision . . . . . . . . . . . . . . . . . . . . . . . . . . . . . . . . . . . . . . . . . . . . . . 82Executing Published Content . . . . . . . . . . . . . . . . . . . . . . . . . . . . . . . . . . . . . . . . . . . . . . . . . . . . 86
iv Contents

1Introduction to SAS Intelligent Decisioning
Enterprise Decision Management Systems . . . . . . . . . . . . . . . . . . . . . . . . . . . . . . . . . . . . . . . . . . . . . . . . . . . . . 1
About Business Rules . . . . . . . . . . . . . . . . . . . . . . . . . . . . . . . . . . . . . . . . . . . . . . . . . . . . . . . . . . . . . . . . . . . . . . . . . . 1
SAS Intelligent Decisioning Features . . . . . . . . . . . . . . . . . . . . . . . . . . . . . . . . . . . . . . . . . . . . . . . . . . . . . . . . . . . 2
Support for Models in Decisions . . . . . . . . . . . . . . . . . . . . . . . . . . . . . . . . . . . . . . . . . . . . . . . . . . . . . . . . . . . . . . . 2
Workflow for Creating and Publishing Decisions . . . . . . . . . . . . . . . . . . . . . . . . . . . . . . . . . . . . . . . . . . . . . . . 3
Sign in to SAS Intelligent Decisioning . . . . . . . . . . . . . . . . . . . . . . . . . . . . . . . . . . . . . . . . . . . . . . . . . . . . . . . . . . 3
Enterprise Decision Management Systems
Enterprise decision management systems can transform how businesses make decisions. They enable businesses to use the information they already have to make better decisions—decisions that are based on predictive analytics rather than on past history. Decision management systems automate the process of making decisions, particularly day-to-day operational decisions. They improve the speed, efficiency, and accuracy of routine business processes, in part by reducing the need for human intervention. Automating decisions with SAS Intelligent Decisioning provides a streamlined mechanism for controlling and monitoring the rules and processes used by your organization. By automating decisions, organizations in every industry can improve interactions with customers, partners, suppliers, and employees. In addition, organizations that are highly regulated, such as financial services, health care, and insurance, can more easily achieve compliance as a result of repeatable, traceable decisions. Explicitly defining a decision makes your organization’s decision-making process transparent, and enables you to monitor the process for accuracy.
SAS Intelligent Decisioning helps organizations manage data, business rules, analytical models, and optimization techniques. Rule management, model management, and data management are integrated into a consistent interface for easier accessibility.
About Business Rules
Business rules capture the logic of business decisions and are a core component of decision management systems. Business rules enable you to codify the decision-making process used by your organization. Business rules make the decision-making process transparent and adaptable, enabling organizations to respond quickly to new information about customers and markets. They enable organizations to identify and deal with fraud, avoid unnecessary risk, and find opportunities hidden in customer data.
1

SAS Intelligent Decisioning Features
You can use SAS Intelligent Decisioning to create a database of business rules, combine those rules together into decisions, and publish the decisions for use by other applications. SAS Intelligent Decisioning provides the following capabilities:
business rule authoringA business rule specifies conditions to be evaluated and action to be taken if those conditions are satisfied. For example, you can create a rule that determines whether a particular customer has a mortgage. That same rule can then add the outstanding balance of the mortgage to a running total of the customer’s debt. With SAS Intelligent Decisioning, you define the conditions and actions for each rule.
rule set management and publishingA rule set is a logical collection of rules. A single rule set can have many rules, but it generally corresponds to a single step in a decision. For example, you can have a rule set that determines a customer’s asset balance and another rule set that determines a customer’s debt level. You can use SAS Intelligent Decisioning to easily create new rule sets, reorder the rules in a rule set, add new rules to existing rule sets, and so on. When a rule set is published, the versioning features of SAS Intelligent Decisioning create a static version of the rule set. This static version helps you enforce integrity and governance over the rules that are put into production.
treatment authoring and managementA treatment is an offer that can be sent to a customer as part of an inbound marketing campaign. For example, when a customer visits your company’s website, a customer service application can capture information about the customer. The application can invoke a decision that includes a set of treatments and pass the customer’s information to the decision. The decision determines which of the treatments (offers) are appropriate to present to that customer at that time. With SAS Intelligent Decisioning, you can author treatments, combine them into treatment groups, and add the groups to decisions.
lookup table authoring and managementLookup tables are tables of key-value pairs. You can use lookup tables for tasks such as retrieving a part name based on a part number or retrieving a location name based on a ZIP code. SAS Intelligent Decisioning provides two predefined lookup tables for use with treatments: one for treatment channels and one for subject levels.
decision authoring and publishingSAS Intelligent Decisioning enables you to combine rule sets, analytical models, treatment groups, code files, Record Contacts nodes, and conditional logic into decisions. You can also add a decision to another decision. You can investigate various scenarios, test and refine the decision logic, and then publish the decisions for use in batch applications and online transactions. After a decision has been published, it is available for use by other applications.
Support for Models in Decisions
Support for a model depends on the tool that is used to create the model and the model’s score code type. For example, decisions that use certain model types cannot be published or can be published only to SAS Micro Analytic Service destinations. For more information, see “High-Level Support Matrix by Model Score Code Type” in SAS Model Manager: User’s Guide.
2 Chapter 1 / Introduction to SAS Intelligent Decisioning

Workflow for Creating and Publishing Decisions
The following list shows the primary steps for creating a decision flow in SAS Intelligent Decisioning. Technically, all of these steps are optional. The actual steps that are required depend on the content of the decision and how your organization uses rule sets and decisions.
1 Create rule sets.
2 Test rule sets.
3 Publish rule sets.
4 Validate published rule sets.
5 Create treatments and treatment groups.
6 Create decisions.
7 Test decisions.
8 Publish decisions.
9 Validate published decisions.
After you publish a rule set or decision, it is available for use by other applications. In a production environment, these applications map variables in the rule set or decision to columns in the input data. The output that is generated when a decision is executed is written to an output table. The location of the input and output data is specified by the application.
Sign in to SAS Intelligent Decisioning
Note: If you are already signed in to SAS Drive, you can access SAS Intelligent Decisioning by clicking and selecting Manage Decisions.
To sign in to SAS Intelligent Decisioning:
1 In the address bar of your web browser, enter the URL for SAS Intelligent Decisioning and press Enter. The Sign In page appears.
Note: Contact your system administrator if you need the URL for SAS Intelligent Decisioning. The default URL is http://host_name/SASDecisionManager.
2 Enter a user ID and password.
3 Click Sign In.
4 (Optional) If you have not previously signed in to SAS Intelligent Decisioning, SAS Intelligent Decisioning displays the Welcome to SAS window in which you can set up a profile. You can choose to enter a profile picture or select a theme. You can also set these properties in the Settings window. For more information, see “Settings” under General Usage in the Help Center.
Sign in to SAS Intelligent Decisioning 3

4 Chapter 1 / Introduction to SAS Intelligent Decisioning

2Working with Business Rules
About Rules, Assignment Rule Sets, and Filtering Rule Sets . . . . . . . . . . . . . . . . . . . . . . . . . . . . . . . . . . . . 6
About Condition and Action Expressions . . . . . . . . . . . . . . . . . . . . . . . . . . . . . . . . . . . . . . . . . . . . . . . . . . . . . . . 7
Create a New Rule Set . . . . . . . . . . . . . . . . . . . . . . . . . . . . . . . . . . . . . . . . . . . . . . . . . . . . . . . . . . . . . . . . . . . . . . . . . . 7
Managing the Variables in a Rule Set . . . . . . . . . . . . . . . . . . . . . . . . . . . . . . . . . . . . . . . . . . . . . . . . . . . . . . . . . . . 8About Variables . . . . . . . . . . . . . . . . . . . . . . . . . . . . . . . . . . . . . . . . . . . . . . . . . . . . . . . . . . . . . . . . . . . . . . . . . . . . . . 8Import Variables from a Data Source . . . . . . . . . . . . . . . . . . . . . . . . . . . . . . . . . . . . . . . . . . . . . . . . . . . . . . . . . . 9Import Variables from a Rule Set or Decision . . . . . . . . . . . . . . . . . . . . . . . . . . . . . . . . . . . . . . . . . . . . . . . . . 10Create a Custom Variable Dynamically . . . . . . . . . . . . . . . . . . . . . . . . . . . . . . . . . . . . . . . . . . . . . . . . . . . . . . . 10Create Custom Variables on the Variables Tab . . . . . . . . . . . . . . . . . . . . . . . . . . . . . . . . . . . . . . . . . . . . . . . . 10Delete Variables . . . . . . . . . . . . . . . . . . . . . . . . . . . . . . . . . . . . . . . . . . . . . . . . . . . . . . . . . . . . . . . . . . . . . . . . . . . . 11Edit Variable Properties . . . . . . . . . . . . . . . . . . . . . . . . . . . . . . . . . . . . . . . . . . . . . . . . . . . . . . . . . . . . . . . . . . . . . 11Edit Metadata for Data Grid Variables . . . . . . . . . . . . . . . . . . . . . . . . . . . . . . . . . . . . . . . . . . . . . . . . . . . . . . . . 11
Add a Stand-Alone Assignment Statement . . . . . . . . . . . . . . . . . . . . . . . . . . . . . . . . . . . . . . . . . . . . . . . . . . . . 11
Defining New Rules in a Rule Set . . . . . . . . . . . . . . . . . . . . . . . . . . . . . . . . . . . . . . . . . . . . . . . . . . . . . . . . . . . . . . 12Add a New Rule in an Assignment Rule Set . . . . . . . . . . . . . . . . . . . . . . . . . . . . . . . . . . . . . . . . . . . . . . . . . . 12Add a New Rule in a Filtering Rule Set . . . . . . . . . . . . . . . . . . . . . . . . . . . . . . . . . . . . . . . . . . . . . . . . . . . . . . . 13Controlling Which Conditions Are Evaluated . . . . . . . . . . . . . . . . . . . . . . . . . . . . . . . . . . . . . . . . . . . . . . . . . . 14How Rules Are Evaluated and When Rule-Fired Records Are Generated . . . . . . . . . . . . . . . . . . . . . . . 15
Defining Expressions in Rules and Assignment Statements . . . . . . . . . . . . . . . . . . . . . . . . . . . . . . . . . . . 15About Defining Expressions . . . . . . . . . . . . . . . . . . . . . . . . . . . . . . . . . . . . . . . . . . . . . . . . . . . . . . . . . . . . . . . . . 15Using the Expression Editor . . . . . . . . . . . . . . . . . . . . . . . . . . . . . . . . . . . . . . . . . . . . . . . . . . . . . . . . . . . . . . . . . 16Enter LOOKUP and LOOKUPVALUE Expressions . . . . . . . . . . . . . . . . . . . . . . . . . . . . . . . . . . . . . . . . . . . . 17Punctuation for Literal Data Values . . . . . . . . . . . . . . . . . . . . . . . . . . . . . . . . . . . . . . . . . . . . . . . . . . . . . . . . . . . 17Operators for Use in Expressions . . . . . . . . . . . . . . . . . . . . . . . . . . . . . . . . . . . . . . . . . . . . . . . . . . . . . . . . . . . . 18Using the LIKE Operator . . . . . . . . . . . . . . . . . . . . . . . . . . . . . . . . . . . . . . . . . . . . . . . . . . . . . . . . . . . . . . . . . . . . 19Using Functions in Expressions . . . . . . . . . . . . . . . . . . . . . . . . . . . . . . . . . . . . . . . . . . . . . . . . . . . . . . . . . . . . . . 20Working with Missing Values . . . . . . . . . . . . . . . . . . . . . . . . . . . . . . . . . . . . . . . . . . . . . . . . . . . . . . . . . . . . . . . . . 21Delete Expressions or ELSE Rules . . . . . . . . . . . . . . . . . . . . . . . . . . . . . . . . . . . . . . . . . . . . . . . . . . . . . . . . . . . 21
Managing Rules . . . . . . . . . . . . . . . . . . . . . . . . . . . . . . . . . . . . . . . . . . . . . . . . . . . . . . . . . . . . . . . . . . . . . . . . . . . . . . . 21Duplicate a Rule . . . . . . . . . . . . . . . . . . . . . . . . . . . . . . . . . . . . . . . . . . . . . . . . . . . . . . . . . . . . . . . . . . . . . . . . . . . . 21Delete a Rule . . . . . . . . . . . . . . . . . . . . . . . . . . . . . . . . . . . . . . . . . . . . . . . . . . . . . . . . . . . . . . . . . . . . . . . . . . . . . . . 21Rename a Rule . . . . . . . . . . . . . . . . . . . . . . . . . . . . . . . . . . . . . . . . . . . . . . . . . . . . . . . . . . . . . . . . . . . . . . . . . . . . . 22Reorder Rules . . . . . . . . . . . . . . . . . . . . . . . . . . . . . . . . . . . . . . . . . . . . . . . . . . . . . . . . . . . . . . . . . . . . . . . . . . . . . . 22
Copy a Rule Set URL . . . . . . . . . . . . . . . . . . . . . . . . . . . . . . . . . . . . . . . . . . . . . . . . . . . . . . . . . . . . . . . . . . . . . . . . . . 22
Managing Rule Sets . . . . . . . . . . . . . . . . . . . . . . . . . . . . . . . . . . . . . . . . . . . . . . . . . . . . . . . . . . . . . . . . . . . . . . . . . . . 23Duplicate Rule Sets . . . . . . . . . . . . . . . . . . . . . . . . . . . . . . . . . . . . . . . . . . . . . . . . . . . . . . . . . . . . . . . . . . . . . . . . . 23Delete Rule Sets . . . . . . . . . . . . . . . . . . . . . . . . . . . . . . . . . . . . . . . . . . . . . . . . . . . . . . . . . . . . . . . . . . . . . . . . . . . . 23Rename Rule Sets . . . . . . . . . . . . . . . . . . . . . . . . . . . . . . . . . . . . . . . . . . . . . . . . . . . . . . . . . . . . . . . . . . . . . . . . . . 23
5

Move Rule Sets to a Different Folder . . . . . . . . . . . . . . . . . . . . . . . . . . . . . . . . . . . . . . . . . . . . . . . . . . . . . . . . . 23
Managing Versions of Rule Sets . . . . . . . . . . . . . . . . . . . . . . . . . . . . . . . . . . . . . . . . . . . . . . . . . . . . . . . . . . . . . . 24Set the Displayed Version . . . . . . . . . . . . . . . . . . . . . . . . . . . . . . . . . . . . . . . . . . . . . . . . . . . . . . . . . . . . . . . . . . . 24Create a New Version . . . . . . . . . . . . . . . . . . . . . . . . . . . . . . . . . . . . . . . . . . . . . . . . . . . . . . . . . . . . . . . . . . . . . . . 24
Testing a Rule Set . . . . . . . . . . . . . . . . . . . . . . . . . . . . . . . . . . . . . . . . . . . . . . . . . . . . . . . . . . . . . . . . . . . . . . . . . . . . 24Create and Run a New Test . . . . . . . . . . . . . . . . . . . . . . . . . . . . . . . . . . . . . . . . . . . . . . . . . . . . . . . . . . . . . . . . . 24Run a Rule-Fired Analysis . . . . . . . . . . . . . . . . . . . . . . . . . . . . . . . . . . . . . . . . . . . . . . . . . . . . . . . . . . . . . . . . . . . 26Working with Test Output Data . . . . . . . . . . . . . . . . . . . . . . . . . . . . . . . . . . . . . . . . . . . . . . . . . . . . . . . . . . . . . . . 28Debugging Rule Set Tests . . . . . . . . . . . . . . . . . . . . . . . . . . . . . . . . . . . . . . . . . . . . . . . . . . . . . . . . . . . . . . . . . . . 29
Publishing and Validating a Rule Set . . . . . . . . . . . . . . . . . . . . . . . . . . . . . . . . . . . . . . . . . . . . . . . . . . . . . . . . . . 29Publishing a Rule Set . . . . . . . . . . . . . . . . . . . . . . . . . . . . . . . . . . . . . . . . . . . . . . . . . . . . . . . . . . . . . . . . . . . . . . . 29Validate a Published Rule Set . . . . . . . . . . . . . . . . . . . . . . . . . . . . . . . . . . . . . . . . . . . . . . . . . . . . . . . . . . . . . . . 31
Executing Published Content . . . . . . . . . . . . . . . . . . . . . . . . . . . . . . . . . . . . . . . . . . . . . . . . . . . . . . . . . . . . . . . . . 32Executing Content Published to SAS Micro Analytic Service Destinations . . . . . . . . . . . . . . . . . . . . . . . 32Executing Content Published to Other Destinations . . . . . . . . . . . . . . . . . . . . . . . . . . . . . . . . . . . . . . . . . . . 32Content Executed by Published Decisions . . . . . . . . . . . . . . . . . . . . . . . . . . . . . . . . . . . . . . . . . . . . . . . . . . . . 33
Importing and Exporting Rule Sets . . . . . . . . . . . . . . . . . . . . . . . . . . . . . . . . . . . . . . . . . . . . . . . . . . . . . . . . . . . . 33Import a Rule Set . . . . . . . . . . . . . . . . . . . . . . . . . . . . . . . . . . . . . . . . . . . . . . . . . . . . . . . . . . . . . . . . . . . . . . . . . . . 33Export a Rule Set . . . . . . . . . . . . . . . . . . . . . . . . . . . . . . . . . . . . . . . . . . . . . . . . . . . . . . . . . . . . . . . . . . . . . . . . . . . 33
About Rules, Assignment Rule Sets, and Filtering Rule Sets
A rule specifies conditions to be evaluated, and it can also specify actions to be taken if those conditions are satisfied. Rules are grouped together into rule sets. Rule sets are logical collections of rules that are grouped together because of interactions or dependencies between the rules or because they are processed together after they are published.
A rule set can be a filtering rule set or an assignment rule set.
filtering rule setscontain rules that correspond to the form:
IF condition_expressions
These rules contain only IF statements. They have conditional expressions but do not have action expressions. Filtering rule sets enable you to select only certain records for processing. Only the records for which the conditions evaluate to True are processed by the remaining objects in the decision.
Filtering rule sets are also used as the eligibility rule set in treatments. In a treatment, the eligibility rule set defines who is eligible to receive the offer that is defined in the treatment.
assignment rule setscontain rules that correspond to one of the following forms:
ASSIGN variable variable_or_value
IF condition_expressions THEN action_expressions
These rules are either assignment statements or IF-THEN statements, or IF-THEN-ELSE statements. IF-THEN and IF-THEN-ELSE statements have both conditional expressions and action expressions.
Assignment statements contain only an action expression. Assignment statements always execute unless a RETURN action stops the execution of the rule set before execution reaches the assignment statement. See
6 Chapter 2 / Working with Business Rules
Step 8 of “Add a New Rule in an Assignment Rule Set” on page 12 for information about the RETURN action.
About Condition and Action Expressions
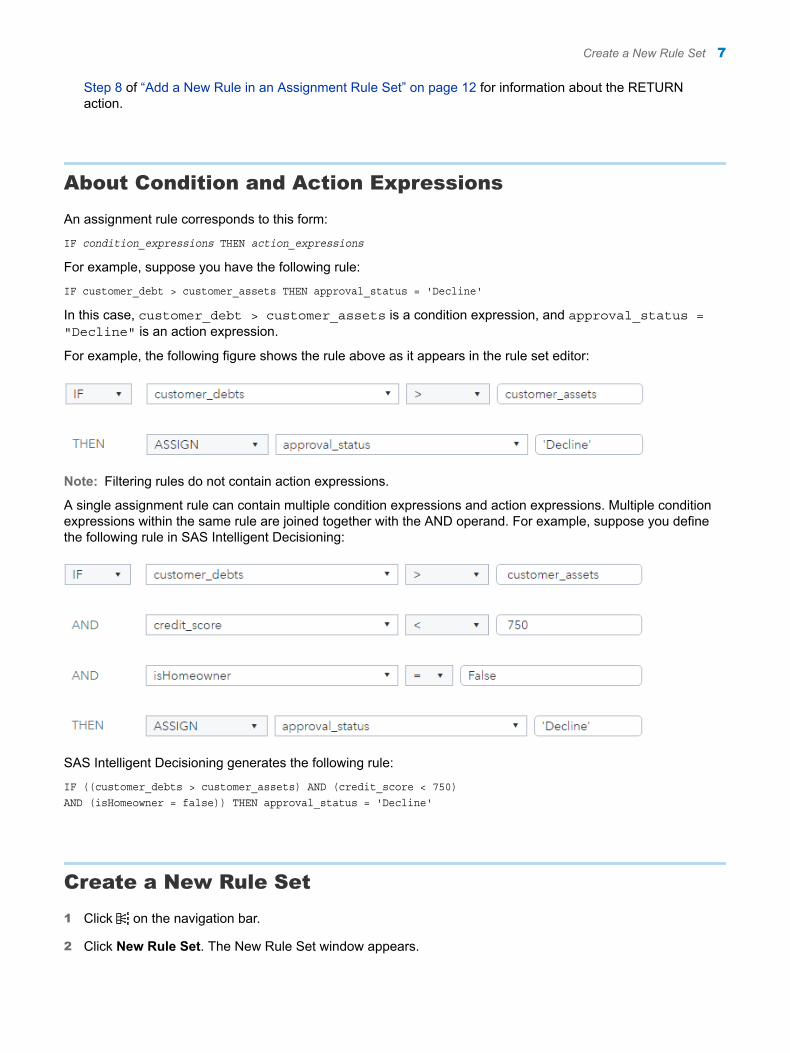
An assignment rule corresponds to this form:
IF condition_expressions THEN action_expressions
For example, suppose you have the following rule:
IF customer_debt > customer_assets THEN approval_status = 'Decline'
In this case, customer_debt > customer_assets is a condition expression, and approval_status = "Decline" is an action expression.
For example, the following figure shows the rule above as it appears in the rule set editor:
Note: Filtering rules do not contain action expressions.
A single assignment rule can contain multiple condition expressions and action expressions. Multiple condition expressions within the same rule are joined together with the AND operand. For example, suppose you define the following rule in SAS Intelligent Decisioning:
SAS Intelligent Decisioning generates the following rule:
IF ((customer_debts > customer_assets) AND (credit_score < 750) AND (isHomeowner = false)) THEN approval_status = 'Decline'
Create a New Rule Set
1 Click on the navigation bar.
2 Click New Rule Set. The New Rule Set window appears.
Create a New Rule Set 7

3 Enter a name for the rule set if you do not want to use the default name. Rule set names are limited to 100 characters and must be unique within a folder.
4 Select the rule set type. See “About Rules, Assignment Rule Sets, and Filtering Rule Sets” on page 6 for descriptions of each rule set type.
Important: You can publish decisions that include filtering rule sets to SAS Micro Analytic Service destinations, but you cannot publish the filtering rule sets themselves to SAS Micro Analytic Service destinations.
5 (Optional) Enter a description for the new rule set. Descriptions are limited to 1000 characters.
TIP You can edit the description at any time on the Properties tab.
6 Click , and select the folder where you want to save the rule set.
7 Click Save. SAS Intelligent Decisioning opens the new rule set and displays the Variables tab.
8 Add variables and rules to the rule set. For more information, see the following topics:
n “Managing the Variables in a Rule Set” on page 8
n “Add a Stand-Alone Assignment Statement” on page 11
n “Defining New Rules in a Rule Set” on page 12
Managing the Variables in a Rule SetTo use a variable in an expression, you must either import the variable from another source or you must create it as a custom variable. You can import variables from data sources, rule sets, and decisions.
About Variables
The Properties of a Variable
Table 2.1 describes the properties of a variable.
Table 2.1 Variable Properties
Property Description
Name Variable names must start with a letter or an underscore (_), and they can contain only alphanumeric characters and the underscore. They can be up to 32 characters long and must be unique within a rule set.
Note: SAS Intelligent Decisioning does not support double-byte character set (DBCS) characters in variable names.Note: Do not use any of these operators or keywords as variable names: AND, OR, IN, NOT, LIKE, TRUE, or FALSE. Do not use _N_ or any DS2 reserved word as a variable name. See SAS DS2 Programmer’s Guide for information about reserved words in the DS2 language.
8 Chapter 2 / Working with Business Rules

Property Description
Data type SAS Intelligent Decisioning supports the following data types: Boolean, character, data grid, date, datetime, decimal, and integer.
For Boolean values, enter True or 1 and False or 0. If you specify True or False, SAS Intelligent Decisioning represents Boolean values using the numbers 1 and 0 in the code that it generates.
Note: For information about data grid variables, see “Using Data Grids in SAS Intelligent Decisioning” in SAS Intelligent Decisioning: Using Data Grids.
Input and Output A variable can be an input variable, an output variable, both, or neither (a temporary variable). See “Input Variables, Output Variables, and Temporary Variables” on page 9 for more information.
Length For character variables that are input-only variables or that are both input and output variables, the length is derived from the length of the column to which the variable is mapped when the rule set is run.
The maximum length for character variables is 32767.
The length for Boolean and numeric variable types is set automatically.
Initial value You can specify an initial value for all data types except data grids. Initial values are used only at run time and only for output-only variables.
Description Descriptions are limited to 256 characters.
Input Variables, Output Variables, and Temporary Variables
For each variable used in a rule set, you must specify whether the variable is an input variable, an output variable, both an input and an output variable, or a temporary variable.
n Input variables are variables that are present in the input table for a rule set. When a rule set is deployed in a production system, all input variables must be mapped to table columns in input data. When you test a rule set in SAS Intelligent Decisioning, for each input variable, you must either map it to a table column or specify a constant as its input value. When you create or edit a variable, clear the Input check box for any variable that you do not want to be mapped to a column in an input table or for which you do not want to specify a value.
n Output variables are variables that are written to the output table that is created when a rule set is run. When you create or edit a variable, clear the Output check box for any variable that you want to exclude from the output data.
n Temporary variables are variables that are not present in the input data and they are not written to the output table. To create a temporary variable for use only while a rule set is executing, clear both the Input and Output check boxes.
When you create a new variable, it is created as both an input and output variable by default.
Import Variables from a Data Source
1 On the Variables tab, click Add Variable and select Data Source. The Choose a Data Source window appears, and the list of SAS Cloud Analytic Services (CAS) tables that are loaded into memory is displayed on the Available tab.
If the table that you need does not appear in the list of available tables, complete these steps:
a On the Data Sources tab, navigate to the table that you need.
Managing the Variables in a Rule Set 9

b Right-click on the table, and select Load.
c Click the Available tab.
If the table does not appear in the list of available tables, click .
2 Select the table from which you want to import variables, and click OK. The Add Variables window appears.
3 Select the variables that you want to import and click . To import all of the variables in the table, click .
4 Click OK.
5 On the Variables tab, select or clear the Input and Output check boxes as necessary. See “Input Variables, Output Variables, and Temporary Variables” on page 9 for more information.
Import Variables from a Rule Set or Decision
1 On the Variables tab, click Add Variable, and select Rule set or Decision. The Add Variables window appears.
2 Select the rule set or decision from which you want to import variables.
3 Select the variables that you want to import and click . To import all of the variables in the table, click .
4 Click OK.
5 On the Variables tab, select or clear the Input and Output check boxes as necessary. See “Input Variables, Output Variables, and Temporary Variables” on page 9 for more information.
Create a Custom Variable Dynamically
To create a variable in a rule set, you can enter the new variable name in any field of an expression where it is valid to enter a variable name. If you enter the name in a condition variable field, SAS Intelligent Decisioning creates the variable as an input-output variable. If you enter the name in an action variable field, SAS Intelligent Decisioning creates the variable as an output variable. By default, SAS Intelligent Decisioning creates a variable of type Decimal. To create a variable of a different type, enter the variable name, a space, and then the data type. For example, you can create an input-output variable of type Decimal named daysLate by entering it in the condition variable field:
You can create an output-only variable of type Boolean named approve by entering it in the action variable field, followed by a space and the data type:
Create Custom Variables on the Variables Tab
Note: For information about data grid variables, see “Defining Data Grid Variables” in SAS Intelligent Decisioning: Using Data Grids.
To create custom variables on the Variables tab:
10 Chapter 2 / Working with Business Rules

1 Click Add Variable and select Custom variable. The Add Variables window appears.
2 Complete these steps for each variable that you want to add:
a Enter the name of the new variable, and select the data type of the variable. See Table 2.1 on page 8 for additional information.
b (Optional) Click to display the Length, Initial value, and Description fields.
c (Optional) Enter a length, initial value, and description for the new variable. See Table 2.1 on page 8 for additional information.
d Click Add. SAS Intelligent Decisioning adds the new variable to the table of variables. By default, variables are added to the table as both input and output variables.
e (Optional) Clear the check boxes in the Input or Output columns.
n Clear the Input check box for any variable that you do not want to be mapped to a column in an input table or for which you do not want to specify a value.
n Clear the Output check box for any variable that you want to exclude from the output data.
n Clear both the Input and Output check boxes to create a temporary variable.
See Table 2.1 on page 8 for additional information.
3 Click OK to add the variables and close the Add Variables window.
Delete Variables
On the Variables tab, select the check box for the variables that you want to delete, click , and select Delete.
Note: You cannot delete a variable if it is used in a rule set or decision.
Edit Variable Properties
On the Variables tab, click on the variable name of the variable that you want to edit. The Edit Variable window appears. Edit the properties as needed, and then click OK.See Table 2.1 on page 8 for additional information.
Edit Metadata for Data Grid Variables
For information, see “Editing Data Grid Variable Metadata” in SAS Intelligent Decisioning: Using Data Grids.
Add a Stand-Alone Assignment Statement
Stand-alone assignment statements always execute unless a RETURN action stops the execution of the rule set before execution reaches the assignment statement. Rule-fired data is not generated for stand-alone assignment statements.
1 On the Rule Set tab, click Add assignment if the rule set is empty or, if the rule set contains at least one statement, select Add ð Add assignment. The application adds an assignment statement to the top of the rule set, below any existing assignment statements.
2 Import or create any variables that are required for the assignment statement that have not already been added to the rule set. You can add or create the variables on the Variables tab, or you can define variables
Add a Stand-Alone Assignment Statement 11

dynamically as you author the statement. See “Managing the Variables in a Rule Set” on page 8 for more information.
3 Select the variable to which you want to assign a value.
4 Enter the expression for the variable in the expression field. See “About Defining Expressions” on page 15for additional information.
5 (Optional) Move the assignment statement to a different position in the rule set. To move the statement, click or .
6 Click to save the rule set. SAS Intelligent Decisioning validates the syntax of the expressions. If it does not detect any problems, it saves the rule set.
Defining New Rules in a Rule Set
Add a New Rule in an Assignment Rule Set
1 Create or open the rule set. If no variables are defined in the rule set, SAS Intelligent Decisioning displays the Variables tab. Otherwise, it displays the Rule Set tab.
2 Import or create any variables that are required for the new rule that have not already been added to the rule set. You can add or create the variables on the Variables tab, or you can define variables dynamically as you author the rule. See “Managing the Variables in a Rule Set” on page 8 for more information.
3 Click the Rule Set tab.
4 Click Add rule if the rule set is empty or, if the rule set contains at least one statement, select one of the following options:
Add ð Add rule or Add Rule.Adds a new IF-THEN rule to the end of the rule set.
Add ð Add assignmentAdds a new assignment statement to the top of the rule set.
5 (Optional) Define the condition expression for the rule. See “About Defining Expressions” on page 15 for additional information.
To add additional condition expressions to the selected rule, select Add ð Condition.
6 Define the action expressions for the rule or assignment statement. See “About Defining Expressions” on page 15 for additional information.
To add additional action expressions to the selected rule, select Add ð Action.
TIP To move condition or action expressions up or down within an IF or ELSE clause, select the expression and click or .
7 (Optional) Change the rule operator to ELSE. If the rule is the first rule in a rule set, the rule operator must be IF.
When you change the operator on a rule from IF to ELSE, the condition expression is preserved, and the rule becomes an ELSE clause with an IF condition. For more information, see “Controlling Which Conditions Are Evaluated” on page 14.
12 Chapter 2 / Working with Business Rules
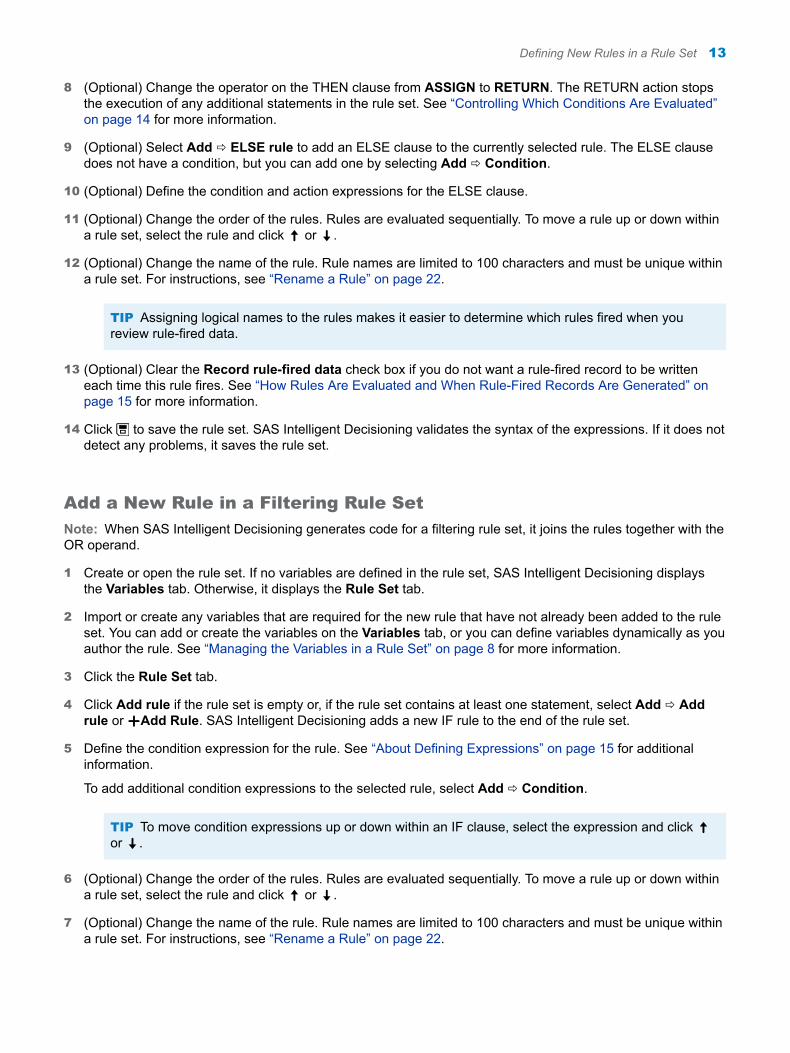
8 (Optional) Change the operator on the THEN clause from ASSIGN to RETURN. The RETURN action stops the execution of any additional statements in the rule set. See “Controlling Which Conditions Are Evaluated” on page 14 for more information.
9 (Optional) Select Add ð ELSE rule to add an ELSE clause to the currently selected rule. The ELSE clause does not have a condition, but you can add one by selecting Add ð Condition.
10 (Optional) Define the condition and action expressions for the ELSE clause.
11 (Optional) Change the order of the rules. Rules are evaluated sequentially. To move a rule up or down within a rule set, select the rule and click or .
12 (Optional) Change the name of the rule. Rule names are limited to 100 characters and must be unique within a rule set. For instructions, see “Rename a Rule” on page 22.
TIP Assigning logical names to the rules makes it easier to determine which rules fired when you review rule-fired data.
13 (Optional) Clear the Record rule-fired data check box if you do not want a rule-fired record to be written each time this rule fires. See “How Rules Are Evaluated and When Rule-Fired Records Are Generated” on page 15 for more information.
14 Click to save the rule set. SAS Intelligent Decisioning validates the syntax of the expressions. If it does not detect any problems, it saves the rule set.
Add a New Rule in a Filtering Rule Set
Note: When SAS Intelligent Decisioning generates code for a filtering rule set, it joins the rules together with the OR operand.
1 Create or open the rule set. If no variables are defined in the rule set, SAS Intelligent Decisioning displays the Variables tab. Otherwise, it displays the Rule Set tab.
2 Import or create any variables that are required for the new rule that have not already been added to the rule set. You can add or create the variables on the Variables tab, or you can define variables dynamically as you author the rule. See “Managing the Variables in a Rule Set” on page 8 for more information.
3 Click the Rule Set tab.
4 Click Add rule if the rule set is empty or, if the rule set contains at least one statement, select Add ð Add rule or Add Rule. SAS Intelligent Decisioning adds a new IF rule to the end of the rule set.
5 Define the condition expression for the rule. See “About Defining Expressions” on page 15 for additional information.
To add additional condition expressions to the selected rule, select Add ð Condition.
TIP To move condition expressions up or down within an IF clause, select the expression and click or .
6 (Optional) Change the order of the rules. Rules are evaluated sequentially. To move a rule up or down within a rule set, select the rule and click or .
7 (Optional) Change the name of the rule. Rule names are limited to 100 characters and must be unique within a rule set. For instructions, see “Rename a Rule” on page 22.
Defining New Rules in a Rule Set 13

TIP Assigning logical names to the rules makes it easier to determine which rules fired when you review rule-fired data.
8 (Optional) Clear the Record rule-fired data check box if you do not want a rule-fired record to be written each time this rule fires. See “How Rules Are Evaluated and When Rule-Fired Records Are Generated” on page 15 for more information.
9 Click to save the rule set. SAS Intelligent Decisioning validates the syntax of the expressions. If it does not detect any problems, it saves the rule set.
Controlling Which Conditions Are Evaluated
By default, rules are assigned the IF rule operator, which means that the rule’s conditions are evaluated regardless of the results of previous rules. In assignment rule sets, you can control whether condition expressions are evaluated by using the RETURN action and the ELSE operator.
The RETURN action stops the execution of any remaining rules in a rule set. If you are executing a single rule set, execution ends. If you are executing a decision, control moves to the next object in the decision. For example, the rule in the following figure stops the execution of any remaining rules in the rule set if the value of the Order_Quantity variable is missing.
If you set a clause’s operator to ELSE, then the clause’s conditions are evaluated only if the previous clause’s conditions evaluated to false. For example, given the rule set shown in the following figure, if Order_Quanitity is 9, the condition for the IF clause evaluates to false, and the condition for the first ELSE clause evaluates to true. Therefore, the action for first ELSE clause is executed, and the condition for the last ELSE clause is not evaluated. The value of Offer_Percent is set to 5.
14 Chapter 2 / Working with Business Rules

How Rules Are Evaluated and When Rule-Fired Records Are Generated
By default, the condition expressions for all rules in a rule set are evaluated sequentially regardless of the results of previous rules. However, in assignment rule sets, you can use the ELSE operator and the RETURN action to control whether condition expressions are evaluated. See “Controlling Which Conditions Are Evaluated” on page 14 for more information.
If a rule’s condition expressions evaluate to True, SAS Intelligent Decisioning, the rule is said to have fired. In assignment rule sets, SAS Intelligent Decisioning executes the rule’s action expressions.
By default, every time a rule fires, it generates a rule-fired record. You can control when rule-fired records are generated by using the Record rule-fired data check boxes. See Step 13 in “Add a New Rule in an Assignment Rule Set” on page 12.
Note: Stand-alone assignment statements always execute unless a RETURN action stops the execution of the rule set before execution reaches the assignment statement. Rule-fired data is not generated for stand-alone assignment statements.
Defining Expressions in Rules and Assignment Statements
About Defining Expressions
Expressions can be up to 1024 characters long. They can contain numeric constants, character strings, variables, operators, SAS DS2 functions, data grid functions, and the SAS Intelligent Decisioning LOOKUP and
Defining Expressions in Rules and Assignment Statements 15

LOOKUPVALUE functions. You can enter expressions directly into the expression fields, or you can use the Expression Editor to create and edit expressions.
TIP Use caution when you test for equality by using scientific notation. Two numbers that appear to be the same might evaluate to different numbers because of the precision involved in scientific notation.
For more information about entering expressions, see the following topics:
n “Using the Expression Editor” on page 16
n “Enter LOOKUP and LOOKUPVALUE Expressions” on page 17
n “Punctuation for Literal Data Values” on page 17
n “Operators for Use in Expressions” on page 18
n “Using the LIKE Operator” on page 19
n “Using Functions in Expressions” on page 20
n “Working with Missing Values” on page 21
n “Using Data Grid Functions” in SAS Intelligent Decisioning: Using Data Grids
Using the Expression Editor
You can use the Expression Editor to enter expressions that do not use the LOOKUP or LOOKUPVALUE functions. You must use the Expression Editor to enter expressions that use the OR operator, the concatenation (||) operator, or the exponent operator (**).
To open the Expression Editor, select an expression, and click .
You can enter expressions directly into the expression field, or you can use the lists of operators, function names, and variable names to add them to the expression.
n To add an operator, click the operator in the rows above the expression field.
n To add a variable, click the Variables tab, and double-click the variable name.
n To add a function call, click the Functions tab, select a function name, and click .
You can click Validate at any time to check the syntax of the expression that you are building. Click Clear to clear the expression field.
16 Chapter 2 / Working with Business Rules

When you are finished building the expression, click Save. The Expression Editor adds the expression to the rule set.
Important: When you use the Expression Editor to enter an expression, the expression field on the Rule Set tab is disabled. You can edit it only by using the Expression Editor. To return to the default view of the field, click
. However, if you revert to the default view, any changes that you made in the Expression Editor are discarded.
Enter LOOKUP and LOOKUPVALUE Expressions
Note: You can enter the LOOKUP function only in condition expressions, and you can enter the LOOKUPVALUE function only in action expressions.
To enter a condition expression that uses the LOOKUP function, select LOOKUP as the rule operator, and select the lookup table in the expression field.
To enter an action expression that uses the LOOKUPVALUE function, complete these steps:
1 Select LOOKUPVALUE as the operator on the THEN clause.
2 In the second field of the THEN clause, select the variable to which you want to assign the value that is retrieved from the lookup table.
3 Click , and select the lookup table from which you want to retrieve the lookup value.
4 In the last field, select the variable whose value matches the value of the lookup key, or select the actual value of the lookup key. To select the value of the lookup key:
a Select Select a lookup key. SAS Intelligent Decisioning displays the list of lookup entries in the specified table.
b Select the record whose key you want to use in the expression, and click Save.
For example, suppose you have a lookup table in which the lookup keys are ZIP codes and the lookup values are city names. You could use the following rule to test whether the lookup table contains an entry for the ZIP code, and, if the entry exists, retrieve the city name that is associated with the ZIP code.
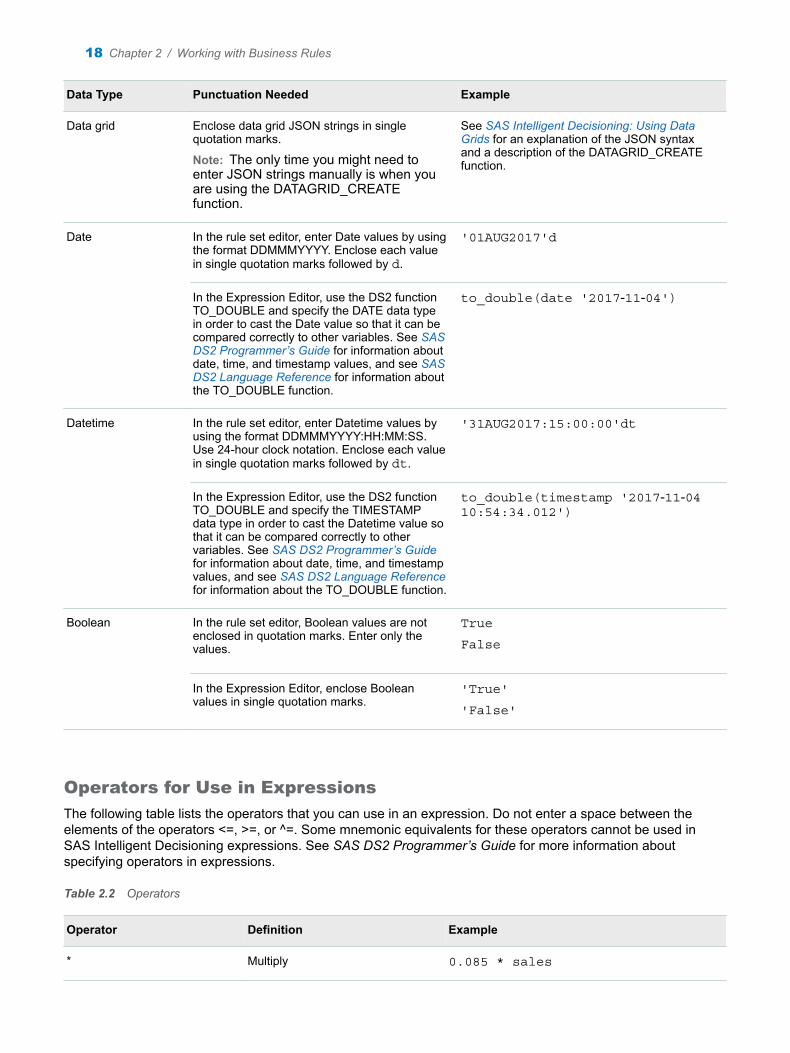
Punctuation for Literal Data Values
Depending on whether you use the Expression Editor or enter expressions directly into the expression fields, you must enter some values differently.
Data Type Punctuation Needed Example
Character Enclose character strings in single quotation marks. For embedded quotation marks, use two single quotation marks.
'Gold Account'
'd''oscail'
Defining Expressions in Rules and Assignment Statements 17
Data Type Punctuation Needed Example
Data grid Enclose data grid JSON strings in single quotation marks.
Note: The only time you might need to enter JSON strings manually is when you are using the DATAGRID_CREATE function.
See SAS Intelligent Decisioning: Using Data Grids for an explanation of the JSON syntax and a description of the DATAGRID_CREATE function.
Date In the rule set editor, enter Date values by using the format DDMMMYYYY. Enclose each value in single quotation marks followed by d.
'01AUG2017'd
In the Expression Editor, use the DS2 function TO_DOUBLE and specify the DATE data type in order to cast the Date value so that it can be compared correctly to other variables. See SAS DS2 Programmer’s Guide for information about date, time, and timestamp values, and see SAS DS2 Language Reference for information about the TO_DOUBLE function.
to_double(date '2017‑11‑04')
Datetime In the rule set editor, enter Datetime values by using the format DDMMMYYYY:HH:MM:SS. Use 24-hour clock notation. Enclose each value in single quotation marks followed by dt.
'31AUG2017:15:00:00'dt
In the Expression Editor, use the DS2 function TO_DOUBLE and specify the TIMESTAMP data type in order to cast the Datetime value so that it can be compared correctly to other variables. See SAS DS2 Programmer’s Guide for information about date, time, and timestamp values, and see SAS DS2 Language Reference for information about the TO_DOUBLE function.
to_double(timestamp '2017‑11‑04 10:54:34.012')
Boolean In the rule set editor, Boolean values are not enclosed in quotation marks. Enter only the values.
True
False
In the Expression Editor, enclose Boolean values in single quotation marks.
'True'
'False'
Operators for Use in Expressions
The following table lists the operators that you can use in an expression. Do not enter a space between the elements of the operators <=, >=, or ^=. Some mnemonic equivalents for these operators cannot be used in SAS Intelligent Decisioning expressions. See SAS DS2 Programmer’s Guide for more information about specifying operators in expressions.
Table 2.2 Operators
Operator Definition Example
* Multiply 0.085 * sales
18 Chapter 2 / Working with Business Rules
http://documentation.sas.com/?docsetId=ds2ref&docsetVersion=9.4&docsetTarget=titlepage.htm&locale=en

Operator Definition Example
/ Divide amount / 5
+ Add num + 3
– Subtract sale ‑ discount
** Raises the first operand to the power of the second operand
num1**num2
= Equal to tries = maxTriesAllowed
|| Concatenates the first string and the second string
string1 || string2
!= Not equal to insufficientFunds != True
^= Not equal to balance ^= 'low'
> Greater than daysLate > 5
>= Greater than or equal to balance >= 1000
<= Less than or equal to balance <= 250
<> The maximum of the left and right operands
num1 <> num2
IN (value-list) Equal to an item in value-list risk in ('high','medium','low')
NOT IN (value-list) Not equal to an item in value-list offerPercent not in (10,20,30)
LIKE 'pattern' If the variable’s value matches the expression pattern in pattern, the result is true.
like 'HS%PP'
expression AND expression If both expressions are true, the result is true.
dateExpired >= '01AUG2015'd AND dateExpired <= '31AUG2015'd
expression OR expression If either expression is true, the result is true.
dateEnrolled >= '01JAN2015' OR member = True
Using the LIKE Operator
The LIKE operator determines whether the value of a variable matches a pattern-matching expression. An expression that uses the LIKE operator has the following syntax:
LIKE 'pattern-matching-expression'
If a variable’s value matches the pattern that is specified by pattern-matching-expression, the expression evaluates to true (1). Otherwise, the expression evaluates to false (0).
There are three classes of pattern-matching characters.
Defining Expressions in Rules and Assignment Statements 19

Table 2.3 Pattern-Matching Characters
Character Description
underscore (_) Matches any single character
percent sign (%) Matches any sequence of zero or more characters
Note: Be aware of the effect of trailing blanks. To match values, you might have to use the TRIM function to remove trailing blanks.
any other character Matches that character
The LIKE expression is case sensitive. To search for mixed-case strings, use the UPCASE function to create an uppercase version of the variable that you want to search. You can use a temporary variable to store the results of the UPCASE function. Use the LIKE operator to search the uppercase version of the variable. For example, you can search the variable Part_Number for mixed-case strings that begin with HS and end with PP by using the two rules shown in the following figure.
The following table shows examples of the matches that result if you search a variable that could have these values: Smith, Smooth, Smothers, Smart, Smuggle.
Table 2.4 Examples of LIKE Expressions
LIKE Expression Example Matching Results
like 'Sm%' Smith, Smooth, Smothers, Smart, Smuggle
like '%th' Smith, Smooth
like 'S__gg%' Smuggle
like 'S_o' (no matches)
like 'S_o%' Smooth, Smothers
like 'S%th' Smith, Smooth
Using Functions in Expressions
SAS Intelligent Decisioning supports the following functions in expressions:
n LOOKUP and LOOKUPVALUE functions. Condition expressions can contain the LOOKUP function, and action expressions can contain the LOOKUPVALUE function. However, if the expression contains the
20 Chapter 2 / Working with Business Rules

LOOKUP or LOOKUPVALUE function, then the expression cannot contain anything else. See “LOOKUP Function” on page 52 and “LOOKUPVALUE Function” on page 53 for more information.
n SAS DS2 functions. Syntax information for the most commonly used functions is available by clicking on a function name in the Expression Editor. For additional information about these functions and additional DS2 functions, see SAS DS2 Language Reference.
n Data grid functions. Syntax information for these functions is available by clicking on a function name in the Expression Editor. For more information about these functions, see “Data Grid Functions” in SAS Intelligent Decisioning: Using Data Grids.
Working with Missing Values
You can use the MISSING function to check for missing values. This function returns 0 (false) or 1 (true). Missing values have a value of false when you use them with logical operators such as AND or OR. You can use the MISSING function to eliminate errors, notes, and warnings in the SAS log that are caused by missing values.
In expressions, you can use the period (.) to denote missing numeric values, and two single quotation marks with no space (the empty string '' ) to denote missing character values.
For information about how DS2 processes nulls and SAS missing values, see SAS DS2 Programmer’s Guide.
Delete Expressions or ELSE Rules
To delete a condition or action expression, click for that expression.
To delete an entire ELSE rule, select the rule, right-click on the rule, and select Delete the selected object.
Managing Rules
Duplicate a Rule
1 Click for the rule, and select Duplicate rule. The Duplicate Rule window appears.
2 Enter a name for the duplicate rule if you do not want to use the default name.
3 If you are duplicating an ELSE rule, select whether you want the duplicate rule to be a new IF rule or an additional ELSE rule, and click Duplicate.
Delete a Rule
1 Click for the rule, and select Delete rule.
2 (Optional) If the rule has an ELSE clause, SAS Intelligent Decisioning asks whether you want to delete both the IF and ELSE rules or only the IF rule. Click Delete All to delete everything, or click Delete IF to delete only the IF clause. If you select Delete IF, then the ELSE clause becomes an assignment statement if it does not have any condition expressions. If it has a condition expression, it becomes the new IF rule.
TIP To delete only the ELSE clause, right-click on the ELSE operator and select Delete the selected object.
Managing Rules 21

Rename a Rule
To rename the IF clause of a rule, select the existing rule name, and enter a new name.
To rename the ELSE clause of a rule:
1 Right-click on the ELSE operator and select Rename rule.
2 Enter the new name and click Rename.
TIP Rule names for ELSE clauses do not appear in the rule set editor.
Reorder Rules
To move a rule up or down within an IF or ELSE clause, select the rule, and click or .
Copy a Rule Set URL
To create a link for external documentation that automatically opens a rule set in SAS Intelligent Decisioning, complete these steps:
1 Open the rule set.
2 Click , and select Copy object URL. The Copy Rule Set URL window appears.
3 Click Copy, and then click Close.
Paste the link into your documentation.
22 Chapter 2 / Working with Business Rules

Managing Rule Sets
Duplicate Rule Sets
Note: You cannot duplicate a rule set if it is open.
To duplicate a single rule set:
1 In the Rule Sets view, select the rule set that you want to duplicate.
2 Click and select Duplicate. The Duplicate Rule Set window appears.
3 Enter a new name for the duplicate rule set
4 (Optional) Enter a description for the rule set.
5 Click Duplicate.
To duplicate multiple rule sets:
1 In the Rule Sets view, select the rule sets that you want to duplicate.
2 Click and select Duplicate. SAS Intelligent Decisioning duplicates the rule sets and appends _Copy to the names of the duplicate copies. If needed, a number is also appended to the names of the duplicate copies.
Delete Rule Sets
Note: You cannot delete a rule set if it is open.
In the Rule Sets view, select the rule sets that you want to delete, click , and select Delete.
Rename Rule Sets
Note: You cannot rename a rule set if it is open.
1 In the Rule Sets view, select the rule set that you want to rename.
2 Click and select Rename. The Rename window appears.
3 Enter a new name for the rule set, and click Rename.
Move Rule Sets to a Different Folder
1 In the Rule Sets view, select the rule sets that you want to move.
2 Click and select Move. The Choose a Location window appears.
3 Select the location to which you want to move the rule sets, and click OK.
Managing Rule Sets 23
Managing Versions of Rule SetsTo change the version of a rule set that is specified in a decision node, edit the properties of the node. For more information, see “Edit the Properties of a Decision Node” on page 73.
Set the Displayed Version
The displayed version is the version whose information is displayed on the other tabs, such as the Properties and Rule set tabs. On the Versions tab, a indicates the displayed version. To change the displayed version, select the version that you want to view, and click Set Version. The displayed version is shown in the title bar.
Create a New Version
Note: The current version of an object is the version with the highest version number. When you create a new version, SAS Intelligent Decisioning locks the current version before it creates the new version.
Note: You cannot save changes to a version that is locked. If you modify a version that is locked and click , SAS Intelligent Decisioning asks you if you want to replace the current unlocked version with your edited version.
Important: You cannot unlock a locked version.
To create a new version:
1 On the Versions tab, click New Version. The New Version window appears.
2 Select the version type: Minor or Major. Version numbers follow the format Major.Minor. If you select Major, the number to the left of the period is incremented. If you select Minor, the number to the right of the period is incremented.
3 (Optional) Enter information about the new version in the Notes field.
TIP You can edit these notes at any time on the Versions tab.
4 Click Save.
Testing a Rule Set
Create and Run a New Test
Testing a rule set is optional, but doing so is a best practice. Testing enables you to discover any problems before the rule set is published and incorporated into a production system.
1 On the Scoring tab, click the Tests tab.
2 Click New Test. The New Test window appears.
3 Enter a name for the test if you do not want to use the default name.
4 (Optional) Enter a description for the test. Descriptions are limited to 1000 characters.
24 Chapter 2 / Working with Business Rules

5 (Optional) Click for the Location field, and select the folder where you want to save the test definition and results.
TIP Selecting a location is optional, but it is highly recommended. Storing test definitions and test results in a folder simplifies the tasks of setting permissions and transferring the test files.
6 Click , select the input table for the test, and click OK.
7 Verify or change the variable mappings. The input variables in the rule set must be mapped to columns in the input table that you selected for the test.
SAS Intelligent Decisioning automatically maps the input variables in the rule set to columns in the input table when the names and data types of the variables match those of the table columns. If any input variables cannot be mapped automatically, an error message is displayed.
You can change the automatic variable mappings in the Variable Mappings window.
To change variable mappings:
a Click Variables. The Variable Mappings window appears.
b For each input variable, select the table column to which the variable should be mapped. Alternatively, for Decimal, Integer, and Character variables, you can select Use value for the table column, and specify a literal value in the Value column.
Note: Do not enclose character strings in quotation marks.
TIP To specify a missing value for character variables, select Use value and leave the Value column empty. When SAS Intelligent Decisioning generates code, it will generate an empty string (''). For numeric values, enter a period (.).
c Click OK to close the Variable Mappings window.
8 (Optional) Click Advanced to display the advanced options.
9 (Optional) Click and select the library where you want to write the output of the test.
10 (Optional) Select the version of the rule set that you want test.
11 (Optional) Select the variable that you want to serve as an input debug variable. You can specify an input-only variable or an input-output variable. The rule set writes the name and value of this variable to the log for each input record that is processed. It writes the value just before the logic of the rule set is executed for the input record.
For more information, see “Debugging Rule Set Tests” on page 29.
12 (Optional) Select Preserve unmapped columns in the output table if you want columns that are not mapped to an output variable to be written to the output table.
13 Click Run to run the test. Alternatively, click Save to save the test definition without running it.
The status of the test is indicated by the icon in the Status column.
Testing a Rule Set 25
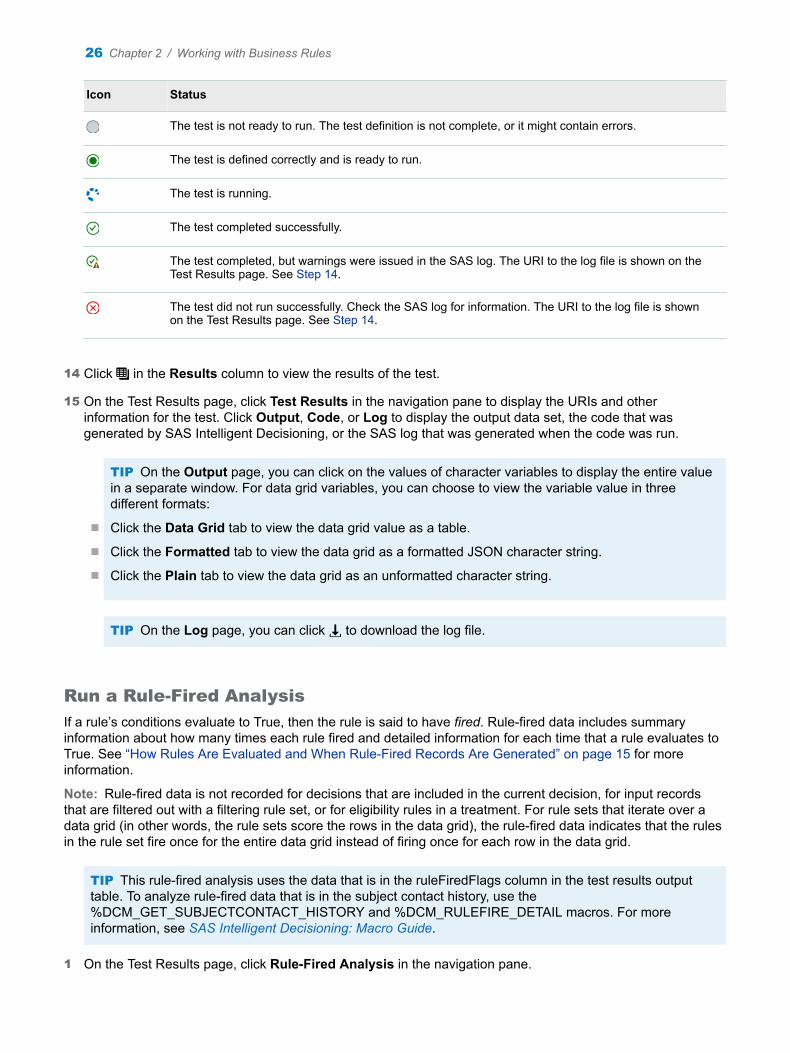
Icon Status
The test is not ready to run. The test definition is not complete, or it might contain errors.
The test is defined correctly and is ready to run.
The test is running.
The test completed successfully.
The test completed, but warnings were issued in the SAS log. The URI to the log file is shown on the Test Results page. See Step 14.
The test did not run successfully. Check the SAS log for information. The URI to the log file is shown on the Test Results page. See Step 14.
14 Click in the Results column to view the results of the test.
15 On the Test Results page, click Test Results in the navigation pane to display the URIs and other information for the test. Click Output, Code, or Log to display the output data set, the code that was generated by SAS Intelligent Decisioning, or the SAS log that was generated when the code was run.
TIP On the Output page, you can click on the values of character variables to display the entire value in a separate window. For data grid variables, you can choose to view the variable value in three different formats:
n Click the Data Grid tab to view the data grid value as a table.
n Click the Formatted tab to view the data grid as a formatted JSON character string.
n Click the Plain tab to view the data grid as an unformatted character string.
TIP On the Log page, you can click to download the log file.
Run a Rule-Fired Analysis
If a rule’s conditions evaluate to True, then the rule is said to have fired. Rule-fired data includes summary information about how many times each rule fired and detailed information for each time that a rule evaluates to True. See “How Rules Are Evaluated and When Rule-Fired Records Are Generated” on page 15 for more information.
Note: Rule-fired data is not recorded for decisions that are included in the current decision, for input records that are filtered out with a filtering rule set, or for eligibility rules in a treatment. For rule sets that iterate over a data grid (in other words, the rule sets score the rows in the data grid), the rule-fired data indicates that the rules in the rule set fire once for the entire data grid instead of firing once for each row in the data grid.
TIP This rule-fired analysis uses the data that is in the ruleFiredFlags column in the test results output table. To analyze rule-fired data that is in the subject contact history, use the %DCM_GET_SUBJECTCONTACT_HISTORY and %DCM_RULEFIRE_DETAIL macros. For more information, see SAS Intelligent Decisioning: Macro Guide.
1 On the Test Results page, click Rule-Fired Analysis in the navigation pane.
26 Chapter 2 / Working with Business Rules

2 Click Run Rule-Fired Analysis. SAS Intelligent Decisioning analyzes the test results to determine which rules fired for each row in the input table, and displays the Analysis page.
The Analysis page displays the number of rules that fired for each output record that was generated by the decision. The number in the Rules Fired Count column is a link to more information. You can click on this link to display the rules that fired for that output row.
For example, the following displays shows the rule-fired analysis for the low_ratio rule set.
3 Click on a number in the Rule Fired Count column. SAS Intelligent Decisioning displays the Rule Fired Count window. This window shows which rules produced the selected output record.
4 Click Close to close the Rule Fired Count window.
5 Click Plot in the navigation pane. SAS Intelligent Decisioning displays a bar chart that shows how many times each rule fired. Position your cursor over a bar to display the name of the rule and the number of times that the rule fired.
Testing a Rule Set 27

6 Click Rule-Fired Analysis in the navigation pane to display the URIs and other information for the rule-fired test.
7 Click Close to close the rule set.
Working with Test Output Data
After you run a test, you can work with the output table in other SAS applications to analyze the data, create and compare models, discover relationships hidden in the data, and generate reports based on the data.
Note: The actions available to you depend on the applications that are available at your site.
On the Test Results page, select the Output table in the navigation pane, click Actions, and select one of the following options:
Explore Lineageopens SAS Lineage Viewer. SAS Lineage Viewer enables you to better understand the relationships between objects in your SAS Viya applications. These objects include data, transformation processes, reports, and visualizations. For more information, see SAS Lineage Viewer: User’s Guide.
Explore and Visualize Dataopens the output table in SAS Visual Analytics. SAS Visual Analytics enables you to create, test, and compare models based on the patterns discovered during exploration of the data. You can export the model before or after performing model comparison for use with other SAS products or to put the model into production. SAS Visual Analytics supports a range of visualization, discovery, and reporting features. For more information, see SAS Visual Analytics: Overview.
Prepare Dataopens the output table in SAS Data Studio. SAS Data Studio enables you to perform data transforms such as joining tables, appending data to a table, transposing columns, creating calculated columns, and so on. For more information, see SAS Data Studio: User’s Guide.
28 Chapter 2 / Working with Business Rules

Manage Dataopens SAS Data Explorer. SAS Data Explorer enables you to import data, connect to databases, and load tables into memory. For more information, see SAS Data Explorer: User’s Guide.
Debugging Rule Set Tests
When you create a test, you can specify a variable to use as a debugging variable. You can specify an input-only variable or an input-output variable. The rule set writes the name and value of this variable to the log for each input record that is processed. It writes the value just before the logic of the rule set is executed for the input record. For more information, see Step 11 on page 25 of “Create and Run a New Test” on page 24.
To capture variable values for input-only or temporary variables after the rule set logic has executed for a specific record, you can specify that the variable is an output variable, and then re-run the test. Before publishing the rule set to a production environment, return the input and output settings for the variable to their previous settings. For more information, see “Input Variables, Output Variables, and Temporary Variables” on page 9 and “Edit Variable Properties” on page 11.
Publishing and Validating a Rule Set
Publishing a Rule Set
Introduction to Publishing
Publishing content makes it available to other applications. Publishing a rule set creates an entity that can be managed and run in another environment. For example, if you publish content to the SAS Micro Analytic Service destination, SAS Intelligent Decisioning creates a DS2 package. The published module becomes a callable REST API endpoint.
Note: The publishing destinations that are available are determined by your system administrator. See SAS Viya Administration: Publishing Destinations for more information.
Publish Rule Sets
TIP When you publish rule sets from the Rule Sets category view, SAS Intelligent Decisioning publishes the latest version of the rule set. If you publish a single rule set by first opening the rule set, you can select the version that you want to publish.
TIP To view the publishing history for a rule set, open the rule set, and click the History tab.
Note: You cannot publish filtering rule sets to SAS Micro Analytic Service destinations.
Note: In content that is published to a SAS Micro Analytic Service destination, the values of date or datetime input variables must be numeric. They cannot be formatted values such as 18jul2019.
To publish the latest versions of one or more rule sets:
1 On the Rule Sets page, select one or more rule sets, click , and select Publish.
Alternatively, to publish a selected version of one rule set:
a On the Rule Sets page, select the rule set, and click .
b Click the Versions tab.
Publishing and Validating a Rule Set 29

c Select the version that you want to publish, click Set Version, and then click Publish.
The Publish Rule Sets window appears.
2 Select the destination to which you want to publish.
Note: The publishing destinations that are available to you depend on what is configured at your site. See SAS Viya Administration: Publishing Destinations for more information.
3 (Optional) In the Items to Publish section, edit the Published Name if you do not want to use the default name for the published module. The maximum length and character restrictions differ depending on your destination. See Table 2.5.
Table 2.5 Requirements and Restrictions for Published Names
DestinationMaximum Length Requirements And Restrictions
SAS Micro Analytic Service
32 The published name must start with a letter or underscore. It cannot contain spaces, special characters, or multi-byte characters.
Teradata 128 The published name must start with a letter or an underscore. It cannot contain spaces, special characters, or multi-byte characters.
SAS Cloud Analytic Services (CAS)
128 The published name cannot contain single or double quotation marks.
Apache Hadoop 128 The published name cannot contain colons (:) or double quotation marks.
4 (Optional) If you have previously published the rule set, select the check box in the Replace column in order to replace the previously published item of the same name in the same destination.
5 (Optional) Select the Rule Fired Tracking check box if you want the published rule set to generate rule-fired data.
Note: You cannot select this option if you are publishing content to SAS Micro Analytic Service.
Note: This rule-fired data is recorded in the ruleFiredFlags column in the output table. The rule-fired data that is recorded when you select Record rule-fired data for a record contacts node is recorded in the subject contact history.
6 Publish the rule sets.
n To publish content to a SAS Cloud Analytic Services (CAS) destination, you must reload the CAS destination table in order to make the newly published item available to other applications. Select one of the following options to publish the decision:
Publishpublishes the rule sets and automatically reloads the CAS destination table. If another user is executing the code for an item that was previously published to CAS while the destination table is being reloaded, reloading the table might cause temporary problems with accessing the table content. After the table is reloaded, all authorized users can access all items in the table.
Publish without reloadingpublishes the rule sets but does not reload the CAS destination table. You must manually reload the table in order for the newly published items to be accessible.
n To publish the rule sets to Teradata, Apache Hadoop, or SAS Micro Analytic Service destinations, click Publish. You do not need to reload the destination table when you publish to these destinations.
30 Chapter 2 / Working with Business Rules

The Publishing Results window appears. It displays the names of the published items, their status, and information about any issues that were encountered during the publishing process.
7 After the status changes to Published successfully, click Close to close the Publishing Results window.
8 (Optional) Click Close to close the rule set.
Validate a Published Rule Set
You can test the published rule set in the target publishing destination. When you publish the rule set, a validation test is automatically defined for that rule set in that destination. To run the publishing validation test:
1 On the Scoring tab, click the Publishing Validation tab. The icon in the Status column indicates that the test has been defined.
2 Click on the test name. The Edit Publishing Validation Test window appears.
Note: To generate the name of the publishing validation test, SAS Intelligent Decisioning appends a timestamp to the rule set name. The timestamp indicates when the rule set was published.
3 (Optional) Click for the Location field, and select the folder where you want to save the test definition and results.
TIP Selecting a location is optional, but it is highly recommended. Storing test definitions and test results in a folder simplifies the tasks of setting permissions and transferring the test files.
4 Click , and select the input table for the test.
Note: If the input table contains a character column, and that column contains control characters in any row, do not use the table as input for publishing validation tests.
Note: If you are validating content that was published to SAS Micro Analytic Service, the time required to run the test depends on the number of worker threads on your system, the number of threads in the middle tier, and the network latency between CAS and the middle tier server. It is recommended that you select an input table with as few input records as needed to accurately test the published content. See SAS Micro Analytic Service: Programming and Administration Guide for more information.
5 (Optional) Expand the Advanced section, click , and select a different library to store the validation test output data.
6 Click Run to run the test. Alternatively, click Save to save the test definition without running it.
The status of the test is indicated by the icon in the Status column.
Icon Status
The test is not ready to run. You must edit the test and select an input data source.
The test is defined correctly and is ready to run.
The test is running.
The test completed successfully.
The test completed, but warnings were issued in the SAS log. The URI to the log file is shown on the Test Results page. See Step 14.
Publishing and Validating a Rule Set 31
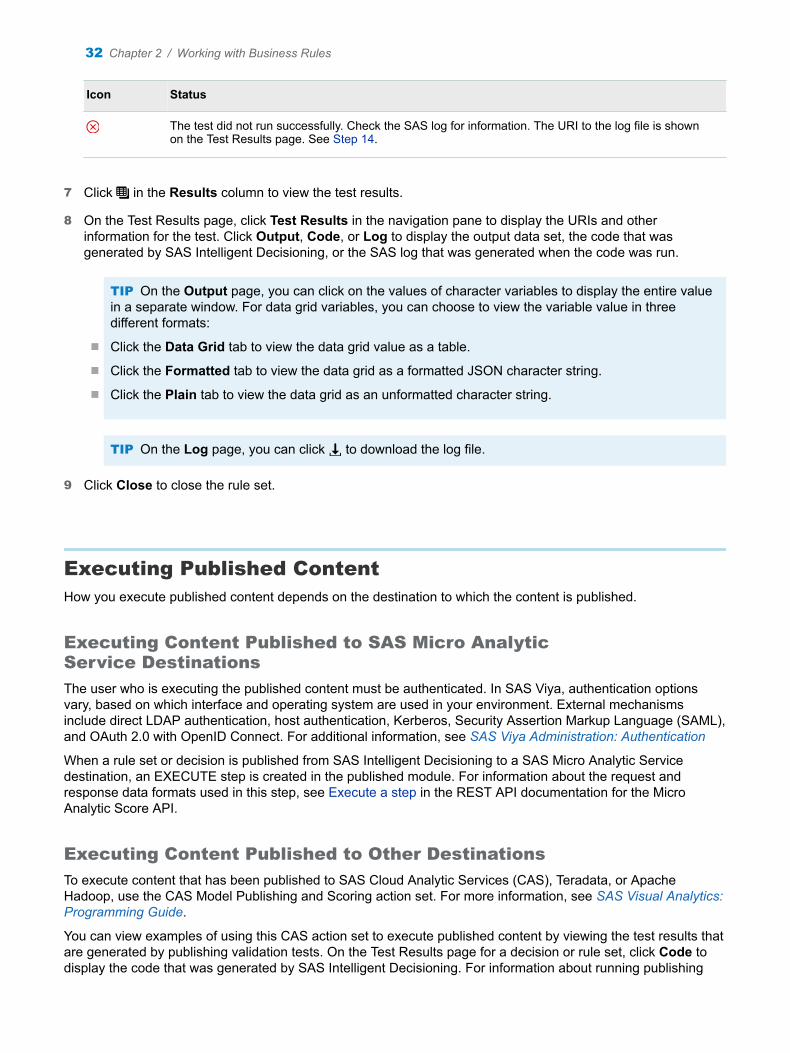
Icon Status
The test did not run successfully. Check the SAS log for information. The URI to the log file is shown on the Test Results page. See Step 14.
7 Click in the Results column to view the test results.
8 On the Test Results page, click Test Results in the navigation pane to display the URIs and other information for the test. Click Output, Code, or Log to display the output data set, the code that was generated by SAS Intelligent Decisioning, or the SAS log that was generated when the code was run.
TIP On the Output page, you can click on the values of character variables to display the entire value in a separate window. For data grid variables, you can choose to view the variable value in three different formats:
n Click the Data Grid tab to view the data grid value as a table.
n Click the Formatted tab to view the data grid as a formatted JSON character string.
n Click the Plain tab to view the data grid as an unformatted character string.
TIP On the Log page, you can click to download the log file.
9 Click Close to close the rule set.
Executing Published ContentHow you execute published content depends on the destination to which the content is published.
Executing Content Published to SAS Micro Analytic Service Destinations
The user who is executing the published content must be authenticated. In SAS Viya, authentication options vary, based on which interface and operating system are used in your environment. External mechanisms include direct LDAP authentication, host authentication, Kerberos, Security Assertion Markup Language (SAML), and OAuth 2.0 with OpenID Connect. For additional information, see SAS Viya Administration: Authentication
When a rule set or decision is published from SAS Intelligent Decisioning to a SAS Micro Analytic Service destination, an EXECUTE step is created in the published module. For information about the request and response data formats used in this step, see Execute a step in the REST API documentation for the Micro Analytic Score API.
Executing Content Published to Other Destinations
To execute content that has been published to SAS Cloud Analytic Services (CAS), Teradata, or Apache Hadoop, use the CAS Model Publishing and Scoring action set. For more information, see SAS Visual Analytics: Programming Guide.
You can view examples of using this CAS action set to execute published content by viewing the test results that are generated by publishing validation tests. On the Test Results page for a decision or rule set, click Code to display the code that was generated by SAS Intelligent Decisioning. For information about running publishing
32 Chapter 2 / Working with Business Rules
validation tests and viewing the results, see “Validate a Published Decision” on page 84 and “Validate a Published Rule Set” on page 31.
Content Executed by Published Decisions
When you publish a decision to a SAS Micro Analytic Service destination, all of the published decision’s content (the SAS Micro Analytic Service module) is locked except treatment groups. Updates to rule sets, models, lookup tables, or custom code files that are used in the decision do not affect the published module. If a treatment group is updated and the updated version is activated, that updated version is used by the published module.
When you publish a decision to a CAS, Teradata, or Hadoop destination, all of the published decision’s content, including treatment groups, is locked. Updates to the objects used in the decision are not used by the published module.
Importing and Exporting Rule SetsYou can import rule sets from and export rule sets to comma-delimited (CSV) files. The format of the CSV file is the same format that is used by the %DCM_IMPORT_RULESET macro. For more information, see “Format of Rule Set CSV Input File” in SAS Intelligent Decisioning: Macro Guide.
Note: If you do not need to edit content as a CSV file, you should use the SAS transfer service to import and export content. For information about the transfer service, see “Promotion: How to Import (Command-Line Interface)” in SAS Viya Administration: Promotion (Import and Export).
Import a Rule Set
Important: If you import rules from a CSV file into a rule set that already contains rules, the existing rules are replaced with the rules that are defined in the CSV file. To avoid replacing existing rules, create a new empty rule set, and then import the contents of the CSV file into the empty rule set. To append rules to a rule set, you can export the rule set, add content to the CSV file, and then re-import the CSV file.
1 Open the rule set into which you want to import new rules.
2 Click Import. The Import Rule Set window appears.
3 Click , and select the CSV file that you want to import.
4 Select the encoding of the CSV file, and click Import.
Export a Rule Set
Important: Do not modify the file structure or the header row in the exported CSV file. You can modify the data values.
To export a rule set, open the rule set and click Export. The table is exported into a CSV file, and a notification appears in the download bar at the bottom of the browser window.
Importing and Exporting Rule Sets 33

34 Chapter 2 / Working with Business Rules

3Working with Treatments and Treatment Groups
About Treatments and Decisions . . . . . . . . . . . . . . . . . . . . . . . . . . . . . . . . . . . . . . . . . . . . . . . . . . . . . . . . . . . . . . 36
Example: A Decision that Includes a Treatment Group . . . . . . . . . . . . . . . . . . . . . . . . . . . . . . . . . . . . . . . . 36Example Decision that Uses Treatments . . . . . . . . . . . . . . . . . . . . . . . . . . . . . . . . . . . . . . . . . . . . . . . . . . . . . . 37
About Attributes, Eligibility Rules, and Effective Dates . . . . . . . . . . . . . . . . . . . . . . . . . . . . . . . . . . . . . . . . 38Attributes and Attribute Aliases . . . . . . . . . . . . . . . . . . . . . . . . . . . . . . . . . . . . . . . . . . . . . . . . . . . . . . . . . . . . . . 38Eligibility Rules . . . . . . . . . . . . . . . . . . . . . . . . . . . . . . . . . . . . . . . . . . . . . . . . . . . . . . . . . . . . . . . . . . . . . . . . . . . . . 39Effective Dates . . . . . . . . . . . . . . . . . . . . . . . . . . . . . . . . . . . . . . . . . . . . . . . . . . . . . . . . . . . . . . . . . . . . . . . . . . . . . 39
Arbitrating Treatments . . . . . . . . . . . . . . . . . . . . . . . . . . . . . . . . . . . . . . . . . . . . . . . . . . . . . . . . . . . . . . . . . . . . . . . . 39
About Channels . . . . . . . . . . . . . . . . . . . . . . . . . . . . . . . . . . . . . . . . . . . . . . . . . . . . . . . . . . . . . . . . . . . . . . . . . . . . . . . 39
Define a Treatment . . . . . . . . . . . . . . . . . . . . . . . . . . . . . . . . . . . . . . . . . . . . . . . . . . . . . . . . . . . . . . . . . . . . . . . . . . . . 40
Define a Treatment Group . . . . . . . . . . . . . . . . . . . . . . . . . . . . . . . . . . . . . . . . . . . . . . . . . . . . . . . . . . . . . . . . . . . . . 41
Activate a Treatment Group . . . . . . . . . . . . . . . . . . . . . . . . . . . . . . . . . . . . . . . . . . . . . . . . . . . . . . . . . . . . . . . . . . . 42
Managing Attributes and Aliases . . . . . . . . . . . . . . . . . . . . . . . . . . . . . . . . . . . . . . . . . . . . . . . . . . . . . . . . . . . . . . 42Delete Attributes from a Treatment . . . . . . . . . . . . . . . . . . . . . . . . . . . . . . . . . . . . . . . . . . . . . . . . . . . . . . . . . . . 43View Attribute Aliases . . . . . . . . . . . . . . . . . . . . . . . . . . . . . . . . . . . . . . . . . . . . . . . . . . . . . . . . . . . . . . . . . . . . . . . 43Remove an Attribute Alias from a Treatment Group . . . . . . . . . . . . . . . . . . . . . . . . . . . . . . . . . . . . . . . . . . . 43
Delete Treatments from a Treatment Group . . . . . . . . . . . . . . . . . . . . . . . . . . . . . . . . . . . . . . . . . . . . . . . . . . . 43
Managing Eligibility Rules for a Treatment . . . . . . . . . . . . . . . . . . . . . . . . . . . . . . . . . . . . . . . . . . . . . . . . . . . . 43Remove Eligibility Rule Set from a Treatment . . . . . . . . . . . . . . . . . . . . . . . . . . . . . . . . . . . . . . . . . . . . . . . . . 43Change the Eligibility Rule Set for a Treatment . . . . . . . . . . . . . . . . . . . . . . . . . . . . . . . . . . . . . . . . . . . . . . . . 43
Managing Treatments and Treatment Groups . . . . . . . . . . . . . . . . . . . . . . . . . . . . . . . . . . . . . . . . . . . . . . . . . 44Duplicate Treatments or Treatment Groups . . . . . . . . . . . . . . . . . . . . . . . . . . . . . . . . . . . . . . . . . . . . . . . . . . . 44Delete Treatments or Treatment Groups . . . . . . . . . . . . . . . . . . . . . . . . . . . . . . . . . . . . . . . . . . . . . . . . . . . . . . 44Rename a Treatment or Treatment Group . . . . . . . . . . . . . . . . . . . . . . . . . . . . . . . . . . . . . . . . . . . . . . . . . . . . 44Move Treatments or Treatment Groups to a Different Folder . . . . . . . . . . . . . . . . . . . . . . . . . . . . . . . . . . . 44
Managing Versions of Treatments and Treatment Groups . . . . . . . . . . . . . . . . . . . . . . . . . . . . . . . . . . . . . 45Set the Displayed Version . . . . . . . . . . . . . . . . . . . . . . . . . . . . . . . . . . . . . . . . . . . . . . . . . . . . . . . . . . . . . . . . . . . 45Create a New Version . . . . . . . . . . . . . . . . . . . . . . . . . . . . . . . . . . . . . . . . . . . . . . . . . . . . . . . . . . . . . . . . . . . . . . . 45
35
About Treatments and Decisions
In SAS Intelligent Decisioning, you use treatments to define offers that you might want to present to subjects that contact your company as a result of an inbound marketing campaign.
In an inbound marketing campaign, a subject initiates contact with a company through a specific channel such as email, a website, or a phone call. A subject can be an individual customer, a company account, a household, or other entity. Depending on the channel, an application or website captures the subject’s behavior or a human representative enters the subject’s information into a form or a customer service application.
The subject usually has an identification number (a subject ID). The customer service application or other calling application uses the subject ID to send a request to SAS Intelligent Decisioning that invokes a decision. The decision typically performs the following tasks:
1 Uses the subject ID to issue a web service call or to query the company database in order to retrieve additional customer data, such as name, address, and household income, if such information exists.
2 Determines the set of offers for which the subject qualifies.
3 Arbitrates the set of offers to determine which ones the subject is most likely to respond to.
4 Generates a response tracking code and subject contact history data. The subject contact history data typically includes the set of offers from step 2.
5 Returns to the calling application the response tracking code and the set of offers for which the subject qualifies.
At this point, the calling application or a customer service representative can present the offers to the customer. The calling application can use the response tracking code to update the subject contact history data. For example, it can record which treatments are presented to the customer and the subject’s response to the treatments.
“Example: A Decision that Includes a Treatment Group” on page 36 shows how to accomplish the tasks listed above by using a decision in SAS Intelligent Decisioning.
Example: A Decision that Includes a Treatment Group
Figure 3.1 shows a basic decision that defines offers, arbitrates these offers, and updates the subject contact history. This example contains only one treatment group and one record contacts node, but decisions can include multiple treatment groups and record contacts nodes.
36 Chapter 3 / Working with Treatments and Treatment Groups

Figure 3.1 Example Decision that Uses Treatments
This decision flow has the following elements:
1 The SQL query node named Retrieve_Contact_Info queries the company database and retrieves additional information about the subject based on the subject ID. For example, if the treatment is an offer to upgrade the subject’s cell phone, the SQL query could retrieve the model number for the subject’s current phone, if that information is available. For more information, see “SQL Query Files” on page 59.
Nodes that retrieve additional information about the subject are typical but not required.
2 The treatment group name Combined_Treatments_Final defines a set of treatments (offers) and includes rules that define who is eligible to receive the treatments. The decision uses the information about the subject and the eligibility rules to determine the treatments for which the subject qualifies.
You can include as many treatment groups in a decision as necessary. Each treatment group in a decision creates a data grid that contains a row for each treatment for which the subject qualifies. You can merge the data grids into a single data grid if needed.
For more information, see the following topics:
n “About Attributes, Eligibility Rules, and Effective Dates” on page 38
n “About Channels” on page 39
n SAS Intelligent Decisioning: Using Data Grids
Example: A Decision that Includes a Treatment Group 37
3 The model AggregatePromoPrediction and the rule set ArbitrationRules arbitrate the treatments. For example, the subject might qualify for several treatments, but you might want to offer them only the two treatments that they are most likely to accept. You might also want to return only the treatments that are appropriate for the channel.
n The model calculates a probability for each treatment (each row in the data grid) that indicates how likely the subject is to respond to the treatment.
n The rule set uses the DATAGRID_TOPN function to sort the treatment data grid based on the values of the probability column. The function returns the top two treatments to which the subject is most likely to respond. See “DATAGRID_TOPN” in SAS Intelligent Decisioning: Using Data Grids for more information.
You can use rule sets, scoring models, attribute values, or other methods to arbitrate treatments. For more information, see “Arbitrating Treatments” on page 39.
4 The record contacts node records information that you want to track, such as the treatments that are returned to the calling application and whether the record is used in generating aggregate reports for the channel. You can also specify variable values to track.
In real-time destinations (SAS Micro Analytic Service destinations), this node writes a record to the subject contact history. In all other destinations (SAS Cloud Analytic Services [CAS], Teradata, and Apache Hadoop), this node creates an output variable that contains the information that you specify that you want to track.
Record contacts nodes also create a response tracking code that the calling application can use to add additional information to the subject contact history.
TIP You can use record contacts nodes to track variable values even if you are not using treatments.
For more information, see the following topics:
n “Add a Record Contacts Node” on page 68
n Subject Contacts REST API
About Attributes, Eligibility Rules, and Effective DatesA treatment defines the details of an offer that can be sent to a subject, who is eligible for the offer, and the dates during which the offer is available to be sent to a subject. A treatment is a set of attributes, eligibility rules, and effective dates.
Attributes and Attribute Aliases
Attributes are name-value pairs that define the specific details of the offer that you present to a subject. For example, for a treatment that gives subjects a 20% discount, you could define an attribute named DISCOUNT that has the value 20. To give subjects a special deal on a specific cell phone model, you can define an attribute named MODEL whose value is the specific model name. You could use treatment attributes to set values such as profitability, risk, cost, priority, or order. You can use the values of these attributes to arbitrate the treatments. For more information, see “Arbitrating Treatments” on page 39.
An attribute can be dynamic or fixed. You can customize dynamic attributes for each treatment group in which a particular treatment is included. See Define Treatment Attributes on page 40 for more information.
You can assign aliases to attributes. An alias is an alternative name that you can assign to a treatment attribute after you add the treatment to a treatment group. Aliases are useful when attributes in different treatments within the group represent the same data but are defined with different names. For example, treatment A could define an attribute named DISCOUNT, and treatment B could define an attribute named DISC. Assuming that these
38 Chapter 3 / Working with Treatments and Treatment Groups

two attributes represent the same value, you can assign an alias to one or both of the attributes. An attribute can have only one alias.
Eligibility Rules
Eligibility rules define who is eligible to receive the offer defined by the treatment. For example, your campaign can target people who already have a specific credit card and who are at least 30 years old, or people who own a home but who do not have a home equity line of credit. You define eligibility rules in the eligibility rule set. An eligibility rule set is a filtering rule set. For more information, see “About Rules, Assignment Rule Sets, and Filtering Rule Sets” on page 6.
Effective Dates
The effective dates for a treatment are the start and end dates when the treatment is active, that is, when it can be returned to a subject. Responses that are defined by a treatment are not returned to subjects outside of the effective dates. Effective dates are not required. A treatment that does not have effective dates is considered to always be active.
Note: The effective dates are always based on the time zone of the server where the decision is executed.
Arbitrating Treatments
You can determine which treatments a subject is most likely to respond to by using one or more of the following methods:
n use filtering rule sets to select only certain records for processing. Only the records whose conditions evaluate to True are processed by the remaining objects in the decision. For more information, see “About Rules, Assignment Rule Sets, and Filtering Rule Sets” on page 6.
Note: Filtering rule sets can be included directly in a decision, but they are also used as the eligibility rule set in treatments.
n use models to score treatments. For example, you might have a model that calculates propensity scores for individual treatments.
n use data grid functions to sort or subset the treatments according to the values of their attributes. For example, you could have attributes for value, profitability, or risk. For more information, see “Data Grid Functions” in SAS Intelligent Decisioning: Using Data Grids.
n use DS2 code files to create custom code for arbitrating the treatments. For more information, see “Using Custom Code Files” on page 55.
About Channels
Channels are routes by which your company and a subject are in contact. Typical channels are email, phone call, and website. A default set of channels is defined in the Treatment Channels lookup table. Your administrator can customize this lookup table for your enterprise. You can use this lookup table in rules to narrow the list of offers to ones that are appropriate for the channel. See “Predefined Lookup Tables” on page 48 for more information.
You can create assignment rules to determine the channel through which your company and a subject are in contact if the channel was not specified in the original request.
About Channels 39
Define a Treatment
Create a New Treatment
1 Click , and then click New Treatment. The New Treatment window appears.
2 Enter a name for the treatment.
3 (Optional) Enter a description for the treatment.
TIP You can edit the description at any time on the Properties tab.
4 Click , and select the folder where you want to save the treatment.
5 Click Save to save the treatment. SAS Intelligent Decisioning opens the new treatment and displays the Attributes tab.
Define Treatment Attributes
A treatment can have zero or more attributes. For more information about attributes, see “About Attributes, Eligibility Rules, and Effective Dates” on page 38.
6 On the Attributes tab, click Add Attribute or click . The Add Attribute window appears.
7 Complete these steps for each attribute:
a Enter a name for the attribute.
b (Optional) Enter a description for the attribute.
c Select the data type for the attribute.
d Select Fixed or Dynamic, depending on how the attribute’s value will be set.
DynamicThe value of a dynamic attribute can be set by the decision at run-time. When you define a dynamic attribute, you can specify a default value for the attribute. Within each treatment group in which the attribute appears, you can specify that the attribute’s value is set by the decision at run time, or you can set a static value that is used only within that specific treatment group.
FixedYou define the value or set of values for fixed attributes when you define the attribute. The values cannot be customized in treatment groups.
e Specify the value or values for the attribute.
n For dynamic attributes, you can specify only a single value. This value is used as the default value if the attribute’s value is not customized in treatment groups.
n For fixed attributes, you can specify a single value or a list of values. Check the List of values check box to specify a list of possible values for the attribute. In the Value field, press Enter after each specific value.
f Click Insert to add the attribute to the table.
8 Click OK to save the attributes.
40 Chapter 3 / Working with Treatments and Treatment Groups

Specify Eligibility Rules
You specify eligibility rules in a filtering rule set. See “About Rules, Assignment Rule Sets, and Filtering Rule Sets” on page 6 for more information.
9 On the Eligibility Rule Set tab, click Add Rule Set. The Select Rule Set window appears.
10 Select the filtering rule set that you want to use as the eligibility rule set for the treatment, and click OK.
11 At the top of the Eligibility Rule Set tab, select the version of the eligibility rule set that you want to use.
TIP You can view or edit an eligibility rule set from the Eligibility Rule Set tab by clicking Open.
(Optional) Specify Effective Dates
12 On the Properties tab, select the Start date and End date for the period in which the treatment can be sent to a subject. If you do not specify effective dates, the treatment is considered as always active.
Note: The effective dates are always based on the time zone of the server where the decision is executed.
Define a Treatment Group
Create a New Treatment Group
1 Click , and then click New Treatment Group. The New Treatment Group window appears.
2 Enter a name for the treatment group.
3 (Optional) Enter a description for the treatment group.
TIP You can edit the description at any time on the Properties tab.
4 Click , and select the folder where you want to save the treatment group.
5 Click Save to save the treatment group. SAS Intelligent Decisioning opens the new treatment group and displays the Treatments tab.
Add Treatments
6 On the Treatments tab, click Add Treatments. The Add Treatments window appears.
7 Select the treatments that you want to add to the treatment group, and click OK.
TIP After you add a treatment to a treatment group, the variables in the eligibility rule set are added to the list of eligibility variables for the treatment group. You can view the eligibility variables for a treatment group on the Eligibility Variables tab.
8 (Optional) Select the version of each treatment that you want to use in the treatment group.
Customize Dynamic Treatment Attributes
For information about dynamic and fixed attributes, see Define Treatment Attributes on page 40.
9 On the Treatments tab, click Set Attributes. The Set Attributes window appears. By default, dynamic attributes are automatically selected, and their values are set at run-time by the decision flow.
Define a Treatment Group 41
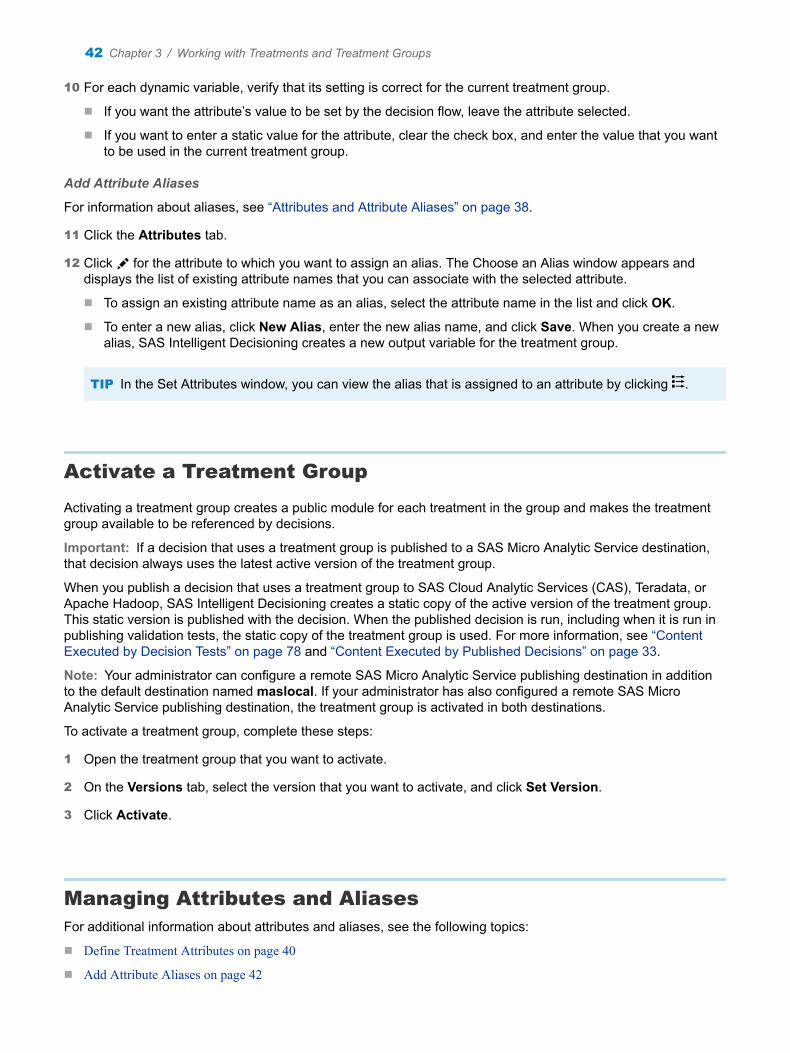
10 For each dynamic variable, verify that its setting is correct for the current treatment group.
n If you want the attribute’s value to be set by the decision flow, leave the attribute selected.
n If you want to enter a static value for the attribute, clear the check box, and enter the value that you want to be used in the current treatment group.
Add Attribute Aliases
For information about aliases, see “Attributes and Attribute Aliases” on page 38.
11 Click the Attributes tab.
12 Click for the attribute to which you want to assign an alias. The Choose an Alias window appears and displays the list of existing attribute names that you can associate with the selected attribute.
n To assign an existing attribute name as an alias, select the attribute name in the list and click OK.
n To enter a new alias, click New Alias, enter the new alias name, and click Save. When you create a new alias, SAS Intelligent Decisioning creates a new output variable for the treatment group.
TIP In the Set Attributes window, you can view the alias that is assigned to an attribute by clicking .
Activate a Treatment Group
Activating a treatment group creates a public module for each treatment in the group and makes the treatment group available to be referenced by decisions.
Important: If a decision that uses a treatment group is published to a SAS Micro Analytic Service destination, that decision always uses the latest active version of the treatment group.
When you publish a decision that uses a treatment group to SAS Cloud Analytic Services (CAS), Teradata, or Apache Hadoop, SAS Intelligent Decisioning creates a static copy of the active version of the treatment group. This static version is published with the decision. When the published decision is run, including when it is run in publishing validation tests, the static copy of the treatment group is used. For more information, see “Content Executed by Decision Tests” on page 78 and “Content Executed by Published Decisions” on page 33.
Note: Your administrator can configure a remote SAS Micro Analytic Service publishing destination in addition to the default destination named maslocal. If your administrator has also configured a remote SAS Micro Analytic Service publishing destination, the treatment group is activated in both destinations.
To activate a treatment group, complete these steps:
1 Open the treatment group that you want to activate.
2 On the Versions tab, select the version that you want to activate, and click Set Version.
3 Click Activate.
Managing Attributes and AliasesFor additional information about attributes and aliases, see the following topics:
n Define Treatment Attributes on page 40
n Add Attribute Aliases on page 42
42 Chapter 3 / Working with Treatments and Treatment Groups

n Customize Dynamic Treatment Attributes on page 41
Delete Attributes from a Treatment
On the Attributes tab of a treatment, select the attribute that you want to delete, and click .
View Attribute Aliases
You can view the aliases that are associated with each attribute on the Attributes tab of a treatment group. In the Set Attributes window, click to view the aliases for a specific attribute.
Remove an Attribute Alias from a Treatment Group
On the Attributes tab of a treatment group, select the attributes whose aliases you want to delete, click , and select Remove alias.
Delete Treatments from a Treatment Group
On the Treatments tab of the treatment group, select the treatments that you want to remove from the group, click , and select Delete.
Managing Eligibility Rules for a TreatmentFor additional information about eligibility rules, see “About Attributes, Eligibility Rules, and Effective Dates” on page 38 and Specify Eligibility Rules on page 41.
Remove Eligibility Rule Set from a Treatment
On the Eligibility Rule Set tab of a treatment, click Remove.
Change the Eligibility Rule Set for a Treatment
1 On the Eligibility Rule Set tab of a treatment, click Replace. The Select Rule Set window appears.
2 Select the filtering rule set that you want to use as the eligibility rule set for the treatment, and click OK.
3 At the top of the Eligibility Rule Set tab, select the version of the eligibility rule set that you want to use.
TIP You can view or edit an eligibility rule set on the Eligibility Rule Set tab by clicking Open.
Managing Eligibility Rules for a Treatment 43

Managing Treatments and Treatment Groups
Duplicate Treatments or Treatment Groups
Note: You cannot duplicate a treatment or treatment group if it is open.
To duplicate a single treatment or treatment group:
1 Click or , and select the treatment or treatment group that you want to duplicate.
2 Click and select Duplicate. The Duplicate Treatment window appears.
3 Enter a new name for the duplicate treatment or treatment group.
4 (Optional) Enter a description for the treatment or treatment group.
5 Click Duplicate.
To duplicate multiple treatments or treatment groups:
1 Click or , and select the treatments or treatment groups that you want to duplicate.
2 Click and select Duplicate. SAS Intelligent Decisioning duplicates the treatments or treatment groups and appends _Copy to the names of the duplicate copies. If needed, a number is also appended to the names of the duplicate copies.
Delete Treatments or Treatment Groups
Note: You cannot delete a treatment or treatment group if it is open.
1 Click or , and select the treatments or treatment groups that you want to delete.
2 Click , and select Delete.
Rename a Treatment or Treatment Group
Note: You cannot rename a treatment or treatment group if it is open.
1 Click or , and select the treatment or treatment group that you want to rename.
2 Click , and select Rename.
3 Enter a new name for the treatment or treatment group, and click Rename.
Move Treatments or Treatment Groups to a Different Folder
1 Click or , and select the treatments or treatment groups that you want to move.
2 Click and select Move. The Choose a Location window appears.
3 Select the location to which you want to move the treatments or treatment groups, and click OK.
44 Chapter 3 / Working with Treatments and Treatment Groups
Managing Versions of Treatments and Treatment GroupsTo change the version of a treatment that is used in a treatment group, open the treatment group, and select the new version number on the Treatments tab.
Set the Displayed Version
The displayed version is the version whose information is displayed on the other tabs, such as the Properties and Attributes tabs. On the Versions tab, a indicates the displayed version. To change the displayed version, select the version that you want to view, and click Set Version. The displayed version is shown in the title bar.
Create a New Version
Note: The current version of an object is the version with the highest version number. When you create a new version, SAS Intelligent Decisioning locks the current version before it creates the new version.
Note: You cannot save changes to a version that is locked. If you modify a version that is locked and click , SAS Intelligent Decisioning asks you if you want to replace the current unlocked version with your edited version.
Important: You cannot unlock a locked version.
To create a new version:
1 On the Versions tab, click New Version. The New Version window appears.
2 Select the version type: Minor or Major. Version numbers follow the format Major.Minor. If you select Major, the number to the left of the period is incremented. If you select Minor, the number to the right of the period is incremented.
3 (Optional) Enter information about the new version in the Notes field.
TIP You can edit these notes at any time on the Versions tab.
4 Click Save.
Managing Versions of Treatments and Treatment Groups 45

46 Chapter 3 / Working with Treatments and Treatment Groups

4Using Lookup Tables and Functions
About Lookup Tables and Functions . . . . . . . . . . . . . . . . . . . . . . . . . . . . . . . . . . . . . . . . . . . . . . . . . . . . . . . . . . 47CSV File Imported Into SAS Intelligent Decisioning . . . . . . . . . . . . . . . . . . . . . . . . . . . . . . . . . . . . . . . . . . . . 48
Predefined Lookup Tables . . . . . . . . . . . . . . . . . . . . . . . . . . . . . . . . . . . . . . . . . . . . . . . . . . . . . . . . . . . . . . . . . . . . 48
Create a New Lookup Table . . . . . . . . . . . . . . . . . . . . . . . . . . . . . . . . . . . . . . . . . . . . . . . . . . . . . . . . . . . . . . . . . . . 48
Importing And Exporting Lookup Tables . . . . . . . . . . . . . . . . . . . . . . . . . . . . . . . . . . . . . . . . . . . . . . . . . . . . . . 49Import or Refresh Lookup Tables . . . . . . . . . . . . . . . . . . . . . . . . . . . . . . . . . . . . . . . . . . . . . . . . . . . . . . . . . . . . . 49Export a Lookup Table . . . . . . . . . . . . . . . . . . . . . . . . . . . . . . . . . . . . . . . . . . . . . . . . . . . . . . . . . . . . . . . . . . . . . . 49
Add Lookup Table Entries . . . . . . . . . . . . . . . . . . . . . . . . . . . . . . . . . . . . . . . . . . . . . . . . . . . . . . . . . . . . . . . . . . . . . 49
Edit Lookup Table Entries . . . . . . . . . . . . . . . . . . . . . . . . . . . . . . . . . . . . . . . . . . . . . . . . . . . . . . . . . . . . . . . . . . . . . 50
Delete Lookup Table Entries . . . . . . . . . . . . . . . . . . . . . . . . . . . . . . . . . . . . . . . . . . . . . . . . . . . . . . . . . . . . . . . . . . 50
Copy a Lookup Table URL . . . . . . . . . . . . . . . . . . . . . . . . . . . . . . . . . . . . . . . . . . . . . . . . . . . . . . . . . . . . . . . . . . . . 50
Managing Lookup Tables . . . . . . . . . . . . . . . . . . . . . . . . . . . . . . . . . . . . . . . . . . . . . . . . . . . . . . . . . . . . . . . . . . . . . 50Duplicate Lookup Tables . . . . . . . . . . . . . . . . . . . . . . . . . . . . . . . . . . . . . . . . . . . . . . . . . . . . . . . . . . . . . . . . . . . . 50Delete Lookup Tables . . . . . . . . . . . . . . . . . . . . . . . . . . . . . . . . . . . . . . . . . . . . . . . . . . . . . . . . . . . . . . . . . . . . . . . 51Rename a Lookup Table . . . . . . . . . . . . . . . . . . . . . . . . . . . . . . . . . . . . . . . . . . . . . . . . . . . . . . . . . . . . . . . . . . . . 51Move Lookup Tables . . . . . . . . . . . . . . . . . . . . . . . . . . . . . . . . . . . . . . . . . . . . . . . . . . . . . . . . . . . . . . . . . . . . . . . . 51
Managing Versions of Lookup Tables . . . . . . . . . . . . . . . . . . . . . . . . . . . . . . . . . . . . . . . . . . . . . . . . . . . . . . . . . 51Set the Displayed Version . . . . . . . . . . . . . . . . . . . . . . . . . . . . . . . . . . . . . . . . . . . . . . . . . . . . . . . . . . . . . . . . . . . 51Create a New Version . . . . . . . . . . . . . . . . . . . . . . . . . . . . . . . . . . . . . . . . . . . . . . . . . . . . . . . . . . . . . . . . . . . . . . . 51
Activate a Lookup Table . . . . . . . . . . . . . . . . . . . . . . . . . . . . . . . . . . . . . . . . . . . . . . . . . . . . . . . . . . . . . . . . . . . . . . 52
LOOKUP Function . . . . . . . . . . . . . . . . . . . . . . . . . . . . . . . . . . . . . . . . . . . . . . . . . . . . . . . . . . . . . . . . . . . . . . . . . . . . 52
LOOKUPVALUE Function . . . . . . . . . . . . . . . . . . . . . . . . . . . . . . . . . . . . . . . . . . . . . . . . . . . . . . . . . . . . . . . . . . . . . 53
About Lookup Tables and Functions
SAS Intelligent Decisioning provides the ability to import lookup tables and reference them from rules. Lookup tables are tables of key-value pairs. For example, you can use a lookup table to retrieve a part name based on the code number of the part or to retrieve the full name for a country based on its abbreviation.
You can import lookup data from comma-separated-values (CSV) files, such as those created by spreadsheet applications, into lookup tables in SAS Intelligent Decisioning. You can re-import updated CSV files as needed to refresh the lookup tables.
Note: SAS Intelligent Decisioning does not support CSV files that contain signature lines.
47

Figure 4.1 CSV File Imported Into SAS Intelligent Decisioning
In a lookup table, each lookup key is associated with a lookup value. Lookup keys must be unique within each lookup table.
SAS Intelligent Decisioning provides two functions, LOOKUP and LOOKUPVALUE, that enable you to determine whether a lookup key exists in a lookup table and to retrieve a lookup value from a lookup table.
Predefined Lookup Tables
SAS Intelligent Decisioning defines two lookup tables for you:
Treatment Channelsdefines several channels for use with treatments. Channels are the route by which your company and a subject are in contact. The predefined channels include ATM, Agent, Call Center, Mail, Phone, and Web.
Subject Leveldefines subject levels for use with treatments. A subject level is the type of account that is associated with a subject. For example, a subject might be an individual customer, a company account, or a household. The predefined levels are Account, Customer, and Household.
Your administrator can modify these tables as described in “Edit Lookup Table Entries” on page 50.
Create a New Lookup Table
1 Click on the navigation bar.
2 Click New Lookup Table. The New Lookup Table window appears.
3 Enter a name for the new lookup table. Lookup table names are limited to 250 characters. Lookup table names are case insensitive and must be unique within the database.
4 (Optional) Enter a description for the new lookup table. Descriptions are limited to 1000 characters.
TIP To modify this description at any time, click next to the Description field on the Properties tab.
48 Chapter 4 / Using Lookup Tables and Functions

5 Click , select the folder where you want to create the new lookup table, and click Save. The application opens the new lookup table and displays the Lookup Table tab.
6 Add entries to the new table either by importing a CSV file or by adding entries manually. See “Import or Refresh Lookup Tables” on page 49 and “Add Lookup Table Entries” on page 49 for more information.
Importing And Exporting Lookup TablesYou can import lookup tables from and export lookup tables to comma-delimited (CSV) files. The format of the CSV file is the same format that is used by the %DCM_IMPORT_LOOKUP macro. For more information, see “Format of the Lookup CSV Input File” in SAS Intelligent Decisioning: Macro Guide.
Note: If you do not need to edit content as a CSV file, you should use the SAS transfer service to import and export content. For information about the transfer service, see “Promotion: How to Import (Command-Line Interface)” in SAS Viya Administration: Promotion (Import and Export).
Import or Refresh Lookup Tables
Note: It is recommended that a single lookup table contains no more than 5000 entries.
You can import entries into an empty table, and you can refresh an existing lookup table by re-importing the same table.
1 Open the lookup table to which you want to import entries.
2 Click Import. The Import Lookup Table window appears.
3 Click , and select the CSV file that contains the lookup table entries.
4 Select the encoding for the lookup table, and click Import.
Export a Lookup Table
Important: Do not modify the file structure or the header row in the exported CSV file. You can modify the data values.
To export a lookup table, open the lookup table and click Export. The table is exported into a CSV file, and a notification appears in the download bar at the bottom of the browser window.
Add Lookup Table Entries
Note: It is recommended that a single lookup table contains no more than 5000 entries.
TIP You cannot add new entries to a lookup table version that has been activated. In order to edit the table, you must create a new version.
1 Open the lookup table to which you want to add entries.
2 Click New Entries if the lookup table is empty, or click if the lookup table already contains entries. The Add Table Entries window appears.
Add Lookup Table Entries 49

3 Enter the lookup key name and value for the new entry. Key names and lookup values are each limited to 100 characters. Key names must be unique within the same lookup table.
To add additional entries, click Add an entry, and enter the new key name and value.
4 Click Save to save the new entries and close the Add Table Entries window.
Edit Lookup Table Entries
TIP You cannot edit entries in a lookup table version that has been activated. In order to edit the table, you must create a new version.
1 Open the lookup table.
2 Select the entries that you want to edit, and click . The Edit Table Entries window appears.
3 Edit the exiting entries, and click Save.
Delete Lookup Table Entries
1 Open the lookup table.
2 Select the entries that you want to delete and click .
Copy a Lookup Table URL
To create a link for external documentation that automatically opens a lookup table in SAS Intelligent Decisioning, complete these steps:
1 Open the lookup table.
2 Click , and select Copy object URL. The Copy Lookup URL window appears.
3 Click Copy, and then click Close.
Paste the link into your documentation.
Managing Lookup Tables
Duplicate Lookup Tables
Note: If you duplicate a lookup table that has an active version, the duplicate table is automatically activated.
To duplicate a single lookup table:
50 Chapter 4 / Using Lookup Tables and Functions

1 Select the table that you want to duplicate, click , and select Duplicate.
2 Enter a new name for the duplicate lookup table. Names are limited to 250 characters. Lookup table names are case insensitive and must be unique within the database.
3 (Optional) Enter a description for the duplicate table. Descriptions are limited to 1000 characters.
4 Click Duplicate.
To duplicate multiple lookup tables, select the tables that you want to duplicate, click , and select Duplicate. SAS Intelligent Decisioning appends an -Copy and a number (if needed) to the duplicate table names.
Delete Lookup Tables
Select the tables that you want to delete, click , and select Delete.
Rename a Lookup Table
1 Select the table that you want to rename, click , and select Rename. The Rename window appears.
2 Enter a new name for the table, and click Rename.
Move Lookup Tables
1 Select the tables that you want to move, click , and select Move. The Choose a Location window appears.
2 Select the folder where you want to move the tables, and click OK.
Managing Versions of Lookup Tables
Set the Displayed Version
The displayed version is the version whose information is displayed on the Properties and Lookup Table tabs. On the Versions tab, a indicates the displayed version. To change the displayed version, select the version that you want to view, and click Set Version. The displayed version is shown in the title bar.
Create a New Version
Note: Creating a new version of a lookup table does not lock the previous version. The only way to lock a lookup table is to activate it.
Note: You cannot save changes to a version that is locked. If you modify a version that is locked and click , SAS Intelligent Decisioning asks you if you want to replace the current unlocked version with your edited version.
Important: You cannot unlock a locked version.
To create a new version:
1 On the Versions tab, click New Version. The New Version window appears.
Managing Versions of Lookup Tables 51

2 Select the version type: Minor or Major. Version numbers follow the format Major.Minor. If you select Major, the number to the left of the period is incremented. If you select Minor, the number to the right of the period is incremented.
3 (Optional) Enter information about the new version in the Notes field.
TIP You can edit these notes at any time on the Versions tab.
4 Click Save.
Activate a Lookup Table
Important: The active version of a lookup table is the version that is used when you run a test for a rule set or decision that uses the lookup table. When you publish a rule set or decision, SAS Intelligent Decisioning creates a static copy of the active version of the lookup table. This static copy is published with the rule set or decision. When the published rule set or decision is run, including when they are run in a publishing validation test, the static copy of the lookup table is used.
Note: Activating a version of a lookup table locks that version. Locked tables cannot be unlocked. In order to edit the lookup entries, you must create a new version.
You must activate a lookup table before you can use it in a rule.
1 Open the lookup table that you want to activate.
2 On the Versions tab, select the version that you want to activate, and set it as the displayed version. See “Set the Displayed Version” on page 51 for more information.
TIP You can also activate a lookup table on the Properties tab. The displayed version is activated.
3 Click Activate.
LOOKUP Function
Determines whether a lookup key exists in a lookup table.
Restrictions:n You can specify the LOOKUP function in condition expressions only.
n If an expression contains the LOOKUP function, then the expression cannot contain anything else.
Returned data type:Boolean
Syntax
LOOKUP ('lookup_table_name', variable_or_value)
lookup_table_namespecifies the name of the lookup table that you want to search.
variable_or_valuespecifies either the literal key value or a variable that contains a lookup key value.
52 Chapter 4 / Using Lookup Tables and Functions

Example
Suppose you have a Country_Codes lookup table that uses two-letter abbreviations for countries as the lookup key and country names as the lookup values.
To verify that the value of the variable Cntry_Key exists as a lookup key in the table Country_Codes, you can use the following expression:
LOOKUP('Country_Codes',Cntry_Key)
If the value of Cntry_Key exists as a lookup key, the LOOKUP function returns the value True.
In the following rule, if the key specified by the variable Cntry_Key exists in the lookup table Country_Codes, then the value that is associated with that key is assigned to the variable Country_Name.
LOOKUPVALUE Function
Retrieves a lookup value from a lookup table.
Restrictions:n You can specify the LOOKUPVALUE function only in action expressions.
n If an expression contains the LOOKUPVALUE function, then the expression cannot contain anything else.
Returned data type:Lookup tables are stored as character data. However, you can assign the results of the LOOKUPVALUE function to the following types of variables: Character, Integer, Decimal, Date, Datetime, or Boolean. The LOOKUPVALUE function converts the results to match the type of the variable.
Syntax
LOOKUPVALUE ('lookup_table_name', variable_or_value)
lookup_table_namespecifies the name of the lookup table that you want to search.
variable_or_valuespecifies either the literal key value or a variable that contains the lookup key value.
Example
Suppose you have a Country_Codes lookup table that uses two-letter abbreviations for countries as the lookup key and country names as the lookup values. The Country_Codes lookup table contains the lookup key CA, and the lookup value that corresponds to that key is Canada.
LOOKUPVALUE Function 53
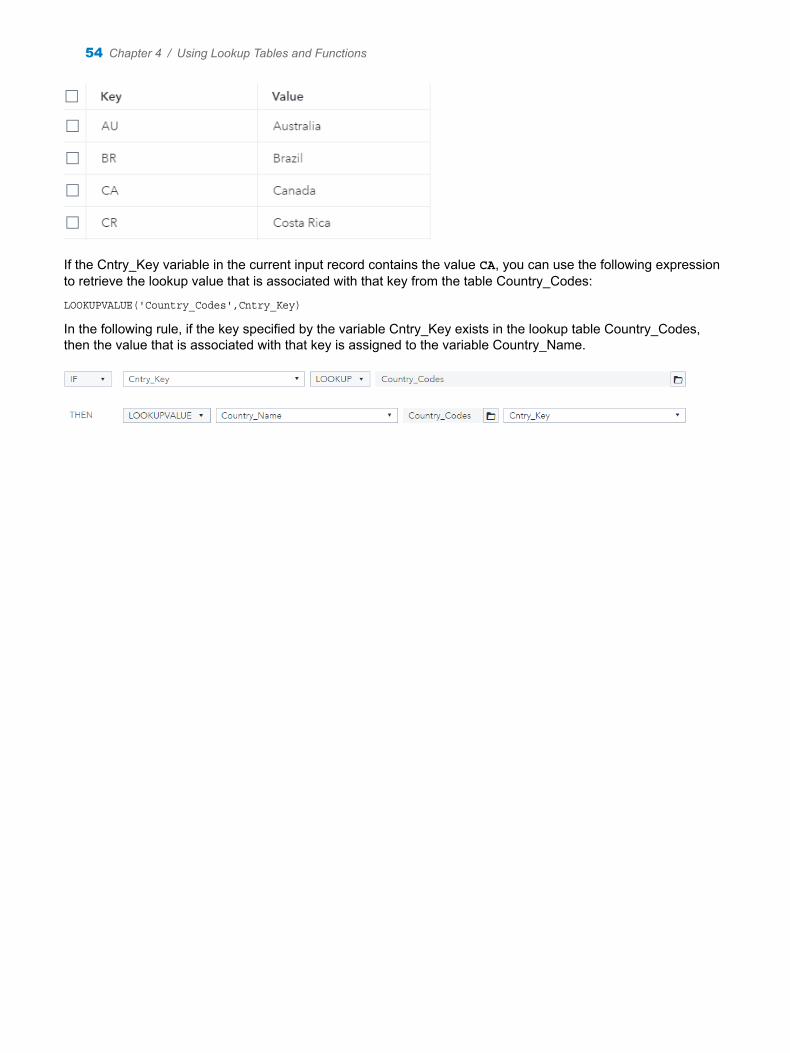
If the Cntry_Key variable in the current input record contains the value CA, you can use the following expression to retrieve the lookup value that is associated with that key from the table Country_Codes:
LOOKUPVALUE('Country_Codes',Cntry_Key)
In the following rule, if the key specified by the variable Cntry_Key exists in the lookup table Country_Codes, then the value that is associated with that key is assigned to the variable Country_Name.
54 Chapter 4 / Using Lookup Tables and Functions
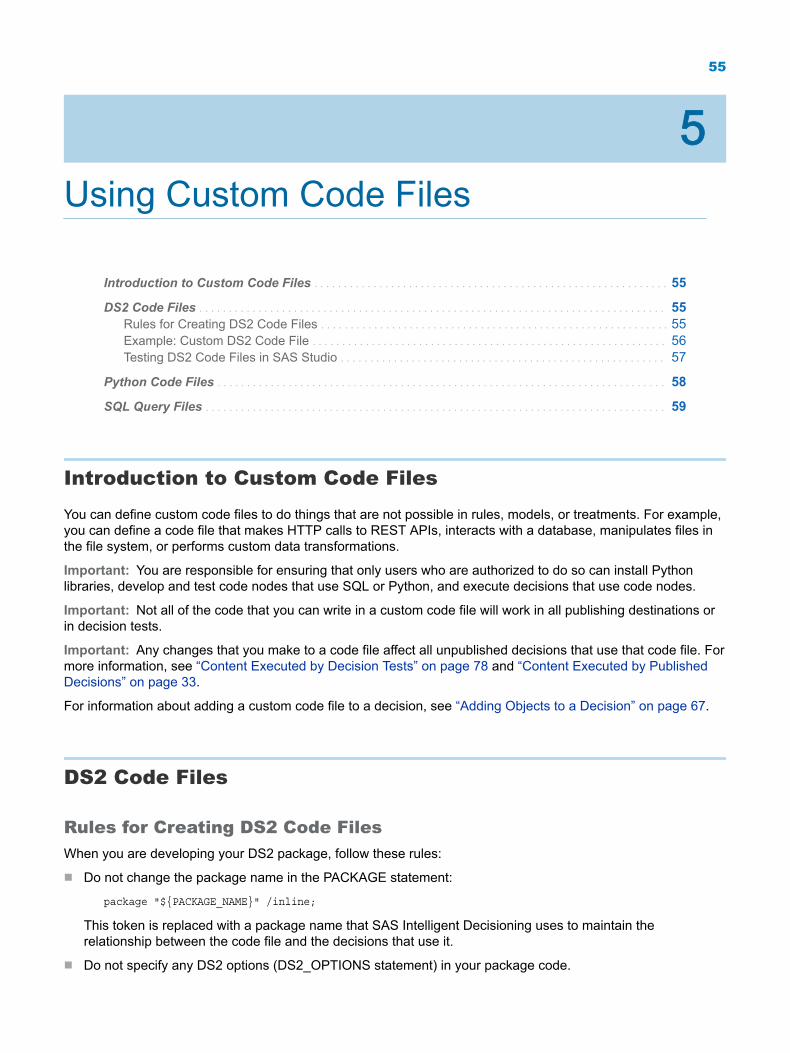
5Using Custom Code Files
Introduction to Custom Code Files . . . . . . . . . . . . . . . . . . . . . . . . . . . . . . . . . . . . . . . . . . . . . . . . . . . . . . . . . . . . 55
DS2 Code Files . . . . . . . . . . . . . . . . . . . . . . . . . . . . . . . . . . . . . . . . . . . . . . . . . . . . . . . . . . . . . . . . . . . . . . . . . . . . . . . 55Rules for Creating DS2 Code Files . . . . . . . . . . . . . . . . . . . . . . . . . . . . . . . . . . . . . . . . . . . . . . . . . . . . . . . . . . . 55Example: Custom DS2 Code File . . . . . . . . . . . . . . . . . . . . . . . . . . . . . . . . . . . . . . . . . . . . . . . . . . . . . . . . . . . . 56Testing DS2 Code Files in SAS Studio . . . . . . . . . . . . . . . . . . . . . . . . . . . . . . . . . . . . . . . . . . . . . . . . . . . . . . . 57
Python Code Files . . . . . . . . . . . . . . . . . . . . . . . . . . . . . . . . . . . . . . . . . . . . . . . . . . . . . . . . . . . . . . . . . . . . . . . . . . . . 58
SQL Query Files . . . . . . . . . . . . . . . . . . . . . . . . . . . . . . . . . . . . . . . . . . . . . . . . . . . . . . . . . . . . . . . . . . . . . . . . . . . . . . 59
Introduction to Custom Code Files
You can define custom code files to do things that are not possible in rules, models, or treatments. For example, you can define a code file that makes HTTP calls to REST APIs, interacts with a database, manipulates files in the file system, or performs custom data transformations.
Important: You are responsible for ensuring that only users who are authorized to do so can install Python libraries, develop and test code nodes that use SQL or Python, and execute decisions that use code nodes.
Important: Not all of the code that you can write in a custom code file will work in all publishing destinations or in decision tests.
Important: Any changes that you make to a code file affect all unpublished decisions that use that code file. For more information, see “Content Executed by Decision Tests” on page 78 and “Content Executed by Published Decisions” on page 33.
For information about adding a custom code file to a decision, see “Adding Objects to a Decision” on page 67.
DS2 Code Files
Rules for Creating DS2 Code Files
When you are developing your DS2 package, follow these rules:
n Do not change the package name in the PACKAGE statement:
package "${PACKAGE_NAME}" /inline;
This token is replaced with a package name that SAS Intelligent Decisioning uses to maintain the relationship between the code file and the decisions that use it.
n Do not specify any DS2 options (DS2_OPTIONS statement) in your package code.
55

n Custom DS2 code files in SAS Intelligent Decisioning support only three data types: double, varchar, and package dcm_datagrid. These data type names are case sensitive. List input-only parameters first. List input-output and output-only parameters next, using the in_out modifier. For example, the following lines define the variables LOAN, REASON, and ASSETS.
double "loan"IN_OUT varchar "reason"package dcm_datagrid "assets"
Note: Packages are input-output data types.
n Your package must define an EXECUTE method.
n The variables that you use as parameters for the EXECUTE method in your code must be defined as variables in your decision.
n If you use a DS2 SQLSTMT package in your code, do not run a publishing validation test in SAS Cloud Analytic Services (CAS). Instead, validate your logic in a SAS Micro Analytic Service destination. Use a published name that is not the same as the final name that you will use to publish your decision.
For information about developing DS2 packages, processing data grids, and the SAS APIs, see the following:
n SAS DS2 Programmer’s Guide
n SAS DS2 Language Reference
n SAS Intelligent Decisioning: Using Data Grids
n http://developer.sas.com
n “DS2 Programming for SAS Micro Analytic Service” in SAS Micro Analytic Service: Programming and Administration Guide
n “Best Practices for DS2 Programming in SAS Intelligent Decisioning” in SAS Micro Analytic Service: Programming and Administration Guide
Example: Custom DS2 Code File
The following DS2 package sends a request to the external API http://helloacm.com/api/fortune. This API returns a character string that contains escaped characters. The GETFORTUNE method uses the DS2 function TRANSTRN to modify these characters.
package "${PACKAGE_NAME}" /inline; dcl package http fortune_pkg(); dcl varchar(1048576) character set utf8 http_response; dcl int rc; dcl int getMethodDefined;
method execute(in_out varchar "fortune"); if missing(getMethodDefined) then do; /* establish GET method */ fortune_pkg.createGetMethod('http://helloacm.com/api/fortune'); "getMethodDefined" = 1; end;
"fortune" = 'Gloom and Doom'; /* default fortune */ fortune_pkg.executeMethod(); fortune_pkg.getResponseBodyAsString(http_response, rc); if (rc = 0) then do; /* clean up escaped characters in the response */ "fortune" = transtrn(http_response,'\n',' '); "fortune" = transtrn("fortune",'\t',' '); "fortune" = transtrn("fortune",'\"','"'); end;
56 Chapter 5 / Using Custom Code Files
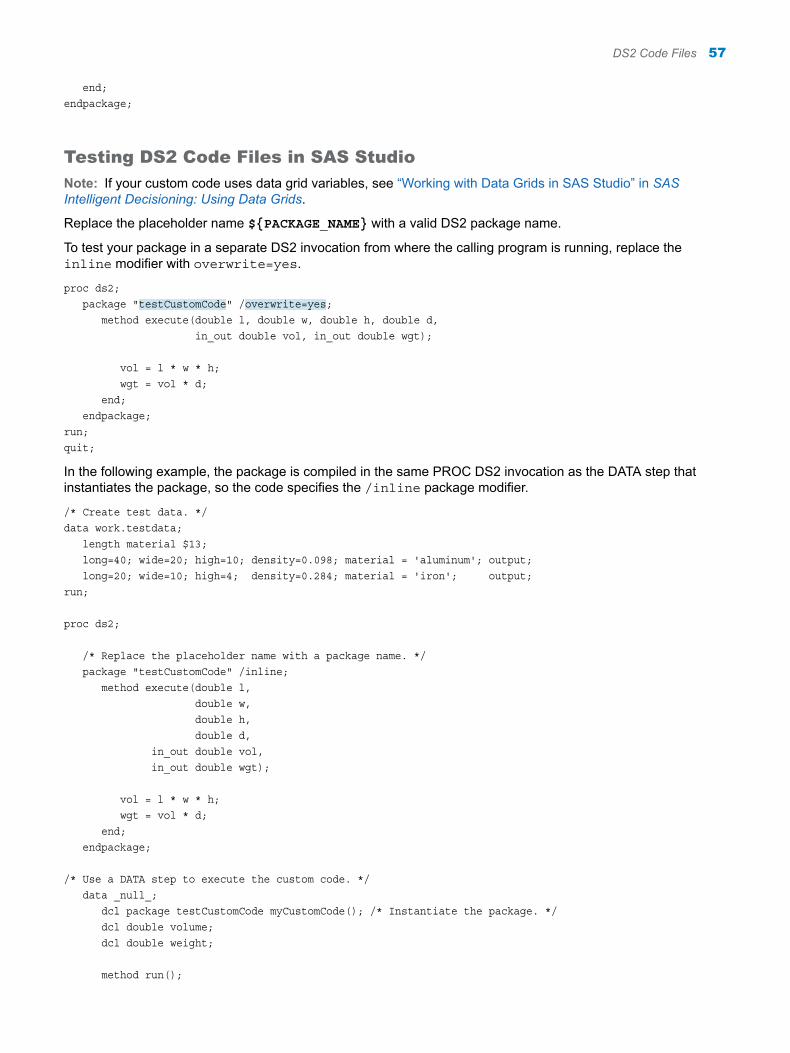
end;endpackage;
Testing DS2 Code Files in SAS Studio
Note: If your custom code uses data grid variables, see “Working with Data Grids in SAS Studio” in SAS Intelligent Decisioning: Using Data Grids.
Replace the placeholder name ${PACKAGE_NAME} with a valid DS2 package name.
To test your package in a separate DS2 invocation from where the calling program is running, replace the inline modifier with overwrite=yes.
proc ds2; package "testCustomCode" /overwrite=yes; method execute(double l, double w, double h, double d, in_out double vol, in_out double wgt);
vol = l * w * h; wgt = vol * d; end; endpackage;run; quit;
In the following example, the package is compiled in the same PROC DS2 invocation as the DATA step that instantiates the package, so the code specifies the /inline package modifier.
/* Create test data. */data work.testdata; length material $13; long=40; wide=20; high=10; density=0.098; material = 'aluminum'; output; long=20; wide=10; high=4; density=0.284; material = 'iron'; output;run;
proc ds2;
/* Replace the placeholder name with a package name. */ package "testCustomCode" /inline; method execute(double l, double w, double h, double d, in_out double vol, in_out double wgt);
vol = l * w * h; wgt = vol * d; end; endpackage;
/* Use a DATA step to execute the custom code. */ data _null_; dcl package testCustomCode myCustomCode(); /* Instantiate the package. */ dcl double volume; dcl double weight;
method run();
DS2 Code Files 57

/* Read in the variables long, wide, high, and density. */ set work.testdata(drop=(material)); volume = .; weight = .; myCustomCode.execute(long, wide, high, density, volume, weight); put _all_; end; enddata;run; quit;
Python Code Files
Important: You can publish decisions that contain Python code files only to SAS Micro Analytic Service and CAS destinations.
When you publish a decision that contains a Python code file, SAS Intelligent Decisioning generates a private DS2 PyMAS package. The package is assigned a random name. Your Python program is encapsulated inside a DS2 EXECUTE method. When the decision is executed, the DS2 process sends the Python program to a Python process to be executed.
When you are developing your Python code, follow these rules:
n Your Python code must define an EXECUTE function. This function is the only public function allowed.
n A docstring is required and must begin with Output:. This string must immediately follow the Python EXECUTE function declaration, and it must be indented within the EXECUTE function definition. In the docstring, list all of the output variables produced by the program. For example, if your program has two output variables named prediction and probability, your docstring would appear as follows:
'''Output: prediction, probability'''
n Optional input arguments to the Python EXECUTE function are not supported.
n You must specify the data types for the input and output variables for the EXECUTE function in your Python code on the Variables tab of the decision. The DS2 package code uses this information to resolve the data types for the variables. These variables are specified in the signature of the DS2 EXECUTE method. If you do not specify the variables on the Variables tab, SAS Intelligent Decisioning creates decision variables with a data type of Unknown. Before you can save the decision, you must edit the decision variables and correct the data types.
n The Python EXECUTE function must return standard Python data types. For more information, see “Return Values ” in SAS Micro Analytic Service: Programming and Administration Guide.
n You can import libraries and define other functions and classes that are used by the Python EXECUTE function.
n Test your Python code by using a Python interpreter that is outside of SAS Intelligent Decisioning before you incorporate your code into a decision.
After you test your code outside of SAS Intelligent Decisioning, incorporate it into a decision and test the decision. In order to run a test for a decision that contains a Python code file, you or an administrator must configure support for Python. See “Configuring Support for Python Code Files” in SAS Intelligent Decisioning: Administrator’s Guide for more information.
For more information about using Python with DS2, see the following:
n “Python Support in SAS Micro Analytic Service” in SAS Micro Analytic Service: Programming and Administration Guide
58 Chapter 5 / Using Custom Code Files

n “Executing Python Modules in DS2 Modules” in SAS Micro Analytic Service: Programming and Administration Guide
SQL Query Files
Important: You can publish decisions that contain SQL files only to SAS Micro Analytic Service destinations.
SQL query nodes always return a data grid as output. For information about data grids, see SAS Intelligent Decisioning: Using Data Grids.
In order to test decisions that contain SQL query files, an administrator must configure support for SQL query files. See “Configuring Support for SQL Query Files” in SAS Intelligent Decisioning: Administrator’s Guide.
Important: Tests that are running in SAS Intelligent Decisioning might encounter a significant performance impact. Pre-publish testing requires SAS Intelligent Decisioning to convert the SQL code to use HTTP protocol and instantiate a MAS module for each call to the SQL package. These actions incur a significant performance impact and create a limitation on the size of the results table. When you test a decision that uses an SQL query node, use an input data set that is as small as possible.
When you are developing your SQL code, follow these rules:
n SQL query nodes support SELECT, INSERT, UPDATE, and DELETE statements. They do not support any data definition language (DDL) statements such as ALTER or DROP that alter the structure of the table.
n SQL query nodes support only the following data types: decimal, string, date, datetime, and integer. You must specify a length for string variables. You cannot specify a length for other variable types. Specify input variables with a question mark (?). Use the AS keyword to specify the input and output variables in the decision as aliases for the database column names. Enclose the decision variable specifications in braces ({}). For example, in the following SELECT statement, DEBTINC, REASON, and BAD are decision variables. The variable BAD is an input variable in the decision. This statement retrieves the values of the DEBTRATIO, CAUSE, TIMESTAMP, and BADLOAN columns from the database and assigns their values to the decision variables DEBTINC, REASON, TS, and BAD.
SELECT debtRatio AS {:debtinc:decimal}, cause AS {:reason:string:8} timestamp AS {:ts:datetime} FROM hmeq_test WHERE badloan = {?:bad:decimal}
The following INSERT statement adds a row that contains the columns NAME and AMT to the table MYTABLE:
INSERT INTO mytable {?:name:string:1000},{?:amt:integer}
Note: You can read data from native SQL date and datetime variables. However, do not rely on the accuracy of data that contains fractional seconds.
n Do not use an asterisk (*) to select database columns. SAS Intelligent Decisioning does not have any metadata about the table, so it cannot determine what columns are in the table.
For syntax information about SQL statements, see “FedSQL Statements” in SAS FedSQL Language Reference. For information about the functions that are supported in SQL code, see “FedSQL Functions” in SAS FedSQL Language Reference.
SQL Query Files 59

60 Chapter 5 / Using Custom Code Files

6Working with Decisions
About Decisions . . . . . . . . . . . . . . . . . . . . . . . . . . . . . . . . . . . . . . . . . . . . . . . . . . . . . . . . . . . . . . . . . . . . . . . . . . . . . . 62
Create a Decision . . . . . . . . . . . . . . . . . . . . . . . . . . . . . . . . . . . . . . . . . . . . . . . . . . . . . . . . . . . . . . . . . . . . . . . . . . . . . 62
Views for Editing a Decision . . . . . . . . . . . . . . . . . . . . . . . . . . . . . . . . . . . . . . . . . . . . . . . . . . . . . . . . . . . . . . . . . . 62The Decision Flow Tab versus the Decision Tab . . . . . . . . . . . . . . . . . . . . . . . . . . . . . . . . . . . . . . . . . . . . . . . 62Condition Nodes in Each Tab . . . . . . . . . . . . . . . . . . . . . . . . . . . . . . . . . . . . . . . . . . . . . . . . . . . . . . . . . . . . . . . . 63Controlling the Tab Display . . . . . . . . . . . . . . . . . . . . . . . . . . . . . . . . . . . . . . . . . . . . . . . . . . . . . . . . . . . . . . . . . . 63
Managing the Variables in a Decision . . . . . . . . . . . . . . . . . . . . . . . . . . . . . . . . . . . . . . . . . . . . . . . . . . . . . . . . . 64About Variables . . . . . . . . . . . . . . . . . . . . . . . . . . . . . . . . . . . . . . . . . . . . . . . . . . . . . . . . . . . . . . . . . . . . . . . . . . . . . 64Import Variables from a Data Source . . . . . . . . . . . . . . . . . . . . . . . . . . . . . . . . . . . . . . . . . . . . . . . . . . . . . . . . . 65Import Variables from a Rule Set or Decision . . . . . . . . . . . . . . . . . . . . . . . . . . . . . . . . . . . . . . . . . . . . . . . . . 65Create Custom Variables on the Variables Tab . . . . . . . . . . . . . . . . . . . . . . . . . . . . . . . . . . . . . . . . . . . . . . . . 66Delete Variables . . . . . . . . . . . . . . . . . . . . . . . . . . . . . . . . . . . . . . . . . . . . . . . . . . . . . . . . . . . . . . . . . . . . . . . . . . . . 66Edit Variable Properties . . . . . . . . . . . . . . . . . . . . . . . . . . . . . . . . . . . . . . . . . . . . . . . . . . . . . . . . . . . . . . . . . . . . . 66Edit Metadata for Data Grid Variables . . . . . . . . . . . . . . . . . . . . . . . . . . . . . . . . . . . . . . . . . . . . . . . . . . . . . . . . 66Determine Which Objects Use a Particular Variable . . . . . . . . . . . . . . . . . . . . . . . . . . . . . . . . . . . . . . . . . . . 67
Adding Objects to a Decision . . . . . . . . . . . . . . . . . . . . . . . . . . . . . . . . . . . . . . . . . . . . . . . . . . . . . . . . . . . . . . . . . 67Add an Existing Object . . . . . . . . . . . . . . . . . . . . . . . . . . . . . . . . . . . . . . . . . . . . . . . . . . . . . . . . . . . . . . . . . . . . . . 67Add a New Code File or SQL Query File . . . . . . . . . . . . . . . . . . . . . . . . . . . . . . . . . . . . . . . . . . . . . . . . . . . . . . 68Add a Record Contacts Node . . . . . . . . . . . . . . . . . . . . . . . . . . . . . . . . . . . . . . . . . . . . . . . . . . . . . . . . . . . . . . . . 68Add a Condition . . . . . . . . . . . . . . . . . . . . . . . . . . . . . . . . . . . . . . . . . . . . . . . . . . . . . . . . . . . . . . . . . . . . . . . . . . . . 69Add an Object to a Condition Path . . . . . . . . . . . . . . . . . . . . . . . . . . . . . . . . . . . . . . . . . . . . . . . . . . . . . . . . . . . 70
Mapping Variables within a Decision . . . . . . . . . . . . . . . . . . . . . . . . . . . . . . . . . . . . . . . . . . . . . . . . . . . . . . . . . . 71About Decision Variables and Mapping . . . . . . . . . . . . . . . . . . . . . . . . . . . . . . . . . . . . . . . . . . . . . . . . . . . . . . . 71Mapping Data Grid Variables in a Rule Set or Model . . . . . . . . . . . . . . . . . . . . . . . . . . . . . . . . . . . . . . . . . . . 72Map Object Variables to Decision Variables . . . . . . . . . . . . . . . . . . . . . . . . . . . . . . . . . . . . . . . . . . . . . . . . . . . 72
Edit the Properties of a Decision Node . . . . . . . . . . . . . . . . . . . . . . . . . . . . . . . . . . . . . . . . . . . . . . . . . . . . . . . . 73
Reorder Objects in a Decision . . . . . . . . . . . . . . . . . . . . . . . . . . . . . . . . . . . . . . . . . . . . . . . . . . . . . . . . . . . . . . . . . 74
Delete an Object from a Decision . . . . . . . . . . . . . . . . . . . . . . . . . . . . . . . . . . . . . . . . . . . . . . . . . . . . . . . . . . . . . . 74
Open an Object from within a Decision . . . . . . . . . . . . . . . . . . . . . . . . . . . . . . . . . . . . . . . . . . . . . . . . . . . . . . . . 74
Copy a Decision URL . . . . . . . . . . . . . . . . . . . . . . . . . . . . . . . . . . . . . . . . . . . . . . . . . . . . . . . . . . . . . . . . . . . . . . . . . 74
Managing Decisions . . . . . . . . . . . . . . . . . . . . . . . . . . . . . . . . . . . . . . . . . . . . . . . . . . . . . . . . . . . . . . . . . . . . . . . . . . 75Duplicate Decisions . . . . . . . . . . . . . . . . . . . . . . . . . . . . . . . . . . . . . . . . . . . . . . . . . . . . . . . . . . . . . . . . . . . . . . . . . 75Delete Decisions . . . . . . . . . . . . . . . . . . . . . . . . . . . . . . . . . . . . . . . . . . . . . . . . . . . . . . . . . . . . . . . . . . . . . . . . . . . . 75Rename a Decision . . . . . . . . . . . . . . . . . . . . . . . . . . . . . . . . . . . . . . . . . . . . . . . . . . . . . . . . . . . . . . . . . . . . . . . . . 75Move Decisions to a Different Folder . . . . . . . . . . . . . . . . . . . . . . . . . . . . . . . . . . . . . . . . . . . . . . . . . . . . . . . . . 75
Managing Versions of Decisions . . . . . . . . . . . . . . . . . . . . . . . . . . . . . . . . . . . . . . . . . . . . . . . . . . . . . . . . . . . . . . 76Set the Displayed Version . . . . . . . . . . . . . . . . . . . . . . . . . . . . . . . . . . . . . . . . . . . . . . . . . . . . . . . . . . . . . . . . . . . 76
61
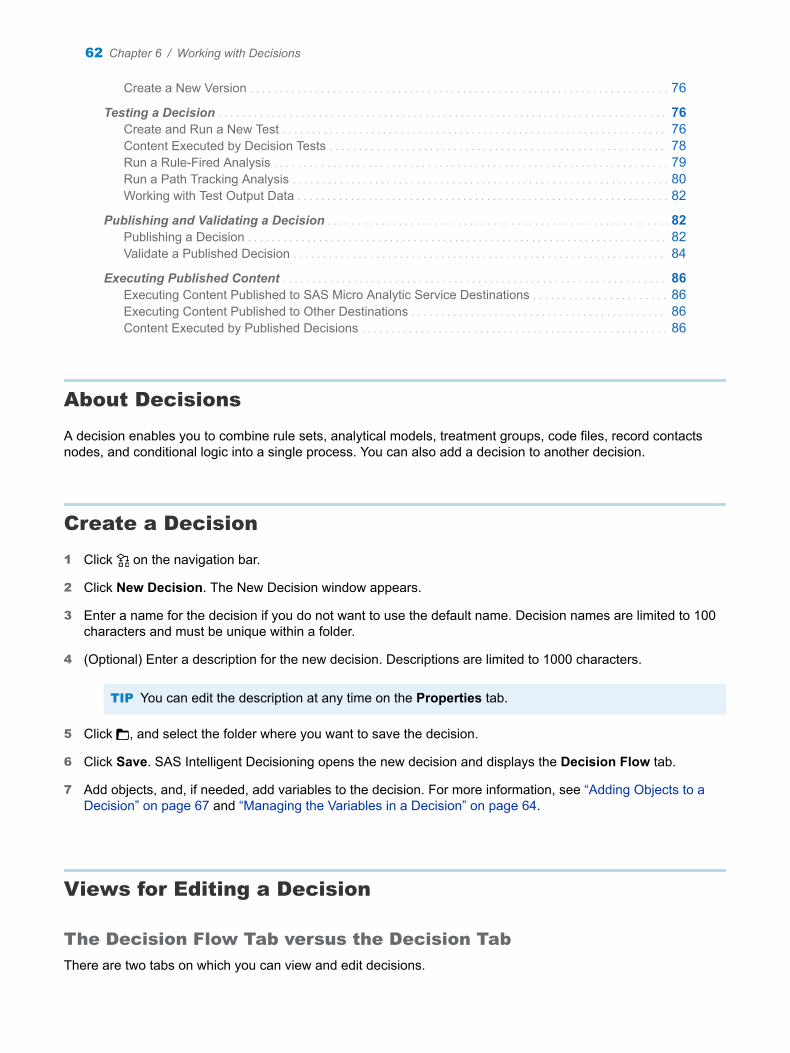
Create a New Version . . . . . . . . . . . . . . . . . . . . . . . . . . . . . . . . . . . . . . . . . . . . . . . . . . . . . . . . . . . . . . . . . . . . . . . 76
Testing a Decision . . . . . . . . . . . . . . . . . . . . . . . . . . . . . . . . . . . . . . . . . . . . . . . . . . . . . . . . . . . . . . . . . . . . . . . . . . . . 76Create and Run a New Test . . . . . . . . . . . . . . . . . . . . . . . . . . . . . . . . . . . . . . . . . . . . . . . . . . . . . . . . . . . . . . . . . 76Content Executed by Decision Tests . . . . . . . . . . . . . . . . . . . . . . . . . . . . . . . . . . . . . . . . . . . . . . . . . . . . . . . . . 78Run a Rule-Fired Analysis . . . . . . . . . . . . . . . . . . . . . . . . . . . . . . . . . . . . . . . . . . . . . . . . . . . . . . . . . . . . . . . . . . . 79Run a Path Tracking Analysis . . . . . . . . . . . . . . . . . . . . . . . . . . . . . . . . . . . . . . . . . . . . . . . . . . . . . . . . . . . . . . . . 80Working with Test Output Data . . . . . . . . . . . . . . . . . . . . . . . . . . . . . . . . . . . . . . . . . . . . . . . . . . . . . . . . . . . . . . . 82
Publishing and Validating a Decision . . . . . . . . . . . . . . . . . . . . . . . . . . . . . . . . . . . . . . . . . . . . . . . . . . . . . . . . . . 82Publishing a Decision . . . . . . . . . . . . . . . . . . . . . . . . . . . . . . . . . . . . . . . . . . . . . . . . . . . . . . . . . . . . . . . . . . . . . . . 82Validate a Published Decision . . . . . . . . . . . . . . . . . . . . . . . . . . . . . . . . . . . . . . . . . . . . . . . . . . . . . . . . . . . . . . . 84
Executing Published Content . . . . . . . . . . . . . . . . . . . . . . . . . . . . . . . . . . . . . . . . . . . . . . . . . . . . . . . . . . . . . . . . . 86Executing Content Published to SAS Micro Analytic Service Destinations . . . . . . . . . . . . . . . . . . . . . . . 86Executing Content Published to Other Destinations . . . . . . . . . . . . . . . . . . . . . . . . . . . . . . . . . . . . . . . . . . . 86Content Executed by Published Decisions . . . . . . . . . . . . . . . . . . . . . . . . . . . . . . . . . . . . . . . . . . . . . . . . . . . . 86
About Decisions
A decision enables you to combine rule sets, analytical models, treatment groups, code files, record contacts nodes, and conditional logic into a single process. You can also add a decision to another decision.
Create a Decision
1 Click on the navigation bar.
2 Click New Decision. The New Decision window appears.
3 Enter a name for the decision if you do not want to use the default name. Decision names are limited to 100 characters and must be unique within a folder.
4 (Optional) Enter a description for the new decision. Descriptions are limited to 1000 characters.
TIP You can edit the description at any time on the Properties tab.
5 Click , and select the folder where you want to save the decision.
6 Click Save. SAS Intelligent Decisioning opens the new decision and displays the Decision Flow tab.
7 Add objects, and, if needed, add variables to the decision. For more information, see “Adding Objects to a Decision” on page 67 and “Managing the Variables in a Decision” on page 64.
Views for Editing a Decision
The Decision Flow Tab versus the Decision Tab
There are two tabs on which you can view and edit decisions.
62 Chapter 6 / Working with Decisions

n On the Decision Flow tab, you can edit a decision by using a graphical editor.
o To add nodes to a decision diagram or to rearrange nodes, drag them.
o To add objects to a decision, right-click on a node to display a pop-up menu or click or .
o To choose objects that have already been defined by navigating to their location, click .
o To add conditions, record contacts nodes, or custom code files by selecting the object type, click .
n On the Decision tab, you can edit the decision by using a tabular view similar to the rule set editor. To add nodes to a decision or to rearrange nodes, you use menu options and icons.
You can switch between the tabs according to your personal preference. Save your work before switching tabs. Click to refresh the view in a tab.
Condition Nodes in Each Tab
A condition node on the Decision Flow tab corresponds to an IF statement on the Decision tab. Objects in a THEN clause on the Decision tab correspond to nodes in a Yes path on the Decision Flow tab. Objects in an ELSE clause correspond to nodes in a No path.
For example, suppose you have the following nodes on the Decision Flow tab:
The same nodes appear on the Decision tab as an IF-THEN-ELSE statement:
Controlling the Tab Display
On the Decision Flow tab:
n Click to open the properties pane for the selected object. Click to hide the properties pane.
n Click to open the diagram overview. The diagram overview is a scaled-down version of the entire diagram. The section that is currently visible on the screen is outlined. The overview is useful when a decision diagram is too large to display all of the nodes on one screen.
Views for Editing a Decision 63
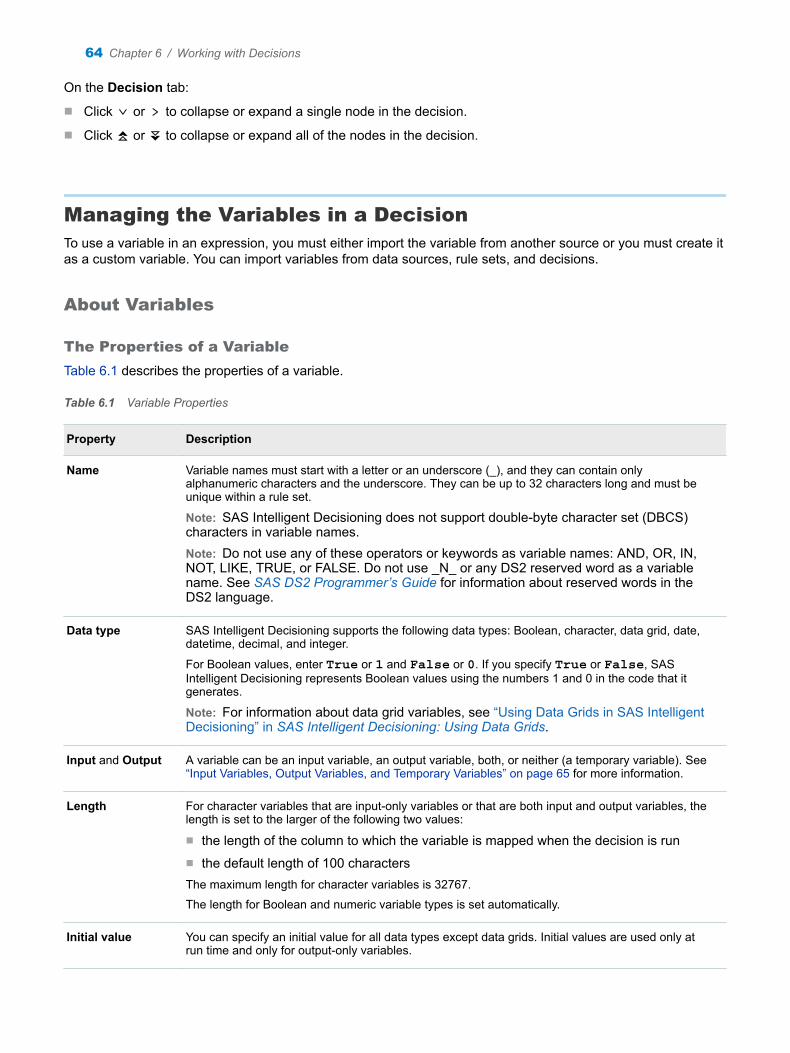
On the Decision tab:
n Click or to collapse or expand a single node in the decision.
n Click or to collapse or expand all of the nodes in the decision.
Managing the Variables in a DecisionTo use a variable in an expression, you must either import the variable from another source or you must create it as a custom variable. You can import variables from data sources, rule sets, and decisions.
About Variables
The Properties of a Variable
Table 6.1 describes the properties of a variable.
Table 6.1 Variable Properties
Property Description
Name Variable names must start with a letter or an underscore (_), and they can contain only alphanumeric characters and the underscore. They can be up to 32 characters long and must be unique within a rule set.
Note: SAS Intelligent Decisioning does not support double-byte character set (DBCS) characters in variable names.Note: Do not use any of these operators or keywords as variable names: AND, OR, IN, NOT, LIKE, TRUE, or FALSE. Do not use _N_ or any DS2 reserved word as a variable name. See SAS DS2 Programmer’s Guide for information about reserved words in the DS2 language.
Data type SAS Intelligent Decisioning supports the following data types: Boolean, character, data grid, date, datetime, decimal, and integer.
For Boolean values, enter True or 1 and False or 0. If you specify True or False, SAS Intelligent Decisioning represents Boolean values using the numbers 1 and 0 in the code that it generates.
Note: For information about data grid variables, see “Using Data Grids in SAS Intelligent Decisioning” in SAS Intelligent Decisioning: Using Data Grids.
Input and Output A variable can be an input variable, an output variable, both, or neither (a temporary variable). See “Input Variables, Output Variables, and Temporary Variables” on page 65 for more information.
Length For character variables that are input-only variables or that are both input and output variables, the length is set to the larger of the following two values:
n the length of the column to which the variable is mapped when the decision is runn the default length of 100 charactersThe maximum length for character variables is 32767.
The length for Boolean and numeric variable types is set automatically.
Initial value You can specify an initial value for all data types except data grids. Initial values are used only at run time and only for output-only variables.
64 Chapter 6 / Working with Decisions
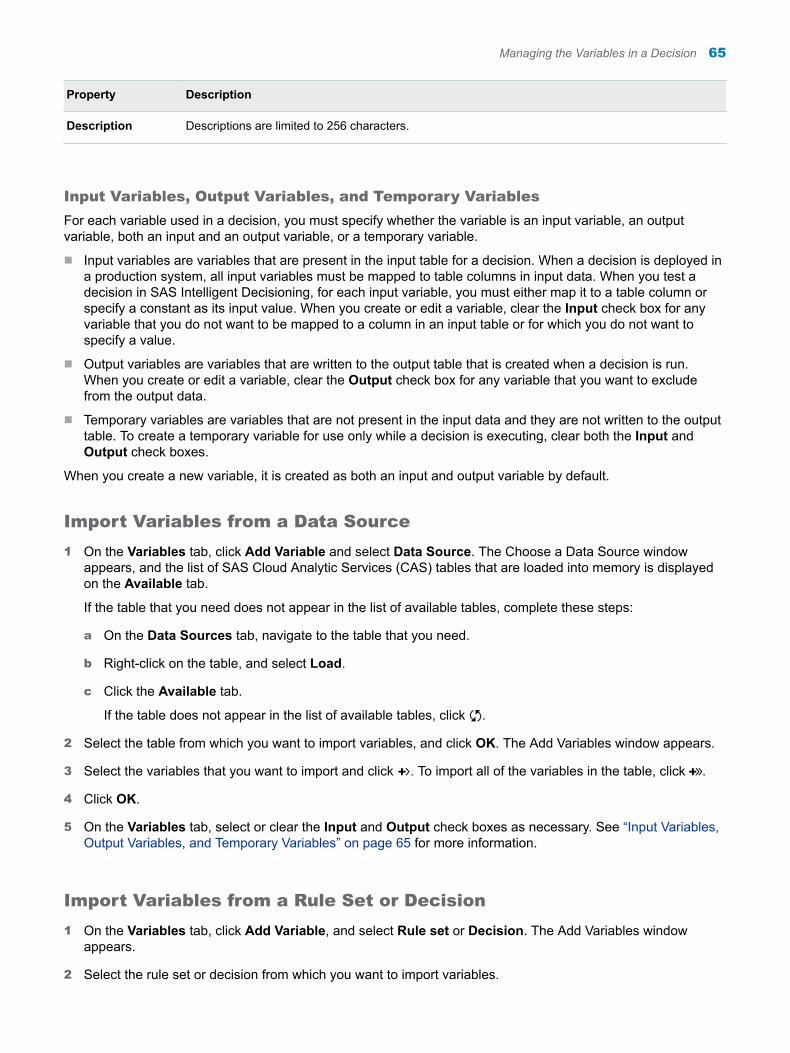
Property Description
Description Descriptions are limited to 256 characters.
Input Variables, Output Variables, and Temporary Variables
For each variable used in a decision, you must specify whether the variable is an input variable, an output variable, both an input and an output variable, or a temporary variable.
n Input variables are variables that are present in the input table for a decision. When a decision is deployed in a production system, all input variables must be mapped to table columns in input data. When you test a decision in SAS Intelligent Decisioning, for each input variable, you must either map it to a table column or specify a constant as its input value. When you create or edit a variable, clear the Input check box for any variable that you do not want to be mapped to a column in an input table or for which you do not want to specify a value.
n Output variables are variables that are written to the output table that is created when a decision is run. When you create or edit a variable, clear the Output check box for any variable that you want to exclude from the output data.
n Temporary variables are variables that are not present in the input data and they are not written to the output table. To create a temporary variable for use only while a decision is executing, clear both the Input and Output check boxes.
When you create a new variable, it is created as both an input and output variable by default.
Import Variables from a Data Source
1 On the Variables tab, click Add Variable and select Data Source. The Choose a Data Source window appears, and the list of SAS Cloud Analytic Services (CAS) tables that are loaded into memory is displayed on the Available tab.
If the table that you need does not appear in the list of available tables, complete these steps:
a On the Data Sources tab, navigate to the table that you need.
b Right-click on the table, and select Load.
c Click the Available tab.
If the table does not appear in the list of available tables, click .
2 Select the table from which you want to import variables, and click OK. The Add Variables window appears.
3 Select the variables that you want to import and click . To import all of the variables in the table, click .
4 Click OK.
5 On the Variables tab, select or clear the Input and Output check boxes as necessary. See “Input Variables, Output Variables, and Temporary Variables” on page 65 for more information.
Import Variables from a Rule Set or Decision
1 On the Variables tab, click Add Variable, and select Rule set or Decision. The Add Variables window appears.
2 Select the rule set or decision from which you want to import variables.
Managing the Variables in a Decision 65

3 Select the variables that you want to import and click . To import all of the variables in the table, click .
4 Click OK.
5 On the Variables tab, select or clear the Input and Output check boxes as necessary. See “Input Variables, Output Variables, and Temporary Variables” on page 65 for more information.
Create Custom Variables on the Variables Tab
Note: For information about data grid variables, see “Defining Data Grid Variables” in SAS Intelligent Decisioning: Using Data Grids.
To create custom variables on the Variables tab:
1 Click Add Variable and select Custom variable. The Add Variables window appears.
2 Complete these steps for each variable that you want to add:
a Enter the name of the new variable, and select the data type of the variable. See Table 6.1 on page 64 for additional information.
b (Optional) Click to display the Length, Initial value, and Description fields.
c (Optional) Enter a length, initial value, and description for the new variable. See Table 6.1 on page 64 for additional information.
d Click Add. SAS Intelligent Decisioning adds the new variable to the table of variables. By default, variables are added to the table as both input and output variables.
e (Optional) Clear the check boxes in the Input or Output columns.
n Clear the Input check box for any variable that you do not want to be mapped to a column in an input table or for which you do not want to specify a value.
n Clear the Output check box for any variable that you want to exclude from the output data.
n Clear both the Input and Output check boxes to create a temporary variable.
See Table 6.1 on page 64 for additional information.
3 Click OK to add the variables and close the Add Variables window.
Delete Variables
On the Variables tab, select the check box for the variables that you want to delete, click , and select Delete.
Note: You cannot delete a variable if it is used in a rule set or decision.
Edit Variable Properties
On the Variables tab, click on the variable name of the variable that you want to edit. The Edit Variable window appears. Edit the properties as needed, and then click OK.See Table 6.1 on page 64 for additional information.
Edit Metadata for Data Grid Variables
For information, see “Editing Data Grid Variable Metadata” in SAS Intelligent Decisioning: Using Data Grids.
66 Chapter 6 / Working with Decisions
Determine Which Objects Use a Particular Variable
On the Variables tab, select the check box for the variable, click , and select Used by. The Variable Used By window appears. This window lists the objects that use the selected variable.
Adding Objects to a DecisionBy default, new objects are added immediately below the currently selected object. If no object is currently selected, the decision editor adds the new object at the beginning of the decision. If the currently selected object is a condition and the condition is expanded, the decision editor adds the new object to the THEN clause. See “Reorder Objects in a Decision” on page 74 for information about reordering the objects in a decision.
Add an Existing Object
1 On the Decision Flow tab, click to choose objects that have already been defined by navigating to their location.
Alternatively, on the Decision tab, click Add and select the object type that you want to add to the decision. If an object in the decision is already selected, select Edit ð Add below, and select the object type. The Content Selection window appears.
2 On the Decision Flow tab, drag the object from the list of objects onto the diagram where you want to add it. Alternatively, on the Decision tab, select the object that you want to add.
3 (Optional) For rule sets, select a different version. Edit the properties of the node and change the version. See “Edit the Properties of a Decision Node” on page 73 for more information.
Note: You cannot change the version of a model, treatment group, or code file that is used in a decision. For more information, see “Content Executed by Decision Tests” on page 78 and “Content Executed by Published Decisions” on page 86.
4 (Optional) On the Properties tab, select the Subject ID variable and the Subject level variable that you want to associate with subject contact records that are recorded by the decision.
TIP If you do not specify the subject ID or subject level, the subject ID or subject level is recorded as NONE in the subject contact history.
For more information about subjects and subject contact histories, see the following topics:
n “About Treatments and Decisions” on page 36
n “Example: A Decision that Includes a Treatment Group” on page 36
n “Add a Record Contacts Node” on page 68
n “Predefined Lookup Tables” on page 48
5 Map the object’s variables to decision variables. For more information, see “Mapping Variables within a Decision” on page 71.
Adding Objects to a Decision 67
Add a New Code File or SQL Query File
See “Using Custom Code Files” on page 55 for information about the content of custom code files. For information about the content that is used when a decision is executed, see “Content Executed by Decision Tests” on page 78 and “Content Executed by Published Decisions” on page 86.
1 On the Decision Flow tab, select , and drag the code file or query object onto the diagram where you want to add it. The New File window appears.
Alternatively, on the Decision tab, complete these steps:
a Click Add and select the object type that you want to add to the decision. If an object in the decision is selected, select Edit ð Add below, and select the object type. The content selection window appears.
b Click New DS2 Code File, New Python Code File, or New SQL Query. The New File window appears.
2 Enter a name for the new file if you do not want to use the default name. File names are limited to 255 characters and must be unique within a folder.
3 (Optional) Enter a description for the new file. Descriptions are limited to 1000 characters.
TIP You can edit the description at any time in the Properties pane.
4 Click , and select the folder where you want to save the file.
5 Click Save. SAS Intelligent Decisioning creates a new code file and adds it to the decision.
6 In the Properties pane, click Edit ð Open to open the new file in the code editor. SAS Intelligent Decisioning adds a basic template to the file. The template depends on the type of object.
7 Add your custom code to the file. For information, see “Using Custom Code Files” on page 55.
8 Click and Close to save and close the code file.
Add a Record Contacts Node
The primary purpose of record contacts nodes is to record the outcome of a decision. You can use record contacts nodes to record the values of specific variables at specific points in a decision. For treatment groups, a record contacts node records metadata for the treatments.
The behavior of record contacts nodes differs based on whether the decision is published to a SAS Micro Analytic destination or to a destination of another type.
n For decisions that are published to a SAS Micro Services destination, a record contacts node writes a record to the subject contact history. The record contains the information that you specified that you want to track, such as the data grid of treatments returned by the decision and the values of other variables. In addition, the record contacts node creates an output variable, the record contacts variable, that contains a response tracking code. An application, such as a customer service application, can use this response tracking code to add additional data to the subject contacts history.
n For destinations of other types, the record contacts node does not write a record to the subject contact history. Instead, the information that you specified that you want to track is written to the record contacts variable. This variable is a character string, and it also contains the response tracking code. You can issue a POST request to post the data to the subject contact history. The POST request type is application/vnd.sas.decision.subject.contact+json. For more information, see the Subject Contacts API documentation.
68 Chapter 6 / Working with Decisions

A decision can contain multiple record contacts nodes. For example, your decision might have different paths for different channels, and you might want a record contacts node on each path.
1 On the Decision Flow tab, select , and drag the Record Contacts object onto the diagram where you want to add it. SAS Intelligent Decisioning opens the Properties pane for the node.
Alternatively, on the Decision tab, select Add ð Record contacts. If an object in the decision is selected, select Edit ð Add below ð Record contacts.
2 (Optional) Rename the record contacts node.
a On the Decision Flow tab, click and select Rename. Alternatively, on the Decision tab, select the node, and select Edit ð Rename. The Rename window appears.
b Enter a new name and click Rename.
3 Click to edit the properties of the record contacts node.
4 (Optional) Select the variable that contains the channel information to which you want to attribute the contact data that is recorded by the node.
5 (Optional) Select the variables whose values you want to record.
Note: You cannot track data grids in record contacts node because of the amount of space required to store the data.
6 (Optional) Select Track treatments if you want to record which treatments are sent to the calling application. Then, select the data grid variable for the specific set of treatments that you want to track.
TIP If you specify a subject ID or subject level in the decision properties, this information is included in the records that are generated for the record contacts node. If you do not specify the subject ID or subject level, the subject ID or subject level is recorded as NONE.
7 (Optional) Clear the Record rule-fired data check box if you do not want to record the rule-fired information for all rules in the decision up to the point at which the record contacts node is included.
Note: Rule-fired data is not recorded for decisions that are included in the current decision.
Note: This rule-fired data is recorded in the subject contact history. The rule-fired data that is recorded when you select Record rule-fired data when you publish a rule set or decision is recorded in the ruleFiredFlags column in the output table.
8 (Optional) Clear the Record path tracking check box if you do not want to record the path-tracking information for all nodes in the decision up to the point at which the record contacts node is included.
Note: Path-tracking data is not recorded for decisions that are included in the current decision.
Note: This path-tracking data is recorded in the subject contact history. The path-tracking data that is recorded when you select Record path tracking when you publish a decision is recorded in the pathID column in the output table.
9 (Optional) Clear the Include in contact policy check box if you do not want this contact record included in aggregate reports for the channel.
10 Click OK to save your changes.
Add a Condition
Note: When you add a condition, any objects that follow the currently selected object become part of the ELSE clause in the condition.
Adding Objects to a Decision 69
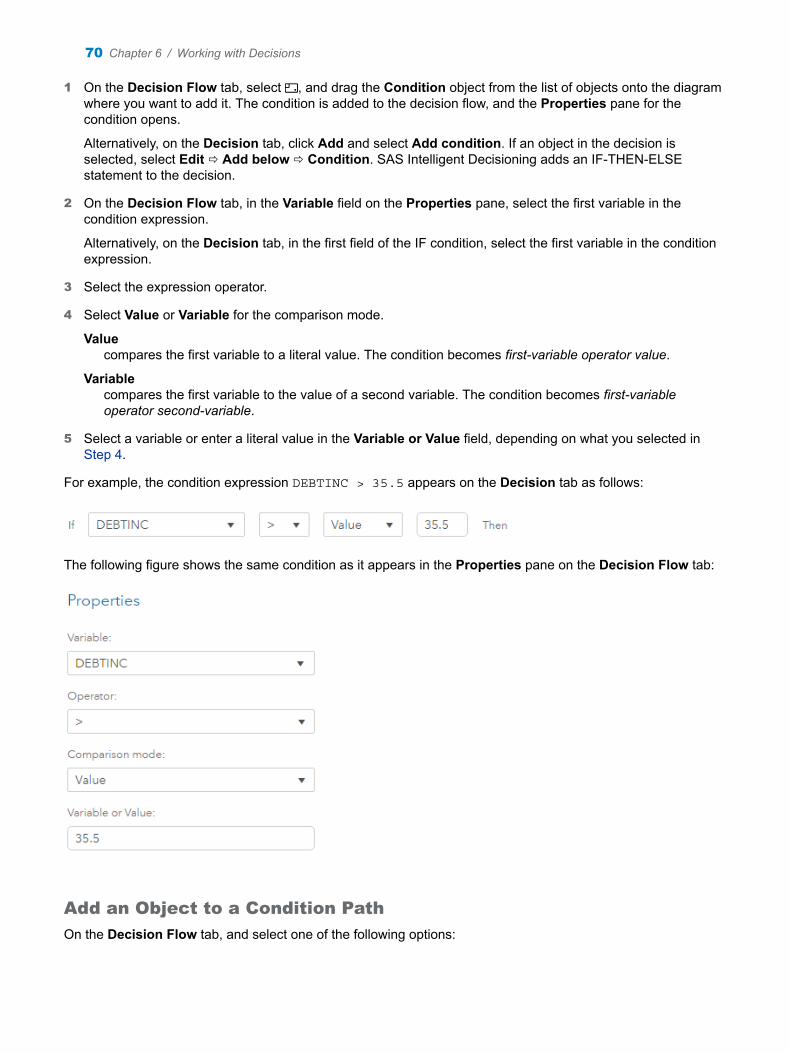
1 On the Decision Flow tab, select , and drag the Condition object from the list of objects onto the diagram where you want to add it. The condition is added to the decision flow, and the Properties pane for the condition opens.
Alternatively, on the Decision tab, click Add and select Add condition. If an object in the decision is selected, select Edit ð Add below ð Condition. SAS Intelligent Decisioning adds an IF-THEN-ELSE statement to the decision.
2 On the Decision Flow tab, in the Variable field on the Properties pane, select the first variable in the condition expression.
Alternatively, on the Decision tab, in the first field of the IF condition, select the first variable in the condition expression.
3 Select the expression operator.
4 Select Value or Variable for the comparison mode.
Valuecompares the first variable to a literal value. The condition becomes first-variable operator value.
Variablecompares the first variable to the value of a second variable. The condition becomes first-variable operator second-variable.
5 Select a variable or enter a literal value in the Variable or Value field, depending on what you selected in Step 4.
For example, the condition expression DEBTINC > 35.5 appears on the Decision tab as follows:
The following figure shows the same condition as it appears in the Properties pane on the Decision Flow tab:
Add an Object to a Condition Path
On the Decision Flow tab, and select one of the following options:
70 Chapter 6 / Working with Decisions

Add to yes path ð objectopens the selection window for the selected object type. After you select the object that you want to add to the decision, SAS Intelligent Decisioning adds it to the Yes path in the decision. This path is executed if the condition expression on the condition node evaluates to True.
Add to no path ð objectopens the selection window for the selected object type. After you select the object that you want to add to the decision, SAS Intelligent Decisioning adds it to the No path in the decision. This path is executed if the condition expression on the condition node evaluates to False.
On the Decision tab, the condition paths are THEN and ELSE clauses. See “Condition Nodes in Each Tab” on page 63 for more information. For more information about adding objects to THEN and ELSE clauses, see “Add an Existing Object” on page 67 and “Add a Condition” on page 69.
Mapping Variables within a Decision
About Decision Variables and Mapping
The objects that you add to a decision, such as models and rule sets (including eligibility rule sets in treatments), each define their own variables. When you add an object to a decision, SAS Intelligent Decisioning automatically defines decision variables that have the same name and data type as the object’s variables. SAS Intelligent Decisioning automatically maps the object’s variables to the decision variables that have the same name and data type.
You can create decision variables with different names, and then change the decision variable mappings on the Input Variables and Output Variables property panes for objects in the decision.
For example, suppose you have a decision named Credit Approval, and this decision contains a model named Loan Default and a rule set named Evaluate Credit. The model has an output variable named em_prob. The value of this variable must be passed as input to the Evaluate Credit rule set, but the rule set is expecting a variable named probability. In order for the value to be passed to the rule set, you must map the output variable of the model, em_prob, to the decision variable em_prob, and you must map the input variable of the rule, probability, to the decision variable em_prob.
Mapping Variables within a Decision 71
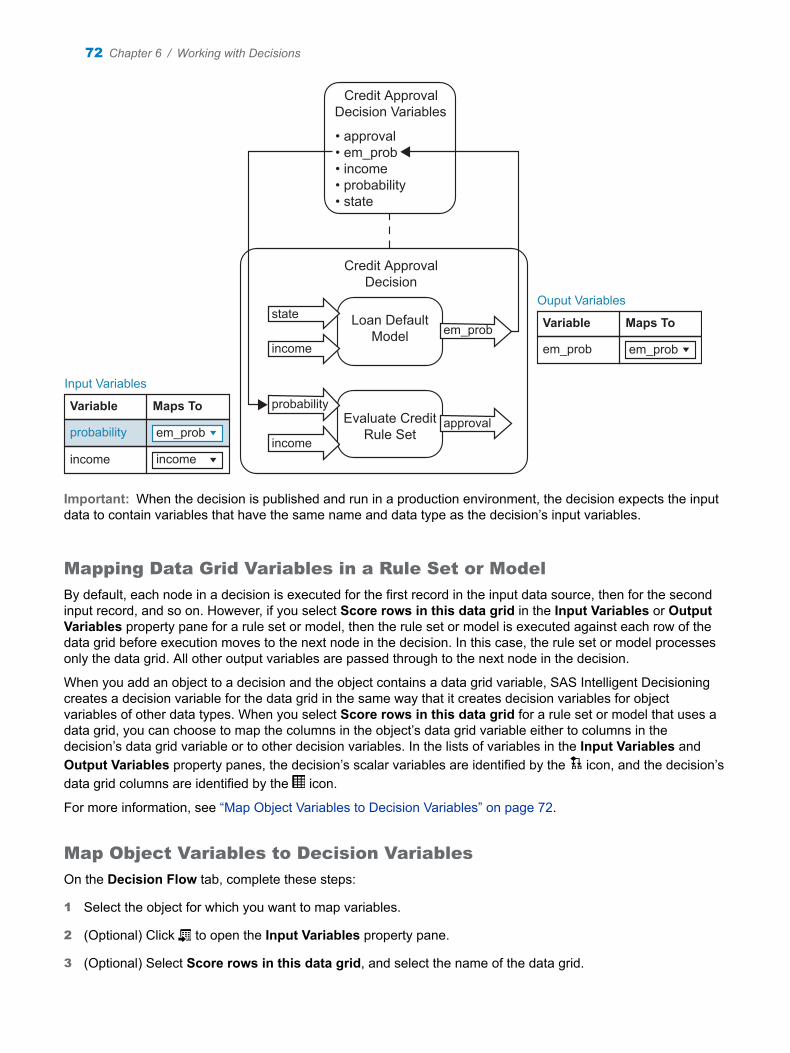
Loan DefaultModel
Credit ApprovalDecision Variables
Credit ApprovalDecision
• approval• em_prob• income• probability• state
Evaluate CreditRule Set
state
income
probability
probability
Variable
Input Variables
em_prob
income income
Maps To
em_prob
Variable
Ouput Variables
em_prob
Maps To
income
em_prob
approval
Important: When the decision is published and run in a production environment, the decision expects the input data to contain variables that have the same name and data type as the decision’s input variables.
Mapping Data Grid Variables in a Rule Set or Model
By default, each node in a decision is executed for the first record in the input data source, then for the second input record, and so on. However, if you select Score rows in this data grid in the Input Variables or Output Variables property pane for a rule set or model, then the rule set or model is executed against each row of the data grid before execution moves to the next node in the decision. In this case, the rule set or model processes only the data grid. All other output variables are passed through to the next node in the decision.
When you add an object to a decision and the object contains a data grid variable, SAS Intelligent Decisioning creates a decision variable for the data grid in the same way that it creates decision variables for object variables of other data types. When you select Score rows in this data grid for a rule set or model that uses a data grid, you can choose to map the columns in the object’s data grid variable either to columns in the decision’s data grid variable or to other decision variables. In the lists of variables in the Input Variables and Output Variables property panes, the decision’s scalar variables are identified by the icon, and the decision’s data grid columns are identified by the icon.
For more information, see “Map Object Variables to Decision Variables” on page 72.
Map Object Variables to Decision Variables
On the Decision Flow tab, complete these steps:
1 Select the object for which you want to map variables.
2 (Optional) Click to open the Input Variables property pane.
3 (Optional) Select Score rows in this data grid, and select the name of the data grid.
72 Chapter 6 / Working with Decisions

Note: This option appears only for rule sets and models that process data grid variables. The data grid name that you select appears on both the Input Variables property pane and the Output Variables property pane, and it is always the same on both panes. If you change it on one pane, it also changes on the other pane. For more information, see “Mapping Data Grid Variables in a Rule Set or Model” on page 72.
4 (Optional) For each object variable in the Input Variable column, select the decision variable that you want to map it to in the Maps To column.
5 (Optional) Click .
6 If the object that you selected is a treatment group, select the data grid that contains the outcome of the treatment group.
7 (Optional) For each object variable in the Output Variable column, select the decision variable that you want to map it to in the Maps To column.
On the Decision tab, complete these steps:
1 Select the object for which you want to map variables.
2 Click to open the Properties window.
3 (Optional) Select Score rows in this data grid, and select the name of the data grid.
Note: This option appears only for rule sets and models that process data grid variables. For more information, see “Mapping Data Grid Variables in a Rule Set or Model” on page 72.
4 For each object variable in the Input Variable column, select the decision variable that you want to map it to in the Maps To column.
5 If the selected node is a treatment group, select the data grid that contains the outcome of the treatment group.
6 For each object variable in the Output Variable column, select the decision variable that you want to map it to in the Maps To column.
7 Click OK to close the Properties window.
Edit the Properties of a Decision Node
On the Decision Flow tab:
1 Select the node and click . The Properties pane appears.
2 (Optional) Select a different model, rule set, or rule set version for the selected node.
3 (Optional) Click . The Input Variables pane appears.
4 (Optional) Modify the input variable mappings for the selected node.
5 (Optional) Click . The Output Variables pane appears.
6 (Optional) Modify the output variable mappings for the selected node.
On the Decision tab:
1 Click for the node. The properties window for the node appears.
2 (Optional) On the Variables tab, modify the variable mappings.
Edit the Properties of a Decision Node 73
3 (Optional) On the Properties tab, select a different model, rule set, or rule set version.
4 Click Close to save your changes and close the properties window.
Reorder Objects in a Decision
On the Decision Flow tab, you can drag rule sets, models, and code files from one position to another. To move a condition, you must delete and re-add the condition in the new location.
On the Decision tab, to move an object up or down, including into and out of conditions, select the object and click or . You can also move the selected object by using Shift + and Shift + .
Delete an Object from a Decision
On the Decision Flow tab, click on the object that you want to delete, and select Delete.
On the Decision tab, click on the object that you want to delete.
Open an Object from within a Decision
On a node in the Decision Flow diagram, click for the object that you want to open, and select Open.
Rule sets open in the rule set editor. Code files open in the code editor. Models open in SAS Model Manager if you have access to that application. For condition nodes, SAS Intelligent Decisioning displays the property pane for the node.
Copy a Decision URL
To create a link for external documentation that automatically opens a decision in SAS Intelligent Decisioning, complete these steps:
1 Open the decision.
2 Click , and select Copy object URL. The Copy Decision URL window appears.
3 Click Copy, and then click Close.
Paste the link into your documentation.
74 Chapter 6 / Working with Decisions
Managing Decisions
Duplicate Decisions
Note: You cannot duplicate a decision if it is open.
To duplicate a single decision:
1 In the Decisions view, select the decision that you want to duplicate.
2 Click and select Duplicate. The Duplicate Decision window appears.
3 Enter a new name for the duplicate decision
4 (Optional) Enter a description for the decision.
5 Click Duplicate.
To duplicate multiple decisions:
1 In the Decisions view, select the decisions that you want to duplicate.
2 Click and select Duplicate. SAS Intelligent Decisioning duplicates the decisions and appends _Copy to the names of the duplicate copies. If needed, a number is also appended to the names of the duplicate copies.
Delete Decisions
Note: You cannot delete a decision if it is open.
In the Decisions category view, select the decisions that you want to delete, click , and select Delete.
Rename a Decision
Note: You cannot rename a decision if it is open.
1 In the Decisions category view, select the decision that you want to rename.
2 Click and select Rename. The Rename window appears.
3 Enter a new name for the decision, and click Rename.
Move Decisions to a Different Folder
1 In the Decisions category view, select the decisions that you want to move.
2 Click and select Move. The Choose a Location window appears.
3 Select the location to which you want to move the decisions, and click OK.
Managing Decisions 75

Managing Versions of Decisions
Set the Displayed Version
The displayed version is the version whose information is displayed on the other tabs, such as the Properties and Decision tabs. On the Versions tab, a indicates the displayed version. To change the displayed version, select the version that you want to view, and click Set Version. The displayed version is shown in the title bar.
Create a New Version
Note: The current version of an object is the version with the highest version number. When you create a new version, SAS Intelligent Decisioning locks the current version before it creates the new version.
Note: You cannot save changes to a version that is locked. If you modify a version that is locked and click , SAS Intelligent Decisioning asks you if you want to replace the current unlocked version with your edited version.
Important: You cannot unlock a locked version.
To create a new version:
1 On the Versions tab, click New Version. The New Version window appears.
2 Select the version type: Minor or Major. Version numbers follow the format Major.Minor. If you select Major, the number to the left of the period is incremented. If you select Minor, the number to the right of the period is incremented.
3 (Optional) Enter information about the new version in the Notes field.
TIP You can edit these notes at any time on the Versions tab.
4 Click Save.
Testing a Decision
Create and Run a New Test
Testing a decision is optional, but doing so is a best practice. Testing enables you to discover any problems before the decision is published and incorporated into a production system.
1 On the Scoring tab, click the Tests tab.
2 Click New Test. The New Test window appears.
3 Enter a name for the test if you do not want to use the default name.
4 (Optional) Enter a description for the test. Descriptions are limited to 1000 characters.
5 (Optional) Click for the Location field, and select the folder where you want to save the test definition and results.
76 Chapter 6 / Working with Decisions
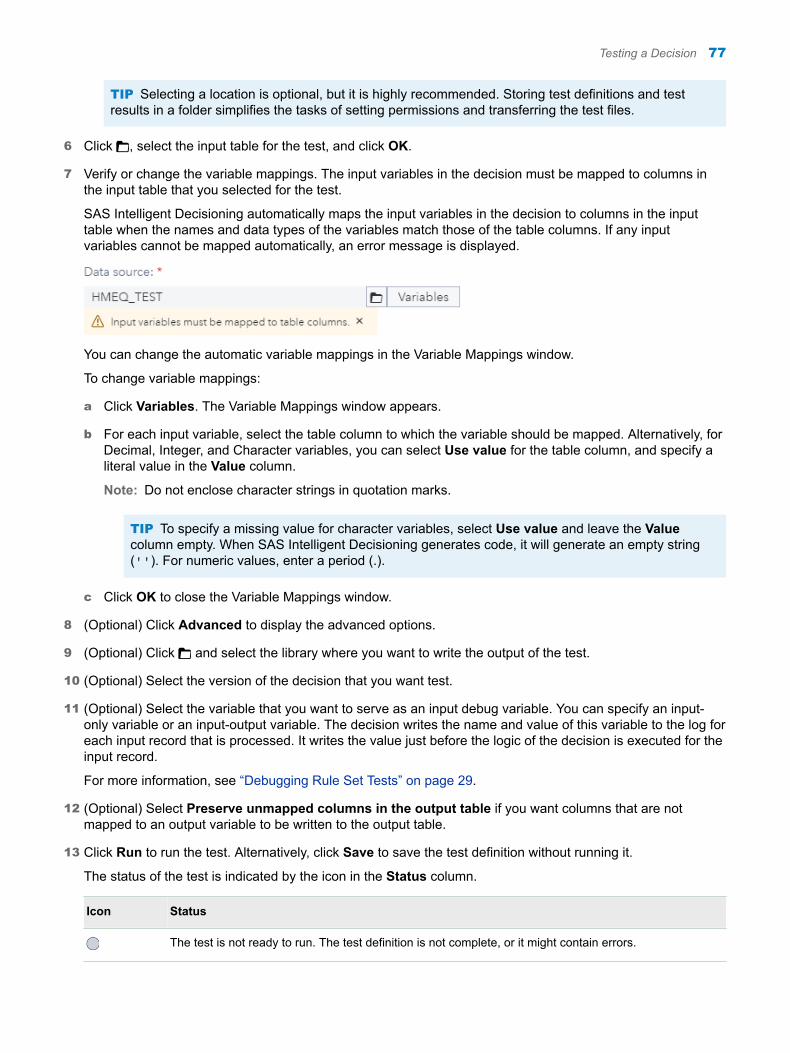
TIP Selecting a location is optional, but it is highly recommended. Storing test definitions and test results in a folder simplifies the tasks of setting permissions and transferring the test files.
6 Click , select the input table for the test, and click OK.
7 Verify or change the variable mappings. The input variables in the decision must be mapped to columns in the input table that you selected for the test.
SAS Intelligent Decisioning automatically maps the input variables in the decision to columns in the input table when the names and data types of the variables match those of the table columns. If any input variables cannot be mapped automatically, an error message is displayed.
You can change the automatic variable mappings in the Variable Mappings window.
To change variable mappings:
a Click Variables. The Variable Mappings window appears.
b For each input variable, select the table column to which the variable should be mapped. Alternatively, for Decimal, Integer, and Character variables, you can select Use value for the table column, and specify a literal value in the Value column.
Note: Do not enclose character strings in quotation marks.
TIP To specify a missing value for character variables, select Use value and leave the Value column empty. When SAS Intelligent Decisioning generates code, it will generate an empty string (''). For numeric values, enter a period (.).
c Click OK to close the Variable Mappings window.
8 (Optional) Click Advanced to display the advanced options.
9 (Optional) Click and select the library where you want to write the output of the test.
10 (Optional) Select the version of the decision that you want test.
11 (Optional) Select the variable that you want to serve as an input debug variable. You can specify an input-only variable or an input-output variable. The decision writes the name and value of this variable to the log for each input record that is processed. It writes the value just before the logic of the decision is executed for the input record.
For more information, see “Debugging Rule Set Tests” on page 29.
12 (Optional) Select Preserve unmapped columns in the output table if you want columns that are not mapped to an output variable to be written to the output table.
13 Click Run to run the test. Alternatively, click Save to save the test definition without running it.
The status of the test is indicated by the icon in the Status column.
Icon Status
The test is not ready to run. The test definition is not complete, or it might contain errors.
Testing a Decision 77
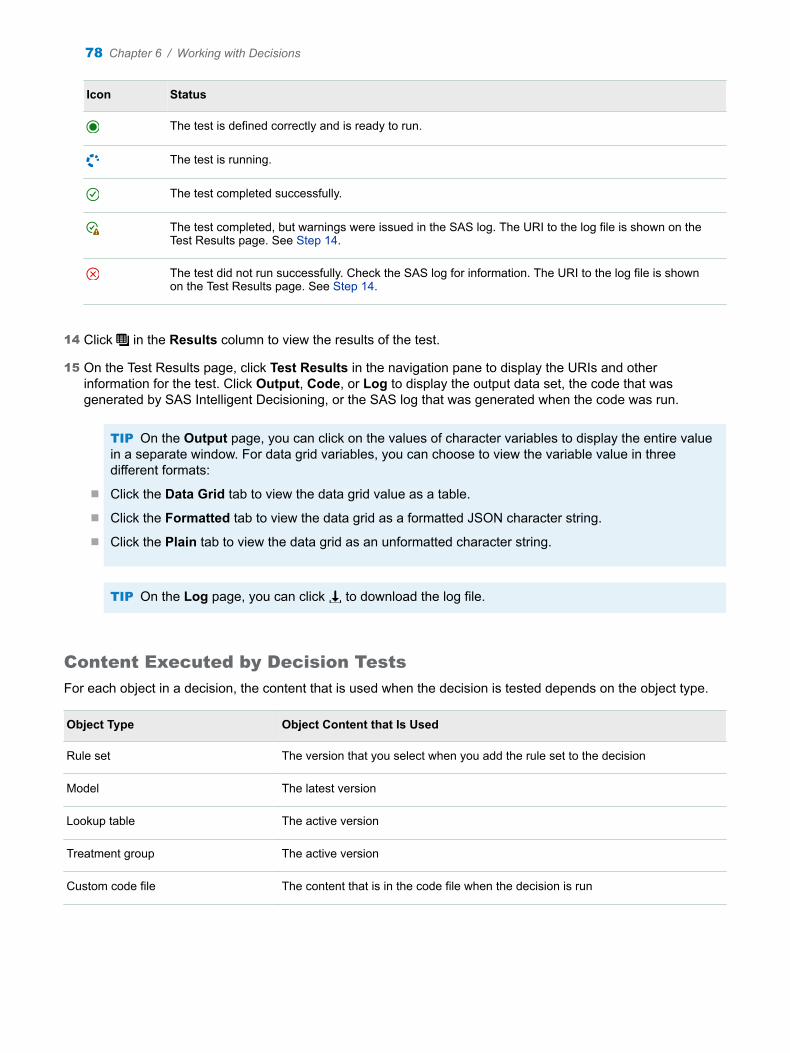
Icon Status
The test is defined correctly and is ready to run.
The test is running.
The test completed successfully.
The test completed, but warnings were issued in the SAS log. The URI to the log file is shown on the Test Results page. See Step 14.
The test did not run successfully. Check the SAS log for information. The URI to the log file is shown on the Test Results page. See Step 14.
14 Click in the Results column to view the results of the test.
15 On the Test Results page, click Test Results in the navigation pane to display the URIs and other information for the test. Click Output, Code, or Log to display the output data set, the code that was generated by SAS Intelligent Decisioning, or the SAS log that was generated when the code was run.
TIP On the Output page, you can click on the values of character variables to display the entire value in a separate window. For data grid variables, you can choose to view the variable value in three different formats:
n Click the Data Grid tab to view the data grid value as a table.
n Click the Formatted tab to view the data grid as a formatted JSON character string.
n Click the Plain tab to view the data grid as an unformatted character string.
TIP On the Log page, you can click to download the log file.
Content Executed by Decision Tests
For each object in a decision, the content that is used when the decision is tested depends on the object type.
Object Type Object Content that Is Used
Rule set The version that you select when you add the rule set to the decision
Model The latest version
Lookup table The active version
Treatment group The active version
Custom code file The content that is in the code file when the decision is run
78 Chapter 6 / Working with Decisions

Run a Rule-Fired Analysis
If a rule’s conditions evaluate to True, then the rule is said to have fired. Rule-fired data includes summary information about how many times each rule fired and detailed information for each time that a rule evaluates to True. See “How Rules Are Evaluated and When Rule-Fired Records Are Generated” on page 15 for more information.
Note: Rule-fired data is not recorded for decisions that are included in the current decision, for input records that are filtered out with a filtering rule set, or for eligibility rules in a treatment. For rule sets that iterate over a data grid (in other words, the rule sets score the rows in the data grid), the rule-fired data indicates that the rules in the rule set fire once for the entire data grid instead of firing once for each row in the data grid.
TIP This rule-fired analysis uses the data that is in the ruleFiredFlags column in the test results output table. To analyze rule-fired data that is in the subject contact history, use the %DCM_GET_SUBJECTCONTACT_HISTORY and %DCM_RULEFIRE_DETAIL macros. For more information, see SAS Intelligent Decisioning: Macro Guide.
1 On the Test Results page, click Rule-Fired Analysis in the navigation pane.
2 Click Run Rule-Fired Analysis. SAS Intelligent Decisioning analyzes the test results to determine which rules fired for each row in the input table, and displays the Analysis page.
The Analysis page displays the number of rules that fired for each output record that was generated by the decision. The number in the Rules Fired Count column is a link to more information. You can click on this link to display the rules that fired for that output row.
For example, in the following display there is one output record for which two rules fired.
3 Click on a number in the Rule Fired Count column. SAS Intelligent Decisioning displays the Rule Fired Count window. This window shows which rules produced the selected output record.
Note: If a decision contains only models, the rule-fired analysis tables are not generated.
Testing a Decision 79

4 Click Close to close the Rule Fired Count window.
5 Click Plot in the navigation pane. SAS Intelligent Decisioning displays a bar chart that shows how many times each rule fired. Position your cursor over a bar to display the name of the rule and the number of times that the rule fired.
Note: If a decision contains only models, the rule-fired plot is not generated.
6 Click Rule-Fired Analysis in the navigation pane to display the URIs and other information for the rule-fired test.
7 Click Close to close the decision.
Run a Path Tracking Analysis
Decision path tracking shows you the route that input records take through the rule sets, models, and conditions in your decision.
80 Chapter 6 / Working with Decisions

Note: The path tracking results do not include data for input records that are filtered out with a filtering rule set.
Note: Path-tracking data is not recorded for decisions that are included in the current decision.
TIP This path-tracking analysis uses the data that is in the pathID column in the test results output table. To analyze path-tracking data that is in the subject contact history, use the %DCM_DECISION_PATH_FREQUENCY, %DCM_DECISION_PATH_NODES, and %DCM_DECISION_NODES_COUNTS macros. For more information, see SAS Intelligent Decisioning: Macro Guide.
1 Click Decision Path Tracking in the navigation pane.
2 Click Run Path Tracking to run a decision path analysis.
3 Click Analysis and Plot to display a Sankey diagram that shows the flow of the input records through the rule sets, models, code files, and conditions in the decision. The numbers in the diagram are the number of rows in the input table that followed each path.
Note: Nodes that are not executed are shown to the right of the Sankey diagram.
4 Click Node Count in the navigation pane to display a table showing the number of input records evaluated at each rule set, code file, and model node in the decision.
Testing a Decision 81

5 Click Close to close the Test Results window.
Working with Test Output Data
After you run a test, you can work with the output table in other SAS applications to analyze the data, create and compare models, discover relationships hidden in the data, and generate reports based on the data.
Note: The actions available to you depend on the applications that are available at your site.
On the Test Results page, select the Output table in the navigation pane, click Actions, and select one of the following options:
Explore Lineageopens SAS Lineage Viewer. SAS Lineage Viewer enables you to better understand the relationships between objects in your SAS Viya applications. These objects include data, transformation processes, reports, and visualizations. For more information, see SAS Lineage Viewer: User’s Guide.
Explore and Visualize Dataopens the output table in SAS Visual Analytics. SAS Visual Analytics enables you to create, test, and compare models based on the patterns discovered during exploration of the data. You can export the model before or after performing model comparison for use with other SAS products or to put the model into production. SAS Visual Analytics supports a range of visualization, discovery, and reporting features. For more information, see SAS Visual Analytics: Overview.
Prepare Dataopens the output table in SAS Data Studio. SAS Data Studio enables you to perform data transforms such as joining tables, appending data to a table, transposing columns, creating calculated columns, and so on. For more information, see SAS Data Studio: User’s Guide.
Manage Dataopens SAS Data Explorer. SAS Data Explorer enables you to import data, connect to databases, and load tables into memory. For more information, see SAS Data Explorer: User’s Guide.
Publishing and Validating a Decision
Publishing a Decision
Introduction to Publishing
Publishing content makes it available to other applications. Publishing a decision creates an entity that can be managed and run in another environment. For example, if you publish content to the SAS Micro Analytic Service destination, SAS Intelligent Decisioning creates a DS2 package. The published module becomes a callable REST API endpoint.
Note: The publishing destinations that are available are determined by your system administrator. See SAS Viya Administration: Publishing Destinations for more information.
Publishing Decisions That Include Analytic Store Models
If you are publishing a decision that includes an analytic store model, the model’s analytic store (ASTORE) file must be in the /opt/sas/viya/config/data/modelsvr/astore directory on the CAS server for the destination to which you are publishing the decision. The ASTORE file is copied to that location when you do any of the following:
82 Chapter 6 / Working with Decisions

n run a decision test for the decision that uses the analytic store model
n set the model as a project champion in SAS Model Manager
n publish the model to SAS Micro Analytic Service from SAS Model Manager
If you are publishing a decision that includes an analytic store model and the model has not been set as a project champion or published from SAS Model Manager, you must test the decision before you publish it. For more information, see “Configuring Access to Analytic Store Models” in SAS Intelligent Decisioning: Administrator’s Guide and “Testing a Decision” on page 76.
Publish Decisions
TIP When you publish decisions from the Decisions category view, SAS Intelligent Decisioning publishes the latest version of the decisions. If you publish a single decision by first opening the decision, you can select the version that you want to publish.
TIP To view the publishing history for a decision, open the decision, and click the History tab.
Note: In content that is published to a SAS Micro Analytic Service destination, the values of date or datetime input variables must be numeric. They cannot be formatted values such as 18jul2019.
To publish the latest versions of one or more decisions:
1 On the Decisions page, select one or more decisions, click , and select Publish.
Alternatively, to publish a selected version of one decision:
a On the Decisions page, select the decision, and click .
b Click the Versions tab.
c Select the version that you want to publish, click Set Version, and then click Publish.
The Publish Decisions window appears.
2 Select the destination to which you want to publish.
Note: The publishing destinations that are available to you depend on what is configured at your site. See SAS Viya Administration: Publishing Destinations for more information.
3 (Optional) In the Items to Publish section, edit the Published Name if you do not want to use the default name for the published module. The maximum length and character restrictions differ depending on your destination. See Table 6.2.
Table 6.2 Requirements and Restrictions for Published Names
DestinationMaximum Length Requirements And Restrictions
SAS Micro Analytic Service
32 The published name must start with a letter or underscore. It cannot contain spaces, special characters, or multi-byte characters.
Teradata 128 The published name must start with a letter or an underscore. It cannot contain spaces, special characters, or multi-byte characters.
SAS Cloud Analytic Services (CAS)
128 The published name cannot contain single or double quotation marks.
Apache Hadoop 128 The published name cannot contain colons (:) or double quotation marks.
Publishing and Validating a Decision 83

4 (Optional) If you have previously published the decision, select the check box in the Replace column in order to replace the previously published item of the same name in the same destination.
5 (Optional) Select the Rule Fired Tracking check box if you want the published decision to generate rule-fired data.
Note: You cannot select this option if you are publishing content to SAS Micro Analytic Service.
Note: Rule-fired data is not recorded for decisions that are included in the current decision.
Note: This rule-fired data is recorded in the ruleFiredFlags column in the output table. The rule-fired data that is recorded when you select Record rule-fired data for a record contacts node is recorded in the subject contact history.
6 (Optional) Select the Path Tracking check box if you want the published decision to generate path tracking data.
Note: You cannot select this option if you are publishing content to SAS Micro Analytic Service.
Note: Path-tracking data is not recorded for decisions that are included in the current decision.
Note: This path-tracking data is recorded in the pathID column in the output table. The path-tracking data that is recorded when you select Record path tracking for a record contacts node is recorded in the subject contact history.
7 Publish the decisions.
n To publish content to a SAS Cloud Analytic Services (CAS) destination, you must reload the CAS destination table in order to make the newly published item available to other applications. Select one of the following options to publish the decision:
Publishpublishes the decisions and automatically reloads the CAS destination table. If another user is executing the code for an item that was previously published to CAS while the destination table is being reloaded, reloading the table might cause temporary problems with accessing the table content. After the table is reloaded, all authorized users can access all items in the table.
Publish without reloadingpublishes the decisions but does not reload the CAS destination table. You must manually reload the table in order for the newly published items to be accessible.
n To publish the decisions to Teradata, Apache Hadoop, or SAS Micro Analytic Service destinations, click Publish. You do not need to reload the destination table when you publish to these destinations.
The Publishing Results window appears. It displays the names of the published items, their status, and information about any issues that were encountered during the publishing process.
8 After the status changes to Published successfully, click Close to close the Publishing Results window.
9 (Optional) Click Close to close the decision.
Validate a Published Decision
You can test the published decision in the publishing destination. When you publish the decision, a validation test is automatically defined for that decision in that destination. To run the publishing validation test:
1 On the Scoring tab, click the Publishing Validation tab. The icon in the Status column indicates that the test has been defined.
2 Click on the test name. The Edit Publishing Validation Test window appears.
84 Chapter 6 / Working with Decisions

Note: To generate the name of the publishing validation test, SAS Intelligent Decisioning appends a timestamp to the decision name. The timestamp indicates when the decision was published.
3 (Optional) Click for the Location field, and select the folder where you want to save the test definition and results.
TIP Selecting a location is optional, but it is highly recommended. Storing test definitions and test results in a folder simplifies the tasks of setting permissions and transferring the test files.
4 Click , and select the input table for the test.
Note: If the input table contains a character column, and that column contains control characters in any row, do not use the table as input for publishing validation tests.
Note: If you are validating content that was published to SAS Micro Analytic Service, the time required to run the test depends on the number of worker threads on your system, the number of threads in the middle tier, and the network latency between CAS and the middle tier server. It is recommended that you select an input table with as few input records as needed to accurately test the published content. See SAS Micro Analytic Service: Programming and Administration Guide for more information.
5 (Optional) Expand the Advanced section, click , and select a different library to store the validation test output data.
6 Click Run to run the test. Alternatively, click Save to save the test definition without running it.
The status of the test is indicated by the icon in the Status column.
Icon Status
The test is not ready to run. You must edit the test and select an input data source.
The test is defined correctly and is ready to run.
The test is running.
The test completed successfully.
The test completed, but warnings were issued in the SAS log. The URI to the log file is shown on the Test Results page. See Step 14.
The test did not run successfully. Check the SAS log for information. The URI to the log file is shown on the Test Results page. See Step 14.
7 Click in the Results column to view the test results.
8 On the Test Results page, click Test Results in the navigation pane to display the URIs and other information for the test. Click Output, Code, or Log to display the output data set, the code that was generated by SAS Intelligent Decisioning, or the SAS log that was generated when the code was run.
TIP On the Output page, you can click on the values of character variables to display the entire value in a separate window. For data grid variables, you can choose to view the variable value in three different formats:
n Click the Data Grid tab to view the data grid value as a table.
n Click the Formatted tab to view the data grid as a formatted JSON character string.
Publishing and Validating a Decision 85

n Click the Plain tab to view the data grid as an unformatted character string.
TIP On the Log page, you can click to download the log file.
9 Click Close to close the decision.
Executing Published ContentHow you execute published content depends on the destination to which the content is published.
Executing Content Published to SAS Micro Analytic Service Destinations
The user who is executing the published content must be authenticated. In SAS Viya, authentication options vary, based on which interface and operating system are used in your environment. External mechanisms include direct LDAP authentication, host authentication, Kerberos, Security Assertion Markup Language (SAML), and OAuth 2.0 with OpenID Connect. For additional information, see SAS Viya Administration: Authentication
When a rule set or decision is published from SAS Intelligent Decisioning to a SAS Micro Analytic Service destination, an EXECUTE step is created in the published module. For information about the request and response data formats used in this step, see Execute a step in the REST API documentation for the Micro Analytic Score API.
Executing Content Published to Other Destinations
To execute content that has been published to SAS Cloud Analytic Services (CAS), Teradata, or Apache Hadoop, use the CAS Model Publishing and Scoring action set. For more information, see SAS Visual Analytics: Programming Guide.
You can view examples of using this CAS action set to execute published content by viewing the test results that are generated by publishing validation tests. On the Test Results page for a decision or rule set, click Code to display the code that was generated by SAS Intelligent Decisioning. For information about running publishing validation tests and viewing the results, see “Validate a Published Decision” on page 84 and “Validate a Published Rule Set” on page 31.
Content Executed by Published Decisions
When you publish a decision to a SAS Micro Analytic Service destination, all of the published decision’s content (the SAS Micro Analytic Service module) is locked except treatment groups. Updates to rule sets, models, lookup tables, or custom code files that are used in the decision do not affect the published module. If a treatment group is updated and the updated version is activated, that updated version is used by the published module.
When you publish a decision to a CAS, Teradata, or Hadoop destination, all of the published decision’s content, including treatment groups, is locked. Updates to the objects used in the decision are not used by the published module.
86 Chapter 6 / Working with Decisions