SAP MDM 2.00 SP05
263
Configuration Guide: SAP MDM Master Data Harmonization und Central Master Data Management SAP MDM 2.00 SP05 August 23, 2004
-
Upload
khangminh22 -
Category
Documents
-
view
2 -
download
0
Transcript of SAP MDM 2.00 SP05

Configuration Guide:
SAP MDM
Master Data Harmonization und
Central Master Data Management
SAP MDM 2.00 SP05
August 23, 2004

© Copyright 2004 SAP AG. All rights reserved. No part of this publication may be reproduced or transmitted in any form or for any purpose without the express permission of SAP AG. The information contained herein may be changed without prior notice. Some software products marketed by SAP AG and its distributors contain proprietary software components of other software vendors. Microsoft, Windows, Outlook, and PowerPoint are registered trademarks of Microsoft Corporation. IBM, DB2, DB2 Universal Database, OS/2, Parallel Sysplex, MVS/ESA, AIX, S/390, AS/400, OS/390, OS/400, iSeries, pSeries, xSeries, zSeries, z/OS, AFP, Intelligent Miner, WebSphere, Netfinity, Tivoli, and Informix are trademarks or registered trademarks of IBM Corporation in the United States and/or other countries. Oracle is a registered trademark of Oracle Corporation. UNIX, X/Open, OSF/1, and Motif are registered trademarks of the Open Group. Citrix, ICA, Program Neighborhood, MetaFrame, WinFrame, VideoFrame, and MultiWin are trademarks or registered trademarks of Citrix Systems, Inc. HTML, XML, XHTML and W3C are trademarks or registered trademarks of W3C®, World Wide Web Consortium, Massachusetts Institute of Technology. Java is a registered trademark of Sun Microsystems, Inc. JavaScript is a registered trademark of Sun Microsystems, Inc., used under license for technology invented and implemented by Netscape. MaxDB is a trademark of MySQL AB, Sweden.
SAP, R/3, mySAP, mySAP.com, xApps, xApp, SAP NetWeaver, and other SAP products and services mentioned herein as well as their respective logos are trademarks or registered trademarks of SAP AG in Germany and in several other countries all over the world. All other product and service names mentioned are the trademarks of their respective companies. Data contained in this document serves informational purposes only. National product specifications may vary. These materials are subject to change without notice. These materials are provided by SAP AG and its affiliated companies ("SAP Group") for informational purposes only, without representation or warranty of any kind, and SAP Group shall not be liable for errors or omissions with respect to the materials. The only warranties for SAP Group products and services are those that are set forth in the express warranty statements accompanying such products and services, if any. Nothing herein should be construed as constituting an additional warranty. Disclaimer Some components of this product are based on Java™. Any code change in these components may cause unpredictable and severe malfunctions and is therefore expressively prohibited, as is any decompilation of these components. Any Java™ Source Code delivered with this product is only to be used by SAP’s Support Services and may not be modified or altered in any way. Documentation in the SAP Service Marketplace You can find this documentation at the following address: http://service.sap.com/instguides
SAP AG Neurottstraße 16 69190 Walldorf Germany T +49/18 05/34 34 24 F +49/18 05/34 34 20 www.sap.com

Terms for Included Open Source Software This SAP software contains also the third party open source software products listed below. Please note that for these third party products the following special terms and conditions shall apply.
For the HTTPClientStack library, the following conditions apply:
HTTPClientStack - a library to enable an easy programmatic access to the
HTTP protocol stack
Copyright © 2001 Ronald Tschalär
This library is free software; you can redistribute it and/or modify it under the
terms of the GNU Lesser General Public License as published by the Free
Software Foundation; either version 2 of the License, or (at your option) any
later version.
This library is distributed by in the hope that it will be useful, but WITHOUT
ANY WARRANTY; without even the implied warranty of
MERCHANTABILITY or FITNESS FOR A PARTICULAR PURPOSE. See
the GNU Lesser General Public License for more details.
SAP’s warranty and liability is subject to your end user license with SAP.
These warranties and liabilities are only on SAP’s behalf and not on behalf of
any other contributors. On behalf of all Contributors all liability for damages,
including direct, indirect, special, incidental and consequential damages, such
as lost profits is expressly excluded.
You should have received a copy of the GNU Lesser General Public License
along with this library; if not, write to the Free Software Foundation, Inc., 59
Temple Place, Suite 330, Boston, MA 02111-1307 USA
Ronald Tschalär
You should also get your employer (if you work as a programmer) or your
school, if any, to sign a "copyright disclaimer" for the library, if necessary.
Here is a sample; alter the names:
Yoyodyne, Inc., hereby disclaims all copyright interest in the library `Frob' (a
library for tweaking knobs) written by James Random Hacker.
<signature of Ty Coon>, 1 April 1990
Ty Coon, President of Vice
For the Jakarta Apache tool, the following conditions apply:
This product includes software developed by the Apache Software Foundation
(http://www.apache.org/).
The Apache Software License, Version 1.1
Copyright © 2000 The Apache Software Foundation. All rights reserved.
Redistribution and use in source and binary forms, with or without
modification, are permitted provided that the following conditions are met:
1. Redistributions of source code must retain the above copyright notice, this
list of conditions and the following disclaimer.
2. Redistributions in binary form must reproduce the above copyright notice,
this list of conditions and the following disclaimer in the documentation
and/or other materials provided with the distribution.

3. The end-user documentation included with the redistribution, if any, must
include the following acknowledgment:
"This product includes software developed by the Apache Software
Foundation (http://www.apache.org/)."
Alternately, this acknowledgment may appear in the software itself, if and
wherever such third-party acknowledgments normally appear.
4. The names "Apache" and "Apache Software Foundation", "Jakarta-Oro"
must not be used to endorse or promote products derived from this
software without prior written permission. For written permission, please
contact [email protected].
5. Products derived from this software may not be called "Apache" or
"Jakarta-Oro", nor may "Apache" or "Jakarta-Oro" appear in their name,
without prior written permission of the Apache Software Foundation.
THIS SOFTWARE IS PROVIDED ``AS IS'' AND ANY EXPRESSED OR
IMPLIED WARRANTIES, INCLUDING, BUT NOT LIMITED TO, THE
IMPLIED WARRANTIES OF MERCHANTABILITY AND FITNESS FOR
A PARTICULAR PURPOSE ARE DISCLAIMED. IN NO EVENT SHALL
THE APACHE SOFTWARE FOUNDATION OR ITS CONTRIBUTORS BE
LIABLE FOR ANY DIRECT, INDIRECT, INCIDENTAL, SPECIAL,
EXEMPLARY, OR CONSEQUENTIAL DAMAGES (INCLUDING, BUT
NOT LIMITED TO, PROCUREMENT OF SUBSTITUTE GOODS OR
SERVICES; LOSS OF USE, DATA, OR PROFITS; OR BUSINESS
INTERRUPTION) HOWEVER CAUSED AND ON ANY THEORY OF
LIABILITY, WHETHER IN CONTRACT, STRICT LIABILITY, OR TORT
(INCLUDING NEGLIGENCE OR OTHERWISE) ARISING IN ANY WAY
OUT OF THE USE OF THIS SOFTWARE, EVEN IF ADVISED OF THE
POSSIBILITY OF SUCH DAMAGE.
This software consists of voluntary contributions made by many individuals on
behalf of the Apache Software Foundation. For more information on the
Apache Software Foundation, please see http://www.apache.org/.
Portions of this software are based upon software originally written by Daniel
F. Savarese. We appreciate his contributions.
SAP and/or its distributors may offer, and charge a fee for, warranty, support,
indemnity or liability obligations to one or more recipients of the software.
However, SAP and/or its distributors may do so only on its/their own behalf,
and not on behalf of the Apache Software Foundation or its contributors.
For the JDom tool, the following conditions apply:
This product includes software developed by the JDOM Project
(http://www.jdom.org/)."
Copyright © 2000 Brett McLaughlin & Jason Hunter.
All rights reserved.
Redistribution and use in source and binary forms, with or without
modification, are permitted provided that the following conditions are met:
1. Redistributions of source code must retain the above copyright notice, this
list of conditions, and the following disclaimer.
2. Redistributions in binary form must reproduce the above copyright notice,
this list of conditions, and the disclaimer that follows these conditions in
the documentation and/or other materials provided with the distribution.
3. The name "JDOM" must not be used to endorse or promote products
derived from this software without prior written permission. For written
permission, please contact [email protected].
4. Products derived from this software may not be called "JDOM", nor may
"JDOM" appear in their name, without prior written permission from the
JDOM Project Management ([email protected]).

In addition, we request (but do not require) that you include in the end-user
documentation provided with the redistribution and/or in the software itself an
acknowledgement equivalent to the following:
"This product includes software developed by the JDOM Project
(http://www.jdom.org/)."
Alternatively, the acknowledgement may be graphical using the logos available
at http://www.jdom.org/images/logos.
THIS SOFTWARE IS PROVIDED ``AS IS'' AND ANY EXPRESSED OR
IMPLIED WARRANTIES, INCLUDING, BUT NOT LIMITED TO, THE
IMPLIED WARRANTIES OF MERCHANTABILITY AND FITNESS FOR
A PARTICULAR PURPOSE ARE DISCLAIMED. IN NO EVENT SHALL
THE APACHE SOFTWARE FOUNDATION OR ITS CONTRIBUTORS BE
LIABLE FOR ANY DIRECT, INDIRECT, INCIDENTAL, SPECIAL,
EXEMPLARY, OR CONSEQUENTIAL DAMAGES (INCLUDING, BUT
NOT LIMITED TO, PROCUREMENT OF SUBSTITUTE GOODS OR
SERVICES; LOSS OF USE, DATA, OR PROFITS; OR BUSINESS
INTERRUPTION) HOWEVER CAUSED AND ON ANY THEORY OF
LIABILITY, WHETHER IN CONTRACT, STRICT LIABILITY, OR TORT
(INCLUDING NEGLIGENCE OR OTHERWISE) ARISING IN ANY WAY
OUT OF THE USE OF THIS SOFTWARE, EVEN IF ADVISED OF THE
POSSIBILITY OF SUCH DAMAGE.
This software consists of voluntary contributions made by many individuals on
behalf of the JDOM Project and was originally created by Brett McLaughlin
([email protected]) and Jason Hunter ([email protected]). For more information
on the JDOM Project, please see http://www.jdom.org/.
For the Jython tool, the following conditions apply:
HISTORY OF THE SOFTWARE
JPython was created in late 1997 by Jim Hugunin. Jim was also the primary
developer while he was at CNRI. In February 1999 Barry Warsaw took over as
primary developer and released JPython version 1.1.
In October 2000 Barry helped move the software to SourceForge where it was
renamed to Jython. Jython 2.0 is developed by a group of volunteers.
The standard library is covered by the BeOpen / CNRI license. See the
Lib/LICENSE file for details.
The oro regular expresion matcher is covered by the apache license. See the
org/apache/LICENSE file for details.
JYTHON CHANGES SOFTWARE LICENSE
Copyright © 2000, Jython Developers
All rights reserved.
Redistribution and use in source and binary forms, with or without
modification, are permitted provided that the following conditions are met:
- Redistributions of source code must retain the above copyright notice,
this list of conditions and the following disclaimer.
- Redistributions in binary form must reproduce the above copyright
notice, this list of conditions and the following disclaimer in the
documentation and/or other materials provided with the distribution.
- Neither the name of the Jython Developers nor the names of its
contributors may be used to endorse or promote products derived from
this software without specific prior written permission.
THIS SOFTWARE IS PROVIDED BY THE COPYRIGHT HOLDERS AND
CONTRIBUTORS ``AS IS'' AND ANY EXPRESS OR IMPLIED
WARRANTIES, INCLUDING, BUT NOT LIMITED TO, THE IMPLIED
WARRANTIES OF MERCHANTABILITY AND FITNESS FOR A
PARTICULAR PURPOSE ARE DISCLAIMED. IN NO EVENT SHALL
THE REGENTS OR CONTRIBUTORS BE LIABLE FOR ANY DIRECT,
INDIRECT, INCIDENTAL, SPECIAL, EXEMPLARY, OR
CONSEQUENTIAL DAMAGES (INCLUDING, BUT NOT LIMITED TO,
PROCUREMENT OF SUBSTITUTE GOODS OR SERVICES; LOSS OF
USE, DATA, OR PROFITS; OR BUSINESS INTERRUPTION) HOWEVER
CAUSED AND ON ANY THEORY OF LIABILITY, WHETHER IN
CONTRACT, STRICT LIABILITY, OR TORT (INCLUDING NEGLIGENCE
OR OTHERWISE) ARISING IN ANY WAY OUT OF THE USE OF THIS
SOFTWARE, EVEN IF ADVISED OF THE POSSIBILITY OF SUCH
DAMAGE.

JPYTHON SOFTWARE LICENSE.
IMPORTANT: PLEASE READ THE FOLLOWING AGREEMENT
CAREFULLY.
BY CLICKING ON THE "ACCEPT" BUTTON WHERE INDICATED, OR
BY INSTALLING, COPYING OR OTHERWISE USING THE SOFTWARE,
YOU ARE DEEMED TO HAVE AGREED TO THE TERMS AND
CONDITIONS OF THIS AGREEMENT.
JPython version 1.1.x
1. This LICENSE AGREEMENT is between the Corporation for National
Research Initiatives, having an office at 1895 Preston White Drive,
Reston, VA 20191 ("CNRI"), and the Individual or Organization
("Licensee") accessing and using JPython version 1.1.x in source or
binary form and its associated documentation as provided herein
("Software").
2. Subject to the terms and conditions of this License Agreement, CNRI
hereby grants Licensee a non-exclusive, non-transferable, royalty-free,
world-wide license to reproduce, analyze, test, perform and/or display
publicly, prepare derivative works, distribute, and otherwise use the
Software alone or in any derivative version, provided, however, that
CNRI's License Agreement and CNRI's notice of copyright, i.e.,
"Copyright ©1996-1999 Corporation for National Research Initiatives;
All Rights Reserved" are both retained in the Software, alone or in any
derivative version prepared by Licensee.
3. Alternatively, in lieu of CNRI's License Agreement, Licensee may
substitute the following text (omitting the quotes), provided, however,
that such text is displayed prominently in the Software alone or in any
derivative version prepared by Licensee: "JPython (Version 1.1.x) is
made available subject to the terms and conditions in CNRI's License
Agreement. This Agreement may be located on the Internet using the
following unique, persistent identifier (known as a handle): 1895.22/1006.
The License may also be obtained from a proxy server on the Web using
the following URL: http://hdl.handle.net/1895.22/1006."
In the event Licensee prepares a derivative work that is based on or
incorporates the Software or any part thereof, and wants to make the
derivative work available to the public as provided herein, then Licensee
hereby agrees to indicate in any such work, in a prominently visible way,
the nature of the modifications made to CNRI's Software.
4. Licensee may not use CNRI trademarks or trade name, including JPython
or CNRI, in a trademark sense to endorse or promote products or services
of Licensee, or any third party. Licensee may use the mark JPython in
connection with Licensee's derivative versions that are based on or
incorporate the Software, but only in the form "JPython-based
___________________," or equivalent.
5. CNRI is making the Software available to Licensee on an "AS IS" basis.
CNRI MAKES NO REPRESENTATIONS OR WARRANTIES,
EXPRESS OR IMPLIED. BY WAY OF EXAMPLE, BUT NOT
LIMITATION, CNRI MAKES NO AND DISCLAIMS ANY
REPRESENTATION OR WARRANTY OF MERCHANTABILITY OR
FITNESS FOR ANY PARTICULAR PURPOSE OR THAT THE USE
OF THE SOFTWARE WILL NOT INFRINGE ANY THIRD PARTY
RIGHTS.
6. CNRI SHALL NOT BE LIABLE TO LICENSEE OR OTHER USERS
OF THE SOFTWARE FOR ANY INCIDENTAL, SPECIAL OR
CONSEQUENTIAL DAMAGES OR LOSS AS A RESULT OF USING,
MODIFYING OR DISTRIBUTING THE SOFTWARE, OR ANY
DERIVATIVE THEREOF, EVEN IF ADVISED OF THE POSSIBILITY
THEREOF. SOME STATES DO NOT ALLOW THE LIMITATION OR
EXCLUSION OF LIABILITY SO THE ABOVE DISCLAIMER MAY
NOT APPLY TO LICENSEE.
7. This License Agreement may be terminated by CNRI (i) immediately
upon written notice from CNRI of any material breach by the Licensee, if
the nature of the breach is such that it cannot be promptly remedied; or
(ii) sixty (60) days following notice from CNRI to Licensee of a material
remediable breach, if Licensee has not remedied such breach within that
sixty-day period.
8. This License Agreement shall be governed by and interpreted in all
respects by the law of the State of Virginia, excluding conflict of law
provisions. Nothing in this Agreement shall be deemed to create any
relationship of agency, partnership, or joint venture between CNRI and
Licensee.
9. By clicking on the "ACCEPT" button where indicated, or by installing,
copying or otherwise using the Software, Licensee agrees to be bound by
the terms and conditions of this License Agreement.

For the RegEX Apache tool, the following conditions apply:
This product includes software developed by the Apache Software Foundation
(http://www.apache.org/)."
The Apache Software License, Version 1.1
Copyright © 1999 The Apache Software Foundation. All rights
reserved.
Redistribution and use in source and binary forms, with or without
modification, are permitted provided that the following conditions are met:
1. Redistributions of source code must retain the above copyright notice, this
list of conditions and the following disclaimer.
2. Redistributions in binary form must reproduce the above copyright notice,
this list of conditions and the following disclaimer in the documentation
and/or other materials provided with the distribution.
3. The end-user documentation included with the redistribution, if any, must
include the following acknowlegement:
"This product includes software developed by the Apache Software
Foundation (http://www.apache.org/)."
Alternately, this acknowlegement may appear in the software itself, if and
wherever such third-party acknowlegements normally appear.
4. The names "The Jakarta Project", "Jakarta-Regexp", and "Apache
Software Foundation" must not be used to endorse or promote products
derived from this software without prior written permission. For written
permission, please contact [email protected].
5. Products derived from this software may not be called "Apache" nor may
"Apache" appear in their names without prior written permission of the
Apache Group.
THIS SOFTWARE IS PROVIDED ``AS IS'' AND ANY EXPRESSED OR
IMPLIED WARRANTIES, INCLUDING, BUT NOT LIMITED TO, THE
IMPLIED WARRANTIES OF MERCHANTABILITY AND FITNESS FOR
A PARTICULAR PURPOSE ARE DISCLAIMED. IN NO EVENT SHALL
THE APACHE SOFTWARE FOUNDATION OR ITS CONTRIBUTORS BE
LIABLE FOR ANY DIRECT, INDIRECT, INCIDENTAL, SPECIAL,
EXEMPLARY, OR CONSEQUENTIAL DAMAGES (INCLUDING, BUT
NOT LIMITED TO, PROCUREMENT OF SUBSTITUTE GOODS OR
SERVICES; LOSS OF USE, DATA, OR PROFITS; OR BUSINESS
INTERRUPTION) HOWEVER CAUSED AND ON ANY THEORY OF
LIABILITY, WHETHER IN CONTRACT, STRICT LIABILITY, OR TORT
(INCLUDING NEGLIGENCE OR OTHERWISE) ARISING IN ANY WAY
OUT
OF THE USE OF THIS SOFTWARE, EVEN IF ADVISED OF THE
POSSIBILITY OF SUCH DAMAGE.
This software consists of voluntary contributions made by many individuals on
behalf of the Apache Software Foundation. For more information on the
Apache Software Foundation, please see http://www.apache.org/.
SAP and/or its distributors may offer, and charge a fee for, warranty, support,
indemnity or liability obligations to one or more recipients of the software.
However, SAP and/or its distributors may do so only on its/their own behalf,
and not on behalf of the Apache Software Foundation or its contributors.

For SAX, the following conditions apply:
SAX 2.0
I hereby abandon any property rights to SAX 2.0 (the Simple API for XML),
and release all of the SAX 2.0 source code, compiled code, and documentation
contained in this distribution into the Public Domain. SAX comes with NO
WARRANTY or guarantee of fitness for any purpose.
David Megginson, [email protected]
2000-05-05
For the Struts Apache tool, the following conditions apply:
This product includes software developed by the Apache Software Foundation
(http://www.apache.org/).
The Apache Software License, Version 1.1
Copyright © 1999-2001 The Apache Software Foundation. All rights reserved.
Redistribution and use in source and binary forms, with or without
modification, are permitted provided that the following conditions are met:
1. Redistributions of source code must retain the above copyright notice, this
list of conditions and the following disclaimer.
2. Redistributions in binary form must reproduce the above copyright notice,
this list of conditions and the following disclaimer in the documentation
and/or other materials provided with the distribution.
3. The end-user documentation included with the redistribution, if any, must
include the following acknowlegement:
"This product includes software developed by the Apache Software
Foundation (http://www.apache.org/)."
Alternately, this acknowlegement may appear in the software itself, if and
wherever such third-party acknowlegements normally appear.
4. The names "The Jakarta Project", "Struts", and "Apache Software
Foundation" must not be used to endorse or promote products derived
from this software without prior written permission. For written
permission, please contact [email protected].
5. Products derived from this software may not be called "Apache" nor may
"Apache" appear in their names without prior written permission of the
Apache Group.
THIS SOFTWARE IS PROVIDED ``AS IS'' AND ANY EXPRESSED OR
IMPLIED WARRANTIES, INCLUDING, BUT NOT LIMITED TO, THE
IMPLIED WARRANTIES OF MERCHANTABILITY AND FITNESS FOR
A PARTICULAR PURPOSE ARE DISCLAIMED. IN NO EVENT SHALL
THE APACHE SOFTWARE FOUNDATION OR ITS CONTRIBUTORS BE
LIABLE FOR ANY DIRECT, INDIRECT, INCIDENTAL, SPECIAL,
EXEMPLARY, OR CONSEQUENTIAL DAMAGES (INCLUDING, BUT
NOT LIMITED TO, PROCUREMENT OF SUBSTITUTE GOODS OR
SERVICES; LOSS OF USE, DATA, OR PROFITS; OR BUSINESS
INTERRUPTION) HOWEVER CAUSED AND ON ANY THEORY OF
LIABILITY, WHETHER IN CONTRACT, STRICT LIABILITY, OR TORT
(INCLUDING NEGLIGENCE OR OTHERWISE) ARISING IN ANY WAY
OUT OF THE USE OF THIS SOFTWARE, EVEN IF ADVISED OF THE
POSSIBILITY OF SUCH DAMAGE.
This software consists of voluntary contributions made by many individuals on
behalf of the Apache Software Foundation. For more information on the
Apache Software Foundation, please see http://www.apache.org/.
SAP and/or its distributors may offer, and charge a fee for, warranty, support,
indemnity or liability obligations to one or more recipients of the software.
However, SAP and/or its distributors may do so only on its/their own behalf,
and not on behalf of the Apache Software Foundation or its contributors.

Typographic Conventions
Type Style Description
Example Text Words or characters quoted from the screen. These include field names, screen titles, pushbuttons labels, menu names, menu paths, and menu options.
Cross-references to other documentation
Example text Emphasized words or phrases in body text, graphic titles, and table titles
EXAMPLE TEXT Technical names of system objects. These include report names, program names, transaction codes, table names, and key concepts of a programming language when they are surrounded by body text, for example, SELECT and INCLUDE.
Example text Output on the screen. This includes file and directory names and their paths, messages, names of variables and parameters, source text, and names of installation, upgrade and database tools.
Example text Exact user entry. These are words or characters that you enter in the system exactly as they appear in the documentation.
<Example text>
Variable user entry. Angle brackets indicate that you replace these words and characters with appropriate entries to make entries in the system.
EXAMPLE TEXT Keys on the keyboard, for example, F2 or ENTER.
Icons
Icon Meaning
Caution
Example
Note
Recommendation
Syntax
Additional icons are used in SAP Library documentation to help you identify different types of information at a glance. For more information, see Help on Help → General Information Classes and Information Classes for Business Information Warehouse on the first page of any version of SAP Library.

SAP MDM Content Consolidation: Configuration Guide for MDM 2
SAP MDM Content Consolidation: Configuration Guide for MDM 2
10 23.08.2004
Contents SAP MDM Content Consolidation: Configuration Guide for MDM 2.00..........................................................................................14
1 Versioning.................................................................................................. 15 2 Hints on Reading and Decision Making .................................................. 21 3 Connecting a New Master Data Client ..................................................... 26 4 Documentation Landscape for SAP Solutions and Business Scenarios ...................................................................................................... 30 5 SAP Notes .................................................................................................. 32 6 Transport of Settings in System Landscapes......................................... 33 7 Further Information ................................................................................... 38 8 General Settings........................................................................................ 39
8.1 Security in MDM Scenarios ...........................................................................................40 8.1.1 Configuring SSL for the CI..........................................................................................44 8.1.2 SP03ff: Encryption in the CI........................................................................................44
8.2 Portal Environment ........................................................................................................47 8.2.1 Defining the Portal Server for the People-Centric UI..................................................52 8.2.2 Connecting Backend Systems to the Portal ...............................................................54 8.2.3 Install and Configure Business Package for CRM......................................................60 8.2.4 EP 5.0: Configuring the Business Package for Portal Users......................................61
8.3 User Management in SAP MDM ....................................................................................62 8.3.1 Recommended Scenario for User Management in SAP MDM ..................................62 8.3.2 SP03ff: Composite Roles in Master Data Management .............................................67 8.3.3 Single Roles in Master Data Management .................................................................68 8.3.4 Roles for Remote Users in Master Data Management...............................................70 8.3.5 Configuring UME 3.0 in the MDM Scenario (EP 5.0 and EP 6.0) ..............................72 8.3.6 Executing User Definition in the LDAP, MDM System, or UME 4.0 ...........................76 8.3.7 Assigning Roles in the Portal......................................................................................77 8.3.8 Making Role Assignments for CI Roles in the UME ...................................................78 8.3.9 Assigning Roles in the Backend Systems ..................................................................80
8.4 People-Centric User Interface .......................................................................................81 8.4.1 Activating the BSP Application ...................................................................................81 8.4.2 Tailoring of the UI Framework ....................................................................................82
8.5 Unicode ...........................................................................................................................82 8.5.1 Configuring SAP GUI for Unicode ..............................................................................82 8.5.2 Connecting Non-Unicode Systems.............................................................................82
8.6 Defining a BW Client in the MDM System....................................................................83 8.7 Defining Number Assignment in the MDM Environment ...........................................84
8.7.1 Using Harmonized Master Data IDs ...........................................................................84 8.7.2 Defining Number Assignment for Master Data Transfer to the MDM System............88 8.7.3 Defining System Access for Generating IDs ..............................................................89
8.8 Solution Manager ...........................................................................................................90 8.8.1 Defining the System Landscape .................................................................................90 8.8.2 SP02/03ff: Customizing Distribution and ID Mapping in MDM Scenarios ..................91 8.8.3 Graphical Overview: Customizing ID Mapping ...........................................................93 8.8.4 SP02/SP03ff: Configuring Customizing Distribution...................................................93

SAP MDM Content Consolidation: Configuration Guide for MDM 2
23.08.2004 11
8.8.5 Configuring Customizing ID Mapping in the Solution Manager..................................99 8.9 SAP Content Integrator................................................................................................100
8.9.1 Starting and Stopping the Content Integrator ...........................................................100 8.9.2 Configuring XI: Defining the CI as a Technical and Business System.....................101 8.9.3 Configuring and Starting the Java Proxy Framework (CI) ........................................102 8.9.4 Configuring XI: Setting Up Message Exchange Between CI and MDM...................104 8.9.5 Creating MDM and MDC Systems in the CI .............................................................109 8.9.6 Defining a Target System for Data Replication from the CI......................................110 8.9.7 Activating Replication in the CI .................................................................................111 8.9.8 SP02: Configuring the RFC Adapter for MDM and CI ..............................................113 8.9.9 SP03ff: Configuring the RFC Adapter for MDM and CI ............................................116 8.9.10 Configuring CI Proxy Settings.................................................................................119 8.9.11 Defining System Access for Querying ID Mapping.................................................119
8.10 SAP Exchange Infrastructure....................................................................................122 8.10.1 Configuration of XI 2.0 and XI 3.0...........................................................................122 8.10.2 Configuring the Integration Server..........................................................................125 8.10.3 SP02/03ff: Defining Systems in the SLD ................................................................125 8.10.4 Connecting Business Systems with an Integration Engine to the Integration Server.................................................................................................................................126 8.10.5 Connecting Business Systems to the Integration Server Using the IDoc Adapter.127 8.10.6 XI Repository Contents for MDM Scenarios...........................................................127 8.10.7 Prepare Extensions for MDM XI Repository Contents ...........................................128
8.11 Configuring XI Mapping.............................................................................................130 8.11.1 Defining an RFC Connection for Reading Data Types from Solution Manager .....130 8.11.2 Defining Structural Mapping for Master Data .........................................................130 8.11.3 Configuring and Activating Customizing ID Mapping .............................................131 8.11.4 Configuring and Activating Data Reduction for Master Data..................................133 8.11.5 Including Mapping Programs in the Object Distribution..........................................135 8.11.6 Deactivate ID Mapping Query Temporarily ............................................................137
8.12 Configuring ALE Middleware in the Client System.................................................138 8.12.1 Sending Master Data Objects to the MDM System with ALE.................................139 8.12.2 Sending Master Data Objects to the MDM System Periodically with ALE .............140
9 Master Data Objects................................................................................ 141 9.1 Graphical Overview: Save Master Data Object .........................................................141 9.2 Graphical Overview: Save Master Data Object (Technical Communication) .........143 9.3 Graphical Overview: Synchronous Matching............................................................143 9.4 Graphical Overview: Process Flow of Synchronous Matching...............................144 9.5 Enterprise Structure.....................................................................................................145
9.5.1 Assigning Organizational Terms from Client Systems .............................................145 9.5.2 Setting Up the Enterprise Structure ..........................................................................146 9.5.3 Transporting the Enterprise Structure for ID Mapping..............................................147
9.6 Business Partner ..........................................................................................................147 9.6.1 Configuring Number Assignment..............................................................................148 9.6.2 Defining Identification Numbers and Tax Number Categories .................................148 9.6.3 Importing Bank Master Records ...............................................................................149 9.6.4 Importing Data in the Regional Structure .................................................................149 9.6.5 Defining Event Control for MDM System and Client Systems..................................150 9.6.6 Configuring XI: MDC R/3 Customer – MDM Business Partner ................................152 9.6.7 Configuring XI: MDC R/3 Vendor – MDM Business Partner ....................................158 9.6.8 Configuring XI: MDC ABA Business Partner – MDM Business Partner...................162
9.7 Products ........................................................................................................................166 9.7.1 Converting Attributes and Set Types........................................................................166 9.7.2 Defining Attributes and Set Types ............................................................................166 9.7.3 Generating a Base Hierarchy ...................................................................................167 9.7.4 SP05ff: Generating Product Categories from Material Types ..................................170

SAP MDM Content Consolidation: Configuration Guide for MDM 2
SAP MDM Content Consolidation: Configuration Guide for MDM 2
12 23.08.2004
9.7.5 SP05ff: Generating Product Categories from Material Groups ................................173 9.7.6 SP05ff: Set Up Product Category Applications ........................................................175 9.7.7 Configuring Number Assignment for Products .........................................................176 9.7.8 Loading MDM Product Categories into CI (Schema Upload)...................................176 9.7.9 Defining the Standard Evaluation Schema in the CI ................................................178 9.7.10 Configuring XI: MDC R/3 Material Types – MDM Product Categories...................179 9.7.11 Configuring XI: MDC R/3 Material Groups – MDM Product Categories.................181 9.7.12 Configuring XI: MDC R/3 Material – MDM Product ................................................183 9.7.13 Configuring XI: MDC CRM/SRM Product – MDM Product .....................................186
9.8 Purchasing Info Records.............................................................................................189 9.8.1 Configuring XI: MDC R/3 Purchasing Info Record – MDM Product Relationship ....189
9.9 Technical Assets ..........................................................................................................191 9.9.1 Maintaining Settings for Products .............................................................................192 9.9.2 Configuring XI: MDC R/3 Functional Location – MDM Technical Asset...................192 9.9.3 Configuring XI: MDM Technical Asset – MDC R/3 Functional Location...................195 9.9.4 Configuring XI: MDC R/3 Equipment – MDM Technical Asset.................................199 9.9.5 Configuring XI: MDM Technical Asset – MDC R/3 Equipment.................................202
9.10 Documents ..................................................................................................................206 9.10.1 Graphical Overview: Documents ............................................................................206 9.10.2 Installing and Configuring Document Services.......................................................207 9.10.3 Checking the Relation Service................................................................................209 9.10.4 EP 5.0: Configuring the Basic Authentication for WebDAV....................................210 9.10.5 Defining Object Links..............................................................................................211 9.10.6 Defining the HTTP Connection to Content Management .......................................212 9.10.7 Defining Document Services in the MDM System..................................................214 9.10.8 Defining the Path for Saving Documents in CM .....................................................214 9.10.9 Defining the RFC Destination for the Logical R/3 Source System .........................214 9.10.10 Configuring XI: MDC R/3 Document – MDM Document.......................................215 9.10.11 Configuring XI: MDM Document – MDC R/3 Document.......................................218
10 Master Data Exchange .......................................................................... 221 10.1 Central Settings for Master Data Exchange ............................................................221
10.1.1 Defining Distribution Systems.................................................................................221 10.1.2 Defining RFC Destinations for XI............................................................................221 10.1.3 Defining Settings for Object Types .........................................................................222
10.2 Process Control and Monitoring for Master Data Exchange .................................222 10.2.1 Defining Parameters for Process Types.................................................................223 10.2.2 Defining Process Chains ........................................................................................223 10.2.3 SP04: Lock Logic for Inbound Extraction Methods.................................................224 10.2.4 SP05ff: Lock Logic for Inbound Extraction Methods...............................................225
10.3 Master Data Transfer to the MDM System ...............................................................226 10.3.1 Generation of Staging Tables .................................................................................226 10.3.2 Extraction ................................................................................................................227
10.3.2.1 Graphical Overview: Master Data Extraction ....................................................228 10.3.2.2 Graphical Overview: Process Flow of Master Data Extraction .........................228 10.3.2.3 Configuring XI: Extraction from the Client System Using the IDoc Adapter .....229 10.3.2.4 Configuring XI: Extraction from the Client System Using the Message Interface...........................................................................................................................237 10.3.2.5 Replicating Metadata ........................................................................................242
10.3.3 Matching .................................................................................................................243 10.3.3.1 Graphical Overview: Asynchronous Matching ..................................................243 10.3.3.2 Graphical Overview: Process Flow of Asynchronous Matching .......................244 10.3.3.3 Configuring Matching in the MDM System........................................................245 10.3.3.4 CI Object Types.................................................................................................247 10.3.3.5 Monitoring the Upload Sequence in the CI .......................................................248

SAP MDM Content Consolidation: Configuration Guide for MDM 2
23.08.2004 13
10.3.3.6 Normalizing Business Partner Data (CI) ...........................................................248 10.3.3.7 Creating Matching Processes (CI) ....................................................................253 10.3.3.8 Creating Change Orders (CI) ............................................................................256 10.3.3.9 Creating Matching Profiles (CI) .........................................................................257 10.3.3.10 Configuring the Job Scheduler (CI).................................................................259
10.4 Graphical Overview: Post..........................................................................................262

SAP MDM Content Consolidation: Configuration Guide for MDM 2
14 23.08.2004
SAP MDM Content Consolidation: Configuration Guide for MDM 2.00 Purpose Business Scenario This Business Scenario configuration guide is valid for the Business Scenario SAP MDM Content Consolidation.
For more information about the SAP MDM Business Scenarios and application components, see the Master Guide for MDM 2.00 on the SAP Service Marketplace at service.sap.com/instguides → Installation and Upgrade Guides → SAP MDM.
Content This business scenario configuration guide tells you everything you need to do to successfully implement the business scenario SAP MDM Content Consolidation. The guide explains the sequence of the individual configuration activities and how these activities are interdependent.
You can find information about the following:
• General settings
• Master data objects
• Master data exchange
• Analytics
Target Group • Technical consultants
• Application consultants
• Project team members
• IT departments of SAP customers
Integration
See the delta guide for SAP MDM 2.00. This contains new and changed units that are relevant to the use of SAP MDM 2.00 with EP 6.0 and XI 3.0.
The delta guide is delivered as a separate document. You will find this on the SAP Service Marketplace at service.sap.com/instguides → Installation and Upgrade Guides → SAP MDM.
Documentation Landscape You have already set up the system landscape using the Master Guide and other documentation. You can find out what other documentation exists and where the newest versions are published under Documentation Landscape [Page 30].

1 Versioning
23.08.2004 15
Feedback for the Business Scenario Configuration Guide We would like to keep improving our Business Scenario Configuration Guide and are therefore interested in your feedback. If you find any errors in the configuration guide, create a message on the SAP Service Marketplace under service.sap.com/messages for the relevant SAP Master Data Management (SAP MDM) component.
1 Versioning In this section, you will find information about the latest changes made to the Configuration Guide.
Date of New Version
Change Unit
07/10/03 First version
07/24/03 Unit contains some new information Further Information [Page 38]
Hotfix for the SAP Enterprise Portal 5.0 changed
Portal Environment [Page 47]
The number of the SAP Note for the Business Package for SAP MDM 2.00 has changed.
SAP Notes [Page 32]
CI unit updated.
For the Content Consolidation scenario, the following units with subunits were inserted:
Technical Assets [Page 191]
Documents [Page 206]
"Procedure" section completed. Defining Distribution Systems [Page 221]
"Prerequisites" section completed. Transporting the Enterprise Structure for ID Mapping [Page 147]
Unit completely reworked. Defining System Access for Generating IDs [Page 89]
Unit completely reworked. Defining System Access for Querying ID Mapping [Page 119]
Graphic and layout of role assignment reworked.
Recommended Scenario for User Management in SAP MDM [Page 62]
Unit contains some new information Security in MDM Scenarios [Page 40]
08/28/03 First step in the section entitled "Procedure" reworked.
Activating the BSP Application [Page 81]
"Use" section completed. Executing User Definition in the LDAP or MDM System [Page 76]
"Use" section completed. In the "Procedure" section, the first and second step have been reworked.
Defining System Access for Querying ID Mapping [Page 119]
Unit contains some new information Defining a BW Client in the MDM System [Page 83]
Unit completely reworked. BW Extraction from MDM [External]

1 Versioning
SAP MDM Content Consolidation: Configuration Guide for MDM 2
16 23.08.2004
Documentation path completed in the "Prerequisites" section.
Configuring Customizing ID Mapping in the Solution Manager [Page 99]
Information about equipment and functional location completed in the "Procedure" section, step 4.
Sending Master Data Objects to the MDM System with ALE [Page 139]
09/25/2003 Structure extended (Master data objects → Purchasing info records)
See "new" entries
New Purchasing Info Records [Page 189]
New Configuring XI: MDC R/3 Purchasing Info Record – MDM Product Relationship [Page 189]
Additional text under "Content" SAP MDM Master Data Harmonization and Central Master Data Management [External]
New table created SAP Notes [Page 32]
Text changed Connecting Backend Systems to the Portal [Page 54]
"iView" replaced by "master iView" where appropriate
Configuring the Business Package for Portal Users [Page 61]
New steps in "Procedure" and example changed
Defining Basic Settings for Workflow [External]
Path for documentation changed Configuring Customizing ID Mapping in the Solution Manager [Page 99]
New message type Sending Master Data Objects to the MDM System Periodically with ALE [Page 140]
"Procedure" contains new text Defining Attributes and Set Types [Page 166]
"Procedure" changed and set type completed
Generating a Base Hierarchy [Page 167]
"Use" section changed Defining the HTTP Connection to Content Management [Page 212]
Name of interface has changed (DocumentMasterOut)
Configuring XI: MDM Document – MDC R/3 Document [Page 218]
"Use" text changed. Generation of Staging Tables [Page 226]
"Procedure" contains new text Defining Number Assignment for Master Data Distribution to MDC Systems [External]
"Procedure" text changed Converting Attributes and Set Types [Page 166]
"Use" section changed Defining Event Control for MDM System and Client Systems [Page 150]

1 Versioning
23.08.2004 17
Information about equipment and functional location deleted from the "Procedure" section, step 4.
Sending Master Data Objects to the MDM System with ALE [Page 139]
11/24/2003 Unit contains some new information Setting Up Access to Help [External]
Information about portal logger added. Portal Environment [Page 47]
"Procedure" section completed. Defining the Portal Server for the People-Centric UI [Page 52]
Paragraph added in "Procedure" section Defining the System Landscape [Page 90]
Step 3 completed in "Procedure" section. Customizing Distribution and ID Mapping in MDM Scenarios [Page 91]
"Procedure" section completed. Using Harmonized Master Data IDs [Page 84]
Unit completely reworked. Defining System Access for Querying ID Mapping [Page 119]
R/3 objects material types and material groups added in "Procedure" section.
Sending Master Data Objects to the MDM System with ALE [Page 139]
Unit completely reworked. Defining System Access for Generating IDs [Page 89]
In step 2 of the procedure, the condition in the second table has been changed.
Configuring XI: MDM Business Partner – MDC R/3 Customer [External]
Paragraph added in "Prerequisites" section.
Configuring XI: MDM Document – MDC R/3 Document [Page 218]
Unit contains some new information Defining RFC Destinations for XI [Page 221]
Paragraph added in "Procedure" section Defining Parameters for Process Types [Page 223]
"Prerequisites" section added. Defining Process Chains [Page 223]
"Use" section changed Configuring XI: Extraction from the Client System Using the IDoc Adapter [Page 229]
Unit contains some new information Configuring XI: Extraction from the Client System Using the Message Interface [Page 237]
All CI units reworked.
Unit contains some new information Configuring SSL for the CI [Page 44]
Units deleted, because no longer required.
Configuring XI: MDM Product Categories – CI Schemas,
Loading MDM Product Categories into CI (Schema Upload)
12/23/2003 Unit contains some new information SP03ff: Encryption in the CI [Page 44]
The XML tag in the code example was
Connecting Backend Systems to the Portal [Page 54]

1 Versioning
SAP MDM Content Consolidation: Configuration Guide for MDM 2
18 23.08.2004
changed to "Accessability", instead of the correct spelling "Accessibility", to match the actual example in the system.
Unit contains some new information
Single roles and composite roles can now be used.
SP03ff: Composite Roles in Master Data Management [Page 67]
Assignment of Single Roles to Composite Roles [Page 68]
• Step "Set up automatic distribution" added in "Procedure" section.
• Step "Generate External Service" deleted.
SP02/03ff: Defining Basic Settings for Workflow [External]
List for R/3_Material_Settyp completed in the "exceptions" section.
SP02/03ff: Customizing Distribution and ID Mapping in MDM Scenarios [Page 91]
Unit contains some new information
As of MDM 2.00 SP03, the configuration of the RFC adapter has changed.
SP03ff: Configuring the RFC Adapter for MDM and CI [Page 116]
Paragraph added in "Procedure" section SP02/03ff: Defining Systems in the SLD [Page 125]
Unit contains some new information SP03ff: Lock Logic for Inbound Extraction Methods [Page 224]
Paragraph added in "Prerequisites" section.
Configuring XI: Extraction from the Client System Using the IDoc Adapter [Page 229]
Unit contains some new information SP03ff: Setting up Confirmation for Distributions to the MDC [External]
The interface namespace for extraction has changed on the MDC side.
• For MDM Request: Inbound interface namespace changed
• For MDM Meta and MDM Receipt: Sender interface namespace changed
Configuring XI: Extraction from the Client System Using the Message Interface [Page 237]
03/08/2004 Note on optimizing system performance for CI added
SAP Notes [Page 32]
Information on portal roles added, roles for Solution Manager corrected
Recommended Scenario for User Management in SAP MDM [Page 62]
Unit contains some new information Roles for Remote Users in Master Data Management [Page 70]
Starting and Stopping the Content Integrator [Page 100]
Information on the generic object search added (for example, delta indexing, configuration in the repository manager, and symbols for object types)
SP04ff: Installation and Parameterization [External]
SP04ff: Indexing [External]

1 Versioning
23.08.2004 19
SP04ff: Schedule Periodic Delta Indexing [External]
Unit contains some new information Configuring Number Assignment [Page 148]
Object name for equipment corrected Sending Master Data Objects to the MDM System with ALE [Page 139]
Function name corrected Defining Event Control for MDM System and Client Systems [Page 150]
"Procedure" completed Configuring XI: MDM Business Partner – MDC R/3 Customer [External]
"Procedure" completed Configuring XI: MDM Business Partner – MDC R/3 Vendor [External]
"Use" completed Configuring XI: MDC ABA Business Partner – MDM Business Partner [Page 162]
"Use" completed Configuring XI: MDM Business Partner – MDC ABA Business Partner [External]
"Procedure" completed Configuring XI: MDM Product – MDC CRM/SRM Product [External]
"Procedure" completed Configuring XI: MDM Technical Asset – MDC R/3 Functional Location [Page 195]
"Procedure" completed Configuring XI: MDM Technical Asset – MDC R/3 Equipment [Page 202]
"Procedure" completed Defining Event Control for MDM System and Client Systems [Page 150]
Unit deleted BW Extraction From CI
5/17/2004 MDM 2.00 SP05
Delta Configuration Guide for changes for EP 6.0 and XI 3.0
The delta configuration guide contains new and changed units that are relevant to the use of SAP MDM 2.00 with EP 6.0 and XI 3.0.
The delta configuration guide is delivered as a separate document. You will find this on the SAP Service Marketplace at service.sap.com/instguides → Installation and Upgrade Guides → MDM.
Transport of Objects Between Two Distributed System Landscapes [Page 33]
Hints on Reading and Decision Making [Page 21]
(Content Consolidation)
New
Hints on Reading and Decision Making [External]
(Master Data Harmonization and

1 Versioning
SAP MDM Content Consolidation: Configuration Guide for MDM 2
20 23.08.2004
Central Master Data Management)
Connecting a New Master Data Client [Page 26]
(Content Consolidation)
Connecting a New Master Data Client [External]
(Master Data Harmonization and Central Master Data Management)
EP 5.0: Configuring the Basic Authentication for WebDAV [Page 210]
Unit reworked
EP 5.0: Configuring the Business Package for Portal Users [Page 61]
Graphical Overview: Generic Search [External]
Graphical Overview: Customizing ID Mapping [Page 93]
Graphical Overview: ID Mapping [External]
Graphical Overview: Save Master Data Object [Page 141]
Graphical Overview: Save Master Data Object (Technical Communication) [Page 143]
Graphical Overview: Synchronous Matching [Page 143]
Graphical Overview: Process Flow of Synchronous Matching [Page 144]
Graphical Overview: Documents [Page 206]
Graphical Overview: Master Data Extraction [Page 228]
Graphical Overview: Process Flow of Master Data Extraction [Page 228]
Graphical Overview: Asynchronous Matching [Page 243]
Graphical Overview: Process Flow of Asynchronous Matching [Page 244]
Graphical Overview: Posting [Page 262]
Graphical Overview: Master Data Distribution [External]
New units with graphical overviews
Graphical Overview: Process Flow of Master Data Distribution [External]
Unit reworked SP02/03ff: Defining Basic Settings for

2 Hints on Reading and Decision Making
23.08.2004 21
Workflow [External]
Defining System Access for Generating IDs [Page 89]
Defining System Access for Querying ID Mapping [Page 119]
SP05ff: Generating Product Categories from Material Types [Page 170]
SP05ff: Generating Product Categories from Material Groups [Page 173]
Configuration of the Connection from EP 6.0/UME 4.0 to the WAS Server [External]
SP05ff: Set Up Product Category Applications [Page 175]
New
SP03ff: Lock Logic for Inbound Extraction Methods [Page 225]
07/01/2004 Connecting Backend Systems to the Portal [Page 54]
Unit contains some new information
Process Control and Monitoring for Master Data Exchange [Page 222]
Configuring XI 3.00: MDC R/3 Customer – MDM Business Partner [External]
Configuring XI 3.00: MDM Business Partner – MDC R/3 Customer [External]
Delta Configuration Guide: new information in units
Configuring XI 3.00: MDC R/3 Vendor – MDM Business Partner [External]
08/23/2004 Generating a Base Hierarchy [Page 167]
SP02/03ff: Defining Basic Settings for Workflow [External]
SP05ff: Generating Product Categories from Material Types [Page 170]
Portal Environment [Page 47]
Unit completed/corrected
Defining Number Ranges for Subscriptions [External]
Section "Manual Postprocessing Required" corrected
Transport of Settings in System Landscapes [Page 33]
2 Hints on Reading and Decision Making The settings described here apply to the business scenario MDM Content Consolidation.

2 Hints on Reading and Decision Making
SAP MDM Content Consolidation: Configuration Guide for MDM 2
22 23.08.2004
See the delta configuration guide for SAP MDM 2.00. This contains new and changed units that are relevant to the use of SAP MDM 2.00 with EP 6.0 and XI 3.0.
The delta configuration guide is delivered as a separate document. You will find this on the SAP Service Marketplace at service.sap.com/instguides → Installation and Upgrade Guides → SAP MDM.
Use This unit tells you which units are relevant to you when configuring SAP MDM, which units you can leave until later, and which may not be relevant, depending on planned use. The units are divided into the following sections:
• Basic Settings
Required Settings (Fast Track) These settings must be defined in order to run the MDM system at all. You can only implement business processes in the MDM system after making these settings. Once these basic settings have been made, you can go on to the settings that are dependent on your use of the system.
Further Settings (Advanced Track)
You can perform the configuration steps in this unit in the course of an implementation project. However, the system can also run without these settings. For example, if a prototype MDM landscape is set up for evaluation purposes, you need not make the settings listed here.
You can also define these further settings in a later project phase.
• Settings Dependent on Planned Use
At the start of each MDM project, decisions on use must be made – for example, which master data objects a customer wants to implement. Depending on these decisions, specific configuration steps must be performed and others not. With the help of the questions in the "Settings Dependent on Planned Use" table, you can determine which units in the configuration guide are relevant to you and which settings must be defined.
Basic Settings – Required Settings (Fast Track) Area Unit
Security in MDM scenarios All of Security in MDM Scenarios [Page 40] with all subunits
Portal environment All of Portal Environment [Page 47] with all subunits
User management in SAP MDM All of Recommended Scenario for User Management in SAP MDM [Page 62] with all subunits
People-centric user interface • People-Centric User Interface [Page 81]
• Activating the BSP Application [Page 81]
Unicode Unicode [Page 82] with all subunits

2 Hints on Reading and Decision Making
23.08.2004 23
Defining a BW client in the MDM system All of Defining a BW Client in the MDM System [Page 83] with all subunits
Defining number assignment in the MDM environment
Defining System Access for Generating IDs [Page 89]
SAP Content Integrator All of SAP Content Integrator [Page 100] with all subunits
SAP Exchange Infrastructure
All of SAP Exchange Infrastructure [Page 122] with all subunits
See also the delta configuration guide mentioned above.
XI mapping All of Configuring XI Mapping [Page 130] with all subunits
Master data exchange Master Data Exchange [Page 221]
Central settings for master data exchange All of Central Settings for Master Data Exchange [Page 221] with all subunits
Process control and monitoring for master data exchange
All of Process Control and Monitoring for Master Data Exchange [Page 222] with all subunits
Master data transfer to the MDM system All of Master Data Transfer to the MDM System [Page 226] with all subunits
Basic Settings – Further Settings (Advanced Track) Area Unit
Access to help Setting Up Access to Help [External]
People-centric user interface Tailoring of the UI Framework [Page 82]
Unicode Connecting Non-Unicode Systems [Page 82]
Alert management Setting Up Alert Management [External]

2 Hints on Reading and Decision Making
SAP MDM Content Consolidation: Configuration Guide for MDM 2
24 23.08.2004
Settings Dependent on Planned Use
If you reply "yes" to a question, the units listed in the right-hand column must be processed. There may be subquestions for a question. Subquestions are slightly indented.
If you reply "No" to a question, you can also skip the relevant subquestions.
Settings Dependent on Planned Use
Question Relevant Units
Do you want to use the Solution Manager for distribution or mapping of Customizing settings?
All of Solution Manager [Page 90] with all subunits
Do you want to use harmonized master data IDs?
Using Harmonized Master Data IDs [Page 84]
Do you want to use non-harmonized master data IDs?
Defining Number Assignment for Master Data Transfer to the MDM System [Page 88]
Do you want to use other organizational units in addition to the "R/3 plant" in the MDM enterprise structure?
• Enterprise Structure [Page 145]
• Assigning Organizational Terms from Client Systems [Page 145]
• Setting Up the Enterprise Structure [Page 146]
• Transporting the Enterprise Structure for ID Mapping [Page 147]
Do you use R/3 systems as master data clients?
• Configuring ALE Middleware in the Client System [Page 138]
• Sending Master Data Objects to the MDM System with ALE [Page 139]
• Sending Master Data Objects to the MDM System Periodically with ALE [Page 140]
Do you want to implement the master data object business partner?
• Extraction [Page 227]
• Defining Identification Numbers and Tax Number Categories [Page 148]
Do you enter the bank details for your business partners?
Importing Bank Master Records [Page 149]
Do you use reference data from third parties for your regional structure, for example, postal code?
Importing Data in the Regional Structure [Page 149]

2 Hints on Reading and Decision Making
23.08.2004 25
Do you use R/3 systems as MDM client systems?
EP 5.0:
• Configuring XI: MDC R/3 Customer – MDM Business Partner [Page 152]
• Configuring XI: MDC R/3 Vendor – MDM Business Partner [Page 158]
• Configuring XI: MDC ABA Business Partner – MDM Business Partner [Page 162]
EP 6.0:
• Configuring XI 3.00: MDC R/3 Customer – MDM Business Partner [External]
• Configuring XI 3.00: MDC R/3 Vendor – MDM Business Partner [External]
• Configuring XI 3.00: MDC ABA Business Partner – MDM Business Partner [External]
Do you use CRM or SRM systems as MDM client systems?
EP 5.0:
Configuring XI: MDC ABA Business Partner – MDM Business Partner [Page 162]
EP 6.0:
Configuring XI 3.00: MDC ABA Business Partner – MDM Business Partner [External]
Do you want to implement the master data object product?
• Extraction [Page 227]
• Converting Attributes and Set Types [Page 166]
• Defining Attributes and Set Types [Page 166]
• Generating a Base Hierarchy [Page 167]
• Configuring Number Assignment for Products [Page 176]
• Defining the Standard Evaluation Schema in the CI [Page 178]
Do you want to use additional product categories (based on material types in one of your existing R/3 systems)?
SP05ff: Generating Product Categories from Material Types [Page 170]
Do you want to use additional product categories (based on material groups in one of your existing R/3 systems)?
SP05ff: Generating Product Categories from Material Groups [Page 173]
Do you use R/3 systems as MDM client systems?

3 Connecting a New Master Data Client
SAP MDM Content Consolidation: Configuration Guide for MDM 2
26 23.08.2004
Do you want the MDM system to be able to receive material types from the master data client?
EP 5.0:
Configuring XI: MDC R/3 Material Types – MDM Product Categories [Page 179]
EP 6.0:
Configuring XI 3.00: MDC R/3 Material Types – MDM Product Categories [External]
Do you want the MDM system to be able to receive material groups from the master data client?
EP 5.0:
Configuring XI: MDC R/3 Material Groups – MDM Product Categories [Page 181]
EP 6.0:
Configuring XI 3.00: MDC R/3 Material Groups – MDM Product Categories [External]
Do you want the MDM system to be able to receive products of type material from the master data client?
EP 5.0:
Configuring XI: MDC R/3 Material – MDM Product [Page 183]
EP 6.0:
Configuring XI 3.00: MDC R/3 Material – MDM Product [External]
Do you use CRM or SRM systems as MDM client systems?
EP 5.0:
Configuring XI: MDC CRM/SRM Product – MDM Product [Page 186]
EP 6.0:
Configuring XI 3.00: MDC CRM/SRM Product – MDM Product [External]
Do you want to implement the master data object purchasing info record?
All of Purchasing Info Records [Page 189] with all subunits
Do you want to implement the master data object technical asset?
All of Technical Assets [Page 191] with all subunits
Do you want to use SAP MDM for evaluations, for example, for global spend analysis?
• Analytical Functions [External]
• BW Extraction From CI [External]
3 Connecting a New Master Data Client The settings described here apply to the business scenario MDM Content Consolidation.
See the delta configuration guide for SAP MDM 2.00. This contains new and changed units that are relevant to the use of SAP MDM 2.00 with EP 6.0 and XI 3.0.
The delta configuration guide is delivered as a separate document. You will find this on the SAP Service Marketplace at

3 Connecting a New Master Data Client
23.08.2004 27
service.sap.com/instguides → Installation and Upgrade Guides → SAP MDM.
Use This unit tells you which units are relevant to you when configuring SAP MDM, if you want to connect a new master data client (MDC) to an existing MDM system. It assumes that you only use object types that are already configured for the MDM server, so no new object types need to be defined in the MDM system when you connect the new master data client.
Required Settings Area Unit
Portal environment Connecting Backend Systems to the Portal [Page 54]
Note: This step is only required if you want to access application functions of the new client system via the portal.
Defining number assignment in the MDM environment
• Using Harmonized Master Data IDs [Page 84] Note: This step is also necessary for non-harmonized master data IDs.
• Defining Number Assignment for Master Data Transfer to the MDM System [Page 88] Note: This step is only required if the configuration steps of this unit were not performed during the initial setup of MDM.
SAP Content Integrator
Creating MDM and MDC Systems in the CI [Page 109]
SAP Exchange Infrastructure • SP02/03ff: Defining Systems in the SLD [Page 125]
• XI Repository Contents for MDM Scenarios [Page 127] Note: This step is only required if you want to connect a different type of master data client.
XI mapping • Configuring and Activating Customizing ID Mapping [Page 131]
• Deactivate ID Mapping Query Temporarily [Page 137]
Master data exchange • Master Data Exchange [Page 221]
• Central Settings for Master Data Exchange [Page 221]
• Defining Distribution Systems [Page 221]
Master data transfer to the MDM system Extraction [Page 227]

3 Connecting a New Master Data Client
SAP MDM Content Consolidation: Configuration Guide for MDM 2
28 23.08.2004
Note on using the following section:
If you reply "yes" to a question, the units listed in the right-hand column must be processed. There may be subquestions for a question. Subquestions are slightly indented.
If you reply "No" to a question, you can also skip the relevant subquestions.
Question Unit
Is the master data client a non-Unicode system?
Connecting Non-Unicode Systems [Page 82]
Do you use the Solution Manager?
Defining the System Landscape [Page 90]
SP02/03ff: Customizing Distribution and ID Mapping in MDM Scenarios [Page 91]
SP02/SP03ff: Configuring Customizing Distribution [Page 93]
Does the master data client have a local Integration Engine?
Connecting Business Systems with an Integration Engine to the Integration Server [Page 126]
Do you want the master data client to be connected using an IDoc adapter?
Connecting Business Systems to the Integration Server Using the IDoc-Adapter [Page 127]
Is the master data client an R/3 system? • Configuring ALE Middleware in the Client System [Page 138]
• Sending Master Data Objects to the MDM System Periodically with ALE [Page 140]
• Sending Master Data Objects to the MDM System with ALE [Page 139]
Master data objects Enterprise Structure [Page 145]
Assigning Organizational Terms from Client Systems [Page 145]
Setting Up the Enterprise Structure [Page 146]
Transporting the Enterprise Structure for ID Mapping [Page 147] Note: perform the configuration steps in these units for the relevant master data client only.
Do you want the new master data client to send or receive objects of type business partner?
Defining Event Control for MDM System and Client Systems [Page 150]

3 Connecting a New Master Data Client
23.08.2004 29
Is the new master data client an R/3 system?
EP 5.0:
• Configuring XI: MDC R/3 Customer – MDM Business Partner [Page 152]
• Configuring XI: MDC R/3 Vendor – MDM Business Partner [Page 158]
• Configuring XI: MDC ABA Business Partner – MDM Business Partner [Page 162]
EP 6.0:
• Configuring XI 3.00: MDC R/3 Customer – MDM Business Partner [External]
• Configuring XI 3.00: MDC R/3 Vendor – MDM Business Partner [External]
• Configuring XI 3.00: MDC ABA Business Partner – MDM Business Partner [External]
Is the new master data client a CRM or SRM system?
EP 5.0:
Configuring XI: MDC ABA Business Partner – MDM Business Partner [Page 162]
EP 6.0:
Configuring XI 3.00: MDC ABA Business Partner – MDM Business Partner [External]
Do you want the master data client to send or receive objects of type product?
• Configuring Number Assignment for Products [Page 176]
Do you want to use additional product categories (based on material types in one of your existing R/3 systems)?
SP05ff: Generating Product Categories from Material Types [Page 170]
Do you want to use additional product categories (based on material groups in one of your existing R/3 systems)?
SP05ff: Generating Product Categories from Material Groups [Page 173]
Is the new master data client an R/3 system?
Do you want the MDM system to be able to receive material types from the master data client?
EP 5.0:
Configuring XI: MDC R/3 Material Types – MDM Product Categories [Page 179]
EP 6.0:
Configuring XI 3.00: MDC R/3 Material Types – MDM Product Categories [External]

4 Documentation Landscape for SAP Solutions and Business Scenarios
SAP MDM Content Consolidation: Configuration Guide for MDM 2
30 23.08.2004
Do you want the MDM system to be able to receive material groups from the master data client?
EP 5.0:
Configuring XI: MDC R/3 Material Groups – MDM Product Categories [Page 181]
EP 6.0:
Configuring XI 3.00: MDC R/3 Material Groups – MDM Product Categories [External]
Do you want the MDM system to be able to receive products of type material from the master data client?
EP 5.0:
Configuring XI: MDC R/3 Material – MDM Product [Page 183]
EP 6.0:
Configuring XI 3.00: MDC R/3 Material – MDM Product [External]
Do you use CRM or SRM systems as MDM client systems?
EP 5.0:
Configuring XI: MDC CRM/SRM Product – MDM Product [Page 186]
EP 6.0:
Configuring XI 3.00: MDC CRM/SRM Product – MDM Product [External]
Do you want the new master data client to send or receive objects of type purchasing info record?
All of Purchasing Info Records [Page 189] with all subunits
Do you want the new master data client to send or receive objects of type technical asset?
All of Technical Assets [Page 191] with all subunits
Do you want the new master data client to send or receive objects of type document?
All of Documents [Page 206] with all subunits
Note: these configuration steps are only useful if the new master data client you want to connect is an R/3 system.
4 Documentation Landscape for SAP Solutions and Business Scenarios Purpose This documentation gives you an overview of the major sources of information available to you on SAP solutions and business scenarios. Always use the current documents in your implementation.
Current documents
Document Quick Link on the SAP Service Marketplace (service.sap.com)
Master Guide, Installation and Upgrade Guides instguides
ibc
Business-Scenario Configuration Guide ibc

4 Documentation Landscape for SAP Solutions and Business Scenarios
23.08.2004 31
Implementation Guide (IMG) Note: This is in the SAP System, not in SAP Service Marketplace
Business Scenario Description ibc
SAP Library helpportal with all releases of a SAP component
Note: Available in the SAP System under Help → SAP Library
The following information supplements the individual documents:
Current supplementary information
Information Quick Link on the SAP Service Marketplace (service.sap.com)
SAP notes notes to the note search
instguides listed by installation and upgrade guide
Technical infrastructure (for example hardware sizing, platforms, network security)
ti
Features The following documents are available for a SAP solution.
Master Guide, Installation and Upgrade Guides These documents describe how you install or upgrade the system landscape required by a business scenario. The central initial access document for each SAP solution is the Master Guide. It lists the SAP application components and third-party applications required by each business scenario, and refers to their installation and upgrade guides. These are component installation guides, business scenario upgrade guides and component upgrade guides.
Business-Scenario Configuration Guide This document describes the settings you use to configure the SAP application components and third-party applications required for a business scenario. It contains information specific to business scenarios for the particular IMG activity. It does not reiterate the IMG documentation but makes reference to particular IMG texts.
Implementation Guide (IMG) This tool adjusts SAP systems to customer requirements. The IMG contains the IMG activities for all SAP components, and general documentation. The structure is component oriented, without reference to a business scenario. The Business-Scenario Configuration Guide establishes the link between the IMG and the various business scenarios.
Business Scenario Description This document describes how a business scenario runs once all components have been installed and configured. All the business processes of a business scenario are represented graphically in the component view, which illustrates the process steps of each SAP component.

5 SAP Notes
SAP MDM Content Consolidation: Configuration Guide for MDM 2
32 23.08.2004
SAP Library This contains the entire documentation of SAP components and business scenarios. The Business Scenario description is part of the SAP Library.
5 SAP Notes Use Before you begin with the configuration of this Business Scenario, read the following SAP Notes. This compilation only contains essential SAP Notes to give you an overview.
The notes listed here apply to the Business Scenarios SAP MDM Content Consolidation, SAP MDM Master Data Harmonization, and SAP MDM Central Master Data Management.
To get a comprehensive and up-to-date overview of the SAP Notes for a Business Scenario and the corresponding mySAP Business Suite application components, use a search for notes on the SAP Service Marketplace under service.sap.com/notes.
Important SAP Notes for the Business Scenarios
Component SAP Note Title of the SAP Note
SAP MDM 619104 MDM 2.00 – Supplementation for Master Guide (summary of all notes)
SAP Enterprise Portal 634637 MDM 2.00 – Configuration Guide – Portal
SAP User Management Engine
634638 MDM 2.00 – Configuration Guide – UME
SAP Content Integrator
692646 Performance Content Integrator
634628 MDM 2.00 – Configuration Guide – MDM General
634629 MDM 2.00 – Configuration Guide – MDM Master Data Objects
634630 MDM 2.00 – Configuration Guide – MDM Master Data Exchange
634631 MDM 2.00 – Configuration Guide – MDM Analytics
Master Data Manager
634632 MDM 2.00 – Configuration Guide – MDM Generic Functions
SAP Exchange Infrastructure
634633 MDM 2.00 – Configuration Guide – XI
SAP Solution Manager 634634 MDM 2.00 – Configuration Guide – Solution Manager
Analytics 634635 MDM 2.00 – Configuration Guide – Analytics
634636 MDM 2.00 – Configuration Guide – MDM – MDCs – SAP R/3
Master Data Clients (MDC)
634639 MDM 2.00 – Configuration Guide – MDM – MDCs – SAP CRM

6 Transport of Settings in System Landscapes
23.08.2004 33
6 Transport of Settings in System Landscapes Content Integrator (CI) Content Integrator has no transport connection. All the settings in CI described in this guide must be reprocessed in each test, development, and productive environment.
Exchange Infrastructure (XI) All the settings described in this guide can be transported.
For the following reason, you transport XI objects within the Exchange Infrastructure:
• To deliver objects from the Integration Repository
• To test a development in the Integration Repository or a configuration of the Integration Directory separately
You can transport XI objects by exporting and importing files. For more information, see the SAP Help Portal at help.sap.com → SAP NetWeaver → SAP Exchange Infrastructure → Design and Configuration Time → Transport via the File System.
Conversions and Merges on Import SAP recommends the use of a System Landscape Directory (SLD) which contains both the test landscape and the productive landscape. To import configuration objects from the test directory to the productive directory, you must define Transport Targets in the SLD. This assigns services of the test directories that are entered as business systems in the SLD to services of the productive directories, and converts dependent objects.
For more information, see the SAP Help Portal at help.sap.com → SAP NetWeaver → SAP Exchange Infrastructure → Design and Configuration Time → Software Logistics → Version Management → Versioning in Transports.
Master Data Server (MDS) You can transport most of the settings on the MDS described below to the various productive, development, and test environments by using Customizing transports.
For more information about the Solution Manager, see the SAP Help Portal at help.sap.com → SAP NetWeaver → SAP Solution Manager.
For more information about the transport of Customizing settings, see the SAP Help Portal at help.sap.com → SAP NetWeaver → Solution Life Cycle Management Customizing → Project Management → Status Values, Keywords, and Documentation Types → Transporting Customizing Settings.
Note
You may have to manually change or postprocess system-specific settings in the new environment. For example, you must process system instances manually in the new landscape, but you must enter other settings completely from scratch.
The following section lists the units for settings on the MDS.
• When you must create new settings in the new landscape
• When you must manually postprocess settings after the transport
• When you must use special transactions to transport entries

6 Transport of Settings in System Landscapes
SAP MDM Content Consolidation: Configuration Guide for MDM 2
34 23.08.2004
Entries that you can normally transport by using Customizing transports and that you need not process subsequently are not listed.
Manual Creation of New Entries Required You must create new entries for the following in each system (test, development, and productive system) manually.
• Setting Up Access to Help [External]
• Workflow [External]
The settings described in this unit cannot be transported and must therefore be defined separately in each MDS system or client.
The following activities are an exception, in that they can be transported:
You can transport customer-specific implementations of Business Add-Ins (BAdIs) MDM_BUP_REQUEST and MDM_PRD_REQUEST with a workbench request, provided that they are assigned to a transportable package.
You can transport the profiles defined with transaction FOXC_PROFILE with a Customizing request.
• People-Centric User Interface [Page 81]
• Connecting Non-Unicode Systems [Page 82]
• Defining a BW Client in the MDM System [Page 83]
• Defining Number Assignment in the MDM Environment [Page 84]
Settings in MDM
You can use the Customizing transaction to transport the entries in transactions DC_SYSTEM_SETTINGS, MDM_CID, MDM_PROP, and SNRO. Since the entries contain system instances or are system specific, you must adjust them after the transport.
You can transport the implemented BAdIs by using a workbench request.
You must create new XI files in each system (test, development, and productive system) by using transaction MDM_GENP.
Settings in XI
All other settings for XI (interface mappings, XSLTs, and entries in the Integration Repository) can be transported by using XI (see the section "XI").
Settings in the MDC
Number ranges can be transported from the Customizing transaction to your test, development, and productive environment. However, if these settings are different in the various test, development, and product environment, you must postprocess these manually.
• Setting Up Alert Management [External]
For all other system landscapes (test, development, and productive systems), you must postprocess the settings manually, because they are system dependent.
You can only transport the alert categories from transaction ALRTCATDEF to the various test, development, and productive environments.
• Enterprise Structure [Page 145]
• Configuring Number Assignment [Page 148]

6 Transport of Settings in System Landscapes
23.08.2004 35
Number ranges and groups can be transported from the Customizing transaction to your test, development, and productive environment. However, if these settings are different in the various test, development, and product environment, you must postprocess these manually.
• Importing Bank Master Records [Page 149]
There is no transport connection for these settings. The data must imported into each system landscape (test, development, and productive environment) separately.
• Importing Data in the Regional Structure [Page 149]
There is no transport connection for these settings. The data must imported into each system landscape (test, development, and productive environment) separately.
• Defining Event Control for MDM System and Client Systems [Page 150]
• Generating a Base Hierarchy [Page 167]
• Generating Product Categories from Material Types [Page 170]
• SP05ff: Generating Product Categories from Material Groups [Page 173]
• Configuring Number Assignment for Products [Page 176]
You can transport the settings from the Customizing transaction to your test, development, and productive environment. However, if these settings are different in the various test, development, and product environment, you must postprocess these manually.
• Installing and Configuring Document Services [Page 207]
• Checking the Relation Service [Page 209]
• EP 5.0: Configuring the Basic Authentication for WebDAV [Page 210]
• Defining Object Links [Page 211]
• Defining the HTTP Connection to Content Management [Page 212]
• Defining Document Services in the MDM System [Page 214]
These entries can be transported to the new portal. However, for Destination for Content Management you must enter the destination that you have defined previously (see Defining the HTTP Connection to Content Management [Page 212]). If this has changes, you must perform this step manually, too.
• Defining the Path for Saving Documents in CM [Page 214]
• Defining the RFC Destination for the Logical R/3 Source System [Page 214]
• Defining Distribution Systems [Page 221]
• Defining RFC Destinations for XI [Page 221]
• Generation of Staging Tables [Page 226]
• Extraction [Page 227]
The metadata must also be replicated in a new system landscape (test, development, and productive system).
• Defining CIOSC Explosion Profiles [External]
The CIOSC explosion profiles (Configuration of Integration via Object Structure Context) cannot be transported. However, you can automate copying of the CIOSC explosion profiles from the transported FOX explosion profiles (Framework for Object Explosion).

6 Transport of Settings in System Landscapes
SAP MDM Content Consolidation: Configuration Guide for MDM 2
36 23.08.2004
To do this, in the MDM system follow the instructions in the Implementation Guide (IMG) for Master Data Distribution under Import FOX Explosion Profiles.
• Generating Publication Scenarios [External]
You can copy publication scenarios from the explosion profiles automatically. Follow the instructions in the implementation guide (IMG) in the MDM system for Master Data Distribution under Generate Publication Scenarios.
• Defining Recipients [External]
• Defining Number Ranges for Subscriptions [External]
You can transport the settings from the Customizing transaction to your test, development, and productive environment. However, if these settings are different in the various test, development, and product environment, you must postprocess these manually.
Manual Postprocessing Required You must postprocess the following entries manually in each system (test, development, and productive system).
• Defining Settings for Object Types [Page 222]
• Defining Parameters for Process Types [Page 223]
• Defining Process Chains [Page 223]
You can transport process chains from transaction RSPC to your test, development, and productive environment.
Note
You may need to adjust the client systems entered in the various process steps manually to fit your new landscape.
Special Transactions for Transports • Converting Attributes and Set Types [Page 166]
• Defining Attributes and Set Types [Page 166]
You can transport set types and attributes from transaction COMM_ATTRSET to your test, development, and productive environment.
• User Management in SAP MDM [Page 62]
Role assignment and transport:
The relevant portal roles are assigned to all MDM users via the portal LDAP. You can transport the roles to your test, development, and productive portals.
In the MDM system, all MDM users are assigned to the relevant backend roles. You can transport the roles to your test, development, and productive environment by using the profile generator.
In the UME (SAP User Management Engine), the relevant CI roles are assigned to the MDM users that require access to Content Integrator. You can transport the CI roles to your test, development, and productive environment by using XML files.
Business Information Warehouse (BW) • BW Extraction From CI [External]

6 Transport of Settings in System Landscapes
23.08.2004 37
You must postprocess the CI settings manually in the various test, development, and product environments. You can transport the settings from transaction SBIW to your test, development, and productive environment by using Customizing transports.
• BW Extraction from MDM [External]
For all other system landscapes (test, development, and productive systems), you must postprocess the settings manually, because they are system dependent.
Master Data Client (MDC) Die ALE (Application Link Enabling) settings under Configuring ALE Middleware in the Client System [Page 138] are all system specific and must be postprocessed in the test, development, and productive systems.
You can also transport these settings and postprocess all system-specific entries manually.
SAP Enterprise Portal (EP) The Business Package for SAP MDM 2.0 60.1 is a native EP 5.0 package. Restrictions are described in the unit Portal Environment [Page 47] in the section "Prerequisites and Restrictions for Version EP 6.0".
We do not recommend exporting Business Package for SAP MDM 2.00 Version 60.1 or higher (for example, from a development portal) and importing it in another portal (for example, a test or productive portal).
We do not recommend changing portal content delivered with Business Package for SAP MDM 2.00 Version 60.1 or higher.
Migrated Business Package To copy the portal content to another portal, you must also migrate the Business Package originally delivered to another portal (import). Then perform the configuration steps described in Portal Environment [Page 47].
Exception: The system templates are delivered as native EP 6.0 portal content in file com.sap.pct.mdm_200_add_on.epa file.
Once you have created the system objects (see Connecting Backend Systems to the Portal [Page 54]), you can export this as portal content from the customer namespace and import it into another portal. To do this, use the export/import function of EP 6.0.
For more information, see:
• The SAP Help Portal under http://help.sap.com/nw04 → SAP NetWeaver → Release ’04 → English/Deutsch → SAP Library → SAP NetWeaver → SAP NetWeaver Configuration → SAP Enterprise Portal → Administration Guide → Portal Platform → System Administration → Transport of Content Objects
• SAP Note 731386
You must adjust the attribute values of the system objects to correspond to the system landscape and the systems that work with the portal.

7 Further Information
SAP MDM Content Consolidation: Configuration Guide for MDM 2
38 23.08.2004
Changes to Portal Content SAP recommends that you create portal content in a customer namespace (for example, with the technical name as a prefix: com.yourcompany.pct). Reference the portal content in namespace com.sap.pct.mdm.* . You can do this by using delta links. For more information, see the SAP Help Portal under http://help.sap.com/nw04 → SAP NetWeaver → Release ’04 → English/Deutsch → SAP Library → SAP NetWeaver → SAP NetWeaver Configuration → SAP Enterprise Portal → Administration Guide → Portal Platform → System Administration Guide → Content Administration → Portal Content.
You can then export or import the customer-specific portal content with the export/import function of EP 6.0.
Other Settings • Activate Search [External]
You must process the settings described in this unit in a second portal. You can only copy the parameters from unit Indexing [External] to a second portal.
To copy the settings you made to a second portal, you can either postprocess the parameters manually or, in the case of data sources, use the XML files created in the first system and copy them to the second portal. These <ID_der_Data_Source>.co.xml files are in the following directories:
EP 5.0:
...\EnterprisePortal\cm\config\confroot\local\plugins\cm\repository_managers\instances
EP 6.0:
...\global\config\cm\config\local\data\cm\repository_managers
You must manually postprocess the search indexes based on these data sources.
After copying the files, you must restart the J2EE engine. Then the data sources configured in the original portal should be visible in the Repository Administration of the target portal.
7 Further Information Use The following list contains information that you may find helpful during the configuration process.
Further Information
Information Alias on the SAP Service Marketplace (service.sap.com)
Master Guide for Master Data Management 2.00
service.sap.com/instguides → Installation and Upgrade Guides → SAP MDM
Configuration Guide for the SAP Exchange Infrastructure
service.sap.com/instguides → Installation and Upgrade Guides → SAP Exchange Infrastructure

8 General Settings
23.08.2004 39
Configuration Guide - SAP User Management Engine 3.0
service.sap.com/instguides → Installation and Upgrade Guides → mySAP SRM → Using SAP EBP 3.5 → mySAP SRM – E-Procurement Capabilities → Direct Procurement SRM EPROC → Configuration Guides → Configuration Guide - SAP User Management Engine 3.0
Administrator’s Guide: SAP User Management
service.sap.com/instguides → mySAP SRM → Using SAP EBP 3.5 → mySAP SRM – E-Procurement Capabilities → Direct Procurement under Additional Documents
Documentation for Business Package for SAP MDM 2.00
www.iviewstudio.com in the documentation for the Business Package for SAP MDM 2.00
Documentation for Business Package for Portal Users
www.iviewstudio.com in the documentation for the Business Package for Portal Users
Documentation for the Business Package for CRM 4.0 50.2
service.sap.com/instguides → Installation and Upgrade Guides → SAP CRM 4.0 → Installation Guide – Business Package for CRM 4.0 50.2
Documentation for the Business Package for CRM 4.0 60.2
service.sap.com/instguides → Installation and Upgrade Guides → SAP CRM 4.0 → Installation Guide – Business Package for CRM 4.0 60.2
Familiarize yourself with the documentation landscape for mySAP Business Suite solutions and business scenarios. You can find out what other types of documentation exist, and where the newest versions are published under Documentation Landscape [Page 30].
8 General Settings Purpose This section contains general information that you need to start the business scenario configuration.
Familiarize yourself with the documentation landscape for SAP solutions and business scenarios. For a description of the types of documentation provided by SAP and where to find the current versions, see Documentation Landscape for SAP Solutions and Business Scenarios [Page 30].
Prerequisites • The system landscape is installed, using the SAP solution master guides, and the SAP
component and business scenario installation and upgrade guides.

8.1 Security in MDM Scenarios
SAP MDM Content Consolidation: Configuration Guide for MDM 2
40 23.08.2004
• You are familiar with the relevant SAP notes about installation, configuration, and upgrade.
For more information, see SAP notes.
Procedure Perform the steps in these guidelines in the sequence in which they appear.
8.1 Security in MDM Scenarios This section describes security aspects and suggested solutions for master data management (SAP MDM) 2.00.
Can all communication channels be made secure by encryption?
Answer
No, not all of them.
The MDM scenarios implement a synchronization and distribution mechanism across several systems that contain data. In this context, master data is transported across system boundaries. Technically, the data transport uses SAP's proprietary RFC protocol or HTTP messages.
The RFC channels can be made secure by using Secure Network Communication (SNC). The necessary system support is integrated in the Web Application Server 6.20 Basis. Other communication channels (for example, to the SAP Enterprise Portal or Knowledge Management, which is based on it) are addressed using HTTP. These channels can be made secure by using integrated SSL (in other words, HTTPS).
However, one HTTP channel in the entire system cannot be made secure by using SSL, because the client-side SSL support required for this is missing in the J2EE part of the basis system. This is the bi-directional channel between the XI component (SAP Exchange Infrastructure) and the CI component (SAP Content Integrator).
Technically, communication uses Java XI proxy classes, which are not SSL enabled in the Java part of basis system 6.20. This function is available in basis 6.30, but is not available for SAP MDM 2.00 because XI 2.0 is based on basis 6.20.
Since the Content Integrator checks for duplicates for SAP MDM, all master data, such as business partner and product master, passes through this channel. In addition, because CI has a user and authorization concept, a server user is required. The logon data of this user is therefore transferred in non-encrypted form as part of the HTTP communication.
Solution
You use other means to make the communication channel between XI and CI secure. We recommend that you set up a VPN (Virtual Private Network) tunnel between CI and XI.
There are many different standard products for this purpose, in a product spectrum ranging from purely software solutions to special hardware. The installation recommendation for SAP MDM 2.00 fulfill the prerequisites for VPN: separate servers for XI and CI with fixed IP addresses.
The solution you choose should be IPSec compatible, and should work with a modern standard such as 3DES (Triple DES) or AES (Advanced Encryption Standard). The older standard DES (Data Encryption Standard) is no longer up to date.
Although all other communication channels can be encrypted using SAP's own techniques and thereby protected against eavesdropping, you may want to

8.1 Security in MDM Scenarios
23.08.2004 41
consider using a global VPN system to set up a network for all of your connections, without using SNC or SSL technology at all. Generally speaking, the overall MDM installation and especially the network technology should be considered extremely carefully. A VPN-based infrastructure is a variant that can be recommended. If additional hardware is used, it can optimize the entire system for encryption.
Is it guaranteed that no passwords are saved in plaintext or transferred?
Answer
No.
In the following cases, logon information is saved in plaintext or transferred: ...
1. The answer is similar to the answer to the previous question ("Can all communication channels be made secure by encryption?").
In the unencrypted communication channel between XI and CI, the logon data of the service user for the CI is transferred from the XI. This is a service user which, however, has extensive authorizations within the CI. Conversely, the XI user is transferred if it is addressed from the CI.
2. In the file system of the CI server, in file rfcadapter.properties, the service user for communication between CI and the MDS (master data server) is entered in plaintext with user ID and password. The protocol used in communication is RFC, so that the user data cannot be read if SNC encryption is used. However, you must protect the CI file system or the password file rfcadapter.properties against unauthorized access.
3. In XI 2.0 there are plaintext passwords in the following files:
File dbconnect.properties
File keymapping.server.properties as part of archive mdm.ear
File keygeneration.properties as part of archive mdm.jar
The latter two files are used only for the ID mapping classes. The passwords in file dbconnect.properties are always required by XI 2.0. For the subsequent version XI 3.0, a completely different password mechanism with a higher security standard is used.
Solution
• Solution for point 1
The encryption of the channel between XI and CI using VPN, as described with reference to the previous question, also makes the password transfer aspect secure.
• Solution for points 2 and 3
All files with plaintext passwords must be protected against unauthorized access, regardless of whether the file is part of a large archive.
This can be done by administrative means, by encrypting either the entire file system or only this one file at operating system level. You should also prevent access to the actual system. Since the CI (like the XI and MDS) is a server component which is usually located in a protected computer center, access is usually allowed only for system administrators.
Can SAP MDM be audited?
Answer
Yes, whereby some additional comments are listed in this document.

8.1 Security in MDM Scenarios
SAP MDM Content Consolidation: Configuration Guide for MDM 2
42 23.08.2004
The CI is a Java component. The users that are used productively are stored on the corporate LDAP server and linked to roles and authorizations by using the User Management Engine 3.0 (UME). The actual user data is read only from the point of view of the UME 3.0, but the roles, the authorizations that go with them, and user assignment can be changed in the UME.
The capability of software to be audited is an important aspect. One requirement for this is traceability and reproducibility, specifically of authorizations and user roles.
In the SAP ABAP environment, traceability is usually ensured by using change documents. However, this technique is not available to Java components such as CI and UME 3.0. For this reason, the UME 3.0 logs the necessary data in a file called mySAP.log and additionally in its own database, which does not, however, have its own evaluation user interface. For this reason, the format used looks different to that of change documents, but contains all the necessary data.
Excerpt from file mySAP.log: Feb 27, 2003 3:54:59 PM com.sapmarkets.usermanagement.util.SecurityAudit.superuser /com/sapmarkets/usermanagement [Client_Thread_27] Info: ROLE= Administrator, USER= testuser2 ~> ROLE.ASSIGN assigned | Do Feb 27 15:54:59 2003
Feb 27, 2003 3:55:23 PM com.sapmarkets.usermanagement.util.SecurityAudit.<systemuser> /com/sapmarkets/usermanagement [Client_Thread_26] Info: USER= superuser ~> LOGOFF.OK | Do Feb 27 15:55:23 2003
Feb 27, 2003 3:55:28 PM com.sapmarkets.usermanagement.util.SecurityAudit.<systemuser> /com/sapmarkets/usermanagement [Client_Thread_31] Info: USER= testuser2 ~> LOGIN.OK | Do Feb 27 15:55:28 2003
Feb 27, 2003 5:00:22 PM com.sapmarkets.usermanagement.util.SecurityAudit.testuser2 /com/sapmarkets/usermanagement [Client_Thread_6] Info: NONE= ROLES_VIEW, NONE= Buyer 3 ~> ACCESS.ERROR | Do Feb 27 17:00:22 2003
Jun 23, 2003 8:37:40 PM com.sapmarkets.usermanagement.util.SecurityAudit.superuser /com/sapmarkets/usermanagement [Client_Thread_25] Info: ROLE= Administrator ~> PRINCIPAL.MODIFY CRMMOM.MOM_MP_ADMIN added | Mo Jun 23 20:37:40 2003
Solution
To ensure long-term reproducibility and therefore auditability, you must save this file regularly and protect it against unauthorized manual changes.
Since the format of the log file is different from the usual SAP change documents, you should make sure before the audit that this difference does not pose any problem during a check.
Can documents or files be scanned by a virus scanner?
Answer
No.
This question refers to documents that are saved in the SAP Enterprise Portal in Knowledge Management (KM). Enterprise portal 5.0 is used, which does not have an integrated virus scanner. A scanner is planned for a later version.

8.1 Security in MDM Scenarios
23.08.2004 43
Solution
No organizational solution can be predefined for this. However, files are only managed in KM – they are never executed. This means that KM itself cannot be attacked by a virus. As long as all application computers on or from which transfers are run have suitable virus scanners, it should not be possible to check in a virus, or any virus would be recognized on download.
Can JavaScript be deactivated in the browser without losing functionality?
Answer
No.
The processing user interface of SAP MDM is based on the standard Internet browser Microsoft Internet Explorer as a front end. The user interface libraries use JavaScript to generate high-quality HTML pages. JavaScript is a prerequisite for this technique, so deactivation means that the user interface can no longer be used properly.
Solution
Install all available Service Packs and Security Patches for the front-end browsers.
Are all additional functions that a customer does not expect deactivated in the standard delivery?
Answer
No. It is possible that unexpected services are active.
The Web Application Servers (WAS 6.20) used in the MDM environment are capable of using a wide range of protocols, and the basic settings provide a large number of services. Especially in the CI or XI environment, deployment may start more services than are required. This means that servers may respond to queries according to the program, although the queries are not necessary for MDM. Also, it may be necessary for the installation of SAP MDM to briefly use services that are no longer required after successful installation (for example, setting up a trusting/trusted system relationship for Single-Sign On).
Solution
Analyze the entire MDM installation per component before you go into productive mode. ...
1. For ABAP services, you can use, for example, transaction SICF to look at all active Web services.
2. Use transaction SM59 to check all the created RFC destinations.
3. Check the Java services in the CI environment that have been run for a deployment.
Is there an application-specific security guide?
Answer
No.
There is no separate document for SAP MDM 2.00 that answers all security questions for MDM scenarios.
Solution
This section of the configuration guide is a starting point. The SAP Enterprise Portal has its own guide on the SAP Service Marketplace at service.sap.com/epinstall. Since we cannot know how many components and which additional third-party software make up an

8.1.1 Configuring SSL for the CI
SAP MDM Content Consolidation: Configuration Guide for MDM 2
44 23.08.2004
MDM installation that is used productively, it is not possible to create a complete set of documentation.
Does the application fulfill FDA requirements?
Answer
No, not completely.
"FDA compliance" refers to compliance with various system requirements originating from the USA. FDA stands for Food and Drugs Association and covers the US food and pharmaceuticals industry. FDA requirements can only be met by using extremely time consuming methods, and cannot be guaranteed across the board in a heterogeneous environment such as SAP MDM, which may include SAP client systems with various basis releases and even non-SAP systems.
8.1.1 Configuring SSL for the CI The settings described here apply to the Business Scenarios MDM Content Consolidation, MDM Master Data Harmonization, and MDM Central Master Data Management.
Use Once Secure Sockets Layer (SSL) has been configured for the SAP J2EE Engine of SAP Content Integrator, you can run the Content Integrator under HTTPS.
Prerequisites You have configured the SAP J2EE Engine of the SAP User Management Engine 3.0 (UME) and the SAP Enterprise Portal for secure communication using Secure Sockets Layer (SSL).
Procedure ...
1. Configure the SAP J2EE Engine of the Content Integrator as described in the guide Enabling SSL for the SAP J2EE Engine.
You can find the guide on the SAP Service Marketplace under sap.service.com/instguides → SAP Enterprise Portal → Enterprise Portal 5.0 → Installation, Upgrade & Patches → EP 5.0 SP5 Roadmap → Installation, Upgrades & Patches SP5.
2. After you have configured the SAP J2EE Engine, switch the URL in the portal configuration to HTTPS by modifying the System.xml file of the portal.
You can find more information security settings for the portal in the SAP Enterprise Portal Security Guide under sap.service.com/instguides → SAP Enterprise Portal → Enterprise Portal 5.0 → Installation, Upgrade & Patches → EP 5.0 SP5 Roadmap → Installation, Upgrades & Patches SP5.
Result You have switched the SAP Content Integrator to SSL communication.
8.1.2 SP03ff: Encryption in the CI The settings described here apply to the business scenarios MDM Content Consolidation, MDM Master Data Harmonization, and MDM Central Master Data Management.

8.1.2 SP03ff: Encryption in the CI
23.08.2004 45
Use The encryption option enables you to encrypt security-relevant data in the properties file of SAP Content Integrator (CI).
We recommend that you encrypt the passwords in the following properties files:
• jndi.properties
• properties (of the RFC adapter)
You can find more information on the RFC adapter of the CI under SP02: Configuring the RFC Adapter for MDM and CI [Page 113] or SP03ff: Configuring the RFC Adapter for MDM and CI [Page 116] (depending on the installed Service Pack).
Prerequisites To implement the encryption, you need the iaik_jce.jar package. You can find this package on the SAP Service Marketplace under service.sap.com → Solution Details → SAP Software Distribution Center → Download → SAP Cryptographic Software.
Copy iaik_jce.jar into the directory of the platform used:
Platform Directory
Windows \\<drive>\usr\sap\<System-name>\j2ee\j2ee_<Instance-name>\cluster\ server\additional-lib
UNIX /usr/sap/<System-name>/j2ee/j2ee_<Instance-name>/cluster/ server/additional-lib
In order to be able to carry out encryption for the RFC adapter of the CI, copy iaik_jce.jar into the following directory of the Java Runtime Environment (JRE) 1.3.1 also:
Platform Directory
Windows <JRE-directory>\lib\ext
UNIX <JRE-directory>/lib/ext
The SAP J2EE Engine of the CI must run with the Java Runtime Environment (JRE) 1.3.1. With other JRE versions, the encryption leads to system errors.
Procedure To encrypt the properties files, make the following modifications: ...
1. Open the jndi.properties file.
You can find this file in the following directories:
Platform Directory
Windows \\<Drive>\usr\sap\<Instance-name>\global\config\ContentIntegrator\lib\
UNIX /usr/sap/<Instance-name>/global/config/ContentIntegrator/lib/

8.1.2 SP03ff: Encryption in the CI
SAP MDM Content Consolidation: Configuration Guide for MDM 2
46 23.08.2004
a. Copy the following code at the start of the file:
Platform Code
Windows # Support of encryption
# A mandatory password
KEYSTORE_PWD=<any password you set>
# Location to store property keystore file
KEYSTORE_FILE=\\<drive>\\usr\\sap\\<Instance-name>\\ global\\config\\ContentIntegrator\\lib\\keystore
# Switch on/off automatic encryption (default true)
KEYSTORE_AUTOENCRYPT=true
UNIX # Support of encryption
# A mandatory password
KEYSTORE_PWD=<any password you set>
# Location to store property keystore file
KEYSTORE_FILE=/usr/sap/<Instance-name>/global/config/ ContentIntegrator/lib/keystore
# Switch on/off automatic encryption (default true)
KEYSTORE_AUTOENCRYPT=true
b. Place {encrypt} in front of the parameters to be encrypted, for example:
java.naming.security.credentials={encrypt}<Password>
The password used in the example is the administrator password you created in SAP J2EE Engine.
c. Open a command line interface and switch to the following directory:
Platform Directory
Windows \<drive>\usr\sap\<Instance-name>\global\config\ContentIntegrator\client\
UNIX /usr/sap/<Instance-name>/global/config/ContentIntegrator/client/
d. Start the stack processing file encrypt.cmd (Windows) or encrypt.sh (UNIX) with the path and name of the jndi.properties file.
Platform Path and name of the jndi.properties file
Windows \\<drive>\usr\sap\<Instance-name>\global\config\ContentIntegrator\lib\ jndi.properties
UNIX \usr\sap\<Instance-name>\global\config\ContentIntegrator\lib\ jndi.properties
e. The system encrypts the password.
2. Open the properties file of the RFC adapter and repeat steps 1a to 1e.
You can find this file in the following directories:

8.2 Portal Environment
23.08.2004 47
Platform Directory
Windows \\<drive>\usr\sap\<Instance-name>\cluster\server\services\cirfcadapter
UNIX /usr/sap/<Instance-name>/cluster/server/services/cirfcadapter
Result You have carried out the recommended encryption for SAP Content Integrator.
8.2 Portal Environment The settings described here apply to the Business Scenarios MDM Content Consolidation, MDM Master Data Harmonization, and MDM Central Master Data Management.
See the delta configuration guide for SAP MDM 2.00. This contains new and changed units that are relevant to the use of SAP MDM 2.00 with EP 6.0 and XI 3.0.
The delta configuration guide is delivered as a separate document. You will find this on the SAP Service Marketplace at service.sap.com/instguides → Installation and Upgrade Guides → SAP MDM.
Use Access to the functions of SAP Master Data Management (SAP MDM) is controlled by the SAP Enterprise Portal. This section describes the necessary configuration steps in the portal environment used by SAP MDM. These include:
• Portal platform (iView technology, user management, and role administration)
• Knowledge management platform (Content Management, retrieval, and classification (TREX))
Prerequisites The following prerequisites must be fulfilled to ensure a successful configuration:
3. You have installed the MDM system components.
4. Installation of the SAP Enterprise Portal Plug-In-Version
On the connected systems, install the SAP Enterprise Portal Plug-In-Version (version 5.00 or higher). This is a prerequisite for the activation of Single Sign-On.
• Note that front-end component SAP GUI for Windows version 6.20 is
used for the roles Master Data Manager and Master Data Administrator for individual applications. This means that users in these roles must have this available locally or as a server installation.
• Also make sure that the front-end add-on for the SAP Business Information Warehouse (BW) has been installed.
5. You have activated BSP applications (see Activating the BSP Application [Page 81]).
6. Installation and Configuration of the Internet Transaction Server (ITS) for Access to Back-End Systems

8.2 Portal Environment
SAP MDM Content Consolidation: Configuration Guide for MDM 2
48 23.08.2004
MDM system
SAP Solution Management
SAP Exchange Infrastructure
For more information about the installation and configuration of the ITS, see the SAP Service Marketplace at service.sap.com/instguides → Installation and Upgrade Guides → SAP Web Application Server → Release 6.20, document SAP@Web Guide 6.20 (SAP ITS), Installation.
• The setting for classic ABAP transactions in the Business Package for
MDM 2.00 is the SAP GUI for HTML as far as possible. You can change this setting for each individual transaction in the business package.
• Note that you must also set corresponding parameters in the ITS later on, when activating Single Sign-On (see Connecting Backend Systems to the Portal [Page 54]).
• Note that, when you leave an ITS transaction, the standard page displayed can be replaced by a Web page you have created yourself by setting parameter ~exitURL in file global.srvc of your ITS installation.
7. Successful installation or upgrade of the portal environment (including Content Management and TREX)
EP 5.0 only – Start
SAP Enterprise Portal 5.0, Service Pack 5, Patch 1, Hotfix 6
For more information about the installation and upgrade of the SAP Enterprise Portal, see the SAP Service Marketplace at service.sap.com/epinstall → EP 5.0 Support Package 5 Roadmap.
For more information about system performance optimization for the SAP Enterprise Portal, see the SAP Service Marketplace at service.sap.com/epinstall under How-To Guides in document Optimize and Fine-Tune the SAP Enterprise Portal.
Knowledge Management, Service Pack 5, Patch 2, Hotfix 5
TREX 6.0, Service Pack 0, Patch 1
EP 5.0 only – Finish
EP 6.0 only – Start
SAP Enterprise Portal 6.0, Service Pack 4, Patch 3
For more information about the installation and upgrade of SAP Enterprise Portal, see the SAP Service Marketplace at service.sap.com/epinstall.
For more information about system performance optimization for the SAP Enterprise Portal, see the SAP Service Marketplace at service.sap.com/epinstall under How-To Guides in document Optimize and Fine-Tune the SAP Enterprise Portal.
Knowledge Management and Collaboration 6.0 Service Pack 4 – KMC SP4
TREX 6.1, Service Pack 2
EP 6.0 only – Finish

8.2 Portal Environment
23.08.2004 49
If you use documents in the MDM system and want to distribute these documents to client systems, your portal server (including Content Management) must have a static IP address. From the MDM system, links are sent under which the content can be collected. A static IP address is required to resolve the URL.
• Note that the Web addresses you use during installation should belong to
the same domain.
• Make sure that you always use the most current support package for your J2EE Engine.
• Make sure that the number of JCo (SAP Java Connector) connections matches your number of users. You define the number of possible JCo connections with the variable CPIC_MAX_CONV. For more information, see SAP note 316877.
EP 6.0 only – Start
Download of the Required Business Packages from the iView Studio
For more information about Business Packages that were released for EP 6.0, see SAP Note 642775.
For general information about the Business Package, see:
SAP Note 673403
How-to-Guides on the SAP Marketplace under http://help.sap.com/nw04
Download of Business Package for SAP MDM 2.00 Version 60.1 from the iView Studio
Before you can install Business Package for MDM 2.00 Version 60.1 or higher from the iView Studio, you must register in the iView-Studio. You must be a licensed user to download the Business Package from http://www.iViewStudio.com:
...
i. Register in the iView Studio and/or log on.
ii. In the iView Studio, choose Content Catalog → Specialist → Other, and scroll to Business Package for MDM 2.00 Version 60.1.
To display further details on downloading the Business Package, choose More Information, then under Licensing Information choose More Information again.
iii. Download Business Package for MDM 2.00 Version 60.1 and the available Support Package.
Download of Business Package for SAP CRM 4.0 Version 60.2 from the iView Studio
Once you have downloaded Business Package for MDM 2.00 Version 60.1 successfully, you are automatically authorized to download Business Package for CRM 4.0.
...
i. Register in the iView Studio.
ii. In the iView Studio, choose Content Catalog → Specialist → Other, and scroll to Business Package for CRM 4.0 Version 60.2.
To display further details on downloading the Business Package, choose More Information, then under Licensing Information choose More Information again.

8.2 Portal Environment
SAP MDM Content Consolidation: Configuration Guide for MDM 2
50 23.08.2004
iii. Download Business Package for CRM 4.0 Version 60.2 and the available Support Package.
The KM Compatibility Package is a prerequisite for Business Package for CRM 4.0 60.2 and prevents errors during migration.
Prerequisites and Restrictions for Version EP 6.0
For Business Package for SAP MDM 2.00 Version 60.1 or higher, you need SAP Enterprise Portal EP 6.0 SP4 Patch 3 or higher. All the prerequisites that SAP Enterprise Portal must fulfill before you can use Business Package for MDM 2.00 Version 60.1 are described in SAP Note 641974.
If you need support, create an OSS message:
For SAP Enterprise Portal EP 6.0: component EP-PIN
For MDM-specific support: component MDM
For more information about restrictions that affect the EP 6.0 platform, see SAP Notes 668548, 709354, and 529924.
The "import“ of a native EP 5.0 package to an SAP Enterprise Portal EP 6.0 is described as a migration. Business Package for SAP MDM 2.0 Version 60.1 is a native EP 5.0 package. The native EP 5.0 components are in folder Portal Content/Migrated Content/EP50 after migration. Log on as the portal administrator. There are restrictions for this folder, which you need to take into account. You can find additional information in the SAP note 642775.
Import Filter
To import Business Package for SAP MDM 2.00 Version 60.1 or higher to SAP Enterprise Portal EP 6.0, you must use an import filter. SAP Note 642999 provides the import filter and describes in detail the filter settings you must make in SAP Enterprise Portal EP 6.0.
EP 6.0 only – Finish
8. Import of the following business packages
EP 5.0 only – Start
Business Package for SAP CRM 4.0, version 50.2 or higher
For more information, see Install and Configure Business Package for CRM [Page 60].
Business Package for Portal User, version 50.5 or higher
For more information, see Configuring the Business Package for Portal Users [Page 61].
Business Package for MDM 2.00, version 50.1 or higher
For more information, see:
Defining Basic Settings for Workflow [External]
Activate Search [External]
Setting Up Alert Management [External]
Documents [Page 206]
EP 5.0 only – Finish

8.2 Portal Environment
23.08.2004 51
EP 6.0 only – Start
Migration of Business Package for SAP CRM 4.0 60.2
If Business Package for SAP CRM 4.0 Version 60.2 is not yet completely installed, you must perform the following steps, which are also required for Business Package for SAP MDM 2.00 Version 60.1:
i. Migrate the KM Compatibility Package.
ii. Migrate the Business Package for SAP CRM 4.0 Version 60.2 and the current Support Package.
iii. See SAP Notes 660774, 645946, and 721279.
For more information, see the SAP Marketplace at http://service.sap.com/crm-inst → SAP CRM 4.0 → Installations & Upgrade Guides → InstallGuide – Business Package SAP CRM 4.0 in the following units:
"Activating crmcontext service"
"Further Information → Troubleshooting when importing par/zar files"
"Troubleshooting in SSO with SAP Logon tickets"
Migration of Business Package for SAP MDM 2.00 Version 60.1
After the download of Business Package for SAP MDM 2.00 Version 60.1, the following ZIP files are available:
Business Package for MDM 2.00 Version 60.1.zip
Unpack the file and start migration by using the import function of SAP Enterprise Portal.
To do this, in SAP Enterprise Portal choose Systemadministration → Transport → Import, then choose the file package.pkg.
The import function displays where the log file for migration was saved to.
com.sap.pct.mdm_200_add_on.epa
This is an add-on. Choose the epa file to start the import.
For more information about importing Business Packages, see the Administration Guide for EP 6.0 and SAP Note 731386.
EP 6.0 only – Finish
Make sure that you use the business packages with the most current patch level.
For more information about the installation and upgrade of business packages, see:
On the Internet, help.sap.com under SAP NetWeaver → SAP Enterprise Portal → Administration Guide
On the SAP Service Marketplace at service.sap.com/instguides → Installation and Upgrade Guides
On the SAP Service Marketplace at service.sap.com/ep → Product Information → Enterprise Portal 5.0 → How to use a Business Package.

8.2.1 Defining the Portal Server for the People-Centric UI
SAP MDM Content Consolidation: Configuration Guide for MDM 2
52 23.08.2004
For more information about the individual business packages, see the iView studio at www.iviewstudio.com.
Only activate the portal logger when needed. The log files grow and could cause your storage systems to overflow. In addition, the writing of log files may itself lead to errors.
8.2.1 Defining the Portal Server for the People-Centric UI The settings described here apply to the Business Scenarios MDM Content Consolidation, MDM Master Data Harmonization, and MDM Central Master Data Management.
Use In the scenarios for SAP MDM, the People-Centric User Interface (UI) is used, for example, for object maintenance. For this purpose, you must specify various parameters for the portal environment in the MDM system.
Prerequisites The CRM Business Package for SAP CRM 4.0 (version 50.2 or higher) has been imported without errors. Service com.sap.pct.crm.crmcontext.zar is unpacked and is available in the portal deployment directory.
For more information about the installation of Business Package for CRM 4.0, see the SAP Service Marketplace at service.sap.com/instguides → Installation and Upgrade Guides.
Procedure Define the settings for the portal server in the MDM system. You do this in Customizing for Generic Functions under Define Portal Server.
Check whether the following values exist, and add them if not:
EP 5.0:
F_NAME F_VALUE Description
BSP_SESSION_MANAGEMENT _VERSION
2 The 2 stands for the new version of session management.
F4_HELP_SERVICE /global/services/ service-iviews/local/ com.sap.pct.mdm. generics.ValueHelp
Component for access to MDM F4 search help
MULTI_WINDOW_SWITCH Defines whether a new window is opened when you navigate from iViews that are not based on the People-Centric UI. If you select this field, a new window is always opened. SAP recommends that you do not check this field.
PORT <Port> Port of the portal server, for example 1080

8.2.1 Defining the Portal Server for the People-Centric UI
23.08.2004 53
PROTOCOL <Protocol> Protocol for communication with the portal server, usually HTTP.
PRT_NAVIGATION_MODEL_VERSION 2 The 2 stands for portal versions that are newer than SAP Enterprise Portal 5.0 SP 4 Patch 1.
SERVER <Portal server> Address of portal server, for example, server.company.com
DISPATCHER_PCD_LOCATOR /global/services/ service-iviews/local/ com.sap.pct.mdm. UrlDispatcher
Component for access to MDM object links
EP 6.0:
F_NAME F_VALUE Description
BSP_SESSION_MANAGEMENT _VERSION
2 See above
F4_HELP_SERVICE_EP6 pcd:portal_content/ com.sap.portal.migrated/ ep_5.0/roles/ com.sap.pct.crm.crm _default_services /nf/com.sap.pct.mdm. generics.ValueHelp
See above
MULTI_WINDOW_SWITCH See above
PATH Irj/portal See above
PORT <Port> See above
PROTOCOL <Protocol> See above
PRT_NAVIGATION_MODEL_VERSION 2 See above
SERVER <Portal server> See above
DISPATCHER_PCD_LOCATOR_EP6 /roles/ com.sap.pct.crm.crm _default_services/nf/ com.sap.pct.mdm. UrlDispatcher
See above
EP_VERSION <portal release>.<portal version>.<time stamp>
For example:
6.4.200403300751 for EP60 SP 4, time stamp 200403300751. You can call this information by logging on as the portal

8.2.2 Connecting Backend Systems to the Portal
SAP MDM Content Consolidation: Configuration Guide for MDM 2
54 23.08.2004
administrator, then choosing System Administration -> Support -> Implementation Version.
8.2.2 Connecting Backend Systems to the Portal The settings described here apply to the Business Scenarios MDM Content Consolidation, MDM Master Data Harmonization, and MDM Central Master Data Management.
Use Define the backend systems that you want to access using the portal. Activate Single Sign-On.
Procedure EP 5.0 – Start ...
1. In the files systems.xml and jcoDestinations.xml, maintain the entries required for at least the following systems. Use the specified identifiers if at all possible, because otherwise you increase the configuration effort.
SAP_MDM for the MDM system
SAP_SolutionManagement for the connected Solution Manager system
SAP_XI for the connected XI server
Example of the system definition of the MDM system in file jcoDestinations.xml: <wpl:Destination name="SAP_MDM">
<wpl:SYSTEM>SAP_MDM</wpl:SYSTEM>
<wpl:TYPE>3</wpl:TYPE>
<wpl:LOGONMETHOD>SAPLOGONTICKET</wpl:LOGONMETHOD>
<wpl:MSHOST> message_server</wpl:MSHOST>
<wpl:LANG>EN</wpl:LANG>
<wpl:R3NAME> ABC</wpl:R3NAME>
<wpl:CLIENT>xxx</wpl:CLIENT>
<wpl:SYSNR>system_nr</wpl:SYSNR>
<wpl:GROUP>PUBLIC</wpl:GROUP>
</wpl:Destination>
Replace the highlighted text with current entries for your system landscape.
The XML tag in the code example really is "Accessability", not the correct spelling "Accessibility" (we apologize for the programmer's spelling).
Example of the system definition of the MDM system in file systems.xml: <System name="SAP_MDM"> <Title multilingual="true"> <pcd:TitleText language="DE"> SAP Master Data Engine (MDE) </pcd:TitleText>

8.2.2 Connecting Backend Systems to the Portal
23.08.2004 55
<pcd:TitleText language="EN"> SAP Master Data Engine (MDE) </pcd:TitleText> </Title> <Description multilingual="true"> <pcd:DescriptionText language="de"> SAP Master Data Engine (MDE) </pcd:DescriptionText> <pcd:DescriptionText language="en"> SAP Master Data Engine (MDE) </pcd:DescriptionText> </Description> <Accessability value="true"/> <Attributes> <pcd:Attribute name="Type" value="3"/> <pcd:Attribute name="MessageServer" value="message_server"/> <pcd:Attribute name="ServerPort" value="serverport"/> <pcd:Attribute name="Group" value="PUBLIC"/> <pcd:Attribute name="Lang" value="DE"/> <pcd:Attribute name="R3Name" value="ABC"/> <pcd:Attribute name="Client" value="xxx"/> <pcd:Attribute name="SystemType" value="SAP_R3"/> <pcd:Attribute name="r3usernamereference" value="1" /> <pcd:Attribute name="UserMappingType" value="admin,user"/> </Attributes> <WebAccessPoints> <WebAccessPoint category="ITS"> <Title multilingual="true" textID="999"> <pcd:TitleText language="de">ITS-Webserver</pcd:TitleText> <pcd:TitleText language="en">ITS web server</pcd:TitleText> </Title> <Description multilingual="true" textID="990"> <pcd:DescriptionText language="de">ITS-Webserver</pcd:DescriptionText> <pcd:DescriptionText language="en">ITS web server</pcd:DescriptionText> </Description> <Protocol>HTTP</Protocol> <HostName>its_server:its_port</HostName> <Path>/scripts/wgate</Path> </WebAccessPoint> <WebAccessPoint category="WAS"> <Title multilingual="true" textID="999"> <pcd:TitleText language="de">WAS-Server</pcd:TitleText> <pcd:TitleText language="en">WAS server</pcd:TitleText> </Title> <Description multilingual="true" textID="990"> <pcd:DescriptionText language="de">WAS server</pcd:DescriptionText> <pcd:DescriptionText language="en">WAS server</pcd:DescriptionText> </Description> <Protocol>HTTP</Protocol> <HostName>was_server:was_port</HostName> <Path></Path> </WebAccessPoint> </WebAccessPoints> <LogonLanguages> <LogonLanguage value="DE"/> <LogonLanguage value="EN"/> </LogonLanguages>

8.2.2 Connecting Backend Systems to the Portal
SAP MDM Content Consolidation: Configuration Guide for MDM 2
56 23.08.2004
</System>
Replace the highlighted text with current entries for your system landscape.
Example of the system definition of the XI system in file systems.xml: <System name="SAP_XI">
<Title multilingual="true">
<pcd:TitleText language="DE">SAP Exchange Infrastruktur (XI)</pcd:TitleText>
<pcd:TitleText language="EN">SAP Exchange Infrastructure (XI)</pcd:TitleText>
</Title>
<Description multilingual="true">
<pcd:DescriptionText language="de">SAP Exchange Infrastruktur (XI)</pcd:DescriptionText>
<pcd:DescriptionText language="EN">SAP Exchange Infrastructure (XI)</pcd:DescriptionText>
</Description>
<Accessability value="true"/>
<Attributes>
<pcd:Attribute name="Type" value="3"/>
<pcd:Attribute name="MessageServer" value=" message_server"/>
<pcd:Attribute name="ServerPort" value="serverport"/>
<pcd:Attribute name="Group" value=" PUBLIC"/>
<pcd:Attribute name="Lang" value=" DE"/>
<pcd:Attribute name="R3Name" value=" ABC"/>
<pcd:Attribute name="Client" value=" xxx"/>
<pcd:Attribute name="SystemType" value="SAP_R3"/>
<pcd:Attribute name="UserMappingType" value="user"/>
<pcd:Attribute name="J2EE" value="http://hostname:port"/>
</Attributes>
...
Replace the highlighted text with current entries for your system landscape. The attribute J2EE is required for setting up the workflow modeler. Here you must specify the computer and port of the J2EE server where the workflow modeler is installed.
The settings for SAP_SolutionManagement follow the same pattern as the examples described.
Make sure that you specify the required Web access points for these systems:
System Name Web Access Point
SAP_MDM WAS, ITS
SAP_SolutionManagement ITS

8.2.2 Connecting Backend Systems to the Portal
23.08.2004 57
SAP_XI ITS
2. In file systems.xml, maintain the definitions for the connected Content Integrator system and the SAP User Management Engine.
For example: <System name="SAP_SRM_ContentIntegrator"> <Title multilingual="true"> <pcd:TitleText language="DE">SAP SRM Content Integrator</pcd:TitleText> <pcd:TitleText language="EN">SAP SRM Content Integrator</pcd:TitleText> </Title> <Description multilingual="true"> <pcd:DescriptionText language="de">SAP SRM Content Integrator</pcd:DescriptionText> <pcd:DescriptionText language="en">SAP SRM Content Integrator</pcd:DescriptionText> </Description> <Accessability value="true"/> <Attributes> <pcd:Attribute name="Host" value="ci_server:ci_port"/> <pcd:Attribute name="Path" value="/ci/Dispatcher"/> <pcd:Attribute name="Protocol" value="http"/> <pcd:Attribute name="SystemType" value="SAP_CI"/> </Attributes> </System> <System name="SAP_UME"> <Title multilingual="true"> <pcd:TitleText language="DE">SAP User Management Engine (UME) </pcd:TitleText> <pcd:TitleText language="EN">SAP User Management Engine (UME) </pcd:TitleText> </Title> <Description multilingual="true"> <pcd:DescriptionText language="de">SAP User Management Engine (UME) </pcd:DescriptionText> <pcd:DescriptionText language="en">SAP User Management Engine (UME) </pcd:DescriptionText> </Description> <Accessability value="true"/> <Attributes> <pcd:Attribute name="Host" value="ume_server:ume_port" /> <pcd:Attribute name="Path" value="/useradmin" /> <pcd:Attribute name="Protocol" value="http"/> <pcd:Attribute name="SystemType" value="SAP_UME" /> </Attributes>
Replace the server (ci_server, ume_server) and port (ci_port, ume_port) with current entries for your system landscape.
EP 5.0 – Finish
EP 6.0 – Start
When upgrading SAP Enterprise Portal EP 5.0 to EP 6.0, the EP 5.0 system landscape, which is for SAP MDM configured in the files Systems.xml and JcoDestinations.xml, is not automatically converted to an EP 6.0 system landscape. This means that you must reconfigure the EP 6.0 system landscape. ...
• Log on to the SAP Enterprise Portal as the Portal Administrator. You can then call file com.sap.pct.mdm_200_add_on.epa, which is delivered with Business Package for MDM 2.0 Version 60.1, and which contains the EP 6.0 system templates for MDM 2.00.

8.2.2 Connecting Backend Systems to the Portal
SAP MDM Content Consolidation: Configuration Guide for MDM 2
58 23.08.2004
After migration of the Business Package for MDM 2.0 Version 60.1 to SAP Enterprise Portal EP 6.0 is completed, you can call the system templates for MDM 2.00 as follows:
Choose System Administration → System Configuration → Systems, then in the folder for portal content Portal Content → Content Provided by SAP → Content for Specialists → Master Data Management → Templates → Systems.
You must create new system objects manually by using the system templates. You must create the alias names for these system objects manually as well.
• The data set in the system objects (for example, message server, host, path, and protocol) is similar to the data set of Systems.xml and JcoDestinations.xml in the EP 5.0 system landscape. For more information about the system landscape of MDM 2.00, see this configuration guide.
When using the import function in the SAP Enterprise Portal, the following system objects exist:
System Templates Customer-Specific System Objects (1)
Name ID Name ID
Alias Names (2)
MDM 2.00 Systems (Comment)
SAP_MDM_R3 _LoadBalancing
com.sap.pct.mdm.tpl.sys.
sap_mdm_r3 _loadbalancing
Cust _MDM
com.yourcompany.pct.sys.mdm
SAP_MDM Master Data Management Server
SAP_MDM_R3 _LoadBalancing
com.sap.pct.mdm.tpl. sys.sap_mdm_r3 _loadbalancing
Cust _XI
com.yourcompany.pct.sys.xi
SAP_XI SAP Exchange Infrastructure
SAP_MDM_R3 _LoadBalancing
com.sap.pct.mdm.tpl. sys.sap_mdm_r3 _loadbalancing
Cust _SMT
com.yourcompany.pct.sys.smt
SAP_Solution Management
SAP Solution Manager
SAP_MDM _J2EE
com.sap.pct.mdm.tpl. sys.sap_mdm_j2ee
Cust _CI
com.yourcompany.pct.sys.ci
SAP_SRM _Content Integrator
Content Integrator
SAP_MDM_J2EE com.sap.pct.mdm.tpl. sys.sap_mdm_j2ee
Cust _UME
com.yourcompany.pct.sys.ume
SAP_UME
SAP User Management Engine
Comments on the Table:
(1) These names serve merely as a template for customer-specific system objects. We recommend that you use a prefix that is specific to the customer's namespace, such as com.yourcompany.pct. This naming convention makes system administration easier and enables better identification of customer-specific system objects if these are transported into other portals.
(2) This Alias is obligatory. These alias names are delivered with the Content of Business Package for MDM 2.00 Version 60.1.
The following lists show the values of system attributes for customer-specific system objects:
Attribute Values for Customer-Specific System Objects, Alias Names (see comment 3)
Attribute Name
SAP_MDM SAP_XI SAP_Solution Management
Example
Client <R/3 client> <R/3 client> <R/3 client> 100

8.2.2 Connecting Backend Systems to the Portal
23.08.2004 59
Group <SAP logon group>
<SAP logon group>
<SAP logon group>
PUBLIC
ITS host name
<host:port> <host:port> <host:port> pgmdn-620- 01.wdf.sap.corp:1080
ITS path <ITS path> <ITS path> <ITS path> /scripts/wgate
ITS protocol
<ITS protocol> <ITS protocol> <ITS protocol> http
J2EE server
<protocol://host:port>
<protocol://host:port>
http://pwdf2044. wdf.sap.corp:50044
Logical system name
<R/3 logical system name>
<R/3 logical system name>
<R/3 logical system name>
MDNCLNT002
Logon method
<Logon method>
<Logon method>
<Logon method>
SAPLOGONTICKET
Message server
<R/3 message server>
<R/3 message server>
<R/3 message server>
pwdf2044.wdf.sap.corp
R/3 reference system
0 0 0
R/3 name <R/3 SID> <R/3 SID> <R/3 SID> MDN
Remote host type
3 3 3
SAP system number
<R/3 SYSNO> <R/3 SYSNO> <R/3 SYSNO> 44
Server port
<R/3 port> <R/3 port> <R/3 port> 5206
System type
SAP_R3 SAP_R3 SAP_R3
WAS host name
<WAS host> <WAS host> pwdf2044.wdf.sap.corp: 50044
WAS protocol
<WAS protocol> <WAS protocol> http
Attribute Values for Customer-Specific System Objects, Alias Names (see comment 3)
Attribute Name
SAP_UME SAP_SRM_Content Integrator
Example
J2EE host name
<host:port> <host:port> pgwdf418.wdf.sap.corp: 50000
J2EE path <J2EE path> <J2EE path> /useradmin for SAP_UME, /ci/Dispatcher for SAP_SRM_Content Integrator

8.2.3 Install and Configure Business Package for CRM
SAP MDM Content Consolidation: Configuration Guide for MDM 2
60 23.08.2004
J2EE protocol <J2EE protocol> <J2EE protocol> http
Logon method SAPLOGONTICKET SAPLOGONTICKET
Comments on the Tables:
(3) The attributes and the attribute values are suggestions. You must define the attributes. The values for your implementation and system landscape may be different.
All connections from SAP Enterprise Portal EP 6.0 to MDM 2.00 systems must be enabled for Single-Sign-On (SSO).
For more information on creating system objects in the SAP Enterprise Portal EP 6.0 by using system templates, see the administration guide for EP 6.0.
EP 6.0 – Finish
For more information about the connection of the systems, see help.sap.com → SAP NetWeaver → SAP Enterprise Portal → Administration Guide → Integration of Applications and Data Sources.
1. Set up Single Sign-On (SSO), with user mapping for access to the connected systems if required. Before you can set up Single Sign-On, the workplace plug-in must be successfully installed in the connected systems.
Remember that Single Sign-On must also be activated for the Internet transaction servers.
For more information about activating Single Sign-On, see:
Internet address help.sap.com → SAP NetWeaver → SAP Enterprise Portal → Administration Guide → Security → Single Sign-On
The SAP Service Marketplace at service.sap.com/instguides → Installation and Upgrade Guides → mySAP SRM → Using SAP EBP 3.5 → mySAP SRM – E-Procurement Capabilities → Direct Procurement SRM EPROC → Configuration Guides → Configuration Guide – SAP User Management Engine 3.0
Result The backend systems used in SAP MDM are defined in the portal environment
and Single Sign-On is activated.
8.2.3 Install and Configure Business Package for CRM The settings described here apply to the Business Scenarios MDM Content Consolidation, MDM Master Data Harmonization, and MDM Central Master Data Management.
Use In order to use MDM iViews, service com.sap.pct.crm.crmcontext.zar must be installed.
• If you want to use CRM 4.0 with the Business Package for CRM 4.0 50.2,
follow the instructions in the Installation Guide. This is on the

8.2.4 EP 5.0: Configuring the Business Package for Portal Users
23.08.2004 61
SAP Service Marketplace, at service.sap.com/instguides → Installation and Upgrade Guides → mySAP CRM → SAP CRM 4.0 → InstallationGuide – Business Package for CRM 4.0 50.2.
• If you use the Business Package for CRM 4.0 50.2 only in connection with the Business Package for MDM 2.00, only the correct installation of the CRM context service is relevant after the import.
Install CRM Context Service ...
1. Log on to the SAP Enterprise Portal as the portal administrator.
2. Choose Content Admin → Roles.
3. In the dropdown box, choose Master iViews.
4. Select the iView com.sap.pct.crm.additionalDeployment.default, and choose Preview.
Files com.sap.pct.crm.crmcontext.zar and com.sap.pct.crm.crmkmext.zar are unpacked form the archive into directory <servlet engine>\irj\root\resources\com.sap.pct.crm.additionalDeployment\externals.
5. Copy the file com.sap.pct.crm.crmcontext.zar to the directory <J2EE servlet path>\irj\root\WEB-INF\deployment.
6. Restart the J2EE server.
EP 6.0 only:
Object Link In addition to the steps described in SAP Notes 659881 and 642515, you must perform further configuration steps, so that the CRM object link works with MDM services. ...
1. Log on to the SAP Enterprise Portal as the content administrator.
2. Process the migrated role CRM Default Services (technical name: com.sap.pct.crm.crm_default_services) and choose subfolder Additional Deployment (technical name: nf).
3. Search for the migrated iView for generic input help (com.sap.pct.mdm.generics.ValueHelp), and add the delta link to the folder named above Additional Deployment (nf).
4. Search for the migrated iView URL-Dispatcher (com.sap.pct.mdm.UrlDispatcher), and add the delta link to the folder named above Additional Deployment (nf).
5. Save the role CRM Default Services (com.sap.pct.crm.crm_default_services).
6. In the role CRM Default Services (com.sap.pct.crm.crm_default_services), search for the PCD locator of components com.sap.pct.mdm.generics.ValueHelp and com.sap.pct.mdm.UrlDispatcher (for example, preview → F11 → Copy Link → Unescape).
Save the PCD locator links in Notepad.
7. In the system alias SAP_MDM, configure the SAP R/3 table CRMC_PRT_CUSTOM with the values specified in Defining the Portal Server for the People-Centric UI [Page 52].
Result The CRM context service has been successfully installed.
8.2.4 EP 5.0: Configuring the Business Package for

8.2.4 EP 5.0: Configuring the Business Package for Portal Users
SAP MDM Content Consolidation: Configuration Guide for MDM 2
62 23.08.2004
Portal Users EP 5.0 only:
The settings described here apply to the Business Scenarios MDM Content Consolidation, MDM Master Data Harmonization, and MDM Central Master Data Management.
Use Before you can process workflow tasks from the MDM system in the Central Worklist master iView of the SAP Enterprise Portal, you must configure the master iView for this purpose. The Central Worklist iView is delivered with the Business Package for Portal User Package.
Procedure Define the MDM system as a relevant system for the Central Worklist master iView. To do this, set the required attributes for the master iView in the Java iView editor. ...
1. Configure the master iView com.sapportals.pct.emp.UniversalWorklist.default and the master iView com.sapportals.pct.emp.UniversalWorklist.admin, and define the value SAP_MDM for the parameters system and destination.
2. Configure the master iView com.sapportals.pct.emp.UniversalWorklist.default and define value SAP_MDM for parameter SystemIdentifier. Set the value "false" for the parameters Enable ITS mode to execute user decision items and Enable ITS mode to view work item detail.
3. Edit the file default.properties in directory <J2EE servlet path> \irj\root\WEB-INF\plugins\portal\resources\com.sapportals.pct.emp.universalworklist\profiles.
For attribute ServiceReferences, insert the entry com.sap.pct.crm.crmcontext: (Service.Reference=htmlb,usermanagement,landscape,urlgenerator,jcoclient,inqmy,cache,com.sapportals.pct.srv.portaldataviewer,com.sap.pct.crm.crmcontext).
For more information on the configuration of the Central Worklist master iView, go to the iView studio at www.iviewstudio.com and see the documentation for the Business Package for Portal Users.
Result Workflow tasks from the MDM system can be processed in the Central Worklist iView.
8.3 User Management in SAP MDM The settings described here apply to the business scenarios MDM Content Consolidation, MDM Master Data Harmonization, and MDM Central Master Data Management.
This section describes the management of users and role assignment in SAP MDM.
8.3.1 Recommended Scenario for User Management in SAP MDM The settings described here apply to the Business Scenarios MDM Content Consolidation, MDM Master Data Harmonization, and MDM Central Master Data Management.
Use In the MDM scenarios, various components are used for the management of users and the assignment of roles to these users:
• Portal LDAP (Lightweight Directory Access Protocol) and corporate LDAP

8.3.1 Recommended Scenario for User Management in SAP MDM
23.08.2004 63
EP 6.0 only: In EP 6.0 scenario, only corporate LDAP.
• UME (SAP User Management Engine)
EP 6.0 only:
UME 3.0 is required to connect Content Integrator. In EP 6.0, an additional UME 4.0 is integrated in the J2EE engine.
• User management of the SAP Web Application Server (BC-SEC-USR)
• Central user administration (CUA), optional
• For use in MDM, we recommend the following combination of these components:
User Data • User data is maintained in the corporate LDAP or in user management in the Web
Application Server of your MDM system.
EP 6.0 only:
If you use EP 6.0, maintenance is also possible in the portal UME 4.0.
• User data can also be synchronized between the systems by using LDAP synchronization.
EP 6.0 only:
The integrated UME 4.0 also allows direct comparisons between UME and user management of the WAS.
• When you use the MDM system as the system for central user administration (CUA), these users can be distributed to additional client systems (basis release >= 4.5) by using ALE.
• UME 3.0 for the connection to Content Integrator 2.0 has read access to the user data of corporate LDAP. Note that user mapping (where different user IDs are mapped to each other) between LDAP and UME is not technically possible for this reason. This means that you must use only user IDs read from the LDAP in the UME.
• We recommend that you create users in one place only.
Role Assignment • In the MDM system, all MDM users are assigned to the relevant backend roles.
• EP 5.0 only:
Using the portal LDAP, all MDM users are assigned to the relevant portal roles.
• EP 6.0 only:
You can use the integrated UME 4.0 to assign portal roles to MDM users. With the right configuration (see below), portal roles that correspond to the backend roles are automatically assigned to the users in the portal.
• In the separate UME 3.0, the relevant CI roles are assigned to the MDM users that have access to Content Integrator (CI).
The following roles are used in the MDM environment:
EP 5.0 only:

8.3.1 Recommended Scenario for User Management in SAP MDM
SAP MDM Content Consolidation: Configuration Guide for MDM 2
64 23.08.2004
SAP Enterprise Portal
Content Integrator
Portal LDAP
User Management Engine 3.0
MDM System (MDE 2.0)WAS 6.20
Central User Management
MDC
R/3
…
Corporate LDAP
Role assignment
User maintenance
Legend:
LDAP Connector(Basis <= 6.10)
ALE (Basis >= 4.5)
EP 6.0 only:
SAP Enterprise Portal
Content Integrator
UME
User Management Engine 3.0
MDM System(MDE 2.0)WAS 6.20
Central User Management
MDC
R/3
…
Corporate LDAP
Role assignment
User maintenance
Legend:
LDAP Connector(Basis <= 6.10)
ALE (Basis >= 4.5)
Read-Write Access to WAS Data Source
4.0
Assigned Roles for the SAP Enterprise Portal
Role Assigned Role
Master Data Administrator com.sap.pct.mdm.MasterDataAdministrator
Master Data Manager com.sap.pct.mdm.MasterDataManager

8.3.1 Recommended Scenario for User Management in SAP MDM
23.08.2004 65
Master Data Specialist com.sap.pct.mdm.MasterDataSpecialist
Local Data Manager com.sap.pct.mdm.LocalDataManager
Master Data User com.sap.pct.mdm.MasterDataUser
EP 5.0 only: In EP 5.0, assign the role portal_user to all MDM users.
EP 6.0 only:
Assign the roles eu_role and com.sap.pct.mdm.mdm_default_service (role for MDM standard services) to all MDM users.
In Business Package for SAP MDM 2.00 60.1, work set Workflow is not in the role Master Data User.
If you still require access to the universal worklist, you can add the Universal Worklist page to a work set (stored in portal content: pcd:portal_content/com.sap.pct/every_user/general/Pages/com.sap.netweaver.bc.uwl.uwl_page).
You then assign the work set to the role of the user that requires access to the universal worklist.
Assigned Roles for the MDM System
Role Assigned Role
Master Data Administrator SAP_WP_MDM_MASTER_DATA_ADMIN
Master Data Manager SAP_WP_MDM_MASTER_DATA_MANAGER
Master Data Specialist SAP_WP_MDM_MASTER_DATA_SPEC
Local Data Manager SAP_WP_MDM_LOCAL_DATA_MANAGER
Master Data User SAP_WP_MDM_MASTER_DATA_USER
For more information about composite roles and single roles in master data management, see Composite Roles in SAP MDM [Page 67] and Overview of Assignments of Single Roles to Composite Roles [Page 68].
Assigned Roles for the UME/Content Integrator
Role Assigned Role
Master Data Administrator • CI_User
• CI_SystemAdministrator
• CI_MatchingAdministrator
• CI_MasterDataManager
Master Data Manager • CI_User
• CI_SystemAdministrator
• CI_MatchingAdministrator
• CI_MasterDataManager

8.3.1 Recommended Scenario for User Management in SAP MDM
SAP MDM Content Consolidation: Configuration Guide for MDM 2
66 23.08.2004
Master Data Specialist • CI_User
• CI_TechnicalExpert
Local Data Manager -
Master Data User -
Assigned Roles for XI
Role Assigned Role
Master Data Administrator • SAP_XI_MONITOR
• SAP_XI_CONFIGURATOR
• SAP_XI_DEVELOPER
Master Data Manager • SAP_XI_MONITOR
Master Data Specialist -
Local Data Manager -
Master Data User -
Assigned Roles for Solution Management
Role Assigned Role
Master Data Administrator SAP_BC_CUS_ADMIN
Master Data Manager -
Master Data Specialist -
Local Data Manager -
Master Data User -
For more information about the roles, see the installation guide for the Solution Manager on the SAP Service Marketplace at service.sap.com/solutionmanager → Installation Guides.
If you want to change the delivered portal roles, follow the instructions for role definition. For more information, see help.sap.com → SAP NetWeaver → SAP Enterprise Portal → Administration Guide → Roles.
It may be useful in your environment to change the assigned worksets to make the roles object specific.
Example
Role Attributes
Generic role Product Business partner Technical asset
Master Data Administrator No changes
Master Data Manager Master Data Manager for
products
Master Data Manager for
Business Partners
Master Data Manager for
Technical Assets

8.3.2 SP03ff: Composite Roles in Master Data Management
23.08.2004 67
Master Data Specialist Master Data Specialist for
Products
Master Data Specialist for
Business Partners
Master Data Specialist for
Technical Assets
Master Data User Master Data User for Products
Master Data User for Business Partners
Master Data User for
Technical Assets
Local Data Manager Local Data Manager for
Products
Local Data Manager for
Business Partners
Local Data Manager for
Technical Assets
If you change the portal roles (by deleting menu options, for example), first change the composite or single roles in the MDM system, then change the role in the portal, because the portal gets the authorizations from the MDM system.
For more information about role management on the SAP Web Application Server, see help.sap.com → SAP NetWeaver → SAP Web Application Server → mySAP Technology Components → SAP Web Application Server → Security → Users and Roles (BC-SEC-USR).
One special feature applies to BSP applications that use the People-Centric UI:
Role-dependent links are defined in Customizing in the MDM system. If you change roles, you must also change this Customizing, so that the links still work.
In EP 5.0, the following iViews also help you:
• PCD locator check
• Copy roles
• Role check
For more information, see the iView studio at www.iviewstudio.com and see the documentation for the Business Package for MDM 2.00.
Procedure Perform the steps in the following units to configure the recommended scenario for user management in MDM.
8.3.2 SP03ff: Composite Roles in Master Data Management The settings described here apply to the Business Scenarios MDM Content Consolidation, MDM Master Data Harmonization, and MDM Central Master Data Management.
Use Single roles are usually assigned to composite roles. You can generate authorization profiles from single roles. The roles put together here are intended as a suggestion for SAP MDM.
SAP also delivers single roles that are not assigned to composite roles. You can link these single roles to suitable composite roles, to add the functionality of the composite role to the single role, as suits your company's requirements. You can also use single roles to put together your own composite roles.

8.3.3 Single Roles in Master Data Management
SAP MDM Content Consolidation: Configuration Guide for MDM 2
68 23.08.2004
For more information about the composite and single roles in SAP MDM (for example, a business description of the roles and an overview of the assignment of Single Roles in Master Data Management [Page 68] to each other and an overview of the Roles for Remote Users Master Data Management [Page 70]), see the SAP Service Marketplace at service.sap.com/instguides → Installation and Upgrade Guides → SAP MDM.
For more information about role maintenance in general, see help.sap.com → SAP NetWeaver → SAP Web Application Server → SAP NetWeaver Components → Technical Operations Manual for mySAP Technology → Administration of the SAP Web Application Server → Management of the ABAP Subsystem → Users and Roles (BC-SEC-USR) → Role Maintenance.
Prerequisites You have defined which roles cover which tasks in your company.
Procedure ...
1. Copy the single and composite roles to your namespace.
2. Check whether the composite roles delivered for SAP MDM with the single roles assigned to them are suitable for your company's needs.
We recommend that you avoid changing delivered, predefined roles, because otherwise the interaction between functions may be impeded.
a. If necessary, create new roles.
b. If required, change the assignment of single roles to composite roles.
c. Define the empty authorization default values in the authorization objects for the single roles.
3. Generate the authorization profile.
Result You have adapted the composite roles and authorization profiles for single roles to meet the needs of your company.
Example You want to define a user that performs all the administration within the system landscape in your company. To do this, you assign the administrator role of the individual systems to this user (for example, KM Administrator or MDM Administrator).
8.3.3 Single Roles in Master Data Management The following table gives an overview of the composite roles supplied for master data management.
Legend for abbreviations of the roles in the assignment table
Abbreviation Name Technical name
1 Master Data Administrator SAP_WP_MDM_MASTER_DATA_ADMIN
2 Master Data Manager SAP_WP_MDM_MASTER_DATA_MANAGER
3 Master Data Specialist SAP_WP_MDM_MASTER_DATA_SPEC

8.3.3 Single Roles in Master Data Management
23.08.2004 69
4 Master Data Manager SAP_WP_MDM_LOCAL_DATA_MANAGER
5 Master Data User SAP_WP_MDM_MASTER_DATA_USER
The following table gives an overview of the suggested composite roles supplied for master data management. It displays which single roles are assigned to which composite roles. You can get the technical names and the names of the corresponding composite roles from the above legend.
Assignment of single roles to composite roles
Composite Role Single Role
1 2 3 4 5
SAP_BC_AUTH_DATA_ADMIN x
SAP_BC_AUTH_PROFILE_ADMIN x
SAP_BC_BMT_WFM_ADMIN x
SAP_BC_BMT_WFM_CONTROLLER x x
SAP_BC_LDAP_ADMIN x
SAP_BC_BMT_WFM_DEVELOPER x
SAP_BC_USER_ADMIN x
SAP_MDM_COMMON x x x x x
SAP_MDM_COMMON_ADMIN x
SAP_MDM_CUA x
SAP_MDM_CUSTOM x
SAP_MDM_ORGA x
SAP_MDM_PROCESS x x
SAP_MDM_SWFMOD_ADMIN x
SAP_MDM_UI x
SAP_MDM_SWFMOD_USER x
SAP_MDM_SEARCH x x x x
SAP_MDM_STAGING x x
SAP_MDM_PUBLICATION x
SAP_MDM_BUPA x x
SAP_MDM_BUPA_EXCHANGE x x
SAP_MDM_BUPA_REQUEST x x
SAP_MDM_PRODUCT x x
SAP_MDM_PRODUCT_REQUEST x x
SAP_MDM_TECH_ASSET x x
SAP_MDM_BUPA_OCC x x
SAP_MDM_PRODUCT_OCC x x

8.3.4 Roles for Remote Users in Master Data Management
SAP MDM Content Consolidation: Configuration Guide for MDM 2
70 23.08.2004
SAP_MDM_TECH_ASSET_OCC x x
SAP_MDM_SUBSCRIPTION x
SAP_MDM_CUSTOM_IMG x
8.3.4 Roles for Remote Users in Master Data Management The following table contains an overview of the composite and single roles for remote users [External] that SAP delivers for master data management.
The table also contains the composite role of the master data administrator, to which remote single roles are assigned.
Legend for abbreviations of the roles in the assignment table
Abbreviation Name Technical name
Composite Roles
1 Outbound and Inbound Processes of the MDS
SAP_WP_MDM_REMOTE_ALE_REMOTE [External]
2 ID Mapping (Outbound and Inbound Processes)
SAP_WP_MDM_REMOTE_MDM_REMOTE [External]
3 Access to CI and Fill ID Mapping in MDS
SAP_WP_MDM_REMOTE_CI_REMOTE [External]
4 Matching CI MDS SAP_WP_MDM_REMOTE_CI_MDS [External]
5 Master Data Administrator SAP_WP_MDM_MASTER_DATA_ADMIN [External]
Single Roles
Structure of Index in TREX SAP_MDM_REMOTE_INDEX_SERVICE [External]
Outbound and Inbound Processes of the MDS (Basis)
SAP_MDM_REMOTE_S_BI-WX_RFC [External]
Send Data to CI and Receive Data from CI
SAP_MDM_REMOTE_MDM_REMOTE [External]
Access to CI SAP_MDM_REMOTE_CI_REMOTE_I [External]
Fill ID Mapping in MDS SAP_MDM_REMOTE_CI_REMOTE_II [External]
Matching CI MDS SAP_MDM_REMOTE_CI_MDS [External]
The user type Communication = Type C must be defined for all users.

8.3.4 Roles for Remote Users in Master Data Management
23.08.2004 71
The following table gives an overview of the suggested composite roles supplied for master data management. It displays which single roles are assigned to which composite roles. You can get the technical names and the names of the corresponding composite roles from the above legend.
Assignment of single roles to composite roles
Composite Role Single role (dialog and remote)
1 2 3 4 5
Dialog
SAP_BC_AUTH_DATA_ADMIN x x
SAP_BC_AUTH_PROFILE_ADMIN x x
SAP_BC_BMT_WFM_ADMIN x x
SAP_BC_BMT_WFM_CONTROLLER x x x x
SAP_BC_LDAP_ADMIN x x
SAP_BC_BMT_WFM_DEVELOPER x x
SAP_BC_USER_ADMIN x x
SAP_MDM_COMMON x x x x
SAP_MDM_COMMON_ADMIN x x
SAP_MDM_CUA x x
SAP_MDM_CUSTOM x x
SAP_MDM_ORGA x x
SAP_MDM_PROCESS x x x x
SAP_MDM_SWFMOD_ADMIN x x
SAP_MDM_UI x x
SAP_MDM_SWFMOD_USER x x x
SAP_MDM_SEARCH x x x
SAP_MDM_STAGING x x x
SAP_MDM_PUBLICATION x x x
SAP_MDM_BUPA x x x
SAP_MDM_BUPA_EXCHANGE x x x
SAP_MDM_PRODUCT x x x
SAP_MDM_TECH_ASSET x x x
SAP_MDM_CUSTOM_IMG x x
SAP_SWFMOD_ADMIN x
Remote
SAP_MDM_REMOTE_INDEX_SERVICE
SAP_MDM_REMOTE_S_BI-WX_RFC x
SAP_MDM_REMOTE_MDM_REMOTE x

8.3.5 Configuring UME 3.0 in the MDM Scenario (EP 5.0 and EP 6.0)
SAP MDM Content Consolidation: Configuration Guide for MDM 2
72 23.08.2004
SAP_MDM_REMOTE_CI_REMOTE_I x
SAP_MDM_REMOTE_CI_REMOTE_II x
SAP_MDM_REMOTE_CI_MDS x
8.3.5 Configuring UME 3.0 in the MDM Scenario (EP 5.0 and EP 6.0) The settings described here apply to the Business Scenarios MDM Content Consolidation, MDM Master Data Harmonization, and MDM Central Master Data Management.
Use In the recommended configuration of SAP Master Data Managements (MDM) the user management is provided by SAP Enterprise Portal 5.0 (EP 5.0); the Lightweight Directory Access Protocol (LDAP) manages the persistency of the user data. You require SAP User Management Engine Release 3.0 Service Pack 07 (UME) in order to assign the necessary SAP Content Integrator roles to the LDAP users. The UME has to have read access to the LDAP.
Since the standard installation of the UME is set up so that the UME is the master system for user management, you must make the following configurations manually:
• The connection to LDAP
• Setting up of Single Sign-On (SSO) via EP 5.0
• Various other settings (that relate to UME and LDAP)
If you implement SAP Enterprise Portal 6.0 (EP 6.0), you use the same configuration settings as for EP 5.0 as long as you use an LDAP as user data source. If you do not use an LDAP as user data source, you configure the UME as described under Configure UME without LDAP as Master System (see below).
Prerequisites You have completed the installation of SAP User Management Engine Release 3.0 Service Pack 07 taking account of SAP Note 630637.
For more information on UME configuration, see the Configuration Guide: SAP User Management Engine in the SAP Service Marketplace under service.sap.com/instguides → mySAP SRM → Using EBP 3.5 → mySAP SRM E-Procurement Capabilities → Direct Procurement under Configuration Guides
You can only install SAP Content Integrator in the MDM system landscape if you have already installed and configured SAP User Management Engine.
Configure LDAP as Master-System for the UME (EP 5.0 and EP 6.0 with LDAP) In order to configure the LDAP as master system for SAP User Management Engine, you must make the changes listed here to the mySAP.properties file. You can find this file in the following directory:

8.3.5 Configuring UME 3.0 in the MDM Scenario (EP 5.0 and EP 6.0)
23.08.2004 73
• Windows: \\<drive>\sapmarkets\properties
• UNIX: /sapmarkets/properties/
LDAP Connection ...
1. Configure the LDAP connection as described under 2.2.14.1 LDAP Connection in the Configuration Guide: SAP User Management Engine 3.0.
2. Maintain the following parameters:
a. UM_MASTER_STORAGE=databaseadapter
Flag this parameter as a comment (using the # symbol).
b. UM_MASTER_STORAGE=ldapadapter?adapterid=myserver
This way you define the LDAP as the master system for user data persistency.
c. um_ldap_myserver_readonly=true
This way you restrict the UME access to the LDAP to read-only.
LDAP Directory Structure ...
1. Configure the structure of the LDAP directory as described under 2.2.14.2 LDAP Directory Structure in the Configuration Guide: SAP User Management Engine 3.0.
Sample configuration for the UME with the Novell LDAP Server (Novell eDirectory) that is delivered with SAP Enterprise Portal: um_ldap_myserver_host=<LDAP_server:port>
um_ldap_myserver_mgr_dn=<LDAP_manager_distinguished_name> (for example, cn=admin,ou=SERVICES,o=PORTALLDAP)
um_ldap_myserver_mgr_pw=<LDAP_manager_password>
um_ldap_myserver_readonly=true
um_ldap_myserver_use_org_structure=false
um_ldap_myserver_org_structure_parent_dn=<LDAP_parent_ distinguished_name_for_users> (for example, ou=Users,O=CORPLDAP)
um_ldap_field_uid=cn
um_ldap_myserver_authenicate_bind=true
UM_UID_MAPPING=false
The following parameters must be flagged as comments (using the hash symbol, #):# um_ldap_myserver_role_parent_dn=# um_ldap_myserver_users_oc=umUser
2. Set the parameter um_ldap_myserver_use_org_structure=false.
This way you deactivate the assignment of users to companies. This assignment is not required in the MDM configuration.
LDAP as Master System Create LDAP object classes as described under 7 Configure LDAP as Master Server in the Configuration Guide: SAP User Management Engine 3.0.

8.3.5 Configuring UME 3.0 in the MDM Scenario (EP 5.0 and EP 6.0)
SAP MDM Content Consolidation: Configuration Guide for MDM 2
74 23.08.2004
Configure UME without LDAP as Master System (EP 6.0) With this configuration that you can only set up for EP 6.0 you cannot have synchronization of users for EP 6.0 and UME 3.0. Instead, you must maintain the users twice, in EP 6.0 and in UME 3.0. If, however, you set up Single Sign-On (SSO), then you do not need to create separate passwords for the users in UME. ...
1. Install SAP User Management Engine 3.0 SP07 (or higher) taking account of SAP Note 630637.
2. For the UME administrator, choose a user name that you have already created in EP 6.0.
3. Configure SSO (see below Configure SSO for EP and UME).
4. Carry out the configurations under Different Configurations (see below).
Configure SSO for EP and UME (EP 5.0 and EP 6.0) In the Standard installation of UME the SAP logon ticket is created by the UME, and the SAP Enterprise Portal (EP) is configured in such a way that it accepts the SAP logon ticket of the UME.
In MDM configuration this works in reverse. Log-on is completed via the EP and the UME (Release 3.0 SP 07) must accept the SAP log-on ticket of the EP. To do this, you make the following modifications: ...
1. Copy the verify.pse file of the EP into the following UME properties directory:
Windows: <UME drive>\sapmarkets\properties
UNIX: /sapmarkets/properties/
The verify.pse file is located in the EP 5.0 directory <EP 5.0-Drive>\ SAP_J2EEngine6.20\alone\services\servlet_jsp\work\ jspTemp\irj\root\WEB-INF\plugins\portal\services\ usermanagement\data.
For EP 6.0 you can download the verify.pse file. To do this, use the following menu path in the Portal: System Administration → System Configuration → Keystore.
2. Set the following parameters in the mySAP.properties file of the UME:
a. SSO_VERIFYPSE_NAME=verify.pse
b. SSO_VERIFYPSE_PWD=
c. UM_SAPLOGON_TICKET_AUTH_SYSID_1=WP3
WP3 is a standard value that has possibly been changed during configuration of the EP. Use the value that you specified in your EP installation.
d. UM_SAPLOGON_TICKET_AUTH_CLIENT_1=000
000 is a standard value that has possibly been changed during configuration of the EP. Use the value that you specified in your EP installation.
3. Make sure that the following parameters are flagged as comments according to the standard (using the # symbol).
a. #UM_SAPLOGON_TICKET_AUTH_SUBJECT_1=
b. #UM_SAPLOGON_TICKET_AUTH_ISSUER_1=
c. #UM_SAPLOGON_TICKET_AUTH_SERIALNO_1=

8.3.5 Configuring UME 3.0 in the MDM Scenario (EP 5.0 and EP 6.0)
23.08.2004 75
Assign UME Administration Rights to an LDAP User (EP 5.0 and EP 6.0 with LDAP) In order to assign administrator rights in the UME to an existing LDAP user, proceed as follows: ...
1. Select a user in the LDAP that is to become the UME administrator.
This LDAP user requires the MDM role Master Data Administrator.
2. Set the following parameters in the mySAP.properties file of the UME:
SUPERUSER=<admin_user_ID>
3. Restart the J2EE Engine of the UME.
4. Log on to the SAP Enterprise Portal with this user.
5. To assign the administrator role to the user, call up the URL <UME-server:port>/useradmin/SuperUser in this browser window.
For more information, see 12.7 Superuser Creation in the Configuration Guide: SAP User Management Engine.
Different Configurations (EP 5.0 and EP 6.0) You must make the following configurations in the mySAP.properties file in SAP User Management Engine. You can find this file in the following directories:
• Windows: \\<drive>\sapmarkets\properties
• UNIX: /sapmarkets/properties/
Deactivating the EBP Adapter As standard, a SAP Enterprise Buyer Adapter is configured on installation of the UME. This is not required in the MDM scenario. In order to deactivate the EBP adapter, flag the following parameter as a comment (using the # symbol).
#UM_SECONDARY_STORAGE_1=r3adapter?adapterid=EBP
Company Dummy Implementation The option in the UME to assign users to a company is irrelevant in the MDM scenario and is deactivated. The system, however, requires a dummy company that you must create by setting the following parameters: ...
1. TPD_CLASSNAME=com.sap.security.core.tpd.SimpleTPD
2. ume.tpd.companies=1
Configure UME Data Source In order that SAP Content Integrator can access the SAP User Management Engine using Enterprise Java Beans (EJBs), you set the following parameters:
UM_DB_DATASOURCE_XA=true.
Configure UME Logon-URL Set the following parameters so that when you call up the UME, the SAP Enterprise Portals (EP) log-on screen appears rather than that of UME: EXTERNAL_LOGON_URL=<entry_URL_of_EP> (for example, server.domain.com:1080/SAPPortal)
8.3.6 Executing User Definition in the LDAP, MDM System, or UME 4.0
SAP MDM Content Consolidation: Configuration Guide for MDM 2
76 23.08.2004
Configuring the Language for CI Users in the UME The procedure for setting the language for the CI User in the User Management Engine is described in SAP Note 680538.
Result You have configured UME and, if appropriate, LDAP for user management.
In order to test the configuration of UME with LDAP, you log on to SAP MDM with the user to which you have assigned the UME administrator rights and then choose User Management → Assign Roles for CI. If the configuration has been successful, you will go to a UME search screen.
8.3.6 Executing User Definition in the LDAP, MDM System, or UME 4.0 The settings described here apply to the Business Scenarios MDM Content Consolidation, MDM Master Data Harmonization, and MDM Central Master Data Management.
Use Create the user data in corporate LDAP, in user management in the Web Application Server of your MDM sysstem, or – if you are using EP 6.0 – in the portal or the related UME 4.0. Note that no direct function for changing passwords is assigned to the portal users in the MDM portal roles or the standard portal roles in EP 5.0. As the administrator, you can configure the SelfRegistration.ChangePassword iView for Novell LDAP accordingly and assign it a user role. The SAP Enterprise Portal 5.0, SP5, Patch 1, Hotfix Collection 7 offers the Change Password iView for the Microsoft Active Directory, in addition. In EP 6.0, you can change the password in the WAS that is used as the source for user management, or in the portal itself, by using the Personalize – User Password function.
Procedure ...
1. Enter the relevant user data in corporate LDAP, in user management of the MDM system, or in the UME 4.0 belonging to the portal.
For more information about user management in corporate LDAP, see help.sap.com → SAP NetWeaver → SAP Enterprise Portal 5.0 → Administration Guide → User Management.
For more information about user management in the MDM system, see help.sap.com → SAP NetWeaver → SAP Web Application Server → mySAP Technology Components → SAP Web Application Server → Security → Users and Roles (BC-SEC-USR).
For more information about user management in portal UME 4.0, see help.sap.com → SAP NetWeaver → SAP Enterprise Portal 6.0 → Administration Guide → User Management.
2. Use LDAP synchronization if you want to transfer users from corporate LDAP to the MDM system or from the MDM system to corporate LDAP.
For more information about synchronization, see help.sap.com → SAP NetWeaver → SAP Enterprise Portal → Administration Guide → User Management → Synchronizing SAP R/3 User Data with Corporate LDAP Directory.

8.3.7 Assigning Roles in the Portal
23.08.2004 77
Result You have made the MDM-relevant users known in corporate LDAP and in the MDM system.
8.3.7 Assigning Roles in the Portal The settings described here apply to the Business Scenarios MDM Content Consolidation, MDM Master Data Harmonization, and MDM Central Master Data Management.
Use Assign the relevant portal roles to MDM users in the portal.
Prerequisites EP 5.0 only:
You have defined the relevant users in the corporate LDAP or transferred them from the MDM system to the corporate LDAP by using an LDAP synchronization (see Executing User Definition in the LDAP or MDM System [Page 76]).
EP 6.0 only: You have defined the MDS system as a data source.
Procedure – EP 5.0 only ...
1. Log on to the SAP Enterprise Portal as the portal administrator.
2. Choose role assignment.
3. Assign the relevant portal roles to the MDM users. You will find an overview of these roles under Recommended Scenario for User Management in SAP MDM [Page 62].
For more information on the portal roles, go to the iView studio at www.iviewstudio.com and see the documentation for the Business Package for MDM 2.00.
Procedure – EP 6.0 You want to assign the portal roles to user groups in the portal.
The roles from the data source (MDM system) exist in UME 4.0 as user groups. The assignment of users to roles in the backend system is copied as assignment of the users to the user groups. By assigning portal roles to the user groups in UME, you ensure that a portal role is assigned to a user after assignment of a role in the backend system. ...
1. Log on as the portal system administrator.
2. Choose User Administration → Roles.
3. Assign portal roles to the following groups:
Group Portal Roles
SAP_WP_MDM_MASTER_DATA_ADMIN com.sap.pct.mdm.MasterDataAdministrator,
com.sap.pct.mdm.mdm_default_service
SAP_WP_MDM_MASTER_DATA_MANAGER com.sap.pct.mdm.MasterDataManager,
com.sap.pct.mdm.mdm_default_service
SAP_WP_MDM_MASTER_DATA_SPEC com.sap.pct.mdm.MasterDataSpecialist,
com.sap.pct.mdm.mdm_default_service

8.3.8 Making Role Assignments for CI Roles in the UME
SAP MDM Content Consolidation: Configuration Guide for MDM 2
78 23.08.2004
SAP_WP_MDM_LOCAL_DATA_MANAGER com.sap.pct.mdm.LocalDataManager,
com.sap.pct.mdm.mdm_default_service
SAP_WP_MDM_MASTER_DATA_USER com.sap.pct.mdm.MasterDataUser,
com.sap.pct.mdm.mdm_default_service
For more information about role assignment, see help.sap.com → SAP NetWeaver → SAP Enterprise Portal → Administration Guide → User Management → Assignment of Users and Groups to Roles.
Result You have assigned the portal roles required for the MDM scenarios to users.
8.3.8 Making Role Assignments for CI Roles in the UME The settings described here apply to the Business Scenarios MDM Content Consolidation, MDM Master Data Harmonization, and MDM Central Master Data Management.
Use You use SAP User Management Engine (UME) to assign the roles of SAP Content Integrator (CI roles) to the corresponding SAP Master Data Management (MDM roles).
You can assign the following CI roles to the following MDM roles:
Name of the CI roles / Technical name
Description of the CI Roles Assignment to MDM roles
CI User / CI_User Users with this role can log on to the Content Integrator from within a portal.
All users who access the CI via the portal require this role.
Master data administrator
Master Data Manager
Master Data Specialist
CI System Administrator / CI_SystemAdministrator
Users with this role can carry out the following actions:
• Manage the CI system landscape
• Manage jobs
Master data administrator
Master Data Manager
CI Administrator for Matching / CI_MatchingAdministrator
Users with this role can carry out the following actions:
• Load ID mapping data
• Manage matching processes
• Configure settings
• Manage change orders
• Manage matching jobs
• Create matching profiles
Master data administrator
Master Data Manager
CI Master Data Manager / Users with this role can carry out the Master data

8.3.8 Making Role Assignments for CI Roles in the UME
23.08.2004 79
CI_MasterDataManager following actions:
• Categorize products
• Create schema mappings
• Configure settings
• Process workitems
• Find ID mapping data
• Replicate ID mapping data
administrator
Master Data Manager
CI Technical Expert / CI_TechnicalExpert
Users with this role can process workitems.
Master Data Specialist
Developer / CI_Developer Users with this role have all rights in the Content Integrator and can carry out all activities.
This role is intended for experts (developers who monitor the functions of the Content Integrator). Therefore, you should assign this role only to selected users.
as required
CI API Client / CI_APIClient
This role allows other SAP Systems access to the following Content Integrator interfaces:
• ID mapping service
• Service for object access
for systems
Prerequisites • You have configured SAP User Management Engine (UME) in the MDM Scenario as
intended; see Configuring UME 3.0 in the MDM Scenario [Page 72].
• You require a user with the MDM role Master Data Administrator and with UME administrator rights.
Procedure In order to assign CI roles to MDM portal users who have to access SAP Content Integrator, you carry out the following steps: ...
1. Log on to the UME via the portal (User Management → Role Assignment for CI).
2. Use the UME search functions to find the users to which you wish to assign CI roles.
3. Process the users by using the Modify symbol in the table containing the search results.
4. Select the required CI roles from the list Available Roles and add these to the list Assigned Roles.
5. Save your changes and activate the user.

8.3.9 Assigning Roles in the Backend Systems
SAP MDM Content Consolidation: Configuration Guide for MDM 2
80 23.08.2004
For more information, see the Administrator’s Guide: SAP User Management Engine under UME User Interface – Administration Console. You can find the Guide in the SAP Service Marketplace under service.sap.com/instguides → mySAP SRM → Using EBP 3.5 → mySAP SRM E-Procurement Capabilities → Direct Procurement under Additional Documents
Result You have assigned CI roles to selected MDM portal users.
8.3.9 Assigning Roles in the Backend Systems The settings described here apply to the business scenarios MDM Content Consolidation, MDM Master Data Harmonization, and MDM Central Master Data Management.
Use In the backend systems, assign the roles that are relevant to you to your MDM users. Roles must be assigned in the following individual systems:
• MDM system
• Integration Server of the SAP Exchange Infrastructure
• SAP Solution Manager
• You can use central user administration (CUA) to support role assignment if required. For more information, see intranet.sap.com/Security → Security in Detail → Identity Management → Centralized Administration → Central User Administration.
Prerequisites You have defined the relevant users in the MDM system or transferred them from the corporate LDAP to the MDM system by using an LDAP synchronization (see Executing User Definition in the LDAP or MDM System [Page 76]).
Procedure ...
1. Get an overview of the roles delivered. You can use report RSUSR070 to display the roles that exist in the backend system.
To run the report, choose Tools → Administration → User Maintenance → Information System → Roles → <Roles by Complex Selection Criteria/By Role Name> from the SAP Easy Access screen.
You will find an overview of these roles for each backend system under Recommended Scenario for User Management in SAP MDM [Page 62].
2. Assign the relevant backend roles to the MDM users. To do this, follow the instructions under help.sap.com → NetWeaver → SAP Web Application Server → mySAP Technology Components → SAP Web Application Server → Security (BC-SEC) → Users and Roles (BC-SEC-USR) → Special Functions of User and Role Maintenance. You can use central user administration (CUA) if required.
For more information about role assignment, see help.sap.com → SAP NetWeaver → SAP Web Application Server → mySAP Technology Components → SAP Web Application Server → Security (BC-SEC) → Users and Roles (BC-SEC-USR).
Result You have assigned the backend roles required for the MDM scenarios to users.

8.4 People-Centric User Interface
23.08.2004 81
8.4 People-Centric User Interface The settings described here apply to the business scenarios MDM Content Consolidation, MDM Master Data Harmonization, and MDM Central Master Data Management.
This section describes the configuration steps required for the People-Centric User Interface.
8.4.1 Activating the BSP Application The settings described here apply to the business scenarios MDM Content Consolidation, MDM Master Data Harmonization, and MDM Central Master Data Management.
Use Some applications for master data management are based on the Business Server Pages (BSPs) of the People-Centric Framework. To use these applications, you must perform the configuration steps described below.
Procedure ...
1. In the MDM system, use transaction SICF to activate the HTTP services required.
In path /default_host/sap/bc/bsp/sap/public:
bc
graphics
In path /default_host/sap/bc/bsp/sap
crm_bsp_frame
crm_bsp_f4_help
crm_bsp_f1_help
crm_bsp_bab_fra
crm_bsp_bab_pan
crm_bsp_bab_dis
crm_bsp_bab_dss
crm_ml_preview
crm_preview
Furthermore, you must activate the services listed in SAP Note 517484, especially those in the J2EE, BSP, load distribution, and logon administration sections.
2. Generate the BSPs in transaction SGEN. Generation at this point avoids timeout errors when you first access the applications.
...
a. To do this, call transaction SGEN and select the option Generation of BSP Applications.
b. On the next screen, select the entry MDM, and on the subsequent screens schedule a generation job.
Result The services required in order to use the BSP applications have been activated. The BSP applications for MDM have been generated, in order to avoid timeout errors due to automatic generation at runtime.

8.4.2 Tailoring of the UI Framework
SAP MDM Content Consolidation: Configuration Guide for MDM 2
82 23.08.2004
8.4.2 Tailoring of the UI Framework The settings described here apply to the business scenarios MDM Content Consolidation, MDM Master Data Harmonization, and MDM Central Master Data Management.
Use The Business Server Page applications for processing objects in the MDM system are based on the People-Centric User Interface. You can use the flexible configuration options to tailor this user interface to specific requirements. The procedure for adapting the user interface is not described in detail here.
For more information, see:
• On the SAP Service Marketplace at service.sap.com/crm-ui, the book The People-Centric UI of mySAP CRM
• In the MDM system, the implementation guide (IMG) for Generic Functions, under Layout of the User Interface (People-Centric UI)
8.5 Unicode The settings described here apply to the business scenarios MDM Content Consolidation, MDM Master Data Harmonization, and MDM Central Master Data Management.
This section describes how to configure the SAP GUI for Unicode and how to connect non-unicode systems.
8.5.1 Configuring SAP GUI for Unicode The settings described here apply to the business scenarios MDM Content Consolidation, MDM Master Data Harmonization, and MDM Central Master Data Management.
Use Some transactions of the MDM systems can only be executed with the SAP GUI for Windows. When accessing Unicode systems such as the MDM system, a special configuration of SAP GUI for Windows must be set up in order to display Unicode character sets correctly.
Procedure If problems with display or input for Unicode processing occur in your system landscape, see the following SAP Notes:
SAP Note Title of the SAP Note
316903 SAPGUI: How to use I18N mode.
508854 SAPGUI: How to use Unicode
562427 GUI code page for Unicode systems
8.5.2 Connecting Non-Unicode Systems The settings described here apply to the business scenarios MDM Content Consolidation, MDM Master Data Harmonization, and MDM Central Master Data Management.

8.6 Defining a BW Client in the MDM System
23.08.2004 83
Use If you want to connect non-Unicode systems to the MDM system group, you need to consider some special points. Such systems either work with a single code page, or are MDMP systems (with multi-display, multi-processing code pages) that can use different code pages depending on the logon language.
In contrast, Unicode systems allow characters from different code pages to be entered in a text in one session. However, in a mixed system group this must be avoided, because then it is not possible to display the text on one code page. The conversion of Unicode to individual code pages of the target system uses the ALE service of the SAP Exchange Infrastructure (XI). The standard SAP MDM 2.00 delivery does not contain this conversion. However, if required, the conversion can be implemented on a project basis. Contact SAP if you wish to do this.
To avoid or trace conversion errors, we advise you to define the following settings.
Procedure ..
1. Settings in the RFC Destination for the Non-Unicode Client in the XI ...
a. In the XI system, call transaction SM59.
b. On the Special Options tab page, in the Character Conversion area, select the Short Dump with Conversion Error indicator.
This determines that no conversion errors are transferred to the client system, so that none can be transferred back to the MDM system at a later date.
2. Settings in the Non-Unicode Client System
Here, the response to conversion errors is controlled by using profile parameters rfc/cp_convert/ignore_error and rfc/cp_convert/conversion_char.
...
a. Display the profile parameters using report RSPARAM, and search for the value of parameter rfc/cp_convert/ignore_error.
b. You can display the documentation on the parameter by double-clicking on the line.
c. Call transaction RZ10 and set the value of the parameter to 0.
For more information about system parameters, see help.sap.com → SAP NetWeaver → SAP Web Application Server → SAP Web Application Server → Computing Center Management System (BC-CCM) → Computing Center Management System (BC-CCM) → Configuration → Profiles.
Result You have set up communication to the client so as to discover Unicode conversion errors, and not transfer them to the client system.
8.6 Defining a BW Client in the MDM System The settings described here apply to the business scenarios MDM Content Consolidation, MDM Master Data Harmonization, and MDM Central Master Data Management.
Use The following notes are important if you want to use the MDM system additionally as an SAP Business Information Warehouse (BW) or if you want to connect the MDM system to an SAP Business Information Warehouse (BW) as a source system.

8.7 Defining Number Assignment in the MDM Environment
SAP MDM Content Consolidation: Configuration Guide for MDM 2
84 23.08.2004
Note that changes to these settings may cause loss of data after the system goes live.
Data can be extracted to BW systems from only one client of the MDM system. This client is entered in table RSADMINA in field BWMANDT.
The first time you call a BW function, for example, calling the Administrator Workbench (transaction RSA1), the client is read from profile parameter login/system_client, and the program checks whether the current user is logged on in this client. If the user is logged on, an error message appears.
This client from the profile parameter is then automatically entered in table RSADMINA. After this, BW functions can be executed in this client only, and you can only connect this client to further BW systems as the source system.
For this reason, we recommend that you enter the operational MDM client in profile parameter login/system_client when you set up your MDM system.
Procedure ...
1. Use report RSPARAM to display the current setting of profile parameter login/system_client. The value of the parameter must be the same as the operational MDM client.
2. If it is not, use transaction RZ10 or RZ11 to change the value of parameter login/system_client to the operational MDM client.
To ensure that this change takes effect, we recommend that you reset the buffer. To do this, enter OK code /$sync.
8.7 Defining Number Assignment in the MDM Environment The settings described here apply to the business scenarios MDM Content Consolidation, MDM Master Data Harmonization, and MDM Central Master Data Management.
This section describes the configuration steps required for number assignment in master data management (SAP MDM).
8.7.1 Using Harmonized Master Data IDs The settings described here apply to the business scenarios MDM Content Consolidation, MDM Master Data Harmonization, and MDM Central Master Data Management.
Use In the MDM environment, there is a distinction between two different number assignment concepts for master data objects:
• Harmonized IDs
In this case, the external IDs that the user sees are identical in all systems in the MDM system group, so that the R/3 material master 4711 also has the external ID 4711 in MDM.
• Non-Harmonized IDs

8.7.1 Using Harmonized Master Data IDs
23.08.2004 85
In this case, factors such as a highly heterogeneous system landscape may make it necessary to support different keys in the connected systems within the MDM system group. This means that the R/3 material master 4711 in system A is identical to the R/3 material master 0815 in system B, and has the external ID 3600 in the MDM system.
In addition, hybrids may be used. For example, object type product – harmonized IDs, object type business partner – non-harmonized IDs, or object type product – harmonized in client systems A and B, but not harmonized in client system C.
The functionality described here is only used if no ID mapping exists on distribution to or from the MDM system, and the object is new from the point of view of the receiving system (MDM system or client system).
The use of harmonized master data IDs is supported for the following master data objects:
• Product (of type material)
• Technical assets
• Business partner
• Change order
However, the use of harmonized IDs is not always possible or useful, due to the large number of possible combinations of Customizing settings (for example, lexicography, templates, length of number, and leading zeros).
The following section uses the product as an example, to describe the issues involved and the scenarios supported.
Standard Delivery (supported)
Length of material/product number
Template Leading Zeros Lexicography
MDM 40 None - -
R/3 18 None - -
CRM 40 None - -
Other supported scenarios are:
Scenario R/3 – 1
Length of material/product number
Template Leading Zeros Lexicography
MDM As in R/3 Any Any -
R/3 18 Any Any -
Scenario R/3 – 2
Length of material/product number
Template Leading Zeros Lexicography
MDM 19 - 40 Any Any -

8.7.1 Using Harmonized Master Data IDs
SAP MDM Content Consolidation: Configuration Guide for MDM 2
86 23.08.2004
R/3 18 None Any -
Scenario R/3 – 3
Length of material/product number
Template Leading Zeros Lexicography
MDM 40 None X X
R/3 18 None X X
Scenario SRM/CRM – 1
Length of material/product number
Template Leading Zeros Lexicography
MDM 1 - 40 Any Any Any
SRM/CRM As in MDM Same number of characters as in MDM
As in MDM As in MDM
Other scenarios must be implemented by adapting the XSLT (Extensible Stylesheet Language Transformations) mapping programs. Contact your SAP consultant for more information.
Prerequisites You know the technical or organizational restrictions that apply to your number assignment concept for objects in the system group.
Procedure For the loading process, it is crucial for harmonization to first define the systems for distribution. You define for each source system which local identifier for which object type of the client system is converted to an identifier of the MDS. You define this in Customizing for Master Data Exchange (MDM-MX) → Central Settings → Systems → Define Systems in Distribution.
Example: Client System A (loading system)
MDM Object Type Local MDM ID Type Local MDC ID Type
BUS1006 PartnerID CustomerID
In this example, in a loading transaction for MDM object type business partner from system A to the MDM system, the system tries to copy the key of the client system that is in the message (CustomerID in this case) to the external key of the MDM system (PartnerID in this case).
The rest of the procedure varies according to object type and is described below.
Product of Type Material • MDM Product – MDC R/3 Material Master

8.7.1 Using Harmonized Master Data IDs
23.08.2004 87
The behavior is controlled in XSLT program MDM20ProductMaterialToMATMASStep2Main.xsl by parameter _ProcessingMode with attribute keyGenerationType. This parameter can have the values ConvertID and KeyGenerator.
ConvertID
As the program runs, a _ConvertID implementation is executed, and the number is copied if possible.
KeyGenerator
A new number is generated.
The default value is ConvertID.
• MDM Product – MDC CRM/SRM Product
The behavior is controlled in XSLT program MDM20ProductMaterialToProductMaterialMain.xsl by parameter _ProcessingMode with attribute keyGenerationType. This parameter can have the values copy and empty.
copy
The program attempts to copy the number.
empty
The number is not copied.
The default value is copy.
• MDC R/3 Material Master – MDM Product
Using BAdI implementation COM_PRD_ID_HANDLING (method GET_PRODUCT_ID), an attempt is made to copy the material number to the external ID of the product, if no ID mapping exists.
• MDC CRM/SRM Product – MDM Product
Using BAdI implementation COM_PRD_ID_HANDLING (method GET_PRODUCT_ID), an attempt is made to copy the product ID to the external ID of the product, if no ID mapping exists.
Technical Asset The definition is done in the same way as for the product, by using global variables in the relevant XSLT programs. Because master data object technical asset is also implemented on the product master, BAdI implementation COM_PRD_ID_HANDLING also applies. ...
Business Partner Two different versions of interface mapping are delivered for the business partner, of which one can be used for non-harmonized ID assignment and the other for harmonization. The version that leads to copying of the ID and thereby harmonization has the suffix _harmonized. The definition is done in the Integration Directory (configuration time) of the SAP Exchange Infrastructure, using the configuration described under Business Partner [Page 147] → Configuring XI:...
For example:
Setting up interface mapping DebmasDebmas06ToMDMBusinesspartner does not lead to a harmonized ID. New IDs are generated for each target system. Setting up interface mapping DebmasDebmas06ToMDMBusinesspartner_harmonized leads to a harmonized ID.

8.7.2 Defining Number Assignment for Master Data Transfer to the MDM System
SAP MDM Content Consolidation: Configuration Guide for MDM 2
88 23.08.2004
Change Order In the XSLT mapping programs for the change order, the standard solution copies the external ID. You can change this by changing the XSLT program in the project.
8.7.2 Defining Number Assignment for Master Data Transfer to the MDM System The settings described here apply to the business scenarios MDM Content Consolidation, MDM Master Data Harmonization, and MDM Central Master Data Management.
Use The following settings are required if you want to use non-harmonized master data IDs for your master data objects. For more information about harmonized master data IDs, see Using Harmonized Master Data IDs [Page 84].
During the distribution of master data from the client system to the MDM system, IDs for master data objects can be generated if required. This is necessary if the object is a new object in the MDM system and therefore has no valid ID mapping.
Procedure The procedure varies according to object type.
Product (of Type Material) Using BAdI implementation COM_PRD_ID_HANDLING (method GET_PRODUCT_ID), an attempt is made to copy the product ID to the external ID of the product, if no ID mapping exists.
If you want to use non-harmonized master data IDs, you must deactivate the example implementation and replace it with your own implementation. See the documentation on the BAdI.
Technical asset Because master data object technical asset is also implemented on the product master, BAdI implementation COM_PRD_ID_HANDLING also applies. ...
Business partner When setting up the interface mappings, use the version that does not lead to copying of the ID and thereby harmonization. This is the version that does not have the suffix _harmonized. The definition is done in the Integration Directory (configuration time) of the SAP Exchange Infrastructure, using the configuration described under Business Partner [Page 147] → Configuring XI:...
For example:
Setting up interface mapping DebmasDebmas06ToMDMBusinesspartner does not lead to a harmonized ID. New IDs are generated for each target system. Setting up interface mapping DebmasDebmas06ToMDMBusinesspartner_harmonized leads to a harmonized ID.
On posting in the MDM system, a number is assigned to the business partner. For more information, see Configuring Number Assignment [Page 148].
Change Order In the XSLT mapping programs for the change order, the standard solution copies the external ID. This can be changed by changing the XSLT program in the project.

8.7.3 Defining System Access for Generating IDs
23.08.2004 89
Product structures On posting in the MDM system, a unique name is assigned to the assembly group. This is formed by concatenating the BOM number (STLNR) from R/3 with the logical system of the client system. The same principle applies to assignment of a name to the assembly header. Here, the BOM number is used.
If an assembly is created manually in the MDM system, you can assign any name you like to the assembly header. The name of the assembly group is then created automatically from internal number range MDM_STUEM, which has the same structure as R/3 number range object STUEM, and the logical system of the MDM system.
8.7.3 Defining System Access for Generating IDs The settings described here apply to the Business Scenarios MDM Content Consolidation, MDM Master Data Harmonization, and MDM Central Master Data Management.
Use Synchronous accessing of the MDM system causes IDs to be generated for master data at runtime on the Integration Server of the SAP Exchange Infrastructure (XI). You must define the system and logon parameters for this system access.
Prerequisites The following prerequisites must be fulfilled:
• You have defined a user for synchronous access in the MDM system. You created the user with the type system and profile MDM_IDMAPRFC.
• You have performed the steps described under Prepare Extensions for MDM XI Repository Contents [Page 128].
Procedure ...
1. Enter the required data in the Integration Repository (design time) of the SAP Exchange Infrastructure.
2. Call Customizing for Master Data Exchange (MDM-MX) in the MDM system. By choosing ID Mapping → Make XI File Settings (transaction MDM_PROP), define the following parameters in the MDS System Data area.
Define the parameters for each MDM system in your system landscape in which you want to generate IDs.
Parameter Value Description
System For example, XYZ_100
MDM system
Logon client <Client> Client number in the MDM system
User ID <User> User in the MDM system for synchronous access
Password <Password> Password
Language <Logon language> Logon language, for example, EN
Target host <Host name> Host name of the

8.8 Solution Manager
SAP MDM Content Consolidation: Configuration Guide for MDM 2
90 23.08.2004
application server of the MDM system
System ID <System number> System number of the MDM system
MaxConnNo <Number> Maximum number of possible connections
In a later step, the keygeneration.properties and keygeneration.xml files are generated from this data.
3. Generate these files in Customizing for Master Data Exchange (MDM-MX) under ID Mapping → Generate XI Files (transaction MDM_GENP):
keygeneration.properties
keygeneration.xml
4. Complete the keygeneration.properties and keygeneration.xml files in the Integration Repository (design time).
a. In the Integration Repository in your software component version, select the imported archives, for example, CUSTXY → CUSTXY, 1 of CustXY.com → http://sap.com/xi/CMDM → Mapping Objects → Imported Archives.
Create the archive MDM20_Keymapping_Framework_Config.
b. Add the files you have generated to an archive (file suffix .ZIP or .JAR), for example by using WinZip®. Ensure that the path for the files in the archive is com/sap/mdm/keygeneration.
c. Import the archive file to MDM20_Keymapping_Framework_Config in the XI archive, save, and activate your settings.
For more information, see Configuration of XI 2.0 and XI 3.0 [Page 122].
Result You have configured the required system and logon parameters for system access to the MDM system for generating IDs.
8.8 Solution Manager The settings described here apply to the business scenarios MDM Content Consolidation, MDM Master Data Harmonization, and MDM Central Master Data Management.
This section describes the configuration steps required for the Solution Manager.
8.8.1 Defining the System Landscape The settings described here apply to the Business Scenarios MDM Content Consolidation, MDM Master Data Harmonization, and MDM Central Master Data Management.
Use Before you can use the Solution Manager for Customizing distribution and Customizing ID mapping in the MDM environment, you must make the client systems and the MDM system known to the Solution Manager and define various RFC connections.

8.8.2 SP02/03ff: Customizing Distribution and ID Mapping in MDM Scenarios
23.08.2004 91
Prerequisites You have successfully installed the Solution Manager, the client systems, and the MDM system.
Procedure Follow the instructions in the Installation Guide for the Solution Manager, in the section "General Settings for Connecting Satellite Systems". You will find this on the SAP Service Marketplace at service.sap.com/solutionmanager → Installation Guides.
This section contains detailed information on the RFC connections, users, and roles required.
For use in MDM scenarios, we recommend that you copy the data from the System Landscape Directory (SLD), due to the use of the SAP Exchange Infrastructure.
Result You have successfully defined the system landscape in the Solution Manager.
8.8.2 SP02/03ff: Customizing Distribution and ID Mapping in MDM Scenarios The settings described here apply to the Business Scenarios MDM Content Consolidation, MDM Master Data Harmonization, and MDM Central Master Data Management.
Use When distributing master data in the MDM environment, you must make the Customizing settings of the various connected systems consistent so that objects whose attributes refer to these Customizing settings can be transferred smoothly. These Customizing settings are described below as Customizing IDs.
In master data management, the following options are available for this, and you can choose which to use for each IMG activity:
• Customizing Distribution or Synchronization
In this case, the Customizing IDs in the systems connected to the distribution are identical, whereby the data formats of the Customizing tables may differ from each other. Example:
Credit Card Definition
Client System A MDM System
Visa Visa
MasterCard MasterCard
... ...
Two tools for synchronizing your Customizing settings are offered by the SAP Solution Manager:
Customizing distribution (initial or delta distribution of Customizing settings)
Customizing Scout (cross-system Customizing comparisons)

8.8.2 SP02/03ff: Customizing Distribution and ID Mapping in MDM Scenarios
SAP MDM Content Consolidation: Configuration Guide for MDM 2
92 23.08.2004
For more information about Customizing distribution, see service.sap.com/customizing → Synchronization of Customizing.
For more information about MDM-relevant Customizing Ids, see Configuring Customizing Distribution [Page 93].
• Customizing ID Mapping
However, you may wish Customizing entities that match semantically to have different identifiers in different systems. For example, different legal systems may be involved. If you do not want to or cannot run a synchronization for specific Customizing IDs in your system landscape, you can use Customizing ID mapping. Example:
Credit Card Definition
Client System A MDM System
VisaCard Visa
EuroCard MasterCard
... ...
The SAP Solution Manager as of version 3.1 provides tools for entering ID mapping between matching Customizing entries in different systems. In master data distribution, the Customizing IDs referenced in the object attributes (for example, in client system A) are replaced by the Customizing IDs of the other system (for example, the MDM system) according to predefined rules. In the MDM system, you define which Customizing IDs are mapped to each other. Value mapping is defined in the Solution Manager. This definition data is evaluated at runtime by the SAP Exchange Infrastructure.
The simultaneous use of Customizing ID mapping and Customizing synchronization for a Customizing object is not possible in version 3.1 of the Solution Manager and MDM 2.00.
For this reason, you must decide before you configure your systems, considering the business scenarios you want to implement, whether specific Customizing objects are to be harmonized using Customizing distribution, or whether to enter Customizing ID mapping.
Procedure ...
1. Configure the Solution Manager (system landscape including RFC connections, and the definition of a Solution Manager project with all systems involved).
2. Use the scenarios and processes that you want to map to identify the objects to be synchronized.
Define:
Which Customizing IDs are to be harmonized (Customizing distribution)
Which Customizing IDs require value mapping (Customizing ID mapping)
Use the information on the Customizing object types and synchronization groups supported in MDM, under Configuring Customizing Distribution [Page 93] and Configuring Customizing ID Mapping in the Solution Manager [Page 99], to do this.
3. Load the synchronization objects of the Solution Manager client (in this case the MDM system) to the Solution Manager. Use transaction SCDT_SETUP or SCDT_GROUPS to do this. By choosing Goto → Load Object Lists, and entering the RFC destination of

8.8.3 Graphical Overview: Customizing ID Mapping
23.08.2004 93
the source system (MDM system), you can download all of the implemented synchronization objects to the Solution Manager.
After a successful load, you can use the synchronization objects in the delivered synchronization groups or set up your own groups.
4. Set up Customizing Distribution [Page 93].
5. Set up Customizing ID mapping (see Configuring Customizing ID Mapping in the Solution Manager [Page 99] and Configuring and Activating Customizing ID Mapping [Page 131].
Look carefully at the prerequisites specified there.
8.8.3 Graphical Overview: Customizing ID Mapping This graphic shows how to include Customizing ID mapping in the system configuration.
Solution Manager Master Data ServerExchange Infrastructure
Definition of therelevant Customizing
objects
Maintenance of the Customizing ID values
Manual maintenance of Customizing IDsin the Integration
Repository
Saving of Customizing ID
values
Definition of the object types in Customizing
Generation of the XSLTs
Saving of generated XSLTsto the Integration
Server
Transport of the Customizing IDvalues
Configuration of the Solution
Manager
8.8.4 SP02/SP03ff: Configuring Customizing Distribution The settings described here apply to the business scenarios MDM Content Consolidation, MDM Master Data Harmonization, and MDM Central Master Data Management.

8.8.4 SP02/SP03ff: Configuring Customizing Distribution
SAP MDM Content Consolidation: Configuration Guide for MDM 2
94 23.08.2004
Use In the Solution Manager, you define which Customizing objects are synchronized between which systems. This definition determines:
• When distribution takes place (on a time basis, on creation of a transport request, or on release of a transport request)
• Which systems and clients are involved in the synchronization
With Customizing distribution, you transport the Customizing from one development system (for example, SAP R/3) to the development system for master data management. Afterwards, you can transport the data in a controlled manner to the quality assurance and productive systems. This means that this Customizing data takes the same route through development and test systems as your other Customizing data.
The basis of the definition are synchronization groups, which can group together a set of synchronization objects and/or IMG activities. Synchronization groups can be structured hierarchically.
A synchronization object is implemented by SAP and delivered with the master data server (MDS). A synchronization object defines which tables contain the Customizing data in the relevant systems/application components, and how this data can be transferred (structural mapping). The synchronization objects are delivered with the MDS and must be loaded to the Solution Manager when you start configuration.
SAP provides MDM-specific synchronization groups that are put together according to semantic criteria. These are delivered in the Solution Manager system and are available for you to use either directly or as a reference for creating customer-specific synchronization groups.
Functionality
Customizing distribution provides two methods for distributing Customizing data:
• Initial distribution
With the initial distribution, you transport a Customizing object in its entirety from a client system (for example, R/3) to the MDM system. Data in the target system is completely replaced by the data from the source system. An initial distribution from the MDM system to MDC systems is not supported.
• Individual distribution
With an individual distribution, you can transfer individual changes, additions, or deletions of Customizing entries from one system to another system. This can be done by including the change in a transport request or on releasing a transport.
Customizing Comparison
Customizing distribution also lets you compare Customizing settings in different systems (Customizing Scout). From the result of the comparison, you can go to the IMG activities in the source or target system, in order to display or change the Customizing data.
Synchronization Groups Delivered in the MDS
With master data management, synchronization groups are delivered for the following application components:
Synchronization Group Application Component
SAPL SAP R/3

8.8.4 SP02/SP03ff: Configuring Customizing Distribution
23.08.2004 95
MDM MDM
CRM BBPCRM
The following naming convention applies to the synchronization groups delivered with MDM in the Solution Manager:
First Level
Term Purpose
Komponente1_Komponente2_Release Distribution of component 1 (for example, MDM) to component 2 (for example, CRM) for release X (for example, CRM 3.1). You can leave the Release field blank if the release is not relevant. The Release field contains the release version of, for example, R/3 or CRM. For reasons of consistency, the release is always at the end of the group name.
The following groups are delivered:
• CRM_MDM_31 Distribution of Customizing data from CRM 3.1 to MDM
• MDM_CRM_31 Distribution of Customizing data from MDM to CRM 3.1
• CRM_MDM_40 Distribution of Customizing data from CRM 4.0 to MDM
• MDM_CRM_40 Distribution of Customizing data from MDM to CRM 4.0
• SAPL_MDM_46C Distribution of Customizing data from R/3 4.6C to MDM
• MDM_SAPL_46C Distribution of Customizing data from MDM to R/3 4.6C
• SAPL_MDM_47 Distribution of Customizing data from R/3 Enterprise to MDM
• MDM_SAPL_47 Distribution of Customizing data from MDM to R/3 Enterprise
• MDM_MDM Distribution of Customizing data from MDM to MDM
The groups named are hierarchical and contain subordinate synchronization groups. These are structured semantically, distinguishing between:
• Product-related Customizing
• Business partner-related Customizing
• General Customizing objects
The following naming convention applies:
Second Level
Term Purpose
Komponente1_Komponente2_SemanticAspect_Release Distribution of all synchronization objects of a semantic context from component 1 to component 2
For example:
CRM_MDM_31 is subdivided as follows:

8.8.4 SP02/SP03ff: Configuring Customizing Distribution
SAP MDM Content Consolidation: Configuration Guide for MDM 2
96 23.08.2004
• CRM_MDM_GENOBJ General objects (for example, units of measurement), release independent
• CRM_MDM_PROD_31 Product-related objects for CRM 3.1
• CRM_MDM_BUPA All business partner-related objects, release independent
If a group contains only objects that are released only for comparison, the group name has the suffix SCOUT.
Exceptions
Customizing objects are made available as synchronization objects. Objects not named here are released for both comparison and distribution from MDS to MDC and from MDC to MDS.
Note the following exceptions:
• Mixed objects
Objects that are known in the SAP R/3 client system as Customizing objects, but are master data objects in the MDM system, cannot be handled using Customizing distribution. These objects have independent distribution solutions.
Plant (represented as an organizational unit in MDM) (see Enterprise Structure [Page 145])
Material group (may be represented as a product category in MDM) (see Generating Product Categories from Material Groups [Page 173])
Material type (may be represented as a product category in MDM) (see Generating Product Categories from Material Types [Page 170])
• Initial distribution
All MDM synchronization objects are released for initial distribution from a client system (R/3 or CRM) to the MDM system, in that direction only. No initial distribution is supported from the MDM system to an R/3 or CRM system.
• The following Customizing objects are released for the Customizing comparison, but not for Customizing distribution.
CRM_MDM_ALLOW_INACTIVE
MDM_MDM_ALLOW_INACTIVE
CRM_MDM_BUPA_RELSHIP_CATEGORIES
MDM_MDM_BUPA_RELSHIP_CATEGORIES
CRM_MDM_LANGUAGE
MDM_MDM_LANGUAGE
SAPL_MDM_LANGUAGE
CRM_MDM_PRODUCT_TYPE
MDM_MDM_PRODUCT_TYPE
CRM_MDM_PRODUCT_VIEW_DEF
MDM_MDM_PRODUCT_VIEW_DEF
CRM_MDM_PROD_COMP_TYP
MDM_MDM_PROD_COMP_TYP
CRM_MDM_PROD_TEXT_INB_MAP

8.8.4 SP02/SP03ff: Configuring Customizing Distribution
23.08.2004 97
MDM_MDM_PROD_TEXT_INB_MAP
CRM_MDM_PR_COMP_SEARCH_METHOD
MDM_MDM_PR_COMP_SEARCH_METHOD
CRM_MDM_PR_COMP_TYP_TRANSACTION
MDM_MDM_PR_COMP_TYP_TRANSACTION
CRM_MDM_PR_CONFIG
MDM_MDM_PR_CONFIG
CRM_MDM_PR_SYSSTAT
MDM_MDM_PR_SYSSTAT
CRM_MDM_PR_TEXT_OBJTYP
MDM_MDM_PR_TEXT_OBJTYP
CRM_MDM_PR_TEXT_P
MDM_MDM_PR_TEXT_P
• The following Customizing objects are released for initial distribution and Customizing comparison, but not for individual distribution.
Regional structure objects
The objects of the regional structure are available temporarily in MDM, until they are replaced by the developer responsible for regional structures.
SAPL_MDM_CITIES
CRM_MDM_CITIES
MDM_MDM_CITIES
SAPL_MDM_STREETS
CRM_MDM_STREETS
MDM_MDM_STREETS
SAPL_MDM_POSTAL_CODES
CRM_MDM_POSTAL_CODES
MDM_MDM_POSTAL_CODES
SAPL_MDM_STREET_TYPES
CRM_MDM_STREET_TYPES
MDM_MDM_STREET_TYPES
SAPL_MDM_BANKEN
CRM_MDM_BANKEN
MDM_MDM_BANKEN
CRM_MDM_GENOBJ_MISC_DIST
• The following Customizing objects are only allowed for distribution from the MDC system to the MDM system, in that direction only.
SAPL_MDM_BOM_STATUS
SAPL_MDM_FORMULA_KEY
R/3_Material_Settyp

8.8.4 SP02/SP03ff: Configuring Customizing Distribution
SAP MDM Content Consolidation: Configuration Guide for MDM 2
98 23.08.2004
SAPL_MDM_PRD_ATTR_ADGE_PROFIL
SAPL_MDM_PRD_ATTR_BFGRP
SAPL_MDM_PRD_ATTR_BFGRP2
SAPL_MDM_PRD_ATTR_CASNR
SAPL_MDM_PRD_ATTR_EKGRP
SAPL_MDM_PRD_ATTR_EXTWG
SAPL_MDM_PRD_ATTR_FPRFM
SAPL_MDM_PRD_ATTR_GPNUM
SAPL_MDM_PRD_ATTR_KOSCH
SAPL_MDM_PRD_ATTR_LABOR
SAPL_MDM_PRD_ATTR_LADGR
SAPL_MDM_PRD_ATTR_MFRGR
SAPL_MDM_PRD_ATTR_MOGRU
SAPL_MDM_PRD_ATTR_MOWNR
SAPL_MDM_PRD_ATTR_MTPOS_MARA
SAPL_MDM_PRD_ATTR_MTVER
SAPL_MDM_PRD_ATTR_MTVFP
SAPL_MDM_PRD_ATTR_SERAIL
SAPL_MDM_PRD_ATTR_SERAIL2
SAPL_MDM_PRD_ATTR_SPART
SAPL_MDM_PRD_ATTR_STAWN
SAPL_MDM_PRD_ATTR_STEUC
SAPL_MDM_PRD_ATTR_TRAGR
SAPL_MDM_PRD_ATTR_USEQU
SAPL_MDM_PRD_ATTR_WRKST
As of SP03:
SAPL_MDM_PRD_ATTR_BEBER
SAPL_MDM_PRD_ATTR_EQART
SAPL_MDM_PRD_ATTR_FLTYP
SAPL_MDM_PRD_ATTR_INGRP
SAPL_MDM_PRD_ATTR_IWERK
SAPL_MDM_PRD_ATTR_RLTYP
SAPL_MDM_PRD_ATTR_STAND
SAPL_MDM_PRD_ATTR_TPLKZ
SAPL_MDM_PRD_ATTR_WERKS

8.8.5 Configuring Customizing ID Mapping in the Solution Manager
23.08.2004 99
Procedure This documentation briefly shows how you can include Customizing synchronization in the system configuration.
For more information about the SAP Solution Manager, see the SAP Service Marketplace at service.sap.com/solutionmanager. For more information about Customizing distribution, see service.sap.com/customizing → Synchronization of Customizing. ...
1. Identify the delivered synchronization groups that contain the synchronization objects that you require for Customizing distribution.
2. Define your own synchronization groups in the Solution Manager if the delivered groups are not suitably defined for your application case.
This may be the case if not all objects in a group are to be distributed, or if you want to distribute synchronization objects that are not delivered by SAP. In this case, group the relevant IMG activities in one or more synchronization groups that you define yourself.
3. Configure the distributions between each of the relevant systems in the Solution Manager within the created Solution Manager project.
4. Start the initial master data server transfer in the Solution Manager.
You must decided for each Customizing object whether it can be transferred as initial from a client system, and which client system is the best basis for the initial transport.
In an initial distribution, you can distribute a synchronization group and the Customizing objects it contains from one client system only to the MDM system. Customizing distribution contains no inbound processing in the target system for the Customizing distribution. The aim of an initial distribution is to duplicate the state of the source system exactly in the target system. For this purpose, before the data is imported from the source system, the corresponding table entries in the target system are deleted.
5. After the initial distribution has run, identify any further Customizing entries in the relevant client system that must be distributed to the MDM system, and include these entries in transport requests. Use the Customizing Scout in the Solution Manager (transaction SCOUT) to identify missing entries.
Result You have run the initial distribution and, if appropriate, individual distribution, for the Customizing objects that you want to synchronize by using Customizing distribution.
8.8.5 Configuring Customizing ID Mapping in the Solution Manager The settings described here apply to the Business Scenarios MDM Content Consolidation, MDM Master Data Harmonization, and MDM Central Master Data Management.
Use Before you can use Customizing ID mapping, various configuration steps are required in the Solution Manager, in the MDM system, and in the SAP Exchange Infrastructure.
For more information about the definition of Customizing ID mapping as opposed to Customizing-distribution, see Customizing Distribution and ID Mapping in MDM Scenarios [Page 91].

8.9 SAP Content Integrator
SAP MDM Content Consolidation: Configuration Guide for MDM 2
100 23.08.2004
Note that, in addition to the configuration steps shown here, special XSL programs are required in the SAP Exchange Infrastructure to analyze the defined value mapping at runtime. For information about the generation of these programs, see help.sap.com → SAP NetWeaver → SAP Solution Manager → SAP Solution Manager 3.10 SP04 (or higher) → Configuring and Activating Customizing ID Mapping [Page 131].
Prerequisites You have successfully installed the Solution Manager, and configured the system accesses to the MDM system and the SAP Exchange Infrastructure.
For more information, see the Internet under help.sap.com → SAP NetWeaver → SAP Solution Manager → SAP Solution Manager 3.10 SP04 (or higher) → Customizing ID Mapping Framework.
Procedure This documentation briefly shows how you can include Customizing ID mapping in the system configuration.
For more information about the SAP Solution Manager, see the SAP Service Marketplace at service.sap.com/solutionmanager. For more information about Customizing ID mapping, see service.sap.com/customizing → Media Library → Documentation. ...
1. In the Solution Manager, define the relevant Customizing objects for Customizing ID mapping, and the systems between which ID mapping is required.
2. Enter the value mapping for the relevant Customizing objects between system pairs in the Solution Manager.
3. Transport these value mappings to the Integration Server of the SAP Exchange Infrastructure.
Result You have performed the steps required to define Customizing ID mapping in the Solution Manager. Further configuration steps that are required are listed under Configuring and Activating Customizing ID Mapping [Page 131].
8.9 SAP Content Integrator The settings described here apply to the business scenarios MDM Content Consolidation, MDM Master Data Harmonization, and MDM Central Master Data Management.
This section describes the configuration steps required for the SAP Content Integrator in master data management (SAP MDM).
8.9.1 Starting and Stopping the Content Integrator The settings described here apply to the business scenarios MDM Content Consolidation, MDM Master Data Harmonization, and MDM Central Master Data Management.

8.9.2 Configuring XI: Defining the CI as a Technical and Business System
23.08.2004 101
Starting and Stopping the Content Integrator in the Console Window
• In order to start the SAP J2EE-Engine of SAP Content Integrator (CI) in a console window, you double click on the file go.bat that you can find in one of the following directories depending on the platform:
Platform Directory
Windows
\\<Drive>\usr\sap\<System-name>\j2ee\j2ee_<Instance-number>\ cluster\dispatcher\go.bat
UNIX /usr/sap/<System-name>/j2ee/j2ee_<Instance-number>/cluster/dispatcher /go.bat
You have successfully started the Content Integrator if the following message is displayed in the console window: Element <Element_No> joined.
• To switch off the Content Integrator, enter the command shutdown in the console window.
Starting and Stopping CI as a Windows Service ...
1. To start Content Integrator as a Windows service – and also to stop it - choose Start → Settings → Control Panel → Administrative Tools → Services.
2. Right-click on the entry SAP J2EE Engine Dispatcher and choose either Start or Stop.
You can check the status of the J2EE Engine in the Engine Server Logs (for example, to see if the start has been successful). You can find these log files in the following directory:
\\<Drive>\usr\sap\<System-name>\j2ee\j2ee_<Instance-number>\cluster\server\ managers\console_logs\<time stamp>_output.log
8.9.2 Configuring XI: Defining the CI as a Technical and Business System The settings described here apply to the business scenarios MDM Content Consolidation, MDM Master Data Harmonization, and MDM Central Master Data Management.
Use The following settings are necessary to include the SAP Content Integrator (CI) in the System Landscape Directory (SLD) of the SAP Exchange Infrastructure (XI). You must configure the Content Integrator as a technical system and as a business system in the Exchange Infrastructure.
Procedure ...
1. To set up the SAP Content Integrator as a technical system in the SAP Exchange Infrastructure, perform the following steps:

8.9.3 Configuring and Starting the Java Proxy Framework (CI)
SAP MDM Content Consolidation: Configuration Guide for MDM 2
102 23.08.2004
a. In the browser, call the Exchange Infrastructure with the following URL: http://<host>:<port>/rep/start/index.jsp.
b. Click on System Landscape Directory.
c. Click on Technical Landscape.
d. Choose New Technical System.
e. Choose SAP Standalone Java System then Next.
f. In the Technical System Identification field, enter: ContentIntegrator_<Host>.
<Host> must be a unique system identifier.
g. In the System Host Name field, enter the name of the system on which the Content Integrator is installed.
The name must uniquely identify the system.
h. Choose Finish.
2. To set up the SAP Content Integrator as a business system in the SAP Exchange Infrastructure, perform the following steps:
a. In the browser, call the Exchange Infrastructure with the following URL: http://<host>:<port>/rep/start/index.jsp.
b. Click on System Landscape Directory.
c. Click on XI Landscape.
d. Choose New Business System.
e. Choose Java Business System then Next.
f. Select ContentIntegrator_<Host> from the System dropdown list box.
This is the technical system identification, that you created under 1.g.
g. Choose Next.
h. Enter a name for the business system and choose Next.
i. Select an integration server from the Related Integration Server dropdown list box and choose Finish.
For more information about configuring technical systems and business systems in the SAP Exchange Infrastructure, see the SAP Help Portal at help.sap.com → SAP NetWeaver → SAP Exchange Infrastructure → Release SAP XI 2.0 → SAP Exchange Infrastructure (BC-XI) → Design and Configuration Time → Configuration → System Landscape Directory in the Exchange Infrastructure.
Result You have configured the SAP Content Integrator as a technical system and as a business system in the SAP Exchange Infrastructure.
8.9.3 Configuring and Starting the Java Proxy Framework (CI) The settings described here apply to the business scenarios MDM Content Consolidation, MDM Master Data Harmonization, and MDM Central Master Data Management.

8.9.3 Configuring and Starting the Java Proxy Framework (CI)
23.08.2004 103
Use The Java Proxy Framework (JPF) encapsulates the message exchange between the SAP Exchange Infrastructure (XI) and the SAP Content Integrator (CI). The JPF is installed on installation of the Content Integrator.
The JPF must always be running when the Content Integrator runs – therefore you should start the JPF when you start the application server.
You must manually configure the following .properties files before you can start the JPF:
• dbconnect.properties
This file contains logon data that enables the JPF to get the exchange profiles from the database of the Integration Server at runtime.
Change this file in each of the following directories of the Content Integrator and the J2EE Engine:
Platform Path
\\<drive>\usr\sap\<Instance-name>\global\config\ContentIntegrator\ server\xiProxy\
(CI directory)
Windows
\\<drive>\usr\sap\<Instance-name>\j2ee\j2ee_<Instance-name> cluster\server\
(J2EE directory)
/usr/sap/<Instance-name>/global/config/ContentIntegrator/ server/xiProxy/
(CI directory)
UNIX
/usr/sap/<Instance-name>/j2ee/j2ee_<Instance-name> cluster/server/
(J2EE directory)
• technicalID.properties
Change this file in the same two directories.
• jpf.properties
Change this file in the CI directory only.
Procedure ...
1. Open file dbconnect.properties in the CI directory.
a. Maintain the following XI parameters:
Name Description
hostname Server name

8.9.4 Configuring XI: Setting Up Message Exchange Between CI and MDM
SAP MDM Content Consolidation: Configuration Guide for MDM 2
104 23.08.2004
systemNumber SAP system number
client Client
user User
password User password
language Logon language
b. Copy the file to the J2EE directory.
2. Open file technicalID.properties in the CI directory.
a. Enter the same technical system that you entered as the technical system for the Content Integrator in the SAP Exchange Infrastructure (see Configuring XI: Defining the CI as a Technical and Business System [Page 101]):
SAPTechnicalSystemIdentification=ContentIntegrator_<Host>. SystemHome.<Host>
b. Copy the file to the J2EE directory.
3. Open file jpf.properties in the CI directory and enter the port of the JPF proxy (1080 is the standard port):
com.sap.aii.proxy.framework.serverURL=http://localhost:<Port>/
4. Start the JPF:
a. Open the input request and switch to the CI directory.
b. Start stack processing file XIProxyServer.cmd (Windows) or XIProxyServer.sh (UNIX) with the parameter start.
Result You have configured and started the Java Proxy Framework for the Content Integrator.
8.9.4 Configuring XI: Setting Up Message Exchange Between CI and MDM The settings described here apply to the business scenarios MDM Content Consolidation, MDM Master Data Harmonization, and MDM Central Master Data Management.
Use The settings described here are necessary to enable the exchange of messages between the SAP Master Data Management System (MDM) and SAP Content Integrator (CI) using the SAP Exchange Infrastructure (XI). The messages are required for the following processes:
• Synchronous and asynchronous matching in the CI
• Object updating from the MDM System to the CI
Define all the necessary settings for the exchange of messages in the Directory in the Integration Builder of the SAP Exchange Infrastructure.
The message and mapping interfaces for exchanging messages are created in the Repository of the SAP Exchange Infrastructure: for the SAP Content Integrator, version 2.0, they are created in namespace http://sap.com/xi/CI, and for MDM, version 200, they are created in namespace http://sap.com/xi/CMDM.

8.9.4 Configuring XI: Setting Up Message Exchange Between CI and MDM
23.08.2004 105
Prerequisites • You have set up the source and target systems (sender and receiver systems) in the
System Landscape Directory (SLD) of the SAP Exchange Infrastructure. For more information, see Configuring XI: Defining the CI as a Technical and Business System [Page 101]. The MDM system must be set up there, too.
• To enable the exchange of messages between the SAP Content Integrator and the MDM system using the SAP Exchange Infrastructure, a Java Proxy Framework is required. The JPF is installed on installation of the Content Integrator, and must be started. For more information, see Configuring and Starting the Java Proxy Framework (CI) [Page 102].
Procedure Configure the exchange of messages for synchronous and asynchronous matching using the following message interfaces:
Name of message interface (CI)
Name of message interface (MDM)
Description Target system
StartMatching_In StartMatching_Out Start matching and the transfer of the objects to be checked.
CI
StartDataTransfer_In
StartDataTransfer_ Out
Start data transfer for the matching in multiple packages.
CI
DataPackage_In DataPackage_Out Transfer of data package for matching.
CI
DataPackageConfirmation_Out
DataPackageConfirmation_In
Confirmation of receipt of a data package (for matching).
MDM
DataPackageTimeout_Out
DataPackageTimeout_In
Notification that the waiting time for subsequent packages in data-package-transfer has been exceeded.
MDM
EndDataTransfer_In EndDataTransfer_Out
Complete data transfer for matching.
CI
ConfirmMatching_Out
ConfirmMatching_In Confirm completion of matching. MDM
GetMatchingObjects_In
GetMatchingObjects_Out
Query results of matching for a single business object.
CI
Configure the exchange of messages for object update using the following message interfaces:
Name of message interface (CI)
Name of message interface (MDM)
Description Target system
StartObjectUpdate_In
StartObjectUpdate_ Out
Start transfer of updated data. CI
ConfirmObjectUpdate_Out
ConfirmObjectUpdate_In
Confirm completion of update. MDM
For more information about configuring the exchange of messages in the SAP Exchange Infrastructure, see the SAP Help Portal at help.sap.com → SAP NetWeaver → SAP Exchange Infrastructure → Release SAP XI 2.0 SAP Exchange Infrastructure (BC-XI) → Design and Configuration Time → Configuration.

8.9.4 Configuring XI: Setting Up Message Exchange Between CI and MDM
SAP MDM Content Consolidation: Configuration Guide for MDM 2
106 23.08.2004
SAP Content Integrator as Target System ...
1. Define or complete the business scenario and receiver determination.
In the Integration Directory, choose Business Scenarios. Enter the following data:
Field Field Contents Description
Sender business system
<source system according to SLD>
Business system for MDM in the System Landscape Directory (SLD) of the XI
Sender interface name
For example: StartMatching_Out
Name of message interface (MDM)
Sender interface namespace
http://sap.com/xi/CMDM SAP namespace
Recipient <target system according to SLD>
Business system for CI in the SLD
2. Save and activate your changes.
3. Define the interface determination for outbound interfaces.
In the Integration Directory, choose Interface Determination for Outbound Interface. Enter the following data:
Field Field Contents Description
Sender business system
<source system according to SLD>
Business system for MDM in the System Landscape Directory (SLD) of the XI
Sender interface name
For example: StartMatching_Out
Name of message interface (MDM)
Sender interface namespace
http://sap.com/xi/CMDM SAP namespace
Recipient <target system according to SLD>
Business system for CI in the SLD
Inbound interface name
For example: StartMatching_In Name of message interface (CI)
Inbound interface namespace
http://sap.com/xi/CI SAP namespace
4. Save and activate your changes.
5. Define end points for the receiver system.
In the Integration Directory, choose Receiver System End Points. Enter the following data:
Field Field Contents Description
Sender business system
* The sender does not need to be defined. If you enter the asterisk symbol (*), all messages from the receiver system are received, regardless of the sending system.
Sender interface * -

8.9.4 Configuring XI: Setting Up Message Exchange Between CI and MDM
23.08.2004 107
name
Sender interface namespace
* -
Recipient <target system according to SLD>
Business system for CI in the SLD
Inbound interface name
* -
Inbound interface namespace
* -
End point type XI connectivity -
Target addressing mode
URL addressing -
Target URL http://<IP-Adresse>: <Port>/sap/xi/ engine?type=entry
The IP address is the fixed IP address of the receiver system (here, the SAP Content Integrator). The port refers to the Java Proxy Framework.
Logon Use logon data Activate this option.
6. Save and activate your changes.
7. Define logon data for the receiver system.
In the Integration Directory, choose Receiver System Logon Data. Enter the following data:
Field Field Contents Description
Sender business system
* The source system does not need to be defined.
Sender interface name
* -
Sender interface namespace
* -
Recipient <target system according to SLD>
Business system for CI in the SLD
Inbound interface name
* -
Inbound interface namespace
* -
Authentification procedure
Password based -
User name <user name> A user defined in the SAP User Management Engine, with the role Matching Administrator.
Password <password> -
8. Save and activate your changes.
MDM as Target System ...

8.9.4 Configuring XI: Setting Up Message Exchange Between CI and MDM
SAP MDM Content Consolidation: Configuration Guide for MDM 2
108 23.08.2004
1. Define or complete the business scenario and receiver determination.
In the Integration Directory, choose Business Scenarios. Enter the following data:
Field Field Contents Description
Sender business system
<source system according to SLD>
Business system for CI in the SLD
Sender interface name
For example: ConfirmMatching_Out
Name of message interface (CI)
Sender interface namespace
http://sap.com/xi/CI SAP namespace
Recipient <target system according to SLD>
Business system for MDM in the SLD
2. Save and activate your changes.
3. Define the interface determination for outbound interfaces.
In the Integration Directory, choose Interface Determination for Outbound Interface. Enter the following data:
Field Field Contents-{}-
Description
Sender business system
<source system according to SLD>
Business system for CI in the SLD
Sender interface name
For example: ConfirmMatching_Out
Name of message interface (CI)
Sender interface namespace
http://sap.com/xi/CI SAP namespace
Recipient <target system according to SLD>
Business system for MDM in the SLD
Inbound interface name
For example, ConfirmMatching_In
Name of message interface (MDM)
Inbound interface namespace
http://sap.com/xi/CMDM SAP namespace
4. Save and activate your changes.
5. Define end points for the receiver system.
In the Integration Directory, choose Receiver System End Points. Enter the following data:
Field Field Contents Description
Sender business system
* The source system does not need to be defined.
Sender interface name
* -
Sender interface namespace
* -
Recipient <target system according to SLD>
Business system for MDM in the SLD

8.9.5 Creating MDM and MDC Systems in the CI
23.08.2004 109
Inbound interface name
* -
Inbound interface namespace
* -
End point type Integration Engine -
Target addressing mode
URL addressing -
Target URL URL of the target system (the MDM System)
Logon You can choose between anonymous log-on or log-on with log-on data.
6. Save and activate your changes.
7. Define logon data for the receiver system.
Depending on the end point type and address type, you can define log-on data for the target system (recipient system). If you have chosen Anonymous Log-on, you do not need to define any log-on data for the target system.
Result You have configured the SAP Exchange Infrastructure for the exchange of messages between SAP Content Integrator and the MDM System.
8.9.5 Creating MDM and MDC Systems in the CI The settings described here apply to the business scenarios MDM Content Consolidation, MDM Master Data Harmonization, and MDM Central Master Data Management.
Use All the SAP Content Integrator (CI) operations that concern the processing of business data objects, for example, upload and matching, refer to the system data of the business data objects. If this system data has not been created in the Content Integrator, the application does not run as intended. The systems created in the CI must map the current MDM system landscape, therefore you create the following systems in the CI system landscape administration:
• SAP Master Data Server (MDS)
• Master Data Client Systems (MDC), from which data is loaded into the MDS and, therefore, into the CI.
Create the systems in the Content Integrator, before you upload data because the business data objects refer to the system data created in the system.
Prerequisites In order to be able to create systems in the Content Integrator, you require a user with the MDM role Master Data Administrator to which the CI roles CI System Administrator and CI User have been assigned in SAP User Management Engine (UME); see Making Role Assignments for CI Roles in the UME [Page 78].

8.9.6 Defining a Target System for Data Replication from the CI
SAP MDM Content Consolidation: Configuration Guide for MDM 2
110 23.08.2004
Procedure To create system data, you log on to SAP MDM and choose Master Data Settings → System Systems → CI System Landscape.
To create a system, you enter the following data in the appropriate entry fields:
Field Description Use is
ID/Name Content is user-defined.
For this field there is a length restriction of 60 characters.
Mandatory
Short name Content is user-defined but it must be unique within the CI.
For this field there is a length restriction of 8 characters.
Mandatory
Description Content is user-defined. Mandatory
Logical system Logical system of a R/3 client.
For this field there is a length restriction of 10 characters
Optional
Business system name
The business system created in the System Landscape Directory (SLD) of the SAP Exchange Infrastructure.
For this field there is a length restriction of 60 characters.
Optional
The created systems are referenced by the business data that is loaded into the CI for matching. Therefore, the created systems must match the actual systems of the MDM system landscape.
For more information on system administration in the Content Integrator, see the SAP Help Portal under help.sap.com → SAP NetWeaver → SAP Master Data Management → SAP Content Integrator → Administration → System Administration.
Result You have created all the required systems in SAP Content Integrator.
8.9.6 Defining a Target System for Data Replication from the CI The settings described here apply to the Business Scenarios MDM Content Consolidation, MDM Master Data Harmonization, and MDM Central Master Data Management.
Use The SAP Content Integrator (CI) enables you to replicate ID mapping data and object data in another SAP system, specifically on the SAP master data server (MDS). Other SAP systems can then access this data on the MDS, and access to the replicated data is faster and more efficient then access to the data in the Content Integrator.

8.9.7 Activating Replication in the CI
23.08.2004 111
In the standard delivery the target system for the data replication is the system that has been specified for the persistence of CI during installation. To define a different SAP System for the data replication, you follow the steps described in the following procedure.
Procedure To define the system in which the data of the Content Integrator is to be replicated, call the SAP J2EE Administrator of the SAP J2EE server where the SAP Content Integrator is installed. You need administrator authorization for the SAP J2EE Engine. ...
1. Choose Connect → Login then Connect in the Login dialog box.
2. Expand the Server node and the Services node and select eisconnector.
3. Choose the Runtime tab.
4. Select CIReplicationConnector620 under Resource Adapter.
5. Choose the Config Properties tab and select CIReplicationConnector620Factory under JNDI-Names.
6. Enter the following Config Properties:
Property Description
SAP Client The client of the system in which the data from the Content Integrator is to be replicated.
UserName User that allows the Content Integrator remote access to the selected system.
If you want to replicate CI data in the MDM system, this is the user that you created in the MDM system: see Defining System Access for Querying ID Mapping [Page 119].
Password User password
Language Language selection
ServerName Name of the server on which the selected system is running.
PortNumber SAP system number
7. Once you have entered these properties and adopted them by using Set (on the Config Properties tab), confirm them with Set (below the Config Properties tab).
8. Exit the SAP J2EE Administrator.
Result You have defined the SAP system in which the Content Integrator replicates data. Other SAP systems can access the data via the RFC adapter, see SP02: Configuring the RFC Adapter for MDM and CI [Page 113] or SP03 ff: Configuring the RFC Adapter for MDM and CI [Page 116] (depending on the installed Service Pack).
Before data from the Content Integrator can be replicated, you must also define some settings in the CI see Activating Replication in the CI [Page 111].
8.9.7 Activating Replication in the CI The settings described here apply to the Business Scenarios MDM Content Consolidation, MDM Master Data Harmonization, and MDM Central Master Data Management.

8.9.7 Activating Replication in the CI
SAP MDM Content Consolidation: Configuration Guide for MDM 2
112 23.08.2004
Use To enable SAP Master Data Management (MDM) and other SAP systems to access the replicated ID mapping and object data SAP Content Integrator (CI), you must define the following settings in the Content Integrator: ...
• Initial Replication
If you activate the replication in the Content Integrator, the following data is replicated as initial replication into the target system:
Matching processes
ID mapping data is defined by matching processes (that contain the matching strategy); therefore the matching processes must exist in the replication target system.
System data
ID mapping data and business object data refers to system data; therefore the system data must exist in the replication target system.
Active ID mapping data
Business object data
The initial replication overwrites all the data that was previously replicated from the Content Integrator into the target system.
The initial replication runs in the background. If new ID mapping data is created and replicated before the background job is completed, the initial replication overwrites the new ID mapping data in the target system. Make sure that no new ID mapping data is created before the initial replication job is completed; otherwise data will be lost.
• Synchronous Replication
If you activate the replication in the Content Integrator, the initial replication is followed by an automatic synchronous replication of the following data:
Active ID mapping data
Business object data
Note that changes made to the matching processes and the system data after the initial replication are not automatically replicated. If you create this new data or change it, you must carry out a manual replication of this data.
• Schema Replication
If you wish to carry out evaluations in SAP Business Information Warehouse (BW) using the standard reporting schema of the Content Integrator, you must also replicate the standard reporting schema.
Note that, if you change the standard reporting schema, the new standard reporting schema is not automatically replicated. You must replicate it manually.
For more information, see Defining the Standard Reporting Schema in the CI [Page 178].

8.9.8 SP02: Configuring the RFC Adapter for MDM and CI
23.08.2004 113
For more information on the replication and the interdependencies between the replicated data, see the SAP Help Portal under help.sap.com → SAP NetWeaver → SAP Master Data Management → SAP Content Integrator → Settings: Replication.
Prerequisites • You have completed the following activities in the Content Integrator before you can
start the initial and schema replications:
Creating MDM and MDC Systems in the CI [Page 109]
Creating Matching Processes (CI) [Page 253]
Defining the Standard Reporting Schema in the CI [Page 178]
Defining a Target System for Data Replication from the CI [Page 110]
SP02: Configuring the RFC Adapter for MDM and CI [Page 113] or SP03ff: Configuring the RFC Adapter for MDM and CI [Page 116] (depending on the installed Service Pack).
• In order to start the initial replication, you require the MDM role Master Data Administrator with the CI role combination CI Manager for Master Data and CI User.
• In order to start the schema replication, you require the MDM role Master Data Manager with the CI role combination CI Manager for Master Data and CI User.
Start Initial Replication and Synchronous Replication ... ...
1. To activate the replication, you log on to SAP MDM and choose Master Data Settings → System Systems → CI Settings.
2. Choose the Replication tab.
3. Set the flag ID Mapping Replication On.
4. Choose Save below the tab page.
Replicate Standard Reporting Schema ...
1. To replicate the standard reporting schema, you log on to SAP MDM and choose Data Consolidation → Overview → Replicate ID Mapping.
2. In the Data for Replication group box, set the Standard Reporting Schema (initial) flag.
3. If the schema replication is to be carried out as a background job, enter a name for the job. If you do not assign a name, the replication is triggered immediately you choose Start Replication.
4. Choose Start Replication.
Result You have configured the replication in the Content Integrator.
8.9.8 SP02: Configuring the RFC Adapter for MDM and CI The settings described here apply to the business scenarios MDM Content Consolidation, MDM Master Data Harmonization, and MDM Central Master Data Management.

8.9.8 SP02: Configuring the RFC Adapter for MDM and CI
SAP MDM Content Consolidation: Configuration Guide for MDM 2
114 23.08.2004
Use The RFC adapter (Remote Function Call) enables communication between SAP Master Data Management (MDM) and SAP Content Integrator (CI). The following data can be called:
• ID mapping data, using the ID mapping service in the CI
• Master data attributes, using the service for object access in the CI
The RFC adapter is a standalone Java application that starts an RFC server. The server is required so that the MDM system (or another system) can call data from the Content Integrator.
All RFC adapter files are located in the following directories:
Platform Directory
Windows \\<drive>\usr\sap\<Instance-name>\global\config\ContentIntegrator\
server\rfcadapter
UNIX /usr/sap/<Instance-name>/global/config/ContentIntegrator/
server/rfcadapter
Prerequisites • Make sure that the following files exist on the CI server with the relevant contents:
Platform File Content
Windows WINNT\system32\ drivers\etc\ services
An entry sapms<System ID> must exist.
If the System ID of an SAP R/3 system is MDM and the port number is 3500, you must enter sapmsMDM 3500/tcp to connect the system to the Content Integrator.
UNIX etc/services An entry sapms<System ID> must exist.
• To process these files on the CI server and configure the RFC adapter, you need administrator authorization for the relevant systems.
• In addition, a user for the SAP User Management Engine (UME user) is required, with CI role API Client, to enable communication between the SAP J2EE Engine and the RFC adapter.
Procedure ...
1. Configure the MDM system so that is can call RFC function modules.

8.9.8 SP02: Configuring the RFC Adapter for MDM and CI
23.08.2004 115
a. To enable the MDM system to call the RFC function modules provided by the RFC adapter, you must configure a TCP/IP connection (Transmission Control Protocol / Internet Protocol) in transaction SM59.
The systems calling the RFC adapter use the TCP/IP connection name as the system ID of the RFC target system. You must use the following settings:
Connection Type: T (TCP/IP)
Technical Settings: Registered Server Program
The other attributes for the connection depend on the settings for your gateway host. You can use your own program ID, but we recommend that you use SAPMCI.
b. Activate the Unicode in transaction SM59 and in file rfcadapter.properties (see step 2).
c. You must maintain the program ID, the gateway host, and the gateway service used by the TCP/IP connection for MDM in file rfcadapter.properties (see step 2).
2. Configure the SAP Content Integrator for the RFC adapter.
To enable the Content Integrator to be connected with the MDM system using the RFC adapter, maintain the following settings in the rfcadapter.properties file of the RFC adapter:
Property Description
rfcAdapter On, Off
Must be set to On (the default setting is Off.)
sapUnicode 0 = Off, 1 = On
Set the Unicode indicator to On, because the MDM system is a Unicode-enabled system.
sapClient SAP Client
sapUser SAP User
sapPassword SAP Password
sapLanguage SAP Language Setting
sapSystemName SAP System Name
sapSystemGroup Name of the application server group.
If you do not use load balancing, choose SPACE.
sapGatewayHostName Name of the Gateway Host
sapGatewayService Gateway Service
sapDestination Program ID
maxServers Number of servers to be started in parallel
maxConnections Number of connections processed by one server
ciUser A UME user for SAP Content Integrator with the role CI_APIClient
ciPassword UME password for SAP Content Integrator

8.9.9 SP03ff: Configuring the RFC Adapter for MDM and CI
SAP MDM Content Consolidation: Configuration Guide for MDM 2
116 23.08.2004
If you want to set up several RFC connections between the SAP Content Integrator and SAP systems, you must create a copy of file rfcadapter.properties for each system, rename the file, and use the file name as a parameter when you start the RFC adapter (see step 3.c below).
The RFC adapter also calls Enterprise Java Beans (EJBs) of the SAP J2EE Engine. This requires an additional file: jndi.properties. This file is automatically provided on installation of the Content Integrator. It is located in the following directories:
Windows: \\<drive>\usr\sap\<Instance-name>\global\config\ ContentIntegrator\lib
UNIX: /usr/sap/<Instance-name>/global/config/ContentIntegrator/lib
3. Start the RFC adapter:
a. Ensure that the J2EE Engine is running.
b. Open the input request and switch to the following directory.
Windows: \\<drive>\usr\sap\<Instance-name>\global\config\ ContentIntegrator\server\rfcadapter
UNIX: /usr/sap/<Instance-name>/global/config/ContentIntegrator/ server/rfcadapter
c. Start the stack processing file rfcadapter.cmd.
If you have connected more than one SAP system, you must start the stack processing file with the relevant .properties files as parameters.
Once you have started the RFC adapter, you can use the following commands to call information about available commands and their functions:
man
help
?
Result You have configured the RFC adapter in both the MDM system and the Content Integrator.
Configure the CI proxy settings, too, so that RFC queries work: see Configuring CI Proxy Settings [Page 119].
8.9.9 SP03ff: Configuring the RFC Adapter for MDM and CI The settings described here apply to the business scenarios MDM Content Consolidation, MDM Master Data Harmonization, and MDM Central Master Data Management.
Use The RFC adapter (Remote Function Call) enables communication between SAP Master Data Management (MDM) and the SAP Content Integrator (CI). The following data can be called:
• ID mapping data, using the ID mapping service in the CI

8.9.9 SP03ff: Configuring the RFC Adapter for MDM and CI
23.08.2004 117
• Master data attributes, using the service for object access in the CI
The RFC adapter is a service of SAP J2EE Engine and it is installed on the same SAP J2EE Engine as the Content Integrator. The service is required so that the MDM system (or another system) can call data from the Content Integrator.
The RFC adapter on the SAP J2EE Engine can only run if SAP Content Integrator is running on the same SAP J2EE Engine.
The properties file of the RFC adapter is located in one of the following directories:
Platform Directory
Windows \\<drive>\usr\sap\<Instance-name>\cluster\server\services\cirfcadapter
UNIX /usr/sap/<Instance-name>/cluster/server/services/cirfcadapter
Prerequisites • Make sure that the following files exist on the CI server with the relevant contents:
Platform File Content
Windows WINNT\system32\ drivers\etc\ services
An entry sapms<System ID> must exist.
If the System ID of an SAP R/3 system is MDM and the port number is 3500, you must enter sapmsMDM 3500/tcp to connect the system to the Content Integrator.
UNIX etc/services An entry sapms<System ID> must exist.
• To process these files on the CI server and configure the RFC adapter, you need administrator authorization for the relevant systems.
• In addition, a SAP User Management Engine user (UME user) is required, with CI role API Client, to enable communication between the SAP J2EE Engine and the RFC adapter.
Procedure ...
1. Configure the MDM system so that is can call RFC function modules.
a. To enable the MDM system to call the RFC function modules provided by the RFC adapter, you must configure a TCP/IP connection (Transmission Control Protocol / Internet Protocol) in transaction SM59.
The systems calling the RFC adapter use the TCP/IP connection name as the system ID of the RFC target system. You must use the following settings:
Connection Type: T (TCP/IP)
Technical Settings: Registered Server Program

8.9.9 SP03ff: Configuring the RFC Adapter for MDM and CI
SAP MDM Content Consolidation: Configuration Guide for MDM 2
118 23.08.2004
The other attributes for the connection depend on the settings for your gateway host. You can use your own program ID, but we recommend that you use SAPMCI.
b. Activate the Unicode both in transaction SM59 and in the properties file of the RFC adapter (see step 2).
c. You must maintain the program ID, the gateway host, and the gateway service used by the TCP/IP connection for MDM in the properties file (see step 2).
2. Configure SAP Content Integrator for the RFC adapter.
To enable the Content Integrator to be connected with the MDM system using the RFC adapter, maintain the following settings in the properties file of the RFC adapter:
Property Description
applicationName Name of the application, that is, ContentIntegrator.
rfcAdapter On, Off
Must be set to On (the default setting is Off.)
sapUnicode 0 = Off, 1 = On
Set the Unicode indicator to On, because the MDM system is a Unicode-enabled system.
sapClient SAP Client
sapUser SAP User
sapPassword SAP password
sapLanguage SAP language setting
sapSystemName SAP system name
sapSystemGroup Name of the application server group.
If you do not use load balancing, choose SPACE.
sapGatewayHostName Name of the gateway host
sapGatewayService Gateway service
sapDestination Program ID
maxServers Number of servers to be started in parallel
maxConnections Number of connections processed by one server
ciUser A UME user for SAP Content Integrator with the role CI_APIClient
ciPassword UME password for SAP Content Integrator
3. The RFC adapter starts automatically when you start SAP J2EE Engine.
Result You have completed the configuration of the RFC adapter service.
We recommend that you encrypt the passwords of the properties files of the RFC adapter.

8.9.10 Configuring CI Proxy Settings
23.08.2004 119
For more information, see SP03ff: Encryption in the CI [Page 44].
Configure the CI proxy settings, too, so that RFC queries work: see Configuring CI Proxy Settings [Page 119].
8.9.10 Configuring CI Proxy Settings The settings described here apply to the Business Scenarios MDM Content Consolidation, MDM Master Data Harmonization, and MDM Central Master Data Management.
Use You set up the necessary RFC connections between SAP Master Data Management (MDM) and the services of the SAP Content Integrator (CI), so that the MDM system can access ID mapping data and master data attributes in the CI.
You can choose between the following services:
• Key mapping service (in the CI itself)
• Key mapping service (replicated)
• Service for object access
We recommend that you activate replication in the CI, because access to replicated ID mapping data reduces the load on the Content Integrator. The two key mapping services provide identical data, so you only need to set up one of these two for the MDM system.
Prerequisites You have activated replication in the Content Integrator, see Defining a Target System for Data Replication from the CI [Page 110] and Activating Replication in the CI [Page 111].
Procedure Define the RFC destinations in Customizing transaction SPRO in the SAP Reference IMG, under Master Data Management → Generic Functions → Content Integrator → Configuring Proxies for the Content Integrator. Proceed as described in the IMG.
Result You have configured the RFC destinations for MDM data queries to the Content Integrator.
8.9.11 Defining System Access for Querying ID Mapping The settings described here apply to the Business Scenarios MDM Content Consolidation, MDM Master Data Harmonization, and MDM Central Master Data Management.
Use The ID mapping information is originally created in the Content Integrator system and can then be replicated in the MDM system to improve the performance of the MDM system. The SAP Exchange Infrastructure reads this data from the MDM system and the Content Integrator (CI) at runtime during the distribution process.
For technical reasons, the ID mapping framework is implemented in two parts, which must be configured separately. If you are using XI 3.0, J2EE is not required.

8.9.11 Defining System Access for Querying ID Mapping
SAP MDM Content Consolidation: Configuration Guide for MDM 2
120 23.08.2004
• Configuration files keymapping.properties and keymapping.xml in the Software Delivery Archive mdm.ear. This mdm.ear file is a packed J2EE application that contains the SAP MDM ID Mapping Framework servlet as well as these configuration files. The mdm.ear file is delivered in the SAP Note 651321.
• You must create configuration file keymapping.properties in XI archive MDM20_Keymapping_Framework in namespace http://sap.com/xi/CMDM.
The necessary configuration steps for both parts are described below.
Prerequisites • You have defined a user for synchronous access in the MDM system and in the J2EE
engine of the CI. We recommend that you use a user of type communication in the MDM system with assigned profile MDM_IDMAPRFC. For more information, see Defining a Target System for Data Replication from the CI [Page 110].
• You have performed the configuration steps described under Prepare Extensions for MDM XI Repository Contents [Page 128].
Procedure ... ...
1. Load the mdm.ear file from the SAP Note 651321 to your local file system.
2. Start deployment with the SAP tool System Delivery Manager (SDM). This tool is automatically installed when you install a Java-based application. Before using the SDM, read SAP Notes 544244 and 544979, and the online documentation within the SDM.
Make sure that the J2EE application in file mdm.ear is installed on the same computer as the runtime environment of the SAP Exchange Infrastructure.
After successful deployment, directory <J2EE Installation Directory>\cluster\server\services\servlet_jsp\work\jspTemp\mdm\root\resources contains two files keymapping_server.properties and keymapping.xml, which are edited or exchanged as described below. Note that you must restart the J2EE application each time you edit or exchange these configuration files, so that the system takes the new settings into consideration.
3. Define the following entries in the MDM system in Customizing for Master Data Exchange → Central Settings → ID Mapping → Make XI File Settings (transaction MDM_PROP).
a. Enter the following parameters in the MDS system data area.
b. Define the following parameters for each MDM system in your system landscape in which you want to define ID mapping.
Parameter Value Description
System For example, XYZ_100
MDM system
Logon client <Client> Client number in the MDM system
User ID <User> User in the MDM system for synchronous access
Password <Password> Password
Language <Logon language> Logon language, for

8.9.11 Defining System Access for Querying ID Mapping
23.08.2004 121
example, EN
Target host <Host name> Host name of the application server of the MDM system
System ID <System number> System number of the MDM system
MaxConnNo <Number> Maximum number of possible connections
In a later step, the keymapping_server.properties file is generated from this data.
4. In this IMG activity, also enter the following parameters in the Assign Matching Processes to Object Types area. Define the CI matching process for each object type that you use. For example:
Parameter Value Description
Key schema For example, PartnerGUID
ID type
System For example, XYZ_100
MDM system
In a later step, the keymapping.xml file is generated from this data.
5. In this IMG activity, also enter the following parameters in the ID Mapping Framework area. Define access to the ID mapping servlet.
Parameter Value Description
Servlet host <Host name> Host name of the J2EE engine on which file mdm.ear was installed.
Servlet port <Port> Number of the HTTP port of the MDM J2EE application
KeyMappingManager factory class
com.sap.mdm.keymapping. KeyMappingManagerFactoryImpl
Name of class that creates the instances of the KeyMappingManager.
In a later step, the keymapping.properties file is generated from this data.
6. Generate these files in Customizing for Master Data Exchange (MDM-MX) → Central Settings → ID Mapping → Generate XI Files (transaction MDM_GENP):
keymapping_server.properties
keymapping.xml
keymapping.properties
7. Copy the files keymapping_server.properties and keymapping.xml to the directory of the servlet installation <J2EE Installation Directory>\cluster\server\services\servlet_jsp\work\jspTemp\mdm\root\resources, and restart your J2EE engine.

8.10 SAP Exchange Infrastructure
SAP MDM Content Consolidation: Configuration Guide for MDM 2
122 23.08.2004
8. Create the keymapping.properties file in the Integration Repository (design time) of the SAP Exchange Infrastructure.
a. In the Integration Repository in your software component version, select the imported archives, for example, CUSTXY → CUSTXY, 1 of CustXY.com → http://sap.com/xi/CMDM → Mapping Objects → Imported Archives.
Export the archive MDM20_Keymapping_Framework_Config.
b. Add the file keymapping.properties that you created. Ensure that the path is com/sap/mdm/keymapping.
c. Import the archive, save, and activate your settings.
Result You have configured the necessary system and logon parameters for querying ID mapping information.
8.10 SAP Exchange Infrastructure The settings described here apply to the Business Scenarios MDM Content Consolidation, MDM Master Data Harmonization, and MDM Central Master Data Management.
This section describes the configuration steps for the SAP Exchange Infrastructure.
See the delta configuration guide for SAP MDM 2.00. This contains new and changed units that are relevant to the use of SAP MDM 2.00 with EP 6.0 and XI 3.0.
The delta configuration guide is delivered as a separate document. You will find this on the SAP Service Marketplace at service.sap.com/instguides → Installation and Upgrade Guides → SAP MDM.
8.10.1 Configuration of XI 2.0 and XI 3.0 Integration Directory The Integration Server uses data from the Integration Directory to decide how to respond when receiving a message. The server uses the assignment of the outbound interface and inbound interface to determine which interface mapping applies.
Graphic 1: Interface Mapping for XI Configuration

8.10.1 Configuration of XI 2.0 and XI 3.0
23.08.2004 123
BusinessPartnerOut
Inbound interface = DEBMAS05InInterface mapping = Bupa2Debmas05From namespace: http://sap.com/xi/CMDMSoftware component version:MDM200
Inbound interface = DEBMAS05InInterface mapping = Bupa2Debmas05From namespace: http://sap.com/xi/CMDMSoftware component version:XIcustomerMDM
Interface determinationfor outbound interface
Inbound interface andinterface mapping
Sender Receiver
The interface mapping consists of:
• An outbound interface
• An inbound interface
• A name for the mapping program, which is usually an XSL mapping
As shown in graphic 1, interface BusinessPartnerOut is configured in such a way that it is assigned to interface Debmas05In by using interface mapping Bupa2Debmas05.
The interface is configured for two versions of interface mapping Bupa2Debmas05: one version from software component version MDM200 and one version from software component version XITestMDM.
The interface mapping from software component version MDM200 must not be used, because otherwise the message mapping executed by XSL fails. The reasons for this are explained below.
Integration Repository – SAP Software Component Version In graphic 2, you see what software component version MDM200 includes. This software component version is delivered to customers by SAP and cannot be modified.
The software component version contains interface mapping Bupa2Debmas05, mentioned in graphic 1. This interface mapping is configured in such a way that it uses Bupa2Debmas05.xsl for message mapping.
Bupa2Debmas05.xsl uses the Java classes in the Keymapping_Framework archive when mapping, to call new ID mappings from MDS/CI and/or add them to MDS/CI.
To add or remove ID mappings, the ID mapping framework requires information such as the host name, system number, user ID, and password, in order to establish an RFC connection to MDS/CI. This information is stored in Customizing files (such as keymapping.properties or keymapping.xml), which can be called via the ID mapping framework.
The Customizing files can contain customer-specific information, and for this reason are not included in software component version MDM200 as delivered by SAP. Since software component version MDM200 is not modifiable, the customer cannot add these files later, either.
Since the Customizing files cannot be added to the software component version, they cannot be found when mapping, so message mapping fails.
For this reason, never reference an MDM200 software component version in interface determination as shown in graphic 1.

8.10.1 Configuration of XI 2.0 and XI 3.0
SAP MDM Content Consolidation: Configuration Guide for MDM 2
124 23.08.2004
Graphic 2: Integration Repository – Software Component Version of Customer
Software component
Software component versionMDM200
Namespace:http://sap.com/xi/CMDM
Interface mapping
Bupa2Debmas05
Imported archives
Bupa2Debmas05.xsl
Keymapping_Framework
Mapping objects
SAP Standard Delivery
uses
uses
Instead, interface determine should be assigned to an interface mapping from a component created by the customer, as shown in graphic 3.
Graphic 3: Integration Repository – Software Component
Software component customer-specific name
Software component versionCustomer_Name_MDM200
Namespace:http://sap.com/xi/CMDM
Interface mapping
Bupa2Debmas05Imported archives
Bupa2Debmas05.xsl
Keymapping_Framework
Mapping objects
Customer-specific copy of the SAP standard version
Keymapping_Framework
uses
uses
uses
Unlike the MDM software component version, the customer can add new objects to a software component version created by the customer.
Once the customer has created software component XITestMDM, software component versions XITestMDM, 2.0 of customer.com, and namespace http://sap.com/xi/CMDM, the customer can run a "release copy" from namespace http://sap.com/xi/CMDM of software component version MDM200 to the same namespace of software component version XITestMDM, 2.0 of customer.com. The release copy function can also be used to copy objects from one software component version to another. For this reason, graphics 2 and 3 show the same interface mappings and imported archives.

8.10.2 Configuring the Integration Server
23.08.2004 125
The only difference is that graphic 3 contains a new imported archive with the name Keymapping_Framework_Config. This new archive, created by the customer, contains the Customizing files mentioned above, which ensure smooth functioning of the ID mapping framework.
Since interface determination is assigned to interface mapping Bupa2Debams05 from XITestMDM, 2.0 of customer.com (graphic 1), the mapping runtime uses Bupa2Debmas05.xsl and the archive Keymapping_Framework from the same software component version and the same namespace. Since archive Keymapping_Framework_Config, which contains the Customizing files, is in the same software component version and in the same namespace, these files are available to the ID mapping framework. This allows message mapping to run successfully.
The configuration is thus complete.
8.10.2 Configuring the Integration Server The settings described here apply to the business scenarios MDM Content Consolidation, MDM Master Data Harmonization, and MDM Central Master Data Management.
Use You integrate a central MDM system and client systems using the SAP Exchange Infrastructure in the MDM scenarios. You must carry out various configuration steps so that messages can be exchanged via the SAP Exchange Infrastructure. Details about these configuration steps are not found in this guide, but rather are described in the configuration guide for the SAP Exchange Infrastructure.
You will find this configuration guide on the SAP Service Marketplace at service.sap.com/instguides → Installation and Upgrade Guides → SAP Exchange Infrastructure.
Prerequisites You installed the SAP Exchange Infrastructure successfully. Further prerequisites are listed in the configuration guide for the SAP Exchange Infrastructure.
Procedure Follow the instructions in the configuration guide for the SAP Exchange Infrastructure in the section "Configuration of a Central Integration Server". Look carefully at the prerequisites and preparatory activities listed there.
Result You successfully configured the Integration Server of the SAP Exchange Infrastructure.
8.10.3 SP02/03ff: Defining Systems in the SLD The settings described here apply to the Business Scenarios MDM Content Consolidation, MDM Master Data Harmonization, and MDM Central Master Data Management.
Use You must define the following systems in the System Landscape Directory (SLD) as technical systems and business systems. Defining them is also a prerequisite, in addition to XI communication, for some configuration steps in Customizing of MDM systems, in which business systems are checked against the SLD.
• XI system

8.10.4 Connecting Business Systems with an Integration Engine to the Integration Server
SAP MDM Content Consolidation: Configuration Guide for MDM 2
126 23.08.2004
• MDM system
• Client systems, for example, CRM, R/3, non-SAP systems
Prerequisites You have successfully installed and configured the System Landscape Directory. You will find the configuration guide for the System Landscape Directory on the SAP Service Marketplace at service.sap.com/instguides → Installation and Upgrade Guides → SAP Exchange Infrastructure.
Procedure ... ...
1. Define the systems listed above as technical systems in the SLD. Select the installed products. For detailed instructions, see the Configuration Guide mentioned above.
2. Define the systems listed above as business systems in the SLD. Assign the relevant role (integration server or application system). Define the XI system as an integration server. Then define the MDM system and the connected client systems as application systems. When you define these systems you must specify the integration server. For detailed instructions, see the Configuration Guide mentioned above.
Special point as of SP03:
If you have entered a new system in the System Landscape Directory, this may not be found immediately during a distribution process. If this is the case, run report RDCSLD_REFRESH.
We recommend that you run this report immediately after the upgrade. Refer to SAP Note 686901 in this connection.
Result The systems relevant to the MDM scenarios are defined in the SLD as technical systems and business systems.
8.10.4 Connecting Business Systems with an Integration Engine to the Integration Server The settings described here apply to the business scenarios MDM Content Consolidation, MDM Master Data Harmonization, and MDM Central Master Data Management.
Use Configure the connection of your systems that have a local Integration Engine (MDM systems and possibly client systems) to the Integration Server of the SAP Exchange Infrastructure.
See the configuration guide for the SAP Exchange Infrastructure, section "Communication and Security". Perform the activities listed there. You will find this configuration guide on the SAP Service Marketplace at service.sap.com/instguides → Installation and Upgrade Guides → SAP Exchange Infrastructure.
To connect your Content Integrator system, see the instructions under Content Integrator [Page 100].

8.10.5 Connecting Business Systems to the Integration Server Using the IDoc Adapter
23.08.2004 127
Prerequisites You have successfully installed the integration engine of the MDM system or client systems.
Procedure Follow the instructions in the configuration guide for the SAP Exchange Infrastructure in the section "Connecting Business Systems with an Integration Engine to the Central Integration Server". Look carefully at the prerequisites and preparatory activities listed there.
Result You have successfully connected the MDM system and client systems, which have an integration engine, to the Integration Server.
8.10.5 Connecting Business Systems to the Integration Server Using the IDoc Adapter The settings described here apply to the business scenarios MDM Content Consolidation, MDM Master Data Harmonization, and MDM Central Master Data Management.
Use Configure the connection of your systems that use an IDoc adapter for the connection (for example, R/3 client systems) to the Integration Server of the SAP Exchange Infrastructure.
See the configuration guide for the SAP Exchange Infrastructure, section "Communication and Security". Perform the activities listed there. You will find this configuration guide on the SAP Service Marketplace at service.sap.com/instguides → Installation and Upgrade Guides → SAP Exchange Infrastructure.
Procedure Follow the instructions in the configuration guide for the SAP Exchange Infrastructure in the section "Integration of Business Systems Using the IDoc Adapter". Look carefully at the prerequisites and preparatory activities listed there.
Result You have successfully connected the client systems that communicate with the Integration Server via an IDoc adapter to the Integration Server.
8.10.6 XI Repository Contents for MDM Scenarios The settings described here apply to the business scenarios MDM Content Consolidation, MDM Master Data Harmonization, and MDM Central Master Data Management.
Use The MDM-relevant XI contents (for example, interfaces and mapping programs) must be installed before configuring the SAP Exchange Infrastructure for use in MDM scenarios.
Procedure ..
1. Identify the parts of the delivery content that are relevant to you, depending on which SAP client systems are to be connected to MDM in your project.

8.10.7 Prepare Extensions for MDM XI Repository Contents
SAP MDM Content Consolidation: Configuration Guide for MDM 2
128 23.08.2004
You will find a complete list of the MDM-relevant XI repository contents in the Master Guide for Master Data Management on the SAP Service Marketplace at service.sap.com/instguides → Installation and Upgrade Guides → SAP MDM.
2. Install the XI repository contents that are relevant to you. To do this, follow the instructions on the Internet under help.sap.com → SAP NetWeaver → SAP Exchange Infrastructure → Design and Configuration Time → Software Logistics → Importing and Exporting Integration Objects.
Result You have installed the XI repository contents that are relevant to MDM scenarios.
8.10.7 Prepare Extensions for MDM XI Repository Contents The settings described here apply to the business scenarios MDM Content Consolidation, MDM Master Data Harmonization, and MDM Central Master Data Management.
Use When configuring the XI repository contents for SAP MDM, it is necessary to change or extend some of the objects delivered by SAP.
Perform the following steps to extend the interface mappings delivered by SAP by using your XSL programs for Customizing ID mapping and data reduction, without modifications. For more information, see Configuring and Activating Customizing ID Mapping [Page 131] and Configuring and Activating Data Reduction for Master Data [Page 133].
We recommend that you copy all archives to your new software component version (even if you only want to extend Customizing ID mapping and data reduction for some objects), because programs may include programs from other archives.
Procedure ...
1. Create Software Component in the System Landscape Directory (SLD) ...
a. Log on to the System Landscape Directory and, in the Software area, choose Third Party Software.
b. Choose Define Product and enter a product definition.
Vendor: This value must not be sap.com, for example, CustXY.com
Name: Product name, for example, CUSTXY
Version: Version number, for example, 1.00
c. Choose Create and add a software component to your product:
Product: CUSTXY, 1.00 of CustXY.com
Vendor: CustXY.com
Name: CUSTXY
Version: 1
d. Choose Create again. The system has created a product version with a software component version.

8.10.7 Prepare Extensions for MDM XI Repository Contents
23.08.2004 129
2. Define Reference to Standard Component ...
a. Go back to the initial screen of the System Landscape Directory and choose Content Maintenance.
b. Choose Subset: Component Information, Class: Software Component Version.
c. Select component version CUSTXY, 1 of CustXY.com (choose Show All Instances if necessary).
d. In the line with your component version, choose x Associated Instances.
i. Choose New Association.
ii. As Association Type, choose Component Component Requisite.
Once you have selected this, you see a text heading Associate CUSTXY, 1 of CustXY.com as.
e. In the dropdown list box, choose Dependent.
f. Select the SAP software component version(s) upon which you want to base the customer component (in this case MDM 200). If necessary, choose Show All Instances.
g. Choose Associate Selected.
3. Import Customer Component to Repository ...
a. Log on to the Integration Repository (design time) and choose Object → Import Software Component Versions.
b. Select the new customer component in the list and choose Import.
4. Assign Namespaces ...
a. Edit the software component version in the Integration Repository (design time), and assign the MDM namespace http://sap.com/xi/CMDM.
b. Activate your changes in the change list.
5. Release Transfer of All Archives for SAP MDM 2.00
For more information about release transfer, see help.sap.com → SAP NetWeaver → SAP Exchange Infrastructure → Design and Configuration Time → Software Logistics → Version Management.
...
a. Display the imported archives for component SAP MDM, version MDM 2.00, namespace http://sap.com/xi/CMDM.
b. In the Integration Repository (design time) of the SAP Exchange Infrastructure, choose Tools → Release Transfer.
c. Specify MDM200 as the source, and your software component version (for example, CUSTXY, 1 of CustXY.com) as the target of the release transfer.
d. Under object selection, select Individual Objects.
e. Specify the objects you want to copy by dragging the imported archives under SAP MDM namespace http://sap.com/xi/CMDM to the display frame.
f. Confirm your entries by choosing Execute.
g. Close the window.

8.11 Configuring XI Mapping
SAP MDM Content Consolidation: Configuration Guide for MDM 2
130 23.08.2004
Result You have created a customer software component with reference to the SAP software component and assigned the SAP namespace. You have also executed a release transfer of the imported archives for component MDM, version SAP MDM 2.00, namespace http://sap.com/xi/CMDM.
8.11 Configuring XI Mapping The settings described here apply to the business scenarios MDM Content Consolidation, MDM Master Data Harmonization, and MDM Central Master Data Management.
This section describes the configuration steps for XI mapping.
8.11.1 Defining an RFC Connection for Reading Data Types from Solution Manager The settings described here apply to the business scenarios MDM Content Consolidation, MDM Master Data Harmonization, and MDM Central Master Data Management.
Use You require the definitions of the ID types for the mapping framework from the Solution Manager at runtime. This information is then buffered in the MDM system. You require an RFC connection to read this information. The following steps describe how to configure it.
Procedure ...
1. Create the RFC connection SOLUTIONMANAGER (type 3) in the MDM system.
2. Define the required information for logging on to the Solution Manager system.
3. Use a user of the type Communication. Assign the role SAP_SOLAR_RO to this user.
Result You set up an RFC connection in the MDM system for reading the ID type definition from the Solution Manager.
8.11.2 Defining Structural Mapping for Master Data Use The settings described here apply to the business scenarios MDM Content Consolidation, MDM Master Data Harmonization, and MDM Central Master Data Management.
Use You map two interfaces to each other structurally (for example, an ALE message with customer data to an MDM business partner and vice versa) using XSL programs. For information on the relevant interface mappings for each object type, see the documentation for the objects (see Master Data Objects [Page 141]).
Within master data management, various interface mappings are delivered for master data objects, such as documents, business partners, products, product structures, technical assets, and change orders. The interface mappings depict these master data objects within R/3 or CRM objects. For information about how to connect these interface mappings, see the respective sections on the objects themselves. Follow the instructions in these chapters for the master data objects relevant for you.

8.11.3 Configuring and Activating Customizing ID Mapping
23.08.2004 131
Background on connecting structural mapping, ID generation, and ID mapping The XSL programs processed in the interface mappings contain calls for ID mapping and ID generation. The following two cases exist: ... ...
• MDC system → MDM system distribution
In the XSL programs for structural mapping delivered by SAP the system queries the ID mapping to determine whether the MDM system already recognizes the object, or to determine which ID of the object the MDM system recognizes. If the system does not recognize the object, it assigns the object a new ID at a later point during the inbound process within the MDM system, and not within the XSL program. This means the message does not contain an initial ID. Furthermore harmonized master data IDs could be used. For more information, see Defining Number Assignment in the MDM Environment [Page 84].
• MDM system → MDC system distribution
In this case as well, the system queries the ID mapping to determine whether the respective MDM recognizes the object, or to determine which ID of the object the MDM system recognizes. If the master data client (MDC) does not recognize the object, an ID is generated. Furthermore harmonized master data IDs could be used. For more information, see Defining Number Assignment in the MDM Environment [Page 84].
8.11.3 Configuring and Activating Customizing ID Mapping The settings described here apply to the business scenarios MDM Content Consolidation, MDM Master Data Harmonization, and MDM Central Master Data Management.
Use When distributing master data in the MDM environment, the Customizing settings of the various connected systems must be made consistent. This is necessary so that objects whose attributes refer to these Customizing settings can be transferred smoothly. These Customizing settings are described below as Customizing IDs.
In master data management, the following options are available for this, and you can choose which to use for each IMG activity.
Customizing Synchronization In this case, the Customizing IDs in the systems connected to the distribution are identical, whereby the data formats of the Customizing tables may differ from each other.
For example:
Credit Card Definition
Client System A MDM system
Visa Visa
MasterCard MasterCard
... ...
Two tools for synchronizing your Customizing settings are offered by the SAP Solution Manager:
• Customizing distribution (initial or delta distribution of Customizing settings)

8.11.3 Configuring and Activating Customizing ID Mapping
SAP MDM Content Consolidation: Configuration Guide for MDM 2
132 23.08.2004
• Customizing Scout (cross-system Customizing comparisons)
For more information about Customizing synchronization, see the SAP Service Marketplace at service.sap.com/customizing → Synchronization of Customizing.
For more information about MDM-relevant Customizing IDs, see Configuring Customizing Distribution [Page 93].
Customizing ID Mapping If you do not want to or cannot run a synchronization for specific Customizing IDs in your system landscape, you use Customizing ID mapping.
For example:
Credit Card Definition
Client System A MDM system
VisaCard Visa
EuroCard MasterCard
... ...
In master data distribution, the Customizing IDs referenced in the object attributes (for example, in client system A) are replaced by the Customizing IDs of the other system (for example, the MDM system) according to predefined rules.
This transformation of the XML message takes place at runtime in the SAP Exchange Infrastructure. The configuration steps that are required in the MDM system, the Solution Manager, and the Integration Directory of the SAP Exchange Infrastructure, are described below.
Prerequisites You have performed the configuration steps described under Prepare Extensions for MDM XI Repository Contents [Page 128].
Procedure ..
1. Configuring Customizing ID Mapping in the MDM System ... ...
a. Define the mapping required in Customizing for Central Settings under Make General Settings for ID Mapping.
b. Under Active mapping object types/interface combinations, choose the source and target objects and their systems, and select Active.
The objects and interfaces to be selected here have been defined by SAP in the IMG activity Make System Settings for ID Mapping and can be added to if required.
For more information about Customizing ID mapping, see the implementation guide (IMG) for the activities named above.
2. Generating and Downloading XSL Programs for Customizing ID Mapping
You must transfer the Customizing entries defined to one or more XLS programs. ...
a. Generate these programs in transaction MDM_GENK for each interface combination and combination of source and target system.
b. From the result screen of generation, download the programs to the local computer by choosing Download XSLT.
...

8.11.4 Configuring and Activating Data Reduction for Master Data
23.08.2004 133
i. Select unconverted.
ii. Assign a file name to each program and make sure that the files have the suffix .XSL.
For more information about generating XSL programs, see the implementation guide (IMG) for the activity named above.
3. Creating an Archive
Compress the files you create to form one or more archive files (file suffix .ZIP or .JAR), using, for example, WinZip®. Object-related grouping of archives may be useful (for example, Business_Partner.zip, or Product.zip).
4. Importing and Activating Archives
The archive files created must be imported into the Integration Repository (design time) and activated.
...
...
a. To do this, select the imported archives in the Integration Repository: CUSTXY → 1 of CustXY.com → http://sap.com/xi/CMDM → Mapping Objects → Imported Archives.
b. Choose New and assign a name and a namespace to your archive.
c. Choose Create.
Make sure that the above namespace is used.
d. On the detail screen for your new archive, choose Imported Archive → Import Archive. Select your archive for upload in the file system. Save your archive.
You should now see your new archive under the Imported Archives node.
e. Activate your archive.
Result You have defined a Customizing ID mapping, generated the necessary XSL programs, loaded it to the Integration Repository of the SAP Exchange Infrastructure as an archive, and activated it The programs in your archive must be assigned to the interface mappings when configuring the interface determinations for outbound interfaces. For more information, see Including Mapping Programs in the Object Distribution [Page 135].
In addition, note that the configuration steps under Configuring Customizing ID Mapping in the Solution Manager [Page 99] must be performed to activate Customizing ID mapping.
8.11.4 Configuring and Activating Data Reduction for Master Data The settings described here apply to the business scenarios MDM Content Consolidation, MDM Master Data Harmonization, and MDM Central Master Data Management.
Use Data reduction allows you to remove unwanted segments of XML messages, in order to optimize system performance or avoid unnecessary complexity in monitoring, for example.
Prerequisites You have performed the configuration steps described under Prepare Extensions for MDM XI Repository Contents [Page 128].

8.11.4 Configuring and Activating Data Reduction for Master Data
SAP MDM Content Consolidation: Configuration Guide for MDM 2
134 23.08.2004
Procedure 5. Defining Unwanted Segments in Customizing
...
a. Define these segments in Customizing for Central Settings under Make Reduction Settings for ID Mapping. Configure the conditions under which this reduction is to be applied. The segments to be reduced are defined using XPath terms.
The language XPath addresses parts of an XML document. For more information, see the W3C recommendation of November 16, 1999, at www.w3.org/TR/1999/REC-xpath-19991116.
For example:
The entry /DEBMAS/E1KNA1M/E1KNBKM[BANKS!='DE'] deletes all /DEBMAS/E1KNA1M/E1KNB1M segments in which the value of field BANKS is not DE.
b. Make sure that you have activated your reduction. To do this, choose Reduction Activation in the above IMG activity.
For more information about data reduction, see the implementation guide (IMG) for the activity named above.
6. Generating and Downloading XSL Programs for Data Reduction
You must transfer the Customizing entries defined to one or more XLS programs. ...
a. Generate these programs in transaction MDM_GENR for each interface combination and combination of source and target system.
b. From the result screen of generation, download the programs to the local computer by choosing Download XSLT.
...
i. Select unconverted.
ii. Assign a file name to each program and make sure that the files have the suffix .XSL.
For more information about generating XSL programs, see the implementation guide (IMG) for the activity named above.
7. Creating an Archive
Compress the files you create to form one or more archive files (file suffix .ZIP or .JAR), using, for example, WinZip®. Object-related grouping of archives may be useful (for example, Business_Partner.zip, or Product.zip).
8. Importing and Activating Archives
The archive files created must be imported into the Integration Repository (design time) and activated.
...
...
a. To do this, select the imported archives in the Integration Repository: CUSTXY → 1 of CustXY.com → http://sap.com/xi/CMDM → Mapping Objects → Imported Archives.
b. Choose New and assign a name and a namespace to your archive.
c. Choose Create.
Make sure that the above namespace is used.

8.11.5 Including Mapping Programs in the Object Distribution
23.08.2004 135
d. On the detail screen for your new archive, choose Imported Archive → Import Archive. Select your archive for upload in the file system. Save your archive.
You should now see your new archive under the Imported Archives node.
e. Activate your archive.
Result You have defined a data reduction, generated the necessary XSL programs, loaded it to the Integration Repository of the SAP Exchange Infrastructure as an archive, and activated it The programs in your archive must be assigned to the interface mappings when configuring the interface determinations for outbound interfaces. For more information, see Including Mapping Programs in the Object Distribution [Page 135].
8.11.5 Including Mapping Programs in the Object Distribution The settings described here apply to the business scenarios MDM Content Consolidation, MDM Master Data Harmonization, and MDM Central Master Data Management.
Use To ensure that the mapping programs (Customizing ID mapping and data reduction) are processed when sending objects, these programs must be included in the object-specific interface mappings of SAP MDM in the Integration Repository (design time) of the SAP Exchange Infrastructure. These interface mappings already contain the structural mapping delivered by SAP.
Prerequisites The following prerequisites must be fulfilled:
• The mapping programs for Customizing ID mapping and data reduction have been successfully generated and activated. For more information, see Configuring and Activating Data Reduction for Master Data [Page 133] and Configuring and Activating Customizing ID Mapping [Page 131].
• You have determined the master data objects that are relevant for you and their interface mappings. For more information about interface mappings with their archives, see Master Data Objects [Page 141] → Configuring XI: ... for the relevant object.
• You have performed the configuration steps described under Prepare Extensions for MDM XI Repository Contents [Page 128].
Procedure ... ...
1. Analyze the SAP interface mapping that you want to extend. ...
a. To do this, call the interface mappings in the Integration Repository. Choose MDM → MDM 200 → http://sap.com/xi/CMDM → Mapping Objects → Interface Mappings.
b. Analyze the interface mapping that you want to extend. You will have to reselect some data in step 2.
c. Make a note of the program name entered for structural mapping. If more than one mapping program is defined, the sequence is also important.
d. Make a note of the inbound and outbound interfaces.
2. Create a new interface mapping each time. ...

8.11.5 Including Mapping Programs in the Object Distribution
SAP MDM Content Consolidation: Configuration Guide for MDM 2
136 23.08.2004
a. In the Integration Repository (design time) of the SAP Exchange Infrastructure, display your software component version (for example, CUSTXY, 1 of CustXY.com) with the namespace http://sap.com/xi/CMDM.
b. Create a new interface mapping. To do this, choose Mapping Objects → Interface-Mappings and choose New from the context menu.
c. Assign a name that starts with the product name of your software component version (for example, CustXYcomNamedesSAPInterface-Mappings).
d. Use the input help to select the inbound and outbound interfaces from step 1 again.
These interfaces have not been copied to your software component version and are therefore under MDM → http://sap.com/xi/CMDM → Message-Interfaces.
e. Assign your XSL programs for Customizing ID mapping and data reduction, and the SAP SXL programs from step 1, to the new interface mapping.
Make sure that you use all XSL programs from your software component version. The sequence of XSL programs is also important.
MDS Object Direction Sequence Description
Change order, product structure, business partner, and document
MDS inbound 1) Customizing ID mapping 2) Structure mapping 3) Data reduction
Change order, product structure, business partner, and document
MDS outbound
1) Customizing ID mapping 2) Structure mapping 3) Data reduction
Product (material) MDS inbound 1) Customizing ID mapping 2) Structure mapping 1 3) Data reduction 4) Structure mapping 2
Data reduction before program MDM20ProductMaterialToProductMain.xsl
Product (material) MDS outbound
1) Structure mapping 1 2) Customizing ID mapping 3) Structure mapping 2 4) Structure mapping 3 5) Data reduction
Customizing ID mapping before program MDM20ProductMaterialToMATMASStep1Main.xsl
Technical asset MDS inbound 1) Customizing ID mapping 2) Structure mapping 1 3) Data reduction 4) Structure mapping 2
Data reduction before program MDM20TechnicalAssetToProductMain.xsl
Technical asset MDS outbound
1) Structure mapping 1 2) Customizing ID mapping 3) Structure mapping 2 4) Structure mapping 3 5) Data reduction
Customizing ID mapping before program MDM20ProductToTechnicalAssetMain.xsl

8.11.6 Deactivate ID Mapping Query Temporarily
23.08.2004 137
f. Save and activate your interface mapping.
Result You have created one or more new interface mappings in your software component version, linking your programs for Customizing ID mapping and data reduction (if defined) to the SAP programs for structure mapping in the correct sequence.
In XI configuration for master data objects, remember to use your new interface mappings instead of the SAP interface mappings shown.
8.11.6 Deactivate ID Mapping Query Temporarily Use The settings described here apply to the business scenarios MDM Content Consolidation, MDM Master Data Harmonization, and MDM Central Master Data Management.
Use You can suppress the reading and writing of ID mapping during distribution. This may be useful in the following situations, for example:
• You want to use an object distribution to test the XI configuration, but the Content Integrator is not yet available.
• You are running an initial load from a newly connected client system whose data cannot yet have ID mapping on the Content Integrator. Queries on ID mapping would therefore lead to unnecessarily long runtimes.
• You are running an initial distribution from a newly connected client system whose data cannot yet have ID mapping on the Content Integrator. Queries on ID mapping would therefore lead to unnecessarily long runtimes.
By changing the calling XLST (eXtensible Stylesheet Language Transformations) programs, you can switch off reading and writing of ID mappings.
Different changes are required to do this for different master data objects. The following documentation uses the example of a product to describe how to switch off reading and writing of ID mappings. For other objects, contact your SAP consultant.
Prerequisites You have performed the configuration steps under Prepare Extensions for MDM XI Repository Contents [Page 128].
Procedure Deactivate ID Mappings When Receiving (MDC R/3 Material – MDM Product) ...
1. Copy the XLST program MDM20MATMASToProductMaterialMain.xsl to a customer-specific name – for example, by using your software component version as a prefix.
2. In this XLST program, change the value of parameter _ProcessingMode.
The _ProcessingMode variable controls the handling of ID mappings. You can use the values yes and no for the attribute searchKeyMapping for this.

8.12 Configuring ALE Middleware in the Client System
SAP MDM Content Consolidation: Configuration Guide for MDM 2
138 23.08.2004
Yes = A query for existing ID mappings runs for the mapping framework.
No = ID mappings are not queried.
You can use parameter _ProcessingMode to control fields MATNR and WERKS of message type MATMAS. The standard settings are:
MATNR searchKeyMapping="yes"
WERKS searchKeyMapping="yes"
3. Instead of the standard mapping program MDM20MATMASToProductMaterialMain.xsl, include your new mapping program in the object distribution.
To do this, follow the instructions under Including Mapping Programs in the Object Distribution [Page 135].
Deactivate ID Mappings When Sending (MDM Product – MDC R/3 Material) ...
1. Copy the XLST program MDM20ProductMaterialToMATMASStep2Main.xsl to a customer-specific name – for example, by using your software component version as a prefix.
2. In this XLST program, change the value of parameter _ProcessingMode.
The _ProcessingMode variable controls the handling of ID mappings. You can use the values yes and no for the attribute searchKeyMapping for this.
Yes = A query for existing ID mappings runs for the mapping framework.
No = ID mappings are not queried.
You can also use the attribute writeKeyMapping.
Yes = A new ID mapping is written.
No = No new ID mapping is written.
You can use parameter _ProcessingMode to control field ProductID. The standard settings are:
ProductID searchKeyMapping="yes"
ProductID writeKeyMapping="yes"
3. Instead of the standard mapping program MDM20ProductMaterialToMATMASStep2Main.xsl, include your new mapping program in the object distribution. To do this, follow the instructions under Including Mapping Programs in the Object Distribution [Page 135].
Result You have temporarily suppressed the reading and/or writing of ID mappings for the applications described above.
8.12 Configuring ALE Middleware in the Client System The configuration steps described here are concerned with ALE communication with a client system. Note that XML message communication is used instead of ALE for some objects, such as ABA business partner.

8.12.1 Sending Master Data Objects to the MDM System with ALE
23.08.2004 139
Use The following settings are necessary to enable message exchange for distribution between the MDM system and the connected client systems. The client system is an R/3 system.
Prerequisites Your client system fulfills the system requirements described in the master guide for Master Data Management. You will find the master guide on the SAP Service Marketplace at service.sap.com/instguides → Installation and Upgrade Guides → SAP MDM.
You have defined an RFC destination for your XI system. For more information, see Connecting Business Systems to the Integration Server Using the IDoc Adapter [Page 127].
8.12.1 Sending Master Data Objects to the MDM System with ALE The settings described here apply to the Business Scenarios MDM Content Consolidation, MDM Master Data Harmonization, and MDM Central Master Data Management.
Use In the client system, the ALE (Application Link Enabling) settings necessary for sending the relevant ALE message types (see table) to the SAP Exchange Infrastructure are defined.
Procedure First, perform the required ALE configuration steps in your client system.
For more information about configuring ALE middleware, see help.sap.com → SAP NetWeaver → SAP Web Application Server → mySAP Technology Components → SAP Web Application Server → Middleware (BC-MID) → Application Link Enabling (BC-MID-ALE). ... ...
1. In transaction SALE, in the Define Logical System area, set up a logical system for each of the following systems:
XI system
MDM system
Client system
Assign the relevant logical system to your client in the client system.
2. In transaction WE21, specify a port of type Transactional RFC for your XI system. Assign the RFC destination to your XI system.
3. In transaction BD64, create a new distribution model.
4. According to your business process, insert the message types required in the distribution model in transaction BD64.
R/3 Object Sender Recipient Message Type
Vendor R/3 client system
XI system CREMAS
Vendor R/3 client system
XI system CREMDM (relevant to initial load)
Customer R/3 client system
XI system DEBMAS

8.12.2 Sending Master Data Objects to the MDM System Periodically with ALE
SAP MDM Content Consolidation: Configuration Guide for MDM 2
140 23.08.2004
Customer R/3 client system
XI system DEBMDM (relevant to initial load)
Material R/3 client system
XI system MATMAS
Purchasing info record
R/3 client system
XI system INFREC
Document R/3 client system
XI system DOCMAS
Bill of material R/3 client system
XI system BOMMAT
Change master R/3 client system
XI system ECMMAS
Material types R/3 client system
XI system MATTYPE
5. According to your business process, insert the BAPIs required in the distribution model in transaction BD64.
R/3 Object Sender Recipient Object Name/Interface
Method
Vendor R/3 client system XI system AddressOrg SaveReplica
Vendor R/3 client system XI system AddressPers SaveReplica
Vendor R/3 client system XI system AddressContPart SaveReplica
Customer R/3 client system XI system AddressOrg SaveReplica
Customer R/3 client system XI system AddressPers SaveReplica
Customer R/3 client system XI system AddressContPart SaveReplica
Functional location
R/3 client system XI system MDM_FuncLoc SAVEREPLICA
Equipment R/3 client system XI system MDM_Equipment SAVEREPLICA
Material groups R/3 client system XI system MaterialGroup SaveReplica
6. Save your changes and generate the partner profile by choosing Environment → Generate partner profiles.
7. In transaction WE20, make any adjustments to the partner profile that are necessary to fulfill the requirements of your business processes. Choose the outbound parameters of the XI system as partners.
Result You have defined the ALE middleware for sending messages as IDocs.
In the client system, the ALE settings necessary for receiving the ALE message types (see table) from the MDM system via the SAP Exchange Infrastructure are defined.
8.12.2 Sending Master Data Objects to the MDM

8.12.2 Sending Master Data Objects to the MDM System Periodically with ALE
23.08.2004 141
System Periodically with ALE The settings described here apply to the business scenarios MDM Content Consolidation, MDM Master Data Harmonization, and MDM Central Master Data Management.
Use The following settings are required to send objects from the client system (in this case an R/3 system) to the MDM system periodically via the SAP Exchange Infrastructure (XI), by using change pointers.
Prerequisites You have configured the ALE middleware for sending messages as IDocs for an R/3 client system (see Sending Master Data Objects to the MDM System with ALE [Page 139]).
Procedure First, perform the required ALE configuration steps in your client system.
In transaction SALE, perform the following steps under Replication of Modified Data. ...
1. Maintain the number range for change pointers.
2. Activate change pointers generally.
3. Activate the change pointer for each message type.
In the MDM context, the following message types are used: ADRMAS, ADR2MAS, ADR3MAS, BOMMAT, CREMAS, DEBMAS, DOCMAS, ECMMAS, MATMAS, MDM_EQUIPMENT_SAVEREPLICA, and MDM_FUNCLOC_SAVEREPLICA. You can activate these according to business process.
4. Schedule the creation of IDocs from change pointers
5. The other steps are optional.
6. For more information about configuring ALE middleware, see help.sap.com → SAP NetWeaver → SAP Web Application Server → mySAP Technology Components → SAP Web Application Server → Middleware (BC-MID) → Application Link Enabling (BC-MID-ALE) and the relevant IMG documentation.
Result You have activated the evaluation of change pointers for an R/3 client system, to create IDocs periodically.
9 Master Data Objects This section describes the configuration steps for master data objects.
9.1 Graphical Overview: Save Master Data Object The following graphic shows what happens in the system when a user saves a master data object:

9.1 Graphical Overview: Save Master Data Object
SAP MDM Content Consolidation: Configuration Guide for MDM 2
142 23.08.2004
Enterprise portalSave the object
Master data engine Exchange infrastructure(XI)
Routing andmapping
SOAP / HTTP
SAP Content Integrator (CI)RFC adapter
ID-mappingservice
RFC
P4 (J2EE)
CI-XI proxy server
SOAP / HTTP
CI adapterstaging
Persistentdata
Load into CI matching framework
ID-mapping service
Master data server (MDS)
MDS database
Object datatable
Object framework(BSP application, business partner)
BW delta queue ID-MappingContent
BW delta queueObject Content
HTTP(S)
RR
R
R R
1
2
3 47
5
6b
6a
R
R
R
R
R
R
RR = Request
SOAP = Simple ObjectAccess Protocol
P4 = Log from J2EE
...
1. A master data user saves a master data object in the MDM portal.
2. The object is written to the MDS database.
3. The BW delta queue is updated with the object information.
4. Using the CI adapter in staging, a proxy message are sent through the XI to the CI for the synchronous duplicate check.
5. The results of the duplicate check are returned synchronously.
6. If identical master records are found in the duplicate check, a new ID mapping is created (a and b).
7. The BW delta queue is updated with information from the ID mapping.

9.2 Graphical Overview: Save Master Data Object (Technical Communication)
23.08.2004 143
9.2 Graphical Overview: Save Master Data Object (Technical Communication) This graphic shows the flow on the system side when a user saves a master data object. The area labeled "opt" describes the optional execution of a synchronous duplicate check. This can be defined in Customizing.
CI MDS XI
ConfirmMatching_Out
StartMatching_OutCreate a CIprocess
Info: Upload of data packets has finished
Create newID mapping
RFCUpdate BW delta queue with ID mappinginformation
…Message sequence identifical to thatof synchronous duplicate check
GetMatchingObjects_OutMatchingof objects
Information about possible duplicates
In case of a determined duplicate: trigger creation of new ID mapping
StartMatching_Out: CI-Prozess ID
opt
Save application object
Update BW delta queue with object information
Update object in MDS database
9.3 Graphical Overview: Synchronous Matching This graphic describes what happens on the system side when a user runs matching during object maintenance.

9.4 Graphical Overview: Process Flow of Synchronous Matching
SAP MDM Content Consolidation: Configuration Guide for MDM 2
144 23.08.2004
Master Data Engine Exchange Infrastructure
(XI)
R Routing andMapping
SOAP/http
Content Integrator (CI)RFC adapter
ID mapping service
RFC
P4 (J2EE)
CI-XI proxy server
SOAP/http
CI adapter staging
Persistentdata
Load to CImatching framework
Master Data Server (MDS)
R
R = Request
SOAP = Simple ObjectAccess Protocol
P4 = Protocol of J2EE
Enterprise Portal(Synchronous)
matching
http(s)
R
R
R
9.4 Graphical Overview: Process Flow of Synchronous Matching This graphic shows the flow of synchronous matching.

9.5 Enterprise Structure
23.08.2004 145
MDS XI CI
GetMatchingObjects_OutTrigger matching
Matching of objectsResult of matching
9.5 Enterprise Structure The settings described here apply to the business scenarios MDM Content Consolidation, MDM Master Data Harmonization, and MDM Central Master Data Management.
The enterprise structure in master data management (SAP MDM) enables you to depict organizational terms you use in your master data client systems within the organizational units in MDM systems. In Release 2.00 the organizational term “plant” from R/3 is used.
Organizational terms are depicted within organizational units in the MDM system. For example, you can assign functions to organizational units in the MDM system, which enable you to depict these terms.
You can also depict organizational terms in non-SAP systems within MDM units.
This configuration guide lists the IMG activities required to use the standard functions, rather than all possible IMG activities.
9.5.1 Assigning Organizational Terms from Client Systems The settings described here apply to the business scenarios MDM Content Consolidation, MDM Master Data Harmonization, and MDM Central Master Data Management.
Use You want to map other organizational terms besides “R/3 plant” in the MDM enterprise structure. This mapping is required for generating ID mappings, which replace the attribute contents of a “message” on the SAP Exchange Infrastructure at runtime.
Defining structure mapping for these terms for MDM organizational units is not a part of the following steps and must occur within the XSL program at the time of structural mapping. The R/3 plant is converted in the structure mapping programs delivered with master data management.
For more information, see Defining Structural Mapping for Master Data [Page 130].
Procedure If necessary, define further organizational terms in your client systems.

9.5.2 Setting Up the Enterprise Structure
SAP MDM Content Consolidation: Configuration Guide for MDM 2
146 23.08.2004
For more information, see the Implementation Guide (IMG) for Master Data Objects under Enterprise Structure.
9.5.2 Setting Up the Enterprise Structure The settings described here apply to the business scenarios MDM Content Consolidation, MDM Master Data Harmonization, and MDM Central Master Data Management.
Use In master data management, the definition of organizational units is a prerequisite if you want to use the following functionality:
• Maintenance of plant-specific data on the product and product structure
• Distribution of objects using organizational units
• Mapping of organizational units between systems when receiving or sending objects
• Contexts in change management
We therefore recommend that you define the organizational units that are relevant to you early on. Organizational units cannot themselves be distributed in SAP MDM 2.00, unlike other MDM master data objects.
Procedure ... ...
1. Define the organizational units that represent your plants, using the SAP Enterprise Portal. You can do this with a user that has the role of master data administrator, for example (com.sap.pct.mdm.MasterDataAdministrator).
To do this, choose Master Data Settings → Enterprise Structure.
2. To enable these organizational units to be used as MDM plants, enter at least one entry on the Organizational Functions tab page of your organizational unit.
Field Field Contents Description
Business System <Business System from SLD>
An MDC system. The F4 help shows you the business systems maintained in the SLD.
Local type of organizational unit
WERKS Term for plant in the standard delivery of SAP MDM
Value For example, 0001 Identifier for this plant in the above business system
3. Make an entry for each business systems that you want to use to exchange plant-specific data.
The table entries beneath your organizational unit control:
Input help
Relevancy to ID mapping
The organizational unit is defined as relevant to ID mapping of the term "plant". In the MDM system, a value table is set up for mapping.

9.5.3 Transporting the Enterprise Structure for ID Mapping
23.08.2004 147
Result You have maintained the organizational units with the corresponding organizational term "plant", and assigned the values belonging to them from the client systems.
9.5.3 Transporting the Enterprise Structure for ID Mapping The settings described here apply to the business scenarios MDM Content Consolidation, MDM Master Data Harmonization, and MDM Central Master Data Management.
Use During the transport of objects out of or into the MDM system, an ID mapping onto organizational terms may occur. For example, plant 0001 of a client system may be translated to plant 1000 in the MDM system. The data is converted at runtime using a mapping table on the SAP Exchange Infrastructure, which is filled or updated in this step.
This step must always be performed when mapping-relevant organizational units are created or changed in the MDM system.
Prerequisites You have maintained the organizational units with mapping data for business system and assigned value, as described under Setting Up the Enterprise Structure [Page 146].
You have defined RFC connection AI_INTEGRATION_SERVER in the MDM system for your SAP Exchange Infrastructure. You must also save this RFC destination as a specific configuration of category RUNTIME. To do this, in transaction SXMB_ADM choose Integration Engine Configuration. See the documentation within the transaction.
For more information, see the SAP Service Marketplace at service.sap.com/instguides → Installation and Upgrade Guides → configuration guide for SAP Exchange Infrastructure 2.0, in the section "Connecting Business Systems with an Integration Engine to the Central Integration Server".
Procedure ...
1. Transfer the mapping table to the SAP Exchange Infrastructure via the SAP Enterprise Portal. You can do this with a user that has the role of master data administrator, for example (com.sap.pct.mdm.MasterDataAdministrator).
To do this, choose Master Data Settings → System Settings → Enterprise Structure → Update XI Mapping for Enterprise Structure.
2. In the Integration Directory (configuration time) of the SAP Exchange Infrastructure, check whether the ID mapping information has been transferred correctly. To do this, choose Tools → Value Mapping.
Result The mapping information has been transferred to the SAP Exchange Infrastructure and can be used at runtime for mapping organizational terms.
9.6 Business Partner The settings described here apply to the business scenarios MDM Content Consolidation, MDM Master Data Harmonization, and MDM Central Master Data Management.
This section describes the configuration steps for the business partner.

9.6.1 Configuring Number Assignment
SAP MDM Content Consolidation: Configuration Guide for MDM 2
148 23.08.2004
It does not list all of the existing IMG activities, but rather those you require to use the standard functions.
9.6.1 Configuring Number Assignment The settings described here apply to the business scenarios MDM Content Consolidation, MDM Master Data Harmonization, and MDM Central Master Data Management.
Use Define how numbers are assigned to business partners in the MDM system. These numbers are assigned in the two situations:
• On central creation of the business partner in the MDM system
• On receipt of a business partner from a client system, if the business partner is not yet known in the MDM system
Group assignment lets you address different number ranges when creating a business partner, according to type.
For more information about identifying objects in the MDM environment, see Defining Number Assignment in the MDM Environment [Page 84]. Define numbers for business partner relationships in addition to the numbers for business partners. These number ranges are a prerequisite for setting up business partner relationships, such as contacts for an organization, and therefore also a prerequisite for the use of workflow-supported scenarios.
Procedure ...
1. Define the number ranges for the business partner in Customizing for the Business Partner under Basic Settings.
For more information, see the Implementation Guide (IMG) for the Business Partner under Define Number Ranges.
2. Define the groupings for the business partner in Customizing for the Business Partner under Basic Settings, and assign these to the number ranges you created. Make sure that the internal standard grouping indicator is set for at least one group.
For more information, see the Implementation Guide (IMG) for the Business Partner under Define Groupings and Assign Number Ranges.
3. Define the number ranges for the business partner relationships in Customizing for the Business Partner Relationship under Basic Settings.
For more information, see the Implementation Guide (IMG) for business partner relationships under Define Number Ranges.
Result You have configured number assignment for business partners and business partner relationships in the MDM system.
9.6.2 Defining Identification Numbers and Tax Number Categories The settings described here apply to the business scenarios MDM Content Consolidation, MDM Master Data Harmonization, and MDM Central Master Data Management.

9.6.3 Importing Bank Master Records
23.08.2004 149
Use Create the ID numbers and tax number categories that you use for master data object business partner. This information can be used at runtime in the Content Integrator for matching. Your business partners can also have this identifying data added to them automatically by the business information provider integration of the MDM system.
Procedure Follow the instructions in Customizing for the Business Partner under Bank Directory. The prerequisites that must be fulfilled and the configuration steps required are under Identification Numbers and Tax Number Categories.
Result You have successfully configured the identification numbers and tax number categories.
9.6.3 Importing Bank Master Records The settings described here apply to the business scenarios MDM Content Consolidation, MDM Master Data Harmonization, and MDM Central Master Data Management.
Use Before you can maintain bank details for the business partner and distribute this data, the bank directory is required in the MDM system. In master data management, you can import this data to the MDM system automatically as follows:
• Distribution from a connected client system using ALE
• Data transfer using file transfer
Procedure Follow the instructions in Customizing for Application-Specific Components under Bank Directory. The prerequisites that must be fulfilled and the configuration steps required are under Distribution of Banks and Bank Directory Data Transfer.
Result You have successfully imported the bank master records for business partner maintenance.
9.6.4 Importing Data in the Regional Structure The settings described here apply to the business scenarios MDM Content Consolidation, MDM Master Data Harmonization, and MDM Central Master Data Management.
Use The regional structure is used to import supporting information for address maintenance to the MDM system (for example, postal codes, cities, and streets).
Prerequisites You have had reference data for your regional structure sent to you by an external supplier.
Procedure Follow the instructions in Customizing for the SAP Web Application Server under Regional Structure/City File.

9.6.5 Defining Event Control for MDM System and Client Systems
SAP MDM Content Consolidation: Configuration Guide for MDM 2
150 23.08.2004
For more information, see the implementation guide (IMG) for the activity named above.
See the documentation of the import report shown, and the SAP Notes specified.
Result You have successfully imported the regional structure/city file.
9.6.5 Defining Event Control for MDM System and Client Systems The settings described here apply to the Business Scenarios MDM Content Consolidation, MDM Master Data Harmonization, and MDM Central Master Data Management.
Use For the master data object business partner, you must configure event control for both master data transfer from a client system and master data distribution to a client system. You use event control to define whether business partner data is sent to the master data server (MDS) immediately (change driven) or deferred (by using a periodic data request). Event control consists of a table where you define which function modules are called on which event. This technique also allows you to integrate customer-specific logic without modifications.
Event control must be defined in the following cases:
• Always in the MDM system, if you want to use the business partner.
• In any client system with which you want to exchange business partners using proxy communication (for example, CRM business partner, R/3 business partner, and SRM business partner).
In a client system of type R/3 with which you only want to exchange R/3 vendors and customers using the IDoc interface, this configuration is not necessary.
Procedure ...
1. In the MDM system, start transaction BUPA_IFC_CALL_FU and copy the SAP delivery Customizing by choosing Utilities → Adjust. The following entries should be available in the MDM system after this:
Event Object Item Function Module Name Call Master Data Management Outbound Processing
Business Partner 1000000 MDM_BUPA_FILL_MAIN_BRUTTO X
Master Data Management Outbound Processing
Business Partner 1500000 MDM_BUP_EI_FILL_BRUTTO X
Master Data Management Outbound Processing
Business Partner 2000000 MDM_BUPA_IMPORT_NET_DATA X
Master Data Management Outbound Processing
Business Partner 3000000 MDM_BUPA_CALL_PROXY X
Master Data Management Outbound Processing
BP relationship 1000000 MDM_BUPR_FILL_REL_BRUTTO X
Master Data Management Outbound Processing
BP relationship 2000000 MDM_BUPR_IMPORT_NET_DATA X
Master Data Management BP relationship 3000000 MDM_BUPR_FILL_CONTACT_PERS X

9.6.5 Defining Event Control for MDM System and Client Systems
23.08.2004 151
Outbound Processing Master Data Management Outbound Processing
BP relationship 4000000 MDM_BUPR_CALL_PROXY X
Mapping Inbound Processing
Business Partner 1000000 BUPA_CONV_EI2BAPI X
Mapping Inbound Processing
Business Partner 2000000 MDM_BUP_CONV_EI2BAPI X
Mapping Inbound Processing
BP relationship 1000000 BUPR_CONV_EI2BAPI X
Object Outbound Processing
Business Partner 1000000 MDM_BUPA_IFC_OUTBOUND X
Object Outbound Processing
BP relationship 1000000 MDM_BUPR_IFC_OUTBOUND X
Mapping Outbound Processing
Business Partner 1000000 BUPA_IFC_FILL_MAIN X
Mapping Outbound Processing
Business Partner 2000000 MDM_BUP_EI_FILL X
Mapping Outbound Processing
BP relationship 1000000 BUPA_IFC_FILL_REL X
2. In every client system with which you want to exchange business partners using proxy communication, start transaction BUPA_IFC_CALL_FU.
Enter the following entries if you want direct (not deferred) sending to the MDM system. Event Object Item Function Module Name Call Master Data Management Outbound Processing
Business Partner 1000000 MDM_BUPA_FILL_MAIN_BRUTTO X
Master Data Management Outbound Processing
Business Partner 2000000 ABA_BUPA_CALL_PROXY X
Master Data Management Outbound Processing
BP relationship 1000000 BUPA_MDM_FILL_REL_BRUTTO X
Master Data Management Outbound Processing
BP relationship 2000000 BUPA_MDM_FILL_CONTACT_PERS X
Master Data Management Outbound Processing
BP relationship 3000000 ABA_BUPR_CALL_PROXY X
Mapping Inbound Processing Business Partner 1000000 BUPR_CONV_EI2BAPI X Mapping Inbound Processing BP relationship 1000000 BUPA_CONV_EI2BAPI X Object Outbound Processing Business Partner 1000000 BUPA_IFC_OUTBOUND X Object Outbound Processing BP relationship 1000000 BUPR_IFC_OUTBOUND X Mapping Outbound Processing
Business Partner 1000000 BUPA_IFC_FILL_MAIN X
Mapping Outbound Processing
BP relationship 1000000 BUPA_IFC_FILL_REL X
Alternatively, enter the following entries if you want deferred sending to the MDM system.
Event Object Item Function Module Name Call Master Data Management Outbound Processing
Business Partner 1000000 BUPA_CREATE_CHANGE_POINTER X

9.6.6 Configuring XI: MDC R/3 Customer – MDM Business Partner
SAP MDM Content Consolidation: Configuration Guide for MDM 2
152 23.08.2004
Master Data Management Outbound Processing
BP relationship 1000000 BUPAR_CREATE_CHANGE_POINTER X
Mapping Inbound Processing Business Partner 1000000 BUPA_CONV_EI2BAPI X Mapping Inbound Processing BP relationship 1000000 BUPAR_CONV_EI2BAPI X Object Outbound Processing Business Partner 1000000 BUPA_IFC_OUTBOUND X Object Outbound Processing BP relationship 1000000 BUPAR_IFC_OUTBOUND X Mapping Outbound Processing
Business Partner 1000000 BUPA_IFC_FILL_MAIN X
Mapping Outbound Processing
BP relationship 1000000 BUPA_IFC_FILL_REL X
Result You have defined event control for business partners in the MDM system and the connected client systems with which you want to exchange business partners using proxy communication.
9.6.6 Configuring XI: MDC R/3 Customer – MDM Business Partner The settings described here apply to the business scenarios MDM Content Consolidation, MDM Master Data Harmonization, and MDM Central Master Data Management.
Use The following settings are required to receive business partners in the MDM system from SAP or non-SAP client systems via the SAP Exchange Infrastructure (XI). Various applications can be connected on a project basis. The following section describes the connection of an R/3 client system for R/3 business object customer.
Overview: MDC R/3 Customer – MDM Business Partner
MDM Interface MDC Interface Interface Mapping Archive
MDMBusinessPartnerIn DEBMAS.DEBMAS06 DebmasDebmas06To MDMBusinesspartner
MDM20_Debmas_ Businesspartner
MDMBusinessPartnerIn ADRMAS.ADRMAS02 AdrmasAdrmas02To MDMBusinesspartner
MDM20_Adr023mas_ Businesspartner
MDMBusinessPartnerIn ADR2MAS.ADR2MAS02 Adr2masAdr2mas02To MDMBusinesspartner
MDM20_Adr023mas_ Businesspartner
MDMBusinessPartnerIn ADR3MAS.ADR3MAS02 Adr3masAdr3mas02To MDMBusinesspartner
MDM20_Adr023mas_ Businesspartner
MDMBusinessPartnerIn DEBMDM.DEBMDM06 DebmdmDEBMDM06To MDMBusinesspartner
MDM20_Debmas_ Businesspartner
Special interface mappings with the suffix _harmonized are supplied for the use of harmonized master data IDs – for example, DebmasDebmas06ToMDMBusinesspartner_harmonized. For more information, see Using Harmonized Master Data IDs [Page 84].
For R/3 4.6x, use the relevant IDoc types (DEBMAS05 and DEBMDM05).

9.6.6 Configuring XI: MDC R/3 Customer – MDM Business Partner
23.08.2004 153
Prerequisites You have successfully configured the management of business partners in the MDM system. In the client system, the ALE (Application Link Enabling) settings necessary for sending ALE message types DEBMAS, ADRMAS, ADR2MAS, ADR3MAS, and DEBMDM to the SAP Exchange Infrastructure are defined.
For more information about configuring ALE middleware, see help.sap.com → SAP NetWeaver → SAP Web Application Server → SAP Web Application Server → Middleware (BC-MID) → Application Link Enabling (BC-MID-ALE).
Procedure In the Integration Directory (configuration time) of the SAP Exchange Infrastructure, define the following settings. ...
1. Define and Complete Business Scenario and Recipient Determination
In the Integration Directory, choose Business Scenarios. Define a new business scenario or add to an existing one, and create recipient determination.
R/3 Customer
Fields Field Contents Description
Sender business system
<source system according to SLD>
Identifier of the source system according to SLD configuration (client system)
Sender interface name
DEBMAS.DEBMAS06 Name of interface
Sender interface namespace
urn:sap-com:document: sap:idoc:messages
SAP Namespace
Recipient <target system according to SLD>
Identifier of the target system according to SLD configuration (MDM system)
R/3 Company Address
Fields Field Contents Description
Sender business system
<source system according to SLD>
Identifier of the source system according to SLD configuration (client system)
Sender interface name
ADRMAS.ADRMAS02 Name of interface
Sender interface namespace
urn:sap-com:document: sap:idoc:messages
SAP Namespace
Recipient <target system according to SLD>
Identifier of the target system according to SLD configuration (MDM system)
R/3 Private Address
Fields Field Contents Description
Sender business <source system according to Identifier of the source system

9.6.6 Configuring XI: MDC R/3 Customer – MDM Business Partner
SAP MDM Content Consolidation: Configuration Guide for MDM 2
154 23.08.2004
system SLD> according to SLD configuration (client system)
Sender interface name
ADR2MAS.ADR2MAS02 Name of interface
Sender interface namespace
urn:sap-com:document: sap:idoc:messages
SAP Namespace
Recipient <target system according to SLD>
Identifier of the target system according to SLD configuration (MDM system)
R/3 Address of Contact Person
Fields Field Contents Description
Sender business system
<source system according to SLD>
Identifier of the source system according to SLD configuration (client system)
Sender interface name
ADR3MAS.ADR3MAS02 Name of interface
Sender interface namespace
urn:sap-com:document: sap:idoc:messages
SAP Namespace
Recipient <target system according to SLD>
Identifier of the target system according to SLD configuration (MDM system)
R/3 Customer (Mass Processing)
Fields Field Contents Description
Sender business system
<source system according to SLD>
Identifier of the source system according to SLD configuration (client system)
Sender interface name
DEBMDM.DEBMDM06 Name of interface
Sender interface namespace
urn:sap-com:document: sap:idoc:messages
SAP Namespace
Recipient <target system according to SLD>
Identifier of the target system according to SLD configuration (MDM system)
For more information about the configuration of interface determination for outbound interfaces, see help.sap.com → SAP NetWeaver → SAP Exchange Infrastructure → Design and Configuration Time → Configuration → Definition of Receiver Determinations.
2. Define an Interface Determination for Outbound Interfaces
In the Integration Directory, choose Interface Determination for Outbound Interface. Define the interface determination.
R/3 Customer

9.6.6 Configuring XI: MDC R/3 Customer – MDM Business Partner
23.08.2004 155
Fields Field Contents Description
Sender business system
<source system according to SLD>
Identifier of the source system according to SLD configuration (client system)
Sender interface name
DEBMAS.DEBMAS06 Name of interface
Sender interface namespace
urn:sap-com:document: sap:idoc:messages
SAP Namespace
Recipient <target system according to SLD>
Identifier of the target system according to SLD configuration (MDM system)
Inbound interface name
MDMBusinessPartnerIn Name of interface
Inbound interface namespace
http://sap.com/xi/CMDM SAP Namespace
Interface mapping: Name
DebmasDebmas06To MDMBusinesspartner
Interface Mapping
Interface mapping: Interface namespace
http://sap.com/xi/CMDM SAP Namespace
R/3 Company Address
Fields Field Contents Description
Sender business system
<source system according to SLD>
Identifier of the source system according to SLD configuration (client system)
Sender interface name
ADRMAS.ADRMAS02 Name of interface
Sender interface namespace
urn:sap-com:document: sap:idoc:messages
SAP Namespace
Recipient <target system according to SLD>
Identifier of the target system according to SLD configuration (MDM system)
Inbound interface name
MDMBusinessPartnerIn Name of interface
Inbound interface namespace
http://sap.com/xi/CMDM SAP Namespace
Interface mapping: Name
AdrmasAdrmas02To MDMBusinesspartner
Interface Mapping
Interface mapping: Interface namespace
http://sap.com/xi/CMDM SAP Namespace
R/3 Private Address
Fields Field Contents Description

9.6.6 Configuring XI: MDC R/3 Customer – MDM Business Partner
SAP MDM Content Consolidation: Configuration Guide for MDM 2
156 23.08.2004
Sender business system
<source system according to SLD>
Identifier of the source system according to SLD configuration (client system)
Sender interface name
ADR2MAS.ADR2MAS02 Name of interface
Sender interface namespace
urn:sap-com:document: sap:idoc:messages
SAP Namespace
Recipient <target system according to SLD>
Identifier of the target system according to SLD configuration (MDM system)
Inbound interface name
MDMBusinessPartnerIn Name of interface
Inbound interface namespace
http://sap.com/xi/CMDM SAP Namespace
Interface mapping: Name
Adr2masAdr2mas02To MDMBusinesspartner
Interface Mapping
Interface mapping: Interface namespace
http://sap.com/xi/CMDM SAP Namespace
R/3 Address of Contact Person
Fields Field Contents Description
Sender business system
<source system according to SLD>
Identifier of the source system according to SLD configuration (client system)
Sender interface name
ADR3MAS.ADR3MAS02 Name of interface
Sender interface namespace
urn:sap-com:document: sap:idoc:messages
SAP Namespace
Recipient <target system according to SLD>
Identifier of the target system according to SLD configuration (MDM system)
Inbound interface name
MDMBusinessPartnerIn Name of interface
Inbound interface namespace
http://sap.com/xi/CMDM SAP Namespace
Interface mapping: Name
Adr3masAdr3mas02To MDMBusinesspartner
Interface Mapping
Interface mapping: Interface namespace
http://sap.com/xi/CMDM SAP Namespace
R/3 Customer (Mass Processing)
Fields Field Contents Description
Sender business system
<source system according to SLD>
Identifier of the source system according to SLD configuration

9.6.6 Configuring XI: MDC R/3 Customer – MDM Business Partner
23.08.2004 157
(client system)
Sender interface name
DEBMDM.DEBMDM06 Name of interface
Sender interface namespace
urn:sap-com:document: sap:idoc:messages
SAP Namespace
Recipient <target system according to SLD>
Identifier of the target system according to SLD configuration (MDM system)
Inbound interface name
MDMBusinessPartnerIn Name of interface
Inbound interface namespace
http://sap.com/xi/CMDM SAP Namespace
Interface mapping: Name
DebmdmDEBMDM06To MDMBusinesspartner
Interface Mapping
Interface mapping: Interface namespace
http://sap.com/xi/CMDM SAP Namespace
For more information about the configuration of interface determination for outbound interfaces, see help.sap.com → SAP NetWeaver → SAP Exchange Infrastructure → Design and Configuration Time → Configuration → Definition of Interface Determinations.
3. Define End Points for Target System
If the end point is an Integration Engine, note that these can always be addressed with either URL or HTTP addressing. For security reasons, use the address type HTTP destination. Address type HTTP destination requires the definition of an RFC destination of type H in transaction SM59 in the Integration Server.
For more information about the use of non-Unicode systems in the MDM environment, see Connecting Non-Unicode Systems [Page 82].
In the Integration Directory (configuration time), choose Receiver System End Points. Define an end point for the MDM system in your system landscape.
Fields Field Contents Description
Business System <target system according to SLD>
Identifier of the target system according to SLD configuration (MDM system)
Interface Name MDMBusinessPartnerIn Name of interface
Interface Namespace http://sap.com/xi/CMDM SAP Namespace
End point type Integration Engine Depending on the end point type, different attributes must be defined.
Also save the necessary addressing information.

9.6.7 Configuring XI: MDC R/3 Vendor – MDM Business Partner
SAP MDM Content Consolidation: Configuration Guide for MDM 2
158 23.08.2004
For more information about the configuration of end points, see help.sap.com → SAP NetWeaver → SAP Exchange Infrastructure → Design and Configuration Time → Configuration → Defining End Points.
4. Define Logon Data for Target System
Depending on the end point type and address type, you can define logon data for the target system.
Note that the logon data must be defined in the assigned RFC destination if the end point is an IDoc adapter.
For more information about the configuration of logon parameters, see help.sap.com → SAP NetWeaver → SAP Exchange Infrastructure → Design and Configuration Time → Configuration → Defining Logon Data.
Result The SAP Exchange Infrastructure is configured for the receiving of business partners from an R/3 client system (R/3 business object customer) in the MDM system.
9.6.7 Configuring XI: MDC R/3 Vendor – MDM Business Partner The settings described here apply to the business scenarios MDM Content Consolidation, MDM Master Data Harmonization, and MDM Central Master Data Management.
Use The following settings are required to receive business partners in the MDM system from SAP or non-SAP client systems via the SAP Exchange Infrastructure. Various applications can be connected on a project basis. The following section describes the connection of an R/3 client system for R/3 business object vendor.
Overview: MDC R/3 Vendor – MDM Business Partner
MDM Interface MDC Interface Interface Mapping Archive
MDMBusinessPartnerIn CREMAS.CREMAS04 CremasCremas04To MDMBusinesspartner
MDM20_Cremas _Businesspartner
MDMBusinessPartnerIn ADRMAS.ADRMAS02 AdrmasAdrmas02To MDMBusinesspartner
MDM20_Adr023mas _Businesspartner
MDMBusinessPartnerIn CREMDM.CREMDM04 CremdmCremdm04To MDMBusinesspartner
MDM20_Cremas _Businesspartner
Special interface mappings with the suffix _harmonized are supplied for the use of harmonized master data IDs – for example, DebmasDebmas06ToMDMBusinesspartner_harmonized. For more information, see Using Harmonized Master Data IDs [Page 84].
For R/3 4.6x, use the relevant IDoc types (CREMAS03 and CREMDM03).

9.6.7 Configuring XI: MDC R/3 Vendor – MDM Business Partner
23.08.2004 159
Prerequisites You have successfully configured the management of business partners in the MDM system. In the client system, the ALE settings necessary for sending ALE message types CREMAS, ADRMAS, and CREMDM to the SAP Exchange Infrastructure have been defined.
For more information about configuring ALE middleware, see help.sap.com → SAP NetWeaver → SAP Web Application Server → SAP Web Application Server → Middleware (BC-MID) → Application Link Enabling (BC-MID-ALE).
Procedure In the Integration Directory (configuration time) of the SAP Exchange Infrastructure, define the following settings. ...
1. Define and Complete Business Scenario and Recipient Determination
In the Integration Directory, choose Business Scenarios. Define a new business scenario or add to an existing one, and create recipient determination.
R/3 Vendor
Field Field Contents Description
Sender business system
<source system according to SLD>
Identifier of the source system according to SLD configuration (client system)
Sender interface name
CREMAS.CREMAS04 Name of interface
Sender interface namespace
urn:sap-com:document: sap:idoc:messages
SAP Namespace
Recipient <target system according to SLD>
Identifier of the target system according to SLD configuration (MDM system)
R/3 Company Address
Field Field Contents Description
Sender business system
<source system according to SLD>
Identifier of the source system according to SLD configuration (client system)
Sender interface name
ADRMAS.ADRMAS02 Name of interface
Sender interface namespace
urn:sap-com:document: sap:idoc:messages
SAP Namespace
Recipient <target system according to SLD>
Identifier of the target system according to SLD configuration (MDM system)
R/3 Vendor (Mass Processing)
Field Field Contents Description
Sender business <source system according to Identifier of the source system according to SLD configuration

9.6.7 Configuring XI: MDC R/3 Vendor – MDM Business Partner
SAP MDM Content Consolidation: Configuration Guide for MDM 2
160 23.08.2004
system SLD> (client system)
Sender interface name
CREMDM.CREMDM04 Name of interface
Sender interface namespace
urn:sap-com:document: sap:idoc:messages
SAP Namespace
Recipient <target system according to SLD>
Identifier of the target system according to SLD configuration (MDM system)
For more information about the configuration of interface determination for outbound interfaces, see help.sap.com → SAP NetWeaver → SAP Exchange Infrastructure → Design and Configuration Time → Configuration → Definition of Receiver Determinations.
2. Define an Interface Determination for Outbound Interfaces
In the Integration Directory, choose Interface Determination for Outbound Interface. Define the interface determination.
R/3 Vendor
Field Field Contents Description
Sender business system
<source system according to SLD>
Identifier of the source system according to SLD configuration (client system)
Sender interface name
CREMAS.CREMAS04 Name of interface
Sender interface namespace
urn:sap-com:document: sap:idoc:messages
SAP Namespace
Recipient <target system according to SLD>
Identifier of the target system according to SLD configuration (MDM system)
Inbound interface name
MDMBusinessPartnerIn Name of interface
Inbound interface namespace
http://sap.com/xi/CMDM SAP Namespace
Interface mapping: Name
CremasCremas04To MDMBusinesspartner
Interface Mapping
Interface mapping: Interface namespace
http://sap.com/xi/CMDM SAP Namespace
R/3 Company Address
Field Field Contents Description
Sender business system
<source system according to SLD>
Identifier of the source system according to SLD configuration (client system)
Sender interface name
ADRMAS.ADRMAS02 Name of interface

9.6.7 Configuring XI: MDC R/3 Vendor – MDM Business Partner
23.08.2004 161
Sender interface namespace
urn:sap-com:document: sap:idoc:messages
SAP Namespace
Recipient <target system according to SLD>
Identifier of the target system according to SLD configuration (MDM system)
Inbound interface name
MDMBusinessPartnerIn Name of interface
Inbound interface namespace
http://sap.com/xi/CMDM SAP Namespace
Interface mapping: Name
AdrmasAdrmas02To MDMBusinesspartner
Interface Mapping
Interface mapping: Interface namespace
http://sap.com/xi/CMDM SAP Namespace
R/3 Vendor (Mass Processing)
Field Field Contents Description
Sender business system
<source system according to SLD>
Identifier of the source system according to SLD configuration (client system)
Sender interface name
CREMDM.CREMDM04 Name of interface
Sender interface namespace
urn:sap-com:document: sap:idoc:messages
SAP Namespace
Recipient <target system according to SLD>
Identifier of the target system according to SLD configuration (MDM system)
Inbound interface name
MDMBusinessPartnerIn Name of interface
Inbound interface namespace
http://sap.com/xi/CMDM SAP Namespace
Interface mapping: Name
CremdmCremdm04To MDMBusinesspartner
Interface Mapping
Interface mapping: Interface namespace
http://sap.com/xi/CMDM SAP Namespace
For more information about the configuration of interface determination for outbound interfaces, see help.sap.com → SAP NetWeaver → SAP Exchange Infrastructure → Design and Configuration Time → Configuration → Definition of Interface Determinations.
3. Define End Points for Target System
If the end point is an Integration Engine, note that these can always be addressed with either URL or HTTP addressing. For security reasons, use the address type HTTP destination. Address type HTTP destination requires the

9.6.8 Configuring XI: MDC ABA Business Partner – MDM Business Partner
SAP MDM Content Consolidation: Configuration Guide for MDM 2
162 23.08.2004
definition of an RFC destination of type H in transaction SM59 in the Integration Server.
For more information about the use of non-Unicode systems in the MDM environment, see Connecting Non-Unicode Systems [Page 82].
In the Integration Directory (configuration time), choose End Points for Receiver System. Define an end point for the MDM system in your system landscape.
Field Field Contents Description
Business System <target system according to SLD>
Identifier of the target system according to SLD configuration (MDM system)
Interface Name MDMBusinessPartnerIn Name of interface
Interface Namespace http://sap.com/xi/CMDM SAP Namespace
End point type Integration Engine Depending on the end point type, different attributes must be defined.
Also save the necessary addressing information.
For more information about the configuration of end points, see help.sap.com → SAP NetWeaver → SAP Exchange Infrastructure → Design and Configuration Time → Configuration → Defining End Points.
4. Define Logon Data for Target System
Depending on the end point type and address type, you can define logon data for the target system.
Note that the logon data must be defined in the assigned RFC destination if the end point is an IDoc adapter.
For more information about the configuration of logon parameters, see help.sap.com → SAP NetWeaver → SAP Exchange Infrastructure → Design and Configuration Time → Configuration → Defining Logon Data.
Result The SAP Exchange Infrastructure is configured for the receiving of business partners from an R/3 client system (R/3 business object vendor) in the MDM system.
9.6.8 Configuring XI: MDC ABA Business Partner – MDM Business Partner The settings described here apply to the business scenarios MDM Content Consolidation, MDM Master Data Harmonization, and MDM Central Master Data Management.
Use The following settings are required to receive business partners in the MDM system from SAP or non-SAP client systems via the SAP Exchange Infrastructure. Various applications can be connected on a project basis. The following section describes the connection of a client system (for example, R/3, CRM, or SRM) for the generic part of business object business partner. This general part is part of the application basis (ABA). If the client system
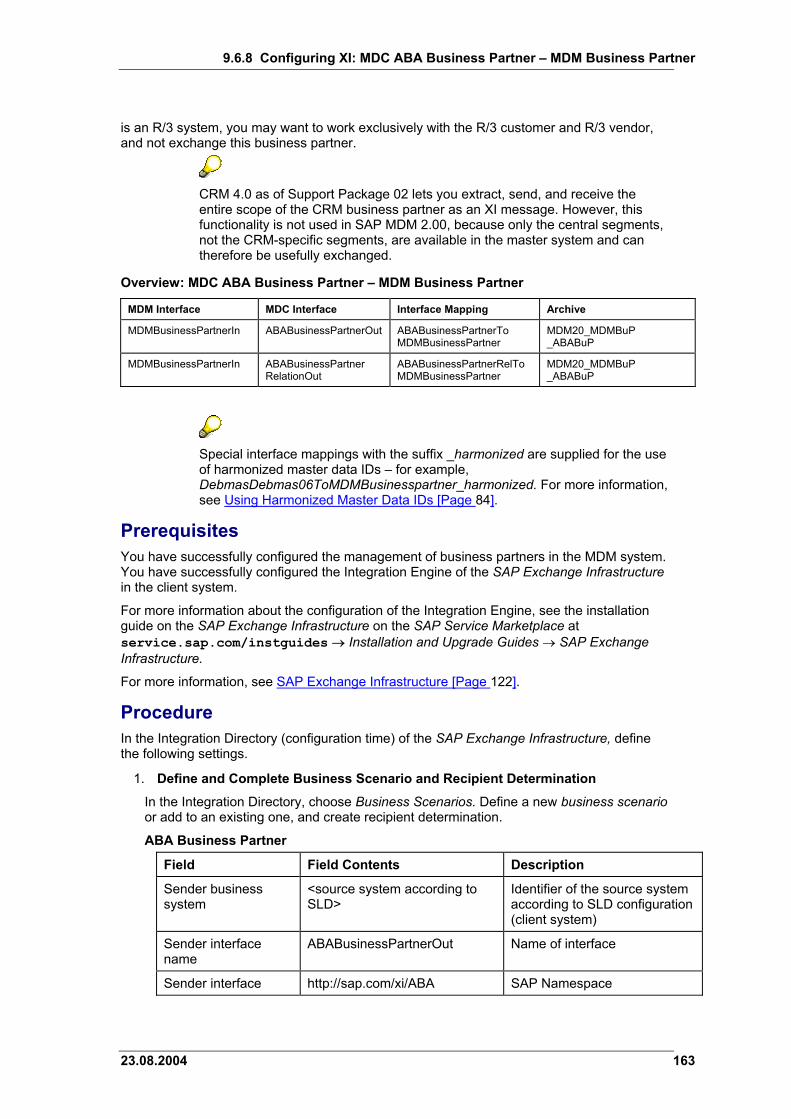
9.6.8 Configuring XI: MDC ABA Business Partner – MDM Business Partner
23.08.2004 163
is an R/3 system, you may want to work exclusively with the R/3 customer and R/3 vendor, and not exchange this business partner.
CRM 4.0 as of Support Package 02 lets you extract, send, and receive the entire scope of the CRM business partner as an XI message. However, this functionality is not used in SAP MDM 2.00, because only the central segments, not the CRM-specific segments, are available in the master system and can therefore be usefully exchanged.
Overview: MDC ABA Business Partner – MDM Business Partner
MDM Interface MDC Interface Interface Mapping Archive
MDMBusinessPartnerIn ABABusinessPartnerOut ABABusinessPartnerTo MDMBusinessPartner
MDM20_MDMBuP _ABABuP
MDMBusinessPartnerIn ABABusinessPartner RelationOut
ABABusinessPartnerRelTo MDMBusinessPartner
MDM20_MDMBuP _ABABuP
Special interface mappings with the suffix _harmonized are supplied for the use of harmonized master data IDs – for example, DebmasDebmas06ToMDMBusinesspartner_harmonized. For more information, see Using Harmonized Master Data IDs [Page 84].
Prerequisites You have successfully configured the management of business partners in the MDM system. You have successfully configured the Integration Engine of the SAP Exchange Infrastructure in the client system.
For more information about the configuration of the Integration Engine, see the installation guide on the SAP Exchange Infrastructure on the SAP Service Marketplace at service.sap.com/instguides → Installation and Upgrade Guides → SAP Exchange Infrastructure.
For more information, see SAP Exchange Infrastructure [Page 122].
Procedure In the Integration Directory (configuration time) of the SAP Exchange Infrastructure, define the following settings. ...
1. Define and Complete Business Scenario and Recipient Determination
In the Integration Directory, choose Business Scenarios. Define a new business scenario or add to an existing one, and create recipient determination.
ABA Business Partner
Field Field Contents Description
Sender business system
<source system according to SLD>
Identifier of the source system according to SLD configuration (client system)
Sender interface name
ABABusinessPartnerOut Name of interface
Sender interface http://sap.com/xi/ABA SAP Namespace

9.6.8 Configuring XI: MDC ABA Business Partner – MDM Business Partner
SAP MDM Content Consolidation: Configuration Guide for MDM 2
164 23.08.2004
namespace
Recipient <target system according to SLD>
Identifier of the target system according to SLD configuration (MDM system)
ABA Business Partner Relationship
Field Field Contents Description
Sender business system
<source system according to SLD>
Identifier of the source system according to SLD configuration (client system)
Sender interface name
ABABusinessPartner RelationOut
Name of interface
Sender interface namespace
http://sap.com/xi/ABA SAP Namespace
Recipient <target system according to SLD>
Identifier of the target system according to SLD configuration (MDM system)
For more information about the configuration of interface determination for outbound interfaces, see help.sap.com → SAP NetWeaver → SAP Exchange Infrastructure → Design and Configuration Time → Configuration → Definition of Receiver Determinations.
2. Define an Interface Determination for Outbound Interfaces
In the Integration Directory, choose Interface Determination for Outbound Interface. Define the interface determination.
ABA Business Partner
Field Field Contents Description
Sender business system
<source system according to SLD>
Identifier of the source system according to SLD configuration (client system)
Sender interface name
ABABusinessPartnerOut Name of interface
Sender interface namespace
http://sap.com/xi/ABA SAP Namespace
Recipient <target system according to SLD>
Identifier of the target system according to SLD configuration (MDM system)
Inbound interface name
MDMBusinessPartnerIn Name of interface
Inbound interface namespace
http://sap.com/xi/CMDM SAP Namespace
Interface mapping: Name
ABABusinessPartnerTo MDMBusinessPartner
Interface Mapping
Interface mapping: Interface namespace
http://sap.com/xi/CMDM SAP Namespace

9.6.8 Configuring XI: MDC ABA Business Partner – MDM Business Partner
23.08.2004 165
ABA Business Partner Relationship
Field Field Contents Description
Sender business system
<source system according to SLD>
Identifier of the source system according to SLD configuration (client system)
Sender interface name
ABABusinessPartner RelationOut
Name of interface
Sender interface namespace
http://sap.com/xi/ABA SAP Namespace
Recipient <target system according to SLD>
Identifier of the target system according to SLD configuration (MDM system)
Inbound interface name
MDMBusinessPartnerIn Name of interface
Inbound interface namespace
http://sap.com/xi/CMDM SAP Namespace
Interface mapping: Name
ABABusinessPartner RelToMDMBusinessPartner
Interface Mapping
Interface mapping: Interface namespace
http://sap.com/xi/CMDM SAP Namespace
For more information about the configuration of interface determination for outbound interfaces, see help.sap.com → SAP NetWeaver → SAP Exchange Infrastructure → Design and Configuration Time → Configuration → Definition of Interface Determinations.
3. Define End Points for Target System
If the end point is an Integration Engine, note that these can always be addressed with either URL or HTTP addressing. For security reasons, use the address type HTTP destination. Address type HTTP destination requires the definition of an RFC destination of type H in transaction SM59 in the Integration Server.
For more information about the use of non-Unicode systems in the MDM environment, see Connecting Non-Unicode Systems [Page 82].
In the Integration Directory (configuration time), choose End Points for Receiver System. Define an end point for the MDM system in your system landscape.
Field Field Contents Description
Business System <target system according to SLD>
Identifier of the target system according to SLD configuration (MDM system)
Interface Name MDMBusinessPartnerIn Name of interface
Interface Namespace http://sap.com/xi/CMDM SAP Namespace
End point type Integration Engine Depending on the end point type, different attributes must

9.7 Products
SAP MDM Content Consolidation: Configuration Guide for MDM 2
166 23.08.2004
be defined.
Also save the necessary addressing information.
For more information about the configuration of end points, see help.sap.com → SAP NetWeaver → SAP Exchange Infrastructure → Design and Configuration Time → Configuration → Defining End Points.
4. Define Logon Data for Target System
Depending on the end point type and address type, you can define logon data for the target system.
Note that the logon data must be defined in the assigned RFC destination if the end point is an IDoc adapter.
For more information about the configuration of logon parameters, see help.sap.com → SAP NetWeaver → SAP Exchange Infrastructure → Design and Configuration Time → Configuration → Defining Logon Data.
Result The SAP Exchange Infrastructure is configured for the receiving of business partners (general part of business object business partner) from a client system, for example of type R/3, CRM, or SRM in the MDM system.
9.7 Products The settings described here apply to the business scenarios MDM Content Consolidation, MDM Master Data Harmonization, and MDM Central Master Data Management.
This section describes the configuration steps for products.
It does not list all of the existing IMG activities, but rather those you require to use the standard functions.
9.7.1 Converting Attributes and Set Types The settings described here apply to the Business Scenarios MDM Content Consolidation, MDM Master Data Harmonization, and MDM Central Master Data Management.
Use For technical reasons you must run the following report before you can create products (materials and technical assets) in the MDM system.
Procedure Execute report COM_SETTYPE_ATTRIBUTE_40 in transaction SA38.
9.7.2 Defining Attributes and Set Types The settings described here apply to the Business Scenarios MDM Content Consolidation, MDM Master Data Harmonization, and MDM Central Master Data Management.

9.7.3 Generating a Base Hierarchy
23.08.2004 167
Use You must define the data model for products (materials and technical assets(in your implementation project and implement them in any extensions to the SAP delivery you may have. The data model is defined using hierarchies, categories, set types, and their attributes. This documentation describes how to check SAP set types and create your own, if required.
If at all possible, set up the set types and attributes before generating staging tables. For more information, see Generation of Staging Tables [Page 226].
For more information about generating hierarchies and categories, see Generating a Base Hierarchy [Page 167], Generating Product Categories from Material Types [Page 170], and Generating Product Categories from Material Groups [Page 173].
Procedure ...
1. In transaction COMM_ATTRSET, check the set types with the prefix MDM that are delivered by SAP, and their attributes for products (materials and technical assets).
See also the information under Generating a Base Hierarchy [Page 167] and Generating Product Categories from Material Types [Page 170], because some set types can be automatically assigned to categories.
2. If required, create new attributes and set types in transaction COMM_ATTRSET.
For more information about set types and attributes, see help.sap.com → SAP Cross-Industry Solutions → SAP Customer Relationship Mgmt. → Master Data → Products → Product Maintenance → Set Types in Product Maintenance.
Result You have checked set types and attributes and created any new ones you require. These set types must be assigned to categories, so that they can be used in product maintenance. This procedure is shown in the following sections.
9.7.3 Generating a Base Hierarchy The settings described here apply to the Business Scenarios MDM Content Consolidation, MDM Master Data Harmonization, and MDM Central Master Data Management.
Use The data model for products consists of set types, hierarchies, and categories. For more information on setting up the set types delivered with SAP MDM, see Defining Attributes and Set Types [Page 166]. These set types are assigned to categories, which are organized in hierarchies.
You can assign any number of set types to a product category. In product maintenance, these set types and their attributes can be shown in screen areas.
Product categories are arranged in category hierarchies. There can be several of these. All subordinate categories inherit the product type and the set types of the category above them. You can assign additional set types to the subordinate categories.
A set type can be assigned to several product categories in a category hierarchy. However, you can assign each set type within one hierarchy only. This prevents multiple assignment of a set type to one and the same product (via different categories).

9.7.3 Generating a Base Hierarchy
SAP MDM Content Consolidation: Configuration Guide for MDM 2
168 23.08.2004
A product can be assigned to several categories, provided that these are in different category hierarchies. In other words, in any one hierarchy a product can be assigned to one category only.
In master data management, all categories for products of type material and technical asset must be assigned to product type material. In addition, object family 0402 (technical asset) is assigned to the categories for technical assets.
For more information about categories and category hierarchies, see help.sap.com → SAP Cross-Industry Solutions → SAP Customer Relationship Mgmt. → Master Data → Products → Product Categories and Category Hierarchies.
If you create products (materials and technical assets), you must create categories.
In the MDM system, report MDM_PRD_BASEHIERARCHY_CREATE is delivered, which creates the hierarchy MDM_BASE with the description MDM Base Hierarchy. This hierarchy is assigned to application 03, which makes it the base hierarchy.
Also, the following categories are created and assigned to hierarchy MDM_BASE:
Hierarchy Category
MDM_BASE MDM base category
MDM_PRODUCT MDM products
MDM_MATERIAL MDM materials
MDM_TECH_ASSET MDM technical assets
MDM_TECH_ASSET_C
MDM technical assets – general
MDM_TECH_ASSET_R3
MDM technical assets – R/3 specific
Set types predefined by SAP are assigned to the categories below MDM_PRODUCT. This means that these set types are inherited by the categories below it in the hierarchy.
Set Types for Category MDM_MATERIAL
Set Type Description View
COMM_PR_GTIN Global Trade Item Number (GTIN) BASIC
COMM_PR_SHTEXT Descriptions BASIC
COMM_PR_UNIT Units of measure BASIC
COMM_PR_LGTEXT1 Texts BASIC
Set Types for Category MDM_TECH_ASSET
Set Type Description View
COMM_PR_LGTEXT1 Texts BASIC
COMM_PR_SHTEXT Descriptions BASIC
Set Types for Category MDM_TECH_ASSET_C

9.7.3 Generating a Base Hierarchy
23.08.2004 169
Set Type Description View
COMM_PR_UNIT Units of measure BASIC
COM_TA_MANUFAC Manufacturer information MDM_IDENT
Set Types for Category MDM_TECH_ASSET_R3
Set Type Description View
MDM_R3_SORT Sort criteria MDM_SORT
COM_TA_R3_ID R/3 identification MDM_IDENT
MDM_R3_EXECUT Execution MDM_ORG
MDM_R3_LOCAT Location data MDM_LOCAT
The With Change Management indicator is not set.
After creating the MDM_BASE hierarchy or uploading the material types to the MDS, you must run transaction COMMPR_PCUI. This creates the necessary blueprint entries for the PC UI, so that the assigned set types can be displayed and maintained on the user interface. After the transaction has run, it may take a moment before the application server buffers are refreshed and the changes become effective. Run /$sync if required.
Prerequisites You have checked the set types delivered for master data management and defined any new set types you require, in order to assign them to your categories.
You have copied the standard settings for the following activities in the SAP Reference IMG from client 000:
• Master Data Exchange → Central Settings → Object Types → Define Object Types of Master Data Server
• Master Data Objects → Products → Further Settings → Define Text Groups
Procedure ...
1. Check the above results of the report.
If you want to change the descriptions of categories or the assignment of set types, you can copy the report to a customer namespace and modify it.
2. Start report MDM_PRD_BASEHIERARCHY_CREATE in transaction SA38.
Note that when you execute this report, the descriptions are maintained in all delivered languages.
3. Call the SAP Enterprise Portal with a user that has the role Master Data Manager (com.sap.pct.mdm.MasterDataManager). Choose Products → Overview → Edit Categories and Hierarchies and perform the following steps.
a. Check whether the categories and set type assignments above have been created successfully.
b. Make any changes you require to descriptions or set type assignments.

9.7.4 SP05ff: Generating Product Categories from Material Types
SAP MDM Content Consolidation: Configuration Guide for MDM 2
170 23.08.2004
c. If required, change the indicators for change management.
4. To display the set data in the SAP Enterprise Portal up to and including CRM Support Package 02, the generation of field groups is required in transaction CRMC_BLUEPRINT.
...
a. Choose Layout Generation.
b. Enter the set type with placeholders (for example *MY_SETTYPE*), deactivate the Check Fieldgroups Only indicator, and execute the report.
Result You have created the base hierarchy and the basic MDM product categories by using a report, and postprocessed them if required. SAP set types have been automatically assigned to your categories.
9.7.4 SP05ff: Generating Product Categories from Material Types The settings described here apply to the Business Scenarios MDM Content Consolidation, MDM Master Data Harmonization, and MDM Central Master Data Management.
Use You have the option of generating additional product categories from the material types of one of your R/3 client systems. If material types are imported from an R/3 system, category MDM_MATERIAL_TYPES is created under category MDM_MATERIAL. Under this, a category is then created for each imported material type, using the naming convention MATTYPE_XXXX. XXXX is the material type (for example, FERT).
For each material type sent, the system tries to find an ID mapping for a product category (matching process IdCat). Depending on this, the procedure continues as follows:
• If an ID mapping for a product category exists, its MDS identification (with the product category GUID) is inserted in the XI message.
• If no ID mapping for a product category exists, an appropriate MDS identification (with the material type or material group) is inserted in the XI message.
You can set the external ID of the related product category on the MDS in Business Add-In (BAdI) MDM_PRD_MDS_CATEGORY.
In the default implementation of the BAdI, the product category IDs have the following structure:
MDC material type: XXXXXX → product category: MATTYPE_XXXXXX
Material types loaded from different MDCs that have the same key are therefore mapped to the same product category (harmonized MDCs). This means that material type FERT of MDC1 is mapped to product category MATTYPE_FERT on the MDS. Material type FERT from MDC2 is also mapped to MATTYPE_FERT.
If your MDCs are not harmonized, you must make the external IDs assigned in the BAdI dependent on the MDC, so that different MDC objects can be assigned to different product categories. For example:
Material type FERT from MDC1 to product category MATTYPE_MDC1_FERT
Material type FERT from MDC2 to product category MATTYPE_MDC2_FERT
You can merge any identical MDC objects into the same product category later, by using manual ID mapping maintenance.

9.7.4 SP05ff: Generating Product Categories from Material Types
23.08.2004 171
• External IDs transferred with the object from an external system are retained.
• If no ID mapping between a material type and a product category exists yet, an ID mapping is created in vector form (for matching process IdCat). The mapping is created for the MDS in the direction MDC → MDS.
• This is also the case if a product category already exists. The delivered object types are:
Product category
Technical object type: PRDCAT
Object type in MDS: PRDCAT
Material type
Technical object type: MATTYPE
Object type in MDC: MATTYPE
The MDM set types are assigned to the categories according to the allowed views for the R/3 material type. For example, sales data could be assigned to category MATTYPE_FERT but not to category MATTYPE_ROH.
The set types that are assigned to all categories based on material types (for example, MDM_MARA_COMM) are assigned to category MDM_MATERIAL_TYPES and inherited by all categories.
Set Types for Category MDM_MATERIAL_TYPES
Set Type Description View
MDM_MARA_ENV Environment MDM_ENV_SAL_DIS
MDM_MARA_COMM General data MDM_BASIC_ECM
MDM_MARA_XCHPF Batch management requirement
MDM_BASIC_ECM
MDM_MARC_COMM General data MDM_BASIC_PLANT
MDM_MARC_XCHPF Batch management requirement
MDM_BASIC_PLANT
Depending on the possible views in Customizing for the Material Master (in the R/3 client system), the following set types are assigned to the MATTYPE_XXXX categories under Define Attributes of Material Types:
Set Type Description View If R/3 User Department
MDM_MARA_PUR Purchasing MDM_ENV_SAL_DIS Purchasing
MDM_MARA_SD Sales MDM_ENV_SAL_DIS Sales
MDM_MARC_SD Shipping MDM_SHIPPING Sales
MDM_MARC_FT Foreign trade MDM_FOREIGN_TRAD
Purchasing, sales
MDM_MARC_FT_LC Foreign trade, export licenses
MDM_FOREIGN_TRAD
Purchasing, sales
MDM_MARC_FT_OR Foreign trade, origin, marketing
MDM_FOREIGN_TRAD
Purchasing, sales

9.7.4 SP05ff: Generating Product Categories from Material Types
SAP MDM Content Consolidation: Configuration Guide for MDM 2
172 23.08.2004
regulations
MDM_MARC_PUR Purchasing MDM_PURCHASE Purchasing, sales, MRP, quality management
If you want to create the categories for your material types in your own hierarchy, not in MDM_BASE, you can change XSL program MDM20MATTYPEToProductCategoryHierarchyCategory.xsl in archive MattypeW_wgrpInfrec_CateghierarchProdrel.
For more information, see the comments in the program. However, in this case you also need to change the XSL programs for structural mapping when sending objects that are R/3 materials to the MDM-System, because an assignment to the MATTYPE_XXX categories in hierarchy MDM_BASE is made here. You will find the affected interface mappings under Configuring XI: MDC R/3 Material Types to MDM Product Categories [Page 179].
After creating the MDM_BASE hierarchy or uploading the material types to the MDS, you must run transaction COMMPR_PCUI. This creates the necessary blueprint entries for the PC UI, so that the assigned set types can be displayed and maintained on the user interface. After the transaction has run, it may take a moment before the application server buffers are refreshed and the changes become effective. Run /$sync if required.
Prerequisites If you want to use the material types in one of your R/3 client systems to infer MDM product categories, the required XI settings and process chain definition for extraction of material types must be defined. For more information about these steps, see Configuring XI: MDC R/3 Material Types to MDM Product Categories [Page 179] and Process Control and Monitoring for Master Data Exchange [Page 222].
If MDCs are not harmonized, SAP recommends that you set the NoProductsAssignableIndicator=true indicator in XSLT mapping for the product categories that correspond to material types and need to be consolidated. This prevents users from assigning products to product categories that are not yet consolidated, by mistake. After consolidation, you delete any superfluous product categories and set the Product/Object Assignments indicator.
Procedure ...
1. Call the import of material types and simultaneous setting up of categories. To do this, call the SAP Enterprise Portal with a user that has the role Master Data Manager (com.sap.pct.mdm.MasterDataManager).
...
2. Choose Process Control → Process Chain.
3. Start a process chain for material type extraction.
For more information about the definition of process chains, see Process Control and Monitoring for Master Data Exchange [Page 222].
The extraction step remains yellow, never green, because product categories are saved directly, not written to staging. There is no success message for the process step.

9.7.5 SP05ff: Generating Product Categories from Material Groups
23.08.2004 173
4. Call the SAP Enterprise Portal with a user that has the role Master Data Manager (com.sap.pct.mdm.MasterDataManager). Choose Products → Overview → Edit Categories and Hierarchies and perform the following steps.
...
a. Check whether the categories and set type assignments above have been created successfully. Make any changes you require to descriptions or set type assignments.
b. If required, change the indicators for change management.
c. Translate the category descriptions, if required.
5. To display the set data in the portal up to and including CRM Support Package 02, the generation of field groups is required in transaction CRMC_BLUEPRINT.
...
a. Choose Layout Generation.
b. Enter the set type with placeholders (for example *MY_SETTYPE*), deactivate the Check Fieldgroups Only indicator, and execute the report.
Result You have created MDM product categories from material types of one of your R/3 systems by using extraction, and postprocessed them if required. SAP set types have been automatically assigned to your categories.
9.7.5 SP05ff: Generating Product Categories from Material Groups The settings described here apply to the Business Scenarios MDM Content Consolidation, MDM Master Data Harmonization, and MDM Central Master Data Management.
Use You have the option of generating additional product categories from the material groups of one of your R/3 client systems. Unlike Generating Product Categories from Material Types [Page 170], a new hierarchy called MDM_MATGRP is generated with category MDM_MATGRP_ROOT. Under this category, a category is then created for each imported material group, using the naming convention MATGRP_XXX. XXX is the material group (for example, 001).
No set types are assigned to the categories that are generated from material groups on import.
For each material group sent, the system tries to find an ID mapping for a product category (matching process IdCat). Depending on this, the procedure continues as follows:
• If an ID mapping for a product category exists, its MDS identification (with the product category GUID) is inserted in the XI message.
• If no ID mapping for a product category exists, an appropriate MDS identification (with the material type or material group) is inserted in the XI message.
You can set the external ID of the related product category on the MDS in Business Add-In (BAdI) MDM_PRD_MDS_CATEGORY.
In the default implementation of the BAdI, the product category IDs have the following structure:
MDC material group: XXXXXX → product category: MATGRP_XXXXXX
Material groups loaded from different MDCs that have the same key are therefore mapped to the same product category (harmonized MDCs). This means that material

9.7.5 SP05ff: Generating Product Categories from Material Groups
SAP MDM Content Consolidation: Configuration Guide for MDM 2
174 23.08.2004
group 0001 of MDC1 is mapped to product category MATGRP_0001 on the MDS. Material group 0001 from MDC2 is also mapped to MATGRP_0001.
If your MDCs are not harmonized, you must make the external IDs assigned in the BAdI dependent on the MDC, so that different MDC objects can be assigned to different product categories. For example:
Material group 0001 from MDC1 to product category MATGRP_MDC1_0001
Material group 0001 from MDC2 to product category MATGRP_MDC2_0001
You can merge any identical MDC objects into the same product category later, by using manual ID mapping maintenance.
• External IDs transferred with the object from an external system are retained.
• If no ID mapping between a material type or material group and a product category exists yet, an ID mapping is created in vector form (for matching process IdCat). The mapping is created for the MDS in the direction MDC → MDS.
This is also the case if a product category already exists. The delivered object types are: Product category
Technical object type: PRDCAT
Object type in MDS: PRDCAT
Material group
Technical object type: BUS1072
Object type in MDC: BUS1072
Prerequisites If you want to use the material groups in one of your R/3 client systems to infer MDM product categories, the required XI settings and process chain definition for extraction of material groups must be defined. For more information, see Configuring XI: MDC R/3 Material Groups to MDM Product Categories [Page 181] and Process Control and Monitoring for Master Data Exchange [Page 222].
If MDCs are not harmonized, SAP recommends that you set the NoProductsAssignableIndicator=true indicator in XSLT mapping for the product categories that correspond to material groups and need to be consolidated. This prevents users from assigning products to product categories that are not yet consolidated, by mistake. After consolidation, you delete any superfluous product categories and set the Product/Object Assignments indicator.
Procedure ...
1. Call the import of material groups and simultaneous setting up of categories. ...
a. Call the SAP Enterprise Portal with a user that has the role Master Data Manager (com.sap.pct.mdm.MasterDataManager).
b. Choose Process Control → Process Chain.
c. Start a process chain for material group extraction.
For more information about the definition of process chains, see Process Control and Monitoring for Master Data Exchange [Page 222].

9.7.6 SP05ff: Set Up Product Category Applications
23.08.2004 175
The extraction step remains yellow, never green, because product categories are saved directly, not written to staging. There is no success message for the process step.
2. Call the SAP Enterprise Portal with a user that has the role Master Data Manager (com.sap.pct.mdm.MasterDataManager). Choose Products → Overview → Edit Categories and Hierarchies and perform the following steps.
...
a. Check whether the hierarchy and categories above have been created to match your material groups. Make any changes you require to descriptions or set type assignments.
b. Translate the category descriptions, if required.
3. To display the set data in the SAP Enterprise Portal up to and including CRM Support Package 02, the generation of field groups is required in transaction CRMC_BLUEPRINT.
a. Choose Layout Generation.
b. Enter the set type with placeholders (for example, *MY_SETTYPE*), deactivate the Check Fieldgroups Only indicator, and execute the report.
Result You have created MDM product categories from material groups of one of your R/3 systems by using extraction, and postprocessed them if required. You have then assigned SAP set types or your own set types to your categories.
9.7.6 SP05ff: Set Up Product Category Applications Use As of SP05, for BW applications in Global Spend you are required to assign product categories to a "product category application". The applications Purchasing and Sales exist. Assignments to more than one application are possible.
In the interface for product category hierarchies and product categories, the CategoryApplicationCode field has been included for categories. This can be used to copy the product category application from an external source. The following applies to material types and material groups:
• Product categories that correspond to material groups always get the assignment Purchasing.
• For product categories that correspond to material type, it depends on Customizing for the material type (transaction OMS2):
If the material type is assigned to user department Purchasing, the product category application Purchasing is assigned.
If the material type is assigned to user department Sales, the product category application Sales is assigned.
Procedure Define the assignment in Customizing for the Product under Product Category → Assign Product Category Applications.

9.7.7 Configuring Number Assignment for Products
SAP MDM Content Consolidation: Configuration Guide for MDM 2
176 23.08.2004
9.7.7 Configuring Number Assignment for Products The settings described here apply to the business scenarios MDM Content Consolidation, MDM Master Data Harmonization, and MDM Central Master Data Management.
Use Define how numbers are assigned to products of types material and technical asset in the MDM system. These numbers are assigned in the following situations:
• On central creation of the product in the MDM system
• On receipt of a product from a client system, if the product is not yet known in the MDM system
In this case, you can influence number assignment with BAdI COM_PRD_ID_HANDLING (generation of a new number or transfer of a number from the client system).
• The product of type material and the technical asset are both implemented in master data management as a product and under one object type, namely material. If you want to use both materials and technical assets, this results in different interdependencies as regards number assignment.
• The length set for the product ID, templates, the display of leading zeros, and lexicographical storage must be the same for both object types.
• Number ranges are assigned to groups of product categories. If you want different number ranges for the two object types, you must define different groups.
• If you transfer objects from the MDM system to a client system and want to use the product number from the MDM system to identify the product in the client system, too, this may necessarily restrict the number length in the MDM system (for example, R/3 material numbers and R/3 equipment numbers have 18 characters).
• The BAdI for number assignment (COM_PRD_ID_HANDLING) must be implemented accordingly.
For more information about identifying objects in the MDM environment, see Defining Number Assignment in the MDM Environment [Page 84].
Procedure ...
1. Define the output format and storage form of the product ID in Customizing for Products under Basic Settings.
For more information about object links, see the implementation guide (IMG) for products, under Define Output Format and Storage Form of Product IDs.
2. Define the number ranges and control of number assignment in Customizing for products under Settings for the Product Type.
For more information, see the Implementation Guide (IMG) for products, under Define Number Ranges for Materials and Determine Control of Number Assignment.
3. In transaction SE19, check the implementation of BAdI COM_PRD_ID_HANDLING and make any changes required.
Result You have configured number assignment for products (material and technical asset) in the MDM system.
9.7.8 Loading MDM Product Categories into CI

9.7.8 Loading MDM Product Categories into CI (Schema Upload)
23.08.2004 177
(Schema Upload) The settings described here apply to the Business Scenarios MDM Content Consolidation, MDM Master Data Harmonization, and MDM Central Master Data Management.
Use You require MDM product categories in the SAP Content Integrator (CI). MDM product categories are called schemas in the CI context.
Products in the Content Integrator refer to their respective product categories; therefore no products from SAP Master Data Management (MDM) can be loaded into the CI if you have not previously had the MDM product categories loaded into the CI.
Via the upload, the objects (products) belonging to the product categories are determined from the Master Data Clients (MDCs) using ID mapping data, and also sent to the CI. Already created CI Objects are enhanced with the uploaded product categories if appropriate.
All MDC Objects from the same MDC are created in the category hierarchy that is analogous to the hierarchy of the objects in the Master Data Server (MDS Objects).
In the case of some product categories from hierarchies that have no counterparts in MDS, ID mapping is generated for MDM 3.00 for compatibility reasons, for example, for the following categories:
• Product category: MATERIAL_TYPES
• Product category: MATGRP_ROOT
The structure of the product category hierarchies is determined in the default coding of the Business Add-In (BAdI) MDM_PRD_MDC_CATEGORY and can be overridden.
Prerequisites You have configured the message exchange via SAP Exchange Infrastructure (XI), see Configuring XI: Setting Up Message Exchange Between CI and MDM [Page 104].
Procedure ...
1. Call up the transaction MDM_PROD_HIER_SEND in the MDM system.
2. Choose the required category hierarchy.
3. Choose Execute.
4. Repeat steps 2 and 3 until you have loaded all the required category hierarchies into the Content Integrator.
You have load schemas as XML files into the Content Integrator.
For more information, see the SAP Help Portal under help.sap.com → SAP NetWeaver → SAP Master Data Management → SAP Content Integrator → Upload → Schema Upload.
You can display the uploaded MDM product categories (called schemas in CI) in the Content Integrator.
For more information, see the SAP Help Portal under help.sap.com → SAP NetWeaver → SAP Master Data Management → SAP Content Integrator → Data Maintenance → Schema View.

9.7.9 Defining the Standard Evaluation Schema in the CI
SAP MDM Content Consolidation: Configuration Guide for MDM 2
178 23.08.2004
Result You have loaded MDM product categories into SAP Content Integrator.
9.7.9 Defining the Standard Evaluation Schema in the CI The settings described here apply to the business scenarios MDM Content Consolidation, MDM Master Data Harmonization, and MDM Central Master Data Management.
Use In SAP Content Integrator (CI) you have to define one schema as the standard evaluation schema in order to support the following processes:
• Global Spend Analysis
Global Spend Analysis by way of SAP Business Information Warehouse uses the categories of the standard evaluation schema to carry out the analysis.
Global Spend is an optional extension of the MDM Business Scenario Content Consolidation. It is part of the solution mySAP Supplier Relationship Management (SRM) and requires a separate licence agreement for joint use with the scenario MDM Content Consolidation.
• Automatic Product Categorization on Upload
During upload into the Content Integrator, products are automatically assigned to a category of the standard evaluation schema. You can recategorize the products later in the CI.
• Schema Mapping
You can assign the categories of additional schemas in the Content Integrator to the categories of the standard evaluation schema. This way, during upload, products that are assigned to the categories of the additional schemas are automatically assigned to the correct categories of the standard evaluation schema.
Prerequisites • You have loaded at least one schema from the MDM System into SAP Content
Integrator using MDM process chains or the CI schema upload function.
For more information on the CI schema upload function, see the SAP Help Portal under help.sap.com → SAP NetWeaver → SAP Master Data Management → SAP Content Integrator → Upload → Schema Upload.
• In order to be able to define the standard evaluation schema, you require the MDM role Master Data Administrator with the CI role combination CI Manager for Master Data and CI User.
Procedure In order to define the standard evaluation schema in the Content Integrator, you carry out the following steps: ...
1. Log on to SAP MDM and choose Master Data Settings → System Systems → CI Settings.

9.7.10 Configuring XI: MDC R/3 Material Types – MDM Product Categories
23.08.2004 179
2. Choose the Schemas tab.
3. Choose the standard evaluation schema from the Schemas dropdown list.
4. Choose Save below the tab.
Result You have defined the standard evaluation schema in SAP Content Integrator.
9.7.10 Configuring XI: MDC R/3 Material Types – MDM Product Categories The settings described here apply to the business scenarios MDM Content Consolidation, MDM Master Data Harmonization, and MDM Central Master Data Management.
Use The following settings are required to receive material types in the MDM system from SAP R/3 client systems via the SAP Exchange Infrastructure (XI).
Overview: MDC R/3 Material Type – MDM Product Category
MDM Interface MDC Interface Interface Mapping Archive
ProductCategory HierarchyCategoryIn
mattype.mattype01 MattypeMattype01ToProduct CategoryHierarchyCategory
MDM20_MattypeW_wgrpInfrec _CateghierarchProdrel
Prerequisites In the client system, the ALE settings necessary for sending ALE message type MATTYPE to the SAP Exchange Infrastructure have been defined.
For more information about configuring ALE middleware, see help.sap.com → SAP NetWeaver → SAP Web Application Server → SAP Web Application Server → Middleware (BC-MID) → Application Link Enabling (BC-MID-ALE).
Procedure In the Integration Directory (configuration time) of the SAP Exchange Infrastructure, define the following settings. ...
1. Define and Complete Business Scenario and Recipient Determination
In the Integration Directory, choose Business Scenarios. Define a new business scenario or add to an existing one, and create recipient determination.
Field Field Contents Description
Sender business system
<source system according to SLD>
Identifier of the source system according to SLD configuration (client system)
Sender interface name
MATTYPE.MATTYPE01 Name of interface
Sender interface namespace
urn:sap-com:document: sap:idoc:messages
SAP Namespace
Recipient <target system according to SLD>
Identifier of the target system according to SLD configuration (MDM system)

9.7.10 Configuring XI: MDC R/3 Material Types – MDM Product Categories
SAP MDM Content Consolidation: Configuration Guide for MDM 2
180 23.08.2004
For more information about the configuration of interface determination for outbound interfaces, see help.sap.com → SAP NetWeaver → SAP Exchange Infrastructure → Design and Configuration Time → Configuration → Definition of Receiver Determinations.
2. Define an Interface Determination for Outbound Interfaces
In the Integration Directory, choose Interface Determination for Outbound Interface. Define the interface determination.
Field Field Contents Description
Sender business system
<source system according to SLD> Identifier of the source system according to SLD configuration (client system)
Sender interface name
MATTYPE.MATTYPE01 Name of interface
Sender interface namespace
urn:sap-com:document: sap:idoc:messages
SAP Namespace
Recipient <target system according to SLD> Identifier of the target system according to SLD configuration (MDM system)
Inbound interface name
ProductCategoryHierarchy CategoryIn
Name of interface
Inbound interface namespace
http://sap.com/xi/CMDM SAP Namespace
Interface mapping: Name
MattypeMattype01ToProduct CategoryHierarchyCategory
Interface Mapping
Interface mapping: Interface namespace
http://sap.com/xi/CMDM SAP Namespace
For more information about the configuration of interface determination for outbound interfaces, see help.sap.com → SAP NetWeaver → SAP Exchange Infrastructure → Design and Configuration Time → Configuration → Definition of Interface Determinations.
3. Define End Points for Target System
If the end point is an Integration Engine, note that these can always be addressed with either URL or HTTP addressing. For security reasons, use the address type HTTP destination. Address type HTTP destination requires the definition of an RFC destination of type H in transaction SM59 in the Integration Server.
For more information about the use of non-Unicode systems in the MDM environment, see Connecting Non-Unicode Systems [Page 82].

9.7.11 Configuring XI: MDC R/3 Material Groups – MDM Product Categories
23.08.2004 181
In the Integration Directory (configuration time), choose End Points for Receiver System. Define an end point for the MDM system in your system landscape.
Field Field Contents Description
Business System <target system according to SLD>
Identifier of the target system according to SLD configuration (MDM system)
Interface Name ProductCategoryHierarchy CategoryIn
Name of interface
Interface Namespace http://sap.com/xi/CMDM SAP Namespace
End point type Integration Engine Depending on the end point type, different attributes must be defined.
Also save the necessary addressing information.
For more information about the configuration of end points, see help.sap.com → SAP NetWeaver → SAP Exchange Infrastructure → Design and Configuration Time → Configuration → Defining End Points.
4. Define Logon Data for Target System
Depending on the end point type and address type, you can define logon data for the target system. Note that the logon data must be defined in the assigned RFC destination if the end point is an IDoc adapter.
For more information about the configuration of logon parameters, see help.sap.com → SAP NetWeaver → SAP Exchange Infrastructure → Design and Configuration Time → Configuration → Defining Logon Data.
Result The SAP Exchange Infrastructure is configured for the receiving of material types from an R/3 client system in the MDM system.
9.7.11 Configuring XI: MDC R/3 Material Groups – MDM Product Categories The settings described here apply to the business scenarios MDM Content Consolidation, MDM Master Data Harmonization, and MDM Central Master Data Management.
Use The following settings are required to receive material groups in the MDM system from SAP R/3 client systems via the SAP Exchange Infrastructure.
Overview: MDC R/3 Material Group – MDM Product Category
MDM Interface MDC Interface Interface Mapping Archive
ProductCategory HierarchyCategoryIn
W_WGRP.W_WGRP01 WWgrpWWgrp01ToProductCategoryHierarchyCategory
MattypeW_wgrpInfrec_CateghierarchProdrel
Prerequisites In the client system, the ALE settings necessary for sending ALE message type W_WGRP to the SAP Exchange Infrastructure have been defined.

9.7.11 Configuring XI: MDC R/3 Material Groups – MDM Product Categories
SAP MDM Content Consolidation: Configuration Guide for MDM 2
182 23.08.2004
For more information about configuring ALE middleware, see help.sap.com → SAP NetWeaver → SAP Web Application Server → mySAP Technology Components → SAP Web Application Server → Middleware (BC-MID) → Application Link Enabling (BC-MID-ALE).
Procedure In the Integration Directory (configuration time) of the SAP Exchange Infrastructure, define the following settings. ...
1. Define and Complete Business Scenario and Recipient Determination
In the Integration Directory, choose Business Scenarios. Define a new business scenario or add to an existing one, and create recipient determination.
Field Field Contents Description
Sender business system
<source system according to SLD>
Identifier of the source system according to SLD configuration (client system)
Sender interface name
W_WGRP.W_WGRP01 Name of interface
Sender interface namespace
urn:sap-com:document: sap:idoc:messages
SAP Namespace
Recipient <target system according to SLD>
Identifier of the target system according to SLD configuration (MDM system)
For more information about the configuration of interface determination for outbound interfaces, see help.sap.com → SAP NetWeaver → SAP Exchange Infrastructure → Design and Configuration Time → Configuration → Definition of Receiver Determinations.
2. Define an Interface Determination for Outbound Interfaces
In the Integration Directory, choose Interface Determination for Outbound Interface. Define the interface determination.
Field Field Contents Description
Sender business system
<source system according to SLD>
Identifier of the source system according to SLD configuration (client system)
Sender interface name
W_WGRP.W_WGRP01 Name of interface
Sender interface namespace
urn:sap-com:document: sap:idoc:messages
SAP Namespace
Recipient <target system according to SLD> Identifier of the target system according to SLD configuration (MDM system)
Inbound interface name
ProductCategoryHierarchy CategoryIn
Name of interface
Inbound interface namespace
http://sap.com/xi/CMDM SAP Namespace
Interface mapping: Name
WWgrpWWgrp01ToProduct CategoryHierarchyCategory
Interface Mapping

9.7.12 Configuring XI: MDC R/3 Material – MDM Product
23.08.2004 183
Interface mapping: Interface namespace
http://sap.com/xi/CMDM SAP Namespace
For more information about the configuration of interface determination for outbound interfaces, see help.sap.com → SAP NetWeaver → SAP Exchange Infrastructure → Design and Configuration Time → Configuration → Definition of Interface Determinations.
3. Define End Points for Target System
If the end point is an Integration Engine, note that these can always be addressed with either URL or HTTP addressing. For security reasons, use the address type HTTP destination. Address type HTTP destination requires the definition of an RFC destination of type H in transaction SM59 in the Integration Server.
For more information about Unicode systems in the MDM environment, see Connecting Non-Unicode Systems [Page 82].
In the Integration Directory (configuration time), choose End Points for Receiver System. Define an end point for the MDM system in your system landscape.
Field Field Contents Description
Business System <target system according to SLD>
Identifier of the target system according to SLD configuration (MDM system)
Interface Name ProductCategoryHierarchy CategoryIn
Name of interface
Interface Namespace http://sap.com/xi/CMDM SAP Namespace
End point type Integration Engine Depending on the end point type, different attributes must be defined.
Also save the necessary addressing information.
For more information about the configuration of end points, see help.sap.com → SAP NetWeaver → SAP Exchange Infrastructure → Design and Configuration Time → Configuration → Defining End Points.
4. Define Logon Data for Target System
Depending on the end point type and address type, you can define logon data for the target system. Note that the logon data must be defined in the assigned RFC destination if the end point is an IDoc adapter.
For more information about the configuration of logon parameters, see help.sap.com → SAP NetWeaver → SAP Exchange Infrastructure → Design and Configuration Time → Configuration → Defining Logon Data.
Result The SAP Exchange Infrastructure is configured for the receiving of material groups from an R/3 client system in the MDM system.
9.7.12 Configuring XI: MDC R/3 Material – MDM

9.7.12 Configuring XI: MDC R/3 Material – MDM Product
SAP MDM Content Consolidation: Configuration Guide for MDM 2
184 23.08.2004
Product The settings described here apply to the business scenarios MDM Content Consolidation, MDM Master Data Harmonization, and MDM Central Master Data Management.
Use The following settings are required to receive products of type material in the MDM system from SAP or non-SAP client systems via the SAP Exchange Infrastructure (XI). Various applications can be connected on a project basis. The following section describes the connection of an R/3 client system for R/3 business object material.
Objects sent from master data client (MDC) systems (from R/3: materials, equipment, and functional locations) are required in the MDM system in the format of data type ProductSet. This means that a transformation of the IDoc message types (MATMAS for R/3 materials) must take place: first to data type ProductMaterial and then to the ProductSetIn interface. Data type ProductMaterial is not an XI interface as such, but is used in the SAP Exchange Infrastructure only as a data type that describes the structure of an example intermediate step during XSL (extensible style language) transformation.
Overview: MDC R/3 Material – MDM Product
MDM Interface MDC Interface Interface Mapping Archive
ProductSetIn matmas.matmas05 MatmasMatmas 05ToProductSet
MDM20_Matmas_Product
For R/3 4.0 to 4.6C, use the interface MATMAS.MATMAS03, and for R/3 Discrete Industries (DI) 4.6C2, use the interface MATMAS.MATMAS04.
Prerequisites You have successfully configured the management of products in the MDM system. In the client system, the ALE settings necessary for sending ALE message type MATMAS to the SAP Exchange Infrastructure have been defined.
For more information about configuring ALE middleware, see help.sap.com → SAP NetWeaver → SAP Web Application Server → SAP Web Application Server → Middleware (BC-MID) → Application Link Enabling (BC-MID-ALE).
Procedure In the Integration Directory (configuration time) of the SAP Exchange Infrastructure, define the following settings. ...
1. Define and Complete Business Scenario and Recipient Determination
In the Integration Directory, choose Business Scenarios. Define a new business scenario or add to an existing one, and create recipient determination.
Field Field Contents Description
Sender business system
<source system according to SLD>
Identifier of the source system according to SLD configuration (client system)
Sender interface name
MATMAS.MATMAS05 Name of interface
Sender interface namespace
urn:sap-com:document: sap:idoc:messages
SAP Namespace

9.7.12 Configuring XI: MDC R/3 Material – MDM Product
23.08.2004 185
Recipient <target system according to SLD>
Identifier of the target system according to SLD configuration (MDM system)
For more information about the configuration of interface determination for outbound interfaces, see help.sap.com → SAP NetWeaver → SAP Exchange Infrastructure → Design and Configuration Time → Configuration → Definition of Receiver Determinations.
2. Define an Interface Determination for Outbound Interfaces
In the Integration Directory, choose Interface Determination for Outbound Interface. Define the interface determination.
Field Field Contents Description
Sender business system
<source system according to SLD>
Identifier of the source system according to SLD configuration (client system)
Sender interface name
MATMAS.MATMAS05 Name of interface
Sender interface namespace
urn:sap-com:document: sap:idoc:messages
SAP Namespace
Recipient <target system according to SLD> Identifier of the target system according to SLD configuration (MDM system)
Inbound interface name
ProductSetIn Name of interface
Inbound interface namespace
http://sap.com/xi/CMDM SAP Namespace
Interface mapping: Name
MatmasMatmas05ToProduct Set
Interface Mapping
Interface mapping: Interface namespace
http://sap.com/xi/CMDM SAP Namespace
For more information about the configuration of interface determination for outbound interfaces, see help.sap.com → SAP NetWeaver → SAP Exchange Infrastructure → Design and Configuration Time → Configuration → Definition of Interface Determinations.
3. Define End Points for Target System
If the end point is an Integration Engine, note that these can always be addressed with either URL or HTTP addressing. For security reasons, use the address type HTTP destination. Address type HTTP destination requires the definition of an RFC destination of type H in transaction SM59 in the Integration Server.
For more information about the use of non-Unicode systems in the MDM environment, see Connecting Non-Unicode Systems [Page 82].
In the Integration Directory (configuration time), choose End Points for Receiver System. Define an end point for the MDM system in your system landscape.

9.7.13 Configuring XI: MDC CRM/SRM Product – MDM Product
SAP MDM Content Consolidation: Configuration Guide for MDM 2
186 23.08.2004
Field Field Contents Description
Business System <target system according to SLD>
Identifier of the target system according to SLD configuration (MDM system)
Interface Name ProductSetIn Name of interface
Interface Namespace http://sap.com/xi/CMDM SAP Namespace
End point type Integration Engine Depending on the end point type, different attributes must be defined.
Also save the necessary addressing information.
For more information about the configuration of end points, see help.sap.com → SAP NetWeaver → SAP Exchange Infrastructure → Design and Configuration Time → Configuration → Defining End Points.
4. Define Logon Data for Target System
Depending on the end point type and address type, you can define logon data for the target system. Note that the logon data must be defined in the assigned RFC destination if the end point is an IDoc adapter.
For more information about the configuration of logon parameters, see help.sap.com → SAP NetWeaver → SAP Exchange Infrastructure → Design and Configuration Time → Configuration → Defining Logon Data.
Result The SAP Exchange Infrastructure is configured for the receiving of products of type material from an R/3 client system (R/3 business object material) in the MDM system.
9.7.13 Configuring XI: MDC CRM/SRM Product – MDM Product The settings described here apply to the business scenarios MDM Content Consolidation, MDM Master Data Harmonization, and MDM Central Master Data Management.
Use The following settings are required to receive products of type material in the MDM system from SAP or non-SAP client systems via the SAP Exchange Infrastructure. Various applications can be connected on a project basis. The following section describes the connection of a CRM client system or SRM client system for business object product.
Overview: MDC CRM/SRM Product – MDM Product
MDM Interface MDC Interface Interface Mapping Archive
ProductSetIn ProductSetOut ProductSetOutCRM ToProductSetIn
MDM20_Matmas_Product

9.7.13 Configuring XI: MDC CRM/SRM Product – MDM Product
23.08.2004 187
Prerequisites Management of products in the MDM system has been configured successfully. You have successfully configured the Integration Engine of the SAP Exchange Infrastructure in the client system.
For more information about the configuration of the Integration Engine, see the installation guide on the SAP Exchange Infrastructure on the Internet at service.sap.com/instguides → Installation and Upgrade Guides → SAP Exchange Infrastructure.
For more information, see SAP Exchange Infrastructure [Page 122].
Procedure In the Integration Directory (configuration time) of the SAP Exchange Infrastructure, define the following settings. ...
1. Define and Complete Business Scenario and Recipient Determination
In the Integration Directory, choose Business Scenarios. Define a new business scenario or add to an existing one, and create recipient determination.
Field Field Contents Description
Sender business system
<source system according to SLD>
Identifier of the source system according to SLD configuration (client system)
Sender interface name
ProductSetOut Name of interface
Sender interface namespace
http://sap.com/xi/CRM SAP Namespace
Recipient <target system according to SLD>
Identifier of the target system according to SLD configuration (MDM system)
For more information about the configuration of interface determination for outbound interfaces, see help.sap.com → SAP NetWeaver → SAP Exchange Infrastructure → Design and Configuration Time → Configuration → Definition of Receiver Determinations.
2. Define an Interface Determination for Outbound Interfaces
In the Integration Directory, choose Interface Determination for Outbound Interface. Define the interface determination.
Field Field Contents Description
Sender business system
<source system according to SLD>
Identifier of the source system according to SLD configuration (client system)
Sender interface name
ProductSetOut Name of interface
Sender interface namespace
http://sap.com/xi/CRM SAP Namespace
Recipient <target system according to SLD>
Identifier of the target system according to SLD configuration

9.7.13 Configuring XI: MDC CRM/SRM Product – MDM Product
SAP MDM Content Consolidation: Configuration Guide for MDM 2
188 23.08.2004
(MDM system)
Inbound interface name
ProductSetIn Name of interface
Inbound interface namespace
http://sap.com/xi/CMDM SAP Namespace
Interface mapping: Name
ProductSetOutCRMTo ProductSetIn
Interface Mapping
Interface mapping: Interface namespace
http://sap.com/xi/CMDM SAP Namespace
For more information about the configuration of interface determination for outbound interfaces, see help.sap.com → SAP NetWeaver → SAP Exchange Infrastructure → Design and Configuration Time → Configuration → Definition of Interface Determinations.
3. Define End Points for Target System
If the end point is an Integration Engine, note that these can always be addressed with either URL or HTTP addressing. For security reasons, use the address type HTTP destination. Address type HTTP destination requires the definition of an RFC destination of type H in transaction SM59 in the Integration Server.
For more information about the use of non-Unicode systems in the MDM environment, see Connecting Non-Unicode Systems [Page 82].
In the Integration Directory (configuration time), choose End Points for Receiver System. Define an end point for the MDM system in your system landscape.
Field Field Contents Description
Business System <target system according to SLD>
Identifier of the target system according to SLD configuration (MDM system)
Interface Name ProductSetIn Name of interface
Interface Namespace http://sap.com/xi/CMDM SAP Namespace
End point type Integration Engine Depending on the end point type, different attributes must be defined.
Also save the necessary addressing information.
For more information about the configuration of end points, see help.sap.com → SAP NetWeaver → SAP Exchange Infrastructure → Design and Configuration Time → Configuration → Defining End Points.
4. Define Logon Data for Target System
Depending on the end point type and address type, you can define logon data for the target system.

9.8 Purchasing Info Records
23.08.2004 189
Note that the logon data must be defined in the assigned RFC destination if the end point is an IDoc adapter.
For more information about the configuration of logon parameters, see help.sap.com → SAP NetWeaver → SAP Exchange Infrastructure → Design and Configuration Time → Configuration → Defining Logon Data.
Result The SAP Exchange Infrastructure is configured for the receiving of products from a CRM or SRM client system (business object product) in the MDM system.
9.8 Purchasing Info Records The settings described here apply to the Business Scenarios MDM Content Consolidation, MDM Master Data Harmonization, and MDM Central Master Data Management.
This section describes the configuration steps for purchasing info records.
It does not list all of the existing IMG activities, but rather those you require to use the standard functions.
9.8.1 Configuring XI: MDC R/3 Purchasing Info Record – MDM Product Relationship The settings described here apply to the Business Scenarios MDM Content Consolidation, MDM Master Data Harmonization, and MDM Central Master Data Management.
Use The following settings are required to receive product relationships between products and business partners in the MDM system from SAP or non-SAP client systems via the SAP Exchange Infrastructure (XI). Various applications can be connected on a project basis. The following section describes the connection of an R/3 client system for R/3 business object purchasing info record.
Overview: MDC R/3 Purchasing Info Record – MDM Product Relationship MDM Interface MDC Interface Interface Mapping Archive ProductRelationSetIn infrec.infrecmass01 InfrecInfrecmass01ToProductRe
lationSet MDM20_MattypeW_wgrpInfrec_CateghierarchProdrel
Prerequisites In the client system, the ALE settings necessary for sending ALE message type INFREC to the SAP Exchange Infrastructure have been defined.
For more information about configuring ALE middleware, see help.sap.com → SAP NetWeaver → SAP Web Application Server → mySAP Technology Components → SAP Web Application Server → Middleware (BC-MID) → Application Link Enabling (BC-MID-ALE).
Procedure In the Integration Directory (configuration time) of the SAP Exchange Infrastructure, define the following settings.
5. Define and Complete Business Scenario and Receiver Determination

9.8.1 Configuring XI: MDC R/3 Purchasing Info Record – MDM Product Relationship
SAP MDM Content Consolidation: Configuration Guide for MDM 2
190 23.08.2004
In the Integration Directory, choose Business Scenarios. Define a new business scenario or add to an existing one, and create recipient determination.
Field Field Contents Description
Sender business system
<source system according to SLD>
Identifier of the source system according to SLD configuration (client system)
Sender interface name INFREC.INFRECMASS01 Name of interface
Sender interface namespace
urn:sap-com:document: sap:idoc:messages
SAP namespace
Recipient <target system according to SLD>
Identifier of the target system according to SLD configuration (MDM system)
For more information about the configuration of interface determination for outbound interfaces, see help.sap.com → SAP NetWeaver → SAP Exchange Infrastructure → Design and Configuration Time → Configuration → Definition of Receiver Determinations.
6. Define an Interface Determination for Outbound Interfaces
In the Integration Directory, choose Interface Determination for Outbound Interface. Define the interface determination.
Field Field Contents Description
Sender business system
<source system according to SLD> Identifier of the source system according to SLD configuration (client system)
Sender interface name
INFREC.INFRECMASS01 Name of interface
Sender interface namespace
urn:sap-com:document: sap:idoc:messages
SAP namespace
Recipient <target system according to SLD> Identifier of the target system according to SLD configuration (MDM system)
Inbound interface name
ProductRelationSetIn Name of interface
Inbound interface namespace
http://sap.com/xi/CMDM SAP namespace
Interface mapping: Name
InfrecInfrecmass01ToProductRelationSet Interface Mapping
Interface mapping: Interface namespace
http://sap.com/xi/CMDM SAP namespace
For more information about the configuration of interface determination for outbound interfaces, see help.sap.com → SAP NetWeaver → SAP Exchange Infrastructure → Design and Configuration Time → Configuration → Definition of Interface Determinations.
7. Define End Points for Target System

9.9 Technical Assets
23.08.2004 191
If the end point is an Integration Engine, note that these can always be addressed with either URL or HTTP addressing. For security reasons, use the address type HTTP destination. Address type HTTP destination requires the definition of an RFC destination of type H in transaction SM59 in the Integration Server.
For more information about the use of non-Unicode systems in the MDM environment, see Connecting Non-Unicode Systems [Page 82].
In the Integration Directory (configuration time), choose Receiver System End Points. Define an end point for the MDM system in your system landscape.
Field Field Contents Description
Business system <target system according to SLD>
Identifier of the target system according to SLD configuration (MDM system)
Interface name ProductRelationSetIn Name of interface
Interface namespace http://sap.com/xi/CMDM SAP namespace
End point type Integration engine Depending on the end point type, different attributes must be defined.
Also save the necessary addressing information.
For more information about the configuration of end points, see help.sap.com → SAP NetWeaver → SAP Exchange Infrastructure → Design and Configuration Time → Configuration → Defining End Points.
8. Define Logon Data for Target System
Depending on the end point type and address type, you can define logon data for the target system. If the end point is an IDoc adapter, the logon data must be defined in the assigned RFC destination.
For more information about the configuration of logon parameters, see help.sap.com → SAP NetWeaver → SAP Exchange Infrastructure → Design and Configuration Time → Configuration → Defining Logon Data.
Result The SAP Exchange Infrastructure is configured for the receiving of product relationships from an R/3 client system (R/3 business object purchasing info record) in the MDM system.
9.9 Technical Assets The settings described here apply to the business scenarios MDM Content Consolidation, MDM Master Data Harmonization, and MDM Central Master Data Management.
This section describes the configuration steps for technical assets.
It does not list all of the existing IMG activities, but rather those you require to use the standard functions.

9.9.1 Maintaining Settings for Products
SAP MDM Content Consolidation: Configuration Guide for MDM 2
192 23.08.2004
9.9.1 Maintaining Settings for Products The settings described here apply to the business scenarios MDM Content Consolidation, MDM Master Data Harmonization, and MDM Central Master Data Management.
Use Technical assets and materials are implemented in master data management as both a product and as an object type, namely material. That is why most of the settings for the MDM master data object, product, are relevant for the master data object, technical asset. If you want to use both master data objects, be aware of the various interdependencies described under Products [Page 166].
Procedure Carry out the configuration steps for the product:
• Convert attributes and set types [Page 166]
• Define attributes and set types [Page 166]
• Generate basis hierarchy [Page 167]
• Configure number assignment for products [Page 176]
Result You made the basic settings for the master data object technical asset. Note that you can make more settings for technical assets in Customizing for the product.
9.9.2 Configuring XI: MDC R/3 Functional Location – MDM Technical Asset The settings described here apply to the business scenarios MDM Content Consolidation, MDM Master Data Harmonization, and MDM Central Master Data Management.
Use The following settings are required to receive technical assets in the MDM system from SAP or non-SAP client systems via the SAP Exchange Infrastructure (XI). Various applications can be connected on a project basis. The following section describes the connection of an R/3 client system for R/3 business object functional location.
Objects sent from MDC systems (from R/3: materials, equipment, and functional locations) are required in the MDM system in the format of data type ProductSet. This means that a transformation of the IDoc message types (MDM_EQUIPMENT_SAVEREPLICA for R/3 equipment and MDM_FUNCLOC_SAVEREPLICA for R/3 functional locations) must take place: first to data type TechnicalAsset and then to the ProductSetIn interface. Data type TechnicalAsset is not an XI interface as such, but is used in the SAP Exchange Infrastructure only as a data type that describes the structure of an example intermediate step during XSL (extensible style language) transformation.
Overview: MDC R/3 Functional Location – MDM Technical Asset
MDM Interface MDC Interface Interface Mapping Archive
ProductSetIn MDM_FUNCLOC_SAVEREPLICA. MDM_FUNCLOC_SAVEREPLICA01
MDM_FUNCLOC_SAVE REPLICA01ToProductSetIn
MDM20_Equiext Funcloext_TechA

9.9.2 Configuring XI: MDC R/3 Functional Location – MDM Technical Asset
23.08.2004 193
Prerequisites You have successfully activated the management of technical assets in the MDM system. In the client system, the ALE settings necessary for sending ALE message type MDM_FUNCLOC_SAVEREPLICA to the SAP Exchange Infrastructure have been defined.
For more information about configuring ALE middleware, see help.sap.com → SAP NetWeaver → SAP Web Application Server → SAP Web Application Server → Middleware (BC-MID) → Application Link Enabling (BC-MID-ALE).
Procedure In the Integration Directory (configuration time) of the SAP Exchange Infrastructure, define the following settings. ...
1. Define and Complete Business Scenario and Recipient Determination
In the Integration Directory, choose Business Scenarios. Define a new business scenario or add to an existing one, and create recipient determination.
Field Field Contents Description
Sender business system
<source system according to SLD>
Identifier of the source system according to SLD configuration (client system)
Sender interface name
MDM_FUNCLOC_SAVE REPLICA. MDM_FUNCLOC_SAVE REPLICA01
Name of interface
Sender interface namespace
urn:sap-com:document: sap:idoc:messages
SAP namespace
Recipient <target system according to SLD>
Identifier of the target system according to SLD configuration (MDM system)
For more information about the configuration of interface determination for outbound interfaces, see help.sap.com → SAP NetWeaver → SAP Exchange Infrastructure → Design and Configuration Time → Configuration → Definition of Receiver Determinations.
2. Define an Interface Determination for Outbound Interfaces
In the Integration Directory, choose Interface Determination for Outbound Interface. Define the interface determination.
Field Field Contents Description
Sender business system
<source system according to SLD> Identifier of the source system according to SLD configuration (client system)
Sender interface name
MDM_FUNCLOC_SAVE REPLICA. MDM_FUNCLOC_SAVE REPLICA01
Name of interface
Sender interface
urn:sap-com:document: SAP

9.9.2 Configuring XI: MDC R/3 Functional Location – MDM Technical Asset
SAP MDM Content Consolidation: Configuration Guide for MDM 2
194 23.08.2004
namespace sap:idoc:messages namespace
Recipient <target system according to SLD> Identifier of the target system according to SLD configuration (MDM system)
Inbound interface name
ProductSetIn Name of interface
Inbound interface namespace
http://sap.com/xi/CMDM SAP namespace
Interface mapping: Name
MDM_FUNCLOC_SAVEREPLICA01ToProductSetIn Interface mapping
Interface mapping: Interface namespace
http://sap.com/xi/CMDM SAP namespace
For more information about the configuration of interface determination for outbound interfaces, see help.sap.com → SAP NetWeaver → SAP Exchange Infrastructure → Design and Configuration Time → Configuration → Definition of Interface Determinations.
3. Define End Points for Target System
If the end point is an Integration Engine, note that these can always be addressed with either URL or HTTP addressing. For security reasons, use the address type HTTP destination. Address type HTTP destination requires the definition of an RFC destination of type H in transaction SM59 in the Integration Server.
For more information about the use of non-Unicode systems in the MDM environment, see Connecting Non-Unicode Systems [Page 82].
In the Integration Directory (configuration time), choose End Points for Receiver System. Define an end point for the MDM system in your system landscape.
Field Field Contents Description
Business System <target system according to SLD>
Identifier of the target system according to SLD configuration (MDM system)
Interface Name ProductSetIn Name of interface
Interface Namespace
http://sap.com/xi/CMDM SAP namespace
End point type Integration Engine Depending on the end point type, different attributes must be defined.

9.9.3 Configuring XI: MDM Technical Asset – MDC R/3 Functional Location
23.08.2004 195
Also save the necessary addressing information.
For more information about the configuration of end points, see help.sap.com → SAP NetWeaver → SAP Exchange Infrastructure → Design and Configuration Time → Configuration → Defining End Points.
4. Define Logon Data for Target System
Depending on the end point type and address type, you can define logon data for the target system.
Note that the logon data must be defined in the assigned RFC destination if the end point is an IDoc adapter.
For more information about the configuration of logon parameters, see help.sap.com → SAP NetWeaver → SAP Exchange Infrastructure → Design and Configuration Time → Configuration → Defining Logon Data.
Result The SAP Exchange Infrastructure is configured for the receiving of technical assets from an R/3 client system (R/3 business object functional location) in the MDM system.
9.9.3 Configuring XI: MDM Technical Asset – MDC R/3 Functional Location Use The settings described here apply to the business scenarios MDM Content Consolidation, MDM Master Data Harmonization, and MDM Central Master Data Management.
Use The following settings are required to send technical from the MDM system to SAP or non-SAP client systems via the SAP Exchange Infrastructure. Various applications can be connected on a project basis. The following section describes the connection of an R/3 client system for R/3 business object functional location.
Technical assets are sent from the MDM system in the format of data type ProductSet, but are required in the client systems as R/3 equipment and R/3 functional locations, for example. This means that a transformation of the data type ProductSet must take place: first to data type TechnicalAsset and then to the IDoc message types (MDM_EQUIPMENT_SAVEREPLICA for R/3 equipment and MDM_FUNCLOC_SAVEREPLICA for R/3 functional locations). Data type Technical Asset is not an XI interface as such, but is used in the SAP Exchange Infrastructure only as a data type that describes the structure of an example intermediate step during XSL transformation.
Overview: MDM Technical Asset – MDC R/3 Functional Location
MDM Interface MDC Interface Interface Mapping Archive ProductSetOut MDM_FUNCLOC_SAVE
REPLICA. MDM_FUNCLOC_SAVEREPLICA01
ProductSetOutToMDM_FUNC LOC_SAVEREPLICA
MDM20_EquiextFuncloext_TechA

9.9.3 Configuring XI: MDM Technical Asset – MDC R/3 Functional Location
SAP MDM Content Consolidation: Configuration Guide for MDM 2
196 23.08.2004
Prerequisites Management of technical assets in the MDM system has been activated successfully. In the client system, the ALE settings necessary for receiving ALE message type MDM_FUNCLOC_SAVEREPLICA from the SAP Exchange Infrastructure have been defined.
For more information about configuring ALE middleware, see help.sap.com → SAP NetWeaver → SAP Web Application Server → mySAP Technology Components → SAP Web Application Server → Middleware (BC-MID) → Application Link Enabling (BC-MID-ALE).
Procedure In the Integration Directory (configuration time) of the SAP Exchange Infrastructure, define the following settings. ...
1. Define and Complete Business Scenario and Receiver Determination
Perform this step only if one of the following conditions applies:
In subscriptions, you want to use recipient type XI for this object type, in other words, you want receiver determination to use the SAP Exchange Infrastructure.
You want certain systems to always receive messages for the object type.
Steps 2-4 must always be performed.
Make sure you consider the interactions described under Defining Recipients [External].
In the Integration Directory, choose Business Scenarios. Define a new Business Scenario or add to an existing one, and create receiver determination.
Field Field Contents Description
Sender business system
<source system according to SLD>
Identifier of the source system according to SLD configuration (MDM system)
Sender interface name
ProductSetOut Name of interface
Sender interface namespace
http://sap.com/xi/CMDM SAP namespace
Recipient <target system according to SLD>
Identifier of the target system according to SLD configuration (client system)
For more information about the configuration of interface determination for outbound interfaces, see help.sap.com → SAP NetWeaver → SAP Exchange Infrastructure → Design and Configuration Time → Configuration → Definition of Receiver Determinations.
2. Define an Interface Determination for Outbound Interfaces
In the Integration Directory, choose Interface Determination for Outbound Interface. Define the interface determination.
Field Field Contents Description
Sender business system
<source system according to SLD> Identifier of the source system according to SLD configuration

9.9.3 Configuring XI: MDM Technical Asset – MDC R/3 Functional Location
23.08.2004 197
(MDM system)
Sender interface name
ProductSetOut Name of interface
Sender interface namespace
http://sap.com/xi/CMDM SAP namespace
Recipient <target system according to SLD> Identifier of the target system according to SLD configuration (client system)
Inbound interface name
MDM_FUNCLOC_SAVEREPLICA. MDM_FUNCLOC_SAVEREPLICA01
Name of interface
Inbound interface namespace
urn:sap-com:document: sap:idoc:messages
SAP namespace
Interface mapping: Name
ProductSetOutToMDM_FUNC LOC_SAVEREPLICA
Interface mapping
Interface mapping: Interface namespace
http://sap.com/xi/CMDM SAP namespace
If you want to send object product of type material as well as technical assets, you need to define the following condition in the interface determination for inbound interface MDM_EQUIPMENT_SAVEREPLICA.MDM_ EQUIPMENT_SAVEREPLICA01 and MDM_FUNCLOC_SAVEREPLICA.MDM_FUNCLOC_SAVEREPLICA01.
If the column for the condition is not displayed, you can temporarily insert an additional line, so that the column appears.
The condition consists of two lines which are linked with AND.
a. First line
Use the input help to select the expression ObjectFamilyCode. Ignore any error messages about not finding data types.
Field Field Contents Description
Type Logical expression Type of condition
XPath /ns0:ProductSetMsg/Product /ObjectFamilyCode and /ns0:ProductSetMsg/Product /ObjectFamilyCode !=''
XPath expression
OP = Operand
Value TRUE Value
b. Second line
Field Field Contents Description
Type Logical expression Type of condition
XPath /ns0:ProductSetMsg/Product/Data[Set TypeID ='COM_TA_R3_ID']/Attribute
XPath expression

9.9.3 Configuring XI: MDM Technical Asset – MDC R/3 Functional Location
SAP MDM Content Consolidation: Configuration Guide for MDM 2
198 23.08.2004
Set/Attribute[AttributeID= 'TAR3_STRUCTURE_CODE']) or /ns0:ProductSetMsg/ Product/Data[SetTypeID ='COM_TA_ R3_ID']/AttributeSet/Attribute [AttributeID='TAR3_ STRUCTURE_CODE']/AttributeContent = ''
OP = Operand
Value TRUE Value
c.
The entire condition should be displayed in the preview as follows: (/ns0:ProductSetMsg/Product/ObjectFamilyCode and /ns0:ProductSetMsg/Product/ObjectFamilyCode !='' = TRUE AND /ns0:ProductSetMsg/Product/Data[SetTypeID ='COM_TA_R3_ID']/AttributeSet/Attribute[AttributeID='TAR3_STRUCTURE_CODE'] and /ns0:ProductSetMsg/Product/Data[SetTypeID ='COM_TA_R3_ID']/AttributeSet/Attribute[AttributeID='TAR3_STRUCTURE_CODE'] /AttributeContent != '' = TRUE)
In the lower screen area of the condition editor, enter the following additional line:
Field Field Contents Description
Prefix ns0
Namespace http://sap.com/xi/CMDM
For more information about the configuration of interface determination for outbound interfaces, see help.sap.com → SAP NetWeaver → SAP Exchange Infrastructure → Design and Configuration Time → Configuration → Definition of Interface Determinations.
3. Define End Points for Target System
If the end point is an IDoc adapter, note that this requires the definition of an RFC connection of type 3 in transaction SM59 in the Integration Server for access to the target system. If the target system is a Unicode system, you must also define the necessary settings for this RFC connection under Special Options.
For more information about the use of non-Unicode systems in the MDM environment, see Connecting Non-Unicode Systems [Page 82].
In the Integration Directory (configuration time), choose Receiver System End Points. Define an end point for the MDC system in your system landscape.
Field Field Contents Description
Business system <target system according to SLD>
Identifier of the target system according to SLD configuration (client system)
Interface name MDM_FUNCLOC_SAVEREPLICA. MDM_FUNCLOC_SAVEREPLICA01
Name of interface

9.9.4 Configuring XI: MDC R/3 Equipment – MDM Technical Asset
23.08.2004 199
Interface namespace urn:sap-com:document: sap:idoc:messages
SAP namespace
End point type IDoc adapter Depending on the end point type, different attributes must be defined.
Also save the necessary addressing information.
For more information about the configuration of end points, see help.sap.com → SAP NetWeaver → SAP Exchange Infrastructure → Design and Configuration Time → Configuration → Defining End Points.
4. Define Logon Data for Target System
Depending on the end point type and address type, you can define logon data for the target system.
Note that the logon data must be defined in the assigned RFC destination if the end point is an IDoc adapter.
For more information about the configuration of logon parameters, see help.sap.com → SAP NetWeaver → SAP Exchange Infrastructure → Design and Configuration Time → Configuration → Defining Logon Data.
Result The SAP Exchange Infrastructure is configured for the sending of technical assets from the MDM system to an R/3 client system.
9.9.4 Configuring XI: MDC R/3 Equipment – MDM Technical Asset The settings described here apply to the business scenarios MDM Content Consolidation, MDM Master Data Harmonization, and MDM Central Master Data Management.
Use The following settings are required to receive technical assets in the MDM system from SAP or non-SAP client systems via the SAP Exchange Infrastructure. Various applications can be connected on a project basis. The following section describes the connection of an R/3 client system for R/3 business object equipment.
Objects sent from MDC systems (from R/3: materials, equipment, and functional locations) are required in the MDM system in the format of data type ProductSet. This means that a transformation of the IDoc message types (MDM_EQUIPMENT_SAVEREPLICA for R/3 equipment and MDM_FUNCLOC_SAVEREPLICA for R/3 functional locations) must take place: first to data type TechnicalAsset and then to the ProductSetIn interface. Data type Technical Asset is not an XI interface as such, but is used in the SAP Exchange Infrastructure only as a data type that describes the structure of an example intermediate step during XSL transformation.
Overview: MDC R/3 Equipment – MDM Technical Asset
MDM Interface MDC Interface Interface Mapping Archive
ProductSetIn MDM_EQUIPMENT_SAVEREPLICA.
MDM_EQUIPMENT_SAVE REPLICA01ToProductSetIn
MDM20_Equiext Funcloext_TechA

9.9.4 Configuring XI: MDC R/3 Equipment – MDM Technical Asset
SAP MDM Content Consolidation: Configuration Guide for MDM 2
200 23.08.2004
MDM_EQUIPMENT_SAVEREPLICA01
Prerequisites You have successfully activated the management of technical assets in the MDM system. In the client system, the ALE settings necessary for sending ALE message type MDM_EQUIPMENT_SAVEREPLICA to the SAP Exchange Infrastructure have been defined.
For more information about configuring ALE middleware, see help.sap.com → SAP NetWeaver → SAP Web Application Server → SAP Web Application Server → Middleware (BC-MID) → Application Link Enabling (BC-MID-ALE).
Procedure In the Integration Directory (configuration time) of the SAP Exchange Infrastructure, define the following settings. ...
1. Define and Complete Business Scenario and Recipient Determination
In the Integration Directory, choose Business Scenarios. Define a new business scenario or add to an existing one, and create recipient determination.
Field Field Contents Description
Sender business system
<source system according to SLD>
Identifier of the source system according to SLD configuration (client system)
Sender interface name
MDM_EQUIPMENT_SAVE REPLICA. MDM_ EQUIP MENT_SAVEREPLICA01
Name of interface
Sender interface namespace
urn:sap-com:document: sap:idoc:messages
SAP Namespace
Recipient <target system according to SLD>
Identifier of the target system according to SLD configuration (MDM system)
For more information about the configuration of interface determination for outbound interfaces, see help.sap.com → SAP NetWeaver → SAP Exchange Infrastructure → Design and Configuration Time → Configuration → Definition of Receiver Determinations.
2. Define an Interface Determination for Outbound Interfaces
In the Integration Directory, choose Interface Determination for Outbound Interface. Define the interface determination.
Field Field Contents Description
Sender business system
<source system according to SLD>
Identifier of the source system according to SLD configuration (client system)
Sender interface name
MDM_EQUIPMENT_SAVE REPLICA. MDM_ EQUIP MENT _SAVEREPLICA01
Name of interface
Sender interface namespace
urn:sap-com:document: sap:idoc:messages
SAP Namespace

9.9.4 Configuring XI: MDC R/3 Equipment – MDM Technical Asset
23.08.2004 201
Recipient <target system according to SLD>
Identifier of the target system according to SLD configuration (MDM system)
Inbound interface name
ProductSetIn Name of interface
Inbound interface namespace
http://sap.com/xi/CMDM SAP Namespace
Interface mapping: Name
MDM_ EQUIPMENT _SAVE REPLICA01ToProductSetIn
Interface Mapping
Interface mapping: Interface namespace
http://sap.com/xi/CMDM SAP Namespace
For more information about the configuration of interface determination for outbound interfaces, see help.sap.com → SAP NetWeaver → SAP Exchange Infrastructure → Design and Configuration Time → Configuration → Definition of Interface Determinations.
3. Define End Points for Target System
If the end point is an Integration Engine, note that these can always be addressed with either URL or HTTP addressing. For security reasons, use the address type HTTP destination. Address type HTTP destination requires the definition of an RFC destination of type H in transaction SM59 in the Integration Server.
For more information about the use of non-Unicode systems in the MDM environment, see Connecting Non-Unicode Systems [Page 82].
In the Integration Directory (configuration time), choose End Points for Receiver System. Define an end point for the MDM system in your system landscape.
Field Field Contents Description
Business System <target system according to SLD>
Identifier of the target system according to SLD configuration (MDM system)
Interface Name ProductSetIn Name of interface
Interface Namespace http://sap.com/xi/CMDM SAP Namespace
End point type Integration Engine Depending on the end point type, different attributes must be defined.
Also save the necessary addressing information.
For more information about the configuration of end points, see help.sap.com → SAP NetWeaver → SAP Exchange Infrastructure → Design and Configuration Time → Configuration → Defining End Points.
4. Define Logon Data for Target System
Depending on the end point type and address type, you can define logon data for the target system.

9.9.5 Configuring XI: MDM Technical Asset – MDC R/3 Equipment
SAP MDM Content Consolidation: Configuration Guide for MDM 2
202 23.08.2004
Note that the logon data must be defined in the assigned RFC destination if the end point is an IDoc adapter.
For more information about the configuration of logon parameters, see help.sap.com → SAP NetWeaver → SAP Exchange Infrastructure → Design and Configuration Time → Configuration → Defining Logon Data.
Result The SAP Exchange Infrastructure is configured for the receiving of technical assets from an R/3 client system (R/3 business object equipment) in the MDM system.
9.9.5 Configuring XI: MDM Technical Asset – MDC R/3 Equipment The settings described here apply to the business scenarios MDM Content Consolidation, MDM Master Data Harmonization, and MDM Central Master Data Management.
Use The following settings are required to send technical from the MDM system to SAP or non-SAP client systems via the SAP Exchange Infrastructure. Various applications can be connected on a project basis. The following section describes the connection of an R/3 client system for R/3 business object equipment.
Technical assets are sent from the MDM system in the format of data type ProductSet, but are required in the client systems as R/3 equipment and R/3 functional locations, for example. This means that a transformation of the data type ProductSet must take place: first to data type TechnicalAsset and then to the IDoc message types (MDM_EQUIPMENT_SAVEREPLICA for R/3 equipment and MDM_FUNCLOC_SAVEREPLICA for R/3 functional locations). Data type TechnicalAsset is not an XI interface as such, but is used in the SAP Exchange Infrastructure only as a data type that describes the structure of an example intermediate step during XSL (extensible style language) transformation.
Overview: MDM Technical Asset – MDC R/3 Equipment
MDM Interface MDC Interface Interface Mapping Archive ProductSetOut MDM_EQUIPMENT_SA
VEREPLICA. MDM_ EQUIPMENT _SAVE REPLICA01
ProductSetOutToMDM_ EQUIPMENT_SAVEREPLICA
MDM20_EquiextFunc loext_TechA
Prerequisites Management of technical assets in the MDM system has been activated successfully. In the client system, the ALE settings necessary for receiving ALE message type MDM_EQUIPMENT_SAVEREPLICA from the SAP Exchange Infrastructure have been defined.
For more information about configuring ALE middleware, see help.sap.com → SAP NetWeaver → SAP Web Application Server → mySAP Technology Components → SAP Web Application Server → Middleware (BC-MID) → Application Link Enabling (BC-MID-ALE).

9.9.5 Configuring XI: MDM Technical Asset – MDC R/3 Equipment
23.08.2004 203
Procedure In the Integration Directory (configuration time) of the SAP Exchange Infrastructure, define the following settings. ...
1. Define and Complete Business Scenario and Receiver Determination
Perform this step only if one of the following conditions applies:
In subscriptions, you want to use recipient type XI for this object type, in other words, you want receiver determination to use the SAP Exchange Infrastructure.
You want certain systems to always receive messages for the object type.
Steps 2-4 must always be performed.
Make sure you consider the interactions described under Defining Recipients [External].
In the Integration Directory, choose Business Scenarios. Define a new Business Scenario or add to an existing one, and create receiver determination.
Field Field Contents Description
Sender business system
<source system according to SLD>
Identifier of the source system according to SLD configuration (MDM system)
Sender interface name
ProductSetOut Name of interface
Sender interface namespace
http://sap.com/xi/CMDM SAP namespace
Recipient <target system according to SLD>
Identifier of the target system according to SLD configuration (client system)
For more information about the configuration of interface determination for outbound interfaces, see help.sap.com → SAP NetWeaver → SAP Exchange Infrastructure → Design and Configuration Time → Configuration → Definition of Receiver Determinations.
2. Define an Interface Determination for Outbound Interfaces
In the Integration Directory, choose Interface Determination for Outbound Interface. Define the interface determination.
Field Field Contents Description
Sender business system
<source system according to SLD>
Identifier of the source system according to SLD configuration (MDM system)
Sender interface name
ProductSetOut Name of interface
Sender interface namespace
http://sap.com/xi/CMDM SAP namespace
Recipient <target system according to Identifier of the target system

9.9.5 Configuring XI: MDM Technical Asset – MDC R/3 Equipment
SAP MDM Content Consolidation: Configuration Guide for MDM 2
204 23.08.2004
SLD> according to SLD configuration (client system)
Inbound interface name
MDM_EQUIPMENT_SAVE REPLICA. MDM_ EQUIP MENT _SAVEREPLICA01
Name of interface
Inbound interface namespace
urn:sap-com:document: sap:idoc:messages
SAP namespace
Interface mapping: Name
ProductSetOutToMDM_ EQUIPMENT _SAVEREPLICA
Interface mapping
Interface mapping: Interface namespace
http://sap.com/xi/CMDM SAP namespace
If you want to send object product of type material as well as technical assets, you need to define the following condition in the interface determination for inbound interface MDM_EQUIPMENT_SAVEREPLICA.MDM_EQUIPMENT_SAVEREPLICA01 and MDM_FUNCLOC_SAVEREPLICA.MDM_FUNCLOC_SAVEREPLICA01.
If the column for the condition is not displayed, you can temporarily insert an additional line, so that the column appears.
The condition consists of two lines which are linked with AND.
a. First line
Use the input help to select the expression ObjectFamilyCode. Ignore any error messages about not finding data types.
Field Field Contents Description
Type Logical expression Type of condition
XPath /ns0:ProductSetMsg/Product/ ObjectFamilyCode and /ns0:ProductSetMsg/Product/ ObjectFamilyCode !=''
XPath expression
OP = Operand
Value TRUE Value
b. Second line
Field Field Contents Description
Type Logical expression Type of condition
XPath not(/ns0:ProductSetMsg/Product/ Data[SetTypeID ='COM_TA_ R3_ID']/AttributeSet/Attribute [AttributeID='TAR3_STRUCTURE _CODE']) or /ns0:ProductSetMsg/ Product/Data[SetTypeID ='COM _TA_R3_ID']/AttributeSet/Attribute [AttributeID='TAR3_STRUCTURE _CODE']/AttributeContent = ''
XPath expression
OP = Operand

9.9.5 Configuring XI: MDM Technical Asset – MDC R/3 Equipment
23.08.2004 205
Value TRUE Value
c.
The entire condition should be displayed in the preview as follows: (/ns0:ProductSetMsg/Product/ObjectFamilyCode and /ns0:ProductSetMsg/Product/ObjectFamilyCode !='' = TRUE AND not(/ns0:ProductSetMsg/Product/Data[SetTypeID ='COM_TA_R3_ID']/AttributeSet/Attribute[AttributeID='TAR3_STRUCTURE_CODE']) or /ns0:ProductSetMsg/Product/Data[SetTypeID ='COM_TA_R3_ID']/AttributeSet/Attribute[AttributeID='TAR3_STRUCTURE_CODE']/AttributeContent = '' = TRUE)
In the lower screen area of the condition editor, enter the following additional line:
Field Field Contents Description
Prefix ns0
Namespace http://sap.com/xi/CMDM
For more information about the configuration of interface determination for outbound interfaces, see help.sap.com → SAP NetWeaver → SAP Exchange Infrastructure → Design and Configuration Time → Configuration → Definition of Interface Determinations.
3. Define End Points for Target System
If the end point is an IDoc adapter, note that this requires the definition of an RFC connection of type 3 in transaction SM59 in the Integration Server for access to the target system. If the target system is a Unicode system, you must also define the necessary settings for this RFC connection under Special Options.
For more information about the use of non-Unicode systems in the MDM environment, see Connecting Non-Unicode Systems [Page 82].
In the Integration Directory (configuration time), choose Receiver System End Points. Define an end point for the MDC system in your system landscape.
R/3 Equipment
Field Field Contents Description
Business system <target system according to SLD>
Identifier of the target system according to SLD configuration (client system)
Interface name MDM_EQUIPMENT_SAVE REPLICA. MDM_ EQUIPMENT _SAVEREPLICA01
Name of interface
Interface namespace urn:sap-com:document: sap:idoc:messages
SAP namespace
End point type IDoc adapter Depending on the end point type, different attributes must be defined.
Also save the necessary addressing information.

9.10 Documents
SAP MDM Content Consolidation: Configuration Guide for MDM 2
206 23.08.2004
For more information about the configuration of end points, see help.sap.com → SAP NetWeaver → SAP Exchange Infrastructure → Design and Configuration Time → Configuration → Defining End Points.
4. Define Logon Data for Target System
Depending on the end point type and address type, you can define logon data for the target system.
Note that the logon data must be defined in the assigned RFC destination if the end point is an IDoc adapter.
For more information about the configuration of logon parameters, see help.sap.com → SAP NetWeaver → SAP Exchange Infrastructure → Design and Configuration Time → Configuration → Defining Logon Data.
Result The SAP Exchange Infrastructure is configured for the sending of technical assets from the MDM system to an R/3 client system.
9.10 Documents The settings described here apply to the business scenarios MDM Content Consolidation, MDM Master Data Harmonization, and MDM Central Master Data Management.
Use In master data management, you can link documents to other business objects, such as products or business partners. If you want to use this functionality, follow the instructions.
This configuration guide lists the IMG activities required to use the standard functions, rather than all possible IMG activities.
Prerequisites The portal environment has been successfully set up (including Content Management and TREX). For more information, see Portal Environment [Page 47].
9.10.1 Graphical Overview: Documents This graphic shows which system components are involved when using the document service.

9.10.2 Installing and Configuring Document Services
23.08.2004 207
Portal Server
Master Data Server
Java API
Master Data Engine
WebDav Client
Web Services
http
Repository Manager
File Server
SAP R/3 DMS
(DocumentMgmt
System)
Web Server
………
Connector Connector Connector
RFC
http
R
R R
R
R
R R R
R R R
9.10.2 Installing and Configuring Document Services The settings described here apply to the Business Scenarios MDM Content Consolidation, MDM Master Data Harmonization, and MDM Central Master Data Management.
Use Install and configure the portal services that are required before you can use documents in SAP MDM.
Prerequisites You have successfully installed the Business Package for SAP MDM 2.00 (version 50.1 or higher, with a current patch) (see Portal Environment [Page 47]).

9.10.2 Installing and Configuring Document Services
SAP MDM Content Consolidation: Configuration Guide for MDM 2
208 23.08.2004
Procedure ...
For EP 6.0, skip points 1. through 3.. ...
1. EP 5.0 only:
Once the business package has been successfully installed, under <J2EE servlet path>\irj\root\WEB-INF\deployment find file com.sap.pct.mdm.edoc.api.portalservice.par.bak.
Open the file with WinZip® and copy the files named below to the specified target folder.
EP 5.0 only:
File Target Folder of the Portal Server
com.sap.pct.mdm.edoc.api.portalservice.zar
<J2EE servlet path>\irj\root\WEB-INF\deployment
EDocEventingService.cc.xml <cm.config.root>\local\plugins\cm\services\config_classes
_edoc_event_receiver.co.xml <cm.config.root>\local\plugins\cm\services\instances
For more information about determining the configuration directory (variable <cm.config.root>), see Installation and Parameterization [External].
2. EP 5.0 only:
Restart the portal to execute deployment for the EdocPortalService.
3. EP 5.0 only:
Open file <J2EE servlet path>\irj\root\WEB-INF\plugins\portal\services\com.sap.pct.mdm.edoc.api.portalservice\config\service.xml, and check the following attributes:
EP 6.0:
Open file <J2EE servlet path>\irj\root\WEB-INF\portal\portalapps\com.sap.pct.mdm.edoc.api.portalservice\configlocal\service.xml, and check the following attributes:
Attribute Value Description
EDocSystemId For example, SAP_MDM
Logical name of the MDM system.
This value must match the system name maintained in Systems.xml or the name maintained for the destination in jcoDestinations.xml (see Portal Environment [Page 47]).
CopyObjectRelations "X" or " " When copying documents, folders, or links, this value determines whether document links are copied, too. The standard setting is that they are not copied.
"X": all links are copied with the object.
" ": only the object is copied (without object links).
AutomaticLinkage "X" or " " When creating documents, folders, or links,

9.10.3 Checking the Relation Service
23.08.2004 209
this value determines whether document links are set up directly from business object maintenance.
"X": all newly created documents whose superordinate folder is not yet linked to the relevant business object are linked to the business object.
" ": no links are created automatically.
4. Configuring the EdocEventing Service
You have the following options for configuring the EdocEventing Service:
EP 5.0 only:
Direct Change to File _edoc_event_receiver.co.xml
Open file _edoc_event_receiver.co.xml in folder <cm.config.root>\local\plugins\cm\services\instances, and change attribute RepositoryManager. This attribute contains the repository managers that are relevant to MDM. The entries are separated by a comma (without blank). If no IDs or non-existent IDs are saved for the attribute, all existing repositories are considered as relevant to MDM.
Example: <property name="RepositoryManager" value="documents,xxx,yyy"/>
Configuration in the Portal Environment ... ... ...
i. Choose KM Admin → Configuration → Content Management.
ii. Choose Global Services.
iii. Select Classes EDocEventingService and switch to change mode.
iv. Change the attribute RepositoryManager as described in the previous section.
5. Configuring the EDoc Logger ...
a. EP 5.0 only:
To activate the EDoc Logger, create folder
com.sap.pct.mdm.edoc.api.portalservice under <J2EE servlet path>\irj\root\WEB-INF\plugins\portal\system\xml\.
b. EP 5.0 only:
Copy the files classLogger.xml and logger.xml from archive com.sap.pct.mdm.edoc.api.edocportalservice.par.bak to the folder you have created.
The changes to the logger become active only when you restart the portal.
For more information about the configuration and use of the logging mechanisms, see help.sap.com → SAP NetWeaver → SAP Enterprise Portal → Administration Guide → Monitoring the Portal Server → Logging in the Portal.
Result The MDM document services have been installed and configured.
9.10.3 Checking the Relation Service The settings described here apply to the business scenarios MDM Content Consolidation, MDM Master Data Harmonization, and MDM Central Master Data Management.

9.10.4 EP 5.0: Configuring the Basic Authentication for WebDAV
SAP MDM Content Consolidation: Configuration Guide for MDM 2
210 23.08.2004
Use Ensure that the relation service has been activated. The relation service must be configured in Content Management.
Procedure ...
1. In the SAP Enterprise Portal choose KM Admin → KM Component Monitor.
2. Choose Runtime → Services.
3. EP 5.0 only:
Check whether an entry exists for the service Relation with the status Running.
Alternatively you can check that the following files exist.
File Target Folder of the Portal Server
RelationRepositoryManager.cc.xml <cm.config.root>\local\plugins\cm\ repository_managers\config_classes
relations.co.xml <cm.config.root>\local\plugins\cm\ repository_managers\instances
RelationService.cc.xml <cm.config.root>\local\plugins\cm\ services\config_classes
relation.co.xml <cm.config.root>\local\plugins\cm\ services\instances
relation (directory) <cm.config.root>\local\plugins\cm\ services\
9.10.4 EP 5.0: Configuring the Basic Authentication for WebDAV The settings described here apply to the business scenarios MDM Content Consolidation, MDM Master Data Harmonization, and MDM Central Master Data Management.
Use Configure the Basic Authentication for WebDAV (Web-Based Distributed Authoring and Versioning). To activate documents in master data management you must configure the WebDAV access in a special way, so that you can log on to Content Management of the SAP Enterprise Portal with your user and password.
Prerequisites In order to use documents you must configure WebDAV access for the MDM system and the SAP Enterprise Portal.
Procedure ...
1. EP 5.0 only:
Open the directory \irj\WEB-INF\plugins\portal\services\usermanagement\data. ...
a. Enter authscheme.default.use_basic_auth_header = 1 in the file usermanagement.properties.

9.10.5 Defining Object Links
23.08.2004 211
b. Save your changes.
2. EP 5.0 only:
Open the directory <cm.config.root>\local\plugins\cm\usermanagement\instances\.
In the file _usermanagement.co.xml change the value of the attribute logon.webdav to <property name="logon.webdav" value="basic" />.
9.10.5 Defining Object Links The settings described here apply to the business scenarios MDM Content Consolidation, MDM Master Data Harmonization, and MDM Central Master Data Management.
Use Perform the following configuration steps to enable links between master data objects and other business objects.
The files used are in archive com.sap.pct.mdm.edoc.api.edocportalservice.par.bak.
Procedure
Linking a Document to a Business Object ...
1. EP 5.0 only:
Copy the file mdm__link__to__object.co.xml to the directory <cm.config.root>\local\plugins\cm\ui\uicommand\instances.
2. Configure the command mdm_link_to_object. You have the following options for this configuration:
EP 5.0 only:
Direct Change to File _resource_actions_group.co.xml
i. Open directory <cm.config.root>\local\plugins\cm\ui\uicommand\instances\.
ii. In file _resource_actions_group.co.xml, insert the new command mdm_link_to_object.
To do this, change the following line:
<property name="cmdList" value="copy,move,rename,create_link,change_link,CopyLinksGroup" />
iii. Change this line as follows:
<property name="cmdList" value="copy,move,rename,create_link,change_link,mdm_link_to_object,CopyLinksGroup" />
Configuration Using the Portal ... ...
i. In the portal, choose KM Admin → Configuration → Content Management.
ii. Choose User Interface → Commands → UI Command Groups.
iii. Select the group ResourceActionsGroup and choose Edit.
iv. Insert the user interface command mdm_link_to_object after change_link.
v. Save your settings.

9.10.6 Defining the HTTP Connection to Content Management
SAP MDM Content Consolidation: Configuration Guide for MDM 2
212 23.08.2004
Display Business Objects That Are Linked to the Document ...
1. EP 5.0 only:
Copy the file mdm__show__linked__objects.co.xml to the directory <cm.config.root>\local\plugins\cm\ui\uicommand\instances.
2. Configure the command mdm_show_linked_objects. You have the following options for this configuration:
EP 5.0 only:
Direct Change to File _details_settings_group.co.xml
i. Open directory <cm.config.root>\local\plugins\cm\ui\uicommand\instances\.
ii. In file details_settings_group.co.xml, insert the new command mdm_show_linked_objects.
To do this, change the following line:
<property name="cmdList" value=" properties,permissions,service_permissions,folder_settings,DetailsSettingsSecondGroup(expanded)" />
iii. Change this line as follows:
<property name="cmdList" value=" properties,permissions,service_permissions,folder_settings,DetailsSettingsSecondGroup(expanded),mdm_show_linked_objects" />
Configuration Using the Portal ...
i. In the portal, choose KM Admin → Configuration → Content Management.
ii. Choose User Interface → Commands → UI Command Groups.
iii. Select the group DetailsSettingsGroup and choose Edit.
Insert the user interface command mdm_show_linked_objects after DetailsSettingsSecondGroup(expanded).
iv. Save your settings.
Property "Links to Master Data Objects" EP 5.0 only:
Copy the file mdm__relation__exist.co.xml to the directory <cm.config.root>\local\plugins\cm\ui\detailsproperties\instances.
Result You have configured the commands for using links between documents and other business objects.
Make sure that the portal server is restarted after these portal-related configuration steps.
9.10.6 Defining the HTTP Connection to Content Management The settings described here apply to the Business Scenarios MDM Content Consolidation, MDM Master Data Harmonization, and MDM Central Master Data Management.

9.10.6 Defining the HTTP Connection to Content Management
23.08.2004 213
Use Before you can use documents in master data management, HTTP communication must be set up between the MDM system and Content Management (CM).
If you use HTTPS (Hypertext Transfer Protocol with SSL) to control communication in the portal environment, see SAP Note 634637 (MDM 2.00 – Configuration Guide – Portal). In this case, you should also define the following connection as an HTTPS connection.
Prerequisites You have successfully installed and configured the portal services for documents. For more information, see Installing and Configuring Document Services [Page 207].
Procedure ... ...
1. Create HTTP Connection
Create an HTTP connection for accessing Content Management in the MDM system in transaction SM59, with the following definition:
Technical Settings
Field Value Description
Connection type G HTTP connection to external server
Description For example, MDM to Content Management
A meaningful description
Target host <host name> Name of the server on which Content Management is running. This is usually the portal server.
Service number <port> Port number for accessing the target host
Path prefix No entry required
Logon/Security
Communication with Content Management cannot use Single Sign-On for technical reasons. For this reason, you must create a user with password in this HTTP connection. This is used to access Content Management in the following scenarios:
When creating or sending documents in distribution
When finding linked documents for an object in dialog
This user needs to be created in Content Management only, and the role com.sapportals.km.km_admin must be assigned to it. Make sure that sufficient authorization for all MDM-relevant documents is assigned.
2. Define Access to Content Management
Specify the HTTP address in Customizing for Documents under Define Content Management for MDM.
For more information on accessing Content Management, see the Implementation Guide (IMG) for Documents.

9.10.7 Defining Document Services in the MDM System
SAP MDM Content Consolidation: Configuration Guide for MDM 2
214 23.08.2004
9.10.7 Defining Document Services in the MDM System The settings described here apply to the business scenarios MDM Master Data Harmonization and MDM Central Master Data Management.
Use For technical reasons, the relevant services must be specified in order to access Content Management from the MDM system.
Prerequisites You have successfully installed and configured the portal services for MDM documents. For more information, see Installing and Configuring Document Services [Page 207].
Procedure ...
1. Start table maintenance (transaction SM30) for table EDOC_CT02 and adapt the paths to the services to match your installation. This step should not be necessary in a standard installation.
EP 6.0:
In an EP 6.0 installation, the paths of the following services are different from the paths in an EP 5.0 installation:
WebDAV-Client: /irj/servlet/prt/portal/prtroot/com.sap.km.cm.docs
CM-Explorer (UI): /irj/servlet/prt/portal/prtroot/com.sap.km.cm.navigation
CM-Detail (UI): /irj/servlet/prt/portal/prtroot/com.sap.km.cm.uidetails
2. Check the connection to Content Management by using report EDOC_CHECK_WEBDAV_CONNECTION.
Result You have successfully configured access to Content Management in the MDM system.
9.10.8 Defining the Path for Saving Documents in CM The settings described here apply to the business scenarios MDM Content Consolidation, MDM Master Data Harmonization, and MDM Central Master Data Management.
Use For the distribution of documents, the definition of a Content Management path (CM path) is absolutely necessary, so that documents can be saved automatically. You have the option of defining a CM path, which simplifies navigation in dialog when creating a document link.
Prerequisites You have defined the relevant repositories in Content Management.
Procedure Define the CM paths you require for distribution and dialog in Customizing for Documents. For more information about paths, see the Implementation Guide (IMG).
9.10.9 Defining the RFC Destination for the Logical

9.10.9 Defining the RFC Destination for the Logical R/3 Source System
23.08.2004 215
R/3 Source System The settings described here apply to the business scenarios MDM Content Consolidation, MDM Master Data Harmonization, and MDM Central Master Data Management.
Use If you want to receive documents from an SAP R/3 client system in the MDM system, you must define an RFC destination for transporting the originals.
Prerequisites You defined the client systems of type R/3, from which documents and their originals should be received.
Procedure ...
1. Define an RFC connection of type 3 for accessing the R/3 client system. To do this, call transaction SM59 in the MDM system.
You require a separate RFC connection for each R/3 client system from which you want to receive documents. Define a user for logging on to this client system to which the role SAP_CA_DMS_MAINTAIN has been assigned.
2. Assign a logical system to each of the RFC connections in Customizing for Documents under Define RFC Destinations for Logical R/3 Source System.
Ensure that the logical system you define matches the logical system of the sending client system in its ALE Customizing.
For more information on defining RFC connections, see the implementation guide (IMG) for Documents.
For more information about configuring ALE middleware, see help.sap.com → SAP NetWeaver → SAP Web Application Server → mySAP Technology Components → SAP Web Application Server → Middleware (BC-MID) → Application Link Enabling (BC-MID-ALE).
9.10.10 Configuring XI: MDC R/3 Document – MDM Document The settings described here apply to the business scenarios MDM Content Consolidation, MDM Master Data Harmonization, and MDM Central Master Data Management.
Use The following settings are required to receive documents in the MDM system from SAP or non-SAP client systems via the SAP Exchange Infrastructure (XI). Various document management applications can be connected on a project basis. The following section describes the connection of a client system for document management in R/3 (CA-DMS).
Overview: MDC R/3 Document – MDM Document
MDM Interface MDC Interface Interface Mapping Archive
DocumentMasterIn docmas.docmas04 DocmasToDocumentMasterIn MDM20_Docmas_Document
Prerequisites You have successfully configured the management of documents in the MDM system. In the client system, the ALE settings necessary for sending ALE message type DOCMAS to the SAP Exchange Infrastructure have been defined.

9.10.10 Configuring XI: MDC R/3 Document – MDM Document
SAP MDM Content Consolidation: Configuration Guide for MDM 2
216 23.08.2004
For more information about configuring ALE middleware, see help.sap.com → SAP NetWeaver → SAP Web Application Server → SAP Web Application Server → Middleware (BC-MID) → Application Link Enabling (BC-MID-ALE).
Procedure In the Integration Directory (configuration time) of the SAP Exchange Infrastructure, define the following settings. ...
1. Define and Complete Business Scenario and Recipient Determination
In the Integration Directory, choose Business Scenarios. Define a new business scenario or add to an existing one, and create recipient determination.
Field Field Contents Description
Sender business system
<source system according to SLD>
Identifier of the source system according to SLD configuration (client system)
Sender interface name
DOCMAS.DOCMAS04 Name of interface
Sender interface namespace
urn:sap-com:document: sap:idoc:messages
SAP Namespace
Recipient <target system according to SLD>
Identifier of the target system according to SLD configuration (MDM system)
For more information about the configuration of interface determination for outbound interfaces, see help.sap.com → SAP NetWeaver → SAP Exchange Infrastructure → Design and Configuration Time → Configuration → Definition of Receiver Determinations.
2. Define an Interface Determination for Outbound Interfaces
In the Integration Directory, choose Interface Determination for Outbound Interface. Define the interface determination.
Field Field Contents Description
Sender business system
<source system according to SLD>
Identifier of the source system according to SLD configuration (client system)
Sender interface name
DOCMAS.DOCMAS04 Name of interface
Sender interface namespace
urn:sap-com:document: sap:idoc:messages
SAP Namespace
Recipient <target system according to SLD>
Identifier of the target system according to SLD configuration (MDM system)
Inbound interface name
DocumentMasterIn Name of interface
Inbound interface namespace
http://sap.com/xi/CMDM SAP Namespace
Interface mapping: Name
DocmasToDocumentMasterIn Interface Mapping

9.10.10 Configuring XI: MDC R/3 Document – MDM Document
23.08.2004 217
Interface mapping: Interface namespace
http://sap.com/xi/CMDM SAP Namespace
For more information about the configuration of interface determination for outbound interfaces, see help.sap.com → SAP NetWeaver → SAP Exchange Infrastructure → Design and Configuration Time → Configuration → Definition of Interface Determinations.
3. Define End Points for Target System
If the end point is an Integration Engine, note that these can always be addressed with either URL or HTTP addressing. For security reasons, use the address type HTTP destination. Address type HTTP destination requires the definition of an RFC destination of type H in transaction SM59 in the Integration Server.
For more information about the use of non-Unicode systems in the MDM environment, see Connecting Non-Unicode Systems [Page 82].
In the Integration Directory (configuration time), choose End Points for Receiver System. Define an end point for the MDM system in your system landscape.
Field Field Contents Description
Business System <target system according to SLD>
Identifier of the target system according to SLD configuration (MDM system)
Interface Name DocumentMasterIn Name of interface
Interface Namespace http://sap.com/xi/CMDM SAP Namespace
End point type Integration Engine Depending on the end point type, different attributes must be defined.
Also save the necessary addressing information.
For more information about the configuration of end points, see help.sap.com → SAP NetWeaver → SAP Exchange Infrastructure → Design and Configuration Time → Configuration → Defining End Points.
4. Define Logon Data for Target System
Depending on the end point type and address type, you can define logon data for the target system.
Note that the logon data must be defined in the assigned RFC destination if the end point is an IDoc adapter.
For more information about the configuration of logon parameters, see help.sap.com → SAP NetWeaver → SAP Exchange Infrastructure → Design and Configuration Time → Configuration → Defining Logon Data.

9.10.11 Configuring XI: MDM Document – MDC R/3 Document
SAP MDM Content Consolidation: Configuration Guide for MDM 2
218 23.08.2004
Result The SAP Exchange Infrastructure is configured for the receiving of documents from an R/3 client system (R/3 business object document) in the MDM system.
9.10.11 Configuring XI: MDM Document – MDC R/3 Document The settings described here apply to the Business Scenarios MDM Content Consolidation, MDM Master Data Harmonization, and MDM Central Master Data Management.
Use The following settings are required to send documents from the MDM system to SAP or non-SAP client systems via the SAP Exchange Infrastructure. Various document management applications can be connected on a project basis. The following section describes the connection of a client system for document management in R/3 (CA-DMS).
Overview: MDM Document – MDC R/3 Document
MDM Interface MDC Interface Interface Mapping Archive
DocumentMasterOut docmas.docmas04 DocumentMasterOutToDocmas MDM20_Docmas_Document
Prerequisites You have successfully configured the management of documents in the MDM system. In the client system, the ALE settings necessary for receiving ALE message type DOCMAS from the SAP Exchange Infrastructure have been defined.
Note that SAP Note 598046 "Enhancement IDOC_INPUT_DOCMAS" is required for ALE inbound processing in R/3 of documents that are distributed from the MDM system.
For more information about configuring ALE middleware, see help.sap.com → SAP NetWeaver → SAP Web Application Server → mySAP Technology Components → SAP Web Application Server → Middleware (BC-MID) → Application Link Enabling (BC-MID-ALE).
HTTP or HTTPS is used for sending originals to an R/3 system. Refer to SAP Note 506314 in this connection.
Procedure In the Integration Directory (configuration time) of the SAP Exchange Infrastructure, define the following settings. ...
1. Define and Complete Business Scenario and Receiver Determination
Perform this step only if one of the following conditions applies:
In subscriptions, you want to use recipient type XI for this object type. In other words, you want receiver determination to use the SAP Exchange Infrastructure.
You want certain systems to always receive messages for the object type.
Steps 2-4 must always be performed.

9.10.11 Configuring XI: MDM Document – MDC R/3 Document
23.08.2004 219
Make sure you consider the interactions described under Defining Recipients [External].
In the Integration Directory, choose Business Scenarios. Define a new Business Scenario or add to an existing one, and create receiver determination.
Field Field Contents Description
Sender business system
<source system according to SLD>
Identifier of the source system according to SLD configuration (MDM system)
Sender interface name
DocumentMasterOut Name of interface
Sender interface namespace
http://sap.com/xi/CMDM
SAP namespace
Recipient <target system according to SLD>
Identifier of the target system according to SLD configuration (client system)
For more information about the configuration of interface determination for outbound interfaces, see help.sap.com → SAP NetWeaver → SAP Exchange Infrastructure → Design and Configuration Time → Configuration → Definition of Receiver Determinations.
2. Define an Interface Determination for Outbound Interfaces
In the Integration Directory, choose Interface Determination for Outbound Interface. Define the interface determination.
Field Field Contents Description
Sender business system
<source system according to SLD>
Identifier of the source system according to SLD configuration (MDM system)
Sender interface name
DocumentMasterOut Name of interface
Sender interface namespace
http://sap.com/xi/CMDM
SAP namespace
Recipient <target system according to SLD>
Identifier of the target system according to SLD configuration (client system)
Inbound interface name
DOCMAS.DOCMAS04 Name of interface
Inbound interface namespace
urn:sap-com:document: sap:idoc:messages
SAP namespace
Interface mapping: Name
DocumentMasterOutToDocmas
Interface Mapping
Interface mapping: Interface namespace
http://sap.com/xi/C SAP namespace

9.10.11 Configuring XI: MDM Document – MDC R/3 Document
SAP MDM Content Consolidation: Configuration Guide for MDM 2
220 23.08.2004
MDM
For more information about the configuration of interface determination for outbound interfaces, see help.sap.com → SAP NetWeaver → SAP Exchange Infrastructure → Design and Configuration Time → Configuration → Definition of Interface Determinations.
3. Define End Points for Target System
If the end point is an IDoc adapter, note that this requires the definition of an RFC connection of type 3 in transaction SM59 in the Integration Server for access to the target system. If the target system is a Unicode system, you must also define the necessary settings for this RFC connection under Special Options.
For more information about the use of non-Unicode systems in the MDM environment, see Connecting Non-Unicode Systems [Page 82].
In the Integration Directory (configuration time), choose Receiver System End Points. Define an end point for the MDC system in your system landscape.
Field Field Contents Description
Business system <target system according to SLD>
Identifier of the target system according to SLD configuration (client system)
Interface name DOCMAS.DOCMAS04 Name of interface
Interface namespace urn:sap-com:document: sap:idoc:messages
SAP namespace
End point type IDoc Adapter Depending on the end point type, different attributes must be defined.
Also save the necessary addressing information.
For more information about the configuration of end points, see help.sap.com → SAP NetWeaver → SAP Exchange Infrastructure → Design and Configuration Time → Configuration → Defining End Points.
4. Define Logon Data for Target System
Depending on the end point type and address type, you can define logon data for the target system.
Note that the logon data must be defined in the assigned RFC destination if the end point is an IDoc adapter.
For more information about the configuration of logon parameters, see help.sap.com → SAP NetWeaver → SAP Exchange Infrastructure → Design and Configuration Time → Configuration → Defining Logon Data.

10 Master Data Exchange
23.08.2004 221
Result The SAP Exchange Infrastructure is configured for the sending of documents from the MDM system to an R/3 client system.
10 Master Data Exchange This section describes the configuration steps for master data exchange.
It does not list all of the existing IMG activities, but rather those you require to use the standard functions.
10.1 Central Settings for Master Data Exchange The settings described here apply to the business scenarios MDM Content Consolidation, MDM Master Data Harmonization, and MDM Central Master Data Management.
This section describes the central configuration steps for master data exchange.
10.1.1 Defining Distribution Systems The settings described here apply to the business scenarios MDM Content Consolidation, MDM Master Data Harmonization, and MDM Central Master Data Management.
Use To use the MDM distribution framework you must define the connected client systems and various parameters for controlling master data transfer and distribution.
Prerequisites You defined the client systems in the System Landscape Directory (SLD) of the SAP Exchange Infrastructure. For more information, see Defining Systems in the SLD [Page 125].
Procedure Follow the instructions in the implementation guide (IMG) in the MDM system for Central Settings under Define Systems in Distribution.
Note that you must transfer the system names to the quality system after the development system transport. Follow the instructions in the implementation guide (IMG) in the MDM system for Central Settings under Assign MDC Systems for Import Post Processing.
Result You defined the relevant client systems to be used in MDM scenarios.
10.1.2 Defining RFC Destinations for XI The settings described here apply to the Business Scenarios MDM Content Consolidation, MDM Master Data Harmonization, and MDM Central Master Data Management.

10.1.3 Defining Settings for Object Types
SAP MDM Content Consolidation: Configuration Guide for MDM 2
222 23.08.2004
Prerequisites To use the MDM distribution framework, the definition of an RFC connection from the MDM system to the XI system is required.
Procedure Follow the instructions in the implementation guide (IMG) in the MDM system for Master Data Exchange (MDM-MX) → Central Settings → Systems → Define RFC Destination for XI.
Note the authorizations for the user in the XI system that are listed in this documentation.
Result You have defined the RFC destination for the XI that is required for master data distribution.
10.1.3 Defining Settings for Object Types The settings described here apply to the business scenarios MDM Content Consolidation, MDM Master Data Harmonization, and MDM Central Master Data Management.
Use Define the behavior of master data object types with reference to various process steps such as distribution, staging, and matching.
Procedure Follow the instructions in the implementation guide (IMG) in the MDM system for Central Settings under Define Settings for Object Types of Master Data Server.
Result You have defined the parameters required for the process steps for master data object types.
10.2 Process Control and Monitoring for Master Data Exchange The settings described here apply to the Business Scenarios MDM Content Consolidation, MDM Master Data Harmonization, and MDM Central Master Data Management.
Note that if XI proxies are heavily used (for example, by inbound processing) the number of dialog work processes used for these tasks should be limited. Otherwise you run the risk of not being able to assign further dialog work processes when a user logs on. Using the SAP profile parameter rdisp/rfc_min_wait_dia_wp you can define how many work processes should be kept free for tasks other than the processing of RFC and HTTP requests (see SAP Note 74141).
The background user ALEREMOTE must exist before you can process process chains. Create this user with the transaction RSBWREMOTE in the MDM system.
For more information, see Roles for Remote Users in Master Data Management [Page 70]

10.2.1 Defining Parameters for Process Types
23.08.2004 223
10.2.1 Defining Parameters for Process Types The settings described here apply to the Business Scenarios MDM Content Consolidation, MDM Master Data Harmonization, and MDM Central Master Data Management.
Use The process chains developed in the Business Information Warehouse (SAP BW) are used in master data management for configuration, control, and monitoring of master data exchange processes. For automatic execution of these process chains, various parameters are required, which are configured as described below.
Procedure Follow the instructions in the implementation guide (IMG) in the MDM system for Process Control and Monitoring under Define Parameters for Process Types.
Pay special attention to the note on direct distribution, for which a special process chain must be created and assigned.
Result You have defined the necessary parameters for process types.
10.2.2 Defining Process Chains The settings described here apply to the Business Scenarios MDM Content Consolidation, MDM Master Data Harmonization, and MDM Central Master Data Management.
Use The configuration, control, and monitoring of the master data exchange in master data management is based on process chains, defined in the following documentation. These process chains consist of MDM-specific process steps, which are first placed in a certain order when the process chain is configured, and then defined by variants.
The documentation for the process chain definition is a part of the Application Help for master data management and is therefore not described in detail here.
Prerequisites Before you can configure a process chain for extracting data from a client system, the definition of the extractors must be available in the MDM system. For more information see Extraction [Page 227].
Procedure Follow the instructions in the implementation guide (IMG) in the MDM system for Process Control and Monitoring under Define Process Chains. For more information, see the Application Help about maintaining process chains.
In addition to actual object distribution, process chains are required for the following preparatory configuration steps:
• Generate product categories from material types
• Generate product categories from material groups
In this case it is sufficient if each process chain contains the process steps start, extraction and synchronization.

10.2.3 SP04: Lock Logic for Inbound Extraction Methods
SAP MDM Content Consolidation: Configuration Guide for MDM 2
224 23.08.2004
Result You have defined the process chains for transferring and distributing master data, and made any necessary preparations.
10.2.3 SP04: Lock Logic for Inbound Extraction Methods The settings described here apply to the Business Scenarios MDM Content Consolidation, MDM Master Data Harmonization, and MDM Central Master Data Management.
Use As of SP03, there is a lock logic that locks the different processes (PIC, initial load, delta load, and asynchronous delta load) against each other. The concept is as follows:
• When a PIC (periodic inbound collector) is running, no other PIC can run.
• When a PIC is running, no initial load or delta load can run, and when an initial load or delta load is running, no PIC can run.
• When a delta load is running, no other delta load can run, and no initial load can run.
• When an initial load is running, no delta load can run. Another initial load can only run if the user sets the lock mode in the variant. Look carefully at the comments in the "Procedure" section.
This leads to lock combinations that are shown in the following lock matrix:
Lock Matrix
PIC Initial Delta Asynchronous
PIC x x x x
Initial x xx x x
Delta x x x x
Asynchronous x x x x
Legend for table:
• x: Processes are locked against each other.
• xx: You can use the Ignore Lock indicator to run initial loads in parallel.
You can set this indicator in the Extraction of Client Data variant. An initial load can then be started, even though another initial load for the same combination of business system and extraction objects is running.
Procedure Starting Parallel Initial Loads If you want to run initial loads in parallel, you can set the Ignore Lock indicator in the Extraction of Client Data variant. An initial load can then be started, even though another initial load for the same combination of business system and extraction objects is running.
However, only set this indicator if you are sure that the selection interval of this variant does not overlap with the initial load variants that are already maintained. If you are not sure, do not set this indicator.

10.2.4 SP05ff: Lock Logic for Inbound Extraction Methods
23.08.2004 225
Otherwise, parallel initial loads running on the MDS may lead to data inconsistencies. This particularly applies when the same objects are processed in two different processes. In this case, the update sequence may be incorrect.
For this reason, only run parallel initial loads if you are certain that they only process different objects. In other words, the selection intervals of the initial loads you want to start do not overlap.
For more information, see SAP Note 673455.
10.2.4 SP05ff: Lock Logic for Inbound Extraction Methods The settings described here apply to the Business Scenarios MDM Content Consolidation, MDM Master Data Harmonization, and MDM Central Master Data Management.
Use In SP05 contains lock logic that locks the various processes (PIC, initial load, delta load, and asynchronous delta load) against each other. This is the effect:
• When a PIC (periodic inbound collector) is running, no other PIC can run.
However, in the read inbound messages variant, you can set the Ignore Lock indicator. If you do this, you can start and run a PIC process, even though another PIC process is running for the same combination of business system and object type.
See the notes in the procedure.
• When a PIC is running, no initial load or delta load can run, and the other way around.
• When a delta load is running, no other delta load and no initial load can run.
• When an initial load is running, no delta load can run, and another initial load can only run if you set the Ignore Lock indicator in the variant.
See the notes in the procedure.
The leads to the lock combinations shown in the following lock matrix:
Lock Matrix
PIC Initial Delta Asynchronous
PIC xx x x x
Initial x xx x x
Delta x x x x
Asynchronous x x x x
Legend for table:
• x: Processes are locked against each other
• xx: Initial loads and PIC processes can run in parallel with the Ignore Lock indicator
You can set the Ignore Lock indicator in the Extraction of Client Data variants for initial load or in the Read Inbound Messages variant for the PIC. If you do this, you can start

10.3 Master Data Transfer to the MDM System
SAP MDM Content Consolidation: Configuration Guide for MDM 2
226 23.08.2004
and run the process, even though other processes are running for the same combination of business system and object type (PIC) or the same combination of business system and extraction object (initial load).
Procedure Starting Parallel PIC Processes You can run parallel PIC processes if you set the Ignore Lock indicator in the Read Inbound Messages variant. If you do this, you can start and run a PIC process, even though another PIC process is running for the same combination of business system and object type.
Sequence problems on posting can no longer occur as of this support package. However, you may still create unwanted duplicates. For example, if two identical objects A and B are sent to the MDS from different business systems. If these objects are processed in two different PIC processes, these objects may not be recognized as duplicates. This is the case if object A in the first process has not yet been created on the MDS. The second process with object B cannot then recognize object A as a duplicate on the server in the match/merge step, and both objects are created.
Starting Parallel Initial Loads If you want to run initial loads in parallel, you can set the Ignore Lock indicator in the Extraction of Client Data variant. An initial load can then be started, even though another initial load for the same combination of business system and extraction objects is running.
However, only set this indicator if you are sure that the selection interval of this variant does not overlap with the initial load variants that are already maintained. If you are not sure, do not set this indicator.
Otherwise, parallel initial loads running on the MDS may lead to data inconsistencies. This particularly applies when the same objects are processed in two different processes. In this case, the update sequence may be incorrect.
For this reason, only run parallel initial loads if you are certain that they only process different objects. In other words, the selection intervals of the initial loads you want to start do not overlap.
For more information, see SAP Note 673455.
10.3 Master Data Transfer to the MDM System The settings described here apply to the business scenarios MDM Content Consolidation, MDM Master Data Harmonization, and MDM Central Master Data Management.
This section describes the configuration steps for master data transfer to the MDM system (for example, generation of staging tables, extraction, matching).
10.3.1 Generation of Staging Tables The settings described here apply to the Business Scenarios MDM Content Consolidation, MDM Master Data Harmonization, and MDM Central Master Data Management.
Use The MDM system has what is known as a staging area, where master data objects can be stored without being saved directly to the object tables of the MDM system as MDM master data objects (for example, when loading from a client system or creating centrally by using forms).

10.3.2 Extraction
23.08.2004 227
In the following situations, you must generate or regenerate the staging tables used for this purpose:
• You are setting up a new system
• You are defining the initial database structure of a master data object
• You are changing the database structure of a master data object, for example by defining append fields or filling customer includes
• After transport of the new database structure for a master data object to a connected system (for example, transport from the development system to a test system), there is no need to generate the staging tables manually in these connected systems. They are generated automatically by an after-import method of the transport.
Procedure We recommend that you define the database structure of master data objects before generating the staging tables. However, it may be necessary to make changes to the database structure after generating the staging tables. On subsequent regeneration of the staging tables, the following distinct cases can occur:
• No master data objects of this type yet exist in the staging area.
In this case, the staging tables can be regenerated directly.
• Master data objects of this type already exist in the staging area. ...
The changes are extensions (for example, a new attribute, a new set type, a new append field, or an increase in field lengths).
In this case you can regenerate without removing the objects from staging first. The objects are automatically copied to the new structure during generation.
The data model has been changed (for example, a reduction in field lengths, field names, or reassignment of substructures).
In this case, the objects must first be copied from the staging area to the database tables of the MDM system by completion of process instances, because the objects cannot be copied to the new structure automatically.
Generate the staging tables for the object type in Customizing for Master Data Transfer under Generate Staging Storage.
For more information about the generation of staging tables, see the Implementation Guide (IMG) for the activity named above.
Result The tables for the staging area for objects have been generated successfully.
10.3.2 Extraction The settings described here apply to the business scenarios MDM Content Consolidation, MDM Master Data Harmonization, and MDM Central Master Data Management.
This section describes the configuration steps for extraction.

10.3.2.1 Graphical Overview: Master Data Extraction
SAP MDM Content Consolidation: Configuration Guide for MDM 2
228 23.08.2004
10.3.2.1 Graphical Overview: Master Data Extraction This graphic shows the system components that are involved in the extraction of master data from a master data client (MDC).
M
Master Data Server (MDS)Master Data Engine
Process step"Extraction of
client data"
Staging DB ID mapping service
Content Integrator (CI)
Exchange Infrastructure
(XI)
Messagerouting
andmapping
Master Data Client (MDC)
Extractionframework
in themaster
data clientMDM IDmapping
framework
SOAP/ http
IDoc/ RFC/ SOAP/ http etc.
RFC
Read ID mappings of the objects being processed
Staging DB
Process control
Process container
R R
RR
R = RequestSOAP = Simple Object
Access Protocol
10.3.2.2 Graphical Overview: Process Flow of Master Data Extraction This graphic shows the flow of master data extraction from a master data client (MDC).
Example: data selection of a material master record from an R/3 MDC to the master data server (MDS).

10.3.2.3 Configuring XI: Extraction from the Client System Using the IDoc Adapter
23.08.2004 229
CI MDS XI MDC
MDMReqOutMDMREQUEST
MDMRECEIPTInfo: Data request
received
MDMReceiptIn
MDMRECEIPTMDMReceiptInInfo: Data selection
started
MATMASRFC
Read IDmapping
RFC: OK
ProductSetIn
MDMRECEIPTMDMReceiptInInfo: Data sent
MDMRECEIPTMDMReceiptInInfo: Data selection
finished
Per data packet
21
3
4
...
1. Application object message in IDoc format (for example, material master from R/3)
2. RFC call from XI to ID mapping framework
3. Result of ID mapping query
4. Application object message in MDS format
10.3.2.3 Configuring XI: Extraction from the Client System Using the IDoc Adapter The settings described here apply to the Business Scenarios MDM Content Consolidation, MDM Master Data Harmonization, and MDM Central Master Data Management.
Use The following settings are necessary to enable message exchange for extraction between the MDM system and the connected client systems.
The following cases exist: ... ...
• The client system is based on the SAP Web Application Server 6.20 or higher.
In this case, communication uses the message interface. Structural mapping is not required.
• The client system is based on the SAP Web Application Server 6.10 or earlier.
In this case, structural mapping to IDoc format runs during communication. In other words, the IDoc adapter is used on the client system side.

10.3.2.3 Configuring XI: Extraction from the Client System Using the IDoc Adapter
SAP MDM Content Consolidation: Configuration Guide for MDM 2
230 23.08.2004
• The settings described here refer to the second case. You also have the option of using the IDoc adapter with the SAP Web Application Server 6.20 or higher.
The following table provides an overview of the message exchange and the interfaces involved.
Name of Message Interface (MDM)
Name of Message Interface (MDC)
Description
MDMReqOut MDMREQUEST.MDMREQUEST01 The MDM system sends a request to a client system.
This request may contain the request to send objects to the MDM system or information about the IDoc structures of master data objects.
MdmMetadata MDMMETA.MDMMETA The client system sends information about IDoc structures of master data objects to the MDM system.
MdmReceiptIn MDMRECEIPT.MDMRECEIPT01 The client system sends status information about the extraction transaction for IDoc structures or objects.
Prerequisites Your client system fulfills the system requirements described in the master guide for Master Data Management. You will find the master guide on the SAP Service Marketplace at service.sap.com/instguides → Installation and Upgrade Guides → SAP MDM.
You have defined an RFC destination for your XI system. For more information, see Configuring ALE Middleware in the Client System [Page 138].
If you populate other systems in addition to the XI, use SAP Note 679139, because otherwise the process step for extraction of client data cannot be ended.
Procedure First, perform the required ALE configuration steps in your client system. ...
1. In transaction SALE, in the Define Logical System area, set up a logical system for each of the following systems:
XI system
MDM system
Client system
Assign the relevant logical system to your client in the client system.
2. In transaction WE21, define a port of type Transactional RFC for your XI system. Assign the RFC destination to your XI system.
3. In transaction WE20, maintain the necessary partner profiles:
Inbound Parameters

10.3.2.3 Configuring XI: Extraction from the Client System Using the IDoc Adapter
23.08.2004 231
Logical system
Message Type Inbound Options: Process Code
Description
MDM system
MDMREQUEST MDMREQ Request from MDM system
Outbound Parameters
Logical system
Message Type Basic IDoc Type Outbound Options: Recipient Port
Description
XI system MDMMETA MDMMETA <XI system> Information about IDoc structures
XI system MDMRECEIPT MDMRECEIPT01 <XI system> Status Information
4. In transaction BD64, define a distribution model.
Sender Recipient Message Type
XI system MDC system MDMREQUEST
MDC system XI system MDMMETA
MDC system XI system MDMRECEIPT
5. After defining the ALE configuration, maintain the necessary data in the Integration Directory (configuration time) of the SAP Exchange Infrastructure.
Configuration steps for the following topics are described below:
• MDM request
• MDM meta
• MDM receipt
MDM Request For this message exchange, you do not define a Business Scenario (and therefore receiver determination), because the target system (MDC system) is defined explicitly in the extraction transaction within the MDM system. ...
1. Define an Interface Determination for an Outbound Interface
In the Integration Directory, choose Interface Determination for Outbound Interface. Define the interface determination.
Field Field Contents Description
Sender business system
<source system according to SLD>
Identifier of the source system according to SLD configuration (MDM system)
Sender interface name
MdmReqOut Name of interface

10.3.2.3 Configuring XI: Extraction from the Client System Using the IDoc Adapter
SAP MDM Content Consolidation: Configuration Guide for MDM 2
232 23.08.2004
Sender interface namespace
http://sap.com/xi/CMDM SAP namespace
Recipient <target system according to SLD>
Identifier of the target system according to SLD configuration (MDC system)
Inbound interface name
MDMREQUEST.MDMREQUEST01 Name of interface
Inbound interface namespace
urn:sap-com:document: sap:idoc:messages
SAP namespace
Interface mapping: Name
MdmReq_MDS_2_MDC Interface mapping
Interface mapping: Interface namespace
http://sap.com/xi/CMDM SAP namespace
For more information about the configuration of interface determination for outbound interfaces, see help.sap.com → SAP NetWeaver → SAP Exchange Infrastructure → Design and Configuration Time → Configuration → Definition of Interface Determinations.
2. Define End Points for Target System
If the end point is an IDoc adapter, note that this requires the definition of an RFC connection of type 3 in transaction SM59 in the Integration Server for access to the target system. If the target system is a Unicode system, you must also define the necessary settings for this RFC connection under Special Options.
For more information about Unicode systems in the MDM environment, see Configuring SAP GUI for Unicode [Page 82].
In the Integration Directory (configuration time), choose Receiver System End Points. Define an end point for the MDC system in your system landscape.
Field Field Contents Description
Business system <target system according to SLD>
Identifier of the target system according to SLD configuration (client system)
Interface name MDMREQUEST.MDMREQUEST01 Name of interface
Interface namespace
urn:sap-com:document: sap:idoc:messages
SAP namespace
End point type IDoc adapter Depending on the end point type, different attributes must be defined.
Also save the necessary addressing information.
For more information about the configuration of end points, see help.sap.com → SAP NetWeaver → SAP Exchange Infrastructure → Design and Configuration Time → Configuration → Defining End Points.

10.3.2.3 Configuring XI: Extraction from the Client System Using the IDoc Adapter
23.08.2004 233
3. Define Logon Data for Target System
Depending on the end point type and address type, you can define logon data for the target system. Note that the logon data must be defined in the assigned RFC destination if the end point is an IDoc adapter.
For more information about the configuration of logon parameters, see help.sap.com → SAP NetWeaver → SAP Exchange Infrastructure → Design and Configuration Time → Configuration → Defining Logon Data.
MDM Meta ...
1. Define and Complete Business Scenario and Receiver Determination
In the Integration Directory, choose Business Scenarios. Define a new Business Scenario or add to an existing one, and create receiver determination.
Field Field Contents Description
Sender business system
<source system according to SLD>
Identifier of the source system according to SLD configuration (client system)
Sender interface name
MDMMETA.MDMMETA Name of interface
Sender interface namespace
urn:sap-com:document: sap:idoc:messages
SAP namespace
Recipient <target system according to SLD>
Identifier of the target system according to SLD configuration (MDM system)
For more information about the configuration of interface determination for outbound interfaces, see help.sap.com → SAP NetWeaver → SAP Exchange Infrastructure → Design and Configuration Time → Configuration → Definition of Receiver Determinations.
2. Define an Interface Determination for Outbound Interfaces
In the Integration Directory, choose Interface Determination for Outbound Interface. Define the interface determination.
Field Field Contents Description
Sender business system
<source system according to SLD>
Identifier of the source system according to SLD configuration (client system)
Sender interface name
MDMMETA.MDMMETA Name of interface
Sender interface namespace
urn:sap-com:document: sap:idoc:messages
SAP namespace
Recipient <target system according to SLD>
Identifier of the target system according to SLD configuration (MDM system)
Inbound interface name
MdmMetdata Name of interface
Inbound interface namespace
http://sap.com/xi/CMDM SAP namespace

10.3.2.3 Configuring XI: Extraction from the Client System Using the IDoc Adapter
SAP MDM Content Consolidation: Configuration Guide for MDM 2
234 23.08.2004
Interface mapping: Name
MdmMetadata Interface mapping
Interface mapping: Interface namespace
http://sap.com/xi/CMDM SAP namespace
For more information about the configuration of interface determination for outbound interfaces, see help.sap.com → SAP NetWeaver → SAP Exchange Infrastructure → Design and Configuration Time → Configuration → Definition of Interface Determinations.
3. Define End Points for Target System
If the end point is an Integration Engine, note that these can always be addressed with either URL or HTTP addressing. For security reasons, use the address type HTTP destination. Address type HTTP destination requires the definition of an RFC destination of type H in transaction SM59 in the Integration Server.
For more information about Unicode systems in the MDM environment, see Configuring SAP GUI for Unicode [Page 82].
In the Integration Directory (configuration time), choose Receiver System End Points. Define an end point for the MDM system in your system landscape.
Field Field Contents Description
Business system <target system according to SLD>
Identifier of the target system according to SLD configuration (MDM system)
Interface name MdmMetadata Name of interface
Interface namespace
http://sap.com/xi/CMDM SAP namespace
End point type Integration Engine Depending on the end point type, different attributes must be defined.
Also save the necessary addressing information.
For more information about the configuration of end points, see help.sap.com → SAP NetWeaver → SAP Exchange Infrastructure → Design and Configuration Time → Configuration → Defining End Points.
4. Define Logon Data for Target System
Depending on the end point type and address type, you can define logon data for the target system. Note that the logon data must be defined in the assigned RFC destination if the end point is an IDoc adapter.
For more information about the configuration of logon parameters, see help.sap.com → SAP NetWeaver → SAP Exchange Infrastructure → Design and Configuration Time → Configuration → Defining Logon Data.

10.3.2.3 Configuring XI: Extraction from the Client System Using the IDoc Adapter
23.08.2004 235
MDM Receipt ...
1. Define and Complete Business Scenario and Receiver Determination
In the Integration Directory, choose Business Scenarios. Define a new Business Scenario or add to an existing one, and create receiver determination.
Field Field Contents Description
Sender business system
<source system according to SLD>
Identifier of the source system according to SLD configuration (client system)
Sender interface name
MDMRECEIPT.MDMRECEIPT01 Name of interface
Sender interface namespace
urn:sap-com:document: sap:idoc:messages
SAP namespace
Recipient <target system according to SLD>
Identifier of the target system according to SLD configuration (MDM system)
For more information about the configuration of interface determination for outbound interfaces, see help.sap.com → SAP NetWeaver → SAP Exchange Infrastructure → Design and Configuration Time → Configuration → Definition of Receiver Determinations.
2. Define an Interface Determination for Outbound Interfaces
In the Integration Directory, choose Interface Determination for Outbound Interface. Define the interface determination.
Field Field Contents Description
Sender business system
<source system according to SLD>
Identifier of the source system according to SLD configuration (client system)
Sender interface name
MDMRECEIPT.MDMRECEIPT01 Name of interface
Sender interface namespace
urn:sap-com:document: sap:idoc:messages
SAP namespace
Recipient <target system according to SLD>
Identifier of the target system according to SLD configuration (MDM system)
Inbound interface name
MdmReceiptIn Name of interface
Inbound interface namespace
http://sap.com/xi/CMDM SAP namespace
Interface mapping: Name
MdmReceipt_MDC_2_MDS Interface mapping
Interface mapping: Interface namespace
http://sap.com/xi/CMDM SAP namespace

10.3.2.3 Configuring XI: Extraction from the Client System Using the IDoc Adapter
SAP MDM Content Consolidation: Configuration Guide for MDM 2
236 23.08.2004
For more information about the configuration of interface determination for outbound interfaces, see help.sap.com → SAP NetWeaver → SAP Exchange Infrastructure → Design and Configuration Time → Configuration → Definition of Interface Determinations.
3. Define End Points for Target System
If the end point is an Integration Engine, note that these can always be addressed with either URL or HTTP addressing. For security reasons, use the address type HTTP destination. Address type HTTP destination requires the definition of an RFC destination of type H in transaction SM59 in the Integration Server.
For more information about Unicode systems in the MDM environment, see Configuring SAP GUI for Unicode [Page 82].
In the Integration Directory (configuration time), choose Receiver System End Points. Define an end point for the MDM system in your system landscape.
Field Field Contents Description
Business system <target system according to SLD>
Identifier of the target system according to SLD configuration (MDM system)
Interface name MdmReceiptIn Name of interface
Interface namespace
http://sap.com/xi/CMDM SAP namespace
End point type Integration Engine Depending on the end point type, different attributes must be defined.
Also save the necessary addressing information.
For more information about the configuration of end points, see help.sap.com → SAP NetWeaver → SAP Exchange Infrastructure → Design and Configuration Time → Configuration → Defining End Points.
4. Define Logon Data for Target System
Depending on the end point type and address type, you can define logon data for the target system. Note that the logon data must be defined in the assigned RFC destination if the end point is an IDoc adapter.
For more information about the configuration of logon parameters, see help.sap.com → SAP NetWeaver → SAP Exchange Infrastructure → Design and Configuration Time → Configuration → Defining Logon Data.
Result You have performed the necessary ALE and XI configuration steps for calling information on IDoc structures and status messages from client systems, and for initializing the sending of objects. For more information on actually sending master data objects, see Configuring XI:… for the individual objects.

10.3.2.4 Configuring XI: Extraction from the Client System Using the Message Interface
23.08.2004 237
10.3.2.4 Configuring XI: Extraction from the Client System Using the Message Interface The settings described here apply to the Business Scenarios MDM Content Consolidation, MDM Master Data Harmonization, and MDM Central Master Data Management.
Use The following settings are necessary to enable message exchange for extraction between the MDM system and the connected client systems.
The following cases exist:
• The client system is based on the SAP Web Application Server 6.20 or higher.
In this case, communication uses the message interface. Structural mapping is not required.
• The client system is based on the SAP Web Application Server 6.10 or earlier.
In this case, structural mapping to IDoc format runs during communication. In other words, the IDoc adapter is used on the client system side.
• The settings described here are only relevant for the first case. You also have the option of using the IDoc adapter with the SAP Web Application Server 6.20 or higher.
The following table provides an overview of the message exchange and the interfaces involved.
Name of Message Interface (MDM)
Name of Message Interface (MDC)
Description
MDMReqOut MDMReqIn The MDM system sends a request to a client system.
This request may contain the request to send objects to the MDM system or information about the IDoc structures of master data objects.
MdmMetadata MdmMetadataOut The client system sends information about the IDoc structures of master data objects to the MDM system.
MdmReceiptIn MdmReceiptOut The client system sends status information about the extraction transaction for IDoc structures or objects.
Prerequisites Your client system fulfills the system requirements described in the Master Guide for Master Data Management. You will find the Master Guide on the SAP Service Marketplace at service.sap.com/instguides → Installation and Upgrade Guides → SAP MDM.
You have successfully configured the Integration Engine of the SAP Exchange Infrastructure in the client system.
For more information about the configuration of the Integration Engine, see the installation guide on the SAP Exchange Infrastructure on the SAP Service Marketplace at service.sap.com/instguides → Installation and Upgrade Guides → SAP Exchange Infrastructure.
For more information, see SAP Exchange Infrastructure [Page 122].

10.3.2.4 Configuring XI: Extraction from the Client System Using the Message Interface
SAP MDM Content Consolidation: Configuration Guide for MDM 2
238 23.08.2004
Procedure Configuration steps for the following topics are described below:
• MDM Request
• MDM Meta
• MDM Receipt
Define the following settings in the Integration Directory (configuration time) of the SAP Exchange Infrastructure.
MDM Request For this message exchange, you do not define a Business Scenario (and therefore receiver determination), because the target system (MDC system) is defined explicitly in the extraction transaction within the MDM system. ...
1. Define an Interface Determination for an Outbound Interface
In the Integration Directory, choose Interface Determination for Outbound Interface. Define the interface determination.
Field Field Contents Description
Sender business system
<source system according to SLD>
Identifier of the source system according to SLD configuration (MDM system)
Sender interface name
MdmReqOut Name of interface
Sender interface namespace
http://sap.com/xi/CMDM SAP namespace
Recipient <target system according to SLD>
Identifier of the target system according to SLD configuration (MDC system)
Inbound interface name
MdmReqIn Name of interface
Inbound interface namespace
http://sap.com/xi/PI_BASIS SAP namespace
2. Define End Points for Target System
If the end point is an Integration Engine, note that these can always be addressed with either URL or HTTP addressing. For security reasons, use the address type HTTP destination. Address type HTTP destination requires the definition of an RFC destination of type H in transaction SM59 on the Integration Server.
For more information about Unicode systems in the MDM environment, see Configuring SAP GUI for Unicode [Page 82].
In the Integration Directory (configuration time), choose Receiver System End Points. Define an end point for the MDC system in your system landscape.
Field Field Contents Description

10.3.2.4 Configuring XI: Extraction from the Client System Using the Message Interface
23.08.2004 239
Business system <target system according to SLD>
Identifier of the target system according to SLD configuration (client system)
Interface name MdmReqIn Name of interface
Interface namespace http://sap.com/xi/PI_BASIS SAP namespace
End point type Integration Engine Depending on the end point type, different attributes must be defined.
Also save the necessary addressing information.
For more information about the configuration of end points, see help.sap.com → SAP NetWeaver → SAP Exchange Infrastructure → Design and Configuration Time → Configuration → Defining End Points.
3. Define Logon Data for Target System
Depending on the end point type and address type, you can define logon data for the target system. Note that the logon data must be defined in the assigned RFC destination if the end point is an IDoc adapter.
For more information about the configuration of logon parameters, see help.sap.com → SAP NetWeaver → SAP Exchange Infrastructure → Design and Configuration Time → Configuration → Defining Logon Data.
MDM Meta ...
1. Define and Complete Business Scenario and Receiver Determination
In the Integration Directory, choose Business Scenarios. Define a new Business Scenario or add to an existing one, and create receiver determination.
Field Field Contents Description
Sender business system
<source system according to SLD>
Identifier of the source system according to SLD configuration (client system)
Sender interface name
MdmMetadataOut Name of interface
Sender interface namespace
http://sap.com/xi/PI_BASIS SAP namespace
Recipient <target system according to SLD>
Identifier of the target system according to SLD configuration (MDM system)
2. For more information about the configuration of interface determination for outbound interfaces, see help.sap.com → SAP NetWeaver → SAP Exchange Infrastructure → Design and Configuration Time → Configuration → Definition of Receiver Determinations.
3. Define an Interface Determination for Outbound Interfaces
In the Integration Directory, choose Interface Determination for Outbound Interface. Define the interface determination.
Field Field Contents Description

10.3.2.4 Configuring XI: Extraction from the Client System Using the Message Interface
SAP MDM Content Consolidation: Configuration Guide for MDM 2
240 23.08.2004
Sender business system
<source system according to SLD>
Identifier of the source system according to SLD configuration (client system)
Sender interface name
MdmMetadataOut Name of interface
Sender interface namespace
http://sap.com/xi/PI_BASIS SAP namespace
Recipient <target system according to SLD>
Identifier of the target system according to SLD configuration (MDM system)
Inbound interface name
MdmMetdata Name of interface
Inbound interface namespace
http://sap.com/xi/CMDM SAP namespace
For more information about the configuration of interface determination for outbound interfaces, see help.sap.com → SAP NetWeaver → SAP Exchange Infrastructure → Design and Configuration Time → Configuration → Definition of Interface Determinations.
4. Define End Points for Target System
If the end point is an Integration Engine, note that these can always be addressed with either URL or HTTP addressing. For security reasons, use the address type HTTP destination. Address type HTTP destination requires the definition of an RFC destination of type H in transaction SM59 on the Integration Server.
For more information about non-Unicode systems in the MDM environment, see Connecting Non-Unicode Systems [Page 82].
In the Integration Directory (configuration time), choose Receiver System End Points. Define an end point for the MDM system in your system landscape.
Field Field Contents Description
Business system <target system according to SLD>
Identifier of the target system according to SLD configuration (MDM system)
Interface name MdmMetadata Name of interface
Interface namespace http://sap.com/xi/CMDM SAP namespace
End point type Integration Engine Depending on the end point type, different attributes must be defined.
Also save the necessary addressing information.
For more information about the configuration of end points, see help.sap.com → SAP NetWeaver → SAP Exchange Infrastructure → Design and Configuration Time → Configuration → Defining End Points.
5. Define Logon Data for Target System

10.3.2.4 Configuring XI: Extraction from the Client System Using the Message Interface
23.08.2004 241
Depending on the end point type and address type, you can define logon data for the target system. Note that the logon data must be defined in the assigned RFC destination if the end point is an IDoc adapter.
For more information about the configuration of logon parameters, see help.sap.com → SAP NetWeaver → SAP Exchange Infrastructure → Design and Configuration Time → Configuration → Defining Logon Data.
MDM Receipt ...
1. Define and Complete Business Scenario and Receiver Determination
In the Integration Directory, choose Business Scenarios. Define a new Business Scenario or add to an existing one, and create receiver determination.
Field Field Contents Description
Sender business system
<source system according to SLD>
Identifier of the source system according to SLD configuration (client system)
Sender interface name
MdmReceiptOut Name of interface
Sender interface namespace
http://sap.com/xi/PI_BASIS SAP namespace
Recipient <target system according to SLD>
Identifier of the target system according to SLD configuration (MDM system)
2. For more information about the configuration of interface determination for outbound interfaces, see help.sap.com → SAP NetWeaver → SAP Exchange Infrastructure → Design and Configuration Time → Configuration → Definition of Receiver Determinations.
3. Define an Interface Determination for Outbound Interfaces
In the Integration Directory, choose Interface Determination for Outbound Interface. Define the interface determination.
Field Field Contents Description
Sender business system
<source system according to SLD>
Identifier of the source system according to SLD configuration (client system)
Sender interface name
MdmReceiptOut Name of interface
Sender interface namespace
http://sap.com/xi/PI_BASIS SAP namespace
Recipient <target system according to SLD>
Identifier of the target system according to SLD configuration (MDM system)
Inbound interface name
MdmReceiptIn Name of interface
Inbound interface namespace
http://sap.com/xi/CMDM SAP namespace

10.3.2.5 Replicating Metadata
SAP MDM Content Consolidation: Configuration Guide for MDM 2
242 23.08.2004
For more information about the configuration of interface determination for outbound interfaces, see help.sap.com → SAP NetWeaver → SAP Exchange Infrastructure → Design and Configuration Time → Configuration → Definition of Interface Determinations.
4. Define End Points for Target System
If the end point is an Integration Engine, note that these can always be addressed with either URL or HTTP addressing. For security reasons, use the address type HTTP destination. Address type HTTP destination requires the definition of an RFC destination of type H in transaction SM59 on the Integration Server.
For more information about Unicode systems in the MDM environment, see Connecting Non-Unicode Systems [Page 82].
In the Integration Directory (configuration time), choose Receiver System End Points. Define an end point for the MDM system in your system landscape.
Field Field Contents Description
Business system <target system according to SLD>
Identifier of the target system according to SLD configuration (MDM system)
Interface name MdmReceiptIn Name of interface
Interface namespace http://sap.com/xi/CMDM SAP namespace
End point type Integration Engine Depending on the end point type, different attributes must be defined.
Also save the necessary addressing information.
For more information about the configuration of end points, see help.sap.com → SAP NetWeaver → SAP Exchange Infrastructure → Design and Configuration Time → Configuration → Defining End Points.
5. Define Logon Data for Target System
Depending on the end point type and address type, you can define logon data for the target system. Note that the logon data must be defined in the assigned RFC destination if the end point is an IDoc adapter.
For more information about the configuration of logon parameters, see help.sap.com → SAP NetWeaver → SAP Exchange Infrastructure → Design and Configuration Time → Configuration → Defining Logon Data.
Result You have performed the necessary ALE and XI configuration steps for calling information on IDoc structures and status messages from client systems, and for initializing the sending of objects. For more information on actually sending master data objects, see the units Configuring XI:… for the individual objects.
10.3.2.5 Replicating Metadata The settings described here apply to the business scenarios MDM Content Consolidation, MDM Master Data Harmonization, and MDM Central Master Data Management.

10.3.3 Matching
23.08.2004 243
Use Metadata contains the properties of extraction objects, such as delta capability or selection fields. Metadata is required in order to send data requests to a client system.
Prerequisites • You have defined the client systems in the distribution (see Defining Distribution
Systems [Page 221]).
• You have defined the necessary settings on the integration server (see Configuring XI: Extraction from the Client System Using the IDoc Adapter [Page 229] or Configuring XI: Extraction from the Client System Using the Message Interface [Page 237].
Procedure Follow the instructions in the implementation guide (IMG) in the MDM system for Master Data Transfer under Replicate Metadata.
Result The metadata structures required to extract master data objects have been successfully transferred to the MDM system.
10.3.3 Matching The settings described here apply to the business scenarios MDM Content Consolidation, MDM Master Data Harmonization, and MDM Central Master Data Management.
This section describes the configuration steps for matching in master data management.
10.3.3.1 Graphical Overview: Asynchronous Matching This graphic describes what happens on the system side when the matching process step is performed.

10.3.3.2 Graphical Overview: Process Flow of Asynchronous Matching
SAP MDM Content Consolidation: Configuration Guide for MDM 2
244 23.08.2004
Master Data Engine Exchange Infrastructure
(XI)
R Routing andmapping
SOAP/http
Content Integrator (CI)
RFC adapter
ID mappingservice
RFC
P4 (J2EE)
R
CI-XI proxy server
SOAP/http
CI adapterstaging
Persistentdata
Load to CI; Matching framework
ID mapping service
Master Data Server (MDS)
R
BW delta queueID mapping
content
R
R R
Process control
Process container
Process step"matching"
Staging database
Staging database
R
R
Processing of cleansing lists(manual/automatic)R
R
R
R = Request
SOAP = Simple ObjectAccess Protocol
P4 = Protocol of J2EE
10.3.3.2 Graphical Overview: Process Flow of Asynchronous Matching This graphic shows the flow of the asynchronous matching process step.

10.3.3.3 Configuring Matching in the MDM System
23.08.2004 245
CI MDS XI
DataPackage_Out
EndDataTransfer_Out
DataPackageConfirmation_Out
ConfirmMatching_Out
Matchingof objects
StartMatching_Out
StartDataTransfer_Out
Create CIprocess StartMatching_Out: CI Prozess-ID
StartDataTransfer_Out: o.k.
Perdatapacket
ConfirmMatching_Out
RFCInfo: Matching subprocess finished
Update ID mapping
Info: Entire matching process is finished
• Processing of cleansing list• Release and activationof cleansing list
Activation
Read matching results from local ID mapping information
Update BW delta queue with information from ID mapping
10.3.3.3 Configuring Matching in the MDM System The settings described here apply to the business scenarios MDM Content Consolidation, MDM Master Data Harmonization, and MDM Central Master Data Management.
Use This configuration step describes how matching can be tailored to the relevant requirements. It especially describes the following:
• Where to determine which attributes of the business partner are transferred to the check tool
• Where the connection to the check tool is defined
• Where to define further details such as the size of data packets
This procedure is especially relevant if you want to extend the scope of attributes that are used in matching. If you want to use the standard delivery, these settings are not required.
Prerequisites You have defined which attributes you want to use for matching.
Procedure ...
1. In the MDM system, call Customizing for Central Settings, IMG activity Define Settings for Object Types of Master Data Server.
2. Select the object type for which you want to define settings (for example, BUS1006 for the business partner) and choose Object Type → Matching.

10.3.3.3 Configuring Matching in the MDM System
SAP MDM Content Consolidation: Configuration Guide for MDM 2
246 23.08.2004
3. In field Impl. of Matching, enter the class that controls the connection to the check tool, including transfer of the attributes to be checked.
The class specified here must implement ABAP OO interface IF_MDM_MATCHING_OBJECT with the following methods:
FILL_MATCHING_ATTRIBUTES
GET_RESULTS_FROM_SYNC_CHECK
UPDATE
As a template for your own code, you can use the implementation of method FILL_MATCHING_ATTRIBUTES in example class CL_MDM_CI_MATCHING_BUP, CL_MDM_CI_MATCHING_PRODUCT, CL_EDOC_CI_MATCHING, or CL_MDM_CI_MATCHING_TA. In particular, you can use the services method FILL_CI_ATTRIBUTE or FILL_CI_SECONDARY_ID to transfer the attributes to the Content Integrator.
CL_MDM_CI_MATCHING_OBJECT
<<Interface>>IF_MDM_MATCHING_OBJECT
+ FILL_MATCHNG_ATTRIBUTES()+ GET_RESULTS_FROM_SYNC_CHECK()+ START_OF_PACKAGE()+ UPDATE()
+ CREATE_NODE()+ GET_ATTRIBUTES()+ CONVERT_APPLSTRUCT2CIFORMAT()
CL_MDM_CI_MATCHING_BUP CL_MDM_CI_MATCHING_PRODUCT CL_EDOC_CI_MATCHING
CL_MDM_CI_MATCHING_TA
If you want to use your own attributes for matching in the Content Integrator, we recommend that you infer these classes and redefine method FILL_MATCHING_ATTRIBUTES as follows: method IF_MDM_MATCHING_OBJECT~FILL_MATCHING_ATTRIBUTES .
CALL METHOD SUPER->IF_MDM_MATCHING_OBJECT~FILL_MATCHING_ATTRIBUTES
EXPORTING
IR_OBJECT_DATA = ir_object_data
* IV_CHECK_TYPE =
iv_object_id = iv_object_id
iv_scheme_id = iv_scheme_id
iv_source_system = iv_source_system
IMPORTING
ER_OBJECT = er_object

10.3.3.4 CI Object Types
23.08.2004 247
ET_ERRORS = et_errors
EXCEPTIONS
INCORRECT_TYPE = 1
others = 2.
********************************************************************
* Your own code follows here *
********************************************************************
If you want to connect your own check tool, you must reimplement method GET_RESULTS_FROM_SYNC_CHECK (for executing the synchronous check) and method UPDATE (for the update of the check tool from the MDM system) in addition to method FILL_MATCHING_ATTRIBUTES.
In MDM 2.00, it is not possible to connect a check tool other than the Content Integrator for executing matching during the initial load.
Note also that you can implement synchronous matching by using RFC function module MDM_GET_DUPLICATES_FOR_BP, from object maintenance in one of your client systems, for example. Contact your SAP consultant for more information.
Result You have configured matching in the MDM system.
10.3.3.4 CI Object Types When you load data from SAP Master Data Management (MDM) into SAP Content Integrator (CI) via the SAP Exchange Infrastructure (XI) for matching, the data is automatically transformed into CI format. Each loaded data object is transformed into one of the following CI object types:
• com/sap/ci/businesstypes/ciPartner
CI object type for mapping of business partner data.
• com/sap/ci/businesstypes/ciMaterial
CI object type for mapping of material data objects. This object type is derived from com/sap/ci/businesstypes/ciProductNew.
• com/sap/ci/businesstypes/ciTechnicalAsset
CI object type for mapping of technical asset data objects. This object type is derived from com/sap/ci/businesstypes/ciProductNew.
• com/sap/ci/businesstypes/ciDocumentLink
CI object type for mapping of data objects that contain information on documents. This object type is derived from com/sap/ci/businesstypes/ciProductNew.
For SAP Master Data Management Release 2.00, it is not possible to modify the object model of the Content Integrator during runtime (when it is being used productively). Modifications of the object model during the design time (before CI is implemented productively) can only be carried out at project level.

10.3.3.5 Monitoring the Upload Sequence in the CI
SAP MDM Content Consolidation: Configuration Guide for MDM 2
248 23.08.2004
For each of the CI object types, standard matching strategies (Java classes) or matching processes are delivered in SAP Content Integrator for the MDM business scenarios.
The Java classes that contain the matching strategies can be modified on a project basis.
Ensure that at least one matching process [Page 253] and one matching profile [Page 257] is created in the Content Integrator for each of the CI object types that is to be checked for matching.
10.3.3.5 Monitoring the Upload Sequence in the CI The settings described here apply to the business scenarios MDM Content Consolidation, MDM Master Data Harmonization, and MDM Central Master Data Management.
Procedure Before you load data objects (products and business partner data) for matching into SAP Content Integrator (CI), you should check that you have completed the following activities or monitored the following dependencies: ...
1. You have created systems in CI, see Creating MDM and MDC Systems in CI [Page 109].
Always create the systems before you load data into the CI because all data objects in the CI refer to system data.
2. You have created matching profiles, see Creating Matching Processes (CI) [Page 257].
For each object type (product and business partner), you must create one matching profile before you can load data of this type into the CI for matching.
3. You have configured the normalization for uploaded data, see Normalizing Business Partner Data (CI) [Page 248].
The data is normalized on upload to the CI, therefore you must have configured the normalization before you load data for matching.
4. You have loaded product categories or schemas into the CI (using MDM process chains or the schema upload function of the CI).
Load product categories (or schemas) before product data into the CI.
For more information on the CI schema upload function, see the SAP Help Portal under help.sap.com → SAP NetWeaver → SAP Master Data Management → SAP Content Integrator → Upload → Schema Upload.
5. Ensure that you load data containing references to other data only after the referenced data is loaded into the Content Integrator. If product data contains references to business partner data, for example, then you must load this business partner data before the product data.
10.3.3.6 Normalizing Business Partner Data (CI) Use In order to be able to test business partner data for matching with the matching strategy MDMPartnerStrategyByTokens, the data must first be normalized. With normalization, the business partner data is processed in such a way that SAP Content Integrator (CI) can find similar or identical business partners during matching.

10.3.3.6 Normalizing Business Partner Data (CI)
23.08.2004 249
The system can not, for example, recognize that a business partner name Görlitz Aktiengesellschaft is the same as the business partner name Goerlitz AG. With normalization, ö is always changed to oe and AG is always changed to Aktiengesellschaft.
You must normalize the following attributes of the CI object type ciPartner:
• companyName
• city
• street
Normalization occurs when the data is loaded into the Content Integrator; therefore you should modify the XML file required for the normalization before the upload.
If you modify the normalization file when data has already been loaded into the CI, then you must load it into the CI again (using the MDM process chains) if the new normalization is to be applied to this data also.
Optionally, you can also normalize the key value of all CI object types using hte user interface of the Content Integrator. The key value remains constant and the system writes the normalized value in the field keyNormalized. If no normalization has been configured, the system writes the key value into the keyNormalized field because matching always uses the keyNormalized value.
For information on normalization using the CI user interface, see the SAP Help Portal under help.sap.com → SAP NetWeaver → SAP Master Data Management → SAP Content Integrator → Administration → Settings: Normalizer.
Procedure Modifying the XML File You modify the XML file BusinessPartnerNormalizingDefaultCustomizing.xml so that business partner data is automatically normalized on upload into the Content Integrator.
You can find the file in the following directories:
Platform Directory
Windows \\<drive>\usr\sap\<Instance-name>\global\config\ContentIntegrator\content\
UNIX /usr/sap/<Instance-name>/global/config/ContentIntegrator/content/
Example of the XML File for Normalization of Business Partner Data
<?xml version="1.0" encoding="ISO-8859-1"?>
<CI-ENVELOPE type="Entity">
<!-- companyName -->
<TokenNormalizer guid="968d5e3f-ccf0-3615-e100-00000a155070"

10.3.3.6 Normalizing Business Partner Data (CI)
SAP MDM Content Consolidation: Configuration Guide for MDM 2
250 23.08.2004
type="com/sap/ci/application/normalize/TokenNormalizer">
<excludeCharacters>.</excludeCharacters>
<minimumTokenLength>3</minimumTokenLength>
<tokenSeparators>- -</tokenSeparators>
<name>companyName</name>
<!-- Characters to be replaced inside a name e.g. Ö by OE -->
<replaceCharacters index="0">
<replace>OE</replace>
<find>Ö</find>
</replaceCharacters>
...
<!-- the removal tokens will be stored as non-name tokens -->
<removalToken index="0">
<remove>AKTIENGESELLSCHAFT</remove>
</removalToken>
...
<!-- the replace tokens replace simple tokens e.g. AG by AKTIENGESELLSCHAFT -->
<replaceToken index="0">
<replace>AKTIENGESELLSCHAFT</replace>
<find>AG</find>
</replaceToken>
…
</TokenNormalizer>
<!-- street -->
<TokenNormalizer guid="978d5e3f-ccf0-3615-e100-00000a155070"
type="com/sap/ci/application/normalize/TokenNormalizer">
<excludeCharacters>.</excludeCharacters>
<minimumTokenLength>3</minimumTokenLength>
<tokenSeparators>- -</tokenSeparators>
<name>street</name>
<replaceCharacters index="0">
<replace>SS</replace>
<find>ß</find>
</replaceCharacters>
…
<replaceToken index="0">
<replace>AVENUE</replace>
<find>AV</find>
</replaceToken>

10.3.3.6 Normalizing Business Partner Data (CI)
23.08.2004 251
…
<removalToken index="0">
<remove>STREET</remove>
</removalToken>
…
</TokenNormalizer>
<!-- city -->
<TokenNormalizer guid="988d5e3f-ccf0-3615-e100-00000a155070"
type="com/sap/ci/application/normalize/TokenNormalizer">
<excludeCharacters>.-_  /\</excludeCharacters>
<minimumTokenLength>3</minimumTokenLength>
<tokenSeparators/>
<name>city</name>
<replaceCharacters index="0">
<replace>SS</replace>
<find>ß</find>
</replaceCharacters>
…
</TokenNormalizer>
</CI-ENVELOPE>
Description of the Modifiable XML Subelements Within the TokenNormalizer Elements
Subelement Number
Description
excludeCharacters 1 List of the characters that are removed from the fields companyName, street, and city. Enter the characters without any blank spaces, for example, ,.-. This means that all characters including commas, dots, and dashes are removed from the fields.
minimumToken Length
1 Defines the number of characters that the tokens must consist of. All tokens that consist of less characters will be removed.
The standard value of the minimumTokenLength is 3. This means that in the case of business partner data where the name contains initials, these initials are omitted during the normalization, for example, A. Smith becomes Smith. You can change the standard value if required.
tokenSeparators 1 List of the characters with which the values in the fields are separated into multiple tokens.
If you wish to separate the values into tokens using blank spaces, you must place the blank between two other

10.3.3.6 Normalizing Business Partner Data (CI)
SAP MDM Content Consolidation: Configuration Guide for MDM 2
252 23.08.2004
characters; otherwise the blanks will be removed by the CI parser. For example: - -
name 1 Must be one of the following three values:
• companyName
• street
• city
replaceCharacters 0 to n Each replaceCharacter element has a replace and a find subelement. The character string in the find subelement is replaced by the character string in the replace subelement.
Each replaceCharacter element has the parameter index. This parameter defines the sequence in which the find character strings are replaced by the replace character strings. Since each find/replace is applied to the results of the previous run, you should define a logical sequence.
replaceToken 0 to n Functions exactly as replaceCharacters but only works with (complete) tokens.
You must also define the parameter index; this has no effect here however.
Do not create an endless loop. If, for example, you define a replaceToken that replaces A with B and a replaceToken, that replaces B with A, this would be an endless loop.
removalToken 0 to n This subelement defines tokens that are not used by the matching strategy as comparison values because they have no relevance; this is because they are elements of several business partner names (for example, Aktiengesellschaft).
Each removalToken element has a remove subelement. For each token that has no relevance for matching, you define a removalToken.
The tokens that have no relevance are not removed; they are flagged as no-name tokens.
Also define the parameter index.
Loading the XML File and Restarting the J2EE Engine Once you have modified the XML file BusinessPartnerNormalizingDefaultCustomizing.xml, you carry out the following steps: ...
1. Load the XML file into the Content Integrator using the schema upload function of the CI.
You can find this function by logging on to SAP MDM and choosing Data Consolidation → Overview → Load Data for Matching.

10.3.3.7 Creating Matching Processes (CI)
23.08.2004 253
You require the MDM role Master Data Administrator and the CI role combination CI Manager for Matching and CI User.
For more information, see the SAP Help Portal under help.sap.com → SAP NetWeaver → SAP Master Data Management → SAP Content Integrator → Upload → Schema Upload.
2. Restart the J2EE Engine of the CI.
The modifications to the XML file are activated on restarting the SAP J2EE Engine.
Result You have ensured that the business partner data is normalized on upload into the Content Integrator.
10.3.3.7 Creating Matching Processes (CI) The settings described here apply to the business scenarios MDM Content Consolidation, MDM Master Data Harmonization, and MDM Central Master Data Management.
Use Matching processes are used by SAP Content Integrator (CI) for matching jobs that are part of MDM process chains. The matching processes each contain a matching strategy that determines the criteria based on which business data objects are checked for matching.
Create a matching process for each object type that is to be checked by the Content Integrator for matching. The matching process is required in turn by the matching profile, see Creating Matching Profiles (CI) [Page 257].
Prerequisites In order to create matching processes, you require the MDM role Master Data Administrator and the CI role combination CI Manager for Matching and CI User.
Procedure To create the required matching processes in the Content Integrator, you log on to SAP MDM and choose Master Data Settings → System Settings → Matching Processes.
To create a matching process, you enter the following data in the appropriate entry fields:
Field Description Use is
Name You can assign the name of the matching process as you wish.
This name is displayed when you create a matching profile.
Mandatory
ID mapping type Select the ID mapping type from the dropdown list.
If the matching process relates to business partners and products, choose Grouped.
Mandatory
Object type Specify the CI object type for which the matching process is being created.
Mandatory

10.3.3.7 Creating Matching Processes (CI)
SAP MDM Content Consolidation: Configuration Guide for MDM 2
254 23.08.2004
You must specify the complete name space and observe the capitalization. The name space may not contain any blank spaces.
Class name of the matching strategy
Specify the name of the Java class with the required matching strategy (see table below).
Observe the capitalization here. The class name may not contain any blank spaces.
Mandatory
Description Enter a description for the matching process. Optional
Release Limit Enter a value between 1 and 100 if you wish to activate the automatic activation in the matching profile.
All ID mapping proposals that come from matching, where the resulting values are equal to or greater than the release limit, are released. All released ID mapping proposals are activated automatically when you switch on automatic activation in the matching profile, see Creating Matching Profiles (CI) [Page 257].
We recommend setting up automatic activation. A prerequisite for this function is the Release Limit.
Recommended
Limit for mapping proposals
Enter a value between 1 and 100. The value must be lower than the release limit.
If you define this release limit then all mapping proposals, that have a result value lower than the release limit for mapping proposals, are automatically excluded from the matching results. This makes the matching results more precise.
Mapping proposals where the resulting values are equal to or greater than the release limit are handled by the system according to the settings for release limit and auto-activation.
Recommended
For information on how to create matching processes, see the SAP Help Portal under help.sap.com → SAP NetWeaver → SAP Master Data Management → SAP Content Integrator → Administration → Matching Processes.
List of the Released Standard Matching Strategies
Class name of the matching strategy
Object type Description ID mapping type
com.sapmarkets.ci. application.matching strategy.ejbs.MDM
com/sap/ci/businesstypes/ciPartner
A strategy for business partners.
The strategy is a combination of the two
Grouped

10.3.3.7 Creating Matching Processes (CI)
23.08.2004 255
PartnerStrategyBy Tokens
other business partner strategies (see the list below) and it uses additional address data in order to find similar or identical business partners.
If you use this strategy, you must normalize the data on upload into CI. You must configure the normalization.
For more information, see Normalizing Business Partner Data (CI) [Page 248].
com.sapmarkets.ci. application.matching strategy.ejbs.MDM ProductStrategyBy GTIN
com/sap/ci/businesstypes/ciMaterial
A strategy for products.
Compares product data records by type (for example, GTIN, Global Trade Item Number or EAN), value, and unit of measurement, in order to find similar or identical products.
Grouped
com.sapmarkets.ci. application.matching strategy.ejbs.MDM ProductStrategyBy GTIN_SPN_MPN
com/sap/ci/businesstypes/ciMaterial
A strategy for products.
Compares product data records by GTIN manufacturer number and supplier part number. This means that, in addition to the master data, the related information from the purchasing info records is also compared.
Grouped
List of Additional Matching Strategies
These matching strategies are examples. For productive use, you must modify them on a project basis.
Class name of the matching strategy
Object type Description ID mapping type
com.sapmarkets.ci. application.matching strategy.ejbs.MDM PartnerStrategyBy PartnerIdentification
com/sap/ci/businesstypes/ciPartner
A strategy for business partners.
Uses certain identifying attributes (for example, DUNS Number) in order to find similar or identical business partners.
Grouped
com.sapmarkets.ci. application.matching strategy.ejbs.MDM PartnerStrategyBy TaxNumber
com/sap/ci/businesstypes/ciPartner
A strategy for business partners.
Uses tax numbers in order to find similar or identical business partners.
Grouped
com.sapmarkets.ci. application.matching strategy.ejbs.MDM
com/sap/ci/businesstypes/ciMaterial
A strategy for products.
Uses ID and logical system and other
Grouped

10.3.3.8 Creating Change Orders (CI)
SAP MDM Content Consolidation: Configuration Guide for MDM 2
256 23.08.2004
ProductStrategyBy ID
details in order to find similar or identical products.
com.sapmarkets.ci. application.matching strategy.ejbs.MDM TechnicalAsset StrategyBy ManufacturerInfo
com/sap/ci/businesstypes/ciTechnicalAsset
A strategy for technical assets.
Uses manufacturer information in order to find similar or identical technical assets.
Grouped
com.sapmarkets.ci. application.matching strategy.ejbs.MDM DocumentLink Strategy
com/sap/ci/businesstypes/ciDocumentLink
A strategy for document links.
Uses simple heuristics (document type, document length, URI and linked objects) in order to find similar or identical documents.
Grouped
Result You have created matching processes that are required for matching jobs in the Content Integrator.
10.3.3.8 Creating Change Orders (CI) Use The system uses change orders for the following tasks:
• In order to save workitems, that is, ID mapping proposals that are generated by the system through matching.
• In order to manage users that may process the workitems.
The system automatically creates a change order when a matching job is started in SAP Content Integrator. The information that the system requires in order to create the change order is transferred with a matching profile from the master data server into the Content Integrator. For this, the matching profile requires change orders of the type Template. You create these change orders in the Content Integrator before you create the corresponding matching profile.
For more information, see Creating Matching Profiles (CI) [Page 257].
Prerequisites In order to be able to create change orders, you require the MDM role Master Data Manager with the CI role combination CI Manager for Matching and CI User.
Procedure To create change orders, you log on to SAP MDM and choose Data Consolidation → Overview → Manage Change Orders for ID Mappings.
The initial screen contains a table with all the available change orders. If the system has been newly installed, the table is empty.
We recommend creating a change order of type Template for each matching process; you then use these in the corresponding matching profiles.
...
1. Choose Create.

10.3.3.9 Creating Matching Profiles (CI)
23.08.2004 257
2. Enter a name for the change order.
You can choose any name you wish; the name is used later when you create the matching profile, see Creating Matching Profiles (CI) [Page 257].
3. Enter a description for the change order.
4. In the dropdown menu Usage, select the entry Template.
5. Select at least one user to process the workitems.
The selected users are assigned to the automatically created change orders that are based on this template. The users can process the assigned workitems.
The available users are listed in a table. If no user with the appropriate role exists, the table is empty. In this case, you or an administrator must create users with the MDM role Master Data Manager with the CI role combination CI Manager for Matching, CI Manager for Master Data and CI User.
Only those users that you select here will later be able to call up the change orders that have been created automatically by the system with the workitems in the worklist.
Only those users that you select here will be able to assign other users to these change orders. If you do not select yourself as a user, you will not be able to call up the change order after saving it in order to assign other users, for example. Keep a note of the users you select so that you know who is authorized to process the change order.
6. Choose Save.
The change order appears in the table of change orders as long as you have assigned yourself as a user. If you have assigned other users, these users can call up the page Manage Change Orders for ID Mappings and then view and process the change order.
For more information on change orders, see the SAP Help Portal under help.sap.com → SAP NetWeaver → SAP Master Data Management → SAP Content Integrator → Matching → Change Order Management.
Result You have created change orders of type Template in the Content Integrator. You use these change orders when you create matching profiles [Page 257].
10.3.3.9 Creating Matching Profiles (CI) The settings described here apply to the Business Scenarios MDM Content Consolidation, MDM Master Data Harmonization, and MDM Central Master Data Management.
Use If you wish to start a process chain in SAP Master Data Management (MDM) with asynchronous matching in SAP Content Integrator (CI), the following conditions must be fulfilled in CI:
• Change requests with assigned users must be created, see Creating Change Requests (CI) [Page 256].
• A matching process must be determined that contains the matching strategy for the matching of business objects, see Creating Matching Processes (CI) [Page 253].

10.3.3.9 Creating Matching Profiles (CI)
SAP MDM Content Consolidation: Configuration Guide for MDM 2
258 23.08.2004
These conditions are bundled in the Content Integrator in a matching profile. When the MDM System starts a matching job, the name of the matching profile is also transmitted to the Content Integrator so that the CI can use the correct profile.
Create a matching profile for each object type that is designated from the MDM System for matching in the Content Integrator (see CI object types [Page 247]).
Prerequisites • You have created the required change orders in the CI.
• You have created the required matching processes in the CI.
• In order to create matching profiles, you require the MDM role Master Data Administrator with the CI role combination CI Manager for Master Data and CI User.
Procedure To create matching profiles, you log on to SAP MDM and choose Master Data Settings → System Settings → CI Settings → Matching Profiles.
To create a matching profile, you enter the following data in the appropriate entry fields:
Field Description Use is
Profile name The profile name is user-defined.
The MDM System forwards the name to the Content Integrator together with the message to start the matching job. You must enter this profile name in Customizing for the MDM system.
Mandatory
Automatic activation
Decide whether the data objects that are subjected to matching are to be released and activated immediately after the check.
The automatic activation can only activate automatically released workitems. In order that the system can automatically release workitems, you must have set the release value limit in the matching process.
For more information, see Creating Matching Processes (CI) [Page 253].
We recommend switching on automatic activation.
Recommended
Matching process Select a matching process from the dropdown list.
The list contains the names of all matching processes that have been created.
Mandatory
Change Order Select a change request from the dropdown list. Mandatory

10.3.3.10 Configuring the Job Scheduler (CI)
23.08.2004 259
The list contains the names of all created change orders of the type Template.
The selected change order simultaneously determines the users who may process the worklist generated by the matching.
For information on how to create matching profiles, see the SAP Help Portal under help.sap.com → SAP NetWeaver → SAP Master Data Management → SAP Content Integrator → Administration → Settings: Matching Profiles.
Result You have created the matching profiles required for the asynchronous matching.
10.3.3.10 Configuring the Job Scheduler (CI) The settings described here apply to the business scenarios MDM Content Consolidation, MDM Master Data Harmonization, and MDM Central Master Data Management.
Use The Job Scheduler is a component of SAP Content Integrator (CI) that enables the asynchronous background processing of various jobs or processes and provides some functions for managing the jobs. The Job Scheduler is installed together with the Content Integrator; its functions for job administration are intended only for job system administrators and also the configuration of the tool should be carried out by an expert.
SAP Content Integrator provides functions for job management for the user via the interface. For more information, see the SAP Help Portal under help.sap.com → SAP NetWeaver → SAP Master Data Management → SAP Content Integrator → Administration → Job Administration.
The system administrator must start the Job Scheduler immediately after starting the J2EE application server on which the Content Integrator is running; otherwise the application cannot carry out the following asynchronous jobs:
• Jobs that are part of the process chains of SAP Master Data Management (MDM).
This includes the following jobs:
Upload jobs
With these jobs, data is loaded from the Master Data Server (MDS) for matching in the CI.
Matching jobs
With these jobs, the uploaded data in the CI is subjected to automatic matching.
Activation jobs
With these jobs, the ID mapping data generated as a result of the matching is activated; this means that is prepared for subsequent processes and queries.
• Replication jobs
With these jobs, data is replicated from the CI into the MDS.

10.3.3.10 Configuring the Job Scheduler (CI)
SAP MDM Content Consolidation: Configuration Guide for MDM 2
260 23.08.2004
The Job Scheduler provides the following functions that you can call up via a command line interface.
• A list of all existing jobs
• A function for canceling jobs
• A deletion function
• A help function
The Job Scheduler has the following optional configuration options:
• Time interval between job calls
The standard time interval between job calls is 30 seconds. You can reduce or extend the time interval depending on your system characteristics.
• Load limitation
The standard load limitation is set at 30 jobs running in parallel. You can increase or decrease the number of jobs running in parallel.
• Load distribution
In the standard configuration the jobs are processed in slots by the system in the order of their creation; no more than 30 jobs run in parallel at any time. You can distribute the load limitation by percentage over the slots of the different job types.
Configuring Time Interval Between Job Calls, Load Limitation and Load Distribution If you change the standard configuration of the Job Scheduler you must do this before you start the Job Scheduler; you cannot change the configuration when the Job Scheduler is running.
You configure the Job Scheduler in the properties file Console.properties. You can find this file in the following directories:
Platform Directory
Windows \\<drive>\usr\sap\<Instance-name>\global\config\ContentIntegrator\ server\jobscheduler
UNIX /usr/sap/<Instance-name>/global/config/ContentIntegrator/server/ jobscheduler
Console.properties contains the following standard configuration:
scheduler.Active=true
scheduler.Looptime=30000
scheduler.MaxConcurrentJobs=30
scheduler.slot1.jobName=MatchingJobEJB
scheduler.slot1.ratio=29
scheduler.slot2.jobName=ActivationJobEJB
scheduler.slot2.ratio=19
scheduler.slot3.jobName=QueuedMessageHandlerJobEJB

10.3.3.10 Configuring the Job Scheduler (CI)
23.08.2004 261
scheduler.slot3.ratio=29
scheduler.slot4.jobName=ClearingHelperEJB
scheduler.slot4.ratio=19
scheduler.slot5.jobName=ReplicationJobEJB
scheduler.slot5.ratio=4 ...
1. In order to configure the time interval between job calls, you change the following parameters:
Looptime=30000
The time interval (loop time) is measured in milliseconds. Note that the time interval should not be shorter than the execution time of the query. When specifying the time interval, you should take your system performance and capacity into account.
2. In order to configure the load limitation, you change the following parameters:
MaxConcurrentJobs=30
The load limitation defines the number of jobs that can be carried out in parallel.
3. In order to configure the load distribution, you change the ratio-parameters for the respective job types.
Note that the sum of the ratio-values may not exceed 100. The ratio-parameter defines the percentage distribution of the load limitation for the job types.
The smallest possible ratio value is calculated as 100 divided by the value MaxConcurrentJobs (rounded to the nearest whole number).
Starting the Job Scheduler The jobscheduler.cmd (Windows) or jobscheduler.sh (UNIX) file are located in the following directories:
Platform Directory
Windows \\<drive>\usr\sap\<Instance-name>\global\config\ContentIntegrator\ server\jobscheduler
UNIX /usr/sap/<Instance-name>/global/config/ContentIntegrator/server /jobscheduler
...
1. In order to start the Job Scheduler, open a command line interface and switch to the directory of the jobscheduler.cmd file (Windows) or the jobscheduler.sh file (UNIX).
2. Start job scheduler file with the parameter start.
The Job Scheduler provides other administrative functions that you can call up using the appropriate commands via the command line interface.
List of Job Scheduler Commands
Command Description/Procedure
? or man or help These commands give you a list of the available commands with descriptions.

10.4 Graphical Overview: Post
SAP MDM Content Consolidation: Configuration Guide for MDM 2
262 23.08.2004
list-jobs This command provides a list of all jobs.
remove-job This command allows you to remove the following jobs:
• Jobs that have been completed normally (Status finished)
• Jobs that have been terminated incorrectly (Status cancelled or finished with errors)
cancel-job This command allows you to send a termination signal to current jobs (Status planned, scheduled or running).
Exactly when the system evaluates the termination signal and terminates the job depends on the implementation of the job. The system must ensure that the data affected by the termination remains consistent.
SAP Content Integrator provides similar job administration functions for job management via the user interface. The Job Scheduler functions described here are intended for administrators only.
Result You have configured and started the Job Scheduler of SAP Content Integrator.
10.4 Graphical Overview: Post The following graphic shows what happens in the system when the Post process step is executed:

10.4 Graphical Overview: Post
23.08.2004 263
Exchangeinfrastructure(XI)
Routing andmapping
SOAP / HTTP
SAP Content Integrator (CI)RFC adapter
ID-mapping service
RFC
P4 (J2EE)
CI-XI Proxy server
SOAP / HTTP
Load in CImatching framework
Master data server (MDS)
R
R
R
R
R
Master data engine
BW delta queueObject Content
BW delta queueID-Mapping Content
ID-mapping service
MDS databaseObject-datatable
Staging DB
Stagingdatabase
CI adapterstaging
Persistentdata
Process stepPost
Process control
Persistent data
R
R
R
R
R
R1a
1b2
6
4a
5
3
74b R = Request
SOAP = Simple Object Access Protocol
P4 = Log from J2EE
...
1. During the execution of a process chain (inbound), the process step Post is called.
2. The master data object is written to the MDS database.
3. The BW delta queue is updated with the object information.
4. ID mapping is created for the newly-posted objects (a and b).
5. The BW delta queue is updated with the ID mapping information.
6. Using the CI adapter in staging, proxy messages are sent through the XI to the CI for the synchronous duplicate check.
7. The results of the duplicate check are returned synchronously.