SAP BW/4HANA
1370
PUBLIC SAP BW/4HANA 2.0 SPS07 2020-12-07 SAP BW/4HANA © 2020 SAP SE or an SAP affiliate company. All rights reserved. THE BEST RUN
-
Upload
khangminh22 -
Category
Documents
-
view
4 -
download
0
Transcript of SAP BW/4HANA

PUBLICSAP BW/4HANA 2.0 SPS072020-12-07
SAP BW/4HANA
© 2
020
SAP
SE o
r an
SAP affi
liate
com
pany
. All r
ight
s re
serv
ed.
THE BEST RUN

Content
1 SAP BW∕4HANA. . . . . . . . . . . . . . . . . . . . . . . . . . . . . . . . . . . . . . . . . . . . . . . . . . . . . . . . . . . . . 9
2 Overview. . . . . . . . . . . . . . . . . . . . . . . . . . . . . . . . . . . . . . . . . . . . . . . . . . . . . . . . . . . . . . . . . .102.1 Concepts in SAP BW∕4HANA. . . . . . . . . . . . . . . . . . . . . . . . . . . . . . . . . . . . . . . . . . . . . . . . . . . . 102.2 Overview of the Architecture of SAP BW∕4HANA. . . . . . . . . . . . . . . . . . . . . . . . . . . . . . . . . . . . . . .122.3 Big Data Warehousing. . . . . . . . . . . . . . . . . . . . . . . . . . . . . . . . . . . . . . . . . . . . . . . . . . . . . . . . . 122.4 Tool Overview. . . . . . . . . . . . . . . . . . . . . . . . . . . . . . . . . . . . . . . . . . . . . . . . . . . . . . . . . . . . . . . 14
3 Data Modeling. . . . . . . . . . . . . . . . . . . . . . . . . . . . . . . . . . . . . . . . . . . . . . . . . . . . . . . . . . . . . .153.1 Working with BW Modeling Tools in Eclipse. . . . . . . . . . . . . . . . . . . . . . . . . . . . . . . . . . . . . . . . . . 15
Basic Concepts. . . . . . . . . . . . . . . . . . . . . . . . . . . . . . . . . . . . . . . . . . . . . . . . . . . . . . . . . . . 16Basic Tasks. . . . . . . . . . . . . . . . . . . . . . . . . . . . . . . . . . . . . . . . . . . . . . . . . . . . . . . . . . . . . . 27Reference. . . . . . . . . . . . . . . . . . . . . . . . . . . . . . . . . . . . . . . . . . . . . . . . . . . . . . . . . . . . . . . 47
3.2 Modeling Data Flows. . . . . . . . . . . . . . . . . . . . . . . . . . . . . . . . . . . . . . . . . . . . . . . . . . . . . . . . . . 51Data Flow. . . . . . . . . . . . . . . . . . . . . . . . . . . . . . . . . . . . . . . . . . . . . . . . . . . . . . . . . . . . . . . 51Working with Data Flows. . . . . . . . . . . . . . . . . . . . . . . . . . . . . . . . . . . . . . . . . . . . . . . . . . . . .55
3.3 Modeling with Fields Instead of InfoObjects. . . . . . . . . . . . . . . . . . . . . . . . . . . . . . . . . . . . . . . . . . 733.4 Definition of physical data models. . . . . . . . . . . . . . . . . . . . . . . . . . . . . . . . . . . . . . . . . . . . . . . . 74
InfoObject. . . . . . . . . . . . . . . . . . . . . . . . . . . . . . . . . . . . . . . . . . . . . . . . . . . . . . . . . . . . . . . 74Creating InfoObjects. . . . . . . . . . . . . . . . . . . . . . . . . . . . . . . . . . . . . . . . . . . . . . . . . . . . . . . 82DataStore Object. . . . . . . . . . . . . . . . . . . . . . . . . . . . . . . . . . . . . . . . . . . . . . . . . . . . . . . . . 111Creating DataStore Objects. . . . . . . . . . . . . . . . . . . . . . . . . . . . . . . . . . . . . . . . . . . . . . . . . . 132Change DataStore Object. . . . . . . . . . . . . . . . . . . . . . . . . . . . . . . . . . . . . . . . . . . . . . . . . . . 143Semantic Groups. . . . . . . . . . . . . . . . . . . . . . . . . . . . . . . . . . . . . . . . . . . . . . . . . . . . . . . . . 146Creating Semantic Groups. . . . . . . . . . . . . . . . . . . . . . . . . . . . . . . . . . . . . . . . . . . . . . . . . . .147
3.5 Definition of Virtual Data Models. . . . . . . . . . . . . . . . . . . . . . . . . . . . . . . . . . . . . . . . . . . . . . . . . 154Open ODS View. . . . . . . . . . . . . . . . . . . . . . . . . . . . . . . . . . . . . . . . . . . . . . . . . . . . . . . . . . 154Creating an Open ODS View. . . . . . . . . . . . . . . . . . . . . . . . . . . . . . . . . . . . . . . . . . . . . . . . . 163CompositeProvider. . . . . . . . . . . . . . . . . . . . . . . . . . . . . . . . . . . . . . . . . . . . . . . . . . . . . . . 186Creating CompositeProviders. . . . . . . . . . . . . . . . . . . . . . . . . . . . . . . . . . . . . . . . . . . . . . . . 204BAdI Provider. . . . . . . . . . . . . . . . . . . . . . . . . . . . . . . . . . . . . . . . . . . . . . . . . . . . . . . . . . . 220Creating BAdI Providers. . . . . . . . . . . . . . . . . . . . . . . . . . . . . . . . . . . . . . . . . . . . . . . . . . . . 222
3.6 Mixed Modeling (SAP BW∕4HANA and SAP HANA). . . . . . . . . . . . . . . . . . . . . . . . . . . . . . . . . . . . 224Generating SAP HANA Views from the SAP BW∕4HANA System. . . . . . . . . . . . . . . . . . . . . . . . 226
4 Data Acquisition. . . . . . . . . . . . . . . . . . . . . . . . . . . . . . . . . . . . . . . . . . . . . . . . . . . . . . . . . . .2494.1 Source System. . . . . . . . . . . . . . . . . . . . . . . . . . . . . . . . . . . . . . . . . . . . . . . . . . . . . . . . . . . . . 249
Transferring Data with an SAP HANA Source System. . . . . . . . . . . . . . . . . . . . . . . . . . . . . . . .249
2 PUBLICSAP BW/4HANA
Content

Transferring Data with a Big Data Source System. . . . . . . . . . . . . . . . . . . . . . . . . . . . . . . . . . 268Transferring Data Using Operational Data Provisioning. . . . . . . . . . . . . . . . . . . . . . . . . . . . . . 268Transferring Data from Flat Files. . . . . . . . . . . . . . . . . . . . . . . . . . . . . . . . . . . . . . . . . . . . . . 292Application Component Hierarchy. . . . . . . . . . . . . . . . . . . . . . . . . . . . . . . . . . . . . . . . . . . . . 292
4.2 Working with Source Systems. . . . . . . . . . . . . . . . . . . . . . . . . . . . . . . . . . . . . . . . . . . . . . . . . . 294Creating a Source System. . . . . . . . . . . . . . . . . . . . . . . . . . . . . . . . . . . . . . . . . . . . . . . . . . 294Hiding Empty Application Components. . . . . . . . . . . . . . . . . . . . . . . . . . . . . . . . . . . . . . . . . 305Creating and Moving Application Components in a Generic Hierarchy. . . . . . . . . . . . . . . . . . . .306Executing Replication. . . . . . . . . . . . . . . . . . . . . . . . . . . . . . . . . . . . . . . . . . . . . . . . . . . . . .306Set Source System to Inactive. . . . . . . . . . . . . . . . . . . . . . . . . . . . . . . . . . . . . . . . . . . . . . . 308
4.3 DataSource. . . . . . . . . . . . . . . . . . . . . . . . . . . . . . . . . . . . . . . . . . . . . . . . . . . . . . . . . . . . . . . 3094.4 Working with DataSources. . . . . . . . . . . . . . . . . . . . . . . . . . . . . . . . . . . . . . . . . . . . . . . . . . . . . 310
Creating DataSources. . . . . . . . . . . . . . . . . . . . . . . . . . . . . . . . . . . . . . . . . . . . . . . . . . . . . .310Editing DataSources. . . . . . . . . . . . . . . . . . . . . . . . . . . . . . . . . . . . . . . . . . . . . . . . . . . . . . .335Metadata Comparison and Updating DataSources. . . . . . . . . . . . . . . . . . . . . . . . . . . . . . . . . 336
4.5 Transformation. . . . . . . . . . . . . . . . . . . . . . . . . . . . . . . . . . . . . . . . . . . . . . . . . . . . . . . . . . . . .336Rule Group. . . . . . . . . . . . . . . . . . . . . . . . . . . . . . . . . . . . . . . . . . . . . . . . . . . . . . . . . . . . . 337Semantic Grouping. . . . . . . . . . . . . . . . . . . . . . . . . . . . . . . . . . . . . . . . . . . . . . . . . . . . . . . 338Error Analysis in Transformations. . . . . . . . . . . . . . . . . . . . . . . . . . . . . . . . . . . . . . . . . . . . . 339Authorizations for the Transformation. . . . . . . . . . . . . . . . . . . . . . . . . . . . . . . . . . . . . . . . . . 339Transport the Transformation. . . . . . . . . . . . . . . . . . . . . . . . . . . . . . . . . . . . . . . . . . . . . . . . 339
4.6 Creating Transformations. . . . . . . . . . . . . . . . . . . . . . . . . . . . . . . . . . . . . . . . . . . . . . . . . . . . . 339Differences Between ABAP Runtime and SAP HANA Runtime. . . . . . . . . . . . . . . . . . . . . . . . . 342Creating a Transformation Using the Wizard. . . . . . . . . . . . . . . . . . . . . . . . . . . . . . . . . . . . . . 343Create Rule Group. . . . . . . . . . . . . . . . . . . . . . . . . . . . . . . . . . . . . . . . . . . . . . . . . . . . . . . . 343Transformation in the SAP HANA Database. . . . . . . . . . . . . . . . . . . . . . . . . . . . . . . . . . . . . . 344Editing Rule Details. . . . . . . . . . . . . . . . . . . . . . . . . . . . . . . . . . . . . . . . . . . . . . . . . . . . . . . 345ABAP Routines in Transformations. . . . . . . . . . . . . . . . . . . . . . . . . . . . . . . . . . . . . . . . . . . . 353SAP HANA SQLScript Routines in the Transformation. . . . . . . . . . . . . . . . . . . . . . . . . . . . . . . 375
4.7 InfoSource. . . . . . . . . . . . . . . . . . . . . . . . . . . . . . . . . . . . . . . . . . . . . . . . . . . . . . . . . . . . . . . . 377Recommendations for Using InfoSources. . . . . . . . . . . . . . . . . . . . . . . . . . . . . . . . . . . . . . . . 379Authorizations for InfoSources. . . . . . . . . . . . . . . . . . . . . . . . . . . . . . . . . . . . . . . . . . . . . . . 381Transporting InfoSources. . . . . . . . . . . . . . . . . . . . . . . . . . . . . . . . . . . . . . . . . . . . . . . . . . . 381
4.8 Creating InfoSources. . . . . . . . . . . . . . . . . . . . . . . . . . . . . . . . . . . . . . . . . . . . . . . . . . . . . . . . 382Creating InfoSources Using the Wizard. . . . . . . . . . . . . . . . . . . . . . . . . . . . . . . . . . . . . . . . . 383Adding InfoObjects. . . . . . . . . . . . . . . . . . . . . . . . . . . . . . . . . . . . . . . . . . . . . . . . . . . . . . . 383Adding Fields. . . . . . . . . . . . . . . . . . . . . . . . . . . . . . . . . . . . . . . . . . . . . . . . . . . . . . . . . . . 384
4.9 Data Transfer Process. . . . . . . . . . . . . . . . . . . . . . . . . . . . . . . . . . . . . . . . . . . . . . . . . . . . . . . . 384Data Transfer Intermediate Storage (DTIS). . . . . . . . . . . . . . . . . . . . . . . . . . . . . . . . . . . . . . .385Handling Data Records with Errors. . . . . . . . . . . . . . . . . . . . . . . . . . . . . . . . . . . . . . . . . . . . 386
4.10 Creating a Data Transfer Process. . . . . . . . . . . . . . . . . . . . . . . . . . . . . . . . . . . . . . . . . . . . . . . . 388
SAP BW/4HANAContent PUBLIC 3

Creating a Data Transformation Process Using the Wizard. . . . . . . . . . . . . . . . . . . . . . . . . . . . 389Editing General Properties. . . . . . . . . . . . . . . . . . . . . . . . . . . . . . . . . . . . . . . . . . . . . . . . . . 390Editing Extraction Properties. . . . . . . . . . . . . . . . . . . . . . . . . . . . . . . . . . . . . . . . . . . . . . . . .392Editing Update Properties. . . . . . . . . . . . . . . . . . . . . . . . . . . . . . . . . . . . . . . . . . . . . . . . . . .393Editing Runtime Properties. . . . . . . . . . . . . . . . . . . . . . . . . . . . . . . . . . . . . . . . . . . . . . . . . . 397Excuting Data Transfer Process. . . . . . . . . . . . . . . . . . . . . . . . . . . . . . . . . . . . . . . . . . . . . . . 398Monitoring Data Transfer Process. . . . . . . . . . . . . . . . . . . . . . . . . . . . . . . . . . . . . . . . . . . . . 400Displaying Properties of the Data Transfer Process. . . . . . . . . . . . . . . . . . . . . . . . . . . . . . . . . 401
4.11 Manual Data Entry. . . . . . . . . . . . . . . . . . . . . . . . . . . . . . . . . . . . . . . . . . . . . . . . . . . . . . . . . . 402Creating and Changing Hierarchies. . . . . . . . . . . . . . . . . . . . . . . . . . . . . . . . . . . . . . . . . . . . 402Creating and Changing Master Data. . . . . . . . . . . . . . . . . . . . . . . . . . . . . . . . . . . . . . . . . . . 405
5 Analysis . . . . . . . . . . . . . . . . . . . . . . . . . . . . . . . . . . . . . . . . . . . . . . . . . . . . . . . . . . . . . . . . . 4115.1 Creating a SAP HANA Analysis Process. . . . . . . . . . . . . . . . . . . . . . . . . . . . . . . . . . . . . . . . . . . . 411
Selecting the Components of the Analysis Process. . . . . . . . . . . . . . . . . . . . . . . . . . . . . . . . . 413Defining the Details for the Data Source. . . . . . . . . . . . . . . . . . . . . . . . . . . . . . . . . . . . . . . . . 417Defining the Details for the Data Analysis. . . . . . . . . . . . . . . . . . . . . . . . . . . . . . . . . . . . . . . . 417Editing Generated Procedures. . . . . . . . . . . . . . . . . . . . . . . . . . . . . . . . . . . . . . . . . . . . . . . . 418Defining the Details for the Data Target. . . . . . . . . . . . . . . . . . . . . . . . . . . . . . . . . . . . . . . . . .418Using Expert Mode. . . . . . . . . . . . . . . . . . . . . . . . . . . . . . . . . . . . . . . . . . . . . . . . . . . . . . . . 419Authorizations for SAP HANA Analysis Processes. . . . . . . . . . . . . . . . . . . . . . . . . . . . . . . . . . 421
5.2 Analytic Functions. . . . . . . . . . . . . . . . . . . . . . . . . . . . . . . . . . . . . . . . . . . . . . . . . . . . . . . . . . .421Conditions. . . . . . . . . . . . . . . . . . . . . . . . . . . . . . . . . . . . . . . . . . . . . . . . . . . . . . . . . . . . . 423Aggregation and Formula Calculation. . . . . . . . . . . . . . . . . . . . . . . . . . . . . . . . . . . . . . . . . . . 477Operations on the Result Set. . . . . . . . . . . . . . . . . . . . . . . . . . . . . . . . . . . . . . . . . . . . . . . . .534Hierarchy. . . . . . . . . . . . . . . . . . . . . . . . . . . . . . . . . . . . . . . . . . . . . . . . . . . . . . . . . . . . . . 541Elimination of Internal Business Volume. . . . . . . . . . . . . . . . . . . . . . . . . . . . . . . . . . . . . . . . . 573Non-Cumulatives. . . . . . . . . . . . . . . . . . . . . . . . . . . . . . . . . . . . . . . . . . . . . . . . . . . . . . . . . 577Stock Coverage. . . . . . . . . . . . . . . . . . . . . . . . . . . . . . . . . . . . . . . . . . . . . . . . . . . . . . . . . . 597Currency Translation. . . . . . . . . . . . . . . . . . . . . . . . . . . . . . . . . . . . . . . . . . . . . . . . . . . . . . 600Quantity Conversion. . . . . . . . . . . . . . . . . . . . . . . . . . . . . . . . . . . . . . . . . . . . . . . . . . . . . . 620Constant Selection. . . . . . . . . . . . . . . . . . . . . . . . . . . . . . . . . . . . . . . . . . . . . . . . . . . . . . . 648CURRENT MEMBER Variables. . . . . . . . . . . . . . . . . . . . . . . . . . . . . . . . . . . . . . . . . . . . . . . .665Displaying Unposted Values in the Query Result. . . . . . . . . . . . . . . . . . . . . . . . . . . . . . . . . . . 673Using Precalculated Value Sets (Buckets). . . . . . . . . . . . . . . . . . . . . . . . . . . . . . . . . . . . . . . .678Standard Queries. . . . . . . . . . . . . . . . . . . . . . . . . . . . . . . . . . . . . . . . . . . . . . . . . . . . . . . . 680Document in the Document Store. . . . . . . . . . . . . . . . . . . . . . . . . . . . . . . . . . . . . . . . . . . . . 680Using the Report-Report Interface. . . . . . . . . . . . . . . . . . . . . . . . . . . . . . . . . . . . . . . . . . . . . 683
5.3 Modeling Analytic Queries. . . . . . . . . . . . . . . . . . . . . . . . . . . . . . . . . . . . . . . . . . . . . . . . . . . . . 706Query. . . . . . . . . . . . . . . . . . . . . . . . . . . . . . . . . . . . . . . . . . . . . . . . . . . . . . . . . . . . . . . . . 707Working with Queries. . . . . . . . . . . . . . . . . . . . . . . . . . . . . . . . . . . . . . . . . . . . . . . . . . . . . . 738Creating a Link Component. . . . . . . . . . . . . . . . . . . . . . . . . . . . . . . . . . . . . . . . . . . . . . . . . .867
4 PUBLICSAP BW/4HANA
Content

Releasing Analytic Queries for Use in SAP Data Warehouse Cloud. . . . . . . . . . . . . . . . . . . . . . .8705.4 Using the Data Preview of an Analytic Query. . . . . . . . . . . . . . . . . . . . . . . . . . . . . . . . . . . . . . . . 872
Guided Tour: Data Preview of an Analytic Query. . . . . . . . . . . . . . . . . . . . . . . . . . . . . . . . . . . 873Guided Tour: Using the Additional Functions in the Analytical Data Preview. . . . . . . . . . . . . . . . 876
6 Agile Information Access: BW Workspace. . . . . . . . . . . . . . . . . . . . . . . . . . . . . . . . . . . . . . . . 8816.1 BW Workspace Designer. . . . . . . . . . . . . . . . . . . . . . . . . . . . . . . . . . . . . . . . . . . . . . . . . . . . . . 882
My Workspace. . . . . . . . . . . . . . . . . . . . . . . . . . . . . . . . . . . . . . . . . . . . . . . . . . . . . . . . . . .883Creating CompositeProviders in BW Workspace Designer. . . . . . . . . . . . . . . . . . . . . . . . . . . . 887Creating a Local Provider. . . . . . . . . . . . . . . . . . . . . . . . . . . . . . . . . . . . . . . . . . . . . . . . . . . 894Transferring Data. . . . . . . . . . . . . . . . . . . . . . . . . . . . . . . . . . . . . . . . . . . . . . . . . . . . . . . . .898Creating a Local Characteristic. . . . . . . . . . . . . . . . . . . . . . . . . . . . . . . . . . . . . . . . . . . . . . . 899Create Local Hierarchy. . . . . . . . . . . . . . . . . . . . . . . . . . . . . . . . . . . . . . . . . . . . . . . . . . . . .904
6.2 BW Workspace Query Designer. . . . . . . . . . . . . . . . . . . . . . . . . . . . . . . . . . . . . . . . . . . . . . . . . 907Calling BW Workspace Query Designer. . . . . . . . . . . . . . . . . . . . . . . . . . . . . . . . . . . . . . . . . 907BW Workspace Query. . . . . . . . . . . . . . . . . . . . . . . . . . . . . . . . . . . . . . . . . . . . . . . . . . . . . 908Defining InfoProviders. . . . . . . . . . . . . . . . . . . . . . . . . . . . . . . . . . . . . . . . . . . . . . . . . . . . . . 911Selecting a BW Workspace. . . . . . . . . . . . . . . . . . . . . . . . . . . . . . . . . . . . . . . . . . . . . . . . . . 917
7 Configuration. . . . . . . . . . . . . . . . . . . . . . . . . . . . . . . . . . . . . . . . . . . . . . . . . . . . . . . . . . . . . 9197.1 Defining Client Administration in the BW System. . . . . . . . . . . . . . . . . . . . . . . . . . . . . . . . . . . . . 9197.2 Defining Client Administration in Source Systems. . . . . . . . . . . . . . . . . . . . . . . . . . . . . . . . . . . . 9207.3 Configuring SAP IQ as a Cold Store. . . . . . . . . . . . . . . . . . . . . . . . . . . . . . . . . . . . . . . . . . . . . . 9207.4 Configuring BW Workspaces. . . . . . . . . . . . . . . . . . . . . . . . . . . . . . . . . . . . . . . . . . . . . . . . . . . 9237.5 Configuring the SAP BW∕4HANA Cockpit. . . . . . . . . . . . . . . . . . . . . . . . . . . . . . . . . . . . . . . . . . .9247.6 Creating a Connection to a Back-End System. . . . . . . . . . . . . . . . . . . . . . . . . . . . . . . . . . . . . . . 925
8 Operation. . . . . . . . . . . . . . . . . . . . . . . . . . . . . . . . . . . . . . . . . . . . . . . . . . . . . . . . . . . . . . . . 9278.1 Control and Monitoring. . . . . . . . . . . . . . . . . . . . . . . . . . . . . . . . . . . . . . . . . . . . . . . . . . . . . . . 927
Process Chain. . . . . . . . . . . . . . . . . . . . . . . . . . . . . . . . . . . . . . . . . . . . . . . . . . . . . . . . . . . 927Monitoring. . . . . . . . . . . . . . . . . . . . . . . . . . . . . . . . . . . . . . . . . . . . . . . . . . . . . . . . . . . . 1000Cache Monitor. . . . . . . . . . . . . . . . . . . . . . . . . . . . . . . . . . . . . . . . . . . . . . . . . . . . . . . . . . 1014
8.2 Query Runtime Statistics. . . . . . . . . . . . . . . . . . . . . . . . . . . . . . . . . . . . . . . . . . . . . . . . . . . . . 1021Analysis of Statistics Data. . . . . . . . . . . . . . . . . . . . . . . . . . . . . . . . . . . . . . . . . . . . . . . . . . 1023Configuring Statistics Properties. . . . . . . . . . . . . . . . . . . . . . . . . . . . . . . . . . . . . . . . . . . . . 1026Overview of Statistics Events (Table RSDDSTATEVENTS). . . . . . . . . . . . . . . . . . . . . . . . . . . . 1029
8.3 Read Access Logging. . . . . . . . . . . . . . . . . . . . . . . . . . . . . . . . . . . . . . . . . . . . . . . . . . . . . . . . 1036What is Relevant for Read Access Logging?. . . . . . . . . . . . . . . . . . . . . . . . . . . . . . . . . . . . . .1038How Does Read Access Logging Work?. . . . . . . . . . . . . . . . . . . . . . . . . . . . . . . . . . . . . . . . 1040
8.4 Test and Trace Tools. . . . . . . . . . . . . . . . . . . . . . . . . . . . . . . . . . . . . . . . . . . . . . . . . . . . . . . . 1044Query Monitor. . . . . . . . . . . . . . . . . . . . . . . . . . . . . . . . . . . . . . . . . . . . . . . . . . . . . . . . . . 1044Analysis and Repair Environment. . . . . . . . . . . . . . . . . . . . . . . . . . . . . . . . . . . . . . . . . . . . . 1051
SAP BW/4HANAContent PUBLIC 5

Trace Tool Environment. . . . . . . . . . . . . . . . . . . . . . . . . . . . . . . . . . . . . . . . . . . . . . . . . . . .1055Test Cockpit. . . . . . . . . . . . . . . . . . . . . . . . . . . . . . . . . . . . . . . . . . . . . . . . . . . . . . . . . . . . 1072
8.5 Transferring BW Test and Demo Scenarios with SDATA. . . . . . . . . . . . . . . . . . . . . . . . . . . . . . . . 1105Functions of SDATA. . . . . . . . . . . . . . . . . . . . . . . . . . . . . . . . . . . . . . . . . . . . . . . . . . . . . . .1108Opening the Tool for Transferring BW Test and Demo Scenarios. . . . . . . . . . . . . . . . . . . . . . . 1109Transferring a BW Test and Demo Scenario Using a Local Client (or File System). . . . . . . . . . . . 1110Transferring a BW Test and Demo Scenario Using Database Storage. . . . . . . . . . . . . . . . . . . . .1114Administration and Maintenance of Configurations. . . . . . . . . . . . . . . . . . . . . . . . . . . . . . . . .1114Displaying the Transfer Logs. . . . . . . . . . . . . . . . . . . . . . . . . . . . . . . . . . . . . . . . . . . . . . . . . 1115
8.6 Search. . . . . . . . . . . . . . . . . . . . . . . . . . . . . . . . . . . . . . . . . . . . . . . . . . . . . . . . . . . . . . . . . . .1115Using SAP Fiori Launchpad Search. . . . . . . . . . . . . . . . . . . . . . . . . . . . . . . . . . . . . . . . . . . . 1116Using BW Search. . . . . . . . . . . . . . . . . . . . . . . . . . . . . . . . . . . . . . . . . . . . . . . . . . . . . . . . . 1117Syntax for Search Queries. . . . . . . . . . . . . . . . . . . . . . . . . . . . . . . . . . . . . . . . . . . . . . . . . . 1121BW Search Configuration. . . . . . . . . . . . . . . . . . . . . . . . . . . . . . . . . . . . . . . . . . . . . . . . . . .1122BW Search Administration. . . . . . . . . . . . . . . . . . . . . . . . . . . . . . . . . . . . . . . . . . . . . . . . . . 1124
8.7 Data Tiering. . . . . . . . . . . . . . . . . . . . . . . . . . . . . . . . . . . . . . . . . . . . . . . . . . . . . . . . . . . . . . .1124Data Tiering Optimization (DTO). . . . . . . . . . . . . . . . . . . . . . . . . . . . . . . . . . . . . . . . . . . . . .1126Near-Line Storage. . . . . . . . . . . . . . . . . . . . . . . . . . . . . . . . . . . . . . . . . . . . . . . . . . . . . . . . 1148
9 Administration. . . . . . . . . . . . . . . . . . . . . . . . . . . . . . . . . . . . . . . . . . . . . . . . . . . . . . . . . . . .11879.1 SAP BW∕4HANA Cockpit. . . . . . . . . . . . . . . . . . . . . . . . . . . . . . . . . . . . . . . . . . . . . . . . . . . . . . 1187
Working with the SAP BW∕4HANA Cockpit. . . . . . . . . . . . . . . . . . . . . . . . . . . . . . . . . . . . . . . 1187Working with Lists in the SAP BW∕4HANA Cockpit. . . . . . . . . . . . . . . . . . . . . . . . . . . . . . . . . 1193Apps in the SAP BW∕4HANA Cockpit. . . . . . . . . . . . . . . . . . . . . . . . . . . . . . . . . . . . . . . . . . .1194
9.2 Managing InfoObjects. . . . . . . . . . . . . . . . . . . . . . . . . . . . . . . . . . . . . . . . . . . . . . . . . . . . . . . .11979.3 Managing DataStore Objects. . . . . . . . . . . . . . . . . . . . . . . . . . . . . . . . . . . . . . . . . . . . . . . . . . 1199
Force Deletion. . . . . . . . . . . . . . . . . . . . . . . . . . . . . . . . . . . . . . . . . . . . . . . . . . . . . . . . . . 1201Uploading a File to the DataStore Object. . . . . . . . . . . . . . . . . . . . . . . . . . . . . . . . . . . . . . . .1202Editing Request Details. . . . . . . . . . . . . . . . . . . . . . . . . . . . . . . . . . . . . . . . . . . . . . . . . . . . 1202Cleaning Up Requests Using Process Chains . . . . . . . . . . . . . . . . . . . . . . . . . . . . . . . . . . . . 1203Remodeling a Data Store Object. . . . . . . . . . . . . . . . . . . . . . . . . . . . . . . . . . . . . . . . . . . . . 1204Displaying a Preview of a DataStore Object. . . . . . . . . . . . . . . . . . . . . . . . . . . . . . . . . . . . . . 1207
9.4 Managing Open Hub Destinations. . . . . . . . . . . . . . . . . . . . . . . . . . . . . . . . . . . . . . . . . . . . . . . 12089.5 Managing the Generation of SAP HANA Views. . . . . . . . . . . . . . . . . . . . . . . . . . . . . . . . . . . . . . 1209
Edit Overview. . . . . . . . . . . . . . . . . . . . . . . . . . . . . . . . . . . . . . . . . . . . . . . . . . . . . . . . . . .1209Checking Object Authorizations. . . . . . . . . . . . . . . . . . . . . . . . . . . . . . . . . . . . . . . . . . . . . . 1210Analytic Privileges. . . . . . . . . . . . . . . . . . . . . . . . . . . . . . . . . . . . . . . . . . . . . . . . . . . . . . . .1210Database Authorizations. . . . . . . . . . . . . . . . . . . . . . . . . . . . . . . . . . . . . . . . . . . . . . . . . . . 1211Settings. . . . . . . . . . . . . . . . . . . . . . . . . . . . . . . . . . . . . . . . . . . . . . . . . . . . . . . . . . . . . . . 1211
9.6 Workspace Administration. . . . . . . . . . . . . . . . . . . . . . . . . . . . . . . . . . . . . . . . . . . . . . . . . . . . 1212The Assigned Main Provider. . . . . . . . . . . . . . . . . . . . . . . . . . . . . . . . . . . . . . . . . . . . . . . . . 1215Settings for Excel Files. . . . . . . . . . . . . . . . . . . . . . . . . . . . . . . . . . . . . . . . . . . . . . . . . . . . .1216
6 PUBLICSAP BW/4HANA
Content

Tips for Editing Workspaces. . . . . . . . . . . . . . . . . . . . . . . . . . . . . . . . . . . . . . . . . . . . . . . . . 1216Managing the Folder Structure. . . . . . . . . . . . . . . . . . . . . . . . . . . . . . . . . . . . . . . . . . . . . . . 1217Enhancement Spot for BW Workspaces. . . . . . . . . . . . . . . . . . . . . . . . . . . . . . . . . . . . . . . . .1217
9.7 Authorizations. . . . . . . . . . . . . . . . . . . . . . . . . . . . . . . . . . . . . . . . . . . . . . . . . . . . . . . . . . . . .1218Standard Authorizations. . . . . . . . . . . . . . . . . . . . . . . . . . . . . . . . . . . . . . . . . . . . . . . . . . . 1220Analysis Authorizations. . . . . . . . . . . . . . . . . . . . . . . . . . . . . . . . . . . . . . . . . . . . . . . . . . . . 1231
9.8 Statistical Analyses of the Data Warehouse Infrastructure. . . . . . . . . . . . . . . . . . . . . . . . . . . . . . 1273Statistics for Data Loading. . . . . . . . . . . . . . . . . . . . . . . . . . . . . . . . . . . . . . . . . . . . . . . . . .1275Data Volume Statistics. . . . . . . . . . . . . . . . . . . . . . . . . . . . . . . . . . . . . . . . . . . . . . . . . . . . 1281Process Chain Statistics. . . . . . . . . . . . . . . . . . . . . . . . . . . . . . . . . . . . . . . . . . . . . . . . . . . 1285Query Runtime Statistics. . . . . . . . . . . . . . . . . . . . . . . . . . . . . . . . . . . . . . . . . . . . . . . . . . . 1291
9.9 Database-Specific Administration. . . . . . . . . . . . . . . . . . . . . . . . . . . . . . . . . . . . . . . . . . . . . . . 1295Triggering a Delta Merge. . . . . . . . . . . . . . . . . . . . . . . . . . . . . . . . . . . . . . . . . . . . . . . . . . . 1295Statistics for Maintenance Processes in SAP HANA Indexes. . . . . . . . . . . . . . . . . . . . . . . . . . 1297SAP HANA Smart Data Access. . . . . . . . . . . . . . . . . . . . . . . . . . . . . . . . . . . . . . . . . . . . . . 1298Using DBA Cockpit with SAP HANA. . . . . . . . . . . . . . . . . . . . . . . . . . . . . . . . . . . . . . . . . . . 1301Tracing in the SAP HANA Database. . . . . . . . . . . . . . . . . . . . . . . . . . . . . . . . . . . . . . . . . . . .1301
9.10 Importing Client-Dependent Objects. . . . . . . . . . . . . . . . . . . . . . . . . . . . . . . . . . . . . . . . . . . . . 13029.11 Processing of Parallel Background Processes. . . . . . . . . . . . . . . . . . . . . . . . . . . . . . . . . . . . . . .1304
Processing Parallel Background Processes with the Queued Task Manager. . . . . . . . . . . . . . . 1305Processing Parallel Background Processes using BW Background Management. . . . . . . . . . . . 1307
9.12 Data Protection Workbench for Replicated Data. . . . . . . . . . . . . . . . . . . . . . . . . . . . . . . . . . . . . 1309Glossary. . . . . . . . . . . . . . . . . . . . . . . . . . . . . . . . . . . . . . . . . . . . . . . . . . . . . . . . . . . . . . . 1311Creating and Processing a Data Protection Worklist. . . . . . . . . . . . . . . . . . . . . . . . . . . . . . . . 1313Using the Data Protection Workbench to Delete Data. . . . . . . . . . . . . . . . . . . . . . . . . . . . . . . 1316Technical Content for the Data Protection Workbench. . . . . . . . . . . . . . . . . . . . . . . . . . . . . . 1318
9.13 Housekeeping. . . . . . . . . . . . . . . . . . . . . . . . . . . . . . . . . . . . . . . . . . . . . . . . . . . . . . . . . . . . . 1322Process Variant for Housekeeping. . . . . . . . . . . . . . . . . . . . . . . . . . . . . . . . . . . . . . . . . . . . 1322
10 Interfaces. . . . . . . . . . . . . . . . . . . . . . . . . . . . . . . . . . . . . . . . . . . . . . . . . . . . . . . . . . . . . . . 132410.1 Interface Overview. . . . . . . . . . . . . . . . . . . . . . . . . . . . . . . . . . . . . . . . . . . . . . . . . . . . . . . . . .132410.2 Interfaces for Data Warehousing. . . . . . . . . . . . . . . . . . . . . . . . . . . . . . . . . . . . . . . . . . . . . . . . 1325
APIs for Master Data. . . . . . . . . . . . . . . . . . . . . . . . . . . . . . . . . . . . . . . . . . . . . . . . . . . . . .1326APIs for Hierarchies. . . . . . . . . . . . . . . . . . . . . . . . . . . . . . . . . . . . . . . . . . . . . . . . . . . . . . 1326Automated Moving of Data to Other Memory Areas. . . . . . . . . . . . . . . . . . . . . . . . . . . . . . . . 1327Open Hub Destination. . . . . . . . . . . . . . . . . . . . . . . . . . . . . . . . . . . . . . . . . . . . . . . . . . . . .1328Open Hub Destination APIs. . . . . . . . . . . . . . . . . . . . . . . . . . . . . . . . . . . . . . . . . . . . . . . . . 1328Distributing Data to Other Systems. . . . . . . . . . . . . . . . . . . . . . . . . . . . . . . . . . . . . . . . . . . 1329
10.3 Interfaces for Analysis. . . . . . . . . . . . . . . . . . . . . . . . . . . . . . . . . . . . . . . . . . . . . . . . . . . . . . . 1353Lightweight Consumption. . . . . . . . . . . . . . . . . . . . . . . . . . . . . . . . . . . . . . . . . . . . . . . . . . 1355
10.4 Web Services and ICF Services. . . . . . . . . . . . . . . . . . . . . . . . . . . . . . . . . . . . . . . . . . . . . . . . . 1364
SAP BW/4HANAContent PUBLIC 7

11 Application Server for ABAP. . . . . . . . . . . . . . . . . . . . . . . . . . . . . . . . . . . . . . . . . . . . . . . . . 1367
8 PUBLICSAP BW/4HANA
Content

1 SAP BW∕4HANA
SAP BW∕4HANA is a data warehouse solution with agile and flexible data modeling, SAP HANA-optimized processes and state of the art user interfaces and which is highly optimized for the SAP HANA platform. SAP BW∕4HANA offers a managed approach to data warehousing. This means that prefabricated templates (building blocks) are offered for building a data warehouse in a standardized way.
The following documentation contains information on the configuration, use, operation and administration of SAP BW∕4HANA, as well as security-relevant information.
SAP BW/4HANASAP BW∕4HANA PUBLIC 9

2 Overview
The following section provides you with an overview of the main concepts, key areas and tools in SAP BW∕4HANA.
2.1 Concepts in SAP BW∕4HANA
The key areas of SAP BW∕4HANA are data modeling, data procurement, analysis , stogether with agile access to information via BW Workspaces.
Data Modeling
Comprehensive, meaningful data analyses are only possible if the data that is mainly in different formats and sources is bundled into a query and integrated.
Enterprise data is collected centrally in the SAP BW∕4HANA Enterprise Data Warehouse. Technical cleanup steps are then performed using transformations, and business rules are applied in order to consolidate the data for evaluations.
InfoProvider are provided for data storage purposes. Depending on the individual requirements, data can be stored in these InfoProviders in different degrees of granularity in various layers of the data warehouse architecture. The scalable layer architecture (LSA++) helps you to design and implement various layers in the SAP BW∕4HANA system for data provision, Corporate Memory, data distribution and data analysis.
InfoProviders are normally made up of InfoObjects. InfoObjects are the smallest (metadata) units in SAP BW∕4HANA. Using InfoObjects, information is mapped in a structured form. This is required for building data stores. To ensure metadata consistency, you need to use identical InfoObjects to define the data stores in the different layers. You also have the option of modeling objects directly from fields however, in cases where you need rapid and agile data integration.
You can create logical views on the physical data stores in the form of InfoProviders in order to provide data from different data stores for a common evaluation. You can use CompositeProvides to merge data from BW InfoProviders with data from SAP HANA views.
You can use Open ODS views to integrate data sources into SAP BW∕4HANA step-by-step, from virtual consumption through to physical integration.
Data Acquisition
SAP BW∕4HANA provides flexible options for data integration. Various interfaces make it possible to connect sources to SAP BW∕4HANA. The connection between a source, a SAP system or a database for example, and
10 PUBLICSAP BW/4HANA
Overview

SAP BW∕4HANA is configured in a source system. For the process of physical data procurement - also known as Extraction, Transformation and Loading (ETL) - you need a DataSource in SAP BW∕4HANA. This delivers the metadata description of the source data and is used for data extraction from a source system and transferal of the data to the SAP BW∕4HANA. The target of the loading process is the physical data stores in SAP BW∕4HANA (InfoProvider). The selections and parameters for data transfer and loading to an InfoProvider are performed in a data transfer process. To consolidate, clean up and integrate the data, a data transfer process uses transformations between source and target. Transformations use transformation rules to convert the fields in a source to the format of the target.
Analysis
The SAP BW∕4HANA system has a number of analysis and navigation functions for formatting and evaluating a company’s data. These allow the user to formulate individual requests on the basis of multidimensionally modeled datasets (InfoProviders). Users can then view and evaluate this data from various perspectives at runtime.
Once you have consolidated your business data, stored it in suitable InfoProviders and defined logical views on it if required, you can start evaluating the data. You can analyze the operative data on the basis of the historical data according to business criteria. The Analytic Manager in the SAP BW∕4HANA system provides extensive analytic functions and services.
Data analyses provide the decision makers in your company with highly valuable information.
● SAP BW∕4HANA uses OLAP technology to analyze data stored in the Data Warehouse. Online Analytical Processing (OLAP) uses SAP BW∕4HANA as a Decision Support System allowing decision makers to analyze multidimensionally modeled data quickly and interactively in line with business management needs.
● The basis for the analysis in SAP BW∕4HANA is the analytic query. This forms the formal definition of a multidimensional query.
Agile Access to Information in the Data Warehouse
Creating ad hoc scenarios is supported in SAP BW∕4HANA by BW Workspaces. A BW workspace is an area where new models can be created based on central data from the SAP BW∕4HANA system and local data. Workspaces can be managed and controlled by a central IT department and used by local special departments. This means you can quickly adjust to new and changing requirements.
Related Information
Data Modeling [page 15]Data Acquisition [page 249]Analysis [page 411]Agile Information Access: BW Workspace [page 881]
SAP BW/4HANAOverview PUBLIC 11

2.2 Overview of the Architecture of SAP BW∕4HANASAP BW∕4HANA is a highly optimized data warehouse solution for the SAP HANA platform.
The following figure shows the architecture of SAP BW∕4HANA:
Various options are available under data integration. SAP data sources can be connected via the ODP framework. The SAP HANA platform provides SAP HANA Smart Data Access (SDA) and EIM interfaces to connect almost any third-party sources or data lake scenarios. ETL tools certified for SAP HANA can also be used to transfer data to SAP BW∕4HANA. Data modeling is agile and flexible; templates are available to support you.
The SAP BW∕4HANA system has a number of analysis and navigation functions for formatting and evaluating a company’s data. These allow the user to formulate individual requests on the basis of multidimensionally modeled datasets. Users can then view and evaluate this data from various perspectives at runtime. The Analytic Manager in SAP BW∕4HANA provides extensive analytic functions and services.
The evaluation can be performed with SAP Business Objects or BI clients from third-party manufacturers.
Creating ad hoc scenarios is supported in SAP BW∕4HANA by BW Workspaces. Workspaces can be managed and controlled by a central IT department and used by local special departments. This means you can quickly adjust to new and changing requirements.
SAP BW∕4HANA has an open architecture. This enables the integration of external, non-SAP sources and the distribution of BW data in downstream systems via the open hub service.
2.3 Big Data WarehousingWith the digital transformation, intelligent companies are faced with the growing need to enhance their core enterprise data warehouse with big data components and storage requirements. These companies will thus be able to build a “Big Data Warehouse” for all kinds of data.
12 PUBLICSAP BW/4HANA
Overview

In this architecture, the big data landscape - orchestrated and managed by the SAP Data Hub - ensures that data is ingested, process and refined, thus making it possible to acquire specific information from it. This information is then combined with business data from the core data warehouse - modeled with SAP BW∕4HANA, thus allowing users to consume the information rapidly.
At this time of digitalization, SAP BW∕4HANA, SAP Data Hub and SAP Vora can thus be leveraged with great effect to build a "big data warehouse". The following list provides you with an overview of the functions available in SAP BW∕4HANA and SAP Data Hub:
● Process Orchestration○ SAP BW∕4HANA process type Start SAP Data Hub Graph (in SAP Data Hub 2.x)
You can use this process type to start graphs that end after a specific time. These graphs are also known as data workflows.More Information: Start SAP Data Hub Graph [page 950]
○ In the SAP Data Hub: Start SAP BW∕4HANA process chains using a data workflow from SAP Data HubMore Information: Execute an SAP BW Process Chain and BW Process Chain Operator in the documentation for SAP Data Hub 2.xFor further information, see SAP Note 2500019 . This describes the prerequisites in SAP BW or SAP BW∕4HANA for using a data workflow in the SAP Data Hub to start a process chain.
● Datea Integration/Data Management○ Big Data Source System (SPARK SQL (DESTINATION) and VORA (ODBC) Adapter)
More Information: Transferring Data with a Big Data Source System [page 268]○ Open Hub Destination: Type File with storage location HDFS File (Hadoop File System)
More Information: Using the Open Hub Destination to Distribute Data from the SAP BW∕4HANA System [page 1332]
○ In the SAP Data Hub: Transferring data from SAP BW∕4HANA to SAP Vora or to other cloud storage using the Data Transfer Operator in SAP Data HubMore Information: Transfer Data from SAP BW to SAP Vora or Cloud Storage und Data Transfer Operator in the documentation for SAP Data Hub 2.x
● Metadata Governance○ In the SAP Data Hub: Connect SAP BW∕4HANA with the SAP Data Hub Metadata Explorer
More Information: Managing Connections and Preview Data in the documentation for SAP Data Hub 2.x
● Data Tiering○ Hadoop (HDFS)-based Cold Store
More Information: Hadoop as a Cold Store [page 1148]
Related Information
For information about “Big Data Warehousing” with SAP BW∕4HANA, see the following blog in the SAP Community:https://blogs.sap.com/2017/09/25/bw4hana-and-the-sap-data-hub/
SAP BW/4HANAOverview PUBLIC 13

2.4 Tool Overview
The table below provides a list of the main tools for SAP BW∕4HANA.
Tool Tasks More Information
BW Modeling Tools in Eclipse Data modeling by defining and editing objects, in particular InfoProviders
Data Acquisition
Definition of analytical queries as the basis for data analysis
● Data Modeling [page 15]● Working with BW Modeling Tools in
Eclipse [page 15]● Data Acquisition [page 249]● Modeling Analytic Queries [page
706]
SAP BW∕4HANA Cockpit Administrative and operational tasks, such as defining and monitoring process chains or InfoProvider administration
● SAP BW∕4HANA Cockpit [page 1187]
Data Warehousing Workbench Administrative and operational tasks, such as transporting SAP BW∕4HANA objects
14 PUBLICSAP BW/4HANA
Overview

3 Data Modeling
Modeling of data in SAP BW∕4HANA helps you to merge data into models and to make these available for reporting and analysis purposes. The central entry point for moedling in SAP BW∕4HANA is the data flow.
The data models in SAP BW∕4HANA are the InfoProviders. They are made up of InfoObjects, or modeled directly from fields. This involves physical data repositories, which the data is loaded into by staging. There are also InfoProviders that are modeled inSAP BW∕4HANA and are made up of other InfoProviders. In these composite InfoProviders, you can merge data from BW InfoProviders with data from SAP HANA views, or database tables and DataSources.
The data flow in SAP BW∕4HANA defines which objects and processes are needed to transfer data from a source to SAP BW∕4HANA and cleanse, consolidate and integrate the data so that it can be made available to for analysis and reporting. A data flow depicts a specific scenario including all involved objects and their relationships. The BW Modeling tools contain an editor with a graphical user interface. This provides you with a simple way of creating, editing and documenting data flows and objects in data flows.
3.1 Working with BW Modeling Tools in Eclipse
The BW Modeling tools provide an Eclipse-based integrated modeling environment for the management and maintenance of SAP BW∕4HANA metadata objects.
The BW Modeling tools are used to support metadata modelers in today’s increasingly complex BI environments by offering flexible, efficient and state-of-the-art modeling tools. These tools integrate with ABAP Development Tools as well as with SAP HANA modeling and the consumption of SAP HANA views in SAP BW∕4HANA metadata objects, like CompositeProviders. The BW Modeling tools have powerful UI (user interface) capabilities.
The BW Modeling perspective provides you with predefined views and configuration for your BW Modeling tasks. This perspective provides you with the tools and functions required for these tasks. You organize your tasks in projects.
The following sections provide information about the basic concepts and tasks in the BW Modeling perspective, with special focus on organizing and structuring work in projects, and the general functions for working with SAP BW∕4HANA metadata objects.
Prerequisites for Using the BW Modeling Tools
You have installed and configured the BW Modeling tools.
For more information, see the Installation Guide for SAP BW Modeling Tools on the SAP Help Portal at https://help.sap.com/viewer/p/SAP_BW4HANA.
SAP BW/4HANAData Modeling PUBLIC 15

3.1.1 Basic Concepts
The following sections introduce the basic concepts for working with the BW Modeling tools.
3.1.1.1 "BW Modeling" Perspective
Just like any other perspectives in Eclipse, the BW Modeling perspective defines the initial set and layout of tools (views and editors) in the Eclipse window. It thus provides a set of functions aimed at accomplishing modeling tasks in SAP BW∕4HANA.
In particular, it enables working with SAP BW∕4HANA metadata objects that are managed by a back end system. When using the BW Modeling perspective, you always have to establish a system connection that is managed by a corresponding BW project. You can use the BW project to access the system's metadata objects.
The BW perspective enables access to both Eclipse-based and GUI-based modeling editors. It consists of an editor area, where the SAP BW∕4HANA metadata object editors are placed, and the following views:
● Project Explorer● Properties● Problems● History● BW Reporting Preview● InfoProvider● Outline
3.1.1.2 Editors
The Editor area provides one or more editors for SAP BW∕4HANA metadata objects.
NoteWhen opening a native Eclipse editor for a SAP BW∕4HANA metadata object (a CompositeProvider or query for example), the object is not locked. The object will only be locked once the user starts working with it. A message to this effect then appears in the header of the BW modeling tools.
3.1.1.3 Views
The following sections describe the default views in the BW Modeling perspective.
16 PUBLICSAP BW/4HANAData Modeling
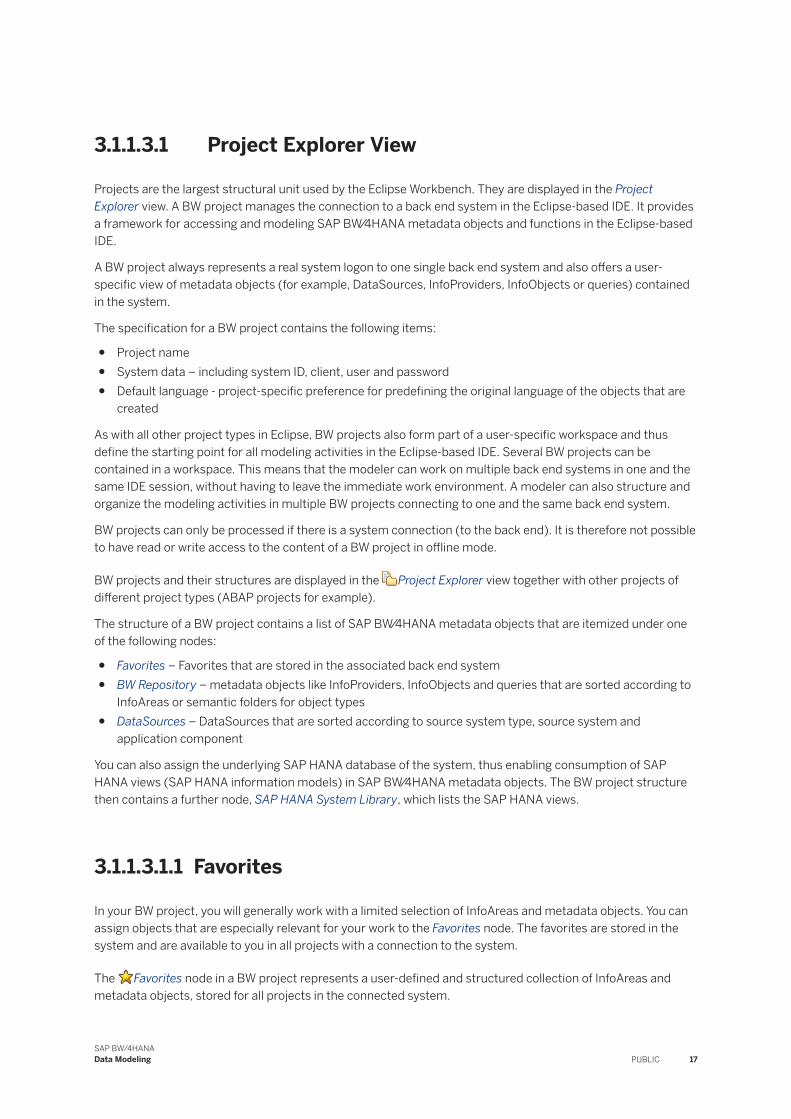
3.1.1.3.1 Project Explorer View
Projects are the largest structural unit used by the Eclipse Workbench. They are displayed in the Project Explorer view. A BW project manages the connection to a back end system in the Eclipse-based IDE. It provides a framework for accessing and modeling SAP BW∕4HANA metadata objects and functions in the Eclipse-based IDE.
A BW project always represents a real system logon to one single back end system and also offers a user-specific view of metadata objects (for example, DataSources, InfoProviders, InfoObjects or queries) contained in the system.
The specification for a BW project contains the following items:
● Project name● System data – including system ID, client, user and password● Default language - project-specific preference for predefining the original language of the objects that are
created
As with all other project types in Eclipse, BW projects also form part of a user-specific workspace and thus define the starting point for all modeling activities in the Eclipse-based IDE. Several BW projects can be contained in a workspace. This means that the modeler can work on multiple back end systems in one and the same IDE session, without having to leave the immediate work environment. A modeler can also structure and organize the modeling activities in multiple BW projects connecting to one and the same back end system.
BW projects can only be processed if there is a system connection (to the back end). It is therefore not possible to have read or write access to the content of a BW project in offline mode.
BW projects and their structures are displayed in the Project Explorer view together with other projects of different project types (ABAP projects for example).
The structure of a BW project contains a list of SAP BW∕4HANA metadata objects that are itemized under one of the following nodes:
● Favorites – Favorites that are stored in the associated back end system● BW Repository – metadata objects like InfoProviders, InfoObjects and queries that are sorted according to
InfoAreas or semantic folders for object types● DataSources – DataSources that are sorted according to source system type, source system and
application component
You can also assign the underlying SAP HANA database of the system, thus enabling consumption of SAP HANA views (SAP HANA information models) in SAP BW∕4HANA metadata objects. The BW project structure then contains a further node, SAP HANA System Library, which lists the SAP HANA views.
3.1.1.3.1.1 Favorites
In your BW project, you will generally work with a limited selection of InfoAreas and metadata objects. You can assign objects that are especially relevant for your work to the Favorites node. The favorites are stored in the system and are available to you in all projects with a connection to the system.
The Favorites node in a BW project represents a user-defined and structured collection of InfoAreas and metadata objects, stored for all projects in the connected system.
SAP BW/4HANAData Modeling PUBLIC 17

The Favorites node is one of the nodes directly below the root of the project tree. Under this node, the
InfoAreas ( ) assigned to the favorites are listed, together with their metadata objects. The metadata objects
assigned individually to the favourites in the corresponding semantic folder ( ), for CompositeProviders or DataStore objects for example, are also listed.
Related Information
Managing Favorites [page 38]
3.1.1.3.1.2 BW Repository
The BW Repository node in a BW project represents the InfoArea tree of the connected system.
Related Information
Creating InfoAreas [page 45]
3.1.1.3.1.2.1 InfoArea
InfoAreas in the BW Modeling tools serve to structure objects (InfoProviders, InfoObjects, InfoSources and open hub destinations and process chains) in the SAP BW∕4HANA metadata repository.
An InfoArea ( ) can contain other InfoAreas as subnodes. In an InfoArea, BW metadata objects are structured
according to their object type in semantic folders ( ) such as CompositeProvider or DataStore Object (advanced). Semantic folders are only displayed if a metadata object exists for the corresponding object type. InfoArea 0BW4_GLOBAL - Global objects contains all currency translation types, quantity conversion types, key date derivation types, and variables in the system.
The hierarchy of the InfoAreas is displayed in the BW Repository tree. In the case of InfoAreas that have been added to the Favorites, the hierarchy beneath them is also displayed in the Favoritestree.
NoteAs previously, DataSources are structured according to the application components of the corresponding source system.
18 PUBLICSAP BW/4HANAData Modeling

Related Information
Creating InfoAreas [page 45]
3.1.1.3.1.2.1.1 Transporting InfoAreas
The InfoArea is integrated into the SAP BW∕4HANA TLOGO framework and can be transported.
The transport object is called AREA.
3.1.1.3.1.3 DataSources
The DataSources node in a BW project displays the overview of the source systems and DataSources of the connected system.
In the Data Sources tree, folders are displayed for the source system types. Under the source system types, the system displays the existing source systems with their application component hierarchy and the DataSources.
Related Information
Source System [page 249]Working with Source Systems [page 294]
3.1.1.3.2 Properties View
The Properties view displays metadata, like package, version, responsible or last modifier for the SAP BW∕4HANA metadata object shown in the active editor. Further information is displayed depending on the object, such as DDIC information for DataStore objects or technical attributes for DataSources.
Whenever you change the active editor, the Properties view automatically switches to the metadata information of the metadata object in the active editor.
Tip● By clicking on the package, you can open an application displaying the package information.● With the toggle button in the Properties view toolbar, you can pin the view to the currently selected
editor. If you use this function, the Properties view will not be updated when you change the active editor.
SAP BW/4HANAData Modeling PUBLIC 19

3.1.1.3.3 Problems View
The Problems view displays messages pertaining to operations (for example checks) executed on SAP BW∕4HANA metadata objects. The messages are displayed regardless of the editor that is currently active.
Tip● By choosing Full Description in the context menu of a message, you can display detailed information
about the message.● In the Configure Contents dialog box in the Problems view, metadata object-related message types can
be selected. Message types that are deselected will not be shown in the Problems view.
3.1.1.3.4 History View
The History view displays a list containing the current and historical versions of the SAP BW∕4HANA metadata object and thus allows you to keep track of changes made to the object over time.
Whenever the object is saved, the system creates a modified version (M version). Whenever the object is activated, the system creates an active version (A version). If there is an A version already prior to activation, a historical version of the existing A version is also created upon activation. The historical versions provide a snapshot of the status of the object at a given point in time, and are numbered consecutively.
You can choose from the following functions:
● You can open a historical version from the History view in display mode.● You can compare two versions with one another.
Tip
● You can call the History view by pressing Show in history view in the toolbar in an Eclipse-based editor.
● With the Link with Editor and Selection switch in the toolbar for the view, you can link the view with the currently active editor. The History view is then updated each time you switch the active editor, hence each time you display a different metadata object in the editor. In this case, the History view always shows the versions for the object that is displayed in the active editor. If the switch is not set, the History view is not updated when you display a different metadata object in the editor. Using the Link with Editor and Selection switch means that is not possible to use the Pin this History View switch.
● Using the Pin this History View switch in the toolbar for the History view, you can fix the History view to the currently selected editor (to the metadata object currently displayed). If you use this function, the History view is not updated when you display a different metadata object in the editor. Using the Pin this History View switch means that is not possible to use the Link With Editor and Selection switch.
● If you choose Open in the context menu of an entry in the History view, the editor is opened and displays the corresponding version of the object.
20 PUBLICSAP BW/4HANAData Modeling
Related Information
Comparing Object Versions [page 43]
3.1.1.3.5 BW Reporting Preview View
The BW Reporting Preview view displays a reporting preview for the SAP BW∕4HANA metadata object in the active editor.
TipYou can open the reporting preview by doing one of the following:
● Choosing Refresh Data Preview on the BW Reporting Preview view toolbar
● Choosing Show Preview on the toolbar of an Eclipse-based editor
3.1.1.3.6 InfoProvider View
The InfoProvider view displays the SAP BW∕4HANA metadata object in the active editor. This is based on how the InfoProvider is displayed in query maintenance. Ther InfoObjects are categorized here by Key Figures, Characteristics and Reusable Components.
Tip
For supported objects, you can call the InfoProvider view by pressing Show InfoProvider View in the toolbar in an Eclipse-based editor.
You can choose from the following functions in the InfoProvider view:
● From the context menu on an InfoObject and reusable query component (such as a calculated key figure), you can open the object or run a where-used list for it.
● From the context menu for an InfoObject, you can define variables.● From the context menu on the Reusable Components folder, you can create calculated and restricted key
figures and global structures and filters.● From the context menu on a folder for a certain type of reusable query component, such as Restricted Key
Figures, you can create a reusable query component of the same type.● From the context menu of a folder in the directory structure for calculated and restricted key figures, you
can create further folders. You can thus create a directory structure in order to hierarchically group calculated and restricted key figures of an InfoProvider.
Related Information
Creating a Where-Used List for SAP BW∕4HANA Objects [page 36]
SAP BW/4HANAData Modeling PUBLIC 21

Using Reusable Query Components [page 801]
3.1.1.3.7 Content Explorer View
The Content Explorer view is available in a BW/4HANA system if the corresponding SAP BW∕4HANA Content add-on is installed on the server. It allows you to select SAP BW∕4HANA Content objects for activation.
Preconfigured BW objects are delivered in SAP BW∕4HANA Content as part of the ready-made information models for analyzing business issues.
In the Content Explorer view, the SAP BW∕4HANA content objects that you can select are displayed in a tree structure. The following object types are supported:
● InfoObject● DataFlow● DataStore Object● CompositeProvider
Related Information
Content Install View [page 22]Copy BW/4HANA Content Objects [page 44]
3.1.1.3.8 Content Install View
Der Content Install view is available in a BW/4HANA system if the corresponding SAP BW∕4HANA Content add-on is installed on the server. It is used to collect the SAP BW∕4HANA Content objects required for activation and to trigger the installation of these objects, in other words transfer and activation of them.
This ensures that all additional required objects are automatically included, together with the activation sequence. You can choose whether to copy, merge, or not install the SAP BW∕4HANA Content objects.
22 PUBLICSAP BW/4HANAData Modeling

The Content Install view has the following tab pages:
Tab page Objects to be Collected
If you have dragged objects from the Content Explorer view to the Content Install view, the following functions are available:
Collection Modes
Collection Mode Description
Only necessary objects Only necessary objects: The system collects all necessary and relevant objects for the objects that you have planned for activation.
Complete scenario from loading to evaluation Complete scenario from loading through to to evaluation: The system collects both objects that send data and objects that receive data.
NoteThis scenario can impact performance. You should therefore only choose it if the number of objects to be collected and transferred is small.
Objects in data flow above (send data) Objects in the data flow above: The system collects objects that pass data to a collected object. In addition to the direct data flow to the data target, this collection mode also collects all data flows for loading the attributes of a data target (secondary data flows).
NoteFor many attributes in the data target, this is very time-consuming and possibly unnecessary. In this case, choose collection mode Objects in direct data flow above (send data).
Objects in direct data flow above (send data) Objects in the direct data flow above: The system collects objects that pass data to a collected object. This collection mode does ignores the additional data flows however.
Objects in data flow below (receive data) Objects in the data flow below: The system collects objects objects that receive data from a collected object.
You can also choose the following settings depending on the object:
● Add Queries for All Contained ... to Collected Result
SAP BW/4HANAData Modeling PUBLIC 23

CautionYou can also search for queries. Note that this action can impact performance if the queries are large, and the system does not support a direct search for individual queries.
● Add Variables for All Contained InfoObjects
Tab page Objects to be Installed
Under Installation Selection, you can make the following settings:
Installation Modes
Option Description
Install Install: The collected objects are installed immediately.
Install in Background Install in the background: Installation of the collected objects is scheduled for background processing.
Installation and Transport Install and write to transport The collected objects are installed immediately and then written to a transport request. Specify the required transport package.
NoteIn the case of a large number of objects, we recommend the Install in Background setting.
The following functions can be called up from the context menu of objects in the list of objects to be installed:
Processing Modes
Installation Mode Description
Copy (Default Setting) In copy mode, the object is overwritten.
Merge If you have changed an activated InfoObject and want to transfer the InfoObject from a newer content, you can align the two versions: With merge mode, you do not lose the modifications of the InfoObject, since the version that you modified and activated is retained in case of overlaps.
CautionNote that the Merge option is not possible for all objects. This mode is important for InfoObjects however and is supported for DataStore objects.
NoteThe selected mode is displayed with a corresponding icon. If no icon is displayed, the system uses the default mode, and this cannot be changed.
24 PUBLICSAP BW/4HANAData Modeling

Remove
Remove Description
Remove If content objects have already been installed, you can see the installation date under Collected Objects in the Active Version: Content Time Stamp column. You can remove these objects by choosing Remove from the context menu. This is only possible for optional objects however.
Remove All Optional Objects You can use this function to remove all optional objects at once.
Tab page Messages
The system displays the relevant messages for the BW jobs.
Related Information
Content Explorer View [page 22]Copy BW/4HANA Content Objects [page 44]
3.1.1.3.9 More Views
You can find more views under Window Show View Other Business Warehouse .
Related Information
BW Job View [page 26]
SAP BW/4HANAData Modeling PUBLIC 25

3.1.1.3.9.1 BW Job View
The BW job view in the BW Modeling Tools provides an overview of BW jobs that run in the systems of your BW projects. If the job type supports this, you can perform activities from the view, such as interrupting a job that is running or restarting a failed job.
In the BW job view, the following BW job types are supported:
● DATAFLOWCOPY● REMODELING● DTP_LOAD (DTP execution using the BW Modeling Tools)● DTO
By choosing (Filter) in the toolbar of the view, you can specify which jobs are displayed in the view.
In accordance with the selected filters, the jobs are displayed on the left of the view in a list with information on the job type, project (the system in which the job is running), user, start time, status and progress. Any messages about the job are displayed too. If the Job type supports this, you can interrupt a job that is running or restart a failed job. In these cases, a column in the overview of the jobs contains the relevant pushbuttons interrupt and restart .
By choosing (Refresh), you can refresh the overview in the view.
If you select a job, the details for this job are displayed to the right of the view, together with the job log if one exists.
If the job type supports this, the BW job view opens directly when you execute a job directly in the BW Modeling tools. You can also open the BW job view by choosing Window Show View Other Business WarehouseBW Job view .
Define Filters for the BW Job View
1. Choose (Filters) to define which jobs are displayed in the BW job view:○ Time Interval: You can specify which time interval the jobs have to be in.○ Destinations: You can specify which BW projects jobs are displayed for.○ Job Status: You can specify which job statuses are included in the display.○ Types: You can specify which job types are included in the display.
2. Choose Apply and Close.
Related Information
Subscribing to the BW Job Repository Feed [page 31]
26 PUBLICSAP BW/4HANAData Modeling

3.1.2 Basic Tasks
The following sections introduce the basic tasks for working with the BW Modeling tools.
3.1.2.1 Working with BW Projects
BW projects form the starting point for working with the BW Modeling tools in the Eclipse-based IDE. In the following sections, you will find detailed descriptions of the basic activities involved in BW projects.
You work with projects in the Project Explorer view. The projects are displayed here in alphabetical order. To work in a BW project and see the subtrees of the BW project, you have to log on to the back end system. There are several ways of opening the logon screen:
● By double-clicking the BW project● By expanding the first level of the BW project
If you double-click or expand a BW project with SSO enabled for the connected BW system, the connection is established without displaying the logon screen.
Once you are logged on to the system for a particular project, you remain logged on for this project until you exit the Eclipse-based IDE or close the project.
3.1.2.1.1 Creating BW Projects
Before you start working with modeling in the Eclipse-based IDE, you first need to create a BW project. The BW project is used to manage the connection to the back-end system that you want to work with. The project acts as a container (on the front end) for the SAP BW∕4HANA metadata objects located in the system.
Prerequisites
● Make sure that you have defined the system that you want to connect to in your local SAP Logon.● For security reasons, check if the Secure Network Communication (SNC) is enabled for the selected
system connection. If SNC is not enabled, use the SAP Logon Pad to enable the option.
Procedure
1. To launch the project creation wizard, choose File New Project in the main menu.
2. Select the project type Business Warehouse BW Project and choose Next.3. In the Connection field, enter the system ID or choose Browse to select a system from SAP Logon. Then
choose Next.
SAP BW/4HANAData Modeling PUBLIC 27

TipWhen entering the system ID, you can access the content assist function by pressing Ctrl + Space.
4. Enter the logon data, for example Client, User and Password (not required for Single Sign-On).5. [Optional:] If you want to change the default language, select the Change Default Language checkbox and
select a language.
NoteThe default language predefines the original language of the new SAP BW∕4HANA metadata objects that will be created in the corresponding system. Consequently, all new metadata objects will automatically be created in the default language. Your BW project might contain objects in different original languages however if you copy objects from other systems for example.
TipYou can access the content assist function by pressing Ctrl + Space.
6. [Optional:] If you want to define a project name, choose Next and enter a project name. If you do not enter a project name, the project name is generated when the BW project is created.
7. [Optional:] If you want to connect a SAP HANA database to your BW project, choose Next and select the SAP HANA system.
8. Choose Finish to create the BW project. If you have not entered a project name, a name is generated using the following naming convention: <system ID>_<client>_<user>_<language>_<identifier for duplicate names>. Example: ABC_000_MUELLER_DE or ABC_000_MUELLER_DE_2.
Results
To check your created project, switch to the Project Explorer and expand the first level of the project structure. Verify that the project structure includes the following nodes:
● Favorites● BW Repository● Data Sources● SAP HANA System Library - (if you have attached a SAP HANA system to your project)
3.1.2.1.2 Attaching SAP HANA to a BW Project
You can use SAP HANA views of the SAP HANA database, on which the BW system is running, in SAP BW∕4HANA metadata objects. In order to enable the consumption of SAP HANA views (analytic or calculation
28 PUBLICSAP BW/4HANAData Modeling

views) in SAP BW∕4HANA metadata objects, you have to attach the corresponding SAP HANA system to the BW project.
Prerequisites
● The SAP HANA database has been added as a system to the SAP HANA system view in the SAP HANA administration console.
● Make sure that a database user has been assigned to the SAP HANA system.
Procedure
If you want to attach a SAP HANA database to a new BW project, proceed as follows:1. In the BW Project creation wizard on the SAP HANA System page, select the Attach SAP HANA System
checkbox.2. Select the system and choose Finish.
If you want to attach a SAP HANA database to an existing BW project, proceed as follows:3. Double-click the BW project to log on to the back end system.4. Choose Attach SAP HANA System in the BW project's context menu.5. Select the SAP HANA system and choose Finish.
Results
The attached SAP HANA system is displayed as the last child node of the BW project in the Project Explorer tree.
TipYou can remove the system again by choosing Remove SAP HANA System in the BW project's context menu. The SAP HANA system is then no longer displayed in the BW project tree.
SAP BW/4HANAData Modeling PUBLIC 29

3.1.2.1.3 Closing BW Projects
If you do not want to process a project as an active project, you can close it. When a project is closed, its sub-nodes no longer appear in the Project Explorer view, but they still reside in the local file system. Closed projects require less memory.
Procedure
1. Select one or more BW projects.2. Open the context menu and choose Close Project.
Results
The project node is still visible in the Project Explorer view. This means that you can reopen the project whenever you need it.
Tip● You can close an open connection to BW system (log off) by closing a BW project.● You can reopen a BW project by selecting it in the Project Explorer view and choosing Open Project in
the context menu.
● You can hide closed projects in the Project Explorer menu by using the View Menu Customize View function.
3.1.2.1.4 Deleting BW Projects
If you no longer need a BW project, you can delete it. In the Project Explorer view, you can also delete projects of other project types (such as ABAP projects).
Procedure
1. Select one or more projects.2. From the context menu, choose Delete.3. A dialog box opens. If you want to delete the project contents on disk, select the relevant checkbox. Note
that this deletion cannot be undone.4. [Optional:] Choose Preview to check your project selection again and make any changes required. On the
following page, you can deselect projects. When you press OK, the selected projects are deleted.
30 PUBLICSAP BW/4HANAData Modeling

5. Choose OK.
Results
Once the BW Project has been deleted, it is removed from the Project Explorer view.
3.1.2.1.5 Subscribing to the BW Job Repository Feed
If you subscribe to the BW Job Repository for a SAP BW∕4HANAsystem, jobs of certain SAP BW∕4HANA job types are displayed in accordance with the specified filter criteria in the Feed Reader.
Context
For the BW Job Repository feed, the following job types are supported:
● DATAFLOWCOPY● REMODELING● DTP_LOAD (DTP execution using the BW Modeling Tools)● DTO
For general information about the Feed Reader view and about subscribing to feeds in the Feed Reader view, see ABAP Development User Guide.
Procedure
1. Open the Feed Reader view. If it is not visible yet in the BW modeling tools, open it by choosing WindowShow View Other ABAP Feed Reader .
2. In the toolbar for the view, choose (Add Feed from Repository).
The Feed Query wizard is displayed.3. To keep feed entries for a particular SAP BW∕4HANA system, select the relevant BW project on the left in
the first wizard step and then select the BW Job Repository feed on the right.4. Choose Next.5. In the next wizard step, configure the feed query for the BW Job Repository feed.
a. If necessary, change the title of the feed.b. If you want to receive popup notifications whenever there are new entries for the feed, select Display
Notification Messages.c. By choosing Refresh Interval, you can specify how often the client should search for new entries. .
SAP BW/4HANAData Modeling PUBLIC 31

d. By choosing Paging, you can specify the number of feed entries after which there should be a page break in the Feed Reader.
e. Set a filter to restrict the jobs to be displayed.1. In the default setting, the system displays all jobs scheduled by the current user and with an age of
up to and including 86,000 seconds (1 day). You can define your own rules for filtering however. For example, you can filter according to user executing a job, job status and job type.
2. You can specify that a feed entry is created if all defined filter rules are complied with, or that an entry is created if just one of the rules is complied with.
6. Choose Finish.
Results
The BW Job Repository feed is displayed in the Feed Reader view below the project selected in the feed query.
By choosing (Refresh selected feeds), you can refresh the feed(s) selected in the Feed Reader view.
Next Steps
In the BW job view you can perform activities such as pausing a job that is running or restarting a failed job (provided that the job type supports this).
Related Information
Feed Reader ViewGetting FeedsBW Job View [page 26]
3.1.2.2 Working with BW Metadata Objects
In the BW Modeling perspective, you can open and edit all SAP BW∕4HANA metadata objects that are displayed in the BW projects. In the case of object types for which there is no native Eclipse editor, the SAP GUI editor is opened in Eclipse-based IDE in an editor view. Process chains are opened in the Process Chain Editor app once the SAP BW∕4HANA Cockpit has been configured.
32 PUBLICSAP BW/4HANAData Modeling

3.1.2.2.1 Opening SAP BW∕4HANA Metadata Objects
There are various ways of opening metadata objects:
● By double-clicking the object in the Project Explorer view.● By opening the context menu for one or more objects in the Project Explorer tree and choosing Open.● By using the Open BW Object dialog box.
NoteWhen a user opens a native Eclipse editor for a metadata object, the object is not locked. The object will only be locked once the user starts working with it.
3.1.2.2.2 Searching for and Opening Objects with the Open BW Object Dialog Box
Using the Open BW Object dialog box, you can search for a SAP BW∕4HANA metadata object by name and by description, and then open the editor of the selected object. Process chains open in the Process Chain Editor app once the SAP BW∕4HANA Cockpit has been configured.
Procedure
1. In the Project Explorer view, select the required BW project.2. Log on to the connected system (not required for SSO).
3. In the main menu, choose Navigate Open BW Object or the Open BW Object pushbutton in the toolbar of the BW Modeling perspective.
NoteIf you have not selected a project before, the Open BW Object dialog box will suggest the first BW project listed in Project Explorer.
TipIn the Open BW Object dialog box, you can also select another project or create a new one.
4. Enter a search string.
The system searches for metadata objects in the selected BW project. It searches for objects where the search term occurs in or matches the prefix of the technical name or the description.
The search is not case sensitive. You can run the following wildcard searches:
○ ? - any character○ * - any string (including the string length 0)
SAP BW/4HANAData Modeling PUBLIC 33

The search results are listed in the dialog box under Matching Items. They are sorted according to object type and description in ascending order.
Note○ There is a maximum number of matching items in the dialog box. The default value is 200. You can
customize this value in the BW modeling tools settings.○ Under Matching Items, you can only see metadata objects that you have at least display
authorization for.
5. Alternatively you can first select an object type and then enter the search term.a. To do this, enter type under Select an item to open and confirm your entry.b. Select the required object type from the list by double-clicking it.c. Enter the search term.
6. In the search results, select the object that you want to open.7. Choose OK.
Results
The editor of the selected SAP BW∕4HANA metadata objects opens. Process chains open in the SAP BW∕4HANA Cockpit in the Web Browser once the SAP BW∕4HANA Cockpit has been configured.
3.1.2.2.3 Searching for SAP BW∕4HANA Objects
The BW search allows you to search for SAP BW∕4HANA objects using various search criteria - either in a specified BW project or system-wide. The function returns a hit list in the Search view. You can also use the BW search to compile a where-used list for SAP HANA objects in SAP BW∕4HANA objects.
Procedure
1. Choose Search Search... in the user menu. As an alternative, you can use the shortcut Ctrl + H or
press the Search ( ) button in the BW Modeling perspective.2. In the popup that now opens, go to the BW Object Search tab page.
TipIf you cannot see this tab page, press the Customize... button and select it to be displayed.
3. Enter your search term in the BW Object Search tab page.
The system searches for objects where the search term occurs as a prefix of the technical name or the description (see next step), or where the search term matches the technical name or the description (see next step).
34 PUBLICSAP BW/4HANAData Modeling

The search is not case sensitive. You can run the following wildcard searches:
○ ? - any character○ * - any string (including the string length 0)
4. Unter Name and Description, specify whether to search by technical name, description or both.5. Under BW Project, select an active project that you want to search in.6. Define further restrictions for the search.
Option Description
Active Objects / Inactive Objects / Content Objects
You can define whether to search for active objects and/or inactive objects. content objects (D version).
Object Type You can restrict the search to one or more object types. Restriction of the search to subtypes is only possible for certain object types, such as InfoObjects.
Under Object Type or Subtype, enter a comma and select the required object type from the list by double-clicking it. To restrict by multiple object types, use commas as separators.
Created From/To You can restrict the search to objects created during a specified time period.
Created By You can restrict the search to objects created by a specified user.
Last Change From/To
You can restrict the search to objects changed during a specified time period.
Last Change By You can restrict the search to objects last changed by a specified user.
Uses Object If you choose Browse, the Uses HANA Object dialog box appears. Here you can select an SAP HANA object by using a search string. The result of the BW object search is restricted to those SAP BW∕4HANA objects, which use the selected SAP HANA object.
This enables you to use the BW modeling tools to compile a where-used list for SAP HANA objects in SAP BW∕4HANA objects. For example, you can check which CompositeProviders a specific SAP HANA view is used in.
7. To start the search, choose Search.
Results
All objects that match your search criteria are displayed in the Search view. You can navigate to the maintenance screen for an object by double-clicking on it in the list, or call various other functions from the context menu.
SAP BW/4HANAData Modeling PUBLIC 35

3.1.2.2.4 Creating a Where-Used List for SAP BW∕4HANA Objects
The where-used list allows you to find all objects that use a certain object. The function returns a hit list grouped by SAP BW∕4HANA object type.
Procedure
1. You can start the where-used list from the following places:
○ For all objects that are displayed in the BW modeling tools: Project Explorer○ For objects that are maintained using a native Eclipse editor: Active Editor○ For InfoObjects and reusuable query components: InfoProvider view
2. You can call the where-used list as follows:
○ For objects that are displayed in the native Eclipse editor: Press the (Where-Used) button in the BW Modeling perspective toolbar.
NoteThe pushbutton is not active for objects that the SAP GUI editor opens for in the Eclipse-based IDE, and which do not have a native Eclipse editor. Open the where-used list for these objects in Project Explorer.
○ For objects in the Project Explorer and InfoProvider view: Open the context menu for the object and choose Where-Used.
Results
The list of usages is displayed in the Search view. The list of usages displays the hits grouped by object types. By double-clicking on an object in the hit list, you can navigate to the object's maintenance screen.
36 PUBLICSAP BW/4HANAData Modeling

3.1.2.2.5 Opening a SAP BW∕4HANA Object in another Project
With this function, you can navigate rapidly between two versions of the same SAP BW∕4HANA object in two different projects.
Procedure
1. In the context menu of the object in question in Project Explorer, choose Open in Project.2. Select the BW project that you want to open the object in.
The system shows you all open BW projects apart from the current package. Note here that projects that do not contain the object in question can also be displayed.
NoteIf the project that you want to open the object in does not exist yet, you can create it by choosing New Project.
Results
In the Editor, the object is opened in the system of the selected BW project. If the object is not contained in the selected BW project, the system displays an error message.
3.1.2.2.6 Creating a Copy of a SAP BW∕4HANA Object
For SAP BW∕4HANA objects with native Eclipse editors, you can create a copy.
This can be done using the following functions:
● For saved objects:○ In the Project Explorer using the Copy option in the context menu of the object.○ In the wizard for creating an object with the Copy From function.
● From the editor by choosing File Save As... .
NoteTo make sure that the texts are copied in all languages when saving InfoObjects under a different name, install SAP Note 2326441 .
For data flow objects, enhanced copy options are provided. You can create multiple target data flows and specify changes for the target data flows in comparison to the copied data flow.
SAP BW/4HANAData Modeling PUBLIC 37

Related Information
Copying a Data Flow [page 68]
3.1.2.2.7 Managing Favorites
For a better overview of the objects that you work with, you can set them as favorites.
Related Information
Adding Objects to Favorites Using the BW Repository Tree [page 38]Adding Objects to Favorites Using the Favorites Tree [page 39]Removing Objects from the Favorites [page 40]Removing Objects from the Favorites [page 40]
3.1.2.2.7.1 Adding Objects to Favorites Using the BW Repository Tree
You can save objects from the BW Repository tree in favorites. Favorites are saved as cross-project favorites in the back end system.
Procedure
1. Double-click the BW project to log on to the back end system.2. Select one or more InfoAreas or SAP BW∕4HANA metadata objects in the BW Repository tree.3. From the context menu, choose Add to Favorites.
Results
If you add complete InfoAreas to the favorites, they are added as children of the favorites node.
If you add metadata data objects to the favorites, they are added as children of the semantic folders that correspond to the relevant object type (for example, CompositeProvider or DataStore Object (advanced)). If the semantic folder does not exist, it is created as a child of the favorites node.
38 PUBLICSAP BW/4HANAData Modeling

TipChoose Refresh from the context menu in order to read current information from the back end system and display it in the BW project.
3.1.2.2.7.2 Adding Objects to Favorites Using the Favorites Tree
You can use the Favorites tree to add objects to the Favorites. Favorites are saved as cross-project favorites in the back end system.
Procedure
1. Double-click the BW project to log on to the back end system.2. In the context menu of the Favorites tree, choose Add Objects.
The Add Objects to Favorites screen appears.3. Enter a search term.
The system searches for SAP BW∕4HANA metadata objects in the BW project. It searches for objects where the search term occurs in or matches the prefix of the technical name or the description.
The search is not case sensitive. You can run the following wildcard searches:
○ ? - any character○ * - any string (including the string length 0)
The search results are listed in the dialog box under Matching Items. They are sorted according to object type and description in ascending order.
Note○ There is a maximum number of matching items in the dialog box. The default value for this is 200.
You can change this value in the settings for the BW Modeling tools.○ Under Matching Items, you can only see metadata objects that you have at least display
authorization for.
4. Select one or more objects and choose OK.
Results
If you add complete InfoAreas to the favorites, they are added as children of the favorites node.
If you add metadata data objects to the favorites, they are added as children of the semantic folders that correspond to the relevant object type (for example, CompositeProvider or DataStore Object (advanced)). If the semantic folder does not exist, it is created as a child of the favorites node.
SAP BW/4HANAData Modeling PUBLIC 39

TipChoose Refresh from the context menu in order to read current information from the back end system and display it in the BW project.
3.1.2.2.7.3 Removing Objects from the Favorites
Procedure
1. Double-click the BW project to log on to the back end system.2. Select one or more InfoAreas or metadata objects in the Favorites tree.3. Open the context menu and choose Remove from Favorites.
Results
When you remove objects from the favorites, they are no longer visible in the favorites for other BW projects connected to the same system.
3.1.2.2.7.4 Removing Objects from the Favorites
Procedure
1. Double-click the BW project to log on to the back end system.2. In the context menu of the Favorites tree, choose Remove All.
Results
The system removes all objects from the favorites, without a security prompt. The objects are then no longer visible in the favorites for other BW projects connected to the same backend system.
40 PUBLICSAP BW/4HANAData Modeling

3.1.2.2.8 Linking a Selection in the Project Explorer View with the Active Editor
In the Project Explorer view, you can precisely locate the SAP BW∕4HANA metadata object, which you are currently working on, in the BW Repository.
Procedure
In the Project Explorer toolbar, press (Link with Editor).
Results
The selection in the BW Repository tree of the Project Explorer view is linked to the active editor. If you switch to the active editor, the metadata object currently being edited is automatically selected in the BW Repository tree.
3.1.2.2.9 Sharing Links to SAP BW∕4HANA Objects
You can share a given SAP BW∕4HANA object by e-mail or using a document of your choosing. To do this, you can create a hyperlink to this object in the BW Modeling tools. The recipient can use this to open the referenced object in another installation of the BW Modelign tools in the corresponding BW project.
Prerequisites
● The Eclipse-based IDE with the BW Modeling tools must be open when the link is opened.● You have access authorization for the corresponding backend system and authorizations for the linked
object.
Procedure
1. Select the object in the Project Explorer and choose Share BWMT Link in the object’s context menu, or
choose (Share BWMT Link) in the object’s native Eclipse editor.2. In the Share BWMT Link dialog box, select one of the following options:
○ To create an e-mail using your default e-mail application: E-Mail LinkAn e-mail is opened, containing a generated subject and the hyperlink to the object as text.
SAP BW/4HANAData Modeling PUBLIC 41

○ To copy the hyperlink to the clipboard: Copy link to clipboardInsert the link into a document of your choosing. The hyperlink is inserted into the document as text.
Results
The following example shows the link for a given CompositeProvider: bwmt://<BW-System-ID>/sap/bw/modeling/hcpr/ztest1/m
You can also create a system-independent link by pressing the shift key in the Share BWMT Link dialog box E-Mail Link and choosing E-Mail Link or Copy Link to Clipboard wählen. The link for a given CompositeProvider then looks like this: bwmt://Systemid/sap/bw/modeling/hcpr/ztest1/m
NoteFor the hyperlink to react to the right mouse click, the recipient must specify which application to start when a hyperlink is opened.
For a BWMT link from an external document or an e-mail to be opened, an installation of the BW Modeling tools must be defined as the installation where the object in question should be opened. If your operating system is Microsoft Windows, you can set the path to the handler by activating the BWMT Link Handling option under
Window Preferences BW Modeling . This option can only be activated for an installation on your local computer.
Alternatively, you can insert the link into the clipbard and choose Navigate Open BWMT Link From Clipboard in the Eclipse menu. This function then opens the object referenced in the link directly.
If you open a system-independent link, the system shows you the BW projects that are open in the installation of the BW Modeling tools, and you can select the relevant project. Note here that projects that do not contain the object in question can also be displayed.
3.1.2.2.10 Reset SAP BW∕4HANA Object to Active Version
You can reset a modified and saved object to the most recently activated version and thus delete the currently revised version. This function is available for InfoObjects, DataStore Objects and CompositeProviders.
Context
In the Eclipse Editor toolbar, the version of the object currently displayed can be seen to the left of the (Show in History View) button. This function is available for objects in revised version (M version), for which an active version exists.
42 PUBLICSAP BW/4HANAData Modeling

Procedure
Choose the Reset to Active Version function by clicking the arrow to the right of the (Show in History View) button.
3.1.2.2.11 Comparing Object Versions
You can compare two versions with one another. You can compare two versions of an object in the same system or a version of an object in one system and the active version of the same object in a different system.
The version comparison is currently supported for CompositeProviders, DataStore objects (advanced) and InfoObjects.
Compare two versions of an object
1. Press the Show in history view pushbutton in the object editor toolbar to call the History view for the object.
2. Select two versions and choose Compare from the context menu.3. In the BW Object Compare view in the upper part of the screen, the system displays all differences in the
newer version.4. Click on an entry to display the difference between the two versions in detail in the lower part of the screen.
Compare the version of an object with the A version of an object from a different system
If you want to compare similar objects in different systems, you can compare the active or historical version in the active editor with an active version in a different system.
1. Open the required version of the object. For the version comparison, the object or the version in the active editor is used.
2. In the toolbar in the BW Modeling tools, press Compare.3. In the Select Compare Target dialog box under BW Project, select the system where the object that you
want to compare the version in the active with is located.4. Select the object for the comparison.5. Choose OK.6. In the BW Object Compare view, in the upper part of the screen, the system displays all differences in the
first object of the version comparison.7. Click on an entry to display the difference between the two versions in detail in the lower part of the screen.
SAP BW/4HANAData Modeling PUBLIC 43

3.1.2.2.12 Copy BW/4HANA Content Objects
You can use the BW Modeling tools to copy preconfigured BW objects that SAP delivers as part of the ready-made information models for analyzing business questions. By doing this, you activate them for use (and for customer-specific modifications).
Context
You are working in a BW/4HANA system with the SAP BW∕4HANA Content add-on installed on the server. The procedure below explain how to copy SAP BW∕4HANA Content to the active version for productive use.
Procedure
1. Select the project.
2. To display the required views, choose Window Show View Other Business Warehouse Content Explorer and Content Install View.
In the Content Explorer view, select the objects that you want to activate, and then make all settings
relevant for copy and activation in the Content Installation view.3. In the Content Explorer view, select the objects that you want to copy and drag them to the Content Install
view in the Objects to be Collected tab page.
Alternatively, you can use the search.4. On the Objects to be Collected tab page, specify the source that you want the objects to be collected from.
If you want to copy objects from the local content, you do not need to select a source system. If you want to copy the objects from a connected source system, you can choose Browse to display a list of all connected systems that can be used to collect content objects. The system does not check whether these systems contain the corresponding content however. Select your required system.
5. On the Objects to be Collected tab page, specify the rules for collecting the objects.
Use the Collection Mode to define the scope of the objects to be collected, and decide whether or not to collect the queries as well. Note that the selection you make here can impact performance.
6. Choose Collect. When this process is finished, the system automatically switches to the next tab page.
On the Objects to be Installed tab page, the system displays the collected objects in the Collected Objects section.
7. Edit the list of objects to be installed.
If content objects have never been copied before, the system marks them with a green checkmark under Collected Objects in the Object to be updated column and automatically adds them to the selection for copy. You cannot remove these objects from the list for installation.
If content objects have already been installed previously, you can see the installation date under Collected Objects in the Active Version: Content Time Stamp column. You can either remove these objects by
44 PUBLICSAP BW/4HANAData Modeling

choosing Remove in the context menu, or leave them in the list so that they can be installed again. Remove is only possible for optional objects however.
8. Specify the installation mode.9. If possible, specify the processing mode using the corresponding entry from the context menu for the
relevant object.
You can select individual objects and assign the required processing mode to them. Alternatively, you can also select multiple objects and then choose Toggle Installation Mode (Merge/Copy) from the context menu. The system then switches to the other mode for each object. Since not all objects support merge mode, the mode can only be switched for the corresponding objects or is only taken into account for these objects.
10. Choose Install.
The system copies the objects and activates them.
When you have finished working in the Content Install view, the system automatically switches to the Messages tab page and displays the corresponding messages for the BW jobs.
Related Information
Content Explorer View [page 22]Content Install View [page 22]
3.1.2.2.13 Creating InfoAreas
You create InfoAreas in order to structure objects in the SAP BW∕4HANA Metadata Repository.
Create InfoArea on the First Level
1. In the Project Explorer view in the context menu of the BW project, choose New Other .2. In the next popup, select the InfoArea Wizard and choose Next.
The wizard for creating InfoAreas appears.3. To create an InfoArea on the first level of the BW Repository tree, leave the InfoArea field blank.4. To ensure that you can find your InfoArea again without difficulty, we recommend setting the Add to
Favorites flag.5. Enter a name and a description for your InfoArea and choose Finish.
Create InfoArea under an Existing InfoArea
1. In the BW repository tree of the BW project, in the context menu of the InfoArea underneath which you want to create the new InfoArea, choose New InfoArea .
SAP BW/4HANAData Modeling PUBLIC 45

The wizard for creating InfoAreas appears. As an alternative, you can call the InfoArea wizard as described in the previous section.
2. Continue as described above, but leave the target InfoArea as it is in the InfoArea field, or enter a different target InfoArea of your choosing.
Results
The InfoArea is created and activated in the BW Repository tree, and displayed if required in Favorites. The editor for the InforArea is opened.
3.1.2.2.13.1 Moving InfoAreas and Objects in the InfoArea Hierarchy
In a BW project, InfoAreas and objects can be moved from one InfoArea to another with a native Eclipse editor. Moving to another InfoArea is a transport-related change.
Procedure
1. Select one or more objects and InfoAreas in the Project Explorer view in the BW Repository tree, or in the Favorites, and choose Move from the context menu.
You can also use drag and drop for this. Multiple selection is also supported here.
The Move dialog box appears.2. Enter a target InfoArea.3. Specify the position in the hierarchy where you want to insert the InfoArea: as a subnode, above or below
the target InfoArea.
NoteThe Above and Below options (above and below the target InfoArea) can only be selected if alphabetical sorting for SAP BW∕4HANA objects is deactivated in the BW project. You can find more information in the documentation for the Display Options for the BW Modeling Tools.
4. The system displays the list of elements that can be moved. By deselecting elements, you can stipulate that they cannot be moved.
5. Press OK.
Related Information
Display Options for the BW Modeling Tools [page 48]
46 PUBLICSAP BW/4HANAData Modeling
InfoArea [page 18]
3.1.2.2.13.2 Deleting InfoAreas
You can delete empty InfoAreas that have no objects assigned to them and do not contain any further InfoAreas.
Procedure
1. Select an InfoArea in the Project Explorer view in the BW Repository tree, or in the Favorites, and choose Delete from the context menu.
2. Confirm the security prompt.
If the InfoArea still contains elements, the system displays a message informing you that the InfoArea is still in use.
3.1.3 Reference
Related Information
Keyboard Shortcuts for BW Modeling Tools [page 47]Display Options for the BW Modeling Tools [page 48]Settings for BW Modeling Tools [page 49]
3.1.3.1 Keyboard Shortcuts for BW Modeling Tools
For an overview of the keyboard shortcuts that you can use in BW modeling tools, choose Help Show Active Keybindings .
The following keyboard shortcuts are specific to BW modeling tools:
Open BW object Ctrl + Shift + D
Activate BW object Ctrl + F3
Check BW object Ctrl + F2
SAP BW/4HANAData Modeling PUBLIC 47

Search for BW object Ctrl + H
Select a BW wizard Ctrl + N
More helpful keyboard shortcuts for working in Eclipse:
Refresh active editor F5
Save object Ctrl + S
Undo last change Ctrl + Z
Apply last change again Ctrl + Y
Create new object Ctrl + N
Close Editor Ctrl + W
Switch between open editors Alt + Left-Arrow
3.1.3.2 Display Options for the BW Modeling Tools
You can use various options to display the content of BW modeling tools just how you want.
Link with Editor
The Link with Editor button can be found in the toolbar in the Project Explorer view. It toggles the link on and off between the Project Explorer view selection and the active editor.
Switch Label Display Mode
The Switch Label Display Mode button in the toolbar in the BW Modeling perspective allows you to switch between various options, to display the technical names (key) and/or descriptions (text) of InfoAreas, SAP BW∕4HANA metadata objects and elements of the CompositeProvider. The default setting is <[key]text>.
NoteNote that this setting is not used in the Open BW Object dialog.
Sort Project Explorer Tree
You can alphabetically sort the folders and objects in a BW project in the Project-Explorer view. To do this, choose Alphabetical Order for BW Objects in the project’s context menu.
48 PUBLICSAP BW/4HANAData Modeling

Once you have selected the entry, the folders in the trees in the Project Explorer view are displayed in
alphabetical order. Sorting is applied in accordance with the Switch Label Display Mode setting on the technical names or the description of the folders.
SAP BW∕4HANA metadata objects are displayed in alphabetical order by technical name.
3.1.3.3 Settings for BW Modeling Tools
Use the dialog box under Window Preferences to specify how you want Eclipse to work. Here you can configure a number of settings for BW Modeling tools.
BW Modeling
You can change the following settings on the BW Modeling preferences page:
● Search and Validation Settings:
Option Explanation Default Value
Max. Number of Entries in Result Set Specifies how many entries are displayed as matches (after a defined latency) in the Open BW Object dialog box and in the wizards for creating SAP BW∕4HANA metadata objects.
200
Input delay (msec) Specifies the latency time that elapses before entries are displayed as matches in the Open BW Object dialog box and in the wizards for creating SAP BW∕4HANA metadata objects.
800
● Result Set Sorting:By default, the result lists in the BW Modeling Tool are sorted firstly by object type, then by name and then by description. You can use the Up and Down buttons to change the order of the criteria for sorting. If you are looking for a string in the name for example, and the string in question occurs frequently, it can help to sort by name first, and then by type.
● BWMT Link Handling:
If you use the (Share BWMT Link) function and want to open a BWMT link from an external document or an e-mail, an installation of the BW Modeling tools must be defined as the installation in which the SAP BW∕4HANA object in question should be opened. If your operating system is Microsoft Windows, you can set the path to the handler by activating the BWMT Link Handling option under Window PreferencesBW Modeling . This option can only be activated for an installation on your local computer.For more information, see Share Link to BW Object
SAP BW/4HANAData Modeling PUBLIC 49

Automatic Checks
On the BW Modeling Automatic Checks page, you can define which objects the checks should be directly displayed for while working on problems in the Editor in the Problems view. You can switch the automatic check on and off for all objects (Mode: All or None) or explicitly decide which objects should be checked (Mode: Individual).
CompositeProvider
You can change the following settings on the BW Modeling CompositeProvider page.:
Option Explanation Default Value
Min. Number of PartProviders for Bulk Load
For more information, see Settings for CompositeProviders
10
Formula Syntax Coloring
On the BW Modeling Syntax Coloring page, you can define the syntax highlighting for formulas in queries and can set the required colors, styles and fonts.
For more information, see Defining Formulas.
Query Designer
On the BW Modeling Query Designer page, you can define whether hierarchies are loaded by node or completely up to the specified level. To improve performance, we recommend selecting the Dynamic Node Loading field.
Related Information
Sharing Links to SAP BW∕4HANA Objects [page 41]Settings for CompositeProviders [page 220]Defining a Formula [page 766]
50 PUBLICSAP BW/4HANAData Modeling

3.2 Modeling Data Flows
The BW Modeling tools contain a graphical user interface. This provides you with a simple way of creating, editing and documenting data flows and objects in data flows. You can also display and modify the data flow, which corresponds to a specific object, on the graphical user interface.
The data flow is the central entry point for modeling in SAP BW∕4HANA. You can use the data flow to model objects and their relationships with each other for a particular scenario.
3.2.1 Data Flow
A data flow depicts a specific scenario in SAP BW∕4HANA. It describes a set of SAP BW∕4HANA objects, including their relationships and interdependencies. The BW Modeling Tools contain various editors with graphical user interfaces that enable you to create, edit, document and analyze data flows and their objects.
Explanations of Terms
The following table contains a definition of important terms that you will encounter when working with data flows:
Term Definition
Data flow The data flow in SAP BW∕4HANA defines which objects are needed at design time and which objects are needed at runtime to transfer data from a source to SAP BW∕4HANA and cleanse, consolidate and integrate the data so that it can be used for analysis, reporting and possibly also for planning. A data flow depicts a specific scenario including all involved objects and their relationships.
Data flow object A data flow object is a TLOGO object in SAP BW∕4HANA, which describes a data flow. Data flow objects are created and edited in a graphical editor. They help you to visualize the SAP BW∕4HANA objects (and their relationships) contained in a data flow. They have no relevance for the SAP BW∕4HANA runtime.
Transient data flow Using an editor you can flexibly show and analyze the data flow for any persistent, active SAP BW∕4HANA object. This representation of a data flow that starts from an object is referred to as a transient data flow. The editor for a transient data flow is referred to as a transient editor. A transient data flow can be saved as a data flow object.
Persistent SAP BW∕4HANA object
A persistent SAP BW∕4HANA object is an object which has already already been saved in the metadata tables in the database and is independent of the data flow object. A persistent object can be contained in multiple data flows and can therefore be used again in different data flows.
SAP BW/4HANAData Modeling PUBLIC 51

Term Definition
Non-persistent SAP BW∕4HANA object
A non-persistent SAP BW∕4HANA object is a draft version of a SAP BW∕4HANA object. It is an object that only attributes such as object type and name have been specified for so far. It is has not been saved on the database. A non-persistent object can only be displayed and used in the data flow in which it was created. If you create a non-persistent object in the transient editor, it will be discarded if you quit the editor without saving the data flow as a data flow object.
Modeling in the BW Modeling Tools
You can create a data flow object and benefit from its advantages. For example, you can start by creating a logical data flow with non-persistent objects and relationships (blueprint) and then create BW objects, transformations and loading processes later on, in order to persist data in the metadata tables.
You do not necessarily require a data flow object to model objects and relationships in data flows. You can also use the transient editor for this. The graphic transient editor provides a far better overview of a data flow than a tree display can. This means, for example, that when you expand a data flow in different directions, the graphical representation always remains very clear. Even loops, which start from one object via transformations (and sometimes further objects) and return to the initial object, are represented more clearly in the graphical editor than in a tree display.
Examples
The following illustration shows the data flow for the inventory management:
52 PUBLICSAP BW/4HANAData Modeling

For more examples of data flows, please refer to the BI Content documentation; for example, the section Supply Chain Management (SAP-HANA-optimized).
3.2.1.1 Data Flow Object
You can model the objects and relationships of a data flow using a data flow object in a graphical editor.
From the data flow object, you can create SAP BW∕4HANA objects and the connections between them both persistently and non-persistently. This allows you to create a scenario in SAP BW∕4HANA from scratch, or define a template for the technical implementation of a scenario. You can also use the data flow object to store a visualization of an existing scenario with persistent object and existing data flows as a BW object type in SAP BW∕4HANA. The data flow object is of no relevance for the runtime.
You do not necessarily require a data flow object to model SAP BW∕4HANA objects and relationships in data flows. You can also use the transient editor for this.
Advantages of using data flow objects
Graphical modeling of data flow objects offers various advantages, especially in the following use cases:
● Top-down modeling of new data flows○ Top-down modeling makes quick and structured modeling possible directly in the system.○ To start with, you can create the logical data flow with all of its elements without having to store the
objects on the database. This allows you to create a blueprint of your data models directly in the system. In a subsequent step, you can add the required technical properties to these objects and therefore persist them to the metadata tables in the system.
● Structuring your implementation using data flows○ You can group modeling objects and store them as a persistent view for your enterprise model.
You can also include existing models (from SAP NetWeaver 7.0 or higher).○ You can get a clearer overview of the data flows by structuring them according to application areas or
Data Warehouse layers, for example.○ You can document your data flows and the objects that they contain.○ You can use the BW transport connection to collect and transport the objects belonging to a data flow.○ You can use naming conventions to use and reuse the same models.
● Using data flows as templates to set modeling standards○ You can model data flows as templates quickly and simply by copying them to your data flow and
adapting them.○ You can use templates to create your own company-wide standards.○ Using templates can help to reduce development costs.
● Organization of existing models in data flows after upgrading to the current release
SAP BW/4HANAData Modeling PUBLIC 53

Related Information
Creating a Data Flow Object [page 55]
3.2.1.2 Documenting Data Flows
You can document a data flow object, including the contained persistent and non-persistent objects, in the context of the data flow object (in other words, in the context of the scenario illustrated by the object).
This function allows you to describe the role of a nodes in a specific data flow. In a data flow object, for example, architects can illustrate a business scenario with no-persistent objects, add comments as documentation to nodes and hand over the scenario to technical experts for implementation.
The documentation for the data flow object and its nodes is created and displayed in the Properties view. To do this, you can use the text editor and HTML editor provided.
Related Information
Creating Documentation [page 66]
3.2.1.3 Transient Data Flow
For a persistent object in SAP BW∕4HANA, you can display and flexibly analyze the corresponding data flow in the transient editor. In this case, the data flow is referred to as a transient data flow. You can use the transient editor to model objects and their relationships in the transient data flow. You can also save a transient data flow as a data flow object.
The graphical transient editor provides you with a clear display of the data flow for the original object. The graphical display also remains clear if you expand the transient data flow in various directions.
The editor of the transient data flow enables you to find the answers to various questions related to a object and the corresponding data flow. For example:
● Are there currently any outbound transformations and data transfer processes for a specific object?● Which other objects consume a specific object?● Where does the data of a specific object come from?
The transient editor can be used to add missing objects in the data flow. Note however that non-persistent objects are discarded when you quit the editor unless you save the data flow as a data flow object.
Related Information
Using a Transient Data Flow for a Persistent Object [page 71]
54 PUBLICSAP BW/4HANAData Modeling

3.2.1.4 Transporting Data Flows
The data flow object is integrated into the SAP BW∕4HANA TLOGO framework and can be transported. The transport object is DMOD (A version) or DDMO (delivery version).
3.2.2 Working with Data Flows
When working with data flows, you can use various functions.
● Create data flow objects in order to depict a scenario with all participating objects and the relationships between them
● Create documentation for data flow objects and the objects contained in them in order to document the nodes contained in the data flow object in the context of the scenario
● Save the entire data flow documentation as an HTML file (including the metadata descriptions from the metadata repository)
● Enhanced data flow copy in order to create multiple target data flows or changes to the copied data flow● Create objects and connections of a data flow using the transient editor (also without a data flow object)● Display and analyze the data flow for an object (using the transient editor)
Related Information
Creating a Data Flow Object [page 55]Creating Documentation [page 66]Saving Data Flow Documentation as an HTML File [page 67]Copying a Data Flow [page 68]Using a Transient Data Flow for a Persistent Object [page 71]
3.2.2.1 Creating a Data Flow Object
In a data flow object, you can depict a scenario in a SAP BW∕4HANA system, including all participating objects and the relationships between them. When creating a data flow object, you can start from scratch and create non-persistent object together with the connections between them. Alternatively you can create a data flow object in order to depict an existing scenario with persistent and, if relevant, also with existing data flows.
Procedure
1. You are in the BW Modeling tools. Choose New Data Flow from the context menu for your BW project on the BW Repository node or the required InfoArea.
SAP BW/4HANAData Modeling PUBLIC 55

Alternatively you can create a data flow object in the transient editor. Open the context menu of a SAP BW∕4HANA object (in the BW repository, in a data flow object or in the transient editor) and choose Explore Data Flow. Next choose File Save As in the Eclipse menu.
2. In the dialog for creating the data flow object, make the required entries:a. Select an InfoArea.b. We recommend selecting the Add to Favorites field so that you can call the data flow object quickly
next time you need it.c. Enter a technical name and a description.d. By choosing Copy from, you can select an object template. This allows you to copy over the properties
from the template to your new data flow object and to edit them as required.e. Choose Finish.
The system opens the new data flow object in the native Eclipse Editor. The General tab opens.3. Add persistent objects, non-persistent objects or existing data flows to the data flow object.4. Define the connections between the objects. Connections can be any of the following:
○ Transformations○ Data transfer processes○ Relationships between objects and their constituent parts, for example in an InfoProvider contained in
a CompositeProvider5. [Optional:] Create documentation for the data flow object and its nodes.6. Save and activate the data flow object.
Related Information
Working with the Data Flow Object Editor [page 56]Functions in the Data Flow Object [page 59]Creating Documentation [page 66]Tips and Tricks for Working with Data Flows [page 72]Recommendations for Working with Large Data Flows [page 72]
3.2.2.1.1 Working with the Data Flow Object Editor
The Data Flow Object Editor provides a graphical interface for modeling data flow objects.
Tab: General
On the General tab, the system displays teh technical name of the data flow object and the description.
You can change the description here. Under Add all existing transformations and DTPs automatically, you can also specify that all transformations and data transfer processes that are not yet contained in the data flow
56 PUBLICSAP BW/4HANAData Modeling

object but whose source and target objects are part of the data flow object, are now added to the data flow object. Once you have made the setting and have saved and activated the data flow, the transformations and data transfer processes are displayed in the editor.
Tab: Details
On the Details tab, the system displays a grid where you can sort and depict the objects and the data flow connections. To add non-persistent objects, you have an object pallet, which you can drag to either the left or the right of the grid.
Objects are inserted as nodes in the cells of the grid. Nodes with blue backgrounds represent persistent objects and nodes with white backgrounds represent non-persistent objects. Transformations and data transfer processes are inserted as connections between the nodes. The icons in the target node indicate if the connections are transformations or data transfer processes. The numbers next to the icons indicate the number of connections. To find out if this number includes non-persistent connections, hover with the mouse pointer over the icons. Relationships between objects and their constituent parts, for example InfoProviders contained in a CompositeProvider, are shown by connections (without arrows).
The various functions in the Data Flow Editor can be executed or called using the following UI interactions:
● Drag and drop (from the pallet or from the Project Explorer view onto the grid)● Context menu (in the grid or on an object )● Context pad on object
Toolbar
The toolbar in the Data Flow Editor contains the following functions:
Function Explanation
Functions to display the data flow
You can use the dropdown menu or the slide bar to set the display size.
(Compressed view) For a better overview of a larger data flow, you can use the compressed view. The display is reduced in size here, and the nodes show the object type and the technical name of the object only.
By choosing (Decompressed View). you can return to the original view.
SAP BW/4HANAData Modeling PUBLIC 57

Function Explanation
(Hide connections) Data transfer processes and transformations are displayed as symbols in the node of the target object. You can switch off the display of data transfer processes and/or transformations. If both of them are switched off, the connections between the nodes are not displayed any more either.
(Auto Layout) For a better overview of a more complex data flow, you can automatically adjust the layout. The system then arranges the nodes and connections in the grid, providing a better overview.
General Data Flow Object Functions (Share BWMT Link) Using this function, you can either send a link that opens the SAP
BW∕4HANA object in the native Eclipse editor by e-mail, or you can copy the link to the clipboard and share the link with other people.
More information: Sharing Links to SAP BW∕4HANA Objects [page 41]
(Show in history view) The History view displays a list with the various versions of the data flow object, together with the version type and creation date.
More information: History View [page 20]
(Delete) You can delete the data flow object here.
(Show Documentation)
You can display the documentation here for an entire data flow in HTML format as a preview, and save the documentation as an HTML file on a computer, or print it.
More Information: Saving Data Flow Documentation as an HTML File [page 67]
Important Views for Data Flow Object
View Meaning for Data Flow Object
Properties The Properties view provides functions that are specific to the Data Flow Object Editor. Here you can:
● Display the data flow object metadata● Create and display documentation for the data flow ob
ject and its nodes● Display the inbound and outbound connections of a
node selected in the editor
More Information: Properties View [page 19]
58 PUBLICSAP BW/4HANAData Modeling

View Meaning for Data Flow Object
Outline The Outline view lists the nodes contained in the data flow object by object type. It helps you to quickly find a node in the data flow: You can use a filter to quickly find a node in the Outline view. If you highlight the node in the Outline view, this node is also highlighted in the editor of the data flow object.
The node context menu contains useful functions for opening the documentation, for example, or displaying the connections for the node in the Properties view.
Miniature View The Miniature View make it easier to navigate your way though large data flows. This view displays the complete data flow as an overview image and highlights the section, which is currently displayed in the editor of the data flow object.
The Miniature View is not one of the default views of the BW Modeling Tools. You can show the view by choosing this
menu command: Window Show View Other
General Miniature View .
Problems The Problems view assist you with troubleshooting.
More Information: Problems View [page 20]
History The History view displays the available versions of the data flow objects.
More Information: History View [page 20]
3.2.2.1.2 Functions in the Data Flow Object
Nodes
Function Explanations
Insert non-persistent objects as nodes You have the following options:
● Drag & drop from the pallet
● New Data Flow Node <Object Type> in the context menu for the grid
SAP BW/4HANAData Modeling PUBLIC 59

Function Explanations
Replace non-persistent objects with (new or existing) persistent ones
You have the following options:
To create a new persistent object:
● Double-click on the node for the non-persistent object● Create Persistent BW Object in the context menu for the
node
To replace the non-persistent object with an existing persistent one:
● Drag & drop from the Project Explorer view● Add Object in the context menu for the node
If you insert a CompositeProvider, its components, together with any SAP HANA views, are automatically inserted with it as separate nodes. If the SAP HANA system is linked with the BW project, you can open the SAP HANA views from the data flow editor.
If you insert a DataSource, the source system is automatically inserted with it as a separate node in the data flow.
Insert persistent objects as nodes You have the following options:
● Drag & drop one or more objects from the Project Explorer
● Add Object in the context menu for the gridIn the popup, you can select one object or multiple objects (with the CTRL button).
If you insert a CompositeProvider, its components, together with any SAP HANA views, are automatically inserted with it as separate nodes. If the SAP HANA system is linked with the BW project, you can open the SAP HANA views from the data flow editor.
If you insert a DataSource, the source system is automatically inserted with it as a separate node in the data flow.
Copy and insert nodes 1. Select one or more nodes and choose Copy from the context menu.
2. Position the mouse on the line in the grid where you want to insert the nodes you are copying and choose Paste from the context menu.
The system retains the layout of the copied nodes when inserting them. Copies of persistent objects are inserted into the dataflow object as non-persistent objects.
Move nodes in the grid Select one or more nodes and move these with drag & drop.
60 PUBLICSAP BW/4HANAData Modeling

Function Explanations
Remove nodes from the dataflow object You have the following options:
● Select one or more nodes and remove these from the dataflow object by choosing Remove Node from the context menu or by pressing the Remove button.
● For a single object, you can also use the (Remove from data flow) function in the context pad.
When removing nodes from the data flow object, no objects are deleted from the SAP BW∕4HANA Repository.
Connections
Function Explanations
Create connections between nodes:
Non-persistent transformations, data transfer processes and InfoPackages, together with relationships between objects and their constituent parts
You have the following options:
● Drag and drop from the source object (onto (Drag to create connections) in the context pad, or from the gray area on the upper edge of the node onto the target object.
● Single click on (Drag to create connections) in the context pad of the source object and then single click on the target object.
● To create multiple connections to target and/or source objects, choose New Connection from the context menu on a node.
The following applies to connections between the source object and target object: A non-persistent transformation is created as the first connection. All other connections are created as non-persistent data transfer processes.
Connections from a object to its components can only be dragged between non-persistent objects. This is not suitable for persistent objects because the components of the CompositeProvider, for example, or the source system of a DataSource can be specified, in the object maintenance screen, as part of the meta definition of the object.
SAP BW/4HANAData Modeling PUBLIC 61

Function Explanations
Highlight connections from one node to another nodes in the display
To be able to recognize all connections from one node to other nodes in the data flow at a glance, you can highlight them.
You have the following options:
● Highlight Relationships in the context menu for the node
● Single click on (Highlight relationships) in the context pad of the node
When you highlight the connections of one node to other nodes, then this node and its connections to other nodes are displayed in color. The icons for the different connection types are displayed on the relevant nodes for transformations and data transfer processes. The number of connections is shown next to the icon. Hover with the mouse pointer to see how many connections are persistent and non-persistent.
62 PUBLICSAP BW/4HANAData Modeling

Function Explanations
Create persistent transformations and data transfer processes from non-persistent connections
Prerequisite: The source nodes and target nodes are persistent objects and the corresponding non-persistent connections are available.
You have the following options:
● Double-click on the transformation or DTP icon in the target nodeIf there is already more than a data transfer process between the source object and target object, you can select the required data transfer process.
● The context menu for the node contains the following entries:
○ Transformations Create <Name of the
Transformation>
○ DTPs Create <Name of the DTP>● Select a node and choose Highlight Relationships from
the node context menu. The icons for the connections are displayed on the relevant nodes.Double-click on the transformation icon to call the maintenance screen for transformations, where you can create transformations.If you double-click on the data transfer process icon, a dialog opens, where you have the following options:○ Insert Existing DTPs
If you select this option, the existing data transfer processes are inserted between the source and the target. If there is no data transfer process between the source and the target, you can create a data transfer process. If there are no transformation between the source and the target yet, the system creates a default transformation.
○ Insert Existing DTPs and Create New DTPIf you select this option, the existing data transfer processes between the source and the target. The screen for creating an additional data transfer process appears.
○ Display Existing DTPs in Transient EditorIf you choose this option, you can display the existing data transfer processes before you create a new data transfer process.
If the objects already exist, you can call the object maintenance screen by double-clicking on them.
● Create DTP in the context menu for the node
SAP BW/4HANAData Modeling PUBLIC 63

Function Explanations
○ If the selected node should serve as a source: Select a target node in the Targets tab page.
○ If the selected node should serve as a destination: Select a source node in the Sources tab page.
The selection window described above appears.
Display connection details Show Connections in the context menu for the node
On the Connections tab page in the Properties view , all of the selected node's incoming and outgoing connections are listed, together with information about the source/target.
Remove connection Remove Connection in the context menu for the node
The system displays all of the node's incoming and outgoing connections that can be removed from the data flow object.
Display incoming connections for a node Entry Incoming: <connection> in the context menu for the node.
Under Display <Name of the connection>, the system displays the incoming persistent connections. Under Create <Name of the connection>, you can create a persistent connection from a non-persistent one.
Data flows
Function Explanations
Insert data flow of an existing data flow object Insert Data Flow in the context menu for the grid
When you insert a data flow, all persistent objects in the data flow are added to the data flow object as persistent objects if they are not there already.
Insert data flow of an existing data flow object as a template You have the following options:
● Insert Data Flow As Template in the context menu for the grid
● Drag & drop one or more data flows to the grid from the Project Explorer
If you insert a data flow as a template, all inserted nodes are inserted as non-persistent objects.
64 PUBLICSAP BW/4HANAData Modeling

Documentation
Function Explanations
Display or create documentation You have the following options:
● Documentation for a node: Show Documentation in the context menu for the node
● Documentation for the data flow object: Open the Properties view and select an empty cell in the data flow object's grid in the editor screen for the data flow object.
Miscellaneous
Function Explanations
Open the editor for persistent object You have the following options:
● Double-click on the node● Open Editor in the context menu for the node
The system opens the object in the editor.
Display transient data flow for a persistent object Explore Data Flow Explore Data Flow Downwards or
Explore Data Flow Explore Data Flow Upwards in the context menu for the node
The system opens an editor to display the transient data flow. The system displays the complete downward or upward data flow for the selected node.
Expand data flow for a persistent object You have the following options:
● Explore Data Flow in the context menu for the node● Single click on one of the expand symbols in the node's
context pad
For the object, you can expand the data flow upward or downward by a single level or completely.
Call InfoProvider administration For InfoProvider that have an administration UI (for example DataStore-Objekt (advanced) or InfoObject): Manage in the context menu for the node
SAP BW/4HANAData Modeling PUBLIC 65

Function Explanations
Change grid Insert in the context menu for the grid
You can insert rows, columns and cells into the grid:
● Insert Row (top)● Insert Column (left)● Insert Cell Left● Insert Cell Right
Align nodes in the grid Select one or more nodes in the data flow and choose Alignment from the context menu. Various alignment functions are available here, for example aligning the node left or right.
Print data flow object Print in the context menu for the grid or for a node
You can make various print settings, such as the size and the position.
Export data flow object as image file Export Diagram in the context menu for the grid or for a node
You can make various export settings, such as the size and the image format.
Related Information
Creating Documentation [page 66]
3.2.2.2 Creating Documentation
You create the documentation for the data flow object and its nodes in the context of the data flow. This means that the documentation is not part of the SAP BW∕4HANA objects. The purpose of this documentation is more to provide a comment on the data flow and its nodes. You could do this for example if you have a data flow object with non-persistent objects and want to provide a colleague with a basic system architecture so that s/he can take over the technical implementation.
Procedure
1. Create documentation for the data flow itself and for the nodes of the data flow object:
○ To create the documentation for the data flow object, open the Properties view and select an empty cell in the data flow object's grid in the data flow object editor.
66 PUBLICSAP BW/4HANAData Modeling

○ To create the documentation for the node of the data flow object, choose Show Documentation from the context menu for the node in the data flow object editor.
In the Properties view, the Documentation tab page displays the interface for maintaining documentation.2. Under Documentation Type, select the editor that you want to create the documentation with, and enter
the text in the editor:
○ TEXT, to create a pure text file○ HTML, to make use of enhanced editing and structuring options
3. For non-persistent objects: You can change the technical name and description of the object. The changes are taken over directly in all places where the node is displayed, for example in the node in the data flow editor or in the Outline view. The system checks whether the entries for the technical names comply with the naming convention for SAP BW∕4HANA objects.
3.2.2.3 Saving Data Flow Documentation as an HTML File
You can display the data flow documentation for an entire data flow in HTML format as a preview, and save the documentation as an HTML file on a computer, or print it. This allows you to keep a record of the current modeling status and have a good basis for creating documentation for your BW project, or auditing it.
Context
The data flow documentation contains the following information:
● Header data: Date on which the HTML page was created, and the system that contains the data flow● Overview table for the objects of the data flow. The object names are linked, and clicking these links
displays information about the objects.● For each active object in a data flow:
○ If available: Documentation created in the data flow editor for the data flow and the individual objects in the data flow
○ Metadata description from the Metadata Repository:○ Table containing a description of the object containing the technical name, descriptions (short and
long), object version, the user who last changed the object, the last change, and the logical system name
○ If available: Links to BW documents about the object○ Table containing an overview of the metadata for the object, for example contained objects such
as InfoObjects or object-specific details○ For transformations:
○ Table showing an overview of field mapping○ For each conversion, formula, or routine: List of fields used in the field mapping overview○ Field details and rule details (can be displayed or hidden)
○ For data transfer processes:○ List of fields used in the filter with information on the filter conditions○ List of key fields for error stack
SAP BW/4HANAData Modeling PUBLIC 67

○ Tables containing overviews of objects in the environment, such as required objects, objects from which data was received, or objects to which data was passed.
Procedure
Calling the Data Flow Documentation as a Preview
Choose (Show Documentation) in the toolbar in the data flow editor.
The system displays the HTML documentation for the data flow as a preview in a window.
NoteYou can only call the function if there is an active version of the data flow object, and the object version currently displayed in the editor is the active version. If you created a new data flow for example and saved it but not activated it yet, you cannot call the function. If there is already an active version, but you have unsaved changes in the editor in the editor, or If a revised version is displayed in the editor, the system displays the documentation for the active version.
Saving the Documentation from the Preview as a File
Choose (Save) in the toolbar in the preview in order to save the data flow documentation as an HTML file on a computer. This saves the documentation as currently displayed in the preview, with the information either shown or hidden. If you open the HTML file, it is displayed in the browser. As in the preview, navigation options are available in the HTML file.
Printing the Documentation from the Preview
Choose (Print) in the toolbar in the preview in order to print the data flow documentation or to save it is a PDF file using a PDF print driver.
Related Information
Creating Documentation [page 66]
3.2.2.4 Copying a Data Flow
You can copy a data flow together with its objects. Using the simply copy function (Copy), you copy the data flow 1:1, and the copy contains the same objects as the original data flow. With the enhanced copy function, you can create multiple data flows and specify changes in comparison with the copied data flow. By choosing the copy mode, you can decide for example to swap objects in the copy with other objects, to create new objects or not to take over objects to the copied data flow.
68 PUBLICSAP BW/4HANAData Modeling

Context
The enhanced data flow copy function supports various scenarios:
● You can use an existing data flow as a "master template" for other data flows.● You can take over an existing data flow from SAP BW∕4HANA Content, copy it and then modify the copy
according to your requirements.● You can copy an existing data flow for one source system for the other source systems you need.
When defining and performing a data flow copy, there is a wizard to help you. Here you select the objects that you want to take over to the target data flow and set the copy mode for the individual objects (for example by creating or using another existing object). You then assign the original objects to the target objects of the copy and - depending on the copy mode you have chosen - specify a technical name and a description for new target objects or select an existing object as the target object. Once you have specified what form the copy/copies should take, you finish the wizard in order to start the copy process.
NoteIf you want to use the enhanced data flow copy, the standard transport system must be deactivated.
Procedure
1. You are in the BW Modeling tools. Here you select Copy Enhanced in the context menu of the required data flow in the Project Explorer.
2. In the first wizard step, specify how many copies you want to create, and then choose Next.
TipIf you want to create a simple 1:1 copy, we recommend using the Copy function in the context menu of the data flow that you plan to copy.
3. In the second step, the system displays the object types present in the original data flow below and lists the objects of the data flow below, with the copy mode and the assignment to the target objects in the target data flows.
4. Set the copy mode for the objects. To do this, highlight the row of the object in question and select the required copy mode under Change Copy Type in the toolbar. Alternatively, you can select the copy mode from the context menu of the row.
Four copy modes are supported:
Copy Mode Description
Original The data flow copy contains the same object as the original data flow.
Different In the data flow copy, the object is replaced with a differ-ent existing object.
SAP BW/4HANAData Modeling PUBLIC 69

Copy Mode Description
Do not copy The object is no longer contained in the data flow copy.
Create In the data flow copy, the object is replaced by a newly created object. The new object is created as a copy of the original object during the copy process.
Which copy modes are available for a given object depends on the object type and on its dependencies to other objects. For the data flow object itself for example, only copy mode Create is available. For source systems, only different is available, meaning that a different source system can be used than in the original data flow. For transformations for example, the copy mode depends on the copy modes of the incoming and outgoing objects. If the incoming object in the copy is newly created for example, a new transformation must be created during the copy.
5. If necessary, edit the objects with copy mode Create or Different. To do this, select the row of the object in question and choose Edit in the toolbar. Alternatively, you can double-click the row.a. Create: In the dialog box, you can modify the proposed technical names and descriptions of the target
objects.b. Different: In the dialog box, you can select a different object.
NoteIf objects such as transformations or data transfer processes are newly created, the technical name and description are created during the copy process. It is therefore not possible to set them manually in this step.
6. The Status column shows you whether or not the assignments of an original to the target objects are correct. If the status is incorrect, correct the assignments. Check for example whether the names of the target objects adhere to the naming conventions for the object type, or whether you have actually selected a different object if using copy mode Different.
7. Once you have made all the settings for the copies, and all objects have the status green, choose Finish to start the copy process.
8. The system displays the BW Job View. This contains an overview of the copy processes. Refresh the display until your current data flow process is displayed.
9. Select the data flow process in order to display the associated job details and logs.
Next Steps
In the InfoArea tree of your original data flow, choose Refresh so that you can see the copied, new data flows in the Project Explorer.
70 PUBLICSAP BW/4HANAData Modeling

3.2.2.5 Using a Transient Data Flow for a Persistent Object
From a persistent SAP BW∕4HANA object, you can call the editor for a transient data flow. In the editor, you can show the data flow of the object and thus better understand the relationships and dependencies between the various objects in the data flow.
1. Call the Editor for a transient data flow. You have the following options:1. In the Project Explorer view, you can choose Explore Data Flow in the context menu of an object.
2. In the editor of a data flow object, you can open the object context menu and choose Explore Data Flow Explore In New Data Flow .
The system opens the editor for the transient data flow and displays the object in question as a node.2. The editor for a transient data flow has the same structure and functions as the Data Flow Object Editor. In
particular, you can do the following here:○ By starting from one object, you can using the transient editor to model further objects in the data flow
and create connections between the objects in the data flow.
NoteHowever, please note that non-persistent objects are discarded when you quit the editor, unless you save the data flow as a data flow object (see below).
○ By starting from one object, you can display and analyze the data flow.You can do this by opening the context menu or the context pad from the selected object.○ Show the targets or sources of the object one level higher or lower in the data flow○ Show the entire upward or downward data flow for the object
Once you have shown data flows for various objects and on various levels, the alignment of nodes and connections in the grid might not be as tidy as before. In this case, you can use the Auto Layout function in the editor toolbar to automatically arrange the nodes and connections and make the display tidier.
○ You can save the transient data flow displayed in the editor as a data flow object.Open the Eclipse menu and choose File Save As . In the popup that appears now, enter an InfoArea, a technical name and a description for the data flow object.
Related Information
Working with the Data Flow Object Editor [page 56]Functions in the Data Flow Object [page 59]
SAP BW/4HANAData Modeling PUBLIC 71

3.2.2.6 Tips and Tricks for Working with Data Flows
Easily Connecting Objects
Creating a Template for a Data Flow
3.2.2.7 Recommendations for Working with Large Data Flows
Various functions are available to make it easier to work with large data flows.
The following views provide helpful information and functions:
● The Outline view provides you with an overview of the nodes in the data flow and allows you to find nodes in the graphical editor quickly and easily.
● The Properties view provides you with a list of all incoming and outgoing connections to a node selected in the editor.
● The Miniature view shows you where the section displayed in the editor is situated in the data flow.
The following functions in the graphical editor are particularly helpful:
● Highlight Relationships in the context menu for a node. This allows you to recognize all incoming and outgoing connections for a node with other nodes in the displayed data flow by highlighting them.
● New Connection in the context menu for a node. This provides you with a popup containing a list of all available source and target nodes.
● Various functions in the editor toolbar help you to have a clearer overview of the data flow in the editor, for example by compressing the view, zooming, or automatically adjusting the layout.
Related Information
Working with Data Flows [page 55]
72 PUBLICSAP BW/4HANAData Modeling

3.3 Modeling with Fields Instead of InfoObjects
Objects in SAP BW∕4HANA can be modeled with InfoObjects or with fields. Modeling InfoObjects brings additional effort, but offers a number of advantages. When deciding whether to model with fields or with InfoObjects, you should consider how much of the flexibility that the fields offer you you need, and which functions or performance that the InfoObjects offer you you can do without.
You should model central master data objects (navigation attributes and hierarchies) using persistent InfoObjects. With many OLAP functions, this offers you advantages in terms of performance.
In the entry layer in the data warehouse however, where there is little need for OLAP functions, and smaller data volumes are processed, using fields can enhance the flexibility and range of the data warehouse.
Functional restrictions when modeling with fields
● The services for InfoObjects (attributes and hierarchies for example) are not available for fields.● Fields are displayed in the CompositeProvider / the query with the generated name 4<InfoProvider>-<field
name>.● Validity characteristics for DataStore objects (advanced) with non-cumulative key figures must be
InfoObjects.● InfoObject attributes must be InfoObjects.● A field-based key figure cannot be an exception aggregation.● An association with an Open ODS view is only possible once for navigation attributes.● Planning queries on DataStore objects (advanced) are only supported with fields as read-only.
Performance when modeling with fields
● If the query contains fields, it can be processed key-based in SAP HANA.● If an open ODS view contains compounded fields, processing in SAP HANA is not possible.● If fields are used in the query definition, the OLAP cache cannot be used.● If fields from open ODS view and InfoObjects are used as navigation attributes based on a SAP HANA view
in CompositeProviders, performance will be impaired when processing the query filter on them in SAP HANA. More information: 2103032
● In the query on a CompositeProvider, not all data types for fields are supported:○ The maximum length for fields is 20 characters.○ Not all characters are supported.
More information: 2185212● If fields are used in the query, the InfoProviders can only be read sequentially.
SAP BW/4HANAData Modeling PUBLIC 73

3.4 Definition of physical data models
The data in the physical data models are loaded and stored via staging.
Physical data models are InfoObjects which can either be the InfoProviders themselves or they can be used in InfoProviders. The DataStore object (advanced) is an InfoProvider that can consist of InfoObjects.
3.4.1 InfoObject
Business evaluation objects are known in BW as InfoObjects.
InfoObjects are divided into characteristics, key figures, units, time characteristics and technical characteristics. InfoObjects are the smallest units in BW. They are used to depict information in a structured form required for creating InfoProviders. InfoObjects with attributes or texts can also be InfoProviders in their own right.
Related Information
Creating Characteristics [page 83]Creating Key Figures [page 106]Creating a Unit [page 110]Creating XXL InfoObjects [page 110]
3.4.1.1 Characteristic
Characteristics are sorting keys, such as company code, product, customer group, fiscal year, period, or region.
They specify classification options for the dataset and are therefore reference objects for the key figures. The characteristics specify the granularity (the degree of detail) at which the key figures are stored in the InfoProvider. In general, an InfoProvider contains only a sub-quantity of the characteristic values from the master data table. The attributes include the permitted values for a characteristic.
Time characteristics are characteristics such as date, fiscal year, and so on.
Technical characteristics are used for administrative purposes only within BW. An example of a technical characteristic is the request number. This is generated when you load a request as an ID and helps you locate the request at a later date.
Special features of characteristics
If characteristics have attributes, texts or hierarchies, these are known as data-bearing characteristics.
74 PUBLICSAP BW/4HANAData Modeling

Master data is data that remains unchanged over a long period of time. Master data contains information that is always needed in the same way. References to this master data can be made in all InfoProviders.
A hierarchy is always created for a characteristic. This characteristic is the basic characteristic for the hierarchy (basic characteristics are characteristics that do not reference other characteristics). Like attributes, hierarchies provide a structure for the values of a characteristic. The company location is an example of an attribute for Customer. You use this to form customer groups for a specific region, for example. You can also define a hierarchy to make the structure of the Customer characteristic clearer.
Related Information
Creating Characteristics [page 83]
3.4.1.1.1 Attribute
There are two types of attributes: Display attributes and navigation attributes.
In the query, display attributes provide additional information about the characteristic. Navigation attributes, on the other hand, are treated like normal characteristics in the query, and can also be evaluated on their own. Attributes are InfoObjects that exist already, and that are assigned logically to a characteristic.
ExampleCosts of the cost center drilled down by person responsible:
You use the Cost Center Manager attribute for the Cost Center characteristic. If you want to navigate in the query using the cost center manager, you have to create the Cost Center Manager attribute as a navigation attribute, and flag it as a navigation characteristic in the InfoProvider.
3.4.1.1.2 High Cardinality
The High Cardinality property allows you to create more than two thousand million characteristic attributes for a characteristic.
As a characteristic with high cardinality has a number of restrictions, you should only set this property if you really expect a larger number of characteristic attributes.A characteristic with high cardinality has no persistent SID values and no SID table. This kind of characteristic can therefore only be used in InfoProviders that store the key instead of the SID value of the characteristics it contains.
Constraints
Characteristics with high cardinality cannot
SAP BW/4HANAData Modeling PUBLIC 75

● be used in InfoCubes● be used in SAP HANA analysis processes● be used as compound parents in a compound● be used as navigation attributes● be used in hierarchies
3.4.1.1.3 Master Data
Master data is data that remains unchanged over a long period of time.
Master data contains information that is always needed in the same way. Characteristics can bear master data in the BW system. Master data contains attributes, texts or hierarchies. If characteristics have attributes, texts or hierarchies, these are known as data-bearing characteristics.
3.4.1.1.3.1 Master Data Types: Attributes, Texts and Hierarchies
Master Data Types
Attributes
Attributes are InfoObjects that are logically subordinate to a characteristic and that cannot be selected in the query.
ExampleYou assign the attributes Person responsible for the cost center and Telephone number of the person responsible for the cost center (characteristics as attributes), as well as Size of the cost center in square meters (key figure as attribute) to a Cost Center.
XXL Attributes
XXL attributes are XXL InfoObjects, which are logically assigned to the characteristic. You can use XXL InfoObjects to save additional information for a characteristic as data type STRING or XSTRING.
Texts
You can create text descriptions for master data or load text descriptions for master data into BW. Texts are stored in a text table.
ExampleIn the text table, the Name of the person responsible for the cost center is assigned to the master data Person responsible for the cost center.
Hierarchies
76 PUBLICSAP BW/4HANAData Modeling

A hierarchy serves as a context and structure for a characteristic according to individual sort criteria. For more detailed information, see Hierarchies [page 541].
Features
Time-dependent attributes:
If the characteristic has at least one time-dependent attribute, a time interval is specified for this attribute. As master data must exist between the period of 01.01.1000 and 12.31.9999 in the database, the gaps are filled automatically.
Time-dependent texts:
If you create time-dependent texts, the system always displays the text for the key date in the query.
Time-dependent texts and attributes:
If texts and attributes are time-dependent, the time intervals do not have to agree.
Language-dependent texts:
You can specify whether texts are language-dependent (in the case of product names: for example, German — Auto, English — car) or not language-dependent (in the case of customer names, for example). The system only displays texts in the selected language.
If texts are language-dependent, you have to load all texts with a language flag.
Only texts exist:
You can also create texts only for a characteristic, without maintaining attributes. When you load texts, the system automatically generates the entries in the SID table.
3.4.1.1.4 Enhanced Master Data Update
For characteristics with attributes and/or texts, you can use the enhanced master data update. This enables parallel loading of data. To do this, the attribute receives additional tables. It then has a structure like a DataStore object with an inbound table and a change log. The enhanced master data update is an advantage if you want to load a large quantity of data or to load data from multiple DataSources simultaneously. You can also load deltas from one InfoObject into another InfoObject.
SAP BW/4HANAData Modeling PUBLIC 77

The data is initially loaded in parellel into the inbound table. When activated, the change log and the attribute and text tables of the InfoObject are updated. The activation can be processed in parallel in ABAP runtime, or in the SAP HANA runtime for SAP HANA 2.0 Patch 03 Rev 32.
You can activate enhanced master data update in InfoObject processing. The enhanced master data update is available in the process chain types for activating master data and for removing change log data.
In transaction RSDMD_SETTINGS, you can make settings for processing requests.
The previous master data update is still available and is by default activated. Parallel loading is not possible here, but if you are only loading a small quantity of data, this solution is preferable. The data is loaded serially into the attribute and text tables directly.
78 PUBLICSAP BW/4HANAData Modeling

Related Information
Managing InfoObjects [page 1197]
3.4.1.1.5 Characteristic as InfoProvider
You can indicate an InfoObject of type characteristic as an InfoProvider if it has attributes.
The data is then loaded into the master data tables using the transformation rules. You can define queries for the master data of the characteristic.
Related Information
Editing General Settings [page 85]Creating Characteristics [page 83]
SAP BW/4HANAData Modeling PUBLIC 79

3.4.1.1.6 Characteristics of Type Integer
In the SAP HANA database, data often has the format integer (INT4, INT8, DEC). To allow this data to be accessed from the BW system or to be loaded, it must be converted to another format. You can use conversion routine SNUMC to do this.
More information: Conversion Routines in the BW System
You need this conversion for example if you want to use an Open ODS view to access a table or a view in SAP HANA or if you load data into the BW system using a SAP HANA DataSource.
Supported data types
SAP HANA data type DDIC data type Internal length
Output length (InfoObject maintenance)
Externe length (SAP HANA DataSource, Open ODS view) Comment
INTEGER INT4 11 14 11
BIGINT INT8 20 26 20
DECIMAL(p,0) (p <= 31)
DEC(n,0) p+1 [2,32] ( 4 * (p+1) -2 ) DIV 3
Same as the internal length
- Fractional units are not supported
- Maximum length in the DDIC: 31
3.4.1.2 Key Figures
The key figures provide the values that are reported on in a query.
Key figures can be quantity, amount, or number of items.
Special Features of Key Figures
A key figure is assigned additional properties that influence the way that data is loaded and how the query is displayed. This includes the assignment of a currency or unit of measure, setting aggregation and exception aggregation, and specifying the number of decimal places in the query.
80 PUBLICSAP BW/4HANAData Modeling

Related Information
Creating Key Figures [page 106]
3.4.1.3 Reference InfoObjects
If an InfoObject has a reference InfoObject, it has its technical properties.
For characteristics these are the data type and length as well as the master data (attributes, texts and hierarchies). The characteristic itself also has the operational semantics. For key figures, these are the key figure type, data type and the definition of the currency / unit of measure. However, the referencing key figure can have another aggregation.
These properties can only be maintained with the reference InfoObject.
Several InfoObjects can use the same reference InfoObject. InfoObjects of this type automatically have the same technical properties and master data.
The operational semantics, that is the properties such as description, display, text selection, relevance to authorization, person responsible, constant, and attribute exclusively, are also maintained with characteristics that are based on one reference characteristic.
Related Information
Creating InfoObjects [page 82]
3.4.1.4 Unit
Units are required so that the values for the key figures have meanings.
Key figures of type amount are always assigned a currency key and key figures of type quantity also receive a unit of measurement.
Related Information
Creating a Unit [page 110]
SAP BW/4HANAData Modeling PUBLIC 81

3.4.1.5 XXL InfoObject
You can use XXL InfoObjects to save additional information for a characteristic as data type STRING or XSTRING.
You can further specify the data type by using a MIME type. Numerous formats are supported including different document types, audio files or video files, texts and images.
Related Information
Creating XXL InfoObjects [page 110]
3.4.1.6 Authorizations for InfoObjects
To work with InfoObjects, you need authorization object S_RS_IOBJA.
3.4.1.7 Transporting InfoObjects
The InfoObject is integrated into the BW TLOGO framework and can be transported.
The transport object is called IOBJ.
3.4.2 Creating InfoObjects
You can create an InfoObject that can be used either in InfoProviders or as an InfoProvider in its own right.
Context
InfoObjects are displayed in the BW Modeling Tools in the BW Repository tree or under the specified InfoArea in the Characteristic, Key Figure, Time Characteristic, Unit and XXL InfoObject folders.
Procedure
1. You are in the BW Modeling tools. In the context menu for your BW project, choose New InfoObject .
82 PUBLICSAP BW/4HANAData Modeling

You can also create InfoObjects from the data flow. To do this, go the BW Object Types in the editing screen for your data flow, select the type InfoObject and drag it to Details. Then open the context menu for this InfoObject and choose Create Persistent BW Object.
You will now be guided through the creation process by a wizard.2. Select an InfoArea. To ensure that you can find your InfoObject again without difficulty, we recommend
setting the Add to Favorites flag.3. Enter a technical name and a description. The technical name can be between three and nine characters in
length.4. By choosing Copy from..., you can select an object template. This allows you to copy over the properties of
this object to your new InfoObject and to edit them as required.5. You can reference an InfoObject. This gives the new InfoObject the technical properties of the reference
object. You can only edit these properties in the reference InfoObject however.6. You can choose from the following InfoObject types: Characteristic, key figure, unit and XXL InfoObject.
Depending on the type you choose, the data type selection will change as well. The InfoObject type cannot be changed subsequently. The data types DATS and TIMS cannot be changed subsequently either.
If you use referenced characteristics, the data type is copied over. If you use referenced key figures, the key figure type is taken over.
7. When you have finished making your settings, choose Finish. The editor appears.8. Now proceed according to the description for your InfoObject type.
Related Information
Creating Characteristics [page 83]Creating Key Figures [page 106]Creating a Unit [page 110]Creating XXL InfoObjects [page 110]Reference InfoObjects [page 81]InfoObject [page 74]
3.4.2.1 Creating Characteristics
You can create a characteristic that serves as a sort criterion, for example, company code, product, customer group, fiscal year, period or region.
Context
SAP BW/4HANAData Modeling PUBLIC 83

Procedure
1. You are in the BW Modeling tools. You have created a new characteristic using the wizard and you are in the editor.
2. Edit the general settings on the General tab page.3. If you have set the property Master Data and/or Texts, then you can now edit the settings for master data
or texts on the Master Data/Texts tab.4. If you have set the Hierarchies property, you can now edit the settings for the hierarchies on the Hierarchies
tab.5. On the BI Clients tab you can configure the settings for the BI clients.6. You can edit the attributes and XXL attributes on the Attributes tab.7. On the Extended tab page, you can make various additional settings:8. If you have set the property Usable as InfoProvider on the General tab, you will see an additional tab:
Runtime Properties. Here you can perform various settings at query runtime. More information: Query Properties
9. Choose Miscellaneous to open either the editing screen for master data or transfer routines (if the characteristic has master data and/or texts) or to open the editing screen for hierarchies (if the characteristic has hierarchies).
NoteWhen you create a transfer routine, it is valid globally for the characteristic and is included in all the transformation rules that contain the InfoObject. The transfer routine is only run in one transformation however, with a DataSource as the source. The transfer routine is only used to correct data before it is updated in the characteristic. During data transfer, the logic stored in the individual transformation rule is executed first. The transfer routine for the value of the corresponding field is then executed for each InfoObject that has a transfer routine. In this way, the transfer routine can store InfoObject-dependent coding that only needs to be maintained once and is then valid for all transformation rules.
10. Under Properties in the screen area under the Editor, you can see information about the DDIC elements, for example, and the number range objects of the characteristic. You can navigate further to the relevant information via the links.
NoteThe generated view are only intended for internal use, not for use as an interface. You can use the external SAP HANA view instead, or official interfaces. More information: Interface Overview [page 1324]
Related Information
Editing General Settings [page 85]Editing the Properties of Master Data/Texts [page 86]Editing Properties of Hierarchies [page 88]
84 PUBLICSAP BW/4HANAData Modeling

Editing the Settings for BI Clients [page 92]Editing Attributes [page 89]Editing Various Settings [page 105]Creating and Changing Hierarchies [page 402]
3.4.2.1.1 Editing General Settings
You can define the characteristic's general properties here.
Context
You are on the General tab. For referenced characteristics, many properties are displayed read-only as they cannot be changed.
Procedure
General1. You can specify whether an attribute view and/or an analytic view should be created for your characteristic
in the SAP HANA database. More information: Generating SAP HANA Views for InfoObjects [page 230]Dictionary2. You can edit the data type and the data length.
3. You can specify a conversion routine. More information: Conversion Routines in the BW SystemThe conversion routine SNUMC is available for data in integer format (INT4, INT8, DEC). More information: Characteristics of Type Integer [page 80]
4. You can set the High Cardinality flag. The High Cardinality property allows you to create more than two thousand million characteristic attributes for a characteristic. As a characteristic with high cardinality has a number of restrictions, you should only set this property if you really expect a larger number of characteristic attributes. More information: High Cardinality [page 75]
5. If you set the Case Sensitive flag, the system differentiates between uppercase letters and lowercase letters when values are entered. If it is not set, the system converts all letters into uppercase letters. No conversion occurs during the load process or during transformation. This means that values with lowercase letters cannot be posted to an InfoObject that does not allow lowercase letters.
NoteIf you allow lowercase letters, be aware of the system response when you enter variables:
If you want to use the characteristic in variables, the system is only able to find the values for the characteristic if the lowercase letters and the uppercase letters are typed in accurately on the input screen for variables. If you do not allow the use of lowercase letters, any characters that you type in the variable screen are converted automatically into uppercase letters.
SAP BW/4HANAData Modeling PUBLIC 85

Properties6. You can specify whether the characteristic should have master data and/or texts. You can then see the
Master Data/Texts tab page and can edit the properties displayed there.7. If the characteristic has master data and/or texts, you can choose Enhanced Master Data Update. More
information: Enhanced Master Data Update [page 77]If data has already been loaded into the characteristic, you can not activate Enhanced Master Data Update.
8. You can specify whether the characteristic should have hierarchies. You can then see the Hierarchies tab page and can edit the properties displayed there.
9. If you set the flag Usable as InfoProvider, then queries can be executed on the characteristic and the flag can be used in a CompositeProvider. Then the additional tab Runtime Properties appears, where you can configure various settings at query runtime. More information: Query Properties
For InfoObjects as InfoProviders, you can execute a standard query by choosing BW Reporting Preview in the lower screen area.
10. If you flag the characteristic as authorization-relevant, the authorization check will run whenever the query is worked on. Set the Authorization-Relevant flag for a characteristic if you want to create authorizations that restrict the selection conditions for this characteristic to single characteristic values.
11. If you select Attribute Only, the characteristic can be used only as a display attribute for another characteristic, not as a navigation attribute.
Compounds12. Under Compounds, you can compound the characteristic with other InfoObjects. Compounding of
InfoObjects can be necessary in order to uniquely identify the characteristic. Choose Edit to create a compound.
NoteIf storage location A for plant B is not the same as storage location A for plant C, you can only evaluate the characteristic Storage Location in connection with once plant. In this case, compound characteristic Storage Location with Plant to make the characteristic unique.
3.4.2.1.2 Editing the Properties of Master Data/Texts
Here you can edit the properties for master data/texts.
Context
The Master Data/Texts tab is displayed if you have set the property Master Data or Texts on the General tab.
86 PUBLICSAP BW/4HANAData Modeling

Procedure
Read Access1. If required, you can change the master data access. We recommend using the default setting.
You have the following options for accessing master data at query runtime:○ Standard: The values from the characteristic's master data table are displayed. This is the default
setting.○ Own Implementation: You can define an ABAP class to implement the access to master data yourself.
To do this, you need to implement interface IF_RSMD_RS_ACCESS. You also have to be proficient in ABAP OO. An example of this is time characteristic 0FISCYEAR, which is delivered with the the Business Content.
○ Direct: This enables you to access the data in a source system directly. If you choose this option, you have to use a data transfer process to connect the characteristic to the required DataSource. You also have to assign the characteristic to a source system.
○ SAP HANA View: You can use this option to create virtual master data.
NoteNote: To achieve optimum reporting performance when using master data (text, attributes, hierarchies), we recommend using InfoObjects with persistent attribute, text and hierarchy tables instead of virtual access to master data via SAP HANA views. As it is not possible to guarantee referential integrity on SAP HANA views, a considerable number of SAP HANA optimizations (push down) in the SAP BW∕4HANA Analytic Engine are not possible with virtual access to master data.
If you intend to model a virtual access to master data, we still recommend using Open ODS views as the central object for accessing data from SAP BW∕4HANA. Note however that restrictions to Open ODS views might apply, which could force you to continue using InfoObjects based on SAP HANA views:○ Hierarchies are not supported in Open ODS views.○ Key date-based access to time-dependent master data is not supported in the Open ODS
views○ In the case of planning scenarios with CompositeProvidern based on field-based DataStore
objects (advanced), navigation attributes cannot from Open ODS views cannot be used.○ The implementation of authorizations in InfoObjects and associations to Open ODS views in
CompositeProviders is different.
Texts2. If the characteristic contains texts, you have to select at least one text. The Short Text (20 characters)
option is set by default, but you can also choose medium-length texts (40 characters) or long texts (60 characters). If you choose the Long text is extra long option, the long text is of type SSTRING and can have up to 1333 characters.
3. You can specify whether or not the texts in the text table are language-dependent. If you specify language-dependent, the language is a key field in the text table. Otherwise, there is no language field in the text table.
4. You can specify whether the texts are time-dependent. If so, the date is included in the key of the text table.Miscellaneous5. If you set the Delete Master Data Using 0RECORDMODE flag, the InfoObject 0RECORDMODE is added as a
time-dependent attribute. You can then flag data records for deletion by loading data with 0RECORDMODE = ‘D’. More information: Deleting Master Data at Single Record Level
SAP BW/4HANAData Modeling PUBLIC 87

Data Target6. You can assign an application component, in order to
○ use a characteristic as an InfoSource using direct update. The system displays the characteristic in the InfoSource tree in the Data Warehousing Workbench. You can assign DataSources and source systems to the characteristic here. You can then also load attributes, texts, and hierarchies for the characteristic. More information: 3.x InfoSource
○ Generate an export DataSource for a characteristic. To be able to do this, the characteristic must also be an InfoSource with direct updating.
7. If you set the Permitted for Real-Time Data Acquisition flag, you can use real-time data acquisition to fill the characteristic with data.
Configure Authorization8. If you set the Master Data Configuration with Authorization Check flag, you can use authorizations to
protect the attributes and texts for this characteristic from being maintained at single-record level. If you activate this option, you can enter the characteristic values for which the user has authorization for each key field in the master data table. You do this in the profile generator in role maintenance using authorization object S_TABU_LIN. If you do not set this flag, you can only assign the authorization for master data maintenance as a whole (for all characteristic values).
3.4.2.1.3 Editing Properties of Hierarchies
Here you can edit the properties for hierarchies.
Context
If you have set the Hierarchies property on the General tab, the system will show the Hierarchies tab.
The system then generates a hierarchy table with hierarchical relationships for the characteristic.
Procedure
Hierarchy Type1. If you want to use various versions of the characteristic hierarchy in the query, you can set the Version-
Dependent flag.2. If you want the entire hierarchy or the hierarchy structure to be time-dependent, you can select the Time-
Dependent flag.Time-Dependent Properties3. If you have set the Time-Dependent flag, you can specify further entries here.
○ If you want to create views of a hierarchy that are valid for a specific period of time, you can specify the entire hierarchy as time-dependent.
○ If you want to model relationships that change time-dependently, you can specify the hierarchy structure as time-dependent.
88 PUBLICSAP BW/4HANAData Modeling

More information: Time-Dependent Hierarchy Structures in the QueryRemote Hierarchy Properties4.
Miscellaneous5. You can define whether intervals in hierarchies are permitted for the hierarchy basic characteristic. More
information: Intervals6. You can define whether the sign reversal function is possible for the hierarchy basic characteristic. If
reversing the sign is activated for hierarchies, the attribute 0SIGNCH is included in the communication structure for hierarchy nodes.
In hierarchy maintenance, you can specify whether the sign for transaction data booked to this node is to be reversed for each hierarchy node. In the query definition, create a formula variable for reversing the sign.
ExampleYou have a hierarchy based on receipts and expenditure. According to accountancy logic, income is displayed with a negative sign and expenses are shown with positive sign. Adding these values produces the profit.
Under certain circumstances, it may be advisable to circumvent accountancy logic and display the query income with a positive sign. This is where reversing the sign comes in. In our example, one would only activate sign reversal for income.
External Characteristics in Hierarchies7. You can specify which characteristics are permitted in the hierarchy nodes. If you do not select an
InfoObject here, only text nodes are permitted as nodes that can be posted to in hierarchies.
3.4.2.1.4 Editing Attributes
Here, you can create display, navigation and XXL attributes for the characteristic and edit its properties.
Context
This tab page is only available if you have set the Master Data flag on the General tab page.
Procedure
Navigation and Display Attributes1. Under Display and Navigation Attributes, you can create a new attribute by choosing Add. Select an
InfoObject and choose OK. The attribute is applied. Via the link on the attribute name, you can call the InfoObject maintenance screen. On the right side of the screen, you can edit the properties of the attribute.
Note the conditions for time characteristics: Navigation Attributes for Time Characteristics [page 90]
SAP BW/4HANAData Modeling PUBLIC 89

General2. You can choose whether the attribute is a display attribute (DIS) or a navigation attribute (NAV). The
attributes are defined as display attributes by default.Properties3. You can determine the sequence in which the attributes for a characteristic are displayed in F4 input help.
There are the following values for this setting:
○ 00: The attribute is not displayed in input help○ 01: The attribute appears in first position (far left) in input help○ 02: The attribute appears in second position in input help.○ 03: ...
The total number of fields allowed in input help is restricted to 40. In addition to the attributes, the characteristic itself, its texts, and the compound characteristics are generated in input help. The total number of fields cannot be greater than 40.
4. You can specify whether the attribute is time-dependent. Even if only one attribute is time-dependent, a time-dependent master data table is created. There can still be time-independent attributes for this characteristic however. These are stored in a separate table.
5. By choosing Part of Index, you stipulate whether the attribute should be added to the secondary index that is defined on the master data tables (P/Q/X/Y) of a characteristic.
Navigation Attribute Properties6. You can enter a description for the navigation attribute. This can be useful if a characteristic appears more
than once in an InfoProvider (as a characteristic and as a navigation attribute). You can thus differentiate between these in the query definition.
7. You can mark navigation attributes as authorization relevant independently of the assigned basic characteristics.
8. By choosing Maintain transitive attributes in the context menu for an attribute, you can define the transitive attributes for the attribute in question. This allows you to make the attributes of the query available for navigation in the query.
9. By choosing Remove, you can remove attributes from the characteristic again.XXL Attributes10. Under XXL Attributes, you can create a new XXL attribute by choosing Add. Select an InfoObject and
choose OK. The XXL attribute is applied.
3.4.2.1.4.1 Navigation Attributes for Time Characteristics
Navigation attributes can be specified for time characteristics.
The following is a list of permitted navigation attributes:
Time Characteristic Permitted Navigation Attributes
0DATE 0CALWEEK
0CALMONTH2
90 PUBLICSAP BW/4HANAData Modeling

Time Characteristic Permitted Navigation Attributes
0HALFYEAR1
0CALQUARTER
0CALQUART1
0WEEKDAY1
0FISCVARNT*
0FISCPER*
0FISCYEAR*
0CALMONTH 0CALMONTH2
0CALYEAR
0CALQUARTER
0CALQUART1
0HALFYEAR1
0CALQUARTER 0CALQUARTER
0CALYEAR
0HALFYEAR1
0FISCPER 0FISCYEAR
0FISCPER3
* Unlike other characteristics, it is possible (or in fact necessary) in this case to add referencing characteristics. Only fiscal variants/periods/years with a constant fiscal variant are used.
The navigation attributes also have to be activated on the referencing characteristic 0CALDAY and can also be activated for other referencing characteristics that are based on 0DATE,0CALMONTH or 0FISCPER.
The fiscal year time characteristics (FISC*) must be created on the basis of a constant fiscal year variant. For every fiscal year variant, a fiscal year group must be created with a reference to 0FISCVARNT, 0FISCPER and 0FISCYEAR.
These fiscal year groups are generated because this is then consistent with the master data table, as there is only one value per date.
If a new value is loaded for a time characteristic in an InfoProvider, the master data entries are automatically filled with the derived attribute values.
SAP BW/4HANAData Modeling PUBLIC 91

3.4.2.1.5 Editing the Settings for BI Clients
You can edit the display properties in BI clients here.
Procedure
General1. Under Display you can specify whether the text in executed query should be displayed, and if yes, which
text. This setting can be overwritten in queries.2. Under Selection you can define if and how the characteristic values have to be restricted in queries.3. If you want the initial value in the query to be displayed sorted (as opposed to at the final position), you can
select Include Initial Value in Sort Sequence.Geographical4. For each geo-relevant characteristic you have to specify a geographical type.
There are five options to choose from:○ 0: No Geographical Data: This characteristic cannot be used as a geo-characteristic. Geographical
attributes of the InfoObject (such as 0LONGITUDE, 0ALTITUDE) are deleted.○ 1: Shapes: For this type you can use shapefiles (country borders, for example), to display the
characteristic on a map.
NoteShapefiles are currently not supported by any front end.
○ 2: Point Data (Attributes 0LONGITUDE and 0LATITUDE): For this type, geo-attributes are generated that make it possible, for example, to display customers as a point on a map. This option is supported by SAP Analytics Cloud.
○ 3: Derived Point Data from Attribute: For this type, the geo-attributes of a geo-characteristic of type 2 or type 4, which is the attribute, are used. Here the point data is referenced, not the shapefiles. This option is supported by SAP Analytics Cloud.
○ 4: Shapes and Point Data This type is a mix of type 1 and type 2. This option is partly supported by SAP Analytics Cloud.
More Information: Shapes and Point Data [page 93]5. If you have selected the geographical type Derived Point Data from Attribute for the characteristic, here you
specify the characteristic attribute whose geo-attributes you want to use.Query Filter Value6. You can specify how the selection of filter values or the restriction of characteristics is determined when
you define a query. When you restrict characteristics, the values from the master data table are usually displayed. For characteristics that do not have master data tables, the values from the SID Table are displayed instead. In many cases it is more useful to only display those values that are also contained in an InfoProvider. Therefore you can also choose the setting Only Values in InfoProvider.
7. You specify how the selection of filter values is determined when a query is executed. When queries are executed, the selection of filter values is usually determined by the data that is selected by the query. This means that only the values for which data has been selected in the current navigation status are displayed. However, in many cases it can be useful to include additional values. Therefore you can also choose the
92 PUBLICSAP BW/4HANAData Modeling

settings Only Values in InfoProvider and Values in master data table. If you make this selection, however, you may get the message "No data found" when you select your filter values.
8. You can specify how the display of filter values is determined when a query is executed. If, for example, the characteristic has very few characteristic values, it may be useful to display the values as a dropdown list box.
3.4.2.1.5.1 Shapes and Point Data
Shapes and point data describe data with a geographical reference (for example, characteristics such as customer, sales region, country).
Maps are used to display and evaluate this geo-relevant data.
There are four different types of geo-characteristic:
1. ShapesFor a characteristic with this geographical type, geographical data can be uploaded: This data from areas or polygons is stored in shapefiles that define the geometry and the attributes of this geo-characteristic.Country and region are two examples of this kind of geo-characteristic.
2. Point DataFor a characteristic with this geographical type, geographical coordinates can be entered. Customer and plant are two examples of these geo-characteristics since they are rooted to one geographical “point” that can be described by an address.A range of standard attributes are added to this geo-characteristic. These standard attributes store the geographical coordinates of the corresponding object for every row in the master data table. The geo-attributes concerned are:
Technical Name Description Data Type Length
LONGITUDE Longitude of the location DEC 15
LATITUDE Latitude of the location DEC 15
ALTITUDE Altitude of the location (height above sea level)
DEC 17
PRECISID Identifies how precise the data is
NUMC 4
SRCID ID for the data source CHAR 4
GEOFEATID Feature ID of a geographic region
NUMC 15
NoteAt present, only the LONGITUDE and LATITUDE attributes are used. ALTITUDE, PRECISID and SRCID are reserved for future use.
SAP BW/4HANAData Modeling PUBLIC 93

If you reset the geographical type of a characteristic to Not a Geo-Characteristic, these attributes are deleted in the InfoObject maintenance.
3. Derived Point Data from AttributeTo save you having to geocode every single dynamic geo-characteristic individually, a dynamic geo-characteristic can take its geo-attributes (longitude, latitude, altitude) from another previously geocoded characteristic of type Point Data - type 2 and type 4 - such as postal code. Customer and plant are examples of this type.The system treats this geo-characteristic as a regular geo-characteristic that describes a location (geographical information as a point on map). The geo-attributes described above are not added to the master data table on the database level. Instead, the geo-coordinates are stored in the master data table of a regular attribute of the characteristic.
NoteYou want to define a geo-characteristic for Plant with the postal code as an attribute. The geo-coordinates are generated from the postal code master data table during the runtime.
NoteThis method prevents redundant entries from appearing in the master data table.
4. Shapes and Point DataThis type is a combination of the types shapes (type1) and point data (type 2). This means that the characteristic is described by a shape and by geographical coordinates. Postal code is an example of this type.
3.4.2.1.5.1.1 Delivered Geo-Characteristics
With BW Content, SAP BW∕4HANA delivers a range of geo-characteristics.
Structure
The following are the most important delivered geo-characteristics:
Static geo-characteristics
Technical Name Description
0COUNTRY Country key
0DATE_ZONE Time zone
94 PUBLICSAP BW/4HANAData Modeling

Technical Name Description
0REGION Region (federal state, province)
Dynamic geo-characteristics
Technical Name Description
0AP_OF_FUND Location number
0TV_P_LOCID IATA location
Dynamic geo-characteristics with values from attributes
Technical Name Attributes Description
0BPARTNER 0POSTCD_GIS Business partner
0CONSUMER 0POSTCD_GIS Consumer
0CUSTOMER 0POSTCD_GIS Customer number
0PLANT 0POSTCD_GIS Plant
0VENDOR 0POSTCD_GIS Vendor
Static geo-characteristics with geo-attributes
Technical Name Description
0CITYP_CODE City district code for city and street file
0CITY_CODE City code for city and street file
0POSTALCODE Postal/ Zip code
0POSTCD_GIS Postal code (geo-relevant)
3.4.2.1.5.2 Using Geo-Relevant Characteristics in SAP Analytics Cloud
You can display SAP BW∕4HANA data geographically in SAP Analytics Cloud (SAC).
For geographical characteristics, select the matching geographical type. When talking about geographical types, a distinction is made between shapes and point data. More Information: Shapes and Point Data [page 93]
SAP BW/4HANAData Modeling PUBLIC 95

When using geographical characteristics, pay attention to a number of points so that these characteristics can be used in SAC: Special Features in the Modeling of Geo-Characteristics [page 97]
In SAP Analytics Cloud, you can add other graph types and a geomap to your story. You can choose from different display types: bubble layer, HeatMap, FlowLayer, and choropleth layer. More Information:
With the choropleth layer, you can use the regional data from the SAP HANA Delivery Unit, or you can upload your own shapes and define your own hierarchy.
Prerequisites
You have installed BW Modeling Tools 1.23 and SAP Analytics Cloud 2020.06.
You need to configure the SAP BW∕4HANA system accordingly: Configuring the Use of Geo-Characteristics in SAC [page 96]
Related Information
Configuring the Use of Geo-Characteristics in SAC [page 96]Special Features in the Modeling of Geo-Characteristics [page 97]Geographical Reporting in SAP Analytics Cloud (SAC) [page 98]
3.4.2.1.5.2.1 Configuring the Use of Geo-Characteristics in SAC
If you want to use geo-characteristics in SAP Analytics Cloud (SAC), note the following prerequisites and manual configuration steps.
Prerequisites
You are running SAP HANA Version 122.06. More information: SAP Note 1600929
Procedure
1. Implement the Spatial Data Delivery Unit for SAP Analytics Cloud containing the regional data for the Choropleth layer. More information: SAP Note 2395407 This contains the following steps:○ Create the spatial reference system 3857.
96 PUBLICSAP BW/4HANAData Modeling

○ Import the.tgz files.2. Activate the BI Content InfoObjects 0GSHAPE3857 and 0GEOFEATID in precisely this sequence.
0GEOFEATID corresponds to the regions in the Spatial Data Delivery Unit for SAP Analytics Cloud.3. Create the BW hierarchy SAPBWWORLDHIERARCHY for InfoObject 0GEOFEATID using report
RSD_GEO_SYNC_HIER. The BW hierarchy is derived from the Spatial Data Delivery Unit for SAP Analytics Cloud.
3.4.2.1.5.2.2 Special Features in the Modeling of Geo-Characteristics
When modeling geo-characteristics, you need to bear a few things in mind so that they can be used in SAC.
Context
During activation of characteristics of type Shapes (type 1), Point Data (type 2) and Shapes and Point Data (type 4), a geotable with SAP HANA spatial type ST_POINT is automatically generated. The SAP HANA spatial type is determined from attributes 0LONGITUDE and 0LATITUDE.
For characteristics of type Shapes (type 1) and Shapes and Point Data (type 4), a field with the SAP HANA Spatial type ST_GEOMETRY is also generated and can be used to store shapes.
For characteristics of type Shapes (type 1) ST_POINT is not determined by 0LONGITUDE and 0LATITUDE - as for other types - but from the corresponding shape.
When the type is selected, characteristics of type Point Data (type 2), Derived Point Data from Attribute (type 3) and Shapes und Point Data (type 4) are automatically given characteristic 0GEOFEATID as their navigation attribute (type 2 and 4) or transitive attribute (type 3).
NoteCharacteristic 0GEOFEATID corresponds to regions of the world as required for the choropleth layer. Attribute 0GEOFEATID is filled with the region that contains the characteristic value geographically and is situated at the lowest position of all regions in the hierarchy. The association in higher regional levels is then created by the hierarchy at runtime.
ExampleThe region BEVERLY HILLS is assigned to a customer geographically. The assignment provides the assignment at higher levels: Beverly Hills - Los Angeles - California - United States.
Characteristics of type Point Data (type 2) and Shapes and Point Data (type 4) are automatically given the attributes LONGITUDE and LATITUDE.
SAP BW/4HANAData Modeling PUBLIC 97

Procedure
1. If you already have geo-characteristics and have upgraded to SAP SAP BW∕4HANA SP04, you have to manually add characteristic 0GEOFEATID to these geo-characteristics as the navigation/transitive attribute.
2. When data is loaded into the transformation, navigation attribute 0GEOFEATID must be assigned to the fields 0LONGITUDE and 0LATITUDE. More information: Creating Transformation for Geo-Relevant Characteristics [page 100]
3. The point data is automatically updated in the geotable during master data activation of 0LONGITUDE and 0LATITUDE.
4. For shapes, you have to upload shapefiles. More information: Uploading Shapefiles [page 104]5. To be able to use the choropleth layer in SAC with BW data, you have to activate navigation attribute
0GEOFEATID in the CompositeProviders that use the queries to be used for geographical reporting. In the queries, you also have to add one or more free dimensions to navigation attribute 0GEOFEATID.
3.4.2.1.5.2.3 Geographical Reporting in SAP Analytics Cloud (SAC)
This section introduces particular technical aspects of geographical reporting in SAP Analytics Cloud (SAC).
Bubble Layer, HeatMap and FlowLayer
The geomap types Bubble Layer, HeatMap and FlowLayer use the geographical information from the characteristic values, derived from their display attributes 0LONGITUDE and 0LATITUDE.
To ensure satisfactory performance, these attribute values are not evaluated at runtime. These two attributes are converted to the SAP HANA spatial format ST_POINT during activation of the master data instead. This SAP HANA spatial type ST_POINT is used at runtime. Geometric calculations are performed on the basis of this, and location information is converted into th text format required by the front end.
Choropleth Layer
In the choropleth layer, a region is geographically assigned to every characteristic value (0LONGITUDE, 0LATITUDE) at every regional level (federal state for example). The Choropleth layer does not display the geographical locations of the geographical characteristic but the regions of the globe (countries, federal states and so on). The key figure of the region is aggregated using the geographically assigned characteristic values. The regions are therefore a navigation attribute of the geo-characteristic.
Choropleth (Default)In SAP BW∕4HANA, you have to import the regional data via a SAP HANA delivery unit. In SAP BW∕4HANA, these regions are represented by the BI Content characteristic 0GEOFEATID. All regions are sorted in the BW
98 PUBLICSAP BW/4HANAData Modeling

hierarchy SAPBWWORLDHIERARCHY (California is thus inserted as a child of USA). Characteristic 0GEOFEATID is added to the geo-characteristic as a navigation attribute.
Attribute 0GEOFEATID is filled with the region that contains the characteristic value geographically and is situated at the lowest position of all regions in the hierarchy. The association in higher regional levels is then created by the hierarchy at runtime.
ExampleThe region BEVERLY HILLS is assigned to a customer geographically. The assignment provides the assignment at higher levels: Beverly Hills - Los Angeles - California - United States.
At runtime, SAP Analytics Cloud queries the regions as navigation attribute 0GEOFEATID of the geographical characteristic (with active hierarchy SAPBWWORLDHIERARCHY).
Choropleth (Custom)Instead of use the default hierarchy SAPBWWORLDHIERARCHY, you can create your own hierarchy for your shapes. This enables you to take account of your own sales regions for example. To do this, you define the dependencies of the characteristics when editing your geo-characteristic. These can be multi-level dependencies.
3.4.2.1.5.2.4 Using Geo-Relevant Characteristics in the Choropleth Layer (Choropleth Default)
You want to use the regional data from the SAP HANA Delivery Unit in order to use geographical characteristics in the choropleth layer.
Procedure
1. You create a characteristic with the geographical type 2, 3, or 4.2. Create a transformation for 0GEOFEATID or fill 0GEOFEATID for the existing transformation. You do not
need this for characteristics with geographical type 3 since filling 0GEOFEATID is done with the geographical attribute characteristic. More information: Creating Transformation for Geo-Relevant Characteristics [page 100]
3. Use the transformation to load the master data.
SAP BW/4HANAData Modeling PUBLIC 99

3.4.2.1.5.2.4.1 Creating Transformation for Geo-Relevant Characteristics
You are using the regional data from the SAP HANA Delivery Unit.
Context
The regions are assigned by means of a transformation. 0GEOFEATID is filled from 0LONGITUDE and 0LATITUDE.
Procedure
1. Create a transformation for your characteristic.2. Choose transformation type Formula and then choose function BW_GEO_FEATURE_ID in formula group
HANA - Geometric Functions. 0GEOFEATID is filled from 0LONGITUDE and 0LATITUDE.
3.4.2.1.5.2.5 Using Geo-Relevant Characteristics with Your Own Shape Hierarchy in the Choropleth Layer (Choropleth Custom)
Instead of using the default hierarchy SAPBWWORLDHIERARCHY, you can create your own hierarchy for your shapes.
Context
This enables you to take account of your own sales regions for example. To do this, you define the dependencies of the characteristics when editing your geo-characteristic. These can be multi-level dependencies.
Procedure
1. You create multiple characteristics with geographical type 1 or 4 (with shapes).2. You create the main characteristic with geographical type 2 or 4, and add the characteristics from step 1 as
navigation attributes.3. Define the hierarchy for the main characteristic. More information: Creating a Hierarchy for Geo-
Characteristics [page 101]
100 PUBLICSAP BW/4HANAData Modeling

3.4.2.1.5.2.5.1 Creating a Hierarchy for Geo-Characteristics
If a characteristic is defined as geographical, you can define a hierarchy for it.
Context
You can either use the default hierarchy or define one of your own. Every region in a hierarchy is represented by a characteristic with the geographical type shape and must be added to the characteristic as a navigation attribute.
Procedure
1. 1. Go to the Attributes tab page.2. 2. In the Depends on column, specify the characteristic that you want to each characteristic to be
dependent on. These can also be multi-level dependencies.
ExampleYou have defined the following dependencies:
SAP BW/4HANAData Modeling PUBLIC 101

This provides you with the following dependencies, and the following hierarchies are available in SAC: [C1,C11], [C1,C12,C121],[C1,C12,C122],[C4] :
3.4.2.1.5.2.5.2 Preparing Shapefiles
In order to be able to display shapes geographically, a connection has to be established between the shapefile data and the corresponding characteristic values.
Prerequisites
The characteristic must have the property With Master Data. The characteristic values do not have be in the master data yet; they are created automatically.
Context
To assign the entries of the dbase file (dbf) to the characteristic values, you have to add a column to the table.
NoteIn previous releases, SAPBWKEY was used for this, but this has changed.
102 PUBLICSAP BW/4HANAData Modeling

Procedure
1. You are on the BI Clients tab in the characteristic editing screen in the BW modeling tools. Choose Geodata download (everything) under Actions. Choose Go. The BW/4 back end opens. You can download the characteristic values in internal format here.
2. Add a column for the characteristic to the table of the dbase file. To assign the entries of the dbase file (dbf) to the characteristic values, you have to add a column with the characteristic name to the table. The type should correspond to the characteristic type, and the characteristic values must be in internal format (example: "0001" instead of "1" for NUMC(4)). For compounded characteristics, you have to add multiple columns.
SAP BW/4HANAData Modeling PUBLIC 103
3.4.2.1.5.2.5.3 Uploading Shapefiles
Prerequisites
You have added a column or field with the characteristic name to the shapefiles that you want to load shapes for. If using compounding characteristics, you have added multiple columns. More Information: Preparing Shapefiles [page 102]
To update the geotable with shapes that are uploaded to the Business Document Server, you need SAP HANA 2.0 Rev 45.
Procedure
1. You are on the BI Clients tab in the characteristic editing screen in the BW modeling tools. You have chosen Shapes or Shapes and Point Data as the geographical type.
2. Choose Upload Shapefiles under Actions. Choose Go. The BW/4 back end opens.3. Select your shapefiles. You need the following three shapefiles: .dbf, . shp, .shx. The shapefiles must be in
the Spatial Reference ID 4326 and should all have the same name before the ending.4. Choose Update Geotable under Actions. Choose Go. You can choose either Delta Update or Full Update.
The uploaded shapes are transformed and stored in SRID (Spatial Reference ID) 3857. It is therefore not possible to use shapes in SAC if they exceed the limitations of this spatial reference system. This means that they must not have degrees of latitude exceeding 85.06° and -85.06°.
NoteThe shapefiles are still uploaded if there are shapefiles there already, but do not overwrite them. If you want to avoid this, you have to delete any existing shapefiles before uploading.
3.4.2.1.5.2.5.4 Troubleshooting When Updating the Geotable with Shapefiles
When updating the geotable, there are a number of things to look out for. If errors occur, you can check what might have caused this.
104 PUBLICSAP BW/4HANAData Modeling

Error Message Action
Invalid table name: Could not find table/view … Check whether you have set the With Master Data flag for the geo-characteristic. This flag should be set automatically, but could be the cause of the error if you are using an older version of the BW modeling tools or if the characteristic in question has not changed since updating to Release 2.0 SPS04.
Spatial error: Exception 1601801: PROJ.4 transformation error: tolerance condition…
The shapefiles must be uploaded in spatial reference system “WGS 84” with spatial reference ID 4326.
The spatial reference system has a number of important limitations: Degrees of latitude exceeding 85.06° and -85.06° are not supported.
Error while handling file <..>.shp ● Every characteristic value should only occur once in all shapefiles.
● The characteristic values should have the internal format:○ In the case of data type NUMC, all entries should
be filled with zeros.○ Use the characteristic values of the dbf file created
by BW/4. More Information: Preparing Shapefiles [page 102]
Reading from .dbf file failed due to missing fields. To establish the connection between the characteristic values and the entries in the shapefiles, you first need to add a column for the characteristic to the dbf.file. In the case of a compound characteristic, you need to add multiple columns. More Information: Preparing Shapefiles [page 102]
3.4.2.1.6 Editing Various Settings
You can make various settings for the characteristic here.
Procedure
Unit Conversion1. You specify a unit InfoObject that is a unit of measure. The unit InfoObject must be an attribute of the
characteristic. This unit InfoObject is used when quantities are converted for the master data-bearing characteristic in the Business Explorer. More information: Quantity Conversion
2. You can define units of measure for the characteristic. A DataStore object is created for units of measure. You can specify the name of the quantity DataStore object, the description, and the InfoArea into which the object is to be inserted. The proposal for the name is: UOM<name of InfoObject to which the quantity DataStore Object is added>. More information: Prerequisites for InfoObject-Specific Quantity Conversion
SAP BW/4HANAData Modeling PUBLIC 105

3. You select a unit InfoObject that is a currency that you have created as an attribute for the characteristic. In this way, you can define variable target currencies in the currency translation types. The system determines the target currency using the master data when you perform currency translation in the query and dynamically when loading data.
Miscellaneous4. You can specify that a characteristic is used as a document property. This enables you to assign a
comment or any document to a combination of characteristic values. More information: Documents5. You can specify a fixed unit of measure.6. By assigning a constant, a fixed value is assigned to a characteristic. The characteristic then exists on the
database (for verifications for example) but does not appear in the query. It is particularly useful to assign constants to compound characteristics.
ExampleThe Storage Location characteristic is compounded with the Plant characteristic. If just one plant is always used in the application, a constant can be assigned to this plant. Validation against the storage location master table should then be performed using this value for the plant. In the query, the storage location only appears as a characteristic however.
7. You can specify a DataStore object for checking the characteristic values. If you create a DataStore object for checking the characteristic values in a characteristic, the valid values for the characteristic are determined from the DataStore object rather than from the master data during transformaton. The DataStore object must contain the characteristic itself and all the fields in the compound as key figures.
8. You can make settings for Read Access Logging (RAL) . To take into account the characteristic for the read access logging, you must enter a business area and a log domain. You must also activate the characteristic log read access the property Activate output for the InfoProvider. More information: Read Access Logging
3.4.2.2 Creating Key Figures
You can create a key figure. Key figures provide the values that are reported on in a query.
Context
For referenced key figures, many properties are displayed read-only as they cannot be changed.
Procedure
1. You are in the BW modeling tools. You have created a new key figure using the wizard and you are in the editor.
Dictionary
106 PUBLICSAP BW/4HANAData Modeling

2. You can change the key figure type and the data type. For the amount, quantity and number, you can choose either decimal numbers or floating point numbers. For the key figures Date and Time, you can choose the decimal display to apply to the fields.
NoteNote: Using floating point numbers results in unavoidable rounding errors in all arithmetical operations. We therefore advise against using floating point numbers for amounts and quantities which exact results are required for. SAP Note 2798 describes this problem and illustrates it with the help of a few examples.
The following combinations of key figure and data type are possible:
Key figure type Data Type
AMO Amount CURR: Currency field, created as DEC
FLTP: Floating point number with 8 byte precision
QUA Quantity QUAN: Quantity field, created as DEC
FLTP: Floating point number with 8 byte precision
NUM Number DEC: Calculation field or amount field with comma and sign
FLTP: Floating point number with 8 byte precision
INT integer INT4: 4 byte integer, whole number with +/- sign
INT8: 8 byte integer
DAT Date DATS: Date field (YYYYMMDD), created as char(8)
DEC: Calculation field or amount field with comma and sign
TIM Time TIMS: Time field (hhmmss), created as CHAR(6)
DEC: Calculation field or amount field with comma and sign
Aggregation3. You can select an aggregation type.
There are four aggregation options:
○ Minimum (MIN) The minimum value of all the values in this column is displayed in the results row.○ Maximum (MAX) The maximum value of all the values in this column is displayed in the results row.○ Total (SUM) The total of all the values in this column is displayed in the results row.○ No Aggregation (X if more than one value exists) (NO2): A value is only shown in the result cell if all
values entered into the result cell have the same value. In the case of standard aggregation NO2, the exception aggregation must also be NO2.
SAP BW/4HANAData Modeling PUBLIC 107

4. You can select an exception aggregation.5. You can specify a reference characteristic for exception aggregation.
Currency/Unit6. You can assign a fixed currency to the key figure. If this field is filled, the key figure bears this currency
throughout BW. You can also assign a variable currency to the key figure.7. You can specify an InfoObject that carries the unit of the key figure. For quantities or amount key figures,
this field must be filled or you must enter a fixed currency or amount unit.Properties8. If you choose High Precision, the OLAP processor calculates internally with floating point numbers with 34
digits. This results in greater accuracy and fewer rounding differences. Normally, the OLAP processor calculates with floating point numbers with 16 digits.
9. If you select Stock Coverage, you can use a special key figure in a query to display how long the available quantity of a given stock value will cover the planned or expected demand for. More information: Stock Coverage
10. If you set the Non-Cumulative flag, the key figure becomes a non-cumulative key figure. You can then see and use the Non-Cumulative tab page. More information: Modeling Non-Cumulatives with Non-Cumulative Key Figures
11. If you select Attribute Only, the key figure that is created can only be used as an attribute for another characteristic. It cannot be used as a key figure in its own right in the InfoCube.
BI Clients12. You can set the default scaling for the field in the query. This layout can be overwritten in queries.13. You can set the default number of decimal places the field has in the query. This layout can be overwritten
in queries.14. You can make settings for Read Access Logging (RAL) . To include the key figure for read access logging,
you must enter a business area and a log domain . You must also activate the property Log Read Access Output for the InfoProvider. More information: Read Access Logging
15. Under Properties in the screen area under the Editor, you can see information about the key figure's DDIC elements. You can navigate further to the relevant information via the links.
NoteThe generated view are only intended for internal use, not for use as an interface. You can use the external SAP HANA view instead, or official interfaces. More Information: Interface Overview [page 1324]
Related Information
Editing Non-Cumulative Key Figures [page 109]Editing the Stock Coverage [page 109]
108 PUBLICSAP BW/4HANAData Modeling

3.4.2.2.1 Editing Non-Cumulative Key Figures
Here you make further specifications for calculating non-cumulatives.
Context
The Non-Cumulative tab is available only if you have set the Non-Cumulative flag on the General tab.
Procedure
1. You can enter a key figure that represents the non-cumulative change of the non-cumulative value. There do not have to be values for this key figure in every time unit. For the non-cumulative key figure, values are only stored for selected times (markers). The values for the remaining times are calculated from the value in a marker and the intermediary non-cumulative changes.
2. Alternatively, you can specify two key figures that represent the inflow and outflow of a non-cumulative value.
NoteFor non-cumulatives with non-cumulative change, or inflow and outflow, the two key figures themselves are not allowed to be non-cumulative values, but must represent cumulative values. They must be the same type (for example, amount, quantity) as the non-cumulative value.
3.4.2.2.2 Editing the Stock Coverage
Here you specify the details for calculating the stock coverage.
Context
The Stock Coverage tab is available only if you have set the Stock Coverage flag on the General tab.
Procedure
1. You are in the BW Modeling tools. Go to the Stock Coverage tab page.2. Under Stock Type, specify whether the referenced key figure for the stock is an opening stock or a closing
stock.
SAP BW/4HANAData Modeling PUBLIC 109

3. Enter the maximum number of time periods that are taken into account. Note that the more time periods are specified here, the more the runtime will be affected.
4. Specify a referenced key figure for the stock. This can be either a non-cumulative key figure or a cumulative key figure.
5. Specify a referenced key figure for the demand.6. Specify a time characteristic that specifies the granularity of the stock coverage. This characteristic also
serves as the reference characteristic for the exception aggregation. An exception aggregation must always be specified for key figures for stock coverage.
3.4.2.3 Creating a Unit
Here you can create unit InfoObjects.
Procedure
1. You are in the BW Modeling tools. You have created a new unit using the wizard and you are in the editor.2. You can still change the unit type that you selected in the wizard.3. Under Display you can specify whether the text in executed query should be displayed, and if yes, which
text. This setting can be overwritten in queries.
3.4.2.4 Creating XXL InfoObjects
You can create XXL InfoObjects here. These can store additional information for a characteristic as data type STRING or XSTRING.
Context
NoteNote that uploading any files carries the risk that a virus or other malware is distributed through this channel. Uploaded files are checked for viruses provided a virus scanner is connected. We strongly recommend that you configure a virus scanner.
Procedure
1. You are in the BW Modeling tools. You have created a new XXL InfoObject using the wizard and you are now in the editor.
110 PUBLICSAP BW/4HANAData Modeling

2. You can still change the data type that you selected in the wizard.3. For data type Byte String, you can still specify a MIME Type.
Open this video in a new window
3.4.2.5 Creating a Copy of an InfoObject
You can save an InfoObject under a different name in order to create a copy of it.
Procedure
1. You have opened an InfoObject in the editor. Choose File Save As … .2. If required, select a different InfoArea to save the InfoObject under.3. Give it a different name and a description.4. Choose Finish. A copy of the InfoObject is created and is opened in the editor.
NoteTo make sure that the texts are copied in all languages when saving the InfoObject under a different name, see SAP Note 2326441 .
3.4.3 DataStore Object
The DataStore object is the central object for data storage and data consolidation in the SAP BW∕4HANA system.
The DataStore object can be used very differently in the data warehouse, depending on the properties you select. The DataStore object can contain both InfoObjects and fields. This allows you to load data into the SAP BW∕4HANA without having to assign InfoObjects. Thanks to its new request management, the DataStore object is particularly well suited to deal with frequent loading and large amounts of data.
The ODP source system is available to help you update data from one InfoProvider to another in a different SAP BW∕4HANA system (data mart). More Information: Transferring Data from SAP BW or SAP BW/4HANA Systems via ODP (InfoProviders, Export DataSources) [page 272]
Modeling for the DataStore object is integrated in the BW Modeling tools.
Related Information
SAP BW/4HANAData Modeling PUBLIC 111

Creating DataStore Objects [page 132]Modeling with Fields Instead of InfoObjects [page 73]
3.4.3.1 Structure of the DataStore Object
The DataStore object consists of a maximum three tables: the inbound table, the change log and the table of active data.
You might not need all three tables. This depends on how you want to use the DataStore object.
The data is initially loaded into the inbound table. The data is either read from the inbound table directly, or it is activated first and then read from the table of active data. This depends on how the data is used. The change log contains the change history for the delta update from the DataStore object to other data targets.
3.4.3.2 Modeling Properties
The modeling properties enable you to control how you can use your DataStore object.
You can set the following modeling properties:
● Standard DataStore ObjectThe standard DataStore object is suitable for the majority of aplication cases and for reporting. More information: Standard DataStore Object [page 113]
● Staging DataStore ObjectThe staging DataStore object can be used in different ways by selecting its properties. More information: Staging DataStore Object [page 115]
● Data Mart DataStore ObjectThe data mart DataStore object is optimized for reporting and analysis. More information: Data Mart DataStore object [page 118]
● Direct Update DataStore Object:In the DataStore object for direct update, you can use an API to write the data directly to the table of active data. More information: DataStore Object for Direct Update [page 120]
112 PUBLICSAP BW/4HANAData Modeling

Special Properties
● Inventory Enabled: In standard DataStore objects and data mart DataStore objects, you can include non-cumulative key figures and define validity characteristics. More Information: Modeling Non-Cumulatives with Non-Cumulative Key Figures [page 577]
● Planning Enabled: You can enable planning for standard DataStore objects with change log, data mart DataStore objects, and direct update DataStore objects.
● Write Interface Enabled: Data can be moved to the inbound table using a tool such as Data Services or Push on SAP Cloud Platform Integration (CPI). This property can be set for all types of standard DataStore objects and staging DataStores. More Information: DataStore Object with Write Interface [page 121]
3.4.3.2.1 Standard DataStore Object
For the standard DataStore object, you can select the following properties:
● Write Change Log: If you choose this option, the delta (new, deleted, and changed records) is saved in the change log. The change log is used to extract the delta. Only if the DataStore object has a change log can requests be rolled back from the DataStore object, that is, the status before the activation of the request can be restored.
● Snapshot Support: If your DataSource only delivers the current dataset as a “FULL”, by setting this indicator, deleted data records can be identified and updated. Upon activation, the system recognizes records that are in the table of active data but not in the load request. These are written to the change log as reverse images.
NoteMake sure that all records are contained during every load, as data could otherwise be lost.
● Unique Data Records: If you only load unique data records (data records with non-recurring key combinations) into the DataStore object, you can select this property. If the indicator is selected, during activation the system checks whether unique records exist. If a record already exists, the activation is cancelled with an error.
SAP BW/4HANAData Modeling PUBLIC 113

Load Data
Requests are loaded into the inbound table.
Activate
Activation transfers the data from the inbound table to the table of active data. Data with the same key are summarized according to the specified aggregation. If the property Write Change Log is selected, the difference of the activation is written to the change log.
Deletion / Rollback
If requests are not activated yet, you can delete them from the inbound table. If you want to roll back a request that has already been activated, you can do this only if you selected the property Write Change Log.
114 PUBLICSAP BW/4HANAData Modeling

Extraction
Data used for the update to a further data target is extracted from the table of active data for initial and full extraction, and from the change log for delta extraction.
Reporting
When a query is executed, the table of active data is accessed and therefore only data that was previously activated is visible. For standard DataStore objects, there is no stable navigation reporting, as is the case with data mart DataStore objects.
3.4.3.2.2 Staging DataStore Object
The staging DataStore object can be used in different ways by selecting its properties.
Structure of a staging DataStore object with the property Compress Data:
Structure of a staging DataStore object with the property Reporting-Enabled:
SAP BW/4HANAData Modeling PUBLIC 115

Load Data
Regardless of the characteristics of the DataStore object, the data is always written to the inbound table.
Activate
For DataStore objects with the properties Reporting-Enabled and Compress data, activation/compression is possible. For DataStore objects with the property Inbound Queue Only, it is not.
For DataStore objects with the property Compress Data, the term “compression” is used, since in this case the data is moved from the inbound table to the table containing the active data, and all records with the same key values are merged in accordance with the default aggregation.
For DataStore objects with the property Reporting-Enabled the term “activation” is used, since in this case the relevant data is replicated from the inbound table to the table containing the active data is replicated and only then is visible for reporting. Records with the same key are merged in accordance with the aggregation here too however.
116 PUBLICSAP BW/4HANAData Modeling

Delete/Rollback
The data can only be deleted at request level if it is not contained in the inbound table yet, i.e. hasn't been activated yet.
Extraction
For DataStore objects with the properties Inbound Queue Only and Reporting-Enabled, full extraction only goes to the inbound table. For DataStore objects with the property Compress Data meanwhile, the inbound table and the table with the active data are accessed.
Delta extraction is always performed from the inbound table. For DataStore objects with the property Compress Data, a request must first be updated to all active delta DTPs before it can be compressed (activated).
Reporting
DataStore objects with the properties Inbound Queue Onlyand Compress Data can only be used for reporting to a very limited extent, since the data in the inbound table is only relevant logically for the object, but the query does not know the activation logic and therefore cannot aggregate over records. DataStore objects of this type can therefore not be added to a CompositeProvider.
For DataStore objects with the property Reporting-Enabled, reporting only takes place on the table containing the active data, meaning that the data is only visible after activation. DataStore objects of this type can be added to a CompositeProvider.
SAP BW/4HANAData Modeling PUBLIC 117

3.4.3.2.3 Data Mart DataStore object
The data mart DataStore object is used for reporting and analysis.
The data mart DataStore object has the following structure:
Permitted Types
In this DataStore object no InfoObjects are allowed to be used that are only display attributes. Also, no fields with the following data types are allowed to be used: STRING, RAW, RAWSTRING, DF16_RAW und DF34_RAW.
Load Data
The data is always loaded into the inbound table.
Only additive deltas can be loaded (for key figures only aggregations MAX, MIN, and SUM are allowed). Therefore, key figures cannot be overwritten.
Activate
No keys can be specified for this DataStore object type, but the records are treated as if all characteristics are in the key (logical key).
118 PUBLICSAP BW/4HANAData Modeling

When you activate the data, the data is copied to the table of active data and grouped according to the aggregation behavior. Afterwards, the data is deleted from the inbound table. The change log is not filled.
Deletion / Rollback
For this type, requests can only be deleted if the request has not yet been activated.
Extraction
The full and initial delta extraction reads the data for the update into a further data target from the inbound table and from the table of active data.
The data for the delta extraction is read from the inbound table.
If a delta extraction is connected and active, a request can only be activated once all active delta extractors have retrieved the request.
Reporting
The query reads data from the inbound table and from the table of active data. Therefore, it is not necessary to activate the data to be able to see all the data. The data read is consistent, since data is only included up to the first inconsistent request. The data read is also stable, since the quantity of data included from the DataStore object does not change during the navigation steps in the query.
SAP BW/4HANAData Modeling PUBLIC 119

3.4.3.2.4 DataStore Object for Direct Update
In a DataStore object for direct update, you can load the data directly into the table for active data.
The Data Mart DataStore object has the following structure:
Load Data
With this DataStore object type, the data is directly written to the table of active data.
The data is written either using a DTP or an API.
When loaded with DTP and with the API, consistency checks are made (for example, SID processing, consistency of time characteristics, areas locked by cold store or NLS).
Activate
Activation is not possible with this type.
120 PUBLICSAP BW/4HANAData Modeling

Deletion / Rollback
Deletions can be made using requests.
Extraction
Only full extraction is possible. The data is read from the table of active data.
Reporting
All data of the active data table is visible in reporting immediately after the data is loaded.
Related Information
APIs for the DataStore Object [page 124]
3.4.3.2.5 DataStore Object with Write Interface
The data in this DataStore object can be moved to the inbound table using a tool such as Data Services or via SAP Cloud Platform Integration (CPI) by PUSH.
The API for writing to DataStore objects is open for third party tools and can be used by external tools. There is no certification process for this API however.
This property can be used for all types of standard DataStore object and staging DataStore object, but not together with Inventory enabled or Planning enabled .
If streaming is used to load data, the data is activated automatically.
You can use RFC or http data to load data into the DataStore object. There are two possible procedures:
● Sending data without a request: For every call, a new internal request is opened● Sending data with a request: The following sequence is used to do this: Open Request, n times Send Data
(with request and package), Close Request
The data is transferred in the internal format.
ExampleA date (data type DATS) is transferred as “20101231”, a time (TIMS) as “235959”.
Fields of type currency (CURR) are transferred in the standard format. During the loading process the decimal place is changed to the SAP standard format.
SAP BW/4HANAData Modeling PUBLIC 121

Example1234 JPY is transferred -> due to the currency Japanese Yen the value is saved in internal format as 12.34.
12.34 EUR is transferred -> due to the Euro currency, the value is also saved as 12.34.
On fields of type Character with the ALPHA conversion routine, conversion into the internal format is done automatically at loading.
ExampleThe value “1234” is transferred with the ALPHA conversion routine into a field of type character with length 10 The value is converted automatically to “0000001234”.
Only after-image deltas can be loaded.
You can find the URIs specific to each DataStore object to call the functions using HTTP (JSON or XML) in the BW Modeling tools, under Properties Template URIs .
The RFC function modules are in the function group RSO_PUSH.
Related Information
SAP Note 2441826
3.4.3.3 Data Tiering Properties
The data tiering properties enable you to control how you can use your DataStore object.
You can classify the data in your DataStore object as hot, warm or cold, depending on how frequently it is accessed. For more information, see Data Tiering Optimization (DTO) [page 1126].
If you have selected the temperature Cold (External Cold Store), you can specify a connection. You can also define whether to allow exceptional updates for the cold store (Exceptional Updates to Cold Store). For more information, see Exceptional Updates for Data in the Cold Store [page 1137].
122 PUBLICSAP BW/4HANAData Modeling

3.4.3.4 Currency Translation and Unit Conversion
If you want to perform a currency translation or unit conversion in your DataStore object (advanced), there are various ways to model this.
InfoObject-Based
If you model your DataStore object with InfoObjects, the reference between the key figures and the associated currencies or units is guaranteed due to the InfoObject.
This is also recognized by a CompositeProvider, which is defined on the DataStore object.
Only Field-Based
If you only model your DataStore object using fields, then the key figures and currencies or units of measure can be stored in a field of any type.
If the types are reporting-compatible, then the fields are visible in a CompositeProvider that is defined on a DataStore object. This means:
A field with the data type quantity (QUAN) must have the following properties:
● The length must be > 1 and < 31 and the decimal places >= 0.● An aggregation behavior must be set.● It must reference a field of type UNIT. This field must have length 3 and cannot have any decimal places.
A field with the data type currency (CURR) must have the following properties:
● The length must be > 1 and < 31 and the decimal places >= 0.● An aggregation behavior must be set.● It must reference a field of type CUKY. This field must have length 5 and cannot have any decimal places.
If the types are not reporting-compatible, then you need to create an Open ODS view on the DataStore object, in order to perform the assignment.
Then you can create associations in the CompositeProvider. This allows you to create an assignment between the key figure and currency/unit of measure field.
Field-Based with Metadata
If you only model your DataStore object using fields, then you can assign the type CURR to the key figure, for which you want perform a currency translation, and assign the type CUKY to the currency. You can assign the type QUAN to the key figure, for which you want to perform a unit conversion, and assign the type UNIT to the unit of measure. You need to specify a field of type CUKY on the key figure.
An association with 0CURRENCY is added for the currency field in the BW back end.
SAP BW/4HANAData Modeling PUBLIC 123

The relationship between the key figure and the currency is then stored in the metadata and a CompositeProvider defined on the DataStore object can derive the assignment from the relationship.
3.4.3.5 APIs for the DataStore Object
You can use various APIs to load, activate and delete data.
The following APIs are available for a standard DataStore object with the property Write Change Log:
Type Target Table API for Local Use API for RFC Use Description
Load Inbound Table RSDSO_WRITE_API RSDSO_WRITE_API_RFC
Loads data from an internal table to the inbound table. The activation can then be started.
Activate Active Data RSDSO_ACTIVATE_REQ_API_RFC
RSDSO_ACTIVATE_REQ_API_RFC
Activates loaded requests
The following APIs are available for a DataStore object for direct updates (Direct Update DataStore object):
Type Target Table API for Local Use API for RFC Use Description
Load Active Data RSDSO_DU_WRITE_API
RSDSO_DU_WRITE_API_RFC
Loads data from an internal table into the active data table.
Delete Active Data RSDSO_DU_DELETE_API_RFC
RSDSO_DU_DELETE_API_RFC
Deletes data from the table of active data. The table of active data can be truncated or selectively deleted.
Status Active Data RSDSO_DU_CLEANUP_API_RFC
RSDSO_DU_CLEANUP_API_RFC
Deletes API requests with errors. Red requests block further load requests by DTP or by API.
3.4.3.6 Using the Concept of Non-Active Data
If DataStore objects do not use the warm store, the concept of non-active data is applied for the inbound table and the change log of the DataStore objects. An exception to this rule applies in the case of inbound table of Data Mart DataStore objects. When these DataStore objects are activated, this means that the inbound table and the change log are automatically flagged for prioritized displacement from the SAP HANA main memory.
124 PUBLICSAP BW/4HANAData Modeling

NoteNote that with data tiering optimization a central solution for handling and storing data in accordance with its temperature classification is available. Within the framework of this solution warm data in a scale-out landscape can be moved to a warm store (extension nodes). If a DataStore object uses the warm store, the concept of active data with preferential displacement from the main memory cannot be used.
For this reason, the following applies: Automatic suppression for the inbound table and the change log of the DataStore objects is only performed if DataStore objects do not use the warm store. An exception to this rule applies in the case of inbound table of Data Mart DataStore objects.
Non-active data is data that is not required, or rarely required, in Data Warehouse processes or for analysis purposes. According to multi-temperature classification, this data is qualified as warm. This data needs to be retained in the system for various reasons (for example, storage of historical data, data storage due to legal reasons, data storage for security reasons to enable reporting-relevant layers to be recovered if necessary). The concept of non-active data allows you to make more effective use of the main memory in SAP HANA in specific cases.
This concept is based on the displacement concept for main memory bottlenecks in the SAP HANA database. If bottlenecks occur in the main memory of the SAP HANA database (or while cleaning up the main memory), strict time-based criteria are used to displace the data from the main memory into the SAP HANA file system. The data is displaced if a threshold value is exceeded by a database process requiring main memory. The columns of table partitions are displaced based on the last access time (last recently used concept). Table columns containing data that has not been accessed for the longest time are displaced first.
The SAP BW∕4HANA non-active data concept ensures for specific cases that any BW data, which does not need to be actively retained in the main memory, is displaced first if bottlenecks occur. Non-active data in a SAP BW∕4HANA system is handled as follows:
● If the main memory has sufficient capacity, non-active data resides in the main memory.● If main memory bottlenecks occur, non-active data is displaced with a higher priority than other data from
the main memory of the database in the SAP HANA file system.● If non-active data that resides in the main memory is accessed, only the smallest possible volume of data is
loaded into the main memory (the columns of the relevant partitions).
Reporting-relevant and process-relevant data nearly always resides in the main memory, which guarantees improved access to this data. It is also possible to reduce the main memory if a large proportion of the data in the system is non-active.
Application in SAP BW∕4HANA
NoteNote that with data tiering optimization a central solution for handling and storing data in accordance with its temperature classification is available. Within the framework of this solution warm data in a scale-out landscape can be moved to a warm store (extension nodes). If a DataStore object uses the warm store, the concept of active data with preferential displacement from the main memory is not used for the tables of this DataStore object.
What Data in SAP BW∕4HANAIs Seen as Non-Active Data
SAP BW/4HANAData Modeling PUBLIC 125

Most of the non-active data (classified as "warm" based on multi-temperature classification) is stored in staging DataStore objects , which only consist of one inbound table. These DataStore objects are used in the data acquisition layer. Data in the corporate memory is non-active data. Data in these layers is retained for security reasons to enable reporting-relevant layers to be restored or to guarantee access to old data. DataStore objects of these layers often contain data that is no longer required. New data is also loaded into these objects every day. Apart from the current request however, this data is usually not required for processing in SAP BW∕4HANA. If a memory bottleneck occurs, these objects therefore should be displaced (instead of data for reporting-relevant objects for example) - even if this data was last used less than 24 hours ago. The data that is no longer needed should not be reloaded into the main memory when new data is loaded either.
This means that when DataStore objects that do not use a warm store are activated, the inbound table and the change log are used automatically for the prioritized displacement (with the exception of the inbound table of Data Mart DataStore objects).
Request by Request Partitioning and Displacement
DataStore objects are created in the database in request partitions. Partitioning by request means that a complete request is written to a partition. If a threshold value is exceeded, a new partition is created. The data of the next request is written to this new partition.
The Data Warehouse processes (load data, read data) usually only access data from the newest partitions. These processes always specify the partition ID for operations performed on tables. This ensures that no data from other partitions is accessed.
The fact that DataStore objects can be partitioned by request means that only the partitions containing non-active data in old requests are displaced from the main memory. The new partitions with requests relevant to the Data Warehouse processes are not displaced. These partitions are used for write and merge operations and therefore remain in the main memory.
Implementing the Concept of Non-Active Data in SAP BW∕4HANA
The Early Unload setting is used to control the displacement of SAP BW∕4HANA object data from the main memory. If a memory bottleneck occurs, the data of these objects is displaced with increased priority from the main memory (UNLOAD PRIORITY7). This is achieved by multiplying the time elapsed since the object was last accessed by a specific factor. This means that objects flagged with Early Unload are displaced more quickly than objects, which have not been accessed for a long time (and this setting has not been applied to these objects).
The inbound table and the change log of DataStore objects that do not use a warm store are automatically assigned the Early Unload setting (with the exception of the inbound table of Data Mart DataStore objects. You cannot change this setting.
The fact that DataStore objects are partitioned by request has the following effects:
● The columns of a non-active partition of a DataStore object are displaced with top priority from the main memory.
● Once a partition has been displaced, it is not reloaded into the main memory because new data is only written to the newest partition.
● Older data is usually not accessed. If older data is accessed, it is loaded into the main memory.This usually occurs with loading processes used to create new targets or when data has to be reloaded. In these cases, it is justifiable to initially load the data into the main memory.
126 PUBLICSAP BW/4HANAData Modeling

● If not all the columns of displaced objects are accessed (for example, transformations that only read specific columns), only these specific columns are loaded into the main memory. All other columns remain in the SAP HANA file system.
Notes and Restrictions
● Note that displacement from the main memory is based on actual access and is not based on the data classification for access frequency (warm). If warm data is frequently needed, this data is therefore not displaced from the main memory (as explained above).
● The system is optimized in such a way that DataStore objects can only be accessed with the relevant partition ID. This avoids the need to load the entire table into the main memory.
CautionAvoid accessing these tables. In other words, avoid making regular manual changes (SQL Editor, transaction SE16) or using customized code. Otherwise, the entire table will be loaded into the main memory.
Monitoring the Handling of Non-Active Data
You are in the Non-Active Data Monitor in the SAP HANA Database (transaction RSHDBMON)).
NoteYou can call also call the monitor from the Data Warehousing Workbench (transaction RSA1). Choose
Administration Monitors Active/Non-Active Data .
Initially, the upper part of the screen provides you with information about the system, while the lower part contains a table with information about the assigned and used memory consumption of the various services of the host.
Setting the search criteria for the detailed selection
1. To view information about the handling of non-active data belonging to a given object, choose . The Detailed Selection dialog box appears.
2. Restrict the search to the required object type. You can select from the following: InfoArea, InfoProvider, DataSource and the more runtime intensive options All Objects and All Objects with Unloads.
NoteAll selections flagged with Runtime Warning can entail very long runtimes, especially when run for the first time. Subsequently, these operations are faster, as the relevant accesses are buffered.
3. Enter the technical name of the object. Input help is provided.4. Define the search method:
○ Exact Match: The system searches for the exact technical name of the object of the specified object type entered in the fields described above.
○ Search Template: The system uses the entries made as a search template for the analysis.5. Define which of the object's tables to search for. You have the following options:
○ Only tables with the setting "Early Unload"
SAP BW/4HANAData Modeling PUBLIC 127

○ Only tables without the setting "Early Unload"○ If both options are selected, the system searches for all tables. This is the default setting.
NoteNote that these settings function as a filter on all other windows.
6. Make other settings:○ Unload Information in Header Area (Warning: Runtime) : If you choose this option, the following unload
information is displayed in the header area:○ Total Unloads via Partitions since the time selected in the next step: Suppression is performed at
column level. There are x partitions, of which suppressions are performed y times. The Total Unloads via Partitions indicates the maximum suppressed columns per partition.
ExampleData has been suppressed once from partition 3 and three times from partition 5. Total Unloads via Partitions would be four in this case, as data has been suppressed from all partitions in the system four times.
○ Number of these that are unloads on reporting/stagingpartitions○ Number of Tables Affected○ Number of these that are reporting/staging tables
○ Unloads since: You can enter an appropriate point in time here.○ No Refresh During Navigation: This setting is selected by default in order to keep the runtime short. It
means however that you do not see changes made to the data during analysis.
Note
If required, you can subsequently update the data display at any time by choosing .
7. Choose . In the upper screen area, the monitor shows you the unload information if you have selected this option. In the lower screen area it contains a table with detailed information about handling of non-active data in the SAP HANA database, filtered to the object set in your search query.
Analysis of Displayed Data
Depending on the search query, you see the tables of objects belonging to an InfoArea, InfoProvider or DataSource. By clicking on the underlined information you can navigate to further details:
● Column InfoProvider: If you click on the technical name of an InfoProvider or a Data Source, the system displays the details for all tables participating in this object and all partitions.
● Column Unloads: If you click on the number of unloads for a given object, the system displays the details for all affected partitions (partition ID, host, early unload, unloads, unload reason).
CautionNote the following exception: If the system shows -1 as the partition ID, this means that the entire table has been suppressed from the main memory (for example with unload reason EXPLICIT, meaning manual unload).
128 PUBLICSAP BW/4HANAData Modeling

● Column Available in Memory?: : You have the following options:
Status of Availability in the Main Memory Description
NO The table is not available in the main memory.
FULL The entire table is available in the main memory.
If you click on status FULL for a table, see the details such all entries for the memory, the number of records and the last access time.
PARTIALLY Parts of the table are not available in the main memory. To be able to tell which one it is, you can click on the PARTIALLY status for the relevant table. You then see all columns of a partition.
If columns of a partition are missing, these are not marked in the Available in Memory? column.
If just an index is missing however, the columns in the Available in Memory? column are marked, as indexes are not listed separately.
If you click on the entry of the unloads for a given object, the system displays details for unloads of this object.
More Information
● For more information about classification of data based on access frequency, see Data Tiering [page 1124].● For information about data tiering optimization, see. Data Tiering Optimization (DTO) [page 1126]● For information about main memory consumption in the SAP HANA database, see the SAP HANA
Administration Guide at https://help.sap.com/viewer/p/SAP_HANA_PLATFORM.● For information about how the non-active data concept affects sizing, see SAP Note 2296290 (New
Sizing Report for BW on HANA).
3.4.3.7 External SAP HANA SQL View
The external SAP HANA SQL view is a stable SAP HANA view which you can use to access the data of a DataStore object directly.
When you activate a DataStore object, an External SAP HANA SQL view is generated. This view is displayed in the definition of the DataStore object in the screen area below the editor.
It is a technical API that can be called in programs, for example in ABAP and SAP HANA SQLScript in routines for transformations. For more complex data warehousing operations (such as delta extractions), you should use the open hub destination or OData, and not this API.
SAP BW/4HANAData Modeling PUBLIC 129

An entry is added in the ABAP Dictionary for the External SAP HANA SQL view. The calculation formula is defined when the DataStore object is activated and is dependent on the settings. For this reason, you are not allowed to make any changes in the ABAP Dictionary.
The view is assigned a name according to the following model: /<namespace>/A<name of the DataStore object>8.
The view contains the following fields:
● All physically existing semantic fields (including non-reporting-relevant fields)● The marker for non-cumulative key figures● Technical field COLD_STORE_FLAG● The technical fields REQTSN, DATAPAKID, RECORD and RECORDMODE for DataStore objects of the types
Staging DataStore object with the property compress data or reporting enabled and data mart DataStore object
● Technical field RECORDTP is included only if the DataStore object contains at least one non-cumulative key figure.
The view does not contain the following fields:
● Virtual key figures such as stock coverage and referencing key figures
Name and semantics of the fields:
● By default, the field names of InfoObjects and fields are used.● Two columns are generated for key figures of type “amount” (even if the DataStore object only contains
one column for it):○ A column named <field name>__INT that contains the values in internal format (without decimal point
shifting)○ A column named <field name>__EXT that contains the values in external format (with decimal point
shifting or fixed currency)If the field name is too long after the suffix is added, then a GUID is used instead of the original field name. For example: IAZO5I2O5O7JQGWMOV2670QI3__EXT and IAZO5I2O5O7JQGWMOV2670QI3__INT. The GUID is stored in table RSOADSOFIELDMAP and is also used for reporting.
● For non-cumulative key figures, an additional column named <field name>__NCUM_REFP ' is generated.If recordtp = 1 for a request,○ the value of the corresponding inflow column (or delta column) is copied to this column○ the corresponding inflow column (or delta column) is deleted○ the values of all SAP time characteristics (0CAL*, 0FISC*) are set to their maximum value.
If recordtp < > 1 for a request,○ this column is initial.
For non-cumulative key figures of type amount the suffixes are concatenated: __NCUM_REFP_INT and __NCUM_REFP_EXT.
● For all requests that read from the cold store/NLS, an X is set in the technical column COLD_STORE_FLAG. For all other requests, this column is empty. This column can be used as a filter. For example, if COLD_STORE_FLAG = '', the SQL optimizer should use pruning to access the cold store.
Tables and Keys
Depending on the type of DataStore object the External SAP HANA SQL view contains different tables and has different keys.
130 PUBLICSAP BW/4HANAData Modeling

For standard DataStore objects with or without a change log, and staging DataStore objects with the property Inbound Queue Only:
Tables Keys
Table of active data Fields of the semantic key
For Data Mart DataStore objects:
Tables Keys
Inbound table (all green requests up to the first red or yellow request), table of active data
REQTSN, DATAPAKID, RECORD, COLD_STORE_FLAG, all characteristics (if there are less than 251), or only the first 251 characteristics if there are more than 251
(Fields REQTSN, DATAPAKID, RECORD, are for all requests read from the table of active data, initial)
For write-optimized DataStore objects:
Tables Keys
Inbound table (all green requests up to the first red or yellow request)
REQTSN, DATAPAKID, RECORD, COLD_STORE_FLAG
For Staging DataStore objects with the property Compress Data:
Tables Keys
Inbound table (all green requests up to the first red or yellow request), table of active data
REQTSN, DATAPAKID, RECORD, COLD_STORE_FLAG
(Fields REQTSN, DATAPAKID, RECORD are generated during running operation if they are read from the table of active data)
For Staging DataStore objects with the attribute Reporting Enabled:
Tables Keys
Table of active data Fields of the semantic key
If a cold store/nearline storage exists, the ON table (virtual table used for access to the archive) is added to the view. If the DataStore object contains non-cumulative key figures, the RP (reference point) table is added to the view.
Repair
You can repair the view using reports RSDG_ADSO_ACTIVATE and RSDG_ADSO_ACTIVATE_ALL. For existing DataStore objects, for which you also want to use this feature, you can generate the External SAP HANA SQL view later using report RSDG_ADSO_ACTIVATE.
SAP BW/4HANAData Modeling PUBLIC 131

3.4.3.8 Transporting DataStore Objects
The DataStore object is integrated into the TLOGO framework of the SAP BW∕4HANA system and can be transported.
The transport object is called ADSO.
3.4.4 Creating DataStore Objects
The DataStore object is the central object for data storage and data consolidation in the BW system.
Procedure
1. You are in the BW Modeling tools. In the context menu for your BW project, choose New DataStore Object (advanced) .
You can also create DataStore objects from the data flow. To do this, go the BW Object Types in the editing screen for your data flow, select the type DataStore Object (advanced) and drag it to Details. Then open the context menu for this DataStore object and choose Create Persistent BW Object.
You will now be guided through the creation process by a wizard. More Information: Creating DataStore Objects Using the Wizard [page 133]
2. The General tab opens. If you set the External SAP HANA View flag, an SAP HANA view is generated from the DataStore object. More Information: Generating SAP HANA Views from the SAP BW∕4HANA System [page 226]
3. Choose the properties that you need. More Information: Modeling Properties [page 112]4. Under Special Types, you can select additional properties for the DataStore object. More Information:
Modeling Properties [page 112]5. Under Data Tiering Optimization, you can classify the data in your DataStore object (advanced) as hot,
warm or cold, depending on how frequently it is accessed. More Information: Data Tiering Optimization (DTO) [page 1126] and Exceptional Updates for Data in the Cold Store [page 1137].
6. On the Details tab, select the InfoObjects that you want to be included in the DataStore object and/or create the fields. You can create groups in order to organize the fields and InfoObjects.More information:○ Adding Fields [page 135]○ Adding InfoObjects [page 134]
7. Optional expert setting: You can create partitions for key fields on the Settings tab.More Information: Creating Partitions [page 137]
8. Optional expert setting: You can create secondary indexes for a DataStore object on the Settings tab. The index is created on the active table. If no active table is found, the index is created on the inbound table. More Information: Creating Indexes [page 142]
9. Optional expert setting: On the Settings tab, you can prevent the creation of indexes that improve performance but that can also result in increased memory consumption. More information: Technical Settings [page 142]
132 PUBLICSAP BW/4HANAData Modeling

10. Activate the DataStore object.11. Under Properties in the screen area under the Editor, you can see information, about the DDIC elements for
example. You can use the links provided to navigate to the relevant information.
NoteThe generated views are only intended for internal use, not for use as an interface. You can use the external SAP HANA view or official interfaces instead.
The external SQL view is an exception. This is released for customers. More Information: External SAP HANA SQL View [page 129]
Open this video in a new window
Results
The DataStore object can be integrated into a data flow.
Related Information
DataStore Object [page 111]
3.4.4.1 Creating DataStore Objects Using the Wizard
You will now be guided through the creation of a DataStore object by a wizard.
Procedure
1. You are in the BW Modeling tools. In the context menu for your BW project, choose New DataStore Object.2. Select an InfoArea. To ensure that you can find your DataStore object again without difficulty, we
recommend setting the Add to Favorites flag.3. Enter a technical name and a description. The technical name can be between three and nine characters
long. If you have a namespace for the DataStore object, the name can only be eight characters long.4. You can select an object template.5. When you have finished making your settings, choose Finish. The editor appears.
SAP BW/4HANAData Modeling PUBLIC 133

3.4.4.2 Adding InfoObjects
You define the DataStore object by adding InfoObjects and/or fields.
Procedure
1. Choose the Details tab.2. To add an InfoObject, choose Add InfoObject. Specify the start of the name, select an InfoObject from the
result list, and press OK. You can also select multiple InfoObjects by pressing Ctrl + Shift. The InfoObjects are added to your DataStore object. Any compound characteristic are added too.
3. You can now configure further settings for the InfoObject properties in the right screen area.
Under General, you can use change type to change a field into an InfoObject and an InfoObject into a field. In this operation, the relevant field/InfoObject is deleted and a new one created. If the DataStore object already contains data, the data for this field/InfoObject will be lost. More information:Change DataStore Object [page 143]
Under Criteria you can specify which data can be loaded directly from a file into the DataStore object. More Information: Uploading a File to the DataStore Object [page 1202]
4. Under Maintain Properties, you can make aggregation and master data check settings for all InfoObjects/fields that support this:
You can select an aggregation type under Aggregation.
Under Master Data Check, you can decide whether you want to check for referential integrity or whether you want to run the check when data is loaded or queries are executed and whether you want to save the SIDs. Saving SIDs is useful if you have a compound characteristic with high cardinality and mainly navigation attributes of this compound characteristic are used in the query. This means the join must be executed very frequently, which can have a negative impact on performance. An additional column is created in the table for the purpose of saving the SIDs for this InfoObject. This column is filled during activation.
NoteInfoObjects of type display attributes do not have master data tables. It is therefore not possible to perform master data checks for these InfoObjects.
5. If you choose Use Navigation Attributes in Extraction, the navigation attributes of this InfoObject can be used in the transformation, if the DataStore object is the source of the transformation. In addition, you can use the navigation attributes as filter criteria in the DTP.
6. You can use groups to organize your InfoObjects. There are no semantic restrictions here. To do this, choose Add Group. You can change the technical name of the group and enter a description. You can move InfoObjects from one group to another using drag and drop.
7. You can define keys. More Information: Defining Keys [page 136]8. To delete InfoObjects, choose Remove.
134 PUBLICSAP BW/4HANAData Modeling

3.4.4.3 Adding Fields
You define the DataStore object by adding fields or InfoObjects.
Context
The advantage of using fields is that you do not need to model any InfoObjects. This is recommended especially if you want to load data types that are not supported by InfoObjects.
Note the restrictions that apply when modeling with fields: Modeling with Fields Instead of InfoObjects [page 73]
Procedure
1. Choose the Details tab.2. To add a field, choose Add Field. The field is added to your DataStore object. You can now define the field in
the right area of the screen.3. Enter a description for the field.4. You can now configure further settings for the InfoObject properties in the right screen area.
Under General, you can use change type to change a field into an InfoObject and an InfoObject into a field. In this operation, the relevant field/InfoObject is deleted and a new one created. If the DataStore object already contains data, the data for this field/InfoObject will be lost. More information:Change DataStore Object [page 143]
Under Criteria you can specify which data can be loaded directly from a file into the DataStore object. More Information: Uploading a File to the DataStore Object [page 1202]
5. If you choose Use Navigation Attributes in Extraction, the navigation attributes of this InfoObject can be used in the transformation, if the DataStore object is the source of the transformation. In addition, you can use the navigation attributes as filter criteria in the DTP.
6. You can use fields to organize your InfoObjects. There are no semantic restrictions here. To do this, choose Add Group. You can change the technical name of the group and enter a description. You can move fields from one group to another using drag and drop.
7. You can define keys. More Information: Defining Keys [page 136]8. To delete fields, choose Remove.9. Under Maintain Properties, you can make aggregation and master data check settings for all InfoObjects/
fields that support this:
You can select an aggregation type under Aggregation.
Under Master Data Check, you can decide whether you want to check for referential integrity or whether you want to run the check when data is loaded or queries are executed and whether you want to save the SIDs. Saving SIDs is useful if you have a compound characteristic with high cardinality and mainly navigation attributes of this compound characteristic are used in the query. This means the join must be executed very frequently, which can have a negative impact on performance. An additional column is
SAP BW/4HANAData Modeling PUBLIC 135

created in the table for the purpose of saving the SIDs for this InfoObject. This column is filled during activation.
3.4.4.4 Defining Keys
You can define keys for the DataStore object.
Context
While you are defining the keys, the system only shows you fields and InfoObjects that are suitable for use as keys. The following fields/InfoObjects are therefore not displayed during when you define the keys:
● Fields of data type SSTR (short string), STRG (string) and RSTR (raw string)● Only fields with undefined aggregation behaviour or aggregation behaviour None● Key Figures
Procedure
1. You are on the Details tab. To define the keys, choose Keys .... A dialog box appears.2. Select the relevant InfoObjects and choose Add to Keys. The keys that you have just created are flagged
with a grey key symbol.3. You can move the InfoObjects in the list using the Up and Down buttons or by dragging them with your
cursor.4. Once you have finished defining your keys, press OK. The keys are then displayed on the General tab page.
3.4.4.5 Using Non-Cumulative Key Figures
You can use non-cumulative key figures in your DataStore object.
Prerequisites
The DataStore objects either has the properties
● Activate/Compress Data and All Characteristics are Key, Reporting on Union of Inbound and Active Table or● Activate/Compress Data und Write Change Log.
The reference points that is required for calculation of the non-cumulatives is updated with the change log data. The DataStore object must therefore have a change log.
136 PUBLICSAP BW/4HANAData Modeling

A key also must have been defined for the DataStore object. InfoObjects must be used as key figures, non-cumulative key figures and validity characteristics. Fields are not supported for this.
Procedure
1. If you select the Inventory flag on the General tab page, another tab page appears with the name Inventory.2. You can now add a non-cumulative key figure. When the non-cumulative key figure is added, the key figure
for non-cumulative changes, or the key figures for inflows and outflows, is/are also added to the DataStore object.
3. The time-reference characteristic is determined automatically if there is a valid time characteristic.4. You can choose valid characteristics from the characteristics in the key, which are not time characteristics.
Related Information
Modeling Non-Cumulatives with Non-Cumulative Key Figures
3.4.4.6 Creating Partitions
You can create partitions for DataStore objects. The partitions can be created statically or dynamically.
Context
You can use partitioning to divide the entire dataset of a DataStore object into several smaller units that are independent and redundancy-free. Partitioning can improve system performance during data analysis. Partitioning can also be necessary if you are loading a large volume of data, because an unpartitioned table or a single partition can contain a maximum of two thousand million records. Partitioning is also needed if you use Data Tiering Optimization at partition level.
Partitions can be created for all DataStore objects with keys and for Data Mart DataStore objects. For DataStore objects with keys, you can use a key field as a partitioning characteristic. For Data Mart DataStore objects, every characteristic can be used as a partitioning characteristic.
No partitions can be created for staging DataStore objects with the property Inbound Queue Only. If you subsequently change the type to Staging DataStore object with the property Inbound Queue Only, all existing partitions are deleted.
Static Versus Dynamic PartitioningPartitions can be defined statically, manually that is, or can be determined and created dynamically. You define static partitions as part of the metadata of the DataStore object at design time. Static partitions are thus transport-relevant, and changes to the partitions must be transported as metadata changes within the system landscape.
SAP BW/4HANAData Modeling PUBLIC 137

In the case of dynamic partitioning however, you only specify the partition field. The partitions are then created dynamically during activation of the data. If partitions do not contain any data, they are automatically deleted. Dynamic partitioning is therefore more flexible than static partitioning.
If you use dynamic partitioning without making any further settings, a new partition (EQUAL) is created for each new value of the partition field during data activation. This can result in a large number of partitions being created.
CautionNote that a large number of partitions has a negative effect on performance. There is also a limit to how many partitions are allowed. Dynamic partitioning is therefore only suitable for characteristics with low cardinality. If the maximum number of allowed partitions is exceeded for dynamic partitioning during activation of the data, the activation process terminates. In this case, you have to change the partitioning properties. You can select a different partitioning characteristic for example, or change the granularity.
If the partition field meets one of the following conditions, specifying a granularity will reduce the number of partitions to be generated:
● The partition field is an SAP time characteristic (0CAL*, 0FISC*) with total order.● The partition field is a characteristic that is derived from one of the following characteristics: 0DATE,
0CALWEEK, 0CALMONTH, 0CALQUARTER, 0CALYEAR, 0FISCPER, or 0FISCYEAR.● The partition field is a characteristic with data type DATS.
You can select Calendar Year (0CALYEAR) as the granularity for partition field Calendar Month (0CALMONTH) for example. During data activation, a new partition (with RANGE) is created for every value for which there is no corresponding RANGE partition yet. In the calendar year example, the corresponding calendar year is determined for every value of the partition field. If there is no RANGE partition yet for the calendar year, this is created, and all values that belong to this calendar year are summarized in the RANGE partition. Without granularity, a separate EQUAL partition would be created for every month appearing in the data instead. If the months 1.2019, 3.2019, 4.2020 and 6.2022 appear in the data for example, they are summarized in the following RANGE partitions: (1.2019 - 1.2020), (1.2020 - 1.2021) and (1.2022 - 1.2023).
138 PUBLICSAP BW/4HANAData Modeling

Which values you can select for granularity depends on the partition field. The time hierarchy that defines which granularity is possible for which fields is shown below:
Note:
● If the partition field is 0CALDAY or a characteristic derived from 0DATE, or a characteristic with data type DATS, you can select 0CALDAY, 0CALWEEK, 0CALMONTH, 0CALQUARTER, 0CALYEAR, or 0FISCPER or 0FISCYEAR as the granularity.
● If the partition field is 0CALWEEK or a characteristic derived from 0CALWEEK, you can select 0CALWEEK as the granularity.
● If the partition field is 0CALMONTH or a characteristic derived from 0CALMONTH, you can select 0CALMONTH, 0CALQUARTER or 0CALYEAR as the granularity.
● If the partition field is 0CALQUARTER or a characteristic derived from 0CALQUARTER, you can select 0CALQUARTER or 0CALYEAR as the granularity.
● If the partition field is 0CALYEAR or a characteristic derived from 0CALYEAR, you can select 0CALYEAR as the granularity.
● If the partition field is 0FISCPER or a characteristic derived from 0FISCPER, you can select 0FISCPER or 0FISCYEAR as the granularity.
● If the partition field is 0FISCYEAR or a characteristic derived from 0FISCYEAR, you can select 0FISCYEAR as the granularity.
Dynamic Deletion of Empty PartitionsTo allow automatic deletion of empty partitions during activation of the data, the following conditions must be met:
● You have chosen dynamic partitioning.● There are partitions without data.
SAP BW/4HANAData Modeling PUBLIC 139

CautionNote that the system only considers a partition to be empty if all corresponding partitions of the various tables of the DataStore object are empty.
The chosen temperature schema determines which tables have semantic partitioning and are thus relevant for dynamic deletion.
● The current temperature and the planned temperature must correspond to the default temperature. This is always the highest possible temperature (“hot” for example if hot and warm store are used, or “warm” if warm and cold store are used).
ExampleIn the case of hot/cold partitioning, only the active data (AT) table has semantic partitioning. If the AT partition is empty then, and there is no corresponding data in the cold store, the partition is removed even though the change log (CL) can contain entries with a key within the partition limits.
In the case of hot/warm/cold partitioning, all tables - inbound queue (AQ), active data (AT), change log (CL), and the reference point table (RP) - have the same semantic partitioning. All corresponding partitions therefore have to be empty so that the corresponding dynamic partition is deleted during activation.
Procedure
1. Choose the Settings tab and expand the Partitions area.2. Select a key field as the partition field. For Data Mart DataStore objects, every characteristic is available for
selection.
NoteWhen selecting the partition field, note that the following characters are not allowed in the partitioning limits: ',', '$', '(', '-', and '*'
3. Select whether the partitions are to be created statically or dynamically.4. If you want to define partitions statically, proceed as follows:
a. You can create partitions by choosing Add. Specify a single value or a lower and an upper limit (interval) for your partition. Choose OK and Next to define a further partition. Choose OK to create the partitions. The partitions are numbered sequentially.
NoteNote:
○ The values of the individual partitions must not overlap each other.○ The upper limit is not contained in the partition. If you want to create seamless partitioning, the
upper limit of a given partition must be identical to the lower limit of the next partition.
b. Choose Edit to change the existing partitions.c. Choose Split to split the existing partitions. You can choose between Simple Split and Equidistant Split:
○ Simple Split: The partition is split into two partitions.
140 PUBLICSAP BW/4HANAData Modeling

○ Equidistant split: You have the option of specifying a time distribution using time characteristics (0CALDAY, 0CALMONTH, 0CALYEAR, 0CALWEEK, 0FISCYEAR, 0FISCVAR, 0QUARTER and their derived characteristics), and generate the partitions by day, month or year.
To do this, you need BW Modeling Tools 1.19 or higher.
The numbering of the partitions is automatically adjusted.d. Choose Merge to merge existing partitions. Select two or more partitions and choose Merge.e. You can delete partitions by choosing Delete.
5. If you have selected dynamic partitioning, the partitions are created dynamically during activation of the data.
You can also select the required granularity for specific partition fields (see above) under Partition Granularity.
6. If you have selected 0FISCPER or 0FISCYEAR as the granularity for dynamic partitioning, enter a constant for the fiscal variant in the DataStore object.a. Go to the Details tab.b. Select 0FISCVARNT from the field list.
c. In the properties for 0FISCVARNT, choose Criteria Direct Input and enter the required fiscal variant in the Equals/From field.
d. Choose Add.7. Activate the DataStore object.
Static Partitioning: When the DataStore object is activated, the database table is created with all specified partitions.
Dynamic Partitioning: When the DataStore object is activated, the table is created with just the overflow partition. If you have not specified a granularity, a partition is created (with EQUAL) during data activation for every value of the partition field. If you have specified a granularity, a new partition is created (with RANGE) during data activation for every value for which there is no corresponding RANGE partition.
NoteYou can also change the following properties of dynamic partitioning for DataStore objects that already contain data:
○ The characteristic to be used for dynamic partitioning○ The granularity that has been set○ Both of these
When this change is made, the system also creates a remodeling job.
You can also switch between the two procedures (dynamic and static partitioning) at a later point in time. You can retain or change the partition characteristic. By switching in this way, you also create a remodeling job.
SAP BW/4HANAData Modeling PUBLIC 141

3.4.4.7 Creating Indexes
You can create secondary indexes for a DataStore object.
Context
NoteThis is an expert setting. There is usually no need to change this setting. Changing the indexes can be useful if a large number of individual records needs to be read in the DataStore object.
The index is created on the active table. If no active table is found, the index is created on the inbound table.
Procedure
Creating Indexes1. Choose the Settings tab and expand the area Indexes.2. Choose New to create a new index. The name of the index is generated automatically from the first
available number that has not already been used for an index.3. Select a field//InfoObject for the index and choose OK. The index is created and is displayed in the index
area.4. You can change or delete the index.
3.4.4.8 Technical Settings
You can make technical settings for a DataStore object.
NoteThis is an expert setting. There is usually no need to change this setting.
Memory Optimized Primary Key Structure
For DataStore objects with keys, the default setting is that the key is created as a concatenated index in the active data table (if the key consists of more than one element). This concatenated index provides optimized performance during access, but can also consume a lot of memory space. It is therefore possible to use an "inverted individual" SAP HANA index instead of a concatenated index. Although this requires significantly less memory space, it can negatively impact performance during access.
Suppress Index Structures for Compounded Characteristics
In the default setting, indexes are created for compound characteristics. This accelerates the join between the master data tables and the tables of the DataStore object during execution of a query. You can deactivate the
142 PUBLICSAP BW/4HANAData Modeling

option for creating these indexes if minimizing memory consumption is more important for you. It is advisable however to check whether this could a negative effect on performance.
Expected Number of Rows
Here you can specify the expected number of data records for an InfoProvider.
This information is used during creation and activation of a (empty) DataStore object in order to create an appropriate number of hash buckets on the SAP HANA database.
If this value is large, the system creates a large number of HASH partitions from the start. If it is small, a partition overflow might occur. The number of HASH partitions is determined from the specified number of data records and the current settings in SAP HANA table TABLE_PLACEMENT. It is still possible to adjust this value later on using the SAP HANA Landscape reorg mechanism (if an overflow threatens the 2 billion limit for a partition). For more information, see SAP Note 2374652 .
CautionSpecify a realistic value. If the value is greater than one billion (1,000,000,000), the system displays a warning.
This is on condition that the tables are first-level HASH-partitioned. The partitioning depends on the selected temperature schema. First-level HASH is used for the following temperature schemas: HO, WO, HWO, HCP, WCP. For more information, see SAP Note 2985173 - DTO: Data Tiering Optimization and Partitioning.
If a DataStore object already contains data, the value of this parameter is irrelevant. Especially during remodeling using shadow tables, the value from the older tables is copied.
CautionCreate the value in your development system and transport it to your production system.
3.4.5 Change DataStore Object
You want to change an existing DataStore object.
Context
You have various options for changing your DataStore object. The options at your disposal depend on whether or not the DataStore already contains data.
Procedure
1. You are in the BW Modeling tools. Open your DataStore object.2. Choose the Details tab.
SAP BW/4HANAData Modeling PUBLIC 143

DataStore object does not contain data3. To add a field or InfoObject, choose Add Field or Add InfoObjects. More Information: Adding Fields [page
135], Adding InfoObjects [page 134]4. By choosing Change Type, you can change a field into an InfoObject and an InfoObject into a field.
When this operation is performed, the relevant field/InfoObject is deleted, and a new one created. If the DataStore object already contains data, the data for this field/InfoObject will be lost.
5. To delete fields or InfoObjects, choose Remove.DataStore object contains data6. You can use remodeling to do the following:
○ Replace an InfoObject with a field or another InfoObject○ Replace a field with another field or an InfoObject○ Fill a new field or InfoObject with either values from data already contained in the DataStore object or
with a constantMore Information: Remodeling InfoObjects and Fields [page 144]
7. To add a field or InfoObject, choose Add Field or Add InfoObjects. More Information: Adding Fields [page 135], Adding InfoObjects [page 134]
8. By choosing Change Type, you can change a field into an InfoObject and an InfoObject into a field.When this operation is performed, the relevant field/InfoObject is deleted, and a new one created. The data that has already been loaded for this field/InfoObject will be lost.
9. To delete fields or InfoObjects, choose Remove.
3.4.5.1 Remodeling InfoObjects and Fields
You have already loaded data into your DataStore object and want to change InfoObjects or fields, without losing any data.
Replacing InfoObjects and Fields
If you want to receive the data, but in spite of this want to change the name or element type (InfoObject or field), or want to replace an InfoObject with another, you can use remodeling.
CautionIf you choose Change Type to change a field into an InfoObject instead, or vice versa, the field/InfoObject in question is deleted, and a new one created. If the DataStore object already contains data, the data for this field/InfoObject will be lost.
You can use remodeling to do the following:
● Replace an InfoObject or a field with a (different) InfoObject● Replace an InfoObject or a field with a (different) field
144 PUBLICSAP BW/4HANAData Modeling

Requirements:
● The InfoObject that is used as the target for the replacement must already exist in an active version, but must not be in the DataStore object yet. The InfoObject that is to be replaced must already exist in the active version of the DataStore object.
● If an InfoObject/field has been replaced, it must no longer be in the DataStore object.● The target object must have the same properties as the InfoObject/field to be replaced:
○ Same data type○ Same length○ Same number of decimal places○ Same conversion routine○ Same setting for lowercase○ Same aggregation behavior○ Any criteria defined on the replacing InfoObject/field must not be more restrictive on the new
InfoObject/field.● If the InfoObject/field to be replaced is in the key, the new InfoObject/field must also be key, and takes over
the partitioning and the indexes.● If the InfoObject/field to be replaced is the partitioning characteristic, the partitioning characteristic (with
all partition boundaries) is transferred to the new object. If you have replaced an InfoObject/field like this kind and then change your mind, you first have to execute a REVERT before specifying a new substitution.
● If the characteristic to be replaced is used in an index, the characteristic is replaced in the index with the new object.
● You can only perform one replacement step on an InfoObject/field. You cannot perform further replacements on the same InfoObject/field until you have activated the DataStore object.
● For DataStore objects with non-cumulative key figures, the time reference characteristic cannot be replaced.
● If there is a cold store filled with data for the DataStore object, the InfoObject/field cannnot be replaced.● If the DataStore object is part of a semantic group, the reference characteristic of the semantic group
cannot be replaced.● Virtual key figures cannot be replaced.
Filling New InfoObjects And Fields with Existing Values
Using Remodeling, you can do the following:
● Fill a field or InfoObject with values from an InfoObject already contained in the DataStore object.● Fill a field or InfoObject with values from a field already contained in the DataStore object.● Fill a field or InfoObject with a constant.
"New" means that the DataStore object has not been activated yet since the element was added. The field or InfoObject therefore does not contain any data yet. The data is copied from the selected field or InfoObject and inserted. The properties of the selected field or InfoObject are not transferred however.
Requirements:
● An InfoObject/field with currency reference (data type: CURR) can only be filled by an InfoObject/field with currency reference.
● An InfoObject/field with unit reference (data type: QUAN) can only be filled by an InfoObject/field with unit reference.
SAP BW/4HANAData Modeling PUBLIC 145

● Type NUMC cannot be changed. Elements with data type NUMC can only be filled by elements with the same data type and the same length.
● The conversion routine of the source and the target element must be identical.● The lowercase characters allowed flag must not be changed.
Execution of the Changes
You can execute the remodeling request in the SAP BW∕4HANA Cockpit. To do this, choose the Remodeling Requests app. More Information: Administration of Remodeling Requests [page 1205]
Transport
All changes arising from remodeling activities can be transported.
3.4.6 Semantic Groups
A semantic group is used to generate semantically partitioned data models.
The semantic group is not an InfoProvider in its own right. It is a tool that used to generate a group from semantically related DataStore objects (advanced). To simplify reporting and analysis over all components of a semantic group, a CompositeProvider can be generated.
Using semantically partitioned data models groups offer the following advantages when compared with individual DataStore objects (advanced):
● Better performance with mass data: Semantic partitioning means that the data sets are distributed over several data containers. This means that runtimes are kept short even if the data volume is large.
● Isolation of the data: Error handling is better. If a request for a region ends with an error, for example, the entire InfoProvider is unavailable for analysis and reporting. With a semantically partitioned data model, the separation of the regions into different partitions means that only the region that caused the error is unavailable for data analysis.
● Working with different time zones: EDW scenarios usually involve several time zones. With a semantically partitioned data model, the time zones can be separated by the partitions. Data loading and administrative tasks can therefore be scheduled independently of the time zone.
Using SAP HANA means that the semantic group has a smaller number of components that contain a large amount of data, as the performance is greatly improved by SAP HANA.
You can generate new components from a semantic group. The structure is taken over from a DataStore object (advanced) template. Existing DataStore objects (advanced) can also be added to the group if certain conditions are met. The DataStore objects (advanced) remain objects in their own right.
146 PUBLICSAP BW/4HANAData Modeling

Staging
When loading data to a DataStore object (advanced) that is part of a semantic group, a filter in the DTP stipulates that only data that is suitable for the DataStore object as part of the semantic group is extracted. The DTP is given the status green even if records have been filtered out.
Reporting and analysis on a semantic group
When creating the semantic group, you can generate a CompositeProvider that contains all DataStore objects (advanced) in the semantic group and assigns them to one another by union. This provides you with the object for reporting and analysis. This CompositeProvider is overwritten every time a change is made to the semantic group. It should therefore not be changed manually.
3.4.6.1 Authorizations for Semantic Groups
There is a specific authorization object for working with semantic groups. The authorization is covered by the objects to be created (DataStore object (advanced) and CompositeProvider).
3.4.6.2 Transporting Semantic Groups
The semantic group itself cannot be transported.
In the development system, objects are generated from the semantic group. These objects can be transported to the production system.
For the transport, the following conditions apply:
● All objects are in the same package.● All objects are on the same request.
3.4.7 Creating Semantic Groups
You can create semantic groups in order to create new components of the semantic group based on a reference structure. You can also include existing DataStore objects (advanced) in a semantic group.
Prerequisites
You are using an SAP HANA database.
SAP BW/4HANAData Modeling PUBLIC 147

You have BW back end version 7.5 SPS04 or higher installed. You have installed and configured the BW Modeling tools.
Procedure
1. You are in the BW Modeling tools. In the context menu for your BW project, choose New Semantic Group .
2. Enter a technical name and a description.
NoteNote that this character is not allowed in the technical name. This is because the forward slash is used for namespaces but the semantic group cannot be transported. However the objects generated by the group can be transported. Therefore namespaces can be used in the objects generated by the semantic group.
3. You can select an object template.4. Choose Finish. The editor appears.5. On the General tab, you can enter a name and description for a CompositeProvider to be generated. You
should not enter the name of an existing CompositeProvider here. The components of the semantic group are then added to this CompositeProvider. It is always adapted whenever components of the semantic group are added or changed. You thus now have an object for analysis and reporting on the semantic group.
6. On the Criteria tab, select an existing DataStore object (advanced) as the reference structure. This serves as the structure template for the components of the semantic group.
7. Under Element, select a partitioning criterion. In the case of DataStore objects (advanced) with the property Activate Data, only elements are allowed that are in the key.
8. By choosing New under Member, you can create and add a new DataStore object (advanced) with the structure of the reference structure.
148 PUBLICSAP BW/4HANAData Modeling

9. By choosing Add, you can add an existing DataStore object (advanced). If the DataStore object (advanced) is different to the reference structure, you can set the Apply Reference Structure flag. When the semantic group is generated, the structure of the DataStore object is then adapted. However you can also leave difference in the structure unchanged. Icons are displayed in the editor to indicate which action is performed when the semantic group is generated. More information: Example of the Definition of a Semantic Group [page 149]
10. In the Detail area under Direct Input, you can specify filter criteria. These can be individual values, ranges or combinations of these.
11. Choose Start Generator. The system displays a summary of the changes that generation would perform. Choose Next.
12. Specify a transport request for the transport to the production system. Choose Generate. The objects are generated.
Related Information
Semantic Groups [page 146]
3.4.7.1 Example of the Definition of a Semantic Group
Icons are displayed in the editor to indicate which action is performed when the semantic group is generated.
When creating a semantic group, you can create new components of the semantic group based on a reference structure. You can also include existing DataStore objects (advanced) in a semantic group. These can have different structures. Depending on whether you select the Apply Reference Structure option, and whether the structure of a DataStore object deviates from the reference structure, different icons in the editor show you
SAP BW/4HANAData Modeling PUBLIC 149

which structures are adjusted during generation, which components have been changed and adjusted, which components have been deleted, and which have been added.
In this example, you see the following various statuses of DataStore objects (advanced):
● SEM_GRP0 is an active component, whose structure is different to the reference. You can tell this from the exclamation mark on the icon. To prevent this structure from being overwritten, the Apply Reference flag is not set. With the next activation, there is therefore no action performed on this object.
● SEM_GRP1 is an active component, whose structure is different to the reference. You can tell this from the exclamation mark on the icon under Action. As the Apply Reference flag is set, the structure is adjusted during the next activation. You can tell this from the Change icon.
● SEM_GRP2 is an active component, whose structure agrees with the reference. As no criteria have been changed, no action is displayed. If changes were made to the reference structure however, these would be applied during the next generation, as the Apply Reference flag is set.
● SEM_GRP3 is an active component, whose structure agrees with the reference. Changes have been made to the criteria here however, and the change icon is therefore displayed for the action. As with SEM_GRP2, future changes to the reference structure ar are applied, as the Apply Reference flag is set.
● SEM_GRP4 is an active component, whose structure agrees with the template. As the Apply Reference flag is not set, future changes to the reference structure are not applied.
● SEM_GRP5 is an active component that is removed from the group during generation. You can tell this from the X under Action. The DataStore object (advanced) itself is retained.
● SEM_GRP6 is created again in accordance with the reference during the next generation and added to the
group. You can tell this from the icon.● ADSO_EXT is an existing DataStore object (advanced) that should be added to the group. At present it is
not known whether the structure agrees or not. A question mark is therefore displayed. Next time it is saved, the corresponding icon should be displayed there. Under Action, a + is displayed.
150 PUBLICSAP BW/4HANAData Modeling

If you choose Generate in this status, the system displays a list for each object showing which actions are performed on it, as in our example:
3.4.7.2 Changing the Semantic Group and Its Objects
You can change a semantic group, but note that restrictions apply.
Adding/deleting fields
You can add or delete elements (InfoObjects or fields) by changing the reference structure and then creating the group again. All components for which the flag apply reference structure is set are adjusted in accordance with the new structure. However, when deleting elements, please note that the reference characteristic must be retained.
Adding new components
You can add a new component to the semantic group at any time.
SAP BW/4HANAData Modeling PUBLIC 151

Deleting components
Active components can be deleted from the group. In this case, only the reference to the group is deleted from the metadata of the DataStore object (advanced); the DataStore object (advanced) itself is retained. If you want to delete the DataStore object (advanced), you need to execute this operation directly on the DataStore object (advanced).
Changing criteria
The criteria can be modified at any time without remodeling. If you restrict the criteria so that they no longer correspond to the loaded data, then remodeling is often necessary. For more information, see section Remodeling after Generation below.
Changing a DataStore object (advanced), which is the component of a group
After adding components, you can directly change the structure of individual components. You can make the change in the editing screen of the DataStore object (advanced) as usual. The editor displays information that the DataStore object (advanced) belongs to a group. Once this type of change is made, the structure of the DataStore object (advanced) generally deviates from the reference structure of group. Please note that the next activation of the semantic group will undo the change, if the keep structure flag is not set. When making changes, please note that the reference characteristic cannot be deleted from the DataStore object (advanced).
Differences between the development system/production system
You can only change semantic groups in the development system. In the production system, you can search for and display semantic groups, but cannot change them. When you display a semantic group, you only see its constituent parts with their criteria, and not see the reference structure or the CompositeProvider.
Remodeling after generation
If components of a semantic group already contain data, then remodeling may be necessary after generation. During the generation process, remodeling jobs are created for the affected components. These jobs need to be manually executed in transaction RSCNV_MONITOR. In this case, the generation of the semantic group runs without errors and only a warning is displayed for the affected components.
Remodeling is often necessary when criteria are restricted. If remodeling is not successful in this case, then you need to either adjust the criteria to match the loaded data or selectively delete the non-matching data from the DataStore object (advanced). Then you must restart the remodeling request.
152 PUBLICSAP BW/4HANAData Modeling

3.4.7.3 Creating a Copy of a Semantic Group
You can save a semantic group under a different name in order to create a copy of it.
Context
When these are copied, a new group is created. This has the same number of partitions with the same criteria. All DataStore objects (advanced) are created again based on the reference structure. The names of the components are created automatically when copied, and can be changed before generating.
Procedure
1. You are in the BW Modeling tools. In the Project Explorer, choose Copy from the context menu on your semantic group.
2. Give the new object a name and a description.3. Choose Finish. The new semantic group is opened in the editor and can be edited there.
3.4.7.4 Deleting Semantic Groups
You can delete a semantic group.
Context
If you delete a semantic group, the participating DataStore objects (advanced) and the CompositeProvider are retained. The references in the individual DataStore objects (advanced) to the group are deleted.
Procedure
You are in the BW Modeling tools. In the Project Explorer, choose Delete from the context menu on your semantic group.
SAP BW/4HANAData Modeling PUBLIC 153

3.5 Definition of Virtual Data Models
Virtual data models are InfoProviders that are modeled in the SAP BW∕4HANA system and are comprised of other InfoProviders.
These InfoProviders include the CompositeProvider, in which you can merge the data from SAP BW∕4HANA InfoProviders with data from SAP HANA views, and the Open ODS view, with which you can consume external data without staging in SAP BW∕4HANA and which enables flexible integration of data in SAP BW∕4HANA without the need to create InfoObjects.
3.5.1 Open ODS View
Open ODS views enable you to define data models for objects like database tables. database views or DataSources (for direct access). These data models allow flexible integration without the need to create InfoObjects. This flexible type of data integration makes it possible to consume external data sources in SAP BW∕4HANA without staging, combine data sources with SAP BW∕4HANA models and physically integrate (load) external data sources by creating DataSources.
The Open ODS view is a SAP BW∕4HANA metadata object that provides a structure description with attributes (fields) and data types. It represents a view on a source and adds analytic metadata to this source. Supported data sources are objects, which describe their data in a structure with attributes and data types (such as database tables), views or SAP BW∕4HANA DataSources. The Open ODS view does not have separate storage for transaction data or master data. This means persistency and analytic modeling are decoupled for the Open ODS view.
Although classic modeling with InfoObjects guarantees a high level of consistency in the data model, any existing modeling already in use for reporting and analysis is difficult to modify. Modeling with Open ODS views is considerably more flexible. You can create an Open ODS view with minimum effort for a data source and assign properties to the fields of the Open ODS view. In particular, when defining the structure of the Open ODS view, you can specify whether a specific field should be interpreted as a key figure or characteristic. An Open ODS view modeled in this way makes data available for consumption (for example, with a query). The view can be enhanced stage by stage for further integration into BW.
Consuming, Combining and Physically Integrating Data
● Consume external data without staging:The Open ODS view allows data sources to be virtually consumed without the need for a separate SAP BW∕4HANApersistence for the data. These data models can be located in a database schema (of the SAP HANA database in SAP BW∕4HANA), which is not managed by SAP BW∕4HANA. Alternatively, the models can be located in other databases, which can be connected to the SAP HANA database in SAP BW∕4HANA using SAP HANA Smart Data Access.
● Combine external data with SAP BW∕4HANA:By using links to InfoObjects, you can combine Open ODS views with SAP BW∕4HANA models and thereby use master data attributes and texts in SAP BW∕4HANA, for example. There is another way of combining the Open ODS view with SAP BW∕4HANA models; by using the Composite Provider.
154 PUBLICSAP BW/4HANAData Modeling

● Physical integration of external data (staging):For ETL purposes, you can create DataSources for Open ODS views and thereby physically integrate data sources into SAP BW∕4HANA. In this case, the persistence of the Open ODS view is ensured by a DataStore object Objekt (advanced), comparable here with a Persistent Staging Area (PSA) in SAP BW. The data can then be processed further in SAP BW∕4HANA from within the DataStore object (advanced).
The degree of integration for data models can be iteratively developed, without invalidating any modeling objects (for example, queries) that are based on these modeling objects. For example, you can model a simple Open ODS view with standard properties for the fields. You can then use this view for queries and, in subsequent steps, link InfoObjects, for example, to the fields of the Open ODS view and use the InfoObject properties in your model.
Restrictions
● Open ODS views cannot be defined for hierarchies.
More Information
SAP Note 2198480 provides practical information about using the Open ODS view.
Note the following information: Modeling with Fields Instead of InfoObjects [page 73]
3.5.1.1 Components of the Open ODS View Definition
An Open ODS view is defined by specifying the following components:
Semantics
● Facts● Master Data● Texts
Source Type
The Open ODS view supports various types of data sources (also known as source types):
● SAP BW∕4HANA DataSource for direct access● DataStore Object (Advanced)
SAP BW/4HANAData Modeling PUBLIC 155

● Database table or view● Virtual table using SAP HANASmart Data Access● Transformation
The source type is the implementation of the interface of the source object. The source type provides static methods for input help and instantiation.
Source Object
The table or table-shaped object, which the Open ODS view is based on, is known as a source object. A source object instance provides a flat list of fields - with data types and texts - and the access methods for the data. The Open ODS view is a view on the source object. It does not contain any data persistence.
Analytic Metadata (Field Properties)
Analytic metadata is added to the fields of the Open ODS view. For each field, you can specify whether it should be interpreted as a characteristic or as a key figure. Other examples of analytic metadata include the aggregation behavior for key figures, or associations and authorization relevance for characteristics or the InfoObject name of an Open ODS view field. This name is used for the Open ODS view field used across the system, for example in the InfoProvider display of the Open ODS view or in a query on the Open ODS view.
3.5.1.2 Supported Sources for Open ODS Views
Various sources for data access with Open ODS views are available: DataSources in SAP BW∕4HANA, DataStore objects (advanced), database tables or views of the SAP BW∕4HANA SAP HANA database, and external sources connected to BW using SAP HANA Smart Data Access. In addition, transformations allow data type conversions, for example, as sources, if data is consumed outside of the SAP BW∕4HANA-managed database schema.
Source Types
Database tables or views of the SAP HANA databaseWith source type database table or view, Open ODS views can access data from any schemas on the SAP BW∕4HANA SAP HANA database. The connection to the relevant schema is configured in the SAP HANA source system with connection type Local SAP HANA Database Schema.
Database tables or views via SAP HANA MDCSAP HANA supports multiple isolated databases in a single SAP HANA system. These are known as tenant databases. A SAP HANA system that was installed in Multiple Database mode can contain more than one tenant database. For more information about prerequisites and supported database objects, see SAP Note
156 PUBLICSAP BW/4HANAData Modeling

2312583 . - FAQ:. BW and SAP HANA Tenant Database: Cross-Database Access in SAP HANA Tenant Databases.
The source type Database Table or View via HANA MDC enables Open ODS views to access data in schemas of a tenant database of the SAP HANA system. The connection to the relevant schema is configured in the SAP HANA source system with connection type SAP HANA Tenant Database Schema.
Tables and Views from External Sources Using SAP HANA Smart Data Access
With source type Virtual Tables Using HANA Smart Data Access, Open ODS views can access remote data from different external sources. The source must be configured in SAP HANA as a remote source. The connection to the source and the relevant schema is configured via a SAP HANA source system with connection type SAP HANA Smart Data Access for SAP BW∕4HANA.
When an Open ODS view is created with source type Virtual Table Using SAP HANA Smart Data Access, a virtual table is created in SAP HANA. The virtual table points to a remote table, which is the source object of the Open ODS view, and allows access to data.
NoteNote that a dedicated source type (Big Data) is available for remote sources with the adapters Spark SQL DESTINATION and VORA (ODBC). Therefore remote sources with these adapters are not available for source type Virtual Tables via SAP HANA Smart Data Access.
Big Data
The source type Big Data enables Open ODS views to access the data of a Hadoop cluster, which is connected via a Big Data source system (and therefore via a remote source with the Spark SQL DESTINATION or VORA (ODBC) adapters) to the SAP HANA database of SAP BW∕4HANA.
DataSources in SAP BW∕4HANA
With the source type DataSource (BW), Open ODS views can access the data of DataSources that support direct access. This is possible for ODP and SAP HANA source systems.
Transformations
Using source type Transformation you can use transformations for example to perform data type conversions, assignments or string operations on data that is consumed via Open ODS views. This can be useful for example if you cannot or do not want to use these transformations in the data source on data, which is outside of the database schema managed by SAP BW∕4HANA.
You can use a transformation as the source for the Open ODS view provided that you have created the corresponding data flow.
DataStore Objects (Advanced)
With the source type DataStore-Object (Advanced), Open ODS views can access data from DataStore objects (advanced). Only DataStore objects for which all reporting takes place on the active table are supported.
SAP BW/4HANAData Modeling PUBLIC 157

Restrictions
Input parameters of SAP HANA views are not visible in the Open ODS view. This applies to both local views and views in the tenant database as well as for access using SAP HANA Smart Data Access. For more information, see SAP Note 2142344.
Related Information
SAP HANA Smart Data Access [page 1298]SAP Note 2142344
3.5.1.3 Suppress Read Access for Unavailable Sources Temporarily
External sources are not always available for read access from an Open ODS view. You can deactivate a source system to suppress access to the source temporarily.
If you use an Open ODS view to directly access a source that currently is not available, this causes an error. This also applies to queries on CompositeProviders that contain an Open ODS view. In the worst case, all queries of a CompositeProvider result in an error if the source for one of the participating Open ODS views is not available. In the source system editor, you can therefore set the affected source system to inactive, thereby suppressing read access to the source temporarily. No data is then displayed for queries on the affected Open ODS views and CompositeProviders. In this case, affected CompositeProviders only display data for other InfoProviders, for example for DataStore objects.
Related Information
Set Source System to Inactive [page 308]
158 PUBLICSAP BW/4HANAData Modeling

3.5.1.4 Structure of the Open ODS View Editor
The Open ODS View Editor always contains the General tab. Depending on the semantics of the Open ODS view, it can also contain the relevant semantic tabs; Facts, Master Data and/or Texts.
Tab: General
In the General tab, you see the name and description of the Open ODS view, together with information about the semantics of the Open ODS view.
Tabs: Facts, Master Data, Texts
The Facts, Master Data and Texts tabs represent the central area for Open ODS view maintenance. Open ODS views for master data can have two types of semantics. In this case, the editor contains both the Master Data tab and the Texts tab.
The tabs are structured as follows:
Tabs screen area Content
Upper screen area Here you see information on the source object. The tooltip can also show further details on the source for certain source types. Certain sources - such as BW DataSource, DataStore object (advanced) and transformation - allow you to navigate to object maintenance.
Left screen area - Source Fields Here you see the structure of the source object including the source fields and their properties.
If you are using a transformation as the source, the InfoSource fields are displayed in the structure of the source object.
Central screen area - View Fields Here you see the structure of the Open ODS view with the view fields organized in field categories. The information displayed on the fields includes the following:
● The Associated Object column shows which association has been configured for the field.
● If navigation attributes have been specified for fields, you can expand the list of navigation attributes using
the arrow button on the field name.
Right screen area - General Here you see the analytic properties of the view field for the selected source field/view field.
TipEnlarge the screen areas Source Fields and View Fields by dragging the edges of the areas with the mouse. Double-click one of the screen areas to expand it and hide the other screen area. Double-click again to restore the size of the screen area.
SAP BW/4HANAData Modeling PUBLIC 159

Further Information on the Open ODS View
You can display different types of information for the Open ODS view by using the Eclipse views Properties, History and InfoProvider.
The Eclipse view BW Reporting Preview opens the default query in the query monitor.
Related Information
Properties View [page 19]History View [page 20]InfoProvider View [page 21]BW Reporting Preview View [page 21]These views provide further information about your Open ODS view.
3.5.1.5 InfoObject Names for Fields in Open ODS Views
For every field in an Open ODS view field and the view navigation attributes, InfoObject names are used in the InfoProvider view and in the query. The InfoObject names are derived according to specific rules.
InfoObject Names for Fields in Open ODS Views
Derivation from... InfoObject name of Open ODS view field
Default
The default is active if you have selected Usage of System-Wide Unique Name, irrespective of whether or not there is an association for the field of the Open ODS view.
2F<name of Open ODS view>-<name of Open ODS view field>
If the Open ODS view is in a namespace: 2F<name of the Open ODS view with generated namespace>-<name of the Open ODS view field>
Association to InfoObject if Direct Usage of Associated Object by Name is selected
<name of associated InfoObject>
Association to Open ODS view if Direct Usage of Associated Object by Name is selected
2F<name of associated Open ODS view>
If the Open ODS view is in a namespace: 2F<name of the Open ODS view with generated namespace>
160 PUBLICSAP BW/4HANAData Modeling

InfoObject Names for Navigation Attributes of Open ODS View Fields
Direct Usage of Associated Object by Name button InfoObject name of navigation attribute
selected <name of associated InfoObject>__<name of navigation attribute>
2F<name of associated Open ODS view>=<name of navigation attribute>
not selected 2F<name of CompositeProvider>-<field name of navigation attribute>
2F<name of CompositeProvider>-<field name of navigation attribute>
3.5.1.6 Authorization Behaviour for Fields of Open ODS Views
The Authorization Relevance property on the characteristic field of the Open ODS view allows you to specify whether or not a field is authorization-relevant. The settings in the Open ODS view also define which analysis authorizations should be checked for the field when the query is executed. When the query is executed, the system also checks whether the user has analysis authorizations.
Which analysis authorizations are checked when the query is executed depends on how the field is set to authorization-relevant.
No Associations Defined for the Characteristic Field: Authorization-Relevance is Defined Locally
If the Authorization Relevance field property is set locally, the system checks all authorizations defined for the Open ODS view field.
NoteIn the administration screen for analysis authorizations, you can use authorization-relevant Open ODS view fields with their InfoObject name for the authorization definition. The fields are displayed as InfoObjects in the administration screen for analysis authorizations.
Dependency of the Authorization Relevance Property on Associations
If you have defined an association for a field of the Open ODS view, the authorization behavior depends on the settings in the Open ODS view as described below:
SAP BW/4HANAData Modeling PUBLIC 161

Settings in the Open ODS view (Eclipse-Based Editor) Authorization behavior
You have defined an association and chosen Direct Usage of Associated Object by Name.
The authorization relevance is inherited by the association and cannot be changed locally.
If the associated object is authorization-relevant, the system checks the analysis authorizations (defined for the associated object) for the Open ODS field view when executing the query.
You have defined an association and chosen Usage of System-Wide Unique Name.
The authorization relevance is inherited by the association.
If the associated object is authorization-relevant, the system checks the analysis authorizations (defined for the associated object) for the Open ODS field view when executing the query.
You have defined an association, chosen Usage of System-
Wide Unique Name and used the button (Toggle Default Value/Manual Entry) to overwrite the property (set locally).
The authorization relevance is determined locally.
If you have set the field as authorization-relevant, the analysis authorizations defined for the Open ODS view field are checked when query is executed. The Open ODS view field is available together with its InfoObject name as an InfoObject in the administration screen for analysis authorizations.
Note
Even if you do not change the entry after pressing (Toggle Default Value/Manual Entry), the system interprets the property as being specified locally and not as the default or inherited value. This means that the analysis authorizations are checked, which are defined for the InfoObject that represents the field of the Open ODS view in the authorization maintenance screen. The analysis authorizations of the associated object are not checked.
3.5.1.7 Transporting Open ODS Views
The Open ODS view is integrated into the SAP BW∕4HANA TLOGO framework and can be transported. The transport object is FBPA (A version) or FBPD (delivery version). It is important to take certain dependencies into account for the transport.
Dependencies for Source Table or Source View
If you use a table or a view as the source object of an Open ODS view, the table or the view must exist in the target system for the transport, when the open ODS view is transported.
If you use SAP HANA Smart Data Access, the SDA connection must be configured so that the table or view is available in the target system.
162 PUBLICSAP BW/4HANAData Modeling

Dependencies for SAP HANA Source System
The Open ODS view does not contain any local system information, such as connection information for the database or the database schema. This information is specified in the source system configuration for Open ODS views that access data from database tables or database views via the SAP HANA source system.
In the transport target system, assignment table RSLOGSYSMAP must be correctly configured for SAP HANA source systems. This is used to access tables or views from Open ODS views.
3.5.1.8 Transformation of Data from External Sources for Open ODS Views
You can use transformations in the SAP BW∕4HANA system for various purposes, for example to perform data type conversions or string operations on data, which is consumed using Open ODS views.
This can be useful for example if you cannot or do not want to use these transformations in the data source on data, which is outside of the database schema managed by SAP BW∕4HANA. When defining the Open ODS view, you can therefore use source type Transformation, with a DataSource as the source and an InfoSource as the target. The InfoSource fields are displayed as source fields for the Open ODS view in the Open ODS view maintenance screen. At runtime, the transformation rules set in the transformation are applied on the fields of the DataSource.
Related Information
Supported Sources for Open ODS Views [page 156]
3.5.2 Creating an Open ODS View
Open ODS views allow the flexible integration of external data sources into SAP BW∕4HANA, without the need to create InfoObjects. In BW modeling tools, you can create simple Open ODS views and enhance them in stages for closer data integration.
Creating a Simple Open ODS View
1. You are in the BW Modeling tools. In the Project Explorer view, choose New Open ODS View in the context menu of your BW project or the context menu of an InfoArea or the semantic folder Open ODS View. There is a wizard to guide you through the process of creating the open ODS view.More information: Creating an Open ODS View Using the Wizard (Defining Semantics and Source) [page 165]
SAP BW/4HANAData Modeling PUBLIC 163

2. In the Open ODS view maintenance screen, you specify the structure of the Open ODS view. To do this, sort the fields of the source object into field categories of the Open ODS view. The selection of categories available for assigning fields depends on the semantics of the Open ODS view. Field categories for facts include characteristics, key figures, currencies or units.The properties of the Open ODS view fields are set by either the source of the Open ODS view field or a system default. The properties are different for fields of different categories. They describe, for example, the aggregation behavior for key figures. For characteristics, for example, the properties specify whether the characteristics are authorization-relevant.More information:Specifying the Structure of the Open ODS View [page 173]Displaying Initial Properties for Open ODS View Fields [page 174]
3. You can now check, save and activate the Open ODS view. This means the view is now available for use and you can virtually use the data source of the Open ODS view, for example, in queries. In further steps you can also flexibly enhance the Open ODS view.
1. Check the Open ODS view ( ).The system displays the check log in the problems view in BW modeling tools.
2. [Optional:] Check the query behavior of the open ODS view in the BW Reporting Preview view.More information: BW Reporting Preview View [page 21]
3. Save ( ) and activate ( ) the Open ODS view.
Additional Editing for Open ODS Views
1. If you perform further editing on an Open ODS view, you can specify various properties and combine the data source of the Open ODS view with SAP BW∕4HANA models (InfoObjects).○ You can adjust and change the properties of the Open ODS view fields. In particular, you can add
associations of other Open ODS views and/or InfoObjects to fields:○ Using associations on fields of type "characteristic", you can link an Open ODS view to master data
and texts of other Open ODS views or InfoObjects. This allows you to inherit properties from the associated object, assign additional key fields (compounding) and use texts and navigation attributes of the associated objects in queries on the Open ODS view.
○ In the case of fields with type "key figure", you can add associations to InfoObjects. This is particularly relevant if you want to reuse formulas or variables (defined on the associated InfoObject) in queries.
○ As with an InfoObject, the Open ODS view can combine language-independent semantics for the attribute keys with language-dependent semantics for texts. You can add extra semantics for an Open ODS view that you initially created with one of the two other semantics (texts or attributes).
○ You can swap the source object in the Open ODS view.More information:Changing Properties for Fields of Type "Characteristic" [page 177]Changing Properties for Fields of Type "Key Figure" [page 179]Adding Texts or Attributes [page 181]Replacing the Source of an Open ODS View [page 182]
2. After you have finished the additional editing, check, save and activate the Open ODS view.
164 PUBLICSAP BW/4HANAData Modeling

3.5.2.1 Creating an Open ODS View Using the Wizard (Defining Semantics and Source)
There is a wizard to guide you through the process of creating an open ODS view. In the wizard, you make general entries for the technical name and description, InfoArea and favorites assignments, and specify whether a proposal should be made for the assignment of the fields in the source object to field categories of the Open ODS view when this is created. During the creation process in the wizard, you select the semantics and the source of the Open ODS view. You also have the option of creating an Open ODS view as a copy of an existing Open ODS view.
Prerequisites
● For transformations as sources of Open ODS views:You can use a transformation as the source for the Open ODS view provided that you have created the corresponding data flow:
● For DataStore objects as sources of Open ODS views:DataStore objects for which all reporting takes place on the active table are supported.
Procedure
In the Project Explorer view, you have chosen New Open ODS View in the context menu of your BW project or the context menu of an InfoArea or the semantic folder You are in the wizard for creating Open ODS views.1. In the first wizard step Open ODS View, enter some basic information.
a. Select an InfoArea.The InfoArea that you selected the last time you opened the dialog box is displayed as the default entry.
TipYou can access the content assist function by pressing Ctrl + Space.
b. To access the Open ODS faster next time you are here, we recommend setting the Add to Favorites flag.c. Enter a technical name for the Open ODS view under Name. A maximum of 12 characters can be
entered for the name.d. Enter a description for the Open ODS view under Description.e. The Create with proposal flag is selected by default. This means that the Open ODS view is created with
automatic assignment of the source fields to the field categories of the Open ODS view (characteristic or key figure for example). If you deselect this, the system does not generate a proposal during the creation process. In this case, you set the assignment in the editor of the Open ODS view.
f. Under Semantics, specify whether you want to create an Open ODS view for facts, master data or texts.
g. Choose Next.
SAP BW/4HANAData Modeling PUBLIC 165

2. In the Select Source Type wizard step, select which type of source object should be used as the basis for the Open ODS view.
For the source types Database Table or View, Database Table or View via HANA MDC, Virtual table using SAP HANA Smart Data Access, and Big Data, specify whether an existing SAP HANA/Big Data source system, or a new source system, should be used to access the source object of the Open ODS view.
3. Choose Next.
The following wizard steps depend on which source type you have selected and - for specific source types (see step 2) - whether you use an existing source system or create a new one.
More information:
○ Selecting the Source for Type Database Table or View [page 166]○ Selecting the Source for Type Database Table or View via HANA MDC [page 168]○ Selecting the Source for Type Virtual Table Using SAP HANA Smart Data Access [page 169]○ Selecting a Source for the Big Data Type [page 171]○ Selecting the Source for Type DataSource (BW) [page 172]○ Selecting the Source for Type Transformation [page 172]○ Selecting the Source for Type DataStore Object (advanced) [page 173]
Results
Once you have completed all wizard steps, the Open ODS View editor opens.
3.5.2.1.1 Selecting the Source for Type Database Table or View
In these wizard steps, you select a database table or a view from a local SAP HANA database schema as the source of the Open ODS view. To do this, you use an existing source system as the connection to the SAP HANA, or create a new SAP HANA source system.
Use Existing Source System
In the previous wizard step, you selected Existing Source System.
1. In the wizard step Select a Source System, enter a search term and select the source system from the list of search results.
2. Choose Next.3. In the wizard step Select a Database Object, enter a search term and select a table or a view from the list of
search results.4. [Optional:] To display an overview of the settings you have made in previous wizard steps in a following
wizard step, choose Next.
166 PUBLICSAP BW/4HANAData Modeling
5. To create the Open ODS view, choose Finish.
Create New Source System
In the previous wizard step, you selected Owner / Schema.
1. In the wizard step Select a DB Object Schema, enter a search term and select the schema (owner) from the list of search results.
2. Choose Next.3. In the wizard step Select a DB Object, enter a search term and select a table or a view from the list of
search results.4. Choose Next.5. In the wizard step Select a Source System under Create new, enter a name for the source system you want
to create.
NoteIf source systems already exist for the schema (owner) that you previously selected, the system proposes the use of an existing source system and displays a list of suitable source systems. If you decide against creating a new source system, you can select an existing source system here instead. If you navigate back in the wizard and change the selection of the schema, the proposal for existing source systems changes too.
6. [Optional:] To display an overview of the settings you have made in previous wizard steps in a following wizard step, choose Next.
7. To create the Open ODS view, choose Finish.The Open ODS View Editor appears.The system creates a SAP HANA source system with connection type Local SAP HANA Database Schema.
Related Information
Connection Types for the SAP HANA Source System [page 250]
SAP BW/4HANAData Modeling PUBLIC 167

3.5.2.1.2 Selecting the Source for Type Database Table or View via HANA MDC
In these wizard steps, you select a database table or a view from a SAP HANA tenant database schema as the source of the Open ODS view. To do this, you use an existing source system as the connection to the SAP HANA, or create a new SAP HANA source system.
Use Existing Source System
In the previous wizard step, you selected Existing Source System.
1. In the wizard step Select a Source System, enter a search term and select the source system from the list of search results.
2. Choose Next.3. In the wizard step Select a Database Object, enter a search term and select a table or a view from the list of
search results.4. [Optional:] To display an overview of the settings you have made in previous wizard steps in a following
wizard step, choose Next.5. To create the Open ODS view, choose Finish.
Create New Source System
In the previous wizard step, you selected Remote Database.
1. In the wizard step Select a Remote Database, enter a search term and select the database from the list of search results.
2. Choose Next.3. In the wizard step Select a DB Object Schema, enter a search term and select the schema (owner) from the
list of search results.4. In the wizard step Select a DB Object, enter a search term and select a table or a view from the list of
search results.5. Choose Next.6. In the wizard step Select a Source System under Create new, enter a name for the source system you want
to create.
NoteIf for the schema (owner) that you selected source systems already exist, the system proposes using an existing source system and displays a list of suitable source systems. If you decide against creating a new source system, you can select an existing source system here instead. If you navigate back in the wizard and change the selection of the schema, the proposal for existing source systems changes too.
7. [Optional:] To display an overview of the settings you have made in previous wizard steps in a following wizard step, choose Next.
8. To create the Open ODS view, choose Finish.
168 PUBLICSAP BW/4HANAData Modeling

The Open ODS View Editor appears.The system creates a SAP HANA source system with connection type SAP HANA TenantDatabase Schema.
3.5.2.1.3 Selecting the Source for Type Virtual Table Using SAP HANA Smart Data Access
In these wizard steps, you select a source object from an external source connected by SAP HANA Smart Data Access as the source of the Open ODS view. To do this, you use an existing source system as the connection to the SAP HANA, or create a new SAP HANA source system.
Use Existing Source System
In the previous wizard step, you selected Existing Source System.
1. In the wizard step Select a Source System, enter a search term and select the source system from the list of search results.
NoteNote that source systems for remote sources with the adapter Spark SQL DESTINATION are not displayed here, because a dedicated source type (Big Data) is available for these systems.
2. Choose Next.3. In the wizard step Select a Database Object, enter a search term and select a table or a view as the source
object from the list of search results.
NoteFor sources with a logical structure (folder), the system displays the path suffix next to the object name in the results list.
4. [Optional:] To display an overview of the settings you have made in previous wizard steps in a following wizard step, choose Next.
5. To create the Open ODS view, choose Finish.
Create New Source System
In the previous wizard step, you selected Remote Source.
1. In the wizard step Select a Remote Source, enter a search term and select the source system from the list of search results.
SAP BW/4HANAData Modeling PUBLIC 169

NoteNote that a dedicated source type (Big Data) is available for remote sources with the adapter Spark SQL DESTINATION. Therefore remote sources with this adapter are not available for source type Virtual Tables via SAP HANA Smart Data Access.
2. Choose Next.3. For sources with schemas:
1. In the wizard step Select a Database Object, enter a search term and select a schema from the list of search results.
2. Choose Next.4. In the wizard step Select a Database Object, enter a search term and select a table or a view as the source
object from the list of search results.
NoteFor sources with a logical structure (folder), the system displays the path to the source object next to the object name in the results list.
5. In the wizard step Select a Source System under Create new, enter a name for the source system you want to create.
NoteIf for the schema (owner) or for the path that you previously selected, source systems already exist, the system proposes the use of an existing source system and displays a list of suitable source systems. If you decide against creating a new source system, you can select an existing source system here instead. If you navigate back in the wizard and change the selection of the schema or path, the proposal for existing source systems changes too.
6. For sources with a logical structure (folder): Under Path Prefix choose from which part of the path of the source object is to be specified as a prefix in the source system setup.
NoteThe part of the path that is not specified as a prefix here becomes the suffix part of DataSource definition.
7. [Optional:] To display an overview of the settings you have made in previous wizard steps in a following wizard step, choose Next.
8. To create the Open ODS view, choose Finish.The Open ODS View Editor appears.The system creates a SAP HANA source system with connection type SAP HANA Smart Data Access.
Related Information
Connection Types for the SAP HANA Source System [page 250]Path Prefix and Suffix [page 252]
170 PUBLICSAP BW/4HANAData Modeling

3.5.2.1.4 Selecting a Source for the Big Data Type
In these wizard steps, you select a source object from a Big Data source (Hadoop) as the source of the Open ODS view. To do this, use an existing source system as the connection to the Big Data source, or create a new Big Data source system.
Using an Existing Source System
In the previous wizard step, you selected Existing Source System.
1. In the wizard step Select a Source System, enter a search term and select the source system from the list of search results.
2. Choose Next.3. In the wizard step Select a Database Object, enter a search term and select a source object from the list of
search results.4. [Optional:] To display an overview of the settings you have made in previous wizard steps in a following
wizard step, choose Next.5. To create the Open ODS view, choose Finish.
Create New Source System
In the previous wizard step, you selected Remote Source.
1. In the wizard step Select a Remote Source, enter a search term and select the source system from the list of search results.
2. Choose Next.3. In the wizard step Select a Database Object, enter a search term and select a schema from the list of
search results.4. In the wizard step Select a Database Object, enter a search term and select a source object from the list of
search results.5. In the wizard step Select a Source System under Create new, enter a name for the source system you want
to create.
NoteIf source systems already exist for the schema that you previously selected, the system proposes the use of an existing source system and displays a list of suitable source systems. If you decide against creating a new source system, you can select an existing source system here instead. If you navigate back in the wizard and change the selection of the schema, the proposal for existing source systems changes too.
6. [Optional:] To display an overview of the settings you have made in previous wizard steps in a following wizard step, choose Next.
7. To create the Open ODS view, choose Finish.The Open ODS View Editor appears.The system creates a Big Data source system.
SAP BW/4HANAData Modeling PUBLIC 171

3.5.2.1.5 Selecting the Source for Type DataSource (BW)
In this wizard step, you select a DataSource from the SAP BW∕4HANA system as the source of the Open ODS view.
Procedure
1. In the wizard step Select a DataSource, enter a search term and select the DataSource from the list of search results.The DataSource information is displayed in the list of search results using the following convention: [<technical name of DataSource>] <description of DataSource> (name of source system).
2. [Optional:] To display an overview of the settings you have made in previous wizard steps in a following wizard step, choose Next.
3. To create the Open ODS view, choose Finish.The Open ODS View Editor appears.
3.5.2.1.6 Selecting the Source for Type Transformation
In this wizard step, you select a transformation as the source for the Open ODS view by specifying both ends of the transformation (DataSource as source of the transformation and InfoSource as target).
Procedure
1. In the wizard step Select a Transformation, under Object Type, specify whether you want to specify the source of the transformation (the DataSource) first or the target (the InfoSource).
2. Enter a search term and select the object from the list of search results.The system only displays DataSources that have an InfoSource as their target, and InfoSources that have a DataSource as their source.
3. To define the other end of the transformation, choose Next.The wizard now shows the displayed end of the transformation. Under Object Type, the object type for the other end of the transformation is already displayed.
4. Enter a search term and select the object from the list of search results.In the list of search results for the other end of the transformation, the system only displays suitable objects, i.e. Objects that have the other end of the transformation (as just defined) as their source or target.
5. [Optional:] To display an overview of the settings you have made in previous wizard steps in a following wizard step, choose Next.
6. To create the Open ODS view, choose Finish.The Open ODS View Editor appears.
172 PUBLICSAP BW/4HANAData Modeling

3.5.2.1.7 Selecting the Source for Type DataStore Object (advanced)
In this wizard, you select a DataStore object (advanced) as the source of the Open ODS view.
Procedure
1. In the wizard step Select a DataStore Object (advanced), enter a search term and select the DataStore object (advanced) from the list of search results.
2. [Optional:] To display an overview of the settings you have made in previous wizard steps in a following wizard step, choose Next.
3. To create the Open ODS view, choose Finish.The Open ODS View Editor appears.
3.5.2.2 Specifying the Structure of the Open ODS View
In the Open ODS view editor, you can specify the structure of the Open ODS view on the semantics tab, by assigning the fields of the source object to field categories (example: for facts, assign to the categories characteristic key, characteristic, key figure and others).
Procedure
1. Go to the Semantics tab.When creating the Open ODS vew, you use the Create with Proposal flag to specify whether the Open ODS view should be created with automatic assignment of the source fields to the field categories of the Open ODS view. In the default settings, automatic assignment is carried out. In this case, you see the automatic assignment of source fields to field categories of the Open ODS view in the middle screen area. A proposal is generated based on the source type.
2. You can change the system proposal if required. If you created the Open ODS view without automatic assignment, define the structure of the Open ODS view. Various options are available here.
Option Description
Drag and Drop You can drag source fields into the field categories of the Open ODS view or move Open ODS view fields from one field category to another.
Add in the context menu of a source field
In the Add Source Fields dialog box , choose Field Type and select the category that you want the field to be assigned to. Confirm your selection by pressing OK.
Move in the context menu of an Open ODS view field.
In the Move Fields dialog box, choose Field Type and select the category that you want to assign the field to. Confirm your selection by pressing OK.
SAP BW/4HANAData Modeling PUBLIC 173

Option Description
Remove in the context menu of an Open ODS view field.
The field is removed from the structure of the Open ODS view and is colored gray in the list of source fields, if it is not assigned to any field categories.
Note○ Unassigned source fields are colored gray (in the left screen area of the tab).○ You can move a source field multiple times in the structure of the Open ODS view, in order to assign
it to different field categories. Source fields assigned multiple times are colored blue (in the left screen area of the tab).
○ If multiple key fields exist for attributes or texts, drag the key field that defines or represents the Open ODS view to field category Representative Key Field.
Results
In the middle screen area of the tab, you see the structure of the Open ODS view.
The names of the Open ODS view fields are copied from the source fields. The names of the view fields are limited to 12 characters. The description of the view fields is copied from the description of the source fields. If the source does not have a description, the field names are used for the description of the view fields.
You can now display the properties of the Open ODS view fields and change the predefined properties.
Related Information
Displaying Initial Properties for Open ODS View Fields [page 174]Changing Properties for Fields of Type "Characteristic" [page 177]Changing Properties for Fields of Type "Key Figure" [page 179]
3.5.2.3 Displaying Initial Properties for Open ODS View Fields
In the right screen area of the semantics tab in the Open ODS View Editor, you can view and modify the properties of the Open ODS view fields. A field can have different properties, depending on the field type. The field properties are initially inherited from the source of the Open ODS view (whenever possible). A default is used for any properties that cannot be identified in the source.
The right screen area of the semantics tab shows the properties of the Open ODS view field, which is selected in the structure of the Open ODS view in the middle screen area.
174 PUBLICSAP BW/4HANAData Modeling

General Field Properties
All types of fields have the following properties, which are displayed under General:
Property Description
Name The field name is read from the source field. Lowercase letters in the source field are converted to uppercase letters, and the name length is limited to 12 letters.
Description The description is read from the source field. If the source field does not have a description, the name of the source field is used as the description of the Open ODS view field.
InfoObject Name
A further property of an Open ODS view field is the InfoObject name. This is the name for the Open ODS view field used across the system, for example in the InfoProvider display of the Open ODS view or in a query on the Open ODS view. It is determined initially from the ODP name and the name of the Open ODS view field and is displayed in Association, under Usage of System-Wide Unique Name.
Further Properties for Fields of Type Characteristic
Fields of type "characteristic" have the following additional properties:
Property Description
Association Using associations on fields of type "characteristic", you can link an Open ODS view to master data and texts of other Open ODS views or InfoObjects. This makes it possible to inherit properties - such as the InfoObject name, the authorization relevance or reporting properties of the associated object - and use texts and navigation attributes of the associated objects in the InfoProvider of the Open ODS view. Initially there are no associations.
SAP BW/4HANAData Modeling PUBLIC 175

Property Description
Characteristic-Specific Properties Authorization Relevance This property specifies whether analysis authorizations are checked at query runtime and which authorizations are checked (if the field is authorization-relevant). Initially the Open ODS view field is not authorization-relevant.
Referential integrity (I confirm the Referential Integrity)
This property is relevant only if the field of the Open ODS view has an association to an InfoObject. In this case, it defines how the data is handled at query runtime with respect to the referential integrity. In the initial setting, this flag is not selected.
Reporting Properties Display This property specifies whether individual characteristic values in the query are displayed and how they are displayed. Initially the characteristic values are displayed with their keys.
Query Execution Filter This property specifies how filter values are selected for query execution: Initially only posted values are displayed.
Properties for Fields of Type "Key Figure"
The fields of type key figure have the following properties:
Property Description
Association Using associations on fields of type "key figure", you can link an Open ODS view with InfoObjects. This allows you for example to use formulas and variables (defined on the associated InfoObject) in queries on the Open ODS view and inherit properties (such as the InfoObject name, aggregation or reporting properties) from the associated InfoObject. Initially there are no associations.
176 PUBLICSAP BW/4HANAData Modeling

Property Description
Key Figure-Specific Properties Currency / Unit Element This property specifies which field in the Open ODS view is used as the currency field or unit field for the key fig-ure. Initially a unit field or currency field is not assigned.
Aggregation Behavior This property specifies which rules are used for key figure aggregation. Initially the field has the aggregation behavior "summation".
Reporting Properties Decimal Places This property specifies how many decimal places are used for the field in the query. Initially two decimal places are set.
Digits to Display This property specifies the scaling factor that is used to display key figure values in the query. Initially scaling factor 1 is set.
3.5.2.4 Changing Properties for Fields of Type "Characteristic"
In the right screen area of the semantics tab in the Open ODS View Editor, you can view and modify the properties of the Open ODS view fields. You can change characteristic properties for fields of an Open ODS view by changing the selections/entries in the properties maintenance screen (overwrite local settings). Alternatively, you can specify an association for the field and this association can pass on various properties to the Open ODS view field.
Changing local field properties
To change a field property locally, proceed as follows:
● For field properties like the name of the view field or the association, change the entry or the selection directly.
● For field properties that display the (Toggle Default Value/Manual Entry) pushbutton (such as the reporting properties), choose the pushbutton for the property and change the entry or selection.
Note
Even if you do not change the entry after pressing (Toggle Default Value/Manual Entry), the system interprets the property as being specified locally and not as the default or inherited value.
SAP BW/4HANAData Modeling PUBLIC 177

NoteThe authorization behaviour of an Open ODS view field depends on whether the Authorization Relevance property has been set locally or via an association.
Creating field associations and specifying field properties using associations
Using associations on fields of type "characteristic", you can link an Open ODS view to master data and texts of other Open ODS views or InfoObjects. This allows you to inherit properties from the associated object, assign additional key fields (compounding) and use texts and navigation attributes of the associated objects in queries on the Open ODS view.
1. To specify an association, choose the associated object type under Association (Open ODS View or InfoObject) and then select the required object.Creating the association for an Open ODS view field transfers the Authorization Relevance properties and the reporting properties (Display, Query Execution Filter) from the associated InfoObject to the Open ODS view field. You can also specify additional properties for the field.
NoteThe authorization behaviour of an Open ODS view field depends on whether the Authorization Relevance property has been set locally or via an association.
2. If you want the info object name for the Open ODS view field to be inherited from the associated object, choose Direct Usage of Associated Object by Name.If you choose Direct Usage of Associated Object by Name, and the associated object is an InfoObject, the InfoObject name of the Open ODS view field matches the name of the associated InfoObject. If you choose Direct Usage of Associated Object by Name, and the associated object is an Open ODS view, the InfoObject name of the Open ODS view field matches the name of the associated Open ODS view.
3. To specify navigation attributes from the associated object for the Open ODS view, choose Navigation Attributes.This pushbutton is available for an association to an InfoObject, provided that the InfoObject contains navigation attributes. This pushbutton is available for an association to an Open ODS view, provided that the Open ODS view contains characteristics.1. A dialog box opens. Select either navigation attributes of the associated InfoObject or select
characteristics of the Open ODS view as navigation attributes of the Open ODS.2. If you have chosen Usage of System-Wide Unique Name, you can change the field names in the Open
ODS view for the selected navigation attributes (under Local Name). The field names are used to derive the InfoObject names of the navigation attributes.
3. You can also change the description of a navigation attribute to be used in queries for an Open ODS view. Enter a description in the Local Description field.
4. To return to the Open ODS view maintenance screen, choose OK.4. To specify a compounding to another field, choose Compounding.
This pushbutton is available for an association to an InfoObject, provided that the InfoObject contains a different characteristic. This pushbutton is available for an association to an Open ODS view, provided that the associated Open ODS view contains the represented key field and at least one additional key field.1. A dialog box opens. Here you see the compounding parent InfoObjects of the associated InfoObject or
the key fields of the associated Open ODS view under Compounding from Association.
178 PUBLICSAP BW/4HANAData Modeling

2. Under Field Name choose the Open ODS view field which you want compound to.3. Once you have specified the compounding, choose OK to return to the Open ODS view maintenance
screen.
NoteIf you have just specified a compounding for a field and this field does not have an association to an Open ODS view - but an association was specified in the Open ODS view of the compounding parent for the source field - then this association is applied when the Open ODS view is checked.
5. For associated InfoObjects: The I confirm the Referential Integrity field is a reminder to make sure that the required master data for all the characteristic values is available in the system. The query result is modified by the field in the following way:If you select the field, a check on referential integrity is made when the query is executed. This means that data is displayed only for those characteristics values where entries exist both in the external source and in the SID table of the associated info object.If you do not select the field, a check on referential integrity is not made when the query is executed. This means that data is also displayed for those characteristics values where entries exist only in the external source and no entries exist in the SID table of the associated info object.
NoteNote the effects of this field on the query result and on the master data table of the associated info object. If you do not select the field and the referential integrity is not confirmed, this can produce a different query result than in the referential integrity check and the master data table of the associated info object is given additional entries when the query is executed.
Note
Properties specified using the association can be modified again on the property; choose (Toggle Default Value/Manual Entry). You can also use this pushbutton to reset local changes.
Related Information
Authorization Behaviour for Fields of Open ODS Views [page 161]
3.5.2.5 Changing Properties for Fields of Type "Key Figure"
In the right screen area of the semantics tab in the Open ODS View Editor, you can view and modify the properties of the Open ODS view fields. You can change key figure properties for fields of an Open ODS view by changing the selections/entries in the properties maintenance screen (overwrite local settings). Alternatively, you can specify an association for the field and this association can pass on various properties to the Open ODS view field.
SAP BW/4HANAData Modeling PUBLIC 179

Changing local field properties
To change a field property locally, proceed as follows:
● For field properties like the name of the view field, change the entry or the selection directly.
● For field properties that display the (Toggle Default Value/Manual Entry) pushbutton (such as the reporting properties), choose the pushbutton for the property and change the entry or selection.
Note
Even if you do not change the entry after pressing (Toggle Default Value/Manual Entry), the system interprets the property as being specified locally and not as the default or inherited value.
NoteThe currency field or unit field under Currency/Unit Element is always assigned locally. There is no default and no inheritance for this property. You can use Open ODS view fields (field types "currency" and "unit") when performing the assignment.
Creating field associations and specifying field properties using associations
Using associations on fields of type "key figure", you can link an Open ODS view with InfoObjects. This allows you, for example, to reuse formulas and variables (defined on the associated InfoObject) in queries on the Open ODS view and inherit properties from the associated object.
1. To specify an association to an InfoObject, choose InfoObject under Association and select the required object.Creating the association for an Open ODS view field transfers the Aggregation Behavior properties and the reporting properties (Decimal Places, Digits to display) from the associated InfoObject to the Open ODS view field.The info object name of the Open ODS view field is also inherited by the InfoObject and is displayed under Direct Usage of Associated Object by Name.
2. The Currency/Unit Element property must be consistent with the associated InfoObject. Make sure that specified currency field or unit field matches the InfoObject properties.
Note
Properties specified using the association can be modified again on the property; choose (Toggle Default Value/Manual Entry). You can also use this pushbutton to reset local changes.
Note that the field properties must be consistent with the associated InfoObject. If you overwrite properties inherited from the InfoObject, the changed entries must match the InfoObject properties.
180 PUBLICSAP BW/4HANAData Modeling

3.5.2.6 Adding Texts or Attributes
To enable an Open ODS view to contain attributes as well as texts, you can add further semantics, apart from the semantics specified during creation, to the view. You can add texts to Open ODS views with attributes, and you can add attributes to Open ODS views with texts.
Context
For example, if, in the first step, you require a simple data model for which you want to use only texts about facts Open ODS views, you can add the attribute modeling during a later step. This means that the function also supports flexible modeling of Open ODS views.
Procedure
1. On the General tab under Semantics (for the semantics that you want to create), choose New.
The wizard for creating semantics appears.2. In the Add Semantics wizard step, under Source Type, select which type of source object should be used as
the basis for the Open ODS view.3. For the source types Database Table or View and Virtual table using SAP HANA Smart Data Access, specify
whether an existing SAP HANA source system, or a new SAP HANA source system, should be used to access the source object of the Open ODS view.
4. Choose Next.
The following wizard steps depend on which source type you have selected and - for the source types Database Table or View and Virtual table using SAP HANA Smart Data Access - whether you use an existing source system or create a new one.
More information:
○ Selecting the Source for Type Database Table or View [page 166]○ Selecting the Source for Type Virtual Table Using SAP HANA Smart Data Access [page 169]○ Selecting the Source for Type DataSource (BW) [page 172]○ Selecting the Source for Type Transformation [page 172]○ Selecting the Source for Type DataStore Object (advanced) [page 173]
5. Once you have completed all wizard steps, the Open ODS View editor opens. The Open ODS view now also displays the tab for the semantics that have been added. Specify the structure of the Open ODS view for the added semantics.
NoteThe system automatically performs the key field assignment where possible.
6. Check the key field assignment and make any required changes.
SAP BW/4HANAData Modeling PUBLIC 181

7. Save and activate the Open ODS view.
Results
The Open ODS view is ready for use.
You can now perform further modeling steps, for example changing field properties or adding associations.
3.5.2.7 Replacing the Source of an Open ODS View
On the General tab in the Open ODS View maintenance screen, you can replace the source of the Open ODS view with a different source. Provided that the Open ODS remains consistent after the source is swapped, objects that build on the Open ODS view - queries for example - can still be used.
Procedure
1. On the General tab, choose Edit under Semantics.
The wizard for creating the source object appears.2. In the Change Source Object wizard step, under Source Type, select which type of source object should be
used as the basis for the Open ODS view.3. For the source types Database Table or View and Virtual table using SAP HANA Smart Data Access, specify
whether an existing SAP HANA source system, or a new SAP HANA source system, should be used to access the source object of the Open ODS view.
4. Choose Next.
The following wizard steps depend on which source type you have selected and - for the source types Database Table or View and Virtual table using SAP HANA Smart Data Access - whether you use an existing source system or create a new one.
More information:
○ Selecting the Source for Type Database Table or View [page 166]○ Selecting the Source for Type Virtual Table Using SAP HANA Smart Data Access [page 169]○ Selecting the Source for Type DataSource (BW) [page 172]○ Selecting the Source for Type Transformation [page 172]○ Selecting the Source for Type DataStore Object (advanced) [page 173]
5. Once you have completed all wizard steps, the Open ODS View editor opens. In the left of the Semantics tab page, the system now displays the source object of the selected new source object. The assignment of source field to field of the Open ODS views is carried out automatically by determining that the names are identical.
6. Once you have made sure that all fields in the Open ODS view are assigned to suitable fields in the source object, you can save and activate the Open ODS view.
182 PUBLICSAP BW/4HANAData Modeling

3.5.2.8 Creating a Data Flow for Open ODS Views
For Open ODS views with source type Database Table or ViewVirtual Table Using SAP HANA Smart Data Access or DataSource (BW), you can create a data flow with a DataStore object (advanced) or a transformation. When the data flow is created, the source of the Open ODS view is automatically replaced with the created object.
Context
Data flow with DataStore object (advanced): You can create a DataStore object (advanced) with data flow as data persistency for the Open ODS view. In this case, the scenario is similar to a Persistent Staging Area (PSA) in SAP BW∕4HANA. The data can then be processed further in SAP BW∕4HANA from within the DataStore object (advanced). For reporting purposes and for using the CompositeProvider, we recommend using the Open ODS view directly.
Transformation: You can use the transformation with data flow to perform data type conversions, assignments or string operations, for example on the source data of an Open ODS view.
For Open ODS view with a database table or a virtual table as a source, the data flow is generated in two steps: the first step is to generate a DataSource, which can be used as a source for the Open ODS view. The second step is to create the target object with the associated data flow.
Creating DataStore Objects (Advanced)
Procedure
1. On the General tab, choose Generate Dataflow under Semantics.The wizard for creating the dataflow appears.
2. If the Open ODS view has a database table or a virtual table as a source, create a DataSource in the first step:a. Assign a DataSource name.b. Specify what to do with the data types of the fields.
The analytic manager only supports specific data types for reporting. If the source uses different data types, these types are automatically converted at runtime.
If you create the target object with SAP BW∕4HANA data types, this conversion does not need to be performed at runtime. In addition, this makes it easier to use the SAP BW∕4HANA target objects in other BW objects.
c. Choose Finish.○ The system now creates a DataSource in the source system of the Open ODS view in application
component NODESNOTCONNECTED. The fields of this DataSource are created from the source fields of the Open ODS view .
○ The system replaces with Open ODS view with the source object. The source object is now the DataSource.
SAP BW/4HANAData Modeling PUBLIC 183
3. If the Open ODS view now has a DataSource as the source, create a DataStore object (advanced): To do this, go to the General tab and choose Generate Dataflow under Semantics.
The wizard for creating the dataflow appears. Enter the target object that you want to generate a data flow for here.
a. Select the object type DataSource object (advanced) as the target object.b. Assign a name for the DataStore object (advanced).c. Specify what to do with the data types of the fields.
The analytic manager only supports specific data types for reporting. If the source uses different data types, these types are automatically converted at runtime.
If you create the target object with SAP BW∕4HANA data types, this conversion does not need to be performed at runtime. In addition, this makes it easier to use the SAP BW∕4HANA target objects in other BW objects.
d. Choose Finish.
Results
● The system creates a DataStore object with an active table in the InfoArea of the open ODS view. The fields of this table are transferred from the fields of the structure of the Open ODS view. Associations to Open ODS view fields are ignored when the DataStore object is created.
● The system replaces with Open ODS view with the source object. The source object is now the DataStore object.
● The system creates a transformation between the DataSource and the DataStore object and a data transfer process for this transformation.
Creating Transformations
Procedure
1. On the General tab, choose Generate Dataflow under Semantics.The wizard for creating the dataflow appears.
2. If the Open ODS view has a database table or a virtual table as a source, create a DataSource in the first step:a. Assign a DataSource name.b. Specify what to do with the data types of the fields.
The analytic manager only supports specific data types for reporting. If the source uses different data types, these types are automatically converted at runtime.
If you create the target object with SAP BW∕4HANA data types, this conversion does not need to be performed at runtime. In addition, this makes it easier to use the SAP BW∕4HANA target objects in other BW objects.
c. Choose Finish.
184 PUBLICSAP BW/4HANAData Modeling

○ The system now creates a DataSource in the source system of the Open ODS view in application component NODESNOTCONNECTED. The fields of this DataSource are created from the source fields of the Open ODS view .
○ The system replaces with Open ODS view with the source object. The source object is now the DataSource.
3. If the Open ODS view now has a DataSource as the source, create an InfoSource as the transformation target: To do this, go to the General tab and choose Generate Dataflow under Semantics.
The wizard for creating the dataflow appears. Enter the target object that you want to generate a data flow for here.
a. Select the object type InfoSource as the target object.b. Assign a value for the InfoSource.c. Specify what to do with the data types of the fields.
The analytic manager only supports specific data types for reporting. If the source uses different data types, these types are automatically converted at runtime.
If you create the target object with SAP BW∕4HANA data types, this conversion does not need to be performed at runtime. In addition, this makes it easier to use the SAP BW∕4HANA target objects in other BW objects.
If you want to create the target object close to the source, with the data type of the source that is, select the Source Object Types option. If you want to create a target object that is close to BW (in other words, with SAP BW∕4HANA BW data types), select the BW Data Types option.
d. Choose Finish.
Results
● The system creates an InfoSource in application component NODESNOTCONNECTED. The fields of this InfoSource are copied from the fields of the structure of the Open ODS view. Associations to Open ODS view fields are ignored when creating the InfoSource. The InfoSource is based on fields.
● The system creates a transformation between DataSource and InfoSource.● The system replaces with Open ODS view with the source object. The source object is now the
transformation.
Related Information
Creating DataStore Objects [page 132]Transformation of Data from External Sources for Open ODS Views [page 163]
SAP BW/4HANAData Modeling PUBLIC 185

3.5.3 CompositeProvider
In a CompositeProvider, you can merge data from BW InfoProviders with data from SAP HANA views using union and join, or just merge data from BW InfoProviders and SAP HANA views.
The SAP HANA views used can be in HDI containers provided that you have activated consumption of SAP HANA views in HDI containers under SAP BW/4HANA Customizing Implementation Guide SAP BW/4HANA
Data Modeling Settings for Consumption of SAP HANA Views in Customizing.
The CompositeProvider's join and union operations are performed in SAP HANA.
You can run queries on a CompositeProvider just like on other BW InfoProviders. You acquire SQL access to the data if you generate a SAP HANA view from the CompositeProvider.
Delta extraction by DTP is supported for CompositeProviders with union, which are based on data mart DataStore objects.
Restrictions
● Only input parameters are supported, not variables.● There are restrictions to how CompositeProviders can be structured and nested. More Information:
Supported Assignments [page 188]
Related Information
Creating CompositeProviders [page 204]SAP Note 2271658
3.5.3.1 Supported Providers
The CompositeProvider offers a range of providers for modeling.
Providers Supported for Union Operations
For CompositeProviders that only contain union assignments, the following providers are supported:
● SAP HANA views (calculation views and analysis views)● The following BW InfoProviders: DataStore object, Open ODS view, InfoObject, aggregation level
SAP HANA views generated from BW InfoProviders are not supported.
186 PUBLICSAP BW/4HANAData Modeling

DataStore objects should have properties that are relevant for reporting. In other words, they should be of type data mart DataStore object, standard DataStore object with the property Write Change Log or staging DataStore object with the property Reporting Enabled.
Open ODS Views that you want to use in CompositeProviders can only contain fields with InfoObject-compatible data types. These are the following data types: CHAR, CUKY, CURR, DEC, DATS, FLTP, INT4, NUMC, TIMS, QUAN, UNIT. Data type STRG is also supported for particularly long characteristic-type field values.
Supported providers that contain more than just a union
For CompositeProviders that contain both join and union assignments, the following providers are supported:
● SAP HANA views (calculation views and analysis views)● The following BW InfoProviders: DataStore object, OpenODSView (with CalcScenario Used to true),
InfoObject
DataStore objects should have properties that are relevant for reporting. In other words, they should be of type data mart DataStore object, standard DataStore object with the property Write Change Log or staging DataStore object with the property Reporting Enabled.
In the case of DataStore objects, data can be read from the near-line storage for unions and joins.
3.5.3.2 Using HDI Containers
You can use SAP HANA views in CompositeProvidern that are contained in HDI containers.
Prerequisites
You have to activate consumption of SAP HANA views in HDI containers under SAP BW/4HANA Customizing Implementation Guide SAP BW/4HANA Data Modeling Settings for Consumption of SAP HANA Views in Customizing.
In terms of consumption, there is no difference between SAP HANA views in HDI containers and SAP HANA views in the repository.
SAP HANA Views in ABAP-Managed HDI Containers
If you use ABAP-managed HDI containers, the SAP HANA views are transported with the BW objects. HDI objects are transported using the The SAP HANA Transport Container (HTC).
SAP BW/4HANAData Modeling PUBLIC 187

SAP HANA Views in XSA Application-Managed HDI Containers
If you use an XSA application-managed HDI container, you have to perform a number of manual steps. This includes maintaining the logical schema mapping in the source system and the target system. The logical schema name must be the same in all systems.
● Create the logical schema names in the ABAP Development Tools.● Maintain the logical and physical schema name in transaction DB_SCHEMA_MAP.
You also have to perform the transport manually: SAP HANA views that are contained in XSA application-managed HDI containers are not transported with the other BW objects.
Related Information
Transporting CompositeProviders [page 203]
3.5.3.3 Supported Assignments
The technical characteristics "Request ID" (0REQUID) and "Record Type" (0RECORDTP) cannot be assigned. They are automatically assigned at runtime. Technical characteristic 1ROWCOUNT is not displayed. If it is in one of the participating providers, it is added automatically as a key figure.
Non-cumulative key figures and other key figures with special semantics (such as elimination of internal business volume) must have a 1:1 assignment to the structure of the CompositeProvider. The Direct Usage of Associated Object by Name property also has to be set.
3.5.3.4 Temporal Join
You use a temporal join to map a period of time.
A temporal join is a join that contains at least one time-dependent characteristic or a pseudo time-dependent InfoProvider.
Related Information
Using Temporal Joins [page 210]
188 PUBLICSAP BW/4HANAData Modeling

3.5.3.5 Possible Assignments of Data Types
When a field is assigned, the system checks whether the target field is suitable for the assignment being performed. A target field is suitable if the following apply:
● It has not already been assigned to another field in the source structure● It has a compatible data type
Compatible Data Types
Source/Target
CHAR
SSTR
STRG
NUMC
CUKY
UNIT
DATS
TIMS
LANG
INT1
INT2
INT4
INT8
FLTP
DEC
D34D
D16D
QUAN
CURR
RAW16
CHAR
X X X X X X X X X X
SSTR
X X
STRG
X X
NUMC
X X X X
CUKY
X X
UNIT
X X
DATS
X X X
TIMS
X X X
LANG
X X
INT1
X X X X
INT2
X X X
INT4
X X
SAP BW/4HANAData Modeling PUBLIC 189

Source/Target
CHAR
SSTR
STRG
NUMC
CUKY
UNIT
DATS
TIMS
LANG
INT1
INT2
INT4
INT8
FLTP
DEC
D34D
D16D
QUAN
CURR
RAW16
INT8
X
FLTP
X X X X
DEC
X X X X X X
D34D
X X X X
D16D
X X X X
QUAN
X X
CURR
X X
RAW16
X X
Compatibility Between SAP HANA Primitive Types and ABAP DDIC Types
SAP HANA Primitive Type ABAP DDIC Type
CHAR CHAR
ALPHANUM CHAR
BIGINT DEC
BLOB RSTR
CLOB STRG
DATE DATS
DECIMAL DEC
DOUBLE FLTP
FLOAT Not supported
190 PUBLICSAP BW/4HANAData Modeling

SAP HANA Primitive Type ABAP DDIC Type
INTEGER INT4
NCLOB STRG
NVARCHAR STRG
REAL FLTP
SECONDDATE DATS
SHORTTEXT STRG
SMALLDECIMAL DEC
SMALLINT INT4
TEXT STRG
TIME TIMS
TIMESTAMP DATS
TINYINT INT4
VARBINARY RSTR
VARCHAR STRG
3.5.3.6 Scenarios for Using CompositeProviders in CompositeProviders
Supported Scenarios
The reused CompositeProvider is included in a CompositeProvider by union and contains one union node only:
The reused CompositeProvider is included in a CompositeProvider by union and contains join assignments only (inner Join, left outer join, mixed):
SAP BW/4HANAData Modeling PUBLIC 191

The reused CompositeProvider is included in a CompositeProvider by union and contains join assignments only (inner Join, left outer join, mixed), a further InfoProvider is included on the left:
The reused CompositeProvider is included in a CompositeProvider as a left join partner and contains union nodes only:
The reused CompositeProvider is included in a CompositeProvider by join and contains join assignments only (inner Join, left outer join, mixed), a further InfoProvider exists on the left:
The reused CompositeProvider is included in a union node of a CompositeProvider by union and by itself contains union node only:
The reused CompositeProvider contains join assignments only (inner join, left outer join, mixed) and is incluced in the existing join chain of a CompositeProvider:
Partly Supported Scenarios
The reused CompositeProvider is included in a CompositeProvider as a right join partner and contains join nodes only:
192 PUBLICSAP BW/4HANAData Modeling

The reusable CompositeProvider could look like this (J1, J2 and J3 are left outer join nodes):
If J1 is joined with J1', the join partners for J1' can only come from PP1, the inner join part. Fields from PP2, PP3 and PP4 cannot be added to the join condition, as they come from the left outer parts.
The reused CompositeProvider J1' is inserted into the existing join chain as a left join partner.
The reusable CompositeProvider could look like this (J1, J2 and J3 are left outer join nodes):
If J1 is joined with J1', the join partners for J1' can only come from PP1, the inner join part. Fields from PP2, PP3 and PP4 cannot be added to the join condition, as they come from the left outer parts.
Unsupported Scenarios
The reused CompositeProvider can never be in a join node on the right:
There can be no union nodes for time-dependent joins.
SAP BW/4HANAData Modeling PUBLIC 193

The sequence join-union-join is not allowed.
The sequence union-join-union is not allowed.
Reusable time-dependent CompositeProviders can only be added to a union node as PartProviders. For this reason, none of the following scenarios are allowed:
194 PUBLICSAP BW/4HANAData Modeling

3.5.3.7 Query Properties
You can make settings for the query properties of an InfoProvider participating in a query.
The following query properties are offered:
● Query Cache Mode: The cache mode defines whether and how the query results and navigational states calculated by the OLAP processor should be saved as highly compressed data in a cache.
● Cache Usage Mode: The cache usage mode is an expert tool for the cache mode. It defines when cache entries can be used to answer a query, and when the data has to be read again.
● Data Integrity: You can choose which request status the data in an InfoProvider should be read with.● Near-Line Storage Read Mode: You can read the data saved in a near-line storage when executing a query.
Constraints
These settings are only available for DataStore objects. The following restrictions also apply:
● For DataStore objects as right join partner, only the Near-Line Storage Read Mode query property is available.
● For time-dependent joins, only the Data Integrity query property is available.
3.5.3.8 Audit
The user can view the audit information for every cell of the query. This information is provided as delta values of the change history in a corresponding audit query.
Supported InfoProviders
You can use the data audit for the following InfoProviders:
● Data Mart DataStore Object: In this type of InfoProvider, the data audit is a fixed component and is always active.
NoteThe audit characteristics should only be used for the audit function. In other words, these characteristics should not be added to InfoProviders that do not support audits.
SAP BW/4HANAData Modeling PUBLIC 195

Using Audit Characteristics in Providers
Data Mart DataStore Object
The prerequisite for this is that the Show Audit Characteristics in Query property is set in a CompositeProvider containing the DataStore object.
The audit infrastructure is a fixed component in the DataStore object. The audit information is updated via the request and can be included in queries via the navigation attributes.
The following InfoObjects are used:
● Time Stamp: 0REQTSN● User: Navigation Attribute 0REQTSN__0AUSER● Data source: Navigation Attribute 0REQTSN__ 0ASOURCE
Related Information
Audit Characteristics [page 196]Audit Query [page 197]
3.5.3.8.1 Audit Characteristics
The system uses specific characteristics to save audit information.
The audit characteristics are supplied with technical content from SAP BW∕4HANA. These characteristics are filled by the system and cannot be modeled by users.
The following table provides an overview of the audit characteristics and their values.
Audit Characteristics
Characteristic Values and Description
0ATIMSTMP This characteristic contains the audit time stamp.
● If the database audit is active, this characteristic contains a time stamp, which indicates when the data was saved on the database.
● If the database audit is inactive, this characteristic contains a fixed time stamp, which indicates when the data audit was switched from active to inactive.
0AMODE This characteristic contains the audit modus. The following values are permitted:
● WHM: This value is used in loading mode (in other words, when data is added to the InfoProvider by loading requests).
● OFF: This value is used if the data audit is set to inactive.
196 PUBLICSAP BW/4HANAData Modeling

Characteristic Values and Description
0AUSER This characteristic contain the name of the user who initiated the save event.
● If the data audit is active, this characteristic contains the content of the ABAP system field SY-UNAME.
● If the data audit is inactive, this characteristic is empty.
0ASOURCE This characteristic contains the name of the source of the data change at the time of saving.
Related Information
Audit [page 195]
3.5.3.8.2 Audit Query
The following example shows how to define an input-ready query and the corresponding audit query. You can either execute an audit query in a way that allows to you to track the changes, or in a way that allows you to view the delta values.
Changes in Input-Ready Query ZTSC0AC10_Q_INVFORML_01 (With and Without Audit)
In the following example, the user has used an input-ready query to write values to a data mart DataStore object.
SAP BW/4HANAData Modeling PUBLIC 197

The following screen shows the executed query:
Then the user made further changes in the input-ready query and then saved the changes immediately. The following changes were made:
1. Subtotal Hardware, Personal Computer: the value of Sales Quantity was changed from 30 to 60.2. Subtotal Hardware, Personal Computer: the value of Sales was changed from 15,000 to 20,000.3. Subtotal Hardware, Personal Computer: the value of Sales Quantity was changed from 60 to 120 and the
value of Sales was changed from 20,000 to 30,000.
198 PUBLICSAP BW/4HANAData Modeling

The following screen shows the executed query after the changes:
Definition of Audit Query ZTSC0H000_Q_AUDIT_00
You usually create the audit query on a CompositeProvider containing all base InfoProviders that are changed with input-ready queries or planning functions. We recommend that you build the audit query in the same way as the input-ready query. However, all the characteristics of the audit dimension should be available as free characteristics.
In our example, the characteristic Request Transaction Sequence Number (0REQTSN) is drilled down in the rows. The characteristic Product is removed from the rows, which makes it easier to track changes to the subtotal.
SAP BW/4HANAData Modeling PUBLIC 199

The following screen shows the definition of the audit query:
Executing the Audit Query ZTSC0H000_Q_AUDIT_00
When you execute the audit query, you see the following result: Using characteristic 0REQTSN, you can track which values have been changed by the user of the input-ready query. You need to use property Cumulate Values for characteristic 0REQTSN in the query definition.
200 PUBLICSAP BW/4HANAData Modeling

The following screen shows the executed query with the changes:
If the audit query is executed without the property Cumulate Values for characteristic 0REQTSN, you can track the changes (delta values).
SAP BW/4HANAData Modeling PUBLIC 201

The following screen shows the executed query with the delta values:
3.5.3.9 Names for CompositeProvider Fields in the Query
For every field of a CompositeProvider, unique names are used in the query. The InfoObject names are derived according to specific rules.
Names for CompositeProvider Fields in the Query
Derivation from... InfoObject Name of CompositeProvider Field
Default
The default is applied if there is no association to the field of the CompositeProvider, or if there is an association, but the direct usage for reporting flag is not set.
4<Name of CompositeProvider>-<Name of CompositeProvider field>
Association to InfoObject and direct usage for reporting flag is set
<name of associated InfoObject>
202 PUBLICSAP BW/4HANAData Modeling

Derivation from... InfoObject Name of CompositeProvider Field
Association to Open ODS View and direct usage for reporting flag is set
2F<name of associated ODS view>
3.5.3.10 Authorizations for CompositeProviders
To work with CompositeProviders, you need authorization object S_RS_HCPR. The analysis authorizations are not a combination of the authorizations of the participating InfoProviders.
To be able to use SAP HANA views, the SAP<SID> database user requires the authorization for DB schema _SYS_BI.
3.5.3.11 Transporting CompositeProviders
The CompositeProvider is integrated into the TLOGO framework of the SAP BW∕4HANA system and can be transported.
The transport object is called HCPR.
During the export step, the system checks whether the individual parts of the CompositeProvider, the participating providers and InfoObjects, are transportable. It does not check whether all participating objects in the CompositeProvider are contained in the transport request. This means that you can transport a CompositeProvider without its providers.
For SAP HANA views, the system does not check whether they are in the target system. You need to transport these objects to the target system separately.
SAP HANA views contained in HDI containers managed in the XSA application are not transported. You have to transport these SAP HANA views manually. If you use ABAP-managed HDI containers, the SAP HANA transport container (HTC) is used to transport HDI objects.
In the target system, the CompositeProvider can then only be used for queries if all individual parts of the CompositeProvider are there.
3.5.3.12 Recommendations for Modeling CompositeProviders
Inner Join versus Left Outer Join
If possible, use an inner join. An inner join is always faster.
SAP BW/4HANAData Modeling PUBLIC 203

Referential Integrity
If referential integrity is guaranteed, you should set the corresponding flag on the Output tab. You then need to make sure that there is exactly one master data record for every value of the characteristic in the provider. If referential integrity exists, this can improve performance. You can also configure this setting later on.
NoteIf you have set the flag for referential integrity, you have to make sure in future that only one master data record exists for each characteristic value in the provider. If you do not do this, you might find that records are missing in the query result because, with referential integrity, fields are assigned with an inner join.
Using OLAP Functions in Mixed Scenarios with SAP HANAviews
If you make significant use of BW OLAP functions, we recommend only using BW-persisted InfoProviders. This ensures the best possible performance when using BW OLAP functions.
OLAP functions (such as exception aggregation) can only be executed optimized in SAP HANA if all fields used in the query have master data IDs (SIDs). SAP HANA views do not have SIDs
3.5.4 Creating CompositeProviders
In a CompositeProvider, you can merge data from BW InfoProviders with data from SAP HANA views using union and join, or just merge data from BW InfoProviders and SAP HANA views.
Prerequisites
You have installed and configured the BW Modeling tools.
If you want to use SAP HANA views that are located in HDI containers, you have to activate consumption of SAP HANA views in HDI containers under SAP BW/4HANA Customizing Implementation Guide SAP BW/4HANA Data Modeling Settings for Consumption of SAP HANA Views in Customizing.
Procedure
1. Create the CompositeProvider. You are in the BW Modeling tools.
You will now be guided through the creation process by a wizard. More Information: Creating CompositeProviders Using the Wizard [page 206]
204 PUBLICSAP BW/4HANAData Modeling

You can also create CompositeProviders from the data flow. To do this, go the BW Object Types in the editing screen for your data flow, select the type CompositeProvider and drag it to Details. Then open the context menu for this CompositeProvider and choose Create Persistent BW Object.
2. Define the properties for the CompositeProvider's runtime:
○ You can generate an SAP HANA view from the CompositeProvider. For more information, see the Help Portal under Generating SAP HANA Views from the BW System.
○ You can set the flag This CompositeProvider can be added to another CompositeProvider, in order to use the CompositeProvider as a provider in another CompositeProvider. More Information: Using a CompositeProvider as a Provider in Other CompositeProviders [page 207]
○ You can use the Show Audit Characteristics in Query flag to switch on the display of audit characteristics in the query. More Information: Audit [page 195]
○ If you activate the Log Read Access Output, then the CompositeProvider for the Read Access Logging (RAL) is included. Accesses to InfoObjects that are allowed are then logged. You can make this setting in the InfoObject editor. More Information: Read Access Logging
○ Under Common Runtime Properties you can configure various settings at query runtime. More Information: General Runtime Properties [page 829]
○ Runtime Profile Properties contains the settings for processing the CompositeProvider. In most cases you can leave these settings unchanged. These are expert settings and can be changed later on if required. More Information: Runtime Profile Properties [page 835]
3. Select other participating InfoProviders or SAP HANA views and make assignments.More information:
Creating Assignments [page 207]
4. You can create an aggregation or projection from the context menu or by pressing the corresponding speed button on a PartProvider. You can use an aggregation node to change the aggregation behavior of a key figure in the target structure.
5. You can define an SQL filter on a PartProvider. This feature should only be used by experts. To do this, choose Create/Edit SQL Filter from the context menu of a union, join, or projection node. The filter expression must be written in SAP HANA SQL. When you create the SQL filter, you receive a list of functions supported by SAP HANA.
You can use a filter to restrict the selection to part of the data of the PartProviders in the CompositeProvider. To define a filter for a particular PartProvider, you have to create an aggregation node above the PartProvider. This is done at database level, which means that no conversion routines or currency shifts are performed when the function is applied.
6. You can define calculated fields in the target structure. To do this, you have to define an SQL expression in SAP HANA SQL. To do this, choose Create Calculated Field from the context menu of the target structure. When creating the SQL Expression, you receive a list of features supported by SAP HANA.This is done at database level, which means that no conversion routines or currency shifts are performed when the function is applied.
7. You can create fields in the target structure. To do this, choose Create Field from the context menu of the target structure. All characteristics have an additional Forced Group by flag in the properties. This modifies their icons. This function is available for all characteristics in the target structure, including calculated fields.
These fields are not available in reporting; they are only visible in staging. Using calculated elements with an SQL expression however, you can convert the data type, so that it is suitable for reporting.
SAP BW/4HANAData Modeling PUBLIC 205

8. You can duplicate fields in the target structure. You can duplicate multiple fields at the same time.9. Define the appearance of the CompositeProvider in the query.
More information:
Changing Properties for Fields of Type "Characteristic" [page 213]
Changing Properties for Fields of Type "Key Figure" [page 216]10. Activate the CompositeProvider.
Related Information
CompositeProvider [page 186]
3.5.4.1 Creating CompositeProviders Using the Wizard
Whenever you create a CompositeProvider, you are guided through the process by a wizard.
Procedure
1. You are in the BW Modeling tools. In the context menu for your BW project, choose NewCompositeProvider .
2. Select an InfoArea. To ensure that you can find your CompositeProvider again without difficulty, we recommend setting the Add to Favorites flag.
3. Enter a technical name and a description. A maximum of 12 characters can be entered for the technical name.
4. Choose Next or Finish:
○ If you choose Finish, the system automatically creates a CompositeProvider with union. The editor appears.
○ If you choose Next, you can initially select InfoProviders from the BW system or - if you have assigned a SAP HANA system to the BW project - select SAP HANA views that you want to be part of the union or join. If you do not select anything here, a CompositeProvider with union is created. If you want to create a CompositeProvider with join, you have to select either two providers in the join provider table or a join provider and multiple union providers. You can move the providers using Drag & Drop by choosing Up and Down from the context menu for the provider or by double-clicking on the provider.
5. Choose Finish. The CompositeProvider is generated. In the case of CompositeProviders with union and join, the union node is appended at the very bottom. The editor appears.
206 PUBLICSAP BW/4HANAData Modeling

3.5.4.2 Using a CompositeProvider as a Provider in Other CompositeProviders
You are on the General tab. You can make the CompositeProvider available as a provider for other CompositeProviders by setting the This CompositeProvider can be added to another CompositeProvider flag.
This reusable CompositeProvider can then be used as the provider in another CompositeProvider.
This function is not available if
● If the CompositeProvider is already used in other CompositeProviders as a provider, you will see a where-used list and the relevant CompositeProviders are set to inactive when the CompositeProvider is activated.
● you want to add two or more reusable CompositeProviders in a CompositeProvider, which contain the same providers.
● a provider, which is part of the reusable CompositeProvider, is already contained in the CompositeProvider. You cannot use a provider more than once as a provider in a union operation.
ExampleInfoProvider IC01 is used in CompositeProvider CP01, which is usable as a provider. CompositeProvider CP01 is added to CompositeProvider CP02. It is not possible to also add InfoProvider IC01 to CompositeProvider CP02.
● The CompositeProvider, which you want to use in another CompositeProvider, already contains a CompositeProvider.
There are also a number of scenarios that are not supported regardless. More Information: Scenarios for Using CompositeProviders in CompositeProviders [page 191]
3.5.4.3 Creating Assignments
You define the CompositeProvider by selecting other participating InfoProviders or SAP HANA views and creating assignments.
Procedure
1. You are on the Scenario tab page.2. Select other participating InfoProviders or SAP HANA views.
To add further objects to the union operation, you have the following options:
○ In the context menu of your uppermost node, choose Add. To find your provider, you can enter the technical name or description as search terms. This will only return providers that you can use in a CompositeProvider.
○ Press (Add). Note that the speed button is not available for all node types.○ You can use drag & drop to add BW InfoProviders from the Project Explorer to the scenario.
SAP BW/4HANAData Modeling PUBLIC 207

3. In the case of join assignments if the join providers are analytic indexes or SAP HANA views, you can change the cardinality by choosing Edit Cardinality in the context menu for a provider. For all providers, the cardinality is calculated first by the system. If the join condition or one of the providers is changed, the system checks the cardinality and changes it if required.
NoteThe cardinality setting can improve performance but can also produce incorrect data. Therefore in most cases you should not change the cardinality suggested by the system. An expert might need to change the suggested cardinality if the system does not recognize the data contents and s/he knows how to configure a more precise cardinality setting.
The following change options are available:
System proposes Possible change
n:m 1:m, n:1 or 1:1
1:n 1...1
4. In the case of join assignments, you can change the join type in the context menu. You can choose from the following join types: Inner Join, Referential Join (only 1:1 Join oder n:1 Join are allowed), Left Outer Join, Right Outer Join and Full Outer Join.
5. By pressing the (Replace) speed button, you can replace one provider with another.6. In the area on the right of the screen, you can configure the assignments for the fields. On the left, you see
the participating providers. To the right of these, the CompositeProvider's fields are displayed.The field types are distinguished by their icons:
○ Characteristic:
○ Characteristic with the Forced Group by: flag
○ Time characteristic:
○ Unit:
○ Key figure:
○ Calculated fields:
In the graphical display, you can add the fields to the CompositeProvider either using drag and drop or by choosing Create Assignments in the context menu and create the assignments. If you add an InfoProvider by drag and drop, the fields and dimensions (groups) of the InfoProvider are applied and any required dimensions that do not already exist are created. You can also add complete dimensions by dragging the dimension to a free area or onto the root node. If you drag a dimension onto another dimension, only the fields are added to the new dimension.
In the case of BW InfoProviders, the InfoObjects are added, and the dimensions are added as groups. If a field does not exist yet in the target structure, the system creates it. If navigation attributes have been added to the CompositeProvider, they are not navigation attributes any more.
NoteWhen a CompositeProvider is opened again, only navigation attributes that have been assigned are displayed in the Scenario tab page. To see all navigation attributes of a participating InfoProvider,
208 PUBLICSAP BW/4HANAData Modeling

choose Show Unassigned Navigation Attributes in the InfoProvider's context menu. If you want to hide it again, choose Hide Unassigned Navigation Attributes in the context menu.
If InfoObject names have been assigned to the fields of the SAP HANA view, these InfoObject names are used to create an association for the field in the CompositeProvider for SAP HANA views. When fields are assigned to the CompositeProvider, the associations are automatically set.
If a SAP HANA view contains input parameters, these are displayed, and you can edit them like normal fields. You can only assign input parameters to other input parameters. An input parameter can be compounded either with an InfoObject or with another input parameter.
7. You can change the join operand under the root node of the target. To do this, choose Change Join Operator in the context menu of the join operand. If the join operand is Equal To, a double assignment is required. If the join operand is Not Equal, every column in the join condition must be assigned to a target field. The system proposes an assignment.
The system performs this mapping automatically if not already done.8. By choosing Set PartProvider Runtime Properties in the context menu of a participating InfoProvider, you
can make the settings for the query properties. More information: Query Properties [page 195]9. You can create groups in order to organize the fields of a CompositeProvider semantically. More
information: Editing Groups [page 211]
10. By choosing Check BW object, you can check whether any assignments are missing.11. In the context menu on one of the fields in your CompositeProvider, you can delete the assignments again.
SAP BW/4HANAData Modeling PUBLIC 209

3.5.4.4 SQL Expression
The filter expression must be written in SAP HANA SQL.
When creating it, you receive a list of features supported by SAP HANA.
This expression is executed at database level, which means that no conversion routines or currency shifts are performed when the function is applied.
3.5.4.5 Using Temporal Joins
You can use temporal joins in a CompositeProvider to depict time flows.
Prerequisites
The following restrictions apply:
● Only InfoObjects and DataStore objects are supported.● Union nodes, aggregation, and projection are not allowed.● SQL filters, SQL expressions, Force Group By, aggregation change and constant mapping are not allowed.● The CompositeProvider cannot contain any fields that are not assigned.
Context
In SAP BW∕4HANA, only master data can be defined as time-dependent data sources. Two additional fields/attributes 0DATEFROM and 0DATETO are added to the characteristic.
DataStore objects themselves cannot be defined as time-dependent however. However, they often contain time characteristics (from which a time interval can be derived), or a minimum of two InfoObjects that refer to 0DATE (which you can use to define a time interval for). This allows the DataStore objects in the CompositeProvider to be considered as time-dependent.
As soon as an InfoProvider that is contained in the CompositeProvider is made pseudo time-dependent, it is handled as a time-dependent data source. An important difference between pseudo time-dependent InfoProviders and time-dependent InfoProviders like InfoObjects, the system cannot prevent gaps or overlaps from occurring in the time stream. This always depends on the dataset of the pseudo time-dependent InfoProvider.
Procedure
Time-Dependent Characteristics
210 PUBLICSAP BW/4HANAData Modeling

1. As soon as you use a time-dependent characteristic in the join, the join becomes time-dependent. You can also deactivate time dependency via Hide Time-Dependent Fields, provided that the characteristic does not exclusively consist of time dependent attributes. The time-dependent fields and the Valid From and Valid To fields are then hidden.
Time-Dependent InfoProviders2. In the context menu of your InfoProvider, choose Define Time Dependency.
You have the following options:○ Select a time characteristic, which is contained in the InfoProvider to be processed as time-dependent
and which can be used for time derivation (0CALMONTH, 0CALQUARTER, 0CALWEEK, 0CALYEAR, 0FISCPER, 0FISCYEAR). Time-dependency is indicated by the addition of the two date attributes 0DATEFROM and 0DATETO to the InfoProvider in the CompositeProvider (below the selected time characteristic).
ExampleIf 0CALYEAR is derived with the value 2014, the start date has the value 01.01.2004 and the end date has the value 31.12.2004
○ Select a characteristic of type Date as the start date (Valid From) and another characteristic of type Date as the end date (Valid To). Make sure here that the dataset is suitable. The value of the attribute that is interpreted as the start date must be smaller than, or equal to, the value of the attribute that is interpreted as the end date. If this is not the case, the data record is interpreted as invalid, and the request will not be taken into account. Characteristics of type Date must have 0DATE as a reference.
3. You can also define a key date. To do this, choose Set Key Date in the context menu for your InfoProvider.Depending on the type of characteristic, there are various ways of defining a key date: Characteristics of type Date with a reference to 0DATE and the time characteristic 0CALDAY can be flagged as key dates. A key date derivation can be defined for time characteristics that describe an interval (0CALWEEK, 0CALMONTH, 0CALQUARTER, 0CALYEAR, 0FISCPER, 0FISCYEAR). You have multiple options:○ Use the first day as the key date○ Use the last day as the key date○ Use a fixed day as key date (i.e. a particular day from the specified time period)○ Key Date Derivation Type: You can specify a key date derivation type.
An artificial characteristic CALDAY, which symbolizes the derived key date, is added to the InfoProvider, which a key date derivation is defined for.
3.5.4.6 Editing Groups
Groups are used to semantically structure the fields of a CompositeProvider. The group structuring is saved at InfoProvider level.
Procedure
1. You are on the Scenario tab page. In the context menu for the root node of your target or for a group, choose Manage Groups to call up the screen where you can edit groups.
SAP BW/4HANAData Modeling PUBLIC 211

2. By choosing Create Group, you can create new groups.3. Enter a technical name and description for the group. Press OK. The group is created under the root node
or under the group.4. You can move fields between groups using drag and drop. You can use drag and drop to assign a field under
a group.5. You can form hierarchies for groups by assigning groups to be subgroups of another group using drag and
drop. By pressing ctrl + drag & drop, you can change the order of the groups in the hierarchy.6. Press OK. The group editing screen closes, and you return to the Scenario tab page.7. By choosing Move to Group in the context menu for a field or a group, you can specify a group that the field
or group should be made a child of.8. Choose Delete in the context menu of a group to delete the group. All the fields in this group are moved to
the group Non-Grouped.
3.5.4.7 Editing Properties
Context
On the Scenario tab, you can now edit certain properties of the CompositeProvider target fields. The Output tab provides more options for editing properties.
Procedure
1. In the context menu on a field of type Characteristic in your CompositeProvider, you can assign a constant.2. By choosing Edit in the context menu on one of the fields in your CompositeProvider, you can change the
field's group assignment, type, name and description.
212 PUBLICSAP BW/4HANAData Modeling

3.5.4.8 Changing Properties for Fields of Type "Characteristic"
You can change various properties for fields of type "characteristic" by changing the properties directly or by specifying a field association, which can pass on various properties to the field.
Procedure
1. You are in the Output tab. All fields in the CompositeProvider are displayed here. When you select a field, you can define or change various properties in the detail area on the right the screen.
2. Choose Move to Group in the field context menu to move fields between groups. Specify the new group in which you want to move the field. Choose Browse to open the dialog for editing groups. You can also move fields in the tree display by drag and drop.
3. By choosing Association, you can associate one of the following for a CompositeProvider field: an InfoObject of type Characteristic, Time or Unit, or an Open ODS view. We recommend that you use the association with InfoObjects if your BW system contains relevant InfoObjects. This means you can also use the master data of the InfoObject.The default properties and description of the associated InfoObject are applied. You can change these
properties by choosing Toggle Default Value/Manual Entry and changing the value.
SAP BW/4HANAData Modeling PUBLIC 213

4. You can chose which name is displayed for this field in the query:
○ Usage of System-Wide Unique Name: A generated name is displayed in the query.○ Direct Usage of Associated Object by Name: The info object name is displayed in the query.
More Information: Names for CompositeProvider Fields in the Query [page 202]5. If you have specified an association and you have set the Direct Usage of Associated Object by Name flag,
you can activate the navigation attributes of the InfoObject or the Open ODS view. More Information: Activating Navigation Attributes [page 215]
6. If you have specified an association, you can set a constant from the InfoObject master data. The existing conversion routines are applied for the constant.If there is an assignment to this field for a provider, the constant functions as a filter. For providers without a link, the field is set to constant.
7. If there are no assignments or associations for a field, you can change the data type of the field.8. Specify whether the field is authorization-relevant using Authorization Relevance. If the field does not have
an association, or Direct Usage of Associated Object by Name is not selected, the field can be used in an authorization object. The local setting at field level is not affected by whether the field is used more than once. An authorization and the InfoProviders therefore decide whether the field is checked.
You have the following options:
Authorization Relevance System Response
The field has an association. You have also selected Direct Usage of Associated Object by Name.
The settings in the associated object are applied.
The field has an association. You have not selected Direct Usage of Associated Object by Name though.
You can choose whether the settings in the associated object are applied, or the local setting that determines whether the field should be included in the authorization checks.
The field has no association. The local setting is applied.
9. For associated InfoObjects: If you set the User confirmed Referential Integrity flag, you have to ensure that only one master data record exists for each characteristic value in the provider. If referential integrity exists, this can improve performance. You can also configure this setting later on.
NoteIf you have set the flag for referential integrity, you have to make sure in future that only one master data record exists for each characteristic value in the provider. If you do not do this, you might find that records are missing in the query result, because, with referential integrity, the field values with the data of the associated InfoObject are assigned with an inner join.
10. You can define the following query properties under Reporting Properties:○ Document Property:
You can specify whether the document property is inherited from the InfoObject. You can then display any documents defined in the executed query.
○ Display:This property specifies whether individual characteristic values in the query are displayed, and how they are displayed:○ No Display: The characteristic display is hidden. This function is particularly useful with the
currency/unit characteristic for example, since the currencies are also displayed in the key figures.
214 PUBLICSAP BW/4HANAData Modeling

○ Key and Text: The characteristic values are displayed with their technical key and their text.○ Text and Key: The characteristic values are displayed with their text and their technical key.○ Text: The characteristic values are displayed with their text.○ Key: The characteristic values are displayed by means of their technical key.
Here you can select whether the Short Text, Long Text, or Medium Text should be displayed. You can specify which texts are available when editing the InfoObject.
○ Selection:You can restrict the selection conditions.
○ Query Execution Filter:This property specifies how filter values are selected for query execution:○ Values in master data table:
The system displays all characteristic values from the master data, independently of transaction data.
○ Only posted values for Navigation:The system displays posted values only.
○ Only values in InfoProvider:The system displays only values contained in the InfoProvider.
11. If you have selected Direct Usage of Associated Object by Name and have associated an InfoObject, you can activate navigation attributes on a field via the context menu provided that the navigation attributes on the associated InfoProviders have been activated too. Navigation attributes can be activated both at field level and as mass maintenance for each folder or if all fields are selected.An exception is made to this in the case of characteristics supplied by an InfoProvider that has a column view. The InfoProviders have one column view: DataStore object (with creation of SID values during activation), InfoObject In this case, navigation attributes can also be used even if they are not activated on the InfoProvider. An additional join is executed for the navigation attribute tables. This usually has a negative impact on performance. You should therefore always activate the relevant navigation attribute on the InfoProvider if possible.
12. Using the field context menu, you can specify compounding to one more other fields.
3.5.4.9 Activating Navigation Attributes
If you have specified an association, then you can activate the available navigation attributes.
Procedure
1. You are in the Output tab. Choose Navigation Attributes in the context menu on a CompositeProvider characteristic. This entry is only available in the context menu if navigation characteristics are available for the characteristic.
2. You see a list of the navigation characteristics. Select the navigation characteristics that you want to use.
SAP BW/4HANAData Modeling PUBLIC 215

3.5.4.10 Changing Properties for Fields of Type "Key Figure"
You can change various properties for fields of type "key figure" by changing the properties directly or by specifying a field association, which can pass on various properties to the field.
Procedure
1. You are in the Output tab. All fields in the CompositeProvider are displayed here. When you select a field, you can define various properties in the detail area on the right of the screen.
2. Choose Move to Group in the field context menu to move fields between groups. Specify the new group in which you want to move the field. Choose Browse to open the dialog for editing groups. You can also move fields in the tree display by drag and drop.
3. Under Association, you can associate a key figure for a CompositeProvider field. The default properties and
description of the associated key figure are applied. You can change these properties by choosing Toggle Default Value/Manual Entry and changing the value.
4. You can choose which name is displayed for this field in the query:
○ Usage of System-Wide Unique Name: A generated name is displayed in the query.
216 PUBLICSAP BW/4HANAData Modeling

○ Direct Usage of Associated Object by Name: The info object name is displayed in the query.
More information: Names for CompositeProvider Fields in the Query [page 202]5. If there are no assignments or associations for a field, you can change the data type of the field. The
following data types are possible:
Type of key figure Data type
Amount CURR, FLTP, DEC
Quantity QUAN , FLTP , DEC
Number DEC , FLTP
Date DEC , DATS
Time DEC ,TIMS
Integer INT4
6. In the case of an associated InfoObject, the aggregation behavior is adopted from this InfoObject. If you have not associated any InfoObjects, you can select a suitable aggregation behavior.
7. In the Fixed Unit field, master data from 0UNIT is displayed. In the Fixed Currency field, master data from 0CURRENCY is displayed.
8. The changeability of the Key Figure-Specific Properties has some dependencies:
Option Description
Setting Changeability
You have associated a key figure. All properties are inherited from the associated key figure. The values under Key Figure-Specific Properties cannot be changed (with the exception of Fixed Unit/Currency and Unit/Currency Element).
You have associated a key figure and the Fixed Unit/Currency flag is set in the associated key figure.
The values under Key Figure-Specific Properties cannot be changed (including the Fixed Unit/Currency field).
You have selected Usage of System-Wide Unique Name.
There may be more than one value under Unit/Currency Element.
You have selected Direct Usage of Associated Object by Name.
The required Unit/Currency Element is set automatically when the matching element is assigned.
9. You can define the following query properties under Reporting Properties:○ Decimal Places:
This property specifies how many decimal places are used for the field in the query.○ Display:
This property specifies the scaling factor that is used to display key figure values in the query.
SAP BW/4HANAData Modeling PUBLIC 217

3.5.4.11 Changes to Used Objects
If you make changes to objects that are used in CompositeProviders, this can affect the CompositeProvider in some cases.
Deleting Objects Used in CompositeProviders
The following objects cannot be deleted if they are used in a CompositeProvider:
● InfoObject● DataStore Object● Aggregation Level
First remove the objects from the CompositeProvider and then delete them.
Changing Objects Used in CompositeProviders
If you delete InfoObjects from InfoProviders that are used in the CompositeProvider, then the CompositeProvider, which contains the corresponding InfoProviders, is set to inactive. The deleted InfoObjects are still displayed in the source. but are flagged as Unknown with a question mark.
Modify the affected CompositeProviders accordingly and activate them again.
Changes to InfoObject Properties
When certain changes are made to an InfoObject (compounding, time dependency, changing a display attribute to a navigation attribute and the other way round), the InfoProvider/CompositeProvider used is set to inactive. Modify the affected CompositeProviders accordingly and activate them again.
If you change navigation attributes to display attributes for example, this causes errors in the CompositeProvider runtime. You can resolve the errors in the CompositeProvider by removing the definition of the navigation attributes on the Output tab.
218 PUBLICSAP BW/4HANAData Modeling

Changes to SAP HANA Views
When structural changes are made to SAP HANA views, the CompositeProvider remains active. However, errors occur in the CompositeProvider. You have to manually remove any deleted SAP HANA views, or deleted fields from SAP HANA views, from the CompositeProvider (Target area). The fields are displayed as Unknown with a question mark in the source. Using the BW object search in the BW modeling tools, you can find out the CompositeProviders in which specific SAP HANA views are used in. More Information: Searching for SAP BW∕4HANA Objects [page 34]
3.5.4.12 Creating a Copy of a CompositeProvider
You can save a CompositeProvider under a different name in order to create a copy of it.
Procedure
1. You have opened a CompositeProvider in the editor. Choose File Save As … .2. If required, select a different InfoArea to save the CompositeProvider under.3. Give it a different name and a description.4. Choose Finish. A copy of the CompositeProvider is created and is opened in the editor.
3.5.4.13 Supplying Data to 0INFOPROV
Every InfoProvider in a union is linked with the characteristic 0INFOPROV. This makes it possible to identify the involved provider, from which the data originates.
With a join, only one of the two sides of the join can be linked with the characteristic 0INFOPROV. With a CompositeProvider, only the left part is linked with 0INFOPROV.
Read requests for a CompositeProvider can only be split for providers that are linked with 0INFOPROV. Requests cannot be split for joins. This is important for functions that require a provider to explicitly specified. For InfoCubes with non-cumulative key figures, the InfoCube must be explicitly requested and must be linked with 0INFOPROV.
The 0INFOPROV link affects delta caching. Delta caching is only possible for providers that are linked with 0INFOPROV. For all other providers: when new data has been loaded, then all the data is read and not just the new data.
The 0INFOPROV link also influences whether the data integrity can be specified in the query definition. Setting data integrity is only possible for providers that are linked with 0INFOPROV. For all other providers: only data with the status All InfoProviders up to released status (0) is read.
SAP BW/4HANAData Modeling PUBLIC 219

Related Information
Delta Caching [page 840]
3.5.4.14 Processing Joins
When processing joins, remember that they are always executed in the SAP HANA database. There is no SQL implementation or ABAP implementation. For analysis in the Query Monitor, this means that you cannot toggle between execution in SAP HANA and execution in SQL (the No optimized Operations in SAP HANA/BWA option) if there are no joins involved.
You should also note that the data of every single InfoProvider must be aggregated before the join. You cannot prevent data aggregation before the join. If the cardinality of individual joins does not correspond to the data, this can result in key figure values being changed during navigation.
3.5.4.15 Settings for CompositeProviders
You can make a setting for the performance of the modeling environment in CompositeProviders.
By choosing Window Preferences BW Modeling CompositeProvider , you can define starting from how many providers per CompositeProvider the system should switch to Bulk Load. The parameter only affects BW InfoProviders as participating providers.
In the default setting, the system switches to Bulk Load when a CompositeProvider contains at least 10 BW InfoProviders.
When a CompositeProvider with fewer than 10 providers is opened in the editor for the BW modeling tools, each provider is queried individually on the back end. These are then written to the cache and are thus quickly available next time the editor is opened. The information stored in the cache can also be used by other models without the need to access the back end again.
When a CompositeProvider with 10 or more providers is opened, the providers are not queried individually. The InfoProvider information is read as part of the CompositeProvider from the back end instead, and is not written to the cache. This allows the editor to open faster. When the editor is opened again however, the information must be read from the back end.
3.5.5 BAdI Provider
The BAdI provider is an InfoProvider that you can enhance by means of ABAP implementation.
NoteIn the case of SAP BW scenarios that you have modeled with VirtualProviders, we recommend executing these in SAP BW∕4HANA with an Open ODS view or a SAP HANA view instead. If program logic is required,
220 PUBLICSAP BW/4HANAData Modeling

we recommend modelling SAP HANA calculation views with SQLScript. This ensures optimum integration and execution in SAP HANA at runtime.
There is no graphical editor for the BAdI provider. It is created using the BAdI RSO_BADI_PROVIDER.
When the query is executed, the Data Manager calls the BAdI implementation corresponding method. These runtime methods follow the implementation pattern for VirtualProviders.
The BAdI provider is based on InfoObjects. Fields are not supported.
The BAdI provider cann be assigned to an InfoArea. This makes it possible to display the BAdI provider in the BW Modeling Tools in the BW repository tree. If not InfoArea is assigned, the BAdI provider is displayed under NODESNOTCONNECTED.
It can be used in CompositeProviders. The following restrictions apply in this case:
● It can only be used in unions. Joins are not supported.● Navigation attributes can only be used if they are activated in the BAdI provider.
Related Information
Creating BAdI Providers [page 222]
3.5.5.1 Authorizations for BAdI Providers
To work with BAdI providers, you need authorization object S_RS_BDPR.
3.5.5.2 Transporting BAdI Providers
The BAdI provider itself is not integrated into the BW/4HANA TLOGO framework.
It is created by implementation of the RSO_BADI_PROVIDER BAdI and integrated into the ABAP transport system by dint of this implementation.
SAP BW/4HANAData Modeling PUBLIC 221

3.5.6 Creating BAdI Providers
Context
You can use Business Add-In (BAdI) RSO_BADI_PROVIDER to implement BAdI Providers. When doing this, you can derive multiple BAdI providers from a single implementation.
The BAdI is filter-dependent. Create a separate implementation for every InfoProvider.
The following rules apply for the filter:
● Every BAdI implementation must define precisely one filter.● The only character allowed as a comparator for filter values is '='.● The filter value must be between 3 and 10 characters long.● Only the characters A-Z and the numbers 0-9 are allowed.
Procedure
1. In the SAP menu, choose Tools ABAP Workbench Utilities Business Add-Ins Implementation . The BAdI-Builder: Implementation Maintenance Entry screen appears.
2. Choose New BAdI and specify enhancement spot RSO_BADI_PROVIDER. Choose Create.3. Program the interface methods in the class builder.4. Activate the implementations.
Related Information
Methods [page 223]
222 PUBLICSAP BW/4HANAData Modeling

3.5.6.1 Methods
BAdI RSO_BADI_PROVIDER provides you with interface IF_RSO_BADI_PROV.
Interface IF_RSO_BADI_PROV has the following methods:
Method Description
GET_INFOPROVIDER_NAMES This method returns the name of the InfoProvider. This must be identical to the filter value of the implementation. As the technical name must be unique, the prefix 3B is added to the technical name of the InfoProvider.
GET_INFOPROVIDER_FIELDS This method returns the structure of the BAdI provider.
The structure is determined by BW characteristics and key figures. Only InfoObjects are allowed. Three exporting parameters need to be supplied with data: E_TSX_CHARACTERISTICS, E_TS_KEYFIGURES, E_TS_GROUPS.
Characteristics can be assigned to groups (dimensions) in a similar fashion to DataStore objects or CompositeProviders. The dimensions must be added to exporting parameter E_TS_GROUPS.
Navigation attributes can be added to the characteristics by using the names of the attributes.
For all fields (characteristics, key figures, navigation attributes), provider-specific descriptions of up to 60 characters can be added.
GET_METADATA_TIMESTAMP The BAdI provider’s metadata can be written to the buffer in order to avoid performance problems. The buffer is based on a time stamp that must be returned by this method. If the time stamp that is returned is not the same as the time stamp in the buffer, the entry in the buffer is deleted, and the BAdI provider’s metadata is built again. It is therefore important for the implementation of this interface method to return the correct time stamp.
GET_DATA_TIMESTAMP The time stamp that is returned should contain the most recent change to the BAdI provider. Implementing this method is not mandatory, but the OLAP cache cannot be used if the correct time stamp is not returned.
SAP BW/4HANAData Modeling PUBLIC 223

Query Runtime
Method Description
RUNTIME_DEFINE This method defines the query access and is called exactly once every time the query is accessed. Method RUNTIME_READ is then called until there is no more data.
This method prepares the basic query access and provides the queried characteristics, key figures, selection criteria and so on. The interface uses the same data types as the RSDRI interface.
RUNTIME_READ This method retrieves the data. This method is called until E_END_OF_DATA is set to ‘X’.
GET_RUNTIME_PROPERTIES This method can be used to make runtime-relevant settings. For details about the settings, see the documentation for BAdI RSO_BADI_PROVIDER. If the method is not implemented, the default values are used.
For detailed information, see the documentation in the system for BAdI RSO_BADI_PROVIDER.
3.5.6.2 Check
You can use report RSO_CHECK_BADI_PROV to check BAdI providers.
Prerequisites
There must be an active implementation for BAdI RSO_BADI_PROVIDER.
Check
Report RSO_CHECK_BADI_PROV checks the BAdI provider for inconsistencies in the implementation. You can either check all active implementations or restrict the check to certain BAdI providers.
3.6 Mixed Modeling (SAP BW∕4HANA and SAP HANA)
With the modeling functionalities available in SAP BW∕4HANA and SAP HANA, mixed modeling makes it possible to access SAP BW∕4HANA data from any schema in the SAP HANA database and to access data from
224 PUBLICSAP BW/4HANAData Modeling

any schema in the SAP HANA database from SAP BW∕4HANA. You can thus create scenarios where data, which is modeled in the SAP BW∕4HANA system, is merged with data modeled in SAP HANA with SAP HANA tools.
When a SAP BW∕4HANA system is running on SAP HANA database, the SAP BW∕4HANA data is stored in a special schema known as the SAP BW∕4HANA-managed schema. In other SAP HANA schemas, data can be stored in SAP HANA tables or views. On the one hand, you can access data from a SAP BW∕4HANA to data from any schema in the SAP HANA database. On the other hand, you can access SAP BW∕4HANA data (data from the schema managed by SAP BW∕4HANA in the SAP HANA database) in another SAP HANA schema. You can use virtual access methods and data replication methods. The following list shows the various options and provides links to further information.
Accessing data from any schema in the SAP HANA database from SAP BW∕4HANA:
● Virtual Access○ Access using CompositeProvider
In a CompositeProvider you can flexibly combine data from multiple SAP BW∕4HANA InfoProviders and SAP HANA views by using unions and joins. The use of a CompositeProvider is particularly recommended in cases where the SAP HANA view displays a complete star schema.More Information: CompositeProvider [page 186]
○ Access using Open ODS ViewOpen ODS views enable you to define SAP BW∕4HANA data models for external data such as database tables and database views of any SAP schema. These data models allow simple, flexible integration without the need to create InfoObjects. The data sources can be used virtually in SAP BW∕4HANA.Modeling of Open ODS views takes place at the field level, but can be complemented by InfoObjects and gradually extended, in order to have a higher level of integration. Open ODS views allow you to switch between virtualization and dedicated Data Warehouse persistences and thereby provide a flexible entry point into replication scenarios.We especially recommend Open ODS views in cases where the format of the external data is suitable for integration into a data flow; in other words, when an external data model displays a pure fact view or a pure dimension view. Prerequisite for integration into a SAP BW∕4HANA data flow: the source model must be divided into facts, master data and texts. Based on these units that can be replicated, Open ODS views allow you to model reporting views on data.More Information: Open ODS View [page 154]
● Replication○ Replication from SAP HANA tables via SAP HANA source system
You can use the SAP HANA source system to replicate data from SAP HANA database tables in SAP BW∕4HANA for further processing. The data from the relevant schema in the SAP HANA database (where the tables are located) is replicated to the SAP BW∕4HANA schema of the SAP HANA database in the SAP BW∕4HANA system.For more information about using SAP HANA source systems for replication from database management systems, see: Transferring Data with an SAP HANA Source System [page 249]
○ Replication from SAP HANA views using the ODP Source SystemYou can use the ODP data replication interface to replicate data from attribute and analytic views in an SAP HANA database to SAP BW∕4HANA for further processing. Replication is supported for the SAP HANA database that the SAP BW∕4HANA system is running on, and also for other SAP HANA databases that ABAP systems are running on. Important: The SAP HANA database (or the ABAP system running on the SAP HANA database) must be connected as an ODP source system to the SAP BW∕4HANA system. You can also use the ODP source system to load master data directly from the SAP HANA views into InfoProviders.More information: Transferring Data Using Operational Data Provisioning [page 268]
SAP BW/4HANAData Modeling PUBLIC 225

Accessing data from any schema managed by SAP BW∕4HANA in the SAP HANA database from any SAP HANA schema:
● Creating SAP HANA views from the SAP BW∕4HANA system for BW InfoProvidersYou can generate SAP HANA views when activating DataStore objects (advanced), InfoObjects, CompositeProviders, local CompositeProviders in the BW Workspace, queries, Open ODS views as the PartProvider of a CompositeProvider in SAP BW∕4HANA.More information: Generating SAP HANA Views from the BW System [page 226]
● Replication from SAP BW∕4HANA Objects using the Open Hub DestinationUsing an open hub destination, you can write data directly to a different SAP HANA database table.More Information: Selecting Database Tables as Destinations [page 1334]
3.6.1 Generating SAP HANA Views from the SAP BW∕4HANA System
When activating BW objects that you want to create, you can generate SAP HANA views with the same structures.
This enables you to create scenarios where data, which is modeled in the SAP BW∕4HANA system, is merged with data modeled in SAP HANA with SAP HANA tools (mixed scenarios).
For SAP BW∕4HANA, the following objects are supported: DataStore object, InfoObject, CompositeProvider, local CompositeProvider in BW Workspace, query, Open ODS view as PartProvider of a CompositeProvider. All generated SAP HANA views will be of type Calculation View.
When SAP HANA views are generated, SAP BW∕4HANA data is published to SAP HANA. These SAP HANA views point directly to data and tables that are managed by the SAP BW∕4HANA. SAP BW∕4HANA data can therefore be consumed directly in SAP HANA. This also provides a clear interface between the schema managed by the BW and an area outside the SAP BW∕4HANA, which is managed by other tools or by another user group. This interface makes clear where the services in the SAP BW∕4HANA system end, and where the manual enhancements or enhancements via third-party tools begin. It is not possible to change generated SAP HANA views manually. The SAP HANA views generated by SAP BW∕4HANA can be overwritten at any time by the system, meaning that any manual changes would be lost.
You can create more SAP HANA views on these generated views however. These will then be stored in another Content package.
226 PUBLICSAP BW/4HANAData Modeling

Generating SAP HANA views from the SAP BW∕4HANA system enables you to generate SAP HANA views without using the SAP HANA Modeler. You can thus access SAP BW∕4HANA data via SQL front ends. All applications that can read SAP HANA views can process the data (for example, SAP BusinessObjects Analysis, edition for Microsoft Office, SAP BusinessObjects Web Intelligence, SAP BusinessObjects Explorer, SAP Lumira and BI Clients from third-party providers).
When a query is executed on the SAP HANA view, the data is requested directly from SAP HANA, without the SAP BW∕4HANA system being addressed.
Generation of SAP HANA views from the BW system has been implemented as an interface for standalone data marts. This means that these SAP HANA views are only suitable for special scenarios.
These SAP HANA views are part of the BW InfoProvider lifecycle. They are transported with the corresponding BW objects. The target system should have an SAP HANA database. If it does not, the property that the object has an SAP HANA view will be lost.
When a BW object is activated with the SAP HANA view, all the dependent SAP HANA views are also activated. If an error occurs with an SAP HANA view that you created, this only leads to a warning and the BW object is activated.
The analysis authorizations in SAP HANA are created during activation of the BW objects and compared with the analysis authorizations in BW.
To manage SAP HANA views from BW objects in the SAP BW∕4HANAcockpit, you can use the app External SAP HANA Views . Here you see an overview of all BW objects with an external SAP HANA view and various administration and check functions.
SAP BW/4HANAData Modeling PUBLIC 227

Restrictions
Not all BW objects properties can be added to the generated SAP HANA view. The following restrictions apply:
● Navigation attributes of InfoObjects, which do not have Standard or SAP HANA Viewas their master data access type, are not supported. If the navigation attribute is also authorization-relevant, it is not possible to generate an SAP HANA view.Navigation attributes of InfoObjects for which the master data access type is not Standard or SAP HANA View, or whose field is associated to an Open ODS view of type Master Data, are not supported. If the navigation attribute is also authorization-relevant, it is not possible to generate a SAP HANA view.
● In the SAP HANAview only fields supported by the OLAP engine are supported. However, you can change this in Customizing under SAP BW/4HANA Customizing Implementation Guide SAP BW/4HANA Modeling Settings for Generating External SAP HANA Views for BW Objects . Here you can specify that the optimized column view is to be used. This means that all field types supported, with the exception of RAW-STRING, RAW, D16R, D34R.
● If the following applies in the case of a CompositeProvider, the navigation attribute is not supported:○ The CompositeProvider characteristic of the navigation attribute is assigned to a navigation attribute
of a PartProvider.○ The CompositeProvider characteristic of the navigation attribute is assigned to a characteristic of a
PartProvider with a basic characteristic other than the basic characteristic of the CompositeProvider characteristic.
● Texts for InfoObjects, which do not have Standard or SAP HANA View as their master data access type, are not supported.
● SAP Note 2073820 describes in detail how to determine the text fields in the solution section.● Non-cumulative numbers are only supported in the SAP HANA view for queries.● Key figures with the aggregation setting No Aggregation are not supported.● Compounding is not supported: There is no attribute in the SAP HANA view, which represents the chained
value of an InfoObject with compounding.● Date conversion and alpha conversion are not supported.● BW hierarchies are only available in SAP HANA views for InfoObjects.● Key figures of data type date or time are not supported with aggregation SUM.● Characteristics with property attribute only are not supported.● Non-cumulative range key figures are not available in an SAP HANA view.● The technical key figure 1ROWCOUNT is only supported for DataStore object, CompositeProvider and BW
queries, which are based on a DataStore object or on a CompositeProvider.● The key date for time-dependent attributes and texts is specified by using input parameter keydate of the
SAP HANA view. If this parameter is not explicitly supplied with data when the access occurs, today’s date is used. The format of the parameter is YYYYMMDD, which corresponds to ABAP type DATS.
Related Information
Determining Text Fields [page 243]Using Near-Line Storage [page 243]
228 PUBLICSAP BW/4HANAData Modeling

3.6.1.1 Generating SAP HANA Views for Local CompositeProviders from BW Workspace
You can generate calculation views for local CompositeProviders in the SAP HANA database from BW Workspace.
Prerequisites
The prerequisites are the same as for the CompositeProvider, which was created with BW modeling tools. More information: Generating SAP HANA Views for CompositeProviders [page 233]
Procedure
1. You are in BW Workspace Designer.2. You can generate an SAP HANA view for an existing CompositeProvider by going to the CompositeProvider
tab under My Workspace. Select your CompositeProvider and choose Change. Choose Create Queries. Set the External SAP HANA View for Reporting flag.
3. If you want to create a new CompositeProvider and generate an SAP HANA view for this CompositeProvider, proceed as follows: Creating CompositeProviders in BW Workspace Designer [page 887]
In the Create Queries step, set the External SAP HANA View for Reporting flag.4. When the CompositeProvider is activated, an SAP HANA view corresponding to the structure of the object
is generated on the SAP HANA database.
3.6.1.2 Generating SAP HANA Views for DataStore Objects
You can generate analytic views for DataStore objects in the SAP HANA database.
Context
If the Optimized Column View option is active in transaction RS2HANA_VIEW, the external SAP HANA view contains all fields of the DataStore object, except for those in binary mode:
RAWSTRING
RAW
DF16_RAW
DF34_RAW
SAP BW/4HANAData Modeling PUBLIC 229

If not, […]
If the Optimized Column View option is not active, the SAP HANA view of a DataStore object contains the InfoObjects and fields that reporting is visible for. These are InfoObjects whose Master-Data-Check property is set to a value other than No Master Data Check / No Reporting. These are fields whose names contain a maximum of 20 characters and whose data type is one of the following:
● Characteristics:CHAR: Length 1 - 250NUMC: Length 1 - 250CUKY: Length 5UNIT: Length 3LANG: Length 1DATS: Length 8TIMS: Length 6
● Key figures:INT4 FLOAT DEC: Length 16 - 31; decimal places 0 - 14CURR: Length 1 - 31; decimal places 1 - 14; there must be an assignment to a CUKY characteristic, and the length must be greater than or equal to the number of decimal places.QUAN: Length 1 - 31; decimal places 0 - -14; there must be an assignment to a UNIT characteristic, and the length must be greater than or equal to the number of decimal places.
If the option Add Measures w/o Decimal Shift is active in transaction RS2HANA_VIEW, the external SAP HANAview of the DataStore object is assigned an additional unit of measurement of type Amount for each key figure of type Amount. This additional unit of measurement does not support transformation from an internal format into an external format.
Procedure
1. You are in the BW modeling tools, on the editing screen for your DataStore object.2. Choose the General tab and activate the External SAP HANA View flag.3. When the DataStore object is activated, an SAP HANA view corresponding to the structure of the object is
generated on the SAP HANA database.
3.6.1.3 Generating SAP HANA Views for InfoObjects
You can generate InfoObjects SAP HANA views for queries in the SAP HANA database.
Prerequisites
This cannot be combined with the function for virtual master data in SAP HANA.
In order to replicate the authorizations to SAP HANA, you need to assign authorizations for authorization object S_TABU_LIN and S_RS_IOMAD for this user.
230 PUBLICSAP BW/4HANAData Modeling

Context
For SAP BW∕4HANA, all generated SAP HANA views must be of type Calculation View.
Key figures of data type CURR are stored in the SAP HANAview in external format. If you have key figures of data type CURR in the internal format, you can set this in Customizing under SAP BW/4HANA Customizing Implementation Guide SAP BW/4HANA Data Modeling Settings for Generating External SAP HANA View for BW Objects under Add measures w/o decimal shift. The SAP HANAview receives an additional key figure for each key figure of type amount. This additional measure has no currency shift.
Procedure
1. You are in the modeling of an InfoObject in the BW modeling tools. Proceed as follows:2. Go to the General tab page and set the External SAP HANA View for Master Data flag for a SAP HANA view
of the master data or External SAP HANA View for Reporting for a SAP HANA view for the master data provider.
3. When the InfoObject is activated, an SAP HANA view corresponding to the structure of the object is generated on the SAP HANA database.
Related Information
SAP HANA Views for Hierarchies [page 231]
3.6.1.3.1 SAP HANA Views for Hierarchies
If you generate a SAP HANA view for an InfoObject that has hierarchies, a SAP HANA view is generated for the hierarchies too.
If the InfoObject is not selected as an InfoProvider, and the External SAP HANA View for Master Data flag is set, a master data view and a hierarchy view are generated. This internal hierarchy view can be used in a query view in order to display the characteristic values in a hierarchical structure.
If the InfoObject is selected as an InfoProvider, and the External SAP HANA View for Master Data InfoProvider flag is set, the system generates a master data view and a view for hierarchy for 'internal' usage, together with a view for hierarchy for usage in reporting and analysis.
SAP BW/4HANAData Modeling PUBLIC 231

Information about the Internal Hierarchy View
The internal hierarchy view is given a name with the following format: <IOBJNM>_HIERARCHY. It is a calculation view of type DIMENSION. It can be used in other SAP HANA view in order to display the characteristic values in a hierarchical structure.
Information about the Reporting Hierarchy View
The reporting hierarchy view is given a name with the following format: <IOBJNM>_REPORTING_HIERARCHY. It is a calculation view of type CUBE.
It can be used standalone in order to display the characteristic values in a hierarchical structure. The transaction data is aggregated accordingly.
You can use the following input parameters for both hierarchy view: hieid (hierarchy ID) and keydate (default: current date).
Information about the Input Help View for Input Parameter hieid
The name of the input help view is HIEID_F4. A subpackage help_view is contained in a content package. Example: <path_set_in_customizing>/help_view/HIEID_F4.
This view is generated with the hierarchy view. For all basic characteristics, the hierarchy IDs with the key and a text with the format <hier_name><validity> are displayed.
If the input value for parameter hieid does not match any of the characteristic's hierarchies, all characteristic values under the NotAssigned node are displayed in the hierarchy.
Restrictions:
The following functions are not supported:
● Link nodes, multiple parents● Parent-child nodes with the same node name● Time dependency of hierarchy structure● Intervals● Characteristic nodes in the hierarchy, which are not basic characteristic nodes, which are not defined as
external characteristics
The following functions are displayed differently:
● Unassigned nodes are always displayed under the NotAssigned node and are not suppressed like in the BW back end.
● In a reporting hierarchy view with transaction data, all nodes in the hierarchy are displayed, with the exception of leaves of the basic characteristic without transaction data.
232 PUBLICSAP BW/4HANAData Modeling

3.6.1.4 Generating SAP HANA Views for CompositeProviders
In the SAP HANA database, you can generate calculation views for CompositeProviders, which you have created in BW modeling tools.
Prerequisites
Data from the following providers is excluded when the SAP HANA view is generated:
● Open ODS views that do not use a CalculationScenario● If the CompositeProvider contains an Open ODS view that uses a CalculationScenario, the SAP database
user of the BW application server must have SELECT authorization with GRANT OPTION for the table or the view that points to that of the Open ODS view.
● InfoObjects as InfoProviders for which the master data access is not Standard● Aggregation levels
If a CompositeProvider only contains providers that are in this list, the SAP HANA view cannot be generated.
The CompositeProvider can use SAP HANA-native tables/views either directly or via an Open ODS view as PartProvider. For ABAP runtime, it must be ensured that the BW database user (SAPSID) has sufficient authorizations to access these SAP HANA-native tables/views. Authorizations for the data of the CompositeProvider for the individual BW user are managed uniquely in the BW. For the external SAP HANA view, these authorizations are replicated in SAP HANA. There is not check or replication however for authorizations in the SAP HANA-native tables/views. It is therefore possible that the SAP HANA user, who corresponds to a BW user with access to the CompositeProvider, cannot access the external SAP HANA view of the CompositeProvider, or that the data in the SAP HANA view does not correspond to the data displayed in the ABAP BW.
ExampleCompositeProvider "CP1" has SAP HANA calculation view "HC1" as a PartProvider. The BW database user (SAPSID) has all SAP HANA authorizations to read data from HC1 without restrictions. BW user "BWUSER" exists. Authorizations are maintained for CP1 in the BW for BWUSER. The user can see all data where "COUNTRY" is identical to the value "GERMANY". BWUSER also has a DBMS user, i.e. the corresponding SAP HANA user "BWUSER_HANA".
Scenario where the user is not authorized: The external SAP HANA view "CP1_HANA" of CP1 is activated. The authorizations for BWUSER are replicated in SAP HANA and assigned to BWUSER_HANA. BWUSER_HANA is not authorized to access HC1. If BWUSER_HANA attempts to read data from SAP HANA view CP1_HANA, the query terminates with a “no authorization” error. The corresponding BW user BWUSER can access the data of CompositeProvider CP1, as user SAPSID is used to read data from SAP HANA using the BW ABAP server. The authorizations for BWUSER are then applied.
Scenario with different data: BWUSER_HANA has SAP HANA authorizations for HC1. If BWUSER_HANA has the SAP HANA authorizations "CALYEAR" = 2000 for HC1, this is taken into account as a filter if BWUSER_HANA reads data from CP1_HANA. Using the BW ABAP stack, this filter is ignored however, as user SAPSID is used.
SAP BW/4HANAData Modeling PUBLIC 233

Solution: The BW makes sure that the SAP HANA user has the correct authorizations for the external SAP HANA view of the CompositeProvider. Maintain the authorizations for the specified PartProvider types manually in SAP HANA, or deactivate the authorization check for the SAP HANA view that is used as a PartProvider in the CompositeProvider.
Request handling is not supported. In other words, all requests are always read.
Procedure
1. You are in the BW modeling tools, in the editing screen for your CompositeProvider.2. Choose the General tab and activate the External SAP HANA View flag.3. When the CompositeProvider is activated, an SAP HANA view corresponding to the structure of the object
is generated on the SAP HANA database.
3.6.1.5 Generating SAP HANA Views for Queries
You can generate calculation views for queries in the SAP HANA database.
Prerequisites
The following prerequisites must be met to generate an SAP HANA view:
● The InfoProviders that the query is defined on must be of type DataStore object (advanced) or CompositeProvider.
● The External SAP HANA View flag must be set for the InfoProvider on which the query is defined.● To use a hierarchy: A SAP HANA view must have already been defined for the InfoObject, on which a
hierarchy is defined.● The CompositeProvider must not have any ambiguous joins.● The query can only comprise elements that are supported. More information: Supported BW Functions
[page 235]● This query is not input-ready.
Context
Queries are compiled by the analytic manager into an optimized execution plan, meaning that most parts are executed in SAP HANA, and only a small part in the BW application server.
In many cases, the result set is complex and multidimensional. In some cases however, the query result can be displayed as a flat view and can be fully calculated in SAP HANA. For these queries, a calculation view can be generated from the BW system. This view can be consumed using SAP HANA native interfaces such as SQL.
234 PUBLICSAP BW/4HANAData Modeling

A calculation view, which has been created from its BW query, cannot be compared to other query interfaces such as BICS. This is because the calculation view cannot perform any calculations such as hierarchies, zero suppression or local calculations, which are normally performed on the BW application server. Therefore there is no guarantee that the result of the calculation view will be exactly the same as the result of the query executed on the BW application server. Here the restrictions of the SAP HANA view of the InfoProvider, which the query is based on, also apply to the query. More information:
● Supported BW Functions [page 235]● Ignored BW Functions [page 242]● Unsupported BW Functions [page 242]
BW Query Designer in the BW Modeling tools is the modeling tool. BW Analytic Manager compiles the execution plan, and the BW system stores the metadata and is used for the transport and the lifecycle of the data model.
The query element texts are always added in the user’s logon language. With key figures, the technical name in the SAP HANA view is the same as the UID if no technical name has been specified. You can display the UID in the UID Query Designer: Properties Advanced . You can display the technical name in the UID Query Designer: Properties Technical Name .
If your change the query in the BW modeling tools, the associated SAP HANA view is automatically updated. However, the global elements are not updated. If global elements have been changed, these elements will only be changed in the query once the query has been activated again. The associated SAP HANA view will also be updated.
Procedure
1. You are in the BW modeling tools, in the editing screen for your query. Choose the option Reporting under General for the SAP HANA View Support field.
2. When the query is activated, an SAP HANA view corresponding to the structure of the object is generated on the SAP HANA database.
3.6.1.5.1 Supported BW Functions
Below you will find a list of functions, which are supported for generating SAP HANA views from queries.
Characteristics
Characteristics, which are selected in the query as dimensions or free characteristics, are assigned as attributes in the SAP HANA view. Navigation attributes of characteristics, which do not have standard as their master data access type, are not supported. If a global restriction for a variable is defined on a characteristic, an attribute is added to the SAP HANA view. This attribute represents the characteristic - even if the characteristic is not selected as a dimension or free characteristic in the query. All compound parents of the
SAP BW/4HANAData Modeling PUBLIC 235

selected characteristics are automatically visible as attributes in the SAP HANA view. Depending on the setting made for the filter value of the InfoObject in the reporting properties area of the InfoProvider of the BW query, the corresponding attribute in the external SAP HANA view can have a different input help column, and the SAP HANA view parameters based on the InfoObject have a different input help:
● Only posted values for navigation (Q): If none of the single and multiple value variables of the BW query used in the global filter have a default value, the input help column and the input help for the parameters in the external SAP HANA view of the query is the attribute itself.
● Only values in the InfoProvider (D); The InfoObject must be available in the InfoProvider’s external SAP HANA view. The input help column and the input help of parameters are the corresponding attribute in the InfoProvider’s external SAP HANA view.
● Values in the master data table (M): The external SAP HANA view for master data of the InfoObjects must be active if the InfoObject does not have a reference to 0CURRENCY or 0UNIT. The input help column and the input help of parameters are the corresponding attribute in the external SAP HANA view for the InfoObject’s master data.
Key Figures
Key figures with standard aggregation MIN, MAX or SUM are supported.
Filter
The filter selection restricts the entire query. All the InfoProvider data is aggregated using the filter selection of the query. Restrictions with variables, which exclude variables, are not supported. There can be a maximum of one variable per characteristic - unless the variable is of type single value. Variables of type single value represent one value exactly - as there is no limitation regarding the number. Filters on hierarchies are supported if the hierarchy meets the required prerequisites. More Information: SAP HANA Views for Hierarchies [page 231]
The external SAP HANA view must be active for the InfoObject too.
The following cases are not supported when using filters on hierarchies:
● Non-cumulative key figures used in the query● Multiple single value variables on hierarchy nodes on restricted key figures● Filter on the same characteristic in different hierarchies
Restricted Key Figures
You can restrict the key figures of an InfoProvider for reuse by selecting one or more characteristics. The key figure that is restricted by one or more characteristic selections can be a basic key figure, or a key figure that is already restricted. Restrictions on hierarchy nodes are supported. The same prerequisites and restrictions apply as for filters. Restrictions with variables are supported if they have specific properties (see below). Rows in which all key figures are null are not removed from the result set.
236 PUBLICSAP BW/4HANAData Modeling

Calculated Key Figures
Calculated key figures are supported. The BW query formula is converted to an equivalent SAP HANA expression. Due to the differences in processing special values and calculating units, which are unique on the BW server, the result of the query execution on an ABAP system or BICS system can differ from the result when the SAP HANA view is used.
● Exception aggregation is not supported.● Supported operators: ◦
○ Basic operators: +, -, *, /, **, (, ), =○ Boolean operators: <, =<, <>, >, >=, ==, AND, NOT, OR, XOR (excluding OR)○ Mathematical functions: abs, ceil, div, exp, floor, log, log10, max, max0, min, min0, mod, sign, sqrt,
trunc○ Trigonometrical functions: acos, asin, atan, cos, cosh, sin, sinh, tan, tanh○ Data functions: count, delta, nodim ◦percentage functions: %, %A, %_A
● Supported operands:○ Basic key figures (must be supported by the external SAP HANA view for the query)○ Restricted key figures (must be supported by the external SAP HANA view for the query)○ Calculated key figures (must be supported by the external SAP HANA view for the query)○ Variables of the type for manual entry, the individual value and the non-initial default value○ Constant
● Special value processing in SAP HANA is not the same as BW ABAP special value processing:○ ERROR, DIV0, NOP, ZERO or other BW special values are not available during access to the query’s
external SAP HANA view.○ Division by zero causes the entire SAP HANA SQL query to terminate. In transaction RS2HANA_VIEW,
it is possible to set that the result should be 0 if ths happens.○ A value overflow causes the entire SAP HANA SQL query to terminate.
● The unit of the formula (including the currencies) cannot always be calculated:○ If the formula contains up to one key figure or variable, the target unit is the same as the unit of the key
figure or variable, and the resulting SAP HANA key figure is semantically linked with this unit. The resulting unit must not be the inverse of a unit, for example 1/$.
○ If the formula contains more than one key figure or variable with a unit, the resulting SAP HANA key figure of the formula is semantically linked with a calculated attribute that represents the unit. This unit is a simple string chain of units and operators in square brackets ([ ]).
○ Basic key figures or restricted key figures are supported as operands of the formula. Unit conversion for the calculated key figure itself is not supported.
○ The technical name of the unit of the calculated key figure is _UNIT.○ We strongly recommend using the data function NODIM in the definition of the formula. This reduces
the number of key figures with units to 1.● The SAP HANA key figure that represents the calculated key figure is a floating decimal number. The
precision and the scaling can vary depending on the value stored for precision (between 1 and 34) and for scaling (-6,111~6,176). The result is not rounding, meaning that the number of decimal places specified in the query definition is ignored.
● The SAP HANA key figures that represent the calculated key figures cannot be aggregated after selection from the external SAP HANA view of the query. This implies that the external SAP HANA view for this kind of query should not be used as a data source in other SAP HANA views.
SAP BW/4HANAData Modeling PUBLIC 237

● Operands of type DATS are converted into the equivalent number of days since 1 January of the year 1. The (interim) results of the formulas with operands of type DATS are a number that displays the number of days since 1 January of the year 1.
● Operands of type TIMS are converted into the equivalent number of seconds since midnight. The (interim) results of the formulas with operands of type TIMS are a number that displays the number of seconds since midnight.
● As a prerequisite for formula variables, a default value must be defined.
Currency Translation
Currency translation is based on currency translation types. The following functions are supported:
● Exchange rate type● Exchange rate type from variable● Inverse exchange rate● Exchange rate determination using FI module● Dynamic determination of exchange rate type● InfoObject for determining target currency● Source currency from data record● Select target currency when converting● Fixed target currency● Target currency from variable● Fixed time reference: current date, key date, time reference from variable, query key date● Variable time reference: Standard InfoObject, start/end of calendar year, start/end of calendar year/
quarter, start/end of month, exact day● Time shift
The generated SAP HANA view contains the following properties:
● The result of currency translation is rounded after the corresponding TCURX-CURRDEC entry. If this entry does not exist, the result is rounded to two decimal places.
● Heterogeneous currencies are aggregated using the standard aggregation of the key figure.● If the currency translation cannot be performed when the SAP HANA view is called, the error is ignored and
the key figure is not converted.● If the source currency is initial, the key figure is not converted and the resulting currency is NULL.● In the case of native SQL access, the resulting currency can be accessed by using the attribute <UID of key
figure>_UNIT.
Quantity Conversion
Quantity conversion is based on quantity conversion types. The following functions are supported:
● Conversion factors using central units of measure (T006)● Conversion factor using reference InfoObject● Conversion factor using reference InfoObject if available; otherwise central units of measure (T006) are
used
238 PUBLICSAP BW/4HANAData Modeling

● Conversion factor using central units of measure (T006) if available; otherwise reference InfoObject is used
● InfoObject for determining unit of measure● Unit of measure from data record● Select unit of measure for conversion● Fixed source unit of measure● Target unit of measure from variable
The generated SAP HANA view contains the following properties:
● In the case of native SQL access, the resulting unit of measure can be accessed by using the attribute <UID of key figure>_UNIT.
● If the data type of the key figure is QUAN, the result is rounded to three decimal places. If the data type of the key figure is FLTP, the result is rounded to 16 decimal places.
● Heterogeneous quantities are aggregated using the standard aggregation of the key figure.● If quantity conversion cannot be performed when the SAP HANA view is called, the error is ignored and the
key figure is not converted.● If the source quantity is initial, the key figure is not converted and the resulting currency is NULL.
Variables
Variables are parameters of a query, which are used as placeholders for characteristic values. Note the following with regard to default values for variables:
Variable represents single value
Variable represents multilple single values
Variable represents interval or selection options
Supported in the global filter Yes Yes Yes
Supported for restricted key figures
Yes Yes No
Default values supported Supported; must have default value
Supported; must have default value if used in restricted key figures
Supported, except for with "Contains Pattern"
Handling of '#' If the variable is set to '#’ during access to the external SAP HANA view, the applied filter corresponds to the initial value of the characteristic if SAP Note 2404268 has been installed. Otherwise the applied filter corresponds to '#'.
If the variable is set to '#’ during access to the external SAP HANA view, the applied filter corresponds to '#’ and not to the initial value of the characteristic.
If the variable is set to '#’ during access to the external SAP HANA view , the applied filter corresponds to '#’ and not to the initial value of the characteristic.
SAP BW/4HANAData Modeling PUBLIC 239

Variable represents single value
Variable represents multilple single values
Variable represents interval or selection options
Handling of '' If the variable is set to '' during access to the external SAP HANA view, the filter is excluded if SAP Note 2404268 has been installed. If not, the filter value is ' '.
If one of the variable values is set to '’ during access to the external SAP HANA view, the filter is excluded if SAP Note 2404268 has been installed. If note, the filter value is ' '.
If the variable is set to '’ during access to the external SAP HANA view , the filter is not excluded, and the filter value is '’.
For BW query variables that are used in the global filter and in restricted key figures, the following applies:
● The setting Mandatory, Initial Value Not Allowed is converted into Mandatory.● Only one variable with the setting Optional is allowed per selection and per characteristic
Variables with the following properties are supported for currency translation and quantity conversion, for calculated key figures and for restricted key figures:
● The processing type is Manual Entry/Default Value, SAP HANA exit or SAP exit (0CMONTH, 0CWEEK, 0CYEAR, 0CQUART, 0DAT)
● This type represents one value only. With restricted key figures, this type can also represent multiple values.
Variables with the following properties are supported for global restrictions:
● The processing type is Manual Entry/Default Value, SAP HANA exit or SAP exit (0CMONTH, 0CWEEK, 0CYEAR, 0CQUART, 0DAT)
● the operator must include and not exclude values● It represents one single value only, multiple single values, an interval or a selection option.
The generated SAP HANA view contains the following properties:
● BW variables that represent one or more single values are converted into a SAP HANA input parameter. If the SAP HANA view is called using native SQL, the input parameter cannot be supplied. In this case, the default values are applied.
● Using SAP HANA SQL you can supply the parameters with the following addition:
with parameters ('placeholder '=('$$<VARIABLE_NAME>$$',‘<VARIABLE_VALUE'))
● BI clients, which can read the BIMC folder from SAP HANA, can generate a corresponding variable screen.● BW variables for global restrictions that represent an interval or range options are transferred to SAP
HANA views variables. If the SAP HANA view is called using native SQL, these variables are ignored.
If a query with a SAP HANA view uses SAP HANA exit variables, the SAP HANA view will become invalid if the source code of the SAP HANA exit procedure is changed. If you try to call the SAP HANA view, an error message appears. To modify the SAP HANA view, you have to save the query or repair the query using transaction RS2HANA_ADMIN. You can check the SAP HANA views of the queries for this using transaction RS2HANA_ADMIN.
240 PUBLICSAP BW/4HANAData Modeling

Non-Cumulative Key Figures
Non-cumulative key figures with the exception aggregation FIRST, MIN, MAX, or AVG0 are supported.
The query must meet the following conditions:
● If the InfoProvider uses 0FISC* characteristics, the query for 0FISCVARNT must have a global filter of type EQ, or the InfoProvider must have a constant character value defined for 0FISCVARNT. In this case, 0CALDAY must be a dimension or a free characteristic if the InfoProvider contains 0CALDAY as a characteristic.
● It must be possible to determine a finite start time and end time that covers all selectable data. This can be done by using global filters for the time characteristics, for example: 0CALYEAR > = '2013' AND 0CALYEAR < = '2020'
● The set of the time characteristics (0CALDAY, 0CALWEEK, 0CALMONTH, 0CALQUARTER, 0CALYEAR, 0FISCPER and 0FISCYEAR) used in the query must be a subset of exactly one of the following sets. If this is not the case, the system returns error message DBMAN(083): "Hierarchy of the time characteristic is not correct":○ {0CALDAY, 0CALWEEK}○ {0CALDAY, 0CALMONTH, 0CALQUARTER, 0CALYEAR}○ {0CALDAY, 0FISCPER, 0FISCYEAR}
● 0WEEKDAY1 can only be used if characteristic 0CALDAY is contained in the set of used time characteristics.
● 0CALMONTH2 can only be used if characteristic 0CALMONTH is contained in the set of used time characteristics.
● 0FISCPER3 can only be used if characteristic 0FISCPER is contained in the set of used time characteristics.
● 0HALFYEAR1 and 0CALQUART1 can only be used if characteristic 0CALQUARTER is contained in the set of used time characteristics.
● Validity objects for non-cumulative key figures are ignored.● In the case of a CompositeProvider, the selected time characteristics are also restricted to the subset of all
sets of the PartProvider time characteristics, and you have to define a constant character value for 0FISCVARNT.
● The SAP HANA key figures that represent the non-cumulative key figures cannot be freely aggregated after selection from the external SAP HANA view of the BW query. If the external SAP HANA view for a query of this kind is used as a data source in other SAP HANA views, this implies that selections for these other SAP HANA views always have to request the time characteristic with the highest granularity of available attributes from the external SAP HANA view of the query.
● An unlimited number of non-cumulative key figures can be used in the same query.● If a non-cumulative key figure with exception aggregation AVERAGE is used, the average is used with the
weighting on the time characteristic with the highest granularity in the provider. Example: If the provider contains 0CALDAY, the average is weighted by the number of days. If 0CALMONTH is the time characteristic with the highest granularity however, every month is treated the same (regardless of the number of days in it) when the average is calculated.
If a time characteristic is used in the SQL-WHERE condition, it must also be contained in the set of selected attributes. If this is not the case, the system returns an SQL error stating that the UNKEEP attribute cannot be removed.
A good level of performance can be achieved if the query restricts most of the characteristics used with constant values and variables of the single value type or multiple single values in the global filter. (Variables of
SAP BW/4HANAData Modeling PUBLIC 241

the single value type can also be used in the report filter). The application can then restrict the result set of the SAP HANA view dynamically using the variables instead of using the SQL-WHERE condition. This ensures that the filter is applied prior to calculation of the non-cumulative key figures. If AVERAGE non-cumulative key figures are queried, we recommend always querying a time characteristic and setting a filter for it.
If no time characteristic is restricted, the entire time period defined in the static filter of the query is used to determine the AVERAGE key figure, even if no data is posted in this time period.
3.6.1.5.2 Ignored BW Functions
The following BW functions are ignored. However, the SAP HANA view can still be generated:
● Hierarchy display settings● Default values for characteristics● Conditions● Exceptions● Local calculations● Display options (number of decimal places)● Zero suppression● Query properties (cache mode, read mode, near-line storage mode)● Hidden key figures● Display attributes● Stable data during navigation: You can configure the query properties so that the data is stable from the
query start onwards - even if new data are loaded into the InfoProvider.For CompositeProviders, new data is always displayed, and the data in a displayed list does not remain consistent with the expanded list view.
● Structures: The information on the structure is not transferred from the BW query to the SAP HANA view.
ExampleThe query contains two structures in the columns. One structure contains m key figures and the other structure contains n selections. The number of key figures in the SAP HANA view is m*n.
3.6.1.5.3 Unsupported BW Functions
The following functions are not supported for generating SAP HANA views from queries. The list is not exhaustive. You should assume that anything not included in the list of supported BW functions is not supported. If any of these functions are contained in the query, no SAP HANA views can be generated.
● Constant selection● Definitions on a cell● Exception aggregation
242 PUBLICSAP BW/4HANAData Modeling

3.6.1.6 Determining Text Fields
The external SAP HANA view of an InfoProvider always includes the key words of a characteristic as well as a corresponding text field if the characteristic contains texts. If you have not maintained any InfoProvider-specific display options, the next type setting of the InfoObject determines which text field is used in the external SAP HANA view.
Theser are the settings and their effects on the text type of the external SAP HANA views:
InfoProvider-specific display options for a characteristic Effects on the text type of the external SAP HANA view
No display, key and text, text, key, text and key The text type setting of the InfoObject is used.
Long text, text and key as long text, key and text as long text Long text
Medium text, text and key as medium text, key and text as medium text
Medium Text
Short text, text and key as short text, key and text as short text
Short text
The external SAP HANA view of a query always ignores the Text Display setting of a characteristic. The text type of the external SAP HANASAP HANA view of the InfoProvider is used. These are the query-specific Display as options for a characteristic and the effects on the external SAP HANA view:
Query specific "Display as” options Effects on the external SAP HANA view
No display The characteristic is a hidden attribute in the external SAP HANA view.
Key and Text Key and text, sequence is ignored
Text Text only
Key Key only
Text and Key Key and text, sequence is ignored
The query-specific Display as option is only taken into account if the Use Characteristic Setting is not selected.
3.6.1.7 Using Near-Line Storage
When using SAP HANA Smart Data Access and SAP IQ, the external SAP HANA view for a DataStore object also contains the data from the NLS archive.
The external SAP HANA view for CompositeProviders contains the data from the NLS archive for the PartProvider of type DataStore-Objekt if SAP HANA Smart Data Access and SAP IQ are used.
SAP BW/4HANAData Modeling PUBLIC 243

The external SAP HANA view of an analytic query contains the data from the NLS archive if the external SAP HANA view of the InfoProvider contains the data from the NLS archive.
The additional parameter _read_nls is available in the SAP HANA view. This parameter can be set to on (read from NLS archive) or off (do not read from NLS archive). The standard value for this parameter is derived from the InfoProvider’s near-line access setting.
The pruning mechanism is active.
3.6.1.8 Pruning
When accessing the external SAP HANA view of a CompositeProvider or InfoProvider with an NLS archive or the external SAP HANA view of a query that uses this kind of InfoProvider, native SAP HANA pruning is performed.
The pruning information that is used for native SAP HANA pruning for the CompositeProvider can be maintained using ABAP program RSPP_PART_MAINTAIN. This pruning information is also used for the ABAP runtime. Pruning information for the semantic group is maintained automatically. Pruning information for the InfoProvider with an NLS archive is derived automatically from the archiving settings.
Time derivation is supported: Filter values that are applied to 0CALYEAR, 0CALQUARTER, 0CALMONTH and 0CALDAY are automatically converted into filter values. These are applied to all of these four time attributes.
ExampleThe pruning information is 0CALDAY = 20110202. The filter when accessing the SAP HANA view is 0CALYEAR = 2009. The filter is automatically converted into 0CALDAY >= 20090101 AND 0CALDAY <= 20091231. The pruning information can be processed on the basis of this.
You can find tracing information for native SAP HANA pruning in the administration tool for the SAP HANA Studio if the tracing level "info" is set for component "llang" in the trace configuration for the SAP HANA index server. Search "BW-on-HANA pruning” in the index server trace file. This row marks the start of the process trace for the native SAP HANA pruning. This trace can be used to find out whether and how the processing information was processed, and which parts are excluded from access. The performance/plan visualization tools in the SAP HANA studio can also be used to find out which parts are excluded.
No native SAP HANA pruning is performed if the WHERE condition is empty, or if null (or match) is used in the WHERE conditions.
3.6.1.9 Authorizations for Generated SAP HANA Views
To be able to access SAP HANA views that have been generated from the SAP BW∕4HANA system, you need certain authorizations in the SAP HANA system and in the SAP BW∕4HANA system.
You can use various transactions for administration of authorizations. More Information:
NoteThe authorization concept for the SAP HANAview is very complex, because two authorization concepts are combined. We recommend that you assign the authorization for the authorization replication as restrictive.
244 PUBLICSAP BW/4HANAData Modeling

Prerequisites in SAP HANA
To be able to access SAP HANA views that have been generated from the SAP BW∕4HANA system, you need the following authorizations:
● Object privilege: SELECT on _SYS_BI● Object privilege: EXECUTE on REPOSITORY_REST(SYS)● Package privilege: REPO.READ on the content package where the generated SAP HANA views are stored.
More Information:
More information: http://help.sap.com/hana_platform Security Information SAP HANA Security Guide SAP HANA Authorization
The session client has to correspond to the SAP BW∕4HANA system client. If roles are used for the replication ( Assignment Type is M) [page 246], the role user must be maintained. More Information: Using the Role User [page 246]
Prerequisites in the SAP BW∕4HANA System
To be able to generate SAP HANA views from the SAP BW∕4HANA system, you need the following authorizations:
● The SAP HANA authorizations must be assigned to the SAP BW∕4HANA users. More Information: https://help.sap.com/doc/saphelp_ewm91/9.1/en-US/22/47bbe205af4c9b9ffef355f9d1a89d/frameset.htm
● The analysis authorizations must be defined for all characteristics flagged as authorization-relevant in the InfoProvider. These authorizations must also be assigned to the SAP BW∕4HANA user. They must also contain all technical characteristics for the InfoProvider, the key figures and the activity.These include the following characteristics:○ 0TCAACTVT○ 0TCAIPPROV○ 0TCAVALID○ 0TCAKYFNM
More Information: Prerequisites for the Management of Analysis Authorizations [page 1236]
Generating the Authorizations
The other authorizations that are needed are generated from the SAP BW∕4HANA system when activated and assigned to the user via roles. An object authorization SELECT is created here for a generated view, and SAP HANA analysis authorizations for the BW analysis authorizations. If a SAP HANA view is generated for a query with SAP HANA exit variable, then the user _SYS_REPO contains the object privilege EXECUTE for the SAP HANA exit procedure.
The roles that are generated always have the following structure for InfoProviders (also for InfoObjects as InfoProviders): <RS2HANA> / <SID> _ <Name of the InfoProvider>. Roles have the following structure for InfoObjects with master data: <RS2HANA> / <SID> _ <Name of the InfoProvider>. If both types of views are
SAP BW/4HANAData Modeling PUBLIC 245

generated for an InfoObject, the reporting view is given the following name: <RS2HANA> / <SID> _ <Name of the InfoProvider>_REPORTING.
You can define in Customizing that the SAP HANA authorizations are assigned to the user directly instead of via roles. To do this, go to Customizing and choose SAP BW/4HANA Customizing Implementation GuideSAP BW/4HANA Data Modeling Settings for Generating SAP HANA Views for BW Objects . You can use assignment type M here to set assignment of multiple roles. The naming convention for the roles then changes to <RS2HANA> / <SID> _ <Name for the roles specified by you in Customizing><user name>. You can also make these settings in SAP BW∕4HANA use General View Settings.
SAP BW∕4HANA authorizations cannot be converted 1:1 to SAP HANA. The following restrictions apply to using SAP BW∕4HANA authorizations as SAP HANA authorizations and are not supported:
● Aggregation authorizations (:)● Restrictions to specific key figures (entries for characteristic/dimension 0TCAKYFNM). Only I CP * for
characteristic/dimension 0TCAKYFNM is supported
Hierarchies are converted into a flat list, and an additional technical column (which is invisible) is added to the SAP HANA view.
RecommendationIf changes are made to the authorizations in the SAP BW∕4HANA system, the SAP HANA analysis authorizations are not automatically adjusted. You should therefore schedule a regular process chain with process type Replicate Authorizations of BW/4 HANA Users to SAP HANA.
Mass Generation of Authorizations
If you want to create an identical SAP HANA user for multiple SAP BW∕4HANA users, you can use report RSUSR_DBMS_USERS for mass synchronization. For more information, see SAP Note 1927767 .
3.6.1.9.1 Using the Role User
When roles are used for replication, the role user must be maintained. Otherwise the replication terminates with an error.
To be able to use the role user, you have to make the following settings:
● You have to create an entry for the user in transaction DBCO.
● You define this entry in Customizing under SAP BW/4HANA Customizing Implementation Guide SAP BW/4HANA Data Modeling Settings for Generating External SAP HANA Views for BW Objects , under DB Connection Name.
The user for role maintenance must meet the following prerequisites:
● The DBMS user defined in transaction DBCO must exist in the database.● The SAPSID user cannot be taken. Another user must be used, preferably one that only exists for this.● The host used must be the same as the host of the ABAP/BW4 system.
246 PUBLICSAP BW/4HANAData Modeling

● The database connection must use the same server as the standard connection.● The database connection in transaction DBCO must not begin with R/3*.● The defined DBMS user must be active.● The defined DBMS user must be able to log on.● The defined DBMS user must not be locked.
3.6.1.10 Storing Generated SAP HANA Views
Package in SAP HANA
The generated SAP HANA views are stored in a content package in SAP HANA. This Content package should be write-protected. Only read-only authorization should be given for the SAP HANA views.
In SAP BW∕4HANA under General View Settings you can set which SAP HANA content package the SAP HANA views are to be stored in.
If you have more than one SAP BW∕4HANA system on your SAP HANA database, you have to specify a different package for each SAP BW∕4HANA system.
If the present package does not contain any objects, you can change its name in Customizing. If it does contain objects, and you want to change its name anyway, you first have to create a new Content package in SAP HANA Modeler and move the objects there.
If you do not make any entries for the package in Customizing, the name of the Content package will be system-local.bw.bw2hana. If the InfoProvider that you want to generate the SAP HANA view from is in a special namespace, a sub-package is created with this namespace.
For CompositeProviders from the BW workspace, the system creates a sub-package called workspace.
ExampleThe CompositeProvider is called @3MY_COPR and is created in BW workspace my_workspace. The package is named system-local.bw.bw2hana.workspaces.my_workspace, and the created view is named MY_QPROV.
Name of SAP HANAView
The SAP HANA view is given the name of the InfoProvider minus the namespace prefix.
For InfoObjects, the name of the SAP HANA view for the master data is the same as the name of the InfoObject without the namespace prefix, and the name of the SAP HANA view for the master data provider is _REPORTING without the namespace prefix.
For queries, a subpackage is created with the name of the InfoProvider.
SAP BW/4HANAData Modeling PUBLIC 247

ExampleThe query is called Query my_query, based on the InfoProvder my_provider: The package is called system-local.bw.bw2hana.my_provider, and the view is called my_query.
For CompositeProviders in the BW workspaces, the generated SAP HANA view is given the name of the CompositeProvider minus the @3 prefix.
Type of the SAP HANA View
The type of the SAP HANA view is always calculation view.
3.6.1.11 Transporting Generated SAP HANA Views
Generated SAP HANA views can be transported.
To transport SAP HANA view, you first have to create an RFC connection in transaction RSTPRFC. More Information: Importing Client-Dependent Objects [page 1302]
To check that everything is correctly configured, you can call transaction RS2HANA_CHECK and run the RFC Destination for AFTER_IMPORT check. More Information:
248 PUBLICSAP BW/4HANAData Modeling

4 Data Acquisition
SAP BW∕4HANA offers flexible ways of integrating data from various sources. Depending on the data warehousing strategy for your application scenario, you can extract and transform the data from the source and load it into the SAP NetWeaver BW system, or directly access the data in the source for reporting an analysis purposes, without storing it physically in the Enterprise Data Warehouse. The process of physical data acquisition, also known as Extraction, Transformation and Loading (ETL),
The sources are connected with the SAP BW∕4HANA using source systems. SAP BW∕4HANA provides interfaces for extracting and transferring data from a large number of sources. To transfer the data, you need a DataSource in SAP BW∕4HANA. The data is loaded in SAP BW∕4HANA using the data transfer process, with transformation and filters. Transformations are used in the data transformation process in order to consolidate, clean and integrate the data.
4.1 Source System
You use source systems in SAP BW∕4HANA to set up the connection to a source for the data transfer.
Source systems are displayed in the BW Modeling tools in the Project Explorer view in the Data Sources tree. You can create source systems here and call source system functions.
The following types of source system are available:
● ODP source systems, to provide data via the ODP data replication API● SAP HANA source systems● Big Data source systems● Flat files that metadata is maintained for manually and is provided using a file interface
Related Information
Working with Source Systems [page 294]
4.1.1 Transferring Data with an SAP HANA Source System
The SAP HANA source system provides central and unified access to sources that are provided using SAP HANA smart data integration or SAP HANA smart data access. It also rovides access to tables, views or native
SAP BW/4HANAData Acquisition PUBLIC 249

DataStore objects from the local SAP HANA databse or a SAP HANA tenant databse (Multitenant Database Container).
The SAP HANA source system allows various source system configurations that make it possible to access tables, views or native DataStore objects from database management systems:
● SAP HANA Smart Data AccessFor databases that are connected with SAP BW∕4HANA by SAP HANA Smart Data Access. When defining the source system, you define which remote source (database) and which schema to access.For databases and other external systems that are connected with SAP BW∕4HANA by SAP HANA Smart Data Integration.
● Local SAP HANA Database SchemaFor database tables, views, or native DataStore objects of the SAP HANA database from SAP BW∕4HANA.
● SAP HANA Tenant Database SchemaFor database tables, views or native DataStore objects of a database container of the SAP HANA database of the SAP BW∕4HANA system.
Use
You can access the data virtually using Open ODS views and CompositeProviders. Data transfer is supported in full mode for all sources, provided the source supports this (generic delta).
For many data provisioning adapters, real-time replication is supported with the SAP HANA source system.
Related Information
Creating a Source System of Type SAP HANA Local Database Schema [page 299]Creating a Source System of Type SAP HANA Smart Data Access [page 300]Creating a Source System of Type SAP HANA Tenant Database Schema [page 301]Creating an SAP HANA DataSource [page 314]
4.1.1.1 Connection Types for the SAP HANA Source System
Various connection types for the SAP HANA source system are available: Connection types that you can use to access source objects in a schema of the local SAP HANA database or in a schema of a SAP HANA tenant database, and a further connection type that you can use to access objects belonging to a source connected with SAP HANA Smart Data Access or SAP HANA Smart Data Integration.
250 PUBLICSAP BW/4HANA
Data Acquisition

Local SAP HANA Database Schema
You use this option if a particular schema in the local SAP HANA database is to be used as the source system. You can then access tables, views or native DataStore objects belonging to the SAP HANA schema defined in the source system configuration.
You specify the schema as a connection parameter.
TipYou can also create a source system of this connection type directly when creating an Open ODS view.
SAP HANA Smart Data Access
Choose this option if you want the source system to be an external data source that is connected by Smart Data Access with the SAP HANA database on which the SAP BW∕4HANA system is running. With this connection type, you can also use sources provided by SAP HANA Smart Data Integration. The connection to the external sources takes place using data provisioning adapters.
As connection parameters, you specify the remote source that connects the source to SAP HANA as well as an area of the source for which access is available via the source system. Depending on the remote source, and therefore, on the adapter, the area is specified either by specifying the remote database and an owner or schema, or, if the source has a hierarchical folder structure instead of schemas, using a path prefix.
SAP HANA Smart Data IntegrationSAP HANA Smart Data Integration allows you to access data from various sources in real time or to transfer the data to the SAP BW∕4HANA. It enables real-time high-speed data acquisition and transferal of masse data and federations. The connection to the external sources takes place using data provisioning adapters. Smart data integration provides adapters for a range of sources and allows custom adapters to be developed using an SDK.
TipYou can also create a source system of this connection type directly when creating an Open ODS view.
SAP HANA Tenant Database Schema
SAP HANA supports multiple isolated databases in a single SAP HANA system. These are known as tenant databases. A SAP HANA system that was installed in Multiple Database mode can contain more than one tenant database.
You use this option if a particular schema in a tenant database of the SAP HANA system is to be used as the source system. You can then access tables, views or native DataStore objects of the schema of the tenant database defined in the source system configuration.
You specify the schema as a connection parameter.
SAP BW/4HANAData Acquisition PUBLIC 251

TipYou can also create a source system of this connection type directly when creating an Open ODS view.
More information
Related Information
SAP HANA Smart Data Access and SAP HANA Smart Data Integration:
● SAP HANA Smart Data Access in the SAP HANA Administration Guide for SAP HANA Platform● SAP HANA Smart Data Integration● Administration Guide for SAP HANA Smart Data Integration and SAP HANA Smart Data Quality● SAP HANA Smart Data Integration and all its patches (SAP HANA SDI 2.0) Product Availability Matrix
(PAM)
SAP HANA Tenant Database Schema
For more information about prerequisites and supported database objects, see SAP Note 2312583 . - FAQ. BW and SAP HANA Tenant Database: Cross-Database Access in SAP HANA Tenant Databases.
4.1.1.2 Path Prefix and Suffix
For connection type SAP HANA Smart Data Access, there are remote sources that provide a hierarchical folder structure instead of a valid database/schema combination in their metadata.
The path is the link for the folder names from the root node to the source object in the structure. The path excludes the remote source (root node) and the source object. It can be divided into a path prefix and a path suffix. The path prefix is the part of the path that is defined in the source system. The path suffix is the remaining part of the path, excluding the source object, which is defined in the DataSource. Both the path prefix and the path suffix can be empty.
The path prefix is a local system setting. It is therefore possible to define a different path prefix in the development system to the one in the quality system or production system. The overview of the objects that can be selected is also improved by restricting it to a part of the folder structure.
4.1.1.3 Real-Time Replication
Real-time replication can be implemented with the SAP HANA source system with two approaches or connection types: SAP BW∕4HANA-controlled with SAP HANA Smart Data Integration or controlled by an external application replicated to a local SAP HANA database schema.
Real-time replication controlled by SAP BW∕4HANA is possible using connection type SAP HANA Smart Data Accesss or, to be more precise, SAP HANA Smart Data Integration. SAP HANA Smart Data Integration provides
252 PUBLICSAP BW/4HANA
Data Acquisition

a large number of Smart Data Integration Data Provisioning adapters that support real-time replication. With this approach, SAP BW∕4HANA controls the replication process by generating SAP HANA remote subcriptions.
Alternatively, the (real-time) replication process can also be controlled by an external application. This type of application can either be a SAP HANA replication task or a flowgraph in the same SAP HANA, or an SLT replication server or another ETL process. The target table or target view of the replication process is in a local SAP HANA schema connected as a source system to the SAP BW∕4HANA system.
The following graphics illustrate the approaches:
SAP BW/4HANAData Acquisition PUBLIC 253

254 PUBLICSAP BW/4HANA
Data Acquisition

4.1.1.3.1 Real-Time Replication (controlled by SAP BW∕4HANA)
Using connection type SAP HANA Smart Data Access or, to be precise, SAP HANA Smart Data Integration, you can control real-time replication by SAP BW∕4HANA. To do this, you can choose from a large number of Smart Data Integration Data Provisioning adapters that support real-time replication.
Using SAP HANA remote subscriptions generated by the SAP BW∕4HANA system, you can replicate data from the SAP HANA source system to the SAP BW∕4HANA system in real-time. The data is available for updating to a DataStore object (advanced) or for direct query access via an Open ODS view. There are two types of remote subscription:
● Remote subscriptions of type UPSERT return a view of the actual status of the data (current data) in the target table of the replication in SAP BW∕4HANA.
SAP BW/4HANAData Acquisition PUBLIC 255

● Remote subscriptions of type INSERT return the complete delta history in the target table of the replication in SAP BW∕4HANA.With remote subscriptions of type INSERT, delta data (with complete before and after images) can be updated to all types of DataStore objects (advanced).
If the DataSource uses a data provisioning adapter that supports real-time replication, you can define which type or types of remot subscription should be used for real-time replication. You do this in DataSource maintenance on the Extraction tab. The selection depends on the required scenario.
Related Information
https://help.sap.com/viewer/p/HANA_SMART_DATA_INTEGRATIONAdministration Guide for SAP HANA Smart Data Integration and SAP HANA Smart Data Quality
4.1.1.3.1.1 Remote Subscription of Type UPSERT
Remote subscriptions of type UPSERT provide a view of the current data in the target table of the replication.
A remote subscription of type UPSERT replicates data in real-time from a remote source object to a table on the local SAP HANA database. Type UPSERT means that all types of data changes (inserts, updates, and deletions) are written to the target table with an UPSERT SQL command. For keys that have been deleted from the remote source object, the statement writes the value D to column SDI_CHANGE_TYPE in the target table. In other cases, the statement writes the value A to column SDI_CHANGE_TYPE. The commit time stamp of the transaction is written to column SDI_CHANGE_TIME.
Use
This type of real-time replication can be used in order to accelerate reporting on an Open ODS view that has a SAP HANA DataSource as its source. It also allows delta extraction and data streaming from a SAP HANA DataSource based on the time stamps in column SDI_CHANGE_TIME.
Dependencies
If you select both remote subscription types UPSERT and INSERT at the same time for a DataSource, the delta procedure is determined by remote subscription type INSERT .
If you only select remote subscription type UPSERT for a DataSource, the delta procedure changes automatically to AIMD After images with deletion indicator. Three further fields are then added to the DataSource:
● SDI_CHANGE_TIME: Returns the commit time stamp of the last data change
256 PUBLICSAP BW/4HANA
Data Acquisition

● SDI_CHANGE_TYPE: Displays the type of the last data change● SDI_RECORD_MODE: Translates the change type into corresponding values of the technical characteristic
0RECORDMODE
When the DataSource is activated for remote subscription type UPSERT , four additional SAP HANA- objects are created:
● The remote subscription● A target table for the real-time replication
The primary key of the target table is the same key as the primary key of the remote source object and the virtual table. The additional columns for the delta extraction are not part of the primary key.
● Two SQL views on the target table – one view for the query access and the full extraction, and another view for delta and delta initialization requestsThe view for the query access and full extraction automatically filters out the deletions (rows with value D in column SDI_CHANGE_TYPE).
In the target table, the additional columns have the following properties:
● SDI_CHANGE_TIME has data type TIMESTAMP.● SDI_CHANGE_TYPE has data type NVARCHAR(1) and value D for deleted record, and A (as in Autocorrect)
for inserted or updated records.● SDI_RECORD_MODE is not part of the target table. It is calculated in the generated SQL view.
In the SQL view, the additional columns have the following properties:
● SDI_CHANGE_TIME is converted into a NUMC(21) value by removal of the decimal point from the DECIMAL(14,7) display. The time stamp 2015-11-11 11:11:11, for example, which is displayed in SAP HANA as decimal value 20151111111111.0000000, is converted into the numerical character value '201511111111110000000' so that it can be consumed more easily in ABAP.
● SDI_CHANGE_TYPE is passed on as CHAR(1). As already mentioned however, value D only occurs in the view for delta extraction, as deleted records are not relevant for query access and full extraction.
● SDI_RECORD_MODE is calculated for the SDI_CHANGE_TYPE value D as 0RECORDMODE value D (delete image) and as ' ' (blank, after-image therefore) for all other SDI_CHANGE_TYPE values.
4.1.1.3.1.2 Remote Subscription of Type INSERT
Remote subscriptions of type INSERT return the complete delta history in the target table of the replication.
A remote subscription of type INSERT replicates data in real time from a remote source object to a table on the local SAP HANA database. Type INSERT means that all types of data changes (inserts, updates, and deletions) are written to the target table with an INSERT SQL command. The statement writes the original change type to the SDI_CHANGE_TYPE column. For each data change, a commit time stamp is written to the SDI_CHANGE_TIME column and a unique sequence number is written to the SDI_CHANGE_SEQUENCE column.
Use
This type of real-time replication can be used to track all data changes that a remote source object has experienced. In this way, you can, for example, process the complete data change history. Another advantage
SAP BW/4HANAData Acquisition PUBLIC 257

of the INSERT remote subscription type compared to the UPSERT type is that before and after images are recorded for each data change. This makes it possible to transfer the data changes to an InfoCube-like INSERT-only target or to aggregate the key figures during the transformation with the "Summation" aggregation behavior. The data target does not, therefore, have to have the same key as the remote source object. Neither are possible with remote subscription type UPSERT, which only delivers after images with deletion indicator.
Dependencies
If you select the INSERT remote subscription type for a DataSource, the delta process of the DataSource changes automatically to ABR Complete delta update with deletion indicator. Five further fields are then added to the DataSource:
● SDI_CHANGE_TIME: Returns the commit time stamp of the last data change● SDI_CHANGE_SEQUENCE: Returns the sequence number for each data change. The sequence number,
together with the commit time stamp, identifies each record uniquely.● SDI_CHANGE_TYPE: Displays the type of the last data change. For updates, two records are added: one
with the values prior to the change and one with the values after the change.● SDI_RECORD_MODE: Translates the change type into corresponding values of the technical characteristic
0RECORDMODE. For updates: a before image and an after image● SDI_ENTITY_COUNTER: Allows a distinction to be made between rows with zero values in the remote
source object and rows that have been deleted from the remote source object
When the DataSource is activated for remote subscription type INSERT, three additional SAP HANA objects are generated:
● The remote subscription● A target table for the real-time replication
The primary key for the target table is SDI_CHANGE_TIME and SDI_CHANGE_SEQUENCE, since the primary key values of a record that has been changed in the remote source object are contained multiple times in the target table.
● An SQL view on the target table
In the target table, the additional columns have the following properties:
● SDI_CHANGE_TIME has data type TIMESTAMP.● SDI_CHANGE_SEQUENCE has data type INTEGER.● SDI_CHANGE_TYPE has data type NVARCHAR(1) and value I for inserted records, valueD for deleted
records, value B for values prior to an update, and value U for values after an update.● SDI_RECORD_MODE is not part of the target table. It is calculated in the generated SQL view.● SDI_ENTITY_COUNTER is not part of the target table. It is calculated in the generated SQL view.
In the SQL view, the additional columns have the following properties:
● SDI_CHANGE_TIME is converted into a NUMC(21) value by removal of the decimal point from the DECIMAL(14,7) display. The time stamp 2015-11-11 11:11:11, for example, which is displayed in SAP HANA as decimal value 20151111111111.0000000, is converted into the numerical character value '201511111111110000000' so that it can be consumed more easily in ABAP.
● SDI_CHANGE_SEQUENCE is passed as INT4.● SDI_CHANGE_TYPE is passed as CHAR(1). However, for values B and D, the signs for key figures are
reversed with aggregation behavior "Summation".
258 PUBLICSAP BW/4HANA
Data Acquisition

● SDI_RECORD_MODE is calculated for the SDI_CHANGE_TYPE value B as 0RECORDMODE value X (before image), as R (reverse image) for the SDI_CHANGE_TYPE value D, and as ' ' (blank, that is, after image) for all other SDI_CHANGE_TYPE values.
● SDI_ENTITY_COUNTER is calculated for the change type values B and D as -1, and for all other change types as 1.
4.1.1.3.1.3 Key Figure Summation for Before Images Without After Images
If you use the Complete delta update with deletion flag (ABR) delta process to transfer data changes (delta) from an SAP HANA source system to a DataStore object with change log, note the following for the transformation. If you select the "Overwrite" aggregation type for all key figures and do not select the "Summation" aggregation type for any key figure, the before images are filtered out in the transformation and only deletions and after images are taken into account. This applies even if a before image is not followed by an after image. For extractors in SAP Business Suite, this case does not occur in the "Complete delta update with deletion flag" (ABR) delta process. This can occur however occur if database tables are used as a source, as illustrated in the following example.
A table has 3 fields (A, B, and C), whereby A is the only key field, B is a selection field, and C is a key figure:
Column A Column B Column C
X X 10
Y Y 10
The following SQL command changes columns A and C of the first row to 'Z' and 17:
Sample Code
update example set a = 'Z', c = 17 where a = 'X';
The corresponding before image and after image have different keys:
Column A Column B Column C Change Type
X X -10 Before image
Z X 17 After image
The following SQL command changes columns B and C of the second row to 'Z' and 18:
Sample Code
update example set b = 'Z', c = 18 where a = 'Y';
SAP BW/4HANAData Acquisition PUBLIC 259

If a filter that selects values from 'X' to 'Y' only is defined on column B in the DTP, the after image is filtered out and only the before image is taken into account for activation.
Column A Column B Column C Change Type
Y X -10 Before image
Y Z 18 After image
In each case, the activation result does not correspond to the expected result or to the result that would be obtained using the "Summation" aggregation type.
For this reason, choose "Summation" for all key figures if you are not sure whether before images without after images could arise as in the example shown. Note that this recommendation applies only if you are transferring data from an SAP HANA source system to a DataStore object with change log using the Complete delta update with deletion indicator (ABR) delta process.
4.1.1.3.1.4 Scenarios for Data Access Using Smart Data Access
The following figure shows the possible scenarios for direct access and data replication if you have set up the source system connection in the SAP HANA source system using SAP HANA smart data access. Depending on the data provisioning adapter used and the use of SAP HANA smart data integration, various options are available for direct access or extraction to data targets.
260 PUBLICSAP BW/4HANA
Data Acquisition

4.1.1.3.1.5 Starting an SAP HANA Remote Subscription
For a DataSource with real-time replication, you can perform the delta initialization, that is, start the remote subscription, the initial data transfer, and the data replication.
1. You are in the BW modeling tools in the DataSource on the Extraction tab page.2. For each remote subscription selected under Real-Time Replication, choose Manage. The administration
screen of the remote subscription for the DataSource appears.3. To start the delta initialization, choose Execute.4. Specify whether you want the delta initialization to be started in dialog mode or in the background.
If it is executed in the background, you can call the job log by choosing the Jobs pushbutton.
Executing the Delta Initialization Using a Process Chain
You can add the delta initialization to a process chain using the Start SAP HANA Remote Subscription process type. In this case, you specify in the process variant maintenance how the system is to behave in the event of a failed or repeated delta initialization for a remote subscription. If the remote subscription has a status that describes an intermediate state (for example, MAT_START_BEG_MARKER or AUTO_CORRECT_CHANGE_DATA), the system resets the remote subscription by default and deletes the data from the target table. If the remote subscription has an active status (APPLY_CHANGE_DATA), the system terminates the process with a success message by default.
For information about the remote subscription status, see Remote Subscription States for Data Provisioning in the Administration Guide for SAP HANA Smart Data Integration and SAP HANA Smart Data Quality.
Related Information
Administration Guide for SAP HANA Smart Data Integration and SAP HANA Smart Data Quality
4.1.1.3.1.6 Administration and Monitoring of Remote Subscriptions
Administration of Remote Subscriptions
By choosing the Manage pushbutton for a selected remote subscription of a DataSource with real-time replication, under Real-Time Replication on the Extraction tab page, you can open the administration screen for the remote subscription.
SAP BW/4HANAData Acquisition PUBLIC 261

You can select the following functions here:
● You can perform a delta initialization with or without data transfer for the remote subscription. More information: Starting an SAP HANA Remote Subscription [page 261]
● If you have added the delta initialization to a process chain, you can call process chain maintenance by choosing the Process Chain pushbutton in the toolbar.
● You can check the current status of the remote subscription by choosing the Check pushbutton. The status is then displayed above the pushbutton.
● You can reset the remote subscription and delete the data in the target table by choosing the Reset pushbutton in the toolbar. This is relevant, for example, if you have a view as a source and have added new columns to this view so that you can perform a new delta initialization.
● You can call an overview of all remote subscriptions in SAP BW∕4HANA by choosing the Overview button in the toolbar.
Overview of the Remote Subscriptions in SAP BW∕4HANA
In the Overview SAP HANA Remote Subscriptions, information about the remote subscriptions is displayed in a table.
By clicking an entry in the Exceptions column, you can display the corresponding error message. By choosing the Subscription Monitor pushbutton in the toolbar of the overview, you can open the data provisioning remote subscription monitor in SAP HANA, where you can analyze and monitor the error further.
NoteWith SAP HANA Smart Data Integration and SAP HANA Smart Data Quality Version 2.0 SP 02 Patch 2 (2.2.2) for SAP HANA 2.0 SPS 02, the data provisioning remote subscription monitor in the SAP HANA cockpit can display the DataSource name and source system name for a remote subscription in column Design Time Name in table Remote Subscription Monitor. For DataSources activated in SAP BW∕4HANA 1.0 SPS04 or higher, this information is displayed automatically. For DataSources activated in earlier releases, this information can be added by re-activating the DataSource.
You can also see from the Last Message Applied column whether there is a problem with replication with the remote subscription. This shows when the last change was transferred. A comparison between the virtual table and the target table of the remote subscription can also be helpful in analyzing errors.
For more information about remote subscription monitoring, see Administration Guide for SAP HANA Smart Data Integration and SAP HANA Smart Data Quality.
Related Information
Administration Guide for SAP HANA Smart Data Integration and SAP HANA Smart Data Quality
262 PUBLICSAP BW/4HANA
Data Acquisition

4.1.1.3.1.7 Reorganizing Target Tables for Real-Time Replication
Target tables for real-time replication (delta tables) grow continuously so long as the remote subscription remains active and has not been reset. By reorganizing, you can set a minimum retention period after which data changes that have been successfully fetched by all data transfer processes extracting from the target tables will be compressed.
Context
No records are deleted from the target tables in real-time replication with remote subscriptions of type INSERT or replication with remote subscriptions of type UPSERT. It is therefore necessary to regularly perform the housekeeping task of compressing data changes that are no longer required (delta history). This is particularly important for remote subscriptions of type INSERT, as all data changes are added to the target table here. Housekeeping is also important for remote subscriptions of type UPSERT however, as the number of logically deleted records can increase sharply over time.
Data changes that have been successfully fetched by all data transfer processes extracting from the target tables are generally no longer needed, apart from in the following cases:
● A new data target is added and has to be filled initially.● An existing data target has to be reloaded.
Reorganisation handles data changes requiring compression in such a way that these cases apply. In other situations, where the data changes are still required, reorganizations should not be used. To prevent unwanted loss of data, reorganization must be started or planned explicitly by an administrator. There is no automatic scheduling or execution by the system.
Procedure
1. Go to Administration in the Data Warehousing Workbench and choose Monitors SAP HANA Remote Subscriptions .
The Remote Subscriptions overview screen appears.
2. Choose Goto Reorganize Delta Tables from the menu.3. Specify a minimum retention period in hours.
The minimum retention period applies for data changes in a target table for real-time replication after all data transfer processes extracting from the table have successfully propagated the data to the connected targets.
4. To perform the reorganization, choose one of the following options:
SAP BW/4HANAData Acquisition PUBLIC 263

Option Description
Programm Execute in Background
If you choose this option, you can set the start conditions and frequency of the reorganization.
(Quick Schedule) button
You can use this option if no periodic scheduling is displayed in the status row under the minimum retention period, and you have the required authorizations. If you choose this option, reorganization is scheduled daily at 2:00:22 (system time) with the BW background user as the executing user.
Program Execute For debugging purposes, reorganization can be executed in the dialog.
In the status row, the system indicates whether reorganization is scheduled as a periodic job.
Results
A periodically scheduled reorganization can compress data changes as soon as the minimum retention period has expired.
For remote subscription type UPSERT, the compression deletes the logically deleted records (all records with a SDI_CHANGE_TYPE value D) that have a SDI_CHANGE_TIME value that is before the expiry date.
For remote subscription type INSERT, the compression works differently depending on whether the record was deleted on the expiry date or logically existed on the expiry date:
● Records that were deleted on the expiry date are identified by the last SDI_CHANGE_TYPE value before the expiry date being B (before image) or D (deletion). These records are deleted, together with all older records having the same semantic key.
● Records that logically existed on the expiry date are identified by the last SDI_CHANGE_TYPE value before the expiry date being I (insert) or U (update). The SDI_CHANGE_TYPE of these records is set to I (insert), and all older records with the same semantic key are deleted.
Next Steps
If reorganization is scheduled periodically, you can monitor execution of the job by pressing the (Job Overview) button.
In the logs of completed jobs, you can see how many records have been processed per DataSource. You can also delete released jobs in the Job Overview in order to reset the reorganization scheduling.
264 PUBLICSAP BW/4HANA
Data Acquisition

4.1.1.3.1.8 Changing the Remote Subscription Type
You can change the remote subscription type for real-time replication for an active DataSource. You can switch from one remote subscription type to another, select an additional remote subscription type, or deactivate real-time replication. Note, however, that such changes can affect data extraction and direct access.
You can change the selection for real-time replication for an active DataSource in the DataSource editor if the data provisioning adapter used by the DataSource supports real-time replication. You can use the Change Remote Subscription Type pushbutton on the Extraction tab page to do this. When you choose this pushbutton, a wizard opens in which you make the change in the first step. In the next step, the wizard shows the effects of the change on an existing delta extraction (data transfer process) or direct access (Open ODS view) if the DataSource is activated with the changes. The change is not made until you have confirmed this step by choosing Finish.
Changing the remote subscription type can result in changes to the delta process of the DataSource. This affects the data transfer process and, therefore, data extraction. Changing the remote subscription type can also result in data access to another table of the DataSource. This means that another table is accessed directly by Open ODS views.
Example: Changing remote subscription type UPSERT to remote subscription types UPSERT and INSERT
Data transfer processes for which the source is a DataSource whose remote subscription type has been changed from UPSERT to UPSERT and INSERT are set to inactive. This is because the delta process of the DataSource is changed from AIMD After images with deletion indicator to ABR Complete delta update with deletion indicator as a result of the change. To transfer the entire delta history to the data target, you perform a delta initialization. When the data transfer process is reactivated, the system checks whether the changed delta process of the DataSource is compatible with the target of the data transfer process.
Alternative to Changing the Replication Method
As an alternative to changing the remote subscription type, you can create an additional DataSource on the remote source object and connect this DataSource to the same data target. Note that any existing data transfer process in extraction mode Delta on the original DataSource must be terminated to avoid duplicate records in the data target. The switch from the original delta DataSource and original data transfer process to the new delta DataSource and new data transfer process must be made with care to ensure delta consistency in the data target.
4.1.1.3.1.9 Condition for Static Filters for SAP HANA DataSources
If the data provisioning adapter makes this necessary, you can specify a static filter condition with SQL syntax for SAP HANA DataSources that support real-time replication. For most SAP HANA DataSources, you do not
SAP BW/4HANAData Acquisition PUBLIC 265

have to enter a static filter condition. This condition can no longer be changed once the initial data load to the generated target tables has been completed.
Only use this filter if the remote source makes this necessary, to specify a particular data set or restrict the data volume.
Example
If you create an SAP HANA DataSource to read Tweets using the Twitter adapter, you should enter a filter condition to specify a particular data set. If you do not enter a filter condition for the "Status" table, note that the Twitter adapter will read Tweets from your home timeline only.
To read all Tweets from the 'SAP' user's timeline, use the following filter condition: "ScreenName" = 'SAP'
To read all Tweets from the public timeline (search), use the following filter condition: "Tweet" like '%SAP%'
4.1.1.3.1.10 Effects of DDL Changes in the Remote Source Object on Real-Time Replication
Various data provisioning adapters in SAP HANA Smart Data Integration support propagation of DDL changes in the remote source to SAP HANA. As of SAP BW∕4HANA 1.0 SPS04, remote subscriptions managed by SAP BW∕4HANA are created with DDL propagation if certain conditions are met. The target table of the replication and the virtual table are then automatically adapted in accordance with the DDL changes, for example if a column is added to the source. The SAP HANA DataSource can apply the changes and adapt the field list in accordance with the DDL change, without the need to reset real-time replication or reinitialize the delta process. Downstream objects in the data flow, such as transformations, data transfer processes and InfoProviders, must be adapted accordingly.
Background
As of Version 1.3, SAP HANA Smart Data Integration supports propagation of DDL changes in the remote source - for example adding a new column to a remote source - to SAP HANA. Propagation of DDL changes is only supported by certain data provisioning adapters. The DDL changes that an adapter can support depend on the version of the adapter in question. The Oracle Log Reader adapter supports more types of DDL changes in Version 2.0 than in Version 1.3 for example.
You can find information about which data provisioning adapters support which DDL changes during replication in the relevant version of the Configuration Guide for SAP HANA Smart Data Integration and SAP HANA Smart Data Quality, in the section dealing with Options for Replication Behavior for Objects in Replication Tasks. See the adapter documentation in the Administration Guide for SAP HANA Smart Data Integration and SAP HANA Smart Data Quality for more information.
266 PUBLICSAP BW/4HANA
Data Acquisition

NoteFor some adapters, it is possible to define a DDL scan interval. From the moment the DDL change is made through to the moment when the DDL changes are propagated to the target database, no DML changes are permitted.
Remote subscriptions created by the SAP BW∕4HANA system prior to SAP BW∕4HANA 1.0 SPS04 cannot propagate DDL changes and terminate if the structure of the remote source object has been modified by a DDL command. To continue real-time replication after this kind of change, delta initialization must be performed again once the DataSource has been adapted and activated in SAP BW∕4HANA. On the other hand, remote subscriptions created by the BW/4HANA system in SAP BW∕4HANA 1.0 SPS04 and higher can progagate DDL changes in the remote source object. Once the DataSource has been adapted and activated, it is not necessary to reset the real-time replication or reinitialize the delta.
Prerequisites
If certain conditions are met, SAP BW∕4HANA creates remote subscriptions with DDL propagation for the supported adapter types:
● SAP HANA 1.0 SPS12 or higher● No static filter condition (SQL) is specified in the DataSource.● All fields in the DataSource are selected for transfer.
System Behaviour with DDL Propagation
For a DataSource with remote subscription with DDL propagation, the following applies: If DDL changes are made in the remote source object, the target tables of the replication and the virtual table are adapted accordingly, subject to the restrictions listed in the Configuration Guide for SAP HANA Smart Data Integration and SAP HANA Smart Data Quality.
As long as you have not adapted the DataSource in SAP BW∕4HANA to the changes, the DDL propagation has no effect on the query-type access and the delta extraction in SAP BW∕4HANA. This is because both access types are to database views that are generated when the DataSource is activated with remote subscription(s), and do not change unless the DataSource changes. If you adapt and then activate the DataSource following a DDL change in the remote source object in SAP BW∕4HANA, you then have to adapt the objects further on in the data flow accordingly.
Adjusting the DataSource in SAP BW∕4HANA
In the development system, you use the Update DataSource function in the DataSource Editor to adapt the fields in the DataSource in accordance with the DDL changes propagated by the remote source object to the development system. You use the usual remodeling functions to adapt the relevant transformations, data transfer processes and InfoProviders. Once the DDL changes have been propagated to the quality system or
SAP BW/4HANAData Acquisition PUBLIC 267

production system, adapt the relevant objects by importing the transport request from the development system.
See also
Configuration Guide for SAP HANA Smart Data Integration and SAP HANA Smart Data Quality on the SAP HANA Smart Data Integration and SAP HANA Smart Data Quality page in the SAP Help Portal.
Administration Guide for SAP HANA Smart Data Integration and SAP HANA Smart Data Quality on the SAP HANA Smart Data Integration and SAP HANA Smart Data Quality page in the SAP Help Portal.
Metadata Comparison and Updating DataSources [page 336]
4.1.2 Transferring Data with a Big Data Source System
The Big Data source system enables central, unified access to sources, which can be provided via SAP HANA Smart Data Access by using the SAP HANA Spark Controller and the SPARK SQL (DESTINATION) or VORA (ODBC) adapters.
Use
You can access the data of a Big Data source system virtually using Open ODS views and CompositeProviders. Data transfer is supported in full mode for all sources, provided the source supports this (generic delta).
Related Information
Creating Source Systems of Type “Big Data” [page 302]Creating a Big Data DataSource [page 325]
4.1.3 Transferring Data Using Operational Data Provisioning
You can use the Operational Data Provisioning Framework (ODP) to transfer data from various SAP repositories to SAP BW∕4HANA.
Operational Data Provisioning offers the following communication channels for data transfer:
● Remote Function Call (RFC)You can access ABAP systems via RFC.
● Web Service (SOAP via HTTP or HTTPS)
268 PUBLICSAP BW/4HANA
Data Acquisition

The Web Service implementation can occur outside of ABAP.
The data in the source is available for extraction in the form of operational data providers. An operational data provider defines interfaces for transaction data and master data (attributes, texts, hierarchies). Once implemented for the repository in question, these interfaces make it possible to access data for replication to SAP BW∕4HANA. For the SAP repositories, there are corresponding providers for the operational delta queues. The SAP BW∕4HANA system that the data is transferred to subscribes to these delta queues. For sources that can deliver data changes, the ODP framework also supports delta procedures. Once an SAP repository has implemented the relevant interfaces of the ODP framework, it is available for data transfer with Operational Data Provisioning.
For more information about operational data provisioning● Extracting and Replicating Data with Operational Data Provisioning Framework [page 284]● Operational Data Provisioning (ODP) FAQ on https://www.sap.com/
Process
1. You create an ODP source system by connecting the SAP repository as the source of the data transfer to the SAP BW∕4HANA system.By specifying a ODP context, you define which SAP repository can be accessed using the source system. You can use the following SAP repositories available:
SAP Repository ODP ContextCommunication via RFC
Communication via HTTP More Information
SAP systems that provide extractors for the transfer
SAPI (DataSources/Extractors)
x - Transferring Data from SAP Source Systems via ODP (Extractors) [page 271]
SAP BW or SAP BW∕4HANA systems that provide InfoProviders or export DataSources for the transfer
BW (BW/4HANA or SAP NetWeaver Business Warehouse)
x - Transferring Data from SAP BW or SAP BW/4HANA Systems via ODP (InfoProviders, Export DataSources) [page 272]
SAP systems that provide ABAP CDS views for the transfer (for example SAP S/4HANA)
ABAP_CDS (ABAP Core Data Services)
x x (for SAP S/4HANA Cloud for example)
Transferring Data from SAP Systems via ODP (ABAP CDS Views) [page 275]
SAP BW/4HANAData Acquisition PUBLIC 269

SAP Repository ODP ContextCommunication via RFC
Communication via HTTP More Information
SAP systems that use the SAP Landscape Transformation Replication Server to provide tables of supported sources in real-time for the transfer.
SLT~<queue alias| (SAP LT queue alias <queue alias>)
x - Transferring Data from SAP Systems with SAP Landscape Transformation Replication Server via ODP (Tables) [page 277]
SAP HANA databases (that an ABAP system runs on) that provide SAP HANA views for the transfer
HANA (HANA information views)
x - Notes about transferring data from SAP HANA using ODP [page 280]
SAP Business ByDesign systems
BYD (ByDesign) - x Notes About Transferring Data from SAP Business ByDesign Systems Using ODP [page 282]
2. You create a DataSource for an operational data provider belonging to the source. ODP DataSources can be created manually or by replication in SAP BW∕4HANA.
Result
You can now set a transformation between the DataSource and an InfoProvider (DataStore object) and load the data to the InfoProvider using a data transfer process. Alternatively, if the DataSource supports direct access, you can use it as a source in an Open ODS view.
In the source system, you can monitor the data extraction and data replication in the monitor for operational delta queues.
Note that the implementation of the ODP framework in SAP ByDesign does not use any operational delta queues.
Related Information
Creating Source Systems of Type ODP (RFC) [page 302]Creating Source Systems of Type ODP (HTTP) [page 304]Creating DataSources for ODP Source Systems [page 326]
270 PUBLICSAP BW/4HANA
Data Acquisition

4.1.3.1 Transferring Data from SAP Source Systems via ODP (Extractors)
You can use Operational Data Provisioning (ODP) to connect an SAP system, such as an ERP system, as the source system to the SAP BW∕4HANA system. Communication is performed using RFC. DataSources are provided for use in SAP BW∕4HANA using the ODP context for DataSources (extractors) (SAP).
Data provisioning using Operational Data Provisioning offers you the following advantages:
● Communication between source and SAP BW∕4HANA system and the configuration of data transfer are simplified. In this way communication using synchronous RFC, ALE/IDocs is skipped and the data trasnfer is not controlled using the qRFC outbound queue.
● The Operational Data Provisioning Framework with the new (operational) delta queues takes over tasks and services that were previously covered by the Persistent Staging Area (PSA). The data transfer process (DTP) in particular can fetch data directly from the (operational) delta queues. This makes InfoPackages and loading using the PSA obsolete. The monitoring of the PSA is triggered by the delta queue monitor (transaction ODQMON).
● Delta data of the application can be retained for a definable time period in the (operational) delta queue and can then be requested for an according time period again by DTP.
● The Operational Data Provisioning Framework uses a unique technology for different consumers of the source data (for example, SAP BW∕4HANA and SAP Data Services).
Prerequisites
● SAP systems that provide DataSources for SAP BW∕4HANA using the Operational Data Provisioning Framework must have at least one of the following release levels:
Release Level of Source Additionally Required SAP Note
SAP NetWeaver 7.0 SPS 24 SAP Note 1521883
SAP NetWeaver 7.0 EHP1 SPS 09
SAP NetWeaver 7.0 EHP2 SPS 08
SAP NetWeaver 7.3 SPS 08 SAP Note 1931427
SAP NetWeaver 7.3 EHP1 SPS 05
SAP NetWeaver 7.4 SPS 02
SAP NetWeaver 7.5
SAP BW/4HANA 1.0
● The DataSources must be released for data provisioning using Operational Data Provisioning. For information about releasing SAP DataSources and customer-defines DataSources for Operational Data Provisioning, see SAP Note 2232584 .
SAP BW/4HANAData Acquisition PUBLIC 271

Configuration of Data Transfer
Different settings and functions are required for the data transfer from an SAP source system to SAP BW∕4HANA. Customizing for extractors (transaction SBIW) is provided in the source system for this. However, note that the following settings and functions listed here are not relevant:
● Maintain the Control Parameter for Data Transfer (Table ROIDOCPRMS)The following table shows if and how the control parameters of the table ROIDOCPRMS are replaced during the data transfer using the ODP framework.
Data Transfer Process
Control Parameter in Table ROIDOCPRMS Setting for Transfer Using the ODP Framework
Maximum size of data package A data package of 50 MB is requested by the extractor. The size of a data package to be transferred can be increased in the definition of the data transfer process on tab page Extraction. However, the data package transferred by the extractor is not divided up again for the transfer in order to reach the DTP package size exactly. Rather, the uncompressed size of the data package transferred by the DTP usually corresponds to that of the largest multiplication of 50 MB that fits into the DTP package size.
Maximum number of rows in a data package Not relevant
Frequency with which the info IDocs are sent obsolete
Maximum number of parallel processes for data transfer In the data transfer process, you can define the maximum
number of work processes using GoTo Batch
Manager Settings .
Target system of the batch job Not available
Maximum number of data packages in a delta request Not available
● Check Delta Queue (transaction RSA7)In the ODP framework there are (operational) delta queues available to you that you can monitor with transaction ODQMON.
Since the data transfer is not controlled using the qRFC outbound queue when using the ODP framework, you do not need any settings in the QOUT Scheduler (transaction SMQS).
4.1.3.2 Transferring Data from SAP BW or SAP BW/4HANA Systems via ODP (InfoProviders, Export DataSources)
The Operational Data Provisioning framework allows you to make use of the ODP source system to use the same technology for a data mart scenario between SAP BW or SAP BW/4HANA systems and SAP BW∕4HANA as you would for providing other SAP source data for the SAP BW∕4HANA.
The sending system is referred to as the source BW system or source SAP BW∕4HANA system, while the receiving system is referred to as the target system. The availability of InfoProviders or generated export DataSources for InfoProviders as the providers of the operational delta queue and of ODP context BW in the
272 PUBLICSAP BW/4HANA
Data Acquisition

source make it possible to make InfoProviders of the source in the target as operational data providers available for the data transfer.
It is important to distinguish between two implementations of ODP context BW in the source:
Availabilty of ODP Context BW in Source Releases as of SAP NetWeaver 7.4 SPS 05 or SAP BW∕4HANA 1.0
Prerequisites
● The source BW system has Release SAP NetWeaver 7.4 SPS 05 or higher. SAP BW∕4HANA systems are generally supported as sources.
● The target BW system or SAP BW∕4HANA system has one of the following releases or higher:○ SAP NetWeaver 7.3 SPS 08 and SAP Note1780912○ SAP NetWeaver 7.3 EhP1 SPS 05 and SAP Note1780912○ SAP NetWeaver 7.4 SPS 05○ SAP NetWeaver 7.5○ SAP BW∕4HANA 1.0
Supported InfoProviders
For source BW systems:
● DataStore objects (advanced) and (classic) (with delta extraction)● CompositeProvider - object type HCPR (full-extraction) Release SAP NetWeaver 7.5 or higher● InfoCubes (with delta extraction)● Semantically partitioned objects● HybridProviders● MultiProviders● InfoSets● InfoObjects
○ Master data○ Texts○ Hierarchies
● Query as InfoProvider
Für source SAP BW∕4HANA systems:
● DataStore objects (advanced) (with delta extraction)● CompositeProvider - Object type HCPR (full extraction)● InfoObjects
○ Master data○ Texts○ Hierarchies
● Query as InfoProvider
SAP BW/4HANAData Acquisition PUBLIC 273

Availabilty of ODP Context BW in Source Releases SAP NetWeaver 7.0 to SAP NetWeaver 7.3 EhP 1
Prerequisites● The source BW system has one of the following releases or higher:
○ SAP BW 7.0 SPS 36○ SAP BW 7.0 EhP1 SPS19○ SAP BW 7.0 EhP2 SPS19○ SAP BW 7.3 SPS 17○ SAP BW 7.3 EhP1 SPS 20
NoteSee SAP Notes 2403202 - ODP API v1.5 and 2404671 - ODQ Queue Model for BW DataMart.
● The target BW system or target SAP BW∕4HANA system has one of the following releases or higher:○ SAP NetWeaver 7.5 SPS 07○ SAP BW∕4HANA 1.0 SPS 03
NoteSee SAP Note 2404673 - ODP API v1.5 in BW DataSource.
Supported InfoProvidersSupports export DataSources (8*) generated for InfoProviders in the supported source BW systems. For export-DataSources generated for DataStore objects or InfoCubes, delta extraction is also supported. Note that hierarchy extraction is only possible as of source Release SAP NetWeaver 7.4 SPS05 or with SAP BW∕4HANA (see Availability of ODP Context BW in Source Releases as of SAP NetWeaver 7.4 SPS 05 or SAP BW∕4HANA 1.0).
Procedure
To set up the data mart scenario, perform the following steps in the target system:
1. Create an ODP source system for the source BW or source SAP BW∕4HANAwith ODP context BW.2. In the DataSource tree for the ODP source system, create the DataSource for the InfoProvider of the
source BW or source SAP BW∕4HANA. You have two options:○ You can replicate the operational data provider from the source BW or source SAP BW∕4HANA to the
target system as a DataSource.○ You can create the DataSource.
274 PUBLICSAP BW/4HANA
Data Acquisition

Authorizations
During extraction from a SAP BW or SAP BW∕4HANA system, the data authorizations for the InfoProviders are checked. For more information, see SAP Note 2425281 .
Related Information
Creating DataSources for ODP Source Systems [page 326]
4.1.3.3 Transferring Data from SAP Systems via ODP (ABAP CDS Views)
You can use Operational Data Provisioning (ODP) to connect a SAP system as the source system to SAP BW∕4HANA.
The ODP context for ABAP CDS views (ABAP_CDS) is used to provide ABAP Core Data Services views (ABAP CDS views) with the corresponding analytics annotations for use in SAP BW∕4HANA.
In particular, this allows you to access correspondingly annotated ABAP CDS view from SAP S/4HANA and SAP S/4HANA Cloud. If the ABAP CDS view contains the required annotations, you can use the view for the full extraction and the data access or for the delta extraction.
Prerequisites
SAP systems that provide ABAP CDS views for SAP BW∕4HANA using the Operational Data Provisioning Framework must have at least one of the following release levels:
For Full Extraction For Delta Extraction
SAP NetWeaver 7.4 SPS08 SAP NetWeaver 7.5 SPS05 or higher
SAP NetWeaver 7.5 (We recommend SPS02 or higher) SAP BW∕4HANA 1.0 SPS01
SAP BW∕4HANA 1.0
SAP BW/4HANAData Acquisition PUBLIC 275

Analytics Annotations for ABAP CDS Views
The ABAP CDS views allow extraction using the analytics annotations:
Full extraction and query-type access (direct access)The following annotations make it possible for an ABAP CDS view to be available for full extraction or for direct access:
● @Analytics.dataCategory● @Analytics.dataExtraction.enabled
Delta ExtractionFor delta extraction, the following additional annotations are available:
● Analytics.dataExtraction.delta.byElement.name● Analytics.dataExtraction.delta.byElement.maxDelayInSeconds● Analytics.dataExtraction.delta.byElement.detectDeletedRecords
NoteWe recommend only using this annotation if there is no other way of determining the deltas from the underlying source tables, and after thorough performance tests have taken place.
● Analytics.dataExtraction.delta.byElement.ignoreDeletionAfterDays
NoteNote that the ODP context ABAP_CDS only supports deltas with after-images (delta process AIM and AIMD). These delta procedures do not allow direct loading into a data mart DataStore object. To be able to load into a data mart DataStore object, an intermediary standard DataStore object with change log is required.
For more information about annotations, see Analytics Annotations in the Documentation for SAP NetWeaver 7.5.
Supported CDS Views in SAP S/4HANA and SAP S/4HANA Cloud
For detailed information about ABAP CDS views supported for extraction and replication, see the following documentation:
Source Application Link to Documentation
SAP S/4HANA Cloud CDS Views in the documentation for SAP S/4HANA Cloud
SAP S/4HANA CDS Views in the documentation for SAP S/4HANA
NoteFor CDS views that extract data in Full mode, not the following: If the source application supports physical deletion in the source tables of the CDS view (to delete incorrect posting directly in the application for
276 PUBLICSAP BW/4HANA
Data Acquisition

example), this can result in inconsistencies in SAP BW∕4HANA if no corresponding reaction takes place in SAP BW∕4HANA modeling. To avoid inconsistencies and to properly take account of the deleted records in the standard DataStore object, select the Snapshot Support option in the modeling properties of the DataStore object. For more information, see Modeling Properties [page 112].
Real-Time Replication
Delta extraction can also run as real-time replication in streaming mode if the data transfer process is contained in a process chain in streaming mode. The chain will then start when it is notified by the delta queue (ODQ).
Related Information
SAP How-to Guide - How to use ABAP CDS for Data Provisioning in BW
4.1.3.4 Transferring Data from SAP Systems with SAP Landscape Transformation Replication Server via ODP (Tables)
Using SAP Landscape Transformation Replication Server (SAP LT Replication Server), you can provide real-time data from tables of supported sources for SAP BW∕4HANA. This is achieved by using the trigger-based replication functionality of the SAP LT Replication Server.
Trigger-based replication (SAP LT Replication Server) allows delta processes to be used for tables that do not have any delta-enabled fields. This allows you for example to use delta processes for DataSources (extractors) without delta logic. If you are working with large master data tables without delta logic that are only changed very infrequently, you can significantly reduce the administration effort for frequent full processes by using trigger-based replication (SAP LT Replication Server) as the transfer method.
NoteNote the licensing conditions when using SAP Landscape Transformation Replication Server.
SAP LT Replication Server offers a useful alternative for data transfer to SAP BW∕4HANA in the following cases:
● The tables in the source are simple tables without joins or transformation logic.● The DataSources (extractors) that you want to replace using the SAP LT Replication Server are
DataSources on simple tables/views that do not provide a delta mechanism and only contain minimal extractor logic.
SAP BW/4HANAData Acquisition PUBLIC 277

CautionNote the following points if you want to use this transfer method to replace extractors:
● Many extractors contain extractor logic (associations and content logic) that is very complicated to reconstruct in the SAP BW∕4HANA system.
● Many extractors can guarantee a consistent delta transfer to the SAP BW∕4HANA system by using the delta queue.
Therefore we recommend that you only replace complex extractors with SAP LT Replication Server in exceptional cases.
You can use operational data provisioning as an interface for implementing the SAP LT Replication Server for transferring data:
● Data transfer using operational data provisioning is supported for tables from SAP systems.SAP LT Replication Server provides the operational data provisioning infrastructure with the source tables as delta queues. The data from the delta queue can be replicated to the SAP BW∕4HANA system as a subscriber.The data is loaded with a data transfer process directly into the InfoProviders. The ODP infrastructure (with delta queues) takes over important services such as monitoring data requests. In addition, the ODP infrastructure has been prepared to support SAP BW∕4HANA and other subscribers with SLT data transfer (for example, SAP Data Services)..
Related Information
Transferring Data from SLT Using Operational Data Provisioning [page 278]
4.1.3.4.1 Transferring Data from SLT Using Operational Data Provisioning
Configure the connections for transferring data between the relevant systems. In the SAP BW∕4HANA system, create the objects required (DataSource and data transfer process) for data transfer.
Prerequisites
● Note the licensing conditions when using SAP LT Replication Server.● SAP LT Replication Server (SLT) has the minimum release version:
○ Add-On DMIS 2011 SP05○ SAP NetWeaver 7.3 SPS10, 7.31 SPS09 or 7.4 SPS04 (ODP infrastructure)
● Add-On DMIS_2011 SP03/SP04 or higher or 2010 SP08/SP09 is installed in the SAP source. You also need SAP Note 1863476 . If you are using Add-On DMIS 2011 SP05, you need SAP Note 1817467 .
278 PUBLICSAP BW/4HANA
Data Acquisition

● The data transfer is possible for simple tables.
Context
Using the operational data provisioning infrastructure and trigger-based replication of SAP Landscape Transformation Replication Server (SAP LT Replication Server), you can transfer data from SAP systems to the SAP BW∕4HANA system in real-time. SAP LT Replication Server is a provider for the operational data provisioning infrastructure. It can make tables from SAP sources available as delta queues. SAP BW∕4HANA can be a subscriber to this delta queue and can access the data replicated using the operational data provisioning infrastructure for further processing.
Procedure
1. In SAP LT Replication Server, use transaction SM59 to create an RFC destination for the SAP system, which is used as a data source.
2. In SAP LT Replication Server, use transaction LTR to create a configuration.
In the configuration, enter the details for the source and target of the SAP LT Replication Server. The source is the SAP system to be used as a data source. The target for data transfer using ODP is the SAP LT Replication Server itself. The connection to SAP BW∕4HANA is established later on by defining an ODP source system in SAP BW∕4HANA.Specifying the source:a. Enter the RFC destination for the SAP system to be used as the source.
Specifying the target:a. Enter the NONE as the RFC connection.b. Choose ODQ Replication Scenario as the scenario for RFC communication.
Using this scenario, you can specify that data is transferred using the operational data provisioning infrastructure with operational delta queues.
a. Assign a six-digit queue alias.The queue alias is used in SAP BW∕4HANA when the source system is created as an ODP context.
3. Create a source system of type ODP in the SAP BW∕4HANA system.
For more information, see .4. Create a DataSource in the SAP BW∕4HANA system.
For more information, see Creating DataSources for ODP Source Systems [page 326].5. To start a data transfer, create an InfoPackage or a data transfer process (DTP) in the SAP BW∕4HANA
system and schedule the data transfer:
SAP BW/4HANAData Acquisition PUBLIC 279

Results
The InfoPackage or data transfer process creates a request, which requests the data and loads it into SAP BW∕4HANA.
Next Steps
On SAP LT Replication Server, you can monitor the data request by using the delta queue monitor (transaction ODQMON). Select the queue using the provider SLT_REPLICATOR. Select the subscriber type using subscription SAP BWand select the queue name using <Queue Alias>~<Table Name>. To obtain detailed information on the data request (at data data record level), you can navigate through the views of the delta queue monitor.
In the SAP BW∕4HANA system, use the extraction monitor or DTP monitor to check whether the data request was completed.
Related Information
Monitoring Delta Queues [page 285]Information on installation and data transfer with the SAP LT Replication Server can be found under http://service.sap.com/instguides -> SAP Components -> SAP Landscape Transformation Replication Server -> Operational Data Provisioning with SAP LT Replication Server.
4.1.3.5 Transferring Data from the SAP HANA Database in an ABAP System Using ODP (SAP HANA Views)
You can use Operational Data Provisioning (ODP) to connect the SAP HANA database of an ABAP system as the source system to the SAP BW∕4HANA system. Communication is performed using RFC. With the ODP context for SAP HANA (HANA), analytic views, calculation views and associated attribute views are provided for replication into SAP BW∕4HANA. This allows you to perform calculations in the SAP HANA database on the views, before they are loaded into SAP BW∕4HANA. These calculations could be currency translations and restricted key figures or key figures calculated before aggregation for example, or joins and unions.
The data transfer with the SAP HANA source system is based on SAP HANA tables however. For more information, see Transferring Data with an SAP HANA Source System [page 249]
Selecting SAP HANA Views via Operational Data Providers in DataSource Maintenance
In the DataSource maintenance transaction, use an operational data provider to select which SAP HANA view you want to transfer the data to the SAP BW∕4HANA system from. You can tell which SAP HANA modelling view
280 PUBLICSAP BW/4HANA
Data Acquisition

can be selected from the name and description of the operational data provider (see below in ODP Naming Conventions and Length Restrictions for Technical Names).
Operational data providers are determined from SAP HANA views as displayed in the table:
SAP HANA-View Semantics of the operational data provider (describes the type of the data to be transferred)
Restrictions/Notes
Analytic View Transaction Data/Facts ● Calculated columns in the analytic view are only taken into account during extraction if they calculate before aggregation (setting in SAP HANA Modeler).
● Attributes in an attribute view that is linked with analytic view's Data Foundation (navigation attributes of the analytic view) are ignored during extraction.
Calculation View Transaction Data/Facts ● Calculated key figures in the calculation view are only taken into account during extraction if they calculate before aggregation (setting in SAP HANA Modeler).
Attribute View Master Data/Attributes -
The description mapping for an attribute in a calculation or attribute view is used to determine a text ODP.
Texts -
NoteTransferring data from the SAP HANA database with ODP is not supported for hierarchies in attribute views.
ODP Naming Conventions and Length Restrictions for Technical Names
ODP Names:
ODP Descriptions:
The descriptions of the ODPs are taken over from SAP HANA. If there is no description for a SAP HANA view in SAP HANA, the BW system uses <package name>/<name of the view in SAP HANA> as the description.
SAP BW/4HANAData Acquisition PUBLIC 281

Authorizations
In the SAP HANA database, analytic privileges are used to define which users are allowed to view which data records for analysis purposes. Analytic privileges are persisted on the SAP BW∕4HANA system and in the SAP HANA database.
The SAP HANA database is accessed using the SAP BW∕4HANA database user (SAP<SAPSID>). To access a view in SAP HANA, this user requires the corresponding analytic privileges and the authorizations for the corresponding schema. In the SAP BW∕4HANA system (ABAP), the access by the user performing the extraction is controlled using authorization object S_RS_ODP_H. The authorization object can control access at SAP HANA package level and at view level. We recommend using the authorization object. If the user performing the extraction does not have authorization object S_RS_ODP_H in his/her profile however, s/he can still perform the extraction if there is a user with the same name with the required analytic privileges in SAP HANA.
To analyze the data replicated into SAP BW∕4HANA, the user executing the query requires the corresponding analysis authorizations. You can find out more about defining and assigning analysis authorizations under Analysis Authorizations [page 1231].
4.1.3.6 Transferring Data from SAP Business ByDesign Systems Using ODP
You can use Operational Data Provisioning (ODP) to connect SAP Business ByDesign system as the source system to the SAP BW∕4HANA system. The communication is via HTTP/SOAP (Web Service). With the ODP context for SAP Business ByDesign (BYD), analysis views, SAP Business ByDesign data is provided for replication into SAP BW∕4HANA. If you are using SAP Business ByDesign in the cloud for subsidiaries of your company, you can integrate local data from SAP Business ByDesign systems and business data from SAP ERP in SAP BW∕4HANA for analysis purposes.
Prerequisites for Creating an ODP Source System
1. To configurate the connection in the SAP BW∕4HANA system, you need the following information from SAP Business ByDesign:○ WSDL (Web Services Description Language) file
This file is needed in order to set up communication between SAP Business ByDesign and the SAP BW∕4HANA system. When creating the ODP source system in SAP BW∕4HANA, you specify this WSDL file in the SOA Manager in order to set up the Web service.
○ Certificates for a secure connection between SAP Business ByDesign and SAP BW∕4HANA:The certificates need to be imported into the SAP BW∕4HANA system using the Trust Manager (transaction STRUST) before you start creating the ODP source system.
282 PUBLICSAP BW/4HANA
Data Acquisition

○ Depending on the authentification method that you have agreed with SAP Business ByDesign, you need the following information about the credentials for the user who communication is set up for:
Authentification method Information
SSL Client Certificate PKCS#12 key pair file with corresponding password
This PKCS#12 key pair file needs to be imported into the BW system using the Trust Manager (transaction STRUST) before you start creating the ODP source system.
User ID and password User ID and password
2. Make sure that ICF service APPL_SOAP_MANAGEMENT is active.For more information, see Activating/Deactivatng ICF Services on the SAP Help Portal Page for SAP NetWeaver 7.5.
For detailed information about the prerequisites, see the SAP Business ByDesign documentation Integrating Analytics with an SAP NetWeaver Business Warehouse system.
Web Service Configuration in the SOA Manager
In the Web Service Configuration in the SOA Manager, you create and configure a logical port for the default consumer proxy CO_RSDSPX_ODP_IN.
For SAP Business ByDesign systems, once you have entered a name and description for the new logical port, select WSDL-Based Configuration as the configuration type and enter the WSDL access setting and the WSDL location. Enter the user name and password under Configuration of the Logical Port on the Consumer Security tab.
For more information, see Configuring the Consumer Proxy on the SAP Help Portal Page for SAP NetWeaver 7.5.
Comments
Note the following:
● SAP ByDesign does not return deltas. The data can be transfered to the SAP BW∕4HANA system in extraction mode Full.
● The implementation of the ODP framework in SAP ByDesign does not use any operational delta queues.
More information
For detailed information about the integration of SAP Business ByDesign and SAP BW∕4HANA, see Integrating Analytics with an SAP NetWeaver Business Warehouse System.
SAP BW/4HANAData Acquisition PUBLIC 283

4.1.3.7 Extracting and Replicating Data with Operational Data Provisioning Framework
Operational Data Provisioning (ODP) provides a technical infrastructure that you can use to support two different application scenarios. The first of these is Operational Analytics for decision making in operative business processes. The other is data extraction and replication.
Operational data provisioning supports extraction and replication scenarios for various target applications and supports delta mechanisms in these scenarios. With its service for extraction, transformation and loading (ETL), Operational Data Provisioning supports data transfer to the target applications SAP BW and SAP BW∕4HANA, as well as to SAP Data Services or SAP HANA Smart Data Integration (SAP HANA SDI). To support the delta procedure, the data from a source is automatically written using an update process to a delta queue, known as the Operational Delta Queue (ODQ) passed to the delta queue using an extractor interface. Source, also known as (ODP) providers, that can provide the delta queues with data, are at present DataSources (extractors), ABAP Core Data Services Views (ABAP CDS Views), SAP BW or SAP BW∕4HANA, SAP Landscape Transformation Replication Server (SLT) and SAP HANA Information Views. The target applications (referred to as subscribers or ODP consumers) retrieve the data from the delta queue and continue processing the data. Monitoring of data extraction and data replication is performed using the delta queues.
In SAP BW∕4HANA, Operational Data Provisioning has become the central infrastructure for data extraction and data replication from SAP (ABAP) applications to a SAP BW∕4HANA Data Warehouse.
The graphic below provides an overview of the possible and most common ODP integration scenarios:
284 PUBLICSAP BW/4HANA
Data Acquisition

Related Information
Operational Data Provisioning (ODP) FAQ on https://www.sap.com/
Monitoring Delta Queues [page 285]
4.1.3.7.1 Monitoring Delta Queues
Use
A delta queue is a data store in the source system. Data records are either written automatically to the delta queue using an update process in the source system (for example, 2LIS_11_VAITM) or retrieved using the extractor interface (for example, 0COSTCENTER_ATTR).
The role of a provider is to provide one or more delta queues of a specific type. The "BW DataSource" is an example of a provider. In this case, the delta queue name matches the DataSource name (for example, 2LIS_11_VAITM). The target application of the delta queue is referred to as the "subscriber" (of a specific data services system, for example). A subscription can be defined as follows: a specific subscriber "orders" data changes from one or more queues and continues processing the transferred data. Subscribers are categorized by their subscriber type (for example, SAP BusinessObjects Data Services). A subscription occurs when the subscriber requests data. Every subscription has a unique transaction number, for example {2010-10-22 08:03:52 000001 CET}. A subscriber can have more than one subscription. A queue can also be in multiple subscriptions for the same subscriber.
The data is stored in a compressed state in the delta queue. A delta request transfers data records from the queue to the subscriber. The data changes to a queue can also be requested by more than one subscriber. A subscriber can also request data from a queue as a one-off request (Full). In this case, the request is not a subscription.
The data is retained in the delta queue for a specified time period for recovery purposes - in other words, in case the subscriber needs to retrieve the data records again.
Delta Queue Monitor
The Delta Queue Monitor (transaction ODQMON) allows you to monitor delta queues in various views:
● QueuesHere you see all the queues available in the system with the status of each queue, the number of associated subscriptions and the number of associated requests.
● SubscriptionsThe detailed information for the subscription level is displayed here.
● RequestsThe detailed information for the request level is displayed here.
● UnitsThe units are displayed here in which the data from a request can be transferred jointly.
You can access the views using pushbuttons or the Monitor menu.
SAP BW/4HANAData Acquisition PUBLIC 285

Procedure
You are on the Delta Queue Monitor screen (transaction ODQMON).
Checking the Data Volume in Queues
The queue overview allows you to identify which delta queues have a high data volume. Queues with a high data volume could mean that requests cannot be retrieved.
1. If you only want to check specific queues, restrict the queue data display by using a preselection in the monitor.For more information, see Functions of the Delta Queue Monitor [page 286].
2. To display the data volume of the queues, choose Calculate Data Volume (Extended View).3. To see which queues contain large volumes of data, you can sort the list of queues by the compressed size
in bytes, for example.4. If you find requests for a queue that have not been retrieved, check these requests. For more information,
see Monitoring Requests in the Delta Queue Monitor [page 289].
Checks for When No Data is Delivered to the Subscriber
If no new data from the queue is delivered to the subscriber, check the corresponding requests.
1. Double-click the row with the relevant queue in the overview. The subscription overview for this queue appears.
2. Double-click the row with the relevant subscriber in the overview. The request overview for the selected subscriber in the selected queue appears.
3. Analyze the requests and execute the actions required to continue with the data transfer. For more information, see Monitoring Requests in the Delta Queue Monitor [page 289]
4.1.3.7.1.1 Functions of the Delta Queue Monitor
Use
Restricting the Displayed Information
There are different ways of restricting the information:
Preselection in the Monitor
In the upper area of the monitor screen, you can restrict the data displayed in the queue using various criteria. This improves the performance of the monitor.
● Provider-Based RestrictionIf you select a specific provider, for example BW DataSource, only the queues belonging to this provider are displayed in the monitor. Subscribers that have not subscribed to any of the queues of this provider are not displayed.If you do not select a provider, all the queues from all providers are displayed in the monitor.
● Queue-Based RestrictionIf you specify a particular queue, for example, a DataSource, then only this specific queue is displayed in the monitor. When specifying the queue, you can use the wildcard * (for example, 0FI*) to restrict the monitor display to several queues.
286 PUBLICSAP BW/4HANA
Data Acquisition

If you do not specify a queue, the monitor display is not restricted.● Subscriber Type Restriction
If you select a specific subscriber type, for example SAP BusinessObjects Data Services, only the queues that have been subscribed to by a subscriber of this type are displayed in the monitor.If you do not select a subscriber type, all the queues of all subscriber types are displayed in the monitor.
● Subscriber-Based RestrictionIf you specify a particular subscriber, for example, a data services system, then only this specific subscriber is displayed in the monitor. When specifying the subscriber, you can use the wildcard * (for example, SAP*) to restrict the monitor display to several subscribers.If you do not specify a subscriber, the monitor display is not restricted.
These settings are applied when you change between monitor views.
Filter Settings in the List
You can set further restrictions for the displayed data, by using the filter function in the list. Filter settings in the list and changes to the list display only apply to the current monitor view. When you change to a different monitor view, these settings and changes are not applied.
ExampleYou can restrict the request overview to unconfirmed requests (in other words, requests that have not been transferred by the subscriber).
Calculating and Displaying the Data Volume of Queues
When you calculate the data volume (extended view) in the upper screen area of the monitor, the data volume and related key figures are calculated and displayed.
NoteThis calculation can take a long time if a lot of units are saved in the delta queues. Therefore the calculation is not performed automatically when the monitor is called. You need to select the relevant checkbox to perform this calculation. When you change to a different monitor view, the calculation setting is applied to the new view.
The following calculations are performed in the monitor view:
● Queues:For each queue, the system counts the number of units, totals the rows and data volume (before and after compression) and finds the compression rate as well as the smallest and largest sequential transaction number (TSN).
● Subscriptions:For each subscription, the system counts the number of changed units per queue that are saved (in a retrievable state) in the delta queue. The system totals the changed rows (data changes) and the volume of saved, non-retrieved data (before and after compression), and also finds the compression rate.
● Requests:For each request, the system counts the number of units per queue, totals the rows and data volume (before and after compression) and finds the compression rate.
● Units:For a unit, the system totals the rows and the volume of saved, non-retrieved data (before and after compression), and also finds the compression rate. Note that the system always performs the calculation at the units level.
SAP BW/4HANAData Acquisition PUBLIC 287

Define Request Selection
In Request Selection, in the upper part of the monitor screen, you can set which requests should be taken into account.
As procuring the data for the extended view can be time consuming if you take all requests (with or without subscription), only requests with a subscription (delta requests and delta initializations) are taken into account when the Delta Queue monitor is called. You can also select for example that only real-time requests or only requests without a subscription - requests for one-off transfers of the current data (full) that is - are displayed.
When you change to a different monitor view, the request selection setting is applied to the new view.
Changing Between Monitor Views
You can switch between monitor views using the pushbuttons queues, subscriptions, requests and units. You can also double-click on a row to change views:
● Switch from the queue overview to the subscription overviewDouble-click on a row in the queue overview. The provider and the queue from the selected row are added to the preselection (in the subscription overview). The subscription overview only displays the subscriptions of the selected queue.
● Switch from the subscription overview to the request overviewDouble-click on a row in the subscription overview. The provider, the queue, the subscriber type and the subscriber from the selected row are added to the preselection (in the request overview). The request overview only displays the requests of a specific subscriber in a specific queue.
● Switch to Unit OverviewFrom all of the other views, you can double-click on the Units or Units (Changed) column of an entry to switch to the unit overview. Depending on the view you switch from, the provider, the queue, the subscriber type and the subscriber from the selected row in the unit overview are added to the preselection. The unit overview then only displays units for this preselection.
Additional Functions
Additional Monitor Functions
The following additional functions are available in the monitor:
●This function reads the displayed data from the database again.
●This function enables you to choose between the technical names and the queue descriptions in the system language.
● Goto Reorganize Delta QueuesUse this function to set retention periods for the data in the delta queues and schedule a background job to delete data from the delta queues (after the retention periods have expired).
● Goto Real-Time DaemonYou can use this function to monitor and schedule the daemon process for real-time processing.More information: Monitoring and Scheduling Daemon Processes for Real-Time Processing [page 291]
List Functions
The following list functions are available in the monitor:
● or
288 PUBLICSAP BW/4HANA
Data Acquisition

Use this function (in the queue overview) to find out, for example, which queues contain a lot of data. Once you have calculated the data volume, sort the data records in descending order by the compressed size in bytes.
●Use this function to show or hide columns in a view. You can save these settings, including the sort sequence and filters, as a user-specific layout for a view.
Application Log
In the application log (transaction SLG1), you can find logs for extraction requests and aministration tasks, such as terminating subscriptions or the reorganization run. To do this, enter ODQ and the Object and Extraction or Administration as the Subobject.
4.1.3.7.1.2 Terminating Subscriptions for Inactive Subscribers
Use
If the delta queue records changes for a subscriber who no longer retrieves data, you can terminate this subscription.
Procedure
In the Subscriptions view, selecte the entries for the subscription and press .
Result
Once the subscriptions have been terminated, the system displays the requests for the terminated subscriptions in the Request view until such time that the requests are removed from the delta queue during a reorganization run.
4.1.3.7.1.3 Monitoring Requests in the Delta Queue Monitor
Use
A request can be defined as a data request from a subscriber. There are two different types of requests:
● A composite request transfers data from one or more queues that have been grouped together into a subscription.
● An extraction request transfers queue data from the provider to the queue storage.
SAP BW/4HANAData Acquisition PUBLIC 289

A composite request can contain several extraction requests. If only data changes are requested that were written to the queue by the source application, the composite request does not contain any extraction requests.
You monitor the requests in the Requests overview in the delta queue monitor view. You can perform various actions for the unconfirmed requests (in other words, requests that have not been transferred by the subscriber).
Procedure
Checking the Status of Current Requests
Use the function to check all the displayed requests to see if any have the status or . If the extraction process was canceled or terminated, the status in the database and in the display is updated (corrected).
Investigating Failed Extraction Requests
1. Analyze the cause of the error:
○ Use the function to open the job overview. Here you can display the log of the relevant background job (if it has not been deleted).
○ In the application log (transaction SLG1), you can analyze the data extraction logs, using object ODQ and subobject Extraction.
○ Use the function to reschedule failed extraction requests. The extraction process is delayed by 60 seconds. This gives you the chance to activate debugging for the background job - in the process
overview ( function in transaction SM50; can also be called via transaction SM66) or the global work process overview (transaction SM66) - and find the cause of the error.
2. Correct the error.3. When you transfer data changes (delta), you have the following options:
○ Use the function to repeat the extraction process.
○ Use the function to conclude the corresonding request and set the status of the extraction request
to . This status means that the data is transferred again when the next request is made. For more information, see the next section.
4. When you transfer a data snapshot (full), a data request is made again.
Closing Unconfirmed Requests
Use the function to conclude requests that have not been confirmed or canceled by the subscriber. It may be necessary to close a request in the monitor for various reasons:
● The request without subscription has not been retrieved (for example, the connection to target system was deleted).In this case, you should not assume that the subscriber will close the request by itself. However, if the
request status is not set to or , the delta queue stores the data until the retention period has expired.Completing these types of requests saves memory space and large data snapshots can be removed from
the delta queue. The status of the request is set as follows: If extraction fails, the status is set to . If
extraction is successful, the status is set to .
290 PUBLICSAP BW/4HANA
Data Acquisition

● The system could not extract the data changes (delta). (Status: ).In this case, none of the subscribers to this queue can continue transferring the new data, because data changes must be transferred seamlessly in the correct sequence. Usually, closing the failed request is not enough to continue transferring the data changes for this queue. You need to solve the cause of the problem, otherwise the next extraction attempt will also fail.
When the request is closed, the extraction request is given status . The request cannot be repeated with
the function. The delta process can be continued subsequently by any subscriber. This creates a new extraction request that fits in seamlessly with the most recent successful extraction.
Displaying Units and Data for Specific Queues or Time Periods
You can display units in the units overview. The preselection made in the monitor or the navigation route to this view (and the associated time stamps and queues) defines which units are displayed here. Double-clicking a row displays the extracted data for a unit in the bottom of the Monitor screen.
4.1.3.7.1.4 Monitoring Daemon Processes for Real-Time Processing
Use
With the first subscription in real-time mode, with the first connector that you schedule real-time indexing for that is, a daemon process is automatically scheduled in the delta queue (known as the ODQ daemon). If the daemon process is already schedules, it adds new subscriptions to the process in real-time mode. The daemon is automatically removed from scheduling if the last subscription is cancelled, if the associated connector is not scheduled any more for real-time indexing.
Procedure
You monitor the daemon process in the delta queue for real-time processing (ODQ daemon) in the Delta Queue Monitor by choosing Goto Real-Time Daemon . You can schedule the daemon manually here if required.
Monitor Daemon Process
A status indicates whether or not a daemon process is scheduled. By pressing , you can call the Job
Selection scrren, where all daemon jobs from the last 24 hours are listed. By pressing , you can call the job overview, where you can call each job's job log.
Manually Schedule Daemon Process
If the daemon process had to be stopped, you can schedule it again by pressing with the default settings for Period (15 minutes) and Takt Cycle (15 seconds).
If you want to schedule the daemon process with settings other than the default settings, you can enter the
Period in Minutes and the Takt Time in Seconds and schedule the process by pressing .
SAP BW/4HANAData Acquisition PUBLIC 291

4.1.4 Transferring Data from Flat Files
SAP BW∕4HANA supports the transfer of data from flat files, files in ASCII format (American Standard Code for Information Interchange) or CSV format (Comma Separated Value).
For example, if budget planning for a company’s branch offices is done in Microsoft Excel, this planning data can be loaded into SAP BW∕4HANA so that a plan-actual comparison can be performed. The data for the flat file can be transferred to SAP BW∕4HANA from a workstation or from an application server.
Process
1. You define a file source system.2. You create a DataSource in SAP BW∕4HANA, defining the metadata for your file in SAP BW∕4HANA.3. You create a data transfer process that includes the parameters for data transfer to the SAP BW∕4HANA
system.
The metadata update takes place in DataSource maintenance in the SAP BW∕4HANA system.
Related Information
Creating Source Systems of Type “File” [page 305]Creating DataSources for File Source Systems [page 327]
4.1.5 Application Component Hierarchy
The application component hierarchy is used to structure the DataSources in the Data Sources tree.
Source systems are displayed in the Data Sources tree in the folder for the source system or connection type with an application component hierarchy.
The appearance of the application component hierarchy depends on the type of the source and on the setting made in the source system editor: Certain ODP sources can provide a hierarchical grouping of source objects (tree). For these sources, you can use the Remote Tree function in the source system editor to specify whether the hierarchical grouping as an application component hierarchy should be applied to the DataSource tree for
292 PUBLICSAP BW/4HANA
Data Acquisition

the source system. The following table shows which ODP contexts can provide a hierarchical grouping of source objects and can thus allow a remote tree, as well as from where the remote tree originates:
ODP context Remote tree possible?From where does the remote tree originate?
SAPI (DataSources/Extractors) Yes The remote tree is taken from the application component hierarchy of the SAP source system (RSA5).
BW (BW/4HANA or SAP NetWeaver Business Warehouse)
Yes The remote tree is taken from the InfoArea hierarchy of the source BW system.
ABAP_CDS (ABAP Core Data Services) Yes The remote tree is taken from the ABAP application component of the package that the CDS view belongs to.
Example: CDS view RVPIOBJT > package RSVP > application component BW-WHM-DBA
SLT~<queue alias| (SAP LT queue alias <queue alias>)
No n/a
HANA (HANA information views) Yes The remote tree is taken from the SAP HANA package structure.
BYD (ByDesign) No n/a
If you do not want to take a tree from the source, or the source is not able to provide hierarchical grouping (for example the SAP HANA source system or the file source system), the generic application component hierarchy from the SAP BW∕4HANA system that is defined for these non-replicating source systems is used in the DataSource tree for the source system. In this generic application component hierarchy, you can create application components and change the hierarchy manually.
In the default setting, empty application components are also displayed. You also have the option of hiding these.
Related Information
Hiding Empty Application Components [page 305]Creating and Moving Application Components in a Generic Hierarchy [page 306]
SAP BW/4HANAData Acquisition PUBLIC 293

4.2 Working with Source Systems
You can create source systems from the BW Modeling tools and can call various source system functions.
● In the Data Sources tree in the Project Explorer view, you can create and edit source systems from the context menu in the relevant folder of the source system type.
● In a source system’s context menu, you can specify whether empty folders in the hierarchy of the source objects (application component hierarchy) should be shown or hidden.
● For replicating source systems, you can replicate the DataSources via the context menu.
Related Information
Creating a Source System [page 294]Hiding Empty Application Components [page 305]Executing Replication [page 306]
4.2.1 Creating a Source System
To connect a source for data access and data transfer with SAP BW∕4HANA, you create a source system.
Prerequisites
Prerequisites for Creating a Source System [page 295]
Procedure
1. You are in the BW Modeling tools. Here you can create a new source system using the function NewSource System :○ from the File menu○ from the context menu of your BW project○ via the context menu for the Data Sources node of your project○ Via the context menu for the folder of the required source system type in the Data Sources tree
More Information: Creating a Source System Using the Wizard [page 298]2. Perform the remaining steps to create the source system.
294 PUBLICSAP BW/4HANA
Data Acquisition

More information:
○ Creating a Source System of Type SAP HANA Local Database Schema [page 299]○ Creating a Source System of Type SAP HANA Smart Data Access [page 300]○ Creating a Source System of Type SAP HANA Tenant Database Schema [page 301]○ Creating Source Systems of Type “Big Data” [page 302]○ Creating Source Systems of Type ODP (RFC) [page 302]○ Creating Source Systems of Type ODP (HTTP) [page 304]○ Creating Source Systems of Type “File” [page 305]
3. Once you have created the source system, go to the Project Explorer view in the Data Sources tree in the folder context menu for the source system type, and choose Refresh.
Results
You have created a source system connection to the source. In the Project Explorer view, you will find the corresponding source system folder in the Data Sources tree. The source systems are grouped here into separate folders for each source system type. In the case of ODP source systems and SAP HANA source systems, they are grouped for each ODP context or connection type.
To group the DataSources in the source system folder, either the hierarchical grouping of the source is used as the application component hierarchy, or the generic application component hierarchy for the non-replicated source systems is used. In the default setting, empty application components are also displayed.
You can now create DataSources. For SAP HANA source systems, it is also possible to create Open ODS views.
Related Information
Application Component Hierarchy [page 292]
4.2.1.1 Prerequisites for Creating a Source System
Depending on the source system type, different prerequisites apply.
SAP BW/4HANAData Acquisition PUBLIC 295

4.2.1.1.1 Prerequisites for Creating a SAP HANA Source System
Depending on the connection type, different prerequisites apply for creating a SAP HANA source system.
Connection type Local SAP HANA Database Schema
The connection type uses the default connection to the SAP HANA database. The SAP <SID> user therefore requires the following authorizations: Object privilege SELECT on schema or object
Connection type SAP HANA Smart Data Access:
To use SAP HANA Smart Data Access, you have to configure the following system requirements and prerequisites:
● The required data provisioning adapters have been set up.● The required remote sources have been created.● The connection type uses the default connection to the SAP HANA database. The SAP <SID> user
therefore requires the following authorizations:○ Object privilege CREATE VIRTUAL TABLE○ If you want to use real-time replication: Object privilege CREATE REMOTE SUBSCRIPTION
● To be able to use SAP HANA Smart Data Integration, the following additional system requirements also have to be met:○ The minimum requirement for SAP HANA is Support Package Stack (SPS) 10. Note, however, that a
large number of adapters have been added with SAP HANA SPS 11. For more information, see the Product Availability Matrix for SAP HANA smart data integration.
○ The SAP HANA smart data integration option is imported to SAP HANA.○ The required data provisioning agenten have been installed.
Connection type SAP HANA Tenant Database Schema
The connection type uses the default connection to the SAP HANA database. The SAP <SID> user therefore requires the following authorizations: Object privilege SELECT on schema or object
For more information about prerequisites and supported database objects, see SAP Note 2312583 . - FAQ. BW and SAP HANA Tenant Database: Cross-Database Access in SAP HANA Tenant Databases.
296 PUBLICSAP BW/4HANA
Data Acquisition

4.2.1.1.2 Prerequisites for Creating a Big Data Source System
There are various prerequisites for creating a big data source system.
● A remote source is available, which you can use to define a connection to a big data source using a SPARK SQL (DESTINATION) or VORA (ODBC) adapter.For more information, see SAP HANA Hadoop Integration and SAP HANA Vora in the SAP HANA Administration Guide on http://help.sap.com/hana_platform.
● The source system uses the default connection to the SAP HANA database. The SAP <SID> user therefore requires the object privilege CREATE VIRTUAL TABLE.
4.2.1.1.3 Prerequisites for Creating an ODP Source System
Various prerequisites apply for creating an ODP source system. These depend to some extent on the ODP context or the SAP repository to be connected.
● If you want to connect an SAP Business ByDesign system: Make sure that you have the required information and that the required settings have been made in the SAP BW∕4HANA system.More information: Notes About Transferring Data from SAP Business ByDesign Systems Using ODP [page 282]
● If you want to connect SAP S/4HANA Cloud: Make sure that secure communication between SAP S/4HANA Cloud und SAP BW∕4HANA is set up in SAP S/4HANA Cloud using communication administration.
NoteFor information about the availability of ABAP CDS views for extraction from SAP S/4HANA Cloud to SAP BW, see SAP Note 2674373 .
More information: Extracting CDS Views to SAP BW/4HANA in the documentation for SAP S/4HANA Cloud● If you want to connect a source using SAP Landscape Transformation Replication Server (SLT): Make sure
that the connection to the data source has been set up in the SLT.More Information: Transferring Data from SLT Using Operational Data Provisioning [page 278]
● For all ODP contexts and SAP repositories:○ You have made the following settings in the SAP BW∕4HANA Customizing Implementation Guide,
under SAP BW/4HANA Data Collection Links to Other Source Systems .○ General connection settings○ Perform automatic workflow Customizing
○ As a rule, system changes are not permitted in production systems. However, connecting a system as a source system to a SAP BW∕4HANA, or connecting a SAP BW∕4HANA to a new source system, results in modifications to the system change options. In the client used in the SAP BW∕4HANA system, you have therefore ensured that the following changes are permitted during the source system connection:○ Cross-client Customizing and repository changes
In the SAP BW∕4HANA Customizing Implementation Guide, under SAP BW/4HANA Data Collection Links to Source Systems General Connection Settings Assign Logical System to Client , select the client in question and choose Goto Details . In the Cross-Client Object Changes field, select Changes to Repository and Cross-Client Customizing Allowed.
SAP BW/4HANAData Acquisition PUBLIC 297

○ Changes to the local developments and Business Information Warehouse software componentsYou use transaction SE03 (Organizer Tools) to set the change options. Choose Organizer ToolsAdministration Set System Change Option . Choose Execute. On the next screen, make the following settings:.
○ Changes to the customer name rangeYou also use transaction SE03 to set the change option for the customer name range.
○ Changes to BW namespaces /BWC/ and /BW0/You also use transaction SE03 to set the change option for the BW namespaces.
4.2.1.1.4 Prerequisites for Creating a File Source System
There are various prerequisites for creating a file source system.
● You have made the following settings in the SAP BW∕4HANA Customizing Implementation Guide, under SAP BW/4HANA Data Collection Links to Other Source Systems .
○ General connection settings○ Connection between flat files and SAP BW∕4HANA system○ Perform automatic workflow Customizing
● As a rule, system changes are not permitted in production systems. However, connecting a system as a source system to a SAP BW∕4HANA, or connecting a SAP BW∕4HANA to a new source system, results in modifcations to the system change options. Therefore, in the client used in the SAP BW∕4HANA system, make sure that the following changes are permitted during the source system connection:○ Cross-client Customizing and repository changes
In the SAP BW∕4HANA Customizing Implementation Guide, under SAP BW/4HANA Data Collection Links to Source Systems General Connection Settings Assign Logical System to Client , select the client in question and choose Goto Details . In the Cross-Client Object Changes field, select Changes to Repository and Cross-Client Customizing Allowed. Customizing allowed.
○ Changes to the local developments and Business Information Warehouse software componentsYou use transaction SE03 (Organizer Tools) to set the change options. Choose Organizer ToolsAdministration Set System Change Option . Choose Execute. On the next screen, make the following settings:.
○ Changes to the customer name rangeYou also use transaction SE03 to set the change option for the customer name range.
○ Changes to BW namespaces /BIC/ and /BI0/You also use transaction SE03 to set the change option for the BW namespaces.
4.2.1.2 Creating a Source System Using the Wizard
You will now be guided through the creation process by a wizard. In the wizard, you specify general specifications for the technical name and description, and select the source system type. The other steps you see in the wizard and editor depend on the source system type that you have selected.
You are in the wizard for creating the source system.
298 PUBLICSAP BW/4HANA
Data Acquisition

Procedure
1. In the first wizard step New Source System, enter a technical name for the source system in Name The system checks the name of the source system. The name can be up to 10 characters long.
2. Enter a Description for the source system.3. Choose Next.4. In the next wizard step, select the source system type. If have created the source system from the folder of
the source system type in the Data Sources tree, the correct type is preselected.5. Choose Next.
The next wizard steps depend on which type you selected.More Information:○ Creating a Source System of Type SAP HANA Local Database Schema [page 299]○ Creating a Source System of Type SAP HANA Smart Data Access [page 300]○ Creating a Source System of Type SAP HANA Tenant Database Schema [page 301]○ Creating Source Systems of Type “Big Data” [page 302]○ Creating Source Systems of Type ODP (RFC) [page 302]○ Creating Source Systems of Type “File” [page 305]
Results
Once you have run all wizard steps, the source system editor opens where you can finish creating the source system.
4.2.1.2.1 Creating a Source System of Type SAP HANA Local Database Schema
The SAP HANA source system provides central and unified access to tables, views, and native DataStore objects in the local SAP HANA database or in a SAP HANA tenant database schema, and to sources that are provided using SAP HANA Smart Data Integration and SAP HANA Smart Data Access. Use these wizard steps to select the connection parameters for the SAP HANA source system of type SAP HANA Local Database Schema.
Prerequisites
More Information: Prerequisites for Creating a SAP HANA Source System [page 296]
SAP BW/4HANAData Acquisition PUBLIC 299

Procedure
You have opened the wizard for creating source systems and you have used the first wizard step to specify the technical name, description and type of the source system.
1. Choose Next.2. In the wizard step Select a DB Object Schema, enter a search term and, in the list of search results, select
the schema you want to create.3. [Optional:] To display an overview of the settings you have made in previous wizard steps in a following
wizard step, choose Next.4. Choose Finish to return to the source system editor.5. [Optional:] Under General Properties, specify the business content type and release.6. Save and activate the source system.
4.2.1.2.2 Creating a Source System of Type SAP HANA Smart Data Access
The SAP HANA source system provides central and unified access to tables, views, and native DataStore objects in the local SAP HANA database or in a SAP HANA tenant database schema, and to sources that are provided using SAP HANA Smart Data Integration and SAP HANA Smart Data Access. Use these wizard steps to select the connection parameters for the SAP HANA source system of type SAP HANA Smart Data Access.
Prerequisites
More Information: Prerequisites for Creating a SAP HANA Source System [page 296]
Procedure
You have opened the wizard for creating source systems and you have used the first wizard step to specify the technical name, description and type of the source system.
1. Choose Next.2. In the wizard step Select a remote source, enter a search term. Then use the list of search results to select
the required remote source, which defines the connection to the source.3. Choose Next.
Depending on the remote source and the adapter, which is specified in the remote source, the system displays following wizard steps:For fields whose objects are in schemas:1. In the wizard step Select a DB Object Schema, enter a search term and, in the list of search results,
select the schema you want to create.
300 PUBLICSAP BW/4HANA
Data Acquisition

For sources with a hierarchical folder structure, you can select a path for a given folder for which you want to create the source system from the folder structure:1. In the wizard step Select Path, enter a search term and select the path prefix from the hierarchy
displayed.4. [Optional:] To display an overview of the settings you have made in previous wizard steps in a following
wizard step, choose Next.5. Choose Finish to return to the source system editor.6. [Optional:] Under General Properties, specify the business content type and release.7. Save and activate the source system.
4.2.1.2.3 Creating a Source System of Type SAP HANA Tenant Database Schema
The SAP HANA source system provides central and unified access to tables, views, and native DataStore objects in the local SAP HANA database or in a SAP HANA tenant database schema, and to sources that are provided using SAP HANA Smart Data Integration and SAP HANA Smart Data Access. Use these wizard steps to select the connection parameters for the SAP HANA source system of type SAP HANA Tenant Database Schema.
Prerequisites
More Information: Prerequisites for Creating a SAP HANA Source System [page 296]
Procedure
You have opened the wizard for creating source systems and you have used the first wizard step to specify the technical name, description and type of the source system.
1. Choose Next.2. In the wizard step Select a Remote Database, enter a search term and select the remote database from the
list of search results.3. Choose Next.4. In the wizard step Select a DB Object Schema, enter a search term and, in the list of search results, select
the schema you want to create.5. [Optional:] To display an overview of the settings you have made in previous wizard steps in a following
wizard step, choose Next.6. Choose Finish to return to the source system editor.7. [Optional:] Under General Properties, specify the business content type and release.8. Save and activate the source system.
SAP BW/4HANAData Acquisition PUBLIC 301

4.2.1.2.4 Creating Source Systems of Type “Big Data”
The Big Data source system enables central, unified access to sources, which can be provided via SAP HANA Smart Data Access by using the SPARK SQL (DESTINATION) or VORA (ODBC) adapters. Use these wizard steps to select the connection parameters for the Big Data source system.
Prerequisites
More Information: Prerequisites for Creating a Big Data Source System [page 297]
Procedure
You have opened the wizard for creating source systems and you have used the first wizard step to specify the technical name, description and type of the source system.
1. Choose Next.2. In the wizard step Select a remote source, enter a search term. Then use the list of search results to select
the required remote source, which defines connection to the Big Data source via the SPARK SQL (DESTINATION) or VORA (ODBC) adapters.
3. Choose Next.4. In the wizard step Select a DB Object Schema, enter a search term and, in the list of search results, select
the schema you want to create.5. [Optional:] To display an overview of the settings you have made in previous wizard steps in a following
wizard step, choose Next.6. Choose Finish to return to the source system editor.7. [Optional:] Under General Properties, specify the business content type and release.8. Save and activate the source system.
4.2.1.2.5 Creating Source Systems of Type ODP (RFC)
If you want communication between the source and SAP BW∕4HANA via RFC, define the destination and specify how the DataSources in the source system should be grouped.
Prerequisites
More Information: Prerequisites for Creating an ODP Source System [page 297]
302 PUBLICSAP BW/4HANA
Data Acquisition

Procedure
You have opened the wizard for creating source systems and you have used the first wizard step to specify the technical name, description and type of the source system.
1. Choose Next.2. In the ODP Page Selection wizard step, configure how the source should be connected with the system:
○ RFC with Remote System: A remote system should be connected with the SAP BW∕4HANA system by RFC.
○ RFC in the Same BW System: The RFC destination should point to the SAP BW∕4HANA system itself (myself scenario).
3. [Optional:] To display an overview of the settings you have made in previous wizard steps in a following wizard step, choose Next.
4. Choose Finish to return to the source system editor.5. [Optional:] Under General Properties, specify the business content type and release.6. Under Specific Properties, create the destinations to the source system. You require a logical destination
from the SAP BW∕4HANA system to the source, together with a callback destination. The dialog destination is optional.1. For RFC with Remote System, the following applies: The system has created an RFC destination with a
dummy target host <ENTER SERVER NAME>.1. To maintain the destination correctly, select the logical destination in the editor under Specific
Properties and choose Edit. You access RFC destination maintenance (transaction SM59).2. Enter the required data for the RFC destination.3. Save and test the destination.4. Return to the editor for creating the source system. Here the system displays the logical
destination and callback destination as valid destinations.2. For RFC in the Same BW System, the following applies: The logical destination already exists and is
valid.
7. To select an ODP context, choose Specific Properties ODP Context . Note that this is only possible once a valid logical destination is available.
8. Under Specific Properties Remote Tree , you can specify for specific sources, which can deliver a hierarchical grouping of source objects (tree), whether the grouping should be copied to the DataSource tree for the source system.If you do not copy the tree from the source, or the source cannot deliver a hierarchical grouping, the generic application component hierarchy defined for the non-replicated source systems is used as the grouping for the DataSource tree.If the Remote Tree field is selected, you can update the hierarchical grouping from the source by pressing Upload Tree in the editor toolbar.
9. Save and activate the source system.
SAP BW/4HANAData Acquisition PUBLIC 303

4.2.1.2.6 Creating Source Systems of Type ODP (HTTP)
If communication between the source and SAP BW∕4HANA via HTTP is required, creating the source system involves the following steps: You perform Web Service configuration in the SOA Manager, select the relevant ODP context, and specify how the DataSources are to be grouped in the source system.
Prerequisites
More Information: Prerequisites for Creating an ODP Source System [page 297]
Procedure
You have opened the wizard for creating the source system, used the wizard to specify a technical name and a description, and selected the source system type.
1. Choose Next.2. In the wizard step ODP Page Selection, select HTTP.3. [Optional:] To display an overview of the settings you have made in previous wizard steps in a following
wizard step, choose Next.4. Choose Finish to return to the source system editor.5. [Optional:] Under General Properties, specify the business content type and release.
6. Choose Specific Properties SOA Manager to call Web service configuration in the SOA Manager.In the Web service configuration, create and configure a logical port for the default consumer proxy CO_RSDSPX_ODP_IN. Note that the logical port must have the same name as the source system. Check and save the consumer proxy and then go back.More information: Configuring a Service Consumer
7. Choose Specific Properties ODP Context to selecte an ODP context.You can use the contexts ABAP_CDS (for ABAP Core Data Services Views) and BYD (for SAP Business ByDesign).
8. Under Specific Properties Remote Tree , you can specify for specific sources, which can deliver a hierarchical grouping of source objects (tree), whether the grouping should be copied to the DataSource tree for the source system. Note that the remote tree is only supported for certain contexts, for example ABAP_CDS.If you do not copy the tree from the source, or the source cannot deliver a hierarchical grouping, the generic application component hierarchy defined for the non-replicated source systems is used as the grouping for the DataSource tree.If the Remote Tree field is selected, you can update the hierarchical grouping from the source by pressing Upload Tree in the editor toolbar.
9. Save and activate the source system.
304 PUBLICSAP BW/4HANA
Data Acquisition

4.2.1.2.7 Creating Source Systems of Type “File”
For source systems of type File, you only need a technical name and a description.
Prerequisites
More Information: Prerequisites for Creating a File Source System [page 298]
Procedure
You have opened the wizard for creating source systems and you have used the first wizard step to specify the technical name, description and type of the source system.
1. [Optional:] To display an overview of the settings you have made in previous wizard steps in a following wizard step, choose Next.
2. Choose Finish to return to the source system editor.3. [Optional:] Under General Properties, specify the business content type and release.4. Save and activate the source system.
4.2.2 Hiding Empty Application Components
In the default setting, application components without DataSources are displayed in the Data Sources tree of a BW project in the BW Modeling tools. To have a better overview, you have the option of hiding empty application components.
Procedure
You are in the BW Modeling tools in the Project Explorer view. For a source system, the Show Empty Folders function is selected by default in the context menu.Choose Show Empty Folders from the source system’s context menu.
Results
The system hides all application components that do not contain any DataSources from the application component hierarchy. To be able to create a DataSource in the hidden application component, you have to show the application components again by choosing Show Empty Folders.
SAP BW/4HANAData Acquisition PUBLIC 305

If there are no DataSources for the source system however, the application component hierarchy is still displayed in its entirety so that you can create a DataSource at all.
4.2.3 Creating and Moving Application Components in a Generic Hierarchy
For replicating source systems, application components are copied over from the source systems with the DataSources. For non-replicating source systems, you can create application components in the generic application component hierarchy yourself in the SAP BW∕4HANA system and move components in the hierarchy.
Procedure
1. You are in the BW Modeling tools. In the Data Sources tree on your source system, choose NewApplication Component . The wizard opens.
2. Enter a technical name and a description.3. When you have finished making your settings, choose Finish. The editor appears. You can change the
description. The source system is not displayed here because the application component does is not dependent on the source system.
4. You can move the application component by choosing Move in the context menu in your application component, or by using drag and drop. Specify the position in the hierarchy where you want to insert the application component: as a subnode, above or below the target application component.
NoteIf you have activated alphabetical sorting for BW objects, you cannot choose whether the application component should be inserted above or below.
5. Choose Add to Favorites to add the application component to your favorites. Since the application component is used for different source systems, the source system - for which you have added the application component to the favorites - is shown in parentheses after the application component.
4.2.4 Executing Replication
For replicating source systems, you can replicate the DataSources in the BW modeling tools.
You are in the Project Explorer view in the BW Modeling tools.
1. In the context menu for the source system or the application component that you want to replicate the DataSources for, choose Replicate. You can also replicate an individual DataSource from the context menu for a DataSource.The system collects the DataSources and displays them in the Replicate DataSources wizard.
306 PUBLICSAP BW/4HANA
Data Acquisition
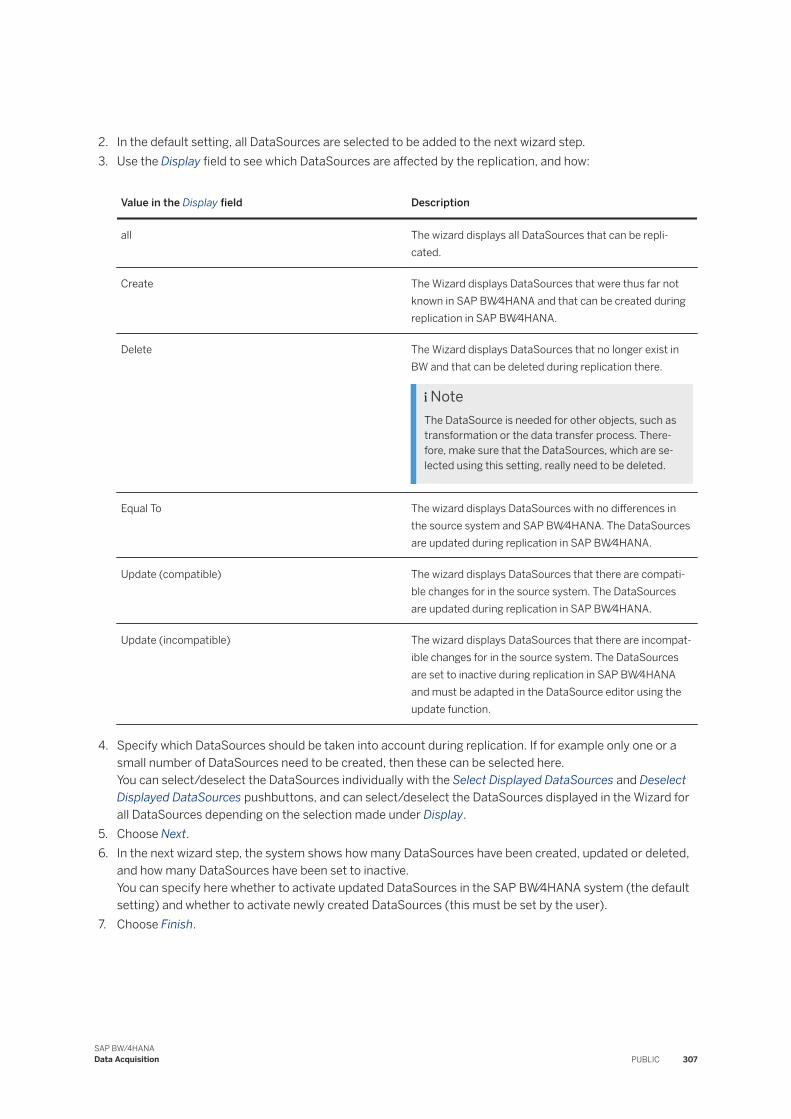
2. In the default setting, all DataSources are selected to be added to the next wizard step.3. Use the Display field to see which DataSources are affected by the replication, and how:
Value in the Display field Description
all The wizard displays all DataSources that can be replicated.
Create The Wizard displays DataSources that were thus far not known in SAP BW∕4HANA and that can be created during replication in SAP BW∕4HANA.
Delete The Wizard displays DataSources that no longer exist in BW and that can be deleted during replication there.
NoteThe DataSource is needed for other objects, such as transformation or the data transfer process. Therefore, make sure that the DataSources, which are selected using this setting, really need to be deleted.
Equal To The wizard displays DataSources with no differences in the source system and SAP BW∕4HANA. The DataSources are updated during replication in SAP BW∕4HANA.
Update (compatible) The wizard displays DataSources that there are compatible changes for in the source system. The DataSources are updated during replication in SAP BW∕4HANA.
Update (incompatible) The wizard displays DataSources that there are incompatible changes for in the source system. The DataSources are set to inactive during replication in SAP BW∕4HANA and must be adapted in the DataSource editor using the update function.
4. Specify which DataSources should be taken into account during replication. If for example only one or a small number of DataSources need to be created, then these can be selected here.You can select/deselect the DataSources individually with the Select Displayed DataSources and Deselect Displayed DataSources pushbuttons, and can select/deselect the DataSources displayed in the Wizard for all DataSources depending on the selection made under Display.
5. Choose Next.6. In the next wizard step, the system shows how many DataSources have been created, updated or deleted,
and how many DataSources have been set to inactive.You can specify here whether to activate updated DataSources in the SAP BW∕4HANA system (the default setting) and whether to activate newly created DataSources (this must be set by the user).
7. Choose Finish.
SAP BW/4HANAData Acquisition PUBLIC 307

Result
The replication is started as a background job in the SAP BW∕4HANA back end. In the BW Modeling tools, the job log is displayed in the Editor area.
The replication is initially performed without package assignment and without transport connection. The replicated objects must subsequently be written to packages and to a transport request.
4.2.5 Set Source System to Inactive
Query access using an Open ODS view or a CompositeProvider with an affected Open ODS view leads to an error when the source that is connected with the source system to the SAP BW∕4HANA system is not available. To avoid this happening in particular for queries on CompositeProviders, you can set the object status for source systems to inactive. For inactive source systems, query access using the Open ODS view or CompositeProvider is suppressed.
Systems that are connected with source systems to SAP BW∕4HANA can have different Service Level Agreements or maintenance plans to the SAP BW∕4HANA system. The operation of these systems can be decoupled from the SAP BW∕4HANA system. For this reason a source may not be available if a query directly accesses data in the source.
Open ODS views allow direct query access to sources. So, if a source is not available, a query on an Open ODS view results in an error.
Queries on CompositeProviders that contain Open ODS views as participating InfoProviders are also affected by this. In the worst case, all queries of a CompositeProvider result in an error if the source for one of the participating Open ODS views is not available.
Suppress Read Acess Temporarily: Set Object Status of Source System to Inactive
1. In the BW Modeling tools, open the editor of the relevant source system.
2. In the toolbar of the source system editor, choose Deactivate Source System.
For Open ODS views that use this source system, query access is suppressed. This means that no data is displayed, only an appropriate message.
Neither is data displayed for Open ODS views that are part of a CompositeProvider and use this source system. The CompositeProvider only displays data for other InfoProviders, such as DataStore objects.
Inactive source systems also affect data transfer processes with DataSources of this source system. For inactive source systems, no data is loaded. Instead, the system displays an appropriate message.
NoteNote that suppression of query access only takes place if the query was defined directly on the Open ODS view, or the Open ODS view is used in a CompositeProvider with Union. For an Open ODS view with master data semantic that is used by another Open ODS view or CompositeProvider through an association for
308 PUBLICSAP BW/4HANA
Data Acquisition

navigation attributes, suppression does not work. For CompositeProviders with a join scenario, suppression is not supported.
Reactivate Read Access: Set Object Status of Source System to Active
When the source is available again, you can set the source system to active again.
1. In the BW Modeling tools, open the editor of the relevant source system.
2. In the toolbar of the BW Modeling tools, choose Activate BW Object.
4.3 DataSource
A DataSource is a set of fields that provide the data for a business unit for data access and extraction and data transfer into SAP BW∕4HANA. From a technical perspective, the DataSource is a set of logically-related fields that are provided for access and transfer data into SAP BW∕4HANA in a flat structure (the extraction structure) or in multiple flat structures (for hierarchies).
DataSources supply the metadata description of source data. They are used to extract data from a source system and to transfer the data to the SAP BW∕4HANA system. They are also used for direct access to the source data from the BW system.
The following types of DataSource exist:
● DataSource for transaction data● DataSource for master data
○ DataSource for attributes○ DataSource for texts○ DataSources for hierarchies (multiple segments)
● DataSources for segmented data
The data can be loaded into the SAP BW∕4HANA system from a source in the DataSource structure using a data transfer process or an InfoPackage. You determine the target to transfer the data from the DataSource to during the transformation. You also assign DataSource fields to InfoObjects or fields of the target object in SAP BW∕4HANA here.
NoteFor certain types of sources, you can also access the data directly via Open ODS views, without DataSources. The data is also loaded into the SAP BW∕4HANA system here using DataSources.
Related Information
Working with DataSources [page 310]
SAP BW/4HANAData Acquisition PUBLIC 309

4.4 Working with DataSources
You can create and edit DataSources in the BW Modeling tools.
● In the Data Sources tree in the Project Explorer view, you can create and edit DataSources via the context menu for a source system or the application component of the source system. You can create DataSources using the guidance of a wizard and specify the DataSource properties in a native Eclipse editor.
● For replicating source systems, you can replicate the DataSource in the Data Sources tree in the Project Explorer view via the context menu.
Related Information
Creating DataSources [page 310]Editing DataSources [page 335]Metadata Comparison and Updating DataSources [page 336]Executing Replication [page 306]
4.4.1 Creating DataSources
To be able to access data from a source, and to transfer this data to the system, the metadata of the source object must be available the system in the form of a DataSource. In addition to replicating the DataSource from a replicating ODP source system, you can also create a DataSource in the BW/4HANA system manually using the DataSource Wizard.
Context
You create DataSources using a wizard and define the DataSource properties in a native Eclipse editor.
Procedure
1. You are in the BW Modeling tools. In the context menu for your BW project, choose New DataSource . Alternatively,you can create DataSources in your BW project’s Data Sources tree or from the context menu on the source system or on the application component of a source system by choosing Copy in the context menu of an existing DataSource or a data flow.
You will be guided through the process by a wizard. More information: Creating a DataSource Using the Wizard [page 312]
Once you have completed all the steps in the wizard, the DataSource editor opens.
310 PUBLICSAP BW/4HANA
Data Acquisition

2. Perform the remaining steps to create the DataSource:a. Define the general properties on the Overview tab.b. On the Extraction tab, you make extractor-specific settings.
For SAP HANA DataSources and ODP DataSources, you can exchange the source object. If you want to exchange the source object of the DataSource, press the Exchange button and then select the new source object. The Confirm Update DataSource opens. This takes an initial proposal from the back end to update the DataSource, and displays this in comparison with the current DataSource version.
c. On the Fields tab, you maintain the properties of the DataSource fields.
If you select a field in the field list, you can maintain the field properties on the right of the DataSource editor. You define the language-dependency or time-dependency of a field in the field list via the field’s context menu.
If you select multiple fields in the field list, you can use mass maintenance to change the properties of the selected fields. If the selected fields have different values for a particular property, this is indicated by the expression <multiple values> or the corresponding flagging of a checkbox. A change made to a property applies to all selected fields. If a property cannot be changed for one of the selected fields, the property cannot be changed in mass maintenance. If the selected fields have different data types, no information is displayed for the length, the number of digits, and the number of decimal places.
3. Check, save and activate the DataSource.
4. By choosing Show Data Preview in the editor toolbar or Window Show View Others , you can call the Data Preview for DataSource view. In this view, the system displays a data preview for the active version of the DataSource. Here you can specify how many data records to display in the preview. For hierarchy DataSources, you can select which segment to the data is displayed for.
5. Once you have created the DataSource, choose Refresh in the context menu of the source system or the application component.
The DataSource is now displayed in the Data Sources tree in the application component of the source system and is ready for use.
Related Information
Creating DataSources for ODP Source Systems [page 326]Creating an SAP HANA DataSource [page 314]Creating a Big Data DataSource [page 325]Creating DataSources for File Source Systems [page 327]Executing Replication [page 306]Metadata Comparison and Updating DataSources [page 336]
SAP BW/4HANAData Acquisition PUBLIC 311

4.4.1.1 Creating a DataSource Using the Wizard
You will be guided through the process by a wizard. In the wizard, you specify what the new DataSource will be based on. You can enter a name, description, DataSource type and - if applicable - specify the assignment to the application component.
Procedure
In the Project Explorer view, you have chosen New DataSource from the context menu of your BW project. You are in the wizard for creating the DataSource and your are on the first wizard step New DataSource.1. Select the source system.
Once you have made a selection, the wizard displays the description and the source system type.2. Choose Next.3. In the wizard step Select Template or Source object, select the template or source that you want your new
DataSource to be based on. Then choose Next.
There are various options available, depending on the source system type:
Template or Source ObjectSource System Type SAP HANA and Big Data Source System Type ODP Source Source System File
None - - x
Copy from DataSource (Same Source System Only)
x x x
Proposal from Operational Data Provider
- x -
Proposal from SAP HANA Table or View
x - -
Proposal from SAP HANA Native DataStore Object
Possible for the following types of SAP HANA source systems:
○ SAP HANA Local Database Schema
○ SAP HANA Tenant Database Schema
○ SAP HANA Smart Data Access (with HANA Adapter or HANA ODBC Adapter)
- -
DataSource as Template - - x
312 PUBLICSAP BW/4HANA
Data Acquisition

Template or Source ObjectSource System Type SAP HANA and Big Data Source System Type ODP Source Source System File
InfoSource as Template - - x
DataStore Object as Template
- - x
InfoObject as Template - - x
If you selected InfoObject as Template, also specify if you want to use attributes, texts, or hierarchies of the InfoObject as a template.
You are taken to the next wizard step: Select <object type of the source object or template>.
If you have a file source system and if you have selected None, you are taken directly to the last wizard step: Confirmation Page.
4. In the Select <Object Type of the Source Object or Template> wizard step, select the object that you want to use as the basis for the DataSource you are creating, and choose Next.
Note○ If you selected Template from DataSource (for a file source system) in the previous wizard step, the
system searches for the specified search string in the DataSource name, in the description and in the source system name.
○ For ODP source systems with context ABAP_CDS, note that the SQL view names of the ABAP CDS views are displayed in the search result list.
5. Enter the following information in the wizard step Confirmation Page:○ Application Component: Select an application component.
NoteIf, while creating an ODP source system, you specified that the hierarchical grouping of the source should be applied as the application component hierarchy of the source system, you cannot specify any application components here. The application component is predefined by the template object.
○ Add to Favorites: We recommend selecting this field so that you can access the DataSource faster.○ Name: Enter a technical name for the DataSource.○ [Optional:] Description: Enter a description.○ DataSource Type: Specify if you want to use the DataSource to access master data attributes, master
data texts, hierarchies or transaction data.
NoteIf you create a file DataSource based on an InfoObject template, the type is set that you selected for the InfoObject in step 3. You can then no longer change the Hierarchies type. You can then no longer change the Master Data Attributes or Master Data Text type into the Hierarchies type.
If you create a DataSource based on a DataStore object template or InfoSource template, you cannot select the Hierarchies type.
SAP BW/4HANAData Acquisition PUBLIC 313

If you create a DataSource based on the template of a hierarchy DataSource (from the local system or another system) to create, only the Hierarchies type is allowed.
6. Choose Finish.
Results
Once you have completed all wizard steps, the DataSource editor opens.
4.4.1.2 Creating an SAP HANA DataSource
Before you can transfer data from a SAP HANA source system, the metadata from the source in must be available in the SAP BW∕4HANA system in the form of a DataSource.
Context
NoteInput parameters of SAP HANA views are not visible in the DataSource. This applies to both local views and views in the tenant database as well as for access using SAP HANA Smart Data Access. No values are given for the parameter when accessing the view. For more information, see SAP Note 2142344.
Procedure
1. You are in the BW Modeling tools. Here you open the context menu for your BW project and choose NewDataSource .
The wizard for creating DataSources appears.2. Make the required entries in the wizard and choose Finish. More Information: Creating a DataSource Using
the Wizard [page 312]
NoteIf you have published the hierarchical structure of the remote source with Enterprise Semantic Services, the value help accesses the indexed data and is faster as a result. For more information about Enterprise Semantic Services, see Enable Enterprise Semantic Services in the Administration Guide for SAP HANA Smart Data Integration and SAP HANA Smart Data Quality.
For smart data access sources with a hierarchical file structure: The tables and views are displayed in the search results list with the Path Suffix – the remaining part of the folder structure path up to the source object (excluding the source object) that is not defined in the source system.
314 PUBLICSAP BW/4HANA
Data Acquisition

The DataSource editor appears.3. On the Overview tab, you make general settings, if required.4. On the Extraction tab, you make extractor-specific settings.
a. [Optional:] You can exchange the source object of the DataSource here. Note that native DataStore objects can only be exchanged with other native DataStore objects, and tables/views can only be exchanged with other tables/views.
b. For data provisioning adapters that support real-time replication: Under Real-Time Replication, you select the replication method by selecting the corresponding remote subscription types.
5. On the Fields tab, you maintain the properties of the DataSource fields.a. Specify which DataSource fields are to be used when reading from the source object (local table/view
or virtual table) for packaging in the data transfer process and for the partitions of the replication table. To do this, select the relevant field in the field list and select the Use for Packaging and Partitioning indicator in the field properties under SDA-Specific Properties. If you select properties for multiple fields, disjunctive selections are made across all fields selected.
For connection type SAP HANA Smart Data Access (SDA), fields must be selected for packaging and partitioning to allow splitting of a data transfer process (DTP) over multiple packages. For other connection types, such as Local SAP HANA Database Schema, fields can be selected for packaging and partitioning. For more information, see Packaged Data Transfer from an SAP HANA Source System.
b. For real-time replication with remote subscription type INSERT: Specify which fields are to be treated like key figures that can be totaled. To do this, select the relevant field in the field list and select the Key Figure (Summation) indicator in the field properties under SDA-Specific Properties.If you want the generated SAP HANA view to reverse the sign of a field value for before and reverse images (SDI_CHANGE_TYPEB and D), choose Key Figure (Summation). If you want a field to be interpreted like a characteristic, for example, like a numeric label for a person or a material, do not set the indicator.
NoteIf you transfer data from an SAP HANA source system to a DataStore object with change log using the delta process Complete delta update with deletion indicator (ABR) and you cannot rule out the occurrence of before images without after images, choose the "Summation" aggregation type for all key figures in the transformation.
6. Save and activate the DataSource.7. Once you have created the DataSource, choose Refresh in the context menu of the source system or the
application component.
Results
The DataSource is displayed in the Data Sources tree in the application component of the source system and is ready for use.
When you activate the DataSource, the system generates various objects such as the transfer program. In the Properties view, you can display the generated objects on the Technical Attributes tab page.
If the connection to the source is established using SAP HANA smart data access, a view on the virtual table is generated for query access. In the same way, a view is created for local tables. The main task of this view is the
SAP BW/4HANAData Acquisition PUBLIC 315

type conversion of SAP HANA data types and ABAP data types. The view is used in the data preview for direct access and full requests if no remote subscriptions of type UPSERT are used and for delta requests if no remote subscriptions of any type are used.
If you use real-time replication, additional SAP HANA objects are generated, depending on the real-time replication method selected:
● Remote subscription(s)● Target table(s) for the real-time replication● SQL view(s) on the target table
In the Properties view, you can display the objects generated for SAP HANA smart data access and real-time replication on the Extraction tab page.
From the Properties view, you can call a generated object by clicking the mouse.
Related Information
Creating a DataSource Using the Wizard [page 312]Real-Time Replication (controlled by SAP BW∕4HANA) [page 255]Remote Subscription of Type UPSERT [page 256]Remote Subscription of Type INSERT [page 257]Condition for Static Filters for SAP HANA DataSources [page 265]Packaged Data Transfer from an SAP HANA Source System [page 316]Key Figure Summation for Before Images Without After Images [page 259]Administration Guide for SAP HANA Smart Data Integration and SAP HANA Smart Data QualitySAP Note 2142344
4.4.1.2.1 Packaged Data Transfer from an SAP HANA Source System
In the SAP HANA DataSource, you determine which fields of the DataSource to use for packaging in the data transfer process, as long as no grouped extraction is defined in the transformation or in the data transfer process.
Background
A data transfer process generally divides the data in a request into multiple packages, to ensure that transformation (and further processing) is carried out in a resource-efficient manner. In particular, this ensures that sufficient system resources are available for transformation (and further processing) (for example, there is no memory overflow). You configure the package size in the data transfer process.
316 PUBLICSAP BW/4HANA
Data Acquisition

Special Feature of SAP HANA Source Systems
A data transfer process that reads data from an SAP HANA source system uses disjunctive selections on specific columns to create package of the configured size. Which columns are used for this is something you define as a property of the fields of a DataSource, as long as no grouped extraction is defined in the transformation or in the data transfer process. For packaging and partitioning, choose columns that have neither a particularly high nor a particularly low cardinality. If, about 10,000 records are added to a source object per month for example, the calendar month (including year) would be a suitable column for packaging and partitioning. If you select multiple columns, disjunctive selections are made across all columns selected. In this case, you should ensure that the correlation between the selected columns is as low as possible.
Note the following in connection with the various connection types:
● For connection type SAP HANA Smart Data Access (SDA), fields in the DataSource, the transformation, or the data transfer process must be selected for packaging and partitioning to allow splitting of a data transfer process (DTP) over multiple packages. If no fields are selected, all data in a request is transferred in a single package. In the case of larger amounts of data, the main memory might not have sufficient capacity. The DataSource check therefore issues a warning if no fields are selected for packaging and partitioning. Note that the fields for packaging and partitioning for real-time replication are also used for delta initialization and for the target table.
● For other connection types, such as Local SAP HANA Database Schema, fields can be selected for packaging and partitioning. If fields are selected, a DTP builds disjunct selections (like with SDA) across all selected fields, to divide up a request into packages. If no fields are defined, the data is divided up using a different algorithm wherever possible. If a generic BW delta process is configured and the delta field is a key field of the source object, the delta field is used for packaging. This algorithm is also applied if the source object does not contain any key fields, such as a database view. For tables in the column store of the SAP HANA database, an internal algorithm for packaging is applied if the delta field is not used and no other fields are selected. There are two situations where it would be better to have no fields selected for packaging:1. An outbound transformation requires the data to be sorted by the delta field of the generic BW delta
process - not only within packages but also beyond packages.2. The internal algorithm for source tables in the column store of the SAP HANA database is more
resource-efficient than packaging by selected fields.Therefore the DataSource check displays a warning if the prerequisites for one of the two situations have been met. The best option for a specific case depends on the outbound transformation.If one of the following statements applies to all outbound transformations, there is no need to sort the data by delta field:○ The delta field is not a key field of the source object.○ The delta field is key field of the data target of the transformation.○ Every selected field for packaging is a key field of the data target of the transformation.○ The aggregation “summation” is selected for all non-key fields of the data target of the transformation.
For special transformations, especially with start routines, expert routines or end routines, it can be particularly advantageous or necessary in the transformation or the data transfer process to select specific fields for packaging, so that every value combination is transferred via these fields in exactly one package. However, it is generally more resource efficient (for source tables in the column store of the SAP HANA database) not to select any fields, so that the internal algorithm can be applied for packaging.
SAP BW/4HANAData Acquisition PUBLIC 317

Special Features
If a data transfer process splits the data from a SAP HANA source system over several packages, the data is only read using a database cursor in certain cases. All packages of a request are therefore now only extracted in the same read transaction in certain cases. The read consistency therefore now only corresponds to the "Read Committed" isolation level on the SAP HANA database in certain cases. In general, the packages are extracted in different processes and therefore in independent read transactions. As a result, the read consistency generally corresponds to the "Read Uncommitted" isolation level. If write transactions are completed on the read data between the read transactions of the DTP request, "dirty reads" can occur.
Procedure for Avoiding Inconsistencies When Reading Packaged Data
If you have sufficient system resources in a specific case, you can configure the DTP to process all of the data in one package. If you want or require multiple packages, you can avoid the inconsistencies described by ensuring that the data set selected does not change during the independent read transactions. It is important to differentiate between the following cases:
1. Reading from a local target table for real-time replication (remote subscription type UPSERT or INSERT): In this case, the system automatically ensures consistent read behavior using the strictly monotonously increasing modification timestamp. Note that this option is available for some data provisioning adapters only.
2. Reading of initial data or data changes (generic BW delta) from a source object: In this case, you can ensure that the selected data set does not change during the independent read transactions by specifying an appropriate upper safety interval.
3. Reading of the current data (full) from a local database object: In this case, there is no generally valid approach. Check whether it is possible to waive the "read committed" isolation level or whether appropriate administrative measures can be employed to ensure that the selected data does not change (locks, time of day, or similar).
Note that in the second and third case, it is irrelevant whether your SAP HANA source system points to a local database schema or to a source (remote source using SAP HANA smart data access).
4.4.1.2.2 Native DataStore Object as Source
If the SAP HANA system, which is connected as a source system to SAP BW∕4HANA, contains SAP HANA Data Warehousing Foundation 2.0 SPS01 or higher, the native DataStore object is available as a source object type of the SAP HANA source system. For native DataStore objects without a change log, the DataStore adapter supports query-like-access (open ODS view or full extraction via the data transfer process). In addition, delta extraction is supported for native DataStore objects with change logs.
The native DataStore object is supported as a source object for SAP BW∕4HANA for the following connection types of the SAP HANA source system:
● SAP HANA Local Database Schema● SAP HANA Tenant Database Schema● SAP HANA Smart Data Access
318 PUBLICSAP BW/4HANA
Data Acquisition

The remote SAP HANA system is connected to SAP BW∕4HANA via the HANA ODBC adapter (Smart Data Access) or via the HANA data provisioning adapter (Smart Data Integration). In addition, SAP HANA Data Warehousing Foundation 2.0 SPS01 or higher must be installed on the remote SAP HANA system.
Prerequisites
In addition to the table for the active data and the change log, the native DataStore object contains multiple administration tables, which are used during data extraction. The following authorizations are therefore required:
● User SAP<SID> requires the INSERT, UPDATE and DELETE authorization for the administration tables in the native DataStore object in order to allow read and write access using the SAP BW∕4HANA system’s default database connection.
● In the case of SAP HANA Smart Data Access: The connection properties for the HANA ODBC in DML Mode must be set to readwrite. The user specified in the remote source definition must have the INSERT, UPDATE and DELETE authorization for the administration tables in the native DataStore object.
Modeling the DataSource
SAP HANA DataSources are created using the DataSource wizard. For the above-mentioned connection types of the SAP HANA source system, you can specify native DataStore objects as source objects here. With the exception of the delta extraction settings (see below), DataSource modeling is essentially the same as for tables or views as source objects. Note however that native DataStore objects as source objects in the DataSource editor can only be exchanged with other native DataStore objects.
In the case of connection type SAP HANA Smart Data Access, virtual tables are created for the administration tables when DataSources are activated for the read and write access to these tables in the native DataStore object. The virtual tables are displayed in the Properties view under Extraction.
Modeling aspects for DataSources with a native DataStore object with change log as source (delta extraction)
If the source object of the DataSource is a native DataStore object with change log, this has the following effects on the definition of the DataSource in terms of the delta extraction:
1. The delta process for the DataSource is set to Additive or overwrite delta (delta queue) ser. by package.2. The delta process cannot be changed, and no properties can be maintained for generic deltas.3. In addition to the columns in the active table of the native DataStore object, three further columns from the
change log are automatically mapped to technical DataSource fields in the DataSource’s field list:
Column technicalKey.activationId
is mapped to DataSource field TECHNICALKEY_ACTIVATIONID
Column technicalKey.recordNo DataSource field TECHNICALKEY_RECORDNO
SAP BW/4HANAData Acquisition PUBLIC 319

Column technicalAttributes.recordMode
DataSource field TECHNICALATTRIBUTES_RECORDMODE
4. The names and data types of the three additional technical fields cannot be changed.
When activating the DataSource, two additional views are generated and displayed in the Properties view under Extraction - a view for the query access and the full extraction from the active table of the native DataStore object, and a view for the delta extraction from the change log. The view for the query access maps the three additional fields to constants.
A data transfer process with a DataSource of this kind as source and extraction mode delta can trigger a process chain for streaming.
Runtime Behavior
If a data transfer process is executed, which has a DataSource as its source, which itself as a native DataStore object as its source, and the status of the DTP request thus changes to Active, a new load process is registered in the administration tables of the native DataStore object. In the case of full extraction or delta initialization, the view on the active table is automatically used as the source. The native DataStore object then blocks data administration operations such as rollback or activation of new data until the load process ends with status green or red. This makes it possible to transfer data by packet.
More Information
SAP HANA Data Warehousing Foundation - Native DataStore Object Administration Guide on the SAP Help Portal page for SAP HANA Data Warehousing Foundation 2.0 SPS 01 or higher, under https://help.sap.com/viewer/p/SAP_HANA_DATA_WAREHOUSING_FOUNDATION
4.4.1.2.3 Generic Delta for SAP HANA DataSources
The generic delta is a delta calculation mechanism for DataSources . It can be used for data transfer from SAP HANA - provided that the source object itself does not provide a delta process.
Using a delta-relevant field whose value rise monotonously over time, the system determines which data to transfer at runtime. For example, if a numerical pointer of this type of delta-relevant field exists, the system determines the data volume transferred in the delta mode by comparing the maximum value transferred with the last load with the amount of data that has since entered the system. Only the new data is transferred. An interval for the delta-relevant field is added to the request selections. Using safety intervals at the upper or lower limit of this interval, you can ensure that data records that are created during an extraction process but cannot be extracted (because they could not be saved for example) are looked at during the next extraction. The current upper stamp for the delta-relevant field is stored in a delta pointer table. The next delta uses the last delta stamp to find out which data has to be transferred.
320 PUBLICSAP BW/4HANA
Data Acquisition

For SAP HANA DataSources with connection type Local SAP HANA Database Schema with a table or a view as a source object, the generic delta is optimized if specific prerequisites are met in terms of deletion, streaming and timestamps as numeric pointers.
Procedure
In the DataSource editor, you have opened the Extraction tab page and chosen the delta process Overwrite delta without deletions (BW local) or Pure additive delta (BW local) for your DataSource:
● With the Overwrite delta without deletions (BW local) procedure, each record to be loaded returns the new status for all characteristics and key figures. The values in SAP BW∕4HANA are overwritten. DataSources with this delta type can write data to DataStore objects and master data tables.
● With the Pure additive delta (BW local) procedure, the record to be loaded for cumulative key figures only returns the change to the respective key figure. The extracted data is added to SAP BW∕4HANA. DataSources with this delta type can write data to DataStore objects.
To use the generic delta, complete the following steps:
1. Expand the Delta Properties area on the Extraction tab page.2. Enter the delta-relevant field type in the Generic Delta field. The following field types are available: numeric
pointers, time stamps as numeric pointers, date fields and time stamps (short and long).Depending on the delta-relevant field type, the system may also show other fields.
3. Enter the delta-relevant field in the Data Field field.4. The following entries depend on the delta-relevant field type:
Numeric pointer and numeric pointers (timestamp):In the Lower Interval field, enter the lower safety interval in the units of the numeric pointer field.
NoteFor delta determination using a numeric pointer, it is not possible to determine an upper limit the delta, as the system does not know the highest value of the numeric pointer field when the request starts. It is therefore not possible to enter an upper safety interval for the numeric pointer.
Time Stamp Long (UTC):Use Time Stamp Long (UTC) if the data is stored in Coordinated Universal Time (UTC).In the Lower Interval or Upper Interval field, enter a lower or upper safety interval in seconds.Date and Time Stamp Short:Use Time Stamp Short if the data is stored in a local (system) time zone.Only use Date if no other delta-relevant fields are available with a finer granularity, such as time stamps or numeric pointers.1. Enter the time zone.2. In the Lower Interval or Upper Interval field, enter a lower or upper safety interval - in days for date
fields and in seconds for time stamp fields.
NoteWhen using Date, note that it is always necessary to weigh up excluding the data that was changed today from the extraction, multiple extraction of data changes, and the risk of skipping data changes.
For more information, see Effects of the Safety Interval Settings for the Date as Delta-Relevant Field.
SAP BW/4HANAData Acquisition PUBLIC 321

Example of Determining Selection Intervals with Generic Delta
Safety interval upper limit
The delta-relevant field is a time stamp.
The last used upper limit is 12:00:00. The delta extraction commences as 12:30:00. The safety interval for the upper limit is 120 seconds. The selection interval for the delta request is then: 12:00:00 to 12:28:00. At the end of the extraction, the pointer is set to 12:28:00.
Safety interval lower limit
The delta-relevant field is a time stamp. After images are transferred. This means that the record in the SAP BW∕4HANA system is overwritten with the status after the change, for example for master data. If duplicate data records are transferred, this does not have any effect in SAP BW∕4HANA.
The last time stamp read is 12:28:00. The delta extraction commences as 13:00. The safety interval for the lower limit is 180 seconds. The selection interval for the delta request is then: 12:25:00 bis 13:00:00. At the end of the extraction, the pointer is set to 13:00:00.
Related Information
Optimizations for Connection Type Local SAP HANA Database Schema [page 322]Effects of the Safety Interval Settings for the Date as Delta-Relevant Field [page 324]
4.4.1.2.3.1 Optimizations for Connection Type Local SAP HANA Database Schema
For SAP HANA DataSources with connection type Local SAP HANA Database Schema with a table or a view as a source object, the generic delta is optimized if specific prerequisites apply related to deletion, streaming and timestamps as numeric pointers.
Prerequisites
The prerequisite for optimizations is that the table or the view of the local SAP HANA schema is the target of an external real-time replication process (in other words, a process not managed by SAP BW∕4HANA). In this case, “external” means that SAP BW∕4HANA does not control the replication process by generating SAP HANA remote subscriptions. Instead, a different application controls the replication process, and the target table or target view of this replication process in the local SAP HANA schema is connected to SAP BW∕4HANA via a SAP HANA DataSource. This type of application can either be a SAP HANA replication task or a flowgraph in the same SAP HANA, or an SLT replication server or another ETL process.
322 PUBLICSAP BW/4HANA
Data Acquisition

Delta with Deletions
If the above-mentioned prerequisites are met, you can use the delta process Overwrite delta with deletions (delta queue) in order to calculate the SDI_RECORD_MODE column from the value in the Change Type column.
NoteIf the source object of the DataSource is filled using a SAP HANA replication task or a flowgraph, make sure that the load behavior is specified for the replication task or the flowgraph Replication with logical delete and that a Change Type Column has been specified in the replication task or flowgraph editor.
Proceed in SAP BW∕4HANA as follows:
1. Go to the Extraction tab page and choose Change under Delta with Deletions.The Change Settings for Delta with Deletions wizard opens.
2. Select the field Enable Delta with Deletions and choose Next.3. In the next wizard step, choose a column (from the source object) for the change type and choose Next.
You can choose from a selection of CHAR (1) fields. The selected column is mapped to the DataSource field SDI_CHANGE_TYPE. No other DataSource fields can have the name of this one.
4. Please note the effects of changing the delta process on the data transfer processes and Open ODS views that use this DataSource, and choose Finish.The delta process of the DataSource changes to Overwrite delta with deletions (delta queue).
5. Specify the properties for the generic delta in the Delta Properties area.6. Continue with the further editing of the DataSource and specify the data type mapping for the DataSource
fields.7. Activate the DataSource.
When the DataSource is activated, two views are created on the target table or target view; one view for query access and full extraction, and one view for delta requests and delta initialization requests. DTP requests or Open ODS views automatically use the correct view at runtime.
The view for query access and full extraction automatically filters out deletions. The view for delta extraction calculates the record mode as an additional field SDI_RECORD_MODE. This field converts the change type into the corresponding values of the technical characteristic 0RECORDMODE.
Streaming
A data transfer process, which extracts deltas from a table or view of the local SAP HANA schema, can trigger a streaming process chain, provided that specific prerequisites are met for the delta-relevant field. These prerequisites are listed in SAP Note 2372534 .
Time stamp as numeric pointer
For source object columns with SAP HANA data type SECONDDATE or TIMESTAMP, you can choose Numeric Pointer (Time Stamp) as the type of delta-relevant field.
SAP BW/4HANAData Acquisition PUBLIC 323

You can map SECONDDATE to ABAP data type DEC (15,0) or NUMC (14), and map TIMESTAMP to DEC (21,7) or NUMC (21). In this way, you can avoid incorrect time stamps being generated as the type of delta-relevant field in specific cases (a problem which can occur with Numeric Pointer).
4.4.1.2.3.2 Effects of the Safety Interval Settings for the Date as Delta-Relevant Field
If you specify Date as the type of the delta-relevant field, you need to consider a number of things when setting the lower and upper ranges of the safety interval.
1. Only choose Date if no other delta-relevant fields are available with finer granularity, such as time stamps or numeric pointers.
2. If you choose Date, there is always a trade-off between excluding the data changed, transferring data changes multiple time, and and the risk of missing out data changes.1. If you leave the lower safety interval (Lower Interval (Days) field) blank, the delta interval starts one day
after the end date of the previous selection.2. If you enter 1 for the lower safety interval, the delta interval starts on the end date of the previous
selection. This means that all records whose delta-relevant field contains the end date of the previous selection are read again.
3. If you leave the upper safety interval (Upper Interval (Days) field) blank, one day is used as the default date. This ensures that data that is changed later in the day is not missed out.
4. If you enter -1 as the upper safety interval, the delta interval contains the current date. This means that data that is changed later on the same day is missed out if you leave the lower safety interval blank.
3. Here are some typical examples. Let us assume that today’s date is 7th July, the end date of the previous selection was 4th July.1. If you leave the lower and upper safety interval blank, the delta selection starts on 5th July and ends on
6th July. This means that there are no duplicates and there is no risk of missing out data changes.2. If you enter 1 for the lower safety interval and -1 for the upper security interval, the delta selection
starts on 4th July and ends on 7th July. This means that data changes from 4th July and 7th July can be transferred twice.
3. If you leave the lower safety interval blank and enter -1 for the upper safety interval, the delta selection starts on 5th July and ends on 7th July. This means that data that is changed later on 7th July will be missed out.
4. Moreover, generic delta extraction can only be requested once per day if you leave the lower and upper safety interval blank or specify the same value for both. If you trigger delta extraction more than once per day, the requests will fail with error message RSDS 240. This message indicates that the lower bound for generic delta extraction is greater than the upper bound.
324 PUBLICSAP BW/4HANA
Data Acquisition

4.4.1.3 Creating a Big Data DataSource
Procedure
1. You are in the BW Modeling Tools. In your BW project in the Data Sources tree, open the context menu on the Big Data source system or the application component of the source system, and choose NewDataSource .The wizard for creating DataSources appears.
2. Make the required entries in the wizard.a. If necessary, specify an application component using Browse.b. To ensure that you can find your DataSource again without difficulty, we recommend setting the Add to
Favorites flag.c. Specify the DataSource name, description, and type.d. Choose Table/View and use Browse to select the table or view in the source.e. Choose Finish.
The DataSource editor appears.3. On the Overview tab, you make general settings, if required.4. On the Extraction tab, you make extractor-specific settings.5. On the Fields tab, you maintain the properties of the DataSource fields.
a. Specify the DataSource fields, which you want the system to use for package by package processing in the data transfer process when reading data from the source object. To do this, select the relevant field in the field list and select the Use for Packaging and Partitioning indicator in the field properties under SDA-Specific Properties. If you select properties for multiple fields, disjunctive selections are made across all fields selected.
6. Save and activate the DataSource.7. Once you have created the DataSource, choose Refresh in the context menu of the source system or the
application component.
Results
The DataSource is displayed in the Data Sources tree in the application component of the source system and is ready for use.
When you activate the DataSource, the system generates various objects such as the transfer program. In the Properties view, you can display the generated objects on the Technical Attributes tab page.
In the Properties view, you can display the objects generated for SAP HANA Smart Data Access on the Extraction tab page. For the query access, a virtual table and a view on the virtual table are created. The main task of this view is the type conversion of SAP HANA data types and ABAP data types.
In the Properties view, you can call a generated object by clicking the mouse.
SAP BW/4HANAData Acquisition PUBLIC 325

4.4.1.4 Creating DataSources for ODP Source Systems
Before you can transfer data from an ODP source system, the metadata from the source in must be available in the SAP BW∕4HANA system in the form of a DataSource. In addition to replicating the DataSource from a replicating ODP source system, you can also create a DataSource in the SAP BW∕4HANA system manually using the DataSource Wizard.
Prerequisites
If there are no suitable application components to group the DataSources with, create an application component in the Data Sources tree for the ODP source system.
Procedure
1. You are in the BW Modeling tools. In your BW project in the Data Sources tree, open the context menu on the ODP source system or the application component of the source system, and choose NewDataSource .The wizard for creating DataSources appears.
2. Enter the required information the wizard pages and then choose Finish.The DataSource editor appears.
3. On the Overview tab, you make general settings, if required.4. On the Extraction tab, you make extractor-specific settings.5. On the Fields tab, you maintain the properties of the DataSource fields.6. Save and activate the DataSource.
Result
The DataSource is displayed in the Data Sources tree in the application component of the source system and is ready for use.
You can now set a transformation between the DataSource and an InfoProvider (DataStore object) and load the data to the InfoProvider using a data transfer process. Alternatively, if the DataSource supports direct access, you can use it as a source in an Open ODS view.
In the SAP BW∕4HANA system, you can monitor the data transfer with the monitor for data transfer processes. In the source, you can monitor the extraction and replication using the delta queues. The exception here is SAP ByDesign systems, as they do not use delta queues when implementing the ODP framework.
326 PUBLICSAP BW/4HANA
Data Acquisition

Related Information
Creating a Data Transfer Process [page 388]Monitoring Delta Queues [page 285]Executing Replication [page 306]
4.4.1.5 Creating DataSources for File Source Systems
Before you can transfer data from a file source system, the metadata (the file and field information) must be available in SAP BW∕4HANA in the form of a DataSource.
Prerequisites
Note the following with regard to CSV files:
● Fields that are not filled in a CSV file are filled with a blank space if they are character fields or with a zero (0) if they are numerical fields.
● If separators are used inconsistently in a CSV file, the incorrect separator (which is not defined in the DataSource) is read as a character and both fields are merged into one field and can be shortened. Subsequent fields are then no longer in the correct order.
● A line break cannot be used as part of a value, even if the value is enclosed with an Escape sign.
Note the following with regard to CSV files and ASCII files:
● The conversion routines that are used determine whether you have to specify leading zeros.● For dates, you usually use the format YYYYMMDD, without internal separators. Depending on the
conversion routine used, you can also use other formats.
Notes on Loading
● When you load external data, you have the option of loading the data from any workstation into the SAP BW∕4HANA system. Loading from a workstation is only possible in the dialog however. For performance reasons, you should store the data on an application server and load it from there into the SAP BW∕4HANA system. This means that you can also load the data in the background and thus use it in process chains too.
● If you want to load a large amount of transaction data into the SAP BW∕4HANA system from a flat file and you can specify the file type of the flat file, you should create the flat file as an ASCII file. From a performance point of view, loading data from an ASCII file is the most cost-effective method. Loading from a CSV file takes longer because the separator characters and escape characters then have to be sent and interpreted. In some circumstances, generating an ASCII file can involve more effort.
● When loading from a workstation, the data is loaded to a file in a single data package. There are various ways of avoiding this:○ We recommend placing the file on the application server. From the application server, data can be read
by package. Note however that Microsoft Excel files cannot be read from the application server. You should therefore convert your file into a CSV file.
○ If possible, an alternative solution is to split your file into multiple smaller files.
SAP BW/4HANAData Acquisition PUBLIC 327

Procedure
1. You are in the BW Modeling tools. Here, from your BW project, go the Data Sources tree for you source system and choose New DataSources from the context menu.The wizard for creating DataSources appears.
2. Make the required entries in the wizard and then choose Finish. More information: Creating a DataSource Using the Wizard [page 312]The DataSource editor appears.
3. Make general settings for the DataSource on the Overview tab.1. [Optional:] Enter a description for the DataSource.2. If required, specify whether the DataSource builds an initial non-cumulative and has the ability to
return duplicate data records in a request.4. On the Extraction tab page, specify the extraction properties. More information: Editing Extraction
Properties [page 328]5. On the Fields tab page, define the field list and the properties of the fields. More information: Editing the
Field List and Field Properties [page 333]6. Check, save and activate the DataSource.
7. By choosing Show Data Preview in the editor toolbar or Window Show View Others , you can call the Data Preview for DataSource view. In the Data Preview for DataSource view, the system displays a preview of the active version of the DataSource. Here you can specify how many data records to display in the preview. For hierarchy DataSources, you can select which segment to the data is displayed for.This function allows you to check whether the data formats and data are correct.
Result
In the BW Modeling Tools, the DataSource is displayed in the Data Sources tree in the application component of the source system and is ready for use.
4.4.1.5.1 Editing Extraction Properties
On the Extraction tab, you define various properties for data extraction.
Procedure
1. Define the delta process for the DataSource.You can use the generic delta. Using a delta-relevant field whose value rise monotonously over time, the system determines which data to transfer at runtime. More information: Using Generic BW Deltas [page 331].
2. Specify whether you want the DataSource to support direct access to data.3. Select the adapter for the data transfer.
328 PUBLICSAP BW/4HANA
Data Acquisition

For DataSources of type Master Data Attributes, Master Data Texts, and Transaction Data, you can select one of the following adapters:○ Load Binary File from Local Workstation○ Load Binary File from Application Server○ Load Microsoft Excel File (XLS) from Local Workstation○ Load Text-Type File from Local Workstation○ Load Text-Type File from Application Server
For DataSources of type Hierarchies, you can select one of the following adapters:○ Load Text-Type File from Local Workstation○ Load Text-Type File from Application Server
Text-type files only contain characters that can be displayed and read as text. CSV and ASCII files are examples of text files. For CSV files, you have to specify a character that separates the individual field values. In the SAP BW∕4HANA system, you have to specify this separator and an escape character which specifies this character as part of the value if required. You then have to use these characters in the file. ASCII files contain data in a specified length. The defined field length in the file must be the same as the length of the assigned field in the SAP BW∕4HANA system.Binary files contain data in the form of bytes. A file of this type can contain any type of byte value, including bytes that cannot be displayed or read as text. In this case, the field values in the file in internal format must match the assigned fields in the SAP BW∕4HANA system.
4. Choose Browse to select the path to the file that you want to load, or enter the name of the file directly, for example C:/Daten/US/Kosten18.csv.If you load text-type files or binary files, you can also create a routine to define the name of your file. If no routine has been created for the name of the file, the file name in the File Name field is interpreted directly.
5. Depending on the adapter and the file to be loaded, there are further settings that need to be made.○ For binary files from the application server:
Specify the character record settings for the data that you want to transfer: By default, the system code page is applied to the data to be transferred. If you want to define the character set settings differently, choose Specify Codepage to Replace System Codepage and make the required settings.
○ For text-type files:1. Under Ignore Header Rows, specify how many rows in your file are header rows and can therefore
be ignored when the data is transferred.2. Specify the character record settings for the data that you want to transfer: By default, the system
code page is applied to the data to be transferred. If you want to define the character set settings differently, choose Specify Codepage to Replace System Codepage and make the required settings.
3. Under Data Format, specify which format the data in the file is in, in a fixed length or separated by separator characters:If you are loading data from an ASCII file, the data is requested with a fixed data record length. In this case, select Fixed Length or Hierarchy Fixed Length.If you are loading data from a CSV file, select Separated by Separator (Example: CSV) or Hierarchy Separated by Separator and set the data separator and the escape character:1. In the Data Separator field, specify the separator that your file uses to divide the fields.2. If the separator is a part of the value, the file indicates this by enclosing the value in particular
start and end characters. Enter these start and end characters in the Escape Sign field.3. In a text editor (Notepad for example), check the separator and the escape character currently
being used in the file. These depend on the country version of the file you are using.4. If you select the Hex flag, you can specify the data separator and the escape character in
hexadecimal format. When you enter a character for the data separator and the escape character, these are displayed as hexadecimal code after the entries have been checked. A two
SAP BW/4HANAData Acquisition PUBLIC 329

character entry for a data separator or an escape sign is always interpreted as a hexadecimal entry.
Note○ Example of how to use data separators and escape characters: You have chosen the ;
character as the data separator. A field in your file has the value 12;45 however. If you have specified “ as the escape character, the value in your file must be in format “12;45“ so that 12;45 is loaded into BW. The complete value that you want to transfer has to be enclosed by the escape characters.
○ If the escape characters do not enclose the value but are used within the value, the system interprets the escape characters as a normal part of the value. If you have specified " as the escape character, the value 12"45 is transferred as 12"45 and 12"45" is transferred as 12"45".
○ Note that if you do not specify an escape character, the space character is interpreted as the escape character. We recommend using a different character as the escape character.
○ For Microsoft Excel files:1. Under Extract Sheet, specify which of the file’s worksheets the data should be transferred from.2. Under Ignore Header Rows, specify how many rows in your file are header rows and can therefore
be ignored when the data is transferred.6. Under Conversion Properties, make the settings for the conversion language and the number format
(thousand separator and character used to represent a decimal point) if necessary.7. Make any further settings that are dependent on your selection if necessary.8. For text or Microsoft Excel files, you can create a proposal for the field list of the DataSource based on the
sample data in your file. To do this, choose Derive Fields from File. The wizard for updating DataSources appears.
NoteFor hierarchies, this function is not available, since you use the hierarchy settings to define the structure of the hierarchy DataSource.
1. In the first step in the wizard, specify how many data records you want to use to generate the proposal for the field list.
2. If the file has header rows, and you have set a fixed length as the data format, you can choose whether the initial proposal for the separation of the fields is based on the header row or on the first data row.
3. Choose Next.4. If a fixed length was set as the data format, you can specify the positions where the separation of fields
occurs in the next step.5. Choose Next.6. In the wizard step Confirm Update DataSource, the system displays the proposed changes for the field
list. Choose Finish in order to adjust the field list of the DataSource.9. For hierarchies, define the structure of the DataSource by pressing Change Hierarchy Settings. The wizard
for defining the hierarchy settings appears.1. In the first step, make the required settings. For this, you can specify the InfoObject that you are
loading hierarchy data for as the target InfoObject. The hierarchy settings are then copied from the InfoObject.
2. You can change the copied settings.3. Choose Next.
330 PUBLICSAP BW/4HANA
Data Acquisition

4. In the wizard step Confirm Changes, the system displays the proposed changes for the field list. Choose Finish in order to adjust the field list of the DataSource.
10. For hierarchies, perform the following additional steps:1. Under Maintain Hierarchy Header in the DataSource editor toolbar, create a hierarchy header. You need
this before loading, as the file does not fill the hierarchy header and header text segments. If the entire hierarchy is time-dependent, the Valid to and Valid from fields are input-ready.
2. To display the proposed structure of the hierarchy file based on the hierarchy-specific settings, select Show File Structure.
3. To show what a file with this structure will look like, select Create Example File. This file is a very simple hierarchy with just one root node, two subnodes and a leaf for each subnode. It does contain all properties defined for the hierarchy though, for example whether the hierarchy nodes are time-dependent or are intervals.
4.4.1.5.1.1 Using Generic BW Deltas
The generic BW delta is a delta calculation mechanism for DataSources from non-SAP source systems. It can be used to transfer data from files.
Using a delta-relevant field whose value rise monotonously over time, the system determines which data to transfer at runtime. If a delta-relevant field of this type exists (a time stamp, for example), the system determines the data volume transferred in the delta mode by comparing the maximum value transferred with the last load with the amount of data that has since entered the system. Only the new data is transferred. An interval for the delta-relevant field is added to the request selections. Using safety intervals at the upper or lower limit of this interval, you can ensure that data records that are created during an extraction process but cannot be extracted (because they could not be saved for example) are looked at during the next extraction. The current lower and upper stamps for the delta-relevant field are stored in a delta pointer table. The next delta uses the last delta stamp to find out which data has to be transferred.
Procedure
You have defined the structure of the DataSource in the DataSource editor and have selected the delta process Overwrite delta without deletions (BW local) or Pure additive delta (BW local) on the Extraction tab page:
● With the Overwrite delta without deletions (BW local) procedure, each record to be loaded returns the new status for all characteristics and key figures. The values in SAP BW∕4HANA are overwritten. DataSources with this delta type can write data to DataStore objects and master data tables.
● With the Pure additive delta (BW local) procedure, the record to be loaded for cumulative key figures only returns the change to the respective key figure. The extracted data is added to SAP BW∕4HANA. DataSources with this delta type can write data to DataStore objects.
You can now expand the Delta Properties on the Extraction tab page.
To be able to use the generic BW delta, complete the following steps:
1. Select the type of the delta-relevant field under Generic Delta. The following field types are offered: Numeric pointers, date fields and time stamps (short and long)..Depending on the delta-relevant field type, the system may also show other fields.
SAP BW/4HANAData Acquisition PUBLIC 331

2. Under Delta Field, select the delta-relevant field. You can select from the fields that are valid for the selected type of data field. For dates, only fields with the data type DATS are displayed, while for time stamps only fields of data type DEC or NUMC are displayed. For numeric pointers, all fields are displayed.
3. The following entries depend on the delta-relevant field type:Numeric pointer and numeric pointers (timestamp):In the Lower Interval (Units) field, enter the lower safety interval in the units of the numeric pointer field.
NoteFor delta determination using a numeric pointer, it is not possible to determine an upper limit the delta, as the system does not know the highest value of the numeric pointer field when the request starts. It is therefore not possible to enter an upper safety interval for the numeric pointer.
Time Stamp Long (UTC):Use Time Stamp Long (UTC) if the data is stored in Coordinated Universal Time (UTC).In the Lower Interval (Seconds) or Upper Interval (Seconds) field, enter a lower or upper safety interval in seconds.Date and Time Stamp Short:Use Time Stamp Short if the data is stored in a local (system) time zone.1. Enter the time zone.2. In the Lower Interval (Seconds) or Upper Interval (Seconds) field, enter a lower or upper safety interval -
in days for date fields and in seconds for time stamp fields.
Example of Determining Selection Intervals with Generic Delta
Safety interval upper limitThe delta-relevant field is a time stamp.
The last time stamp read is 12:00:00. The delta extraction commences as 12:30:00. The safety interval for the upper limit is 120 seconds. The selection interval for the delta request is then: 12:00:00 to 12:28:00. At the end of the extraction, the pointer is set to 12:28:00.
Safety interval lower limitThe delta-relevant field is a time stamp. After images are transferred. This means that the record in the SAP BW∕4HANA system is overwritten with the status after the change, for example for master data. If duplicate data records are transferred, this does not have any effect in SAP BW∕4HANA.
The last time stamp read is 12:28:00. The delta extraction commences as 13:00. The safety interval for the lower limit is 180 seconds. The selection interval for the delta request is then: 12:25:00 to 13:00:00. At the end of the extraction, the pointer is set to 13:00:00.
332 PUBLICSAP BW/4HANA
Data Acquisition

4.4.1.5.2 Editing the Field List and Field Properties
On the Fields tab, you define the field list of the DataSource and the properties of the fields.
Edit Field List
1. If the field list is generated from the file with a proposal, the system displays this proposal under Fields. You can change the field list here or create one if there is no proposal.
2. You can locate changes between the file and the field by choosing Update DataSource. If differences are found, the system displays a change proposal. You can then decide whether or not to apply the proposed changes in the field list. More information: Metadata Comparison and Updating DataSources [page 336]
3. To add fields to the field list manually, choose Add Field or Add InfoObjects.
NoteThis is not possible for hierarchy DataSources, since the structure of the DataSource is defined using the hierarchy settings on the Extraction tab.
1. Instead of generating a proposal for the field list, you can enter InfoObjects to define the fields for the DataSource. To do this, choose Add InfoObjects. The system displays a dialog box where you can add one or more InfoObjects from the list to the selection pane. You can also copy a list of InfoObject names to the clipboard and add this to the selection.
2. Choose OK to add all corresponding fields to the field list of the DataSource for all InfoObjects from the selection area. This field name and description are derived from the InfoObject, and the technical properties of the InfoObject are added to the DataSource field.In the field list, the InfoObject that the field attributes were copied from is displayed in the InfoObject Template column.
NoteEntering InfoObjects here does not equate to assigning them to DataSource fields. This assignment is made in the transformation. When you define the transformation, the system proposes the InfoObjects you entered here as InfoObjects that you might want to assign to a field.
4. Choose Up or Down in order to move selected fields up or down in the field list.5. Choose Remove in order remove selected fields from the field list.6. Under Transfer, specify the decision-relevant DataSource fields that you want to be available for extraction
and transferred to the SAP BW∕4HANA system.7. In the context menu for a field, specify the field type, in other words whether the data is language-
dependent or time-dependent.
Maintain Field Properties
For manually created fields, you re-define the properties. For fields that are based on a proposal, you can change the properties that were derived or taken over from the proposal.
SAP BW/4HANAData Acquisition PUBLIC 333

NoteFor fields of hierarchy segments, not all field properties can be edited.
1. Select the field whose properties you want to edit.2. Under General, enter a field name and a description (optional).3. Under Data Type , enter the data type and, depending on the selected data type, the length of the field or
the number of digits and number of decimal places.4. Under InfoObject template, you can also add the technical properties of an InfoObject to the field at field
level.
NoteEntering an InfoObject here does not equate to assigning it the DataSource field. This assignment is made in the transformation. When you define the transformation, the system proposes the InfoObject you entered here as an InfoObject that you might want to assign to a field.
5. Under Technical Properties, make the following entries:1. For an unit or currency field: Under Unit/Currency Field, select the referenced currency or unit field or,
if the field has a fixed currency or unit, specify the currency or unit directly under Fixed Unit/Currency.If you specify the referenced currency or unit field, this field must be contained in the DataSource structure and be of type CUKY (currency) or UNIT (unit).Specifying a reference field or a fixed currency is only necessary if the amount field is delivered in external format. For quantities (data type QUAN), the specification is purely for information purposes and is not checked at runtime.
2. Under Key Field, specify whether the field is a key field of the DataSource.3. For a character-type field: Select Case-Sensitive if lower case letters are supported in characteristic
values.The property can be edited for the following data types: CHAR, SSTR, STRG, LANG, CUKY, and UNIT. The system checks the data type of the DataSource field, not the data type of the source field. If the data type of a type that does not support the property is changed into a type that does support the property, the Case-Sensitive property is selected by default. If the data type is changed in such a way that it does not support the Case-Sensitive property, the selection is removed.
6. Under Conversion Properties, make the following entries:1. Specify whether the source returns the data in internal format or external format.
Source data that is transferred as text can differ from the internal, SAP character representation, that is, the internal format. Choose one of the following options:○ Internal: Only choose this option if you are sure that the data source returns the data in internal
format for this field. If this is the case, no checks and conversions are performed. If the source does not return an internal format, there could be data inconsistencies or errors in the loading process. Example: A date field is always returned with data in format yyyymmdd.
○ External: Select this option if you know that the data is not in internal format and requires conversion to internal format before being passed on to the transformation. Example: The data for a date field has the format dd.mm.yyyy. It should be converted to the internal format yyyymmdd.
○ Check Choose this option if the data from the souce should be be in internal format, but needs to be checked before being passed on to the transformation. Choose this option to ensure data conformity. Example: The source should return format yyyymmdd for a date field, but this is not the case.
2. If necessary, under Conversion Routine, specify a conversion routine that converts data from external format to internal format.
334 PUBLICSAP BW/4HANA
Data Acquisition
3. If you choose external format, make sure under External Length that the output length of the field (external length) is correct. Change the entries if necessary.
7. Under Selection Properties, make the following entries:1. Under Selection, specify whether defining selections is allowed for the field when scheduling a data
request, or whether selections for the field are required in order to be allow extraction of data. The selectable fields can be found in the data transfer process for the filter. Data for this type of field is then transferred in accordance with the selections (filter) specified in the data request.
2. Under Selection Options, define which selection options (such as EQ, BT) you want to be available for selection.
Mass Maintenance of Field Properties
If you select multiple fields in the field list, you can use mass maintenance to change the properties of the selected fields. If the selected fields have different values for a particular property, this is indicated by the expression <multiple values> or the corresponding flagging of a checkbox. A change made to a property applies to all selected fields. If a property cannot be changed for one of the selected fields, the property cannot be changed in mass maintenance. If the selected fields have different data types, no information is displayed for the length, the number of digits, and the number of decimal places.
4.4.2 Editing DataSources
You can call the DataSource maintenance transaction from the context menu for a DataSource.
Procedure
You are in the Project Explorer view in the BW Modeling tools.Call the context menu for the DataSource in the Data Sources tree and choose Open.
Results
Depending on the source system type and the source field, you can change certain properties of the DataSource and the DataSource fields.
For SAP HANA DataSources and ODP DataSources, you can exchange the source object in the editor. If you want to exchange the source object of the DataSource, press the Exchange button and then select the new source object. The Confirm Update DataSource opens. This takes an initial proposal from the back end to update the DataSource, and displays this in comparison with the current DataSource version. When editing SAP HANA DataSources, note that native DataStore objects can only be exchanged with other native DataStore objects, and tables/views can only be exchanged with other tables/views.
SAP BW/4HANAData Acquisition PUBLIC 335

4.4.3 Metadata Comparison and Updating DataSources
In the DataSource Editor in the BW Modeling tools, you can perform a metadata comparison between the source object and the DataSource in SAP BW∕4HANA and update the DataSource in SAP BW∕4HANA.
You are in the DataSource Editor.
1. In the editor toolbar, choose Update.The Confirm Update DataSource wizard appears. For the various areas header data, extraction, segment properties and fields, the wizard indicates whether there are differences to the source. The wizard displays a proposal from the back end based on the metadata of the current object that the DataSource is based on. All relevant properties of the current M version of the DataSource are compared with the proposal.
2. You can use the Only Changed flag to specify that only differences detected in compared DatsSource properties are displayed instead of all DataSource properties.
3. In the Take Proposal column, the system indicates whether the value of a proposal should overwrite the current value in the DataSource.For all header data, segment properties and extraction properties, this is fixed and cannot be changed. The same applies for new or deleted fields. For differences in the field properties, you can decide whether to accept the proposal at field level by making a selection in the column. For properties that cannot be maintained by the user and are set by the source, the selection for whether a proposal should be overwritten is set by the system.By pressing Select All and Deselect All, you can specify whether or not the proposal should be accepted for all fields at once.
4. To update the DataSource in accordance with your selection, choose Finish.When activating the DataSource, note that the transformation might become inactivated and require adjustment.
4.5 Transformation
The transformation process allows you to consolidate, cleanse, and integrate data.
You can semantically integrate data from various sources.
You create a transformation between a source and a target. When data is loaded from a BW object or virtual object to a target BW object, the data passes through a transformation. A transformation converts the fields of the source into the format of the target.
A transformation consists of at least one transformation rule. Various rule types, transformation types, and routine types are available. These allow you to create very simple and highly complex transformations.
336 PUBLICSAP BW/4HANA
Data Acquisition

The following figure illustrates how the transformation is integrated in the data flow:
4.5.1 Rule Group
Use
A rule group is a group of transformation rules. It contains one transformation rule for each key field of the target. A transformation can contain multiple rule groups.
Rule groups allow you to combine various rules. This means that for a characteristic, you can create different rules for different key figures.
Features
Each transformation initially contains a standard group. Besides this standard group, you can create additional rule groups.
If you have defined a new rule in rule details, you can specify whether this rule is to be used as a reference rule for other rule groups. If it is used as a reference rule, then this rule is also used in existing rule groups as a reference rule where no other rule has been defined.
Example
The source contains three date characteristics:
● Order date● Delivery date● Invoice date
SAP BW/4HANAData Acquisition PUBLIC 337

The target only contains one general date characteristic. Depending on the key figure, this is filled from the different date characteristics in the source.
Create three rule groups which, depending on the key figure, update the order date, delivery date, or invoice date to the target.
4.5.2 Semantic Grouping
If a semantic grouping is used, data records with the same values in the selected fields form a logical key and are processed together in one package.
This setting must be considered in combination with the settings for semantic groups in DTP:
If handling data records with errors is activated, only the sources fields of key fields can be selected in DTP. The actual grouping uses the intersection of these selected key fields and the fields selected from the transformation for semantic grouping.
If handling data records with errors is switched off, all the sources fields that were also selected in the transformation can be selected in DTP. The selection of the semantic group is formed from this intersection.
If handling data records with errors is switched off, and no source fields have been selected in the transformation for the semantic grouping, all the source fields can be selected in DTP. This function has been retained for compatibility reasons, due to it not being possible to display source fields for the semantic grouping in the transformation. We recommend selecting the fields in the transformation however.
Related Information
Conditional Update through Semantic Grouping [page 338]
4.5.2.1 Conditional Update through Semantic Grouping
Use
The purpose of conditional updating is to update data records to a DataStore object only if a certain condition (logical expression) has been fulfilled. The data records should not be updated if this condition has not been fulfilled. To ensure that the most recent data record can always be checked, it must be processed together with all the other data records of the logical key. This can be ensured by using the semantic grouping. Here, all of the data records in a semantic group are processed together in one package.
The conditional update is programmed in the globally valid section of a routine, within the transformation. Two steps are required:
● If the condition has been fulfilled, the source value should be updated.● If the condition has not been fulfilled, the value in the target is first initialized using the standard setting for
the DataStore object. Since this initial value is not to be updated and the original value from the target is to
338 PUBLICSAP BW/4HANA
Data Acquisition

be retained, however, the initial value must be overwritten again with the value from the A table or activation queue.
Further examples of using semantic groupings include the calculation of averages, checksums, and totals across a characteristic or characteristic group.
4.5.3 Error Analysis in Transformations
With the Simulate and Debug DTP Requests function, you can simulate a transformation prior to the actual data transfer to check whether it returns the desired results. You can set Breakpoints at the following times in the processing: before the transformation, after the transformation, after the start routine, and before the end routine. More information: Simulating and Debugging DTP Requests [page 399].
4.5.4 Authorizations for the Transformation
To work with transformations, you need authorization object S_RS_TR.
4.5.5 Transport the Transformation
The transformation is integrated into BW's TLOGO framework, and can be transported.
Routines are transported together with the transformation.
The transport object is called TRFN.
4.6 Creating Transformations
The transformation process allows you to consolidate, clean up, and integrate data.
Context
You can semantically integrate data from various sources.
You create a transformation between a source and a target. When data is loaded from a BW object or virtual object to a target BW object, the data passes through a transformation. A transformation converts the fields of the source into the format of the target.
A transformation consists of at least one transformation rule. Various rule types, transformation types, and routine types are available. These allow you to create very simple and highly complex transformations.
SAP BW/4HANAData Acquisition PUBLIC 339

The following figure illustrates how the transformation is integrated in the data flow:
Procedure
1. You are in the BW modeling tools, in the editing screen for your data flow. You have already created connections, and your objects are active. In the context menu of a data flow object, choose Transformations Create Transformation . The wizard for creating transformations opens. More information: Creating a Transformation Using the Wizard [page 343]
2. The General tab opens.3. With Allow Currency and Unit Conversion, you can enable currency translation and unit conversion for
InfoSources and DataStore objects. As a prerequisite for this, all currencies and units of measure must be contained in the key of the target. For DataStore objects, translation/conversion of currencies and units is only supported with InfoObjects.
4. With Check Units for Consistency, you can activate the consistency check for units. This allows you to prevent records from being updated with initial units of measure for example.
5. In Runtime Properties, you can see whether the transformation is being processed in SAP HANA or in ABAP runtime. The default value is SAP HANA You can switch this value to process the transformation in ABAP runtime. For the switch, the system checks that the rules and any existing routines are still supported.Note:○ The differences between the two terms: Differences Between ABAP Runtime and SAP HANA Runtime
[page 342]○ The supported objects: Transformation in the SAP HANA Database [page 344]
NoteWith an ODP source system, we recommend using ABAP runtime, since the extraction is done by ABAP anyway. A transformation in SAP HANA would cause unnecessary effort, since the data must first be persisted.
6. In Global Routines you can create routines for your transformation. Depending on the processing setting in Runtime Properties (SAP HANAor in ABAP runtime), you can create routines in SAP HANA SQLScript or
340 PUBLICSAP BW/4HANA
Data Acquisition

ABAP routines. End routines can be created in SAP HANAruntime as a SAP HANA SAPScript or as an ABAP routine. In ABAP runtime, only ABAP routines can be created.More information: Routines in Transformations [page 353]
7. In Extraction Grouped By, you can select source fields for the semantic grouping. Data records with the same values in the selected fields form a logical key and are processed together in a package.More information: Semantic Grouping [page 338]
8. In Additional Rule Groups by choosing Add you can create additional rule groups.More information: Rule Group [page 337], Create Rule Group [page 343]
9. Choose the Rules tab.
The system proposes a transformation. The proposal is generated on the basis of a comparison with existing transformations. The system also checks for Basis InfoObjects that can be assigned (UNIT to 0UNIT for example) or whether the DataSource can be assigned to InfoObjects while editing the DataSource.
You can accept the proposed transformation or modify it. On the left side of the screen, you see the source; on the right the target.
NoteFor InfoProviders with non-cumulative key figures, you cannot change the transformation proposed by the system. These transformation rules fill the time reference characteristic of the InfoProvider. All other time characteristics are automatically derived from the time-reference characteristic.
10. With Filter Pattern you can filter the fields.11. You can use the mouse to drag new connecting arrows. You can change or delete existing connecting
arrows in the Properties View.12. You can edit the rule details. More information: Editing Rule Details [page 345]13. You can copy a rule by choosing Copy Rule in the context menu of a target field, and apply this rule in
another target field by choosing Paste Rule from the context menu of this field. You can then change this rule.
14. The Technical Rules tab displays the rules of technical fields.
15. In Show in History View you get an overview of the versions of the transformation.16. Activate the transformation.
Results
The transformation is executed with the corresponding data transfer process when the data is loaded.
To check whether the transofrmation provides the required results, you can simulate it to begin with. To do this, execute the simulation of the DTP request. The transformation is also simulated when the data update is simulated.
More information: Simulating and Debugging DTP Requests [page 399].
SAP BW/4HANAData Acquisition PUBLIC 341

4.6.1 Differences Between ABAP Runtime and SAP HANA Runtime
The transformations can be processed in ABAP or in SAP HANA. You make this setting for a transformation explicitly on the General tab.
SAP HANA runtime provides better performance than ABAP runtime, and mass data can be processed very quickly. SAP HANA runtime is more complex to work with however.
There are essential differences between the two runtime types, which can lead to different results. When using SAP HANA runtime, you should therefore carefully validate the results against expected results, especially if existing ABAP transformations are to be replaced.
The main differences between the runtimes are described below:
Type Conversion
In ABAP runtime, types supported in ABAP are converted automatically, so a value of a character field can easily be written to an integer field if the field contains numbers at runtime. In SAP HANA runtime, a runtime error will occur if you do not explicitly specify the type conversion in the formula or in the SAP HANA script.
See example of a formula: Creating a Formula [page 349]
In all more complex transformations, you have to check that the result meets your expectations. As described above, different behavior and different results might occur.
Rounding of Values
Unlike with ABAP runtime, the results of calculations when working with SAP HANA are truncated according to the decimal places, and are not rounded.
ExampleYou have an amount key figure of type DEC (decimal 17) with three decimal places and the value 2.
The formula AMOUNT / 3 calculates the value 0.667 (rounded up to the last decimal place) in ABAP runtime, but 0.666 in SAP HANA runtime.
If you use a formula, you can assure the rounding by additional conversions and an explicit rounding:
TO_DECIMAL(ROUND(TO_DOUBLE(AMOUNT) / TO_DOUBLE(/BIC/SZRDEC02); 3; ''); 17; 3)
342 PUBLICSAP BW/4HANA
Data Acquisition

Error Handling
You can use error handling for data records with errors in the DTP. More information: Specifying How Data Records Are Handled [page 393] .
4.6.2 Creating a Transformation Using the Wizard
Whenever you create a transformation, you are guided through the process by a wizard.
Context
Procedure
1. 1. You are in the BW Modeling tools. In the context menu for your BW project, choose New Transformation .
2. Select the source object in Source.3. You can select an object from which the transformation rules are to be copied.4. When you have finished making your settings, choose Finish. The editor appears.
4.6.3 Create Rule Group
Context
Besides the standard rule group, you can create additional rule groups.
Procedure
1. You are on the General tab, editing your transformation. Under Additional Rule Groups enter a name for the group and choose Add. A new tab appears for the group.
2. The rules of the standard group are displayed as dashed lines on this tab. If you want to change one of these rules, in the Properties View you can choose the function Copy Original Rule. This rule is then displayed with a solid line, and can be changed.
SAP BW/4HANAData Acquisition PUBLIC 343

3. With Reset to Original in the Properties View, you can reset the rule back to the rule for the standard group.
4.6.4 Transformation in the SAP HANA Database
If possible, transformations are processed in the SAP HANA database.
Processing in SAP HANAgenerally improves perfomance. By default, the transformation is therefore processed in SAP HANA You can switch this value to process the transformation in ABAP runtime. For the switch, the system checks that the rules and any existing routines are still supported.
For InfoObjects and data mart DataStore objects, there is combined SAP HANAand ABAP processing. Extraction and transformation are performed using SAP HANA and SID handling is executed and written using ABAP. This does not improve performance for standard transformations using 1:1 assignments. If you have selected Read Master Data or Read from DataStore object as the rule type, this leads to improved performance.
NoteWith an ODP source system, we recommend using ABAP runtime, since the extraction is done by ABAP anyway. A transformation in SAP HANA would cause unnecessary effort, since the data must first be persisted.
Routines are created as SAP HANAscript or ABAP routines depending on the selected runtime.
More Information:
● SAP HANA SQLScript Reference● Transformation in the SAP HANA Database [page 344]● ABAP Routines in Transformations [page 353]
If you need special transformations that are not possible with the standard transformation rules, you can create these as expert routines as SAP HANAscript in SAP HANA. This function is intended for experts only. You need to be registered as a developer, in order to use this function.
NoteYou have to model date calculations (such as sy-date + 1) with formula ADD_DAYS_TO_DATE, both for internal and external display.
Unsupported Objects
The following objects are not supported for executing transformations in SAP HANA:
● Objects with hierarchies● InfoSources with the property that the data is to be aggregated● Customer-defined functions in the formula editor● Implicit type conversion in formulas● To read data from DataStore objects, the entire key must be provided.● Nearline connection
344 PUBLICSAP BW/4HANA
Data Acquisition

For more information, see SAP Note 2329819 .
4.6.5 Editing Rule Details
You can modify the generated rule details according to your needs.
Procedure
1. You are in the BW modeling tools, editing your transformation on the Rules tab.2. Select a field/InfoObject whose rule you want to edit by double-clicking on the line representing the rule, or
by using the context menu of the source or target field. The rule details are displayed in the Properties View.
3. With Type you can change the rule type.More information: Rule Type [page 346]
4. If you selected Lookup as the type, you have to assign an InfoObject or a DataStore object from which data is to be read from.
Using Map Fields of Lookup Object you can display the assignment of the fields and assign missing fields. For DataStore objects, all key fields can be assigned to source fields.
5. You can activate the conversion routine, if it has been created. This is deactivated in the default setting, as the system assumes that the DataSource provides the internal format. The data should generally be in an internal format. This means that the conversion exit should be executed in the DataSource if possible. Only conversion routines ALPHA, GJAHR, NUMCV, PERI6 and PERI7 are supported.More information: Conversion Routines in the BW System
6. Under Run Master Data check for InfoObject, for individual characteristics you can activate the check for referential integrity. The check for referential integrity determines the validity of a characteristic's value before it is updated. The system checks if the master data table (attribute table) or DataStore object specified in the InfoObject maintenance for this characteristic contains an entry for this characteristic. If no entries are found, an error message is displayed. If a characteristic does not contain any attributes, the check is not offered.
7. With key figures, you can select the aggregation type. More Information: Aggregation Type [page 350]8. For key figures, you can specify a transformation type. If you have set the indicator Allow Currency and Unit
Conversion on the General tab, you can define a currency translation or quantity conversion.More information:
Currency Translation During Transformation [page 351]
Quantity Conversion During Transformation [page 352].
SAP BW/4HANAData Acquisition PUBLIC 345

4.6.5.1 Rule Type
The rule type defines whether and how a characteristic/key figure or a data field/key field is updated into the target.
Direct Assignment:
The field is filled directly from the chosen source InfoObject. If the system does not propose a source InfoObject, you can assign a source InfoObject of the same type (amount, number, integer, quantity, float, time) or create a routine.
If you assign a source InfoObject to a target InfoObject that has the same type but a different currency, you have to translate the source currency to the target currency using a currency translation, or transfer the currency from the source.
If you assign a source InfoObject to a target InfoObject that has the same type but a different unit of measure, you have to convert the source unit of measure into the target unit of measure using a unit of measure conversion, or transfer the unit from the source.
Routine:
The field is filled by a transformation routine that you have written. Depending on the runtime selected, ypu have to implement the routine in ABAP or SQLScript SAP HANA
NoteFor DataStore objects and InfoObjects: You cannot use the return code in the routine for data fields that are updated by being overwritten. If you do not want to update specific records, you can delete these from the start routine.
A routine can have any number of fields as input fields and one field (data or key field) as the output parameter. Using the input parameters, and ABAP code or SAP HANASQLScript (depending on the selected runtime), you specify the value of the target field.
If you fill the target key figure from a transformation routine, currency translation has to be performed using the transformation routine. This means that no automatic calculation can be performed.
More Information:
● ABAP Routines in Transformations [page 353]● SAP HANA SQLScript Routines in the Transformation [page 375]
Formula:
The InfoObject is updated with a value determined using a formula.
346 PUBLICSAP BW/4HANA
Data Acquisition

More information: Creating a Formula [page 349]
Read:
You can read data from InfoObjects or DataStore objects.
Read from InfoObjects:
The InfoObject is updated by reading the master data table of a characteristic from the source with a key and a value and contains the corresponding InfoObject as an attribute. The attributes and their values are read from the key and are then returned.
ExampleThe Financial Management Area characteristic is included in the target but is not a characteristic in the source. There is a characteristic (cost center, for example) in the source however. This has the Financial Management Area characteristic as an attribute. You can read the Financial Management Area attribute from the master data table and use it to fill the characteristic in target.
NoteIt is not possible to read additional attributes for the attributes. You have to use routines for this.
If you have changed master data, you have to execute the change run. This is because the active version is read when the master data is read.. If this cannot be found, the system raises an error.
In transformations with an open hub destination, it is not possible to read from master data.
If the attribute is time-dependent, you also have to define the read time: On the current date (sy-date), at the beginning or end of a period (determined by the time characteristic in the InfoSource) or on a constant date that you enter directly. Sy-date is used in the default setting.
Read from DataStore Object (advanced):
To read from a DataStore object (advanced), the system first provides you with a proposal for how the fields can be assigned. The key fields must be assigned to the source fields of the transformation. When assigning the fields, the names do not need to be identical.
Constant:
The field is filled directly with the value entered.
InfoObject 0RECORDMODE is an exception to this. The system chooses Constant for this, but no value is required. In this case, the constant is required for delta administration (after images) with DataStore objects or InfoObjects as InfoProviders. Apart from this, no records are deleted. If your DataSource return a suitable field for 0RECORDMODE, you can assign this directly instead.
SAP BW/4HANAData Acquisition PUBLIC 347

Time Update:
When performing a time update, automatic time conversion and time distribution are provided.
Direct update: The system provides an automatic time conversion.
Time Conversion:
You can update source time characteristics to target time characteristics using automatic time conversion. This function is not available for DataStore objects, as time characteristics are treated as normal data fields. The system only offers time characteristics that have an automatic time conversion routine.
Time Distribution:
You can update time characteristics with time broadcasting. All the key figures that can be added are split into correspondingly smaller units of time. If the source contains a time characteristic (such as 0CALMONTH) that is not as precise as a time characteristic of the target (such as 0CALWEEK), you can combine these characteristics in the rule. The system then performs time broadcasting in the transformation.
ExampleYou might for example divide calendar month 07.2001 into weeks 26.2001, 27.2001, 28.2001, 29.2001, 30.2001 and 31.2001. Every key figure that can be added receives 1/31 of the original value for week 26.2001, 7/31 for each of weeks 27,28,29 and 30, and exactly 2/31 of it for week 31.
The example is clearer if you compare it with the calendar below:
Time broadcasting always applies to all key figures.
348 PUBLICSAP BW/4HANA
Data Acquisition

Initial:
Initial is the default rule type for key fields (and only possible for these). The correct type for the initial entry is written to the field.
Unit of Measure Conversion and Currency Translation:
You can convert data records into the unit of measure or currency of the target transformation.
For more information, see
● Currency Translation During Transformation [page 351]● Quantity Conversion During Transformation [page 352]
0RECORDMODE Calculation for ODP
If the source of your transformation is a DataSource taht supplied with data via an Operdational Data Provider (ODP), and the target is a DataStore object or InfoObject, you need rule type 0RECORDMODE Calculation for ODP for the ODQ_CHANGEMODE and ODQ_ENTITYCNTR source fields. This rule type can also be used to calculate the 0RECORDMODE field.
If you load deltas from an ODP that does not return just one image type (after images, delete images and new images for example), this change behaviour is provided by the ODQ_CHANGEMODE and ODQ_ENTITYCNTR fields. The 0RECORDMODE field has to be calculated from these fields for use in the BW system.
4.6.5.2 Creating a Formula
You can create a formula as a rule type.
Context
Various predefined functions are available to do this.
The InfoObject is updated with a value calculated by a formula.
NoteIn the SAP HANA runtime no implicit type conversion is supported for runtime/ modelling time.
Example of a formula with differently typed formula elements (HX_INF6 of type C, 0 typed with I):
Variant A: IF (HX_INF6 > 0, 10, 20)
SAP BW/4HANAData Acquisition PUBLIC 349

Variant A can be executed in ABAP runtime because ABAP runtime ensures that the value of HX_INF6 is converted implicitly from type C to type I before the actual comparison HX_INF6 > 0 is executed. This variant cannot be executed in the SAP HANA runtime.
Variant B: IF(TO_INT( HX_INF6 ) > 0, 10, 20)
Variant B can be executed in SAP HANA runtime because the casting function TO_INT explicitly ensures that the value of HX_INF6 is converted from type C to type I before the actual comparison HX_INF6 > 0 is executed. This variant cannot be executed in ABAP runtime because the casting function TO_INT is not available in the ABAP stack.
Procedure
1. You are in the BW modeling tools, processing your transformation. You have selected Formula as the rule type.
2. In the Properties View next to the input field, choose the Edit formula. The formula editor appears.3. You can define your formula in the Formula field. To simplify the task of formula definition, you can select
the required operands and operators for the formula from Formula Groups. The system then inserts these into the formula definition with the correct syntax. You can use the numeric keypad on the right to enter basic arithmetic operations.
With each step, the system checks the syntactic correctness of the formula. If the formula is incomplete or syntactically incorrect, the system underlines the error in red.
4. Choose Format Formula to format your formula. In this step for example, the system removes any unneeded spaces and inserts any line breaks required.
5. Confirm your formula definition by pressing OK. The formula is displayed in the Formula field.
4.6.5.3 Aggregation Type
You use the aggregation type to control how a key figure or data field is updated to the InfoProvider.
For InfoObjects:
Only the Overwrite option is available. With this option, new values are updated to the InfoObject.
For DataStore Objects (advanced):
Depending on the properties of the DataStore object (advanced) in question, you are offered the option Summation, Maximum, Minimum or Overwrite. When you choose one of these options, new values are updated to the DataStore object.
If you have selected the modeling properties Activate Data and All Characteristics are Key, Reporting on Union of Inbound and Active Table, you can choose from the following aggregation types: Summation, Maximum and Minimum.
If you have selected the modeling properties Activate Data and Write Change Log, you can choose from the following aggregation types: Summation, Maximum, Minimum and Overwrite.
If you have not selected any modeling properties, you are not offered any aggregation types at all.
350 PUBLICSAP BW/4HANA
Data Acquisition

4.6.5.4 Currency Translation During Transformation
Currency translation during transformation enables you to convert data records from the source currency into a currency of the target of the transformation.
Currency translation during transformation is performed using previously defined translation types. More information: Currency Translation Types [page 602].
You can also create a currency translation for fields that are not in the key. If the fields are not in the key, there should be no more than one currency field in the target however.
Currency translation types that contain variables cannot be used in the transformation.
This can also be done using user-defined subprograms (formulas and routines).
Depending on the type of currency, there are two different types of key figures:
1. Key figures with a fixed currency (for example, DEM, USD)With a fixed currency, the currency is fixed with the amount. As the key figure refers specifically to the currency (for example DM, US$), this does not have to be entered again in the data record.
2. Key figures with a variable currency (foreign currency for example).With a variable currency, the currency is determined by an InfoObject, (ODOC_CURRCY) for example.
More information: Creating Key Figures [page 106]
Features
When transforming key figures, you have two options:
1. You can assign a source key figure of the same type to the target key figure (sales revenue instead of sales quantity revenue, for example).○ If both key figures have the same currency, no currency translation is performed.○ If the currencies are different, translation can be performed either using a currency translation type or
by simply assigning a currency.The following table provides an overview of possible combinations where the currency is not the same in the source and target key figures:
Source Key Figure Currency Target Key Figure CurrencyCurrency Translation (CT) Activated
Fixed Variable By default CT is deactivated, but it can be activated.
Fixed Fixed CT
Variable Fixed CT
Variable Variable CT or assignment possible
2. Translating the source currency: For fixed currencies you can define a field or InfoObject as a variable currency and vice versa.
SAP BW/4HANAData Acquisition PUBLIC 351

3. If there is no corresponding source key figure of the same type, you can fill the key figure of the target using a routine.○ If the currency of the target key figure is fixed, no currency translation is performed. This means that
you have to perform the translation in a routine if required.○ If the currency of the target key figure is variable, you also have to assign a variable source currency to
the routine. You can use input help to select a currency from the variable currencies that exist for the target. You have two options:○ You can assign the selected variable currency.○ You can select a currency translation type and a currency to translate into ('to' currency).
The target currency can be defined in the UI. This also applies for formulas.
4.6.5.5 Quantity Conversion During Transformation
Use
Quantity conversion during transformation enables you to convert data records from the source unit of measure into a unit of measure in the target of the transformation.
Quantity conversion during transformation is generally performed using previously defined conversion types. More information: Quantity Conversion Types [page 623].
This can also be done using user-defined subprograms (formulas and routines).
Depending on the type of unit of measure, there are two different types of key figures:
1. Key figures with a fixed unit of measureWith a fixed unit of measure, the unit is fixed for the key figure. The key figure refers specifically to the unit of measure. meaning that the unit does not have to be entered again in the data record.
2. Key figures with a variable unit of measureA variable unit of measure references an InfoObject.
More information: Creating InfoObjects: Key Figures.
Features
When transforming key figures, you have the following options:
1. You can assign a source key figure of the same type to the target key figure.○ If the units of measure of both key figures are the same, no quantity conversion can take place.○ If the units of measure are different, a conversion can take place either using a quantity conversion
type or by simply assigning a unit of measure.2. If there is no corresponding source key figure of the same type, you have to fill the key figure of the target
using a routine.○ If the unit of measure of the target key figure is fixed, no quantity conversion is performed. This means
that you have to perform the conversion in a routine if necessary.
352 PUBLICSAP BW/4HANA
Data Acquisition

○ If the unit of measure of the target key figure is variable, you also have to assign a variable source unit of measure to the routine. You can use input help to select a unit of measure from the variable units of measure for the target. You have two options:○ You select a variable unit of measure and assign it.○ You select a quantity conversion type and a unit of measure that you want to convert to.
Conversion Using a Quantity Conversion Type
If you have chosen an InfoObject for determining the target unit of measure in the quantity conversion type, you must heed the following when maintaining the transformation rules:
The InfoObject for determining the target unit of measure must be contained in both the source and target systems and must be filled using a rule.
More information: Defining Target Units of Measure Using InfoObjects [page 626].
Routines for Quantity Conversions
If you want to convert units of measure during the transformation but quantity conversion is not available for one of the reasons stated above, you can create a routine. On the transformation rule definition, choose Routine with Unit. The routine editor gives you the additional return parameter UNIT, whose value is used to determine the target unit of measure.
More information: Routines in Transformations [page 353].
4.6.6 ABAP Routines in Transformations
You use routines to define complex transformation rules.
NoteIf you want to create ABAP routines, you must select the ABAP runtime under Runtime Properties.
ABAP routines are methods of a local ABAP class that consist of a predefined definition area and an implementation area. The TYPES for the inbound and outbound parameters and the signature of the routine (ABAP method) are stored in the definition area. The routine itself is created in the implementation area. ABAP object statements are available in the coding of the routine. Upon generation, the coding is embedded in the local class of the transformation program as the method.
NoteYou should not change this class, and you should only call it using the transformation.
SAP BW/4HANAData Acquisition PUBLIC 353

The following graphic shows the position of these routines in the data flow:
Features
The routine has a global part and a local part. In the global part, you define global data declarations 'CLASS DATA'. These are available in all routines.
NoteDo not create any global implementations. These cannot be processed. Changes or enhancements outside of the methods cannot be applied and are therefore lost.
354 PUBLICSAP BW/4HANA
Data Acquisition

NoteIn earlier releases you could create declarations in a second global area. The second global area is no longer supported. You have to copy these declarations from the second global area into the first global area. See SAP Note 2654109 for more details.
You can create function modules, methods or external subprograms in the ABAP Workbench if you want to reuse source code in routines. You can call these in the local part of the routine. The source code of the method is copied into the metadata of the transformation and transported with the transformation. In the target system, a new class is created from the metadata.
There are various types of routine in the transformation: start routine, routine for key figures or characteristics, end routine and expert routine.
SAP BW/4HANAData Acquisition PUBLIC 355

The following figure shows the structure of the transformation program with transformation rules, start routine, and end routine:
356 PUBLICSAP BW/4HANA
Data Acquisition

The following figure shows the structure of the transformation program with expert routine:
Start Routine
The start routine is run for each data package at the start of the transformation. The start routine has a table in the format of the source structure as input and output parameters. It is used to perform preliminary calculations and store these in a global data structure or in a table. You can access this structure or table from other routines. You can modify or delete data in the data package.
Routine for Key Figures or Characteristics
This routine is available as a rule type; you can define the routine as a transformation rule for a key figure or a characteristic. The input and output values depend on the selected field in the transformation rule. For more information, see the Routine section under Rule Type [page 346].
End Routine
SAP BW/4HANAData Acquisition PUBLIC 357

An end routine is a routine with a table in the target structure format as an inbound parameter and an outbound parameter. You can use an end routine to post-process data, package-by-package, after transformation. For example, you can delete records that are not to be updated, or perform data checks.
The ABAP end routine can be created independently of the runtime in ABAP or in SAP HANA script, but only in the last transformation that is written to the target.
CautionIf the target of the transformation is a DataStore object, key figures are updated by default with the aggregation behavior Overwrite (MOVE). You have to use a dummy rule to override this.
Expert Routine
This type of routine is only intended for use in special cases. You can use the expert routine if the other transformation functions are not sufficient. You can use the expert routine as an interim solution until the necessary functions are available in the standard routine.
If you have already created transformation rules, the system deletes them once you have created an expert routine.
Navigation attributes of the source of the transformation are not available in the expert routine.
CautionIf the target of the transformation is a DataStore object, key figures are updated by default with the aggregation behavior Overwrite (MOVE).
More information:
Example of Start Routine [page 360]
Example of Characteristic Routine [page 360]
Example of End Routine [page 362]
4.6.6.1 Create ABAP Routine
Prerequisites
You have created an ABAP in Eclipse project.
Procedure
1. You are in the BW modeling tools, editing your transformation on the General tab.
○ To create a start routine, choose Start Routine Create .
○ To create an expert routine, choose Expert Routine Create .
358 PUBLICSAP BW/4HANA
Data Acquisition

○ To create an end routine, choose End Routine Create ABAP .○ To create a characteristic routine, select the characteristic. In the Properties view, you can select the
rule type Routine in the rule details.2. If you are creating a characteristic routine, the routine editor appears immediately. If you are creating a
start routine or an end routine, you can first select fields that are to be updated. Some fields are required for further processing however, meaning that they must be updated. These fields are marked as mandatory.
3. You are in the routine editor. To create a routine, enter the following:Between *$*$ begin of global ... and *$*$ end of global ..., you can define 'CLASS DATA' global data declarations. These are available in all routines. Data declarations with ‘DATA' can only be accessed in the current package.This means that you can use intermediate results in other routines for example, or reuse results when you call a routine again at a later time.
NoteWhen you perform serial loads, one process instance is used for the entire request. In this case, data with the 'CLASS DATA' data declaration can be accessed for the entire request (all packages).
Several process instances are used when you perform parallel loads.
A single process instance can be used multiple times. The exact number of times depends on the number of data packages to be processed and the number of process instances that are available. This means that with parallel loads too, data with the 'CLASS DATA' data declaration is not initialized for each data package and may still contain data from predecessor packages.
Therefore use 'CLASS DATA' or 'DATA' for the global data, depending on the scenario.
4. Insert your program code for the routine between *$*$ begin of routine ... and *$*$ end of routine ....
NoteEditing outside of the two comments is not prevented technically. However, if you enter code outside of the two comments, this coding is lost when the routine is transferred.
For information about the parameters of the routine, see:○ Start Routine Parameters [page 362]○ Routine Parameters for Key Figures or Characteristics [page 363]○ End Routine Parameters [page 364]
CautionDo not use an SAP COMMIT in your program code (ABAP statement: COMMIT WORK). When this statement is executed, the cursor used to read from the source is lost. Use a DB COMMIT (call function module DB_COMMIT) instead, or avoid using such COMMITs altogether.
5. Check the syntax of your routine.6. Save the routine. You end the editing of the routine by leaving the editor.
More information:
Example of Start Routine [page 360]
Example of Characteristic Routine [page 360]
SAP BW/4HANAData Acquisition PUBLIC 359

Example of End Routine [page 362]
4.6.6.1.1 Example of a Start Routine
Use
You are loading data using DataSource General Ledger: Transaction Figures (FI_GL_1) in the SAP ERP system into DataStore object FIGL: Transaction Figures (0FIGL_O06).
You want to create a start routine that deletes all the records from a data package with debit and credit postings that are zero.
1. Create a transformation. The source of the transformation has the Total Debit Postings (UMSOL) and Total Credit Postings (UMHAB) fields. They are assigned to the InfoObjects Total Debit Postings (0DEBIT) and Total Credit Postings (0CREDIT).
2. You are in the BW modeling tools, editing your transformation on the General tab. Choose Start RoutineCreate . The routine editor opens.
3. Go to the local part of the routine. Enter the following code:
Sample Code *----------------------------------------------------------------------* METHOD start_routine.*=== Segments ===
FIELD-SYMBOLS: <SOURCE_FIELDS> TYPE _ty_s_SC_1.
*$*$ begin of routine - insert your code only below this line *-*
DELETE SOURCE_PACKAGE where UMHAB = 0 and UMSOL = 0.
*$*$ end of routine - insert your code only before this line *-* ENDMETHOD. "start_routine*----------------------------------------------------------------------*
The DELETE statement is the only line you need to filter debit and credit postings without values from the data package.
4. Save the class and go back to the transformation editor.5. Activate the transformation. The transformation has object status Active, but the version status is Revised.
4.6.6.1.2 Example of Characteristic Routine
Use
You are loading data using DataSource General Ledger: Transaction Figures (0FI_GL_1) in the SAP ERP system into DataStore object FIGL: Transaction Figures (0FIGL_O06). Transaction Figures (0FIGL_O06).
360 PUBLICSAP BW/4HANA
Data Acquisition

You want to create a routine for the characteristic Debit/Credit Indicator (0FI_DBCRIND) in the target that assigns the value D to debit postings and the value C to credit postings.
1. You are in the BW modeling tools, editing your transformation on the Rules tab. Select the InfoObject Debit / Credit Indicator (0FI_DBCRIND) and the rule detailsare displayed in the Properties View.
2. You choose Add Fields and add the Total Debit Postings (UMSOL) and Total Credit Postings (UMHAB) fields so that they are available in the routine.
3. You choose Routine as the rule type. When you choose Routine Edit the class editor opens.4. You enter the following lines of code. They return either a D or a C as the result value:
Sample Code *---------------------------------------------------------------------*
METHOD compute_0FI_DBCRIND.
DATA: MONITOR_REC TYPE rsmonitor.
*$*$ begin of routine - insert your code only below this line *-*
* result value of the routine if SOURCE_FIELDS-umhab ne 0 and SOURCE_FIELDS-umsol eq 0. RESULT = 'D'. elseif SOURCE_FIELDS-umhab eq 0 and SOURCE_FIELDS-umsol ne 0. RESULT = 'C'. else. monitor_rec-msgid = 'ZMESSAGE'. monitor_rec-msgty = 'E'. monitor_rec-msgno = '001'. monitor_rec-msgv1 = 'ERROR, D/C Indicator'. monitor_rec-msgv2 = SOURCE_FIELDS-umhab. monitor_rec-msgv3 = SOURCE_FIELDS-umsol. append monitor_rec to monitor. RAISE EXCEPTION TYPE CX_RSROUT_ABORT. endif.
*$*$ end of routine - insert your code only before this line *-* ENDMETHOD. "compute_0FI_DBCRIND*---------------------------------------------------------------------*
The system checks whether the debit and credit postings contain values:○ If the debit posting has values that are not equal to zero and the credit posting is equal to zero, the
system assigns the value D.○ If the credit posting has values that are not equal to zero and the debit posting is equal to zero, the
system assigns the value C.○ If both the debit and credit postings contain values, the system outputs an error in the monitor and
terminates the load process.5. Save and activate the class, and close the class editor.6. You save the transformation.
SAP BW/4HANAData Acquisition PUBLIC 361

4.6.6.1.3 Example of an End Routine
Use
You are loading data using DataSource General Ledger: Transaction Figures (0FI_GL_1) in the SAP ERP system into DataStore object FIGL: Transaction Figures (0FIGL_O06). Transaction Figures (0FIGL_O06).
You want to create an end routine to fill the additional InfoObject Plan/Actual Indicator (ZPLACTUAL). You also want the routine to read the Value Type field. If the value is 10 (actual), value A is written to the Plan/Actual Indicator InfoObject; if the value is 20 (plan), value P is written to the Plan/Actual Indicator InfoObject.
1. You are in the BW modeling tools, editing your transformation on the General tab. Choose End RoutineCreate ABAP . The routine editor opens.
2. You enter the following lines of code:
Sample Code *----------------------------------------------------------------------* METHOD end_routine.*=== Segments ===
FIELD-SYMBOLS: <RESULT_FIELDS> TYPE _ty_s_TG_1.
*$*$ begin of routine - insert your code only below this line *-* loop at RESULT_PACKAGE assigning <RESULT_FIELDS> where vtype eq '010' or vtype eq '020'. case <RESULT_FIELDS>-vtype. when '010'. <RESULT_FIELDS>-/bic/zplactual = 'A'. "Actual when '020'. <RESULT_FIELDS>-/bic/zplactual = 'P'. "Plan endcase. endloop.*$*$ end of routine - insert your code only before this line *-* ENDMETHOD. "end_routine*----------------------------------------------------------------------*
The code loops through the result_package searching for values that have the value type 10 or 20. For these values, the appropriate value is passed on to InfoObject Plan/Actual Indicator (ZPLACTUAL).
3. Save the class and go back to the transformation editor.4. Activate the transformation. The transformation has object status Active, but the version status is Revised.
4.6.6.2 Start Routine Parameters
Importing
● REQUEST: Request ID● DATAPAKID: Number of the current data package● SEGID: Number of the segment
Exporting
362 PUBLICSAP BW/4HANA
Data Acquisition

● MONITOR: Table for user-defined monitoring. This table is filled using row structure MONITOR_REC (the record number of the processed record is inserted automatically from the framework).
Changing:
● SOURCE_PACKAGE: Structure that contains the inbound fields of the routine.
Raising:
● CX_RSROUT_ABORT: If a raise exception type cx rsrout_abort is triggered in the routine, the system terminates the entire load process. The request is highlighted in the extraction monitor as having been terminated. The system stops processing the current data package. This can be useful if serious errors occur.
● CX_RSBK_ERRORCOUNT: If a raise exception type cx rsbk_errorcount is triggered in the routine, the entire processing of the data package is terminated.
4.6.6.3 Routine Parameters for Key Figures or Characteristics
Importing
● REQUEST: Request ID● DATAPAKID: Number of the current data package● SOURCE_FIELDS: Structure with the routine source fields defined on the UI● SEGID: Number of the segment
Exporting
● MONITOR: Table for user-defined monitoring. This table is filled using row structure MONITOR_REC (the record number of the processed record is inserted automatically from the framework).
● RESULT: You have to assign the result of the computed key figure or computed characteristic to the RESULT variables.
● CURRENCY (optional): If the routine has a currency, you have to assign the currency here.● UNIT (optional): If the routine has a unit, you have to assign the unit here.
Raising
Exception handling by means of exception classes is used to control what is written to the target:
● CX_RSROUT_SKIP_RECORD: If a raise exception type cx_rsrout_skip_record is triggered in the routine, the system stops processing the current row and continues with the next data record.
● CX_RSROUT_SKIP_VAL: If an exception type cx_rsrout_skip_val is triggered in the routine, the target field is deleted.
● CX_RSROUT_ABORT: If a raise exception type cx rsrout_abort is triggered in the routine, the system terminates the entire load process. The request is highlighted in the extraction monitor as having been terminated. The system stops processing the current data package. This can be useful if serious errors occur.
SAP BW/4HANAData Acquisition PUBLIC 363

4.6.6.4 End Routine Parameters
Importing
● REQUEST: Request ID● DATAPAKID: Number of the current data package● SEGID: Number of the segment
Exporting
● MONITOR: Table for user-defined monitoring. This table is filled using row structure MONITOR_REC (the record number of the processed record is inserted automatically from the framework).
Changing
● MONITOR: Table for user-defined monitoring. This table is filled using row structure MONITOR_REC (the record number of the processed record is inserted automatically from the framework).
Raising
● CX_RSROUT_ABORT: If a raise exception type cx rsrout_abort is triggered in the routine, the system terminates the entire load process. The request is flagged as terminated in the extraction monitor. The system stops processing the current data package. This can be useful if serious errors occur.
● CX_RSBK_ERRORCOUNT: If a raise exception type cx rsbk_errorcount is triggered in the routine, the entire processing of the data package is terminated.
CautionIf only the key fields are updated for master data attributes, all the attributes are initialized, regardless of the settings described here. For more information, see 1096307 .
NoteIf key fields are filled in the end routine, these fields are also filled in the DataStore object. This occurs regardless of the settings for the field list of the end routine.
4.6.6.5 Creating Inversion Routines
Using inversion routines make sense for virtual providers and to improve performance by reducing the size of requests to large amounts of data. Inversion routines convert the selection criteria of a query into selection criteria for the extractor. Without these selection criteria, all values of the source are selected.
You also have to create an inversion routine when calling up a transaction in another SAP system using the report-report interface if a routine is used in the transformation, as the selections cannot otherwise be transferred to the source system.
You can create an inversion routine for all types of routine. The following rules apply:
● With expert routines, there is no segmentation into conditions.● With start routines, the system performs segmentation into conditions. The system applies this to the
complete source structure. The source structure is the start and end point.
364 PUBLICSAP BW/4HANA
Data Acquisition

● With end routines, the target structure is the start and end point.
NoteIf SAP HANAis set as the runtime, no inverse routine is available for ABAP end routines.SAP HANA
Prerequisites
You have already created a routine. On the General tab in the editing screen for your transformation, you have set the Create Inverse Routines for ABAP Routinesflag.
Procedure
You are in the routine editor. To create an inversion routine, enter the following:
1. Insert your program code for the inversion routine between *$ *$ begin of routine - insert your code only below this line *-* and *$ *$ end of routine - insert your code only before this line *-*.With an inversion routine for a jump using the report-report interface, you have to make an exact inversion so that the selections can be transferred exactly.For information about the parameters of the routine, see Inversion Routine Parameters [page 365]
2. Check the syntax of your routine.3. Save the class and close the class editor.
Example
Here is an example of an inversion routine: Example of Inversion Routine [page 366]
4.6.6.5.1 Inversion Routine Parameters
The inversion routine has method invert.
It has the following parameters:
Importing
● i_th_fields_outbound: Fields/InfoObjects for the query structure● i_r_selset_outbound: Query selection conditions● i_is_main_selection: Allows you to transfer complex selection conditions such as selection conditions for
columns.● i_r_selset_outbound_complete: All selections● i_r_universe_inbound: Description of source structure with regard to set objects.
Changing
SAP BW/4HANAData Acquisition PUBLIC 365

● c_th_fields_inbound: Fields/InfoObjects for the target structure● c_r_selset_inbound: Taget selection conditions. You can fill the target field from more than one source field.
In this case, you have to define more than one condition.● c_exact: Allows you to specify whether you want the transformation of the selection criteria to be
performed exactly. If the condition can be filled exactly, a direct call is possible. This is important when you call the report-report interface. If the condition cannot be filled exactly, a selection screen appears for the user.
4.6.6.5.2 Example of Inversion Routine
Use
In this example, the German keys 'HERR' and 'FRAU' in the target characteristic are mapped to the English keys 'MR' and 'MRS' from the PASSFORM field (form of address) in the source. All other values from the source field are mapped to the initial value.
The coding of the routine is as follows:
Sample Code
*---------------------------------------------------------------------** CLASS routine DEFINITION*---------------------------------------------------------------------***---------------------------------------------------------------------*CLASS lcl_transform DEFINITION. PUBLIC SECTION.
TYPES: BEGIN OF _ty_s_SC_1,* Field: PASSFORM Anrede. PASSFORM TYPE C LENGTH 15, END OF _ty_s_SC_1. TYPES: BEGIN OF _ty_s_TG_1,* InfoObject: 0PASSFORM Anrede. PASSFORM TYPE /BI0/OIPASSFORM, END OF _ty_s_TG_1. PRIVATE SECTION.
TYPE-POOLS: rsd, rstr.
*$*$ begin of global - insert your declaration only below this line *-* DATA p_r_set_mr TYPE REF TO cl_rsmds_set. DATA p_r_set_mrs TYPE REF TO cl_rsmds_set. DATA p_r_set_space TYPE REF TO cl_rsmds_set.
*$*$ end of global - insert your declaration only before this line *-* METHODS compute_0PASSFORM IMPORTING request type rsrequest datapackid type rsdatapid SOURCE_FIELDS type _ty_s_SC_1 EXPORTING RESULT type _ty_s_TG_1-PASSFORM
366 PUBLICSAP BW/4HANA
Data Acquisition

monitor type rstr_ty_t_monitor RAISING cx_rsrout_abort cx_rsrout_skip_record cx_rsrout_skip_val. METHODS invert_0PASSFORM IMPORTING i_th_fields_outbound TYPE rstran_t_field_inv i_r_selset_outbound TYPE REF TO cl_rsmds_set i_is_main_selection TYPE rs_bool i_r_selset_outbound_complete TYPE REF TO cl_rsmds_set i_r_universe_inbound TYPE REF TO cl_rsmds_universe CHANGING c_th_fields_inbound TYPE rstran_t_field_inv c_r_selset_inbound TYPE REF TO cl_rsmds_set c_exact TYPE rs_bool.ENDCLASS. "routine DEFINITION*$*$ begin of 2nd part global - insert your code only below this line *... "insert your code here*$*$ end of 2nd part global - insert your code only before this line *
*---------------------------------------------------------------------** CLASS routine IMPLEMENTATION*---------------------------------------------------------------------***---------------------------------------------------------------------*CLASS lcl_transform IMPLEMENTATION.
METHOD compute_0PASSFORM.
* IMPORTING* request type rsrequest* datapackid type rsdatapid* SOURCE_FIELDS-PASSFORM TYPE C LENGTH 000015* EXPORTING* RESULT type _ty_s_TG_1-PASSFORM
DATA: MONITOR_REC TYPE rsmonitor.
*$*$ begin of routine - insert your code only below this line *-*
CASE SOURCE_FIELDS-passform. WHEN 'HERR'. RESULT = 'MR'. WHEN 'FRAU'. RESULT = 'MRS'. WHEN OTHERS. RESULT = space. ENDCASE.
*$*$ end of routine - insert your code only before this line *-* ENDMETHOD. "compute_0PASSFORM
The corresponding inversion routine is as follows:
Sample Code *$*$ begin of inverse routine - insert your code only below this line*-* DATA l_r_set TYPE REF TO cl_rsmds_set. IF i_r_selset_outbound->is_universal( ) EQ rsmds_c_boolean-true.
* If query requests all values for characteristic 0PASSNAME* request also all values from source field PASSNAME c_r_selset_inbound = cl_rsmds_set=>get_universal_set( ). c_exact = rs_c_true. "Inversion is exact
SAP BW/4HANAData Acquisition PUBLIC 367

ELSE. TRY. IF me->p_r_set_mrs IS INITIAL.* Create set for condition PASSFORM = 'FRAU' me->p_r_set_mrs = i_r_universe_inbound->create_set_from_string( 'PASSFORM = ''FRAU''' ). ENDIF. IF me->p_r_set_mr IS INITIAL.* Create set for condition PASSFORM = 'HERR' me->p_r_set_mr = i_r_universe_inbound->create_set_from_string( 'PASSFORM = ''HERR''' ). ENDIF. IF me->p_r_set_space IS INITIAL.* Create set for condition NOT ( PASSFORM = 'FRAU' OR PASSFORM = 'HERR' ) l_r_set = me->p_r_set_mr->unite( me->p_r_set_mrs ). me->p_r_set_space = l_r_set->complement( ). ENDIF.
* Compose inbound selection c_r_selset_inbound = cl_rsmds_set=>get_empty_set( ).* Check if outbound selection contains value 'MR' IF i_r_selset_outbound->contains( 'MR' ) EQ rsmds_c_boolean-true. c_r_selset_inbound = c_r_selset_inbound->unite( me->p_r_set_mr ). ENDIF.* Check if outbound selection contains value 'MRS' IF i_r_selset_outbound->contains( 'MRS' ) EQ rsmds_c_boolean-true. c_r_selset_inbound = c_r_selset_inbound->unite( me->p_r_set_mrs ). ENDIF.* Check if outbound selection contains initial value IF i_r_selset_outbound->contains( space ) EQ rsmds_c_boolean-true. c_r_selset_inbound = c_r_selset_inbound->unite( me->p_r_set_space ). ENDIF. c_exact = rs_c_true. "Inversion is exact
CATCH cx_rsmds_dimension_unknown cx_rsmds_input_invalid cx_rsmds_sets_not_compatible cx_rsmds_syntax_error.
* Normally, should not occur* If the exception occurs request all values from source* for this routine to be on the save side c_r_selset_inbound = cl_rsmds_set=>get_universal_set( ). c_exact = rs_c_false. "Inversion is no longer exact
ENDTRY. ENDIF.
* Finally, add (optionally) further code to transform outbound projection* to inbound projection* Check if outbound characteristic 0PASSFORM (field name PASSFORM)* is requested for the drilldown state of the query READ TABLE i_th_fields_outbound WITH TABLE KEY segid = 1 "Primary segment fieldname = 'PASSFORM' TRANSPORTING NO FIELDS. IF sy-subrc EQ 0.* Characteristic 0PASSFORM is needed* ==> request (only) field PASSFORM from the source for this routine DELETE c_th_fields_inbound WHERE NOT ( segid EQ 1 OR fieldname EQ 'PASSFORM' ). ELSE.* Characteristic 0PASSFORM is not needed* ==> don't request any field from source for this routine CLEAR c_th_fields_inbound.
368 PUBLICSAP BW/4HANA
Data Acquisition

ENDIF.
*$*$ end of inverse routine - insert your code only before this line *-* ENDMETHOD. "invert_0PASSFORMENDCLASS. "routine IMPLEMENTATION
4.6.6.5.3 Details for Implementing the Inversion Routine
Use
Set Objects
The purpose of an inverse transformation is to convert selection conditions of the query that are formulated for the target of the transformation (outbound) into selection conditions for the source (inbound). To do this, the selection conditions are converted into a multidimensional set object. In ABAP objects, these are the instances of class CL_RSMDS_ST). The advantage of this representation is that set operations (intersection, union, and complement), that can only be processed with a great deal of effort with the usual RANGE table representation, can now be processed easily.
Universes
There are always two uniquely defined trivial instances of class CL_RSMDS_SET that represent the empty set and the total set (that is, all the values). You can recognize these instances from the result RSMDS_C_BOOLEAN-TRUE of the functional methods IS_EMPTY and IS_UNIVERSAL. All other instances are always assigned to a Universe (instance of class CL_RSMDS_UNIVERSE) and return the result RSMDS_C_BOOLEAN-TRUE for the specified methods. You can obtain the reference of the assigned universe for non-trivial instances of class CS_RSMDS_SET with method GET_UNIVERSE. This method returns an initial reference for these two trivial instances since the universe is not uniquely defined in this case.
A universe represents the sum of all the dimensions (represented by instances of the interface IF_RSMDS_DIMENSION). A dimension is always uniquely defined by a dimension name in the universe. With method GET_DIMENSION_BY_NAME in class CL_RSMDS_UNIVERSE, you can obtain a dimension reference using the unique dimension name. The dimension name is generally the same as the field name in a structure. There are different types of universe in the system (subclasses of class CL_RSMDS_UNIVERSE). The dimensions have different meanings. For example, a dimension corresponds to an InfoObject in class CL_RS_INFOOBJECT_UNIVERSE. In the case of InfoObjects, you have the two methods IOBJNM_TO_DIMNAME and DIMNAME_TO_IOBJNM that transform an InfoObject name into a dimension name or a dimension name into an InfoObject name. For an InfoObject-based universe, there is exactly one instance (singleton) that contains (nearly) all the active InfoObjects in the system as dimensions (with the exception of InfoObjects in InfoSets). This instance is returned with the method GET_INSTANCE of class CL_RS_INFOOBJECT_UNIVERSE.
In the case of DataSources, there is a uniquely defined universe for each combination of logical system name (I_LOGSYS), DataSource name (I_DATASOURCE) and segment ID (I_SEGID). You can find the reference of the universe with the method CREATE_FROM_DATASOURCE_KEY of class CL_RSDS_DATASOURCE_UNIVERSE. The initial segment ID always provides the primary segment, which normally is the only segment on which selection conditions can be formulated for a source and accepted. All the fields in the DataSource segment that are selected for direct access form the dimensions of a DataSource universe with the same name. Here, too, you get a dimension reference (instance for interface IF_RSMDS_DIMENSION) with the method GET_DIMENSION_BY_NAME of the universe.
SAP BW/4HANAData Acquisition PUBLIC 369

If you want to project a selection to a given dimension from a general selection, that is for any instance of the class CL_RSMDS_SET, you first need a reference to the universe to which the instance belongs (method GET_UNIVERSE, see above). You get the dimension reference from the reference to the universe using the dimension/field name from method GET_DIMENSION_BY_NAME. With the dimension reference, you can then project a representation for a one-dimensional condition using method TO_DIMENSION_SET. You can then convert a one-dimensional projection into an Open SQL or RANGE condition for the corresponding field with the methods TO_STRING and TO_RANGES. Vice versa, you can create an instance on the dimension reference for a one-dimensional set object from a RANGE table using the method CREATE_SET_FROM_RANGES. The SIGNs 'I' and 'E' as well as the OPTIONs 'EQ', 'NE', 'BT', 'NB', 'LE', 'GT', 'LT', 'GE', 'CP' and 'NP' are supported. There are only restrictions for 'CP' and 'NP'. These may only be used for character-type dimensions/fields and may only contain the masking character'*', which must always be at the end of the character chain. For example, 'E' 'NP' 'ABC*' is a valid condition, but 'I' 'CP' '*A+C*' is not.
Using method GET_DIMENSIONS in class CL_RSMDS_SET, you can get a table with the references of all dimensions that are restricted in the corresponding instance of the set object. With the method GET_NAME, you can get the unique dimension name for each dimension reference in the table that is returned. In this way you can check if there is a restriction for a given InfoObject or field. It can be projected as described above.
With the universe reference, you can create an instance for a set object (especially for multidimensional set objects) from an Open SQL expression. In the Open SQL expression that is passed, the "field names" must be the valid dimension names in the universe. You may use elementary conditions with the comparison operators '=', '<>', '<=', '>', '<' und '>=' in the Open SQL expression. The left side must contain a valid dimension name and the right side must contain a literal that is compatible with the data type of the dimension. You can also use elementary conditions with 'BETWEEN', 'IN' and 'LIKE' with the appropriate syntax. Elementary conditions may be linked with the logical operators 'NOT', 'AND' and 'OR' to create complex conditions. You may also use parentheses to change the normal order of evaluation ('NOT' is stronger than 'AND', 'AND' is stronger than 'OR').
With the method CREATE_SET_FROM_RANGES of the universe reference, you can also directly create a set object for a multidimensional condition. To do this, the internal table passed in I_T_RANGES must contain a RANGE structure (with the components SIGN, OPTION, LOW and HIGH) in its row structure and must also have an additional component for a dimension name. Parameter I_FIELDNAME_DIMENSION must pass the name of these components to method CREATE_SET_FROM_RANGES.
You can always create an instance for the complementary condition for any instance of the class CL_RSMDS_SET using the functional method.
If two instances of the class CL_RSMDS_SET belong to the same universe, you can create an instance for the intersection or union by passing the other instance as parameter I_R_SET when you call the functional method INTERSECT or UNITE.
With the method TRANSFORM, you can also transform an instance of a set object into an instance of a set object of another universe. If required, you can thus perform a projection or assign dimension names in a different manner. These methods are recommended, for example if the name of the source field differs from the name of the target field within the transformation. You can pass a reference to the target universe to the method in the optional parameter I_R_UNIVERSE. If the parameter remains initial, the system assumes that the source and target universes are identical. With parameter I_TH_DIMMAPPINGS you can map the dimension names of the source universe (component DIMNAME_FROM) in different dimension names on the target universe (component DIMNAME_TO). If component DIMNAME_TO remains initial, a restriction of the source dimension (in DIMNAME_FROM) is not transformed into a restriction of the target universe. As a result, there is a projection. The following mapping table
370 PUBLICSAP BW/4HANA
Data Acquisition
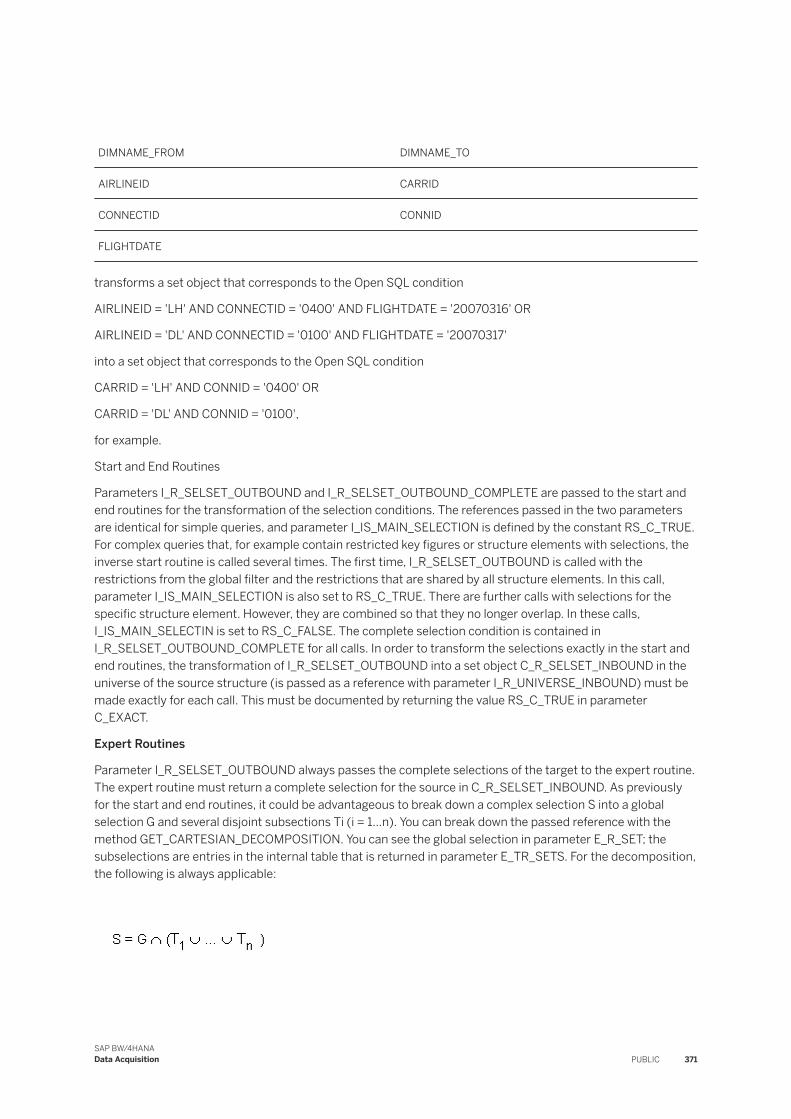
DIMNAME_FROM DIMNAME_TO
AIRLINEID CARRID
CONNECTID CONNID
FLIGHTDATE
transforms a set object that corresponds to the Open SQL condition
AIRLINEID = 'LH' AND CONNECTID = '0400' AND FLIGHTDATE = '20070316' OR
AIRLINEID = 'DL' AND CONNECTID = '0100' AND FLIGHTDATE = '20070317'
into a set object that corresponds to the Open SQL condition
CARRID = 'LH' AND CONNID = '0400' OR
CARRID = 'DL' AND CONNID = '0100',
for example.
Start and End Routines
Parameters I_R_SELSET_OUTBOUND and I_R_SELSET_OUTBOUND_COMPLETE are passed to the start and end routines for the transformation of the selection conditions. The references passed in the two parameters are identical for simple queries, and parameter I_IS_MAIN_SELECTION is defined by the constant RS_C_TRUE. For complex queries that, for example contain restricted key figures or structure elements with selections, the inverse start routine is called several times. The first time, I_R_SELSET_OUTBOUND is called with the restrictions from the global filter and the restrictions that are shared by all structure elements. In this call, parameter I_IS_MAIN_SELECTION is also set to RS_C_TRUE. There are further calls with selections for the specific structure element. However, they are combined so that they no longer overlap. In these calls, I_IS_MAIN_SELECTIN is set to RS_C_FALSE. The complete selection condition is contained in I_R_SELSET_OUTBOUND_COMPLETE for all calls. In order to transform the selections exactly in the start and end routines, the transformation of I_R_SELSET_OUTBOUND into a set object C_R_SELSET_INBOUND in the universe of the source structure (is passed as a reference with parameter I_R_UNIVERSE_INBOUND) must be made exactly for each call. This must be documented by returning the value RS_C_TRUE in parameter C_EXACT.
Expert Routines
Parameter I_R_SELSET_OUTBOUND always passes the complete selections of the target to the expert routine. The expert routine must return a complete selection for the source in C_R_SELSET_INBOUND. As previously for the start and end routines, it could be advantageous to break down a complex selection S into a global selection G and several disjoint subsections Ti (i = 1...n). You can break down the passed reference with the method GET_CARTESIAN_DECOMPOSITION. You can see the global selection in parameter E_R_SET; the subselections are entries in the internal table that is returned in parameter E_TR_SETS. For the decomposition, the following is always applicable:
SAP BW/4HANAData Acquisition PUBLIC 371

and
You should invert the global selection and each subselection individually
and compose the inverted results again in the form
Usually you can only ensure an exact inversion of a complex selection condition by using this type of decomposition. If the method GET_CARTESIAN_DECOMPOSITION is called with I_REDUCED = RSMDS_C_BOOLEAN-FALSE, the following is already valid for the decomposition
It is no longer applicable if the call is made with I_REDUCED = RSMDS_C_BOOLEAN-TRUE and
is usually a superset of S. In this case, the selections Ti are usually simpler.
Passing the Selection Conditions
If the transformed selection conditions for the source return exactly the data records that satisfy the selection conditions of the target after execution of the transformation, then the inverse transformation is considered to be exact. This will not always be possible. For this reason a transformation that is not exact may provide more data records than are needed to satisfy the selection conditions of the target. You can ensure that the results are exact by filtering them with the selection conditions of the target. An inverse transformation, however,
372 PUBLICSAP BW/4HANA
Data Acquisition

should not create a selection condition for the source that selects fewer data records from the source than are needed to satisfy the selection condition of the target.
An inverse transformation that is not exact is indicated by the return value RS_C_FALSE in parameter C_EXACT for at least one inverse routine run. This only has an effect on the performance for queries on the analytic manager (OLAP) since they are always filtered again there. However, in the RSDRI interface, in transaction LISTCUBE, and in function Display Data in the context menu of a VirtualProvider, there is no further filtering and the superfluous records are returned or displayed. The property of being exact for an inverse transformation otherwise only has an effect if it is called in the report-report interface. An inversion that is not exact always causes the selection screen to be displayed before the target transaction is executed. This gives the user the chance to check the selections again and to correct them if necessary.
An inverse routine that is not implemented always requests all the values for all the source fields of this routine. Accordingly, parameters C_R_SELSET_INBOUND and C_EXACT always contain an instance for the "All Values" condition or the value RS_C_FALSE when they are called.
NoteOne final comment. Selections are always stored in a normed manner in a set object. This means, for example, that the two Open SQL expressions
CARRID = 'LH' AND FLDATE < '20070101'
and
CONNID <= '20061231' AND CARRID = 'LH'
have the same representation as the set object. If you call all the methods that cause the creation of a set object as result with the parameter I_FINAL = RSMDS_C_BOOLEAN-TRUE (this should normally be the default value), you must also make sure that the two objects are identical in the above case (that is, they should have the same references). To check if two instances of the class CL_RSMDS_SET represent the same selection condition, however, you should nevertheless use the method IS_EQUAL and check against the result RSMDS_C_BOOLEAN-TRUE.
4.6.6.6 Regular Expressions in Routines
You can use regular expressions in routines.
A regular expression (abbreviation: RegExp or Regex) is a pattern of literal and special characters which describes a set of character strings. In ABAP, you can use regular expressions in statements FIND and REPLACE, and in classes CL_ABAP_REGEX and CL_ABAP_MATCHER. For more information, see the ABAP key word documentation in the ABAP Editor. This documentation describes the syntax of regular expressions. You can test regular expressions here.
This section provides sample code to illustrate how you can use regular expressions in routines.
Sample Code
REPORT z_regex. DATA: l_input TYPE string, l_regex TYPE string, l_new TYPE string.
SAP BW/4HANAData Acquisition PUBLIC 373

* Example 1: Insert thousand separator l_input = '12345678'.l_regex = '([0-9])(?=([0-9]{3})+(?![0-9]))'.l_new = '$1,'. WRITE: / 'Before:', l_input. "12345678 REPLACE ALL OCCURRENCES OF REGEX l_regex IN l_input WITH l_new. WRITE: / 'After:', l_input. "12,345,678 * Example 2: Convert date in US format to German format l_input = '6/30/2005'.l_regex = '([01]?[0-9])/([0-3]?[0-9])/'.l_new = '$2.$1.'. WRITE: / 'Before:', l_input. "6/30/2005 REPLACE ALL OCCURRENCES OF REGEX l_regex IN l_input WITH l_new. WRITE: / 'After:', l_input. "30.6.2005 * Example 3: Convert external date in US format to internal date DATA: matcher TYPE REF TO cl_abap_matcher, submatch1 TYPE string, submatch2 TYPE string, match TYPE c. l_input = '6/30/2005'.l_regex = '([01]?)([0-9])/([0-3]?)([0-9])/([0-9]{4})'. matcher = cl_abap_matcher=>create( pattern = l_regex text = l_input ). match = matcher->match( ). TRY. CALL METHOD matcher->get_submatch EXPORTING index = 1 RECEIVING submatch = submatch1. CATCH cx_sy_matcher.ENDTRY. TRY. CALL METHOD matcher->get_submatch EXPORTING index = 3 RECEIVING submatch = submatch2. CATCH cx_sy_matcher.ENDTRY. IF submatch1 IS INITIAL. IF submatch2 IS INITIAL. l_new = '$5\0$2\0$4'. ELSE.
374 PUBLICSAP BW/4HANA
Data Acquisition

l_new = '$5\0$2$3$4'. ENDIF.ELSE. IF submatch2 IS INITIAL. l_new = '$5$1$2\0$4'. ELSE. l_new = '$5$1$2$3$4'. ENDIF.ENDIF. WRITE: / 'Before:', l_input. "6/30/2005 REPLACE ALL OCCURRENCES OF REGEX l_regex IN l_input WITH l_new. WRITE: / 'After:', l_input. "20050630
4.6.7 SAP HANA SQLScript Routines in the Transformation
In the SAP HANA runtime, you can create SAP HANASQLScript routines.
If you want to create complex transformation rules, for which the existing rule types are not sufficient, you can define SAP HANA SQLScript routines for them.
Note the differences between the two runtimes: Differences Between ABAP Runtime and SAP HANA Runtime [page 342]
You can create SAP HANASQLScript routines as SQLScript. They are then created as a SAP HANAprocedure that is implemented as a method in an AMDP (ABAP managed database procedure) class. The AMDP class is generated by the BW framework and can only be edited in the ABAP Development tools for SAP NetWeaver (ADT).
Related Information
Create SAP HANA SQLScript Routines [page 375]
4.6.7.1 Create SAP HANA SQLScript Routines
In the SAP HANA runtime, you can create SQLScript routines. SAP HANA
Context
You have created an ABAP project for processing the AMDP ABAP class.
SAP BW/4HANAData Acquisition PUBLIC 375

Procedure
1. You are in the BW modeling tools, editing your transformation on the General tab.
○ To create a start routine, choose Start Routine Create .
○ To create an expert routine, choose Expert Routine Create .
○ To create an end routine, choose either End Routine Create SAP HANA Script or End RoutineCreate ABAP . You can also create an ABAP end routine in a transformation with the SAP HANAruntime. This only applies to transformations that have a persistent target. For other serially activated data flows, an ABAP routine can only be created for the last transformation.
○ To create a characteristic routine, select the characteristic. In the Properties view, you can select the rule type Routine in the rule details .
2. You can automatically initialize fields in SAP HANA SQLScript routines that contain null values. The null values are then initialized when the routine is executed. If the flag is not set, and there are fields containing null values in the routine, a runtime error occurs, since SAP HANA routines do not allow null values.
3. For start and end routines: Select the fields for the routine.4. Select an ABAP project. The AMDP class is opened in the ABAP Development Tools for SAP NetWeaver
(ADT).5. Insert your program code.
NoteMake your changes only within the method. All changes outside of the method are not transported and will be overwritten with the next activation.
6. Check the syntax of your routine.
For creating breakpoints, see SAP Note 2659814 7. Activate the AMDP class. You end the editing of the routine when you leave the editor.
Related Information
SAP HANA SQLScript Reference
4.6.7.2 The ADMP Class
When creating a SAP HANA SQLScript routine, an ABAP class is generated.
The class implements the marker interface IF_AMDP_MARKER_HDB of the ABAP managed database procedure (AMDP). The interface marks the ABAP class as an ADMP class. Methods of an ADMP class can be written as a dabase procedure. The AMDP framework thereby creates a definition of a SAP HANA-specific database procedure for the method. The method name of a field routine is made up of segment ID, group ID and rule ID.
376 PUBLICSAP BW/4HANA
Data Acquisition

ExampleIf for example the segment ID is S001, the group ID G01, and the rule ID R8, the method name will be S0001_G01_R8.
Related Information
AMDP - SQLScript for the SAP HANA Database
4.7 InfoSource
A structure consisting of InfoObjects without persistence for connecting two transformations.
You always use an InfoSource when you want to perform two (or more) transformations consecutively in the data flow - without additional storage of the data.
If you do not need two consecutive transformations, you can model the data flow without an InfoSource. A transformation is used to write data from the source to the target.
It might be necessary to use one or more InfoSources however due to semantic reasons or the level of complexity. For example, you can specify the format and assignment to InfoObjects in the first transformation. The actual business rules can be performed in the next transformation. If the rules are very complex and interrelated, it might be advisable to use more than one InfoSource.
More information: Recommendations on Using InfoSources [page 379].
InfoSource with Key
You can mark the InfoObjects of the InfoSource as keys. This function is provided for special situations. You should check whether the result really is the one you want.
The way keys are used in InfoSources depends on integration into the corresponding load scenario. If you set the Aggregation flag in the definition of the InfoSource, the incoming data will be aggregated according to this key.
This is generally not necessary however, as the transformation in the path with the actual InfoProvider as its target compresses the data by data package anyway in accordance with the keys.
If you flag InfoObjects of the InfoSource as keys, it is very important for this key definition to be compatible with the load scenario that this InfoSource is used in. If the granularity of the key between the InfoSource and the target InfoProvider is not identical, incorrect data might arise. With aggregation SUM, this does not matter. With overwriting however, it is important that overwriting takes place for the correct key combinations.
The InfoSource key must therefore have at least the same granularity as the connected InfoProvider. It is important here to be aware of complex transformations that could change the values in the key fields.
SAP BW/4HANAData Acquisition PUBLIC 377

ExampleExample of a simple assignment:
If the data target has key characteristics A and B, and characteristics A, B and C can be selected as keys in the corresponding InfoSource, at least characteristics A and B must be selected as keys in the InfoSource.
In complex transformation scenarios, deriving a compatible key definition from the InfoSource might be different, or even impossible.
DataStore Object (classic)-Like InfoSource
With a DataStore object as the target of the transformation, you can define the InfoSource as similar to a DataStore object (classic). The InfoObject 0RECORDMODE is then added to the InfoSource. The aggregation behavior is the same as for a DataStore object (classic).
The output from the InfoSource is then the same as if the data were written to the table of new data for a DataStore object (classic). In the case of a reverse image, a record is created with RECORDMODE = R, which results in the record being deleted when the request is activated. If a prior record has already written an after image with the same key in the same data package however, this will be deleted from the data package, and just the reverse image will be passed on to the transformation.
Integration
The following graphic shows how the InfoSource is integrated into the dataflow:
Create the data transfer process from the DataSource to the InfoProvider. Since the InfoSozrce is not a persistent data store, it cannot be used as a target for a data transfer process. Create each transformation on the InfoProvider (as a target) with the InfoSource (as a source) and on the InfoSource (as a target) with the DataSource (as a source).
378 PUBLICSAP BW/4HANA
Data Acquisition

4.7.1 Recommendations for Using InfoSources
Use
This section outlines three scenarios for using InfoSources. The decision to use an InfoSource depends on how the effort involved in maintaining the InfoSource and any potential changes in the scenario can be minimized.
1. Data Flow Without an InfoSource:
The DataSource is connected directly to the target by means of a transformation.
Since there is only one transformation, performance is better.
However, if you want to connect multiple DataSources with the same structure to the target, this can result in additional maintenance effort for the transformation, since you need to create a similar transformation for each DataSource.
You can avoid this if the DataSource is the same, it just appears in different source systems. In this case, you can use source system mapping when you transport to the target system so that only one transformation has to be maintained in the test system. The same transformation is created automatically for each source system in the production system.
2. Data Flow with One InfoSource
The DataSource is connected to the target by means of an InfoSource. There is one transformation between the DataSource and the InfoSource and one transformation between the InfoSource and the target.
SAP BW/4HANAData Acquisition PUBLIC 379

We recommend that you use an InfoSource if you want to connect a number of different DataSources to a target and the different DataSources have the same business rules. In the transformation, you can align the format of the data in DataSource with the format of the data in the InfoSource. The required business rules are applied in the subsequent transformation between the InfoSource and the target. You can make any changes to these rules centrally in this one transformation, as required.
3. Data Flow with Two InfoSources
380 PUBLICSAP BW/4HANA
Data Acquisition

We recommend that you use this type of data flow if your data flow not only contains two different sources, but the data is to be written to multiple targets that are identical or almost identical. The required business rules are executed in the central transformation so that you only have to modify the one transformation in order to change the business rules. You can connect sources and targets that are independent of this transformation.
4.7.2 Authorizations for InfoSources
To work with InfoSources, you need authorization object S_RS_IOBJA.
4.7.3 Transporting InfoSources
The InfoSource is integrated into BW's TLOGO framework and can be transported.
The transport object is called TRCS.
SAP BW/4HANAData Acquisition PUBLIC 381

4.8 Creating InfoSources
You create an InfoSource to join two transformations.
Context
When InfoSources are created in the BW Modeling Tools, they are assigned to an InfoArea.
Procedure
1. You are in the BW Modeling tools. Open the context menu for your BW project here and choose NewInfoSource .
As an alternative, you can create InfoSources from the data flow. To do this, go the BW Object Types in the editing screen for your data flow, select the type InfoSource and drag it to Details. Then open the context menu for this InfoSource and choose Create Persistent BW Object.
You will be guided through the process by a wizard. More information: Creating InfoSources Using the Wizard [page 383]
2. The General tab opens.3. If you set the Aggregate Records Based on InfoSource Key Fields flag, the incoming data will be aggregated
with regard to the key.4. If you set the When filling the InfoSource, process 0RECORDMODE as if the target were an activated
DataStore object flag, InfoObject 0RECORDMODE will be added to the InfoSource. The aggregation behaviour is the same as for a DataStore object.
5. On the Details tab, select the InfoObjects that you want to be included in the InfoSource and/or create the fields.
6. Under Manage Keys, you can define keys for the InfoSource.7. Activate the InfoSource.
Related Information
InfoSource [page 377]
382 PUBLICSAP BW/4HANA
Data Acquisition

4.8.1 Creating InfoSources Using the Wizard
Whenever you create an InfoSource, you are guided through the process by a wizard.
Procedure
1. 1. You are in the BW Modeling tools. In the context menu for your BW project, choose New InfoSource. You will be guided through the process by a wizard.
2. Select an InfoArea. To ensure that you can find your InfoSource again without difficulty, we recommend setting the Add to Favorites flag.
3. Enter a technical name and a description. The technical name can be up to 30 characters long.4. By choosing Copy from..., you can select an InfoSource as a template. This allows you to copy over its
properties to your new InfoSource and to edit them as required.5. You can select a different object type as a template.6. When you have finished making your settings, choose Finish. The editor appears.
4.8.2 Adding InfoObjects
You define the InfoSource by adding InfoObjects or fields.
Procedure
1. Choose the Details tab.2. To add an InfoObject, choose Add InfoObject. Specify the start of the name, select an InfoObject from the
result list, and press OK. You can also select multiple InfoObjects by pressing Ctrl + Shift. The InfoObjects are added to your InfoSource. Any compound characteristic are added too.
3. You can now configure further settings for the InfoObject properties in the right screen area. You can select an aggregation type under Aggregation.
4. Under Manage Keys, you can define keys.5. To delete InfoObjects, choose Delete.
SAP BW/4HANAData Acquisition PUBLIC 383

4.8.3 Adding Fields
You define the DataStore object by adding fields or InfoObjects.
Context
The advantage of using fields is that you do not need to model any InfoObjects. This is recommended especially if you want to load data types that are not supported by InfoObjects.
Procedure
1. Choose the Details tab.2. To add a field, choose Add Field. The field is added to your InfoSource. You can now define the field in the
right area of the screen.3. Enter a description for the field.4. You can specify an InfoObject under Identify with:. This changes the field into an InfoObject. The properties
of the InfoObject are applied. You can undo this by switching to Field under Identify with:.5. Enter the data type and data length.6. Under Manage Keys, you can define keys.7. To delete fields, choose Delete.
4.9 Data Transfer Process
A data transfer process (DTP) is an object that determines how data is transferred between two persistent objects (source and target) in the SAP BW∕4HANA system.
You use the data transfer process to transfer data in SAP BW∕4HANA from one persistent object to another object, in accordance with certain transformations and filters. You can create a transformation between the source and the target of the data transfer process. Alternatively, you can use InfoSources, which do not have persistence, to perform the data transfer process with several consecutive transformations (a transformation path).
The data transfer process makes the transfer processes in the data warehousing layer more transparent. Optimized parallel processing improves the performance of the transfer process (the data transfer process determines the processing mode). You can use the data transfer process to separate delta processes for different targets and you can use filter options between the persistent objects on various levels.
You define data transfer processes in the BW modeling tools. We recommend that you integrate data transfer processes into process chains. In this case, the data transfer process is executed when it is triggered by an event in the predecessor process in the process chain. Alternatively, in process chain maintenance, you can execute a data transfer process in the background. A debug mode is also available.
384 PUBLICSAP BW/4HANA
Data Acquisition

The request is an instance that is generated at the runtime of the data transfer process. The request is processed in the steps that have been defined for the data transfer process (extraction, transformation, filter and so on). The monitor for the data transfer process request shows the header information, request status, and the status and messages for the individual processing steps.
With a data transfer process, you can transfer data either in full extraction mode or in delta mode. In full mode, the entire dataset of the source is transferred to the target; in delta mode, only the data that was posted to the source since the last data transfer is transferred. The data transfer process controls delta handling and therefore allows you to fill several targets with different deltas from one source. With a data transfer process, you do not need to explicitly initialize the delta method.
4.9.1 Data Transfer Intermediate Storage (DTIS)
The data transfer intermediate storage (DTIS) is a table with technical key. This is generated when a data transfer process (DTP) is activated, or when a SAP HANA transformation is generated for each DTP source object upon generation.
Only one data transfer intermediate storage is generated for an object that is used as a source in multiple DTPs.
The DTIS is used in the following cases:
● For error handlingIf error handling is activated, the DTIS is used as an error stack
● To allow sorting on sources that cannot be read sortedFor sorting, the key is used that you define in the Extraction Grouped by setting (semantic grouping).
● To allow execution of the transformation in SAP HANA if the source does not support thisSAP HANA DataSources and the DataStore object (advanced) for example support execution of the transformation in SAP HANA. File or ODP DataSources on the other hand do not support SAP HANA execution.
The DTIS is based on the data source; it thus stores records from the source.
The system decides whether or not to create a DTIS depending on the DTP source, the DTP target, the transformation, and the settings in the data transfer process. It is created for example for file or ODP source systems that grouped extraction should be performed for and/or for which the transformations should be executed in SAP HANA.
All records extracted from the source are written to the DITS. They are handled according to the request status, as follows:
● Red: If a DTP request has the status red, all data records in the DTIS are retained.● Green: If a DTP request has the status red, all data records are deleted apart from those with errors.● Deleted When a DTP request is deleted, the associated data records in the data transfer intermediate
storage are also deleted.
Data transfer intermediate storage as error stack
The data transfer intermediate storage (DTIS) is used as a persistence layer for error handling in SAP BW∕4HANA (error stack). If error handling is activated for the DTP, records with errors are written at runtime to
SAP BW/4HANAData Acquisition PUBLIC 385
the data transfer intermediate storage. You use the data transfer intermediate storage to update the data to the target destination once the error is resolved.
If error handling is activated, and there are data records with errors, you can call the data transfer intermediate storage and display and edit the data records in question. The authorizations for DTIS maintenance are checked using authorization object S_RS_DTP. You require activity 23 (Maintain DTP Definition). You can call the data transfer intermediate storage in the following ways:
● You can call it in the data transfer process editor by choosing Open DTIS Maintenance from the Update tab. The data records displayed in the DTIS are then restricted to the current requests for this DTP.
● You can call it from the Request Monitor by choosing Error Stack.
With an error DTP, you can update the data records to the target manually or by means of a process chain. Once the data records have been successfully updated, they are deleted from the data transfer temporary store. If there are still any erroneous data records, they are written to the data transfer temporary store again in a new error DTP request.
4.9.2 Handling Data Records with Errors
On the Update tab in the data transfer process (DTP), the error handling settings allow you to control how the system responds if errors occur in the data records when data is transferred from a data transfer process (DTP) source to a data transfer process target.
Settings for Error Handling
For a data transfer process, you can specify how you want the system to respond when data records contain errors. If you activate error handling, the data records containing errors are written to a database table, the data transfer intermediate storage. You can use a special data transfer process, the error DTP, to update the records to the target.
Temporary storages are available after each processing step of the DTP request. This allows you to find out which processing step the error occurred in.
NoteFor information about error handling in transformations and data transfer processes during execution in SAP HANA, see SAP Note 2580109 .
386 PUBLICSAP BW/4HANA
Data Acquisition

Checks for Data Records with Errors
The following table provides an overview of where checks for data records with errors can be run:
Where does the check take place? Examples of Data Records with Errors
In the transformation Field contains invalid characters or lowercase characters
Error during conversion
Error during currency translation
A routine returns a return code <> 0
Characteristic value is not found for master data
Error while reading master data
Customer-specific formula results in error
When data is updated to the master data table or text table Invalid characters in key or navigation attribute
If no SID exists for the value of the navigation attribute
If no language field is defined for texts
Implausible "from" and "to" dates
Duplicate data records (duplicate keys)
Overlapping and invalid time intervals
When updating data to the DataStore object If no SID exists for the characteristic value
When checking referential integrity of an InfoObject against master data tables or DataStore objects
If no SID exists for the characteristic value
Data Transfer Intermediate Storage
The data transfer intermediate storage (DTIS) is used as a persistence layer for error handling in SAP BW∕4HANA. The data transfer intermediate storage is a table with a technical key, which is generated for each DTP source object during DTP activation. Therefore only a data transfer intermediate storage is generated for an object that is used as a source in multiple DTPs. If you activate error handling, the data records containing errors are written to the data transfer intermediate storage.
"Repairing" with Error DTP
You create an error DTP for an active data transfer process on the Update tab page. You run it directly in the background or include it in a process chain so that you can schedule it regularly in the context of your process chain. The error DTP uses the full update mode to extract data from the data transfer intermediate storage and transfer it to the target, which you specified in the original data transfer process.
SAP BW/4HANAData Acquisition PUBLIC 387

4.9.2.1 Temporary Storages
A temporary storage is a table that contains the data records processed with the request in a specific data transfer process processing step. The table contains correct records as well as erroneous records with a status display.
Temporary storages are used at runtime to allow processes to be restarted without a significant impact on performance and consistency when errors occur. They also allow you to find records that have errors. Unlike on the source level, this is only possible if, under Level of Detail, you have set Trace of Erroneous Records or Trace of Transformation by Records.
You make settings for the temporary storage in the data transfer process editor on the Runtime Properties tab. For more information, see Specifying How Data Records Are Handled [page 393].
You can display the temporary storage for each of the processing steps using the monitor for the data transfer process request by choosing the pushbutton in the Data column. The records with errors can be identified by the symbol.
4.10 Creating a Data Transfer Process
You use the data transfer process (DTP) to transfer data from a source to a target object. You can also use the data transfer process to access InfoProvider data in the source directly.
Prerequisites
You have used transformations to define the data flow between the source and target object.
Procedure
1. You are in the BW Modeling tools. You can create a new data transfer process here by choosing NewData Transfer Process .○ from the File menu○ from the context menu of your BW project○ in the BW repository tree, from the context menu on the target object of the data transfer process or on
the transformationAlternatively, you can create the data transfer process via the data flow.You are guided through the creation process by a wizard. More information: Creating a Data Transformation Process Using the Wizard [page 389]Once the wizard is finished, the data transfer process editor appears.
2. Edit the properties of the data transfer process on the tab pages.More Information:Editing General Properties [page 390]
388 PUBLICSAP BW/4HANA
Data Acquisition

Editing Extraction Properties [page 392]Editing Update Properties [page 393]Editing Runtime Properties [page 397]
3. Check, save, and activate the data transfer process.
4. If you have activated error handling, go to the Update tab page and create an error DTP by pressing .
Results
The data transfer process can now be executed. If you want to control execution using a process chain, you can
insert the data transfer process into a chain in the process chain editor. Under Start execution of data transfer process in the data transfer editor, you can choose other execution options.
Related Information
Data Transfer Process [page 384]Excuting Data Transfer Process [page 398]
4.10.1 Creating a Data Transformation Process Using the Wizard
A wizard will now guide you through the processs for creating a data transfer process. In the wizard, select the target and the source of the data transfer process. The system then displays the Editor, where you edit the properties of the data transfer process.
Procedure
In the Project Explorer view in the BW Repository tree of your BW project, you have chosen New Data Transfer Process from the context menu for your target object. You are in the wizard for creating the data transfer process in the first wizard step New Data Transfer Process. The BW project and the target object are already selected.1. Select the source object in Source.
a. Select the object type.b. Select the source object.
By choosing Browse, you can select the object from the complete list of objects in the system.
By choosing Browse Paths, you can display the paths that lead to objects that are already connected as sources with the target object. By selecting a path, you can set the source object.
SAP BW/4HANAData Acquisition PUBLIC 389

To select a DataSource, you can also first specify the source system.2. Choose Finish. The editor appears.
4.10.2 Editing General Properties
On the General tab, you set the general properties for the data transfer process (DTP). This includes general properties for extraction and properties for executing the data transfer process.
Procedure
General1. You can change the description.2. You can call the editor for the source or the target of the data transfer process.
General Extraction Settings - Extraction Settings3. Extraction Mode: Choose Extraction Mode.
You can choose Delta or Full mode. To transfer non-cumulative data from ODP source systems with ODP context SAPI or from file source systems, you can use extraction mode Initial Non-Cumulative for Non-Cumulative Values if the source of the data transfer process is a DataSource that builds an initial non-cumulative (the Initial Non-Cumulative flag is set in the DataSource).
Note○ For certain sources, only extraction mode Full is offered.○ For a CompositeProvider as a source, Delta mode is only available if the CompositeProvider is
made up entirely of standard DataStore objects, Data Mart DataStore objects. A DataStore object can only be the target of a delta from a CompositeProvider if the CompositeProvider is made up entirely of DataStore objects.
General Extraction Settings - Request Selection4. If you have extraction mode Delta, you can define further parameters:
a. Get all new data request by request: Here you define how new data is retrieved from the source.
Since a DTP bundles all transfer-relevant requests from the source, it can generate very large requests. If you do not want to use a single DTP request to transfer the dataset from the source because the dataset is too large for example, you can set the Get all new data request by request flag. This specifies that you want the DTP to read only one request from the source at a time. Once processing is completed, the DTP request checks for further new requests in the source. If it finds any, it automatically creates an additional DTP request.
NoteYou can change this flag at any time, even if data has already been transferred. If you set this flag, you can transfer data request by request as a one-off activity. If you deselect the flag, the DTP reverts to transferring all new source requests at one time at periodically scheduled intervals.
390 PUBLICSAP BW/4HANA
Data Acquisition

b. Only get delta once: Here you specify whether the source requests should only be transferred once.
Setting this flag ensures that the content of the InfoProvider is an exact representation of the source data.
A scenario of this type might be required if you always want an InfoProvider to contain the most up-to-date data set for a source, but technical reasons prevent the DataSource on which it is based from delivering a delta (new, changed, or deleted data records). For this type of DataSource, the current data set for the required selection can only be transferred using a Full Update.
In this case, a DataStore object cannot usually be used to determine the missing delta information (overwrite and creation of delta). If this is not logically possible because data is deleted in the source without delivering reverse records for example, you can set this flag and perform a snapshot scenario. Only the most up-to-date request for this DataSource is retained in the InfoProvider. Earlier requests for the DataSource are deleted from the (target) InfoProvider before a new one is requested (this is done by a process in a process chain, for example). They are not transferred again during the DTP delta process. When the system determines the delta when a new DTP request is generated, these earlier (source) requests are seen as already fetched.
c. Perform delta initialization without data: Here you specify whether the first request of a delta DTP should be transferred without any data.
If this flag is set, the source data is flagged as fetched, but is not actually transferred to the target. The data flagged as fetched is not read by the next request. Instead only the new source data accrued in the meantime is read. Use this setting in scenarios where the DTP is automatically implemented within a process chain to rebuild a data target.
NoteThis setting is a transport-relevant change to the metadata of the DTP. If you want to flag source data as fetched just for test purposes, use the Set delta status to 'Fetched' option. You thus prevent a transport-relevant change being made to the metadata of the DTP.
d. Extract all green requests: This flag is displayed if the source of the data transfer process is a staging DataStore object that has only one inbound table. If you set this flag, all green requests are extracted, regardless of whether there are yellow or red requests between them. If the flag is not set, only those green requests are extracted that are older than the first yellow or red request.
5. Only retrieve last request: For a data transfer process that loads data in Full mode from a DataSource or an InfoPackage, you can stipulate here that the request of the data transfer process only retrieves the last request in the queue.
Execution6. Processing Mode: The system normally defines the processing mode for the background processing of the
respective data transfer process automatically.7. Technical Request Status: Specify which technical status the request should be given if there are warnings
in the log.8. Overall Status of Request: Specify how the overall status of the request is defined.
Once the technical processing stage for a DTP request has been completed, the overall status of the request can be set automatically (based on the technical status of the request) or set manually (by the user). If the overall status is set manually, the status initially remains unchanged, if the technical processing stage was completed with a red or green status. In particular, this means that data for a green request is not released for reporting or further processing. The overall status has to be set manually by the user or by a process in a process chain.
SAP BW/4HANAData Acquisition PUBLIC 391

9. Automatically repeat red requests: Specify whether red requests should be automatically repeated in process chains.
If a DTP resulted in a canceled request during the previous run of a periodically scheduled process chain, this setting is evaluated the next time the process chain is started. If the flag is set, the previous request containing errors is automatically deleted and a new one is started. If the flag is not set, the DTP is terminated and an error message appears explaining that a new request cannot be started until the previous request is either repaired or deleted.
NoteIf a delta update is carried out, the repaired request not only contains the data of the terminated request, but also all the data that has been added to the source since then. This can cause performance and consistency problems. Example of a consistency problem: A transfer with the prerequisite that data can only be transferred for one day at a time. This transformation then produces incorrect results, which leads to consistency problems if, during the repair, data for more than one day is to be transported at the same time.
4.10.3 Editing Extraction Properties
On the Extraction tab page, the extraction-specific properties of the source object are displayed. You can define and change certain extraction-specific properties for the source object, define filter and grouping for the extraction.
Procedure
Type of the source object1. You can call the editor for the source object directly.
Settings for extraction from the source object2. The system displays the extraction properties for the source object.3. Depending on the source object, you can define and change settings.
Filter4. If the source offers selectable fields, you can define filter criteria for data transfer.
This means that you can use multiple data transfer processes with disjunctive selection conditions to efficiently transfer small sets of data from a source into one or more targets, instead of transferring large volumes of data. The filter thereby restricts the dataset to be transferred. You can specify single values, multiple selections, intervals, selections based on variables, or routines.
a. Using Select, you can select fields from the source for the filter.b. To define a filter for a field, select the field and choose Restrict.c. To create or edit a filter routine for a field, select the field and choose Maintain.
Extraction Grouped by5. Specify how you want to build the data packages that are read from the source (DataSource or
InfoProvider).
392 PUBLICSAP BW/4HANA
Data Acquisition

To do this, choose the fields of the source that you want to form a semantic key for the grouping. Data records that have the same key are combined in a single data package and processed together.
With this setting, you also define the key for handling of data records with errors. You thus ensure that the data can be updated in the target in the correct order once the data records with errors have been corrected.
4.10.4 Editing Update Properties
On the Update tab page, properties for updating to the target object are displayed. You can set and change the properties for updating to the target object. You can also stipulate whether error handling is performed, and how.
Procedure
Target Object Type1. You can call the editor for the target object.
Properties for Updating to the Target Object2. The system displays the properties for updating to the target object.3. Depending on the target object, you can make and change settings.
Error Handling4. Make the settings for error handling.
For more information, see Specifying How Data Records Are Handled [page 393].
4.10.4.1 Specifying How Data Records Are Handled
To write data records with errors to the data transfer intermediate storage, so that they can be updated to the target of the data transfer process once the error has been resolved, a number of settings have to be made in the data transfer process (DTP).
Context
In the default setting, error handling is completely deactivated (option Request is canceled, records are not tracked and target is not updated). This setting produces the best performance in all cases where the data quality is satisfactory, and the data flow has been tested. If the Track records after failed requestfield is selected on the Update tab, the DTP is executed again in the following cases with the option Request is canceled, first incorrect record is tracked and target is not updated:
● If a red request is restarted (because of the DTP setting Automatically repeat red requests in process chains for example).
SAP BW/4HANAData Acquisition PUBLIC 393

● If the check triggered by the Track records after failed request field when request processing begins detects that the previous request has the technical status red.
If a request contains an error, selecting this field makes it possible to perform error analysis if executed again, and to track records back to the source in order to find out which one caused the error. Please note that the Terminate request; First record with errors is traced; No updating option and the Activate Monitoring Automatically checkbox are not available for SAP HANA execution.
We recommend activating error handling if errors occur during execution of the DTP. If error handling is activated, the data records with errors are written to the data transfer intermediate storage, where they can be corrected before being written to the data target using an error DTP.
Procedure
1. Define the key for error handling under Extraction Grouped By on the Extraction tab.
If errors occur, all subsequent records with the same key are written to the data transfer intermediate storage along with the incorrect record; they are not updated to the target. This guarantees the serialization of the data records, and consistent data processing. The serialization of the data records and thus the explicit definition of key fields for the error stack is not relevant for targets that are not updated by overwriting.
NoteThe key should be as detailed as possible. A maximum of 16 key fields is permitted. The fewer the number of key fields defined, the more records are updated to the data transfer intermediate storage.
For targets that are not updated by overwriting, the system automatically creates the key fields of the target as key fields for error handling. In this case, you cannot change the key fields.
2. On the Update tab page under Request Handling, specify how you want the system to respond to data records with errors.For error handling, the following options are available. The main difference between them is how the status of the request is set once all data packages have been processed:○ Request is set to failed, error stack is written and valid records are updated○ Request is set to success, error stack is written and valid records are updated
3. Specify the acceptable number of invalid records for error handling. If more than this specified number of errors occur, the transfer is terminated.
NoteIf you leave this blank, handling for incorrect data records is not activated, and the update is terminated as soon as the first error occurs.
4. On the Runtime Properties tab, make the settings for the temporary storage .The intermediate storage supports you with troubleshooting and when restarting the load process. In these settings, you specify the processing steps after which you want the system to temporarily store the DTP request (such as extraction, filtering, removing new records with the same key and transformation). You also specify when the temporary storage should be deleted. This can be done either after the request has been updated successfully to the target, when the request is deleted or a specified amount of time after the request is processed. Under Level of Detail, you specify how you want to track the transformation.
394 PUBLICSAP BW/4HANA
Data Acquisition

5. Once you have activated your data transfer process, create an error DTP on the Update tab page by
pressing and include it in a process chain or start manually if errors occur.6. Analyze the error and correct the data records with errors.
The intermediate storage for the individual processing steps can be displayed in the Request Monitor for the DTP by pressing the button in the Data column. The records with errors can be identified from the icon.
If the request contains records with errors, you can call the data transfer intermediate storage (DTIS) (error stack) by pressing Open DTIS Maintenance on the Update tab in the data transfer process and correcting the records there. The authorizations for DTIS maintenance are checked using authorization object S_RS_DTP. You require activity 23 (Maintain DTP Definition).
7. Execute the error DTP manually or via a process chain.
SAP BW/4HANAData Acquisition PUBLIC 395

4.10.4.2 Options for Error Handling
You have the following options in the data transfer process maintenance transaction on the Update tab under Error Handling:
Options for Error Handling Error Handling is.... Explanation
Request is canceled, records are not tracked and target is not updated
Fully deactivated. This is the default setting in the data transfer process.
With the first error, updating is terminated for the entire data package, and the error is reported as a package error in the DTP monitor. The request is not released for reporting.
The incorrect records are not written to the data transfer intermediate storage (error stack), since the request has been terminated and has to be completely updated again.
The error is not assigned to the data record. The cross-reference table to determine the data record number is not created. This allows for faster processing.
This option produces the best performance in all cases where the data quality is satisfactory, and the data flow has been tested.
With this option, selecting the Track records after failed request field provides you with the option of switching error handling to Request is canceled, first incorrect record is tracked and target is not updated in the following cases:
● If a red request is restarted (because of the DTP setting Automatically repeat red requests for example).
● If the check triggered by the Track records after failed request field when request processing begins detects that the previous request has the technical status red.
With this setting, the cross-reference table is created, thus allowing better troubleshooting. If errors occur, the cross-reference table makes it possible to trace back to the source in order to find out which data record caused the error.
396 PUBLICSAP BW/4HANA
Data Acquisition

Options for Error Handling Error Handling is.... Explanation
Request is canceled, first incorrect record is tracked and target is not updated
Deactivated. The system behaves the same as with the Request is canceled, records are not tracked and target is not updated option, with the difference that the cross-reference table for determining the data record number is created during the processing of all DTP data packages. If errors occur, the cross-reference table makes it possible to trace back to the source in order to find out which data record caused the error.
Request is set to failed, error stack is written and valid records are updatedRequest red; Write error stack; Update valid records
Activated. If errors occur, the technical status of the request is set to red once the data packages have been processed.
This option makes it possible to update valid data that is been released for reporting. This does not happen however until after the updated records have been checked, and the request has been released manually by setting the overall status.
The records with errors are written to a data transfer intermediate storage where they are edited and can be updated manually using an error DTP.
Request is set to success, error stack is written and valid records are updatedRequest green; Write error stack; Update valid records
Activated. If errors occur, the technical status of the request is set to green once the data packages have been processed.
The valid records are available immediately for reporting and analysis purposes. Any subsequent actions are performed automatically.
The records with errors are written to a data transfer intermediate storage where they are edited and can be updated manually using an error DTP.
4.10.5 Editing Runtime Properties
On the Runtime Properties tab, make the settings for the temporary storage and BW background processing . You can only make settings for temporary storage if processing is not in SAP HANA.
Context
Temporary storages are tables that contain the data records that have been processed in a particular step during the data transfer process request processing. They are used at runtime to allow processes to be restarted without a significant impact on performance and consistency when errors occur.
SAP BW/4HANAData Acquisition PUBLIC 397
BW Background processing enables you make load processes parallel.
Procedure
Temporary Storage1. Level of Detail: Specify the level of detail.2. Fill Storage After Selected Steps: Specify which request processing steps temporary storage should be
written for.3. Delete Storage: Specify when the temporary storages should be deleted again.
Background Processing4. Number of Parallel Processes: Define the maximum number of work processes that should be used to
process the data transfer process.5. Job Class of Processes: Specify a job class for defining the job priority.6. Servers: Define which server(s) to execute the work processes process on.
4.10.6 Excuting Data Transfer Process
Execution of the data transfer process is generally managed using a process chain. In the data transfer process editor, you can execute a data transfer process directly in the background, simulate execution in debugging mode, or execute a delta without transferring any data for test purposes.
With the Start execution of data transfer process function, you have the following options:
● Execute in Background: The data transfer process is started directly in the background. You can stipulate taht the monitor is called after execution.
● Simulate in Dialog: If you want to execute the data transfer process in debugging mode, choose this option. The system now displays the program flow. You can set breakpoints here. The request is processed synchronously in a dialog process, and the update of the data is simulated. If you select Expert Mode, you can also define selections for the simulation and activate or deactivate intermediate storage. You can set breakpoints as well. More information: Simulating and Debugging DTP Requests [page 399].
● Set delta status to 'Fetched': If you want to execute a delta without transferring any data for test purposes, select this option. This option is available when the data transfer process extracts in delta mode. In this case you execute the DTP directly in the dialog. A request that is started in this way marks the data that is found in the source as fetched, without actually transferring it to the target. You can also use this option if delta requests have already been transferred for this data transfer process. This processing mode implies that no transport-relevant changes have been made to the DTP metadata.
398 PUBLICSAP BW/4HANA
Data Acquisition

4.10.6.1 Simulating and Debugging DTP Requests
Simulating the data update and debugging a data transfer process request (DTP request) help you to analyze an incorrect DTP request. You can also simulate a transformation prior to the actual data transfer if you want to check whether it provides the desired results.
NoteRequests that are processed with processing mode SAP HANA Execution cannot be debugged.
Procedure
Simple Simulation and Debugging
1. If you want to execute a data transfer process in debugging mode, choose function Start execution of data transfer process Simulate in Dialog in the data transfer process editor.
2. On the next screen, in the overview for program execution, you define breakpoints for debugging by choosing Change Breakpoints.
3. Choose Simulate.The simulation request is started. The request is processed synchronously in a dialog process. If you have defined breakpoints, the ABAP Debugger now opens. If you have defined a breakpoint for the transformation, you can call the corresponding data in the ABAP source code from the Data section.The result of the simulation is displayed in the DTP monitor.
Simulation and Debugging in Expert Mode
In addition to setting breakpoints, expert mode enables you to specify selections for simulating the request and for defining the substep after which you want to write to temporary store during the simulation .
1. You can perform the simulation of a request in expert mode from the data transfer process editor or from the DTP monitor.1. In the data transfer process monitor, select the execution option Simulate in dialog. On the next screen,
select the Expert Mode field and choose Simulate.
2. In the DTP monitor, choose Debugging.The Debug Request screen appears.
2. Make the settings on the Filter tab page.When you call the simulation from the DTP monitor, the filter settings that are displayed as initial are copied from the request displayed in the monitor. When you call from the data transfer process monitor, the filter settings displayed as initial are copied from the next "real" request of the DTP.○ You can change the filter in order to restrict the data for the analysis. In addition to selection via the
fields of the source, you can also select via the the technical fields of the request . You should restrict the data in order to prevent the simulation from running for a long time, for example, if you loaded a large amount of data. Selections are also recommended if the fields refer to certain data records in the source or to a certain selection of data in the source.
○ With Save as Variant, you can store the selections in the database for later use.○ With Load Variant, you can call a selection variant stored for this request.
SAP BW/4HANAData Acquisition PUBLIC 399

○ With Technical Field Name / Description, you can switch between displaying the technical field name and the description.
○ With Change Selection, you can change the list of fields displayed in the selection screen.3. Make your settings on the Temporary Storage and Breakpoints tab page.
You can define if and when to write data to temporary storage during processing and set breakpoints at different times.
4. Choose Execute.The simulation request is started. The request is processed synchronously in a dialog process. If you have defined breakpoints, the ABAP Debugger now opens. If you have defined a breakpoint for the transformation, you can call the corresponding data in the ABAP source code from the Data section.The result of the simulation is displayed in the monitor and can be analyzed.
4.10.7 Monitoring Data Transfer Process
A request is generated to execute a data transfer process (DTP). The DTP Monitor app allows you to keep track of the request in the various processing steps.
Prerequisites
The SAP BW∕4HANA Cockpit has been configured. More Information: Configuring the SAP BW∕4HANA Cockpit [page 924]
Call Monitor
You can call DTP Monitor in the following ways:
● By choosing Show Monitor Show Last Request from the data transfer process editor in the BW Modeling tools.
● By pressing the DTP Monitor button in the SAP BW∕4HANA Cockpit in the request administration screen for a DataStore object or InfoObject in the details for the load request.
● Using the Process Monitor (Processes app).
Display Header Information for Request
You can use the arrow icon to display the header information for the request. This provides detailed information about the request, together with various navigation options. You can navigate to the source object, to the data transfer process or to the transformation for example if you have already opened the BW Modeling tools, or you can navigate to the administration screen for the the data target. For a streaming request, you can navigate to the previous and subsequent request, and display the streaming process.
400 PUBLICSAP BW/4HANA
Data Acquisition

Display Detailed Information About the Processing of the Request
The Request Monitor for a request in the data transfer process request displays detailed information about the processing of the request. In the Request Processing Steps column, you can see the request processing steps in a hierarchical tree display. At the first level of the detail tree, you can see the status of the requests at various points during the process, for example during generation, when processing the steps during the DTP program, and when setting the technical and complete status of the request. The status display for the processing is then divided further according to the steps of the data transfer process and displays the status and messages for each of the processing steps and data packages in the processing steps.
In the Details column, you can call notifications or other information for the entries in the Request Monitor, or navigate to the transformation that was executed in this step. At the processing step level, you can call the temporary storage display for this processing step for example if you have specified for the data transfer process that the temporary storage is to be filled after this processing step. At the transform execution level, you can navigate to the transform for example if you have opened the BW Modeling tools.
The buttons at the top right of the screen provide you with various navigation options. You can call the job overview, the request administration screen for the data target, and the DTP process monitor, where you can see an overview of all requests belonging to the DTP. You can call to error stack, if one exists, or, if the DTP is executed via a process chain, call the process chain logs for the process chain run that the request was executed with. You can also switch to another request, using the TSN, request ID or SID.
The toolbar at the bottom right of the screen provides you with the following features:
● DeleteYou can delete a request if it has not been updated to a target yet.
● RepairYou can repair a request that has errors. The repair can be performed either synchronously or asynchronously. When a request is repaired, a new run ID is created, and the system attempts to write the data package that had errors again. In the Details section in the Request Monitor, the processing steps that are repeated are displayed with the run ID in brackets.
● Change Overall StatusYou can specify the overall status of the request here, regardless of its technical status.
4.10.8 Displaying Properties of the Data Transfer Process
The Properties view displays information about the data transfer process (DTP) in the active editor.
General
Administrative information is displayed here, such as the assigned package, the version, information about the person responsible or the last change.
SAP BW/4HANAData Acquisition PUBLIC 401

Technical
The DTP ID and the DTP type are displayed here, as well as information about the error DTP and generated programs and objects.
Usage
The data flow for the DTP (source, destination, transformation) is displayed here, together with the process chains if the DTP is used in process chains. You can navigate from here to the data flow display or the process chain display transaction.
Program Flow
The program flow for the data transfer process is illustrated here.
4.11 Manual Data Entry
In addition to loading data, you can also enter data manually.
Hierarchical structures can be manually created directly in the BW system.
You can enter the values directly in the BW system for the master data.
4.11.1 Creating and Changing Hierarchies
You can create or change a hierarchy.
Prerequisites
You have installed and configured the SAP BW∕4HANA Cockpit. More Information: Configuring the SAP BW∕4HANA Cockpit [page 924]
402 PUBLICSAP BW/4HANA
Data Acquisition

Context
You can edit hierarchies in an app in the SAP BW∕4HANA Cockpit. You can also call this app from the BW Modeling tools in the characteristics editing screen if the characteristic has hierarchies.
Procedure
1. You are in the SAP BW∕4HANA cockpit in the InfoObject Hierarchy app. If the hierarchy that you want to edit already exists, select the relevant characteristic.
2. Choose Create Hierarchy to create a new hierarchy. You can display existing hierarchies by clicking on the entry in the list.
Creating Hierarchies3. Enter a name and a description for the hierarchy. Choose OK.4. By choosing Create Text Node, you can insert new nodes into the hierarchy. You can insert new nodes either
as subnodes or at the same level.5. By choosing Create Characteristic Node, you can insert external characteristic nodes that you previously
defined on the InfoObject.6. By choosing Create Interval Node, you can insert intervals.7. By choosing Cut, you can remove selected nodes from the hierarchy.
8. By choosing Technical Information, you can show or hide the technical details of the nodes.9. By choosing Hierarchy Attributes, you can set hierarchy attributes and thus influence how hierarchies are
displayed and processed in analysis and reporting.10. Header Data allows you to display additional information about the technical properties of your hierarchy.11. Maintain Levels allows enter descriptions for the hierarchy levels. These texts are shown in the context
menu when navigating in the query.12. Save and activate your hierarchy.
Related Information
Hierarchy Attributes [page 404]
SAP BW/4HANAData Acquisition PUBLIC 403

4.11.1.1 Hierarchy Attributes
You can set hierarchy attributes and thus influence how hierarchies are displayed and processed in reporting.
Do Not Display Leaves for Inner Nodes in the Query
A postable node with lower-level nodes is displayed in the query by default with a leaf with the same text inserted under it (see Modeling Nodes and Leaves). If you set this flag, these (additional) leaves are suppressed.
Display Behavior for Leaves of Inner Nodes Can Be Changed
You can set whether the afore-mentioned display behavior can be changed at query runtime.
Suppression of the Node Unassigned Nodes
If there are characteristic values that do not appear in the hierarchy, an Unassigned Nodes node is added to the hierarchy by default. If you set this flag, no Unassigned Nodes is created for the hierarchy.
ExampleThere are 1000 characteristic values for characteristic Material. A hierarchy with material groups from a total of 100 materials is defined for it. The remaining nodes (1000-100, i.e. 900 characteristic values) are positioned under the Unassigned Nodes node. If you select Suppress 'Unassigned' Node, these 900 characteristic values are filtered out.
If a characteristic has a large number of values, but only a fraction of them appear in the hierarchy, the Unassigned Nodes node will contain a lot of nodes, and the internal hierarchy presentation will be very large. This can result in longer runtimes and problems when saving.
Root/sum position
You can specify here whether the root and total position of the hierarchy is displayed at the bottom in the hierarchy, with the leaves at the top, or whether the root and total position appear at the top, with the leaves at the bottom.
404 PUBLICSAP BW/4HANA
Data Acquisition

Start drilldown level
Here you can determine how many hierarchy levels in the query are included in then drilldown the first time it is called. If no number is entered, three levels are displayed.
4.11.2 Creating and Changing Master Data
In master data maintenance, you can manually change attributes and texts for each characteristic, or create new ones.
Prerequisites
You have installed and configured the SAP BW∕4HANA cockpit. More Information: Configuring the SAP BW∕4HANA Cockpit [page 924]
Context
You can maintain master data in an app in the SAP BW∕4HANA cockpit. You can also call this app from the BW
modeling tools in the characteristics editing screen by choosing Miscellaneous, provided that the characteristic in question has master data and/or texts.
Procedure
1. You are in the SAP BW∕4HANA cockpit in the Master Data Maintenance app. Select the characteristic to be processed.
2. Depending on the complexity of your characteristic, you can edit the entries on four tabs: One for time-independent values, one for time-dependent values, one for texts and one for XXL attributes.
3. By choosing Add Line, you can create new master data. You can create multiple lines at once here by choosing Add 10 Lines and copying multiple entries from the clipboard.
4. If you have a very large number of master data entries for an InfoObject, you can restrict the view using the filter in the header area. If you have already specified a filter, you can use Adapt Filters to further refine it. You can also set a range.
5. By choosing Change Records, you can choose whether to change all records or only those selected.6. By choosing Delete, you can flag master data that is not used for deletion. It is only deleted when you save
however. The deletion is always executed in the background. This deletes all entries for a key, over all tab pages. You have various other options for this too. More Information: Deleting Master Data for a Characteristic [page 407]
SAP BW/4HANAData Acquisition PUBLIC 405

7. By choosing Discard Changes, you can reverse all changes you have made for the selected line.8. By choosing Where-Used, you can generate a where-used list and call it via Application Log. More
Information: Running a Where-Used List [page 406]
9. For XXL attributes, there are a number of other special features. You can use to edit the file, and to delete it. Using the first icon, you can view the file. Note that not all file types are supported for the preview.
10. To save your entries, choose Save.
4.11.2.1 Running a Where-Used List
You can use the where-used list in master data editing to view the usage of individual master data records in DataStore objects and in other master data.
Context
All usages are display and navigation attributes are recorded. This also includes usage in active hierarchies and in objects that do not have SIDs. On the other hand, a where-used list performed when deleting master data only finds usages in objects that have SIDs.
Procedure
1. You are in master data editing. Select the master data records that you would like to run the where-used list for.
2. By choosing Where-Used, you can start the where-used list.3. Select one of the search options for the where-used list. The search mode has a significant impact on the
runtime of the where-used list. The following search modes are available:○ O: only one usage per value:
Once the where-used list finds a given value, the system stops searching for this value in the other InfoProviders. This search mode is the default setting. This mode is useful if you simply want to delete all values that are no longer used, but do not need to perform any more complex searches and want to keep the run-time of the where-used list to a minimum.
○ P: one usage per value per InfoProvider:The system searches every value in every InfoProvider. Each time a hit is found in an InfoProvider, the search stops in that InfoProvider. This search mode is useful if you are interested in the usage: you can find out which InfoProvider you have to delete from before you can delete them all.
○ E one usage is enough:After a value is found once, the search stops. This setting is useful if you only want to completely delete the attributes and texts.
○ A all usages of all values:The system searches every value in every InfoProvider. Every usage is counted. This is a complete where-used list. This search time has the longest runtime. You should only used it if you are interested in all usages.
406 PUBLICSAP BW/4HANA
Data Acquisition

4. In the dropdown box, you can specify whether the process should run in the dialog or in the background. We recommend running the process in the background if there is a significant amount of data or number of dependent objects. No locks are set while the process is running.
5. By choosing Application Log Open Where-Used Log you can view the result of the where-used list. The object for the where-used list is called RSDMD. The subobject is called MD_UC.
6. In the Details column in the Application Log, you can view which objects records are used in.
4.11.2.2 Deleting Master Data for a Characteristic
You can delete all master data that exists for a characteristic, including all attributes and texts. You can use attribute values to restrict the selection of the master data.
Prerequisites
Master data can only be deleted if it is not being used by other DataStore objects or InfoObjects:
● Not used as an attribute for other InfoObjects (transitive attributes are ignored) and no use of references (If references exist) as an attribute for other InfoObjects
● Not used in active hierarchies that exist for the InfoObject● Not used in a DataStore object in which the check for referential integrity is activated for the characteristic
Procedure
● 1. You are in the SAP BW∕4HANA cockpit in the Manage InfoObjects app. Select the characteristic to be processed.
2. By choosing Further Actions Delete Data , you can delete master data.3. To begin with, you can choose whether to delete master data or to delete all requests that do not have
master data. With enhanced master data update, you can also delete multiple load requests.4. When deleting master data, you have various options. You can choose
○ Whether entries in the SID table of the characteristic are to be retained or deleted.If you delete the SID table entry for a particular characteristic value, the SID value assigned to the characteristic value is lost. If you reload attributes for this characteristic value later, a new SID value has to be created for the characteristic value. This has a negative effect on the runtime required for loading. In some cases, deleting entries from the SID table can also result in serious data inconsistencies. This occurs if the list of used SID values generated from the where-used list is incomplete.Delete, Retaining SIDsFor the reasons given above, you should choose this option as standard. If for example you want to make sure that individual characteristic attributes that are no longer needed are deleted before you load master data attributes or texts, the option of deleting master data but retaining the entries from the SID table is also perfectly adequate.
SAP BW/4HANAData Acquisition PUBLIC 407

Delete with SIDs:Note that deleting entries from the SID table is rarely necessary or useful. Deleting entries from the SID table does make sense if the composition of the characteristic key is fundamentally changed for example, and you want to swap a large record of characteristic values with a new record with new key values.
○ Whether the texts are to be deleted. If you select this option, the texts for the selected master data values are also deleted from the text table.
○ Whether unused values are to be deleted.5. Define which values you want to delete:
○ No Restrictions: All values are deleted.○ Define Selective Restrictions: Only values that meet certain criteria are deleted. If you choose this
option, various input options appear to restrict the values.○ Use Values from Latest Where-Used Computation: Only values from a previous where-used list are
deleted. You can choose to delete all used or unused values. To do this, you must first create a where-used list.
6. To create a where-used list, choose Where used.7. Select one of the search options for the where-used list. The search mode signficantly impacts the
runtime for the where-used list. The following search modes are available:○ O only one usage per value:
Once the where-used list finds a value, the system no longer searches for this value in the other InfoProviders. This search mode is the default setting. This mode is useful if you simply want to delete all values that are no longer used, but do not need to perform any more complex searches and want to keep the run-time of the where-used list to a minimum.
○ P one usage per value per InfoProvider:The system searches every value in every InfoProvider. Each time a hit is found in an InfoProvider, the search stops in that InfoProvider. This search mode is useful if you are interested in the usage: you can find out which InfoProvider you have to delete from before you can delete them all.
○ E one usage is enough:After a value is found once, the search stops. This setting is useful if you only want to completely delete the attributes and texts.
○ A all usages of all values:The system searches every value in every InfoProvider. Every usage is counted. This is a complete where-used list. This search time has the longest runtime. You should only used it if you are interested in all usages.
8. You can run a where-used list in dialog mode or in the background.9. If you choose Use values from Latest Where-Used Computation, you can display both used values and
unused values. Based on this, you may want to change your deletion option again. You can also display the application log here.
10. Choose Delete, if you have selected all options. You can choose to perform the deletion operation in dialog mode or in the background. The where-used list will be deleted too.
11. Once the deletion is complete, a message appears, and you can display the log.
408 PUBLICSAP BW/4HANA
Data Acquisition

4.11.2.3 Deleting Master Data at Single Record Level
Use
If you want to selectively delete master data, you have the following options:
● You can use report RSDMD_DELETE_BATCH.● You can use report RSDMD_DELETE_BATCH_PACKAGE. Deleting master data using report
RSDMD_DELETE_BATCH can take a very long time if the InfoObject has a large number of entries in the master data tables. In cases like this, you can use report RSDMD_DELETE_BATCH_PACKAGE instead.
NoteYou can only delete master data records if no transaction data exists for the master data that you want to delete, the master data is not used as attributes for an InfoObject, and there are no hierarchies for this master data.
Procedure
Selective Deletion Using Report RSDMD_DELETE_BATCH
1. Enter report RSDMD_DELETE_BATCH in the ABAP Editor (transaction SE38) and create a variant for it.2. Execute the variant.3. Specify the InfoObject with the master data that you want to delete.4. In Filter Data, you can specify which data you want to delete.5. You can specify a deletion mode for the data (parameter P_SMODE).
More information: Deleting Attributes and Texts for a Characteristic [page 407]6. You can simulate the report before running it (parameter P_SIMUL).7. You can schedule the report in the background. If you want to clear up your master data at regular
intervals, you can also integrate the report into a process chain using process type ABAP program.
Selective Deletion Using Report RSDMD_DELETE_BATCH_PACKAGE
1. Enter report RSDMD_DELETE_BATCH_PACKAGE in the ABAP Editor (transaction SE38) and create a variant for it.
2. Execute the variant. The steps which follow are the same as when executing report RSDMD_DELETE_BATCH. There is an additional parameter however, which you use to set the maximum number. The default value for this parameter is 50000.
3. You can specify that all master data values should be generated.
SAP BW/4HANAData Acquisition PUBLIC 409

4.11.2.4 BAdI for Master Data Maintenance
Context
You can use the Business Add-In (BAdI) RSDMDM_CHECKS to implement checks for master data maintenance. When master data is created, the system then performs a validity check on entries at either InfoObject or role level. There is a method for every data type: Time-independent values, time-dependent values, text and XXL attributes. If a data entry has errors, it cannot be stored.
You can implement BAdI RSDMDM_CHECKS multiple times.
Procedure
1. In the SAP menu, choose Tools ABAP Workbench Utilities Business Add-Ins Implementation . The BAdI-Builder: Implementation Maintenance Entry screen appears.
2. Choose New BAdI and specify enhancement spot RS_MD_MAINTENANCE. Choose Create.3. Program the interface methods in the class builder.4. Activate the implementations.
410 PUBLICSAP BW/4HANA
Data Acquisition
5 Analysis
SAP BW∕4HANA provides you with analytical OLAP functions and services.
Online Analytical Processing (OLAP) formats information for large amounts of operative and historical data and allows you perform multidimensional analyses based on different business perspectives. Queries are the basis of every analysis in SAP BW∕4HANA.
Related Information
Analytic Functions [page 421]Modeling Analytic Queries [page 706]
5.1 Creating a SAP HANA Analysis Process
You can use a SAP HANA analysis process to analyze data from certain perspectives, for example to calculate ABC classes or to find scoring information.
Prerequisites
The PAL Library must be installed. More Information: http://help.sap.com/saphelp_hanaplatform/helpdata/en/69/256eceb70c4f5dbdd85416ebf903f8/content.htm
Context
With the SAP HANA analysis process, BW users are able to use the functions of the SAP HANA database and can combine these with the functions in the BW system. A SAP HANA analysis process is always made up of exactly one data source, a function for data analysis and a data target. A SAP HANA analysis process can also be used as the source for another SAP HANA analysis process.
SAP BW/4HANAAnalysis PUBLIC 411

The graphic below shows the design time object that is integrated into the BW system process management:
ExampleOnly InfoObjects that have Standard master data access are supported. This is the only type of master data access that there is a colum view for on the SAP HANA database. If you InfoObject has a different type of master data access, you should check whether this is really necessary.
In the SAP HANA analysis process, there are no joins or unions. We recommend doing this using a CompositeProvider. SAP HANA will then be used for processing, and satisfactory performance can be guaranteed.
You cannot use all InfoProviders directly. By connecting to the DTP however, you can connect all InfoProviders that are supported by the DTP.
Procedure
1. In the SAP Easy Access menu, choose SAP BW/4HANA Special Analysis Procedure Model Analysis Process .
2. Enter a name for your analysis process. Choose Create.3. Enter a description in the Overview tab page and select an InfoArea.4. Select a data source.5. Select the function or procedure for the data analysis.
412 PUBLICSAP BW/4HANA
Analysis

6. Select the data target.7. Make any further required settings on the Data Source, Definition of the Procedure, Data Analysis and Data
Target tab pages.8. Activate your analysis process. Once activated, an analysis process can be transported to other BW
systems.9. You have various options for executing the analysis process:
○ By choosing Execute Synchronously, you can execute the analysis process directly and schedule it in
the background by choosing Schedule for Background Processing. The result is displayed in the monitor.
○ You can insert the analysis process into a process chain. To do this, go to the editing transaction for your process chain, choose process type Other BW Processes Execute SAP HANA Analysis Process .
○ If you have specified in the definition of your analysis process that it can be used in a data transfer process, you can create a transformation for this. To do this, choose Modeling SAP HANA Analysis Process in the Data Warehousing Workbench. Choose Create Transformation in the your analysis process's context menu.
Related Information
Selecting the Components of the Analysis Process [page 413]Defining the Details for the Data Source [page 417]Defining the Details for the Data Analysis [page 417]Editing Generated Procedures [page 418]Defining the Details for the Data Target [page 418]Creating Process Chains [page 964]
5.1.1 Selecting the Components of the Analysis Process
On the Overview tab page, you can make settings for the data source, data analysis and data target.
Procedure
1. The data source can be an InfoProvider, a database table or a SAP HANA analysis process.Data source SAP HANA Analysis Process allows you to execute a series of analysis processes in sequence and only to execute the whole result.
2. The data analysis can be one of the following:
○ Function or Script: A number of selected PAL functions from SAP HANA are available to you here.
SAP BW/4HANAAnalysis PUBLIC 413

NoteTo use the PAL functions, you have to install SAP HANA SPS06 with the Application Function Library (AFL). The Application Function Library (AFL) contains the PAL functions. For more information, see the SAP HANA Installation Guide
The following PAL functions are supported:○ ABC Analysis○ Apriori○ Double Exponential Smoothing○ K-means○ Outliers○ Single Exponential Smoothing○ Triple Exponential Smoothing○ Weighted Score Table
You can find the documentation for the PAL functions in the SAP HANA Predictive Analysis Library (PAL).
○ Procedure:○ You can select a procedure that you have implemented in the SAP HANA Modeler as a content
procedure. These are located in a particular schema and are assigned to a package. To refine the search, you can specify the schema or the package where the procedure is located. For a content procedure, a repository procedure is always generated. The analysis process access these repository procedures.The advantage of implementing a procedure yourself is that you can reuse it later. You always need to take care of the transport yourself.
○ You can generate a suggestion implementation that you have to adjust to your requirements. In the proposal implementation, the fields are projected, but not modified.It is generated in accordance with the assignment information that you define on the source and target. A name is generated according to the following pattern: 0BW:DAP:<Name of Analysis Process>~PN. When the analysis process is activated, the procedure in the repository is generated as a repository procedure in the schema defined for this. This does not have a package assignment and can be found via the schema. The advantage of a generated procedure is that it is transported with the SAP HANA analysis process.
○ You can select an ABAP managed database procedure that you have created in ABAP in Eclipse. The ABAP runtime environment creates a corresponding database procedure on the SAP HANA database. You can then use this database procedure in the SAP HANA analysis process. For more information about ABAP Managed Database Procedures, see the ABAP key word documentation at http://help.sap.com/abapdocu_740/en/index.htm?file=abenamdp.htm.You should normally use formulas, especially for calculations by field. The system provides better support for this. If you use procedures, you need to implement a lot of things yourself that are actually already in the system, currency translation for example. You can create formulas directly on the field, in the details for the data source or data target.You should use procedures if you need complete algorithms that should not be calculated by field and for cases that no formulas exist for.
○ You can generate an ABAP Managed Database Procedure and then adapt it to suit your particular requirements. Generated procedures are useful if you do not want to perform calculations by field, and for complex algorithms.If you generate an ABAP Managed Database Procedure, the class is generated first of all. This comprised the prefix HAP_ and a generated ID. If the analysis process is changed, the procedure is
414 PUBLICSAP BW/4HANA
Analysis

generated again. You can only insert your own coding in the body. This is not overwritten if the procedure is regenerated. This allows you to enhance the existing method without creating one of your own. If you edit the SAP HANA analysis process from the ABAP Development Tools, you can call the editor directly by double-clicking on the generated procedure. If you edit the SAP HANA analysis process from the BW system, double-clicking on the generated procedure only takes you to the Class Builder. You can display the generated coding here, but cannot edit it.
3. The data target can be one of the following:
○ Analytic Index: You can either have the system generate an analytic index (default setting) or choose an existing one. If you select a generated analytic index as the data target, you need authorization for creating, changing, loading and deleting data on an analytic index. These authorizations are assigned using authorization object S_RS_AI.The result can be saved or, if using the analysis process as the data source for a further analysis process, not saved. If a query is executed on an analytic index, the analysis is executed at runtime if the data is not saved. The control parameters can be entered when executing the query.
○ Database Table○ Embedded in Data Transfer Process: If you choose this option, you can create a transformation for your
SAP HANA analysis process, and thus use this analysis process as a source for other analysis processes. To do this, choose Environment Transformation .
4. Save and activate your SAP HANA analysis process.
5.1.1.1 Registering Procedures
All procedures that you create yourself have to be registered.
Context
If you go to the Overview tab page and enter a procedure that you have created yourself as the data analysis method, the system prompts you to register this procedure. During registration, the properties are assigned to the procedure's output fields.
NoteGenerated procedures do not have any control parameters. The registration can therefore be peformed automatically. This registration is performed together with the SAP HANA analysis process.
Procedure
Registrating a Single Procedure1. Choose Register on the Overview tab page under Data Analysis. The procedure registration popup appears.2. On the Parameter Classification tab page, you have to enter exactly one input table and one output table. If
you have more than one table, you can define the role of the table here. You always have to define an input table and an outpuot table when doing this. Specifying one or more control tables is optional.
SAP BW/4HANAAnalysis PUBLIC 415

3. On the Output Properties tab page, you can define the properties of the fields. The properties of the fields are taken from the input fields. Alternatively, you can specify a reference InfoObject to take over the properties from. By doing this, you create a connection to the BW metadata. Alternatively, you can select fields as key figures.The SQL data types are mapped to the ABAP data types as follows:
SQL Data Type ABAP Data Type
TINYINT INT4 (Key Figure)
SMALLINT INT4 (Key Figure)
INTEGER INT4 (Key Figure)
DECIMAL DEC (Key Figure)
FLOAT FLTP (Key Figure)
DOUBLE FLTP (Key Figure)
CHAR CHAR (Characteristic)
VARCHAR STRG (Characteristic)
NVARCHAR CHAR (Characteristic)
DATE DATS (Characteristic)
TIME TIMS (Characteristic)
4. On the Procedure Definition tab page, you see the definition of the procedure.
5. By choosing Check, you can view any errors that have occurred.6. Choose Export. The registration is saved.
NoteThe registration must be transported separately. It can be reused in other SAP HANA analysis processes.
Registering Multiple Procedures
7. Choose . On the Procedures tab page, you see an overview of all registered procedures. Procedures with the prefix TR_ are expert routines in transformations. These are displayed here but cannot be processed in any way.
8. You can change your procedures here or create new ones that can then be used in analysis processes. Schema _SYS_BIC and analysis type 0BW_OPER_PROC are pre-defined settings here.
416 PUBLICSAP BW/4HANA
Analysis

5.1.2 Defining the Details for the Data Source
On the Data Source tab page, you can make assignments between the fields of the data source and the entry table of a function or procedure, and create filters and calculations.
Procedure
1. Choose the Data Source tab.2. If you data source is an InfoProvider, you can specify a fixed or variable date. If required, you can recreate
the date variable directly. More information: Defining Variables [page 811]3. Use the mouse to drag the arrows between the fields in the data source and the entry table of the function
or procedure, or choose the relevant fields (in a projection or a generated procedure for example).
4. By double-clicking in the Filter column, you can define a filter with variable or fixed values for the corresponding InfoObject.
5. If your data source is an InfoProvider, and you have key figures with currencies or units, you can double-click on the corresponding unit or currrency symbol to specify a quantity conversion or currency translation type. When the analysis process runs, the unit or currencies are then processed accordingly.
6. By choosing Formula Create in an InfoObject's context menu, you can create a new formula. To begin with, enter a description and a referenced InfoObject or a data element. When creating the formula, you can make use of predefined functions in the formula editor.
7. You have to model date calculations (such as sy-date + 1) with formula ADD_DAYS_TO_DATE, both for internal and external display.
Related Information
Creating Quantity Conversion Types [page 628]Creating Currency Translation Types [page 606]
5.1.3 Defining the Details for the Data Analysis
On the Data Analysis tab page, you can change the parameters of the selected PAL function.
Context
To use the functions on this tab page, you must have selected a PAL function for data analysis.
SAP BW/4HANAAnalysis PUBLIC 417

Procedure
1. Choose the Data Analysis tab page.2. Make your entries for the parameters of the selected PAL function.
You can find the documentation for the PAL functions (and your parameters) in the SAP HANAPredictive Analysis Library (PAL).
In the data transfer process, you can also view and edit these input fields under Extraktion. These entry fields are available for all PAL functions in the query monitor, though only if the source data is accessed directly, i.e. if the result has not been saved.
5.1.4 Editing Generated Procedures
On the Procedure tab page, you can edit a generated procedure.
Context
To use the functions on this tab page, you must have generated a procedure for data analysis.
Procedure
1. Choose the Procedure tab page.2. You can enhance the default logic of the generated procedure.
5.1.5 Defining the Details for the Data Target
On the Data Target tab page, you can make loading behaviour settings and edit your data target.
Context
418 PUBLICSAP BW/4HANA
Analysis

Procedure
1. Choose the Data Target tab.2. Select the required loading behaviour:
○ Overwrite Existing Data with New Data: The content of the data target is deleted before the logic is executed.
○ Add New Data to Existing Data
3. By choosing Formula Create in an InfoObject's context menu, you can create a new formula. To begin with, enter a description and a referenced InfoObject. When creating the formula, you can make use of predefined functions in the formula editor.
4. You have to model date calculations (such as sy-date + 1) with formula ADD_DAYS_TO_DATE, both for internal and external display.
5. If you have set an analytic index as your data target, the Analytic Index tab page appears too. You can view the definition of the analytic index here and switch to editing mode.
Related Information
5.1.6 Using Expert Mode
Expert Mode offers extra functions for use by administrators and by support.
Context
Procedure
1. To switch to Expert Mode, choose Extras Expert Mode On/Off . The system then displays two additional tab pages, CalculationScenario and Query. It also displays two additional functions in the toolbar,
and .2. On the CalculationScenario tab page, you can view a simulation of the CalculationScenario's runtime. The
CalculationScenario is the source for reading while a query is running. When activated, it is generated from the analysis process. Calculations are made while reading.The runtime simulation provides you with a prior consistency check. You can view both the XML representation and the script definition. In the XML representation, you can click on underlined elements to navigate to them and view sample data. This allows you to check whether the result is the one you want.
SAP BW/4HANAAnalysis PUBLIC 419

By choosing Export CalculationScenario, you can export the simulation as an XML file for analysis if errors occur.
3. On the Script Definition, you can view the script, provided that one exists.4. On the Query tab page, the Query Monitor is embedded. This allows you to run standard queries for your
analysis process.5. By choosing Maintenance Execution, you can simulate execution of the SAP HANA analysis process for
troubleshooting purposes.
6. By choosing , you can export the SAP HANA analysis process as an XML file for analysis if errors occur.
7. By choosing , you can display an overview of all existing registrations.
Related Information
Registering Procedures [page 415]Editing Analysis Types [page 420]
5.1.6.1 Editing Analysis Types
Context
Procedure
1. Choose . On the Analysis Types tab page, you see an overview of all registered analysis types. Analyse types with the prefix 0BW_ are delivered by SAP and cannot be changed in any way.
2. By choosing , you can create your own analysis types.
3. By choosing , you can change your own analysis types.
5.1.6.2 Deleting Administrative Data
Every time a SAP HANA analysis process is executed, header data from logs and statistical data is stored for support purposes. To keep the amount of data stored to a reasonable size, you should delete it at regular intervals.
By choosing Extras Delete , you can see various deletion options. You have the following options:
420 PUBLICSAP BW/4HANA
Analysis

● Delete the header data of executed SAP HANA analysis processes● Delete statistical data
Both of these options allow you to set deletion of data once it has reached a certain age or which was created before a certain date.
5.1.7 Authorizations for SAP HANA Analysis Processes
To be able to work with SAP HANA analysis processes, you need certain authorizations both in SAP HANA and in the BW system.
Authorizations in SAP HANA
You have created a package in the Content and selected the ABAP schema.
Create a role with the following authorizations and assign it to the database user.
● Object authorization: SELECT on <ABAP Schema>, _SYS_BI and _SYS_BIC● Object authorization: EXECUTE on SYS.REPOSITORY_REST● Package authorization: REPO.READ, REPO.MAINTAIN_NATIVE_PACKAGES, REPO.EDIT_NATIVE_OBJECTS
and REPO.ACTIVATE_NATIVE_OBJECTS on the Content package
5.2 Analytic Functions
The overall functionality for retrieving, processing, and formatting data requested by a query is provided by Analytic Manager.
Analytic Manager, a component of the SAP BW∕4HANA server, lies between the user and the database. It makes the multidimensionally formatted data available to both the front end and, using special interfaces (Open Analysis Interfaces), to third-party administrator front ends. Analytic Manager is therefore optimized for analyzing and reporting large datasets.
The table below provides an overview of the OLAP functions and services implemented in Analytic Manager in SAP BW∕4HANA.
Overview of OLAP Functions and Services
OLAP Function Operations in Detail
Navigation ● Drilldown to characteristic / structure element. Remove element drilldown from the view (dice)
● Expand (drilldown) and hide (drill up) hierarchy nodes● Swap drilldown elements
SAP BW/4HANAAnalysis PUBLIC 421

OLAP Function Operations in Detail
Filter ● Restrict (slice) characteristics to selections (single value, value range, hierarchy element, exclusion)
Aggregation ● Standard aggregation: Default, key-figure-dependent calculation formula for the aggregation of single result values
● Exception aggregation: Special aggregation setting in relation to a particular characteristic. For example, aggregation average of account balance with reference to the time characteristic
● Local aggregation or local calculations (calculation of individual values displayed for normalization to the overall result for example)
Display ● Characteristics displayed as key/description● Display/suppress results rows● Change position of hierarchy nodes (up / down)
Result-dependent selection and layout ● Threshold values (exceptions): Colored highlighting of uncommon variances in key figure values
● Conditions: Key-figure-dependent restriction of characteristics according to defined conditions
Structuring ● Hierarchical assignment of characteristic values with drill down for more than one element ('Universal Display Hierarchy')
Generic and business analysis functions ● Sorting with reference to characteristics and key figures● Calculated key figures and formulas (enables statistical
and mathematical calculation on the basis of key figure values)
● Currency Translation● Quantity Conversion● Elimination of internal business volume (business elimi
nation of internal transactions)
Concepts for runtime optimization ● OLAP Cache (can be implemented in cache mode, depending on the query)
● Non-Cumulatives
Integrated additional functions ● Variables for parameterization and greater reusability of queries
● Report-report interfaces for navigation in different reports
● Authorization concept for setting user authorizations for accessing data
422 PUBLICSAP BW/4HANA
Analysis

Related Information
Conditions [page 423]Aggregation and Formula Calculation [page 477]Operations on the Result Set [page 534]Hierarchy [page 541]Elimination of Internal Business Volume [page 573]Non-Cumulatives [page 577]Stock Coverage [page 597]Currency Translation [page 600]Quantity Conversion [page 620]Constant Selection [page 648]CURRENT MEMBER Variables [page 665]Displaying Unposted Values in the Query Result [page 673]Using Precalculated Value Sets (Buckets) [page 678]Standard Queries [page 680]Using the Report-Report Interface [page 683]
5.2.1 Conditions
To improve the efficiency of data analysis, you can formulate conditions. In the results area of the query, the data is filtered according to the conditions so that only the part of the results area that you are interested in is displayed.
Use
If you apply conditions to a query, you are not changing any figures. You are merely hiding the numbers that are not relevant for you. Conditions therefore have no effect on the values displayed in the results rows. The results row of a query with an active condition corresponds to the results row of the query without this condition.
You can define multiple conditions for a query. Conditions are evaluated independently of each other. The result set is therefore independent of the evaluation sequence. The result is the intersection of the individual conditions. Multiple conditions are linked logically with AND.
Key Features
Using conditions, you can restrict how you view query data as follows:
Threshold: An entry is filtered independently of the other entries if its reference value has a specific relationship to a comparison value. An entry is not displayed for example if its reference value exceeds or is less than a specific threshold value.
SAP BW/4HANAAnalysis PUBLIC 423

Ranked Lists: All entries for the displayed list or all entries for a logical section of the list (with multiple characteristics in the drilldown) are considered and their relationship to each other determines whether the entry is displayed. For ranked lists, the sorting is switched on automatically when the condition is activated.
You can use the following operators to create ranked lists:
● Top N, Bottom N The ranked list is arranged according to a particular number.
TipCustomers: Top 3 with bottom 5 sales volumes
A list of the three customers with the strongest sales and the five customers with the weakest sales is displayed, that is, the union of both condition rows Top 3 Sales and Bottom 5 Sales.
● Top percent, bottom percent: The ranked list is arranged according to a particular percentage.
TipMaterial Top 25% of revenue
You receive a list of the strongest materials - with respect to revenue - until 25% of the total revenue is attained.
Material Bottom 25% of revenue
You receive a list of the weakest materials - with respect to revenue - until 25% of the total revenue is attained.
● Top total, bottom total: The ranked list is arranged according to a particular total value.
TipProduct: Top total EUR 20,000 of sales volume
You see a list of products with the highest sales volume, for which the combined sales volume totals EUR 20,000. All sales volumes are first sorted in descending order. Then totals are calculated until the threshold value of 20,000 is exceeded. Those products that exceed the EUR 20,000 threshold remain in the list.
An example of the ranked list for this condition is as follows:
Product Sales
A EUR 11,000
B EUR 7,000
C EUR 5,000
Product C is included in the list, even though the total then exceeds EUR 20,000. All products that have a lower sales volume than product C are no longer displayed.
If you want to create a ranked list of the products with the lowest sales volume for which the combined sales total a certain amount, use the Bottom Total operator.
424 PUBLICSAP BW/4HANA
Analysis

Related Information
Using Conditions [page 425]Enhanced Basics and Example Scenarios for Conditions [page 448]How Conditions Interact with Hierarchies [page 472]Using Conditions [page 474]Background Information on Conditions [page 475]Defining Conditions [page 789]
5.2.1.1 Using Conditions
This section provides a guide to using conditions, together with a number of example scenarios.
Overview
Note that the system processes conditions according to the following rules:
● Rule 1: By applying conditions to a query, you do not change any numbers. You merely hide numbers that are not relevant for you. This means that conditions do not have any effect on results rows. The results row of a query with an active condition is the same as the results row of the query without a condition.
● Rule 2: Multiple conditions in a query are logically lined with AND. The conditions are evaluated independently of each other. The result set is therefore independent of the evaluation sequence. The intersection of conditions is displayed in the query. A characteristic value is only displayed if it meets all (active) conditions in the query.
● Rule 3: The condition rows for a condition are logically linked with OR. The union of conditions row results is displayed in the query. A characteristic value is displayed if it meets at least one of the condition rows.
● Rule 4: The All Characteristics in Drilldown Independent setting means that each characteristic of the drilldown has a condition (identical) defined for it These conditions are linked with AND in accordance with rule 2. The All Characteristics in Drilldown Independent setting enables you to be able to use a condition in a general way. This is especially useful for threshold value conditions with relative key figures and ranked list conditions.
● Rule 5: If condition For All Characteristics in Drilldown Independent is active in a query, and results row suppression is active for certain characteristics, the system still generates all results and applies the condition(s) to each of these results levels according to rule 4.
● Rule 6: With several characteristics, the Single Characteristics and Characteristic Combinations setting always stands for the combination of these characteristics rather than for a set of (independent) characteristics. A condition on a combination of characteristics is only applied if the following prerequisites are met:○ Both characteristics are in the drilldown.○ Both characteristics are on the same axis.○ The two characteristics are immediately next to one another.○ The axis that the two characteristics are drilled down on has no hierarchical display.○ If one of the two characteristics has an active presentation hierarchy, only one threshold condition can
be applied for the characteristic combinations, but not a ranked list condition.
SAP BW/4HANAAnalysis PUBLIC 425

The system attempts to adapt the list display to these prerequisites by automatically activating results row suppression.
● Rule 7: Ranked list conditions cannot be applied to characteristics with active presentation hierarchies.● Rule 8: In a cross-classified table, where characteristics are contained both in the rows and in the columns,
conditions are only applied to the axes. The axes span across the border of the matrix, and all cells are displayed for which both the rows and the columns meet the active conditions.
● Rule 9: If there are several characteristics in the drilldown, and a results row on this multi-level drilldown list does not meet the conditions and is then filtered out, all of the associated detail rows and detailed (interim) results rows disappear.
● Rule 10: If a threshold value condition is applied to a characteristic with an active presentation hierarchy, a node that does not meet the condition and would normally be filtered out is shown despite this if at least one of the subordinate nodes in the drilldown meets the condition.The same applies for:○ Conditions on characteristic combinations if the (interim) results rows are being displayed○ Conditions on hierarchically displayed axes
Related Information
Ranked List Condition: Top 5 Products [page 427]Joining Two Conditions: Bottom 2 Revenue and Invoiced Quantity > 100,000,000 [page 428]Ranked List Condition with 2 Condition Rows: Top 2 Products and Bottom 2 Products [page 429]Ranked List Condition for All Characteristics in Drilldown Independent: Top 3 Products and Top 3 Sales Channels [page 430]Query with Condition and Results Row Suppression [page 432]Ranked List Condition for Characteristic Combination: Top 10 Combinations from Product and Sales Channel [page 438]Threshold Condition for a Characteristic in a Cross-Classified Table [page 440]Condition for All Characteristics in Drilldown Independent [page 441]Enhanced Basics and Example Scenarios for Conditions [page 448]
426 PUBLICSAP BW/4HANA
Analysis

5.2.1.1.1 Ranked List Condition: Top 5 Products
You have the following sample query:
You now only want to see the five products with the highest revenue. Define the following condition:
1. When you are defining the condition, choose All Characteristics in Drilldown Independent, under Characteristic Assignment.
2. Enter the following condition row:Choose the key figure Net Revenue, the operator Top N and enter 5 as the value.
The query now displays the five products with the highest revenue:
Rule 1: No Influence on Results Rows
SAP BW/4HANAAnalysis PUBLIC 427

Note here that the overall result is not the sum of the Top 5 products. This is because, by default, the total is calculated without taking the conditions into account.
If you apply conditions to a query, you are not changing any numbers. Instead, you are just hiding the numbers that are not relevant for you. Conditions have no effect on the displayed values of the results rows. The results row of a query with an active condition always corresponds to the results row of the query without a condition.
If you want to have the overall result to represent the sum of the Top 5 products, you need to use the function Calculate Results as Summation:
In the context menu, choose Calculate Results as Summation.For more information, seeCalculate Results As....
Top 5 products with local calculation of the results row as a sum:
5.2.1.1.2 Joining Two Conditions: Bottom 2 Revenue and Invoiced Quantity > 100,000,000
You want to identify the two products which may well be sold in large unit quantities but whose total revenue is small. In other words, both conditions should apply.
Define the following conditions:
● Bottom 2 revenue:1. When you are defining the condition, choose All Characteristics in Drilldown Independent under
Characteristic Assignment.2. Enter the following condition row: Choose the key figure Net Revenue, the operator Bottom N, and
enter 2 as the value.● Invoiced quantity is larger than one million:
1. When you are defining the condition, choose All Characteristics in Drilldown Independent under Characteristic Assignment.
2. Enter the following condition row: Choose the key figure Invoiced Quantity, the operator Greater than and enter 100,000,000 as the value.
428 PUBLICSAP BW/4HANA
Analysis

The query displays the product Post-It Set that meets the two conditions: It has a high quantity of units sold (> 100,000,000), but only provides a small total revenue:
Rule 2: Joining Multiple Conditions
Multiple conditions in a query are joined logically with AND if the conditions are active and applicable. For each condition, there is a set of matching records. In the case of multiple conditions, these quantities are intersected.
A characteristic value is only displayed if it meets all the conditions.
5.2.1.1.3 Ranked List Condition with 2 Condition Rows: Top 2 Products and Bottom 2 Products
You want to display the two products with the least revenue and the two products with the most revenue.
Define the following condition:
1. When you define the condition, choose All Characteristics in Drilldown Independent under Characteristic Assignment.
2. Enter the following condition rows:○ Choose the key figure Net Revenue, the operator Top N, and enter 2 as the value.○ Choose the key figure Net Revenue, the operator Bottom N, and enter 2 as the value.
The query now displays the two products with the most revenue and the two with the least:
Rule 3: Linking Multiple Condition Rows
The individual components of a condition, the condition rows are logically linked with OR. A characteristic value is displayed if it fulfills at least one of the condition rows.
SAP BW/4HANAAnalysis PUBLIC 429

In this case, you can see the union of the two condition lines, the two products with the greatest revenue and the two with the lowest revenue.
5.2.1.1.4 Ranked List Condition for All Characteristics in Drilldown Independent: Top 3 Products and Top 3 Sales Channels
You want to see a query in which the top 3 net revenue generating products are displayed. You also want to see the top 3 sales channels for these products.
Define the following condition:
1. When you are defining the condition, choose All Characteristics in Drilldown Independent, under Characteristic Assignment.
2. Enter the following condition row:Choose the key figure Net Revenue, the operator Top N and enter 3 as the value.
In the query, put the characteristics Product and Sales Channel into the drilldown. The query now displays the top 3 products and the associated top 3 sales channels:
430 PUBLICSAP BW/4HANA
Analysis

NoteThe sum in the overall result is calculated locally using the function Calculate Results as Sum in the above example.
In this case, the system first determines the top 3 products and then the top 3 sales channels for each of the three products. In total, in addition to the three results rows and the overall results row, nine rows are displayed.
You now want to see the Top 3 sales channels with which you have had the largest net revenue and the top 3 products for each one.
In the context menu, choose the function Exchange Sales Channel with Product. The required query view then appears:
Note
NoteThe sum in the overall result is calculated locally using the function Calculate Results as Sum in the above example.
First the system determines the top 3 sales channels, and for each of these three sales channels, it determines the top three products.
SAP BW/4HANAAnalysis PUBLIC 431

You can use the same condition for both queries as the condition is defined independently for all characteristics in the drilldown.
Rule 4: Setting All Characteristics in Drilldown Independent
The setting All Characteristics in Drilldown Independent means that each characteristic of the drilldown has a condition (identical) defined for it These conditions are linked with AND according to rule 2 (linking of multiple conditions).
A condition that is independently defined for all characteristics in the drilldown can be used everywhere. It generates different results for different queries.
The definition of the condition with the setting All Characteristics in Drilldown Independent returns the same result as the definition of conditions for each separate characteristic.In this example, you can also define one condition for Sales Channel and one for Product to answer the same query.
● You could define the following condition for Sales Channel:1. When you are defining the condition, choose Single Characteristics and Characteristic Combinations,
under Characteristic Assignment.2. Select the Sales Channel characteristic.3. Enter the following condition row:
Choose the key figure Net Revenue, the operator Top N and enter 3 as the value.● You could define the following condition for Product:
1. When you are defining the condition, choose Single Characteristics and Characteristic Combinations, under Characteristic Assignment.
2. Select the Product characteristic.3. Enter the following condition row:
Choose the key figure Net Revenue, the operator Top N and enter 3 as the value.
In the query, you need to actively set both conditions to get the same results as displayed above.
The setting All Characteristics in Drilldown Independent is more efficient in this case and allows you to easily use the condition in a very general way.In this example, you do not need to define a condition for each characteristic to make the condition apply to all characteristics individually.
5.2.1.1.5 Query with Condition and Results Row Suppression
In queries that have a condition that is active for a characteristic, and at the same time, the property Suppress Results Row is active for another characteristic, the result will generally be an incomprehensible output list.
432 PUBLICSAP BW/4HANA
Analysis

You have the following example query in which you are analyzing the net revenue 2001 of your products in relation to your customers:
Activate the property Suppress Results Rows for the Product characteristic. For more information, seeProperties of the Characteristic.
SAP BW/4HANAAnalysis PUBLIC 433

The results rows are hidden:
CautionNote that a scaling factor of 1000 is being used in this example query. The values in the condition definition refer to the actual values because the scaling factor is not considered in the evaluation of the condition. In the query, the values are displayed with a scaling factor of 1000. For more information, seeBackground Information on Conditions [page 475].
Now you are interested in every customer that has a net revenue of more than $350,000. Define the following condition:
1. When you are defining the condition, choose Single Characteristics and Characteristic Combinations, under Characteristic Assignment.
2. Select the Customer characteristic.3. Enter the following conditioning row:
Choose the structure Net Revenue 2001, the operator greater than and enter 350,000 as the value.
434 PUBLICSAP BW/4HANA
Analysis

You will see the following output list:
The output is incomprehensible because the condition refers to the Customer characteristic and the values that the system evaluates in relation to the condition are the values in the results row in this drilldown. Because you activated the property Suppress Results Rows at the same time, it is not clear how this output list is created.
If you deactivate the property Suppress Results Rows in the properties of the Product characteristic, you get the following output list:
Here you see the connection and the reason why the values for the Dawson Agency customer are being displayed. The condition refers to the Customer characteristic and the results row shows that only this customer fulfills the condition.
In extreme cases, the simultaneous use of a condition and results row suppression in a query can lead to incomprehensible results. If you define the condition for All Characteristics in Drilldown Independent for this query now, the system will find no data and you will get an error message.
You have the query displayed above. Now, activate the property Suppress Results Rows for the Product characteristic and the Customer characteristic.
SAP BW/4HANAAnalysis PUBLIC 435

You will see the following output list:
Define the following condition:
1. When you are defining the condition, choose All Characteristics in Drilldown Independent, under Characteristic Assignment.
2. Enter the following conditioning row:Choose the structure Net Revenue 2001, the operator greater than and enter 350,000 as the value.
You get an error message saying that the system found no data. The system cannot find any data in this case because you defined the condition for all characteristics in the drilldown independently.
Rule 5: Condition for all characteristics in the drilldown independent and results row suppression
If a condition For All Characteristics in Drilldown Independent is active in a query and results row suppression is active for some characteristics, the system still generates all results and applies the condition(s) to each of these results levels according to rule 4(setting All Characteristics in Drilldown Independent) .
436 PUBLICSAP BW/4HANA
Analysis

If you deactivate the results row suppression on Product and Customer and also deactivate the condition, then you will get the query displayed above, which looks like this:
The results row, which refers to the customer Dawson Agency Inc., fulfills the condition. The values for Dawson Agency Inc., however, are not displayed, because the condition for All Characteristics in Drilldown Independent
SAP BW/4HANAAnalysis PUBLIC 437

has been defined. The system applies the condition to the Product characteristic. If you now choose Swap Customer with Product in the context menu, you will get the following output list:
Here you see that none of the results rows fulfill the condition. All products have a net revenue that is less than $350,000.
In this case, the system considers both results levels in the setting All Characteristics in Drilldown Independent. For the Customer characteristic, a characteristic value passed the test for the condition, that is, Dawson Agency Inc. For the Product characteristic, however, none of the characteristic values passes the test. The system does not find any applicable data and relays an error message.
5.2.1.1.6 Ranked List Condition for Characteristic Combination: Top 10 Combinations from Product and Sales Channel
You only want to see the ten combinations that generate the most revenue from all possible product/sales channel combinations.
438 PUBLICSAP BW/4HANA
Analysis

Define the following condition:
1. When you are defining the condition, choose Single Characteristics and Characteristic Combinations, under Characteristic Assignment.
2. Select both Sales Channel and Product characteristics.3. Enter the following condition row:
Choose the key figure Net Revenue, the operator Top N and enter 10 as the value.
The query now displays the ten product/sales channel combinations that generate the most revenue:
In this case, you are only interested in the combination of Product/Sales Channel. Thus, you need to store this accordingly in the definition of the condition. The evaluation of the condition is only performed in this case, if the following prerequisites are fulfilled:
● Both characteristics are in the drilldown● Both characteristics are on the same axis.● The two characteristics are next to one another.● There are no active presentation hierarchies for these characteristics● The axis upon which the two characteristics are drilled down has no hierarchical display (seeWorking with
Hierarchies in the section Displaying as Hierarchy)
Differentiation of the settings All Characteristics in Drilldown Independently and Single Characteristics and Characteristic Combinations:
The two settings all Characteristics in Drilldown Independent and Single Characteristics and Characteristic Combinations are NOT identical, even if all characteristics are in the drilldown.
Rule 6: Condition on Characteristic Combinations
With several characteristics, the setting Single Characteristics and Characteristic Combinations always stands for the combination of these characteristics and not for a set of (independent) characteristics. Characteristic
SAP BW/4HANAAnalysis PUBLIC 439

combinations behave as if the characteristics involved were combined into a single characteristic. Also seeBackground Information on Conditions [page 475] under Conditions for Characteristic Combinations.
You can use the setting Single Characteristics and Characteristic Combinations to create a separate condition for each individual characteristic in the drilldown. This corresponds to the setting all characteristics in drilldown independent. SeeRanked List Condition for All Characteristics in Drilldown Independent: Top 3 Products and Top 3 Sales Channels [page 430].
5.2.1.1.7 Threshold Condition for a Characteristic in a Cross-Classified Table
You have the following example query in which you are analyzing the net revenue of your products in relation to your customers:
The Product characteristic is located in the rows and the Customer characteristic and the key figure Net Revenue 2001 are located in the columns.
The query looks like this:
CautionNote that a scaling factor of 1000 is used in this example query. The values in the condition definition refer to the actual values because the scaling factor is not considered in the evaluation of the condition. In the query, the values are displayed with a scaling factor of 1000. For more information, seeBackground Information on Conditions [page 475].
Now you want to see each product that has a net revenue of more than $240,000. Define the following condition:
1. When you are defining the condition, choose Single Characteristics and Characteristic Combinations, under Characteristic Assignment.
2. Select the Product characteristic.3. Enter the following condition row:
Choose the structure Net Revenue 2001, the operator Greater Than and enter 240,000 as the value.
In the query, you see each product that has a net revenue of more than $240,000.
440 PUBLICSAP BW/4HANA
Analysis

The system proceeds as follows:
At first, the condition is only applied to the results rows, that is the borders of the matrix. Then the single values within the borders are filled.
The two products Business Card Case and Coffee Mug do not fulfill the condition, which means that these rows are hidden.
Rule 8: Conditions in Cross-Classified Tables
In a cross-classified table, which means that characteristics are not only in the rows, but also in the columns, conditions are only applied to the axes. The axes span across the border of the matrix and all cells are displayed for which both the rows and the columns correspond to the active conditions.
5.2.1.1.8 Condition for All Characteristics in Drilldown Independent
If there are multiple characteristics in the drilldown of a query, the threshold value conditions with absolute values for all characteristics in drilldown independent is not useful in most cases. The setting All Characteristics in Drilldown Independent is especially intended for threshold conditions with relative key figures. This setting is also suitable for ranked list conditions.
In general, the setting All Characteristics in Drilldown Independent is intended for queries with only one characteristic in the drilldown, in which you can switch the characteristics, and can use one single condition to answer various questions regarding Top 3 Customers and Top 3 Products.
SAP BW/4HANAAnalysis PUBLIC 441

You have the following example query in which you are analyzing the net revenue of your products in relation to your customers:
442 PUBLICSAP BW/4HANA
Analysis

CautionNote that a scaling factor of 1000 is being used in this example query. The values in the condition definition refer to the actual values because the scaling factor is not considered in the evaluation of the condition. In the query, the values are displayed with a scaling factor of 1000. For more information, seeBackground Information on Conditions [page 475].
Threshold Condition for All Characteristics in Drilldown Independent: Net Revenue > $ 60,000
Now you want to see all customers and the associated products that have net revenues of more than $60,000. Define the following condition:
1. When you are defining the condition, choose All Characteristics in Drilldown Independent, under Characteristic Assignment.
2. Enter the following conditioning row:Choose the key figure Net Revenue, the operator greater than and enter 60,000 as the value.
In the query, you see only those customers and products that have net revenues of more than $60,000.
SAP BW/4HANAAnalysis PUBLIC 443

444 PUBLICSAP BW/4HANA
Analysis

The system proceeds as follows:
First the system checks the individual results. If the condition does not apply, the entire block of results and the associated single values are hidden. If the condition applies, the result is displayed and the system checks the single values. If a single value passes the test, it is displayed. If a single value does not pass the test, it is hidden.
For example, if a single value fits the condition and passes the test, but the associated result does not, then the single value that does fulfill the condition is not displayed. This often-unexpected behavior can result when another single value in this block is a negative value.
Rule 9: Procedure for Condition Checks with Multiple Characteristics in the Drilldown
If there are several characteristics in the drilldown and if a results row on this multi-level drilldown list does not fulfill the conditions and is then filtered out, then all of the associated detail rows and detailed (interim) results rows disappear.
NoteIf you evaluate single values, we recommend that you not define the condition for all characteristics in the drilldown independently. Instead use the setting Single Characteristics and Characteristic Combinations when defining the condition and select the desired characteristic. Note that with a drilldown with multiple characteristics, the characteristic to be evaluated (in the example above, this would be the characteristic Product for the single values) must be the characteristic on the far right side.
If there are multiple characteristics in the drilldown of a query, threshold value conditions with absolute values for all characteristics in the drilldown independent are unsuitable in most cases because the counted values of the single values are on a different scale from the counted values of the results. In the example above, the single values have an average of about $ 80,000, while the results have an average of about $ 300,000. In the following example with a threshold condition on relative values, you see that the counted values for the single values and the counted values for the results are similar. A threshold condition can be quite useful in this case.
Threshold Condition for All Characteristics in Drilldown Independent: Variance Net Revenue 2000/2001 > 5%
SAP BW/4HANAAnalysis PUBLIC 445

You have the following example query, in which you are analyzing the net revenue from 2001 for your products in relation to your customers and include the percentage variance of the net revenue for 2001 compared with 2000:
Now you want to see each row that has a variance of more than five percent, so you define the following condition:
1. When you are defining the condition, choose All Characteristics in Drilldown Independent, under Characteristic Assignment.
2. Enter the following conditioning row:Choose the key figure % Variance to 2000, the operator greater than and enter 5 as the value.
446 PUBLICSAP BW/4HANA
Analysis

In the query, you only see the customer Acadia Transfer Inc, along with the associated products:
NoteThe system proceeds as described above. The product Candy Tin for the customer Dawson Agency Inc also has a variance that is larger than five percent (5.09720 %). However, this row is not displayed because the result is below five percent (0.31765 %) and the system hides the entire block and the does not evaluate the associated single values.
Ranked List Condition for All Characteristics in Drilldown Independent: Top 2 Customers and Top 2 Products
You want to see the two customers with the most revenue and the two products with the most revenue. Define the following condition:
1. When you are defining the condition, choose All Characteristics in Drilldown Independent, under Characteristic Assignment.
2. Enter the following conditioning row:Choose the key figure Net Revenue, the operator Top N and enter 2 as the value.
In the query, you see both the two customers with the highest revenue and the associated two products with the highest revenue.
SAP BW/4HANAAnalysis PUBLIC 447

The setting All Characteristics in Drilldown Independent can be applied universally to a query with multiple characteristics in the drilldown and to a ranked list condition. For example, if you choose Switch Product with Customer in the context menu, you will see the products with the highest revenue and the two associated customers with the highest revenue. Depending on the drilldown status, the system shows different information and answers different questions. SeeRanked List Condition for All Characteristics in Drilldown Independent: Top 3 Products and Top 3 Sales Channels [page 430].
The setting All Characteristics in Drilldown Independent is especially suitable for drilldown switching. If you only drilldown one characteristic in the query and have a ranked list condition Top 5, for example, you can switch the characteristics and then evaluate the Top 5 Products, then the Top 5 Customers or the Top 5 Sales Channels and so on, using only one condition.
5.2.1.2 Enhanced Basics and Example Scenarios for Conditions
In this section, we will explain enhanced basics for using conditions in connection with two structures, active presentation hierarchies and hierarchically displayed axes, illustrated with example scenarios.
Scope
Take note of the following when using conditions if you are using two structures, active presentation hierarchies, the function Display as Hierarchy on Axes or the property Suppress Results Rows in a query:
● In queries with two structures, you can also apply the conditions the same way you do with queries with one structure: The structural components of both structures are available for selection in the definition.
● Ranked list conditions are not possible in queries with active display hierarchies (= rule 7). Threshold conditions for single characteristics and characteristic combinations are possible, however.
448 PUBLICSAP BW/4HANA
Analysis

● Ranked list conditions and threshold value conditions are possible in queries with a hierarchically displayed axis, but only when the hierarchical display is expanded up to the specific characteristic. Conditions for characteristic combinations in a query with a hierarchically displayed axis are not possible.
Overview
The following table shows which types of conditions are possible in the various queries and what you need to watch for, for example, when you use active presentation hierarchies in the query.
Special Features and Applicability of Conditions
Type of Condition Hierarchy Threshold Value Conditions Ranked Lists Conditions
Condition for single characteristic
Without display hierarchy Possible Possible
With display hierarchy Possible Not applicable
Axis displayed hierarchically Possible as long as the hierarchical display is expanded up to this characteristic.
Possible as long as the hierarchical display is expanded up to this characteristic.
Condition for all characteristics in drilldown independent
Characteristics on an axis Possible Possible as long as the characteristics do not have a display hierarchy
Characteristics on both axes (cross-classified table)
Possible Possible as long as the characteristics do not have a display hierarchy
Axis displayed hierarchically Possible and is applied up to the last characteristic in the expanded hierarchy.
Possible and is applied up to the last characteristic in the expanded hierarchy.
Condition for characteristic combination
All involved characteristics next to one another on an axis
Possible Possible as long as the characteristics do not have a display hierarchy
Involved characteristics separate and not on one axis
Not applicable Not applicable
Axis displayed hierarchically Possible as long as the hierarchical display is expanded up to the characteristic that is part of the characteristic combination.
Not applicable
SAP BW/4HANAAnalysis PUBLIC 449

Related Information
Query with Two Structures and Threshold Value Conditions: And/Or Linking [page 450]Query with Two Structures and Ranked-List Conditions [page 453]Query with a Presentation Hierarchy and Conditions [page 456]Query with Two Presentation Hierarchies and Conditions [page 460]Query with Hierarchically Displayed Axis and Conditions [page 466]Using Conditions [page 425]
5.2.1.2.1 Query with Two Structures and Threshold Value Conditions: And/Or Linking
You have defined a query with two structures and now you want to apply conditions with threshold values to it.
You analyze the net revenue for the product Mousepad in relation to the sales channels Fax, Internet and Telephone for the calendar year 2003.
CautionNote that a scaling factor of 1000 is used in this example query. The values in the condition definition refer to the actual values because the scaling factor is not considered in the evaluation of the condition. In the query, the values are displayed with a scaling factor of 1000. For more information, seeBackground Information on Conditions [page 475].
Both Structures of the Query Are Located on the Same Axis, for Example in the Columns:
The Calendar Year/Month characteristic is located in the rows. The following can be found in the columns:
● Structure 1 with the restricted characteristics Fax and Mousepad, Internet and Mousepad and Telephone and Mousepad.
● Structure 2 with the key figure Net Revenue.
Condition: Net Revenue > $ 4,250,000 for Internet and Mousepad
Now you want a query that only shows you the net revenue of the product Mousepad that is greater than $4,250,000 where the product Mousepad was sold over the Internet.
Define the following condition:
1. When you are defining the condition, choose All Characteristics in Drilldown Independent, under Characteristic Assignment.
2. Enter the following condition row:Choose the key figure Net Revenue, the structure Internet and Mousepad, the operator greater than and enter 4,250,000 as the value.
All of the rows with a net revenue that is less than $4,250,000 for Internet and Mousepad are hidden in the query.
450 PUBLICSAP BW/4HANA
Analysis

Condition with Two Condition Rows: Net Revenue > $ 4,250,000 for Internet and Mousepad or Net Revenue < $ 4,800,000 for Telephone and Mousepad
Now you want a query that shows you the net revenue of the product Mousepad, through the sales channel Internet, that is greater than $4,250,000. Also, the query must show the net revenue for Mousepad through the sales channel Telephone that is less than $4,800,000.
Define the following condition:
1. Upon defining the condition, choose All Characteristics in Drilldown Independent, under Characteristic Assignment.
2. Enter the following condition rows:○ Choose the key figure Net Revenue, the structure Internet and Mousepad, the operator Greater Than
and enter 4,250,000 as the value.○ Choose the key figure Net Revenue, the structure Internet and Mousepad, the operator Less Than and
enter 4,800,000 as the value.
SAP BW/4HANAAnalysis PUBLIC 451

The values that are shown in the query fulfill at least one of the two condition rows:
For example, the row for 08.2003 is displayed although the value of the net revenue for the sales channel telephone exceeds $ 4,800,000. But, because the condition row for the sales channel Internet (revenue > $ 4,250,000) applies, it is displayed in the query.
The condition rows are linked logically with OR and the system displays the union of the condition rows.
Two Conditions: Net Revenue > $ 4,250,000 for Internet and Mousepad and Net Revenue < $ 4,800,000 for Telephone and Mousepad
Now you want a query that includes two conditions: On the one hand, you only want to see the net revenue of the product Mousepad through the sales channel Internet that is greater than $4,250,000. On the other hand, you only want to see the net revenue for Mousepad through the sales channel Telephone that is less than $4,800,000.
Define the following conditions:
● Net revenue > $ 4,250,000 for Internet and mousepad: see above● Net revenue < $ 4,800,000 for telephone and mousepad.
1. Upon defining the condition, choose All Characteristics in Drilldown Independent, under Characteristic Assignment.
2. Enter the following condition row:Choose the key figure Net Revenue, the structure Internet and Mousepad, the operator Less Than and enter 4,800,000 as the value.
452 PUBLICSAP BW/4HANA
Analysis

The values that are shown in the query fulfill both conditions:
Only the values for the months of April and December 2003 fulfill both conditions.
Multiple Conditions in a query are linked logically with AND if the conditions are active and applicable. The system shows the intersection of the two conditions.
Both Structures of the Query Are Distributed on Both Axes. One Structure Is Located in the Columns and the Other Structure Is in the Rows.
Structure 1 with the restricted characteristics Fax and Mousepad, Internet and Mousepad and Telephone and Mousepad is located in column 1. The following can be found in the rows:
● the characteristic Calendar Year/Month● Structure 2 with the key figure Net Revenue.
If you now apply the two conditions, Net Revenue > $ 4,250,000 for Internet and Mousepad and Net Revenue < $ 4,800,000 for Telephone and Mousepad, to the query, you get the same result as in the example above, except that the layout is different.
NoteThreshold conditions do not differ in their applicability in queries with two structures from those in queries with one structure.
5.2.1.2.2 Query with Two Structures and Ranked-List Conditions
You have defined a query with two structures and now you want to apply conditions with ranked lists to it.
You analyze the net revenue for the product Mousepad in relation to the distribution channels Fax, Internet and Telephone for the calendar year 2003.
SAP BW/4HANAAnalysis PUBLIC 453

The Calendar Year/Month characteristic is located in the rows. The following can be found in the columns:
● Structure 1 with the restricted characteristics Fax and Mousepad, Internet and Mousepad and Telephone and Mousepad.
● Structure 2 with the key figure Net Revenue.
All Characteristics in Drilldown Independent
Condition: Top 4 for Internet and Mousepad
You want a query that shows you the four months with the highest revenue in regard to sales of the product Mousepad over the Internet.
Define the following condition:
1. When you are defining the condition, choose All Characteristics in Drilldown Independent, under Characteristic Assignment.
2. Enter the following condition row:Choose the key figure Net Revenue, the structure Internet and Mousepad, the operator Top N and enter 4 as the value.
In the query, you only see the rows with the four months with the highest revenue for Internet and Mousepad.
454 PUBLICSAP BW/4HANA
Analysis

Characteristic Combination
Now you want to determine net revenue by customer and so, in addition to the Calendar Year/Month characteristic, you include the Customer characteristic to the lines of the query.
Condition: Top 3 Combinations of Calendar Year/Month and Customer
You would like a query that shows you the three customer/month combinations that have the highest revenue out of all of the possible combinations of the two.
Define the following condition:
1. When you are defining the condition, choose Single Characteristics and Characteristic Combinations, under Characteristic Assignment.
2. Select the characteristics CalYear/Month and Customer.3. Enter the following condition row:
Choose the key figure Net Revenue, the structure Internet and Mousepad, the operator Top N and enter 3 as the value.
In the query, you see only the three customer/month combinations with the highest revenue for sales over the Internet:
NoteRanked list conditions are equally applicable to queries with two structures to those with one structure.
SAP BW/4HANAAnalysis PUBLIC 455

5.2.1.2.3 Query with a Presentation Hierarchy and Conditions
You analyze the net revenue for your products in relation to your customers.
You have defined the following query:
Both the Customer and the Product characteristics are located in the rows and the columns contain the key figure Net Revenue. You are also using an active presentation hierarchy for the Customer characteristic.
CautionNote that a scaling factor of 1000 is used in this example query. The values in the condition definition refer to the actual values because the scaling factor is not considered in the evaluation of the condition. In the query, the values are displayed with a scaling factor of 1000. For more information, seeBackground Information on Conditions [page 475].
456 PUBLICSAP BW/4HANA
Analysis

The query looks like this:
SAP BW/4HANAAnalysis PUBLIC 457

Threshold Condition for the Customer Characteristic
Now you want to see each customer that has a net revenue of more than $350,000. Define the following condition:
1. When you are defining the condition, choose Single Characteristics and Characteristic Combinations, under Characteristic Assignment.
2. Select the Customer characteristic.3. Enter the following condition row:
Choose the structure Net Revenue, the operator Greater Than and enter 350,000 as the value.
In the query, you see the customer Dawson Agency Inc and the nodes Regular Customers and Non-Assigned.Customers, each of which has a net revenue of greater than $350,000.
For example, if the node Non-Assigned Customers does not fulfill the condition due to the inclusion of negative single values, it will still be displayed. This is necessary, because otherwise the customer Dawson Agency Inc. could not be classified. As a result, the system ensures that the business context for the end user of the query remains visible after a condition has been applied.
Rule 10: Display of Hierarchy Nodes
If a threshold value condition is applied to a characteristic with an active presentation hierarchy, a node that does not actually fulfill the condition and would normally be filtered out is shown anyway, if at least one of the subordinate nodes fulfills the condition.
Threshold Condition for Characteristic Combination Customer/Product
458 PUBLICSAP BW/4HANA
Analysis

Now you only want to see all customer/product combinations that have a net revenue of more than $100,000.
Define the following condition:
1. When you are defining the condition, choose Single Characteristics and Characteristic Combinations, under Characteristic Assignment.
2. Select both Customer and Product characteristics.3. Enter the following condition row:
Choose the structure Net Revenue, the operator Greater Than and enter 100,000 as the value.
In the query. you only see combinations of Product and Customer that have a net revenue of more than $100,000. Here the condition refers to the characteristic combination. All values for the net revenue are greater than $100,000. Only products and customers are displayed that fulfill the condition.
The system proceeds as follows:
First the condition is checked for the innermost characteristic with the singe values and then the superordinate values.
Ranked List Conditions
For example, if you want to see the five customers with the highest revenues on this query with the active presentation hierarchy and you defined a ranked list condition for it, the system will return a Not Applicable status description.
Rule 7: Ranked Lists on Characteristics with Active Presentation Hierarchy Not Possible.
SAP BW/4HANAAnalysis PUBLIC 459

See also:
Using Conditions [page 474]
5.2.1.2.4 Query with Two Presentation Hierarchies and Conditions
You analyze the net revenue for your products in relation to your customers.
You have defined the following query:
Both the Customer and the Product characteristics are located in the rows and the columns contain the key figure Net Revenue. You are also using active presentation hierarchies on both characteristics.
CautionNote that a scaling factor of 1000 is being used in this example query. The values in the condition definition refer to the actual values because the scaling factor is not considered in the evaluation of the condition. In the query, the values are displayed with a scaling factor of 1000. For more information, seeBackground Information on Conditions [page 475].
460 PUBLICSAP BW/4HANA
Analysis

The query looks like this:
SAP BW/4HANAAnalysis PUBLIC 461

Threshold Condition for the Customer Characteristic
Now you want to see each customer that has a net revenue of more than $350,000. Define the following condition:
1. When you are defining the condition, choose Single Characteristics and Characteristic Combinations, under Characteristic Assignment.
2. Select the Customer characteristic.3. Enter the following condition row:
Choose the structure Net Revenue, the operator greater than and enter 350,000 as the value.
In the query, you see the customer Dawson Agency Inc and the nodes Regular Customers and Non-Assigned.Customers, each of which has a net revenue of greater than $350,000.
462 PUBLICSAP BW/4HANA
Analysis

For example, if the node Non-Assigned Customers does not fit the condition due to the inclusion of negative single values, it will still be displayed. This is necessary, because otherwise the customer Dawson Agency Inc.
SAP BW/4HANAAnalysis PUBLIC 463

could not be classified. As a result, the system ensures that the business context of the query remains visible after a condition has been applied.
Rule 10: Display of Hierarchy Nodes
If a threshold value condition is applied to a characteristic with an active presentation hierarchy, then a node that actually does not fulfill the condition and would normally be filtered out is shown anyway if at least one of the subordinate nodes fulfills the condition.
If you drilldown the Product characteristic in the columns now, then the query will appear as follows:
Threshold Condition for Characteristic Combination Customer/Product
Now you only want to see all customer/product combinations that have a net revenue of more than $100,000.
Define the following condition:
1. When you are defining the condition, choose Single Characteristics and Characteristic Combinations, under Characteristic Assignment.
2. Select both Customer and Product characteristics.3. Enter the following condition row:
Choose the structure Net Revenue, the operator greater than and enter 100,000 as the value.
In the query, you only see combinations of Product and Customer that have a net revenue of more than $100,000. The condition here refers to the characteristic combination. All values for the net revenue are greater than $100,000. Only products and customers are displayed that fit the condition.
464 PUBLICSAP BW/4HANA
Analysis

SAP BW/4HANAAnalysis PUBLIC 465

The system proceeds as follows:
First the condition is checked for the innermost characteristic with the singe values and then the superordinate values.
Ranked List Conditions
For example, if you want to see the five customers with the highest revenues on this query with both active presentation hierarchies and you defined a ranked list condition for it, you will get a not applicable status description from the system.
Rule 7: Ranked Lists on Characteristics with Active Presentation Hierarchy Not Possible.
See also:
Using Conditions [page 474]
5.2.1.2.5 Query with Hierarchically Displayed Axis and Conditions
You analyze the net revenue for your products in relation to your customers.
You have defined the following query:
Both the Customer and Product characteristics are located in the rows and the columns contain the Net Revenue key figure. In the properties of the rows, you have activated the Display As Hierarchy function so that this axis is displayed hierarchically.
CautionNote that a scaling factor of 1000 is used in this example query. The values in the condition definition refer to the actual values because the scaling factor is not considered in the evaluation of the condition. In the query, the values are displayed with a scaling factor of 1000. For more information, seeBackground Information on Conditions [page 475].
466 PUBLICSAP BW/4HANA
Analysis

The query looks like this:
Threshold Value Condition for the Customer Characteristic
Now you only want to see those customers with a net revenue greater than $350,000. Define the following condition:
1. When you are defining the condition, choose Single Characteristics and Characteristic Combinations underCharacteristic Assignment.
2. Select the Customer characteristic.3. Enter the following condition row:
Select the Net Revenuestructure and the greater thanoperator and enter 350,000 as the value.
In the query, you only see customer Dawson Agency Inc with a net revenue greater than $350,000.
SAP BW/4HANAAnalysis PUBLIC 467

Ranked List Condition for the Customer Characteristic
You want to see the three customers with the highest revenues. Define the following condition:
1. When you are defining the condition, choose Single Characteristics and Characteristic Combinations underCharacteristic Assignment.
2. Select the Customer characteristic.3. Enter the following condition row:
Choose the Net Revenuestructure and the Top Noperator and enter 3 as the value.
468 PUBLICSAP BW/4HANA
Analysis

You see the three customers with the highest revenues in the query:
The threshold value condition and the ranked list condition in the examples above each refer to the Customer characteristic. In queries with a hierarchically displayed axis, threshold value and ranked list conditions are always possible up to the characteristic to which you have expanded the hierarchical display. In the examples above, the Customercharacteristic is the outermost characteristic, so the condition has an effect. For example, if you now define a condition for the Product characteristic, you have to set Expand to <Product> in the context menu of the associated axis (in this case, the rows) in the Query Designer. You can also make this setting on the Web during runtime. In the context menu of the Web application, choose Data Provider Propertiesand make the appropriate setting under Formatting of Data(more information:Data Provider Properties).
Also note that it is not enough to manually expand the appropriate nodes during runtime. The drilldown level must be set using the Expand tofunction so that the condition can be applied.
Ranked List Condition for the Product Characteristic
You want to see the two products with the highest revenues. In the context menu of the rows in the Query Designer, choose Expand to Productand define the following condition:
1. When you are defining the condition, choose Single Characteristics and Characteristic Combinations underCharacteristic Assignment.
2. Select the Product characteristic.3. Enter the following condition row:
Choose the Net Revenuestructure and the Top Noperator and enter 2 as the value.
SAP BW/4HANAAnalysis PUBLIC 469

You see the two products per customer with the highest revenues in the query:
Threshold Value Condition for All Characteristics in Drilldown Independent
470 PUBLICSAP BW/4HANA
Analysis

You want to see all customers and the associated products that have net revenues greater than $100,000. In the context menu of the rows in the Query Designer, choose Expand to Productand define the following condition:
1. When you are defining the condition, choose All Characteristics in Drilldown Independent underCharacteristic Assignment.
2. Enter the following condition row:Choose the Net Revenue key figure and the greater thanoperator and enter 100,000 as the value.
You see all customers and products that have net revenues greater than $100,000.
Ranked List Condition for All Characteristics in Drilldown Independent
You want to see the two customers with the highest revenue and the two products with the highest revenue for these two customers. In the context menu of the rows in the Query Designer, choose Expand to Productand define the following condition:
1. When you are defining the condition, choose All Characteristics in Drilldown Independent underCharacteristic Assignment.
2. Enter the following condition row:Choose the Net Revenue key figure and the Top N operator and enter 2 as the value.
You see the two customers with the highest revenue and the two products with the highest revenue for these two customers.
SAP BW/4HANAAnalysis PUBLIC 471

Ranked List Condition for Characteristic Combination Customer/Product
If you now want to define a ranked list condition for characteristic combination Customer/Product (such as top 3 customer/product combinations), the system responds with status description Not Applicable. Ranked list conditions for characteristic combinations in a query with a hierarchically displayed axis are not possible.
More Information:
Using Conditions [page 474]
5.2.1.3 How Conditions Interact with Hierarchies
You are advised to pay attention to certain things when using conditions in queries containing characteristics with active presentation hierarchies or in which axes are displayed hierarchically.
Key Features
No Ranked Lists with Display Hierarchies (Rule 7)
There are two types of authorization check: Conditions with threshold values (for example x>y) and ranked lists (for example Top N). Semantically speaking there are two kinds of key figure: Absolute key figures (such as revenue, or profit) and relative key figures (such as plan-actual variance in percent, or profit-sales ratio).
472 PUBLICSAP BW/4HANA
Analysis

The following table shows how conditions are used in combination with display hierarchies:
Threshold Value Conditions Ranked Lists Conditions
Relative key figure Possible Not possible
Absolute key figure Possible, though not often useful Not possible
Using ranked lists in combination with display hierarchies is not supported for the following reasons:
With ranked lists, all rows of the displayed list are considered, and the relationship between them decides whether the row is displayed. Ranked lists are also always automatically displayed sorted.
Automatic sorting could destroy the structure of a display hierarchy. Hierarchy nodes and values that have generally been arranged in a display hierarchy based on certain business modeling would be arranged in a different way because of the sorting. The business context would thus be lost.
Using threshold value conditions with absolute key figures in combination with display hierarchies is usually not particularly useful. The reason is as follows:
If you have an absolute key figure such as Revenue for a characteristic with an active display hierarchy such as Region in the query, and you apply a condition to it with threshold values such as Revenue >2000. In this case, the condition is not usually useful since the values on each hierarchy level are usually very different. The values on hierarchy level “Region” are usually much higher than those on hierarchy level “Country”. Similarly, the values on hierarchy level “Country” are usually somewhat higher than those on hierarchy level “State”.
Features of Displaying Display Hierarchies and Hierarchically Displayed Axes (Rule 10)
Even if it does not meet the condition, a hierarchy node is displayed if it has at least one subordinate node that meets the condition. This is necessary, because otherwise the subordinate node could not be classified. This ensures that the business context for the end user of the query remains after a condition has been applied.
Conditions on Characteristic Combinations with Hierarchies
Conditions on characteristic combinations are possible for display hierarchies as long as the condition is a threshold value condition.
With hierarchically displayed axes, conditions are possible for characteristic combinations as long as the condition is a threshold value condition and as long as the hierarchical display is expanded up to the characteristic that the condition is to affect (see below).
Queries with Hierarchically Displayed Axis and Conditions
If you define conditions for queries in which you display the axis hierarchically, make sure that you expand the hierarchical display up to the characteristic that the condition is to affect. You have to make the setting Expand to <Characteristic> in the context menu for the associated axis (rows or columns) in the Query Designer. You can also make this setting on the Web during runtime. In the context menu of the Web application, choose Data Provider Properties and make the appropriate setting under Formatting of Data (see Data Provider Properties).
Also note that it is not enough to manually expand the appropriate nodes during runtime. The drilldown level must be set using the Expand to <Characteristic> function so that the condition can be applied.
SAP BW/4HANAAnalysis PUBLIC 473

Related Information
Query with a Presentation Hierarchy and Conditions [page 456]Query with Two Presentation Hierarchies and Conditions [page 460]Query with Hierarchically Displayed Axis and Conditions [page 466]
5.2.1.4 Using Conditions
You can define several conditions for a query, thus geneating various views on the data when the query is displayed in the front end.
Using Several Conditions in a Single View
If you have set a condition to Active in the definition, the status Active appears next to the description of the condition. If several conditions are defined for a query, conflicts can arise between conditions that refer to the same characteristics. In this case, certain rules of priority apply. Generally, the most specific condition applies when there are conflicts.
TipOne condition defines the Top 5 Sales for the characteristic Customer, and a second condition defines the Bottom 3 Sales in the customer-product combination.
If only the characteristic Customer is in the drilldown, only the first condition applies. Only the condition Top 5 Sales is therefore used for the characteristic Customer.
If Customer and Product are both in the drilldown, you can use both conditions in accordance with their definitions. The second condition then applies, since it is more specific due to its reference to the characteristic combination.
If a condition cannot be used in a query, the following status descriptions can appear in the display:
● Cannot Be Used The condition refers for example to:○ A characteristic that has not been drilled down○ A characteristic combination and the two characteristics are not drilled down next to each other on an
axis○ A characteristic combination and an involved characteristic are not drilled down○ A characteristic combination and the axis has a hierarchical display, whereas the condition is a ranked
list○ A characteristic that is drilled down with an active display hierarchy, whereas the condition is a ranked
list○ Not Used The condition refers to a characteristic that is already being used in another active condition.
This results in a collision. Only when you deactivate the other condition does this condition come into effect. The status appears as Active in the display.
474 PUBLICSAP BW/4HANA
Analysis

TipCondition 1: Customers: Top 3 or bottom 5 Sales
Condition 2: Customers and Products: Purchase order value > 50.000
If the characteristics “Customers” and “Products” have been drilled down, and condition 2 is active, condition 1 automatically has the status Not Used. If you deactivate condition 2, condition 1 is automatically activated. If you activate condition 1, condition 2 is automatically not used.
Related Information
How Conditions Interact with Hierarchies [page 472]
5.2.1.5 Background Information on Conditions
If you use conditions, and the query displays an unexpected result, check the following points:
Applicability of Conditions
Check if the condition can be applied. In the front end, you can view the existing conditions for the query. You can tell from the status descriptions whether the condition is active, inactive, not used, or not applicable.
No Consideration of Local Calculations, Scaling Factors and Currency Translation
The values in a condition always refer to the actual values and not to the values changed for the display. Local calculations (for single values or results), cumulations, normalizations, scaling factors and currencies are ignored during evaluation of conditions.
Tipif you have activated scaling factors in the query properties for example, and have not taken this into account with the condition definition, unexpected results can arise during execution of the query. This is because you might not chosen enough number values in the condition.
When defining the condition, take account of the scaling, or switch it off for the key figures.
Dependency of Drilldown State
Conditions are dependent on the drilldown. The For All Characteristics in Drilldown Independent setting relies on the condition being defined very generally and being applicable for all characteristics in the drilldown. This does not mean however that the conditions are independent of the characteristic distribution for the axes.
Swapping characteristics on an axis causes a change in the result just like swapping characteristics between the axes would.
Conditions for Characteristic Combinations
Applicability
Note that the characteristics involved have to be next to one another on the same axes with conditions for characteristic combinations. No characteristic or characteristic combination involved can be removed from the
SAP BW/4HANAAnalysis PUBLIC 475

drilldown. Otherwise the condition cannot be applied. Furthermore, the axis cannot have a hierarchical display. If one of the two characteristics has a display hierarchy, conditions are possible for the characteristic combinations. These must be threshold conditions however. Ranked list conditions are not possible for characteristics with active display hierarchy.
Results Rows
If you activate a characteristic for characteristic combinations, the results rows are automatically left out. The overall results row for the quantity of characteristics for the condition remains intact however.
This is because the characteristic values merge with a characteristic combination. If you define a condition on a combination of two characteristics, the system does not evaluate the separate characteristic rows for each characteristic. Rather, it evaluates the combination of the characteristic rows instead. Results for the individual characteristics are therefore not calculated. With a drilldown according to sales channel and products and the active condition Top 10 Product/Sales Channel Sales, you do not see a results for the inner characteristic (in this case, products).
The overall results for the characteristic combination can then be calculated and is displayed. Note however that the overall result for the characteristic combination is specified without taking account of the condition. This is because conditions have no influence on the display of the results.
Query with Condition and Results Row Suppression
In the case of queries that have a condition that is active for a characteristic while the “Suppress Results Row” property is active for another characteristic, the result will generally be an incomprehensible output list. It is then necessary to deactivate results row suppression in order to make the output list comprehensible.
Related Information
Using Conditions [page 474]Ranked List Condition for All Characteristics in Drilldown Independent: Top 3 Products and Top 3 Sales Channels [page 430]Query with Hierarchically Displayed Axis and Conditions [page 466]Query with a Presentation Hierarchy and Conditions [page 456]
476 PUBLICSAP BW/4HANA
Analysis

Ranked List Condition for Characteristic Combination: Top 10 Combinations from Product and Sales Channel [page 438]Ranked List Condition: Top 5 Products [page 427]Query with Condition and Results Row Suppression [page 432]
5.2.2 Aggregation and Formula Calculation
Selected key figures are aggregated in the analytic manager in the SAP BW∕4HANA. The following section provides you with an overview of the two basic types of aggregation behaviour.
Use
The aggregation behavior determines how key figure values are aggregated in queries that use different characteristics and characteristic values. In order to calculate the values of key figures, the data from the InfoProvider has to be aggregated to the detail level of the query. Formulas might also have to be calculated. A number of characteristics need to be aggregated here.
The basic form of aggregation is Standard Aggregation. When performing standard aggregation, the system can aggregate key figures according to the following rules: Summation (SUM), Minimum (MIN), and Maximum (MAX). The standard aggregation is independent from a specific characteristic. The system performs standard aggregation over all charactertistics that are not in the breakdown, irrespective of their sequence. This is the most well-known aggregation behavior.
In addition to standard aggregation, there is also Exception Aggregation. The aggregation rules for exception aggregation depend on a characteristic. You specify how a restricted or calculated key figure or a formula is aggregated in the analytic manager with regard to one or more reference characteristics. (Calculated key figures and formulas mostly behave accordingly; Only in exceptions can there be differences in the query results). A characteristic is needed for exception aggregation in order to define the granularity with which the aggregation rule is applied. The system aggregates the key figures to this detail level according to the rules of standard aggregation. It is only possible to use multiple reference characteristics for formula exception aggregation (multidimensional exception aggregation).
Exception aggregation is also always performed in addition to standard aggregation. It is not an alternative to standard aggregation.
ExampleLet us take aggregation rule (AVG) as an example: The system calculates the average from the sum of all values divided by the number of entries. To define the number of entries, a granularity of data must be defined to which the system is to aggregate the multi-dimensional data according to the rules of standard aggregation. The result of the standard aggregation is the starting point of the exception aggregation, as the basis for the calculation according to the Average of All Values rule.
RecommendationFrom a business point of view for example, exception aggregation arises if warehouse stock cannot be totalled up at the time, or if counters count the number of characteristics for a specific characteristic.
SAP BW/4HANAAnalysis PUBLIC 477

Activities
You create the various types of aggregation behaviour of standard and exception aggregation for basis key figures in InfoObject maintenance for structure members of a query (formula and calculated key figures) in the query definition.
NoteYou can also overwrite the settings for aggregation with the settings in the query (Local Calculations: Calculate Results as..., Calculate Individual Values as...).
Related Information
Multi-Dimensional Exception Aggregation [page 478]Rules for Standard Aggregation and Exception Aggregation [page 480]Aggregation Steps [page 488]Currency Aggregation [page 491]Aggregation and Special Values [page 494]Hierarchy Exception Aggregation NGA and NHA [page 497]Formula Calculation [page 499]Formula Calculation and Special Values [page 525]
5.2.2.1 Multi-Dimensional Exception Aggregation
In an exception aggregatoin, you can use up to five reference characteristics, so that the aggregation rule will be applied in a calculation step on the combination of all these characteristics.
ExampleYou want to define a calculated key figure Sales per Employee and Product and Year.
● Variant 1 without Multi-Dimenstional AggregationYou have to model three key figures in total, with the latter two building on the preceding one:○ Sales per Employee○ Sales per Employee and Product○ Sales per Employee and Product and Year
● Variant 2 with Multi-Dimenstional AggregationYou can define a single calculated key figure that contains all three characteristics as reference characteristics.
This serves to simplify modeling. Thanks to all exception aggregation rules being performed on single records, without the need to calculate the substeps, performance is faster.
With multi-dimensional exception aggregation, it is also possible to create new analyses, to calculate average values for the combination of characteristics for example.
478 PUBLICSAP BW/4HANA
Analysis

ExampleThe following example shows that multi-dimensional exception aggregation allows other analyses by nesting multiple exception aggregations. The question of which average sales all employees can achieve with all products can be answered in two ways, taking either the average over all products that the employees have sold (variant 1) or taking the sales that the employees have made on average with their products (variant 2).
Average by Sales, Product and Person
Person Product Sales in EURO Average Sales in EURO
Tom O'Connor A 80 -
B 40 -
Total 120 60
Max Wall C 50 -
D 70 -
E 90 -
Total 210 70
Total 330 ● Variant 1: 330/5 = 66● Variant 2: 130/2 = 65
● Variant 1: Multi-dimensional exception aggregation according to calculation ruleAVG (Sales) by Product, Personcalculates on the individual values for sales of all products by all persons. This produces the following result: 330/5 = 66
● Variant 2: Nested exception aggregation according to calculation ruleAVG( AVG (Sales) by Product) by Personcalculates on the average sales per person. With this variant, the averages by products for each employee are formed first: 120/2 = 60 and 210/3 = 70. The result of the first calculation step is then used to form the average by the employees: 60+70 = 130. This produces the following result: 130/2 = 65
SAP BW/4HANAAnalysis PUBLIC 479

5.2.2.2 Rules for Standard Aggregation and Exception Aggregation
The following table provides an overview of the rules for standard aggregation and exception aggregations in the BW system.
Use
Abbreviation Aggregation Rule Description
AV0 Average (Values not Equal to Zero)
(Average of All Values < > 0)
If you aggregated with the reference characteristic, the average of the column values is displayed as not equal to zero in the result line.
AV1 Average (Weighted with Number of Days)
(Average Weighted with Calendar Days)
If you aggregate with the reference characteristic, the average of the column values weighted with the number of days is displayed in the result line.
AV2 Average (Weighted with Number of Work Days; Factory Calendar)
(Average Weighted with Working Days)
If you aggregate with the reference characteristic, the average of the column values weighted with the number of working days is displayed in the result line.
AVG Average (All Values)
(Average of All Values)
The average of all values is displayed.
CN0 Counter (Values not Equal to Zero)
(Count All Values <> 0)
The number of values <> zero is displayed in the result line.
CNT Counter (All Values)
(Count All Values)
The number of available values is displayed in the result line.
FIR First Value
(First Value)
The first value in relation to the reference characteristic is displayed in the result line.
LAST Last Value (Last Value) The last value in relation to the reference characteristic is displayed in the result line.
480 PUBLICSAP BW/4HANA
Analysis

Abbreviation Aggregation Rule Description
MAX Maximum
(Maximum)
The highest value of all displayed values in this column is shown in the result line.
MED Median
(Median)
The middle value (central value) of a set sorted in ascending order is displayed:
● For a set with an uneven number of elements, the result is the middle value.
NoteFor a set of five elements, the result is the value of the third element. Suppose you have the following values: 1, 12, 2, 4, 24. When the values are sorted in ascending order (1, 2, 4, 12, 24), the median is the third middle value, which is 4.
● For a set with an even number of elements, the result is the average of the two middle values.
NoteFor a set of six elements, the result is the average of the third and fourth elements. Suppose you have the following values: 1, 12, 2, 4, 24, 6. When the values are sorted in ascending order (1, 2, 4, 12, 24, 6), the median is the average of the values 4 and 12, which is 8.
MIN Minimum
(Minimum)
The lowest value of all displayed values in this column is shown in the result line.
NGA (No Aggregation of Posted Nodes Along the Hierarchy)
No aggregation of postable nodes along the hierarchy.
NHA (No Aggregation Along the Hierarchy) No aggregation along the hierarchy.
SAP BW/4HANAAnalysis PUBLIC 481

Abbreviation Aggregation Rule Description
NO1 (Exception If More Than One Record Occurs)
The result of the aggregation is the value of the record if exactly one record goes into the aggregation. Otherwise, the result is the special value NOP.
NO2 (Exception If More Than One Value Occurs)
If only records with the same value go into the aggregation, the result of the aggregation is this value. If the records have different values, then the result is the special value NOP.
NOP (Exception If More Than One Value <> 0 Occurs)
Behaves like NO2 with the difference that records with the value 0 are ignored. If all records have the value 0, the result is 0.
SLC Simple linear regression: (empirical) correlation coefficient
Simple Linear Regression: Correlation Coefficient)
The simple linear regression is a static method, whereby a straight line is drawn through a set of n points so that the vertical distance between the points and the straight line is as small as possible.
With exception aggregation SLS, the empirical correlation coefficient is displayed, which specifies how accurate the estimated regression line is (in other words, how far the points in the point set are from the straight line). The value of the correlation coefficient is between -1 and +1.
SLI Simple linear regression: Y Point of Intersection
Simple Linear Regression: Y-Intercept)
The simple linear regression is a static method, whereby a straight line is drawn through a set of n points so that the vertical distance between the points and the straight line is as small as possible.
With exception aggregation SLI, the value of the point of intersection between the regression line and the y axis (for x=0) is displayed.
482 PUBLICSAP BW/4HANA
Analysis

Abbreviation Aggregation Rule Description
SLS Simple linear regression: Gradient
Simple Linear Regression: Slope)
The simple linear regression is a static method, whereby a straight line is drawn through a set of n points so that the vertical distance between the points and the straight line is as small as possible.
With exception aggregation SLS, the gradient of the regression line is displayed.
STD Standard Deviation
( Standard Deviation)
After aggregating with the reference characteristic, the standard deviation of the displayed values is displayed in the results row.
SUM Summation
( Total)
The total of all values in this column is shown in the result line.
VAR Variance
( Variance)
After aggregating with the reference characteristic, the variance of the displayed values is displayed in the results row.
Related Information
Exception Aggregations of Simple Linear Regression [page 483]
5.2.2.2.1 Exception Aggregations of Simple Linear Regression
The simple linear regression is a static method, whereby a straight line is drawn through a set of n points so that the vertical distance between the points and the straight line is as small as possible.
The aim of the calculation for linear regression is to find a straight line. With Cartesian coordinates (x,y), a straight line fulfills the equation:
The alpha number is the y axis section or ordinate section.
The beta number specifies the gradient of the line.
SAP BW/4HANAAnalysis PUBLIC 483

Exception aggregation
The analytic manager supports the following exception aggregations based on the model of simple linear regression:
Gradient (SLS exception aggregation):
With exception aggregation SLS, the gradient of the regression line is displayed.
Y point of intersection (SLI exception aggregation):
With the exception aggregation SLI, the value of the point of intersection between the regression line and the y axis (for x=0) is displayed.
484 PUBLICSAP BW/4HANA
Analysis

The following illustration shows the exception aggregation for simple linear regression for the gradient and the y point of intersection:
Empirical Correlations Coefficient (SLC):
With exception aggregation SLS, the empirical correlation coefficient is displayed, which specifies how accurate the estimated regression line is (in other words, how far the points in the point set are from the straight line). The value of the correlation coefficient is between -1 and +1.
● For a negative gradient, a correlation coefficient of -1 is very good. In other words, all points lie on the line.● For a positive gradient, a correlation coefficient of +1 is very good. In other words, all points lie on the line.● If the correlation coefficient is 0, there is no linear correlation between the points.
If one of the divisor factors is 0, the correlation coefficient is +1. In this case, all x values and y values have the average value.
SAP BW/4HANAAnalysis PUBLIC 485

Value set with one value
If the value set has exactly one valid value, it is not possible to specify the gradient or the correlation between characteristic value (x) and key figure value (y). Aggregation is not possible. In this case, the analytic manager returns the special value NPO for all three types of exception aggregation.
Requirements for the exception aggregation reference characteristic and zero point
The exception aggregation reference characteristic must fulfill the following prerequisites:
● It must be possible to calculate the interval of two characteristic values.● The interval of two characteristic values cannot be 0.
Therefore it is only possible to calculate the exception aggregation for simple linear regression for exception aggregation reference characteristics, which have one of the following data types:
● NUMC (character string with numbers only)● DATS (date field)● TIMS (time field with the format hhmmss)
To calculate linear regression, a value of the exception aggregation reference characteristic must be specified as the point of origin (zero point). By default, this is the initial value of the characteristic. The data set's lowest value, for which the key figure value is not equal to NULL, is set as the point of origin for all total time characteristics and characteristics of data type DATS.
NoteA total time characteristic is a time characteristic that absolutely determines the time or time period.
ExampleThe calendar day 0CALDAY is a total time characteristic.
A partial time characteristic is a time characteristic that determines the time or time period within a predefined time period.
ExampleThe weekday 0WEEKDAY1 is a partial time characteristic. It specifies the weekday within a calendar week 0CALWEEK, whereby 0CALWEEK is a total time characteristic. On the date 19.06.2015, 0WEEKDAY1 has the value 05 (for Friday) and 0CALWEEK has the value 25.2015.
486 PUBLICSAP BW/4HANA
Analysis

The following illustration shows the exception aggregation reference characteristic "calendar year" (0CALYEAR):
Special features regarding the characteristics fiscal year period (0FISCPER) and posting period (0FISCPER3)
● When calculating the linear regression, the analytic manager ignores period 0.● The analytic manager only takes special periods into account, if values not equal to NULL are entered for
special periods for exception aggregation. Otherwise special periods are ignored.● For posting period 0FISCPER3, the system takes into account whether a period is a special period and not
the year-specific settings for special periods.● Fiscal year variants must be uniquely determined.
○ If fiscal year period (0FISCPER) is the exception aggregation reference characteristic and the fiscal year variant cannot be uniquely determined, the result of the exception aggregation is ERROR.
○ If posting period (0FISCPER3) is the exception aggregation reference characteristic and the fiscal year variant (PERIV and SELDR) cannot be uniquely determined, an exception is raised (like with unposted values for fiscal year periods).
SAP BW/4HANAAnalysis PUBLIC 487

Currency and unit
● SLS: The gradient has the currency or unit of the y point of intersection - divided by the currency or unit of the exception aggregation reference characteristic.
ExampleFor example, if you use a key figure with the unit "dollar" and the characteristic "calendar day" with the unit "day", the unit of the gradient is "dollars per day".
● SLI: The y point of intersection has the currency or unit of the values xi, which were aggregated with exception aggregation SUM. If the currency or unit of the the values xi is heterogeneous, then mixed is displayed.
● SLC: The correlation coefficient does not have a unit. If the currency or unit of the the values xi is heterogeneous, then mixed is displayed.
5.2.2.3 Aggregation Steps
Use
The order in which the calculations are performed in Analytic Manager is decisive. The OLAP processor therefore always begins with the standard aggregation up to the defined level of detail before performing the exception aggregation. The following graphic gives an overview of the order of the aggregation authorizations.
488 PUBLICSAP BW/4HANA
Analysis

There are two control programs (agents) in the aggregation process. One is responsible for the aggregation of the key figures and the other for the aggregation and handling of currencies and units. The system proceeds as follows when processing aggregation calculations:
1. Firstly, the standard aggregation (that is, the aggregation behavior of a basis key figure) is executed. Possible aggregation types include summation (SUM), minimum (MIN) and maximum (MAX). Currencies and units are not aggregated here.
2. Secondly, the conversion of currencies and units of the data entries to the target currency or unit by currency and unit agents takes place provided that this is defined in the query definition (see Currency Conversion [page 600]).
3. After the conversion, the third step aggregation using currencies or units take place, which belong to the standard aggregation. Here there is another standard aggregation of the key figures with the special handling of currencies or units.
NoteAll of the following aggregations (and formula calculations) execute this special handling of the currencies or units. If no unique currency or unit can be determined for the result of the aggregation, the system returns a '*' instead of the currency or unit (see Currency Aggregation [page 491]).
4. The fourth step sees the aggregation of restricted or calculated key figures using one or more selected characteristics (Exception Aggregation). The available exception aggregation types include summation (default), minimum, maximum, average, first value, last value, no aggregation, counter, standard deviation, and variance.
NoteYou can also calculate exception aggregation in the database (see Operations in SAP HANA [page 841]).
As a further aggregation step is executed with the exception aggregation, the currencies and units must be aggregated again. However, this is not a separate step as with the standard aggregation, but is executed as part of the exception aggregation. The aggregation agent communicates during the aggregation with the currency and unit agents.
5. After the numbers have been aggregated completely, the Formula Calculation occurs.There are the following exceptions to this rule:○ For the key figure, a calculation time was selected in which the calculation of the formula is to be done
before the aggregation.○ A formula variable is used with replacement from an attribute value in a calculated key figure.
NoteSee Tab Page: Aggregation [page 771].
As part of the formula calculation (just as with the exception aggregation), the currency and unit agent calculates the currencies or units of the operands.
6. Finally, the Formula Exception Aggregation is executed, that is, the exception aggregation on the result of the formula calculation. The currency and unit agent aggregates the currencies or units as part of the formula exception aggregation.
Note that also in cases where the reference characteristic is not explicitly included in the query, an aggregation is still executed after taking the reference characteristic into consideration. In other words, the standard
SAP BW/4HANAAnalysis PUBLIC 489

aggregation does aggregate using the reference characteristics of the exception aggregation that is to be executed later.
The system reads the values at the level of the reference characteristic from the underlying InfoProvider of the query. Due to this increasing level of details, particularly if you use reference characteristics with a large number of different characteristic values (instances), the system can deliver large amounts of data to the OLAP processor for further processing. Even if the data volume on the frontend were to be very small, the data volume that is read for it can be very large.
ExampleThe reference characteristic 0BPARTNER is used in the exception aggregation of a calculated key figure. 2,000,000 different characteristic values of 0BPARTNER are applied for the filter of the query. At least 2,000,000 data records are forwarded to the OLAP processor accordingly.
Example
The following example illustrates how the sequence in which the values are calculated affects the result of the query.
The example is based on the following data:
Country Customer Month Net Sales
US Peter January $100
US Andi February $50
DE Peter March $70
DE Stefan January $30
DE Andi March $20
NoteThe data could appear in a much higher level of granularity. You can therefore list this example data to the highest detail level of aggregated data as required in the query.
The following table shows a query for this example data with four aggregated key figures:
Country Net Sales Number of CustomersAverage Revenue for Each Customer (AVG)
Number of Customers in January
DE $120 3 $40 1
US $150 2 $75 1
490 PUBLICSAP BW/4HANA
Analysis

Country Net Sales Number of CustomersAverage Revenue for Each Customer (AVG)
Number of Customers in January
Total $270 3 $90 2
1. Net Revenue: This is a basis key figure with standard aggregation SUM so that the sum is displayed in the sum row. With reference to the example data, the sum of all net revenue is without consideration of any characteristic value.
2. Number of Customers: This is a key figure with exception aggregation CNT. To display the right result in the sum row, the system must include the values of the customer characteristic. Since the customers "Peter" and "Andi" exist in both countries "US" and "DE", the customer column must be evaluated in order to determine the number of customers correctly.
3. Average Revenue for Each Customer (AVG): This is a calculated key figure. The formula is defined as a division of the net sales by the number of customers. It is important for this that the formula of the correct subtotal is calculated. The formula must be calculated after the aggregation at the level of the relevant country. The other totals of the input are in the total row.
4. Number of Customers in January: This is a restricted key figure. It deals with the number of customers, restricted to the month of January. The data for this must first be filtered to the month of January before aggregation and then, as with the key figure for the number of customers, evaluated including the value of the Customer characteristic.
5.2.2.4 Currency Aggregation
Use
The system processes currencies and units after the standard aggregation and before the exception aggregation (see Aggregation Steps [page 488]). The first currency aggregation takes place after converting the currency. This means that values with different currencies or units are aggregated in a result value. The currency aggregation is repeated for all further aggregation steps, that is, it is executed repeatedly for multiple aggregation steps.
ExampleThe following example shows some aggregationsto the data records V1 and V2 where data record V2 consists of values with different currencies.
Data record V1 contains values with the same currency:
V1 = { (Luke, 10€), (Obi-Wan, 12€), (Anakin, 8€) }
This produces the following results for different aggregations:
Aggregation Explanation
SUM(V1) = 30€ Calculates the total of all values 10€ + 12€ + 8€
CNT(V1) = 3 Calculates a counter of {Luke, Obi-Wan, Anakin}
SAP BW/4HANAAnalysis PUBLIC 491

Aggregation Explanation
AVG(V1)= 10€ Calculated as division from SUM(V1)/CNT(V1)
MIN(V1) = 8€ Calculated as minimum value of all values {10€, 12€, 8€}
MAX(V1) = 12€ Calculated as maximum value of all values {10€, 12€, 8€}
LAST(V1) = 8€ Calculated as the last value of all members of the expression {Luke, Obi-Wan, Anakin} including the alphabetical sequence. This is therefore the value "Obi-Wan".
Data record V2 contains values with different currencies:
V2 = { (Luke, 10€), (Leia, 15$) }
This produces the following results for different aggregations:
Aggregation Explanation
SUM(V2) = * Since the values show different currencies, the total cannot be calculated correctly. The result is '*'. This is the symbol for mixed currencies or units.
CNT(V2) = 2 Calculated as counter of {Luke, Leia} irrespective of currencies.
AVG(V2) = * As this is to be calculated as a division of SUM(V2)/CNT(V2) and the result of the aggregation SUM(V2) = *, the average is also *.
However, you should note that not all aggregation types for different currencies or units cause an uncertain result ('*').
The different aggregation types differ in the following way with regard to the currencies and units:
1. Aggregation types that are completely independent from currencies or units are CNT and CN0. Neither the input nor the output of these aggregation types includes currencies or units.
2. An aggregation type that includes currencies and units in their input, but where no currency or unit is assigned to the result, is VAR. The result has no currency or unit, but if the variance of two different currencies or units is to be calculated, the result is '*'.
3. All other aggregation types include currencies and units both in their input and output. The result of these aggregation types refers to currencies and units.
To include aggregation types, currencies, and units (second and third), there are rules for the case that currencies or units appear mixed in the aggregation result or are determined uniquely.
The system first implements the following aggregation rules:
● If different values that do not equal 0 are aggregated with different currencies or units, the result currency or unit is undetermined ('*'). If there is only one currency or unit, this is the one of the result.
492 PUBLICSAP BW/4HANA
Analysis
● If the data record contains values that are equal to 0, the system only includes the currencies or units of those key figure values that do not equal 0. It is determined from this if the currency or unit is unique or not.
● If the data record only contains values that are equal to 0, the system takes on one of the currencies or units that appear in the result.
During the currency aggregation of aggregation types that are not MIN and MAX, the OLAP processor establishes two sets of currencies or units: One contains all currencies or units of key figure values that do no equal = (set CUP) and the other contains all currencies or units of key figure values that equal 0 (set CU0). If the CUP set only contains one entry, the result is unique. If the CUP contains more than one entry, the result is '*'. If the CUP set is empty, the result has a currency or unit from CU0.
ExampleCurrency aggregation with aggregation type SUM
V2 = { (Luke, 10€), (Leia, 15$) }
SUM(V2) = *
V3 = { (Leia, 15$), (Palpatine, 0€)}
SUM(V2) = 15$
V4 = { (Palpatine, 0€), (Boba, 0$) }
SUM(V2) = 0 ? (? could be either € or $ depending on the system)
In addition to the rules named above, others apply to the Aggregation Types MIN and MAX. For MIN and MAX the system does not establish two sets of currencies or units, but three. The first set contains all currencies or units of key figure values that are equal to 0 (corresponding to CU0). The second set contains all currencies or units of positive key figure values (CUP) and the third set contains all currencies or units of negative key figure values (CUN).
The following rules apply to the aggregation type MIN:
● If different values smaller than 0 are aggregated with different currencies or units, the result currency or unit is undetermined ('*'). If there is only one currency or unit, this is the one of the result.
● If there is no key figure value smaller than 0 in the data record, the system includes the currencies or units of the key figure values that are equal to 0. If there is only one currency or unit, this is the one of the result, otherwise the result currency or unit is undefined ('*').
● If there are no key figure values smaller than or equal to 0 in the data record, the system checks is all positive key figure values have the same currency or unit and uses this for the result. If this is not the case, the result currency or unit is undefined ('*').
ExampleCurrency aggregation with aggregation type MIN
SAP BW/4HANAAnalysis PUBLIC 493

V5 = { (Han Solo, -12€), (Chewbacca, 0£), (Leia, 15$) }
MIN(V5) = -12€
V6 = { (Yoda, -61$), (Han Solo, -12€), (Palpatine, 0€) }
MIN(V6) = *
V7 = { (Palpatine, 0€), (Leia, 15$), (R2D2, 28€) }
MIN(V7) = 0€
In comparison to the aggregation type MIN, the system applies the same rules for the aggregation type MAX but for the subsets or key figure values larger, equal to, and smaller than 0 in reverse order from positive to negative values. The rules are as follows:
● If different values greater than 0 are aggregated with different currencies or units, the result currency or unit is undetermined ('*'). If there is only one currency or unit, this is the one of the result.
● If there is no key figure value greater than 0 in the data record, the system includes the currencies or units of the key figure values that are equal to 0. If there is only one currency or unit, this is the one of the result, otherwise the result currency or unit is undefined ('*').
● If there are no key figure values greater than or equal to 0 in the data record, the system checks is all negative key figure values have the same currency or unit and uses this for the result. If this is not the case, the result currency or unit is undefined ('*').
ExampleCurrency aggregation with aggregation type MAX
V5 = { (Han Solo, -12€), (Chewbacca, 0£), (Leia, 15$) }
MAX(V5) = 15$
V6 = { (Yoda, -61$), (Han Solo, -12€), (Palpatine, 0€) }
MAX(V6) = 0€
V7 = { (Palpatine, 0€), (Leia, 15$), (R2D2, 28€) }
MAX(V7) = *
5.2.2.5 Aggregation and Special Values
Use
The aggregation rules outlined in the previous sections produce unique results for value sets with valid values. There are also more complex value sets that contain special values such as 0, NULL , or DIV0.
The following example shows that a value set of this kind does not lead to a unique result based on the previous rules.
494 PUBLICSAP BW/4HANA
Analysis
Example
V8 = { (R2D2, 28 €) (Palpatine, 0€), (Boba, NULL), (Ackbar, 122$), (Jabba, DIV0) }
AVG(V8) = ???
NoteIn Customizing, you can set how you want special values to be displayed in the query result. You can find more information in the SAP Implementation Guide under SAP Customizing Implementation GuideSAP NetWeaver Business Warehouse Settings for Reporting and Analysis General Settings for Reporting and Analysis Displaying Special Values in a Query Result .
The following section explains the different combinations for exception aggregation rules (AVG, AV0, and so on) and special value sets (for example, { 0€ }, { 0€, DIV0 }, { 42€, 13$ }, { 0€, DIV0, 42€, 13$ } ) and the results that they produce. Firstly, the special behavior and results of the standard and exception aggregations for basis key figures are described as well as for calculated and restricted key figures (known as formula exception aggregation). These aggregation rules are then compared with different value sets that contain the values which appear in the special situations (for example, ERROR or mixed currencies).
There are the following types of special values that have to be included in value sets:
1. ERROR: This special value is the result of an incorrect calculation, such as, division by 0 (DIV0).2. NOP: This special value is the result of the aggrgation rules NO1, NO2, and NOP. An aggregation could not be executed.3. *: This symbol represnts a valid value.4. NULL: This special value means that there are no values.
The order of this list corresponds to the priority with which the OLAP processor includes the special values in an aggregation: Firstly ERROR, then NOP, then *, and finally NULL.
Special value NOP is handled like ERROR so that the following rules apply:
● An aggregation that returns the special value ERROR for the set {*, NULL, ERROR}, also returns the special value NOP for the set {*, NULL, NOP} , however it returns the special value ERROR for the set {*, NULL, NOP, ERROR}.
● An aggregation that does not return the special value ERROR for the set {*, NULL, ERROR}, also does not return the special value NOP for the set {*, NULL, NOP}. Examples of this are the aggregation rules CN0, AV0, FIRST, LAST, and CNT.
The following tables apply the priority rules to some example sets (in the columns) and show the different aggregation rules (in the rows). For the sake of charity, the characteristic names are left out of the example sets. The special exception rules AV1, average (weighted with number of days), and AV2, average (weighted with number of working day; factory calendar) are not displayed: As the displayed value sets do not reference the time characteristics, AV1 and AV2 behave like AVG. (For hierarchy exception aggregations NHA and NGA, seeHierarchy Exception Aggregation NGA and NHA [page 497]).
SAP BW/4HANAAnalysis PUBLIC 495

B={ NULL } C={ 0€ } D={ DIV0 } E={ 42€ } F={ 0€, DIV0 } G={ 0€, 13$ }
AVG NULL 0 € DIV0 42 € DIV0 6,5 $
AV0 NULL 0 € NULL 42 € 0 € 13 $
CNT 0 1 1 1 2 2
CN0 0 0 0 1 0 1
FIR NULL 0 € DIV0 42 € 0 € 0 €
LAS NULL 0 € DIV0 42 € DIV0 13 $
MAX NULL 0 € DIV0 42 € DIV0 13 $
MIN NULL 0 € DIV0 42 € DIV0 0 €
NO1 NULL 0 € DIV0 42 € DIV0 NOP
NO2 NULL 0 € DIV0 42 € DIV0 NOP
NOP NULL 0 € DIV0 42 € DIV0 13 $
STD NULL 0 € DIV0 0 DIV0 9,192 $
SUM NULL 0 € DIV0 42 € DIV0 13 $
VAR NULL 0 DIV0 0 DIV0 84,5
H={DIV0, 42€ } I={ 42€, 13$ } J={ 42€, -13$ }K={ 0€, DIV0, 13$ }
L={ 0€, 42€, 13$ }
AVG DIV0 * * DIV0 *
AV0 42 € * * 13 $ *
CNT 2 2 2 3 3
CN0 1 2 2 1 2
FIR DIV0 42 € 42 € 0 € 0 €
LAS 42 € 13 $ - 13 $ 13 $ 13 $
MAX DIV0 * 42 € DIV0 *
MIN DIV0 * - 13 $ DIV0 0 €
NO1 DIV0 NOP NOP DIV0 NOP
NO2 DIV0 NOP NOP DIV0 NOP
496 PUBLICSAP BW/4HANA
Analysis

H={DIV0, 42€ } I={ 42€, 13$ } J={ 42€, -13$ }K={ 0€, DIV0, 13$ }
L={ 0€, 42€, 13$ }
NOP DIV0 NOP NOP DIV0 NOP
STD DIV0 * * DIV0 *
SUM DIV0 * * DIV0 *
VAR DIV0 * * DIV0 *
M={ NOP } N={ 0€, NOP } O={ NOP, 13$ } P={ DIV0, NOP, 13$ }
AVG NOP NOP NOP DIV0
AV0 NULL NULL 13 $ 13 $
CNT 1 2 2 3
CN0 0 0 1 1
FIR NOP 0 € NOP DIV0
LAS NOP NOP 13 $ 13 $
MAX NOP NOP NOP DIV0
MIN NOP NOP NOP DIV0
NO1 NOP NOP NOP DIV0
NO2 NOP NOP NOP DIV0
NOP NOP NOP NOP DIV0
STD NOP NOP NOP DIV0
SUM NOP NOP NOP DIV0
VAR NOP NOP NOP DIV0
5.2.2.6 Hierarchy Exception Aggregation NGA and NHA
Use
Hierarchy exception aggregations NGA and HGA are special aggregation rules for hierarchies with postable nodes. Postable nodes are hierarchy nodes that do not simply aggregate their child nodes but also have a value of their own that is added to the aggregation. It is possible to display the own value of a postable node as the child of this node so that the display corresponds to that of a normal hierarchy.
SAP BW/4HANAAnalysis PUBLIC 497

ExampleIn the following example there is a normal hierarchy node (node 1) and a postable node below it with a value part (page 1) of its own. Page 1 can be displayed a the child of the postable node. Apart from this the postable node has an actual child (page 2). The following graphic shows the result of an aggregation of type SUM.
If output aggregation NGA is applied to key figure 1, this produces the result that the postable node only has the value of its own value part, that is, from page 1. The node on a higher level also only includes this value part so that node 1 of the example above also displays the value of page 1. This means that NGA ensures that a postable node does not aggregate its own value and that of its children, but only displays its own value part.
This means that the value of a node appears as follows (if the hierarchy uses the exception aggregation NGA):
● If the node is a leaf or a posted node, the value is simply the node's own value (and not the aggregate of its subnodes).
● If the node is a simple hierarchy node, its value is the total of all its posted sibling nodes, which can either be leaves or posted nodes. Siblings of posted nodes are ignored. Only the value of the posted node is taken into account.
NHA works in a similar way: This aggregation type also ensures that nodes with a postable value part (but which only aggregate the values of their children) are displayed as NULL. This means they have no value if they are not postable nodes.
498 PUBLICSAP BW/4HANA
Analysis

The rules are simple with regard to the special values NULL, ERROR, or NOP. NGA and NHA do not specify any aggregation rules, they only define that the postable part of a postable node is included as the only value in the standard aggregation. Only the value of a postable node is included for the hierarchy exception aggregations NGA and HGA, irrespective of whether it is a special value or not. The rules of the standard aggregation SUM, MIN, and MAX are applied accordingly.
5.2.2.7 Formula Calculation
Use
There are always two operands connected with an operator in a formula.
NoteOn the frontend formulas are often also called key figures.
The following objects can be operands in a formula:
● Basis Key Figures● Calculated Key Figures● Restricted Key Figures
There are the following types of operators in the BW system:
● Basic Functions● Percentage Functions● Data Function● Mathematical Functions● Trigonometrical Functions● Boolean Operators
More Information
● Basic Functions [page 500]● Percentage Functions [page 500]● Data Function [page 503]● Mathematical Functions [page 514]● Trigonometrical Functions [page 516]● Boolean Operators [page 517]
SAP BW/4HANAAnalysis PUBLIC 499

5.2.2.7.1 Basic Functions
Use
Some important operators from the area of basic functions are listed in the following table:
Operator Operator Name Description
+ Plus Adds Both Operands
- Minus Subtracts Second Operand from First
* Multiply Multiplies Both Operands
/, DIV Divide Divides First Operand by Second
** High Square an operand with another, for example, 4**2 means 4 high 2 results in 16.
5.2.2.7.2 Percentage Functions
Use
You can use the following percentage functions when defining a formula or a calculated key figure as an operator.
Features
Operator Operator Name Description
% Percentage Deviation <Operand1> % <Operand2>
Specifies the percentage deviation of Operand1 to Operand2. Identical to the formula 100 * (<Operand1> - <Operand2>) / abs(<Operand2>) if <Operand2> is not equal to 0, as well as with the error value for 'Division by 0' if <Operand2> equals 0.
500 PUBLICSAP BW/4HANA
Analysis

Operator Operator Name Description
%A Percentage <Operand1> %A <Operand2>
Specifies the percentage amount of Operand1 to Operand2. Identical to the formula 100 * (<Operand1> - <Operand2>) / abs(<Operand2>) if <Operand2> is not equal to 0, as well as with the error value for 'Division by 0' if <Operand2> equals 0.
%_A Percentage Share with Signed Base Value (%_A)
<Operand1> %_A <Operand2>
%CT Percentage of Total %CT <Operand>
Specifies how high the percentage amount is with regard to the result. Result here means the result of the aggregation at the next-highest level (intermediate result).
%GT Percentage of Total of the Grand Total %GT <Operand>
Specifies how high the percentage amount is with regard to the grand total. Grand total here means the result of the aggregation at the highest level of the list. The dynamic filters (filters that were not already defined in the Query Designer) are also included in the calculation of the grand total.
%RT Percentage of Total of Query Total %RT <Operand>
The same as the percentage function %GT; In contrast to the calculation of the grand total, the dynamic filters are not included in the calculation of the query result, that is, it is always normalized to the same size, irrespective of the dynamic filter and navigation status.
%XT Percentage Share of Result Along the Columns
%XT <Operand>
%YT Percentage Share of Result Along the Rows
%YT <Operand>
SAP BW/4HANAAnalysis PUBLIC 501

Example
Percentage Deviation (%)
'Planned Revenue' % 'Actual Revenue' specifies the percentage by which the actual revenue exceeds the planned revenue.
Percentage Amount (%A)
'Fixed Costs' %A 'Costs' specifies how high the fixed cost part is of a product total cost.
Percentage of Total of Result (%CT)
Year Region Revenue %CT 'Sales'
1999 North 30 50
South 30 50
Result 1999 60 33.3333
2000 North 60 50
South 60 50
Result 2000 120 66.6667
Overall Result 180 100
Percentage of Total of the Grand Total (%GT)
Year Region Revenue %GT 'Sales'
1999 North 30 16.6667
South 30 16.6667
Result 1999 60 33.3333
2000 North 60 33.3333
South 60 33.3333
Result 2000 120 66.6667
Overall Result 180 100
Percentage of Total of Query Total (%RT)
502 PUBLICSAP BW/4HANA
Analysis

Year Region Revenue %RT 'Sales'
1999 North 30 16.6667
South 30 16.6667
Result 1999 60 33.3333
Overall Result 60 66.6667
The year 1999 is in the dynamic filter. The 100% refers to the revenue 180 that cannot be seen in the table (including Jahr 2000) (see %GT).
5.2.2.7.3 Data Functions
Use
When defining a formula or calculated key figure, you can use the following data functions as operators.
Features
Operator Operator Name Description
COUNT Counter COUNT(<Expression>)
Returns value 1 if the expression <> identified by <Expression> results in 0, otherwise 0.
CMR Current Member Result CMR(<Expression>)
DATE Casting Operator Date DATE
The value is given as the number of days starting from 01.01.0000 and then displayed as a date.
The value can be between 0 and a million. This which allows for a date range between 01.01.0000 and 27.11.2738.
SAP BW/4HANAAnalysis PUBLIC 503

Operator Operator Name Description
DELTA Delta DELTA(<Expression>)
Returns value 1 if the expression identified by <Expression> results in 0, otherwise 0.
CautionThis function is identical to the NOT operator and should not be used anymore.
FIX FIX Fixes the context of the aggregation by preventing the exception aggregation from using the GROUP-BY clause. The constant selection is therefore made before the formula calculation (see Fix Operator [page 508]).
NDIV0 No DIV0 NDIV(<Expression>)
Results in 0 if the expression identified by <Expression> is caused by a division by 0 during calculation. Otherwise, the result is the value of the expression. This is used in order to avoid error messages or so that you can continue calculating with a defined result.
NODIM Value without Units or Currencies NODIM(<Expression>)
Returns purely numerical values of <expression> and suppresses units and currencies.
NOERR No Error NOERR(<Expression>)
Results in 0 if the calculation of <expression> causes an arithmetical error. Otherwise, the result is the value of the expression. This is used in order to avoid error messages or so that you can continue calculating with a defined result.
SCAL Constant as Scalar Constant as scalar size, meaning that it is characterized solely by its numerical value; existence based on other operands
504 PUBLICSAP BW/4HANA
Analysis

Operator Operator Name Description
SUMCT Norming Operation Result SUMCT <Operand>
Returns the result of the operand at the next-highest level (subtotal) (see also Percentage Functions [page 500], %CT).
SUMGT Norming Operation Grand Total SUMGT <Operand>
Returns the grand total of the operand (see also Percentage Functions [page 500], %GT).
SUMRT Norming Operation Query Result SUMRT <Operand>
Returns the query result of the operand (see also Percentage Functions [page 500], %RT).
Unlike the process for calculating the overall result, dynamic filters are not used in the calculation of the query result. This means that the calculation always normalizes to the same value, irrespective of the filter status and the navigational state.
SUMXT Subtotal Along the Columns SUMXT <Operand>
SUMYT Subtotal Along the Rows SUMYT <Operand>
SAP BW/4HANAAnalysis PUBLIC 505

Operator Operator Name Description
TIME Casting Operator Time TIME
The TIME operator turns any key figure or (sub)formula into a key figure of type TIME. The system removes the decimal digits, interprets the value as seconds, and returns the value as +-hh:mm:ss.
Example-4812 for example is therefore displayed as -1:20:12.
A number is expressed as the number of seconds from 00:00:00 and is expressed in hours, minutes, and seconds. A key figure of type TIME with the value 0 is displayed as 00:00:00.
Negative times are allowed: For a negative number the system calculates backwards from 00:00:00.
You can enter any number of hours. After 24 hours, the system does not restart again at 0.
VECT Constant as Vector Constant as vector; existence like a posted key figure
Example
NOERR (x): Equal to 0 for undefined calculations, otherwise x
NOERR(SQRT(-1)) = 0
Result (SUMCT)
Year Region Revenue SUMCT 'Revenue'
1999 North 30 60
South 30 60
Result 1999 60 180
506 PUBLICSAP BW/4HANA
Analysis
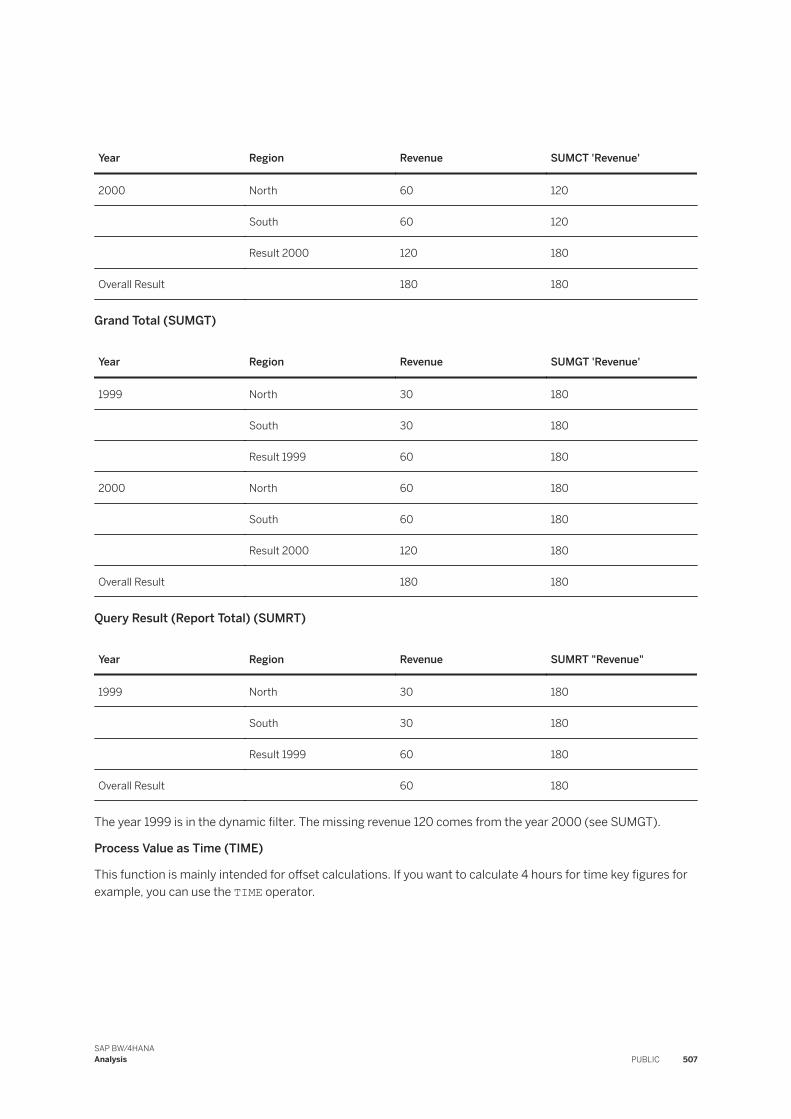
Year Region Revenue SUMCT 'Revenue'
2000 North 60 120
South 60 120
Result 2000 120 180
Overall Result 180 180
Grand Total (SUMGT)
Year Region Revenue SUMGT 'Revenue'
1999 North 30 180
South 30 180
Result 1999 60 180
2000 North 60 180
South 60 180
Result 2000 120 180
Overall Result 180 180
Query Result (Report Total) (SUMRT)
Year Region Revenue SUMRT "Revenue"
1999 North 30 180
South 30 180
Result 1999 60 180
Overall Result 60 180
The year 1999 is in the dynamic filter. The missing revenue 120 comes from the year 2000 (see SUMGT).
Process Value as Time (TIME)
This function is mainly intended for offset calculations. If you want to calculate 4 hours for time key figures for example, you can use the TIME operator.
SAP BW/4HANAAnalysis PUBLIC 507

5.2.2.7.3.1 FIX Operator
The FIX operator is a data function that fixes the context of the aggregation. It prevents the exception aggregation from passing on its reference characteristics to the GROUP BY clause of the preceding aggregation and calculation steps. This allows execution of the constant selection before calculation of the formula, as expected.
Use
There is a correlation between exception aggregation and constant selection: The data that flows into the exception aggregation is grouped by the reference characteristic of the exception aggregation, for example by characteristic Product. In conjunction with a constant selection, this behavior means that the constant selection by Product is basically rendered ineffective. This makes sense in scenarios where the exception aggregation and constant selection are performed using different characteristics.
Example● Constant selection: 1% of sales with constant selection by all products,● Exception aggregation: Number of years in which the sales per product is greater than 1% of total sales,
This is different is the exception aggregation and constant selection are performed using the same characteristic.
Example● Constant selection: 1% of sales with constant selection by all products,● Exception aggregation: Sales by product > percentage of sales with constant selection by all products
The following example serves to illustrate that, in this case, the correct execution of aggregation and constant selection in the analytic manager can cause unexpected results from the customer's perspective. The customer might want to specifically influence the result on which the formula exception aggregation is executed at the end.
A query is used to calculate how many products have sales of over 1% of the total sales for all products.
The query has the following key figures:
● The basic key figure is Sales.● The second key figure is the restricted key figure Sales with constant selection on characteristic Product.
This means that the key figure shows the sales for all products, not just for the product in the filter (Product A).
● The third key figure is calculated using the formula 1% of sales with constant selection by Product. The key figure Sales with constant selection on characteristic Product is multiplied by 0.01 here.
● The fourth key figure is also calculated using a formula: This is a binary comparative operation between Sales and 1% of sales with constant selection by Product. The system should return 1 if Sales is greater than 1% of sales with constant selection by Product. Otherwise it should return 0. This key figure contains the exception aggregation SUM by Product.
The following table shows the query result with an unexpected result from the customer's perspective for key figure Sales > Sales with constant selection by Product:
508 PUBLICSAP BW/4HANA
Analysis

Query Result with Unexpected Result for Key Figure Sales > Sales with Constant Selection by Product
Product SalesSales with Constant Selection by Product
1% of Sales with Constant Selection by Product
Sales > Sales with Constant Selection by Product
A EUR 450 EUR 100,000 EUR 1000 1
B EUR 1200 EUR 100,000 EUR 1000 1
Total EUR 1650 EUR 100,000 EUR 1000 2
The analytic manager returns 1 as the result for Product A. As the sales value of 450 is less than als 1000, the expected result would actually be 0. How did this happen?
The analytic manager calculates according to the following formula:
SUM( Sales > ( 0.01 * (Sales with constant selection by product) ) by productAs the fourth key figure is calculated using a formula, there is a formula exception aggregation here: The exception aggregation SUM is executed on the result of the formula calculation. In accordance with the sequence of aggregation calculations in the analytic manager, formula exception aggregations are executed at the end. This means that reference characteristic Product in the GROUP-BY clause is contained in every part of the formula subtree. The exception aggregation therefore overwrites the constant selection here. This is because the following rules applies for the constant selection:
The constant selection only affects the selection and has no effect on the order in which the aggregation and formula calculation are processed. The constant selection is not executed before aggregation.
Even if all products were part of the subtotal in accordance with the constant selection, the result can never be correct, as the analytic manager calculates with the sales of the products rather than with the percentage from the constant selection. As X > 0,01 * X, the result is always positive.
● For Product A: 450 > 450*0,01. In this case, the result value "1" is not as expected, as the individual product sales value is smaller than the percentage sales with constant selection over all products.
● For Product B: 1200 > 1200*0.01. In this case, the result value "1" is only as expected because as the individual product sales value is greater than the percentage sales with constant selection over all products.
To prevent the constant selection from being ineffective in scenarios like this, you should use the FIX operator. The FIX operator has the task of excluding the GROUP-BY clause during calculation of the exception aggregation. This allows execution of the constant selection before calculation of the formula. This ensures that the expected result is achieved.
Query Result with FIX Operator
Product SalesSales with Constant Selection by Product
1% of Sales with Constant Selection by Product
Sales > Sales with Constant Selection by Product
A EUR 450 EUR 100,000 EUR 1000 0
B EUR 1200 EUR 100,000 EUR 1000 1
Total EUR 1650 EUR 100,000 EUR 1000 1
If the FIX operator is used in the example above, the analytic manager calculates according to the following formula:
SUM ( Sales > FIX ( 0.01 * (Sales with constant selection by product) ) by product
SAP BW/4HANAAnalysis PUBLIC 509

The system works as follows:
● The system checks which exception aggregation rule is next in the sequence and asks for the reference characteristic.
● It aggregates by the characteristic in accordance with the aggregation rule.● This single value then serves as the basis for the following calculations:
The query result now provides the expected values.
CautionNote that the FIX operator only influences one individual exception aggregation. It does this by excluding the GROUP-BY information for the reference characteristic used in the formula. With nested formulas, other formulas are not affected.
Related Information
FIX Operator and Various Aggregations [page 510]FIX Operators and Various Constant Selections and Aggregations [page 512]FIX Operator and Restricted Key Figures [page 512]FIX Operator and Restricted Constants [page 514]
5.2.2.7.3.1.1 FIX Operator and Various Aggregations
The following examples show how the system performs a calculation if the FIX operator is in an exception aggregation or if an exception aggregation is in the FIX operator.
The FIX operator only affects the reference characteristic used in the formula of a particular exception aggregation. In the example below, we expand on the example for using the FIX operator with reference characteristic Calendar Month. The following key figure is added: SUM (Sales > 1% of sales with constanct selection by product) by calendar month. This means that we add an additional exception aggregation, SUM by calendar month. To make the table clearer, we restrict the calendar month to the months 04.2004 and 05.2004.
FIX Operator and Various Aggregations, Table 1
Calendar Month Product Sales
Sales with Constant Selection by Product
1% of Sales with Constant Selection by Product
Sales > 1% of Sales with Constant Selection by Product
Sales > 1% of Sales with Constant Selection by Product by Calendar Month
04.2004 A EUR 40 EUR 8,000 EUR 100 0 0
B EUR 120 EUR 8,000 EUR 80 1 1
Total EUR 160 EUR 8,000 EUR 80 1 1
510 PUBLICSAP BW/4HANA
Analysis

Calendar Month Product Sales
Sales with Constant Selection by Product
1% of Sales with Constant Selection by Product
Sales > 1% of Sales with Constant Selection by Product
Sales > 1% of Sales with Constant Selection by Product by Calendar Month
05.2004 A 20 EUR 10,000 EUR 100 0 0
B 320 EUR 10,000 EUR 100 1 1
Total 340 EUR 100,000 EUR 100 1 1
Total 500 EUR 100,000 EUR 180 1 2
The formula that the analytic manager executes is as follows:SUM( SUM( Sales > FIX( 0.01 * (Sales with constant selection by product) ) by product ) by calendar monthThe FIX operator only removes the GROUP-BY clause for Product, as this characteristic is the reference characteristic of the subformula. The GROUP-BY clause is retained for the Calendar Month characteristic. This explains the deviating result in the total.
What would happen if an exception aggregation were defined in the FIX operator?
In the following example, the reference key figure was changed: It is now 1% of the average sales of all products per calendar month. The formula that the analytic manager executes is as follows:AVG( 0,01* (Sales with constant selection by product)) by calendar monthThe check is performed as in the previous example, but with the new reference characteristic:SUM( Sales > FIX( AVG( 0,01 * (Sales with constant selection by product)) by calendar month) ) by product
FIX Operator and Various Aggregations, Table 2
Product SalesSales with Constant Selection by Product
1% of Sales with Constant Selection by Product
Sales > 1% of Sales with Constant Selection by Product
A EUR 60 EUR 18,000 EUR 93 0
B EUR 440 EUR 18,000 EUR 93 1
Total EUR 500 EUR 18,000 EUR 193 1
This example illustrates that the FIX operator prevents the inner aggregation from being executed as defined by the inner formula. It does not affect the aggregation of the formula result.
SAP BW/4HANAAnalysis PUBLIC 511

5.2.2.7.3.1.2 FIX Operators and Various Constant Selections and Aggregations
The following examples show how the system performs a calculation if the FIX operator is in an exception aggregation or if an exception aggregation is in the FIX operator.
We take the example of using the FIX operator here and add the calculated reference key figure Sales with Constant Selection by Product, Calendar Month. The restriction to calendar month in the previous example is thus omitted. The comparison figure, Sales > 1‰, is now given a nested exception aggregation again:SUM ( SUM (X) by Product ) by Calendar MonthThe following values are calculated in the result:
FIX Operators and Various Constant Selections and Aggregations
Calendar Month Product Sales
Sales with Constant Selection by Product
1‰ of Sales with Constant Selection by Product
Sales > 1‰ of Sales with Constant Selection by Product, Calendar Month
04.2004 A EUR 40 EUR 100,000 EUR 100 0
B EUR 120 EUR 100,000 EUR 100 1
Total EUR 160 EUR 100,000 EUR 100 1
05.2004 A 20 EUR 100,000 EUR 100 0
B 320 EUR 100,000 EUR 100 1
Total 340 EUR 100,000 EUR 100 1
Total 500 EUR 100,000 EUR 100 2
The formula that the analytic manager uses for the column on the far right is as follows:SUM( FIX( SUM( Sales > FIX( 0.001 * (Sales with Constant Selection by Product, Calendar Month) ) by Product ) ) Calendar MonthEvery FIX operator removes a reference characteristic: The outer one removes the GROUP-BY clause for Calendar Month, the inner one removes the GROUP-BY clause for Product. If there are multidimensional aggregations with nested formulas, the formula must be defined as in this example. Having two FIX operators ensures that both reference characteristics are removed. Note however that the outer FIX operator also removes the GROUP-BY clause for Calendar Month, which is also needed for the calculation of the sales figure in the inner formula. In cases like this, the only way to obtain the right result is to always calculate against the full reference key figure and with the basic key figure in its full granularity.
5.2.2.7.3.1.3 FIX Operator and Restricted Key FiguresThe following is an example without constant selection and serves to show that the FIX operator can also be used in cases like this.
Working without constant selection offers no benefits however, as you obtain the same results as you would have without the FIX operator.
The following example has the following key figures:
512 PUBLICSAP BW/4HANA
Analysis

● The basic key figure is Sales again.● The second key figure is the restricted key figure Sales (Product A), restricted to product "A".● The third key figure is the restricted key figure Sales (Product A, Product B), restricted to the products "A"
and "B".● The fourth key figure is calculated using a formula: Sales (Product A) / Sales (Product A, Product B) with
Exception Aggregation SUM by Product.
FIX Operator and Restricted Key Figures, Table 1
Product Sales Sales (Product A)Sales (Product A, Product B)
Sales (Product A) / Sales (Product A, Product B) by Product
A EUR 450 EUR 450 EUR 450 1
B EUR 1200 EUR 1200
Total EUR 1650 EUR 450 EUR 1650 1
The formula that the analytic manager executes is as follows:SUM( Sales (Product A)/ Sales (Product A, Product B) ) by ProductIncorporating the FIX operator, this formula is:SUM( Sales (Product A)/FIX( Sales (Product A, Product B) ) ) by Product
FIX Operator and Restricted Key Figures, Table 2
Product Sales Sales (Product A)Sales (Product A, Product B)
SUM( Sales (Product A)/FIX( Sales (Product A, Product B) ) ) by Product
A EUR 450 EUR 450 EUR 450 1
B EUR 1200 EUR 1200
Total EUR 1650 EUR 450 EUR 1650 0,27
The FIX operator causes Sales (Product A) / Sales (Product A, Product B) to be aggregated with the standard aggregation, as there is no exception aggregation defined in the inner formula. As the FIX operator removes the GROUP-BY clause for Product, the entire formula exception aggregation by product is omitted. The calculation therefore has the same result as it would if no exception aggregation had been defined in the formula.
SAP BW/4HANAAnalysis PUBLIC 513

5.2.2.7.3.1.4 FIX Operator and Restricted Constants
The following example illustrates another way of using the FIX operator: Restricted constants
FIX Operator and Restricted Constants
Product
Sales (Product A, Product B, Product C)
10 (Product A, Product B)
SUM (10(Product A, Product B)) by Product
SUM ( (SUM(10 (Product A, Product B)) by Product) / (Sales (Product A, Product B, Product C)) ) by Product
SUM ( (SUM(10 (Product A, Product B)) by Product) / FIX (Sales (Product A, Product B, Product C)) ) by Product
A EUR 450 10 10 0,022 0,022
B EUR 1200 10 10 0,008 0,008
C EUR 1210 10
Total EUR 2860 10 20 0,030 0,007
This example serves primarily to illustate the difference between a formula without exception aggregation and a formula with exception aggregation.
● In a formula without exception aggregation, a constant is always treated as a value.● In a formula with exception aggregation, the system takes the restriction of a restricted key figure and
aggregates accordingly. In a formula with exception aggregation, the system performs the calculation along the drilldown. In other words, the total is calculated from the subtotals. This gives us the value 0.030 for key figure SUM ( (SUM(10 (Product A, Product B)) by Product) / (Sales (Product A, Product B, Product C)) ) by Product.
If we want to have a formula with exception aggregation, but the calculation direction of a formula without exception aggregation, i.e. the total of the operands should be be the total of the formula result, we can use the FIX operator: Formula SUM ( (SUM(10 (Product A, Product B)) by Product) / FIX (Sales (Product A, Product B, Product C)) ) by Product results in 0.007, calculated from 10 (Product A) / 2860 + 10 (Product B) / 2860 + NULL (Product C) / 2860 = 20/2860. This is the same as the calculation of a formula without exception aggregation, but using a formula with exception aggregation in order to have the restricted key figure as the starting point.
5.2.2.7.4 Mathematical Functions
Use
Some important operators from the area of mathematical functions are listed in the following table:
Operator Operator Name Description
ABS Absolute Value
514 PUBLICSAP BW/4HANA
Analysis

Operator Operator Name Description
CEIL Round-Up Function Rounds up to the smallest integer value that is greater than or equal to the operand
DIV Integer Division
EXP Exponential Function
FLOOR Round-Down Function Rounds down to the largest integer value that is smaller than or equal to the operand
FRAC Decimal Digits of the Operand Maps the numerical value of the operand to its decimal digits
LOG Logarithm
LOG10 Logarithm with Base 10
MAX Maximum Returns the larger of two operands
MAX0 Maximum of 0 and Operand
MIN Minimum Returns the smaller of two operands
MIN0 Minimum of 0 and Operand
MOD Modulo Returns the remainder after the division of two operands
SIGN Sign of the Operand
SQRT Square Root
TRUNC Truncate Integer value of the operand with its decimal digits removed
SAP BW/4HANAAnalysis PUBLIC 515

5.2.2.7.5 Trigonometric functions
Trigonometical functions describe the calculation relationships between angles and measurements.
Use
The following functions are supported:
Trigonometric functions
ACOS Arc Cosine ACOS(<Expression>)
Returns the arc cosine of the expression <Expression>.
ASIN Arc Sine ASIN(<Expression>)
Returns the arc sine of the expression <Expression>.
ATAN Arc Tangent ATAN(<Expression>)
Returns the arc tangent of the expression <Expression>.
COS Cosine COS(<Expression>)
Returns the cosine of the expression <Expression>.
COSH Hyperbolic Cosine COSH(<Expression>)
Returns the hyperbolic cosine of the expression <Expression>.
SIN Sine SIN(<Expression>)
Returns the sine of the expression <Expression>.
SINH Hyperbolic Sine SINH(<Expression>)
Returns the hyperbolic sine of the expression <Expression>.
TAN Tangent TAN(<Expression>)
Returns the tangent of the expression <Expression>.
516 PUBLICSAP BW/4HANA
Analysis

TANH Hyperbolic Tangent TANH(<Expression>)
Returns the hyperbolic tangent of the expression <Expression>.
5.2.2.7.6 Boolean Operators
Boolean operators are functions that you can use as operators for defining a formula or a calculated key figure.
Use
The following functions are supported:
Features
Operator Operator Name Description
<, <=, <>, ==, >, >= Relational Operators <Expression1> <Operator> <Expression2>
The result is 1 if the expression described by <Expression1> in the relationship described by <Operator> for <Expression2> (i.e. <Expression1> <Operator> <Expression2> is true). Otherwise it is 0. Only the number values of <Expression1> und <Expression2> are compared without considering the unit.
ExampleCosts < Revenue returns 1 if the revenue is greater than the costs and 0 if the costs are greater or equal to the revenue.
SAP BW/4HANAAnalysis PUBLIC 517

Operator Operator Name Description
AND Logical AND <Expression1> AND <Expression2>
The result is 1 if <Expression1> and <Expression2> are (both) greater than or less than 0. Otherwise it is 0. Only the number values of <Expression1> and <Expression2> are compared without considering the unit.
OR Logical OR <Expression1> OR <Expression2>
The result is 1 if <Expression1> oder <Expression2> is greater than or less than 0. Otherwise it is 0. Only the number values of <Expression1> und <Expression2> are compared without considering the unit.
XOR Logical Exclusive OR <Expression1> XOR <Expression2>
The result is 1 if either <Expression1> oder <Expression2> (but not both of them) is greater than or lower than 0. Otherwise it is 0. Only the number values of <Expression1> and <Expression2> are compared without considering the unit.
NOT Logical NOT NOT <Expression>
The result is 1 if <Expression> is 0. Otherwise it is 0. Only the number value of <Expression> is compared without considering the unit.
518 PUBLICSAP BW/4HANA
Analysis

Operator Operator Name Description
LEAF Leaf The result is 0 on the results line, or the real (inner) node of a hierarchy, and 1 on the elementary line or the leaves of a hierarchy.
With this operator you can perform different calculations on results lines and elementary lines.
SAP BW/4HANAAnalysis PUBLIC 519

Operator Operator Name Description
IF Conditional Calculations Conditional calculations can be performed by the IF operator with three operands.
IF( < operand_cond >; < operand_true >; < operand_false > )
ExampleIF (Actual Costs > Plan Costs; Plan Costs + Plan Deviation; Actual Costs)
Calculation Logic
Value of <operand_cond>
Result of the IF Operator
ERROR, DIV0, OVERFLOW, NOP
<operand_cond>
Greater than or less than 0
<operand_true>
0 or NULL <operand_false>
NoteIf the condition is false, and you want the formula to output a special value, you can add one of the following variables to the formula instead of the third operand <operand_false>:
● 0NOP_VALUE for the special value NOP
● 0ERR_VALUE for the special value ERROR
ExampleIF( CNT Insured >= 200; Key Figure; 0NOP_VALUE)
520 PUBLICSAP BW/4HANA
Analysis

Operator Operator Name Description
Please note the following rules when using the IF operator:
● Only comparisons between number values are allowed.
● If <operand_cond> has the value 1 (= true) and <operand_false> has an error value (NOP, ERROE, DIV0), the error value will not be returned as the result of the IF operator. The same occurs if <operand_cond> does not have the value 1 (= false) and <operand_false> has an error value.
● On the basis of <operand_cond>, either <operand_true> or <operand_false> is calculated (excluding the formula exception aggregation).
● If <operand_cond> is NULL, <operand_false> will be returned as the result of the IF operator.
● The currency or unit of measure of <operand_cond> has no effect on the result of the IF operator.
5.2.2.7.7 Priority of Formula Operators
This section provides information about which priority the Analytic Engine executes formula operators with.
Formulas are stored in the database as an execution tree. This means that the brackets set by the user cannot be stored. They are taken into account however when the system creates the execution tree. Whenever BW Modeling Tools load a query, they only display brackets that are actually necessary.
The tables below provide a list of the function groups together with their priorities: 1 stands for the lowest priority, while 5 stands for the highest. The Analytic Engine calculates operations with higher priority first.
ExampleIn the case of the formula a + b * c, the calculation b * c is performed first, since the * operator has priority 2, whereas the der + operator has priority 1. If the user enters the formula a + ( b * c), the system removes the brackets when saving, since these are optional. If the user enters the formula (a + b) * c, the system does not remove the brackets, since they are required in order to perform the calculation in accordance with the user’s requirements.
SAP BW/4HANAAnalysis PUBLIC 521

NoteNote that your own system might not provide all of the operators listed here.
Basic Functions
Priority Operator Operator Name
5 - Unary Minus
3 ** High
2 * Multiply
2 /, DIV Divide
1 + Unary Plus
1 + Plus
1 - Minus
1 = Equal
Percentage Functions
Priority Operator Operator Name
4 %CT Percentage of Total
4 %GT Percentage of Grand Total
4 %YT Percentage of Total Along the Rows
4 %XT Percentage of Total Along the Columns
4 %RT Percentage of Query Total
3 %A Percentage
3 % Percentage Deviation
3 %_A Percentage with Signed Base Value (%_A)
Data Functions
Priority Operator Operator Name
4 SUMYT Subtotal Along the Rows
4 SUMXT Subtotal Along the Columns
4 SUMRT Norming Operation Query Total
522 PUBLICSAP BW/4HANA
Analysis

Priority Operator Operator Name
4 SUMGT Norming Operation Grand Total
4 SUMCT Norming Operation Total
4 SCAL Constant as Scalar; Based on Other Operands
4 NOERR No Error
4 NODIM Value Without Units or Currencies
4 NDIV0 No DIV0
4 TIME Casting Operator Time
4 VECT Constant as Vector; like a posted key figure
4 CMR Current Member Result
4 COUNT Counter
4 DATE Casting Operator Date
4 DELTA Delta
4 FIX FIX
Mathematical Functions
Priority Operator Operator Name
4 EXP Power Function
4 FLOOR Largest integer that is smaller than or equal to the operand
4 FRAC Decimal Digits of the Operand
4 TRUNC Integer value of the operand [TRUNC]
4 LOG Logarithm
4 CEIL Smallest integer that is greater than or equal to the operand
4 ABS Absolute Value
4 SQRT Root
4 LOG10 Logarithm with Base 10
SAP BW/4HANAAnalysis PUBLIC 523

Priority Operator Operator Name
4 SIGN Sign of the Operand
4 MAX0 Maximum of 0 and Operand
4 MIN0 Minimum of 0 and Operand
2 MAX Maximum
2 MIN Minimum
2 MOD Modulo
2 DIV Integer Division
Trigonometric Functions
Priority Operator Operator Name
4 COS Cosine
4 COSH Hyperbolic Cosine
4 SIN Sine
4 SINH Hyperbolic Sine
4 TAN Tangent
4 TANH Hyperbolic Tangent
4 ACOS Arc Cosine
4 ASIN Arc Sine
4 ATAN Arc Tangent
Boolean Operators:
Priority Operator Operator Name
4 LEAF Leaf
3 IF Conditional Calculations
3 <, <=, <>, ==, >, >= Relational Operators
3 NOT Logical NOT
2 AND Logical AND
1 OR Logical OR
1 XOR Logical Exclusive OR
524 PUBLICSAP BW/4HANA
Analysis

5.2.2.8 Formula Calculation and Special Values
Use
This section explains the basic rules that the system uses to calculate null values and other special values into formulas.
Note
See also 794006 .
The following special values are explained:
● NULL represents the value null;● DIV0 is the result of a division by 0;● ERROR displays an error;● NOP displays that no aggregation is possible.● W stands for a valid value and * for a value;● O1 is a unary operator (such as NODIM, NOERR)● O2 is a binary operator (like +, -, *)
NOP is the result of aggregations NO1, NO2, and NOP (see Aggregation and Special Values [page 494]). As the result of an operation (or a non-homogeneous value set) NOP has lost its place between NULL and ERROR in the following priority rule.
1. ERROR/DIV02. NOP3. NULL or a normal value depending on the operation.
The following rules apply for formulas:
● NOERR( ERROR ) = 0, NDIV0(DIV0) = 0, O1(NULL) = NULL and O1(ERROR) = ERROR for all remaining unary operators O1. For NOP also NOERR(NOP) = 0, NDIV0(NOP) = NOP, O1(NOP) = NOP for all remaining unary operators O1. This basic rule states that all operators only result in one parameter DIV0 / NULL / ERROR / NOP values provided that the parameter is DIV0, NULL, ERROR, or NOP and the operator is not an operator for suppressing these values.
● O2(NULL,NULL) = NULL, O2(ERROR,*)= ERROR and O2(*,ERROR) = ERROR for all binary operators. This basic rule states that ERROR (including DIV0) is dominant in all operations and all operations with only NULL as an entry also have NULL as their result.
● O2(ERROR,NOP)= ERROR and O2( {value OR NULL} ,NOP) = NOP for all binary operators. This basic rule states that DIV0/ERROR is dominant over NOP, and NOP is dominant over all other values.
● O2(NULL,W) = O2(0,W) and O2(W,NULL) = O2(W,0) with exception of the following combinations that have NULL as their result: NULL * W, W * NULL, NULL / W, NULL %A W, NULL %_A W, NULL %RT W, NULL %GT W, NULL %CT W, NULL ** W, NULL DIV W, NULL MOD W.
Adding a structure element does not necessarily mean that the content of of all structure elements will be changed. The OLAP processor also therefore handles a division by null without canceling the query immediately. If a cell also contains a division by null or another error, the other cells do not need to be affected.
SAP BW/4HANAAnalysis PUBLIC 525

As DIV0 is a special type of ERROR, DIV0 and ERROR behave in the same way when they are combined with other parameter values in operations. The behavior of DIV0 and ERROR in binary operations is unspecific and depends on the binary operation O2:
● O2(DIV0, ERROR) = DIV0 or ERROR● O2(ERROR, DIV0) = DIV0 or ERROR
DIV0 is more specific and can therefore get the priority before ERROR. But the behavior is not defined uniquely.
The following table gives an overview of the behavior and all rules:
OperatorLeft Operand Right Operand
Y NULL NOP DIV0 / ERROR
+, - X X op Y X NOP DIV0 / ERROR
NULL Y (-Y) NULL
NOP NOP
DIV0 / ERROR
DIV0 / ERROR
* X X op Y NULL NOP
NULL NULL NULL
NOP NOP
DIV0 / ERROR
DIV0 / ERROR
/, DIV, MOD X X op Y DIV0 NOP
NULL NULL NULL
NOP NOP
DIV0 / ERROR
DIV0 / ERROR
High (**) X X ** Y 1 NOP
NULL NULL NULL
NOP NOP
DIV0 / ERROR
DIV0 / ERROR
%, %_A, %_RT, %_GT, %_CT
X X op Y X op 0 NOP
526 PUBLICSAP BW/4HANA
Analysis

OperatorLeft Operand Right Operand
NULL NULL NULL
NOP NOP
DIV0 / ERROR
DIV0 / ERROR
Other operations, such as MIN, MAX
X X op Y X op 0 NOP
NULL 0 op Y NULL
NOP NOP
DIV0 / ERROR
DIV0 / ERROR
5.2.2.9 Examples in the InfoObject Maintenance
Related Information
Exception Aggregation Last Value (LAS) and Average (AV0) [page 527]Exception Aggregation Average (AV1) [page 529]
5.2.2.9.1 Exception Aggregation Last Value (LAS) and Average (AV0)
Use
Non-Cumulative Key Figures:
An example of the use of standard aggregation and exception aggregation for a key figure is a key figure for the non-cumulative value (non-cumulative key figure).
For non-cumulative key figures such as warehouse stock, you want to summate the warehouse stock relating to various articles and warehouse (standard aggregation), but determining the final count relating to month (LAST aggregation) (exception aggregation relating to the time characteristic Calendar Month).
See also Aggregation Behavior of Non-Cumulative Key Figures [page 581].
Numerator:
A further example of the use of standard aggregation and exception aggregation for a key figure is the key figure as a numerator.
SAP BW/4HANAAnalysis PUBLIC 527

You have an InfoProvider Performance Appraisal for example:
Pers. No. Type of Appraisal YearNo. of Performance Appraisals
4711 Potential assessment 2002 1
4711 Goal achievement 2002 0
4711 Performance appraisal 2002 1
4712 Potential assessment 2002 1
4712 Goal achievement 2002 0
A query would deliver the following result:
Employee 4711 would be counted twice because the different appraisal types are added together, which would make the result incorrect. To avoid this, key figure Number of MA Appraisals has an exception aggregation (for example, Average (Values Unequal to Zero)) for characteristic Appraisal Type. This means that the No. of Performance Appraisals is not totaled.
The query then appears as follows:
528 PUBLICSAP BW/4HANA
Analysis

5.2.2.9.2 Exception Aggregation Average (AV1)
Use
You want to calculate the average of an overall value by day. The query looks like this:
From Date To DatePeriod of Time in Days Value
Period of Time in Days Multiplied by Value
20050618 20050620 2 3 6
20050620 20050625 5 2 10
20050625 20050629 4 2 8
20050629 20050630 1 27 27
20050630 20050708 8 44 352
20050708 20050807 30 1 30
20050807 20050807 1 0 0
Total 51 79 433
You calculate the average as follows:
433 : 51 = 8,490
To get this result, the key figure must have the exception aggregation Average (AV1), relating to the characteristic Calendar Day (0CALDAY).
For a key figure with the exception aggregation Average (AV1) relating to the characteristic Calendar Month (0CALMONTH), the result is as follows:
From Date To Date Period of Time in Days Value Period of Time in Days Multiplied by Value
200506 200506 30 3 90
200506 200506 30 2 60
200506 200506 30 2 60
200506 200506 30 27 810
200506 200507 61 44 2684
200507 200508 62 1 62
SAP BW/4HANAAnalysis PUBLIC 529

200508 200508 31 0 0
Total 274 79 3766
You calculate the average as follows:
3766 : 274 = 13,744
5.2.2.10 Examples in the Query Definition
Related Information
Counting Exception Aggregations [page 530]Extended Counting of Exception Aggregations [page 532]
5.2.2.10.1 Counting Exception Aggregations
Use
The following scenario shows how you can use the query definition to count the results of a calculated key figure.
You have loaded the following data into your InfoProvider:
Region Customer Sales
USD
NY A 400,000
B 200,000
C 50,000
CA A 800,000
C 300,000
In the query, you want to determine the number of customers where the revenue is under 1,000,000 USD. To do this, you create the calculated key figure Revenue Customer <= 1,000,000 (F1) with the following properties:
● Formula definition: Revenue <= 1,000,000● Exception aggregation: Total, reference characteristic: Customer
530 PUBLICSAP BW/4HANA
Analysis

This query would deliver the following result:
Region Customer Sales F1
USD
NY A 400,000 1
B 200,000 1
C 50,000 1
Result 650,000 3
CA A 800,000 1
C 300,000 1
Result 1,100,000 2
Overall Result 1,750,000 2
NoteThe grand total of the calculated key figure F1 is calculated as follows:
Revenue customer A (400,000 + 800,000) does not meet the condition (revenue <= 1.000.000) - the result is 0,
Revenue customer B (200,000) meets the condition - the result is 1,
Revenue customer C (50,000 + 300,000) meets the condition - the result is 1,
The grand total for F1 is 2.
A query with the breakdown according to region would give the following result:
Region Sales F1
USD
NY 650,000 3
CA 1,100,000 2
Overall Result 1,750,000 2
NoteBy assigning the reference feature Customer during the exception aggregation of the calculated key figure F1, the query also returns the required data without a breakdown according to reference features.
SAP BW/4HANAAnalysis PUBLIC 531

5.2.2.10.2 Extended Counting of Exception Aggregations
Use
The following scenario shows how you can use the query definition to count the results of differently calculated key figures. The data is taken from the following example and enhanced: Counting Exception Aggregations [page 530].
You have loaded the following data into your InfoProvider:
Country Region Customer Sales
USD
US NY A 400,000
B 200,000
C 50,000
CA A 800,000
C 300,000
In the query, you now want to determine the number of customers where the revenue is under 1,000,000 USD and calculate the following values:
● Number of customers with revenue between 100,000 and 1,000,000● Number of customers with revenue between 100,000 and 1,000,000 in at least one region
To be able to calculate these values, you must create the following calculated key figures:
● F1: Customers with Revenue <= 1,000,000○ Formula definition: Revenue <= 1,000,000○ Exception aggregation: Total, reference characteristic: Customer
● F2: Customers with revenue between 100,000 and 1,000,000○ Formula definition: (Revenue >= 100,000) AND (Revenue <=1,000,000)○ Exception aggregation: Total, reference characteristic: Customer
● F3: Customers with revenue between 100,000 and 1,000,000 in at least one regionFor this key figure, you need the help key figure H1 (to aggregate the regions with revenue between 100,000 and 1,000,000 USD)○ Formula definition: (Revenue >= 100,000) AND (Revenue <=1,000,000)○ Exception aggregation: Maximum, reference characteristic Region
The help key figure (H1) is used in F3:○ Formula definition: Help key figure (H1)○ Exception aggregation: Total, reference characteristic: Customer
532 PUBLICSAP BW/4HANA
Analysis

● The query would then deliver the following result:
Country Region Customer Sales F1 F2 F3
USD
US NY A 400,000 1 1 1
B 200,000 1 1 1
C 50,000 1 0 0
Result 650,000 3 2 2
CA A 800,000 1 1 1
C 300,000 1 1 1
Result 1,100,000 2 2 2
Overall Result 1,750,000 2 2 3
NoteThe grand total of the calculated key figure F2 is calculated in the following way:
Revenue customer A (1,200,000) does not meet the condition (revenue between 100,000 and 1,000,000) - the result is 0,
Revenue customer B (200,000) meets the condition - the result is 1,
Revenue customer C (350,000) meets the condition - the result is 1;
when totalled together, the grand total for F2 is 2.
The grand total of the calculated key figure F3 is illustrated by the following view:
Customer Country Region Sales F1 F2 F3 H1
USD
A US NY 400,000 1 1 1 1
CA 800,000 1 1 1 1
Result 1,200,000 0 0 1 1
B US NY 200,000 1 1 1 1
Result 200,000 1 1 1 1
C US NY 50,000 1 0 0 0
SAP BW/4HANAAnalysis PUBLIC 533

Customer Country Region Sales F1 F2 F3 H1
CA 300,000 1 1 1 1
Result 350,000 1 1 1 1
Overall Result
1,750,000 2 2 3 0
5.2.3 Operations on the Result Set
Use
Operations on the result set created by the Analytic Manager are semantic functions that refilter or recalculate the data being displayed without actually changing the original data.
Concept
Operations on the result cannot request any data themselves. The OLAP Controller is a layer that allows communication between the Analytic Manager and the front end. It has the task of calling the Analytic
534 PUBLICSAP BW/4HANA
Analysis
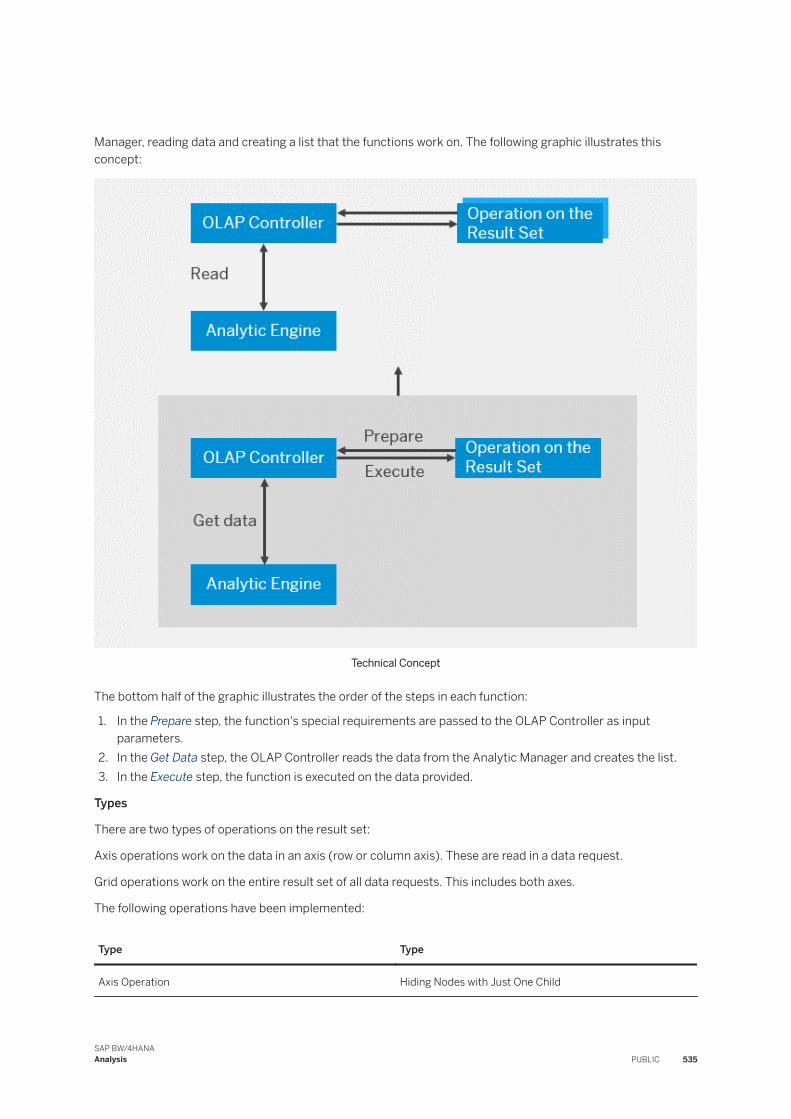
Manager, reading data and creating a list that the functions work on. The following graphic illustrates this concept:
Technical Concept
The bottom half of the graphic illustrates the order of the steps in each function:
1. In the Prepare step, the function's special requirements are passed to the OLAP Controller as input parameters.
2. In the Get Data step, the OLAP Controller reads the data from the Analytic Manager and creates the list.3. In the Execute step, the function is executed on the data provided.
Types
There are two types of operations on the result set:
Axis operations work on the data in an axis (row or column axis). These are read in a data request.
Grid operations work on the entire result set of all data requests. This includes both axes.
The following operations have been implemented:
Type Type
Axis Operation Hiding Nodes with Just One Child
SAP BW/4HANAAnalysis PUBLIC 535

Type Type
Grid Operations Suppression of Zero Rows and Zero Columns
Local Calculations
Conditional Totals Suppression (in the Result Row)
Order of Execution
If more than one operation is executed on the result set created by the Analytic Manager, the system works in a given order. It is important to follow this, as every operation builds on the result of the preceding one. The system executes the operations as follows:
1. Suppression of Zero Rows and Zero Columns2. Hiding Nodes with Just One Child3. Local Calculations4. Conditional Totals Suppression (in the Result Row)
Integration
Operations on the OLAP result set can be called either in Query Designer or directly in the query.
Related Information
Suppression of Null Rows and Null Columns [page 536]Hiding Nodes with Just One Child [page 537]Local Calculations [page 538]Conditional Totals Suppression (in the Result Row) [page 539]Example: Combination of Various Operations [page 539]
5.2.3.1 Suppression of Null Rows and Null Columns
Use
Null suppression is a filter operation in the display similar to a condition. It causes rows and/or columns with null values to be hidden after aggregation. This function is related to the result set of just one data request, i.e. to an axis. It works both for hierarchies and for result sets without hierarchies, and can be applied to structures in the drilldown.
CautionNote that error values such as DIV0, OVERFLOW or ERROR cannot be suppressed.
536 PUBLICSAP BW/4HANA
Analysis

When working with the null suppression function, you can choose the setting variants active and active (all values = 0).
The only difference between these two queries is how they affect queries that contain characteristics in the rows and in the columns (Cross-Tab). These settings have exactly the same effect on queries that contain characteristics only in the rows or only in the columns.
Active
With this setting, the system checks for null values in the results area and hides any rows or columns containing null values.
Active (All Values = 0)
With this setting, the system only hides rows or columns that contain just null values.
Additional condition: Property of a structure
In the structure properties, you can define that null suppression is applied to the structure components.
NoteIn the query definition, the standard setting is for null values only to be suppressed if all elements = 0.
Integration: Creating a query
In the Properties of a Query dialog, you can define whether or not rows or columns that contain nulls as values should be displayed.
In the Properties of the Structure dialog, on the Display tab, you can define whether suppression of rows and/or columns with null values should also be applied to the corresponding structure.
Related Information
Screen Area: Zero Suppression [page 823]Structure Properties [page 749]
5.2.3.2 Hiding Nodes with Just One Child
Use
Hiding nodes with just one child is a filter operation that is similar to conditional row suppression. Nodes in a display hierarchy that only have one child are hidden. This function is a setting for the hierarchy in the characteristic. If several characteristics are on the same axis, they are processed one after the other, always starting from the outermost characteristic and working inwards (in other words, left to right or top to bottom).
SAP BW/4HANAAnalysis PUBLIC 537

Integration: Creating a query
When defining a query, you can specify in the Characteristic Properties on the Hierarchy tab page on the Display of Nodes screen whether you want the system to always show or hide the nodes.
Related Information
Tab: Hierarchy [page 748]
5.2.3.3 Local Calculations
Local calculations are performed (on the client) on the result set provided by the analytic manager. This allows you to recalculate results or single values from a report based on specific criteria.
ExampleFor example, you can create ranking lists or calculate the total of a top 10 product list.
This function is a key figure setting.
CautionNote the following features:
● Local calculations only work on the displayed data. This means that local calculations only change how the values are displayed. For any subsequent calculations (such as formulas), the system uses the original values calculated by the analytic manager and NOT the display values changed by the local calculations.
● Local calculations cannot be applied to hierarchies.● If you are processing large result sets, local calculations can take significantly more time to perform.
Integration: Creating a query
In the query definition, you can specify for a structure element which rules are used to recalculate result rows and/or single values, and in which direction the calculations are performed.
Related Information
Tab: Calculations [page 755]Calculate Results As [page 755]
538 PUBLICSAP BW/4HANA
Analysis

Calculate Single Values As [page 758]These links takes to you to the documentation for BW Modeling tools.
5.2.3.4 Conditional Totals Suppression (in the Result Row)
Conditional suppression is a filter operation that is similar to hiding nodes with only child. The result rows on an axis (the aggregate of a single value) are hidden. In this case, the single value and the result would be identical. The analytic manager calculates the subtotal, checks whether only one child exists and then deletes the total. This function is a characteristic setting. If several characteristics are on the same axis, they are processed one after the other.
Integration: Creating a query
In the query definition, you can use the Characteristic Properties screen to specify how you want to display result rows for a specific characteristic; always show, always hide or display for more than one value. If you choose display for more than one value, select a condition total suppression.
Standard Query
This is the default setting for standard queries.
Related Information
Tab: General [page 743]This link takes to you to the documentation for BW Modeling tools.Standard Queries [page 680]
5.2.3.5 Example: Combination of Various Operations
If you want to perform multiple operations on the result set provided by the analytic engine, the system processes the operations one after the other according to the defines sequence, always continuing with the result from the previous operation:
1. Suppression of Zero Rows and Zero Columns2. Hiding Nodes with Just One Child3. Local Calculations4. Conditional Totals Suppression (in the Result Row)
The following examples are provided to illustrate certain aspects. In each of these graphics, the query before the operations are performed on the result set is shown at the top, while the query after these operations have been performed is shown at the bottom.
Combination of Hiding Nodes with Just One Child and Suppressing Zero Rows
SAP BW/4HANAAnalysis PUBLIC 539

Example 1
Combination of Conditional Totals Suppression (in the Result Row) and Suppression of Zero Rows
540 PUBLICSAP BW/4HANA
Analysis

Example 2
5.2.4 Hierarchy
Use
In SAP BW∕4HANA there are different options for modeling hierarchical structures. The following table provides an overview:
Hierarchy Type Description
Hierarchy definition for characteristics
Characteristic hierarchy Characteristic values of a characteristic in a tree structure. Characteristic hierarchies are stored in their own data tables. Like master data, they can be used in all InfoProviders.
Example: Hierarchy of cost centers that are assembled in cost center groups.
Specifying hierarchical structures in InfoCube modeling
SAP BW/4HANAAnalysis PUBLIC 541

Hierarchy Type Description
In the dimensions of an InfoProvider Example: Time dimension. The definitions of InfoObjects 0CALDAY, 0CALMONTH, and 0CALYEAR form a hierarchy.
Example: 04.09.2003 04.2003 2003
Specification of hierarchical structures in InfoCube maintenance
In the attributes of a characteristic Example: The definitions of InfoObjects 0MATERIAL, 0MATL_GROUP, 0MATL_TYPE, and 0IND_SECTOR form a hierarchy.
To use attributes in the query as hierarchy levels, they have to be defined as navigation attributes.
The most appropriate type of modeling depends on the individual case. The modeling types differ, for example, with regard to how data is stored in the source system, performance, authorization checks, the use of aggregates, or whether parameters can be set for the query.
NoteIn addition, you can organize the elements of a structure as a hierarchy in the query definition. Hierarchies for characteristics are not required for these functions.
You can display one or both axes (rows and columns) as a hierarchy.
The following sections deal exclusively with the maintenance of characteristic hierarchies.
RecommendationAvoid grouping properties that belong to semantically different "dimensions" - such as "Time", "Product", "Customer", and "Countries" - in one artificial characteristic.
Example: Distribution Channel and Product Group in artificial characteristic Profit Center.
If you want to define characteristic hierarchies to use in reporting to display different views, we recommend that you do not code separate dimensions in one artificial characteristic. This has the following drawbacks:
● The hierarchies are unnecessarily large. System performance is negatively affected during reporting. A hierarchy should contain no more than 50,000-100,000 leaves.
● Comprehensive change runs occur too frequently.
Characteristic hierarchies also allow you to create queries for reporting in several ways.
Integration
In InfoObject maintenance you have to specify whether a characteristic can have hierarchies. A characteristic of this type is called a hierarchy basic characteristic.
542 PUBLICSAP BW/4HANA
Analysis

Hierarchies can only be created for hierarchy basic characteristics. All characteristics that reference a hierarchy basic characteristic automatically inherit the corresponding hierarchies. A hierarchy basic characteristic can have as many hierarchies as required.
ExampleAn example of a hierarchy basic characteristic is 0COSTCENTER.
In InfoObject maintenance, the properties of all the hierarchies for the respective characteristic are defined.
Features
The following table provides you with an overview of the functions associated with characteristic hierarchies in the BW system.
Overview of functions associated with hierarchies
Function Description
Loading Hierarchies You can load characteristic hierarchies from a source system or from a different BW system into your BW system or into a different BW system.
Creating Hierarchies You can create characteristic hierarchies in your BW system.
CautionNote that the size of the hierarchy influences performance.
Editing Hierarchies In hierarchy maintenance for the BW system, you can change, copy, delete, or set reporting-relevant hierarchy attributes in characteristic hierarchies.
Activating Hierarchies To use hierarchies in reporting, you have to activate your hierarchies.
The BW system predefines all useful hierarchies for time characteristics. Activate a useful selection from the complete list of proposals.
Modifying hierarchy changes When you create or load new hierarchies you also need to create the corresponding aggregates. When you change a hierarchy or activate a changed hierarchy, all existing aggregates are modified automatically (see System Response Upon Changes to Master Data and Hierarchies).
SAP BW/4HANAAnalysis PUBLIC 543

Function Description
Modeling Data Flows for Hierarchies with Direct Access The structure of a hierarchy with direct access is read in the source system at runtime. As with all other hierarchies, you can also use a hierarchy with direct access in the query (see Modeling Data Flows for Hierarchies with Direct Access).
Related Information
Options for Hierarchical Modeling [page 544]Hierarchy Nodes [page 546]Activating Virtual Time Hierarchies [page 553]Hierarchy Properties [page 554]
5.2.4.1 Options for Hierarchical Modeling
Comparison of modeling in different hierarchical structures
Characteristic HierarchyHierarchical Structures in InfoCube Dimensions or DataStore Objects
Hierarchical Structures in Attributes Characteristics
As Posted view is not possible.
Different views (such as version, key date) of the data are possible.
As Posted view is possible. As Posted view is not possible.
Different data views are not possible. Exception: The view for the key date is possible if the characteristic or respective attributes are time dependent.
Cross-InfoProvider Only valid for an InfoProvider Cross-InfoProvider, because it is modeled in the master data.
Changeable Not changeable, unless you reload the InfoProvider.
Changeable (with master data changes or with the addition of attributes).
Drill-down path is defined by the structure.
Drill-down path is not defined by the structure. Levels can therefore be skipped.
Drill-down path is not defined by the structure. Levels can therefore be skipped.
Duplicate leaves are always displayed. Duplicate leaves are only possible in As Posted view.
Duplicate leaves are not possible.
Balanced and unbalanced hierarchies are possible.
Hierarchy structures have to be balanced.
Hierarchy structures have to be balanced.
The following sections deal exclusively with the maintenance of characteristic hierarchies.
544 PUBLICSAP BW/4HANA
Analysis

Example
The following graphic shows a sales hierarchy as a typical example of a characteristic hierarchy in the BEx Analyzer.
The following graphic shows a hierarchical structure modeled in the dimensions of an InfoCube in the BEx Analyzer.
SAP BW/4HANAAnalysis PUBLIC 545

Using the Display as Hierarchy (Universal Display Hierarchy) function, you can also display the modeling as a tree in the query, like the characteristic hierarchy shown above (seeWorking with Hierarchies).
5.2.4.2 Hierarchy Nodes
Definition
Hierarchy nodes are components of a characteristic hierarchy. A characteristic hierarchy is assigned to a hierarchy basic characteristic and is therefore subject to the valid hierarchy properties Version Dependency, Time Dependency, Interval, and Sign Reversal for all hierarchies assigned to this characteristic (see Hierarchy Properties [page 554]).
The structure of a characteristic hierarchy is defined by the link relationships among the hierarchy nodes.
● Each node has exactly one parent node (predecessor). The "depth" (level) of the node corresponds to the number of its predecessors increasing up to the root of one. This means that the roots have level 1.
● The set quantity of children or subnodes (successors) is assigned to each node. The "degree" of a node corresponds to the number of its successors.
● Nodes that have special features in one of the two relationships are roots (nodes) and leaves. All nodes are indicated as inner nodes whose degree is not zero, meaning that they have successors.
546 PUBLICSAP BW/4HANA
Analysis

● With regard to the structure of a hierarchy, the hierarchy nodes are assembled into hierarchy levels and subtrees.
Depending on whether a node refers to a hierarchy basic characteristic or not, we differentiate postable and not postable nodes.
All nodes (except for leaves and link nodes) can only occur once in a hierarchy. More information: Modeling Nodes and Leaves and Link Nodes [page 552].
Structure
Special hierarchy nodes
Hierarchy nodes Description
Root (nodes) A node that is not assigned under any node and has no parent node (predecessor). A hierarchy can have more than one root node.
Leaf A node without lower-level nodes (successors). Leaves are postable but are not postable nodes (see the "Postability of Nodes" table below).
Leaves are always characteristic values for the hierarchy basic characteristic.
Value specification: The value is moved from the InfoProvider.
Intervals A quantity of leaves that are indicated by their lower and upper limit.
Inner nodes A node that has successors, which means all nodes except for leaves.
Grouping of hierarchy nodes
Grouping Description
Hierarchy level A hierarchy level consists of all nodes with the same depth.
Root nodes have depth (level) 1. The depth of a node corresponds to the number of parent or grandparent nodes up to the root node + 1 (increased by one)
A hierarchy can have a maximum of 98 levels. Each level can have a name.
SAP BW/4HANAAnalysis PUBLIC 547

Grouping Description
Subtree A subtree includes a node (root node of the subtree) with its lower-level or subnodes.
Nodes that are on the lower border of a subtree are called border nodes. This is relevant for hierarchy authorizations (see Settings for Hierarchy Authorizations [page 1243]).
Postability of nodes
Postability Description
Postable nodes A node that corresponds to a characteristic value for the hierarchy basic characteristic.
(In other words, a node that corresponds to a characteristic value for a characteristic that references the hierarchy basic characteristic. This definition includes the hierarchy basic characteristic.)
Unlike a leaf, additional nodes or leaves are assigned under a postable (inner) node.
Value specification: The value of a postable node is specified by the aggregation of the values of its lower-level nodes and of its value in the InfoProvider. For an example, see Modeling Nodes and Leaves.
Non-postable nodes A node that does not refer to a hierarchy basic characteristic and is not a postable node (see Text Nodes, External Characteristic Nodes).
Value specification: The value of a node that is not postable is specified by the aggregation of the values of its child nodes.
Text node A text node is a new, artificial term. Text nodes are special characteristic nodes for the artificial characteristic 0HIER_NODE.
External characteristic nodes A node that is identified by any specification of any InfoObject is an External Characteristic Node.
For a characteristic to be used in the hierarchy as an external characteristic node, this has to be explicitly selected in the InfoObject maintenance for the hierarchy basic characteristic.
548 PUBLICSAP BW/4HANA
Analysis

Postability Description
Not assigned The system automatically creates a root node REST_H, under which all characteristic values are positioned. These characteristic values exist in the master data, but are not explicitly arranged in the hierarchy.
The Not Assigned node guarantees that no data is lost when a presentation hierarchy is activated (see Characteristic Properties). In the query, this node is always collapsed first and does not react to Expand to Level It can be explicitly expanded however.
Hierarchy balance
Hierarchy type Description
Unbalanced A hierarchy whose leaves are on various levels is called an unbalanced hierarchy.
If various sources of information are delivered with different degrees of detail (one to the Material level for example, another only to the Material Group level), this can result in unbalanced hierarchies (see the example below).
Balanced A hierarchy whose leaves all have the same depth is called a balanced hierarchy.
A balanced hierarchy, in which all nodes for a level have the same semantics (such as characteristic nodes with the same characteristic), is called a Named Level Hierarchy (see example 1 below). In level maintenance, you can assign the levels for the respective texts (see Level Maintenance).
Typical examples of these hierarchies are geographic hierarchies, with the levels Continent- Country- State- Region- City for example, or time hierarchies (see the example below).
NoteSAP NetWeaver Business Intelligence can process both balanced and unbalanced hierarchies without restriction.
Example
Example 1
The following graphic provided an example of a hierarchy for InfoObject Month 0CALMONTH to illustrate the relationships between the hierarchy nodes and their grouping in hierarchy levels.
SAP BW/4HANAAnalysis PUBLIC 549

This time hierarchy is a typical example of a balanced hierarchy. It has several root nodes, as the nodes with characteristic values 2002 and 2003 for the InfoObjects transferred in addition to the time characteristic Year 0CALYEAR ( external characteristic node), are not normally positioned under a special parent node (like text node Year).
The hierarchy has three levels. Since each level corresponds to an InfoObject (0CALYEAR, 0CALQUARTER, 0CALMONTH), this is a Named Level Hierarchy.
Postable nodes are green, while nodes that cannot be posted to are displayed in yellow. The definition of nodes 1.2002/0CALQUARTER and 1.2003/0CALQUARTER is identical. Specifiying intervals as a summary of several leaves provides an easier entry option, but is not a new structure component.
Example 2a
The following graphic provides an example of a hierarchy for InfoObject Customer to illustrate the relationships between the hierarchy nodes and their grouping in hierarchy levels. This customer hierarchy is a typical example of an unbalanced hierarchy and has one root node only. Postable nodes and leaves are green, while nodes that cannot be posted to are displayed in yellow.
Example 2b
550 PUBLICSAP BW/4HANA
Analysis

The following graphic provides an example of a hierarchy for the InfoObject Customer to illustrate how this kind of hierarchy is displayed when you model it in the hierarchy maintenance transaction. The various node types are displayed as follows:
● Folder symbol: Text nodes, in this case the Customer Hierarchy root node● Yellow InfoObject symbol: Nodes that cannot be posted with characteristic values for the additionally
transferred InfoObjects Region ( External Characteristic Nodes) in the customer hierarchy● Green InfoObject symbol: Postable nodes and leaves for InfoObject Customer
See also:
Link Nodes [page 552]
Loading Data as Subtrees
Creating Hierarchies
Modeling Nodes and Leaves
Editing Hierarchies
Hierarchy Properties [page 554]
SAP BW/4HANAAnalysis PUBLIC 551

5.2.4.2.1 Link Nodes
Definition
A link node is a hierarchy node that refers to another hierarchy node, which is known as the original node.
Use
With a link node you can hang the subtree that is under the corresponding, original node several times in a hierarchy.
Structure
The link node has the same name (NODENAME) as the original node externally, while internally it keeps another ID (node ID).
The link node succeeds all properties and subtrees for the original node. It has no children "of its own". The children transferred from the original node are not displayed in the hierarchy maintenance.
Link and original nodes differ with regard to their parent nodes and neighboring nodes.
These special features are expressed by the indicator that is set with the link node.
Integration
Loading link nodes
The link node has its own NODEID and PARENTID when loading. The CHILDID has to be blank. NODENAME, INFOOBJECT, and the time intervals (fields of the from-to date), if necessary, are identical to the values for the original node. The link indicator must be set.
You can find additional information using the named fields underDownloading Hierarchies from Flat Files.
Example
The following graphic illustrates how a specific, customer organization hangs both under the Sales Organization New York as well as under the Sales Organization California.
In the hierarchy maintenance, only the link node is displayed as a reference to the original. The arrow clarifies this relationship. In the query, the children nodes transferred from the original node are contrasted here in white.
552 PUBLICSAP BW/4HANA
Analysis

The value is not counted twice for the overall total Sales Organization USA.
See also:
Modeling Nodes and Leaves
5.2.4.3 Activating Virtual Time Hierarchies
Use
You can use this function to release hierarchies for time characteristics with which you want to work in reporting. You can choose the hierarchies you want to use from a list of suitable hierarchies for a time characteristic. The selected hierarchies are then made available for you in reporting.
NoteThe hierarchies for time characteristics are not saved in the database tables, but generated virtually in the main memory. This is why they are called Virtual Time Hierarchies.
Procedure
1. Choose SAP Reference IMG → SAP Customizing Implementation Guide → SAP NetWeaver → Business Intelligence → Settings for Reporting and Analysis → General Settings for Reporting and Analysis → Set F4 Help and Hierarchies for Time Characteristics/OLAP Settings.
2. Choose the Virtual Time Hierarchies tab page.
SAP BW/4HANAAnalysis PUBLIC 553

On the left, you can see the active time characteristics in the system (such as date, month, calendar month, and fiscal year/period) that hierarchies are supported for in characteristic maintenance.
3. Choose the required time characteristic using the button (date, for example).In the upper screen area, you can see the hierarchies suitable for the time characteristic.
4. Select the required hierarchies by double-clicking on them or using drag and drop to move them to the lower-right screen area.
The hierarchy tree symbol shows that the selected hierarchies are active and listed in the lower area.5. You can now select the start level for the activated hierarchies in the lower screen area, and enter short,
medium, and long descriptions.With the start level, you determine the level to which the hierarchy is expanded in the opening drilldown.
NoteIf you do not enter a description, the system creates one automatically.
6. Choose Save.
Result
You have activated virtual time hierarchies and can now use them in Query Designer for reporting.
5.2.4.4 Hierarchy Properties
Definition
Hierarchy properties are properties of all hierarchies for a hierarchy basic characteristic, delivered by SAP and freely-definable according to the needs of the customer.
Use
Hierarchy properties are fixed in InfoObject maintenance for a characteristic and are valid for all hierarchies that have been created for this characteristic.
NoteNote that hierarchy attributes are fixed in hierarchy maintenance and only apply to the hierarchy that is currently opened. You can find more information underHierarchy Attributes.
554 PUBLICSAP BW/4HANA
Analysis
Structure
The following hierarchy properties are available:
● Version dependency [page 555]● Time dependency [page 557]● Intervals [page 568]● Reversing the sign [page 570]
5.2.4.4.1 Hierarchy Version
Use
Characteristic hierarchies can be used in different versions. This option should be selected when hierarchy versions are to be addressed in reporting.
Integration
If there are different hierarchy versions in the source system, you can map these into BW. You can also generate different versions for one and the same hierarchy from the source system.
Features
In InfoObject maintenance, you specify whether the hierarchy basic characteristic has the property Version-Dependent Hierarchies (seeTab Page: Hierarchy).
In the master data maintenance for characteristic 0HIER_VERS, you can create and change hierarchy versions (seeMaintain Hierarchy Versions [page 556]).
In the hierarchy maintenance you edit the hierarchy versions (seeEditing Hierarchies).
In reporting you can use the different hierarchy versions, for example, for comparisons. You can display the hierarchy version data sequentially or simultaneously in different columns. Variables can be used to set parameters for the different versions.
Example
For example, you can create a company structure by area for different hierarchy versions for the InfoObject Main Area in order to execute a plan-actual comparison in a query.
Plan-actual comparison with hierarchy versions
SAP BW/4HANAAnalysis PUBLIC 555

Hierarchy version PLAN Hierarchy version ACTUAL
Main Area NORTH Main Area NORTH
Area 1
Area 2 Area 2
Main Area SOUTH Main Area SOUTH
Area 1
Area 3 Area 3
Area 4 Area 4
See also:
Hierarchy Properties [page 554]
5.2.4.4.1.1 Maintaining Hierarchy Versions
Procedure
1. From the main menu in the Data Warehousing Workbench, select Tools → Maintain Hierarchy Versions. The Characteristic 0HIER_VERS - Maintain Master Data: Selectionscreen appears.
2. Select a hierarchy version that is already available in the system. Input help is available.
NoteIf you want to create or modify versions in a particular language, select the corresponding language key.
3. Choose Execute. The Characteristic 0HIER_VERS - Maintain Master Data: List screen appears.
4. You use the Change function to modify existing versions and the Create function to create new hierarchy versions. A dialog box appears, in which you specify the hierarchy version and enter a long description for it. (The language is set to correspond to the language key that you specified on the selection screen.)
5. Enter the appropriate texts.6. Choose Continue.
NoteIn the hierarchy maintenance screen, you can create various hierarchy versions under the same technical name by copying a hierarchy and saving the copy as a different hierarchy version. However, you can only specify the description of the hierarchy version in the master data maintenance screens of the 0HIER_VERScharacteristic.
556 PUBLICSAP BW/4HANA
Analysis

Result
You have modified an existing version of a hierarchy or created a new hierarchy version including a descriptive text. You can use this version when you create a hierarchy with versions.
The texts for the hierarchy version and the description are independent of the hierarchy basic characteristic.
TipIf, for example, the version 001 has the text "Plan", each hierarchy version 001 has the text "Plan", regardless of which hierarchy basic characteristic was used to define the hierarchy.
See also:
Hierarchy Versions [page 555]
Hierarchy Properties [page 554]
5.2.4.4.2 Time-Dependent Hierarchies
Use
In a hierarchy that is not time dependent, the characteristic values are always the same.
If you want to create views of a hierarchy that are valid for a specific time period, you need to create the entire hierarchy as time dependent.
If you want to model relationships that change time-dependently, you need to create the hierarchy structure time-dependently.
Functions
In InfoObject maintenance, you can set whether and in which ways a hierarchy is time dependent. You can choose from the following:
the hierarchy is not time dependent (Hierarchy Not Time-Dependent). This is set by default.
the entire hierarchy is time dependent (Entire Hierarchy Time-Dependent).
every individual node relationship is time dependent (Hierarchy Structure Time-Dependent)
a temporal hierarchy join is used with time-dependent hierarchy structures (Use Temporal Hierarchy Join)
Entire Hierarchy is Time-Dependent
You can either load time-dependent hierarchies (see Loading Time-Dependent Hierarchies [page 567]) or create them in the BW system (see Creating a Hierarchy). When you create a time-dependent hierarchy, you have to enter a validity interval (Valid To and Valid From fields).
SAP BW/4HANAAnalysis PUBLIC 557

If an entire hierarchy is time dependent, the system creates hierarchy versions that are valid for separate intervals. The system automatically uses the current valid version in this case. The hierarchy valid in each case can be uniquely identified by its technical name and the From-To Date.
In the InfoObject tree in Data Warehousing Workbench, all time-dependent hierarchies under the associated
InfoObject are displayed with the corresponding To Date, for example Time-Dependent Hierarchy 05/31/2000.
In reporting, the system returns the valid hierarchy when a query is executed using the query key date.
TipWhen restructuring the areas of your enterprise, you can create time-dependent versions of a hierarchy for the Main Area InfoObject. This allows you to compare the restructuring over different time periods in a query.
Time-dependent hierarchy 01/01/1999 - 05/31/1999 Time-dependent hierarchy 06/01/1999 - 12/31/1999
Main Area NORTH Main Area NORTH
Area 1
Area 2 Area 2
Main Area SOUTH Main Area SOUTH
Area 1
Area 3 Area 3
Area 4 Area 4
NoteIn reporting, you can work in the individual columns of the report structure with fixed date values. You may want to do this to compare Main Area North in the Time-Dependent Hierarchy 05/31/2000 with Main Area North in the Time-Dependent Hierarchy 06/01/2000 (simulation).
Time-Dependent Hierarchy Structures
You can either load time-dependent hierarchies (see Loading Time-Dependent Hierarchies [page 567]) or create them in the BW system (see Creating a Hierarchy).
In hierarchy maintenance, you can determine a valid time interval for each hierarchy node (Valid To and Valid From fields).
In reporting, a hierarchy with time-dependent hierarchy structures is created either for the current key date or for the key date defined for the query. In addition, you can evaluate a hierarchy historically using the temporal hierarchy join.
TipYou can assign an employee to different cost centers at different times within the context of a restructuring.
558 PUBLICSAP BW/4HANA
Analysis

By choosing Display hierarchy from the context menu for a hierarchy, you can access the hierarchy display: Every node and every leaf here is marked with a date symbol. Hierarchy nodes that are assigned to different places in the hierarchy structure, depending on the time, are displayed more than once. By double clicking on a hierarchy node, you can display the associated validity period for the node relation.
TipIn the following example, you can double click on the “Jones” leaf to see that the employee Jones was assigned to region USA between 01/01/1999 and 05/31/1999 and Puerto Rico from 06/01/1999 to 12/31/1999.
In order to use a hierarchy with a time-dependent hierarchy structure in reporting, you require the following settings in BEx Query Designer:
1. If you want to evaluate a hierarchy with a time-dependent hierarchy structure for a fixed key date, enter the key date in query definition.
2. If you want to evaluate a hierarchy with a time-dependent hierarchy structure historically, for a key date that is to be derived from the data, choose the temporal hierarchy join option and specify the derivation type for the key date.
For a more detailed description of the functions and differences between the two evaluation views, see Time-Dependent Hierarchy Structures in the Query [page 561].
SAP BW/4HANAAnalysis PUBLIC 559

In maintenance screen fro the key date derivation type (RSTHJTMAINT) determine which rule to use to determine the key date from the data. You thus determine the time characteristic and how the key date is to be derived.
NoteFor the key date derivation type, there is also an editor in the BW Modeling tools. The editor can be called from the context menu of any InfoArea. The key date derivation type is then assigned to central InfoArea 0BW4_GLOBAL however.
1. First specify the time characteristic.If you choose a Basic Time Characteristic as a time characteristic (for example, 0CALDAY, 0CALMONTH, 0FISCPER), you can use a key date derivation type of this kind for all InfoProviders that contain exactly one time characteristic which references the selected basic time characteristic. If there are several time characteristics in an InfoProvider that reference the basic time characteristic, you have to either determine the time characteristic more specifically or select a particular time characteristic from a particular InfoSet (Time Characteristic from InfoSet).
2. Determine how you want the key date to be derived from the time characteristic.The following derivation types are available:○ First day of the period○ Last day of the period○ Delay by number of days (you specify this in the Delay by Days field). In this case, the key date is
calculated from the first day of the period plus the number of days specified minus one. If this key date does not fall within the period, the last day of the period is selected.
TipKey date derivation type with (basic characteristic = 0CALMONTH, derivation type = "first day of period"):
○ For January 2005 the key date is calculated as 1/1/2005.○ For February 2005 the key date is calculated as 2/1/2005.
Key date derivation with (basic characteristic = 0FISCPER, derivation type = "delay by number of days" and "delay " = 29):
○ For K4/01.2005 the key date is calculated as 1/29/2005.○ For K4/02.2005 the key date is calculated as 2/28/2005.○ For K4/03.2005 the key date is calculated as 3/29/2005.
CautionNote that the way in which you determine the key date derivation type affects performance. The number of data records that the OLAP processor reads corresponds to the level of detail on which the time characteristic and the leaf level lie. For this reason, choose the time characteristic as approximately as possible in order to keep the hierarchy small.
TipA small hierarchy has 100 leaves. For a period of 12 months, the OLAP Processor reads 1200 data records at month level. At day level, it reads 36500 data records.
560 PUBLICSAP BW/4HANA
Analysis

See also:
Maintaining Hierarchy Versions [page 556]
Hierarchy Properties [page 554]
5.2.4.4.2.1 Time-Dependent Hierarchy Structures in the Query
The following example explains the features and different analysis options with time-dependent hierarchy structures.
Time-Dependent Hierarchies
The time-dependent hierarchy for characteristic M has the following structure:
Hierarchy for Characteristic M
Successor Node Predecessor Node Valid from Valid to
Root node 1.1. 31.12.
Node1 Root node 1.1. 31.12.
Node2 Node1 1.1. 16.2.
Leaf1 Node2 1.1. 16.2.
Leaf2 Node2 1.1. 31.1.
Node4 Node1 1.1. 31.12.
Leaf2 Node4 1.2. 31.12.
Leaf3 Node4 1.1. 31.12.
Node3 Root node 1.1. 31.12.
Node2 Node3 17.2. 31.12.
Leaf1 Node2 17.2. 31.12.
Leaf4 Node2 17.2. 31.12.
Node5 Node3 1.1. 31.1.
Leaf5 Node5 1.1. 31.1.
Node6 Root node 1.2. 31.12.
SAP BW/4HANAAnalysis PUBLIC 561

Successor Node Predecessor Node Valid from Valid to
Leaf5 Node6 1.2. 31.12.
The following figure outlines the hierarchy from a modeling perspective:
InfoProvider
An InfoProvider with the characteristics Characteristic M, Day, Month and the key figure Key Figure contains the following data:
InfoProvider Data
Characteristic M Day Month Key Figure
Leaf1 15.1. Jan 10
Leaf2 15.1. Jan 20
Leaf3 15.1. Jan 30
Leaf4 15.1. Jan 40
Leaf5 15.1. Jan 50
Leaf1 15.2. Feb 25
Leaf1 28.2. Feb 5
Leaf2 15.2. Feb 15
562 PUBLICSAP BW/4HANA
Analysis

Characteristic M Day Month Key Figure
Leaf3 28.2. Feb 5
Leaf4 28.2. Feb 35
Leaf5 28.2. Feb 25
Fixed Key Date
A query based on this InfoProvider contains three structural elements; key figure restricted to January Key Figure(Jan), key figure restricted to February Key Figure(Feb), key figure restricted to the whole year key figure and the characteristic CharacteristicM in the columns.
The hierarchy has a fixed key date (15.2.) and is being used as a display hierarchy.
The InfoProvider data specified above produces the following result in the query:
Query Result
Key Figure (Jan) Key Figure (Feb) Key Figure
Overall result 150 110 260
* Root 110 75 185
** Node1 60 50 110
*** Node2 10 30 40
**** Leaf1 10 30 40
*** Node4 50 20 70
**** Leaf2 20 15 35
**** Leaf3 30 5 35
** Node6 50 25 75
*** Leaf5 50 25 75
* Non-assigned 40 35 75
** Leaf 4 40 35 75
The following graphic illustrates the query results:
SAP BW/4HANAAnalysis PUBLIC 563

Temporal hierarchy join
Query1: Display hierarchy
The hierarchy has a temporal hierarchy join and is used as a display hierarchy. The key date is derived from the posted data.
The InfoProvider data specified above produces the following result in the query:
Query1 Result
Key Figure (Jan) Key Figure (Feb) Key Figure
Overall result 150 110 260
* Root node 110 110 220
** Node1 60 45 105
*** Node2 30 25 55
**** Leaf1 10 25 35
**** Leaf2 20 20
564 PUBLICSAP BW/4HANA
Analysis

Key Figure (Jan) Key Figure (Feb) Key Figure
*** Node4 30 20 50
**** Leaf2 15 15
**** Leaf3 30 5 35
** Node3 50 40 90
*** Node2 40 40
**** Leaf1 5 5
**** Leaf4 35 35
*** Node5 50 50
*** Leaf5 50 50
** Node6 25 25
*** Leaf5 25 25
* Non-assigned 40 40
** Leaf4 40 40
The following graphic illustrates the query results:
● The value of leaf1 on 15.2. is assigned to node2 which has node1 as its predecessor because leaf1 belongs to this hierarchy path on the posting day.
SAP BW/4HANAAnalysis PUBLIC 565

● The value of leaf1 on 28.2. is assigned to node2 which has node3 as its predecessor because leaf1 belongs to this hierarchy path on the posting day.
● The value of leaf4 on 15.1. is assigned to the non-assigned node because leaf4 did not belong to this hierarchy on the posting day.
Query2: Restriction for key figure
A query based on the data specified above, with one structural element key figure restricted to node2 key figure(node2) and month in the columns, produces the following result:
Query2 Result
Key Figure(Node2)
Jan 30
Feb 65
Result 95
● The value for January is the total of the values (leaf1, 15.1.) and (leaf2, 15.1.).● The value for February is the total of values (leaf1, 15.2.) (leaf2, 28.2.) and (leaf4, 28.2.).
Query3: Display hierarchy with filters on nodes
If, in addition, query1 is filtered using characteristicM = node2, the following result is produced:
Query2 Result
Key Figure (Jan) Key Figure (Feb) Key Figure
Overall result 30 65 95
* Node2 30 25 55
** Leaf1 10 25 35
** Leaf2 20 20
* Node2 40 40
** Leaf1 5 5
** Leaf4 35 35
NoteTo use a temporal hierarchy join in the definition of a query for the presentation or as a filter, proceed as follows in BEx Query Designer: You are in the Select Hierarchy dialog box (see Selecting Hierarchies). Under Select Hierarchy Date, select Of Data, Derivation Type. Use F4 to select the required key date deviation type. The key date deviation types that were set in transaction RSTHJTMAINT and are possible in this context are displayed in F4 input help.
566 PUBLICSAP BW/4HANA
Analysis

5.2.4.4.2.2 Loading Time-Dependent Hierarchies
Use
The procedure for loading time-dependent hierarchies is described in Loading Hierarchies. Also note the following special features when loading time-dependent hierarchies.
If you load a time-dependent hierarchy into a BW system and a hierarchy with the same technical name exists in this system already, the new hierarchy overrules the old one. If the time interval of the hierarchy that you want to load does not completely match the time interval of the existing hierarchy, the time interval of the existing hierarchy is adjusted accordingly.
CautionIf the time interval of the new hierarchy overlaps the time interval of the existing hierarchy, the time interval of the existing hierarchy is reduced so that the two time intervals run seamlessly into one another.
This does not apply if the time interval of the existing hierarchy contains the time interval of the new hierarchy. That is,if the from-date of the new hierarchy is greater than the from-date of the existing hierarchy and the to-date of the new hierarchy is less than the to-date of the existing hierarchy. In this case, the new hierarchy cannot be loaded. You have to change the time interval for either the new hierarchy or the existing hierarchy, so that the time interval of the new hierarchy is not contained in the time interval of the existing hierarchy.
If there are existing hierarchies with time intervals that are included in the time interval of a new hierarchy, the existing hierarchies are deleted.
NoteIf you do not want to specify the validity of a hierarchy in advance, you specify the current date as the from-date and the latest date possible as the to-date, for example, 12.31.9999. You do the same for any other hierarchies that are subsequently loaded. When you load each hierarchy, the system automatically sets the to-date of the last hierarchy that was loaded as the day before the from-date of the new hierarchy. This procedure applies only to hierarchies that support transfer rules, see Special Features when Loading Data using the PSA.
Hierarchy Structure is Time-Dependent
In the scheduler, you select the time intervals that you want to load. For more information, see Tab Page: Update in the Time Selections for Time-Dependent Data section..
Whether the hierarchy is extracted as time-dependent or not depends on the properties the hierarchy has in the SAP source system and in the DataSource.
ExampleThere are two DataSources for the InfoObject 0CUST_SALES:
· The first DataSource extracts the hierarchy that is valid for the current date. The extracted hierarchy is not time-dependent.
· The second DataSource extracts the complete hierarchy as time-dependent.
SAP BW/4HANAAnalysis PUBLIC 567

You are able to load a time-independent DataSource for an InfoObject, whose hierarchies are set as time-dependent. The date fields are set to the lowest (1.1.1000) and the highest (12.31.9999) dates possible. On the other hand, you are not able to load a time-dependent DataSource for an InfoObject, whose hierarchies are not time-dependent, because the time-dependent hierarchy nodes will be duplicated at various points in the hierarchy.
See also:
Time-Dependent Hierarchies [page 557]
5.2.4.4.3 Intervals
Use
Under postable and non-postable nodes you can position an interval instead of a quantity of leaves. An interval includes a quantity of characteristic values for the hierarchy basic characteristic and is defined by its lower limit (the From-<Characteristic Value>) and its upper limit (the To-<Characteristic Value>). Since an interval corresponds to a quantity of leaves, you cannot position other objects under an interval. (You can find additional information about the individual hierarchy nodes underHierarchy Nodes [page 546].)
Features
In the InfoObject maintenance, you define whether intervals in hierarchies are permitted for the hierarchy basic characteristic (seeTab Page: Hierarchy).
In the hierarchy maintenance, you model the hierarchy with intervals, if necessary.
If you add an interval to a hierarchy in the hierarchy maintenance, the system creates a node to the hierarchy basic characteristic. This node represents the interval. The limits of the interval are entered in the fields LEAFFROM and LEAFTO of the /BI*/J<IOBJNM> hierarchy table. The description of the interval is comprised of the description for the characteristic values selected for these fields.
You can also create intervals for characteristic values that no master data has been posted for yet. If you post new data for the corresponding characteristic values, the system automatically arranges it. This means that you do not have to expand the hierarchy when accessing master data again.
In reporting, an interval is not displayed as a node, but as triggered: All leaves which are in the interval and that data is posted for in the InfoProvider are displayed.
Example
Example 1 - Cost Element Hierarchy
In a hierarchy for the Cost Element (0COSTELMNT) InfoObject, you want to add cost elements 100 to 1000 as an interval under the Material Costs node. Previously, your BW system only posted the characteristic values 100 to 500 in the InfoProvider for the hierarchy basic characteristic.
568 PUBLICSAP BW/4HANA
Analysis

1. Create the Material Costs text node.2. You can create the interval directly under the Material Costs node. In this case, the leaves for the individual
cost elements are likewise displayed directly under the Material Costs node in the query.
NoteHowever, if you also want to see a node in the query that summarizes the cost elements included in the interval, you can then create a Cost Element 100 to 1000 text node under the node.
This way of modeling intermediate nodes is also suitable for a customer hierarchy for example where rather than seeing all customers at the same time you want to display groups, such as Customers A-C and Customers D-F.
3. Under the Material Costs (or Cost Element 100 to 1000) parent node, create an interval for Cost Element InfoObject.
4. Specify the interval limits in the Create Interval dialog box. Since the Controlling Area (0CO_AREA) InfoObject is compounded to the Cost Element (0COSTELMNT) InfoObject, specifying the required controlling area you want is also necessary. Example:From-ContArea 1000From-CostElmnt 100To-ContArea 1000To-CostElmnt 1000Long Description10000000000100 - 10000000001000The Node Level corresponds to the place where you add the interval.
NoteIf the interval nodes (or a part of the values) in the hierarchy already exists, you receive a Warning: Duplicate Nodes. Usually, the user does not want values to occur more than once in a hierarchy. You can decide though whether the system will transfer the duplicate node. (This is the default setting.)
In the query, the leaves with values 100 to 500 are displayed in the cost element hierarchy under the node Material Costs (or Cost Element 100 to 1000). If cost elements are added to the material costs, and you create the master data for the values from 501, the new cost elements are automatically displayed in the query as soon as the transaction data has been loaded.
SAP BW/4HANAAnalysis PUBLIC 569

The following graphic shows both types of modeling cost element hierarchies:
Example 2 - Time Hierarchy
Another typical example of how intervals can be used is the time hierarchy (seeHierarchy Nodes [page 546], example 1).
See also:
Hierarchy Properties [page 554]
5.2.4.4.4 Sign Reversal
Use
In some applications (for example, in finance applications), you may want to be able to select by node whether the sign for a key figures should be reversed. To do this, you can load the attribute Sign Reversal onto the hierarchy or you can set it in hierarchy maintenance for each hierarchy node. In the query, you can then reverse the sign in formulas by multiplication with a formula variable (replacement path from Sign Reversal hierarchy attribute).
Prerequisites
To be able to use this function, the hierarchy must have flexible hierarchy structures. This is the case when the hierarchy is loaded via the PSA and, as a result, has transfer rules. Refer toSpecial Features when Loading using the PSA.
570 PUBLICSAP BW/4HANA
Analysis

Functions
In InfoObject maintenance, define whether reverse sign function is possible for the hierarchy basic characteristic (seeTab Page: Hierarchy). If reversing the sign is activated for hierarchies, the attribute 0SIGNCH is included in the communication structure for hierarchy nodes. You can find an example under Special Features when Loading using the PSA.
In hierarchy maintenance, you can specify whether the sign for transaction data booked to this node is to be reversed for each hierarchy node.
In the query definition, create a formula variable for reversing the sign.
NoteYou can find additional information about this procedure underUsing Sign Reversal [page 572].
Example
You have a hierarchy based on receipts and expenditure. According to accountancy logic, income is displayed with a negative sign and expenses are shown with positive sign. Adding these values produces the profit.
Under certain circumstances, it may be advisable to circumvent accountancy logic and display the query income with a positive sign. This is where reversing the sign comes in. In our example, one would only activate sign reversal for income.
The following graphic illustrates such a case: Reversing the sign is activated for the node REV (Revenue) and its sub-nodes. In the third column, the amounts appear without sign reversal, that is, with a negative sign. In the fourth column, the amounts are calculated using a formula variable with reversing the sign and then displayed as a positive value.
SAP BW/4HANAAnalysis PUBLIC 571

See also:
Hierarchy Properties [page 554]
5.2.4.4.4.1 Using Sign Reversal
Procedure
Setting sign reversal for a hierarchy basic characteristic
In InfoObject maintenance, you define whether or not sign reversal is possible for the InfoObject (seeTab Page: Hierarchy). The Sign Reversal for Nodes setting determined here applies to all hierarchies that are based on this InfoObject. If sign reversal is allowed for hierarchies, the attribute 0SIGNCH is included in the communication structure for the hierarchy nodes.
Sign reversal for hierarchy nodes
Determining sign reversal What You Need to Know
Set sign reversal per node in hierarchy maintenance Choose Change Node from the context menu of a hierarchy node to set sign reversal for this node. Note: The sign reversal only applies to the node itself not to its children or subnodes.
Load the sign reversal hierarchy attribute flexibly SeeSpecial Features when Loading Data via the PSA.
BEx Query Designer: Creating formula variables
You have loaded data into your InfoProvider. To be able to use sign reversal in reporting, you have to define a formula variable in the query definition:
1. You are in the Query Designer. Under Key Figures, use the context menu to choose New Formula. The Formula Builder opens.
2. Under Formula Variables, choose New Variable from the context menu. The variables wizard appears.3. Enter a name and a short text for the variable. Choose Replacement Path as the processing type.4. Choose your hierarchy basic characteristic.5. Choose Hierarchy Attribute as the replacement. The attribute Sign Reversal is automatically displayed.6. Save your formula variable. When defining the formula variable, you get the factor 1 or -1, with which you
can multiply the required key figure.
NoteFor more information, seeDefining Variables.
See also:
Sign Reversal [page 570]
Hierarchy Properties [page 554]
572 PUBLICSAP BW/4HANA
Analysis

5.2.5 Elimination of Internal Business Volume
You can use this function to eliminate the internal business volume when executing a query. In other words, the effect of this function is that revenues made between two cost centers in an organization are no longer displayed.
Prerequisites
You have an InfoProvider that includes two characteristics (sender and receiver) that contain the same basic reference (and thereby also contain the same master data) and are on the same level within the hierarchy.
Features
To eliminate internal business volume in an InfoProvider, you have to create a key figure with a reference. You then include this in the InfoProvider. The value is kept here after elimination during the query, but is not included in the persistency layer for the InfoProvider.
Example
The profit center Production Accessories (UK) has $50.00 of internal revenue from profit center Internal Service (DE). This amount needs to be eliminated.
In the following example, different options are shown for different cases, including using these example hierarchies to display a profit center hierarchy and a country hierarchy.
SAP BW/4HANAAnalysis PUBLIC 573

Query example 1:
You create a referenced key figure, Profit Center Sales. For your characteristic pair, you choose Profit Center (0PROFIT_CTR) and Partner Profit Center (0PART_PRCTR). In the query you use the profit center hierarchy. The (internal business volume) amount of $50, which Production Accessories received internally, is eliminated for this profit center for the next highest level.
Query example 2:
You create a referenced key figure, Country Sales. As your characteristic pair, you choose Country (0COUNTRY) and Partner Country (0PCOUNTRY). In the query, you use the country hierarchy. The (internal business volume) amount for Europe and the country is eliminated, because the amount of $50 was counted from Germany to the UK.
574 PUBLICSAP BW/4HANA
Analysis
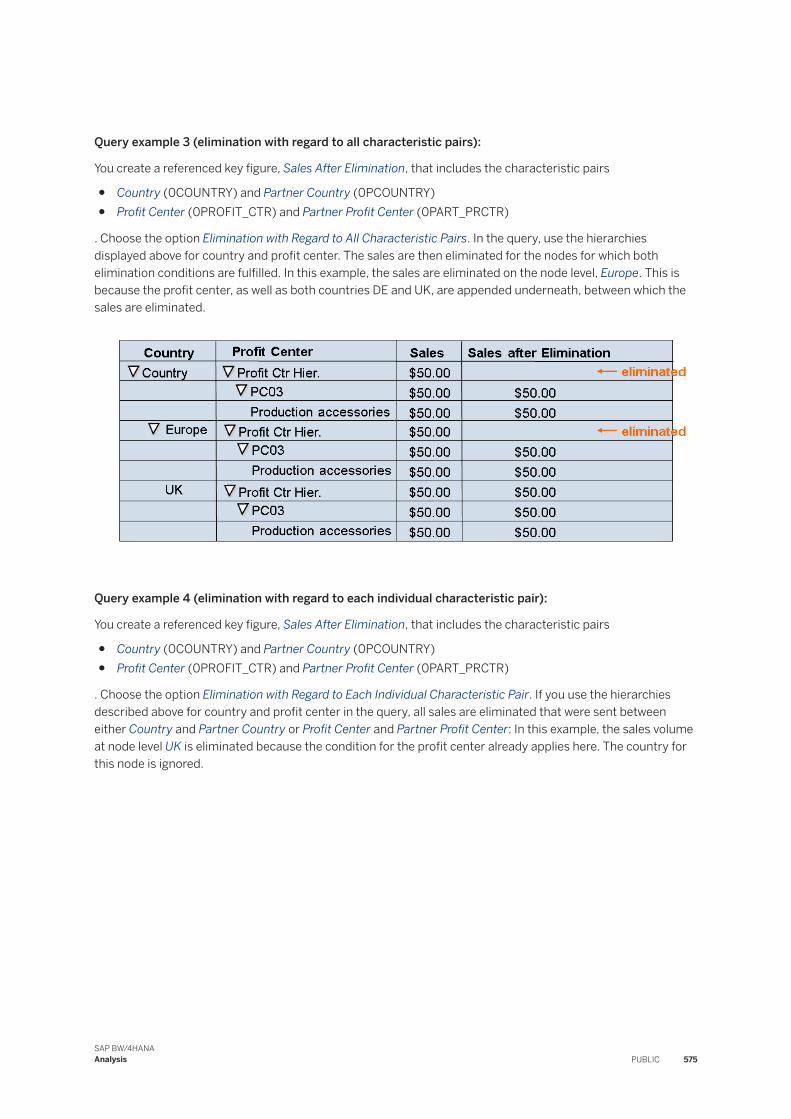
Query example 3 (elimination with regard to all characteristic pairs):
You create a referenced key figure, Sales After Elimination, that includes the characteristic pairs
● Country (0COUNTRY) and Partner Country (0PCOUNTRY)● Profit Center (0PROFIT_CTR) and Partner Profit Center (0PART_PRCTR)
. Choose the option Elimination with Regard to All Characteristic Pairs. In the query, use the hierarchies displayed above for country and profit center. The sales are then eliminated for the nodes for which both elimination conditions are fulfilled. In this example, the sales are eliminated on the node level, Europe. This is because the profit center, as well as both countries DE and UK, are appended underneath, between which the sales are eliminated.
Query example 4 (elimination with regard to each individual characteristic pair):
You create a referenced key figure, Sales After Elimination, that includes the characteristic pairs
● Country (0COUNTRY) and Partner Country (0PCOUNTRY)● Profit Center (0PROFIT_CTR) and Partner Profit Center (0PART_PRCTR)
. Choose the option Elimination with Regard to Each Individual Characteristic Pair. If you use the hierarchies described above for country and profit center in the query, all sales are eliminated that were sent between either Country and Partner Country or Profit Center and Partner Profit Center: In this example, the sales volume at node level UK is eliminated because the condition for the profit center already applies here. The country for this node is ignored.
SAP BW/4HANAAnalysis PUBLIC 575

Related Information
Creating a Key Figure with Reference [page 576]
5.2.5.1 Creating a Key Figure with Reference
To eliminate internal business volume in an InfoProvider, you have to create a key figure with a reference. You then include this in the InfoProvider.
Context
The key figure with reference contains one or more characteristic pairs, with relation to which the key figures are eliminated. A "sending characteristic" and a "receiving characteristic" are always chosen here. A typical example of a pair of characteristics like this is Sending Cost Center and Receiving Cost Center. The characteristics in a pair like this have to have the same reference characteristic.
Procedure
Procedure in the BW modeling tools1. You are in the BW Modeling tools. You create a new key figure in the wizard.2. Select an InfoObject under Referenced InfoObject. You now see an additional area in the editor: Elimination.3. Enter one or more pairs of characteristics here. The key figure is eliminated with relation to these
characteristic pairs.
576 PUBLICSAP BW/4HANA
Analysis

4. If you have specified more than one pair of characteristic pairs, you have to specify which mode to use for elimination.
5.2.6 Non-Cumulatives
A non-cumulative is a key figure that cannot be aggregated over time. Time-based aggregation is performed using "exception aggregation", which for example calculates the first, last maximum or average value across a time period. Examples of non-cumulatives are headcount, account balance, and material inventory.
Using non-cumulative key figures means that a marker is saved for every characteristic combination (in addition to the posted data). In this way, the retention and volume of data in the data load process is optimized. A data record is then only loaded into the InfoProvider if a non-cumulative changes because of a transaction. This is because records do not have to be created for characteristic combinations that have not been changed. Non-cumulatives can then be evaluated at any time in queries, using non-cumulative key figures.
DataStore objects can be used as InfoProviders for non-cumulatives.
The fact table for the InfoProvider with non-cumulative key figures looks something like this (simplified):
Period Material Delta
2003001 AAA 100
2003002 AAA -150
2003003 AAA -50
2003004 AAA 400
2003006 AAA -300
2003009 AAA 1400
The last record in this case is the marker (the InfoProvider was compressed after this request). The non-cumulative for the period 2003005 is calculated as follows: 1400 - (-300) = 1700. This calculation is only performed at query runtime. Non-cumulatives can thus be displayed for time periods that no transaction data has been loaded for.
See also the First-Guidance document for non-cumulatives in SAP BW∕4HANA in the SAP community: https://www.sap.com/documents/2019/04/2cd3175e-497d-0010-87a3-c30de2ffd8ff.html
5.2.6.1 Modeling Non-Cumulatives with Non-Cumulative Key Figures
A non-cumulative key figure is modeled in SAP BW∕4HANA using the corresponding field for the non-cumulative value change or the corresponding fields for inflows or outflows. You can determine the current non-cumulative or the non-cumulative at a particular point in time. To do this, you use the current, end non-cumulative and the non-cumulative changes and/or the inflows and outflows.
SAP BW/4HANAAnalysis PUBLIC 577

The purpose of the special folder for non-cumulative key figures is to optimize data transport into the SAP BW∕4HANA system, to retain data, and to access the database when evaluating in reporting in the SAP BW∕4HANA system.
Model of Non-Cumulative Key Figures
A non-cumulative InfoProvider (DataStore object) is modeled with at least one non-cumulative key figure.
These non-cumulative key figures are mapped using one key figure for non-cumulative changes or two key figures for inflows and outflows. The option you choose depends on how you want to evaluate the non-cumulative key figure.
The key figures for non-cumulative value change or for inflows and outflows are normal cumulative key figures that have 'summation'both as aggregation and exception aggregation. Non-cumulative key figures always have summation as standard aggregation (aggregation behavior on the database, for example, upon compression). However, with reference to a time characteristic, they have an exception aggregation (in reporting) that is not equal to summation, as it would not make sense to cumulate non-cumulatives by time.
ExampleNon-cumulative key figures such as Number of Employees are cumulated using characteristics such as Cost Center. There is not much point in totaling the number of employees using different months however. With months, you can form an average for example.
With the cumulative value Sales Revenue for example, it makes sense to cumulate the individual sales revenues using different months, and using characteristics such as Products and Customers.
Example of the difference between non-cumulative and cumulative key figures:
Sales volume (cumulative value):
Sales volume 01.20 + sales volume 01.21 + sales volume 01.23 gives the total sales volume for these three days.
Warehouse stock (non-cumulative key figure):
Stock 01.20 + stock 01.21 + stock 01.23 does not give the total stock for these three days.
Technically, non-cumulatives are stored for a completely compressed/activated InfoProvider by using a marker for the current time (current non-cumulative) and the storage of non-cumulative changes, or inflows and outflows. The current, valid end non-cumulative is stored in the marker. You can determine the current non-cumulative or the non-cumulative at a particular point in time. To do this, you use the current, end non-cumulative and the non-cumulative changes and/or the inflows and outflows.
Queries for the current non-cumulative can be answered very quickly, since the current non-cumulative is created as a directly accessible value. There is only one marker for each combination of characteristic values. This is always updated when the non-cumulative InfoProvider (InfoProvider that contains the non-cumulative key figures) is compressed. To ensure that access to queries is as quick as possible, non-cumulative InfoProviders should be activated regularly, thus keeping the marker as up to date as possible.
ExampleIn month 03 for example, the marker is read with three non-cumulative changes for a query. In month 04, the marker is updated so that the current marker has to be read with only one non-cumulative change for a query in month five. If the marker were not updated, it would still have four non-cumulative changes to read.
578 PUBLICSAP BW/4HANA
Analysis

Data Transfer or Storage, and Aggregation for Non-Cumulative Key Figures
To optimize the data transport and data retention for non-cumulative key figures in the SAP BW∕4HANA system, non-cumulative key figures are treated differently from cumulative values in both technical data transfer and storage:
● Non-cumulative key figures are mapped using one key figure for non-cumulative changes or two key figures for inflows and outflows.More information: Non-Cumulative Key Figures [page 579].
● A non-cumulative InfoProvier has to contain a time-reference characteristic, meaning that there must be a time-reference characteristic for exception aggregation of the non-cumulative key figure.See also: Time Reference Characteristics [page 580].
● A non-cumulative key figure always has a time-related exception aggregation.See also: Aggregational Behavior of Non-Cumulative Key Figures [page 581].
● In certain cases it might be necessary to define the validity of a non-cumulative.More information: Validity Area [page 584].
● Non-cumulatives are transferred in an initialization run and in the change runs that follow (initialization can also be omitted here).More information: Transferring Non-Cumulative Data into BW [page 594].
Integration
In query definition and navigation, cumulative and non-cumulative key figures are handled in exactly the same way. Cumulative and non-cumulative key figures can be analyzed at the same time in a query.
Special handling of non-cumulative key figures is only possible in the DataStore object.
If you are using a SAP HANA database, note that non-cumulative processing with reference points is only supported in certain releases. You can check the release using method IS_REFP_UPDATE_SUPPORTED in class CL_RSDRC_NCUM_PROCESSOR. If your SAP HANA database supports non-cumulative processing with reference points, all new InfoCubes with non-cumulative key figures will be processed in this way. If you have InfoProviders that were created with an earlier SAP HANA release, you can convert them using report RSDD_SWITCH_NCUM_HANDLING.
5.2.6.1.1 Non-Cumulative Key Figures
There are two different ways to define non-cumulative key figures:
● Non-cumulative key figure with non-cumulative changes:Before you can define the non-cumulative key figure, an additional cumulative key figure must exist as an InfoObject. The non-cumulative changes are saved in this key figure.
● Non-cumulative key figure with inflows and outflows:There has to be two additional cumulative key figures as InfoObjects for non-cumulative key figures - one for inflows and one for outflows.
The cumulative key figures have to have the same technical properties as the non-cumulative key figure, and the aggregation and exception aggregation have to be SUM.
SAP BW/4HANAAnalysis PUBLIC 579

You can evaluate separately the non-cumulative changes on their own, or also the inflow and outflow, according to the type of chosen non-cumulative key figure in addition to the non-cumulative.
For aggregation, see Aggregation Behavior of Non-Cumulative Key Figures [page 581]
5.2.6.1.2 Time Reference Characteristic
If the InfoProvider contains a non-cumulative key figure, then a time-based reference characteristic for the exception aggregation of the non-cumulative key figure must exist. There can be several time characteristics for each InfoProvider, but only one time reference characteristic. This means that the time-based reference characteristic is the same for all the non-cumulative key figures of an InfoProvider.
The time reference characteristic for an InfoProvider when there are several time characteristics in the InfoProvider is always the most refined, since all other times in the InfoProvider are derived from this.
ExampleAn InfoProvider contains warehouse key figures that should be evaluated for the calendar month and calendar year. In this case, the calendar month is the most refined common time reference characteristic.
You can only maintain the time-reference characteristic and the fiscal year variant when updating an InfoProvider with non-cumulative key figures. All other time characteristics are automatically derived from the time-reference characteristic. Therefore, the time-reference characteristic must not be left blank.
There is a difference between complete and incomplete time characteristics:
The complete time characteristics are the SAP time characteristics calendar day (0CALDAY), calendar week (0CALWEEK), calendar month (0CALMONTH), calendar quarter (0CALQUARTER), calendar year (0CALYEAR), fiscal year (0FISCYEAR) and fiscal period (0FISCPER). They are clearly assigned to a point in time. Only these SAP time characteristics can be used as time reference characteristics, since you must be able to derive time characteristics automatically from the most detailed time characteristic must be possible with the non-cumulative folder.
Incomplete time characteristics, such as 0CALMONTH2, 0CALQUART1, 0HALFYEAR1, 0WEEKDAY1 or 0FISCPER3 can be used in a non-cumulative InfoProvider but cannot be a time reference characteristic, since they are not assigned to a specific point in time.
The following graphic gives an overview of the hierarchy for SAP time characteristics:
580 PUBLICSAP BW/4HANA
Analysis

NoteIf you have a non-cumulative for a week and for a month in the same InfoProvider at the same time, the roughest common time characteristic is calendar day. The time characteristic calendar day must be included in the InfoProvider, so that it can function as a reference characteristic for time-based aggregation.
5.2.6.1.3 Aggregation Behavior of Non-Cumulative Key Figures
Use
Aggregation behavior determines whether and how key figure values are aggregated in reports using various characteristics or characteristic values. Aggregation behavior can depend on whether time characteristics or other characteristics are used for aggregation.
You can see how aggregation affects the query result under Interpreting Query Results [page 595].
If you add up all the cumulative values such as Sales Revenue using all characteristics (including time characteristics), the period initial non-cumulatives (without changes to the currently observed period) (FIRST aggregation), the last value (including postings for the current period) (LAST aggregation) or the average (AVERAGE) is often taken for non-cumulative key figures relating to the time characteristics.
For more information about aggregation types, see Creating Key Figures [page 106].
ExampleThe following example explains the difference between the FIRST aggregation and the LAST aggregation. Taking the aggregated values for 02.02.02 for example, the non-cumulative is 90 with the FIRST aggregation, which is the non-cumulative without receipts. The non-cumulative with the LAST aggregation is 110, which is the non-cumulative of 90 plus the receipts of 20.
Date Month Material Receipt
1/29/2002 Jan 4711 30
1/30/2002 Jan 4711 10
1/31/2002 Jan 4711 20
2/1/2002 Feb 4711 30
2/2/2002 Feb 4711 20
There are two possible kinds of aggregation behavior for non-cumulative key figures:
● The standard aggregation specifies how a key figure is compressed using all characteristics (but not time characteristics).
SAP BW/4HANAAnalysis PUBLIC 581

● The exception aggregation specifies how a key figure is compressed using all time characteristics.
Exception aggregations in terms of time
Every key figure has a standard aggregation and an exception aggregation. Non-cumulative key figures always have summation as standard aggregation, whereas time characteristics have an exception aggregation of not equal to summation.
ExampleThe non-cumulative key figure Warehouse Stock is aggregated using Summation for characteristics that are not time-related such as Articles or Stock. For time characteristics such as Calendar Month, however, the non-cumulative key figure Warehouse Stock has the exception aggregation Last Value.
Meaningful aggregations for non-cumulative key figures are primarily Average Weighted According to Calendar Days (AV1) and Last Value (LAS). Additional, possible exception aggregations for non-cumulative key figures are listed in the following table.
Technical name Description
AV1 Average (weighted with the number of calendar days)
AV2 Average (weighted with the number of working days according to the factory calendar with the ID 01)
AVS Total of all non-cumulative values
FIR First value
LAS Last value
MAX Maximum
MIN Minimum
ExampleThe time at which non-cumulatives were posted for different materials is displayed in the following graphic. The evaluation results for the non-cumulative for Material 1, for exception aggregation Average, and the exception aggregation Last Value, are listed in the following tables, where they are displayed once by calendar month and once by calendar day.
582 PUBLICSAP BW/4HANA
Analysis

Average (calendar day) Last Value
January 100 110
February 140 160
March 150 140
Drilldown on the non-cumulative value for material 1 by calendar day
Note that non-cumulatives that are evaluated by calendar day, both for the average and for the last value, always produce the same result. The reason for this is that Calendar Day is the smallest unit of time to which the data is transferred. This always occurs when you drill down to the most detailed time characteristic.
Average (calendar day) Last Value
01.01.2000 90 90
02.01.2000 90 90
03.01.2000 90 90
SAP BW/4HANAAnalysis PUBLIC 583

Average (calendar day) Last Value
04.01.2000 90 90
... ... ...
09.01.2000 90 90
10.01.2000 90 90
11.01.2000 99 99
... ... ...
5.2.6.1.4 Validity Area
Only the currently valid end non-cumulative and the non-cumulative changes are stored in the database. To be able to evaluate the non-cumulative (for example, to calculate mean values or to execute a drilldown according to period), you need to know for which time interval you can calculate the non-cumulative.
The time-based validity of non-cumulatives is mapped using a validity area. The validity area describes in which time period non-cumulatives have been managed. The minimum and maximum loaded values of the time reference characteristic (for every feature of the validity table) are thus used as standard as a threshold for the validity area.
This time interval is normally valid for all records for the InfoProvider, for example for all cost centers, materials, etc. The validity interval is comprised of the minimum and the maximum of all postings.
ExampleIf the first values are posted for a product group on 12.31.1999 and a non-cumulative change was posted for the last time on 3.10.2000, the validity area is the time interval from 12.31.1999 until 3.10.2000.
For a detailed description of how the area is calculated where a query displays data on a non-cumulative InfoProvider with non cumulative key figures, see Determining the Effective Time Filter [page 589]
In certain cases however, it might be necessary to adjust the validity manually, for example if a characteristic value is only valid for a restricted time period. In this case, you should define a validity area, especially if you want to guarantee correct calculation of averages.
More information: Maintaining the Validity Area [page 587]
Another example: If the data from various sources systems has been loaded into the InfoProvider at different times, it can be useful to keep the relevant validity area for each different subarea.
ExampleSource system 1 Returns values for the current month
Source system 2 Returns values for the previous month
584 PUBLICSAP BW/4HANA
Analysis

If the source systems deliver values at different times, aggregation can become affected over a period of time and contain inaccurate values. The calculated monthly average is too high, for example (see example at the end of this section).
All validity periods for an InfoProvider with non-cumulative key figures are stored in the validity table. This validity table automatically contains the most detailed, selected time characteristic of the InfoProvider, known as the time-reference characteristic.
Features
Validity-Determining Characteristics
Validity-Determining Characteristics: Characteristics that define the time-based validity area of the non-cumulative in the InfoProvider.
Validity-specific characteristics are characteristics that specify the assignment to a source system for example.
More information: Non-Cumulative Parameter Maintenance.
Aggregation Using Validity-Determining Characteristics
With aggregations that do not calculate an average (MIN, MAX, FIRST, LAST), virtual entries are added in the validity interval margin so that all intervals have the same start and end points. The aggregation is then executed. These virtual entries are highlighted explicitly way in the results view. Without these virtual entries, the totals row would deliver inaccurate results. This is not the case for the aggregation type AVERAGE.
ExampleIn the following example, the receipts for plants A, B, and C are displayed. The virtual entries are indicated explicitly in the query. Looking at plant B, there are only receipts in March and April. For January and February, the virtual entry 120 is set, because this is the non-cumulative excluding the receipts from March. For May, the virtual entry 150 is set, which is the final non-cumulative for April. In the totals row, the total of virtual entries and the actual non-cumulatives is calculated.
Receipts:
Jan Feb March April May Marker
Plant A +30 +20 +40 +10 100
Plant B +10 +20 150
Plant C +20 +30 50
Query:
LAST
Plant A 30 30 50 90 100 100
Plant B [120] [120] 130 150 [150] 150
SAP BW/4HANAAnalysis PUBLIC 585

Plant C [0] [0] [0] 20 50 50
SUM 150 170 180 260 300 300
CautionWhen creating an InfoProvider with non-cumulative key figures, we recommend using validity-determining characteristics only in the cases specified. If you have too many validity-determining characteristics or a validity-determining characteristic with a lot of characteristic values, this can have a negative impact on performance.
If you decide later on to add more validity-determining characteristics, you can modify the selection using report RSDG_CUBE_VALT_MODIFY. In this report, the InfoProvider with non-cumulative key figures is only changed to the extent that the new validity-determining characteristics are selected, and the validity table is reconstructed. The structure of the InfoProvider with non-cumulative key figures remains the same. You do not have to reload the transaction data for it.
For each combination of characteristic values for the validity-determining characteristics, the validity area is, by default, the interval between initialization (or the first change in non-cumulative) and the last posted non-cumulative change for this combination. That is, the validity area is created from the posting data from when the data was loaded.
When evaluating in reporting, the non-cumulative for the requested time period is evaluated using the current final non-cumulative and the corresponding non-cumulative changes (meaning that the non-cumulative is defined at every moment within the validity area). In this way, the non-cumulatives for time periods for which no change was posted are also identified.
ExampleAssuming that every plant separately delivers its data to the BW system at different times, the characteristic Plant has to be validity-determining. If you also assume that the characteristic values are Boston Plant, Dallas Plant, and San Francisco Plant, the validity intervals appear as follows:
586 PUBLICSAP BW/4HANA
Analysis

ExampleFor the Dallas plant and the San Francisco plant, the validity table is maintained as follows:
Plant From (fixed) To (fixed)
Dallas 001.2000 003.2000
San Francisco 001.2000 002.2000
The following data is then displayed in the query:
Plant January February March Result Comment
Dallas: Material stock
700 700 900 766.66 (Ø per month)
Dallas: Material receipts
200 0 200 400 (SUM)
San Francisco: Material stock
200 300 [300] 250 (Not 266.66!)
San Francisco: Material receipts
50 100 [0] 150 (SUM)
In the query, the average amount from January and February is given as the result for the San Francisco plant, since only these time periods have been defined as valid. If a validity area had not been defined, the average given would have been too high (266.66).
5.2.6.1.4.1 Configuring the Validity Area
Prerequisites
User-specific changes in the validity table can only be made once the corresponding InfoProvider has been activated.
Context
The minimum and maximum loaded values of the time reference characteristic (for every feature of the validity table) are used as standard as a threshold for the validity period toolbar. You can also change the validity of the individual characteristic values independently of the data loaded.
SAP BW/4HANAAnalysis PUBLIC 587

The analytic manager works on the assumption that no changes to non-cumulative values ever occur outside the validity period. When a validity period is changed, you must therefore never shorten the validity period. You should always lengthen them by the time posted instead. Shortening the validity period can result in incorrect opening balances being found and incorrect figures being displayed.
Procedure
● 1. Call transaction RSDV2. The Report on Validity Slice Maintenance window appears. Enter the name of the InfoProvider that you
want to maintain the validity period for, and press Execute.3. In the Editing the Validity Slice for Non-cumulative InfoProviders window, press Display/Change.4. You can now set the update method for each attribute for the lower ('from' mode) and upper ('to'
mode) limits of the validity period. You have the following selection options:5) Attribute " "This is the standard setting, meaning that the minimum or maximum (time-related) loaded value is taken for every attribute.The current, valid value is displayed in the From (Fixed) field (for the start value) or the To (Fixed) field (for the end value). You cannot change these values.1) Attribute "F"You can specify a fixed start or end date here. Enter the values you want in the from fixed field (for the start value) or the to fixed field (for the end date).The input format must be adjusted to the corresponding time characteristic.
ExampleIf 0CALDAY is the time-reference characteristic, the input format has to correspond to the date/month/year format as specified in the global setting, for example 01.01.2000 or 2000/01/01. If 0CALMONTH is the time-reference characteristic, the input format must contain the corresponding month and year, for example 01.2000.
1) Attribute "R"You can specify the interval thresholds relative to the current time here. Enter the values you want (positive or negative integers) in the from rel field (for the start value) and to rel field (for the end value). The specified values describe movement in units with time reference characteristics with reference to the current time.
ExampleIf '+1' is entered in the rel. to, field for time-reference characteristic 0CALDAY, the validity period threshold is the current next day. However, if 0CALMONTH is the time-reference characteristic, the threshold for the validity period is the following month.
5. Save your entries.
Results
The modified validity table is taken into account in reporting.
588 PUBLICSAP BW/4HANA
Analysis

5.2.6.1.4.2 Determining the Effective Time Filter
The system determines the area in which a query displays data on a non-cumulative InfoProvider as follows:
1. In general, the times are projected onto the most detailed time characteristic that occurs in the query.2. The effective time filter is determined. The system calculates the set of all the time points from the static
filter of the query. Global filters and structure elements that contain non-cumulative key figures are included here. The resulting set of time points from the static filter intersects the set of time points from the dynamic filter.
3. The validities are still taken into consideration. The query only displays non-cumulative values for time points, which are within the validity area for at least one cell in the query.
4. Separate validities are calculated for cells without selection and for cells with constant selection. A query can contain a maximum of two validity areas: one for cells without constant selection and one for cells with constant selection. The validity area for cells without constant is not influenced by the cells with constant selection. However, the validity area for cells with constant selection is influenced by the validity of cells without constant selection. There are two reasons for this:○ The constant selection does not create objects. This means that constant selection cannot create new
cells in the result. The validity of cells with constant selection therefore cannot influence cells without constant selection.
○ Constant selection is often chosen to display a comparison value. The validity of cells without constant selection therefore also applies to cells with constant selection.
More information: Constant Selection [page 648]
5.2.6.1.4.3 Validity and Aggregation
Concept
The following topic provides information about validity and aggregation.
Averages and Integrals
This includes aggregations AV1 (Average weighted according to calendar day), AV2 (Average weighted with the number of working days according to the factory calendar with the ID 01) and AVS (Total of all non-cumulative values). For these aggregations, a virtual value is never included or displayed in the calculation of the aggregated value outside the validity. A value is flagged as virtual if it is completely outside the validity.
Minimum and Maximum
For aggregations MIN (Minimum non-cumulative) and MAX (Maximum non-cumulative), virtual non-cumulative values are found outside the validity (but within the effective time filter).
First and Last Value
Aggregation FIRST (First value) displays the initial non-cumulative for a given point in time. The validity is therefore lengthened by one time unit at the end, so that it is still possible to display non-cumulative changes in the last time unit in the validity. Aggregation LAST (last value) displays the closing non-cumulative for a given
SAP BW/4HANAAnalysis PUBLIC 589

point in time. The validity is therefore lengthened by one time unit at the beginning, so that it is still possible to display non-cumulative changes in the first time unit in the validity.
Virtual Values and Aggregation
If a value has parts that are both in and outside the validity, it is not flagged as virtual anymore. The virtuality of a value is therefore recessive in terms of aggregation.
5.2.6.1.4.4 Examples: Aggregations and Validity
Concept
Dataset:
Plant Initial non-cumulative
A 200
B 300
C 400
Plant Month Non-cumulative change
A January 50
A March 100
B February 30
B April 40
C March 30
C May 30
Plant Validity
A January - March
B February - April
C March - May
Validity and Exception Aggregation AV1
590 PUBLICSAP BW/4HANA
Analysis

Filter: Non-cumulative value with AV1, Plant = A,B
Month/plant A B Total
January 250 250
February 250 330 580
March 350 330 680
April 370 370
Total 284,44 343,48 627,93
The time filter is determined from the merge of the validities of plants A, B. For exception aggregation AV1, no values are determined outside the validity.
Validity and Exception Aggregation MAX
Filter: Non-cumulative value with MAX, month in [January - March], plant = A,B
Month/plant A B Total
January 250 [300] 550
February 250 330 580
March 350 330 680
Total 350 330 680
The time filter is determined from the global filter [January - March] and intersected with the merge of the validities of plants A,B ([January - April]). For plant B, the value for January, which is outside the validity, is added.
Validity and Exception Aggregation FIRST
Filter: Non-cumulative value with FIRST, month in [January - June], plant = A,B
Month/plant A B Total
January 200 [300] 500
February 250 300 550
March 250 330 580
SAP BW/4HANAAnalysis PUBLIC 591

April 350 330 680
May [350] [370] [720]
Total 200 300 500
The time filter is determined from the global filter [January - June] and intersected with the merge of the validities of plants A,B ([January - May]) that have been extended at the end because of the FIRST aggregation . For plant B, the value for January, which is outside the validity, is added. The value for May is added for both plants. For plant B, the value for May is different to the value for April, as there was no non-cumulative change yet in April, and initial non-cumulatives are displayed with FIRST aggregation.
5.2.6.1.4.5 Examples: Validities and Constant Selection
Concept
For cells with constan selection, a separate validity range is found. The examples below illustrate this.
More information: Constant Selection [page 648]
Dataset:
Plant Initial non-cumulative
A 200
B 300
C 400
Plant Month Non-cumulative change
A January 50
A March 100
B February 30
B April 40
C March 30
C May 30
Plant Validity
592 PUBLICSAP BW/4HANA
Analysis

A January - March
B February - April
C March - May
Example 1:
Filter: Plant = A
Month Non-cumulative with LAST Non-cumulative with LAST, plant = B, constant selection on plant
January 250 [300]
February 250 330
March 350 330
Total 350 370
The validity for the part of the query without constant selection is the validity of plant A [January - March]. This results in the times that are visible in the drilldown. The validity for the part of the query with constant selection is the merge of the validities of plants A,B [January - April]. A value for January is therefore displayed for the second structure element. The value for the second structure element in the totals row arises from the non-visible value for plant B in April.
Example 2
Filter: Plant = A
Month Non-cumulative with LAST Non-cumulative with LAST, plant = B, constant selection on plant, month = May
Non-cumulative with LAST, plant = C, constant selection on plant
January 250 [400]
February 250 [400]
March 350 430
Total 350 [370] 460
The validity for the part of the query without constant selection is the validity of plant A [January - March]. This results in the times that are visible in the drilldown. The validity for the part of the query with constant selection is the merge of the validities of plants A,B,C [January - May]. A value is therefore displayed in the totals row for the second structure element. The value for this structure element in the totals row arises from the non-visible virtual value for plant B in May. If structure element three did not exist, this value would not be displayed. The value for the third structure element in the totals row arises from the non-visible value for plant C in May.
SAP BW/4HANAAnalysis PUBLIC 593

5.2.6.1.5 Transferring Non-Cumulative Data into the SAP BW∕4HANA System
Non-cumulatives can first be included through initialization or by loading a non-cumulative change. With initialization you are only able to post one initial non-cumulative for each combination of characteristics in the InfoProvider. This causes non-cumulative changes.
If the source and target are non-cumulative InfoProviders (DataStore objects with non-cumulative key figures) you only need to create one data transfer process (DTP) for them. This then transfers non-cumulative initialization, non-cumulative changes and historical transactions with one single request. If data is read from other sources, you need three DTPs:
● A DTP for the non-cumulative initialization: Transfers the current non-cumulatives from the source to the non-cumulative InfoProvider.
NoteThe non-cumulative initialization is supported for transferring non-cumulative data from ODP source systems with ODP context SAPI and file source systems. You can then use extraction modeInitial Non-Cumulative for Non-Cumulative Values in the DTP if the source of the DTP is a DataSource that builds an initial non-cumulative (the Initial Non-Cumulative flag is set in the DataSource). For more information, see SAP Note 2395703 .
● A DTP for the non-cumulative changes: Transfers the current transactions (goods receipts, goods issues and so on).
● A DTP for historical transactions (optional)
The initial non-cumulatives are loaded first, followed by non-cumulative changes.
5.2.6.1.6 Process Flow for Evaluating Non-Cumulative Key Figures
1. Source SystemThere are two extraction modes for non-cumulatives in the source system. The DataSources for non-cumulatives have to support one of these extraction modes.
2. Modeling:Determine how you want to evaluate the non-cumulative key figure. If you only want to evaluate the non-cumulative or the non-cumulative changes as well as the non-cumulative using a particular time period, choose modeling as a non-cumulative key figure with non-cumulative changes. If you also want to evaluate the inflows and outflows separately, choose modeling as a non-cumulative key figure with inflows and outflows.
3. Key figure definition:The non-cumulative change or inflows and outflows that you require for the definition of the non-cumulative key figure must already be created as InfoObjects when the non-cumulative key figure is created. Where necessary therefore, define either the non-cumulative change or the inflow and outflow as normal cumulative key figures first. In type definition, these key figures must correspond to the non-cumulative key figures that still have to be defined. The non-cumulative changes or inflows and outflows must have the aggregation and exception aggregation type ‘Summation’.
594 PUBLICSAP BW/4HANA
Analysis

Define the non-cumulative key figure by assigning to it the previously defined non-cumulative change or in and outflows.Choose the exception aggregation you want to use. Standard aggregation is always summation.
4. You can model non-cumulatives in DataStore objects:More information:Using Non-Cumulative Key Figures [page 136]
5. Load Data for a DataStore Object: If the data is loaded from a DataStore object, you only need to create one single DTP for it. If data is read from other sources, you need three DTPs:
6. Query definition:In the InfoProvider, both the non-cumulative key figure and the non-cumulative change, or inflows and outflows, can be selected for query definition.With evaluations in reporting, there is no difference in the way cumulative and non-cumulative values are handled. Cumulative and non-cumulative key figures can be evaluated at the same time in a query, since the key figures are automatically aggregated correctly.
5.2.6.1.7 Interpreting Query Results
Use
Before you can start interpreting the result of a query on an InfoProvider with a non-cumulative key figure, you need to know the sequence of the aggregations.
The OLAP processor executes the aggregations in the following sequence:
1. Normal aggregation2. Exception aggregation with respect to the reference characteristic3. Currency and units aggregation
NoteNote: Even in cases where you haven't included the reference characteristic in the query, an aggregation is implicitly executed using the reference characteristic.
Example:
Your query has a key figure with the exception aggregation last value (LAS) and the reference characteristic 0CALDAY. You have loaded the following data into your InfoProvider:
SAP BW/4HANAAnalysis PUBLIC 595

You now have the following drilldown by plant in your query:
This result comes from the fact that the normal aggregation is carried out with respect to the plants. The exception aggregation now has an influence in the construction of the result. As only one value was booked for plant 1 for the last date (16.06), only the value for plant 1 is included in the result, that is, 15.
5.2.6.1.8 Additional Information: Modeling Non-Cumulative Key Figures with Different Time Reference Characteristics
Use
If an InfoProvider contains a non-cumulative key figure, a time-based reference characteristic for the exception aggregation of the non-cumulative key figure must exist. There can be several time characteristics for each InfoProvider, but only one time reference characteristic. This means that the time-based reference characteristic is the same for all non-cumulative key figures of an InfoProvider.
Different Time Reference Characteristics
If you have characteristics that you manage non-cumulatives for, and which refer to a data object in different stages of editing, such as delivery stock, order quantity and billing quantity, these non-cumulative key figures all have different time references. It is therefore not possible to evaluate these non-cumulative key figures like this in a joint InfoProvider.
Modeling Proposal
You can map the different time references using a characteristic transaction.
You then have a 'non-cumulative' key figure with the most detailed time reference characteristic calendar day, and a 'transaction' characteristic with the characteristic values 'delivery', 'order'’, and 'billing'. This means that you can store the non-cumulative for the various transactions in one, single InfoProvider.
For evaluation in reporting, you can then use the restricted key figure 'non-cumulative' that is restricted to one of the characteristic values of the 'transaction' characteristic, as a structure element in the query definition.
In this way, you can evaluate the 'delivery stock', the 'order quantity', and the 'billing quantity' using restricted key figures.
This allows you to minimize data transfer and storage, and to reduce the number of key figures.
596 PUBLICSAP BW/4HANA
Analysis

5.2.6.1.9 Performance Tips
The following tips will help you to attain good performance with queries on non-cumulative InfoProviders.
Compression:
Compress all requests in the non-cumulative InfoProviders, or at least most of them.
The performance of a query based on a non-cumulative InfoProvider depends greatly on how the InfoProvider is compressed. If you want to improve the performance of a query of this type, start by checking - if possible - whether the data in the InfoProvider should be compressed. You should always compress data if you are sure that the request in question should not need to be deleted from the InfoProvider.
Validity Table
Use as few validity-determining characteristics as possible.
The number and cardinality of the validity-determining characteristics heavily influences performance. You should therefore only define characteristics as validity-determining characteristics if really necessary.
Time Restrictions in the Query
As far as possible, restrict queries based on non-cumulative InfoProviders to time characteristics.
The stricter the time-based restriction, the faster the query is generally executed, as the non-cumulative is reconstructed if the number of times is smaller.
Time Drilldown in the Query
If you don't need the average any more, split a query on a non-cumulative InfoProvider (which contains both key figures with LAST aggregation and key figures with AVERAGE aggregation) into two queries.
With non-cumulative key figures with the exception aggregation LAST, the time characteristic included in the drilldown makes a difference to performance. If both Calendar Day and Calendar Month are included in the InfoProvider for example, drilldown by month is faster than drilldown by day, since the number of points in time that a non-cumulative has to be calculated for is smaller.
For the other types of exception aggregation (average, average weighted with factory calendar, minimum and maximum), this rule is not valid as in these cases, the data is always calculated on the level of the most detailed time characteristic first before exception aggregation is performed.
Totals Rows
Hide the totals row in the query if not necessarily required.
Depending on the type of aggregation being used, the calculation of totals rows can be very time-consuming.
5.2.7 Stock Coverage
You can use a special key figure in a query to display how long the available quantity of a given stock value will cover the planned or expected demand for.
The special key figure for stock coverage calculates how long the stock will last for using the key figures for stock and demand with reference to a time characteristic.
SAP BW/4HANAAnalysis PUBLIC 597

ExampleThe stock in a calendar week is 10 items. This is a closing stock. The first demand to be taken into account for the stock coverage calculation is therefore in the week that follows the stock. The expected demand for the following four weeks is two items, three items, four items and two items. The stock will therefore last for 3.5 weeks. (Cells whose value is not relevant for the example contain an x).
Calendar Week Stock Demand Stock Coverage
14.2013 10 x 3,5
15.2013 x 2 x
16.2013 x 3 x
17.2013 x 4 x
18.2013 x 2 x
ExampleThe stock in a calendar week is 5 items. This is an opening stock. The expected demand for the calendar week is two items. For the following two weeks, the expected demand is two items and four items. The stock will therefore last for 2.25 weeks.
Calendar Week Stock Demand Stock Coverage
14.2013 5 2 2,25
15.2013 x 2 x
16.2013 x 4 x
A key figure for stock coverage can be used in all InfoProviders, with the exception of DataStore objects. If a key figure for stock coverage is used in aggregation levels, it is not input-enabled.
A key figure for stock coverage can be used in formulas, formulas with exception aggregation, conditions and in all possible navigation states of a query. Key figures for stock coverage are not availablein the standard queries on an InfoProvider.
If a time characteristic in the query is in the drilldown or filter, or a time characteristic is a reference for an exception aggregation, this time characteristic must be compatible with the time characteristic for calculating stock coverage. If it is not compatible, you will not be able to obtain meaningful results. A time characteristic is compatible with the time characteristic for calculating the stock coverage if a unique value from the time characteristic can be assigned for every value in the time characteristic for calculating stock coverage.
ExampleCalendar week is compatible with Calendar day. Calendar week is not compatible with Caldendar month however (and vice versa).
To be able to obtain meaningful results, the values in the time characteristics must also be consistent. The system can only check this for InfoCubes. For all other InfoProviders, you have to ensure time consistency yourself.
598 PUBLICSAP BW/4HANA
Analysis

ExampleAn InfoProvider contains the time characteristics Calendar day and Calendar month. In a data set, calendar day has the value 25.04.2014, and calendar month has the value 04.2014. The time characteristics in this data set are consistent. In a second data set, calendar day has the value 18.03.2014, and calendar month has the value 02.2014. The time characteristics in this data set are not consistent. On account of the second data set, there is no consistency with regard to the time characterstics in the InfoProvider.
If fiscal periods are selected as time characteristics for calculating stock coverage, no coverage is calculated for special periods. The demand from special periods is taken into account during the stock coverage calculation, but the special period is not counted in the stock coverage calculation.
ExampleThe stock in this example is a closing stock.
The stock in fiscal period 11.2013 is sufficient to fully cover the demand in fiscal period 12.2013 and special period 1 2013, and to partly cover the demand in special period 2 2013. For the stock coverage calculation, only fiscal period 12.2013 is counted. The special periods are not counted. The stock coverage in fiscal period 11.2013 is therefore 1.
The stock in fiscal period 12.2013 is sufficient to fully cover the demand in special periods 1 2013 and 2 2013, and to cover 50% of the demand in fiscal period 2.2013. For the stock coverage calculation, only fiscal period 1.2014 is counted. The special periods are not counted. The stock coverage in fiscal period 12.2013 is therefore 0.5.
No stock coverage is calculated in special periods 1 2013 and 2 2013.
Fiscal Period Stock Demand Stock Coverage
11.2013 10 x 1
12.2013 8 5 0,5
Special Period 1 2013 5 3
Special Period 2 2013 3 3
18.2013 x 4 x
5.2.7.1 Editing the Stock Coverage
Here you specify the details for calculating the stock coverage.
Context
The Stock Coverage tab is available only if you have set the Stock Coverage flag on the General tab.
SAP BW/4HANAAnalysis PUBLIC 599

Procedure
1. You are in the BW Modeling tools. Go to the Stock Coverage tab page.2. Under Stock Type, specify whether the referenced key figure for the stock is an opening stock or a closing
stock.3. Enter the maximum number of time periods that are taken into account. Note that the more time periods
are specified here, the more the runtime will be affected.4. Specify a referenced key figure for the stock. This can be either a non-cumulative key figure or a cumulative
key figure.5. Specify a referenced key figure for the demand.6. Specify a time characteristic that specifies the granularity of the stock coverage. This characteristic also
serves as the reference characteristic for the exception aggregation. An exception aggregation must always be specified for key figures for stock coverage.
5.2.8 Currency Translation
Use
You can use currency translation to translate key figures with currency fields that exist in the source system in different currencies into a standard currency in the BW system (the local currency or company currency for example). Another application serves as the currency difference report, where you can compare the actual exchange rates with the exchange rates that were valid on the posting date, thus determining the effect of changes to exchange rates. More information: Scenarios for Currency Translation [page 601].
Features
This function allows you to translate posted data records from the source currency into a target currency, or into different target currencies if translation is repeated. It is based on the standard SAP function for currency translation.
Currency translation is based on currency translation types. The business transaction rules for the translation are established in the currency translation type. A combination of various parameters (source and target currency, exchange rate type, time reference for conversion) determines how exchange rate determination is performed for the translation. More information: Currency Translation Types [page 602]
The currency translation type is stored ready for reuse.
In the transformation rules for InfoProviders, you can specify for each key figure or data field whether currency translation is performed during the update. In special cases, you can also run currency translation in user-defined routines in the transformation rules.
More information: Currency Translation During Transformation [page 351].
In the BI client, you can do the following:
600 PUBLICSAP BW/4HANA
Analysis

1. Specify a currency translation in the query definition.2. Translate currencies at query runtime. Translation is more limited here than in the query definition
however.
5.2.8.1 Scenarios for Currency Translation
The following application scenarios are conceivable for currency translation:
Translation into group- or local currency:
● You store all values in the document currency in your InfoProvider. You want to translate all values in your queries into the group currency. You can use a specific translation type for this purpose.
● You will get values in various currencies from your source system. You want to store all values in the document currency and in your group currency (EUR for example) in the InfoProvider.
● You store all the values in one currency in your InfoProvider. Subsidiaries want to translate these values into their local currency ad hoc in your BI tool using the exchange rate for the current day.
Currency difference report:
● You want to compare values with both current exchange rates and historical exchange rates. This way you can analyze the effect of exchange rates.
SAP BW/4HANAAnalysis PUBLIC 601

● You want to compare the actual exchange rates with those valid on the posting date. This allows you to analyze the effect of changes in the exchange rates between the posting date and the current date.
● You want to analyze the effect of exchange rate changes on your plan and actual data.For this purpose, you have created an InfoProvider for plan and actual data. The plan data was loaded into the InfoProvider with the exchange rate that was valid when during planning. The actual data is translated using the current exchange rate. In your InfoProvider, you then have the following four key figures: Plan original currency, plan group currency, actual original currency, actual group currency. Now compare plan/actual, each on the level of the original currency and the group currency. In this way you can analyze the currency translation effects.
5.2.8.2 Currency translation type
A translation type is a combination of different parameters that establish how the exchange rate for the translation is determined.
Structure
The parameters that determine the exchange rate are the source and target currencies, exchange rate type and the time reference for the translation.
To define a translation type you have to define the exchange rate type, the time reference, and how and when the inverse exchange rate is used. Entering the target currency is optional.
● Exchange rate determination: You use the Exchange Rate Determination Using FI Module indicator to specify that the exchange rate is determined using the currency translation mechanisms used in ERP or the services offered in the enterprise service-oriented architecture.
● Exchange rate type: The exchange rate type distinguishes between exchange rates that are valid in the same time frame, for example, the bid rate, ask rate, or middle rate. The exchange rate types are stored in a central table (TCURV) and can by maintained in Customizing by choosing SAP BW/4HANA Customizing Implementation Guide General Settings Currencies Check Currency Types . Alternatively you can specify any variable that exists for InfoObject 0RTYPE.
● Inverse exchange rate: You can choose whether the inverse exchange rate is to be used for the translation type. If you choose translation with the inverse exchange rate, then the reverse exchange rate is used in the
602 PUBLICSAP BW/4HANA
Analysis

relevant translation from one currency to another. Translation using the inverse exchange rate is useful, for example, when values from the original documents have been translated before being saved in the data targets and you want to restore the original values.
ExampleYou have maintained the following exchange rates:
EUR USD 0.940
USD EUR 1.070
When translating from USD to EUR using the inverse exchange rate, a rate of 1/0.940 = 1.064 is used and not a rate of 1.070.
● Source Currency: The source currency is the currency that is to be translated. You have the following options:○ The source currency is determined dynamically using the data record. This is always the case when
you perform currency translation in the BI Client.○ The source currency is determined dynamically using a specified InfoObject (characteristic). During
the data load process, the source currency can be determined either from the data record or using a specified characteristic that bears master data (see example: Defining Target Currencies Using InfoObjects [page 604] - the source currency from an InfoObject is determined in the same way).
○ You can use a fixed source currency in planning functions. Data records with the same currency key as the source currency are translated.
○ You can specify any variable that exists for InfoObject 0CURRENCY. You can also use these options in planning functions.
● Target currency:To determine the target currency, you have the following options:○ You can establish that the target currency be determined upon translation. In the Query Designer
under the properties for the relevant key figure, you specify either a fixed target currency or a variable to determine the target currency.
○ You can enter a fixed target currency (for example, 'EUR').○ You can specify any variable that exists for InfoObject 0CURRENCY.○ In the currency translation type, you can specify the InfoObject used to determine the target currency
during currency translation. To do this, you need to specify a currency attribute in the characteristic editing screen.See also the example forDefining Target Currencies Using InfoObjects [page 604]. If the Only Use in Transformation flag is set, you can also enter InfoObjects that do not have a currency attribute set in InfoObject maintenance. InfoObjects that are entered here have to be available in the source and contain a currency as an attribute.
● Time reference: The time reference for the currency translation can be either fixed or variable.If the time reference is fixed, the time at which the exchange rate is determined is independent of the data. You have the following options:○ You can establish that the time reference be determined upon translation.○ You can select the current date.○ You can specify a fixed date as the key date.○ You can specify any variable that exists for InfoObject 0DATE.○ You can establish that the query key date be used. This is determined in the query settings.
SAP BW/4HANAAnalysis PUBLIC 603

If the time reference is variable, the time at which the exchange rate is determined is decided by a time characteristic value.○ A variable time reference can, for example, be determined using the end or start of a fiscal year or
calendar year, a period and a month – or even to the exact day. The corresponding standard InfoObject is selected automatically (0FISCYEAR, 0FISCPER, 0CALYEAR, 0CALQUARTER, 0CALMONTH, 0CALWEEK and 0CALDAY).
○ The time reference can also be determined using a customer-specific InfoObject of type date (for example, trading day). Note that this InfoObject has to have the same properties as the standard InfoObject selected in the variable time reference or must reference it.
○ In the Time Shift field of type INT4, you can specify whole numbers with a +/- sign.○ In the Time Shift from Variable field, you can specify formula variables (1FORMULA). As these values of
the variables may have to be whole numbers, they are rounded to whole numbers (integers) where necessary.Regardless of whether it is fixed or variable, the time shift is always based on the InfoObject specified under Variable Time Reference.
ExampleExample of a time shift of -3:
The variable time reference is To the exact day and the InfoObject under Variable Time Reference is 0CALDAY. Instead of 07.11.2006, after the time adjustment, 04.11.2006 is used for the translation.
The variable time reference is End of Week and the InfoObject under Variable Time Reference is 0CALWEEK. Instead of 52.2004, the week 49.2004 is calculated and the end date is calculated from this.
○ If you defined StartPeriod or End Period (standard InfoObject: OFISCPER) as the variable time reference, you can specify how Period 0 should be handled.
See also:
Creating Currency Translation Types [page 606]
5.2.8.2.1 Defining Target Currencies Using InfoObjectsIf you want to determine the target currency for currency translation using an InfoObject, proceed as follows:
1. You need a characteristic that can be defined as an attribute for this InfoObject. This characteristic, for example 0CURRENCY, must contain valid currency units, and the corresponding exchange rates have to be maintained.
2. In characteristic maintenance, set the currency attribute for the InfoObject which you are using to determine the target currency.
3. Define a currency translation type in which the target currency will be determined using this InfoObject.4. In the transformation rules for your InfoProvider, specify that the values for the corresponding key figures
are to be translated in the transformation and enter the previously defined translation type.Or use the currency translation type for currency translation in the BI client.
Example
You want to load data from a CSV file and update it into an InfoProvider. The InfoProvider has two key figures (kyf1 and kyf2) of type Amount with different unit InfoObjects.
604 PUBLICSAP BW/4HANA
Analysis

CSV file extract:
Z_COUNTRY kyf1 kyf_unit1
D 1 USD
CH 2 USD
In the update rules, specify that kyf1 is updated to the InfoProvider without changes. kyf2 is filled from source key figure kyf1, and currency translation is performed with currency translation type WUA01. In WUA01, you have specified that the source currency is determined from the data record, and that InfoObject Z_COUNTRY be used to determine the target currency.
You already defined a currency attribute for InfoObject Z_COUNTRY in InfoObject maintenance on the Business Explorer tab page - for example 0CURRENCY.
In order for key figure kyf2 of InfoCube to be updated with the currency conversion, Z_COUNTRY must contain the attributes 'D' and 'CH'. 0CURRENCY also has to contain valid currency units, and corresponding exchange rates must have been maintained.
Result:
Master data-bearing characteristic Z_COUNTRY:
Characteristic: Z_COUNTRY Currency Attribute: 0CURRENCY ...
D EUR ...
CH CHF ...
... ... ...
In the transformation rules, 1 USD was translated into EUR, and 2 USD into CHF.
5.2.8.2.2 Creating Variables for Currency Translation Types
Context
When you create a currency translation type, you can use a variable for the exchange rate, target currency, or time reference.
SAP BW/4HANAAnalysis PUBLIC 605

Procedure
● 1. Open Query Designer.2. Create a new (dummy) query for an InfoProvider that contains the InfoObjects Exchange Rate Type
(0RTYPE), Currency Key (0CURRENCY), or Date (0DATE), depending on which variable you require. You need this query to be able to create a variable in Query Designer. More information: Working with Queries [page 738]
3. Create a new variable on the corresponding InfoObject (either 0RTYPE, 0CURRENCY or 0DATE). More information:Defining Variables [page 811]
4. Enter a description for the variable.5. If necessary, change the automatically generated suggestion for the technical name of the variable.6. Choose the required processing type in the Processing by field. If you choose User Entry/Default Value,
the system prompts you to enter the currency in a dialog box in the query.7. On the Currencies and Units tab page, select an appropriate dimension.8. Press OK. The variable is saved with the settings you have made, and the Variables Editor closes.9. Close Query Designer.
Results
The variable can be used in the currency translation type.
5.2.8.2.3 Creating Currency Translation Types
Prerequisites
If you want to use variables in the currency translation type, you have to create them beforehand. See Creating Variables for Currency Translation Types [page 605].
Procedure
1. You are in the BW Modeling tools. Choose Currency Translation Type in the context menu of your InfoArea.
NoteThe currency translation types are always assigned to infoArea 0BW4_GLOBAL, even if you create them on a different InfoArea.
2. Enter a technical name and a description for the currency translation type. The name must be between three and ten characters long and begin with a letter. Choose Finish. The editor appears.
606 PUBLICSAP BW/4HANA
Analysis

3. Under Source Currency, specify whether the source currency is:○ Determined using the data record○ Based on a fixed source currency○ Determined using a variable○ Determined using an InfoObject. Specify the InfoObject that you want to use to determine the source
currency. For more information, see the example under Defining Target Currency from InfoObjects [page 604].
4. Choose Exchange Rate Type or Ex. Rate Type from Var. to determine the exchange rate dynamically. With Ex. Rate Type from Var., you can select any variable that has been created for 0RTYPE using input help.
5. Choose Dynamic Exchange Rate Determination or enter an InfoObject (key figure) that is to be used to determine the exchange rate. The latter is only supported in the transformation.
6. Define whether to perform the currency translation with the inverse exchange rate. In this case, the required translation from one currency to another is performed using the reverse exchange rate. This can be useful for example if values have already been translated, and you need to restore the original values.
7. Under Target Currency, specify whether the target currency is:○ Determined using the data record○ Based on a fixed source currency○ Determined using a variable Here you can use input help to select a variable created for 0CURRENCY.○ Determined using an InfoObject. Specify the InfoObject that you want to use to determine the source
currency. For more information, see the example under Defining Target Currency from InfoObjects [page 604].
8. Select a fixed or a variable time base for the currency translation. With a fixed time reference you can choose one of the following options:○ Today’s date○ Query key date. In this case, the time reference is the key date that is set in the query properties in
Query Designer.○ Fixed key date○ Time reference using a variable (variable for 0DATE)
With a variable time reference, you can make the following settings:
○ Select a time characteristic. The standard time characteristic is set by the system to correspond to the time of the translation (e.g. 0FISCYEAR for Start Fiscal Year, 0CALYEAR for Start Calendar Year).
○ You can define the handling of period 0 if you selected Start or End Period as the variable time reference (0FISCPER ). If value 000.2002 is now entered at runtime for the value of 0FISCPER, there are different ways to determine a start and end date. Period 0 controls how the first day (FIRSTDAY) and last day (LASTDAY) of period 0 are determined. This day is then used as the key date for the currency translation.
ExampleEnd Period and standard InfoObject 0FISCPER were selected as time reference. The value of 0FISCPER is specified as 000.2002. Period 0 is handled according to variant B, so that the date 31.12.2002 is determined at runtime. This date is used for currency translation.
SAP BW/4HANAAnalysis PUBLIC 607

ExampleStart Period and standard InfoObject 0FISCPER were selected as time reference. The value of 0FISCPER is specified as 000.2002. Period 0 is handled according to variant A, so that the date 01.01.2002 is determined at runtime. This date is used for currency translation.
○ In the Time Shift field, you can specify integers with the +/- sign.Regardless of whether it is fixed or variable, the time shift is always based on the InfoObject specified under Variable Time Reference.
ExampleFor a variable time reference To the Exact Day, 0CALDAY and a time shift of -3 for example, 04.11.2006 would be used for the translation instead of 07.11.2006
9. Save your entries.
Results
The currency translation type is available to you for translating currencies.
See also:
Currency Translation Type [page 602]
5.2.8.2.4 Transferring Exchange Rates for Currencies from SAP Systems
You use this function to upload exchange rates for currencies from other SAP systems into the TCURR table in your BW system.
Procedure
1. In the Data Warehousing Workbench under Administration, choose the source system tree.
2. In the context menu of your , choose Transfer Exchange Rates. The Transfer Exchange Rates: Selection screen appears.
3. Choose the exchange rate type that you want to load and the date from which changes should be transferred.
4. Under Mode you can select whether you want to simulate upload or update or copy the exchange rates. With the Update exchange rates option, existing records are updated. With the Recopy exchange rates option, table TCURR is deleted before new records are loaded.
5. Choose .
608 PUBLICSAP BW/4HANA
Analysis

See also:
Exchange Rates for Currencies in Flat Files [page 609]
5.2.8.2.5 Transferring Global Table Entries for Currencies from SAP Systems
You use this function to transfer all the tables relevant to the currency translation from the other SAP systems connected to the BW system. Specifically, this includes the following tables:
TCURC (currency codes)
TCURF (conversion factors)
TCURN (notations)
TCURS (spreads)
TCURT (description of currency codes)
TCURV (exchange rate types for currency translation)
TCURW (usage of exchange rate types)
TCURX (decimal places for currencies)
Procedure
1. In the Data Warehousing Workbench under Administration, choose the source system tree.
2. In the context menu of your , choose Transfer Global Settings. The Transfer Global Settings: Selection screen appears.
3. Under Transfer Global Table Contents, select the Currencies field.4. Under Mode you can select whether you want to simulate upload or update or copy the exchange rates.
With the Update exchange rates option, existing records are updated. With the Recopy exchange rates option, table TCURR is deleted before new records are loaded.
5. Choose .
See also:
Transferring Global Settings
5.2.8.2.6 Exchange Rates for Currencies in Flat Files
You use this function to upload exchange rates for currencies into table TCURR in your BW system from a flat file. This is necessary if your BW system is not connected to an SAP system and the table cannot receive input from an SAP system.
SAP BW/4HANAAnalysis PUBLIC 609

If your BW system is connected to an SAP system, proceed as described in:
Transferring Exchange Rates for Currencies from SAP Systems [page 608]
Prerequisites
Your flat file should have the following format (corresponds to table TCURR without CLIENT field):
Field Data Type Length Decimal Places Meaning
KURST CHAR 4 0 Exchange rate type
FCURR CUKY 5 0 From currency
TCURR CUKY 5 0 To currency
GDATU CHAR 8 0 Date when the rate will be valid
UKURS DEC 9 5 Exchange rate
FFACT DEC 9 0 Factor for the units of the 'from' currency
TFACT DEC 9 0 Factor for the units of the 'to' currency
The date (field: GDATU) must be in internal format (YYYYMMDD).
Example for a table with periods as decimal points:
KURST FCURR TCURR GDATU UKURS FFACT TFACT
M EUR USD 20020101 1.00010 0 0
B EUR USD 20020112 0.98300 0 0
Example of the structure of a CSV file with ';' as a separator. M;EUR;USD;20020101;1.00010;0;0
B;EUR;USD;20020112;0.98300;0;0
See also:
Uploading Exchange Rates from Flat Files [page 611]
610 PUBLICSAP BW/4HANA
Analysis

5.2.8.2.6.1 Uploading Exchange Rates from Flat Files
Procedure
● 1. In the Data Warehousing Workbench under Administration, choose the source system tree.2. In the context menu of your source system (for example PC_FILE), choose Transfer Exchange Rates.
The Transfer Exchange Rates: Selection screen appears.3. Select where you want to load your file from. You differentiate between files that are on the application
server and files that are on client workstations. Select your file and specify the separator that is being used. Only CSV files are allowed as the file type.
4. Under Mode you can select whether you want to simulate upload or update or copy the exchange rates. With the Update exchange rates option, existing records are updated. With the Recopy exchange rates option, table TCURR is deleted before new records are loaded.After the data has been uploaded from the CSV file, the OLAP caches are invalidated so that the system uses the new exchange rates during translation.
5. Choose .
NoteIf the csv file contains exchange rate types that are not present in the BW system (table TCURV), this will be noted in the log. The entries appear as follows: Exchange rate type &cv1 not in table TCURV. The data from the CSV file is then written to table TCURR. The entries missing from TCURV can be maintained later on manually ( SAP BW/4HANA Customizing Implementation GuideGeneral Settings Currencies Check Exchance Rate Types ).
5.2.8.3 Currency Translation in BI Clients
Prerequisites
You have created one or more currency translation types.
More information: Creating Currency Translation Types [page 606].
SAP BW/4HANAAnalysis PUBLIC 611

Features
If you want to translate a currency from key figures in the query, you can determine the translation type from two places:
1. In the query definition for individual key figures or structure elements2. In the executed query, using the context menu for all elements of key figure type: amount
Currency Translation According to Query Definition
A more complex currency translation is available in the query definition. You can determine how the individual elements (key figures of type: amount) of the query are to be converted. One currency translation type can be specified for each element. Note that this can cause overlapping of two different translation types in one cell. If this occurs, the system always uses the translation type you set most recently. See Multiple Currency Translation Types in One Query [page 614]
Depending on the definition of the target currency determination in the currency conversion type, either a fixed target currency or a variable for the determination of the target currency can also be specified.
See also the section Currency Translation in Properties of the Selection/Formula/Cell.
If a variable is used, the system will request the variable when you execute the query. You can see the procedure in Setting Variable Currency Translation [page 613].
The values of a query can exist in different currencies, depending on the corresponding elements and the currency translation selected. At the same time, you need to take account of certain currency translation modalities (translation of plan data is performed with year-specific exchange rates for example, whereas actual data is translated using month-specific exchange rates).
Currency Translation in the Executed Query
By choosing Query Properties in the context menu for the key figure in the BI client, you have various options for translating the displayed currency.
● Convert to Currency as Defined in Query: Complex currency translations can be configured using the Query Designer. If this type of translation is configured in your query, you can use this function in your query results.
● Translate to Currency: Select this option to translate results to a specific currency. In the dropdown list, select the currency that you want the results to be displayed in.○ Use Currency Translation: After you have selected the currency for the results, select the required
translation type to use when converting from this dropdown box.○ Consider Translation from Query Definition: Select this checkbox to convert to the currency defined in
the query first, and then convert to the currency specified in these settings.● Display Original Currency: Select this option to disable currency translations.
More information: Query Properties
Restrictions:
The following currency translation types are not available at the runtime of the query.
● Inactive translation types● Translation types for which a variable is stored (variable time reference, source currency from variable,
target currency from variable, and so on)● Translation types in which an InfoObject is used for determining the source currency or target currency or
time reference.
612 PUBLICSAP BW/4HANA
Analysis

Currency Translation Is Possible…
● Generally only for the use of selection elements (formulas are applied to translated values).● When using formula variables with the dimensions Amount and Price● When using formula variables with a replacement path● With key figure attributes if the key figure is of type Amount
5.2.8.3.1 Setting Variable Target Currency in the Query Designer
Prerequisites
You have created a currency translation type. You have selected the Selection of Target Currency with Translation option on the Target Currency tab page in this translation type.
Procedure
● 1. You are in the Query Designer. In the properties for your amount key figure, choose the Translations tab page.
2. Select your translation type under Currency Translation.3. Select the Variables Entry field and choose New Variable. The variables editor appears. See also
Defining Variables.4. Enter a description for the variable.5. If necessary, change the automatically generated suggestion for the technical name of the variable.6. In the Processing by field, choose the processing type User Entry/Default Value. The Currency
characteristic (0CURRENCY) is the default.7. Under Details, choose between the following input options:
○ Optional○ mandatory○ Mandatory, initial values not permitted
This field is ready for input by default.8. Assign a default value for the variable.9. Choose OK. The variable is saved with the settings you made and the variables editor closes.
Results
When the query is executed, the system gets the variables for the target currency.
SAP BW/4HANAAnalysis PUBLIC 613

5.2.8.3.2 Multiple Currency Translation Types in One Query
Use
In the following a query with two structures will be considered. The structure element of the column is the key figure Net Sales. The structure elements of the lines are comprised of specifications from the Country characteristic. If currency translation types are defined for both structures, there can be overlays form two different translation types in one cell. Then it depends on the order in which you defined the translation conversion types. The translation type that you last set always takes precedence, even within a structure.
Prioritization will be clarified using the following examples. The numbers show in which sequence the individual elements were defined in the Query Designer of a currency translation type. The following examples refer to this sequence. If the structure element in the Net Sales column has a translation type, it always has USD as the target currency. The structure elements from the lines are always translated into the respective country currency (United Kingdom GBP, Canada CAD, Switzerland CHF, Germany EUR) as long as they have a translation type.
Structure elements of the lines:
614 PUBLICSAP BW/4HANA
Analysis

Structure element of the column:
Example 1:
None of the elements have a defined currency translation type, that is, all currencies will be displayed in the currency DB:
Example 2:
A currency translation type with a target currency of USD is defined for the 'net sales'key figure:
Example 3:
Only one currency translation is defined in the structure element of the line. The translation should be performed into each country's currency.
SAP BW/4HANAAnalysis PUBLIC 615

Example 4:
First a currency translation type is defined for the structure element of the line for Canada. The translation is made into CAD. Then a currency translation type is defined for the structure element of the line for Switzerland - the translation should be made into CHF. Then a currency translation type is defined for the key figure 'net sales', which stipulates that the translation should be into USD (see mapping of the structures above: 1, 2, 3):
Example 5:
616 PUBLICSAP BW/4HANA
Analysis

The example is structured exactly as in 4), with the only difference being that a translation type for Germany and the United Kingdom is defined afterwards for the structure elements of the line. Both are translated into the country's currency (see mapping of the structures above: 1, 2, 3, 4, 5):
Example 6:
The example is structured exactly as in 5), with the only difference being that a translation type for Canada and Switzerland is defined afterwards for the structure elements of the line. Both are translated into the country currency (see mapping of structures above: 1, 2, 3, 4, 5, 6, 7):
5.2.8.4 Currency and Unit Display in BI Client
There are various settings for displaying currencies in the BI Client.
Displaying currencies and units in the results area of a query
Values in different currencies can be fundamentally aggregated and, by calculation, attached to the results area of the query. Linked values from different currencies are, however, displayed differently to values that have a common currency. There are, then, two different cases for displaying values and currencies when analyzing data in the BI Client:
● If all the values that go into the cell of the query's results area have the same currency, the associated value is displayed in this currency.
SAP BW/4HANAAnalysis PUBLIC 617

● In certain situations, it is impossible to clearly specify number values and texts for currencies or units in BI Client. In these cases, predefined texts are displayed instead of number values and currencies or units.○ If the calculation contains a division by zero, "0/0" is displayed.○ If a number value cannot be found, NOP is displayed (does not exist).○ If a number value cannot be calculated due to a numeric overflow or another undefined mathematical
function, "X" is displayed.○ If the values that go into a cell have different currencies, the value is displayed in a numerical,
aggregated form. The currency will be represented by a placeholder. The symbol "*" is displayed instead of a currency identifier.
ExampleThe following rules are valid for aggregation behavior in the OLAP processor. For example:
3 USD + 5 EUR = 8 *
3 USD + 0 EUR = 3 USD
0 USD + 0 EUR = 0 USD or 0 EUR, depending on the sequence
3 USD - 3 USD + 5 EUR = 5 EUR
3 USD + 5 EUR - 3 USD = 5 *
3 USD + 5 = 8 *, since it is an initial currency = currency ERROR
● To drilldown further by currency, you must define the characteristic Currency/Unit as a free characteristic in the query definition. The amounts you specified for the different currencies can now be entered into the query cells by drilling down on Currency/Unit (1 CUDIM).
● Alternatively, you can display the different currencies in the query monitor (transaction RSRT). Execute the query and choose Key Figure Definition from the results list. Currencies and units are always broken down for display – never aggregated.
Example
Country Actual Revenue Currency Plan Revenue Currency
USA 734 USD 700 USD
Germany 82 EUR 50 USD
Switzerland 70 * 50 USD
Result 886 * 800 USD
Country Currency/Unit Actual Revenue Currency Plan Revenue Currency
USA USD 734 USD 700 USD
Germany EUR 82 EUR 50 USD
Switzerland EUR 40 EUR
618 PUBLICSAP BW/4HANA
Analysis

Country Currency/Unit Actual Revenue Currency Plan Revenue Currency
CHF 30 CHF
USD 50 USD
Result 886 * 800 USD
● If a user is not authorized to display a certain number value of a cell in the active query, you can display a text in the cell instead (No authorization).
● If a calculated number value is made up of different currencies or units, you can choose to either display the number value or not. Choose mixed values to display the number value. If the 'mixed value' setting is not active, the text that you entered under 'mixed currencies' is displayed.
Displaying the Currency Key
The currency key can be displayed only in the column heading under the following conditions – instead of before or after the currency value:
● The currency for a query was translated into a common target currency.● The data source only provides one currency so that a translation into a common target currency is not
necessary.
To display the currency key in the column header, select Properties on the column in question using the context menu. Under Display, select Scaling Factors for Displaying Key Figures and choose OK. The currency key is taken from the column fields and displayed in the column header.
Also note the Priority Rule for Formatting Settings for this kind of formatting settings.
Setting up the currency display
In Customizing, you can make settings for how you want to display the currencies. You can decide which key you want each currency to be displayed with, and whether the key is placed before or after the value.
Example
Currency (ISO norm) Alt. Text Before or After Value
EUR EUR After value
USD $ Before value
GBP £ Before value
NoteThe above values are displayed for each default setting, just as the example shows. If you want to change these settings, you can do so in Customizing.
To make the settings in Customizing, go to the SAP BW/4HANA Customizing Implementation Guide and choose SAP BW/4HANA Analysis General Reporting Settings in Business Explorer Set Alternative Display for
Currencies .
SAP BW/4HANAAnalysis PUBLIC 619

5.2.9 Quantity Conversion
Quantity conversion allows you to convert key figures with units that have different units of measure in the source system into a uniform unit of measure in the BW system.
Features
This function makes it possible to convert updated data records from the source unit of measure into a target unit of measure, or into different target units of measure if the conversion is repeated. The functionality is similar to currency translation.
It is based in part on the quantity conversion functionality in the Application Server. Simple conversions can be performed between units of measure that belong to the same dimension (such as meters to kilometers, kilograms to grams). You can also perform InfoObject-specific conversions (for example, two palettes (PAL) of material 4711 were ordered and this order quantity has to be converted to the stock quantity Carton (CAR)).
Quantity conversion is based on quantity conversion types. The business transaction rules for the conversion are set in the quantity conversion type. The conversion type is a combination of different parameters (conversion factors, source and target units of measure) that determine how the conversion is performed. More information: Quantity Conversion Types [page 623].
Integration
The quantity conversion type is stored for future use and can be used for quantity conversions in the transformation rules for InfoProviders and in BI Clients:
In the transformation rules for InfoProviders you can specify for each key figure or data field whether quantity conversion is performed during the update. In certain cases, you can also run quantity conversion in user-defined routines in the transformation rules.
More information: Quantity Conversion in Transformations [page 352].
In the BI client, you can do the following:
● Establish a quantity conversion in the query definition.● Convert quantities at query runtime. Translation is more limited here than in the query definition.
RecommendationWe recommend performing and storing the quantity conversion in the transformation. It is then already possible to access the converted values at query runtime, thus improving query runtime performance. The extent to which this happens depends on the amount of data to be converted.
620 PUBLICSAP BW/4HANA
Analysis

5.2.9.1 General Information About Quantity Conversion
The conversion of units of measure is required to convert business measurements into other units. Business measurements encompass physical measurements which are either assigned to a dimension or are nondimensional. Non-dimensional measurements are understood as countable measurements (palette, unit..).
You differentiate between conversions for which you only need to enter a source and target unit in order to perform conversion and conversions for which specifying these values alone is not sufficient. For the latter, you have to enter a conversion factor which is derived from a characteristic or a characteristic combination (compound characteristic) and the corresponding properties.
1. Measurements of length:Conversions within the same dimension ID (T006-DIMID) - for example, length:1 m = 100 cm (linear correlation)Meter and Centimeter both belong to dimension ID LENGTH.
2. Measurements of number associated with measurements of weightConversions involving different dimension IDs - for example, number and weight.1 unit = 25 g (linear correlation)Unit has dimension ID AAAADL and Gram has dimension ID MASS.
SAP BW/4HANAAnalysis PUBLIC 621

Example
Number Unit Number Unit
1 Chocolate bar = 25 g
1 Small carton = 12 Chocolate bar
1 Large carton = 20 Small carton
1 Europallet = 40 Large carton
Question: How many chocolate bars fit on one europallet (PAL)?
5.2.9.2 Prerequisites for InfoObject-Specific Quantity Conversion
Any characteristic containing at least one unit as an attribute can be used for quantity conversion.
To use a characteristic for quantity conversion, you have to make the following settings in characteristic maintenance:
Configure the settings on the Extended tab page in the editing screen for InfoObjects in the BW modelling tools.
Specify a Basic Unit of Measure
Unit conversion is always performed based on the base unit of measure (as with material management conversion, table MARM R/3).
Create a Unit of Measure for the Characteristic
When creating a unit of measure for the characteristic, the system creates a DataStore object for units of measure.
You can specify the name of the quantity DataStore object, the description, and the InfoArea that you want to add the object to. The system proposes the name: UOM<Name of the InfoObject that the quantity DataStore Object is being added to>.
With objects of this type, the system generates an SID column in the database table for each characteristic and stores the characteristic attributes in the form of SIDs.
The SID columns are automatically filled in the transformation and cannot be changed in the end routine.
622 PUBLICSAP BW/4HANA
Analysis

Assignments of quantity DataStore objects to characteristics are 1:1. This means that only one characteristic can be assigned to a quantity DataStore object, and one quantity DataStore object can be assigned to a characteristic.
NoteSince the object is generated by the system, you cannot enhance or change a quantity DataStore object in DataStore object maintenance. You can only display it there.
You can only fill the quantity DataStore object with data by using a data transfer process with transformation.
You can also fill the quantity DataStore object using an expert routine with data. Note that the SID fields are not filled automatically in this case.
If a characteristic with a quantity DataStore object assigned to it is changed subsequently, (by making changes to the compounding or base unit of measure for example), you have to delete the quantity DataStore object and regenerate it. In practice, this does not occur after the data model has been finalized.
Key <Characteristic>
Key <Compounding for characteristic, where applicable>
Key <Unit of measure that you can convert into>
<Base unit of measure>
<Conversion factor: Counter>
<Conversion factor: Denominator>
<SID_Characteristic>
<SID_Compounding for characteristic, where applicable>
<SID_Unit of measure that you can convert into>
<SID_Base unit of measure>
5.2.9.3 Quantity conversion type
A quantity conversion type is a combination of different parameters that establish how the conversion is performed.
The parameters that determine the conversion factors are the source and target unit of measure and the option you choose for determining the conversion factors.
SAP BW/4HANAAnalysis PUBLIC 623

The decisive factor in defining a conversion type is the way in which you want conversion factors to be determined. Entering source and target quantities is optional.
Conversion Factors
The following options are available:
● Using reference InfoObjectThe system tries to determine the conversion factors from the reference InfoObject you have chosen or from the associated quantity DataStore object.If you want to convert 1000 grams into kilograms but the conversion factors are not defined in the quantity DataStore object, the system cannot perform the conversion, even though this is a very simple conversion.
● Using central units of measure (T006)Conversion is performed using the function module UNIT_CONVERSION_SIMPLE using unit of measure table T006. Conversion can only take place if the source unit of measure and target unit of measure belong to the same dimension (for example, meters to kilometers, kilograms to grams, and so on).
● Using reference InfoObject if available, central units of measure (T006) if notThe system tries to determine the conversion factors using the quantity DataStore object you have defined. If the system finds conversion factors, it uses these to perform the calculation. If the system cannot determine conversion factors from the quantity DataStore object it tries again using table T006 for units of measure.
● Using central units of measure (T006) if available, reference InfoObject if not.The system tries to find the conversion factors in table T006 for units of measure. If the system finds conversion factors it uses these to perform the conversion. If the system cannot determine conversion factors from the central units of measure it tries to find conversion factors that match the attributes of the data record by looking in the quantity DataStore object.
● Using SI units (/ISQC/C_UT)The conversion is performed using measurements stored in table /ISQC/C_UT. These are the measurements of the international unit system (SI, abbreviation of: Le Système international d'unités). This conversion is also used in ERP using class /ISQC/CL_QTY_CONVERSION with method UNIT_CONVERSION.
● Using reference InfoObject if available, SI units (/ISQC/C_UT) if notThe system tries to determine the conversion factors using the quantity DataStore object you have defined. If the system finds conversion factors, it uses these to perform the calculation. If the system cannot determine conversion factors from the quantity DataStore object it tries again using table /ISQC/C_UT.
● Using SI units (/ISQC/C_UT) if available, reference InfoObject if notThe system tries to find the conversion factors in table /ISQC/C_UT for SI units. If the system finds conversion factors it uses these to perform the conversion. If the system cannot determine conversion
624 PUBLICSAP BW/4HANA
Analysis

factors from the central units of measure it tries to find conversion factors that match the attributes of the data record by looking in the quantity DataStore object.
The settings that you can make in this regard affect performance and the decision must be strictly based on the data set.
If you only want to perform conversions within the same dimension, option 2 is most suitable.
If you are performing InfoObject-specific conversions (for example, material-specific conversions) between units that do not belong to the same dimension, option 1 is most suitable.
In both cases, the system only accesses one database table. That table contains the conversion factors.
With option 3 and option 4, the system tries to determine conversion factors at each stage. If conversion factors are not found in the central table (T006), the system searches again in the quantity DataStore object, or in reverse.
The option you choose should depend on how you want to spread the conversion. If the source unit of measure and target unit of measure belong to the same dimension for 80% of the data records that you want to convert, first try to determine factors using the central units of measure (option 4), and accept that the system will have to search in the second table also for the remaining 20%.
The Conversion Factor from InfoObject option (as with Exchange Rate from InfoObject in currency translation types) is only available when you load data. The key figure you enter here has to exist in the InfoProvider and the attribute this key figure has in the data record is taken as the conversion factor.
Source Unit of Measure
The source unit of measure is the unit of measure that you want to convert. The source unit of measure is determined dynamically from the data record or from a specified InfoObject (characteristic). In addition, you can specify a fixed source unit of measure or determine the source unit of measure using a variable.
When converting quantities in the BI Client, the source unit of measure is always determined from the data record.
During the data load process the source unit of measure can be determined either from the data record or using a specified characteristic that bears master data.
You can use a fixed source unit of measure in planning functions. Data records are converted that have the same unit key as the source unit of measure.
The values in input help correspond to the values in table T006 (units of measure).
You access maintenance for the unit of measure in SAP BW/4HANA Customizing Implementation GuideGeneral Settings Check Units of Measure .
In reporting, you can use a source unit of measure from a variable. The variables that have been defined for InfoObject 0UNIT are used.
Target Unit of Measure
You have the following options for determining the target unit of measure:
● You can enter a fixed target unit of measure in the quantity conversion type (for example, ‘UNIT’).● You can specify an InfoObject in the quantity conversion type that is used to determine the target unit of
measure during the conversion. This is not the same as defining currency attributes where you determine a currency attribute on the BI Client tab page in characteristic maintenance. With quantity conversion types you determine the InfoObject in the quantity conversion type itself. Under InfoObject for Determining Unit
SAP BW/4HANAAnalysis PUBLIC 625

of Measure, all InfoObjects are listed that have at least one attribute of type Unit. You have to select one of these attributes as the corresponding quantity attribute.
● Alternatively, you can determine that the target unit of measure be determined during the conversion. In the Query Designer under the properties for the relevant key figure, you specify either a fixed target unit of measure or a variable to determine the target unit of measure.
5.2.9.3.1 Defining Target Units of Measure Using InfoObjects
Use
If you want to determine the target unit of measure for quantity conversion using an InfoObject, proceed as follows:
1. You require a characteristic that has at least one unit as an attribute. This characteristic, for example 0PO_UNIT, has to contain valid units of measure and the corresponding conversion rates have to be maintained (either specific to an InfoObject or in the central units of measure).
2. Define a quantity conversion type in which the target unit of measure will be determined using this InfoObject.
3. In Associated Quantity Attribute, set the quantity attribute for the InfoObject which you are using to determine the target quantity.
4. In the transformation rules for your InfoProvider, specify that the values for the corresponding key figures are to be translated in the transformation and enter the previously defined translation type. The InfoObject specified in the quantity conversion type must exist in both the source and the target system and be filled using a rule.
Example
You want to load data from a CSV file and update it into an InfoProvider. The InfoProvider has two key figures (kyf1 and kyf2) of type Unit with different unit InfoObjects.
CSV file extract:
Z_COUNTRY kyf1 kyf_unit1
D 1 PAL
CH 2 BX
In the transformation rules, you specify that kyf1 is updated to the InfoProvider without changes. kyf2 is filled from the source key figure kyf1 and the unit of measure conversion is performed using quantity conversion type WUA01. In WUA01, you have specified that the source unit of measure is determined from the data record and that InfoObject Z_COUNTRY is used to determine the target unit of measure.
You have already chosen the associated quantity attribute 0PO_UNIT for InfoObject Z_COUNTRY.
To ensure that key figure kyf2 of the InfoProvider is updated with the quantity conversion, Z_COUNTRY must contain the attributes 'D' and 'CH'. 0PO_UNIT also has to contain valid units of measure, and corresponding conversion rates must have been maintained.
626 PUBLICSAP BW/4HANA
Analysis

Result:
Master data-bearing characteristic Z_COUNTRY:
Characteristic: Z_COUNTRY Quantity attribute: 0PO_UNIT ...
D CAR ...
CH UNIT ...
... ... ...
In the transformation rules, 1 PAL was converted into CAR and 2 BX into UNIT.
5.2.9.3.2 Creating Variables for Quantity Conversion Types
Context
When you create a quantity conversion type you can use a variable for the source and target unit of measure.
Procedure
● 1. Open Query Designer.2. Create a new (dummy) query for an InfoProvider that contains the Unit InfoObject (0UNIT). You need
this query to be able to create a variable in Query Designer. More information: Working with Queries [page 738]
3. Create a new variable for the InfoObject 0UNIT. More information: Defining Variables [page 811]4. Enter a description for the variable.5. If necessary, change the automatically generated suggestion for the technical name of the variable.6. Choose the required processing type in the Processing by field. If you choose User Entry/Default Value,
the system requests that you enter the unit of measure in a dialog box in the query.7. On the Currencies and Units tab page, select Quantity as the dimension.8. Press OK. The variable is saved with the settings you have made, and the Variables Editor closes.9. Close Query Designer.
Results
The variable can be used in the quantity conversion type.
SAP BW/4HANAAnalysis PUBLIC 627

5.2.9.3.3 Creating Quantity Conversion Types
Prerequisites
If you want to use variables in the quantity conversion type, you have to create them beforehand. See Creating Variables for Quantity Conversion Types [page 627].
Procedure
1. You are in the BW Modeling tools. Choose Currency Translation Type in the context menu of your InfoArea.
NoteThe currency translation types are always assigned to infoArea 0BW4_GLOBAL, even if you create them on a different InfoArea.
2. Enter a technical name and a description for the currency translation type. The name must be between three and ten characters long and begin with a letter. Choose Finish. The editor appears.
3. Choose Dynamic Determination of Conversion Factor or Conversion Factor from InfoObject.4. If you choose Dynamic Determination of Conversion Factor you can enter further information in the
dropdown box. For more information, see the conversion factors section in Quantity Conversion Types [page 623].
5. Under Source Unit of Measure, choose whether the source unit of measure○ is determined from the data record○ has a fixed unit of measure○ is determined from a variable○ Determined using an InfoObject. Specify the InfoObject that you want to use to determine the source
currency.6. Under Target Unit of Measure, choose whether the target unit of measure
○ is selected during the conversion○ has a fixed unit of measure○ is determined from a variable○ is determined from an InfoObject Specify the InfoObject you want to use to determine the target
currency.7. Save your entries.
Result
The quantity conversion type is available for converting amounts (for InfoProvider transformation and for data analysis in the BI Client).
628 PUBLICSAP BW/4HANA
Analysis

5.2.9.3.4 Transferring Global Table Entries for Units of Measure from SAP Systems
Context
You use this function to transfer all the tables relevant to the quantity translation from the other SAP systems connected to the BW system. Specifically, this includes the following tables:
T006
T006A
T006B
T006C
T006D
T006I
T006J
T006T
Procedure
● 1. In the Data Warehousing Workbench under Administration, choose the source system tree.
2. In the context menu of your , choose Transfer Global Settings. The Transfer Global Settings: Selection screen appears.
3. Under Transfer Global Table Contents, select the Units of Measure field.4. Under Mode you can select whether you want to simulate upload or update or copy the tables again.
With the Update Tables option, existing records are updated. With the Rebuild Tables option, the corresponding tables are deleted before the new records are loaded.
5. Choose .
5.2.9.4 Quantity Conversion in the BI Client
Prerequisites
You have created one or more quantity conversion types.
See also Creating Quantity Conversions Types [page 628].
SAP BW/4HANAAnalysis PUBLIC 629

Features
If you want to convert the units of measure of the key figures in the query, you can determine the conversion type for the individual key figures or structure elements in query definition. You can determine how the individual elements (key figures of type: amount) of the query are to be converted. You can specify one quantity conversion type for each element.
Depending on how the target quantity determination is defined in the quantity conversion type, you can either specify a fixed target quantity or a variable that the system uses to determine the target quantity.
If a variable is used, the system will request the variable when you execute the query. For information on the procedure, see Setting Variable Target Units of Measure in the Query Designer [page 630].
5.2.9.4.1 Setting Variable Target Units of Measure in the Query Designer
Prerequisites
You have created a quantity conversion type. You have selected the Selection of Unit of Measure During Conversion option on the Unit of Measure tab page in this conversion type.
Procedure
● 1. You are in the Query Designer. In the properties for your amount key figure, choose the Translations tab page.
2. Under Unit Conversion, select your conversion type.3. Select the Variables Entry field and choose New Variable. The variables editor appears. See also
Defining Variables.4. Enter a description for the variable.5. If necessary, change the automatically generated suggestion for the technical name of the variable.6. In the Processing by field, choose the processing type User Entry/Default Value. The unit of measure
characteristic (0UNIT) is the default.7. Under Details, specify whether the entry is to be: You can select from the following:
○ Optional.○ Mandatory○ Mandatory, initial values not permitted
8. Assign a default value for the variable.9. Choose OK. The variable is saved with the settings you made and the variables editor closes.
630 PUBLICSAP BW/4HANA
Analysis
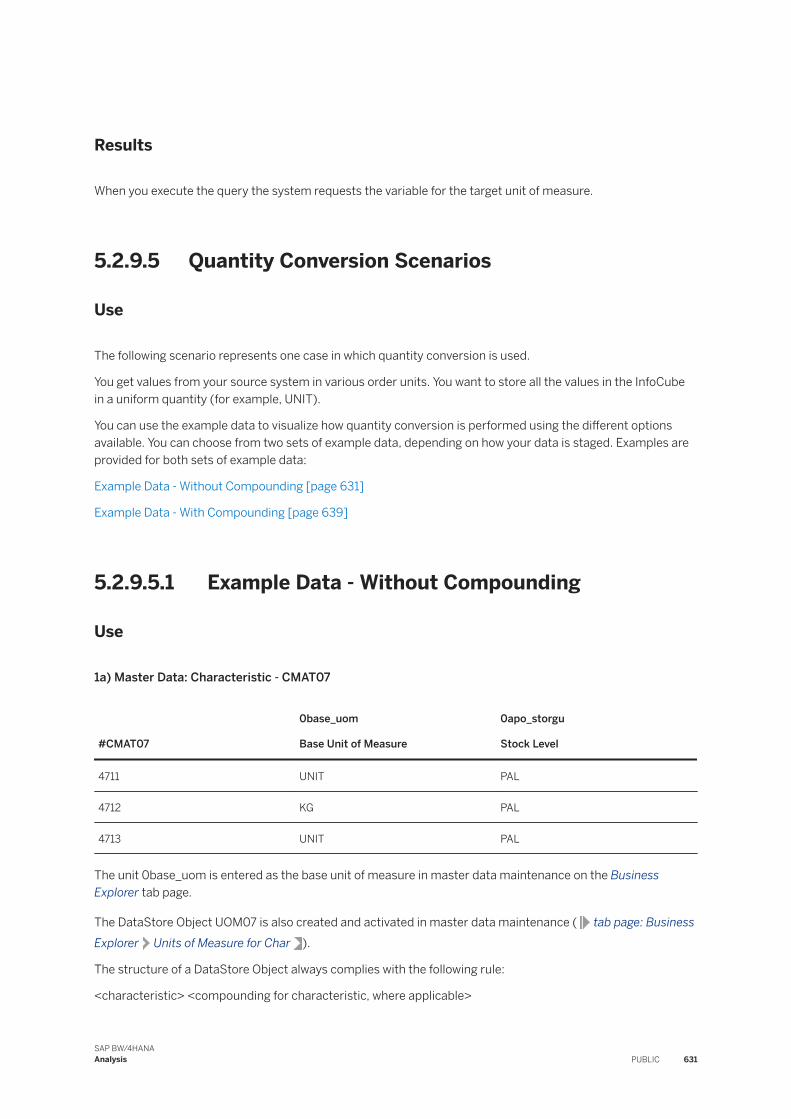
Results
When you execute the query the system requests the variable for the target unit of measure.
5.2.9.5 Quantity Conversion Scenarios
Use
The following scenario represents one case in which quantity conversion is used.
You get values from your source system in various order units. You want to store all the values in the InfoCube in a uniform quantity (for example, UNIT).
You can use the example data to visualize how quantity conversion is performed using the different options available. You can choose from two sets of example data, depending on how your data is staged. Examples are provided for both sets of example data:
Example Data - Without Compounding [page 631]
Example Data - With Compounding [page 639]
5.2.9.5.1 Example Data - Without Compounding
Use
1a) Master Data: Characteristic - CMAT07
#CMAT07
0base_uom
Base Unit of Measure
0apo_storgu
Stock Level
4711 UNIT PAL
4712 KG PAL
4713 UNIT PAL
The unit 0base_uom is entered as the base unit of measure in master data maintenance on the Business Explorer tab page.
The DataStore Object UOM07 is also created and activated in master data maintenance ( tab page: Business Explorer Units of Measure for Char ).
The structure of a DataStore Object always complies with the following rule:
<characteristic> <compounding for characteristic, where applicable>
SAP BW/4HANAAnalysis PUBLIC 631

<target unit of measure> <base unit of measure> <conversion factor: counter>
<conversion factor: denominator> <SID columns for all characteristics>
1b) Quantity DataStore Object: UOM07 (SID columns are not listed in the following table)
#Cmat07 #0unit 0base_uom 0uomz1d 0uomn1d
4711 G UNIT 1 25
4711 CAR UNIT 240 1
4711 BX UNIT 24 1
4711 PAL UNIT 9600 1
4712 G KG 1 1000
4712 UNIT KG 1 5
4713 CAR UNIT 1 0
4713 BX UNIT 0 2
The table is read as follows:
1 UNIT → 25 G
240 UNIT → 1 CAR
24 UNIT → 1 BX
9600 UNIT → PAL
For material 4711: InfoObject-specific conversions are possible between:
UNIT, G, CAR, BX, PAL
The conversion is always performed using the base unit of measure and therefore is performed in a maximum of two steps. If, for example, you convert from PAL to BX, the system first converts from PAL to UNIT and thereupon from UNIT to BX.
For material 4712: InfoObject-specific conversions are possible between:
G, UNIT, KG
For material 4713: InfoObject-specific conversions are possible between:
CAR, UNIT, BX
Theoretically you could try to load the quantity DataStore object as follows (aim: convert CAR directly to BX and BX to CAR):
Quantity DataStore object: UOM07
632 PUBLICSAP BW/4HANA
Analysis

#Crxmatkl #0unit 0base_uom 0uomz1d 0uomn1d
4711 G UNIT 1 25
4711 CAR UNIT 240 1
4711 BX UNIT 24 1
4711 PAL UNIT 9600 1
4711 CAR BX 10 1
The direct reference between CAR and BX is specified in the last row. This entry is incorrect on one hand because the primary key is violated if data record 2 already exists in the object. If record 2 does not already exist, the entry is still incorrect because the column 0base_uom does not contain the base unit of measure from the master data (UNIT).
2) Master Data cruom1 (can be used to calculate the unit of measure from the unit of measure attribute)
#cruom1 Crf1 0sales_unit 0unit
M1 C1 KG G
M2 C2 CAR BX
M3 C3 PAL UNIT
3) Master Data cruom1kl (can be used to calculate the unit of measure from the unit of measure attribute)
#cruom1 #0bp_contper Crf1 0sales_unit 0unit
M1 Akino C1 KG G
M2 Bertolini C2 CAR BX
M3 Smith C3 PAL UNIT
Examples
The examples listed below are based on the example data given above. These examples illustrate the results produced by the different options available with unit conversion:
Examples of Conversion with Fixed Target Unit of Measure [page 634]
Examples of Conversion Using Factor from InfoObject [page 635]
Examples of Conversion with Target Unit of Measure Using Attribute in InfoObject [page 636]
Examples of Conversion with Fixed Target Unit of Measure and Dynamic Determination Without Options [page 638]
SAP BW/4HANAAnalysis PUBLIC 633

5.2.9.5.1.1 Conversion with Fixed Target Quantity
Use
Example 1: One-Step Conversion with Fixed Target Quantity
Source
C2aufnr Cmat07 C2faCtor C2faCtorf C2kyf1 C2kyf2
1 4711 1.5 1.7 12 CAR ?
Conversion type: <xyz>
Conversion factors: Determined dynamically using reference InfoObject CMAT07
Source unit of measure: Unit of measure from data record
Target unit of measure: Fixed unit of measure: UNIT
Target
C2aufnr Cmat07 C2faCtor C2faCtorf C2kyf1 C2kyf2
1 4711 1.5 1.7 12 CAR 2880 UNIT
Example 2: Two-Step Conversion with Fixed Target Quantity
Source
C2aufnr Cmat07 C2faCtor C2faCtorf C2kyf1 C2kyf2
1 4711 1.5 1.7 12 CAR ?
Conversion type: <xyz>
Conversion factors: Determined dynamically using reference InfoObject CMAT07
Source unit of measure: Unit of measure from data record
Target unit of measure: Fixed unit of measure: BX
Target
C2aufnr Cmat07 C2faCtor C2faCtorf C2kyf1 C2kyf2
1 4711 1.5 1.7 12 CAR 120 BX
Example 3: Two-Step Conversion with Fixed Target Quantity
Source
634 PUBLICSAP BW/4HANA
Analysis

C2aufnr Cmat07 C2faCtor C2faCtorf C2kyf1 C2kyf2
1 4711 1.5 1.7 12 CAR ?
Conversion type: <xyz>
Conversion factors: Determined dynamically using reference InfoObject CMAT07
Source unit of measure: Unit of measure from data record
Target unit of measure: Fixed unit of measure: PAL
Target
C2aufnr Cmat07 C2faCtor C2faCtorf C2kyf1 C2kyf2
1 4711 1.5 1.7 12 CAR 0.3 PAL
5.2.9.5.1.2 Conversion Using Factors from InfoObjects
Use
Example 1: Conversion Using Factors from InfoObjects
Source
C2aufnr Cmat07 C2faCtor C2faCtorf C2kyf1 C2kyf2
1 4711 0.025 1.7 12 CAR ?
Conversion type: <xyz>
Conversion factors: From InfoObject C2FACTOR
Source unit of measure: Unit of measure from data record
Target unit of measure: Fixed unit of measure: PAL
Target
C2aufnr Cmat07 C2faCtor C2faCtorf C2kyf1 C2kyf2
1 4711 0.025 1.7 12 CAR 0.3 PAL
Example 2: Conversion Using Factors from InfoObjects
Source
C2aufnr Cmat07 C2faCtor C2faCtorf C2kyf1 C2kyf2
SAP BW/4HANAAnalysis PUBLIC 635

1 4711 0.025 1.7 12 CAR ?
Conversion type: <xyz>
Conversion factors: From InfoObject C2FACTORF
Source unit of measure: Unit of measure from data record
Target unit of measure: Fixed unit of measure: PAL
Target
C2aufnr Cmat07 C2faCtor C2faCtorf C2kyf1 C2kyf2
1 4711 0.025 1.7 12 CAR 20.4 PAL
5.2.9.5.1.3 Conversion with Target Unit of Measure Using Attribute in InfoObject
Use
Example 1: Conversion with Target Unit of Measure Using Attribute in InfoObject CRUOM1
Source
C2REQnr Cmat07 C2faCtor C2faCtorf C2kyf1 C2kyf2 CRUOM1
1 4711 0.025 1.7 12 CAR ? M3
Conversion type: <xyz>
Conversion factors: Determined dynamically using reference InfoObject CMAT07
Source unit of measure: Unit of measure from data record
Target unit of measure: InfoObject for determining unit of measure: CRUOM1; related quantity attribute: 0SALES_UNIT
Target
C2REQnr Cmat07 C2faCtor C2faCtorf C2kyf1 C2kyf2 CRUOM1
1 4711 0.025 1.7 12 CAR 0.3 PAL M3
Example 2: Conversion with Target Unit of Measure Using Attribute in InfoObject CRUOM1
Source
636 PUBLICSAP BW/4HANA
Analysis

C2REQnr Cmat07 C2faCtor C2faCtorf C2kyf1 C2kyf2 CRUOM1
1 4711 0.025 1.7 12 CAR ? M1
Conversion type: <xyz>
Conversion factors: Determined dynamically using reference InfoObject CMAT07
Source unit of measure: Unit of measure from data record
Target unit of measure: InfoObject for determining unit of measure: CRUOM1, related quantity attribute: 0UNIT
Target
C2REQnr Cmat07 C2faCtor C2faCtorf C2kyf1 C2kyf2 CRUOM1
1 4711 0.025 1.7 12 CAR 72000 G M1
Example 3: Conversion with Target Unit of Measure Using Attribute in InfoObject CRUOM1
Source
C2REQnr Cmat07 C2faCtor C2faCtorf C2kyf1 C2kyf2 CRUOM1
1 4711 0.025 1.7 12 CAR ? M2
Conversion type: <xyz>
Conversion factors: Determined dynamically using reference InfoObject CMAT07
Source unit of measure: Unit of measure from data record
Target unit of measure: InfoObject for determining unit of measure: CRUOM1, related quantity attribute: 0UNIT
Target
C2REQnr Cmat07 C2faCtor C2faCtorf C2kyf1 C2kyf2 CRUOM1
1 4711 0.025 1.7 12 CAR 120 BX M2
Example 4: Conversion with Target Unit of Measure Using Attribute in InfoObject CRUOM1
Source
C2REQnr Cmat07 C2faCtor C2faCtorf C2kyf1 C2kyf2 CRUOM1
1 4711 0.025 1.7 12 CAR ? M3
Conversion type: <xyz>
Conversion factors: Determined dynamically using reference InfoObject CMAT07
Source unit of measure: Unit of measure from data record
Target unit of measure: InfoObject for determining unit of measure: CRUOM1, related quantity attribute: 0UNIT
SAP BW/4HANAAnalysis PUBLIC 637

Target
C2REQnr Cmat07 C2faCtor C2faCtorf C2kyf1 C2kyf2 CRUOM1
1 4711 0.025 1.7 12 CAR 2880 UNIT M3
5.2.9.5.1.4 Conversion with Fixed Target Unit of Measure and Dynamic Determination Without Options
Use
Example 1: Conversion Factors Determined Dynamically Using Reference InfoObject Only
Source
C2REQnr Cmat07 C2faCtor C2faCtorf C2kyf1 C2kyf2
1 4711 0.025 1.7 18 PAL ?
Conversion type: <xyz>
Conversion factors: Determined dynamically using reference InfoObject CMAT07, factors are searched for in the reference InfoObject only
Source unit of measure: Unit of measure from data record
Target unit of measure: Fixed unit of measure: UNIT
Target
C2REQnr Cmat07 C2faCtor C2faCtorf C2kyf1 C2kyf2
1 4711 0.025 1.7 18 PAL 172800 UNIT
Example 2: Conversion Factors Determined Dynamically Using Central Units of Measure Only (T006)
Source
C2REQnr Cmat07 C2faCtor C2faCtorf C2kyf1 C2kyf2
1 4711 0.025 1.7 18 PAL ?
Conversion type: <xyz>
Conversion factors: Determined dynamically using central units of measure (T006), factors are searched for in the central units of measure (T006) only
Source unit of measure: Unit of measure from data record
Target unit of measure: Fixed unit of measure: G
638 PUBLICSAP BW/4HANA
Analysis

Target
C2REQnr Cmat07 C2faCtor C2faCtorf C2kyf1 C2kyf2
1 4711 0.025 1.7 18 PAL No conversion possible
Conversion is not possible because PAL and G do not belong to the same dimension.
5.2.9.5.2 Example Data - With Compounding
Use
1a) Master Data: Compound Characteristic - crxmatKl
#C2PLANT #C2COUNTRY #Crxmatkl
0base_uom
Base Unit of Measure
0apo_storgu
Stock Level
P001 DE 4711 UNIT PAL
P001 DE 4712 ROL PAL
P002 G.B. 4712 KG PAL
P025 SE 4713 UNIT PAL
The unit 0base_uom is entered as the base unit of measure in the master data on the Business Explorer tab page.
The DataStore Object uomcrxkl is also created and activated from the master data ( tab page: Business Explorer Units of Measure for Char ).
The structure of a DataStore Object always complies with the following rule:
<characteristic> <compounding for characteristic, where applicable>
<target unit of measure> <base unit of measure> <conversion factor: counter>
<conversion factor: denominator> <SID columns for all characteristics - not listed in following table>
#Crxmatkl #C2PLANT #C2COUNTRY #0UNIT 0base_uom 0uomz1d 0uomn1d
4711 P001 DE G UNIT 1 25
4711 P001 DE CAR UNIT 240 1
4711 P001 DE BX UNIT 24 1
SAP BW/4HANAAnalysis PUBLIC 639

#Crxmatkl #C2PLANT #C2COUNTRY #0UNIT 0base_uom 0uomz1d 0uomn1d
4711 P001 DE PAL UNIT 9600 1
4712 P002 G.B. G KG 1 1000
4712 P002 G.B. UNIT KG 1 5
4712 P001 DE TO ROL 2 1
4712 P001 DE UNIT ROL 1 450
4713 P025 SE CAR UNIT 1 0
4713 P025 SE BX UNIT 0 2
The table is read as follows:
1 UNIT -> 25 G
240 UNIT -> 1 CAR
24 UNIT -> 1 BX
9600 UNIT -> 1 PAL
Material 4711: InfoObject-specific conversions are possible between:
UNIT, G, CAR, BX, PAL
The conversion is always performed using the base unit of measure and therefore is performed in a maximum of two steps. If, for example, you convert from PAL to BX, the system first converts from PAL to UNIT and thereupon from UNIT to BX.
Material 4712: Plant P002: InfoObject-specific conversions are possible between:
G, UNIT, KG
Material 4712: Plant P001: InfoObject-specific conversions are possible between:
TO, ROL, UNIT
Material 4713: InfoObject-specific conversions are possible between:
CAR, UNIT, BX
Theoretically you could try to load the quantity DataStore object as follows (aim: convert CAR directly to BX and BX to CAR):
Quantity DataStore object: uomcrxkl
#Crxmatkl #C2PLANT #C2COUNTRY #0UNIT 0base_uom 0uomz1d 0uomn1d
4711 P001 DE G UNIT 1 25
4711 P001 DE CAR UNIT 240 1
640 PUBLICSAP BW/4HANA
Analysis

#Crxmatkl #C2PLANT #C2COUNTRY #0UNIT 0base_uom 0uomz1d 0uomn1d
4711 P001 DE BX UNIT 24 1
4711 P001 DE PAL UNIT 9600 1
4711 P001 DE CAR BX 10 1
The direct reference between CAR and BX is specified in the last row. This entry is incorrect on one hand because the primary key is violated if data record 2 already exists in the object. If record 2 does not already exist, the entry is still incorrect because 0base_uom does not contain the base unit of measure from the master data (UNIT).
2) Master Data cruom1 (can be used to calculate the unit of measure from the unit of measure attribute)
#CrUOM1 #CRF1 0SALES_UNIT 0UNIT
M1 C1 KG G
M2 C2 CAR BX
M3 C3 PAL UNIT
3) Master data cruom1kl (can be used to calculate the unit of measure from the measure attribute)
#CrUOM1 #0bp_contper #CRF1 0SALES_UNIT 0UNIT
M1 Akino C1 KG G
M2 Bertolini C2 CAR BX
M3 Smith C3 PAL UNIT
Examples
The examples listed below are based on the example data given above. These examples illustrate the results produced by the different options available with unit conversion:
Examples of Conversion with Fixed Target Unit of Measure [page 642]
Examples of Conversion Using Factor from InfoObject [page 643]
Examples of Conversion with Target Unit of Measure Using Attribute in InfoObject [page 644]
Examples of Conversion with Fixed Target Unit of Measure and Dynamic Determination Without Options [page 646]
SAP BW/4HANAAnalysis PUBLIC 641

5.2.9.5.2.1 Conversion with Fixed Target Unit of Measure
Use
Example 1: One-Step Conversion with Fixed Target Quantity
Source
C2REQnr Crxmatkl C2PLANT C2COUNTRY C2faCtor C2faCtorf C2kyf1 C2kyf2
1 4711 P001 DE 1.5 1.7 12 CAR ?
Conversion type: <xyz>
Conversion factors: Determined dynamically using reference InfoObject: CRXMATKL
Source unit of measure: Unit of measure from data record
Target unit of measure: Fixed unit of measure: UNIT
Target
C2REQnr Crxmatkl C2PLANT C2COUNTRY C2faCtor C2faCtorf C2kyf1 C2kyf2
1 4711 P001 DE 1.5 1.7 12 CAR 2880 UNIT
Example 2: One-Step Conversion with Fixed Target Quantity
Source
C2REQnr Crxmatkl C2PLANT C2COUNTRY C2faCtor C2faCtorf C2kyf1 C2kyf2
1 4711 P001 DE 1.5 1.7 12 CAR ?
Conversion type: <xyz>
Conversion factors: Determined dynamically using reference InfoObject: CRXMATKL
Source unit of measure: Unit of measure from data record
Target unit of measure: Fixed unit of measure: BX
Target
C2REQnr Crxmatkl C2PLANT C2COUNTRY C2faCtor C2faCtorf C2kyf1 C2kyf2
1 4711 P001 DE 1.5 1.7 12 CAR 120 BX
Example 3: One-Step Conversion with Fixed Target Quantity
Source
642 PUBLICSAP BW/4HANA
Analysis

C2REQnr Crxmatkl C2PLANT C2COUNTRY C2faCtor C2faCtorf C2kyf1 C2kyf2
1 4711 P001 DE 1.5 1.7 12 CAR ?
Conversion type: <xyz>
Conversion factors: Determined dynamically using reference InfoObject: CRXMATKL
Source unit of measure: Unit of measure from data record
Target unit of measure: Fixed unit of measure: PAL
Target
C2REQnr Crxmatkl C2PLANT C2COUNTRY C2faCtor C2faCtorf C2kyf1 C2kyf2
1 4711 P001 DE 1.5 1.7 12 CAR 0.3 PAL
5.2.9.5.2.2 Conversion Using Factors from InfoObjects
Use
Example 1: Conversion Using Factors from InfoObjects
Source
C2REQnr Crxmatkl C2PLANT C2COUNTRY C2faCtor C2faCtorf C2kyf1 C2kyf2
1 4711 P001 DE 0.025 1.7 12 CAR ?
Conversion type: <xyz>
Conversion factors: From InfoObject C2FACTOR
Source unit of measure: Unit of measure from data record
Target unit of measure: Fixed unit of measure: PAL
Target
C2REQnr Crxmatkl C2PLANT C2COUNTRY C2faCtor C2faCtorf C2kyf1 C2kyf2
1 4711 P001 DE 0.025 1.7 12 CAR 0.3 PAL
Example 2: Conversion Using Factors from InfoObjects
Source
SAP BW/4HANAAnalysis PUBLIC 643

C2REQnr Crxmatkl C2PLANT C2COUNTRY C2faCtor C2faCtorf C2kyf1 C2kyf2
1 4711 P001 DE 0.025 1.7 12 CAR ?
Conversion type: <xyz>
Conversion factors: From InfoObject C2FACTORF
Source unit of measure: Unit of measure from data record
Target unit of measure: Fixed unit of measure: PAL
Target
C2REQnr Crxmatkl C2PLANT C2COUNTRY C2faCtor C2faCtorf C2kyf1 C2kyf2
1 4711 P001 DE 0.025 1.7 12 CAR 20.4 PAL
5.2.9.5.2.3 Conversion with Target Unit of Measure Using Attribute in InfoObject
Use
Example 1: Conversion Using Attribute in InfoObject CRUOM1
Source
C2REQnr Crxmatkl C2PLANTC2COUNTRY C2faCtor C2faCtorf C2kyf1 C2kyf2 CRUOM1
1 4711 P001 DE 0.025 1.7 12 CAR ? M3
Conversion type: <xyz>
Conversion factors: Determined dynamically using reference InfoObject CRXMATKL
Source unit of measure: Unit of measure from data record
Target unit of measure: InfoObject for determining unit of measure: CRUOM1; related quantity attribute: 0SALES_UNIT
Target
C2REQnr Crxmatkl C2PLANTC2COUNTRY C2faCtor C2faCtorf C2kyf1 C2kyf2 CRUOM1
1 4711 P001 DE 0.025 1.7 12 CAR 0.3 PAL M3
Example 2: Conversion Using Attribute in InfoObject CRUOM1
644 PUBLICSAP BW/4HANA
Analysis

Source
C2REQnr Crxmatkl C2PLANTC2COUNTRY C2faCtor C2faCtorf C2kyf1 C2kyf2 CRUOM1
1 4711 P001 DE 0.025 1.7 12 CAR ? M1
Conversion type: <xyz>
Conversion factors: Determined dynamically using reference InfoObject CRXMATKL
Source unit of measure: Unit of measure from data record
Target unit of measure: InfoObject for determining unit of measure: CRUOM1; related quantity attribute: 0UNIT
Target
C2REQnr Crxmatkl C2PLANTC2COUNTRY C2faCtor C2faCtorf C2kyf1 C2kyf2 CRUOM1
1 4711 P001 DE 0.025 1.7 12 CAR 72000 G M1
Example 3: Conversion Using Attribute in InfoObject CRUOM1
Source
C2REQnr Crxmatkl C2PLANTC2COUNTRY C2faCtor C2faCtorf C2kyf1 C2kyf2 CRUOM1
1 4711 P001 DE 0.025 1.7 12 CAR ? M2
Conversion type: <xyz>
Conversion factors: Determined dynamically using reference InfoObject CRXMATKL
Source unit of measure: Unit of measure from data record
Target unit of measure: InfoObject for determining unit of measure: CRUOM1; related quantity attribute: 0UNIT
Target
C2REQnr Crxmatkl C2PLANTC2COUNTRY C2faCtor C2faCtorf C2kyf1 C2kyf2 CRUOM1
1 4711 P001 DE 0.025 1.7 12 CAR 120 BX M2
Example 4: Conversion Using Attribute in InfoObject CRUOM1
Source
SAP BW/4HANAAnalysis PUBLIC 645

C2REQnr Crxmatkl C2PLANTC2COUNTRY C2faCtor C2faCtorf C2kyf1 C2kyf2 CRUOM1
1 4711 P001 DE 0.025 1.7 12 CAR ? M3
Conversion type: <xyz>
Conversion factors: Determined dynamically using reference InfoObject CRXMATKL
Source unit of measure: Unit of measure from data record
Target unit of measure: InfoObject for determining unit of measure: CRUOM1; related quantity attribute: 0UNIT
Target
C2REQnr Crxmatkl C2PLANTC2COUNTRY C2faCtor C2faCtorf C2kyf1 C2kyf2 CRUOM1
1 4711 P001 DE 0.025 1.7 12 CAR 2880 UNIT M3
5.2.9.5.2.4 Conversion with Fixed Target Unit of Measure and Dynamic Determination Without Options
Use
Example 1: Conversion Factors Determined Dynamically Using Reference InfoObject Only
Source
C2REQnr Crxmatkl C2PLANT C2COUNTRY C2faCtor C2faCtorf C2kyf1 C2kyf2
1 4711 P001 DE 0.025 1.7 18 PAL ?
Conversion type: <xyz>
Conversion factors: Determined dynamically using reference InfoObject CRXMATKL, factors are searched for in the reference InfoObject only
Source unit of measure: Unit of measure from data record
Target unit of measure: Fixed unit of measure: G
Target
C2REQnr Crxmatkl C2PLANT C2COUNTRY C2faCtor C2faCtorf C2kyf1 C2kyf2
1 4711 P001 DE 0.025 1.7 12 CAR 4320000 G
Example 2: Conversion Factors Determined Dynamically Using Reference InfoObject Only
646 PUBLICSAP BW/4HANA
Analysis

Source
C2REQnr Crxmatkl C2PLANT C2COUNTRY C2faCtor C2faCtorf C2kyf1 C2kyf2
1 4711 P001 DE 0.025 1.7 18 PAL ?
Conversion type: <xyz>
Conversion factors: Determined dynamically using reference InfoObject CRXMATKL, factors are searched for in the reference InfoObject only
Source unit of measure: Unit of measure from data record
Target unit of measure: Fixed unit of measure: UNIT
Target
C2REQnr Crxmatkl C2PLANT C2COUNTRY C2faCtor C2faCtorf C2kyf1 C2kyf2
1 4711 P001 DE 0.025 1.7 12 CAR 172800 UNIT
Example 3: Conversion Factors Determined Dynamically Using Central Units of Measure Only (T006)
Source
C2REQnr Crxmatkl C2PLANT C2COUNTRY C2faCtor C2faCtorf C2kyf1 C2kyf2
1 4711 P001 DE 0.025 1.7 18 PAL ?
Conversion type: <xyz>
Conversion factors: Determined dynamically using central units of measure, factors are searched for in the central units of measure (T006) only
Source unit of measure: Unit of measure from data record
Target unit of measure: Fixed unit of measure: G
Target
C2REQnr Crxmatkl C2PLANT C2COUNTRY C2faCtor C2faCtorf C2kyf1 C2kyf2
1 4711 P001 DE 0.025 1.7 12 CAR No conversion possible
Conversion is not possible because PAL and G do not belong to the same dimension.
SAP BW/4HANAAnalysis PUBLIC 647

5.2.10 Constant Selection
Use
In the query definition, you make selections to specify which data is visible when a report is run. You can then use navigation and filtering to can restrict the filter selection at runtime.
The property Constant Selection allows you to define a selection in query definition as constant. Navigation and filters then have no effect on this selection at runtime. This makes it easy to select reference sizes that do not change while the report is running.
Filter on a Query Result Cell
As constant selection is a property that influences the effect of filters on cells, it is important to know which filters can affect a query result cell. For the sake of transparency, the following abbreviations will be used for the filters. In general, the following filters can have an effect:
● The global or fixed filter (SF). This represents all restrictions, which you can make for characteristics in the query definition and which are in the free characteristics or the columns and rows under Filter.
● The dynamic filter (SD), restrictions in the query's navigation block.● The attributes of the drilldown characteristics (SA). These are the characteristic values that are in the
corresponding header column or column header.
Depending on the number of structures in the query, other filters can also have an effect on the cell.
648 PUBLICSAP BW/4HANA
Analysis

ExampleAn illustrated example of a query with a key figure structure in the rows and a characteristic structure in the columns:
● If the query contains two structures, the following filters take effect:○ The filter from the selection in the first structure (S1). The structure element in the first structure will
be referred to from now on as Eo.○ The filter from the selection in the second structure (S2). The structure element in the second
structure will be referred to from now on as Fo.○ If it is an exception cell, (S1) and (S2) are replaced by the filter on the exception cell (SC).
● If the query contains a structure, the filter affects the selection for this structure (S1), and (S2) is omitted.
Features
The Constant Selection property is offered for selections in structural components, cells and restricted key figures.
● You can also define components of selections - individual characteristics and their filter values - as constant. During navigation, the selection only remains unaffected by filters with relation to this characteristic.
SAP BW/4HANAAnalysis PUBLIC 649

CautionA restricted key figure cannot be selected as a constant in its entirety. This is only possible for its characteristics.
● You can define entire selections as constant on structural components and cells. During navigation, a constant selection is independent of all filters.
● Constant selection on a selection element (CSE) takes precedence over the constant selection on the characteristic (CSC) defined on selections in this structure element.
Related Information
Working with Queries [page 738]Cells with Constant Selection on the Element (CSE) and Constant Selection on the Characteristic (CSC) [page 650]Object Generation [page 651]Constant Selection and Formula Aggregation [page 652]Constant Selection and Non-Cumulative Values [page 653]Constant Selection in Examples [page 653]Using Constant Selection for a Market Index [page 658]Using Constant Selection for CompositeProviders [page 660]
5.2.10.1 Cells with Constant Selection on the Element (CSE) and Constant Selection on the Characteristic (CSC)
Constant selection on a selection element (CSE) takes precedence over the constant selection on the characteristic (CSC) defined on selections in this structure element. The constant selection (CSC) defined on characterstic M is ignored for an element with (CSE). This applies especially for special functions in connection with (CSC) in the context of characteristic 0INFOPROV.
In the case of queries with two structures, all cells originating from a structure element with constant selection (CSE) inherit the property (CSE). This means that the cells inherit all filters from both participating structure elements, and all other filters are ignored as though all filters in the cell had been defined by a single structure element with (CSE). For this cell it therefore makes no difference whether the Constant Selection property has been set on the structure element (CSE) on one structure element or on both, and the resulting constant selection (CSE) also takes precedence over any constant selection on the characteristic (CSC) for this cell.
ExampleSee Constant Selection in Examples [page 653], Example 1.
650 PUBLICSAP BW/4HANA
Analysis

5.2.10.2 Object Generation
The quantity of the characteristic values displayed in a drilldown does not change if additional structure elements with constant selection are added. The following sections explain the effect that this can have in specific cases.
For cell display, the following rule (CS) applies:
Selection elements with (CSE) or with selections set to constant (CSC) do not generate any additional objects in the drilldown.
Object Generation for Cross-Drills
Cross-drills are drilldowns where characteristics are drilled down both the rows and in the characteristics. Every cell or combination of characteristic values in the row and column drilldown is treated as an object here. For a structure element with (CSC), a value is therefore only displayed in the cell if there is at least one further structure element (whether visible or not) that has a value other than ZERO. This is not an error either if the key figure definition displays a value other than ZERO for the empty cell. When the key figure definition is called, the system informs the user with message BRAIN149 'The 'Display Non Postable Values' option has been activated'.
ExampleSee Constant Selection in Examples [page 653], Example 2.
Object generation for queries that are not made up of structure elements with constant selection
If all structure elements in the query have the Constant Selection property (CSC) or (CSE), the rule (CS) stipulates that the query can never display data. The system informs the user of this with message BRAIN200 "Query contains selection elements with Constant Selection only" and sets all elements to object creation. If you subsquently add further normal selection elements to the query, the system has to reset the object creation for the constant selection elements, which means that adding further selection elements sometimes results in fewer objects being displayed.
ExampleSee Constant Selection in Examples [page 653], Example 3.
Non-Effective Constant Selection
If a characteristic M is set to constant (CSC) in a structure element, and this characteristic is neither a free characteristic nor a globally filtered on, the constant selection on this element is noneffective until such time
SAP BW/4HANAAnalysis PUBLIC 651

that object generation is deactivated. This is shown using message BRAIN201 "Property constant selection for element &1 is not necessary". The same applies for elements with (CSE).
ExampleSee Constant Selection in Examples [page 653], Example 4.
Object-Generating Constant Selection
If you want a structure element Eo with (CSC) or (CSE) to generate objects despire rule (CS), we recommend copying structure element Eo to E1 and deactvating the Constant Selection property for E1. You can then always hide E1. E1 now remains object-creating, even though it is not visible in the list.
5.2.10.3 Constant Selection and Formula Aggregation
The constant selection only affects the selection and has no effect on the order in which the aggregation and formula calculation are processed.
NoteThe system does not support expressing percentages of aggregration reference characteristics with a formula that defines the reference point with constant selection.
ExampleHow many products have revenue of > 1% of the total revenue?
This question could be expressed as follows:
● Total revenue: Revenue with constant selection on characteristic Product● Relative revenue = Revenue / total revenue● Number of relevant products = relevant revenue > 0.01 with aggregation TOTAL over characteristic
Product
This example would work if the aggregated total revenue went into the relative revenue. As the constant selection only affects the filter however, the relative revenue in the example above will always be 1 if revenue is > 0. This means that the number of relevant products is identical to the number of all products that data has been posted for.
NoteThe FIX operator is a data function that fixes the context of the aggregation. It prevents the exception aggregation from passing on its reference characteristics to the GROUP BY clause of the preceding aggregation and calculation steps. This allows execution of the constant selection before calculation of the formula, as expected (see FIX Operator [page 508]).
652 PUBLICSAP BW/4HANA
Analysis

5.2.10.4 Constant Selection and Non-Cumulative Values
For cells with constant selection, a separate validity range is found.
Related Information
Examples: Validities and Constant Selection [page 592]
5.2.10.5 Constant Selection in Examples
The basis for the data in the following examples is the query 0D_FC_AE_CNSTSEL_Q001. The table below illustrates the data involved:
Query 0D_FC_AE_CNSTSEL_Q001
Region Customer Calendar Year Billed Quantity Net Sales
America FC016 Plaza Mayor 2004 1 UNIT EUR 3.00
Europe FC001 Anchor Inn 2003 1 UNIT EUR 2.00
Europe FC001 Anchor Inn 2007 1 UNIT EUR 5.00
Europe FC002 Banquetes Bennati Ltd
2006 1 UNIT EUR 2.00
Europe FC002 Banquetes Bennati Ltd
2007 1 UNIT EUR 3.00
Related Information
Constant Selection [page 648]Example 1: Query with Two Structures and a Combination of CSE and CSC [page 654]Example 2: Query with Two Structures and Empty Cell for CSC [page 656]Example 3: Query with CSC [page 657]Example 4: Non-Effective Constant Selection [page 657]
SAP BW/4HANAAnalysis PUBLIC 653

5.2.10.5.1 Example 1: Query with Two Structures and a Combination of CSE and CSC
Query 0D_FC_AE_CNSTSEL_Q002
Region America EuropeOverall Result
Customer FC016 Plaza Mayor Result FC001 Anchor Inn Result
Calendar Year
2004 Result 2003 2007 Result
Net Sales Europe
Anchor Inn
EUR 7.00 EUR 7.00 EUR 7.00 EUR 2.00 EUR 5.00 EUR 7.00 EUR 7.00 EUR 7.00
Anchor Inn with CSC
EUR 2.00 EUR 5.00 EUR 7.00 EUR 7.00 EUR 7.00
Anchor Inn with CSE
EUR 7.00 EUR 7.00 EUR 7.00 EUR 7.00 EUR 7.00
All Customers (Anchor Inn, Plaza, Bennati)
EUR 2.00 EUR 5.00 EUR 7.00 EUR 7.00 EUR 7.00
Net Sales Europe with CSC
Anchor Inn
EUR 7.00 EUR 7.00 EUR 2.00 EUR 5.00 EUR 7.00 EUR 7.00 EUR 7.00
Anchor Inn with CSC
EUR 7.00 EUR 7.00 EUR 2.00 EUR 5.00 EUR 7.00 EUR 7.00 EUR 7.00
Anchor Inn with CSE
EUR 7.00 EUR 7.00 EUR 7.00 EUR 7.00 EUR 7.00 EUR 7.00 EUR 7.00
All Customers (Anchor Inn, Plaza, Bennati)
EUR 7.00 EUR 2.00 EUR 5.00 EUR 7.00 EUR 7.00 EUR 7.00
Net Sales Europe with CSE
Anchor Inn
EUR 7.00 EUR 7.00 EUR 7.00 EUR 7.00 EUR 7.00 EUR 7.00 EUR 7.00 EUR 7.00
Anchor Inn with CSC
EUR 7.00 EUR 7.00 EUR 7.00 EUR 7.00 EUR 7.00 EUR 7.00 EUR 7.00 EUR 7.00
Anchor Inn with CSE
EUR 7.00 EUR 7.00 EUR 7.00 EUR 7.00 EUR 7.00 EUR 7.00 EUR 7.00 EUR 7.00
654 PUBLICSAP BW/4HANA
Analysis

Region America EuropeOverall Result
All Customers (Anchor Inn, Plaza, Bennati)
EUR 12.00 EUR 12.00 EUR 12.00 EUR 12.00 EUR 12.00 EUR 12.00 EUR 12.00 EUR 12.00
Net Sales Anchor Inn
EUR 2.00 EUR 5.00 EUR 7.00 EUR 7.00 EUR 7.00
Anchor Inn with CSC
EUR 2.00 EUR 5.00 EUR 7.00 EUR 7.00 EUR 7.00
Anchor Inn with CSE
EUR 7.00 EUR 7.00 EUR 7.00 EUR 7.00 EUR 7.00 EUR 7.00 EUR 7.00 EUR 7.00
All Customers (Anchor Inn, Plaza, Bennati)
EUR 3.00 EUR 3.00 EUR 3.00 EUR 2.00 EUR 5.00 EUR 12.00 EUR 12.00 EUR 12.00
● In the global filter, the query only contains the customers Anchor Inn and Plaza Mayor.● The outer structure contains key figures with filters on the region; either without constant selection (Net
Sales Europe, Net Sales), with constant selection on characteristic Region (Net Sales Europe with CSC), or with constant selection on the structure element (Net Sales Europe with CSE).
● The inner structure contains filters on the customer, either without constant selection (Anchor Inn, All Customers), with constant selection on characteristic Customer (Anchor Inn with CSC) or with constant selection on the structure element (Anchor Inn with CSE).
● All cells in which either the structure element of the outer structure or of the inner structure has the property Constant Selection on the structure element (CSE), are completely constant and are thus completely independent of the drilldown. For structure element 'All Customers' in combination with CSE, the data for customer Banquetes Bennati Ltd also appears in the total.
● All cells that have only activated constant selection on the characteristic (CSC) either on the region or the customer or on both, are not constant in terms calendar year, meaning that there are detailed values for the calendar year.
SAP BW/4HANAAnalysis PUBLIC 655

5.2.10.5.2 Example 2: Query with Two Structures and Empty Cell for CSC
Example with Empty Cell
Query 0D_FC_AE_CNSTSEL_Q003
Customer Calendar Year 2003 2006 2007
FC001 Anchor Inn Net Sales Bennati 2006
Net Sales 2003-2007 Anchor Inn
EUR 2.00 EUR 5.00
Net Sales Banquetes Bennati Ltd CSC
EUR 3.00
FC002 Banquetes Bennati Ltd
Net Sales Bennati 2006
EUR 2.00
Net Sales 2003-2007 Anchor Inn
Net Sales Banquetes Bennati Ltd with CSC
EUR 2.00
● With the cross-drill, query 0D_FC_AE_CNSTSEL_Q003 creates graphic cells for the characteristic combination (Banquetes Bennati Ltd, 2007), as the value 2007 arises from structure element 'Net Sales 2003-2007 Anchor Inn' and the value Banquetes Bennati Ltd arises from structure element 'Net Sales Bennati 2006'.
● The characteristic combination (Banquetes Bennati Ltd, 2007) does not contain any data for structure elements without constant selection, with the result that no data is displayed for structure element 'Net Sales Banquetes Bennati Ltd CSC' with this combination either.
Modified Example with Filled Cell
Query 0D_FC_AE_CNSTSEL_Q004
Customer Calendar Year 2003 2006 2007
FC001 Anchor Inn Net Sales Bennati 2006
Net Sales 2003-2007 EUR 2.00 EUR 5.00
Net Sales Banquetes Bennati Ltd CSC
EUR 3.00
FC002 Banquetes Bennati Ltd
Net Sales Bennati 2006
EUR 2.00
656 PUBLICSAP BW/4HANA
Analysis

Customer Calendar Year 2003 2006 2007
Net Sales 2003-2007 EUR 2.00 EUR 3.00
Net Sales Banquetes Bennati Ltd CSC
EUR 2.00 EUR 3.00
Query 0D_FC_AE_CNSTSEL_Q004 contains data for the characteristic combination (Banquetes Bennati Ltd, 2007) for structure elements without constant selection. A value is therefore also now displayed for structure element 'Net Sales Banquetes Bennati Ltd CSC' with the characteristic combination (Banquetes Bennati Ltd, 2007).
5.2.10.5.3 Example 3: Query with CSC
Query 0D_FC_AE_CNSTSEL_Q005 only has structure elements with constant selection. This means that constant selection creates objects in this case. The table below provides an example of how this works:
Query 0D_FC_AE_CNSTSEL_Q005
CustomerNet Sales Banquetes Bennati Ltd with CSC
Net Sales Anchor inn, Banquetes Bennati Ltd with CSC
FC001 Anchor Inn EUR 5.00 EUR 12.00
FC002 Banquetes Bennati Ltd EUR 5.00 EUR 12.00
If a structure element without constant selection is added (as in query 0D_FC_AE_CNSTSEL_Q006 for example), this reduces the result: The 'Anchor Inn' row is then no longer displayed in the enhanced query. The table below provides an example of how this works:
Query 0D_FC_AE_CNSTSEL_Q006
CustomerNet Sales Banquetes Bennati Ltd with CSC
Net Sales Anchor inn, Banquetes Bennati Ltd with CSC
Net Sales Banquetes Bennati Ltd without CSC
FC002 Banquetes Bennati Ltd
EUR 5.00 EUR 12.00 EUR 5.00
5.2.10.5.4 Example 4: Non-Effective Constant Selection
Query 0D_FC_AE_CNSTSEL_Q007 generates message BRAIN201 "Property constant selection for element &1 is not necessary". This is because the characteristic of the constant selection (CSC), the calendar year, is not filtered in the query or contained as a free characteristic.
SAP BW/4HANAAnalysis PUBLIC 657

5.2.10.6 Using Constant Selection for a Market Index
Use
In a product list ( product is in drilldown), you do not want to see the absolute sales revenue. Instead you want to see the sales revenue normalized for (in relation to) a specific product group. Using the property Constant Selection, you can select the sales revenue of a specific product group as a constant in relation to the drilldown. You can relate the sales revenue of each product in this product group to the sales revenue for the product group and, for example, work out the percentage share of sales revenue for each product in the product group.
Procedure
Define the key figures as follows:
● Absolute Revenue is the key figure Revenue.● Constant Revenue (Constant Selection CSC) is a selection with the key figure Revenue and the
characteristic Product. Constant selection is activated for the Product characteristic.● Normalized Revenue (Formula) is a formula with ' Absolute Revenue %A' Constant Revenue (Selection)'. %A
is the percentage deviation. More information: percentage functions.● Constant Revenue (formula with SUMCT) is a formula with the data function Result (SUMCT), which relates
to the key figure Revenue. More information: Data Functions.● Normalized Revenue (formula with SUMCT) is a formula with ' Constant Absolute Revenue %A (formula with
SUMCT)'. %A is the percentage deviation.
Product Group ProductAbsolute Revenue
Constant Revenue (Constant Selection CSC)
Normalized Revenue (Formula)
Constant Revenue (Formula with SUMCT)
Normalized Revenue (Formula with SUMCT)
Office Supplies Paper 30 120 25% 120 25%
Envelopes 30 120 25% 120 25%
Pens 60 120 50% 120 50%
Result: Office Supplies
120 120 100% 240 50%
Furniture Chair 60 120 50% 120 50%
Table 60 120 50% 120 50%
Result: Furniture
120 120 100% 240 50%
Overall Result 240 240 100% 240 100%
658 PUBLICSAP BW/4HANA
Analysis

Result
The following example table shows how the table changes, if the characteristic value Envelopes of the Product characteristic is removed from the filter. You will see that changing the navigation or using a filter for the Product characteristic has no effect on the column for constant selection.
NoteTo make it easier to understand constant selection, we recommend that you initially only compare the columns Absolute Revenue and Constant Revenue (Constant Selection CSC) in both tables. Afterwards you can compare the differences between the columns Constant Revenue (Constant Selection CSC) and Constant Revenue (Formula with SUMCT). The two columns with Normalized Revenue illustrate a typical use case.
Product Group ProductAbsolute Revenue
Constant Revenue (Constant Selection CSC)
Normalized Revenue (Formula)
Constant Revenue (Formula with SUMCT)
Normalized Revenue (Formula with SUMCT)
Office Supplies Paper 30 120 25% 90 33,3%
Pens 60 120 50% 90 66,6%
Result: Office Supplies
90 120 75% 210 42,85%
Furniture Chair 60 120 50% 120 50%
Table 60 120 50% 120 50%
Result: Furniture
120 120 100% 210 57,15%
Overall Result 210 240 87,5% 210 100%
Removing the characteristic value Envelopes has reduced the Result: Office Supplies and the Total Result from Absolute Revenue by 30. This represents 25% in relation to the Office Supplies product group or 12.5% in relation to the total result.
More Information
Constant Selection [page 648]
SAP BW/4HANAAnalysis PUBLIC 659

5.2.10.7 Using Constant Selection for CompositeProviders
Context
Using constant selection, you can resolve problems with CompositeProviders.
Example: The CompositeProvider has two InfoProvider with data on price and quantity for various products and the corresponding sites. InfoProvider 2 also contains the characteristic Customer. Therefore, if you drilldown by customer, all the data from InfoProvider 1 under the initial value # (not assigned) is displayed. This example is explained in more detail in the next section.
Plant Product Price
101 Candy Tin 0.12
101 Coffee Mug 0.14
102 Candy Tin 0.11
103 Mouse Pad 0.23
104 Post-It Set 0.15
Plant Product Customer Quantity
101 Candy Tin Dawson Agency Inc 100
101 Candy Tin Acadia Transfer Inc 110
101 Coffee Mug Acadia Transfer Inc 110
101 Coffee Mug Evans Hotel Inc 110
102 Candy Tin Evans Hotel Inc 105
103 Mouse Pad Thompson Inc 115
104 Post-It Set Thompson Inc 110
104 Post-It Set Bear Express Co Inc 110
660 PUBLICSAP BW/4HANA
Analysis

Since characteristic Customer is contained in InfoProvider 2 but not in InfoProvider 1, in a drilldown according to Customer, all data from InfoProvider 1 is displayed under initial value # (not assigned). The query on the CompositeProvider would look like this:
Plant Product Customer Price Quantity
101 Candy Tin # (not assigned) 0.12 0
101 Candy Tin Dawson Agency Inc 0 100
101 Candy Tin Acadia Transfer Inc 0 110
101 Coffee Mug # (not assigned) 0.14 0
101 Coffee Mug Acadia Transfer Inc 0 110
101 Coffee Mug Evans Hotel Inc 0 110
102 Candy Tin # (not assigned) 0.11 0
102 Candy Tin Evans Hotel Inc 0 105
103 Mouse Pad # (not assigned) 0.23 0
103 Mouse Pad Thompson Inc 0 115
104 Post-It Set # (not assigned) 0.15 0
104 Post-It Set Thompson Inc 0.15 110
104 Post-It Set Bear Express Co Inc 0 110
Procedure
● 1. In Query Designer, define a selection that contains the Price key figure and the Customer characteristic.
2. We recommend that you set the 0INFOPROV characteristic on the Price key figure to Constant Selection. This means the rows with initial value # (not assigned) are filtered out. However, the data for the Price key figure is retained.
NoteFor more information, see Constant Selection [page 648] in the section Constant Selection on Characteristic 0INFOPROV.
Alternatively, set the Customer characteristic on the Price key figure to Constant Selection. However, this process can have a disadvantage, in the case of multiple characteristics that are not contained in the same InfoProvider. Unlike with the recommended procedure described above (set 0INFOPROV to Constant Selection), here you need to set the Constant Selection property for every one of these characteristics.
SAP BW/4HANAAnalysis PUBLIC 661

NoteYou can also solve this problem for CompositeProviders by using InfoSets (instead of using constant selection). However, InfoSets are predefined in the data model and are very static. Constant selection on the other hand is set in Query Designer and is very flexible: You can set the links of the data records for a query (based on a CompositeProvider) on any InfoObject, which is part of a selection.
Results
In the drilldown, the rows with initial value # (not assigned) on characteristic Customer are grayed out, but the data about key figure Price is retained. The query looks like this:
Plant Product Customer
Price with constant selection using customer Quantity
101 Candy Tin Dawson Agency Inc 0.12 100
101 Candy Tin Acadia Transfer Inc 0.12 110
101 Coffee Mug Acadia Transfer Inc 0.14 110
101 Coffee Mug Evans Hotel Inc 0.14 110
102 Candy Tin Evans Hotel Inc 0.11 105
103 Mouse Pad Thompson Inc 0.23 115
104 Post-It Set Thompson Inc 0.15 110
104 Post-It Set Bear Express Co Inc 0.15 110
Next Steps
Constant Selection [page 648]
5.2.10.8 Constant Selection on a Characteristic (CSC)
If the Constant Selection property is set in a cell for a characteristic, the system does not apply any further selections with regard to the corresponding characteristic. A constant selection can therefore be seen as an exclusive or dominant selection.
Without the Constant Selection property, all filters described under Constant Selection affect a single cell, provided that these filters exist. In mathematical terms, this means that the filter that affects this cell is the
662 PUBLICSAP BW/4HANA
Analysis

intersection of filters (SF), (SD), (SA), (S1), (S2), (SC). Constant selection on characteristic M of the cell means that selections (SF), (SD) and (SA) are ignored with regard to characteristic M. Constant selection on the characteristic will be referred to from here on as (CSC).
Constant Selektion on Characteristic 0INFOPROV
Characteristic 0INFOPROV has a special role in CompositeProviders. If the Constant Selection property is activated on 0INFOPROV, and there is a filter for a specific PartProvider contained in the CompositeProvider, the system searches for all characteristics N of the CompositeProvider, which are not filled by the corresponding PartProvider, filters N to the initial value '#' and automatically sets the Constant Selection property. For this cell, this basically means that all filters are deactivated on characteristics that are not supplied with data by the PartProvider. This make sense, as these filters could otherwise prevent the PartProvider from being displayed for this cell.
ExampleIf a PartProvider P1 does not contain characteristic Calendar Year, every filter on the calendar year that has the initial value would therefore normally prevent data from this PartProvider from flowing to the cell result. If the Constant Selection property is set on characteristic 0INFOPROV however, and filter 0INFOPROV = P1 is set on the structure element, all filters on the calendar year, which affect the cell externally (contained in (SF), (SD) or (SA)) do not affect the cell anymore.
Another example can be found here: Using Constant Selection with MultiProviders [page 660].
RecommendationIf the Constant Selection property is set on characteristic 0INFOPROV, there is the Display Values Not Posted addition (CSA). This would completely change how the property is processed. SAP recommends not not using this property anymore, and setting the Access Type for Result Values to Master Data for the characteristic instead. You do this under Properties on the Extended tab page in Query Designer (see Properties of the Characteristic).
Navigation Attributes and Dependent Characteristics
The analytic manager generally handles navigation attributes in the same way as independent characteristics. If the query uses a navigation attribute NA for the reference characteristic M, and the Constant Selection property is set for M (CSC), we recommend adding the navigation attribute to the selection without filters and setting the Constant Selection property.
We recommend the same procedure for time characteristics that are also treated as independent characteristics in the analytic manager (except for non-cumulatives and unposted values), and for any other characteristics for which a strict dependency is known.
SAP BW/4HANAAnalysis PUBLIC 663

Compound Characteristics
The Constant Selection property only ever affects the characteristic itself and does not automatically affect dependent (less specific) characteristics. We also recommend adding these to the selection and setting them as constant.
ExampleFor more information, see Example: Constant Selection on a Compound Characteristic [page 664]
5.2.10.8.1 Example: Constant Selection on a Compound Characteristic
The following example illustrates why with characteristics set as constant it is also advisable to add compound characteristics to the selection and to set them as constant too.
Let us assume that characteristic C is dependent on characteristic P. C is also filtered to an individual SID - by a hierarchy node for example and is set to contant selection (CSC) in a structure element Eo. This means implicitly that P is also filtered to the unique value. As the constant selectoin on C does not have any effect on P however, a fixed or dynamic filter on P that does not contain po would prevent Eo from providing any data. In this case, we also recommend adding P to the selection of Eo without filters and setting it as constant. This rule is illustrated in the following simple example.
ExampleThe 'Region' characteristic (compounded with the 'Country' characteristic) has the following characteristic values:
Country Region
DE BW
DE BAY
DE HAM
US NY
There is also a hierarchy on the Region characteristic. The South Germany hierarchy node contains the following leaves: DE-BW and DE-BAY.
We assume that the hierarchy selection Region Southern Germany is set to constant selection (CSC) in a structure element. This means that the implicit country filter for this cell is set to DE, but is not constant. A dynamic filter set to Country = US means that the cell does not return any more data. If the Country is also set to constant selection (CSC) however, the cell continues to return data for South Germany.
664 PUBLICSAP BW/4HANA
Analysis

5.2.11 CURRENT MEMBER VariablesWith a CURRENT MEMBER variable, you can define filters for structure elements of a query; these filters have limits that depend on the value of a characteristic in the drilldown.
This allows you to define queries to cover the following business scenarios for example:
1. Comparison with previous month: The query shows the value of a key figure per month together with the value of the key figure in the previous month. These values can be used in formulas, for example to calculate the change or percentage change in comparison with the previous month. You can define the value from the previous month in Query Designer by defining a restricted key figure and restricting the month with the CURRENT MEMBER variable with an offset of -1.
2. YTD (year to date) analyses:○ YTD (year to date) analyses: The query shows the aggregated value of a key figure per month starting
from the value for January through to the month in the row. You can define this key figure in Query Designer by defining a restricted key figure and restricting the month by a range with January of the year in question as the lower limit and the CURRENT MEMBER variable as the upper limit.
○ Multi-year YTD (year to date) analyses: As in the YTD analysis in example 2a, the query displays the aggregated value of a key figure per month. In this case however the lower limit is not fixed. The start of the year is fixed instead. This is taken from the value for the month. As long as the report only involves a single year, there is no difference between this and example 2a. As soon as the report involves a second year however, the figures are only cumulated by year.
3. Rolling window: The query shows the aggregated value of a key figure over the last three months starting with month in the row. You can define this key figure in Query Designer by defining a restricted key figure and restricting the month by a range with the CURRENT MEMBER variable with offset -2 as the lower limit and the CURRENT MEMBER variable as the upper limit.
4. Rolling average: Rather than showing the value aggregated using standard aggregation (as in example 3), this should show the average value over the last three months. Firstly, define a restricted key figure in example 3. Then define a formula equal to this key figure and set exception aggregation "Average“ for the month.
NoteWhereas time characteristic Month is used here, you can take any other time characteristic.
CURRENT MEMBER variables can only be defined for characteristics, which relate to a calendar. These include 0CALDAY, 0CALMONTH, 0FISCPER and other similar characteristics, as well as characteristics that reference these. This function is not possible for other characteristics, especially pseudo time characteristics such as 0CALMONTH2 or 0FISCPER3.
The corresponding variables for the content time characteristics are delivered with the technical content in SAP BW∕4HANA. The technidal name of the variables is made up of the prefix 0CURMEM_ and the technical name of the time characteristic, 0CURMEM_CALDAY or 0CURMEM_CALMONTH for example. You can also create a variable of your own.
For a CURRENT MEMBER variable, a First Value or Last Value operator can be extended in the variable definitions. You also have to select a time characteristics that can be derived from the time characteristic of the variables.
ExampleYou have defined a characteristic value variable for characteristic 0CALMONTH with replacement path CURRENT MEMBER. You select the First Value operator and time characteristic 0CALYEAR. In a result row,
SAP BW/4HANAAnalysis PUBLIC 665

a variable of this kind is not replaced by the value itself but by the First Month of the Year. This makes it possible to have example 2b.
NoteNote regarding system performance: the system reads the data from the database, in the granularity of the characteristic of the CURRENT MEMBER. In addition, different database access types may be required for various restrictions with CURRENT MEMBER variables.
How it Works
The CURRENT MEMBER variable can be used in restricted key figures as either the lower limit or the upper limit in combination with an offset. However, only one restriction with a CURRENT MEMBER variable - with a maximum of one interval - is allowed per restricted key figure.
In a colum (row) with a key figure restricted in this way, a different filter affects every cell displayed in the query result:
● In cells where the characteristic of the CURRENT MEMBER variable has been clearly defined, the CURRENT MEMBER variable is replaced with this value. As this occurs for both the lower limit and the upper limit, a range selection normally results.
● In cellls where the characteristic of the CURRENT MEMBER variables has not been clearly defined (in the result rows for example), the other filters on time characteristics are converted to ranges for the characteristic with the CURRENT MEMBER variable. The CURRENT MEMBER variable in the lower limit is replaced by the upper limit of the range, and the CURRENT MEMBER variable in the upper limit is replaced by the lower limit of the range.
NoteFor the cells that filters on the time characteristics cannot be converted in ranges of the characteristic with the CURRENT MEMBER for, the system returns the value none exists.
● If there are any other restrictions for the characteristic in the structure element with the CURRENT MEMBER variable, these are intersected with the restrictions by the CURRENT MEMBER variable. This way of handling deviates from the rule that different restrictions on a characteristic should be linked with a logical OR and a union set should be built accordingly.
● In structure elements with CURRENT MEMBER variables, the system converts global filters into filters for the CURRENT MEMBER characteristic.
NoteIf a query is restricted to the month interval January 2013 to December 2013, then a column, which is restricted to CM-1, would still show the value for December 2012 as the value for January 2013.
ExampleThe value for every cell in the example below can be reproduced by a query, in which the characteristic with the CURRENT MEMBER variable for month contains exactly the filter entered in the cell. The filter in the query definition is Year = 2013. The CURRENT MEMBER variable is abbreviated as CM in the following table. CM-1 is the variable with offset -1.
666 PUBLICSAP BW/4HANA
Analysis

Example query for using CURRENT MEMBER variables; the global filter is included.
Month CM -1 01.2013 - CM (CM-2) - CM(CM-2) - CM [02.2013, 12.2013]
01.2013 12.2012 01.2013-1.2013 11.2012-01.2013 empty set
02.2013 01.2013 01.2013-2.2013 12.2012-02.2013 02.2013-02.2013
... ... ... ... ...
Result 12.2012-11.2013 01.2013-12.2013 11.2012-12.2013 02.2013-12.2013
Dependency of Query Display on Characteristic Property Access Type for Result Value
If the CURRENT MEMBER variable in an interval is used in a structure element, the cells are only displayed in certain circumstances:
● A cell is displayed if there is a posting for the key figure of the time characteristic.● A cell is displayed if the option has been specified that all values - including unposted values - are displayed
for the time characteristic in the drilldown of the query. In the Query Designer, this is specified using the property Access Type for Result Values with the value Master Data.
ExampleOnly the following values are posted in an InfoProvider:
● 01.2013 with the value 10● 06.2013 with the value 15
In this case, the query displays:
Query with restriction of the cells on posted values
Month Key figure 01.2013 - CM
01.2013 10
06.2013 15
Result 25
If the property Access Type for Result Values is selected for the characteristic Month with the value master data, the query displays the following image:
Query displaying all cells
Month Key figure 01.2013 - CM
01.2013 10
02.2013 10
... ...
05.2013 10
SAP BW/4HANAAnalysis PUBLIC 667

Month Key figure 01.2013 - CM
06.2013 25
... ...
12.2013 25
Result 25
CM.FirstQuarter is a CURRENT MEMBER variable for 0CALMONTH with the First Value operator and time reference 0CALQUARTER. The query appears as follows:
Query with CM.FirstQuarter
Month Key figure CM.FirstQuarter - CM
01.2013 10
02.2013 10
03.2013 10
04.2013 0
... ...
05.2013 0
06.2013 15
... ...
Result 25
Constraints
● A CURRENT MEMBER variable can only be defined for time characteristics.● This function can only be used if the time characteristics of the selected InfoProvider have the same
semantics and are thus dependent on each other.● Time characteristics that cannot be expressed as an interval of the characteristic of the CURRENT
MEMBER variables are not permitted in the global filter or as a free characteristic.
NoteIf the CURRENT-MEMBER variable relates to 0CALMONTH (for example), then 0CALYEAR and 0CALQUARTER (for example) are permitted as free characteristics but 0CALDAY, 0CALWEEK or 0FISCPER are not permitted.
● A CURRENT MEMBER variable can only be used in selections of a structure element or in a restricted key figure, but NOT in the filter for the query.
● Each structure element can have just one selection with a CURRENT MEMBER variable or with a range made up of CURRENT MEMBER variables. This filter cannot be defined as "excluding“ (only INCLUDING is allowed).
668 PUBLICSAP BW/4HANA
Analysis

● Due to technical reasons, an upper or a lower limit is needed in the global filter of a query for the characteristic of the CURRENT MEMBER variables, if the variable is used as an upper or a lower limit. If this limit is not set, the system displays a warning and the value non exists is shown in the relevant cells.
● Manual planning is not possible on structure elements with a CURRENT MEMBER variable.
Related Information
Example Query for Using a CURRENT MEMBER Variable [page 669]Examples of Using the CMR Operator [page 670]Defining Variables [page 811]Replacement from CURRENT MEMBER Variable [page 725]
5.2.11.1 Example Query for Using a CURRENT MEMBER Variable
The screenshot below shows the query with the technical name 0D_FC_AE_CURNTMEM_Q002:
The query structure contains the following characteristics:
● Calendar Year, restricted to calendar year 2007● Calendar Year/Month
The query contains the following key figures:
● Net Sales This column shows the Net Sales figure per month.Result: Total of all sales figures posted in 2007.
● Net Sales - 1: This column shows the Net Sales figure from the previous month.Row 01.2007 contains the sales figure from December 2006.Result: The total of all sales posted from December 2006 to November 2007.
● 02.2007 to CURRENT MEMBER (0CALMONTH): This is a year-to-date analysis performed using the CURRENT MEMBER variable 0CURMEM_0CALMONTH. The system calculates the cumulative sales from Februar 2007 up to and including the current month.Result: Total of all sales figures posted in 2007 from February onwards. As no sales were posted in Januar, this is the total of all sales for the entire year.
SAP BW/4HANAAnalysis PUBLIC 669

● CURRENT MEMBER (0CALMONTH) to 12.2007: The system calculates the sales figure from the current month to December 2007.Result: Total of all sales figures posted in 2007.
● (CURRENT MEMBER (0CALMONTH) - 2) to CURRENT MEMBER (0CALMONTH): This is a rolling screen. The system calculates the cumulative sales figure for the last three months.
NoteYou can also use this key figure in formulas, for example to calculate the share of the sales figure from a given month in a given quarter.
Result: Total sales figure from 2006 to December 2007.● AVG ((CURRENT MEMBER (0CALMONTH) - 2) to CURRENT MEMBER (0CALMONTH)): This key figure is
defined using formula exception aggregation AVG for reference characteristic 0CALMONTH. The system calculates the average sales from the last three months.Result: Total sales figure from November 2006 to December 2007 dvided by the number of values posted. If sales were only posted in 10 of the 14 months in question, the division is made by 10.
5.2.11.2 Examples of Using the CMR Operator
If your queries incorporate key fiigures restricted by CURRENT MEMBER variables, you can define formulas using the CMR (CURRENT MEMBER result) operator. This data function does not calculate the results based on the data in the InfoProvider. Instead it calculates the them based on the values moved by the CURRENT MEMBER variable.
The folowing examples will illustrate how the CMR operator works.
Example Query 1
In the following example, the variable with replacement path CURRENT MEMBER refers to the content time characteristic Month (0CALMONTH). CMR in the header refers to the CURRENT MEMBER result operator. Sales in December 2006 = 2.00.
Example query 1 with CURRENT MEMBER variables for the month
Calendar Year/Month Sales CM-1 - CMAVG (CM-1 - CM, Month)
AVG (CMR (CM-1 - CM), Month)
01.2007 2,00 2,00 2,00
02.2007 20,00 20,00 20,00 20,00
03.2007 7,00 27,00 13,50 27,00
04.2007 7,00 7,00 7,00
05.2007 6,00 6,00 6,00 6,00
06.2007 10,00 16,00 8,00 16,00
07.2007 1,00 11,00 5,50 11,00
670 PUBLICSAP BW/4HANA
Analysis

Calendar Year/Month Sales CM-1 - CMAVG (CM-1 - CM, Month)
AVG (CMR (CM-1 - CM), Month)
08.2007 1,00 1,00 1,00
09.2007
10.2007 6,00 6,00 6,00 6,00
11.2007 27,00 33,00 16,50 33,00
12.2007 3,00 30,00 15,00 30,00
Result 80,00 82,00 9,11 14,455
The query contains the following key figures:
● Sales: This column shows the Net Sales figure per month. Sales is a key figure in the InfoProvider.○ Result: Total of all sales figures posted in 2007.
● (CM-1) - CM, in other words (CURRENT MEMBER (0CALMONTH)-1) - CURRENT MEMBER (0CALMONTH): This is rolling window. The system calculates the cumulative sales from the last three months.○ The value for month 07.2007 is 11.00, as (CM-1) - CM defines the interval of the months 06.2007 (=
CM-1) to 07.2007, and the total for the months of June (10,00) and July (1,00) is exactly 11.00.○ Result: Total sales figure from 2006 to December 2007.
● AVG ((CM-1) - CM, Monat), in other words AVG ((CURRENT MEMBER (0CALMONTH) - 1) bis CURRENT MEMBER (0CALMONTH)): This key figure is defined using formula exception aggregation AVG for reference characteristic 0CALMONTH. The system calculates the average sales per month based on incoming data from the last two months, i.e. the two-month sales average.○ The value for month 07.2007 is 5.50, as the system divides the cumulative sales for the months of June
to July - 11.00 - by the number of months with incoming data, in this case 2.○ The value for month 08.2007 is 1.00, as the system divides the cumulative sales for the months of July
to August - 1.00 - by the number of months with incoming data, in this case 1.○ Result: Average sales per month. The system calculates the total sales for all months (82.00) and
divides this by the number of months with incoming postings (1 in 2006 and 8 in 2007 - divided by 9).
NoteAn example of where average calculations of this kind are used is the 200 day average of sales.
● AVG (CMR (CM-1 - CM), Monat), in other words CMR ((CURRENT MEMBER (0CALMONTH) - 1) bis CURRENT MEMBER (0CALMONTH)): This key figure shows the average of the interval values and not the average of the incoming values. This is specified by the CMR operator. This means that the average is not calculate based on the data in the InfoProvider. Instead, it is calculated based on the values moved by the CURRENT MEMBER variable (see (CM-1) - CM)). The values from the previous month are included in the range for the current month, meaning that it is not possible to differentiate for individual months between the cumulative values in columns (CM-1) - CM) and values changed by the CMR operator in AVG (CMR (CM-1 - CM), Monat). The difference can be seen in the result however.○ Result: Average sales per interval. The system calculates the total sales from all intervals (159) and
divides this by the number of intervals with values (11 in 2007).
SAP BW/4HANAAnalysis PUBLIC 671

Example Query 2
This example shows a query that is used to find out how many months show growth in sales compared to the previous month.
Example Query 2
Calendar Year/MonthSales for Current Month
Sales for Previous Month
Difference in Sales to Previous Month
Difference in Sales to Previous Month > 0
01.2007 2,00 -2,00 0
02.2007 20,00 20,00 1
03.2007 7,00 20,00 -13,00 0
04.2007 7,00 -7,00 0
05.2007 6,00 6,00 1
06.2007 10,00 6,00 4,00 1
07.2007 1,00 10,00 -9,00 0
08.2007 1,00 -1,00 0
09.2007 0
10.2007 6,00 6,00 1
11.2007 27,00 6,00 21,00 1
12.2007 3,00 27,00 -24,00 0
Result 80,00 79,00 1,00 5,00
The query contains the following key figures:
● Sales for Current Month: This column shows the Net Sales figure per month. Sales is a key figure in the InfoProvider.○ Result: Total of all sales figures posted in 2007.
● Sales for Previous Month, in other words Umsatz von (CURRENT MEMBER (0CALMONTH)-1): This column shows the Net Sales figure from the previous month.○ Result: Total sales figure from December 2006 to end of November 2007.
● Difference in Sales to Previous Month, in other words Umsatz (CM) - Umsatz (CM-1): The system subtracts the sales for the previous month from the sales for the current month.○ The value for month 07.2007 is -9,00, as the system subtracts the sales for month 06.2007- 10.00 -
from the sales for month 07.2007- 1.00.○ Result: Difference between results: 80.00 - 79.00 = 1.00.
● Differenz des Umsatzes zum Vormonat > 0, in other words CMR (Umsatz (CM) - Umsatz (CM-1)): This key figure is defined using the CMR operator. If the condition is met, the system returns 1. Otherwise it returns 0.○ Result: Total of all positive values, in this case 5.00. 5 months displayed growth in sales when
compared to the previous month.
672 PUBLICSAP BW/4HANA
Analysis

Related Information
5.2.12 Displaying Unposted Values in the Query Result
The following section describes which rules are applied when displaying unposted value if there are navigation attributes, compounded characteristics or time characteristics (either comparable or non-comparable) in the drilldown.
In Query Designer, the Master Data option has been selected as the Access Type for Result Values for the relevant characteristic on the Advanced tab (see ).
NoteA simple example of how unposted values are displayed is the slow-moving item list (see ).
Related Information
Navigation Attributes in the Drilldown [page 673]Navigation Attributes in the Drilldown and Universal Display Hierarchy [page 674]Compound Characteristics in the Drilldown [page 675]Comparable Time Characteristics in the Drilldown [page 676]Non-Comparable Time Characteristics in the Drilldown [page 677]Unposted Values for Fiscal Year Periods [page 677]Unposted Values and Formula Variables [page 678]
5.2.12.1 Navigation Attributes in the Drilldown
The following section describes which rules are applied when displaying unposted value if there are navigation attributes in the drilldown.
The navigation attribute comes before the attribute-bearing characteristic in the drilldown.
● You want to display unposted values for the attribute-bearing characteristic:All tuples (navigation attribute, attribute-bearing characteristic) are displayed in accordance with the master data of the attribute-bearing characteristic.
● You want to display unposted values for the navigation attribute:
SAP BW/4HANAAnalysis PUBLIC 673

No unposted values are displayed for the navigation attribute. The system displays a suppressible warning explaining this.
The navigation attribute comes after the attribute-bearing characteristic in the drilldown.
● You want to display unposted values for the attribute-bearing characteristic:All tuples (attribute-bearing characteristic, navigation attribute) are displayed in accordance with the master data of the attribute-bearing characteristic.
● You want to display unposted values for the navigation attribute:No unposted values are displayed for the navigation attribute. The system displays a suppressible warning explaining this.
However, only the navigation attribute is in the drilldown, and not the attribute-bearing characteristic.
● You want to display unposted values for the attribute-bearing characteristic:As the attribute-bearing characteristic is not in the drilldown, the display of unposted values is ignored. Only posted values of the navigation attribute are displayed.
● You want to display unposted values for the navigation attribute:All values of the navigation attribute are displayed in accordance with the master data of the attribute-bearing characteristic.
5.2.12.1.1 Navigation Attributes in the Drilldown and Universal Display Hierarchy
The following section describes which rules are applied when displaying unposted value if there are navigation attributes in the drilldown, and the general analysis function Display as Hierarchy (known as Universal Display Hierarchy) is used.
The following example serves to describe the system behaviour: The navigation attribute comes before the attribute-bearing characteristic in the drilldown. You want to display unposted values for the attribute-bearing characteristic. For the display, "Universal Display Hierarchy" is used, with drilldown by multiple elements.
Before a navigation attribute node is expanded, the query behaves as though only the navigation attribute - and not the attribute-bearing characteristic - were in the drilldown: Only posted values - and no unposted values - are displayed for the attribute-bearing characteristic.
If the navigation attribute node is expanded up to the attribute-bearing characteristic, the associated values of the attribute-bearing characteristic are displayed for every expanded node in accordance with the master data.
Without "Universal Display Hierarchy", all tuples (navigation attribute, attribute-bearing characteristic) are displayed in accordance with the master data of the attribute-bearing characteristic.
674 PUBLICSAP BW/4HANA
Analysis

With "Universal Display Hierarchy" no tuples (navigation attribute, attribute-bearing characteristic) are displayed if there is not one or more posted values of the attribute-bearing characteristic for the value of the navigation attribute.
Related Information
Navigation Attributes in the Drilldown [page 673]
5.2.12.2 Compound Characteristics in the Drilldown
The following section describes which rules are applied when displaying unposted value if there are compound characteristics in the drilldown.
The compound parent comes before the compound child in the drilldown.
● You want to display unposted values for the compound parent:All values of the compound parent are displayed in accordance with the master data of the compound parent. For every value of the compound parent, the posted values of the compound child are displayed.
● You want to display unposted values for the compound child:For every value of the compound parent that has at least one compound child, all associated values of the compound child are displayed in accordance with the master data of the compound child.
● You want to display unposted values for the compound parent and for the compound child:All tuples (compound parent, compound child) are displayed that are valid in accordance with the master data. Compound parents without compound children are also displayed.
The compound child comes before the compound parent in the drilldown.
● You want to display unposted values for the compound parent:For every posted value of the compound child, the associated unique value of the compound parent is displayed. Displaying unposted values here does affect the query result in any way.
● You want to display unposted values for the compound child:All values of the compound child are displayed in accordance with the master data of the compound child. For every value of the compound child, the associated unique value of the compound parent is displayed if it is a posted record.
● You want to display unposted values for the compound parent and for the compound child:All values of the compound child are displayed in accordance with the master data of the compound child. For every value of the compound child, the associated unique value of the compound parent is displayed if it is a posted record. No unposted values are displayed for the compound parent. The system displays a suppressible warning explaining this.
SAP BW/4HANAAnalysis PUBLIC 675

5.2.12.3 Comparable Time Characteristics in the Drilldown
The following section describes which rules are applied when displaying unposted value if there are comparable time characteristics (such as Calendar Quarter and Calendar Year) in the drilldown.
The coarser time characteristic comes before the finer time characteristic in the drilldown:
● You want to display unposted values for the coarser time characteristic:The values of the coarser time characteristic are displayed in accordance with the characteristic's master data. For every value of the coarser time characteristic, all posted values of the finer time characteristic are displayed.
● You want to display unposted values for the finer time characteristic:For every posted value of the coarser time characteristic, all values of the finer time characteristic are displayed in accordance with this time characteristic's master data.
● You want to display unposted values for both the coarser and the finer time characteristic:All valid tuples (coarser time characteristic, finer time characteristic) are displayed in accordance with the master data.
The finer time characteristic comes before the broader time characteristic in the drilldown:
● You want to display unposted values for the coarser time characteristic:For every posted value of the finer time characteristic, the associated value of the coarser time characteristic is displayed. Displaying unposted values here does affect the query result in any way.
● You want to display unposted values for the finer time characteristic:All values of the finer time characteristic are displayed in accordance with this time characteristic's master data. For every posted value of the finer time characteristic, the associated unique value of the coarser time characteristic is displayed if it is a posted record.
● You want to display unposted values for both the coarser and the finer time characteristic:All valid tuples (finer time characteristic, coarser time characteristic) are displayed in accordance with the master data.
676 PUBLICSAP BW/4HANA
Analysis

5.2.12.4 Non-Comparable Time Characteristics in the Drilldown
The following section describes which rules are applied when displaying unposted value if there are non-comparable time characteristics (such as Calendar Month and Calendar Week) in the drilldown.
Time characteristic <a> comes before time characteristic <b> in the drilldown.
● You want to display unposted values for time characteristic <b>:For every postable value of <a>, the associated values of <b> are displayed in accordance with the master data of <b>.
● You want to display unposted values for tme characteristic <a>:All values of <a> are displayed in accordance with its master data. For every value of <a>, all associated and posted values of <b> are displayed.
● You want to display unposted values for both time characteristics <a> and <b>:All valid tuples (<a>, <b>) are displayed in accordance with the master data.
5.2.12.5 Unposted Values for Fiscal Year Periods
In a query, unposted values are displayed for characteristic Fiscal Year/Period (0FISCPER). The following section describes which rules are applied when displaying unposted special periods and unposted period 00 (per fiscal year).
The rule is as follows: Unposted special periods and unposted period 00 are only displayed if the unposted values for Fiscal Year/Period (0FISCPER) are not derived from another time characteristic.
If there are unposted values on time characteristics, all time characteristics that are in the drilldown or are defined for a filter are taken into account. The system uses this set to determine the coarsest time characteristic from which all time characteristics contained in this set can be derived. The system determines the unposted values for this time characteristic and derives the values of the time characteristics that are taken into account from this. It then checks these agains the filters or fills the unposted values.
ExampleIf a filter is defined on characteristic Calendar Year (0CALYEAR) for example, and you want to display unposted value for characteristic Fiscal Year/Period (0FISCPER), the system determines the unposted values for characteristic Calendar Day (0CALDAY) and derives the values from Fiscal Year/Period (0FISCPER) and Calendar Year (0CALYEAR).
As derivation of a fiscal year period from a calendar day always returns a regular fiscal year period, no unposted special periods and unposted periods 00 are displayed.
SAP BW/4HANAAnalysis PUBLIC 677

ExampleIf a filter is defined on characteristic Fiscal Year (0FISCYEAR) for example, and you want to display unposted value for characteristic Fiscal Year/Period (0FISCPER), the system determines the unposted values for characteristic Fiscal Year/Period (0FISCPER).
Unposted special periods and unposted period 00 (per fiscal year) are then also displayed.
NoteIf unposted special periods and unposted period 00 are displayed, and you want to suppress this, you can define a filter on characteristic Posting Period (0FISCPER3) and set a filter on the regular periods.
5.2.12.6 Unposted Values and Formula Variables
For unposted variables, formula variables are only executed with a replacement path if they are executed after aggregation.
A replacement is not executed from an attribute, for example. However, a replacement from hierarchy attributes is executed, because these are executed after aggregation.
NoteFor a replacement from hierarchy attributes, remember that a hierarchy must be active or must exist on the characteristic.
Related Information
5.2.13 Using Precalculated Value Sets (Buckets)
Use
A bucket is a precalculated value set that is stored in a database table and can be used as a filter in an analytic query.
The filter is defined in an analytic query as a variable with processing type replacement path (replacement from a result of a pre-query) and executed at runtime. It is important here that the filter is executed on the database before all the data from the bucket has to be loaded to OLAP processing. This makes for significant runtime improvements if large amounts of data are processed in the bucket.
A variable that refers to buckets can only be used as a filter in characteristic restrictions. It cannot be used in default values, structure elements and the like.
678 PUBLICSAP BW/4HANA
Analysis

To fill a bucket with data, you can either use a reference table or add the data directly.
Procedure
You are in the Bucket Definition screen (transaction RSBUCKET).
To create a bucket, proceed as follows:
1. Select the characteristic that you want to create a bucket for.2. Specify the name of the bucket.
NoteInput help is provided for existing buckets.
3. You can also enter a description.4. If you want to use an existing reference table, select Use Existing Sources. You can select the reference
table under Existing Table. The system reads the data from a specified column in a database table (that is known to the ABAP DDIC).1. To view the content of a table, press Display Table.
CautionNote that displaying a large table can be time-consuming if a large number of rows is set as standard for it in the Data Browser (transaction SE16). You do have the option however of refining the display and thus minimizing the number of values that are actually displayed.
2. Specify an ABAP table as a reference.3. Choose either key values (by selecting Table contains keys) or SID values (by selecting Table contains
SIDs).4. In the Field Name in Table field, specify the column that you want the characteristic values to be read
from.5. If you do not want to use an existing reference table, do not select Use Existing Sources. You can select the
characteristic values under Characteristic Values of the Bucket. You can select the values manually, copy them from the buffer or upload them from files.
6. To save your settings, press Save.
Result
The system has precalculated the required value set, which is now available in the form of a bucket. In an analytic query, you can use this bucket to define a variable with processing type replacement path (replacement from a query).
SAP BW/4HANAAnalysis PUBLIC 679

Related Information
Replacement from Query [page 726]Example: Using a Variable with Replacement from Query [page 813]
5.2.14 Standard Queries
A query that is created for every InfoProvider in the SAP BW∕4HANA system by default is called a standard query.
The standard query is created when an InfoProvider is accessed for the first time. It contains all characteristics of an InfoProvider as free characteristics and a structure with all key figures of the InfoProvider.
It can be used for test and analysis purposes, but cannot normally replace a query modeled for specific customer purposes.
NoteSpecial naming conventions apply for standard queries. These depend on the area that they are called in:
● BW Server: !<InfoProvider-Name>● BICS: !<InfoProvider-Name>● MDX: $<InfoProvider-Name>
5.2.15 Document in the Document Store
In a suitable front end, you can document cells in a query with numbers. You can use these (text) documents on the backend store. TLOGO object. Document Store is used for this.
A document is identified by the name of the key figure and the filter for this key figure, which affects the cell in the query. The text length of a document is unlimited. You can assign a document to a hierarchy node or a subtotal. You can also assign a document to restricted and calculated key figures. To make it possible to add comments for calculated key figures, you have to assign a technical ID. Make sure that these are unique. As soon as the query contains characteristic 0REQTSN, no comments can be created.
Documents can be reused in other queries if the filter selection is identical. A document is therefore visible in all queries that contain the same cell. You can even find documents from the drilldown in the selection and vice versa, as long as their common part is identical.
In the Document Store, you have to define which InfoProviders it will store. Queries that are based on these InfoProviders can work with comments from this document storage.
NoteNote the authorization concept: In the query, you can document what you can see on the basis of the analysis authorizations for the query. You also require the authorizations for standard authorization object S_RS_DOCA (activities READ and WRITE) in order to read and edit documents.
680 PUBLICSAP BW/4HANA
Analysis

Related Information
Document Support [page 866]Creating a Document Store [page 681]Overview: Authorization Objects [page 1220]
5.2.15.1 Creating a Document Store
To be able to create and reuse documents in queries, you need a document store.
Context
When you create a document store, the system creates a DataStore object in the background as a physical document store. The name of this generated DataStore object is displayed in the maintenance transaction.
NoteMake sure that you have activated the InfoObjects 0DOC* of the technical content, as the generated DataStore object requires this.
The fields of the DataStore Object are derived from the characteristics of the InfoProviders that are assigned to the document store. Since several fields are generated for each characteristic, SAP recommends choosing the list of assigned InfoProviders in such a way that the number of characteristics is not too large. Otherwise, the DataStore object cannot be generated any more.
CautionYou can also find the generated DataStore objects whose name begins with /1BW using the search function in the BW modeling tools. Note that you cannot change the generated DataStore objects.
Procedure
1. You are in the Project Explorer. Iin the context menu for the required InfoArea, choose New Document Store . The New Document Store dialog box appears.
2. Enter a name and a description for the document store.3. If you want to use a document store as a template, choose Browse to select if from the existing document
stores.4. Choose Finish. The Document Store maintenance screen appears. On the General tab, the system displays
the and the description.5. To assign the document store to InfoProviders, switch to the InfoProvider tab and choose Add. The Add
InfoProvider screen appears.
SAP BW/4HANAAnalysis PUBLIC 681

6. Specify the name of the required InfoProvider. You can also enter * to obtain a list of all InfoProviders. You can select one or more InfoProviders from this and choose OK .
CautionThe InfoProvider types supported for this are CompositeProviders and DataStore objects.
7. Activate the document store.
NoteNote that you have to activate the document store again if an assigned InfoProvider changes. The system then adjusts the generated DataStore object.
8. As an administrator, you can call Document Administration for the documents in this document store by pressing the spanner (wrench) symbol. There is also a function to download this overview.
NoteNote the authorization concept: You require the authorizations for standard authorization object S_RS_DOCA (activities DISPLAY and MAINTAIN).
If you have selected a row, you can perform the following functions:○ By pressing Details, you can call a display of the details for the selected document, including header
data (dokument ID, version), metadata (docment type and document status, user name, key figure name, InfoProvider that belongs to the query with which the document was created) and further technical data.
○ By choosing Show Document, you can call a preview of the document.○ By choosing Show SELDR, you can view the filter definition of the cell. You can check the selection
conditions here.○ By choosing Delete Keys, you can delete the document (and all existing versions). (The keys are
determined from the filter in the cell and serve to rapidlay assign the documents to a query.)
NoteIf you want to delete multiple documents at once, you can use report RSDOC_DELETE_TAGGED_DOCS.
You can use report RSDOC_DELETE_DOCUMENTS to physically remove deleted documents from the database.
Related Information
Document in the Document Store [page 680]Document Support [page 866]Overview: Authorization Objects [page 1220]
682 PUBLICSAP BW/4HANA
Analysis

5.2.16 Using the Report-Report Interface
Use
The report-report interface (RRI) allows you the flexibility to call a jump target (receiver) online from a BEx query (sender) within or outside of the BW system. Jump targets assigned to a query are available in the BI client under the Goto function.
Queries, transactions, reports, and Web addresses can be jump targets. The parameterization of the target action is taken from the context of the cell that you have jumped from. You can set parameters for calling query using input variables that are filled from the selection conditions and the element definitions of the selected cells in the sender query.
More information: Process when Calling the RRI [page 683]
Prerequisites
If you want to jump from a Web application to a transaction or ABAP/4 report using the RRI, first you need to install an Internet Transaction Server (ITS) for the target system. The transaction or ABAP report is than displayed in the SAP GUI for HTML, which is part of the ITS. The ITS is also used for jump targets within the BW server. However, this does not have to be installed separately because it is automatically included in a BW system. The URL for starting a transaction in SAP GUI for HTML is generated by the BW server.
Example
For your cost center report (Sender), you want to request master data from an SAP system (Receiver).
For a query with the up-to-date sales figures for your customer (Sender), you want to request up-to-date stock market data on your customer listed on the stock exchange from the Internet.
5.2.16.1 Process when Calling the RRI
When it is called, the report-report interface (RRI) first collects the following information from the cell of the sender query before passing it to the receiver as selections:
● The global filter: the lines and columns of the query definition;● the dynamic filter: Thes are the values in the navigation block of the query (filter that can be changed by
navigation), including the hierarchies;● Filters from the selected, restricted key figure;● In formulas, only the selections that are identical in all operands are passed● Filters from the selected drilldown characteristics;
There is no specified or definable sequence for the allocation. This means that if the drilldown is first performed according to characteristic A and then according to characteristic B, the result produced is
SAP BW/4HANAAnalysis PUBLIC 683

different to the result of the reverse sequence (B, A). There is no way of specifying within a query that a jump from characteristic A automatically has a different jump target than a jump from characteristic B.
This process uses the following additional functions to map the contents in an appropriate manner.
● If the receiver query has variables, the system tries to fill these variables; if there are no suitable variables, the values are passed as dynamic filters.
NoteHierarchy variables are not transferred as they are regarded as query properties and not as selections.
● If there is a specific relationship between the sending and receiving InfoObjects, the system tries to use this relationship:○ If there is compounding, a restriction to a compounded characteristic is also applied to the parent of
the compounding if it is the receiving query in the navigation block.○ When time selections are implicitly transferred, only the selections from superordinate time
characteristics are passed to subordinate time characteristics.Other possible relationships that can be mapped:○ Attribute restrictions are mapped to the master characteristic.○ Restrictions to navigation attributes are also mapped to characteristics that bear master data, and
restrictions to characteristics are also applied to navigation attributes if these are present in the receiver.
ExampleThe sender contains the characteristic City in the drilldown, and the receiver contains the corresponding navigation attribute Zip Code. The restriction of City to the zip code is applied and passed to the navigation attribute Zip Code in the receiver.
○ Referencing characteristics are mapped to the basic characteristic.● When jumping to another system, note that the mapping rules are created in the target system. Make sure
that all the InfoObjects with implicit mapping rules from the sending query also exist in the target system. Otherwise the jump will not work.
There are some special features when handling the different receivers.
More information: Receivers [page 687]
5.2.16.2 Changing and Creating Sender/Receiver Assignments
To be able to use report-report interfaces in executed queries, you must define a sender/receiver assignment.
You use the sender/receiver assignment to make the settings required to be able to connect a query to the report-report interface (RRI). You can assign receiver reports to a sender report - a query - in either the BW system or in another SAP system.
684 PUBLICSAP BW/4HANA
Analysis

Procedure
Creating Sender/Receiver Assignments
1. Call transaction RSBBS. The Maintain Sender-Receiver Assignment screen appears.2. Select one of the two tab pages and enter the required data.
Tab Page Description
Query Enter the technical name of the sender query or select a query using input help.
All InfoProvider queries If you want to assign the same jump destinations to all queries for an InfoProvider, enter the technical name of the InfoProvider or select it using input help.
3. Choose Create. The Maintain Sender/Receiver Assignment dialog box appears.4. Under Report Type, select a receiver. You have the following options:
Report type Description
Transaction Call a transaction in an SAP system. The transaction must be classified for using SAP GUI for HTML.
More information: Creating a Transaction As a Receiver [page 692]
ABAP/4 Report Call an ABAP/4 report in an SAP system.
Web Address Call any web address and pass the parameters in the URL.
More information: Creating a Web Address As a Receiver [page 694]
Own Report Type Call any target in the web or SAP GUI for HTML. The call and the parameters can be modified using customer-specific code.
More information: Creating Your Own Report Type As a Receiver [page 697]
More information: Receivers [page 687].
5. Choose a Target System. You have the following options:
Local Local: The jump target is within the BW system.
Source system: The jump target is outside of the BW system.
● One source system as a target system:Specify the name of the source system. You can also choose the source system using input help.
● All source systems as target systems:Choose All Source Systems. Specify the source system where you want to select the required report initially.
SAP BW/4HANAAnalysis PUBLIC 685

Log on to this source system.
1. In the Report field, enter a description for the receiver report. Once you have saved your entry, this description is displayed as the Report Title.
2. Choose . The Maintain Sender-Receiver Assignment screen appears.3. Save your entries.4. If absolutely necessary, you can still maintain the assignment details. See also Maintain Assignment
Details [page 703].
Changing Sender/Receiver Assignments
Once a receiver has been created, you can make the following changes to the input-ready fields in the table.
Group Description What you need to know
Report Title Enter a name.
Source System Select the required source system using input help. To assign all source systems, enter an asterisk (*).
InfoSource If an InfoProvider receive data from multiple InfoSources, you can specify which InfoSource to extract data from when assigning the received report. In the InfoSource column, select the InfoSource you want to use by using input help.
If you also want to change the Report Type, Target System, or Report settings, choose Change. The Maintain
Sender-Receiver Assignment screen appears. Make the required changes and choose Apply.
Deleting Sender/Receiver Assignments
1. If you want to delete an assignment, select the relevant row entry in the Receiver table.
2. Choose Delete. The system deletes the selected assignment.
Transporting Sender/Receiver Assignments
To call the transport connection, choose Transport Wizard. You can use this to transport sender/receiver assignments that you have created. All jump destinations are then transported together. Queries as sender are collected by the object collector as required objects, and receivers as optional objects.
Result
Jump targets assigned to a query are available in the BI client under the Goto function.
686 PUBLICSAP BW/4HANA
Analysis
5.2.16.3 Receivers
The report-report interface supports different jump targets - also referred to as receivers.
This topic will explain the particular features of the various receivers.
BW Query
When calling the RRI, the selections are transferred as generally described here: Process when Calling the RRI [page 683]
For more information, see BEx Query As a Receiver [page 688].
Transaction and ABAP/4 Report
Calling the RRI with a transaction or an ABAP/4 Report as the receiver is done with the RRI from the SAP NetWeaver Application Server. This is possible in an ERP system, a CRM system or within the BW system. The selections are prepared by the BW system that does not recognize the transaction or the report. The assignment is transferred from the RRI of the SAP NetWeaver Application Server using inverse transformation rules. There must also be a complete chain from the DataSource of the source system to the InfoSource, through transformations up to the InfoProvider. This does not mean that data absolutely has to be loaded using this chain. If this chain does not exist, the RRI cannot transfer the selections to the source system.
Calling the RRI only works for fields with dictionary reference. For ABAP reports, this means that the parameter has to be
PARAMETERS param LIKE <table_field>
. For transactions, this means that the Dynpro has to have a dictionary reference. Not every transaction can be called with the RRI of the SAP Application Server. For some transactions (such as SV03), you need to program a utility program if you still want to call it using the RRI.
See also Creating a Transaction As a Receiver [page 692].
InfoSet Query
The same applies to InfoSet queries as does for transactions and ABAP/4 reports.
Web Dynpro
When you call the RRI with a Web address as a receiver, the assignment details must be correctly entered.
SAP BW/4HANAAnalysis PUBLIC 687

Web Address
When you call the RRI with a Web address as a receiver, the assignment details must be correctly entered. You have to specify the name of the input field in the Field Name column. URL variables cannot be used.
See also Creating a Web Address As a Receiver [page 694].
5.2.16.3.1 Query as a Recipient
You can assign a query in BW as the recipient to another query as sender.
In order to be able to call a query as a recipient with the RRI, you need to be aware of a few guidelines during query definition.
General
● Characteristics that are to be filled from the sender query must be defined as free characteristics. A hierarchy node restriction can also be transferred to free characteristics as a property, for example.
● Changeable variables for the recipient query are not filled by the RRI.● Selections for various InfoObjects are transferred when the InfoObjects have the same reference
characteristic.
See also the section Query under Receivers [page 687].
Using Hierarchies
When using hierarchies in the query, you should be aware of the following cases:
Sender and receiver queries use the same hierarchy or hierarchies that are based on the same basic characteristic.
Jumping from one node in the hierarchy of the sender query to the same node of the hierarchy in the receiver query works as usual. The hierarchy settings are transferred with the RRI.
Sender and receiver queries use different hierarchies:
The hierarchy setting for the receiver query remains unchanged and the selections for the RRI are deleted. The system filters by leaves in the node.
NoteA few InfoObjects are different from one another, but they are treated as assignable by the system. This is a special development for Business Content. For example, values are transferred from account number (0ACCOUNT) to cost element (0COSTELMNT) or to general ledger account (0GL_ACCOUNT). For more information, see the Example for a BEx Query As a Receiver [page 689].
The receiver query uses a hierarchy, but the sender query does not:
If the selections of the RRI only consist of single values, the hierarchy setting for the receiver query remains unchanged; otherwise the hierarchy is deactivated.
The sender query uses a hierarchy, but the receiver query does not:
The hierarchy is set to inactive.
688 PUBLICSAP BW/4HANA
Analysis

Hierarchies and Compound Characteristics
With hierarchies for compound characteristics, you have to create a variable for the basic characteristic of the hierarchy for the receiver query so that the values can be transferred correctly.
If you define the query without this variable, the dynamic filter will be used and the hierarchy will be deactivated because the InfoObject is compounded. When you use this non-changeable variable, the RRI can transfer the value to this variable and the hierarchy remains active.
Using Variables
If you go from a query to a query with variables, the variable screen for the target query is only displayed if it was not possible to fill all variables when calling it. This is especially the case if the variable screen contains optional variables only.
Unlike hierarchy node variables, hierarchy variables are not applied.
Adding Targets Dynamically
You can use the BAdI RS_BBS_BADI_DYNAMIC to extend the context menu for jump targets dynamically from an executed query. As a result, further recipients are added to the recipients in the sender/receiver assignment. This means that the context menu is not extended until runtime and is defined by the column, row, cell content (and key figure value), query, or InfoProvider.
Example
As a special case with different hierarchies and compounded characteristic, see the example Example for BEx Query as Receiver [page 689].
5.2.16.3.1.1 Example of a Query as a Receiver
The following example contains two peculiarities: The queries linked using the RRI use different hierarchies, and the basic characteristic of the hierarchy in the receiver query is a compounded characteristic.
From a query on a cost element, you want to display the corresponding account. The queries are based on two different InfoCubes.
The sender query uses a hierarchy that is based on the basic characteristic cost element (0COSTELMNT). The receiver query uses a hierarchy that is based on the characteristic account number (0ACCOUNT).
NoteHierarchies that are based on different characteristics cannot normally be transferred. However this a special case: The characteristics cost element (0COSTELMNT) and account number (0ACCOUNT) have the same key and are recognized by the system as similar characteristics whose values can be transferred to one another. The same link exists between account number (0ACCOUNT) and general ledger account (0GL_ACCOUNT). If this was not the case, the hierarchy in this example could not be transferred with the RRI.
Defining Your Receiver Query
SAP BW/4HANAAnalysis PUBLIC 689

As the hierarchy basic characteristic is a compounded characteristic (account number is compounded to chart of accounts), you have to create a variable for characteristic account number so that the values can be transferred correctly.
NoteIf you define the query without this variable, the dynamic filter will be used and the hierarchy will be deactivated because the InfoObject is compounded.
By using this variable, which cannot be changed, the RRI can transfer the value to this variable and the display hierarchy remains active.
Create a variable with the following properties for characteristic account number:
Variable Type Characteristic Value Variable
Processing Type Manual entry/Default value
Variable represents selection option
Variable value is Optional
Input Ready Switched on
Changeable with query navigation Switched off
Creating Sender/Receiver Assignments
Create a sender/receiver assignment for both of your queries. You do not need to maintain the assignment details.
Executing the Jump
690 PUBLICSAP BW/4HANA
Analysis

When the hierarchies for both queries are structured in the same way, the jump from the sender query to the receiver query appears as follows:
SAP BW/4HANAAnalysis PUBLIC 691

When the hierarchies for both queries are structured differently, the jump from the sender query to the receiver query appears as follows:
5.2.16.3.2 Creating a Transaction as a Receiver
Use
You can assign a transaction as a receiver to a sender query in the BW system.
Prerequisites
● If you want to go from a Web application to a transaction or ABAP/4 report using the RRI, an ITS has to be assigned for the target system beforehand.
● The value of the input field to be supplied must be known at the time of the jump (for example by entering a single value on the selection screen of the sender or by the cursor position at the time of the jump).
● Sender and receiver fields that correspond to one another generally must link to the same data element or at least to the same domain, otherwise the values cannot be assigned to one another.
● The assignment of sender and receiver fields must always be a 1:1 assignment. For example, the transactions called from the start screen cannot have two input fields of the same data type. Then it is not clear which of the fields is to be supplied, which means neither of them is supplied.
692 PUBLICSAP BW/4HANA
Analysis

● There has to be a complete chain from the DataSource of the source system to the InfoSource, through update rules up to the target. See also the section Transaction and ABAP/4 Report in Receiver [page 687].
Procedure
Simple Cases:
1. Specify a query or an InfoProvider as sender and choose .2. Choose Transaction as the report type for the receiver.3. Choose a target system, either local for a transaction within the BW system or Source System for a
transaction in another SAP system.4. Specify the required transaction as the receiver report.
5. Choose . You return to the Maintain Sender-Receiver Assignments screen.
Complex Cases:
For some transactions, it is necessary to make a detailed assignment. One reasons for this can be that the transaction uses a hidden initial screen and does not fill the parameters using the MemoryID of the data element.
Proceed as follows after you have created the sender/receiver assignment as described above.
1. Select your sender-receiver assignment and choose . See also Maintain Assignment Details [page 703].2. As the type, choose Table Field. The columns Field Name, Data Element, Domain, and Set-/Get Parameter
become input ready.3. Specify the field name, data element, domain and parameter ID for the receiver transaction. You need to
know this information because input help is not available. You can usually find the parameter ID in the ABAP dictionary entry for the data element.
Further Option:
You can define a transformation or InfoSource with DataSource that you use to define an assignment between InfoObjects in the sending source system and the fields in the target.
Further Option:
You can use BAdI SMOD_RSR00004 to define the mapping logic: In previous releases, customer exit EXIT_SAPLRSBBS_002 was used. This is now obsolete and has been replaced by the BAdI.
If the RRI Jump Still Does not Work:
Many transactions and programs are not prepared for a call with parameters from the RRI, for example because programs with additional screens are called in transactions and the sender and target fields are not compatible.
In this case, a custom program containing all the necessary parameters and tables as selections fields and that then calls the actual transaction with the ABAP command
CALL TRANSACTION or calls the desired program with SUBMIT can help.
See the documentation about the ABAP commands and SAP Notes 363203 and 694244 (as an example for calling transaction KSB5) and SAP Note 383077 (RRI: Transaction call fails).
SAP BW/4HANAAnalysis PUBLIC 693
Individual fields must be declared as PARAMETERS, and tables must be declared as TABLES. You can only call tab pages from within this type of custom development.
If you jump from a node of a BEx query, the hierarchy is expanded before being passed to the target program or the target transaction in the leaves of the parent node. In this scenario, a list of values is always passed. It is not possible to pass the node name itself to a transaction or program.
5.2.16.3.3 Creating a Web Address As a Receiver
Prerequisites
It may be necessary to insert an InfoObject that contains the value to be transferred into your sender query. See also the Examples for Jumping to Web Pages [page 695].
Context
You can assign a Web address as a receiver to a sender query in the BW system.
Procedure
● 1. You are on the Maintain Sender-Receiver Assignments screen.Specify a query or an InfoProvider as
sender and choose .2. Choose Web Address as the report type for the receiver.3. Enter the required Web address for the receiver report using the input help. This Web address has to
link directly to the input field. Examples for Jumping to Web Pages [page 695] explains how to determine this.
CautionIf this Web page changes, you need to change your sender-receiver assignment accordingly.
4. Choose . You return to the Maintain Sender-Receiver Assignments screen.
5. Select your sender-receiver assignment and choose .Now the system sets URL Parameter as the processing method (type) and it sets selection type to Parameter.
6. Enter the name of the input field in the Field Name column. Examples for Jumping to Web Pages [page 695] explains how to determine this.
7. Choose Close. You return to the Maintain Sender-Receiver Assignments screen.
694 PUBLICSAP BW/4HANA
Analysis

8. You can change the title of the report. This title is then displayed in the query as the jump target via the context menu. Save your entries.
Results
You can call the Web address from your query or Web application with the associated search term using Jump. The search parameter is then filled with the key for the associated InfoObject and the search results are displayed on the Web page.
Example
See Examples for Jumping to Web Pages [page 695].
5.2.16.3.3.1 Examples of Web Addresses as Receivers
Use
You want to display the share price of the customer in a query. To do so, jump to the customer on the CNN Money Web page using the context menu.
SAP BW/4HANAAnalysis PUBLIC 695

Query Definition:
Add the characteristic Stock Search Term to your query. It is a navigation attribute for Customer. This characteristic must appear in the drilldown in the query. It is passed as a parameter when the RRI is called. From the properties of the characteristic, define that the characteristic should not be displayed.
The characteristic Stock Search Term must be defined so that the key of the characteristic passes the precise search term.
CautionOnly the key, and no text, can be passed.
In this case, the three-place acronym of the company is passed:
The length of the characteristic must be defined with a length of three places; otherwise the other preceding places will be filled with zeroes.
Determining the Web Address and the Field Name:
To jump to the search term on the Web page, you need the Web address of the page to which the input field for the stock search term refers as well as the name of the input field.
You have two options:
1. You look at the HTML code of the Web page:This is the corresponding part of the source code of the Web page CNN Money; the relevant parameters are highlighted in red. The tag form is followed by the URL that sends the data; the tag input is followed by the attribute name, which gives the name of the expected parameter:<form action="http://quote.money.cnn.com/quote/quote" method="get"><td width="60" valign="bottom"><img src="http://i.cnn.net/money/images/searchbar/enter_symbol.gif" alt="" width="49" height="16" hspace="3" vspace="0" border="0"></td><td width="55" valign="bottom"><input type="text" name="symbols" value="" size="5" maxlength="38" style="font-size: 11px"></td>...
2. Execute the action on the Web page with a stock search term. On the Web page, enter for example SAP in the search field and confirm it. Copy the URL of the new window.http://quote.money.cnn.com/quote/quote?symbols=SAP
696 PUBLICSAP BW/4HANA
Analysis

The query string appears after the question mark. All the parameters name=value are listed here; individual parameters are separated with &.
Sender/Receiver Assignments:
Proceed as in Creating a Web Address As a Receiver [page 694]. Specify the Web address you determined beforehand http://quote.money.cnn.com/quote/quote.
In the assignment details for the InfoObject Stock Search Term, enter the field name SYMBOLS that you determined beforehand. You can set the indicator Required Entry so that the Web page is only called if this stock search term is found on the Web page.
Give the report the title CNN Money.
Jump to Google™
You want to search for information about a customer in a query in the Internet. To do so, jump to the customer on the Web page of the search engine Google™ using the context menu.
Query Definition:
Define your query as described above with a characteristic that has the search term as key.
Sender/Receiver Assignment:
Proceed as in Creating a Web Address As a Receiver [page 694]. Determine the Web address that refers to the input field for the search as described above. In this case, it is: http://www.google.de/search?. Give the report the title Google.
In the assignment details, enter q as field name. This is the name of the input field that you determined beforehand as described above. When the RRI is called, the key of the corresponding InfoObject is passed to the Web page.
5.2.16.3.4 Creating Your Own Report Type As a Receiver
Use
The report-report interface provides a number of report types as jump target (receiver). In certain situations, it could be necessary to perform specific operations that are not performed by the generic standard interface between the sender and receiver. If the standard interface does not satisfy your requirements, you can implement a specific enhancement. These enhancements can call the receiver using individual parameters. There can be more or fewer parameters than in the standard interface. Sender-receiver assignments can be ignored or enhanced with additional navigation commands.
Procedure
To implement a specific enhancement:
1. Create an ABAP class with the interface IF_RS_BBS_BADI_HANDLER.More information:Creating ABAP Classes with Interface IF_RS_BBS_BADI_HANDLER [page 698]
SAP BW/4HANAAnalysis PUBLIC 697

2. Create an implementation to the classic BAdI RS_BBS_BADI.More information:Creating an Implementation to the BAdI RS_BBS_BADI [page 701]
3. Create the sender-receiver assignment.More information:Creating Sender-Receiver Assignments [page 702]
Result
You can use the new jump target in the executed query.
Example
The procedures are based on the following example:
A query has the characteristic Product in its rows and the two key figures Revenue und Quantity in its columns. A further characteristic Customer is one of the free characteristics. When you jump to the target, the new report type means that the free characteristic Customer is drilled down in the rows. At the same time, a key figure is filtered.
This is shown in the first part of the example.
For more information about URL parameters used, seeUsing Parameters to Call Web Applications.
The UID of the key figure is visible in the BEx Query Designer in the properties of the key figure on the tab page Enhanced.
The second part of the example shows how a key value can be passed to the Google search. You can also pass a key value to Google without this implementation, but with the enhancement it is possible to also pass the text. The text, however, must first be determined from the master data.
For more information about the solution without implementation, see: http://help.sap.com/nw73 → Application Help → SAP Library → SAP NetWeaver → SAP NetWeaver Library: Function-Oriented View → Business Warehouse → SAP Business Explorer → BEx Web → BEx Web → BEx Web Application Designer → Web Design API → Using Parameters to Call Web Applications
5.2.16.3.4.1 Creating ABAP Classes with Interface IF_RS_BBS_BADI_HANDLER
Procedure
1. In the SAP Easy Access menu, choose Tools → ABAP Workbench → Development → Class Builder.2. Enter a name for the object type (in the example: ZCL_IM_RS_BBS_BADI_HANDLER_DET).
3. Choose Create.4. Save the class interface.
698 PUBLICSAP BW/4HANA
Analysis

5. Choose the Interfaces tab page.6. Specify the interface IF_RS_BBS_BADI_HANDLER.7. Save your entries. By saving your entries, the methods of the interface become visible.
More information:○ Attributes of Interface IF_RS_BBS_BADI_HANDLER [page 700]○ Methods of Interface IF_RS_BBS_BADI_HANDLER [page 701]
s
8. Select the Methods tab page.9. Create method CLASS_CONSTRUCTOR. Since the method does not exist in the interface, you must create
it manually. To do so, copy the coding in the example.10. Change the method IF_RS_BBS_BADI_HANDLER~GET_TARGETS in order to obtain an input help under
Report in the maintenance transaction for the sender-receiver assignment.11. Change the method IF_RS_BBS_BADI_HANDLER~CALL_URL in order to create the URL and append the
required parameters.12. Activate the class interface.
Example
The example adds a new entry Drilldown to Details in the dropdown box under Report Type when you create or change the sender-receiver assignment (see method CLASS_CONSTRUCTOR). The input help under Report contains the three entries Details of Product, Details of Customer and Search at Google (see method ...GET_TARGETS).
methodCLASS_CONSTRUCTOR.* This text appears in dropdown box of new jump target in transaction RSBBSif_rs_bbs_badi_handler~n_text = 'Drilldown to Details'.* Define what calls can be handledif_rs_bbs_badi_handler~n_url_call = rs_c_true. if_rs_bbs_badi_handler~n_sapgui_call = rs_c_false.endmethod.methodif_rs_bbs_badi_handler~get_targets. data: ls_f4_list typersbbs_s_f4_list.* These entries ("Details of Product" and "Details of Customer") appear as value helpclearls_f4_list. ls_f4_list-icon= icon_complete. appendls_f4_list toe_t_f4_list. appendls_f4_list toe_t_f4_list. appendls_f4_list toe_t_f4_list.endmethod.methodif_rs_bbs_badi_handler~call_url. data: l_sx_mapping typersbbs_sx_mapping, l_s_range typerrrangesid, l_query typestring, l_data_provider typestring, l_structure typestring, l_structure_member typestring, l_characteristic typestring, l_characteristic_value typestring, l_characteristic_drill_down typestring. casei_onam. when'CUSTOMER'. readtablei_thx_mapping intol_sx_mapping withkeyfieldnm = '0D_PH2'. readtablel_sx_mapping-range intol_s_range index1. l_characteristic_value = l_s_range-low. readtablei_thx_mapping intol_sx_mapping withkeyfieldnm = '1KYFNM'. readtablel_sx_mapping-range intol_s_range index1. casel_s_range-low. when'0D_INV_QTY'. when'0D_NETSALES'. concatenate* Initial URL'/irj/servlet/prt/portal/prtroot/pcd!3aportal_content!2fcom.sap.pct!2fplatform_add_ons!2fcom.sap.ip.bi!2fiViews!2fcom.sap.ip.bi.bex?QUERY='l_query* Filter characteristic'&BI_COMMAND_1-BI_COMMAND_TYPE=SET_SELECTION_STATE''&BI_COMMAND_1-TARGET_DATA_PROVIDER_REF_LIST-TARGET_DATA_PROVIDER_REF_1='l_data_provider '&BI_COMMAND_1-CHARACTERISTICS_SELECTIONS-CHARACTERISTIC_SELECTIONS_1-SELECTIONS-SELECTION_1=SELECTION_INPUT_STRING''&BI_COMMAND_1-CHARACTERISTICS_SELECTIONS-CHARACTERISTIC_SELECTIONS_1-SELECTIONS-SELECTION_1-SELECTION_INPUT_STRING='l_characteristic_value '&BI_COMMAND_1-CHARACTERISTICS_SELECTIONS-CHARACTERISTIC_SELECTIONS_1-
SAP BW/4HANAAnalysis PUBLIC 699

CHARACTERISTIC='l_characteristic* Filter key figure'&BI_COMMAND_2-BI_COMMAND_TYPE=SET_SELECTION_STATE''&BI_COMMAND_2-TARGET_DATA_PROVIDER_REF_LIST-TARGET_DATA_PROVIDER_REF_1='l_data_provider '&BI_COMMAND_2-CHARACTERISTICS_SELECTIONS-CHARACTERISTIC_SELECTIONS_1-SELECTIONS-SELECTION_1=SELECTION_INPUT_STRING''&BI_COMMAND_2-CHARACTERISTICS_SELECTIONS-CHARACTERISTIC_SELECTIONS_1-SELECTIONS-SELECTION_1-SELECTION_INPUT_STRING='l_structure_member '&BI_COMMAND_2-CHARACTERISTICS_SELECTIONS-CHARACTERISTIC_SELECTIONS_1-CHARACTERISTIC='l_structure* Drill down new characteristic'&BI_COMMAND_3-BI_COMMAND_TYPE=DRILL_DOWN''&BI_COMMAND_3-TARGET_DATA_PROVIDER_REF_LIST-TARGET_DATA_PROVIDER_REF_1='l_data_provider '&BI_COMMAND_3-CHARACTERISTIC='l_characteristic_drill_down intor_url. when'PRODUCT'.* PRODUCT is equivalent to CUSTOMERwhen'GOOGLE'. readtablei_thx_mapping intol_sx_mapping withkeyfieldnm = '0D_PH2'. readtablel_sx_mapping-range intol_s_range index1. concatenate'http://www.google.com/search?q='l_s_range-low intor_url. endcase.endmethod.
type-pools icon. ls_f4_list-objnm = 'PRODUCT'. ls_f4_list-txtlg = 'Details of Product'. ls_f4_list-objnm = 'CUSTOMER'. ls_f4_list-txtlg = 'Details of Customer'. ls_f4_list-objnm = 'GOOGLE'. ls_f4_list-txtlg = 'Search at Google'. l_query = 'TK_RRI'. l_data_provider = 'DP_1'. l_structure = '44U3MQMQ9244NORNFYM5XRCRB'. l_characteristic = '0D_PH2'. l_structure_member = '44U3MQUES0PU6BB3LSOI7TBH3'. l_structure_member = '44U3MR23AZBJOXUJRMQUHVA6V'. endcase. l_characteristic_drill_down = '0D_CUSTOMER'.
5.2.16.3.4.1.1 Attributes of Interface IF_RS_BBS_BADI_HANDLER
● N_TEXT: Textual description of the report type. This text is displayed in the Sender-Receiver Assignment.● N_URL_CALL, possible values RS_C_FALSE (default) and RS_C_TRUE:
The implementation supports calls of the method CALL_URL. If possible, CALL_URL should always be implemented, as otherwise it is not possible to jump to the Web runtime or the BEx Analyzer without SAPGUI.
● N_SAPGUI_CALL, possible values RS_C_FALSE (default) and RS_C_TRUE:The implementation supports calls of method CALL_SAPGUI. If N_SAPGUI_CALL is RS_C_TRUE, method CALL_SAPGUI is called when you jump to the BEx Analyzer with SAPGUI.
● N_REMOTE with possible values N_C_REMOTE_NONE (default), N_C_REMOTE_BW, N_C_REMOTE_R3_SOURCE, N_C_REMOTE_SAP_ALL:This indicator describes whether this report type should be offered for the local system only (N_C_REMOTE_NONE), for other BW systems (N_C_REMOTE_BW), for all BW source systems (N_C_REMOTE_R3_SOURCE) or for all SAP RFC destinations (N_C_REMOTE_SAP_ALL). The BAdIs are always called and the interface IF_RSR_BBS_BADI_HANDLER is always implemented in the local BW system. The corresponding RFC destinations are passed when the individual methods are called.
● N_SELECTION_HANDLE, possible values RS_C_FALSE(default) and RS_C_TRUE:If N_SELECTION_HANDLE has the value RS_C_TRUE, the selections are stored in a database table before calling the method CALL_URL or CALL_SAPGUI. Therefore, not all of the filter values must be passed with the URL when the URL is created. Instead, you can call function RSBBS_CLUSTER_IMPORT in another work process so that you can read the selections from the database table in the receiver first.
700 PUBLICSAP BW/4HANA
Analysis

5.2.16.3.4.1.2 Methods of Interface IF_RS_BBS_BADI_HANDLER
● GET_TARGETS: The list of possible jump targets for this type of receiver is passed to the sender-receiver maintenance here.
● CALL_URL: This method is called if the jump target is to be executed without SAPGUI, for example because N_SAPGUI_CALL has the value RS_C_FALSE or the jump is executed in the Web runtime. This method should always be implemented.
● CALL_SAPGUI: This method is optional. The jump target can be executed directly in the SAPGUI, for example with CALL TRANSACTION or SUBMIT REPORT.
● CALL_BATCH: This method is no longer used.
5.2.16.3.4.2 Creating an Implementation to the BAdI RS_BBS_BADI
Procedure
1. In the SAP Easy Access menu, choose Tools → ABAP Workbench → Utilities → Business Add-Ins → Implementation.
2. Under Create Implementation, choose the option Classic BAdI.3. Enter RS_BBS_BADI as the name of the BAdI.
4. Choose Create Implementation.5. Enter a name for the implementation (in the example: Z_RS_BBS_BADI_DET).6. Enter a short description.7. Choose the Interface tab page.8. Enter a name for the implementing class and copy the proposal from the system (in the example:
ZCL_IM__RS_BBS_BADI_DET).9. Save your implementation.10. Double-click the method GET_TYPES.11. Copy the coding in the example.12. Activate the implementing ABAP class (in the example: ZCL_IM__RS_BBS_BADI_DET).13. Activate the implementation (in the example: Z_RS_BBS_BADI_DET).
Example
Note: In this example, two different report types (Details of Productand Details of Customer on the one hand and Search at Google on the other hand) are implemented in one ABAP class. In a real application, we recommend that the two report types be implemented in two different ABAP classes with the interface IF_RS_BBS_BADI_HANDLER. The two ABAP classes must be added in the method IF_EX_RS_BBS_BADIi~GET_TYPES. In the maintenance of the sender-receiver assignment, two entries now appear in the dropdown box under Report.
SAP BW/4HANAAnalysis PUBLIC 701

methodif_ex_rs_bbs_badi~get_types. data: ls_handler typersbbs_s_badi_handler.* Technical application name (any customer-defined name)ls_handler-appl = 'ZDET'.* ABAP class implementing interface IF_RS_BBS_BADI_HANDLER (see first step)createobject ls_handler-handlertypezcl_im_rs_bbs_badi_handler_det. insertls_handler intotablec_th_handler.** Add second entry with other ABAP class* ls_handler-appl = 'Zxxx'.* create object ls_handler-handler type zcl_im_rs_bbs_badi_handler_xxx.* insert ls_handler into table c_th_handler.endmethod.
5.2.16.3.4.3 Creating Sender/Receiver Assignments
Procedure
Creating Sender/Receiver Assignments
1. Call transaction RSBBS. The Maintain Sender-Receiver Assignment screen appears.2. Proceed as described in Editing Sender-Recipient Assignments for the RRI in the BW System [page 684].3. Under Report Type, choose the receiver you implemented from the dropdown box (example: Drilldown to
Details).4. Under Report, use input help to select one of the objects you implemented (in this example: Details of
Product, Details of Customer, or Search at Google).5. Choose Apply.6. Save your entries.
Testing the Implementation of New Report Types
You can test the implementation of new report types for jump targets from the query monitor.
1. Set a session breakpoint in your ABAP class.2. Call the query monitor (transaction RSRT).3. Execute the query in the query monitor. Once the new receiver has been selected, the debugger starts
automatically and you can test the coding.
Result
You can use the new jump target in the executed query.
702 PUBLICSAP BW/4HANA
Analysis

5.2.16.4 Maintaining Assignment Details
Prerequisites
You have created a sender-receiver assignment.
Context
RecommendationThis is an expert function. In general, you should be able to use the RRI to create the sender-receiver assignment without having to specify any other assignment details.
In certain cases however, it might be necessary to maintain these assignment details, such as
● If you do not want to transfer certain selections, for example differing date information● If an assignment is not clear, for example if the vendor needs to be assigned to the purchaser.
CautionThe system does not check the assignment details you maintained to make sure they make sense.
Procedure
● 1. Select your sender-receiver assignment in the Receiver table.
2. Choose . The Field Assignments dialog box appears.3. If you want to make changes to the individual fields, choose the required settings using input help. You
can assign the processing method (type) of selections for characteristics and the permitted Selection Type, and can set the field as Required Entry Field.
SAP BW/4HANAAnalysis PUBLIC 703

You can choose between the following input options:
Processing Method (Type) Effects
Generic (default) Selections are automatically transferred from the Report-Report Interface to the jump target. We recommend that you first execute the jump with this setting and that you only make other settings when the jump does not display the required result. Only then is the full functionality of the RRI available. Here is a description of the rules used to transfer the selections:
Process when Calling the RRI [page 683]
V Variable Selections are transferred directly to the specified variables. In the Field Name column, you have to enter the technical name of the variables. The Data Element, Domain and Parameter ID columns are automatically fil-led from the properties of the variables.
This processing method is only applicable for BEx Queries. This is recommended if you want to fill a variable in the receiver query; and the variable in question has no technical connection to the InfoObject of the sender query.
I InfoObject Selections are transferred directly to the specified characteristic. In the Field Name column, you have to enter the technical name of the characteristic. The Data Element, Domain and Parameter ID columns are automatically filled from the properties of the characteristic.
This processing method is only applicable for BEx Queries. It is useful when an assignment is not unique, and a specific characteristic is to be transferred explicitly. The characteristics assigned to one another have to have the same (non-compounded) key. For example, the characteristics 0MATERIAL and 0MATPLANT can be assigned to one another.
704 PUBLICSAP BW/4HANA
Analysis

Processing Method (Type) Effects
3 Table field Selections are transferred directly to the specified field. This setting is only useful for non-BW jump targets. The setting is designed to enable jumps into other applications and fills the selection fields of programs or transactions. The Field Name, Data Element, and Domain columns have to be filled correctly. It also makes sense to fill the column Parameter ID with the correct parameter ID. You can usually find the parameter ID in the ABAP dictionary entry for the data element.
See also Creating a Transaction As a Receiver [page 692].
P URL parameters This setting is only useful for the Web Address jump target. Specification of a field name is then mandatory.
See also Creating a Web Address As a Receiver [page 694].
Delete X All selections for this characteristic are deleted and not transferred to the jump target.
This setting is useful when you do not want to transfer certain selections. For example, you may not want selections for a characteristic to be transferred to a characteristic that has the same reference characteristic.
NoteWhen using these explicit rules, make sure that the assignment is already made in the sender system. If you jump to another system, note that the sending and receiving InfoObjects of the assignment must exist in the sender system. Otherwise the jump will not work.
Choosing a selection type is worthwhile when the jump target is a longer-running query or transaction. When you choose a selection type with the Required Entry indicator, during the jump you can prevent a report that was called from starting if it does not fulfill certain conditions. In this way, you avoid putting unnecessary load on the system. Before the jump, the system checks whether the selection that is marked as a required entry is present in the jump target; otherwise the jump is not executed.
NoteFor example, for a jump to an ERP system in the transaction MM03, you can mark the InfoObject Material with selection type P Parameter as a required entry field. The jump is only executed if the InfoObject Material is found in the ERP system.
SAP BW/4HANAAnalysis PUBLIC 705

Permitted Selection Type Effects
* (default) No restriction of the selection type. Single values, intervals, free selection options and hierarchy nodes can be transferred.
P Parameters In the report-report interface, only one single value is permitted.
E Individual values In the report-report interface, a list of values is permitted.
I Interval In the report-report interface, only one single interval is permitted.
S Selection option Single values, intervals and free selection options (such as >, <, <>,…) can be chosen. Hierarchy nodes are expanded in lists of single values.
H Hierarchy nodes Only hierarchy nodes are permitted.
When the system calls up the recipient, the settings made in the Field Assignments dialog box are set. The system proposes all other field assignments generically.1. Choose Close. The assignment details you defined are saved and are taken into account when the
jump target is called.
5.3 Modeling Analytic Queries
To analyze the dataset in the SAP BW∕4HANA, you define queries for InfoProviders.
To formally define a multidimensional request, a query defines the following:
● The structure - like a worksheet● The filter that affects this structure● The navigation space (free characteristics).
By selecting and combining InfoObjects (characteristics and key figures) or reusable query elements (restricted and calculated key figures, filters, structures, variables) in a query, you define how you want to evaluate the data from the selected InfoProvider. The more precisely the query is defined, the quicker it is to execute and navigate in.
You can use input-ready queries for manual planning and to create short texts.
Related Information
Query [page 707]
706 PUBLICSAP BW/4HANA
Analysis

Working with Queries [page 738]
5.3.1 Query
A query is the formal definition of a multidimensional query. You use analytic queries to analyze the data in the SAP BW∕4HANA.
The following sections provide details about the concepts of an analytic query:
Related Information
Characteristic [page 707]Structure [page 708]Structure Element [page 709]Selection [page 709]Formula [page 710]Cell, Exception Cell and Help Cell [page 710]Filter [page 711]Condition [page 712]Exception [page 712]Reusable Query Components [page 713]FEMS [page 737]Transporting Queries [page 737]These links take you to the documentation for query concepts.Working with Queries [page 738]This link takes to you to the documentation for modeling queries.
5.3.1.1 Characteristic
A characteristic is a classification group, such as company code, product, customer group, fiscal year, period, or region. It stipulates classification options for the dataset and can therefore be seen as a reference object for the key figures.
Special features of characteristics
● Time characteristics are characteristics with a time reference, such as date, month, calendar month, fiscal year/period.
● If a characteristic has attributes, texts or hierarchies, it is a master data-bearing characteristic.
SAP BW/4HANAAnalysis PUBLIC 707

Master data is data that remains unchanged over a long period of time. Master data contains information that is always needed in the same way. References to this master data can be made in all InfoProviders.
NoteThe company location is an example of an attribute for Customer. You use this to form customer groups for a specific region for example.
● If a characteristic has one or more hierarchies, it is a hierarchy basic characteristic.A characteristic hierarchy is the representation of a characteristic's values in a tree structure. Like master data, characteristic hierarchies can be used in all InfoProviders.
NoteA hierarchy for characteristic "Cost Center" makes it possible to consolidate cost centers into cost center groups for example.
Related Information
Including Characteristics [page 742]
5.3.1.2 Structure
A structure is an object that is created when a query is defined. It is freely definable. In a query, you can one structure, two structures or no structures at all.
A structure forms the basic framework of the axes in a table (rows or columns). You can combine structures freely with other characteristics on the axes.
A structure is made up of structural elements. The following types of structures exist:
● Key figure structure: The structural elements of a key figure structure are always based on key figure selections (basic key figures, restricted key figures and calculated key figures). You can use a maximum of one key figure structure per query.
● Characteristic structure: The structural elements of a characteristic structure cannot contain any key figure selections.
The setup of the structure determines the sequence and number of key figures or characteristic values in the columns and rows of the query. You can navigate through the structures in the executed query and set filters for them.
If the query contains two axes, a key figure structure in the columns and a characteristic structure in the rows for example, a table is created with fixed cell definitions.
NoteYou have to use two structures as a prerequisite for defining exception cells. You can override the value of cell values created implicitly at the intersection of two structural elements.
708 PUBLICSAP BW/4HANA
Analysis

Related Information
Structure Element [page 709]This link refers to a related concept.Defining the Structure [page 749]Defining Structure Elements [page 750]These links refer to unrelated tasks.
5.3.1.3 Structure Element
A structure element is part of a structure.
Structure elements can be hierarchically arranged in a structure. They have common properties. There are two subtypes: Selections (with and without key figures) and formulas for creating calculated key figures.
Related Information
Selection [page 709]Formula [page 710]These links refer to related concepts.Defining Selections [page 750]Defining a Formula [page 766]These links refer to related tasks.
5.3.1.4 Selection
A selection is a structural element that restricts a key figure or a characteristic to a certain selection of values.
Related Information
Defining Selections [page 750]Selection Properties [page 751]
SAP BW/4HANAAnalysis PUBLIC 709

5.3.1.5 Formula
A formula is a structural element that uses a formula definition to recalculate the values of a key figure.
Related Information
Defining a Formula [page 766]Formula Properties [page 768]
5.3.1.6 Cell, Exception Cell and Help Cell
The definition of a cell arises from the intersection of two structural elements from different structures. This implicit cell definition can be overwritten by an explicit definition. This defines an exception cell. You can add one or more help cells to an exception celll.
Cell
If you use two structures in a query, the system implicitly creates a generic cell definition at the intersection of two structural elements, thus defining the value to be presented in the cell.
Exception Cell
Cell-specific definitions allow you to define formulas and selection conditions for cells, thus overwriting the implicitly created cell values. You can create precisely one such explicitly defined exception cell for each cell. Exception cells allow you to design queries with a much higher degree of detail.
CautionNote that using exception cells can significantly increase the time it takes to execute your query.
You have the following options when defining an exception cell:
● As a reference cell that is used in an exception cell that is defined as a formula or selection,● As a formula● As a selection
The properties of an exception cell correspond to those of the corresponding structural element (formula or selection). To define how an exception cell is displayed, you can make settings that deviate from those in the column where the cell is situated.
710 PUBLICSAP BW/4HANA
Analysis

Help Cell
You can also define one or more help cells for a cell. These do not have any direct connection with the corresponding structural elements. These cells are not displayed. They are used for help selections and for help formulas.
You have the following options when defining a help cell:
● As a formula● As a selection
Related Information
Defining Exception Cells and Help Cells [page 780]
5.3.1.7 Filter
A filter is an object that describes a multidimensional extract of data from a data set.
You can use filters to restrict data to a certain business area, certain product groups, or certain time periods for example. By segmenting the data set, you can ensure that users or user groups only have access to the data that is relevant to them and can only see the relevant data areas in an application scenario.
The filter selection applies to the entire query. All the InfoProvider data is aggregated using the filter selection of the query. You can select characteristics from the InfoProvider's directory tree and restrict them to individual characteristic values. You can also select individual characteristic values or exactly one key figure.
Decide whether to base all the query data on the numerical values of just one key figure or to base it on multiple key figures. If you want to base the query on the numerical values of exactly one key figure, select the key figure in question as your filter. You can also use a restricted or calculated key figure for this.
By selecting default values, you can create a query that is based on extensive data, but for which only a specific part of the data is displayed when the query is executed. The data displayed here is the data that you are most interested in. You can then change the filter by adding new objects for example, and analyze the other data.
NoteExample: You want to analyze all customers in a query. In the query's start state however, you initally only want to see special customers.
Related Information
Defining Filters [page 784]
SAP BW/4HANAAnalysis PUBLIC 711

5.3.1.8 Condition
A condition is an object that restricts the view of the data in a query by hiding numbers that do not meet the defined condition(s).
By applying conditions to a query, you do not change any figures. You simply hide figures that are not relevant for you. Conditions therefore have no effect on the values displayed in the result rows. The results row of a query with an active condition corresponds to the results row of the query without this condition.
You can define multiple conditions for a query. Conditions are evaluated independently of each other. The result set is therefore independent of the evaluation sequence. The result is the intersection of the individual conditions. Multiple conditions are linked logically with AND. A characteristic value is only displayed if it meets all (active) conditions in the query.
Using conditions, you can restrict how you view query data as follows:
● Threshold Values: An entry is filtered independently of the other entries if its reference value has a specific relationship to a comparison value. An entry is not displayed for example if its reference value exceeds or is less than a specific threshold value.
● Ranked List: All entries for the displayed list or all entries for a logical section of the list (with multiple characteristics in the drilldown) are considered. Their relationship to each another determines whether the entry is displayed. For ranked lists, the sorting is switched on automatically when the condition is activated.
Related Information
Defining Conditions [page 789]Conditions [page 423]
5.3.1.9 Exception
An exception is an object that allows you to highlight unusual deviations from the expected results. Deviations from defined threshold values are highlighted with a specified colour.
The definition of exceptions contains the following specifications:
● The specification of threshold values or intervals, which are given a priority (bad, critical, good). The priority given to an exception corresponds to preassigned colors that become more 'intense' the greater the deviation. Up to nine different shades of the traffic light colors (red, yellow, and green) are used.
● The specification of characteristic restrictions. Using characteristic restrictions, you specify which cells you want to apply the exception to.
Related Information
Defining Exceptions [page 792]
712 PUBLICSAP BW/4HANA
Analysis

5.3.1.10 Reusable Query Components
A reusable query component is an object that is not created within the scope of a query definition, but either for an InfoProvider or an InfoObject.
You can use a reusable query component in all queries that are defined for this InfoProvider or with this InfoObject. When a reusable object is changed, the changes are applied everywhere that the object is used.
The following reusable objects can be defined for an InfoProvider:
● restricted key figure● calculated key figure● structure● filter
The following reusable object can be defined for an InfoObject:
● variable
Related Information
Calculated Key Figure [page 714]Restricted Key Figure [page 713]Structure [page 714]Filter [page 715]Variable [page 715]These links take you to the documentation for concepts.Using Reusable Query Components [page 801]Restricting Characteristics [page 785]Defining Calculated Key Figures [page 801]Defining Restricted Key Figures [page 804]Defining the Structure [page 807]Defining Filters [page 809]Defining Variables [page 811]These links take you to the documentation for tasks.
5.3.1.10.1 Restricted Key Figure
You can restrict a key figure of an InfoProvider by using one or more characteristic selections. To do so, you define a selection for a base key figure, a calculated key figure, or an already restricted key figure. It can then be reused as a restricted key figure in all queries for the underlying InfoProvider.
A restricted key figure is not an actual element in a query. It is a placeholder that references the restricted key figure created in the InfoProvider.
SAP BW/4HANAAnalysis PUBLIC 713

Related Information
Defining Restricted Key Figures [page 804]Using Restricted Key Figures [page 806]Overwriting Restricted Key Figures Locally [page 806]
5.3.1.10.2 Calculated Key Figure
You can recalculate the key figures of an InfoProvider using a formula. Calculated key figures consist of formula definitions that may contain basic key figures, restricted key figures or precalculated key figures. Calculated key figures are reusable.
A calculated key figure is not an actual element in a query. It is a placeholder that references the calculated key figure created in the InfoProvider.
Related Information
Defining Calculated Key Figures [page 801]Using Calculated Key Figures [page 803]Overwriting Calculated Key Figures Locally [page 803]
5.3.1.10.3 Structure
A structure created for an InfoProvider can be reused in all queries to this InfoProvider.
This kind of reusable structure is built in the same way as a structure that is created in a query (locally).
Related Information
Structure [page 708]This link takes to you to the documentation for the concept of a (local) structure.Using Structures [page 808]Locally Overwriting a Structure [page 809]These links take you to the documentation for the procedures for a reusable structure.
714 PUBLICSAP BW/4HANA
Analysis

5.3.1.10.4 Filter
A filter created for an InfoProvider can be reused in all queries to this InfoProvider.
This kind of reusable global filter is structured in the same way as a filter that is created in a query (locally).
Related Information
Filter [page 711]This link takes to you to the documentation for the concept of a (local) filter.Reusing Filters [page 810]Overwriting Filters Locally [page 811]These links take you to the documentation for the procedures for a reusable filter.
5.3.1.10.5 Variable
A variable is a means of parameterizing a query or a query component, as a variable is filled with values only once the query is executed. You define a variable for an InfoObject. This variable is then available in all InfoProviders that use this InfoObject, and can be processed in many different ways.
Variables act as placeholders for characteristic values, hierarchies, hierarchy nodes, texts, or formula elements. The variable type indicates for which object you can use a variable.
Depending on the variable type, variables can be processed in various ways. The processing type of a variable determines how the variable is filled with a value at the runtime of the query.
Related Information
Overview of Variable Types and Processing Types [page 716]Variable Type [page 717]Processing Type [page 718]Display Area [page 735]These links take you to the documentation for query concepts.Restricting Characteristics [page 785]Restricting Characteristics by Characteristic Values [page 785]Restricting Characteristics on Hierarchy Nodes [page 787]These links take you to the documentation for query procedures.
SAP BW/4HANAAnalysis PUBLIC 715

5.3.1.10.5.1 Overview of Variable Types and Processing Types
When you create a variable, you may need to select a processing type - depending on the variable type. Depending on the variable type, only certain processing types are useful.
The following table gives an overview of the possible combinations of variable types and processing types.
Variable type
Processing type: User Entry (manual entry) and default value
Processing type: Replacement Path Processing type: Exit
Processing type: Authorization
Characteristic Value: Characteristic Value Variable
Yes Replacement from CURRENT MEMBER variable, query or variable
Customer Exit, SAP Exit, SAP HANA Exit
Yes
Hierarchy: Hierarchy Variable
Yes Customer Exit, SAP Exit
Hierarchy Nodes: Hierarchy Node Variable
Yes Customer Exit, SAP Exit
Yes
Text: Text Variable Yes Replacement from InfoObject or variable
Customer Exit, SAP Exit
Formula: Formula Variable
Yes Replacement from InfoObject or variable
Customer Exit, SAP Exit, SAP HANA Exit
Related Information
Variable Type [page 717]Processing Type [page 718]
716 PUBLICSAP BW/4HANA
Analysis

5.3.1.10.5.2 Variable Type
When creating a variable, the variable type indicates for which object you can use a variable.
The following table provides an overview of the variable types:
Variable Types
Type Description
Characteristic Value: Characteristic Value Variable Characteristic value variables represent characteristic values and can be used wherever characteristic values can be used.
If you restrict characteristics to specific characteristic values, you can also use characteristic value variables instead of fixed values.
Hierarchy: Hierarchy Variable Hierarchy variables represent hierarchies and can be used wherever hierarchies can be selected.
If you restrict characteristics on hierarchies or presentation hierarchies, you can use variable hierarchies with hierarchy variables instead of fixed ones.
Hierarchy Nodes: Hierarchy Node Variable Hierarchy node variables represent nodes in a hierarchy and can be used wherever hierarchy nodes can be used.
If you restrict characteristics to hierarchy nodes, you can also use hierarchy node variables.
Text: Text Variable Text variables represent a text and can be used in descriptions of queries, calculated key figures and structural components (selections and formulas).
If the system finds either no values or multiple values for the reference characteristic when replacing text variables, and is thus unable to determine a unique value, it outputs the technical name of the text variables as the result.
Formula: Formula Variable A formula variable represents numeric values and can be used in formulas and for selecting exceptions and conditions.
ExampleBy using a formula variable for the interest rate, you do not need to process the current interest rate until after you have executed the query.
SAP BW/4HANAAnalysis PUBLIC 717
Related Information
Restricting Characteristics [page 785]Restricting Characteristics by Characteristic Values [page 785]Restricting Characteristics on Hierarchy Nodes [page 787]
5.3.1.10.5.3 Processing Type
When you create the variable, you use the processing type to specify how the variable is filled with a value at query runtime.
The system supports the following processing types:
● User Entry: Manual Entry/Default Value● Replacement Path: Replacement Path● Customer Exit: Customer Exit● BRFplus Exit: BRFplus Exit● SAP Exit: SAP Exit● SAP HANA Exit: SAP HANA exit● Authorization: Authorization
Related Information
Manual Entry/Default Value [page 718]Replacement Path [page 719]Customer Exit [page 728]BRFplus Exit [page 732]SAP Exit [page 733]SAP HANA Exit [page 733]Authorization [page 735]
5.3.1.10.5.3.1 Manual Entry/Default Value
The processing type User Entry allows you to either enter the required value manually or use the default value for the variable when you execute the query.
The processing type User Entry is available for all variable types.
718 PUBLICSAP BW/4HANA
Analysis

Manual Entry
If you select the processing type User Entry for an input-ready variable, you can manually enter the required value when executing the query.
Default Value
When you create the variable, you can specify a default value on the Default Values tab in the Variables Editor. If you enter a default value, this is shown in the input field of the variables screen for variables that are ready-for-input. For variables that are not ready-for-input, the default value is used as the variable value.
Related Information
Additional Tabs Available for Specific Processing Types [page 817]
5.3.1.10.5.3.2 Replacement Path
You use the Replacement Path processing type to specify the value that automatically replaces the variable when you execute the query.
The Replacement Path processing type can be used with characteristic value variables, text variables, and formula variables.
The following table provides an overview of the possibilities of the Replacement Rule:
Replacement Options Independent of Variable Type
Variable Type Replacement with
Characteristic Value: Characteristic Value Variable ● CURRENT MEMBER variable● Query● Variable
Text: Text Variable ● InfoObject● Variable
Formula: Formula Variable ● InfoObject● Variable
Related Information
SAP BW/4HANAAnalysis PUBLIC 719

Replacement from Characteristic Value [page 720]Replacement from CURRENT MEMBER Variable [page 725]Replacement from Query [page 726]Replacement from Variable [page 727]
5.3.1.10.5.3.2.1 Replacement from Characteristic Value
Text and formula variables with the processing type Replacement Path can be replaced with a corresponding characteristic value. The value of a formula variable has to be a number. The value of a text variable has to be a text.
Variables Wizard
On the Variable - Replacement Rule dialog in the second step of the variables wizard, you specify that the variable derives its value from an InfoObject.
Variables Editor
In the variables editor under Replacement Rule, the system indicates that a variable serves as the source for replacing the variable. This replacement rule cannot be modified.
You can still change the object that you want to use for the replacement however. Choose Browse. A dialog box appears where you can select a different object.
The following properties are still modifiable:
● Replacment With: Choose where the value of the variable will be determined from.○ Key The value of the variable is replaced with the characteristic key.○ External Characteristic (of the key) The value of the variable is replaced with an external value of the
characteristic (external/internal conversion).○ Name The value of the variable is replaced with the name of the characteristic.
CautionNote that formula variables have to contain numbers in their names so that the formula variable represents a number after replacement.
○ [1ATTRREF] Characteristic Reference (Constant 1) - this setting is only available for formula variables.○ [0SIGNCH] Sign Change: The variable value is replaced with a value of a hierarchy attribute. You need
this setting for sign reversal with hierarchy nodes. This is only available for formula variables.● After Aggregation (replacement of the variable after aggregation): This option is set by default. If you
deselect this, the variable will be replaced before aggregation. It is not always possible to change this however. Replacement of the variable in the case of [1ATTRREF] Characteristic Reference (Constant 1) always takes place before aggregation. In the case of Name and [0SIGNCH] Sign Change, it takes place after aggregation.
720 PUBLICSAP BW/4HANA
Analysis

● Interpret Result As Boolean Value (True=1; False=0) This function is only available for formula variables. If you select this setting, the formula variable will not be replaced with a value (the key value for example) but merely specifies the existence of a value.○ The value of the variable is 0 when the value to be replaced is a string with only blank spaces or a zero.○ The value of the variable is 1 when the value to be replaced is a string with characters that are not blank
spaces or a number does not equal 0.
ExampleYou want to calculate paid amounts only.
Create a formula variable with processing type Replacement Path and replacement rule InfoObject in order to replace the variable with the value of an attribute. Choose the attribute Paid. (The master data attribute Paid shows open invoices with a blank space " " and paid invoices with the value "X".) Select Interpret Result As Boolean Value (True=1; False=0).
You then get a 0 for blanks and a 1 for the value "X". By a multiplication with this kind of formula variable, all unpaid amounts in the query are then omitted. You have met your objective of only having paid amounts.
Under Details, you can make the following settings:
● If Interval Use:○ From Value○ To Value○ Difference
If the replacement value found is an interval, you can use this setting to specify whether the lower interval limit (from value) or the upper interval limit (to value) is used as the replacement value.For formula variables, you can also choose the interval difference as the replacement value. Using this setting, you can easily calculate the difference of period boundaries. The interval difference is obtained by subtracting the From value from the To value and then adding 1.
ExampleThe period January to March therefore has a 3 (To value 3 minus From value 1 plus1).
● Offset Settings:○ Offset Start○ Offset Length:
You use this function to specify the start and length of the text output.
ExampleYou want to create a text variable for the fiscal year.
Create a text variable with processing type Replacement Path and replacement rule InfoObject in order to replace the variable with the value of an attribute. Under Replacement with, choose replacement by key and define the offset start at value 2 and the offset length as 2.
The fiscal year contains four digits. The output of the value begins after the second digit and shows two digits. In the query, the text variable for fiscal year 2005 is therefore replaced with the value "05".
SAP BW/4HANAAnalysis PUBLIC 721

Related Information
Calculating with Formula Variables [page 722]Offset for Text Variables [page 724]Additional Tabs Available for Specific Processing Types [page 817]
5.3.1.10.5.3.2.1.1 Calculating with Formula Variables
The following example shows how you can calculate with formula variables using processing type Replacement Path with replacement from a characteristic value with the properties/values of the characteristic. The formula is replaced here in accordance with the cell context.
Using Formula Variables in Calculated Key Figures and Formulas
The replacement of formula variables with the processing type Replacement Path from a characteristic value acts differently in calculated key figures and formulas:
● If you use a formula variable with "Replacement from the Value of an Attribute" in a calculated key figure, the system automatically adds the drilldown according to the reference characteristic for the attribute. The system then evaluates the variables for each characteristic value for the reference characteristic. The calculated key figure is then calculated and, subsequently, all of the other operations are executed (all additional, calculated key figures, aggregations, and formulas). Before aggregation with the reference characteristic, the system therefore only calculates the operators which are assembled in the calculated key figure itself.
CautionNote that calculation before aggregation can have a negative impact on performance.
● If you are using a formula variable with Replacement from the Value of an Attribute in a formula element, the variable is only calculated if the reference characteristic is uniquely specified in the corresponding row, column, or in the filter.
ExampleYou might want to multiply basic key figure Sales Quantity with the current value for attribute Price for characteristic Material for example. To do this, you have to use a formula variable that has been defined accordingly. Processing type Replacement Path, replacement from characteristic Material, Replace Variable with an Attribute Value, here the attribute Price.
Replacement from the Value of an Attribute
When using formula variables, you can create a reference to the reference characteristic of the variable by taking the value of the variables from attribute [1ATTRREF] Characteristic Reference (Constant 1). This object is
722 PUBLICSAP BW/4HANA
Analysis

a dummy attribute that is available with each characteristic. It is used to create a reference to the characteristic, which is not used for aggregation. By choosing this attribute, you can influence the aggregation behavior of calculated key figures in a targeted way and can improve performance during calculation.
ExampleMaster data table for material
InfoProviders
The example query has the following objects:
● Material Price (V1) is a variable that is replaced by the material price.● K1 = Material Price (V1) is a calculated key figure.● F1 = Material Price (V1) is a formula.● K2 = Material Price (V1) * Sales Quantity is a calculated key figure.● F2 = Material Price (V1) * Sales Quantity is a formula.● K3 = K1 * Sales Quantity is a calculated key figure in which calculated key figure K1 is further
processed.
Query View 1
Query View 2
SAP BW/4HANAAnalysis PUBLIC 723

In the results rows, columns F1 and F2 are not specified, because the material value is not unique. The system cannot calculate F1 and F2 in the overall Query View 2 either. K1 only aggregates the prices. K3 multiplies these aggregated prices with the aggregated sales quantities. The results from K1 and K3 usually have no meaning. Calculated key figure K2 delivers the required results.
5.3.1.10.5.3.2.1.2 Offset for Text Variables
The following example shows the settings that can be made for text variables using processing type Replacement Path with replacement from a characteristic in terms of the properties Replacement With (key or external attribute of the key) together with Offset Start and Offset Length.
The following table shows the internal and external display of the key for the characteristic values fiscal year variant K4 and fiscal year/period 2002/008 without offset settings:
Internal and External Display of the Key without Offset Settings
Replacement With Fiscal Year 0FISCYEAR Fiscal Year / Period 0FISCPER
Internal display (key) K42002 K42002008
External display (external characteristic value of the key)
K4/2002 K4/008.2002
Internal Display (Key)
Fiscal Year 0FISCYEAR
● If you want to replace K42002 with 2002 in the query, you have to set the offset start to 2 and the offset length to 4 for the characteristic fiscal year 0FISCYEAR.
Fiscal Year/Period 0FISCPER
● If you only want to display the year in the text output, set the offset start to 2 and the offset length to 4. In the query, K42002008 is replaced by 2002.
● If you want to display the year and period in the text output, set the offset start to 2 and the offset length to 7. In the query, K42002008 is replaced by 2002008.
724 PUBLICSAP BW/4HANA
Analysis

The following table illustrates how you can influence the internal display of the key for the characteristic values fiscal year variant K4 and fiscal year/period 2002/008 using offset settings:
Internal Display of the Key with Offset Settings
Characteristic Offset Start Offset Length 4
0FISCYEAR Offset Start 2 Offset Length 4
0FISCPER Offset Start 2 ● Offset length 4 for year● Offset length 7 for year and period
External Display (External Characteristic Value of the Key)
Fiscal Year 0FISCYEAR
● If you want to replace K4/2002 with 2002 in the query, you have to set the offset start to 3 and the offset length to 4.
Fiscal Year / Period 0FISCPER
● If you want to display only the year in the text output, set the offset start to 7 and the offset length to 4. In the query, K4/008.2002 is replaced by 2002.
● If you only want to display the period in the text output, set the offset start to 3 and the offset length to 3. In the query, K4/008.2002 is replaced by 008.
● If you want to display the year and period in the text output, set the offset start to 3 and the offset length to 8. In the query, K4/008.2002 is replaced by 008.2002.
The following table illustrates how you can influence the external display of the key for the characteristic values fiscal year variant K4 and fiscal year/period 2002/008 using offset settings:
External Display of the Key with Offset Settings
Characteristic Offset Start Offset Length 4
0FISCYEAR Offset Start 3 Offset Length 4
0FISCPER ● Offset length 7 for year● Offset start 3 for period● Offset start 3 for year and period
● Offset length 4 for year● Offset length 3 for period● Offset length 8 for year and period
5.3.1.10.5.3.2.2 Replacement from CURRENT MEMBER Variable
The variable derives its value from a CURRENT MEMBER variable.
To define filters that relate to the values of a time characteristic in the drilldown of a query during analyses, define a restricted key figure using a CURRENT MEMBER variable. This is a variable with the replacement path CURRENT MEMBER.
SAP BW/4HANAAnalysis PUBLIC 725

The CURRENT MEMBER variable can be used in restricted key figures as either the lower limit or the upper limit in combination with an offset. Only one restriction with a CURRENT MEMBER variable is allowed per restricted key figure however.
Related Information
CURRENT MEMBER Variables [page 665]
5.3.1.10.5.3.2.3 Replacement from Query
Characteristic value variables with the Replacement Path processing type can be replaced with the results of a query. The variable is replaced from the data result of the selected query.
Variables Wizard
On the Variable - Replacement Rule dialog in the second step of the variables wizard, you specify that the variable derives its value from the data result of a query. You then select the required query with Browse.
CautionNote that, for technical reasons, variables with processing type Replacement from Query cannot be used in restricted key figures or in selection structure elements.
Variables Editor
On the Replacement Path tab of the variables editor, you can select another query if you want to use its data result in future. In addition, you can specify whether this view should be used at the start of the query.
Related Information
Additional Tabs Available for Specific Processing Types [page 817]Example: Using a Variable with Replacement from Query [page 813]
726 PUBLICSAP BW/4HANA
Analysis

5.3.1.10.5.3.2.4 Replacement from Variable
Characteristic value variables, hierarchy variables, text variables and formula variables with processing type Replacement Path can be replaced by the value from a different variable, the source variable. The value is determined either from the key, the external attribute of the key, the description, or the attribute value. You can also define an offset start and offset length. The variable is replaced in the Variables screen with each data release.
The target variable and source variable must meet the following prerequisites:
Prerequisites for Replacement by Variable
Object Properties
Target variable: The variable to be replaced should ● not be input-enabled● Screen area Single Value
Source variable: The variable that is used to make the replacement
● Not a hierarchy node variable● Input ready● Must exist in the query● Screen area Single Value or Interval
Variables Wizard
On the Variable - Replacement Rule dialog in the second step of the variables wizard, you specify that the variable derives its value from a variable. You then select the required variable by choosing Browse.
Variables Editor
In the variables editor under Replacement Rule, the system indicates that a variable serves as the source for replacing the variable. This replacement rule cannot be modified.
You can still change the object that you want to use for the replacement however. Choose Browse. A dialog box appears where you can select a different object.
The following properties are still modifiable:
● Replacment With: Choose where the value of the variable will be determined from.○ Key The value of the variable is replaced with the characteristic key.○ External Characteristic (of the key) The value of the variable is replaced with an external value of the
characteristic (external/internal conversion).○ Name The value of the variable is replaced with the name of the characteristic.○ [1ATTRREF] Characteristic Reference (Constant 1) (attribute value of the reference characteristic): The
value of the variable is replaced with the value of an attribute of the characteristic that the source variable is defined on. This setting is only available for formula variables.
SAP BW/4HANAAnalysis PUBLIC 727

NoteIf the attribute is time-dependent, the system cannot determine the variable value or does notreplace the variable with the expected value, since the key date of the query is not properly taken into account if it is variable.
If the attribute and the target characteristic have the same basic characteristic, and this is compounded, the target variable must contain the uncompounded value. Proceed as follows:
○ The source characteristic is either the characteristic that the source variable belongs to or the attribute that the replacement will be made from. If the basic characteristic of the source characteristic and the basic characteristic of the target variable are the same, and the internal value is to be transferred, the system directly applies the uncompounded value.
○ In all other cases (if the basic characteristics are not the same, or replacement is to be made from the external format or the text), you must cut the uncompounded value with the offset and length specifications out of the target variable definition.
○ [0SIGNCH] Sign Change: The value of the variable is replaced with a value of a hierarchy attribute. You need this setting for sign reversal with hierarchy nodes. This is only available for formula variables.
● After Aggregation (replacement of the variable after aggregation): This option is set by default. If you deselect this, the variable will be replaced before aggregation. It is not always possible to change this however. Replacement of the variable in the case of [1ATTRREF] Characteristic Reference (Constant 1) always takes place before aggregation. In the case of Name and [0SIGNCH] Sign Change, it takes place after aggregation.
● Interpret Result As Boolean Value (True=1; False=0) As in the case of replacement from a characteristic value, this function is only available for formula variables. If you select this setting, the formula variable will not be replaced with a value (the key value for example) but merely specifies the existence of a value.
Under Details - as in the case of replacement from a characteristic value - you can define the values for using an interval (If Interval Use), as well as the Offset Start and Offset Length for the text output.
Related Information
Replacement from Characteristic Value [page 720]Additional Tabs Available for Specific Processing Types [page 817]
5.3.1.10.5.3.3 Customer Exit
The processing type Customer Exit allows you to set up a processing type for variables that is specially tailored for your requirements. A customer exit is designed as an enhancement that you can configure with customer-specific logic. The customer exit enables you to generate default values for variables ,or create variable values from specified variables automatically. You can also check all the variables after they have been entered.
You can process all variable types (characteristic value variables, hierarchy node variables, hierarchy variables, formula variables, and text variables) using the processing type Customer Exit.
728 PUBLICSAP BW/4HANA
Analysis

RestrictionPlease note that processing type Customer Exit cannot be used in conjunction with external SAP HANA views. Processing type SAP HANA Exit is provided for this purpose.
The prerequisite here is that you need to create the enhancement implementation for the enhancement spot RSROA_VARIABLES_EXIT_BADI (located in package RSROA_VAR) in the ABAP Development Tools. The BAdl implementation includes the interface IF_BADI_INTERFACE.
ExampleYou want to derive a characteristic value from another one. The InfoProvider contains the calendar day. You also want to see the cumulative value for the associated period in the query (starting with the first day of the month). Define a variable for the first day of the month with processing type Customer Exit.
If you now enter the current calendar day (for example, 6/19/2015), a start date of 6/1/2015 appears in the customer exit, and the cumulated value of this period can be displayed.
Article Sales 6/19/2015 Sales 6/1/2015 - 6/19/2015
A 5 263
B 7 157
C 2 67
Related Information
Dependencies in Customer Exit Variables [page 729]
5.3.1.10.5.3.3.1 Dependencies in Customer Exit Variables
If you execute a query that contains variables of processing type Customer Exit, there are three possible times when the exit can be called: Before the variable is entered (default values can be generated), after the variable is entered (variable values can be derived from other entries) and after variable processing is complete (to check the variable values).
Defining when the enhancement is called
This enhancement spot RSROA_VARIABLES_EXIT_BADI is called multiple times when reports are executed. Parameter I_STEP dictates when the enhancement is called.
SAP BW/4HANAAnalysis PUBLIC 729

The following table provides an overview of the values of parameter I_STEP:
Value for Parameter I_STEP
Value for Parameter I_STEP Description
I_STEP = 1 Call directly before the variable is entered.
I_STEP = 2 Call directly after the variable is entered.
This step is only used executed for non-input-ready variables, which could not be filled in I_STEP = 1. You can find an exception to this rule in parameter C_CHECK_AGAIN.
I_STEP = 3 Use this call to check the values of the variables. If an exception (RAISE) is triggered, the Variables screen appears again. I_STEP = 2 is then executed again.
I_STEP = 0 The enhancement is not called from the variables screen. The call can originate from the authorization check or from the monitor.
If a query contains multiple variables with customer exits, then the order of the variables is not defined in one step.
NoteIf variable 2 needs to be derived from specifiable variable 1 and variable 3 needs to be derived from variable 2, then the value for variable 2 must be generated in STEP 2 when variable 3 is derived. You can store the value for variable 2 in the buffer, in order to avoid the need to calculate it several times.
Method Signature
All parameters with names beginning with I_ are importing parameters. All parameters with names beginning with C_ need to be filled in the method.
Parameters of Method “Process”
Parameter Description
I_VNAM Technical name of variable to be edited.
I_VARTYP Variable type of variable to be edited
I_IOBJNM Characteristic name of variable to be edited
I_S_COB_PRO Characteristic properties
I_S_RKB1D Properties of the query, in particular the fields COMPUID (query name) and INFOCUBE (InfoProvider)
730 PUBLICSAP BW/4HANA
Analysis

Parameter Description
I_PERIV Fiscal year variant (if specified and if unique)
I_T_VAR_RANGE Values already known from other variable; see table below Fields of Structure RRRANGEEXIT.
I_STEP See table above Values for Parameter I_STEP
C_T_RANGE Return values
C_NO_SCREEN If value ‘'X’ is set in STEP 1, the system does not display the variable on the variable screen.
C_CHECK_AGAIN If value ‘'X’ is set in STEP 1, the system also processes the variable in STEP 2.
CX_RS_ERROR Exception: An error occurred during processing.
Specifying values of other variables
When the enhancement spot RSROA_VARIABLES_EXIT_BADI is called, the system passes the currently available values of the other variable in table I_T_VAR_RANGE. The table type is RRS0_T_VAR_RANGE, and row type RRS0_S_VAR_RANGE. references structure RRRANGEEXIT.
The following table provides an overview of the values of the fields in structure RRRANGEEXIT:
Field in Structure RRRANGEEXIT
Field Description
VNAM Name of the variable
IOBJNM Name of the InfoObject
SIGN (I)ncluding [ ] or (E)xcluding ] [
OPT Operator: EQ =, BT → →, LE →→, LT →, GE →→, GT →, CP, and so on
LOW Characteristic value
HIGH Characteristic value of upper limit for intervals or node InfoObject for hierarchy nodes
In the following example, the current month is taken from an input-enabled variable MONTH. This is then used to generate an interval that includes all months from January ('01') up to the current month. The customer exit variable CUMMONTH contains the interval as the value.
Sample Code
DATA: L_S_RANGE TYPE RSR_S_RANGESID.
SAP BW/4HANAAnalysis PUBLIC 731

DATA: L_S_VAR_RANGE TYPE RRRANGEEXIT.CASE I_VNAM.WHEN 'CUMMONTH'.IF I_STEP = 2. "after the popupREAD TABLE I_T_VAR_RANGE INTO L_S_VAR_RANGE WITH KEY VNAM = 'MONTH'.IF SY-SUBRC = 0.CLEAR L_S_RANGE.L_S_RANGE-LOW = LOC_VAR_RANGE-LOW(4)."low value, z. B. 200601L_S_RANGE-LOW+4(2) = '01'.L_S_RANGE-HIGH = LOC_VAR_RANGE-LOW. "high value = inputL_S_RANGE-SIGN = 'I'.L_S_RANGE-OPT = 'BT'.APPEND L_S_RANGE TO E_T_RANGE.ENDIF.ENDIF. ENDCASE.
5.3.1.10.5.3.4 BRFplus Exit
Variables of processing type BRFplus Exit make it possible to access the functions of the SAP rule engine Business Rules Framework plus (BRFplus) in SAP BW∕4HANA.
In the BW Modeling Tools, you assign a a BRFplus function to a variable of this processing type. These BRFplus functions must have a corresponding BRFplus context (signature) and a corresponding result data object (result object).
A BRFplus function is suitable if it has one of the following result data objects:
Variable Type Result Data Object Data Object Type
Text Variable E_RS_VARIABLE_TEXT_RESULT Element Text
Formula Variable E_RS_VARIABLE_FORMULA_RESULT Element Number
Other Variable Type E_T_RS_VARIABLE_RES_RANGE Table with DDIC binding for table types RSSB_T_RANGE
In the context signature, the following data objects can also be used:
Data Object Name Type
I_VNAM Element (text)
I_VARTYP Element (text)
I_IOBJNM Element (text)
I_COMPID Element (text)
I_INFOPROV Element (text)
I_PERIV Structure with DDIC binding for structure RRKB1F
I_T_VAR_RANGE Table with structure with DDIC binding for structure RRRANGEEXIT
I_STEP Element (number)
732 PUBLICSAP BW/4HANA
Analysis

Data Object Name Type
E_NO_SCREEN Element (boolean)
E_CHECK_AGAIN Element (boolean)
You can define the BRFplus function from any of the following modes: Function Mode, Event Mode or Function and Event Mode. If required, you can also use rule sets to define the logic.
Related Information
Using a Variable with Replacement from BRFplus [page 814]
5.3.1.10.5.3.5 SAP Exit
With the SAP Exit processing type you can use variables delivered by SAP within BI Content.
Please note that you can use the variables provided by SAP only once they exist as an active version. You may have to activate these delivered variables before you can use them.
You can find the variables provided by SAP by searching for object type ELEM with subtype VAR. The technical names of delivered SAP objects always begin with a number.
ExampleIf you want to define a query that only ever displays the data from the current month, drag the delivered variable current month (technical name 0CMONTH) for the characteristic calendar year/month (technical name 0CALMONTH) into the query filter.
RestrictionPlease note that the SAP Exit processing type is not possible with external SAP HANA views. The SAP HANA Exit processing type is available for this.
5.3.1.10.5.3.6 SAP HANA Exit
Processing type SAP HANA Exit is a specific form of processing type Customer Exit. It allows you to use an AMDP class implementation to determine default values for variables. We particularly recommend using the SAP HANA Exit in queries that you want to generate an external SAP HANA view for, and which special requirements apply for in terms of determining the variable values. In the query itself, the use of this variable type has no advantages. We recommend using SAP exit or customer exit variables.
SAP BW/4HANAAnalysis PUBLIC 733

Definition of Variables
In the BW Modeling Tools, you create variables of processing type SAP HANA Exit.
You can process variables of types characteristic value variables and formula variables with processing type SAP HANA Exit. If you use these for a formula variable, the entry type must not be optional.
A variable with processing type SAP HANA Exit represents a single value or multiple single values. In the case of multiple single values, the variable cannot be ready for input. It is therefore not possible to map characteristic values containing characters ' or ,.
The moment when the enhancement implementation is called depends on whether the variable is input-enabled:
● If the variable is input-enabled, the SAP HANA exit procedure is called exactly once before the variable screen. The variable is then automatically given the default values of the other variables in the procedure.
● If the variable is not input-enabled, the SAP HANA exit procedure is called exactly once after the variable screen. The variable is then given the values from the variable screen in the procedure.
Enhancement Implementation
In the ABAP Development Tools, you create the enhancement implementation for the enhancement spot RSROA_VARIABLES_HANA_EXIT. This is contained in package RSROA_VAR. The BAdI implementation class requires an AMDP class containing the following interfaces: IF_BADI_INTERFACE, IF_AMDP_MARKER_HDB and IF_RSROA_VAR_HANA_EXIT.
ExampleAs an example, you can use class CL_RSROA_HANA_EXIT_FALLBACK. Implement the following methods. After the method name, you have to enter the addition by database procedure for hdb language SQLSCRIPT. The code must comply with SAP HANA SQLSCRIPT syntax.
1. if_rsroa_var_hana_exit~ get_properties○ Parameter C_IS_ACTIVE should have the value 'X'. This stipulates that this coding should be used
to define the value of the variableThe system can contain no more than one BAdI implementation with the value 'X for the query/variable name combination.
○ Parameter C_TS_VNAM_INDEX defines the allocation of variable values from the query to the I_VAR_VALUE_X parameters of method if_rsroa_var_hana_exit~process. The specification of row {VNAM_COUNTRY, 1} in parameter C_TS_VNAM_INDEX stipulates that the value of variable VNAM_COUNTRY is assigned to parameter I_VAR_VALUE_1.A maximum of 20 entries of this type can be made.
2. if_rsroa_var_hana_exit~ process○ Parameter c_value should specify the value of the variable. If the variable represents multiple
single values, they must be in a comma-separated format, for example 'DE' ,'AT'.
734 PUBLICSAP BW/4HANA
Analysis

Related Information
Generating SAP HANA Views for Queries [page 234]
5.3.1.10.5.3.7 Authorization
With the Authorization processing type you can specify that a variable is automatically filled with the values from the user authorization. When the user opens a query, the system automatically selects the data according to his or her authorizations.
The Authorization processing type can be used with characteristic value variables and hierarchy node variables. As a precondition, you must have maintained the authorizations.
5.3.1.10.5.4 Display Area
When you create a variable, you choose the display area for the Var. Represents field.
The table below provides an overview of the possible display areas:
Display Areas for Variables
Display Area Description
Single Value: single value The variable represents exactly one value.
Interval: interval The variable represents a specific 'from' value and a specific 'to' value, i.e. an interval.
Multiple Single Values: multiple single values The variable represents multiple single values.
This setting is useful in hierarchy nodes, for example to allow you to enter multiple single nodes.
SAP BW/4HANAAnalysis PUBLIC 735

Display Area Description
Selection Option: selection option The variable represents any combination of single values and intervals.
In addition, when you select values for variables, you can use operators (>,<,=, and so on), use the contains pattern option (for example, search for all values that begin with A: A*), and exclude certain values (by specifying the values for which you do not want to search).
CautionNote that you can only use the selection option variables with the Contains Pattern option in the filter. You cannot use them in the dynamic filter. The Contains Pattern option is also only supported for characteristics of type CHAR. The option is not supported for numeric characteristics.
Vorberechnet: Precalculated Value Set The variable represents a precalculated value set of characteristic values. You can use this variable type to select value sets created for an InfoObject at query runtime.
5.3.1.11 Linked Component
A linked component can be automatically synchronized whenever changes are made to the corresponding source component.
Example scenario: You have two highly similar InfoProviders, IP_A and IP_B. You have created the query Q_A for IP_A. You now want to create the query Q_B for InfoProvider IP_B. You want this query to be very similar to query Q_A and to be automatically adjusted whenever changes are made to query Q_A.
To do this, you use the link component concept: You create the linked target query Q_B for source query Q_A. This is more than just a copy, as the system also retains the mapping information. This mapping information makes it possible to synchronize the queries.
NoteFor queries, the system supports mapping of the following query components: InfoObjects, hierarchies, restricted and calculated key figures, and variables.
Note that certain query settings cannot be mapped. Filter entries or currency translations/unit conversions cannot be adjusted.
If this makes it impossible to synchronize the query, you can create it as a standalone copy and make the adjustments there.
736 PUBLICSAP BW/4HANA
Analysis

Related Information
Creating a Link Component [page 867]Apply Changes from the Source Component [page 868]Changing a Target Component [page 869]
5.3.1.12 FEMS
FEMS (Form EleMent Selection) refers to the effectively acting local filter.
To calculate the result of a query, the elementary building blocks required for query generation are defined. A building block of this kind is generally a key figure with a filter. This is created either directly from a selection or indirectly as the operand of a calculated key figure. The filter is made up of all participating filters.
ExampleIf you have created a calculated key figure Sales in North America for example, with the formula Sales in USA + Sales in Canada, and use this calculated key figure in a selection (structural element) containing a filter on the year 2015, two building blocks are required for the calculation of the result:
1. Sales in USA, 20152. Sales in Canada, 2015
This kind of effective local filter is known as a FEMS.
If multiple structures or nestings of calculated and restricted key figures are used, all of them go into the FEMS in the filter acting on the operand.
Related Information
Blog about FEMS when using a SAP HANA database
5.3.1.13 Transporting Queries
The query is integrated into BW's TLOGO framework and can be transported.
The transport object is called ELEM.
All components of the query are written to the transport request individually. The number of entries in the transport request therefore depends on the complexity of the query. All required generation steps are performed on the target system.
You can define transport requests for query components package by package. In addition to this, it is possible to use a standard request for all development packages that are not covered by package-specific transport requests. The contain query components only, such as queries, filters, restricted key figures, calculated key figures and variable definitions.
SAP BW/4HANAAnalysis PUBLIC 737

Once the various query components have been saved, they are written to the relevant (package-specific or general) transport request. You do not need to select a transport request.
5.3.2 Working with Queries
You define a query in order to analyze data in the SAP BW/4HANA.
Prerequisites
You have created a BW project in the BW Modeling perspective and connected it with a back end system.
Context
The main parts of the query definition are navigation and filters:
● For navigation, you select free characteristics and define the content of the rows and columns in the query. You use this selection to specify which data areas of the InfoProvider you want to navigate through. The alignment of row and column content determines the initial view for the query.
● The selections in the filter apply to the query in its entirety. When defining the filter, you select characteristic values from one or more characteristics. You can also set a key figure as a filter. If you do this, the query only has characteristics in the rows and columns. All the InfoProvider data is aggregated using the filter selection for the query.
You can parameterize queries by using variables for characteristic values, hierarchies, hierarchy nodes, formulas and texts, or by defining new variables where necessary.
To make the selection of InfoObjects more precise, you have the following possibilities:
● You can restrict characteristics to characteristic values or hierarchy nodes.● You can define selections.● You can define formulas.● You can define Exception Cells and Help Cells.● You can use local structures.● You can define conditions.● You can define exceptions.● You can define calculated and restricted key figures as reusable query components.
Procedure
1. Create a query using the wizard.2. Define the query properties in the editor.
738 PUBLICSAP BW/4HANA
Analysis

Related Information
Creating a Query Using the Wizard [page 739]Defining Queries in the Editor [page 740]Opening and Changing Existing Queries [page 866]These links take you to the documentation for modeling queries.Query [page 707]This link takes to you to the documentation for query concepts.
5.3.2.1 Creating a Query Using the Wizard
Whenever you create a query, you are guided through the process by a wizard.
Context
In the Project Explorer view, you can create a query either for a BW project or for an InfoProvider. You can also create a query as a copy of an existing query.
Procedure
1. To do this, open the context menu for a BW project or an InfoProvider and choose New BW Query , or open the context menu for the query you want to use as a template and choose Copy To ... . The New BW Query dialog box appears. Depending on your point of entry, the system will have already preselected certain objects.
2. The system preselects the current BW project at the very least. By choosing Browse, you have the option of selecting a different BW project.
3. If you have created a query for a BW project, you also have to select the required InfoProvider. Enter its technical name or a corresponding search term. The system helps you when searching for the technical name, and returns a list of results under Matching items.
4. If you have created a query for an InfoProvider, the system preselects this InfoProvider. By choosing Browse, you have the option of selecting a different InfoProvider.
5. To add your query to your local favourites, choose Add to Favorites.6. Enter a unique technical name and a description for your query.7. If you have created a query as a copy of an existing query, the system preselects this query. By choosing
Browse, you have the option of selecting a query as the template.8. Choose Finish.
SAP BW/4HANAAnalysis PUBLIC 739

Results
The system opens the new query in the Eclipse Editor. The General tab opens, together with all query settings that you have made so far.
Related Information
Defining Queries in the Editor [page 740]This link takes to you to the documentation for modeling queries.Query [page 707]This link takes to you to the documentation for query concepts.
5.3.2.2 Defining Queries in the Editor
You can define the properties of a query in the native Eclipse editor.
Context
On the General tab you will find all the query settings that you have made so far.
Procedure
1. Choose the Sheet Definition tab.
2. Press the Show InfoProvider View button.
The available objects for the InfoProvider you selected are displayed as a directory tree in the InfoProvider view:○ Key Figures○ Characteristics○ Reusuable objects Reusable Components): Calculated Key Figures, Restricted Key Figures, filters and
structures.
NoteYou can drag the InfoProvider View to another location of your choosing.
3. Specify which characteristics, key figures, or structures you want to be available for navigating through the query data.a. In the BW Repository, choose the required characteristics and drag them to the relevant part of the
query:
740 PUBLICSAP BW/4HANA
Analysis

b. Define the required selections - with and without key figures.
If you select an InfoObject, you can view and edit its properties on the right of the Sheet Definition tab.4. Define the required formulas, filters conditions and exceptions.5. Save the query definition.
Results
To view the query in the preview, choose File Refresh and then Show Preview.
Related Information
Including Characteristics [page 742]Defining the Structure [page 749]Defining Structure Elements [page 750]Defining Exception Cells and Help Cells [page 780]Defining Priorities [page 782]Defining Filters [page 784]Defining Conditions [page 789]Defining Exceptions [page 792]Saving Queries [page 796]Using Reusable Query Components [page 801]Query Properties (General Tab) [page 819]Dependency Structure Tab [page 827]Changing Query Runtime Properties (Runtime Properties tab) [page 828]These links take you to the documentation for modeling queries.Query [page 707]This link takes to you to the documentation for query concepts.
SAP BW/4HANAAnalysis PUBLIC 741

5.3.2.2.1 Including Characteristics
By including a characteristic in the query, you specify that this characteristic should be available for navigation in the query data.
Procedure
In the BW Repository, choose the required characteristics and drag them to the relevant part of the query: In the Rows, Columns or under Free Characteristics. Alternatively, you can choose Add Characteristics in the context menu. The dialog box for selecting characteristics appears.
If you insert a characteristics that has a compound characteristic, the system automatically inserts this too. This also applies to copying and pasting. The system always inserts the compound characteristic into the filter's characteristic restrictions.
ExampleCharacteristic Country is compounded with characteristic Region. Drag characteristic Region to Free Characteristics. The system automatically inserts characteristic Country into the filter's characteristic restrictions.
You can use as many characteristics as you want in the query.
RestrictionIf you want to release the query for Remote Access by OLE DB for OLAP (in the properties of the query, Screen Area: Remote Access [page 822]), note the following restriction: Rows and columns together can contain a maximum of 50 - <number of structures> characterstics.
If the query does not contain a structure, a total of 50 characteristics are permitted in the rows and columns. If the query contains a structure, a total of 49 characteristics are permitted in the rows and columns. If the query contains two structures, a total of 48 characteristics are permitted in the rows and columns.
Related Information
Characteristic [page 707]Properties of the Characteristic [page 743]Tab: General [page 743]Tab: Hierarchy [page 748]
742 PUBLICSAP BW/4HANA
Analysis

5.3.2.2.1.1 Properties of the Characteristic
If you have inserted a characteristic in the query definition, the properties of this characteristic appear in the screen area on the right.
The Properties screen area is divided into tab pages, each of which provides different settings.
Caution
Note that you can activate manual input for the settings by using .
If you want to use a default value specified on the object again, choose . The system displays the default settings as non-input-ready fields.
Related Information
Tab: General [page 743]Tab: Hierarchy [page 748]
5.3.2.2.1.1.1 Tab: General
On the General tab, you can view the properties of the characteristic and make various settings.
General
This area displays the technical name and the description.
You can change the description. The new description text is different to the text in InfoObject maintenance and is used in the query display.
Value Output Format
Under Value Output, the system displays the output type. To change this, choose .
SAP BW/4HANAAnalysis PUBLIC 743

Under Display As, you can specify whether the values of the characteristic are displayed, and how. You can choose here from the options created for the characteristic in InfoObject maintenance. The following table provides an overview of the possible display options in the BW system:
Display Type
Display Type Description
Do Not Display No display: The characteristic is hidden.
This function is particularly useful with the currency/unit characteristic for example, since the currencies are also displayed in the key figures.
[Key] Text Key and Text: The characteristic values are displayed by means of their technical key and their description text.
Text Text: The characteristic values are displayed by means of their description text.
[Key] Key: The characteristic values are displayed by means of their technical key.
Text [Key] Text and Key: The characteristic values are displayed by means of their description text and their technical key.
If you set a display type that contains text, you can select a particular text type under Text Output Format. You have the following possibilities:
Text Display
Display Type Description
Standard Standard: The shortest available text is used for the characteristic values.
Short Short text: The short text for the characteristic values is used.
Medium Medium text: The medium text for the characteristic values is used.
Long Long text: The long text for the characteristic values is used.
Sorting
Under Sorting, the system displays the sorting criteria. To change this, choose .
744 PUBLICSAP BW/4HANA
Analysis

Sorting Criteria
Criterion Description
Sorting Attribute Sorting Attribute: Select either this characteristic or the attribute that you want to sort by.
TipYou want to sort your articles according to specific criteria. To do this, you create an attribute for the Article characteristic that contains these criteria, and sort the articles by this attribute.
Sort by Sort by: Text or Key
Sort Direction Sort Direction: Ascending or descending
Result Output Format
Here, you can decide under which conditions and in what form you want result rows to be displayed:
Result Row Display
Option Description
Always Always: The result rows are always displayed.
Only if more than one child If there is more than one individual value: The result rows are displayed if there are two or more individual values.
Never Never: The result rows are always suppressed.
Cumulate Values: You can specify for each characteristic that the key figure values can be cumulated for the relevant characteristic attributes - regardless of the aggregation behavior of the key figure.
Example● If the key figure has the standard aggregation SUM, the individual values of an area are cumulated; the
first value is added to the second value, the result is added to the third value, and so on.● If the key figure has the standard aggregation MIN, the system checks two consecutive values to
determine which value is smaller. The systems this value as the cumulative value and compares it to the third single value.
In the columns, the values are cumulated from top to bottom, and in the rows, the values are cumulated from left to right. With blocks of single values, a drilldown in both the rows and the columns, the values are cumulated from top to bottom and from left to right.
CautionNote that you can only cumulate with characteristic values and not with the structural elements of a characteristic structure. The Cumulate Values function only takes effect if you have a characteristic instead of a characteristic structure in the drilldown. If you use two structures however - the key figure structure and a characteristic structure - you can cumulate using cell-specific definitions.
SAP BW/4HANAAnalysis PUBLIC 745

Display Level
This allows you to categorize a characteristic in the filter. This means that you can categorize purely technically filters (which are not relevant for end users) as the detail overview (In Detailed Overview Only). These are then only displayed if the detailed view is set for display in the front end. You can therefore create a special view of the filtered characteristics that is tailored to end users.
The following categorizations are available:
● Also in Simple Overview The characteristic always appears in the list of static filters● In Normal Overview The characteristic only appears in the list of static filters if the (In Normal Overview) or
(In Detailed Overview Only) option is selected.● In Detailed Overview Only The characteristic only appears in the list of static filters if the (In Detailed
Overview Only) option is selected.
Extended
Under Access Type for Result Values, you can define the access type for result values. You have the following options:
Access Type for Result Values
Option Description
Master Data Master data:
When the query is executed, a row of data is always displayed for the characteristic. As long as values have been maintained for this characteristic in the master data, they will be displayed here. The display does not depend on transaction data.
Posted Values Posted values:
When the query is executed, a row of data is only displayed for the characteristic if there are posted values for this characteristic.
Characteristic Relationships Characteristic Relationships:
When the query is executed, a row of data is only displayed for the characteristic if you have modeled corresponding characteristic relationships.
746 PUBLICSAP BW/4HANA
Analysis

Under Filter Value Selection, you can define how filter values are selected when the query is executed. You have the following options:
Filter Value Selection During Query Execution
Option Description
Only Values in InfoProvider Only values in the InfoProvider:
The system only displays values contained in the InfoProvider.
Values in Master Data Table Values in the master data table:
The system displays all characteristic values from the master data, independently of transaction data.
Only Posted Values for Navigation Only posted values for navigation:
The system displays posted values only.
Under Refresh Variables, you can define how to refresh the variables that you use in default values or for defining presentation hierarchies. You have the following options:
Refresh Variables
Option Description
Dynamically Refresh dynamically:
If you choose this option, the system refreshes the application using the settings from the current navigation view.
As Designed Refresh in accordance with the design:
If you choose this option, the system refreshes the application using the hierarchy and filter settings in the query defi-nition.
Under Value Help in New Lines, you can specify whether the value help for the characteristic value in new rows is according to master data or characteristic relationships.
Related Information
SAP BW/4HANAAnalysis PUBLIC 747

5.3.2.2.1.1.2 Tab: Hierarchy
If there are one or more hierarchies for the selected characteristic, you can select the required hierarchy and view or change its properties by going to the Hierarchy tab.
General
In this screen area, you can select the hierarchy that you want to use in the query (Activate Hierarchy). You can also deactivate the hierarchy, select a different hierarchy for the selected characteristic, and view or change the name and the date of the hierarchy. You can also see the version of the current hierarchy.
Display of Nodes
Each hierarchy has properties that you specify in the hierarchy definition. To change the properties for the
current hierarchy, choose .
Here you can override the following hierarchy properties for the hierarchy node display:
Display of Hierarchy Nodes
Option Description
Position of Child Nodes Position of child (lower-level) nodes: Choose whether you want to position the lower-level nodes either (above) or (below).
Choose "above" if you want to see the overall result at the bottom of the screen, for example.
Nodes with Only One Child Node Nodes with only one child (lower-level) node: Choose whether you want to show (Always Show) or hide (Hide) nodes with only one child node.
Values of Postable Nodes Values of posted nodes: Choose whether you want to show (Always Show) or hide (Hide) the values of posted nodes.
In hierarchies, nodes always display the aggregated values of the lower-level nodes and leaves. To display this value posted to the node, the system inserts an additional leaf with the same name as the node. This leaf also displays the value posted to the node.
Expand to Level Expand to level: Choose the hierarchy level to display the hierarchy to when expanded.
748 PUBLICSAP BW/4HANA
Analysis

Sorting
In the hierarchy, you can set the sorting according to the key (Key) or text (Text) in ascending (Ascending) or descending (Descending) order. To change the sort criterion or the sort order for the current hierarchy, choose
.
5.3.2.2.2 Defining the Structure
You can use structures both in the Rows and in the Columns. You can create a maximum of two structures per query. Only one of these structures can contain key figures.
Context
There are various ways of creating a structure:
● Choose a key figure from the BW Repository and drag it to either the Rows area or the Columns area. The system automatically generates a new structure containing the selected key figure. This structure has the description Key Figures.
● Choose New Structure in the context menu for either Rows or Columns.
Related Information
Defining Structure Elements [page 750]Defining Priorities [page 782]
5.3.2.2.2.1 Structure Properties
If you have inserted a structure into the rows or columns of a query when defining the query, the system displays the structure's properties in the right-hand screen area.
● Under General, you can set the technical name and enter a description.● Under Display, you can make settings regarding Visibility of Structure Member and Zero Suppression.
SAP BW/4HANAAnalysis PUBLIC 749

5.3.2.2.3 Defining Structure Elements
Objects, which can only be defined in structures, are selections and formulas.
Context
A structure is required in order to define a structure element. Structure elements can be hierarchically arranged in a structure. They have common properties.
Related Information
Structure Element [page 709]Defining Selections [page 750]Defining a Formula [page 766]
5.3.2.2.3.1 Defining Selections
You can define selections with and without key figures.
Context
You are on the Sheet Definition tab in the query definition.
Procedure
1. Define a selection with key figures if this is required for your query definition.a. Choose a key figure from the BW Repository and drag it to either the Rows area or the Columns area.
The system automatically generates a new structure containing the selected key figure. This structure has the description Key Figures. The system automatically sets the selection for this key figure.Note that you can have precisely one key figure structure per query. If you want to use more than one key figure, the key figure structure must contain all of these.
b. To restrict a key figure, open the context menu for the key figure in question and choose Edit. The Edit Selection dialog box appears. In the properties of the key figure, you see the selection in the General tab under Selection Details.
750 PUBLICSAP BW/4HANA
Analysis

Note that you can only use a key figure restricted in this way in the current query. You can find all restricted key figures used in queries for an InfoProvider by choosing Reusable ComponentsRestricted Key Figures in the BW Repository.
2. Define a selection without key figures if this is required for your query definition.a. Choose New Selection from the context menu for the required structure. The Edit Selection dialog box
appears.b. Add the required characteristic.c. Select the required characteristic values and confirm your selection by choosing OK.
Related Information
Selection [page 709]Selection Properties [page 751]Restricting Key Figures [page 764]Restrict Formula [page 765]Defining Restricted Key Figures [page 804]This link takes to you to the documentation for reusable query components.
5.3.2.2.3.1.1 Selection Properties
If you have inserted a key figure as part of a structure in the rows and columns of a query during definition, the system creates a selection. You can edit the properties of the selection on the right of the screen. If you have defined a selection without key figures, you can edit the properties of this selection in the right of the screen.
The Properties screen area is divided into tab pages, each of which provides different settings.
Caution
Note that you can activate manual input for the settings by using .
If you want to use a default value specified on the object again, choose . The system displays the default settings as non-input-ready fields.
Related Information
Tab: General [page 752]Tab: Conversion [page 754]Tab: Calculations [page 755]
SAP BW/4HANAAnalysis PUBLIC 751

5.3.2.2.3.1.1.1 Tab: General
On the General tab, you can view the properties of the selection and make various settings.
General
This area displays the technical name and the description.
You can change the description. The new description text is different to the text in InfoObject maintenance and is used in the query display.
NoteIn the description, you can use text variables, which the user can enter at query runtime.
● If you want to use one of the existing text variables in the description, choose Add Text Variable. The dialog box for choosing text variables appears. Mark the selected text variable and confirm with OK. The system inserts the selected text variable into the description. The text variable starts and ends with the character &.
● If you want to create a new text variable, start with the character &. Using the key combination CTRL + space you can display the input help with all the variable names available in the system. You can also
enter a new name. End the name with the character &.
Constant Selection
The Constant Selection property is available for selections in structural components, cells and restricted key figures in queries.
If you go to the General tab and then go to the Constant Selection screen area and select total as constant, this means that this selection cannot be used at runtime for navigation and filtering. Therefore this selection can serve as a reference size.
You can also define components of selections - individual characteristics and their filter values - as constant. To do this, open the Edit Selection dialog box, go to the Edit Selection screen and choose Constant Selection from the context menu of the selection component. During navigation, the selection only remains unaffected by filters with relation to this characteristic.
If the specifications for constant selection overlap (in other words, if entire selections have been defined as constant on structure components and on cells, and if components of these same selections have been individually defined as constant), then the following rule applies: Constant selection on a selection element takes precedence over the constant selection on the characteristic defined on selections in this structure element.
752 PUBLICSAP BW/4HANA
Analysis

Display
Under Display As, you can specify whether the key figure values of the selection are displayed, and how. You can choose here from the options created for the key figure in InfoObject maintenance. The following table provides an overview of the possible display options in the BW system:
Display Type
Display Type Description
Hide Hide:
If you choose Always Show, the key figure is always visible.
If you choose Always Hide , the key figure is always hidden in the executed report.
If you choose Hide (Can be Shown), the key figure is initially hidden in the executed report but can be displayed again from within the report. You can use this setting to ensure that only information that is really necessary is displayed in the start view for the report. You can also show additional details if required.
Highlight Highlight:
You can choose whether to show the key figure using Normal Display or Highlighted Display.
Number of Decimal Places Number of decimal places:
You can specify the number of decimal places. Numbers can have any number of decimal places from zero up to nine decimal places (0, 0.0, 0.00... to 0.000000000).
Scaling Factor Scaling factor:
You can specify a scaling factor between one and one billion.
If you set 1000 for example, the value 3000 is displayed in the report as 3.
Change Sign Change sign:
Specify whether you want to keep the signs (Keep +/- Sign) or reverse the signs (Reverse Sign).
If you choose Reverse Sign, a positive number is given a minus sign (85 becomes -85, for example) and a negative number is given a plus sign (-38 becomes +38, for example).
Note that reserve sign is purely a display function. If the key figure is added to a formula, for example, it is calculated with its correct values.
SAP BW/4HANAAnalysis PUBLIC 753

Display Type Description
Node Status Node status:
If you have arranged the structure elements in hierarchical way, you can specify how the node is displayed in the structure: (expanded) or (collapsed). This property applies to the executed query and is unaffected by the status of the node in query definition.
Selection Details
This area displays the selection. To change the selection, choose Edit. The Edit Selection dialog box appears.
Related Information
Restricting Key Figures [page 764]
5.3.2.2.3.1.1.2 Tab: Conversion
On the Conversion tab, you can configure various settings for converting currencies and units.
Currency Translation
Here you can select a currency translation type and a target currency for a structural component.
You can choose from the currency translation types that you created in your BW system. Choose SAP MenuModeling Object Maintenance Currency Translation Types .
Unit Conversion
Here you can select a unit conversion type and a target unit for a structural component.
You can choose from the unit conversion types that you created in your BW system. Choose SAP MenuModeling Object Maintenance Unit Conversion Types .
754 PUBLICSAP BW/4HANA
Analysis

5.3.2.2.3.1.1.3 Tab: Calculations
On the Calculations tab, you can configure local calculation settings for a formula or a key figure.
Local calculations are performed (on the client) on the result set provided by your BW system. This allows you to recalculate results or single values from a report based on specific criteria. On the Calculations screen, you can specify for a structure component which rules are used to recalculate result rows and/or single values, and in which direction the calculations are performed.
NoteFor example, you can create ranking lists or calculate the total of a top 10 product list.
Note the following features:
● Local calculations only work on the displayed data. This means that local calculations only change how the values are displayed. For any subsequent calculations (such as formulas), the system uses the original values calculated by the BW system and NOT the display values changed by the local calculations.
● Local calculations cannot be applied to hierarchies.● If you are processing large result sets, local calculations can take significantly more time to perform.
NoteFor performance reasons, we recommend that you work with exception aggregation and calculated key figures. This is because all the operations executed on the server can be processed significantly faster (especially when using the SAP HANA database).
Related Information
Calculate Results As [page 755]Example: Calculate Results As [page 757]Calculate Single Values As [page 758]Examples: Calculate Single Values As [page 761]
5.3.2.2.3.1.1.3.1 Calculate Results As
Calculate Result As allows you to select which rule to use to locally recalculate the results of a report.
Note that the functions listed below are not fully supported by all clients.
SAP BW/4HANAAnalysis PUBLIC 755

You can choose from the following settings:
Settings Description
(Not defined) This setting displays the results provided by the analytic manager. No local calculation takes place.
Average The average (total divided by total number of values) of all values for the corresponding area is displayed as the result.
Average of Detailed Values That are Not Zero, Null or Error The average (total divided by number) of all values for the corresponding area is displayed as the result, with the exception of zeroes, meaning that values equal to zero are not counted.
Counter of All Detailed Values The number of values for the corresponding area is displayed as the result.
Counter of All Detailed Values That are Not Zero, Null or Error The number of values for the corresponding area, excluding zeroes, is displayed as the result; values equal to zero are not included.
First Value The highest value or the value furthest to the left of the corresponding area is displayed as the result.
Hide The result is not displayed.
Last Value The lowest value or the value furthest to the right of the corresponding area is displayed as the result.
Maximum The largest value for the corresponding area is displayed as the result.
Minimum The smallest value for the corresponding area is displayed as the result.
Standard Deviation Statistical deviation is a measure of the distribution of the values with respect to the mean value (average). Statistical deviation = root from the variance: SQRT (variance).
Summation The sum total of the values for the corresponding area is displayed as the result.
756 PUBLICSAP BW/4HANA
Analysis

Settings Description
Summation of Rounded Values If you have set a scaling factor, it is useful to calculate the total sum of rounded values locally since the total sums can differ considerably (in particular with high scaling factors).
NoteIf the result is a totals row, the area calculated is the corresponding column.
If the result is a totals column, the area calculated is the corresponding row.
With higher totals, multiple drilldowns (with results and an overall result) that is, all single values affected are taken into account (without results).
Variance The following formula is used to calculate the statistical variance:
(å x² - (å x)² / N) / (N-1) for N > 1 and notexist for N=1
Related Information
Example: Calculate Results As [page 757]
5.3.2.2.3.1.1.3.1.1 Example: Calculate Results As
The following example serves to illustrate the significance of the Summation of Rounded Values function. The first table shows the values of a simple query in which sales have been set with a scaling factor of 1,000:
Customer Sales
EUR 1,000
Customer 1 2.246
Customer 2 2.126
Total 4.372
SAP BW/4HANAAnalysis PUBLIC 757

If you reduce the number of decimal places, the values are rounded:
Customer Sales
EUR 1,000
Customer 1 2.25
Customer 2 2.13
Total 4.37
You can see that the total displayed locally is not the value that you would expect. This value was calculated by first making the calculation and the displaying and rounding the values.
If you use the Summation of Rounded Values function, the values are first rounded and then calculated and displayed. The query then appears as follows:
Customer Sales
EUR 1,000
Customer 1 2.25
Customer 2 2.13
Total 4.38
Related Information
Calculate Results As [page 755]Example: Calculate Results As [page 757]
5.3.2.2.3.1.1.3.2 Calculate Single Values As
Calculate Result As allows you to select which rule to use to locally recalculate individual values of a report.
Note that the functions listed below are not fully supported by all clients.
You can choose from the following settings:
Settings Description
(Not defined) This setting displays the data provided by the analytic manager. No local calculation of single values takes place.
Hide The system only displays the results; the single values are suppressed.
758 PUBLICSAP BW/4HANA
Analysis

Settings Description
Maximum The system displays the maximum key figure value for a characteristic.
Minimum The system displays the minimum key figure value for a characteristic.
Moving Average The system calculates the average of all values.
Moving Average that is Not Zero, Null or Error The system calculates the average of all values, but ignores any zero values.
Normalize According to Next Group Level Result The data is displayed as a percentage of the result of the next group level. The values of the results row and the overall results row are not displayed as percentages but as absolute values.
If there is only one characteristic in the drilldown, the result of a group level is the same as the overall result.
Normalize According to Overall Result The data is displayed as a percentage of the overall result. The values of the results row and the overall results row are not displayed as percentages but as absolute values.
If there are multiple characteristics in the drilldown, there are different results, which are combined to form an overall result.
Normalize According to Unrestricted Overall Result The data is displayed as a percentage of the unrestricted result (query result). The values of the results row and the overall results row are not displayed as percentages but as absolute values.
Each key figure for a query has a query result. This is the result of the key figure that results from the aggregation of all characteristics for the query. The overall result and the query result are identical to one another, provided that none of the characteristics are filtered at runtime.
SAP BW/4HANAAnalysis PUBLIC 759

Settings Description
Olympic Rank Number The Olympic ranked list differs from the basic ranked list as follows: In the Olympic ranked list, when a value occurs more than once, the next smallest value is not assigned the rank incremented by one, but the rank that corresponds to the number of previous characteristic values (including the current value).
TipThere are three products with a higher rank than product D, therefore D has rank 4 and rank 3 is not assigned since B and C have the same rank (2).
A 100 = Rank 1
B 50 = Rank 2
C 50 = Rank 2
D 20 = Rank 4
Rank Number The characteristic values are sorted according to the selected structure element and are given a ranking. The order of the ranked list is based on the size of the value for the structure element, where the largest value has rank 1 and the smallest value has the last rank.
If a value occurs more than once, the corresponding characteristic values are assigned the same rank. In a basic ranked list, the next smallest value is assigned this rank incremented by one.
TipYou can create a ranked list of products according to sales.
A 100 = Rank 1
B 50 = Rank 2
C 50 = Rank 2
D 20 = Rank 3
Related Information
Examples: Calculate Single Values As [page 761]
760 PUBLICSAP BW/4HANA
Analysis

5.3.2.2.3.1.1.3.2.1 Examples: Calculate Single Values As
Overview of Functions
The following table provides an overview of the following functions: Normalize According to Next Group Level Result, Normalize According to Overall Result and Normalize According to Unrestricted Overall Result:
Customer Sales
Normalize According to Next Group Level Result
Normalize According to Overall Result
Normalize According to Unrestricted Overall Result
Customer 1 10 10.86 % 0.97 % 0.12 %
Customer 2 0 00.00 % 0.00 % 0.00 %
Customer 3 17 18.47 % 1.66 % 0.21 %
Customer 4 8 08.69 % 0.78 % 0.10 %
Customer 5 15 16.30 % 1.46 % 0.19 %
Customer 6 22 23.91 % 2.15 % 0.28 %
Customer 7 15 16.30 % 1.46 % 0.19 %
Result 92
Overall Result 1023
Query Result 7812
The following table provides an overview of the functions Rank Number and Olympic Rank Number:
Customer Sales Rank Number Olympic Rank Number
Customer 1 10 4 5
Customer 2 0 6 7
Customer 3 17 2 2
Customer 4 8 5 6
Customer 5 15 3 3
Customer 6 22 1 1
Customer 7 15 3 3
SAP BW/4HANAAnalysis PUBLIC 761

The following table provides an overview of the functions Maximum and Minimum:
Customer Sales Maximum Minimum
Customer 1 10 22 0
Customer 2 0 22 0
Customer 3 17 22 0
Customer 4 8 22 0
Customer 5 15 22 0
Customer 6 22 22 0
Customer 7 15 22 0
The following table provides an overview of the functions Moving Average, Moving Average that is Not Zero, Null or Error and Hide:
Customer Sales Moving AverageMoving Average that is Not Zero, Null or Error Hide
Customer 1 10 10.00 10.00
Customer 2 0 5.00 10.00
Customer 3 17 9.00 13.50
Customer 4 8 8.75 11.66
Customer 5 15 10.00 12.50
Customer 6 22 12.00 14.40
Customer 7 15 12.43 14.50
Calculation direction
The calculation direction is always from the top in the direction of the drilldown.
● In this case (characteristics in the rows and key figures in the column), the calculation direction is from top to bottom.
● If the key figures are in the rows and the characteristics are in the columns, the calculation direction is from left to right.
● If a query contains characteristics in the rows and in the columns and the query is filtered by a key figure (for example, sales), the calculation begins at the top left and works down to the bottom right.
762 PUBLICSAP BW/4HANA
Analysis

Example query with Sales in the filter and Customer and Region in the drilldown:
Customer Germany England France Result
BMW 10 17 35 62
VW 0 15 17 32
Mercedes 12 22 3 37
Result 22 54 55 131
The following table shows the query with the function Normalize According to Overall Result:
Customer Germany England France
BMW 7.63 % 12.97 % 26.71 %
VW 0.00 % 11.45 % 12.97 %
Mercedes 9.16 % 16.79 % 2.29 %
The following table shows the query with the Rank Number function.
Customer Germany England France
BMW 6 3 1
VW 8 4 3
Mercedes 5 2 7
The following table shows the query with the Olympic Rank Number function:
Customer Germany England France
BMW 7 3 1
VW 9 5 3
Mercedes 6 2 8
Related Information
Calculate Single Values As [page 758]
SAP BW/4HANAAnalysis PUBLIC 763

5.3.2.2.3.1.2 Restricting Key Figures
You can restrict a key figure using one or more characteristic selections. This key figure can a basic key figure, a calculated key figure or a key figure figure that is already restricted. The key figure that you restrict can only be used in the context of the current query.
Context
You are in the Edit Selection screen for the selected key figure.
Procedure
1. Here you can enter a new technical name and description for your restricted key figure. If you do not specify anything new, the key figure retains its existing technical name and description.
2. The left side of the lower area displays the directory of all the available objects for the InfoProvider. The Selection Details area on the right side displays the selected key figure. Select the InfoObject that you want to restrict and then drag and drop it onto the Selection Details area.
Example
You have selected the "Sales" key figure and you want to restrict it to the year 2013.
1. To do this, choose "Calendar Year" (0CALYEAR) from the time characteristics in the InfoProvider directory. Drag and drop this characteristic onto the "Sales" key figure.
2. Open the context menu of the "Calendar Year" characteristic and choose Restrict. The Edit Filter dialog box appears.
3. Select the required characteristic value - in our example "2013" - and choose Add.4. Confirm your filter definition by pressing OK.5. Confirm your restriction definition by pressing OK.
Related Information
Defining Filters [page 784]
764 PUBLICSAP BW/4HANA
Analysis

5.3.2.2.3.1.3 Restrict Formula
In a key figure structure, you can restrict a local formula in a further selection. The restricted selection can only be used in the context of the current query.
Context
You are in your query’s Sheet Definition.
Procedure
1. First create a new selection.2. Now drag the formula that you want to restrict to this selection.3. To restrict the formula, open the context menu from the key figure and choose Edit. The Edit Selection
dialog appears. Here you can enter a new technical name and description for your restricted formula. If you do not make any entries here, the key figure retains its existing technical name and description.
4. The left side of the lower area displays the directory of all the available objects for the InfoProvider. The system displays the available local formulas under the Formulas node. Under Selection Details on the right side of the screen, you can see the selected key figure or formula.
5. Select the formula that you want to restrict and then drag and drop it onto the Selection Details area.6. Select the characteristic value that you want to restrict and then drag and drop it onto the Selection Details
area.7. Choose OK.
Results
The system inserts the new formula, that is key figure-based and restricted by the characteristic value. into the key figure structure.
Example
You have selected the Average Price formula and want to restrict it to country Germany.
1. To do this, choose country COUNTRY from the characteristic of the InfoProvider directory, choose Germany here in our example, and drag and drop to drag it this the formula.
2. Confirm the definition of your restriction by pressing OK.
SAP BW/4HANAAnalysis PUBLIC 765

5.3.2.2.3.2 Defining a Formula
You can recalculate the key figures in a structure using a formula. This allows you to obtain calculated key figures. You can include basic key figures, restricted key figures, calculated key figures, and reusable key figures in the formula definition.
Context
You are on the Sheet Definition tab in the query definition.
Procedure
1. If the query does not have a key figure structure yet, create a New Structure in the Rows or Columns by selecting the row or column directory using the right mouse button and choosing New Structure from the context menu.
2. If the structure does not contain any key figures yet, drag a (basic) key figure from the InfoProvider to the directory of the new structure.
3. Select the structure directory and choose New Formula from the context menu. The Create Formula dialog box appears.
4. You can enter a technical name and description for your formula here. If you do not do this, the formula is given the description Formula n, with "n" corresponding to the number of formulas per query.In the description, you can use text variables, which the user can enter at query runtime.
○ If you want to use one of the existing text variables in the description, choose Add Text Variable. The dialog box for choosing text variables appears. Mark the selected text variable and confirm with OK. The system inserts the selected text variable into the description. The text variable starts and ends with the character &.
○ If you want to create a new text variable, start with the character &. Using the key combination CTRL + space you can display the input help with all the variable names available in the system. You can also
enter a new name. End the name with the character &.
5. Define the formula. You can use input help for this. To simplify the task of formula definition, you can select the required operands and operators for the formula from Groups. The system then inserts these into the formula definition with the correct syntax.a. From Groups, select the operands required for the formula definition. You can choose from all structure
elements that you have assigned to the structure so far.Choose Groups Structure: Key Figures . Das System zeigt im Bildbereich Formula Elements die Kennzahlen Sales und Quantity. Sie markieren Sales und wählen Add.
b. Choose the required operation for the formula definition. If it is a basic arithmetic operation, you can enter it using the numeric keypad on the right. You can select other operators from the Groups. You can choose from the following function types here:○ Percentage Functions○ Data Functions
766 PUBLICSAP BW/4HANA
Analysis

○ Mathematical Functions○ Trigonometrical Functions○ Boolean Operators
Select the symbol for dvision as operator on the numeric keypad on the right. In our example, we still need the second key figure Quantity as the divisor. We insert this as described above.With each step, the system checks the syntactic correctness of the formula. If the formula is incomplete or syntactically incorrect, the system underlines the error in red.
c. Specify any numerical values you require for the formula by entering them on the numeric keypad.
NoteYou can also enter digits, parentheses and basic arithmetical operations using the keyboard.
d. Choose Format Formula to format your formula. In this step for example, the system removes any unneeded spaces and inserts any line breaks required.
You can also change the syntax highlighting for the formula. To do this, choose WindowPreferences BW Modeling Query Formula Syntax Coloring , and configure the required colors, styles and fonts.
6. Confirm your formula definition by pressing OK. You are back on the Sheet Definition tab in the query definition.
7. Make any necessary settings for the properties of the formula on the right of the screen.
Related Information
Formula [page 710]Formula Calculation [page 499]Basic Functions [page 500]Percentage Functions [page 500]Data Functions [page 503]Mathematical Functions [page 514]Trigonometric functions [page 516]Boolean Operators [page 517]Formula Properties [page 768]Tab: General [page 768]Tab Page: Aggregation [page 771]Tab: Calculations [page 755]Defining Calculated Key Figures [page 801]
SAP BW/4HANAAnalysis PUBLIC 767

5.3.2.2.3.2.1 Formula Properties
If you have inserted a formula - as part of a structure - into the rows or columns of a query when defining the query, the system displays the formula properties in the right-hand screen area.
The Properties screen area is divided into tab pages, each of which provides different settings.
Caution
Note that you can activate manual input for the settings by using .
If you want to use a default value specified on the object again, choose . The system displays the default settings as non-input-ready fields. The default values for a formula do not depend on the settings of the InfoObjects involved in the formula.
Related Information
Tab: General [page 768]Tab Page: Aggregation [page 771]Tab: Calculations [page 755]
5.3.2.2.3.2.1.1 Tab: General
On the General tab, you can view the formula properties and make various settings.
General
This area displays the technical name and the description.
You can change the description. The new description text is different to the text specified for the key figure in InfoObject maintenance and is used for presentation in the query.
Formula Collision
Whenever you define two structures that both contain formulas, it may be unclear to the system how to calculate the formulas at the point where both formulas intersect. Collisions always occur when multiplication/division and addition/subtraction are mixed in competing formulas. If both formulas involve multiplication/division or addition/subtraction only, both calculation directions return the same result.
768 PUBLICSAP BW/4HANA
Analysis

Example
Example of Formula Collision
Column 1 Column 2 Column 1 x Column 2
Row 1 Value A Value B AxB
Row 2 Value C Value D CxD
Row 1 + Row 2 A+C B+D Formula Collision
In the cell in which the row formula and column formula meet, there is a formula collision: If you calculate according to the column formula in this cell, the cell contains (A+C)x(B+D). If you calculate according to the row formula in this cell, the cell contains (AxB)+(CxD). The result achieved therefore depends on the type of calculation performed.
When a formula collision occurs, you can specify how the formula is calculated.
Resolving Formula Collisions
Option Description
(Default value) If you do not specify a value, the formula that was last specified and saved takes priority in a formula collision.
Use result of this formula Use result of this formula:
The result of this formula has priority in a collision.
Use result of concurrent formula Use result of concurrent formula
The result of a competing formula has priority in a collision.
Display
Under Display As, you can specify whether the formula is displayed and how. The following table provides an overview of the possible display options in the BW system:
Display Type
Display Type Description
Hide Hide:
If you choose Always Show, the key figure is always visible.
If you choose Always Hide , the key figure is always hidden in the executed report.
If you choose Hide (Can be Shown), the key figure is initially hidden in the executed report but can be displayed again from within the report. You can use this setting to ensure that only information that is really necessary is displayed in the start view for the report. You can also show additional details if required.
SAP BW/4HANAAnalysis PUBLIC 769

Display Type Description
Highlight Highlight:
You can choose whether to show the key figure using Normal Display or Highlighted Display.
Number of Decimal Places Number of decimal places:
You can specify the number of decimal places. Numbers can have any number of decimal places from zero up to nine decimal places (0, 0.0, 0.00... to 0.000000000).
Scaling Factor Scaling factor:
You can specify a scaling factor between one and one billion.
If you set 1000 for example, the value 3000 is displayed in the report as 3.
Change Sign Change sign:
Specify whether you want to keep the signs (Keep +/- Sign) or reverse the signs (Reverse Sign).
If you choose Reverse Sign, a positive number is given a minus sign (85 becomes -85, for example) and a negative number is given a plus sign (-38 becomes +38, for example).
Note that reserve sign is purely a display function. If the key figure is added to a formula, for example, it is calculated with its correct values.
Node Status Node status:
If you have arranged the structure elements in hierarchical way, you can specify how the node is displayed in the structure: (expanded) or (collapsed). This property applies to the executed query and is unaffected by the status of the node in query definition.
Formula
This area displays the formula.
To change the formula definition, choose Edit. The Edit Formula dialog box appears.
770 PUBLICSAP BW/4HANA
Analysis

5.3.2.2.3.2.1.2 Tab Page: Aggregation
On the Aggregation tab, you can create an exception aggregation for a formula and select or exclude reference characteristics.
Related Information
Rules for Standard Aggregation and Exception Aggregation [page 480]
5.3.2.2.3.2.1.3 Tab: Calculations
On the Calculations tab, you can configure local calculation settings for a formula or a key figure.
Local calculations are performed (on the client) on the result set provided by your BW system. This allows you to recalculate results or single values from a report based on specific criteria. On the Calculations screen, you can specify for a structure component which rules are used to recalculate result rows and/or single values, and in which direction the calculations are performed.
NoteFor example, you can create ranking lists or calculate the total of a top 10 product list.
Note the following features:
● Local calculations only work on the displayed data. This means that local calculations only change how the values are displayed. For any subsequent calculations (such as formulas), the system uses the original values calculated by the BW system and NOT the display values changed by the local calculations.
● Local calculations cannot be applied to hierarchies.● If you are processing large result sets, local calculations can take significantly more time to perform.
NoteFor performance reasons, we recommend that you work with exception aggregation and calculated key figures. This is because all the operations executed on the server can be processed significantly faster (especially when using the SAP HANA database).
Related Information
Calculate Results As [page 755]Example: Calculate Results As [page 757]Calculate Single Values As [page 758]Examples: Calculate Single Values As [page 761]
SAP BW/4HANAAnalysis PUBLIC 771

5.3.2.2.3.2.1.3.1 Calculate Results As
Calculate Result As allows you to select which rule to use to locally recalculate the results of a report.
Note that the functions listed below are not fully supported by all clients.
You can choose from the following settings:
Settings Description
(Not defined) This setting displays the results provided by the analytic manager. No local calculation takes place.
Average The average (total divided by total number of values) of all values for the corresponding area is displayed as the result.
Average of Detailed Values That are Not Zero, Null or Error The average (total divided by number) of all values for the corresponding area is displayed as the result, with the exception of zeroes, meaning that values equal to zero are not counted.
Counter of All Detailed Values The number of values for the corresponding area is displayed as the result.
Counter of All Detailed Values That are Not Zero, Null or Error The number of values for the corresponding area, excluding zeroes, is displayed as the result; values equal to zero are not included.
First Value The highest value or the value furthest to the left of the corresponding area is displayed as the result.
Hide The result is not displayed.
Last Value The lowest value or the value furthest to the right of the corresponding area is displayed as the result.
Maximum The largest value for the corresponding area is displayed as the result.
Minimum The smallest value for the corresponding area is displayed as the result.
Standard Deviation Statistical deviation is a measure of the distribution of the values with respect to the mean value (average). Statistical deviation = root from the variance: SQRT (variance).
Summation The sum total of the values for the corresponding area is displayed as the result.
772 PUBLICSAP BW/4HANA
Analysis

Settings Description
Summation of Rounded Values If you have set a scaling factor, it is useful to calculate the total sum of rounded values locally since the total sums can differ considerably (in particular with high scaling factors).
NoteIf the result is a totals row, the area calculated is the corresponding column.
If the result is a totals column, the area calculated is the corresponding row.
With higher totals, multiple drilldowns (with results and an overall result) that is, all single values affected are taken into account (without results).
Variance The following formula is used to calculate the statistical variance:
(å x² - (å x)² / N) / (N-1) for N > 1 and notexist for N=1
Related Information
Example: Calculate Results As [page 757]
5.3.2.2.3.2.1.3.1.1 Example: Calculate Results As
The following example serves to illustrate the significance of the Summation of Rounded Values function. The first table shows the values of a simple query in which sales have been set with a scaling factor of 1,000:
Customer Sales
EUR 1,000
Customer 1 2.246
Customer 2 2.126
Total 4.372
SAP BW/4HANAAnalysis PUBLIC 773

If you reduce the number of decimal places, the values are rounded:
Customer Sales
EUR 1,000
Customer 1 2.25
Customer 2 2.13
Total 4.37
You can see that the total displayed locally is not the value that you would expect. This value was calculated by first making the calculation and the displaying and rounding the values.
If you use the Summation of Rounded Values function, the values are first rounded and then calculated and displayed. The query then appears as follows:
Customer Sales
EUR 1,000
Customer 1 2.25
Customer 2 2.13
Total 4.38
Related Information
Calculate Results As [page 755]Example: Calculate Results As [page 757]
5.3.2.2.3.2.1.3.2 Calculate Single Values As
Calculate Result As allows you to select which rule to use to locally recalculate individual values of a report.
Note that the functions listed below are not fully supported by all clients.
You can choose from the following settings:
Settings Description
(Not defined) This setting displays the data provided by the analytic manager. No local calculation of single values takes place.
Hide The system only displays the results; the single values are suppressed.
774 PUBLICSAP BW/4HANA
Analysis

Settings Description
Maximum The system displays the maximum key figure value for a characteristic.
Minimum The system displays the minimum key figure value for a characteristic.
Moving Average The system calculates the average of all values.
Moving Average that is Not Zero, Null or Error The system calculates the average of all values, but ignores any zero values.
Normalize According to Next Group Level Result The data is displayed as a percentage of the result of the next group level. The values of the results row and the overall results row are not displayed as percentages but as absolute values.
If there is only one characteristic in the drilldown, the result of a group level is the same as the overall result.
Normalize According to Overall Result The data is displayed as a percentage of the overall result. The values of the results row and the overall results row are not displayed as percentages but as absolute values.
If there are multiple characteristics in the drilldown, there are different results, which are combined to form an overall result.
Normalize According to Unrestricted Overall Result The data is displayed as a percentage of the unrestricted result (query result). The values of the results row and the overall results row are not displayed as percentages but as absolute values.
Each key figure for a query has a query result. This is the result of the key figure that results from the aggregation of all characteristics for the query. The overall result and the query result are identical to one another, provided that none of the characteristics are filtered at runtime.
SAP BW/4HANAAnalysis PUBLIC 775

Settings Description
Olympic Rank Number The Olympic ranked list differs from the basic ranked list as follows: In the Olympic ranked list, when a value occurs more than once, the next smallest value is not assigned the rank incremented by one, but the rank that corresponds to the number of previous characteristic values (including the current value).
TipThere are three products with a higher rank than product D, therefore D has rank 4 and rank 3 is not assigned since B and C have the same rank (2).
A 100 = Rank 1
B 50 = Rank 2
C 50 = Rank 2
D 20 = Rank 4
Rank Number The characteristic values are sorted according to the selected structure element and are given a ranking. The order of the ranked list is based on the size of the value for the structure element, where the largest value has rank 1 and the smallest value has the last rank.
If a value occurs more than once, the corresponding characteristic values are assigned the same rank. In a basic ranked list, the next smallest value is assigned this rank incremented by one.
TipYou can create a ranked list of products according to sales.
A 100 = Rank 1
B 50 = Rank 2
C 50 = Rank 2
D 20 = Rank 3
Related Information
Examples: Calculate Single Values As [page 761]
776 PUBLICSAP BW/4HANA
Analysis

5.3.2.2.3.2.1.3.2.1 Examples: Calculate Single Values As
Overview of Functions
The following table provides an overview of the following functions: Normalize According to Next Group Level Result, Normalize According to Overall Result and Normalize According to Unrestricted Overall Result:
Customer Sales
Normalize According to Next Group Level Result
Normalize According to Overall Result
Normalize According to Unrestricted Overall Result
Customer 1 10 10.86 % 0.97 % 0.12 %
Customer 2 0 00.00 % 0.00 % 0.00 %
Customer 3 17 18.47 % 1.66 % 0.21 %
Customer 4 8 08.69 % 0.78 % 0.10 %
Customer 5 15 16.30 % 1.46 % 0.19 %
Customer 6 22 23.91 % 2.15 % 0.28 %
Customer 7 15 16.30 % 1.46 % 0.19 %
Result 92
Overall Result 1023
Query Result 7812
The following table provides an overview of the functions Rank Number and Olympic Rank Number:
Customer Sales Rank Number Olympic Rank Number
Customer 1 10 4 5
Customer 2 0 6 7
Customer 3 17 2 2
Customer 4 8 5 6
Customer 5 15 3 3
Customer 6 22 1 1
Customer 7 15 3 3
SAP BW/4HANAAnalysis PUBLIC 777

The following table provides an overview of the functions Maximum and Minimum:
Customer Sales Maximum Minimum
Customer 1 10 22 0
Customer 2 0 22 0
Customer 3 17 22 0
Customer 4 8 22 0
Customer 5 15 22 0
Customer 6 22 22 0
Customer 7 15 22 0
The following table provides an overview of the functions Moving Average, Moving Average that is Not Zero, Null or Error and Hide:
Customer Sales Moving AverageMoving Average that is Not Zero, Null or Error Hide
Customer 1 10 10.00 10.00
Customer 2 0 5.00 10.00
Customer 3 17 9.00 13.50
Customer 4 8 8.75 11.66
Customer 5 15 10.00 12.50
Customer 6 22 12.00 14.40
Customer 7 15 12.43 14.50
Calculation direction
The calculation direction is always from the top in the direction of the drilldown.
● In this case (characteristics in the rows and key figures in the column), the calculation direction is from top to bottom.
● If the key figures are in the rows and the characteristics are in the columns, the calculation direction is from left to right.
● If a query contains characteristics in the rows and in the columns and the query is filtered by a key figure (for example, sales), the calculation begins at the top left and works down to the bottom right.
778 PUBLICSAP BW/4HANA
Analysis

Example query with Sales in the filter and Customer and Region in the drilldown:
Customer Germany England France Result
BMW 10 17 35 62
VW 0 15 17 32
Mercedes 12 22 3 37
Result 22 54 55 131
The following table shows the query with the function Normalize According to Overall Result:
Customer Germany England France
BMW 7.63 % 12.97 % 26.71 %
VW 0.00 % 11.45 % 12.97 %
Mercedes 9.16 % 16.79 % 2.29 %
The following table shows the query with the Rank Number function.
Customer Germany England France
BMW 6 3 1
VW 8 4 3
Mercedes 5 2 7
The following table shows the query with the Olympic Rank Number function:
Customer Germany England France
BMW 7 3 1
VW 9 5 3
Mercedes 6 2 8
Related Information
Calculate Single Values As [page 758]
SAP BW/4HANAAnalysis PUBLIC 779

5.3.2.2.4 Defining Exception Cells and Help Cells
A cell is the cross product of two structural elements. On the Cells tab, you can specify whether a cell is used as an exception cell or help cell.
Prerequisites
The query contains two structures.
Context
The system automatically adds the Cells tab.
● In the Cells screen area, you can define exception cells.● In the Help Cells screen area, you can define help cells.● The Properties screen area displays the properties of the cell, which match the properties of the relevant
structure element.
Procedure
1. To define an exception cell, select the required cell in the Cells area.
○ To set the cell as a reference cell, choose New Reference Cell from the context menu.○ To set the cell as a formula, choose New Formula Cell from the context menu.○ To set the cell as a selection, choose New Selection Cell from the context menu.
2. To define a help cell, choose the required option from the context menu in the Help Cells screen area:
○ To create a help formula cell, choose New Formula Cell from the context menu.○ To create a help selection cell, choose New Selection Cell from the context menu.
Related Information
Cell, Exception Cell and Help Cell [page 710]Defining Cell References [page 781]Defining Help Cells [page 781]Defining Selections [page 750]Defining a Formula [page 766]Defining Priorities [page 782]
780 PUBLICSAP BW/4HANA
Analysis

5.3.2.2.4.1 Defining Cell References
You can use a reference cell to reuse the implicit cell definition in a formula, without needing to manually create this value by using a new selection.
Context
You have a query with two structures and you want to reuse the value of the implicitly generic cell definition, which is created at the intersection of two structure elements.
Procedure
1. Select the required cell in the Cells screen area.2. Open the context menu and choose New Reference Cell. A description based on the two structural
components now automatically appears in the cell. The symbol shows you that this exception cell is a reference cell.
3. Specify the properties of the reference cell in the Properties screen area.
○ On the General tab, you can change the technical name, description and display properties of a defined exception cell.
○ On the Calculations tab, you can specify local calculations.
5.3.2.2.4.2 Defining Help Cells
The following example shows how an additional cell created in the Help Cells screen area can be used as a help selection for an exception cell of type "formula". The help cell itself is not displayed in the query.
Context
You can define an invoice in a help cell of type "selection" and use this in an exception cell of type "formula", in order to calculate a duplicated invoice.
Procedure
1. Open the context menu for the empty cell in the Help Cells area and choose New Selection Cell. The Edit Selection dialog box appears.
SAP BW/4HANAAnalysis PUBLIC 781

2. Enter a technical name for the help cell. You can also enter a new description.3. Use drag and drop to move the invoice key figure to the Selection Details area on the right of the screen.4. Press OK. The help cell contains the description of the selection. The symbol indicates that a selection has
been made for this help cell.5. Next, choose New Formula Cell from the context menu of the required query cell in the upper screen area.
The Edit Formula dialog box appears.6. Enter a technical name for the exception cell. You can also enter a new description.7. In the Cells group, double-click on the help cell defined on the "invoice" key figure, in order to select the cell.8. Choose the buttons x 2.9. Press OK. The cell now displays the exception cell whose formula is calculated instead of the cross product
of the structure elements.
5.3.2.2.5 Defining Priorities
If you use two structures in a query, the system takes into account the properties, which have been specified (for the structures or for specific cells) as cross products of two structure elements. The system takes the properties into account according to the order in which the properties are specified. The last specification made has priority. On the Priorities tab, you can modify the priority handling by explicitly specifying which property is actually taken into account. This is a power user function.
Prerequisites
The query contains two structures and only one of these structures can contain key figures.
Context
The system automatically adds the Priorities tab.
Procedure
1. You are on the Priorities tab. Open the dropdown list for the field Select Property and select the property that you want to set.
2. Select a cell, whose values you want to change, in the row or column.3. If you also want to change explicitly set cell values, deselect the field Keep Explicit Cell Value.
The field Keep Explicit Cell Value is selected by default so that explicitly set cell values are retained.4. Choose Apply Row Value to apply the default value to the row structure. A symbol indicates that the value
has been applied (blue arrow pointing left).
782 PUBLICSAP BW/4HANA
Analysis

5. Choose Apply Column Value to apply the default value to the column structure. A symbol indicates that the value has been applied (blue arrow pointing up).
Results
The changes to the values are displayed in the grid. If you have changed an explicitly set cell value, the system adds the expression (Cell) to the new value.
Next Steps
Save the query.
Related Information
Tab: Priorities [page 783]
5.3.2.2.5.1 Tab: Priorities
For every structure element or for a cell, you can explicitly specify which property has priority.
For the field Select Property, the system displays a list of properties, for which you can set priorities. These are display properties, which you can find in the definition of a structure element (selection or formula) or a cell on the General tab.
Here you see the two structures of the query with their structure elements in the grid. If the properties of a structure element have not been changed in the query definition, the system displays the default values configured on the InfoObject maintenance screen. However if a property of a structure element in the query definition has been explicitly changed, the system displays the changed value.
The values are indicated as follows in the grid:
Symbols in the grid
Symbol Meaning
(equals sign in front of blue background) The value in the column structure matches the value in the row structure.
(blue arrow pointing links) The structure element inherits the property from the structure in the row.
SAP BW/4HANAAnalysis PUBLIC 783

Symbol Meaning
(blue arrow pointing up) The structure element inherits the property from the structure in the column.
, , Symbol for the cell definition: An explicitly set cell value has priority.
NoteThe field Keep Explicit Cell Value is selected by default, in order to save values in the event of any changes. This means explicitly set cell values are retained, even if the default value of the row structure or column structure is to be generally applied.
Related Information
Tab: General [page 752]This link takes to you to the documentation for the properties of a selection.Tab: General [page 768]This link takes to you to the documentation for the properties of a formula.
5.3.2.2.6 Defining Filters
On the Filter tab, you can restrict characteristics or select exactly one key figure as a filter. This type of filter selection restricts the entire query. All the InfoProvider data is aggregated using the filter selection of the query.
You can define various filters:
● Filters with Fixed Values: The characteristic values selected as the filter selection cannot be changed at runtime.
● Filters with Default Values: The characteristic values selected as the filter selection are default values. The user can change or delete these values at runtime (in the preview for example).
Related Information
Filter [page 711]Restricting Characteristics [page 785]Specifying a Key Figure as a Filter [page 789]
784 PUBLICSAP BW/4HANA
Analysis

5.3.2.2.6.1 Restricting Characteristics
On the Filter tab, you can restrict characteristics to characteristic values (or characteristic value intervals) or to hierarchy nodes (either fixed or variable).
Procedure
1. In the BW Repository, select a characteristic and drag and drop it onto one of the filter areas.2. Open the InfoObject's context menu and choose Restrict. The Edit Filter screen opens on Members tab. The
system shows the characteristic values (members) on the left of the screen.3. Restrict the characteristic to:
○ a single characteristic value○ a variable characteristic value interval○ variable characteristic values○ a specific hierarchy node○ a variable hierarchy node
4. You can change the sequence of the selected characteristic values and variables in the filter:
○ To move a filter element up, choose Up.○ To move a filter element down, choose Down.
5. Confirm your filter definition by pressing OK.
Related Information
Restricting Characteristics by Characteristic Values [page 785]Restricting Characteristics on Hierarchy Nodes [page 787]
5.3.2.2.6.1.1 Restricting Characteristics by Characteristic Values
The following section explains how to restrict a characteristic to one or more characteristic values, or to one characteristic interval (fixed or variable).
Context
The filter contains a characteristic that you can restrict. The Edit Filter dialog box appears.
SAP BW/4HANAAnalysis PUBLIC 785

Procedure
1. If you want to select one or more characteristic values or a characteristic interval, proceed as follows:
○ If you want to restrict the characteristic to a single characteristic value, select the value and drag it to the filter definition area.
○ If you want to restrict the characteristic to a single characteristic value and give this a name, write this name in the Direct Input field and choose Add. The system validates your entry on the back end, and inserts the characteristic value with your name in the filter definition.
○ If you want to restrict the characteristic to a characteristic range, add the required start and end value of the range by double-clicking in the filter definition area, select the two characteristic values and choose Create Range.
2. If you want to restrict the characteristic to variable characteristic values rather than fixed values, choose a characteristic value variable as follows:a. Choose the Variables tab. On the left of the screen, the system shows a list of all variables. If you select
a variable, the system shows the details of this variable in the lower part of the screen:b. Copy over the required variable by double-clicking on the filter definition area.c. You can specify offset values for a characteristic value variable (with the Single Value display range) by
choosing Create Range. The Enter Offsets Values for Range dialog box appears. Here you can move the interval limits by adjusting the start value and end values (or just one of these values) by one integral offset value.
You are using the Current Calendar Year variable in your filter definition. You want to select the last 5 years as the period for your data analysis. Select the variable, choose Create Range. The Enter Offsets Values for Range dialog appears. Set the lower limit to the offset value -5. Do not enter an offset (oder 0) for the upper limit. Press OK.
d. If you want to define the range between two variables as a filter element, select the required start and end value of the range in the filter definition area and choose Create Range. If the variables are characteristic value variables (Single Value), you can also specify offset values for the interval built from these variables in the Enter Offsets Values for Range dialog box.
e. If the variables are characteristic value variables with the Single Value display range, the Enter Offsets Values for Range dialog box opens.
3. The system applies the characteristic values or characteristic interval to the filter definition, in the order in which they are selected, using the operator Equal by default. You can change the operation to be used for the selected characteristic values and variables in the filter: Proceed as follows:a. Select a filter element.
b. Press Change Operator . You can also choose this command in the filter element's context menu.c. Select the required operator. You can choose from the following operators:
Operator Description
Equal To Equal to
Greater Than or Equal To Greater than or equal to
Greater Than Greater than
Less Than or Equal To Less than or equal to
Less Than Less than
4. The system applies the characteristic values or the characteristic interval to the filter definition - using include by default. If there are values that you want to exclude from the selection, proceed as follows:
786 PUBLICSAP BW/4HANA
Analysis

○ Select the filter element that you want to exclude and choose Change Mode Exclude .
○ To include a filter element again, choose Change Mode Include .
CautionThis function is only used with single values or single value variables.
Results
You have now restricted the characteristic to characteristic values or characteristic value intervals (fixed or variable).
If you have used variables, then before the query is executed, a dialog box appears where you can manually enter variable values (provided that the variable is flagged as input-ready).
Related Information
Variable [page 715]
5.3.2.2.6.1.2 Restricting Characteristics on Hierarchy Nodes
The following section explains how to restrict a characteristic to a hierarchy node (either a fixed or variable restriction).
Context
You have a characteristic in the filter, for which there are one or more hierarchies. You can restrict this characteristic to a hierarchy node. The Edit Filter dialog box appears.
The following table provides an overview of the various possibilities for restricting hierarchies and hierarchy nodes (fixed or variable restriction):
Using Variables for Hierarchies and Hierarchy Nodes
Selection Example
Fixed Hierarchy Node - Fixed Hierarchy Report on department A (fixed hierarchy node) for the hierarchy valid for 2015 (fixed hierarchy)
Variable Hierarchy Node - Fixed Hierarchy Report on chosen department (variable hierarchy node) for the hierarchy valid for 2015 (fixed hierarchy)
SAP BW/4HANAAnalysis PUBLIC 787

Selection Example
Variable Hierarchy Node - Variable Hierarchy Report on a chosen department (variable hierarchy node) for the hierarchy valid for the current calendar year (variable hierarchy).
Procedure
1. If you want to restrict a hierarchy-bearing characteristic to a specific hierarchy node, proceed as follows:a. Choose the Hierarchy Nodes tab.b. Select a characteristic hierarchy using Browse. On the left of the screen, you see a list of all available
hierarchy nodes.c. Add the hierarchy node of your choice by double-clicking it.d. Confirm by pressing OK.
2. If you want to allow a user to be able to restrict a characteristic at query runtime to a variable hierarchy node (of a hierarchy specified as fixed or variable), proceed as follows:a. Choose the Hierarchy Nodes Variables tab. In field Referenced Hierarchy, the system displays the first
characteristic hierarchy that it finds as a reference hierarchy.b. If you want to use a different characteristic hierarchy as a reference hierarchy, choose Change. The
Select Hierarchy dialog box appears: Choose Browse to select a different characteristic hierarchy. If you want to keep the hierarchy selection flexible, you can assign a variable for the reference hierarchy by using the variable symbol. Confirm your selection by pressing OK.
c. Drag the hierarchy node variable into the right-hand screen area. The variable is either linked to the default reference hierarchy or to a reference hierarchy that you specified.
The system applies the hierarchy node variable to the Filter and Sheet tabs.
You have now restricted a characteristic to either a fixed hierarchy node of a fixed selected hierarchy, or to a variable node within a fixed or variable hierarchy. If you have used variables, then before the query is executed, a dialog box appears where you can manually enter variable values (provided that the variable is flagged as input-ready).
Related Information
Variable [page 715]
788 PUBLICSAP BW/4HANA
Analysis

5.3.2.2.6.2 Specifying a Key Figure as a Filter
On the Filter tab, you can specify exactly one key figure as a filter if no key figure has been selected on the axles. The values of this key figure are displayed in the cells when the query is executed.
Procedure
1. In the BW Repository, select a key figure and drag and drop it onto one of the filter areas.2. If you want to change the operator, select the required operator from the right screen area under Details.
Option Description
Operator Description
Equal Equal to
LessThan Less than
GreaterThan Greater than
LessEqual Less than or equal to
GreaterEqual Greater than or equal to
ContainsPattern Contains pattern
3. If you want to exclude the specified values, choose Exclude.
Example: Special Feature: Query Definition Without Key Figure
You want to define a query that only contains characteristics in the columns and in the rows. Every query must contain at least one key figure however. You can ensure this by adding a key figure to the Filter: Fixed Values and - if required - setting operators and excludes.
5.3.2.2.7 Defining Conditions
To achieve more effective data analysis, you can formulate conditions on the Conditions tab.
Context
In the results area of the query, the data is filtered according to the conditions so that only the part of the results area that you are interested in is displayed. You can restrict the view to the data of a query; with regards to defined threshold values or based on a defined ranked list.
SAP BW/4HANAAnalysis PUBLIC 789

Procedure
1. You are on the Conditions tab in the query definition. Open the context menu in Conditions and choose Create Condition. The system inserts a new condition.
2. Make the required settings on the General tab page.3. Make the required settings on the Assignments tab page.4. Press OK. You return to the query definition.5. Save the query.
Results
You have defined or changed a condition for a query. Execute the query. Only objects that meet the defined conditions are displayed.
NoteYou can display the condition descriptions in the query view and activate or deactivate them there.
Related Information
Condition [page 712]Tab: General [page 790]Tab Page: Assignments [page 791]
5.3.2.2.7.1 Tab: General
On the General tab page, you can activate the condition and edit its parameters.
General
This area displays the default text for the description. You can change the description.
In the default setting, the new condition is flagged as active. If you change this setting, the condition will no longer be available for analysis of the query data.
The Ignore NULL Values flag is set by default. If the flag is set, NULL values are ignored and therefore never meet the condition (see Conditions Calculated in the SAP HANA [page 856]).
790 PUBLICSAP BW/4HANA
Analysis

Condition Parameters
You can define the parameters of the condition here.
1. To create a parameter, choose Add. The Define Condition Parameter dialog box appears.2. Select the structure element that you want the condition to be based on. If you are using two structures in
your query, you can select a First Member and a Second Member.3. Select the comparison operator.
You can choose from the following operators for threshold value conditions:○ Equal○ NotEqualTo○ LessThan○ GreaterThan○ LessEqual○ GreaterEqual: >= Greater Than or Equal To○ Between○ NotBetween
The values for these operators must be floating point numbers. For the operators Between and Not Between, you have to enter a value range by specifying an upper and a lower threshold value.You can choose from the following operators for ranked list conditions:○ TopN○ BottomN○ Top%○ Bottom%○ TopSUM○ BottomSUM
For Top/BottomN, you have enter a positive integer. For Top/Bottom%, you have to enter a number between 0 and 100. For Top/BottomSUM, you can enter a decimal number (15.7 for example).
4. To remove a parameter, select it and choose Remove.
5.3.2.2.7.2 Tab Page: Assignments
One the Assignments tab page, you define a characteristic assignment that deviates from the default setting.
Mode
For the Characteristic Assignments, you have the following options:
● All Characteristics in drilldown Independent:This setting allows you to apply a condition in a general way. Depending on which characteristics you use in the drilldown, you obtain different results. This option is optimized for ranked list conditions, but can also be used for threshold value conditions with relative values.
SAP BW/4HANAAnalysis PUBLIC 791

CautionCharacteristics that are already used in an active condition for characteristic combinations are not included.
● Most Detailed Along Rows:This option is optimized for threshold value conditions. The condition is applied to the most detailed characteristic of the rows.
● Most Detailed Along Columns:This option is optimized for threshold value conditions. The condition is applied to the most detailed characteristic of the columns.
● Individual:
Select Individual Characteristics
This setting allows you to evalute the condition for characteristics or characteristic combinations defined for specific drilldowns only. You can select any characteristic (of the characteristics used in the query in rows, columns, or in the free characteristics) or a characteristic combination.
● If you only want to evaluate the condition when a certain characteristic is present in the drilldown, select this characteristic.
● If you want to evaluate the condition for characteristic combinations, select multiple characteristics.
5.3.2.2.8 Defining Exceptions
On the Exceptions tab, you can define threshold values (exceptions) for a query. Data that deviates from these thresholds is highlighted in a different colour or flagged using icons. You can use these exceptions to instantly identify deviations from expected results.
Procedure
1. You are on the Exceptions tab in the query definition. Open the context menu in Exceptions and choose Create Exception. The system inserts a new exception.
2. Make the required settings on the General tab page.3. Make the required settings on the Definition tab page.4. Make the required settings on the Cell Restrictions tab page.5. Press OK. You return to the query definition.6. Save the query.
792 PUBLICSAP BW/4HANA
Analysis

Related Information
Exception [page 712]Tab: General [page 793]Tab Page: Definition [page 794]Tab Page: Cell Restriction [page 795]
5.3.2.2.8.1 Tab: General
On the General tab, you can activate the exception and edit its parameters.
General
This area displays the default text for the description. You can change the description.
In the default setting, the new exception is flagged as active. If you change this setting, the exception will no longer be available for analysis of the query data.
Exception Parameters
You can define the parameters of the exception here.
1. To create a parameter, choose Add. The Define Exception Parameter dialog box appears.2. Select the Alert Level.
Depending on the selection you make here, the system uses different background colors to highlight the values. The exception is displayed with the background color of the data cell or characteristic cell. The color shading ranges from dark green for alert level Good1 through yellow for alert level Critical 1 to dark red for alert level Bad3. There are a total of nine color shades, representing nine different levels of priority.You can choose from the following alert levels:○ Good1○ Good2○ Good3○ Critical1○ Critical2○ Critical3○ Bad1○ Bad2○ Bad3
3. Select the comparison operator.You can choose from the following operators:○ Equal: =
SAP BW/4HANAAnalysis PUBLIC 793
○ LessThan:<○ GreaterThan: >○ LessEqual: <=○ GreaterEqual: >=○ Between: []○ NotBetween: ][○ ContainsPattern
4. Enter a value. The values for most of these operators must be floating point numbers. For the operators Between and Not Between, you have to specfiy an upper and a lower threshold value in the Value and To Value fields.The input format depends on the country setting for the operating system.
5. To complete your parameter definition, choose OK.6. To remove a parameter, select it and choose Remove.
5.3.2.2.8.2 Tab Page: Definition
On the Definition tab, you define on which structure element, at what moment in time and in which manner the exception should be applied.
Is defined on
You specify which key figures the exception is evaluated for. The exception can affect all structure elements (All Elements) of a structure or a given structure element (Given Element).
NoteThe exceptions in the query that is run can only take effect if the key figure specified here is contained in the drilldown.
If say you define an exception on a key figure K1 (Billed Quantity for example), that affects key figure K2 (Net Sales for example), it is not enough if just K2 is in the drilldown. The exception can only take effect if K1 is in the drilldown as well.
Time of Evaluation
You can set whether the evaluation of the exception is to take place before or after a local calculation (see Tab: Calculations [page 755]).
In the standard setting, the exception is evaluated before a local calculation (Before List Calculation).
794 PUBLICSAP BW/4HANA
Analysis

Is Displayed in Data Cells
You can define whether the exception affects data cells or characteristic cells. In accordance with your setting, the highlighting for the exception is displayed on the numbers for the selected key figure or the text for the most detailed characteristic value. The standard setting here is Is Displayed in Data Cells.
When you display the exception on data cells, you can choose whether the exception is to be displayed on the evaluated structure element, on a given element, or on all structure elements.
You can use the option Active to specify whether the affected setting should be applied (activated).
Display in Characteristic Cells
When you display the exception on characteristic cells, you can choose whether the exception is to be displayed on rows, on columns, or on both rows and columns.
You can use the option Active to specify whether the affected setting should be applied (activated).
5.3.2.2.8.3 Tab Page: Cell Restriction
On the Cell Restriction tab, you specify which cells the exception is to be evaluated for.
Standard operator for all characteristics not listed
Here, you specify whether the exception should affect all rows or only result rows in the characteristics that you have not defined a restrictoin for in the lower screen area.
Cell Restrictions
By choosing Add, you can create a cell restriction for a characteristic regarding the exception. You can change a cell restriction by choosing Edit and delete it by choosing Remove.
You can choose from any of the free characteristics, or characteristics from the rows and columns used in a query. You cannot use characteristics that are already used in another restriction row in the list.
Select the required validity areas (operators) for the characteristic and restrict the characteristics as required.
SAP BW/4HANAAnalysis PUBLIC 795

Possible Validity Areas
Validity Area Description
Everything The validity area is not restricted. The exception is valid for all drilldown states for the characteristic.
Totals Only The exception is valid for aggregated values of the characteristic only.
Everything Except Totals The exception applies to all values of the characteristic apart from aggregated values.
Fixed Values The exception is valid for just one particular value of the characteristic (for example Spare Parts under Product Group). Select the required characteristic value.
Level The exception is valid for a particular hierarchy level of the characteristic only. Select the required hierarchy level.
5.3.2.2.9 Saving Queries
Once you have finished defining a query, you can save it under its current name by choosing File Save .
Context
You can also save a query if you have not made any changes to the definition. You can save your query at any time.
5.3.2.2.10 Publishing to Roles
If you want to make sure that users with particular role authorizations can see a particular query, you can assign this query to the corresponding roles.
Prerequisites
You are authorized to perform role maintenance.
796 PUBLICSAP BW/4HANA
Analysis

Assignment to Role
1. You are in the query. Choose Publish to Role from the toolbar. The screen for maintaining role assignments appears.
2. Select the required roles listed under Selection options and move these to the Assignments section by drag and drop or by choosing the corresponding entry in the context menu. If you would like to assign further queries to the same roles, you can copy your selection to the buffer.
3. Save your role assignment.
Test
To test your role assignment, open the context menu for your project and choose Open Query by Role.
5.3.2.2.11 Precalculating Value Sets
A precalculated value set can be used as a filter in an analytic query. The filter is defined as a variable of type predefined value set and is executed at runtime. If the precalculated value set is large, query runtime can be improved considerably. A precalculated value set is always assigned to a characteristic that is used in the query.
Context
There are three different ways of entering precalculated value sets:
● Using an analytic query● Entering them manually● By referencing a table
The following section describes entry using a query.
The precalculated value set with query assignment is stored in a database table.
Procedure
1. You use a special query to determine the set of characteristic values to be available as a precalculated value set.
2. You use a variable to make this value set available in other queries.3. You define a query for your reporting. In this query you use the variable in the filter, and can thus switch
between various precalculated value sets at query runtime.
SAP BW/4HANAAnalysis PUBLIC 797

5.3.2.2.11.1 Filling a Value Set
You fill a value set by defining a query with a filter that restricts the amount of characteristic values in accordance with your requirements.
Procedure
1. Define a query for filling the value set. Create the characteristic that you want to create a precalculated value set for in the rows.
TipWe recommend making the query as simple as possible. The focus should be on selecting the characteristic values for filling the value set.
2. Define a filter that restricts the characteristic values at runtime in accordance with your requirements.3. Choose Update Value Set by Query in your query’s toolbar. The Precalculated Value Sets (Buckets) dialog
box appears. The system displays the value sets belonging to the characteristic in the rows.4. Select the target value set.
NoteIf you choose the Show All Query-Related Value Sets option, the system displays all value sets with a query assignment, regardless of the characteristic.
NoteFrom the context menu for the entries in this results list, you can create additional values set or delete existing ones.
5. Choose Fill Value Set. The system writes the selected characteristic values to the value set.
Example
1. You define a query by dragging characteristic CITY to Rows. The system automatically adds it to Filter: Default Values. The columns contain your key figure structure, with key figure SALES for example.
2. You use characteristic COUNTRY in the fixed filter and restrict it to the value Germany.3. Choose Update Value Set by Query in your query’s toolbar. The Precalculated Value Sets (Buckets) dialog
box appears. The system displays the value sets belonging to characteristic CITY.4. Select the target value set. Let’s call it CITY STANDARD SET.5. Choose Fill Value Set. The system writes the selected characteristic values - all city names stored for
Germany that is - to value set CITY STANDARD SET.6. Then create another value set containing only the cities in the German state of Baden-Württemberg, called
CITY BW SET.
798 PUBLICSAP BW/4HANA
Analysis

5.3.2.2.11.2 Defining a Variable for a Precalculated Value Set
To access a precalculated value set at query runtime, you first define a variable that represents the precalculated value set.
Prerequisites
You have used a special query to determine the amount of characteristic values to be available as a precalculated value set.
Procedure
1. Create a characteristic value variable with processing type Manual Input / Default Value (User Entry) for the same target characteristic that you used in the query for filling the value set.
2. For the Var. Represents field, choose the Precalculation (Precalculated) display area. The variable now represents the precalculated value set for the required target characteristic.
3. Open the Variables Editor. We advise against setting the Input Type to Optional on the General tab page. We recommend setting it to Mandatory with Initial instead. The variable will then be visible at query runtime for the query to be used.
4. You have the option of defining a precalculated value set as a default value set on the Default Values tab page.
CautionNote that you will receive a list of all available value sets from the Content Assistant CTRL + SPACE , not just those that relate to the characteristic of your variables.
Example
You create a characteristic value variable called CITY VALUE SET VARIABLE, make all of the settings described above, and set CITY STANDARD SET as the default value set on the Default Values tab page.
Related Information
Display Area [page 735]
SAP BW/4HANAAnalysis PUBLIC 799

5.3.2.2.11.3 Using Precalculated Value Sets
In this topic you will learn how to use a precalculated value set by means of a variable in the filter.
Prerequisites
You have used a special query to determine the amount of characteristic values to be available as a precalculated value set.
You have used a variable to make this value set available in other queries.
Procedure
1. Create a query in which you use the previously defined variable as a filter.
NoteDuring execution of the query, the values from the precalculated value set are used as a filter.
2. At runtime, you can switch between various value sets. To do this, choose Browse under Variables and select the value set defined for the target characteristic.
Results
By using precalculated value sets, you do not need to define filter values. This improves runtime, especially in complex scenarios.
Example
1. You define a second query in which you include characteristic CITY in the fixed filter and restrict to variable CITY VALUE SET VARIABLE.
2. At runtime, you can switch between the value sets CITY STANDARD SET and CITY BW SET, thereby viewing the figures for all German cities in the one, and for cities in the state of Baden-Württemberg in the other.
800 PUBLICSAP BW/4HANA
Analysis

5.3.2.2.12 Using Reusable Query Components
You can reuse objects that appear in the BW Repository under Reusable Components in all the queries of an InfoProvider. You can also reuse characteristic variables.
When changes are made to a reusable object, note that these are applied everywhere that the object is used.
You can use the BW search to find an overview of the reusable query components, which are used in a project or available system-wide.
1. Choose Search Search... in the user menu. As an alternative, you can use the shortcut Ctrl + H or
press the Search ( ) button in the BW Modeling perspective.2. A popup opens. Go to the BW Object Search tab page.3. Enter a search string * (any string).4. Choose Advanced Filter the object type ELEM [query element] as an additional restriction for the search.
The system displays all reusable query elements under Subtypes (except the query itself).5. Select the required subtype and choose Search to start the search.
Related Information
Defining Calculated Key Figures [page 801]Defining Restricted Key Figures [page 804]Defining the Structure [page 807]Defining Filters [page 809]Defining Variables [page 811]
5.3.2.2.12.1 Defining Calculated Key Figures
If you recalculate a key figure of an InfoProvider using a formula, then this calculated key figure can be reused in all queries of this InfoProvider.
Procedure
1. Open the context menu for the InfoProvider and choose New Calculated Key Figure . The New Calculated Key Figure wizard opens. The system applies the properties from the BW project and the InfoProvider, which the project is based on, as the default settings.
2. Enter a description and a technical name for the new calculated key figure.3. If you have created a directory structure for your reusable objects in the component hierarchy
maintenance screen (transaction code RSZTREE), you can enter the required folder in field Folder. Choose Browse. A dialog box appears where you can select an object. (You can also leave this selection blank. You
SAP BW/4HANAAnalysis PUBLIC 801

can also leave this blank. Then the system displays the calculated key figure in folder Reusable Components Calculated Key Figures ).
4. You have now configured the basic settings. Choose Finish to create the calculated key figure. The editor appears.
5. In the Formula area on the General tab, you will find the input field for the formula, which you want to use to calculate the key figure. Base key figures, restricted key figures, already calculated key figures and formulas can be used as operands. The procedure for defining a reusable calculated key figure correspond to the procedure for defining a formula.
6. Change the settings as required for the properties of the calculated key figure in the Properties screen area.
The Properties screen area contains the following tabs, which correspond to the properties of a formula:
○ General tab: For calculated key figures, the same properties are available in the Formula Collision and Display screen areas as are available for the properties of a formula. The only difference is that the Formula screen area is not available because the calculated key figure cannot be changed in the query.
○ Aggregation tab○ Calculations tab
7. Select the calculated key figure.
Results
You have created a calculated key figure for an InfoProvider. This key figure can be reused in queries, which are based on this InfoProvider.
You can find the calculated key figure either in the BW Repository of the query under the Reusable Components Calculated Key Figures , or by using the search. To search for the key figure, find the toolbar in
the BW Modeling perspective and choose (Search). Now you can search for the query on the BW Object Search tab. In the Advanced Filter area, you can restrict the search to the type ELEM [Query Element] and subtype CKF [Calculated Key Figure].
Related Information
Using Calculated Key Figures [page 803]Overwriting Calculated Key Figures Locally [page 803]Defining a Formula [page 766]The following links take you to the documentation for related procedures.Tab: General [page 752]Tab Page: Aggregation [page 771]Tab: Calculations [page 755]The following links take you to the documentation for properties of the formula.Calculated Key Figure [page 714]This link takes to you to the documentation for concepts.
802 PUBLICSAP BW/4HANA
Analysis

5.3.2.2.12.1.1 Using Calculated Key Figures
You can reuse objects that appear in the BW Repository under Reusable Components in all the queries of an InfoProvider.
Context
You are on the Sheet Definition tab in the query definition.
Procedure
1. Select the required calculated key figure and add it to the query definition. There are various options here:
○ In the BW Repository, select one or more objects from the available reusable query components under Calculated Key Figures. Drag and drop the objects onto the relevant area of the query definition.
○ Open the context menu for the area of the query definition and choose Add Reusable ComponentsCalculated Key Figures . A dialog box appears where you can select the required object. Select one or more calculated key figures. Choose OK to add them to the query definition.
2. Save your query definition.
5.3.2.2.12.1.2 Overwriting Calculated Key Figures Locally
You can overwrite a calculated key figure for a query. However, the changes that you make remain local.
Context
You are in the definition of a query that contains the calculated key figure. You want to further restrict this calculated key figure (by using an additional characteristic selection, for example) and change other properties on the General, Conversion and Calculations tabs.
NoteNote that you reusable key figures within a query cannot be overwritten. A local query element is created that references the calculated key figure. You can now perform further modifications on this local query element.
SAP BW/4HANAAnalysis PUBLIC 803

Procedure
1. Select the calculated key figure and choose Edit from the context menu. The Edit Selection dialog box appears.
2. Enter a technical name and a description.
NoteNote that the technical name only relates to the local query element and not to the calculated key figure in use.
3. Make changes to the definition of the calculated query as required.4. Save the query.
Results
You have locally overwritten a calculated key figure in your query.
You will find the calculated key figure either in the query definition or in the outline view of the query elements. In the Calculated Key Figure directory, you can see the base reusable calculated key figure and the locally overwritten calculated key figure in the Sheet area of the query definition. Both key figures have the same technical key but have different UIDs.
5.3.2.2.12.2 Defining Restricted Key Figures
You can restrict the key figures of an InfoProvider by using one or more characteristic selections. The key figure that is restricted by one or more characteristic selections can be a basic key figure, a calculated key figure, or a key figure that is already restricted. A restricted key figure is reusable
Procedure
1. Open the context menu for the InfoProvider and choose New Restricted Key Figure . The New Restricted Key Figure wizard opens. The system applies the properties from the BW project and the InfoProvider, which the project is based on, as the default settings.
2. Enter a description and a technical name for the restricted key figure.3. In the Key Figure field, you can enter the Key Figure of the InfoProvider. Choose Browse. A dialog box
appears where you can select an object. (You can also leave this blank and create the selection in the editor).
4. If you have created a directory structure for your reusable objects in the component hierarchy maintenance screen (transaction code RSZTREE), you can enter the required folder in field Folder. Choose Browse. A dialog box appears where you can select an object. (You can also leave this blank. Then the system displays the calculated key figure in folder Reusable Components Restricted Key Figures ).
804 PUBLICSAP BW/4HANA
Analysis

5. You have now configured the basic settings. Choose Finish to create the restricted key figure. The editor appears.
6. On the General tab, you can configure the required restrictions in the Selection area. To do this, drag and drop the required key figure of the InfoProvider into the selection area and restrict the key figure by selecting one or more characteristic values.
NoteYou can also use variables instead of characteristic values. Note that, due to technical reasons, you cannot use variables with processing type Replacement Path with replacement from a query in restricted key figures.
7. Change the settings as required for the properties of the restricted key figure in the Properties screen area.
The Properties screen area contains the following tabs, which correspond to the properties of a selection:
○ General tab: For calculated key figures, the same properties are available in the Constant Selection and Display screen areas as are available for the properties of a selection. The only difference is that the Selection screen area is not available because the calculated key figure cannot be changed in the query.
○ Conversion tab○ Calculation tab
8. Select the restricted key figure.
Results
You have created a restricted key figure for an InfoProvider. This key figure can be reused in queries, which are based on this InfoProvider. The restricted key figure is not an actual element in this query. It is a placeholder that references the restricted key figure created for the InfoProvider.
You can find the restricted key figure either in the BW Repository of the query under the Reusable Components Restricted Key Figures , or by using the search. To search for the key figure, find the toolbar in
the BW Modeling perspective and choose (Search). Now you can search for the query on the BW Object Search tab. In the Advanced Filter area, you can restrict the search to the type ELEM [Query Element] and subtype RKF [Restricted Key Figure] .
Related Information
Using Restricted Key Figures [page 806]Overwriting Restricted Key Figures Locally [page 806]Defining Selections [page 750]The following links take you to the documentation for related procedures.Tab: General [page 752]Tab: Conversion [page 754]Tab: Calculations [page 755]
SAP BW/4HANAAnalysis PUBLIC 805

The following links take you to the documentation for properties of the selection.Restricted Key Figure [page 713]This link takes to you to the documentation for concepts.
5.3.2.2.12.2.1 Using Restricted Key Figures
You can reuse objects that appear in the BW Repository under Reusable Components in all the queries of an InfoProvider.
Context
You are on the Sheet Definition tab in the query definition.
Procedure
1. Select the required restricted key figure and add it to the query definition. There are various options here:
○ In the BW Repository, select one or more objects from the available reusable query components under Calculated Key Figures. Drag and drop the objects onto the relevant area of the query definition.
○ Open the context menu for the area of the query definition and choose Add Reusable ComponentsRestricted Key Figures . A dialog box appears where you can select the required object. Select one or more restricted key figures. Choose OK to add them to the query definition.
2. Save your query definition.
5.3.2.2.12.2.2 Overwriting Restricted Key Figures Locally
You can overwrite a restricted key figure for a query. However, the changes that you make remain local.
Context
You are in the definition of a query that contains the restricted key figure. You want to further restrict this restricted key figure (by using an additional characteristic selection, for example).
NoteNote that you reusable restricted key figures within a query cannot be overwritten. A local query element is created that references the restricted key figure. You can now perform further modifications on this local query element.
806 PUBLICSAP BW/4HANA
Analysis

Procedure
1. Select the restricted key figure and choose Edit from the context menu. The Edit Selection dialog box appears.
2. Enter a technical name and a description.
NoteNote that the technical name only relates to the local query element and not to the restricted key figure in use.
3. Make changes to the definition of the restricted query as required.4. Save the query.
Results
You have locally overwritten a restricted key figure in your query.
You will find the restricted key figure either in the query definition or in the outline view of the query elements. In the Restricted Key Figure directory, you can see the base reusable restricted key figure and the locally overwritten calculated key figure in the Sheet area of the query definition. Both key figures have the same technical key but have different UIDs.
5.3.2.2.12.3 Defining the Structure
When you create a structure for an InfoProvider, it can be reused in all queries for this InfoProvider.
Procedure
1. Open the context menu for the InfoProvider in question and choose New Structure . The New Structure wizard for creating reusable objects opens. The system applies the properties from the BW project and the InfoProvider which the project is based on as the default settings.
2. Enter a description and a technical name for the structure.3. You have now configured the basic settings. Choose Finish to create the structure. The editor appears.4. You can change properties and select structure members here.
○ Under General, you can change the technical name and the description.○ Under Display, you can make settings regarding Visibility of Structure Member and Zero Suppression.○ Under Details, you can select members. To do this, choose one of the following options in the context
menu:○ New Selection○ New Formula
SAP BW/4HANAAnalysis PUBLIC 807

○ Add Key Figures...○ Add Reusable Components
5. Save your structure.
Related Information
Using Structures [page 808]Locally Overwriting a Structure [page 809]The following links take you to the documentation for related procedures.Structure Properties [page 749]This link takes to you to the documentation for the properties of a structure.Structure [page 714]Structure [page 708]This link takes to you to the documentation for concepts.
5.3.2.2.12.3.1 Using Structures
You can reuse objects that appear in the BW Repository under Reusable Components in all the queries of an InfoProvider.
Context
You are on the Sheet Definition tab in the query definition.
Procedure
1. Select the object you require from the query components that can be reused in all queries for an InfoProvider under Reusable Components Structures .
2. Drag the object to the area of your choosing in the query definition.
Related Information
Locally Overwriting a Structure [page 809]
808 PUBLICSAP BW/4HANA
Analysis

5.3.2.2.12.3.2 Locally Overwriting a Structure
A reusable structure is a global object that cannot be changed in the context of a query. You can make a local object from this kind of structure however.
Procedure
1. If you want to make changes to the structure in the context of your query, choose Dereference from the context menu.The system creates a local copy of the structure.
2. Enter a new description.3. Make the required changes to the local structure object.
Results
You have used the global structure object as the basis for a local structure object. You can use this structure in the context of your query, but not in other queries.
Related Information
Defining Structure Elements [page 750]
5.3.2.2.12.4 Defining Filters
When you create a filter for an InfoProvider, it can be reused in all queries for this InfoProvider.
Procedure
1. Open the context menu for the InfoProvider in question and choose New Filter . The New Filter wizard for creating reusable objects opens. The system applies the properties from the BW project and the InfoProvider which the project is based on as the default settings.
2. Enter a description and a technical name for the filter.3. You have now configured the basic settings. Choose Finish to create the filter. The editor appears.4. You can select the screen areas Fixed Values and Default Values in the editor.5. Save your filter.
SAP BW/4HANAAnalysis PUBLIC 809

Related Information
Reusing Filters [page 810]Overwriting Filters Locally [page 811]The following links take you to the documentation for related procedures.Filter [page 715]Filter [page 711]This link takes to you to the documentation for concepts.
5.3.2.2.12.4.1 Reusing Filters
You can reuse objects that appear in the BW Repository under Reusable Components in all the queries of an InfoProvider.
Context
You are on the Filter tab in the query definition.
Procedure
1. Select the object you require from the query components that can be reused in all queries for an InfoProvider under Reusable Components Filter .
2. Drag the object to the area of your choosing in the query definition.
Related Information
Overwriting Filters Locally [page 811]
810 PUBLICSAP BW/4HANA
Analysis

5.3.2.2.12.4.2 Overwriting Filters Locally
A reusable filter is a global object that cannot be changed in the context of a query. You can make a local object from this kind of filter however.
Procedure
1. If you want to make changes to the filter in the context of your query, choose Dereference from the context menu.The system creates a local copy of the filter.
2. Enter a new description.3. Make the required changes to the local filter object.
Results
You have used the global filter object as the basis for a local filter object. You can use this filter in the context of your query, but not in other queries.
Related Information
Defining Filters [page 784]
5.3.2.2.12.5 Defining Variables
You can define reusable variables for InfoObjects. These variables will also be available for filtering queries.
Context
The basic properties of the variable (such as variable type, processing type, reference characteristic, display area and input type), which you set when you create the variable, cannot be changed later on. However, you can edit the technical name, description and specific settings for the processing type in the properties of the variable later on.
SAP BW/4HANAAnalysis PUBLIC 811

Procedure
1. Open the context menu of the required InfoObject and choose New Variable . The New Variable wizard opens. The system has applied the properties from the BW project and the reference characteristic as the default setting.
2. Enter a description and a technical name for the variable.3. Select the variable type for field Type of Variable.4. Select the processing type for field Processing By. Depending on the variable type, only certain processing
types are useful. The Variables Wizard automatically only offers you the processing types that are possible for your selection.
5. If you want to specify a different InfoObject as a reference characteristic, choose Browse for field Ref. Characteristic.
6. Choose the display area for the Var. Represents field.7. If you have selected processing type Replacement Path, choose Next. In the next step you specify the
Replacement Rule.8. Once you have finished defining the variable, choose Finish. The system creates the variable. The Variables
Editor opens and you see the screen area that shows the properties of the variable.9. In the properties of the variable you can change various settings as required on the General tab. You can
also, for example, set default values or settings for starting the query on the available tabs (tab availability depends on processing type).
10. To delete a variable, choose the delete symbol (Delete) in the properties of the variable.
Results
You have created a variable, which can be used in queries containing the reference characteristic.
You can find the variable either in the BW Repository of the query under the reference characteristic, or by
using the search. To search for the variable, find the toolbar in the BW Modeling perspective and choose (Search). Now you can search for the query on the BW Object Search tab. Under Advanced Filter, you can restrict the search to the type ELEM [Query Element] and subtype VAR [Variable].
You can also use the variable in InfoArea (0BW4_GLOBAL) Global Objects.
Related Information
Variable [page 715]Overview of Variable Types and Processing Types [page 716]Variable Type [page 717]Processing Type [page 718]Display Area [page 735]The following links take you to the documentation for variable concepts.Example: Using a Variable with Replacement from Query [page 813]
812 PUBLICSAP BW/4HANA
Analysis

Variable Properties [page 815]Restricting Characteristics [page 785]Restricting Characteristics by Characteristic Values [page 785]Restricting Characteristics on Hierarchy Nodes [page 787]The following links take you to the documentation for relevant procedures.
5.3.2.2.12.5.1 Example: Using a Variable with Replacement from Query
Context
You want to insert the result of the query Top 5 Products as a variable into the query Sales - Calendar Year/Month.
Procedure
1. Select the characteristic Product and choose New Formula from the context menu. The New BW Variable wizard opens.
2. Enter a description and a technical name for the new characteristic value variable.3. Select variable type Characteristic Value for field Type of Variable.4. Select processing type Replacement Path for field Processing By.5. Choose Next.6. Choose Query as the Replacement Rule.7. Choose the query Top 5 Products using the input help.8. You have not completed the definition of the variable. Choose Finish. The system creates the variable. The
Variables Editor opens and you see the screen area that shows the properties of the variable.
Results
You can now insert the variable into query Sales - Calendar Year/Month. This allows you to determine how the sales for these five top-selling products has developed month for month.
NoteEvery time you execute query Sales - Calendar Year/Month, query Top 5 Products is executed beforehand (hence the term "pre-query"). This can lead to longer runtimes. If you do not need to immediately execute the pre-query, we recommend that you use a variable, which represents a precalculated value set. This
SAP BW/4HANAAnalysis PUBLIC 813

could be the case for example if you do not need to determine the top 5 products every time, because they only change on a monthly basis.
Related Information
Using Precalculated Value Sets (Buckets) [page 678]
5.3.2.2.12.5.2 Using a Variable with Replacement from BRFplus
In the BW Modeling Tools , you assign a a BRFplus function that you define in the Business Rules Framework plus to a variable with processing type BRFplus-Exit.
Prerequisites
In Business Rules Framework plus (transaction BRFPLUS), you have defined the following:
● A suitable BRFplus application● A BRFplus function (as described in BRFplus Exit [page 732])
NoteProgram RSR_BRFPLUS_TOOL supports you in your work with variables in the BRFplus functions that can be used by variables in SAP BW∕4HANA.
Function Description
Display BRFplus Function for Var. With this option, the system displays the available BRFplus functions that can besed for a variable on the basis of their context signature. Double-click to call the BRFplus maintenance screen.
Execute Variable You can use this option to execute a BRFplus function from this report. Note that not all information that can be used as parameters at runtime is available here.
Also note that the first execution of a BRFplus function subsequent to the logic being changed always results in re-generation of the function and therefore takes longer than subsequent execution runs.
814 PUBLICSAP BW/4HANA
Analysis

Function Description
Create BRFplus Function With this option, you can create new BRFplus functions with a suitable context signature. In the Business Rules Framework plus, you then have to define the required logic.
Procedure
1. Variables of processing type BRFplus Exit have a BRFplus Function tab page. On this tab page, you can assign a BRFplus function to the variable. This BRFplus function is then executed when the variable is processed.
2. You can set the required logic for this kind of BRFplus function in the Business Rules Framework plus (transaction BRFPLUS).
Related Information
BRFplus Exit [page 732]
5.3.2.2.12.5.3 Variable Properties
If you have created a variable using the Variables Wizard, the properties of the variable appear in the right-hand area of the Variables Editor.
This area is divided into tabs. The individual tabs and settings vary, depending on the variable type and processing type. The Variables Editor automatically displays only those settings that are relevant and available.
Related Information
Tab: General [page 816]Additional Tabs Available for Specific Processing Types [page 817]
SAP BW/4HANAAnalysis PUBLIC 815

5.3.2.2.12.5.3.1 Tab: General
The General tab of the Variables Editor is required in almost all variable types. Only variables with processing type Replacement Path do not require this tab. In this case, the fields on this tab are not input-ready.
Screen Area: General
The system displays the technical name and the description. You can change the description as required.
Screen Area: Global Settings
The system displays the reference characteristic, the variable type and the processing type. Choose Reference Characteristic to open the properties of the reference characteristic.
Screen Area: Details
The system shows the display area of the variables as not changeable.
The following properties are changeable:
● Input Type:○ Optional: If you select this setting, the variable does not have to be filled with a value at runtime.
NoteVariables with the processing type Authorization have the default setting Optional.
○ Mandatory With Initial: If you select this setting, at least one value has to be specified for the variable at runtime. The initial value (#) is permitted. The initial value # means "unassigned", meaning that you can use it to explicitly select all data records where this characteristic does not have any instances.
○ Mandatory Without Initial If you select this setting, at least one value has to be specified for the variable at runtime. The initial value (#) is not permitted. You must enter one or more concrete values to be able to execute the query.
● Input-Ready:Using this option, you can specify whether the variable is input-ready when the query is executed. The option is activated by default.○ If a variable is input-ready, then when the query is executed, the system first shows the requested
values, on which you can confirm or modify the default values.○ If you deactivate the option Input-Ready, the system automatically executes the query with the default
value.○ If you deactivate this option Input-Ready but you have specified the variable value as mandatory and
you have not specified a default value, then the system cannot execute the query. When you try to execute the query, an error message appears.
816 PUBLICSAP BW/4HANA
Analysis

● Copy Personalization from Variable:Users can personalize variable values for input-ready variables. The personalized values are saved for each variable and user.If you want to use the same personalization data in more than one variable, enter the names of the variables that the personalization data is stored under in this input field. Enter the names manually, or select them using the input help.
NoteYou have to enter the variable without an ampersand (&).
ExampleYou have defined a variable "Customer1", which is mandatory and input-ready. You now define a "Customer2" variable, which is mandatory (initial value not allowed) and input-ready. By entering variable "Customer1" in the input-ready field for variable "Customer" choosing Copy Personalization from Variable, you ensure that both variables have the same personalized values.
Related Information
Display Area [page 735]This link takes to you to the documentation for variable concepts.Additional Tabs Available for Specific Processing Types [page 817]This link takes to you to the documentation for variable properties.
5.3.2.2.12.5.3.2 Additional Tabs Available for Specific Processing Types
The tabs Default Values, Replacement Path and Currencies and Units are available in the variable editor - depending on the processing type.
Default Values
This tab is available for variables of processing types User Entry and Text.
In the Default Values screen area, you can enter one or more default values depending on the variable type. These appear when the query is executed.
NoteIf the variable is input-enabled, you can overwrite the default value and choose another one when executing the query. If the variable is not input-enabled, the query is filled with the default value. In this case, you can no longer change the value when executing the query.
SAP BW/4HANAAnalysis PUBLIC 817

● With characteristic variables you can enter one or more default values, depending on the selected processing type. Choose Browse, Add or Edit to open a dialog box where you can select default values.
● Only one default value is required for formula and text variables. Enter the required default value into the input field manually.
● With hierarchy variables and hierarchy node variables, choose Change to open a dialog box where you can select a specific hierarchy or a specific hierarchy node as a default value.
Replacement Path
The tab is available for all variable types with processing type Replacement Path.
In the Replacement Rule screen area, the system shows the source which variable replacement is based on (CURRENT MEMBER variable, query, variable or InfoObject). This replacement rule cannot be modified.
You can still change the object that you want to use for the replacement however. Choose Browse. A dialog box appears where you can select a different object.
Depending on the replacement type, you can set additional properties in the Replacement Rule and Details screen areas.
Currencies and Units
This tab is available for variables of Formula variable type.
Formula variables usually represent numbers without dimensions. In the Dimension Settings screen area, you can select a dimension indicator, which means that the formula variable represents a specific dimension. Depending on the dimension, you can then determine a currency or a unit.
The following table provides an overview of the various available dimensions:
Dimension indicator
Dimension Currency and unit
Amount Currency
Quantity Unit
Price You can select a currency and a unit. (Price = Currency/Unit)
Number You do not need to make any more entries.
Date You do not need to make any more entries.
Time You do not need to make any more entries.
818 PUBLICSAP BW/4HANA
Analysis

Related Information
Overview of Variable Types and Processing Types [page 716]Replacement Path [page 719]Replacement from Characteristic Value [page 720]Replacement from CURRENT MEMBER Variable [page 725]Replacement from Query [page 726]Replacement from Variable [page 727]
5.3.2.2.13 Query Properties (General Tab)
You can make various settings for your query in the General tab.
The General tab is divided into the following screen areas:
Related Information
Screen Area: General [page 819]Screen Area: Output Settings [page 820]Screen Area: Remote Access [page 822]Screen Area: Variables Order [page 822]Screen Area: Result Location [page 822]Screen Area: Zero Suppression [page 823]Screen Area: Universal Display Hierarchy [page 823]Screen Area "Extended" [page 825]
5.3.2.2.13.1 Screen Area: General
In the General screen area of the General tab, you can view the general properties of the query and configure various settings.
The following general properties are available:
● Technical Name: Displays the technical name of the query.● Description: You can enter or change the query description here.● InfoProvider: Displays the technical name of the InfoProvider that the query is based on. Choose
InfoProvider to open the maintenance screen for the InfoProvider.● Key Date: Every query has a key date. For time-dependent data, the key date determines the time for which
the data is selected. The default value for the key date is the date when the query is executed: <today>.1. To enter a key date manually, choose Change.... The Edit Key Date dialog box appears.
SAP BW/4HANAAnalysis PUBLIC 819

2. Select a date from the calendar.If you select 01/01/1999 for example, the system reads time-dependent data for 01/01/1999.
3. Choose OK.
4. Choose to switch between the default value and manual input for a key date.
5.3.2.2.13.2 Screen Area: Output Settings
In the Output Settings screen area of the General tab, you can view and configure settings for query output.
The following settings are available for query output:
● Adjust Formatting after Refreshing: This setting allows you to decide whether the formatting of the query is adapted after refreshing.The formatting for the query underlines the type of data contained in a cell and highlights the structure of the delivered results. The position and size of the cell area in the analysis grid change when the query is refreshed. The Adjust Formatting After Refreshing function guarantees that the format is adjusted when the updated query data is refreshed. The setting Adjust Formatting after Refreshing is activated by default.
● Suppress Repeated Key Values: You can specify whether to display identical key values more than once in the query. The Suppress Repeated Key Values setting is active in the default setting. This means that only the first key value is displayed for each characteristic, while other identical key values are hidden.
NoteThe key value is the value that the characteristic is presented with. This can be the characteristic description or the characteristic key for example. You can specify how the characteristic is presented by using characteristic properties.
TipIn the following example, the Suppress Repeated Key Values setting is activated:
Region Order Sales
DE A EUR 14,900
B EUR 15,800
C EUR 17,600
USA A EUR 12,800
C EUR 32,800
In the following example, the Suppress Repeated Key Values setting is deactivated:
Region Order Sales
DE A EUR 14,900
820 PUBLICSAP BW/4HANA
Analysis

Region Order Sales
DE B EUR 15,800
DE C EUR 17,600
USA A EUR 12,800
USA C EUR 32,800
● Show Scaling for Measures: Key figures can have scaling factors and units or currencies. If you activate the Show Scaling for Measures setting, an additional header row is added to the row or column header in the query. This additional header row contains information about the scaling factor and the unit or currency, as long as it is consistent (for example EUR 1,000).This setting is normally deactivated.
TipIn the following example, the settings Suppress Repeated Key Values and Show Scaling for Measures are activated:
Region Order Sales
EUR 1,000
DE A 14
B 15
C 17
F D 12
E 32
● Sign Format: This allows you to specify how the minus sign (-) is displayed. You have the following options for displaying negative values:○ Before the number: -123.45. The minus sign is positioned before the value (this is the default setting).○ After the number: 123.45-. The minus sign is positioned after the value.○ In brackets: (123.45). Negative values are displayed in brackets.
● Zero Format: You have the following options for displaying zeroes:○ With Currency: Zero with currency/unit. Zeroes are displayed with the relevant currency/unit, for
example EUR 0.00. This is the default setting.○ Without Currency: Zero without currency/unit. Zeros are displayed without a currency or unit entry, for
example 0.00.○ As Space: Zero as an empty space. Cells containing a zero value remain empty.○ Custom: Zero as a custom text. If you choose this setting, the Show Zeroes field is activated. You can
now enter the required value (character, number, or letter), for example an asterisk (*). All cells that contain a zero will now be filled with this value.
SAP BW/4HANAAnalysis PUBLIC 821

5.3.2.2.13.3 Screen Area: Remote Access
In the Remote Access screen area of the General tab, you can view and configure the settings for remote access.
The following remote access options are available:
External reporting tools use queries as their data source. This allows you to determine whether and how the query is accessed.
● By OData: The integration of SAP BW∕4HANA with SAP Gateway allows you to provide analytic queries of SAP BW∕4HANA as OData queries for mobile scenarios. Queries with OData access are specialized for REST access. To generate the query as an OData query, select By OData.
● By OLE DB for OLAP: If you want to release this query as the data source for external reporting tools that communicate using interface OLE DB for OLAP, select By OLE DB for OLAP.
NoteQueries that contain formulas with the operators %RT, %CT, %GT, SUMRT, SUMCT, SUMGT, and LEAF cannot be released for OLE DB for OLAP. The required result can be achieved using constant selection.
● External SAP HANA View: If the query is based on an InfoProvider that supports SAP HANA views, you can use this setting to make the system create a SAP HANA view for the current query.
Related Information
Generating SAP HANA Views from the SAP BW∕4HANA System [page 226]
5.3.2.2.13.4 Screen Area: Variables Order
In the Variables Order screen area of the General tab, you can view and configure settings for the input order of variables in the query.
If your query contains variables, this setting allows you to define the order in which the user enters them. Choose Up and Down to move the variables up or down. When the query is executed, the system generates a variable input window, which displays the variables in the order specified here.
5.3.2.2.13.5 Screen Area: Result Location
In the Result Location of the General tab, you can specify where the result is displayed.
● Rows: above or below (Above/Below)● Columns: left or right (Left/Right)
In the default setting, the results are displayed on the bottom right.
822 PUBLICSAP BW/4HANA
Analysis

5.3.2.2.13.6 Screen Area: Zero Suppression
Under Zero Suppression on the General tab, you can define whether or not to display rows or columns containing zero values.
Under Applies to, you specify whether suppression of zeros should be applied to rows and columns, only to rows, or only to columns.
The following options (Condition) are available for suppressing zeros:
● Only result value must be zero: If the rows and columns contain characteristics, all rows or columns with a result of zero are not displayed.
NoteThe row or column contains the values 1, -1, 1, -1 for example, meaning that the result is 0. If you select Only result value must be zero, the entire row or column is not displayed.
● All values must be zero: Columns or rows containing zero values in all cells are not displayed.
5.3.2.2.13.7 Screen Area: Universal Display Hierarchy
In the Universal Display Hierarchy screen area of the General tab, you can specify whether characteristics are displayed hierarchically in the rows or columns, and up to which level in this display hierarchy data is read. This can be significant in terms of performance.
Note that the display hierarchy always relates to the current query definition.
Example● For example, if you have the characteristics country, federal state and city in the rows and you do not
select the option Universal Display Hierarchy, the system reads all the data for all characteristics in the drilldown when the query is executed.
Without Universal Display Hierarchy
Country Federal State City Sales
A AA AAA 100
AAB 100
Total 200
B BA BBA 50
BBB 50
BBC 100
Total 200
C CA CCA 50
Total 50
SAP BW/4HANAAnalysis PUBLIC 823

Country Federal State City Sales
Total 450
● However, if you choose the option Universal Display Hierarchy and specify when the query is executed to only expand up to level 1 (in other words, country), the system only reads the data on the country level (sales per country and not sales per city) when the query is executed.
With universal display hierarchy up to level 1
Country Sales
A 200
B 200
C 50
Total 450
● However, if you choose the option Universal Display Hierarchy and specify when the query is executed to only expand up to level 2 (in other words, federal state), the system only reads the data on the federal state level, when the query is executed, and displays the data in a hierarchy.
With universal display hierarchy up to level 2
Country Sales
A
AA 200
B
BA 50
BB 150
C
CA 50
Total 450
● If you insert a different characteristic (at the first position above the characteristic Country, for example), such as the characteristic Payment Method, and you have activated the option Universal Display Hierarchy up to level 2, the system displays the data by payment method and then underneath by country.
Changed query definition with universal display hierarchy up to level 2
Payment Method Sales
BZ01
B 150
C 50
BZ02
824 PUBLICSAP BW/4HANA
Analysis

Payment Method Sales
A 200
B 50
Total 450
If you want to view the data by country and by federal state on the executed query, expand the relevant nodes of the universal display hierarchy. The system reads the required data again.
5.3.2.2.13.8 Screen Area "Extended"
Under Extended in the General tab, you can make data integrity settings. These are relevant if your back-end system supports this.
Request-Status
If the InfoProvider is suitable for this, you can specify how recent the displayed InfoProvider data is. In one InfoProvider, data can be read with different request statuses. The following request statuses are possible:
● Green: Request loaded successfully● Yellow: Request not loaded successfully (still loading)● Red: Request not loaded successfully
The system supports the following alternatives for InfoProvider data integrity:
Options for Specifying Data Integrity
Option Description
All InfoProviders up to released status (RQTS0): All InfoProviders Up to Released Status (RQTS0) (0)
The system reads all data up to the first open request or request with errors. This is the default setting for queries.
Planning-Mode-Support-Enabled ADSOs up to current version: Data Mart DataStore objects and direct update DataStore objects up to the current version (1)
In addition to the All InfoProviders up to released status (RQTS0) mode, the system still reads the data of a plannable DataStore object up to and including the first open request.
NoteThe InfoProvider up to current version is suitable for queries that are defined for example on a CompositeProvider that contains plan data in a DataStore object and actual data in another InfoProvider.
SAP BW/4HANAAnalysis PUBLIC 825

Option Description
All InfoProviders up to current version (to Qualok): All InfoProviders Up to Current Version (to Qualok) (2)
In addition to the All InfoProviders up to released status (RQTS0) mode, the system also reads the data up to and including the first open request for all InfoProviders.
All InfoProviders up to current version (all green requests): All InfoProviders Up to Current Version (All Green Requests) (3)
The system reads all requests that have no errors (all green requests); this includes requests created after requests with errors or requests that were not completed.
Every InfoProvider in CompositeProvider according to its setting: Every InfoProvider in the CompositeProvider according to its setting (7)
The system reads the data from all InfoProviders of a CompositeProvider according to their request statuses. This setting is only possible for CompositeProviders.
All InfoProviders (including red requests): All InfoProviders Complete (Red Requests as Well) (9)
The system reads all available data; all incorrect requests and all open requests for a query are included.
If you do not want to select a particular request status, you can also define a variable.
Cold Store (Nearline)
If the query is based on an InfoProvider that data has already been stored for in a cold store, you can stipulate that the stored data is read and displayed when the query is run.
Cold Store (Nearline) Access Options
Option Description
Use Cold Store According to Basic Provider Setting: Cold store access is made in accordance with the InfoProvider setting.
This option is only relevant for a CompositeProvider. If this option is activated, the setting for each individual InfoProvider in the CompositeProvider is taken into account.
Do Not Read Cold Store: Cold store access is switched off Even if data has been stored in a cold store, the query does not access this data. If a CompositeProvider contains an InfoProvider that allows access, this setting overwrites this and prevents access.
NoteIf you have deactivated access in the InfoProvider settings, you cannot activate it again in the query properties.
826 PUBLICSAP BW/4HANA
Analysis

Option Description
Read Cold Store: Cold store access is switched on Access to data in the cold store is possible if one of the following conditions are met:
● There is a data archiving process for the InfoProvider.● This is connected to a cold store.● The selection conditions of the navigation step intersect
with the previously archived data area.
In a CompositeProvider, this setting allows access to all the InfoProviders of the CompositeProvider that meet the aforementioned conditions (even if access is deactivated in the InfoProvider).
You can also define a variable for cold store access.
Document Links for:
If you select the corresponding setting, the system displays links to documents - provided that you have created the documents for the InfoProvider data, master data or metadata of the query.
5.3.2.2.14 Dependency Structure Tab
On the Dependency Structure tab, you can see a graphic visualization of the components used in the query.
The display of the query components makes it simple for you to clarify questions such as:
● Which dependencies are there between components?● How can changes to individual components affect the query result?● Which query objects must be transported?
Using the context menu, you can print out the display, highlight dependencies or export the entire display or part of the display as a .bmp file.
SAP BW/4HANAAnalysis PUBLIC 827

5.3.2.2.15 Changing Query Runtime Properties (Runtime Properties tab)
On the Runtime Properties tab, you can make settings for individual analytic queries that deviate from the settings for the InfoProvider that the queries are based on.
Context
The Runtime Propertis tab is divided into the following screen areas:
● Common Runtime Properties● Runtime Profile Properties
CautionNote that the system only displays settings that are relevant for the query in question.
Example: If the query does not have any virtual key figures or characteristics, settings that relate to virtual key figures or characteristics are not displayed.
Procedure
1. To be able to change one of the query properties, first switch via from the default value set on the InfoProvider to manual entry of query properties.
2. Make the required settings for the query or queries in question. This can be either activation or deactivation of the query, or selection of a particular value.
Note that the other runtime profile properties you can specify depend on the chosen data integrity profile.3. Save the query.
Related Information
General Runtime Properties [page 829]Runtime Profile Properties [page 835]
828 PUBLICSAP BW/4HANA
Analysis

5.3.2.2.15.1 General Runtime Properties
On the Runtime Properties tab, you can make general runtime settings for individual analytic queries that deviate from the settings for the InfoProvider that the queries are based on.
● Process Key Figure with High Precision● No Parallel Processing● Calculating Commutative Formulas After Aggregation (Calc. Commut. Formulas After Aggregation)● Query is used as InfoProvider● Generation Log● OLAP Effort
Related Information
Calculating Key Figures with High Accuracy [page 829]Not Using Parallel Processing [page 830]Calculating Commutative Formulas After Aggregation [page 831]Query as InfoProvider [page 832]Generation Log [page 833]OLAP Effort [page 834]
5.3.2.2.15.1.1 Calculating Key Figures with High Accuracy
By setting a specific accuracy, you decide which number format is used internally for calculating key figures. The level of calculation accuracy can be specified in the InfoObject maintenance transaction for an individual key figure (system-wide), and specified in the query properties for all key figures of a particular query.
Use
Decimal floating point numbers are used for calculation in the analytic manager. This avoids problematic conversions of the data type float from the decimal system to the dual system and the other way round.
There are two levels of precision for decimal floating point numbers:
● Decimal floating point numbers with 16 places ("decfloat16", "short decfloat")● Decimal floating point numbers with 34 places ("decfloat16", "long decfloat")
Short decfloats are used by default in the analytic manager for numerical data, to minimize the memory requirements for the main memory and the OLAP cache. If you choose the query property Process Key Figure with High Precision, the Analytic Manager calculates all key figures of the selected query with 34 figure decimal floating point numbers (long decfloats).
SAP BW/4HANAAnalysis PUBLIC 829

TipChoose this option for application areas where a high accuracy is required (for queries in the accounting and cost accounting areas for example).
RestrictionThe processing effort for long and short decfloats is similar. Due to the higher memory requirements for long decfloats, we recommend that you do not use this number format for all query key figures. Only use it for key figures that require a high degree of accuracy. You can do this by using the calculation precision setting for the required key figures in the InfoObject maintenance screen.
5.3.2.2.15.1.2 Not Using Parallel Processing
A query based on an InfoProvider is split internally into subqueries. These are automatically processed in parallel. You can use this property to switch off parallel processing for a query.
Use
In most cases, parallel processing of subqueries improves performance. In certain cases however, sequential processing can achieve the best improvements in query performance:
If you choose the Do Not Use Parallel Processing property, the selected query will be processed sequentially from now on.
Related Information
Processing Queries [page 830]
5.3.2.2.15.1.2.1 Processing Queries
Use
A query can be divided into sub-queries by the system. This division is performed in the following circumstances:
● The query contains cells with a constant selection or other definitions that cannot be read using a logical read operation.
● The query contains complex selections, such as calculated or restricted key figures with hierarchy conditions. The selections are then split into multiple accesses.
830 PUBLICSAP BW/4HANA
Analysis

If dividing the query results in more than one sub-query, the read operation is performed in parallel by in the default setting.
Parallel Processing
Multiple dialog work processes are required in order to execute queries in parallel. The maximum degree of parallelism determines the maximum number of work processes that are used for each query.
The actual degree to which queries are executed in parallel depends on the load on the system at any given time and lies between 1 (sequential processing) and the maximum value. If the number of sub-queries is greater than the maximum level of parallelism, all existing sub-queries are divided between the work processes determined by the degree of parallelism.
The results of all sub-queries are collected at a synchronization point and collated to form an overall result.
In sequential processing, the sub-queries are processed one after the other. The interim result is immediately passed on to the analytic manager.
Sequential Processing
In the following cases, the system chooses sequential (non-parallel) processing:
● The entire query consists of one sub-access only.● The query is running in a batch process.● The query requests non-cumulative key figures.● There are not enough dialog processes available when the query is executed. These are required for parallel
processing.● The query is configured for non-parallel processing.● You want to save the result of the query in a file or a table.
Partial Parallel Processing
Queries on an InfoProvider with non-cumulative key figures cannot be processed in parallel because of their high memory consumption. All queries that are based on this kind of InfoProvider are therefore divided into sub-queries that are separated from the other sub-queries. The ‘normal’ sub-queries are processed in parallel first, and the sub-queries that are based on the non-cumulatives are processed sequentially afterwards.
5.3.2.2.15.1.3 Calculating Commutative Formulas After Aggregation
In query monitor, you can use the Query Properties dialog box to specify when a commutative formula is calculated for existing queries.
Context
Commutative formulas are can be calculated before or after aggregation with the same result. By default, the OLAP Engine calculates commutative formulas, which use formula exception aggregation, before aggregation.
A formula calculated before aggregation is part of the generated query report and can be executed with higher system performance than a formula calculated after aggregation (which must be evaluated at runtime). The
SAP BW/4HANAAnalysis PUBLIC 831

result of a formula before aggregation can be saved in the OLAP cache. The formula before aggregation is calculated for every data record, which is transferred from the InfoProvider to the OLAP Engine (see statistics event ID 9010: total number transportable records, DBTRANS).
If the formula is calculated after aggregation, then the number of calculations depends on the granularity of the drop-down characteristic and the reference characteristic of the formula exception aggregation.
The use of function Calculate Commutative Formulas After Aggregation can be more efficient if data aggregation is high due to the standard aggregation and exception aggregation. This means that only a few aggregated data records remain, for which the formula needs to be calculated.
Related Information
Aggregation Steps [page 488]Overview of Statistics Events (Table RSDDSTATEVENTS) [page 1029]
5.3.2.2.15.1.4 Query as InfoProvider
It can sometimes make sense to process query data as an InfoProvider: The advantage in doing this is that you can calculate the query's functions in the Analytic Server before reading the data. This improves performance, especially in the case of simple queries that contain a very large amount of data.
CautionIf you use a query as an InfoProvider, not all query functions are supported.
The following functions are supported:
● Standard aggregations (SUM, MIN, MAX)● Formulas that are totaled before aggregation (+, -, constant factor)● Unit and currency translations● Non-cumulative key figures● Constant selection● Formulas with quotients, like prices● Formulas with exception aggregation
832 PUBLICSAP BW/4HANA
Analysis

In the following cases, it is not possible to activate a query as an InfoProvider:
● The query has input-ready required variables.● Temporal hierarchy join is enabled.● The query has more than one structure.● The technical name of the query is more than 20 characters in length.
The following settings are not taken over from the query:
● Set hierarchies● Local aggregations● Elimination of internal business volume● Conditions
Special Features in the Result of the Query Execution
When you execute a query, the result is displayed differently, according to whether or not you use the query as an InfoProvider. If you use a query as your InfoProvider, note the following:
● For values with a mixed currency or unit basis (10€ + 5$ for example) and for values with compound units or currencies (15 $/kg for example), the unit display in the result is the initial (unassigned) value.
● Key figure values where nothing (NULL) is displayed in the result set display the value "0".
5.3.2.2.15.1.5 Generation Log
You can use this property to specify whether a log should be written when a query is regenerated.
Context
This function is used for test and support purposes. In certain cases, queries have to be generated again; for example, when a query definition is changed. If you select the Generation Log option, the system writes entries to the application log. These entries provide information on why the query was generated again.
SAP BW/4HANAAnalysis PUBLIC 833

5.3.2.2.15.1.6 OLAP Effort
If InfoProviders store large amounts of data, certain queries can retrieve large result sets. OLAP effort is the maximum effort expected by Analytic Manager for processing the data it retrieves.
Use
This property can force the use of filters or the removal of drilldown characteristics if queries exceed the specified upper limit for OLAP effort. This restricts the effort for a query and with this the waiting time for the query result.
You can decide what has priority here: Would you like to restrict the query effort or would you prefer to have a result in spite of longer processing and response times?
The effort for Analytic Manager depends on the size of the result set and on the complexity of the query:
● Complex Queries: Although a large data set is retrieved from the database in the back end, the result set that the user sees is quite small in some cases. This occurs in the case of exception aggregations and currency translations for example.
● Simple Queries: Queries without complex functions or with functions that have been moved out to the SAP HANA database are considered simple queries.
Overview of the modes
● Default (0):A default value of the user’s choosing can be set for the query. Normally the default value is “infinite”. This therefore has no effect on the queries.
● Low (4):This mode is suitable for simple queries with small result sets.
● High (6):This mode is suitable for simple queries with large result sets or for complex queries with small or medium-sized result sets.
● Medium (5):This mode is suitable for simple and complex queries if the size of the result set is situated between low and high.
● Infinite (9):This mode returns the query result regardless of the size of the OLAP effort.
834 PUBLICSAP BW/4HANA
Analysis

5.3.2.2.15.2 Runtime Profile Properties
On the Runtime Properties tab, you can make runtime settings for individual analytic queries that deviate from the settings for the InfoProvider that the queries are based on. The Data Integrity Profile property has a significant influence on the other selection options.
● Data Integrity Profile● Query Read Mode● Query Cache Mode● Cache Usage Mode● Update Cache Objects in Delta Process● Type of SP Grouping for Delta Caching● Operations in SAP HANA/BWA● Materialize Intermediate Query Result● Use Selection of Structure Elements● Also Read Child Members● Optimization Mode● Optimization Periods● Stat. Detail Level
Related Information
Data Integrity Profile [page 836]Read Mode [page 837]Cache Mode [page 838]Cache Usage Mode [page 839]Delta Caching [page 840]Specifying the InfoProvider Grouping for Delta Caching [page 841]Operations in SAP HANA [page 841]Materializing the Intermediate Result of the Query [page 861]Using the Selection of Structure Elements [page 862]Reading Child Members with Hierarchy Structure Nodes [page 864]Optimization Mode [page 865]Optimization Periods [page 865]Statistic Details Display [page 866]
SAP BW/4HANAAnalysis PUBLIC 835

5.3.2.2.15.2.1 Data Integrity Profile
The data integrity profile provides you with an easy way of testing the data integrity of a query, without the need to make separate expert data integrity or request status settings in the read mode, cache mode, cache usage mode and the InfoProvider grouping.
You can choose from the following profiles:
● ' ': Standard: No Profile (expert settings are used)The behaviour of the query is tested using the expert settings.
● 'G': Guaranteed Stable Data from Start of QueryWe only recommend this mode for queries with very few characteristics and restricted navigation, as it can take up a large amount of memory on the BW application server. It can even cause the query to terminate.If you choose this profile, the query will always show the data from when the query starts. When called for the first time, the system transfers a data snapshot of the query - which is requried for all possible drilldowns or navigation - to a memory segment of the BW application server. Every subsequent navigation step in the query is only performed on the transferred data set.Note that the initial reply time can be very long, as a snapshot of the data has to be created when the query starts. The system uses read modeQuery to Read All Data at Once (A).
RestrictionThe following restrictions apply:
○ It is not possible to add free characteristics in this mode.○ It is not possible to use Operations in SAP HANA / BWA in this mode (with the exception of
Optimized Access).○ Whenever variables belonging to the query's static filter are changed, the system creates a new
snapshot.
● 'S': Stable Data from Start of QueryThis mode offers stable data with adequate performance.Data mart DataStore objects are read with data integrity mode (or request status) All InfoProviders Up to Released Status (RQTS0). If InfoProviders cannot read old datasets, navigation steps could fail, and it might be necessary to set the Operations in SAP HANA option to Optimized Access mode. The system then changes the read mode from Query to read when you navigate or expand hierarchies (H) to Query to read during navigation (X).
● 'P': Provider specific: Plannable (or transactional) InfoProviders with current dataThis mode implicitly offers the standard behaviour for the system, which is always applied if no expert settings are changed.InfoProviders that can read old datasets are read the same way as in profile 'S'.Plannable (or transactional) InfoProviders are read with data integrity mode (or request status) Real-Time InfoCubes up to Current Version. For plannable (or transactional) InfoProviders and InfoProvider that cannot read old datasets, cached data is used if available. If not, current data must be read. The Operations in SAP HANA option is not adjusted. If InfoProviders cannot read old datasets, the read is changed from from Query to read when you navigate or expand hierarchies (H) to Query to read during navigation (X).
● 'C': Consistent Current DataThis mode returns current data every time a new list is calculated. Operations that cause a new list to be calculated are all operations that affect the entire list. These include filters, changing characteristic properties, and changing the settings for row and column axese.Whenever hiearchy nodes are expanded or collapsed, the system keeps new numbers consistent with the numbers that are already in the list.
836 PUBLICSAP BW/4HANA
Analysis

Data mart DataStore objects are read with data integrity mode (or request status) All InfoProviders Up to Current Status (Qualok). Plannable (or transactional) InfoProviders wth current data are read with data integrity mode (or request status) Real-Time InfoCubes up to Current Version. If InfoProviders cannot read old datasets, this can cause the system to change the Operations in SAP HANA / BWA option to Optimized Access mode, and to change the read mode from Query to read when you navigate or expand hierarchies (H) to Query to read during navigation (X).
● 'M': Most Current DataThis mode always displays the most current data and does not keep the data consistent in a list displayed if you drill down in the list.Data mart DataStore objects (including plannable ones) are read with data integrity mode (or request status) All InfoProviders Complete (Red Requests as Well). The Operations in SAP HANA / BWA option can be used without restrictions.
● 'D': Dirty DataThis mode behaves the same as 'M', but deactivates the cache in the Analytic Manager. The reply time can therefore be very long.
NoteAll InfoProviders that use the delta cache can read old datasets.
These are mainly data mart DataStore objects or providers created by customers, which implement delta cache interface IF_RSD_DELTACHACE_SUPPORT with the corresponding settings.
5.3.2.2.15.2.2 Read Mode
The read mode determines how the OLAP processor acquires data during navigation. You set the mode for InfoProviders in Customizing and for queries in the query monitor.
The following types are supported:
● Query to be read when you navigate or expand hierarchies (H)The amount of data transferred from the database to the OLAP processor is the smallest in this mode. However, it has the highest number of read processes.In the Query to Read Data during Navigation mode, the data for the fully expanded hierarchy is requested for a hierarchy drilldown. In the Query to be read when you navigate or expand hierarchies mode, the data across the hierarchy is aggregated and transferred to the OLAP processor on the hierarchy level that is the lowest in the start list. When expanding a hierarchy node, the children of this node are then read.
● Query to read during navigation (X)The OLAP processor only requests data that is needed for each navigational status of the query in the front end. The data that is needed is read for each step in the navigation.Unlike with the Query to be read when you navigate or expand hierarchies mode, presentation hierarchies are always imported completely at leaf level here.The OLAP processor can read data from the main memory when the nodes are expanded.When accessing the database, the best aggregate table is used and, if possible, data is aggregated in the database.
● Query to read all data at once (A)There is only one read process in this mode. When you execute the query on the front end, all data in the main memory area of the OLAP processor that is needed for all possible navigational steps of this query is
SAP BW/4HANAAnalysis PUBLIC 837

read. During navigation, all new navigational states are aggregated and calculated from the data from the main memory.
The Query to be read when you navigate or expand hierarchies read mode significantly improves performance in almost all cases compared to the other two modes. The reason for this is that only the data the user wants to see is requested in this mode.
Compared to the Query to be read when you navigate or expand hierarchies mode, the Query to read data during navigation setting only effects performance for queries with presentation hierarchies.
Unlike the other two modes, the Query to Read All Data At Once setting also improves performance for queries with free characteristics. The OLAP processor aggregates on the corresponding query view. For this reason, the aggregation concept, working with pre-aggregated data, is least supported in the Query to Read All Data At Once mode.
We recommend using the Query to be read when you navigate or expand hierarchies mode.
Only choose a different read mode in exceptional circumstances. The Query to Read All Data At Once read mode might be of use in the following cases:
● The InfoProvider does not support selection. The OLAP processor reads significantly more data than the query needs anyway.
● A user exit is active in a query. This prevents data from already being aggregated in the database.
5.3.2.2.15.2.3 Cache Mode
Definition
The cache mode defines whether and how the query results and navigational states calculated by the OLAP processor should be saved as highly compressed data in a cache.
The mode can be set as the default value for an InfoProvider in Customizing and for a query in the query monitor.
Use
Caching is a means of improving query performance. Care should be taken to balance benefits against cost however:
● Benefits: Better query response time● Cost: Expenditure involved in structuring and storing data in the cache
You can store cache data in the database or locally at runtime. The option that you choose depends on various parameters. These include:
● How often the query is requestedWe recommend saving frequently requested queries in the cache. There are practically no limitations on the memory space available in the database for the database cache.
● The complexity of the query
838 PUBLICSAP BW/4HANA
Analysis

Caching improves performance for queries whose evaluation is more complex. We recommend keeping complex data processed by the OLAP processor in the cache.
● How often data is loadedThe cache does not constitute an advantage if query-relevant data is frequently changed and therefore has to be loaded frequently, since the cache has to be regenerated every time.
Overview of Cache Modes
● Cache mode I: Cache is inactiveNew data is read during every single navigation step.
● Cache mode 0: Local cacheThe database cache is deactivated. In this case, the system works exclusively with the local cache.
● Cache mode D: Cache in databaseThe cache data is persistent in database tables. In this mode, no data is displaced, and the memory size is unlimited. The database instance for the table carries the load. More space is required, but this method also saves time.
● Cache mode P: Every provider as set in the InfoProvider definitionThis mode is only available for queries on MultiProviders and CompositeProviders. It makes it possible to cache the data from the contained InfoProviders in accordance with the cache made set in the definition of each individual InfoProvider.
Related Information
Cache Monitor [page 1014]
5.3.2.2.15.2.4 Cache Usage Mode
The cache usage mode is an expert tool for the cache mode. It defines when cache entries can be used to answer a query, and when the data has to be read again.
Cache Usage Modes
The following cache usage modes are available:
● "S" Always display data from query start (stable data)The time that the query starts at determines the status of the data. If you navigate within the query, the data is always displayed in the status it had when the query started.
SAP BW/4HANAAnalysis PUBLIC 839

NoteIf a provider is not able to provide an old version of the data, and the requested data is not in the query cache, the system displays a warning.
● "C" Always display current data (current data)Current data is taken during every navigation step. This does not mean that data is read from the database during every navigation step however. If the status of the InfoProvider has not changed, and the cache already contains data to resond to the current query, the system uses this data. The data only needs to be read from the database again if the status of the InfoProvider has changed.
NoteCache usage mode "Curent Data" makes it possible to always take new data for InfoProviders that are updated frequently.
● " " Daten from query start if possible, otherwise current data (standard behaviour)In the case of InfoProviders that offer a mechanism for reading older versions of the data, the time when the query starts determines the status of the data, as with the "Stable Data" mode. InfoProviders that do not facilitate reading of older versions of the data provide new data if the data cannot be taken from the cache.
InfoProvider-Specific Information
● Data Mart DataStore Objects:The behavior of these DataStore objects can generally be defined with the semantics for data integrity, as InfoCubes offer the option of reading older data versions.With cache usage mode "C - Current Data", it is also possible using DataStore objects with the data integrity mode (or request status) All InfoProviders Up to Released Status (RQTS0) (0) to make changes in the released status visible with every navigation step.
5.3.2.2.15.2.5 Delta Caching
You can use the Update Cache Objects in Delta Process property to specify that individual data in a query is added to the cache.
Use
With the delta cache procedure, you do not need to read all data for the query from the database when the data basis changes. Whether the data is read directly from the database or from the cache does not have any impact on the query results.
Data mart DataStore objects are suited to the delta cache process because their request ID can be used to identify which entries have been added.
840 PUBLICSAP BW/4HANA
Analysis

CautionThe cache still has to be rebuilt when:
● changes are made to metadata, master data, hierarchies, or exchange rates● InfoProviders are not suited to the delta cache process● InfoProviders have been compressed
5.3.2.2.15.2.6 Specifying the InfoProvider Grouping for Delta Caching
You can use the Type of SP Grouping for Delta Caching setting to optimize the behaviour of the delta cache.
Use
If a query is based on a CompositeProvider, you can specify that the data that each of the InfoProviders for the CompositeProvider supplies is to be treated separately and stored separately in the cache.
The advantage of this grouping is that you do not have to read all data for all InfoProviders again when data for just one sub-InfoProvider changes.
The disadvantage of this grouping however is that it requires more memory space because the data cannot be aggregated using the various InfoProviders. The data is not aggregated until the query is run.
CautionThe grouping is only taken into account if the delta cache process is activated for the query.
The following modes are supported:
● No Provider Partitioning (0)There is no partitioning. All results for the InfoProvider are merged into one result and cached. If the data for an InfoProvider changes, the cache has to be rebuilt. This is the default setting.
● Grouping depending on InfoProvider Types (1)With grouping based on the InfoProvider types, all InfoCubes are saved in a group. The remaining InfoProviders are either stored in one group or stored in multiple groups according to their properties. DataStore objects or InfoProviders that can supply hierarchy nodes are grouped for example.
● Every Provider Separate (3)With this setting, all InfoProviders are stored separately.
5.3.2.2.15.2.7 Operations in SAP HANA
The system always checks whether optimized operations can be performed in the SAP HANA for the InfoProvider that the selected query is based on.
SAP BW/4HANAAnalysis PUBLIC 841

If you are using a CompositeProvider, the system checks each InfoProvider it contains.
The following standard modes are available:
● Defensive (J): This mode corresponds to expert mode Optimized Access (3).● Standard (M): The optimizer for operations in SAP HANA decides whether the query is executed with
expert mode Formulas Calculated in SAP HANA with Complex Currency or Unit (8) or expert mode, Optimized Access (3).
● Offensive (P): The optimizer for operations in SAP HANA decides whether the query is executed with expert mode Conditions Calculated in SAP HANA (9) or expert mode, Optimized Access (3).
For experts, you also have the option of selecting one of the following expert modes provided they have been activated.
Note
For information about activation, see 2505732
Note that the optimizer for operations in SAP HANA is not called when you choose one of these expert modes.
Also note the following case: A user activates the switch for expert modes and sets an expert mode for a query. After this, other users who use this query can also see the selected expert mode even if they have not activated the switch for expert modes.
● Expert: No optimized operations in SAP HANA (0)If you do not want the system to use optimized operations in theSAP HANA database, choose this mode.
● Expert: Individual Access per InfoProvider(2):The SAP HANA is used with this mode in the same way as with the Optimized Access (3) mode.For CompositeProviders however, a separate access is made for each participating InfoProvider.
CautionIf the mode has been changed manually, this manual setting can still be used - regardless of whether this was done in the query or directly in the InfoProvider.
● Expert: Optimized Access (3):In this mode, optimized access to the SAP HANA database is activated.
NoteIf virtual characteristics or key figures are used in the query, a warning appears.
For CompositeProviders, joint optimized access is made to all participating InfoProviders.● Expert: Exception Aggregation (6)
You can calculate exception aggregations in the SAP HANAdatabase.
NoteIf it is not possible to use optimized operations for some of the InfoProviders contained in a CompositeProvider or MultiProvider, the system reads these InfoProviders without optimized access and temporarily copies the data read in them to the SAP HANA database.
If the exception aggregation cannot be calculated in SAP HANA because of the functionality used, the Optimized Access (3) mode is used.
842 PUBLICSAP BW/4HANA
Analysis

● Expert: Formulas Calculated in SAP HANA (7):This mode allows you to calculate formulas with exception aggregations in the SAP HANA. This requires SAP HANA 1.0 SP11 (or higher). All prerequisites that apply for mode Exception Aggregation (6) also apply here. If such a formula operand of a formula does not have an exception aggregation, this operand is also performed in. SAP HANA
● Expert: Formulas Calculated in SAP HANA with Complex Currency or Unit of Measure (8)In addition to mode Formulas Calculated in SAP HANA (7), the system also supports formulas with a complex currency or unit. This requires SAP HANA 1.0 SP12 Revision 122.04 (or higher).
● Expert: Conditions Calculated in SAP HANA (9):The system supports the calculation of conditions. This requires SAP HANA 2.0 SP3 Revision 30 (or higher).
Related Information
Optimizer for Operations in SAP HANA [page 843]Learning Program for the Optimization of Operations in SAP HANA [page 845]Exception Aggregation in SAP HANA [page 848]Formulas Calculated in SAP HANA [page 851]Formulas Calculated in SAP HANAwith Complex Currency or Unit of Measure [page 854]Conditions Calculated in the SAP HANA [page 856]Aggregation and Formula Calculation [page 477]
5.3.2.2.15.2.7.1 Optimizer for Operations in SAP HANA
The optimizer helps you to select the relevant mode in the system that can execute operations to your advantage SAP HANA
If you execute a query with standard mode, the optimizer decides whether the query is executed with the Optimized Access (3) mode (negative decision) or with export mode Formulas Calculated in SAP HANA with Complex Currency or Unit of Measure (8) (positive decision).
If an enhanced expert mode is used, you get a smaller result set in the database (DBTRANS). This shortens the processing time of the result set in the analytic manager. On the other hand, there are additional setup costs for enhanced expert modes. For this reason, it is only useful to execute a query with an enhanced expert mode if the benefit (shorter processing time for the result set returned by the database) is greater than the additional setup costs.
The following table illustrates this:
Example Query Execution in SAP HANA No Execution in SAP HANA
Response Time (ms) DBTRANS Response Time (ms) DBTRANS
Q01 5093 2 7015 76092
SAP BW/4HANAAnalysis PUBLIC 843

Example Query Execution in SAP HANA No Execution in SAP HANA
Q02 5766 12 3000 10
Q01 is faster when executing operations in SAP HANA because less data has to be transferred. Q02 is faster when not executing operations in SAP HANA because in this case the additional setup costs are greater than the gain in transfer time.
The optimizer for operations in SAP HANA estimates the number of rows in the result set in the database for the positive decision [EST_DBTRANS_POSITIVE_DECISION] and for the negative decision [EST_DBTRANS_NEGATIVE_DECISION]. The estimation only includes those parts of the query that are executed differently with a positive or negative decision. The estimation takes global filters into account.
The system calculates a reduction factor by which the result set in the database is smaller with a positive decision: [EST_DBTRANS_NEGATIVE_DECISION] / [EST_DBTRANS_POSITIVE_DECISION].
If this reduction factor is greater or equal to the "minimum reduction factor”, and [EST_DBTRANS_NEGATIVE_DECISION] is greater or equal to the "minimum DBTRANS (negative decision)", the optimizer accepts for operations in SAP HANA that the benefit of the smaller result set is greater than the additional setup costs for the enhanced expert mode. The optimizer thus makes positive decisions for operations in SAP HANA, meaning that the query is to be executed with the Enhanced Expert mode. Otherwise, the optimizer decides negatively for operations in SAP HANA, and the query is executed with the Optimized Access (3) mode.
You can change the "minimum reduction factor" and "minimum DBTRANS (negative decision)" in the Implementation Guide (transaction SPRO).
Note
SAP Reference IMG SAP BW/4HANA Customizing Implementation Guide SAP BW/4HANA AnalysisSettings for Performance of Analytic Manager
If the "minimum reduction factor" and "Minimum DBTRANS (negative decision)" have values 0 or 1, the optimizer is deactivated for operations in SAP HANA The queries are then always executed with enhanced expert modes. You can use the Learning Program for the Optimization of Operations in SAP HANA to generate proposals for the "minimum reduction factor" and "minimum DBTRANS (negative decision)”.
The statistics event Effective TREXOPS specifies the current value of the query property Operations in SAP HANA (used for executing the navigation step) in the column Event Prop. If the optimizer is used, this is the result of the optimizer, provided that this value could be applied to the navigation step.
ExampleThe optimizer concludes that the query is to be executed with Formulas Calculated in SAP HANA with Complex Currency or Unit of Measure (8) If the navigation step to be executed does not contain a formula however, it is executed with the maximum possible value, in this example Expert: Exception Aggregation (Standard) (6):
844 PUBLICSAP BW/4HANA
Analysis

Related Information
Operations in SAP HANA [page 841]Learning Program for the Optimization of Operations in SAP HANA [page 845]Configuring the Learning Program [page 846]Evaluation of Learning Results [page 847]Overview of Statistics Events (Table RSDDSTATEVENTS) [page 1029]
5.3.2.2.15.2.7.1.1 Learning Program for the Optimization of Operations in SAP HANA
The learning program (transaction code RSR_LTO) determines the optimum reduction factor that you can use as the default value in the Implementation Guide in the performance settings for the analytic manager.
The learning program executes a series of trace steps.
The trace steps are divided into those that are quicker with execution of operations in SAP HANA, and those that take longer. Trace steps that do not contain any operations in SAP HANAor only have a non-relevant runtime difference are not included. SAP HANA
For each trace step the result set of the database (DBTRANS) is included without execution of operations in SAP HANA and the reduction factor of the result set of the database with / without execution of operations in SAP HANA
The optimum "minimum reduction factor” and the optimal “minimum DBTRANS” (negative decision) are in the area in which both trace step sets intersect. The learning program then determines the appropriate values within this range, so that at least 90% of the cases with operation in SAP HANAare faster and performance is increased.
The following figure illustrates this:
SAP BW/4HANAAnalysis PUBLIC 845

Related Information
Configuring the Learning Program [page 846]Evaluation of Learning Results [page 847]Optimizer for Operations in SAP HANA [page 843]
5.3.2.2.15.2.7.1.1.1 Configuring the Learning Program
You can specify the key figures with which the learning program is to execute the trace steps.
Context
You are on the Measure tab.
Procedure
1. Enter a test package that you created in the trace tool environment in the CATT trace area. Input help is provided.
2. Enter a minimum runtime difference. You can do this in seconds or as a percentage.
If a trace step requires the same runtime with and without executing operations in SAP HANA, it is not worth including it in the decision.
Specifying a tolerated difference is useful to rule out measurement errors. For example, if you enter 0.5 (seconds), it means that only those trace steps that have a runtime greater than or equal to 0.5 (seconds) are included.
3. Enter the number of parallel processes for the execution of the trace.
The recommendation is the value 1, since a higher value might serialize processes in the database and this could lead to incorrect learning results.
4. Decide whether the query before the calculation is to be executed once, which means that the caches in the database are filled once and the query is generated once.
5. Execute the job.
846 PUBLICSAP BW/4HANA
Analysis

Next Steps
Choose the Analyze Jobs tab:
Related Information
CAT Tool [page 1069]Evaluation of Learning Results [page 847]
5.3.2.2.15.2.7.1.1.2 Evaluation of Learning Results
On the tab page Analyze Jobs you will find the results of the learning program.
The table gives an overview of all jobs in the selected period. If a job has finished (see the Statuscolumn), you can display the learning results by choosing Analyze.
Screen area Learning Results for the Optimizer for Operations in SAP HANA
● Default value for the "minimal reduction factor"● Default value for "Minimum DBTRANS (negative decision)"
NoteIf you want to use these default values in the Implementation Guide, choose Save.
Screen area Operations in SAP HANA
● Main measurement (e.g. Offensive (P)● Reference measurement (e.g. Expert: Optimized Access (3):
Table Trace ID
The adjacent table shows the traces with different measurement that have been made (green). For these traces, you can display the relevant query runtime statistics.
Traces that have a yellow status do not contain any operations to be executed in SAP HANA and are not relevant for this learning program.
SAP BW/4HANAAnalysis PUBLIC 847

Traces in which an error occurred are marked red. You can execute these again by choosing execute.
Table Trace Steps Executed in Different Ways:
In the lower screen area, you can see the analysis of the trace steps that contain operations to be executed in SAP HANA and were executed differently in the two measurements. You can see whether the traces were faster with or without execution of operations in SAP HANA, which decision the optimizer made, and whether this decision was the correct one. In the following columns you can find the technical key figures for the optimization.
Related Information
Configuring the Learning Program [page 846]Optimizer for Operations in SAP HANA [page 843]Overview of Statistics Events (Table RSDDSTATEVENTS) [page 1029]
5.3.2.2.15.2.7.2 Exception Aggregation in SAP HANA
Supported Aggregations
The following exception aggregations can be calculated in SAP HANA:
Supported Aggregations
Exception Aggregation SAP HANA
Count All Values [CNT] X
Constant with exception aggregation SUM X
Multiple-dimensional exception aggregation SUM for a constant
X
Total [SUM] X
Minimum [MIN] X
Maximum [MAX] X
Count All Values <> 0 [CN0] X
Average of All Values [AVG] X
848 PUBLICSAP BW/4HANA
Analysis

Exception Aggregation SAP HANA
Average of All Values < > 0 [AV0] X
First Value [FIR] 2156123
Last Value [LAST] 2156123
No aggregation if more than one record arises [NO1] SAP HANA 1.0 SP11 (or higher)
No aggregation if more than one value arises [NO2] SAP HANA 1.0 SP11 (or higher)
Standard Deviation [STD] SAP HANA 1.0 SP12 (or higher)
Variance [VAR] SAP HANA 1.0 SP12 (or higher)
Non-Supported Functions for Individual Key Figures
Calculating exception aggregation in SAP HANAis not possible if the key figure uses one of the following functions:
● Non-cumulative key figures● Key figures with elimination of internal business volume● Virtual key figures● Stock coverage key figures● If the key figure uses a currency translation or unit conversion that uses an InfoObject to deterrmine the
target currency/unit.
Commutative Formulas before Aggregation
Commutative formulas are formulas that can be calculated before or after aggregation and always have the same result.
Examplea * 5: If key figure a has aggregation total [SUM], this formula is a commutative formula.
a * b: With multiplication of the key figures a and bbefore aggregation, this produces a different result. This is therefore not a commutative formula.
If a commutative formula has a supported exception aggregation, and commutative formulas are calculated before aggregation in accordance with the query properties, this formula is calculated in SAP HANA.
SAP BW/4HANAAnalysis PUBLIC 849

Non-Supported Functions in a Query
Calculating exception aggregations for a query in SAP HANAis not possible if the query uses one of the following functions:
● Determination of time-dependent hierarchies for an event (temporal hierarchy join)● Virtual characteristics● Artificial characteristic "currency/unitt" (1CUDIM)
Pushdown of additional features
If it is possible to calculate an exception aggregation in SAP HANA, the following calculations are performed in SAP HANA even if they are not in an exception aggregation:
● Currency translations with a variable time reference from a special InfoObject are calculated in SAP HANA.● If the source unit of quantity is determined from the data record,
○ the system uses a reference InfoObject in the SAP HANA to calculate unit conversions.○ As of SAP HANA 2.0, the system uses a reference InfoObject and central units of key figures (T006) in
the SAP HANA to calculate unit conversions.● Variables with replacement from the attribute value of a characteristic
Variables with replacement from the attribute value of a characteristic
Variables with processing type Replacement path, with replacement from the attribute value of a characteristic are supported as of SAP HANA1.0 SP11 (or higher). The following prerequisites must be met:
● The replacement does not take place after aggregation.● The attribute is either a key figure or a characteristic. If the attribute is a characteristic, it must be either a
currency or a unit, or it must have one of the following data types:○ CHAR - Character String○ NUMC - Numerical Text○ DATS - Date in Format YYYYMMDD○ TIMS - Time in Format HHMMSS○ SNUMC - Signed numeric text (is supported up to a length of 20 letters as of SAP HANA 1.0 SP12)
NoteIn the case of compound characteristics, note that this also applies to the characteristic that serves as the compounding parent.
● In the case of the characteristic or - in the case of referencing characteristics - the referenced characteristic, one of the following conditions applies:○ It has no master data read class.○ If it does have a master data read class, this allows the use of master data tables. These include master
data read classes of the time characteristics delivered by SAP, provided that the time characteristic has at least one navigation attribute. In this case, the system does not support transitive attributes.
○ For all other characteristics, the system supports the replacement of the artificial attributes “Key” and “Characteristic Reference (Constant 1)” only.
850 PUBLICSAP BW/4HANA
Analysis

5.3.2.2.15.2.7.3 Formulas Calculated in SAP HANA
Supported Aggregations
The following exception aggregations are supported as of SAP HANA 1.0 SP11:
Supported Aggregations
Exception Aggregation SAP HANA
Count All Values [CNT] X
Total [SUM] X
Minimum [MIN] X
Maximum [MAX] X
Count All Values <> 0 [CN0] X
Average of All Values [AVG] X
Average of All Values < > 0 [AV0] X
First Value [FIR] 2156123
Last Value [LAST] 2156123
No aggregation if more than one record arises [NO1] X
No aggregation if more than one value arises [NO2] X
Standard Deviation [STD] As of SAP HANA 1.0 SP12
Variance [VAR] As of SAP HANA 1.0 SP12
Supported formula operators
Calculating formula exception aggregations in SAP HANA is possible for the following operators:
Supported formula operators
Operator NODIM-like Requires NODIMFloating comma not supported
Plus [+]
Minus [-]
SAP BW/4HANAAnalysis PUBLIC 851

Operator NODIM-like Requires NODIMFloating comma not supported
Divide [/]
Multiply [*]
Value without units or currencies [NODIM]
X
Whole division [DIV]
CURRENT MEMBER result [CMR]
Counter [COUNT] X
Delta [DELTA] X
Absolute value [ABS]
Maximum (MAX)
Minimum (MIN)
+/- sign of the operator [SIGN]
X
Whole number value of the operand [TRUNC]
Less than [<] X
Less than or equal to [<=] X
Not equal to [<>] X
Equal to [==] X
Greater than [>] X
Less than or equal to [<=] X
Logical AND [AND] X
If condition [IF] 1
Logical NOT [NOT] X
Logical OR [OR] X
Logical exclusive OR [XOR] X
852 PUBLICSAP BW/4HANA
Analysis

Operator NODIM-like Requires NODIMFloating comma not supported
Smallest whole number value that is greater than operand [CEIL]
X
Greatest whole number value that is less than operand [FLOOR]
X
Decimal part of operand [FRAC]
X X
Remainder with whole-number division [MOD]
2
High (**) X
Potential function [EXP] X
Logarithm [LOG] X
Logarithm for basis 10 [LOG10]
X
Root [SQRT] X
NDIV0(x): Is equal to 0 on division by 0, else x [NDIV0]
X
NOERR (x): Is equal to 0 with undefined calculations, else x [NOERR]
X
Maximum of 0 and operand [MAX0]
X
Minimum of 0 and operand [MIN0]
X
Explanation of the table columns:
● NODIM-like:○ X: The result of the operator never has a currency or a unit, even if the operands have a currency or
unit. This means that the operator ignores the currencies or units of all operands.● <n>: The curerncy or unit of the nth operand is ignored. n = 1 for example therefore means that the
currency or unit of the first operand is ignored.● Requires NODIM: Operator O1 is only supported if its operands do not have currency or unit, or the
operation of O1 is an operand of a NODIM-type operator O2, for which a currency or unit is ignored.● NODIM type: The operator is only supported if no operands are of type floating comma.
SAP BW/4HANAAnalysis PUBLIC 853

Currencies and Units
A formula with exception aggregation can only be calculated in SAP HANA if the formula result does not have a currency or a unit, or the currency or unit of the formula result is taken over from another individual operand.
Examplea * b: If a contains a currency or unit, and b does not, this formula can be calculated in SAP HANA.
a * ( b = 0 ): Because the operator = operator is NODIM-like, the formula can be calculated in SAP HANA.
a + b: This formula cannot be calculated in SAP HANA if a or b has a currency or unit.
5.3.2.2.15.2.7.4 Formulas Calculated in SAP HANAwith Complex Currency or Unit of Measure
The system supports the calculation of formulas with complex currency or unit of measure in SAP HANA
Supported Aggregations
The system supports the same exception aggregations as in the Formulas Calculated in SAP HANA (7) mode.
Supported Formula Operators
The system supports the same operators as in the Formulas Calculated in SAP HANA (7) mode.
You also require the following formula operators not NODIM:
● NDIV0(x): Is equal to 0 on division by 0, else x [NDIV0]● NOERR(x): Is equal to 0 with undefined calculations, else x [NOERR]● Maximum of 0 and operand [MAX0]● Minimum of 0 and operand [MIN0]
Currencies and Units
A formula with exception aggregation can only be calculated in SAP HANA if the result of the formula and all subtotals have up to five currencies and units of measure. The currencies and units of measure can have an exponent.
854 PUBLICSAP BW/4HANA
Analysis

Examplea * b: The factors a and b have one currency or unit of measure. The result of the formula has two currencies or units of measure. The formula can therefore be calculated in the SAP HANA.
a / b: The operands have one currency or unit of measure. The result of the formula has two currencies or units of measure:
● Currency or unit of measure of operand a (with exponent 1)● Currency or unit of measure of operand b (with exponent -1)
The formula can be calculated in the SAP HANA.
a + b: The summands a and b have one currency or unit of measure. The result of the formula has one currency or unit of measure. The formula can therefore be calculated in the SAP HANA.
● If a and b have the same currency or unit of measure, this is the currency or unit of measure of the result of the formula.
● If a und b have different currencies or units of measure, the currency or unit of measure of the result of the formula is mixed.
a * b/c * d * e/f: The operands a, b, c, d, e, f have one currency or unit of measure. If all of these currencies and units of measure are different, the result of the formula has six currencies and units of measure. This means that this formula has more than five currencies and units of measure and that it therefore cannot be calculated in the SAP HANA.
Different result in case of mixed currencies and units of measure
The system handles currencies and units of measure separately if a formula cannot be calculated in the SAP HANA. Calculation of formulas in the SAP HANA makes no distinction between currencies and units of measure however.
For results of formulas with currencies and units of measure, this produces different results if currencies and units of measure are mixed.
Example10 EUR * (2 m + 4 s): The result of the formula has one currency (EUR) but a mixed unit (m + s = *),
● Result of the formula without calculation of the formula in the SAP HANA: 60 EUR *● Result of the formula with calculation of the formula in the SAP HANA: 60 *
(10 EUR - 5 USD) * (2 m + 4 s): The result of the formula has a mixed currency or unit of measure.
● Result of the formula without calculation of the formula in the SAP HANA: 30 EUR **● Result of the formula with calculation of the formula in the SAP HANA: 30 *
SAP BW/4HANAAnalysis PUBLIC 855

5.3.2.2.15.2.7.5 Conditions Calculated in the SAP HANA
The system supports the calculation of conditions in the SAP HANA.
Application Scenario
A telecommunications company would like to gather information about the top three of their 20 million customers. The following section shows how can be down both with and without calculation on the SAP HANA:
Procedure without calculation of the condition on the SAP HANA
1. The system retrieves data for all 20 million customers from the database.2. The system calculates exception aggregations, conversions, formulas and so on for all 20 million
customers.3. The system determines the top three customers.4. The system displays the data for the top three customers only.
Disadvantage: The application server retrieves the data for all 20 million customers and performs calculations with this data, but the does not see the data for the remaining 19,999,997 customers in the query result.
Procedure with calculation of the condition on the SAP HANA
1. SAP HANA determines the top three customers.2. The system retrieves data for the top three customers from the database.3. The system calculates exception aggregations, conversions, formulas and so on for the top three
customers.4. The system displays the data for the top three customers.
Advantage: To begin with, the TopN condition is calculated on the SAP HANA. The application server then retrieves the data for the top three customers only and performs calculations with this data, which the customer can then see in the query result.
Features
Every condition is applied at the corresponding subtotal level. This evaluation process runs from the coarsest subtotal level through to the finest one on every axis. If conditions can be calculated in the SAP HANA, the system runs a pre-query for every corresponding subtotal level. The pre-query returns the corresponding characteristic tuple. The results of the pre-query are later used as a filter.
As coarser subtotals also contain data that lies outside the condition filter of a finer subtotal level, the data from the finer subtotal level cannot be aggregated to the coarser subtotal levels. The data for the coarser subtotal levels needs to be retrieved separately from the database instead.
856 PUBLICSAP BW/4HANA
Analysis

Prerequisites
For the calculation of conditions in SAP HANA, the following prerequisites apply:
● It must be possible to calculate all condition parameters in SAP HANA.● NULL values never meet the condition. This must be ensured by one of the following cases:
○ NULL values that are considered to be “0” when conditions are processed cannot meet a condition.○ If the Ignore NULL Values flag has been selected in the condition definition, NULL values cannot meet a
condition either, as they are ignored (see Tab: General [page 790]).
NoteYou can either set the Ignore NULL Values flag for individual conditions of a query using the BW Modeling tools, or can use report RSO_RES_QD_CONDMODE to set multiple queries for all conditions.
Supported Operators
A condition parameter can only be calculated in SAP HANA if it uses a supported parameter operator.
Supported ranking operators● TopN● BottomN● TopSUM● BottomSUM
Supported having operators● Equal● NotEqualTo● LessThan● GreaterThan● LessEqual● GreaterEqual● Between● NotBetween
Structure member that is used by a condition parameter
A condition parameter can only be calculated in SAP HANA if the structure member used can be calculated in SAP HANA.
● The structure member can be calculated in SAP HANA with the option Formulas calculated in SAP HANA with complex currency/unit.
SAP BW/4HANAAnalysis PUBLIC 857

● The structure member fulfills all prerequisites for the calculation in SAP HANA with the option Formulas calculated in SAP HANA with complex currency/unit except the prerequisite that it has an exception aggregation.
Condition parameters using formulas
A condition parameter that uses a formula as a structure member can only be calculated in SAP HANA if the following prerequisites are met:
● All operands in the formula have the same context of a constant selection.● All operands of the formula have the same current member context.
A current member context is defined by the current member variable, the selected range, the offset, and the characteristics that are used for the exception aggregation.
● The formula result is NULL if all formula operands are NULL.
Constant Selection and Current Member Context of Condition Parameters
A condition can only be calculated in SAP HANA if all condition parameters have the same unique constant selection and current member context.
Limitations for conditions using ranking operators
If more than one condition with ranking operators is applied to the subtotal level, no conditions can be calculated for this subtotal level in SAP HANA.
If only one of the conditions applied to a subtotal level uses ranking operators, only this condition will be calculated for this subtotal level in SAP HANA.
If one of the conditions with a ranking operator is applied to a structure element that uses a current member interval, this condition cannot be calculated in the SAP HANA.
Performance
If the conditions significantly reduce the query result set, the calculation of conditions in SAP HANA results in improved performance.
Improved performance is unlikely for example if a TopN = 3 condition is calculated in SAP HANA, and there are only five characteristic values.
858 PUBLICSAP BW/4HANA
Analysis

5.3.2.2.15.2.7.5.1 Different Condition Result with Exception Aggregation Counters (CNT or CN0)
This section describes a scenario that illustrates how the Analytic Engine handles the exception aggregations Counter (all values) [CNT] and Counter (values unequal to 0) [CN0].
Scenario
A query contains a key figure or a formula K1 with exception aggregation Counter (all values) [CNT] or Counter (values unequal to 0) [CN0].
For a certain characteristic value combination, no value is booked for K1. The characteristic value combination therefore only shown in the query result because there is a posting for another structure element or because unposted values are displayed in the query result.
The Analytic Engine writes an artificial value 0 to the query result for K1 or uses this value as an operand in a formula F2 that does not have exception aggregation.
A condition exists for K1 or F2.
Value 0 meets the condition.
The condition result is different if conditions like these are calculated in the SAP HANA because the artificial 0 values introduced by the Analytic Engine are not known during processing of a condition in the SAP HANA.
In the case of a threshold condition, the condition result can be smaller because characteristic value combinations with an artificial 0 are lost in the condition result.
In the case of a ranked list condition, the condition result can be different because only characteristic value combinations with a real value - and not characteristic value combinations with an artificial 0 - are part of the condition result.
Scenario Example
Let us assume that a query has the following result:
Year Quantity Quantity in GermanyQuantity in Germany, CNT on Product
2015 100 50 2
2016 200 20 1
2017 150 0
Now let's apply the condition Amount in Germany, CNT on Product <= 1
SAP BW/4HANAAnalysis PUBLIC 859

If the conditions are not calculated in the SAP HANA, the query result is as follows:
Year Quantity Quantity in GermanyQuantity in Germany, CNT on Product
2016 200 20 1
2017 150 0
If the conditions are calculated in the SAP HANA, the query result is different because the artificial 0 from 2017 is ignored during processing of the condition in the SAP HANA:
Year Quantity Quantity in GermanyQuantity in Germany, CNT on Product
2016 200 20 1
If structure element Quantity is not selected in the query, this difference does not apply. In this case, the results are the same, regardless of whether or not the condition was processed in the SAP HANA:
Year Quantity in Germany Quantity in Germany, CNT on Product
2016 20 1
Recommendation
In order to avoid artificial 0 values and to achieve the same condition result regardless of whether or not the condition was processed in the SAP HANA, you can proceed as follows:
Instead of Counter (all values) [CNT], use exception aggregation Summation [SUM] on the constant 1 with the same filter as though it were the operand of exception aggregation Counter (all values) [CNT].
Instead of Counter (values unequal to 0) [CN0], use exception aggregation Summation [SUM] of a formula that uses the operator Counter [COUNT] and the operand of exception aggregation Counter (values unequal to 0) [CN0] as the operand.
Recommendation Example
Let us assume that a query has the following result:
Year Quantity Quantity in GermanyQuantity in Germany, SUM on Product
2015 100 50 2
2016 200 20 1
2017 150
Now let's apply the condition 1 in Germany, SUM on Product <= 1
860 PUBLICSAP BW/4HANA
Analysis

The query results are the same, regardless of whether or not the condition was processed in the SAP HANA:
Year Quantity Quantity in Germany1 in Germany, SUM on Product
2016 200 20 1
5.3.2.2.15.2.8 Materializing the Intermediate Result of the Query
You can change the standard settings for processing the intermediate results for existing queries.
Prerequisites
This property is only relevant if query property Operations in SAP HANA is set to Expert: Exception Aggregation (Standard) (6) or higher.
Context
If query property Operations in SAP HANA is set to Expert: Exception Aggregation (Standard) (6) or higher, a significant part of query processing takes place in the SAP HANA database.
The intermediate results of the processing are calculated in this processing. If the query contains many characteristics with intermediate results in the drilldown, these intermediate results can be used again during the result calculations.
It is generally quicker to recalculate the intermediate results each time, since optimizations can then be used at the level of the intermediate results. In some cases, however, it is quicker to materialized the results sets of the intermediate results.
These exception cases occur when more than one of the following properties apply:
● A large number of characteristics in the drilldown, each characteristic with intermediate results.● A great reduction in data due to the standard aggregation.● Very little reduction in data due to filters.
Procedure
1. Deselect the InfoProvider Setting option.2. You can activate or deactivate the Materialize Intermediate Results of the Query options specifically for the
selected query.
SAP BW/4HANAAnalysis PUBLIC 861

Example
The InfoProvider contains two billion rows. The data includes the following:
● 500 unique material numbers● 20 countries● Five billing types● 12 months
The query counts the material numbers per country, per country and billing type, and per country, billing type, and month. The set of intermediate results has the most finely grained tuples required in this query. If all combinations of characteristics exist, the size of the intermediate result is 500*20*5*12 = 600000 rows.
This intermediate results contains over 1000 times fewer records than the InfoProvider. This means that it probably cheaper to materialize and reuse the intermediate result than use the optimizations that can be applied when calculating the individual levels of the intermediate results from the InfoProvider data. In this case, therefore, the recommended action is to materialize the intermediate result.
Related Information
Operations in SAP HANA [page 841]
5.3.2.2.15.2.9 Using the Selection of Structure Elements
You can use the query property Use Selection of Structure Elements to ensure that data is read only for exactly the structure elements that are being read. This means that the drilldown characteristics can display fewer attributes.
Context
The Use Selection of Structure Elements option influences system performance. This function should therefore normally be activated.
Example
Example of a Simple Query Without Selection
Country Sales Volume (DE) Sales Volume (US)
DE 50
US 60
862 PUBLICSAP BW/4HANA
Analysis

Query with Selection on Structure Element "Sales Volume (DE)" Without Selection of Structure Elements
Country Sales Volume (DE)
DE 50
US
Query with Selection on Structure Element "Sales Volume (DE)" and Selection of Structure Elements
Country Sales Volume (DE)
DE 50
Technically speaking, the system only passes to the database the selections and key figures of the columns (or structure elements, to be more precise) that are required to determine the filtered elements. This means that cells that only exist because of non-selected structure elements are not displayed.
Structure elements with constant selection are an exception, as they do not create any objects (see Object Generation [page 651]). If the selection contains a structure element with constant selection, data for further structure elements outside the selection are requested.
Example
Example of a Simple Query Without Selection
CountrySales Volume (Constant Country Selection) Sales Volume (DE) Sales Volume (US)
DE 300 50
US 300 60
Query with Selection on Structure Element "Sales Volume (Constant Country Selection)" and "Sales Volume (DE)" and Selection of Structure Elements
CountrySales Volume (Constant Country Selection) Sales Volume (DE)
DE 300 50
US 300
If you deactivate this function, the data is read for the entire structure or for both structures from the database. This function therefore can also not be activated if the query has read mode 'A' (see Read Mode [page 837]).
You can expect a significant improvement in performance from using this function in the following scenarios:
● You are using the SAP HANA database or the SAP BW Accelerator.● You are using queries that contain a large number of selections or restricted key figures, which are not all
displayed in the initial drilldown.● You execute a lot of operations where you filter using selections or restricted key figures, such as the "Filter
and Drill Down By" function.
Deactivating this function does not normally bring any advantages.
SAP BW/4HANAAnalysis PUBLIC 863

Related Information
Reading Child Members with Hierarchy Structure Nodes [page 864]
5.3.2.2.15.2.10 Reading Child Members with Hierarchy Structure Nodes
If you have activated the Use Selection of Structure Elements setting, you can use this setting to specify which data-driven cells are displayed if the query has a hierarchy on a structure.
Use
The following example illustrates this:
Example
Month January February March
Amount EUR 10 EUR 20 EUR 30
Amount in January EUR 10
+- Amount in February EUR 20
+- Amount in March EUR 30
Amount in Feb is a child of Amount in Jan, and Amount in March is a child of Amount in Feb.
If Amount in Jan is filtered, the result set will only consist of the January column. If the Amount in Jan node is expanded now, the result set must consist of the January and February columns for Amount in Jan and Amount in Feb.
Most clients however do not recognize a situation where a drilldown on one axis can result in more data on another axis. This drilldown therefore normally only shows the January column.
If the Also Read Child Members setting is activated, a filter on a structural element will implicitly include all of its hierarchical successors in the filter. In the example above, a filter on Amount in Jan would return the columns for Januar, February and March, as Amount in Feb and Amount in March are predecessors of Amount in Jan.
Related Information
Using the Selection of Structure Elements [page 862]
864 PUBLICSAP BW/4HANA
Analysis

5.3.2.2.15.2.11 Optimization Mode
With the Optimization Mode property, you can define how often the OLAP processor memory requirement is optimized for existing queries.
Context
If you do not make any other settings, the OLAP processor specifies the optimal memory requirements for the data processed in the OLAP processor. This is done after the query is executed for the first time and then again 31 days after the last optimization. A report is generated automatically.
The following modes exist:
● Query Will Be Optimized after Generation (0): Default setting.● Query Optimization with Individual Periods in Days (1): You can define the optimization period as
required. You can use this setting if the InfoProvider data is periodically fully reloaded or rebuilt.● Query Optimization Inactive (9) : This setting is usually only used for test and support purposes or in
exceptional cases.
Note
For more information, see SAP Note 1137994 .
Related Information
Optimization Periods [page 865]
5.3.2.2.15.2.12 Optimization Periods
If you have set the optimization mode to Query Optimization with Individual Period in Days (1), you can set any optimization period of your choosing.
You can use this setting if the InfoProvider data is periodically fully reloaded or rebuilt.
Related Information
Optimization Mode [page 865]
SAP BW/4HANAAnalysis PUBLIC 865

5.3.2.2.15.2.13 Statistic Details Display
The system displays the detail level for statistic details of query runtime statistics as defined in the statistic properties maintenance transaction (RSDDSTAT) for object type Query.
Related Information
Configuring Statistics Properties [page 1026]
You can find the relevant information under Statistic Detail Level for Object Type Query in the documentation for maintenance of statistic properties.
5.3.2.2.15.2.14 Document Support
You can use query property Document Support to specify whether documents can be created for the query.
If you set value Yes for query property Document Support, you can use the Default Document Application ID field to stipulate which document store the documents will be stored in. You can select from all document stores to which the InfoProvider that the query is based on is assigned. This covers the following InfoProviders:
● DataStore Object● CompositeProvider
If you do not select a document store, and keep the value [] instead, the user has to assign a document store at runtime.
Related Information
Document in the Document Store [page 680]Creating a Document Store [page 681]
5.3.2.3 Opening and Changing Existing Queries
Context
There are various ways of opening a query:
● From your favorites (provided that you have added the query to your favorites)
866 PUBLICSAP BW/4HANA
Analysis

● Using Open BW Object● Using BW Object Search. Here, you can refine the search to type ELEM [Query Element] under Advanced
Filter.● From the BW Repository in the Project Explorer view
If you have changed a query definition, an asterisk is displayed in front of the technical query name. This asterisk remains until you save your changes.
Related Information
Working with Queries [page 738]Searching for and Opening Objects with the Open BW Object Dialog Box [page 33]Searching for SAP BW∕4HANA Objects [page 34]Saving Queries [page 796]
5.3.3 Creating a Link Component
You want to create a target component (for example target query Q_B) that is kept synchronous when changes are made to the corresponding source component (for example source query Q_A).
Procedure
1. Open the source component.
In our example, open source query Q_A.2. Press the Show Linked Components View button.
The system displays the Linked Components tab.3. Open the context menu for the source component and choose New Component.
The New Component dialog box appears.4. Enter the name of the target component and a description.5. Specify the name of the target InfoProvider. Alternatively, you can press CTRL + Space to call input help
and select the required InfoProvider.6. Choose Create Proposal.
The system displays the mapping proposal in the Mapping Details table: In the Source column, you see the definition of the source component. In the Target column, you see the matching elements in the target component as determined by the system. If the system does not find any corresponding fields, it indicates this in the status information.
7. If you want to change a mapping, click in the field of the target element.
A dialog box appears where you can select a different element in the target InfoProvider to map.
SAP BW/4HANAAnalysis PUBLIC 867

8. To have your changes checked by the system, choose Validate.
The system performs type and existence checks.9. If all statuses are displayed as green, choose Create.
You are returned to the Linked Components tab. The system displays the target component you have created as hierarchically assigned to the source component.
Results
Any changes you make to the source component now will be kept synchronous in the target components by the system.
Related Information
Linked Component [page 736]This link takes to you to the documentation for query concepts.Apply Changes from the Source Component [page 868]Changing a Target Component [page 869]These links take you to the documentation for further tasks.
5.3.3.1 Apply Changes from the Source Component
You have created a linked target component and made changes to the source component. The main advantage of having a linked component is that it allows you to automatically apply changes made in the source component.
Procedure
1. Open the source component.
On the Linked Components tab, the target component icon is modified, thus indicating that the target component is currently not synchronous with the source component.
2. To start synchronization, choose Synchronize from the context menu for the source component.
The system indicates the progress of the synchronization in a separate dialog.3. To check that synchronization has been performed successfully, open the target component and choose
Refresh.
868 PUBLICSAP BW/4HANA
Analysis

Related Information
Creating a Link Component [page 867]
5.3.3.2 Changing a Target Component
You have created a linked target component and would now like to change it.
Context
As linking two components only makes sense if the source component and target component correspond with one another, changes to the target component are only possible if these meet the conditions for linking.
Procedure
1. Open the context menu for the link target component on the Linked Components tab and choose Open.
The maintenance screen for the target component appears.2. Under General, press the Edit mapping and synchronize with source component button.
The Mapping dialog box appears.3. Make the required changes.
You can change the description or the mapping for example.4. To have your changes checked by the system, choose Validate.
The system performs type and existence checks.5. If all statuses are displayed as green, choose Synchronize.
You are returned to the Linked Components tab.
Results
You have changed the target component and synchronized the link connection.
If you want to make further changes to the target component, you have to decouple the link connection. To do
this, press the Decouple button under General. The target component will then no longer be connected with the source component. You can now make any changes as required. The previous target component is completely independent of the source component.
SAP BW/4HANAAnalysis PUBLIC 869

Related Information
Creating a Link Component [page 867]
5.3.4 Releasing Analytic Queries for Use in SAP Data Warehouse Cloud
You can release analytic queries for use in SAP Data Warehouse Cloud.
Prerequisites
You are running SAP Data Warehouse Cloud.
CautionMake sure that you have also implemented the following SAP Notes after SAP BW/4HANA 2.0 SP07:
● 2714624 Version Comparison False Result● 2754328 Disable Creation of HTTP Security Sessions per Request● 2840529 Sporadic HTTP 403 CSRF Token Validation Errors● 2976147 Import of query views in the BW/4 hybrid scenario: No search results of BW back ends with
Release SAP_BASIS 753
Context
You have defined analytic queries in SAP BW/4HANA and want to generate business entities in SAP Data Warehouse Cloud based on these queries. This allows you to use existing models and metadata in SAP BW/4HANA for modeling in SAP Data Warehouse Cloud without having to build them again manually.
To be able to do this, you first have to call transaction RSDWC_QUERY and release the analytic queries in for use in SAP Data Warehouse Cloud.
NoteNote that the structure of the query is transferred. This includes the characteristics and the key figures (both restricted and calculated key figures), but does not include any display properties. The system therefore does not transfer any activated display attributes or the content of the rows and columns. Likewise, properties such as the number of decimal places are not transferred.
870 PUBLICSAP BW/4HANA
Analysis

Procedure
1. Call transaction RSDWC_QUERY. A screen appears listing all queries that have been released thus far.
2. To release a new query, choose Create DWC Variant. The query selection dialog appears.3. Select the query that you want to use. Input help is provided. To see all queries, search for *.4. As SAP BW/4HANA variables do not have a direct equivalent in SAP Data Warehouse Cloud, any variables
must be replaced with values. If there are variables without manual entry, you can use Set Variable Values to fill them with values. In the case of input-enabled variables, a dialog box appears where you can enter the values, which are then fixed. When the query is released, it is saved with these values.
You can create several variants if you require various variable assignments. Always assign unique names for the variants of a query. The system formats the variants for SAP Data Warehouse Cloud.
If the query does not contain any variables, you can select the relevant query in SAP Data Warehouse Cloud using the name of the query. If there are multiple variants for a query, you can select the corresponding query variants using the name. This of the name of the query and the name of the variant.
CautionNote that conditions apply for queries that are to be released for use in SAP Data Warehouse Cloud. For more information, see SAP Note 2932647 .
If you need filters during execution, you can do this using the story.5. Choose Release.
You have now released the query for use in SAP Data Warehouse Cloud.6. You can update or change the variable assignment after releasing the query.
○ To update the variable assignment (in the case of exit variables for example), choose Refresh Variant. The SAP BW/4HANA system performs the variable replacement. SAP Data Warehouse Cloud provides you with this exact view.
NoteReport RSDWC_QUERY_VIEW_REFRESH allows you to update the query variant. You can schedule this report to run at regular intervals.
○ To change the variable assignment, choose Edit.7. Release the changed query variant by choosing Update.
8. If you want to cancel the activation, you can delete the query from the list. Choose Delete.
This only deletes the release, not the query itself.
SAP BW/4HANAAnalysis PUBLIC 871

5.4 Using the Data Preview of an Analytic Query
You can display the data of an analytic query, modify and refine the preview, save it as a defined view, and share it.
Context
You have installed and configured the SAP BW∕4HANA Cockpit. If required, you have created an RFC connection to a back-end system with the queries you want to view. You have chosen the data preview for an analytic query.
Open this video in a new window
Procedure
1. Expand the arrow icon in the middle of the header line.2. Choose one of the following options:
Function Description
Data Grid display of the query data.
Chart Graphical representation of the data.
Layout Modify the type of display by distributing characteristics and key figures on the axes (rows and columns).
3. To create a text for your view of the data, choose Personal Comments.4. To adjust the filter, choose Filter. You can add objects to the filter or delete the filter definition. The filter
takes effect as soon as you press Go.5. To save a navigational state for yourself, or to share it with another user by e-mail, choose the
corresponding function from the menu for Actions.
To save the navigational state locally, you can use the Export function under More Functions.6. If you want to make settings for the size of the grid or for using a universal display hierarchy, or would like
to view the technical information, choose Additional Functions and then Settings.
Related Information
Guided Tour: Data Preview of an Analytic Query [page 873]Guided Tour: Using the Additional Functions in the Analytical Data Preview [page 876]Creating a Connection to a Back-End System [page 925]
872 PUBLICSAP BW/4HANA
Analysis

5.4.1 Guided Tour: Data Preview of an Analytic Query
Using the example of a query delivered with query content, the following sections introduce you to the data preview concept.
5.4.1.1 Calling the Query
First call the demo query.
To run the demo scenario, you first have to call the demo query.
● To do this, choose More Actions Open . A dialog box appears where you can select a query. As key, enter the technical key of the demo query 2CBW4_PT_CHART_4D .
● Alternatively, you can append the technical name of the demo query to the query-specific URL parameter #AnalyticQuery-preview?query=. The technical name of the demo query is: 2CBW4_PT_CHART_4D.
● Alternatively, you can use the search: Enter 2CBW4_PT_CHART_4D in the search field. In the search results display, choose the Preview function for the relevant demo query.
NoteNote that you leave the guided tour briefly at this point.
This example corresponds to the demo content under SAP UI5 Demo Kit.
5.4.1.2 Changing the Layout
You learn how to hide a column.
To open the header area, click on the triangle icon in the middle of the screen. You are in the Data tab. The data is displayed in a table.
To hide the Percentage column, navigate to the top of the Percentage column, click the left-hand mouse button and choose Remove from Layout. The system hides the column.
5.4.1.3 Restricting Values
You can restrict the display to certain values for Store.
You can restrict the display to views that you are interested in, for example by defining the Store column in such a way that only the values 000009, 000003, and 00004 are displayed for this characteristic.
Navigate to the header of the Store column and choose Filter Select Filter from the left mouse button menu. The Select: Select Filter for store dialog box appears. Select the required filter values in the specified sequence and press OK to confirm.
SAP BW/4HANAAnalysis PUBLIC 873

NoteIf a display hierarchy is active on a characteristic, the displayed characteristic key comprises the node name and the node value, together with a system-specific separator.
Navigate to the header of the Store column and choose Exchange with Percentage from the left mouse button menu.
To show the filters as a separate line above the grid, choose Filter. The system displays the key figures Revenue, Cost and Consumption.
To see the filter values selected for Store, choose Adapt Filters. The dialog box for adapting filters appears. Choose More Filtersand select Store. Press Go to confirm. In addition to the key figures, the filter row now also shows the characteristic values added to the filter for Store.
Use the input help for characteristic Store to add value 000002. Press Go to apply the new filter. Note that the change in the grid change, even though Store is not in the drilldown.
5.4.1.4 Changing the Display
You change display properties and view the data in the new layout.
You will change various display properties and then view the data in the new layout.
Check whether the header area is visible. (You can make this visible by clicking on the triangle icon in the middle of the screen.) In the header area, switch to Layout.
From the left-hand mouse button menu for dimension Percentage, choose Remove from Layout.
Choose free dimension Store from the left-hand mouse button menu and choose Add to Rows.
From the left-hand mouse button menu for dimension Store, choose Properties. The Settings of Store dialog box appears. Change the display properties by specifying that the key is displayed rather than the text. Choose sort instruction Selection. For Show Totals, choose If more than one value. Choose OK to confirm.
Switch to the Data tab page. Note the sorting of the stores in the order in which you selected them, and the display of the totals row. Close the Header.
Open the variant management function using the triangle icon on the query name. Save your display properties under the name GT1.
5.4.1.5 Data in the Chart
You can view the data in a chart.
To display the data graphically in a chart, switch to the Chart tab. You see the data in a bar chart.
NoteNote that no data can be displayed in the chart if there are no active hierarchies.
874 PUBLICSAP BW/4HANA
Analysis

For more information about this type of chart, see Bar Chart.
For information about other types of charts, see List of Chart Types.
Click on the blue bar. The dialog box for setting the column properties appears. Replace the colour blue with black, and orange with yellow. Confirm the dialog box.
Close the header area.
Under Share, choose Send E-Mail. The system generates an e-mail with a link to the chart with your choice of colours. By choosing Share, you can also save the current layout as a tile.
5.4.1.6 Further Actions
This menu bundles together various actions.
Open Further Actions in the first line of the header area.
Choose Export to Spreadsheet. The data is downloaded in a CSV file.
If your query contains variables, you can change the values for the input-enabled variables using the variables dialog.
Under Settings, you have a number of further options for customizing the appearance of the query results. By clicking the Technical Information icon in the footer, you can view information about your browser session.
5.4.1.7 Display Attributes
You can set which attributes are displayed and in which order.
Switch to the Query for Bar Chart query variant.
From the menu for Store, choose Properties.
Switch to the Attributes tab.
Display the key for Store Size and Latitude.
Move Store Size to the very top by selecting the line and moving it above the triangle icons.
Confirm the dialog box.
In the grid, you can now see that Store Size is displayed next to Store.
5.4.1.8 Hierarchies
You can display the characteristics hierarchically in the grid.
Move Percentage over the corresponding menu entry to the columns.
From the menu for Store, choose Properties.
SAP BW/4HANAAnalysis PUBLIC 875

Switch to the Hierarchy Properties tab.
Flag the hierarchy as active.
Confirm the dialog box.
In the grid, you can now see that Store is displayed hierarchically.
Expand the store Choices Franchise 6.
5.4.1.9 Data in a Map
You can display your data in a map.
Switch to query variant GT1.
Make sure that the header area is open and switch to the Chart tab. Choose chart type Map.
To be able to see a map here, you have to configure the map providers in the SAP reference IMG. For more information, see Maintaining the Map Providers . The application name in this procedure is GEOMAP_DEMO. Please make sure however that you use BW4_DATA_PREV for the application name instead. For the map layer stack, please use BASE.
5.4.2 Guided Tour: Using the Additional Functions in the Analytical Data Preview
Using the example of a query delivered with demo content, the following sections introduce you to additional data preview functions.
5.4.2.1 Calling the Query
First call the demo query.
To run the demo scenario, you first have to call the demo query.
● To do this, choose More Actions Open . A dialog box appears where you can select a query. As key, enter the technical key of the demo query 2CBW4_PT_CHART_2D .
● Alternatively, you can append the technical name of the demo query to the query-specific URL parameter #AnalyticQuery-preview?query=. The technical name of the demo query is: 2CBW4_PT_CHART_2D.
● Alternatively, you can use the search: Enter 2CBW4_PT_CHART_2D in the search field. In the search results display, choose the Preview function for the relevant demo query.
NoteNote that you leave the guided tour briefly at this point.
This example corresponds to the demo content under SAP UI5 Demo Kit.
876 PUBLICSAP BW/4HANA
Analysis

5.4.2.2 Currency Translation
You will lean how to change the currency and format of the displayed numbers.
To change the currency, choose Additional Functions Currency Translation . The dialog box for defining the currency translation appears.
● Select Define Currency Translation.● Select the required currency translation type. In our example, the target currency is euros.● Choose OK to confirm.
The system displays the amounts in the European currency.
To change the number format, open the menu on the left mouse button for Costs and choose Properties. A dialog box appears providing various options for displaying the data records. In our example, the numbers should no longer be displayed a decimal numbers but as thousands.
● Delete the numeric value in the Decimal Places field.● Enter the numeric value 3 in the Scaling Factor (in Powers of 10) field.● Choose OK to confirm.
The system displays the amounts in Costs column as multiples of 1000.● Repeat this for key figure Revenue.
5.4.2.3 Creating a Formula
You will learn how to create a formula to calculate the following margin: (revenue - costs) / costs.
To begin with, create a formula and call it Margin. From the left mouse button menu for Costs, choose Add Formula. The dialog for creating formulas appears.
Enter Margin as the description.
From New, choose an opening bracket.
From New Variable , choose the first variable: Revenue.
From New, choose the operation Subtraction.
From New Variable , choose the second variable: Costs.
From New, choose a closing bracket.
From New, choose a division sign.
From New Variable , choose the third variable: Costs.
Choose OK to confirm.
The system adds the new column Margin to the grid.
From the left mouse button menu for Margin, choose Keep Filter... Filter Keep Filter... . The system displays the columns Revenue and Costs.
SAP BW/4HANAAnalysis PUBLIC 877

5.4.2.4 Defining Exceptions
You will learn how to define an exception so that all stores with a margin greater than 5 are highlighted in a different colour.
To open the header area, click on the triangle icon in the middle of the screen. You are in the Data tab. Switch to the Exceptions tab.
Choose Create. The dialog for creating new exceptions appears.
In the Description field in General, enter GoodMargin.
For the Alert Level, select Positive.
In Evaluation, select the formula you just described (Margin) as the key figure.
Select > as the comparison operator.
Select 5 as the value.
In Display, select Revenue as the key figure.
Choose OK to confirm.
Switch to the Data tab. In the Revenue column, all data records corresponding to the exception GoodMargin are highlighted in green.
5.4.2.5 Defining Conditions
You will learn how to define a condition so that only the three most profitable stores are displayed.
Make sure that the header area is expanded. Switch to the Conditions tab.
Choose Create. The dialog for creating new conditions appears.
In the Description field in Properties, enter Good Stores.
As key figure, choose the formula Margin.
As comparison operator, choose TopN Values.
For the value, choose 3.
Choose OK to confirm.
Switch to the Data tab. The system only displays the three data records that meet the condition.
5.4.2.6 Displaying Attributes
You learn how to display attributes.
From the left-hand mouse button menu for the Dairy World store, choose Display. The dialog box for displaying attributes appears.
878 PUBLICSAP BW/4HANA
Analysis

5.4.2.7 Additional Properties
You will learn how to show totals rows and to change their position in the grid.
From the left-hand mouse button menu for dimension Store, choose Properties. A popup appears where you can enter values in the Display Totals field in order to define whether totals rows are never displayed, always displayed or only displayed if there is more than one value. Select Always.
Under the three stores, the system displays a totals row with the overall result for all stores in the Revenue, Costs and Margin columns.
To display the totals row at another position in the grid, choose Additional Functions Properties . The dialog box for setting the query properties appears.
In the Rows screen area, select Top for the Result Alignment field.
Choose OK to confirm.
Switch to the Data tab. The system now displays the totals rows at the first position in the grid.
NoteIf you would like to receive regular e-mails containing the query in exactly the layout that you defined it in, choose Additional Functions Subscribe . This opens a dialog box where you can specify the recipient of the notifications and how often they are sent. You also have the option of specifying the text of the mail.
5.4.2.8 Using Explain
The explain query enables users to understand how a number was calculated.
From the left mouse button menu for a numeric value in the row belonging to the Dairy World store, choose Explain. The system shows how this number was calculated.
Using the Back arrow icon, you can return to the query display.
5.4.2.9 Adding Structure Elements
If you are interested in particular data, you can add suitable structure elements to the layout of a given query without having to model a new query.
● You can use formulas for example to define your own calculation sheet for costs.To do this, open the key figure’s context menu and choose Add Formula . The dialog for creating formulas appears.
NoteTo view the definition of a formula, choose Display from the context menu.
SAP BW/4HANAAnalysis PUBLIC 879

5.4.2.10 Subscriptions
If you are interested in certain data, you can register and then receive regular e-mails containing the query in the exact layout that you defined it in.
Specify the name of the recipients in the To and cc fields. The system proposes users to you if these are stored in the system.
Select the frequency with which the notification should be sent.
NoteThe administrator creates various variants of report BW4_PREC in back-end transaction SE30. The authorizations for these variants define which user can register for which times. You can schedule the variants in the background and in a process chain.
Enter a title for the message in the Subject field.
Write a text for the message in the Mail Text field.
Test your notification.
Choose OK to confirm.
Related Information
Managing Subscriptions [page 880]
5.4.2.11 Managing Subscriptions
In your user-specific settings, under Subscriptions, you can manage subscriptions belonging to you that are flagged in the system.
Under Data, you can find an overview of your subscriptions belonging to you that are flagged in the system.
The conditions allow you to specify which objects you will be notified about.
By deleting a row, you remove the subscription.
Related Information
Subscriptions [page 880]
880 PUBLICSAP BW/4HANA
Analysis

6 Agile Information Access: BW Workspace
A BW Workspace enables business users to create ad-hoc scenarios for rapid prototyping.
A BW Workspace is an environment that is customized for a specific business user. The workspace provides the business user with selected, simplified SAP BW∕4HANA functions. This allows the the user to create ad-hoc scenarios, which are integrated into the BW landscape.
A BW workspace is an area where new models can be created based on central data from the BW system and local data. Workspaces can be managed and controlled by a central IT department and used by local special departments. This means you can quickly adjust to new and changing requirements. The aim of workspaces is to bridge the gap between the central requirements and the flexibility required locally. Central architected data marts from the IT department can be combined, in a workspace, with data marts from the specialized departments.
BW workspaces consist of an administrator tool, workspaces administration and a Web-based working environment for business users. This environment includes BW Workspace Designer and BW Workspace Query Designer.
The administrator has the following tasks to perform for workspace administration:
● Creating and monitoring workspaces.● Making InfoProviders from the BW system available in the workspaces.● Assigning authorizations for workspaces and data from the BW system.
The business user can do the following in Workspace Designer:
● Upload his/her own data.● Create new data models based on their own data and InfoProviders.● Create queries.
The providers of a BW Workspace can be used as data sources in SAP BusinessObjects Analysis, edition for Microsoft Office.
Prerequisites
You have performed the required configuration steps. More information: Configuring BW Workspaces [page 923]
You have set up the required authorizations. More information: Authorizations for BW Workspaces [page 1227]
Related Information
http://help.sap.com/businessobject/product_guides/AMS14/en/14_aaoffice_user_en.pdf
SAP BW/4HANAAgile Information Access: BW Workspace PUBLIC 881

6.1 BW Workspace Designer
BW Workspace Designer enables business users to easily create new models for data analysis or enhance existing models. Various BW InfoProviders are available in the workspace. You can also upload your own providers. In a CompositeProvider, you can connect your own data to BW data by using union or join. This means you can react quickly to new or modified requirements.
Queries are usually based on CompositeProviders. If new fields need to be added, these CompositeProviders must be changed on the back end.
BW Workspace Designer enables you to react quickly to new analysis requirements: This means you can add fields to a query without changing the objects on the back end. The BW system administrator is still responsible for managing and checking the data from the BW system and for data storage (InfoProviders).
You might be planning a sales campaign for example and want to combine plan data with the actual sales data for 2010 and display ABC customer ranking data too. The plan/actual data has been stored in the BW in two DataStore objects (advanced) that are contained in a CompositeProvider. You have saved the customers' ABC ranking in an Excel file. You upload the file with ABC data to your workspace. The two DataStore objects are automatically connected by union in your workspace. You can then link the data from your file by join.
Area: My Workspace
Here you see an overview of
● All CompositeProviders created in this workspace● The assigned central providers (that you can use as the basis for CompositeProviders)● Your own local providers● The settings for this workspace
More information: My Workspace [page 883]
Area: Create CompositeProviders
Here you can create CompositeProviders.
More information: Creating CompositeProviders in BW Workspace Designer [page 887]
Area: Create Local Provider
Here you can upload local providers that you want to use in a CompositeProvider.
882 PUBLICSAP BW/4HANA
Agile Information Access: BW Workspace

More information: Creating a Local Provider: [page 894]
Transferring Data
Here you can transfer data from local providers to central BW providers.
More Information: Transferring Data [page 898]
Area: Local Data
Here you can create a local characteristic or a local hierarchy.
More information:
Creating a Local Characteristic [page 899]
Create Local Hierarchy [page 904]
Area: Workspace Tools
If you have authorization for multiple workspaces, you can decide which workspace you want to work in on the Change Workspace tab page. If you just have authorization for just one workspace, this is selected automatically.
On the Unlock Workspace tab page, you can revoke Workspace locks caused by Internet browser problems for example.
On the Clear Workspace tab page, you can can select CompositeProvider to view CompositeProviders created or last accessed before a certain date. The same applies to the following areas: Local Providers, Local Data and Local Queries.
You can then delete any objects that you do not need anymore.
6.1.1 My Workspace
My Workspace provides you with an overview of the providers contained in the workspace.
Tab Page: Local CompositeProviders
Here you see a list of all CompositeProviders that have been created in the workspace.
SAP BW/4HANAAgile Information Access: BW Workspace PUBLIC 883

You can create, change and delete CompositeProviders here. By pressing Display Data, you can view a CompositeProvider's data. By pressing Inform User, you can inform a user by e-mail. If you select a CompositeProvider, its links and fields are displayed in the table at the bottom of the screen. You can then view an overview of the associated queries. You can create, change and delete queries here.
You see the status of the CompositeProviders:
● Draft: The CompositeProvider has been saved as a Draft, but not activated yet.● Active: The CompositeProvider has been saved and activated.● Inactive: The CompositeProvider is given status Inactive if one of the local providers it contains has been
deleted.● Inactive (obsolete): The CompositeProvider already had status Active and has been changed and saved
using Save Draft, but not activated yet.
If CompositeProviders have status Draft, queries can only be saved as drafts too.
Tab Page: Central Providers
Here you see a list of all the providers that have been assigned by the workspace administrator. These are providers that have been created centrally in the SAP BW∕4HANA system.
The following providers can be used here if you are using SAP BW∕4HANA: InfoObjects as InfoProviders (that have not implemented any master data classes), CompositeProviders, DataStore objects, Open ODS views as PartProviders of a CompositeProvider, SAP HANA views as PartProviders of a CompositeProvider.
Data content can be displayed and where-used lists run concerning usage in CompositeProviders.
For providers that have received data from local providers, you can view information about all previously transferred requests on the Transferred Requests tab page.
NoteThe application log is used to display the requests. Depending on the log settings, there might be nothing displayed here.
To simplify data transfer to central providers, you can use the Create Template File function to generate an Excel or csv file with the structure of a central provider, and this as a template for local providers. To do this, commentary rows are written. These start with $$ and contain the InfoObject description, as well as information about whether or not the characteristic is a mandatory characteristic for writing. If you use this template in csv format to create a local provider, the header is automatically recognized by the editor, and the InfoObjects are automatically assigned. For templates in Excel format, you have to make sure that the header is specified correctly yourself.
Tab Page: Local Providers
The uploaded providers are dislayed here together with information such as file size.
You can create new local providers, delete existing ones, view data and create a where-used list.
884 PUBLICSAP BW/4HANA
Agile Information Access: BW Workspace

Choose Reload to load modified files from the original location or from a different one, and save them under the same name. This is only possible if the structure of the file has not changed considerably. You can add new columns to the right, but cannot remove columns or change column headers.
For providers that have transferred data to local providers, you can view information about all previously transferred requests on the Transferred Requests tab page. You can also delete previously transferred requests. When you do this, the requests are deleted from the central provider.
NoteThe application log is used to display the requests. Every activity remains in the log for a year unless deleted by the administrator.
Tab Page: Local Data
Here you see the local characteristics and local hierarchies, which were created for this BW Workspace in BW Workspace Designer.
You can create new local characteristics/hierarchies, delete existing characteristics/hierarchies, edit master data and run a where-used list.
Local Queries
Here you see all the queries, which were created for this BW Workspace in BW Workspace Designer. You can only change standard queries by editing the CompositeProvider, for which the queries were created. You can change workspace queries in Workspace Query Designer. Workspace Query Designer opens automatically when you select a query choose Change. More Information: BW Workspace Query Designer [page 907]
Tab: Settings
In the Settings tab, you see general information, such as the name and prefix of the workspace, the maximum memory space for your own workspace providers and the memory space currently used by your own providers, contacts and the expiry date.
You can also check whether a main provider has been defined. If an InfoProvider that is contained in a defined main provider is used in a workspace for modeling a CompositeProvider, the links in the main provider are taken over as they are and cannot be changed manually.
SAP BW/4HANAAgile Information Access: BW Workspace PUBLIC 885

6.1.1.1 Copying and Managing Key Figures
Prerequisites
The Key Figure Copying Allowed flag has been set in the Administration screen of your workspace.
Context
You can copy calculated and restricted key figures, which have been defined for the individual InfoProviders of a CompositeProvider, as the global key figures for a CompositeProvider. You can delete key figures that have already been copied, or update them if the original key figures have changed.
Procedure
1. You are in Workspace Designer, in the screen area My Workspace CompositeProvider .
2. Select a CompositeProvider and choose the Key Figures tab in the lower screen area. Any key figures you have already copied are displayed here.
3. Choose Key Figure Administration to copy key figures or manage copied key figures.
The upper part of the screen Available Key Figures shows all calculated and restricted key figures that can be copied. Display All Key Figures also displays the key figures that cannot be copied. The Can Be Copied column shows which key figures can be copied and the reason why certain key figures cannot be copied.
4. To copy key figures, select one or more key figures and choose Add. The selected key figures are displayed in the lower screen area under Copied Key Figures and flagged for copying. A name suggestion is generated that you can either accept or change.
5. If key figures have been copied, the Status column shows whether changes have been made to the original key figure. If a key figure has been changed, you can set a flag in the Update column. When they are saved, all key figures flagged for updating are set to the current status of the original template key figure.
NoteAny changes made to the copied key figures in Query Designer are lost.
6. To delete copied key figures, select the required key figures and choose Remove. The key figures are displayed again in the upper part of the screen, under Available Key Figures. They are not permanently deleted until you press save.
7. Choose Save once you have finished editing the key figures. The relevant key figures are copied or deleted, depending on what you have selected.
886 PUBLICSAP BW/4HANA
Agile Information Access: BW Workspace
6.1.2 Creating CompositeProviders in BW Workspace Designer
In a CompositeProvider, you can combine all the data that you want to view in your query.
Context
As data providers, you can use all BW InfoProviders assigned to the workspace, together with your own data. This can be uploaded Microsoft Excel/CSV files, uploaded query results or uploaded data from DataSources.
Procedure
1. If you want to use a specific query as the data basis, you can specify it here. The system finds the corresponding InfoProvider(s). Choose Start. The wizard guides you through each step of the application.
Choose Provider2. Enter a name and description for your CompositeProvider. The file name must begin with the prefix of the
workspace.3. Select the required providers. You can select the central data assigned to the workspace and your own
data.4. Choose Continue.
Model CompositeProvider5. The system automatically takes the links from the central CompositeProvider if you use InfoProviders from
the CompositeProvider defined in the workspace in your CompositeProvider. Choose Generate Proposal for each individual provider to assign the remaining fields. More information: Generating a Link Proposal [page 890]
6. A tabular view in the lower part of the screen allows you to check the field connections. On the left part of the screen, CompositeProvider is displayed together with its fields. The connected providers are shown next to these. If you place the mouse pointer on the header of the provider columns, the system displays additional information (for example, the number of assigned fields, the number of display fields and how many fields in the model have not been used). If you select Display All Fields, the unused fields will also be listed at the end of the table.
NoteIn previous releases you could switch to the graphical view. This option is no longer available. More information: SAP Note 2634877 .
If the table is too large, and the headings are no longer legible, you can modify the display: Open the context menu in the table preview and choose User Settings More… . You can hide columns and restrict the number of rows (the rest is displayed using a scrollbar).
7. You can choose from the following assignment types: Union, Inner Join and Left Outer Join. Key figures cannot be assigned to connection type Join. The connection of InfoCubes participating in the MultiProvider defined in the workspace is always Union, and the corresponding field assignment cannot be changed.
SAP BW/4HANAAgile Information Access: BW Workspace PUBLIC 887

More information: Union / Inner Join / Left Outer Join [page 892]8. You can also create assignments manually. Choose Assignment Details. First, you can get the system to run
the analysis for each field. To do this, choose Details Complete Proposal . The system now recommends which fields to assign.
For fields that are not assigned, not assigned is displayed in the Field of CompositeProvider column. In this column, you can select a suitable CompositeProvider field from the drop-down list box. If you have selected a field, the assignment is displayed immediately in the graphical view below. The provider to be joined is displayed on the left, and the CompositeProvider on the right.
If you do not want to assigned a field but still want to add it to the CompositeProvider, choose Standalone Field.
Once you have made all required assignments, press Apply.9. Choose Display Data to see a data preview. This enables you to check whether the assignments return the
expected result. If the data preview does not return the expected result, you can analyze the join connections by choosing Analysis.
More information: Extended Checks10. Under Assignment Details, you can create a constant for connections of type Union. To do this, select a
field and choose Assignment to Constant... Create .
11. Under Assignment Details, you can also create simple calculations for characteristics. You can only use this function for local providers and with connection type Join, and not for InfoProviders from the BW system. To do this, select a characteristic of your provider and choose Create Calculated Characteristic. In the dialog, you can enter a name for the calculated characteristic. You can choose from the following calculations:○ Cut left (LEFTSTR)○ Cut right (RIGHTSTR)○ Cut middle (MIDSTR)○ Fill left (LPAD)○ Fill right (RPAD)○ Concatenate
NoteIf you choose concatenate, you can also define a constant. To do this, just enter one character string and leave the second one empty.
NoteDuring the calculation, note the differences between the internal and external display. More information: External and Internal Display of Characteristic Values [page 891]
Once you have selected a calculation, the parameters for the calculation are displayed together with an example. Enter the parameters and press OK. Select the calculated characteristic to use. This will be added to the list of CompositeProvider fields. Choose Return to CompositeProvider Modeling.
12. For Join connections: You can get the system to check whether key figure multiplication might occur. To do this, select the provider linked by Join and choose Analysis Check Key Figure Multiplication (for Join) .
Further information about key figure multiplication: Union / Inner Join / Left Outer Join [page 892]
888 PUBLICSAP BW/4HANA
Agile Information Access: BW Workspace

13. Choose Continue.Edit Fields14. The system displays an overview of all CompositeProvider fields that will also be available in the query later
on. You can now change the field names.15. You can activate navigation attributes. By choosing Details, you see a list of all non authorization-relevant
navigation attributes and can select individual navigation attributes. You can also add a description for these.
16. If you have created local characteristics, you can choose whether the original characteristic or the local characteristic should be assigned. You can mark the attributes of the local characteristic as navigation attributes. All additional attributes of the local characteristic, and the navigation attributes of the reference characteristic that is not authorization-relevant, are navigation attributes by default. Individual navigation attributes can be selected (maximum 750).
17. For local providers, you can specify whether a unit or a currency should be assigned for key figures. These must be contained in the local provider. For key figures with a currency key such as 0AMOUNT, the assignment is automatic. Choose Continue.
Create Queries18. You can now generate a standard query for your CompositeProvider, or use an existing query as a reference
query. Select the query type.○ Standard: All fields in the CompositeProvider are added to the query as free characteristics or key
figures. This query cannot be changed in Query Designer. It changes automatically when the CompositeProvider is changed.If calculated or restricted key figures have already been defined on one of the InfoProviders that belongs to the CompositeProvider, you can select this InfoProvider when defining the standard query.
○ Reference: Select a query that you want to reference. A referenced query can be any query based on the central CompositeProvider or one of the InfoProviders being used. As soon as an InfoProvider is used in the CompositeProvider that is contained in the central CompositeProvider, it is only possible to select queries that are based on the CompositeProvider.Changes to the referenced query have an immediate effect on the transient query. The referenced query can only contain fields that are also contained in the CompositeProvider however. If it contains other characteristics in the free characteristics, these are removed in the reference query.
NoteThis allows you to use calculated key figures from the referenced query for example.
19. You can specify that a SAP HANA view should be generated. More Information: Generating SAP HANA Views from the SAP BW∕4HANA System [page 226]
20.Choose Continue. The system displays an overview of all objects that you have defined.21. Choose Save and Generate. The CompositeProvider and associated queries are now generated.
SAP BW/4HANAAgile Information Access: BW Workspace PUBLIC 889

6.1.2.1 Generating an Assignment Proposal
Context
The system proposes possible links for the fields. Ideally, you can take these without the need for manual post-processing.
Procedure
1. You have selected the required parameters and pressed Continue.
Existing models are analyzed. The system checks in the workspace or higher level workspace (parent node in the folder structure of the workspace in administration) for existing CompositeProviders that contain the selected providers. The history of models that have been deleted in the meantime is also included in the analysis.
The system displays a list of the ten CompositeProviders with the greatest similarity in terms of provider structure, sorted in descending order. Where CompositeProviders have the same ranking according to these criteria, they are sorted according to when they were last activated. A higher valuation indicates a greater match, meaning that the higher the valuation, the more suited a CompositeProvider is as a template. If you select a CompositeProvider and confirm your selection by pressing OK, the links and the link type of the matching providers in the CompositeProvider will be applied to the currently selected providers.
The system automatically takes the links from the central provider if you use InfoProviders from the provider defined in the workspace in your CompositeProvider.
2. If the system cannot make any link proposals from the central provider or existing CompositeProviders, it selects a provider. The connection type selected for InfoProviders from the BW system is Union, and all fields are linked with the CompositeProvider. InfoObjects as InfoProviders and analytic indexes are an exception to this. Connection type Inner Join is selected for these, and no automatic field links are created.
3. For providers that have not been linked yet, you can generate a proposal. To do this, choose Generate Proposal.
You now have various options for generating a proposal for links:
○ Analyze Existing Models:If only some providers were linked after the first analysis, you should run the analysis of existing models again. The system only takes the links for one model. There might be several suitable models though, in which case these links can be taken in a second run.
○ Analyze Metadata: This analysis method is particularly suitable for InfoProviders from the BW system. It analyzes InfoObjects, technical field names and descriptions.
○ Analyze Data: The data in the providers fields is compared here with the data in the CompositeProvider fields. This option is not available for union links. For providers that should be linked by Join, it is possible to combine the metadata and data analyses. Key figures cannot be compared using this method.
890 PUBLICSAP BW/4HANA
Agile Information Access: BW Workspace

CautionThis method can take up a lot of runtime. You can monitor the progress of this analysis, or cancel it, in the dialog box that automatically appears. If the analysis run is terminated, the analysis results found so far are reused in a subsequent run. The administrator can also set a maximum runtime. To do this, parameter MAX_RUNTIME_PROPOSER must be changed in table RSDDTREXADMIN . The entry under Value represents the maximum runtime in seconds. If no entry is made here, the maximum runtime is 300 seconds. Value = 0 represents an unlimited runtime.
Further Options:
○ Overwrite Existing Links: All existing links in the selected provider are removed from the analysis.○ Take Over Fields as Dedicated: With this option, provider fields that no suitable CompositeProvider can
be found to link with are assigned to the CompositeProvider as dedicated fields.4. The system then proposes and applies possible links. After each link proposal run, you can view and
complete the diagnosis in the link details and in Details. You should always check these links, especially when using the data and metadata analysis.
5. You can get the system to run the analysis again from the start. Choose Link Details and Complete Proposal.
CautionWith large amounts of data, this analysis can be very time consuming.
In the Diagnosis column, the system now proposes which fields to link.
6.1.2.2 External and Internal Display of Characteristic Values
Concept
When creating simple calculations for characteristics, the way a field is displayed internally can be different to the visible external display.
Note the following cases:
● The selected field is a date field. The internal display is as follows: YYYYMMDD for the full date, YYYYMM for just year/month.
ExampleExternal display: 02.03.2006 - internal display: 20060302
External display: 04/2010 - internal display: 201004
● The selected field is a character string with numeric characters only (0123456789). The internal display is subject to an alpha conversion (fill with 0) up to a certain character length. If the field contains just characters or a mixture of characters and numeric characters, there is no difference between the internal display and the external one. More information: http://sathya-sapbw.blogspot.com/2007/10/faq-alpha-conversion.html
SAP BW/4HANAAgile Information Access: BW Workspace PUBLIC 891

ExampleExternal display: 17485 - internal display: 00017485 with a length of 8
External display: 234 - internal display: 234 with a length of 3
Characteristics are always calculated based on how the field is displayed internally. The following examples show you how to proceed when calculating characteristics:
● To extract a month from a date field, you need the following parameters: MIDSTR( date field, 5, 2).● To extract the two digits before the last one from a numeric field (123) with alpha conversion of length 8,
you need the following parameters: MIDSTR( numeric_field, 6, 2).● Cutting the month from calendar day: Internal display of the calendar day: 20100416, desired result: 04.
From the fifth place, you need to cut out with length 2. The following parameters are required for this: MIDSTR (5, 2).
6.1.2.3 Union / Inner Join / Left Outer Join
A union combines data from multiple providers and builds the union sets for the relevant data. All the values are combined.
A join combines two tables by using specific criteria. You can choose between inner join and left outer join.
The inner join combines data from both tables if all the specified criteria are met. If one or more criteria are not met, no data records are created in the result set.
The left outer join takes all the values from the left table and combines them with the values from the right table that meet the criteria. All the values from the left table are included in the result table, even if they do not meet the criteria. If the left table returns a table row and the right table returns more than one watching row, then the values of the left table are repeated for every row in the right table.
Inner Join / Left Outer Join Comparison
If a product has not been assigned to any product groups for example, this product will not be displayed with an inner join, but will with a left outer join instead.
Key Figure Multiplication in Joins
If the provider linked by join contains a provider such as a characteristic that is not contained in the providers connected by union, this could result in multiplication of key figures and therefore produce incorrect results.
Example:
The InfoCubes connected by union contain characteristic Distribution Channel and key figure Sold Quantity, but do not contain characteristic Product. Characteristic Product is now added by Join. For each product, the total value for the sold quantity is now displayed in the result set, as no setting has been made to define how much should be allocated to each product. The sold quantity is thus multiplicated, and the result is incorrect.
892 PUBLICSAP BW/4HANA
Agile Information Access: BW Workspace

The InfoCubes contain the following data records:
The result of the union is:
The result of the join is:
SAP BW/4HANAAgile Information Access: BW Workspace PUBLIC 893

In the query, it looks as though 1 450 laptops and 450 keyboards have been sold over the distribution channel, though it was really only 450 of both products.
6.1.3 Creating a Local Provider
Context
If you want to use data that is not available in the BW system in a CompositeProvider, you can upload this data manually to Workspace Designer. To do this, create your own local providers that get data from files, queries or DataSources.
Procedure
1. Select a source type and choose Start.
2. Proceed as described according to the source type:○ Creating a Local Provider:File as Source [page 894]○ Creating Local Providers: Query as Source [page 897]○ Creating a Local Provider:DataSource as Source [page 898]
3. Choose Upload Data. An analytic index is created and filled. You can now use the data as a local provider in Workspace Designer.
6.1.3.1 Creating Local Providers: File as Source
Procedure
Select File
894 PUBLICSAP BW/4HANA
Agile Information Access: BW Workspace

1. Select a file to upload to the workspace. The system can process text-based files containing comma-separated values (CSV files) and Microsoft Excel files. You can let the system evaluate which continuous range of the file contains the data.
NotePlease note that this function ignores leading empty lines in the Microsoft Excel file.
2. You can specify the header that contains the field names.3. Enter the first data row if it deviates from the default setting (in the default setting, the first data row is in
row two).4. For CSV files: Make settings for how separators, decimals, date and field separators are displayed. The field
separator sign can be used to set special characters in the date field. If the field separator is contained in the date itself, it has to be set twice in the date field.
NoteIf you CSV file is very large, and no field separator signs are required, you should remove the ' " ' in order to improve load performance.
For the date, the format that the dates in the file are in has to be taken. During uploading, the date for storage in the analytic index is converted to the external format.
NoteWith Excel files, the formatting generally taken from the file. We therefore recommend formating the columns accordingly in Excel files.
5. By choosing Display Data, you can see where the first data row begins, and how many headers there are.6. Enter a name and a description for the provider you want to create. The file name must begin with the
prefix of the workspace.7. Choose Continue.
Change Columns
1. The system has analyzed the data.For Excel files, the system has analyzed the formatting of the first data row and determined the data types from this. If a key figure has been formatted without decimal places in the Excel file, the system proposes INTEGER as the data type.For CSV files, see: Data Analysis for CSV Files [page 896]Deselect the fields that will not be needed later on. If you have specified a header, the field names are taken from this row.
2. If you have not specified a header, the field names are generated by the system. You can overwrite these field names.
3. The system has generated proposals for the field types of the individual columns. It proposes type Characteristic with the following data types: Character string, date or time.You have to flag key figures yourself. The system then identifies the data types Integer, Decimal or Floating Point Number. The data type 'decimal' always has three decimal places. The data type 'floating point number' is suggested for local data with several decimal places. You can either accept this suggestion or switch to 'decimal' (note that selecting 'decimal' means that values are truncated after the third decimal place).You can also select Character String with Leading Zeros or InfoObject as the type. If you assign an InfoObject, the internal format of the key figure is used. You can then run the conversion routine for this
SAP BW/4HANAAgile Information Access: BW Workspace PUBLIC 895

InfoObject and compare the values in the file with the master data. To do this, set theUse Conversion Routine or Check Master Data flag under Details for the column in question.If you have created a local characteristic, you can select this characteristic instead of the original InfoObject. This means for example, you can define values for new key values of the local characteristic.
4. If you want to use the local provider for data transfers to a central provider, you can use the transfer check to find out whether the data in the local provider suits the central provider. You can also create cleansing rules that can be saved on the local provider.
Column Cleansing
1. By choosing Simulate Upload, you can view the data cleansing statistics. You can also view details of any errors that have occurred.
2. For rows containing errors, you can then select various activities in Column Cleansing. To do this, select the row containing errors and choose Add.The following activities are then available under Activity:○ Initialize values with conversion errors: As the value cannot be converted into the specified type for the
column, the value is initialized○ Delete rows with conversion errors: As an error occurred during conversion, the whole row is not
uploaded○ Replace value: The value is replaced in the column with a user-defined value.
3. If you have specified one or more activities and then choose Propose Type, your wishes are complied with under Column Cleansing. This allows you to correct an incorrectly proposed type.
ExampleIf one or more incorrect values are recognized as character strings, a column is classified as a characteristic column, even if it actually contains mainly numeric key figures. In this case, you cannot set the type of the column to Key Figure. You can then use Column Cleansing to replace incorrect values with zero for example. By choosing Propose Type, you can perform column cleansing and set the column type to Key Figure.
NoteThe cleaning settings are saved for the provider and used again next time it is loaded.
4. Choose Continue.
Edit Provider Properties
1. Choose Attach to reload a local provider and attach the new data to the old data.2. By choosing Delete Duplicates, you can make the system delete all duplicate rows in the provider.3. Choose Upload and Activate Provider.
6.1.3.1.1 Data Analysis for CSV Files
Concept
Before a CSV file is uploaded, the following parts of the file are analyzed:
● The first 500 data rows (starting from the first data row)
896 PUBLICSAP BW/4HANA
Agile Information Access: BW Workspace

● 500 rows in the middle of the file (for example, rows 750 - 1250 in a file with 2000 rows)● The last 500 rows
When uploading the file, the system might find a data type that does not match the analyzed rows (if the analyzed files only contain numbers, and one of the rows not analyzed contains a character string for example). The upload is aborted, and a message is displayed with a recommended course of action: You either make changes to the file (if it contains errors) and upload it again or you can change the data type of the column.
Column-Based File Analysis
The system checks every cell of each column in the file using the following priority:
1. STRING/DATS/TIMS is always proposed. If a column is a key figure, you have to select this. The system then determines whether it is a decimal, integer etc.
2. The date and date format of the cells are then checked. If the data in the content matches the data format selected in the application for uploading CSV files (or if the internal ABAP date format YYYYMMDD was selected with the format option YYYY.MM.DD), the cell content is identified as a date, and the data type DATS is selected.
3. Finally, the system checks whether the cell contains a time characteristic. If this is the case, the data type TIMS is selected.In all other cases, the data type STRING is selected.The 'leading zeros' flag can be set for characteristics with the data type STRING. In this case, an alpha conversion is performed (CHAR field).
6.1.3.2 Creating Local Providers: Query as Source
Procedure
Selecting a Query
1. Select a query. If a query contains variables, it can only be selected if a previously created variant is selected. You can create variants directly in Workspace Designer when creating the local provider, in the Query Monitor or in Query Designer.More information: Defining Variables [page 811]
Change Columns
1. The system has analyzed the query. The InfoObjects used in the query are displayed under Type Details. This selects the key figures and characteristics used in the query drilldown. You can also select the free characteristics defined in the query, together with the compounded characteristics of the InfoObjects in the query drilldown.
2. Select the fields that you need.3. You can overwrite the field names.4. Choose Continue.
Edit Provider Properties
1. Choose Upload and Activate Provider.
SAP BW/4HANAAgile Information Access: BW Workspace PUBLIC 897

6.1.3.3 Creating Local Providers: DataSource as Source
Procedure
Select DataSource
1. Select a DataSource. DataSources are available that allow direct access. In the source system (for example, in the SAPI context), this depends on the exact DataSource setting in the source system; direct access is not possible in the SLT context. The following types are available:○ File DataSources○ ODP DataSources○ SAP HANA DataSources
Change Columns
1. The data types are determined automatically from the DataSource. The system can also tell whether it is a characterstic or a key figure.
2. You can change a key figure into a characteristic if it is a time stamp for example, and you want to use the time stamp as a character string.
3. You can set a filter to restrict the data volume during the upload.
RecommendationWe recommend setting ths filter, as the upload takes place in the dialog and therefore cannot be packaged. This helps to limit the time it takes to upload the data. For larger amounts of data you should therefore create an InfoProvider in the BW system.
4. Select the fields that you need.5. You can overwrite the field names.6. Choose Continue.
Edit Provider Properties
1. Choose Upload and Activate Provider.
6.1.4 Transferring Data
You can transfer data from local providers to central BW providers.
Context
You retain control of the data while doing this.
898 PUBLICSAP BW/4HANA
Agile Information Access: BW Workspace

Procedure
1. Go to the Transfer Data screen area.2. Enter a local provider as the source provider.3. Enter a target provider. DataStore objects (advanced) are supported, which correspond to the types
InfoCube, Standard DataStore Object and Corporate Memory. Only DataStore objects (advanced) that have been released for data transfer by the administrator can be selected.
4. Choose Continue. A list opens containing the InfoObjects in the DataStore object (advanced), which are activated for writing by the backend. InfoObjects that are mandatory in workspace administration are flagged accordingly. You also see any filters created in workspace administration.
5. You can create additional filters and select non-mandatory InfoObjects for data transfer.6. If you click on the status, you can see in the lower screen area which checks are being performed. To run
the check, choose Check.7. By choosing Cleansing, you can create a cleaning rule for the data. If you then run the check again, you will
see a cleansing notification in the lower screen area.8. Choose Transfer Data. The system creates a transfer log for you.
6.1.5 Creating a Local Characteristic
You can create a local characteristic that takes its properties and attributes from a central master InfoObject.
Prerequisites
An InfoObject can act as a master InfoObject if:
● It is used in at least one of the workspace's central providers● It has master data● It is not set to constant● It is not authorization relevant● It is not compounded to a characteristic that is authorization relevant
Authorization-relevant attributes of the master InfoObject are ignored in the local characteristic. Changes to the master data of the master InfoObject also appear in the master data of the local characteristic, provided that the key values were not changed when the local characteristic was created.
Context
You can create a local characteristic that takes its attributes and most of its properties from a master InfoObject. This is always non-time dependent and non-language dependent, even if the master InfoObject is time-dependent and language-dependent. If the Master-InfoObject has texts, texts can also be defined for new values in the local characteristic. Existing texts cannot be overwritten. You can load data into the local characteristic using a file (CSV or Microsoft Excel) or by entering the data manually.
SAP BW/4HANAAgile Information Access: BW Workspace PUBLIC 899

You can also define additional attributes. The additional attributes are stored locally.
The local characteristic can only be used in local providers and in local CompositeProviders in the same workspace. In the local provider, you can assign an InfoObject to a column. When doing this, you can choose whether the original characteristic or the local characteristic should be assigned. In the local CompositeProvider, you can choose whether the original characteristic or the local characteristic should be assigned.
Procedure
1. Choose Create Local Characteristic.2. Select a master InfoObject to base the local characteristic on. Only one local characteristic can be created
per characteristic and per workspace. Choose either file or BW InfoObject as the source. Choose Continue.File as Source3. If you have selected File as the source, proceed as follows:
1. Select a file to upload to the workspace. The system can process text-based files containing comma-separated values (CSV files) and Microsoft Excel files. The columns in the file should be aligned as follows:
Keysof the reference characteristic
Attributes of the reference characteristic Local attributes
Texts (TXTSH, TXTMD, TXTLG)
○ Key of master InfoObject: the column for the keys should have the same name as in the master InfoObject. If it has a compound, the key name of the compound parenet should be included in a column of its own.
○ Attributes of master InfoObject: attributes of master InfoObject are automatically flagged as changeable. The values from the file are used as values for the local characteristic's master data.
○ Local attributes You can define local attributes. These are automaticlly marked as changeable.○ Texts: If the master InfoObject has texts, you can create columns with the supported text types.
You can thus define texts for new key values. The column headers must be TXTSH for short texts, TXTMD for medium texts and TXTLG for long and extra-long texts.
2. You can specify the header that contains the field names. If you do not specify anything, the first row is used as the header.
3. Enter the first data row if it deviates from the default setting (in the default setting, the first data row is in row two).
4. For CSV files: Make settings for how separators, decimals, date and field separators are displayed. The field separator sign can be used to set special characters in the date field. If the field separator is contained in the date itself, it has to be set twice in the date field.
NoteIf you CSV file is very large, and no field separator signs are required, you should remove the ' " ' in order to improve load performance.
For the date, the format that the dates in the file are in has to be taken.
900 PUBLICSAP BW/4HANA
Agile Information Access: BW Workspace

NoteWith Excel files, the formatting generally taken from the file. We therefore recommend formating the columns accordingly in Excel files.
5. By choosing Display Data, you can see where the first data row begins, and how many headers there are.
6. The name for the local characteristic is made up as follows: 3L<workspace prefix><name of the reference characteristic>. You can change the generated name, but the prefix (3L<workspace prefix>) cannot be changed. Enter a description.
7. Choose Continue. The attributes from the file are mapped to the attributes of the master InfoObject. Additional attributes from the file are added as purely local attributes.
Editing the Attributes: 4. Locale attributes, and attributes that are contained in the master InfoObject and in the file, are flagged as
changeable. If an attribute does not have the property Changeable, you cannot edit it in master data maintenance.
5. You can flag attributes that are not contained in the master InfoObject as excluded. These are then not used in the query.
6. For local attributes, you can change the type.7. By choosing Add Attribute, you can add further attributes (characteristics or key figures) that are not in the
reference characteristic or in the file. These are always changeable. As these attributes do not contain any data at first, you then need to create some data by editing the master data.
8. Choose Create and Load. The local characteristic is now saved, and the data is loaded from the file.InfoObject as Source9. If you have selected InfoObject as the source, proceed as follows:
1. You can change the name and the description. The prefix of the generated name (3L<Workspace-Präfix>) cannot be changed however. Choose Continue.
2. As no data exists yet, the system does not make a proposal in terms of whether it is changeable or not. You can decide yourself which attributes are changeable and which should be excluded from the query.
3. Choose Create Characteristic. The local characteristic is now saved.4. As these attributes do not contain any data at first, you then need to create some data by editing the
master data.10. The next step is to create a new CompositeProvider that uses the characteristic, create another local
characteristic, or edit the master data.
Related Information
Creating CompositeProviders in BW Workspace Designer [page 887]Creating a Local Characteristic [page 899]Editing Master Data [page 902]
SAP BW/4HANAAgile Information Access: BW Workspace PUBLIC 901

6.1.5.1 Editing Master Data
Once you have created a local characteristic, you can edit the master data.
Context
If the workspace does not have the property Creation of Master Data Allowed, only values that already exist in the corresponding InfoObjects can be used.
Procedure
1. You can create or change master data for all attributes that have been marked as changeable, and for all additional local attributes.
2. If the Master InfoObject has texts, you can define new descriptions for every text type defined on the master InfoObject. You cannot overwrite descriptions of existing key values. Any time and language dependencies that the master InfoObject has are ignored.
3. Save and activate your entries.
Related Information
6.1.5.2 Changes to the Central InfoObject
If a central InfoObject with relationships with local characteristics is changed and activated, these local characteristics are automatically adjusted, together with any CompositeProviders defined on them.
In the administration screen for BW Workspaces, you can view a log detailing changes to InfoObjects and recognize how these will affect your local characteristics and CompositeProviders. You can call the log by choosing Display Impact Logs for InfoObjects in the initial screen for BW Workspace administration.
If changes have been made to an InfoObject, this can have consequences in various usages of the InfoObject. In the context of local characteristics, the InfoObject can have the following roles:
● As a central master InfoObject of one or more local characteristics● As an attribute of the central characteristic● As an assigned InfoObject of a local attribute or local characteristic● As a compound parent of a master InfoObject
902 PUBLICSAP BW/4HANA
Agile Information Access: BW Workspace

Changes that make it necessary to modify the local characteristic or activate CompositeProviders
The following changes to the central characteristic result in the local characteristics in the relationship being modified:
● Adding an attribute:If the attribute is not authorization-relevant, it appears as a non-modifiable attribute in the local characteristic. All local CompositeProviders dependent on the local characteristic are reactivated, making the new attribute visible in the queries defined on it.
● Deleting an attribute:If an attribute is deleted from the local characteristic, all local CompositeProviders dependent on the local characterstic are reactivated. In certain cases, the existence of the deleted attribute is a prerequisite for a local attribute. This can be the case if the attribute is a compound parent of a local attribute. In this case, a local attribute is created for the local characteristic. This local attribute references the deleted attribute in order to keep the local characteristic consistent.
ExampleThe master InfoObject has the attribute A1. A1 is not excluded in the local characteristic. A1 is the compound parent of A2. The local characteristic as a local attribute that references A2. This means A2 is fully specified.
If A1 is now deleted from the master InfoObject, the local attribute A2 still exists in the local characteristic but does not have a compound parent. In order to avoid this inconsistency, a local attribute is created that references A1. A2 is thus fully specified again.
● Changing the time-dependency of an attribute:The local characteristic is reactivated. This has no effect on the local CompositeProviders.
● Changing the navigation properties of an attribute:If the attribute is not excludes from the characteristic, all CompositeProviders that use the local characteristic and that have the attribute as a navigation attribute are reactivated. You can exclude attributes in the definition of the local characteristic when editing attributes.
● Changing the authorization relevance of a navigation attribute:If the attribute is not excludes from the characteristic, all CompositeProviders that use the local characteristic and that have the attribute as a navigation attribute are reactivated.
● Changing the description of a navigation attribute:If the attribute is not excludes from the characteristic, all CompositeProviders that use the local characteristic and that have the attribute as a navigation attribute are reactivated.
● Changing the text properties of an InfoObject:If the InfoObject is a master InfoObject, the local characteristics have to be modified so that they have the same text properties. All local CompositeProviders dependent on the local characteristic are activated. If however the InfoObject is a navigation attribute in a master InfoObject or is assigned to a local attribute of a local characteristic, only the local CompositeProviders that have the attribute as their navigation attribute are reactivated.
● Changing the compounding of an InfoObject:If the compound parent is deleted or added for a master InfoObject, the local characteristic is modified accordingly. The compound parent is only added to the local characteristic, if the parent is not authorization-relevant. All local CompositeProviders are reactivated. If the compound parent is authorization relevant, the master InfoObject cannot be used as the basis for local characteristics anymore. All local characteristics are deleted, and the CompositeProviders are set to inactive.
SAP BW/4HANAAgile Information Access: BW Workspace PUBLIC 903

If the compounding is removed, an attribute might habe been excluded because of its authorization-relevant compound parent in the local characteristic. In this case, the attribute will appear again. If the InfoObject was used in a local attribute, a new local attribute is created with the compound parent.
● Deleting an InfoObject:If the InfoObject is a master InfoObject, the local characteristics are deleted, and the CompositeProviders set to inactive. If the attribute is in a master InfoObject, the same procedure applies as when deleting attributes. If the attribute is referenced in a local attribute, it is also deleted from the local characteristic, and all CompositeProviders are activated.
● Authorization relevance of an InfoObject:If the InfoObject is marked as authorization relevant, and the InfoObject is a master InfoObject or a parent of a master InfoObject, the same applies as when deleting an InfoObject. If the InfoObject is an attribute of a master InfoObject, it is excluded and processed the same way as for deletion of an attribute. If it is referenced in a local attribute, this attribute is deleted from the local characteristic.
● If a master InfoObject is excluded from being used in the BW Workspace in BW Workspace Administration, the local characteristics defined on it are deleted, and all CompositeProviders defined from it are inactive.
Whenever an attribute is deleted from the local characteristic, the local data for this attribute is lost. Changing the authorization relevance of an InfoObject in particular can result in data being deleted from local characteristics and not being reproducible when this property is restarted.
Restarting modification of the local characteristic
If modification of the local characteristic terminates or cannot be performed, because the Workspace is locked for example, you can restart it. To do this, you use report RSL_WSP_EXECUTE_IOBJ_IMPACT. You can find the parameters required from the messages in the log. You have to select the corresponding action on an InfoObject and also the attribute name in the case of attributes. If you choose Force Activation, all affected objects are activated.
6.1.6 Create Local Hierarchy
You can create a local hierarchy, which derives its structure from a central hierarchy or file. Alternatively you can create the hierarchy structure yourself.
Context
You can change the local hierarchy structure by inserting additional nodes and master data values, changing and deleting nodes.
The following InfoObjects are available as basic characteristics for a local hierarchy:
● central characteristics, which have master data and support hierarchies● local characteristics (even if their master InfoObject does not support hierarchies)● local transient characteristics of a local provider or a local attribute. For these characteristics, you can only
create empty hierarchies or hierarchies from a file.
904 PUBLICSAP BW/4HANA
Agile Information Access: BW Workspace

If the InfoObject, which the hierarchy is based on, is authorization-relevant, then this has the following effect:
● When you select a template hierarchy, it is filtered by the analysis authorizations. Then you can only see the structure, which you would see when executing a query.
● Only the master data for which you have authorization is displayed.● If a different user opens your local hierarchy, this user only sees the structure for which he/she is
authorized. Therefore a local hierarchy on an authorization-relevant InfoObject can only edited by the user who created the hierarchy.
● If the hierarchy is loaded from a file, then only the permitted values are allowed to be part of the local hierarchy.
The following functions are not supported by hierarchies:
● Time dependency of hierarchy structure: For time-dependent BW hierarchies as sources, you need to decide when (on which key date) you want the hierarchy to be loaded.
● Versions● Time intervals● External characteristics: For BW hierarchies as sources, nodes with external characteristics are converted
to text nodes.● Reverse +/- signs● Virtual hierarchies
Procedure
1. Choose Local Data Create Local Hierarchy from the menu.2. Choose either File, BW Hierarchy or Empty Hierarchy as the source. Select the BW InfoObject for which you
want to create the local hierarchy. If you choose BW Hierarchy you can also select the template hierarchy, if multiple hierarchies exist for this InfoObject. If the structure of the template hierarchy is time-dependent, you also need to select a date. Choose Continue.
3. If you have selected File as a source, you first need to select your file. Proceed as follows: Creating a Local Hierarchy with Files as Sources [page 906]
4. You can change the name and the description. The prefix of the generated name (3H workspace prefix) cannot be changed however. Choose Continue. The editor for local hierarchies appears.
5. If you selected File or BW Hierarchy as the source, the current hierarchy is displayed and you can modify the hierarchy as required. If you selected Empty Hierarchy as the source, the table for the hierarchy is initially empty. You can now create your hierarchy.
6. Choose Create Nodes to insert new nodes into the hierarchy. When you insert new nodes, you can immediately decide whether you want a new node to be a subnode or a node on the same level.
7. Choose Add Keys to display the master data values (keys and texts) of the InfoObject, which the hierarchy is based on, in the right-hand area of the screen. Drag and drop the required values from the right-hand area into the hierarchy.
8. Choose Change Node to change the description of a structure node. You cannot change the technical name.
9. If you insert a node with a technical name that already exists, a prompt appears asking you whether you want to insert the node as a link. A node and the complete subtree under this node can be inserted multiple times into a hierarchy as a link node.
SAP BW/4HANAAgile Information Access: BW Workspace PUBLIC 905

10. Choose Delete Nodes to delete all selected nodes.
11. Choose Display Technical IDs to show or hide the technical details of the nodes.12. Choose Export to Spreadsheet to export the hierarchy as a CSV file.13. Choose Finish. The local hierarchy is saved and is now available in queries.
6.1.6.1 Creating a Local Hierarchy with Files as SourcesIf you have selected file as the source, proceed as follows:
Procedure
1. Select a file to upload to the workspace. The system can process text-based files containing comma-separated values (CSV files) and Microsoft Excel files. Files created with the export function in hierarchy maintenance can also be loaded. The columns in the file should be aligned as follows:
NODEID IOBJNM NODENAME PARENTID TEXTSH
or like this:
PARENT_NAME CHILD_NAME IS_LEAF TEXTSH
The column TEXTSH is optional in both cases. If you omit this column, NODENAME or PARENT_NAME is displayed.
For compound InfoObjects, you need to specify the concatenated characteristic value.
2. You can specify the header that contains the field names. If you do not specify anything, the first row is used as the header.
3. Enter the first data row if it deviates from the default setting (in the default setting, the first data row is in row two).
4. For CSV files: Make settings for how separators, decimals, date and field separators are displayed. The field separator sign can be used to set special characters in the date field. If the field separator is contained in the date itself, it has to be set twice in the date field.
NoteIf you CSV file is very large, and no field separator signs are required, you should remove the ' " ' in order to improve load performance.
For the date, the format that the dates in the file are in has to be taken.
NoteWith Microsoft Excel files, the formatting is generally taken from the file. We therefore recommend formating the columns accordingly in Excel files.
906 PUBLICSAP BW/4HANA
Agile Information Access: BW Workspace

5. Now edit the hierarchy as described here: Create Local Hierarchy [page 904]
6.2 BW Workspace Query Designer
BW Workspace Designer enables casual users to easily create new BW Workspace queries for data analysis or enhance existing queries.
A BW Workspace query always has a reference to a BW Workspace, because its definition is stored in a workspace. The definition has a subset of the functions of a query, which is created with BW Modeling Tools. You can also enhance queries, which you have defined with BW Modeling Tools, in BW Workspace Query Designer. For every BW Workspace query, the system generates a BW query ID. This allows a Workspace query to be consumed like any other analytic query from SAP BW∕4HANA.
The central InfoProviders of the BW Workspace with their exposed data can be used as InfoProviders for the BW Workspace query. You can also create local CompositeProviders or upload local providers. In a local CompositeProvider you can merge your own custom data with data from BW.
Related Information
Calling BW Workspace Query Designer [page 907]BW Workspace Query [page 908]Defining InfoProviders [page 911]Selecting a BW Workspace [page 917]
6.2.1 Calling BW Workspace Query Designer
You call BW Workspace Query Designer from your web browser.
Prerequisites
● Make sure that there are SAP BW∕4HANAWorkspaces in the back end system (transaction RSWSP).● Make sure that SAP BW∕4HANAthe following Internet connection services are activated in the back end
system (transaction SICF):○ /sap/bc/ui5_ui5/sap/rsl_wqd○ /sap/bw/modelling
● BW Workspace Designer can be called from various web browsers. This includes in particular Windows Internet Explorer (Version 10 and higher), Google Chrome and Firefox.
SAP BW/4HANAAgile Information Access: BW Workspace PUBLIC 907

● Make sure that you have the required authorizations. Before executing reports or displaying data from InfoProviders, the system checks the existing start and analysis authorizations. To model and execute BW Workspace queries, additional authorization for BW Workspaces is required (RS_WSPAC).
Context
You have opened your web browser.
Procedure
1. Enter one of the following URLs in your browser, depending on which port is configured (HTTP or HTTPS).○ http://<Web Server Host>:<Web Server Port>/sap/bw/wqd/index.html○ https://<Web Server Host>:<Web Server Port>/sap/bw/wqd/index.html
2. You can add further parameters to the URL:○ ?sap-client=<client number>○ &sap-language=<language>
3. If required, enter your user name and password.
Results
The Workspace Query Designer screen opens.
6.2.2 BW Workspace Query
A query is the formal definition of a multidimensional query used to analyze data. By selecting and combining individual query components (dimensions and measures) or reusable query elements (restricted and calculated measures) in a query, you define how you want to evaluate the data from the selected InfoProvider. You can use input-enables queries for manual planning.
The components of a BW Workspace query are as follows:
● Global filter:The selections in the filter apply to the query in its entirety. When defining the filter, you select characteristic values from one or more characteristics. All the InfoProvider data is aggregated using the
filter selection of the query. You can the filter definition screen via or by choosing Query EditRestrictions from the menu.
● Dimensions:In the query definition, you assign the dimensions in the InfoProvider to the rows, columns and free characteristics in the query. With this selection, you to specify the data areas of the InfoProvider through
908 PUBLICSAP BW/4HANA
Agile Information Access: BW Workspace

which you want to navigate. The alignment of row and column content determines the initial view for the query.
● Measure structure:You can also create exactly on structure. You use the structure members to define which numerical data is displaye.Structure members can be any of the following objects:○ Measures from the underlying InfoProvider, with restrictions to certain measure values if required.○ Formulas, i.e. calculatios based on the measures or other structure members contained in the
InfoProvider.
You can reference complex BW queries, which have been defined by your IT department for example, in your BW Workspace query. This allows you to use further functions without the need to create or modify them. These include variables for parameterizing the query.
Related Information
Opening a BW Workspace Query [page 909]Creating a BW Workspace Query [page 910]Creating a BW Workspace Query Based on a BW Query [page 910]
6.2.2.1 Opening a BW Workspace Query
If you have created queries for the current BW Workspace, you can select them from the list of available queries.
Procedure
1. Choose Open. A dialog box appears where you can select a query.2. Select the required query and confirm your selection by pressing OK. The screen with the definition of the
selected BW Workspace query opens.
Results
On the left side of the screen, you can see the InfoProvider's measures, dimensions and (if applicable) facts. You can use the various options in the context menu to edit the corresponding object and to add it to the query definition.
On the right side of the screen, you can see the current query definition, with the sections Free Dimensions, Columns, Rows and Facts. You can use the various options in the context menu to edit the corresponding object and to use it in other parts of the query definition or to remove it from them.
SAP BW/4HANAAgile Information Access: BW Workspace PUBLIC 909

Exactly one measure structure can be created in a BW Workspace query. This can be assigned to either the columns or the rows. If you drag a measure to one of these two areas, the system automatically creates a measure structure. You can use the various options in the context menu to edit the structure.
NoteThe BW Workspace query can also inherit further structures from the reference query. These can only be enhanced in the definition of the BW Workspace query however.
6.2.2.2 Creating a BW Workspace Query
Context
By choosing Change, you can create a BW Workspace query based on an existing InfoProvider in the current Workspace .
● As the InfoProvider, you can use all InfoProviders from the current Workspace.● If the Workspace has the corresponding setting, the system offers all InfoProviders for selection under
Others. This includes InfoProviders that do not belong to the current Workspace.
The query definition screen appears. From the view on the underlying InfoProvider, you can use drag and drop or the context menu to insert dimensions and measures, including the calculated and restricted measures to the rows, columns or free characteristics.
If you have added at least one measure, the system inserts the measure structure. If you choose Add Structure Member in the context menu for the measure structure, the Member Properties screen will open. You can define the selection for the measure, or calculate the measure by entering a formula.
If you created the query on a local CompositeProvider, you can upload new dimensions and measures. In this case, the system also displays the Additional Data and Additional Facts repositories in addition to the measures and dimensions of the underlying InfoProvider.
Related Information
Load Additional Data [page 915]
6.2.2.3 Creating a BW Workspace Query Based on a BW Query
You can create a new BW Workspace query based on an existing analytic query. It does not matter how complex the referenced analytic query is. It can contain multiple structures, and it can also contain two
910 PUBLICSAP BW/4HANA
Agile Information Access: BW Workspace

characteristic structures. The referenced query is not modified in any way. You can change the order of the dimensions and measures however, and can add new dimensions, measures and global filter conditions.
Context
● Any analytic queries defined on a central provider in the current Workspace can be used for this. If a local CompositeProvider has already been created for the central provider, you can create the query on the local CompositeProvider. This is the prerequisite for uploading new dimensions and measures.
● If the Workspace has the corresponding setting, the system offers all queries for selection under Others. This includes queries of InfoProviders that do not belong to the current Workspace.
NoteNote that any changes made to the referenced query can also affect the Workspace.
6.2.3 Defining InfoProviders
An InfoProvider serves as the data source of your query. You can either use an existing InfoProvider from the current BW Workspace or you can create a new BW Workspace-specific provider as the basis for your query.
The following types of providers are supported in a BW Workspace:
● Central InfoProvider: BW InfoProvider that is created centrally in the SAP BW∕4HANA back end system and is assigned to the current BW Workspace.
● Local provider: BW Workspace specific provider, which contains data from a local file.● Local CompositeProvider: BW Workspace-specific provider, which contains local data and also data from a
central or local provider in the BW Workspace.
Related Information
Opening an InfoProvider [page 912]Creating InfoProviders from Local Data [page 912]Creating InfoProviders from Local Data and BW Data [page 914]
SAP BW/4HANAAgile Information Access: BW Workspace PUBLIC 911

6.2.3.1 Opening an InfoProvider
If you want to create a query based on an existing InfoProvider in the current BW Workspace, you can select the InfoProvider from a list.
Procedure
1. Choose Open. The dialog box for selecting the InfoProvider opens.2. Select the required InfoProvider and confirm your selection by pressing OK. The screen for defining BW
Workspace queries opens.
NoteThe system informs you if the InfoProvider is already in use by other queries. Note that removing or modifying data can have unintended consequences
6.2.3.2 Creating InfoProviders from Local Data
If you want to create a new provider based on your query in the current BW Workspace by uploading local data from a file, you can create a local provider here
Procedure
1. Choose Create Local Provider. The Create Local Provider dialog box opens.2. Enter a name.3. Choose Browse. A dialog box opens where you can select the local file to upload the Workspace to. The
system can process text-based files containing comma-separated values (CSV files) and Microsoft Excel files (XLSX or XLSM).
4. Choose Open. The system analyzes the data and displays them in a form structure.○ You can restrict the area in the columns and rows to be used for the local provider. To do this, select the
corresponding ranges in the columns and rows.○ You can specify whether the content of the first row should be interpreted as a column header. The
default setting here is the option First Row as Column Header.5. You can make further changes to the local provider, for example by changing the column settings. To do
this, open the context menu from the column header and choose Properties. The dialog box for setting the column properties appears.○ Name: You can set a new name for the column.○ Data Type: You can select a different data type to the system default data type. Depending on the data
type, certain other settings can be made. The system shows you fixed properties for information purposes. Note that you cannot change these properties however.
912 PUBLICSAP BW/4HANA
Agile Information Access: BW Workspace

ExampleIn the case of data type STRING, the system indicates that the length has a maximum of 250 characters. In the case of data type CHARACTER, the system indicates that it is an alpha conversion, but that the length is changeable in this case.
You can use data type InfoObject Assignment to select a different InfoObject as the basis of the data type. As a prerequisite for this, the InfoObject must be in a central provider of the BW Workspace and be of the right data type. The system helps you here by greying out all data types that cannot be selected. You can use the InfoObject List to restrict the selection to a group of InfoObjects, from which you can then select the required InfoObject. Note that the technical name is displayed if you hover the mouse over the InfoObject. If there is a local dimension for a dimension, this can also be selected.
○ Assignment of Units and Currencies: The system checks unit and currency columns against units and currencies in the BW system. If a measure in the neighboring column is positioned before the associated unit or currency, the system recognizes this and automatically proposes the corresponding assignment. If the unit or currency column is not positioned immediately after the associated measure column, or relates to multiple measure columns, you have to make the assignment yourself.
ExampleIf a column contains the measure Sales, and the following column Currency Key, the system displays the data type in the properties of the Sales column as Amount and automatically assigned the currency key in the Unit field. If this unit relates to multiple preceding columns however, you have to set this explicitly in the properties of these columns.
○ Key Field: This is the default setting for dimensions.
ExampleIf you have defined Distribution Channel and Product as key fields for example, this results in exactly one data record for each distribution channel and product.
NoteIf you have created local characteristics for central master InfoObjects, the system also offers these for selection. You can recognize these by their technical name, which is made up as follows: 3L<Workspace prefix><Name of the reference characteristic>.
6. You can make further changes to the local provider by changing data in the columns, or by adding or deleting rows.○ To change data, select the value of a row and enter the new value.○ To add rows, choose Add Empty Rows. The system adds five empty rows.○ To delete rows, select the rows you want to delete and choose Delete Selected Rows.
7. To test the upload to your BW system, choose Check. The system simulates a data upload and used column cleansing to point out errors.
NoteNote that the column cleansing settings are saved for the provider and used again next time it is loaded.
SAP BW/4HANAAgile Information Access: BW Workspace PUBLIC 913

You can perform the following actions:
Error correction options
Possible source of error Error correction options
Conversion ○ Initialize values with conversion errors: As the value cannot be converted into the specified type for the column, the value is initialized
○ Delete rows with conversion errors: As an error occurred during conversion, the whole row is not uploaded
Existence of master data ○ Initialize: As no corresponding master data exists, the value of the cell is initialized.
○ Delete: As no corresponding master data exists, the entire row is not uploaded.
○ Allow: The value is displayed as new master data in the query. Note that this option is dependent on the Workspace settings.
NoteColumn Cleansing is also integrated in the Properties dialog for a column with certain data types (such as CURRENCY).
8. To save your local provider, choose Save. The system saves the data on the back end as a new local provider. The screen for defining BW Workspace queries opens.
6.2.3.3 Creating InfoProviders from Local Data and BW Data
If you want to create a new provider based on your query in the current BW Workspace by uploading local data and merging data from an existing central or local provider, you can create a local CompositeProvider here
Procedure
1. Choose Create in Order to Merge Local Data. The Create Local CompositeProvider dialog box opens.2. Enter a name.3. Define whether the local CompositeProvider should be based on a central provider or a local provider.
All fields in the selected provider will become measures and dimensions in the local CompositeProvider.
NoteIf InfoObjects with navigation attributes are used in a provider, you can switch these on or off on the local CompositeProvider.
914 PUBLICSAP BW/4HANA
Agile Information Access: BW Workspace

4. Select the required provider from the current BW Workspace.5. To save your local CompositeProvider, choose Save. The screen for defining BW Workspace queries opens.
The local CompositeProvider display contains the Additional Data directory. You can add additional measures, dimensions and data records here when defining the query.
In the dimension properties, you can change the name of the dimension and specify whether you want to use the local dimension (if provided). This change cannot be made once plannable key figures have been added to the CompositeProvider.
Related Information
Load Additional Data [page 915]
6.2.3.3.1 Load Additional Data
If you are using a local CompositeProvider as the basis of your query, you can still add various data to the local CompositeProvider while defining the query. This can be local data or data from an existing local provider.
Context
You have created a local CompositeProvider and are in the query definition screen. You would now also like to include data from a local file.
In the InfoProvide tree, the system also displays the Additional Data directory in addition to the measures and dimensions of the underlying InfoProvider.
NoteYou can view the objects of the InfoProviders in a sorted view. To do this, choose the corresponding symbol in the taskbar. Instead of displaying the additional data in the Additional Data directory, the system then assigns it to the relevant categories (dimensions, measures or data records).
Procedure
1. If you want to add local data, select the required option from the context menu of the corresponding node in the Additional Data directory.
You have the following options:
○ Add New Measure. (The result is displayed in a new column)○ Add New Data Records. (The result is displayed in new rows below the existing data rows.)
SAP BW/4HANAAgile Information Access: BW Workspace PUBLIC 915

2. The dialog for adding new objects or new data records opens. Give the object you are creating a name, select the field(s) that the value of the new dimension or measure should be dependent on or, if you are creating data records, which are available for the new data records, and press OK.
3. The dialog box for entering data appears. From the properties of the columns (in the context menu or by double-clicking the column header), you can change the text and the metadata provided that the columns have not been saved in the back end yet. For information about the metadata that can be set, see Creating InfoProviders from Local Data [page 912].
The system restricts the metadata accordingly, depending on whether you are creating a measure or a dimension.
4. Enter the data.
○ You can select a source for this, which the new object or the new data records should be loaded from. This can be either a local file or a local provider of the current workspace.
○ You can enter data in the cells in the (entry) table. This is still possible after data has been loaded from a local file or a local provider.
5. If you load data from a source, the system displays a preview of the data from the local file or the local provider (preview table). Every column is displayed exactly above the currently assigned column in the entry table. You can change the assignment either using the function in the context menu for the column headers (by deleting the existing assignment or assigning to a different object that is) or moving the column headers using drag and drop.
Note that data can only be mapped if the metadata and data match. For information about the current status, hold the mouse over the status symbols in the mapping row.
6. Once the assignment is how you want it, and there are no assignment errors, choose Transfer in order to transfer the data to the entry table. If this already contains data, and you want to replace this data, choose Replace. If this already contains data, and you want to replace this data, choose Replace.
The function keys below the entry table allow you to perform the following functions:
○ If you want to add empty rows, choose Add Empty Rows.○ If you want to add rows that contain data generated by the system, choose Add Generated Rows. From
the Generate from Rows dialog box, you can select for each dimension the values that data rows should be generated for. The system generates rows for each combination of all selected values in the dimension columns (up to a maximum of 10,000).
○ If you want to delete rows, select them and choose Delete Selected Rows.○ If you want to add more columns, choose Add Column. You can add columns using any of the following
methods:○ Insert from InfoProvider.○ Insert from File○ Attach New Column.
○ By choosing Download, you can save the data in the entry table locally as a csv file.7. To finish adding data to the CompositeProvider, press OK. The data in the entry table is then transferred to
the BW system. The added data is checked again at this stage by means of column cleansing and removal of any errors. You can also trigger this check manually using the Check button.
916 PUBLICSAP BW/4HANA
Agile Information Access: BW Workspace

Results
You have added new dimensions, measures or data records to the local CompositeProvider. These are now available in all queries for this provider.
CautionNote that you have to move the new data records to the corresponding area in the query definition using drag and drop, so that they can be analyzed in reporting. This ensures that they are not also displayed in other queries based on the same local CompositeProvider, where the additional data has not been explicitly added to the area in the query definition.
6.2.4 Selecting a BW Workspace
You can use the corresponding pushbuttons to display the settings for the current BW Workspace and to switch to another BW Workspace. This makes sense if you work in two areas and manage the relevant objects for these in two different workspaces (one for requirements for accounting for example, and another for requirements from sales). You can then switch easily between these areas and their specific queries.
Display Current BW Workspace
The properties display screen for the current BW Workspace appears:
● General Properties:○ Workspace name○ Technical Name○ Contact data for person responsible○ Namespace
● Settings:○ Should BW Workspace queries be permitted for non-local InfoProviders?○ Is the creation of master data permitted?○ Workspace prefix
● Restrictions:○ Number of local providers (status green/yellow/red)○ Amount of memory taken up by own providers (status in green/yellow/red)○ Expiry Date
● Administration data○ Name of Person Who Created the Object (Created by)○ Created on○ Last Changed by○ Changed on
SAP BW/4HANAAgile Information Access: BW Workspace PUBLIC 917

Switching BW Workspace
If there are multiple BW Workspaces in your SAP BW∕4HANA back end system, and you are assigned to these in user administration, you can use the corresponding pushbuttons to switch to another BW Workspace and use the queries defined there.
The name of the current BW Workspace is preselected in the Select Workspace field. You can select the Workspace you want to switch to from the dropdown list.
918 PUBLICSAP BW/4HANA
Agile Information Access: BW Workspace

7 Configuration
Use
You can find information about how to configure SAP BW∕4HANA in the Implementation Guide (IMG) in the SAP BW∕4HANA system (transaction SPRO).
The remaining chapters in this structure provide additional information to the IMG.
7.1 Defining Client Administration in the BW System
Context
You use this function to define the properties of client-dependent and client-independent objects when changes or transports take place.
Procedure
● 1. In the SAP Menu, choose Tools Administration Administration Client Administration Client Maintenance. The Display Clients: Overview screen appears.
2. Choose Display -> Change.
3. Select your clients and choose .4. Specify a standard currency.5. Enter Customizing for the role of the client.6. Check the settings for changes and transports.
NoteIf you want to transfer the settings using BC Sets, you have to select the options Automatic Recording of Changes and Changes to Repository and Cross-Client Customizing Allowed.
7. Save your settings.
SAP BW/4HANAConfiguration PUBLIC 919

7.2 Defining Client Administration in Source Systems
Context
With this function you are able to define the properties of client-dependent and client-independent objects when changes or transports take place in the source system.
Procedure
● 1. In the SAP Menu, choose Tools Administration Administration Client Administration Client Maintenance . The Display Clients: Overview screen appears.
2. Choose Display Change .
3. Select your clients and choose .4. Select the following options:
○ Automatic recording of changes○ Changes to Repository and cross-client Customizing allowed○ eCATT and CATT allowed
5. Save your settings.
7.3 Configuring SAP IQ as a Cold Store
Prerequisites
You have installed the SAP IQ Server and SQL Anywhere ODBC driver. For more information, see SAP Note 1737415 and SAP Note 1796393 .
This procedure also applies when using SAP IQ as a near-line storage solution.
Configuration steps in SAP HANA
In order to access the data in the cold store via SAP HANA Smart Data Access, you need a remote source. The remote source in SAP HANA should point to the same SAP IQ database that is also used as near-line storage for the SAP BW∕4HANA system. The remote source should also be bound to the same user as the near-line storage connection. You create the remote source using the provisioning folder in SAP HANA studio.
920 PUBLICSAP BW/4HANAConfiguration

Prerequisites
You need the following authorization in SAP HANA:
● System Privilege: CREATE REMOTE SOURCE
If the remote source is not created with the SAP<SID> user but with a different database user instead, then this database user must assign the corresponding object authorizations to the SAP<SID> user:
● Object privilege: CREATE VIRTUAL TABLE on VIRTUAL_TABLES (SYS)● Object privilege: DROP on VIRTUAL_TABLES (SYS)
For more information on creating remote sources, see Help Portal under SAP HANA Administration GuideAdding Remote Data Sources .
Configuration steps in SAP BW∕4HANA
Creating a Database Connection
1. Call transaction DBCO and create a database connection to SAP IQ. For more details, see step 4 of SAP Note 1737415 .
CautionThe DBCO user and the SAP IQ user both have to be created with uppercase letters.
Parameter SYBASE_IQ_CESU-8 under Connection Information must be set to 0 if you use UTF8 as the character set.
Creating a Cold Store Connection
1. Create a cold store connection. You can call this transaction in Customizing by choosing SAP BW/4HANA Customizing Implementation Guide SAP BW/4HANA Information Lifecycle Management Edit Cold Store Connection and in the Data Warehousing Workbench under Administration Current Settings Cold Store Connections .
2. Choose New Entries.3. Enter a name for the cold store connection. When defining Data Tiering Optimization for a DataStore
object, you can select it.4. Specify if you want the connection to be the default connection. When defining Data Tiering Optimization,
the default connection is set by default.5. As the name, enter class CL_RSDA_SYB_CONNECTION.6. Specify the connection mode. This defines the operation mode of a cold store connection.7. Specify a database connection. This specification replaces DBCON=… Parameters under Connection
Parameters. This provides you with a clean foreign key relation from table RSDANLCON to table DBCON.If you have entered a value under Database Connection, this overrides the entry made under Connection Parameters.
8. In the Remote Source field, enter the remote source, which you want to use for data access via SAP HANA Smart Data Access.If you have entered a value under Remote Source, this overrides the entry made under Connection Parameters.
SAP BW/4HANAConfiguration PUBLIC 921

9. Enter a connection string under Connection Parameters. The connection string generally comprises a list of name/value pairs, separated by a semi-colon. Each name/value pair must be entered as follows:<Name of the parameter>=<Value of the parameter>The following parameters are supported:○ REMOTE_SOURCE: The specification made in field Remote Source overrides the specification made
under Connection Parameters.○ DBCON: The specification made in field Database Connection overrides the specification made under
Connection Parameters.○ BACKUP_REQUEST_EVENT (optional):
The value should be either DUMMY or the name of an event that has been defined in the SAP IQ database and which triggers a new data backup. If this parameter is entered, and all data has been copied to SAP IQ, the end of the write phase triggers this event. This makes it possible to perform data backup in SAP IQ at the same time as the verification phase. Before the actual deletion process begins, the system checks for a backup in SAP IQ. The deletion phase cannot continue until this has happened.A special event called DUMMY triggers an event in the SAP IQ database. It checks for a more recent data backup however before the data in the request is deleted from the SAP BW∕4HANA database. The DUMMY event should therefore be used if database backups are detected before the data is deleted and the data backups are automatically created by the SAP IQ database.If the parameter is left out or does not contain any values, no event is triggered, and the system does not check for data backups. You should only choose this setting in non-productive systems.
○ BACKUP_WAIT_SEC (optional)If the BACKUP_REQUEST_EVENT has been specified, and no data backup is detected before the start of the deletion phase, the process waits for a period specified here in seconds. If no data backup is performed during this period, the DTO job terminates with error message RSDA_SYB197: "No new data backup since the end of the copy phase. The current data backup ID is still <backup ID> of <timestamp>." The parameters <backup ID> and <timestamp> refer to the columns bu_id and bu_time in the Sybase IQ system view SYSIQBACKUPHISTORY. All rows with the condition selective_type in (1,2) are taken into account. This excludes all data backups that only refer to read-only files. The DTO job only be restarted once the data backup has been created.
○ PACKET_SIZE_MB (optional)The package size of a single LOAD statement in MB. If this parameter is left out or does not contain any values, the package size of the LOAD statement is exactly the same as the package size of the FETCH of the online table. This is currently set to 20 MB. A package size greater than 2000 is ignored and replaced by 2000 MB.
You can find a complete overview and details of the individual parameters in the F1 help.10. Save your settings.
Configuration Steps in SAP IQ
These configuration steps in SAP IQ are optional in order to integrate an automated data backup mechanism.
1. Log on to SAP IQ with user DBA using Sybase Central or IQISQL.2. Create an event that triggers a new data backup. As the name of the event, enter the name that you
entered in the cold store connection in the connection parameters for BACKUP_REQUEST_EVENT. The way the event is handled depends on your data backup and data recovery strategy.
922 PUBLICSAP BW/4HANAConfiguration

The following event definition shows a very simple strategy. Here, a data backup is always started whenever the event is triggered. The data backup files are stored in a directory in the database's Home directory. The name of the database forms part of the path name and of the file name.
CREATE EVENT BACKUP_REQUESTHANDLER BEGIN -- Declare and set unique filename DECLARE filename varchar(255); SET filename = '../backup/' || db_name() || '/' || db_name() || '_' || dateformat(now(),'yyyymmdd_hhnnss.ssssss'); -- Perform incremental backup BACKUP DATABASE FULL TO filename; END
Related Information
Defining Data Tiering Optimization for a DataStore Object [page 1128]Creating Near-Line Storage Connections [page 1153]
7.4 Configuring BW Workspaces
Prerequisites
You have installed the following components:
● SAP NetWeaver BW 7.3 SP 5 or higher○ With SAP HANA 1.0 as the database
● SAP Business Client for HTML/Windows 3.0More information: SAP Business Client
● the OfficeControl for uploading Microsoft Excel files. More information: Office-Integration
Procedure
1. Activate the following ICF services for the Web Dynpro application of the workspaces in transaction SICF:○ RSL_UI_MY_WORKSPACE○ RSL_UI_CREATE_COPR○ RSL_UI_CREATE_PROVIDER○ RSL_UI_CHANGE_WORKSPACE
SAP BW/4HANAConfiguration PUBLIC 923

○ RSL_UI_CHANGE_QUERIES○ RSL_UI_SUBMIT_DATA○ RSL_UI_CREATE_LCHA○ RSL_UI_CREATE_LCHY
2. Create the required roles and authorizations/authorization profiles. More information: Authorizations for BW Workspaces [page 1227]
3. Provide the business user with an environment to use BW Workspace Designer. To do this, give him/her a link that provides access to SAP Business Client or assign role SAP_BW_WORKSPACE_DESIGNER, or portal role com.sap.ip.bi.bi_showcase.
4. For uploading data: Make sure that the parameters in Internet Communication Manager (ICM) are set accordingly:
Most of the data comes from the BW system. It is not possible to upload mass data in Workspace Designer with the Upload Data function. The CSV files you want to upload should have no more than 10-15 columns and a million rows. Microsoft Excel files should be no larger than 2 MB. Importing a file generally takes about one minute (depending on the system requirements and the data), while the analysis takes a few seconds and the upload up to five minutes.
Timeout:
The recommended setting for the ICM timeout is 10 minutes. For more information see SAP Note 824554.
Upload:
The default setting for the maximum size of http requests is 100 MB.
More information: icm/<PROT>/max_request_size_KB5. To use SAP Business Client: Activate ICF service nwbc_launch in transaction SICF.
7.5 Configuring the SAP BW∕4HANA Cockpit
To configure the SAP BW∕4HANA Cockpit, perform the following steps.
Prerequisites
You have performed the post-installation, post-upgrade or update steps described in the Master Guide (see Post-Installation, Post Upgrade Steps / Update Process).
Note
If you encounter problems while configuring the SAP BW∕4HANA Cockpit, see 2918492 .
924 PUBLICSAP BW/4HANAConfiguration

Procedure
1. Set the required authorizations for the SAP BW∕4HANA Cockpit and assign the Fiori Launchpad catalogs and groups to the users. The assignment of Launchpad catalogs is done using PFCG roles. Once the catalogs have been assigned, the tiles contained in them appear in the app finder in the SAP Fiori Launchpad. With the additional assignment of Fiori Launchpad groups, the tiles immediately appear on the Launchpad homepage.
Proceed as follows:
○ Call transaction PFCG. You can use the pre-delivered template roles there. Business role BW/4HANA Modeler (SAP_BW4_MODELER) contains all the necessary authorizations. More information: User Roles [page 1223] and Authorizations for Working with the SAP BW∕4HANA Cockpit [page 1226]
○ You also have to assign the SAP Fiori Tile Catalogs and SAP Fiori Tile Groups to users and user roles on the Menu tab in transaction PFCG. The SAP Fiori Tile Catalogs are required to make the tiles visible in the App Finder. The SAP Fiori Tile Groups are required to display tiles by default in the launchpad. More Information: Configuring Roles for Tile Catalogs and GroupsThe relevant catalogs and groups are those beginning with BW4_BC. These are BW4_BC_MODELING, BW4_BC_MONITORING, BW4_BC_MANAGE.
2. Configure the context-sensitive help. The documentation is located on a dedicated SAP help server and is not contained in the BW server. To be able to call the context-sensitive help, you therefore require a SAP Web Dispatcher, which redirects requests for the context-sensitive help to the help server. More information: Configuring SAP Web Dispatcher for In-Application Help
3. When setting up the notifications, perform the following steps:a. Assign the Fiori Launchpad catalog /UI2/CONFIG_NOTIFICATION to your users and thus activate the
notification button for them in the SAP BW∕4HANA Cockpit.
This catalog is already contained in the delivered PFCG roles SAP_BW_MODELER, SAP_BW_ADMINISTRATOR, SAP_BW4_OPERATOR. If you use these roles directly, you can skip this step.
If you have created your own role, check that a PFCG role containing this launchpad catalog is assigned to the users.
b. Schedule the housekeeping program RS_BW4_FLP_NOTIF_DELETE to delete old notifications.The notifications and the status "Discarded" are stored in database tables for each user. This table grows over time. Although the notifications are discarded, they are not deleted from the database yet at this point. To reduce memory consumption, we recommend scheduling program RS_BW4_FLP_NOTIF_DELETE to run daily in order to delete all that notifications that are more than two days old.
7.6 Creating a Connection to a Back-End System
To be able to view data preview queries from another back-end system, you first have to create an RFC connection to this system.
SAP BW/4HANAConfiguration PUBLIC 925

Configuration of RFC Connections
Go to the configuration screen for RFC connections (transaction SM59) and create an ABAP connection (type 3). Enter a name and a description
TipOn the Logon & Security tab, we recommend using the Current User option.
Customizing
Go to the Implementation Guide (transaction SPRO), and choose SAP Reference IMG SAP NetWeaver Gateway OData Channel Configuration Connection Settings SAP Gateway to SAP Systems Manage SAP System Alias . Create a system alias for your RFC connection.
TipWe advise against using the Local Gateway option.
Related Information
Using the Data Preview of an Analytic Query [page 872]
926 PUBLICSAP BW/4HANAConfiguration

8 Operation
Operating SAP BW∕4HANA includes defining processes, monitoring, and data tiering. A number of test and trace tools are also available.
Process chains allow central control, automation and monitoring of the processes and efficient operation of the Enterprise Data Warehouse.
Information Lifecycle Management in SAP BW∕4HANA includes strategies and methods for optimal data retention and history management. This allows you to classify data according to frequency of access, and to store it accordingly in different storage areas or storage media. This reduces the volume of data in the system, improves the performance, and reduces the administrative overhead.
8.1 Control and Monitoring
8.1.1 Process Chain
A process chain is a sequence of processes that are scheduled in the background for an event. Some of these processes trigger a separate event that can, in turn, start other processes.
In an operating SAP BW∕4HANA system, a number of processes occur regularly. If you use process chains, you can:
● automate the complex process flows in BW using event-controlled processing● visualize the processes using network graphics● centrally control and monitor processes
The fundamental principals of the process chain concept are:
● OpennessThe abstract meaning of process as any process flow with a defined start and end enables openness with regard to the type of process that can be integrated into a process chain. The principle of openness is applied to process chains so that user-defined programs and processes can be implemented. In addition, you can include process chains in other process chains. These are known as meta chains. You can integrate process chains from the system in which the meta chain is found, or from other systems. In this context, we talk about local and remote process chains.
● SecurityUsing process chains ensures a high level of security in the process flow. This is based on the principals of background management:○ Processes are scheduled before they run and can be monitored using the standard background
monitor.More information: Process Chain Log Display [page 990]
SAP BW/4HANAOperation PUBLIC 927

○ Background events trigger subsequent processes.○ Short dumps and terminations are recognized and handled accordingly.
● FlexibilityThe subsequent process is responsible for getting all the information it needs from the predecessor processes so that is can run correctly. This means that you can integrate new process types without having to modify the existing types.
Structure of a Process Chain
A process chain consists of processes of different process types: Processes [page 929]: It consists of a start process, individual application processes, and the collection processes.
You can define the start condition of a process chain with the start process. All other processes in the chain are scheduled to wait for an event. Application processes are the actual work processes that you want to automate in process chain maintenance. They represent activities typically performed in the operative use of SAP BW∕4HANA, for example load processes. Collection processes are handled differently in process chain management. They allow you to combine multiple chain strings into one individual string. This means that you only have to schedule the actual work processes once. Processes are connected using events that are triggered by a predecessor process to start a subsequent process.
Process Categories and Process Types
The SAP BW∕4HANA differentiates between processes based on the following categories:
● General services● Loading processes and postprocessing processes● Data target administration processes● Other BW processes● Other
Processes that you have implemented yourself
You can find an overview of the process types in SAP BW∕4HANA under Process Types [page 929].
Integration
A process chain is an object of the TLOGO framework in SAP BW∕4HANA with a transport connection.
928 PUBLICSAP BW/4HANA
Operation

8.1.1.1 Process
A process in the context of process chains is a procedure inside of or external to an SAP system with a defined beginning and end. The following process types are possible: start process, application process and collection process.
In order to automate runs in SAP BW∕4HANA, processes are compiled into process chains. The processes are scheduled in the background. Each process can trigger one or more events, which trigger further processes.
A process has the following characteristics:
Process Chain Characteristic Explanation
Process Type The process type is the category of the process, for example, a loading process. The process type decides which tasks the process has and which properties it has in the maintenance.
The process type is set in the RSPROCESSTYPES view.
See also: Maintenance of Process Types [page 975]
Process Variant The process variant is the name of the process. Within the process chain context, the variant displays the configuration (of a process with a particular process type), which is set at the time of definition. A variant is only uniquely defined together with the process type. A process can have different variants. During the loading process, for example, a data transfer process represents a process variant.
The user normally defines the process variant at the time when the process is scheduled. With some process types, the variants are defined internally and are stored as GUIDs.
Prozess Instance The process instance is the characteristic value of the process. It contains important information, which the process wants to communicate to any subsequent processes. In the loading process, this would be the name of the request, for example. If the process is ended, the instance is transferred to the process chain management and saved. The logs for the process are stored under the process instance.
The instance is defined by the process itself at runtime, and is normally defined uniquely; non-time-specific and non-system-specific.
8.1.1.2 Process Types
The following table lists process types delivered with SAP BW∕4HANA sorted by process category.
SAP BW/4HANAOperation PUBLIC 929

Process Category Process Type More Information
General services Start process Start Process [page 932]
Interrupt process Interrupt Process [page 933]
AND (last) Collection process [page 934]
OR (every)
EXOR (first)
ABAP program Execute ABAP Program [page 934]
Operating System Command Operating system command [page 936]
Local Process Chains Local process chain [page 937]
Process chain remote Process chain remote [page 937]
Workflow (remote) Workflow [page 938] (also remote)
Deciding between multiple alternatives Decision [page 940]
Is the previous run in the chain still active?
Is the previous run in the chain still active? [page 942]
Start job in SAP BusinessObjects Data Services
Starting Jobs in SAP Data Services [page 943]
Loading process and postprocessing Delete overlapping requests from the DataStore object (advanced)
-
Data transfer process Creating a Data Transfer Process [page 388]
Set quality status/data release Set Quality Status for Requests [page 954]
Trigger delta merge Triggering Delta Merge via Process Chain [page 1296]
Start SAP HANA remote subscription Starting an SAP HANA Remote Subscription [page 261]
930 PUBLICSAP BW/4HANA
Operation

Process Category Process Type More Information
Start SAP Data Hub Task Workflow
NoteThis process type is obsolete. For SAP Data Hub 2.x, you can use the process type Start SAP Data Hub graph.
Start SAP Data Hub Task Workflow (Obsolete) [page 949]
Start SAP Data Hub Graph Start SAP Data Hub Graph [page 950]
Trigger BW Event in SAP BusinessObjects BI Platform
Triggering a BW Event in the SAP BusinessObjects BI Platform [page 953]
Data target administration Adjust Data Tiering Optimization Defining the Temperature of Objects or Partitions Manually [page 1132]
Activate requests in DataStore objects (advanced)
Managing DataStore Objects [page 1199]
For the additional options to set data tiers in scope , see Performing Exceptional Updates for Data in the Cold Store [page 1141].
Delete all data target content Managing DataStore Objects [page 1199]
Archive data from a DataStore object Scheduling Data Archiving Processes Using Process Chains [page 1170]
Clean up archive Deleting an Archiving Request [page 1178]
Clean up old requests from the DataStore object (advanced)
Cleaning Up Requests Using Process Chains [page 1203]
Activate master data Managing InfoObjects [page 1197]
Delete master data from the Change Log
Managing DataStore Objects [page 1199]
Housekeeping Process Variant for Housekeeping [page 1322]
Other BW processes Replicate authorizations of BW users to SAP HANA
Authorizations for Generated SAP HANA Views [page 244]
Run SAP HANA analysis process Creating a SAP HANA Analysis Process [page 411]
Other Job in SAP CPS -
SAP BW/4HANAOperation PUBLIC 931

Process Category Process Type More Information
Event in SAP CPS -
Creat database statistics for virtual tables
Creating Database Statistics for Virtual Tables [page 1299]
To illustrate customer-specific processes, you can also implement your own process types. For more information, see Implementing Your Own Process Type [page 944].
In the ABAP system, you can call up documentation for a process type by selecting the process type in the overview tree and choosing F1. You find the overview tree in process chain maintenance on the left-hand area of the screen. You can also call the documentation from the dialog box in which you specify variants. You do this
by choosing (Documents) when you add a process to the process chain. In the SAP BW∕4HANAcockpit you can call the documentation for a process type in the process variant editor.
8.1.1.2.1 Start Process
You can define the start condition of a process chain by using a start process.
The background control options are available to schedule the start process directly. You can start the process chain immediately (when activating the process chain), at a specified time, or after a particular event. When you activate the process chain the start process is scheduled in the background, as defined in your selections.
If the options available with background control are not sufficient, you can trigger the start of the process chain using the API. You use function module RSPC_API_CHAIN_START here. The SAP Scheduling Framework can be used to start the chain using the API and has more extensive scheduling options.
You can also trigger the start of a process chain using a metachain. If a process chain is integrated in a different process chain (meta chain), then the integrated process chain is started directly by the meta chain. The start process of the integrated chain is not scheduled when you activate the chain. The integrated process is only started once the meta chain in which it is integrated is running. You can use the process types process chain local and process chain remote, in order to connect a process chain to a metachain.
All other processes in a chain are scheduled to wait for an event.
The start process has the following special features:
● Only the start process can be scheduled without a predecessor process.● The start process cannot be a successor of another process.● Only one start process is allowed for each process chain.● A start process can only be used in a single process chain.
If you want to define more than one start condition to execute a process chain or part of a process chain, use the interrupt process and the start process.
Related Information
Starting the Process Chain in the Local System [page 937]
932 PUBLICSAP BW/4HANA
Operation

Starting a Process Chain in a Remote System [page 937]Interrupt Process [page 933]
8.1.1.2.2 Interrupt Process
The interrupt process is a process type with which the processing of a process chain can be interrupted up until a condition is fulfilled.
If a process chain (in part or in full) is only to be processed if more than one start condition is met, you use this process type to specify the additional conditions. As for the start process, the options for background control are available (for example immediate start, start at a specific time or after a specific event), and you can specify whether the start condition is set periodically. For more information, see Specifying Job Start Conditions in the documentation for SAP background control.
You can use this process type for example to load the data once the start condition occurs (for example a specific system event occurs) or once a specific condition occurs (for example, a specified time point), and then continue processing the data.
When using the interrupt process, a process chain runs as follows: The chain is started if the start process condition is fulfilled. The interrupt process will interrupt the processing of the chain until the condition of the interrupt process is fulfilled. Whilst it is interrupting, it has the status “Active”. The interrupt process schedules an additional background job that starts based on the relevant condition. Therefore the interrupt process is not really active during the interrupt phase; it does not use any resources during this time.
If the start process condition is filled again before the interrupt process condition is fulfilled, the chain will start again and will only run up until the point of interruption. As soon as the interrupt process condition is filled, the system continues the last run of the chain only. The earlier runs remain unchanged.
If the condition of the interrupt process is fulfilled before the condition of the start process, the chain starts as soon as the start condition is filled; the interrupt process no longer interrupts the chain because its condition has already been filled. If the interrupt process condition is fulfilled again before the start condition of the chain is fulfilled, this does not influence the processing of the chain. This is not stopped by the interrupt process.
NoteNote that the chain has the status "active" until the interrupt process runs. For this reason, this process type is not suitable for closing particular branches of the chain. To do this, you use the process type Decision.
The interrupt process enables an AND link of start conditions in a process chain. If you require OR operations (for example, "chain starts Mondays or when another process is finished"), you can model these using meta-chains, one of which is scheduled for each of the conditions. These start your own chain.
Related Information
Specifying Job Start Conditions
SAP BW/4HANAOperation PUBLIC 933

8.1.1.2.3 Collection processA collection process collects several chain strings to form one string in the process chain maintenance.
Process chain management handles collection processes in a particular way. The system makes the variant names unambiguous and guarantees that all processes of the same name, which have been scheduled more than once, trigger the same event. This enables the several chain strings to be collected to form one and also makes multiple-scheduling of the actual application processes unnecessary.
The following collection processes are available in the process chain maintenance:
● And Process (Last)This process does not start before all events of the predecessor processes, that is including the last event, that it has waited for, have been successfully triggered.Use this collection process when you want to combine processes and when further processing is dependent on all these predecessors.
● Or Process (Every)The application process starts every time a predecessor process event has been successfully triggered.Use this collection process when you want to avoid multi-scheduling the actual application process.
● XOR Process (First)The application process starts when the first event in one of the predecessor processes has been successfully triggered .Use this collection process when you want to process processes in parallel and schedule further independent processes after these ones.
Owing to the time components, the collection processes do not display logical gates in the normal sense, because the system cannot distinguish between whether a 0 entry (no event received), means that the event was never received or whether it has not been received yet. The reason for this is that the checks do not run continuously but only take place when the event is received.
8.1.1.2.4 Execute ABAP ProgramWith the process type Execute ABAP Program, you have the option of scheduling a program (ABAP report) with or without a program variant in a process chain.
This is recommended if you use a simple, independent program in a process chain or a program scheduled in the background by a user or another program. For more complex processes that are not covered by process types are covered, we recommend you implement your own process type.
The following scheduling options are available:
● Synchronous, localSpecify the program name and variant under Program to be Called Program . The program is started after the event for the predecessor process has been triggered.The program is executed in the background on the same server on which the process chain is scheduled. The process chain waits until the program has finished before it continues with any possible successors.
● AsynchronousChoose this option if your program is asynchronous.An asynchronous process is also called a distributed process. Distributed processes are characterized as having different work processes involved in specific tasks. A program is asynchronous when it does not end
934 PUBLICSAP BW/4HANA
Operation

the task which it started itself. In an asynchronous process, the process chain maintenance does not equate the end of the process with the end of the background process. The process status remains active.In asynchronous processes, successor events are not automatically triggered. To mark the actual end of your process, at the end of your program you must call the remote-enabled function module RSPC_ABAP_FINISH. The process is then flagged as completed and the successor events are triggered.Inform the function module of the process variant, with which your program is scheduled. To do this, you need to either hardcode the process variant in the program, or transfer the process variant to a program variant You need the following lines in your program to do this:PARAMETERS variant TYPE rspc_variant.
CautionThe process chain management does not recognize the termination of your program.
Therefore, when you restart the chain it will also terminate, since the old run is not finished. To avoid this, you need to manually set the process in the chain log view in the process monitor to cancelled before the next start.
● Asynchronous, localChoose this option if your program is asynchronous (it effects a user decision or makes an asynchronous RFC); or if you want to start a scheduled program in the background. In this case, the program must be scheduled to wait for a batch event. Enter the event and, if necessary, the parameter under Program to be Called Scheduled Program .
● Asynchronous, destinationIn this option you must schedule the program to be called on the target server to wait for an event.Under Called From, enter the destination for the target system and under Program to be CalledScheduled Program enter the event and, if necessary, the parameter.
NoteWe recommend that you write a local program, in which you synchronously call a remote-enabled function module in the target system. Then choose the option Synchronous, Local. This allows you to monitor your process using process chain management.
You can write logs without much effort by issuing success messages. These logs are displayed, using the context menu for a process, in the process chain maintenance log view. Choose Display Messages Tab Page Batch .
CautionError messages terminate the job. Therefore, write your logs as success messages. Furthermore, for this process type, it is not possible to evaluate the error messages as a status in the program so that you can trigger possible success processes By Error. If you require this function, see Implementing Your Own Process Type [page 944].
Related Information
Implementing Your Own Process Type [page 944]
SAP BW/4HANAOperation PUBLIC 935

8.1.1.2.5 Operating System Command
You can use this process type to Execute an Operating System Command in an application server's operating system.
More information: External Commands and External Programs
After the run has completed, you can find the text produced by the command as a standard output by accessing the Process tab page of the log for this process.
For processes you have implemented yourself, this log can be called up using the method CL_RSPC_SYSTEMCOMMAND→IF_RSPC_GET_LOG~GET_LOG.
8.1.1.2.5.1 Including Operating System Commands as Processes in a Process Chain
The procedure for defining process chains in SAP GUI is described below. In the SAP BW∕4HANAcockpit you can call the documentation for this process type in the process variant editor.
Procedure
You are in the plan view of the process chain, in which you want to include an operating system command as a process.
The operating system command process type is available in the General Services process category.
1. Use drag and drop or double-click to include the operating system command process type into the process chain.
2. In the next dialog box, select a process variant and confirm your entry, or create a new variant.
To create a new process variant, choose Create.
In the following dialog box, enter the description of the process variant and choose Next.3. The maintenance screen for process variants appears.4. Here, under Execution, define:
○ The command nameThe command is defined using CCMS Configuration External Commands . You can also create
and change a command using the Change function.For more information, see Defining External Commands.
○ The operating system of the application server, on which you want to execute the command.○ Additional parameters, providing these are allowed by the defined command.
If a user is allowed to specify additional arguments when scheduling the external command in a background job, you can specify these arguments here. The additional parameters are added to the parameter strings specified in the command definition, under Parameters for the Operating System Command.
○ The application server on which the command is to be executed.
936 PUBLICSAP BW/4HANA
Operation

If you always want to use the current host, set the corresponding indicator. If you enter a different host to the current one in the Target Machine (Host) field, the system automatically deselects the Current Host indicator.
5. Under Evaluation, set whether you want to evaluate the output of the command.You can evaluate the process as either successful or having errors if the output of the command contains a character string that you specified. If the system cannot find the character string, the process is either ended by the counter status, or repeated. When you have determined that the process is to be repeated, you can specify after how many seconds and how often it is to be repeated.This allows you to check, for example, whether a particular file exists in a directory before you load data to it. If the file is not available in the directory, the check is repeated according to the previously specified intervals before the process is ended and loading starts.
6. Save your entries and return to the previous screen.7. In the following dialog box, confirm the insertion of the process variants into the process chain.
Result
You have included an operating system command as a process in a process chain. After including any additional process variants in your chain, check the chain and activate it.
8.1.1.2.6 Starting the Process Chain in the Local System
Process chains can be scheduled as processes in additional process chains. These are called metachains. If the process chain that you want to execute is in the metachain, use the process type Starting the Process Chain in the Local System.
A local process chain consists of processes that are scheduled in the same system as the metachain.
In addition to local process chains, you can also schedule remote process chains as processes in a metachain. A remote process chain calls a process chain in another system. This is executed in the other system.
8.1.1.2.7 Starting a Process Chain in a Remote System
Process chains can be scheduled as processes in additional process chains. These are called metachains. If the process chain you want to execute is in another remote system, use process type Start Process Chain in Remote System, referred to in this document as the remote process chain.
A remote process chain is a local process in the calling system that calls a process chain in this system, using a destination in a remote system, that is to be executed there. The remote process chain thus communicates with the remote system and synchronously starts the executed process chain. One the process chain is terminated in the remote system, this is reported back to the metachain in the calling system.
In addition to remote process chains, you can also schedule local process chains as processes in a meta chain. A local process chain consists of processes that are scheduled in the same system as the metachain. It is scheduled as a process in the same system as the metachain.
SAP BW/4HANAOperation PUBLIC 937

Prerequisites
Before you can run a process chain in a remote system, you have to perform the following steps:
● In the remote system, define the process chain that you want to run there.● Maintain a destination to the remote system.
NoteThis destination is used for both background activities (starting the remote process chain for example) and for activities in the dialog (calling process monitors in the remote system for example). You therefore need to make sure that a dialog user Is entered as the user in this destination.
● Maintain a destination in the remote system pointing back to the calling system.This destination is used by the executing chain to report the completion status. There is no need for a dialog user here.
8.1.1.2.8 Workflow
In the context of process chain maintenance, a Workflow can be both a process type and also a workflow activity.
8.1.1.2.8.1 Including a Workflow as a Process in a Process Chain
The following describes the procedure for defining process chains in SAP GUI. In the SAP BW∕4HANAcockpit you can call the documentation for this process type in the process variant editor.
Prerequisites
In the system, in which the workflow is executed, you have carried out automatic workflow customizing (transaction SWU3).
Requests Sent to the Workflow to Be Executed
A model workflow has been delivered to display requests sent to the workflow. The workflow model is : WS43200002 (ropc_verify2).
The most important task that the workflow must contain is dispatching the end notification to the process chain. This task was also delivered as standard task TS43200003. Note how the container element "&CALLINGCHAIN&" (business object "ROPE_WF") is bound to the work item ID.
In the delivered example, another user decision was inserted to represent the Miscellaneous Tasks of the workflow.
938 PUBLICSAP BW/4HANA
Operation

Procedure
You are in the plan view of the process chain, in which you want to include an workflow as a process.
The workflow process type is available in the General Services process category.
1. Use drag and drop or double-click to insert the process into the process chain.2. In the next dialog box, choose a process variant and confirm your entry, or create a new variant.
3. To create a new process variant, choose Create.4. In the resulting dialog boxes, enter the technical name and a description of the process variant and choose
Next.You are now in the maintenance of process variants for a workflow.
5. Choose the destination in which the workflow is to be executed.
NoteIn the destination into the remote system, use the usual background user, so that the assigned profile S_BI_WX_RFC has the authorizations necessary for executing and monitoring a workflow. Note: However, this destination is also used for dialog logons, for example, for workflow monitoring.
If you do not specify the destination, the specified workflow is executed in the system directly.6. Choose the workflow to be executed (also called model workflow, or multi-step task).
You can also create and change a workflow with the Change function.7. If required, choose a destination in the remote system with which the workflow can call the process chain
back.8. If required, specify the end option which is to be transferred to the process chain. The relevant event is
triggered, based on the options entered here.If you do not specify an option, the process ends successfully without an option.For more information about setting end-options for a process, see Maintenance of Process Types [page 975].
9. Save your entries and return to the previous screen.10. In the resulting dialog box, confirm the insertion of the process variant into your process chain.
Result
You have inserted a workflow as a process into a process chain. After including any additional process variants in your chain, check the chain and activate it.
8.1.1.2.8.2 Executing a Process Chain Within a Workflow
Prerequisites
If you want to execute a process chain in a remote system, you must connect the starting system in which the workflow is executed to the BW system as a source system in which the process chain is executed. This is
SAP BW/4HANAOperation PUBLIC 939

because the callback destination is returned to the workflow system using the relationship to the source system.
Requests sent to the process chain
● You have activated the process chain and it is scheduled in the background.● In the start process of the process chain to be executed, Start with Metachain or API is set.
Requests Sent to the Workflow
A model workflow has been delivered to display requests sent to the workflow. The workflow model is: WS43200001 (ropc_verify1).
The workflow must contain two activities:
1. Starting the process chainThis task was also delivered as standard task TS43200001. This task is a "creation activity". The process chain to be started as well as the destination on which the process chain can be found is supplied with the ROPC process chain object to be created. The task receives the process chain instance as a return value.
NoteNote the binding of "&CHAIN&" and "&DESTINATION&" to the export parameters "Chain" and "Destination" and the return "&PROCESSCHAINSAPI&".
2. Wait until the process chain has finished.This is a wait step that ends when the process chain triggers the event.
NoteEnsure that business object ROPC is the container element.
In the delivered example, an additional task, "displaying the process chain" is supplied. This shows you how to access the process chain log from the workflow.
Procedure
More information: Workflow Builder
8.1.1.2.9 Decision
The process type Decide Between Multiple Alternatives (Decision) allows you to determine a set of conditions which form the basis of a decision, in accordance with a specific logic.
The logic is: "If condition A is filled, option X applies, if condition B is filled, option Y applies,... otherwise, option Z applies"
The conditions have a description and are formulated as logical expressions using the formula builder. In the formula builder, only syntax fields are directly available as fields. In particular, this allows decisions on the basis of date and time. To incorporate this, the function library in the formula builder has been enhanced with the formula function DATE_WEEKDAY1.
940 PUBLICSAP BW/4HANA
Operation

The DATE_WEEKDAY1 formula function calculates the day of the week as a technical specification (1..7) from the date. For example, you can check the form DATE_WEEKDAY1( date of the weekday) = '6' OR DATE_WEEKDAY1 (date of the weekday ) = '7'. This allows you to change the way the chain runs at the weekend, in comparison to the other days of the week.
The function library of the formula builder has also been enhanced by the Process Chain category. This allows you to access additional information within the formula. The Process Chain category contains the following formula functions:
● PREDECESSOR_PARAMETER: Runtime parameter of direct predecessor● PROCESS_PARAMETER: Runtime parameter of a process in the current chain● PROCESS_VALUE_EXISTS: Process in chain has a parameter value
These functions allow you to access values from predecessor (and successor) processes of the current process chain. If the process is a predecessor process, the system requests the instance values; otherwise the maintained variant values are requested.
8.1.1.2.9.1 Including Decisions as a Process in Process Chains
Procedure
You are in the plan view of the process chain, in which you want to include a decision as a process.
The decision process type is available in the General Services process category.
1. Insert the decision process type into the process chain by using drag and drop or by double-clicking.2. In the next dialog box, select a process variant and confirm your entry, or create a new variant.
3. To create a new process variant, choose Create.
4. In the next screen, enter a technical name and a description, and choose Continue.The maintenance screen for process variants appears.
5. Enter the decision paths for the process variant in the table; that is, you specify the conditions on the basis of which specific options are to be selected as events. For a decision path, the table displays in a row the condition that has to be fulfilled as well as the event that is triggered when fulfilling a condition.When creating the variant, the system displays the first row with the if … then commands and the second, last row with the commands otherwise … then. You can insert additional rows. These are inserted between the first and last rows with the otherwise if … then commands.
6. Specify a condition for each row using the formula builder by choosing Create in the Formula column. For the formula, enter the description that is displayed in the table.
For more information about using the formula builder, see Information in the application toolbar of the formula builder.When using the process chains category function in the formula builder, note the following: Input help is available. The input help refers to the process type. Fill the function parameters from left to right with the Constant pushbutton. The dialog box that appears enables input help that is dependent on the current process chain and the parameters for the function that have been maintained.
7. Additionally, specify in each row which option is to be chosen when fulfilling the condition as an event.8. For the last row, you cannot specify a formula because the condition is "If none of the previous conditions is
fulfilled, chose <Option X> as event."
SAP BW/4HANAOperation PUBLIC 941

9. Save your entries and return to the previous screen.10. In the resulting dialog box, confirm the insertion of the process variant into your process chain.11. Link the process to the follow-up processes. The dialog box for determining the color of the connection
allows you to select one of the options you defined and the connection when there are errors.
CautionWhenever a follow-process waits for an option, follow-up processes have to be available for the other possible options because a possible follow-up process that is missing leads to errors when the missing option is chosen. If this is not the case, the system outputs a warning during the scheduling time check. On the other hand, the system outputs a warning when a follow-up process is waiting for an option that is not declared.
Result
You have included a decision process as a process in a process chain. After including any additional process variants in your chain, check the chain and activate it.
8.1.1.2.10 Is the previous run in the chain still active?
This process checks the status of the previous run in the process chain that the run was inserted into.
You use this process if execution of a subsequent process depends on the status of the previous run in the chain.
Once the process has been completed, two events can be triggered, both of which trigger follow-on processes:
● active● inactive
Under Previous run must be finished since (seconds), enter the time in seconds that must have passed since the end of the previous run in order for this run to count as inactive. The process then triggers the inactive event. The next run of the chain can therefore not start until the amount of time specified here has passed since the end of the previous run. By setting the Not if failed flag, you can stipulate that previous runs that failed count as inactive immediately.
Under Wait for the previous run to finish for (seconds), enter the waiting period in seconds that must elapse before the process triggers the active event. This waiting period must be less than the frequency with which the start process of the chain is repeated. Otherwise it has no effect.
942 PUBLICSAP BW/4HANA
Operation

8.1.1.2.11 Starting Jobs in SAP Data Services
With a process variant, you can use process chains to start jobs in SAP Data Services while working in the SAP BW∕4HANA system.
Prerequisites
● SAP Data Services has Release 4.1 or higher● In the Administrator tool in SAP Data Services Management Console, you have created an SAP connection
for SAP BW∕4HANA. You have created an RFC service interface for this connection and then started the RFC Server Interface connection. You will need the RFC program ID later when creating the reverse connection from BW to SAP Data Services. SAP Data Services can now receive RFC calls from the BW system.
NoteTo establish a secure connection between SAP BW∕4HANA and SAP Data Services, and to allow a logon check whenever a BW user calls a function in SAP Data Services, you can make SNC settings when creating the RFC server. You need the BOE CMC user configuration to do this.
For more information on RFC Server Management in SAP Data Services, go to the SAP Help Portal and choose http://help.sap.com/bods <Your Data Services Release> Installation, Upgrade, Deploymentin the Management Console Guide.
● There is an RFC destination from the SAP BW∕4HANA system to the Data Services system.If the SAP Data Services system is connected as a source system to the SAP BW∕4HANA system, a destination already exists. If the SAP Data Services system is not a source system for the SAP BW∕4HANA system, create the RFC destination in transaction SM591. Enter a technical name.2. Select T (TCP/IP Connection) as the connection type.3. Enter a description.4. On the Technical Settings tab page, enter the RFC program ID that you created in the SAP Data
Services Management console as the Registered Server Program under Program ID.5. Once you have made the SNC settings in the Administrator tool, in the SAP Data Services
Management Console in the RFC Server Interface, select the Logon and Security tab page and press Send Logon Ticket Without Reference to a Source System under Logon Procedure.
6. Save and test the connection.
Procedure
1. In the plan view of the process chain where you want to insert the process variant, go to the list of process types under General Services and select the Start Job in SAP BusinessObjects Data Services process category by double-clicking on it.
2. To insert the process variant, choose Create.
SAP BW/4HANAOperation PUBLIC 943

3. In the next screen, enter a technical name and a description, and choose Continue.The maintenance screen for process variants appears.
4. Specify which SAP Data Services system you want the job to start in.You have two options:○ The SAP Data Services system is connected as a source system to the SAP BW∕4HANA system:
Specify the system as Source System (Optional).For more information, see
○ No source system connection is defined for the SAP Data Services system: Under Data Services System, enter the RFC destination that you created earlier.
5. Specify the SAP Data Services repository and the job server. To select the data, the system creates a connection to the SAP Data Services system.
6. Enter the name of the job that you want to execute in the SAP Data Services system.7. Save the variant and go back to the previous screen.8. In the next window, confirm that you want to insert the process variant into the process chain.
The plan view for the process chain appears. The process variant for starting the job in the SAP Data Services system has now been added to your process chain.
8.1.1.2.12 Implementing Your Own Process Type
Purpose
If you:
● write your own application log to be displayed in the Process tab strip for the Logs for a Process in the Process Chain Maintenance [page 990], or:
● have implemented your own monitor, or● have implemented a Customizing interface that goes beyond the parameters of a program, or● want to access preceding chain processes in your program, or● want to take errors when executing your program in modeling into consideration or are aware of multiple
end states (see process type Decisions [page 940])
we recommend implementing your own process type.
Prerequisites
Good working knowledge of the ABAP object-orientated language enhancement, see ABAP Objects.
Process Flow
1. In the SAP menu, choose Tools → ABAP Workbench → Development → Class Builder. Define a class here and implement the interfaces that you need.
944 PUBLICSAP BW/4HANA
Operation

NoteFor more information about the class builder, see Class Builder.
In the class builder itself, you can find documentation about the IF_RSPC_* interfaces. Enter the name of the interface as the Object Type and choose Display. You can access the documentation in the subsequent screen using the Goto menu.
The following interfaces are available:
Interface IF_RSPC_* Description Method is called in ... Implementation is ....
EXECUTE Executes the process.
This interface is the main interface used to implement your own process type and is the only process chain maintenance interface that is obligatory.
Note that a non-initial instance and a status must be returned in the EXECUTE method. Otherwise the process terminates with an error during execution.
Runtime Mandatory
GET_INFO Passes information about a process to the successor.
Maintenance and runtime Optional
GET_LOG Returns the log for a variant and an instance to the process chain maintenance, either as a title and text or as a list of messages
Runtime and log view Optional
MAINTAIN Enables process variants to be created and maintained in the process chain maintenance. It also determines the header information for a variant so that it can be displayed in the process chain maintenance.
Maintenance Alternative or in addition to interface IF_RSPC_GET_VARIANT
SAP BW/4HANAOperation PUBLIC 945

Interface IF_RSPC_* Description Method is called in ... Implementation is ....
GET_VARIANT Provides input help (F4) for variants.
You need to implement this interface and/or interface IF_RSPC_MAINTAIN, in order to be able to add process variants to a chain.
Maintenance Alternative or in addition to interface IF_RSPC_MAINTAIN
GET_DEFAULT_CHAIN Indicates the default chain for a process. For each variant to be scheduled, you can propose which additional processes it would make sense to schedule before or after the process.
Maintenance Optional
946 PUBLICSAP BW/4HANA
Operation

Interface IF_RSPC_* Description Method is called in ... Implementation is ....
CHECK Consistency check at scheduling time for the process/chain
You can carry out a check to determine:
○ the consistency of a process
○ dependencies with regard to other processes in the same chain and
○ dependencies with regard to other processes in other chains
○ authorizations of current user to execute process
NoteFor security reasons, we recommend implement an adequate authorization check.
Particular care should be taken if RFC access is possible via the process type. In this case, any user who is logged on is able to select an RFC connection for which the defined user actually has authorizations that s/he does not possess. This enables the on user in question to start processes that s/he does not have authorization for.
Maintenance Optional
SAP BW/4HANAOperation PUBLIC 947

Interface IF_RSPC_* Description Method is called in ... Implementation is ....
GET_STATUS We recommend implementing this interface for distributed processes. With distributed processes, such as loading processes, a number of different work processes are involved in the relevant tasks.
The interface allows you to request the status of the instance in the process chain maintenance(for distributed processes when follow-on events are not sent). This makes it possible to recognize terminations in distributed tasks as well.
Runtime and log view Optional
CALL_MONITOR Calls up the process monitor from the log view in the process chain maintenance.
Log view Optional
TRANSPORT Returns TLOGO entry. Maintenance Optional
CONTEXTMENU Adds functions to the context menu for a process in the process chain maintenance.
Maintenance Optional
VARIABLES Declares whether the process can process runtime variables
Runtime Optional
SIMULATION Passes on and displays the simulation result
Runtime Optional
MULTI_EVENT Declares the possible end states of the process
Maintenance and runtime Optional
2. Enter the process type under Settings → Maintain Process Types (RSPROCESSTYPES view) in the process chain maintenance transaction.To do this, choose Edit → New Entries, enter a technical name, short and long description for the process type, enter the name of your class and choose ABAP-OO Class as the Object Type. Make the other settings for your process type and save the entry.See also:Maintenance of Process Types [page 975]
948 PUBLICSAP BW/4HANA
Operation

3. If using service class CL_RSPC_APPL_LOG, enter your process type as a sub-object to log object BW_PROCESS.
Result
Your process is available in process chain maintenance for the process category you assigned.
8.1.1.2.13 Start SAP Data Hub Task Workflow (Obsolete)
With process type Start SAP Data Hub Task Workflow, you can start a SAP Data Hub Task Workflow (Task Workflow) in a connected SAP Data Hub from the SAP BW∕4HANA system.
NoteThis process type is obsolete. For SAP Data Hub 2.x, you can use the process type Start SAP Data Hub graph.
Prerequisites
● You are running SAP Data Hub 1.2 or a higher 1.x version.
NoteFor SAP Data Hub 2.x, you can use the process type Start SAP Data Hub graph.
● You are using the Secure Sockets Layer protocol (SSL) protocol for authentication between SAP BW∕4HANA and the SAP Data Hub. For secure transfer of the login information, you have defined SSL certificates:In the SAP Data Hub, you have defined the SSL certificate either in the SAP HANA XS Administration Tool Trust Manager or by using the set-certificatecommand in the XS Advanced Command Line Tool. More Information: Managing Trust RelationshipsIn SAP BW∕4HANA, you have maintained the SSL certificate in the Trust Manager in Application Server for ABAP for Standard SSL Client PSE (Personal Security Environment). More Information: Adding Certificates to PSE Certificate Lists
● In the SAP BW∕4HANA system, you have created an HTTPS destination to the SAP Data Hub and have created a connection back to the SAP BW∕4HANA system in the SAP Data Hub. More Information:○ Creating an HTTP Connection to the SAP Data Hub [page 952]○ Create a Connection
SAP BW/4HANAOperation PUBLIC 949

Procedure
You are in the Variant Editor in the SAP BW∕4HANA cockpit.
1. Make the following entries on the Properties tab page:1. Choose the HTTP destination from the SAP BW∕4HANA system to the SAP Data Hub.2. Choose the connection from the SAP Data Hub to the SAP BW∕4HANA system.
NoteIn the input help for the Match column, the system displays the connection you just selected from the SAP BW∕4HANA system to the SAP Data Hub system as the RFC destination.
3. Choose the task workflow that you would like to start.2. Save the process variant.3. In the dialog box, enter a name for the variant and specify the package.4. Choose OK.5. Check and activate the process variant.
Results
If the process variant is used in a process chain, and the chain is executed, the task workflow is started in the SAP Data Hub. When the task workflow is completed successfully, it will automatically continue the process chain. The process log contains success messages or error messages about the communication with the task workflow and the result of task workflow execution. In the graphical log view of the process, you can directly call the task workflow log in the SAP Data Hub. To do this, click on the information icon in the process node and choose External Log at the top right of the message window.
8.1.1.2.14 Start SAP Data Hub Graph
With process type Start SAP Data Hub Graph, you can start a graph in a connected SAP Data Hub from the SAP BW∕4HANA system. This supports graphs that end after a given time. These graphs are also known as data workflows.
Prerequisites
● You are running SAP Data Hub 2.3 Patch 3 or higher.● You are using the Secure Sockets Layer protocol (SSL) protocol for authentication between SAP
BW∕4HANA and the SAP Data Hub. For secure transfer of the login information, you have defined SSL certificates:You have imported the SSL certificate in the SAP Data Hub Connection Management application. More Information: Manage Certificates
950 PUBLICSAP BW/4HANA
Operation

In SAP BW∕4HANA, you have maintained the SSL certificate in the Trust Manager in Application Server for ABAP for Standard SSL Client PSE (Personal Security Environment). More Information: Adding Certificates to PSE Certificate Lists
● You have create an HTTPS destination for the SAP Data Hub in the SAP BW∕4HANAsystem. More Information: Creating an HTTP Connection to the SAP Data Hub [page 952]
● The graph used must end after a given time (data workflow). Permanently running graphs (streaming) would result in the process variant never ending.
Context
The process type connects itself using and HTTPS destination that you specify in the variant editor with a SAP Data Hub 2.x system. Once you have specified a destination, you can select a graph from the connected SAP Data Hub.
Procedure
You are in the Variant Editor in the SAP BW∕4HANA Cockpit.1. Make the following entries on the Properties tab page:
a. Choose the HTTP destination from the SAP BW∕4HANA system to the SAP Data Hub.b. Choose the graph that you would like to start.c. If global variables (SAP Data Hub configuration substitutions) have been defined for the graph, these
are displayed now, and you can specify values for the variables.2. Save the process variant.3. In the dialog box, enter a name for the variant and specify the package.4. Choose OK.
The values for the variables are saved with the variant.5. Check and activate the process variant.
Results
If the process variant is used in a process chain, and the chain is executed, the graph is started in the SAP Data Hub, and the the values for the global variables are transferred. The process in the process chain remains active until execution of the graph is completed. Completion of execution is determined actively by SAP BW∕4HANA by query the status in the SAP Data Hub.. If (error) messages are generated during execution of the graph, these are returned to SAP BW∕4HANA when the graph is completed. The messages are display in the detailed process log together with the messages about start, end, and status of the process.
SAP BW/4HANAOperation PUBLIC 951

Related Information
Create Graphs (SAP Data Hub 2.x)Parameterize the Process Execution (SAP Data Hub 2.x)
8.1.1.2.14.1 Creating an HTTP Connection to the SAP Data Hub
To use process types Start SAP Data Hub Task Workflow and Start SAP Data Hub Graph, you need a connection to the SAP Data Hub. In the Configuration of RFC Connections (transaction SM59), create a destination of of type HTTP Connection to External Server, which points to the SAP Data Hub.
Prerequisites
You use the Secure Sockets Layer protocol (SSL) for authentication between SAP BW∕4HANA and the SAP Data Hub. For secure transfer of login information, you have defined SSL certificates:
For Start SAP Data Hub Task Workflow: In SAP Data Hub 1.x, you have maintained the SSL certificate either in the SAP HANA XS Administration Tools Trust Manager or by using the set-certificate command in the XS Advanced Command Line tool. More Information: Managing Trust Relationships
For Start SAP Data Hub Graph: You have imported the SSL certificate in the Connection Management application in SAP Data Hub 2.x. More Information: Manage Certificates
In SAP BW∕4HANA, you have maintained the SSL certificate in the Trust Manager in Application Server for ABAP for Standard SSL Client PSE (Personal Security Environment). More information: Adding Certificates to PSE Certificate Lists
Procedure
1. Go to transaction, SM59 Create.
2. Enter a name for the destination.3. Choose connection type G - HTTP Connection to External Server.4. [Optional:] Enter a description.5. Make the following settings on the Technical Settings tab page:
○ Target Host: Enter the full name of the host (including the domain) that you want to create a connection to.
○ Service No.: Enter the port under which the app com.sap.bdh.objectservices .router can be reached.
6. Make the following entries on the Logon & Security tab page:
952 PUBLICSAP BW/4HANA
Operation

a. Logon Procedure Logon with User : Under Basic Authentication, enter the SAP Data Hub user with password.
b. Logon Procedure Logon with Ticket : Select Do Not Send Logon Ticket.
c. Security Options Status of Secure Protocol : For SSL, select Active. For SSL Certificate, select DFAULT SSL Client (Standard).
7. Save the destination and perform a connection test.
Related Information
Establishing a Connection Using a Destination (SM59)Displaying, Editing, and Testing Destinations
8.1.1.2.15 Triggering a BW Event in the SAP BusinessObjects BI Platform
You can trigger a BW event in the SAP BI Platform.
In the SAP BusinessObjects Business Intelligence Platform (BI Platform), BW events are used for event-based scheduling of reports that are based on a BW data source. You can trigger this type of BW event in a connected SAP BI Platform system using a process chain from the the SAP BW∕4HANA system.
You can use the process type in the case of changes in the SAP BW∕4HANA system (when loading data or activating data in the DataStore object for example), which you want to broadcast in the SAP BI Platform. When the process is executed, the BW event in the SAP BI Platform is triggered. This event then triggers further steps in the SAP BI Platform.
Prerequisites
You are using SAP BI Platform version 4.2 or higher.
You are using the Secure Sockets Layer protocol (SSL) for authentication between SAP BW∕4HANA and the SAP BI Platform. For secure transfer of the login information, you exchanged the SSL certificates.
You have created a destination in the SAP BW∕4HANA system of type HTTP Connection to Ext. Server pointing to the SAP BI Platform.
The prerequisites for creating a process variant for the process type are described in steps 1-8 in the following documentation: To integrate BI platform and ABAP system
SAP BW/4HANAOperation PUBLIC 953

Procedure
1. Select the destination to the SAP BI Platform.2. Select the event that you want to trigger in the SAP BI Platform.
If the process is running as part of a process chain, the BW event specified in the process variant is triggered in the SAP BI Platform, and the associated report scheduled.
Related Information
For information about event-based scheduling of reports in the SAP BusinessObjects Business Intelligence Platform, see the Business Intelligence Platform Administrator Guide at:BW Events-Based Scheduling
8.1.1.2.16 Set Quality Status for Requests
You can change the overall status for requests manually or automatically.
Once the technical processing stage for a DTP request has been completed, the overall status of the request can be set automatically (based on the technical status of the request) or set manually by the user or by a process in a process chain.
In the data transfer process, you specify whether the overall status is to be set automatically or manually.
If the overall status is set manually, the status initially remains unchanged, if the technical processing stage was completed with a red or green status. In particular, this means that data for a green request is not released for reporting or further processing. For these data transfer processes you can control the overall status manually in the request monitor or using the process type Set Quality Status.
8.1.1.3 Process Chains for Streaming
A process chain for streaming can be started and executed very frequently, and makes it possible to update data in real-time to DataStore objects (advanced). Process chains therefore provide a holistic solution for periodic and very frequent scheduling and for streaming. They therefore serve to simplify the architecture of SAP BW/4HANA. You set whether or not a process chain should be used for streaming using an attribute in the process chain.
System Behaviour for Process Chain Execution with High Frequency
If a process in a process chain takes up a certain amount of time, and the chain is started several times during this period, the chain behaves differently depending on how it is executed when the second, third or a subsequent execution reaches the process that is currently running.
954 PUBLICSAP BW/4HANA
Operation

Process chain is executed in the background (default background mode):
If the process chain is executed in the background, the second execution waits 10 minutes for the previous execution to complete. If the previous is not completed within this period, the second execution is canceled, and the process chain is interrupted and fails. If the current process completes before 10 minutes have passed, execution of the process starts. The third execution will wait again however. During execution of the process chain the background, multiple background jobs therefore wait in parallel. This number increases every time the process chain is restarted. This situation can be avoided by using process type “Is the previous run in the chain still active?”.
Process chain is executed synchronously.
If the process chain is executed synchronously, whether the current process allows parallel execution or not depends on the process type. If the process does not allow parallel execution (like the load process), the process chain framework waits for an unlimited period of time for the current process to complete. As synchronous execution generally runs in the dialog, this can lead to cancelation due to timeout however.
Process chain runs in streaming mode:
If the process chain is executed in streaming mode, there is a flexible number of “worker” jobs that get the next process from a queue. If a second, third or further execution reaches the current process, the request to start this process once more is only written to the queue. No more resources are used, and the system does not wait. As soon as the current process is finished, the “worker” job gets all of these start requests for a given process and starts the process just once. The process chain framework takes the last chain execution in the queue and assigns the process execution to it. This means that the second and third chain execution are stopped, and the next chain execution continued.
Monitoring
Process chains for streaming make it possible to start a process chain with any frequency, regardless of how long it takes to execute a certain process in the chain. In extreme cases, this would result in there being so many parallel executions of the chain as there are processes in the chain. This means that all processes in the chain run in parallel, regardless of the predecessor/successor definition modeled in the process chain. The parallel process executions are performed in the same number of process chain runs however, meaning that the predecessor/successor relationship is retained: When a running process ends, the successor process must be started again.
In the list of process chain logs, the most recent run is displayed as a cumulative virtual process chain run. This has the name %%RECENT%%, and shows the most recent execution of every process in the chain, regardless of the actual process chain run that it runs in. This virtual process chain run therefore reflects that various processes can have status yellow all at one time, although they are modeled in one sequence. The virtual log is displayed in transaction RSPCM, and the status of the virtual log in RSPCM is used. In the monitor, you can therefore see the most recent status of any process but not the status of the most recent (incomplete) process chain run.
With the setting in the process chain’s Streaming Mode attribute, you can specify the number of logs to be retained. If the number of process chain runs exceeds the number specified in this setting, these are automatically deleted if a new run is created, thus ensuring that there are no more than the maximum number of logs on the database at any one time. The default value is 1,440 logs. If the process chain starts every minute, this setting means that the logs are retained for a single day.
SAP BW/4HANAOperation PUBLIC 955

Requirements from the Process
For the accumulated execution to work, the process type must meet a certain requirement: It must be able to determine its worklist independently. This means that it does not have to look into other processes in the same process chain run. A process declares its ability to meet this requirement with the implementation of interface IF_RSPC_STREAMING and method IS_SUPPORTED.
Various Types of Processes
In terms of streaming, there are three types of processes:
● Processes that can trigger a process chain for streaming:○ Data transfer processes (DTPs) for a (real-time )SAP HANA DataSource or ODP DataSource○ Start process
● Processes that can be used in and run in process chains for streaming:○ DataStore-Objekt (advanced) activation○ ABAP program○ Decision○ AND, OR, EXOR○ Data transfer process that transfer data changes (deltas) between objects that use the new request
administration (RSPM), or data transfer processes that transfer data changes (deltas) directly from the remote source object.
● Processes that are not allowed in a process chain for streaming:○ All other processes, for example deletion and housekeeping processes
Options for Triggering a Process Chain for Streaming
You have the following options when triggering a process chain for streaming:
/ DTP-based triggering START-based triggering
Pull-based (highly frequent) DTP on a (real-time ) SAP HANA DataSource
(the system checks for a delta every 60 seconds)
START process with highly frequent periodic scheduling
(up to once per minute)
Push-based (with API) DTP on a (real-time ) ODP DataSource
(message from ODQ daemon event)
Chain START via API
(event)
956 PUBLICSAP BW/4HANA
Operation

Delta Initialization or Full extraction from DataStore Object with Activation Process in Streaming Mode
If you use a DataStore object (advanced) whose activation process is already running in streaming mode as the source of a data transfer process for a delta initialization or full extraction process, the activation process pauses until extraction with the data transfer process is complete. Activation of the DataStore object then continues.
8.1.1.4 Working with Process Chains in the SAP GUI
8.1.1.4.1 Process Chain Maintenance in the SAP GUI
Process chain maintenance is used to automate process flows in SAP BW∕4HANA.
NoteThe following sections describe process chain maintenance in the SAP GUI. The SAP BW∕4HANA Cockpit provides you with an intuitive, web-based user interface for modelling process chains and process variants. More Information: Working with Process Chains in the SAP BW/4HANA Cockpit [page 993]
Features
You can execute various tasks in specified views in the process chain maintenance. There are various views that simplify chain management, which you can access from the Go To menu.
● You define the process chain and schedule individual processes in the . You can use drag and drop to include the processes to be scheduled in the chain, beginning with the general start process. You can then create links between the processes.More Information: Creating Process Chains [page 964]
● Before you activate the chain, check for errors in the .More Information: Creating Process Chains [page 964]
● Once you scheduled the process chain and started the chain run based on the options selected in the start
process, you can display the logs for a process chain run in the the .More Information: Process Chain Log Display [page 990]
Accessing the Process Chain Maintenance
There are various ways of accessing the process chain maintenance.
● In the Administration function area of the Data Warehousing Workbench, choose in the navigation window.
SAP BW/4HANAOperation PUBLIC 957

● From the toolbar in Data Warehousing Workbench, choose (or choose Edit Process Chains from the menu).
● In the maintenance dialog boxes of the supported processes, choose on the toolbar to access process chain maintenance.
If you start from the Data Warehousing Workbench, you access the process chain tree. The process chain tree contains various functions such as search the object tree, add objects from the tree to your favorites, access functions from the context menu.
The process chain tree is structured as follows:
● The process chains are structured in the tree using the display components. You can use the context menu to create display components in the process chain tree on the root node or create them on another display component and thereby build a hierarchy structure.
● If a process chain contains subchains, they are displayed in the tree underneath the meta chain.● Generated process chains, such as process chains for HybridProviders or semantically partitioned objects,
are shown in the display component Unassigned Nodes.
To open a process chain, select the chain in the tree and choose Display or Change in the context menu. To create a new chain, choose Create Process Chain in the context menu of a display component. The plan view for the process chain appears. Note that in display mode, the active version of a chain is shown, the chain is locked and the transport system cannot be called. If the active and edited versions of the chain match each other, you can schedule the chain in display mode.
When you access process chain maintenance from the maintenance dialog boxes in a process, the system displays the process chain in the Data Warehousing Workbench and displays the process chain that contains the process as a variant. If the process is used in more than one process chain, you can select which process chain to display. If no process chains exist for this process, you can create a one in the maintenance dialog, provided that this option is supported.
Structure of the Process Chain Maintenance
The system displays the process chain (processes and their links) in a network graphic in the right-hand area of the maintenance screen.
NoteYou can also display the chains in a tree display that is designed for screen reader devices. You can choose between the display variants under Settings Network Display/Tree Display .
You can view information on the status of the processes and links by choosing the pushbutton of a process chain maintenance view.
The left area of the process chain maintenance screen contains a navigation area. Here you see either a navigation tree for selecting process types or a tree containing a chronological list of the changes and runs of the process chain. You can switch between the process type tree and the log tree by using the pushbuttons on the toolbar of this navigation area.
8.1.1.4.1.1 Functions in the Plan View and Check View You can access the functions available in the plan and check views of process chain maintenance either from the menu or the toolbar in process chain maintenance. If the functions relate to a process, you can also access
958 PUBLICSAP BW/4HANA
Operation

them from the context menu of the corresponding process. In addition, you can use drag and drop to transfer extra process chains to the plan view and call other process chains by double-clicking them.
Functions in the Process Chain Maintenance Menu
Menu Process Chain
Menu Option Description
Create You specify a technical name and a description for the process chain and a dialog box appears. In the dialog box, you create the start process for the process chain.
Copy You use this function to copy the process chain you have selected, along with its references to process variants, and save it under a new name and description. If necessary, swap process variants with the variants needed in the new chain or delete or enhance the variants.
Save You use this function to save the current status of the process chain.
Activate You use this function to activate the process chain. You can only activate the chain if the system did not find errors during the check.
Reset to active version You use this function to reset a process chain that has been changed and saved, back to its status when it was last activated.
Transport You use this function to display the transport connection. You can transport the process chain and the dependent objects.
Attributes You use this function to display or specify various attributes for process chains.
More information: Display/Maintenance of Process Chain Attributes [page 968]
Print You use this function to print the network graphic for a process chain.
Save as image You use this function to save the network graphic for a process chain as a jpg file.
Menu View
SAP BW/4HANAOperation PUBLIC 959

Menu Option Description
Rotate You use this function to switch between vertical and horizontal views.
Navigator On/Off With this function you hide or display a movable navigator in the right-hand area of the process chain maintenance screen. It gives you an overview of your process chain that is being processed. It also enables you to enlarge or reduce the view by moving the mouse.
Zoom In With this function, you can enlarge your process chain view by about ten percent.
Zoom Out With this function, you can reduce your process chain view by about ten percent.
Adjust With this function, you adjust the process chain view to the size of the right-hand screen area.
Detail View On/Off This function shows you the detailed view for process chain maintenance. Here you see the process type, technical name of the variant and the description of the variant are shown for each process. Important elements of the worklist saved in the variant are also listed. For example, when updating the PSA, information about the data loading process and data target is listed.
A collection process is displayed several times in the detailed view. The multiple display helps you to visualize that a job is started for each process and for each event triggered by the process.
Choose 'Detail View Off' to return to the simplified view of process chain maintenance. Only process types and variant descriptions are displayed for a process here.
Remove from Display This function removes a process chain from the display.
Menu Execute
Menu Option Description
Schedule You use this function to schedule and execute the process chain in the background, based on the settings in the start process.
Remove from scheduling You use this function to cancel process chain scheduling. The chain is not executed.
960 PUBLICSAP BW/4HANA
Operation

Menu Option Description
Execute Synchronously You use this function to schedule and execute the process in dialog mode - instead of in the background.
The processes in the chain are processed serially using a dialog process. The system writes a log entry for each process. You can display the chain run in the log view.
The separate processes themselves are processed serially, if this is possible. If this is not possible (depending on the process type), synchronous processing is terminated at this point and is only resumed when the other process has fin-ished, and this has been communicated to the process chain.
We recommend that you only execute simple chains with small datasets synchronously. In this case, the performance gain of executing in dialog (you do not have to schedule a background job) may outweigh the performance loss due to parallelization. Multiple runs can be processed in parallel, since there are no conflicts regarding the required background jobs.
Execute as simulated You use this function to simulate the process chain. The system does not write log entries or process the data persistently. The process chain is displayed in the log view immediately after execution. If a process type supports this function, the context menu of the process contains the entry Simulation Result. This displays the result of the process.
Execute synchronous to debugging You use this function to debug the execution of the process chain. The process chain is executed synchronously. If the chain contains separated processes, the system waits until these processes are completed.
SAP BW/4HANAOperation PUBLIC 961

Menu Option Description
Stop Active Run Immediately This function is only available when the process chain is being executed.
You use this function to stop the current process chain run. This may be necessary, for example, if the configuration of the processes in the chain leads to an unbearably high load volume or an unbearably long runtime. In this case, it may be better to improve the configuration of the relevant processes and then restart the process chain run. if you stop the active chain run, scheduling is canceled for all remaining jobs and an instruction is sent to the loading processes (data transfer processes) to cancel loading as soon as possible.
NoteWhile the process chain is still running, this function is also available in the toolbar of the process chain log
view: ( Stop Active Run Immediately).
Menu Goto
Menu Option Description
Plan view You use this function to switch between the display and change modes for the process chain.
Check view You use this function to switch to the plan view for the process chain.
If the chain that you create does not correspond to the standard, the system displays a warning. You can ignore these warnings if you are sure that you are creating a chain that meets your requirements. Warnings do not affect how the chain operates at runtime. Your chain is checked in the check view and during activation. The system tells you if it discovers any errors.
Log view You use this function to switch to the log view for the process chain.
See also: Process Chain Log Display
Job Overview You use this function to display a new mode in the job overview (transaction SM37).
Back You use this function to undo the last navigation step. Then
choose (Next Object) to repeat the navigation step.
Menu Settings
962 PUBLICSAP BW/4HANA
Operation

Menu Option Description
Maintain process types You use this function to display process type maintenance.
See also: Maintenance of Process Types [page 975]
Maintain alert categories You use this function to display alert category maintenance (table RSPC_ALERT_CAT).
See also: Send Alerts for Process Chains [page 974]
Default chains You use this function to determine that the system does not propose processes for the process chain.
If you insert a process, which is linked to other processes, into the process chain, the corresponding process variants are generated and inserted into the process chain automatically. These variants are proposals that can be changed, replaced or removed from the chain as required. Variant maintenance is called when the change run performs automatic insert.
If you want to insert a second process of the same type in the process chain and the selection conditions of the process overlap with those of the process already inserted in the chain, the system does not generate process variants. In this case, the system does not generate additional process variants, since it cannot guarantee that this is required.
If you want to specify the processes that are to be included in a chain yourself, select Do Not Suggest Processes. As a result, the system does not suggest, generate, or automatically insert any processes into the chain. This setting is user-specific.
Tree display/network display You use this function to switch between a tree display and a network-graphic display for the process chain. The tree display is designed for screen reader devices.
Additional Functions in Process Chain Maintenance
Displaying Additional Process Chains
You can also display additional chains for the current process chain in the right area of the screen in process chain maintenance. You can use drag and drop to move these from the process chain tree into the right area of the screen.
If you link the processes of two chains vertically, the processes are added to a chain of another chain, and the superfluous chain is deleted.
If you display several chains, the system asks you which chain you want to select every time you perform an action. For example, if you have displayed several chains and want to remove one chain from the view, the system asks you to choose the chains that need to be removed when you execute the function.
SAP BW/4HANAOperation PUBLIC 963

If you save or activate, all the chains displayed are saved or activated respectively.
Displaying Other Process Chains
If you want to display another chain instead of the current process chain, select the one you want by double-clicking on the process chain tree.
Context Menu
If you select a process or a link by left-clicking on it, you can call up different functions by using the context menu (right-click mouse). The functions offered in the context menu depend on whether you are in the plan, check, or log view, and whether process chains are already running. For more information about the respective functions, see Creating Process Chains [page 964] and Process Chain Log Display [page 990].
8.1.1.4.1.2 Creating Process Chains
Prerequisites
You cannot load flat file data from a client workstation in the background. You therefore have to store your data on an application server.
Procedure
1. You can either create a process chain directly in the Data Warehousing Workbench or using a maintenance dialog box for a process:○ If you are in the process tree in the Data Warehousing Workbench, work through the following steps:
1. Create a display component (either using the context menu on the process tree's root node or using the context menu for another display component), or select an existing display component.
2. In the context menu for the display component, choose Create Process Chain.○ If you are in the maintenance dialog box for a process that you want to add to the process chain,
choose Process Chain Maintenance.
NoteIf the process is already contained in a process chain, the system displays the process chain in question. If the process is used in more than one process chain, you can select the process chain to display.
2. A dialog box appears where you enter a technical name and a description for the chain that you want to create.
3. Confirm your entries.4. In the Add Start Process dialog box, create a variant for the start process:
1. A dialog box appears. Enter a technical name and a description for the start process.2. On the Maintain Start Process screen, choose whether you want to schedule the chain directly or using
a metachain.3. If you choose to schedule the chain directly, enter the start date value for the chain under Change
Selections and save your entries.
964 PUBLICSAP BW/4HANA
Operation

The Maintain Start Process screen appears again.4. Save your entries, go back to the previous screen and confirm your entries in the Add Start Process
dialog box.
The Plan View of the process chain maintenance screen appears. The left side of the screen contains a navigation area where the process types can be selected. On the right side of the screen, the process chain is displayed. The Settings menu allows you to specify whether the process chain is displayed as a network or as a tree.
NoteIf you insert a process that is linked to other processes into the process chain, the corresponding process variants are generated and inserted into the process chain automatically. These variants are proposals that can be changed, replaced or removed from the chain as required. Variant maintenance is called when the change run insert processes automatically. Under Settings Default Chains , you can deactivate the option that allows the system to generate process variants and add them to the system.
5. Insert further relevant processes into your process chain. You have the following options:○ Drag and drop from the process type overview in the process chain maintenance navigation area○ Double-clicking on a process type in the process type overview
6. When you add a process, you need to select a process variant or create a new variant. For collection processes, the system uniquely identifies the variants.
NoteVarious functions for editing the process are available in the context menu:
Context Menu Entry for a Process Function Information
Maintain Variant With the exception of variants in the OR and EXOR collection processes, you can use this function to change all process variants.
Exchange Variant You can exchange the variant for an existing variant or a variant to be created.
Link with… You can use this function to link a process to a successor process. You can choose from the processes that are not yet linked to the current process. They are grouped according to process type in submenus.
Display Scheduled Jobs Once the process chain is active, you can use this function to display the jobs that have been scheduled.
Display All Jobs After at least one process chain run, you can display all of the scheduled jobs for a specific process and all of the jobs with which this process was run. The Job Overview appears and you can call the relevant job log.
SAP BW/4HANAOperation PUBLIC 965

Context Menu Entry for a Process Function Information
Create Message You can also send success and/or failure messages to an application process belonging to the chain:
1. Using the context menu for the process in question, create another process variant of type Send Message.
2. When you edit a message, first specify whether you want it to be sent when the process has been completed successfully or unsuccessfully. Then choose Next.
3. A dialog box appears where you can select an existing process variant or create a new one.
4. If you create a new process variant, edit the document to be sent and specify a list of recipients.
NoteNote that you cannot add attachments to the message.
5. Save your process variant and go back.
The message process variant is now assigned to your application process. When the message is sent, the status information and the process log are also sent.
Debug LoopOnly use this function to debug a process run.
Specify how long (in seconds) you want the delay to be between one event being triggered and the next process starting.
You can capture the process in the debugger by using transaction SM37 (Job Overview) or SM50 (Process Overview).
Skip Process If a data target has been affected by an error, and the error cannot be resolved before the next process chain run, the process chain run will fail. To avoid this, you can use this function to make the system skip the processes in question when running the chain until the original problem has been solved. These processes are not executed during the process chain run and are displayed in gray in the log view. The process status is SKIPPED, indicating successful execution. As a result, any subsequent processes that follow a successful event are also run.
Once the error has been resolved, you can include the process in the process chain run again. To do this, choose Undo Skip Process.
966 PUBLICSAP BW/4HANA
Operation

Context Menu Entry for a Process Function Information
Remove Process You use this function to remove a process from a process chain.
Administrate Source You can use this function to call the administration transaction for the source of process variants for certain process types.
Administrate Target You can use this function to call the administration transaction for the target of process variants for certain process types.
7. Hold down the left mouse button to connect the processes with events. A dialog box appears. Specify whether you want the event to be triggered after the previous process has been completed successfully or unsuccessfully, or whether you want the event to be triggered independently of the outcome of the process that precedes it. If the process that triggers the event has more than one option, choose the option after which the successor process is to be run (see process type Decisions [page 940]).
NoteIf the process chain is shown as a network, first select the process underneath the row displaying the process type and then drag the cursor to the required process. When you select the process type row, the whole process is moved into the plan view.
From the context menu for a link, you can display the event or remove the link again. To do this, select the link and right-click with the mouse.
8. If you did not create the process chain using a display component, assign it to a display component by choosing Attributes Display Component .
9. Define any additional process chain attributes required.
10. Check your process chain in the Check View and make any necessary corrections.
Note
○ The Legend explains the meaning of the different colors used to display the processes and links.○ From the context menu for a process, you can display the messages resulting from the check.
During the check, the system calculates the number of parallel processes according to the structure of the chain (subchains are recursively taken into account here). The result is compared with the number of background processes on the chosen server (or the total of all available servers if no server is specified in the attributes of the process chain). If the number of parallel processes is greater than the number of available background processes, the system highlights every level of the process chain where the number of processes is too high. The system produces a warning for these levels.
11. Save and activate your process chain if it does not contain any errors.
Result
Now your process chain can be scheduled and executed. Once it has been scheduled, the chain starts as defined in the start process. If you scheduled the start process directly for example and chose Immediately as
SAP BW/4HANAOperation PUBLIC 967

the start time, the chain run starts immediately after scheduling. In the plan view or check view, the Execute menu offers you additional execution modes (for example, simulation or synchronous execution) and the option to remove the chain from scheduling or stop a running chain.
In the Log View, you can display the messages for the chain runs.
Related Information
Functions in the Plan View and Check View [page 958]Displaying/Setting Process Chain Attributes [page 968]Monitoring Process Chain Runs [page 977]
8.1.1.4.1.2.1 Variant Maintenance Tips
For various process types, variant maintenance in process chain maintenance is performed using the following table:
Object Object Type Object Name Object Description
Symbol of object/process type is displayed
Description of object/process type is displayed
Technical name of object/process is displayed
Description of object/process is displayed
The following is valid when using this table:
● If you select an object type in the Object Type field, for example, InfoCube, then the execution of this process refers to the object specified in the Object Name field.
● If you select a process type in the Object Type field, for example Execute InfoPackage, then the execution of the process refers to the objects in the referenced process that was selected in the Object Name field.
You are also able to make process-specific settings in variant maintenance.
8.1.1.4.1.3 Displaying/Setting Process Chain Attributes
Use
You can display technical attributes, display or create documents for a process chain, and specify how process chains behave when they are executed.
968 PUBLICSAP BW/4HANA
Operation

Features
Using the menu command Process Chain Attribute you can display or edit the following process chain attributes:
Process Chain > Attribute >... What you need to know
Name You can change the name of a process chain.
Display Components Display components act as the sort criterion in process chain maintenance. Assigning process chains to display components makes it easier to access the chain you want.
You can use the process chain attributes to change the assignment of the current chain. You can also change the descriptions of display components or create new display components.
To create a new display component, in the Assign Display Components window, choose the input help. In the Display Grouping dialog box that appears, assign a technical name and a description to the display component. You can also change the description of a display component using the input help.
Documents You can create and display documents for a process chain.
Last Changed by Displays the technical attributes of the process chain:
● When it was last changed and by which user.● When it was last activated and by which user.● Object catalog entry
Evaluation of Process Status If you set this flag and schedule a successor process Upon Error or Always, the system classifies all the incorrect processes of the chain as successful with regard to the overall status of the run.
The flag is relevant for the use of metadata: Errors in processes in subchains can be evaluated as "unimportant" for the metachain run. The subchain is evaluated as successful, regardless of errors in such processes of the subchain. If the successor of the subchain is scheduled upon success in the metachain, the metachain run continues regardless of errors in the “unimportant” processes of the subchain.
This indicator does not apply to mailing or alerting; these functions are still triggered if there are incorrect processes with a successor processor scheduled Upon Error.
SAP BW/4HANAOperation PUBLIC 969

Process Chain > Attribute >... What you need to know
Polling Flag This flag allows you to control how the main process behaves with distributed processes. With distributed processes, such as loading processes, a number of different work processes are involved in the relevant tasks.
You use the polling flag to specify whether you want to keep the main process until the process itself has ended.
NoteSelecting the flag
- ensures a high level of certainty in the process flow and
- provide external scheduling tools with the status of the distributed processes.
However, the system resource consumption is increased, and an additional background process is required.
Monitoring The flag in the Remove Chain from Automatic Monitoring? dialog box allows you to specify that you want to remove a process chain from automatic monitoring using CCMS.
In the default setting, automatic process chain monitoring is activated by CCMS.
For more information about the CCMS-context process chains see section BW Monitor in CCMS [page 972].
Alerting You use alert management to send alerts if errors occur during a process chain run.
For more information, see Sending Alerts for Process Chains [page 974].
Background Server Here you can specify the server or server group, where you want to schedule all the jobs in the chain. If you do not specify a server or server group, background management distributes the jobs across the available servers.
970 PUBLICSAP BW/4HANA
Operation

Process Chain > Attribute >... What you need to know
Processing Client If you are using process chains in a client-dependent application, here you specify one exclusive client in which the chain can be used. Then the process chain can only be displayed, edited, scheduled, and executed in this client.
If you do not set this attribute, you can display, edit, schedule, and execute the process chain in all clients.
Process variants of the General Services category that are included in a process chain that has this attribute are also only displayed in the specified client.
This attribute is transported. You can change it during the import by specifying an import client. In the target system, you have to create a destination for import post-processing in the client that is specified here (transaction RSTPRFC). After the import, the chain is activated and scheduled, if required, in this client.
Execution User With the default setting, a BW background user executes the process chain.
You can change the default setting so that you can see the user who executes the process chain and the processes. This information is shown in the job overview (transaction SM37). You can select the current dialog user, who schedules the process chain job, or specify a different user.
The setting is transported.
The BW background user has all the required authorizations to execute all process types. Other users have to assign themselves these authorizations so that authorization errors do not occur during processing.
Job Priority You use this attribute to set the job priority for all the jobs in a process chain.
SAP BW/4HANAOperation PUBLIC 971

Process Chain > Attribute >... What you need to know
Reset Previous Run If processes fail in the process chain run, it may be the case that the instances of these processes still exist in the data target. These instances can have a negative impact on the next process chain run.
Using the Reset Previous Run function, you can remove and delete these failed processes from the data targets before the next process chain run, provided that this is supported by the process type. The function is supported, for example, by the data transfer process.
A dialog box opens. Choose Automatically Reset Errors in Previous Run. The process chain makes all failed processes clean their previously failed instances before a new process chain is started.
Streaming Mode You can specify that a process chain is performed in streaming mode. This allows for more frequent execution.
For more information, see Process Chains for Streaming [page 954]
8.1.1.4.1.3.1 BW Monitor in CCMS
Use
The Computing Center Management System (CCMS) has an alert monitor to help you monitor and operate your SAP systems. Together with the BW monitor, the CCMS monitor sets in the alert monitor contain a selection of BW-relevant standard SAP monitoring trees and monitoring trees for process chains and consistency checks in the analysis and repair environment.
Activities
1. To call the alert monitor, choose Tools → CCMS → Control Data/Monitoring → CCMS Monitor Sets or run transaction RZ20.In the overview tree of the CCMS monitor sets under the SAP BW∕4HANA Monitor node, you find the BW Monitor.
2. Select the BW Monitor and choose Monitor → Start Monitor.The monitoring trees that the monitor objects are displayed for are located under the node for your BW system. A monitoring tree therefore combines a group of logically related monitor objects.Monitor objects are specific components from your SAP system or its environment that you need to monitor.The monitor attributes are displayed for a monitor object. These describe data types that can be reported for a specific monitor object. Alerts can be deleted based on values that are reported for an attribute.
972 PUBLICSAP BW/4HANA
Operation

For more information about using the Alert Monitor for CCMS, see Alert Monitor.
Monitoring Process Chains in CCMS
Monitoring Tree
The Process Chains monitoring tree contains all process chains that have run since the system was last started.
By setting the transfer parameter for method execution DAYS_TO_KEEP_LOGSRSPC_CCMS_STARTUP in the method definition, you can specify the process chain runs that you want to display from those that ended before the BI system was last started. In the default setting, this parameter is set at seven days. This means that the process chain runs from the last seven days are displayed. To call the method definition run transaction RZ21 and enter Methods -> Definitions.
By double-clicking on the Process Chains monitoring tree, you can call process chain maintenance.
Monitor Objects
In the Process Chains monitoring tree, process chains that have run since last time the system was started are displayed as monitor objects, as well as ones defined in transaction RZ21.
The nodes show the technical name of the process chain.
By double-clicking on a process chain, you can call the maintenance screen for the chain.
Attributes are displayed for each process chain. These are:
● Text attributeThe text attribute specifies the description of the process chain.
● Monitor attributeAll runs in the chain (represented by the log ID together with month, day, and time) for the last n days are displayed as monitor objects.You can define the parameter n as the transfer parameter for method execution DAYS_TO_KEEP_LOGSRSPC_CCMS_AGENT in the method definition. If no changes have been made to the run for n days, it is removed from the display. You can still access the log directly from the process chain maintenance screen though. By setting the parameter to OFF, you can generally exclude the process chains from being monitored by the CCMS.This agent runs a maximum of every ten minutes and monitors all of the runs displayed. The batch job for this is SAP_CCMS_MONI_BATCH_DP. In the default setting, it is scheduled to run once an hour you save the method. You can change the scheduling in transaction SM37.When you select a run and choose Display Details, all messages for this run are displayed, as well as a message for every process that has finished. The default setting is to display the messages from the last 30 minutes. You can change this setting.
By double-clicking on a process chain run, you can call the log view of the process chain maintenance for this run.
SAP BW/4HANAOperation PUBLIC 973

Consistency Check Messages in the Analysis and Repair Environment (RSRV)
In the RSRV Checks monitoring tree, you can display the messages for the consistency checks that you have executed in the analysis and repair environment (transaction RSRV).
8.1.1.4.1.3.2 Send Alerts for Process Chains
Use
You can send alerts if errors occur while processing processes or in the background processing for a process chain. Process chain maintenance uses alert management for this purpose.
The alert is sent to the user who scheduled the process chain. You can assign additional recipients by assigning roles or specifying individual users in alert category maintenance (transaction ALRTCATDEF).
The recipient's display program displays the alerts. The display program can be the Universal Worklist (UWL) in the portal, the alert inbox (transaction ALRTINBOX) or an application that calls alerts using API. You can also send alerts by E-Mail, fax or SMS. This is dependent on the configuration.
Features
If you have set the indicator in attribute maintenance for the process chain, an alert is sent by default for each process that has errors.
Before the system can trigger and send alerts, alert categories have to be assigned to the process types. The recipient, texts, priorities, escalation options, and so on can be determined in an alert category. The system determines the alert category as follows:
● Errors in background processingAlert category BWAC_PROCESS_CHAIN_FRAMEWORK is used for errors in background processing. For this category, fixed alert texts are delivered. These can be sent to the recipients if an alert occurs.
● Errors in the processThe system searches table RSPC_ALERT_CAT for an entry for the process type (process chain maintenance → Settings → Maintain Alert Categories). You can change the entries in this table. It is locked against changes through SAP deliveries. This means that additional entries that are delivered can be transferred, but the existing entries are not overwritten.Maintain the table in two ways:○ Assign a customer-defined alert category to a process type○ Assign a class, which implements interface IF_RSPC_EVENT_RESOLUTION. Method
if_rspc_event_resolution~get_category receives process variants and instances and determines the alert category dynamically.Since this class does not have to be identical to the class that implements the other process chain interfaces for this type, you can also implement alert triggers for SAP process types, without modification.You can include instances of alerting where the exception DONT_RAISE is triggered.
974 PUBLICSAP BW/4HANA
Operation

If you do not enter a customer-specific alert category in the table, the system uses the alert category delivered for this process type.You can exclude a process type from alerting by selecting No Alert for the process type in table RCPC_ALERT_CAT.If table RSPC_ALERT_CAT does not contain entries for a process type, the system uses category BWAC_PROCESS_CHAIN_ERROR. This category uses the generic information on the process for the dynamic texts. This is also used when the system sends messages. Unlike sending messages using process chain maintenance, you can create an individual text for each process.
See also:
Alert Management (BC-SRV-GBT-ALM)
Definition of Alert Categories
8.1.1.4.1.4 Process Type Maintenance
In the plan and check views of the process chain maintenance, you can display a table overview which shows how the process types are configured. You can also apply this configuration to process types you have implemented yourself. Choose Settings Maintain Process Types .
The following details are displayed in the process type maintenance transaction for SAP process types, and can be defined for process types that you have implemented yourself.
CautionDo not change the settings for the SAP process types. Otherwise inconsistencies could arise in the data handled by the process.
Field What you need to know
Process Type Specifies the technical name of the process type.
Short Description
Long Description
Class/Interface Specifies the class where the interfaces required for this process type are implemented.
Object Type ABAP OO Class
SAP BW/4HANAOperation PUBLIC 975

Field What you need to know
Possible Events Events that might be triggered after the process run:
● Process finished "successfully" or "with errors"● Process finished, status unspecified● Process is always the last process in a chain● Process finished with complex status
You use this setting to control the flow of the process chain on the basis of a logic with multiple values. For predecessor processes that end successfully, you can define flexible process paths on the basis of multi-value decisions. The process type has to implement interface IF_RSPC_MULTI_EVENT.If you want to link this process to a successor process, you can select from the valid end statuses for a process that finished successfully.See Process Type Decision [page 940]
Repeat If an instance is terminated, you can repeat the process. If you repeat a process, the system generates a new instance.
See: Repeating Terminated Processes [page 991]
Rep. (Repair) If an instance is terminated, you can repair the process. This means that you can repeat the process with the same instance.
See: Repeating Terminated Processes [page 991]
+ (Symbol) Symbol that represents the process type in process chain maintenance.
GUID The variant name is determined internally and is not specified in the variant maintenance.
No Mail Process chain mail service is not being used because the process type has implemented its own mail handling.
Process Category Group of process types in process chain maintenance.
No. Number for the position in the process category where the process type is displayed in process chain maintenance.
Documentation Type Documentation type for connecting documentation to the process type.
Documentation Object Documentation object for connecting documentation to the process type.
976 PUBLICSAP BW/4HANA
Operation

Field What you need to know
BW Only Restricts a process type so that it can only be used in the BW standard client. In this case, the process type is not shown in the selection list in process chain maintenance when non-BW clients are used. The system highlights the corresponding processes as having errors when checking the process chain.
8.1.1.4.2 Monitoring Process Chain Runs
NoteThe following sections describe process chain monitoring in the SAP GUI. As of 1.0 SPS08, you can also monitor process chains and process chain runs in the SAP BW∕4HANA cockpit, on an intuitive, web-based user interface. More Information: SAP BW∕4HANA Cockpit [page 1187]
Use
There are a number of work environments available for monitoring process chain runs:
Work environment where you can monitor process chains
When should you use this work environment? More information
Monitoring of Periodic Process Chains (Transaction RSPCM)
With transaction RSPCM you monitor the last run of selected process chains in a SAP BW∕4HANA system.
Use this transaction to regularly check the status of the current runs for selected process chains. You can navigate to the detailed log view for a process chain run from here.
Monitoring Current Runs of Periodic Process Chains [page 978]
Monitoring Apps in the SAP BW∕4HANA Cockpit
The SAP BW∕4HANA cockpit provides you with various apps to monitor periodic process chains and process chain runs.
Apps in the SAP BW∕4HANA Cockpit [page 1194]
SAP BW/4HANAOperation PUBLIC 977

Work environment where you can monitor process chains
When should you use this work environment? More information
App for process chain monitoring With the app for process chain monitoring, you can monitor the last run of selected process chains in a SAP BW∕4HANA system.
On your mobile device, you can use the app for process chain monitoring to check the status of process chains, analyze errors, repeat any failed processes or send e-mails about errors - wherever you are and whenever you want.
App for Process Chain Monitoring [page 985]
Log view for runs of a process chain in process chain maintenance (transaction RSPC)
You go to the log view of process chain maintenance from the process chain maintenance (transaction RSPC) or process chain maintenance for a given process chain (transaction RSPC1). You check the logs for process chain runs here.
Use this transaction to display one or more runs for a process chain in the log view.
Process Chain Log Display [page 990]
Process Chain Maintenance for a Given Process Chain Run (Transaction RSPC1)
Use this transaction to call the log view for this run by specifying the log ID of a concrete process chain run.
-
BW Monitor in the Computing Center Management System (CCMS)
The Alert Monitor of the CCMS displays the runs for a given time and the relevant status information for process chains.
Use the BW Monitor in the CCMS to monitor your system landscape centrally and globally, and possibly also to apply external monitoring tools.
BW Monitor in CCMS [page 972]
8.1.1.4.2.1 Monitoring Current Runs of Periodic Process Chains
With the Monitoring of Periodic Process Chains you monitor the last run of selected process chains. For the process chains selected, the system displays a list of the statuses on the execution, the runtime, and the delaying of process chain runs, as well as other related information. In the default setting, the system displays the execution status. You can also activate the status display for the delay and the runtime for each process
978 PUBLICSAP BW/4HANA
Operation

chain. Report RSPC_MONITOR is executed to determine the status of the process chain runs. The settings made in Monitoring Periodic Process Chains are user-dependent.
To call the Monitoring of Periodic Process Chains, you have the following options:
● From the Process Chain Maintenance: Goto Monitoring of Periodic Process Chains
● In the Administration functional area, choose Monitors Process Chains● Using transaction RSPCM
Behavior when Called Up for the First Time after an Upgrade
When you call up the Monitoring of Periodic Process Chains, and no chains are selected for monitoring yet for you as the calling user, the system reacts as follows:
If chains were already selected for display in RSPCM before the upgrade, the system whether the process chains selected independently of the user before the upgrade should be transferred into the user-dependent list asks after completion of the upgrade. If no user-independent list exists, the system asks whether no chains or all the chains in the system (apart from subchains) should be displayed. From the second call onwards, the last list configured by the user is always called up.
Selecting Process Chains for Monitoring
Selecting Individual Process Chains and Chains of an Application Component
1. To select a process chain to be monitored, choose (Add Chain) in the table toolbar, select a process
chain in the next dialog box, and choose (Continue).
2. To select the process chains of a process chain application component, choose (Add All Chains of a
Component), select an application component in the next dialog box, and choose (Apply).
3. To exclude one or more process chains from monitoring, select it in the overview and choose (Remove Chain).
Using Includes
To be able to offer specific groupings of process chains for selection to multiple users in RSPCM, you can create and edit includes:
1. To create an include, select the transaction (Include bearbeiten) in the toolbar, and in the following
dialog box select the entry <New>. Enter a name for the include, choose (Continue) and select how the include will be created (empty or with all the chains in the system, excluding subchains).
2. The screen for editing the include appears, and here, as described above under Selecting Process Chains for Monitoring, you can select or deselect other chains. You can also enter the setting for time monitoring described below, and you can nest includes. The include is saved automatically after each setting.
3. You go back to return to your personal list of the process chains monitored.
To insert an include into the list of the process chains monitored, or into another include, you proceed as follows:
1. Choose (Select Include) in the toolbar in the transaction.2. Select the include and choose Apply.
The process chains contained in the include will be displayed immediately in the list of process chains monitored, or in the higher-level include.
SAP BW/4HANAOperation PUBLIC 979

3. Instead of displaying the process chains contained in the includes directly in the list of monitored process
chains, you can display the includes by pressing (Compress Includes).
NoteNote that for the process chains included, the time monitoring can only be activated or deactivated in the include itself. In the list of process chains monitored or in a higher-level include, you can only make this setting for directly inserted process chains.
Defining the Behavior for Refreshing the List when the Transaction is Started
Under Extras Refresh at Start , you define how the status is refreshed when the transaction is started. You can choose from the following options:
● All Chains: The statuses for all chains are determined again when the transaction is started.● Only if Status is Unclear: Only the statuses for those chains with the yellow execution status are determined
again when the transaction is started.● No Automatic Refreshing: The statuses of the chains are not determined again when the transaction is
started.
NoteWhen the transaction is called for the first time, the system displays the persistent status for the chains.
If you perform the status determination in the background, the status for all the chains is always determined again. For more information on status determination in the background, see the section Setting Up Automatic Monitoring and Notification for RSPCM Alerts.
Refreshing the List
To refresh the status for all process chains in the list, choose (All - Refresh All Chains).
To refresh the status for process chains with execution status yellow, choose (Yellow - Refresh Yellow Lines).
Changing the Layout of the List
You can modify the layout of the list and, in addition to the fields displayed in the standard setting, you can add fields with information on the log ID, the current deviation from the mean runtime, and the mean deviation. To
change the layout of the list, choose (Choose Layout). For more information, see Changing Layout
980 PUBLICSAP BW/4HANA
Operation

Activating the Time Monitoring
If you also want to monitor the runtimes and delays for the process chains, you activate the time monitoring. When the time monitoring is activated, then status determinations for the runtime and the delay are also performed. The status determination is always based on the last 30 process chain runs. The time monitoring is not activated by default.
1. To activate the time monitoring for all the process chains displayed in the list, choose the transaction (Time Monitoring) in the toolbar.You thus select the checkbox Time Monitoring for all the process chains in the list.
With (No Time Monitoring), you deactivate time monitoring for all process chains displayed.2. To activate the time monitoring for individual process chains, you select the checkbox Time Monitoring for
these process chains in the list.
When you activate the time monitoring for one or more process chains, the statuses for the runtime and the delay are determined for these chains and are displayed in the list with the runtime of the current run and the forecast starting time for the next run.
Monitoring the Status for Executing the Process Chain Runs
The following table shows how the status symbols for the execution status (symbol in the column Status) of a process chain run are assigned:
Status symbol Meaning
: The chain was completed successfully.
: The chain is active.
: The chain ended with an error, or it was terminated.
: The status is unknown (if the chain has not run yet).
To obtain more information about the status of a process chain run, click on the status symbol:
● When you click on the green status, you go to the log view of the process chain run.● When you click on the yellow or red status, you go to a dialog box in which you can perform the error
analysis for the current run and start the repair process. The error messages for each process are displayed in the dialog box with their long texts. The following activities are possible in the dialog box:
○ Press the (Log) pushbutton to go to the log view for the run.
○ Press the (Next Start) pushbutton to go to the job overview for the start job of the process chain or, depending on the chain, to another dialog box for analyzing the time intervals between the last 30 process chain runs. For more information, see the section Monitoring the Process Chain Delays.
○ When you press the (Runtime) pushbutton, you go to another dialog box that displays the determination of the runtime for the current run and a history for the last 30 runs. For more information, see the section Monitoring the Runtime of the Process Chains.
SAP BW/4HANAOperation PUBLIC 981

○ By pressing (Repair), you can start repairing the process chain. If there are errors in the processes, when they are repaired these processes are repeated. If there are errors in the process chain framework, the chain is rescheduled and the processes for which the successors could not be started in the previous run are completed again so that the successor processes can be started.
Monitoring the Process Chain Delays
If you have activated the time monitoring for process chains, the column Delay displays the status for the delay of the process chain run. The following table shows how the status symbols for the delay status of a process chain run are assigned:
Status symbol Meaning for…
time-based process chains that are scheduled periodically
● process chains with immediate start
● subchains● event-controlled chains
that are scheduled periodically
time-based process chains or event-controlled process chains that are not scheduled periodically
: If the delay is less than 5 minutes
If the delay is less than the length of the mean delay
NoteThe mean delay corresponds to the mean deviation from the mean period. The calculation of the mean values is based on the maximum last 30 runs of the chain (unless there were less than 30 runs).
-
: If the delay is between 5 and 10 minutes
If the delay is between one and two times as long as the mean delay
-
: If the delay is 10 minutes or more
If the delay is more than twice as long as the mean delay
-
(gray)
(Irregular Execution)
- If the last run of a process chain was more than two months ago
These chains have status Inactive because they are executed irregularly or have not been executed for a long time
982 PUBLICSAP BW/4HANA
Operation

(Not scheduled) If the process chain is not scheduled (any more)
- -
The Next Start column displays information depending on the type of the process chain:
Type of process chain Information displayed in column Next Start
Time-based chains that are scheduled periodically (job scheduling),
such as chains that are always scheduled for Tuesday at 8 a.m.
Next start date
Time-based chains that are not scheduled periodically No expected start date is displayed because the chains are executed irregularly.
Chains that are not time-based,
such as chains that are based on events, or chains that a user starts manually
Next expected start +/- mean deviation of the runs from the mean period between two runs
NoteThe next expected start is calculated by adding the mean period between two runs to the starting time of the last run, and the resulting time is displayed as the next expected start.
To obtain more information about the delay status, click on the status symbol:
● For time-based chains, you go to the job overview for the starting job of the process chain.● For non-time-based chains, you go to a dialog box displaying a histogram. On the horizontal axis, the
histogram shows the time intervals / periods between the chain runs, and on the vertical axis the number
of chain runs. Use the pushbuttons (Reduce Intervals) and (Increase Intervals) to adjust the precision of the time axis. The upper screen area also displays the next start calculated, the current delay, and the mean period between the runs.
Monitoring the Runtime of the Process Chains
If you have activated the time monitoring for process chains, the column Runtime displays the status for the runtime of the process chain run. The runtime of the last process chain run is also displayed. The following table shows how the status symbols for the runtime status of a process chain run are assigned:
Status symbol Meaning
SAP BW/4HANAOperation PUBLIC 983

: If the current deviation from the mean runtime is smaller than the mean deviation from the mean runtime.
NoteThe mean runtime is calculated as follows: The sum of the runtimes of the successful processes (for example, also repaired processes) for the maximum last 30 successful chain runs (unless there were less than 30 successful runs) is divided by the number of process chain runs. A confidence interval is used to exclude outliers from this calculation.
: If the current deviation is greater than the mean deviation.
: If the current deviation is more than twice as big as the mean deviation.
To obtain more information about the runtime status, click on the status symbol.
A dialog box appears displaying the runtime statistics for the process chain. A diagram shows the last 30 successful chains and their runtimes. The horizontal axis displays the runtime, and the vertical axis shows
when the chain ran. You can use (Analyze More Values) or (Analyze Fewer Values) to define how many
chain runs are used for calculating and displaying the statistics in the dialog box. Outliers ( (Display/Hide Outliers)) are always based on the statistics calculated and displayed, and are displayed in red. The current run is displayed in green.
In addition, the following statistical values are displayed in the upper screen area which relate to the values currently used for the calculation and displayed:
● Runtime of the current process chain run and mean runtime● Current deviation from the mean runtime● Runtime change
If there is a plus sign in front of it, this is the time by which the runtime worsens per day. If the sign is a minus sign, the time improves. The runtime change is based on linear regression analysis.
● Current and mean idle timeThe current idle time is the sum of the idle times between the processes in the current run. The mean idle time is the sum of the idle times between the processes in the runs on which the statistics are based, divided by the number of these runs.
Press the Show Processes pushbutton to go to another dialog box that lists the processes of the run in a table, with their status and runtime. In the default setting, the list is sorted by runtime in descending order. Click on a process to go to the log dialog box for that process.
Setting Up Automatic Monitoring and Notification for RSPCM Alerts
You can automate the monitoring by scheduling the calculation of the status (and the delay and runtime calculations) and the sending of information about runs with errors and runs with alerts to a previously defined
984 PUBLICSAP BW/4HANA
Operation

list of recipients in the background. These messages are user-dependent. When you create a message, a corresponding process chain variant RSPC_<user name> is generated.
1. Choose (Automatic Notification).The message editing screen appears.
2. If required, create an introductory text for the information about the incorrect process chain runs.
NoteNote that you cannot add attachments to the message.
3. Define the list of recipients for the message.4. Save the message and go back to the previous screen.
5. To schedule the status calculation with report RSPC_MONITOR, choose (Schedule Monitoring).6. On the Execute a Report in the Background screen, press Schedule.7. On the next screen, enter a job name and a date of execution and choose Schedule Periodically.
8. In the next dialog box, define the interval at which the report should be executed and choose .When it is executed in the background, the report calculates the status, and if applicable the delay and the runtime, for the process chains defined in transaction RSPCM and sends a message about incorrect process chain runs to the recipient list previously defined.
NoteIf you decide not to schedule the report and press Execute Immediately on the Execute a Report in the Background screen instead, a message will also be sent to the recipient list here, unlike when executing in the dialog.
By pressing (Display Jobs), you can display an overview of the background jobs for the status calculation.
8.1.1.4.2.2 App for Process Chain Monitoring
As an administrator, you can use the app for process chain monitoring to monitor the last runs of process chains - wherever you are and whenever you want.
The app accesses the function for monitoring the periodic process chains (transaction RSPCM) of a SAP BW∕4HANA system. It enables you to monitor process chains, which you have selected in transaction RSPCM by using an intuitive Web interface, without needing to log on to a SAP BW∕4HANA system (SAP GUI). You can easily identify failed and delayed process chains, perform error analysis, send e-mails with information about errors and repair processes.
The app for process chain monitoring is a Web-based monitor, which is based on SAPUI5. Once you have performed the configuration steps, you can start the app in a Web browser on your end device (desktop PC, tablet or smartphone). The connection between the SAP BW∕4HANA backend and the app is established using Gateway. The connection is based on the OData protocol. The functionality and data for process chain monitoring are provided using an OData service.
SAP BW/4HANAOperation PUBLIC 985

There are several ways to start the app:
● Enter the address in the Web browser on your device as follows: http|https://<SAP BW/4HANA system host>:<http port|https port>/rspcm_web, for example https://vmw9460.wdf.sap.corp:50000/rspcm_web
NoteYou can add the following to the address, in order to start the app with specific parameters: ?<Parameter 1>=<value>&<Parameter 2>=<value>.
If you want to start the app in a specific language and for a specific client of the BW system, enter the address as follows: http|https://<SAP BW/4HANA system host>:<http-Port|https-Port>/rspcm_web?sap-client=<SAP BW/4HANA system client>&sap-language=<SAP BW/4HANA system language key>, for example https://vmw9460.wdf.sap.corp:50000/rspcm_web?sap-client=000&sap-language=EN
● Start the app from the SAP BW∕4HANA system (SAP GUI):
○ Data Warehousing Workbench (transaction RSA1) Administration Monitors Process Chain App
○ Transaction RSPCM_WEB
Functions/Key Features
● Display lists of the last runs of periodic process chains; subdivided into failed, delayed, active and all process chains.
NoteLong-running programs are displayed in the app under active process chains and not under delayed process chains.
● Navigate in the list of processes for a process chain. Icons indicate the current process status; executed, failed or not executed.
● Filter processes in a chain by status● Display error logs for all failed processes in a chain● Repair a process chain by calling the corresponding function● Display logs for a chain process and switch between job log and process log as required● Repair a process or a subchain by calling the corresponding function● Skip a process or a subchain by calling the corresponding function● Send an e-mail with information on the selected process by calling the corresponding function● Configure the list display for specific end devices (by selecting the required columns)
986 PUBLICSAP BW/4HANA
Operation

Technical Prerequisites
● The software components that are relevant for using the app are included in your installation:○ SAP BW∕4HANA○ Gateway○ SAPUI5
● Users of the app can access data on the SAP BW∕4HANA backend system from their devices.
For more information on Gateway, including information on configuration, administration and security, see SAP Gateway Foundation (SAP_GWFND).
Supported Platforms
Supported device types: desktop PC, smartphone and tablet. For an overview of the supported operating systems, versions and browsers, see SAP Note 1716423 and the links contained in the Note.
NoteNote that Blackberry OS is not supported as an operating system for the process chain app. Linux with Mozilla Firefox (latest version) is also supported for desktop PCs.
Related Information
Configuring the App for Process Chain Monitoring [page 987]
8.1.1.4.2.2.1 Configuring the App for Process Chain Monitoring
Before you can use the app for process chain monitoring, you need to perform various configuration steps in SAP BW∕4HANA, Gateway and SAPUI5.
Technical Integration
The following steps are required for the technical integration of the relevant components:
Configuration of Gateway
1. Activate Gateway.
1. In Customizing (transaction SPRO) choose SAP Gateway OData Channel ConfigurationActivate or Deactivate SAP NetWeaver Gateway .
SAP BW/4HANAOperation PUBLIC 987

2. A dialog box appears. Choose Activate.2. Define the system alias LOCAL for Gateway.
This step is only necessary if a system alias LOCAL has not yet been defined.
1. In Customizing (transaction SPRO) choose SAP Gateway OData Channel ConfigurationConnection Settings SAP NetWeaver Gateway for SAP System Manage SAP System Alias .
2. Create a new entry with the following values:
Field Value
SAP System Alias LOCAL
Local GW Selected
RFC Destination NONE
Software Version DEFAULT
3. Save the entry.
For more information on Gateway, including information on configuration, administration and security, see SAP Gateway Foundation (SAP_GWFND).
Activation of ICF Services
For SAPUI5 you need active services for Web icons and Business Server Pages (BSP).
1. Call transaction SICF_INST.
2. Under Technical Name, enter the following service names using multiple selection and then choose (Execute):○ SAP-ICONS○ BSPBASIS
Specific actions for the app for process chain monitoring
1. Activate the OData service for the app for process chain monitoring.
1. In Customizing (transaction SPRO) choose SAP Gateway OData Channel AdministrationGeneral Settings Activating and Managing Services
2. Press the Add Service button.3. A dialog box appears. Choose the system alias LOCAL and the service name RSPCM_GW_SERVICE_SRV
from the Filter group.The service is displayed under Selected Backend Services.
4. Select the entry with the service and choose Add Selected Services.5. On the following dialog box, the system displays the service with the technical name
ZRSPCM_GW_SERVICE_SRV . Do notchange this name.6. Assign a package to the service (or choose local object) and keep the default settings on the screen.
7. To activate the service, confirm your entries by choosing (Continue).2. Activate the SAPUI5 application for process chain monitoring.
1. Call transaction SICF.
2. Under Service Name, enter RSPCM* and choose (Execute).
988 PUBLICSAP BW/4HANA
Operation

3. Navigate to default_host sap bc ui5_ui5 sap , select the service rspcm_web and activate the service using the context menu.
4. Navigate to default_host sap bc ui5_ui5 sap , select the service rspcm_gw_service_srv and choose Activate Service from the context menu.
5. The Activation of ICF Services dialog box appears. Choose Yes.
Security Aspects
User Authentication and Single Sign-On
We recommend X.509 client certificates for user authentication. For more information, see the SAP Gateway Gateway Foundation Security Guide: SAP Gateway Authentication and Single Sign-On.
Network and Communication Security
We recommend you use the SSL protocol for secure communication in your productive system landscape. For more information, see the SAP Gateway Gateway Foundation Security Guide: Configuring Secure Communication in Your Landscape via SSL.
Authorizations
In order to work with the app for process chain monitoring, you need the following authorizations, which are contained in the role templates S_RS_RDEAD - BW role: administrator (development system) and S_RS_ROPAD - BW role: administrator (productive system):
Authorization Object Values for Authorization Fields
S_SERVICE Service type: TADIR service
Object type and name: R3TR IWSG ZRSPCM_GW_SERVICE_SRV_0001
S_SERVICE Service type: TADIR service
Object type and name: R3TR IWSV RSPCM_GW_SERVICE_SRV 0001
S_TCODE TCD: RSPCM
Business Integration
In the Periodic Process Chain Monitoring screen (transaction RSPCM), choose the process chains that you want to monitor. The app for process chain monitoring only displays the process chains that you previously added to your user-specific list in transaction RSPCM. If you have not selected any process chains, the app displays an error message.
More Information: Monitoring Current Runs of Periodic Process Chains [page 978], Section Selecting Process Chains for Monitoring
SAP BW/4HANAOperation PUBLIC 989

8.1.1.4.2.3 Process Chain Log Display
Use
You can check process chain runs in the log view of the process chain maintenance.
Key Features
Calling the Log View of a Process Chain Run
You access the log view of a process chain either by choosing the Log View icon from the toolbar of the
process chain maintenance or the Logs icon from the toolbar of the navigation area.
When you go to the log view, first choose the time frame for which you want to display the chain runs.
In the left-hand area of the screen, information about the time of creation, change, or activation as well as about the chain runs is displayed. Symbols display the status of the runs: Yellow indicates that the chain is active, green that the chain ended successfully, red that the chain ended with errors or was terminated.
Unknown is displayed if the status is unknown, for example after an upgrade. Choose Goto → Other Log ( on the process chain maintenance toolbar) to refresh the status display of the runs.
Double-click on the appropriate row to choose the log view for a run. You can refresh the log view for a selected run using the menu View.
You use the Legend to get information regarding the status of the processes and the links.
NoteDepending on whether the chain has been changed since the last run, you can display processes that have not yet been run in the log view for a process chain. If the chain has not changed since the run to be checked, then the processes that have not been run are displayed in gray in the log view for this run. Also, the link for such processes is marked with dashes if the event has not yet been triggered. However, if the chain has been changed since the run to be checked, then the processes that have not yet been run and the events that have not yet been triggered are not displayed in the log view for this run.
Merging an Active Version
If the chain has been changed since the run to be checked, you can display the processes that have not yet been run in gray by choosing View → Active Version. This is particularly useful if the chain is to be continued after an error even if it has since been reactivated and/or scheduled.
Display Messages for a Process
Choose “Display Messages” in the process context menu to open the logs. The logs are displayed in the dialog box that appears on the tab pages Chain, Batch, and Process.
● The Chain tab page contains information about the start and end of the process and the created instance.● On the Batch tab page, the logs for the job in which the process itself has run are displayed in the SAP List
Viewer Grid Control. You access the job overview for your job using the Batch Monitor pushbutton.
990 PUBLICSAP BW/4HANA
Operation

● The Process tab page contains the process-based messages.This tab page is displayed if the process type writes its own log, or if the interfaces IF_RSPC_GET_LOG and/or IF_RSPC_CALL_MONITOR are implemented for the process type.You can use Process Monitor to access this monitor for processes that have a special monitor attached (for example, data transfer processes).
NoteIf you set the flag Get All New Data in Source Request by Request in the DTP maintenance for the data transfer process (DTP), the system checks if the source contains additional requests after processing the DTP request. In this case an additional DTP requests is generated and processed. Therefore, the log for a process chain run, which contains this type of DTP, displays a list of the DTP requests (on the process monitor) that retrieved all source requests during the process chain run.
More information: Creating Data Transfer Processes [page 388]
Delete Process Chain Run Logs
If you want to delete the logs for a process chain and its assigned processes, choose Log → Delete. You select the currently displayed log on the next screen. You can also specify the time period you want to delete the log in.
Choose Execute. The system deletes all background jobs as well as the header and detail logs of the process chain framework.
If you set the Ignore Error flag, the system proceeds with the deletion process despite any errors. If you do not set the flag, the system terminates the deletion process.
You receive a list of deleted logs upon completion of the deletion process. The deleted run is no longer displayed in the log view and it cannot be restored.
Reselect the Process Chain Log
You can reselect the log for this process chain by choosing Goto → Other Log ( on the toolbar of the process chain maintenance). The system updates the overview of the process chain runs according to your time selection. The system also refreshes the status of the runs.
See also:
Process Chain Attributes [page 968] → Section: Monitoring.
8.1.1.4.3 Repeating Terminated Processes
You can restart any chain process (instance) that was terminated; this in turn ends the chain run. The process can be repeated either automatically or manually.
Depending on the process type, there are two ways of starting a process:
● A process can be repaired. In this case, the terminated instance is executed again.This enables you to restart processes that cannot be repeated with a new instance, because the data to be edited is attached to the instance, as with a data transfer process, for example. A data transfer process, for example, cannot be repeated with a new request number, because the data itself is attached to the request.
SAP BW/4HANAOperation PUBLIC 991

● A process can be repeated. In this case, a new instance is created.
Restarting a process in a process run can either be controlled manually in the log view (process chain maintenance screen), or the restart can be automated by using the options in the plan view (process chain maintenance screen).
Prerequisites
You can restart a terminated process, if this is possible for the process type. In the plan view of process chain maintenance you can set whether a process can be repaired or repeated when terminated, under Settings →
Maintain Process Types (table RSPROCESSTYPES).
CautionDo not change the settings for the SAP process types. Otherwise this could lead to inconsistencies in the data handled by the process.
Repeating or Repairing Terminated Processes Manually
In the log view of the affected process chain, choose Repeat or Repair from the context menu of the terminated process.
NoteIf the process cannot be repaired or repeated after termination, the corresponding entry is missing from the context menu in the log view of process chain maintenance. In this case, you are able to start the subsequent processes. A corresponding entry can be found in the context menu for these subsequent processes.
Repeating or Repairing Terminated Processes Automatically
1. In the plan view of the process chain, open the context menu and choose Automatic Repeat for the processes which you want to be automated.
2. In this dialog box, enter the following information and choose (Continue):1. For seconds, enter the minimum time the system should wait before repeating or repairing the
terminated process.2. For Number of Repetitions, enter the number of times that the process should be repeated or repaired.
3. Save and activate your process chain.
Now the terminated processes of process chain runs will be repeated as specified in the settings.
992 PUBLICSAP BW/4HANA
Operation

8.1.1.4.4 Authorizations for Process Chains
Use
You use authorization checks in the process chain maintenance to protect the process chain, or the processes of a chain, from being used by unauthorized users.
● You can control whether a user is allowed to perform specific activities with a process chain.● You can control whether a user is allowed to schedule the processes in a chain.
The authorization check for the processes in a chain is performed when the system is checking the process chain during scheduling or during synchronous execution. The check is also performed in display mode. The check is performed for each user that schedules the chain, not for the user who executes the chain. The user who executes the chain is usually the BW background user. The BW background user automatically has the required authorizations for executing all BW process types. In the attribute maintenance for the process chain, you can specify the user who is to execute the process chain.See also: Display/Maintenance of Process Chain Attributes [page 968]> Executing User.
Features
For the administration processes that are included in process chains, you require authorizations for authorization object S_RS_ADMWB.
To work with process chains, you require authorizations for authorization object S_RS_PC. You use this authorization object to specify whether process chains can be displayed, changed, or executed, and whether logs can be deleted. Along with using the name of the process chain for restriction purposes, authorizations for chains can also be restricted using the application components that are assigned.
8.1.1.5 Working with Process Chains in the SAP BW/4HANA Cockpit
SAP BW/4HANAOperation PUBLIC 993

8.1.1.5.1 Creating Process Chains
In the SAP BW∕4HANA cockpit, you can use the Process Chain Editor - Edit Chains app. The app provides a graphical editor to create and edit process chains. On the canvas in the graphical editor, you insert processes as nodes in the chain, and set up connections between the individual processes.
Prerequisites
The SAP BW∕4HANA cockpit has been configured. More Information: Configuring the SAP BW∕4HANA Cockpit [page 924]
Procedure
1. You are in the SAP BW∕4HANA cockpit. Open the Process Chain Editor - Edit Chains app.
Note○ If you prefer working with a view of the process chains grouped by InfoAreas, go to the Process
Chain Editor - Edit in InfoArea Hierarchy app. Provided that you have the required authorizations (S_RS_AREA), you can also use this to create new InfoAreas or to re-assign existing ones in the hierarchy in order to specify hierarchical structuring for the process chains. Note that changes in the InfoArea hierarchy affect all objects in the relevant InfoAreas and not just the process chains.
○ Alternatively, you can use the BW Modeling tools to create process chains. In the Project Explorer view, choose New Process Chain in the context menu of your BW project or the context menu of an InfoArea or the semantic folder Process Chains. Process chains are created in a wizard. In the first step in this wizard, you specify the name, description and InfoArea assignment, before switching to the Process Chain Editor in the SAP BW∕4HANA cockpit by choosing Finish.
The app displays a list of all process chains in the system. The toolbar at the bottom right of the screen provides various functions for working with process chains.
2. Choose Create.
The graphical editor for modelling the process chain opens. The canvas already displays a node for the start process.
3. Insert the nodes on the canvas in the editor:
Pushbutton Description
Insert Process A node for an application process is inserted on the screen.
Insert Collector A node for a collection process (AND, OR, EXOR) is inserted on the screen.
Insert Decision A node is inserted, which stands for one of the following process types:
994 PUBLICSAP BW/4HANA
Operation

Pushbutton Description
○ Decision○ Start Workflow○ Is the previous run active?
At this point in time the nodes are just placeholders and not actual processes. A new node is always inserted after the currently selected node, and ist connected with it. If no node is selected prior to insertion, the new node is displayed on the canvas without being connected. Then draw a connection from the port of the required node to the newly inserted node.
4. If you have inserted a node for a collection process: Also connect the other predecessor processes of the individual chain threads, which you want to combine into a thread, with the collection process.
5. Use the Properties button of the process chain to specify the scheduling and monitoring properties.
NoteProcess chains for streaming do not support all process types. If you want the process chain to be used for streaming, we therefore recommend setting the streaming property before continuing to edit the chain and selecting specific processes for the nodes.
6. Define the processes for the individual nodes. To do this, click the Display Properties icon in a node.a. On the General tab in the subsequent dialog, define the process:
○ Start ProcessSpecify the start conditions for the process chain.More Information: Start Process [page 932]
○ Application ProcessSelect the process type. Then determine how the process is specifically defined. Depending on the process type, you can set the process by using a variant or by maintaining the parameters directly in the property dialog. In certain cases, for example a data transfer process, you select the process directly.More Information: Process Types [page 929]
○ Collection ProcessChoose whether the collection process type is AND (last), OR (every) or EXOR (first).More Information: Collection process [page 934]
○ DecisionSpecify the decision process type as either Decision, Workflow or Previous Run Active?. Then determine how the process is specifically defined. Depending on the process type, you can do this by selecting a variant or by maintaining the parameters directly in the dialog box.More Information: Process Types [page 929]
NoteA variant is a special attribute of the parameter of a process type. You explicitly assign a name to this attribute. Process variants can be created and edited independently of the context of a process chain in the Process Variant Editor. Processes whose parameters you specify directly in the Process Chain Editor are only visible and available in the context of the current chain however.
b. [Optional:] On the Mail tab, specify whether a message should be sent when a process is completed. Note that is not possible to add attachments to the message.
SAP BW/4HANAOperation PUBLIC 995

c. [Optional:] For processes and decisions, you can also make settings for process execution debugging on the Runtime tab.
7. If you define certain actions for a process, an icon appears at the bottom right of the node, indicating that you can select the action. This is possible for streaming processes for which you can set the start condition for example.
8. If required, adjust the connections between the nodes:a. To change a connection, select it and pull on one of the end points.b. To set up a new connection, select the port of a process and drag the connection to the required target
process.c. Decision processes have multiple results, which you can display using the Insert Result of the Decision
icon as the port on the node. Every port for a possible result must be connected with the subsequent process. Otherwise an error will occur while executing the chain if the result occurs for which there is no subsequent process.
9. Save the process chain and specify a technical name and description for the chain if you have not already done this in the properties.
The system does not perform any checks when saving.
Above the canvas to the right, you now see the Metadata button. You can use this to call the metadata repository.
10. Activate the process chain.
During activation, the system performs a consistency check and displays a log with the results.
You now see the additional pushbuttons Monitoring and Usage. Choose Monitoring, to switch to the Monitoring view of the process chain. You can schedule the process chain there.
8.1.1.5.1.1 Properties
You can display and change the design properties.
You can make or change general properties, properties for scheduling and properties for monitoring the chain. You can also display administrative data, such as information about the last change, the last activation, and the objet directory entry.
General
● DescriptionYou can create or change the description of a process chain.
● InfoAreaInfoAreas are used as a sort criterion when editing process chains. Assigning process chains to InfoAreas makes it easier to access the chain you want. Process chains are also integrated in the BW Modeling tools.
996 PUBLICSAP BW/4HANA
Operation

Scheduling
● Execution ServerHere you can select the server or server group, where you want to schedule all the jobs in the chain. If you do not make a selection, background management distributes the jobs across the available servers.
● Execution UserWith the default setting, a BW background user executes the process chain.You can change the default setting so that you can see the user who executes the process chain and the processes. This information is shown in the job overview (transaction SM37). You can select the current dialog user, who schedules the process chain job, or specify a different user.The BW background user has the authorizations required in order to execute all process types. For other users, you have to assign these authorizations yourself, so that authorization errors do not occur during processing.The setting is transported.
● Job PriorityHere you set the job priority for all jobs in a process chain.
● Current Client Only.If you are using process chains in a client-dependent application, you specify here whether the chain can be used in just the current client. The process chain can then only be displayed, edited, scheduled, and executed in this client.If you do not select this, the process chain can be displayed, edited, scheduled, and executed in all clients.Process variants of the General Services category that are included in a process chain that has the property Current Client Only are also only displayed in the current client.This property is transported. You can change it during the import by specifying an import client. In the target system, you have to create a destination for import post-processing in the client that is specified here. After the import, the chain is activated and scheduled, if required, in this client.
● StreamingYou can specify that a process chain can be executed in streaming mode. Streaming allows for more frequent execution.
Monitoring
● Automatic MonitoringThis flag determines whether automatic monitoring of the chain by the CCMS is activated.In the default setting, monitoring is activated.For more information about CCMS context Process Chains see BW Monitor in CCMS [page 972] in the SAP BW∕4HANA documentation.
● Reset AutomaticallyIf processes fail in the process chain run, it might be that the instances of these processes still exist in the data target. These instances can have a negative impact on the next process chain run.You use this flag to stipulate that failed instances are cleaned up before the next process chain run (if the process type supports this). The function is supported by process types that have implemented interface IF_RSPC_RESET, for example the data transfer process.
● Send Alert in Case of ErrorsHere, you can stipulate that alerts are sent via Alert Management if errors occur in a process chain.For more information, see the Send Alerts for Process Chains [page 974] in the SAP BW∕4HANA documentation.
SAP BW/4HANAOperation PUBLIC 997

● Polling for Main ProcessThis flag allows you to control how the main process behaves with distributed processes. With distributed processes, such as loading processes, a number of different work processes are involved in the relevant tasks.You use the polling flag to specify whether you want to keep the main process until the process itself has ended.
NoteSelecting this flag ensures high level of certainty in the process flow and allows external scheduling tools to be given the status of the distributed processes. The system resource consumption is increased however, and an additional background process is required.
● Classify Local Failure as SuccessIf you set this flag and schedule a successor process Upon Error or Always, the system classifies all the incorrect processes of the chain as successful with regard to the overall status of the run.The flag is relevant for the use of metadata: Errors in processes in subchains can be evaluated as "unimportant" for the metachain run. The subchain is evaluated as successful, regardless of errors in such processes of the subchain. If the successor of the subchain is scheduled upon success in the metachain, the metachain run continues regardless of errors in the “unimportant” processes of the subchain.This indicator does not apply to mailing or alerting; these functions are still triggered if there are incorrect processes with a successor processor scheduled Upon Error.
● Only for streaming: Threshold for Errors (per Process)Here you set the maximum permitted number of executions with errors per process.If a process fails repeatedly for a greater number of times than set here, it is skipped the next time the process chain is executed (even if it contains data or an event). If the process decides whether the chain is started, it is no longer involved in this decision once the maximum number of executions with errors has been reached.
● Only for streaming: Number of Logs to KeepEvery process chain run generates a log. Here you define how many logs to store.
8.1.1.5.2 Creating a Process Variant
In the SAP BW∕4HANA Cockpit, you can use the Process Variant Editor - Edit Variants app.
Prerequisites
The SAP BW∕4HANA Cockpit has been configured. More Information: Configuring the SAP BW∕4HANA Cockpit [page 924]
Context
For most of the process types, you can create and edit process variants. A variant is a special attribute of the parameter of a process type. You explicitly assign a name to this attribute. Processes such as the data transfer
998 PUBLICSAP BW/4HANA
Operation

process, the SAP HANA analysis process and the local process chain do not have any parameters specific to the process type that have to be included in a variant. You can therefore select them directly in the Process Chain Editor.
Procedure
1. You are in the SAP BW∕4HANA Cockpit. Open the Process Variant Editor - Edit Variants app.
The app displays a list of all process variants in the system. The toolbar at the bottom right of the screen provides various functions for working with process variants.
2. Choose Create.3. In the next dialog box, select a process type and choose Continue.4. Define the properties for the variant in the Variant Editor.5. Choose Save.6. In the next dialog box, enter a name for the variant and specify the package.7. Choose OK.8. Check the variant.9. Activate the variant.
Results
The variant is now available for selection in the Process Chain Editor.
8.1.1.6 Generate Process Chain from Data Flow Object
You can create a process chain from a data flow object. The relevant processes are inserted into the chain automatically, and the default settings applied.
Prerequisites
There must be an active version of the data flow object.
Context
If you create a process chain from an existing data flow object, a number of processes, such as the data transfer process, activation of the DataStore object, and deletion of data from the change log (with certain
SAP BW/4HANAOperation PUBLIC 999

presettings) are automatically inserted into the process chain. In order to improve performance, the system attempts to parallelize all processes that can run in parallel, such as data transfer processes.
If the data flow is modified, you cannot adapt the previously generated process chain to the changes in the data flow by generating the process chain again. Once a process chain has been generated, your only options are to adjust it manually or to generate a new process chain for the modified data flow.
Procedure
You are in the BW Modeling Tools.1. Choose one of the following options:
○ Function New Process Chain in the Project Explorer view:○ from the File menu○ from the context menu of your BW project○ In the BW Repository tree from the context menu of an InfoArea or the required data flow object
○ Generate New Process Chain from Data Flow button in the data flow editor2. In the wizard for generating the process chain, enter a name and a description for the chain and select a
suitable InfoArea if required.
3. Under Templates Data Flow , select the data flow that you want the chain to be generated for.4. Choose Finish.
Once the system has generated the process chain, the chain is displayed directly in the process chain editor in the SAP BW/4HANA Cockpit.
8.1.2 Monitoring
You can use various monitoring functions to keep an eye on the processes in the SAP BW∕4HANA data warehouse.
Related Information
BW Job View [page 26]Monitoring Data Transfer Process [page 400]Process Chain Dashboard [page 1003]Monitoring Process Chains [page 1007]Monitoring Process Chain Runs [page 1010]Monitoring Processes [page 1013]
1000 PUBLICSAP BW/4HANA
Operation

8.1.2.1 BW Job View
The BW job view in the BW Modeling Tools provides an overview of BW jobs that run in the systems of your BW projects. If the job type supports this, you can perform activities from the view, such as interrupting a job that is running or restarting a failed job.
In the BW job view, the following BW job types are supported:
● DATAFLOWCOPY● REMODELING● DTP_LOAD (DTP execution using the BW Modeling Tools)● DTO
By choosing (Filter) in the toolbar of the view, you can specify which jobs are displayed in the view.
In accordance with the selected filters, the jobs are displayed on the left of the view in a list with information on the job type, project (the system in which the job is running), user, start time, status and progress. Any messages about the job are displayed too. If the Job type supports this, you can interrupt a job that is running or restart a failed job. In these cases, a column in the overview of the jobs contains the relevant pushbuttons interrupt and restart .
By choosing (Refresh), you can refresh the overview in the view.
If you select a job, the details for this job are displayed to the right of the view, together with the job log if one exists.
If the job type supports this, the BW job view opens directly when you execute a job directly in the BW Modeling tools. You can also open the BW job view by choosing Window Show View Other Business WarehouseBW Job view .
Define Filters for the BW Job View
1. Choose (Filters) to define which jobs are displayed in the BW job view:○ Time Interval: You can specify which time interval the jobs have to be in.○ Destinations: You can specify which BW projects jobs are displayed for.○ Job Status: You can specify which job statuses are included in the display.○ Types: You can specify which job types are included in the display.
2. Choose Apply and Close.
Related Information
Subscribing to the BW Job Repository Feed [page 31]
SAP BW/4HANAOperation PUBLIC 1001

8.1.2.2 Monitoring Data Transfer Process
A request is generated to execute a data transfer process (DTP). The DTP Monitor app allows you to keep track of the request in the various processing steps.
Prerequisites
The SAP BW∕4HANA Cockpit has been configured. More Information: Configuring the SAP BW∕4HANA Cockpit [page 924]
Call Monitor
You can call DTP Monitor in the following ways:
● By choosing Show Monitor Show Last Request from the data transfer process editor in the BW Modeling tools.
● By pressing the DTP Monitor button in the SAP BW∕4HANA Cockpit in the request administration screen for a DataStore object or InfoObject in the details for the load request.
● Using the Process Monitor (Processes app).
Display Header Information for Request
You can use the arrow icon to display the header information for the request. This provides detailed information about the request, together with various navigation options. You can navigate to the source object, to the data transfer process or to the transformation for example if you have already opened the BW Modeling tools, or you can navigate to the administration screen for the the data target. For a streaming request, you can navigate to the previous and subsequent request, and display the streaming process.
Display Detailed Information About the Processing of the Request
The Request Monitor for a request in the data transfer process request displays detailed information about the processing of the request. In the Request Processing Steps column, you can see the request processing steps in a hierarchical tree display. At the first level of the detail tree, you can see the status of the requests at various points during the process, for example during generation, when processing the steps during the DTP program, and when setting the technical and complete status of the request. The status display for the processing is then divided further according to the steps of the data transfer process and displays the status and messages for each of the processing steps and data packages in the processing steps.
In the Details column, you can call notifications or other information for the entries in the Request Monitor, or navigate to the transformation that was executed in this step. At the processing step level, you can call the
1002 PUBLICSAP BW/4HANA
Operation

temporary storage display for this processing step for example if you have specified for the data transfer process that the temporary storage is to be filled after this processing step. At the transform execution level, you can navigate to the transform for example if you have opened the BW Modeling tools.
The buttons at the top right of the screen provide you with various navigation options. You can call the job overview, the request administration screen for the data target, and the DTP process monitor, where you can see an overview of all requests belonging to the DTP. You can call to error stack, if one exists, or, if the DTP is executed via a process chain, call the process chain logs for the process chain run that the request was executed with. You can also switch to another request, using the TSN, request ID or SID.
The toolbar at the bottom right of the screen provides you with the following features:
● DeleteYou can delete a request if it has not been updated to a target yet.
● RepairYou can repair a request that has errors. The repair can be performed either synchronously or asynchronously. When a request is repaired, a new run ID is created, and the system attempts to write the data package that had errors again. In the Details section in the Request Monitor, the processing steps that are repeated are displayed with the run ID in brackets.
● Change Overall StatusYou can specify the overall status of the request here, regardless of its technical status.
8.1.2.3 Process Chain Dashboard
In the Process Chain Dashboard app, you can find charts for the current run, scheduling, runtime, start delay, terminated or failed runs, and average sizes.
Related Information
Latest Run [page 1004]Scheduling [page 1004]Runtime [page 1005]Start Delay [page 1005]Aborted or Failed [page 1006]Average Runtime [page 1007]Average Start Delay [page 1007]Average Runtime Degradation [page 1007]
SAP BW/4HANAOperation PUBLIC 1003

8.1.2.3.1 Latest Run
By clicking on a bar in the chart, you can call the process chain monitor.
By clicking on a bar in the chart, you can call the process chain monitor. The list of process chains is displayed there, pre-filtered according to the status of the latest run clicked on in the chart.
You can also call the process chain monitor by clicking on the header area of the tile. Here, the entire list of the process chains in the dashboard is displayed.
Meaning of the Statuses
● Active: The loading process has not finished yet. The process chain is active.● Failed: At least one error occurred during the run.● Aborted: The run has terminated or was intentionally aborted.● New: The run does not exist yet. The process chain has not been executed yet.● Success: The run has been completed successfully.
8.1.2.3.2 Scheduling
By clicking on a bar in the chart, you can call the process chain monitor.
By clicking on a bar in the chart, you can call the process chain monitor. The list of process chains is displayed there, pre-filtered according to the scheduling status clicked on in the chart.
You can also call the process chain monitor by clicking on the header area in the tile. The entire list of the process chains in the dashboard is displayed here.
Meaning of the Status
● Scheduled: The process chain is scheduled, but at present is not being executed.● Listening: The process chain is waiting for the process starting the chain to send an event or a notification
(push).● Polling: At regular intervals the process chain asks the process starting the chain whether the condition for
the start is met.● Running: The process chain is currently active.● Not Scheduled: The process chain is not scheduled.● Scheduling Error: The process chain is not scheduled correctly. Either processes are scheduled in
duplicate, or an error occurred resulting in the chain being removed from scheduling.
1004 PUBLICSAP BW/4HANA
Operation

8.1.2.3.3 Runtime
By clicking on a bar in the chart, you can call the process chain monitor.
By clicking on a bar in the chart, you can call the process chain monitor. The list of process chains is displayed there, pre-filtered according to the runtime status of the current run clicked on in the chart.
You can also call the process chain monitor by clicking on the header area in the tile. The entire list of the process chains in the dashboard is displayed here.
Meaning of the Status
The benchmark for calculating the runtime status of a process chain run is the mean runtime of the process chain. This is calculated as follows: The sum of the runtimes of the successful processes (also including any repaired processes) for the maximum last 30 successful chain runs (unless there were less than 30 successful runs) is divided by the number of process chain runs. A confidence interval is used to exclude outliers from this calculation.
● No Executions: There have not been any runs yet. The process chain has never been run.● Runtime OK: The deviation from the mean runtime is smaller than or equal to the mean deviation from the
mean runtime.● Inactive: It not currently possible to make a statistical statement.● Irregular Execution: There are so few runs in the process chain that it is not possible to make a meaningful
statistical statement.● Runtime Critical: The deviation from the mean runtime is larger than the mean deviation from the mean
runtime.● Runtime Too Long: The deviation from the mean runtime is more than twice as big as the mean deviation
from the mean runtime.
8.1.2.3.4 Start Delay
By clicking on a bar in the chart, you can call the process chain monitor.
By clicking on a bar in the chart, you can call the process chain monitor. The list of process chains is displayed, pre-filtered according to the delay status of the current run clicked on in the chart. The meaning of the status is different for each type of chain.
When you click on the header area of the tile, you also go to the process chain monitor. Here, the entire list of the process chains in the dashboard is displayed.
SAP BW/4HANAOperation PUBLIC 1005

Meaning of the Status
Meaning of the status for time-based process chains that are scheduled periodically:
● No Executions: There is no run yet. The process chain has never been run.● No Delay: The delay of the start is less than five minutes.● Not Scheduled: The process chain is not scheduled (any more).● Calculation Error: There was an error when reading the chain definition or when caculating the current
time.● Start Delayed: The delay is between 5 and 10 minutes.● Start Seriously Delayed: The delay is more than 10 minutes.
Meaning of the status for process chains with immediate start, process chains used as subchains, and event-controlled process chains that are scheduled periodically:
The benchmark for calculating the delay status of a process chain run is the mean value of the process chain delay. This corresponds to the mean deviation from the mean time. The calculation of the mean values is based on the maximum last 30 runs of the chain (unless there were less than 30 runs).
● No Executions: There is still no run. The process chain has never been run.● No Delay: The delay of the start is less than the mean delay.● Inactive: The last process chain run is more than two months ago.● Calculation Error: There was an error when reading the chain definition or when calculating the current
time.● Start Delayed: The delay of the start is longer than the mean delay.● Start Seriously Delayed: The delay of the start is more than twice as long as the mean delay.
Meaning of the status for time-based process chains or event-controlled process chains that are not scheduled periodically:
● No Executions: There is no run yet. The process chain has never been run.● Irregular Execution: The chain is currently not scheduled, but according to its start condition it is
supported for ad hoc starts. Therefore, a statistical analysis is not performed.● Calculation Error: There was an error when reading the chain definition.
8.1.2.3.5 Aborted or Failed
By clicking on a bar in the chart, you can call the list of process chain runs.
By clicking on a bar in the chart, you can call the overview of process chain runs. The list of runs is displayed here prefiltered according to the bars clicked on in the chart, i.e. according to the aborted or failed runs.
You can also call the process chain monitor by clicking on the header area of the tile. The entire list of aborted or failed process chain runs is displayed here.
1006 PUBLICSAP BW/4HANA
Operation

8.1.2.3.6 Average Runtime
By clicking on a process chain takes, you can call the runs for the chain.
By clicking on a specific process chain, you can call the overview of the runs for this process chain.
By clicking on the header area of the tile, you can call the process chain monitor. Process chains with an average runtime greater than 0 are displayed here, together with runtime-specific information.
8.1.2.3.7 Average Start Delay
By clicking on a process chain takes, you can call the runs for the chain.
By clicking on a specific process chain, you can call the overview of the runs for this process chain.
By clicking on the header area of the tile, you can call the process chain monitor. Process chains with an average start delay greater than 0 are displayed here, together with information about the delay.
8.1.2.3.8 Average Runtime Degradation
By clicking on a process chain takes, you can call the runs for the chain.
By clicking on a specific process chain, you can call the overview of the runs for this process chain.
By clicking on the header area of the tile, you can call the process chain monitor. Process chains with a runtime degradation greater than 0 (in minutes per day) are displayed here, together with runtime-specific information.
8.1.2.4 Monitoring Process Chains
In the Process Chain Monitor app, you can see the process chains with monitoring information.
The list contains the active and revised process chains in the system.
You can display status information and statistical key figures for the process chains and their last runs. To do this, a large number of columns for selection is available in the Settings.
Various functions are available in the application toolbar at the bottom right of the screen. In particular, you can schedule process chains that you selected in the list for execution, or remove them from scheduling.
To go to the overview of the last run of a process chain, click on the process chain in the list.
Related Information
Working with Lists [page 1008]
SAP BW/4HANAOperation PUBLIC 1007

Refresh [page 1009]Schedule [page 1010]Unschedule [page 1010]Repair Run [page 1010]
8.1.2.4.1 Working with Lists
Among other things, you can search for, filter, and personalize the list.
When working with lists, you can use functions for searching, filtering, sharing, personalization and export.
Search and Filter
Using General SearchIf you expand the filter bar above the list, a search field appears where you can perform a fuzzy search . You can use * as a wildcard for any number of characters, and ? as a placeholder for a single character. In this case, a pattern-based search is performed.
The displayed list is then filtered in accordance with the search result.
Select Columns to FilterYou can use the Adjust Filter in the filter bar to select additional columns to add to the filter bar. If you search in a column in the filter bar in order to define the filter, you can use either the exact search or the pattern-based search with placeholders.
1. Choose Additional Filters in the Adjust Filter popup.2. Select one or more columns and choose OK. The columns are then automatically selected for display in the
filter bar.3. Choose Start.
The selected columns are now displayed in the filter bar for filtering the list.
Settings: Define Columns, Grouping and Sorting
In the settings for the list, you can select which columns are displayed in the list, which columns are sorted and how, and which column the list is to be grouped by.
Personalization: Save List as View
Once you have adapted a list to your requirements using the filters and setting, you can save it as a view. You can quickly access a particular status of the list in the app, and make this available to other users.
1008 PUBLICSAP BW/4HANA
Operation

1. To the upper-left of the list, press Choose View on the current view.2. In the My Views popup, choose Save As.3. In the Save View popup, enter a name for the view.4. If you select Set as Default this view will be displayed whenever the app is opened.5. If you select Public, all users can see the view in View Administration.6. Choose OK.
The view of the list is added to the My Views dialog. Under Manage, you can make changes to the saved view, remove view from the My Views dialog, or delete views altogether.
Personalization: Save List as Tile
You can save the current status of a list as a tile and assign it to a group in the SAP BW∕4HANA Cockpit. Whereas a view can be called in the app, the tile can be added directly to the SAP BW∕4HANA Cockpit home page. This is only available to the user who saved it however.
1. Press the Share above the list to the right.2. In the menu that opens, choose Save as Tile.3. In the Save as Tile dialog, enter a title, subtitle and a description (optional).4. Select the group that you want to assign the tile to. The default setting is My Home Page.5. Choose OK.
The tile is added to the selected group in the SAP BW∕4HANA Cockpit.
Export List
You can export the list in file format xlsx. All settings for the list (column selection, sorting, grouping, and filters) are included.
8.1.2.4.2 Refresh
The cache is updated for selected chains.
Use this function if you want to display the current statistical information for selected process chain.
Background:
The statistical information displayed in the process chain monitor is collected in background processes at 30 second intervals and written to a cache table. When you refresh the browser page, the data is loaded from the cache. If you select one or more process chains and click Refresh however, the cache for the selected chains is updated synchronously, and the data is loaded from the cache for all other chains.
SAP BW/4HANAOperation PUBLIC 1009

8.1.2.4.3 Schedule
When you schedule the chain, it is executed.
Click here to schedule and run the process chain in the background. The execution starts when the start condition of the chain is filled.
8.1.2.4.4 Unschedule
If you unschedule the chain, it will not be executed anymore.
You use this function to unschedule the process chain. The chain is then not executed anymore.
8.1.2.4.5 Repair Run
Incorrect processes are repeated or the chain is rescheduled.
If there are errors in the processes, when they are repaired these processes are repeated. If there are errors in the process chain framework, the chain is rescheduled and the processes for which the successors could not be started in the previous run are completed again so that the successor processes can be started.
8.1.2.5 Monitoring Process Chain Runs
In the Process Chain Runs app, you can see the process chains in the system, with monitoring information.
To go to the overview of a specific process chain run, click on the run in the list. The overview is divided into a header area, a message area, and an area for a graphical log view.
Related Information
Working with Lists [page 1008]Refresh [page 1012]Repair Run [page 1010]
8.1.2.5.1 Working with Lists
Among other things, you can search for, filter, and personalize the list.
When working with lists, you can use functions for searching, filtering, sharing, personalization and export.
1010 PUBLICSAP BW/4HANA
Operation

Search and Filter
Using General Search
If you expand the filter bar above the list, a search field appears where you can perform a fuzzy search . You can use * as a wildcard for any number of characters, and ? as a placeholder for a single character. In this case, a pattern-based search is performed.
The displayed list is then filtered in accordance with the search result.
Select Columns to Filter
You can use the Adjust Filter in the filter bar to select additional columns to add to the filter bar. If you search in a column in the filter bar in order to define the filter, you can use either the exact search or the pattern-based search with placeholders.
1. Choose Additional Filters in the Adjust Filter popup.2. Select one or more columns and choose OK. The columns are then automatically selected for display in the
filter bar.3. Choose Start.
The selected columns are now displayed in the filter bar for filtering the list.
Settings: Define Columns, Grouping and Sorting
In the settings for the list, you can select which columns are displayed in the list, which columns are sorted and how, and which column the list is to be grouped by.
Personalization: Save List as View
Once you have adapted a list to your requirements using the filters and setting, you can save it as a view. You can quickly access a particular status of the list in the app, and make this available to other users.
1. To the upper-left of the list, press Choose View on the current view.2. In the My Views popup, choose Save As.3. In the Save View popup, enter a name for the view.4. If you select Set as Default this view will be displayed whenever the app is opened.5. If you select Public, all users can see the view in View Administration.6. Choose OK.
The view of the list is added to the My Views dialog. Under Manage, you can make changes to the saved view, remove view from the My Views dialog, or delete views altogether.
SAP BW/4HANAOperation PUBLIC 1011

Personalization: Save List as Tile
You can save the current status of a list as a tile and assign it to a group in the SAP BW∕4HANA Cockpit. Whereas a view can be called in the app, the tile can be added directly to the SAP BW∕4HANA Cockpit home page. This is only available to the user who saved it however.
1. Press the Share above the list to the right.2. In the menu that opens, choose Save as Tile.3. In the Save as Tile dialog, enter a title, subtitle and a description (optional).4. Select the group that you want to assign the tile to. The default setting is My Home Page.5. Choose OK.
The tile is added to the selected group in the SAP BW∕4HANA Cockpit.
Export List
You can export the list in file format xlsx. All settings for the list (column selection, sorting, grouping, and filters) are included.
8.1.2.5.2 Refresh
The cache is updated for selected runs.
Use this function if you want to display the current statistical information for selected process chain runs.
Background:
The statistical information that is displayed in the overview of process chain runs is collected in background processes regularly at 30 second intervals and written to a cache table. When you refresh the browser page, the data is loaded from the cache. If you select one or more process chain runs and click Refresh however, the cache for the selected runs is updated synchronously, and the data is loaded from the cache for all other runs.
8.1.2.5.3 Repair Run
Incorrect processes are repeated or the chain is rescheduled.
If there are errors in the processes, when they are repaired these processes are repeated. If there are errors in the process chain framework, the chain is rescheduled and the processes for which the successors could not be started in the previous run are completed again so that the successor processes can be started.
1012 PUBLICSAP BW/4HANA
Operation

8.1.2.6 Monitoring Processes
The Processes app allows you to monitor processes that run in the RSPM framework.
The app assists you in the following scenarios:
● Monitoring incorrect or long-running processes, especially if there is no specific app for monitoring these processes
● Troubleshooting in the case of processes that are terminated because they were executed at the same time● Ad hoc analysis for a data target
Prerequisites
The SAP BW∕4HANA Cockpit has been configured. More Information: Configuring the SAP BW∕4HANA Cockpit [page 924]
Overview of the Processes
By default, the Process Monitor displays all processes that have run during the past 24 hours, with the exception of streaming processes. In the filter bar, you can restrict the list of processes so that it only displays ones that meet your requirements.
Monitoring of Incorrect or Long-Running ProcessesBy defining a filter on the process status, you can restrict the overview so that it only contains processes that have ended with errors or that are still active.
Troubleshooting Terminated ProcessesIf you use the process status to only display processes that have ended with errors, and use additional filters to restrict the view to a specific DataStore object and time interval, you can find out whether conflicts are caused by simultaneously executed processes. These conflicts can occur for example if loading to a DataStore object and archiving for the DataStore object are performed simultaneously. The process monitor is better suited for analysing this kind of problem than the process chain monitor, as the process chain monitor cannot recognize them directly if the processes are contained in different process chains.
Ad hoc Analysis for a Data TargetYou can perform ad hoc analyses for data targets by defining filters for a specific time interval, data target and process types.
Display Details for a Process
To display additional information for a process, click the corresponding entry in the list of processes. If there is an app with detailed information for the process type, the app now opens. In the case of load processes for
SAP BW/4HANAOperation PUBLIC 1013

example (process type DTP Load Data, the data transfer process monitor opens. In the case of process types that have their own monitoring or administration apps that provide further information, the detail page in the process monitor opens. On the Detail page for the selected process, you can find information about the data target and, if relevant, the request.
Display Log
From the process overview, you can navigate directly to the RSPM log for a process, without first having to switch to the corresponding monitoring or administration app. To display the RSPM log for a process, select an entry from the list of processes and press the Log button.
8.1.3 Cache Monitor
The Cache Monitor screen (transaction RSRCACHE) provides you with information about the local cache, the parameters of the database cache, the amount of memory used by the query runtime objects and the current underlying cache structure.
Purpose
The OLAP processor accesses two types of cache, the local cache and the database cache.
The local cache stores the results calculated by the OLAP Processor in the role area for each session. This is based on a single query instance at runtime.
Unlike the local cache, the database cache is cross-transactional. This makes it possible for various query instances to access the data stored here. This data is optimized for the OLAP Processor. This speeds up execution of the query due to faster access and the fact that the data has already been formatted.
At runtime, all drilldown states of the query – from a given calculation level - are cached locally to start with and then stored in the database cache if required. The entries in the database cache are generated from the local runtime (cache) objects.
Integration
● The cache parameters are set in Customizing during implementation. The same settings can also be made in the Cache Monitor.
● You can call the Cache Monitor from the Query Monitor (transaction RSRT) by choosing Cache Monitor.● By choosing Properties in the Query Monitor, you can call the query properties for the selected query. You
can view and change cache-related settings there.
● By choosing Technical Info in the Query Monitor, you can call an overview of all relevant technical data for the selected query, including the cache-related data (important time stamps for example).
1014 PUBLICSAP BW/4HANA
Operation

Features
Cache Status
You use this pushbutton to display the cache parameters. The display is based on the settings made in Customizing. Example:
Cache Status Description
Cache Active Cache is active
7352 The database cache limit is set to 7352 entries.
Note
If you want to choose any of these settings, choose Cache Parameter.
Database Cache
You use this pushbutton to view the database cache-related data in the system:
Pushbutton Display
Technical information Displays cache-related technical data for the query runtime objects and the cache size and number of entries in the cache
Buffer Objects Hierarchical Display or Buffer Objects List Display
Displays the buffer objects
In the default setting, the system displays buffer objects in a hierarchically structured query directory.
Toolbar Functions
The following general functions are available in the toolbar:
Function What you need to know
Refresh
Delete Deletes the cached data in accordance with the cache mode selected, deleting the buffer objects that you have chosen to display. If no selection has been made, the system does not delete any data. This function is useful when testing.
Cache Parameter The Edit Cache Parameters screen is displayed.
SAP BW/4HANAOperation PUBLIC 1015

Related Information
Cache Parameters [page 1016] Cache Structure [page 1019]Query Monitor [page 1044]Query Properties [page 1046]Technical information [page 1048]
8.1.3.1 Cache Parameters
On the Edit Cache Parameters screen, you can change the settings for the cache.
Integration
The cache parameters are set centrally during implementation of the SAP BW∕4HANA system.
Note
For more details, see the Implementation Guide (IMG) under Performance Settings Global Cache Settings .
Features
You can set the following parameters:
Local Cache Only
If you set this parameter, the database cache is deactivated centrally, and the local cache used instead. Note that this option impairs the performance of all queries throughout the system.
Activate Statistics
You can stipulate whether or not cache statistics are recorded.
Statistics are recorded for each cache element every time a query is executed. These include:
● The user who created an element by executing the query,● When it was created,● The user who changed an entry,● When it was changed,● The last user to read the entry● The time it was read at,● The number of times it has been read.
1016 PUBLICSAP BW/4HANA
Operation

Creating statistics involves additional database access and can therefore impair performance. It is therefore possible to deactivate creation of statistics.
The standard setting is for this to be activated. In the standard setting, the statistics are buffered initially and written to the database in their entirety at the end of a query navigation step. System performance is then considerably better than when writing each individual data record to the database.
Database Cache Limit
With the database cache limit, you can set the maximum number of entries allowed in the database cache. Set this limit high enough so that it will not be exceeded during normal operation. This limit serves to intercept outlier batches. This allows you to prevent the directory becoming too large, and performance being impaired.
NoteWe recommend setting the database cache limit very high in the production system for a given period (for a week for example). Once this period has elapsed, you can assess how high the requirement is in regular operation and can set the database cache limit accordingly.
If the database cache limit is exceeded, the system deletes data automatically. It does not delete all entries however. Instead, it deletes only until the cache contains a certain number of entries below the database cache limit again.
TipYou have set the database cache limit to 500 entries. The system carries on deleting until the cache contains 300 entries.
The following rules apply for deletion:
1. The system starts by deleting all entries that are flagged for deletion. A query sets this flag itself, for example once an entry becomes obsolete. You can set this flag yourself in the Cache Monitor. To do this, call the context menu for an entry in the database cache and choose Delete.
2. If deleting entries flagged for deletion is not enough to bring the total number of entries below the database cache limit, the system then deletes entries that were last used by a query more than three days ago.
3. If it still not possible to get back below the database cache limit, we recommend increasing the limit.
Automatic Adjustment
If you set this parameter, the database cache limit is automatically optimized. The system does this by analyzing the deletion as described above at runtime and attempting to set the database limit in such a way that the deletion runs once every three days.
This setting is selected by default.
Automatic Limit
If this parameter is set, the system compares the estimated search time with the estimated calculation time needed to recalculate the queried data while searching for a suitable cache object. If the estimated calculation time is shorter, the system aborts the search and recalculates the queried data. In order to make future search queries faster, the cache objects that have not been used for the longest period are also removed from the list of valid cache objects.
This setting is selected by default.
SAP BW/4HANAOperation PUBLIC 1017

Additional Cache Settings for Query
The Cache Settings for Query screen appears.
Here, you can make cache compression settings (Threshold, Size, Dynamic) for every query in the system.
TipWe only advise this course of action if problems occur when executing the query with cache mode Database Cache.
The system lists all queries that have already been executed.
NoteIn order to make cache compression settings for a query before it is executed for the first time, choose Create. A dialog box appears where you can select a query.
The following table provides an overview of the various cache compression settings:
Cach Compression Settings
Cach Compression Setting Description
Threshold If the number of rows with data in the cache object exceeds the number set here, the size of the cache object is restricted. The setting for the cache compression size is then used. The compression threshold should generally not be higher than 5000. This helps to avoid impairment of performance that would be caused by memory-sapping calculations of the size of most cache objects. As long as the query performance does not result in a dump, you should set this number as high as possible.
Size If the size of the cache object (in bytes) exceeds the number set here, the system compresses block by block. The compression size should be around 2 GB, though enough memory space should be left for the object's metadata. A lower compression size results in a larger number of blocks and longer runtimes.
Dynamic The cache object can be highly heterogenous. It is therefore not always possible to split it into identical blocks of a fixed size. Only use the dynamic method in cases where there are no runtime dumps, and set the compression size to under 100 MB. The dynamic method results in longer runtimes.
Related Information
Cache Monitor [page 1014] Cache Structure [page 1019]
1018 PUBLICSAP BW/4HANA
Operation

8.1.3.2 Cache Structure
If you call up a cache monitor buffer object, the system displays information about the structure elements of the database cache.
From a logical viewpoint, the database cache is structured as a hierarchy. This corresponds to the Hierarchical Display. For every query request, a directory is displayed in an extensive query directory that maps the structure elements of the cache on a total of three levels.
From a physical viewpoint, all elements in the cache are stored in a flat structure. Their sequence reflects the order in which they were created.
The following table provides an overview of the logical structuring of information in the cache monitor according to the memory ID in the hierarchical display and the corresponding structure element:
Mapping between memory IDs and structure elements of the cache
Memory ID Structure element Meaning
Query name (technical name) QUERY Table with queries in the cache (directory)
Hierarchies / variables VAR/SH Complex structure for variables in fixed filters and display hierarchies that have been requested for the query
Selection / data FF Store table: Data package, a series of bytes
NoteBy double-clicking on the Detail Display dialog box at the Query Name and Hierarchies/Variables level, you can display more statistical values and information about variables and hierarchies.
Like the query name itself, these details belong to the key for the cache.
CautionIf no data is loaded from the cache, this is often due to the variable assignment. You can use the Detailed Display for Hierarchies/Variables to check this:
If variables are part of a fixed filter and therefore cannot be changed for query navigation, and are filled differently in each case (by manual input or user-defined variables), the cache for the query has to be regenerated every time.
We therefore recommend that you make variables for query navigation changeable. You can thus achieve the highest possible level of reusability for the cache.
The following graphic shows the relationship between the different cache structure elements.
SAP BW/4HANAOperation PUBLIC 1019

Buffer Object Display in the Cache Monitor
Column Meaning
Memory ID Cache structure element ID
Changed
GUID
Parent memory ID Cache structure element ID that is logically on the next highest hierarchy level
Parent GUID Internal logical ID of parent element
Information
Persistence Mode
Bytes Cache structure element size in bytes
Bytes aggregated
You can flag an entry for deletion in the context menu.
Related Information
Cache Monitor [page 1014]Cache Parameters [page 1016]
1020 PUBLICSAP BW/4HANA
Operation

8.2 Query Runtime Statistics
Purpose
Using query runtime statistics, you can determine how much time the execution of certain user actions take in the front end and in the analytic engine. The system records performance-intensive processing steps (known as statistics events). It calculates the net times by calculating the runtime of an event using the difference between the start and end times (minus the times for other events called from within the event).
Query runtime statistics incorporate the following areas, which clearly differ with relation to event processing:
● Front End and Calculation Layer of the Analytic Manager:○ Front end-specific statistics events, such as the Consumer Services and MDX interfaces.○ OLAP-specific statistics events, such as generation of queries, creation of cache entries, quantity
conversion. Many events are processed serially.● Aggregation Layer in the Analytic Manager:
○ Data manager-specific statistics events. A small number of various events are processed with a large degree of parallelization.
The statistics data is stored in various tables.
Implementation Considerations
In the transaction for maintaining statistics properties, you can specify the required granularity for each object that you want to record statistical data for. You can also activate and deactivate the statistics for all queries belonging to an InfoProvider.
SAP BW/4HANAOperation PUBLIC 1021

Key Features
The following figure provides an overview of the process for a runtime reading with query runtime statistics:
The runtime reading starts with the first user action and finishes when the session is ended by the user (log out). All times for this session are saved under the same SESSIONUID.
Numerous user actions can occur in between. Each user action is defined as a step and generates a new STEPUID if it contains events relevant for the statistics. The times for the event are summarized under this UID.
Events in a step are assigned to the relevant context (such as Front End, OLAP, Planning). The context is specified by the handle type. If events in the same context, i.e. with the same handle type, are executed for various objects in a step, the system differentiates between them using different handle IDs.
A handle consists of the tuple from the handle type and the handle ID. A handle has only one object for which events are recorded. The object type is attached to the handle type. The name of the object is also saved.
If an event is executed multiply in the same context (that is, during the same session, in the same step, and with the same handle), the system cumulates the times for the event. For each event, it calculates the net time by subtracting from the runtime the times for other events called from within the event, if applicable.
TipIn the event OLAP: Read Data (event 3100), a data request is sent to the data manager; the system therefore records event 9000. For event 3100, however, the system only logs the time before and after the data manager is called.
1022 PUBLICSAP BW/4HANA
Operation

In the front end and the calculation layer in the analytic manager (FE/Calculation Layer), the accumulated times of all events in a step can therefore be less than or equal to the overall runtime of the step.
This does not apply in the area of the aggregation layer of the analytic manager since multiple processes, and thus multiple events, are executed in parallel.
When a request is sent to the data manager in the context of a query execution from the OLAP area, the system records the event Data Manager (event 9000) for the handle type OLAP. It then records the exact times and data separately in the data manager statistics. The front end/calculation layer and aggregation layer data are then linked by the key from STEPUID and the handle (handle type, handle ID).
Events and Handles
Events and corresponding short descriptions for them are in the table RSDDSTATEVENTS.
NoteYou can create new events using the table maintenance (transaction SM30).
There are two basic types of statistics events: Pure counter events, and time events.
● For pure counter events, the flag is selected in the Count Only column. The system does not record time, but cumulates an integer value for this event.
TipEvent 2525 counts the read accesses for the OLAP cache. You can therefore identify from this figure, or from the fact that this event does not exist, whether a query uses the OLAP cache.
● If the event is not a pure counter event, the system always records a time. It can also write a counter. What the counter reveals in some cases results from the Description of the event.
The Start-End column has just one technical meaning in the way data is recorded.
Handle types and corresponding short descriptions for them are stored in table RSDDSTATHANDLTP.
NoteYou can create new handle types using the table maintenance (transaction SM30).
Related Information
Analysis of Statistics Data [page 1023]Configuring Statistics Properties [page 1026]Overview of Statistics Events (Table RSDDSTATEVENTS) [page 1029]
8.2.1 Analysis of Statistics Data
The statistics data is spread over a number of different database tables. It is therefore easiest to use two predefined views (RSDDSTAT_OLAP and RSDDSTAT_DM). You use Data Browser (transaction SM16) to do this.
SAP BW/4HANAOperation PUBLIC 1023

RSDDSTAT_OLAP
View RSDDSTAT_OLAP contains the data from the events in the areas for the front end and calculation layer in the analytic manager (Front End/Calculation Layer):
Field Description
SESSIONUID UID of the user session (a role area)
STEPUID UID of the user step
HANDLEID Counter for the runtime object
HANDLETP Type of runtime object
EVENTID ID (NUMC9) of the event from the RSDDSTATEVENTS table
UNAME User name
STEPTP Type of step (RSDDSTATSTEPTP table)
STEPCNT Ascending count of steps
UTIME Time (type TIMS) from STARTTIME field
CALDAY Calendar day (type DATS) from STARTTIME field
RUNTIME Duration of a step in seconds
INFOPROV InfoProvider (if valid)
OBJNAME Name of the runtime object (such as query or Web template)
OBJPROP Properties of the object encoded as CHAR10
Examples for queries:
● Read mode (see data element RSRREADMODE)● Mode for data integrity (see data element RRACTUAL
DATA)● Delta cache on/off (see data element RRDELTACACHE)● Partition mode (see data element RRSPPARTION
MODE)● Cache mode (see data element RSRCACHEMODE)● Persistence mode (see data element RSRPERSIST
MODE)
STATLEVEL Statistics detail level (0, 1, 2)
EVTIME (Net) Runtime of event
EVCOUNT Counter for this event (not required for all events)
1024 PUBLICSAP BW/4HANA
Operation

Field Description
EVENTIDCNT Number of calls for this event (for internal use only)
EVPROP Event property
STARTTIME Start time of step in yyyymmddhhmmss,mmmuuun format
RSDDSTAT_DM
View RSDDSTAT_DM contains the event data from the area for the aggregation layer and analytic manager:
Field Description
STEPUID UID of the user step
HANDLEID Counter for the runtime object
HANDLETP Type of runtime object
DMUID UIP for data manager access
ACCESSCNT Data access counter during a data manager event
UNAME User name
UTIME Time (type TIMS) from STARTTIME field
CALDAY Calendar day (type DATS) from STARTTIME field
OBJNAME Name of the runtime object (such as query)
INFOPROV InfoProvider
PARTPROV If INFOPROV is a CompositeProvider, PARTPROV indicates the InfoProvider that it contains.
AGGREGATE INFOPROV that the system uses to access.
TIMEDMPREP Preparation time of data access, for ACCESSCNT = 0 only, since not parallel
TIMEDMPOST Postprocessing time for data, for ACCESSCNT = 0 only, since not parallel
TIMEREAD Date read time
TIMESID Time for calculation/determination of new SIDs
SAP BW/4HANAOperation PUBLIC 1025

Field Description
TIMENAVATTR Time for reading master data
TIMEHIERARCHY Time for the hierarchy handling. Contains the time when the hierarchy is resolved and the time required to save the hierarchy on the database for further processing.
DBSEL Number of records read from the database
DBTRANS Number of records transferred
WP_ID ID of the work process where the (possibly parallel) data read access was made
STARTTIME Start time of step in yyyymmddhhmmss,mmmuuun format
Related Information
Monitoring [page 1000]
8.2.2 Configuring Statistics Properties
Use
On the Maintenance of Statistics Properties screen (transaction RSDDSTAT), you can edit the statistics properties for individual objects as well as the default settings for the object types listed above.
NoteConfiguring the statistics properties for a query (or and InfoProvider) only affects runtimes in the analytic manager and in the data manager. A complete recording of the runtime (data manager - analytic manager - front end) is, therefore, only guaranteed if the statistics properties are configured for the relevant query and front end objects.
Note that the system records a large amount of detailed runtime data as part of the query runtime statistics. Recording the runtime of a navigation step for a query generates an average of 20-80 records, depending on the level of detail of the statistics. Deactivate the detailed runtime recording for all objects that performance analyses are not needed for.
1026 PUBLICSAP BW/4HANA
Operation

Changing Statistics Properties
The various objects are located on the corresponding tab pages. You can use the sorting and filter functions for the table to preselect the objects to be changed.
1. Select the objects you want to change.2. Select the required settings using the Settings selection list for the object. You can choose whether the
statistics are to be switched on or off, or you can choose the default setting (D) for the object type. For queries, you can also specify the detail level for the statistics.
3. To apply the settings to the list, choose Replace Values. The system sets the relevant indicator in the Last Changed column.
4. Choose .
Default Setting for Object TypesEvery new object initially has the default setting for its object type as the statistics property.
To change this setting, choose Extras Change Default . The dialog box with the current default settings for the object type appears. You can change the default values here. All objects of this type with "D" in the Statistics On/Off column are then treated according to the new default setting when statistics are recorded.
An exception to this rule is the Query object type. If no specific statistics property is set for a query, that is, the default value "D" is set, the system first determines the statistics property for the InfoProvider of the query. If the InfoProvider has "D" as the statistics property, the system reverts to the default setting for the query. Otherwise, it uses the InfoProvider setting (with the OLAP detail level from the InfoProvider setting).
NoteA new query is created. It has the statistics setting "D". The default setting for the query is Statistics Off. The InfoProvider for the query explicitly has the setting Statistics On (not as default setting) however. The system then records statistics data for the query.
This derivation relates only to the InfoProvider that the query is directly based on. If this involves a CompositeProvider, no additional derivation is made of the possible settings from the InfoProviders contained in the CompositeProvider.
Statistics Detail Level for the Query Object TypeFor queries, you also have the option of selecting a detail level for the statistics data. You can choose from the following:
● 0 - Aggregated Data: The system aggregates all OLAP events (apart from events 3010 and 3100 that are needed to calculate the query counter) for the query in event 99999. This contains all times (cumulated) in the OLAP processing for this query. The system does not record data from the aggregation layer of the analytic manager.
● 1 - Only Front End/Calculation Layer Data: The system records all OLAP events, but not separate data from the aggregation layer of the analytic manager. The system writes only the general data manager event 9000 in the OLAP context as well as the aggregation information.
● 2 - All: The system records all data from the area for the front end and calculation layer as well as data from the area for the aggregation layer and aggregation information.
● 9 - No Data: The system does not record any data from the front end and calculation layer, or from the aggregated event 99999 either.
SAP BW/4HANAOperation PUBLIC 1027

Change statistical properties of an InfoProvider
In addition to the default setting described for queries of an InfoProvider, you can also change the following statistics properties for an InfoProvider on the InfoProvider tab page:
● Data from the aggregation layer for the external BW read interface (RSDRI): You can activate and deactive recording. Since queries through the external read interface do not run through the OLAP processor, for this type of request, the system records only the event 9001 (External Read Interface) with the handle type EXTN in the area for front end and calculation layer. Processing in the area for the aggregation layer does not differ from a "normal" query. The relevant statistics can therefore be recorded for this.
NoteFor InfoProviders, the statistics detail level relates to the default setting for the queries of the InfoProvider only, and not to the processes listed above.
Delete
Deleting Statistics Data Manually
If you choose Delete Statistical Data, a dialog box appears. Here, you can select the areas where you want to delete statistics data. You can select multiple areas.
● Query statistics tables: The system deletes the data BI query runtime statistics.● Statistics logging tables
You can delete all data or just a part of it. You can also define how old the statistics data to be deleted should be. You can delete data that is over one day old, over a week old or that is over 30 days old. Alternatively, you can enter a date of your choosing.
If you decide to delete all data, this will be executed using the TRUNCATE TABLE command, and not using selective deletion in the database. This version is therefore considerably faster.
If an Up To time is specified to data that is older than a given time period, references to a number of tables might need to be resolved. This means it can take some time to delete large amounts of data. With these restrictions, however, packages of just 1000 records are deleted from the tables. This is followed by a database commit. This makes it possible to restart after a termination (from a TIMEOUT, for example), without having to redo previous work.
The deletion is performed in a dialog process.
You can also schedule deletion of statistics data using program RSDDSTAT_DATA_DELETE and run the deletion in the background. In addition to the areas mentioned above, this program also allows you to delete data from the data transfer process statistics tables (RSDDSTATDTP).
1028 PUBLICSAP BW/4HANA
Operation

8.2.3 Overview of Statistics Events (Table RSDDSTATEVENTS)
Analytic Manager: Front End
The front-end events for the analytic manager relate to:
● BI Consumer Services (BICS)● Multidimensional Interfaces of the Analytic Server (MDX)
Event ID Long Text Description
The BI Consumer Services (BICS) comprise the following APIs:
● BICS Consumer API: API that is used by BI clients that use the BICS● BICS Provider API: API that has to implement a provider in order to be used in the BICS
13001 BI Consumer Services Build initial view Set the initial status of the data provider.
13002 BI Consumer Services Load view Load the view definition from the ABAP back end.
13003 BI Consumer Services Master Data Access
Master data access (input help)
13050 ABAP BICS: Provider Initialization Initialization of the data provider on the ABAP page.
13004 BI Consumer Services Load result data Java time to load and format the result set (minus provider time)
13040 BI Consumer Services Load provider result data
Provider Java time to load the result set (minus time 13054 OLAP)
13054 ABAP BICS: Read result set ABAP time to load the result set (minus OLAP time)
13055 ABAP BICS: Create output data ABAP time for formatting data for transport to Java
13051 ABAP BICS: Load status Time for synchronization when status changes (navigation) from Java to ABAP, here: when loading the state When loading the state
13052 ABAP BICS: Set status Time for synchronization when status changes (navigation) from Java to ABAP, here: when loading the state When setting the status
SAP BW/4HANAOperation PUBLIC 1029

Event ID Long Text Description
13053 ABAP BICS: Read master data Time for master data access (such as input help or filter texts). The customer can only adjust the master data accesses, for example, by selecting the read mode or by avoiding filter dropdown boxes
13056 ABAP BICS: Set Hierarchy Time for setting the hierarchy config-ured in Java in ABAP and reading the metadata
13057 ABAP BICS: Read hierarchy master data
Time for master data access, here: For reading a master data hierarchy
13058 ABAP BICS: Other Other time in the data provider in ABAP.
Multidimensional Interfaces of the Analytic Server (MDX)
40000 OLAP BAPI This event measures runtimes in the OLAP BAPIs that are not specified in more detail.
40001 Create MDX Runtime Object This event measures the time taken to generate a runtime object, including the call of the MDX parser if necessary.
40002 Delete MDX Runtime Object This event measures the time taken to release resources that are no longer needed.
40010 MDX Execution This event measures the general runtime for the MDX execution.
40011 MDX Execution (Initialization) This event measures the time taken to read the metadata for an MDX InfoCube.
40012 MDX Execution (Axes) This event measures the runtime for preparing the axes. The total number of data cells is in the counter.
40013 MDX Execution (Transaction Data) This event measures the runtime needed to read the cell data from the analytic manager (OLAP).
40020 Read MDX Query Object This event measures the time taken to read the query definition and start the analytic query.
1030 PUBLICSAP BW/4HANA
Operation

Event ID Long Text Description
40021 MDX OLAP Accesses This event counts accesses to read the cell data from the analytic manager (OLAP).
40030 MDX Axis Data This event measures the runtime taken to retrieve the axis data. Here, the texts and display attributes are first of all requested and sorted.
40031 MDX Axis Info This event measures the runtime taken to determine the geometry of the multidimensional result set. NON EMPTY is usually evaluated here. The total runtime is high in this case because the analytic manager (OLAP) has to be addressed.
40032 MDX Cell Data This event measures the runtime taken to retrieve and format the cell data.
40033 MDX Flattening This event measures the time taken to convert the multidimensional result into a flat table. Here, the texts and display attributes are requested and sorted.
40034 MDX basXML Information about the rowset
40035 MDX basXML Set binding for rowset
40036 MDX basXML Get data of rowset
Analytic Manager: Calculation Layer
The events for the analytic manager relate to:
● Data Manager (reading of the data)● OLAP Services (calculation and provision of the query results)
Event ID Long Text Description
0 Global Event for "Non-Assigned" Times Collective event for all parts that are not explicitly assigned to an event (normally a small value)
SAP BW/4HANAOperation PUBLIC 1031

Event ID Long Text Description
1 Wait Time of User Time between two steps, such as entry of a variable, execution of an additional navigation step.
1000 Front end: Unassigned times
99999 Aggregated Events (No Detailed Info Recorded)
The setting for the statistic object (such as query, template) is set to "aggregated", which means that all times are added together for this event.
Data Manager
9000 Data Manager Event This event measures the time in the data manager if the data manager is called from the OLAP. You can find more detailed data in the data manager statistics (table RSDDSTAT_DM). The times measured there do not normally cumulate to the data manager time.
9001 External Call of the Data Manger (RSDRI)
This event measures the time in the data manager if the data manager is called using the RSDRI read interface. You can find details of this in the data manager statistics if the corresponding detail level was selected for the InfoProvider.
9002 Execution of Delta Cache Test This event measures the time taken to execute the delta cache test.
9010 Total Number of Transported Records (DBTRANS)
This event measures the number of transported records, aggregated from all read accesses (counter event).
9011 Total Number of Read Records (DBSEL) This event measures the number of read records, aggregated from all the read accesses (counter event).
OLAP Services: Cache Times
2500 Generation of a Cache Entry In each query execution, the generation of the cache object and the objects that belong to this is determined (even if the global cache is deactivated, a cache object is generated). The CREATE time is therefore always greater than "0".
1032 PUBLICSAP BW/4HANA
Operation

Event ID Long Text Description
2505 Read Cache Entries This event includes the search of a storage entry or data entry and the reading from the persistent medium if this has not yet happened (SPs that have already been read are buffered locally in the roll area)
2510 Write Cache Entries
2515 Deletion of Cache Entries or Whole Cache
2520 Commitment of Cache Entries The OLAP processor marks entries that are stored in the cache as Committed and therefore as suitable to be written into the persistent storage. Since a local cache is created even if the cache is deactivated, the COMMIT time is always greater than "0".
2525 Counts the Read Accesses to the Cache This event counts and measures, on a deeper level of the cache framework, the read accesses to the persistent storage. This is only done if the global cache is active.
2530 Counts the Write Accesses to the Cache
This event counts and measures, on a deeper level of the cache framework, the write accesses to the persistent storage. This is only done if the global cache is active.
OLAP Services: OLAP Times
3000 OLAP: Settings This event measures the time that is needed to process the interface settings, especially the disclosure of the display hierarchy.
3010 OLAP: Query Generation This event measures the time that is needed to check the query definition and, if necessary, to generate the query.
NoteIf events 3010 and 3100 have been run in a session for a query handle, the query counter (0TCTQUCOUN) for a navigation step is set to 1.
SAP BW/4HANAOperation PUBLIC 1033

Event ID Long Text Description
3100 OLAP: Read Data This event measures the time needed to group together the data requests to the data manager or to read the OLAP cache. The number of characteristic combinations that have been read is in the counter.
NoteIf events 3010 and 3100 have been run in a session for a query handle, the query counter (0TCTQUCOUN) for a navigation step is set to 1.
3110 OLAP: Data Selection (Check) This event measures the time taken to call the data manager and to sort the read data according to structure element selection or a restricted key fig-ure.
3115 Effective TREXOPS This event specifies the current value of query property Operations in SAP HANA used to execute the navigation step in the Event Prop column.
If the optimizer is used, this is the result of the optimizer, provided that this value could be applied to the navigation step. If this is not the case, the system applies the maximum possible value that is smaller than the result of the optimizer.
3120 OLAP: Pruning based on CompositeProvider hint
In the case of a CompositeProvider, it is decided here whether an InfoProvider contained in it has to be read.
This decision can be made on the basis of the cha-const. conditions, the metadata restrictions or the CompositeProvider hint. These events measure the times for performance of the corresponding algorithms and the number of the CompositeProvider’s InfoProviders that could be excluded from the query.
3121 OLAP: Pruning Based on Cha-Const. Conditions
3122 OLAP: Pruning Based on Metadata Restrictions
3130 User exit IF_EX_RSR_OLAP_BAPI This event measures the time needed in the exit for virtual characteristics and key figures.
1034 PUBLICSAP BW/4HANA
Operation

Event ID Long Text Description
3200 OLAP: Data Transfer to Front End During a data transfer to the front end, exception aggregations and simple currency translations are carried out, formulas are calculated, and the correct number of decimal places for the data cells is determined. The result set is also sorted according to the interface settings. The number of cells that have been read is in the counter.
3210 Reading Master Data This event measures the time taken to call the Input Help on the SAPGUI Variables screen.
3310 Quantity Conversion This event measures the time taken to call the quantity conversion.
3500 OLAP Initialization This event measures the time taken to start the query, read the query defini-tion, execute the variable exists, and replace the variables.
3510 OLAP: EXIT
Variables
OLAP: Process EXIT Variables
3900 OLAP: Read Texts Texts are read to sort the data. This event measures the time taken to call the text read class.
3999 OLAP Other Time Runtimes in the analytic manager (OLAP) that are not specified in more detail.
OLAP Services: Times for Authorizations
4300 Authorized Values and Intervals This event measures the time taken to determine the authorized individual values and intervals.
4400 Authorized Hierarchy Nodes This event measures the time taken to determine the authorized hierarchy nodes.
4500 Authorization Check Selection This event measures the time taken to thoroughly check the authorizations.
SAP BW/4HANAOperation PUBLIC 1035

Event ID Long Text Description
4600 Filling the Authorization Buffer This event measures the time taken to buffer the authorization data; it is always executed.
OLAP Services: Times for Input Helps
6000 Input help: Flat This event measures the time taken to call the input help for selecting individual values, the transformation of the records from the database to the input help output structure (concatenate for compounding and internal-external conversion).
6001 Input help: Read Data from Database (or Generate)
This event measures
● for generic InfoObjects - the time taken to read the records from the database.
● for InfoObjects with a separate master data read class - the time in the respective master data read class.
6010 Input Help for Hierarchy Nodes - Initialization
This event measures the time taken to execute the hierarchy node input help. It includes the restriction of the hierarchy by means of the selected F4 mode and the initial structure of the hierarchy until the predefined start level.
6011 Input Help for Hierarchy Node - Read Nodes/Children
This event measures the time taken to execute the hierarchy node input help. It includes the reading of subnodes in a hierarchy.
6013 Input Help for Hierarchy Node - Find Node
8.3 Read Access Logging
Read Access Logging keeps a record of who has accessed sensitive data during a particular time period.
The system logs access via specific interfaces (INA, Java BICS, MDX, OData), queries, query results or query output, input help for activities in monitoring, modeling and administration, master data maintenance, and the data preview in the BW Modeling tools.
1036 PUBLICSAP BW/4HANA
Operation

Configuration
You can see the configuration in transaction SRALMANAGER. To use Read Access Logging, you simply need to activate configuration ANALYTICS for channel BW Analytics. To do this, proceed as follows:
1. On the Read Access Logging screen, go to the Administration tab and choose the Configuration link. The Read Access Logging: Configuration screen appears.
2. In the Channel field, choose Analytics.3. Choose Find. In the search result, the system displays the configuration BW Analytics.4. Choose Activate.
NoteFor more information, see the documentation for Read Access Logging under Configuring Read Access Logging.
Modeling in SAP BW∕4HANA
You can assign InfoObjects (characteristics and key figures) to a business area and a log domain for Read Access Logging.
In the InfoProvider context (DataStore object, Open ODS view, CompositeProvider, characteristic), you can select the Load Read Access Output property. An aggregation level inherits this property from its basic InfoProvider. If the Log Read Access Output property is selected, the result of the request is logged in addition to the request itself. If the request is relevant for logging, the read request is always logged regardless of the Log Read Access Output property.
Note● Referencing characteristics can be assigned to a different business area and log domain than the basic
characteristic. The assignment is not inherited from the basic characteristic.● If compounding is used, business areas and log log domains are not inherited from the parent
characteristic.● Business area and log domain cannot be overwritten in the context of an InfoProvider.
Evaluation Options
For more information, see the documentation for Read Access Logging under Monitoring the Read Access Log.
Related Information
Editing Various Settings [page 105]
SAP BW/4HANAOperation PUBLIC 1037

Creating Key Figures [page 106]What is Relevant for Read Access Logging? [page 1038]How Does Read Access Logging Work? [page 1040]Query Request [page 1040]Query Result [page 1042]Input Help [page 1042]Master Data Maintenance [page 1043]Data Preview of an InfoProvider [page 1043]
8.3.1 What is Relevant for Read Access Logging?
A log entry is written whenever an object that is relevant for logging is involved in a read access. The criteria that serve to decide whether an object is relevant for logging are described below.
InfoObject (Characteristic or Key Figure)
An InfoObject is relevant for logging if one or more of the following conditions are met:
● The InfoObject is assigned to a business area and a log domain.● It is a navigation attribute, and the attribute is an InfoObject that is relevant for logging.● It is a field that is associated with an InfoObject that is relevant for logging (in a CompositeProvider or Open
ODS view).
Structure Member of a Query
A structure member of a query is relevant for logging if one or more of the following conditions are met:
● Key figure: The key figure is relevant for logging as an InfoObject.● Restricted key figure: Either the key figure itself or one of the characteristics of the filter is relevant for
logging.● Formula: One of the operands, which is a simple or restricted key figure, is relevant for logging.
Query Request
A query request is relevant for logging if one or more of the following conditions are met:
● The query has a static filter for a characteristic that is relevant for logging.● The drilldown contains a characteristic that is relevant for logging (in the rows or the columns).
○ If a characteristic has hierarchies with external nodes, and an external characteristic of a hierarchy is relevant for logging, this relevance is not passed on to the main characteristic of the hierarchy. If a
1038 PUBLICSAP BW/4HANA
Operation

hierarchy such as this is displayed in a query, this is not sufficient for read access logging. The main characteristic of the hierarchy must be relevant for logging.
○ If the parent characteristic of a compound characteristic is relevant for logging, but the child characteristic is not, they query request can only be relevant for logging if the parent characteristic is explicitly in the drilldown. The criteria for read access logging are not met if the child characteristic is displayed in concatenated form while the compound parent is not in the drilldown.
● There is a dynamic filter for a characteristic that is relevant for logging.● A structure member that is relevant for logging is required.
Attribute of a Characteristic
An attribute of a characteristic is relevant for logging if it is an InfoObject that is relevant for logging.
Input Help Request
An input help is relevant for logging if one or more of the following conditions are met:
● The characteristic is relevant for logging.● The characteristic is compounded to a characteristic that is relevant for logging.● One of the requested attributes is relevant for logging.● There is a filter on a characteristic that is relevant for logging in the key or attribute.
Master Data Maintenance
Master data maintenance is relevant for logging if one or more of the following conditions are met:
● The characteristic is relevant for logging.● The characteristic is compounded to a characteristic that is relevant for logging.● One of the requested attributes is relevant for logging.● There is a filter on a characteristic that is relevant for logging in the key or attribute.
Data Preview of an InfoProvider
A data preview is relevant for logging if one or more of the following conditions are met:
● An InfoObject that is relevant for logging is required.● There is a filter on a characteristic that is relevant for logging.
SAP BW/4HANAOperation PUBLIC 1039

Related Information
Read Access Logging [page 1036]How Does Read Access Logging Work? [page 1040]
8.3.2 How Does Read Access Logging Work?
If the BW ANALYTICS configuration or a comparable configuration that uses the ANALYTICS log domains is active for the ANALYTICS channel in the RAL Manager, read access logging is performed.
The following sections explain what exactly is logged.
Related Information
Query Request [page 1040]Query Result [page 1042]Input Help [page 1042]Master Data Maintenance [page 1043]Data Preview of an InfoProvider [page 1043]
8.3.2.1 Query Request
If a query request is relevant for logging, it is logged in RAL.
The following information is written to the RAL log:
Static Part
Log Domain Field Value
ANALYTICS/KEY_FIGURES List of key figures relevant for logging, separated by semicolons
ANALYTICS/QUERY_DRILL_CHAR List of all characteristics in the drilldown and all display attributes, separated by semicolons
ANALYTICS/QUERY_FILTER For each characteristic with a dynamic filter, a row is logged with the name of the characteristic and a string that describes the filter.
1040 PUBLICSAP BW/4HANA
Operation

Log Domain Field Value
ANALYTICS/QUERY_VARIABLES For each characteristic with a variabe, a row is logged with the name of the variable and a string that describes the variable value. (This applies for all variables, not just for input-ready ones.)
ANALYTICS/QUERY_NAME Query name
SAP_BASIS\USERNAME User name
ANALYTICS/QUERY_LOG_CHAR CDS name of the characteristics and display attributes that are relevant for logging
Together with the definition of the query, this information makes it possible to work out which parameters the user executed a query with. Filters and drilldown are therefore also logged by characteristics that are not relevant for logging.
Fields Without Log Domain
Channel Field Field Value
INFOPROVIDER Name of the InfoProvider of the query
This field is redundant, but can be used for conditions in the configuration. This means that not all query requests that are relevant for logging are actually logged; only query requests for InfoProviders set in the configuration are logged.
Dynamic Part
If a characteristic is relevant for logging, the system writes an entry for the log domain. The value is the same as the corresponding value in ANALYTICS/QUERY_FILTER or ANALYTICS/QUERY_VARIABLES. The name of the characteristic or the variable is not mentioned.
If there is a static filter for a characteristic that is relevant for logging, the system logs this filter with the log domain of the characteristic.
If there is a filter of a restricted key figure for a characteristic that is relevant for logging, the system logs this filter with the log domain.
These entries make it possible to search effectively in the RAL log.
SAP BW/4HANAOperation PUBLIC 1041

8.3.2.2 Query Result
The query result is logged in RAL if it is relevant for logging, and the Log Read Access Output property is set for the InfoProvider.
In addition to the data from the request, the following information is also written to the RAL log:
For a structure member, display attribute or characteristic in the drilldown that is relevant for logging, a row is written. The log domain is either that of the structure member, of the attribute or of the characteristic. If no log domain exists, the system uses the generic log domain ANALYTICS/RESULT_SET.
For the derivation of a log domain from a structure member, the following applies:
● Key figure: Log domain of the key figure● Restricted key figure: Log domain of the key figure (The log domain of the characteristic filters is not
relevant for output).● Formula: The generic log domain ANALYTICS/RESULT_SET is always used.
Field value is a list of values separated by semi-colons. If the generic log domain ANALYTICS/RESULT_SET is used, the system also writes the technical name of the element to the field value.
NoteWhereas all characteristics are logged, note that structure members and attributes are only logged if they are relevant for logging.
Since the system only saves the list of different values, the exact result set cannot be traced back.
If a key figure is assigned to a log domain, and this key figure is used in multiple restricted key figures, the system logs multiple entries with the same log domain but with different field values. The assignment of an entry to a restricted key figure can be derived from the log field in the log.
8.3.2.3 Input Help
If it is relevant for logging, the result of an input help is logged in RAL.
The system writes a row to the RAL log for every relevant attribute and key field.
The log domain is as follows:
● The log domain assigned to the attribute in the case of attributes.● The log domain of the characteristic in the case of characteristics.● The log domain belonging to the higher-level characteristic in the case of higher-level characteristics (with
compounding).
If an attribute or characteristic of the key is not assigned to a log domain, the system uses the generic log domain ANALYTICS/F4_HELP. Field value is a list of values separated by semi-colons. If the system uses the generic log domain, it writes the name of the InfoObject to the column log field.
1042 PUBLICSAP BW/4HANA
Operation

8.3.2.4 Master Data Maintenance
If the data that the user sees when calling master data maintenance is relevant for logging, the system logs it.
Static Part
Log-Domain Field Value
BW_ADMIN\MASTERDATA Name of the characteristic
BW_ADMIN\LOG_INFOOBJECTS List of InfoObjects relevant for logging, separated by semi-colons
BW_ADMIN\FILTER For each characteristic with a filter, a row is logged with the name of the characteristic and a string that describes the fil-ter.
SAP_BASIS\USERNAME User name
Output
The output is only logged if the characteristic is an InfoProvider with the property Log Read Access Output. For every InfoObject that is requested and is relevant for logging, a row is written with its log domain. Field value is a list of values separated by semi-colons.
8.3.2.5 Data Preview of an InfoProvider
If the preview contains InfoObjects that are relevant for logging in the output or in the filter, the system logs these InfoObjects.
Static Part
Log-Domain Field Value
BW_ADMIN\INFOPROVIDER Name of the InfoProvider
BW_ADMIN\LOG_INFOOBJECTS List of InfoObjects relevant for logging, separated by semi-colons
BW_ADMIN\FILTER For each characteristic with a filter, a row is logged with the name of the characteristic and a string that describes the fil-ter.
SAP BW/4HANAOperation PUBLIC 1043

Log-Domain Field Value
SAP_BASIS\USERNAME User name
Output
The output is logged if the preview is relevant for logging, and the Log Read Access Output property is set for the InfoProvider. For every InfoObject that is requested and is relevant for logging, a row is written with its log domain. Field value is a list of values separated by semi-colons. Key fields that are not relevant for logging are logged in the same way with the domain BW_ADMIN/OUTPUT.
8.4 Test and Trace Tools
8.4.1 Query Monitor
The Query Monitor (transaction RSRT2 or RSRT) is used for testing, checking and administration of analytic queries. You use the Query Monitor to test or regenerate queries and query views, and to check or change query properties.
Purpose
As previous technical knowledge is presumed, the Query Monitor is a transaction for administrators.
You can use Query Monitor to display technical information about queries. The Query Monitor also allows you to call the Cache Monitor.
Implementation Considerations
You can use this component from the SAP BW/4HANA system without a front end. You need to have already defined the analytic queries however.
1044 PUBLICSAP BW/4HANA
Operation

Features
1. Enter the technical name of the required analytical query in the input-enabled field. You can use input help for the search.
2. Select an option to display the query.
NoteWe recommend selecting the default display option ABAP BICS.
3. The following functions are available in the Query Monitor toolbar:
Pushbutton Function
Execute Execute the query or query view.
This calls a screen where the query is displayed, together with information about the query, the filters, variable values and the navigation area.
The various pushbuttons allow you to perform other functions on the query. You can set bookmarks for example.
Execute + Debug Execute the query or query view with chosen debug settings. This option is only available to SAP Support.
The dialog box for making the debug settings appears. The settings are used to simplify analysis of the query.
Generate Report Regenerates the query code. The code is stored as a generated report. Regenerating the query code also ensures that it matches with the query definition.
The Log Display dialog box appears.
Properties The Query Properties dialog box appears.
Performance Information The Performance Info screen appears. This information relates to the query definition and the InfoProvider defini-
tion. The system uses a symbol ( ) to display all performance-relevant information for the query which does not adhere to the system recommendations.
Technical Info The Technical Information screen appears.
Cache Monitor The Cache Monitor screen appears.
SAP BW/4HANAOperation PUBLIC 1045

Restrictions
The functionality provided by the front end is not supported in every part of the Query Monitor.
Related Information
Query Properties [page 1046]Technical information [page 1048]Cache Monitor [page 1014]
8.4.1.1 Query Properties
In the Query Properties dialog box in the query monitor, you can make settings for individual analytic queries that deviate from the settings for the InfoProvider that the queries are based on. These are the same query runtime properties that you can set in the BW Modeling Tools on the Runtime Properties tab.
Prerequisites
You have created the relevant query in Query Designer. The settings specified in Customizing for the InfoProvider that the query is based on, or the settings specified earlier in the query monitor, are applied to the query.
Use
In the Query Properties dialog box in the query monitor, you can change the relevant settings for existing queries.
CautionNote that the system only displays settings that are relevant for the query in question.
Example: If the query does not have any virtual key figures or characteristics, settings that relate to virtual key figures or characteristics are not displayed.
Related Information
General Runtime Properties [page 829]
1046 PUBLICSAP BW/4HANA
Operation

Runtime Profile Properties [page 835]The following links take you to the documentation for modeling with the BW Modeling Tools in Eclipse.
8.4.1.1.1 Defining Query Properties Different to the InfoProvider Settings
The properties of the InfoProvider properties are applied to the query by default. If you do not want this, you can use the Query Properties dialog box in the query monitor to explicitly set your preferred properties.
Prerequisites
In the InfoProvider maintenance transaction, default settings for query and cache-specific settings are made for an InfoProvider. If the setting is changed on the InfoProvider, this change is applied to all queries where the InfoProvider Setting option is selected for the relevant property.
NoteFor more information, see Query Properties [page 195]
Procedure
1. If you do not want a query property from the InfoProvider properties to be applied, remove the flag for the InfoProvider Setting option.Some options are always available, whereas other options are only available for queries based on certain InfoProviders.
2. Make the required settings for the query or queries in question. This can be either activation or deactivation of the query, or selection of a particular value.
Note that the other runtime profile properties you can specify depend on the chosen data integrity profile.3. Save the query.
Related Information
Query Properties [page 1046]
SAP BW/4HANAOperation PUBLIC 1047

8.4.1.2 Technical information
The Technical Information screen provides an overview of the main technical parameters of a query. The technical information is created automatically.
Integration
To call the Technical Information screen, select a query from the Query Monitor screen and choose Technical Info.
Features
The technical information is grouped by category for the selected query. Depending on the query definition, all or part of the categories are displayed. The first line of the HTML control contains links to the categories that are displayed in table form in the lower area of the page.
System entries are specified in the first column for some of the categories:
The symbol means that the value of the technical parameter corresponds exactly to the system recommendation.
The symbol means that the value of the technical parameter possibly does not correspond to the system recommendation.
The symbol means that the value of the technical parameter does not correspond to the system recommendation. In this case, it might be advisable to make changes. This does not necessarily mean that there is an error however.
General Data
● Data target(s)
Query Definition Data
● Technical name of the query definition● Last change to the query definition (date and time)
OLAP-Relevant Data
● Query name (technical name and internal name)● Name of the generated programs (by choosing Display Gen. Report, you can display the program; see
below).● Last change to query runtime object● Generation time (technical reasons, no cache invalidation)● Generation time (cache invalidation)● Version (external/internal)● Generation status (active/inactive)
1048 PUBLICSAP BW/4HANA
Operation

● Read mode● Data integrity● Should near-line storage be read?● Released for OLE DB for OLAP (see Screen Area: Remote Access [page 822])● Calculate before aggregation (see Tab Page: Aggregation [page 771])● Formulas with exception aggregation● Virtual characteristics/key figures● Characteristics with hierarchy “as posted”● Currency translation in the query definition● Query can use aggregates● Value field groups (groups of key figure IDs or selection elements and basic sizes for the form elements,
combined by specific properties, for example, their aggregation behavior or by specific steps of the process that are required, for example, calculating as packed numbers)
● Key figure IDs for display (KIDs)● Calculated key figure IDs● Constant selection (for more information, see Constant Selection [page 648]).● Fiscal year variant● Query key date● Elimination of internal business volume● Stock coverage● Access type for result values: Master data● Link to the Cache-Relevant Data table (see below)
Non-Cumulative Indicators
● There is a non-cumulative value with AVI● There are non-cumulative values with LAST or FIRST● There are non-cumulative values with MAX or MIN
For more information about the types of exception aggregation for non-cumulative values, see Aggregation Behavior of Non-Cumulative Values [page 581]
● More than one provider of non-cumulatives (see Evaluating Non-Cumulative Values [page 594] in the InfoCube definition section)
● NCUMTIM is not unique (see Time Reference Characteristic [page 580]).● Query does not interrupt the critical interval (see Validity Period [page 584])● Non-cumulative method L1 is required● Non-cumulative method L2 is required
Statistics
This section lists the key figures, providing the current and maximum number:
● InfoProviders involved in CompositeProviders● FEMS number (selection groups)● Number of elements in structure 1 and 2 (for the structures in the columns and rows)● Selection rows● Columns in the SP storage table● Free characteristics● Basis key figures● Formula components
SAP BW/4HANAOperation PUBLIC 1049

● Hierarchies● Hierarchy nodes● Variables
Invisible Drilldown Characteristics
If a query has invisible drilldown characteristics, they are displayed in this section with their technical name and description, for example 0CURRENCY units or currency field.
Cache-Relevant Data
● Query can use the cache (if necessary specifying the reason why the query cannot use the cache)
This section also includes important time stamps:
● Query generation time (corresponds to the value under OLAP-Relevant Data)● Time of the last loading of data into the InfoProvider (last data change)● Last change to data value set (pre-calculated value set)● Last master data change for navigation attributes
NoteThis time stamp influences the invalidation of the cache. If the last time stamp for a cache entry for the selected query is older than one of the time stamps specified above, the cache is rebuilt.
Optimization Information
● Optimizes table sizesWhen a query has been executed for the first time, the OLAP processor determines the optimal initial size of internal tables and automatically generates the report. The system shows the date and time of this last update. If the query definition is not changed, there is no automatic re-optimization. You can force a re-optimization however by choosing Optimize Again.
The following functions are available in the toolbar:
Function What you need to know
Display Gen. Report Calls the ABAP editor.
You see the ABAP program generated for the query you selected. (You can find the name of the generated report under OLAP-Relevant Data)
Query Def. Designer Calls the ABAP debugger.
You see the code for the interface between the query defini-tion and the OLAP processor.
Query Def. Processor Calls the ABAP debugger.
You see the code a few lines after the above-mentioned interface. The complex data structure SX_REPORT and internal control tables are displayed for the query at this break point.
1050 PUBLICSAP BW/4HANA
Operation

8.4.2 Analysis and Repair Environment
In the analysis and repair environment, you can perform consistency checks on the data and metadata stored in a SAP BW∕4HANA system.
Integration
You can call the analysis and repair environment in the following ways:
● On the SAP Easy Access screen, choose Administration Analysis Tool (transaction RSRV).
● On the SAP Easy Acccess screen, choose Modeling Object Maintenance InfoObject (transaction RSD1). Select the InfoObject you want.
Choose Analyze from the initial screen.Or:Choose Maintain. The maintenance screen appears. Choose Edit Analyze InfoObject .The Analysis and Repair of SAP BW∕4HANA Objects screen appears.
NoteIf you are using the analysis and repair environment for the first time, you will see the message “values have not been found for all setting parameters”. This warns you that no settings have been saved for your user yet.
Features
The Analysis and Repair of SAP BW∕4HANAObjects screen is divided into two parts:
On the left, you see a tree structure with a list of existing tests.
You can select elementary or combined tests:
An elementary test is a test that cannot be subdivided into smaller tests and therefore can only be executed as a whole.
A combined test determines which elementary tests are to be performed according to the parameters entered.
NoteYou can display a short description of a test by choosing Description from the context menu of a test.
The right half of the screen is empty to begin with. It is then populated with the tests that you select.
NoteA selection of tests is referred to as a test package.
SAP BW/4HANAOperation PUBLIC 1051

Compiling and Executing a Test Package
1. Select the tests you want. You can transfer an individual test or a whole folder with all the tests that exist in the hierarchical structure of this folder in your test package in the following ways:○ by double-clicking on the required test or folder in the left-hand side of the screen○ with drag and drop, by transferring the required test or folder from the test list to the right-hand screen
areaEach selected test is displayed in the right-hand side of the screen as a closed folder.
CautionAn exception to this is elementary tests without parameters. These do not appear as folders.
2. Provide parameters for the tests. You can start parameter input in the following ways:○ By double-clicking a test (a test package)○ By expanding the folder for the test
CautionYou do not need to provide parameters for tests that do not have them. Take note of the appropriate message after selecting the test.
The Parameter Input dialog box appears. Enter the required parameters. Input help is available in many cases.Once the parameters have been entered, a folder with the name Parameter is inserted under the test in question. This contains the values of the parameter. In some circumstances the name of the test is also changed so that you can see at a glance the parameter values that test is to be performed for. This is particularly helpful if you have selected the same test several times and want to provide different parameters for it.If you have provided parameters for a combined test, an additional Elementary Tests folder is inserted along with the Parameter folder. This folder contains the elementary tests from which the combined test is built.
NoteYou can delete individual elementary tests from the test package by dragging them back to the list of tests. Doing this helps to reduce runtime.
3. Once you have provided parameters for all tests, you can start the test run. Choose Execute. During
execution, the symbol for the test is changed from
○ To if no errors occurred for the test,
○ To if warnings only were issued,
○ To if the test produced errors.
NoteTo delete all elementary tests from the current test package that has not produced errors or warnings,
choose Deselect Tests Without Errors. If you want to delete the entire currently selected test
package, choose Delete.
Test Output
1052 PUBLICSAP BW/4HANA
Operation

The output of the test is written to the application log and stored in the database. These are then available for comparison with subsequent test runs.
Settings can also be made for the system so that the log is automatically displayed after a test run (see
"Settings"). Otherwise, choose Display in the Analysis and Repair of SAP BW∕4HANA Objects screen. The Log screen appears.
The left half of this screen contains an overview of the most recently performed test runs. If you double-click on a folder, the system displays all messages below this node as a flat list in the right half of the screen.
You can use the functions listed below to view further information (provided that this is available):
● Detail Information
● Long Text for Message
● Technical Information
Repairs
Some tests can repair any errors and inconsistencies that are discovered. Automatic corrections are not generally possible however.
NoteWe recommend always reading the test documentation first in order to obtain a clear idea of where the errors lie before performing repairs.
To perform repairs, go back to the Analysis and Repair of SAP BW∕4HANA Objects screen. If you want to start a
repair, choose Remove Error. As the dataset may have changed since the time of the analysis, the required tests are run once more before the repair is performed. The test output can be found in the application log.
Additional Functions on the Analysis and Repair of SAP BW∕4HANA Objects Screen
Test Package Menu
If you quit the analysis and repair environment, the test package currently displayed is removed. You have a way of saving it beforehand however: Choose Edit → Test Package → Save (see Application Log Menu below).
You can select further functions under Edit Test Package :
● Load (load test package)● Edit (load test package for editing; the test package is then locked against changes by a third party)● Delete● Schedule (schedule test package to be executed subsequently or regularly in background processing; see
Jobs Menu below)
Jobs Menu
If you have scheduled a test package and want to monitor its status, choose Jobs Job Overview .
Application Log Menu
This option allows you to display old logs, both from previous test runs and from scheduled test runs. You also have the option of deleting test logs here.
Settings Menu
SAP BW/4HANAOperation PUBLIC 1053

You can make and save user-specific settings here by choosing Settings Change Settings .
Setting Selection
Display Result After Test Run Always / With Errors / Never
Screen Size Customize Screen Areas: Size of the Left and Right Control
Application Log Modify the layout, specify an expiry date and a delete condition
The settings are read automatically when you start the test environment.
NoteIf no values are available for new settings options, the user will be notified with a message when starting the application.
Executing Test Packages in Process Chains
In process chain maintenance (transaction RSPC) add ABAP programm RSRV_JOB_RUNNER to your process chain. (To do this, use drag and drop to select the process type "ABAP Program" under "General Services" in the process type view.) To edit the process variant, you have to specify the program name and the name of a program variant. Enter RSRV_JOB_RUNNER as the program name and choose a program variant name. Choose Change. On the following screen, you can either change or display an existing variant, or create a new one. When creating a new variant, you have to specify the following:
● The package name (input help is provided).● The level of detail to which the log is to be integrated into RSRV in the process chain log.● The message type as of which processing of the process chain should be interrupted.
The log of the RSRV process in the process chain consists of the following parts:
● A summary that specifies whether errors, warnings, or no errors at all where output for each individual elementary test.
● A view of the log for the test package, at the level of detail specified.
TipIf you have chosen 3 for the level of detail, only messages up to level 3 are included in the log of process chain processes. Messages with a lower level of a test in the test package are not displayed in this log.
Unlike in the application log, errors in the processes log errors are not propagated from deep levels of detail to lower levels of detail. If a single error is output on level 4 for example, the summary mentions that the corresponding test has delivered an error, but this error is not listed in the second part of the log.
A complete log is always written, independently of the RSRV process in the process chain. You can display this by choosing Application Log Display Log From Background Processing .
1054 PUBLICSAP BW/4HANA
Operation

Transport Test Packages to Other Systems
Note that there is a transport object (TLOGO object RSRV) for test packages. These can therefore be transported.
After saving a test package, choose Edit Test Package Transport . Assign the test package to a transport package and specify a transport request.
NoteTo be able to assign the test package to a transport package, users require developer authorizations for authorization object S_DEVELOP in both the source system and the target system.
8.4.3 Trace Tool Environment
Purpose
A trace is a self-contained quantity of logged user actions. The trace tool environment (transaction RSTT) has special tools to log and play back traces (trace tool) and to process automatic regression tests (computer aided test tool).
The constructs of the Trace Tool environment provide the technical basis for the Test Cockpit: The system uses RSTT traces as central execution units.
Application Area
The application area encompasses a particular part of the SAP BW∕4HANA system where user actions can be logged. Assigninment to a particular application area is user-dependent (see Administration [page 1071]).
Logging and Playing Back Traces
Logging traces is advisable in the following cases:
● to conserve and analyze errors and questionable process flows● to repeatedly execute selected navigation sequences (such as query navigations)
Users who want to record a trace must be activated before recording starts recording and be deactivated again after recording. The lifetime of a trace depends on the lifetime of the session of the processes to be recorded. As soon as a session is ended, the system closes the trace too.
How traces are played back depends on the controlled execution of the recorded sequence of program calls. A user can either execute the trace completely or stop execution at a given location, in order to call the ABAP Debugger directly. The latter option is recommended for detailed analysis of the recorded processing (for troubleshooting for example).
Processing of Automatic Regression Tests
With automatic regression tests, you can monitor the quality of the system over a longer period of time (for example during the cycle of a support package).
SAP BW/4HANAOperation PUBLIC 1055

A wizard is provided to help users create automatic tests (called CATT traces). This guides the user through the various definition steps: S/he makes settings for storing the test reference data, assignments for the data structures to be tested, and creates descriptions for the navigation steps.
When the tests are executed, the CATT traces are executed internally, and the current results are compared with the test reference data stored in the definition. If the traces are displayed successfully and the current results values agree with those of the test reference data, the test was successful. In all other cases, the test was not successful. The system provides a user interface for displaying the tested data contents.
To combine a larger number of CATT traces, test packages can be generated that can be refined using certain selection criteria. Test packages can be scheduled as repeatable test jobs for background processing. The system stores logs relating to the state of the test run in log files (job log and application log). The system writes the results of the tests directly to InfoObjects or InfoProviders as master data or transaction data and immediately makes them available for reporting.
Features
The trace tool environment allows you to work with traces, test packages and test jobs. It includes the following functions:
● Activating or deactivating users for logging traces● Analyzing, editing or deleting traces● Playing traces● Using traces as a CATT trace● Logging reference data● Performing regression tests● Creating, editing or deleting test packages● Creating, editing or deleting test jobs
You access the interfaces of the individual task areas using the navigation window. These are assigned to the following areas:
Functional areas for the trace tool environment
Area Use
Trace tool ● General user activation● Managing traces● Collectively displaying multiple traces
CAT tool (Computer Aided Test Tool) ● Managing CATT traces, test packages and test jobs
Administration ● Specifying global settings for trace tool environment
Related Information
Trace Tool [page 1057]
1056 PUBLICSAP BW/4HANA
Operation

Tracing User Actions [page 1058]Determining a Logged Trace [page 1061]Reexecution of Logged User Actions [page 1062]Maintain Trace Properties [page 1064]CAT Tool [page 1069]Administration [page 1071]
8.4.3.1 Trace Tool
Purpose
The trace tool allows you to log and play back processes from the respective application area.
TipIn the Reporting, Planning and OLAP Technology application area, the trace tool allows you to save selected executed queries and the subsequent query navigations, .
Saving and analyzing error patterns
If error situations occur when logging traces, you can save them together with the steps that led to these situations arising.
TipIn the Reporting, Planning and OLAP Technology application area, the following errors can occur: System errors, terminations, ambiguity in terms of the correcness of query result values. Some error situations only occur after a series of special query navigations.
For error situations that are hard to simulate, you can considerably reduce the support effort required by logging a trace that contains all of the actions up until when the error occurred.
Reusability and ability to schedule a trace
You can control the execution of traces that have been logged, meaning that you can execute them regularly or recurrently as a background job that can be scheduled.
TipIn the Reporting, Planning and OLAP Technology application area, you can use this functionality to fill the OLAP cache automatically. This allows you to increase the read performance of analytic queries with respect to selected executions of queries and query navigations.
Integration
You can use the CAT tool to develop CAT traces from standard traces.
SAP BW/4HANAOperation PUBLIC 1057

Features
User Activation
Under User Activation, you can activate/deactivate yourself to record traces, or - if you are an administrator - do this for other users. A table provides you with a list of all users currently active for recording traces.
Trace
Under Trace, you can select a trace so that you can see or edit its properties in trace management, or execute or delete it.
Input help is provided for the Trace (ID) field. Note that the system only displays the traces for the current application area.
In the History of Last Trace table, the system displays the traces that you last selected, created or edited. You can double-click on a table entry to select a trace.
By choosing Display or Change, you can call the trace administration screen.
Under Trace, you can play ( Execute) or delete ( Delete) traces.
Trace Collection
Under Trace Collection, the system shows a selection of traces. You can use the selection criteria Trace User, Application Layer and Trace Type to refine the display. Note that the system only displays the traces for the current application area. The selection lists for Application Layer and Trace Type each display the possible selections for the currently selected user.
By double-clicking on a table entry, you can call the trace administration screen.
Under Trace Collection, you can play ( Execute) or delete ( Delete) traces.
Related Information
Tracing User Actions [page 1058]Determining a Logged Trace [page 1061]Reexecution of Logged User Actions [page 1062]Maintain Trace Properties [page 1064]
8.4.3.1.1 Tracing User Actions
Use
Recording traces allows you to save user actions in the respective application areas over a long period of time.
1058 PUBLICSAP BW/4HANA
Operation

TipIn the Reporting, Planning and OLAP Technology application area, you can trace selected executions of queries and the subsequent query navigations, .
You can trace the following:
● Query execution in the Query Monitor (transaction RSRT)● Query execution using SAP BusinessObjects Analysis for Microsoft Office
Integration
● The constructs of the Trace Tool environment provide the technical basis for the Test Cockpit: The system uses RSTT traces as central execution units.
● You can rerun and control traces, as well as use them to define automatically executable regression tests in the CAT Tool.
● The Trace Tool allows you to call the Query Monitor directly from the Reporting, Planning and OLAP Technology application area.
Prerequisites
● The user has sufficient authorizations to execute traces.● The user executes actions that can be traced using the Trace Tool.
Features
Successful execution of a trace comprises the following steps:
● Activating the trace● Executing the actions to be traced● Deactivating the trace
It is irrelevant if the activation or deactivation and the execution of the actions takes place in the same mode, or in two different modes.
During activating and deactivating a trace, the following cases are supported:
● Users want to activate or deactivate themselves.● An administrator wants to activate or deactivate a particular user.
You can determine for each user, if, in addition to tracing user actions, they are to be activated or deactivated for generating tests.
SAP BW/4HANAOperation PUBLIC 1059

Activities
Activating Execution of the Trace
1. Choose the User Activation area from the Trace Tool functional area in the navigation window.2. The Trace User field is initialized with the current user name.
If, as an administrator, you want to activate another user, enter this name in the Trace User field.3. If the user intends to convert a trace into an automatic test, set the Activation flag for the Test Generation
option.
4. To activate yourself as a user, choose Activate <user name>.If, as an administrator, you want to activate a user whose name you have entered in the Trace User field,
choose Activate.As a result of your activation, the system displays the activated user as well as the time of activation and the selection for the test generation in the user table.
User Interaction
1. To execute a trace in the Reporting, Planning and OLAP Technology application area, call the required environment for executing the query :
2. Perform all actions (query navigations ) that you want the system to trace.
Deactivating Execution of the Trace
1. To end execution of the trace, go back to User Activation in the Trace Tool.
2. If you want to deactivate yourself as a user, choose BDeactivate <user name>.If you want to deactivate yourself, or as an administrator, you want to deactivate another user, select the
corresponding entry in the user table and choose Deactivate.
NoteIf the current session ends while tracing user actions, the system automatically stops tracing. Actions such as re-executing the Query Monitor therefore result in interruption of the tracing. If further interactions take place, a new trace is started.
If on the other hand, the user for the trace recording is deactivated and then reactivated in a second session, and this then executes further interactions in the first session, a new trace is also started.
Related Information
Determining a Logged Trace [page 1061]Reexecution of Logged User Actions [page 1062]Maintain Trace Properties [page 1064]Authorizations for Trace Tool Environment [page 1231]Test Cockpit [page 1072]Query Monitor [page 1044]
1060 PUBLICSAP BW/4HANA
Operation

8.4.3.1.2 Determining a Logged Trace
Use
Each trace is uniquely determined by two system-generated keys:
Generated Key of a Trace
Key Description
Trace GUID 32-digit code that cannot be changed during the lifetime of the trace
Trace (ID) Key with a name, also generated by the system according to a certain naming convention, but can, however, be changed by the user
To be able to find a trace and, if necessary, edit, play, or delete it, you must first determine which key the system generated.
To do this, you either use the overview of all trace loggings in the Trace Collection area, or the selection of individual traces in the Trace area.
To make it easier to find the trace again, you can change the system-generated trace (ID).
Prerequisites
You have determined which trace is required.
Activities
To determine the trace ID of a current trace logging, proceed as follows:
1. Choose the Trace Collection area from the Trace Tool functional area in the navigation window. In the initial status, the system fills the Trace User field with the current user name for the restriction.
2. Add trace type Standard Trace as the restriction criteria for the displayed trace from the trace list.
NoteEvery newly logged trace is of type Standard Trace.
3. The system displays a list of the existing traces. The list is sorted by date, in descending order. The first entry in the list is therefore a link to the current trace.
4. To display all the properties of the logged trace, change to the display of the trace properties using one of the methods described below:1. Double-click on the required entry in the trace list.
SAP BW/4HANAOperation PUBLIC 1061

2. Select the required entry in the trace list, and choose Display.3. Switch to the Trace area and restrict the selection to the required trace.
Related Information
Tracing User Actions [page 1058]Reexecution of Logged User Actions [page 1062]Maintain Trace Properties [page 1064]
8.4.3.1.3 Reexecution of Logged User Actions
Use
In the trace tool environment, you can replay the program objects recorded in a trace, using the same transfer parameters that were saved in the system during recording.
You can use this function to inform an employee working in support about an error.
You can also use traces for regression tests: The current check data is compared here with the reference data that has been saved and verified in order to check the correctness of the software.
Prerequisites
● You have recorded the required user actions.● You have determined which trace is required.● You have the required authorization to use the ABAP Debugger.
Features
The trace tool supports different process flows when executing a trace:
● You can directly execute a trace. This option is suitable for regression tests, for example.● You can cause the play of the trace to be interrupted before particular program objects. This option is
particularly useful if you want to analyze errors. The ABAP Debugger appears directly before the selected program object is called.Since the trace tool only plays those program objects that belong to the application layer that is currently chosen, you can only select to play these objects.
On the Execution of Traces screen, the system in the Trace screen area shows the standard information for the trace (Trace GUID, Trace(ID), Description).
1062 PUBLICSAP BW/4HANA
Operation

In the Process screen area you can select a Process Mode. This specifies how the trace is to be handled when it is played:
● The Play Mode (Play Trace) mode causes the trace to be played. For standard traces, this is the only possible selection.
● The Check Mode (Test Trace) mode starts the regression test. This mode is only available for CATT traces.
The following tab pages are displayed in the lower screen area:
● On the Display Settings tab page, you can set the display mode. You also have the following options:○ Debugging at Call Position: The system interrupts the execution of a trace at a recorded program
object.○ Debugging at Check Position: The system interrupts the execution of a trace at a checked program
object.● On the Play Settings tab page, you can select from trace-type-dependent settings that influence the
execution of a trace.
TipFor traces from the application area Reporting, Planning and OLAP Technology, the following settings are made:
○ Read mode: Read All, Read During Navigation, Read During Hierarchy/Navigation.○ Cache mode: Without Cache, With Cache (Initial), With Cache (Filled).○ Aggregation mode: Optimization mode for the operations in the SAP HANA ("Operations in SAP
HANA").
Use Execute to start the execution of a trace. The system documents the process flow step by step, using corresponding messages. The messages are displayed in a window in the lower screen area.
Activities
1. You can play a trace from the Trace or Trace Collection areas of the Trace Tool functional area. You can do this as follows:1. In the navigation window, under Trace Tool, you can choose the Traces area. This allows you either to
enter the name of the trace to be played in the Trace (ID) field, to select it from the input help, or to select it from the appropriate line in the History of Last Traces table to transfer it.
2. In the navigation window, under Trace Tool, you can choose Trace Collection. This allows you to display a selection of traces for a given user, application layer, and trace type. Once you have specified the selection criteria, press Enter. The system displays all traces that meet the selection criteria. Select the required trace.
2. You can call the Execution of Traces screen as follows:
1. Choosing Execute takes you directly to the Execution of Traces screen.
2. Choosing Display or Change takes you to the Trace Attributes screen that is used to maintain
traces. Choosing Execute takes you directly to the Execution of Traces screen.Define the settings for executing a trace as described in the features section.
3. To execute the chosen trace, you have the following options:
SAP BW/4HANAOperation PUBLIC 1063

1. On the Execution of Traces screen, play the entire trace by choosing Execute.2. Alternatively, on the Logged Program Objects tab page on the Trace Attributes screen, you can execute
the trace directly by selecting a row in the table. The system interrupts the process flow at the program object in the selected row.
Related Information
Tracing User Actions [page 1058]Determining a Logged Trace [page 1061]Maintain Trace Properties [page 1064]CAT Tool [page 1069]Read Mode [page 837]Cache Mode [page 838]
8.4.3.1.4 Maintain Trace Properties
Use
The Trace Attribute screen displays information on a selected trace.
In Change mode, you can change certain properties, for example to enter a description for the trace, change the name or trace (ID), or execute the trace up to a certain program object.
Integration
You can access the maintenance of trace properties for a particular trace, using the Trace and Trace Collection areas of the trace tool.
Prerequisites
The required user activities have been logged, and the corresponding trace determined.
Features
In the upper screen area, the system displays the trace GUID, trace (ID) and description of the chosen trace.
1064 PUBLICSAP BW/4HANA
Operation

In Change mode, you can change the trace (ID) and description:
Changes to Trace (ID) and Description
Property Description
Trace (ID) Key with name that the system generates using the following pattern: systemname/xxxxxx ( xxxxxx represents a 6-digit sequence number).
You can change the generated trace ID to any 20-digit term.
Note that the trace (ID) must be unique in the system.
You can reuse the trace (ID)s of deleted traces.
Description Free Text
Basis Attributes Tab Page
The Basis Attributes tab page shows different default values:
Default values of a trace
Property Description
Trace Type Type of Trace
● Standard Trace● CATT Trace Special standard trace used to generate au
tomatic tests.● OLAP Trace: CATT trace in the Reporting, Planning and
OLAP Technology application area
Application Area Isolated process area where you can log user actions.
This setting is determined, depending on the user, in the global settings.
Application layer Clearly definable call layer during process editing, within an application area.
TipThe following application layers exist:
● Front End● Open Analysis Interfaces● Aggregation Layer● Core Calculation Layer● Data Access Layer
Author User who logged the trace
Date of creation, time of creation Date and time of first logging
SAP System ID Technical Name of BW System
SAP BW/4HANAOperation PUBLIC 1065

Property Description
Current Release
Patch Level
Last Changed by Last user to change the trace
Date of modification, time of modification Date and Time of Last Change
In Change mode, you can choose the application layer here.
The image below illustrates the process of executing a trace using an example from the Reporting, Planning and OLAP Technology application area:
While executing a trace, selecting a certain application layer allows the extent of the execution to be controlled by logged program objects.
1066 PUBLICSAP BW/4HANA
Operation

TipIf an upper application layer is not interesting because executing the logged program objects requires a great deal of time or certain authorizations, you can hide this layer and let the trace run on a lower application layer with the logged input parameters.
Logged Program Objects Tab Page
The Logged Program Objects tab page displays all the important information about all of the program objects whose interface parameters (in the Reporting, Planning and OLAP Technology application area while a query was executed) were logged and lets them be played again.
In this sense, program objects are:
● Function modules● Static methods● Instance methods
In the default setting, the system only displays program objects in the call table that belong to the application layer set for the trace (see Basis Attributes tab page).
Change Call View gives you the option of displaying all of the logged program objects for this trace.
Using Parameters, the system displays the values of the parameters for each program object as XML.
Double-click on a table entry to start executing the trace:
● If the program object of this table entry is in the application layer chosen on the Basis Attributes tab page, the ABAP Debugger appears. The system stops directly before calling the program object.
● If the program object is in a different application layer, the system executes the entire trace. The run is documented in corresponding messages.
The information in the table includes:
Special information on the Logged Program Objects tab page
Column Description
Sequence number In the Reporting, Planning and OLAP Technology application area, the sequence number specifies the sequence regarding the query navigation. See the Sequence Descriptions tab page.
Item Sequential number of program objects together with the ID for the call.
Program type Type of logged program object.
Program module Technical name of the program object.
Framework program
Runtime
SAP BW/4HANAOperation PUBLIC 1067

Column Description
Layer depth Application layer depth: Current position (nesting depth) within an application layer.
Layer depth = 0 is the entry point for playing on the respective application layer.
Stack depth Stack depth: Current position (depth) in the call list, relating to the highest call module.
Application layer See Basis Attributes tab page
Test object See Test Objects tab page
The following image illustrates the determining of layer and stack depths for the function modules FU1, FU2 and FU3 using an example from the Reporting, Planning and OLAP Technology application area:
Testable Program Objects Tab Page
The Testable Program Objects tab page displays all of the program objects, whose parameters or variables were recorded, that can be checked in a regression test.
NoteThis tab page is only of relevance for CATT traces (not for standard traces).
To use this, the user must be activated for logging the trace and for generating the test.
1068 PUBLICSAP BW/4HANA
Operation

In addition to the information on the Logged Program Objects, tab page, the table includes the following:
Special information on the Testable Program Objects tab page
Column Description
Check Position Type Developer information:
● I for Interface After Input● O for Interface Before Output● S for Special Parameters: A parameter can be queried
up to ten times. You can use this for example to check the intermediate status of a local or interface parameter of a program object.
Check Alias Explanatory name that the developer assigns to a check position
Test Objects Tab Page
The Test Objects tab page provides you with an overview of the logical objects that were logged using this trace.
TipIn the Reporting, Planning and OLAP Technology application area, this can be an analytic query.
Sequence Descriptions Tab Page
The Sequence Descriptions tab page provides you with an overview of all of the logged sequences for this trace run.
TipIn the Reporting, Planning and OLAP Technology application area, a sequence corresponds to a navigation step in the analytic query.
In Change mode, you can enter a descriptive text for the sequences.
Related Information
Tracing User Actions [page 1058]Determining a Logged Trace [page 1061]Reexecution of Logged User Actions [page 1062]
8.4.3.2 CAT Tool
Purpose
The CAT tool (Computer Aided Test Tool) defines, executes and evaluates automatic regression tests.
SAP BW/4HANAOperation PUBLIC 1069

TipWith regard to the processing of automatic regression tests, the application area Reporting, Planning and OLAP Technology is restricted to the functional accuracy and completeness of query results (BEx) .
Integration
You have logged a standard trace in the required application area with the trace tool.
Features
Wizard
You can use the Wizard to convert standard traces into CATT traces. The wizard gives you step-by-step instructions for completing a CATT trace. You can assign special themes to the test, select targeted individual parameters or variables of the Testable Program Objects as to be checked, and log reference data.
CATT Traces
In the CATT Trace area, the system displays the attributes for a CATT trace. You can use Change to edit the properties of the CATT traces.
The attributes of the CATT traces correspond to those of the standard traces, but are enhanced by CATT-trace-specific attributes. You can check and modify them on the appropriate tab pages:
● On the Test Themes tab page, you can assign predefined test themes to your CATT trace. These themes describe the CATT trace.
● On the Check Parameter Selection tab page, for each of the logged Testable Program Objects for your regression test, you can specify which parameters or variables are to be included in the check.
● On the Reference Data tab page, you can determine that reference data is to be logged.
Test Packages
The Test Packages area allows you to create test packages and to assign a collection of traces to them. In the Trace Type field you can select which trace type can be assigned to this test package. This already influences the selection of the assigned trace.
● On the Trace Selection tab page you can specify various criteria to restrict the assignment of the traces to the test package.
● On the Play Modes Selection tab page, you can set which play modes the traces for the current test package are played with.
● On the Trace List tab page, the system displays all traces that correspond to the Trace Type and the criteria of the first tab, and that are assigned to the test package according to this tab.
Test Jobs
You create automatically executed jobs in the Test Jobs area. You can schedule each job for default job execution in SAP systems. Each test job has exactly one test package and a row of traces assigned to it that are
1070 PUBLICSAP BW/4HANA
Operation

executed in the current test job. In the Trace Type field, select which types of test packages and therefore which types of traces are assigned to the current job.
● On the Parameter tab page, you can assign a test package to the test job. Specify the process mode (play or check), the type of execution (sequential or parallel execution) and the type of logging.
● On the Time Setting tab page, you can set when and how often the test job is executed.
Related Information
Trace Tool Environment [page 1055]
8.4.3.3 Administration
Use
In the administration functional area you can determine personalized global settings that are valid for the entire trace tool environment.
Features
Global Settings
You can determine the following global settings for the trace tool environment:
Global Settings for the Trace Tool Environment
Global Setting Description
Application area Using the selection list, you can determine the area of the system where you want to log user actions or execute tests.
With the system, SAP delivers the following application areas:
● Reporting, Planning and OLAP Technology: User interactions based on the execution of analytical queries
Start Screen Using the selection list, you can select a work area as a personalized start screen. When you call the trace tool environment, this work area is displayed.
Related Information
Trace Tool Environment [page 1055]
SAP BW/4HANAOperation PUBLIC 1071

8.4.4 Test Cockpit
The Test Cockpit (transaction RSTEST) has the task of supporting product-specific test activities for central processes in SAP BW∕4HANA. Analytical processing, in particular query execution, plays a central part.
Running these tests supports the following tasks:
● Checking error-free and correct determination of query results● Monitoring and valuating runtimes and throughput rates
The Test Cockpit thus supports automatic testing with regard to two important quality characteristics: Functional correctness and efficiency/performance.
The technical basis of the Test Cockpit is provided by constructs from the Trace Tool environment (transaction RSTT): The system uses RSTT traces as central execution units.
Unlike the limited possibilities for testing in the Trace Tool environment, the Test Cockpit is set up in such a way that even inexperienced testers can set up and execute automatic tests with little effort or prior knowledge. The Test Cockpit also provides useful services for analyzing test results.
The graphic below illustrates the architectural relationship between the Test Cockpit and the Trace Tool environment:
As an application for executing and administrating automatic tests, the Test Cockpit provides services that guide, support and inform the user during the course of the test process. Software tests generally comprise the following activities:
1. Preparing the test2. Defining the test3. Executing the test
1072 PUBLICSAP BW/4HANA
Operation

4. Analyzing and post-processing
The Test Cockpit is aligned to these process steps, while the preparation step is not supported by the tool side, as it deals primarily with cognitive and non-test specific topics. Since it is so crucial for the quality and stability of tests however, this process step is described in detail.
To call the Test Cockpit, enter transaction RSTEST. On the home page, you can create new tests and make changes to existing ones. You can also start background processing of tests and view the results once execution of the tests has been completed. A dedicated display page for each test provides you with a detailed analysis of the test results. In the case of functional tests with data consistency checks, you also have the option at elementary level of examining and evaluating the performance of individual traces containing errors.
The graphic below illustrates how you can use the Test Cockpit to create, execute and analyze automatic tests for a particular part of your system functionality.
Related Information
Usage Scenarios for the Test Cockpit [page 1073]Preparing a Test [page 1077]Defining a Test [page 1080]Executing a Test [page 1101]Analyzing a Test [page 1103]
8.4.4.1 Usage Scenarios for the Test Cockpit
This topic provides information about which test requirements the Test Cockpit is suitable for.
It should be suitable for the following categories:
● The tool must be able to handle the thematic functionality being tested.● The requested test procedures must be supported with regard to the standards being checked.
SAP BW/4HANAOperation PUBLIC 1073

● The requested requirements should be met.
Thematic Functionality
The testable functionality for the Test Cockpit is determined by the integration of RSTT traceability. The Trace Tool environment (RSTT) supports various user interactions in the Analytic Manager and the ABAP APIs for front-end communication and design time.
NoteThe Trace Tool environment works with ABAP macros in the ABAP routine to be recorded, which can only function however if certain technical prerequisites are met. All functional areas that are already traceable meet these prerequisites. This allows enhancement by SAP and also by individual implementations.
There are two basic types of traceability: Tracing of the successful re-execution of the listed interaction, and tracing used to additionally check defined data content during execution. The ability of data content to be checked is a basic attribute of all RSTT traces. It is set by users by activating the trace.
NoteIf a trace has been recorded without the data check option, it cannot be used in the Test-Cockpit for functional tests.
The following section provides an overview of the testable functionality:
FunctionalityUseable for Performance and Load Tests Useable for Functional Tests Details
Query execution using SAP BusinessObjects Analysis for Microsoft Office
Yes Yes
Query execution using Firefly - BICS INA interface
Yes Yes
Query execution using SAP BusinessObjects Design Studio
Yes Yes
Query execution with the Query Monitor (transaction RSRT) - ABAP BICS
Yes Yes
1074 PUBLICSAP BW/4HANA
Operation

FunctionalityUseable for Performance and Load Tests Useable for Functional Tests Details
Query execution using ODATA
Yes (with restrictions) Yes (with restrictions) In certain cases, ODATA communicates statelessly with the back end. The Trace Tool environment (RSTT) cannot handle stateless applications with multiple process steps. This means that only the first query is traceable.
Query execution using SAP Business Objects Cloud (BOC) - based on the technology of Firefly - BICS INA interface
Yes Yes
Test Procecures and Test Standards (Quality Characteristics)
The test procedure describes how the tool makes a qualitative statement with regard to the requirement being tested. The Test Cockpit supports the following test procedures:
● Regression test with statically verified comparison basis● Comparison test of different execution configurations● Stress or throughput test● Single execution
Test standards serve to categorize characteristics that describe the quality of the product to be tested. The main focus of the Test Cockpit is the following standards:
● Functional correctness○ Monitoring the executability of query views○ Monitoring the data consistency of query results○ Checking query generation
● Efficiency/performance○ Runtime determination for query executions○ Evaluation of optimum query settings with regard to runtime○ Throughput determination for query executions
● Data security○ Monitoring reporting authorizations during query execution
SAP BW/4HANAOperation PUBLIC 1075

Test Administration
The Test Cockpit provides various administrative functions that allow you to make test activities and test results traceable for long periods of time. This includes the following:
● Special test requirements can be saved as an identifiable test object, known as the “test”.● The tests can be started manually or scheduled for one-off or periodic execution. You are therefore able to
set up and execute one-off test projects and to continuously monitor the quality of the system.● For clearly separable system modifications (installing an SAP Note or importing a Support Package for
example), the Test Cockpit provides a pre-defined test configuration.● The test logs all test executions and allows you to store manual descriptions for any errors that occur.● The test-specific and result-specific data is processed and administrated locally (not cross-system).● The test results are stored in relational database tables. You can use these as the data basis for individual
report applications.
Related Information
Performance Notes [page 1076]Test Cockpit [page 1072]
8.4.4.1.1 Performance Notes
Special prerequisites and limitations apply for the various test types.
Functional regression tests are dependent on a constant test basis. You therefore need to make sure that the underlying data and object settings remain unchanged for the duration of the test phase.
● If the results of queries should check their consistency, it is necessary to ensure that the queries are constant.
● If processes dictate that it is impossible to avoid changes to the data basis (InfoProvider transaction data and master data from the characteristics for example), special parameter settings can be made on the test objects (time-related filters in the query definition for example) to guarantee that the data is constant.
Functional regression tests must always be performed in the same language. Many parts of the data being tested can be language-dependent.
Comparative performance tests must always be performed under comparable system conditions. The resource load of application and database servers plays a crucial part here.
● Check the user interaction in the system.● Check the background processes in the system.
With all kinds of tests, pay attention to user-specific processing. The same test can behave differently depending on the user executing it.
● Also pay attention to variable exits that use sy-uname in the implementation.● Pay attention to queries with authorization-related settings.
1076 PUBLICSAP BW/4HANA
Operation

Related Information
Preparing a Test [page 1077]
8.4.4.2 Preparing a Test
Preparing a test first involves clarifying what is expected of the test procedure, the test data used, and the functionality to be tested.
Procedure
1. Answer the following question: What are my expectations from the test?
The expectations generally describe the following:
○ The test procedure and the kind of test used (functional regression tests or stress tests for example)○ The thematic area to be tested (for example query execution, query of data transfer processes
including the data transformation or definition of CompositeProviders)○ The quality characteristics or standards to be checked (functional correctness, performance or
security)○ The scheduling and frequency of the test (one-off, regularly, depending on dates or events)○ Additional requirements, such as data security of the test results (auditability), possibility of extending
the scope of the test2. Answer the following question: Is the test basis fully available in the test system/environment?
The test basis comprises all data components that affect execution of the test. Which data components of the test basis are required depends on on the feature to be tested.
The following list relates to the tests basis of analytic query requests: If provides an overview of the central components, but is not exahaustive.
○ Meta-objects of the types:○ RSTT Trace○ Query and other query element types (such as variable or calculated key figure)○ InfoProvider○ InfoObject○ Currency translation type
○ Transactional InfoProvider data○ Master data (attributes, texts and hierarchies) of characteristics○ System settings in basis tables○ Other settings (such as SPRO)
It is especially important to make sure that the test basis is complete in cases where functioning tests are to be transferred from one system into another initial system.
SAP BW/4HANAOperation PUBLIC 1077

If the automatic tests are built in a test environment, at least part of the test basis should be available, where relevant on the basis of manual test activities (such as test queries of the InfoProvider and associated transaction data and master data).
The trace in the Trace Tool (RSTT Trace) has a pivotal role in the test basis. The RSTT Trace can encapsulate multiple interactions of a user running in a role area of the back end with regard to a SAP BW∕4HANA process. This makes it possible to include many generic processes that are not directly represented by object or process definition. RSTT traces are therefore particularly suitable as processsing rules for automatic tests. It is generally necessary to create and record RSTT traces manually however.
The following graphic explains the difference between a SAP BW∕4HANA meta-object and an RSTT trace, taking the query or query execution as an example:
3. Answer the following question: Are the required traces available to the Trace Tool Environment (RSTT)?
RSTT traces are the basic units of all tests in the Test Cockpit. RSTT traces thus combine the processing rules of the functionality to be tested with additional parameters and data from the relevant test procedure. Of particular note here are the expected query results (known as the test reference data) and the selected execution settings for the query (such as the optimization mode for the operations in the SAP HANA ("operations in SAP HANA").
To create RSTT traces, you have the following options:○ Manual creation by recording user interactions and subsequent conversion to the CATT trace
1. Substep: Manual Recording of RSTT TracesPerform the following steps:1. Either activate your user yourself or with the support of an administrator in the BW back end
for RSTT recording in transaction RSTT in Trace Tool - User Activation. Make sure that you activate the Test Generation setting.
2. Log on to the front-end application or start the required back-end transaction.3. Perform the interactions that you want to record.4. Quit the application.5. Finish the recording by deactiving your user in transaction RSTT.
Notetype
The recording of RSTT traces continues for as long the back-end session is open. The system thus also records subsequent actions in the application being recorded, even if the user has already been deactivated for tracing. If in another case multiple interactions are each executed
1078 PUBLICSAP BW/4HANA
Operation

in a new back-end session (stateless applications like ODATA for example), multiple RSTT traces are created.
As soon as the recording is complete, the trace must be converted into a CATT trace. Traces of type "Standard" cannot be used as test units because important test-specific information is missing.
2. Substep: Conversion of a Recorded Trace into a CATT Trace.The system adds test-related and additional data here and thus makes it possible to check the consistency of supported data content. The central part of this conversion is determining what is known as the test reference data. This is the expected result of the data content being checked. As the person responsible for the test, check the technical conversion of the trace and the correctness of the test reference data determined.In many cases however, it is difficult or even impossible to thoroughly check the correctness for every data cell. The person responsible should therefore have experience of evaluating data content for testing, for example in query results or input help for characteristics. If incorrect planned results are considered to be correct, the test reports the test status "successful". This is because the test status only becomes “incorrect” once the actual results of the test deviate from the planned results. This is therefore the decisive manual step that you have to perform when preparing the trace. Only verified test reference data can guarantee high-quality testing.
○ Automatic generation based on a special source objectIn certain cases, the Test-Cockpit can generate the RSTT traces automatically. This includes the following scenarios:○ Initial query execution of queries without mandatory variables○ Initial execution of JAVA Web Bookmarks
4. Answer the following question: Is the test basis constant and consistent throughout? Is this necessary?
Normally it is advisable not to modify the tests basis during the test activities. For better comparability of functional correctness and of performance key figures, consistency of the data, objects and settings used serves to provide greater clarity when interpreting the test result.
Generally the following applies:
○ Tests that compare current results with historically determined target results or runtime indicators must have a constant test basis between the target and actual state. This state must be maintained over a longer period of time depending on the time horizont of the test. Traditional regression tests often require consistency over a period of years.
○ Tests that compare different execution set-ups at runtime only need to have a constant test basis for the duration of the test activities.
Next Steps
You then create the objects required in accordance with your requirements, provide the relevant transaction data, master data and system data, and make the required system settings.
Related Information
Defining a Test [page 1080]
SAP BW/4HANAOperation PUBLIC 1079

Trace Tool Environment [page 1055]
8.4.4.3 Defining a Test
To create a test, the user has to define requirements for the test procedure (test context) and the test object use. You can define objects of different test object types. Based on these settings, the system determines a list of test tasks that are worked through during definition.
Context
Various manual activities can be required here, depending on the test procedure used. A subsequent task can only be processed if all preceding tasks have been completed.
In the Test Cockpit (transaction RSTEST), you can create new tests and make changes to existing ones.
The interface is divided into the following areas, which allow you to make all parameter settings for your test:
Test Cockpit Screen Area
Screen Area Description
Test Identifies the test.
You enter a name and description for the test here, and select the required test area
Test Context Categorizes the test.
You set the use case, execution mode and process type here.
1080 PUBLICSAP BW/4HANA
Operation

Screen Area Description
Object Selection Selects the test units or objects.
You set the object type here.
Test Process Aspects Is used for navigation.
You nagivate here to the required test tasks and logs.
List of Necessary Test Tasks Provides a detailed display of the selections in Test Process Aspects.
You can find details of the test tasks and test logs of the test results.
Procedure
1. To create a new test, enter a unique name and appropriate description in the Test pane.2. Set the test area in the Trace Tool environment. At present, only Reporting, Planning and OLAP Technology
is supported.3. In the Test Context pane, select the use case, execution mode and process type in order to define the
purpose of the test and the test procedure.4. In the Object Selection pane, select the test object type and one or more test objects in order to define the
content of the test.5. Work through the test tasks in the Task Process Aspects pane. The various tasks here have to be processed
consecutively. Depending on the test context, the final step is always made up of saving the defined test and either executing it directly or scheduling it.
6. While you are working through the test tasks, the system prompts you to make test-specific settings. Work through the tasks in the List of necessary test tasks pane. The settings here depend on the test context selected and determine the test execution type.
The Test Cockpit saves all relevant changes automatically as soon as you select the first step of the test tasks. It is then no longer necessary to actively save in the entire application.
Results
You have defined a test and can now execute it.
To open and/or make changes to an existing test, choose Open in the toolbar. A hit list is displayed, containing either all tests or just the ones that you have defined. Double-click a test to select it.
To delete an existing test, choose Delete in the toolbar. Once you have confirmed the security prompt, all data, object definitions and job schedules directly related to the test are deleted.
SAP BW/4HANAOperation PUBLIC 1081

Related Information
Test Context [page 1082]Test Object Type [page 1087]Test Task [page 1088]Executing a Test [page 1101]Analyzing a Test [page 1103]
8.4.4.3.1 Test Context
To meet the various requirements for testing system functionality, the Test Cockpit offers pre-defined test categories with which tests can be specifically defined, executed and logged. This provides the test context.
The current test context reflects the current composition of the following categories:
● Application scenario● Execution mode● Processing type
These categories are interdependent of one another: If you select an application scenario, the system restricts the execution modes to those which are supported for the application scenario in question. Meanwhile, each execution mode only supports certain processing types. The application scenario is the least specific category. It has the task of governing the purpose of the test. This involves defining which quality characteristic is examined and which test principle is applied.
The table below provides an overview of the various application scenarios together with the execution modes that can be used with them:
Application Scenario Permitted Execution Modes
Functional test 1. Execution with static reference data check2. Dual execution with various execution settings
Performance test 1. Execution to determine throughput
System update test 1. Single execution2. Dual execution with various execution settings3. Multiple execution to evaluate query settings
Load test 1. Execution with static reference data check
1082 PUBLICSAP BW/4HANA
Operation

The table below provides an overview of the various execution modes together with the process types that can be used with them:
Execution Mode Permitted Processing Types
Single execution 1. No verification2. Message verification
Dual execution with various execution settings 1. No verification (only with performance test)2. Message verification3. Data consistency and message verification (only with
functional test)
Execution with static reference data check 1. Data consistency and message verification (only with functional test)
Multiple execution to evaluate query settings 1. No verification2. Message verification
Execution to determine throughput 1. No verification2. Message verification
Related Information
Functional Test [page 1083]Performance Test [page 1084]System Update Test [page 1086]Stress Test [page 1086]Defining a Test [page 1080]
8.4.4.3.1.1 Functional TestDuring a functional test, predefined processes are executed and data contents from two execution versions are compared.
Generated execution statuses (messages, exceptions, dumps) and identified data deviations can influence the test result. The test begins with the main execution of the test-related processes and then compares the collected data contents with the saved data contents from a previous execution (“static test reference”) or from a reference execution (“dynamic test reference”). Alternatively the test can also be defined just by using message validation and ignore any data inconsistencies.
The following graphic explains the principle of a functional test:
SAP BW/4HANAOperation PUBLIC 1083

CautionThe prerequisite for a valid test (for an intended data consistency check) is that all test data used for both execution versions remains unchanged. This includes the following specific data:
● Master data types (attributes, texts and hierarchies)● Transaction data (InfoProvider data and DataStore object data)● Meta definitions of the involved objects (such as InfoObject, InfoProvider, query)● All other relevant system data (such as currency information and fiscal time information).
Related Information
Test Context [page 1082]
8.4.4.3.1.2 Performance Test
A performance test investigates the runtime of the test units executed.
With this type of test, users can choose from single, dual, and multiple execution. As execution processes in analytics often support different execution parameter settings, the Test Cockpit can directly compare the runtimes of the required execution parameter settings.
NoteA parameter of interest in query execution is the optimization mode for operations in the SAP HANA ("Operations in SAP HANA").
1084 PUBLICSAP BW/4HANA
Operation

The graphic below illustrates the various possibilities for executing performance tests:
In a performance test, you can set the severity of the validity check as you would for a functional test: The test can either ignore execution states like messages, or consider them in a final evaluation.
CautionIn addition to data consistency as a basic prerequisite for a valid test, peformance tests also require a comparable load on the system, database and network for all relevant test executions.
Related Information
Test Context [page 1082]Operations in SAP HANA [page 841]
SAP BW/4HANAOperation PUBLIC 1085

8.4.4.3.1.3 System Update Test
The system update test is used specifically for discrete system modifications to check that functions are working correctly.
Regardless of the type of system modification (importing correction instructions of a Note, changing a profile parameter or importing an upgrade), the system update test enables you to identify the data contents to be checked before the system change and compare it to the data after the system change. This means data deviations caused by the system modification can be easy identified.
The following graphic explains the principle of the system update test:
CautionThe basic prerequisite of data consistency for the functional test also applies here.
Related Information
Test Context [page 1082]
8.4.4.3.1.4 Stress Test
A stress test checks the total number of test units executed during a specified time period.
Stress tests enable you to determine the query throughput under predefined general conditions. Here it is possible to specify the number of parallel processes, the execution duration and sequence rules. The user has the option of acting on system messages and terminations, or ignoring them. Executions, which are incomplete when they end, should usually not be counted as part of a stress test. It is therefore advisable to act on exceptions and dumps.
1086 PUBLICSAP BW/4HANA
Operation

The following graphic explains the principle of a stress test:
CautionA stress load test requires consistency for all relevant test data (similar to a performance test). It also requires a comparable load across the system, database and network for all test executions.
Related Information
Test Context [page 1082]
8.4.4.3.2 Test Object Type
Every test requires a clearly defined set of test units, regardless of the use case or test type. The test units describe which processes are executed, and with which parameters and objects or data.
The RSTT trace acts an elementary test unit.
The following object types are also supported:
● Multiple RSTT traces● RSTT trace package● Multiple queries● Multiple JAVA bookmarks
RSTT traces are automatically generated by the application for queries and Java bookmarks.
SAP BW/4HANAOperation PUBLIC 1087

There are type-specific restrictions or conditions for the used initial objects:
Object Type Comment
RSTT trace Traces of type 'Standard' cannot be used for use cases with a data consistency check.
RSTT trace package The playback settings of the RSTT package (see package definition in RSTT) are overridden by the Test Cockpit.
Query Only queries without mandatory variables can be used.
JAVA bookmark To generate traces based on JAVA bookmarks, you need to ensure that the JAVA engine is fully and correctly configured. Trace generation triggers an HTTP request and records BICS interaction in ABAP.
Related Information
Defining a Test [page 1080]Trace Tool [page 1057]
8.4.4.3.3 Test Task
Every test configuration in the test cockpit generates a task list that based on the selected use case.
Here the user is prompted to complete all the necessary steps in the specified order. The individual tasks include:
Tasks Note
Prepare test: Specify settings The parameters to be configured depend on the test context.
Execute test Starts the test as a background process.
NoteIf “regular execution” is selected as the execution type in the "Specify settings” task, scheduling is performed at the designated time for the job. The default mode is "direct execution". This results in direct execution in the background process.
1088 PUBLICSAP BW/4HANA
Operation

Tasks Note
Update system version (manual task) Only for the use case “system update test”. Here the test user must implement the intended system modifications (for example, import a support package using transaction SNOTE) and confirm the implementation in the test cockpit.
CautionThe implementation itself is not performed in the test cockpit.
End all data loading process in test-related objects Only for the use case “system update test”.
NoteIf regular execution is selected as the execution type in the "Specify setttings” task, scheduling is performed at the designated time for the job. The default mode here is "direct execution". This results in direct execution in the background process.
Related Information
Setting the Parameters for a Functional Test [page 1090]Setting the Parameters for a Performance Test [page 1092]Setting the Parameters for the System Update Test [page 1095]Setting the Parameters for the Stress Test [page 1097]Execution Type [page 1099]Variant for Execution Settings [page 1100]Defining a Test [page 1080]
SAP BW/4HANAOperation PUBLIC 1089

8.4.4.3.3.1 Setting the Parameters for a Functional Test
Once you have defined the name of the text, the test context, and the test object selection, you are prompted via the task list to set the parameters for the functional test.
Context
When setting the text context, you can choose from two execution modes:
● Execution with static reference data check: This variant makes it possible to run a test against an older, verified system state. Setting the parameters in this way therefore represents the classical functional regression test.
● Dual execution with different execution settings: With this test variant, two executions with different execution settings are juxtaposed. The test reference is therefore not static and historical. Instead it is dynamic and determined currently at runtime.
NoteThe parameters displayed under Test Reference depend on the execution mode selected.
Procedure
1. Make the required settings under Test Execution.
The following list explains the meaning of the various parameters:
Parameter Description
Variant for execution settings The execution settings related to how the process anchored in the trace should be executed. For the execution of queries, there is a series of parameters that influence processing in the Analytic Manager and on database-specific optimizations. A large number of these settings can be set for the definition of tests. The combination of all parameter values is depicted in the form of a variant that the system creates as an attribute of a test.
Number of parallel processes The traces contained there can be executed sequentially or in parallel. You set the number of parallel processes here.
1090 PUBLICSAP BW/4HANA
Operation

Parameter Description
Collection of query runtime statistics The runtime statistics provides detailed information about runtimes and of record quantities in the query execution. These can be created and saved for each trace execution depending on the test requirements.
Store statistical data separately As runtime statistics are deleted on a regular basis, it can be a good idea to save this data seprately. If you want it to be possible to make statistical comparisons with current test runs over a long period of time (to compare different Support Package versions for example), you can activate this parameter.
2. Make the required settings under Test Reference.
The following list explains the meaning of the various parameters available with execution mode Execution with static reference data check:
Parameter Description
Type of reference The system displays the type of reference data check here.
Selection type The parameters for the test reference are set via the test reference variant. Among other things, this sets which execution settings are used to determine the test reference data (planned results). Using the selection type, the system determines whether the test reference variant of the trace definition should be used, or whether a different variant should be used.
Name of the reference If you have opted for selection type Existing Test Reference Variant, you have to select the name of the variant to be used here.
The following list explains the meaning of all parameters which have a different meaning in connection with dual execution with various execution settings compared to their meaning for a static test reference:
Parameter Description
Type of reference The system displays the type of reference data check here.
Selection type With the dynamic reference, you can set whether the system should create a new reference variant (default setting) or use an existing one.
SAP BW/4HANAOperation PUBLIC 1091

Parameter Description
Name of the reference If you want a new reference variant to be created, the name is defined by the application. If you have opted for selection type Existing Test Reference Variant, you have to select the name of the variant to be used here.
Variant for execution settings If you want a new reference variant to be created, you set here which execution settings are used to start the reference execution.
Tolerance for runtime differences As two different executions are compared with each other in the dual execution, it is possible to compare the runtimes of the two executions. The tolerance for runtime differences sets a runtime deviation in percent after which the deviation should be flagged up by the system.
3. Make the required settings under Execution Type.
Related Information
Variant for Execution Settings [page 1100]Execution Type [page 1099]
8.4.4.3.3.2 Setting the Parameters for a Performance Test
Once you have defined the name of the text, the test context, and the test object selection, you are prompted via the task list to set the parameters for the performance test.
Context
When setting the text context, you can choose from two execution modes:
● Simple execution: The simple execution executes every trace just once and determines its runtime.● Dual execution with different execution settings: With this test variant, two executions with different
execution settings are juxtaposed. The comparison criteria here are the runtime and the system messages (optional). This test variant is always of interest if you have certain optimization procedures for query execution in your runtime and would like to analyze how well they function. An example is the runtime comparison between two different parameter settings for the runtime profile property Operations in SAP HANA.
● Multiple execution for evaluation of execution settings If you would like to examine the efficiency or runtime of three or more execution settings, you can use this variant to obtain a clear runtime evaluation. The
1092 PUBLICSAP BW/4HANA
Operation

analysis provides you with a direct recommendation in terms of which execution setting ensures the best runtime for which trace or which query.
NoteThe parameters displayed depend on the execution mode selected.
Procedure
1. Make the required settings under Test Execution.
If you have selected Simple Execution or Dual execution with different execution settings, you have to make the following settings under Test Execution:
Parameter Description
Variant for execution settings The execution settings relate to how the process anchored in the trace should be executed. For the execution of queries, there is a series of parameters that influence processing in the Analytic Manager and on database-specific optimizations. A large number of these settings can be set for the definition of tests. The combination of all parameter values is depicted in the form of a variant that the system creates as an attribute of a test.
Number of parallel processes The traces contained there can be executed sequentially or in parallel. You set the number of parallel processes here.
Collection of query runtime statistics The runtime statistics provides detailed information about runtimes and of record quantities in the query execution. These can be created and saved for each trace execution depending on the test requirements.
Store statistical data separately As runtime statistics are deleted on a regular basis, it can be a good idea to save this data seprately. If you want it to be possible to make statistical comparisons with current test runs over a long period of time (to compare different Support Package versions for example), you can activate this parameter.
SAP BW/4HANAOperation PUBLIC 1093

If you have selected Multiple execution for evaluation of execution settings, you also have to make the following settings under Test Execution:
Parameter Description
Number of Iterations To determine a representative valuation of runtimes for individual traces or queries, it generally helps to execute all traces and to compare the average runtime of the execution settings you want to examine. You use this parameter to define how often each trace is executed for each execution setting.
With test variant Multiple execution for evaluation of execution settings, you can set the relevant execution settings either manually or using a template. The template supports the permutation of two important query runtime properties: Operations in SAP HANA (TREXOPS) and Always Materialize Intermediate Results (MATERIALIZE). If both parameters are selected, a list of variants of the execution settings (execution code for short) is predefined. As parameter values, the system displays the technically valid key values of the parameter in question.
2. If you have selected Dual execution with different execution settings, you also have to make the required settings under Test Reference.
The following list explains the meaning of the various parameters:
Parameter Description
Variant for execution settings If you want a new reference variant to be created, you set here which execution settings are used to start the reference execution.
Tolerance for runtime differences As two different executions are compared with each other in the dual execution, it is possible to compare the runtimes of the two executions. The tolerance for runtime differences sets a runtime deviation in percent after which the deviation should be flagged up by the system.
3. Make the required settings under Execution Type.
Related Information
Variant for Execution Settings [page 1100]Operations in SAP HANA [page 841]Execution Type [page 1099]
1094 PUBLICSAP BW/4HANA
Operation

8.4.4.3.3.3 Setting the Parameters for the System Update Test
The system update test is different to the other test application cases. The difference lies in the process control of the individual test-related activities. The system update test is a functional test. It compares data content before and after a system modification.
Context
This type of test is suitable for verifying specific system modifications, particularly after importing Support Packages or implementing SAP Notes.
Unlike all other application cases, the task list is made up of the following steps:
Procedure
1. The system prompts you to suspend all activities that modify the test basis. This is the prerequisite for a consistent comparison between the state before and after the system modification.
NoteOnly the confirmation is created in the Test Cockpit. You have to perform the load and write processes in the relevant application.
2. In this step, you set the relevant test parameters. Once you have defined all relevant parameters, the Test-Cockpit starts a background process which automatically updates all test reference data in the participating traces. This persists the state before the system modification.
3. Once all test reference data has been updated, the application prompts you to perform the system modification.
NoteOnly the confirmation for the modification is created in the Test Cockpit. The modification itself must be performed in the relevant application (using transaction SNOTE or SPAM for example).
4. Once the system has been successfully modified, you can start the test.5. Make the required settings under Test Execution.
SAP BW/4HANAOperation PUBLIC 1095

The following list explains the meaning of the various parameters. It is equivalent to the one in the functional test with a static test reference check:
Parameter Description
Variant for execution settings The execution settings related to how the process anchored in the trace should be executed. For the execution of queries, there is a series of parameters that influence processing in the Analytic Manager and on database-specific optimizations. A large number of these settings can be set for the definition of tests. The combination of all parameter values is depicted in the form of a variant that the system creates as an attribute of a test.
Number of parallel processes The traces contained there can be executed sequentially or in parallel. You set the number of parallel processes here.
Collection of query runtime statistics The runtime statistics provides detailed information about runtimes and of record quantities in the query execution. These can be created and saved for each trace execution depending on the test requirements.
Store statistical data separately As runtime statistics are deleted on a regular basis, it can be a good idea to save this data seprately. If you want it to be possible to make statistical comparisons with current test runs over a long period of time (to compare different Support Package versions for example), you can activate this parameter.
6. Make the required settings under Test Reference.
Unlike in the normal functional test, the test reference is selected and then created again at runtime. The type of the test reference is therefore different. To create the current test reference data, it is also possible to set the variant of the execution settings.
The following list explains the meaning of the various parameters:
Parameter Description
Type of reference The system displays the type of reference data check here.
Selection type The parameters for the test reference are set via the test reference variant. Using the selection type, the system determines whether the test reference variant of the trace definition should be used, or whether a different variant should be used.
1096 PUBLICSAP BW/4HANA
Operation

Parameter Description
Name of the reference The name of the test reference variant to be created is determined by the application and cannot be changed.
Variant for execution settings The test reference data is determined by means of simple execution of the various traces. The variant for execution settings for the test reference defines how the traces are executed.
7. Make the required settings under Execution Type.
Related Information
Variant for Execution Settings [page 1100]Execution Type [page 1099]
8.4.4.3.3.4 Setting the Parameters for the Stress Test
In the stress test, the duration of the test is not influenced by the number of traces or defined iteration cycles, but is set directly during definition of the test. The purpose of the stress test is to determine the total number of traces executed during the duration of the test. As well as the duration, you can set further parameters that govern how traces are executed.
Context
The system processes the entire trace list for each execution cycle before the execution cycle starts executing new traces. This guarantees that the tests remain comparable and that every trace is executed with more or less the same frequency.
Procedure
1. Make the required settings under Test Execution.
SAP BW/4HANAOperation PUBLIC 1097

The following list explains the meaning of the various parameters:
Parameter Description
Variant for execution settings The execution settings related to how the process anchored in the trace should be executed. For the execution of queries, there is a series of parameters that influence processing in the Analytic Manager and on database-specific optimizations. A large number of these settings can be set for the definition of tests. The combination of all parameter values is depicted in the form of a variant that the system creates as an attribute of a test.
Number of parallel processes Unlike the other test contexts, this sets how many autonomous processes are started in parallel, which execute all relevant traces in a clearly defined sequence. The sequence is defined with the Random Trace Selection and Random Seed Starter parameters. You set the number of parallel processes here.
Collection of query runtime statistics The runtime statistics provides detailed information about runtimes and of record quantities in the query execution. These can be created and saved for each trace execution depending on the test requirements.
Store statistical data separately As runtime statistics are deleted on a regular basis, it can be a good idea to save this data seprately. If you want it to be possible to make statistical comparisons with current test runs over a long period of time (to compare different Support Package versions for example), you can activate this parameter.
Duration of Execution Duration of Test Execution in Minutes
Random Trace Selection This parameter controls how the sequence is determined for an execution cycle in an individual parallel process
If you activate random trace selection, the system decides randomly at runtime which trace to execute next. The randomly determined order is then reused for all subsequent execution cycles of this process. The sequences of the various processes thus vary, and repeated parallel execution of the same traces is reduced.
If you deactivate random trace selection, trace sorting for all parallel processes is the same.
1098 PUBLICSAP BW/4HANA
Operation

Parameter Description
Random Seed Starter This parameter governs whether the randon trace selection procedure is identical in multiple executed tests. If the Random Seed Starter parameter is activated, the same randomly sorted trace sequence is therefore determined for every parallel process when the stress test is executed multiple times. This parameter also increases the degree of comparability between different test runs.
Warm-Up If you activate this parameter, there is a one-off execution of every trace before the actual stress test begins. This ensures that the status of the applications to be tested is prepared. This means for example that cache entries are filled, and data segments from the database are written to the working memory. This in turn serves to increase the comparability of different test runs.
2. Make the required settings under Execution Type.
Related Information
Variant for Execution Settings [page 1100]Execution Type [page 1099]
8.4.4.3.3.5 Execution Type
The execution type is part of the test parameterization: You can execute a test directly as a one-time test or you can schedule the test to be run periodically in the background.
You have the following options here:
Type of Execution Period Description
Direct Execution - You can start the direct execution manually as soon as you have specified all relevant parameters. If it is necessary to repeat the execution, this can be done very easily.
Scheduled Execution One-Time The system schedules the test to run in the background at a specified time. The system prompts you to specify the day and time.
SAP BW/4HANAOperation PUBLIC 1099

Type of Execution Period Description
Daily The system schedules the test for daily execution in the background. The system prompts you to specify when (day and time) you want the test to be executed for the first time.
Weekly The system schedules the test for weekly execution in the background.
Monthly The system schedules the test for monthly execution in the background.
Related Information
Setting the Parameters for a Functional Test [page 1090]Setting the Parameters for a Performance Test [page 1092]Setting the Parameters for the System Update Test [page 1095]Setting the Parameters for the Stress Test [page 1097]
8.4.4.3.3.6 Variant for Execution Settings
The test cockpit supports a concept for parameterizing the execution of RSTT traces.
You can save the values of multiple runtime settings during query execution in a variant for execution settings (or execution code for short). This expression is represented by a 20-character field and can depict all the important runtime parameters for query execution.
The system supports the following execution settings as direct parameters (selectable via list):
● Read mode● Cache mode● Aggregation Level● OLAP layer
The system still supports special debug settings as indirect parameters. Select the corresponding function key. The system displays the following debug settings in a tree structure with selection fields:
● Force use of structure elements● Always materialize intermediate results - Never materialize intermediate results
1100 PUBLICSAP BW/4HANA
Operation

Related Information
Setting the Parameters for a Functional Test [page 1090]Setting the Parameters for a Performance Test [page 1092]Setting the Parameters for the System Update Test [page 1095]Setting the Parameters for the Stress Test [page 1097]Runtime Profile Properties [page 835]
8.4.4.4 Executing a Test
Once you have defined a test, you can start it. It is always executed in a background process.
Context
The system creates all RSTT traces stipulated in the definition of the test, groups them as an RSTT trace package and then executes them directly via a generated RSTT job. Once the system has processed all traces, it logs the test result in specific RSTT database tables.
You can either start the text manually or schedule it to run once or recurrently.
Procedure
1. To execute a test, choose Execute from the toolbar on the start screen or the last action button in the task list.
At a technical level, an RSTT test job is created during the first execution. This job then schedules the test or executes it directly. The technical name of the RSTT test job is derived automatically from the prefix "@T_" and the test name. Once the test process has been started in the background, the individual test units are processed in accordance with the relevant test context. The results of the individual test executions are consolidated at runtime by the main process and are persisted to database tables once execution is completed. Process-related entries are also written to the job log (transaction SM37).
2. Once the test run has finished, you can call the test result log from the navigation area in the start window.3. To update the execution status, choose Refresh in the toolbar on the start screen.
Results
At the end of the test run, you can call the test results from the navigation area in the start window.
SAP BW/4HANAOperation PUBLIC 1101

Related Information
Logging the Test Results [page 1102]
8.4.4.4.1 Logging the Test Results
At the end of the test run, you can call the test results from the navigation area in the start window. At runtime, no intermediate test results are passed. Every test run has a unique test run key assigned to it.
The log is always made up of two parts:
● The test run header data, with aggregated key figures for the trace number and runtime including the consolidated test status (database table: RSTTLOG)
● Elementary test results for all individual trace executions (database table: RSTTRES)
Test Run Header Data
The individual test runs of a test are displayed hierarchically in the navigation area. Every entry provides information about when the test was started, the success rate of the individual trace executions, and the absolute execution counters ("successful" or "with errors"):
If they are supported by the test context, key figures are also displayed for test analysis.
Elementary Test Results for All Individual Trace Executions
The elementary test results for the individual trace executions are displayed in a table. The field selection for this depends on the test context.
1102 PUBLICSAP BW/4HANA
Operation

The graphic below shows how the results are displayed for a functional test with static reference data check:
Individual trace executions are specified by means of the trace ID, the execution code and the test reference. The test status (“successful” or ”with errors”) provides a rough indication of the test result, while the result type provides a finer classification of various error statuses. Runtimes and time stamps describe the timeframe.
By pressing the Test button, you can run the selected trace again in isolation.
If you press the BW Statistics button, the system displays a detailed analysis of the runtime statistics for the execution in question.
Related Information
Executing a Test [page 1101]
8.4.4.5 Analyzing a Test
Once the test run has ended, you can view the results. If the test context supports detailed test analysis, you can use further services for analyze results and appraise errors.
Context
As well as displaying the basic test results, the test analysis supports recognition of recurring errors, aggregated comparison of results from various test groups, and reusable documentation and assignment of defects.
SAP BW/4HANAOperation PUBLIC 1103

Procedure
1. Once a test run has ended, select the test run that you want to analyze.2. Choose Analyze in the navigation toolbar. The analysis page is displayed.
This page is divided into four sections:
○ Test run summary○ Result filter○ Aggregated display of individual traces○ Basic test results (not for all test contexts)
Results
Every basic test returns a specific test result profile depending on the text context. Certain test configurations are therefore not supported by the analysis services.
Related Information
Available Analysis Services [page 1104]
8.4.4.5.1 Available Analysis Services
You can use the following analysis services to analyze results and appraise errors.
Aggregated result display of individual test groupsThe aggregated result display provides all test configurations that execute individual traces multiple times with a clear display grouped by traces. For special use cases, a direct recommendation is also provided for runtime-optimized execution settings.
Automatic recognition of recurring error states ("pattern recognition")If the test is a functional test including a data consistency check, the pattern recognition of error states can tell in the case of recurring incorrect trace execution whether the individual error situation is different or stays the same over the period of time. This is particularly useful if the tests are executed regularly in short cycles, and there are errors in the basic tests over a long period of time.
Documentation of errors and reference to test results ("defect assignment")The automatic test process normally ends in the logging of the test results. These test results provide the basis for a more detailed analysis, which has the task of answering the following questions:
● Why were individual tests not successful?
1104 PUBLICSAP BW/4HANA
Operation

● What caused this?● What needs to happen for the cause of the error to be remedied, and the test to run successfully?
The system automatically assign a unique key to every test execution. This makes it possible to explicitly describe error situations and test cases. Together with with automatic error pattern recognition, this provides an efficient service that simplifies and accelerates regular analysis of your periodically executed tests.
Related Information
Analyzing a Test [page 1103]
8.5 Transferring BW Test and Demo Scenarios with SDATA
Using the tool SDATA - for transferring BW scenario data (transaction RSDATA) - you can transfer BW objects, including data (transaction data and master data), from a source to a target. This is intended for test and demo purposes. The intention of SDATA is to reduce the effort required to set up BW objects and BW data for test and demo scenarios in new environments (initially installed BW systems).
CautionNote that the SDATA is intended exclusively for test and demo purposes and is not suitable for transporting BW objects or transferring data in a productive system landscape.
The basic installation is usually sufficient to evaluate the productivity and quality of an SAP BW system version. During the software lifecycle of a BW system, specific business scenarios are needed for test purposes for tasks such as verifying release upgrades or support packages. These business scenario models are often similar to productive models, which are based on a well-defined quantity of BW objects, including the object data. In the following sections of documentation, these models are referred to as "BW test and demo scenarios" or simply "BW scenarios".
Usually once BW scenarios have been created, they are copied in a new environment (target systems for evaluations) using a system copy, or they are manually distributed using the transport connection transport of requests and data provisioning (staging). However, the following documentation describes which system activities are required to distribute BW test and demo scenarios (including their objects and data), which already exist in a system, as target systems in not copied systems by using SDATA.
Possible application areas of SDAA include:
● Setting up test scenarios for support package tests and upgrade tests● Providing business scenarios for customer validations or proof of concept projects● Support of upgrade evaluations, preparations and proof of concepts (for example, SAP BW on SAP HANA
trial version in the Cloud).
The transfer of BW test and demo scenarios using SDATA is supported by a two-step method:
1. The objects and data are exported from a (source) system into a local or global file system.2. The objects and data are imported by the saved SDATA files into the target system.
SAP BW/4HANAOperation PUBLIC 1105

NoteThe transfer can be performed using an SDATA-specific storage on the BW database. This option allows you to save specific scenario states, so that you can reset a test and demo scenario if required.
Prerequisites
● Note the information in the following Notes:○ SAP 2018326 - Transferring BW Reporting Scenarios Between Two Systems○ SAP Note 2098307 - SDATA: Restrictions in transfer of BW reporting scenarios
● Authorization object S_RS_SDATA is required for working with SDATA.
● We recommend the following general GUI setting: Modify Local Layout Options Security Security Settings Status: Deactivated
Supported Objects and Data
SDATA supports the following BW objects:
Object Category Supported Objects
BW Object Main Types ● InfoObjects● InfoCubes● MultiProviders● DataStore object (classic)● Aggregation levels● DataStore object (advanced)● Display hierarchy● CompositeProvider
Report-Specific Types ● Query● Query variable● Calculated key figure● Restricted key figure● Query filter● Query structure● Currency translation type● Unit conversion type● Key date derivation type
1106 PUBLICSAP BW/4HANA
Operation

Object Category Supported Objects
BW Trace Tool Types ● RSTT trace● RSTT trace package● RSTT trace job● RSTT test reference variant● RSTT test object replacement variant
Basis Object Types ● System settings (such as supported characters or currencies, units) from tables T00* and TCUR
● Database table
SDATA can handle the following data types:
● InfoCube data● Active data of DataStore object (classic) by copying the data content of the A table (see chapter
Restrictions for more details)● Data from a DataStore object (advanced): The request data can be transferred by writing the data via
request handling.● Attribute data and text data of characteristics● Hierarchy version data for display hierarchies
Limitations
Unfortunately SDATA cannot handle every possible scenario constellation, because SDATA does not support every InfoProvider type and does not support all BW object settings.
General limitations
1. SDATA does not currently offer any version concept, except for InfoObjects (metadata) and RSTT traces. If a BW object exists in the source system and in the target system, SDATA cannot identify whether the object versions are identical or inconsistent. The same issue occurs with existing BW data instances such as InfoCube requests or InfoObject attributes.
2. In cases where BW objects (start objects) relate to subobjects that are not supported by SDATA, most of the master objects are not set up correctly. Example: a query based on a VirtualProvider with DTP access. Since SDATA cannot transfer DTP objects, the query execution at the end will only be successful if the DTP already exists in the target system.SDATA helps you to transfer a scenario by helping you with the list of tasks required before or after the transfer.
Object-related limitations
1. The data of DataStore objects (classic) can only be used to execute queries. Since SDATA copies the data of the active table directly into the target DSO, the load request status is not consistent. Therefore no data staging activity is possible on the DSO data (for example, using the data transfer process to load data into another data target). In addition, it is currently not possible to create SIDs for all included characteristic values.
2. Specific InfoProvider types cannot be transferred: InfoSet, HybridProvider.
SAP BW/4HANAOperation PUBLIC 1107

3. ABAP implementations are not supported. Examples: user exit variables, master data read classes and data access implementations for VirtualProviders. In all these cases, the BW object itself is transferred correctly, but the associated implementation is not transferred.
More Information
● SAP 2018326 - Transferring BW Reporting Scenarios Between Two Systems● SAP Note 2098307 - SDATA: Restrictions in transfer of BW reporting scenarios
8.5.1 Functions of SDATA
The transfer of BW test and demo scenarios with SDATA is based on specific underlying ideas and functions, which combine flexibility - specification of transfer direction and object selection - with efficient mechanisms for extraction, creating objects and loading data.
Transfer and Transfer Path
SDATA supports the transfer of data between a source and a target. During a transfer, the transfer source extracts the data units of a test scenario and demo scenario and sends them to the transfer target. The BW metadata is created in the target and the associated data is written to the target. The source or target can be either a BW system or a local client/file system. The transfer path specifies the source and target for the transfer of a test and demo scenario, including the relevant BW objects and BW data.
Selecting and Collecting Objects
The required BW objects - such as BEx queries or InfoProviders - can be selected for the specified source. SDATA uses a simple object model, which includes the data belonging to the object and the dependent objects. SDATA processes all BW objects and BW data, which necessarily depend on the object selection.
SDATA Object Model
SDATA provides an object model that offers an abstract understanding of how BW objects and BW data represent a test and demo scenario in the context of SDATA. This object model fulfills specific requirements:
● AccuracyThe objects and data supplied by SDATA must be consistent and identical to the source .
● CompletenessEvery object that is necessary for a scenario must be transferred. The same applies to the data.
1108 PUBLICSAP BW/4HANA
Operation
● FlexibilityThe object model can be modified in line with different object definitions and data formats, in order to integrate further BW object types in the future.
The SDATA object model has two entity types:
● BW objects as individual entities of a BW scenario - referred to as scenario objects. Examples: BEx Query, InfoCube, InfoObject, display hierarchy
● Data units of a scenario object - referred to as elementary objects. Examples: InfoCube requests, characteristic attributes, meta definitions of a query element
The model also has two relationship types:
● A directional relationship between the main scenario object and the lower-level scenario objects ("based on"). Examples: query Q based on InfoCube C, or InfoObject A based on InfoObject B
● A relation between the scenario object and the associated elementary object ("contains"). Examples: InfoCube A contains data request R, or characteristic C contains text data.
Based on this concept, BW test and demo scenarios with nested BW object dependencies can be analyzed and prepared for a fully automated transfer process.
Transfer Process
Once all objects have been collected, the transfer from the user can be started. During the transfer, all associated data objects are processed one after the other in a well-defined order. With large data packages, transaction data and master data is handled in blocks. The extraction of objects and data from a BW system is based on BW services. Creating objects and loading data is also based on BW functions. These guarantee consistent SID generation in the target system.
8.5.2 Opening the Tool for Transferring BW Test and Demo Scenarios
To start the tool for transferring BW test and scenario data (SDATA), call transaction RSDATA.
The process for configuring and executing the transfer is divided into the following steps:
● Set configuration● Transfer path● Select objects● Collect dependent objects● Start transfer● Further Settings
On the right side of the screen, the system displays the relevant information for each step, and you make the relevant settings.
SAP BW/4HANAOperation PUBLIC 1109

8.5.3 Transferring a BW Test and Demo Scenario Using a Local Client (or File System)
SDATA two-step method: the objects and data of a BW test and demo scenario are first exported from a BW system (source) into a local or global file system. Then the SDATA files stored in this file system are used to import the objects and data into the target BW system.
Related Information
Transferring a BW Test and Demo Scenario to a Local Client (or File System) -> File Export [page 1110]Transferring a BW Test and Demo Scenario from the Local Client (or File System) to a BW System -> File Import [page 1113]
8.5.3.1 Transferring a BW Test and Demo Scenario to a Local Client (or File System) -> File Export
Procedure
1. Call transaction RSDATA in the BW system with the required test and demo scenario.
2. To create a new configuration, press Configuration Maintenance New under Transfer Configuration on the left side of the screen.
Entering a configuration name and a description is optional. However, to save the transfer configuration, a unique configuration name is required. This is generated by the system.
3. Under Special Settings, the following settings can be made:
Option Description
Ignore load request structure for data from the InfoCube and the ADSO
If you select this field, the requests are not retained 1:1 when the data is transferred. All data is read and transferred via all closed requests instead. This generally allows you to optimize performance, for example in scenarios with a large number of small requests.
Collect master data for InfoProvider-related InfoObjects only
If you select this field, the master data is not collected over all levels. It is only collected over the first levels relevant for the query. This setting allows you optimize performance during the transfer.
Collect technical time characteristics
SDATA also collects technical characteristics. It is not normally necessary to transfer technical time characteristics. To make sure that no important time characteristics (such as
1110 PUBLICSAP BW/4HANA
Operation

Option Description
0CALDAY) are overwritten unintentionally in the target during the transfer, you have to explicitly activate collection of technical time characteristics.
4. To define in which the direction the transfer should be performed, press Transfer Path under Transfer Configuration on the left side of the screen.
For a classic file export, choose System as the source and File on PC as the target.
If you choose File on PC, the system will ask for a folder location in the user's file system. The SDATA transfer on the file system automatically creates a structured folder tree with a root folder named SAP_BW_SDATA.
5. To define the selection of BW objects, choose Objekte festzulegen, press Object Selection under Transfer Configuration on the left side of the screen.a. To select the relevant start objects for the BW test and demo scenario, click on a scenario object type.
NoteWith the SDATA object model, the following applies: the higher the dependency level of the selected scenario object, the greater the number of related scenario objects identified. If you select an InfoObject for example, only the mandatory lower-level InfoObjects and all associated display hierarchies are displayed. If you select a BEx query for example, all associated query elements, InfoProviders, InfoObjects and hierarchies are collected.
b. Enter one or more start objects in the dialog box. The use of * is supported when entering objects.c. On the right screen area, you can restrict object collection to specific element object and scenario
object types, by deselecting the types not required.d. To select additional start objects of a different scenario type for the BW scenario, click on the relevant
scenario type and enter the required objects in the dialog box.6. To start collecting objects, press Dependent Objects under Transfer Configuration on the left side of the
screen.
The collected objects are displayed in the system.
The duration of the collection process depends on the number of objects identified, the selected transfer source and selected transfer target.
All involved scenario objects and elementary objects are collected. A status check is also triggered in the source location and in the target location - for each found object. If the elementary object already exists in the target system, the status Object completely available is displayed. If the object does not exist, the status Object does not exist is displayed. All the objects that do not exist in the target are selected for transfer automatically (column Apply). To overwrite objects that already exist in the target, you can select the relevant objects manually in the Apply column.
CautionThe overwrite mechanism behaves differently depending on the elementary object type and should be used very carefully. Overwriting metadata settings of an InfoObject might invalidate existing BW objects, which are not part of the SDATA transfer. Overwriting InfoCube data requests is generally not allowed.
Once the required transfer configuration settings are completed, the transfer can be started.
SAP BW/4HANAOperation PUBLIC 1111

7. To make further object-specific settings for the transfer, press Further Settings under Optional Settings on the left side of the screen. You have the following options here for modifying data for individual BW objects before transferring them to the target system:
Option Description
Filters Specify one or more characteristics or fields and define filters on them. Make sure that you enter these correctly, as the system does not check this.
Manipulate
SDATA provides an algorithm for data masking. Specify a manipulation rate for the algorithm.
For manipulation/data masking, you can also define your own routines. For more information, see SAP Note 2132326 .
If you select Apply to All Objects , data masking is applied to all collected objects of the same type.
Reduce Enter a percentage. The system removes the specified percentage of data for the transfer.
NoteNote that the options can only be chosen for objects that they make sense for or which are logical combinations.
8. To perform the transfer, press Start Transfer under Transfer Configuration on the left side of the screen.
In the Execution Settings tab page on the right side of the screen, the system shows how the transfer is executed. We recommend that you use the default settings here.
In cases where BW objects (start objects) of the scenario to be transferred are related to child objects not supported by SDATA, the system offers your system support in order to process the manual tasks that are required. Under Additional Tasks, the system informs you whether or not manual tasks have to be performed. If tasks have to be performed, you can call the list of these tasks via the Details button. You can confirm processing of the individual tasks once they have all been completed, and start the transfer.
9. To start the transfer, press Execute on the Execution Settings tab page on the right side of the screen.
The transfer is executed in the dialog box. If no access is made to a local client during the transfer, you can perform it in the background, with large amounts of data for example. To do this, select the Background Processing field and choose Execute.
Once the transfer is completed, the log view is displayed. The Scenario Object Details tab displays object-specific logging information. If you click on a scenario object, you will see detailed information about all associated elementary objects and included process steps in the right area of the tab. The Log Information tab shows a transfer log summary.
The files are now available in your file system.
NoteThe folder structure created in the root folder SAP_BW_SDATA is required, in order to ensure a consistent scenario import. If the SDATA files need to be delivered to an “external” file system (outside the available network), make sure that the folder structure will not be destroyed. Zipping the entire folder and file set also saves the folder structure.
1112 PUBLICSAP BW/4HANA
Operation

8.5.3.2 Transferring a BW Test and Demo Scenario from the Local Client (or File System) to a BW System -> File Import
The procedure for importing a BW test and demo scenario from the file system into a BW system is almost the same as for exporting from the file system. The only difference is that the transport path has to be set in the opposite direction.
Procedure
1. Call transaction RSDATA in the BW system, into which you want to import the test and demo scenario.
2. To create a new configuration, press Configuration Maintenance New under Transfer Configuration on the left side of the screen.
3. To define in which the direction the transfer should be performed, press Transfer Path under Transfer Configuration on the left side of the screen.
For a file import, choose File on PC as the source and System as the target.
If you choose File on PC, the system will ask for a folder location in the user's file system. Enter the folder that contains the root folder SAP_BW_SDATA.
4. To define the selection of BW objects, choose Objekte festzulegen, press Object Selection under Transfer Configuration on the left side of the screen.a. To import the complete object selection from the file system, choose Select All.b. On the right screen area, you can restrict object collection to specific element object and scenario
object types, by deselecting the types not required.5. To start collecting objects, press Dependent Objects under Transfer Configuration on the left side of the
screen.
Again in this step, the source location is scanned for all associated scenario objects and elementary objects. A status check is also performed for the source location and target location.
As with the import process, SDATA recommends which objects should be included in the transfer: objects that do not exist in the target system.
6. To make further object-specific settings for the transfer, press Further Settings under Optional Settings on the left side of the screen. You have the following options here:
Option Description
InfoArea Here you can set an (existing) InfoArea as the target for every object to be transferred to a target system.
NoteNote that the options can only be chosen for objects that they make sense for or which are logical combinations.
7. Press Start Transfer under Transfer Configuration on the left side of the screen and check whether any manual tasks have to be performed for the transfer.
SAP BW/4HANAOperation PUBLIC 1113

8. To start the transfer, press Execute on the Execution Settings tab page on the right side of the screen.
All the elementary objects that were selected in the Apply column during the collection process are processed sequentially in a clearly defined order. Once the transfer is completed, the log view is displayed
9. Now you can check whether the scenario is available in the target location and fully usable.
8.5.4 Transferring a BW Test and Demo Scenario Using Database Storage
Besides using a file system transfer, you can also transfer the objects and data of a BW test and demo scenario by storing them on the database of the BW system. This option allows you to save BW objects (and their data) in a specific state in SDATA-specific storage on the database.
When configuring the source definition of the transfer path, choose Storage on Database and specify a variant, which you can use to store and access the scenario on the database. Variants allow you to store different backups, which you can open - even if the BW objects and data are no longer available in the BW storage.
In other words, database storage enables you to freeze the states of BW objects and data and make these states available for specific tests and demos whenever required. You can also reset scenarios to a previously saved state, if necessary.
In the Start Transfer step, you can make settings on the Execution Settings tab page on the right side of the screen in order to stipulate that the (meta) information written by SDATA is written to a transport request. You can then use the connected transport system for the transfer. If you do not use a transport request, you will have to transfer the data to target manually using binary export.
8.5.5 Administration and Maintenance of Configurations
The Configuration Maintenance step provides you with various functions for the administration and maintenance of configurations.
You can:
● Create a configuration● Open an existing configuration● Save a configuration while editing it● Save a configuration under a different name● Delete a configuration
1114 PUBLICSAP BW/4HANA
Operation

8.5.6 Displaying the Transfer Logs
You can call a history of the transfer logs. This allows you to look for errors in previous logs.
By choosing (Display Logs), you can call the history of transfer logs performed with your user. You can select the following functions here:
Function Description
Call log details By clicking on the execution time for a transfer log, you can view the log details.
(Refresh) This function refreshes the log display.
(Delete Selected Logs) You can select and delete one or more logs.
(Other Logs) This function allows you to call logs for transfer runs performed by other users and to restrict the log display according to various criteria.
8.6 Search
The SAP BW∕4HANA Cockpit provides a search function for the metadata and the where-used list of the objects in your system.
Prerequisites
You have configured the SAP BW∕4HANA Cockpit (see Configuring the SAP BW∕4HANA Cockpit [page 924]).
Context
Note that the search results can be filtered in accordance with the authorizations defined in your BW system.
NoteThe SAP BW∕4HANA Modeling tools also provide a search function for the metadata and the where-used list of the objects in your system. This uses the same server components. More information:
● Searching for SAP BW∕4HANA Objects [page 34]● Creating a Where-Used List for SAP BW∕4HANA Objects [page 36]
SAP BW/4HANAOperation PUBLIC 1115

Procedure
1. Use the magnifying glass icon to call the Fiori launchpad search. Here, you can search in the metadata of the objects in your system. You can either search for the metadata of a particular object or view the metadata of all objects in your system. Enter either the exact name of the object you are looking for, or select the object type from the list of the main object types, and enter * (asterisk) to search for all objects of this type in your system.
2. Alternatively, you can use the BW search. To find the relevant tile, choose Home Configuration BW Search . In BW Search, you can either search for the metadata or where-used list of a particular object or view the metadata of all objects in your system.
3. You can view information about the search and define search parameters. To find the relevant tile in the SAP BW∕4HANA Cockpit, choose Home Configuration Configuration of BW Search .
4. You can activate or deactivate BW Search for individual TLOGO objects. You cannot change the associations. Only SAP Support can do this. To find the relevant tile in the SAP BW∕4HANA Cockpit, choose
Home Configuration BW Search Administration .
Related Information
Using SAP Fiori Launchpad Search [page 1116]Using BW Search [page 1117]Syntax for Search Queries [page 1121]BW Search Configuration [page 1122]BW Search Administration [page 1124]
8.6.1 Using SAP Fiori Launchpad Search
Use the magnifying glass icon to call SAP Fiori launchpad search in the metadata of the objects of your SAP BW∕4HANA.
Procedure
1. Click on the magnifying glass icon. The Search field opens as the main entry screen for the search.2. Enter the exact name of the object you are looking for, or select the object type from the list of the main
object types, and then enter * (asterisk) to search for all objects of this type in your system.
You can choose from the object types:○ Apps○ Aggregation levels○ CDS queries
1116 PUBLICSAP BW/4HANA
Operation

○ CompositeProviders○ Data transfer processes○ DataStore objects○ InfoObjects○ Open Hub Destination○ Open ODS views○ Process chains○ Process variants○ Queries
3. The system displays either the searched object or a list of objects that match the search query, together with their metadata.
The system provides object-specific navigation from this result list to administration or to the data preview.
8.6.2 Using BW Search
With BW Search, the SAP BW∕4HANA Cockpit provides you with a search function for the metadata and the where-used list of the objects in your system.
Prerequisites
If the tile is not visible on your Home screen yet, choose Home Configure BW Search .
Procedure
1. Decide whether to search in the metadata of an object or in the where-used list.
Task Description
Searching in the Metadata To search in the metadata of an object, choose the Search Objects tab.
Searching in the Where-Used List To search in the where-used list of an object, choose the Search Where-Used tab.
2. Formulate your search query.3. To start the search, choose Go.
The system displays the list with the search results.4. To view the logs, choose Display Logs. The system always shows the message log, even if no warnings or
errors occur during execution of the search query.5. To view information about the runtime of the search, choose Runtime Information.
SAP BW/4HANAOperation PUBLIC 1117

Related Information
Searching in the Metadata [page 1118]Searching in the Where-Used List [page 1119]Syntax for Search Queries [page 1121]BW Search Configuration [page 1122]BW Search Administration [page 1124]
8.6.2.1 Searching in the Metadata
You can restrict BW Search by only selecting the relevant metadata before starting the search.
Context
You are on the Search Objects tab.
Procedure
1. Formulate your search query.2. In the default setting, the system searches in the technical name and the description. You can restrict the
search by deselecting a a category:○ Technical Name: The system searches in the technical name of all existing TLOGO objects in
accordance with your search query. This is the default option.○ Description The system searches in the description of all existing TLOGO objects in accordance with
your search query. This is the default option.3. To further restrict the search, you can choose Advanced Options:
○ Search in TLOGO Objects: You can select one or more TLOGO objects here. If you leave this field empty, the system searches in all TLOGO objects maintained and activated for BW Search in accordance with your search query.○ Object Version: You can restrict your search to objects with a certain version. In the default
setting, active is selected.○ Object Status: You can restrict your search to objects with a certain status. In the default setting,
active, executable is selected.○ Association Type: Certain TLOGO objects use a generic store in order to store the usage of other
objects. This includes all TLOGO objects supporting the XREF setting, for example CompositeProviders (TLOGO HCPR) and local CompositeProviders (TLOGO COPR). The system supports various association types (Objects Dependent, Objects Used, Receive Data from, Send Data to, Others). In the default setting, Dependent Objects is selected.
○ Technical Settings:
1118 PUBLICSAP BW/4HANA
Operation

○ Display Results: You can define a range for the result display. From the ensuing result, the system then only displays results that are in the specified range. If you do not specify a range, the system will display all results.
○ Search Method: You can define a search method.○ Exact Search○ Fuzzy Search○ Pattern Search (SQL Like). This is the default option.○ No Search Method
○ Activity: You can select an activity (Create Object, Display Object, Edit Object, Delete Object). In the default setting, Display Object is selected.If you select an activity here, the system performs the search and checks whether you can perform the required activity for the search results. This only displays objects that you have the corresponding authorization for.
○ Regenerate Views on Errors: If you select this option, the system does not terminate immediately if errors occur while calling the result set. The system tries to regenerate all required views in the database instead, so as to be able to execute the search query again. If calling the results fails again while regenerating the required views, the process terminates.
○ Bypass Buffer: If you choose this option, the system does not use the application buffer. Note that this can impair performance of the search.
4. To start the search, choose Go.
The system displays the list with the search results in Metadata of the Objects. The Display Where-Used List link provides you with access to the where-used list of the object in the search results.
Related Information
Searching in the Where-Used List [page 1119]
8.6.2.2 Searching in the Where-Used List
Every TLOGO object contains information about which other TLOGO object it uses. In BW Search, you can search by the dependent TLOGO object.
Context
You are on the Search Where-Used tab.
SAP BW/4HANAOperation PUBLIC 1119

Procedure
1. Formulate your search query.
○ If you want to search for all objects that use a certain object or a group of objects with the same TLOGO type, you need to make entries in the TLOGO and Object Name fields.
NoteIf you want to call a list of all objects that use InfoObject 0VC_CUST for example, you need to enter IOBJ in TLOGO Type and 0VC_CUST in Object Name.
○ If you want to search for all objects that are used by a certain object or a group of objects with the same TLOGO type, choose Advanced Options and enter the details of the object that you want to call the used objects for in the Superior TLOGO and Superior Object Name fields.
NoteIf you want to call a list of all objects used by a query for example, you need to enter ELEM in Superior TLOGO and the name of the query in Superior Object Name.
2. To further restrict the search, you can choose Advanced Options:○ Search in TLOGO Objects: You can select one or more TLOGO objects here. If you leave this field
empty, the system searches in all TLOGO objects maintained and activated for BW Search in accordance with your search query.○ Object Version: You can restrict your search to objects with a certain version. In the default
setting, active is selected.○ Association Type: Certain TLOGO objects use a generic store in order to store the usage of other
objects. This includes all TLOGO objects supporting the XREF setting, for example CompositeProviders (TLOGO HCPR) and local CompositeProviders (TLOGO COPR). The system supports various association types (Objects Dependent, Objects Used, Receive Data from, Send Data to, Others). In the default setting, Dependent Objects is selected.
○ Technical Settings:○ Display Results: You can define a range for the result display. From the ensuing result, the system
then only displays results that are in the specified range. If you do not specify a range, the system will display all results.
○ Activity: You can select an activity (Create Object, Display Object, Change Object, Delete Object), Edit Object). In the default setting, Display Objects is selected.If you select an activity here, the system performs the search and checks whether you can perform the required activity for the search results. This only displays objects that you have the corresponding authorization for.
○ Regenerate Views on Errors: If you select this option, the system does not abort immediately if errors occur while calling the result set. The system tries to regenerate all required views in the database instead, so as to be able to execute the search query again. If calling the results fails again while regenerating the required views, the process terminates.
○ Bypass Buffer: If you choose this option, the system does not use the application buffer. Note that this can impair performance of the search. To enhance performance, the application otherwise stores data in the buffer. This includes generated SQL strings, processed and corrected user input and information about the required views.
3. To start the search, choose Go.
1120 PUBLICSAP BW/4HANA
Operation

Related Information
Searching in the Metadata [page 1118]
8.6.3 Syntax for Search Queries
The behaviour of a BW search depends your chosen search method. The search can thus return different results for one and the same search query.
With fuzzy search, exact search and pattern search, you can use placeholders (%, *, ?, _).
With fuzzy search and exact search, you can also use the following special characters:
Special Characters and Placeholders for BW Search
Name Example Description
OR sap OR hana A search like sap OR hana looks for all records containing "sap" or "hana" in the selected attributes.
The key word OR is case-sensitive. Sap or hana therefore looks for records that contain “sap” and “or” and “hana”.
If your search query contains the letters "or", make sure that these are not capitalized (OR). Otherwise, the OR semantic will be applied, as described above.
- (Minus Sign) sap -hana A search like sap -hana looks for all records that containg "sap", but do not contain "hana".
If the second term is a search phrase, as in sap "-hana", the system looks for records containing "sap" und "-hana". In text columns, the minus sign is removed from the second term, as it serves as a separator.
If your search query contains terms beginning with a minus sign, make sure that you put these terms in quotation marks. Otherwise, the NOT semantics will be applied, as described above.
" (Quotation Marks) "sap hana" A search like "sap hana" looks for all records containing SAP HANA, without any other terms inbetween.
SAP BW/4HANAOperation PUBLIC 1121

Name Example Description
* (Asterisk) hana* The asterisk activates a placeholder search. In this case, the system does not perform a fuzzy search. It performs an exact search with placeholders instead.
% (Percentage Sign) hana% The system replaces a percentage sign with an asterisk and performs a placeholder search.
8.6.4 BW Search Configuration
You can view information about the search and define search parameters. This is optional, and you can perform searches without making any further settings.
To find the relevant tile in the SAP BW∕4HANA Cockpit, choose Home Configuration Configuration of BW Search .
General Information
Information Description
Overall Status Indicates whether or not BW Search is active.
Status of the Shared Buffer Indicates whether the shared buffer is completely available, partially available or not available at all.
● The shared buffer is completely available if all data required for performance of a search query or generated when a search query is performed, is written to the application server's shared buffer. If called up on multiple occasions, this improves the performance of BW Search.
● The shared buffer is partially available if only the metadata of the TLOGO objects is written to the buffer. Note that partial storage of data in the shared buffer can impair performance, as the system has to read the non-buffered data from the database.
● The shared buffer is not available. The system reads all of the data from the database. Note that this can impair performance of the search.
SAP HANA Package Indicates the SAP HANA package that contains the views.
TLOGO Objects Number of TLOGO objects that the system supports BW Search for. If all TLOGO objects are also active, the pie chart is completely green. If some TLOGO objects are not active, a corresponding section of the pie chart is not green.
Metadata Views The number of metadata views. For technical reasons, this number does not reflect the number of maintained TLOGO objects and is somewhat higher.
Where-Used List Views The number of where-used list views. For technical reasons, this number does not reflect the number of maintained TLOGO objects and is somewhat higher.
1122 PUBLICSAP BW/4HANA
Operation

BW Search Configuration
To change settings for the configuration of BW Search, choose Edit.
Global Settings
Information Description
SAP HANA Package You can set a package other than the standard package to contain the views in the SAP HANA database.
Time for Buffer Check (in Seconds): You can set how much time should elapse before the system checks for views in the SAP HANA database. If the system does not find any views, it generates them.
Runtime Settings for the Search
Information Description
Note every run in the application log You can specify whether the system writes every run to the application log.
Note runtime information for every run You can specify whether the system writes runtime information to the application log for every run.
General Buffer Settings
Information Description
Switch Buffer Off You can specify that the buffer is not to be used. The system then reads all data from the database.
Elapsed Time after Buffer Entry (in Seconds)
You can specify the time in seconds that the entries are retained in the buffer for before being recalculated by the system.
Maximum Number of Buffer Entries You can specify the maximum number of buffer entries.
Detailed Buffer Settings (Shared Buffer)
The following settings allow you to restrict the amount of information written to the shared buffer. If the shared buffer is only partially available, we recommend reducing the amount of data to be buffered following the order of your list from top to bottom:
● Write All Data● Write Processed Entry● Write Generated SQL Statements● Write Generated Field List● Write Generated Result Tables
Related Information
BW Search Administration [page 1124]
SAP BW/4HANAOperation PUBLIC 1123

8.6.5 BW Search Administration
You can activate or deactivate BW Search for individual TLOGO objects. You cannot change the associations. Only SAP Support can do this.
To find the relevant tile in the SAP BW∕4HANA Cockpit, choose Home Configuration BW Search Administration .
Display Associations
You can find out which associations there are in the system.
Only SAP Support is able to create or modify association types.
Activate / Deactivate
You can activate or deactivate one or more TLOGO objects for BW Search.
By choosing Update Views, you can instruct the system to regenerate the current views in the database.
Related Information
BW Search Configuration [page 1122]
8.7 Data Tiering
Data Tiering allows you to assign data to various storage areas and storage media. The critera for this decision are data type, operational considerations, performance requirements, frequency of access, and security requirements.
Customers often employ a multi-temperature or data tiering storage strategy, with data classified depending on frequency of access and certain other criteria as either hot, warm or cold. Depending on this classification, the data is kept in different storage areas or media.
Data tiering can be required for various reasons. For example:
● Storage of historical data● Storage of mass data (settlement data, automatic logs, clickstream data) but restricted capacity on your
SAP HANA database● Guidelines for saving company data, such as the need to save all data for at least seven years in order to
comply with legal requirements.
1124 PUBLICSAP BW/4HANA
Operation

In addition to frequently accessed active data, large SAP BW∕4HANA systems also contain a large volume of data that is only accessed rarely. The data is either never or rarely needed in Data Warehouse processes or for analysis. The main challenge of implementing a data tiering strategy is to seamlessly integrate the warm and cold memory areas and to make these areas invisible to the outside, in order to ensure that all required functions are applied to this data. SAP provides data tiering solutions for this, helping to reduce TCO thanks to optimized SAP HANA main memory resource management.
The following graphic provides an overview of multi-temperature data classification and the storage areas available for the various data categories:
The following solutions are available in SAP BW∕4HANA for data tiering.
Data Tiering Optimization (DTO)Data Tiering Optimization (DTO) is the strategic solution for data tiering in SAP BW∕4HANA. It offers the following advantages:
● A single data tiering solution for hot data (hot store in SAP HANA), warm data (warm store in SAP HANA Extension Nodes or SAP HANA Native Storage Extension) and cold data (cold store in SAP IQ)
● Central definition of the data temperature based on partitions of the DataStore object● Movement of the data to the dedicated storage location as a simple and periodically performed
housekeeping activity (TCO reduction)● Smooth co-existence of Data Tiering Optimization and the existing near-line storage approach, as the
same technical concepts are used for the storage areas for cold data, such as locking archived data
Near-Line StorageNear-line storage (with no DTO support) with SAP IQ is still supported in SAP BW∕4HANA. This provides you with:
● Continuity for data archiving scenarios that are already implemented with near-line storage with SAP IQ before SAP BW∕4HANA Data Tiering Optimization is introduced
● Support for more complex data archiving scenarios that are not covered by SAP BW∕4HANA Data Tiering Optimization
CautionSAP BW/4HANA only supports Hadoop in a specific constellation as described in the following SAP Note: 2363218 (Hadoop NLS: Information, Recommendations and Limitations). Note that Hadoop cannot be used any more in higher software versions.
SAP BW/4HANAOperation PUBLIC 1125

8.7.1 Data Tiering Optimization (DTO)
Data Tiering Optimization (DTO) helps you to classify the data in your DataStore object as hot, warm or cold, depending on how frequently it is accessed.
Depending on this classification and how the data is used, the data is stored in different storage areas. Data Tiering Optimization provides you with a central UI, where all storage options can be set. Partitions from the SAP HANA database can be used for this.
NoteYou have the option thus far of storing data using the data archiving process. However, for a DataStore object you can only use one of these options: either Data Tiering Optimization or the data archiving process. For some scenarios, a data archiving process is required. For example, archiving with time characteristics that are not contained in the key, multi-dimensional partitioning in the external tier (cold).
You can define which temperatures/memory areas are supported by an object in the editing screen for the DataStore object. The actual information about which data is stored at which temperature/in which memory area is not specified in the modeling of the DataStore object. This information is specified in a separate definition (saved on the local system) of the object temperature/partition temperature (not a transport property).
You have the following options:
● Hot (SAP HANA standard nodes): The data is stored in SAP HANA.● Warm (SAP HANA Extension Nodes or SAP HANA Native Storage Extension): The data is stored in an SAP
HANA extension node or managed with the SAP HANA Native Storage Extension.● Cold (external cold store): The data is stored in an external data storage solution (SAP IQ or Hadoop).
NoteNote that data records in the cold tier (external storage) cannot be changed, and no regular updates can be applied (due to write protection).
The hot store and warm store represent one logical unit for which high availability can be guaranteed. The cold store is handled separately. You should implement the necessary measures for data security. More information: Setting Up Automatic Data Backups [page 1156]
1126 PUBLICSAP BW/4HANA
Operation

A data tiering optimization job moves the data to the corresponding storage areas at regular intervals.
Prerequisites
You have performed the required configuration steps. More information: Configuring SAP IQ as a Cold Store [page 920]
The remote source must have the property readwrite as the DLM Mode under Connection Properties.
The near-line connection must be selected in the IMG activity as the default connection.
SAP BW/4HANAOperation PUBLIC 1127

8.7.1.1 Defining Data Tiering Optimization for a DataStore Object
You can define which temperatures/memory areas are supported by an object in the editing screen for the DataStore object.
Prerequisites
If you want to use Data Tiering Optimization at partition level, you have to set the modeling properties of the DataStore object in such as way that it supports partitions. For partitioning, a key field is used. For Data Mart DataStore objects, any other characteristic can be used as well.
If you want to use Data Tiering Optimization at object level, no partitioning is necessary. In this case, the cold store is not supported.
Procedure
In the BW modeling tools, you perform the following steps in the editing screen for your DataStore object.1. In Data Tiering Properties, on the General tab, you can select which tiers you want the object to support.
Hot (SAP HANA Standard Nodes), Warm (SAP HANA Extension Nodes, or SAP HANA Native Storage Extension) or Cold (External Cold Store). Your further options are determined by the modeling properties of the DataStore object. Depending on the selected temperatures, you can also specify whether you want to perform subsequent data moves to the selected memory areas by partition or for the entire object.
NoteIf you are using “hot” and “warm” simultaneously in a temperature schema, note that it is not possible to use HASH-based partitioning of the DataStore object and thus to parallelize data activation. In cases like this, RANGE partitioning has to be used instead. This can lead to performance issues for SAP HANA processes based on DataStore objects.
NoteThe data move at partition level is absolutely necessary if you have selected the cold store. Since the data in the external layer is mainly only accessed in read mode, you should only store data areas for which changes are rarely expected. You can then perform exceptional updates for these.
2. You can specify a Cold Store Connection . If you do not specify anything here, the default connection is used that you specified in customizing.If you want to change the connection subsequently, you first have to deactivate data tiering property Cold (External Cold Store) and activate the DataStore object, without data existing in the cold store. You can then change the connection and activate the DataStore object again.
3. If you have a cold store, you can decide whether or not to allow exceptional updates. For more information, see Exceptional Updates for Data in the Cold Store [page 1137].
1128 PUBLICSAP BW/4HANA
Operation

4. If you have chosen Data Movement at Partition Level, create partitions. For more information, see Creating Partitions [page 137].
You should select an appropriate number of partitions for object modeling and the planned data moves to the memory areas; in particular, the definition of partitions should not be too granular. The partitions you define should not contain any gaps. This improves query performance.
If you make changes to static partitions that you have created, the system checks whether remodeling is necessary during activation. If this is the case, a remodeling job is created. You can start the remodeling job using a link at the top of the editor.
In the SAP BW∕4HANA cockpit, perform the following steps in the DataStore Object - Manage Data Tiering app:5. Define the object temperature or partition temperature.
More information:
○ Creating a Rule for Changing the Object Temperature or Partition Temperature: Managing Data Tiering [page 1129]
○ Defining the Temperature of Objects or Partitions Manually [page 1132]
NoteIn the case of non-cumulative providers, note that the markers cannot be archived.
6. Execute planning.
For more information, see Managing Data Tiering [page 1129].
8.7.1.2 Managing Data Tiering
The DataStore Object - Manage Data Tiering app provides you with an overview of all DataStore objects and their temperatures. You can define rules here for temperature changes, perform DTO jobs for temperature changes, check the availability of the stores, and physically delete data from the cold store.
Prerequisites
You have configured the SAP BW∕4HANA cockpit. More Information: Configuring the SAP BW∕4HANA Cockpit [page 924]
Context
You can access the DataStore Object - Manage Data Tiering app from the SAP BW∕4HANA Cockpit.
SAP BW/4HANAOperation PUBLIC 1129

Procedure
Overview of DataStore ObjectsAll DataStore objects are displayed, plus the distribution of the temperatures and the size of the objects. The distribution of the temperatures is displayed as a bar chart: Red means hot, yellow means warm, blue means cold. Gray indicates a mix of temperatures including the deleted status.
Calling the Detail View for a DataStore ObjectIf you click on the entry for a DataStore object, the system displays a detail display of the temperature distribution for the object or - if it has any - its partitions. You can define the temperature change for the object or its partitions manually.
Defining the Rules for Temperature ChangesIn addition to the manual definition of the temperature of a partition or object using the detail view or API RSO_ADSO_DTO_API_SET_TEMPS, you can also define temperature changes rules for selected objects. Rules can be defined for DataStore objects with Data Tiering Optimization at partition level and with an SAP time characteristic or a field of data type DATS as the partition field. In the rule, starting from the current date, you can specify a relative time based condition for the various possible temperatures. You can specify warm temperature for data that is over a year old for example, and cold for data that is over five years old.
1. Select one or more DataStore objects to create a rule for.
2. Choose Rule Create .3. In the following dialog box, define one or more conditions for your rule:
1. Under Data Older Than:, select the time interval that you want to use for each condition, for example days, weeks, or years, and specify a number for it.
2. Select the required temperature change to be carried out if the condition is met.A rule can have between one and three conditions for moving data to the warm store, to the cold store, and deleting it from the cold store.The following applies for the conditions: <Value for the temperature change to "warm"> must be lower than <value for the temperature change to "cold"> must be lower than <value for the temperature change to "deleted">
NoteNote that you can specify the values with different levels of granularity.
A rule with the following conditions is therefore permissible: All data that is more than 3 months old is to be moved to temperature “warm", and all data that is more than 1 year old is to be moved to temperature “cold".
A rule with the following conditions is not permissible: All data that is more than 6 months old is to be moved to temperature “warm", and all data that is more than 3 months old is to be moved to temperature “cold".
3. The rule is active by default. You can switch it off however if you do not want it to be applied directly.4. Choose OK.
The system creates a separate rule for each DataStore object.
Every time the temperature change is started for DataStore objects with a rule using the DTO job, the rule is evaluated first. This determines the new target temperature. The determination method is as follows: For partitions whose upper limit corresponds to the condition in the rule, the target temperature selected in the
1130 PUBLICSAP BW/4HANA
Operation

condition is set. If the upper limit of a partition is more than one year old for example, and you have defined in your rule that all data more than one year old is to be moved to the warm store, the target temperature is set to "warm" for this partition. Note that the evaluation of the rule only takes into account the interval limits. The data that is actually stored in the partition is ignored. Partitions are always moved in their entirety. In the case of partitions consisting of just one single value (EQUAL), this value is the upper value. The actual move is then performed with the DTO job.
By choosing Rule, you can remove, activate, or deactivate rules for the selected DataStore objects.
A rule can only be edited at the level of an individual DataStore object. To do this, click Active in the Status of the Temperature Rule column and choose Edit. You can also deactivate or remove the rule for the selected object here.
NoteNote the following:
● If you activate a rule for a DataStore object and then specify the temperature change manually for one or more partitions of the object, the rule is deactivated for the entire object.
● There are no gaps allowed in rule-based temperature changes, as the conditions specified in the rule cannot have a lower limit.
Performing Temperature ChangesUsing a DTO job, you can perform, simulate or repair temperature changes for selected objects and their partitions immediately, or can schedule them.
1. Select one or more DataStore objects to create a rule for.2. Choose Execute.3. In the following dialog box, you have several options:
○ You can choose Adjust to execute the DTO job.○ You can choose Simulate to run a simulation of the DTO job.○ The Repair option is only intended for cases where there was an error, and Adjust cannot be selected.
In this case first execute Repair and then Adjust.4. Choose OK.5. To view a log of the changes, choose in the Logscolumn in the DataStore object overview.
You can also integrate the DTO job into a process chain by using process type Adjust Data Tiering.
If the DTO job is running, streaming is automatically paused.
Removing a DTO Job from SchedulingBy choosing Unschedule, you can undo the scheduling of DTO jobs for the selected DataStore objects.
Physically Deleting Data from the Cold StoreBy choosing Clean Up, you can physically delete data that has the temperature deleted. The cleanup applies to the entire DataStore object. All data of the partitions that have deleted the temperature is deleted. More Information: Deleting Data [page 1143]
Checking the Availability of Hot, Warm, and Cold StoresYou can use Check Store to check whether the changes you want to make to the temperature of the selected objects or partitions are possible.
SAP BW/4HANAOperation PUBLIC 1131

ExampleIf an external node is not available for example, this can mean that a cold store is not available as well.
Proceed as follows:
1. To begin with, specify which DataStore objects you want to view notifications for. By selecting the checkbox in the header line in front of DataStore Object, you can select all objects.
2. Choose Check Store. The system sends a request to the back end and shows you the current notifications for the selected DataStore objects.
8.7.1.2.1 Defining the Temperature of Objects or Partitions Manually
Depending on the settings, you assign the required temperature for either the partitions in your DataStore object or for the entire DataStore object.
Prerequisites
You have configured the SAP BW∕4HANA cockpit. More Information: Configuring the SAP BW∕4HANA Cockpit [page 924]
Procedure
1. You are in the DataStore Object - Manage Data Tiering app.2. Click on the required DataStore object.
In a detail view, the system displays the DataStore object and its partitions (if it has them) together with the current and planned temperatures.
3. To set the temperature change for the object (at object level for data tiering) or for partitions of the object (at partition level for data tiering), select the corresponding entries and choose Plan Temperature.
NoteIf you have activated a rule for a DataStore object and then manually specified the temperature change for one or more partitions of the object, the rule is deactivated for the entire object.
4. In the dialog box that appears now, choose the planned temperature and press OK.The system only displays the temperature values selected in the temperature schema of the DataStore object. For data with the temperature Cold, you can select the temperature deleted. The data is removed logically from the cold store. All data must be activated before it can be moved to the cold store.
1132 PUBLICSAP BW/4HANA
Operation

NoteThere should be no gaps in the definition of the temperature of the partitions. For non-cumulative providers, the following applies: If any partitions exist that are older than the partition whose temperature you have changed, they are given the same temperature. This improves query performance.
Next Steps
To perform the temperature change, go back to the DataStore Object - Manage Data Tiering app.
8.7.1.3 Data Volume Statistics
You can use data volume statistics to query which data takes up the most space on the database for specific periods.
Prerequisites
You have configured the SAP BW∕4HANA cockpit. More Information: Configuring the SAP BW∕4HANA Cockpit [page 924]
The Data Volume Statistics dashboard is available as an app in the SAP BW∕4HANA Cockpit.
Analyze the data volume to help you make optimum use of the available memory. Using the app for the selection statistics, you can determine the location of the greatest data volume and which data is rarely accessed and thus decide which data is moved to the cold store.
NoteTo display historical data, you need to have activated automatic job scheduling.
Multiple stacked cards help you to analyze the volume of data in your SAP HANA database:
● Schema Categories in the Database: The share of the schemas on the SAP HANA database is shown here.● Data Categories in the Managed Schema: The SAP BW∕4HANA-managed schema is broken down in more
detail here.● Object Types in Application Custom Tables: Here the application tables are broken down in more detail, so
that you can see which object types consume the most memory.● Volume Trend: Here you see how the data volume develops over time.
In each card, you can click on the part of the graphic that you are interested in, navigate directly to the underlying query and hence drill down to specific characteristics. If you navigate to the display of individual DataStore objects, you can a DataStore object and choose Go to Manage to access an app for the administration of DataStore objects. Here you can check the settings for data tiering optimization.
SAP BW/4HANAOperation PUBLIC 1133

Using Configure, you can define how often the statistics are to be written to the table for historical data and how long they are to be kept there for. The snapshot is created using the scheduled job RSV_DVHN_HISTORISATION. The job always starts at 5:00 in the morning at the specified time intervals and executes report RSV_DVHN_HISTORY_REPORT.
Choose Delete to delete the statistics data.
Choose Data Tiering to go to the Data Tiering Optimization overview.
8.7.1.4 Selection Statistics
Selection statistics allow you to find out which data was queried from which InfoProviders in a given period.
Prerequisites
You have configured the SAP BW∕4HANA cockpit. More Information: Configuring the SAP BW∕4HANA Cockpit [page 924]
The Data Selection Statistics dashboard in the SAP BW∕4HANA Cockpit is available to you as an app.
You can use the queries to determine the data that is no longer selected in queries. You can use this information to decide which data can be archived. In the charts, you can click the values to navigate directly to the underlying query and then drill down to specific characteristics.
To create InfoProviders for the selection statistics, you must first activate them. To do this, choose Configure and select the InfoProviders in question in the Activecolumn. You can also make restrictions here by using a time characteristic.
Choose Delete, to delete the statistics data.
Choose Data Tiering to go to the Data Tiering Optimization overview.
8.7.1.5 Reading Data from the Cold Store as Part of Dynamic Tiering Optimization (Extended Pruning)
Enhanced pruning helps to avoid unnecessary query access to the cold store.
Application Scenario
You are executing a query for an DataStore object whose data has been partially moved to a cold store. The global filter of the query does not restrict the time characteristic that is used as the partition characteristic in
1134 PUBLICSAP BW/4HANA
Operation
DTO maintenance. There are global filters defined on the basis of other absolute time characteristics however. Standard pruning for the cold store ignores these filter conditions.
The query then accesses the cold store even though no data exists for these absolute time restrictions. Enhanced pruning helps to avoid this unnecessary query access to the cold store.
How it Works
This is done by means of projecting the absolute time characteristics to the partition characteristic by calculating and storing minimum and maximum deviations in days between every absolute time characteristic and the partition characteristic.
Absolute time characteristics are:
● 0DATE● 0CALWEEK● 0CALMONTH● 0CALQUARTER● 0CALYEAR● 0FISCPER● 0FISCYEAR
This also includes any other characteristic or field that references one of the aforementioned basic time characteristics.
This index information is updated whenever a partition is moved to the cold store, reloaded to the hot store or set to deleted (table/view RSDAADSOREQTSH_V)
The sum of all index information per DataStore object is stored in aggregated form in table RSDADAPTIMSHFT. This aggregated information is then used to ensure optimized cold store access by avoiding any unnecessary query access to the cold store.
NoteIf the fiscal year variant is not uniquely specified in the query’s global filter criteria, note that extended pruning is skipped for fiscal year and fiscal period .
Activation
Extended pruning is optional. To use it, you have to explicitly activate it.
SAP BW/4HANAOperation PUBLIC 1135

The activiation status of extended pruning is controlled by the BW administration parameter RSDA_TIMESHIFT_INDEX (table RSADMIN). The parameter supports three different statuses:
Value Description
ACT or PRD The index is maintained by archiving processes (archive, reload, or delete) and is used by query processing for pruning.
INA: The index is maintained by archiving processes (archive, reload or delete), but is not used by query processing for pruning.
This setting can be used in emergency situations if query processing is negatively impacted by extended pruning.
OFF or
All others
The index information is neither maintained nor used for pruning. To be activated again, the index must be rebuilt after being reset to the value INA.
Program RSDA_REBUILD_TIMESHIFT_INDEX
To edit the parameter values, use program RSDA_REBUILD_TIMESHIFT_INDEX. This program also collects the required index information from the cold store if archived data already exists when the index is activated.
You can use the program to enter a selection for DataStore objects/data archiving processes (DAPs) and a connection to the cold store. In addition to rebuilding the index information, it allows you to monitor and change the activation status of extended pruning.
The Rebuild Index Completely option deletes all index information from the selected DataStore objects/DAPs and rebuilds it from scratch. If you do not select this option, existing index information is adjusted where required. The system implicitly applies the Rebuild Complete Index option whenever the activation status is changed from Off to Inactive or Active.
The Simulation Run option makes it possible to run the program in simulation mode without making any changes to the persistence.
NoteEven if extended pruning is enabled, an empty result set might still be returned for some queries that access a cold store. This is because advanced pruning only checks for sufficient conditions whether the current query navigation step returns an empty result set from the cold store and then skips access in this case. In most cases, the checks are also not required conditions for an empty result set.
1136 PUBLICSAP BW/4HANA
Operation

Additional Technical Information
The index information can be retrieved using the following two views:
RSDADAPTIMSHFTThis view shows the aggregated information at DataStore object/DAP level that is actually used for pruning. The view has has the following fields:
Field Name Description
DAPNAME Name of DataStore Object/Data Archiving Process
DIMNAME Field name that can be used for extended pruning. Every field belongs to an absolute time characteristic from the underlying InfoProvider.
TIMNM. Field name of the primare time characteristic
LOWER_SHIFT Lower time shift for dimension DIMNAME with reference to dimension TIMNM. The system calculates as follows:
MIN( FIRST_DATE(DIMNAME) - FIRST_DATE(TIMNM) )
UPPER_SHIFT Upper time shift for dimension DIMNAME with reference to dimension TIMNM. The system calculates as follows:
MAX( FIRST_DATE(DIMNAME) - FIRST_DATE(TIMNM) )
MIN() and MAX() describe the aggregation of all archived data records. FIRST_DATE is a pseudo function that assigns each characteristic value to its start date (for date characteristics, this is simply the same assignment).
RSDAADSOREQTSH_VThis view shows the same index information, but broken down to the archiving request level. It is mainly used to rebuild the index at DataStore object/DAP level whenever requests are removed from a cold store.
8.7.1.6 Exceptional Updates for Data in the Cold Store
You can update the data stored in an external cold store at regular defined time intervals. This should only be an exception however.
Concept
The following sections provide an overview of the concepts involved in performing exceptional updates.
NoteThis option is only available for standard DataStore objects with the Write Change Log modeling property.
SAP BW/4HANAOperation PUBLIC 1137

Metadata Activation
If you activate a standard DataStore object for Exceptional Updates to Cold Store, the system creates a second inbound table specifically for data records that are classified as cold.
Load
If you load data into a DataStore object that has been activated for Exceptional Updates to Cold Store, the system analyzes the data records to determine whether they belong to hot or cold data. It then sorts them immediately into the correct inbound tables. Records that belong to the hot store are therefore routed to the first inbound table (AQ), whereas records that belong to the cold store are routed to the second inbound table (AX).
The graphic below illustrates this process:
Activate
You can activate both parts of the load request independently of each other. There are two different activation requests with two different request IDs in the change log for the hot and cold activation. Hot activation results in changes to the data in the active table, whereas cold activation results in changes to the data in the cold store.
1138 PUBLICSAP BW/4HANA
Operation

CautionNote that the part in the hot store must always be activated first.
As is usual in standard DataStore objects, you can also group (condense) different load requests into an activation request for standard DataStore objects with the Exceptional Updates to Cold Store property.
CautionIf you want to carry out the activation manually though, note the following: You can only ever decide whether you want to group activations for the hot store. The system then handles the cold store accordingly. The following cold activation must group exactly the same load requests into a cold activation request.
ExampleThe following table illustrates the grouping of activation requests. Load requests 6 and 7 are grouped together for the hot store in activation request 11 and for the cold store in activation request 13.
Condensation of Load Requests
Load Request With a Cold Part Hot Activation Request Cold Activation Request
20 X
19 X
17 X 18
15 - 16
10 X 12 14 (only from 8 and 10)
9 -
8 X
7 X 11 13
6 X
4 - 5 No Cold Activation Request
1 X 2 3
Change Temperature
A move between Hot Store and Cold Store involves a movement of data between the active table of the DataStore object and the cold store. This movement of data does not involve moving data from the change log or the two inbound tables however.
If data is loaded into a DataStore object but not yet activated, the data records are divided into hot and cold in accordance with the hot/cold specification of the partitioning as it was valid at the time of loading, and is distributed to the two inbound tables (AQ and AX). They are therefore already classified, but not yet activated. You cannot change the temperature at this point in time. You first have to activate all data. The system thus deletes this data from the inbound tables. You can then move a partition between hot store and cold store.
SAP BW/4HANAOperation PUBLIC 1139

Deletion
Deletion of an ActivationAs the data was deleted from the inbound tables after being successfully activated, it is not possible to restore the status that the inbound table had prior to activation. Deletion of an activation must therefore always delete the corresponding load requests as well. Since a hot activation and the corresponding cold activation share the same load requests, they must always be deleted together.
The following rule applies: During deletion, the hot and cold activation requests and the two related load requests must always be deleted together. The system supports you during deletion by listing the requests that also require deletion. As long as the data is still in the change log, this type of deletion is possible.
Note that the requests must be deleted in the opposite order to their activation. This means that an older activation cannot be deleted until all newer activations have been deleted.
CautionIt is not possible to delete an activation request if the partitions that refer to the same load request have been moved in the meantime, and data that was activated for the hot store for example, is now in the cold store. To be able to delete these activation requests, you first have to retrieve the moved partitions to the hot store.
This does not work the other way around however: Data that was activated cold (as exceptional updates) and then moved to the hot store cannot be deleted any more even if moved back to the cold store.
Deletion from the Change LogEvery time you load and activate data when operating a DataStore object, the system logs all changes in the change log. As a result, this constantly grows in size. After a certain period of time, the older entries are no longer needed because they are no longer relevant for deletion of current requests. We therefore recommend cleaning up the change log from time to time.
CautionNote that activations whose related requests have been removed from the change log cannot be undone again.
Deletion from the Cold StoreDuring cold activation, the partitions in the cold store are completely duplicated.
In order to prevent the cold store from overflowing, we recommend deleting the older partitions at intervals. After cleaning up like this, note that you cannot delete the older cold data any more. As a result, it is no longer possible to delete the related older hot activations either.
1140 PUBLICSAP BW/4HANA
Operation

The following graphic illustrates the update process in the cold store. This can only be undone in reverse order:
Related Information
Performing Exceptional Updates for Data in the Cold Store [page 1141]
8.7.1.6.1 Performing Exceptional Updates for Data in the Cold Store
You can release a DataStore object for exceptional updates in an external cold store, activate the corresponding requests, and include them in a process chain.
Prerequisites
This option is only available for standard DataStore objects with the Write Change Log modeling property.
Context
The following sections provide an overview of the tasks involved in performing exceptional updates.
Metadata Activation
SAP BW/4HANAOperation PUBLIC 1141

You have selected the data tiering properties of the DataStore object in the BW Modeling tools.
Now select the Exceptional Updates to Cold Store option.
CautionOnce you have selected this option and there is data in the DataStore object, note that the exceptional updates cannot be deactivated again unless you completely empty the DataStore object.
Temperature Change
Call the SAP Fiori app DataStore Objects - Manage Data Tiering from the SAP BW∕4HANA Cockpit. Select the required DataStore object. The detail display view appears. Select the required partition, choose the Planned Temperature function, and reschedule the temperature. The status of the partition in question changes to Temperature Change.
NoteIf you have changed the temperature, you first have to execute a change run for the DataStore object by choosing Execute. Only then are the partitions actually moved. In the detail display for the DataStore object, the current and the planned temperature of the partition in question match again, and the status is OK.
Activation and Deletion of the Requests
Call the SAP Fiori app DataStore Objects - Manage Requests from the SAP BW∕4HANA Cockpit. Select the required DataStore object and open the detail display in the Default View. If two requests have the same request ID, this is a request that has forwarded data partly to the hot store and partly to the cold store. In the Exceptional Updates column, you can see whether updates have already been loaded to the cold store.
Click on the required request to go to the detail view. The Activate and Delete functions are available here.
NoteIf you have activated a load request for the hot store, we recommend activating the load request for the cold store immediately afterwards.
Scheduling Activation to a Process Chain
Call the SAP Fiori app Process Variant Editor - Edit Variantsapp from the SAP BW∕4HANA Cockpit, under Modeling.
To be able to include activation of requests in a process chain, create a process variant for process type Data Target Administration - Activate DSO Data .
Select the required DataStore object. If the data tiering property Exceptional Updates to Cold Storeis set for this DataStore object, the following options are available in the Data Tiers in Scope column. If the property is not set, no entries can be made in this column.
● Hot/warm and cold activation: The system performs a hot and cold activation.● Hot/warm activation only: The system only performs a hot activation.● Cold activation only: The system only performs a cold activation.
If you do not make any selections, the system activates all requests loaded so far for this DataStore object.
1142 PUBLICSAP BW/4HANA
Operation

Related Information
Exceptional Updates for Data in the Cold Store [page 1137]Data Tiering Properties [page 122]Managing Data Tiering [page 1129]Managing DataStore Objects [page 1199]Process Types [page 929]
8.7.1.7 Deleting Data
By assigning the temperature Deleted.to the partitions of your DataStore object, you can delete data.
Temperature Schema Without Cold
If you are using Data Tiering Optimization at partition level, you can already select the temperature Deleted if the partition has the temperature Warm. You need a hot/warm partition scheme to be able to do this.
SAP BW/4HANAOperation PUBLIC 1143

Temperature Schema with Cold
You can select the temperature Deleted if the partition already has the temperature Cold.
The data is then flagged for deletion, meaning that is is not deleted immediately. The data is removed logically from the cold store. You can then delete this data physically in SAP BW∕4HANA in the Data Tiering Maintenance app (choose Clean Up) or by using the process chain type Cleanup Archive. These partitions are then not displayed any longer in DTO temperature administration.
For both procedures (temperature schema with or without cold), a lock is used for data with temperature Deleted. This lock prevents records from being loaded into the InfoProvider if the values of these records for the partitioning characteristic fall in the deleted area.
To deactivate this lock, you can simply change the temperature to Warm or Hot.
NoteThe Deleted status can also be used for rule-based DTO. You need to ensure that the partitions are moved to Warm or to Cold however, before they can be set to Deleted.
CautionThe deletion process is irreversible. Once data has been deleted, it therefore cannot be restored.
1144 PUBLICSAP BW/4HANA
Operation

8.7.1.8 Automated Moving of Data to Other Memory Areas
You can use APIs for Data Tiering optimization to implement automated temperature adjustments.
A typical use case is a temperature adjustment by ABAP program to certain objects and partitions using API RSO_ADSO_DTO_API_SET_TEMPS. This ABAP program can then be combined by process chain with the actual execution of the temperature change using process type DTO Adjustment.
APIs RSO_ADSO_DTO_API_GET_INFO (read temperatures) and RSO_ADSO_DTO_API_EXECUTE (executing temperature changes) can be used for more extensive automation. Normally however, only the central RSO_ADSO_DTO_API_SET_TEMPS API should be used.
APIs for Defining Temperature
API Description
RSO_ADSO_DTO_API_GET_INFO Reads the partition temperatures of a specific DataStore object (advanced)
RSO_ADSO_DTO_API_GET_TEMPS Changes the partition temperatures
RSO_ADSO_DTO_API_EXECUTE Executes the DTO job
8.7.1.9 SAP HANA Extension Node as a Warm Store
To implement a multi-temperature memory strategy in your SAP BW∕4HANA system, as of SAP HANA 1.0 SPS12 (DSP), you can use the extended node concept for warm data. The data (with no functional restrictions) is saved in a dedicated SAP HANA scale-out node. This enables you to optimize usage of the main memory in SAP HANA.
Based on typical data distribution in a SAP BW∕4HANA system, a single extension node is normally used. Multiple extension nodes should only be used in exceptional circumstances. If you do use data tiering optimization with multiple extension nodes, SAP HANA 2.0 is a prerequisite.
Extension Node Concept
If you are using an extension node, the scale-out landscape consists of two different node groups:
1. For hot data: Node with standard sizingThe SAP HANA hardware sizing guidelines recommend a 2:1 ratio between the available main memory and the saved data volume (data footprint: 50% of available main memory). This ensures that all the data can be stored in the main memory at any time and that there is sufficient space for immediate result sets.
2. For warm data: Extension node with a “less strict sizing”The sizing guidelines can be defined less strictly for warm data due to various reasons.○ Warm data is accessed less frequently.○ When warm data is accessed, lower service level agreements are applicable with regards to
performance.
SAP BW/4HANAOperation PUBLIC 1145

○ Fewer CPU-intensive processes are required to access warm data.○ Only parts of warm data are accessed simultaneously.
The following graphic shows a SAP HANA scale-out landscape with extension node:
This enables you to run a SAP HANA scale-out landscape with fewer nodes and less main memory for the same data volume. A further advantage of this setup is that all SAP HANA functions related to operation, updates, and data management are available out of the box.
With data tiering optimization you can configure DataStore objects (advanced) so that SAP HANA stores the data (object-based or partition-based) in an extension node.
Prerequisites
You are using SAP HANA 1.0 SPS12 (DSP) or higher and you have configured SAP HANA for use with the extension node. More Information: SAP Note 2343647
You have specified the data tiering properties (information about which temperatures or memory areas should be supported by an object) in the modeling screen for the relevant DataStore objects. You have used the definition of an object temperature or partition temperature to specify which data is stored in which memory area.
Move Data to SAP HANA Extension Nodes
A data tiering optimization job regularly moves data to extension nodes for the corrresponding configured DataStore objects (advanced) currently in operation.
To execute a project for the reorganization and optimization of the SAP HANA scale out system landscape, you can use the SAP HANA data distribution optimizer.
1146 PUBLICSAP BW/4HANA
Operation

More information
● SAP Note 2343647 - How to configure HANA for the BW extension node● For more information about classification of data based on access frequency, see Data Tiering [page 1124].● Information about Data Temperature: Extension Node, see the SAP HANA Administration Guide on the SAP
Help Portal page for SAP HANA platform.● FAQ: SAP BW∕4HANA and SAP BW-On-HANA with SAP HANA Extension Nodes
8.7.1.10 SAP HANA Native Storage Extension as Warm Store
SAP HANA Native Storage Extension is a universal storage management solution for warm data. It is integrated with SAP HANA and allows you to manage data that does not need to be accessed frequently, without having to load it fully into the SAP HANA memory. SAP HANA NSE is available as of SAP HANA 2.0 SPS 04.
SAP HANA NSE was introduced with SAP BW∕4HANA 2.0 SPS 04 as an additional solution for warm data in SAP BW∕4HANA and is an alternative to SAP HANA Extension Node . Whether or not SAP HANA NSE is used in SAP BW∕4HANA for Data Tiering is decided at system level: SAP HANA NSE is only used as the data tier for warm data if there are no SAP HANA extension nodes configured for the system, and the landscape is a single-node landscape rather than a scale-out landscape. In all other cases, either SAP HANA Extension Nodes is used as the storage area for warm data (if any extension nodes exists) or there is no storage area at all for warm data.
Data Tiering Optimization SAP BW∕4HANA is handled the same way regardless of whether SAP HANA Extension Node or SAP HANA NSE is used for warm data. During modeling you therefore define the data tiering properties in your DataStore object as previously using the temperatures to be supported. At a later point in time, you can specify the temperature for the entire object or for individual partitions, and then change the temperature using a DTO job.
More Information
● For information about SAP HANA Native Storage Extension, see the SAP HANA Administration Guide on the SAP Help Portal page for SAP HANA Platform.
● SAP Hinweis 2799997 - FAQ: SAP HANA Native Storage Extension (NSE)● SAP Note 2771956 - SAP HANA Native Storage Extension Functional Restrictions
SAP BW/4HANAOperation PUBLIC 1147

8.7.1.11 Hadoop as a Cold Store
You can use Hadoop as a cold store.
Prerequisites
You have configured Hadoop as a cold store. More information: Configuring Hadoop as a Cold Store / Near-Line Storage Solution [page 1162]
Features
You can store the data in formats TEXTFILE, ORC and PARQUET in Hadoop. With the TEXTFILE format, uncompressed CSV files are saved in HDFS. You can specify the format in Customizing under SAP BW/4HANA Customizing Implementation Guide SAP BW/4HANA Information Lifecycle Management Edit Cold Store Connection . To do this, under Connection Parameters define parameter table_format=<required format>.
To check whether the files have arrived in Hadoop, you can use the Hadoop File System Browser. To do this, in transaction SE38 call program RSDA_HDP_BROWSE_HDFS. You get information about the metadata of the files and their structure.
If you want to physically delete data, you can use program RSDA_CLEANUP_ARCHIVE.
For more information on Hadoop as a cold store, see 2363218 (Hadoop NLS: Information, Recommendations and Limitations).
8.7.2 Near-Line Storage
Increasing amounts of data, which need to be available for further analysis but are rarely required, place a load on your BW system. The granular storage of data can quickly result in a large volume of data, particularly in the Enterprise Data Warehousing layer.
NoteData Tiering Optimization (DTO) is a new solution for storing data in various memory areas. You can still use BW Near-Line Storage to store data with a data archiving process. Existing scenarios can therefore be retained. For new DataStore objects however, you should use Data Tiering Optimization (DTO) wherever possible.
If you want to keep the amount of data in your system constant without deleting data, you can use the External Store as part of BW Near-Line Storage. The data is first moved to an archive or near-line storage and then deleted from the SAP BW∕4HANA system. You can either access the data directly or load it back as required, depending on how you archived the data.
1148 PUBLICSAP BW/4HANA
Operation

For DataStore objects (advanced), you can store the data in near-line storage using a data archiving process. Storing historical data in near-line storage reduces the data volume of InfoProviders, but the data is still available for queries. You do not have to load the data back into the SAP BW∕4HANA system. The database partitions and the near-line storage partitions for an InfoProvider consistently reflect the total dataset.
Data Archiving Process Flow
The data archiving process consists of three main steps:
1. Creating the archive data/near-line objects2. Storage of the archive file in near-line storage3. Deletion of the archived data from the database
A data archiving process is always assigned to one specific InfoProvider and has the same name as this InfoProvider. It can be created retrospectively for an existing InfoProvider that is already filled with data.
A near-line object is generated from the data archiving process for every InfoProvider. The near-line object addresses the connected near-line storage solution. Near-line objects consist of different near-line segments that reflect the different views of the corresponding InfoProviders and can also reflect the various versions of an InfoProvider.
Data archiving processes can be transported like all TLOGO objects. The data archiving process must be assigned to a transportable package and change recording must be activated in SAP BW∕4HANA. The NLS connection name must also be the same in the systems.
8.7.2.1 Archiving Data
Prerequisites
You have already loaded data into an InfoProvider.
Context
Procedure
● 1. Optional: You start by analyzing which data in queries can no longer be selected. You can use this information to decide which data can be archived. More Information:
SAP BW/4HANAOperation PUBLIC 1149

2. You create a data archiving process for the InfoProvider from which you want to archive data.More information: Creating Data Archiving Processes [page 1150]
3. You generate and then schedule the archiving request. More information:○ Manual request processing: Creating and Executing Archiving Requests [page 1174]
4. You can load archived data back into InfoProviders.More information: Loading Archived Data Using a Data Transfer Process [page 1184]
5. In a query, you can access data stored in near-line storage.More information: Reading Stored Data [page 1185]
8.7.2.2 Creating Data Archiving Processes
Prerequisites
For the following DataStore objects (advanced), the data to be archived must be activated before it can be archived:
● DataStore objects (advanced) with the Activate Data properties (Corporate Memory - Compression Capabilities)
● DataStore objects (advanced) with the Activate Data and Write Change Log properties (Data Warehouse Layer - Delta Calculation)
● DataStore objects (advanced) with the Activate Data and All Characteristics are Key, Reporting on Union of Inbound and Active Table properties (Data Warehouse Layer - Data Mart)
● DataStore objects (advanced) with the Activate Data, All Characteristics are Key, Reporting on Union of Inbound and Active Table, and planning mode properties (Planning on InfoCube-Like)
For DataStore objects (advanced) with non-cumulative key figures, an archiving process be created if the DataStore object has one of the following combinations of modeling properties:
● Data Warehouse Layer - Delta calculation and the property inventory● Data Warehouse Layer - data mart and the property inventory
You also have to use SAP IQ as a near-line storage solution in order to use this function.
The maximum length for the fields of a DataStore object (advanced) is 18 characters.
For DataStore objects (advanced) with properties Activate Data and Keep Inbound Data, extract from Inbound Table, it is not possible to create a data archiving process.
If you want to use SAP IQ as a near-line storage solution, you need to install and configure SAP IQ. More information: Sybase IQ as a Near-Line Storage Solution [page 1155]
If you want to use Hadoop as a near-line storage solution, you need to have already configured a Hadoop cluster and performed the relevant configurations. More information: Hadoop as a Near-Line Storage Solution [page 1160]
1150 PUBLICSAP BW/4HANA
Operation
Procedure
1. You are in the BW modeling tools, in the editing screen for your DataStore object (advanced). Choose
Manage the Data Archiving Process.2. The data archiving process contains the same technical name as the InfoProvider. Enter a description.
Tab: General Settings
1. Select a near-line connection. The default near-line connection is predefined for a new data archiving process.
Tab: Selection Profile
1. You specify which data from the InfoProvider is selected for the archiving session.As far as the selected time characteristic is concerned, the time slice archiving always creates time intervals that directly follow on from one another. These can be connected, with conditions, to additional, time-independent partitioning characteristics. You can use these characteristics to further refine the selection.
NoteTo create the best possible conditions for using queries subsequently on near-line storage, the selected time characteristic must also be highly relevant for the queries.
For a DataStore object, you can only select a key characteristic as the partitioning characteristic in time slice archiving. This is necessary in order to ensure that the archived records are consistent, which is not the case with non-key fields. The characteristic for the time slice generation can also be a non key characteristic. However, you then have to select a separate partitioning characteristic from the key with a monotonous time reference and that the time conditions can be applied to (such as Clearing Date in the data part and Document Number in the key). At runtime, the system attempts to apply the time restriction to a partitioning characteristic restriction. In the InfoCube, all characteristics always count as key characteristics. For more information, see SAP Note 1000784 .
You cannot select constant values as characteristics for time slice archiving.
You can also define that non-compressed data can be archived. If you do not compress, you can save time and memory space. You can change this setting while the system is running. However, you should only do this once all archiving runs have finished. You also need to be aware of the effect this has when deleting requests. More information: Tab Page: Requests.
Tab: Near-Line Storage
1. Specify a maximum size for the data package. You should take the memory capacity of your storage medium into account. It can be restricted by the number of data objects. The limit that is reached first is decisive. During an archiving run, a new data package is created when the maximum size is reached.
2. Activate the data archiving process. If the data archiving process is active, it is no longer possible to change many of the settings.More information: Changes to a Data Archiving Process [page 1169]
SAP BW/4HANAOperation PUBLIC 1151

Result
A connection to a near-line storage is generated.
You can now schedule the data archiving process. See:
● Scheduling Data Archiving Processes Using Process Chains [page 1170]● Manual request processing: Creating and Executing Archiving Requests [page 1174]
8.7.2.2.1 Staging DataStore Objects with Inbound Table - Points to Consider
Prerequisites
All requests must be updated in order to allow archiving.
Special Features
In the case of staging DataStore objects with the property Inbound Queue Only, there are a number of things to consider when creating a data archiving process:
Tab: General Settings
Request-based archiving is the default setting and cannot be changed. The reasons for this are:
● The contents of this kind of DataStore object are managed by requests.● The request TSN is the primary technical key characteristic of this type of DataStore object.
Request-based archiving is a special form of time slice archiving: Only complete requests can be archived. The time slice condition is converted into a request condition. If is not possible to select at least one complete request with the selected time slice condition, no data is archived.
A technical attribute of the load request (Request Creation Date or Request Load Date for example) can also be selected as a time slice characteristic. Subsequent processing is the same as for standard DataStore objects.
1152 PUBLICSAP BW/4HANA
Operation

Tab: Selection Profile
In addition to the time characteristics, you can also select the characteristics Load Date of Request or Creation Date of Request as the characteristic for time slices. This type of DataStore object does not have a semantic key. Therefore it is only possible to select a characteristic for time slices (and not a partitioning characteristic).
CautionThis means when data is being archived or loaded, no check is performed to determine if the data has already been archived or loaded.
Reload
Individual requests cannot be reloaded, as no gaps are allowed in this kind of DataStore object. The follow-on requests must therefore always be reloaded.
8.7.2.2.2 Creating Near-Line Storage Connections
If you want to create a data archiving process with near-line storage, you first have to create a connection to your near-line storage.
Procedure
● 1. You can call the transaction for processing near-line storage either in Customizing under SAP BW/4HANA Customizing Implementation Guide SAP BW/4HANA Information Lifecycle ManagementEdit Near-Line Storage Connection or in the Data Warehousing Workbench under AdministrationCurrent Settings Near-Line Storage Connections.
2. Choose New Entries.3. Enter a name for the near-line storage connection. This name is then offered to you for selection when
you create a data archiving process.4. Specify if you want the connection to be the default connection. When you create a new data archiving
process, the default connection is used automatically.5. Enter the name of the class that implements the near-line storage connection.6. Specify the near-line connection mode. This defines the operation mode of a near-line storage
connection. The following modes are supported:○ Productive ( ):
This is the recommended mode for productive use. Every operation on the near-line connection is passed on to the near-line provider. Especially when processing queries, these are terminated with an error message if near-line storage is not available unless a pruning mechanism has excluded the near-line access in advance.
SAP BW/4HANAOperation PUBLIC 1153

○ Emergency (E):This mode can be used if near-line storage is temporarily unavailable. In this mode, queries that run over the Data Manager return empty result sets from every near-line provider that is assigned to this near-line connection. A warning message is sent to the front end aswell. All other operations, for example moving data into or out of near-line storage (like archiving and restoring), data extraction from the near-line storage (for ETL processes in SAP BW∕4HANA) or creating new near-line tables/editing existing ones, terminate with an error message, without the corresponding near-line interface method being called. You can use this mode if near-line storage crashes or has to be switched off for maintenance. In particular, this mode covers queries that the near-line access do not exclue already by means of an explicit definition (near-line read mode) or a successful pruning mechanism.If you set the near-line connection to this mode, you should issue a system message informing users that results in the queries might be incomplete.
○ Read-Only (R):This mode is the same as productive mode, with the difference that no operations can be transferred to near-line storage if this would change the status with regard to the BW system. This means that no DDL commands (create, edit and store near-line tables) or DML commands (create, edit near-line requests, open writer handles) are allowed at the near-line interface level. If a BW process triggers a command of this type, it receives an exception with an error message indicating that the command is not possible in this mode.This mode can be used during system migration for example if both the original system and the copied system should use the near-line storage. In this case, the mode has to be set in both systems of course.
○ Off (O):This mode should be used if a near-line storage has been permanently disconnected from the system, but there are still active data archiving processes (DAPs) in the system. In this mode, all DDL and DML commands returns an error message with an exception. Errors of type DROP_TABLE are ignored in order to allow deletion of DAPs without having to connect the system with near-line storage again. Every read access on near-line data returns an empty result set, as the system expects all near-line requests and the corresponding data to be deleted.
7. Optional: Specify a database connection. This parameter is relevant for SAP IQ as a near-line storage solution. You can specify the database connection (instead of the DBCON=… parameter) under Connection Parameters. This provides you with a clean foreign key relation from table RSDANLCON to table DBCON.If you have entered a value under Database Connection, this overrides the entry made under Connection Parameters.
8. [For Hadoop as a near-line storage solution:] In the Destination field, enter the destination name of the host, on which the WebHCat service is running.
9. In the Remote Source field, enter the remote source, which you want to use for data access via SAP HANA Smart Data Access.If you have entered a value under Remote Source, this overrides the entry made under Connection Parameters.
10. The entries for the Connection Parameters field are made by your near-line storage solution. For more information on individual parameters, see the F1 help.
11. Save your entries. When you save, the connection to the near-line storage solution is opened and then closed again. Near-line storage solution then returns a status indicating whether the connection is working and providing system information. In the upper area of the screen, the system displays the connection, with its status and system information. The log is displayed in the lower part of the screen.
1154 PUBLICSAP BW/4HANA
Operation

CautionNote that you should not change a near-line storage connection if it is being used in an active data archiving process. Most importantly of all, the implementing class should not be changed any more.
Related Information
Configurations in SAP BW∕4HANA [page 1167]Configuring SAP IQ as a Cold Store [page 920]
8.7.2.2.3 SAP IQ as a Near-Line Storage Solution
The adapter for SAP IQ as a near-line solution is delivered with SAP BW∕4HANA.
Integration of SAPIQ makes it possible for you to separate data that you access frequently from data that you access rarely, thus making less demands on the resources in the SAP BW∕4HANA system. The near-line data is stored in compressed form and needs to be backed up less frequently. You can thus reduce the costs incurred by data that is accessed less frequently.
To ensure consistency between online data and near-line data, the archived time partitions are locked and are read-only. On the online side, the data is made read-only by means of a logical lock on the time slice. The data in the near-line storage can be read directly using queries without having to be reloaded.
You access your data in the SAP IQ near-line storage via SAP HANA Smart Data Access (SDA). SAP HANA Smart Data Access enables you to access remote data, without needing to replicate the data in the SAP HANA database beforehand. This improves performance for queries, which use a lot of a navigation attributes and hierarchies. More information: SAP HANA Smart Data Access [page 1298] and the SAP Notes with FAQs 2165650 and 2100962
Prerequisites
You have installed the SAP IQ Server and SQL Anywhere ODBC driver. For more information, see SAP Notes 1737415 and 1796393 .
You have performed the required configuration steps. More information: Configuring SAP IQ as a Cold Store [page 920]
SAP BW/4HANAOperation PUBLIC 1155

8.7.2.2.3.1 Setting Up Automatic Data Backups
You can set up an automatic data backup for the near-line connection between SAP IQ and SAP BW∕4HANA. If errors occur, it will then be possible to restore consistency between SAP BW∕4HANA and SAP IQ.
Prerequisites
The database user used for the near-line connection between SAP IQ and SAP BW∕4HANA needs sufficient authorizations to trigger an event.
Procedure
1. Define a suitable event in Sybase IQ.2. Specify the name of the event in the connection parameters for the near-line connection in the SAP
BW∕4HANA system. More information: Configuring SAP IQ as a Cold Store [page 920]
For more information about defining the event and about the process in general, see 1900379 .
8.7.2.2.3.2 Assigning a Remote Source to an Existing Near-Line Storage Connection for SAP IQ
With Support Package Stack 01 and higher, it is mandatory to access the data in SAP IQ as a near-line storage via SAP HANA Smart Data Access (SDA). If you want to use an existing near-line storage connection, which was defined without a remote source up till now, then you need to assign a remote source to the connection. New near-line storage connections can only be created if a remote source has been specified.
Procedure
1. Create a remote source in SAP HANA Studio.More information: Creating a Remote Source in SAP HANA Studio [page 1157]
2. Assign the remote source to the near-line storage connection.More information: Assigning a Remote Source to the Near-Line Connection [page 1157]
3. Reactivate the data archiving process.More information: (Re-)Activating Data Archiving Processes [page 1158]
1156 PUBLICSAP BW/4HANA
Operation

Related Information
Configuring SAP IQ as a Cold Store [page 920]
8.7.2.2.3.2.1 Creating a Remote Source in SAP HANA Studio
Context
In order to access the data in near-line storage via SAP HANA Smart Data Access, you need a remote source. The remote source in SAP HANA should point to the same IQ database that is also used as near-line storage for the SAP BW∕4HANA system. The remote source should also be bound to the same user as the near-line storage connection. You create the remote source using the provisioning folder in SAP HANA studio.
Prerequisites
You need the following authorization in SAP HANA:
● System Privilege: CREATE REMOTE SOURCE
If the remote source is not created with the SAP<SID> user but with a different database user instead, then this database user must assign the corresponding object authorizations to the SAP<SID> user:
● Object privilege: CREATE VIRTUAL TABLE on VIRTUAL_TABLES (SYS)● Object privilege: DROP on VIRTUAL_TABLES (SYS)
For more information on creating remote sources, see Help Portal under SAP HANA Administration GuideAdding Remote Data Sources .
8.7.2.2.3.2.2 Assigning a Remote Source to the Near-Line Connection
The remote source must be assigned to the near-line connection in the SAP BW∕4HANA system using Customizing.
Procedure
1. You can call this transaction in Customizing by choosing SAP BW/4HANA Customizing Implementation Guide SAP BW/4HANA Information Lifecycle Management Edit Near-Line Storage Connections and in the Data Warehousing Workbench under Administration Current Settings Near-Line Storage Connections .
SAP BW/4HANAOperation PUBLIC 1157

2. In the Remote Source field, enter the remote source, which you want to use for data access via SAP HANA Smart Data Access.
NoteIf you have entered a value under Remote Source, this overrides the entry made under Connection Parameters.
3. Save your entries.
8.7.2.2.3.2.3 (Re-)Activating Data Archiving Processes
If a remote source has been assigned to a near-line connection, then Smart Data Access (SDA) is used for a query on the near-line provider SAP HANA. To ensure that existing data archiving processes can use SDA, they need to be re-activated.
Procedure
1. When you create new data archiving processes, a virtual table is created in SAP HANA when they are activated. This is displayed in the activation log.
2. If you want existing data archiving processes to use SDA, you need to re-activate them.
8.7.2.2.3.3 Administration of SAP IQ Partitions
Use
Moving the data creates a partitioned table for every InfoProvider in the SAP IQ database. The system creates a new partition for every new archiving request. It does this either by splitting the MAX partition, which should always be empty, or by splitting the partition that belongs to the previous archiving request.
SAP IQ, Version 15.4 can manage up to 1024 partitions per table. If you move data to SAP IQ very frequently, you might reach the upper limit for partitions. In this case, you can manage the partitions.
You can monitor and reduce the number of partitions using report RSDA_SYB_PARTITION_MONITOR. The report attempts to reduce the partitions by deleting or merging them. To start with, all partitions are deleted that are flagged for deletion or as invalid. The system deletes the partitions in order of age, starting with the oldest. If this deletion step does not bring the number of partitions back below the limit, the system merges the partitions.
1158 PUBLICSAP BW/4HANA
Operation

Prerequisites
To run the report, you need authorization STOR for field S_ADMI_FCD in authorization object S_ADMI_FCD and authorization 03 (Display) for field ACTVT in authorization object S_RZL_ADM. You can then only see which activities are being executed. You can also run the report in simulation mode. With authorization 01 (Add or Create) for field ACTVT in authorization object S_RZL_ADM, you can merge or delete partitions manually.
Procedure
Run SAP IQ Partition Monitor Manually
1. Run report RSDA_SYB_PARTITION_MONITOR. You can run it in the dialog or schedule it to run periodically in the background.
2. Enter the name of your near-line connection to SAP IQ.3. You also have the option of entering the name of the database table in SAP IQ. If you do not enter anything
here, the system will check all partitions.4. Specify a lower and upper threshold value. The default setting is 20% for the lower threshold and 80% for
the upper threshold. The system then checks for tables with over 80% of the maximum number of partitions. If this threshold value is exceeded, the system reduces the partitions for this table until the lower threshold is reached.
5. In execution mode, you can decide whether to just run a check or to actually have partitions deleted and/or merged.
6. If you run the report in the dialog, the system first displays a list of all selected tables. All tables where the number of partitions exceeds the upper threshold value are marked in red in the Partitions column. By double-clicking on a row, you can call the detail view for the partitions in a table. Here you see one partition per row. In the Action column, you can see what options you have for reducing the number of partitions. If you have selected Drop and Merge Partitions as the execution mode, you have the following options:○ No icon: This partition cannot be deleted or merged with another partition.
○ : This partition can be deleted.
○ : This partition can be merged with the following partition.In the Seq.No column, you can see the sequence in which the merge is performed.In execution mode Drop Partitions (no Merge), you only see partitions that can be deleted. In execution mode Merge Partitions (no Drop), you only see partitions that can be merged.
If you have selected one or more rows and choose Drop & Merge, this action is performed for the selected rows. To start with, all rows are selected that need to be processed in order to reach the lower threshold value.
7. If you run the report in the background, the partitions are processed automatically in accordance with the system proposal.The report starts by attempting to delete all partitions that only contain requests with request status Invalid (8). It processes the requests in order of age, starting with the oldest. If the lower threshold value can be reached in this way, the report stops deleting. If this lower threshold value cannot be reached in this way, the report attempts to merge neighboring partitions. Neighboring partitions are always merged if they only contain requests that have at least request status Active (7). The system starts by merging neighboring partitions that are smallest when put together.Partitions that contain requests with a lower status are not merged. The partitions are merged in order of size, starting with the smallest. Once the lower threshold is reached, the report stops merging.
SAP BW/4HANAOperation PUBLIC 1159

Schedule SAP IQ Partition Monitor by Process Chain
1. Call the process chain maintenance transaction. Choose under Administration in the Data Warehousing Workbench. The Process Chain Maintenance Planning View screen appears.
2. In the left-hand screen area of the required display component, navigate to the process chain where you want to integrate the SAP IQ Partition Monitor and double-click to select it. The system displays the process chain plan view in the right-hand screen area.If you cannot find a suitable process chain, create a new one. More information: Creating Process Chains [page 964].
3. To insert the process, choose in the left-hand screen area. The system displays all process categories that you can choose from.
4. In process category Others, choose application process type SAP IQ Partition Monitor.5. Use drag and drop to insert this application process type into the process chain. The dialog box for
inserting a process variant appears.6. Connect the processes.7. Save and check your process chain as described in Creating Process Chains [page 964].
The process step is completed successfully once the upper threshold value is no longer exceeded for any of the selected tables. If the upper threshold value is exceeded for one or more of the selected tables, the process step ends with an error. You now have the option of using the alerting function in the process chains, for example to send an e-mail to the system administrator.Here you can configure the same options for the variant as you can for manual execution. If you configure the process step to perform drop and/or merge operations (in addition to running checks), then the condition for triggering the error/alert applies to the status after executing the drop/merge operations.More information: Sending Alerts to Process Chains [page 974]
8.7.2.2.4 Hadoop as a Near-Line Storage Solution
You can use Hadoop as near-line storage for SAP BW∕4HANA and store archived data in Hadoop for all objects that are supported by near-line storage.
The adapter for Hadoop as a near-line solution is delivered with SAP BW∕4HANA.
The Hadoop Distributed File System (HDFS) provides you with inexpensive, distributed storage, which has been created for mass data. The integration of Hadoop enables you to separate data, for which there is limited access or no access at all, and data, which is accessed frequently. This reduces the strain on the system and thereby reduces the costs of data with limited access.
To ensure consistency between online data and near-line data, the archived time partitions are locked and are read-only. On the online side, the data is made read-only by means of a logical lock on the time slice. The data in the near-line storage can be read directly using analytic queries without having to be reloaded. SAP HANA Smart Data Access (SDA) is used for query access related to data stored in the near-line storage. The data is accessed in this case via the Spark SQL Adapter.
1160 PUBLICSAP BW/4HANA
Operation

Role Within Multi-Temperature Data Management
The following graphic shows how Hadoop as near-line storage is integrated into the solution portfolio for multi-temperature data management:
Recommendations for Using Hadoop as Near Line Storage
We recommend that you only use Hadoop as near-line storage if a Hadoop cluster has already been configured in your IT landscape. In order to use a Hadoop cluster as near-line storage, you need sufficient knowledge of cluster management.
In particular, we recommend Hadoop as near-line storage for the entry layer of the data warehouse (data collection and corporate memory; no reporting).
Note that the data, which is archived with this solution, still “belongs” to SAP BW∕4HANA, and therefore no direct data manipulation with HDFS-based tools is possible.
More Information
For more information on prerequisites, recommendations and restrictions, see SAP Note 2363218 .
SAP BW/4HANAOperation PUBLIC 1161

8.7.2.2.4.1 Architecture
The following figure shows an overview of the architecture of Hadoop as near-line storage:
The NLS table definitions in Hadoop are created via Hive. The data is archived via a ReST-based API. Query access and reloading are supported by the Spark-SQL adapter via SAP HANA Smart Data Access.
8.7.2.2.4.2 Configuring Hadoop as a Cold Store / Near-Line Storage Solution
Prerequisites
You need a Hadoop cluster and the required components with the minimum recommended versions or higher. For more information, see Hadoop Cluster [page 1163].
Configuration Steps
1. Perform the configuration steps on Hadoop.
1162 PUBLICSAP BW/4HANA
Operation
2. Perform the configuration steps on SAP HANA.3. Perform the configuration steps in SAP BW∕4HANA.
More Information
For more information on prerequisites, recommendations and restrictions, see 2363218 .
Related Information
Configurations for Hadoop [page 1164]Configuration on SAP HANA [page 1166]Configurations in SAP BW∕4HANA [page 1167]
8.7.2.2.4.2.1 Hadoop Cluster
Before you can use Hadoop as near-line storage, you need to have configured a Hadoop cluster.
We recommend using a Hadoop distribution (such as Hortonworks, Cloudera, Map-R) and following the instructions in its installation guide.
The following table lists the components that are required for the Hadoop cluster.
NotePlease note that SAP only supports the specified Hadoop versions. No other versions are supported.
Component More Information
HDFS 2.7.1
Apache Hadoop Distributed File System
https://hadoop.apache.org/docs/stable/
MapReduce2 2.7.1
Apache Hadoop NextGen MapReduce (YARN)
YARN 2.7.1
Apache Hadoop NextGen MapReduce (YARN)
Tez 0.7.0
Tez is the next generation Hadoop Query Processing framework written on top of YARN.
https://tez.apache.org/
SAP BW/4HANAOperation PUBLIC 1163

Component More Information
Hive 1.2.1
Data warehouse system for ad-hoc queries & analysis of large datasets and table & storage management service
https://hive.apache.org/
Pig 0.15.0
Scripting platform for analyzing large datasets
https://pig.apache.org/
ZooKeeper 3.4.6
Centralized service which provides highly reliable distributed coordination
http://zookeeper.apache.org/
For SAP HANA Smart Data Access with SAP HANA Spark Controller:
Spark 1.5.2
Apache Spark is a fast and general engine for large-scale data processing.
https://spark.apache.org/
SparkController 1.6.0 PL1
SAP HANA Spark Controller
SAP Note 2344239
[Optional for authentication:] Knox https://knox.apache.org/
8.7.2.2.4.2.2 Configurations for Hadoop
The following section describes the procedure for simple authentication. You find information on other authentication methods in the Hadoop documentation under https://hadoop.apache.org/docs/stable/hadoop-auth/ or in the documentation for the relevant distributions.
1. Create a user for the SAP BW∕4HANA system on Hadoop. This user is used to establish a connection to Hadoop and controls the authorizations for data access on Hadoop. Create the user at operating system level on all Hadoop nodes. The recommended naming convention for the user is as follows: sap<SAP BW∕4HANA system ID in lowercase letters> (sap<sid>).sudo useradd sap<sid>
2. Create a group for the SAP BW∕4HANA system. Use the same name for the group as for the user you just created.sudo groupadd sap<sid>
3. Add the user you created in step 1 - as well as the users dfs, hive, spark and hanaes - to the new group.sudo usermod <Benutzername> -a -G sap<sid>
1164 PUBLICSAP BW/4HANA
Operation

User Name
hdfs
hive
spark
hanaes
4. Using the user, who is authorized to create folders in the root directory of Hadoop Distributed File System (HDFS), create a directory for the SAP BW∕4HANA system. In a local operating system, this is usually the user hdfs. The recommended naming convention for this directory is as follows: /sap/bw/<SAP BW/4HANA system ID in lowercase letters> (/sap/bw/<sid>).hdfs dfs -mkdir -p /sap/bw/<sid>Check if the directory /sap/bw/<sid> already exists.
5. Change the owner rights for the directory /sap/bw/<sid> so that the directory belongs to the user and group, which you created in the first two steps (sap<sid>):hdfs dfs -chown <User Name>:<Group Name> /sap/bw/<sid>hdfs dfs -chown sap<sid>:sap<sid> /sap/bw/<sid>
6. Change the access rights for the folder, so that the user sap<sid> who owns the directory has all permissions (read, write, execute) and the group of the sap<sid> user has at least read and execution permissions (by using the following command, for example).hdfs dfs -chmod 750 /sap/bw/<sid>
7. [Optional:] Using the sap<sid> user, create additional directories under the /<sid> directory.hdfs dfs -mkdir -p /sap/bw/<sid>/<NLS Directory>
NLS Directory Purpose
nldata Data directory that contains files for external Hive tables.
nlmeta Metadata directory that contains the DDL statement for the Hive tables created
nljobs Control data and log data for Hive jobs
NoteThis step is optional because the directories are only created automatically by the SAP BW∕4HANA system when accessed for the first time. However, this step can be useful; for example if you need to assign specific access rights for the directories.
8. Create a database in Hive with the name sap<sid>. A database in Hive corresponds to a schema. You can use the hive user to run the following command in a node where the hive client is installed:hive -e 'create database sap<sid>;' Check if the database sap<sid> already exists.
9. Create a dedicated YARN queue for TempletonControllerJobs.For more information, see the documentation for Hadoop: Capacity Scheduler under Setting up queues.
SAP BW/4HANAOperation PUBLIC 1165

10. Assign the name of the YARN queue in the Hive configuration file hive-site.xml to the property with the key templeton.hadoop.queue.name.For more information on Hortonworks Data Platform for distribution and Tez as the execution engine for Hive, see https://docs.hortonworks.com/HDPDocuments/HDP2/HDP-2.4.2/bk_installing_manually_book/content/ref-d677ca50-0a14-4d9e-9882-b764e689f6db.1.html .
11. Ensure that the WebHDFS and WebHCat services are correctly configured.For more information, see the documentation for Hadoop HDFS in section WebHDFS REST API.For more information on WebHCat, see https://cwiki.apache.org/confluence/display/Hive/WebHCat
12. [Optional:] Install and configure the Apache Knox Gateway, in order to establish secure WebHDFS and WebHCat connectivity to the SAP BW∕4HANA system.For more information, see https://knox.apache.org/ .
13. Install and configure the SAP HANA Spark Controller as described in the documentation delivered with SAP Note 2344239 .
8.7.2.2.4.2.3 Configuration on SAP HANA
You need a remote source in the SAP HANA database from SAP BW∕4HANA, in order to access your data in Hadoop via SAP HANA Smart Data Access (SDA).
Prerequisites
You have installed and configured the SAP HANA Spark Controller as described in the documentation delivered with SAP Note 2344239 .
Creating a Remote Source
Create a remote source in SAP HANA Studio. Alternatively you can create a remote source using SQL command CREATE REMOTE SOURCE.
PrerequisitesIn SAP HANA you need the system privilege CREATE REMOTE SOURCE.
If the remote source is not created with the SAP<SID> user but with a different database user instead, then this database user must assign the corresponding object authorizations to the SAP<SID> user:
Object privilege: CREATE VIRTUAL TABLE on VIRTUAL_TABLES (SYS)
Object privilege: DROP on VIRTUAL_TABLES (SYS)
Procedure1. In SAP HANA Studio expand the Provisioning node in the Systems view.2. Select the folder Remote Sources and choose New Remote Source in the context menu.
1166 PUBLICSAP BW/4HANA
Operation

3. Open the Adapter Name dropdown list and choose the adapter SAPRK SQL (DESTINATION).4. Enter the following information:
○ Source Name: Enter a name for the remote source.○ Source Location: indexserver○ Connection Properties:
○ Server: Enter the fully qualified name of the domain for the Hadoop node, which the SAP HANA Spark Controller is running on.
○ Port: 7860 (This is the default value. If the port was configured differently for the Sark Controller, enter the corresponding port number.)
○ SSL Mode: Choose either enabled or disabled depending on your security strategy.○ Credentials:
○ Credentials Mode: Choose Technical user.○ User Name: Enter the user name that you created in the first step of the Hadoop configuration.○ Password: Enter a password of your choice.
5. Choose the Save this editor symbol in the top right corner of the editor. You can also choose the Test connection symbol to check if the connection to the source can be successfully established.The remote source - together with its tables - is now displayed in the Remote Source folder.
You can find more information about SAP HANA Smart Data Access and remote sources on the SAP Help Portal in the SAP HANA Administration Guide.
8.7.2.2.4.2.4 Configurations in SAP BW∕4HANA
In SAP BW∕4HANA you need destinations for communication with Hadoop and you need to create a connection to Hadoop near-line storage.
Creating Destinations
Communication between SAP BW∕4HANA and Hadoop is via ReST APIs WebHDFS and WebHCat (Templeton). In the configuration screen for each RFC connection, create an HTTP connection for the server where the WebHDFS or WebHCat service is running.
1. Go to the screen Configuration of RFC Connections (transaction SM59).
2. Choose Edit Create from the menu:3. Enter a name for the RFC connection and assign a description.4. Choose G - HTTP connection to external server as the connection type.5. Make the following settings on the tab page Technical Settings:
○ For WebHCat:○ Target Machine: <Name of host, which the WebHCat service is running on>○ Service Number: 50111 or a different port, if a non-default value was selected in the Hadoop
configuration (step 11).○ Path Prefix: /templeton
SAP BW/4HANAOperation PUBLIC 1167

○ For WebHDFS:○ Target Machine: <Name of host, which the WebHDFS service is running on>○ Service Number: 50070 or a different port, if a non-default value was selected in the Hadoop
configuration (step 11).○ Path Prefix: /webhdfs
6. If you use plain http communication and you haven't implemented any security mechanisms on Hadoop, then keep the default settings for the destination.
Creating Near-Line Storage Connections
1. In Customizing, choose SAP BW/4HANA Customizing Implementation Guide SAP BW/4HANAInformation Lifecycle Management Edit Near-Line Storage Connections .
2. Choose New Entries.3. Enter a name for the near-line storage connection. This name is then offered to you for selection when you
create a data archiving process.4. Specify if you want the connection to be the default connection. When you create a new data archiving
process, the default connection is used automatically.5. Enter CL_RSDA_HDP_CONNECTION as the name of the class.6. Choose Connection Mode and then Productive Mode .7. In the Destination field, enter the destination name of the host, on which the WebHCat service is running.8. In the Remote Source field, enter the remote source, which you want to use for data access via SAP HANA
Smart Data Access.If you have entered a value under Remote Source, this overrides the entry made under Connection Parameters.
9. Enter a connection string under Connection Parameters. The connection string generally comprises a list of name/value pairs, separated by a semi-colon. Each name/value pair must be entered as follows: <Name of the parameter>=<Value of the parameter>Enter the following string: HDFS_DEST=<Name of destination for host, on which the WebHDFS service is running>;REMOTE_SOURCE=<Name of remote source>You can find an overview and the documentation for the available parameters in the F1 help for the field Connection Parameters.
10. To run a connection check, press Enter on the keyboard. The system opens the connection to the near-line storage and then closes it again. Near-line storage solution then returns a status indicating whether the connection is working and providing system information. In the upper area of the screen, the system displays the connection, with its status and system information. The log is displayed in the lower part of the screen. A successful check is indicated by the following messages:○ WebHCat: Destination '<Name of destination for the host, which the WebHCat service is running on>',
status = 'ok', version = 'v1', schema = '<Name of the Hive schema>'○ WebHDFS: Destination '<Name of destination for the host, which WebHDFS service is running on>',
user = '<Name of the Hadoop user>', path = '<HDFS base path>/nldata', size = ... GByte○ Remote source '<Name of the remote source>’ for Smart Data Access (SDA) checked successfully
11. Save your settings.
1168 PUBLICSAP BW/4HANA
Operation

Related Information
Creating Near-Line Storage Connections [page 1153]
8.7.2.2.5 Recommendations for Archiving with Hadoop
In order to achieve the optimal archiving throughput, we recommend that you use the available parallelization options for data archiving processes for NLS and Hadoop (for example, separate variants in process chains and settings for parallelization). Make sure that the configured parallelization is compatible with the existing resources on the Hadoop cluster. For the archiving process, it is necessary to convert the CSV files - created during the copy phase - to orc (parquet) format. This requires a certain amount of resources. If there are not sufficient resources available, this results in an unwanted serialization of the processes. This can lead to long-running background processes or timeouts in BW.
Related Information
Parallel Processing of Process Chains for Data Archiving [page 1171]
8.7.2.2.6 Security
In order to establish a secure connection, you can use the Apache Knox Gateway as a reverse proxy on Hadoop, configure a suitable authentication method (for example, Kerberos) and import the relevant certificates in the SAP BW∕4HANA system using the Trust Manager (transaction TRUST). Then you can call transaction SM59 (HTTP destination for WebHCat and WebHDFS), go to the tab page Logon and Security, choose Basic Authentication as the logon procedure and activate SSL in the security options.
8.7.2.2.7 Changes to the Data Archiving Process
If you have created a data archiving process for an InfoProvider, you can only make limited changes to this InfoProvider. This ensures that you can still archive data or access archived data.
The following changes are not permitted:
● If you delete a data archiving process, you lose the connection to the data that has already been archived.● All type changes or structure changes not listed below are not permitted if data has already been stored in
the near-line storage.
You can only make incompatible structure changes if no data has been stored or if the stored data has been completely reloaded.
SAP BW/4HANAOperation PUBLIC 1169

The following type changes and structure changes are permitted when using a near-line storage:
● You can add new characteristics and key figures.● You can increase the length of characteristics of data type CHAR.● You can change characteristics of data type DATS, NUMC and TIMS into data type CHAR, as long as you do
not shorten the character length.● You can change characteristics of data type DATS and TIMS into data type NUMC, as long as you do not
change the character length.● You can change key figures of data type INT4 into data type DEC, CURR or QUAN, as long as you do not
reduce the value range (number of whole number places).● With key figures of data type CURR, DEC and QUAN, you can expand the value range (number of whole
number places) or the accuracy (number of decimal places).● You can change key figures of data type CURR, DEC and QUAN into data type INT4, as long as you expand
the value range.
8.7.2.3 Scheduling Data Archiving Processes Using Process Chains
Prerequisites
You have created a data archiving process.
Procedure
● 1. You are in the Administration area in Data Warehousing Workbench. Choose Process Chains. The Process Chain Maintenance Planning View screen appears.
2. In the left-hand screen area of the required display component, navigate to the process chain where you want to insert your data archiving process and double-click to select it. The system displays the process chain plan view on the right side of the screen.If you cannot find a suitable process chain, create a new one. More information: Creating Process Chains [page 964].
3. On the left of the screen, choose Process Types. The system displays all process categories that you can choose from.
4. In process category Data Target Administration, choose application process type Archive Data from the DataStore Object.
5. Insert the application process type into the process chain by dragging it. The dialog box for inserting a process variant appears.
6. Create a process variant and confirm your entries. An additional dialog box appears.7. Select your data archiving process.
1170 PUBLICSAP BW/4HANA
Operation

8. Make the required settings:○ Under Process Flow Control, you can either resume unfinished archiving processes or specify
whether an archiving process should only run until a specific status is reached. See Status of Archiving Request [page 1175].
○ Under Relative Time Restrictions, you can precisely define the period to be archived. Using a relative time condition in the form of a minimum age allows you to schedule periodic archiving runs without having to adapt a variant with every run.The relative time restriction is changed into a selection condition for the time slice characteristic, depending on the start time of the write process. An intersection is created using the absolute time conditions for the time slice characteristic and the selection conditions for the other characteristics. This intersection is then used to derive the area that has already been archived and the selection conditions from other archiving requests that are still open. The resulting selection condition is stored with the newly created archiving request and is used for the subsequent selection of data in the write phase and the delete phase.
○ Under Further Restrictions, you can select values for your partitioning characteristics.9. Confirm your entries. At runtime for the process step, an archiving request is generated from this
variant, which controls entire archiving session.10. Save and activate your process chain. The process chain starts according to the selections in the start
process.
NoteThe DataStore object to be archived is not locked against data loading during the entire process. It only needs to be locked for a short period before the data is copied. After this, only the previously archived data areas and the area that is currently being archived are locked.
8.7.2.3.1 Parallel Processing of Process Chains for Data Archiving
When a process chain is used for archiving, the process steps for the copy phase (40), the verification phase (50) and the deletion phase (70) can be processed in parallel.
Prerequisites
If the following conditions are all met, archiving requests which are assigned to the process step of application process type "Archive Data from the InfoProvider" are processed in parallel:
1. Parallel processing has been explicitly modeled in a process chain for the creation phase (10) of a data archiving process. In other words, more than one created archiving request is valid for continuing in the copy phase (40), in the verification phase (50) and the deletion phase (70). Note that this not does not depend on how you have modeled the archiving using process chains:You have modeled all phases of a data archiving process in a single process chain. This means:○ ○ a process type for start processes
○ Next: N different parallel processes of type Archive Data from the InfoProvider, which only continue their processing up to phase 10 ("request created")
SAP BW/4HANAOperation PUBLIC 1171

○ Next: A single process step of type AND for continuation of the previously defined steps of type Archive Data from the InfoProvider
○ Next: A single process step of process type Archive Data from the InfoProvider, which continues processing for phases 30 to 70. In this case, the options Continue Open Archiving Request(s) and Only Archiving Requests in Previous Process Steps and must be activated.
○ You have modeled data archiving in multiple process chains:○ A process chain, which contains the process type for start processes and N different parallel
processes of type Archive Data from the InfoProvider, which only continue their processing up to phase 10 ("request created").
○ Additional and separately scheduled process chains, the individual process steps of process type Archive Data from the InfoProvider, which continue processing for phases 30 to 70. In this case, the options Continue Open Archiving Request(s) and All Open Archiving Requests must be activated.
2. When the process chain runs, there are enough free background processes to continue parallel execution of the process step.
Context
You can set parallelization for process type Archive Data from the InfoProvider either individually at process variant level or globally for process type Archive Data from the InfoProvider.
If all of these conditions are met, the action is executed in the original batch process of the process step up to the lock phase. Once all archiving requests have reached the lock status (request state 30), the process step is continued controlled by the batch manager in additional parallel batch processes for the copy and verification phase. The original batch process is completed.
If all of the archiving requests selected for continuation delete data from various InfoProviders (this only applies for semantically partitioned objects), the deletion also occurs in parallel. In this case, the deletion phase is performed immediately after the verification phase in the same batch process.
If there are two or more archiving processes that archive and delete data from the same InfoProvider, the deletion phase is posponed until the end of the verification phase of all parallel batch processes and processed sequentially for every InfoProvider by the batch process that last completed the verification phase.
Procedure
Globally setting of process type ARCHIVE in BW background processing
1. In the Data Warehousing Workbench, choose Administration Current Settings Batch Manager .
The screen BW Background Management, Logs and Tools appears.2. Under Parallel Processing, select the Archive process.3. Choose Parameter Settings. Check the global value for Number of Processes and adjust it as required (the
default setting is 3).
Set Number of Processes to 1 (serial processing) if you would like to activate parallel processing individually for each DAP variant in a process chain rather than by default for all variants.
1172 PUBLICSAP BW/4HANA
Operation

4. Save the setting in order to create an initial entry in table RSBATCH.Individual setting for each archiving process variant in a process chain
5. In the Data Warehousing Workbench, choose Administration Process Chains .6. To maintain the number of parallel processes individually for a particular process variant, open the
maintenance dialog of a DAP variant (Archive Process Type Data from the InfoProvider) in a process chain.
7. Choose Goto Maintain Settings for Batch Manager... .8. Select the option for the number of processes.
Alternatively, you can edit the number of processes for multiple DAP variants of process type ARCHIVE simultaneously by choosing Mass Maintenance of All Settings for Parallel Processing.
9. To reset the parallel setting for process type ARCHIVE, choose Goto Reset Batch Manager to Default .
8.7.2.4 Administration of Data Archiving Processes
When administrating an InfoProvider, you can manually (without using process chains) create, execute, and reload the archiving requests, as well as make them invalid.
Prerequisites
You have created and activated a data archiving process for an InfoProvider.
Features
In administration, you can create an archiving request for active data archiving processes. With data archiving processes that store the data in near-line storage, you can create a request, lock the selection area, write the data to near-line storage, verify the storage, and delete the data from the InfoProvider. If for any reason your requirements have changed at any point before the verification, you can mark the request as invalid. Once the request has completed, all the steps involved and the overall status are green. You can now reload the data back into the InfoProvider.
More information:
Creating and Executing Archiving Requests [page 1174]
Status of the Archiving Request [page 1175]
SAP BW/4HANAOperation PUBLIC 1173

8.7.2.4.1 Creating and Executing Archiving Requests
Prerequisites
You have created and activated a data archiving process for an InfoProvider.
Context
You can create an archiving request manually without using a process chain.
Procedure
● 1. You are in the BW modeling tools, in the editing screen for your DataStore object (advanced). Choose
Manage DataStore Object (advanced).
2. Under Manage Archiving, you can create an archiving request.
3. Choose Create Archiving Request.4. Make the required settings:
○ Under Primary Time Restrictions, you can set the exact partition range that you want to archive by specifying relative or absolute times.
○ Under Further Restrictions, you can use the characteristics that you specified as additional partitioning characteristics to set further restrictions.
○ Under Process Flow Control, you can either resume unfinished archiving processes or specify whether a archiving process should only run until a specific status is reached. See Status of Archiving Request [page 1175].
○ Under Further Restrictions, you can select values for your partitioning characteristics.5. Before starting the archiving session in productive mode, you can start it in test mode first:
○ To perform the run in test mode, choose In the Background or In Dialog.
○ To perform the run in productive mode, choose In the Background or In Dialog.6. Choose Back. The generated archiving request is displayed.7. You start other processing steps using the status columns. The status of the request depends on what
you specified under Process Flow Control. You can execute the rest of the steps by choosing the pushbutton for the last status entry. For more information on the different statuses, see Status of Archiving Request [page 1175].
8. In the Archivierung Request Monitor, you can view a list of archiving requests. By double-clicking on a request, you can view the archived data.By choosing Goto Sybase IQ , you can view the table contents for a selected near-line connection
and a schema. If you switch to Expert Mode, you can create your own SELECT statement in order to display certain data.
1174 PUBLICSAP BW/4HANA
Operation

Via SQL statements, you can view a list of the current statements.Via SQL statistics, you can view the SAP IQ statistics.
Results
If the archiving request has run in the productive mode and the status is green, the data has been archived. If you then discover that you still need the data in the InfoProvider, you can reload it.
More information:
Reloading Archived Data [page 1184]
Loading Archived Data Using a Data Transfer Process [page 1184]
8.7.2.4.2 Status of Archiving Request
In the administration of an archiving request, you can execute additional processing steps using the respective last status.
An icon in the four status columns Copy Status, Verification Status, Deletion Status and Overall Status becomes a pushbutton with which you can execute further processing steps if there is no longer an active process for the request and the request can be continued or repeated (after an error) in the corresponding phase. When you press the pushbutton, a dialog appears in which the request can be continued.
The columns Copy Status, Verification Status and Deletion Status show
● no icons if the corresponding phase was not yet started or if the request was invalidated● a yellow traffic light if the corresponding phase is currently active● a green traffic light if the corresponding phase was already completed● a red traffic light if processing was terminated in the corresponding phase or if it ended with an error
The Overall Status column shows
● a green traffic light if the request reached a consistent intermediate or end state and there are no more active processes for this request
● the Activity icon if there is an active process for this request● the Failed icon if request processing was terminated or if it ended with an error.
The section below explains what happens when a particular status is set, and what to consider in each case.
1. Lock Status
You can lock the selected data area of the archiving request to prevent any changes. This is necessary before data archiving begins. This step can be executed in dialog mode.
2. Copy Status
The data to be archived is copied into near-line storage or the archive. This step is to be executed in the background.
When the write phrase is complete, the archiving request can be marked as invalid if your requirements have changed in the meantime. The data to be archived is still available in the InfoProvider.
SAP BW/4HANAOperation PUBLIC 1175

3. Verification Status
In the verification phase, the system checks that the write phase was successful and that the data can be deleted from the InfoProvider.
The archive file assigned to the process is opened in test mode and read completely. This ensures that the archive file is complete and can be accessed. If the check is successful, this is noted in a separate status table for the archive file.
4. Deletion Status
When the archived data is deleted from the InfoProvider, the archiving process is complete.
The archived data is deleted from the InfoProvider with the same selection conditions used to copy the data from the InfoProvider.
Once the data has been successfully deleted from the InfoProvider, all the archive files from the archiving run are confirmed using the near-line storage.
5. Overall Status
Once all steps of the archiving request have been completed, you cannot changes the status of the request any more. You can only reload the data. To do this, you can create another request for the reload.
8.7.2.4.3 Setting Archiving Requests to Invalid
Use
An archiving request can have status yellow during the write and verification phase. This can happen for a variety of reasons. You can then set the request to invalid either automatically or manually in order to create a new archiving request and restart archiving. The archiving request is then automatically flagged for deletion provided that it has already been created and that it is a near-line request.
Automatic Request Invalidation
You can activate automatic invalidation of requests for an archiving request in the administration settings.
With automatic request invalidation, an archiving request with status yellow during the write or verification phase is automatically set to invalid. This allows you to prevent an InfoProvider from being locked against further actions. Especially in the case of a DataStore object with a time slice characteristic from the data part that is still used as a primary partitioning characteristic in the archive, otherwise the DataStore object remains locked for the activation of new reports and for other actions that result in the data being changed in the active table.
Manual Request Invalidation
You can set an archiving request to invalid manually in the archiving administration transaction. This allows you to automatically set to invalid both archiving runs that are given status yellow during the write or verification phase and terminated reload requests.
1176 PUBLICSAP BW/4HANA
Operation

8.7.2.4.4 Deleting and Unlocking Archiving Requests from Near-Line Storage
You can delete archiving requests from near-line storage in order to reduce the amount of data in your near-line storage.
Deleting an archiving request involves two steps:
● The archiving request is now flagged for deletion.● The archiving request is physically deleted.
You can manually flag archiving requests. The system also automatically flags requests in the following cases:
● when archiving requests have been reloaded into the DataStore object (advanced)● when archiving requests have been set to invalid
This deletion cannot be undone. After the archiving request is physically deleted, it is assigned the target status Flagged for deletion or Request deleted. The time slice of the archiving request remains locked and can be unlocked using report RSDA_CLEANUP_ARCHIVE.
Once you have removed the lock, you can reload the data for the time slice. The system does not check for overlaps with the archive however.
Related Information
Flagging an Archiving Request for Deletion [page 1177]Deleting an Archiving Request [page 1178]Unlocking Archiving Requests [page 1179]
8.7.2.4.4.1 Flagging an Archiving Request for Deletion
If you want to delete an archiving request, you first need to flag the request for deletion.
Context
You can flag an archiving request for deletion manually or by using a process chain.
Procedure
Flagging an archiving request for deletion flag
SAP BW/4HANAOperation PUBLIC 1177

1. You are in the BW modeling tools, in the editing screen for your DataStore object (advanced). Choose Manage the DataStore Object (advanced). The administration screen of the DataStore object (advanced) opens in a separate tab.
2. Choose Manage Archiving.3. Choose the pushbutton in the Overall Status column for the request you want to delete.
4. Choose Delete Archiving Request (NL) and then Execute. The archiving request is now flagged for
deletion. This is indicated by the entry in the Overall Status column. An archiving request flagged for deletion is no longer visible in the query.
NoteDataStore objects (advanced), for which no modeling properties have been selected (data acquisition layer), can only be flagged for deletion using a process chain.
Flagging an archiving request for deletion using a process chain5. You are in the Process Chains area of the Data Warehousing Workbench. Create a new process chain. More
information: Creating Process Chains [page 964]6. Choose the process type Archive Data from the DataStore Object under Data Target Administration.7. Insert the process type using drag and drop. The dialog box for inserting a process variant appears.8. Create a process variant.9. Choose Delete Request under Process Flow Control.10. Specify a selection condition.11. Schedule the process chain.
Results
All archiving requests that fulfill the selection conditions are flagged for deletion. In the administration screen
of the data archiving processes, the requests are assigned the entry Flagged for Deletion in column Overall Status.
8.7.2.4.4.2 Deleting an Archiving Request
Once you have flagged an archiving request for deletion, you can then delete it.
Context
You can delete an archiving request manually or by using a process chain.
1178 PUBLICSAP BW/4HANA
Operation

Procedure
Deleting an archiving request manually
1. You are in the BW modeling tools, in the editing screen for your DataStore object (advanced). Choose Manage the DataStore Object (advanced). The administration screen of the DataStore object (advanced) opens in a separate tab.
2. Choose Manage Archiving.
3. Choose Cleanup Archive.4. Choose Delete under Delete/Unlock Archiving Requests.5. You can run the deletion for all data archiving requests by entering * for Data Archiving Process for a group
of data archiving processes or for only one data archiving process. You can also run the deletion as a simulation initially, in order to test if deletion is possible.
Deleting an archiving request by process chain6. You are in the Process Chains area in the Data Warehousing Workbench. Create a new process chain. More
information: Creating Process Chains [page 964]7. Choose process type Create Archive under Data Target Administration.8. Insert the process type using drag and drop. The dialog box for inserting a process variant appears.9. Create a process variant. A variant for the program RSDA_CLEANUP_ARCHIVE is created simultaneously.
Choose Delete under Delete/Unlock Archiving Requests.10. You can run the deletion for all data archiving requests by entering * for Data Archiving Process for a group
of data archiving processes or for only one data archiving process. You can also run the deletion as a simulation initially, in order to test if deletion is possible.
Results
On the administration screen for the data archiving process, the physically deleted requests remain visible and
are assigned the entry Request deleted in column Overall Status.
8.7.2.4.4.3 Unlocking Archiving Requests
If you want to reload data for a time slice, you first need to remove the lock.
Context
You can unlock an archiving request manually or by using a process chain.
SAP BW/4HANAOperation PUBLIC 1179

Procedure
Unlocking an archiving request manually
1. You are in the BW modeling tools, in the editing screen for your DataStore object (advanced). Choose Manage the DataStore Object (advanced). The administration screen of the DataStore object (advanced) opens in a separate tab.
2. Choose Manage Archiving.
3. Choose Create Archive button.4. Choose Unlock under Delete/Unlock Archiving Requests. You can also choose Delete & Unlock if you want
to perform the unlock operation immediately after deletion.5. You can perform the unlock operation for all data archiving requests by entering * for Data Archiving
Process for a group of data archiving processes or for only one data archiving process. You can also run the unlock operation as a simulation initially, in order to test if unlocking is possible.
Deleting an archiving request by process chain6. You are in the Process Chains area of the Data Warehousing Workbench. Create a new process chain. More
information: Creating Process Chains [page 964]7. Choose process type Create Archive under Data Target Administration.8. Insert the process type using drag and drop. The dialog box for inserting a process variant appears.9. Create a process variant. A variant for the program RSDA_CLEANUP_ARCHIVE is created simultaneously.
Choose Unlock under Delete/Unlock Archiving Requests. You can also choose Delete & Unlock if you want to perform the unlock operation immediately after deletion.
10. You can perform the unlock operation for all data archiving requests by entering * for Data Archiving Process for a group of data archiving processes or for only one data archiving process. You can also run the unlock operation as a simulation initially, in order to test if unlocking is possible.
Results
On the administration screen for the data archiving process, the physically deleted requests remain visible and
are assigned the entry Request deleted in column Overall Status.
8.7.2.5 Reading Stored Data
Concept
The lookup API CL_RSDA_INFOPROV_QUERY allows you use a transformation rule routine to read data from the active table of a DataStore object, that contains data which has been partially stored in a near-line storage.
Parameters
The static method SELECT has the following interface:
Importing parameters:
1180 PUBLICSAP BW/4HANA
Operation

● I_INFOPROV: InfoProvider● I_T_ENTRIES (optional): "FOR ALL ENTRIES" table● I_T_ENTRY_FIELDS (optional): Fields of "FOR ALL ENTRIES" table● I_T_FIELD_SELECTIONS (optional): Selection clause● I_R_SELECTION_SET (optional): Selection condition as a multidimensional set object● I_WHERE_CONDITION (optional): Selection condition as an OpenSQL expression on the active table● I_APPEND (optional): Indicator: Adding selected records to C_T_DATA
Changing parameters:
● C_T_DATA: Return table for selected data records of the active table
Exception conditions (exceptions):
● CX_RSDA_INPUT_INVALID: Incorrect input parameterization● CX_RSDA_ACCESS_ERROR: Error while accessing data
NoteNote that the lookup API works with the field names derived from the characteristic names (field name EMPL_ID for characteristic 0EMPL_ID or field name /BIC/EMPL_ID for the characteristic EMPL_ID in the customer namespace) and not with the characteristic names themselves.
For more information, see SAP Notes 985609 and 1028450.
8.7.2.5.1 Reading Data from NLS (Extended Pruning)
Enhanced pruning helps to avoid unnecessary query access to the NLS.
Application Scenario
You are executing a query for an InfoProvider whose data has been partially moved to a near-line storage. The global filter of the query does not restrict the time characteristic that is used as the primary time slice characteristic in the corresponding data archiving process. There are global filters on other absolute time characteristics however. Standard pruning for the near-line part of the query ignores these filter conditions.
Extended pruning calculates MIN and MAX aggregates for every absolute time characteristic for the archived data however, thus making it possible to use data from a near-line storage (NLS).
How it Works
Extended pruning collects MIN and MAX values for every InfoProvider and absolute time characteristic. Absolute time characteristics are as follows:
● 0DATE
SAP BW/4HANAOperation PUBLIC 1181

● 0CALWEEK● 0CALMONTH● 0CALQUARTER● 0CALYEAR● 0FISCPER● 0FISCYEAR
This also includes all characteristics that reference one of the above mentioned basic time characteristics.
Extended pruning calculates minimum and maximum deviations in days between every absolute time characteristic and the primary time characteristics. It stores these two values for each archiving request and time characteristic in the SAP BW/4HANA primary database. These values are used after aggregation at InfoProvider/DAP level to extend the selection conditions of the query to other time characteristics before they are mapped to the primary time slice characteristic and intersected with the cross-partition conditions between the online and near-line part of the InfoProvider data. The index information is updated when a new archiving request is confirmed or an existing archiving request is reloaded or deleted.
If you use extended pruning, you can archive your InfoProvider on a specified closing date. This is a good indicator for cold data. In queries however you can filter by the posting date or fiscal period.
NoteIf the fiscal year variant is not uniquely specified in the query’s global filter criteria, note that extended pruning is skipped for fiscal year and fiscal period .
Activation
Extended pruning is optional. To use it, you have to explicitly activate it.
The activiation status of extended pruning is controlled by the BW administration parameter RSDA_TIMESHIFT_INDEX (table RSADMIN). The parameter supports three different statuses:
Value Description
ACT or PRD The index is maintained by archiving processes (archive, restore, or delete) and is used by query processing for pruning.
INA: The index is maintained by archiving processes (archive, restore or delete), but is not used by query processing for pruning.
This setting can be used in emergency situations if query processing is negatively impacted by extended pruning.
OFF or
All others
The index information is neither maintained nor used for pruning. To be activated again, the index must be rebuilt after being reset to the value INA.
1182 PUBLICSAP BW/4HANA
Operation

Program RSDA_REBUILD_TIMESHIFT_INDEX
To edit the parameter values, use program RSDA_REBUILD_TIMESHIFT_INDEX. This program also collects the required index information from near-line storage if archived data already exists when the index is activated.
You can use the program to enter a selection for data archiving processes (DAPs) and a near-line connection. In addition to rebuilding the index information, it allows you to monitor and change the activation status of extended pruning.
The Rebuild Index Completely option deletes all index information from the selected DAPs and rebuilds it from scratch. If you do not select this option, existing index information is adjusted where required. The system implicitly applies the Rebuild Complete Index option whenever the activation status is changed from “Off” to “Inactive” or “Active”.
The Simulation Run option makes it possible to run the program in simulation mode without making any changes to the persistence.
NoteEven if extended pruning is activated, note that some queries that access near-line storage still receive an empty result set from the NLS. This is because advanced pruning only checks for sufficient conditions, the current query navigation step returns an empty result set from near-line storage and then skips near-line access. In most cases, the checks are also not required conditions for an empty result set.
Additional Technical Information
The index information can be retrieved using the following two views:
RSDADAPTIMSHFT_V
This view shows the aggregated information at DAP level that is actually used for pruning. The view has has the following fields:
Field Name Description
DAPNAME Name of the data archiving process
DIMNAME Field name that can be used for extended pruning. Every field belongs to an absolute time characteristic from the underlying InfoProvider.
TIMNM. Field name of the primare time characteristic
LOWER_SHIFT Lower time shift for dimension DIMNAME with reference to dimension TIMNM. The system calculates as follows:
MIN( FIRST_DATE(DIMNAME) - FIRST_DATE(TIMNM) )
SAP BW/4HANAOperation PUBLIC 1183

Field Name Description
UPPER_SHIFT Upper time shift for dimension DIMNAME with reference to dimension TIMNM. The system calculates as follows:
MAX( FIRST_DATE(DIMNAME) - FIRST_DATE(TIMNM) )
MIN() and MAX() describe the aggregation of all archived data records. FIRST_DATE is a pseudo function that assigns each characteristic value to its start date (for date characteristics, this is simply the same assignment).
RSDAARCHREQTSH_VThis view shows the same index information, but broken down to the archiving request level. It is mostly used to rebuild the index at DAP level whenever requests are removed from a near-line table.
8.7.2.6 Reloading Archived Data
You can reload InfoProvider data that has been archived with a data archiving process back into the same InfoProvider. This restores the InfoProvider's physical dataset. If it is a near-line request, the archiving request is automatically flagged for deletion.
The reload request is directly related to the archiving request which it is created for. If it terminates, you can flag the reload request as invalid and create a new one.
NoteYou can only reload the data to the original InfoProvider using the reload functoin. You cannot use a data transfer process.
Procedure
1. You are in the InfoProvider administration screen.2. To create a reload request, press the button in the completed request's Overall Status column.
8.7.2.7 Loading Archived Data Using a Data Transfer Process
Use
InfoProvider data that has been archived using a data archiving process can be loaded into other InfoProviders. Using a data transfer process whose source is the archived InfoProvider, you can populate a connected InfoProvider directly from the archive.
1184 PUBLICSAP BW/4HANA
Operation

Procedure
1. You create a data transfer process for an InfoProvider that is connected to the archived InfoProvider by means of a transformation. The source of the data transfer process is thus the archived InfoProvider and the connected InfoProvider is the target.More information: Creating Data Transfer Processes [page 388].
2. In the data transfer process, you can decide whether you want to extract from the archive by choosing the appropriate option on the Extraction tab page under Extraction from. You do not need to select the archiving sessions concerned.The filter conditions of the data transfer process are mapped to the selection conditions of the current archiving sessions before the archive is accessed, meaning that an intersection is calculated. If they overlap, the relevant archiving request is opened automatically for extraction.
3. Execute the data transfer process.
8.7.2.8 Read Stored Data
You can read the data saved in a near-line storage when executing a query.
You can set access to data in near-line storage either in the properties of the CompositeProvider or in the properties of the query created on the InfoProvider. You can also create a variable on characteristic 0NEARLINE. This allows you to decide at runtime whether to read from the near-line storage.
In the default setting, access to data in near-line storage is deactivated, even if a data archiving process with near-line storage exists for an InfoProvider.
Procedure
On the CompositeProvider:
1. You are in the BW Modeling tools. In the editing screen for a CompositeProvider, go to the General tab page.2. Under Common Runtime Properties, you can change the Near-Line Storage Read Mode.3. Save the CompositeProvider.
For the query:
1. You are in the BW Modeling tools. In the editing screen for a query, go to the General tab page.2. Under Extended, you can change the read mode under Near-Line Storage.
You have the following options here:○ Do Not Read Near-Line Storage:
The query does not access the data, even if the data has been stored in a near-line storage. This setting overwrites the setting allowing access in a CompositeProvider contained here.If you have deactivated access in the CompositeProvider settings, you cannot activate it again in the query properties.
○ Read Near-Line StorageAccess to data in a near-line storage is possible if○ there is a data archiving process for the InfoProvider,
SAP BW/4HANAOperation PUBLIC 1185

○ the InfoProvider is connected to a near-line storage and○ the selection conditions of the navigation step intersect with the previously archived data area.
○ Use Near-Line Storage According to InfoProviderThe individual setting for every CompositeProvider is taken into account.
3. Save your entries.
Result
When the query is executed, the data in near-line storage will either be read or not read, depending on the settings made.
1186 PUBLICSAP BW/4HANA
Operation

9 Administration
This topic provides a description of the various functions and tools, together with the authorization concept.
9.1 SAP BW∕4HANA Cockpit
The SAP BW∕4HANA Cockpit is a central entry point for the administration of an SAP BW∕4HANA system.
The SAP BW∕4HANA Cockpit is an intuitive, Web-based user interface that is available with a SAP Fiori launchpad. Installation and deployment take place as a local SAP Fiori Launchpad for each SAP BW/4HANA system (embedded deployment). Deploying the SAP BW∕4HANA Cockpit on the central SAP Fiori front-end server (hub deployment) is not supported. You can however make the system-specific local launchpad accessible in the central SAP Fiori launchpad by including a customer-specific tile there, which uses URL integration to call the local launchpad with the SAP BW∕4HANA Cockpit in a separate browser tab or browser window. For more information, see SAP Fiori Deployment Options and System Landscape Recommendations
https://www.sap.com/ .
The SAP BW∕4HANA Cockpit contains a number of SAP Fiori apps that can used for process control, monitoring, and administration in SAP BW∕4HANA. In addition, other BW administration groups provide you with access to functions and tools that are currently not available as an SAP Fiori app.
Related Information
Configuring the SAP BW∕4HANA Cockpit [page 924]
9.1.1 Working with the SAP BW∕4HANA Cockpit
You use the SAP BW∕4HANA Cockpit to call apps for administration and monitoring of SAP BW∕4HANA.
Authorizations
To work with the SAP BW∕4HANA cockpit, you require a user who has a role with the required authorizations assigned.
More information: Authorizations for Working with the SAP BW∕4HANA Cockpit [page 1226]
SAP BW/4HANAAdministration PUBLIC 1187

Open SAP BW∕4HANA Cockpit
In the browser
You open the SAP BW∕4HANA Cockpit in a Web browser. For information about which browsers are supported, see the SAP BW∕4HANA Product Availability Matrix.
Enter the following URL in your browser: <protocol>://<host name>:<Port>/sap/bc/ui2/flp?sap-client=<client>&sap-language=<language>#Shell-home
In the configuration of the Web Dispatcher the address can be wrapped.
Using the BW Modeling tools
From the BW modeling tools, you can open the SAP BW∕4HANA cockpit by choosing Open BW/4 Cockpit on
your SAP BW∕4HANA project or by choosing Open BW/4 Cockpit in the toolbar.
Using SAP GUI
From the SAP GUI, you can call the SAP BW∕4HANA cockpit by calling transaction /nbw4web.
Personalize Home Page
You can personalize the home page by creating groups of apps and setting the appearance of the SAP BW∕4HANA Cockpit.
More information: Personalizing the Home Page [page 1189]
Make the Language Setting for the SAP BW∕4HANA Cockpit
The language for the texts in the SAP BW∕4HANA Cockpit is determined using a specific logic. You can change the language setting.
More information: Setting Language Preferences for the Launchpad in the SAP NetWeaver documentation for the SAP Fiori Launchpad
Related Information
SAP BW∕4HANA Planning Product Availability Matrix
1188 PUBLICSAP BW/4HANAAdministration

9.1.1.1 Personalizing the Home Page
You can personalize the home page to suit your work style and the requirements of your tasks. You can organize the apps into groups and change the appearance of the SAP BW∕4HANA Cockpit.
NoteYour administrator determines whether the home page can be personalized or not.
The SAP BW∕4HANA Cockpit contains predefined groups. Each group contains tiles,each with an application for controlling and administrating SAP BW∕4HANAprocesses or for general administration of SAP BW∕4HANA. When you click a tile, the corresponding application opens.
You have various options to personalize the home page of the SAP BW∕4HANA cockpit.
Use the avatar icon to open the Me Area of the SAP BW∕4HANA cockpit. This is where you find various functions for personalization:
Function Description
Edit Home Page You can perform various actions, such as:
● Add a group● Add tiles to a group● Rename tiles and groups● Reorder tiles or remove them from a group● Delete a group or reset it to its initial status
To return to the Me Area, choose the Close pushbutton at the bottom of the screen.
App Finder With the App Finder, you can find all the apps delivered with the SAP BW∕4HANA cockpit (SAP Fiori, SAP GUI, and Web Dynpro ABAP apps), and add them to groups.
For more information, see Adding and Removing Apps Using the Catalog in the SAP NetWeaver documentation for the SAP Fiori launchpad under Adding and Removing Apps.
Settings You can change the appearance of the user interface by setting a theme and by displaying and making other settings for the Home Page and SAP BW∕4HANA Cockpit. You can make settings for notifications or subscriptions to SAP BW∕4HANA objects for example, and display information about your user account, the language and the region, as well as information about the SAP BW/4HANA system.
More Information: Managing Settings [page 1190]
NoteAdministrators can lock predefined groups to prevent them from being personalized. Locked groups are displayed above the My Home group and cannot be edited.
SAP BW/4HANAAdministration PUBLIC 1189

9.1.1.2 Managing Settings
In the Me Area in the SAP BW∕4HANA Cockpit, you can make launchpad settings.
Here you can see and change the visual appearance of your launchpad and change various functions, such as settings for notifications or subscriptions on SAP BW∕4HANAobjects.
Where are the settings maintained?
In the Me Area in theSettings toolbar. The settings are displayed in a dialog box.
Are the settings visible or modifiable?
NoteSome settings are read-only and cannot be changed directly in the Settings dialog box.
Setting Description
User Account Displays settings for your user account, such as name, e-mail or server address.
Appearance Here you can change the theme and display settings.
For hybrid devices with both touch and mouse options, you can choose Large Interaction Items in order to enlarge the space between controls and thus be able to operate them better with your finger.
On older or less powerful devices or browsers, animation and transition effect can influence the performance of the Cockpit. In this case, or if you prefer to have fewer animation effects, you can switch the Animation setting from Full to Minimum.
Home Page Here, you can choose whether to display all groups on the home page or to display just one group at a time.
The selection list for groups at the top of the home page is the same for both options, but behaves differently for each option:
● Display All Content: Behaves like an anchor bar; if you select a group at the top of the home page, you scroll to the contents of this group.
● Display One Group at a Time: Behaves like a tab bar; if you select a group, the system displays the contents of this group .
For groups with a large number of apps, displaying one at a time might be the better option.
Language and Region Displays your logon language and date and time format.
1190 PUBLICSAP BW/4HANAAdministration

Setting Description
User Activities You can specify whether to trace user activities.
If you set Trace Last Used and Frequently Used Apps to NO, tracking is stopped, and the Last Used and Frequently Used lists are removed from the Me Area.
If you choose delete in order to delete your user activities, and set Trace Last Used and Frequently Used Apps to YES, the Last Used and Frequently Used lists are deleted, but the still traces your activities and displays new entries in the lists.
User Profiling Here you can activate the Personalized Search if you want to allow the system to collect data about your search behavior. This data is then used to improve future search results. You can also delete the data collected by deleting your history.
Notifications Here you can personalize various settings for notifications displayed in the launchpad and/or the SAP BW∕4HANA Cockpit.
More Information: Notifications [page 1191]
Subscriptions Here you can use conditions to specify which SAP BW∕4HANAobjects you want to be receive notifications for (provided you have the authorization for the InfoArea). The object name with the from selection value is checked against the condition.
More Information: Notifications [page 1191]
RememberChoose Save to apply your changes.
9.1.1.3 Notifications
In the SAP BW∕4HANA Cockpit, the system displays notifications of relevance for you in accordance with of your business role.
NoteFor the purpose of configuring the SAP BW∕4HANA Cockpit, note that the settings for the notifications must also have been made so that you receive notifications (see Configuring the SAP BW∕4HANA Cockpit [page 924]).
The (Notifications) icon displays the number of unread notifications in a red circle.
By clicking on the (Notifications) icon in the toolbar, you can call the Notifications section. The notifications are displayed with the specified sorting. In the default setting, they are sorted by date starting with the newest notification. You can also sort the notifications by type or priorit.
SAP BW/4HANAAdministration PUBLIC 1191

Notification Display in the SAP Fiori Launchpad
Every notification consists of a title and a description. The title is generic, and the description contains a reference to the object that the notification is being sent for. Notifications also have a colour to indicate their priority, with red indicating “very high priority”.
From inside a notification, you can call another application, where you can receive further information about the object or can trigger an immediate action.
Settings: Notifications
In the Me Area in theSettings toolbar. The settings are displayed in a dialog box. Choose Notifications.
You can specify which content you want to see in the notifications area: Every notification type can be switched on or off using the relevant button. Notifications with high priority cannot be switched off.
You can also choose whether to display a preview of the notifications above the current screen.
Settings: Subscription
In the Me Area in the Settings toolbar. The settings are displayed in a dialog box. Choose Subscriptions.
Subscriptions to notifications are a SAP BW∕4HANA-specific enhancement of the notification concept.
This allows users to receive notifications even if they would not normally do so. You can subscribe to DataStore objects and process chains. To be able to view notifications for the subscribed objects, you need authorizations for their InfoArea. To define a subscription conditions, choose an option (for example "equal to") and the name or name pattern of one or more objects. Input help is provided. If the system generates a notification, it compares the object name with the condition. If this condition is met, the user receives the notifications for the object.
Questions and answers about notifications
● When do I receive notifications?○ At the end of the execution of a process chain○ At the end of execution of a DTP○ At the end of an activity that was triggered by the SAP BW∕4HANA Cockpit but executed
asynchronously in the background. Examples of this are remodeling runs and DTO runs.● Which users receive notifications?
For process chains, the owner, the person who created them, and the last person to change them receive notifications.You can also add a subscription in the personalization dialog in the SAP BW∕4HANA Cockpit.
● I receive too many notifications. How can I reduce the number of notifications?
1192 PUBLICSAP BW/4HANAAdministration

You can change the events that you are assigned to in the Notifications section in the personalization dialog in the SAP BW∕4HANA Cockpit.
9.1.2 Working with Lists in the SAP BW∕4HANA Cockpit
Various apps in the SAP BW∕4HANA Cockpit work with lists. When working with lists, you can use functions for searching, filtering, sharing, personalization and export.
Search and Filter
Using General SearchIf you expand the filter bar above the list, a search field appears where you can perform a fuzzy search on the columns in the list. At the beginning and/or the end of the search string, you use * as a wildcard for any number of characters. In this case, a pattern-based search is performed.
The displayed list is then filtered in accordance with the search result.
Select Columns to FilterYou can use the Adjust Filter in the filter bar to select additional columns to add to the filter bar. If you search in a column in the filter bar in order to define the filter, you can use either the exact search or the pattern-based search with * as a placeholder.
1. Choose Additional Filters in the Adjust Filter popup.2. Select one or more columns and choose OK. The columns are then automatically selected for display in the
filter bar.3. Choose Start.
The selected columns are now displayed in the filter bar for filtering the list.
Settings: Define Columns, Grouping and Sorting
In the settings for the list, you can select which columns are displayed in the list, which columns are sorted and how, and which column the list is to be grouped by.
Personalization: Save List as View
Once you have adapted a list to your requirements using the filters and setting, you can save it as a view. You can quickly access a particular status of the list in the app, and make this available to other users.
1. To the upper-left of the list, choose Choose View on the current view.2. In the My Views popup, choose Save As.
SAP BW/4HANAAdministration PUBLIC 1193

3. In the Save View popup, enter a name for the view.4. If you select Set as Default this view will be displayed whenever the app is opened.5. If you select Public, all users can see the view in View Administration.6. Choose OK.
The view of the list is added to the My Views dialog. Under Manage, you can make changes to the saved view, remove view from the My Views dialog, or delete views altogether.
Personalization: Save List as Tile
You can save the current status of a list as a tile and assign it to a group in the SAP BW∕4HANA Cockpit. Whereas a view can be called in the app, the tile can be added directly to the SAP BW∕4HANA Cockpit home page. This is only available to the user who saved it however.
1. Press the Share above the list to the right.2. In the menu that opens, choose Save as Tile.3. In the Save as Tile dialog, enter a title, subtitle and a description (optional).4. Select the group that you want to assign the tile to. The default setting is My Home Page.5. Choose OK.
The tile is added to the selected group in the SAP BW∕4HANA Cockpit.
Export List
You can export the list in file format xlsx. All settings for the list (column selection, sorting, grouping, and filters) are included.
9.1.3 Apps in the SAP BW∕4HANA Cockpit
The SAP BW∕4HANA Cockpit contains a number of SAP Fiori apps that can be used to perform administration tasks.
Which applications you see in the SAP BW∕4HANA Cockpit depends on which Fiori launchpad catalogs and groups are assigned to the roles that are assigned to your user. With SAP BW∕4HANA, user role BW/4HANA Modeler (SAP_BW4_MODELER) is delivered. This contains the authorizations for basic administration functions.
1194 PUBLICSAP BW/4HANAAdministration

Overview of the apps available on the home page via role BW/4HANA Modeler (SAP_BW4_MODELER)
Group (Initial Assignment) App Description More information
Modeling Process Chain Editor The system displays a list of all process chains in the system. You can create, change, and delete process chains here. To create and edit process chains, you can use the graphical editor in the app. You can insert processes there by selecting process variants, or define processes directly in the editor.
Creating Process Chains [page 994]
Process Variant Editor The system displays a list of all process variants in the system. You can create process variants for many process types here. You can use these process variants in process chains.
Creating a Process Variant [page 998]
Analysis Authorization Editor You can create analysis authorizations.
Using the App to Create Analysis Authorizations [page 1261]
Monitoring Process Chains - Display Dashboard
The system displays various charts with an overview of important statistical analyses of process chains and process chain runs. From here, you can navigate to the monitoring list of process chains or to the list of process chain runs.
Process Chains - Display Latest Status
The system displays a list of all process chains with status information. You can schedule, deschedule or repair process chains here, and can call the log for the current run.
SAP BW/4HANAAdministration PUBLIC 1195

Group (Initial Assignment) App Description More information
Process Chain Runs The system displays a list of all process chain runs in the system with status information. You can repair a run here or call the log of a run in order to analyze errors.
Processes The system displays a list of all RSPM processes with status information. You can navigate from here to more detailed information.
Monitoring Processes [page 1013]
Remodeling Requests You can manage remodeling requests.
Administration of Remodeling Requests [page 1205]
Data Volume Statistics The system displays an overview of memory usage.
Data Volume Statistics [page 1133]
Data Selection Statistics The system displays an overview indicating which the frequency with which various data is used in queries.
Selection Statistics [page 1134]
Data Administration DataStore Objects - Manage Requests
The system displays technical information about the content of the DataStore object. You can view details of the various requests in the DataStore object display, and perform administrative tasks such as deleting and activating requests. For archiving requests, you can also view details and create new archiving request. You can view logs for all requests.
Managing DataStore Objects [page 1199]
InfoObjects - Manage Requests
The system displays technical information about the content of the InfoObject. You can view details of the various requests in the InfoObject, and perform administrative tasks such as deleting and activating requests. You can view logs for all requests.
Managing InfoObjects [page 1197]
External SAP HANA View You can manage external SAP HANA views.
1196 PUBLICSAP BW/4HANAAdministration

Group (Initial Assignment) App Description More information
Data Tiering Summary The system displays an overview of all DataStore objects and their temperatures.
Managing Data Tiering [page 1129]
Data Tiering Maintenance You can change and manage the temperature for the partitions of the DataStore objects.
Defining the Temperature of Objects or Partitions Manually [page 1132]
Data Protection Data Protection Notifications The system displays an overview of data protection notifi-cations from the source systems (SAP Business Suite or SAP S/4HANA). You can select notifications and group them into worklists.
Data Protection Workbench for Replicated Data [page 1309]
Data Protection Worklists The system displays an overview of the worklists in the system. You can call the Data Protection Workbench for a worklist and delete the data in the relevant DataStore objects and InfoObjects there.
Data Protection Workbench for Replicated Data [page 1309]
Provided that you have the necessary authorizations in the SAP BW∕4HANA Cockpit, you can also use further SAP Fiori apps for SAP BW∕4HANA administration tasks, along with functions that are not implemented as SAP Fiori apps. Using the App Finder or the Edit Home Page function in the Me Area, you can add apps to your home page.
9.2 Managing InfoObjects
.
Prerequisites
You have configured the SAP BW∕4HANA Cockpit. More Information: Configuring the SAP BW∕4HANA Cockpit [page 924]
SAP BW/4HANAAdministration PUBLIC 1197

Context
You can view technical information about the content of the InfoObject. You can perform administrative tasks here, such as delete requests.
Procedure
1. You are in the BW modeling tools, in the editing screen for your InfoObject. Choose Manage Characteristic. You can also call the app for managing InfoObjects directly in the SAP BW∕4HANA Cockpit.
2. The system displays all requests that have been loaded to the InfoObject. By default, the system displays the last 10 requests. You can change this by choosing Last 10 Requests. Under Select status, you can also display the deleted requests. Requests that have already been activated are not displayed.
3. The display is updated automatically by default. If there are too many updates, you can deactivate them using Automatic Updates.
4. If you click on the request ID, details of the request are displayed.
With Attributes, you can select the subtype of the InfoObject. By default, the requests for the attributes displayed.
Under Processes, you can view the history. If you click on the entry in the Action column, a log of the request is displayed. Here, you can use Change Request Data to change the master data if the request has not been activated yet. If the request has already been activated, the master data can only be displayed. You can activate the request by choosing Activate. All previous requests are then activated as well. By choosing Copy Shortcut, you can send the log to Support for analysis.
Under Corresponding Requests, you can see the load request. If you click on Load Request, you can see more information about the DTP under DTP Properties. If you click on the name of the DTP here, this takes you to the DTP display screen in the BW modeling tools.
NoteNote that this will only happen if you have already opened the BW modeling tools.
If you click on the link to the load monitor under DTP Properties, the system will display the monitor with details about the DTP.
5. By choosing , you can return to the request overview.6. In the Last Action column, the status of the last action is displayed. By choosing Log, you can view a log of
the request. The same functions are provided here as from the detailed display.7. By choosing Metadata, you can view an overview of the properties of the InfoObject.
8. Choose Delete Data to delete data records.
If you are using enhanced master data update, the following applies: Data records for attributes are not deleted completely; they are merely logically deleted. If a record selected for deletion is activated in the inbound table, the attributes of the record are deleted, and the record mode is set to 'R'. More information: Enhanced Master Data Update [page 77]
If you delete a record in the text table, it is immediately deleted.
1198 PUBLICSAP BW/4HANAAdministration

9. By choosing Open Request , you can open a specific request if you know its ID.
Open this video in a new window
9.3 Managing DataStore Objects
Prerequisites
The DataStore object is active.
You have configured the SAP BW∕4HANA Cockpit. More Information: Configuring the SAP BW∕4HANA Cockpit [page 924]
Context
The Manage the DataStore Object function allows you to display technical information about the contents of the DataStore object. You can perform administrative tasks here, like deleting requests.
Procedure
1. You are in the BW modeling tools, in the editing screen for your DataStore object. Choose Manage the DataStore Object. You can also call the app for managing DataStore objects directly in the SAP BW∕4HANA Cockpit.
2. The system displays all requests that have been loaded to the DataStore object. By default, the system displays the last 10 requests. You can change this by choosing Last 10 Requests. Under Select status, you can also display the deleted requests. Requests that have already been activated are not displayed.
3. The display is updated automatically by default. If there are too many updates, you can deactivate them using Automatic Updates.
4. If you click on the request ID, details of the request are displayed. More information: Editing Request Details [page 1202]
Under Processes, you can view the history. If you click on the entry in the Action column, a log of the request is displayed. Here, you can use Change Request Data to change the master data if the request has not been activated yet. If the request has already been activated, the master data can only be displayed. You can activate the request by choosing Activate. All previous requests are then activated as well. By choosing Copy Shortcut, you can send the log to Support for analysis.
SAP BW/4HANAAdministration PUBLIC 1199

Under Corresponding Requests, you can see the load request. If you click on Load Request, you can see more information about the DTP under DTP Properties. If you click on the name of the DTP here, this takes you to the DTP display screen in the BW modeling tools.
NoteNote that this will only happen if you have already opened the BW modeling tools.
If you click on the link to the load monitor under DTP Properties, the system will display the monitor with details about the DTP.
5. By choosing , you can return to the request overview.6. If you click the entry in the Last Action column, the system displays a log for the request, and you can use
the same functions as in the detailed display.7. By clicking on the header, you can display an overview of the tables of the DataStore object together with
their properties. By clicking on the name of a table, you can view the table in question. The settings for data tiering optimization are displayed, together with which part of the data is in which memory.
8. By choosing Open Request, you can open a specific request if you know its ID.9. By choosing Further Actions, you can do to the following:
○ Display the data of the DataStore object.○ Delete selected data of the DataStore object, or delete the contents of all tables.○ Upload a file to the DataStore object The following formats are supported: xlsx, xlsm and csv. More
Information: Uploading a File to the DataStore Object [page 1202]
Load requests cannot always be deleted.
You can delete data selectively from the active table.
You can use selective deletion to delete records from the DataStore object with keys that no more data will be loaded for. This is the case for example if a product is taken out of a product range and no more data is loaded to its product number
You might also want to delete data that is no longer needed, for example because it is already over three years old or if the personal reference in the data requires deletion. You can also selectively delete data that has errors due to its processing in the BW system. On the other hand, data created with errors in the source system should not be selectively deleted. It should be corrected with reverse postings instead.
For Data Mart DataStore objects, the data is deleted from the inbound table with selective deletion.
In certain cases, selective deletion is not allowed. If this is the case, it can be forced however. More information: Force Deletion [page 1201]
For DataStore objects with the propertiy Write Change Log, you can also delete data from the change log selectively using the Propagate Deletion flag. These changes can then be rolled back again, and the deletion can be passed on to other connected InfoProviders. This would not be possible if the data in the change log was unchanged.
10. By choosing Archiving Requests, you can view existing archiving requests. If you click on the request ID of the archiving request, details of the request are displayed. To create archiving requests, choose Maintain Archiving Requests. To display logs, choose Display Logs.To display reload requests, choose Display Reload Requests. Reloaded requests that have been deleted are not displayed.
1200 PUBLICSAP BW/4HANAAdministration
11. By choosing Advanced View and Highlight Relationships, you can view related requests. The related requests are highlighted with an icon. By chooing Range Slider at the top right, you can adjust the complexity of the display.
NoteThe Advanced View is not available on smartphones.
Open this video in a new window
9.3.1 Force Deletion
In certain cases, selective deletion is not allowed, but can be forced in spite of this.
Selective deletion of records from the DataStore object is not allowed if it could result in inconsistencies. In this case, inconsistencies means that not all records will be deleted from a document. If you are sure that no inconsistencies will result however, you can set the Force Deletion flag to enforce selective deletion.
By default, selective deletion is not allowed if
● at least one filter condition is defined on a non-key field, and● either the inbound queue or the change log table is relevant for selective deletion from a DataStore object.
This restriction is necessary, as this type of scenario might contains pairs of records (BEFORE and AFTER image) in the tables, which must be deleted together. If the filter condition is defined on a non-key field, this cannot be checked by the system.
No inconsistencies will occur for example if
● neither the inbound queue nor the changelog table contain BEFORE and AFTER images simultaneously (RECORDMODE = ‘X’ and RECORDMODE = ‘ ‘), or
● the type of the DataStore object does not allow the definition of a key (for example Staging DataStore Object with inbound queue only), but the filter condition is defined on elements that are part of the ‘logical key’, which is used during the generation of the BEFORE image/AFTER image pairs.
ExampleFor a sales document, the filter is defined on Document Number. No inconsistencies arise, as the document number will not change. Inconsistencies can arise however if the filter is defined on Status, as this is likely to change at some point, and all records with a certain document number will probably be deleted.
SAP BW/4HANAAdministration PUBLIC 1201

9.3.2 Uploading a File to the DataStore Object
You can upload a file in to DataStore object.
Procedure
1. You are in the SAP Fiori app Manage DataStore objects. Under Further Actions, choose Upload Data.2. Using Generate Template, you can generate a CSV file with a header line and all field names of the
DataStore object. You can use this file as a template for your data.3. By choosing Browse, you can select an existing file. The following formats are supported: xlsx, xlsm and
csv. The system proposes how to assign the fields.4. In every column, you can manually assign fields usnig either a dropdown menu or an input field.5. By choosing Constant Values, you can assign a constant to a field.6. By choosing Cleansing Defaults, you can change the settings for the check by the back end.
The following options are available:
If a conversion error occurs or in the case of a new value:○ Reject upload: The value is not uploaded○ Initialize cell: The value is initialized○ Delete row: The entire row is not uploaded
In the case of a new value, there is also the option:○ Upload anyway: The value is uploaded despite the new value
You can set which values are permitted in the modeling transaction for the DataStore object. More Information: Adding InfoObjects [page 134]
7. You can also use the Cleansing Settings for each column by clicking on the column name.8. By choosing Check, you can check the data in accordance with the settings.9. By choosing Upload, you can upload the data.
9.3.3 Editing Request Details
In DataStore object administration, you can view and edit details of requests.
Procedure
1. You are in the BW modeling tools, in the editing screen for your DataStore object. Choose Manage the DataStore Object. You can also call the app for managing DataStore objects directly in the SAP BW∕4HANA Cockpit.
1202 PUBLICSAP BW/4HANAAdministration

2. You click on the request ID of a request to view detailed information about the request.3. Under Processes, you can view the history.4. If you click on the entry in the Action column, a log of the request is displayed. Here, you can use Change
Request Data to change the master data if the request has not been activated yet. If the request has already been activated, the master data can only be displayed.
5. You can activate the request by choosing Activate. All previous requests are then activated as well. For data mart DataStore objects, you can select zero elimination. When zero elimination is applied, all records in the active table for which the total for every key figure is zero are deleted.
6. Under Related Source, you can see the load request. If you click on the load request, you can view more information about the DTP under DTP Properties. If you click on the name of the DTP here, this takes you to the DTP display screen in the BW modeling tools.
NoteNote that this will only happen if you have already opened the BW modeling tools.
If you click on the link to the load monitor under DTP Properties, the system will display the monitor with details about the DTP.
9.3.4 Cleaning Up Requests Using Process Chains
To clean up data from the DataStore object (advanced), you can use process chain type Cleaning Up Data from DataStore Objects (advanced).
Prerequisites
The requests must have already been updated before they can be removed/compressed.
Context
Removing requests avoids a situation where the object consumes too much memory space. Only the oldest requests are removed. These requests can then no longer be reloaded.
Procedure
1. You are in the plan view of the process chain where you want to insert the process variant. To insert a process variant for cleaning up requests from the change log in the process chain, select process type Clean Up Requests from DataStore Object (advanced) from process category Data Target Administration by double-clicking.
SAP BW/4HANAAdministration PUBLIC 1203

2. In the next dialog box, enter a name for the process variant and choose Create.3. On the next screen, enter a description for the process variant and choose Continue. The maintenance
screen for process variants appears. Here you define the selection patterns, for which you want to clean up requests from the DataStore object.
4. Enter a DataStore object. You can use the placeholders Asterisk * and + Plus to flexibly select requests with a certain character string for multiple DataStore objects.
ExampleThe character string ABC* selects all DataStore objects that start with ABC and end with any characters. The character string ABC+ results in the selection of all DataStore objects that start with ABC and that end with any other character.
5. The following three options are available under Clean Up Action:○ Removal of old requests from the inbound table, for DataStore objects (advanced) without modeling
properties and with the properties Activate Data and Keep Inbound Data, Extract from Inbound Table.○ Remove old requests from the change log - for DataStore objects (advanced) with the modeling
property Activate Data and Write Change Log.○ Activate requests - for DataStore objects (advanced) with modeling properties Activate Data and All
Characteristics are Key, Reporting on Union of Inbound and Active Table. In this case, the requests are compressed.
The system automatically selects the relevant option for the object. If you have specified a name part with a placeholder, you can choose whichever option you want. If you want to have multiple clean-up actions for a name pattern, you need to create multiple lines for this name pattern (one line for each option).
6. In the Requests field, you can specify the number of requests that should not be cleaned up.7. Enter a date or a number of days in the field Older than, in order to define the time when the requests
should be removed/activated. If you have already specified a restriction under Requests, both restrictions are taken into account. This means that adding the second restriction reduces the number of requests to be cleaned up.
NoteWe recommend only using one of these restriction methods.
8. Save your entries and return to the previous screen.9. On the following screen, confirm that you want to include the process variant in the process chain. The plan
view for the process chain is displayed. The process variant for cleaning up requests is added to your process chain.
9.3.5 Remodeling a Data Store Object
You want to change a DataStore object that contains data.
Prerequisites
You have already loaded data into your DataStore object.
1204 PUBLICSAP BW/4HANAAdministration

Context
You make your changes in the BW modeling tools, in the editing screen for your DataStore object (advanced).
The following changes are currently not supported:
● Any change to properties that would cause a change to the table for delta extraction.● The property Unique Data Records cannot be activated.● The time reference characteristic cannot be changed for non-cumulatives.
Procedure
1. You are in the BW modeling tools. Open the DataStore object you want to modify and make the required changes.
2. Activate the DataStore object. The system checks whether the object can be activated immediately or whether it needs to be remodeled first. If remodeling is required, a warning appears. The DataStore object is not activated and a remodeling request is created. When you are editing the DataStore object, a message appears to remind you that remodeling has not been completed.
If you have made two or more changes remodeling-related changes to your DataStore object, these changes are compiled into one remodeling request.
You can continue to use the DataStore object version that you have used up till now, provided that the remodeling request has not been executed.
3. You can execute the remodeling request in the SAP BW∕4HANA cockpit. To do this, choose the Remodeling Requests app. More Information: Administration of Remodeling Requests [page 1205]
4. If you want to transport a remodeled DataStore object from the test system to the productive system and the DataStore object already exists in the productive system, the system checks whether remodeling is necessary and the required remodeling request is created in the target system.If you want to transport a DataStore object, for which a remodeling request has been created but not yet executed, a warning appears informing you that the M version and A version are different. You can only transport the A version (without the current changes).
9.3.5.1 Administration of Remodeling Requests
Prerequisites
You have installed and configured the SAP BW∕4HANA cockpit. More Information: Configuring the SAP BW∕4HANA Cockpit [page 924]
SAP BW/4HANAAdministration PUBLIC 1205

Context
You can maintain remodeling requests in an app in the SAP BW∕4HANA cockpit.
Procedure
1. You are in the Remodeling Requests app. All remodeling requests are displayed.2. With Configure, you can specify how the request is to be executed for each InfoProvider. You can also select
the user that you want to be used to schedule the jobs.3. To execute a remodeling request, select an InfoProvider with status Not Scheduled, and choose Run. You
can choose the execution mode.4. When you click on an InfoProvider, the detail view appears. The system displays the various remodeling
steps that the object is running through or has already run through.
The steps that have already been completed are marked in green. Steps with errors are marked red.
If you click on one of the steps, the system displays the application log for this step. For steps with errors, you can choose Reset Step. The step is reset, and its status changes indicating that it has not run yet.
5. For remodeling request that have terminated with an error, you can choose Reset or Restart.
Reset means that the remodeling request is reset to the last green/successful step. This step is then given a status indicating that it has not run yet.
Restart means that canceled requests can be restarted. If the error occurred during the conversion step and you can rectify the problem, you must correct the error and then restart the request. The remodeling request restarts at the place where it had stopped.
1206 PUBLICSAP BW/4HANAAdministration

9.3.6 Displaying a Preview of a DataStore Object
You can display a preview of the data of a DataStore object, modify and refine the preview, save it as a defined view, and share it.
Context
You have installed and configured the SAP BW∕4HANA cockpit. You have chosen the data preview for a DataStore object.
Procedure
1. Expand the arrow icon in the middle of the header line.2. Choose one of the following options:
Function Description
Data Display the data of the DataStore object in a grid.
Chart Graphical representation of the data.
Layout Modify the type of display by distributing characteristics and key figures on the axes (rows and columns).
3. To create a text for your view of the data, choose Personal Comments.4. To adjust the filter, choose Filter. You can add objects to the filter or delete the filter definition. The filter
takes effect as soon as you press Go.5. To save a navigational state for yourself, or to share it with another user by e-mail, choose the
corresponding function from the menu for Actions.
To save the navigational state locally, you can use the Export function under More Functions.
Related Information
Guided Tour: Data Preview of an Analytic Query [page 873]
SAP BW/4HANAAdministration PUBLIC 1207

9.4 Managing Open Hub Destinations
You can manage open hub destinations in an app in the SAP BW∕4HANA Cockpit.
Prerequisites
You have configured the SAP BW∕4HANA Cockpit. More Information: Configuring the SAP BW∕4HANA Cockpit [page 924]
Context
You can view technical information about the content of the open hub destination. You can perform administrative tasks here, like deleting requests.
Procedure
1. You are in the SAP BW∕4HANA Cockpit. Choose the Open Hub Destinations app. The system displays all open hub destinations.
2. If you click on an open hub destination, the requests are displayed. The system displays all requests that have been loaded into the open hub destination. By default, the system displays the last 10 requests. You can change this by choosing Last 10 Requests. Under Select status, you can also display the deleted requests. Requests that have already been activated are not displayed.
3. By choosing Log, you can view a log of the request. The same functions are provided here as from the detailed display.
4. By expanding the header, you can display an overview of the properties of the open hub destination.5. By clicking on a request, you can display its details. Under Processes, you can view the history. By choosing
Log, you can view a log of the request.6. You can delete load requests. You have the option here of deleting multiple requests at one time.
1208 PUBLICSAP BW/4HANAAdministration

9.5 Managing the Generation of SAP HANA Views
Managing the generation of SAP HANA views includes various functions.
Prerequisites
You have configured the SAP BW∕4HANA. More Information: Configuring the SAP BW∕4HANA Cockpit [page 924]
Context
Management of the generation of SAP HANA view is offered in an app in the SAP BW∕4HANA Cockpit.
Procedure
1. Under Object Details, the system displays an overview of all generated SAP HANA views. More Information: Edit Overview [page 1209]
2. Under Object Authorizations, you can check the prerequisites for successful replication of the SAP BW∕4HANA authorizations to SAP HANA. More Information: Checking Object Authorizations [page 1210]
3. Under Analytic Privileges, you can generate SAP HANA privileges from SAP BW∕4HANA analysis authorizations. More Information: Analytic Privileges [page 1210]
4. Under Database Privileges, you can assign the standard database authorizations to users. More Information: Database Authorizations [page 1211]
5. Under General Settings, you can make various settings for generation of SAP HANA views. More Information: Settings [page 1211]
9.5.1 Edit Overview
An overview of all generated SAP HANA views is displayed.
Context
You are in the SAP BW∕4HANA Cockpit in the External SAP HANA Views app.
SAP BW/4HANAAdministration PUBLIC 1209

Procedure
1. The system displays the package and the ID of the SAP HANA view.2. You can display the XML code for each SAP HANA view. This allows you to check whether the view is
consistent.3. With Regenerate View, you can generate a selected SAP HANA view again, for example, if it has to be
modified after a correction.4. With Check View Consistency, you can check the consistency of a view.
9.5.2 Checking Object Authorizations
You can check the prerequisites for successful replication of the SAP BW∕4HANAauthorizations to SAP HANA.
1. Indicate the BW objects or BW users that you want to check the consistency of.2. Select the checks. The InfoProvider-specific checks and the user-specific checks are selected by default,
but you can also select further checks.3. Choose Check. The check is carried out.
9.5.3 Analytic Privileges
You can generate SAP HANA privileges from BW analysis authorizations.
The technical SAP SAP<SID> requires the following privileges:
● System privilege ROLE ADMIN (if no database connections are configured for the special user specifically for creating roles and M is configured as the setting for the assignment type).
● System privilege STRUCTUREDPRIVILEGE ADMIN● EXECUTE on procedure TRUNCATE_PROCEDURE_OBJECTS● EXECUTE on procedure GET_PROCEDURE_OBJECTS
If SAP HANA Change Recording is activated in the SAP HANA database, the SAP<SID> user also requires the following privileges:
● System privilege REPO.MODIFY_CHANGE● System privilege REPO.MODIFY_OWN_CONTRIBUTION
1. Specify the BW objects or BW users that you want to replicate the authorizations for.2. Choose Replicate Authorizations to generate authorizations.3. By choosing Check user, you can check the consistency of various users.4. Expert mode provides you with additional functions.5. Choose Execute.
1210 PUBLICSAP BW/4HANAAdministration

9.5.4 Database Authorizations
You can assign the standard database authorizations to users.
1. Choose User or All Users.2. In the next step, the option that you chose is selected in the General Settings area under assignment type.3. All standard authorizations are selected by default.4. Choose Execute.
9.5.5 Settings
You can make various settings for the SAP HANA view generation.
1. Under General View Settings, you can make the following settings:○ Specify which SAP HANA content package the views should be written to.○ Enforce execution in SQL engine.○ Enable text attributes for time characteristics and characteristics of data types DATS and TIMS.○ Specify if the external SAP HANA views are enabled for multi-tenant access. This requires that you also
enable the setting SQL AP with subselect under authorizations.○ You can specify that the optimized column display is to be used. Field types are therefore no longer
supported.○ You can specify that the SAP HANAview gets an additional key figure for each key figure of type
amount. This additional key figure has no shifting of decimal places. This allows you to transfer key figures in internal format as well as in external format.
2. Under Authorizations, you can make the following settings:○ Specify how the SAP HANA privileges are assigned to the SAP HANA user:
○ Multiple roles (M): This is the recommended setting. The roles will be generated per InfoProvider and per user.
○ Direct assignment (D): The SAP HANA authorizations are assigned directly to the SAP HANA users.
○ Specify a separate database connection for authorization assignment type M, which is only used for generating authorizations. Otherwise timeouts might occur.
○ Specify which actions the BW analysis authorizations are replicated on to SAP HANA○ Specify the SAP HANA role name used to create the SAP HANA model generation role in SAP HANA.○ Choose the AP generation mode:
○ If you select option U (recommended), user-specific analysis authorizations are created. Each user that is authorized to access the generated SAP HANA view receives his own analytic privilege. Each generated analytic privilege contains the allowed filter values as a static list already in the privilege definition and does make use of stored procedures or SQL SELECT statements to read the data from tables RS2HANA_AUTH_STR or RS2HANA_AUTH_FIL during query runtime.
○ If option <blank> or S is selected, an analysis authorization is created for each SAP HANAview. This analysis authorization is assigned to all those users who are authorized to read data from the generated external SAP HANA view. The analytic authorization is generic as it either uses a stored procedure to read the generated filter string from table RS2HANA_AUTH_STR, or uses SQL SELECT statements to read the valid filter values for the session user from table RS2HANA_AUTH_FIL (option S).
SAP BW/4HANAAdministration PUBLIC 1211

Choose option U if performance problems occur at query runtime. Such problems might occur because the SQL plan cache cannot be used while analysis authorizations are being generated (option <blank> or S). Analytic authorizations using dynamic procedures (option <blank>) or SQL SELECT statements (option S) to retrieve the filter values during query runtime force the database to avoid using the SQL plan cache.Select either option <blank> or S if you do not encounter performance issues but want to reduce the number of generated analytic authorizations in the database to a minimum.
3. Under Query HANA View Settings, you can make the following settings:○ Enable a special logic for any formula expression in the external SAP HANA view of the query where a
quotient is used: if(isNull("divisor") or "divisor" = 0, 0, "quotient")○ You can activate input help D (Only Values in InfoProvider).
4. Choose Save.
9.6 Workspace Administration
A workspace has to be created by an administrator before a business user can work in it.
The administrator defines settings such as lifetime, maximum disk space and the BW InfoProviders available in the workspace.
Procedure
1. Call Workspace Administration from your user menu. You can use this to edit either one individual workspace (transaction RSWSP) or to edit several workspaces using a structure (transaction RSWSPW).
2. Choose Display Impact Logs for InfoObjects to display a Workspace-neutral log, which lists the changes made to InfoObjects and their effects on local characteristics and CompositeProviders. More Information: Changes to the Central InfoObject [page 902]
3. By choosing Display Workspace Action Logs, you can view all user actions and the administrator actions Create and Delete for this workspace.
Editing Individual Workspaces
1. Select a workspace to edit or enter a name for a new workspace and choose Create.
Editing Multiple Workspaces
1. The folder <ROOT> is initial. You can create your own folders for your workspaces below this. You can also upload a folder structure from a CSV file. More information: Managing the Folder Structure [page 1217]
2. Choose a workspace to edit or create a new one by choosing Create Workspace in the context menu for your folder.
Tab: Settings
1212 PUBLICSAP BW/4HANAAdministration

1. You can make settings to define how the workspace is used:○ General Settings:
○ You can set an expiry date. Once the expiry date is reached, the workspace is no longer available in Workspace Designer. Following consultation with the user, the administrator can extend the validity of the workspace or delete it, together with the objects it contains.
○ You can set a prefix for the providers in the workspace. All providers and transient queries in the workspace are then given this prefix. This prefix cannot be changed once an object hast been created with it.
○ You can enter the name of two contacts who can be called upon if problems arise with the workspaces.
○ Settings for Central Providers:You can assign a main provider of type "central CompositeProvider" to the workspace. This is then assigned as a central provider. You need to explicitly select the InfoProviders you need from the main provider on the Central Providers tab page.More Information: The Assigned Main Provider [page 1215]
○ Settings for Local Providers: These settings apply for local providers, local characteristics and local hierarchies:○ You can set the maximum memory space for your own data in the workspace and the maximum
number of providers. One provider is created for each uploaded data source. The system also displays the used memory and the number of providers created. If you have not made any entries, there is no restriction. This may be displayed as zero, depending on the system.
○ Settings for Data/Provider/CompositeProvider/Workspace Queries:○ Under certain circumstances, uploading local data can cause new master data attributes to be
created when a query is created. The Local Master Data Allowed flag allows you decide whether or not this should happen. For local characteristics and providers, this means that you can also load characteristic values that do not exist in the master data tables of BW InfoObjects.
○ If you set the Non-Unique Join Columns Allowed flag, a multiplication of key figures can occur if join links are used when modeling a CompositeProvider. For information about key figure multiplication, see: Union / Inner Join / Left Outer Join [page 892]
Tab Page: Central Providers
1. You can drag indexed BW InfoProviders from the object repository on the left to the right. (BWA-indexed as secondary persistence; SAP HANA as primary persistence) from the the left to the right.
NoteIf you subsequently call a workspace with central providers that have already been assigned, the object
tree is not displayed automatically. You have to choose for this to happen.
2. You can also select DataSources that can be used in BW Workspace Designer as the source for creating a
local provider. To select DataSources, choose . For DataSources of type File, the system checks whether the file is located on the application server. If not, it cannot be selected.
NoteUsing DataSources in BW Workspaces is not recommended for mass data.
The InfoProviders that you drag to the right are assigned to the workspace and can then be used in Workspace Designer for modeling CompositeProviders.
SAP BW/4HANAAdministration PUBLIC 1213

The DataSources that you drag to the right serve as the source for uploads to a local provider that can be used for modeling.
3. By double-clicking on an InfoProvider, you can display it.4. For InfoCubes from assigned MultiProviders, you can define whether they can be used for the workspace.5. You can also define whether certain key figures or characteristics can be used for the workspace.
Tab: Transfer Targets
1. Here you can select the InfoProviders that are allowed for the transfer of data from local providers to
central BW InfoProviders. By choosing , you can view the InfoProvider tree on the left side of the screen. The supported target providers are DataStore objects (advanced) with the properties Activate Data, Activate Data and Write Change Log and Activate Data and All Characteristics are Key, Reporting on Union of Inbound and Active Table.
2. Add the InfoProviders that you want to allow for data transfer by dragging them to the right side of the screen.
3. Each InfoObject of the InfoProvider has two properties: writable and mandatory. The default setting for key fields of DataStore-objects is writable and mandatory.
4. Provider Transfer Settings allows you to specify whether the data should be activated directly after transfer. You can also define filters here in order to restrict the data and to define whether the master data should be checked.
NoteRequest-based deletion is only possible if the requests are still in the inbound table and therefore have not yet been activated. We threfore recommend not activating the data directly after transfer. This allows the business user check the data and to delete it again if necessary.
Tab Page: Local Providers
1. If data has already been uploaded in Workspace Designer, you see a list of local providers created during the upload. The system displays the status for each local provider. OK, With Errors, Inactive or Analytic index does not exist. You can remove workspace assignments from the list for analytic indexes that no
longer exist. By choosing you can run a more detailed analysis of the status.These local providers are edited in Workspace Designer.
2. You can also restore the analytic indexes if they are backed up in the BW system (if you are using a BWA).
Choose .
NoteIf data backup is activated, your models and data that you have uploaded are also restored during a complete restore of BWA indexes belonging to a BW system. In BW Accelerator Monitor (transaction RSDDBIAMON), you can use the Rebuild BWA Indexes function.
Tab Page: Local CompositeProviders
1. The system displays a list of the local CompositeProviders that have been created in Workspace Designer. The system displays the status for each CompositeProvider. OK, With Errors, Inactive or CompositeProvider does not exist.
2. You can remove workspace assignments from the list for CompositeProviders that no longer exist.
Tab Page: Local Data
1214 PUBLICSAP BW/4HANAAdministration

1. The system displays a list of the local characteristics and local hierarchies that have been created in Workspace Designer. The system displays the status of each object: OK, With Errors, Inactive or does not exist. You see the memory consumption, number of records and further information.
2. You can remove workspace assignments from the list for local characteristics and hierarchies that no longer exist.
Tab: Workspace Queries
1. The system displays a list of the workspace queries that have been created in Workspace Designer.
Tab: Users
1. The system displays a list of users who are authorized to work or run workspace-specific queries in the workspace in question. The authorizations are checked using the assigned roles/profiles in the user master record. The various authorizations (Workspace Designer/query) are displayed in the list using flags.
NoteNote however that the list can only contain users that you are authorized to display user master record maintenance for.
Finish Editing the Workspace
1. Check the workspace. During the check, the system checks the active and revised version if one exists.
NoteThere are two versions of the check if you have already activated the workspace (active version), made another change and only saved it for the time being (revised version).
2. Save and activate the workspace. You can only use activated workspaces in Workspace Designer.
More information:
Tips for Editing Workspaces [page 1216]
9.6.1 The Assigned Main Provider
You can assign a main provider of type "central CompositeProvider" to the workspace.
This has the following result:
● On the Central Data tab page in the administration transaction, all InfoProviders belonging to the main provider are displayed and can be selected for use in the CompositeProvider.
● You cannot change this assignment once a CompositeProvider has been created.● The main provider's links are taken over automatically if you use InfoProviders from the main provider
defined in the workspace in a CompositeProvider.● A query based on this main provider can be used as a referenced query for a CompositeProvider.● The authorizations on the main provider are applied for query execution.
SAP BW/4HANAAdministration PUBLIC 1215

9.6.2 Settings for Excel Files
You can prevent Excel files from being uploaded in Workspace Designer. This causes the system to stop trying to install the local ActiveX Control (Active Component Framework). If your browser does not support the Active Component Framework, the framework will not be installed. It is still possible to upload CSV files.
To do this, go to Customizing and choose SAP BW/4HANA Customizing Implementation Guide SAP BW/4HANA Agile Information Access: BW Workspaces Settings for BW Workspaces .
9.6.3 Tips for Editing Workspaces
This section provides information about tools and functions that support you when changing workspaces.
Assigning Workspaces to Another Folder
You can use drag and drop to assign workspaces to another folder in the folder structure.
Editing Multiple Workspaces
By double-clicking a folder, you can edit all workspaces in this folder at once. If you are in the detail view, you can use the arrow key next to the name of the workspace to switch to the workspace to edit. The list view is
easier to use however: To do this, choose . You can now make changes to and activate multiple workspaces.
Find Workspaces
By choosing Environment Detailed Search , you can search for workspaces with certain properties. Program RSL_WSP_SEARCH allows you to perform the search in the background.
ExampleYou might want to find all workspaces that are assigned to a specific central CompositeProvider, for example.
Check Workspaces
By choosing Environment Collective Check , you can check a number of workspaces at once. Program RSL_WSP_CHECK allows you to schedule these checks at regular intervals. To display the check log, choose
Environment Display Check Logs .
Deleting Workspaces and Deleting Content
By choosing Workspace Delete , you can delete a workspace. This also deletes the local providers and CompositeProviders, together with queries defined on these providers.
By choosing Workspace Delete Content , you can delete the local providers and CompositeProviders, together with queries defined on these providers. The workspace itself, together with the workspace settings and the assignments between the central provider and the workspace are not deleted.
1216 PUBLICSAP BW/4HANAAdministration

9.6.4 Managing the Folder Structure
Procedure
Upload Folder Structure in a File
If you have created a structure in a CSV file and want to use it to organize your workspaces, you can upload them in Workspace Administration.
1. Choose Goto Upload Folder from File .2. Make the required entries for the file.3. Under Execution Mode, you can upload the file in test mode to check if the required result has been
produced.4. You have the option of performing a delta upload. If you to this, existing folders are kept, and the system
only takes over new folders from the file. If you opt for the full upload, the structure of the file becomes the new structure. You can combine this with an existing structure or delete all existing folders. If you do this, only the file's structure remains.
5. Choose Execute.
Restore Earlier Versions of the Folder Structure
1. If you want to reuse an earlier version of your folder structure, choose Goto Version Management to reload earlier versions.
Reorganizing Folders and Workspaces
1. If existing folders or workspaces are not displayed in the structure, choose Reorganize Folders and Workspaces from the context menu on the root node <ROOT>.
9.6.5 Enhancement Spot for BW Workspaces
Enhancement spot RSL_WORKSPACE for BW Workspaces provides you with the following BAdIs:
● RSL_WORKSPACE_BADI: Enhancements of BW Workspaces● RSL_WORKSPACE_DESIGNER_BADI: Enhancements in BW Workspace Designer● RSL_WORKSPACE_SUBMISSION_BADI: Additional checks for transferring data from local providers to
central providers.
You can learn how the BAdIs RSL_WORKSPACE_BADI and RSL_WORKSPACE_DESIGNER_BADI are used by taking a look at the example implementations.
For more general information about using Business Add-Ins (BAdIs), see Business Add-Ins (BAdIs)
SAP BW/4HANAAdministration PUBLIC 1217

9.7 Authorizations
To ensure that the data warehousing solution maps the structure of your company and meets your company requirements, you have to define who has access to which data.
An authorization allows a user to perform a certain activity on a certain object in the BW system. There are two different concepts for this depending on the role and tasks of the user: Standard authorizations and analysis authorizations.
CautionAn authorization concept must always have already been included in the modeling phase. Otherwise there could be functional or security restrictions.
Standard Authorizations
These authorizations are required by all users who model or load data, and who work in the planning workbench or define queries.
Each authorization refers to an authorization object and defines one or more values for each field that is contained in the authorization object. Individual authorizations are grouped into roles by system administration. You can copy the roles delivered by SAP and adjust them as necessary. The system administrator creates these authorizations and enters them into individual users' master records in the form of profiles.
More information: Standard Authorizations [page 1220].
These authorizations are based on the SAP standard authorization concept.
NoteMore detailed documentation on SAP's standard authorization concept: ABAP Authorization Concept
1218 PUBLICSAP BW/4HANAAdministration

The graphic below illustrates the structure of the authorizations:
Analysis Authorizations
All users who want to display transaction data from authorization-relevant characteristics in a query require analysis authorizations for these characteristics.
Authorizations of this type are not based on the standard SAP authorization concept. They use their own concept based on the BW reporting and analysis features instead. Publishing queries allows a much larger group of users to access query data. With the special BW authorization concept for displaying query data, you can far better protect especially critical data.
More information: Analysis Authorizations [page 1231].
How Authorizations Work
Authorization checks can be used to protect any functions, objects or values in the system. When you perform an action, the authorization check compares the values for the individual fields of an authorization object or an authorization assigned to the user with the values set for executing an action in the program. A user is only authorized to perform an action if the authorization check is successful for every field in an authorization object or authorization. This enables complex user authorization checks.
SAP BW/4HANAAdministration PUBLIC 1219

9.7.1 Standard Authorizations
Standard authorizations are required by all users that
● model and load data● define queries● work in the planning workbench
Features
Each authorization refers to an authorization object and defines one or more values for each field in the authorization object. Authorization objects for the various areas are delivered for this.
For more information, see Overview: Authorization Objects [page 1220].
Individual authorizations are grouped into roles by system administration. You can copy the roles delivered by SAP and adjust them as necessary. The system administrator creates these authorizations and enters them into individual users' master records in the form of profiles.
For more information, see Authorization Templates [page 1223].
These authorizations are based on the SAP standard authorization concept.
9.7.1.1 Overview: Authorization Objects
Authorization Objects for Working in the Data Warehousing Workbench, the BW Modeling Tools, and the SAP BW∕4HANA Cockpit (Object Class RS):
Authorization Object/Technical Name Description
Data Warehousing Workbench – Objects /
S_RS_ADMWB
Authorizations for working with the Data Warehousing Workbench and the BW Modeling tools. These include the following: Source system, InfoObject, monitor, application component, InfoArea, Data Warehousing Workbench, settings, metadata, documents (for metadata, master data, hierarchies, transaction data), document store administration, (Customer) Content system administration.
BW4HANA Edition - Administration / S_RS_B4H Authorizations for executing programs RS_B4HANA_CHECK_ENABLE and RS_B4HANA_WHITELIST_MAINTAIN.
InfoObject / S_RS_IOBJA Authorizations for working with individual InfoObjects with InfoAreas and their subobjects, processing and activating master data.
1220 PUBLICSAP BW/4HANAAdministration

DataSource / S_RS_DS Authorizations for working with DataStore objects and their subobjects
DTP / S_RS_DTP Authorizations for working with individual InfoObjects and their subobjects.
The authorizations assigned for the DTP object have a higher priority than the authorizations for the underlying TLOGO objects. Users with DTP authorization for a source/target combination do not require read authorization for the source object or write authorization for the target object to execute the DTP.
InfoSource (InfoArea) / S_RS_TRCS Authorizations for working with InfoSources for BW systems that are using a SAP HANA database.
Transformation rules / S_RS_TR Authorizations for working with transformation rules and their subobjects
DataStore Object (Advanced) / S_RS_ADSO Authorizations for working with DataStore objects (advanced) and their subobjects
Authorization object for local and ad hoc CompositeProviders/S_RS_CPRO
Authorizations for working with localand ad-hoc CompositeProviders and their subobjects
Central CompositeProvider/S_RS_HCPR Authorizations for working with (central) CompositeProviders and their subobjects
BAdI Provider / S_RS_BDPR Authorizations for working with BAdI providers and their subobjects
Document Store /S_RS_DOCA Authorizations for working with the document store.
Authorizations for TLOGO object history / S_RS_HIST Authorizations for working with version management
Hierarchy / S_RS_HIER Authorizations for working with hierarchies
Process chains / S_RS_PC Authorizations for working with process chains
Open hub destination / S_RS_OHDST Authorizations for working with open hub destinations
Authorizations for the SAP HANA analysis process/RSHAAP Authorizations for working with SAP HANA analysis processes
Authorizations for SAP HANA analysis elements/RSHAOT Authorizations for working with SAP HANA analysis elements
Open ODS View / S_RS_ODSV Authorizations for working with Open ODS Views
ODP: Extraction from SAP HANA / S_RS_ODSP_H Authorizations for extraction from SAP HANA using ODP
Data Warehousing Workbench – currency translation type / S_RS_CTT
Authorizations for working with currency translation types
Data Warehousing Workbench - quantity conversion type / S_RS_UOM
Authorizations for working with quantity conversion types
SAP BW/4HANAAdministration PUBLIC 1221
Data Warehousing Workbench – key date derivation type / S_RS_THJT
Authorizations for working with key date derivation types
Authorization object for the RS trace tool / S_RS_RST Authorizations for the RS trace tool
Authorization object for data protection worklists / S_RS_DPPWL
Authorizations for working with data protection worklists
Authorization Objects for BW Workspaces (Object Class RS):
Authorization Object/Technical Name Description
BW Workspace/ S_RS_WSPAC Authorizations for working with BW Workspaces
Authorization Objects for Working with SAP BusinessObjects Analysis, edition for Microsoft Office (Object Class RS):
Authorization Object/Technical Name Description
Analysis Office: Authorization object / S_RS_AO Authorizations for Working with SAP BusinessObjects Analysis, edition for Microsoft Office
Authorization Objects for Working with Xcelsius (Object Class RS):
Authorization Object/Technical Name Description
Frontend Integration - Xcelsius Dashboard / S_RS_XCLS Authorizations for working with Xcelsius dashboard
Authorization Objects for Working with SAP Business Objects Design Studio (Object Class RS):
Authorization Object/Technical Name Description
Design Studio / S_RS_ZEN Authorizations for working with SAP Business Objects Design Studio
Authorization Objects for the Administration of Analysis Authorizations
Authorization Object/Technical Name Description
Infrastructure of analysis authorizations / S_RSEC Authorization for assigning and administrating analysis authorizations
Analysis authorizations in role / S_RS_AUTH Authorization object for including analysis authorizations in roles
1222 PUBLICSAP BW/4HANAAdministration

Authorization Objects for SAP DemoContent:
Technical Name Description
S_RS_RSFC Authorization for SAP DemoContent:
NoteSee the online documentation for authorization objects. You can call the documentation in the SAP Easy Access Menu by choosing Tools Administration User Maintenance Infosystem Authorization Objects Authorization Objects by Complex Selection Criteria By Object Class. Specify RS as the object class (for BW objects) and choose Execute. Select an authorization object and choose Documentation. A description of the fields defined in the authorization object is displayed.
More information:
Authorization Templates [page 1223]
9.7.1.2 User Roles
When creating roles, you can use user roles delivered by SAP. These roles contain authorizations for roles and user tasks that have been defined for BW. Each user role includes the authorizations required for performing basic user tasks.
In addition to the SAP BW∕4HANA user roles, users need role SAP_BC_DWB_WBDISPLAY in order to display objects from the ABAP Dictionary and ABAP environment. More information:
You can use the roles in Role Maintenance (transaction PFCG). To assign these roles to users, you should copy the roles first of all in order to prevent them from being overwritten by new strndard roles during a subsequent upgrade or release change. More information:
Roles specifically for SAP BW∕4HANA start with SAP_BW4.
For SAP BW∕4HANA, the following roles are predefined:
● BW Modeler (SAP_BW4_MODELER) [page 1223]● Reporting Developer (SAP_BW4_REPORTING_DEVELOPER) [page 1224]● BW Administrator (production system) (SAP_BW4_ADMINISTRATOR) [page 1224]● BW Operator (production system) (SAP_BW4_OPERATOR) [page 1224]● BW Authorization Administrator (development system) (SAP_BW4_AUTHORIZATION_ADMIN) [page
1224]● Reporting User (SAP_BW4_REPORTING_USER) [page 1225]● Roles for BW Workspaces [page 1225]
1. BW/4HANA Modeler (SAP_BW4_MODELER):The BW/4HANA Modeler connects source systems, models data flows, performs data transfer processes and schedules process chains. This takes place in the development system.
SAP BW/4HANAAdministration PUBLIC 1223

The BW/4HANA Modeler role has the following authorizations:○ Create/change/delete data flows, InfoObjects, InfoProviders (DataStore object, CompositeProvider,
Open ODS view), transformations, data transfer processes and process chains in the BW Modeling tools and on the back end
○ Administration of InfoProviders○ Execute data transfer processes○ Schedule process chains○ Transport objects on existing transport requests
2. BW/4HANA Reporting Developer (SAP_BW4_REPORTING_DEVELOPER):The BW/4HANA Reporting Developer creates queries, executes queries, administrates analysis authorizations and their assignments to roles, and creates currency and unit conversion types and key data derivation types. This normally takes place in development systems, but this role can also be used in the production system for key users.The BW/4HANA Reporting Developer role has the following authorizations:○ Create and execute queries○ Create currency and quantity conversion types and key date derivation types
3. BW/4HANA Administrator (production system) (SAP_BW4_ADMINISTRATOR):The BW/4HANA Administrator in the production system loads data from the source system, monitors processes, analyzes errors in detail, and creates and executes data archiving processes.The BW/4HANA Administrator role (production system) has the following authorizations:○ Load data from the source system○ Schedule process chains○ Display data flows○ Administration of InfoProviders○ Create and execute data archiving processes○ Load data from the source system○ Analyze runtime errors (transaction ST22)○ Check the system log (transaction SM21)○ Check the database performance (transaction ST04)○ Check authorizations (transaction SU53 and SU56)
4. BW/4HANA Operator (production system) (SAP_BW4_OPERATOR)The BW/4HANA Operator in the production system loads data from the source system, schedules process chains, monitors processes and performs basic troubleshooting.The BW/4HANA Operator role (production system) has the following authorizations:○ Load data from the source system○ Schedule process chains○ Display data flows○ Administration of InfoProviders○ Create and execute data archiving processes
5. BW/4HANA Authorization Administrator (development system) (SAP_BW4_AUTHORIZATION_ADMIN)The BW/4HANA Authorization Administrator is responsible for the creation and administration of analysis authorizations. Assignment of analysis authorizations should be performed by the role administrator however.The BW/4HANA Authorization Administrator role has the following authorizations:○ Create and manage analysis authorizations○ Set objects to authorization-relevant○ Authorization analysis (transaction RSUDO)
1224 PUBLICSAP BW/4HANAAdministration

○ Check authorization logs (transaction RSECPROT)6. BW/4HANA Reporting User (SAP_BW4_REPORTING_USER)
The BW/4HANA Reporting User executes queries in SAP BusinessObjects Analysis, edition for Microsoft Office and SAP BusinessObjects Cloud or BI Clients of third-party providers.The BW/4HANA Reporting User role has the following authorizations:○ Execute queries○ Analysis authorizations
The following roles are assigned for BW Workspaces:
1. BW Workspace Administrator (SAP_BW_WORKSPACE_ADMINISTRATOR): The BW Workspace Administrator creates BW Workspaces, defines their properties, make central data available in them and administrates the BW Workspaces.
2. BW Workspace Designer (SAP_BW_WORKSPACE_DESIGNER) : The user for BW Workspace Designer (business user) can load personal data into the Workspace and then create CompositeProviders.
3. BW Workspace Query User (SAP_BW_WORKSPACE_QRY_DESIGNERO) : The BW Workspace Query User can execute queries on CompositeProviders.
9.7.1.3 Authorization Profiles for Working with the Data Warehousing Workbench
Use
As an administrator, you need special authorizations in the BW system and in the source system. You can make these in the user settings.
You need the following authorization profiles for the administrator's tasks:
● In the BW system:S_RS_ALL (Business Warehouse: All authorizations)
● In the Source System:S_IDOC_ALL (All authorizations for IDoc functions)B_ALE_ALL (All authorizations for ALE/EDI authorization objects)S_A.CUSTOMIZ (Customizing [for all activities in the system setting])
The ALE user also needs two further authorization profiles. See Authorization Profiles for Background Users [page 1225].
9.7.1.3.1 Authorization Profiles for Background Users
The background user needs the following authorization profiles:
● In the BW system:S_BI-WHM_RFC (Business Warehouse: RFC users in the warehouse)
● In the source system:S_BI-WX_RFC (Business Warehouse: RFC users in extraction)
SAP BW/4HANAAdministration PUBLIC 1225

In the start menu of the BW system and the source system, choose the path Tools AdministrationMaintain Users Users and assign the profiles to the background user.
9.7.1.4 Authorizations for Working with the SAP BW∕4HANA Cockpit
The authorizations for working with the SAP BW∕4HANA cockpit are assigned using the following authorization objects:
Authorization Objects Description
S_BW4_REST We recommend assigning the authorization on /sap/bw4/*.
S_SERVICE Authorization for OData services. List of ODATA services: Authorizations for Working with the SAP BW∕4HANA Cockpit [page 1226]
S_RS_ADSO, S_RS_IOBJA, S_RS_PC, S_RS_DTP Authorizations for the BW objects that can be displayed and edited using the SAP BW∕4HANA cockpit
9.7.1.5 Authorizations for Working with Queries
Authorizations allow you to control the extent to which a user can create or change a query in the BW Modeling tools.
You can use authorization object S_RS_COMP1 to make queries belong to specific owners (= OWNER = query creator ) available to other users ( = USER) for display or processing. Authorization object S_RS_COMP1 has four fields: COMPID, COMPTYPE, OWNER, ACTVT. You can grant this authorization to a particular team or use the variable $USER to give all users the authorization for queries that they created themselves. During the authorization check, $USER is replaced by the corresponding user name.
Authorization object S_RS_COMP1 is checked in conjunction with authorization object S_RS_COMP. This allows you to restrict the components which it is possible to work with in the definition of the query. Authorization object S_RS_COMP has the fields InfoArea, InfoProvider, Component Type, Name (ID) and Activity. To execute queries, note that a user requires activity 16 (“Execute”).
For queries based on CDS views with the annotation @Analytics.query : true, authorization object SDDLVIEW is relevant. This authorization object has the fields DDLSRCNAME, DDLNAME and Activity. To display queries, note that a user requires activity 03 (“Display”).
ExampleThe user should be authorized to execute a query that is derived from CDS view ExampleCDSViewQuery. This view uses data from CDS view ExampleCDSViewCube. CDS view ExampleCDSViewCube must have the annotation @Analytics.dataCategory : #CUBE oder #DIMENSION; CDS view ExampleCDSViewQuery must have the annotations @Analytics.query : true.
1226 PUBLICSAP BW/4HANAAdministration

The user needs the following authorizations:
● DDLNAME: 'ExampleCDSViewQuery'● DDLSRCNAME: 'ExampleCDSViewCube'● ACTIVITY: 03
Since DDLSRCNAME can be derived from DDLNAME, the following authorizations are applicable:
● DDLNAME: 'ExampleCDSViewQuery'● DDLSRCNAME: '*'● ACTIVITY: 03
If the user is to execute all queries that use data from ExampleCDSViewCube, the following authorization is required:
● DDLNAME: '*'
9.7.1.6 Authorizations for BW Workspaces
The following user roles have been created for BW Workspaces:
● The BW Workspace Administrator creates BW Workspaces, defines their properties, make central data available in them and manages the BW Workspaces.
● In Workspace Designer or Workspace Query Designer, the Business User can upload his/her own data for a BW workspace, create CompositeProviders and define queries.
● The query user can execute queries on CompositeProviders belonging to a BW workspace.
To allow you to work with BW workspaces, SAP provides authorization templates, authorization proposal data and a role. The authorizations are assigned using authorization object S_RS_WSPAC (workspace name and activities).
Authorization Templates
The following authorization templates are delivered for the three user roles:
● BW Workspace Administrator (S_RS_TWSPA)● BW Workspace Designer (S_RS_TWSPD)● BW Workspace Query User (S_RS_TWSPQ)
To use the authorization templates when assigning authorizations, follow the instructions here: Setting Up Standard Authorizations
Authorization Proposal Data
To allow you to work in the transactions for workspace administration and to work in Workspace Designer, authorization proposal data is provided. If you use these, you can go to role maintenance and obtain proposals that simplify the assignment of authorizations. To use these, follow the instructions here: Editing Authorization Proposal Data (Customer System)
To work in the workspace administration transaction, enter RSWSPW and/or RSWSP as the transaction.
SAP BW/4HANAAdministration PUBLIC 1227

To work in Workspace Designer, select Web Dynpro Application as the application type and enter the following Web Dynpro applications as objects:
● RSL_UI_MY_WORKSPACE My Workspace● RSL_UI_CREATE_COPR Create CompositeProvider● RSL_UI_CREATE_PROVIDER Create Local Provider● RSL_UI_CHANGE_WORKSPACE Workspace Tools● RSL_UI_CHANGE_QUERIES Maintain Queries for a CompositeProvider
Role
For the business user, role SAP_BW_WORKSPACE_DESIGNER is provided. This user role offers a broad user menu for BW Workspace Designer. This can be used together with the authorization templates or authorization proposal values to create new roles.
To use the role when assigning authorizations, follow the instructions here: Changing the Standard Role
Portal role Reporting, Analysis and Planning (com.sap.ip.bi.bi_showcase) also provides access to BW Workspace Designer in the SAP Enterprise Portal.
9.7.1.6.1 Authorizations for BW Workspace Query Designer
Authorizations for BW Workspace Query Designer are assigned by the BW administrator and are checked when the query is defined.
There are three aspects to this:
● A user can only model workspace objects if s/he has authorization for the workspace.● Authorizations for InfoProviders are passed on to the local providers in the workspace.● Authorization to execute referenced queries is inherited by the workspace queries.
Authorizations for BW Workspace Query Designer are assigned using authorization object S_RS_WSPAC (workspace name and activities). Users who have authorization for Workspace Designer also have authorization for Workspace Query Designer.
To execute a query, the user needs "Execute" authorization. Existing analysis authorizations are also checked. Analysis authorizations are passed on from the central providers to the CompositeProviders.
Queries can be defined on all InfoProviders independently of the central providers activated for the workspace, provided that this has been allowed in workspace administration.
With authorizations to execute queries, there are three distinct cases:
● Executing a workspace query on a local provider in the workspace:The user requires authorization for the workspace with activity "Execute". If the query is defined on a CompositeProvider that references a query on a central provider, authorization to execute the referenced query is required too.
● Executing a workspace query that references an existing query on a non-local provider:The user requires authorization for the standard query on the InfoProvider and for the workspace with activity "Execute".
● Executing a new workspace query on a provider that is not assigned to the workspace:
1228 PUBLICSAP BW/4HANAAdministration

The user requires authorization for the workspace with activity "Execute" and authorization to execute the referenced query. If the workspace query uses additional fields, authorization for the standard query is required.
9.7.1.7 Authorizations for Documents
Definition
A user needs the appropriate authorizations to display or edit a document for a BI object.
Use
To edit documents in the Documents functional area of the Data Warehousing Workbench, the user needs authorization for the authorization object S_RS_ADMWB Data Warehousing Workbench Object with the respective document class:
● Metadata: DOC_META● Master Data: DOC_MAST● InfoProvider Data: DOC_TRAN
To edit documents on the Documents screen for a specific BI object, the user needs the following authorizations for the individual document classes:
1. MetadataIf you have the authorization to display or to edit a metadata object, you can also display or edit the documents for these metadata objects.Valid activities are:
Activity Name in BI Context Information
03 (display) display
23 (maintain) maintain Included are: create, change, delete
2. Master DataIf you have the authorization to display or to edit in specific master data, you can also display or edit the documents for these characteristic values.Valid activities are:
Activity Name in BI Context Information
03 (display) display
23 (maintain) maintain Included are: create, change, delete
SAP BW/4HANAAdministration PUBLIC 1229

3. InfoProvider DataAuthorization objects for InfoProvider data are not delivered. They are created as required. For more information, seeAnalysis Authorizations [page 1231].
CautionNote: The Activity field needs to be included in the authorization objects that are to model the authorizations for documents. The user only has display authorization if this field is missing. We recommend you include the Activity field particularly for new projects or subprojects.
To include the Activity field in existing authorization objects, you first need to delete all previous authorizations. For running projects, we therefore recommend the following procedure: Assign the old authorizations to those users who receive the display authorization. Create a new authorization object with the Activity field and also give this to users who are also to be given authorization for editing documents.
If a Reporting user has the display authorization for the InfoProvider data of a specific area (for example, customer 1-1000 and material 3000-5000), this user can also display the documents for this InfoProvider data.
The BI Security Manager has to be configured on the portal so that the checks described can also be performed for the documents on the portal.
NoteYou also have to assign a read authorization to the end user on the portal. Navigate to your BI system object on the portal by choosing System Administration → System Configuration → System Landscape → Portal Content. Double-click the BI system object. In the Object dropdown box, choose the Permissions option and select the read authorization (Read) for the relevant role (for example, Everyone) that is assigned to the portal user.Select the End User indicator.
To give a user the authorization for editing InfoProvider data documents, the system administrator has the following options:
Activity Name in BW context Information
The user receives the authorization for the data with activity 36 (enhanced maintenance) in the authorization objects for InfoProvider data.
maintain_documents You can also assign display authorization for one area, and edit authorization for the other.
CautionNote: In this case, the user is not allowed the authorization "Authorization object S_RS_ADMWB Data Warehousing Workbench Object = DOC_TRAN" for the maintenance of documents (see next row).
1230 PUBLICSAP BW/4HANAAdministration

With the authorization objects for InfoProvider data, the user has display authorization for the data (display) and additionally receives authorization to maintain documents: Authorization object S_RS_ADMWB Data Warehousing Workbench Object = DOC_TRAN
maintain A different assignment of authorizations is not possible: The user additionally receives edit authorization for all areas for which the user currently has display authorization.
We recommend that you only assign this combination of authorizations to a Reporting user if it is too time-consuming to change all the existing authorization objects individually.
9.7.1.8 Authorizations for Trace Tool Environment
Definition
The standard authorization object S_RS_RSTT allows you to use the trace tool environment (RSTT).
Structure
Authorization object S_RS_RSTT is made up of three fields:
Fields of the Authorization Object
Field Description
RSTTBOBJ This field allows you to specify one particular object type or multiple object types for which the selected user (field 2) is to authorize a particular activity (field 3).
USER This field allows you to specify one user or multiple users who are the authors and persons responsible for object types. This entry authorizes the current user to execute certain activities (field 3) for his or her object type(s).
ACTVT This field allows you to specify a certain activity or a series of activities that a user or user group perform to interact with the selected object type(s).
9.7.2 Analysis Authorizations
All users who want to display transaction data from authorization-relevant characteristics or navigation attributes in a query require analysis authorizations. Authorizations of this type are not based on the standard
SAP BW/4HANAAdministration PUBLIC 1231

SAP authorization concept. They use their own concept based on reporting and analysis features instead. Publishing queries allows a much larger group of users to access query data. With the special authorization concept of SAP BW∕4HANA for displaying query data, you can far better protect especially critical data.
Prerequisites
You have flagged characteristics that you want to protect as authorization-relevant in InfoObject maintenance.
RecommendationIn principle, all authorization-relevant characteristics are checked for existing authorizations if they occur in a query or in an InfoProvider that is being used. You should therefore avoid flagging too many characteristics as authorization-relevant. This will keep the administrative effort to a minimum and ensure satisfactory performance.
To prevent performance from being impaired, we recommend having no more than 10 authorization-relevant characteristics in a query. Authorization-relevant characteristics with asterisk (*) authorization are an exception. You can include more authorization-relevant characteristics of this type in a query.
Features
Analysis authorizations are not based on authorization objects. You create authorizations that include a group of characteristics instead. You restrict the values for these characteristics.
The authorizations can include any authorization-relevant characteristics, and treat single values, intervals and hierarchy authorizations in the same way. Navigation attributes can also be flagged as authorization-relevant in the attribute maintenance for characteristics and can be added to authorizations as separate characteristics.
You can then assign this authorization to one or more users. Since the authorizations are TLOGO objects (analytics security objects), they can also be transported to other systems.
All characteristics flagged as authorization-relevant are checked when a query is executed.
A query always selects a set of data from the database. If authorization-relevant characteristics are part of this data, you have to make sure that the user who is executing the query has sufficient authorization for the complete selection. Otherwise, an error message is displayed indicating that the user does not have the required authorization. In general, the authorizations do not work as filters. Very restricted exceptions to this rule are hierarchies in the drilldown and variables that are filled from authorizations. Hierarchies are mostly restricted to the authorized nodes, and variables that are filled from authorizations act like filters for the authorized values for the characteristic in question.
9.7.2.1 Authorization Dimension
An authorization comprises multiple dimensions. An authorization dimension is a characteristic or navigation attribute.
1232 PUBLICSAP BW/4HANAAdministration

Features
You can authorize characteristics and navigation attributes independently of one another.
An authorization dimension contains a set of values, intervals, and hierarchy authorizations.
You can add any number of characteristic and navigation attributes to an authorization as dimensions; you can authorize single values, intervals, simple patterns, variables, and hierarchy nodes.
To display aggregated values, such as totals rows, you require the authorization for aggregated values; this authorization is indicated with a colon (I EQ :). The definition of the authorization in this case is:
Including/Excluding OperatorTechnical Characteristic Value (from)
Technical Characteristic Value (to)
I (including) EQ ( equal : single value) :
The pound sign (I EQ #) stands for non-assigned values. The definition of the authorization in this case is:
Including/Excluding OperatorTechnical Characteristic Value (from)
Technical Characteristic Value (to)
I (including) EQ ( equal : single value) #
Only patterns that end with a single pattern symbol, that is, with an asterisk (*) for any character string, are permitted. The only exception to this is the characteristic 0TCAVALID for the validity period.
Exclusion definitions (negative authorizations) are not possible; all authorizations have to be positively defined. Again, the only exception to this is the characteristic 0TCAVALID for the validity period.
Special Dimensions
In addition to these generic dimensions, an authorization includes special dimensions. These consist of the characteristics 0TCAACTVT (activity), 0TCAIPROV (InfoProvider), and 0TCAVALID (validity). These special characteristics must be included in at least one authorization for a user. Otherwise the user is not authorized to execute a query.
SAP BW/4HANAAdministration PUBLIC 1233

NoteWe recommend adding these special characteristics to every authorization.
You do not have to include them in every authorization, but for reasons of clarity and analysis security, we recommend that you do this.
CautionThese special characteristics cannot be used in queries.
The special characteristics are delivered with the BI Content and are activated automatically. They are not designated as authorization-relevant yet however. You need to set this flag yourself in InfoObject maintenance before you use the characteristics in authorizations.
Using characteristic 0TCAACTVT (activity), you can restrict the authorization to certain activities. Read (03) is set as the default activity; you must also assign the activity Change (02) for integrated planning.
Using characteristic 0TCAIPROV (InfoProvider), you can restrict the authorization to individual InfoProviders. The default is that all InfoProviders are authorized with the asterisk (*). Its master data and the hierarchy characteristic for the InfoArea represent the structure of the InfoProvider in the Data Warehousing Workbench. This allows you to assign authorizations for entire InfoAreas. Note that this type of authorization assignment can have a negative impact on performance.
Using characteristic 0TCAVALID (validity), you can restrict the validity of an authorization. Always valid (*) is set as the default for validity. You can restrict this validity. You can also specify a single value or an interval. With single values, the relational operator is set to EQ (equal to) during the check. With intervals, you can select from more relational operators than you can with other characteristics. This allows you to set the validity accurately. You can use the following pattern here: * (asterisk) for any number of characters or + (Plus) for exactly one character For single-digit information for days and months with patterns, continue using the two-digit format. For example, 12/0+/2005 if you want to authorize December 1-9, 2005. 12.2005 want to authorize.
TipIn the following example, the authorization is restricted to the 1 - 10 of each month for the year 2004.
1234 PUBLICSAP BW/4HANAAdministration

Including/Excluding OperatorTechnical Characteristic Value (from)
Technical Characteristic Value (to)
I (including) BT ( between: interval) ++.01.2004 ++.10.2004
In the following example, the authorization is only valid until 12/31/2004.
Including/Excluding OperatorTechnical Characteristic Value (from)
Technical Characteristic Value (to)
I (including) LE ( less or equal : Everything < = the value in field from)
12/31/2004
Characteristic 0TCAKYFNM is the special characteristic for key figure authorizations (with the earlier concept for reporting authorizations, the technical characteristic 1KYFNM was used for this purpose). Authorizations are created and checked for this special characteristic when key figure authorizations are required. Hierarchy authorizations cannot be used on 0TCAKYFNM.
NoteIf this characteristic becomes authorization-relevant, it is always checked. You should therefore only mark it as authorization-relevant after careful consideration.
9.7.2.2 Management of Analysis Authorizations
Transaction RSECADMIN provides a central entry point for all functions that you need in order to manage analysis authorizations. You can also create analysis authorizations using the Analysis Authorizations Editor app in the SAP BW∕4HANA Cockpit. More Information: Using the App to Create Analysis Authorizations [page 1261]
Prerequisites
See Prerequisites for Managing Analysis Authorizations [page 1236].
Features of Transaction RSECADMIN
Authorizations Tab Page
SAP BW/4HANAAdministration PUBLIC 1235

On the Authorizations tab page, you can find all the functions for creating, changing, generating and transporting authorizations:
● Individual maintenance: The transaction for creating and changing analysis authorizations opens. For more information, see Defining Analysis Authorizations [page 1237].
● Mass maintenance: The transaction for mass maintenance of analysis authorizations opens. More information: Mass Maintenance [page 1248]
● Generation: The transaction for generating analysis authorizations opens. For more information, see Generating Analysis Authorizations [page 1251].
● Transport: You use this to write authorizations that you have created to a transport request.
User Tab Page
On the User tab page, you can find all the functions you need to assign analysis authorizations to a user:
● Individual assignment: The transaction for assigning analysis authorizations to a user opens. More information: Assigning Authorizations to a User [page 1258].
● Mass assignment: The transaction for mass maintenance of users opens. More information: Mass Maintenance [page 1248]
● Transport: You can transport authorizations that have been created and assigned.
● User maintenance: The SAP NetWeaver user maintenance screen opens.
● Role maintenance: The SAP NetWeaver role maintenance screen opens. With the authorization object S_RS_AUTH, you can include analysis authorizations in roles. You enter the authorizations you previously created as fields for the authorization object S_RS_AUTH.
Analysis Tab Page
On the Analysis tab page, you can find all the functions you need for checking and monitoring analysis authorizations:
● Execute as....: You can execute various transactions as a test under another user to check their authorizations. This is password-protected.
● Error logs: The system generates a log of the authorization check. For more information, see Error Log [page 1260].
● Generation logs: The system generates a log of all generation runs for authorizations.
9.7.2.2.1 Prerequisites for the Management of Analysis Authorizations
Authorization
For all activities in the management of analysis authorizations you need authorization for authorization object S_RSEC, which covers all relevant objects with namespace authorizations for specific activities. For more information, see the documentation for the authorization object in the BW system.
Activate Technical BI Content
Activate all objects of the technical BI Content for authorizations. Select all the InfoObjects and InfoProviders that start with 0TCA*.
1236 PUBLICSAP BW/4HANAAdministration

Define Characteristics as Authorization Relevant
Flag the following InfoObjects in the technical BI Content as authorization relevant: 0TCAACTVT, 0TCAIPPROV, 0TCAVALID und 0TCAKYFNM. Flag all the characteristics that are to be checked by the authorization check as authorization relevant.
Procedure in the BW modeling tools: Editing General Settings [page 85]
Flag the navigation attributes as authorization relevant too if you want these to be checked.
For more information, see Editing Attributes [page 89].
9.7.2.2.2 Defining Analysis Authorizations
Prerequisites
See: Prerequisites for Managing Analysis Authorizations [page 1236].
Procedure
● 1. In SAP Easy Access, choose SAP Menu SAP BW∕4HANA Business Explorer Manage Analysis Authorizations .
2. Choose Individual Maintenance.3. Enter a technical name for the authorization.4. Under Version, any existing BI Content authorizations are displayed. You can also choose from
different versions of authorizations here. You can also deactivate the runtime version. This allows you to check for example how the system would behave without this authorization.
5. Choose or . The Maintain Authorizations screen appears.6. Enter a description for the authorization.7. Add the characteristics 0TCAACTVT (activity), 0TCAIPROV (InfoProvider) and 0TCAVALID (validity)
using .
RecommendationWe recommend adding these special characteristics to every authorization.
You do not have to add these special characteristics to every authorization, but doing so will provide greater transparency. Every user has to have authorizations for each of these special characteristics however.
SAP BW/4HANAAdministration PUBLIC 1237

In the default setting, they are assigned standard values in the intervals:
Read (03) is set as the default activity. Always Valid (*) is set as the validity, and All (*) is set for the InfoProvider. You also need to assign the activity Change (02) for changes to data in Integrated Planning.
8. Choose . Using input help, you can select characteristics and navigation attributes that were previously flagged as authorization-relevant.If you want to create an authorization for a specific InfoProvider, you can choose InfoCube Authorizations instead and select an InfoProvider. This makes selecting the characteristics easier. The system then determines the characteristics in this InfoProvider that have been flagged as authorization-relevant. You can select the required characteristics and specify if aggregation authorization (:) or full authorization (*) is to be assigned.
9. By choosing , you can call the screeen for maintaining values and hierarchy authorizations for the characteristic.
10. On the Value Authorizations tab page, you can specify an interval or a single value. You have the following options:○ Using the information in the Including/Excluding column, you define whether this value or value
interval is included or excluded (Excluding is only possible for 0TCAVALID). Using the Operator column, you can still specify this information.
○ You can insert an exit variable using Insert Exit Variable. See Authorizations with Variables [page 1245].
○ You can use to see whether your specifications make sense. For a more detialed explanation, see the long texts for the messages displayed when you click the messages.
11. On the Hierarchy Authorizations tab page, you can specify one or more hierarchies. With the you can○ Specify one or more hierarchy nodes○ Make settings for the type of hierarchy authorization, the hierarchy level, and area of validity. See
Settings for Hierarchy Authorizations [page 1243].12. Save and activate the authorization. Only active authorizations can be assigned to users. While the
data is being saved, the system checks the format of the value authorizations and displays a warning if there is a problem. The system corrects errors and adds them to the log.
Results
The authorization can only be assigned to one user.
See Assigning Authorizations to Users [page 1258].
The authorization can be transported to other systems.
9.7.2.2.2.1 Settings for Value Authorizations
Possible Settings
1238 PUBLICSAP BW/4HANAAdministration

You can make the following general entries to define value authorizations:
● Single valueExample: Characteristic value = A
Including/Excluding OperatorTechnical Characteristic Value (from)
I (including) EQ (equal: single value) A
● IntervalExample: A <= Characteristic value <= B
Including/Excluding OperatorTechnical Characteristic Value (from)
Technical Characteristic Value (to)
I (including) BT (between: interval) A B
● Pattern:* (Star) for any number of characters or + (Plus) for exactly one characterExample:
Including/Excluding OperatorTechnical Characteristic Value (from)
I (including) CP (contains pattern: find pattern) A*
● Aggregation authorization:: (Colon) for the authorization for aggregated valuesExample:
Including/Excluding OperatorTechnical Characteristic Value (from)
I (including) EQ (equal: single value) :
Patterns
Only patterns that end with a single pattern symbol, that is, with an asterisk (*) for any character string or with a plus sign (+) for exactly one character, are permitted. A*A and A+A are not allowed as entries. The pattern + is currently not checked. It is therefore possible to enter it, but this does not return the expected results.
Operators
The operators E (excluding), GT (greater than), GE (greater or equal), LT (less than) and LE (less or equal) are not allowed for any characteristics with the exception of 0TCAVALID (validity).
E (excluding) and the relational operators are allowed for 0TCAVALID (validity). These are converted to actual intervals with the limits 10000101 and 99991231.
Variables of Type Customer Exit
A variable has the operator EQ (equal), no matter how it is filled by the coding.
More information:Authorizations with Variables [page 1245]
SAP BW/4HANAAdministration PUBLIC 1239

Character Groups, Uppercase and Lowercase
The entry of values can depend on uppercase and lowercase notation. Use the input help to ensure the correct notation. The order in which the characters are stored in the system is of importance for intervals. For example, the lowercase letter a comes after the uppercase letter A.
For characteristics of type CHAR with a length greater than 1, you must define separate intervals for number and letter values. Valid examples are the intervals from A to Z and from 1 to 9. Do not define an interval from A to 9. This would either result in a message that you do not have authorization or too much data would be displayed.
Automatic Corrections
When you define authorizations, the system tries to correct intervals if it can interpret them. However, this does not mean the interpretation is always correct.
Examples of Automatic Correction:
For characteristics in general:
1. Example:
Including/Excluding OperatorTechnical Characteristic Value (from)
Technical Characteristic Value (to)
I (including) EQ (equal: single value) A B
Is corrected to:
Including/Excluding OperatorTechnical Characteristic Value (from)
Technical Characteristic Value (to)
I (including) BT (between: interval) A B
2. Example:
Including/Excluding Operator Technical Characteristic Value (from)
I (including) EQ (equal: single value) A*
Is corrected to:
Including/Excluding Operator Technical Characteristic Value (from)
I (including) CP (contains pattern: find pattern) A*
For the characteristic Validity(0TCAVALID):
1. Example:
Including/Excluding Operator Technical Characteristic Value (from)
I (including) BT (between: interval) 200+1231
1240 PUBLICSAP BW/4HANAAdministration

Is corrected to:
Including/Excluding Operator Technical Characteristic Value (from)
I (including) EQ (equal: single value) 200+1231
2. Example:
Including/Excluding OperatorTechnical Characteristic Value (from)
Technical Characteristic Value (to)
I (including) CP (contains pattern: find pattern)
2001++13 2001++14
Is corrected to:
Including/Excluding OperatorTechnical Characteristic Value (from)
Technical Characteristic Value (to)
I (including) BT (between: interval) 2001++13 2001++14
3. Example:
Including/Excluding Operator Technical Characteristic Value (from)
I (including) CP (contains pattern: find pattern) 200+1015
Is corrected to:
Including/Excluding Operator Technical Characteristic Value (from)
I (including) EQ (equal: single value) 200+1015
4. Example:
Including/Excluding Operator Technical Characteristic Value (from)
I (including) GT (equal: single value) 20041231
Is corrected to:
Including/Excluding OperatorTechnical Characteristic Value (from)
Technical Characteristic Value (to)
I (including) BT (greater than) 20050101 99991231
Values, intervals and patterns are not corrected if the result is not clear.
SAP BW/4HANAAdministration PUBLIC 1241

Examples of definitions that are not allowed:
Including/Excluding Operator Technical Characteristic Value (from)
I (including) CP (contains pattern: find pattern) A*A
Including/Excluding Operator Technical Characteristic Value (from)
I (including) LE (less or equal) A
The operator LE is only allowed for the characteristic Validity (0TCAVALID).
Numeric characteristics can be truncated depending on the length for which they were defined. This means that the authorization cannot be assigned. For example, for a definition for a characteristic of length 3:
Including/Excluding Operator Technical Characteristic Value (from)
I (including) EQ (equal: single value) 000*
This is not checked automatically.
A warning (error message) is usually output for combinations that are not allowed. In this case the authorization cannot be saved.
For corrected errors, a warning is output and the authorization can be saved if the error was not a real one.
9.7.2.2.2.2 Authorization for Aggregated Values
This documentation explains the functions of the authorization for aggregated values that are assigned by means of a colon (:).
You must have authorization for aggregated values to display the values of an authorization-relevant characteristic in aggregated form in the query.
Example
Characteristic 0COUNTRY is authorization-relevant and is contained in the InfoProvider that is being used. You have defined a query as follows:
1. Case 1: 0COUNTRY is contained in the free characteristics (not in the drilldown) without any selections.
2. Case 2: 0COUNTRY is not used in the query.
In both cases, no values of 0COUNTRY are displayed in the query. Characteristic 0COUNTRY is not restricted to any values. During the authorization check, authorization for aggregated values is required. In the authorization log, the message "Check for ':' was added" appears.
1242 PUBLICSAP BW/4HANAAdministration

Note in particular:
● Case 2 is often overlooked: The authorization-relevant characteristic is not contained in the query, but in the InfoProvider. This does not mean that no authorization check takes place for this characteristic. The displayed key figures are implicitly aggregated over all values of the characteristic and this display form must also be authorized.
● In a query, a selection can occur locally in a restricted key figure or in a structure. If, however, there are other key figures in the query for which this local selection is not valid (and for which no other selection is valid), the authorization for aggregated values is also required in the authorization.
Procedure
For authorization problems of this type, you can do the following:
● If queries that have no restrictions are to display values: Give the user authorization for aggregated values.● If you do not want to give the user authorization for aggregated values: Restrict the characteristic in the
query to a certain selection (single value, interval, hierarchy nodes, and so on) and authorize this selection explicitly.
You must take one or other of these actions if the characteristic is authorization-relevant.
Other Special Features
● The asterisk (*) authorization authorizes everything, including queries that require authorization for aggregated values.
● If you use a variable of type Fill from Authorization, the authorization for aggregated values is not taken into consideration, since at the time the variable is processed the system does not know if the characteristic in question is in the drilldown.
9.7.2.2.2.3 Settings for Hierarchy Authorizations
Type of Authorization
You can define the authorization starting from a node of the hierarchy in different ways:
● 0 for the node● 1 for a subtree below the node● 2 for a subtree below the node up to and including a level (absolute)
You must define a level for this type. A typical example of an absolute level is data protection with regard to the degree of detail of the data (works council ruling: no reports at employee level only at more summarized levels).
● 3 for the entire hierarchy● 4 for a subtree below the node up to and including a level (relative)
SAP BW/4HANAAdministration PUBLIC 1243

You must specify a level that is defined relative to the node for this type. It makes sense to specify a relative distance if an employee may only expand the hierarchy to a certain depth below his or her initial node, but this node moves to another level when the hierarchy is restructured.
Hierarchy Levels
For types 2 and 4 you can specify, in Hierarchy Level, the level to which the user can expand the hierarchy.
● With authorization type 2 (up to and including a level, absolute), the level refers to the absolute number of the level in the hierarchy where the top-most node of the hierarchy is level 1.
● With authorization type 4 (up to and including a level, relative) the level number refers to the number of levels starting from the selected node itself which is level 1.
Validity Area
In the Validity Area you specify in exactly which ways a hierarchy authorization has to match a selected display hierarchy for it to be included in the authorization check.
● Type 0 (very strict check): Name and version of the hierarchy upon which the hierarchy authorization is based have to agree with the selected display hierarchy. Your key date (the upper validity limit) has to be greater than or equal to the key date (the upper validity limit) of the selected display hierarchy.
● Type 1: The name and version of the hierarchy upon which the hierarchy authorization is based have to agree with the selected display hierarchy.
● Type
2
: The name of the hierarchy on which the hierarchy authorization is based has to agree with the display hierarchy.
● Type 3 (least strict check): None of the three properties have to match.
CautionNote that in some circumstances, setting a check level that is too low may lead to more nodes being selected using hierarchy node variables that are filled from authorizations, than actually exist in the display hierarchy for the query. This can cause an error message.
Note that hierarchy authorizations can calculate single values that are the end nodes (leaves) of non-displayed hierarchy, but that in this case, the strictest check type, which is 0, is valid.
NoteAs a general rule, make the check as strict as possible. The default is type 0.
9.7.2.2.2.4 Authorizations for CompositeProvider
Local and Ad Hoc CompositeProviders
The authorizations for working with ad hoc and local CompositeProviders are assigned using authorization object S_RS_CPRO. The analysis authorizations for local and ad hoc CompositeProviders are a combination of the analysis authorizations defined for the subobjects and the analysis authorizations defined for the
1244 PUBLICSAP BW/4HANAAdministration

CompositeProvider. The system uses the authorizations of individual InfoProviders to build the intersection. The analysis authorizations created for the CompositeProvider are then combined with the derived authorizations.
In the definition of the CompositeProvider, you can also specify that only the analysis authorizations that were created for the CompositeProvider can be used for the authorization check.
Example
This example focuses on a CompositeProvider consisting of an InfoCube and a MultiProvider, which are connected by Union.
The authorizations are combined:
● Authorizations in the InfoCube: The Product characteristic is restricted to the Sandals value.● Authorizations in the MultiProvider: The Distribution Channel characteristic is restricted to the values 2,3.● Authorizations in the CompositeProvider: The Distribution Channel field is restricted to the values 2-4.
In the query, the results for Distribution Channel 2-4 are displayed for product Sandals.
Central CompositeProviders
To work with this type of CompositeProvider, you need authorization object S_RS_HCPR. Analysis authorizations are handled in the same way as for MultiProviders. In other words, the authorizations of the relevant InfoProviders are not combined
9.7.2.2.2.5 Authorizations with Variables
Definition
Instead of using a single value or interval, you can also use variables of type customer exit in authorizations. The customer exit is called for these variables while the authorization check is running. The call is carried out with I_STEP = 0. The intervals of characteristic values or hierarchies for which the user is authorized can be returned here. By doing this, the maintenance effort for authorizations and profiles may be considerably reduced.
SAP BW/4HANAAdministration PUBLIC 1245

NoteThis type of variable should not be confused with characteristic variables that are filled from authorizations!
For more information about variables with customer exits, seeCustomer Exit.
TipEvery cost center manager should only be allowed to evaluate data for his/her cost center. Within the SAP authorization standard, a role or a profile with the authorization for the InfoObject 0COSTCENTER equal to 'XXXX' (XXXX stands for the particular cost center) would have to be made for every cost center manager X. This has to be entered in the user master data for the cost center manager. In organizations where cost centers change on a regular basis, this involves significant administrative effort.
Using a variable reduces the authorization maintenance workload with the InfoObject 0COSTCENTER equal to '$VARCOST', as well as with the role or the profile, which is maintained for all cost center managers. The value of the variable 'VARCOST' is then set for runtime during the authorization check by the CUSTOMER-EXIT 'RSR00001'.
Maintaining the authorizations restricts the entries for the values to the length of the existing InfoObject. It is possible, however, to use both limits of the interval. In the example 0COSTCENTER with 4 spaces, the variable 'VARCOST' is, therefore, entered as '$VAR' - 'COST'.
Use
Exit variables can be entered beginning with $. If there is a variable value in both the lower and the upper limit, the two are combined as subnames of an overall variable in authorization processing. Intervals are not corrected automatically by the system if an error was found during the check. You get an error message and can analyze the error yourself.
There is a buffer for these variables. If this buffer is switched on, the customer exit is only called up once for a variable with the authorization check. In doing so, you avoid calling up the customer exit for variables over and over, as well as decreasing performance. If you want to call up the customer exit each time, you have to deactivate this buffer in the maintenance of analysis authorizations. To do this, in the main menu, choose Extras → Buffering Variables → Deactivate.
You can also call up the customer exit for authorizations for hierarchies.
Enter the variables of type hierarchy node into an authorization. To do this, in the hierarchy authorization
maintenance, under Node, choose a variable with Select Exit Variable. The customer exit is then called up while the authorization check is running. In the return table E_T_RANGE, the technical name of one or more nodes is expected in the LOW fields. In the HIGH field, the InfoObject type of the node is expected.
1246 PUBLICSAP BW/4HANAAdministration

9.7.2.2.2.6 Authorizations for Display Attributes
Definition
Authorization-relevant display attributes are hidden in the query if the user does not have sufficient authorization.
Use
For Characteristics:
The user needs to have complete authorization (*) to see the display attribute in the query.
TipFor the characteristic 0EMPLOYEE, the 0EMPLSTATUS attribute is authorization-relevant. Only users with authorization "*" for 0EMPLSTATUS can display the attribute in the query.
For Key Figures:
Key figures cannot be marked as authorization-relevant. To use this function for key figure attributes anyway, the system checks against meta object 1KYFNM. The user then needs the field 0TCAKYFNM in an authorization.
TipThe key figure attribute 0ANSALARY is contained in the 0EMPLOYEE characteristic.
If the user has the 0TCAKYFNM field in his or her authorization, and the authorization "*", he or she can display all key figure attributes.
If the user has the 0TCAKYFNM field in his or her authorization and the 0ANSALARY key figure as a value of the authorization, he or she can only see this key figure attribute. If the user is not supposed to see this attribute, do not give the authorization "*" but only assign the key figures for authorization that are to be displayed.
9.7.2.2.2.7 Authorizations for Navigation Attributes
Use
In authorizations, navigation attributes are handled as ordinary characteristics.
You can mark navigation attributes as authorization relevant independently of the assigned basic characteristics. To mark a navigation attribute as authorization relevant, select the relevant indicator on the Attributes tab page in the InfoObject maintenance.
SAP BW/4HANAAdministration PUBLIC 1247

9.7.2.2.3 Mass Maintenance
Context
You can use mass maintenance of analysis authorizations to make changes to multiple authorizations at the same time. Before editing the authorizations, you run a search for all authorzations that need to be changed. You can run the search either by authorizations or by users.
Procedure
1. In SAP Easy Access, choose SAP BW∕4HANA SAP Menu Business Explorer Manage Analysis Authorizations .
2. Choose Mass Maintenance. The Mass Search screen appears.
3. Choose Complex Search. You can now run searches with various criteria for authorizations and users
4. Once you have found the authorzations/users that need to be changed, select them in the list and choose Mass Maintenance. The Mass Maintenance screen has two parts: On the left, there is a worklist containing the authorizations/users that you have selected. You can transport, activate and delete these. You can also change the descriptions of the authorizations.
On the right, you can edit the authorizations/users. This part of the screen displays the contents of the value and hierarchy authorizations in compressed form, together with the users that the authorizations are assigned to.
The Cardinality column indicates whether the authorization is set for all objects in the worklist or just in some:
The authorization is assigned to all users/authorizations in the worklist.
The authorization is only assigned to a certain user or users in the worklist.
The authorization/user assignment is assigned to all users in the worklist after saving.
To find out more about the various change options, see: Change Options [page 1249]5. Activate the changed authorizations/users. The changes only take effect once they have been activated.
Example
More information: Examples of How to Use the Mass Search [page 1250]
1248 PUBLICSAP BW/4HANAAdministration

9.7.2.2.3.1 Change Options
Concept
Value Authorization Options:
You can perform the following tasks here:
You can copy the selected rows. When saved, these rows are automatically assigned to all analysis authorizations in the worklist.
You can add a new value authorization. When saved, this row is automatically assigned to all analysis authorizations in the worklist.
You can delete the selected rows from the list. If the cardinality column contains a delete icon, the deletion action is not performed when you save. This icon marks a row as not relevant.
You can remove the selected row from the analysis authorizations in the worklist.
Among other things, you can check whether the intervals are syntactically correct and whether the InfoObjects are relevant for authorization.
You can assign the selected rows to all analysis authorizations in the worklist.
Provided that the original version of the row is on the database, you can reset the changes in the selected rows.
You can delete the changes and read the content of the analysis authorizations again.
Hierarchy Authorization Options:
You can perform the following tasks here:
You can create a new hierarchy authorization. When saved, this row is automatically assigned to all analysis authorizations in the worklist.
You can delete the selected rows from the list. If the cardinality column contains a delete icon, the deletion action is not performed when you save. This icon marks a row as not relevant.
You can remove the selected row from the analysis authorizations in the worklist.
Among other things, you can check whether the intervals are syntactically correct and whether the InfoObjects are relevant for authorization.
You can display details of the selected hierarchy authorizations.
All other buttons are as described above under Value Authorization Options.
User Options:
You can copy a user from the clipboard. When saved, this row is automatically assigned to all analysis authorizations in the worklist.
SAP BW/4HANAAdministration PUBLIC 1249

You can add a new user. When saved, this row is automatically assigned to all analysis authorizations in the worklist.
All other buttons are as described above under Value Authorization Options.
9.7.2.2.3.2 Examples of How to Use the Mass Search
Example 1:
You want to find out which authorizations are assigned to the users of cost center '0101017203'.
1. On the SAP Easy Access screen, choose: SAP BW∕4HANA SAP Menu Business Explorer Manage Analysis Authorizations Authorizations Tab Mass Maintenance .
2. Choose Complex Search.3. Choose the By Users tab.4. Select the multiple selection button.5. Use the input help.6. Choose the Users by Address Data tab.7. Enter the cost center number and start the search.8. Select all entries and choose Continue.9. Next perform the mass search.
Example 2:
You want to find out which authorizations contain non authorization-relevant InfoObjects, so that you can remove them in the maintenance screen later on.
1. On the SAP Easy Access screen, choose: SAP BW∕4HANA SAP Menu Business Explorer Manage Analysis Authorizations Authorizations Tab Mass Maintenance .
2. Choose Complex Search.3. Choose the By InfoObjects tab.4. Select the multiple selection button.5. Use the input help.6. Choose the tab By Non Authorization-Relevant InfoObjects in Authorizations.7. Choose Continue.8. Select the entire search result and accept it.9. Next perform the mass search.
Example 3:
You want to find out which authorizations are relevant for a specific InfoProvider, so that you can assign these authorizations to a user in the mass maintenance screen later on.
1. On the SAP Easy Access screen, choose: SAP BW∕4HANA SAP Menu Business Explorer Manage Analysis Authorizations Authorizations Tab Mass Maintenance .
2. Choose Complex Search.
1250 PUBLICSAP BW/4HANAAdministration

3. Choose the By InfoProviders tab.4. Use the input help to find the InfoProvider.5. Next perform the mass search.
Example 4:
You want to find out which authorizations are assigned to users who have the authorization ABC.
1. On the SAP Easy Access screen, choose: SAP BW∕4HANA SAP Menu Business Explorer Manage Analysis Authorizations Authorizations Tab Mass Maintenance .
2. Choose Complex Search.3. Choose the By Users tab.4. Use the input help and choose the Users By Authorizations tab.5. Enter ABC as the BW authorization.6. Next perform the mass search.
Example 5:
You want to find out which authorizations are relevant for an InfoProvider, that contains a specific InfoObject.
1. On the SAP Easy Access screen, choose: SAP BW∕4HANA SAP Menu Business Explorer Manage Analysis Authorizations Authorizations Tab Mass Maintenance .
2. Choose Complex Search.3. Choose the By InfoProviders tab.4. Use the input help and choose the Search for InfoProviders By InfoObjects tab.5. Enter the InfoObject.6. Next perform the mass search.
9.7.2.2.4 Generating Analysis Authorizations
By generating analysis authorizations, you can load authorized values from other systems into DataStore objects (advanced) and generate authorizations from them.
This makes it possible to generate the required authorizations using data from an application (such as HR). The data that users are permitted/not permitted to see in BW is therefore the same as in the application transactions, even if the authorization concepts are different.
You can use this function to generate either single authorizations or mass authorizations. It is suitable for scenarios that generate new authorizations periodically and are thus constantly changing. It does not necessarily make sense to assign these authorizations to the users in roles and profiles. This is also not possible for automatically generated names that keep changing. The generated authorizations are therefore assigned directly in the BW system. This is considerably faster than generating them from profiles. If a fixed name is assigned however, this can be done manually from role maintenance. Keep in mind however the risk of overwriting constant names.
Generation of authorizations is a dynamic authorization assignment that is an alternative to the role concept.
SAP BW/4HANAAdministration PUBLIC 1251

Prerequisites
An extractor must be available for authorizations (so far for HR and Controlling).
For HR:
You have to copy the DataStore objects (advanced) 0TCA_AD01 and 0TCA_AD02 (optional 03 to 05) from BI Content. These DataStore objects should be copied for every application, which must have been loaded completely.
For Controlling:
A complete scenario is available. Copy over the following Content objects: 0CO_OM_CCA_USER1 (DataSource and InfoSource), as well as the DataStore objects including update rules 0CCA_001, 0CCA_002, and 0CCA_003.
For all other applications:
Copy the templates 0TCA_AD01 and 0TCA_AD02 (optional 03 to 05) in DataStore objects for your application area (department etc). Note the naming convention with the digits 1 to 5 at the end.
You need sufficient authorization for generation activities such as deleting, changing and generating of analysis authorizations, changing user assignments (authorization object R_SEC), along with any other activities for creating or changing system users. Which authorizations are required depends on the generation scenario.
Features
You can call this function via the analysis authorzation administration transaction (RSECADMIN) under Authorizations Generation of Authorizations .
The DataStore objects for generating authorizations have the same structure as the authorizations and contain the following authorization values:
● Authorization data (values) (0TCA_AD01)● Authorization data (hierarchy) (0TCA_AD02)● Description texts for authorizations (0TCA_AD03)● Assignment of authorizations to users (0TCA_AD04)● Generation of users for authorizations (0TCA_AD05)
The actual data to be used in the generated authorizations can be found in the two template DataStore objects 0TCA_AD01 and 0TCA_AD02.
More Information:
● Template for DataStore Objects with Authorization Data (Values) [page 1254]● Template for DataStore Objects with Authorization Data (Hierarchy) [page 1255]
You define which authorizations to generate from which DataStore objects. You then load your authorization data for them. This can be done with CSV files or extractors for example. Automatic generation assumes correctly filled DataStore objects. The system tries to detect incorrect intervals and other errors however, and tries to correct them if possible. This is entered in the log.
1252 PUBLICSAP BW/4HANAAdministration

For CSV files, the User and Authorization fields can be left empty. In general however, names and numbers can be entered in these fields. There can be various results when you assign authorizations. You can find more detailed information in the detailed descriptions of the two template DataStore objects above.
In transaction RSECADMIN, you can generate the authorizations on the Authorizations tab page, under Generation. Alternatively, report RSEC_GENERATE_AUTHORIZATIONS can start or schedule generation.
Generating Single Authorizations:
Maintain the user in DataStore object 0TCA_DS01. This is assigned to the user during generation. This can be used to assign highly user-specific authorizations.
Generating Mass Authorizations
In DataStore object 0TCA_AD01, leave the User key field emptry and generate the authorizations. A profile appears that can be assigned to any number of users. The profile gets its texts from DataStore object 0TCA_AD03. There can be language-dependent short, medium and long texts. You maintain the users in DataStore object 0TCA_AD04. This generates your mass authorizations.
Generating Users
You can also generate users with 0TCA_AD05. To do this, specify an reference user to copy from. The newly created users are assigned randomly generated initial passwords that are not transparent. Users can only log on after manually changing this password.
Generating Authorization Names
Generate explicit (meaningful) authorization names by entering your chosen in name in the field for 0TCTAUTH. As an alternative, you can also specify numbers to mark characteristic dimensions that belong to the same authorization. If field 0TCTAUTH is empty, technical names are generated according to the pattern RSR_00000012. All entries with the same name (or an empty field) are assigned the same authorization.
If a technical name with eight digits (RSR_nnnnnnnn) was created for an authorization and then generated again, the existing names are deleted and new technical names are generated. As a result, the previous authorization is deleted and replaced with the new authorization. This new authorization might not be identical to the old one. You can prevent unintended overwriting by using a number range. There is an overflow after 100,000,000 generated authorizations, and numbering starts again with 1.
Deleting and Regenerating Authorizations
For users with data in the DataStore object that has to be regenerated, first the existing, generated authorizations are deleted. This is done while the program is running (program RSEC_GENERATE_AUTHORIZATIONS or transaction RSECADMIN Generate Authorizations).
Deletion revokes the authorizations from the users that they were assigned to. Authorizations are then generated as usual with the data in the DataStore objects. The two steps, deletion and regeneration, are performed one after the other and cannot be uncoupled or influenced in any way.
If a data record with the user name 'D_E_L_E_T_E' is loaded into the DataStore object 0TCA_AD01, first the generated authorizations for all (!) users in the BI system for the DataStore object record are completely deleted (separated by the first part of the name before the digits) and then generated for the rest of the data.
Generation Log
A detailed log is created during generation. This documents the generation steps and is displayed automatically. You can view old logs in transaction RSECADMIN by choosing Analysis Generation Logsor by starting report RSEC_GENERATE_AUTHORIZATIONS with the log symbol.
SAP BW/4HANAAdministration PUBLIC 1253

NoteNote about performance during generation:
Thousands of data records can be processed during generation. The runtimes cannot be compared with performance when reading transaction data from a DataStore object however. A generation run can therefore also run in the background using program RSEC_GENERATE_AUTHORIZATIONS.
Tips about Generation
1. During generation, all generated authorizations are deleted. During a generation run, all affected users lose their authorization until the newly generated authorizations have been assigned. This is also true if no changes have been made to the contents of the structure of the authorization. A generation that takes a number of hours can result in downtime of the same duration.You can prevent this by using the delta mechanism: You should only generate authorizations that have actually changed. You can check this in the corresponding extraction program before filling the DataStore objects. Since these are normally far fewer than the total number of users, you can significantly speed up the entire process so that there is hardly any downtime. You might find it beneficial to generate delta authorizations more regularly.
2. You can perform the occasional clean-up with user D_E_L_E_T_E, which precedes a completely refreshed generation run (for example, monthly). You can also do this by inserting an additional row in the DataStore object for the values or hierarchies.This deletes any obsolete user authorizations that were already locked or deleted and that will never be regenerated. The authorizations generated here would not otherwise be automatically deleted.
9.7.2.2.4.1 Template for DataStore Objects with Authorization Data (Values)
Technical name: 0TCA_AD01
Key Fields
Key Field Description
0TCTUSERNM User
0TCTAUTH Authorization (Technical Name)
0TCTADTO End of Validity of an Authorization
0TCTIOBJNM InfoObject
0TCTSIGN Plus/minus sign
0TCTOPTION Selection Operator
1254 PUBLICSAP BW/4HANAAdministration

Key Field Description
0TCTLOW Selection value (upper limit)
0TCTHIGH Selection value (upper limit)
0TCTOBJVERS Object Version
0TCTSYSID BW System
Data Fields
Data Field Description
0TCTADFROM Start of validity of an authorization
Field 0TCTUSERNM is used for assigning an authorization row in the DataStore object to users. You can fill the field with the name of the user who is to be granted the authorizations. If you leave the field empty, authorizations are generated, but not assigned. They are then available as authorizations in a pool and can be assigned at a later time, for example for mass authorizations.
Field 0TCTAUTH can be used to assign names for authorizations and has a special role. If it is empty, technical names are generated. You can enter numbers or real names, for example to maintain different areas of similar characteristic combinations.
Fields 0TCTADFROM and 0TCTADTO define the time span in which the corresponding DataStore object rows are used for generation. If these columns are empty, the corresponding rows are ignored.
Fields 0TCTIOBJNM, 0TCTSIGN, 0TCTOPTION, 0TCTLOW and 0TCTHIGH are used to generate intervals for the InfoObject in 0TCTIOBJNM. The valid intervals can only use inclusive selections (0TCTSIGN must always be filled with 'I' =Including).
Field 0TCTOBJVERS must always be set to A (=active).
You can leave field 0TCTSYSID empty or enter the system name there.
9.7.2.2.4.2 Template for DataStore Objects with Authorization Data (Hierarchy)
Technical Name: 0TCA_AD02
Key Fields
Key Field Description
0TCTUSERNM User
SAP BW/4HANAAdministration PUBLIC 1255

Key Field Description
0TCTAUTH Authorization (Technical Name)
0TCATADTO End of Validity of an Authorization
0TCTIOBJNM InfoObject
0TCTHIENM Hierarchy Name
0TCTHIEVERS Hierarchy Version
0TCTHIEDATE Hierarchy, Valid to Date
0TCTNIOBJNM InfoObject of Node
0TCTNODE Nodes of a Hierarchy
0TCTATYPE Type of Authorization for a Hierarchy
0TCTACOMPM Validity Area of Hierarchy Authorization
0TCTTLEVEL Hierarchy Level
0TCTNDEF BW Reporting Authorizations: Default Value Node Variables
0TCTOBJVERS Object Version
0TCTSYSID BW System
Data Fields
Data Field Description
0TCTADFROM Start of validity of an authorization
Field 0TCTUSERNM is used for assigning an authorization row in the DataStore object to users. You can fill the field with the name of the user who is to be granted the authorizations. If you leave the field empty, authorizations are generated, but not assigned. They are then available as authorizations in a pool and can be assigned at a later time, for example for mass authorizations.
Field 0TCTAUTH can be used to assign names for authorizations and has a special role. If it is empty, technical names are generated. You can enter numbers or real names, for example to maintain different areas of similar characteristic combinations.
Fields TCTADFROM and 0TCATADTO define the time span in which the corresponding DataStore object rows are used for generation. If these columns are empty, the corresponding rows are ignored.
Fields 0TCTIOBJNM, 0TCTHIENM, 0TCTHIEVERS, 0TCTHIEDATE, 0TCTNODE, 0TCTNIOBJNM, 0TCTATYPE, 0TCTTLEVEL and 0TCTACOMPM are used to define hierarchy node authorizations for the hierarchy whose
1256 PUBLICSAP BW/4HANAAdministration

name is in column 0TCTHIENM and version in column 0TCTHIEVERS for the InfoObject in 0TCTIOBJNM. The hierarchy date is in column 0TCTHIEDATE and often has the value 99991231.
The authorized technical node name is entered in 0TCTNODE, whereas the type of the node must be entered in field 0TCTNIOBJNM (text node = 0HIER_NODE; chargeable characteristic node = characteristic name; leaf = empty/no entry).
The details for the authorized node are defined in the remaining fields 0TCTATYPE (type of authorization), possibly level in 0TCTLEVEL and 0TCTCOMPM (validity range of node authorization).
Field 0TCTOBJVERS must always be set to A (=active).
You can leave field 0TCTSYSID empty.
9.7.2.2.4.3 Examples of Generated Authorizations
Some examples of values in the DataStore objects 0TCA_AD01 and 0TCA_AD02 together with the resulting authorizations are shown below.
0TCA_AD01 0TCA_AD02 After Generation
User Authorization User Authorization
User1 - User1 - A technical name (RSR_01)* is generated for the authorizations and the authorization is assigned to User1 (flat and hierarchy authorization)
User1 - User2 - User1: Is assigned a flat authorization with generated technical name (RSR_01)*
User2: Is assigned a hierarchy authorization with generated technical name (RSR_02)*
User1 Number/Name User1 Number/Name If a number is entered, a technical name is generated. If a name is entered, this name is used. In all four cases, User1 is assigned the flat and hierarchy authorization.
SAP BW/4HANAAdministration PUBLIC 1257

0TCA_AD01 0TCA_AD02 After Generation
User1 Number/Name User2 Number/Name User1: Is assigned a flat authorization with assigned technical name (number) or entered name.
User 2: Hierarchy authorization with naming as above.
- - - - The flat authorization and the hierarchy authorization are both stored in an authorization pool and are not assigned to any particular user. The authorizations are assigned a technical name by the system.
- Number/Name - Number/Name The flat authorization and the hierarchy authorization are both stored in an authorization pool and are not assigned to any particular user. The values filled with numbers are assigned a technical name and those whose name was entered are assigned their own name.
- Number/Name - - As above
- - - Number/Name As above
* The name assignments of the generated authorizations as for RSR_01 consist of RSR_ and eight digits.
9.7.2.2.5 Assigning Authorizations to Users
Use
Before an authorization for an activity can be checked, it has to be assigned to one or more users.
1258 PUBLICSAP BW/4HANAAdministration

Prerequisites
You are authorized to use the authorization object S_RSEC. You have already created an authorization.
Procedure
There are two ways of assigning an authorization to a user:
Assigning an Authorization to a User Directly
1. Open the SAP Easy Access menu and choose Business Explorer Manage Analysis Authorizations .
2. Select the User tab and under Analysis Authorizations Assignment .3. Select a user and choose Edit.4. You have two options:
○ Under Authorization Selections, choose one or more previously created authorizations. Using Insert, you can add the authorization to the list of assigned authorizations.
○ Choose Node to select nodes for a hierarchy that you created previously for characteristic 0TCTAUTH in hierarchy maintenance. The authorizations are available as virtual master data for characteristic 0TCTAUTH and can be grouped hierarchically to create thematic arrangements.
NoteThe inserted authorizations are selected. This allows you to undo incorrect entries immediately.
5. Save your entries.
Assigning an Authorization using Profiles
Analysis authorizations can be assigned using roles. However the use of roles is not mandatory. To assign an authorization to a user, it is sufficient to proceed as described above.
Alternatively you can using the authorization object S_RS_AUTH to assign authorizations. The entries in this object are analysis authorization names. This means you can use roles (general role maintenance and general SAP NetWeaver user maintenance) to assign authorizations to a user.
The input help for this authorization object in role maintenance contains all the defined BI analysis authorizations.
Mixed scenarios, in other words, assignments from roles in addition to directly assigned authorizations, are also possible.
Special Authorization for Everything: 0BI_ALL
An authorization for all values of all authorization-relevant characteristics is created automatically in the system. This authorization has the name 0BI_ALL. It can be displayed but not changed. Every user with this authorization can access all the data at any time. Each time an InfoObject is activated and the Authorization-Relevant property has changed for the characteristic or a navigation attribute, 0BI_ALL is adjusted. If this automatic adjustment does not always work, you can perform the adjustment manually. On the administration of analysis authorizations screen, choose Extras Update Authorization 0BI_ALL.
Every user who has a profile containing the authorization object S_RS_AUTH and who has entered 0BI_ALL (or has included it using an asterisk (*), for example), has complete access to all data.
SAP BW/4HANAAdministration PUBLIC 1259

NoteThis authorization is the simplest way to assign authorization for everything to a user. It is very useful for modifying standard profiles for specific user groups.
Result
On the Manual/Generated tab page, the manually created authorizations in this transaction are displayed for this user. Icons are used to distinguish between the different authorizations.
On the From Roles/Profiles tab page, the authorizations for this user that originate from roles are displayed. They cannot be changed. You can create authorizations of this type on the role maintenance screen.
9.7.2.2.6 Error Log
Use
An authorization log logs all checks for the analysis authorizations and displays them in a readable format as HTML. The logs are stored persistently in compressed format on the database and are only converted into the display format when they are being displayed.
Features
You can find the error log using the transaction Management of Analysis Authorizations using the Analysis → Error Log tab page.
On the start screen you can select logs using input help. They are sorted by time and user name. You can also search for certain logs by entering a user name or with patterns.
After selecting a log, you can start to build the log. In the same way, you can select individual logs and delete them or select and delete all logs for a user.
In the table, you can enter the user that is always logged. In contrast, you can use the transaction Execute As Other User to log all checks for specific transactions by setting the indicator with Log.
1260 PUBLICSAP BW/4HANAAdministration

9.7.2.3 Using the App to Create Analysis Authorizations
As an alternative to the analysis authorization administration transaction, you can use app to create analysis authorizations.
Prerequisites
You have configured the SAP BW∕4HANA Cockpit. More Information: Configuring the SAP BW∕4HANA Cockpit [page 924]
Context
The app to create analytic privileges does not provide you with all the functions available in the analysis authorization administration transaction. You can only create analysis authorizations.
Procedure
1. In the SAP BW∕4HANA cockpit, choose the Analysis Authorizations Editor app.2. Enter a name and description for the authorization.3. Insert the special characteristics Validity (0TCAVALID), InfoProvider (0TCAIPROV), Key Figures, and
0TCAACTVT (Activity).
You can restrict the validity to single values or ranges. With InfoProvider you can authorize specific DataStore objects or with Key Figures you can authorize specific key figures. If you choose Full, all InfoProviders and key figures are authorized. With Activity you can choose Display or Change.
If you choose Default, the special characterisrics are assigned default values in the ranges:
The activity Display is set as the default activity, always valid (*) is set as the default validity, and Full (*) is set for the InfoProvider.
In the expert mode you can restrict validity using patterns too.4. Under Characteristics by choosing Add you can select characteristics and navigation attributes for which
you want to assign the authorization. These must have already been flagged as authorization-relevant.5. If you have added characteristics, you can edit further details by clicking a characteristic. You can restrict
the selection to single values. If you choose Full, all values are authorized. If hierarchies are available, you can restrict the selection using a hierarchy.
6. Save and activate the authorization. You can now assign the authorization to a user.
SAP BW/4HANAAdministration PUBLIC 1261

9.7.2.4 Optimization of Authorizations
This documentation describes how authorizations are combined and optimized at query runtime before the actual check takes place. In particular, this documentation explains how characteristics for which no explicit entries are available are handled.
The optimization runs as follows:
1. Filling of empty dimensionsIf a characteristic is not specified in an authorization, this means first of all that the authorized values for this characteristic are not defined. Therefore, all authorized entries of all other authorizations are referenced - of course taking into account the rules for multidimensional "combinatory" restrictions. Only if the user has no other authorization that can contribute to the empty characteristic does this user have no authorization at all. The message "No authorization" then appears if this characteristic occurs here in the InfoProvider. Note: Even if the characteristic does not occur in the query, authorization is required. For more information, seeAuthorization for Aggregated Values [page 1242].
2. Combination of authorizationsAfter the empty dimensions have been filled, the resulting authorizations are combined if possible.
3. IterationSteps (1) and (2) are repeated until no further optimization is possible.
This logic simplifies the maintenance and delivers a mechanism with which different contexts can be split up into different authorizations and then automatically combined "as expected".
Recommendations
You can trace the optimization steps in the authorization log. Multiple iteration steps can be required to obtain the final record of authorizations. For these reasons, the authorizations are simply numbered (1, 2, 3, and so on). This is displayed in the authorization log. The process for combining and preoptimizing the authorizations was itself optimized and some of the steps are not therefore obvious.
It is of course always possible to build authorizations in such a way that they produce so many new different authorizations that performance is negatively impacted. It is not technically possible, however, to clearly predict this and display a warning when the authorizations are being assigned to users.
You should therefore try to keep the authorization concept simple. You can do this, for example, by reducing the number of authorization-relevant characteristics in the InfoProvider or by reducing the number of authorizations that are assigned to a user.
An inconsistent description of characteristic values can also have undesirable effects. For example, using an interval [01,03] in one authorization and individual values 01 and 03 in another. Logically, this is the same for Activity. This is not however the same for characteristics with a length of 10 characters. Here, the consistent use of one of the two expressions (interval or list of individual values) would be logically identical, but would result in better performance.
Important: A differentiation is normally made between the two descriptions. The underlying type of the characteristic cannot be checked for performance reasons, and the two descriptions are not usually identical.
1262 PUBLICSAP BW/4HANAAdministration

9.7.2.4.1 Filling Empty Dimensions and Combining Authorizations
Example 1 (Simplest Case):
There are two authorization-relevant characteristics: 0CALYEAR and 0COUNTRY. The user has two authorizations, both of which have a characteristic with filled single authorizations (values, intervals, and so on):
Authorization 1:
Characteristics Values
0CALYEAR 1999-2002
- -
Authorization 2:
Characteristics Values
- -
0COUNTRY DE, US
These authorizations have the same meaning as the following single authorization:
Result:
Characteristics Values
0CALYEAR 1999-2002
0COUNTRY DE, US
The authorizations are combined. It is possible to express this in such a way that the "empty" dimension (characteristic) has been filled by the other dimensions that are not empty.
Example 2:
Authorization 1:
Characteristics Values
0CALYEAR 1999-2002
0COUNTRY AU
SAP BW/4HANAAdministration PUBLIC 1263

Authorization 2:
Characteristics Values
- -
0COUNTRY DE, US
This is a process flow with two steps: First of all, dimension 0CALYEAR is filled from Authorization1 to Authorization2.
Step 1:
Result 1:
Characteristics Values
0CALYEAR 1999-2002
0COUNTRY AU
Result 2:
Characteristics Values
0CALYEAR 1999-2002
0COUNTRY DE, US
The two authorizations are then combined to form a new authorization.
Step 2:
Result:
Characteristics Values
0CALYEAR 1999-2002
0COUNTRY AU, DE, US
For more examples of this type, seeCombining Authorizations [page 1269].
9.7.2.4.2 Generalization for Any Number of Dimensions
Example 1:
Authorization 1:
1264 PUBLICSAP BW/4HANAAdministration

Characteristics Values
0CALYEAR 1999-2002
0PRODUCT Pencil
0CUSTOMER Miller
0COUNTRY -
Authorization 2:
Characteristics Values
0CALYEAR -
0PRODUCT Case
0CUSTOMER Smith
0COUNTRY DE, US
The authorizations are combined to form the following two authorizations:
Result 1:
Characteristics Values
0CALYEAR 1999-2002
0PRODUCT Pencil
0CUSTOMER Miller
0COUNTRY DE, US
Result 2:
Characteristics Values
0CALYEAR 1999-2002
0PRODUCT Case
0CUSTOMER Smith
0COUNTRY DE, US
Note: Combination 0PRODUCT = Pencil, 0CUSTOMER = Smith is not authorized. This shows that the multidimensional combinations of authorizations are taken into consideration.
SAP BW/4HANAAdministration PUBLIC 1265

This example shows that the result of two authorizations that are to be combined can generate more than one new authorization. There can also be two new authorizations, which contain authorized entries for all dimensions that belong to the authorization.
Example 2:
This example shows what happens when there are more than two authorizations.
Authorization 1:
Characteristics Values
0CALYEAR 1999-2002
0PRODUCT Pencil
0CUSTOMER -
0COUNTRY -
Authorization 2:
Characteristics Values
0CALYEAR 1999-2002
0PRODUCT Case
0CUSTOMER Smith
0COUNTRY -
Authorization 3:
Characteristics Values
0CALYEAR -
0PRODUCT Pencil
0CUSTOMER Miller
0COUNTRY DE, US
Here, all authorizations are first of all compared and are combined with the other authorizations in several steps.
Step 1:
Authorization1 must be combined with Authorization2. This produces Result1 and Result2.
Result 1:
1266 PUBLICSAP BW/4HANAAdministration

Characteristics Values
0CALYEAR 1999-2002
0PRODUCT Pencil
0CUSTOMER Smith
0COUNTRY -
Result 2:
Characteristics Values
0CALYEAR 1999-2002
0PRODUCT Case
0CUSTOMER Smith
0COUNTRY -
Step 2:
Authorization1 is combined with Authorization3 to give Result3 and Result4.
Result 3:
Characteristics Values
0CALYEAR 1999-2002
0PRODUCT Pencil
0CUSTOMER Miller
0COUNTRY DE, US
Result 4:
Characteristics Values
0CALYEAR 1999-2002
0PRODUCT Pencil
0CUSTOMER Miller
0COUNTRY DE, US
It is immediately obvious that the results are identical and can therefore also be combined.
Step 3:
SAP BW/4HANAAdministration PUBLIC 1267

Authorization2 and Authorization3 are combined as follows:
Result 5:
Characteristics Values
0CALYEAR 1999-2002
0PRODUCT Pencil
0CUSTOMER Miller
0COUNTRY DE, US
Result 6:
Characteristics Values
0CALYEAR 1999-2002
0PRODUCT Case
0CUSTOMER Smith
0COUNTRY DE, US
In Result1 and Result2, the entries for 0COUNTRY are missing. The entire process flow must therefore be repeated. All authorizations are once again combined with all others.
The repetition returns the following end results, whereby all identical authorizations are ignored:
End Result 1:
Characteristics Values
0CALYEAR 1999-2002
0PRODUCT Pencil
0CUSTOMER Smith
0COUNTRY DE, US
End Result 2:
Characteristics Values
0CALYEAR 1999-2002
0PRODUCT Case
0CUSTOMER Smith
1268 PUBLICSAP BW/4HANAAdministration

Characteristics Values
0COUNTRY DE, US
End Result 3:
Characteristics Values
0CALYEAR 1999-2002
0PRODUCT Pencil
0CUSTOMER Miller
0COUNTRY DE, US
9.7.2.4.3 Combining Authorizations
In many cases, two authorizations can be combined even if all their dimensions are filled. This process is called Merging.
In the simplest case, there are two identical authorizations.
The following examples are more complex.
Example 1:
Authorization 1:
Characteristics Values
0CALYEAR 1999-2002
0PRODUCT Pencil
Authorization 2:
Characteristics Values
0CALYEAR 1999-2002
0PRODUCT Case
All combinations in the time period 1999-2002 with Pencil or Case are authorized. Both Pencil and Case are authorized, which means a logical OR. It therefore makes sense to simplify the two authorizations into one single authorization, that is, to combine them into a "mixed" authorization.
Result:
SAP BW/4HANAAdministration PUBLIC 1269

Characteristics Values
0CALYEAR 1999-2002
0PRODUCT Pencil, Case
The general rule for this is as follows:
Authorizations can be combined if they differ in a maximum of one dimension (entries for a characteristic).
Example 2:
Authorization 1:
Characteristics Values
0CALYEAR 1999-2002
0PRODUCT Pencil
0CUSTOMER Smith
0COUNTRY DE, US
Authorization 2:
Characteristics Values
0CALYEAR 1999-2002
0PRODUCT Case
0CUSTOMER Smith
0COUNTRY DE, US
These can be combined to produce:
Result:
Characteristics Values
0CALYEAR 1999-2002
0PRODUCT Pencil, Case
0CUSTOMER Smith
0COUNTRY DE, US
1270 PUBLICSAP BW/4HANAAdministration

Example 3:
In this case, an authorization has all authorizations for all characteristics. This can cover all other authorizations with the same characteristics.
Authorization 1:
Characteristics Values
0CALYEAR *
0PRODUCT *
0CUSTOMER *
0COUNTRY *
Authorization 1:
Characteristics Values
0CALYEAR 1999-2002
0PRODUCT Case
0CUSTOMER Smith
0COUNTRY DE, US
These can be combined to produce:
Result:
Characteristics Values
0CALYEAR *
0PRODUCT *
0CUSTOMER *
0COUNTRY *
0BI_ALL is a special authorization of this type, which automatically contains all authorization-relevant characteristics, with authorization for all respective values.
Note:
The reduction in the number of authorizations does not influence the authorized combinations. It is an optimization that is only made for performance reasons. This is not logically necessary. In some cases, authorizations are not combined because it would take too much time to recognize and take advantage of the respective situation.
SAP BW/4HANAAdministration PUBLIC 1271

An example of a case in which authorizations are not combined is if there are two authorizations that have intervals in all dimensions. In each dimension of the first authorization, the interval is selected in such a way that it overlaps the interval of the second authorization. It would be possible to combine this into one authorization, but because it would take too much time to recognize, this optimization is not made.
9.7.2.5 BAdI for Virtual Analysis Authorizations
Use
You can create virtual analysis authorizations using the RSEC_VIRTUAL_AUTH_BADI BAdI. These are not created and checked until runtime.
This means that authorizations can be created flexibly. They can also be read from other systems at runtime.
For more information, see the BAdI documentation in the BW system.
9.7.2.6 Change Documents (Legal Auditing)
The change documents provide you with an overview of changes made to authorizations. This ensures a high degree of transparency in the management of authorizations.
All changes to authorizations and assignments of users are listed. The following CDS views are delivered with the technical Content:
● Rv_I_Rsec_Val (SQL view RVIRSECVAL): Change documents for value authorizations● Rv_I_Rsec_IpHie (SQL view RVIRSECHIE): Change documents for hierarchy authorizations● Rv_I_Rsec_IpUserAuth (SQL view RVIRSECUA): Change documents for user authorization assignments
These CDS views read the required information from the corresponding tables.
These CDS views behave like InfoProviders. You can create queries on them to monitor the activities. You can use the standard queries 2C<SQL view>/!2C<SQL view> for this.
9.7.2.7 Archiving Change Records of Analysis Authorizations (BW-BEX-OT)
Definition
Using the archiving object RSEC_CHLOG, you can archive the change log of analysis authorizations.
1272 PUBLICSAP BW/4HANAAdministration

Use
We recommend archiving the data before making a system copy, as this involves a large amount of data that is not actually needed in the new system.
Structure
Tables containing the data to be archived:
Technical Name Description
RSECHIE_CL Authorizations Hierarchies Changes Change Log
RSECSESSION_CL Session IDs
RSECTXT_CL Change documents for authorization texts
RSECUSERAUTH_CL BI AS authorizations: Assignment of User Auth (Change Log)
RSECVAL_CL Authorizations Values Change (Change Log)
Archiving Programs:
Program Function
RSEC_CHLOG_ARCH_WRITE Write
RSEC_CHLOG_ARCH_DELETE Delete
More information: Data Archiving Procedure
9.8 Statistical Analyses of the Data Warehouse Infrastructure
There are various options available to you for statistical analyses of the data warehouse infrastructure. These queries are based on the core data services technology (CDS).
For the various areas, analytic queries based on query CDS views (CDS views with the analytics annotation @Analytics.query: true) are available. These serve as proposals for default analysis with the most important information, and can be executed in your BI client. You can also define queries based on TransientProviders derived from cube views (CDS views with analytics annotation @Analytics.dataCategory: #CUBE). To do this, the Search for TransientProvider field in the Query Wizard must be selected.
SAP BW/4HANAAdministration PUBLIC 1273

The use of CDS technology means that no installation or activation of technical content is required, nor is there any need to load data. The data is available in real-time.
You can use CDS technology to analyze the following areas of the Data Warehouse:
● Data Loading● Data Volume● Process chains● Query Runtime
Authorizations for Analytic Queries
Using authorization object S_RS_COMP, you can control which actions a user is allowed to perform for queries. If you want to prohibit specific actions (for example, query execution), you can restrict authorization values for S_RS_COMP as required.
Full Extraction
There are cube views that support full extraction (analytics annotation @Analytics.dataExtraction.enabled: true). These views support full extraction and can be used with operational data provisioning to model a historical analysis by loading snapshots and subsequently creating time series. To do this, in an ODP-Myself source system with ODP context ABAP Core Data Services you can create a DataSource on operational data provider RV* and load the snapshots into a DataStore object (advanced). You can find out whether a view supports full extraction in the documentation for the statistics.
Time in Statistics Views and Queries
Before SAP BW∕4HANA 2.0, all times in the statistics views and queries were in UTC time only, not in local user time. As of SAP BW∕4HANA 2.0, time specifications in the cube views and query CDS views are also made in the local user time.
The fields in the query CDS views are only offered in the local user time. Fields that were previously delivered in UTC are now delivered in the local user time. To ensure consistency, certain fields in the two query CDS views Rv_C_RspmDtpLoadQuery (RSPM DTP load statistics) and Rv_C_RspmRequestQuery (RSPM request statistics) are delivered in both UTC and in the local user time.
CDS Views for Overview via Changes from Analysis Authorizations
You can use various CDS view to display change logs of analysis authorizations. For more information, see Change Documents (Legal Auditing) [page 1272].
1274 PUBLICSAP BW/4HANAAdministration

Related Information
Statistics for Data Loading [page 1275]Data Volume Statistics [page 1281]Process Chain Statistics [page 1285]Query Runtime Statistics [page 1291]
9.8.1 Statistics for Data Loading
To analyze data loading, you can use the RSPM request statistics and RSPM DTP load statistics.
Related Information
RSPM Request Statistics [page 1275]RSPM DTP Load Statistics [page 1279]
9.8.1.1 RSPM Request Statistics
To analyze data loads, you can use the RSPM request statistics with query CDS view “Rv_C_RspmRequestQuery”and cube view “Rv_C_RspmRequest”.
Technical Information for Default Analysis
Object Type Name More Information
Query CDS View Rv_C_RspmRequestQuery NoteMost of the time fields in this view are offered in the local user time, not in UTC.
SAP BW/4HANAAdministration PUBLIC 1275

Object Type Name More Information
Analytic Query 2CRVCREQQRY The query returns information on requests for a BW target object (whether the requests were successful for example). DataStore objects (advanced), InfoObjects and open hub destinations are all supported as target objects.
Technical Information for Defining Custom Queries
Object Type Name More Information
Cube View Rv_C_RspmRequest This view supports full extraction and can be used with operational data provisioning to model a historical analysis by loading snapshots and subsequently creating time series. To do this, in an ODP-Myself source system with ODP context ABAP Core Data Services you can create a DataSource on operational data provider RVCREQUEST and load the snapshots into a DataStore object (advanced).
TransientProvider 2CRVCREQUEST
Source Table / Source View
Statistics Table: RSPMREQUEST
Fields in Query CDS View and Cube View
Field (<Field in Query-View> / <Field in Cube-View>) Description Contained in query view? Contained in cube view?
TLOGO Object Type X X
DATATARGET Name of the Target Object X X
STORAGE Storage in the Object X X
INFOAREA InfoArea X X
1276 PUBLICSAP BW/4HANAAdministration

Field (<Field in Query-View> / <Field in Cube-View>) Description Contained in query view? Contained in cube view?
SYSTEMDATE Calendar Day (System Time) X X
REQUESTTSN Request Transaction Sequence Number
X X
COUNTER Total Number of Requests X X
OKCOUNTER Successful Requests X X
FAILEDCOUNTER Failed Requests X X
RECORDNUMBER Number of Records X X
MOVEDCOUNTER Moved Requests X X
DELETEDCOUNTER Deleted Requests X X
RUNNINGCOUNTER Running Requests X X
DURATION Duration in Seconds X X
AVGDURATION Average Duration in Seconds X -
LASTOPERATYPE RSPM Operation Type (CRUD)
- X
LASTPROCESSTSN Process Transaction Sequence Number
- X
LASTCHANGEDAT Time Stamp of Last Change - X
LASTCHANGEDATTIME Time of Last Change (System Time)
- X
LASTCHANGEDATDATE Date of Last Change (System Time)
- X
LASTCHANGEDATTIMEUSERTIME
Time of Last Change (User Time)
- X
LASTCHANGEDATDATEUSERTIME
Date of Last Change (User Time)
- X
CREATIONENDTIME Time Stamp of Creation - X
CREATEDATTIME Time of Creation (System Time)
- X
CREATEDATDATE Date of Creation (System Time)
- X
CREATEDATTIMEUSERTIME Time of Creation (User Time) - X
CREATEDATDATEUSERTIME Date of Creation (User Time) - X
SOURCE Name of the Source Object - X
REQUESTSTATUS RSPM Request Status - X
REQSTATBEFDEL RSPM Request Status Before Deletion
- X
REQISINPROCESS Request is in Process - X
SAP BW/4HANAAdministration PUBLIC 1277

Field (<Field in Query-View> / <Field in Cube-View>) Description Contained in query view? Contained in cube view?
SYSTEMTIME Calendar Second (System Time)
- X
HOUSEKEEPSTAT RSPM Housekeeping Status - X
OKSTATUS State of Request - X
LASTTIMESTAMP / TIMESTAMP
Last Time Stamp X X
CALSECOND / CALSECONDUSERTIME
Calendar Second (User Time)
X X
CALMINUTE / CALMINUTEUSERTIME
Calendar Minute (User Time) X X
CALHOUR / CALHOURUSERTIME
Calendar Hour (User Time) X X
CALDAY / CALDAYUSERTIME
Calendar Day (User Time) X X
CALMONTH / CALMONTHUSERTIME
Calendar Month (User Time) X X
CALYEAR / CALYEARUSERTIME
Calendar Year (User Time) X X
CALMINUTE Calendar Minute (System Time)
- X
CALHOUR Calendar Hour (System Time)
- X
CALMONTH Calendar Month (System Time)
- X
CALYEAR Calendar Year (System Time) - X
1278 PUBLICSAP BW/4HANAAdministration

9.8.1.2 RSPM DTP Load Statistics
To analyze data loads, you can use the RSPM DTP load statistics with query CDS view “Rv_C_RspmDtpLoadQuery”and cube view “Rv_C_RspmDtpLoad”.
Technical Information for Default Analysis
Object Type Name More Information
Query CDS View Rv_C_RspmDtpLoadQuery NoteMost of the time fields in this view are offered in the local user time, not in UTC.
Analytic Query 2CRVCDTPLOADQ The query returns information for requests that are executed during execution of the DTP. DataStore objects (advanced), InfoObjects and open hub destinations are all supported as target objects.
Technical Information for Defining Custom Queries
Object Type Name More Information
Cube View Rv_C_RspmDtpLoad This view supports full extraction and can be used with operational data provisioning to model a historical analysis by loading snapshots and subsequently creating time series. To do this, in an ODP-Myself source system with ODP context ABAP Core Data Services you can create a DataSource on operational data provider RVCDTPLOAD and load the snapshots into a DataStore object (advanced).
TransientProvider 2CRVCDTPLOAD -
SAP BW/4HANAAdministration PUBLIC 1279

Source Table / Source View
Statistics Tables: RSPMREQUEST, RSPMXREF, RSPMPROCESS, RSBKDTP
Fields in Query CDS View and Cube View
Field (<Field in Query-View> / <Field in Cube-View>) Description Contained in query view? Contained in cube view?
SRCTLOGO Object Type of the Source Object
X X
SRCOBJ Name of the Source Object X X
TGTTLOGO Object Type of the Target Object
X X
TGTOBJ Name of the Target Object X X
TGTINFOAREA InfoArea of the Target Object X X
STORAGE Storage in the Target Object X X
PROCESSTSN Process Transaction Sequence Number
X X
REQUESTTSN Request Transaction Sequence Number
X X
SYSTEMDATE Calendar Day (System Time) X X
DTPANAME Data Transfer Process ID X X
COUNTER Total Number of Requests X X
OKCOUNTER Successful Requests X X
FAILEDCOUNTER Failed Requests X X
RECORDNUMBER Number of Records X X
MOVEDCOUNTER Moved Requests X X
DELETEDCOUNTER Deleted Requests X X
RUNNINGCOUNTER Running Requests X X
DURATION Duration in Seconds X X
AVGDURATION Average Duration in Seconds X -
REQUESTSTATUS RSPM Request Status - X
OKSTATUS State of Request - X
LASTTIMESTAMP / TIMESTAMP
Last Time Stamp X X
CALSECOND / CALSECONDUSERTIME
Calendar Second (User Time)
X X
1280 PUBLICSAP BW/4HANAAdministration

Field (<Field in Query-View> / <Field in Cube-View>) Description Contained in query view? Contained in cube view?
CALMINUTE / CALMINUTEUSERTIME
Calendar Minute (User Time) X X
CALHOUR / CALHOURUSERTIME
Calendar Hour (User Time) X X
CALDAY / CALDAYUSERTIME
Calendar Day (User Time) X X
CALMONTH / CALMONTHUSERTIME
Calendar Month (User Time) X X
CALYEAR / CALYEARUSERTIME
Calendar Year (User Time) X X
CALSECOND Calendar Second (System Time)
- X
CALMINUTE Calendar Minute (System Time)
- X
CALHOUR Calendar Hour (System Time)
- X
CALMONTH Calendar Month (System Time)
- X
CALYEAR Calendar Year (System Time) - X
9.8.2 Data Volume Statistics
To analyze data volume, you can use the statistics for the combined SAP HANA /cold store data volume, the statistics for the SAP HANA online data volume, and the statistics for the cold store data volume. The statistics for the combined data volume provide you with an entry point for analyzing the data volume. They deliver a view of the entire data volume in the system at the present time, together with the option of storing snapshots of data volume information at regular defined intervals. The statistics for SAP HANA online data volume and the statistics for cold Store data volume provide you with more detailed information.
Related Information
SAP HANA Online Data Volume Statistics [page 1282]Statistics for the Cold Store Data Volume [page 1284]
SAP BW/4HANAAdministration PUBLIC 1281

9.8.2.1 SAP HANA Online Data Volume Statistics
To analyze the volume of data, you can use the SAP HANA Online Data Volume Statistics with query CDS view “Rv_C_Dvhd_TabSizesQuery” and cube view “Rv_C_Dvhd_TabSizes”.
NoteIn the context of data volume statistics, note that one megabyte/MB is 1024² bytes.
Technical Information for Default Analysis
Object Type Name More Information
Query CDS View Rv_C_Dvhd_TabSizesQuery -
Analytic Query 2CRVCDVHDTABSIZEQ The query provides information about the data volume of database tables in the SAP HANA database of the SAP BW∕4HANAsystem.
Technical Information for Defining Custom Queries
Object Type Name More Information
Cube View Rv_C_Dvhd_TabSizes -
TransientProvider 2CRVCDVHDTABSIZE -
Source Table / Source View
SAP HANA views: M_CS_TABLES, M_RS_TABLES
Fields in Query CDS View and Cube View
Field (<Field in Query-View> / <Field in Cube-View>) Description Contained in query view? Contained in cube view?
HOST Host Name X X
1282 PUBLICSAP BW/4HANAAdministration

Field (<Field in Query-View> / <Field in Cube-View>) Description Contained in query view? Contained in cube view?
PORT Port X X
SCHEMANAME Schema Name X X
TABLENAME Table Name X X
PARTID Partition ID X X
COMPONENT Software Component X X
RECORDCOUNT HANA Record Count X X
MEMORYSIZE Memory Size in Row and Column Store [MB]
X X
TLOGO Object Type X X
OBJECTNAME Object Name X X
TABLETYPE Table Type X X
INFOAREA InfoArea X X
TEMPERATURE Data Tiering Temperature X X
STORAGETYPE HANA Storage Type - X
ALLOCATEDSIZE Allocated Size in Row Store [MB]
- X
USEDSIZE Used Size in Row Store [MB] - X
LOADED Columns of Table That are Loaded in Memory
- X
GROUPTYPE Group Type - X
SUBTYPE Subtype - X
MEMORYSIZEINTOTAL Total Memory Size in Column Store [MB]
- X
MEMORYSIZEINMAIN Memory Size in Main Index in Column Store [MB]
- X
MEMORYSIZEINDELTA Memory Size in Delta Index in Column Store [MB]
- X
ESTIMMAXMEMORYSIZEINTOTAL
Estimated Maximum Memory Consumption in Column Store [MB]
- X
LASTESTIMMEMORYSIZE Last Estimated Memory Size in Column Store [MB]
- X
RAWRECORDCOUNTINMAIN Raw Record Count in Main Index in Column Store [MB]
- X
RAWRECORDCOUNTINDELTA
Raw Record Count in Delta Index in Column Store [MB]
- X
LASTCOMPRRECORDCOUNT
Last Compressed Record Count
- X
SAP BW/4HANAAdministration PUBLIC 1283

Field (<Field in Query-View> / <Field in Cube-View>) Description Contained in query view? Contained in cube view?
DLVUNIT Software Component - X
DEVCLASS Development Class of Table - X
9.8.2.2 Statistics for the Cold Store Data Volume
To analyze the data volume, you can use the statistics for the cold store data volume with query CDS view “Rv_C_NlStatQuery” and cube view “Rv_C_NlStat”.
NoteIn the context of data volume statistics, note that one megabyte/MB is 1024² bytes.
Technical Information for Default Analysis
Object Type Name More Information
Query CDS View Rv_C_NlStatQuery -
Analytic Query 2CRVCNLSTATQ The query returns information about the data volume, which was moved from DataStore objects (advanced) to the cold store and saved there. The statistical information includes:
● Table size in the cold store● Raw size of the transferred data● Number of records● Compression rate
Technical Information for Defining Custom Queries
Object Type Name More Information
Cube View Rv_C_NlStat -
TransientProvider 2CRVCNLSTAT -
1284 PUBLICSAP BW/4HANAAdministration

Source Table / Source View
View: RSDANLSTAT_V
Fields in Query CDS View and Cube View
Field (<Field in Query-View> / <Field in Cube-View>) Description Contained in query view? Contained in cube view?
INFOPROV InfoProvider X X
TABLENAME Table Name X X
INFOPROVDESCR Object Name X X
CONNAME Cold Store Connection Name X X
NLCONCLASSNAME Cold Store Class Name X X
NLCONCLASSDESC Cold Store Connection Type X X
NLCONDBCONNAME Logical Name of a Database Connection
X X
NLCONPARAMS Cold Store Connection Parameters
X X
INFOAREA InfoArea X X
RECORDS Record Count X X
TABLESIZEINMB / TABLESIZE
Size [MB] X -
COMPRESSIONRATE Compression Rate X -
ROWCOUNTCONTRIB Record Count (at object level, table records contributing to row count of InfoProvider)
- X
9.8.3 Process Chain Statistics
To analyze the process chains, you can use the process chain status statistics together with the statistics for status and runtime information for process instances.
Related Information
Statistics for the Process Chain Status [page 1286]Statistics for Status and Runtime Information of Process Instances [page 1289]
SAP BW/4HANAAdministration PUBLIC 1285

9.8.3.1 Statistics for the Process Chain Status
To analyze the process chains, you can use the process chain status statistics with query CDS view “Rv_C_PcmPcQuery” and cube view “Rv_C_PcmPcCube”.
Technical Information for Default Analysis
Object Type Name More Information
Query CDS View Rv_C_PcmPcQuery NoteThe fields in this view are provided in the local user time, not in UTC.
Analytic Query 2CRVCPCMPCQ The query shows the current status of all process chains in the system with the same information as the process chain monitor or the monitoring of periodic process chains (transaction RSPCM). The statistics provide a snapshot of the current status information and no history.
You can use the statistics for a customer-specific process chain monitoring, which is based on current information about the process chain status.
Technical Information for Defining Custom Queries
Object Type Name More Information
Cube View Rv_C_PcmPcCube -
TransientProvider 2CRVCPCMPCC -
Source Table / Source View
Statistics Tables: RSPCCHAINATTR, RSPCRECENTRUN
1286 PUBLICSAP BW/4HANAAdministration

Fields in Query CDS View and Cube View
Field (<Field in Query-View> / <Field in Cube-View>) Description Contained in query view? Contained in cube view?
CHAINID Process Chain X X
LASTSTATUS Latest Run: Status X X
LASTRUNTIMESTATUS Latest Run: Runtime Status X X
SCHEDULINGSTATUS Schedule Status X X
NEXTSTARTDELAYSTATUS Next Start: Delay Status X X
APPLICCOMP InfoArea - X
ISSTREAMINGCHAIN Process Chain is Streaming Enabled
- X
PERSONRESPONSIBLE Person Responsible for a Repository Object
- X
CREATEDATTIMEUSERTIME Time Stamp of Creation - X
CREATEDATTIME Time of Creation (System Time)
- X
CREATEDON Date of Creation (System Time)
- X
CREATEDATTIMEUSERTIME Time of Creation (User Time) - X
CREATEDATDATEUSERTIME Date of Creation (User Time) - X
LastChangedBy Last Changed By - X
LASTCHANGEDATTIMESTAMP
Time Stamp of Last Change - X
LASTCHANGEDATTIME Time of Last Change (System Time)
- X
LASTCHANGEDATDATE Date of Last Change (System Time)
- X
LASTCHANGEDATTIMEUSERTIME
Time of Last Change (User Time)
- X
LASTCHANGEDATDATEUSERTIME
Date of Last Change (User Time)
- X
LOGID Latest Run: Log ID - X
LASTSTARTTIMESTAMP Latest Run: Start Time - X
LASTSTARTTIME / LASTSTARTTIMEUSERTIME
Latest Run: Start Time (User Time)
- X
LASTSTARTDATE / LASTSTARTDATEUSERTIME
Latest Run: Start Date (User Time)
- X
LASTENDTIMESTAMP Latest Run: End Time - X
SAP BW/4HANAAdministration PUBLIC 1287

Field (<Field in Query-View> / <Field in Cube-View>) Description Contained in query view? Contained in cube view?
LASTENDTIME Latest Run: End Time (System Time)
- X
LASTENDDATE Latest Run: End Date (System Time)
- X
LASTENDTIMEUSERTIME Latest Run: End Time (User Time)
- X
LASTENDDATEUSERTIME Latest Run: End Date (User Time)
- X
NEXTSTARTTIMESTAMP Next Start: Expected Time Stamp
- X
NEXTSTARTTIME Next Start: Expected Time (System Time)
- X
NEXTSTARTDATE Next Start: Expected Date (System Time)
- X
NEXTSTARTTIMEUSERTIME Next Start: Expected Time (User Time)
- X
NEXTSTARTDATEUSERTIME Next Start: Expected Date (User Time)
- X
NEXTSTARTDELAYINMIN Next Start: Delay (Min.) - X
AVERAGESTARTDELAYINMIN
Start Average Delay (Min.) - X
AVERAGESTARTPERIODINMIN
Start Average Period (Min.) - X
LASTRUNTIMEINMIN Latest Run: Runtime (Min.) - X
LASTIDLETIMEINMIN Latest Run: Idle Time (Min.) - X
AVERAGERUNTIMEINMIN Average Runtime Calculated from Last 30 Runs in Minutes
- X
AVERAGERUNTIMEDEVIATIONINMIN
Runtime: Average Deviation (Min.)
- X
AVERAGERUNTIMEDEGRADATIONINMIN
Runtime: Degradation (Min. / Day)
- X
AVERAGEIDLETIMEINMIN Runtime: Average Idle Time (Min.)
- X
LASTPROCESSEDENTITIES Latest Run: Processed Entities (Count)
- X
AVERAGEPROCESSEDENTITIES
Processed Entities: Average (Count)
- X
AVERAGEPROCESSEDENTITIESGROWTH
Processed Entities: Degradation (Count / Day)
- X
COUNTCHAINS Counter - X
1288 PUBLICSAP BW/4HANAAdministration

Field (<Field in Query-View> / <Field in Cube-View>) Description Contained in query view? Contained in cube view?
LASTSTARTTIME Latest Run: Start Time (System Time)
- X
LASTSTARTDATE Latest Run: Start Date (System Time)
- X
9.8.3.2 Statistics for Status and Runtime Information of Process Instances
To analyze the process chains, you can use the statistics for status and runtime information of process instances with cube view Rv_C_PcmLogStepCube.
Technical Information for Default Analysis
n/a
Technical Information for Defining Custom Queries
Object Type Name More Information
Cube View Rv_C_PcmLogStepCube This view supports full extraction and can be used with operational data provisioning to model a historical analysis by loading snapshots and subsequently creating time series. To do this, in an ODP-Myself source system with ODP context ABAP Core Data Services you can create a DataSource on operational data provider RVCPCMLOGSTEPC and load the snapshots into a DataStore object (advanced).
SAP BW/4HANAAdministration PUBLIC 1289

Object Type Name More Information
TransientProvider 2CRVCPCMLOGSTEPC With these statistics, status and runtime information are written for all process instances of all runs of all process chains. You can use the statistics for example to find out which processes in which chains typically take the most time during runs, or which often terminate. You can also use these to perform analyses over a period of time, thus gaining insights which you could not gain from the process chain status statistics, which only offer a snapshot of the process chain.
Source Table / Source View
Statistics Tables: RSPC*
Fields in Cube view
Field (<Field in Query-View> / <Field in Cube-View>) Description
CHAINID Process Chain
LOGID Log-ID of a Process Chain Run
PROCESSTYPE Process Type
VARIANT Process Variant
PROCESSCHAINSTATUS Process Chain Status
PROCESSSTEPSTATUS RSPM Process Status
CHAINLASTCHANGEDBY (Chain) Last Changed By
APPLICCOMP InfoArea
STREAMING Process Chain is Streaming Enabled
STARTTIMESTAMP Start Time Stamp
STARTTIME Start Time (System Time)
STARTDATE Start Date (System Time)
STARTTIMEUSERTIME Start Time (User Time)
STARTDATEUSERTIME Start Date (User Time)
1290 PUBLICSAP BW/4HANAAdministration

Field (<Field in Query-View> / <Field in Cube-View>) Description
ENDTIMESTAMP End Time Stamp
ENDTIME End Time (System Time)
ENDDATE End Date (System Time)
ENDTIMEUSERTIME End Time (User Time)
ENDDATEUSERTIME End Date (User Time)
UPDATETIMESTAMP Update Time Stamp
UPDATETIME Update Time (System Time)
UPDATEDATE Update Date (System Time)
UPDATETIMEUSERTIME Update Time (User Time)
UPDATEDATEUSERTIME Update Date (User Time)
RUNTIMEINSEC Runtime (Sec.)
LOGINSTANCE Process Instance
COUNTRUNS Counter
9.8.4 Query Runtime Statistics
To analyze the query runtime you can use the query runtime statistics with query CDS view “Rv_C_OlapStatAQuery”and cube view “Rv_C_OlapStatACube”.
Technical Information for Default Analysis
Object Type Name More Information
Query CDS View Rv_C_OlapStatAQuery NoteThe fields in this view are offered in the local user time, not in UTC.
Analytic Query 2CRVCOLAPSTATAQ The query returns information about the query runtime statistics. This displays the average query execution time for various layers, such as front end, OLAP or data manager.
SAP BW/4HANAAdministration PUBLIC 1291

Technical information for defining your own queries
Object Type Name More Information
Cube View Rv_C_OlapStatACube This view supports full extraction and can be used with operational data provisioning to model a historical analysis by loading snapshots and subsequently creating time series. To do this, in an ODP-Myself source system with ODP context ABAP Core Data Services you can create a DataSource on operational data provider RVCOLAPSTATAC and load the snapshots into a DataStore object (advanced).
TransientProvider 2CRVCOLAPSTATAC -
Source Table / Source View
Statistics tables: RSDDSTAT_OLAP (view), RSDDSTATHEADER, RSDDSTATINFO, RSDDSATEVDATA
More Information:
● Query Runtime Statistics [page 1021]● Aggregation of Query Runtime Statistics [page 1293]
Fields in Query CDS View and Cube View
Field (<Field in Query-View> / <Field in Cube-View>) Description Contained in query view? Contained in cube view?
OBJNAME Object Name X X
SESSIONUID Session UID X X
STEPUID Step UID X X
USERNAME User Name X X
INFOPROV InfoProvider X X
INFOAREA InfoArea X X
OBJCOUNT Object Count for Query Steps X X
STARTTIME Start Time - X
1292 PUBLICSAP BW/4HANAAdministration
Field (<Field in Query-View> / <Field in Cube-View>) Description Contained in query view? Contained in cube view?
OBJCOUNTALL Object Count for Average Time Calculation
- X
CALSECOND / CALSECONDUSERTIME
Calendar Second (User Time)
X X
CALMINUTE / CALMINUTEUSERTIME
Calendar Minute (User Time) X X
CALHOUR / CALHOURUSERTIME
Calendar Hour (User Time) X X
CALDAY / CALDAYUSERTIME
Calendar Day (User Time) X X
CALMONTH / CALMONTHUSERTIME
Calendar Month (User Time) X X
CALYEAR / CALYEARUSERTIME
Calendar Year (User Time) X X
TIMEFRONTEND Time Recorded on Front End X X
TIMEOLAP Time Recorded for OLAP X X
TIMEDM Time Recorded for Data Manager
X X
TIMEPLAN Time Recorded for Planning X X
TIMENA Time Not Assigned X X
CALSECOND Calendar Second (System Time)
- X
CALMINUTE Calendar Minute (System Time)
- X
CALHOUR Calendar Hour (System Time)
- X
CALDAY Calendar Day (System Time) - X
CALMONTH Calendar Month (System Time)
- X
CALYEAR Calendar Year (System Time) - X
9.8.4.1 Aggregation of Query Runtime Statistics
Query runtime statistics in SAP BW∕4HANA are recorded by handle types and event IDs. This results in a large amount of data per navigation step, as information about every query runtime event is recorded. In order to simplify the analysis of this data, this detailed data are aggregated to the following key figures:
● Time spent in the front end● Time spent in the Analytical Engine (OLAP und Planning)
SAP BW/4HANAAdministration PUBLIC 1293

● Time spent in the data manager
Extraction Logic
The following extraction logic is used to aggregate the detailed data:
1. The technical name of the handle type is retrieved.2. The event IDs of the events triggered for this handle type are retrieved.3. Depending on the handle types and event IDs, the statistics are assigned to the relevant aggregated key
figure.
The following table shows the handle type, event IDs, and aggregated key figures:
Handle Type
Time recorded on front-end side (TIMEFE)
Time recorded for OLAP (TIMEOLAP)
Time recorded for Data Manager (TIMEDM)
Time recorded for Planning (TIMEPLAN)
Time not assigned to front-end, OLAP or Data Manager (TIMENA) no extraction
DFLT (Default Handle)
all other EVENTIDs
000000001
BTCH (Batch Queries)
all other EVENTIDs
000009000
MDX (OLAP BAPI)
all other EVENTIDs
000009000
PLAN (Planning)
all EVENTIDs
EXTN (External Read)
000004500 000009001
000009010
000009011
all other EVENTIDs
OLAP (OLAP) 000019950
000019951
000019952
all other EVENTIDs
000009000
000009010
000009011
000000001
all other HANDLETPs (for examplre: F4 (value help))
all EVENTIDs
1294 PUBLICSAP BW/4HANAAdministration

Example:
● For handle type DFLT (default handle), all event IDs other than 000000001 are assigned to TIMENA (Time not assigned to front-end, OLAP, or DataManager). The event ID 000000001 is not extracted from the DataSource.
● For handle type MDX (OLAP BAPI), event ID 000009000 is assigned to TIMEDM (Time Recorded for Data Manager). All other event IDs triggered for handle type MDX are assigned to aggregated key figure TIMEOLAP (Time Recorded for OLAP).
● For handle type EXTN (External Read):○ Event ID 000004500 is assigned to aggregated key figure TIMEOLAP (Time Recorded for OLAP).○ Event IDs 000009001, 000009010, and 000009011 are assigned to TIMEDM (Time Recorded for
Data Manager).○ All other event IDs are assigned to TIMENA (Time not assigned to front-end, OLAP, or DataManager).
9.9 Database-Specific Administration
9.9.1 Triggering a Delta Merge
If you are using an SAP HANA database, data modifications are initially saved in a delta storage that is optimized for write access. The modifications then have to be transferred to the main storage by means of a delta merge.
Data modifcations are initially stored in the database in a delta storage optimized for write access. Most of the data is saved in a highly compressed format in the main storage however, which is optimized in terms of required memory space and read performance. A delta merge is used to transfer modifications from the delta storage to the main storage. First, an asynchronous check is performed for see whether a delta merge is required. If a threshold value is exceeded, the merge is carried out in the delta storage. When a read access is executed, the data is read from the main storage and the delta storage and the results are merged together.
Once the DataStore object (advanced) has been activated, an automatic check is run to see whether a delta merge can be performed.
The data transfer process (DTP) has an Update tab that contains the Trigger Database Merge checkbox. This controls the delta merge, once the DTP request has been successfully processed. This checkbox is selected in the default setting.
NoteIn certain exceptional cases, performing a delta merge after processing a DTP request is not recommended, due to load balancing issues. You can only use a process type in exceptional situations like this.
SAP BW/4HANAAdministration PUBLIC 1295

Related Information
Triggering Delta Merge via Process Chain [page 1296]
9.9.1.1 Triggering Delta Merge via Process Chain
In certain exceptional cases, performing a delta merge after processing a DTP request is not recommended, due to load balancing issues. In this case, an alternative method is to trigger the delta merge via a process type.
Context
In exceptional cases only, which result in load distribution problems, we recommend deselecting the checkbox in the DTP and using the Trigger Delta Merge process type to trigger the delta merge. An example of this is an object that data is loaded into from multiple sources. The delta merge check is only performed at the end of the entire loading process.
NoteMake sure that the DTP or process type always triggers a delta merge. If no delta merge takes place, the data remains in delta storage. Over time, this will result in storage problems and have a negative impact on read performance.
Procedure
You are in the plan view of the process chain where you want to include the process. Process type Trigger Delta Merge is available in process category Load Process and Post-Processing.1. Drag and drop process type Trigger Delta Merge to a suitable position in the process chain.
2. A dialog box appears. To create a new process variant, choose .
3. In the next screen, enter a name and a description for the process variant and choose .4. On the process variant maintenance screen, specify the type and name of the object for the delta merge.5. Save your entries and return to the plan view for the process chain.6. Link the process to the required loading processes.
Related Information
Creating Process Chains [page 964]
1296 PUBLICSAP BW/4HANAAdministration

9.9.2 Statistics for Maintenance Processes in SAP HANA Indexes
Use
To acquire an overview of the runtimes of specific subprocesses in SAP HANA/BWA index maintenance, you can display table RSDDSTATTREX. If you are using the SAP HANA database, the same parameters are relevant as when using any other database with an SAP HANA. Not all subprocesses are relevant however. You can use the same statistics for the relevant subprocesses (for the SAP HANA database) as you use for a BWA.
In terms of the SAP HANA indexes, the system writes the runtimes for the initial indexing process to the statistics table.
Prerequisites
The statistics have to be switched on for the relevant InfoProviders. You make this setting on the statistics properties maintenance screen (choose Tools Settings for BW Statistics on the Data Warehousing Workbench screen). For more information, see Maintenance of Statistics Properties [page 1026].
Features
Statistics table RSDDSTATTREX contains the following information for each table that is indexed:
Column Description
STATUID Unique identification key
TABLNM Table Name
CHANGEMODE Specifies whether the process is part of a rebuild ("N")
FILLMODE Fill mode Full ("F") or delta ("D")
TIMEACTIVATE Time of activation
TIMEREAD Time required to read data from the database
TIMEFILL Time required for packing and indexing
TIMEOPTIMIZE Time for Prepare Optimize
TIMECOMMIT Time of Commit Optimize
REC_INSERTED Number of indexed records
SAP BW/4HANAAdministration PUBLIC 1297

Column Description
TSTPNM User
TIMESTMP Start time stamp
9.9.3 SAP HANA Smart Data Access
In SAP BW∕4HANA, SAP HANA Smart Data Access is used as the source for Open ODS views and SAP HANA DataSources, as well as for query access to data in SAP IQ as the cold store.
With SAP HANA Smart Data Access, data can be merged in heterogeneous EDW landscapes (data federation). SAP HANA Smart Data Access make it possible to access remote data, without having to replicate the data to the SAP HANA database beforehand. The following are supported as sources: SAP HANA, SAP IQ, Intel Distribution for Apache Hadoop. A list of all supported sources is provided in the SAP HANA Administration Guide. SAP HANA handles the data like local tables on the database. Automatic data type conversion makes it possible to map data types from databases connected via SAP HANA Smart Data Access to SAP HANA data types.
The following are example of activities that you can perform using SAP HANA Smart Data Access:
● Make other data warehouses transparent for the BW system's SAP BW∕4HANA database.● Consolidate your data warehouse landscape.● Consume SAP HANA data mart scenarios from a connected database.
When SAP HANA Smart Data Access is used for query access to data in SAP IQ as the cold store and as the source for Open ODS views and DataSources, it offers the following advantages:
● SAP HANA Smart Data Access optimizes execution of queries by moving processing as far as possible to the database connected via SAP HANA Smart Data Access. The SQL queries then work in SAP HANA on virtual tables. The SAP HANA Query Processor optimizes the queries and executes the relevant part in the connected database, returns the result to SAP HANA and completes the operation. If you connect and define facts and master data from the source via associations in the Open ODS view, facts and master data are joined directly at database level at query runtime, together with operations on the navigation attributes.
● For Open ODS views and DataSources, using SAP HANA Smart Data Access makes it possible to use data sources that are not managed by the SAP BW∕4HANA system. For Open ODS views, this provides the option of expanding modeling in the SAP BW∕4HANA system without significant effort, from direct consumption of the data source via the virtual table to using a persistent SAP BW∕4HANA data store for ETL purposes.
Prerequisites
To use SAP HANA Smart Data Access as the source type for Open ODS views and DataSources, or for query access to cold store data, the following prerequisites apply:
● You have installed the ODBC drivers for the databases that you want to connect with SAP HANA Smart Data Access.
1298 PUBLICSAP BW/4HANAAdministration

More Information: SAP Note 1868702● You have connected the databases SAP HANA Smart Data Access as remote sources.
More Information: SAP HANA Administration GuidePay particular attention here to which databases are supported in which versions for SAP HANA Smart Data Access.
● Note that the SAP HANA system authorization CREATE REMOTE SOURCE is required to create a remote source. If the remote source is not created with the SAP<SID> user but with a different database user instead, then this database user must assign the corresponding object authorizations to the SAP<SID> user (CREATE VIRTUAL TABLE and DROP).More Information: SAP HANASecurity Guide
● The remote data is accessed from the SAP BW∕4HANA system with the database user that is used for the connection of the SAP BW∕4HANA system to the SAP HANA database. When creating a remote source in SAP HANA, you specified a user for the connection to the source database. SAP HANA passes the SQL statements on to this user. Make sure that this user has sufficient authorizations in the relevant schemas and tables in the source database.More Information: SAP HANASecurity Guide
NoteTo generate the virtual table when creating Open ODS views or DataSources that use SAP HANA Smart Data Access, the SAP<SID> user requires object authorization CREATE VIRTUAL TABLE. This can result in the user who creates Open ODS views or DataSources creates using SAP HANA Smart Data Access (and the technical user in the SAP HANA remote source) being able to read data in the remote system that s/he should not actually be authorized to read.
To avoid this, we recommend creating the virtual tables manually with a suitable SAP HANA user for the required source objects. From the SAP BW∕4HANA system, you can then use connection type Local SAP HANA Database Schema to access the source, without the SAP<SID> user needing object authorization CREATE VIRTUAL TABLE.
Related Information
Open ODS View [page 154]Transferring Data with an SAP HANA Source System [page 249]Assigning a Remote Source to an Existing Near-Line Storage Connection for SAP IQ [page 1156]
9.9.3.1 Creating Database Statistics for Virtual Tables
Using the database statistics for virtual tables you can optimize the query performance for InfoProviders, which use SAP HANA Smart Data Access (SDA). In the process chain maintenance screen, you will find a process type that enables you to select or create a variant of the program RSSDA_CREATE_TABLE_STAT.
Virtual SAP HANA tables can be used with SAP HANA Smart Data Access. SAP BW∕4HANA Smart Data Access can be used in SAP HANA in various cases including:
● Accessing the remote data of a source database, which is configured as a remote source in SAP HANA, from Open ODS views.
SAP BW/4HANAAdministration PUBLIC 1299

● Query access to data in SAP IQ as a near-line storage solution.● DataSources of the SAP HANA source system.
SAP HANA should have access to database statistics for the virtual table, in order to create a suitable query execution plan. The number of records in the source table is the minimum that should be known to SAP HANA. Using the process type you can integrate the creation of database statistics for a virtual table into process chains.
Prerequisites
The creation of database statistics for virtual tables is supported for the following InfoProviders:
● Open ODS views, which use SAP HANA Smart Data Access to access data.● DataStore objects (advanced) - for which a data archiving process is defined for a SAP IQ near-line storage
- and which use SAP HANA Smart Data Access (SDA) to access data in SAP IQ near-line storage for reporting.
You have maintenance authorization for the relevant InfoProvider .
Procedure
1. You are in the Administration area in Data Warehousing Workbench. Choose Process Chains. The Process Chain Maintenance Planning View screen appears.
2. In the left-hand screen area of the required display component, navigate to the process chain where you want to integrate the creation of database statistics for an InfoProvider. Double-click the process chain to select it and change to edit mode. The system displays the process chain plan view on the right side of the screen.If you cannot find a suitable process chain, create a new one.
3. In the process category Other, choose the application process type Create database statistics for virtual tables.
4. Insert the application process type into the process chain by dragging it. The dialog box for inserting a process variant appears.
5. Select a process variant or create a new process variant. The process variant is a program variant of program RSSDA_CREATE_TABLE_STAT. When you create a new process variant, this screen appears: ABAP:Variant Initial Screen. Here you can perform the following actions:
1. Specify the technical name for the variant and choose Create.2. Either select an InfoProvider, which fulfills the above prerequisites, or specify a source system and a
SAP HANA DataSource.3. Select the statistics type.
You can find information on the SAP HANA statistics types for virtual tables in section Creating Statistics on Virtual Tables in the SAP HANA Administration Guide.
4. Enter a field name if you only want statistics to be created for one field. If you do not enter a field, statistics are created for all the fields in the virtual table.
1300 PUBLICSAP BW/4HANAAdministration

NoteThe creation of database statistics can produce a high workload for the source system, especially if large tables are involved. In order to avoid this, we recommend that you create simple statistics for a single field, which ideally has a low cardinality.
5. Configure the variant attributes, save the variant and go back to the dialog box for adding a process variant.
6. Select the process variant that you have just created and choose Next to add the process variant to the process chain.
7. Link the process to the required processes. Once you have configured the statistics creation (for example, for an InfoProvider with data archiving via near-line storage and SDA access), link the process variant in the chain to the data archiving process.
8. Save and activate your process chain.
9.9.4 Using DBA Cockpit with SAP HANA
Use
Using the DBA Cockpit, you can monitor and manage your SAP HANA database in the BW system.
More information: DBA Cockpit for SAP HANA
9.9.5 Tracing in the SAP HANA Database
Use
If errors occur in queries, or performance problems arise with the SAP HANA database, it can help to record system responses as traces. SAP support has tools to evaluate these traces. To record traces for query execution, use the Query Monitor (see Query Monitor [page 1044]). If you are using the SAP HANA database, the same parameters are relevant as when using any other database with a SAP Business Warehouse Accelerator. Therefore, you can use the same standard traces (for the SAP HANA database) as you use for a BWA. There are two other standard traces for BWA. If using the SAP HANA database, these traces can be created with the DBA Cockpit (see DBA Cockpit for SAP HANA).
Procedure
Tracing Queries in the Query Monitor (RSRT)
In the Query Monitor, you can execute and debug queries.
1. Select the query that you want to record a standard trace for.
SAP BW/4HANAAdministration PUBLIC 1301

2. Choose Execute + Debug. The Debug Options dialog box appears. The options are ordered in a hierarchy.
3. Choose SAP HANA/BWA SAP HANA/BWA Default Trace .If you set the flag for SAP HANA/BWA Default Trace, the system automatically activates all traces listed under this option. These record information about the query currently being executed.You also have the option of selecting just one trace type.
Trace Type Description
Python Trace The index server is traced. The system generates an executable Python program.
To find out the selections for a query for example, SAP support can reproduce a query (without recording the ABAP read interface).
Plan/Performance Trace A trace is recorded for the executing SAP HANA database component. The system generates an executable program.
To analyze the steps that the SAP HANA database performs, SAP support can reproduce a query (without recording the ABAP read interface).
Display
Once you have activated a trace type, the system displays the trace that the query was executed by. You can make changes to the trace file and save it locally.
Large trace files can cause runtime problems. You can therefore also save a trace file without displaying or changing it.
More Information
Statistics for Maintenance Processes in SAP HANA Indexes [page 1297]
9.10 Importing Client-Dependent Objects
Prerequisites
A user for background processes (BW background user) was created in the Implementation Guide (IMG) under SAP BW/4HANA Data Acquisition Create Use for Background Processes .
1302 PUBLICSAP BW/4HANAAdministration

For Web service DataSources: the background user has sufficient authorizations to be able to edit Web service DataSources (role template S_RS_WDS).
Context
The import postprocessing takes place in client 000. So that the objects can be correctly created or activated (and scheduled, if necessary) in the target client, an RFC logon with a change of user must be carried out in the target client. An RFC destination that is intended for this is required in the target system. This destination is used during the import postprocessing for the logon from client 000 into the target client.
In BW, there are objects whose processing is client-dependent.
● During the creation of Web service DataSources, client-dependent objects (ICF nodes) occur in the BW standard client.For Web service DataSources, a destination in the BW standard client is necessary.
● Process chains schedule background jobs that are client-dependent. You can also use the Editing Client attribute to mark individual process chains as client-dependent.As soon as the attribute is maintained, the chain can only be displayed, edited, activated, executed, and scheduled in the specified client. The attribute is transported with the process chain. During an import into a target system, you can modify the attribute by specifying another client as the target client into which the import should take place. If you do not specify a target client or import client here, in the target system the import is carried out into the client that has the same number as the client in the export system.
NoteProcess chains for which no processing client was defined must be imported into the BW standard client in order to schedule the background jobs in the BW standard client.
For process chains, an appropriate destination must be available in the relevant clients. This can be the BW standard client if no editing client has been specified for the process chain. It can also be the specified editing client for the process chain or the client that was specified during the import.
NoteThe destinations are also required during the transport of the deletion of the objects.
Procedure
● 1. In the Implementation Guide (IMG), choose SAP BW/4HANA Data Modeling Transport SettingsCreate Destination for Import Postprocessing (transaction RSTPRFC).
2. Select a target client.○ Select the BW standard client to transport of Web service DataSources and process chains
without specifying a client.○ For the transport of a client-dependent process chain, select the client that is specified in the
attribute of the process chain or was specified in the import.
SAP BW/4HANAAdministration PUBLIC 1303

3. Enter a description for the destination.4. Enter the background user and password.
The RFC call is executed with this user name when you perform postprocessing steps for the import. For the standard client, the BW background user is displayed.
NoteThe user entered there must have authorization profile S_BI-WHM_RFC.
5. Save your entries.
Results
The destination is created when you save your entries. It contains the name of the target client, a host of the same system, and a background user with authorization profile S_BI-WHM_RFC.
The destination of the BW standard client is entered in the RSADMINA table in the TPBWMANDTRFC field. The destinations of additional target clients are entered in the RSTPRFC table.
In the after-import or during the execution of the method, the specified RFC destination is called in the target system of the transport so that the objects are correctly created and activated in the respective target client.
More Information:
Handling the Target Client
Displaying the Process Chain Attributes [page 968]
9.11 Processing of Parallel Background Processes
Parallel processing of background processes in SAP BW∕4HANAis supported by the BW background management, and in some areas from the queued task manager. The use of the task queue enables a much lower resource consumption compared to conventional background processing
Related Information
Processing Parallel Background Processes with the Queued Task Manager [page 1305]Processing Parallel Background Processes using BW Background Management [page 1307]
1304 PUBLICSAP BW/4HANAAdministration

9.11.1 Processing Parallel Background Processes with the Queued Task Manager
Using task queues and ABAP push channels technology, parallel background processes can be efficiently processed. This procedure is already used for example, in process chains in streaming mode and by RSPM housekeeping. The task queue framework runs under the BW background user.
The functions of the queued task manager can be illustrated very well using a process chain in streaming mode.
If the process chain is executed in streaming mode, there is a flexible number of “worker” jobs that get the next process from a queue. If a second, third or further execution reaches the current process, the request to start this process once more is only written to the queue. No more resources are used, and the system does not wait. As soon as the current process is finished, the “worker” job gets all of these start requests for a given process and starts the process just once. The process chain framework takes the last chain execution in the queue and assigns the process execution to it. This means that the second and third chain execution are stopped, and the next chain execution continued.
The figure below shows the behavior during the execution in streaming mode:
In the figure, a new instance of the process is created every minute. If the first execution is still running and after one minute the second run starts, it is put in the task queue. Further executions (run 3) are put in the task queue for as long as a previous process execution is running. When the previous execution is finished, the system assigns the task queue framework an event using ABAP push channels and starts an execution (run 3). Execution 2 is omitted. This behavior is only possible for processes that can handle this and that can execute cumulative work consistently.
The use of the task queue enables a much lower resource consumption compared to conventional background processing.
If there is an error, you can check the tasks in a monitor (transaction ODQ_TQ_MONITOR), and, if necessary, reset the task by removing the chain from scheduling and then rescheduling it.
SAP BW/4HANAAdministration PUBLIC 1305

Related Information
Process Chains for Streaming [page 954]
9.11.1.1 Scheduling of Tasks in the Task Queue Framework for Execution of Process Chains with a Different User to the BW Background User
The task queue framework runs under the BW background user. If a process chain with a user other than the BW background user is executed, (process chain attribute Execution User), this can mean that a process processed by the task queue framework cannot be scheduled. For example, this is the case for program ODQ_TQ_CHECK_FRAMEWORK. This program reorganizes RSPM logs and is started automatically when data is activated in the DataStore object (advanced).
The execution user is not authorized to schedule a background job for a different user. So if a process chain has a different execution user than the BW background user, you must ensure that any tasks that the task queue framework processes can be scheduled. The following options are available for this purpose:
● If the task with the other user (execution user of the process chain) is to be executed, this user needs the authorization S_BTCH_NAM.
● You can use the BW transport RFC destination (destination for import post-processing) to enable the user to schedule tasks in task queue framework on the BW background user. To do this, you require 2549530with 2545859 as a prerequisite and a correct and suitably defined RFC destination.
NoteActually, the BW transport RFC destination defined in transaction RSTPRFC is used in import post-processing for logging on from client 000 to the BW standard client. It is therefore necessary that the connection in the target system of the transport is defined. If process chains have to be executed with a different user than the BW background user and the assignment of authorization S_BTCH_NAM to this user is not possible, you have to maintain transaction RSTPRFC and the associated RFC destination in all systems of your landscape (in the development system too).
Related Information
Importing Client-Dependent Objects [page 1302]
1306 PUBLICSAP BW/4HANAAdministration

9.11.2 Processing Parallel Background Processes using BW Background Management
Use
BW background management enables you to perform a variety of load and administration processes in parallel in SAP BW∕4HANA You can configure the maximum number of work processes for the supported processes. In parallel processing, additional work processes for processing processes are split off from the main work process. Parallel processes are usually executed in the background, even if the main process is executed in dialog. BW background management is instrumental in attaining a performance-optimized processing of processes. In addition to the degree of parallelization, you can specify the servers on which the processes are to run and with which priority (job class). BW background management thus supports an efficient distribution of the work processes in order to reduce the system load when processing the processes. Another advantage is that logs are created for monitoring processes. The settings for parallel processing are stored in tables RSBATCHPARALLEL and RSBATCHSERVER.
BW background management supports most of the load and administration processes in BW. Table RSBATCHDEBUGTYPE contains the process types processed by BW background management. Some of the process types listed here are process types of process chains (table RSPROCESSTYPES) and some are special process types of BW background management for which there is no process type for process chains. Not all of the process types of process chains are handled by background management.
There is one initial setting for parallel processing for each process type supported by BW background management. In BW background management, these initial settings are displayed for a process type as <BW Process> Without Process Chain Variant, for example Data Transfer Process Without Process Chain Variant. In the default setting, three parallel background work processes are set for the process types, and processing is divided among all the servers of the system.
You can change the initial setting for a process type in the BW background management. The initial setting for a process type is valid for a process of this type as long as this process has not maintained its own settings for parallelization. You can change the settings for parallel processing for a process in the relevant variant maintenance of the process chain maintenance. This overrides the initial setting of the process type for exactly this process. Only when the settings for parallel processing for a process are saved in the (variant) maintenance of the process can you display these settings in the BW background management and change them there in the central mass maintenance. The initial setting for a process type also appears here only if it has been changed or if settings in the (variant) maintenance of the process were saved for a process of this type.
You thus have the following options for setting parallel processing of processes:
● Change initial setting for a process type.Here you change the setting for a process type and thus for all processes of this type for which you did not make your own settings.
● Set parallel processing for a specific process in the (variant) maintenance of the process.Here you set parallel processing for a specific process if the setting differs from the setting for the process type.
● Set parallel processing for a process in the mass maintenance of BW background managementHere you can make the settings in a table overview for all the processes for which parallel processing settings were already saved in the (variant) maintenance of the process.
SAP BW/4HANAAdministration PUBLIC 1307

Prerequisites
Make sure that there are sufficient background processes (type BTC) available to process the BW processes in the system in parallel. More background work processes (approximately 50% more) are needed than without BW background management.
Procedure
Change initial setting for a BW process type
1. In the Data Warehousing Workbench choose Administration Housekeepnig Tasks Batch Manageror transaction RSBATCH.The screen BW Background Management, Logs and Tools appears.
2. On the tab Background and Parallel Processes in the group frame Settings for Parallel Processing, select a process type by choosing Select Process.
3. Choose Parameter Settings.The Settings for Parallel Processing dialog box appears.
4. Under Number of Processes, define the maximum number of work processes that should be used to process the BW process.If you enter 1, the process is processed serially.If you enter a number greater than 1, the process is processed in parallel.
NoteNote that a degree of parallelization (number of processes) greater than or equal to 2 means that further work processes are split off from the main process, which also monitors the work processes and distributes the work packages.
5. In the Parallel Processing group frame, make the relevant settings for parallel processing in the background:1. Enter a job class for defining the job priority.
The job priority defines how the jobs are distributed among the available background work processes.
NoteYou can define whether, and how many, background work processes for jobs of class A (high priority) should be reserved. In this case the reserved work processes are kept for class A jobs (high priority). Class B jobs (medium priority) obtain the other free work processes before class C jobs (low priority). If you do not reserve any work processes for class A jobs, first the class A jobs get the free work processes, then class B jobs, and finally class C jobs.
When defining the job class, consider in particular the effect of class A jobs on the use of background work processes.
2. To distribute the processing of the processes optimally to your system resources, under Server/Host/Group define the server(s) on which the work processes should be executed.
6. To write the settings to a transport request, choose Transport. The entries in tables RSBATCHPARALLEL and RSBATCHSERVER (for hosts and server groups) are written on a transport request of the Change and Transport System.
1308 PUBLICSAP BW/4HANAAdministration

7. Save your entries.
Set parallel processing for a specific BW process in the (variant) maintenance of the process
To overwrite the initial setting of the process type for a specific process:
1. Call the function for setting the parallel processes.You can call the function in the process variant maintenance of a process chain or in the process maintenance. The function call varies for the different processes. For example, in the data transfer process
you call the function with Miscellaneous Background Processing .The Settings for Parallel Processing dialog box appears.
2. Proceed as described above in steps 4 - 7.
Once you have saved the settings, this BW process is displayed in BW background management.
Set parallel processing for a BW process in the mass maintenance of BW background management
1. In the Data Warehousing Workbench choose Administration Housekeeping Tasks Batch Manageror transaction RSBATCH.The screen BW Background Management, Logs and Tools appears.
2. On the tab page Background and Parallel Processes, in the group frame Settings for Parallel Processing, choose Mass Maintenance of All Settings for Parallel Processing.The Maintain Parallel Processing Settings screen appears, in which all processes and their settings are displayed in a table, as well as the initial settings for the process types. This user interface gives you a good overview of multiple processes and simplifies the maintenance for multiple processes.
NoteWith Process Type Selection you can improve the clarity by restricting the display of the table to a selected process type.
3. In the corresponding columns, make the settings described above in steps 4 - 7 concerning the number of parallel work processes, the work process type, the servers to be used, and possibly the job priority. Save your entries.
Result
The BW processes are processed according to your settings. If there is no work process free on the assigned servers for a process with parallel processing, it is normally processed serially.
9.12 Data Protection Workbench for Replicated Data
Whenever personal data is blocked or deleted in an SAP source system, the replicated data in SAP BW∕4HANA must also be handled accordingly in order to meet data protection requirements. This involves the data being either depersonalized or deleted. SAP BW∕4HANA thus provides you with functions for selective deletion from the DataStore object and deletion of master data. Exchanging notifications between the operative system and SAP BW∕4HANA makes it possible to simplify the deletion of replicated data.
SAP BW/4HANAAdministration PUBLIC 1309

SAP Business Suite systems, SAP S/4HANA systems and SAP S/4HANA Cloud systems are examples of source systems that replicate data to SAP BW∕4HANA. Data that is blocked in these systems at the end of the usage purpose and deleted when the retention period expires, must also be deleted in SAP BW∕4HANA. The data protection apps Data Protection Notifications and Data Protection Worklists help data protection administrators to process replicated data like this from the source systems in SAP BW∕4HANA. The Data Protection Workbench in the Data Protection Worklists app provides a graphical environment for doing this. The data flows in question are displayed here, and can be processed in order to take account of data protection requirements. To do this, the source system must pass on information about blocking and deletion of personal data to SAP BW∕4HANA together with other information that makes it possible to identify the relevant persistence objects and data in SAP BW∕4HANA. In particular, the information in the source about blocks and deletions must be assigned to the relevant operational data providers that are used for the replication to the SAP BW∕4HANA system. This information can then be passed on to SAP BW∕4HANA in the form of data protection notifications . Source systems that can support sending these notifications are SAP Business Suite, SAP S/4HANA and SAP S/4HANA Cloud. For information about which versions are supported, see Supported SAP Source Systems below.
In SAP BW∕4HANA, the relevant notifications are displayed in the Data Protection Notifications app. Related data protection notifications can be grouped together here in a data protection worklist, for example in the case of notifications from a particular source system or operational data providers from a particular application. The Data Protection Worklists app provides you with an overview of the worklists in the system. For the operational data providers that belong to the notifications of a worklist, the data flows with the relevant persistent InfoProviders can be determined and processed in the Data Protection Workbench. The following applies for the determination of InfoProviders:
● On the basis of the notifications in, the staging data flow in SAP BW∕4HANA is identified by the DataSource along the InfoSources and the relevant InfoProviders (DataStore objects and InfoObjects). The Data Protection Workbench only displays persistent objects, as these are the only objects that it is possible (and relevant) to perform actions on.
● Supported InfoProviders are DataStore objects and InfoObjects for which a data transfer process has been defined with the InfoProvider as the target.
● The notifications contain the names of the operational data providers with which the data was loaded into the SAP BW∕4HANA system. The system only takes into account operational data provider for which there is an active data transfer process with the operational data provider as the source.
● The Data Protection Workbench supports data flows for DataSources from SAP source systems. Objects or data that do not have a BW repository (virtual objects) are not supported and are thus ignored during determination by the Data Protection Workbench. This applies for example to data that is accessed via SAP HANA views. Processing of data with the SAP HANA analysis process is also ignored. Similarly, CompositeProviders, Open ODS views, BAdI providers and queries are also ignored. For objects that store the personal data in a target provider, this data must be deleted manually by the administrator, using selective deletion for example.
Once you have determined the data flows for a worklist, you can perform activities at InfoProvider level in the Data Protection Workbench in order to delete the relevant data. Also at InfoProvider level, you can set a status to indicate that the required activities have been performed, and the relevant data has been deleted.
Once a worklist has been processed completely in the Data Protection Workbench, you can flag the entire worklist as processed.
1310 PUBLICSAP BW/4HANAAdministration

Supported SAP Source Systems
SAP Business Suite / SAP ERP 6.0 Enhancement Package 8 Support Package 12 or higherFor more information, see the application help for SAP ERP 6.0 enhancement package 8 SP12 or higher under:
● Deleting Personal Data in SAP BW/4HANA● Using ILM Notifications ● Configuring ILM Notifications
For information about which application areas support data protection notifications to SAP BW∕4HANA, see SAP Note 2748685 .
SAP S/4HANA 1909 FPS01 or higherFor more information, see the application help for SAP S/4HANA under:
● Deleting Personal Data in SAP BW/4HANA● ILM Notifications
For information about which application areas support data protection notifications to SAP BW∕4HANA, see SAP Note 2824456 .
SAP S/4HANA Cloud 2002 or higherFor more information, see the application help for SAP SAP S/4HANA Cloud 2002 or higher under:
● Deleting Personal Data in SAP BW/4HANA● ILM Notifications
9.12.1 Glossary
SAP BW/4HANAAdministration PUBLIC 1311

Term Definition
Data protection notification Notifications that are generated by the operational system and passed on to SAP BW∕4HANA whenever personal data (documents or master data) is archived or deleted.
Operational systems that can support sending these notifications are SAP Business Suite, SAP S/4HANA and SAP S/4HANA Cloud. If this is the case, ILM notifi-cations are generated by SAP Information Lifecycle Management (ILM) for ILM events, such as data archiving or data destruction for a particular business object instance. During extraction, BW-related information is added to these in a central, cross-application DataSource. From the point of view of SAP BW∕4HANA, these notifications are known as data protection notifications. The cross-application, central DataSource thus contains all information required in SAP BW∕4HANA, in order to also be able to react to blocks and deletions in the SAP Business Suite in the replicated data.
The following information is contained in a data protection notification:
● Source system● Operational data provider (for example, DataSource) used to transfer the
data to SAP BW∕4HANA● Data protection mode (archived or deleted for example)● Key of the application/master data object with the corresponding field
names (in JSON format)● Notification object (ILM object for example)● Data protection even that generated the notification● ID that globally identifies the data protection notification● Time stamp:
○ Time stamp of the block (UTC)○ Time stamp of the expiration date (UTC)○ Time stamp of the notification (UTC)
Data protection worklist Selection of data protection notifications that are to be processed together (deleted for example) in SAP BW∕4HANA in accordance with data protection rules.
A worklist comprises the following elements:
● A selection of data protection notifications replicated to SAP BW∕4HANA.● The relevant persistent InfoProviders for the operational data providers of
the selected DPP notifications. The InfoProviders are determined by means of the data flow in SAP BW∕4HANA.
● The logs of the actions executed on each InfoProvider, such as selective deletion or deletion of master data (determined by the user).
● Status information at InfoProvider level and worklist level (defined by the user).
1312 PUBLICSAP BW/4HANAAdministration

Term Definition
Data Protection Workbench Graphic environment in which you edit the relevant data flows in SAP BW∕4HANA for a selected data protection worklist.
The workbench determines the relevant persistent InfoProviders (DataStore objects and InfoObjects) in SAP BW∕4HANA based on the data protection notifica-tions in the worklist. For this purpose, the SAP BW∕4HANA data flows for the operational data providers or DataSources that belong to the notifications in the worklist are determined. The system only takes into account operational data providers for which there is an active data transfer process with the operational data provider as the source. An InfoProvider is considered relevant in terms of data protection if a data transfer process has been defined with this InfoProvider as the target. The objects that are relevant for data protection activities in the data flows are displayed in a graphical overview in the Data Protection Workbench. At InfoProvider level, you can perform various activities in order to delete the relevant data and to document the deletion.
9.12.2 Creating and Processing a Data Protection Worklist
You can create a worklist for selected data protection notification. For the operational data providers that belong to the worklist, the data flows with the relevant persistent InfoProviders are then determined in the Data Protection Workbench. You can then perform various activities at InfoProvider level to delete the relevant data. You can document the processing of the InfoProviders and the worklist by setting a status.
Prerequisites
● The required technical content for storing notifications has been activated. This is done in task list SAP_BW4_ACTIVATE_DPP_WORKBENCH in transaction STC01. More Information: Technical Content for the Data Protection Workbench [page 1318]
● The SAP BW∕4HANA Cockpit has been configured. More Information: Configuring the SAP BW∕4HANA Cockpit [page 924]
● After creation of the data protection notifications in the SAP source system, they have been loaded from there (for SAP Business Suite, SAP S/4HANA and SAP S/4HANA Cloud with an ILM job).
NoteNote that a number of Customizing activities are required in the SAP source system so that data protection notifications can be transferred to SAP BW∕4HANA.
You can do this using process chain 0DPP_LOAD_NOTIF, which is delivered with the technical content, or with a process chain of your own. Note that the chain delivered with the content does not start automatically after activation and scheduling. More Information: Technical Content for the Data Protection Workbench [page 1318]
● To be able to work with the Data Protection Workbench, you need authorization object S_RS_DPPWL.
SAP BW/4HANAAdministration PUBLIC 1313

Procedure
1. Open the Data Protection Notifications app in the SAP BW∕4HANA Cockpit.2. Use the arrow icon in the header area of the app to open the filter area, and use the filters accordingly to
select the data protection notifications that you want to process from the list.
The app now only displays relevant notifications that are still not assigned to a worklist and whose blocking date has already passed. Relevant notifications are ones for active DataSources for which there is a data transfer process.
TipAn example of a meaningful selection of notifications for a worklist would be filtering to particular operational data providers.
3. Create a data protection worklist for the notifications. The toolbar at the bottom of the screen provides you with the following options:
Option Description
Create Worklist Creates the worklist for the notifications selected in the list.
NoteNote that the function for selecting all notifications only applies to the notifications currently visible in the scroll area.
Create Worklist from Filter Creates the worklist for all notifications that meet the filter conditions. You do not have to select the notifications manually. The system also adds notifications that are not visible in the scrollbar to the worklist.
The Data Protection Worklists app opens. This provides you with an overview of all worklists.
4. To open the Data Protection Workbench for the worklist you have just created, click on the worklist.
When you open a worklist for the first time, the system determines the data flows for the operational data providers of the notifications contained in the worklist. The data flows contain the DataSources and the relevant persistent InfoProviders in SAP BW∕4HANA (DataStore objects and InfoObjects). In a graphical display starting from the operational data providers, the system shows the data flows with the DataSources and persistent InfoProviders as nodes.
NoteIf a data flow contained in a worklist changes during processing, for example because transformations have been changed, or another InfoProvider has been connected, you can choose Rebuild Data Flow in the Data Protection Workbench in order to adjust the data flow there and to take account of the changes in your activities. Note that all logs and key determinations for this worklist in the Workbench are then lost.
5. You can now perform various activities for an InfoProvider. Which ones can be performed depends on the type of InfoProvider. Click on the node for an InfoProvider and choose (Activities) to call up the activities supported for this InfoProvider.
1314 PUBLICSAP BW/4HANAAdministration

a. To translate the key information from the notifications into the format of the InfoProvider, in other words from the format of the source to the format of the target, choose Determine Key.
During key determination, the transformations defined in the data flow are applied 1:1.
Note○ The keys for an InfoProvider are determined from the keys of the InfoProvider before it in the
data flow. It is therefore necessary to execute the key determination along the data flow.○ If a notification contains more than one key field, and one of these fields is not mapped to the
target in the transformation (aggregation), no key determination takes place, and you see an error message to this effect in the log.
○ Key determination is only supported for the conversion exit alpha. If a target field used any other conversion exit, no keys can be determined.
○ If you perform key determination for InfoProviders whose transformations have start or end routines, the routines are ignored. A system message informs you that you should only proceed with key determination if you are certain that the routine does not modify the values of the key fields. Key determination is only performed if and when you confirm this message.
You can now use the new BAdI implementation RSDPP_KEY_MAPPER_TRFN_EXT to influence key determination.
ExampleYou want to add an additional key field to the key determination.
b. To display the keys determined for the InfoProvider, choose Display Keys.c. Perform the deletion(s) for the InfoProvider. Which options are available in the Data Protection
Workbench depends on the type of the InfoProvider.
More Information: Using the Data Protection Workbench to Delete Data [page 1316]d. To document that you have performed all data protection-related activities for the InfoProvider, choose
Mark as Completed.
In the same way, you can open an InfoProvider for processing again, thereby reversing the manually set status.
6. To call logs for actions performed on the InfoProvider (for example key determination and deletion), click on the InfoProvider’s node and choose (Display Logs).
The logs are displayed in a dialog box. You can call Detailed Logs for the deletions here. For deletion of master data, this calls the application log.
7. From the worklist overview, you can call an overview of all logs for any worklist. You can also call logs from here for actions performed on the InfoProviders in the worklist, and navigate to more detailed logs.
8. Once you have processed and completed all InfoProviders in the data flows of a worklist, set the status of the worklist to Completed.○ In the Data Protection Workbench for the worklist, you do this by pressing the Mark as Complete
button.○ In the worklist overview, you do this by pressing the Mark as Complete button for the selected worklist.
As is the case with completed InfoProviders, you can also set completed worklists back to “In Processing”.
SAP BW/4HANAAdministration PUBLIC 1315

Related Information
Enhanced Key Determination for Data Flows [page 1316]
9.12.2.1 Enhanced Key Determination for Data Flows
BAdI RSDPP_KEY_MAPPER_TRFN_EXT (Enhancement Spot RSDPP_KEY_MAPPER) provides you with the option of enhancing the key at package or data record level.
When you process notifications in the Data Protection Workbench, the main step before changing the data in the data target (for example before selective or master data deletion) is to map the keys of the predecessor data target to the current one.
The BAdI implementation RSDPP_KEY_MAPPER_TRFN_EXT allows you to specifically influence key determination for all relevant transformations.
ExampleYou want to add an additional key field to the key determination.
You can also discard data records.
TipYou require the authorization to edit BAdI implementations.
9.12.3 Using the Data Protection Workbench to Delete Data
Whether you are able to use the Data Protection Workbench to delete data, and which options are available to you there, depends on the InfoProvider. The delete functions are available in the Data Protection Workbench in the actions menu for the InfoProvider.
DataStore Object
Selective DeletionIn the actions menu for the InfoProvider, choose Perform Selective Deletion in order to delete the data.
More Information: Managing DataStore Objects [page 1199]
Selective deletion with propagationIf the DataStore object has a change log, the Perform Selective Deletion with Propagation option is available as a separate action.
1316 PUBLICSAP BW/4HANAAdministration

If you use the Perform Selective Deletion with Propagation function, the deletion is passed on from the original InfoProvider to all other InfoProviders that receive data with data transfer processes from the original InfoProvider. The propagation occurs as part of the normal runs of these data transfer processes, meaning that the deletion records will be updated to the connected InfoProviders next time data is loaded from the object. In the Data Protection Workbench, you can then set the status Completed Successfully for all InfoProviders downstream of the InfoProvider that you performed selective deletion for..
NoteNote for Aggregated Target InfoProviders
In certain cases, the propagation is undesired: If some of the InfoProviders that receive data are aggregated for example, and the data in these InfoProviders can therefore be regarded as non-personal, deleting with propagation means that the key figures in these InfoProviders can be changed regardless. If this change of values in aggregated InfoProviders is not desired, we recommend performing selective deletion without propagation for the individual InfoProviders .
Dependencies Between Transaction Data and Master Data Deletion
Also take note of the dependencies between transaction data and master data deletion during selective deletion: During selective deletion with propagation, deletion entries are written in the InfoProvider's change log, so that the deletion is updated to the subsequent InfoProviders. These deletion entries are found in the where-used list during master data deletion, thus preventing deletion of the corresponding master data. If transaction data and master data is to be deleted in the context of data protection activities, transaction data deletion with update (and the data transfer process run that forces this update) must be followed by deletion of the DataStore object’s change log in such a way that no more problematic master data usages remain. If the change logs are automatically deleted at regular intervals using process type Clean up old requests from the DataStore object (advanced), this problem can be easily solved by performing master data deletions at a suitable distance of time from the transaction data deletions.
More Information:
● Managing DataStore Objects [page 1199]● Cleaning Up Requests Using Process Chains [page 1203]
InfoObject
In the actions menu for the InfoObject, choose Delete Master Data in order to delete the data.
Note that master data can only be deleted if it is not used in other objects. To avoid this, first delete the records with the used keys from the DataStore objects. If the log for the master data deletion then displays continued usages, you have to manually delete the master data from the objects for these usages. You can find details about this in the log.
More Information: Deleting Master Data for a Characteristic [page 407]
SAP BW/4HANAAdministration PUBLIC 1317

Staging DataStore Object with Inbound Queue Only
1. In the action menu for the InfoProvider, choose Perform Selective Delete.In the default setting, staging DataStore objects with the property Inbound Queue Only do not support selective deletion, since this can result in inconsistencies if the filter conditions for deletion were defined on a non-key field.
2. If you are certain that selective deletion will not result in inconsistencies, you can force deletion. To do this, press the Delete button in the Selective Deletion dialog box.
CautionBefore deleting data selectively from a staging DataStore object with the property Inbound Queue Only, note the information provided in the dialog box if you press Details, together with the following information: Force Deletion [page 1201].
3. If you are not able to categorically rule out the possibility of the deletion resulting in inconsistencies, we recommend deleting the data using process type Clean up old requests from the DataStore object (advanced) instead. The process can be scheduled periodically using a process chain.More Information: Cleaning Up Requests Using Process Chains [page 1203]
9.12.4 Technical Content for the Data Protection Workbench
If you want to use the Data Protection Workbench to depersonalize or delete replicated data, certain technical content objects must be activated. You activate these objects in task list SAP_BW4_ACTIVATE_DPP_WORKBENCH in transaction STC01.
If you are using SAP Business Suite or SAP S/4HANA as the source system to transfer data protection notifications for DataSources (extractors), you need the following technical content objects in order to work with the Data Protection Workbench:
Object Type Object Name and Description More Information
DataSource 0DPP_GEN_NOTIF - Data Protection: Generic Notifications to BW
Returns the data protection notifica-tions from SAP Business Suite or from SAP S/4HANA, together with required in SAP BW∕4HANA so that it is possible to also react to blocks and deletions in the source in the replicated data.
NoteWhen executing the task list, select the source system(s) (of type ODP - SAP (Extractors)) that you want the DataSource to be activated for.
1318 PUBLICSAP BW/4HANAAdministration

Object Type Object Name and Description More Information
DataStore Object 0DPPNOT_I - Data Protection Notifications (All)
Contains data protection notifications for DataSources that are active in the corresponding source.
DataStore Object 0DPPNOT_R- Data Protection Notifications (Relevant for BW)
Contains data protection notifications for active DataSources for which there is a data transfer process.
Process Chain 0DPP_LOAD_NOTIF - Data Protection: Load Notifications
Contains the processes for loading the data protection notifications.
NoteNote that the scheduling option in the start process of the standard process chain is configured in such a way that the chain does not start automatically after copying from the content and scheduling. Only set the scheduling option in such a way that the chain starts once the job for creating the data protection notifications has run before you schedule or start the chain.
SAP BW/4HANAAdministration PUBLIC 1319

If you are using SAP S/4HANA Cloud or SAP S/4HANA as the source system to transfer data protection notifications for ABAP CDS views, you need the following technical content objects in order to work with the Data Protection Workbench :
Object Type Object Name and Description More Information
DataSource 0I_ILMDATAPRIVACYNOTIFICATION - Data Protection Notifications
Returns the data protection notifica-tions from the SAP S/4HANA Cloud, together with information that is required in SAP BW∕4HANA so that it is possible to react to blocks and deletions in the source in the replicated data as well.
SAP S/4HANA Cloud provides the ABAP CDS view I_ILMDataPrivacyNotification for extracting notifications.
NoteWhen executing the task list, select the source system(s) (of type ODP - ABAP CDS Views) that you want the DataSource to be activated for.
DataStore Object DPPNOT_C - Data Privacy Notifications Contains data protection notifications for ABAP CDS views in the format of CDS view I_ILMDataPrivacyNotification.
Siehe auch Housekeeping for Objects in the Data Protection Workbench [page 1321].
DataStore Object 0DPPNOT_R- Data Protection Notifications (Relevant for BW)
Contains data protection notifications for active DataSources for which there is a data transfer process.
In the transformation of DPPNOT_C to 0DPPNOT_R, the data is transformed from the format of the CDS view to the format that the Data Protection Workbench is based on.
1320 PUBLICSAP BW/4HANAAdministration

Object Type Object Name and Description More Information
Process Chain 0DPP_LOAD_NOTIF_CDS - Data Protection: Load Notifications from CDS View
Contains the processes for loading the data protection notifications.
NoteNote that the scheduling option in the start process of the standard process chain is configured in such a way that the chain does not start automatically after copying from the content and scheduling. Only set the scheduling option in such a way that the chain starts once the job for creating the data protection notifications has run before you schedule or start the chain.
9.12.4.1 Housekeeping for Objects in the Data Protection Workbench
You can remove notifications from the active table of DataStore object 0DPPNOT_R and workbench log entries at worklist level.
Data protection notifications are stored in the active table of DataStore object 0DPPNOT_R. After these notifications have been processed using worklists, the entries remain in the active table. The Data Protection Workbench log tables also grow over time. Most entries are only required for audits however. The increasing number of notifications and log entries slows down selection of unprocessed notifications and processing of worklists.
When you execute housekeeping for a worklist, the selected notifications are selectively deleted, and the relevant log entries are copied to the housekeeping tables in Data Protection Workbench. If the change log of DataStore object 0DPPNOT_R has not been cleaned up, the notifications are still available from the change log.
Report RSDPP_HOUSEKEEPING makes it possible to perform and to monitor the housekeeping processes. You can also display the worklists that you have performed housekeeping for.
TipYou require the authorization to delete worklists (authorization object S_RS_DPPWL), and to delete data from DataStore object 0DPPNOT_R.
SAP BW/4HANAAdministration PUBLIC 1321

9.13 Housekeeping
Housekeeping is a service in Process and Request Status Management (RSPM). It ensures that processes are processed in a given sequence. Housekeeping can be used to reduce the number of table entries in RSPM.
Concept
Housekeeping removes requests and processes from the main tables in RSPM and copies them to RSPMHK* tables.
A request can be removed by housekeeping if it no longer physically exists as a separate entity. For load requests (DTPs), this is the case if they have been activated. For change log requests, this is the case if the data records of the requests have been removed.
Housekeeping can be performed for DataStore objects, InfoObjects, and open hub destinations.
Additional Conditions
For every object, specific conditions apply for moving requests by housekeeping:
1. For staging DataStore objects with the property Inbound Queue Only, the following applies: Housekeeping is possible if the request has been propagated by all retrieving delta DTPs, and the records of this request have been deleted. If archiving by request is selected, housekeeping is not possible.
2. For DataStore objects with activation, the following applies: Housekeeping is possible if the request has been propagated by all retrieving delta DTPs. The request must be activated.
3. For standard DataStore objects or InfoObjects with enhanced master update, the following applies: Housekeeping is possible for both the load requests and the activation requests as long as the requests are activated. The corresponding change log requests must be propagated by all retrieving delta DTPs. The change log requests and their records must have been deleted.
4. For DataStore objects with direct update and open hub destinations (with the exception of open hub destinations with the destination database table and a technical key, see Selecting Database Tables as Destinations [page 1334]) the following applies: Housekeeping is always possible. This also includes InfoObjects without enhanced master data update.
5. All deleted requests are removed by housekeeping. Source request lists of successfully executed full DTPs are also removed from the corresponding administration table.
Related Information
Process Variant for Housekeeping [page 1322]
9.13.1 Process Variant for Housekeeping
You can define a process variant for housekeeping and add it to a process chain.
Concept
1322 PUBLICSAP BW/4HANAAdministration

You can only perform housekeeping for one object at any one time.
The advantage of the process variant is that the system can perform housekeeping for all required objects: If necessary, the system pauses execution of the process variant until no other housekeeping processes are running.
Specification of the Process Variant
A process variant is a special attribute of the parameter of a process type. You explicitly assign a name to this attribute. You define the process variant for housekeeping by defining which objects and which requests are to be cleaned up. You do this with the following parameters:
● The object type (either DataStore object, InfoObject, or open hub destination)● The area of the objects (list of objects starting with...): A request is cleaned up if it is older than the
"number of days". The last process that contained this request must also be older.● The number of days (older than ...)
CautionSpecific conditions also apply for each object (DataStore object, InfoObject, or open hub destination). The objects in question can only be moved by housekeeping if these conditions are met.
Related Information
Housekeeping [page 1322]
SAP BW/4HANAAdministration PUBLIC 1323

10 Interfaces
SAP BW∕4HANA provides an open architecture in many areas: You can extract data from various systems into a SAP BW∕4HANA system and evaluate this data for your reporting using various front-end tools.
The following section provides you with information about the interfaces in SAP BW∕4HANA. This includes a quick reference to provide you with an overview of the interfaces, as well as detailed descriptions of the interfaces for data warehousing and analysis. There is also an overview of the Web services and ICF services delivered with SAP BW∕4HANA.
Related Information
Interface Overview [page 1324]Interfaces for Data Warehousing [page 1325]Interfaces for Analysis [page 1353]Web Services and ICF Services [page 1364]
10.1 Interface Overview
This overview of the various interfaces in SAP BW∕4HANA shows the main properties and can therefore help you with decision-making.
Interface Service:
Read
Write
Display *
Programming Language
Support for Mass Data
Background/
Dialog
Type Prerequisites
File Interface W ABAP X D/B Tool DataSource/InfoProvider
APIs for Master Data
R/W ABAP - H API Master Data
APIs for Hierarchies
R/W ABAP - H Programming Master Data
1324 PUBLICSAP BW/4HANA
Interfaces

APIs for DataStore Objects (advanced)
W ABAP X D/B Programming InfoProvider
APIs for Data Tiering Optimization
W ABAP Programming InfoProvider
Open Hub Destination
R - X H Tool InfoProvider
OLE DB for OLAP
R Various - D Programming Query/InfoProvider
OLAP BAPI R ABAP - D Programming Query/InfoProvider
XML for Analysis
R XML - D Programming/API
Query/InfoProvider
OData Query R Open Data Protocol
- H Programming/API
Query
* READ returns data that can be processed further. DISPLAY returns data that is for display only.
You can find a detailed description of the interfaces in the following section.
CautionIf you extract data from your system into non-SAP systems, you need to have this scenario certified. This is required irrespective of the tool you are using for the extraction (whether you are using an open hub destination, list output (LISTCUBE), APIs, or download to Microsoft Excel).
Related Information
Interfaces for Data Warehousing [page 1325]Interfaces for Analysis [page 1353]
10.2 Interfaces for Data Warehousing
SAP BW/4HANAInterfaces PUBLIC 1325

10.2.1 APIs for Master Data
Use
For master data InfoObjects, APIs are available that enable you to write, read, change, and delete data in the master data.
API Use
RSDMD_API_ATTRIBUTES_UPDATE Writes attributes using a fixed transfer structure
RSDMD_API_TEXTS_UPDATE Writes texts using a fixed transfer structure
RSDMD_API_XXL_ATTR_UPDATE Writes XXL attributes using a fixed transfer structure
RSDMD_API_DELETE Deletes master data
Interface Properties:
● Write and read interface● Programming language is ABAP● Mass data is not supported● Execution in the dialog● Programming knowledge is required● An InfoObject with master data is a prerequisite
More Information:
The APIs are described in the function module documentation
10.2.2 APIs for Hierarchies
Use
For InfoObjects, APIs are available that enable you to write, read, change, and delete hierarchies.
API Use
RSDMD_API_HI_HEADER_GET_ALL Read all hierarchy headers entries for an InfoObject
RSDMD_API_HI_STRUCTURE_GET Read a hierarchy from the SAP BW∕4HANA hierarchy storage
RSDMD_API_HI_STRUCTURE_UPDATE Update a hierarchy to the SAP BW∕4HANA hierarchy storage
RSDMD_API_HI_ACTIVATE Activate a hierarchy.
1326 PUBLICSAP BW/4HANA
Interfaces

RSDMD_API_HI_DELETE Delete a hierarchy.
RSDMD_API_HI_SUBTREE_DELETE Delete a subtree of a hierarchy.
RSDMD_API_HI_BW_NODENMCREATE Convert a node name to the internally compiled format.
RSDMD_API_HI_EX_NODENMCREATE Convert the internally compiled node name into the external format.
RSDMD_API_HI_NODENAME_CREATE Create a node name
Interface Properties:
● Write and read interface● Programming language is ABAP● Mass data is not supported● Execution in the dialog● Programming knowledge is required● An InfoObject with hierarchies is a prerequisite
More Information:
The APIs are described in the function module documentation in the SAP BW∕4HANA system.
10.2.3 Automated Moving of Data to Other Memory Areas
You can use APIs for Data Tiering optimization to implement automated temperature adjustments.
A typical use case is a temperature adjustment by ABAP program to certain objects and partitions using API RSO_ADSO_DTO_API_SET_TEMPS. This ABAP program can then be combined by process chain with the actual execution of the temperature change using process type DTO Adjustment.
APIs RSO_ADSO_DTO_API_GET_INFO (read temperatures) and RSO_ADSO_DTO_API_EXECUTE (executing temperature changes) can be used for more extensive automation. Normally however, only the central RSO_ADSO_DTO_API_SET_TEMPS API should be used.
APIs for Defining Temperature
API Description
RSO_ADSO_DTO_API_GET_INFO Reads the partition temperatures of a specific DataStore object (advanced)
RSO_ADSO_DTO_API_GET_TEMPS Changes the partition temperatures
RSO_ADSO_DTO_API_EXECUTE Executes the DTO job
SAP BW/4HANAInterfaces PUBLIC 1327

10.2.4 Open Hub Destination
Use
The open hub destination allows you to distribute data from a SAP BW∕4HANA system to non-SAP data marts, analytical applications, and other applications. It allows you to ensure controlled distribution across several systems.
Interface Properties:
● Read interface● Programming language is ABAP● Mass data is supported● Execution in background● No programming knowledge required
More information: Using the Open Hub Destination to Distribute Data from the SAP BW∕4HANA System [page 1332]
See also: Open Hub Destination APIs [page 1328]
10.2.5 Open Hub Destination APIs
You can use the open hub destination to extract data to non-SAP systems. Various APIs allow you to connect a third-party tool (such as Ascential) to the SAP BW∕4HANA system and to distribute the data to other non-SAP systems.
API Use
RSB_API_OHS_ETL_NOTIFY This API sends a message to the third-party tool after extraction. It transfers the open hub destination, the request ID, the name of the database table, the number of extracted data records and the time stamp. You have to implement this module in the target destination with exactly the same name and interface. Once transferal has been confirmed, the DTP is continued.
RSB_API_OHS_ETL_SETSTATUS This API sets the status of the extraction to the third-party tool in the open hub monitor. Red means that the existing table is not overwritten. If the status is green, the request is processed further. The message appears in the DTP log.
RSB_API_OHS_ETL_READ_DATA This API enables you to use RFC to read the data from the destination table if the destination type and connection type have been set to Database Table and No Connection (Local Database) respectively.
1328 PUBLICSAP BW/4HANA
Interfaces

Interface Properties:
● Read interface● Programming language is ABAP● Mass data is supported● Execution in background● Programming knowledge is required● Data must be in an InfoProvider
10.2.6 Distributing Data to Other Systems
As well as data staging and data processing, the data warehousing capabilities in SAP BW∕4HANA also offer processes for distributing data.
You can distribute data both within the SAP BW∕4HANA system and to other systems. In the latter case, the SAP BW∕4HANA system is the source, or hub, of the data transfer.
To exchange data between SAP BW∕4HANA systems, you can use the ODP source system.
To exchange data and extract it to other SAP systems and to external systems and applications, you can use the following tools:
● Open Hub Destination● ODP-based data exchange via OData● Generating SAP HANA Views from the SAP BW∕4HANA System
Related Information
Transferring Data from SAP BW or SAP BW/4HANA Systems via ODP (InfoProviders, Export DataSources) [page 272]Extracting Data from the SAP BW∕4HANA System [page 1332]Generating SAP HANA Views from the SAP BW∕4HANA System [page 226]
10.2.6.1 Transferring Data from SAP BW or SAP BW/4HANA Systems via ODP (InfoProviders, Export DataSources)
The Operational Data Provisioning framework allows you to make use of the ODP source system to use the same technology for a data mart scenario between SAP BW or SAP BW/4HANA systems and SAP BW∕4HANA as you would for providing other SAP source data for the SAP BW∕4HANA.
The sending system is referred to as the source BW system or source SAP BW∕4HANA system, while the receiving system is referred to as the target system. The availability of InfoProviders or generated export DataSources for InfoProviders as the providers of the operational delta queue and of ODP context BW in the
SAP BW/4HANAInterfaces PUBLIC 1329

source make it possible to make InfoProviders of the source in the target as operational data providers available for the data transfer.
It is important to distinguish between two implementations of ODP context BW in the source:
Availabilty of ODP Context BW in Source Releases as of SAP NetWeaver 7.4 SPS 05 or SAP BW∕4HANA 1.0
Prerequisites
● The source BW system has Release SAP NetWeaver 7.4 SPS 05 or higher. SAP BW∕4HANA systems are generally supported as sources.
● The target BW system or SAP BW∕4HANA system has one of the following releases or higher:○ SAP NetWeaver 7.3 SPS 08 and SAP Note1780912○ SAP NetWeaver 7.3 EhP1 SPS 05 and SAP Note1780912○ SAP NetWeaver 7.4 SPS 05○ SAP NetWeaver 7.5○ SAP BW∕4HANA 1.0
Supported InfoProviders
For source BW systems:
● DataStore objects (advanced) and (classic) (with delta extraction)● CompositeProvider - object type HCPR (full-extraction) Release SAP NetWeaver 7.5 or higher● InfoCubes (with delta extraction)● Semantically partitioned objects● HybridProviders● MultiProviders● InfoSets● InfoObjects
○ Master data○ Texts○ Hierarchies
● Query as InfoProvider
Für source SAP BW∕4HANA systems:
● DataStore objects (advanced) (with delta extraction)● CompositeProvider - Object type HCPR (full extraction)● InfoObjects
○ Master data○ Texts○ Hierarchies
● Query as InfoProvider
1330 PUBLICSAP BW/4HANA
Interfaces

Availabilty of ODP Context BW in Source Releases SAP NetWeaver 7.0 to SAP NetWeaver 7.3 EhP 1
Prerequisites● The source BW system has one of the following releases or higher:
○ SAP BW 7.0 SPS 36○ SAP BW 7.0 EhP1 SPS19○ SAP BW 7.0 EhP2 SPS19○ SAP BW 7.3 SPS 17○ SAP BW 7.3 EhP1 SPS 20
NoteSee SAP Notes 2403202 - ODP API v1.5 and 2404671 - ODQ Queue Model for BW DataMart.
● The target BW system or target SAP BW∕4HANA system has one of the following releases or higher:○ SAP NetWeaver 7.5 SPS 07○ SAP BW∕4HANA 1.0 SPS 03
NoteSee SAP Note 2404673 - ODP API v1.5 in BW DataSource.
Supported InfoProvidersSupports export DataSources (8*) generated for InfoProviders in the supported source BW systems. For export-DataSources generated for DataStore objects or InfoCubes, delta extraction is also supported. Note that hierarchy extraction is only possible as of source Release SAP NetWeaver 7.4 SPS05 or with SAP BW∕4HANA (see Availability of ODP Context BW in Source Releases as of SAP NetWeaver 7.4 SPS 05 or SAP BW∕4HANA 1.0).
Procedure
To set up the data mart scenario, perform the following steps in the target system:
1. Create an ODP source system for the source BW or source SAP BW∕4HANAwith ODP context BW.2. In the DataSource tree for the ODP source system, create the DataSource for the InfoProvider of the
source BW or source SAP BW∕4HANA. You have two options:○ You can replicate the operational data provider from the source BW or source SAP BW∕4HANA to the
target system as a DataSource.○ You can create the DataSource.
SAP BW/4HANAInterfaces PUBLIC 1331

Authorizations
During extraction from a SAP BW or SAP BW∕4HANA system, the data authorizations for the InfoProviders are checked. For more information, see SAP Note 2425281 .
Related Information
Creating DataSources for ODP Source Systems [page 326]
10.2.6.2 Extracting Data from the SAP BW∕4HANA System
You can distribute data from the SAP BW∕4HANA system to other non-SAP systems.
The following functions, which are suitable for extracting mass data, are available:
● Open hub destination○ With a Selecting Database Tables as Destinations [page 1334]○ With a Selecting Files as Destinations [page 1337]
● ODP-based data extraction via ODataMore Information: ODP-Based Data Extraction via OData [page 1339]
10.2.6.2.1 Using the Open Hub Destination to Distribute Data from the SAP BW∕4HANA System
The open hub destination allows you to distribute data from a SAP BW∕4HANA system to non-SAP data marts, analytical applications, and other applications. It allows you to ensure controlled distribution across several systems.
Prerequisites
You have already loaded data into an InfoProvider or DataSource.
Context
The open hub destination defines the target that the data is relayed to. Any objects supported by the data transfer process can be used as open hub data sources.
1332 PUBLICSAP BW/4HANA
Interfaces

Database tables and flat files can serve as open hub destinations. The database table can be located in SAP BW∕4HANA or in another database system that is supported by SAP NetWeaver. The data can be extracted from the database to a downstream system.
Procedure
1. Creating Open Hub Destinations
Create an open hub destination with the required target.2. Creating Transformations
Create a transformation for your open hub destination. Note that not all rule types are available in the transformation for an open hub destination. Master data reading, time conversion, currency translation and unit conversion are not available. If certain prerequisites are met, execution in SAP HANA is supported.
3. Creating a Data Transfer Process
Create a data transfer process for your open hub destination.
10.2.6.2.1.1 Creating Open Hub Destinations
The open hub destination defines the target that the data is relayed to.
Procedure
1. You are in the BW Modeling tools. In the context menu for your BW project, choose New Open Hub Destination .
You can also create open hub destinations from the data flow. To do this, go the BW Object Types in the editing screen for your data flow, select the type Open Hub Destination and drag it to Details. Then open the context menu for this open hub destination and choose Create Persistent BW Object.
Whenever you create an open hub destination, you are guided through the process by a wizard. More information: Creating an Open Hub Destination Using the Wizard [page 1334]
2. On the General tab, you can change the open hub destination type again if required. The other settings that you can make on this tab depend on this.○ Selecting Database Tables as Destinations [page 1334]○ Selecting Files as Destinations [page 1337]
3. Edit the field list on the Details tab. More information: Edit Fields [page 1338]4. Activate the open hub destination.
SAP BW/4HANAInterfaces PUBLIC 1333

10.2.6.2.1.1.1 Creating an Open Hub Destination Using the Wizard
Whenever you create an open hub destination, you are guided through the process by a wizard.
Context
Procedure
1. 1. You are in the BW Modeling tools. In the context menu for your BW project, choose New Open Hub Destination .
You can also create open hub destinations from the data flow. To do this, go the BW Object Types in the editing screen for your data flow, select the type Open Hub Destination and drag it to Details. Then open the context menu for this open hub destination and choose Create Persistent BW Object.
2. Select an InfoArea. To ensure that you can find your open hub destination again without difficulty, we recommend setting the Add to Favorites flag.
3. Enter a technical name and a description. We recommend using the object that you want to update data to the open hub destination from as the template.
4. Select the required open hub destination type.5. When you have finished making your settings, choose Finish. The editor appears.
10.2.6.2.1.2 Selecting Database Tables as Destinations
You can write data from the BW system to a database table via the open hub destination.
Context
You can also connect another database. The data is then also written to the generated table in this database. This allows you to publish data directly from the BW system to another system. There is no need to replicate the data, and no third-party tools are required. If you are using SAP HANA, you can also process the data subsequently using SAP HANA functions.
The following databases are supported: SAP HANA, SAP IQ (Intelligent Query), SAP ASE (Adaptive Server Enterprise), Oracle, IBM DB2, DB4, DB6, Microsoft SQL Server, Sybase.
1334 PUBLICSAP BW/4HANA
Interfaces

Procedure
1. Choose Database Table as the type of destination. When you activate the open hub destination, the system generates a database table. The generated database table has the prefix /BIC/OHxxx, xxx being the technical name of the destination.
2. By selecting the Send Notification to RFC Destination flag, you can have a notification sent after successful execution of the DTP (fill or destination). When this happens, module RSB_API_OHS_ETL_NOTIFY is called by RFC. This module must therefore also be implemented in the target destination with exactly the same name and interface. Once this has been confirmed, the DTP is continued.
3. By selecting the DTPs Wait for Status Set by External Program flag, you can set the status for a request in the target system to red or green and append a message. After successful execution, the DTP is stopped in the technical state, meaning that the DTP is executed and fills the destination. The status of the DTP then remains green technically and yellow overall until module RSB_API_OHS_ETL_SETSTATUS is called. Here you can set the status of the request to red or green and append a message. The message appears in the DTP log.
4. Under Connection Type, you can have the following options:
Connection Type Description
No Connection (local database) You create the table in the local database.
Database Connection (DBCON) You create the table using a connection in a remote database. Under Database Connection, enter a previously created database connection so that the data is also written to this database. You can create or edit the connection to the database in the DBA cockpit. For more information about the DBA cockpit, go to http://help.sap.com/netweaver SAP NetWeaver Platform Application Help
Function-Oriented View Database Administration <Your Database> .
In the target system (in the database), a table is created with prefix /BIC/.
If the database instance also has an SAP instance, like an SAP ERP system on a SAP HANA database for example, the DDIC object also has to be generated manually. The namespace is also registered when this is done. The DB table name in the remote system is identical to the DDIC name in the local system, or corresponds to the name that would have been created locally on the database.
NoteYou have to make sure here that there is no table with the same name in the target system, as this would result in an error when creating the table. The SAP_BASIS version of both SAP systems must also be either identical or compatible, and the codepage (ASCII, Unicode) should match.
Smart Data Access (SDA) You create the table using Smart Data Access (SDA). This allows you to create a virtual table in the local database
SAP BW/4HANAInterfaces PUBLIC 1335

Connection Type Description
that references a remote table in a remote database. The data is processed in the SAP HANA runtime.
CautionThis connection type is available for SAP HANA, SAP IQ (intelligent query), and SAP ASE (Adaptive Server Enterprise). No other databases are supported.
To be able to use the connections, you - or a member of your IT team - need to edit table RSBOHCONNECTIONS in the SAP GUI via the maintenance view (transaction SM30) by specifying a name for the connection, the remote source, the remote database, and the remote schema.
NoteThe database user of the ABAP server requires the two object privileges CREATE VIRTUAL TABLE and REMOTE TABLE ADMIN on the SAP HANA remote source (see CREATE VIRTUAL TABLE Statement (Data Definition)).
TipWe recommend choosing Connection TypeSmart Data Access (SDA) wherever possible.
5. Under Extraction Type, you have the following options:○ Delete data and insert data records: The fields are overwritten. The table is completely deleted before
every extraction and regenerated. We recommend this if you do not want to store the history of the data in the table.
○ Retain data and insert records (only with technical key selected): The data records are inserted. The table is generated just once prior to the first extraction. This allows you to obtain the history of the extracted data.
○ Retain data and change records (only with semantic key selected): You can only do this if you have selected Semantic Key. (If you have selected technical key, this option behaves in the same way as "Retain Data and Insert Records”. )
NoteNote that the table is always deleted and regenerated if changes are made to the properties of the database table (by adding fields for example).
6. You can choose whether to use a technical key or a semantic key.○ If you set the Technical Key flag, the system generates a unique key from the technical fields (request
number, package number, record number). These fields display the individual key fields for the table. These also include the technical name for the request. See Monitoring Data Transfer Process [page 400].
1336 PUBLICSAP BW/4HANA
Interfaces

NoteUsing a technical key with a target table is particularly useful if you want to extract data to a table that is not deleted before extraction. Where a record is extracted with the same key as a record already in the system, a short dump occurs due to the presence of duplicate records. The technical key for the delta information is also required if the DTP loads deltas.
○ If you set the Semantical Key flag, you can explicitly select the key fields. Note however that using a semantic key can result in duplicate records. The records are not aggregated. Instead each extracted record is saved in the table.
10.2.6.2.1.3 Selecting Files as Destinations
You can write data from the BW system to a file via the open hub destination.
Context
Procedure
1. Choose File as the type of destination. The file formats CSV, ASCII, and XML are supported for extraction to files. A control file with information about the metadata is also generated.
2. You can either save the file on the application server as an HDFS File (if you are using Hadoop) or in a local directory. If the file is located on the application server, you can schedule extraction in the background.
CautionIf you save the file locally, the file size must not exceed half a gigabyte. When transferring mass data, you should save the file on the application server.
The User Account Control (UAC) in Windows 7 and Windows Vista can create the impression that data is written to a local directory, but no files are actually created. Do not use a directory with restricted authorization.
3. If you want to write the data to an application server from the BW system, you have two options for the file name:
○ File name: The file name is made up of the technical name of the open hub destination and the extension .CSV, .TXT or .XML. You cannot change this name.
○ Logical file name: You can use input help to select a logical file name that you have already defined in Customizing. To do this, you create a logical path and assign a logical file name to it. More information: Defining the Logical Path Name and File NameA logical file name can be made up of fixed path information and variables - such as calendar day and time. Logical file names can be transported.
SAP BW/4HANAInterfaces PUBLIC 1337

4. If you save the data as an HDFS File, you have to specify an RFC connection of type HTTP for the Hadoop server that you created previously. The file is saved in the home directory. You can change the name of the file.
5. If you save the file in a local directory, you cannot change the name of the file. It is made up of the technical name of the open hub destination and the extension .CSV, .TXT or .XML. The associated control file is given the prefix S_.
6. If you select data format XML, you can choose the following formats:
○ SAP Standard XML ist the default SAP XML format. It is optimized for data exchange between SAP and external systems in both directions.
○ SAP Binary Protocol XML is an internal binary SAP variant of asXML. It can only be used in the SAP system environment. With binary and structure compression however, it provides considerable performance and storage advantages compared to other XML options.The XML is generated using the CALL TRANSACTION command: http://ld9460.wdf.sap.corp:50000/sap/public/bc/abap/docu?sap-language=EN&sap-client=000&format=STANDARD&object=ABENABAP_XML_TRAFOS&tree=X
7. You can either use the default system code page or specify a code page of your choosing. It is normally not advisable to change this however.
10.2.6.2.1.4 Edit Fields
You define the fields to be transferred together with their properties.
Context
If you have created the open hub destination based on a template, you will be offered all fields from the template as fields for the open hub destination. You can edit the field list by removing or adding fields. You can also change the properties of these fields.
If the template for the open hub destination is a DataSource, the field SOURSYSTEM is automatically added to the field list with reference to InfoObject 0SOURSYSTEM. This field is required if data from heterogeneous source systems is being written to the same database table. The data transfer process inserts the source system ID that is relevant for the connected DataSource. You can delete this field if it is not needed.
If you have selected Database Table as the destination and Semantic Key as the property, the field list is given an additional column. You can define the key fields for the semantic key here.
Procedure
1. Choose the Details tab.2. To add an InfoObject, choose Add InfoObject. Specify the start of the name, select an InfoObject from the
result list, and press OK. You can also select multiple InfoObjects by pressing Ctrl + Shift. The InfoObjects are added to your open hub destination. Any compound characteristic are added too.
1338 PUBLICSAP BW/4HANA
Interfaces

3. You can now configure further settings for the InfoObject properties in the right screen area.4. To add a field, choose Add Field. The field is added to your open hub destination. You can now define the
field in the right area of the screen.5. Enter a description for the field.6. You can specify an InfoObject under Identify with:. This changes the field into an InfoObject. The properties
of the InfoObject are applied. You can undo this by switching to Field under Identify with:.7. Specify a data type and data length for the field.8. To delete InfoObjects or fields, choose Delete Field(s).9. Under Manage Keys, you can define keys for the open hub destination.
10.2.6.2.2 ODP-Based Data Extraction via OData
Using ODP-based data extraction via OData (based on the OData communication protocol) you can perform consistent, scalable delta extraction of ODP data into external non-ABAP recipients (such as Cloud and mobile applications).
Overview
OData is connected to the ODP data replication API as a communication protocol. The ODP framework provides the subscriber type OData access for operational data provisioning (ODP), which enables OData access to ODP data.
ODP-based data extraction via OData:
● supports data extraction between different systems, technology stacks, products and deployment modes.In an analytic context, operational data provisioning is the set standard for extracting from an ABAP system into another system. Since there is an increasing need in heterogeneous customer system landscapes for more flexibility, it should also be possible to use ODP in other integration scenarios. Data sources should be accessed for extraction for applications, which have been implemented with technologies other than ABAP. Applications should also be supported, which are run in the Cloud (Software as a Service) and not on-premise in a customer system landscape. Using OData as a communication protocol (HTTP-based and following REST principles) means that is possible to provide the qualities of ODP for these scenarios and numerous consumers, for which the ABAP RFC interface is not suitable.
● is available for all ODP contexts in the back end system for the extraction of available ODP contexts, such as SAP NetWeaver Business Warehouse (for InfoProviders of the BW system), DataSource/ extractors or HANA information layer.This means ODP data sources can also be accessed for extraction in new scenarios. This is especially true for:○ DataSources in SAP Business Suite systems○ InfoProvider in BW systems
● is can be achieved by using SAP Gateway Foundation and by generating an OData service (with the SAP Gateway Service Builder) based on an operational data provider (ODP). The service (URL) can then be called from an external application (OData client) via OData/HTTP.
SAP BW/4HANAInterfaces PUBLIC 1339

● provides the known ODP qualities:○ Direct access for small data volumes without an operational delta queue (for a preview, for example)○ Package-based full extraction via the operational delta queue for large data volumes○ Delta extraction (with initial full extraction) via the operational delta queue for changes, provided that
the ODP data source supports deltas (for example, DataStore object (advanced) in the BW system)
Concepts for ODP based data extraction with OData
To provide ODP data for extraction via OData, you need an OData service. You can generate this service in the SAP Gateway Builder. Using this service (and the data model defined within it), you can convert the data structures in the ODP framework into the OData protocol. The data model specifies which data sets should be accessible (entity set) and the structure of these data sets (entity type). Every ODP can be converted into an entity set. Associations between ODPs can be taken into account by adding associated ODPs to the data model of the service. This means the OData service can include all the entities required to display a self-contained, relevant scenario for data extraction: Facts and master data (attributes and texts). When data is accessed, one of the entity sets (ODP) belonging to the scenario is addressed. The following illustration shows an OData service, which contains multiple associated ODPs as entity sets and which thus corresponds to an application or self-contained scenario:
Once the service is generated and registered in the SAP Gateway system, external applications can consume the service. Standard OData requests are used to extract the data. Here the possibility to provide partial responses (packages) and delta requests is supported. Since OData is REST-based, all resources of the entity sets are addressed via URLs. This means the model metadata can be made accessible via URL and extraction
1340 PUBLICSAP BW/4HANA
Interfaces
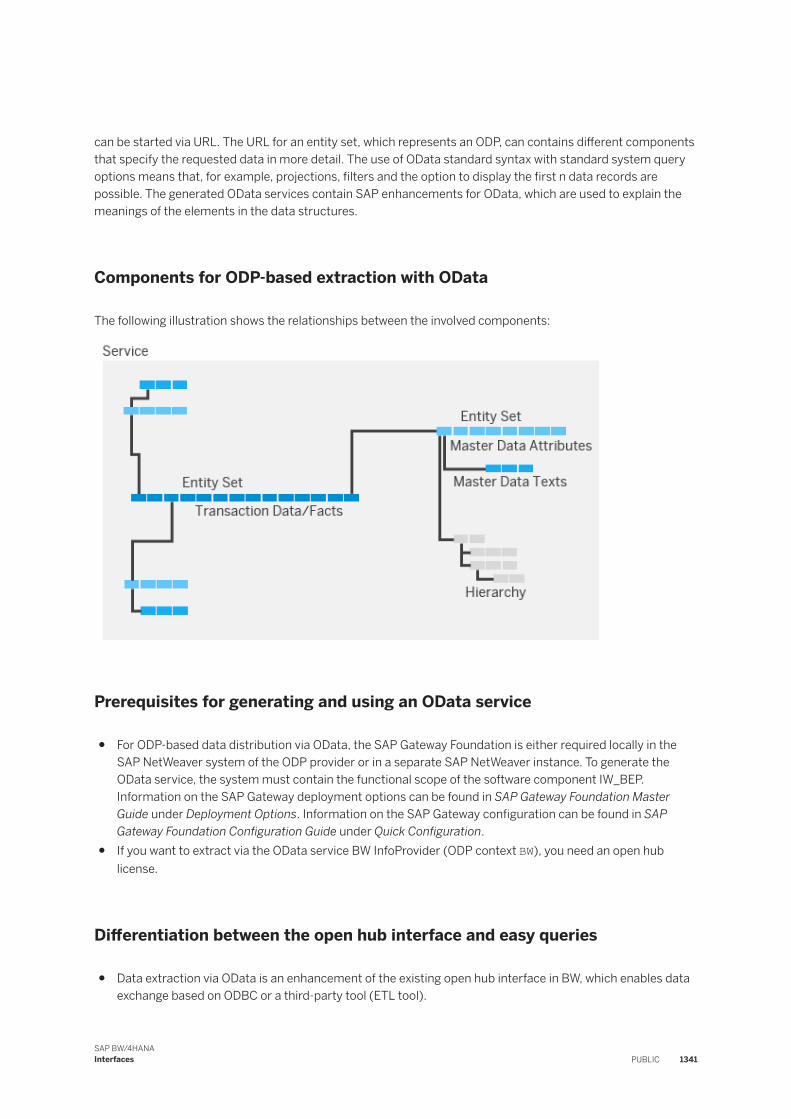
can be started via URL. The URL for an entity set, which represents an ODP, can contains different components that specify the requested data in more detail. The use of OData standard syntax with standard system query options means that, for example, projections, filters and the option to display the first n data records are possible. The generated OData services contain SAP enhancements for OData, which are used to explain the meanings of the elements in the data structures.
Components for ODP-based extraction with OData
The following illustration shows the relationships between the involved components:
Prerequisites for generating and using an OData service
● For ODP-based data distribution via OData, the SAP Gateway Foundation is either required locally in the SAP NetWeaver system of the ODP provider or in a separate SAP NetWeaver instance. To generate the OData service, the system must contain the functional scope of the software component IW_BEP.Information on the SAP Gateway deployment options can be found in SAP Gateway Foundation Master Guide under Deployment Options. Information on the SAP Gateway configuration can be found in SAP Gateway Foundation Configuration Guide under Quick Configuration.
● If you want to extract via the OData service BW InfoProvider (ODP context BW), you need an open hub license.
Differentiation between the open hub interface and easy queries
● Data extraction via OData is an enhancement of the existing open hub interface in BW, which enables data exchange based on ODBC or a third-party tool (ETL tool).
SAP BW/4HANAInterfaces PUBLIC 1341

● Unlike the BW easy query, which provides the BW query data for end user UIs, the goal of ODP-based data extraction via OData is reliable extraction of data into the storage of the receiving application.
Related Information
Generating a Service for Extracting ODP Data via OData [page 1342]Using the OData Service for Extracting ODP Data [page 1349]http://www.odata.orgSAP Gateway Foundation (SAP_GWFND)Deployment OptionsQuick Configuration
10.2.6.2.2.1 Generating a Service for Extracting ODP Data via OData
To generate an OData service for extracting ODP data, you need to perform various steps in SAP Gateway Service Builder.
Context
There are various functions available in SAP Gateway Service Builder, which you need in order to generate and register the OData service. These functions include a wizard, which requests values for different parameters that are part of the ODP OData service. These values include:
● an RFC destination to address the target system, for which an ODP context and any required number of ODPs can be selected
● an ODP context● the ODPs required for a self-contained data extraction scenario
Using the service you can generate the following artifacts in a customer package:
● The provider classes○ Model provider class for accessing model metadata○ Data provider class for data access
● Artifacts for service registration● Model (R3TR IWMO)● Service (R3TR IWSV)
1342 PUBLICSAP BW/4HANA
Interfaces

Procedure
1. Create a project.2. Define the data model of the service. In the data model, specify which operational data providers will be
provided for extraction.3. Save the project.4. Generate the runtime objects. Proceed as described in the SAP Gateway documentation for generating
ABAP classes. The system suggests names for the artifacts to be created.5. Register the service. Proceed as described in the SAP Gateway documentation for service administration.
Related Information
Create Project [page 1343]Defining a Data Model for the Service [page 1344]Generating ABAP ClassesService Maintenance
10.2.6.2.2.1.1 Create Project
To be able to create the service for data extraction, you need a service builder project.
Context
NoteEvery service requires its own project. This means that it is not possible to manager more than one service under one project.
Procedure
1. In the menu for SAP Gateway Service Builder (transaction SEGW), choose Project Create .2. Enter the required data:
1. Project name2. Description3. Project type: Service with SAP Annotations4. Generation strategy: Default
SAP BW/4HANAInterfaces PUBLIC 1343

5. The package where the new project should be created.
3. Choose Continue.
The project is created with the following structure.
○ Data model○ Service implementation○ Runtime artefacts○ Service administration
4. Save your project.
Related Information
Creating a Service Builder Project
10.2.6.2.2.1.2 Defining a Data Model for the Service
You create the data model for the service by redefining the service of the ODP framework.
Context
To create services for the extraction of ODP data, you can use the wizard in the SAP Gateway Service Builder.
Procedure
You have opened the previously created project in the SAP Gateway Service Builder (transaction SEGW). If the project is not open, choose Project Open .
1. In the context menu of the Data Model folder, chosoe Redefine ODP Extraction .
The system opens the popup Wizard - Step 1 of 3: OData Access for Operational Data Provisioning. You specify ODP-specific parameters here.
2. Select the RFC destination for the system where the ODPs are located that you want to extract using the service.
NoteThe RFC destination describes the connection between the system that you are using the SAP Gateway Service Builder to define the ODP OData service on (SAP Gateway Application) and the back end system that the ODPs should be distributed to other systems from.
Background: With the configuratio of the system alias for the OData service and an optional BAdI implementation, the connections in the processing of an OData request between the SAP Gateway hub,
1344 PUBLICSAP BW/4HANA
Interfaces

the SAP Gateway Application and the BW back end system can be defined. Various combinations are possible for this. Two extreme scenarios are as follows:
1. All three systems are located on the same system (embedded deployment).2. All three systems are located on different systems that are connected via an RFC connection.
3. Select the ODP context.4. Define the quantity of ODPs for the selected context. ODPs that have already been selected are displayed
in a table in the popup. To select the ODPs, you have the following options. These can be performed multiple times and independently of each other:○ Select an ODP and press Add ODP. For ODP contexts that offer a hierarchy, yo can select the ODP from
the hierarchy by pressing (Hierarchy).The ODP is added to the table displayed in the popup.
○ If you want to enhance the data model of the service, add the associated ODPs. You can add master data ODPs to a fact ODP for example, and then add text ODPs to them.You can use the following pushbuttons for this:
Pushbutton Description
(Delete Row) You can use this button to delete one or more selected ODPs from the data model.
(Add Associated ODPs) You can add the associated ODPs to the data model for one or more selected ODPs.
(Delete Associated ODPs) You can remove the associated ODPs from the data model for one or more selected ODPs.
5. Choose Continue.
The system opens the popup Wizard - Step 2 of 3: OData Access for Operational Data Provisioning. Here you define the name for the service-specific classes, the model and service name, and the package and transport request.
6. To proceed to the next step in the wizard, you have to enter the required data in all of the input-enabled fields:
Fields Description
Package Enter the package name in which generated artefacts (in particular model provider class and data provider class) should be after being generated.
Transport Request Enter a valid transport request number.
Model Provider Class The system creates a proposal for the name in accordance with the following naming convention: CL_<Projektname>_MPC_<X>. You can change this proposal.
SAP BW/4HANAInterfaces PUBLIC 1345

Fields Description
Data Provider Class The system creates a proposal for the name in accordance with the following naming convention: CL_<Projektname>_DPC_<X>. You can change this proposal.
Mode name, version and description ○ The system creates a proposal for the name in accordance with the following naming convention: <Projektname>_<X>_MDL. You can change this proposal. Note that the name of the model must be unique.
○ When the model is redefined for the first time, the system sets the system value to <X>1.
○ Enter a description. Note the entering a description is mandatory. You cannot proceed to the next step in the wizard if you have not done this.
Service Name, Version and Description ○ The system creates a proposal for the name in accordance with the following naming convention: <Projektname>_<X>_SRV. You can change this proposal. Note that the name of the model must be unique.
○ When the model is redefined for the first time, the system sets the system value to <X>1.
○ Enter a description. Note the entering a description is mandatory. You cannot proceed to the next step in the wizard if you have not done this.
7. Choose Continue.8. Enter a package for the model and choose Continue.
The system opens the popup Wizard - Step 3 of 3: OData Access for Operational Data Provisioning. The system displays all generated artefacts of the service here. This includes in particular the entity types for the selected ODPs, together with function imports. The generated function imports are operations that are specific for ODP extraction, such as terminating the delta extraction (TerminateDeltasForFactsOf<ODP-Name>).
9. Select the required artefacts.10. Choose Finish.
The Service Builder runs a consistency check and dislays a message accordingly. The data model is created (model provider class), and the service is implemented (data provider class).
The artefacts selected during definition of the data model are displayed in the corresponding Data Model folders for the project. In the Model References folder, the name and version of the service are displayed. The Service Implementation folder contains references to the operations and methods for the service.
1346 PUBLICSAP BW/4HANA
Interfaces

Related Information
Redefining Services from External Framework (SPI, BW Query, GenIL)OData Artefacts Available for Extraction of ODP Data [page 1347]
10.2.6.2.2.1.2.1 OData Artefacts Available for Extraction of ODP Data
The following table provides an overview of the artefacts that can be exposed by a generated OData service. Which artefacts can be exposed depends on the properties of the selected ODPs.
OData Artefact Type OData Artefact Name Description
Entity set with an associated entity type with the same name
An ODP is represented in the OData service as an entity type.
NoteThe semantics of an ODP form the ODP name suffix. Fact ODPs end mit $F for example. Some ODPs do not have this, meaning that there cannot be a <$<X> suffix in the name.
FactsOf<ODP name> Entity set for a fact ODP
AttrOf<ODP name> Entity set for an ODP for attributes
TimeDepAOf<ODP nName> Entity set for an ODP for time-dependent attributes
TextsOf<ODP name> Entity set for an ODP for texts
EntityOf<ODP name> Entity set for an ODP without semantics
Function Import
ODP providers provide functionality that makes it possible to manage delta extractions throughout the period. These functions are exposed in the OData service as function imports, and can be referenced by URI.
SubscribedTo<entity set name> This function import indicates whether or not the calling service consumer has a delta subscription for this ODP entity set.
TerminateDeltasFor<entity set name> This function import invalides previous and current delta links, together with all associated resources for this ODP entity set in the ODP provider. It terminates the delta extraction.
SAP BW/4HANAInterfaces PUBLIC 1347

10.2.6.2.2.1.3 Generating Service Runtime Objects
Once you have defined the data model, generate the service runtime objects (model provider class, data provider class, model and service). Once generated, these runtime objects use some of the runtime objects generated in the SAP Gateway Service Builder Wizard.
Procedure
Proceed as described in the SAP Gateway documentation for generating ABAP classes. The system proposed names for the artefacts to be created.
Related Information
Generating ABAP Classes
10.2.6.2.2.1.4 Registering and Testing a Service in the SAP Gateway System
Using the service administration function, you can register the service in an SAP Gateway system. You can then test the OData service on the SAP Gateway client. The service serves as an HTTP client and enables you to display HTTP responses as they would occur at runtime.
Procedure
Proceed as described in the SAP Gateway documentation for service administration and for the SAP Gateway client.
Related Information
Service MaintenanceSAP Gateway Client
1348 PUBLICSAP BW/4HANA
Interfaces

10.2.6.2.2.2 Using the OData Service for Extracting ODP Data
An OData client can consume the service for extracting ODP data via URLs and request the resources of the data model. Here standard OData requests and the OData standard syntax is used.
Basic URL structure for extracting ODP data
http://<Host>:<Port>/sap/opu/odata/SAP/<Service Name>/<Entity Set Name>/<Query Options>
URL structure for accessing the model metadata of the service
http://<Host>:<Port>/sap/opu/odata/SAP/<Service Name>/$metadata
The OData service can expose its entity model and its structure via a URL. Information is displayed about the entity sets and their structures (entity types). SAP-specific enhancements allow ODPs (sap:aggregation-role="dimension" or "measure") to access semantics, for example. You can find an overview of these enhancements on the SAP Community Network on http://scn.sap.com/docs/DOC-44986 .
OData query options for data extraction
Using standard OData query options you can specify the data you want to extract in more detail:
System query options Description of the use case
$select
For example, $select=field1,field2,...
Using this option you can express a projection for which fields you want to request.
$filter
For example, $filter=field3 eq <value> and …
With this option you can use Boolean operators to express which entries or records you want to request.
$inlinecount
For example, inlinecount=allpages
With this option you can output the total number of entries to be extracted.
SAP BW/4HANAInterfaces PUBLIC 1349

System query options Description of the use case
$top
For example, $top=<N>
Using this option you can restrict the entries to be extracted to the first N entries.
This option is only used for the preview.
NoteThe preview is implemented via direct access without packaging and without using the operational delta queue.
$skip
For example, $skip=<M>
Using this option you can specify that extraction should start from entry M.
This option is only used for the preview.
NoteThe preview is implemented via direct access without packaging and without using the operational delta queue.
$format
For example, $format=xlsx
Using this option you can specify the output format for extraction, for example json, xml or xlsx.
A URL for facts could look something like this:
● http://<Host>:<Port>/sap/opu/odata/sap/<Service Name>/FactsOfZXYFADSO01?$ select=AIRLINEID,FLIGHTDATE,BOOKDATE,CALDAY,CONNECTID,CANCELLED,RECORDMODE,BOOKINGID,CUSTOMERID,CLASS,LUGGWEIGHT,PRICELOCAL,CURRENCY&$filter=FLIGHTDATE ge datetime ' 2010-01-01T00:00:00' &$top=100&$format= xlsx
If the service also contains master data, the master data can be accessed via the corresponding URLs, for example:
● http://<Host>:<Port>/sap/opu/odata/sap/<Service Name>/AttrOf0AIRLINEID?$top=20&$format=xlsx
● http://<Host>:<Port>/sap/opu/odata/sap/<Service Name>/TextsOf0AIRLINEID?$top=20&$format=xlsx
1350 PUBLICSAP BW/4HANA
Interfaces

Using the request header Prefer for data extraction
To control a full extraction or delta extraction, the URL can be called on the corresponding entity set, which represents the ODP, by using the following request header values (standard OData):
● Extraction with paging:If you want the ODP data in packages to be retrieved, you can do this via paging by using the following header:
Header Name Header Value
Prefer odata.maxpagesize=<N>
For example, odata.maxpagesize=50
A background job is started for paging and the data is cached in the operational delta queue. Using the odata.maxpagesize value you can specify the quantity of packages to be retrieved from the delta queue. The end of the response contains a relative link, which can be used to retrieve the next package.
● Delta extraction:Delta extraction can be performed using the following request header value:
Header Name Header Value
Prefer odata.track-changes
The OData service can access the ODP data in delta mode for a delta-enabled operational data provider (ODP). When odata.track-changes is used, there is a differentiation between delta extraction and full extraction. When this value is called for the first time, a delta initialization is performed that can also be performed by package. Once the initialization is complete, the end of the response of a request in delta mode contains a relative link to the next delta query (delta link). This can be used with the next HTTP request, in order to retrieve data, which has been changed since the delta link was created.Note that deltas are always returned with a reference to the user used by the OData client to log on to the OData service.
NoteYou can combine paging and delta extraction, by listing both header values separated by commas, for example odata.maxpagesize=50,odata.track-changes.
There are two additional functions available (via function imports) as a service for delta management:
● To determine whether a delta subscription exists: http://<Host>:<Port>/sap/opu/odata/sap/<Service Name>/SubscribedToFactsOf<ODP Name>The response returns the information SubscribedFlag equals true or false. Note that the OData service name and the the name of the user logged on to the OData service must be used, in order to determine whether a delta subscription exists. This means that a user of an ODP, which is provided via various services, can have multiple subscriptions.
● To log off delta extraction: http://<Host>:<Port>/sap/opu/odata/sap/<Service Name>/TerminateDeltasForFactsOf<ODP Name>
SAP BW/4HANAInterfaces PUBLIC 1351

The response returns the information ResultFlag equals true or false.
Displaying the delta history and extracting data, which has been changed since a specific delta (restore)
With entity sets that can retrieve data in delta mode from the source, the changes made since the last delta link are retrieved in delta mode. However, there may also be a history of available delta links that can be displayed and used to restore the data changed since a specific delta link, if an error occurs. The help entity set DeltaLinksOf<EntitySet> is available to you here; <EntitySet> is the name of the delta-enabled entity set, for which you want to retrieve the changed data.
Displaying the delta history
You can open a history of the delta links for entity set ZXYFADSO01 via the following URL, for example:
● http://<Host>:<Port>/sap/opu/odata/sap/<Service-Name>/DeltaLinksOfFactsOfZXYFADSO01
The following properties are displayed for every delta link:
Property Meaning
DeltaToken Returns an ID for the delta.
CreatedAt Specifies when the data changed since the last delta link was retrieved when the current delta link was created.
IsInitialLoad Specifies if the delta link belongs to a delta initalization (= true) or to a delta (= false).
If you only want to view deltas from a specific point in time in the history, you can filter by CreatedAt using the comparison operators "greater than" and "greater than or equal to", for example:
● http://<Host>:<Port>/sap/opu/odata/sap/<Service-Name>/DeltaLinksOfFactsOfZXYFADSO01?$filter=DataAfter gt datetime'2015-10-02T11:54:22'
Accessing data that have been changed since a specific delta link
Data that have been changed since a specific delta link is accessed via the navigation ChangesAfter. The navigation is executed for an entry of the entity set DeltaLinksOf<EntitySet>. For example, for entity set ZXYFADSO01 with a delta link entry with DeltaToken D20151001131537_000052000, the URL is:
● http://<Host>:<Port>/sap/opu/odata/sap/<Service-Name>/DeltaLinksOfFactsOfZXYFADSO01('D20151001131537_000052000')/ChangesAfter
Requirements for the OData client
Some ODP contexts such as BW and SAPI supports the extraction of data changes. The way in which data changes are transferred for a source (for example, BW DataSource) is specified in the delta procedure. In order to be able to receive deltas, the client must fulfill the following requirements:
1352 PUBLICSAP BW/4HANA
Interfaces

● It must be able to give HTTP header fields to the OData request.● It must know what a delta link. Information about support for deltas can be found in the SAP Gateway
Foundation Developer Guide, section Delta Query Support.● It must understand the delta procedures of the extraction sources.
A central feature of delta procedures is record mode. This mode describes how a record needs to be updated in the delta procedures (which image is used, for example: before image, after image or reverse image). A delta procedure is made up of a subset of this information. This information is contained in table RODELTAM - the central storage of the delta procedure properties.In order to correctly receive deltas, the developer of the OData client must understand which delta procedure is used with images of a source. The developer must understand what type of data is receives when he/she uses the delta link. In other words, he must know which images are returned by the records. He must also understand field ODQ_ENTITIYCNTR, which provides the change behavior of an ODP by using ODQ_CHANGEMODE.
Otherwise the query will run via standard OData.
Related Information
http://scn.sap.com/docs/DOC-44986Delta Query Supporthttp://odata.orgFor detailed information on the URL components, request headers and delta links, see the documentation for URL conventions and OData protocol.Monitoring Delta Queues [page 285]
10.3 Interfaces for Analysis
To analyze data via diverse front end tools, you can use the interfaces of the Analytic Manager (Open Analysis Interfaces). These include multidimensional interfaces and the Lightweight Consumption interfaces.
The following multidimensional standard interfaces are based on MDX (Multi-Dimensional Expressions):
● OLE DB for OLAP (ODBO)● OLAP BAPI (Business Application Programming Interface)● XML for Analysis
These interfaces allow the front end tools of third-party providers to send queries to the MDX processor of the SAP BW∕4HANA system. This processor forwards the request to the OLAP processor.
You can send queries directly to the OLAP processor via Lightweight Consumption by using a OData query.
The OLAP processor accesses InfoProviders. The InfoProviders either contain the data objects or reporting-relevant views on data objects.
SAP BW/4HANAInterfaces PUBLIC 1353

The following table provides an overview of the properties of the individual interfaces:
CriterionOLE DB for OLAP (ODBO) OLAP BAPI
XML for Analysis (XML/A) OData
Technical Protocol COM(Component Object Model) protocol
RFC (Remote Function Call) protocol
HTTP/SOAP protocol OData
Query Language MDX MDX MDX Service-Specific Entry Parameters
Data Acquisition Data is formatted in generic form.
Processing of data is flexible, but therefore complex as well.
Data is formatted in generic form.
Processing of data is flexible, but therefore complex as well.
Data is formatted in generic form.
Processing of data is flexible, but therefore complex as well.
Communication Stateless Stateless Stateless
Client-Side Requirements
Driver installation on clients
SOAP client proxy must be generated on the basis of the WSDL description.
Platform Dependency For Microsoft Windows platform only
Every platform supported by SAP
Every platform Every platform
Platform Dependency
Use of the interfaces OLE DB for OLAP and OLAP BAPI depends on the platform: OLE DB for OLAP assumes MS Windows, OLAP BAPI assumes an SAP platform. OData is platform-independent.
Related Information
Lightweight Consumption [page 1355]
1354 PUBLICSAP BW/4HANA
Interfaces

10.3.1 Lightweight Consumption
Lightweight consumption enables you to access analytic queries of SAP BW∕4HANA in simple scenarios (for example, from mobile platforms). Mass access is not supported.
The integration of SAP BW∕4HANA with SAP Gateway allows you to provide analytic queries as OData queries for mobile scenarios. There are two types of OData queries:
● analytic queries with query property By OData● CDS-view-based analytic queries; in other words, CDS views with the annotations @Analytics:true and
@OData.publish:true
Related Information
Architecture Overview of an OData Query [page 1356]Creating an OData Query [page 1357]Removing Access to OData [page 1358]Parameters for OData Queries [page 1358]Parameters for ODataQuery – Hierarchy Handling (New) [page 1360]These links take you to the documentation for Lightweight Consumption.Analytics AnnotationsOData AnnotationsThese links take you to the documentation for Annotations for ABAP CDS.
SAP BW/4HANAInterfaces PUBLIC 1355

10.3.1.1 Architecture Overview of an OData Query
External access to the analytic query of SAP BW∕4HANA can be achieved via OData.
The graphic below illustrates the architecture of the interface usage:
NoteOData access means special requirements are needed in the query definition. For more information about the criteria, which an analytic query must fulfill, in order to be declared as an easy query, see SAP Note 2367553 ..
Related Information
Creating an OData Query [page 1357]Removing Access to OData [page 1358]Parameters for OData Queries [page 1358]
1356 PUBLICSAP BW/4HANA
Interfaces

10.3.1.2 Creating an OData Query
The following section provides an overview of the steps required to create an OData query.
The graphic below illustrates the various steps:
Creating an OData Query
Query with the By OData Property CDS-View-Based Query, Released for OData Access
Releasing the query for access via OData
● Define or select the required analytic query with the standard view that you want to make available.
● In the query properties (General tab page), go to the Remote Access screen area and choose By OData.
● Save the query.
Releasing the CDS view based query for access via OData.
● Define or select the required CDS-view-based query with the standard view that you want to make available.
● Insert the annotation for granting OData access: @OData.publish:true.
● Save the query.
The OData service is released in a separate step.
Release: Use the maintenance service (transaction /IWFND/MAINT_SERVICE) to release the service.
The OData service is automatically shared.
Related Information
Removing Access to OData [page 1358]OData Annotations
SAP BW/4HANAInterfaces PUBLIC 1357

10.3.1.3 Removing Access to OData
The following section provides an overview of the steps required to delete the gateway service of an analytic query.
Deleting an OData query
Query with the By OData Property CDS-View-Based Query, Released for OData Access
Deleting the query and the service:
If the query had the By OData property and the gateway service was released, then the service can be used, regardless of whether the OData flag is removed.
If you delete the property in the query definition, this does not delete the service. The service is only automatically deleted once you delete the query.
@OData.publish:flase
If you change the value of the annotation (for granting access to OData access) to @OData.publish:flase, the query is retained and the gateway service is automatically deleted.
Alternatively you can keep the query and only delete the service. Delete access to the gateway service with /IWFND/MAINT_SERVICE.
1. Delete access to the gateway service with /IWFND/MAINT_SERVICE.1. Select the service.2. Delete the system assignment.3. Delete the ICF node.
2. Delete the service.
10.3.1.4 Parameters for OData Queries
The following table provides you with an overview of the relevant parameters relevant for OData queries.
Parameter List
Parameter Description
$metadata
../QuerynameResults Result set without variables
../QuerynameResults?$inlinecount=allpages Result set with number of lines
../QuerynameResults?$skip=10 Result set without the first 10 lines, but with all subsequent ones
../QuerynameResults?$top=3 Result set with the three first lines (top3)
../QuerynameResults?$skip=5&$top=3 Result set with the three first lines beginning with line 6
1358 PUBLICSAP BW/4HANA
Interfaces

Parameter Description
../QuerynameResults?$skip=0&$top=3&$orderby=char1 desc
Result set with the three first lines in accordance with sorting by characteristic 1
../QuerynameResults?$orderby=char1 desc (asc/desc) Result set sorted by characteristic 1
../Queryname(var1=value,var2=value,...)/Results Result set with variables (single value selection)
NoteIf the query was created as CDS-view-based, the “Results” label in the parameter might be left out - depending on the modeling type.
../Queryname(var1=datetime'2013-08-05T00:00:00')/Results
Result set with date variables (single value selection)
../Queryname(var1='..', var1TO='..')/Results Result set with variables (range selection)
NoteMake sure that you adhere to the syntax exactly. This can be found in the response from $metadata.
../QuerynameResults?$select=char1,char2,keyf4... Output size of the result set reduced by field selection (can be rolled up)
../QuerynameResults?$filter=char1 eq 'value' Output size of the result set reduced by filters
../Queryname(..)/Results?$select=...&$filter=...&sap-ds-debug=true
Result set with variables, filters, field selection and debug mode
../Queryname?...$format=json Results in output format json
../Queryname?...$format=xlsx Results in output format xlsx (this format is available but is not recommended and therefore not supported)
SAP BW/4HANAInterfaces PUBLIC 1359

10.3.1.5 Parameters for ODataQuery – Hierarchy Handling (New)
$filter and $select are general key words for OData. For analytic queries with a hierarchy, they have a special semantic however. Read on for an explanation.
If a presentation hierarchy is active in a query for characteristics, the system offers the following fields:
In a query modeled in the BW system with the Per OData property CDS-Based Query Description
<CHARNAME>_O <FIELDNAME>_NodeText Text of the hierarchy element (i.e. of the node or the leaf)
<CHARNAME>_N <FIELDNAME>_NodeID Identifier
<CHARNAME>_M <FIELDNAME>_NodeIDExt External display, i.e. the display used for presentation
<CHARNAME>_P <FIELDNAME>_ParentID Identifier of the parent hierarchy element
<CHARNAME>_L <FIELDNAME>_Level Hierarchy level
CautionThe count begins with “0”.
<CHARNAME>_D <FIELDNAME>_Drillstate Whether or not child nodes are visible
<CHARNAME>_G <FIELDNAME>_Nodecount Number of hierarchy elements
NoteExplanation of the annotations:
● <CHARNAME> stands for the technical name of the characteristic in a query modeled in the BW system.
● <FIELDNAME> stands for the field name in a CDS-based query.
The properties follow.
1360 PUBLICSAP BW/4HANA
Interfaces

You can modify the hierarchy in the request using key word $filter:
In a query modeled in the BW system with the Per OData property CDS-Based Query Semantics Result
$filter=<CHARNAME>_L le 1 $filter=<FIELDNAME>_Level le 1
Expand level 0 + 1 Hierarchy levels 0 and 1
All existing unassigned nodes are displayed as collapsed, regardless of which level is set.
Requesting the children of the unassigned node is a separate step.
$filter=<CHARNAME>_L lt 1 $filter=<FIELDNAME>_Level lt 1
Expand level 0 (root level) Hierarchy root level
Without $filter All leaves on all levels Fully expanded hierarchy without children of the unassigned node
$filter=<CHARNAME>_L eq 1 $filter=<FIELDNAME>_Level eq 1
Only leaves on level 1 Hierarchy elements of level 1
$filter=<CHARNAME>_P eq '[nodetype]:[member]‘
$filter=<FIELDNAME>_Pa-rentID eq '[nodetype]:[member]‘
Expand hierarchy node Hierarchy with child elements of the requested parent nodes (without the parent nodes itself)
$filter=<CHARNAME>_P eq '1HIER_REST:REST_H‘
$filter=<FIELDNAME>_Pa-rentID eq '1HIER_REST:REST_H‘
Expand unassigned node Hierarchy with children of the unassigned node (without the unassigned node itself)
SAP BW/4HANAInterfaces PUBLIC 1361

In a query modeled in the BW system with the Per OData property CDS-Based Query Semantics Result
&$filter=<CHARNAME>_N eq '[nodetype]:[member]'
&$filter=<FIELDNAME>_No-deID eq '[nodetype]:[member]'
Set hierarchy node variable It is normally not possible to filter the _NodeID property. This is possible however if the query has a hierarchy node variable that was modeled for the hierarchy.
● Hierarchy is active (i.e $select contains _NodeID): Subtree selection => The reply contains all nodes (including leaves) below the filtered node.
● Hierarchy is inactive, and the characteristic is not selected (i.e. $select contains the characteristic but not _NodeID): Filter on the leaves => The reply contains all leaves below the filtered node as a flat list.
● Hierarchy is inactive, and the characteristic is not selected: The reply contains values aggregated over all leaves below the filtered node.
● Two hierarchies are permitted (query design time)
● Only one hierarchy can be used at query runtime however ($select cannot contain more than one _NodeID in a single call)
Example
URL Segments
..$filter=CostCenter_Level le 1
1362 PUBLICSAP BW/4HANA
Interfaces

URL Segments
..$filter=CostCenter_Level eq 1
..$filter=CostCenter_ParentID eq '2CZCSTCNTGRP_V:US01WORLD‘
..$filter=CostCenter_ParentID eq '1HIER_REST:REST_H
NoteWhen you work with a hierarchy, you always use $filter for at least one level. You can thus prevent the entire hierarchy from being read. If you work without ..$filter=CostCenter_Level..., performance issues can arise.
The following table provides an overview of how you can use key word $select in the request.
In a query modeled in the BW system with the Per OData property CDS-Based Query Semantics Result
select=<CHARNAME>_N select=<FIELDNAME>_NodeID
The hierarchy is active. The property is only filled for leaf elements. _NodeID and _NodeIDExt contain all hierarchy elements (nodes and leaves).
$select=<CHARNAME>_... $select=<FIELDNAME>_... $select without _NodeID switches the hierarchy off.
Hierarchy fields (_NodeID, _IDExt, _Parent, _Drillstate, _Level) remain empty when they are requested.
Without select The hierarchy is active, and nodecount is not executed.
All characteristics are used.
$select=...nodecount... Switched the nodecount calculation on.
Nodecount is the number of successors a node has. The system only counts successors that are in the result. The nodecount calculation is performance-intensive and is thus only performed if requested.
Note: Nodecount only works if you have just one characteristic in the rows. Only the hierarchy basic characteristic is permitted here.
SAP BW/4HANAInterfaces PUBLIC 1363

Example
Hierarchy Handling URL Segments
With hierarchy $select=CostCenter_NodeID,CostCenter_NodeIDExt,CostCenter_NodeText,CostCenter_ParentID,CostCenter_Level,CostCenterName,ControllingArea
Without hierarchy $select=CostCenter,CostCenterName,ControllingArea,..
NoteIf you do not use NodeID, switch the hierarchy off.
10.4 Web Services and ICF Services
Various different Web services and ICF services are delivered with SAP BW∕4HANA.
ICF Services
ICF services are based on the Internet Communication Framework (ICF) of the Application Server for ABAP. ICF services are HTTP services that are used to execute HTTP request handlers. The SAP BW∕4HANA HTTP services allow you to display or exchange data from SAP BW∕4HANA using a URL. Some of these services are implemented as Web services.
Structure of the URL
The URL of an HTTP service delivered in a BW namespace has the following structure:
<Protocol>://<Server>:<Port>/sap/bw/<Service>
● URL PrefixThe values used for the place holder in the specified URL schema depend on the installation. For <Protocol>, http and https can be selected. For <Server>, enter your message server.You can check which URL prefix your BW system has generated as follows:1. Call Function Builder (transaction SE37).2. Enter RSBB_URL_PREFIX_GET as the function module name.
3. Choose Test/Execute. The Test Function Module screen appears.4. As import parameter I_HANDLERCLASS, enter the name of the ICF handler (HTTP Request Handler)
for the required service.
1364 PUBLICSAP BW/4HANA
Interfaces

NoteYou can find out the name of the ICF handler in the service maintenance transaction (SICF): Navigate to the required service component in the HTTP services tree. Double-click to open the Change/Create a Service dialog box. The HTTP request handler for the service is displayed on the Handler List tab page.
5. Choose Execute. Export parameter E_URL_PREFIX contains the generated URL prefix.● Service:
Enter the technical name of the required service here. The name is made up of all elements of the path in the HTTP services tree (transaction SICF).
Prerequisites for Using the Service
The required HTTP service must be active.
NoteTo check this, navigate to the required service component in Service Maintenance (transaction SICF). If the service is active, you cannot select the Activate Service entry in the context menu.
Web Services Required for SAP BW∕4HANA
Web Services for Web Services
Automatic activation via task list SAP_BW4_SETUP_SIMPLE in the task manager for technical configuration (transaction STC01)?
Web Dynpro ABAP as Basis /default_host/sap/public/bc/ur
/default_host/sap/public/bc/icons
/default_host/sap/public/bc/icons_rtl
/default_host/sap/public/bc/webicons
/default_host/sap/public/bc/pictograms
Yes
Start progra for Analysis /default_host/sap/bw/analysis Yes
Modeling Tools (REST Services) /default_host/sap/bw/modeling Yes
Workspace Designer /default_host/sap/bc/webdynpro/sap/rsl_ui_*
Yes
Workspace Query Designer /default_host/sap/bc/ui5_ui5/sap/rsl_wqd
Yes
SAP BW/4HANAInterfaces PUBLIC 1365

Web Services for Web Services
Automatic activation via task list SAP_BW4_SETUP_SIMPLE in the task manager for technical configuration (transaction STC01)?
SAP BW∕4HANA Master Data Maintenance
/default_host/sap/bc/webdynpro/sap/RSDMDM_MD_MAINTENANCE_APP
/default_host/sap/bc/webdynpro/sap/RSDMDM_MD_NEW_APP
Yes
SAP BW∕4HANA Hierarchy Maintenance
/default_host/sap/bc/webdynpro/sap/RSSHWDY_HIERARCHY_MAINT_APP
Yes
UI Building-Blocks for Query Display /default_host/sap/bc/webdynpro/sap/fpm_bics_ovp
Yes
REST-based reporting interface /default_host/sap/bw/ina/* No
XML for Analysis /default_host/sap/bw/xml/soap/xmla No
Web Dynpro-based metadata repository
/default_host/sap/bc/webdynpro/sap/rso_metadata_repository
No
For information about the ICF and OData services required in order to use the SAP BW∕4HANA Cockpit, see Configuring the SAP BW∕4HANA Cockpit [page 924].
1366 PUBLICSAP BW/4HANA
Interfaces

11 Application Server for ABAP
SAP BW∕4HANA is based on the ABAP Platform software components SAP_BASIS, SAP_UI, SAP Gateway Foundation (SAP_GWFND) and SAP_ABA long.
You can find the documentation for these components in the following sections.
SAP BW/4HANAApplication Server for ABAP PUBLIC 1367

Important Disclaimers and Legal Information
HyperlinksSome links are classified by an icon and/or a mouseover text. These links provide additional information.About the icons:
● Links with the icon : You are entering a Web site that is not hosted by SAP. By using such links, you agree (unless expressly stated otherwise in your agreements with SAP) to this:
● The content of the linked-to site is not SAP documentation. You may not infer any product claims against SAP based on this information.● SAP does not agree or disagree with the content on the linked-to site, nor does SAP warrant the availability and correctness. SAP shall not be liable for any
damages caused by the use of such content unless damages have been caused by SAP's gross negligence or willful misconduct.
● Links with the icon : You are leaving the documentation for that particular SAP product or service and are entering a SAP-hosted Web site. By using such links, you agree that (unless expressly stated otherwise in your agreements with SAP) you may not infer any product claims against SAP based on this information.
Videos Hosted on External PlatformsSome videos may point to third-party video hosting platforms. SAP cannot guarantee the future availability of videos stored on these platforms. Furthermore, any advertisements or other content hosted on these platforms (for example, suggested videos or by navigating to other videos hosted on the same site), are not within the control or responsibility of SAP.
Beta and Other Experimental FeaturesExperimental features are not part of the officially delivered scope that SAP guarantees for future releases. This means that experimental features may be changed by SAP at any time for any reason without notice. Experimental features are not for productive use. You may not demonstrate, test, examine, evaluate or otherwise use the experimental features in a live operating environment or with data that has not been sufficiently backed up.The purpose of experimental features is to get feedback early on, allowing customers and partners to influence the future product accordingly. By providing your feedback (e.g. in the SAP Community), you accept that intellectual property rights of the contributions or derivative works shall remain the exclusive property of SAP.
Example CodeAny software coding and/or code snippets are examples. They are not for productive use. The example code is only intended to better explain and visualize the syntax and phrasing rules. SAP does not warrant the correctness and completeness of the example code. SAP shall not be liable for errors or damages caused by the use of example code unless damages have been caused by SAP's gross negligence or willful misconduct.
Gender-Related LanguageWe try not to use gender-specific word forms and formulations. As appropriate for context and readability, SAP may use masculine word forms to refer to all genders.
1368 PUBLICSAP BW/4HANA
Important Disclaimers and Legal Information

SAP BW/4HANAImportant Disclaimers and Legal Information PUBLIC 1369

www.sap.com/contactsap
© 2020 SAP SE or an SAP affiliate company. All rights reserved.
No part of this publication may be reproduced or transmitted in any form or for any purpose without the express permission of SAP SE or an SAP affiliate company. The information contained herein may be changed without prior notice.
Some software products marketed by SAP SE and its distributors contain proprietary software components of other software vendors. National product specifications may vary.
These materials are provided by SAP SE or an SAP affiliate company for informational purposes only, without representation or warranty of any kind, and SAP or its affiliated companies shall not be liable for errors or omissions with respect to the materials. The only warranties for SAP or SAP affiliate company products and services are those that are set forth in the express warranty statements accompanying such products and services, if any. Nothing herein should be construed as constituting an additional warranty.
SAP and other SAP products and services mentioned herein as well as their respective logos are trademarks or registered trademarks of SAP SE (or an SAP affiliate company) in Germany and other countries. All other product and service names mentioned are the trademarks of their respective companies.
Please see https://www.sap.com/about/legal/trademark.html for additional trademark information and notices.
THE BEST RUN