SAP BusinessObjects Profitability and Cost Management ...
150
PUBLIC SAP BusinessObjects Profitability and Cost Management Document Version: 10.0 – 2020-07-15 SAP BusinessObjects Profitability and Cost Management Installation Guide © 2020 SAP SE or an SAP affiliate company. All rights reserved. THE BEST RUN
-
Upload
khangminh22 -
Category
Documents
-
view
0 -
download
0
Transcript of SAP BusinessObjects Profitability and Cost Management ...

PUBLICSAP BusinessObjects Profitability and Cost ManagementDocument Version: 10.0 – 2020-07-15
SAP BusinessObjects Profitability and Cost Management Installation Guide
© 2
020
SAP
SE o
r an
SAP affi
liate
com
pany
. All r
ight
s re
serv
ed.
THE BEST RUN
Content
1 History of Changes. . . . . . . . . . . . . . . . . . . . . . . . . . . . . . . . . . . . . . . . . . . . . . . . . . . . . . . . . . .5
2 Introduction to Profitability and Cost Management. . . . . . . . . . . . . . . . . . . . . . . . . . . . . . . . . . 82.1 About this document. . . . . . . . . . . . . . . . . . . . . . . . . . . . . . . . . . . . . . . . . . . . . . . . . . . . . . . . . . 8
What is Profitability and Cost Management?. . . . . . . . . . . . . . . . . . . . . . . . . . . . . . . . . . . . . . . 8Target audience. . . . . . . . . . . . . . . . . . . . . . . . . . . . . . . . . . . . . . . . . . . . . . . . . . . . . . . . . . . .9Integration. . . . . . . . . . . . . . . . . . . . . . . . . . . . . . . . . . . . . . . . . . . . . . . . . . . . . . . . . . . . . . 10Constraints. . . . . . . . . . . . . . . . . . . . . . . . . . . . . . . . . . . . . . . . . . . . . . . . . . . . . . . . . . . . . . 11
2.2 New Features. . . . . . . . . . . . . . . . . . . . . . . . . . . . . . . . . . . . . . . . . . . . . . . . . . . . . . . . . . . . . . . 112.3 Before You Start. . . . . . . . . . . . . . . . . . . . . . . . . . . . . . . . . . . . . . . . . . . . . . . . . . . . . . . . . . . . . 12
SAP notes for the installation. . . . . . . . . . . . . . . . . . . . . . . . . . . . . . . . . . . . . . . . . . . . . . . . . .13Information available in SAP Service Marketplace. . . . . . . . . . . . . . . . . . . . . . . . . . . . . . . . . . . 13
2.4 Software Location. . . . . . . . . . . . . . . . . . . . . . . . . . . . . . . . . . . . . . . . . . . . . . . . . . . . . . . . . . . . 14
3 Planning. . . . . . . . . . . . . . . . . . . . . . . . . . . . . . . . . . . . . . . . . . . . . . . . . . . . . . . . . . . . . . . . . . 153.1 System Component Deployment. . . . . . . . . . . . . . . . . . . . . . . . . . . . . . . . . . . . . . . . . . . . . . . . . 15
System Component Installation Order. . . . . . . . . . . . . . . . . . . . . . . . . . . . . . . . . . . . . . . . . . . 15Installation in a SAP BusinessObjects Business Intelligence platform Environment. . . . . . . . . . . . 17
3.2 Installing and Configuring SAP BusinessObjects Profitability and Cost Management. . . . . . . . . . . . . 19
4 Preparation. . . . . . . . . . . . . . . . . . . . . . . . . . . . . . . . . . . . . . . . . . . . . . . . . . . . . . . . . . . . . . . . 214.1 Tips For a Smooth Installation. . . . . . . . . . . . . . . . . . . . . . . . . . . . . . . . . . . . . . . . . . . . . . . . . . . 214.2 Preinstallation Checklist. . . . . . . . . . . . . . . . . . . . . . . . . . . . . . . . . . . . . . . . . . . . . . . . . . . . . . . 224.3 Pre-installation Tasks. . . . . . . . . . . . . . . . . . . . . . . . . . . . . . . . . . . . . . . . . . . . . . . . . . . . . . . . . 24
Installing IIS 7.0 or IIS 7.5 Prerequisites for the .NET Web Service Component. . . . . . . . . . . . . . . 25Firewall Configuration. . . . . . . . . . . . . . . . . . . . . . . . . . . . . . . . . . . . . . . . . . . . . . . . . . . . . . 25
4.4 User Account Control. . . . . . . . . . . . . . . . . . . . . . . . . . . . . . . . . . . . . . . . . . . . . . . . . . . . . . . . . 29
5 Installation. . . . . . . . . . . . . . . . . . . . . . . . . . . . . . . . . . . . . . . . . . . . . . . . . . . . . . . . . . . . . . . .305.1 Installing Prerequisite Software. . . . . . . . . . . . . . . . . . . . . . . . . . . . . . . . . . . . . . . . . . . . . . . . . . 30
Prerequisite Software Installed with the Product. . . . . . . . . . . . . . . . . . . . . . . . . . . . . . . . . . . . 30Prerequisite Software Not Installed with the Product. . . . . . . . . . . . . . . . . . . . . . . . . . . . . . . . . 33
5.2 Installing the SAP BusinessObjects Profitability and Cost Management Database Schema. . . . . . . . 40Setting up a New Microsoft SQL Server Database Structure. . . . . . . . . . . . . . . . . . . . . . . . . . . 40Setting up a New Oracle Database Structure. . . . . . . . . . . . . . . . . . . . . . . . . . . . . . . . . . . . . . 42Setting up a New SAP Adaptive Server Enterprise Database Structure. . . . . . . . . . . . . . . . . . . . 42Setting Up an SAP HANA Database for Export to HANA. . . . . . . . . . . . . . . . . . . . . . . . . . . . . . .43
5.3 Installing the SAP BusinessObjects Profitability and Cost Management Software. . . . . . . . . . . . . . . 44
2 PUBLICSAP BusinessObjects Profitability and Cost Management Installation Guide
Content
Connectivity Pack. . . . . . . . . . . . . . . . . . . . . . . . . . . . . . . . . . . . . . . . . . . . . . . . . . . . . . . . . 47Remote Configuration Tool. . . . . . . . . . . . . . . . . . . . . . . . . . . . . . . . . . . . . . . . . . . . . . . . . . . 47
5.4 Performing a SAP BusinessObjects Profitability and Cost Management Silent Installation. . . . . . . . . 47To Configure a Silent Installation. . . . . . . . . . . . . . . . . . . . . . . . . . . . . . . . . . . . . . . . . . . . . . . 48To Launch a Silent Installation. . . . . . . . . . . . . . . . . . . . . . . . . . . . . . . . . . . . . . . . . . . . . . . . .52
5.5 Installing SAP BusinessObjects Information Platform Services 4.0. . . . . . . . . . . . . . . . . . . . . . . . . 53
6 Post-Installation. . . . . . . . . . . . . . . . . . . . . . . . . . . . . . . . . . . . . . . . . . . . . . . . . . . . . . . . . . . .546.1 Configuring the Software. . . . . . . . . . . . . . . . . . . . . . . . . . . . . . . . . . . . . . . . . . . . . . . . . . . . . . .54
Configuring the Application Server. . . . . . . . . . . . . . . . . . . . . . . . . . . . . . . . . . . . . . . . . . . . . 54Configuring the Web Server. . . . . . . . . . . . . . . . . . . . . . . . . . . . . . . . . . . . . . . . . . . . . . . . . . 66Configuring a Client Machine. . . . . . . . . . . . . . . . . . . . . . . . . . . . . . . . . . . . . . . . . . . . . . . . . 76To Re-configure a Server Installation. . . . . . . . . . . . . . . . . . . . . . . . . . . . . . . . . . . . . . . . . . . . 84
6.2 DCOM Security Configuration. . . . . . . . . . . . . . . . . . . . . . . . . . . . . . . . . . . . . . . . . . . . . . . . . . . 85Configuring Application Server DCOM Security. . . . . . . . . . . . . . . . . . . . . . . . . . . . . . . . . . . . 86Configuring Web server DCOM Security. . . . . . . . . . . . . . . . . . . . . . . . . . . . . . . . . . . . . . . . . . 93Configuring DCOM Security for the Remote Configuration Tool . . . . . . . . . . . . . . . . . . . . . . . . . 97
6.3 Web Server: IIS configuration. . . . . . . . . . . . . . . . . . . . . . . . . . . . . . . . . . . . . . . . . . . . . . . . . . . 101General Web Server Configuration . . . . . . . . . . . . . . . . . . . . . . . . . . . . . . . . . . . . . . . . . . . . 103Additional Web Settings to Enhance Model Accessibility. . . . . . . . . . . . . . . . . . . . . . . . . . . . . . 117Web Server URL Changes. . . . . . . . . . . . . . . . . . . . . . . . . . . . . . . . . . . . . . . . . . . . . . . . . . . 121
6.4 Integrating Profitability and Cost Management with Financial Information Management. . . . . . . . . .123Configuring the FIMService Web Service Connection. . . . . . . . . . . . . . . . . . . . . . . . . . . . . . . . 125
6.5 Installation Checks. . . . . . . . . . . . . . . . . . . . . . . . . . . . . . . . . . . . . . . . . . . . . . . . . . . . . . . . . . 129Logging in to a Profitability and Cost Management Application. . . . . . . . . . . . . . . . . . . . . . . . . 129Model creation basic checks. . . . . . . . . . . . . . . . . . . . . . . . . . . . . . . . . . . . . . . . . . . . . . . . . 131
7 Additional Information. . . . . . . . . . . . . . . . . . . . . . . . . . . . . . . . . . . . . . . . . . . . . . . . . . . . . . 1327.1 Configuration Wizard Settings. . . . . . . . . . . . . . . . . . . . . . . . . . . . . . . . . . . . . . . . . . . . . . . . . . 132
About Windows Sockets. . . . . . . . . . . . . . . . . . . . . . . . . . . . . . . . . . . . . . . . . . . . . . . . . . . . 132About Advanced IP Filtering. . . . . . . . . . . . . . . . . . . . . . . . . . . . . . . . . . . . . . . . . . . . . . . . . 132About Advanced Server Options. . . . . . . . . . . . . . . . . . . . . . . . . . . . . . . . . . . . . . . . . . . . . . 133
7.2 Setting up End-to-End Root Cause Analysis. . . . . . . . . . . . . . . . . . . . . . . . . . . . . . . . . . . . . . . . . 136About the SAP Diagnostics Agent. . . . . . . . . . . . . . . . . . . . . . . . . . . . . . . . . . . . . . . . . . . . . .137About Profitability and Cost Management Metrics . . . . . . . . . . . . . . . . . . . . . . . . . . . . . . . . . 138SAP Diagnostics Agent Installation Prerequisites. . . . . . . . . . . . . . . . . . . . . . . . . . . . . . . . . . .139Installing the SAP Diagnostics Agent Without Connection to the SAP Solution Manager . . . . . . . 140Configuring the SAP Diagnostics Agent Without Connection to the SAP Solution Manager. . . . . . . . . . . . . . . . . . . . . . . . . . . . . . . . . . . . . . . . . . . . . . . . . . . . . . . . . . . . . . . . . . . . . . 141Testing the SAP Diagnostics Agent. . . . . . . . . . . . . . . . . . . . . . . . . . . . . . . . . . . . . . . . . . . . . 143
7.3 SAP BusinessObjects Profitability and Cost Management Program Maintenance. . . . . . . . . . . . . . .144To Modify an Existing Installation. . . . . . . . . . . . . . . . . . . . . . . . . . . . . . . . . . . . . . . . . . . . . . 144
SAP BusinessObjects Profitability and Cost Management Installation GuideContent PUBLIC 3
To Repair an Existing Installation. . . . . . . . . . . . . . . . . . . . . . . . . . . . . . . . . . . . . . . . . . . . . . 145Uninstalling the software. . . . . . . . . . . . . . . . . . . . . . . . . . . . . . . . . . . . . . . . . . . . . . . . . . . . 145
4 PUBLICSAP BusinessObjects Profitability and Cost Management Installation Guide
Content
1 History of Changes
The current version of this document is version 1.6. The most recent version of the SAP BusinessObjects Profitability and Cost Management Installation Guide is always located on the SAP Service Marketplace at service.sap.com/instguides. The following table provides an overview of the most important changes to prior and current versions of this document:
Version Date Important Changes
Version 1.0 May-10-2011 Initial version of the SAP BusinessObjects Profitability and Cost Management Installation Guide for SAP BusinessObjects Profitability and Cost Management 10.0.
Version 1.1 August-2011 As part of the updated Profitability and Cost Management version released in August 2011, the document contains the following amendments or additions:
● The section on how to uninstall the product is updated to describe the uninstall process for Microsoft Windows Server 2008.
● The topics “Microsoft SQL Command”, “Microsoft SQL Native Client” and “Installing the SAP BusinessObjects Profitability and Cost Management Software”, are updated to inform users that Microsoft SQL Native Client is an installation prerequisite for Microsoft SQL Command.
● The topic “Configuring the Application Server” is amended in step 8 to clarify the options for configuring disk space levels.
Version 1.2 September-2011 As part of the release of Support Package 01, the document contains the following changes:
● The “Installing Oracle Instant Client 11g R2” topic is updated with a recommendation to copy Oracle Instant Client files into the install directory in the event of compatibility issues with previous Oracle installations.
Version 1.3 2012 As part of the release of Support Package 03, the document contains the following changes:
SAP BusinessObjects Profitability and Cost Management Installation GuideHistory of Changes PUBLIC 5
Version Date Important Changes
● The 64-bit version of MDX ODBO Connector is now compatible with SAP BusinessObjects EPM Add-in for Microsoft Office, and it is no longer necessary to install the 32-bit version. Obsolete text is removed as follows:○ In “Installing and Configuring
SAP BusinessObjects Profitability and Cost Management”, Note 4 is removed.
○ In “Installing the SAP BusinessObjects Profitability and Cost Management Software”, in Step 1, the Note is removed.
● To clarify the set-up procedure for integrating Profitability and Cost Management with Financial Information Management, the following changes are made in Chapter 6 “Post-Installation”:○ A new topic is added,
“Integrating Profitability and Cost Management with Financial Information Management”, which outlines all the tasks that are required to enable integration.
○ A new topic is added, “Testing the Web Server Installation”, which provides the steps required to ensure that your Profitability and Cost Management Web Server Installation is operating correctly at all stages.
○ The following topics are amended:○ “Configuring IIS 6.0
Active Server Pages”○ “Installing IIS 7 Active
Server Pages”○ “Configuring the
FIMService Web Service Connection”
○ “To Configure the FIMService Web Service Security Account in IIS 6.0”
6 PUBLICSAP BusinessObjects Profitability and Cost Management Installation Guide
History of Changes
Version Date Important Changes
○ “To Configure the FIMService Web Service Security Account in IIS 7”
● The topic “Integration” is updated by adding the component SAP BusinessObjects Financial Information Management.
● The guide is updated to include support for IIS 7.5.
Version 1.4 August 2012 As part of the release of Support Package 04, the document contains the following changes:
● The procedure for executing a silent uninstall is added:○ The section “Uninstalling the
software” is added, to replace the section “To uninstall SAP BusinessObjects Profitability and Cost Management”.
○ The topic “To Perform a Silent Uninstall” is added.
Version 1.5 Novermber 2012 As part of the release of Support Package 05, the document contains the following changes:
The topics “Changing 64-bit Settings” and “Configuring IIS 6.0 to Run 32-Bit Applications” are changed to reflect the fact that the FIMService web service will run in 64-bit mode on a 64-bit installation.
Version 1.6 November 2013 As part of the release of Support Package 08, the document contains the following changes:
● The “Web Server: IIS Configuration” section contains several new topics on how to configure IIS 8.0 for the Web server.
● The “Installing Prerequisite Software” and “Web Server: IIS Configuration” sections are updated with the requirements for using the EPM add-in write-back feature.
SAP BusinessObjects Profitability and Cost Management Installation GuideHistory of Changes PUBLIC 7
2 Introduction to Profitability and Cost Management
This document describes the installation and configuration process for SAP BusinessObjects Profitability and Cost Management. An overview of the Profitability and Cost Management system and configuration is explored in this guide.
The type of installation process that you perform is dependent on the type of network configuration and system components that are installed and configured, and therefore it is strongly recommended that you read through the introductory sections before you start the installation process.
2.1 About this document
The objective of this guide is to explain in detail how to install, configure, re-configure, and uninstall the software. It explains the preparatory steps for consideration before installing, and the step-by-step procedure for installation. Configuration options and their implications are also described, and any post-configuration tasks you may be required to perform.
NoteUpgrade information can be found in the SAP BusinessObjects Profitability and Cost Management Upgrade Guide.
2.1.1 What is Profitability and Cost Management?
Profitability and Cost Management is a software product designed to allow financial analysts, reporters, and end users to create financial models of their organization, and to analyze the data in a flexible and responsive manner.
The integral part of the 32-bit and 64-bit Microsoft Windows application consists of four different modeling types:
● Profitability and Costing● Objectives and Metrics● Transactional Costing● Bill of Materials
These all have an extensive feature set, and the following ancillary applications also work in conjunction with them to allow different activities:
8 PUBLICSAP BusinessObjects Profitability and Cost Management Installation Guide
Introduction to Profitability and Cost Management
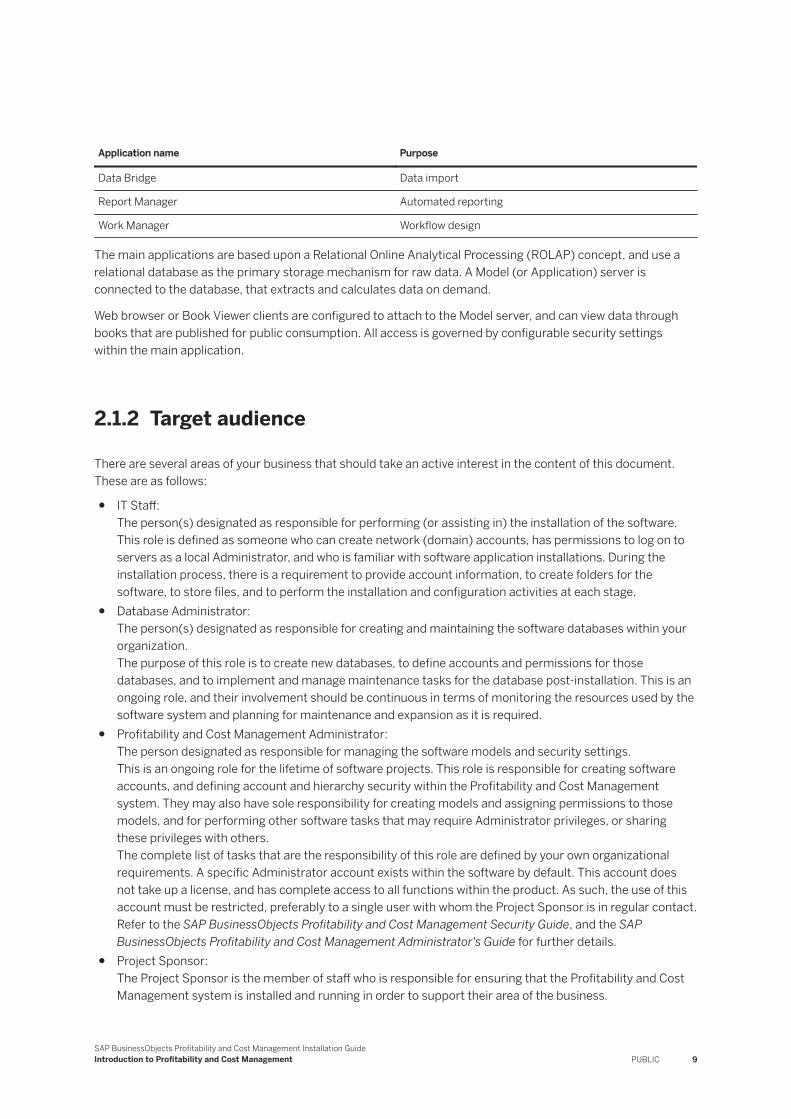
Application name Purpose
Data Bridge Data import
Report Manager Automated reporting
Work Manager Workflow design
The main applications are based upon a Relational Online Analytical Processing (ROLAP) concept, and use a relational database as the primary storage mechanism for raw data. A Model (or Application) server is connected to the database, that extracts and calculates data on demand.
Web browser or Book Viewer clients are configured to attach to the Model server, and can view data through books that are published for public consumption. All access is governed by configurable security settings within the main application.
2.1.2 Target audience
There are several areas of your business that should take an active interest in the content of this document. These are as follows:
● IT Staff:The person(s) designated as responsible for performing (or assisting in) the installation of the software.This role is defined as someone who can create network (domain) accounts, has permissions to log on to servers as a local Administrator, and who is familiar with software application installations. During the installation process, there is a requirement to provide account information, to create folders for the software, to store files, and to perform the installation and configuration activities at each stage.
● Database Administrator:The person(s) designated as responsible for creating and maintaining the software databases within your organization.The purpose of this role is to create new databases, to define accounts and permissions for those databases, and to implement and manage maintenance tasks for the database post-installation. This is an ongoing role, and their involvement should be continuous in terms of monitoring the resources used by the software system and planning for maintenance and expansion as it is required.
● Profitability and Cost Management Administrator:The person designated as responsible for managing the software models and security settings.This is an ongoing role for the lifetime of software projects. This role is responsible for creating software accounts, and defining account and hierarchy security within the Profitability and Cost Management system. They may also have sole responsibility for creating models and assigning permissions to those models, and for performing other software tasks that may require Administrator privileges, or sharing these privileges with others.The complete list of tasks that are the responsibility of this role are defined by your own organizational requirements. A specific Administrator account exists within the software by default. This account does not take up a license, and has complete access to all functions within the product. As such, the use of this account must be restricted, preferably to a single user with whom the Project Sponsor is in regular contact. Refer to the SAP BusinessObjects Profitability and Cost Management Security Guide, and the SAP BusinessObjects Profitability and Cost Management Administrator's Guide for further details.
● Project Sponsor:The Project Sponsor is the member of staff who is responsible for ensuring that the Profitability and Cost Management system is installed and running in order to support their area of the business.
SAP BusinessObjects Profitability and Cost Management Installation GuideIntroduction to Profitability and Cost Management PUBLIC 9
The role of the Project Sponsor in the installation process, is to oversee the activities of the Database Administrator and IT Staff to ensure that their work is co-ordinated at the correct times. Once the installation is completed, the Project Sponsor may wish to organize the testing of the system connectivity and permissions to ensure that everything works and performs as expected. It is the responsibility of the Project Sponsor to appoint a software Administrator's role.
2.1.3 Integration
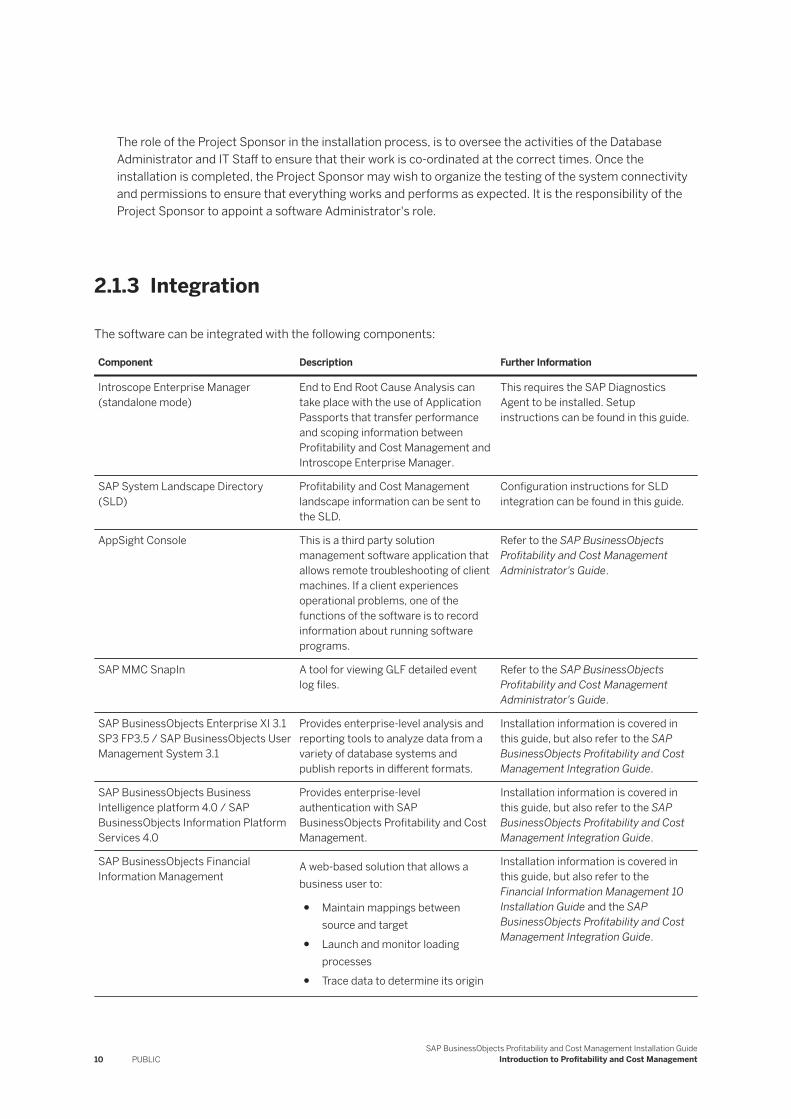
The software can be integrated with the following components:
Component Description Further Information
Introscope Enterprise Manager (standalone mode)
End to End Root Cause Analysis can take place with the use of Application Passports that transfer performance and scoping information between Profitability and Cost Management and Introscope Enterprise Manager.
This requires the SAP Diagnostics Agent to be installed. Setup instructions can be found in this guide.
SAP System Landscape Directory (SLD)
Profitability and Cost Management landscape information can be sent to the SLD.
Configuration instructions for SLD integration can be found in this guide.
AppSight Console This is a third party solution management software application that allows remote troubleshooting of client machines. If a client experiences operational problems, one of the functions of the software is to record information about running software programs.
Refer to the SAP BusinessObjects Profitability and Cost Management Administrator's Guide.
SAP MMC SnapIn A tool for viewing GLF detailed event log files.
Refer to the SAP BusinessObjects Profitability and Cost Management Administrator's Guide.
SAP BusinessObjects Enterprise XI 3.1 SP3 FP3.5 / SAP BusinessObjects User Management System 3.1
Provides enterprise-level analysis and reporting tools to analyze data from a variety of database systems and publish reports in different formats.
Installation information is covered in this guide, but also refer to the SAP BusinessObjects Profitability and Cost Management Integration Guide.
SAP BusinessObjects Business Intelligence platform 4.0 / SAP BusinessObjects Information Platform Services 4.0
Provides enterprise-level authentication with SAP BusinessObjects Profitability and Cost Management.
Installation information is covered in this guide, but also refer to the SAP BusinessObjects Profitability and Cost Management Integration Guide.
SAP BusinessObjects Financial Information Management
A web-based solution that allows a business user to:
● Maintain mappings between source and target
● Launch and monitor loading processes
● Trace data to determine its origin
Installation information is covered in this guide, but also refer to the Financial Information Management 10 Installation Guide and the SAP BusinessObjects Profitability and Cost Management Integration Guide.
10 PUBLICSAP BusinessObjects Profitability and Cost Management Installation Guide
Introduction to Profitability and Cost Management
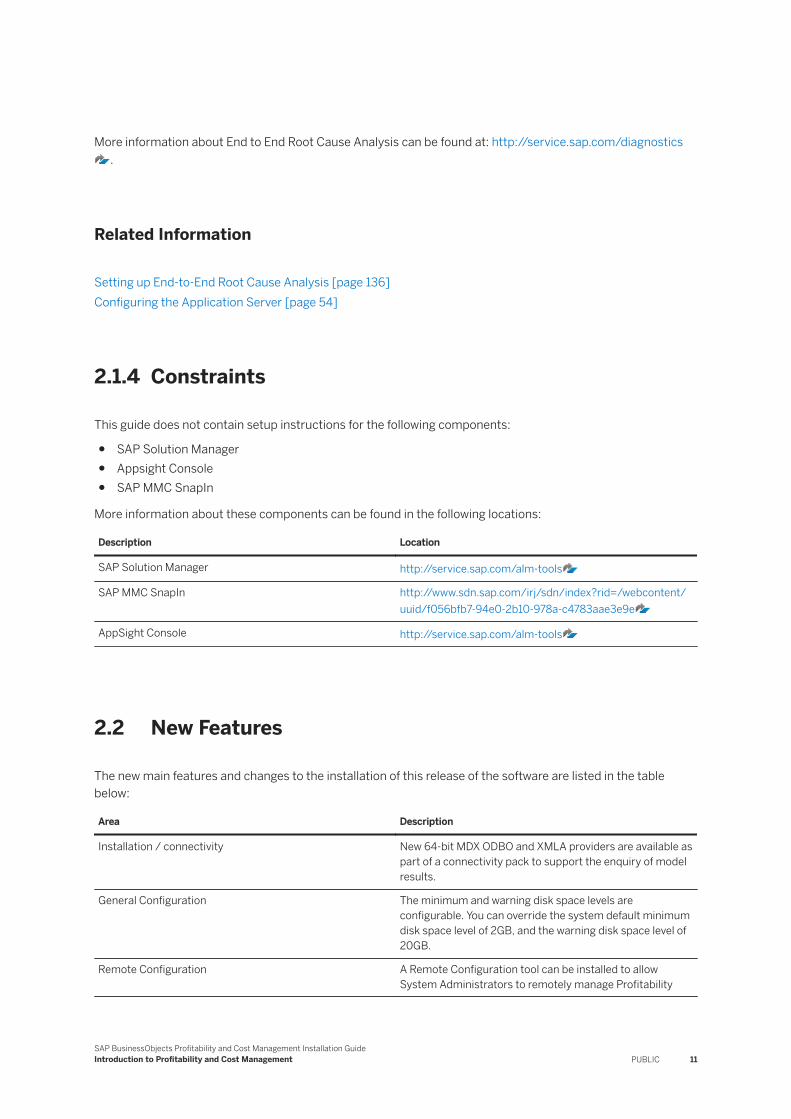
More information about End to End Root Cause Analysis can be found at: http://service.sap.com/diagnostics.
Related Information
Setting up End-to-End Root Cause Analysis [page 136]Configuring the Application Server [page 54]
2.1.4 Constraints
This guide does not contain setup instructions for the following components:
● SAP Solution Manager● Appsight Console● SAP MMC SnapIn
More information about these components can be found in the following locations:
Description Location
SAP Solution Manager http://service.sap.com/alm-tools
SAP MMC SnapIn http://www.sdn.sap.com/irj/sdn/index?rid=/webcontent/uuid/f056bfb7-94e0-2b10-978a-c4783aae3e9e
AppSight Console http://service.sap.com/alm-tools
2.2 New Features
The new main features and changes to the installation of this release of the software are listed in the table below:
Area Description
Installation / connectivity New 64-bit MDX ODBO and XMLA providers are available as part of a connectivity pack to support the enquiry of model results.
General Configuration The minimum and warning disk space levels are configurable. You can override the system default minimum disk space level of 2GB, and the warning disk space level of 20GB.
Remote Configuration A Remote Configuration tool can be installed to allow System Administrators to remotely manage Profitability
SAP BusinessObjects Profitability and Cost Management Installation GuideIntroduction to Profitability and Cost Management PUBLIC 11

Area Description
and Cost Management configuration files on servers and clients within the same domain.
Work Manager The Work Manager service can be disabled at installation time, to prevent unnecessary service processes from running in the background. Work Manager can now be installed as a Server and/or Client on a server or client machine. If the client option is selected in Configure, you do not have to enter details of the Work Manager server.
Report Manager The Report Manager service can be disabled at installation time, to prevent unnecessary service processes from running in the background. Report Manager can now be installed as a Server and/or Client on a server or client machine. If the client option is selected in Configure, you do not have to enter details of the Report Manager server.
Multiple system login A new Login Options screen in the Configuration Wizard allows a System Administrator to control what type of "Single Sign On" methods are available to system users. This can range from the default method, or multiple ways to login to the software. A new Multi System Options screen in the Configuration Wizard controls which servers in the domain are visible to the user. This enables users to choose which server they log in to.
Diagnostics An Advanced Server Options screen in the Configuration Wizard enables a System Administrator to configure Application Passport levels. The Application Passport feature collects performance metrics of server components for end-to-end root cause analysis in an SAP Solution Manager landscape. In the same screen, event logging can be configured for the same server-side components and NCS configuration to control the level of performance counters.
A new SLD Connection screen also allows you to send system component information to the SAP System Landscape Directory.
2.3 Before You Start
The following sections provide information about:
● SAP Notes for the Installation● Information Available on SAP Service Marketplace● Naming Conventions
12 PUBLICSAP BusinessObjects Profitability and Cost Management Installation Guide
Introduction to Profitability and Cost Management
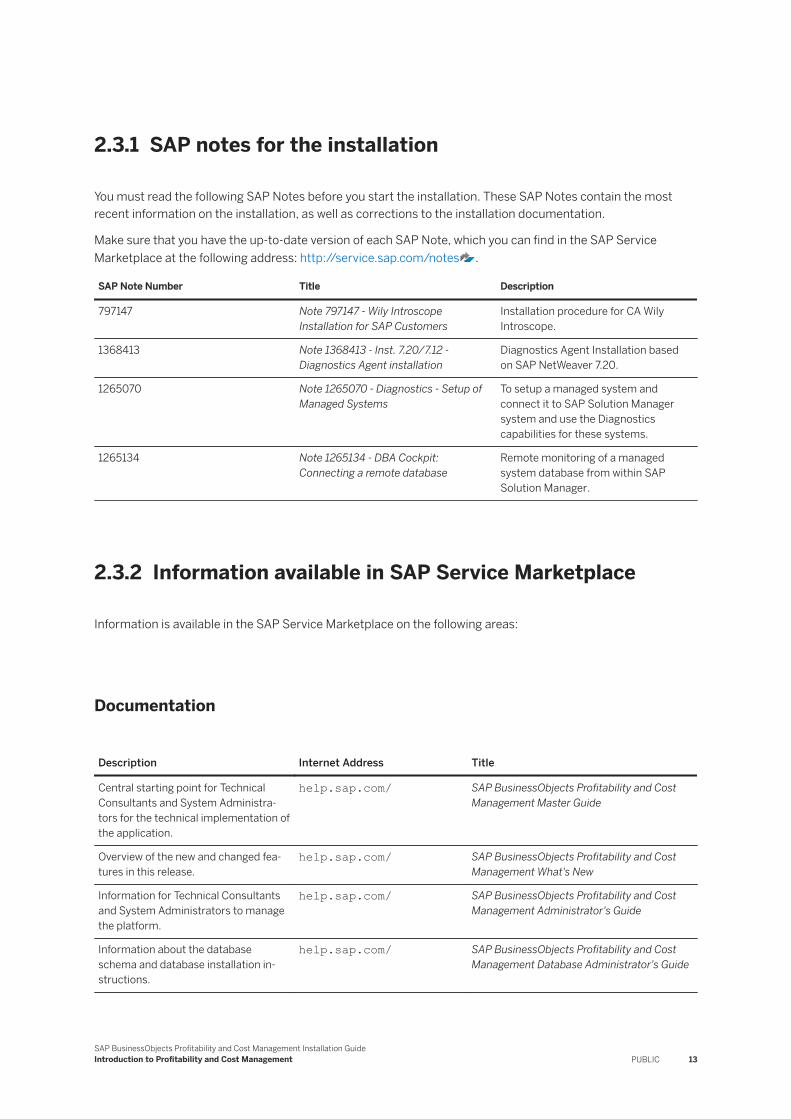
2.3.1 SAP notes for the installation
You must read the following SAP Notes before you start the installation. These SAP Notes contain the most recent information on the installation, as well as corrections to the installation documentation.
Make sure that you have the up-to-date version of each SAP Note, which you can find in the SAP Service Marketplace at the following address: http://service.sap.com/notes .
SAP Note Number Title Description
797147 Note 797147 - Wily Introscope Installation for SAP Customers
Installation procedure for CA Wily Introscope.
1368413 Note 1368413 - Inst. 7.20/7.12 - Diagnostics Agent installation
Diagnostics Agent Installation based on SAP NetWeaver 7.20.
1265070 Note 1265070 - Diagnostics - Setup of Managed Systems
To setup a managed system and connect it to SAP Solution Manager system and use the Diagnostics capabilities for these systems.
1265134 Note 1265134 - DBA Cockpit: Connecting a remote database
Remote monitoring of a managed system database from within SAP Solution Manager.
2.3.2 Information available in SAP Service Marketplace
Information is available in the SAP Service Marketplace on the following areas:
Documentation
Description Internet Address Title
Central starting point for Technical Consultants and System Administrators for the technical implementation of the application.
help.sap.com/ SAP BusinessObjects Profitability and Cost Management Master Guide
Overview of the new and changed features in this release.
help.sap.com/ SAP BusinessObjects Profitability and Cost Management What's New
Information for Technical Consultants and System Administrators to manage the platform.
help.sap.com/ SAP BusinessObjects Profitability and Cost Management Administrator's Guide
Information about the database schema and database installation instructions.
help.sap.com/ SAP BusinessObjects Profitability and Cost Management Database Administrator's Guide
SAP BusinessObjects Profitability and Cost Management Installation GuideIntroduction to Profitability and Cost Management PUBLIC 13
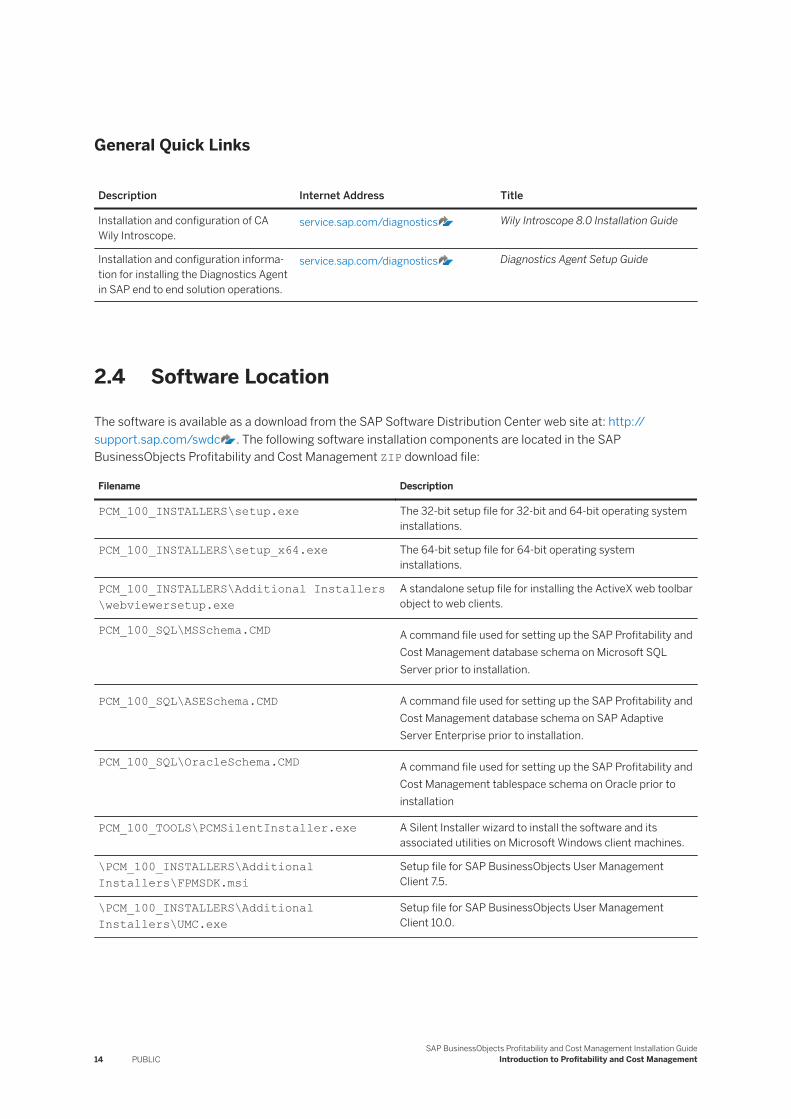
General Quick Links
Description Internet Address Title
Installation and configuration of CA Wily Introscope.
service.sap.com/diagnostics Wily Introscope 8.0 Installation Guide
Installation and configuration information for installing the Diagnostics Agent in SAP end to end solution operations.
service.sap.com/diagnostics Diagnostics Agent Setup Guide
2.4 Software Location
The software is available as a download from the SAP Software Distribution Center web site at: http://support.sap.com/swdc . The following software installation components are located in the SAP BusinessObjects Profitability and Cost Management ZIP download file:
Filename Description
PCM_100_INSTALLERS\setup.exe The 32-bit setup file for 32-bit and 64-bit operating system installations.
PCM_100_INSTALLERS\setup_x64.exe The 64-bit setup file for 64-bit operating system installations.
PCM_100_INSTALLERS\Additional Installers\webviewersetup.exe
A standalone setup file for installing the ActiveX web toolbar object to web clients.
PCM_100_SQL\MSSchema.CMD A command file used for setting up the SAP Profitability and Cost Management database schema on Microsoft SQL Server prior to installation.
PCM_100_SQL\ASESchema.CMD A command file used for setting up the SAP Profitability and Cost Management database schema on SAP Adaptive Server Enterprise prior to installation.
PCM_100_SQL\OracleSchema.CMD A command file used for setting up the SAP Profitability and Cost Management tablespace schema on Oracle prior to installation
PCM_100_TOOLS\PCMSilentInstaller.exe A Silent Installer wizard to install the software and its associated utilities on Microsoft Windows client machines.
\PCM_100_INSTALLERS\Additional Installers\FPMSDK.msi
Setup file for SAP BusinessObjects User Management Client 7.5.
\PCM_100_INSTALLERS\Additional Installers\UMC.exe
Setup file for SAP BusinessObjects User Management Client 10.0.
14 PUBLICSAP BusinessObjects Profitability and Cost Management Installation Guide
Introduction to Profitability and Cost Management

3 Planning
3.1 System Component Deployment
The following system components are required for an n-tier SAP BusinessObjects Profitability and Cost Management installation:
● Database server● Application server● Web server● Clients (Workstations, Web, and Terminal)
Optional components:
● Microsoft Terminal Services/Citrix Xen Desktop
3.1.1 System Component Installation Order
Certain conditions must exist in order for SAP BusinessObjects Profitability and Cost Management to be installed successfully. Primarily, minimum system requirements must be met and specific prerequisites must be installed as detailed in the accompanying SAP BusinessObjects Profitability and Cost Management Master Guide.
Certain components are dependent on the presence and successful configuration of specific additional components, particularly the Database server and the Application server, and so must be configured in the following order where components are separated across different physical machines:
1. Database server1. The Oracle or Microsoft SQL Server Database server handles the storage and retrieval of data, that is
fed through to the Model servers for consolidation or calculation. For information concerning database platform version, refer to the SAP BusinessObjects Profitability and Cost Management Master Guide document.
2. The installation and configuration of the RDBMS software is not supported by SAP, and you should consult the documentation associated with your chosen database software in order to perform such an installation. It is recommended that this installation is performed by your Database Administrator.
3. The database schema installation must be performed by your Database Administrator before the software is installed. You need to familiarize yourself with the account information that will be used for database connectivity during this process. Details of how to install or upgrade the software database schema is contained in the SAP BusinessObjects Profitability and Cost Management Database Administrator's Guide.
2. Application serverThere are two types of Application server:○ Primary Model server - A single server installation is designated as the primary model server. The
primary model server is responsible for co-ordinating the calculation of model results, and also for
SAP BusinessObjects Profitability and Cost Management Installation GuidePlanning PUBLIC 15
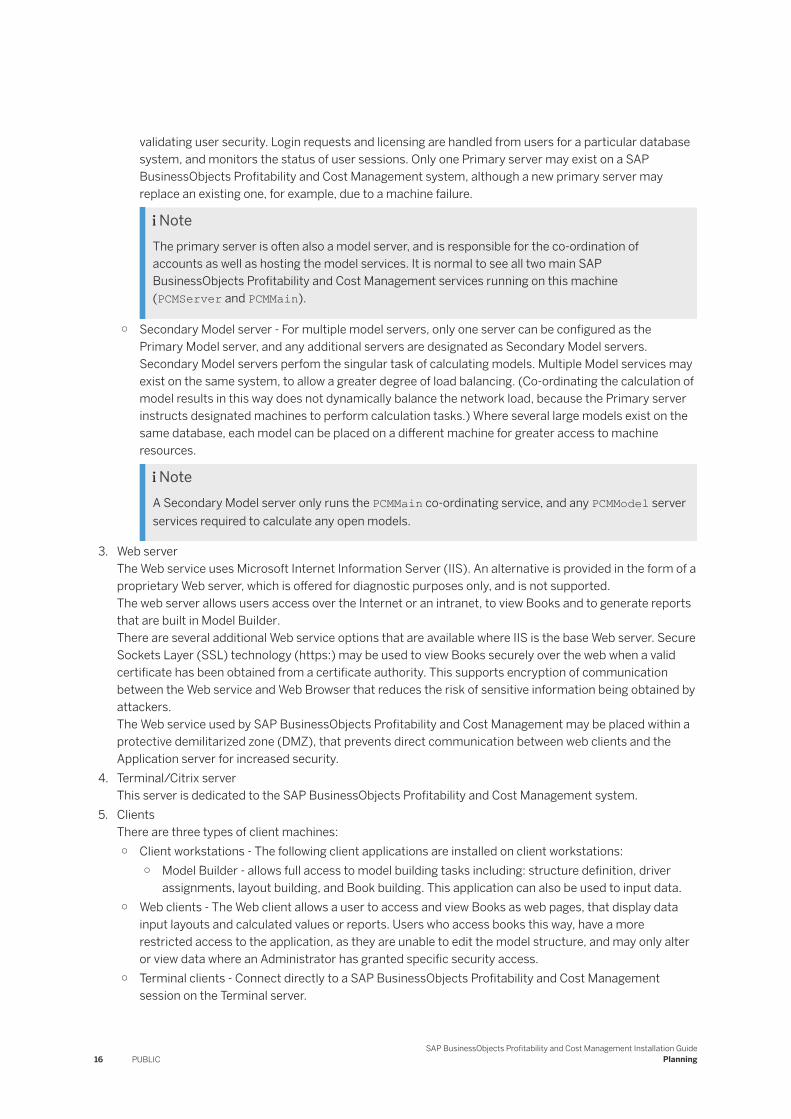
validating user security. Login requests and licensing are handled from users for a particular database system, and monitors the status of user sessions. Only one Primary server may exist on a SAP BusinessObjects Profitability and Cost Management system, although a new primary server may replace an existing one, for example, due to a machine failure.
NoteThe primary server is often also a model server, and is responsible for the co-ordination of accounts as well as hosting the model services. It is normal to see all two main SAP BusinessObjects Profitability and Cost Management services running on this machine (PCMServer and PCMMain).
○ Secondary Model server - For multiple model servers, only one server can be configured as the Primary Model server, and any additional servers are designated as Secondary Model servers. Secondary Model servers perfom the singular task of calculating models. Multiple Model services may exist on the same system, to allow a greater degree of load balancing. (Co-ordinating the calculation of model results in this way does not dynamically balance the network load, because the Primary server instructs designated machines to perform calculation tasks.) Where several large models exist on the same database, each model can be placed on a different machine for greater access to machine resources.
NoteA Secondary Model server only runs the PCMMain co-ordinating service, and any PCMModel server services required to calculate any open models.
3. Web serverThe Web service uses Microsoft Internet Information Server (IIS). An alternative is provided in the form of a proprietary Web server, which is offered for diagnostic purposes only, and is not supported.The web server allows users access over the Internet or an intranet, to view Books and to generate reports that are built in Model Builder.There are several additional Web service options that are available where IIS is the base Web server. Secure Sockets Layer (SSL) technology (https:) may be used to view Books securely over the web when a valid certificate has been obtained from a certificate authority. This supports encryption of communication between the Web service and Web Browser that reduces the risk of sensitive information being obtained by attackers.The Web service used by SAP BusinessObjects Profitability and Cost Management may be placed within a protective demilitarized zone (DMZ), that prevents direct communication between web clients and the Application server for increased security.
4. Terminal/Citrix serverThis server is dedicated to the SAP BusinessObjects Profitability and Cost Management system.
5. ClientsThere are three types of client machines:○ Client workstations - The following client applications are installed on client workstations:
○ Model Builder - allows full access to model building tasks including: structure definition, driver assignments, layout building, and Book building. This application can also be used to input data.
○ Web clients - The Web client allows a user to access and view Books as web pages, that display data input layouts and calculated values or reports. Users who access books this way, have a more restricted access to the application, as they are unable to edit the model structure, and may only alter or view data where an Administrator has granted specific security access.
○ Terminal clients - Connect directly to a SAP BusinessObjects Profitability and Cost Management session on the Terminal server.
16 PUBLICSAP BusinessObjects Profitability and Cost Management Installation Guide
Planning

The diagram below illustrates how the system components are setup in a three-tier environment, and represents the order in which they are installed from left to right:
On a three-tier system, the server version is installed on the middle tier, and the client version on any client workstations. The server must be installed alongside the database connectivity components for your database to allow connection to the database.
CautionThere can only be one primary model server installation through which additional model servers communicate. The primary server handles login requests by users. Model servers handle processing and calculation required by models.
3.1.2 Installation in a SAP BusinessObjects Business Intelligence platform Environment
The software can be integrated for security authentication purposes with the following SAP BusinessObjects Business Intelligence platform environments:
● SAP BusinessObjects Enterprise XI 3.1 SP3 FP3.5For more information on how to install it, see the SAP web site: http://help.sap.com.
● SAP BusinessObjects User Management System 3.1For more information on how to install it, see the SAP web site: http://help.sap.com.
● SAP BusinessObjects Business Intelligence platform 4.0.For more information on how to install it, see the SAP web site: http://help.sap.com.
● SAP BusinessObjects Information Platform Services 4.0.For more information on how to install it, see the SAP BusinessObjects Information Platform Services Installation Guide and the SAP web site: http://help.sap.com.
SAP BusinessObjects Profitability and Cost Management Installation GuidePlanning PUBLIC 17

Information about synchronizing users between the systems can be found in the SAP BusinessObjects Profitability and Cost Management Integration Guide.
RestrictionTo be able to use Enterprise authentication, you must install either SAP BusinessObjects User Management Client 7.5 or SAP BusinessObjects User Management Client 10.0 on any server or client machine that needs to use this type of login method. This needs to be installed manually before you install SAP BusinessObjects Profitability and Cost Management.
For web clients using Enterprise authentication, the SAP BusinessObjects User Management Client needs to be installed only on the web server. Authentication requests are handled on the server rather than the client. However, if web clients need to authenticate with the Central Management Server (CMS) using the Windows AD, Windows NT, LDAP or SAP type of authentication, then the SAP BusinessObjects User Management Client must be installed on the web clients.
SAP BusinessObjects Enterprise XI 3.1 SP3 FP3.5 interfaces with the following SAP BusinessObjects Enterprise applications:
● SAP BusinessObjects InfoView● SAP BusinessObjects Voyager● SAP BusinessObjects Web Intelligence
3.1.2.1 SAP BusinessObjects Information Platform Services
The SAP BusinessObjects Information Platform Services 4.0 and SAP BusinessObjects User Management System 3.1 software provides Enterprise Single Sign On authentication services, and user, group, and server management capabilities, without the need to install a full SAP BusinessObjects Business Intelligence platform installation.
The software can be installed in the following scenarios:
● Single machine - Both software products are installed on the same machine.● Separate machines - The software is installed on one (or more) machine(s), and the SAP BusinessObjects
Information Platform Services 4.0 or SAP BusinessObjects User Management System 3.1 is installed on a separate machine.
Related Information
Installing SAP BusinessObjects Information Platform Services 4.0 [page 53]
18 PUBLICSAP BusinessObjects Profitability and Cost Management Installation Guide
Planning
3.2 Installing and Configuring SAP BusinessObjects Profitability and Cost Management
A database needs to be created on the database server, and relevant setup scripts applied before the software can be installed on subsequent servers.
The setup program is executed on the following servers:
● Application (Model) server(s)This is any server that is used to control and calculate models, and may be a single physical server or several.
NoteThe procedure for installing the software is the same for both Primary and Secondary Model servers.
● Web serverIf you want to initiate a dedicated Web server installation, and you plan to install the Work Manager server on your primary Model server, you also need to install the Work Manager client component on your Profitability and Cost Management web server. The web server needs to be able to decode information relating to Work Manager components because they are passed via the web books, and these necessary files are available only if a Work Manager client component is installed.
● Work Manager server (optional)The Work Manager application and services are normally installed on the Application server. The Work Manager server is a service that controls the management of Work Manager process instances. When a process instance is initiated, the server monitors that instance, initiating any actions defined within the process as the users move from state to state.
● Report Manager server (optional)The Report Manager application and services are normally installed on the Application server. The Report Manager server is a service that manages Report Manager tasks. When a reporting task is initiated, the service renders the Profitability and Cost Management book(s) that forms the basis of the report, and sends that data to the designated printer as a print job or Adobe PDF document.
The software applications (Model Builder, Report Manager, Work Manager, Data Bridge) must also be selectively installed on any of the following existing clients:
● Client workstations● Web clients● Terminal users
The setup program offers a group of software features to install that can be selected or deselected individually as appropriate. For example, if you are installing the software on to a Web server, then you only need to select the Core and Web components to install, but other software features are recommended.
The table of custom installation scenarios below describes which software installation features are optional (O), mandatory (M), recommended (R), or not applicable (N/A) for each physical system component in a typical three tier network configuration:
SAP BusinessObjects Profitability and Cost Management Installation GuidePlanning PUBLIC 19
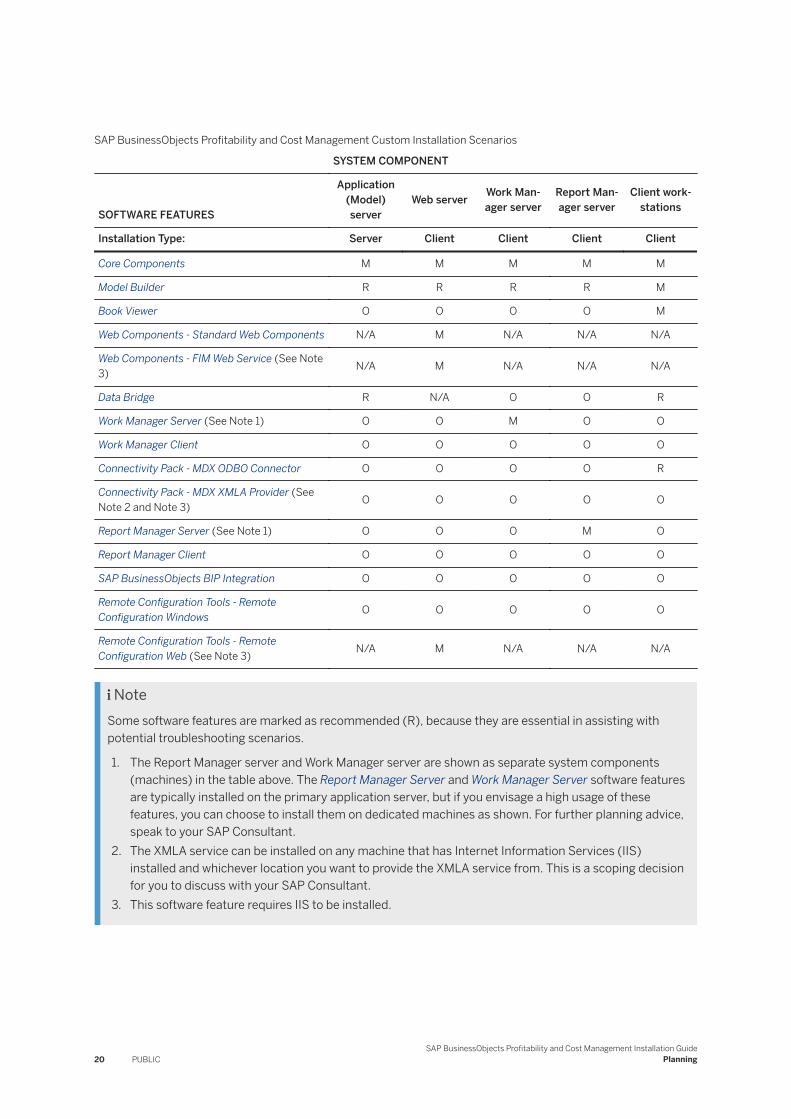
SAP BusinessObjects Profitability and Cost Management Custom Installation Scenarios
SYSTEM COMPONENT
SOFTWARE FEATURES
Application (Model) server
Web server Work Manager server
Report Manager server
Client workstations
Installation Type: Server Client Client Client Client
Core Components M M M M M
Model Builder R R R R M
Book Viewer O O O O M
Web Components - Standard Web Components N/A M N/A N/A N/A
Web Components - FIM Web Service (See Note 3) N/A M N/A N/A N/A
Data Bridge R N/A O O R
Work Manager Server (See Note 1) O O M O O
Work Manager Client O O O O O
Connectivity Pack - MDX ODBO Connector O O O O R
Connectivity Pack - MDX XMLA Provider (See Note 2 and Note 3) O O O O O
Report Manager Server (See Note 1) O O O M O
Report Manager Client O O O O O
SAP BusinessObjects BIP Integration O O O O O
Remote Configuration Tools - Remote Configuration Windows O O O O O
Remote Configuration Tools - Remote Configuration Web (See Note 3) N/A M N/A N/A N/A
NoteSome software features are marked as recommended (R), because they are essential in assisting with potential troubleshooting scenarios.
1. The Report Manager server and Work Manager server are shown as separate system components (machines) in the table above. The Report Manager Server and Work Manager Server software features are typically installed on the primary application server, but if you envisage a high usage of these features, you can choose to install them on dedicated machines as shown. For further planning advice, speak to your SAP Consultant.
2. The XMLA service can be installed on any machine that has Internet Information Services (IIS) installed and whichever location you want to provide the XMLA service from. This is a scoping decision for you to discuss with your SAP Consultant.
3. This software feature requires IIS to be installed.
20 PUBLICSAP BusinessObjects Profitability and Cost Management Installation Guide
Planning
4 Preparation
4.1 Tips For a Smooth Installation
Context
Before you start the installation, ensure that you perform the following tasks, to avoid troubleshooting issues later.
Procedure
1. Discuss your proposed install or upgrade with the SAP Solution Management team. The team have a wide variety of experience dealing with customer upgrades, and the types of issues that you may encounter. They can also help with guidelines for your installation environment, including a detailed specification of your servers.
2. Ensure that you have the correct software ready to install. Your consultant, or the SAP Solution Management team can advise you on what version of software to obtain, and how to obtain it.
3. Software keys are required for a first time installation, so ensure that you are in posession of all relevant software keys. This is also applicable for a software upgrade.
4. If you are performing an upgrade, then please refer to the SAP BusinessObjects Profitability and Cost Management Upgrade Guide.
5. It is important to have the availability of a Domain Administrator and a Database Administrator from your IT department. Their input may be required during the upgrade or installation process.Ensure you have adequate database housekeeping procedures in place, because log files, (especially transaction logs) can grow substantially, and may have adverse effects on the performance of the software.
6. During the install or upgrade process, the following access security is required:a. Access to the database server, and a suitable database user name and password to create or upgrade
the database.b. Access to your Application, Web and Terminal/Citrix servers to perform a software upgrade or
installation.c. A suitable network user name and password to provide machine and domain administration privileges.
7. If certain system components are going to reside in different domains to any of the Application servers, then you may need specific advice on how to configure your environment to operate correctly. Please discuss this with the SAP Solution Management team.
8. If you are performing an upgrade, ensure that you have a full working backup of your database. Although it is rare, it is possible that the upgrade may fail, and in this instance you will need to restore your database to its original condition before the upgrade was started.
9. Install the software in the order recommended in this guide.
SAP BusinessObjects Profitability and Cost Management Installation GuidePreparation PUBLIC 21
10. Ensure the first client machine is installed correctly before moving on to the other clients. This ensures that any installation problems are dealt with once, rather than once for each client.
4.2 Preinstallation Checklist
Quick Checklist
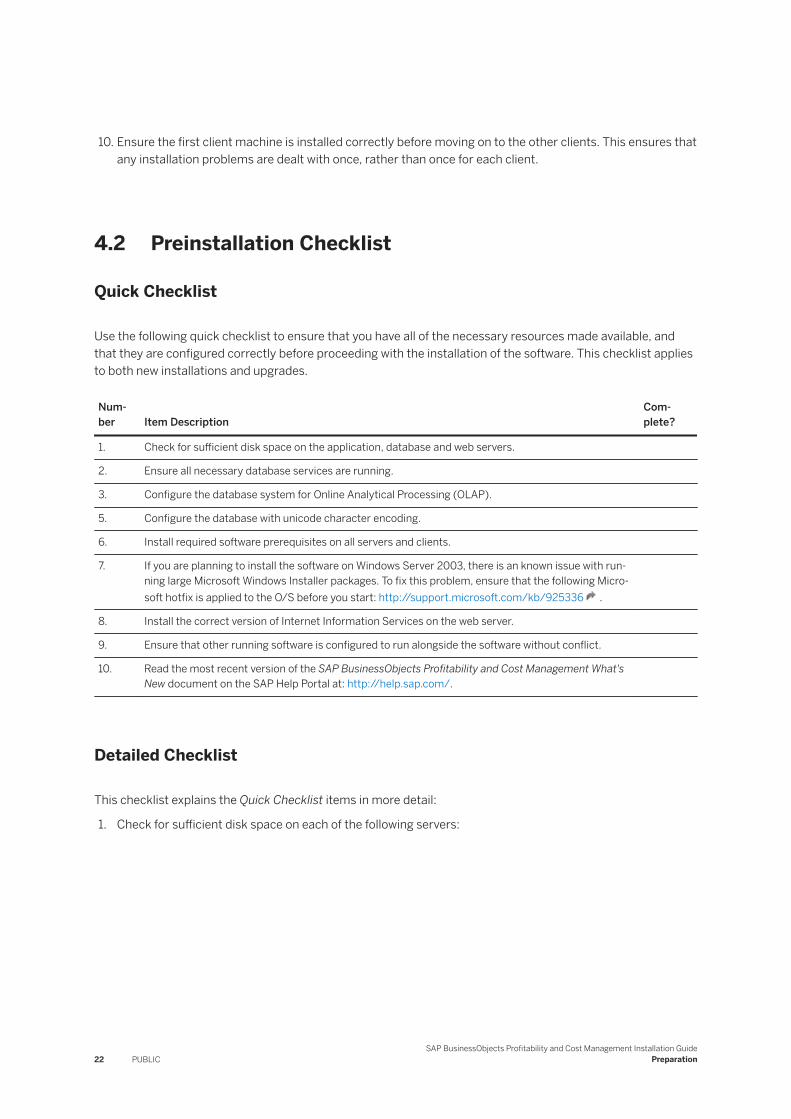
Use the following quick checklist to ensure that you have all of the necessary resources made available, and that they are configured correctly before proceeding with the installation of the software. This checklist applies to both new installations and upgrades.
Number Item Description
Complete?
1. Check for sufficient disk space on the application, database and web servers.
2. Ensure all necessary database services are running.
3. Configure the database system for Online Analytical Processing (OLAP).
5. Configure the database with unicode character encoding.
6. Install required software prerequisites on all servers and clients.
7. If you are planning to install the software on Windows Server 2003, there is an known issue with running large Microsoft Windows Installer packages. To fix this problem, ensure that the following Microsoft hotfix is applied to the O/S before you start: http://support.microsoft.com/kb/925336 .
8. Install the correct version of Internet Information Services on the web server.
9. Ensure that other running software is configured to run alongside the software without conflict.
10. Read the most recent version of the SAP BusinessObjects Profitability and Cost Management What's New document on the SAP Help Portal at: http://help.sap.com/.
Detailed Checklist
This checklist explains the Quick Checklist items in more detail:
1. Check for sufficient disk space on each of the following servers:
22 PUBLICSAP BusinessObjects Profitability and Cost Management Installation Guide
Preparation
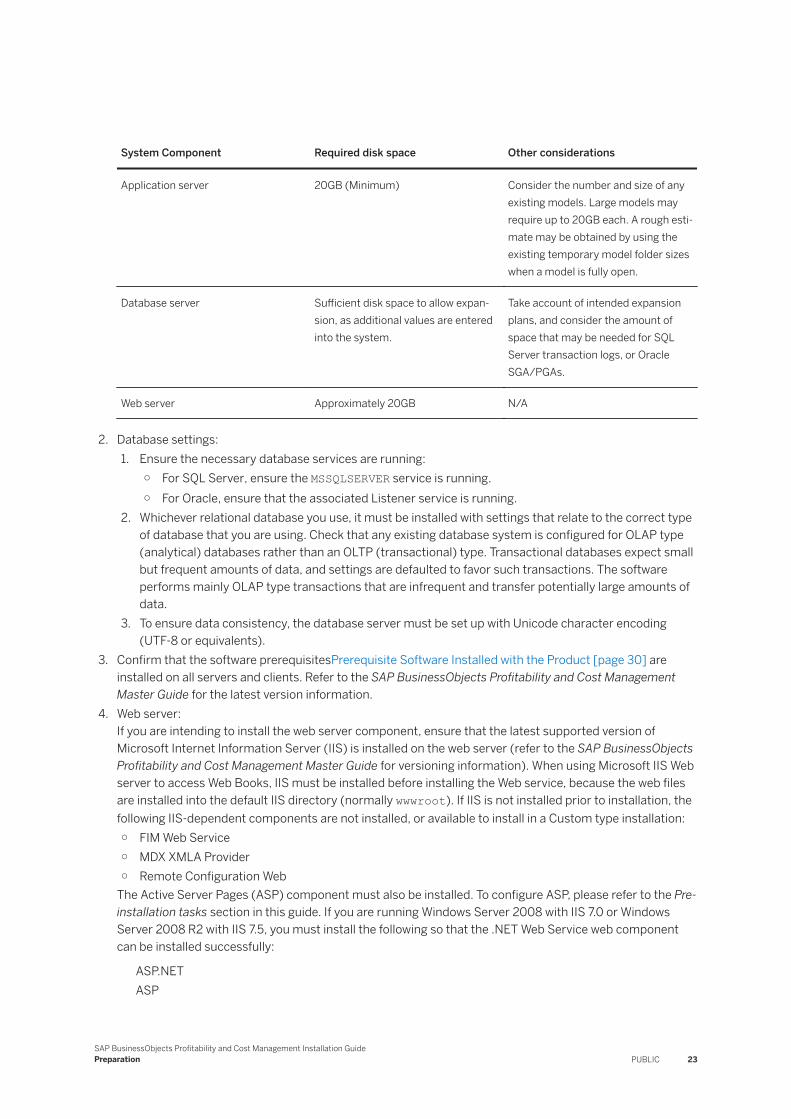
System Component Required disk space Other considerations
Application server 20GB (Minimum) Consider the number and size of any existing models. Large models may require up to 20GB each. A rough estimate may be obtained by using the existing temporary model folder sizes when a model is fully open.
Database server Sufficient disk space to allow expansion, as additional values are entered into the system.
Take account of intended expansion plans, and consider the amount of space that may be needed for SQL Server transaction logs, or Oracle SGA/PGAs.
Web server Approximately 20GB N/A
2. Database settings:1. Ensure the necessary database services are running:
○ For SQL Server, ensure the MSSQLSERVER service is running.○ For Oracle, ensure that the associated Listener service is running.
2. Whichever relational database you use, it must be installed with settings that relate to the correct type of database that you are using. Check that any existing database system is configured for OLAP type (analytical) databases rather than an OLTP (transactional) type. Transactional databases expect small but frequent amounts of data, and settings are defaulted to favor such transactions. The software performs mainly OLAP type transactions that are infrequent and transfer potentially large amounts of data.
3. To ensure data consistency, the database server must be set up with Unicode character encoding (UTF-8 or equivalents).
3. Confirm that the software prerequisitesPrerequisite Software Installed with the Product [page 30] are installed on all servers and clients. Refer to the SAP BusinessObjects Profitability and Cost Management Master Guide for the latest version information.
4. Web server:If you are intending to install the web server component, ensure that the latest supported version of Microsoft Internet Information Server (IIS) is installed on the web server (refer to the SAP BusinessObjects Profitability and Cost Management Master Guide for versioning information). When using Microsoft IIS Web server to access Web Books, IIS must be installed before installing the Web service, because the web files are installed into the default IIS directory (normally wwwroot). If IIS is not installed prior to installation, the following IIS-dependent components are not installed, or available to install in a Custom type installation:○ FIM Web Service○ MDX XMLA Provider○ Remote Configuration Web
The Active Server Pages (ASP) component must also be installed. To configure ASP, please refer to the Pre-installation tasks section in this guide. If you are running Windows Server 2008 with IIS 7.0 or Windows Server 2008 R2 with IIS 7.5, you must install the following so that the .NET Web Service web component can be installed successfully:
ASP.NETASP
SAP BusinessObjects Profitability and Cost Management Installation GuidePreparation PUBLIC 23
IIS 6 Management Compatibility
To install these prerequisites, refer to the “Installing IIS 7.0 or IIS 7.5 prerequisites for the .NET Web Service component” section in the Pre-installation tasks section in this guide.
5. Other software:Other running software can affect the operation of SAP BusinessObjects Profitability and Cost Management. In particular anti-virus software has the potential to perform a scan on any newly created files. Because the software often creates temporary results files to store calculated data in memory-mapped files, anti-virus software must be configured to ignore software directories, or should be removed entirely (depending upon the policies of your organization).Ensure that the model folder where the ModelRes.EPM files are created (this is usually C:\PCMTemp\Models), is added to the exclusion list in your anti-virus software. This is because many temporary files are created in this location when the system is running. The files are updated several times and if they are not excluded, the anti-virus software performs continuous checks on those files, which can affect performance.For Microsoft operating systems we also recommend that the Automatic Updates feature is turned off on the servers. Installing updates has the potential to overwrite files that are essential to the software without them being tested for compatibility first.
6. Read the SAP BusinessObjects Profitability and Cost Management What's New document that accompanies this release to check for updates or changes that may be relevant to your organization.
Related Information
Configuring IIS 6.0 Active Server Pages [page 103]Installing IIS 7.0 or IIS 7.5 Prerequisites for the .NET Web Service Component [page 25]
4.3 Pre-installation Tasks
Certain configuration aspects of your network topology and system components must be considered and confirmed before installing the SAP BusinessObjects Profitability and Cost Management software.
In addition to stepping through the pre-installation checklist, please also refer to the SAP BusinessObjects Profitability and Cost Management Master Guide, to confirm minimum specifications, database platforms and supported operating systems.
24 PUBLICSAP BusinessObjects Profitability and Cost Management Installation Guide
Preparation
4.3.1 Installing IIS 7.0 or IIS 7.5 Prerequisites for the .NET Web Service Component
Context
If the server is running Microsoft Windows Server 2008 (or 2008 R2) or Windows 7, and Internet Information Server (IIS) 7.0 or 7.5, the following components need to be installed for the .NET Web Service to be installed correctly:
ASP.NETASPIIS 6 Management Compatibility
Procedure
1. Select Start Administrative Tools Server Manager .2. In the navigation pane on the left, expand Roles, right-click Web Server (IIS) and select Add Role Services.3. In the Role Services pane of the Add Role Services wizard, scroll to Application Development and select
ASP.NET and ASP.4. Scroll to Management Tools, select IIS 6 Management Capability, and then click Next.5. On the Confirmation page, click Install.6. When the installation is complete, click Close.
4.3.2 Firewall Configuration
There are two different types of transport mechanisms that provide the connection and communication between the client software application, and the server software application:
● DCOM● Sockets
To establish two way communication between the client and the server, any existing firewalls must be configured to allow DCOM or Sockets to use specific ports to pass information requests on.
4.3.2.1 DCOM Firewall Security
SAP BusinessObjects Profitability and Cost Management can use the Distributed Component Object Model (DCOM) protocol to establish two way communications between the client and server software. DCOM enables a client machine to communicate over TCP/IP with the server software running on separate server hardware.
SAP BusinessObjects Profitability and Cost Management Installation GuidePreparation PUBLIC 25
Sometimes the route between the client machine and the server machine requires the TCP/IP protocol to communicate through a firewall. There are particular services that must be allowed through the firewall in order to allow DCOM and associated security processes to continue to operate correctly.
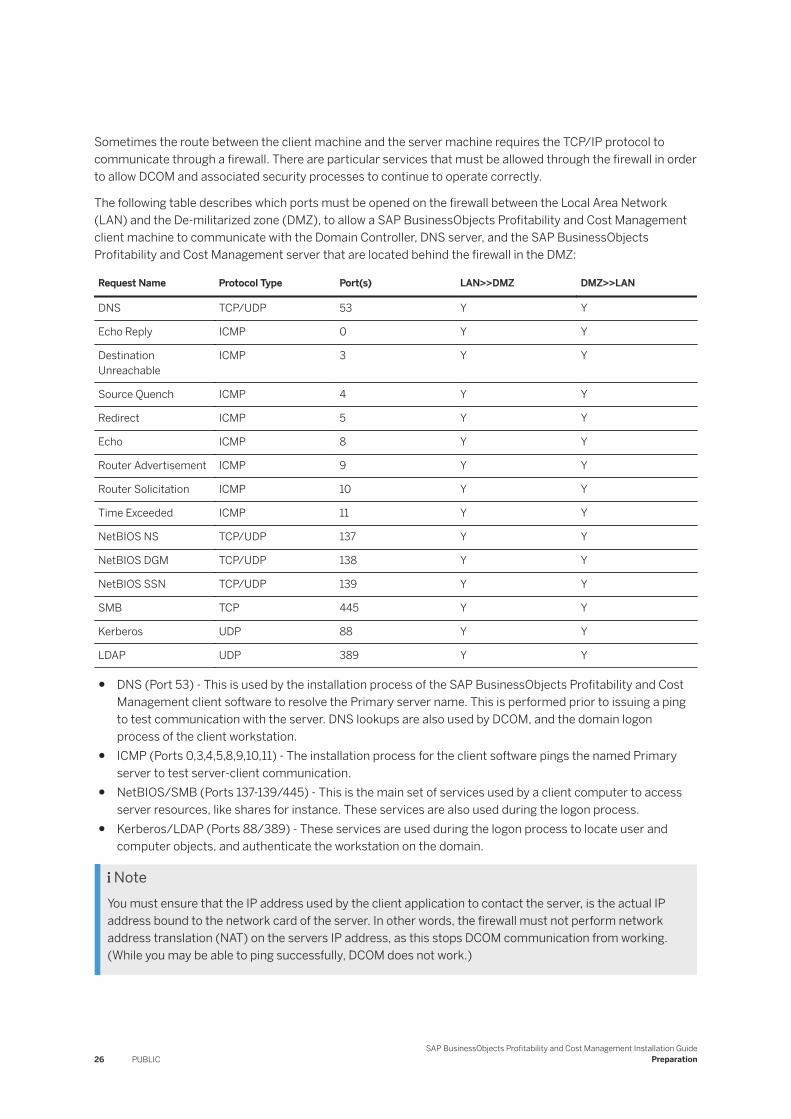
The following table describes which ports must be opened on the firewall between the Local Area Network (LAN) and the De-militarized zone (DMZ), to allow a SAP BusinessObjects Profitability and Cost Management client machine to communicate with the Domain Controller, DNS server, and the SAP BusinessObjects Profitability and Cost Management server that are located behind the firewall in the DMZ:
Request Name Protocol Type Port(s) LAN>>DMZ DMZ>>LAN
DNS TCP/UDP 53 Y Y
Echo Reply ICMP 0 Y Y
Destination Unreachable
ICMP 3 Y Y
Source Quench ICMP 4 Y Y
Redirect ICMP 5 Y Y
Echo ICMP 8 Y Y
Router Advertisement ICMP 9 Y Y
Router Solicitation ICMP 10 Y Y
Time Exceeded ICMP 11 Y Y
NetBIOS NS TCP/UDP 137 Y Y
NetBIOS DGM TCP/UDP 138 Y Y
NetBIOS SSN TCP/UDP 139 Y Y
SMB TCP 445 Y Y
Kerberos UDP 88 Y Y
LDAP UDP 389 Y Y
● DNS (Port 53) - This is used by the installation process of the SAP BusinessObjects Profitability and Cost Management client software to resolve the Primary server name. This is performed prior to issuing a ping to test communication with the server. DNS lookups are also used by DCOM, and the domain logon process of the client workstation.
● ICMP (Ports 0,3,4,5,8,9,10,11) - The installation process for the client software pings the named Primary server to test server-client communication.
● NetBIOS/SMB (Ports 137-139/445) - This is the main set of services used by a client computer to access server resources, like shares for instance. These services are also used during the logon process.
● Kerberos/LDAP (Ports 88/389) - These services are used during the logon process to locate user and computer objects, and authenticate the workstation on the domain.
NoteYou must ensure that the IP address used by the client application to contact the server, is the actual IP address bound to the network card of the server. In other words, the firewall must not perform network address translation (NAT) on the servers IP address, as this stops DCOM communication from working. (While you may be able to ping successfully, DCOM does not work.)
26 PUBLICSAP BusinessObjects Profitability and Cost Management Installation Guide
Preparation
In addition to opening these ports, there are two separate methods for allowing DCOM dynamic to communicate across TCP/IP in a firewalled environment. We recommend applying either one of the following methods:
● Allow DCOM to use HTTP requests on port 80or:
● Allow DCOM to communicate through SCM requests on port 135
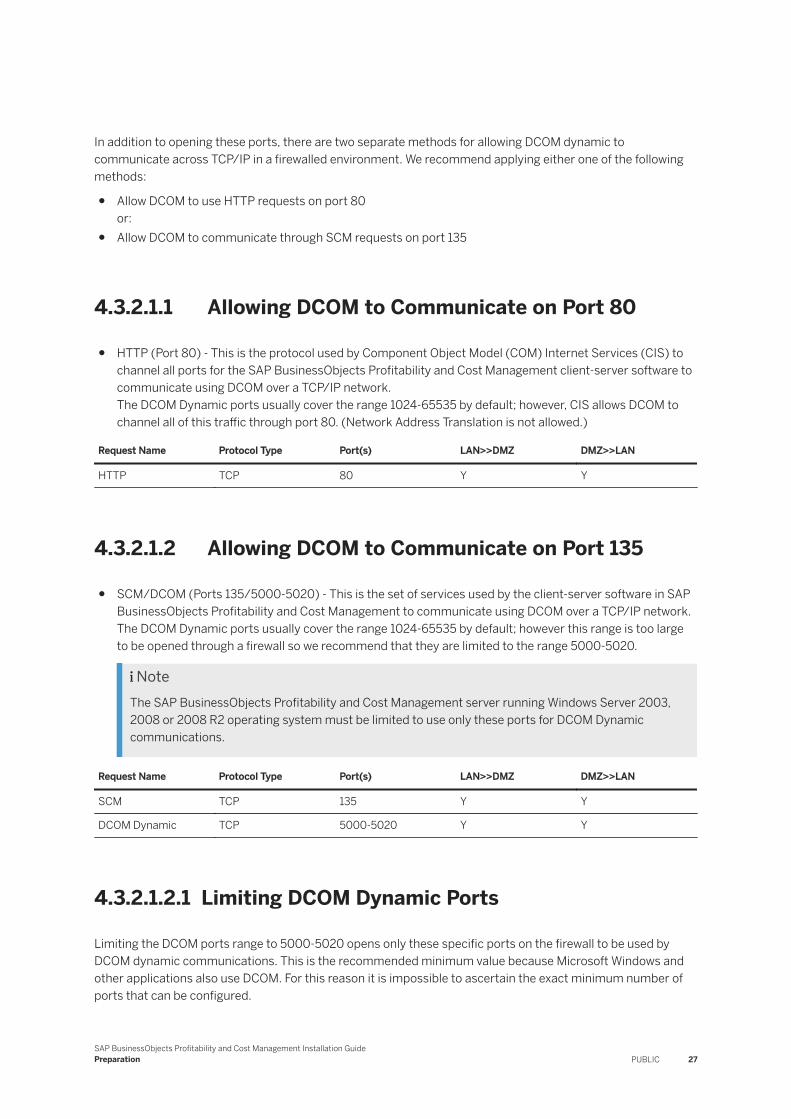
4.3.2.1.1 Allowing DCOM to Communicate on Port 80
● HTTP (Port 80) - This is the protocol used by Component Object Model (COM) Internet Services (CIS) to channel all ports for the SAP BusinessObjects Profitability and Cost Management client-server software to communicate using DCOM over a TCP/IP network.The DCOM Dynamic ports usually cover the range 1024-65535 by default; however, CIS allows DCOM to channel all of this traffic through port 80. (Network Address Translation is not allowed.)
Request Name Protocol Type Port(s) LAN>>DMZ DMZ>>LAN
HTTP TCP 80 Y Y
4.3.2.1.2 Allowing DCOM to Communicate on Port 135
● SCM/DCOM (Ports 135/5000-5020) - This is the set of services used by the client-server software in SAP BusinessObjects Profitability and Cost Management to communicate using DCOM over a TCP/IP network. The DCOM Dynamic ports usually cover the range 1024-65535 by default; however this range is too large to be opened through a firewall so we recommend that they are limited to the range 5000-5020.
NoteThe SAP BusinessObjects Profitability and Cost Management server running Windows Server 2003, 2008 or 2008 R2 operating system must be limited to use only these ports for DCOM Dynamic communications.
Request Name Protocol Type Port(s) LAN>>DMZ DMZ>>LAN
SCM TCP 135 Y Y
DCOM Dynamic TCP 5000-5020 Y Y
4.3.2.1.2.1 Limiting DCOM Dynamic Ports
Limiting the DCOM ports range to 5000-5020 opens only these specific ports on the firewall to be used by DCOM dynamic communications. This is the recommended minimum value because Microsoft Windows and other applications also use DCOM. For this reason it is impossible to ascertain the exact minimum number of ports that can be configured.
SAP BusinessObjects Profitability and Cost Management Installation GuidePreparation PUBLIC 27

If you experience any problems with this port limitation, then increase the range from 5000-5020 to 5000-5030, or more if needed. However you must also increase the range in the firewall Allow rule to match the new increased range.
To limit the ports used by DCOM Dynamic to 5000-5020 on the Windows Server 2003 operating system, the registry must be modified.
4.3.2.1.2.1.1 To Modify the DCOM Port Registry Settings
Procedure
1. To open the registry editor, type regedt32 at a command prompt, or select Run from the Start menu, type the command into the text box, and click OK.Do not use the regedit utility because this does not support the type of registry modifications that are required.
2. In the Registry Editor window, navigate to HKEY_LOCAL_MACHINE\SOFTWARE\Microsoft\Rpc.
3. With the Rpc folder highlighted, click Edit New Key , and type Internet as the name for the new key.
4. Inside the Internet key, create the following three new values:
Name Value Type Value
Ports Multi-String (REG_MULTI_SZ) 5000-5020
PortsInternetAvailible String (REG_SZ) Y
UseInternetPorts String (REG_SZ) Y
The Ports value of 5000-5020 ensures only these ports are available to DCOM dynamic communications. This is the recommended minimum value because Microsoft Windows itself and other applications also use DCOM. For this reason it is impossible to state exactly what the minimum number of ports to be configured should be.
TipAs a rule of thumb, if you experience problems as a result of these changes, the range can be increased from 5000-5020 to 5000-5030 or more as required. However, do not forget to also increase the range configured in the firewall Allow rule to match any increases in range.
Next Steps
CautionThis configuration may have negative effects for a client workstation accessing other servers, that have not been reconfigured to use CIS. After reconfiguring your client workstation to communicate with the Application server, your workstation may not communicate properly with other servers in the network.
28 PUBLICSAP BusinessObjects Profitability and Cost Management Installation Guide
Preparation
4.3.2.2 Sockets Firewall Security
Microsoft Windows Sockets (also known as Winsock), is the standard Application Programming interface (API) that allows Microsoft Windows based TCP/IP applications to establish network communication.
The SAP BusinessObjects Profitability and Cost Management software can be configured to use this transport method at installation/configuration time as an alternative to DCOM, and in this scenario certain ports must be allowed on the firewall to enable successful client-server communication.
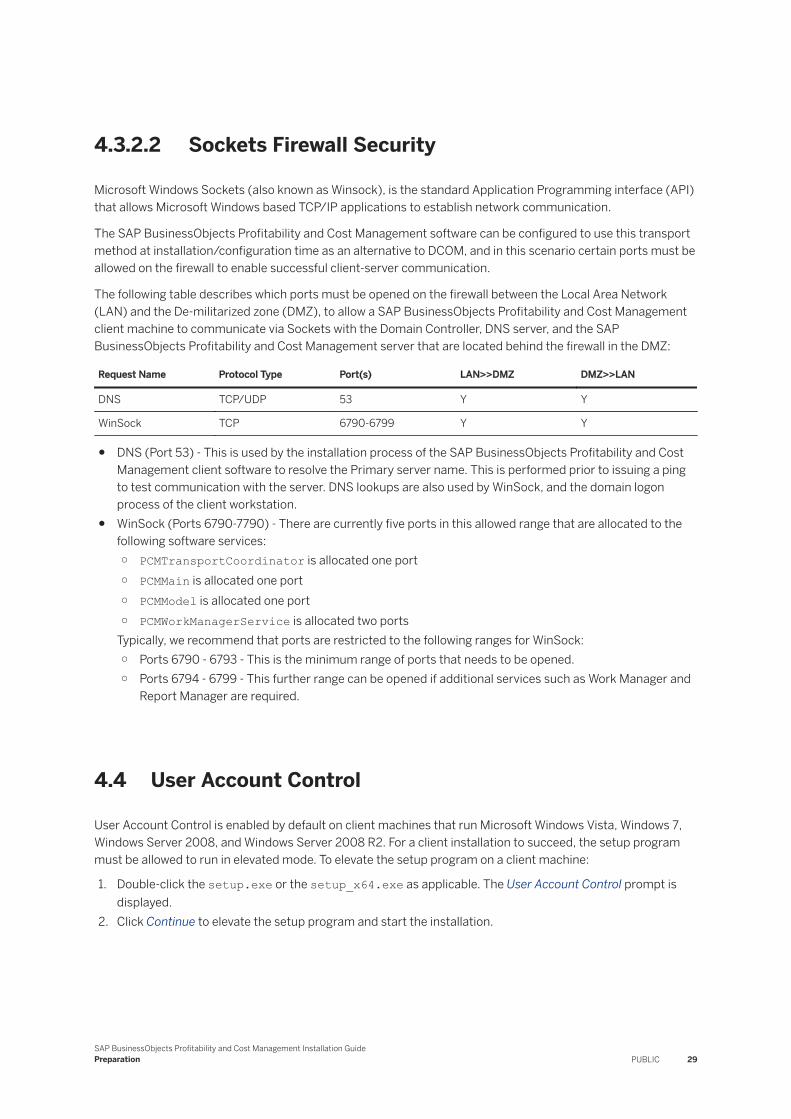
The following table describes which ports must be opened on the firewall between the Local Area Network (LAN) and the De-militarized zone (DMZ), to allow a SAP BusinessObjects Profitability and Cost Management client machine to communicate via Sockets with the Domain Controller, DNS server, and the SAP BusinessObjects Profitability and Cost Management server that are located behind the firewall in the DMZ:
Request Name Protocol Type Port(s) LAN>>DMZ DMZ>>LAN
DNS TCP/UDP 53 Y Y
WinSock TCP 6790-6799 Y Y
● DNS (Port 53) - This is used by the installation process of the SAP BusinessObjects Profitability and Cost Management client software to resolve the Primary server name. This is performed prior to issuing a ping to test communication with the server. DNS lookups are also used by WinSock, and the domain logon process of the client workstation.
● WinSock (Ports 6790-7790) - There are currently five ports in this allowed range that are allocated to the following software services:○ PCMTransportCoordinator is allocated one port○ PCMMain is allocated one port○ PCMModel is allocated one port○ PCMWorkManagerService is allocated two ports
Typically, we recommend that ports are restricted to the following ranges for WinSock:○ Ports 6790 - 6793 - This is the minimum range of ports that needs to be opened.○ Ports 6794 - 6799 - This further range can be opened if additional services such as Work Manager and
Report Manager are required.
4.4 User Account Control
User Account Control is enabled by default on client machines that run Microsoft Windows Vista, Windows 7, Windows Server 2008, and Windows Server 2008 R2. For a client installation to succeed, the setup program must be allowed to run in elevated mode. To elevate the setup program on a client machine:
1. Double-click the setup.exe or the setup_x64.exe as applicable. The User Account Control prompt is displayed.
2. Click Continue to elevate the setup program and start the installation.
SAP BusinessObjects Profitability and Cost Management Installation GuidePreparation PUBLIC 29
5 Installation
5.1 Installing Prerequisite Software
SAP BusinessObjects Profitability and Cost Management requires additional prerequisite software to enable available functionality within the software to work correctly.
NoteThe SAP BusinessObjects Profitability and Cost Management Master Guide provides more detailed system requirement information about which prerequisite software versions are compatible with this release.
5.1.1 Prerequisite Software Installed with the Product
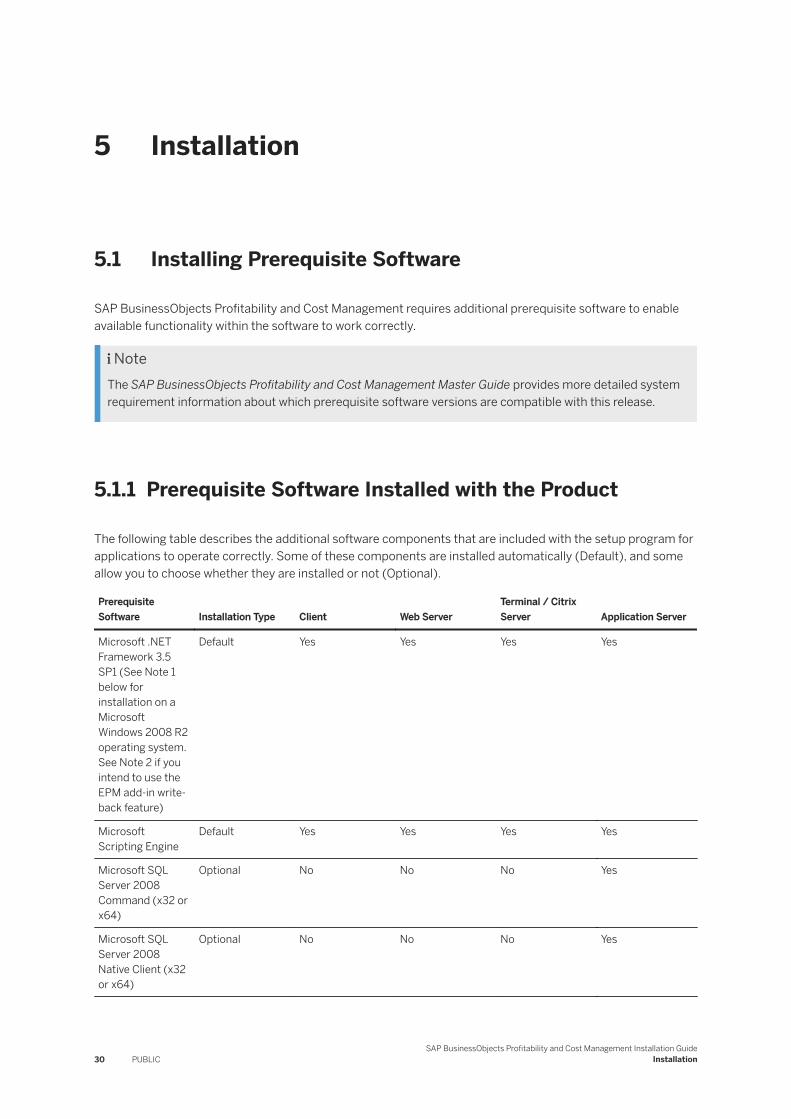
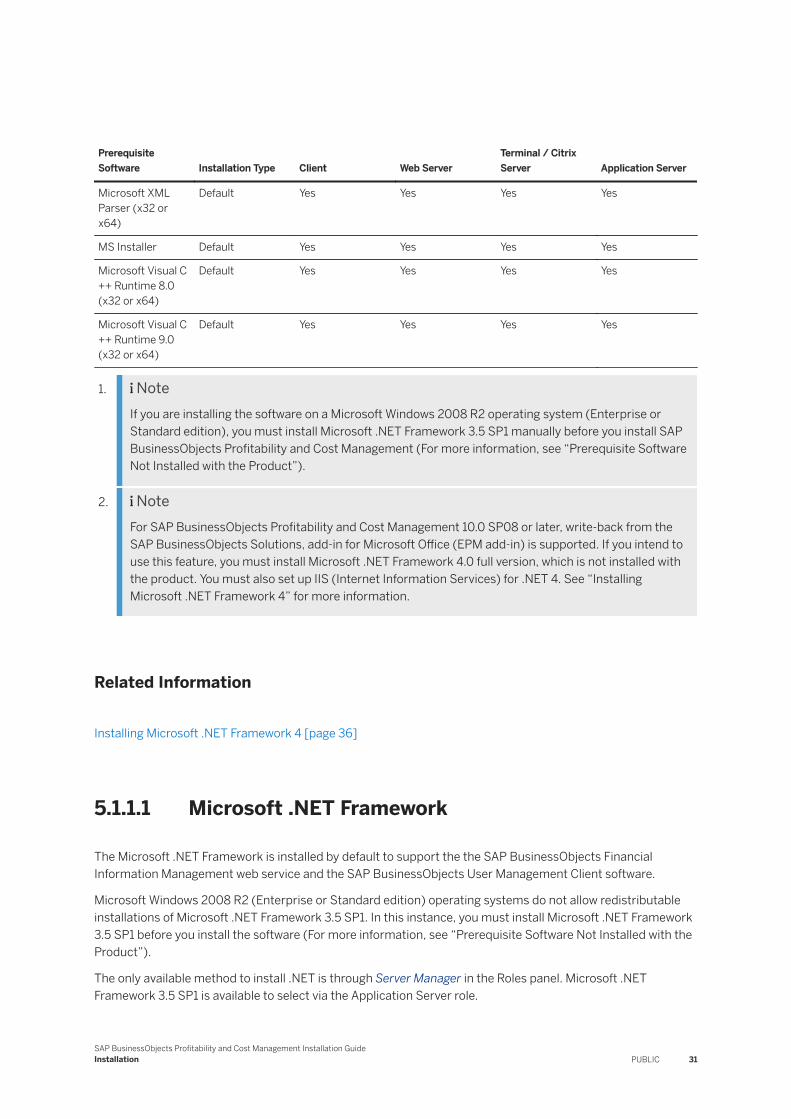
The following table describes the additional software components that are included with the setup program for applications to operate correctly. Some of these components are installed automatically (Default), and some allow you to choose whether they are installed or not (Optional).
Prerequisite Software Installation Type Client Web Server
Terminal / Citrix Server Application Server
Microsoft .NET Framework 3.5 SP1 (See Note 1 below for installation on a Microsoft Windows 2008 R2 operating system. See Note 2 if you intend to use the EPM add-in write-back feature)
Default Yes Yes Yes Yes
Microsoft Scripting Engine
Default Yes Yes Yes Yes
Microsoft SQL Server 2008 Command (x32 or x64)
Optional No No No Yes
Microsoft SQL Server 2008 Native Client (x32 or x64)
Optional No No No Yes
30 PUBLICSAP BusinessObjects Profitability and Cost Management Installation Guide
Installation
Prerequisite Software Installation Type Client Web Server
Terminal / Citrix Server Application Server
Microsoft XML Parser (x32 or x64)
Default Yes Yes Yes Yes
MS Installer Default Yes Yes Yes Yes
Microsoft Visual C++ Runtime 8.0 (x32 or x64)
Default Yes Yes Yes Yes
Microsoft Visual C++ Runtime 9.0 (x32 or x64)
Default Yes Yes Yes Yes
1. NoteIf you are installing the software on a Microsoft Windows 2008 R2 operating system (Enterprise or Standard edition), you must install Microsoft .NET Framework 3.5 SP1 manually before you install SAP BusinessObjects Profitability and Cost Management (For more information, see “Prerequisite Software Not Installed with the Product”).
2. NoteFor SAP BusinessObjects Profitability and Cost Management 10.0 SP08 or later, write-back from the SAP BusinessObjects Solutions, add-in for Microsoft Office (EPM add-in) is supported. If you intend to use this feature, you must install Microsoft .NET Framework 4.0 full version, which is not installed with the product. You must also set up IIS (Internet Information Services) for .NET 4. See “Installing Microsoft .NET Framework 4” for more information.
Related Information
Installing Microsoft .NET Framework 4 [page 36]
5.1.1.1 Microsoft .NET Framework
The Microsoft .NET Framework is installed by default to support the the SAP BusinessObjects Financial Information Management web service and the SAP BusinessObjects User Management Client software.
Microsoft Windows 2008 R2 (Enterprise or Standard edition) operating systems do not allow redistributable installations of Microsoft .NET Framework 3.5 SP1. In this instance, you must install Microsoft .NET Framework 3.5 SP1 before you install the software (For more information, see “Prerequisite Software Not Installed with the Product”).
The only available method to install .NET is through Server Manager in the Roles panel. Microsoft .NET Framework 3.5 SP1 is available to select via the Application Server role.
SAP BusinessObjects Profitability and Cost Management Installation GuideInstallation PUBLIC 31

5.1.1.2 Microsoft Scripting Engine
One of the major features of the SAP BusinessObjects Profitability and Cost Management Books is the ability to supplement the in-built functions of the existing controls using custom script. Supported scripting languages are VBScript and JavaScript (Microsoft’s Jscript 3.0 implementation specifically). The VBScript components are required on client and web server machines in order to process client-side scripts that may be present in books.The installer for this feature, and more information about it, can be found on the Microsoft Scripting web site.
NoteThe most recent operating systems are shipped with the scripting engine already installed.
5.1.1.3 Microsoft SQL Command
Microsoft SQL Command is an optional pre-requisite software component that can be installed to write and execute SQL queries from the command prompt. It should be installed on the Application server. It does not need to be installed in an Oracle database environment.
NoteIf you require Microsoft SQL Command, then Microsoft SQL Native Client must also be installed as it is an installation prerequisite.
Related Information
Microsoft SQL Native Client [page 32]
5.1.1.4 Microsoft SQL Native Client
Microsoft SQL Native Client is an optional pre-requisite software component that can be installed on an Application server to connect to a Microsoft SQL database platform. This does not need to be installed in an Oracle database environment.
NoteMicrosoft SQL Command has a dependency on Microsoft SQL Native Client and cannot be installed successfully without it.
32 PUBLICSAP BusinessObjects Profitability and Cost Management Installation Guide
Installation
Related Information
Microsoft SQL Command [page 32]
5.1.1.5 Microsoft XML Parser
In order to render Books to import XML data, and to prepare data for storage in XML format (via the Export feature), it is necessary to have Microsoft XML Parser installed. The XML Parser may already be installed on many of the potential server and clients in your organization because it is included with later Microsoft operating systems and data access components. Web clients do not require this prerequisite, however, we recommend that it is installed on those clients that have the option to use Book Viewer instead of a web client.
5.1.1.6 MS Installer
SAP BusinessObjects Profitability and Cost Management uses the Microsoft Windows Installer (MSI) component to allow a customizable installation of the product. Prior to the advent of the Windows Server 2003 platform, the installer component was not included as part of the operating system, and is automatically installed as part of the setup program. Refer to the Microsoft web site for more information about this product.
5.1.2 Prerequisite Software Not Installed with the Product
A number of other software components are required to be able to successfully install and configure SAP BusinessObjects Profitability and Cost Management, but they are not included with the setup program.
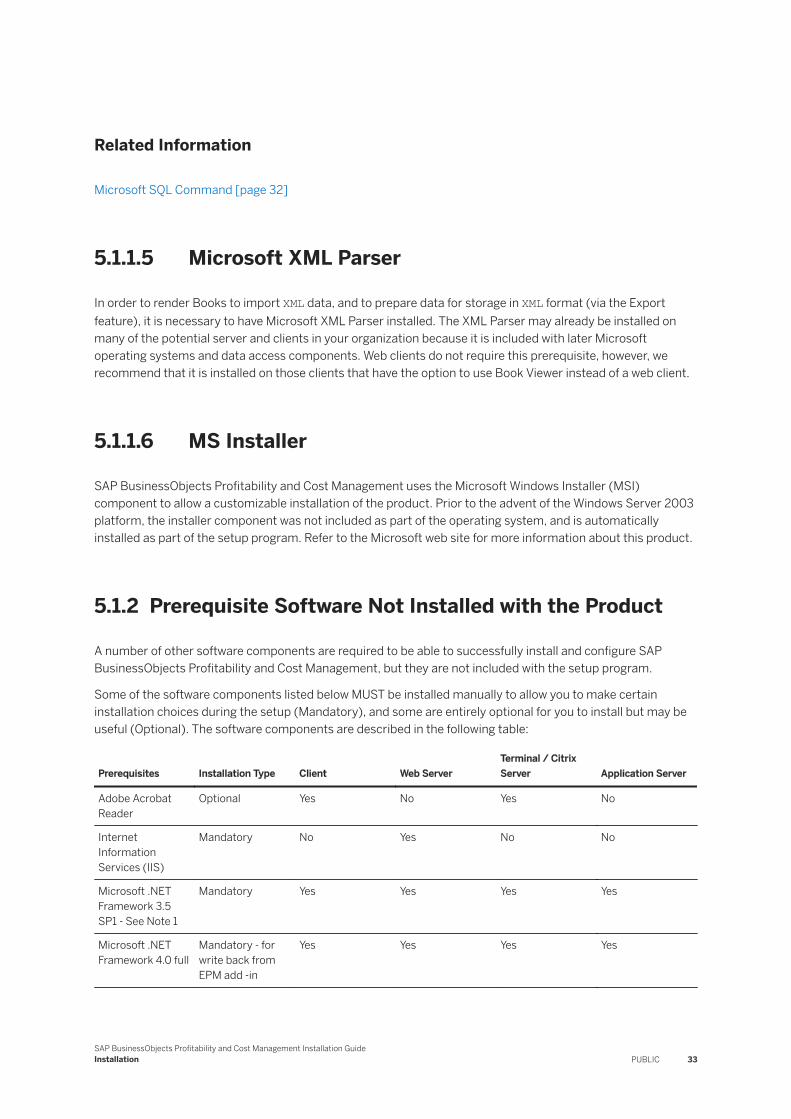
Some of the software components listed below MUST be installed manually to allow you to make certain installation choices during the setup (Mandatory), and some are entirely optional for you to install but may be useful (Optional). The software components are described in the following table:
Prerequisites Installation Type Client Web ServerTerminal / Citrix Server Application Server
Adobe Acrobat Reader
Optional Yes No Yes No
Internet Information Services (IIS)
Mandatory No Yes No No
Microsoft .NET Framework 3.5 SP1 - See Note 1
Mandatory Yes Yes Yes Yes
Microsoft .NET Framework 4.0 full
Mandatory - for write back from EPM add -in
Yes Yes Yes Yes
SAP BusinessObjects Profitability and Cost Management Installation GuideInstallation PUBLIC 33
Prerequisites Installation Type Client Web ServerTerminal / Citrix Server Application Server
version - See Note 2
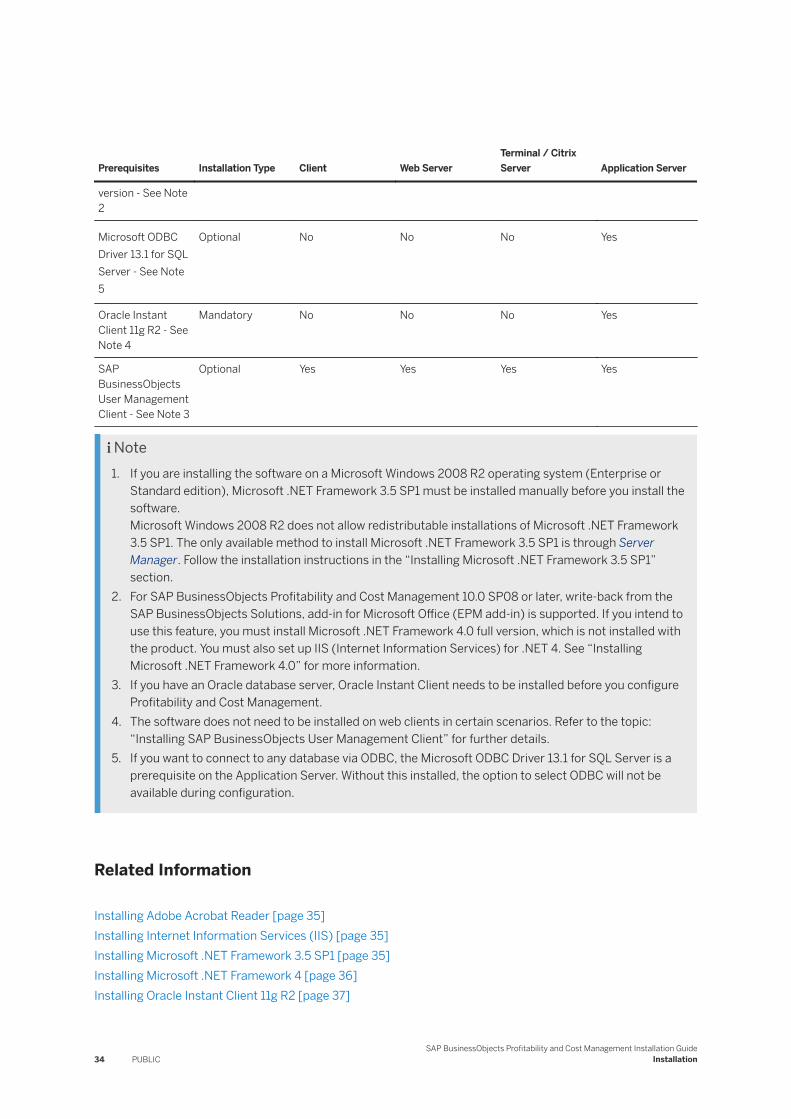
Microsoft ODBC Driver 13.1 for SQL Server - See Note 5
Optional No No No Yes
Oracle Instant Client 11g R2 - See Note 4
Mandatory No No No Yes
SAP BusinessObjects User Management Client - See Note 3
Optional Yes Yes Yes Yes
Note1. If you are installing the software on a Microsoft Windows 2008 R2 operating system (Enterprise or
Standard edition), Microsoft .NET Framework 3.5 SP1 must be installed manually before you install the software.Microsoft Windows 2008 R2 does not allow redistributable installations of Microsoft .NET Framework 3.5 SP1. The only available method to install Microsoft .NET Framework 3.5 SP1 is through Server Manager. Follow the installation instructions in the “Installing Microsoft .NET Framework 3.5 SP1” section.
2. For SAP BusinessObjects Profitability and Cost Management 10.0 SP08 or later, write-back from the SAP BusinessObjects Solutions, add-in for Microsoft Office (EPM add-in) is supported. If you intend to use this feature, you must install Microsoft .NET Framework 4.0 full version, which is not installed with the product. You must also set up IIS (Internet Information Services) for .NET 4. See “Installing Microsoft .NET Framework 4.0” for more information.
3. If you have an Oracle database server, Oracle Instant Client needs to be installed before you configure Profitability and Cost Management.
4. The software does not need to be installed on web clients in certain scenarios. Refer to the topic: “Installing SAP BusinessObjects User Management Client” for further details.
5. If you want to connect to any database via ODBC, the Microsoft ODBC Driver 13.1 for SQL Server is a prerequisite on the Application Server. Without this installed, the option to select ODBC will not be available during configuration.
Related Information
Installing Adobe Acrobat Reader [page 35]Installing Internet Information Services (IIS) [page 35]Installing Microsoft .NET Framework 3.5 SP1 [page 35]Installing Microsoft .NET Framework 4 [page 36]Installing Oracle Instant Client 11g R2 [page 37]
34 PUBLICSAP BusinessObjects Profitability and Cost Management Installation Guide
Installation
Installing SAP BusinessObjects User Management Client [page 40]
5.1.2.1 Installing Adobe Acrobat Reader
In order to view static versions of Books (as reports, for example), it is necessary to have Adobe Acrobat Reader installed. It is also useful to be able to download and read the technical and user guides.
You can download Adobe Acrobat Reader by visiting the Adobe web site.
5.1.2.2 Installing Internet Information Services (IIS)
IIS needs to be installed on the web server to allow web clients to access SAP BusinessObjects Profitability and Cost Management models through Internet Explorer. If IIS is not installed, then the following IIS-reliant software components cannot be installed, because they are not available to choose from in a custom type of installation:
● FIM Web Service● MDX XMLA Provider● Remote Configuration Web
To install IIS, refer to the appropriate Microsoft setup instructions for the version of IIS that is included with your operating system.
5.1.2.3 Installing Microsoft .NET Framework 3.5 SP1
Context
To install Microsoft .NET Framework 3.5 SP1 on your Windows Server 2008 R2 web server, perform the following:
Procedure
1. Click Start Programs Administrative Tools Server Manager .2. In Server Manager, click Roles.3. In the Role Summary screen, click Add Roles in the top right hand area of the screen. .
The Select Server Roles screen is displayed.4. Select Application Server in the Roles list.
The Add Role Wizard screen is displayed.5. Click Add Required Features.
SAP BusinessObjects Profitability and Cost Management Installation GuideInstallation PUBLIC 35

6. In the Select Server Roles screen click Next.The Application Server screen is displayed.
7. Click Next on the Application Server screen. andThe Select Role Services screen is displayed with .NET Framework 3.5.1 selected by default.
8. Click Next on the Select Roles Services screen.The Confirm Installations Selections screen is displayed.
9. Click Install on the Confirm Installations Selections screen.Microsoft .NET Framework 3.5.1 starts to install.
10. Click Close on the Results screen.Microsoft .NET Framework 3.5.1 is now installed.
11. Exit Server Manager.
5.1.2.4 Installing Microsoft .NET Framework 4
Windows 7 and Windows Server 2008 R2 and earlier
For the following supported operating systems, you must download Microsoft .NET Framework 4 from the appropriate Microsoft website and install it according to instructions:
Microsoft Windows Server 2003 SP2 x86Microsoft Windows Server 2003 SP2 x64Microsoft Windows Server 2003 R2 SP2 x86Microsoft Windows Server 2003 R2 SP2 x64Microsoft Windows Server 2008 x86Microsoft Windows Server 2008 x64Microsoft Windows Server 2008 R2 x64Microsoft Windows XP SP3 x86Microsoft Windows XP SP3 x64Microsoft Windows Vista SP2 x86Microsoft Windows Vista SP2 x64Microsoft Windows 7 x64Microsoft Windows 7 x86
Windows 8
Microsoft .NET Framework 4.5 is installed by default on Microsoft Windows 8 operating systems.
Windows Server 2012
For Microsoft Windows Server 2012, if Microsoft .NET Framework 4.5 is not installed by default, you can install it via Server Manager as follows:
36 PUBLICSAP BusinessObjects Profitability and Cost Management Installation Guide
Installation
1. Select All Programs Administrative Tools Server Manager .
2. In the Server Manager dashboard, select the local server, and select Manager Add Roles and Features .
3. In the Add Roles and Features wizard, navigate to the Server Roles page and select Application Server in the Roles pane.
4. Move to the Features page and select .NET 4.5 Framework Features.5. Confirm your selections in the Confirmation page and click Install.
RememberOnce you have installed Microsoft .NET Framework 4 or later, you must configure IIS (Internet Information Services) to use it. For more information, see Configuring IIS for Microsoft .NET Framework 4.
Related Information
Configuring IIS for Microsoft .NET Framework 4 [page 116]
5.1.2.5 Installing Oracle Instant Client 11g R2
Context
If you are running an Oracle database server, you must install the Oracle 11g R2 version of Instant Client on the application server(s) before you configure the software. This is because you are asked to specify the location of the oci.dll and oraocci11.dll files during the configuration of SAP BusinessObjects Profitability and Cost Management.
To install Instant Client:
Procedure
1. Download the appropriate version of the Oracle 11g R2 Instant Client package from the Oracle web site. At the time of release, this is patch set 11.2.0.1.0 or 11.2.0.2.0.The version of Instant Client must also match the version of Profitability and Cost Management you want to install, for example;○ For 32-bit Profitability and Cost Management, download the 32-bit Oracle Instant Client package for
Microsoft Windows.○ For 64-bit Profitability and Cost Management, download the 64-bit Oracle Instant Client package for
Microsoft Windows.2. Unzip the Instant Client package to an accessible location on the primary and secondary application
servers.
SAP BusinessObjects Profitability and Cost Management Installation GuideInstallation PUBLIC 37
TipIf you experience compatibility issues with existing Oracle installations, we recommend you extract the oci.dll and oraocci11.dll files to the appropriate install directory as follows:○ For 32-bit versions, the install directory is C:\Program Files\SAP BusinessObjects\PCM○ For 64-bit versions, the install directory is C:\Program Files\SAP BusinessObjects\PCM
\x64
Next Steps
TipWe also recommend installing the SQLPlus Instant Client on a machine that can access the database server if your Oracle database is installed on a non-Windows operating system. This is essential for running the database installation or upgrade scripts, and can be downloaded from the same Instant Client downloads web page on the Oracle web site.
5.1.2.5.1 Installing Oracle Instant Client in a SAP BusinessObjects Enterprise XI 3.1 Environment
Context
If you want to install the software in a 64-bit environment with an Oracle database, and you also want to integrate the software with SAP BusinessObjects Enterprise XI 3.1, then the software needs to use both 32-bit and 64-bit versions of Oracle Instant Client files. This requires some files to be manually copied.
The reason for this is that in order to integrate with SAP BusinessObjects Enterprise XI 3.1, you need to install SAP BusinessObjects User Management Client 7.5 which is 32-bit only. Therefore, in a 64-bit environment, the software needs the 64-bit versions of oci.dll and oraocci.dll to communicate with the database, and the 32-bit versions of oci.dll and oraocci.dll to communicate with the 32-bit SAP BusinessObjects User Management Client 7.5.
You need to download both 32-bit and 64-bit versions of the Oracle 11g R2 Instant Client if you want to install and use the following components together:
● 64-bit version of SAP BusinessObjects Profitability and Cost Management on a 64-bit operating system● 32-bit SAP BusinessObjects User Management Client 7.5
To install the software in this scenario, perform the following:
38 PUBLICSAP BusinessObjects Profitability and Cost Management Installation Guide
Installation
Procedure
1. Install the Oracle database schema on the database server.2. Install SAP BusinessObjects User Management Client 7.5 on the application server(s).
The setup file location is: \PCM_100_INSTALLERS\Additional Installers\FPMSDK.msi3. Download the 32-bit and 64-bit Oracle 11g R2 Instant Client packages from the Oracle web site, and extract
both zip files into a suitable location on the application server(s).4. Install the 64-bit version of SAP BusinessObjects Profitability and Cost Management on the application
server.The setup file location is: \PCM_100_INSTALLERS\setup_x64.exe
5. On the last screen of the installation wizard, ensure that the Launch SAP BusinessObjects Profitability and Cost Management Configuration Wizard box is not selected.The SAP BusinessObjects Profitability and Cost Management setup completes without launching the Configuration Wizard.
6. Copy the 32-bit Oracle 11g R2 Instant Client files into the root of the SAP BusinessObjects Profitability and Cost Management installation folder on the application server(s).Only copy the individual files from the root folder. The vc8 and vc9 sub-folders do not need to be copied.
For example; copy C:\instantclient-basic-win32-11.2.0.1.0\instantclient_11_2\*.* C:\Program Files\SAP BusinessObjects\PCM
7. Copy the oraocci.dll file from the vc9 folder into the root of the SAP BusinessObjects Profitability and Cost Management installation folder.This is the Microsoft Visual Studio 2008 version of the oraocci.dll file that is compatible with SAP BusinessObjects Profitability and Cost Management.For example; copy C:\instantclient-basic-win32-11.2.0.1.0\instantclient_11_2\vc9\oraocci.dll C:\Program Files\SAP BusinessObjects\PCMThe Microsoft Visual Studio 2005 version of the oraocci.dll is replaced.
8. Run SAP BusinessObjects Profitability and Cost Management Configure from the Start ProgramsSAP BusinessObjects Profitability and Cost Management Tools Configure menu.
9. In the Oracle Client Configuration screen, click Browse next to the Location of 64 bit oci.dll box, navigate to the 64-bit Oracle 11g R2 Instant Client package location and double-click the oci.dll in the root of the folder.The Location of 64 bit oraocci11 for Microsoft Visual Studio 2008 (VC9 Folder) box is automatically completed. Click Next.
Results
Once the configuration steps are completed, the software setup is complete.
SAP BusinessObjects Profitability and Cost Management Installation GuideInstallation PUBLIC 39
5.1.2.6 Installing SAP BusinessObjects User Management Client
The SAP BusinessObjects User Management Client 10.0 and SAP BusinessObjects User Management Client 7.5 setup files are included in the following setup folder:
● SAP BusinessObjects User Management Client 10.0 - \PCM_100_INSTALLERS\Additional Installers\UMC.exeThis enables communication between SAP BusinessObjects Profitability and Cost Management and SAP BusinessObjects Business Intelligence platform 4.0 or SAP BusinessObjects Information Platform Services 4.0.
● SAP BusinessObjects User Management Client 7.5 - \PCM_100_INSTALLERS\Additional Installers\FPMSDK.msiAllows communication between SAP BusinessObjects Profitability and Cost Management and SAP BusinessObjects Enterprise XI 3.1 SP3 FP3.5 or SAP BusinessObjects User Management System 3.1.
NoteThis is an optional integration prerequisite, however, you must install the SAP BusinessObjects User Management Client on servers and client machines if you are planning to use Enterprise authentication. Web clients can use Enterprise authentication with the SAP BusinessObjects User Management Client installed on the web server only. If any other type of Enterprise authentication method is required for web clients, such as Windows AD, Windows NT, LDAP, or SAP, then the SAP BusinessObjects User Management Client must be installed directly on to web clients.
5.2 Installing the SAP BusinessObjects Profitability and Cost Management Database Schema
The database schema installation must be performed by your Database Administrator before the software is installed. More details about recommended preparation steps before you install the database schema is contained in the SAP BusinessObjects Profitability and Cost Management Database Administrator's Guide.
5.2.1 Setting up a New Microsoft SQL Server Database Structure
Prerequisites
Before you start, ensure the character set is configured as “Latin1_General_CI_AS” as described in the “Pre-Installation Tasks” section. Also ensure that you have downloaded the correct version of the software from the SAP Software Distribution Center on the SAP Service Marketplace at: http://service.sap.com/swdc . Instructions for downloading the software can be found in the following SAP Note: 772755 .
40 PUBLICSAP BusinessObjects Profitability and Cost Management Installation Guide
Installation
Context
Configuring the initial database structure involves creating a new blank database, running the provided SQL script to create the software database schema, and assigning a role to the database user.
Procedure
1. Log into the Microsoft SQL Server Management Studio as a user with administration rights.2. Create a database on the server without any spaces in the name.3. Ensure an administrative user exists who is a member of the db_owner role.
This user name is used when executing database creation scripts.4. Unzip the downloaded software zip file and copy the PCM_100_SQL folder into a location on the hard drive
where you have read and write access.5. Open a command prompt window:
a. Click Start Run on the Windows Start menu.b. Type CMD in the Open text box.c. Click OK or press Enter .
6. At the command prompt change directory to where the PCM_100_SQL folder has been copied. For example:cd\PCM_100_SQL
7. Run the SQL script batch files to set up the database structures. The MSSchema.cmd must be run with the following parameters:<Database Server Name> <Database Name> <Admin User Name> <Admin Password>
For the current release, type the command below supplying the specific parameters in place of the specified terms:MSSchema.cmd SERVER DATABASE ADMINUSER PASSWORD
NoteAlternatively you can use Windows NT authentication in which case SSPI may be entered in place of the database administrator name and password, providing that the NT user has dbo access:
MSSchema.cmd SERVER DATABASE SSPI
Once this is created, we recommend that you check the file MSSchema.log in the PCM_100_SQL folder for any possible errors. Any error messages are normally identified by the following string; msg.
8. If you are using SSPI and a Windows user account instead of a Microsoft SQL Server login, you can create the EPOACCESS role to be the user role that is used to access the database during configuration. To do this, follow the steps in “To create the EPOACCESS role for Microsoft SQL Server”.
SAP BusinessObjects Profitability and Cost Management Installation GuideInstallation PUBLIC 41
5.2.2 Setting up a New Oracle Database Structure
Prerequisites
Before you start, ensure that you have downloaded the correct version of the software from the SAP Support Portal at SAP Support Portal Instructions for downloading the software can be found in the following SAP Note: 772755 .
Procedure
1. Unzip the downloaded software zip file and copy the PCM_100_SQL folder into a location on the hard drive where you have read and write access.
2. Open a Command Prompt window by selecting Run from the Windows Start menu, and type CMD in the Open text box. Click OK or press Enter to continue.
3. At the command prompt change to the directory where the PCM_100_SQL folder has been copied.
4. Run the SQL script batch files to set up the database structures.5. Run OracleSchema.cmd with the following parameters:
<Database Alias> <Admin User Name> <Admin Password> <Restricted Username> <Restricted User Password>
For example, for the current release, type the command below supplying the specific values in place of the parameters: OracleSchema epo adminepo password usrepo password
TipTo configure the “Database Alias”, use the Net Manager utility on the server from where the scripts are to be executed to create a Network Service Name (NSN) entry in the local TNSNames.ORA file. The entry effectively creates a local database alias point at either a local or remote server which can be utilized via SQLPlus for script execution.
Once this is created, it is recommended that you check the file OracleSchema.log in the PCM_100_SQL folder for errors. Any error messages are normally identified by the following strings; ora- and pls-.
5.2.3 Setting up a New SAP Adaptive Server Enterprise Database Structure
Prerequisites
Before you start, ensure the character set is configured as utf-8, the page size is 8k and the default sort order (and default unicode sort order) is configured as nocase, as described in the Pre-Installation Tasks section. Also
42 PUBLICSAP BusinessObjects Profitability and Cost Management Installation Guide
Installation

ensure that you have downloaded the correct version of the software under Download Software on the SAP Support Portal at: https://support.sap.com/en/index.html . Information published on SAP site. Instructions for downloading the software can be found in the following 772755 Information published on SAP site.
Context
Configuring the initial database structure involves creating a new blank database, running the provided SQL script to create the software database schema, and assigning a role to the database user.
Procedure
1. Create a database on the server without any spaces in the name.2. Ensure an administrative user exists who is a member of the sa_role role. This user name is used when
executing database creation scripts.3. Unzip the downloaded software zip file and copy the PCM_100_SQL folder into a location on the hard drive
where you have read and write access.4. Open a command prompt window:5. Click Start Run on the Windows Start menu.6. Type CMD in the Open text box.
7. Click OK or press Enter.8.9. At the command prompt change the directory to where the PCM_100_SQL folder has been copied. For
example: cd\PCM_100_SQL10. Run the SQL script batch files to set up the database structures. The ASESchema.cmd must be run with
the following parameters: <Database Server Name> <Database Name> <Admin User Name> <Admin Password>. For the current release type the command below supplying the specific parameters in place of the specified terms: ASESchema.cmd SERVER DATABASE ADMINUSER PASSWORD.
The command file should report any errors running the script. However, we recommend that you check the file ASESchema.log in the PCM_100_SQL folder for any possible errors. Any error messages are normally identified by the following string; msg.
5.2.4 Setting Up an SAP HANA Database for Export to HANA
From Support Package 08 onward, SAP BusinessObjects Profitability and Cost Management 10 supports the export of model results to an SAP HANA database. For more information on the Export to HANA feature, see the “Export to HANA” section of the SAP BusinessObjects Modeling User Guide.
To enable the Export to HANA feature on the SAP HANA database, a sample SQL script called PCM10HANA.sql is provided in a directory called HANA within the PCM_100_SQL folder provided in the support package ZIP file. This sample script must to be executed on the SAP HANA instance that you wish to export model data to. The
SAP BusinessObjects Profitability and Cost Management Installation GuideInstallation PUBLIC 43

script creates a schema/catalog called “EPM_PCM” and creates suitable column tables within this schema to hold exported results from SAP BusinessObjects Profitability and Cost Management, as well as views that make viewing the results more meaningful. These tables and views are documented in section “Export to HANA: Tables and Views” of the SAP BusinessObjects Profitability and Cost Management Modeling User Guide. If you wish to create a differently named schema, replace all “EPM_PCM” strings in the sample SQL with your required schema/catalog.
5.3 Installing the SAP BusinessObjects Profitability and Cost Management Software
Prerequisites
Before you start this task, please refer to the SAP BusinessObjects Profitability and Cost Management Master Guide for information about which prerequisite software is required for model, web, and client machines.
CautionIf you are installing any components that require Internet Information Services (IIS), such as the FIMService web service or the PCM XMLA Provider, the setup program must communicate with IIS to create virtual directories and application pools. To do this, setup must know which port to use to communicate with IIS. The setup program always expects IIS to use port 80. So, if IIS in your environment is configured to use a port other than port 80, the IIS-dependent components cannot be installed and this can cause the installation to roll back. To resolve this issue, proceed as follows:
1. Launch the setup program from the command line and use a command line option to tell the setup program which port IIS is using. The command syntax is as follows:
setup.exe /v"DEFAULT_IIS_PORT=<port number>">
For example, if IIS is configured to use port 1080, you use the following command:
setup.exe /v"DEFAULT_IIS_PORT=1080"
2. Proceed with the installation by skipping Step 1 below and following the instructions from Step 2.
Context
The installation tasks in this section are applicable to both server and client machines.
Procedure
1. From the installation folder, double-click the 32-bit setup.exe (client or server), or the 64-bit setup_x64.exe (server only) if installing on a 64-bit operating system.
44 PUBLICSAP BusinessObjects Profitability and Cost Management Installation Guide
Installation
2. The following required software applications are presented at the start of the installation (if they are not already present) on a server or client before the main installation process starts:
○ Microsoft .NET Framework 3.5 SP1 (mandatory component required to support the SAP BusinessObjects Financial Information Management web service, and SAP User Management Client software. This must be installed prior to the software if you are running a Microsoft Windows 2008 R2 operating system.)
○ MSXML 6.0 SP1 (mandatory)○ Microsoft SQL Server 2008 Native Client (optional, however this is an installation prerequisite for
Microsoft SQL Server 2008 Command)○ Microsoft SQL Server 2008 Command (optional)
NoteMicrosoft SQL Server 2008 Native Client is an installation prerequisite for Microsoft SQL Server 2008 Command, and it must also be installed or already installed, for Microsoft SQL Server 2008 Command to install successfully.
Click Install to install the software, or click Cancel to exit the setup program.3. Click Next on the Welcome screen.4. Click I accept the terms in the license agreement, and click Next.5. In the Customer Information screen, enter a user name into the User Name text box, enter your company
name into the Organization text box, and then click Next.These credentials are stored in the registry as a record of who installed the software.
6. In the Destination Folder screen, the Profitability and Cost Management installation files are installed in the C:\Program Files\SAP BusinessObjects\PCM folder by default. Click Change to alter the destination folder, or click Next to continue.
7. In the Setup Type screen, select one of the following options:
○ Complete - Select this option to install all available software features, and click Next.○ Custom - To manage the installation of individual features, choose this option and click Next .
1. In the Custom Setup screen, all features and subfeatures in the list are marked for installation by default. To deselect an individual feature, click the icon adjacent to the feature in the list, and select This feature will not be available. (You cannot deselect the core components feature, as this is mandatory.)Available features are as follows:
Feature Description
Core Components Mandatory core product components.
Model Builder The main application for creating and administering models.
Book Viewer End user application to view predefined books from Microsoft Windows or web clients.
Web Components - Standard Web Components The components that allow books to be viewed from client machines in Internet Explorer.
Web Components - FIM Web Service The web service that allows the transfer of information between the software and Financial
SAP BusinessObjects Profitability and Cost Management Installation GuideInstallation PUBLIC 45
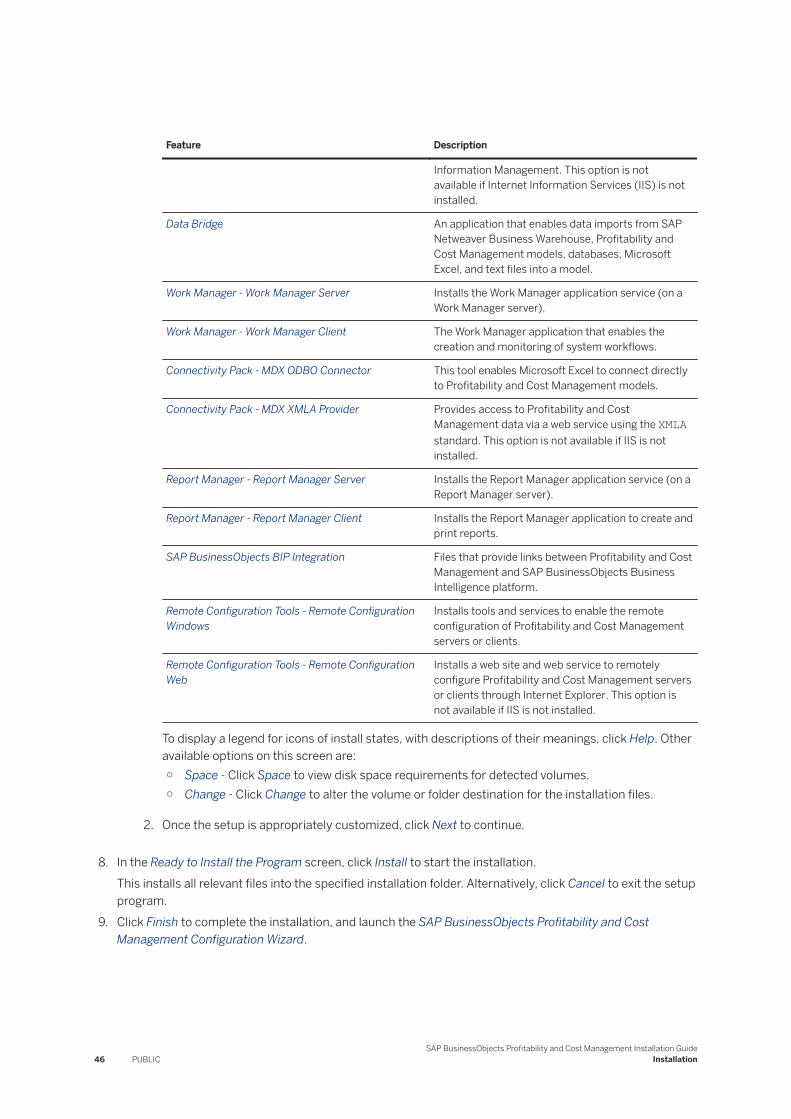
Feature Description
Information Management. This option is not available if Internet Information Services (IIS) is not installed.
Data Bridge An application that enables data imports from SAP Netweaver Business Warehouse, Profitability and Cost Management models, databases, Microsoft Excel, and text files into a model.
Work Manager - Work Manager Server Installs the Work Manager application service (on a Work Manager server).
Work Manager - Work Manager Client The Work Manager application that enables the creation and monitoring of system workflows.
Connectivity Pack - MDX ODBO Connector This tool enables Microsoft Excel to connect directly to Profitability and Cost Management models.
Connectivity Pack - MDX XMLA Provider Provides access to Profitability and Cost Management data via a web service using the XMLA standard. This option is not available if IIS is not installed.
Report Manager - Report Manager Server Installs the Report Manager application service (on a Report Manager server).
Report Manager - Report Manager Client Installs the Report Manager application to create and print reports.
SAP BusinessObjects BIP Integration Files that provide links between Profitability and Cost Management and SAP BusinessObjects Business Intelligence platform.
Remote Configuration Tools - Remote Configuration Windows
Installs tools and services to enable the remote configuration of Profitability and Cost Management servers or clients.
Remote Configuration Tools - Remote Configuration Web
Installs a web site and web service to remotely configure Profitability and Cost Management servers or clients through Internet Explorer. This option is not available if IIS is not installed.
To display a legend for icons of install states, with descriptions of their meanings, click Help. Other available options on this screen are:○ Space - Click Space to view disk space requirements for detected volumes.○ Change - Click Change to alter the volume or folder destination for the installation files.
2. Once the setup is appropriately customized, click Next to continue.
8. In the Ready to Install the Program screen, click Install to start the installation.This installs all relevant files into the specified installation folder. Alternatively, click Cancel to exit the setup program.
9. Click Finish to complete the installation, and launch the SAP BusinessObjects Profitability and Cost Management Configuration Wizard.
46 PUBLICSAP BusinessObjects Profitability and Cost Management Installation Guide
Installation
5.3.1 Connectivity Pack
The Connectivity Pack contains the following components:
● MDX ODBO Connector - this allows licensed clients to interface with Microsoft Excel via MDX (MultiDimensional Expressions).Either the 32-bit or 64-bit version of the MDX ODBO Connector is installed, depending on which version of the setup.exe is used to install the software.
● MDX XMLA Provider - this is a web service that provides an XMLA (Extensible Markup Language for Analysis) interface for other applications to query Profitability and Cost Management results via the EPM Connector.
5.3.2 Remote Configuration Tool
The Remote Configuration tool enables System Administrators to remotely view, modify, save, backup and distribute Profitability and Cost Management configuration settings across server and client machines within the domain. The tool can also display system information and enables remote management of Profitability and Cost Management services on clients and servers.
If you are using DCOM, you also need to configure DCOM settings specifically for the Remote Configuration Tool. Instructions for this can be found in the “Post Installation” section.
Related Information
Configuring DCOM Security for the Remote Configuration Tool [page 97]
5.4 Performing a SAP BusinessObjects Profitability and Cost Management Silent Installation
A Silent Installer is provided to install the software and its associated utilities on a client machine with minimum disruption to the user.
RestrictionOnly Microsoft Windows clients can be silently configured using the Silent Installer application. The Silent Installer may be used to install the software on a server machine, but in this case, it must be configured manually afterwards.
A silent installation can be instigated on a clean operating system, or a machine that has the same version of the software installed.
SAP BusinessObjects Profitability and Cost Management Installation GuideInstallation PUBLIC 47
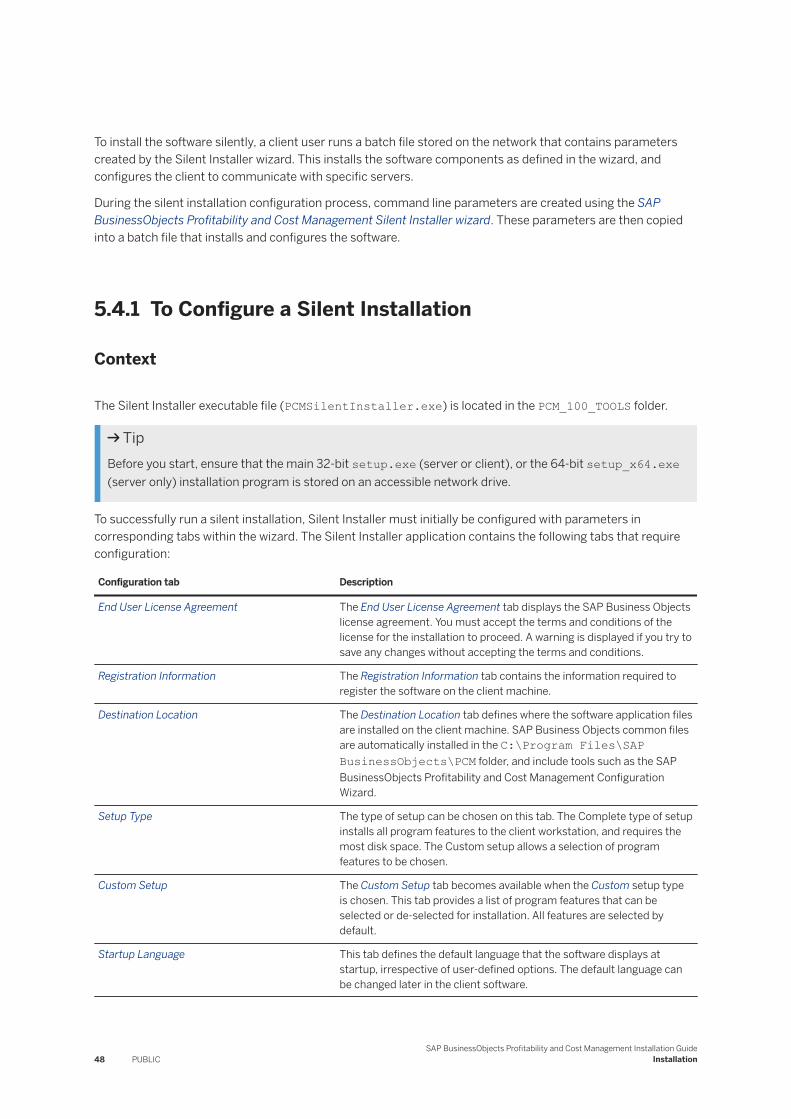
To install the software silently, a client user runs a batch file stored on the network that contains parameters created by the Silent Installer wizard. This installs the software components as defined in the wizard, and configures the client to communicate with specific servers.
During the silent installation configuration process, command line parameters are created using the SAP BusinessObjects Profitability and Cost Management Silent Installer wizard. These parameters are then copied into a batch file that installs and configures the software.
5.4.1 To Configure a Silent Installation
Context
The Silent Installer executable file (PCMSilentInstaller.exe) is located in the PCM_100_TOOLS folder.
TipBefore you start, ensure that the main 32-bit setup.exe (server or client), or the 64-bit setup_x64.exe (server only) installation program is stored on an accessible network drive.
To successfully run a silent installation, Silent Installer must initially be configured with parameters in corresponding tabs within the wizard. The Silent Installer application contains the following tabs that require configuration:
Configuration tab Description
End User License Agreement The End User License Agreement tab displays the SAP Business Objects license agreement. You must accept the terms and conditions of the license for the installation to proceed. A warning is displayed if you try to save any changes without accepting the terms and conditions.
Registration Information The Registration Information tab contains the information required to register the software on the client machine.
Destination Location The Destination Location tab defines where the software application files are installed on the client machine. SAP Business Objects common files are automatically installed in the C:\Program Files\SAP BusinessObjects\PCM folder, and include tools such as the SAP BusinessObjects Profitability and Cost Management Configuration Wizard.
Setup Type The type of setup can be chosen on this tab. The Complete type of setup installs all program features to the client workstation, and requires the most disk space. The Custom setup allows a selection of program features to be chosen.
Custom Setup The Custom Setup tab becomes available when the Custom setup type is chosen. This tab provides a list of program features that can be selected or de-selected for installation. All features are selected by default.
Startup Language This tab defines the default language that the software displays at startup, irrespective of user-defined options. The default language can be changed later in the client software.
48 PUBLICSAP BusinessObjects Profitability and Cost Management Installation Guide
Installation
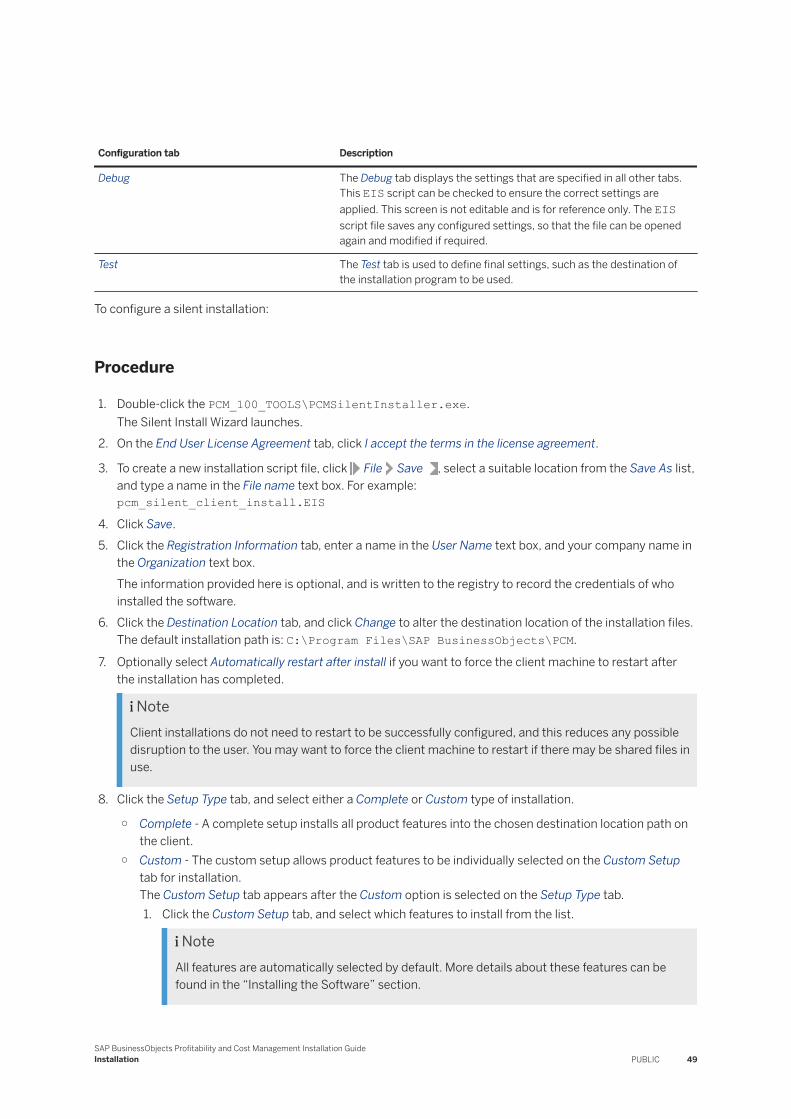
Configuration tab Description
Debug The Debug tab displays the settings that are specified in all other tabs. This EIS script can be checked to ensure the correct settings are applied. This screen is not editable and is for reference only. The EIS script file saves any configured settings, so that the file can be opened again and modified if required.
Test The Test tab is used to define final settings, such as the destination of the installation program to be used.
To configure a silent installation:
Procedure
1. Double-click the PCM_100_TOOLS\PCMSilentInstaller.exe.The Silent Install Wizard launches.
2. On the End User License Agreement tab, click I accept the terms in the license agreement.
3. To create a new installation script file, click File Save , select a suitable location from the Save As list, and type a name in the File name text box. For example:pcm_silent_client_install.EIS
4. Click Save.5. Click the Registration Information tab, enter a name in the User Name text box, and your company name in
the Organization text box.The information provided here is optional, and is written to the registry to record the credentials of who installed the software.
6. Click the Destination Location tab, and click Change to alter the destination location of the installation files. The default installation path is: C:\Program Files\SAP BusinessObjects\PCM.
7. Optionally select Automatically restart after install if you want to force the client machine to restart after the installation has completed.
NoteClient installations do not need to restart to be successfully configured, and this reduces any possible disruption to the user. You may want to force the client machine to restart if there may be shared files in use.
8. Click the Setup Type tab, and select either a Complete or Custom type of installation.
○ Complete - A complete setup installs all product features into the chosen destination location path on the client.
○ Custom - The custom setup allows product features to be individually selected on the Custom Setup tab for installation.The Custom Setup tab appears after the Custom option is selected on the Setup Type tab.1. Click the Custom Setup tab, and select which features to install from the list.
NoteAll features are automatically selected by default. More details about these features can be found in the “Installing the Software” section.
SAP BusinessObjects Profitability and Cost Management Installation GuideInstallation PUBLIC 49
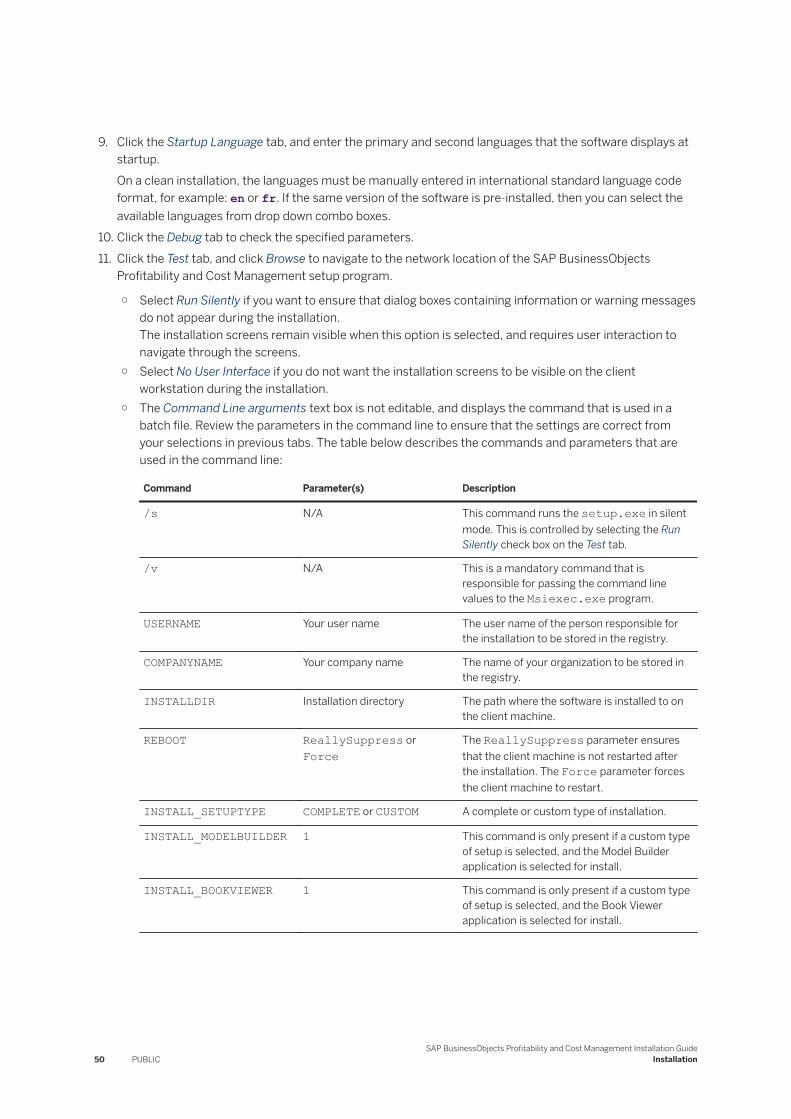
9. Click the Startup Language tab, and enter the primary and second languages that the software displays at startup.On a clean installation, the languages must be manually entered in international standard language code format, for example: en or fr. If the same version of the software is pre-installed, then you can select the available languages from drop down combo boxes.
10. Click the Debug tab to check the specified parameters.11. Click the Test tab, and click Browse to navigate to the network location of the SAP BusinessObjects
Profitability and Cost Management setup program.
○ Select Run Silently if you want to ensure that dialog boxes containing information or warning messages do not appear during the installation.The installation screens remain visible when this option is selected, and requires user interaction to navigate through the screens.
○ Select No User Interface if you do not want the installation screens to be visible on the client workstation during the installation.
○ The Command Line arguments text box is not editable, and displays the command that is used in a batch file. Review the parameters in the command line to ensure that the settings are correct from your selections in previous tabs. The table below describes the commands and parameters that are used in the command line:
Command Parameter(s) Description
/s N/A This command runs the setup.exe in silent mode. This is controlled by selecting the Run Silently check box on the Test tab.
/v N/A This is a mandatory command that is responsible for passing the command line values to the Msiexec.exe program.
USERNAME Your user name The user name of the person responsible for the installation to be stored in the registry.
COMPANYNAME Your company name The name of your organization to be stored in the registry.
INSTALLDIR Installation directory The path where the software is installed to on the client machine.
REBOOT ReallySuppress or Force
The ReallySuppress parameter ensures that the client machine is not restarted after the installation. The Force parameter forces the client machine to restart.
INSTALL_SETUPTYPE COMPLETE or CUSTOM A complete or custom type of installation.
INSTALL_MODELBUILDER 1 This command is only present if a custom type of setup is selected, and the Model Builder application is selected for install.
INSTALL_BOOKVIEWER 1 This command is only present if a custom type of setup is selected, and the Book Viewer application is selected for install.
50 PUBLICSAP BusinessObjects Profitability and Cost Management Installation Guide
Installation
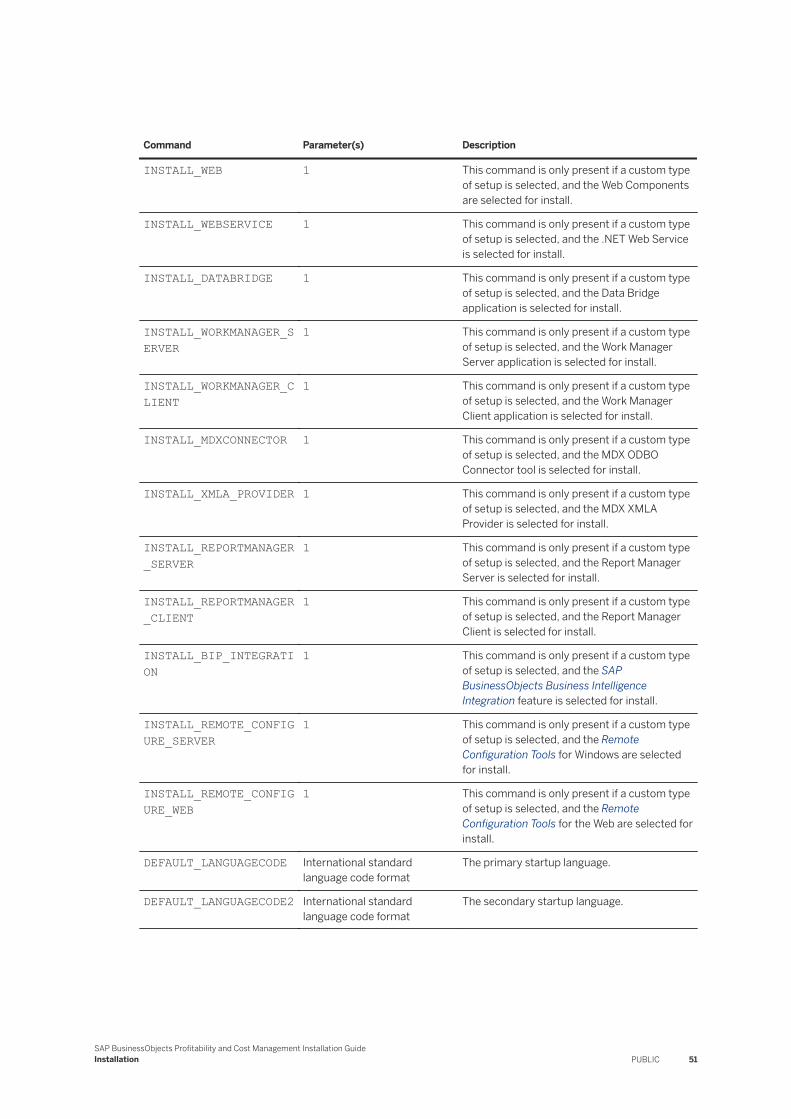
Command Parameter(s) Description
INSTALL_WEB 1 This command is only present if a custom type of setup is selected, and the Web Components are selected for install.
INSTALL_WEBSERVICE 1 This command is only present if a custom type of setup is selected, and the .NET Web Service is selected for install.
INSTALL_DATABRIDGE 1 This command is only present if a custom type of setup is selected, and the Data Bridge application is selected for install.
INSTALL_WORKMANAGER_SERVER
1 This command is only present if a custom type of setup is selected, and the Work Manager Server application is selected for install.
INSTALL_WORKMANAGER_CLIENT
1 This command is only present if a custom type of setup is selected, and the Work Manager Client application is selected for install.
INSTALL_MDXCONNECTOR 1 This command is only present if a custom type of setup is selected, and the MDX ODBO Connector tool is selected for install.
INSTALL_XMLA_PROVIDER 1 This command is only present if a custom type of setup is selected, and the MDX XMLA Provider is selected for install.
INSTALL_REPORTMANAGER_SERVER
1 This command is only present if a custom type of setup is selected, and the Report Manager Server is selected for install.
INSTALL_REPORTMANAGER_CLIENT
1 This command is only present if a custom type of setup is selected, and the Report Manager Client is selected for install.
INSTALL_BIP_INTEGRATION
1 This command is only present if a custom type of setup is selected, and the SAP BusinessObjects Business Intelligence Integration feature is selected for install.
INSTALL_REMOTE_CONFIGURE_SERVER
1 This command is only present if a custom type of setup is selected, and the Remote Configuration Tools for Windows are selected for install.
INSTALL_REMOTE_CONFIGURE_WEB
1 This command is only present if a custom type of setup is selected, and the Remote Configuration Tools for the Web are selected for install.
DEFAULT_LANGUAGECODE International standard language code format
The primary startup language.
DEFAULT_LANGUAGECODE2 International standard language code format
The secondary startup language.
SAP BusinessObjects Profitability and Cost Management Installation GuideInstallation PUBLIC 51
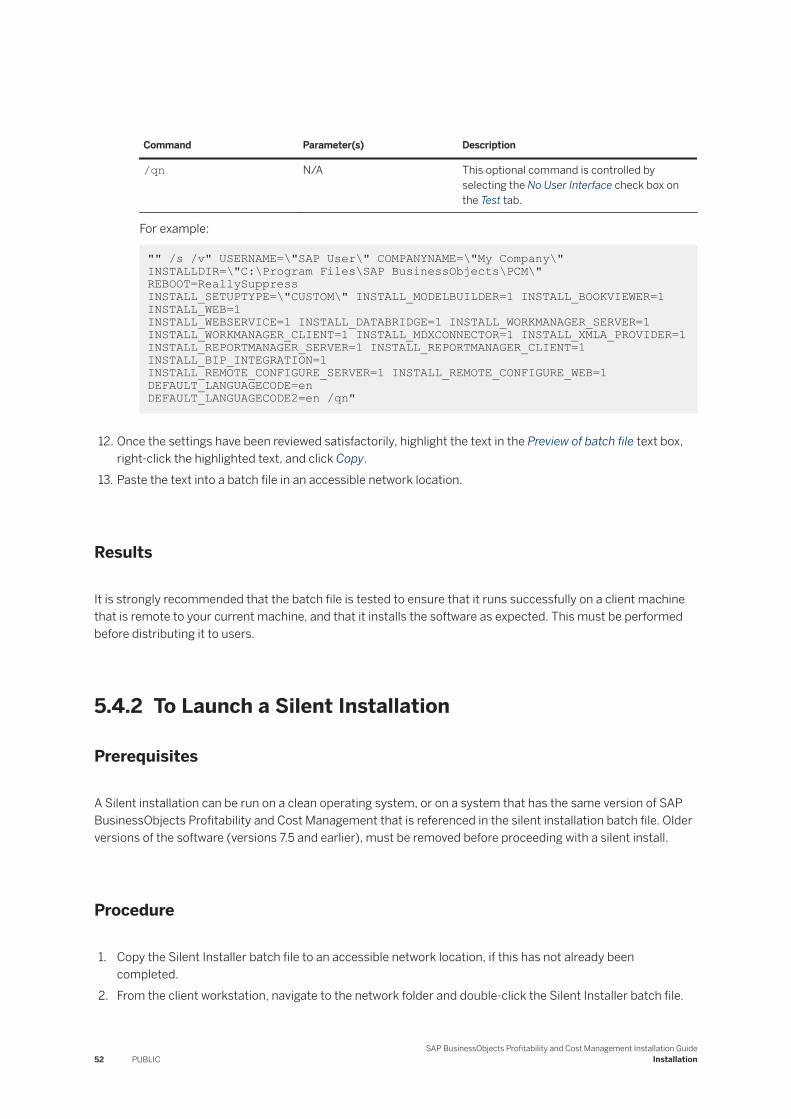
Command Parameter(s) Description
/qn N/A This optional command is controlled by selecting the No User Interface check box on the Test tab.
For example:
"" /s /v" USERNAME=\"SAP User\" COMPANYNAME=\"My Company\" INSTALLDIR=\"C:\Program Files\SAP BusinessObjects\PCM\" REBOOT=ReallySuppressINSTALL_SETUPTYPE=\"CUSTOM\" INSTALL_MODELBUILDER=1 INSTALL_BOOKVIEWER=1 INSTALL_WEB=1INSTALL_WEBSERVICE=1 INSTALL_DATABRIDGE=1 INSTALL_WORKMANAGER_SERVER=1INSTALL_WORKMANAGER_CLIENT=1 INSTALL_MDXCONNECTOR=1 INSTALL_XMLA_PROVIDER=1INSTALL_REPORTMANAGER_SERVER=1 INSTALL_REPORTMANAGER_CLIENT=1 INSTALL_BIP_INTEGRATION=1INSTALL_REMOTE_CONFIGURE_SERVER=1 INSTALL_REMOTE_CONFIGURE_WEB=1 DEFAULT_LANGUAGECODE=en DEFAULT_LANGUAGECODE2=en /qn"
12. Once the settings have been reviewed satisfactorily, highlight the text in the Preview of batch file text box, right-click the highlighted text, and click Copy.
13. Paste the text into a batch file in an accessible network location.
Results
It is strongly recommended that the batch file is tested to ensure that it runs successfully on a client machine that is remote to your current machine, and that it installs the software as expected. This must be performed before distributing it to users.
5.4.2 To Launch a Silent Installation
Prerequisites
A Silent installation can be run on a clean operating system, or on a system that has the same version of SAP BusinessObjects Profitability and Cost Management that is referenced in the silent installation batch file. Older versions of the software (versions 7.5 and earlier), must be removed before proceeding with a silent install.
Procedure
1. Copy the Silent Installer batch file to an accessible network location, if this has not already been completed.
2. From the client workstation, navigate to the network folder and double-click the Silent Installer batch file.
52 PUBLICSAP BusinessObjects Profitability and Cost Management Installation Guide
Installation

5.5 Installing SAP BusinessObjects Information Platform Services 4.0
Context
Before installing Information Platform Services 4.0, perform the following steps:
Procedure
1. Retrieve the Information Platform Services 4.0 setup files from the SAP Service Market Place at: http://service.sap.com
2. In the PCM_100_TOOLS source installation folder, copy the PlatformInstaller.exe file and paste it into the same folder where the Information Platform Services 4.0 setup is stored.
NoteIf you cannot paste the PlatformInstaller.exe into the same folder where the Information Platform Services 4.0 setup is stored, you can execute the following DOS command:
PlatformInstaller.exe <setup_filename>
For example:
PlatformInstaller.exe D:\install_IPS\setup.exe
3. Double-click the PlatformInstaller.exe file to launch the Information Platform Services 4.0 setup. The PlatformInstaller.exe launches the setup with pre-loaded license information.
SAP BusinessObjects Profitability and Cost Management Installation GuideInstallation PUBLIC 53
6 Post-Installation
To complete the installation of the software, you must configure the following components:
● Configuration Wizard - This is normally launched straight after the installation, so that the software settings can be configured at the same time. However, the Configuration Wizard can be launched at any time to configure or re-configure the software.
● Internet Information services (IIS) (If you have configured the Web server as IIS). The following tasks must be performed for you to view SAP BusinessObjects Profitability and Cost Management web pages from your local browser:○ The most significant configuration setting for IIS is IIS Timeouts. You must implement these settings to
ensure your web access operates correctly. Certain special configuration options are required for Microsoft Windows Server 2003, which uses IIS 6. Additional options must be set for very large models that use IIS 6 under Microsoft Windows Server 2003.
○ By default, the web files for the software applications are created in the default IIS root folder. This is normally: C:\Inetpub\wwwroot.
○ It is advisable to stop and restart the IIS service to ensure that the changes are effected immediately. To perform this, select the context menu from the top node in Internet Information Services (IIS) Manager and click Restart IIS.
● Basic installation checks - model creation and login security
Related Information
Configuration Wizard Settings [page 132]
6.1 Configuring the Software
6.1.1 Configuring the Application Server
Context
The SAP BusinessObjects Profitability and Cost Management Configuration Wizard starts automatically after the InstallShield wizard has finished. The Wizard can also be manually launched at any time, to re-configure the initial specified settings.
Refer to the To re-configure a server installation section in this chapter if you have already performed an initial configuration of the software.
54 PUBLICSAP BusinessObjects Profitability and Cost Management Installation Guide
Post-Installation
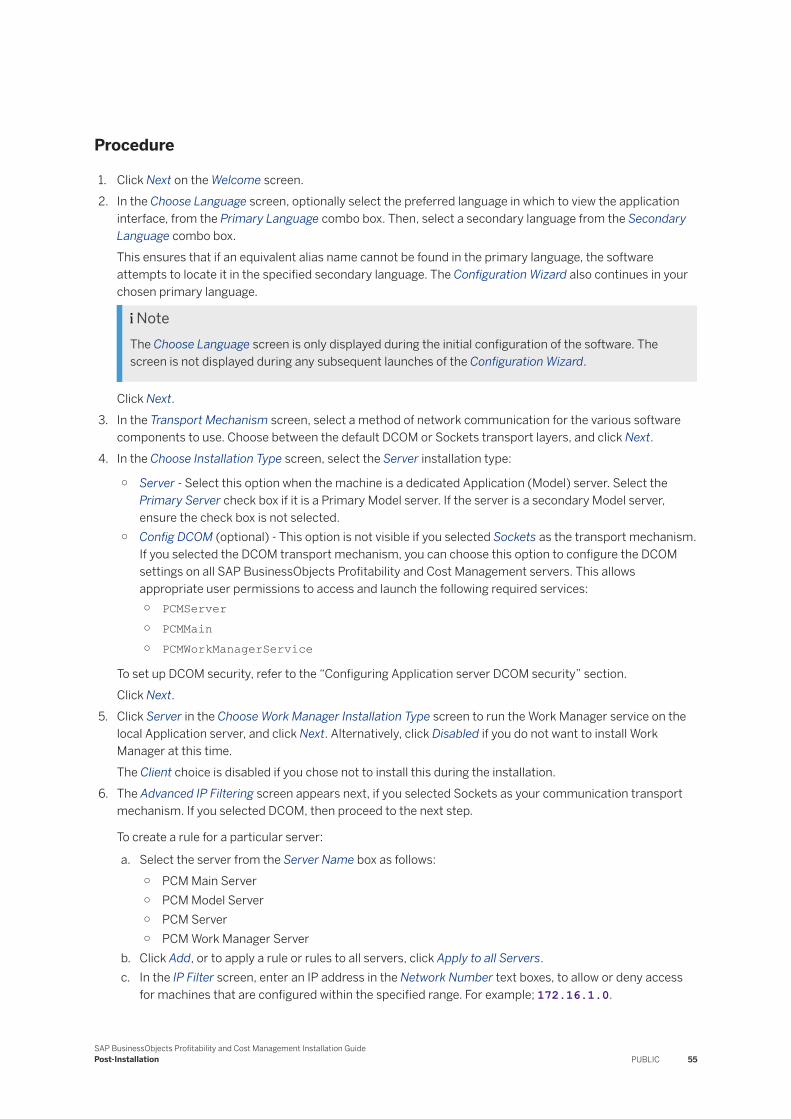
Procedure
1. Click Next on the Welcome screen.2. In the Choose Language screen, optionally select the preferred language in which to view the application
interface, from the Primary Language combo box. Then, select a secondary language from the Secondary Language combo box.This ensures that if an equivalent alias name cannot be found in the primary language, the software attempts to locate it in the specified secondary language. The Configuration Wizard also continues in your chosen primary language.
NoteThe Choose Language screen is only displayed during the initial configuration of the software. The screen is not displayed during any subsequent launches of the Configuration Wizard.
Click Next.3. In the Transport Mechanism screen, select a method of network communication for the various software
components to use. Choose between the default DCOM or Sockets transport layers, and click Next.4. In the Choose Installation Type screen, select the Server installation type:
○ Server - Select this option when the machine is a dedicated Application (Model) server. Select the Primary Server check box if it is a Primary Model server. If the server is a secondary Model server, ensure the check box is not selected.
○ Config DCOM (optional) - This option is not visible if you selected Sockets as the transport mechanism. If you selected the DCOM transport mechanism, you can choose this option to configure the DCOM settings on all SAP BusinessObjects Profitability and Cost Management servers. This allows appropriate user permissions to access and launch the following required services:○ PCMServer○ PCMMain○ PCMWorkManagerService
To set up DCOM security, refer to the “Configuring Application server DCOM security” section.Click Next.
5. Click Server in the Choose Work Manager Installation Type screen to run the Work Manager service on the local Application server, and click Next. Alternatively, click Disabled if you do not want to install Work Manager at this time.The Client choice is disabled if you chose not to install this during the installation.
6. The Advanced IP Filtering screen appears next, if you selected Sockets as your communication transport mechanism. If you selected DCOM, then proceed to the next step.
To create a rule for a particular server:
a. Select the server from the Server Name box as follows:○ PCM Main Server○ PCM Model Server○ PCM Server○ PCM Work Manager Server
b. Click Add, or to apply a rule or rules to all servers, click Apply to all Servers.c. In the IP Filter screen, enter an IP address in the Network Number text boxes, to allow or deny access
for machines that are configured within the specified range. For example; 172.16.1.0.
SAP BusinessObjects Profitability and Cost Management Installation GuidePost-Installation PUBLIC 55

d. Enter the relevant subnet mask in the Subnet Mask text boxes. For example; 255.255.255.192.
The value of X, which in this example is represented in the right-most Network Number text box, defines the range of host IDs. The Network Number Preview text boxes display the results of applying the subnet mask to the network number. If Classless Inter-Domain Routing (CIDR) is selected, the subnet mask is transformed to the equivalent CIDR block prefix. In this example, it is 26.
e. Select Allow or Deny to specify if the communication is permitted, and click OK.The rule is listed in the lower pane of the Advanced IP Filtering screen
Rules are stored as text in the ipfilters.ipt file, that is usually located in the C:\Program Files\SAP BusinessObjects\PCM folder by default. Click Browse to change this location.
Click Edit, Delete, Move Up or Move Down to manage the order of the rules.
Click Next.7. In the Database Connectivity screen, select one of the following database access protocols:
○ Microsoft OLE DB Provider (Default) - Select this option if you want to configure the following database providers:○ Microsoft OLE DB provider for SQL Server○ SQL Server Native Client 10.0
NoteSQL native calls are part of the infrastructure of the database software, and do not need to be translated into an external compliant format, as OLE DB calls do.
1. Click Next.Click Build In the Server Database Setup screen, if you want to fine tune the database provider and connection, or you can select details using pre-populated lists rather than entering details manually. The details required remain the same as the following manual steps.
2. Select SQL Server Native Client 10.0 or the Microsoft OLE DB provider from the Database Provider list.
3. Enter the name of the Microsoft SQL Server instance in the Data Source text box. This often defaults to the name of the database host machine.
4. If you are using Microsoft SQL Server, enter the name of the database to connect to in the Catalog (Database Name) text box.
5. Select one of the following security options:○ Use Windows NT Integrated Security - Select this option if the NT integrated user logs into the
Application server and has database owner (dbo) access to the database. For a Microsoft SQL Server installation, the logon account for the MSSQLSERVER service also needs to be set to this account.Alternatively, the user assigned to the EPOACESS role can be used. For either server database, you can choose to restrict the privileges a user has to prevent access to additional databases. If this is the case, specify the user created in the server database setup.
○ Use a specific user name and password - Type a valid database owner (dbo) user name and password in the User Name and Password text boxes.
○ Oracle Instant Client - Select this option to configure the built-in native Oracle Call Interface (OCI) database calling mechanism.1. Click Next.
The Oracle Client Configuration screen is displayed.
56 PUBLICSAP BusinessObjects Profitability and Cost Management Installation Guide
Post-Installation
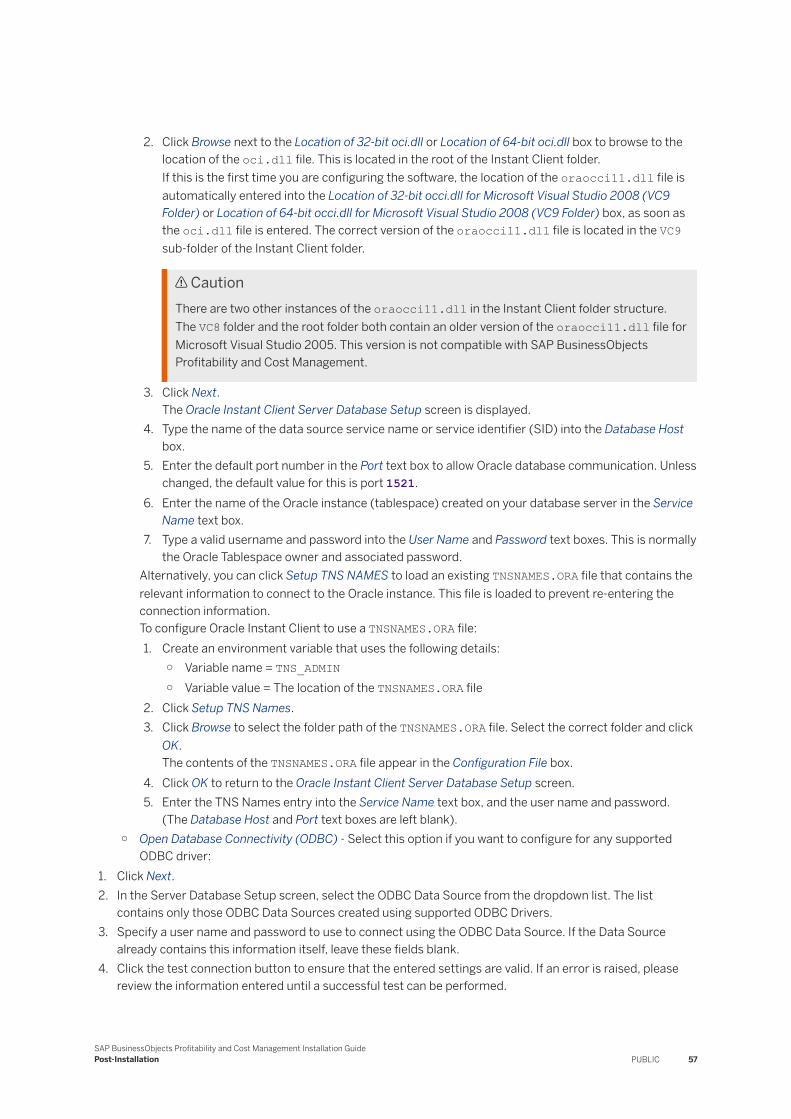
2. Click Browse next to the Location of 32-bit oci.dll or Location of 64-bit oci.dll box to browse to the location of the oci.dll file. This is located in the root of the Instant Client folder.If this is the first time you are configuring the software, the location of the oraocci11.dll file is automatically entered into the Location of 32-bit occi.dll for Microsoft Visual Studio 2008 (VC9 Folder) or Location of 64-bit occi.dll for Microsoft Visual Studio 2008 (VC9 Folder) box, as soon as the oci.dll file is entered. The correct version of the oraocci11.dll file is located in the VC9 sub-folder of the Instant Client folder.
CautionThere are two other instances of the oraocci11.dll in the Instant Client folder structure. The VC8 folder and the root folder both contain an older version of the oraocci11.dll file for Microsoft Visual Studio 2005. This version is not compatible with SAP BusinessObjects Profitability and Cost Management.
3. Click Next.The Oracle Instant Client Server Database Setup screen is displayed.
4. Type the name of the data source service name or service identifier (SID) into the Database Host box.
5. Enter the default port number in the Port text box to allow Oracle database communication. Unless changed, the default value for this is port 1521.
6. Enter the name of the Oracle instance (tablespace) created on your database server in the Service Name text box.
7. Type a valid username and password into the User Name and Password text boxes. This is normally the Oracle Tablespace owner and associated password.
Alternatively, you can click Setup TNS NAMES to load an existing TNSNAMES.ORA file that contains the relevant information to connect to the Oracle instance. This file is loaded to prevent re-entering the connection information.To configure Oracle Instant Client to use a TNSNAMES.ORA file:1. Create an environment variable that uses the following details:
○ Variable name = TNS_ADMIN○ Variable value = The location of the TNSNAMES.ORA file
2. Click Setup TNS Names.3. Click Browse to select the folder path of the TNSNAMES.ORA file. Select the correct folder and click
OK.The contents of the TNSNAMES.ORA file appear in the Configuration File box.
4. Click OK to return to the Oracle Instant Client Server Database Setup screen.5. Enter the TNS Names entry into the Service Name text box, and the user name and password.
(The Database Host and Port text boxes are left blank).○ Open Database Connectivity (ODBC) - Select this option if you want to configure for any supported
ODBC driver:1. Click Next.2. In the Server Database Setup screen, select the ODBC Data Source from the dropdown list. The list
contains only those ODBC Data Sources created using supported ODBC Drivers.3. Specify a user name and password to use to connect using the ODBC Data Source. If the Data Source
already contains this information itself, leave these fields blank.4. Click the test connection button to ensure that the entered settings are valid. If an error is raised, please
review the information entered until a successful test can be performed.
SAP BusinessObjects Profitability and Cost Management Installation GuidePost-Installation PUBLIC 57
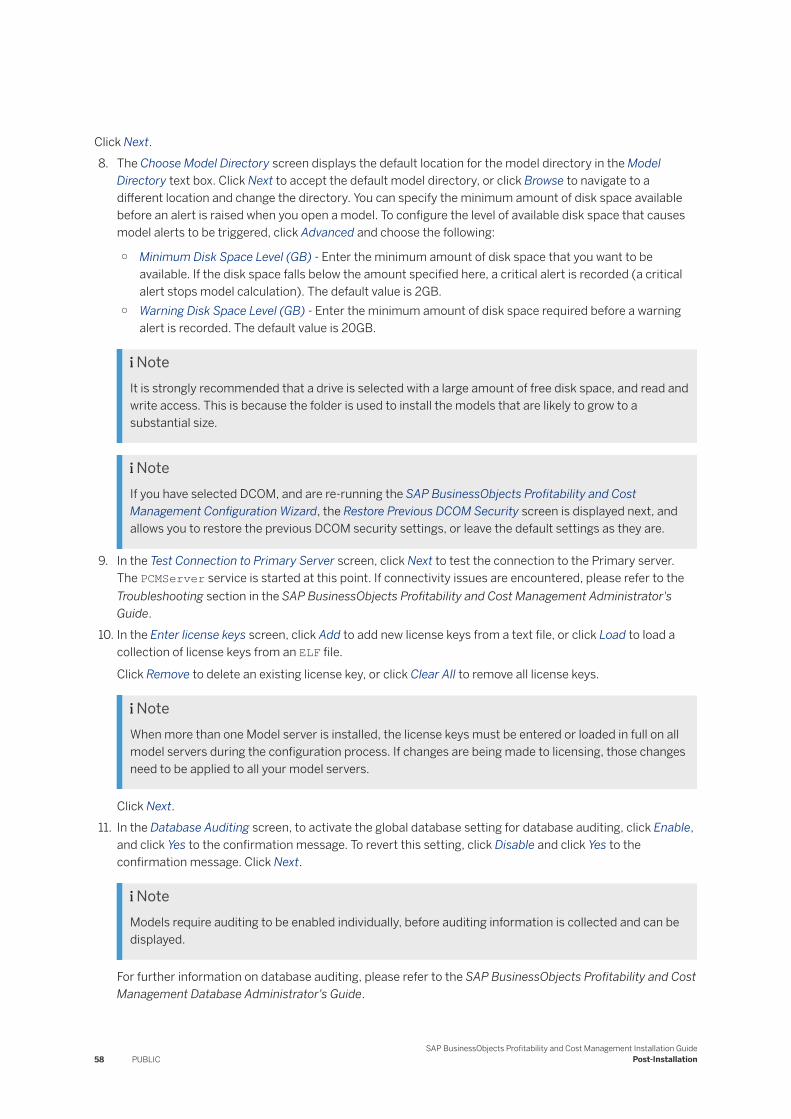
Click Next.8. The Choose Model Directory screen displays the default location for the model directory in the Model
Directory text box. Click Next to accept the default model directory, or click Browse to navigate to a different location and change the directory. You can specify the minimum amount of disk space available before an alert is raised when you open a model. To configure the level of available disk space that causes model alerts to be triggered, click Advanced and choose the following:
○ Minimum Disk Space Level (GB) - Enter the minimum amount of disk space that you want to be available. If the disk space falls below the amount specified here, a critical alert is recorded (a critical alert stops model calculation). The default value is 2GB.
○ Warning Disk Space Level (GB) - Enter the minimum amount of disk space required before a warning alert is recorded. The default value is 20GB.
NoteIt is strongly recommended that a drive is selected with a large amount of free disk space, and read and write access. This is because the folder is used to install the models that are likely to grow to a substantial size.
NoteIf you have selected DCOM, and are re-running the SAP BusinessObjects Profitability and Cost Management Configuration Wizard, the Restore Previous DCOM Security screen is displayed next, and allows you to restore the previous DCOM security settings, or leave the default settings as they are.
9. In the Test Connection to Primary Server screen, click Next to test the connection to the Primary server. The PCMServer service is started at this point. If connectivity issues are encountered, please refer to the Troubleshooting section in the SAP BusinessObjects Profitability and Cost Management Administrator's Guide.
10. In the Enter license keys screen, click Add to add new license keys from a text file, or click Load to load a collection of license keys from an ELF file.
Click Remove to delete an existing license key, or click Clear All to remove all license keys.
NoteWhen more than one Model server is installed, the license keys must be entered or loaded in full on all model servers during the configuration process. If changes are being made to licensing, those changes need to be applied to all your model servers.
Click Next.11. In the Database Auditing screen, to activate the global database setting for database auditing, click Enable,
and click Yes to the confirmation message. To revert this setting, click Disable and click Yes to the confirmation message. Click Next.
NoteModels require auditing to be enabled individually, before auditing information is collected and can be displayed.
For further information on database auditing, please refer to the SAP BusinessObjects Profitability and Cost Management Database Administrator's Guide.
58 PUBLICSAP BusinessObjects Profitability and Cost Management Installation Guide
Post-Installation
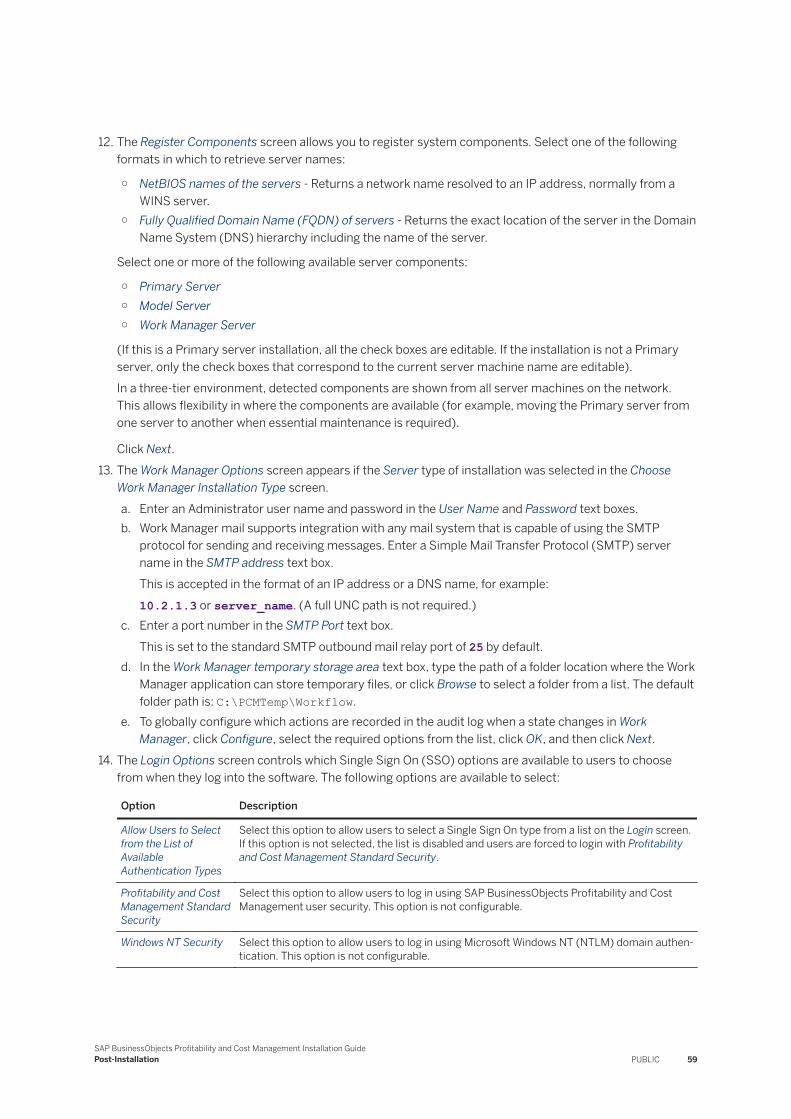
12. The Register Components screen allows you to register system components. Select one of the following formats in which to retrieve server names:
○ NetBIOS names of the servers - Returns a network name resolved to an IP address, normally from a WINS server.
○ Fully Qualified Domain Name (FQDN) of servers - Returns the exact location of the server in the Domain Name System (DNS) hierarchy including the name of the server.
Select one or more of the following available server components:
○ Primary Server○ Model Server○ Work Manager Server
(If this is a Primary server installation, all the check boxes are editable. If the installation is not a Primary server, only the check boxes that correspond to the current server machine name are editable).In a three-tier environment, detected components are shown from all server machines on the network. This allows flexibility in where the components are available (for example, moving the Primary server from one server to another when essential maintenance is required).
Click Next.13. The Work Manager Options screen appears if the Server type of installation was selected in the Choose
Work Manager Installation Type screen.a. Enter an Administrator user name and password in the User Name and Password text boxes.b. Work Manager mail supports integration with any mail system that is capable of using the SMTP
protocol for sending and receiving messages. Enter a Simple Mail Transfer Protocol (SMTP) server name in the SMTP address text box.This is accepted in the format of an IP address or a DNS name, for example:10.2.1.3 or server_name. (A full UNC path is not required.)
c. Enter a port number in the SMTP Port text box.This is set to the standard SMTP outbound mail relay port of 25 by default.
d. In the Work Manager temporary storage area text box, type the path of a folder location where the Work Manager application can store temporary files, or click Browse to select a folder from a list. The default folder path is: C:\PCMTemp\Workflow.
e. To globally configure which actions are recorded in the audit log when a state changes in Work Manager, click Configure, select the required options from the list, click OK, and then click Next.
14. The Login Options screen controls which Single Sign On (SSO) options are available to users to choose from when they log into the software. The following options are available to select:
Option Description
Allow Users to Select from the List of Available Authentication Types
Select this option to allow users to select a Single Sign On type from a list on the Login screen. If this option is not selected, the list is disabled and users are forced to login with Profitability and Cost Management Standard Security.
Profitability and Cost Management Standard Security
Select this option to allow users to log in using SAP BusinessObjects Profitability and Cost Management user security. This option is not configurable.
Windows NT Security Select this option to allow users to log in using Microsoft Windows NT (NTLM) domain authentication. This option is not configurable.
SAP BusinessObjects Profitability and Cost Management Installation GuidePost-Installation PUBLIC 59
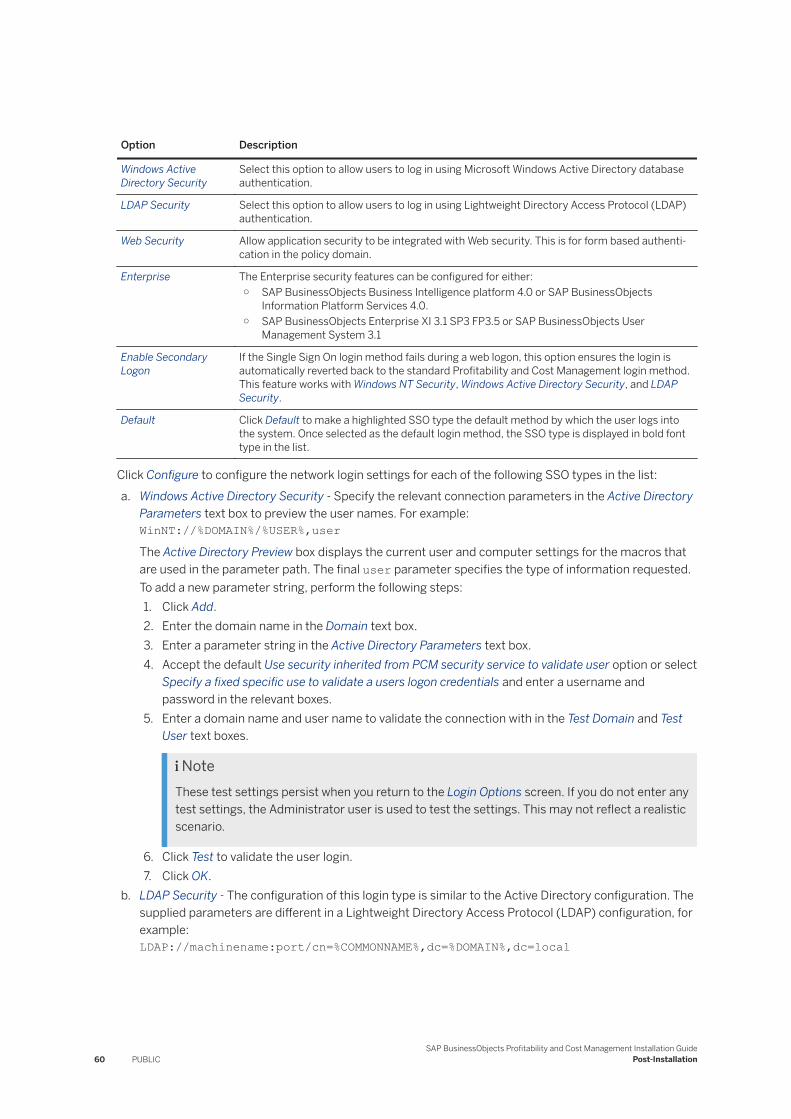
Option Description
Windows Active Directory Security
Select this option to allow users to log in using Microsoft Windows Active Directory database authentication.
LDAP Security Select this option to allow users to log in using Lightweight Directory Access Protocol (LDAP) authentication.
Web Security Allow application security to be integrated with Web security. This is for form based authentication in the policy domain.
Enterprise The Enterprise security features can be configured for either:○ SAP BusinessObjects Business Intelligence platform 4.0 or SAP BusinessObjects
Information Platform Services 4.0.○ SAP BusinessObjects Enterprise XI 3.1 SP3 FP3.5 or SAP BusinessObjects User
Management System 3.1
Enable Secondary Logon
If the Single Sign On login method fails during a web logon, this option ensures the login is automatically reverted back to the standard Profitability and Cost Management login method. This feature works with Windows NT Security, Windows Active Directory Security, and LDAP Security.
Default Click Default to make a highlighted SSO type the default method by which the user logs into the system. Once selected as the default login method, the SSO type is displayed in bold font type in the list.
Click Configure to configure the network login settings for each of the following SSO types in the list:a. Windows Active Directory Security - Specify the relevant connection parameters in the Active Directory
Parameters text box to preview the user names. For example:WinNT://%DOMAIN%/%USER%,userThe Active Directory Preview box displays the current user and computer settings for the macros that are used in the parameter path. The final user parameter specifies the type of information requested. To add a new parameter string, perform the following steps:1. Click Add.2. Enter the domain name in the Domain text box.3. Enter a parameter string in the Active Directory Parameters text box.4. Accept the default Use security inherited from PCM security service to validate user option or select
Specify a fixed specific use to validate a users logon credentials and enter a username and password in the relevant boxes.
5. Enter a domain name and user name to validate the connection with in the Test Domain and Test User text boxes.
NoteThese test settings persist when you return to the Login Options screen. If you do not enter any test settings, the Administrator user is used to test the settings. This may not reflect a realistic scenario.
6. Click Test to validate the user login.7. Click OK.
b. LDAP Security - The configuration of this login type is similar to the Active Directory configuration. The supplied parameters are different in a Lightweight Directory Access Protocol (LDAP) configuration, for example:LDAP://machinename:port/cn=%COMMONNAME%,dc=%DOMAIN%,dc=local
60 PUBLICSAP BusinessObjects Profitability and Cost Management Installation Guide
Post-Installation
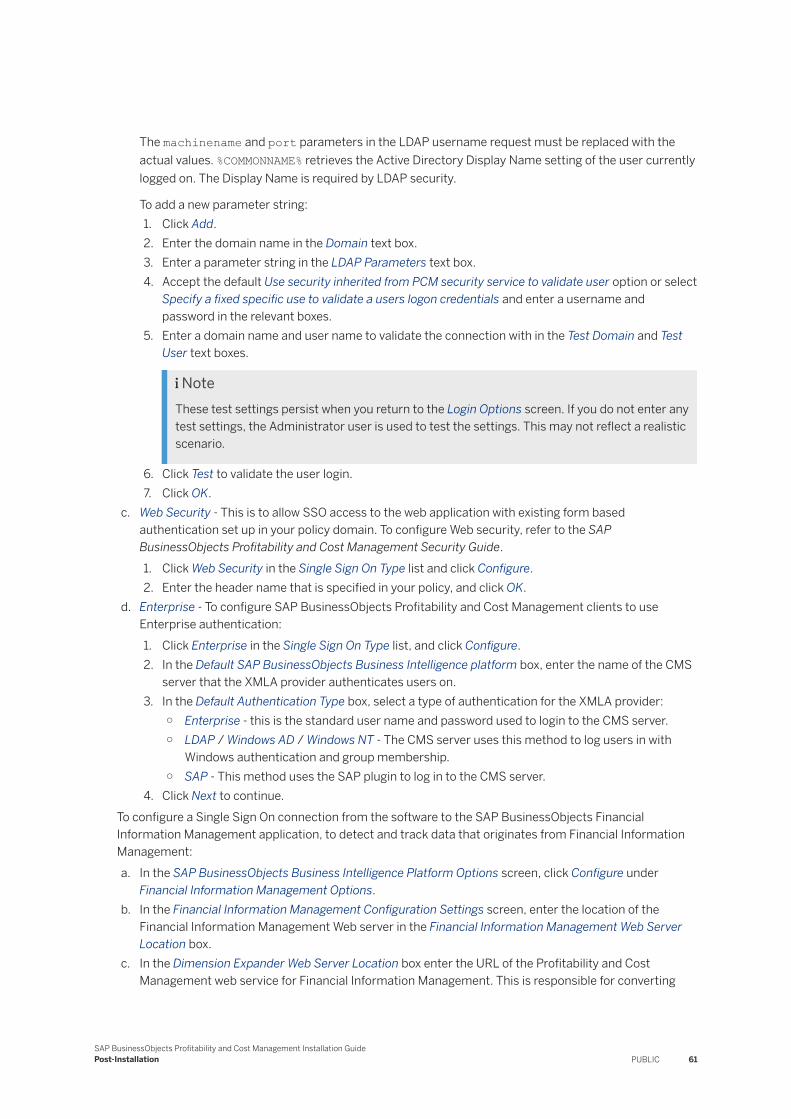
The machinename and port parameters in the LDAP username request must be replaced with the actual values. %COMMONNAME% retrieves the Active Directory Display Name setting of the user currently logged on. The Display Name is required by LDAP security.
To add a new parameter string:1. Click Add.2. Enter the domain name in the Domain text box.3. Enter a parameter string in the LDAP Parameters text box.4. Accept the default Use security inherited from PCM security service to validate user option or select
Specify a fixed specific use to validate a users logon credentials and enter a username and password in the relevant boxes.
5. Enter a domain name and user name to validate the connection with in the Test Domain and Test User text boxes.
NoteThese test settings persist when you return to the Login Options screen. If you do not enter any test settings, the Administrator user is used to test the settings. This may not reflect a realistic scenario.
6. Click Test to validate the user login.7. Click OK.
c. Web Security - This is to allow SSO access to the web application with existing form based authentication set up in your policy domain. To configure Web security, refer to the SAP BusinessObjects Profitability and Cost Management Security Guide.1. Click Web Security in the Single Sign On Type list and click Configure.2. Enter the header name that is specified in your policy, and click OK.
d. Enterprise - To configure SAP BusinessObjects Profitability and Cost Management clients to use Enterprise authentication:1. Click Enterprise in the Single Sign On Type list, and click Configure.2. In the Default SAP BusinessObjects Business Intelligence platform box, enter the name of the CMS
server that the XMLA provider authenticates users on.3. In the Default Authentication Type box, select a type of authentication for the XMLA provider:
○ Enterprise - this is the standard user name and password used to login to the CMS server.○ LDAP / Windows AD / Windows NT - The CMS server uses this method to log users in with
Windows authentication and group membership.○ SAP - This method uses the SAP plugin to log in to the CMS server.
4. Click Next to continue.To configure a Single Sign On connection from the software to the SAP BusinessObjects Financial Information Management application, to detect and track data that originates from Financial Information Management:a. In the SAP BusinessObjects Business Intelligence Platform Options screen, click Configure under
Financial Information Management Options.b. In the Financial Information Management Configuration Settings screen, enter the location of the
Financial Information Management Web server in the Financial Information Management Web Server Location box.
c. In the Dimension Expander Web Server Location box enter the URL of the Profitability and Cost Management web service for Financial Information Management. This is responsible for converting
SAP BusinessObjects Profitability and Cost Management Installation GuidePost-Installation PUBLIC 61
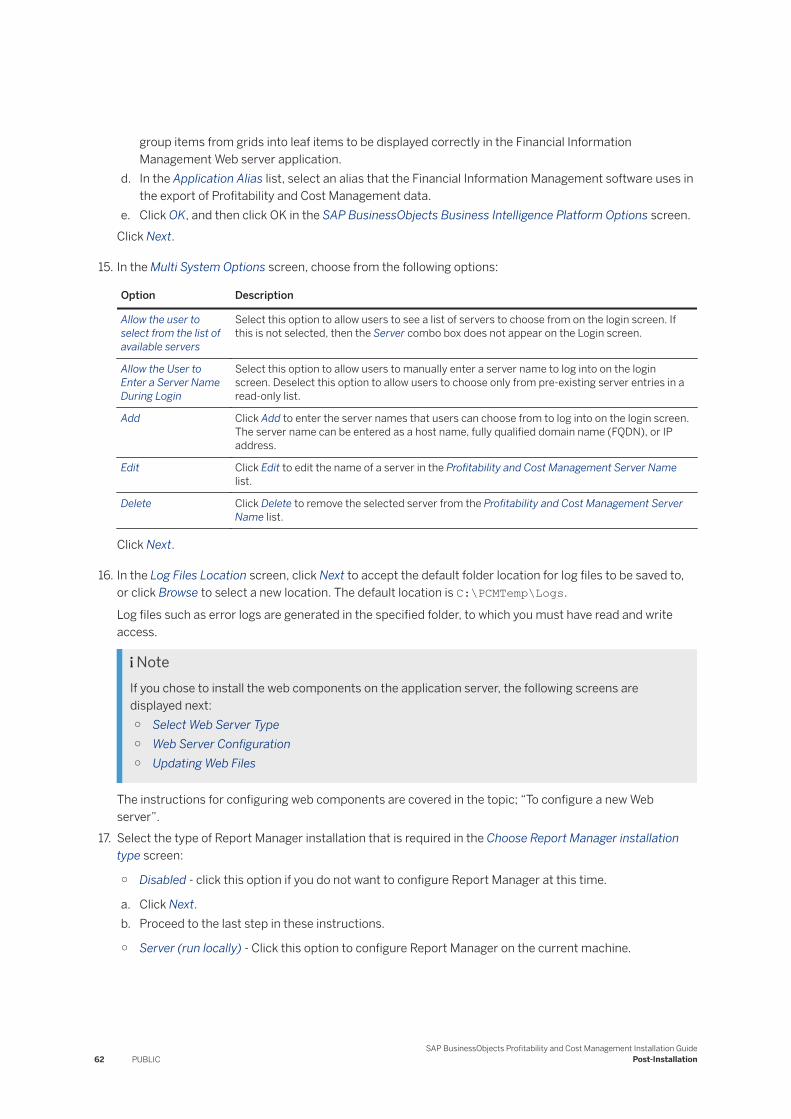
group items from grids into leaf items to be displayed correctly in the Financial Information Management Web server application.
d. In the Application Alias list, select an alias that the Financial Information Management software uses in the export of Profitability and Cost Management data.
e. Click OK, and then click OK in the SAP BusinessObjects Business Intelligence Platform Options screen.Click Next.
15. In the Multi System Options screen, choose from the following options:
Option Description
Allow the user to select from the list of available servers
Select this option to allow users to see a list of servers to choose from on the login screen. If this is not selected, then the Server combo box does not appear on the Login screen.
Allow the User to Enter a Server Name During Login
Select this option to allow users to manually enter a server name to log into on the login screen. Deselect this option to allow users to choose only from pre-existing server entries in a read-only list.
Add Click Add to enter the server names that users can choose from to log into on the login screen. The server name can be entered as a host name, fully qualified domain name (FQDN), or IP address.
Edit Click Edit to edit the name of a server in the Profitability and Cost Management Server Name list.
Delete Click Delete to remove the selected server from the Profitability and Cost Management Server Name list.
Click Next.
16. In the Log Files Location screen, click Next to accept the default folder location for log files to be saved to, or click Browse to select a new location. The default location is C:\PCMTemp\Logs.
Log files such as error logs are generated in the specified folder, to which you must have read and write access.
NoteIf you chose to install the web components on the application server, the following screens are displayed next:○ Select Web Server Type○ Web Server Configuration○ Updating Web Files
The instructions for configuring web components are covered in the topic; “To configure a new Web server”.
17. Select the type of Report Manager installation that is required in the Choose Report Manager installation type screen:
○ Disabled - click this option if you do not want to configure Report Manager at this time.
a. Click Next.b. Proceed to the last step in these instructions.
○ Server (run locally) - Click this option to configure Report Manager on the current machine.
62 PUBLICSAP BusinessObjects Profitability and Cost Management Installation Guide
Post-Installation
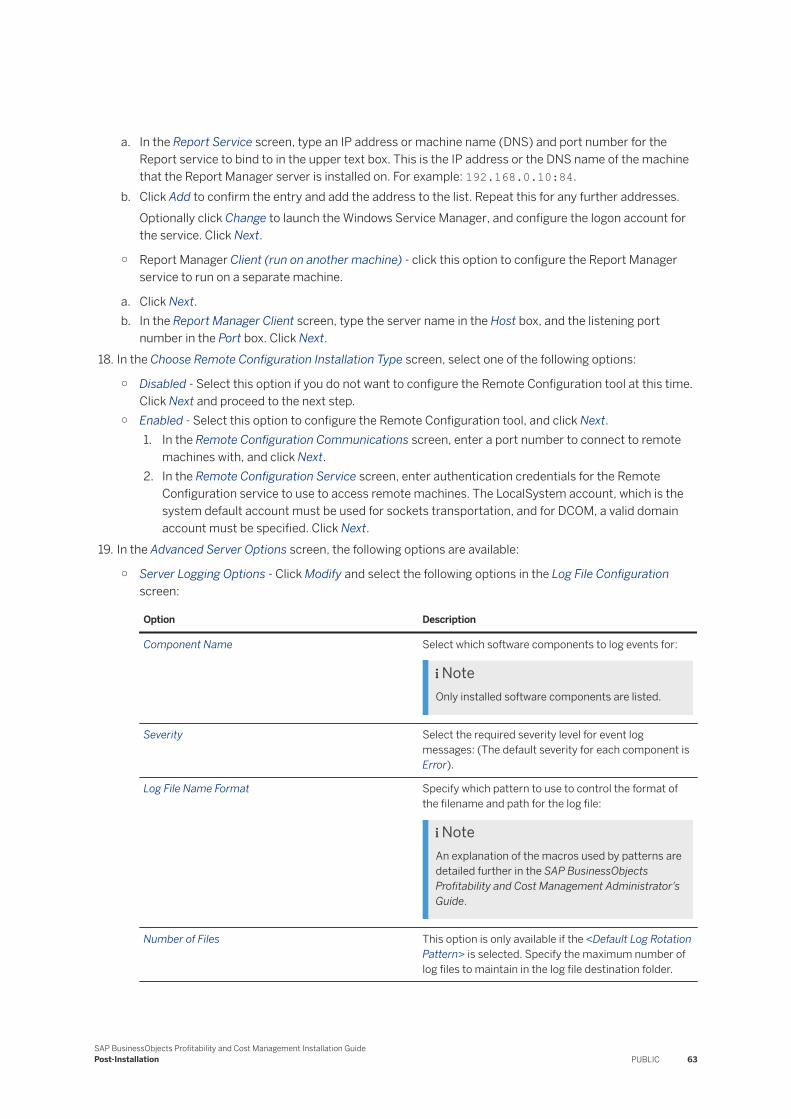
a. In the Report Service screen, type an IP address or machine name (DNS) and port number for the Report service to bind to in the upper text box. This is the IP address or the DNS name of the machine that the Report Manager server is installed on. For example: 192.168.0.10:84.
b. Click Add to confirm the entry and add the address to the list. Repeat this for any further addresses.Optionally click Change to launch the Windows Service Manager, and configure the logon account for the service. Click Next.
○ Report Manager Client (run on another machine) - click this option to configure the Report Manager service to run on a separate machine.
a. Click Next.b. In the Report Manager Client screen, type the server name in the Host box, and the listening port
number in the Port box. Click Next.18. In the Choose Remote Configuration Installation Type screen, select one of the following options:
○ Disabled - Select this option if you do not want to configure the Remote Configuration tool at this time. Click Next and proceed to the next step.
○ Enabled - Select this option to configure the Remote Configuration tool, and click Next.1. In the Remote Configuration Communications screen, enter a port number to connect to remote
machines with, and click Next.2. In the Remote Configuration Service screen, enter authentication credentials for the Remote
Configuration service to use to access remote machines. The LocalSystem account, which is the system default account must be used for sockets transportation, and for DCOM, a valid domain account must be specified. Click Next.
19. In the Advanced Server Options screen, the following options are available:
○ Server Logging Options - Click Modify and select the following options in the Log File Configuration screen:
Option Description
Component Name Select which software components to log events for:
NoteOnly installed software components are listed.
Severity Select the required severity level for event log messages: (The default severity for each component is Error).
Log File Name Format Specify which pattern to use to control the format of the filename and path for the log file:
NoteAn explanation of the macros used by patterns are detailed further in the SAP BusinessObjects Profitability and Cost Management Administrator's Guide.
Number of Files This option is only available if the <Default Log Rotation Pattern> is selected. Specify the maximum number of log files to maintain in the log file destination folder.
SAP BusinessObjects Profitability and Cost Management Installation GuidePost-Installation PUBLIC 63
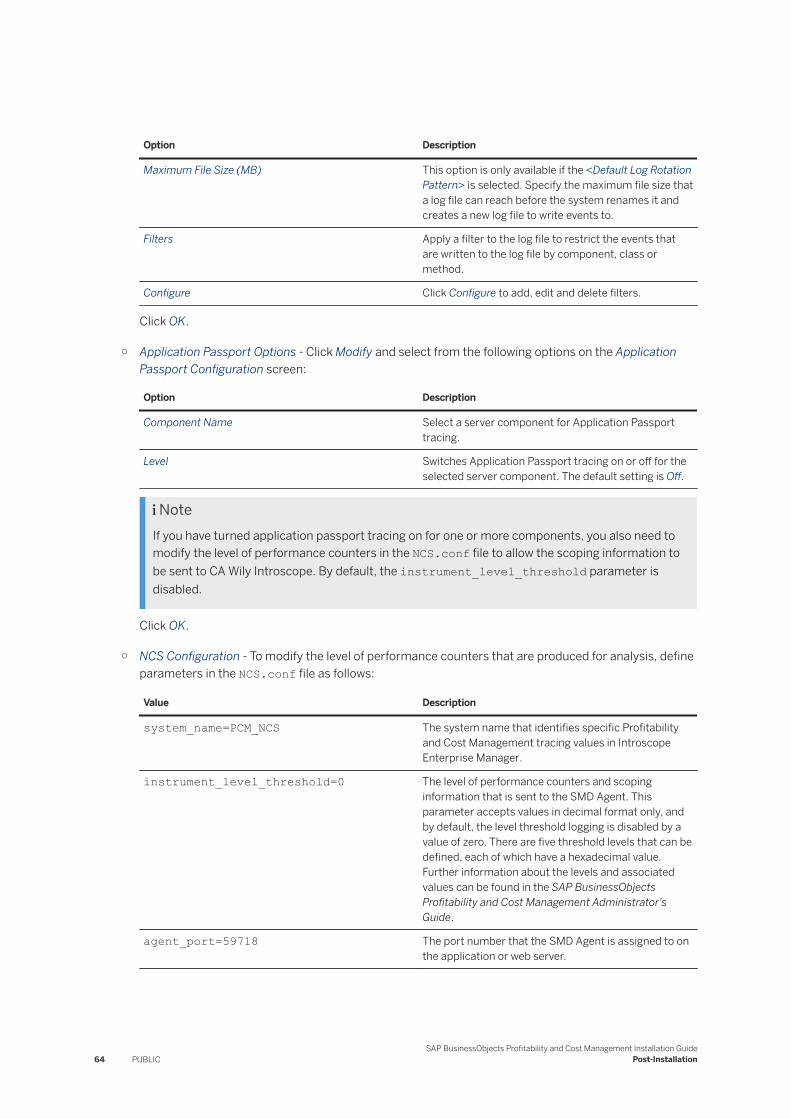
Option Description
Maximum File Size (MB) This option is only available if the <Default Log Rotation Pattern> is selected. Specify the maximum file size that a log file can reach before the system renames it and creates a new log file to write events to.
Filters Apply a filter to the log file to restrict the events that are written to the log file by component, class or method.
Configure Click Configure to add, edit and delete filters.
Click OK.
○ Application Passport Options - Click Modify and select from the following options on the Application Passport Configuration screen:
Option Description
Component Name Select a server component for Application Passport tracing.
Level Switches Application Passport tracing on or off for the selected server component. The default setting is Off.
NoteIf you have turned application passport tracing on for one or more components, you also need to modify the level of performance counters in the NCS.conf file to allow the scoping information to be sent to CA Wily Introscope. By default, the instrument_level_threshold parameter is disabled.
Click OK.
○ NCS Configuration - To modify the level of performance counters that are produced for analysis, define parameters in the NCS.conf file as follows:
Value Description
system_name=PCM_NCS The system name that identifies specific Profitability and Cost Management tracing values in Introscope Enterprise Manager.
instrument_level_threshold=0 The level of performance counters and scoping information that is sent to the SMD Agent. This parameter accepts values in decimal format only, and by default, the level threshold logging is disabled by a value of zero. There are five threshold levels that can be defined, each of which have a hexadecimal value. Further information about the levels and associated values can be found in the SAP BusinessObjects Profitability and Cost Management Administrator's Guide.
agent_port=59718 The port number that the SMD Agent is assigned to on the application or web server.
64 PUBLICSAP BusinessObjects Profitability and Cost Management Installation Guide
Post-Installation
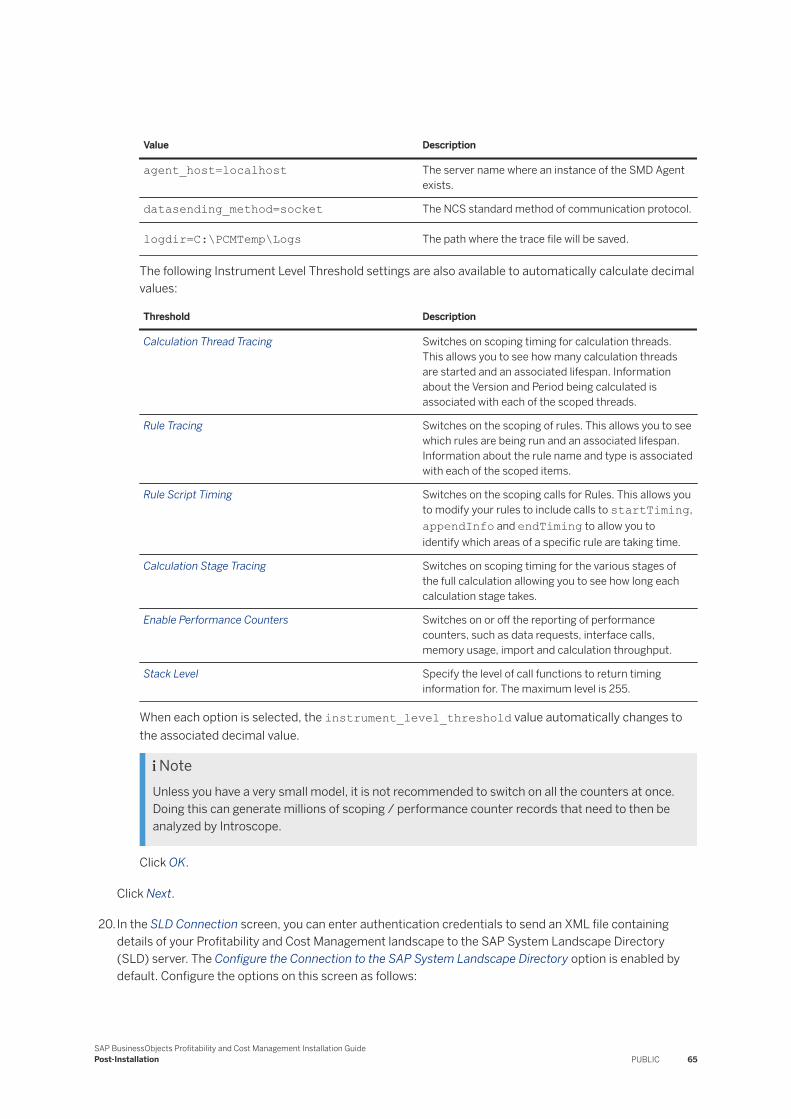
Value Description
agent_host=localhost The server name where an instance of the SMD Agent exists.
datasending_method=socket The NCS standard method of communication protocol.
logdir=C:\PCMTemp\Logs The path where the trace file will be saved.
The following Instrument Level Threshold settings are also available to automatically calculate decimal values:
Threshold Description
Calculation Thread Tracing Switches on scoping timing for calculation threads. This allows you to see how many calculation threads are started and an associated lifespan. Information about the Version and Period being calculated is associated with each of the scoped threads.
Rule Tracing Switches on the scoping of rules. This allows you to see which rules are being run and an associated lifespan. Information about the rule name and type is associated with each of the scoped items.
Rule Script Timing Switches on the scoping calls for Rules. This allows you to modify your rules to include calls to startTiming, appendInfo and endTiming to allow you to identify which areas of a specific rule are taking time.
Calculation Stage Tracing Switches on scoping timing for the various stages of the full calculation allowing you to see how long each calculation stage takes.
Enable Performance Counters Switches on or off the reporting of performance counters, such as data requests, interface calls, memory usage, import and calculation throughput.
Stack Level Specify the level of call functions to return timing information for. The maximum level is 255.
When each option is selected, the instrument_level_threshold value automatically changes to the associated decimal value.
NoteUnless you have a very small model, it is not recommended to switch on all the counters at once. Doing this can generate millions of scoping / performance counter records that need to then be analyzed by Introscope.
Click OK.
Click Next.
20.In the SLD Connection screen, you can enter authentication credentials to send an XML file containing details of your Profitability and Cost Management landscape to the SAP System Landscape Directory (SLD) server. The Configure the Connection to the SAP System Landscape Directory option is enabled by default. Configure the options on this screen as follows:
SAP BusinessObjects Profitability and Cost Management Installation GuidePost-Installation PUBLIC 65

a. SLD Instance Identifier - Enter a value to identify this server, or a cluster of servers that are associated with a particular server. The value must be 3 characters long. For example, if you are configuring SLD parameters on Application Server 1, and enter an SLD instance identifier of AP1, then any other server machines that are associated with this application server, should also be given the same identifier.
b. User - Enter a valid SLD username.c. Password - Enter a valid password for the SLD username.d. Confirm Password - Re-enter the password.e. Host - Enter the hostname of the SLD server.f. Port - The SLD server listening port number. This is set to the default SLD port number of 50000.g. Click Next.
Each server is individually registered to the SLD, and all registered systems with the same SLD Identifier are assumed to be in a cluster. The information you have entered is used to create the secure SLD connection file: C:\ProgramData\SAP BusinessObjects\PCM\sldest.cfg, which contains encrypted authentication information to allow a connection to the SLD server.
When either Finish or Cancel are clicked on the next screen, the SLD XML file is generated, and the C:\ProgramData\SAP BusinessObjects\PCM\pcmslddataset.xml file is sent to the SLD server. If SLD Connection details have been provided, the data is sent each time the Configuration Wizard is run. Refer to the SAP BusinessObjects Profitability and Cost Management Administrator's Guide for further information.
21. On the Congratulations screen, if there are any warnings, select the check box to confirm your agreement, and then click Finish.If you have configured Oracle Instant Client DLL file locations during the configuration, then a Restart dialog box is displayed. Click Yes to restart your machine now, or No if you want to restart your machine manually. The server must be restarted to enable Profitability and Cost Management services to detect the new Instant Client DLL file paths.
For more information see also About Windows Sockets, About Advanced IP Filtering, About Advanced Server Options About Single Sign On in the SAP Profitability and Cost Management Installation guide.
6.1.2 Configuring the Web Server
Prerequisites
This task assumes that only the following installation components have been installed:
● Core Components (mandatory)● Web Components
NoteThe types of components that are installed affects which screens are displayed in the SAP BusinessObjects Profitability and Cost Management Configuration Wizard.
66 PUBLICSAP BusinessObjects Profitability and Cost Management Installation Guide
Post-Installation

Context
Follow these steps to configure the software on a dedicated Web server:
Procedure
1. Click Next on the SAP BusinessObjects Profitability and Cost Management Configuration Wizard Welcome screen.
2. In the Choose Language screen, optionally select the preferred language in which to view the application interface, from the Primary Language combo box. Then, select a secondary language from the Secondary Language drop-down combo box.This ensures that if an equivalent alias name cannot be found in the primary language, the software attempts to locate it in the specified secondary language. The SAP BusinessObjects Profitability and Cost Management Configuration Wizard also continues in the selected language.
NoteThe Choose Language screen is only displayed during the initial configuration of the software. The screen is not displayed during any subsequent launches of the Configuration Wizard.
Click Next.3. In the Transport Mechanism screen, select a method of network communication for the software
components to use. Choose between the following default Microsoft DCOM and Windows Sockets transport layers:
○ DCOM - Select this method if the Primary server is also configured to use DCOM.○ Sockets - Select this transport layer if the Primary server is also configured to communicate via
Sockets.
Click Next.4. In the Choose Installation Type screen, select Client, and click Next.5. In the Client Setup screen, type the name or IP address of the primary model server (application server) in
the text box, or click Browse to search for the relevant server, and then click Next.The server credentials are written to the Windows Registry. Local Administrator rights are required for this setting to be written to a central location. If the person configuring this setting does not have local Administrator rights, an override registry key is generated, and this setting is used in preference to the centrally configured default server setting.
6. In the Test Connection to Primary Server screen, click Next to test the connection between the application server and your client machine.
The Next command tests whether the database connectivity information supplied in previous screens is sufficient to connect to the current database server, and also checks if the PCMServer service on the Application server can be connected to.
7. In the Enter license keys screen, the license information from the Primary Model server is displayed. Click Next.
8. The Login Options screen controls which Single Sign On (SSO) options are available to users to choose from when they log into the software. The following options are available to select:
SAP BusinessObjects Profitability and Cost Management Installation GuidePost-Installation PUBLIC 67
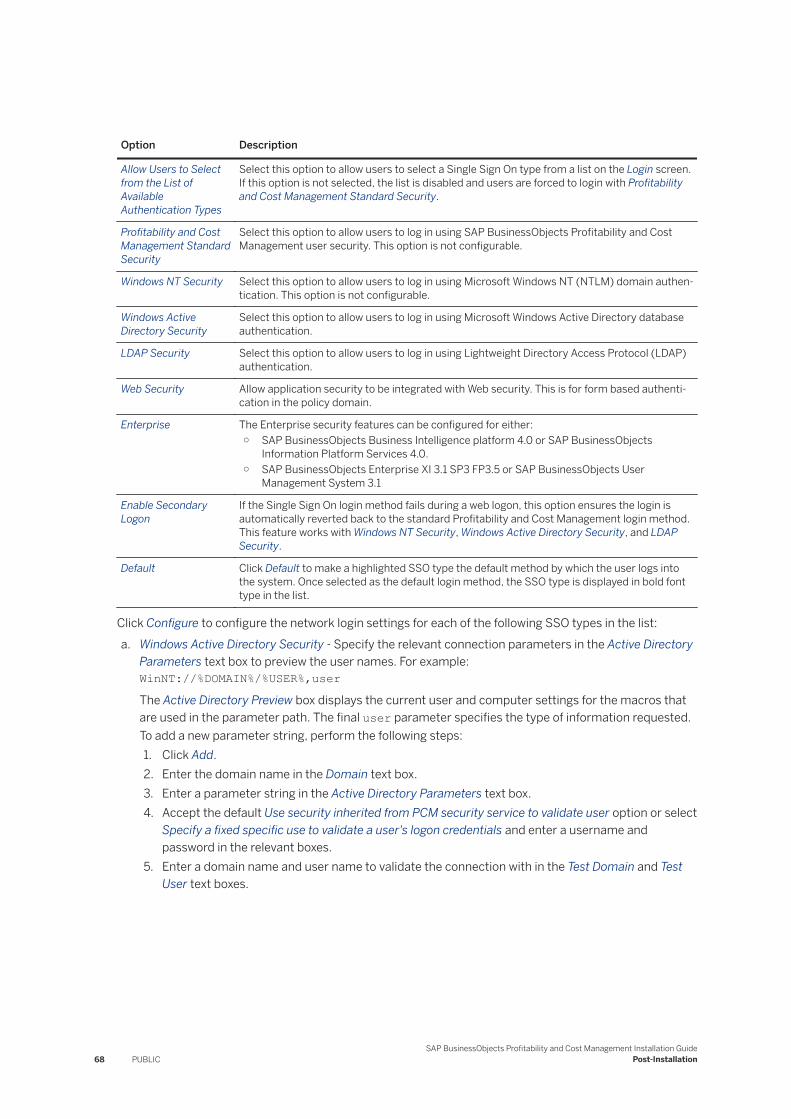
Option Description
Allow Users to Select from the List of Available Authentication Types
Select this option to allow users to select a Single Sign On type from a list on the Login screen. If this option is not selected, the list is disabled and users are forced to login with Profitability and Cost Management Standard Security.
Profitability and Cost Management Standard Security
Select this option to allow users to log in using SAP BusinessObjects Profitability and Cost Management user security. This option is not configurable.
Windows NT Security Select this option to allow users to log in using Microsoft Windows NT (NTLM) domain authentication. This option is not configurable.
Windows Active Directory Security
Select this option to allow users to log in using Microsoft Windows Active Directory database authentication.
LDAP Security Select this option to allow users to log in using Lightweight Directory Access Protocol (LDAP) authentication.
Web Security Allow application security to be integrated with Web security. This is for form based authentication in the policy domain.
Enterprise The Enterprise security features can be configured for either:○ SAP BusinessObjects Business Intelligence platform 4.0 or SAP BusinessObjects
Information Platform Services 4.0.○ SAP BusinessObjects Enterprise XI 3.1 SP3 FP3.5 or SAP BusinessObjects User
Management System 3.1
Enable Secondary Logon
If the Single Sign On login method fails during a web logon, this option ensures the login is automatically reverted back to the standard Profitability and Cost Management login method. This feature works with Windows NT Security, Windows Active Directory Security, and LDAP Security.
Default Click Default to make a highlighted SSO type the default method by which the user logs into the system. Once selected as the default login method, the SSO type is displayed in bold font type in the list.
Click Configure to configure the network login settings for each of the following SSO types in the list:a. Windows Active Directory Security - Specify the relevant connection parameters in the Active Directory
Parameters text box to preview the user names. For example:WinNT://%DOMAIN%/%USER%,userThe Active Directory Preview box displays the current user and computer settings for the macros that are used in the parameter path. The final user parameter specifies the type of information requested. To add a new parameter string, perform the following steps:1. Click Add.2. Enter the domain name in the Domain text box.3. Enter a parameter string in the Active Directory Parameters text box.4. Accept the default Use security inherited from PCM security service to validate user option or select
Specify a fixed specific use to validate a user's logon credentials and enter a username and password in the relevant boxes.
5. Enter a domain name and user name to validate the connection with in the Test Domain and Test User text boxes.
68 PUBLICSAP BusinessObjects Profitability and Cost Management Installation Guide
Post-Installation

NoteThese test settings persist when you return to the Login Options screen. If you do not enter any test settings, the Administrator user is used to test the settings, This may not reflect a realistic scenario.
6. Click Test to validate the user login.7. Click OK.
b. LDAP Security - The configuration of this login type is similar to the Active Directory configuration. The supplied parameters are different in a Lightweight Directory Access Protocol (LDAP) configuration, for example:LDAP://machinename:port/cn=%COMMONNAME%,dc=%DOMAIN%,dc=local
The machinename and port parameters in the LDAP username request must be replaced with the actual values. %COMMONNAME% retrieves the Active Directory Display Name setting of the user currently logged on. The Display Name is required by LDAP security.
To add a new parameter string:1. Click Add.2. Enter the domain name in the Domain text box.3. Enter a parameter string in the LDAP Parameters text box.4. Accept the default Use security inherited from PCM security service to validate user option or select
Specify a fixed specific use to validate a user's logon credentials and enter a username and password in the relevant boxes.
5. Enter a domain name and user name to validate the connection with in the Test Domain and Test User text boxes.
NoteThese test settings persist when you return to the Login Options screen. If you do not enter any test settings, the Administrator user is used to test the settings. This may not reflect a realistic scenario.
6. Click Test to validate the user login.7. Click OK.
c. Web Security - This is to allow SSO access to the web application with existing form based authentication set up in your policy domain. To configure Web security, refer to the SAP BusinessObjects Profitability and Cost Management Security Guide.1. Click Web Security in the Single Sign On Type list and click Configure.2. Enter the header name that is specified in your policy, and click OK.
d. Enterprise - To configure SAP BusinessObjects Profitability and Cost Management clients to use Enterprise authentication:1. Click Enterprise in the Single Sign On Type list, and click Configure.2. In the Default SAP BusinessObjects Business Intelligence platform box, enter the name of the CMS
server that the XMLA provider authenticates users on.3. In the Default Authentication Type box, select a type of authentication for the XMLA provider:
○ Enterprise - this is the standard user name and password used to login to the CMS server.○ LDAP / Windows AD / Windows NT - The CMS server uses this method to log users in with
Windows authentication and group membership.
SAP BusinessObjects Profitability and Cost Management Installation GuidePost-Installation PUBLIC 69
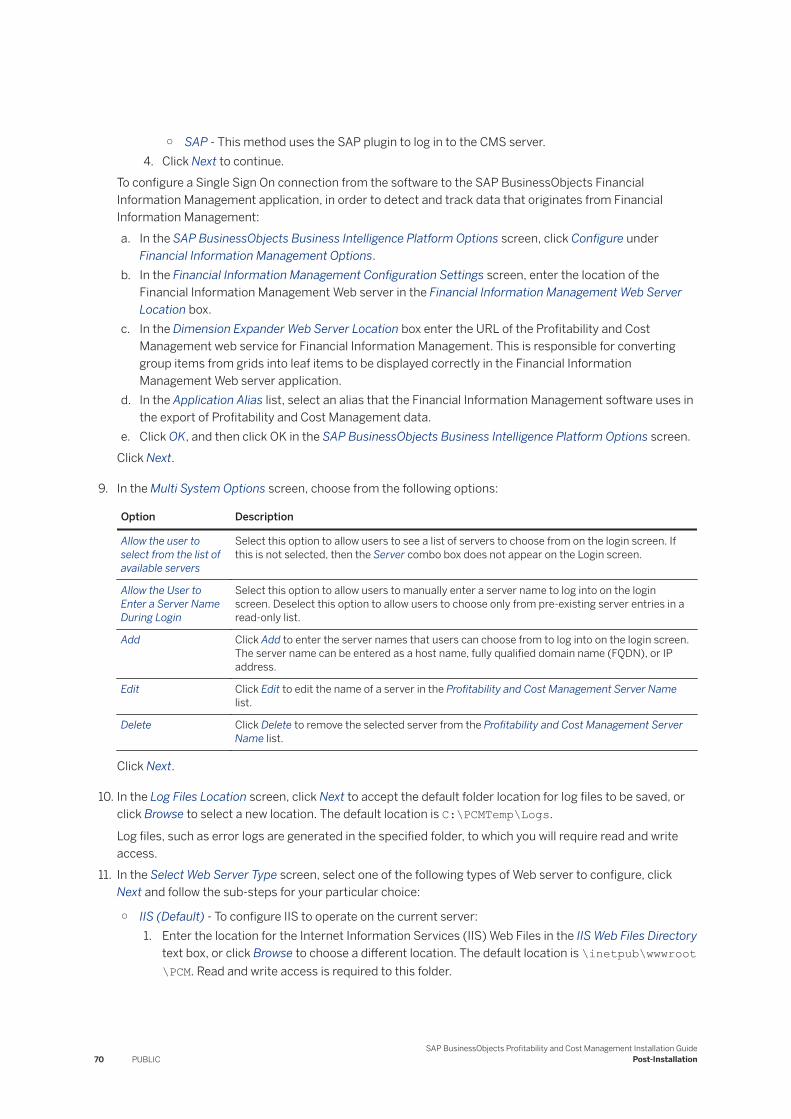
○ SAP - This method uses the SAP plugin to log in to the CMS server.4. Click Next to continue.
To configure a Single Sign On connection from the software to the SAP BusinessObjects Financial Information Management application, in order to detect and track data that originates from Financial Information Management:a. In the SAP BusinessObjects Business Intelligence Platform Options screen, click Configure under
Financial Information Management Options.b. In the Financial Information Management Configuration Settings screen, enter the location of the
Financial Information Management Web server in the Financial Information Management Web Server Location box.
c. In the Dimension Expander Web Server Location box enter the URL of the Profitability and Cost Management web service for Financial Information Management. This is responsible for converting group items from grids into leaf items to be displayed correctly in the Financial Information Management Web server application.
d. In the Application Alias list, select an alias that the Financial Information Management software uses in the export of Profitability and Cost Management data.
e. Click OK, and then click OK in the SAP BusinessObjects Business Intelligence Platform Options screen.Click Next.
9. In the Multi System Options screen, choose from the following options:
Option Description
Allow the user to select from the list of available servers
Select this option to allow users to see a list of servers to choose from on the login screen. If this is not selected, then the Server combo box does not appear on the Login screen.
Allow the User to Enter a Server Name During Login
Select this option to allow users to manually enter a server name to log into on the login screen. Deselect this option to allow users to choose only from pre-existing server entries in a read-only list.
Add Click Add to enter the server names that users can choose from to log into on the login screen. The server name can be entered as a host name, fully qualified domain name (FQDN), or IP address.
Edit Click Edit to edit the name of a server in the Profitability and Cost Management Server Name list.
Delete Click Delete to remove the selected server from the Profitability and Cost Management Server Name list.
Click Next.
10. In the Log Files Location screen, click Next to accept the default folder location for log files to be saved, or click Browse to select a new location. The default location is C:\PCMTemp\Logs.
Log files, such as error logs are generated in the specified folder, to which you will require read and write access.
11. In the Select Web Server Type screen, select one of the following types of Web server to configure, click Next and follow the sub-steps for your particular choice:
○ IIS (Default) - To configure IIS to operate on the current server:1. Enter the location for the Internet Information Services (IIS) Web Files in the IIS Web Files Directory
text box, or click Browse to choose a different location. The default location is \inetpub\wwwroot\PCM. Read and write access is required to this folder.
70 PUBLICSAP BusinessObjects Profitability and Cost Management Installation Guide
Post-Installation
CautionIf IIS was not installed before you started the SAP BusinessObjects Profitability and Cost Management installation, then the default location in this text box is C:\Program Files\SAP BusinessObjects\PCM\IIS Files. IIS can only integrate with the software when it is installed prior to installation and configuration. In this instance, exit the SAP BusinessObjects Profitability and Cost Management Configuration Wizard, install IIS, re-launch the SAP BusinessObjects Profitability and Cost Management Configuration Wizard, and then navigate back to this step.
2. Enter a location where the IIS ASP files are to be stored in the Temporary Directory text box, or click Browse to choose a different location. The default location is C:\PCMTemp\Temp.
3. Type the web server URL in the Web Server URL text box. The default address is http://servername/PCM.The IP address of the machine may be used here, but this must also be used by web clients. Web clients that attempt to access a Book using details different to those specified in this screen, are denied access.
The Proxy Web service method places an extra bridge in the connection from the client software to the web server. This is needed when a firewall is present on the system. A firewall makes connecting via DCOM much more difficult, so the new bridge uses TCP/IP and HTTP to pass through the firewall. To configure IIS to use a proxy web server:This facility is only available when using IIS as a web server. The proprietary web server does not support the Web Proxy Service.1. Select Use Web Proxy Service.2. Enter the location of the local web client software in the Proxy URL text box. The entry must
have /tun appended to the end of the URL to be able to use the Web Proxy service. For example: //YourMachineName/pcm/tun. (The server IP address is also an acceptable format for this entry).Extra ASP and graphics files are present after the web service installation, and are used by web clients in the /tun sub-folder.
3. Type the address of the host IIS Web server that connects to the software in the Destination URL text box. For example: //HostInternalProfitabilityandCostManagementWebserver/pcm. (The server IP address is also an acceptable format for this entry).
NoteIf an IP address is supplied for the Proxy URL and the Destination URL paths, users must use this IP address as the URL in the Internet Explorer web client, rather than the DNS machine name.
4. Enter the IIS files location on the Web Proxy server in the Proxy Files Directory text box, or click Browse to choose a location from a list. For example: \inetpub\wwwroot\PCM.
The diagram below outlines the basic system architecture for the SAP BusinessObjects Profitability and Cost Management Web Proxy service facility:
SAP BusinessObjects Profitability and Cost Management Installation GuidePost-Installation PUBLIC 71

Internal Network - The internal network contains the Host IIS Web server, that connects to the primary server in the normal manner.DMZ (Demilitarized zone) - This contains the proxy IIS Web server, that must have a one to one relationship with the Host IIS Web server. (Where multiple proxy Web servers are used, each must connect to a corresponding host Web server).External Client - This is the web user connecting through Internet Explorer to the URL of the Proxy IIS Web server.
○ Web Server (For diagnostic purposes with assistance from Customer Assurance)1. Enter the port number to be listened on in the Web Port text box. The default is port 80.
If you choose to use an alternative port number, then this port number must be added after the Web server URL, preceded by a colon, to allow web client access. For Example: http://YourMachineName:82 (where 82 is the alternative port required).
NoteAdditional ports that are used for the web server must be operational to allow a successful connection to Web Books. If an invalid port is specified in the SAP BusinessObjects Profitability and Cost Management Configuration Wizard, you cannot successfully log in to the application using this port.
2. Type in the location for temporary images to be stored in the Temporary Directory text box, or click Browse to choose a location from a list. The default location is C:\PCMTemp\Temp.
72 PUBLICSAP BusinessObjects Profitability and Cost Management Installation Guide
Post-Installation
3. Enter the URL path for the Web server in the Web Server URL text box. The default location is http://servername.
Click Next.12. On the Updating Web Files screen, click Next to update the web files.13. In the Advanced Server Options screen, the following options are available:
○ Server Logging Options - Click Modify and select the following options in the Log File Configuration screen:
Option Description
Component Name Select which software components to log events for:
NoteOnly installed software components are listed.
Severity Select the required severity level for event log messages: (The default severity for each component is Error).
Log File Name Format Specify which pattern to use to control the format of the filename and path for the log file:
NoteAn explanation of the macros used by patterns are detailed further in the SAP BusinessObjects Profitability and Cost Management Administrator's Guide.
Number of Files This option is only available if the <Default Log Rotation Pattern> is selected. Specify the maximum number of log files to maintain in the log file destination folder.
Maximum File Size (MB) This option is only available if the <Default Log Rotation Pattern> is selected. Specify the maximum file size that a log file can reach before the system renames it and creates a new log file to write events to.
Filters Apply a filter to the log file to restrict the events that are written to the log file by component, class or method.
Configure Click Configure to add, edit and delete filters.
Click OK.
○ Application Passport Options - Click Modify and select from the following options on the Application Passport Configuration screen:
Option Description
Component Name Select a server component for Application Passport tracing.
SAP BusinessObjects Profitability and Cost Management Installation GuidePost-Installation PUBLIC 73

Option Description
Level Switches Application Passport tracing on or off for the selected server component. The default setting is Off.
NoteIf you have turned application passport tracing on for one or more components, you also need to modify the level of performance counters in the NCS.conf file to allow the scoping information to be sent to CA Wily Introscope. By default, the instrument_level_threshold parameter is disabled.
Click OK.
○ NCS Configuration - To modify the level of performance counters that are produced for analysis, define parameters in the NCS.conf file as follows:
Value Description
system_name=PCM_NCS The system name that identifies specific Profitability and Cost Management tracing values in Introscope Enterprise Manager.
instrument_level_threshold=0 The level of performance counters that is sent to the SMD Agent. This parameter accepts values in decimal format only, and by default, the level threshold logging is disabled by a value of zero. There are five threshold levels that can be defined, each of which have a hex value. Further information about the levels and associated values can be found in the SAP BusinessObjects Profitability and Cost Management Administrator's Guide.
agent_port=59718 The port number that the SMD Agent is assigned to on the application or web server.
agent_host=localhost The server name where an instance of the SMD Agent exists.
datasending_method=socket The NCS standard method of communication protocol.
logdir=C:\PCMTemp\Logs| The path where the trace file will be saved.
The following Instrument Level Threshold settings are also available to automatically calculate decimal values:
Threshold Description
Calculation Thread Tracing Switches on scoping timing for calculation threads. This allows you to see how many calculation threads are started and an associated lifespan. Information about the Version and Period being calculated is associated with each of the scoped threads.
Rule Tracing Switches on the scoping of rules. This allows you to see which rules are being run and an associated lifespan.
74 PUBLICSAP BusinessObjects Profitability and Cost Management Installation Guide
Post-Installation
Threshold Description
Information about the rule name and type is associated with each of the scoped items.
Rule Script Timing Switches on the scoping calls for Rules. This allows you to modify your rules to include calls to startTiming, appendInfo and endTiming to allow you to identify which areas of a specific rule are taking time.
Calculation Stage Tracing Switches on scoping timing for the various stages of the full calculation allowing you to see how long each calculation stage takes.
Enable Performance Counters Switches on or off the reporting of performance counters, such as data requests, interface calls, memory usage, import and calculation throughput.
Stack Level Specify the level of call functions to return timing information for. The maximum level is 255.
When each option is selected, the instrument_level_threshold value automatically changes to the associated decimal value.
NoteUnless you have a very small model, it is not recommended to switch on all the counters at once. Doing this can generate millions of scoping / performance counter records that need to then be analysed by Introscope.
Click OK.
Click Next.
14. In the SLD Connection screen, you can enter authentication credentials to send an XML file containing details of your Profitability and Cost Management landscape to the SAP System Landscape Directory (SLD) server. The Configure the Connection to the SAP System Landscape Directory option is enabled by default. To configure the options on this screen:a. SLD Instance Identifier - Enter a value to identify this server, or a cluster of servers that are associated
with a particular server. The value must be 3 characters long. For example, if you are configuring SLD parameters on Application Server 1, and enter an SLD instance identifier of AP1, then any other server machines that are associated with this application server, should also be given the same identifier.
b. User - Enter a valid SLD username.c. Password - Enter a valid password for the SLD username.d. Confirm Password - Re-enter the password.e. Host - Enter the hostname of the SLD server.f. Port - The SLD server listening port number. This is set to the default SLD port number of 50000.g. Click Next.
Each server is individually registered to the SLD, and all registered systems with the same SLD Identifier are assumed to be in a cluster. The information you have entered is used to create the secure SLD connection file: C:\ProgramData\SAP BusinessObjects\PCM\sldest.cfg, which contains encrypted authentication information to allow a connection to the SLD server. Refer to the SAP BusinessObjects Profitability and Cost Management Administrator's Guide for further information.
SAP BusinessObjects Profitability and Cost Management Installation GuidePost-Installation PUBLIC 75
When either Finish or Cancel are clicked on the next screen, the SLD XML payload is generated, and the C:\ProgramData\SAP BusinessObjects\PCM\pcmslddataset.xml file is sent to the SLD server. If SLD Connection details have been provided, the data is sent each time the Configuration Wizard is run.
15. On the Congratulations screen, if there are any warnings, select the check box to confirm your agreement, and then click Finish.
Related Information
About Windows Sockets [page 132]About Advanced IP Filtering [page 132]About Advanced Server Options [page 133]
6.1.3 Configuring a Client Machine
Prerequisites
If workflow objects are embedded into books, then the Work Manager client must be installed on any Model Builder or Book Builder client that is used to edit or view books, or web server that delivers the books.
Context
The following configuration steps are based on performing a custom installation of software features on a Windows client workstation. These steps assume that the following software features are NOT installed:
● Web server components● Data Bridge● Work Manager Server● Report Manager Server
Procedure
1. Click Next on the SAP BusinessObjects Profitability and Cost Management Configuration Wizard Welcome screen.
2. In the Choose Language screen, optionally select the preferred language in which to view the application interface, from the Primary Language drop-down combo box. Then, select a secondary language from the Secondary Language drop-down combo box.This ensures that if an equivalent alias name cannot be found in the primary language, the software attempts to locate it in the specified secondary language. The SAP BusinessObjects Profitability and Cost Management Configuration Wizard also continues in the selected language.
76 PUBLICSAP BusinessObjects Profitability and Cost Management Installation Guide
Post-Installation
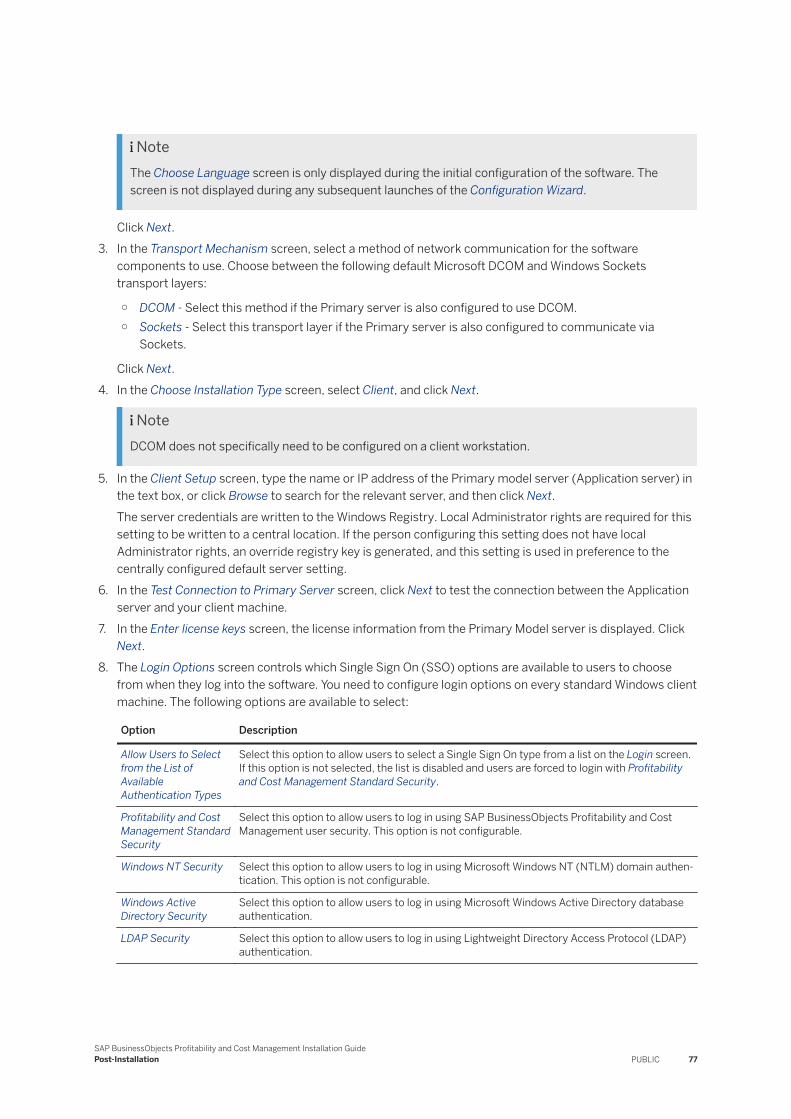
NoteThe Choose Language screen is only displayed during the initial configuration of the software. The screen is not displayed during any subsequent launches of the Configuration Wizard.
Click Next.3. In the Transport Mechanism screen, select a method of network communication for the software
components to use. Choose between the following default Microsoft DCOM and Windows Sockets transport layers:
○ DCOM - Select this method if the Primary server is also configured to use DCOM.○ Sockets - Select this transport layer if the Primary server is also configured to communicate via
Sockets.
Click Next.4. In the Choose Installation Type screen, select Client, and click Next.
NoteDCOM does not specifically need to be configured on a client workstation.
5. In the Client Setup screen, type the name or IP address of the Primary model server (Application server) in the text box, or click Browse to search for the relevant server, and then click Next.The server credentials are written to the Windows Registry. Local Administrator rights are required for this setting to be written to a central location. If the person configuring this setting does not have local Administrator rights, an override registry key is generated, and this setting is used in preference to the centrally configured default server setting.
6. In the Test Connection to Primary Server screen, click Next to test the connection between the Application server and your client machine.
7. In the Enter license keys screen, the license information from the Primary Model server is displayed. Click Next.
8. The Login Options screen controls which Single Sign On (SSO) options are available to users to choose from when they log into the software. You need to configure login options on every standard Windows client machine. The following options are available to select:
Option Description
Allow Users to Select from the List of Available Authentication Types
Select this option to allow users to select a Single Sign On type from a list on the Login screen. If this option is not selected, the list is disabled and users are forced to login with Profitability and Cost Management Standard Security.
Profitability and Cost Management Standard Security
Select this option to allow users to log in using SAP BusinessObjects Profitability and Cost Management user security. This option is not configurable.
Windows NT Security Select this option to allow users to log in using Microsoft Windows NT (NTLM) domain authentication. This option is not configurable.
Windows Active Directory Security
Select this option to allow users to log in using Microsoft Windows Active Directory database authentication.
LDAP Security Select this option to allow users to log in using Lightweight Directory Access Protocol (LDAP) authentication.
SAP BusinessObjects Profitability and Cost Management Installation GuidePost-Installation PUBLIC 77
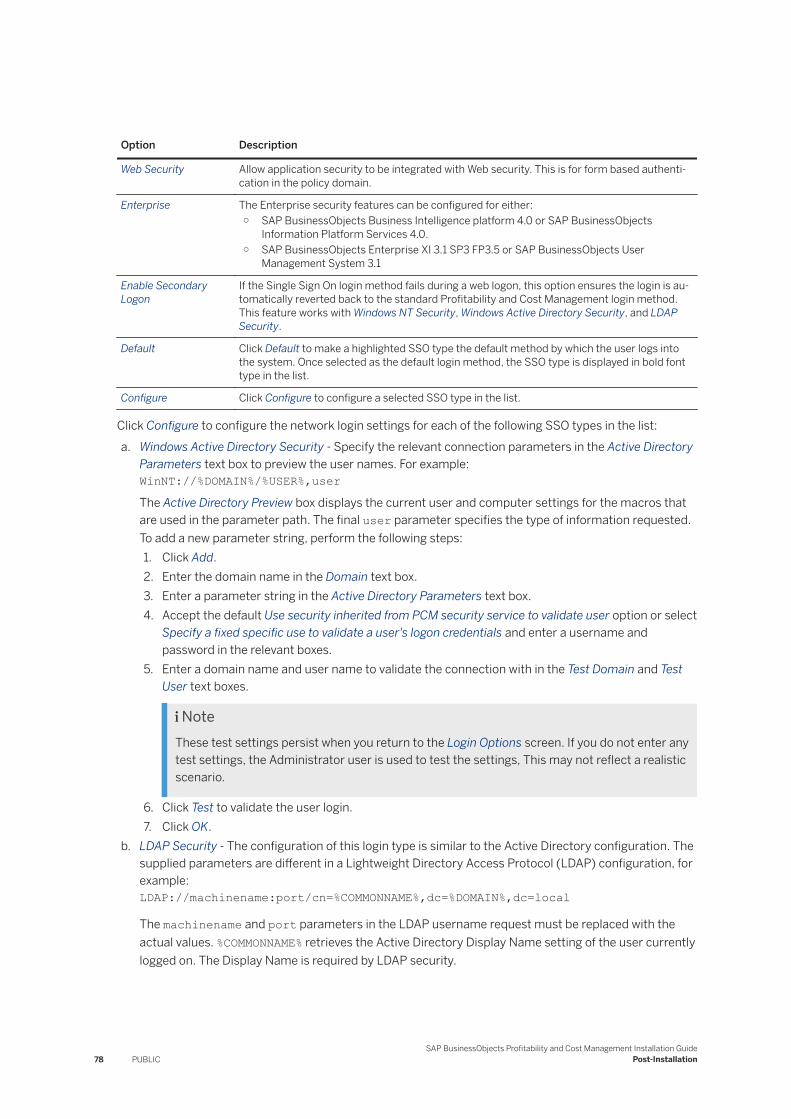
Option Description
Web Security Allow application security to be integrated with Web security. This is for form based authentication in the policy domain.
Enterprise The Enterprise security features can be configured for either:○ SAP BusinessObjects Business Intelligence platform 4.0 or SAP BusinessObjects
Information Platform Services 4.0.○ SAP BusinessObjects Enterprise XI 3.1 SP3 FP3.5 or SAP BusinessObjects User
Management System 3.1
Enable Secondary Logon
If the Single Sign On login method fails during a web logon, this option ensures the login is automatically reverted back to the standard Profitability and Cost Management login method. This feature works with Windows NT Security, Windows Active Directory Security, and LDAP Security.
Default Click Default to make a highlighted SSO type the default method by which the user logs into the system. Once selected as the default login method, the SSO type is displayed in bold font type in the list.
Configure Click Configure to configure a selected SSO type in the list.
Click Configure to configure the network login settings for each of the following SSO types in the list:a. Windows Active Directory Security - Specify the relevant connection parameters in the Active Directory
Parameters text box to preview the user names. For example:WinNT://%DOMAIN%/%USER%,userThe Active Directory Preview box displays the current user and computer settings for the macros that are used in the parameter path. The final user parameter specifies the type of information requested. To add a new parameter string, perform the following steps:1. Click Add.2. Enter the domain name in the Domain text box.3. Enter a parameter string in the Active Directory Parameters text box.4. Accept the default Use security inherited from PCM security service to validate user option or select
Specify a fixed specific use to validate a user's logon credentials and enter a username and password in the relevant boxes.
5. Enter a domain name and user name to validate the connection with in the Test Domain and Test User text boxes.
NoteThese test settings persist when you return to the Login Options screen. If you do not enter any test settings, the Administrator user is used to test the settings, This may not reflect a realistic scenario.
6. Click Test to validate the user login.7. Click OK.
b. LDAP Security - The configuration of this login type is similar to the Active Directory configuration. The supplied parameters are different in a Lightweight Directory Access Protocol (LDAP) configuration, for example:LDAP://machinename:port/cn=%COMMONNAME%,dc=%DOMAIN%,dc=local
The machinename and port parameters in the LDAP username request must be replaced with the actual values. %COMMONNAME% retrieves the Active Directory Display Name setting of the user currently logged on. The Display Name is required by LDAP security.
78 PUBLICSAP BusinessObjects Profitability and Cost Management Installation Guide
Post-Installation
To add a new parameter string:1. Click Add.2. Enter the domain name in the Domain text box.3. Enter a parameter string in the LDAP Parameters text box.4. Accept the default Use security inherited from PCM security service to validate user option or select
Specify a fixed specific use to validate a user's logon credentials and enter a username and password in the relevant boxes.
5. Enter a domain name and user name to validate the connection with in the Test Domain and Test User text boxes.
NoteThese test settings persist when you return to the Login Options screen. If you do not enter any test settings, the Administrator user is used to test the settings. This may not reflect a realistic scenario.
6. Click Test to validate the user login.7. Click OK.
c. Web Security - This is to allow SSO access to the web application with existing form based authentication set up in your policy domain. To configure Web security, refer to the SAP BusinessObjects Profitability and Cost Management Security Guide.1. Click Web Security in the Single Sign On Type list and click Configure.2. Enter the header name that is specified in your policy, and click OK.
d. Enterprise - To configure SAP BusinessObjects Profitability and Cost Management clients to use Enterprise authentication:1. Click Enterprise in the Single Sign On Type list, and click Configure.2. In the Default SAP BusinessObjects Business Intelligence platform box, enter the name of the CMS
server that the XMLA provider authenticates users on.3. In the Default Authentication Type box, select a type of authentication for the XMLA provider:
○ Enterprise - this is the standard user name and password used to login to the CMS server.○ LDAP / Windows AD / Windows NT - The CMS server uses this method to log users in with
Windows authentication and group membership.○ SAP - This method uses the SAP plugin to log in to the CMS server.
4. Click Next to continue.To configure a Single Sign On connection from the software to the SAP BusinessObjects Financial Information Management application, in order to detect and track data that originates from Financial Information Management:a. In the SAP BusinessObjects Business Intelligence Platform Options screen, click Configure under
Financial Information Management Options.b. In the Financial Information Management Configuration Settings screen, enter the location of the
Financial Information Management Web server in the Financial Information Management Web Server Location box.
c. In the Dimension Expander Web Server Location box enter the URL of the Profitability and Cost Management web service for Financial Information Management. This is responsible for converting group items from grids into leaf items to be displayed correctly in the Financial Information Management Web server application.
SAP BusinessObjects Profitability and Cost Management Installation GuidePost-Installation PUBLIC 79
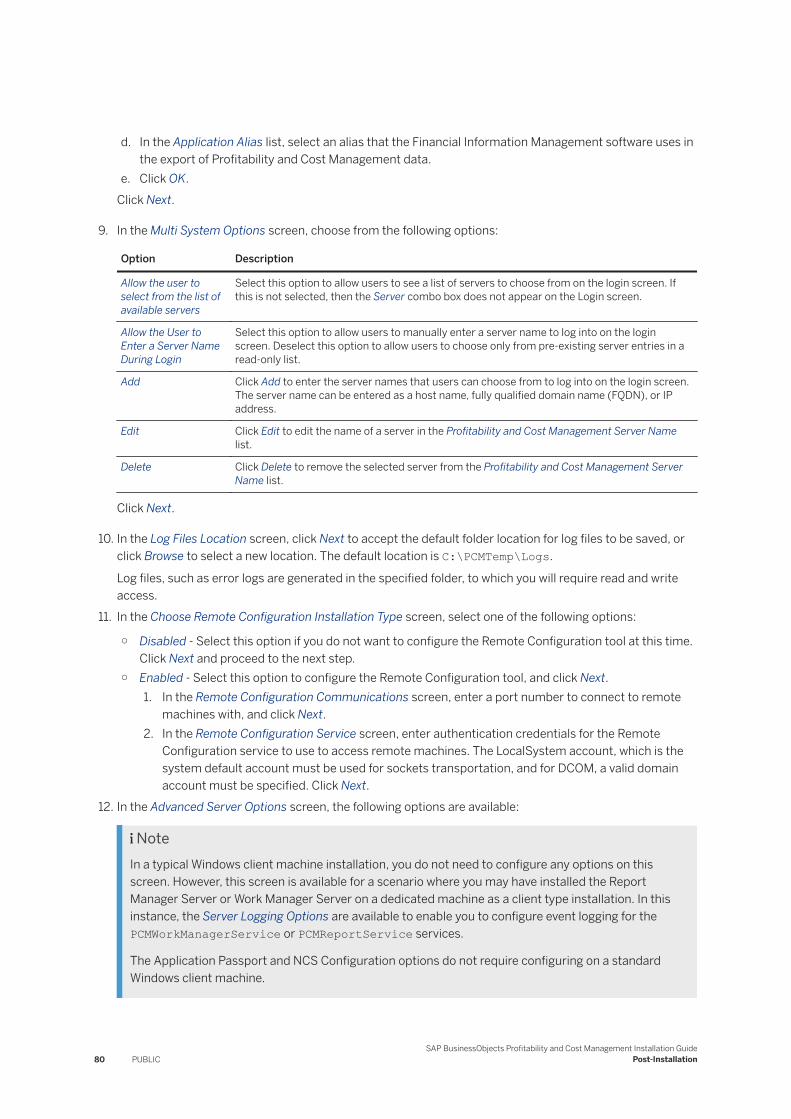
d. In the Application Alias list, select an alias that the Financial Information Management software uses in the export of Profitability and Cost Management data.
e. Click OK.Click Next.
9. In the Multi System Options screen, choose from the following options:
Option Description
Allow the user to select from the list of available servers
Select this option to allow users to see a list of servers to choose from on the login screen. If this is not selected, then the Server combo box does not appear on the Login screen.
Allow the User to Enter a Server Name During Login
Select this option to allow users to manually enter a server name to log into on the login screen. Deselect this option to allow users to choose only from pre-existing server entries in a read-only list.
Add Click Add to enter the server names that users can choose from to log into on the login screen. The server name can be entered as a host name, fully qualified domain name (FQDN), or IP address.
Edit Click Edit to edit the name of a server in the Profitability and Cost Management Server Name list.
Delete Click Delete to remove the selected server from the Profitability and Cost Management Server Name list.
Click Next.
10. In the Log Files Location screen, click Next to accept the default folder location for log files to be saved, or click Browse to select a new location. The default location is C:\PCMTemp\Logs.
Log files, such as error logs are generated in the specified folder, to which you will require read and write access.
11. In the Choose Remote Configuration Installation Type screen, select one of the following options:
○ Disabled - Select this option if you do not want to configure the Remote Configuration tool at this time. Click Next and proceed to the next step.
○ Enabled - Select this option to configure the Remote Configuration tool, and click Next.1. In the Remote Configuration Communications screen, enter a port number to connect to remote
machines with, and click Next.2. In the Remote Configuration Service screen, enter authentication credentials for the Remote
Configuration service to use to access remote machines. The LocalSystem account, which is the system default account must be used for sockets transportation, and for DCOM, a valid domain account must be specified. Click Next.
12. In the Advanced Server Options screen, the following options are available:
NoteIn a typical Windows client machine installation, you do not need to configure any options on this screen. However, this screen is available for a scenario where you may have installed the Report Manager Server or Work Manager Server on a dedicated machine as a client type installation. In this instance, the Server Logging Options are available to enable you to configure event logging for the PCMWorkManagerService or PCMReportService services.
The Application Passport and NCS Configuration options do not require configuring on a standard Windows client machine.
80 PUBLICSAP BusinessObjects Profitability and Cost Management Installation Guide
Post-Installation
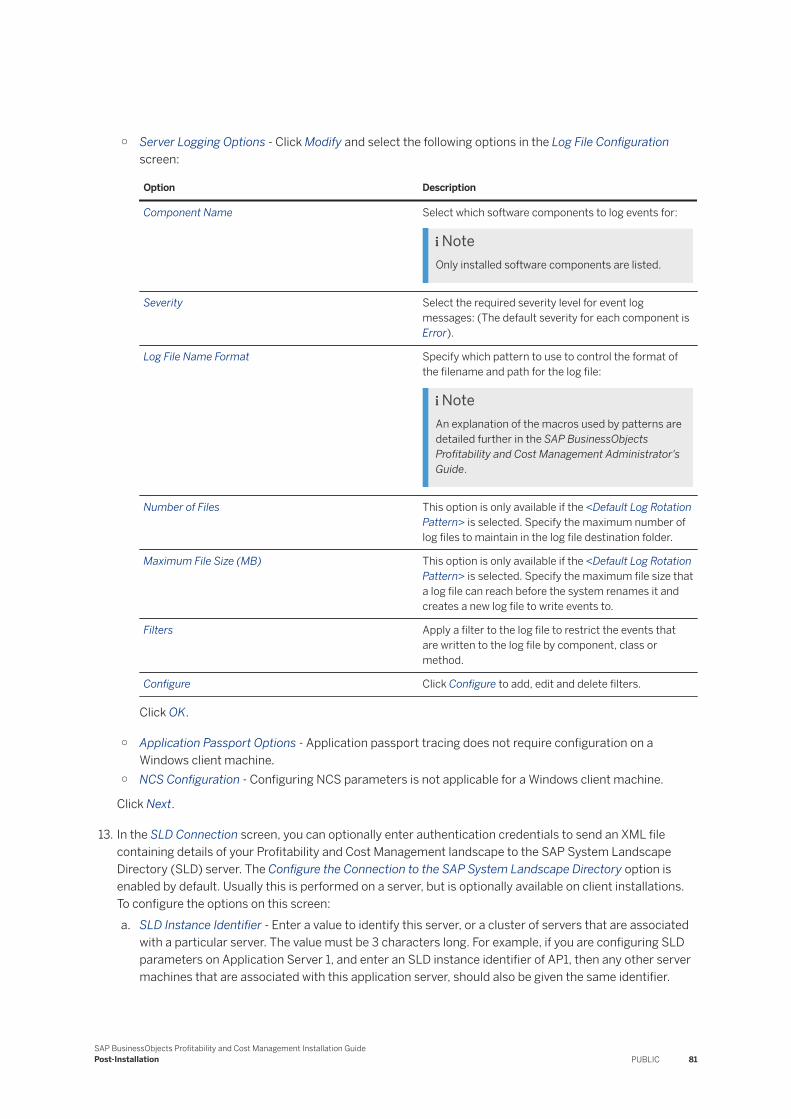
○ Server Logging Options - Click Modify and select the following options in the Log File Configuration screen:
Option Description
Component Name Select which software components to log events for:
NoteOnly installed software components are listed.
Severity Select the required severity level for event log messages: (The default severity for each component is Error).
Log File Name Format Specify which pattern to use to control the format of the filename and path for the log file:
NoteAn explanation of the macros used by patterns are detailed further in the SAP BusinessObjects Profitability and Cost Management Administrator's Guide.
Number of Files This option is only available if the <Default Log Rotation Pattern> is selected. Specify the maximum number of log files to maintain in the log file destination folder.
Maximum File Size (MB) This option is only available if the <Default Log Rotation Pattern> is selected. Specify the maximum file size that a log file can reach before the system renames it and creates a new log file to write events to.
Filters Apply a filter to the log file to restrict the events that are written to the log file by component, class or method.
Configure Click Configure to add, edit and delete filters.
Click OK.
○ Application Passport Options - Application passport tracing does not require configuration on a Windows client machine.
○ NCS Configuration - Configuring NCS parameters is not applicable for a Windows client machine.
Click Next.
13. In the SLD Connection screen, you can optionally enter authentication credentials to send an XML file containing details of your Profitability and Cost Management landscape to the SAP System Landscape Directory (SLD) server. The Configure the Connection to the SAP System Landscape Directory option is enabled by default. Usually this is performed on a server, but is optionally available on client installations. To configure the options on this screen:a. SLD Instance Identifier - Enter a value to identify this server, or a cluster of servers that are associated
with a particular server. The value must be 3 characters long. For example, if you are configuring SLD parameters on Application Server 1, and enter an SLD instance identifier of AP1, then any other server machines that are associated with this application server, should also be given the same identifier.
SAP BusinessObjects Profitability and Cost Management Installation GuidePost-Installation PUBLIC 81
b. User - Enter a valid SLD username.c. Password - Enter a valid password for the SLD username.d. Confirm Password - Re-enter the password.e. Host - Enter the hostname of the SLD server.f. Port - The SLD server listening port number. This is set to the default SLD port number of 50000.g. Click Next.
Each server is individually registered to the SLD, and all registered systems with the same SLD Identifier are assumed to be in a cluster. The information you have entered is used to create the secure SLD connection file: C:\ProgramData\SAP BusinessObjects\PCM\sldest.cfg, which contains encrypted authentication information to allow a connection to the SLD server.
When either Finish or Cancel are clicked on the next screen, the SLD XML file is generated, and the C:\ProgramData\SAP BusinessObjects\PCM\pcmslddataset.xml file is sent to the SLD server. If SLD Connection details have been provided, the data is sent each time the Configuration Wizard is run. Refer to the SAP BusinessObjects Profitability and Cost Management Administrator's Guide for further information.
14. In the Congratulations screen, select the check box to acknowledge any possible disk space or memory warnings, and click Finish.
6.1.3.1 Web Client Deployment
If you intend to deploy the SAP BusinessObjects Profitability and Cost Management application to remote web users, there are some important pieces of information that need to be considered to ensure an efficient deployment:
● Microsoft ActiveX - The Web client uses Microsoft ActiveX technology to provide web users with a logon panel in their Microsoft Internet Explorer browser. When a new version of the software is released and a client connects to the web site, a new version of the signed ActiveX control (called EPODataConnection Control) is downloaded as a set of files into the local Windows\Downloaded Program Files folder on the client machine.
● Enterprise Authentication - Several Enterprise authentication methods require the SAP BusinessObjects User Management Client (UMC) to be installed locally on the web client machine. The Enterprise authentication method is available as default to the web user, but to be able to select alternative Enterprise methods from the Login screen, an installation of the UMC is required for the following:○ LDAP○ Windows AD○ Windows NT○ SAP
6.1.3.1.1 Installing the Web Client
There are two alternative methods for installing the ActiveX toolbar object on to web client machines:
● Web download● Web client setup program
82 PUBLICSAP BusinessObjects Profitability and Cost Management Installation Guide
Post-Installation
6.1.3.1.1.1 Web Download
By default, Microsoft Internet Explorer permits the downloading of signed ActiveX controls. This level of security allows SAP to deploy new versions of the control without any intervention required by the web user.
Some organizations have stricter security policies that modify the default Microsoft Internet Explorer security settings, and this can affect the downloading of the control. If security is set to High, or signed ActiveX downloads are set to Disable, the control does not download the newer version and the web user is unable to log onto the system.
The best method of resolving this problem is to add the web server address into the list of trusted sites.
NoteLocal administrator rights are required to effect any changes to Internet Explorer settings. If you do not have local administrator access you cannot download the ActiveX control if your current settings do not permit such downloads.
6.1.3.1.1.1.1 To Add the Web Server to the List of Trusted Sites
Procedure
1. Open Microsoft Internet Explorer and choose Tools Internet Options 2. In the Internet Options screen, click the Security tab and click the Trusted sites icon.3. Click Sites to open the list of trusted sites.4. Type the name of your web server(s), and click Add to add it to the list.5. If Require server verification is selected, then clear it unless your web server address begins with https:
denoting a secure site.6. Click Close, and click OK to confirm your setting changes.
6.1.3.1.1.2 Web Client Installation Program
The Web client installation program is designed for use by System Administrators. It provides a means of installing the ActiveX web toolbar object without the necessity for the installation to be performed by the client from within the web browser.
There are several benefits to using the installation program instead of the web download method. These are:
● The installation can be automated using a method such as the Microsoft System Management Server. This type of program can also distribute the executable to all the SAP BusinessObjects Profitability and Cost Management clients at a convenient time.
● The client machine can be updated with the correctly versioned control before requiring access to the web books, and reducing inconvenience.
● A centrally controlled roll out of the installation ensures that there is consistency of software versions amongst the client community.
SAP BusinessObjects Profitability and Cost Management Installation GuidePost-Installation PUBLIC 83
To run the program on the client, run the executable WebViewerSetUp.exe that is located in the \PCM_100_INSTALLERS\Additional Installers folder. A restart of the client is not required after installation.
6.1.3.2 Testing the Web Server Installation
Context
Open your Internet Browser on the web server to test the connection to the Profitability and Cost Management web site.
Procedure
1. Open Microsoft Internet Explorer on the web server.2. Enter the URL of the Profitability and Cost Management web site.
This is usually: http://server_name/pcm.
3. Enter your user name and password in the Login screen, and click OK.4. Select a model from the Model box.
The model opens successfully.5. Close the model and click Logout.
The model closes and logs out successfully.
6.1.4 To Re-configure a Server Installation
Procedure
1. Launch the SAP BusinessObjects Profitability and Cost Management Configuration Wizard from Start Programs SAP BusinessObjects Profitability and Cost Management Tools Configure .
2. Click Next on the Welcome screen.3. The Options available screen displays a choice of software components installed on the machine that can
be configured. Select the check boxes of the components you wish to re-configure. If all check boxes remain selected, the SAP BusinessObjects Profitability and Cost Management Configuration Wizard displays the configuration screens for ALL the components installed on your machine.For example, if it is only the location of the server you are connecting to that needs to be changed, select the Primary Server check box, and clear the check boxes for all other components.
84 PUBLICSAP BusinessObjects Profitability and Cost Management Installation Guide
Post-Installation
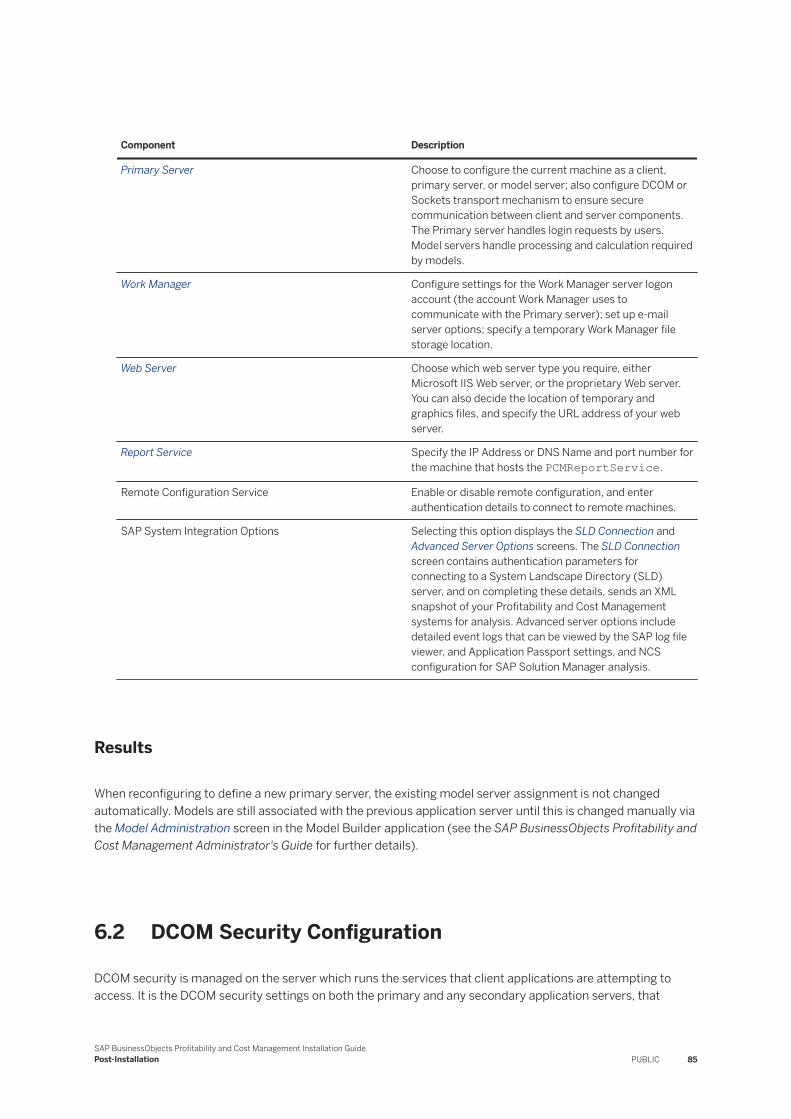
Component Description
Primary Server Choose to configure the current machine as a client, primary server, or model server; also configure DCOM or Sockets transport mechanism to ensure secure communication between client and server components. The Primary server handles login requests by users. Model servers handle processing and calculation required by models.
Work Manager Configure settings for the Work Manager server logon account (the account Work Manager uses to communicate with the Primary server); set up e-mail server options; specify a temporary Work Manager file storage location.
Web Server Choose which web server type you require, either Microsoft IIS Web server, or the proprietary Web server. You can also decide the location of temporary and graphics files, and specify the URL address of your web server.
Report Service Specify the IP Address or DNS Name and port number for the machine that hosts the PCMReportService.
Remote Configuration Service Enable or disable remote configuration, and enter authentication details to connect to remote machines.
SAP System Integration Options Selecting this option displays the SLD Connection and Advanced Server Options screens. The SLD Connection screen contains authentication parameters for connecting to a System Landscape Directory (SLD) server, and on completing these details, sends an XML snapshot of your Profitability and Cost Management systems for analysis. Advanced server options include detailed event logs that can be viewed by the SAP log file viewer, and Application Passport settings, and NCS configuration for SAP Solution Manager analysis.
Results
When reconfiguring to define a new primary server, the existing model server assignment is not changed automatically. Models are still associated with the previous application server until this is changed manually via the Model Administration screen in the Model Builder application (see the SAP BusinessObjects Profitability and Cost Management Administrator's Guide for further details).
6.2 DCOM Security Configuration
DCOM security is managed on the server which runs the services that client applications are attempting to access. It is the DCOM security settings on both the primary and any secondary application servers, that
SAP BusinessObjects Profitability and Cost Management Installation GuidePost-Installation PUBLIC 85
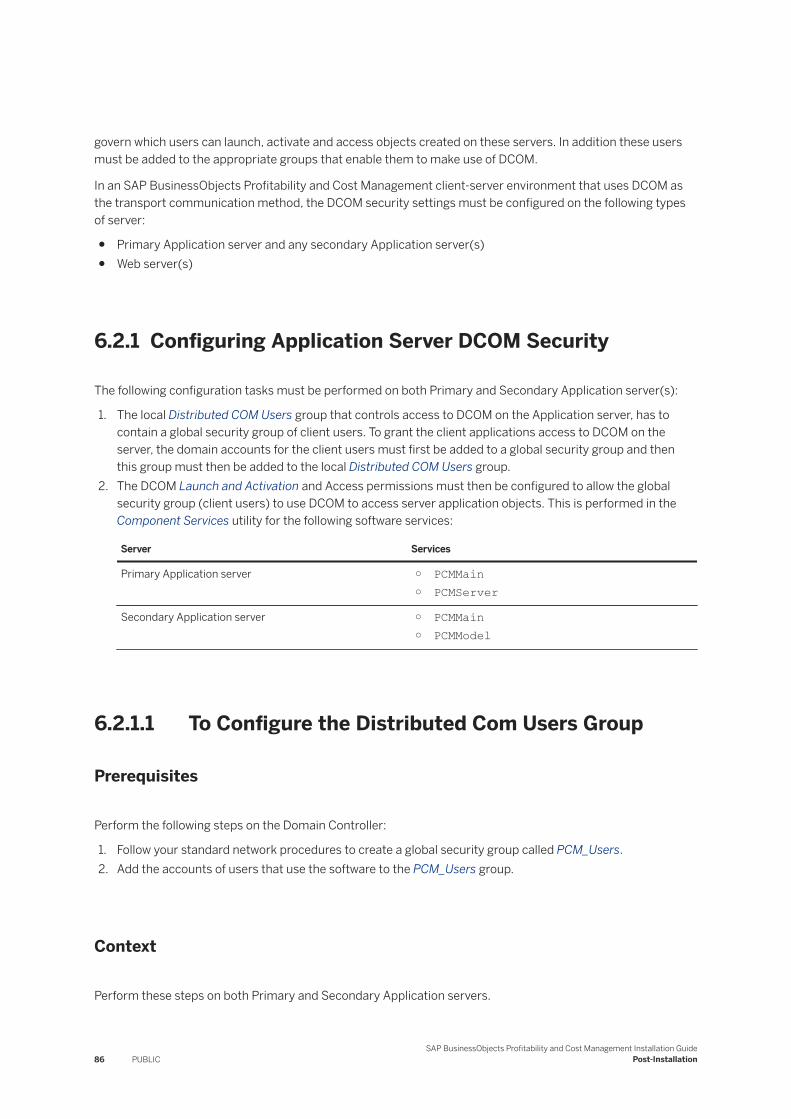
govern which users can launch, activate and access objects created on these servers. In addition these users must be added to the appropriate groups that enable them to make use of DCOM.
In an SAP BusinessObjects Profitability and Cost Management client-server environment that uses DCOM as the transport communication method, the DCOM security settings must be configured on the following types of server:
● Primary Application server and any secondary Application server(s)● Web server(s)
6.2.1 Configuring Application Server DCOM Security
The following configuration tasks must be performed on both Primary and Secondary Application server(s):
1. The local Distributed COM Users group that controls access to DCOM on the Application server, has to contain a global security group of client users. To grant the client applications access to DCOM on the server, the domain accounts for the client users must first be added to a global security group and then this group must then be added to the local Distributed COM Users group.
2. The DCOM Launch and Activation and Access permissions must then be configured to allow the global security group (client users) to use DCOM to access server application objects. This is performed in the Component Services utility for the following software services:
Server Services
Primary Application server ○ PCMMain○ PCMServer
Secondary Application server ○ PCMMain○ PCMModel
6.2.1.1 To Configure the Distributed Com Users Group
Prerequisites
Perform the following steps on the Domain Controller:
1. Follow your standard network procedures to create a global security group called PCM_Users.2. Add the accounts of users that use the software to the PCM_Users group.
Context
Perform these steps on both Primary and Secondary Application servers.
86 PUBLICSAP BusinessObjects Profitability and Cost Management Installation Guide
Post-Installation
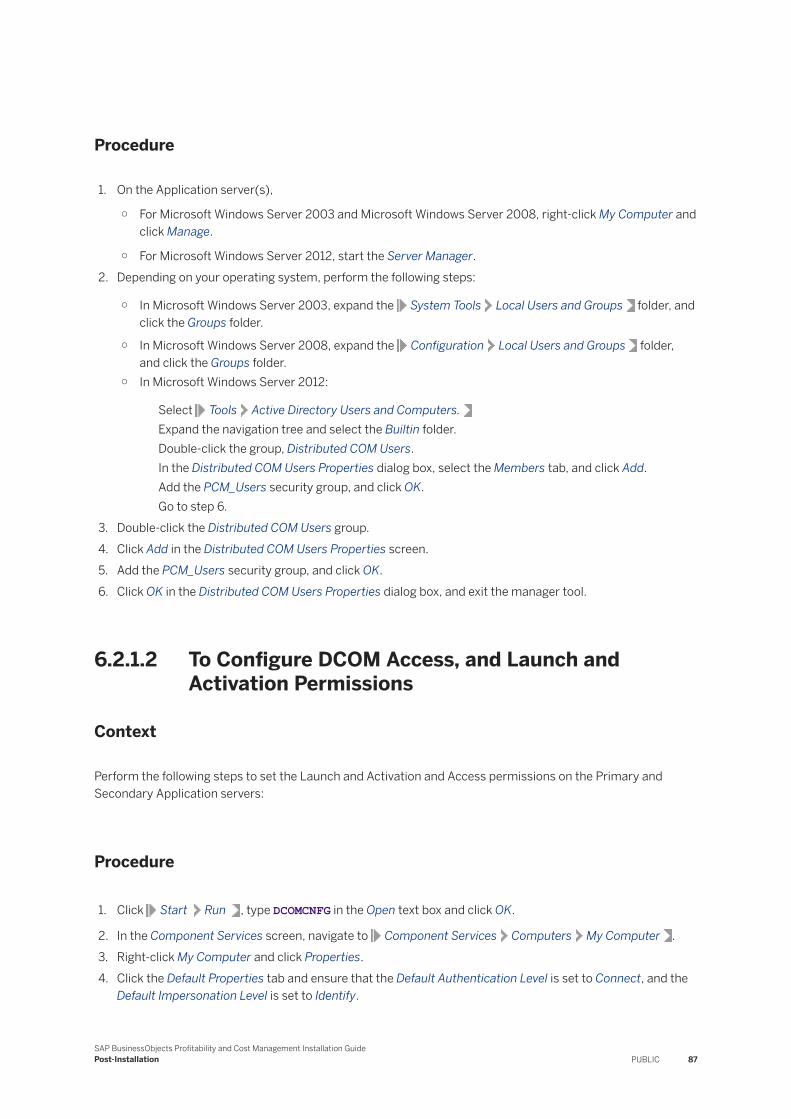
Procedure
1. On the Application server(s),
○ For Microsoft Windows Server 2003 and Microsoft Windows Server 2008, right-click My Computer and click Manage.
○ For Microsoft Windows Server 2012, start the Server Manager.2. Depending on your operating system, perform the following steps:
○ In Microsoft Windows Server 2003, expand the System Tools Local Users and Groups folder, and click the Groups folder.
○ In Microsoft Windows Server 2008, expand the Configuration Local Users and Groups folder, and click the Groups folder.
○ In Microsoft Windows Server 2012:
Select Tools Active Directory Users and Computers.Expand the navigation tree and select the Builtin folder.Double-click the group, Distributed COM Users.In the Distributed COM Users Properties dialog box, select the Members tab, and click Add.Add the PCM_Users security group, and click OK.Go to step 6.
3. Double-click the Distributed COM Users group.4. Click Add in the Distributed COM Users Properties screen.5. Add the PCM_Users security group, and click OK.6. Click OK in the Distributed COM Users Properties dialog box, and exit the manager tool.
6.2.1.2 To Configure DCOM Access, and Launch and Activation Permissions
Context
Perform the following steps to set the Launch and Activation and Access permissions on the Primary and Secondary Application servers:
Procedure
1. Click Start Run , type DCOMCNFG in the Open text box and click OK.
2. In the Component Services screen, navigate to Component Services Computers My Computer .3. Right-click My Computer and click Properties.4. Click the Default Properties tab and ensure that the Default Authentication Level is set to Connect, and the
Default Impersonation Level is set to Identify.
SAP BusinessObjects Profitability and Cost Management Installation GuidePost-Installation PUBLIC 87

5. Click the COM Security tab, and set Access and Launch and Activation permissions for the following user groups:
Access Permissions - Edit Limits
Groups and Users Permissions Allow Deny
ANONYMOUS LOGON Local Access Yes -
Remote Access Yes -
Distributed COM Users Local Access Yes -
Remote Access Yes -
Everyone Local Access Yes -
Remote Access Yes -
Access Permissions - Edit Default
Groups and Users Permissions Allow Deny
SELF Local Access Yes -
Remote Access Yes -
SYSTEM Local Access Yes -
Remote Access - -
Launch and Activation Permissions - Edit Limits
Groups and Users Permissions Allow Deny
Administrators (local) Local Launch Yes -
Remote Launch Yes -
Local Activation Yes -
Remote Activation Yes -
Distributed COM Users Local Launch Yes -
Remote Launch Yes -
Local Activation Yes -
Remote Activation Yes -
Everyone Local Launch Yes -
Remote Launch - -
Local Activation Yes -
Remote Activation - -
Launch and Activation Permissions - Edit Default
Groups and Users Permissions Allow Deny
Administrators (local) Local Launch Yes -
Remote Launch Yes -
Local Activation Yes -
88 PUBLICSAP BusinessObjects Profitability and Cost Management Installation Guide
Post-Installation

Groups and Users Permissions Allow Deny
Remote Activation Yes -
INTERACTIVE Local Launch Yes -
Remote Launch Yes -
Local Activation Yes -
Remote Activation Yes -
SYSTEM Local Launch Yes -
Remote Launch Yes -
Local Activation Yes -
Remote Activation Yes -
6. After setting the permissions, click OK on the My Computer Properties screen.
6.2.1.2.1 To Configure DCOM Permissions for PCMServer
Context
Perform the following steps on the PRIMARY Application server only:
Procedure
1. In the Component Services screen, navigate to the Component Services Computers My ComputerDCOM Config folder.
2. Right-click the PCMServer component object in the right-hand pane of the Component Services window, and click Properties.
3. In the PCMServer properties screen, click the Security tab, click Customize and Edit for each of the following areas, and add the relevant users and permissions detailed in each table below:
PCMServer - Launch and Activation Permissions
Add Group Permissions Allow Deny
PCM_Users (domain) Local Launch Yes -
Remote Launch Yes -
Local Activation Yes -
Remote Activation Yes -
SAP BusinessObjects Profitability and Cost Management Installation GuidePost-Installation PUBLIC 89
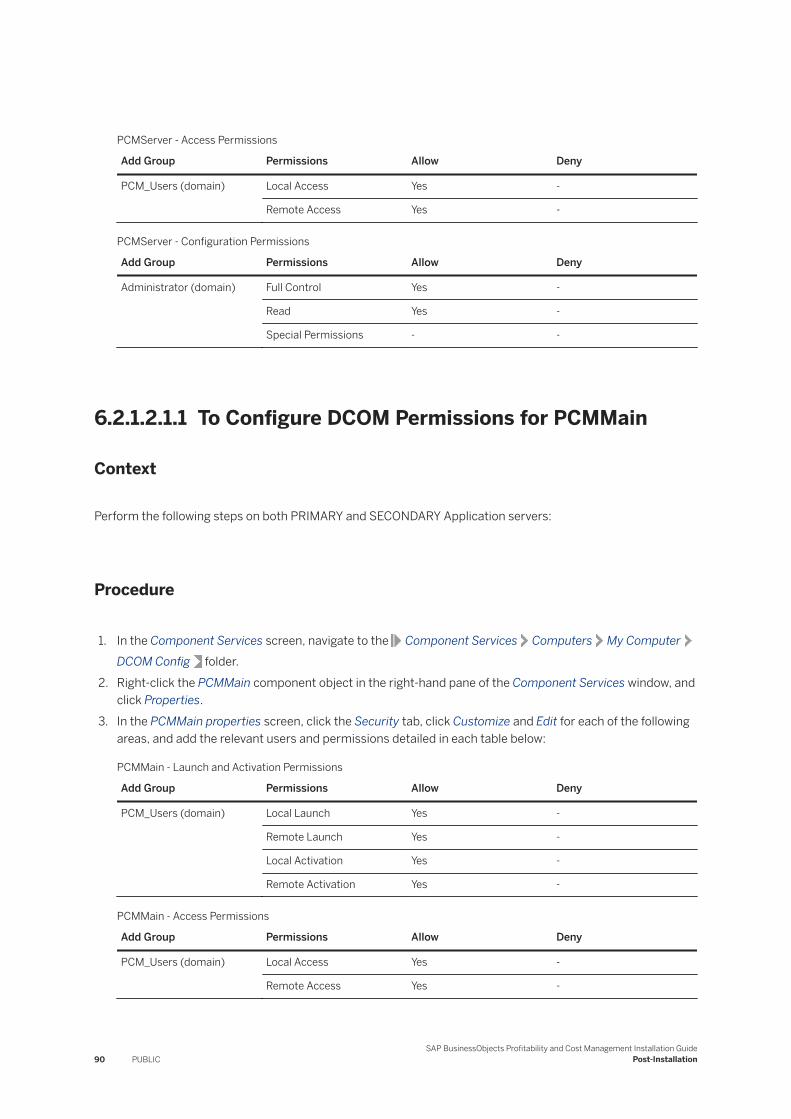
PCMServer - Access Permissions
Add Group Permissions Allow Deny
PCM_Users (domain) Local Access Yes -
Remote Access Yes -
PCMServer - Configuration Permissions
Add Group Permissions Allow Deny
Administrator (domain) Full Control Yes -
Read Yes -
Special Permissions - -
6.2.1.2.1.1 To Configure DCOM Permissions for PCMMain
Context
Perform the following steps on both PRIMARY and SECONDARY Application servers:
Procedure
1. In the Component Services screen, navigate to the Component Services Computers My ComputerDCOM Config folder.
2. Right-click the PCMMain component object in the right-hand pane of the Component Services window, and click Properties.
3. In the PCMMain properties screen, click the Security tab, click Customize and Edit for each of the following areas, and add the relevant users and permissions detailed in each table below:
PCMMain - Launch and Activation Permissions
Add Group Permissions Allow Deny
PCM_Users (domain) Local Launch Yes -
Remote Launch Yes -
Local Activation Yes -
Remote Activation Yes -
PCMMain - Access Permissions
Add Group Permissions Allow Deny
PCM_Users (domain) Local Access Yes -
Remote Access Yes -
90 PUBLICSAP BusinessObjects Profitability and Cost Management Installation Guide
Post-Installation
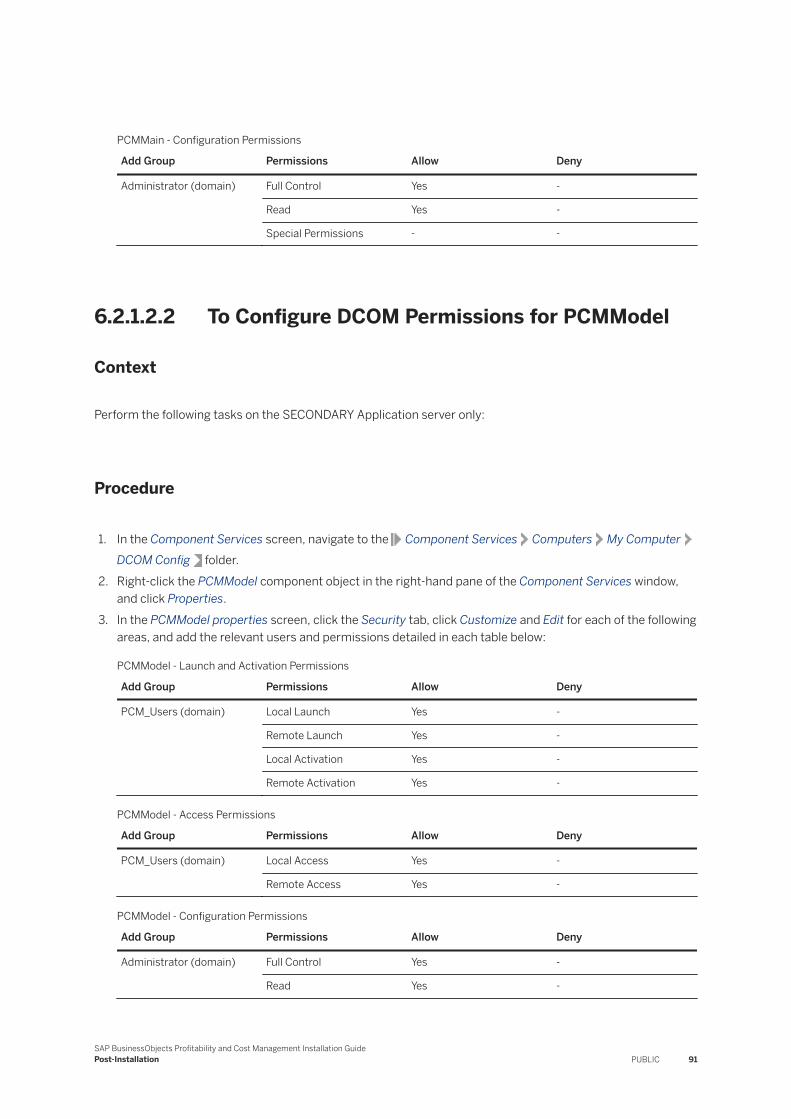
PCMMain - Configuration Permissions
Add Group Permissions Allow Deny
Administrator (domain) Full Control Yes -
Read Yes -
Special Permissions - -
6.2.1.2.2 To Configure DCOM Permissions for PCMModel
Context
Perform the following tasks on the SECONDARY Application server only:
Procedure
1. In the Component Services screen, navigate to the Component Services Computers My ComputerDCOM Config folder.
2. Right-click the PCMModel component object in the right-hand pane of the Component Services window, and click Properties.
3. In the PCMModel properties screen, click the Security tab, click Customize and Edit for each of the following areas, and add the relevant users and permissions detailed in each table below:
PCMModel - Launch and Activation Permissions
Add Group Permissions Allow Deny
PCM_Users (domain) Local Launch Yes -
Remote Launch Yes -
Local Activation Yes -
Remote Activation Yes -
PCMModel - Access Permissions
Add Group Permissions Allow Deny
PCM_Users (domain) Local Access Yes -
Remote Access Yes -
PCMModel - Configuration Permissions
Add Group Permissions Allow Deny
Administrator (domain) Full Control Yes -
Read Yes -
SAP BusinessObjects Profitability and Cost Management Installation GuidePost-Installation PUBLIC 91
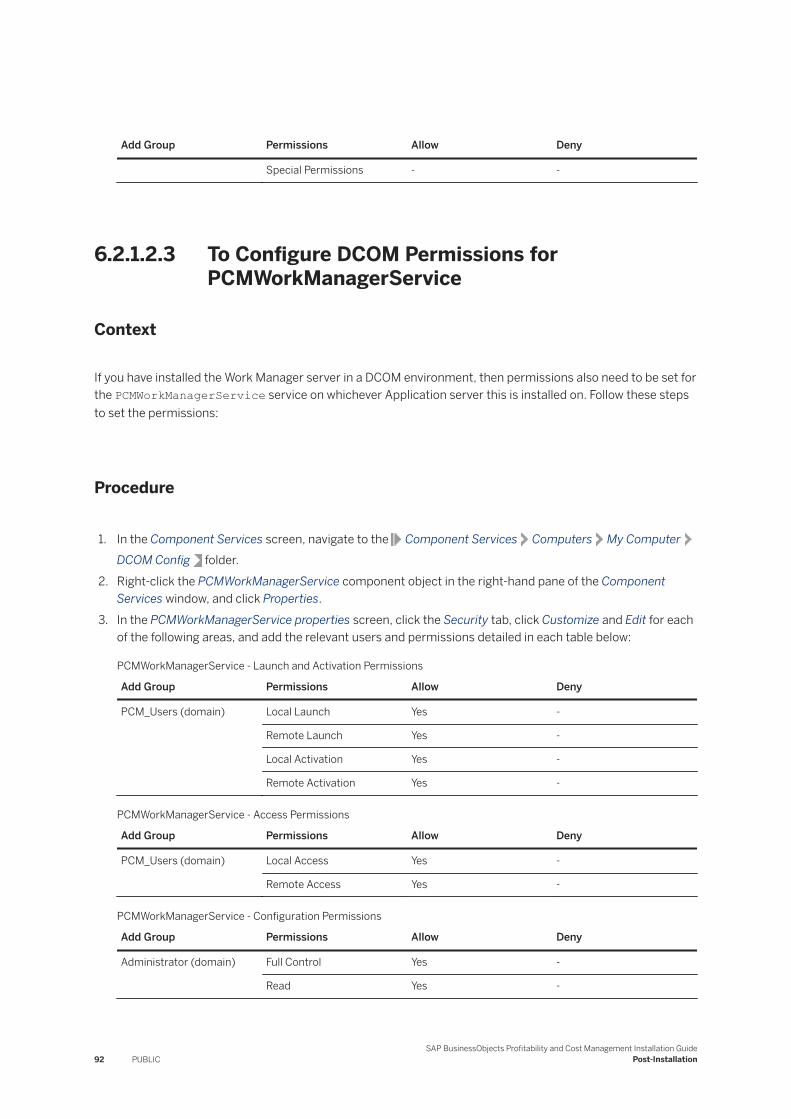
Add Group Permissions Allow Deny
Special Permissions - -
6.2.1.2.3 To Configure DCOM Permissions for PCMWorkManagerService
Context
If you have installed the Work Manager server in a DCOM environment, then permissions also need to be set for the PCMWorkManagerService service on whichever Application server this is installed on. Follow these steps to set the permissions:
Procedure
1. In the Component Services screen, navigate to the Component Services Computers My ComputerDCOM Config folder.
2. Right-click the PCMWorkManagerService component object in the right-hand pane of the Component Services window, and click Properties.
3. In the PCMWorkManagerService properties screen, click the Security tab, click Customize and Edit for each of the following areas, and add the relevant users and permissions detailed in each table below:
PCMWorkManagerService - Launch and Activation Permissions
Add Group Permissions Allow Deny
PCM_Users (domain) Local Launch Yes -
Remote Launch Yes -
Local Activation Yes -
Remote Activation Yes -
PCMWorkManagerService - Access Permissions
Add Group Permissions Allow Deny
PCM_Users (domain) Local Access Yes -
Remote Access Yes -
PCMWorkManagerService - Configuration Permissions
Add Group Permissions Allow Deny
Administrator (domain) Full Control Yes -
Read Yes -
92 PUBLICSAP BusinessObjects Profitability and Cost Management Installation Guide
Post-Installation
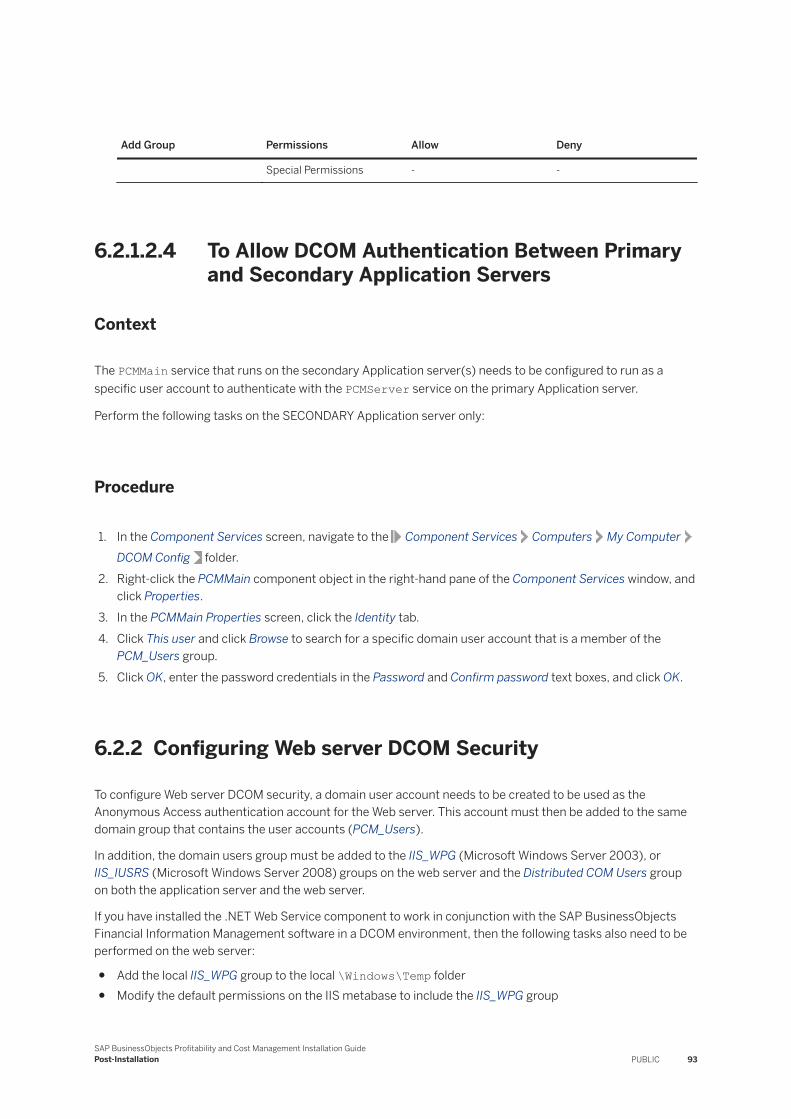
Add Group Permissions Allow Deny
Special Permissions - -
6.2.1.2.4 To Allow DCOM Authentication Between Primary and Secondary Application Servers
Context
The PCMMain service that runs on the secondary Application server(s) needs to be configured to run as a specific user account to authenticate with the PCMServer service on the primary Application server.
Perform the following tasks on the SECONDARY Application server only:
Procedure
1. In the Component Services screen, navigate to the Component Services Computers My ComputerDCOM Config folder.
2. Right-click the PCMMain component object in the right-hand pane of the Component Services window, and click Properties.
3. In the PCMMain Properties screen, click the Identity tab.4. Click This user and click Browse to search for a specific domain user account that is a member of the
PCM_Users group.5. Click OK, enter the password credentials in the Password and Confirm password text boxes, and click OK.
6.2.2 Configuring Web server DCOM Security
To configure Web server DCOM security, a domain user account needs to be created to be used as the Anonymous Access authentication account for the Web server. This account must then be added to the same domain group that contains the user accounts (PCM_Users).
In addition, the domain users group must be added to the IIS_WPG (Microsoft Windows Server 2003), or IIS_IUSRS (Microsoft Windows Server 2008) groups on the web server and the Distributed COM Users group on both the application server and the web server.
If you have installed the .NET Web Service component to work in conjunction with the SAP BusinessObjects Financial Information Management software in a DCOM environment, then the following tasks also need to be performed on the web server:
● Add the local IIS_WPG group to the local \Windows\Temp folder● Modify the default permissions on the IIS metabase to include the IIS_WPG group
SAP BusinessObjects Profitability and Cost Management Installation GuidePost-Installation PUBLIC 93
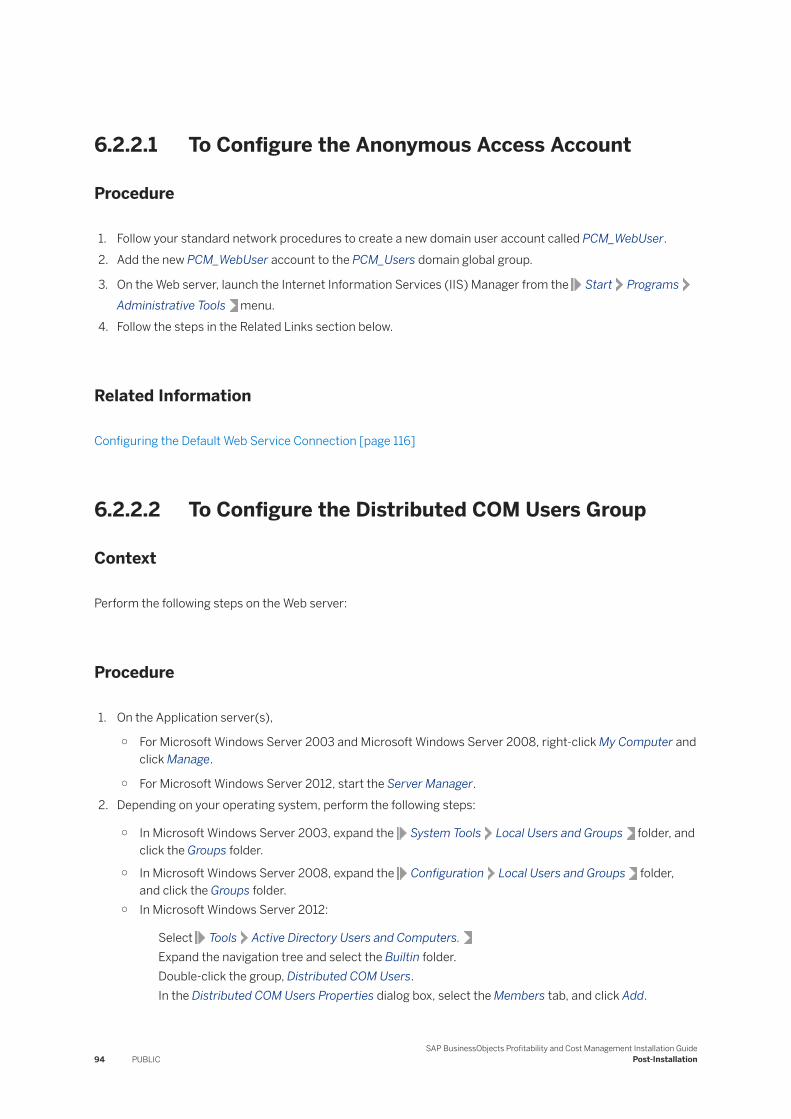
6.2.2.1 To Configure the Anonymous Access Account
Procedure
1. Follow your standard network procedures to create a new domain user account called PCM_WebUser.2. Add the new PCM_WebUser account to the PCM_Users domain global group.
3. On the Web server, launch the Internet Information Services (IIS) Manager from the Start ProgramsAdministrative Tools menu.
4. Follow the steps in the Related Links section below.
Related Information
Configuring the Default Web Service Connection [page 116]
6.2.2.2 To Configure the Distributed COM Users Group
Context
Perform the following steps on the Web server:
Procedure
1. On the Application server(s),
○ For Microsoft Windows Server 2003 and Microsoft Windows Server 2008, right-click My Computer and click Manage.
○ For Microsoft Windows Server 2012, start the Server Manager.2. Depending on your operating system, perform the following steps:
○ In Microsoft Windows Server 2003, expand the System Tools Local Users and Groups folder, and click the Groups folder.
○ In Microsoft Windows Server 2008, expand the Configuration Local Users and Groups folder, and click the Groups folder.
○ In Microsoft Windows Server 2012:
Select Tools Active Directory Users and Computers.Expand the navigation tree and select the Builtin folder.Double-click the group, Distributed COM Users.In the Distributed COM Users Properties dialog box, select the Members tab, and click Add.
94 PUBLICSAP BusinessObjects Profitability and Cost Management Installation Guide
Post-Installation
Add the PCM_Users security group, and click OK.Go to step 6.
3. Double-click the Distributed COM Users group.4. Click Add in the Distributed COM Users Properties screen.5. Add the PCM_Users security group, and click OK.6. Click OK in the Distributed COM Users Properties dialog box, and exit the manager tool.
6.2.2.3 To Add a Domain Account to the IIS Worker Process Group in IIS 6.0
Procedure
1. Right click My Computer on the desktop, and click Manage.2. Expand the Local Users and Groups folder and click Groups.3. Double click the IIS_WPG group and click Add.4. Type in the name of the domain user account to use for IIS authentication, and click Check Names to verify.5. Click OK to return to the IIS_WPG Properties dialog box, and click OK.6. Exit the Computer Management utility.
6.2.2.4 To Add a Domain Account to the IIS_IUSRS Group in IIS 7.0 or IIS 7.5
Context
In Microsoft Windows Server 2008 (IIS 7.0) or Microsoft Windows Server 2008 R2 (IIS 7.5), the IIS_IUSRS group replaces the IIS_WPG group. Perform the following steps to add the Profitability and Cost Management domain account to this group if you are running Microsoft Windows Server 2008 (or 2008 R2) on the web server:
Procedure
1. Right click Computer on the desktop, and click Manage.
2. Expand the Configuration Local Users and Groups nodes and click Groups.3. Double click the IIS_IUSRS group and click Add.4. Type in the name of the domain user account to use for IIS authentication, and click Check Names to verify.5. Click OK to return to the IIS_IUSRS Properties dialog box, and click OK.
SAP BusinessObjects Profitability and Cost Management Installation GuidePost-Installation PUBLIC 95
6. Exit the Server Manager utility.
6.2.2.5 To Add a Domain Account to the IIS_IUSRS Group in IIS 8.0
Context
In Microsoft Windows Server 2012 (IIS 8.0), the IIS_IUSRS group replaces the IIS_WPG group. Perform the following steps to add the Profitability and Cost Management domain account to this group if you are running Microsoft Windows Server 2012 on the web server:
Procedure
1. In Microsoft Windows Server 2012, start the Server Manager.
2. Select Tools Active Directory Users and Computers.3. Expand the navigation tree and select the Builtin folder.4. Double-click the IIS_IUSRS group and click Add.5. Type in the name of the domain user account to use for IIS authentication, and click Check Names to verify.6. Click OK to return to the IIS_IUSRS Properties dialog box, and click OK.7. Exit the Server Manager utility.
6.2.2.6 To Configure DCOM for the FIMService Web Service
Prerequisites
The following steps need to be performed on the Web server, only if you have installed the .NET Web Service component to work in conjunction with the SAP BusinessObjects Financial Information Management software.
Context
Firstly, the IIS_WPG group needs to be granted Modify permissions on the local \Windows\Temp folder to access the compiled version of the .NET framework, and then the same local group needs to be granted permissions on the IIS metabase.
96 PUBLICSAP BusinessObjects Profitability and Cost Management Installation Guide
Post-Installation
Procedure
1. Launch Windows Explorer from the Start Programs Accessories menu.2. In the Folders list, navigate to the default Microsoft Windows temporary folder. This is usually C:\Windows
\Temp.
3. Right-click the Temp folder, and click Sharing and Security.4. Click the Security tab, click Add, type the group name IIS_WPG in the text box, click Check Names, and
then click OK.5. In the Temp Properties screen, highlight the IIS_WPG group in the Group or user names list, set the Modify
permission to Allow in the Permissions list, and then click OK.6. Next, download the MetaACL.exe self-extracting executable from the Microsoft website (accessed from
the “Related Topics” section below), to a suitable location on the Web server.7. Once the file download is complete, run the following commands from a Windows command prompt:
cscript metaacl.vbs IIS://Localhost/W3SVC/AppPools IIS_WPG RE
cscript metaacl.vbs IIS://Localhost/W3SVC/Filters IIS_WPG RE
Related Information
The MetaAcl tool for modifying metabase permissions on the IIS Admin Objects
6.2.3 Configuring DCOM Security for the Remote Configuration Tool
Context
When the Remote Configuration Tool is installed on a management machine, it allows you to remotely view, modify, save, backup and distribute Profitability and Cost Management configuration settings on any configured remote machine by running the Profitability and Cost Management Configure tool remotely on that machine.
Any machine can be a management machine, and once installed, the Remote Configuration Tool can manage a remote machine through a service called PCMWCFHost running on that remote machine. If you are using DCOM, you need to create an Active Directory security group to contain the remote machines running the PCMWCFHost service, and then add this group to the DCOM User group to allow the PCMWCFHost service to authenticate with the application server.
To do this, perform the following:
SAP BusinessObjects Profitability and Cost Management Installation GuidePost-Installation PUBLIC 97
Procedure
1. Create an Active Directory security group called RemoteConfigMachines.2. Add the machine objects that are running the PCMWCFHost service to the RemoteConfigMachines Active
Directory security group.
NoteThe application server machine does not need adding to this group, because it runs the PCMMAIN and PCMSERVER services which the other machines authenticate against.
3. Add the RemoteConfigMachines Active Directory security group to the Distributed COM Users group on the application server. Perform these steps on both primary and secondary application servers:a. On the application server(s), right-click My Computer and click Manage.b. Depending on your operating system, perform the following:
1. In Microsoft Windows Server 2003, expand the System Tools Local Users and Groups folder, and click the Groups folder.
2. In Microsoft Windows Server 2008, expand the Configuration Local Users and Groupsfolder, and click the Groups folder.
c. Double-click the Distributed COM Users group.d. Click Add in the Distributed COM Users Properties screen.e. Add the RemoteConfigMachines security group, and click OK.
f. Click OK in the Distributed COM Users Properties screen, and click File Exit to close Computer Management.
4. Configure Launch, Access, and Activation permissions for the RemoteConfigMachines Active Directory security group for PCMMAIN and PCMSERVER component objects on the application server(s).
For instructions, refer to the topics: “To Configure DCOM Permissions for PCMServer”, and “To Configure DCOM Permissions for PCMMain”.
5. Restart all machines that are running the PCMWCFHost service to ensure that the group membership privileges are created.
Next Steps
Following this initial configuration, there are two approaches you can choose from to configure DCOM security on the machines that run the Remote Configuration Tool. These are as follows:
1. Run the Remote Configuration windows service (PCMWCFHost.exe) under the LocalSystem account on all Remote Configuration machines.
2. Run the Remote Configuration Windows service under a domain user account and use Group Policy to apply the required permissions to the user.
98 PUBLICSAP BusinessObjects Profitability and Cost Management Installation Guide
Post-Installation
Related Information
To Configure DCOM Permissions for PCMServer [page 89]To Configure DCOM Permissions for PCMMain [page 90]
6.2.3.1 Approach 1: Running the Remote Configuration Service as the Local System Account
6.2.3.1.1 Local System: Configuring the PCMWCFHost Service Account on all Remote Machines
Context
The PCMWCFHost service needs to be configured to run as localsystem on each remote machine, or an identity that has local administrative rights to run the Profitability and Cost Management Configure tool locally. This can be performed in Windows Services or the Profitability and Cost Management Configure tool.
To configure the PCMWCFHost service to run as a Local System account in the Profitability and Cost Management Configure tool, perform the following:
Procedure
1. On the remote machine (which is a machine you want to manage that is running the Remote Configuration Tool), click Start Programs SAP BusinessObjects Profitability and Cost Management Tools Configure .
2. In the Options Available screen, select Remote Configuration Service only, and click Next.3. Navigate to the Remote Configuration Service screen. In the Windows Account box, enter the domain user
name; LocalSystem, or enter an account name and password that has local administrative rights to run the Profitability and Cost Management Configure tool. Then enter the password in the Password box, confirm the password in the Confirm Password box, and click Next.
4. Click Finish on the Congratulations screen.
SAP BusinessObjects Profitability and Cost Management Installation GuidePost-Installation PUBLIC 99
6.2.3.2 Approach 2: Running the Remote Configuration Service as a Domain User
6.2.3.2.1 Creating the User, Groups, and Policy for the Remote Configuration Service
Context
The Remote Configuration Windows service can be run under the context of a domain user account. However this domain user account must have administrative permissions on the machine in order to perform the necessary actions. This can be achieved by using Windows Active Directory Group Policy.
On the Active Directory Domain Controller, perform the following:
Procedure
1. Create a domain user called; RemoteConfigServiceUser.2. Create a Global Security domain group called; RemoteConfigDomainGroup.3. Add the RemoteConfigServiceUser user created in Step 1 to the newly created group;
RemoteConfigDomainGroup.4. Create a new Organisational Unit (OU) called; RemoteConfigUnit. This OU will contain the
RemoteConfigMachines Active Directory security group that contains all the machine objects in the Remote Configuration host landscape.
5. Add the RemoteConfigMachines Active Directory security group to the OU.6. Right-click the RemoteConfigUnit OU and click Properties.7. Click the Group Policy tab and click New.
The Group Policy Editor opens.
8. In the Group Policy Editor, navigate to Computer Configuration Windows Settings Security Settings , right-click the Restricted Groups node, and click Add group.
9. Add the RemoteConfigDomainGroup OU group, click Save and close the Group Policy Editor.10. The RemoteConfigDomainGroup group now needs to be added to the DCOM Users group on the
application server, and the DCOM permissions configured. For instructions on performing these actions please follow the instructions in the section; “Adding the Remote Configuration Security Account to DCOM Groups”.
6.2.3.2.1.1 Making the RemoteConfigServiceUser Available on Remote Configuration Host Machines
Now that the domain user has been created and configured, the Remote Configuration host machines need to be updated to be made aware of the new user and the relevant group policy.
100 PUBLICSAP BusinessObjects Profitability and Cost Management Installation Guide
Post-Installation
This can be done by either restarting each machine or using a command prompt to refresh group policy immediately with the following command:
gpupdate /force
6.2.3.2.2 Domain Policy: Configuring the PCMWCFHost Service Account on all Remote Machines
Context
The PCMWCFHost service needs to be configured to run as the domain user; RemoteConfigServiceUser on each remote machine. This can be performed in Windows Services or the Profitability and Cost Management Configure tool.
To configure the PCMWCFHost service to run as the domain user in the Profitability and Cost Management Configure tool, proceed as follows:
Procedure
1. On the remote machine (which is a machine you want to manage that is running the Remote Configuration Tool), click Start Programs SAP BusinessObjects Profitability and Cost Management Tools Configure .
2. In the Options Available screen, select Remote Configuration Service only, and click Next.3. Navigate to the Remote Configuration Service screen. In the Windows Account box, enter the domain user
name; RemoteConfigServiceUser, then enter the domain password in the Password box, confirm the password in the Confirm Password box, and click Next.
4. Click Finish on the Congratulations screen.
6.3 Web Server: IIS configuration
If the software is configured to communicate via DCOM in a three-tier network configuration, then the default web service must be configured in IIS to allow SAP BusinessObjects Profitability and Cost Management related web pages to be accessed from Microsoft Internet Explorer.
Further tasks are then required to create an application pool and configure associated access rights. The actual steps to perform are varied, depending on which operating system (and integrated IIS version) is installed on your web server. Use the table below to ascertain which tasks need to be performed for each operating system:
SAP BusinessObjects Profitability and Cost Management Installation GuidePost-Installation PUBLIC 101

Web Server O/S Web Server Configuration Tasks
Microsoft Windows Server 2003 x32 (IIS 6.0) Perform all tasks in the “General Web Server Configuration” section.
Microsoft Windows Server 2003 x64 (IIS 6.0) 1. Perform all tasks in the “General Web Server Configuration” section.
2. Configure IIS 6.0 to run 32-bit applications in the “Changing 64-bit IIS settings” section.
Microsoft Windows Server 2008 x32 (IIS 7.0) 1. Perform all tasks in the “General Web Server Configuration” section.
2. Configure the IIS domain account in the “To Add a Domain Account to the IIS_IUSRS Group in IIS 7.0 or IIS 7.5 ” section.
Microsoft Windows Server 2008 x64 (IIS 7.0) 1. Perform all tasks in the “General Web Server Configuration” section.
2. Configure IIS 7.0 to run 32-bit applications in the “Changing 64-bit IIS settings” section.
3. Configure the IIS domain account in the “To Add a Domain Account to the IIS_IUSRS Group in IIS 7.0 or IIS 7.5” section.
Microsoft Windows Server 2008 R2 x32 (IIS 7.5) 1. Perform all tasks in the “General Web Server Configuration” section.
2. Configure the IIS domain account in the “To Add a Domain Account to the IIS_IUSRS Group in IIS 7.0 or IIS 7.5 ” section.
Microsoft Windows Server 2008 R2 x64 (IIS 7.5) 1. Perform all tasks in the “General Web Server Configuration” section.
2. Configure IIS 7.5 to run 32-bit applications in the “Changing 64-bit IIS settings” section.
3. Configure the IIS domain account in the “To Add a Domain Account to the IIS_IUSRS Group in IIS 7.0 or IIS 7.5” section.
Microsoft Windows Server 2012 x64 (IIS 8.0) 1. Perform all tasks in the “General Web Server Configuration” section.
2. Configure IIS 8.0 to run 32-bit applications in the “Changing 64-bit IIS settings” section.
3. Configure the IIS domain account in the “To Add a Domain Account to the IIS_IUSRS Group in IIS 8.0” section.
NoteIf you are running IIS 6.0 in IIS 5.0 compatibility mode, please refer to earlier versions of this document for instructions on how to configure IIS anonymous access settings. All documentation can be found on the SAP help portal at: http://help.sap.com.
102 PUBLICSAP BusinessObjects Profitability and Cost Management Installation Guide
Post-Installation
Related Information
General Web Server Configuration [page 103]Changing 64-bit IIS Settings [page 110]To Add a Domain Account to the IIS_IUSRS Group in IIS 7.0 or IIS 7.5 [page 95]
6.3.1 General Web Server Configuration
The tasks in this section must be performed on the web server after the main software installation, to configure IIS to allow software related web pages to be accessed by web clients.
6.3.1.1 IIS Active Server Pages Configuration
6.3.1.1.1 Configuring IIS 6.0 Active Server Pages
Context
The Active Server Pages (ASP) component of the IIS installation that allows ASP files to run is not installed by default, and must be configured after installing IIS.
Procedure
1. Launch the Microsoft Windows Control Panel from the Start menu.2. In the Add or Remove Programs dialog box, click Add/Remove Windows Components.3. In the Windows Components Wizard, click Application Server and click Details.4. In the Application Server dialog box, click Internet Information Services (IIS) and click Details.5. In the Internet Information Services (IIS) dialog box, click World Wide Web Service and click Details.6. In the World Wide Web Service dialog box, select Active Server Pages to allow ASP files, and click OK.
7. Click OK in the Internet Information Services (IIS) dialog box.8. Click OK in the Application Server dialog box.9. Click Next in the Windows Components Wizard to start the Active Server Pages configuration.10. Click Finish.
SAP BusinessObjects Profitability and Cost Management Installation GuidePost-Installation PUBLIC 103
Results
The Profitability and Cost Management web pages are now available from your browser. You can check this by navigating to: http://yourwebservername/pcm/about.asp (where yourwebservername is the name of your web server).
Next Steps
Now carry out the steps in “Allowing IIS 6.0 ASP Web Service Extensions”, to enable ASP.NET.
Related Information
Allowing IIS 6.0 ASP Web Service Extensions [page 104]
6.3.1.1.2 Allowing IIS 6.0 ASP Web Service Extensions
Context
The Active Server Pages (ASP) web service extensions must be allowed before the software web pages can be accessed.
Procedure
1. Launch the Internet Information Services(IIS) Manager from the Start Programs Administrative Tools menu.
2. Expand the (local computer) node, and click Web Service Extensions.3. In the Web Service Extension list, ensure that Active Server Pages is set to a status of Allowed. If this is
currently set to Prohibited, then perform the following actions:a. Click Active Server Pages in the Web Service Extension list.b. Click Allow.
104 PUBLICSAP BusinessObjects Profitability and Cost Management Installation Guide
Post-Installation
6.3.1.1.3 Installing IIS 7.0 or IIS 7.5 Active Server Pages
Context
To install Active Server Pages (ASP) in Internet Information Services (IIS) 7.0 or 7.5, perform the following:
Procedure
1. Click Start Programs Administrative Tools Server Manager .2. In Server Manager, click Roles.3. In the Roles Summary area, click Web Server (IIS).4. Scroll down to the Role Services area, and click Add Role Services in the right-hand pane.5. In the Select Roles Services screen select the following items under Application Development:
○ ASP.NET - The Add Role Services screen is displayed. Click Add Required Role Services.○ ASP
6. Click Next or click Confirmation in the left hand navigation bar.7. On the Confirm Installation Selections page, click Install.8. On the Installation Results page, click Close.9. Review the Role Services list.
The status of ASP.NET and ASP is set to Installed.10. Exit Server Manager, and restart IIS.
Next Steps
Now carry out the steps in “Allowing IIS 7.0 or IIS 7.5 ASP Web Service Extensions”, to enable ASP.NET.
Related Information
Allowing IIS 7.0 or IIS 7.5 ASP Web Service Extensions [page 106]
SAP BusinessObjects Profitability and Cost Management Installation GuidePost-Installation PUBLIC 105
6.3.1.1.4 Allowing IIS 7.0 or IIS 7.5 ASP Web Service Extensions
Context
To allow IIS 7.0 or IIS 7.5 ASP web service extensions, perform the following:
Procedure
1. Click Start Programs Administrative Tools Internet Information Services (IIS) Manager .2. Click the computer node in the Connections pane.3. In the IIS area, double-click ISAPI and CGI Restrictions.4. In the ISAPI and CGI Restrictions window, both Active Server Pages and ASP.NET v2.050727 should have a
Restriction value of Allowed.5. If the Restriction is set to Not Allowed, then perform the following:
a. Double-click Active Server Pages.b. In the Edit ISAPI or CGI Restriction dialog box, click Allow extension path to execute, and click OK.c. Double-click ASP.NET v2.050727. On a 64-bit machine (Windows Server 2008 R2), there are two
locations of ASP.NET v2.0.50727 files. The first one is the path for the 64-bit version of the .NET Framework, and the second one is the 32-bit version of the .NET Framework that the SAP BusinessObjects Profitability and Cost Management web applications use.
d. In the Edit ISAPI or CGI Restriction dialog box, click Allow extension path to execute, and click OK.
6.3.1.1.5 Installing IIS 8.0 Active Server Pages
Context
To install Active Server Pages (ASP) in Internet Information Services (IIS) 8.0, perform the following steps:
Procedure
1. Select Start All Programs Administrative Tools Server Manager .
2. In the Server Manager Dashboard, select Manage Add Roles and Features .The Add Roles and Features Wizard opens.
3. In the Before You Begin page, click Next.4. In the Installation Type page, ensure that the option, Role-based or feature-based installation, is selected,
and click Next.
106 PUBLICSAP BusinessObjects Profitability and Cost Management Installation Guide
Post-Installation
5. In the Server Selection page, select the server from the Server Pool list, and click Next.
6. In the Server Roles page, expand Web Server (IIS) Web Server Application Development .7. Under Application Development, select the following:
○ ASP
○ ASP.NET - A dialog box is displayed that advises you that cannot install ASP.NET unless you install additional role services and features. Click Add Features to install the required role services and features.
8. To proceed, you can either:
○ Click Next, and then click Next in the Features page.○ Click Confirmation in the left-hand navigation pane.
The Confirmation page lists the role services and features to be installed.9. Click Install.10. On the Results page, click Closed.11. Review the installed roles in the Roles Services page.
The status of ASP and ASP.NET appears as (Installed).12. Exit Server Manager and restart IIS.
Next Steps
Carry out the steps in “Allowing IIS 8.0 ASP Web Service Extensions” to enable ASP.NET.
Related Information
Allowing IIS 8.0 ASP Web Service Extensions [page 107]
6.3.1.1.6 Allowing IIS 8.0 ASP Web Service Extensions
Context
To allow IIS 8.0 Active Server Pages (ASP) web service extensions, perform the following steps:
Procedure
1. Click Start Programs Administrative Tools Internet Information Services (IIS) Manager .2. Click the computer node in the Connections pane.
SAP BusinessObjects Profitability and Cost Management Installation GuidePost-Installation PUBLIC 107
3. In the IIS area, double-click ISAPI and CGI Restrictions.4. In the ISAPI and CGI Restrictions window, both Active Server Pages and ASP.NET v2.050727 should have a
Restriction value of Allowed.5. If the Restriction is set to Not Allowed, then perform the following:
a. Double-click Active Server Pages.b. In the Edit ISAPI or CGI Restriction dialog box, click Allow extension path to execute, and click OK.c. Double-click ASP.NET v2.050727. On a 64-bit machine (Windows Server 2008 R2), there are two
locations of ASP.NET v2.0.50727 files. The first one is the path for the 64-bit version of the .NET Framework, and the second one is the 32-bit version of the .NET Framework that the SAP BusinessObjects Profitability and Cost Management web applications use.
d. In the Edit ISAPI or CGI Restriction dialog box, click Allow extension path to execute, and click OK.
6.3.1.2 Creating Application Pools
Creating an Application Pool is important to enable the Profitability and Cost Management and the Financial Information Management web sites to be served by different worker processes. Placing the web site(s) into these different groups (Application Pools) increases general stability across the URLs that are hosted on the web server.
TipWe therefore recommend that a separate Application Pool is created for each individual web service and Profitability and Cost Management web site.
A number of methods are available to create an Application Pool on the web server, which include the user interface in IIS, running commands from a command line, or editing files directly. The instructions in this section concentrate solely on setting up an Application Pool in IIS on three different operating system versions, as follows:
● IIS 6.0 on Windows Server 2003● IIS 7.0 or IIS 7.5 on Windows Server 2008● IIS 8.0 on Windows Server 2012
NoteThe configuration wizard for the application automatically creates the required application pools, virtual directories,and applications in IIS. This section is provided in case you wish to alter the default settings.
6.3.1.2.1 Creating a New Application Pool in IIS 6.0
Context
To create a new Application Pool in IIS 6.0, perform the following:
108 PUBLICSAP BusinessObjects Profitability and Cost Management Installation Guide
Post-Installation

Procedure
1. In the Internet Information Services (IIS) Manager, right click the Application Pools folder, and select New Application Pool .
2. In the Application pool ID text box, type a name for the new Application Pool, for example; PCMServiceAppPool, and click OK.
3. Right-click the new Application Pool item under the Application Pools folder, and click Properties.4. Click the Identity tab and click Configurable.5. Click Browse to select the preferred domain user account and password, (this is usually PCM_Webuser)
click OK, and click OK again to return to the Internet Information Services(IIS) Manager screen.
6.3.1.2.2 Creating a New Application Pool in IIS 7.0 or IIS 7.5
Context
To create a new Application Pool in IIS 7.0 or IIS 7.5, perform the following:
Procedure
1. In Internet Information Services (IIS) Manager, click Application Pools in the Connections pane.2. In the Application Pools page, click Add Application Pool in the Actions pane.3. In the Add Application Pool window, enter a new Application Pool name in the Name text box, for example:
PCMServiceAppPool. In the .NET Framework version combo box, ensure that .NET Framework v.2.0.50727 is selected and then select Classic in the Managed pipeline mode combo box. Click OK.
4. In the Application Pools page, right-click the new Application Pool and select Advanced Settings.5. In the Advanced Settings window, in the Process Model list, click Identity and then click the ellipsis button
next to the default NetworkService value.6. In the Application Pool Identity window, click Custom Account and click Set.7. In the Set Credentials window, enter the user name and password of the domain user account and click OK.8. Click OK in the Application Pool Identity window, and then click OK in the Advanced Settings window to
return to the Internet Information Services (IIS) Manager screen.9. Close Internet Information Services (IIS) Manager.
SAP BusinessObjects Profitability and Cost Management Installation GuidePost-Installation PUBLIC 109
6.3.1.2.3 Creating a New Application Pool in IIS 8.0
Context
To create a new application pool in IIS 8.0, perform the following steps:
Procedure
1. In Internet Information Services (IIS) Manager, click Application Pools in the Connections pane.2. In the Application Pools page, click Add Application Pool in the Actions pane.3. In the Add Application Pool window, enter a new Application Pool name in the Name text box, for example:
PCMServiceAppPool. In the .NET Framework version combo box, ensure that .NET Framework v.2.0.50727 is selected and then select Classic in the Managed pipeline mode combo box. Click OK.
4. In the Application Pools page, right-click the new Application Pool and select Advanced Settings.5. In the Advanced Settings window, in the Process Model list, click Identity and then click the ellipsis button
next to the default ApplicationPoolIdentity value.6. In the Application Pool Identity window, click Custom Account and click Set.7. In the Set Credentials window, enter the user name and password of the domain user account and click OK.8. Click OK in the Application Pool Identity window, and then click OK in the Advanced Settings window to
return to the Internet Information Services (IIS) Manager screen.9. Close Internet Information Services (IIS) Manager.
6.3.1.2.4 Changing 64-bit IIS Settings
The software is supported only in 32-bit mode on the web server, and we support this mode on 64-bit operating systems (refer to the SAP BusinessObjects Profitability and Cost Management Master Guide for full details of supported operating systems).
This means that existing 64-bit IIS settings need to be converted to 32-bit if you are running a 64-bit operating system on the web server. This extra configuration allows web pages to be loaded from web clients.
6.3.1.2.4.1 Configuring IIS 6.0 to Run 32-Bit Applications
Prerequisites
These configuration changes are designed for web servers running editions of Microsoft Windows Server 2003 x64 with IIS 6.0.
110 PUBLICSAP BusinessObjects Profitability and Cost Management Installation Guide
Post-Installation

Context
The version of IIS that runs on the 64 bit editions of Microsoft Windows Server 2003 only supports web sites that are developed to run in 32 bit or 64 bit mode, but not both simultaneously. The default mode on a 64 bit operating system supports 64 bit web applications.
Therefore, in order to support the 32 bit components in the software, IIS must be reconfigured to run in 32 bit mode by running the adsutil.vbs script.
Procedure
To run the script, perform the following steps:
a. Ensure that you have local Administrator permissions on the machine, and click Start Run , type cmd in the text box and click OK to open a command prompt.
b. At the command prompt, type cd\ c:\Inetpub\AdminScripts.c. Type the following command: "cscript.exe adsutil.vbs set W3SVC/AppPools/
Enable32BitAppOnWin64 true" and press Enter .d. Close the command window.
NoteIf the FIMService web service is required, it must assigned to either a new or existing (for example PCMXMLA) 64-bit pool. See the topics on creating application pools for more information.
Related Information
Creating Application Pools [page 108]
6.3.1.2.4.2 Configuring IIS 7.0 or IIS 7.5 to run 32-bit applications
Prerequisites
These configuration changes are designed for web servers running editions of Microsoft Windows Server 2008 x64 with IIS 7.0 or Microsoft Windows Server 2008 R2 x64 with IIS 7.5.
SAP BusinessObjects Profitability and Cost Management Installation GuidePost-Installation PUBLIC 111
Context
IIS 7.0 or IIS 7.5 on a 64-bit operating system must be configured to run the 32-bit web software components in 32-bit mode, because the default setting runs the web site in 64-bit mode.
This is achieved by creating an Application Pool specific to the software (see the topic, Creating a New Application Pool in IIS 7.0 or IIS 7.5 ), configuring this to run in 32-bit mode, and then adding the Default Web site to the modified Application Pool.
Related Information
Creating a New Application Pool in IIS 7.0 or IIS 7.5 [page 109]
6.3.1.2.4.2.1 Configuring IIS 7.0 or IIS 7.5 to Run 32-bit applications with Sockets
Context
If you have set up the software to communicate using Windows sockets, then perform the following steps to configure IIS 7.0 or IIS 7.5 to run 32-bit applications:
Procedure
1. Open the Internet Information Services (IIS) Manager.2. Select the Application Pools object associated with the web service or PCM web site in the Connections
pane, right-click the required Application Pool in the Application Pools window and select Advanced settings, or select Advanced settings from the Actions pane.
3. In the (General) section of the Advanced Settings window, select Enable 32-Bit Applications, and then click on the second column and select True from the drop-down list.
4. Click OK, and restart IIS to ensure that the new settings are applied.
112 PUBLICSAP BusinessObjects Profitability and Cost Management Installation Guide
Post-Installation
6.3.1.2.4.2.2 Configuring IIS 7.0 or IIS 7.5 to Run 32-bit Applications with DCOM
Context
If you have set up the software to use DCOM, then perform the following steps to configure IIS 7.0 or IIS 7.5 to run 32-bit applications:
Procedure
1. Open the Internet Information Services (IIS) Manager.2. Select the Application Pools object associated with the web service or PCM web site in the Connections
pane, right-click the required Application Pool in the Application Pools window and select Advanced settings, or select Advanced settings from the Actions pane.
3. In the (General) section of the Advanced Settings window, select Enable 32-Bit Applications, and then click on the second column and select True from the drop-down list.
4. In the Process Model section, select Identity, and then click the ellipsis (...) button in the second column to open the Application Pool Identity window.
5. Click Custom account and click Set.6. Enter the correct domain name and domain user name in the User name text box, and enter associated
password values in the Password and Confirm password text boxes. Click OK.7. In the Application Pool Identity window, click OK, and then click OK in the Advanced Settings window to
complete the operation.
8. In the Connection Pane select Default Web Site. Either right-click Default Web Site and click Manage Website Advanced Settings , or click Advanced settings in the Actions pane.
9. In the (General) section of the Advanced Settings window, click Application Pool, and then click the ellipsis (...) button in the second column to open the Select Application Pool window.
10. Select the software specific Application Pool created earlier, for example; PCMServiceAppPool, and click OK.
11. Click OK on the Advanced Settings window.12. With the Default Website node still selected, double-click Authentication in the Security section of the
Default Web Site Home pane.13. In the Authentication pane, either right-click Anonymous Authentication and click Edit, or click Edit in the
Actions pane.14. In the Edit Anonymous Authentication Credentials window, click Application pool identity, and click OK to
close the window.15. Restart IIS to ensure that the new settings are applied.
SAP BusinessObjects Profitability and Cost Management Installation GuidePost-Installation PUBLIC 113
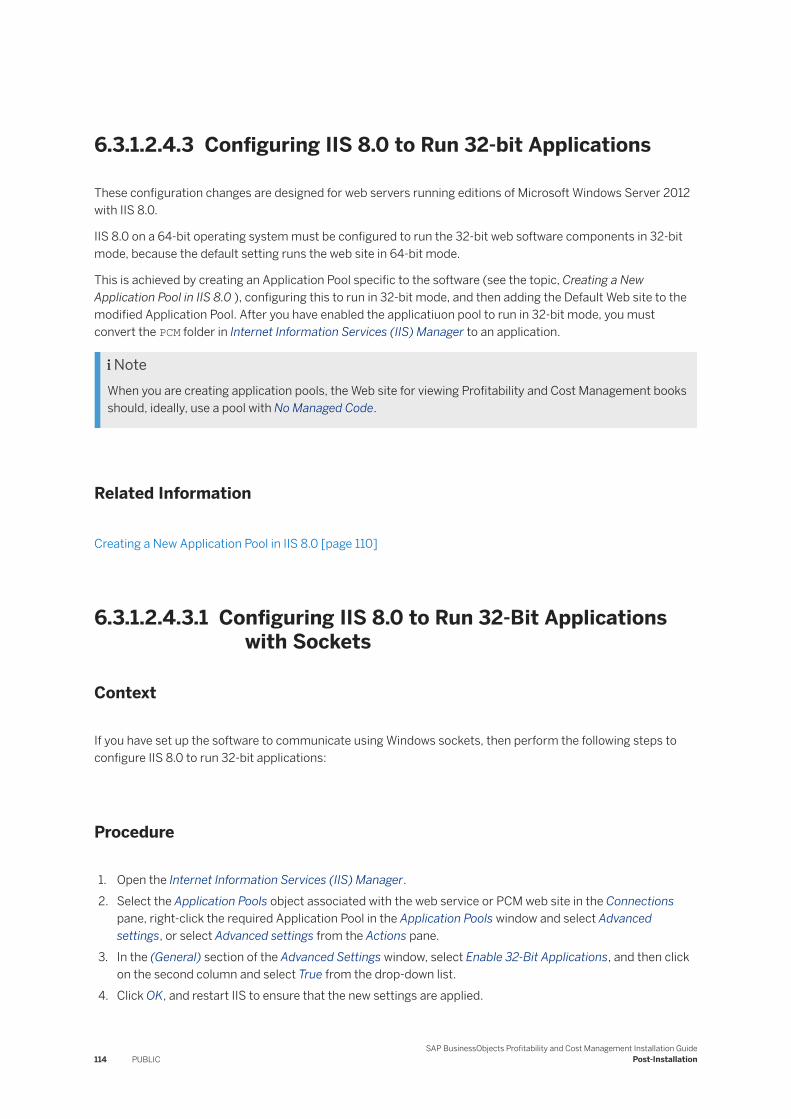
6.3.1.2.4.3 Configuring IIS 8.0 to Run 32-bit Applications
These configuration changes are designed for web servers running editions of Microsoft Windows Server 2012 with IIS 8.0.
IIS 8.0 on a 64-bit operating system must be configured to run the 32-bit web software components in 32-bit mode, because the default setting runs the web site in 64-bit mode.
This is achieved by creating an Application Pool specific to the software (see the topic, Creating a New Application Pool in IIS 8.0 ), configuring this to run in 32-bit mode, and then adding the Default Web site to the modified Application Pool. After you have enabled the applicatiuon pool to run in 32-bit mode, you must convert the PCM folder in Internet Information Services (IIS) Manager to an application.
NoteWhen you are creating application pools, the Web site for viewing Profitability and Cost Management books should, ideally, use a pool with No Managed Code.
Related Information
Creating a New Application Pool in IIS 8.0 [page 110]
6.3.1.2.4.3.1 Configuring IIS 8.0 to Run 32-Bit Applications with Sockets
Context
If you have set up the software to communicate using Windows sockets, then perform the following steps to configure IIS 8.0 to run 32-bit applications:
Procedure
1. Open the Internet Information Services (IIS) Manager.2. Select the Application Pools object associated with the web service or PCM web site in the Connections
pane, right-click the required Application Pool in the Application Pools window and select Advanced settings, or select Advanced settings from the Actions pane.
3. In the (General) section of the Advanced Settings window, select Enable 32-Bit Applications, and then click on the second column and select True from the drop-down list.
4. Click OK, and restart IIS to ensure that the new settings are applied.
114 PUBLICSAP BusinessObjects Profitability and Cost Management Installation Guide
Post-Installation
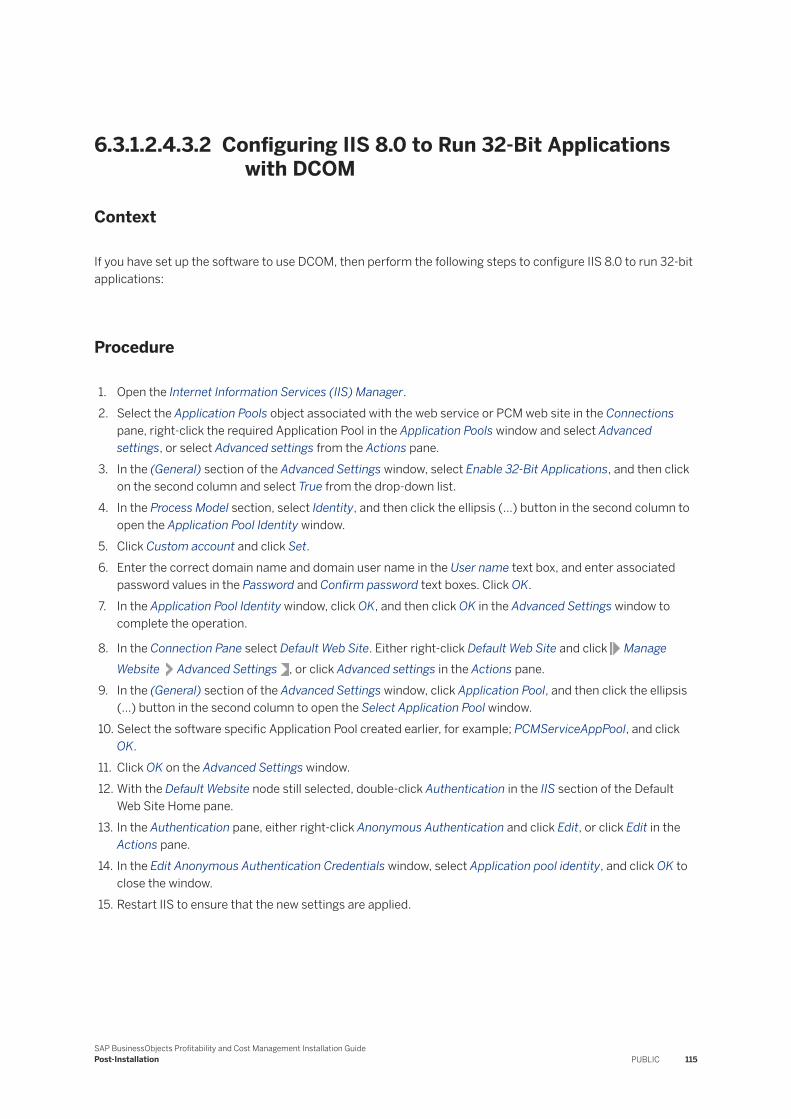
6.3.1.2.4.3.2 Configuring IIS 8.0 to Run 32-Bit Applications with DCOM
Context
If you have set up the software to use DCOM, then perform the following steps to configure IIS 8.0 to run 32-bit applications:
Procedure
1. Open the Internet Information Services (IIS) Manager.2. Select the Application Pools object associated with the web service or PCM web site in the Connections
pane, right-click the required Application Pool in the Application Pools window and select Advanced settings, or select Advanced settings from the Actions pane.
3. In the (General) section of the Advanced Settings window, select Enable 32-Bit Applications, and then click on the second column and select True from the drop-down list.
4. In the Process Model section, select Identity, and then click the ellipsis (...) button in the second column to open the Application Pool Identity window.
5. Click Custom account and click Set.6. Enter the correct domain name and domain user name in the User name text box, and enter associated
password values in the Password and Confirm password text boxes. Click OK.7. In the Application Pool Identity window, click OK, and then click OK in the Advanced Settings window to
complete the operation.
8. In the Connection Pane select Default Web Site. Either right-click Default Web Site and click Manage Website Advanced Settings , or click Advanced settings in the Actions pane.
9. In the (General) section of the Advanced Settings window, click Application Pool, and then click the ellipsis (...) button in the second column to open the Select Application Pool window.
10. Select the software specific Application Pool created earlier, for example; PCMServiceAppPool, and click OK.
11. Click OK on the Advanced Settings window.12. With the Default Website node still selected, double-click Authentication in the IIS section of the Default
Web Site Home pane.13. In the Authentication pane, either right-click Anonymous Authentication and click Edit, or click Edit in the
Actions pane.14. In the Edit Anonymous Authentication Credentials window, select Application pool identity, and click OK to
close the window.15. Restart IIS to ensure that the new settings are applied.
SAP BusinessObjects Profitability and Cost Management Installation GuidePost-Installation PUBLIC 115
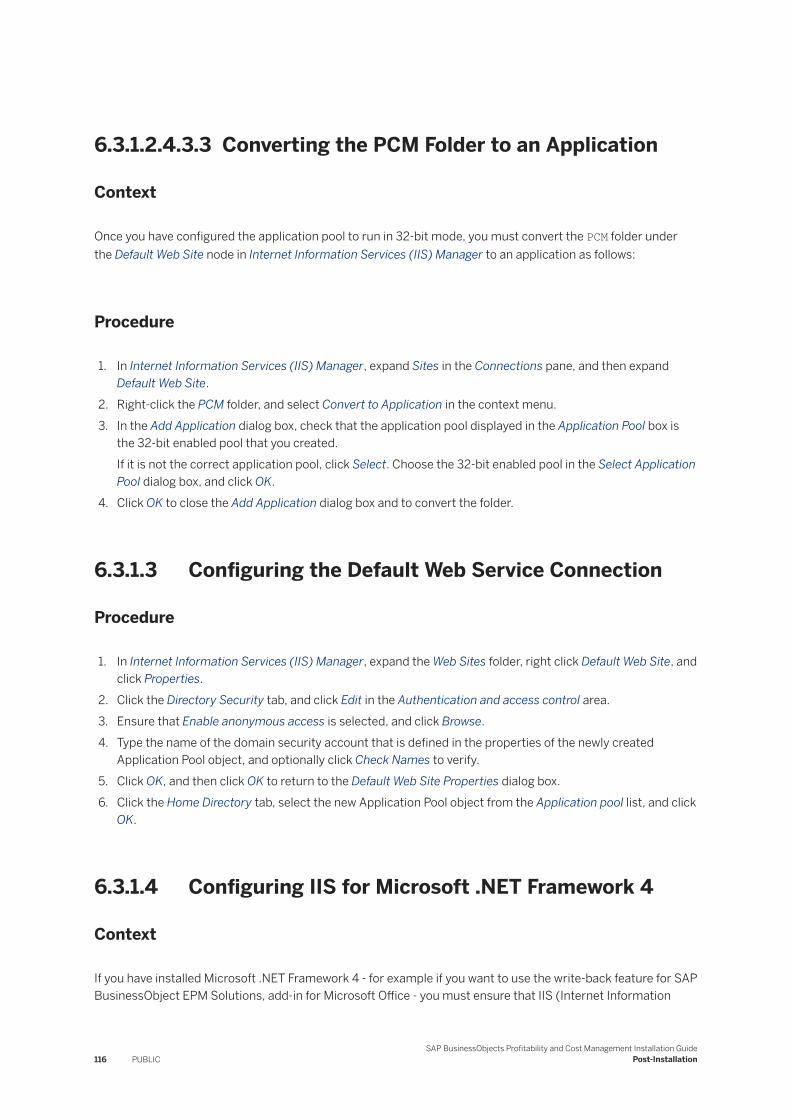
6.3.1.2.4.3.3 Converting the PCM Folder to an Application
Context
Once you have configured the application pool to run in 32-bit mode, you must convert the PCM folder under the Default Web Site node in Internet Information Services (IIS) Manager to an application as follows:
Procedure
1. In Internet Information Services (IIS) Manager, expand Sites in the Connections pane, and then expand Default Web Site.
2. Right-click the PCM folder, and select Convert to Application in the context menu.3. In the Add Application dialog box, check that the application pool displayed in the Application Pool box is
the 32-bit enabled pool that you created.If it is not the correct application pool, click Select. Choose the 32-bit enabled pool in the Select Application Pool dialog box, and click OK.
4. Click OK to close the Add Application dialog box and to convert the folder.
6.3.1.3 Configuring the Default Web Service Connection
Procedure
1. In Internet Information Services (IIS) Manager, expand the Web Sites folder, right click Default Web Site, and click Properties.
2. Click the Directory Security tab, and click Edit in the Authentication and access control area.3. Ensure that Enable anonymous access is selected, and click Browse.4. Type the name of the domain security account that is defined in the properties of the newly created
Application Pool object, and optionally click Check Names to verify.5. Click OK, and then click OK to return to the Default Web Site Properties dialog box.6. Click the Home Directory tab, select the new Application Pool object from the Application pool list, and click
OK.
6.3.1.4 Configuring IIS for Microsoft .NET Framework 4
Context
If you have installed Microsoft .NET Framework 4 - for example if you want to use the write-back feature for SAP BusinessObject EPM Solutions, add-in for Microsoft Office - you must ensure that IIS (Internet Information
116 PUBLICSAP BusinessObjects Profitability and Cost Management Installation Guide
Post-Installation
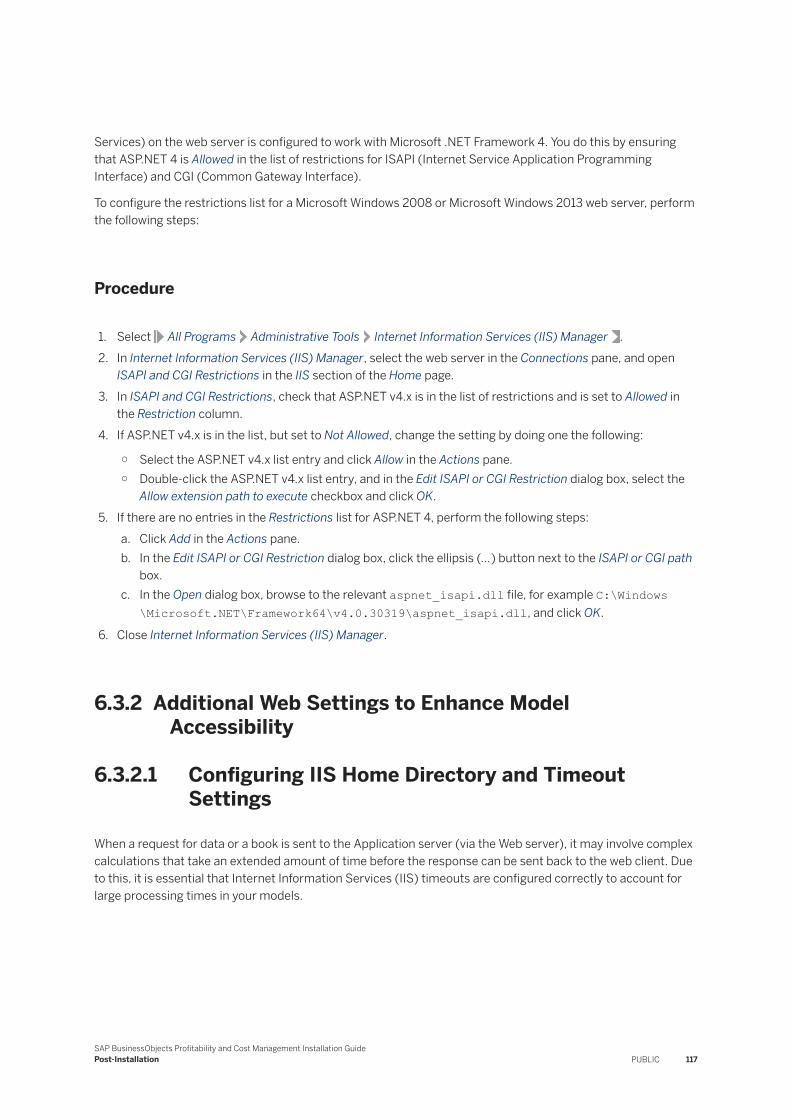
Services) on the web server is configured to work with Microsoft .NET Framework 4. You do this by ensuring that ASP.NET 4 is Allowed in the list of restrictions for ISAPI (Internet Service Application Programming Interface) and CGI (Common Gateway Interface).
To configure the restrictions list for a Microsoft Windows 2008 or Microsoft Windows 2013 web server, perform the following steps:
Procedure
1. Select All Programs Administrative Tools Internet Information Services (IIS) Manager .2. In Internet Information Services (IIS) Manager, select the web server in the Connections pane, and open
ISAPI and CGI Restrictions in the IIS section of the Home page.3. In ISAPI and CGI Restrictions, check that ASP.NET v4.x is in the list of restrictions and is set to Allowed in
the Restriction column.4. If ASP.NET v4.x is in the list, but set to Not Allowed, change the setting by doing one the following:
○ Select the ASP.NET v4.x list entry and click Allow in the Actions pane.○ Double-click the ASP.NET v4.x list entry, and in the Edit ISAPI or CGI Restriction dialog box, select the
Allow extension path to execute checkbox and click OK.5. If there are no entries in the Restrictions list for ASP.NET 4, perform the following steps:
a. Click Add in the Actions pane.b. In the Edit ISAPI or CGI Restriction dialog box, click the ellipsis (...) button next to the ISAPI or CGI path
box.c. In the Open dialog box, browse to the relevant aspnet_isapi.dll file, for example C:\Windows
\Microsoft.NET\Framework64\v4.0.30319\aspnet_isapi.dll, and click OK.
6. Close Internet Information Services (IIS) Manager.
6.3.2 Additional Web Settings to Enhance Model Accessibility
6.3.2.1 Configuring IIS Home Directory and Timeout Settings
When a request for data or a book is sent to the Application server (via the Web server), it may involve complex calculations that take an extended amount of time before the response can be sent back to the web client. Due to this, it is essential that Internet Information Services (IIS) timeouts are configured correctly to account for large processing times in your models.
SAP BusinessObjects Profitability and Cost Management Installation GuidePost-Installation PUBLIC 117

6.3.2.1.1 To Configure IIS 6.0 Home Directory and Timeout Settings
Context
To configure connection timeout settings and Active Server Pages (ASP) script timeout settings, proceed as follows:
Procedure
1. In the Internet Information Services Manager, expand the local computer node and the Web Sites folder, right click Default Web Site or the virtual folder that contains the pcm folder and select Properties.
2. In the Default Web Site Properties screen, click the Web Site tab. Set the Connection timeout to a time greater than you would expect any model requests and calculations to take.
3. Click the Home Directory tab.The default access permission of Read and Execute permissions of Scripts only are sufficient to allow access to the SAP BusinessObjects Profitability and Cost Management web files, and can be left as these values.
4. Click Configuration to set the configuration options in the Application Configuration screen.5. Click the Options tab, and set the ASP script timeout to a time greater than you would expect any model
requests and calculations to take.
6.3.2.1.2 To Configure IIS 7.0 or IIS 7.5 Home Directory and Timeout Settings
Context
To configure connection timeout and Active Server Pages (ASP) script timeout settings, proceed as follows:
Procedure
1. In Internet Information Services (IIS) Manager, in the Connections pane on the left, expand the local computer node, expand Sites, and select Default Web Site or the virtual folder that contains the PCM folder.
2. To configure the connection timeout setting, perform one of the following procedures:
○ In the Actions pane on the right, click Limits in the Configure section. In the Edit Web Site Limits dialog box, enter a timeout value (in seconds) in the Connection time-out box and click OK.
118 PUBLICSAP BusinessObjects Profitability and Cost Management Installation Guide
Post-Installation

○ In the Actions pane on the right, click Advanced Settings in the Browse Web Site section. In the Advanced Settings dialog box, expand Connection Limits in the Behavior section. Enter a new value (in seconds) in the Connection Time-out field and click OK.
3. To set the ASP script timeout setting, double-click the ASP icon in the Default Web Site Home pane.4. In the ASP pane, expand Limits Properties.5. In the Script Time-out field, enter an appropriate value for the default length of time that a script can run
before it is terminated.6. To set the new timeout value, click Apply in the Actions pane.
6.3.2.1.3 To Configure IIS 8.0 Home Directory and Timeout Settings
Context
To configure connection timeout and Active Server Pages (ASP) script timeout settings, proceed as follows:
Procedure
1. In Internet Information Services (IIS) Manager, in the Connections pane on the left, expand the local computer node, expand Sites, and select Default Web Site or the virtual folder that contains the PCM folder.
2. To configure the connection timeout setting, perform one of the following procedures:
○ In the Actions pane on the right, click Limits in the Configure section. In the Edit Web Site Limits dialog box, enter a timeout value (in seconds) in the Connection time-out box and click OK.
○ In the Actions pane on the right, click Advanced Settings in the Browse Web Site section. In the Advanced Settings dialog box, expand Limits in the Behavior section. Enter a new value (in seconds) in the Connection Time-out field and click OK.
3. To set the ASP script timeout setting, double-click the ASP icon in the Default Web Site Home pane.4. In the ASP pane, expand Limits Properties.5. In the Script Time-out field, enter an appropriate value for the default length of time that a script can run
before it is terminated.6. To set the new timeout value, click Apply in the Actions pane.
6.3.2.2 Configuring IIS to Access Large Models
When a book is viewed over the web, all dimension and alias information is transferred to the Internet Explorer client when a model is opened. For very large models, that may have hundreds of thousands of dimension items, the size of the Active Server Pages (ASP) buffer must be changed to accommodate these large data transfers. To do this, you configure the property in Internet Information Services (IIS) that controls the maximum number of bytes that ASP can write to the buffer before a flush occurs.
SAP BusinessObjects Profitability and Cost Management Installation GuidePost-Installation PUBLIC 119
In IIS 6.0, the property that controls the buffer size is ASPBufferingLimit. In a standard IIS 6.0 installation, the default value for the property is 4MB.
In IIS 7.0, IIS 7.5, or IIS 8.0, the property that controls the buffer size is Response Buffering Limit. The default value is 4194304 bytes or 4MB.
A buffer limit of 4MB is too low for large models and needs to be increased. The amount to increase by is dependent on the number of items in all the dimensions, although a current method does not exist to accurately determine a relationship. As a guide, a model with 500,000 dimension items operates correctly with a buffer limit of 400MB. We advise that you increase the limit until no further problems are encountered. If in doubt contact your SAP consultant.
6.3.2.2.1 To Change the IIS AspBufferingLimit in IIS 6.0
Procedure
1. In Internet Information Services Manager, right click <servername> (local computer), point to All Tasks and click Restart IIS.
2. In the Stop/Start/Restart screen, select Stop Internet Services on <servername> and click OK.3. Open Windows Notepad, and open the C:\windows\system32\inetsrv\MetaBase.xml file.
4. Locate the text AspBufferingLimit="xxxxxxx" where xxxxxxx is a numeric value.
5. Change the current numeric value to the new value and save the xml document.
6. In Internet Information Services Manager, right click <servername> (local computer), point to All Tasks and click Restart IIS.
7. In the Stop/Start/Restart screen, select Start Internet Services on <servername> and click OK.
Results
For this change to take effect, Microsoft Windows 2003 Server SP1 must be installed. For more information on the cause, refer to the Related Topics section below:
Related Information
Microsoft KB article 826756
120 PUBLICSAP BusinessObjects Profitability and Cost Management Installation Guide
Post-Installation
6.3.2.2.2 To Change the IIS Response Buffering Limit in IIS 7.0 or IIS 7.5
Context
To change the setting for the Response Buffering Limit for Internet Information Services (IIS) 7.0 or 7.5, proceed as follows:
Procedure
1. In Internet Information Services (IIS) Manager, in the Connections pane on the left, expand the local computer node, expand Sites, and select Default Web Site or the virtual folder that contains the PCM folder.
2. Double-click the ASP icon in the Default Web Site Home pane.3. In the ASP pane, expand Limits Properties.4. In the Response Buffering Limit field, enter an appropriate size for the buffer in bytes.5. To set the new value, click Apply in the Actions pane.
6.3.2.2.3 To Change the Response Buffering Limit in IIS 8.0
Context
To change the setting for the Response Buffering Limit for Internet Information Services (IIS) 8.0:
Procedure
1. In Internet Information Services (IIS) Manager, in the Connections pane on the left, expand the local computer node, expand Sites, and select Default Web Site or the virtual folder that contains the PCM folder.
2. Double-click the ASP icon in the IIS section of the Default Web Site Home pane.3. In the ASP pane, expand Limits Properties.4. In the Response Buffering Limit field, enter an appropriate size for the buffer in bytes.5. To set the new value, click Apply in the Actions pane.
6.3.3 Web Server URL Changes
If changes are made to the configuration of the web server that affect the URL used to access the SAP BusinessObjects Profitability and Cost Management web pages, the SAP BusinessObjects Profitability and Cost
SAP BusinessObjects Profitability and Cost Management Installation GuidePost-Installation PUBLIC 121
Management Configuration Wizard must be used to configure the new URL. Examples of when this change is required include; configuring SSL to use an HTTPS URL, and using a Reverse Proxy server.
Related Information
Configuring the Application Server [page 54]
6.3.3.1 To Change the Web Server URL
Context
Perform this task on the Web server, if the Web server URL has changed, and Web clients communicate directly with the Web server.
Procedure
1. Launch the SAP BusinessObjects Profitability and Cost Management Configuration Wizard from the StartPrograms SAP BusinessObjects Profitability and Cost Management Tools Configure menu.
2. Navigate through the Wizard to the Web Server configuration screen.3. In the Web Server URL text box, change the path to the new URL.
For example, if the Web security has been changed through the SelfSSL tool in IIS, then the new URL needs to be changed to: https://servername/PCM, as opposed to the original http protocol.
4. Navigate through the Wizard, accepting the default settings, and click Finish on the Congratulations screen.
6.3.3.2 To Change the Web Proxy URL
Context
Perform this task on the Web server, if the Web server proxy destination URL has changed, and Web clients communicate through a proxy service with the Web server.
Procedure
1. Launch the SAP BusinessObjects Profitability and Cost Management Configuration Wizard from the StartPrograms SAP BusinessObjects Profitability and Cost Management Tools Configure menu.
122 PUBLICSAP BusinessObjects Profitability and Cost Management Installation Guide
Post-Installation
2. Navigate through the Wizard to the Web Server configuration screen.3. In the Proxy URL text box, change the path to the new URL.
For example, if the Web security has been changed through the SelfSSL tool in IIS, then the new URL needs to be changed to: https://servername/PCM, as opposed to the original http protocol.
4. Navigate through the Wizard, accepting the default settings, and click Finish on the Congratulations screen.
6.4 Integrating Profitability and Cost Management with Financial Information Management
Context
Profitability and Cost Management and Financial Information Management can be integrated to allow the transfer of information between the two applications. To achieve this, the following installation and configuration tasks must be carried out:
Procedure
1. Install the Profitability and Cost Management Web server on the Financial Information Management Web server, by carrying out the following actions:a. Install the software on the Financial Information Management Web server (if you have not already done
so) by following the steps in “Installing the SAP BusinessObjects Profitability and Cost Management software”.
b. Configure the Financial Information Management Web server by following the steps in “Configuring the Web Server”.
c. Configure IIS Active Server Pages by following the steps in “Configuring IIS 6.0 Active Server Pages” or “Installing IIS 7.0 or IIS 7.5 Active Server Pages”, as appropriate.
d. Enable ASP.NET by following the steps in “Allowing IIS 6.0 ASP Web Service Extensions” or “Allowing IIS 7.0 or IIS 7.5 ASP Web Service Extensions”, as appropriate.
e. Install the ActiveX control by following the steps in “Web Client Deployment”.f. Test the Profitability and Cost Management Web site on the Financial Information Management Web
server by following the steps in “Testing the Web Server Installation”.g. Create a new Application Pool by following the steps in “Creating Application Pools”.h. Configure the Default Web Service Connection by following the steps in “Configuring the Default Web
Service Connection”.i. Test the Profitability and Cost Management Web site on the Financial Information Management Web
server again, by repeating the steps in “Testing the Web Server Installation”.2. On the Profitability and Cost Management Web server, configure the FIMService by carrying out the
actions in “Configuring the FIMService Web Service Connection”.3. Configure Profitability and Cost Management to Financial Information Management integration, by
carrying out the following actions:
SAP BusinessObjects Profitability and Cost Management Installation GuidePost-Installation PUBLIC 123
a. Set the Financial Information Management configuration options by following the steps in “Configuring Single Sign On Authentication for the Profitability and Cost Management Application” in the Financial Information Management 10 Installation Guide.
b. Set the Drill to Origin feature by following the steps in “Enabling Drill to Origin in the Profitability and Cost Management Application” in the Financial Information Management 10 Installation Guide.
4. Install the CMS (Central Management Server) and configure Profitability and Cost Management to CMS Enterprise authentication, by carrying out the following actions:a. Refer to the prerequisites listed in “SAP BusinessObjects Prerequisites” in the Financial Information
Management 10 Installation Guide.b. Perform Profitability and Cost Management to CMS integration by following the steps in “Configuring
Access Between SAP BusinessObjects Profitability and Cost Management and SAP BusinessObjects Business Intelligence platform 4.0” in the SAP BusinessObjects Profitability and Cost Management Integration Guide.
c. Configure Single Sign On by following the steps in “Configuring Single Sign On and the Profitability and Cost Management folder in BI Launchpad (InfoView)” in the SAP BusinessObjects Profitability and Cost Management Integration Guide.
5. Configure the groups and users in the CMS and Profitability and Cost Management by carrying out the actions in “Creating Financial Information Management User Groups” in the Financial Information Management 10 Installation Guide.
6. Install Data Services by carrying out the actions in “Data Services Installation” in the Financial Information Management 10 Installation Guide.
7. Install and configure Financial Information Management by carrying out the following actions:a. Follow the steps in “Installing the Financial Information Management Application” in the Financial
Information Management 10 Installation Guide.b. Follow the steps in “Configuring the Application” in the Financial Information Management 10
Installation Guide.
Related Information
Installing the SAP BusinessObjects Profitability and Cost Management Software [page 44]Configuring the Web Server [page 66]Configuring IIS 6.0 Active Server Pages [page 103]Installing IIS 7.0 or IIS 7.5 Active Server Pages [page 105]Allowing IIS 6.0 ASP Web Service Extensions [page 104]Allowing IIS 7.0 or IIS 7.5 ASP Web Service Extensions [page 106]Web Client Deployment [page 82]Testing the Web Server Installation [page 84]Creating Application Pools [page 108]Configuring the Default Web Service Connection [page 116]Configuring the FIMService Web Service Connection [page 125]
124 PUBLICSAP BusinessObjects Profitability and Cost Management Installation Guide
Post-Installation
6.4.1 Configuring the FIMService Web Service Connection
You need to configure the FIMService Web Service on the Profitability and Cost Management Web server, to enable successful communication with the Application server. This involves the following tasks:
● Installing the FIMService Web Service Security Account in IIS (see the topics “To Configure the FIMService Web Service Security Account in IIS 6.0” or “To Configure the FIMService Web Service Security Account in IIS 7.0 or IIS 7.5”, as appropriate).
● Enabling ASP.NET web service extensions in IIS.● Testing the connection to the FIMService Web page (see topic “To Test the Connection to the FIMService
Web Page”).● Serializing FIMService Web Service requests (see topic “To Serialize FIMService Web Service Requests”).
6.4.1.1 To Configure the FIMService Web Service Security Account in IIS 6.0
Prerequisites
Before you start, follow the steps to create a new Application Pool, as described in the “Creating a new Application Pool in IIS 6.0” section, ensuring that the domain account is the same as the domain account configured for DCOM objects on the Application server.
Procedure
1. Right-click FIMService in the Default Web Site folder and click Properties.2. Click the Directory Security tab, and click Edit.3. Ensure that Enable anonymous access is selected, and click Browse.4. Type the name of the domain security account that is defined in the properties of the newly created
Application Pool object, optionally click Check Names to verify, and then Click OK.5. In the Virtual Directory tab, select the new Application Pool from the Application Pool list, and click OK.
Next Steps
If you have not already done so, ensure that the ASP web service extensions are allowed by following instructions in the topic: “Allowing IIS 6.0 ASP Web Service Extensions”.
SAP BusinessObjects Profitability and Cost Management Installation GuidePost-Installation PUBLIC 125
Related Information
Allowing IIS 6.0 ASP Web Service Extensions [page 104]Creating a New Application Pool in IIS 6.0 [page 108]
6.4.1.2 To Configure the FIMService Web Service Security Account in IIS 7.0 or IIS 7.5
Prerequisites
Before you start, follow the steps to create a new Application Pool, as described in the topic “Creating a New Application Pool in IIS 7.0 or IIS 7.5”, ensuring that the domain account is the same as the domain account configured for DCOM objects on the Application server.
Procedure
1. Click FIMService under the Default Web Site folder and click Basic Settings in the Actions pane.2. Click Select next to the Application name, select the newly created Application Pool from the drop down
list, and click OK.3. If the web server component is on a separate server to the application server, then click Connect As, and
enter the credentials for the PCM Webuser.This ensures that both servers have a common security account for authentication purposes. When the web server component is installed on the same application server, the default settings use the identity associated with the assigned Application Pool to allow access to the folder where the FIMService Web service files are located. In this scenario, the PCM Webuser credentials do not need to be specified.
4. Click Test Settings to verify that the user credentials are valid.5. Click OK to return to the Internet Information Services IIS Manager screen.6. To ensure a successful connection to the Financial Information Management web site, you must restart IIS.
Click the web server name in the Connections pane, and in the Actions pane, click Restart under Manage Server.
Next Steps
If you have not already done so, ensure that the ASP web service extensions are allowed by following instructions in the topic: “Allowing IIS 7.0 or IIS 7.5 ASP Web Service Extensions”.
126 PUBLICSAP BusinessObjects Profitability and Cost Management Installation Guide
Post-Installation

Related Information
Allowing IIS 7.0 or IIS 7.5 ASP Web Service Extensions [page 106]Creating a New Application Pool in IIS 7.0 or IIS 7.5 [page 109]
6.4.1.3 To Test the Connection to the FIMService Web Page
Procedure
1. To test the connection to the SAP BusinessObjects Financial Information Management Web Service page, expand the Web Sites folder, and then expand the Default Web Site folder.
2. Click FIMService, right click FIM.asmx, and click Browse.The appropriate test web page appears for a successful connection.
6.4.1.4 To Serialize FIMService Web Service Requests
Context
If multiple Execute Data Loader Routines (PP_EXECUTEDLROUTINES), or Export to Database operations run concurrently to exchange data between Profitability and Cost Management and Financial Information Management, then the application server may become overloaded with FIMService web service requests. To manage this more efficiently, you can place the FIMService web service requests in a queue, by editing the web configuration file.
The web.config file for the FIMService web service can be found in the C:\Program Files\SAP BusinessObjects\PCM\WebServices\x86\FIMWebService folder. The file contains a MaxQueueLength attribute that can be configured with an integer value, which ensures that requests are executed one at a time until the maximum number of requests that you have defined is reached. If the maximum queue length is exceeded, any additional requests are immediately stopped and a SOAP (Simple Open Access Protocol) error is returned as follows:
MaxQueueLength Exceeded
Effectively, this prevents clients from continually requesting Financial Information Management imports and exports when the Profitability and Cost Management application server cannot respond to the demand.
To configure the maximum allowed number of FIMService web service requests, perform the following:
Procedure
1. On the web server, navigate to the C:\Program Files\SAP BusinessObjects\PCM\WebServices\x86\FIMWebService folder.
SAP BusinessObjects Profitability and Cost Management Installation GuidePost-Installation PUBLIC 127
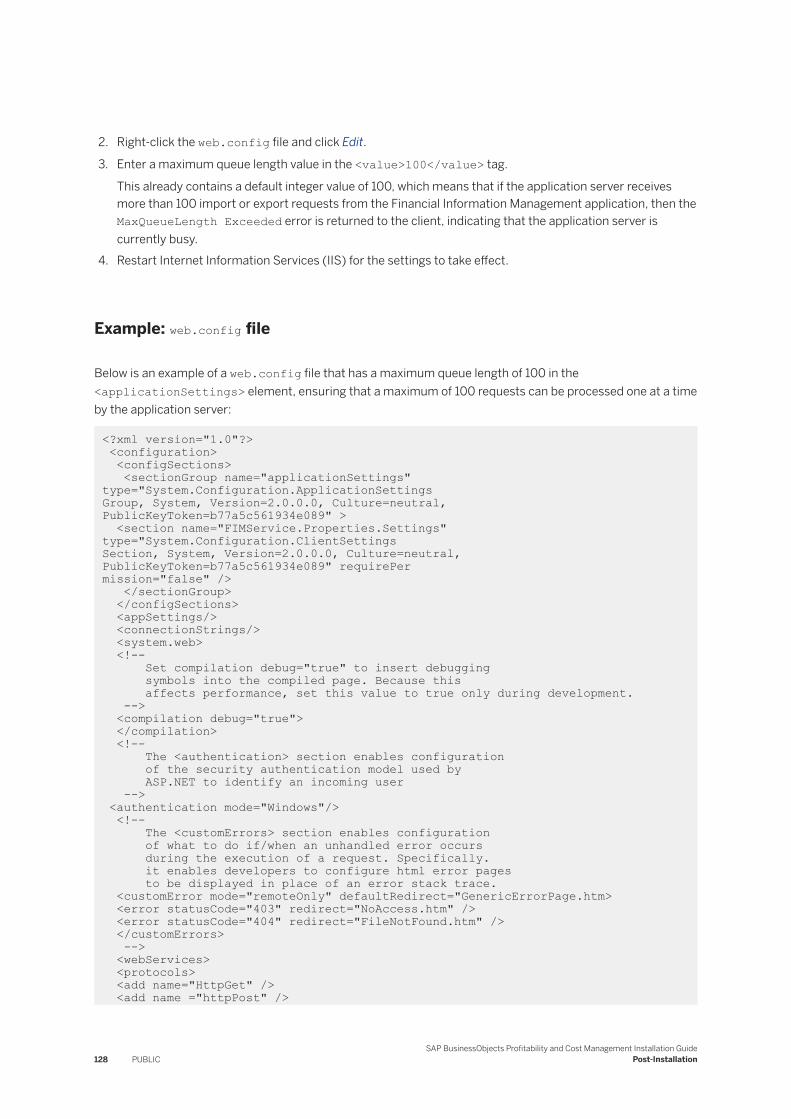
2. Right-click the web.config file and click Edit.
3. Enter a maximum queue length value in the <value>100</value> tag.
This already contains a default integer value of 100, which means that if the application server receives more than 100 import or export requests from the Financial Information Management application, then the MaxQueueLength Exceeded error is returned to the client, indicating that the application server is currently busy.
4. Restart Internet Information Services (IIS) for the settings to take effect.
Example: web.config file
Below is an example of a web.config file that has a maximum queue length of 100 in the <applicationSettings> element, ensuring that a maximum of 100 requests can be processed one at a time by the application server:
<?xml version="1.0"?> <configuration> <configSections> <sectionGroup name="applicationSettings" type="System.Configuration.ApplicationSettingsGroup, System, Version=2.0.0.0, Culture=neutral, PublicKeyToken=b77a5c561934e089" > <section name="FIMService.Properties.Settings" type="System.Configuration.ClientSettingsSection, System, Version=2.0.0.0, Culture=neutral, PublicKeyToken=b77a5c561934e089" requirePermission="false" /> </sectionGroup> </configSections> <appSettings/> <connectionStrings/> <system.web> <!-- Set compilation debug="true" to insert debugging symbols into the compiled page. Because this affects performance, set this value to true only during development. --> <compilation debug="true"> </compilation> <!-- The <authentication> section enables configuration of the security authentication model used by ASP.NET to identify an incoming user --> <authentication mode="Windows"/> <!-- The <customErrors> section enables configuration of what to do if/when an unhandled error occurs during the execution of a request. Specifically. it enables developers to configure html error pages to be displayed in place of an error stack trace. <customError mode="remoteOnly" defaultRedirect="GenericErrorPage.htm> <error statusCode="403" redirect="NoAccess.htm" /> <error statusCode="404" redirect="FileNotFound.htm" /> </customErrors> --> <webServices> <protocols> <add name="HttpGet" /> <add name ="httpPost" />
128 PUBLICSAP BusinessObjects Profitability and Cost Management Installation Guide
Post-Installation
</protocols> </webServices> </system.web> <system.codedom> </system.codedom> <!-- The system.webServer section is required for running ASP.NET AJAX under Internet Information Services 7.0. It is not necessary for previous version of IIS. --> <system.webServer> </system.webServer> <applicationSettings> <FIMService.Properties.Settings> <setting name="MaxQueueLength" serializeAs="String"> <value>100</value> </setting> </FIMservice.Properties.Settings> <applicationSettings></configuration>
NoteFor further information about how Financial Information Management benefits from this serialization please refer to available Financial Information Management documentation.
6.5 Installation Checks
6.5.1 Logging in to a Profitability and Cost Management Application
The Login dialog box is displayed when you open a Profitability and Cost Management application. You can also obtain it by selecting File Login from the Windows toolbar or clicking on the Login icon in the toolbar.
At first login, the options that are available on the Login screen are determined by the options that the Administrator selects when the system is configured. Features that may be available to you on the Login screen are as follows:
● A list of Single Sign On (SSO) authentication types - These can include;○ Profitability and Cost Management Standard Security○ Windows NT Security○ Windows Active Directory Security○ LDAP Security○ Web Security○ Enterprise
SAP BusinessObjects Profitability and Cost Management Installation GuidePost-Installation PUBLIC 129
● A list of servers to log in to.
During an initial login, you can personalize your login details by choosing a server and authentication type and making these the default choices for your profile.
If your login fails and Profitability and Cost Management has been configured with secondary login, you will be able to login to the application by holding the SHIFT key down and selecting the Login option in the normal manner, via the icon or File menu.
6.5.1.1 To Log into a Profitability and Cost Management Application
Procedure
1. Launch the required application.2. In the Login screen, you may have the following multiple system options:
○ Server - select which server you want to log in to.○ Authentication Type - select which authentication login method to use.○ Make Default - select this option to retain your choices for all subsequent logins.
3. Depending on your chosen authentication type, the following user credentials options are available: (These options are available only for Profitability and Cost Management Standard Security and Enterprise security types).
○ System - (Enterprise authentication only) Select the SAP BusinessObjects Business Intelligence platform Central Management server to log into.
○ User Name - Enter your user name credentials. Your user name is not case sensitive.○ Password - Enter your password. Your password must have a minimum of five characters. The first
login following a new installation must use the predefined user, Administrator, who has the ability to operate in any role.
○ Authentication - (Enterprise authentication only) Select a method of Enterprise authentication:○ Enterprise○ LDAP○ SAP○ Windows AD
○ Remember User Details - select this option to retain your user name credentials for each time you log in.
4. Click OK.
NoteThe login choices that you are presented with are retained in your registry settings. To see the original login settings, press Shift and click the login icon on the toolbar.
NoteYou are allowed only three successive unsuccessful attempts to log in. Thereafter, your account will be locked and you must contact an administrator to clear it.
130 PUBLICSAP BusinessObjects Profitability and Cost Management Installation Guide
Post-Installation
6.5.2 Model creation basic checks
Context
After your initial login, the Model Selection screen appears.
Procedure
1. Click Model Admin to open the Model Administration screen where you can create your first model. In the Model Administration screen click New.
2. In the Create New Model dialog box, type a model name in the Model Name text box. Accept the default selection in the Model Type dropdown combo box, and type a description in the New Model Description text box, if required. Click OK.
Your newly created Model appears on the Administration tab. To open the model, double-click it or select the model and click Open.
The main Model Builder application screen is displayed.
Next Steps
You should now set up some of your Users and Groups before proceeding any further with your Model.
TipInformation on setting up security permissions and model administration is detailed in the SAP BusinessObjects Profitability and Cost Management Security Guide.
SAP BusinessObjects Profitability and Cost Management Installation GuidePost-Installation PUBLIC 131
7 Additional Information
7.1 Configuration Wizard Settings
Some of the settings that are configured in the Profitability and Cost Management Configuration Wizard involve a degree of complexity that may require further information to complete. In this section you can find more information about configuring Winsock communication, IP filtering, Single Sign On logging methods, and advanced server options for event logging and SAP diagnostics.
7.1.1 About Windows Sockets
Microsoft Windows Sockets (WINSOCKS) provides a simpler implementation of the transport layer, in that it works across domains, firewalls and through NAT (Network Address Translation) with the minimum of configuration. Unlike DCOM, the sockets layer installs additional SAP BusinessObjects Profitability and Cost Management sockets services to relay communications between clients and servers, and these services have default global settings that do not require security configuration. Security is provided for through IP-based rules that are defined so as to limit access to selected hosts in an individual or range-based manner, using the host IP address to determine if a connection can be made or not. The range of sockets available to the software can also be restricted or redefined.
7.1.2 About Advanced IP Filtering
In the Advanced IP Filtering screen, you can optionally create rules to allow or deny access to the software services. These rules are configured to identify the IP or network address of the originating machine, and then allow or deny access to the software service. Each service has its own list of rules that allow granular control over which hosts or networks can communicate with specific Profitability and Cost Management services. Rules for each service are configured for the appropriate server, and the ordering of the rules in each list is significant. The specific servers for which rules can be written are determined by the type of installation performed on each machine.
NoteThe order in which rules are listed is important because they are evaluated in consecutive order from top to bottom. If the IP address of the calling machine matches the specific IP address or range in the uppermost rule in the list, communication is allowed or denied on the basis of that rule alone. If the IP address is not matched, evaluation of the rules continues on to the next, and the default applies where all communication is allowed.
If rules are not present in the Advanced IP Filtering screen, the default is to allow communication between all machines and the services they run.
132 PUBLICSAP BusinessObjects Profitability and Cost Management Installation Guide
Additional Information
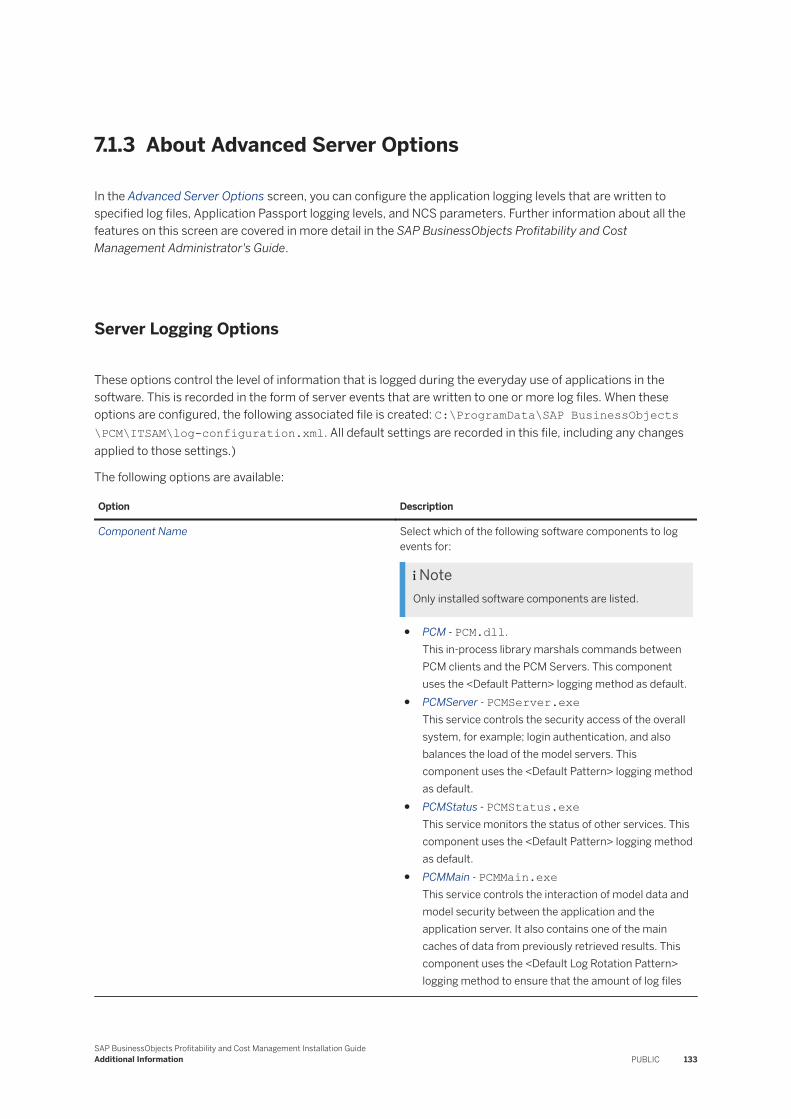
7.1.3 About Advanced Server Options
In the Advanced Server Options screen, you can configure the application logging levels that are written to specified log files, Application Passport logging levels, and NCS parameters. Further information about all the features on this screen are covered in more detail in the SAP BusinessObjects Profitability and Cost Management Administrator's Guide.
Server Logging Options
These options control the level of information that is logged during the everyday use of applications in the software. This is recorded in the form of server events that are written to one or more log files. When these options are configured, the following associated file is created: C:\ProgramData\SAP BusinessObjects\PCM\ITSAM\log-configuration.xml. All default settings are recorded in this file, including any changes applied to those settings.)
The following options are available:
Option Description
Component Name Select which of the following software components to log events for:
NoteOnly installed software components are listed.
● PCM - PCM.dll.This in-process library marshals commands between PCM clients and the PCM Servers. This component uses the <Default Pattern> logging method as default.
● PCMServer - PCMServer.exeThis service controls the security access of the overall system, for example; login authentication, and also balances the load of the model servers. This component uses the <Default Pattern> logging method as default.
● PCMStatus - PCMStatus.exeThis service monitors the status of other services. This component uses the <Default Pattern> logging method as default.
● PCMMain - PCMMain.exeThis service controls the interaction of model data and model security between the application and the application server. It also contains one of the main caches of data from previously retrieved results. This component uses the <Default Log Rotation Pattern> logging method to ensure that the amount of log files
SAP BusinessObjects Profitability and Cost Management Installation GuideAdditional Information PUBLIC 133
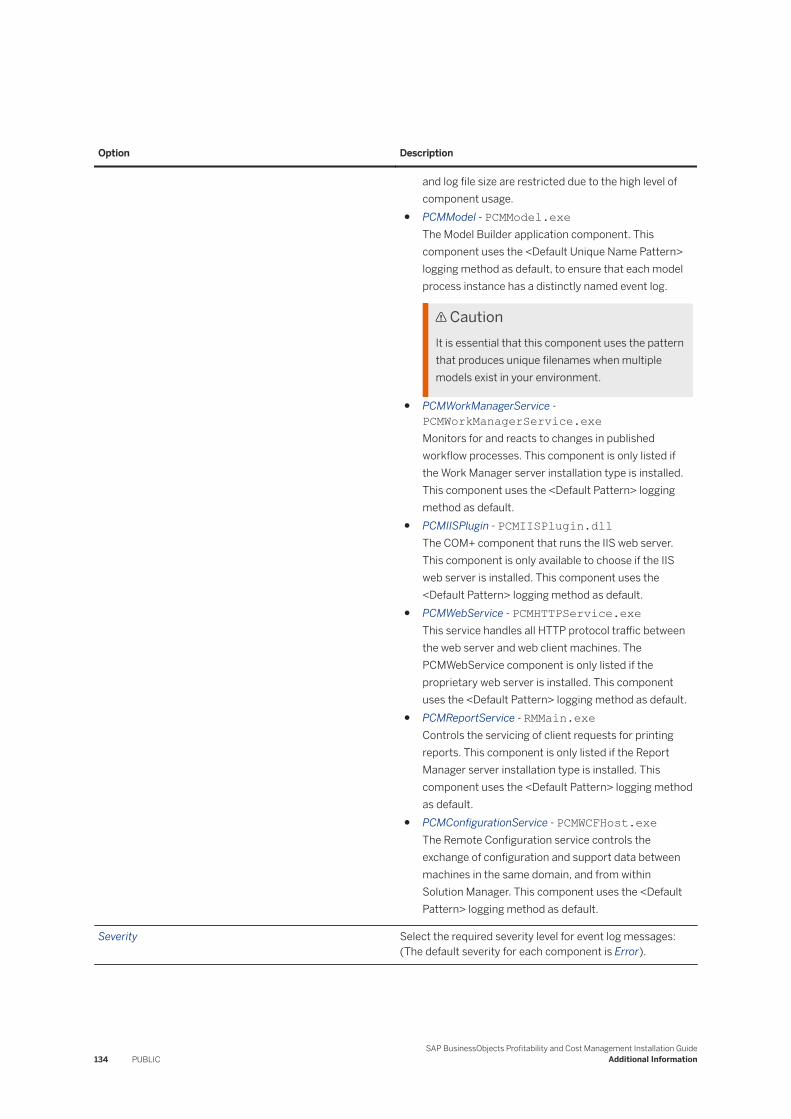
Option Description
and log file size are restricted due to the high level of component usage.
● PCMModel - PCMModel.exeThe Model Builder application component. This component uses the <Default Unique Name Pattern> logging method as default, to ensure that each model process instance has a distinctly named event log.
CautionIt is essential that this component uses the pattern that produces unique filenames when multiple models exist in your environment.
● PCMWorkManagerService - PCMWorkManagerService.exeMonitors for and reacts to changes in published workflow processes. This component is only listed if the Work Manager server installation type is installed. This component uses the <Default Pattern> logging method as default.
● PCMIISPlugin - PCMIISPlugin.dllThe COM+ component that runs the IIS web server. This component is only available to choose if the IIS web server is installed. This component uses the <Default Pattern> logging method as default.
● PCMWebService - PCMHTTPService.exeThis service handles all HTTP protocol traffic between the web server and web client machines. The PCMWebService component is only listed if the proprietary web server is installed. This component uses the <Default Pattern> logging method as default.
● PCMReportService - RMMain.exeControls the servicing of client requests for printing reports. This component is only listed if the Report Manager server installation type is installed. This component uses the <Default Pattern> logging method as default.
● PCMConfigurationService - PCMWCFHost.exeThe Remote Configuration service controls the exchange of configuration and support data between machines in the same domain, and from within Solution Manager. This component uses the <Default Pattern> logging method as default.
Severity Select the required severity level for event log messages: (The default severity for each component is Error).
134 PUBLICSAP BusinessObjects Profitability and Cost Management Installation Guide
Additional Information
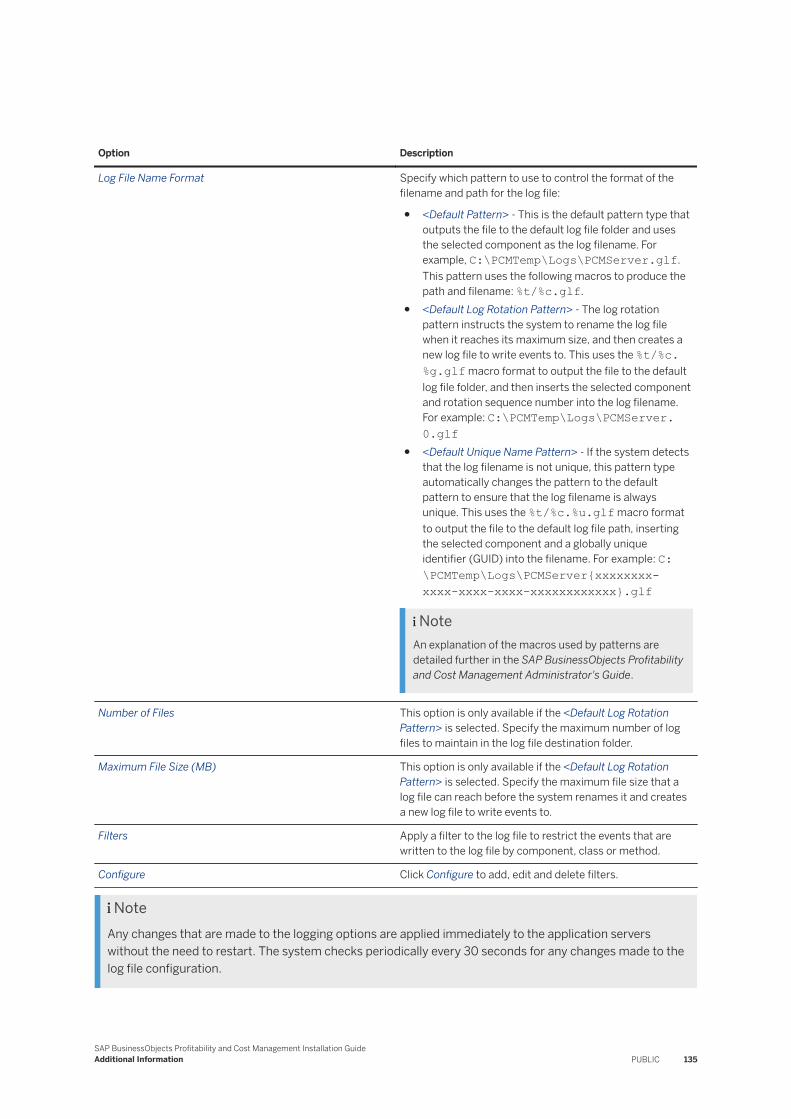
Option Description
Log File Name Format Specify which pattern to use to control the format of the filename and path for the log file:
● <Default Pattern> - This is the default pattern type that outputs the file to the default log file folder and uses the selected component as the log filename. For example, C:\PCMTemp\Logs\PCMServer.glf. This pattern uses the following macros to produce the path and filename: %t/%c.glf.
● <Default Log Rotation Pattern> - The log rotation pattern instructs the system to rename the log file when it reaches its maximum size, and then creates a new log file to write events to. This uses the %t/%c.%g.glf macro format to output the file to the default log file folder, and then inserts the selected component and rotation sequence number into the log filename. For example: C:\PCMTemp\Logs\PCMServer.0.glf
● <Default Unique Name Pattern> - If the system detects that the log filename is not unique, this pattern type automatically changes the pattern to the default pattern to ensure that the log filename is always unique. This uses the %t/%c.%u.glf macro format to output the file to the default log file path, inserting the selected component and a globally unique identifier (GUID) into the filename. For example: C:\PCMTemp\Logs\PCMServer{xxxxxxxx-xxxx-xxxx-xxxx-xxxxxxxxxxxx}.glf
NoteAn explanation of the macros used by patterns are detailed further in the SAP BusinessObjects Profitability and Cost Management Administrator's Guide.
Number of Files This option is only available if the <Default Log Rotation Pattern> is selected. Specify the maximum number of log files to maintain in the log file destination folder.
Maximum File Size (MB) This option is only available if the <Default Log Rotation Pattern> is selected. Specify the maximum file size that a log file can reach before the system renames it and creates a new log file to write events to.
Filters Apply a filter to the log file to restrict the events that are written to the log file by component, class or method.
Configure Click Configure to add, edit and delete filters.
NoteAny changes that are made to the logging options are applied immediately to the application servers without the need to restart. The system checks periodically every 30 seconds for any changes made to the log file configuration.
SAP BusinessObjects Profitability and Cost Management Installation GuideAdditional Information PUBLIC 135

Application Passport Options
These options allow you to specify which server components are identified for end to end tracing. An Application Passport can be applied to each server component to produce detailed tracing messages for troubleshooting analysis. When these options are configured, the following associated file is created: C:\ProgramData\SAP BusinessObjects\PCM\ITSAM\application-passport.xml.
NCS Configuration
Profitability and Cost Management uses an SAP utility called Native Component Supportability (NCS) to send performance and scoping metrics to an instance of the Diagnostics Agent on the application and/or web server(s), which then forwards the messages to the Introscope Enterprise Manager for analysis. You can modify the settings contained in the NCS configuration file (C:\ProgramData\SAP BusinessObjects\PCM\ITSAM\ncs.conf) in the Advanced Server Options screen.
7.2 Setting up End-to-End Root Cause Analysis
SAP provides a complete diagnostics solution for your environment which includes the installation of SAP Solution Manager and CA Wily Introscope Enterprise Manager in your landscape. Each application typically contains the following software components:
● SAP Solution Manager:○ System Landscape Directory (SLD) - contains information about the network components in your
landscape, including Introscope Enterprise Manager.● CA Wily Introscope:
○ Introscope Enterprise Manager - This allows you to monitor and manage your application performance in live production environments. Although this application can be installed on a dedicated server, it is usually installed on the Solution Manager server.
○ Introscope Workstation - This allows you to view and manipulate data that is stored by the Enterprise Manager.
○ Introscope WebView - This is a browser-based alternative to the Workstation client application. WebView is installed as part of the Introscope core package and runs independently of an application server. This is a standard Web browser that can view Introscope data.
Setting up end-to-end root cause analysis can help you to identify the cause of performance related problems by producing scoping metrics for Profitability and Cost Management server components. Scoping metrics provide information about every component and method accessed by a task that a user performs, and can be searched on in CA Wily Introscope Enterprise Manager by a unique identifier called an Application Passport. The generation of scoping metrics relating to each component:class:method:function accessed depends on whether the application passport is set to ON for the required components.
Before you start the process of setting up a diagnostics solution in your environment, refer to the “Information available in SAP Service Marketplace” section at the start of this guide for relevant SAP notes and links to SAP Solution Manager related guides.
136 PUBLICSAP BusinessObjects Profitability and Cost Management Installation Guide
Additional Information
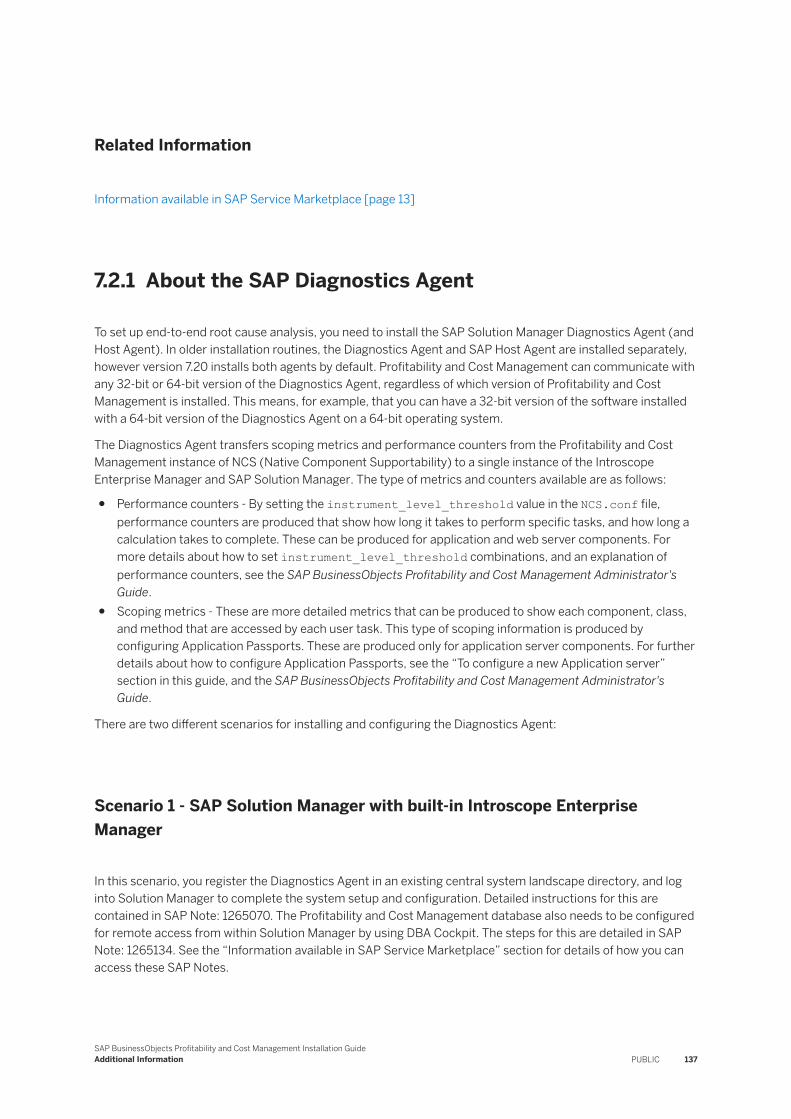
Related Information
Information available in SAP Service Marketplace [page 13]
7.2.1 About the SAP Diagnostics Agent
To set up end-to-end root cause analysis, you need to install the SAP Solution Manager Diagnostics Agent (and Host Agent). In older installation routines, the Diagnostics Agent and SAP Host Agent are installed separately, however version 7.20 installs both agents by default. Profitability and Cost Management can communicate with any 32-bit or 64-bit version of the Diagnostics Agent, regardless of which version of Profitability and Cost Management is installed. This means, for example, that you can have a 32-bit version of the software installed with a 64-bit version of the Diagnostics Agent on a 64-bit operating system.
The Diagnostics Agent transfers scoping metrics and performance counters from the Profitability and Cost Management instance of NCS (Native Component Supportability) to a single instance of the Introscope Enterprise Manager and SAP Solution Manager. The type of metrics and counters available are as follows:
● Performance counters - By setting the instrument_level_threshold value in the NCS.conf file, performance counters are produced that show how long it takes to perform specific tasks, and how long a calculation takes to complete. These can be produced for application and web server components. For more details about how to set instrument_level_threshold combinations, and an explanation of performance counters, see the SAP BusinessObjects Profitability and Cost Management Administrator's Guide.
● Scoping metrics - These are more detailed metrics that can be produced to show each component, class, and method that are accessed by each user task. This type of scoping information is produced by configuring Application Passports. These are produced only for application server components. For further details about how to configure Application Passports, see the “To configure a new Application server” section in this guide, and the SAP BusinessObjects Profitability and Cost Management Administrator's Guide.
There are two different scenarios for installing and configuring the Diagnostics Agent:
Scenario 1 - SAP Solution Manager with built-in Introscope Enterprise Manager
In this scenario, you register the Diagnostics Agent in an existing central system landscape directory, and log into Solution Manager to complete the system setup and configuration. Detailed instructions for this are contained in SAP Note: 1265070. The Profitability and Cost Management database also needs to be configured for remote access from within Solution Manager by using DBA Cockpit. The steps for this are detailed in SAP Note: 1265134. See the “Information available in SAP Service Marketplace” section for details of how you can access these SAP Notes.
SAP BusinessObjects Profitability and Cost Management Installation GuideAdditional Information PUBLIC 137
Scenario 2 - Introscope Enterprise Manager without connection to the SAP Solution Manager (standalone mode)
This chapter concentrates on the steps involved in a scenario where the Diagnostics Agent is installed separately on the application and/or web server(s) as a standalone Java engine that communicates directly with Introscope Enterprise Manager.
This is appropriate for existing software customers who do not have an existing SAP system in place.
For this scenario, you need to perform the following steps:
1. Install and configure the Diagnostics Agent on the application and web server(s).2. Configure Application Passport, and NCS settings in the Configuration Wizard to start the recording of
performance counters and/or scoping metrics.
RememberApplication Passport settings cannot be configured on the web server.
As with any installation of the software, we recommend that the Diagnostics Agent is installed by the IT Administrator in conjunction with the Administrator of the software, and the Project Sponsor.
7.2.2 About Profitability and Cost Management Metrics
Generally, the on-site IT Administrator can perform an initial analysis of an IT problem, and if a solution cannot be found in the Solution Database or on the SAP Service Marketplace, then a deeper analysis of the scoping metrics provided by the software can be started in Introscope Enterprise Manager.
Once configured, the scoping metrics and performance counters are recorded for the following server components:
Profitability and Cost Management Server Server Component
Primary Application Server ● PCMServer
Primary and Secondary Application Server(s) ● PCMMain● PCMModel● PCMWorkManagerService● PCMReportService
Web Server ● PCMWebService● PCMIISPlugin
The metrics that can be seen in Introscope Enterprise Manager are for all user activities that occur at the server component level, and not for tasks that are performed by a user at the application level.
If you want to see scoping metrics for specific user tasks that occur on a Win32 client machine in specific applications, then these are recorded by the End to End Trace Launcher tool, which is started by the user on request. Information about using the End to End Trace Launcher tool, and how to see the results in Introscope Enterprise Manager can be found in the SAP BusinessObjects Profitability and Cost Management Administrator's Guide.
138 PUBLICSAP BusinessObjects Profitability and Cost Management Installation Guide
Additional Information
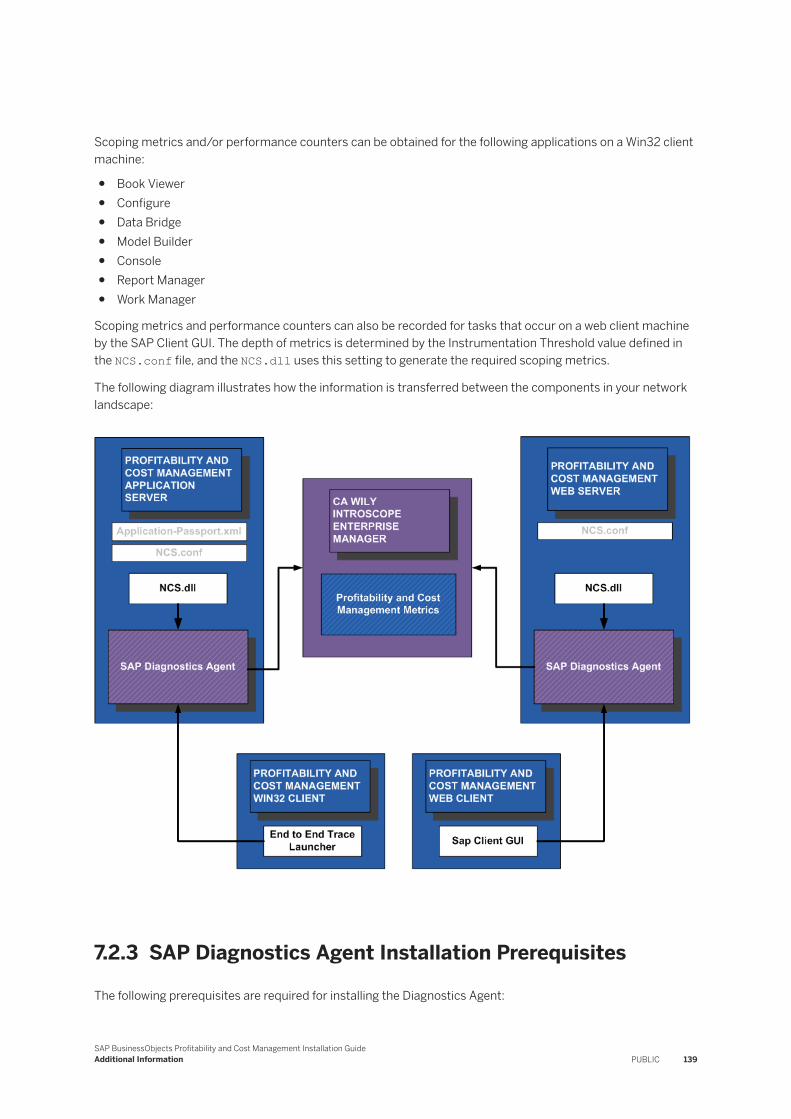
Scoping metrics and/or performance counters can be obtained for the following applications on a Win32 client machine:
● Book Viewer● Configure● Data Bridge● Model Builder● Console● Report Manager● Work Manager
Scoping metrics and performance counters can also be recorded for tasks that occur on a web client machine by the SAP Client GUI. The depth of metrics is determined by the Instrumentation Threshold value defined in the NCS.conf file, and the NCS.dll uses this setting to generate the required scoping metrics.
The following diagram illustrates how the information is transferred between the components in your network landscape:
7.2.3 SAP Diagnostics Agent Installation Prerequisites
The following prerequisites are required for installing the Diagnostics Agent:
SAP BusinessObjects Profitability and Cost Management Installation GuideAdditional Information PUBLIC 139
● A single instance of the Introscope Enterprise Manager already needs to be installed in your environment. Refer to the Wily Introscope 8.0 Installation Guide. The location of this document can be found in the “Information available in SAP Service Marketplace” section.
● Ensure that you can communicate with this application from the Diagnostics Agent machine.● The Diagnostics Agent machine name can only contain a maximum of 13 characters.● Before you start, you need to know the following information:
Parameter Value Description
Default Diagnostics Agent System ID (SID)
DAA Security Identifier for the Diagnostics Agent.
Instance Number 97 The port number is a technical identifier for controlling internal processes such as assigned memory. The Diagnostics Agent uses to communicate with Introscope Enterprise Manager, and it must be unique for this installation host.
Hostname <machine_name> Fully qualified host name of the Diagnostics Agent machine.
Default port number 6001 The RMI port of the Introscope Enterprise Manager.
Template ID bobj The configuration ID for standalone mode, to connect to Introscope without SAP Solution Manager.
User ID and password SMD_ADMIN Created during the setup.
7.2.4 Installing the SAP Diagnostics Agent Without Connection to the SAP Solution Manager
Prerequisites
Download version 7.20 of the Diagnostics Agent from the SAP Software Download Center at: http://service.sap.com/swdc . You also need to refer to the Diagnostics Agent Setup Guide which is accessed from the link provided in Information available in SAP Service Marketplace.
Procedure
1. Log on to the server with local or domain Administrator credentials.2. Launch a command prompt and navigate to the location of the SMD Agent files, for example:
cd\ SMD_Agent_7.20\SMD720_00_IM_WINDOWS_I386 for the 32-bit Diagnostics Agent.
cd\ SMD_Agent_7.20\SMD720_00_IM_WINDOWS_X86_64 for the 64-bit version of the Diagnostics Agent.
140 PUBLICSAP BusinessObjects Profitability and Cost Management Installation Guide
Additional Information
3. Execute the following command: Sapinst SMD_INSTALLATION_SCENARIO=bobj.The SAP Software Delivery Tool is launched, and the Choose Option screen is displayed.
4. Follow the installation steps in the Diagnostics Agent Setup Guide. When the SLD Destination for the Diagnostics Agent screen is displayed, select No SLD destination to install the Diagnostics Agent in standalone mode, and in the Connection Type for the Diagnostics Agent screen, select None.
5. Continue with the installation, referring to the Diagnostics Agent Setup Guide.
7.2.5 Configuring the SAP Diagnostics Agent Without Connection to the SAP Solution Manager
Context
To enable the Diagnostics Agent to send scoping metrics from the software to the Introscope Enterprise Manager, you need to modify the SapAgentConfig.xml file to enable the socket listener for Profitability and Cost Management performance monitoring, and then enter the Introscope server and template details.
To do this, perform the following steps:
Procedure
1. Navigate to the following folder on the Profitability and Cost Management server where you have installed the Diagnostics Agent:C:\usr\sap\DAA\SMDA97\SMDAgent\applications\com.sap.smd.agent.application.wilyhost_7.02.3.0.20090918180321\
2. Right-click the SapAgentConfig.xml file, and then click Edit.
3. Add the following tag and attribute settings into the SapAgentConfig.xml file:
<destination class="com.sap.smd.wily.hostagent.destination.SocketDestination" name="localhost"> <property name="port" value="59718"/> </destination>
Ensure that the following attributes are added inside the <pool> tag:
<action prefix="" name="TCP" destination="localhost" template="SapMDM" metriclimit="5000"/>
An example of a what a completed SapAgentConfig.xml file looks like is shown below:
<?xml version="1.0" encoding="utf-8" ?> <sapagent> <!-- parameters for destinations --> <!-- <destination class="com.sap.smd.wily.hostagent.destination.JCODestination" name="PIB|WDFD00176320A_PIB_00"> <property name="jco.client.ashost" value="WDFD00176320A"/>
SAP BusinessObjects Profitability and Cost Management Installation GuideAdditional Information PUBLIC 141
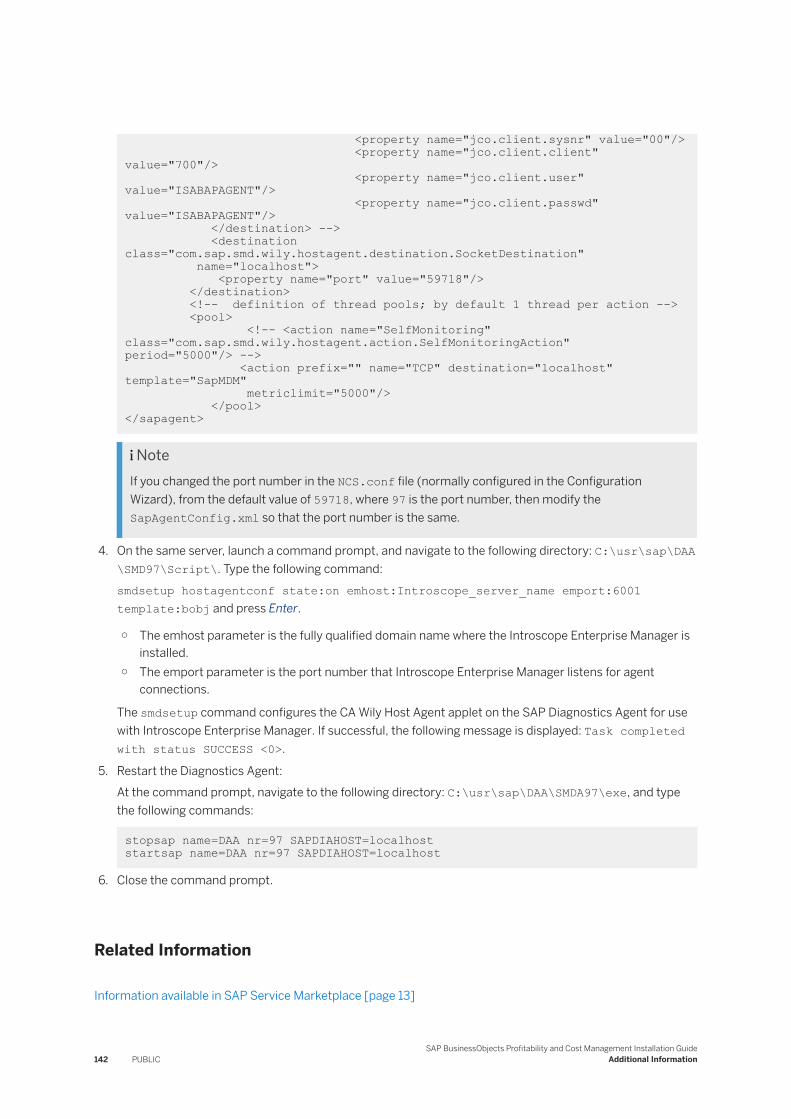
<property name="jco.client.sysnr" value="00"/> <property name="jco.client.client" value="700"/> <property name="jco.client.user" value="ISABAPAGENT"/> <property name="jco.client.passwd" value="ISABAPAGENT"/> </destination> --> <destination class="com.sap.smd.wily.hostagent.destination.SocketDestination" name="localhost"> <property name="port" value="59718"/> </destination> <!-- definition of thread pools; by default 1 thread per action --> <pool> <!-- <action name="SelfMonitoring"class="com.sap.smd.wily.hostagent.action.SelfMonitoringAction" period="5000"/> --> <action prefix="" name="TCP" destination="localhost" template="SapMDM" metriclimit="5000"/> </pool> </sapagent>
NoteIf you changed the port number in the NCS.conf file (normally configured in the Configuration Wizard), from the default value of 59718, where 97 is the port number, then modify the SapAgentConfig.xml so that the port number is the same.
4. On the same server, launch a command prompt, and navigate to the following directory: C:\usr\sap\DAA\SMD97\Script\. Type the following command:smdsetup hostagentconf state:on emhost:Introscope_server_name emport:6001 template:bobj and press Enter.
○ The emhost parameter is the fully qualified domain name where the Introscope Enterprise Manager is installed.
○ The emport parameter is the port number that Introscope Enterprise Manager listens for agent connections.
The smdsetup command configures the CA Wily Host Agent applet on the SAP Diagnostics Agent for use with Introscope Enterprise Manager. If successful, the following message is displayed: Task completed with status SUCCESS <0>.
5. Restart the Diagnostics Agent:At the command prompt, navigate to the following directory: C:\usr\sap\DAA\SMDA97\exe, and type the following commands:
stopsap name=DAA nr=97 SAPDIAHOST=localhost startsap name=DAA nr=97 SAPDIAHOST=localhost
6. Close the command prompt.
Related Information
Information available in SAP Service Marketplace [page 13]
142 PUBLICSAP BusinessObjects Profitability and Cost Management Installation Guide
Additional Information
7.2.6 Testing the SAP Diagnostics Agent
Ensure that the application and or web server(s) where the Diagnostics Agent is installed can directly communicate with Introscope Enterprise Manager.
7.2.6.1 Testing the SAP Diagnostics Agent Without Connection to the SAP Solution Manager
Procedure
1. Launch the Introscope Manager Enterprise Server (Workstation).2. Open Investigator and expand the SuperDomain directory tree.3. Check that the machine name where the Diagnostics Agent is installed, exists as a sub-folder in the folder
tree.
The machine name is displayed with the following sub-folders: SAP HostAgent Process SAP HostAgent SMDA97 .
Results
If the machine name exists, and the icon next to SAP HostAgent SMDA97 is not grayed out, then the Diagnostics Agent is running and communicating with Introscope Manager Enterprise Server (Workstation).
Once Profitability and Cost Management is installed and configured to produce scoping metrics (Advanced Server Options screen in the Configuration Wizard), then a PCM_NCS folder is created in the Investigator tree structure for the machine, and the metrics are collected here. More information about the Profitability and Cost Management performance metrics including what they are called, and what they indicate can be found in the SAP BusinessObjects Profitability and Cost Management Administrator's Guide.
7.2.6.2 Testing the SAP Diagnostics Agent With a Connection to the SAP Solution Manager
Context
To test if the Diagnostics Agent is connected to SAP Solution Manager:
SAP BusinessObjects Profitability and Cost Management Installation GuideAdditional Information PUBLIC 143
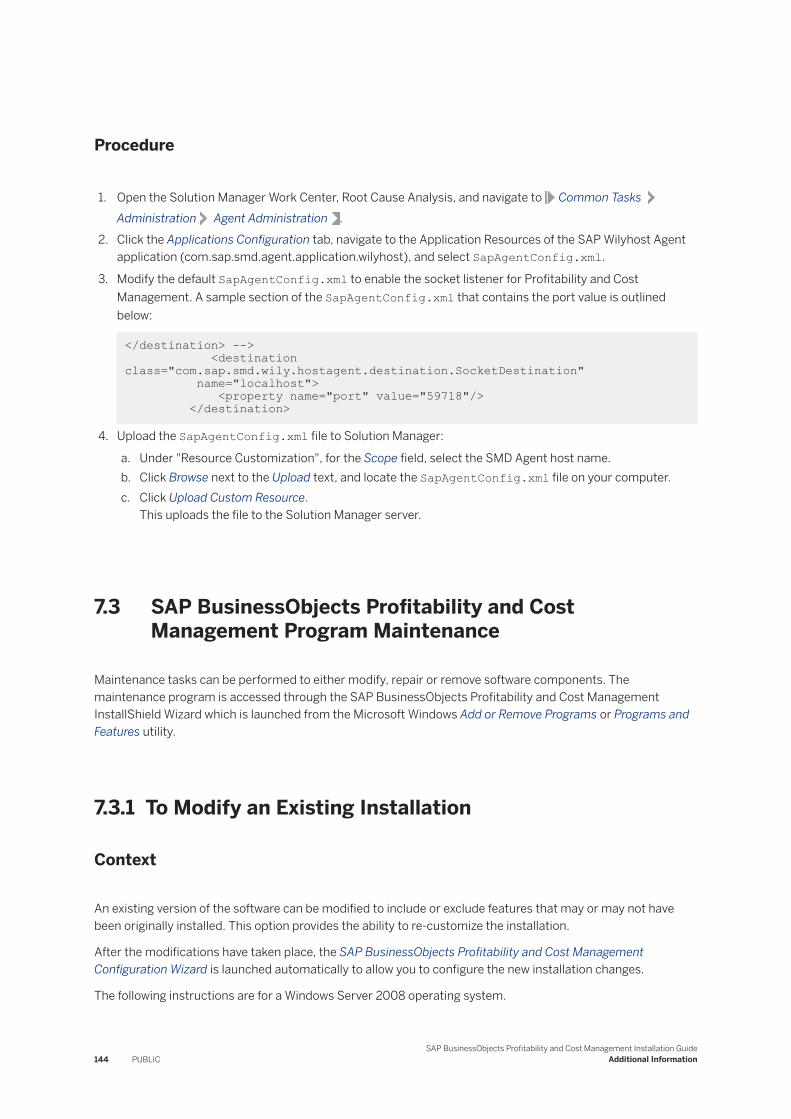
Procedure
1. Open the Solution Manager Work Center, Root Cause Analysis, and navigate to Common Tasks Administration Agent Administration .
2. Click the Applications Configuration tab, navigate to the Application Resources of the SAP Wilyhost Agent application (com.sap.smd.agent.application.wilyhost), and select SapAgentConfig.xml.
3. Modify the default SapAgentConfig.xml to enable the socket listener for Profitability and Cost Management. A sample section of the SapAgentConfig.xml that contains the port value is outlined below:
</destination> --> <destination class="com.sap.smd.wily.hostagent.destination.SocketDestination" name="localhost"> <property name="port" value="59718"/> </destination>
4. Upload the SapAgentConfig.xml file to Solution Manager:
a. Under "Resource Customization", for the Scope field, select the SMD Agent host name.b. Click Browse next to the Upload text, and locate the SapAgentConfig.xml file on your computer.c. Click Upload Custom Resource.
This uploads the file to the Solution Manager server.
7.3 SAP BusinessObjects Profitability and Cost Management Program Maintenance
Maintenance tasks can be performed to either modify, repair or remove software components. The maintenance program is accessed through the SAP BusinessObjects Profitability and Cost Management InstallShield Wizard which is launched from the Microsoft Windows Add or Remove Programs or Programs and Features utility.
7.3.1 To Modify an Existing Installation
Context
An existing version of the software can be modified to include or exclude features that may or may not have been originally installed. This option provides the ability to re-customize the installation.
After the modifications have taken place, the SAP BusinessObjects Profitability and Cost Management Configuration Wizard is launched automatically to allow you to configure the new installation changes.
The following instructions are for a Windows Server 2008 operating system.
144 PUBLICSAP BusinessObjects Profitability and Cost Management Installation Guide
Additional Information
Procedure
1. Click Start Settings Control Panel Programs and Features .2. Right-click the SAP BusinessObjects Profitability and Cost Management program in the list, and click
Change.3. In the Welcome screen, click Next.4. In the Program Maintenance screen, select Modify, and click Next.5. In the Custom Setup screen, click the adjacent icons to the relevant features to install or remove, and select
This feature, and all subfeatures, will be installed on local hard drive, or This feature will not be available.6. Click Next.7. Click Install to implement the modifications, or click Cancel to exit the wizard.8. Once the InstallShield Wizard has completed the changes, click Finish.
The SAP BusinessObjects Profitability and Cost Management Configuration Wizard starts.9. Navigate through the SAP BusinessObjects Profitability and Cost Management Configuration Wizard and
change any specific settings that relate to your installation modifications. Each screen displays the original configuration settings from the registry.
7.3.2 To Repair an Existing Installation
Context
It may be neccessary to repair an installation of the software, to replace missing or corrupt files, shortcuts and registry entries.
Procedure
1. Click Start Settings Control Panel Programs and Features .2. Right-click the SAP BusinessObjects Profitability and Cost Management program in the list, and click
Repair.3. In the Welcome screen, click Next.4. In the Program Maintenance screen, click Repair and click Next.5. In the Ready to Repair the Program screen, click Install to initialize the repair process.
7.3.3 Uninstalling the software
Before removing the software you must ensure that:
● All users have logged out of the software applications. This can be verified in the User Monitor application.
SAP BusinessObjects Profitability and Cost Management Installation GuideAdditional Information PUBLIC 145
● All the software services have been stopped. This can be verified in the Service Manager application.
NoteDuring the removal of the software, the SAP BusinessObjects User Management Client application is not automatically removed, and must be manually removed after the removal of the software.
7.3.3.1 To Uninstall SAP BusinessObjects Profitability and Cost Management
Context
The following instructions are for a Microsoft Windows Server 2008 operating system.
Procedure
1. Click Start Settings Control Panel and double-click Programs and Features.2. Click the SAP BusinessObjects Profitability and Cost Management program in the list, and click Uninstall.3. In the Programs and Features dialog box, click Yes.
A progress bar is displayed indicating the progress of uninstalling the software, and may take several minutes.
Once the software is uninstalled, SAP BusinessObjects Profitability and Cost Management is removed from the list.
Results
Do not manually delete the local folders that contain any of the software files.
7.3.3.1.1 To Remove the SAP BusinessObjects User Management Client
Context
The SAP BusinessObjects User Management Client is manually uninstalled through the Microsoft Windows Program Features utility.
146 PUBLICSAP BusinessObjects Profitability and Cost Management Installation Guide
Additional Information
NoteThis must be done after the removal of the software, and not before.
Procedure
1. Click Start Settings Control Panel Programs and Features .2. Right-click SAP BusinessObjects User Management Client, and click Uninstall.3. In the Programs and Features dialog box, click Yes to remove the application.
7.3.3.2 To Perform a Silent Uninstall
Context
You can uninstall the software silently by entering commands at the command prompt.
You add parameters that specify what is displayed while the removal procedure is in process, such as /QB (display a progress bar only), or /QN (no information is displayed). Refer to the Microsoft Installer options for more information about available parameters.
The following instructions are for a Windows Server 2008 operating system.
Procedure
1. Open a Command Prompt window by selecting Run from the Windows Start menu, and type CMD in the Open text box. Click OK or press Enter to continue.
2. To silently uninstall Profitability and Cost Management from the Server and Client, enter the following command: MsiExec.exe /X{BBB9385F-7C16-4C58-AC1C-33B6D8B22218} /QB
3. To silently uninstall Profitability and Cost Management from the Web Client, enter the following command: MsiExec.exe /X{695BD886-28BB-4925-8AF2-48B7651A00EA} /QB
4. To silently uninstall the SAP BusinessObjects User Management Client, locate the executable and enter the following command as appropriate, for example: "C:\Program Files (x86)\SAP BusinessObjects\setup.exe" -u product.umc-4.0-core-32,14.0.0.760 -q
SAP BusinessObjects Profitability and Cost Management Installation GuideAdditional Information PUBLIC 147
Important Disclaimers and Legal Information
HyperlinksSome links are classified by an icon and/or a mouseover text. These links provide additional information.About the icons:
● Links with the icon : You are entering a Web site that is not hosted by SAP. By using such links, you agree (unless expressly stated otherwise in your agreements with SAP) to this:
● The content of the linked-to site is not SAP documentation. You may not infer any product claims against SAP based on this information.● SAP does not agree or disagree with the content on the linked-to site, nor does SAP warrant the availability and correctness. SAP shall not be liable for any
damages caused by the use of such content unless damages have been caused by SAP's gross negligence or willful misconduct.
● Links with the icon : You are leaving the documentation for that particular SAP product or service and are entering a SAP-hosted Web site. By using such links, you agree that (unless expressly stated otherwise in your agreements with SAP) you may not infer any product claims against SAP based on this information.
Videos Hosted on External PlatformsSome videos may point to third-party video hosting platforms. SAP cannot guarantee the future availability of videos stored on these platforms. Furthermore, any advertisements or other content hosted on these platforms (for example, suggested videos or by navigating to other videos hosted on the same site), are not within the control or responsibility of SAP.
Beta and Other Experimental FeaturesExperimental features are not part of the officially delivered scope that SAP guarantees for future releases. This means that experimental features may be changed by SAP at any time for any reason without notice. Experimental features are not for productive use. You may not demonstrate, test, examine, evaluate or otherwise use the experimental features in a live operating environment or with data that has not been sufficiently backed up.The purpose of experimental features is to get feedback early on, allowing customers and partners to influence the future product accordingly. By providing your feedback (e.g. in the SAP Community), you accept that intellectual property rights of the contributions or derivative works shall remain the exclusive property of SAP.
Example CodeAny software coding and/or code snippets are examples. They are not for productive use. The example code is only intended to better explain and visualize the syntax and phrasing rules. SAP does not warrant the correctness and completeness of the example code. SAP shall not be liable for errors or damages caused by the use of example code unless damages have been caused by SAP's gross negligence or willful misconduct.
Gender-Related LanguageWe try not to use gender-specific word forms and formulations. As appropriate for context and readability, SAP may use masculine word forms to refer to all genders.
148 PUBLICSAP BusinessObjects Profitability and Cost Management Installation Guide
Important Disclaimers and Legal Information

SAP BusinessObjects Profitability and Cost Management Installation GuideImportant Disclaimers and Legal Information PUBLIC 149
www.sap.com/contactsap
© 2020 SAP SE or an SAP affiliate company. All rights reserved.
No part of this publication may be reproduced or transmitted in any form or for any purpose without the express permission of SAP SE or an SAP affiliate company. The information contained herein may be changed without prior notice.
Some software products marketed by SAP SE and its distributors contain proprietary software components of other software vendors. National product specifications may vary.
These materials are provided by SAP SE or an SAP affiliate company for informational purposes only, without representation or warranty of any kind, and SAP or its affiliated companies shall not be liable for errors or omissions with respect to the materials. The only warranties for SAP or SAP affiliate company products and services are those that are set forth in the express warranty statements accompanying such products and services, if any. Nothing herein should be construed as constituting an additional warranty.
SAP and other SAP products and services mentioned herein as well as their respective logos are trademarks or registered trademarks of SAP SE (or an SAP affiliate company) in Germany and other countries. All other product and service names mentioned are the trademarks of their respective companies.
Please see https://www.sap.com/about/legal/trademark.html for additional trademark information and notices.
THE BEST RUN