
SAN Host Transition and Remediation Guide - NetApp Support
107
7-Mode Transition Tool 3.2 SAN Host Transition and Remediation Guide February 2017 | 215-11980-A0 [email protected]
-
Upload
khangminh22 -
Category
Documents
-
view
5 -
download
0
Transcript of SAN Host Transition and Remediation Guide - NetApp Support

7-Mode Transition Tool 3.2
SAN Host Transition andRemediation Guide
February 2017 | [email protected]


Contents
Deciding whether to use this guide ............................................................. 77-Mode Transition Tool transition phases .................................................. 8VMware ESXi host remediation ................................................................. 9
ESXi versions and features supported for SAN transitions using 7MTT ................... 9
Preparing for transition of ESXi hosts ........................................................................ 9
What the Inventory Collect Tool is ................................................................ 10
Preparing Linux guest operating systems for transition ................................ 10
Preparing Windows guest operating systems for transition .......................... 13
How to identify VM snapshots that must be removed before transition ....... 13
Testing transitioned LUNs and ESXi host applications before the cutover phase
of copy-based transitions ..................................................................................... 14
Downtime at apply configuration (precutover) phase of ESXi host transition ......... 15
Post-transition remediation requirements for ESXi hosts ......................................... 16
Preparing for post-transition ESXi host remediation .................................... 16
Reregistering VMs after transition on non-SAN boot ESXi hosts using
vSphere Client ......................................................................................... 17
Reconfiguration of VMware software iSCSI initiator after transition .......... 17
Setting up ESXi hosts configured for SAN boot after transition .................. 18
Determining whether VMFS volumes need to be remounted after
transition .................................................................................................. 19
Reattaching RDM LUNs to VMs .................................................................. 21
Post-transition remediation for Linux and Windows guest operating
systems .................................................................................................... 24
Recommended settings for ESXi hosts after transition remediation ............. 25
Enabling CAW on a datastore using the ESXi CLI ................................................... 25
RHEL host remediation ............................................................................. 27Gathering pretransition information from the Inventory Assessment Workbook ..... 27
What the Inventory Collect Tool is ................................................................ 28
Transitioning RHEL DMMP devices without file systems ....................................... 28
Verifying that RHEL LUNs are ready for transition using the Inventory
Assessment Workbook ............................................................................ 29
Verifying that RHEL 5 LUNs are ready for transition using the CLI ........... 29
Verifying that RHEL 6 DDMP devices are ready for transition using
CLI ........................................................................................................... 29
Testing DMMP devices without file systems on RHEL hosts before the
cutover phase of copy-based transitions .................................................. 30
Preparing for cutover when transitioning a Linux host DMMP device
without a file system ................................................................................ 31
Replacing 7-Mode LUN WWIDs on Linux hosts after transition of
LUNs ....................................................................................................... 32
Transitioning LUNs with mount points using DMMP device names ....................... 33
Table of Contents | 3

Preparing RHEL LUNs with mount points using DMMP device names
for transition using the Inventory Assessment Workbook ....................... 34
Preparing RHEL LUNs with mount points using DMMP alias names for
transition using the CLI ........................................................................... 35
Testing DMMP devices with file systems on RHEL hosts before the
cutover phase of copy-based transitions .................................................. 36
Preparing for the cutover phase when transitioning LUNs with mount
points using DMMP device names on Linux hosts ................................. 37
Remounting DMMP devices on Linux hosts after transition ........................ 38
Transitioning LUNs with mount points using DMMP alias names .......................... 40
Preparing RHEL LUNs with mount points using DMMP alias names for
transition using the CLI ........................................................................... 40
Testing LUNs with mount points using DMMP alias names on RHEL
hosts before the cutover phase of copy-based transitions ........................ 41
Preparing for the cutover phase when transitioning LUNs with mount
points using DMMP device names on Linux hosts ................................. 43
Remounting LUNs with mount points using DMMP alias names on
Linux hosts after transition ...................................................................... 43
Transitioning Linux host file systems on LVM devices ............................................ 45
Testing LUNs with file systems on LVM devices before the cutover
phase of copy-based transitions ............................................................... 46
Preparing for cutover phase when transitioning Linux host file systems
on LVM devices ....................................................................................... 48
Mounting logical volumes on Linux hosts after transition ........................... 49
Transitioning of SAN boot LUNs ............................................................................. 50
Types of SAN boot LUNs supported for transition ....................................... 51
Preparing for transition of FC or FCoE SAN boot LUNs on RHEL hosts ... 51
Preparing for transition of iSCSI SAN boot LUNs ....................................... 52
Testing SAN boot LUNs on RHEL hosts before the cutover phase of
copy-based transitions ............................................................................. 54
Preparing for the cutover phase when transitioning SAN boot LUNs .......... 56
Discovering SAN boot LUNs after transition ............................................... 56
Windows host remediation ........................................................................ 57Preparing Windows hosts for transition .................................................................... 57
What the Inventory Collect Tool is ................................................................ 57
Testing transitioned LUNs on Windows hosts before the cutover phase .................. 58
Preparing for cutover phase when transitioning Windows hosts .............................. 59
Bringing Windows hosts online after transition ........................................................ 60
Exceptions and known issues when transitioning SAN hosts to ONTAP ................. 61
HP-UX host remediation ............................................................................ 62Transitioning HP-UX host LUNs with file systems .................................................. 62
Preparing to transition HP-UX host LUNs with file systems ....................... 62
Testing data LUNs on HP-UX hosts before the cutover phase of copy-
based transitions ...................................................................................... 63
4 | SAN Host Transition and Remediation Guide

Preparing for cutover phase when transitioning HP-UX host data LUNs
with file systems ...................................................................................... 65
Mounting HP-UX host LUNs with file systems after transition ................... 65
Transitioning HP-UX host SAN boot LUNs with FC/FCoE configurations ............ 66
Preparing to transition SAN boot LUNs on HP-UX hosts with FC
configurations .......................................................................................... 67
Testing transitioned SAN boot LUNs on HP-UX hosts before the
cutover phase of copy-based transitions .................................................. 67
Preparing for the cutover phase when transitioning SAN boot LUNs .......... 68
Making a SAN boot LUN the primary boot LUN for HP-UX Emulex
HBAs after transition ............................................................................... 69
Making a SAN boot LUN the primary boot LUN for HP-UX QLogic
HBAs after transition ............................................................................... 70
AIX host remediation ................................................................................. 73Transition of SAN boot LUNs on AIX hosts with FC/FCoE configurations ............ 73
Preparing to transition SAN boot LUNs on AIX hosts with FC/FCoE
configurations .......................................................................................... 73
Testing transitioned SAN boot LUNs on AIX hosts before the cutover
phase of copy-based transitions ............................................................... 74
Preparing for the cutover phase when transitioning AIX hosts with FC/
FCoE configurations. ............................................................................... 74
Booting from SAN boot LUN on AIX hosts with FC/FCoE
configurations after transition .................................................................. 75
Transitioning AIX host data LUNs with file systems ............................................... 76
Preparing to transition AIX host data LUNs with file systems ..................... 76
Testing transitioned LUNs on AIX hosts before the cutover phase of
copy-based transitions ............................................................................. 76
Preparing for cutover phase when transitioning AIX host data LUNs
with file systems ...................................................................................... 77
Mounting AIX host data LUNs with file systems after transition ................ 78
Solaris host remediation ............................................................................ 79Transitioning Solaris host data LUNs with ZFS file systems ................................... 79
Preparing to transition Solaris host data LUNs with ZFS file system .......... 79
Testing data LUNs on Solaris hosts with ZFS file system before the
cutover phase of copy-based transitions .................................................. 80
Preparing for cutover phase when transitioning Solaris host data LUNs
with ZFS file systems .............................................................................. 83
Mounting Solaris host LUNs with ZFS file systems after transition ............ 84
Transitioning Solaris host data LUNs with Sun Volume Manager ........................... 86
Preparing to transition Solaris host LUNs with Sun Volume Manager ......... 87
Testing data LUNs on Solaris hosts with Sun Volume Manager before
the cutover phase of copy-based transitions ............................................ 88
Preparing for cutover phase when transitioning Solaris host Sun Volume
Manager data LUNs ................................................................................ 90
Table of Contents | 5

Mounting Solaris host LUNs with Solaris Volume Manager after
transition .................................................................................................. 91
Rolling back LUNs to 7-Mode after transition ........................................ 94Rolling back ONTAP LUNs to 7-Mode LUNs on RHEL hosts ............................... 94
Rolling back ONTAP LUNs to 7-Mode LUNs on Windows hosts ........................... 95
Copyright information ............................................................................... 96Trademark information ............................................................................. 97How to send comments about documentation and receive update
notifications ............................................................................................ 98Index ............................................................................................................. 99
6 | SAN Host Transition and Remediation Guide

Deciding whether to use the SAN Host Transitionand Remediation Guide
If you are transitioning data and configurations from Data ONTAP operating in 7-Mode to clusteredData ONTAP 8.3 or later using the 7-Mode Transition Tool (7MTT) 2.2 or later, you must performremediation steps for SAN hosts before and after transition.
The 7-Mode Transition Tool SAN Host Transition and Remediation Guide provides the necessarypretransition and post-transition steps for VMware ESXi, Windows, Red Hat Enterprise Linux(RHEL), HP-UX, and AIX hosts.
Related information
Copy-based transition
Copy-free transition
7-Mode Transition Tool installation and administration
7

7-Mode Transition Tool transition phases
You can use the 7-Mode Transition Tool (7MTT) to perform a copy-free transition (CFT) or a copy-based transition (CBT) from Data ONTAP operating in 7-Mode to clustered Data ONTAP. You mustknow the phases of each transition method so that you also understand when to perform the specificremediation steps required for your hosts.
The CFT phases are as follows:
The CBT phases are as follows:
8

VMware ESXi host remediation
If you are using the 7-Mode Transition Tool (7MTT) to move from Data ONTAP operating in 7-Mode to clustered Data ONTAP in a SAN environment, you must perform a series of steps on yourVMware ESXi hosts before the Data ONTAP transition. You must power down your hosts beforecutover and you must perform another series of steps after transition before you can begin servicingdata.
Related concepts
Post-transition remediation requirements for ESXi hosts on page 16
Related tasks
Testing transitioned LUNs and ESXi host applications before the cutover phase of copy-basedtransitions on page 14
ESXi versions and features supported for SAN transitionsusing 7MTT
Only certain versions and features of ESXi are supported for SAN transitions using the 7-ModeTransition Tool (7MTT).
The following versions and features are supported as listed in the Interoperability Matrix.
• ESXi 5.0, 5.1, 5.5, and later
You must upgrade hosts running ESX/ESXi 4.x or earlier to ESX/ESXi 5.0 or later to transitionthem.
• VMFS3 and VMFS5 datastores
• SAN boot configurations
• RDM (RAW device map) devices
• All Guest OS supported in the Interoperability Matrix
• All SAN protocols (FC/FCoE/iSCSI)
Related information
NetApp Interoperability Matrix Tool
Preparing for transition of ESXi hostsYou must complete several prerequisite tasks before you use the 7-Mode Transition Tool (7MTT) totransition your ESXi hosts from Data ONTAP operating in 7-Mode to ONTAP.
Steps
1. Configure clustered Data ONTAP as described in the 7-Mode Transition Tool Copy-BasedTransition Guide or the 7-Mode Transition Tool Copy-Free Transition Guide based on the type oftransition that you are performing.
2. Gather the following information for the ESXi hosts that you are transitioning:
9

• IP address
• Host name
• Authentication details
3. Complete the zoning between FC or FCoE hosts and new clustered Data ONTAP nodes.
You can use the Collect and Assess feature to generate the zoning plan.
4. Use the Interoperability Matrix to verify that the following are supported for transition toclustered Data ONTAP:
• Your version of Data ONTAP operating in 7-ModeIn some cases, you might have to upgrade your version of Data ONTAP operating in 7-Modeto a 7MTT SAN compatible version. For example, Data ONTAP 7.3.7 operating in 7-Mode isnot compatible for transitions using the 7MTT. If you are running this version, you mustupgrade it before initiating transition.
• Your ESXi host configuration
• Your HBA driver and firmwareFor iSCSI, only software initiators are supported. For FC and FCoE, only QLogic and Emulexinitiators are supported. If your ESXi FC or FCoE initiator is not supported, you must upgradeto a version that is supported by clustered Data ONTAP as described in the InteroperabilityMatrix.
5. If configured, disable VMware high availability (HA) and Distributed Resource Scheduler (DRS).
VMware HA and DRS are not supported during transition.
Related information
NetApp Documentation: 7-Mode Transition Tool
NetApp Interoperability Matrix Tool
Retaining resource pools when disabling VMware DRS clusters in the vSphere Web Client
Disabling VMware High Availability (HA)
What the Inventory Collect Tool is
The Inventory Collect Tool (ICT) is a stand-alone utility for collecting configuration and inventoryinformation about 7-Mode storage controllers, hosts attached to controllers, and applications runningon these hosts for assessing the transition readiness of these systems. You can use the ICT to generateinformation about your LUNs and the configuration that you need for transition.
The ICT generates an Inventory Assessment Workbook and an Inventory Report XML file thatcontains configuration details of the storage and host systems.
The ICT is available for ESXi, 5.x, ESXi 6.x, and Windows hosts.
Preparing Linux guest operating systems for transition
If have 7-Mode LUNs mapped as physical compatible RDM (PTRDM) to Linux virtual machines(VMs) for the boot device, there are steps you must perform to prepare your Linux VMs fortransition.
About this task
• For copy-based transitions, perform these steps before initiating the Storage Cutover operation inthe 7-Mode Transition Tool (7MTT).
• For copy-free transitions, perform these steps before initiating the Export & Halt 7-Mode Systemsoperation in the 7MTT.
10 | SAN Host Transition and Remediation Guide

Steps
1. Obtain the SCSI device serial numbers:
cat /boot/grub/menu.lst
Example
In the following example, 360a9800032466879362b45777447462d-part2 and360a9800032466879362b45777447462d-part1 are SCSI device numbers:
# cat /boot/grub/menu.lst...kernel /boot/vmlinuz-3.0.13-0.27-default root=/dev/disk/by-id/scsi-360a9800032466879362b45777447462d-part2 resume=/dev/disk/by-id/scsi-360a9800032466879362b45777447462d-part1
2. Determine the mapping between the SCSI device serial numbers and SCSI devices/partitions:
# ls -l /dev/disk/by-id
Example
The following example shows how the relationship mapping is displayed. The SCSI devices/partitions are displayed following the SCSI device/partition serial numbers. In thisexample, ../../sda, ../../sda1, and ../../sda2 are SCSI devices/partitions.
lrwxrwxrwx 1 root root 9 Oct 27 06:54 scsi-360a9800032466879362b45777447462d -> ../../sda lrwxrwxrwx 1 root root 10 Oct 27 05:09 scsi-360a9800032466879362b45777447462d-part1 -> ../../sda1 lrwxrwxrwx 1 root root 10 Oct 27 02:21 scsi-360a9800032466879362b45777447462d-part2 -> ../../sda2
3. Determine the mapping between the SCSI device paths and the UUIDs:
ls -l /dev/disk/by-uuid
Example
The following example shows how the relationship mapping is displayed. In this example,33d43a8b-cfae-4ac4-9355-36b479cfa524 is the UUID for SCSI device/partition sda2,603e01f8-7873-440a-9182-878abff17143 is the UUID for SCSI device/partition sdb, andc50b757b-0817-4c19-8291-0d14938f7f0f is the UUID for SCSI device/partition sda1.
lrwxrwxrwx 1 root root 10 Oct 27 02:21 33d43a8b-cfae-4ac4-9355-36b479cfa524 -> ../../sda2 lrwxrwxrwx 1 root root 9 Oct 27 06:54 603e01f8-7873-440a-9182-878abff17143 -> ../../sdb lrwxrwxrwx 1 root root 10 Oct 27 05:09 c50b757b-0817-4c19-8291-0d14938f7f0f -> ../../sda1
4. Use the UUID to update the device reference in the grub boot menu.lst file by matching it withthe SCSI device path and SCSI serial number.
Example
#blkid/dev/sda1: UUID="c50b757b-0817-4c19-8291-0d14938f7f0f" TYPE="swap"/dev/sda2: UUID="33d43a8b-cfae-4ac4-9355-36b479cfa524" TYPE="ext3"/dev/sdb: UUID="603e01f8-7873-440a-9182-878abff17143" SEC_TYPE="ext2" TYPE="ext3"
VMware ESXi host remediation | 11

5. Use the UUID you just retrieved to update the device reference in the grub boot menu.lst file.
Example
The following example shows the menu.lst file after it has been updated:
# Modified by YaST2. Last modification on Fri Oct 17 02:08:40 EDT 2014default 0timeout 8##YaST - generic_mbrgfxmenu (hd0,1)/boot/message##YaST - activate###Don't change this comment - YaST2 identifier: Original name: linux###title SUSE Linux Enterprise Server 11 SP2 - 3.0.13-0.27root (hd0,1)kernel /boot/vmlinuz-3.0.13-0.27-default root=/dev/disk/by-uuid/e5127cdf-8b30-418e-b0b2-35727161ef41 resume=/dev/disk/by-uuid/d9133964-d2d1-4e29-b064-7316c5ca5566splash=silent crashkernel=128M-:64M showopts vga=0x314initrd /boot/initrd-3.0.13-0.27-default
6. Update the /etc/fstab file:
a. Use the UUID you just retrieved to update the device reference in the /etc/fstab file.
Example
The following example shows an /etc/fstab file with a SCSI serial number:
/dev/disk/by-id/scsi-360a9800032466879362b45777447462d-part1 swap swapdefaults 0 0/dev/disk/by-id/scsi-360a9800032466879362b45777447462d-part2 / ext3acl,user_xattr 1 1proc /proc proc defaults 0 0sysfs /sys sysfs noauto 0 0debugfs /sys/kernel/debug debugfs noauto 0 0devpts /dev/pts devpts mode=0620,gid=5 0 0
b. Replace the reference to the SCSI serial number with the UUID.
Example
The following example shows an /etc/fstab file that has been updated to replace the SCSIserial number with the UUID:
cat /etc/fstabUUID="c50b757b-0817-4c19-8291-0d14938f7f0f swap swap defaults0 0UUID="33d43a8b-cfae-4ac4-9355-36b479cfa524 / ext3 acl,user_xattr1 1proc /proc proc defaults 0 0sysfs /sys sysfs noauto 0 0debugfs /sys/kernel/debug debugfs noauto 0 0devpts /dev/pts devpts mode=0620,gid=5 0 0
12 | SAN Host Transition and Remediation Guide

Preparing Windows guest operating systems for transition
If your Windows VMs use physical compatible RDM (PTRDM) devices, you must take the disksoffline on the Windows VM before transition. You can use Disk Manager to take the disks offline.
• For copy-based transitions, perform these steps before initiating the Storage Cutover operation inthe 7-Mode Transition Tool (7MTT).
• For copy-free transitions, perform these steps before initiating the Export & Halt 7-Mode Systemsoperation in the 7MTT.
How to identify VM snapshots that must be removed before transition
Snapshots virtual machines (VMs) with Virtual RDM attached do not survive transition from DataONTAP operating in 7-Mode to clustered Data ONTAP. These snapshots must be removed beforetransition. Snapshots of VMs with only VMFS vDisks and Physical RDM (PTRDM) do survivetransition and do not have to be removed.
You can use the Inventory Assessment Workbook generated by the Inventory Collect Tool to identifyall VMs with Virtual RDMs attached. Snapshots listed in the Inventory Assessment Workbook underthe VM Snapshots column and the NPTRDM column with a value greater than 0 are VMs that have aVirtual RDM attached with VM snapshots.
Deleting VM snapshots copies using vSphere Client
If you are not familiar with the ESXi CLI or if it is more convenient for your environment, you candelete Virtual Machine (VM) snapshots using vSphere Client.
About this task
• For copy-based transitions, perform these steps before initiating the Storage Cutover operation inthe 7-Mode Transition Tool (7MTT).
• For copy-free transitions, perform these steps before initiating the Export & Halt 7-Mode Systemsoperation in the 7MTT.
Steps
1. Open the ESXi host or vCenter Server managing the ESXi host.
2. Right-click the VM from which you need to remove snapshots.
3. Open the Snapshot > Snapshot Manager Snapshots window.
4. Click Delete All.
Removing VM snapshots using the ESXi CLI
You can choose to use the ESXi CLI to remove the snapshots if you are using the Host RemediationTool (HRT), or if you prefer the flexibility of CLI usage.
Before you begin
You must have the VMID from the Host VMs tab in the Inventory Assessment Workbook generatedby the 7-Mode Transition Tool (7MTT).
Steps
1. Use SSH to log in to the ESXi console.
2. Remove all VM snapshots of the VM with the applicable VMID:
VMware ESXi host remediation | 13

# vim-cmd vmsvc/snapshot.removeall VMID
After you finish
After deleting snapshots, you must regenerate the Inventory Assessment Workbook to collectinformation related to Data ONTAP operating in 7-Mode and your ESXi hosts.
Testing transitioned LUNs and ESXi host applicationsbefore the cutover phase of copy-based transitions
If you are using the 7-Mode Transition Tool (7MTT) 2.2 or later and Data ONTAP 8.3.2 or later totransition an ESXi host, you can test your transitioned clustered Data ONTAP LUNs to verify thatyou can bring your host and applications online before the cutover phase. Your source host cancontinue to run I/O to your source 7-Mode LUNs during testing.
Before you begin
• The new test host must be provisioned in a new test environment.To avoid IP/MAC or UUID duplication or conflicts, test hosts must be configured in a privatenetwork.
• If you are transitioning a host booted from a local hard disk, the test host must have the sameESXi version and drivers as the source host.
• Zoning must be complete between FC or FCoE hosts and new clustered Data ONTAP nodes.
• Zoning must not exist between the source host and the new clustered Data ONTAP host.If transitioned clustered Data ONTAP LUNs are visible to the source host during test mode, youmight experience unexpected service disruptions on the source host.
• If you are transitioning a SAN booted host, your network adapter must be disabled.
About this task
You must maintain hardware parity between the test host and the source host and you must performthe following steps on the test host:
Your clustered Data ONTAP LUNs are in read/write mode during testing. They convert to read-onlymode when testing is complete and you are preparing for the cutover phase.
Steps
1. After the baseline data copy is complete, select Test Mode in the 7MTT user interface (UI).
2. In the 7MTT UI, click Apply Configuration.
3. Zone the clustered Data ONTAP nodes on the test host.
4. Log in to the clustered Data ONTAP node, and then add new test host initiators to the igroupcreated by the 7MTT during the test phase.
5. Navigate to C:\Program Files\NetApp\operating in 7-Mode Transition Tool\.
6. Generate the 7-Mode to clustered Data ONTAP LUN mapping file from the Linux host where the7MTT is installed:
transition cbt export lunmap -p project-name -o file_path
Example
For example:
14 | SAN Host Transition and Remediation Guide

transition cbt export lunmap -p SanWorkLoad -o c:/Libraires/Documents/7-to-C-LUN-MAPPING.csv
7. Bring the test host online.
• Reconfigure your VMware software iSCSI initiator after transition on page 17
• Set up your ESXi hosts configured for SAN boot after transition on page 18
8. Verify that all transitioned clustered Data ONTAP LUNs are discovered.
9. If you are transitioning a non-SAN booted host, reregister your VMs.
Re-registering VMs after transition of ESXi host. on page 17
10. Complete the necessary post-transition steps for ESXi hosts.
Post transition requirements for ESXi hosts on page 16
11. Bring the host and applications online.
12. Perform your testing as needed.
13. Shut down the test host.
14. In the 7MTT UI, click Finish Testing.
The new clustered Data ONTAP LUNs are now read-only, and the data from the source 7-ModeLUNs is resynchronized.
15. If you plan to use the same source after you complete your transition, then edit the igroup on theclustered Data ONTAP node to add the appropriate initiator.
If you are planning to promote your test host to production, then you do not need to edit theigroup.
After you finish
After you complete your test, plan time to shut down the source host connected to your controllersrunning Data ONTAP operating in 7-Mode. When you click Complete Transition, your source 7-Mode volumes and LUNs go offline and the transitioned clustered Data ONTAP LUNs become read/write.
Related information
Copy-based transition
Downtime at apply configuration (precutover) phase of ESXihost transition
You must plan for downtime at the apply configuration (precutover) phase while transitioning ESXihosts.
After you complete the prerequisites for ESXi host transitions, you can use the 7-Mode TransitionTool (7MTT) to transition your LUNs from Data ONTAP operating in 7-Mode to ONTAP. ESXihosts, VMs, and applications can be online until the apply configuration (precutover) phase of the7MTT transition. However, at the apply configuration (precutover) phase, all applications and guestoperating systems must be powered down. If ESXi hosts are SAN booted, or if SAN booted LUNsare part of the transition, the ESXi hosts must also be powered down at the apply configuration(precutover) phase.
If the host is not SAN booted and you need to keep your service running to non-transitioning LUNsor array LUNs that are not made by NetApp, you can choose not to shut it down. However, if you do
VMware ESXi host remediation | 15

not shut it down, you might experience the all-paths-down (APD) condition. To avoid the APDcondition, you can mask Data ONTAP operating in 7-Mode LUNs. See the VMware KnowledgebaseID 1009449 for more information.
Post-transition remediation requirements for ESXi hostsAfter you transition LUNs for ESXi hosts from Data ONTAP operating in 7-Mode to clustered DataONTAP using the 7-Mode Transition Tool (7MTT), you must perform a series of remediation tasksto bring your LUNs online and begin servicing data.
Related concepts
Post-transition remediation for Linux and Windows guest operating systems on page 24
Recommended settings for ESXi hosts after transition remediation on page 25
Related tasks
Preparing for post-transition ESXi host remediation on page 16
Reregistering VMs after transition on non-SAN boot ESXi hosts using vSphere Client on page17
Setting up ESXi hosts configured for SAN boot after transition on page 18
Determining whether VMFS volumes need to be remounted after transition on page 19
Reattaching RDM LUNs to VMs on page 21
Enabling CAW on a datastore using the ESXi CLI on page 25
Preparing for post-transition ESXi host remediation
After the 7-Mode Transition Tool (7MTT) transition is complete, you must perform various ESXihost remediation tasks. There are several steps you must complete before you can perform thosetasks.
About this task
• For copy-based transitions (CBTs), perform these steps before initiating the Storage Cutoveroperation in the 7MTT.
• For copy-free transitions (CFTs), perform these steps before initiating the Export & Halt 7-ModeSystems operation in the 7MTT.
Steps
1. Generate the 7-Mode to ONTAP LUN mapping file:
• For CBTs, run the following command from the Linux host where 7MTT is installed:
transition cbt export lunmap -p project-name -o file_path
For example:
transition cbt export lunmap -p SanWorkLoad -o c:/Libraires/Documents/7-to-C-LUN-MAPPING.csv
• For CFTs, run the following command from the system where the 7MTT is installed:
transition cft export lunmap -p project-name -s svm-name -o output-file
For example:
transition cft export lunmap -p SanWorkLoad -s svm1 -o c:/Libraires/Documents/7-to-C-LUN-MAPPING-svm1.csv
16 | SAN Host Transition and Remediation Guide
Note: You must run this command for each of your Storage Virtual Machines (SVMs).
2. Verify that igroup and initiator mappings are present.
7MTT re-creates the same igroup with initiators used in Data ONTAP operating in 7-Mode, andremaps the clustered Data ONTAP LUN to the host.
3. Verify that zoning is appropriate for the new clustered Data ONTAP target.
4. If you are doing a copy-free transition (CFT), run vol rehost.
See the 7-Mode Transition Tool Copy-Free Transition Guide for vol rehost procedures.
Related information
Copy-free transition
Reregistering VMs after transition on non-SAN boot ESXi hosts usingvSphere Client
After you transition a non-SAN booted host, you must reregister your Virtual Machines (VMs).
Before you begin
The host must be online and the LUNs must be discovered.
About this task
• For copy-based transitions, perform these steps before initiating the Storage Cutover operation inthe 7-Mode Transition Tool.
• For copy-free transitions, perform these steps before initiating the Export & Halt 7-Mode Systemsoperation in the 7MTT.
Steps
1. Open the Inventory Assessment Workbook generated by the Inventory Collect Tool (ICT).
2. Navigate to the Host VMs tab, and then record the VM Config File path and Location/Datastore Name of the VM.
3. Use vSphere Client to log in to the ESXi host or the vCenter Server managing the ESXi host.
4. Under Host and Clusters, select the ESXi host.
5. Navigate to Configuration > Hardware > Storage.
6. Select the datastore with the datastore name you previously noted.
7. Right click and select Browse Datastore.
The Datastore Browser window opens.
8. Navigate to the VM Config File path you previously noted.
9. Right click the .vmx file, and then select Add To Inventory.
10. Repeat these steps for each VM listed in the Host VMs tab in the Inventory AssessmentWorkbook generated by the ICT.
Reconfiguration of VMware software iSCSI initiator after transition
If your ESXi host accessed your Data ONTAP operating in 7-Mode system with the VMwaresoftware iSCSI initiator, then after transition from 7-Mode to clustered Data ONTAP, you must
VMware ESXi host remediation | 17

reconfigure the VMware software iSCSI initiator on your ESXi host and enable it to discover the newclustered Data ONTAP target.
For copy-based transitions, you must reconfigure your VMware software iSCSI initiator beforeinitiating the Storage Cutover operation in the 7-Mode Transition Tool (7MTT). For copy-freetransitions, you must reconfigure your VMware software iSCSI initiator before initiating the Export& Halt 7-Mode Systems operation in the 7MTT.
During the reconfiguration, you must retrieve the iSCSI IP and IQN used by the new clustered DataONTAP target. If the target IP subnet has changed, the respective IP subnet changes are required onthe host iSCSI initiator ports as well.
To make the required changes to the software iSCSI initiator on the VMware ESXi host, see theVMWare vSphere ESXi5.x Storage Guide.
Related information
System administration
Setting up ESXi hosts configured for SAN boot after transition
If your ESXi host was configured for SAN boot before transition from Data ONTAP operating in 7-Mode, you must perform several steps before using the host after transition.
About this task
• For copy-based transitions, perform these steps before initiating the Storage Cutover operation inthe 7MTT.
• For copy-free transitions, perform these steps before initiating the Export & Halt 7-Mode Systemsoperation in the 7MTT.
Steps
1. Reconfigure your FC and FCoE HBA BIOS to boot from the SAN boot LUN of the clusteredData ONTAP system.
2. Boot the ESXi host.
3. Reset the host configurations to the pretransition settings.
4. For iSCSI hosts, see how to reconfigure your VMware iSCSI initiator.
Reconfigure your VMware iSCSI initiator on page 17
5. Remount the VMFS datastores created from the boot LUN in the default installation.
Related tasks
Remounting VMFS volumes after transition using vSphere Client on page 19
Remounting VMFS volumes after transition using the ESXi CLI on page 20
Related information
SAN administration
18 | SAN Host Transition and Remediation Guide

Determining whether VMFS volumes need to be remounted after transition
After transitioning from Data ONTAP operating in 7-Mode to clustered Data ONTAP, you mighthave VMFS volumes that need to be remounted to bring VMFS datastores and VMs to theirpretransition states.
About this task
• For copy-based transitions, perform these steps before initiating the Storage Cutover operation inthe 7-Mode Transition Tool (7MTT).
• For copy-free transitions, perform these steps before initiating the Export & Halt 7-Mode Systemsoperation in the 7MTT.
Steps
1. Open the Inventory Assessment Workbook generated by the Inventory Collect Tool (ICT).
2. Click the SAN Host Filesystems tab.
3. Check the Drive / Mount / Datastore Name column for the filesystems and datastores mountedon the host before transition.
4. Make a note of the corresponding LUN naa IDs in the SCSI Device ID/Device Name column forthe datastore.
5. Check whether the naa IDs noted for the datastore are listed in the 7MTT mapping file that wasgenerated after the transition.
• If none of the naa IDs are present in the 7MTT mapping file, the datastore and its underlyingLUNs were not part of the 7MTT transition and no remediation is required.
• If only part of the naa IDs are present in the 7MTT mapping file, your transition is incompleteand you cannot proceed.
• If all naa IDs are present, you must remount your VMFS volumes.
Related concepts
What the Inventory Collect Tool is on page 10
Related tasks
Remounting VMFS volumes after transition using vSphere Client on page 19
Remounting VMFS volumes after transition using the ESXi CLI on page 20
Remounting VMFS volumes after transition using vSphere Client
After transition, you must remount your VMFS volumes to bring your datastores and virtualmachines (VMs) to their pretransition states. If you are not familiar with the ESXi CLI or it is moreconvenient in your environment, you can use vSphere Client to remount your volumes.
About this task
These steps apply to volumes and spanned volumes.
Steps
1. Log in to the ESXi host or the vCenter Server managing the ESXi host.
2. Under Hosts and Clusters, select the ESXi host.
VMware ESXi host remediation | 19

3. Navigate to Configuration > Hardware > Storage.
4. In the upper-right corner, click Add storage.
5. Select Disk/LUN.
6. Click Next.
7. In the list of LUNs, locate the VMFS_label column displaying the name of the datastore.
8. Select the LUN to complete the remount operation.
If you are remounting a spanned VMFS volume, the first LUN in the span is marked “head”. Youmust select the “head” LUN to complete the remount operation.
9. Click Next.
10. In the Select VMFS Mount Options window, select Keep the existing signature.
11. Complete the wizard.
12. Repeat these steps for all of the LUNs displaying the datastore name in the VMFS_label column.
Datastores are remounted and VMs are active.
Remounting VMFS volumes after transition using the ESXi CLI
After transition, you can use the ESXi CLI to remount your volumes and bring your datastores andVMs to their pretransition states.
Before you begin
The original 7-Mode LUN must be unmapped or offline.
About this task
These steps apply to volumes and spanned volumes.
Steps
1. Log in to the ESXi console using SSH.
2. List the newly added LUNs with existing VMFS signatures and VMFS labels:
# esxcfg-volume -l
Example
The following is an example of the LUNs listed with VMFS signatures and VMFS labels.
# esxcfg-volume -lVMFS UUID/label: 53578567-5b5c363e-21bb-001ec9d631cb/datastore1Can mount: YesCan resignature: YesExtent name: naa.600a098054314c6c445d446f79716475:1 range: 0 - 409599(MB)
3. Remount the VMFS volumes persistently with the same signature:
• For regular volumes:
esxcfg-volume -M|--persistent-mount VMFS UUID|label
• For spanned volumes:
# esxcfg-volume -M vmfs-span-ds
20 | SAN Host Transition and Remediation Guide

Related information
VMware KB: vSphere handling of LUNs detected as snapshot LUNs
Reattaching RDM LUNs to VMs
For VMs attached to Raw Device Mapped (RDM) LUNs to function after transition, you mustremove the RDM disks hosting the LUN from the VM. Then you must reattach the RDM disks to theVM based on the LUN serial number provided by the 7-Mode Transition Tool (7MTT).
About this task
• For copy-based transitions, perform these steps before initiating the Storage Cutover operation inthe 7MTT.
• For copy-free transitions, perform these steps before initiating the Export & Halt 7-Mode Systemsoperation in the 7MTT.
Steps
1. In the Inventory Assessment Workbook, navigate to the Host VM Disk Details tab.
2. Identify the ESXi host VM with PTRDM or NPTRDM in the Type column.
3. Note the VM name, the disk path details in the Disk column, and the naa ID from the DeviceMapped column.
4. Verify that the naa ID is listed in the 7MTT mapping file that was generated after transition.
5. Verify that the naa ID has a corresponding new naa ID in the LUN WWID column of themapping file.
This is the new clustered Data ONTAP LUN naa ID.
6. Use the clustered Data ONTAP LUN naa ID from the LUN WWID column and the disk pathdetails to reattach the clustered Data ONTAP LUN to the VM.
Related tasks
Removing stale RDMs using vSphere Client on page 21
Reattaching RDM to VMs using vSphere Client on page 22
Reattaching RDM using ESXi the CLI/console on page 23
Removing stale RDMs using vSphere Client
All RDM LUNs become stale during the transition from ONTAP operating in 7-Mode to clusteredData ONTAP. After transition, the RDMs must be removed and reattached before the LUNs canbegin servicing data.
Before you begin
You must have the VM name and disk path of the RDM from the Inventory Assessment Workbook.
Steps
1. Open the ESXi host or vCenter Server managing the ESXi host.
2. Right-click the VM, and then select Edit Settings.
The VM Properties window is displayed.
3. Select the hard disk from the list of devices using the disk path from the Inventory AssessmentWorkbook.
VMware ESXi host remediation | 21

4. Make note of the Virtual Device Node and Compatibility Mode from the VM Propertieswindow.
Example
Virtual Device Node: SCSI 0:2
Compatibility Mode: Physical
5. Click Remove.
6. Select Remove from virtual machine and delete files from disk.
7. Click OK.
An error message similar to the following appears. You can ignore this message.
8. Click Close.
Reattaching RDM to VMs using vSphere Client
After transition of an ESXi host using the 7-Mode Transition Tool (7MTT), you must reattach yourRDMs to virtual machines (VMs).
Before you begin
Your stale Raw Device Mappings (RDMs) must have been removed.
Steps
1. Open the ESXi host or vCenter server managing the ESXi host.
2. Right-click the VM, and then select Edit Settings.
The VM Properties window opens.
3. Click Add.
The Add Hardware window opens.
4. Click Hard Disk.
5. Click Next to select the disk.
6. Select Raw Device Mappings.
7. Click Next to select the target LUN.
8. Select the LUN with the new clustered Data ONTAP NAA ID that you noted from the 7MTTmapping file.
22 | SAN Host Transition and Remediation Guide

9. Click Next.
10. Choose Select Datastore.
11. Select the datastore that matches the disk path that you noted in the 7MTT mapping file.
12. Click Next.
13. Choose either Physical or Virtual for the Compatibility Mode.
Choose the compatibility mode noted when your stale RDM was removed.
14. Click Next.
15. Choose Advance Options.
16. Select the Virtual Device Node.
Select the virtual device mode that you noted when you removed the stale RDM.
17. Click Next.
18. Click Finish to submit your changes.
19. Repeat the steps for all VMs with RDM attached.
Related tasks
Removing stale RDMs using vSphere Client on page 21
Reattaching RDM using ESXi the CLI/console
After transition from Data ONTAP operating in 7-Mode to clustered Data ONTAP you must reattachyour raw device mapping (RDM).
Before you begin
• You must retrieve the RDM disk file listed in the Disk column of the Inventory AssessmentWorkbook.
• You must retrieve the new clustered Data ONTAP LUN naa ID from the 7MTT mapping file.
Steps
1. Log in to the ESXi console using SSH.
2. Use the mv command to make a backup of the RDM disk file and the associated device file.
The RDM disk file is listed in the Disk column of the Inventory Assessment Workbook.
Example
If the RDM disk file is /vmfs/volumes/53a3ac3d-df5aca03-3a94-001ec9d631cb/VM2-win-bus-A/VM2-winbus-A.vmdk, you would issue the following command:
mv /vmfs/volumes/53a3ac3d-df5aca03-3a94-001ec9d631cb/VM2-win-bus-A/VM2-winbus-A.vmdk /vmfs/volumes/53a3ac3d-df5aca03-3a94-001ec9d631cb/VM2-win-bus-A/VM2-win-bus-A.vmdk _bak
• For physical compatibility RDM (PTRDM):
mv RDM_disk_file_name-rdmp.vdmk RDM_disk_file_name-rdmp.vdmk_bak
For example:mv /vmfs/volumes/53a3ac3d-df5aca03-3a94-001ec9d631cb/VM2-win-bus-A/VM2-winbus-A-rdmp.vmdk /vmfs/volumes/53a3ac3d-df5aca03-3a94-001ec9d631cb/VM2-winbus-A/VM2-win-bus-A-rdmp.vmdk _bak
VMware ESXi host remediation | 23

• For virtual compatibility RDM (NPTRDM):
mv RDM_disk_file_name-rdmp.vdmk RDM_disk_file_name-rdmp.vdmk_bak
For example:
mv /vmfs/volumes/53a3ac3d-df5aca03-3a94-001ec9d631cb/VM2-win-bus-A/VM2-winbus-A-rdmp.vmdk /vmfs/volumes/53a3ac3d-df5aca03-3a94-001ec9d631cb/VM2-winbus-A/VM2-win-bus-A-rdmp.vmdk _bak
3. Use the new clustered Data ONTAP LUN naa ID and the RDM disk file to re-create the RDMconfiguration and device files.
• For PTRDM:
# vmkfstools –z /vmfs/devices/disks/new_clustered_Data_ONTAP_naa_ID.vmdk
For example:
vmkfstools –z /vmfs/devices/disks/naa.600a098054314c6c442b446f79712313 /vmfs/volumes/53a3ac3d-df5aca03-3a94-001ec9d631cb/VM2-win-bus-A/VM2-win-bus-A.vmdk
• For NPTRDM:
# vmkfstools –r /vmfs/devices/disks/new_clustered_Data_ONTAP_naa_ID.vmdk
For example:
vmkfstools –r /vmfs/devices/disks/naa.600a098054314c6c442b446f79712313 /vmfs/volumes/53a3ac3d-df5aca03-3a94-001ec9d631cb/VM2-win-bus-A/VM2-win-bus-A.vmdk
4. Confirm that the configuration and pointer files are created:
# ls /vmfs/volumes/datastore/VM_directory
Example
#ls /vmfs/volumes/53a3ac3d-df5aca03-3a94-001ec9d631cb/VM2-win-bus-A
The new configuration and pointer files are displayed under the VM directory path.
5. Repeat the steps for all VMs with RDM attached.
6. Restart the hostd and vpxa agents in the ESXi host:
/etc/init.d/hostd/restart
/etc/init.d/vpxa/restart
Post-transition remediation for Linux and Windows guest operatingsystems
Linux and Windows guest operating systems might require additional remediation after transition ofLUNs from Data ONTAP operating in 7-Mode to clustered Data ONTAP.
For copy-based transitions, do the following after completing the Storage Cutover operation in the7MTT. For copy-free transitions, do the following after the Import Data & Configuration operation inthe 7MTT is complete.
• Linux
If the mount points are defined in the /etc/fstab file, you must mount the LUN (mount –a).
• Windows
If Failover Cluster is configured on the VM, you must bring the disks online from FailoverCluster Manager.
24 | SAN Host Transition and Remediation Guide

Recommended settings for ESXi hosts after transition remediation
After you complete the post-transition remediation steps for your ESXi host, you should apply therecommended ESXi host settings for clustered Data ONTAP on the host.
You can use Virtual Storage Console (VSC) to configure ESXi host settings. VSC is the standardNetApp plug-in that enables vSphere vCenter to configure ESXi host settings for Data ONTAP. ESXihosts and virtual machines (VMs) deployed on the source 7-Mode system should be configured usingVSC. Alternatively, you can configure VMs manually by using the information in the following KBarticles:
• Guest OS tunings
• Task Set Full (QFull) Tunables for LUNs in vSphere 5.1
• Storage Array Type Plugin option for a NetApp array on VMware vSphere
• HardwareAcceleratedLocking setting required for VMware deployment
Enabling CAW on a datastore using the ESXi CLIIf you did not have support for Compare and Write (CAW) in Data ONTAP operating in 7-Mode, youmust manually enable CAW support when you transition to clustered Data ONTAP. Clustered DataONTAP supports CAW by default.
Before you begin
• There must be no I/O or VMs actively running on the VMFS datastore.
• The datastore must be remounted, if it was migrated.
• You must have the new ONTAP LUN naa ID from the 7-Mode Transition Tool (7MTT) mappingfile.
About this task
CAW must be enabled only when no I/O or VMs are actively running on the VMFS datastore.
• CAW must be enabled only when no I/O or VMs are actively running on the VMFS datastore.
• For copy-based transitions, perform these steps after completing the Storage cutover operation inthe 7MTT.
• For copy-free transitions, perform these steps after the Import Data & Configuration operation inthe 7MTT is complete.
Steps
1. Open the Inventory Assessment Workbook generated by the Inventory Collect Tool (ICT).
2. Navigate to the SAN Host Filesystems tab.
3. Verify the CAW status for the datastore.
The ATS/CAW value for the datastore should display Disabled, and the Filesystem columnshould display VMFS.x.
4. Note the name of the datastore in the Disk column
5. Log in to the ESXi console using SSH.
VMware ESXi host remediation | 25
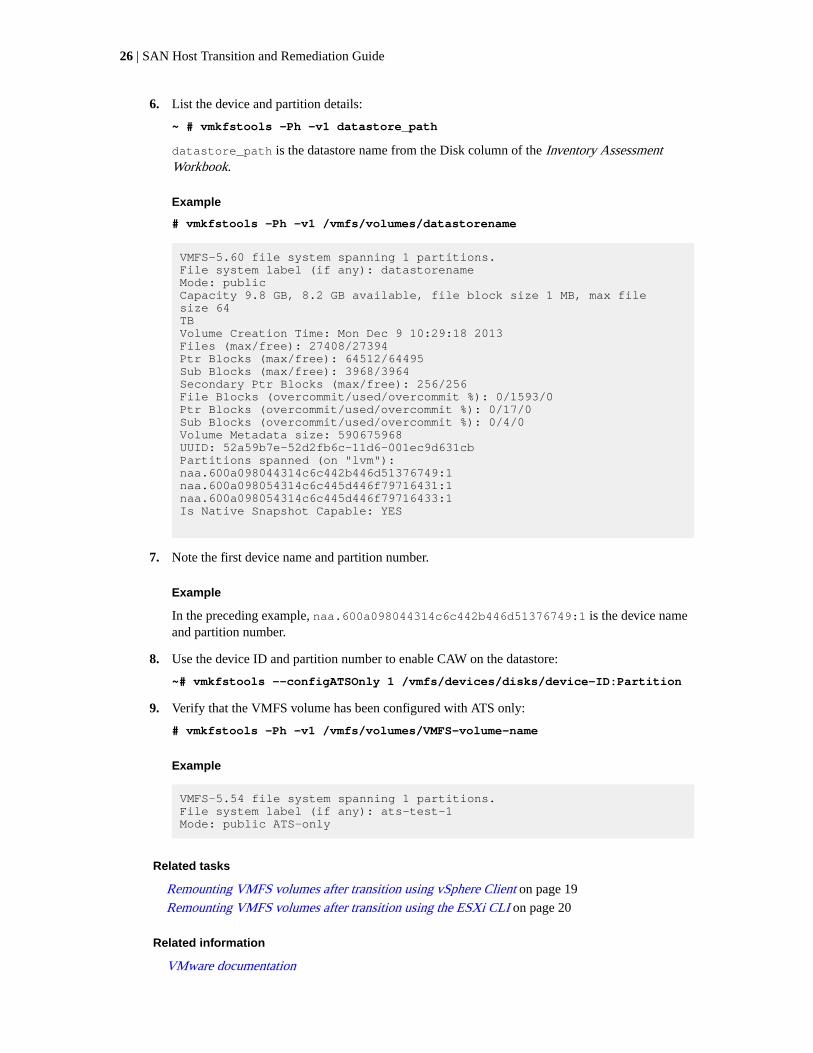
6. List the device and partition details:
~ # vmkfstools -Ph -v1 datastore_path
datastore_path is the datastore name from the Disk column of the Inventory AssessmentWorkbook.
Example
# vmkfstools -Ph -v1 /vmfs/volumes/datastorename
VMFS-5.60 file system spanning 1 partitions.File system label (if any): datastorenameMode: publicCapacity 9.8 GB, 8.2 GB available, file block size 1 MB, max file size 64TBVolume Creation Time: Mon Dec 9 10:29:18 2013Files (max/free): 27408/27394Ptr Blocks (max/free): 64512/64495Sub Blocks (max/free): 3968/3964Secondary Ptr Blocks (max/free): 256/256File Blocks (overcommit/used/overcommit %): 0/1593/0Ptr Blocks (overcommit/used/overcommit %): 0/17/0Sub Blocks (overcommit/used/overcommit %): 0/4/0Volume Metadata size: 590675968UUID: 52a59b7e-52d2fb6c-11d6-001ec9d631cbPartitions spanned (on "lvm"):naa.600a098044314c6c442b446d51376749:1naa.600a098054314c6c445d446f79716431:1naa.600a098054314c6c445d446f79716433:1Is Native Snapshot Capable: YES
7. Note the first device name and partition number.
Example
In the preceding example, naa.600a098044314c6c442b446d51376749:1 is the device nameand partition number.
8. Use the device ID and partition number to enable CAW on the datastore:
~# vmkfstools --configATSOnly 1 /vmfs/devices/disks/device-ID:Partition
9. Verify that the VMFS volume has been configured with ATS only:
# vmkfstools -Ph -v1 /vmfs/volumes/VMFS-volume-name
Example
VMFS-5.54 file system spanning 1 partitions.File system label (if any): ats-test-1Mode: public ATS-only
Related tasks
Remounting VMFS volumes after transition using vSphere Client on page 19
Remounting VMFS volumes after transition using the ESXi CLI on page 20
Related information
VMware documentation
26 | SAN Host Transition and Remediation Guide

RHEL host remediation
If you are using the 7-Mode Transition Tool (7MTT) to move from Data ONTAP operating in 7-Mode to clustered Data ONTAP in a SAN environment, you must perform a series of steps on yourRed Hat Enterprise Linux (RHEL) hosts based on your LUN type before and after the transition toavoid transition complications.
7MTT transitions only support RHEL 5 and RHEL 6.
Related concepts
Transitioning RHEL DMMP devices without file systems on page 28
Transitioning LUNs with mount points using DMMP device names on page 33
Transitioning LUNs with mount points using DMMP alias names on page 40
Transitioning Linux host file systems on LVM devices on page 45
Transitioning of SAN boot LUNs on page 50
Gathering pretransition information from the InventoryAssessment Workbook
There is information in the Inventory Assessment Workbook that you need in various phases of thetransition. You should gather and record this information before you begin the transition so that youcan reference it as needed throughout the process.
Steps
1. Use the Inventory Collect Tool (ICT) to generate the Inventory Assessment Workbook.
2. Open the Inventory Assessment Workbook.
3. Go to the LUN tab.
4. In the LUN name column, identify and record the name of the LUN to be transitioned.
5. Go to the SAN Host LUNs tab.
6. In the SCSI Device ID column, identify and record the SCSI device name.
7. In the OS Device ID column, identify and record the DMMP device name for the LUN to betransitioned.
8. In the Filesystems column, identify and record the file system configured on the DMMP device.
9. In the UUID column, identify and record the UUID number for the LUN.
10. In the Mount column, identify and record the directory on which the DMMP device is mounted.
11. Go to the LVMs tab.
12. In the Physical Volume Name column, identify and record the DMMP devices that are used bythe logical volume.
13. Go to the SAN Host LVMs tab.
14. In the Volume Group Name column, identify and record the volume group.
15. In the Logical Volume Path column, identify and record the logical volume.
27
16. Go to the SAN Host Filesystems tab.
17. In the Filesystem column, identify and record the file system configured on the logical volume.
18. In the Mount column, identify and record the directory to which the logical volumes aremounted.
19. Go to the GRUB Configuration tab.
20. In the initrd column, identify and record the initrd image to be modified.
21. Go to the SAN Host HBAs tab.
You can also see the iSCSI SAN Interfaces tab to identify the iSCSI IQN number and IPaddresses that are configured on 7-Mode controllers.
22. In the Target IPs (iSCSI) column identify and record the iSCSI sessions for the 7-Modecontrollers.
Related concepts
What the Inventory Collect Tool is on page 10
What the Inventory Collect Tool is
The Inventory Collect Tool (ICT) is a stand-alone utility for collecting configuration and inventoryinformation about 7-Mode storage controllers, hosts attached to controllers, and applications runningon these hosts for assessing the transition readiness of these systems. You can use the ICT to generateinformation about your LUNs and the configuration that you need for transition.
The ICT generates an Inventory Assessment Workbook and an Inventory Report XML file thatcontains configuration details of the storage and host systems.
The ICT is available for ESXi, 5.x, ESXi 6.x, and Windows hosts.
Transitioning RHEL DMMP devices without file systemsBefore transition of a Red Hat Enterprise Linux (RHEL) DMMP device without a file system, youmust verify that the DMMP device does not have a file system. You must also perform specific stepsto prepare for the cutover phase, and after transition you must replace the WWID.
Related tasks
Verifying that RHEL LUNs are ready for transition using the Inventory Assessment Workbook onpage 29
Verifying that RHEL 5 LUNs are ready for transition using the CLI on page 29
Verifying that RHEL 6 DDMP devices are ready for transition using CLI on page 29
Preparing for cutover when transitioning a Linux host DMMP device without a file system on page31
Replacing 7-Mode LUN WWIDs on Linux hosts after transition of LUNs on page 32
28 | SAN Host Transition and Remediation Guide

Verifying that RHEL LUNs are ready for transition using the InventoryAssessment Workbook
If your Red Hat Enterprise Linux (RHEL) 5 or RHEL 6 LUN is configured with a device mappermultipath (DMMP), you should verify that a file system is not configured before you transition theLUN from Data ONTAP operating in 7-Mode to clustered Data ONTAP.
About this task
This procedure applies to copy-based transitions and copy-free transitions.
Steps
1. Gather pretransition information from the Inventory Assessment Workbook.
2. Check whether the DMMP device entry is present under the SAN Host File system tab.
If the DMMP device entry is not present, a file system is not configured and you can transitionthe LUN.
Verifying that RHEL 5 LUNs are ready for transition using the CLI
If your Red Hat Enterprise Linux (RHEL) 5 LUN is configured with a device mapper multipath(DMMP), you should verify that a file system is not configured before you transition the LUN fromData ONTAP operating in 7-Mode to clustered Data ONTAP.
Steps
1. Locate the SCSI device name for the LUN to be transitioned:
sanlun lunshow
2. Identify the DMMP device name for the LUN:
multipath -11
The DMMP device name can be a device handle ID (WWID) such as360a980003753456258244538554b4b53, or it can be an alias, such as, dmmp_raw_lun.
3. Verify that the LUN does not have a file system:
dumpe2fs/dev/mapper/DMMP device name
If the LUN does not have a file system, Couldn't find valid filesystem superblock isdisplayed in the output.
Verifying that RHEL 6 DDMP devices are ready for transition using CLI
Before you transition your Red Hat Enterprise Linux (RHEL) 6 DMMP device, you must verify thatit is not part of a Logical Volume Manager (LVM) and that it does not have a file system.
Steps
1. Gather pretransition information from the Inventory Assessment Workbook.
2. Verify that the DMMP device exists in the /dev/mapper directory:
ls /dev/mapper/ DMMP_device_name
If the DMMP device is not displayed, the device might be using an alias or a user-friendly name.
3. Determine whether the DMMP device is part of an LVM and whether the DMMP device has afile system:
RHEL host remediation | 29

blkid
If the DMMP device is not part of an LVM and has no file system the device entry should not bedisplayed in blkid output.
Testing DMMP devices without file systems on RHEL hosts before thecutover phase of copy-based transitions
If you are using the 7-Mode Transition Tool (7MTT) 2.2 or later and Data ONTAP 8.3.2 or later totransition your Red Hat Enterprise Linux (RHEL) 5 host, you can test your transitioned clusteredData ONTAP LUNs to verify that you can bring your host and applications online before the cutoverphase. Your source host can continue to run I/O to your source 7-Mode LUNs during testing.
Before you begin
Your new clustered Data ONTAP LUNs must be mapped to your test host and your LUNs must beready for transition.
About this task
You should maintain hardware parity between the test host and the source host and you shouldperform the following steps on the test host.
Your clustered Data ONTAP LUNs are in read/write mode during testing. They convert to read-onlymode when testing is complete and you are preparing for the cutover phase.
Steps
1. After the baseline data copy is complete, select Test Mode in the 7MTT user interface (UI).
2. In the 7MTT UI, click Apply Configuration.
3. Rescan your new clustered Data ONTAP LUNs on the test host:
rescan-scsi-bus.sh
4. Obtain the new SCSI device names for the clustered Data ONTAP LUNs:
sanlun lun show
Example
In the following example, /dev/sdl is the SCSI device name for the lun_dmmp_raw LUN,and /dev/sdk is the SCSI device name for the lun_dmmp_raw_alias LUN:
[root@ibmx3550-229-108 /]# sanlun lun showcontroller(7mode/E-Series)/vserver (cDOT/FlashRay lun-pathname filename------------------------------------------------------------------------vs_brb /vol/dmmp_raw_vol/lun_dmmp_raw /dev/sdlvs_brb /vol/dmmp_raw_alias_vol/lun_dmmp_raw_alias /dev/sdk
5. Obtain the device handle IDs (WWIDs) for the clustered Data ONTAP LUNs:
/sbin/scsi_id -g-u-s /block/SCSI_device_name
Example
The following is an example of a WWID: “3600a09804d532d79565d47617679764d”
6. Check whether an alias is defined in the /etc/multipath.conf file on the source host.
30 | SAN Host Transition and Remediation Guide

7. If there is an alias defined on the source host, add the alias to the /etc/multipath.conf file onthe test host, but replace the 7-Mode device handle ID with the clustered Data ONTAP LUN ID.
8. Update the DMMP alias settings:
multipath
9. Verify that the DMMP alias name correctly references the clustered Data ONTAP LUN:
multipath -ll
10. Perform your testing as needed.
11. After you have completed your testing, shut down the test host:
shutdown -h -t0 now
12. In the 7MTT UI, click Finish Testing.
After you finish
If your clustered Data ONTAP LUNs are to be remapped to your source host, you must prepare yoursource host for the cutover phase. If your clustered Data ONTAP LUNs are to remain mapped to yourtest host, no further steps are required on the test host.
Related tasks
Gathering pretransition information from the Inventory Assessment Workbook on page 27
Verifying that RHEL LUNs are ready for transition using the Inventory Assessment Workbook onpage 29
Preparing for cutover when transitioning a Linux host DMMP device without a file system on page31
Preparing for cutover when transitioning a Linux host DMMP device withouta file system
If you are transitioning a DMMP device without a file system from a Linux host, there are severalsteps you must perform before entering the cutover phase.
Before you begin
For FC configurations, you must have fabric connectivity and zoning to clustered Data ONTAPcontrollers.
For iSCSI configurations, your iSCSI sessions must be discovered and logged in to your clusteredData ONTAP controllers.
About this task
• For copy-based transitions, perform these steps before initiating the Storage Cutover operation inthe 7-Mode Transition Tool (7MTT).
• For copy-free transitions, perform these steps before initiating the Export & Halt 7-Modeoperation in 7MTT.
Steps
1. Stop I/O to the mount points.
2. Shut down the applications that are accessing the LUNs according to the application vendor'srecommendations.
RHEL host remediation | 31

3. Flush the 7-Mode LUN DMMP device or alias:
multipath -f device_name
If needed, you can get the DMMP device name from the OS Device ID column under the SANHost LUNs tab in the Inventory Assessment Workbook.
Replacing 7-Mode LUN WWIDs on Linux hosts after transition of LUNs
After LUN transition, the 7-Mode LUN WWID changes. You must replace it with the correspondingONTAP LUN WWID before you can begin servicing data.
Before you begin
If you are doing a copy-free transition (CFT), then procedures for vol rehost must be complete.
See the 7-Mode Transition Tool Copy-Free Transition Guide for details.
About this task
• For copy-based transitions (CBTs), perform these steps after completing the Storage cutoveroperation in the 7MTT.
• For CFTs, perform these steps after the Import Data & Configuration operation in the 7MTT iscomplete.
Steps
1. Generate the 7-Mode to ONTAP LUN mapping file:
• For CBTs, run the following command from the Linux host where the 7MTT is installed:
transition cbt export lunmap -p project-name -o file_path
For example:
transition cbt export lunmap -p SanWorkLoad -o c:/Libraires/Documents/7-to-C-LUN-MAPPING.csv
• For CFTs, run the following command from the system where the 7MTT is installed:
transition cft export lunmap -p project-name -s svm-name -o output-file
For example:
transition cft export lunmap -p SanWorkLoad -s svml -0 c:/Libraries/Documents/7-to-C-LUN-MAPPING-svml.csv
Note: You must run this command for each of your Storage Virtual Machines (SVMs).
2. Make a note of the new ONTAP LUN device handle ID from the LUN mapping file.
3. Remove the SCSI devices created for 7-Mode LUNs:
• To remove all of the SCSI devices:
rescan-scsi-bus.sh -r
• To remove each SCSI device individually:
echo 1> /sys/block/SCSI_ID/delete
This command must be executed on all 7-Mode LUN SCSI devices. See the SCSI Device IDcolumn on the SAN Host LUNs tab of the Inventory Assessment Workbook to identify theSCSI device IDs for the LUNs.
4. Discover new ONTAP LUNs:
rescan-scsi-bus.sh
32 | SAN Host Transition and Remediation Guide

5. Identify the SCSI devices of the new ONTAP LUNs:
sanlun lun show
6. Get the WWIDs for the new ONTAP LUNs:
/lib/udev/scsi_id -g -u -d /dev SCSI_dev
7. If a DMMP alias is defined, then update the /etc/multipath.conf file to replace the 7-ModeLUN WWID with its corresponding ONTAP LUN WWID, so that the DMMP alias points to theclustered Data ONTAP LUN:
cat /etc/multipath.conf
8. Configure the DMMP devices:
multipath
9. Verify that the DMMP alias is correctly referencing the ONTAP LUN WWID:
multipath -11
Example
In the following sample output, the DMMP alias dmmp_raw_lun is referencing3600a098051764b2d4f3f453135452d31 as the ONTAP WWID:
root@IBMx3550M3-229-169 ~]# multipath -ll dmmp_raw_lundmmp_raw_lun (3600a098051764b2d4f3f453135452d31) dm-8 NETAPP, LUN C-Mode[size=1.0G] [features=3 queue_if_no_path pg_init_retries 50] [hwhandler=1 alua] [rw]\_round-robin 0 [prio=50][enabled] \_5:0:0:6 sdx 65:112 [active][ready] \_8:0:0:6 sdab 65:176 [active][ready]\_round-robin 0 [prio=10][enabled] \_6:0:0:6 sdy 65:128 [active][ready] \_7:0:0:6 sdaa 65:160 [active][ready]
Related information
Copy-free transition
Copy-based transition
Transitioning LUNs with mount points using DMMP devicenames
Before transitioning a LUN with a mount point using a DMMP device name, you must replace theDMMP device name with its corresponding file system UUID number. You must perform specificsteps to prepare for the cutover phase and you must remount the DMMP devices on the host aftertransition. You perform the same procedures for Red Hat Enterprise Linux (RHEL) 5 and RHEL 6.
Related tasks
Preparing RHEL LUNs with mount points using DMMP device names for transition using theInventory Assessment Workbook on page 34
Preparing RHEL LUNs with mount points using DMMP alias names for transition using the CLIon page 35
Preparing for the cutover phase when transitioning LUNs with mount points using DMMP devicenames on Linux hosts on page 37
Remounting DMMP devices on Linux hosts after transition on page 38
RHEL host remediation | 33

Preparing RHEL LUNs with mount points using DMMP device names fortransition using the Inventory Assessment Workbook
Before transition of a LUN with a mount point using a DMMP device name, you must replace theDMMP device name with its respective file system UUID number. This applies to Red Hat EnterpriseLinux (RHEL) 5 and RHEL 6.
About this task
This procedure applies to copy-based transitions and copy-free transitions.
Steps
1. Gather pretransition information from the Inventory Assessment Workbook.
Specifically, you need the following information:
• The file system configured on the DMMP device
• The directory on which the DMMP device is mounted
• The file system UUID for the DMMP device
2. Verify that the mount points for the DMMP device are defined in the /etc/fstab file.
3. Create a backup of the file:
cp /etc/fstab /etc/fstab_pre_transition
4. Edit the /etc/fstab file to replace the DMMP device name with its respective file systemUUID number.
Example
In the following example, the DMMP device /dev/mapper/360a9800037534562572b453855496b41 is replaced by UUIDa073547e-00b6-4bf9-8e08-5eef08499a9c:
[root@IBMx3550M3-229-169 ~]# cat /etc/fstab/dev/VolGroup00/LogVol00 / ext3 defaults 1 1LABEL=/boot /boot ext3 defaults 1 2tmpfs /dev/shm tmpfs defaults 0 0devpts /dev/pts devpts gid=5, mode=620 0 0sysfs /sys sysfs defaults 0 0proc /proc proc defaults 0 0/dev/VolGroup00/LogVol01 swap swap defaults 0 0 /dev/mapper/test_vg-test_lv /mnt/lvm_ext3 ext3 defaults,_netdev 0 0UUID=a073547e-00b6-4bf9-8e08-5eef08499a9c /mnt/dmmp_ext3 ext3 defaults,_netdev 0 0
Related tasks
Gathering pretransition information from the Inventory Assessment Workbook on page 27
34 | SAN Host Transition and Remediation Guide

Preparing RHEL LUNs with mount points using DMMP alias names fortransition using the CLI
Before transition of a mount point using a DMMP device name, you must replace the DMMP devicename with its respective file system UUID number.
About this task
This procedure applies to copy-based transitions and copy-free transitions.
Steps
1. Identify and record the SCSI device ID for the LUN to be transitioned:
sanlun lun show
The SCSI device ID is listed under the filename column in the output.
2. Identify and record the DMMP device name for the LUN to be transitioned:
multipath -ll SCSI_device_ID
Example
In the following example, 360a9800037534562572b453855496b41 is the DMMP devicename:
[root@IBMx3550M3-229-169 ~]# multipath -ll /dev/sdcdmmp_fs_lun (360a9800037534562572b453855496b41) dm-3 NETAPP, LUN[size=1.0G] [features=3 queue_if_no_path pg_init_retries 50] [hwhandler=0][rw]\_ round-robin 0 [prio=2][active] \_ 9:0:0:1 sdc 8:32 [active][ready] \_ 9:0:0:1 sdg 8:96 [active][ready]
3. Identify the file system configured on the DMMP device:
blkid | grep -i DMMP_device_name
The TYPE value in the output identifies the file system.
Example
In the following example, the file system is ext3.
[root@ibmx3550-229-108 ~]#blkid | grep -i 3600a09804d532d79565d47617679658/dev/mapper/3600a09804d532d79565d47617679658: UUID="450b999a-4f51-4828-8139-29b20d2f8708" TYPE="ext3" SEC_TYPE="ext2"
4. Identify the UUID number for the LUN:
dumpe2fs device_path_name | grep UUID
5. Identify the directory on which the DMMP device is mounted:
df -h
Example
In the following example, /mnt/dmmp_ext3 represents the directory on which the DMMPdevice is mounted:
RHEL host remediation | 35

[root@IBMx3550M3-229-169 ~]# df -hFilesystem Size Used Avail Use% Mounted on/dev/mapper/dmmp_fs_lun1008M 34M 924M 4% /mnt/dmnp_ext3
6. Verify in the /etc/fstab file that the mount points for the DMMP device are defined:
cat /etc/fstab
The DMMP device name and mount directory should be displayed in the output.
7. Create a backup of the /etc/fstab file:
cp /etc/fstab /etc/fstab_pre_transition_bkup
8. Edit the /etc/fstab file to replace the DMMP device name with its respective file systemUUID number.
Testing DMMP devices with file systems on RHEL hosts before the cutoverphase of copy-based transitions
If you are using the 7-Mode Transition Tool (7MTT) 2.2 or later and Data ONTAP 8.3.2 or later toperform a copy-based transition of your Red Hat Enterprise Linux (RHEL) host, you can test yourtransitioned clustered Data ONTAP LUNs to verify that you can mount your DMMP device beforethe cutover phase. Your source host can continue to run I/O to your source 7-Mode LUNs duringtesting.
Before you begin
Your new clustered Data ONTAP LUNs must be mapped to your test host and your LUNs must beready for transition.
About this task
You should maintain hardware parity between the test host and the source host.
Perform these steps on the test host.
Steps
1. After the baseline data copy is complete, select Test Mode in the 7MTT user interface (UI).
2. In the 7MTT UI, click Apply Configuration.
3. Obtain the new SCSI device names for the clustered Data ONTAP LUNs:
sanlun lun show
Example
In the following example, /dev/sdl is the SCSI device name for the lun_dmmp_raw LUN,and /dev/sdk is the SCSI device name for the lun_dmmp_raw_alias LUN:
[root@ibmx3550-229-108 /]# sanlun lun showcontroller(7mode/E-Series)/vserver (cDOT/FlashRay) lun-pathname filename-----------------------------------------------------------vs_brb /vol/dmmp_raw_vol/lun_dmmp_raw /dev/sdlvs_brb /vol/dmmp_raw_alias_vol/lun_dmmp_raw_alias /dev/sdk
4. Configure the DMMP devices for your clustered Data ONTAP LUNs:
multipath
36 | SAN Host Transition and Remediation Guide
5. Obtain the device handle ID for the clustered Data ONTAP LUNs:
multipath -ll
Example
The following is an example of a device handle ID: “3600a09804d532d79565d47617679764d”
6. Identify the file system configured on the DMMP device:
blkid | grep -i device_handle_ID
7. Determine whether a mount point entry for the logical volume exists in the /etc/fstab file onthe source host.
8. If a mount point entry exists for the logical volume on the source host, manually edit the /etc/fstab file on the test host to add the mount point entries.
9. Mount the LUN:
mount -a
10. Verify that the DMMP device is mounted:
mount
11. Perform your testing as needed.
12. After you have completed your testing, shut down the test host:
shutdown -h -t0 now
13. In the 7MTT UI, click Finish Testing.
After you finish
If your clustered Data ONTAP LUNs are to be remapped to your source host, you must prepare yoursource host for the cutover phase. If your clustered Data ONTAP LUNs are to remain mapped to yourtest host, no further steps are required on the test host.
Related tasks
Gathering pretransition information from the Inventory Assessment Workbook on page 27
Preparing for the cutover phase when transitioning LUNs with mount points using DMMP devicenames on Linux hosts on page 37
Preparing for the cutover phase when transitioning LUNs with mountpoints using DMMP device names on Linux hosts
If you are transitioning a LUN with a mount point using an alias name on a Linux host, there areseveral steps you must perform before entering the cutover phase.
Before you begin
For FC configurations, you must have fabric connectivity and zoning to clustered Data ONTAPcontrollers.
For iSCSI configurations, your iSCSI sessions must be discovered and logged in to your clusteredData ONTAP controllers.
About this task
• For copy-based transitions, perform these steps before initiating the Storage Cutover operation inthe 7-Mode Transition Tool (7MTT).
RHEL host remediation | 37

• For copy-free transitions, perform these steps before initiating the Export & Halt 7-Mode Systemsoperation in the 7MTT.
Steps
1. Stop I/O to the mount points.
2. Shut down the applications that are accessing the LUNs according to the application vendor'srecommendations.
3. Unmount DMMP devices:
umount dir_name
4. Flush the 7-Mode LUN DMMP device ID:
multipath -f device_name
If needed, you can get the DDMP device name from the OS Device ID column under the SANHost LUNs tab in the Inventory Assessment Workbook.
Related tasks
Gathering pretransition information from the Inventory Assessment Workbook on page 27
Remounting DMMP devices on Linux hosts after transition
After transition from ONTAP operating in 7-Mode to clustered Data ONTAP, you must remount yourDMMP devices for RHEL 5 and RHEL 6. Your 7-Mode LUNs are not accessible to the host untilyour DMMP devices are mounted.
Before you begin
If you are doing a copy-free transition (CFT), procedures for vol rehost must be complete. See the7-Mode Transition Tool Copy-Free Transition Guide for details.
About this task
• For copy-based transitions, perform these steps after completing the Storage cutover operation inthe 7-Mode Transition Tool (7MTT).
• For CFTs perform these steps after the Import Data & Configuration operation in the 7MTT iscomplete.
Steps
1. Generate the 7-Mode to ONTAP LUN mapping file:
• For copy-based transitions, run the following command from the Linux host where the 7MTTis installed:
transition cbt export lunmap -p project-name -o file_path
For example:
transition cbt export lunmap -p SanWorkLoad -o c:/Libraires/Documents/7-to-C-LUN-MAPPING.csv
• For copy-free transitions, run the following command from the system where the 7MTT isinstalled:
transition cft export lunmap -p project-name -s svm-name -o output-file
For example:
38 | SAN Host Transition and Remediation Guide

transition cft export lunmap -p SanWorkLoad -s svml -0 c:/Libraries/Documents/7-to-C-LUN-MAPPING-svml.csv
Note: You must run this command for each of your Storage Virtual Machines (SVMs).
2. Make a note of the new ONTAP LUN device handle ID from the LUN mapping file.
3. Remove the SCSI devices created for 7-Mode LUNs:
• To remove all of the SCSI devices:
rescan-scsi-bus.sh -r
• To remove each SCSI device individually:
echo 1> /sys/block/SCSI_ID/delete
This command must be executed on all 7-Mode LUN SCSI devices. See the SCSI Device IDcolumn on the SAN Host LUNs tab of the Inventory Assessment Workbook to identify theSCSI device IDs for the LUNs.
4. Discover newONTAP LUNs:
rescan-scsi-bus.sh
5. Verify that the ONTAP LUNs are discovered:
sanlun lun show
The ONTAP LUN's SCSI devices should be listed under the filename column.
6. Configure DMMP devices for ONTAP LUNs:
multipath
7. Verify that the DMMP devices are present:
multipath -ll LUN_SCSI_device_name
Example
In the following example, 3600a098051764937303f4479515a7451 represents the DMMPdevice handle ID:
[root@IBMx3550M3-229-169 ~]#multipath -ll /dev/sdq3600a098051764937303f4479515a7451 dm-6 NETAPP,LUN C-Mode
8. Mount the LUN:
mount device_name mountpoint
If the mount points are defined in the /etc/fstab file, you can run the mount -a command tomount all of the mount points.
9. Verify the mount points:
mount
Related information
Copy-free transition
Copy-based transition
RHEL host remediation | 39

Transitioning LUNs with mount points using DMMP aliasnames
When you transition a LUN with a mount point using an alias name, you must perform specific stepsto prepare for the cutover phase and you must remount the LUNs after the transition.
Related tasks
Preparing for the cutover phase when transitioning LUNs with mount points using DMMP devicenames on Linux hosts on page 37
Remounting LUNs with mount points using DMMP alias names on Linux hosts after transition onpage 43
Preparing RHEL LUNs with mount points using DMMP alias names fortransition using the CLI
Before transition of a mount point using a DMMP device name, you must replace the DMMP devicename with its respective file system UUID number.
About this task
This procedure applies to copy-based transitions and copy-free transitions.
Steps
1. Identify and record the SCSI device ID for the LUN to be transitioned:
sanlun lun show
The SCSI device ID is listed under the filename column in the output.
2. Identify and record the DMMP device name for the LUN to be transitioned:
multipath -ll SCSI_device_ID
Example
In the following example, 360a9800037534562572b453855496b41 is the DMMP devicename:
[root@IBMx3550M3-229-169 ~]# multipath -ll /dev/sdcdmmp_fs_lun (360a9800037534562572b453855496b41) dm-3 NETAPP, LUN[size=1.0G] [features=3 queue_if_no_path pg_init_retries 50] [hwhandler=0][rw]\_ round-robin 0 [prio=2][active] \_ 9:0:0:1 sdc 8:32 [active][ready] \_ 9:0:0:1 sdg 8:96 [active][ready]
3. Identify the file system configured on the DMMP device:
blkid | grep -i DMMP_device_name
The TYPE value in the output identifies the file system.
Example
In the following example, the file system is ext3.
40 | SAN Host Transition and Remediation Guide

[root@ibmx3550-229-108 ~]#blkid | grep -i 3600a09804d532d79565d47617679658/dev/mapper/3600a09804d532d79565d47617679658: UUID="450b999a-4f51-4828-8139-29b20d2f8708" TYPE="ext3" SEC_TYPE="ext2"
4. Identify the UUID number for the LUN:
dumpe2fs device_path_name | grep UUID
5. Identify the directory on which the DMMP device is mounted:
df -h
Example
In the following example, /mnt/dmmp_ext3 represents the directory on which the DMMPdevice is mounted:
[root@IBMx3550M3-229-169 ~]# df -hFilesystem Size Used Avail Use% Mounted on/dev/mapper/dmmp_fs_lun1008M 34M 924M 4% /mnt/dmnp_ext3
6. Verify in the /etc/fstab file that the mount points for the DMMP device are defined:
cat /etc/fstab
The DMMP device name and mount directory should be displayed in the output.
7. Create a backup of the /etc/fstab file:
cp /etc/fstab /etc/fstab_pre_transition_bkup
8. Edit the /etc/fstab file to replace the DMMP device name with its respective file systemUUID number.
Testing LUNs with mount points using DMMP alias names on RHEL hostsbefore the cutover phase of copy-based transitions
If you are using the 7-Mode Transition Tool (7MTT) 2.2 or later and Data ONTAP 8.3.2 or later toperform a copy-based transition of your Red Hat Enterprise Linux (RHEL) host, you can test yourtransitioned clustered Data ONTAP LUNs with mount points using alias names before the cutoverphase. Your source host can continue to run I/O to your source 7-Mode LUNs during testing.
Before you begin
Your new clustered Data ONTAP LUNs must be mapped to your test host and your LUNs must beready for transition.
About this task
You should maintain hardware parity between the test host and the source host and you shouldperform the following steps on the test host.
Your clustered Data ONTAP LUNs are in read/write mode during testing. They convert to read-onlymode when testing is complete and you are preparing for the cutover phase.
Steps
1. After the baseline data copy is complete, select Test Mode in the 7MTT user interface (UI).
2. In the 7MTT UI, click Apply Configuration.
RHEL host remediation | 41

3. Obtain the new SCSI device names for the clustered Data ONTAP LUNs:
sanlun lun show
Example
In the following example, /dev/sdl is the SCSI device name for the lun_dmmp_raw LUN,and /dev/sdk is the SCSI device name for thelun_dmmp_raw_alias
LUN:
[root@ibmx3550-229-108 /]# sanlun lun showcontroller(7mode/E-Series)/vserver (cDOT/FlashRay) lun-pathname filename-----------------------------------------------------------------vs_brb /vol/dmmp_raw_vol/lun_dmmp_raw /dev/sdlvs_brb /vol/dmmp_raw_alias_vol/lun_dmmp_raw_alias /dev/sdk
4. Configure the DMMP devices for your clustered Data ONTAP LUNs:
multipath
5. Obtain the device handle IDs for the clustered Data ONTAP LUNs:
multipath -ll
Example
The following is an example of a device handle ID: “3600a09804d532d79565d47617679764d”
6. Check whether an alias is defined in the /etc/multipath.conf file on the source host.
7. Manually copy the alias configuration to the /etc/multipath.conf file on the test host, butreplace the 7-Mode device handle ID with the corresponding clustered Data ONTAP devicehandle ID.
8. Use the multipath command to configure DMMP devices for your clustered Data ONTAPLUNs.
9. Identify the file system created on the DMMP alias device:
blkid dmmp_device_name
10. Mount the DMMP device:
mount
11. Perform your testing as needed.
12. After you have completed your testing, shut down the test host:
shutdown -h -t0 now
13. In the 7MTT UI, click Finish Testing.
After you finish
If your clustered Data ONTAP LUNs are to be remapped to your source host, you must prepare yoursource host for the cutover phase. If your clustered Data ONTAP LUNs are to remain mapped to yourtest host, no further steps are required on the test host.
Related tasks
Gathering pretransition information from the Inventory Assessment Workbook on page 27
42 | SAN Host Transition and Remediation Guide

Preparing for the cutover phase when transitioning LUNs with mount points using DMMP devicenames on Linux hosts on page 37
Preparing for the cutover phase when transitioning LUNs with mountpoints using DMMP device names on Linux hosts
If you are transitioning a LUN with a mount point using an alias name on a Linux host, there areseveral steps you must perform before entering the cutover phase.
Before you begin
For FC configurations, you must have fabric connectivity and zoning to clustered Data ONTAPcontrollers.
For iSCSI configurations, your iSCSI sessions must be discovered and logged in to your clusteredData ONTAP controllers.
About this task
• For copy-based transitions, perform these steps before initiating the Storage Cutover operation inthe 7-Mode Transition Tool (7MTT).
• For copy-free transitions, perform these steps before initiating the Export & Halt 7-Mode Systemsoperation in the 7MTT.
Steps
1. Stop I/O to the mount points.
2. Shut down the applications that are accessing the LUNs according to the application vendor'srecommendations.
3. Unmount DMMP devices:
umount dir_name
4. Flush the 7-Mode LUN DMMP device ID:
multipath -f device_name
If needed, you can get the DDMP device name from the OS Device ID column under the SANHost LUNs tab in the Inventory Assessment Workbook.
Related tasks
Gathering pretransition information from the Inventory Assessment Workbook on page 27
Remounting LUNs with mount points using DMMP alias names on Linuxhosts after transition
After transition from ONTAP operating in 7-Mode to clustered Data ONTAP, you must remount yourLUNs with mount points. The7-Mode volumes are offline and the 7-Mode LUNs are not accessibleto your hosts.
Before you begin
If you are doing a copy-free transition (CFT), procedures for vol rehost must be complete.
See the 7-Mode Transition Tool Copy-Free Transition Guide for details.
RHEL host remediation | 43

About this task
• For copy-based transitions (CBTs), perform these steps after completing the Storage Cutoveroperation in the 7MTT.
• For CFTs, perform these steps after the Import Data & Configuration operation in the 7MTT.
Steps
1. Generate the 7-Mode to ONTAP LUN mapping file:
• For copy-based transitions, run the following command from the Linux host where the 7MTTis installed:
transition cbt export lunmap -p project-name -o file_path
For example:
transition cbt export lunmap -p SanWorkLoad -o c:/Libraires/Documents/7-to-C-LUN-MAPPING.csv
• For copy-free transitions, run the following command from the system where the 7MTT isinstalled:
transition cft export lunmap -p project-name -s svm-name -o output-file
For example:
transition cft export lunmap -p SanWorkLoad -s svml -0 c:/Libraries/Documents/7-to-C-LUN-MAPPING-svml.csv
Note: You must run this command for each of your Storage Virtual Machines (SVMs).
2. Make a note of the ONTAP device handle ID in the LUN mapping file.
3. Remove the SCSI devices created for 7-Mode LUNs:
• To remove all of the SCSI devices:
rescan-scsi-bus.sh -r
• To remove each SCSI device individually:
echo 1> /sys/block/SCSI_ID/delete
This command must be executed on all 7-Mode LUN SCSI devices. See the SCSI Device IDcolumn on the SAN Host LUNs tab of the Inventory Assessment Workbook to identify theSCSI device IDs for the LUNs.
4. Discover the new ONTAP LUNs:
rescan-scsi-bus.sh
5. Verify that the ONTAP LUNs are discovered:
sanlun lun show
The ONTAP LUN's SCSI devices should be listed in the device filename column.
Example
An example of a SCSI device name is /dev/sdp.
6. In the /etc/multipath.conf file, replace the 7-Mode device handle ID with the clustered DataONTAP LUN's device handle ID so that the alias name points to the clustered Data ONTAPLUN ID.
44 | SAN Host Transition and Remediation Guide

Example
You should update the multipaths section as displayed below. The following example showsthe /etc/multipath.conf file, before replacing the 7-Mode LUN ID. In this example, theLUN ID 360a9800037534562572b453855496b43 is pointing to the dmmp_fs_lun aliasname.
multipaths { multipath { wwid 360a9800037534562572b453855496b43 alias dmmp_fs_lun }}
After replacing the 7-Mode LUN ID with the ONTAP LUN ID360a9800037534562572b453855496b43, the example files looks as follows:
multipaths { multipath { wwid 3600a098051764937303f4479515a7452 alias dmmp_fs_lun }}
7. Configure DMMP devices for ONTAP LUNs:
multipath
8. Verify that the DMMP alias points to the ONTAP LUN device handle ID:
multipath -ll device_handle_ID
9. Mount the ONTAP LUN to its mount point directory:
mount /dev/mapper/alias_name mount_dir_name
If the mount points are defined in the /etc/fstab file, use the mount -a command to mountthe LUN.
10. Verify that the DMMP device is mounted:
mount
Related information
Copy-free transition
Transitioning Linux host file systems on LVM devicesWhen you transition a Linux host file system on a Logical Volume Manager (LVM), you mustperform specific steps to prepare for the cutover phase and you must mount the logical volumes afterthe transition.
Related tasks
Preparing for cutover phase when transitioning Linux host file systems on LVM devices on page48
Mounting logical volumes on Linux hosts after transition on page 49
RHEL host remediation | 45

Testing LUNs with file systems on LVM devices before the cutover phase ofcopy-based transitions
If you are using the 7-Mode Transition Tool (7MTT) 2.2 or later and Data ONTAP 8.3.2 or later toperform a copy-based transition of your Red Hat Enterprise Linux (RHEL) host, you can test yourtransitioned clustered Data ONTAP LUNs with file systems on LVM devices before the cutoverphase. Your source host can continue to run I/O to your source 7-Mode LUNs during testing.
Before you begin
• Your new clustered Data ONTAP LUNs must be mapped to the test host.
• Your LUNs must be ready for transition.
About this task
You should maintain hardware parity between the test host and the source host and you shouldperform the following steps on the test host.
Your clustered Data ONTAP LUNs are in read/write mode during testing. They convert to read-onlymode when testing is complete and you are preparing for the cutover phase.
During test mode you do not deactivate or export the volume group. For this reason, you might seefile system errors when you mount the logical volumes on the test host.
Steps
1. After the baseline data copy is complete, select Test Mode in the 7MTT user interface (UI).
2. In the 7MTT UI, click Apply Configuration.
3. On the test host, discover your new clustered Data ONTAP LUNs:
rescan-scsi-bus.sh
4. Verify that your new clustered Data ONTAP LUNs have been discovered:
sanlun lun show
5. Configure DMMP devices for your clustered Data ONTAP LUNs:
multipath
6. Obtain the device handle ID for the clustered Data ONTAP LUNs:
multipath -ll
Example
The following is an example of a device handle ID: “3600a09804d532d79565d47617679764d”
7. Identify the DMMP devices used by the LVM:
pvscan
Example
3600a09804d532d79565d476176797655 is an example of a DMMP device used by the LVM.
8. Identify the volume group:
vgscan
9. Identify the logical volume:
46 | SAN Host Transition and Remediation Guide

lvscan
10. Enable the logical volumes:
vgchange -ay volume_group
11. Verify the logical volume status:
lvdisplay
The LV Status column in the output should display available.
12. Determine whether a mount point entry for the logical volume exists in the /etc/fstab file onthe source host.
Example
In the following example, logical volume /dev/mapper/vg_7MTT-lv1 is displayed inthe /etc/fstab file:
# /etc/fstab...tmpfs /dev/shm tmpfs defaults 0 0devpts /dev/pts devpts gid=5, mode=620 0 0sysfs /sys sysfs defaults 0 0proc /proc proc defaults 0 0/dev/mapper/vg_7MTT-lv1 /7MTT ext4 defaults 0 0
13. If a mount point entry for the logical volume exists in the /etc/fstab file on the source host,manually edit the /etc/fstab file on the test host to add the mount point entry.
14. Mount the mount point:
mount -a
15. Verify that the mount points are mounted:
mount
16. Perform your testing as needed.
17. After you have completed your testing, shut down your host:
shutdown -h -t0 now
18. In the 7MTT UI, click Finish Testing.
After you finish
If your clustered Data ONTAP LUNs are to be remapped to your source host, you must prepare yoursource host for the cutover phase. If your clustered Data ONTAP LUNs are to remain mapped to yourtest host, no further steps are required on the test host.
Related tasks
Gathering pretransition information from the Inventory Assessment Workbook on page 27
Preparing for cutover phase when transitioning Linux host file systems on LVM devices on page48
RHEL host remediation | 47

Preparing for cutover phase when transitioning Linux host file systems onLVM devices
If you are transitioning a Linux host file system on a Logical Volume Manager (LVM) device, thereare steps you must perform before the cutover phase.
Before you begin
• For FC configurations, you must have fabric connectivity and zoning to clustered Data ONTAPcontrollers.
• For iSCSI configurations, your iSCSI sessions must be discovered and logged in to your clusteredData ONTAP controllers.
• You must have the following pretransition information gathered from the Inventory AssessmentWorkbook:
◦ The DMMP device names used by the LVM
◦ The volume group name
◦ The logical volume name
◦ The file system configured on the logical volume device
◦ The directory on which the logical volumes are mounted
About this task
• For copy-based transitions, perform these steps before initiating the Storage Cutover operation inthe 7-Mode Transition Tool (7MTT).
• For copy-free transitions, perform these steps before initiating the Export & Halt 7-Modeoperation in the 7MTT.
Steps
1. Stop I/O to LV mount points.
2. Shut down the applications accessing the LUNs according to application vendor'srecommendations.
3. Unmount the LV mount point:
umount dir_name
4. Disable the logical volume:
vgchange -an vg_name
5. Verify the logical volume status:
lvdisplay dir_name
The LV status should display “NOT available”.
6. Export the volume group:
vgexport vg_name
7. Verify the VG status:
vgdisplay vg_name
The VG status should display “exported”.
48 | SAN Host Transition and Remediation Guide

8. Flush the 7-Mode DDMP device IDs:
multipath -f device_name
Related tasks
Gathering pretransition information from the Inventory Assessment Workbook on page 27
Mounting logical volumes on Linux hosts after transition
After the transition from ONTAP operating in 7-Mode to clustered Data ONTAP, your logicalvolumes are offline. You must mount those logical volumes for your LUNs to be accessible to yourhosts.
Before you begin
If you are doing a copy-free transition (CFT), procedures for vol rehost must be complete. See the7-Mode Transition Tool Copy-Free Transition Guide for details.
About this task
• For copy-based transitions (CBTs), perform these steps after completing the Storage Cutoveroperation in the 7-Mode Transition Tool (7MTT).
• For CFTs, perform these steps after the Import Data & Configuration operation in the 7MTT.
Steps
1. Generate the 7-Mode to clustered Data ONTAP LUN mapping file:
• For copy-based transitions, run the following command from the Linux host where the 7MTTis installed:
transition cbt export lunmap -p project-name -o file_path
For example:
transition cbt export lunmap -p SanWorkLoad -o c:/Libraires/Documents/7-to-C-LUN-MAPPING.csv
• For copy-free transitions, run the following command from the system where the 7MTT isinstalled:
transition cft export lunmap -p project-name -s svm-name -o output-file
For example:
transition cft export lunmap -p SanWorkLoad -s svml -0 c:/Libraries/Documents/7-to-C-LUN-MAPPING-svml.csv
Note: You must run this command for each of your Storage Virtual Machines (SVMs).
2. Remove the SCSI devices created for 7-Mode LUNs:
• To remove all of the SCSI devices:
rescan-scsi-bus.sh -r
• To remove each SCSI device individually:
echo 1> /sys/block/SCSI_ID/delete
This command must be executed on all 7-Mode LUN SCSI devices. See the SCSI Device IDcolumn on the SAN Host LUNs tab of the Inventory Assessment Workbook to identify theSCSI device IDs for the LUNs.
RHEL host remediation | 49

3. Discover new ONTAP LUNs:
rescan-scsi-bus.sh
4. Configure DMMP devices for ONTAP LUNs:
multipath
5. Verify that ONTAP LUNs are discovered:
sanlun lun show
6. Determine the new ONTAP LUN device handle ID:
multipath -ll Device_handle_name
7. Import the volume group:
vgimport vg_name
8. Verify the volume group status:
vgdisplay
9. Enable logical volumes:
vgchange -ay vg_name
10. Verify the logical volume status:
lvdisplay
The LV status should be displayed as “available”.
11. Mount the logical volumes from the ONTAP LUN to its respective mount point directory:
mount lv_name mount_point
If the mount points are defined in the etc/fstab file, you can use the mount -a command tomount the logical volumes.
12. Verify the mount points:
mount
Related information
Copy-free transition
Copy-based transition
Transitioning of SAN boot LUNsYou must reboot SAN boot LUNs before you transition from Data ONTAP operating in 7-Mode toclustered Data ONTAP using the 7-Mode Transition Tool (7MTT). You must perform specific stepsto prepare for the cutover phase, and after transition you must discover your LUNs.
Related tasks
Preparing for transition of FC or FCoE SAN boot LUNs on RHEL hosts on page 51
Preparing for transition of iSCSI SAN boot LUNs on page 52
Discovering SAN boot LUNs after transition on page 56
50 | SAN Host Transition and Remediation Guide

Types of SAN boot LUNs supported for transition
Only certain types of SAN boot LUNs are supported for transition from Data ONTAP operating in 7-Mode to clustered Data ONTAP.
The following SAN boot LUNs are supported for transition:
• FC or FCoE SAN boot LUNs
• iSCSI SAN boot LUNs for Red Hat Enterprise Linux (RHEL) 6
Transition of iSCSI SAN boot LUNs for RHEL 5.x is not supported.
Preparing for transition of FC or FCoE SAN boot LUNs on RHEL hosts
Before you transition an FC or FCoE SAN boot LUN, you must perform specific steps on your RedHat Enterprise Linux (RHEL) host.
Before you begin
You must have the following information from the Inventory Assessment Workbook:
• 7-Mode LUN name on which RHEL 5 or RHEL 6 is installed
• SCSI device name for the transition LUN
• DMMP device name for the transition LUN
• Mount directory
• File system configured on the DMMP device
• UUID number of the /boot partition
• Name of the initrid image
About this task
This procedure applies to copy-based transitions and copy-free transitions.
Steps
1. Verify that the DMMP device exists in the /dev/mapper directory:
ls /dev/mapper/ DMMP_device_name
If you cannot locate the DMMP device, then it might be using an alias or user-friendly name.
2. Identify the DMMP devices and Logical Volume Manager (LVM) names on which the RHEL 5 orRHEL 6 operating system /boot and root (/) directories are installed:
df - h
By default, RHEL 5 and RHEL 6 are installed on the root (/) partition on the logical volume. Ifthe root partition is installed on the logical volume, then no pretransition changes to theconfiguration are required.
3. If the /boot partition is installed on the DMMP device, confirm how the /boot partition isreferenced to mount in /etc/fstab at boot time.
4. If the /boot partition is referenced in /etc/fstab by its DMMP device name, replace theDMMP device name with the file system UUID name.
5. Make a backup of the /etc/fstab file:
RHEL host remediation | 51

cp /etc/fstab /etc/fstab_pre_transition_file_name
6. Edit the /etc/fstab file to replace the DMMP device name with its respective file systemUUID number.
7. Make a backup of the initrd image file:
cp /boot/initrd_image_file_name initrd_image_file_name.bak
8. For RHEL 5 only:
a. In the /etc/mutipath.conf file, identify the SWAP partition device.
Example
In the following example, /dev/VolGroup00/LogVol01 is the SWAP partition device:/dev/VolGroup00/LogVol01 swap swap defaults 0 0
b. Create a label for mounting the swap partition:
swapoff swap-partition_device
mkswap -L label-for-swap swap-partition-device
swapon swap-partition_device
c. Replace the SWAP partition device name in the /etc/fstab file with THE SWAP label.
Example
The updated line in the /etc/fstab file should be as follows:
LABEL=SwapPartition swap swap defaults 0 0
9. Re-create the initrd image.
• For RHEL5:
mkinitrd -f/boot/ initrd-"'uname-r'".img 'uname-r' --with multipath
• For RHEL 6:
dracut --force --add multipath --verbose
10. Restart the host to boot from the new initrd image.
Related tasks
Gathering pretransition information from the Inventory Assessment Workbook on page 27
Preparing for transition of iSCSI SAN boot LUNs
Before you transition an iSCSI SAN boot LUN, you must perform specific steps on the host.Transition of Red Hat Enterprise Linux (RHEL) 5.x is not supported. Transition of RHEL 6 issupported.
Before you begin
You must have the following information from the Inventory Assessment Workbook:
• Name of the LUN that RHEL 6 is installed on
• DMMP device name for the transition LUN
• Logical volume (LV) name
52 | SAN Host Transition and Remediation Guide

• Volume group (VG) name
• Physical volume (PV) devices
• Logical Volume Manager (LVM) names and mount directories on which RHEL 6 /boot and root(/) partitions are installed
• File system configured on DMMP
• iSCSI sessions for 7-Mode controllers
• Grub information
• IQN number of the Storage Virtual Machine (SVM) where the iSCSI SAN boot LUN will becreated
• LIF IP address of the clustered Data ONTAP SVM where the iSCSI SAN boot LUN will becreated
About this task
This procedure applies to copy-based transitions and copy-free transitions.
Steps
1. Verify that the DMMP device exists in the /dev/mapper directory:
ls /dev/mapper/DMMP_device_name
If the DMMP device is not displayed, the device might be using an alias or a user-friendly name.
2. Determine whether the DMMP device is part of an LVM:
blkid
If the DMMP device TYPE value is LVM2_member, the DMMP is part of an LVM.
3. Obtain the mount point details of the / and /boot partitions from the /etc/fstab file:
• If the /boot partition is installed on a DMMP device, check how it is referenced to mount inthe /etc/fstab file at boot time.
• If the /boot partition is mounted using the file system UUID that you obtained using theblkid command output, then no pretransition change are required.
4. If the /boot partition is referenced in /etc/fstab file by its DMMP device name, replace theDMMP device name with the file system UUID name.
5. For iSCSI SAN booted hosts, edit the /boot/grub/grub.conf file to create a new kernelcommand-line entry that includes the clustered Data ONTAP controller’s IQN number and iSCSIsession information.
Example
This example shows the /boot/grub/grub.conf file before editing. The kernel command linehas the 7-Mode controller’s IQN number and iSCSI session information.
title Red Hat Enterprise Linux Server (2.6.32-431.el6.x86_64) root (hd0,0) kernel /vmlinuz-2.6.32-431.el6.x86_64 ro root=/dev/mapper/vg_ibmx3550m3229-LogVol00 ifname=eth0:5c:f3:fc:ba:46:d8 rd_NO_LUKS netroot=iscsi:@10.226.228.241::3260::iqn.1992-08.com.netapp:sn.1574168453 LANG=en_US.UTF-8 rd_LVM_LV=vg_ibmx3550m3229/LogVol01 rd_LVM_LV=vg_ibmx3550m3229/LogVol00 rd_NO_MD
RHEL host remediation | 53

netroot=iscsi:@10.226.228.155::3260::iqn.1992-08.com.netapp:sn.1574168453 iscsi_initiator= iqn.1994-08.com.redhat:229.167 crashkernel=auto ip=eth0:dhcp initrd /initramfs-2.6.32-431.el6.x86_64.img
This example shows the /boot/grub/grub.conf file after adding a new title with the cDOTsuffix, and the new kernel command line with the clustered Data ONTAP controller’s IQNnumber and iSCSI session information:
title Red Hat Enterprise Linux Server (2.6.32-431.el6.x86_64) - cDOT root (hd0,0) kernel /vmlinuz-2.6.32-431.el6.x86_64 ro root=/dev/mapper/vg_ibmx3550m3229-LogVol00 ifname=eth0:5c:f3:fc:ba:46:d8 rd_NO_LUKS netroot=iscsi:@10.226.228.99::3260:: ::iqn.1992-08.com.netapp:sn.81c4f5cc4aa611e5b1ad00a0985d4dbe:vs.15 LANG=en_US.UTF-8 rd_LVM_LV=vg_ibmx3550m3229/LogVol01 rd_LVM_LV=vg_ibmx3550m3229/LogVol00 rd_NO_MD netroot=iscsi:@10.226.228.98::3260:: ::iqn.1992-08.com.netapp:sn.81c4f5cc4aa611e5b1ad00a0985d4dbe:vs.15 netroot=iscsi:@10.226.228.97::3260:: ::iqn.1992-08.com.netapp:sn.81c4f5cc4aa611e5b1ad00a0985d4dbe:vs.15 netroot=iscsi:@10.226.228.96::3260:: ::iqn.1992-08.com.netapp:sn.81c4f5cc4aa611e5b1ad00a0985d4dbe:vs.15 iscsi_initiator= iqn.1994-08.com.redhat:229.167 crashkernel=auto ip=eth0:dhcp initrd /initramfs-2.6.32-431.el6.x86_64.img
6. Back up the existing initramfs file.
Example
# cd /boot# cp initramfs-2.6.32-71.el6.x86_64.img initramfs-2.6.32-71.el6.x86_64.img.img_bak
7. Update the 7-Mode kernel line in the /boot/grub/grub.conf file with the backup initrdimage name.
For RHEL 6.4 and later, verify that the clustered Data ONTAP kernel line is appended with“rdloaddriver=scsi_dh_alua” in the /boot/grub/grub.conf file.
8. If the /boot/grub/grub.conf file is updated, then update the kernel initial RAM disk(initramfs).
The initramfs file must be re-created so that the new clustered Data ONTAP IQN number andiSCSI sessions are referenced, and so that the host establishes an iSCSI connection with clusteredData ONTAP controllers at boot time.
9. Re-create the initrd image by using the dracut -force --add multipath --verbosecommand.
Related tasks
Gathering pretransition information from the Inventory Assessment Workbook on page 27
Testing SAN boot LUNs on RHEL hosts before the cutover phase of copy-based transitions
If you are using the 7-Mode Transition Tool (7MTT) 2.2 or later, and Data ONTAP 8.3.2 or later toperform a copy-based transition your Red Hat Enterprise Linux (RHEL) host, you can test your
54 | SAN Host Transition and Remediation Guide

transitioned ONTAP SAN boot LUNs before the cutover phase. Your source host can continue to runI/O to your source 7-Mode LUNs during testing.
Before you begin
Your new ONTAP LUNs must be mapped to your test host and your LUNs must ready for transition.
About this task
You should maintain hardware parity between the test host and the source host.
• For copy-based transitions, you must perform these steps after completing the Storage Cutoveroperation in the 7-Mode Transition Tool.
• For copy-free transitions, you must perform these steps after the Import Data and Configurationoperation in the 7-Mode Transition Tool.
Steps
1. For FC and FCoE configurations only:
a. Enter the HBA BIOS settings mode.
b. Choose Rescan to discover the ONTAP SAN boot LUNs on the host.
c. Remove the 7-Mode boot LUN ID.
d. Add the ONTAP boot LUN ID in the HBA BIOS.
e. Exit the HBA BIOS settings mode, and then reboot the host.
2. After the host reboots, change the IP address and host name on the test host.
3. Verify that your new ONTAP LUNs have been discovered:
sanlun lun show
4. Configure DMMP devices for your ONTAP LUNs:
multipath -ll
5. Perform your testing as needed.
6. Shut down the test host:
shutdown -h -t0 now
7. In the 7-Mode Transition Tool user interface (UI), click Finish Testing.
After you finish
If your ONTAP LUNs are to be remapped to your source host, you must prepare your source host forthe cutover phase. If your ONTAP LUNs are to remain mapped to your test host, no further steps arerequired on the test host.
Related concepts
Preparing for the cutover phase when transitioning SAN boot LUNs on page 56
Related tasks
Gathering pretransition information from the Inventory Assessment Workbook on page 27
RHEL host remediation | 55

Preparing for the cutover phase when transitioning SAN boot LUNs
If you are transitioning SAN boot LUNs from Data ONTAP operating in 7-Mode to clustered DataONTAP, there are certain prerequisites you must be aware of before entering the cutover phase.
You must have fabric connectivity and zoning to your clustered Data ONTAP controllers for FCconfigurations. For iSCSI configurations, your iSCSI sessions must be discovered and logged in toyour clustered Data ONTAP controllers. You must also shut down your host.
• For copy-based transitions, you should shut down your host before initiating the Storage Cutoveroperation in the 7-Mode Transition Tool (7MTT). Copy-free transitions are not supported on HP-UX hosts.
• For copy-free transitions, you should shut down your host before initiating the Export & Halt 7-Mode operation in the 7MTT.
Discovering SAN boot LUNs after transition
After transition of your SAN boot LUNs from Data ONTAP operating in 7-Mode to clustered DataONTAP, you must discover the SAN boot LUNs on your host. This is necessary for copy-basedtransitions (CBTs) and copy-free transitions (CFTs). This applies to FC, FCoE, and iSCSIconfigurations.
Before you begin
If you are doing a CFT, procedures for vol rehost must be complete. See the 7-Mode TransitionTool Copy-Free Transition Guide for details.
Steps
1. Boot the host.
2. For FC and FCoE configurations only:
a. Enter the HBA BIOS settings mode.
b. Choose Rescan to discover the clustered Data ONTAP SAN boot LUNs on the host.
c. Remove the 7-Mode boot LUN ID.
d. Add the clustered Data ONTAP boot LUN ID in the HBA BIOS.
e. Exit the HBA BIOS settings mode, and then reboot the host.
3. After the reboot is complete, verify the clustered Data ONTAP LUNs:
sanlun lun show
4. Verify the DMMP device:
multipath -ll
Related information
Copy-free transition
Copy-based transition
56 | SAN Host Transition and Remediation Guide
Windows host remediation
If you are using the 7-Mode Transition Tool (7MTT) to move from Data ONTAP operating in 7-Mode to clustered Data ONTAP, you must perform specific steps to prepare your Windows host fortransition. You must also perform specific steps to prepare for the cutover phase, and after transition,you must bring your Windows host online.
Related tasks
Preparing Windows hosts for transition on page 57
Preparing for cutover phase when transitioning Windows hosts on page 59
Bringing Windows hosts online after transition on page 60
Preparing Windows hosts for transitionThere are steps you must perform before you transition Windows hosts from Data ONTAP operatingin 7-Mode to clustered Data ONTAP.
About this task
This procedure applies to copy-based transitions and copy-free transitions.
Note: If you are using Windows 2003, you must upgrade to Windows 2008. The Host RemediationTool (HRT) is not supported on Windows 2003 and needs Windows 2008 or later to run properly.
Steps
1. Identify the LUN serial numbers, LUN IDs, and corresponding Windows physical disk numbersof the LUNs being transitioned.
• If your system is running Data ONTAP DSM, use the Data ONTAP DSM ManagementExtension Snap-In (accessible through Server Manager or the get-sandisk WindowsPowerShell cmdlet).
• If your system is running MSDSM, use the Inventory Collect Tool (ICT).
2. Prepare to make the LUNs visible to the host after transition is complete.
• If the LUNs being transitioned are FC or FCoE LUNs, create or modify fabric zoning.
• If the LUNs being transitioned are iSCSI LUNs, create iSCSI sessions that connect to theclustered Data ONTAP controller.
3. Use the ICT to generate the Inventory Assessment workbook.
Related information
SAN configuration
What the Inventory Collect Tool is
The Inventory Collect Tool (ICT) is a stand-alone utility for collecting configuration and inventoryinformation about 7-Mode storage controllers, hosts attached to controllers, and applications running
57

on these hosts for assessing the transition readiness of these systems. You can use the ICT to generateinformation about your LUNs and the configuration that you need for transition.
The ICT generates an Inventory Assessment Workbook and an Inventory Report XML file thatcontains configuration details of the storage and host systems.
The ICT is available for ESXi, 5.x, ESXi 6.x, and Windows hosts.
Testing transitioned LUNs on Windows hosts before thecutover phase
If you are using the 7-Mode Transition Tool (7MTT) 2.2 or later and Data ONTAP 8.3.2 or later totransition your Windows host LUNs, you can test your transitioned clustered Data ONTAP LUNs toverify that you can bring your disk online and that your application operations work as expectedbefore the cutover phase. Your source host can continue to run I/O to your source 7-Mode LUNsduring testing.
Before you begin
Your 7-Mode LUNs must be ready for transition.
About this task
You should maintain hardware parity between the test host and the source host, and you shouldperform the following steps on the test host.
Your clustered Data ONTAP LUNs are in read/write mode during testing. They convert to read-onlymode when testing is complete and you are preparing for the cutover phase.
Steps
1. After the baseline data copy is complete, select Test Mode in the 7MTT user interface (UI).
2. In the 7MTT UI, click Apply configuration.
3. Generate the 7-Mode to clustered Data ONTAP LUN mapping file:
• For copy-based transitions, run the following command from the host where the 7MTT isinstalled:
transition cbt export lunmap -p project-name -o file_path
For example:
transition cbt export lunmap -p SanWorkLoad -o c:/Libraires/Documents/7-to-C-LUN-MAPPING.csv
• For copy-free transitions, run the following command from the system where the 7MTT isinstalled:
transition cft export lunmap -p project-name -s svm-name -o output-file
Note: You must run this command for each of your Storage Virtual Machines (SVMs).
For example:
transition cft export lunmap -p SANWorkLoad -s svml -o c:/Libraries/Documents/7-to-C-LUN-MAPPING-svml.csv
4. Bring the transitioned disks and applications online:
• If the transitioned disks are not part of Cluster Failover, use the Windows Disk Manager tobring the disks online.
58 | SAN Host Transition and Remediation Guide

• If the transitioned disks are part of Cluster Failover, use the Cluster Failover Manager to bringthe disks online.
5. Perform your testing as needed.
6. After your testing is complete, take your applications and disks offline:
• If the transitioned disks are not part of Cluster Failover, use the Windows Disk Manager totake the disks offline.
• If the transitioned disks are part of Cluster Failover, use the Cluster Failover Manager to takethe disks offline.
After you finish
If your clustered Data ONTAP LUNs are to be remapped to your source host, you must prepare yoursource host for the cutover phase. If your clustered Data ONTAP LUNs are to remain mapped to yourtest host, no further steps are required on the test host.
Preparing for cutover phase when transitioning Windowshosts
If you are transitioning a Windows host from Data ONTAP operating in 7-Mode to clustered DataONTAP, there are steps you must perform after the transition begins, but before the cutover phasebegins.
Before you begin
If you are running Data ONTAP DSM, the version of Data ONTAP DSM installed on the server mustbe supported for the version of Data ONTAP that is running on the target clustered Data ONTAPnode.
If you are running MSDSM, the version of Windows Host Utilities installed on the server must besupported for the version of Data ONTAP that is running on the target clustered Data ONTAP node.
About this task
• For copy-based transitions, perform these steps before initiating the Storage Cutover operation inthe 7-Mode Transition Tool (7MTT).
• For copy-free transitions, perform these steps before initiating the Export & Halt 7-Modeoperation in the 7MTT.
Steps
1. Use Disk Manager to take offline the disks to be transitioned.
2. If the host is booted from SAN and the boot LUN is being transitioned, shut down the boot host.
3. If the host is clustered, use Failover Cluster Manager to take offline the clustered disks, includingthe quorum disk.
4. If the host is running Windows Server 2003 and you need to migrate the quorum device, stop thecluster services on all cluster nodes.
5. If you are transitioning LUNs on a server that has Hyper-V enabled, perform the appropriate hostside transition steps for your guest operating system.
6. If you are transitioning LUNs on a server that has Hyper-V enabled and the boot device of theguest OS resides on a Data ONTAP LUN that is being transitioned, do the following:
Windows host remediation | 59

a. Shut down the guest OS.
b. Take offline the corresponding disk on the parent system.
Bringing Windows hosts online after transitionAfter you transition your LUNs using the 7-Mode Transition Tool (7MTT) for Windows hosts, youmust complete several steps to bring your host online and begin servicing data again.
Before you begin
If you are doing a copy-free transition (CFT), procedures for vol rehost must be complete. See the7-Mode Transition Tool Copy-Free Transition Guide for details.
About this task
• For copy-based transitions (CBTs), perform these steps after completing the Storage Cutoveroperation in the 7-Mode Transition Tool (7MTT).
• For CFTs, perform these steps after completing the Import & Data Configuration operation in the7MTT.
Steps
1. Generate the 7-Mode to ONTAP LUN mapping file:
• For copy-based transitions, run the following command from the host where the 7MTT isinstalled:
transition cbt export lunmap -p project-name -o file_path
For example:
transition cbt export lunmap -p SanWorkLoad -o c:/Libraires/Documents/7-to-C-LUN-MAPPING.csv
• For copy-free transitions, run the following command from the system where the 7MTT isinstalled:
transition cft export lunmap -p project-name -s svm-name -o output-file
Note: You must run this command for each of your Storage Virtual Machines (SVMs).
For example:
transition cft export lunmap -p SANWorkLoad -s svml -o c:/Libraries/Documents/7-to-C-LUN-MAPPING-svml.csv
2. If the Windows host is SAN-booted and the boot LUN was transitioned, power on the host.
3. Update the FC BIOS to enable the system to boot from the LUN on the clustered Data ONTAPcontroller.
See the HBA documentation for more information.
4. On the Windows host, rescan the disks from the Disk Manager.
5. Obtain the LUN serial numbers, LUN IDs, and corresponding Windows physical disk numbers ofthe LUNs mapped to the host.
• For systems running Data ONTAP ONTAPDSM: Use the Data ONTAPDSM ManagementExtension Snap-In or the get-sandisk Windows PowerShell cmdlet.
• For systems running MSDSM: Use the Inventory Collect Tool (ICT).
60 | SAN Host Transition and Remediation Guide

The LUN ID, LUN serial number, and corresponding serial number is captured under theSAN Host LUNs tab.
6. Use the LUN serial numbers, LUN IDs, and corresponding Windows physical disk numbers ofthe LUNs along with the LUN map output and the data collected in the pretransition state, todetermine whether the LUNs have transitioned successfully.
7. Note whether the physical disk numbers of the transitioned LUNs have changed.
8. Bring your disks online.
• Use Windows Disk Manager to bring online disks that are not part of Cluster Failover.
• Use Failover Cluster Manager to bring online disks that are part of Cluster Failover.
9. If the host you are transitioning is running Windows Server 2003 and you have migrated thequorum device, start the cluster services on all of the cluster nodes.
10. If Hyper-V is enabled on the host and pass-through devices are configured to the VMs, modifythe settings from Hyper-V Manager.
The physical disk number of the LUN corresponding to the pass-through device might havechanged as a result of the transition.
Related concepts
What the Inventory Collect Tool is on page 10
Related information
Copy-free transition
Copy-based transition
Exceptions and known issues when transitioning SAN hoststo ONTAP
You should be aware of certain exceptions and known issues when transitioning SAN hosts from 7-Mode to ONTAP.
• For transitioning Hyper-Virutal Machine (VMs) with only VHD or VHDX file types, storage livemigration can be used instead of the 7-Mode Transition Tool (7MTT).
For details about Hyper-V storage live migration, see the Microsoft documentation.
• If you used the same igroup name on both nodes of the 7-Mode controller, the transition toolmight fail to resolve igroup conflict.
For details, see Bugs Online ID 804962.
Windows host remediation | 61
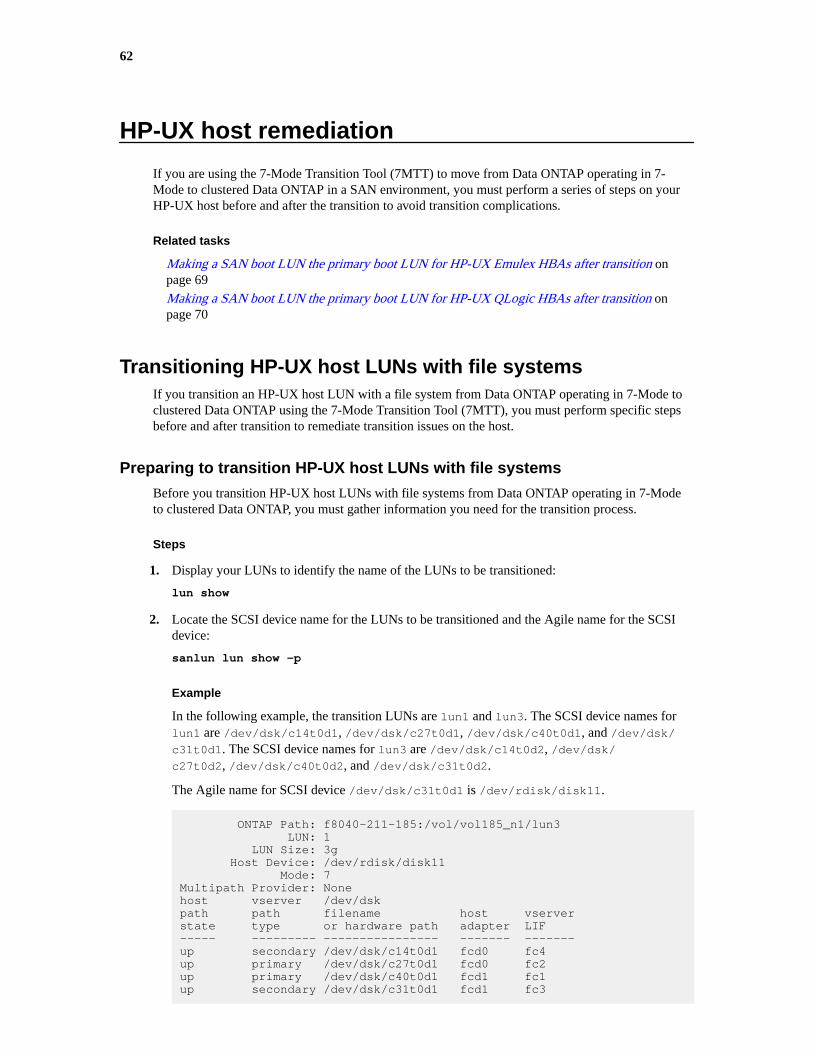
HP-UX host remediation
If you are using the 7-Mode Transition Tool (7MTT) to move from Data ONTAP operating in 7-Mode to clustered Data ONTAP in a SAN environment, you must perform a series of steps on yourHP-UX host before and after the transition to avoid transition complications.
Related tasks
Making a SAN boot LUN the primary boot LUN for HP-UX Emulex HBAs after transition onpage 69
Making a SAN boot LUN the primary boot LUN for HP-UX QLogic HBAs after transition onpage 70
Transitioning HP-UX host LUNs with file systemsIf you transition an HP-UX host LUN with a file system from Data ONTAP operating in 7-Mode toclustered Data ONTAP using the 7-Mode Transition Tool (7MTT), you must perform specific stepsbefore and after transition to remediate transition issues on the host.
Preparing to transition HP-UX host LUNs with file systems
Before you transition HP-UX host LUNs with file systems from Data ONTAP operating in 7-Modeto clustered Data ONTAP, you must gather information you need for the transition process.
Steps
1. Display your LUNs to identify the name of the LUNs to be transitioned:
lun show
2. Locate the SCSI device name for the LUNs to be transitioned and the Agile name for the SCSIdevice:
sanlun lun show -p
Example
In the following example, the transition LUNs are lun1 and lun3. The SCSI device names forlun1 are /dev/dsk/c14t0d1, /dev/dsk/c27t0d1, /dev/dsk/c40t0d1, and /dev/dsk/c31t0d1. The SCSI device names for lun3 are /dev/dsk/c14t0d2, /dev/dsk/c27t0d2, /dev/dsk/c40t0d2, and /dev/dsk/c31t0d2.
The Agile name for SCSI device /dev/dsk/c31t0d1 is /dev/rdisk/disk11.
ONTAP Path: f8040-211-185:/vol/vol185_n1/lun3 LUN: 1 LUN Size: 3g Host Device: /dev/rdisk/disk11 Mode: 7Multipath Provider: Nonehost vserver /dev/dskpath path filename host vserverstate type or hardware path adapter LIF----- --------- ---------------- ------- -------up secondary /dev/dsk/c14t0d1 fcd0 fc4 up primary /dev/dsk/c27t0d1 fcd0 fc2up primary /dev/dsk/c40t0d1 fcd1 fc1up secondary /dev/dsk/c31t0d1 fcd1 fc3
62
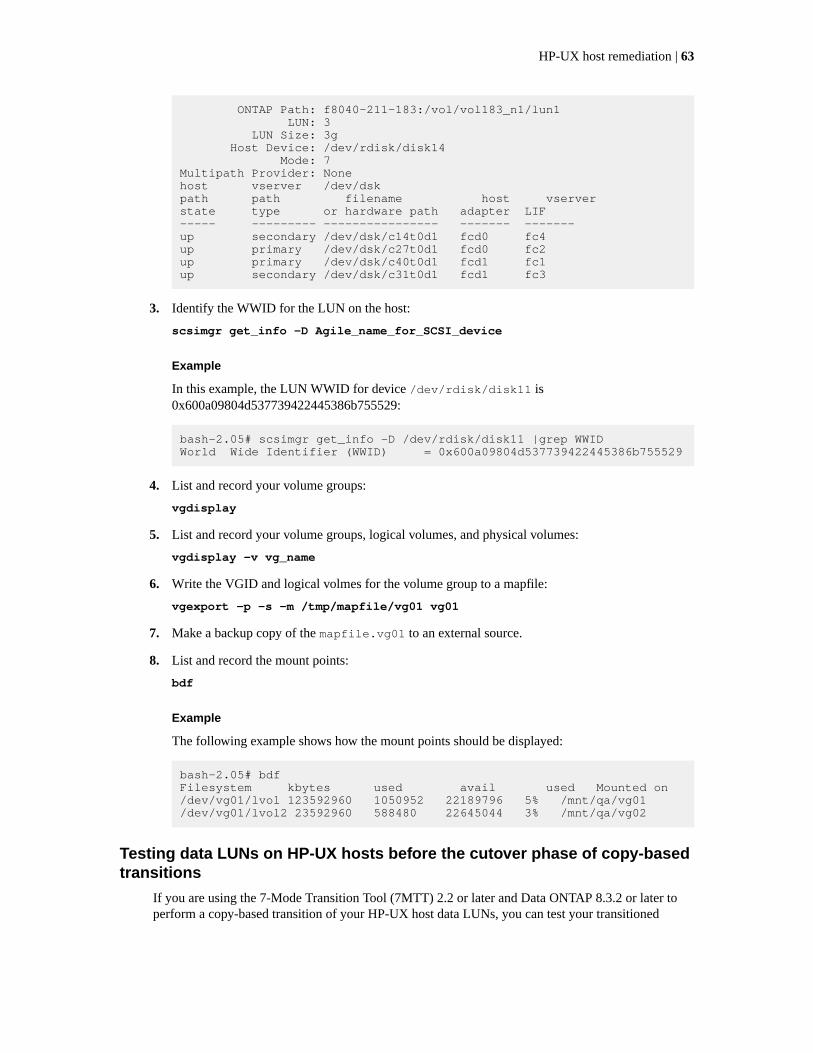
ONTAP Path: f8040-211-183:/vol/vol183_n1/lun1 LUN: 3 LUN Size: 3g Host Device: /dev/rdisk/disk14 Mode: 7Multipath Provider: Nonehost vserver /dev/dskpath path filename host vserverstate type or hardware path adapter LIF----- --------- ---------------- ------- -------up secondary /dev/dsk/c14t0d1 fcd0 fc4 up primary /dev/dsk/c27t0d1 fcd0 fc2up primary /dev/dsk/c40t0d1 fcd1 fc1up secondary /dev/dsk/c31t0d1 fcd1 fc3
3. Identify the WWID for the LUN on the host:
scsimgr get_info -D Agile_name_for_SCSI_device
Example
In this example, the LUN WWID for device /dev/rdisk/disk11 is0x600a09804d537739422445386b755529:
bash-2.05# scsimgr get_info -D /dev/rdisk/disk11 |grep WWIDWorld Wide Identifier (WWID) = 0x600a09804d537739422445386b755529
4. List and record your volume groups:
vgdisplay
5. List and record your volume groups, logical volumes, and physical volumes:
vgdisplay -v vg_name
6. Write the VGID and logical volmes for the volume group to a mapfile:
vgexport -p -s -m /tmp/mapfile/vg01 vg01
7. Make a backup copy of the mapfile.vg01 to an external source.
8. List and record the mount points:
bdf
Example
The following example shows how the mount points should be displayed:
bash-2.05# bdfFilesystem kbytes used avail used Mounted on/dev/vg01/lvol 123592960 1050952 22189796 5% /mnt/qa/vg01/dev/vg01/lvol2 23592960 588480 22645044 3% /mnt/qa/vg02
Testing data LUNs on HP-UX hosts before the cutover phase of copy-basedtransitions
If you are using the 7-Mode Transition Tool (7MTT) 2.2 or later and Data ONTAP 8.3.2 or later toperform a copy-based transition of your HP-UX host data LUNs, you can test your transitioned
HP-UX host remediation | 63

clustered Data ONTAP LUNs to verify that you can mount your MPIO device before the cutoverphase. Your source host can continue to run I/O to your source 7-Mode LUNs during testing.
Before you begin
Your new ONTAP LUNs must be mapped to your test host and your LUNs must be ready fortransition
About this task
You should maintain hardware parity between the test host and the source host, and you shouldperform the following steps on the test host.
Your ONTAP LUNs are in read/write mode during testing. They convert to read-only mode whentesting is complete and you are preparing for the cutover phase.
Steps
1. After the baseline data copy is complete, select Test Mode in the 7MTT user interface (UI).
2. In the 7MTT UI, click Apply Configuration.
3. On the test host, rescan your new ONTAP LUNs:
ioscan -fnC disk
4. Verify that your ONTAP LUNs are present:
sanlun lun show
5. Copy the /tmp/mapfile.vg01 mapfile previously copied to your external source to your newhost.
6. Use the mapfile to import the volume group:
vgimport -s -m /tmp/mapfile/vg01 vg01
7. Verify that the VG Status is displayed as available:
vgdisplay
8. Convert the legacy Device Special Filename (DSF) to persistent DSF:
vgdsf -c /dev/vg01
9. Use the mount command to manually mount each of the logical volumes.
10. Run the fsck command if you are prompted to do so.
11. Verify the mount points:
bdf
12. Perform your testing as needed.
13. Shut down the test host.
14. In the 7MTT UI, click Finish Test.
After you finish
If your ONTAP LUNs must be remapped to your source host, then you must prepare your source hostfor the cutover phase. If your ONTAP LUNs must remain mapped to your test host, then no furthersteps are required on the test host.
64 | SAN Host Transition and Remediation Guide

Preparing for cutover phase when transitioning HP-UX host data LUNs withfile systems
If you are transitioning an HP host data LUN with a file system from Data ONTAP operating in 7-Mode to clustered Data ONTAP, you must perform certain steps before entering the cutover phase.
Before you begin
If you are using an FC configuration, fabric connectivity and zoning to the clustered Data ONTAPnodes must be established.
If you are using an iSCSI configuration, the iSCSI sessions to the clustered Data ONTAP nodes mustbe discovered and logged in.
About this task
For copy-based transitions, perform these steps after completing the Storage Cutover operation in the7-Mode Transition Tool (7MTT). Copy-free transitions are not supported for HP-UX hosts.
Steps
1. Stop I/O on all mount points.
2. Shut down each application accessing the LUNs according to the recommendations of theapplication vendor.
3. Unmount all of the mount points:
umount mount_point
4. Export your volume group and write the VGID and logical volumes for the volume group to amapfile:
vgexport -p -s -m /tmp/mapfile.vg01 vg01
5. Make a backup copy of the mapfile.vg01 file to an external source.
6. Disable the volume group:
vgchange -a n vg_name
7. Export the volume group:
vgexport vg_name
8. Verify that the volume group has been exported:
vgdisplay
The exported volume group information should not be displayed in the output.
Mounting HP-UX host LUNs with file systems after transition
After transitioning HP-UX host LUNs with file systems from Data ONTAP operating in 7-Mode toclustered Data ONTAP, you must mount the LUNs.
About this task
For copy-based transitions, perform these steps after completing the Storage Cutover operation in the7-Mode Transition Tool (7MTT). Copy-free transitions are not supported for HP-UX hosts.
HP-UX host remediation | 65
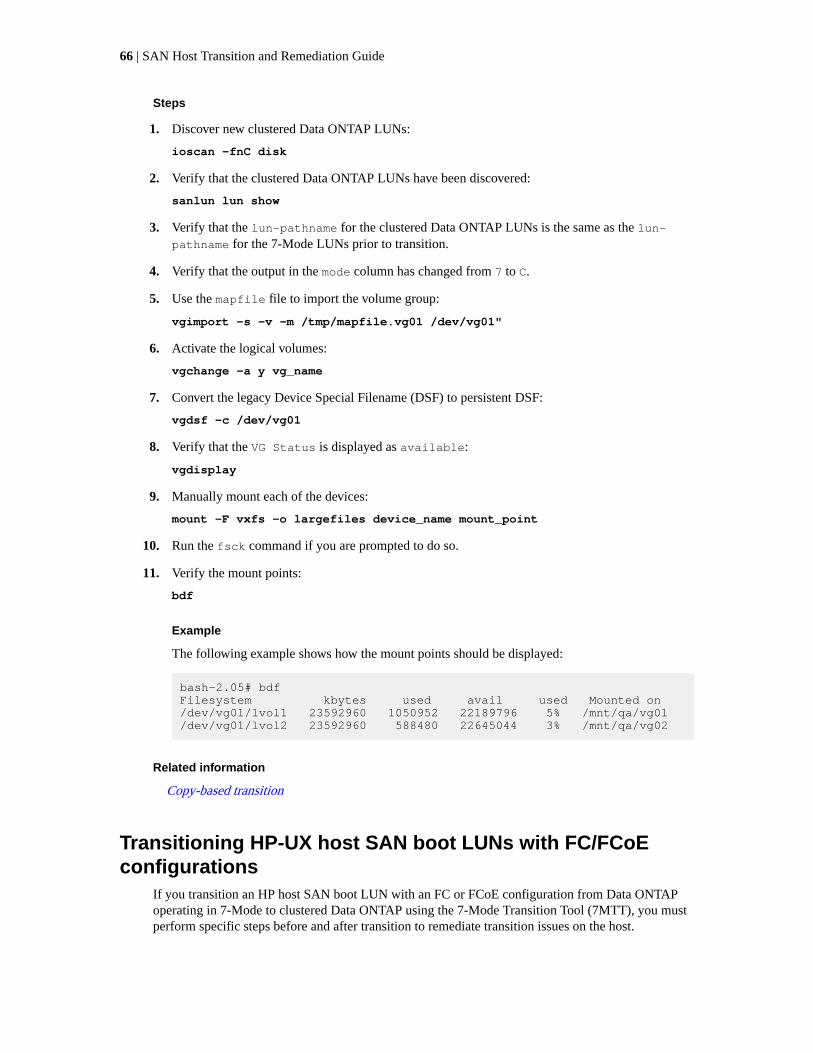
Steps
1. Discover new clustered Data ONTAP LUNs:
ioscan -fnC disk
2. Verify that the clustered Data ONTAP LUNs have been discovered:
sanlun lun show
3. Verify that the lun-pathname for the clustered Data ONTAP LUNs is the same as the lun-pathname for the 7-Mode LUNs prior to transition.
4. Verify that the output in the mode column has changed from 7 to C.
5. Use the mapfile file to import the volume group:
vgimport -s -v -m /tmp/mapfile.vg01 /dev/vg01"
6. Activate the logical volumes:
vgchange -a y vg_name
7. Convert the legacy Device Special Filename (DSF) to persistent DSF:
vgdsf -c /dev/vg01
8. Verify that the VG Status is displayed as available:
vgdisplay
9. Manually mount each of the devices:
mount -F vxfs -o largefiles device_name mount_point
10. Run the fsck command if you are prompted to do so.
11. Verify the mount points:
bdf
Example
The following example shows how the mount points should be displayed:
bash-2.05# bdfFilesystem kbytes used avail used Mounted on/dev/vg01/lvol1 23592960 1050952 22189796 5% /mnt/qa/vg01/dev/vg01/lvol2 23592960 588480 22645044 3% /mnt/qa/vg02
Related information
Copy-based transition
Transitioning HP-UX host SAN boot LUNs with FC/FCoEconfigurations
If you transition an HP host SAN boot LUN with an FC or FCoE configuration from Data ONTAPoperating in 7-Mode to clustered Data ONTAP using the 7-Mode Transition Tool (7MTT), you mustperform specific steps before and after transition to remediate transition issues on the host.
66 | SAN Host Transition and Remediation Guide

Preparing to transition SAN boot LUNs on HP-UX hosts with FCconfigurations
Before you transition a SAN boot LUN on an HP-UX host with an FC configuration, you mustrecord the name of the 7-Mode LUN on which HP-UX is installed, the SCSI device name for thatLUN, the Agile naming convention, and the WWID.
Steps
1. From the console of the 7-Mode controller, display your 7-Mode LUNs to identify the LUN nameon which the “HPUX11v3 March 2014” operating system is installed:
lun show
2. Obtain the SCSI device name for the LUN:
sanlun lun show -p
Example
In this example, the transition LUN is bootlun_94. The SCSI devices for this LUNare /dev/dsk/c14t0d0, /dev/dsk/c27t0d0, /dev/dsk/c40t0d0, and /dev/dsk/c31t0d0 .
ONTAP Path: f8040-211-183:/vol/vol_183/bootlun_94 LUN: 0 LUN Size: 100g Host Device: /dev/rdisk/disk6 Mode: 7Multipath Provider: Nonehost vserver /dev/dskpath path filename host vserverstate type or hardware path adapter LIF----- ------- ---------------- ------- -------up secondary /dev/dsk/c14t0d0 fcd0 fc4up primary /dev/dsk/c27t0d0 fcd0 fc2up primary /dev/dsk/c40t0d0 fcd1 fc1up secondary /dev/dsk/c31t0d0 fcd1 fc3
3. Identify the WWID for the LUN on the host:
scsimgr get_info -D SCSI_device_name |grep WWID
Example
In the following example, the LUN WWID for device /dev/rdisk/disk6 is0x600a09804d537739422445386b75556:
bash-2.05# scsimgr get_info -D /dev/rdisk/disk6 | grep WWIDWorld Wide Identifier (WWID) = 0x600a09804d537739422445386b755564bash-2.05#
Testing transitioned SAN boot LUNs on HP-UX hosts before the cutoverphase of copy-based transitions
If you are using the 7-Mode Transition Tool (7MTT) 2.2 or later and Data ONTAP 8.3.2 or later totransition your HP-UX host SAN boot LUNs, you can test your transitioned clustered Data ONTAP
HP-UX host remediation | 67

LUNs before the cutover phase. Your source host can continue to run I/O to your source 7-ModeLUNs during testing.
Before you begin
Your new clustered Data ONTAP LUNs must be mapped to your test host and your LUNs must beready for transition
About this task
You should maintain hardware parity between the test host and the source host, and you shouldperform the following steps on the test host.
Your clustered Data ONTAP LUNs are in read/write mode during testing. They convert to read-onlymode when testing is complete and you are preparing for the cutover phase.
Steps
1. After the baseline data copy is complete, select Test Mode in the 7MTT user interface (UI).
2. In the 7MTT UI, click Apply Configuration.
3. On the test host, enter the HBA BIOS.
4. Change the IP address and host name on the test host.
5. Verify that your clustered Data ONTAP LUNs are present on the test host:
sanlun lun show
6. Perform your testing as needed.
7. Shut down the test host:
shutdown -h -y 0
8. In the 7MTT UI, click Finish Testing.
After you finish
If your clustered Data ONTAP LUNs are to be remapped to your source host, you must prepare yoursource host for the cutover phase. If your clustered Data ONTAP LUNs are to remain mapped to yourtest host, no further steps are required on the test host.
Preparing for the cutover phase when transitioning SAN boot LUNs
If you are transitioning SAN boot LUNs from Data ONTAP operating in 7-Mode to clustered DataONTAP, there are certain prerequisites you must be aware of before entering the cutover phase.
You must have fabric connectivity and zoning to your clustered Data ONTAP controllers for FCconfigurations. For iSCSI configurations, your iSCSI sessions must be discovered and logged in toyour clustered Data ONTAP controllers. You must also shut down your host.
• For copy-based transitions, you should shut down your host before initiating the Storage Cutoveroperation in the 7-Mode Transition Tool (7MTT). Copy-free transitions are not supported on HP-UX hosts.
• For copy-free transitions, you should shut down your host before initiating the Export & Halt 7-Mode operation in the 7MTT.
68 | SAN Host Transition and Remediation Guide

Making a SAN boot LUN the primary boot LUN for HP-UX Emulex HBAsafter transition
If your Data ONTAP operating in 7-Mode HP-UX host was SAN booted, you must make the SANboot LUN the primary boot LUN after transition to clustered Data ONTAP.
Before you begin
Your data migration must be complete and your boot LUN must be mapped to your host from yourclustered Data ONTAP node.
About this task
For copy-based transitions, perform these steps after completing the Storage Cutover operation in the7-Mode Transition Tool. Copy-free transitions are not supported on HP-UX hosts.
Steps
1. From the shell prompt, list the Emulex HBAs:
drivers
2. Select the Emulex HBA, and then press Enter.
3. Select Setup Utility.
4. Select Configure Boot Parameters.
5. Select Configure Boot Devices.
6. Select any device from the list, and then press Enter.
7. Select Scan Targets.
8. Select the LUN with the boot path you want, and then press Enter.
9. Select Peripheral dev as the Mode, and then press Enter.
10. Select Boot this device via WWN, and then press Enter.
Your boot LUN is displayed.
11. Press Esc until you return to the shell prompt.
12. Display your LUN to obtain the path of the LUN from which you want to boot:
map -r
The LUN paths are listed under the Device column. The bootable SAN disk are displayed underthe mapping table column and have “WWN” and “Part 1” in the output string.
13. Enter the LUN path of your SAN boot LUN.
Example
An example of a LUN path is fs0.
14. Exit the EFI shell:
cd efi
15. Enter the HPUX directory:
cd hpux
HP-UX host remediation | 69

16. Make the new clustered Data ONTAP SAN boot LUN the primary boot LUN:
bcfg boot add 1 hpux.efi "HP-UX-Primary Boot"
17. Manually update the HBA BIOS by making an entry in the EFI for the SAN boot LUN.
18. Optional: Create an alternate boot path:
bcfg boot add 2 hpux.efi “HPUX alternate boot”
19. Optional: Create a third boot path:
bcfg boot add 2 hpux.efi “HPUX third boot”
20. Optional: Create a fourth boot path:
bcfg boot add 2 hpux.efi “HPUX fourth boot”
Making a SAN boot LUN the primary boot LUN for HP-UX QLogic HBAsafter transition
If your Data ONTAP operating in 7-Mode HP-UX host was SAN booted, you must make the SANboot LUN the primary boot LUN after transition to clustered Data ONTAP.
Before you begin
• Your data migration must be complete.
• Your boot LUN must be mapped to your host from your clustered Data ONTAP node.
About this task
SAN boot is supported for HP-UX 11.3x on HP 9000 systems using the BCH menu and on HPIntegrity servers using the HP-UX Loader (EFI).
For copy-based transitions, perform these steps after completing the Storage Cutover operation in the7-Mode Transition Tool. Copy-free transitions are not supported on HP-UX hosts.
Steps
1. Open the shell prompt: Ctrl B
2. Boot to the EFI shell.
The EFI shell is available only on HP Integrity systems.
3. Use a serial console to access the login to the service processor (MP).
4. Access the console list: CO
This opens the EFI Boot Manager menu.
5. From the EFI Boot Manager menu, select the EFI shell menu option to access the EFI shellenvironment.
6. Identify your QLogic driver numbers:
drivers
The driver numbers are located in the DRV column.
7. Identify the corresponding controller number for each driver:
drvcfg driver_number
70 | SAN Host Transition and Remediation Guide

Example
In the following example, 27 is the corresponding controller number for driver 23 and 26 is thecorresponding controller number for driver 24:
Shell> drvcfg 23Configurable Components Drv[23] Ctrl[27] Lang[eng]
Shell> drvcfg 24Configurable Components Drv[24] Ctrl[26] Lang[eng]
8. Open the driver BIOS:
drvcfg drv_number ctrl_number -s
9. Enter 4 to select 4. Edit Boot Settings.
10. In Edit Boot Settings, enter 6 to select 6. EFI Variable EFIFCScanLevel.
11. Enter 1 to change the value of EFI Variable EFIFCScanLevel from 0 to 1.
12. Enter 7 to select 7. Enable World Login.
13. Enter y to enable world login.
14. Enter 0 to go to the previous menu.
15. In the Main Menu, enter 11 to save your changes.
16. Enter 12 to quit.
17. In the shell prompt, rescan your devices:
reconnect -r
18. Display the LUN to obtain the path of the LUN from which you want to boot:
map -r
The LUN paths are listed under the Device column. The bootable SAN disk are displayed underthe mapping table column and have “WWN” and “Part 1” in the output string.
19. Enter the LUN path of your SAN boot LUN.
Example
An example of a LUN path is fs0.
20. Exit the EFI shell:
cd efi
21. Enter the HPUX directory:
cd hpux
22. Make the new clustered Data ONTAP SAN boot LUN the primary boot LUN:
bcfg boot add 1 hpux.efi "HP-UX-Primary Boot"
23. Manually update the HBA BIOS by making an entry in the EFI for the SAN boot LUN.
24. Optional: Create an alternate boot path:
bcfg boot add 2 hpux.efi “HPUX alternate boot”
HP-UX host remediation | 71

25. Optional: Create a third boot path:
bcfg boot add 2 hpux.efi “HPUX third boot”
26. Optional: Create a fourth boot path:
bcfg boot add 2 hpux.efi “HPUX fourth boot”
72 | SAN Host Transition and Remediation Guide

AIX host remediation
If you are using the 7-Mode Transition Tool (7MTT) to move from Data ONTAP operating in 7-Mode to clustered Data ONTAP in a SAN environment, you must perform a series of steps on yourAIX host before and after transition to avoid transition complications.
Transition of SAN boot LUNs on AIX hosts with FC/FCoEconfigurations
If you transition a SAN boot LUN on an AIX host with an FC or FCoE configuration from DataONTAP operating in 7-Mode to clustered Data ONTAP using the 7-Mode Transition Tool (7MTT),you must perform specific steps before and after transition to remediate transition issues on the host.
Preparing to transition SAN boot LUNs on AIX hosts with FC/FCoEconfigurations
Before you transition a SAN boot LUN on an AIX host with an FC/FCoE configuration, you mustrecord the name of the 7-Mode LUN on which AIX is installed and the SCSI device name for thatLUN.
Steps
1. From the console of your Data ONTAP operating in 7-Mode controller, identify the 7-Mode LUNname on which AIX 7.1 and AIX 6.1 operating system is installed:
lun show
2. Obtain the SCSI device name for the LUN on the host:
sanlun lun show
Example
In the following example, the transition LUN is lun_sanboot_fas3170_aix04 and the SCSIdevice for this LUN is hdisk0.
[04:02 AM root@822-aix03p1/]: sanlun lun showcontroller[7mode]/vserver[Cmode] lun-pathname---------------------------------------------------------------------fas3170-aix04 /vol/vol_fas3170_aix04_sanboot/lun_sanboot_fas3170_aix04kit /vol/kit/kit_0kit /vol/kit/kit_0filename adapter protocol size mode-------------------------------------hdisk0 fcs0 FCP 100g 7hdisk1 fcs0 FCP 5g Chdisk2 fcs0 FCP 5g C
73

Testing transitioned SAN boot LUNs on AIX hosts before the cutover phaseof copy-based transitions
If you are using the 7-Mode Transition Tool (7MTT) 2.2 or later and Data ONTAP 8.3.2 or later totransition your 7-Mode Windows host LUNs, you can test your transitioned clustered Data ONTAPLUNs before the cutover phase to verify that they are functioning as desired.
Before you begin
Your 7-Mode LUNs must be ready for transition.
About this task
You should maintain hardware parity between the test host and the source host, and you shouldperform the following steps on the test host.
Your clustered Data ONTAP LUNs are in read/write mode during testing. They convert to read-onlymode when testing is complete and you are preparing for the cutover phase.
Steps
1. After the baseline data copy is complete, select Test Mode in the 7MTT user interface (UI).
2. In the 7MTT UI, click Apply Configuration.
3. On the test host, log in to the Hardware Management Console, and then boot your host in theSMS menu.
4. After the host boots, change the IP address and host name.
5. Verify that your clustered Data ONTAP LUNs are present:
sanlun lun show
6. Perform your testing as needed.
7. Shut down the test host:
shutdown -h
8. In the 7MTT UI, click Finish Testing.
After you finish
If your clustered Data ONTAP LUNs are to be remapped to your source host, you must prepare yoursource host for the cutover phase. If your clustered Data ONTAP LUNs are to remain mapped to yourtest host, no further steps are required on the test host.
Preparing for the cutover phase when transitioning AIX hosts with FC/FCoEconfigurations.
Before entering the cutover phase for AIX hosts with FC or FCoE configurations, you must performspecific steps.
Before you begin
Fabric connectivity and zoning to the clustered Data ONTAP nodes must be established.
About this task
For copy-based transitions, perform these steps after completing the Storage Cutover operation in the7-Mode Transition Tool. Copy-free transitions are not supported on AIX hosts.
74 | SAN Host Transition and Remediation Guide

Step
1. Shut down your host:
shutdown -h
Booting from SAN boot LUN on AIX hosts with FC/FCoE configurationsafter transition
After transitioning a SAN boot LUN on an AIX host with an FC or FCoE configuration, you mustperform certain steps to boot your host from the SAN boot LUN.
About this task
For copy-based transitions, you must perform these steps after completing the Storage Cutoveroperation in the 7-Mode Transition Tool. Copy-free transitions are not supported on AIX hosts.
Steps
1. Log in to the Hardware Management Console (HMC), and then boot your host in the SMSmenu.
2. Select the host.
3. Select Operations > Activate > Profile.
4. Click the Advanced tab.
5. Select SMS, and then click OK.
6. In the SMS Main Menu, enter 5 to select 5. Select Boot Options.
7. Enter 1 to select 1. Select Install/Boot Device.
8. Enter 5 to select 5. List all Devices.
9. Enter the device number of the ONTAP SAN boot LUN that you want to boot with.
Example
In the following example, the desired LUN is option 5:
Select DeviceDevice Current DeviceNumber Position Name1. - PCIe2 4-port 1GbE Adapter ( loc=U78CB.001.WZS062Y-P1-C12-T1 )2. - PCIe2 4-port 1GbE Adapter ( loc=U78CB.001.WZS062Y-P1-C12-T2 )3. - PCIe2 4-port 1GbE Adapter ( loc=U78CB.001.WZS062Y-P1-C12-T3 )4. - PCIe2 4-port 1GbE Adapter ( loc=U78CB.001.WZS062Y-P1-C12-T4 )5. - 107 GB FC Harddisk, part=2 (AIX 7.1.0) ( loc=U78CB.001.WZS062Y-P1-C7-T1-W232200a09830ca3a-L0000000000000000 )6. - 107 GB FC Harddisk, part=2 (AIX 7.1.0) ( loc=U78CB.001.WZS062Y-P1-C7-T2-W232200a09830ca3a-L0000000000000000 )---------------------------------------------------------------Navigation keys:M = return to Main Menu N = Next page of list
AIX host remediation | 75

ESC key = return to previous screen X = eXit System Management Services---------------------------------------------------------------Type menu item number and press Enter or select Navigation keys: 5
10. Enter 2 to select 2. Normal Mode Boot.
11. Enter 1 to exit the SMS menu.
12. Wait for your operating system to boot.
13. Display the LUN path name:
sanlun lun show
The output in the mode column should have changed from 7 to C.
Transitioning AIX host data LUNs with file systemsIf you transition an AIX host data LUN with a file system from Data ONTAP operating in 7-Mode toclustered Data ONTAP using the 7-Mode Transition Tool (7MTT), you must perform specific stepsbefore and after transition to remediate transition issues on the host.
Preparing to transition AIX host data LUNs with file systems
Before you transition AIX host data LUNs with file systems from Data ONTAP operating in 7-Modeto clustered Data ONTAP, you must gather information you need for the transition process.
Steps
1. On the 7-Mode controller, identify the name of the LUN to be transitioned:
lun show
2. On the host, locate the SCSI device name for the LUN:
sanlun lun show
The SCSI device name is located in the device filename column.
3. List and record the physical volumes used by the volume group configured in the data LUNs to betransitioned:
lsvg -p vg_name
4. List and record the logical volumes used by the volume group:
lsvg -l vg_name
Testing transitioned LUNs on AIX hosts before the cutover phase of copy-based transitions
If you are using the 7-Mode Transition Tool (7MTT) 2.2 or later and Data ONTAP 8.3.2 or later totransition your AIX host LUNs, you can test your transitioned clustered Data ONTAP LUNs to verifythat you can mount your MPIO device before the cutover phase. Your source host can continue to runI/O to your source 7-Mode LUNs during testing.
Before you begin
Your LUNs must be prepared for transition.
76 | SAN Host Transition and Remediation Guide

About this task
You should maintain hardware parity between the test host and the source host and you shouldperform the following steps on the test host.
Your clustered Data ONTAP LUNs are in read/write mode during testing. They convert to read-onlymode when testing is complete and you are preparing for the cutover phase.
Steps
1. After the Baseline Data Copy is complete select Test Mode in the 7MTT user interface (UI).
2. In the 7MTT UI, click Apply Configuration.
3. On the test host, rescan your new clustered Data ONTAP LUNs:
cfgmgr
4. Verify that your new clustered Data ONTAP LUNs are present:
sanlun lun show
5. Verify the volume group status:
lsvg vg_name
6. Mount each of the logical volumes:
mount -o log/dev/loglv00 file_system_mount_point
7. Verify the mount points:
df
8. Perform your testing as needed.
9. Shut down the test host:
shutdown -h
10. In the 7MTT UI, click Finish Testing.
After you finish
If your clustered Data ONTAP LUNs are to be remapped to your source host, you must prepare yoursource host for the cutover phase. If your clustered Data ONTAP LUNs are to remain mapped to yourtest host, no further steps are required on the test host.
Preparing for cutover phase when transitioning AIX host data LUNs withfile systems
If you are transitioning an AIX host data LUN with a file system from Data ONTAP operating in 7-Mode to clustered Data ONTAP, you must perform certain steps before entering the cutover phase.
Before you begin
Fabric connectivity and zoning to the clustered Data ONTAP nodes must be established.
About this task
For copy-based transitions, perform these steps after completing the Storage Cutover operation in the7-Mode Transition Tool. Copy-free transitions are not supported on AIX hosts.
Steps
1. Stop I/O on all of the mount points.
AIX host remediation | 77

2. Shut down each application accessing the LUNs according to the recommendations of theapplication vendor.
3. Unmount all of the mount points:
umount mount_point
4. Disable the volume group:
varyoffvq vg_name
5. Export the volume group:
exportvg vg_name
6. Verify the volume group status:
lsvg
The exported volume group should not be listed in the output.
7. If there are any stale entries, remove them:
rmdev -Rdl hdisk#
Mounting AIX host data LUNs with file systems after transition
After transitioning AIX host data LUNs with file systems from Data ONTAP operating in 7-Mode toclustered Data ONTAP, you must mount the LUNs.
About this task
After LUN transition, the Logical Volume Manager (LVM) attributes, such as the logical volumename and volume group name, do not change. You continue to use the pretransition logical volumename and volume group name for post-transition configuration.
For copy-based transitions, perform these steps after completing the Storage Cutover operation in the7-Mode Transition Tool. Copy-free transitions are not supported on AIX hosts.
Steps
1. Discover your new clustered Data ONTAP LUNs:
cfgmgr
2. Verify that your clustered Data ONTAP LUNs have been discovered:
sanlun lun show
Your clustered Data ONTAP LUNs should be listed and the output in the mode column should bechanged from 7 to C.
3. Import your volume group:
importvg -y vg_name pv_name
You can use any physical volume name in your volume group.
4. Verify that your volume group was imported:
lsvg vg_name
5. Mount each device:
mount -o log=/dev/loglv00 file_system mount_point
6. Verify the mount points:
df
78 | SAN Host Transition and Remediation Guide

Solaris host remediation
If you are using the 7-Mode Transition Tool (7MTT) to move from ONTAP operating in 7-Mode toclustered ONTAP in a SAN environment, you must perform a series of steps on your Solaris hostbefore and after transition to avoid transition complications.
The following scenarios are not supported for any transition workflow (support for copy-based orcopy-free transitions):
• Transition of SAN boot LUNs
• Solaris host clustering transition
• Veritas configuration
Transitioning Solaris host data LUNs with ZFS file systemsIf you transition a Solaris host data LUN with ZFS file system from Data ONTAP operating in 7-Mode to clustered Data ONTAP using the 7-Mode Transition Tool (7MTT), you must performspecific steps before and after transition to remediate transition issues on the host.
Preparing to transition Solaris host data LUNs with ZFS file system
Before you transition Solaris host LUNs with ZFS file systems from Data ONTAP operating in 7-Mode to clustered Data ONTAP, you must gather information you need for the transition process.
About this task
This applies to copy-based transitions and copy-free transitions.
Steps
1. On the 7-Mode controller, identify the name of the LUN to be transitioned:
lun show
Example
fas8040-shu01> lun show /vol/ufs/ufs1 5g (5368709120) (r/w, online, mapped) /vol/ufs/ufs2 5g (5368709120) (r/w, online, mapped) /vol/zfs/zfs1 6g (6442450944) (r/w, online, mapped) /vol/zfs/zfs2 6g (6442450944) (r/w, online, mapped)
2. On the host, locate the SCSI device file name for the LUN:
sanlun lun show
The SCSI device file name is located in the device filename column.
Example
# sanlun lun showcontroller(7mode)/ device host lunvserver(Cmode) lun-pathname filename adapter protocol size mode--------------------------------------------------------------------------------------------------------------------------
79

fas8040-shu01 /vol/zfs/zfs2 /dev/rdsk/c0t60A98000383035356C2447384D396550d0s2 scsi_vhci0 FCP 6g 7fas8040-shu01 /vol/zfs/zfs1 /dev/rdsk/c0t60A98000383035356C2447384D39654Ed0s2 scsi_vhci0 FCP 6g 7fas8040-shu01 /vol/ufs/ufs2 /dev/rdsk/c0t60A98000383035356C2447384D39654Ad0s2 scsi_vhci0 FCP 5g 7fas8040-shu01 /vol/ufs/ufs1 /dev/rdsk/c0t60A98000383035356C2447384D396548d0s2 scsi_vhci0 FCP 5g 7
3. List the zpool:
zpool list
4. Record the zpool and get the disks associated with the zpool:
zpool status pool-name
Example
# zpool listNAME SIZE ALLOC FREE CAP HEALTH ALTROOTn_pool 11.9G 2.67G 9.27G 22% ONLINE -
# zpool status pool: n_pool state: ONLINE scan: none requestedconfig:
NAME STATE READ WRITE CKSUM n_pool ONLINE 0 0 0 c0t60A98000383035356C2447384D396550d0 ONLINE 0 0 0 c0t60A98000383035356C2447384D39654Ed0 ONLINE 0 0 0
errors: No known data errors
5. List and record the ZFS datasets within a ZFS storage pool:
zfs list
Example
# zfs listNAME USED AVAIL REFER MOUNTPOINTn_pool 2.67G 9.08G 160K /n_pooln_pool/pool1 1.50G 2.50G 1.50G /n_pool/pool1n_pool/pool2 1.16G 2.84G 1.16G /n_pool/pool2
Testing data LUNs on Solaris hosts with ZFS file system before the cutoverphase of copy-based transitions
If you are using the 7-Mode Transition Tool (7MTT) 2.2 or later and Data ONTAP 8.3.2 or later totransition your Solaris host ZFS data LUNs, you can test your transitioned clustered Data ONTAPLUNs to verify that you can mount your MPIO device before the cutover phase.
Before you begin
• Your source host with ZFS data LUNs need to be offline before starting the test phase transition.
See Oracle Doc ID 1316472.1: LUN Copy Is Not Supported While ZFS Zpool Is Online fordetails.
• Your new clustered Data ONTAP LUNs must be mapped to your test host and your LUNs mustbe ready for transition.
• Exporting the zpool on the production host causes application disruption; all I/O operationsshould be stopped prior to 7-Mode LUN.
80 | SAN Host Transition and Remediation Guide

About this task
You should maintain hardware parity between the test host and the source host, and you shouldperform the following steps on the test host.
Your clustered Data ONTAP LUNs are in read/write mode during testing. They convert to read-onlymode when testing is complete and you are preparing for the cutover phase.
Steps
1. On the production (source) host, export the zpool:
#zpool export pool-name
Example
# zpool export n_pool
# zpool import pool: n_pool id: 5049703405981005579 state: ONLINEaction: The pool can be imported using its name or numeric identifier.config:
n_pool ONLINE c0t60A98000383035356C2447384D396550d0 ONLINE c0t60A98000383035356C2447384D39654Ed0 ONLINE
2. After the baseline data copy is complete, select Test Mode in the 7MTT user interface (UI).
3. In the 7MTT UI, click Apply Configuration.
Note: After this step, you can set the application back to online and start I/O operations to 7-Mode LUNs. Subsequent steps do not cause any application disruptions.
4. On the production host, import the zpool:
#zpool import pool-name
Example
# zpool import n_pool
5. On the test host, rescan your new clustered Data ONTAP LUNs:
a. Identify the FC host ports (type fc-fabric):
#cfgadm –l
b. Unconfigure the first fc-fabric port:
#cfgadm –c unconfigure c1
c. Configure the 1st fc-fabric port:
#cfgadm –c unconfigure c2
d. Repeat the steps for other fc-fabric ports.
e. Display information about the host ports and their attached devices:
# cfgadm –al
f. Reload the driver:
Solaris host remediation | 81

# devfsadm –Cv
# devfsadm –i iscsi
6. Verify that your clustered Data ONTAP LUNs are present:
#sanlun lun show
Example
# sanlun lun showcontroller(7mode)/ device host lunvserver(Cmode) lun-pathname filename adapter protocol size mode--------------------------------------------------------------------------------------------------------------------------vs_5 /vol/zfs/zfs2 /dev/rdsk/c5t600A0980383030444D2B466542485935d0s2 scsi_vhci0 FCP 6g Cvs_5 /vol/zfs/zfs1 /dev/rdsk/c5t600A0980383030444D2B466542485934d0s2 scsi_vhci0 FCP 6g Cvs_5 /vol/ufs/ufs2 /dev/rdsk/c5t600A0980383030444D2B466542485937d0s2 scsi_vhci0 FCP 5g Cvs_5 /vol/ufs/ufs1 /dev/rdsk/c5t600A0980383030444D2B466542485936d0s2 scsi_vhci0 FCP 5g C
7. Verify that the zpool planned to test is available for import:
#zpool import
Example
# zpool import pool: n_pool id: 5049703405981005579 state: ONLINEaction: The pool can be imported using its name or numeric identifier.config:
n_pool ONLINE c5t600A0980383030444D2B466542485935d0 ONLINE c5t600A0980383030444D2B466542485934d0 ONLINE
8. Import the zpool using the pool name or the pool ID:
• #zpool import pool-name
• #zpool import pool-id
Example
#zpool import n_pool
Example
#zpool import 5049703405981005579
9. Verify that the ZFS datasets are mounted:
• zfs list
• df -ah
82 | SAN Host Transition and Remediation Guide

Example
# zfs listNAME USED AVAIL REFER MOUNTPOINTn_pool 2.67G 9.08G 160K /n_pooln_pool/pool1 1.50G 2.50G 1.50G /n_pool/pool1n_pool/pool2 1.16G 2.84G 1.16G /n_pool/pool2
10. Perform testing as needed.
11. Shut down the test host.
12. In the 7MTT UI, click Finish Test.
After you finish
If your clustered Data ONTAP LUNs are to be remapped to your source host, you must prepare yoursource host for the cutover phase. If your clustered Data ONTAP LUNs are to remain mapped to yourtest host, no further steps are required on the test host.
Preparing for cutover phase when transitioning Solaris host data LUNs withZFS file systems
If you are transitioning a Solaris host data LUN with ZFS file system from Data ONTAP operating in7-Mode to clustered Data ONTAP, you must perform certain steps before entering the cutover phase.
Before you begin
If you are using an FC configuration, fabric connectivity and zoning to the clustered Data ONTAPnodes must be established.
If you are using an iSCSI configuration, the iSCSI sessions to the clustered Data ONTAP nodes mustbe discovered and logged in.
About this task
For copy-based transitions, perform these steps before initiating the Storage Cutover operation in the7-Mode Transition Tool (7MTT).
For copy-free transitions, perform these steps before initiating the Export & Halt 7-Mode operationin 7MTT.
Steps
1. Stop I/O on all mount points.
2. Shut down each application accessing the LUNs according to the recommendations of theapplication vendor.
3. Export the zpool:
zpool export pool-name
Example
# zpool export n_pool
4. Verify that the zpools are exported:
• Should list the zpool that is exported:
zpool import
Solaris host remediation | 83

• Should not list the zpool that is exported:
zpool list
Example
# zpool export n_pool
# zpool listno pools available
# zpool import pool: n_pool id: 5049703405981005579 state: ONLINEaction: The pool can be imported using its name or numeric identifier.config:
n_pool ONLINE c0t60A98000383035356C2447384D396550d0 ONLINE c0t60A98000383035356C2447384D39654Ed0 ONLINE
Mounting Solaris host LUNs with ZFS file systems after transition
After transitioning Solaris host LUNs with ZFS file systems from Data ONTAP operating in 7-Modeto clustered Data ONTAP, you must mount the LUNs.
About this task
For copy-based transitions, you perform these steps after completing the Storage Cutover operationin the 7-Mode Transition Tool (7MTT).
For copy-free transitions, you perform these steps after the Import Data & Configuration operation inthe 7MTT is complete.
Steps
1. Discover your new clustered Data ONTAP LUNs by rescanning the host.
a. Identify the FC Host Ports (type fc-fabric):
#cfgadm –l
b. Unconfigure the 1st fc-fabric port:
#cfgadm –c unconfigure c1
c. Unonfigure the second fc-fabric port:
#cfgadm –c unconfigure c2
d. Repeat the steps for other fc-fabric ports.
e. Verify that the information about the host ports and their attached devices is correct:
# cfgadm –al
f. Reload the driver:
# devfsadm –Cv
# devfsadm –i iscsi
2. Verify that your clustered Data ONTAP LUNs have been discovered:
sanlun lun show
84 | SAN Host Transition and Remediation Guide

• The lun-pathname values for the clustered Data ONTAP LUNs should be the same as thelun-pathname values for the 7-Mode LUNs prior to transition.
• The mode column should display “C” instead of “7”.
Example
# sanlun lun showcontroller(7mode)/ device host lunvserver(Cmode) lun-pathname filename adapter protocol size mode--------------------------------------------------------------------------------------------------------------------------vs_sru17_5 /vol/zfs/zfs2 /dev/rdsk/c5t600A0980383030444D2B466542485935d0s2 scsi_vhci0 FCP 6g Cvs_sru17_5 /vol/zfs/zfs1 /dev/rdsk/c5t600A0980383030444D2B466542485934d0s2 scsi_vhci0 FCP 6g Cvs_sru17_5 /vol/ufs/ufs2 /dev/rdsk/c5t600A0980383030444D2B466542485937d0s2 scsi_vhci0 FCP 5g Cvs_sru17_5 /vol/ufs/ufs1 /dev/rdsk/c5t600A0980383030444D2B466542485936d0s2 scsi_vhci0 FCP 5g C
3. Check for zpools that are available to import:
zpool import
Example
# zpool import pool: n_vg id: 3605589027417030916 state: ONLINEaction: The pool can be imported using its name or numeric identifier.config:
n_vg ONLINE c0t600A098051763644575D445443304134d0 ONLINE c0t600A098051757A46382B445441763532d0 ONLINE
4. Import the zpools that were used for transition by pool name or using the pool ID:
• zpool import pool-name
• zpool import pool-id
Example
# zpool listno pools available
# zpool import pool: n_pool id: 5049703405981005579 state: ONLINEaction: The pool can be imported using its name or numeric identifier.config:
n_pool ONLINE c0t60A98000383035356C2447384D396550d0 ONLINE c0t60A98000383035356C2447384D39654Ed0 ONLINE
# zpool import n_pool
Solaris host remediation | 85

Example
# zpool import 5049703405981005579
[59] 09:55:53 (root@sunx2-shu04) /tmp# zpool listNAME SIZE ALLOC FREE CAP HEALTH ALTROOTn_pool 11.9G 2.67G 9.27G 22% ONLINE -
5. Check whether the zpool is online by doing one of the following:
• zpool status
• zpool list
Example
# zpool status pool: n_pool state: ONLINE scan: none requestedconfig:
NAME STATE READ WRITE CKSUM n_pool ONLINE 0 0 0 c0t60A98000383035356C2447384D396550d0 ONLINE 0 0 0 c0t60A98000383035356C2447384D39654Ed0 ONLINE 0 0 0
errors: No known data errors
Example
# zpool listNAME SIZE ALLOC FREE CAP HEALTH ALTROOTn_pool 11.9G 2.67G 9.27G 22% ONLINE -
6. Verify the mount points by using one of the following commands:
• zfs list
• df –ah
Example
# zfs listNAME USED AVAIL REFER MOUNTPOINTn_pool 2.67G 9.08G 160K /n_pooln_pool/pool1 1.50G 2.50G 1.50G /n_pool/pool1n_pool/pool2 1.16G 2.84G 1.16G /n_pool/pool2
#df –ahn_pool 12G 160K 9.1G 1% /n_pooln_pool/pool1 4.0G 1.5G 2.5G 38% /n_pool/pool1n_pool/pool2 4.0G 1.2G 2.8G 30% /n_pool/pool2
Transitioning Solaris host data LUNs with Sun VolumeManager
If you transition a Solaris host data LUN with Solaris Volume Manager from Data ONTAP operatingin 7-Mode to clustered Data ONTAP using the 7-Mode Transition Tool (7MTT), you must performspecific steps before and after transition to remediate transition issues on the host.
86 | SAN Host Transition and Remediation Guide

Preparing to transition Solaris host LUNs with Sun Volume Manager
Before you transition Solaris host data LUNs with Sun Volume Manager from ONTAP operating in7-Mode to clustered ONTAP, you must gather information you need for the transition process.
About this task
This task applies to copy-based transitions and copy-free transitions.
Steps
1. Display your LUNs to identify the name of the LUNs to be transitioned:
lun show
Example
fas8040-shu01> lun show /vol/ufs/ufs1 5g (5368709120) (r/w, online, mapped) /vol/ufs/ufs2 5g (5368709120) (r/w, online, mapped) /vol/zfs/zfs1 6g (6442450944) (r/w, online, mapped) /vol/zfs/zfs2 6g (6442450944) (r/w, online, mapped)
2. On the host, locate the device file name for the LUN:
#sanlun lun show
The device file name is listed in the device filename column.
Example
# sanlun lun showcontroller(7mode)/ device host lunvserver(Cmode) lun-pathname filename adapter protocol size mode--------------------------------------------------------------------------------------------------------------------------fas8040-shu01 /vol/zfs/zfs2 /dev/rdsk/c0t60A98000383035356C2447384D396550d0s2 scsi_vhci0 FCP 6g 7fas8040-shu01 /vol/zfs/zfs1 /dev/rdsk/c0t60A98000383035356C2447384D39654Ed0s2 scsi_vhci0 FCP 6g 7fas8040-shu01 /vol/ufs/ufs2 /dev/rdsk/c0t60A98000383035356C2447384D39654Ad0s2 scsi_vhci0 FCP 5g 7fas8040-shu01 /vol/ufs/ufs1 /dev/rdsk/c0t60A98000383035356C2447384D396548d0s2 scsi_vhci0 FCP 5g
3. List and record the SVM, and then get the disks associated with the SVM:
metaset
metaset -s set-name
Example
# metasetSet name = svm, Set number = 1Host Owner Solarisx2-shu04 YesDrive Dbase/dev/dsk/c0t60A98000383035356C2447384D39654Ad0 Yes/dev/dsk/c0t60A98000383035356C2447384D396548d0 Yes
# metastat -s svmsvm/d2: Concat/Stripe Size: 10452992 blocks (5.0 GB) Stripe 0: Device Start Block Dbase Reloc /dev/dsk/c0t60A98000383035356C2447384D396548d0s0 0 No Yes
Solaris host remediation | 87

svm/d1: Concat/Stripe Size: 10452992 blocks (5.0 GB) Stripe 0: Device Start Block Dbase Reloc /dev/dsk/c0t60A98000383035356C2447384D39654Ad0s0 0 No Yes
Device Relocation Information:Device Reloc Device ID/dev/dsk/c0t60A98000383035356C2447384D396548d0 Yes id1,sd@n60a98000383035356c2447384d396548/dev/dsk/c0t60A98000383035356C2447384D39654Ad0 Yes id1,sd@n60a98000383035356c2447384d39654a
4. List and record the mount points:
df –ah
Example
# df -ahFilesystem size used avail capacity Mounted on/dev/md/svm/dsk/d1 4.9G 1.5G 3.4G 31% /d1/dev/md/svm/dsk/d2 4.9G 991M 3.9G 20% /d2
Testing data LUNs on Solaris hosts with Sun Volume Manager before thecutover phase of copy-based transitions
If you are using the 7-Mode Transition Tool (7MTT) 2.2 or later and Data ONTAP 8.3.2 or later totransition your Solaris host ZFS data LUNs, you can test your transitioned clustered Data ONTAPLUNs to verify that you can mount your MPIO device before the cutover phase. Your source host cancontinue to run I/O to your source 7-Mode LUNs during testing.
Before you begin
Your source host with Sun Volume Manager data LUNs needs to be offline before starting the testphase transition.
Your new clustered Data ONTAP LUNs must be mapped to your test host and your LUNs must beready for transition
About this task
You should maintain hardware parity between the test host and the source host, and you shouldperform the following steps on the test host.
Your clustered Data ONTAP LUNs are in read/write mode during testing. They convert to read-onlymode when testing is complete and you are preparing for the cutover phase.
Steps
1. On the production host, disable the disk sets:
metaset -s svm -t
metaset -s svm -A disable
metaset -s svm -r
metaset -s svm -P
metaset
2. After the baseline data copy is complete, select Test Mode in the 7MTT user interface (UI).
3. In the 7MTT UI, click Apply Configuration.
4. In the production host, import the disk sets:
88 | SAN Host Transition and Remediation Guide

metaimport –s set-name
Example
# metaimport -s svmDrives in regular diskset including disk c0t60A98000383035356C2447384D39654Ad0: c0t60A98000383035356C2447384D39654Ad0 c0t60A98000383035356C2447384D396548d0More info: metaimport -r -v c0t60A98000383035356C2447384D39654Ad0
[22] 04:51:29 (root@sunx2-shu04) /# metastat -s svmsvm/d2: Concat/Stripe Size: 10452992 blocks (5.0 GB) Stripe 0: Device Start Block Dbase Reloc /dev/dsk/c0t60A98000383035356C2447384D396548d0s0 0 No Yes
svm/d1: Concat/Stripe Size: 10452992 blocks (5.0 GB) Stripe 0: Device Start Block Dbase Reloc /dev/dsk/c0t60A98000383035356C2447384D39654Ad0s0 0 No Yes
Device Relocation Information:Device Reloc Device ID/dev/dsk/c0t60A98000383035356C2447384D396548d0 Yes id1,sd@n60a98000383035356c2447384d396548/dev/dsk/c0t60A98000383035356C2447384D39654Ad0 Yes id1,sd@n60a98000383035356c2447384d39654a
5. On the test host, rescan your new clustered Data ONTAP LUNs:
a. Identify the FC host ports (type fc-fabric):
#cfgadm –l
b. Unconfigure the first fc-fabric port:
#cfgadm –c unconfigure c1
c. Configure the first fc-fabric port:
#cfgadm –c unconfigure c2
d. Repeat the steps for the other fc-fabric ports.
e. Display information about the host ports and their attached devices:
# cfgadm –al
f. Reload the driver:
# devfsadm –Cv
# devfsadm –i iscsi
6. Verify that your clustered Data ONTAP LUNs are present:
sanlun lun show
Example
# sanlun lun showcontroller(7mode)/ device host lunvserver(Cmode) lun-pathname filename adapter protocol size mode--------------------------------------------------------------------------------------------------------------------------
Solaris host remediation | 89

vs_5 /vol/zfs/zfs2 /dev/rdsk/c5t600A0980383030444D2B466542485935d0s2 scsi_vhci0 FCP 6g Cvs_5 /vol/zfs/zfs1 /dev/rdsk/c5t600A0980383030444D2B466542485934d0s2 scsi_vhci0 FCP 6g Cvs_5 /vol/ufs/ufs2 /dev/rdsk/c5t600A0980383030444D2B466542485937d0s2 scsi_vhci0 FCP 5g Cvs_5 /vol/ufs/ufs1 /dev/rdsk/c5t600A0980383030444D2B466542485936d0s2 scsi_vhci0 FCP 5g C
7. Verify that the Sun Volume Manager planned to test is available for import:
metaimport –r –v
Example
# metaimport -r -vImport: metaimport -s <newsetname> c5t600A0980383030444D2B466542485937d0Device offset length replica flagsc5t600A0980383030444D2B466542485937d0 16 8192 a m luoc5t600A0980383030444D2B466542485936d0 16 8192 a luo
8. Import the metaset with a new name:
metaimport –s set-name disk-id
Disk-id is obtained from the metaimport –r –v command.
Example
# metaimport -s svm c5t600A0980383030444D2B466542485937d0Drives in regular diskset including disk c5t600A0980383030444D2B466542485937d0: c5t600A0980383030444D2B466542485937d0 c5t600A0980383030444D2B466542485936d0More info: metaimport -r -v c5t600A0980383030444D2B466542485937d0
9. Check whether the metaset is available:
metaset
10. Run the file system check:
fsck -F ufs /dev/md/svm/rdsk/d1
11. Use the mount command to manually mount.
12. Perform testing as needed.
13. Shut down the test host.
14. In the 7MTT UI, click Finish Test.
After you finish
If your clustered Data ONTAP LUNs are to be remapped to your source host, you must prepare yoursource host for the cutover phase. If your clustered Data ONTAP LUNs are to remain mapped to yourtest host, no further steps are required on the test host.
Preparing for cutover phase when transitioning Solaris host Sun VolumeManager data LUNs
If you are transitioning a Solaris host data LUN with Sun Volume Manager from Data ONTAPoperating in 7-Mode to clustered Data ONTAP, you must perform certain steps before entering thecutover phase.
Before you begin
If you are using an FC configuration, fabric connectivity and zoning to the clustered Data ONTAPnodes must be established.
90 | SAN Host Transition and Remediation Guide

If you are using an iSCSI configuration, the iSCSI sessions to the clustered Data ONTAP nodes mustbe discovered and logged in.
About this task
For copy-based transitions, perform these steps before initiating the Storage Cutover operation in the7-Mode Transition Tool (7MTT).
For copy-free transitions, perform these steps before initiating the Export & Halt 7-Mode operationin 7MTT.
Steps
1. Stop I/O on all mount points.
2. Shut down each application accessing the LUNs according to the recommendations of theapplication vendor.
3. Unmount all of the mount points:
umount mount_point
Example
#umount /d1#umount /d2
4. Perform the following operations on metaset:
metaset –s set-name –A disable
metaset –s set-name –r
metaset –s set-name –P
Example
metaset -s n_vg -A disablemetaset -s n_vg -rmetaset -s n_vg -P
Mounting Solaris host LUNs with Solaris Volume Manager after transition
After transitioning Solaris host LUNs with Solaris Volume Manager from ONTAP operating in 7-Mode to clustered ONTAP, you must mount the LUNs.
About this task
For copy-based transitions, you perform these steps after completing the Storage Cutover operationin the 7-Mode Transition Tool (7MTT).
For copy-free transitions, you perform these steps after the Import Data & Configuration operation inthe 7MTT is complete.
Steps
1. Discover your new clustered ONTAP LUNs by rescanning the host.
a. Identify the FC host ports (type fc-fabric):
#cfgadm –l
b. Unconfigure the first fc-fabric port:
Solaris host remediation | 91
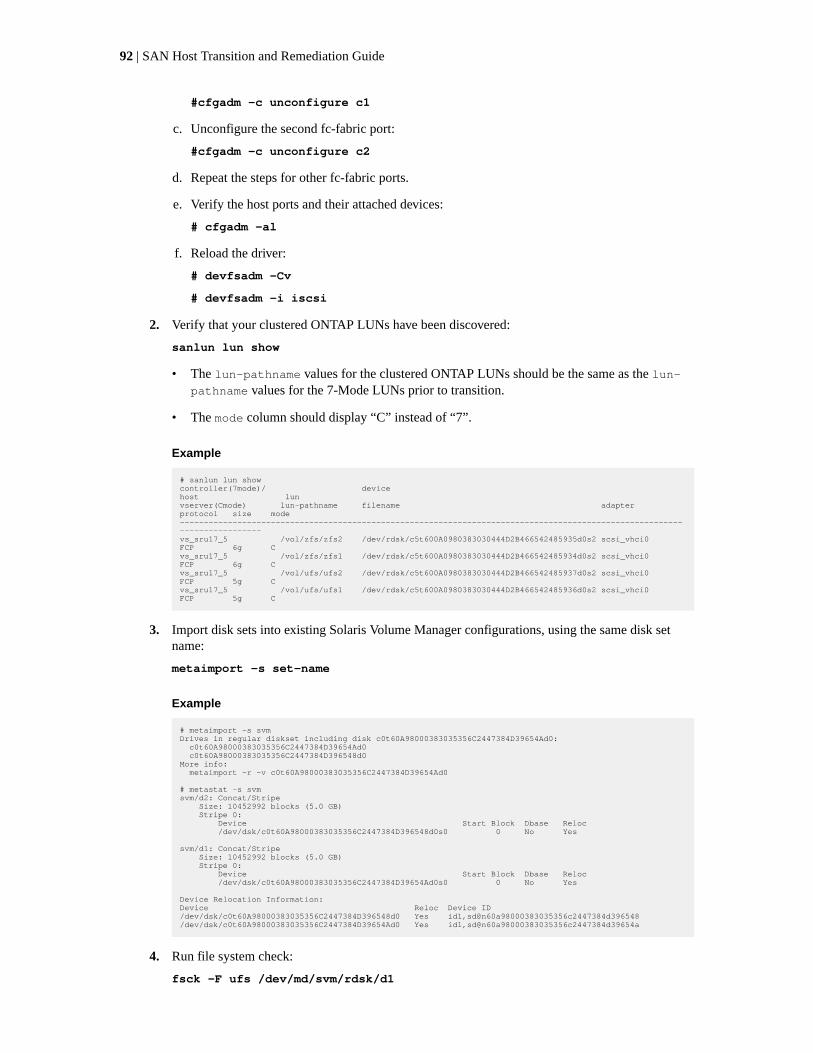
#cfgadm –c unconfigure c1
c. Unconfigure the second fc-fabric port:
#cfgadm –c unconfigure c2
d. Repeat the steps for other fc-fabric ports.
e. Verify the host ports and their attached devices:
# cfgadm –al
f. Reload the driver:
# devfsadm –Cv
# devfsadm –i iscsi
2. Verify that your clustered ONTAP LUNs have been discovered:
sanlun lun show
• The lun-pathname values for the clustered ONTAP LUNs should be the same as the lun-pathname values for the 7-Mode LUNs prior to transition.
• The mode column should display “C” instead of “7”.
Example
# sanlun lun showcontroller(7mode)/ device host lunvserver(Cmode) lun-pathname filename adapter protocol size mode--------------------------------------------------------------------------------------------------------------------------vs_sru17_5 /vol/zfs/zfs2 /dev/rdsk/c5t600A0980383030444D2B466542485935d0s2 scsi_vhci0 FCP 6g Cvs_sru17_5 /vol/zfs/zfs1 /dev/rdsk/c5t600A0980383030444D2B466542485934d0s2 scsi_vhci0 FCP 6g Cvs_sru17_5 /vol/ufs/ufs2 /dev/rdsk/c5t600A0980383030444D2B466542485937d0s2 scsi_vhci0 FCP 5g Cvs_sru17_5 /vol/ufs/ufs1 /dev/rdsk/c5t600A0980383030444D2B466542485936d0s2 scsi_vhci0 FCP 5g C
3. Import disk sets into existing Solaris Volume Manager configurations, using the same disk setname:
metaimport -s set-name
Example
# metaimport -s svmDrives in regular diskset including disk c0t60A98000383035356C2447384D39654Ad0: c0t60A98000383035356C2447384D39654Ad0 c0t60A98000383035356C2447384D396548d0More info: metaimport -r -v c0t60A98000383035356C2447384D39654Ad0
# metastat -s svmsvm/d2: Concat/Stripe Size: 10452992 blocks (5.0 GB) Stripe 0: Device Start Block Dbase Reloc /dev/dsk/c0t60A98000383035356C2447384D396548d0s0 0 No Yes
svm/d1: Concat/Stripe Size: 10452992 blocks (5.0 GB) Stripe 0: Device Start Block Dbase Reloc /dev/dsk/c0t60A98000383035356C2447384D39654Ad0s0 0 No Yes
Device Relocation Information:Device Reloc Device ID/dev/dsk/c0t60A98000383035356C2447384D396548d0 Yes id1,sd@n60a98000383035356c2447384d396548/dev/dsk/c0t60A98000383035356C2447384D39654Ad0 Yes id1,sd@n60a98000383035356c2447384d39654a
4. Run file system check:
fsck -F ufs /dev/md/svm/rdsk/d1
92 | SAN Host Transition and Remediation Guide

Example
# fsck -F ufs /dev/md/svm/rdsk/d1** /dev/md/svm/rdsk/d1** Last Mounted on /d1** Phase 1 - Check Blocks and Sizes** Phase 2 - Check Pathnames** Phase 3a - Check Connectivity** Phase 3b - Verify Shadows/ACLs** Phase 4 - Check Reference Counts** Phase 5 - Check Cylinder Groups3 files, 1573649 used, 3568109 free (13 frags, 446012 blocks, 0.0% fragmentation)
5. Manually mount each of the devices using the mount command.
Example
# /sbin/mount -F ufs -o largefiles /dev/md/svm/dsk/d1 /d1 # /sbin/mount -F ufs -o largefiles /dev/md/svm/dsk/d2 /d2
6. Verify the mount point:
df -ah
Solaris host remediation | 93

Rolling back LUNs to 7-Mode after transition
If you are not satisfied with the performance of your clustered Data ONTAP LUNs, you can rollbackfrom clustered Data ONTAP to Data ONTAP operating in 7-Mode for copy-free transitions (CFTs).Rollback is not supported for copy-based transitions (CBTs). Rollback is only supported on certainhosts.
You can rollback from clustered Data ONTAP to Data ONTAP operating in 7-Mode at any pointbefore you click commit in the 7-Mode Transition Tool (7MTT). After you click commit, youcannot rollback.
The following hosts support rollback:
• Windows
• Red Hat Enterprise Linux (RHEL)
• ESXi
The following hosts do not support rollback:
• HP-UX
• AIX
Rolling back ONTAP LUNs to 7-Mode LUNs on RHEL hostsIf your ONTAP LUNs are not performing as you expect after transition from Data ONTAP operatingin 7-Mode, you can rollback from ONTAP to 7-Mode LUNs on a Red Hat Enterprise Linux (RHEL)5 or RHEL 6 host.
Before you begin
Your 7-Mode LUNs must be mapped back to your RHEL 5 or RHEL 6 host.
Steps
1. Discover the 7-Mode LUNs:
rescan-scsi-bus.sh
2. Configure your DMMP devices for 7-Mode LUNs:
multipath
3. Verify your 7-Mode LUNs:
sanlun lun show
4. Determine the 7-Mode LUN device handle ID:
multipath -ll device_handle_name
5. If the host was configured with Logical Volume Manager (LVM), do the following:
a. Import the volume group:
vgimport vg_name
b. Verify the volume group status:
vgdisplay
94
c. Enable logical volumes:
vgchange -ay vg_name
d. Verify logical volume status:
lvdisplay
The LV Status should be displayed as available.
e. Mount the logical volumes from the ONTAP LUN to its respective mount point directory:
mount lv_name mount_point
If the mount points are defined in the etc/fstab file, you can also use the mount -acommand to mount the logical volumes.
f. Verify the mount points:
mount
Rolling back ONTAP LUNs to 7-Mode LUNs on Windowshosts
If your ONTAP LUNs are not performing as you expect after transition from Data ONTAP operatingin 7-Mode, you can rollback from ONTAP to 7-Mode LUNs on a Windows host.
Before you begin
Your 7-Mode LUNs must be remapped to your host.
Steps
1. Use Hyper-V Manager to shut down all virtual machines (VMs) running on the LUNs.
2. Use Windows Disk Manager to take the LUNs offline.
3. Use Cluster Disk Manager to take the cluster disks offline.
4. Shut down the host.
5. Revert back to Data ONTAP operating in 7-Mode.
6. Boot the host.
7. Use Windows Disk Manager to bring your 7-Mode LUNs online.
8. Use Cluster Disk Manager to bring cluster disks online.
9. Use Hyper-V Manager to bring your VMs online.
Rolling back LUNs to 7-Mode after transition | 95

Copyright information
Copyright © 1994–2017 NetApp, Inc. All rights reserved. Printed in the U.S.
No part of this document covered by copyright may be reproduced in any form or by any means—graphic, electronic, or mechanical, including photocopying, recording, taping, or storage in anelectronic retrieval system—without prior written permission of the copyright owner.
Software derived from copyrighted NetApp material is subject to the following license anddisclaimer:
THIS SOFTWARE IS PROVIDED BY NETAPP "AS IS" AND WITHOUT ANY EXPRESS ORIMPLIED WARRANTIES, INCLUDING, BUT NOT LIMITED TO, THE IMPLIEDWARRANTIES OF MERCHANTABILITY AND FITNESS FOR A PARTICULAR PURPOSE,WHICH ARE HEREBY DISCLAIMED. IN NO EVENT SHALL NETAPP BE LIABLE FOR ANYDIRECT, INDIRECT, INCIDENTAL, SPECIAL, EXEMPLARY, OR CONSEQUENTIALDAMAGES (INCLUDING, BUT NOT LIMITED TO, PROCUREMENT OF SUBSTITUTEGOODS OR SERVICES; LOSS OF USE, DATA, OR PROFITS; OR BUSINESS INTERRUPTION)HOWEVER CAUSED AND ON ANY THEORY OF LIABILITY, WHETHER IN CONTRACT,STRICT LIABILITY, OR TORT (INCLUDING NEGLIGENCE OR OTHERWISE) ARISING INANY WAY OUT OF THE USE OF THIS SOFTWARE, EVEN IF ADVISED OF THEPOSSIBILITY OF SUCH DAMAGE.
NetApp reserves the right to change any products described herein at any time, and without notice.NetApp assumes no responsibility or liability arising from the use of products described herein,except as expressly agreed to in writing by NetApp. The use or purchase of this product does notconvey a license under any patent rights, trademark rights, or any other intellectual property rights ofNetApp.
The product described in this manual may be protected by one or more U.S. patents, foreign patents,or pending applications.
RESTRICTED RIGHTS LEGEND: Use, duplication, or disclosure by the government is subject torestrictions as set forth in subparagraph (c)(1)(ii) of the Rights in Technical Data and ComputerSoftware clause at DFARS 252.277-7103 (October 1988) and FAR 52-227-19 (June 1987).
96

Trademark information
Active IQ, AltaVault, Arch Design, ASUP, AutoSupport, Campaign Express, Clustered Data ONTAP,Customer Fitness, Data ONTAP, DataMotion, Fitness, Flash Accel, Flash Cache, Flash Pool,FlexArray, FlexCache, FlexClone, FlexGroup, FlexPod, FlexScale, FlexShare, FlexVol, FPolicy,Fueled by SolidFire, GetSuccessful, Helix Design, LockVault, Manage ONTAP, MetroCluster,MultiStore, NetApp, NetApp Insight, OnCommand, ONTAP, ONTAPI, RAID DP, RAID-TEC,SANscreen, SANshare, SANtricity, SecureShare, Simplicity, Simulate ONTAP, Snap Creator,SnapCenter, SnapCopy, SnapDrive, SnapIntegrator, SnapLock, SnapManager, SnapMirror,SnapMover, SnapProtect, SnapRestore, Snapshot, SnapValidator, SnapVault, SolidFire, SolidFireHelix, StorageGRID, SyncMirror, Tech OnTap, Unbound Cloud, and WAFL and other names aretrademarks or registered trademarks of NetApp, Inc., in the United States, and/or other countries. Allother brands or products are trademarks or registered trademarks of their respective holders andshould be treated as such. A current list of NetApp trademarks is available on the web.
http://www.netapp.com/us/legal/netapptmlist.aspx
97

How to send comments about documentation andreceive update notifications
You can help us to improve the quality of our documentation by sending us your feedback. You canreceive automatic notification when production-level (GA/FCS) documentation is initially released orimportant changes are made to existing production-level documents.
If you have suggestions for improving this document, send us your comments by email.
To help us direct your comments to the correct division, include in the subject line the product name,version, and operating system.
If you want to be notified automatically when production-level documentation is released orimportant changes are made to existing production-level documents, follow Twitter account@NetAppDoc.
You can also contact us in the following ways:
• NetApp, Inc., 495 East Java Drive, Sunnyvale, CA 94089 U.S.
• Telephone: +1 (408) 822-6000
• Fax: +1 (408) 822-4501
• Support telephone: +1 (888) 463-8277
98

Index
7-Mode LUNsrolling back to, from ONTAP LUNs on RHEL hosts94rolling back to, from ONTAP LUNs on Windowshosts 95
7-Mode Transition Toolillustration of transition phases 8
A
about this guidedeciding whether to use the SAN Host Transitionand Remediation Guide 7
AIX hostsmounting data LUNs with file systems aftertransition from 7-Mode to clustered Data ONTAP 78preparing for cutover phase when transitioning dataLUNs with file systems 77preparing for the cutover phase when transitioningFC/FCoE configurations 74preparing to transition data LUNs with file systems76remediation introduction 73testing transitioned LUNs on, before the cutoverphase of copy-based transitions 74, 76testing transitioned SAN boot LUNs on, before thecutover phase of copy-based transitions 67transition of data LUNs with file systemsintroduction 76with FC/FCoE configurations, booting from SANboot LUN after transition from 7-Mode to ONTAP75with FC/FCoE configurations, preparing to transitionSAN boot LUNs on 73with FC/FCoE configurations, transition of SANboot LUNs on introduction 73
applications, ESXi hosttesting transitioned LUNs and, before the cutoverphase of copy-based transitions 14
apply configuration (precutover) phasedowntime for ESXi host transition 15
audiencefor this guide 7
B
boot LUNs, SANdiscovering on hosts after transition 56making them the primary boot LUN for HP-UXEmulex HBAs after transition 69making them the primary boot LUNs for HP-UXQLogic HBAs 70transition introduction 50transition of on AIX hosts with FC/FCoEconfigurations introduction 73types supported for transition 51
boot LUNs, transitioned SAN
testing on AIX hosts before the cutover phase ofcopy-based transitions 67
C
CAWenabling on a datastore using the ESXi CLI 25
CLI, ESXiusing to enable CAW on a datastore 25using to reattach RDM 23
CLI, RHELusing to preparing RHEL LUNs with mount pointsusing DMMP device names for transition 35, 40using to verify that RHEL 5 LUNs are ready fortransition 29
clustered Data ONTAPhosts that support reversion to, from Data ONTAPoperating in 7-Mode 94
commentshow to send feedback about documentation 98
Compare and Writeenabling on a datastore using the ESXi CLI 25
configurations, FCintroduction to transitioning HP-UX host SAN bootLUNs 66
configurations, FCoEintroduction to transitioning HP-UX host SAN bootLUNs 66
configurations, Sun Volume Managerintroduction to transitioning Solaris host data LUNs86
configurations, SVMintroduction to transitioning Solaris host data LUNs86
console, ESXiusing to enable CAW on a datastore 25using to reattach RDM 23
copy-based transitionsillustration of 7MTT transition phases 8testing data LUNs on HP-UX hosts before thecutover phase 63testing DMMP devices with file systems on RHELhosts before the cutover phase 36testing DMMP devices without file systems onRHEL hosts before the cutover phase of 30testing LUNs with file systems on LVM devicesbefore the cutover phase 46testing SAN boot LUNs on RHEL hosts before thecutover phase 54Testing transitioned LUNs and ESXi hostapplications before the cutover phase 14testing transitioned LUNs on AIX hosts before thecutover phase 76testing transitioned SAN boot LUNs on AIX hostsbefore the cutover phase 74
copy-free transitionsillustration of 7MTT transition phases 8
cutover phasepreparing for transitioning Windows hosts 59
Index | 99

preparing for when transitioning SAN boot LUNs56, 68preparing for, when transitioning a Linux hostDMMP device without a file system 31preparing for, when transitioning AIX host dataLUNs with file systems 77preparing for, when transitioning AIX hosts with FC/FCoE configurations 74preparing for, when transitioning HP-UX host dataLUNs with file systems 65preparing for, when transitioning Linux host filesystems on LVM devices 48preparing for, when transitioning LUNs with mountpoints using DMMP device names on Linux hosts37, 43preparing for, when transitioning Solaris host dataLUNs with Sun Volume Manager 90preparing for, when transitioning Solaris host dataLUNs with ZFS file systems 83testing transitioned LUNs on Windows hosts before58
cutover phase of copy based-transitionstesting SAN boot LUNs before 54
cutover phase of copy-based transitionstesting DMMP devices with file systems before 36testing DMMP devices without file systems before30testing LUNs with file systems on LVM devicesbefore 46testing transitioned data LUNs on HP-UX hostsbefore 63testing transitioned LUNs and ESXi hostapplications before 14testing transitioned LUNs on AIX hosts before 74,76testing transitioned SAN boot LUNs on AIX hostsbefore 67
D
data LUNs withSun Volume Managercutover phase of copy-based transitions
Solaris 88Solaris hosts 88
data LUNs, Solaris hostmounting with Solaris Volume Manager aftertransition from 7-Mode to clustered ONTAP 91preparing to transition with Sun Volume Manager 87preparing to transition with ZFS file system 79with ZFS file systems, introduction to transitioning79
data LUNs, transitionedtesting on HP-UX hosts before the cutover phase ofcopy-based transitions 63
Data ONTAP operating in 7-Modehosts that support reversion to, from clustered DataONTAP 94
datastoresenabling CAW on, using the ESXi CLI 25
DDMP devices, RHELtransition of without file systems introduction 28
DDMP devices, RHEL 6verifying that they are ready for transition 29
definitionsInventory Collect Tool 10, 28, 57
deletingVM snapshots using vSphere Client 13
devices, DMMPremounting on Linux hosts after transition from 7-Mode to clustered Data ONTAP 38
devices, LVMpreparing for cutover phase when transitioningLinux host file systems on 48transition of Linux host file system on introductions45
devices, RHEL 6 DDMPverifying that they are ready for transition 29
DMMP alias namestransition of LUNs with mount points usingintroduction 40
DMMP device namesLUNs with mount points using, preparing fortransition using the CLI 35, 40LUNs with mount points using, preparing fortransition using the Inventory Assessment Workbook34preparing for cutover phase when transitioningLUNs with mount points on Linux hosts 37, 43transition of LUNs with mount points usingintroduction 33
DMMP devicesremounting on Linux hosts after transition from 7-Mode to clustered Data ONTAP 38with file systems, testing before the cutover phase ofcopy-based transitions 36without file systems, testing before the cutover phaseof copy-based transitions 30
DMMP devices, Linux hostpreparing for cutover when transitioning without afile system 31
documentationhow to receive automatic notification of changes to98how to send feedback about 98
E
Emulex HBAs, HP-UXmaking a SAN boot LUN the primary boot LUN for,after transition 69
ESXiversions and features supported for SAN transitionusing 7MTT 9
ESXi CLIusing to enable CAW on a datastore 25using to reattach RDM 23using to remount VMFS volumes after transition 20using to remove VM snapshots 13
ESXi consoleusing to enable CAW on a datastore 25using to reattach RDM 23
ESXi hostsconfigured for SAN boot, setting up after transition18downtime at apply configuration (precutover) phase15
100 | SAN Host Transition and Remediation Guide

introduction to post-transition remediationrequirements 16preparing for post-transition remediation 16preparing for transition of 9recommended settings after transition remediation25testing transitioned LUNs and host applicationsbefore the cutover phase of copy-based transitions 14
ESXi hosts, non-SAN bootreregistering VMs on after transition, using vSphereClient 17
exceptionswhen transitioning SAN hosts to ONTAP 61
F
FC configurationsintroduction to transitioning HP-UX host SAN bootLUNs 66on AIX hosts, booting from SAN boot LUN aftertransition from 7-Mode to ONTAP 75on AIX hosts, preparing to transition SAN bootLUNs 73on AIX hosts, transition of SAN boot LUNsintroduction 73on HP-UX hosts, preparing to transition SAN bootLUNs 67preparing for the cutover phase when transitioningwith, on AIX hosts 74
FC SAN boot LUNspreparing for transition on RHEL hosts 51
FCoE configurationsintroduction to transitioning HP-UX host SAN bootLUNs 66on AIX hosts, booting from SAN boot LUN aftertransition from 7-Mode to ONTAP 75on AIX hosts, preparing to transition SAN bootLUNs 73on AIX hosts, transition of SAN boot LUNsintroduction 73preparing for the cutover phase when transitioningwith, on AIX hosts 74
FCoE SAN boot LUNspreparing for transition on RHEL hosts 51
feedbackhow to send comments about documentation 98
file systems, Linux hostpreparing for cutover phase when transitioning onLVM devices 48transition of on LVM devices introduction 45
G
guest operating systemspost-transition remediation for Linux 24post-transition remediation for Windows 24
guest operating systems, Linuxpreparing for transition 10
guest operating systems, Windowspreparing for transition 13
H
HBAs, Emulex HP-UXmaking a SAN boot LUN the primary boot LUN for,after transition 69
HBAs, HP-UX QLogicmaking a SAN boot LUN the primary boot LUN for70
host data LUNs, Solarispreparing to transition with ZFS file systems 79with ZFS file systems, introduction to transitioning79
host file systems, Linuxtransition of on LVM devices introduction 45
host remediationHP-UX 62RHEL introduction 27VMware ESXi introduction 9Windows introduction 57
hostsdiscovering SAN boot LUNs on, after transition 56supported for reversion from Data ONTAP operatingin 7-Mode to clustered Data ONTAP 94
hosts, AIXmounting data LUNs with file systems aftertransition from 7-Mode to clustered Data ONTAP 78preparing for cutover phase when transitioning dataLUNs with file systems 77preparing for the cutover phase when transitioningFC/FCoE configurations 74preparing to transition data LUNs with file systems76remediation introduction 73testing transitioned LUNs on, before the cutoverphase of copy-based transitions 74, 76testing transitioned SAN boot LUNs on, before thecutover phase of copy-based transitions 67transition of data LUNs with file systemsintroduction 76with FC/FCoE configurations, booting from SANboot LUN after transition from 7-Mode to ONTAP75with FC/FCoE configurations, preparing to transitionSAN boot LUNs on 73with FC/FCoE configurations, transition of SANboot LUNs on introduction 73
hosts, ESXiconfigured for SAN boot, setting up after transition18downtime at apply configuration (precutover) phase15introduction to post-transition remediationrequirements 16preparing for post-transition remediation 16preparing for transition of 9recommended settings after transition remediation25testing transitioned LUNs and applications beforethe cutover phase of copy-based transitions 14
hosts, ESXi non-SAN bootreregistering VMs on after transition, using vSphereClient 17
hosts, HP-UX
Index | 101

introduction to transitioning LUNs with file systems62introduction to transitioning SAN boot LUNs withFC or FCoE configurations 66mounting LUNs with file systems after transitionfrom 7-Mode to clustered Data ONTAP 65preparing for cutover phase when transitioning dataLUNs with file systems 65preparing to transition LUNs with file systems 62remediation introduction 62testing transitioned data LUNs on, before the cutoverphase of copy-based transitions 63with FC configurations, preparing to transition SANboot LUNs on 67
hosts, Linuxmounting logical volumes on, after transition from 7-Mode to ONTAP 49remounting DMMP devices after transition from 7-Mode to clustered Data ONTAP 38remounting mount points using alias names aftertransition 43replacing 7-Mode LUN WWID after transition ofLUNs 32
hosts, RHELpreparing for transition of FC or FCoE SAN bootLUNs on 51preparing for transition of iSCSI SAN boot LUNs on52remediation introduction 27rolling back ONTAP LUNs back to 7-Mode LUNs94testing DMMP devices with file systems on, beforethe cutover phase of copy-based transitions 36testing DMMP devices without file systems on,before the cutover phase of copy-based transitions 30testing LUNs with file systems on LVM devicesbefore the cutover phase of copy-based transitions 46testing LUNs with mount points using alias nameson before the cutover phase of copy-based transitions41testing SAN boot LUNs on before the cutover phaseof copy-based transitions 54
hosts, SANexceptions and known issues when transitioning toONTAP 61
hosts, Solariscutover phase of copy-based transitions 88introduction to transition remediation 79introduction to transitioning host data LUNs withSun Volume Manager (SVM) 86mounting LUNs with Solaris Volume Manager aftertransition from 7-Mode to clustered ONTAP 91mounting LUNs with ZFS file systems aftertransition from 7-Mode to clustered Data ONTAP 84preparing for cutover phase when transitioning dataLUNs with Sun Volume Manager 90preparing for cutover phase when transitioning dataLUNs with ZFS file systems 83preparing to transition LUNs with Sun VolumeManager 87SVM 88testing data LUNs 88transitioning LUNs with ZFS file systems 80
hosts, VMware ESXiremediation introduction 9
hosts, Windowsbringing online after transition from 7-Mode toclustered Data ONTAP 60preparing for cutover phase when transitioning 59preparing for transition from 7-Mode to clusteredData ONTAP 57remediation introduction 57rolling back ONTAP LUNs back to 7-Mode LUNs95testing transitioned LUNs on, before the cutoverphase 58
HP-UX Emulex HBAsmaking a SAN boot LUN the primary boot LUNafter transition 69
HP-UX hostsintroduction to transitioning LUNs with file systems62introduction to transitioning SAN boot LUNs withFC or FCoE configurations 66mounting LUNs with file systems after transitionfrom 7-Mode to clustered Data ONTAP 65preparing for cutover phase when transitioning dataLUNs with file systems 65preparing to transition LUNs with file systems 62remediation introduction 62testing transitioned data LUNs on, before the cutoverphase of copy-based transitions 63with FC configurations, preparing to transition SANboot LUNs on 67
HP-UX QLogic HBAsmaking a SAN boot LUN the primary boot LUN for70
I
ICTdefined 10, 28, 57generating information about LUNs and theconfiguration needed for transition. 10, 28, 57
identifyingVM snapshots that must be removed beforetransition 13
informationhow to send feedback about improvingdocumentation 98
initiators, VMware iSCSI softwarereconfiguration after transition from 7-Mode toclustered Data ONTAP 17
introductionsof SAN boot LUN transition 50to transition of SAN boot LUNs on AIX hosts withFC/FCoE configurations 73to transitioning Linux host file systems on LVMdevices 45to transitioning LUNs with mount points usingDMMP alias names 40to transitioning LUNs with mount points usingDMMP device names 33to transitioning RHEL DMMP devices without filesystems 28
Inventory Assessment Workbook
102 | SAN Host Transition and Remediation Guide

gathering pretransition information from 27using to preparing RHEL LUNs with mount pointsusing DMMP device names for transition 34using to verify that RHEL LUNs are ready fortransition 29
Inventory Collect Tooldefined 10, 28, 57stand-alone utility for collecting configuration andinventory information about 7-Mode storagecontrollers 10, 28, 57
iSCSIVMware software initiator, reconfiguration aftertransition from 7-Mode to clustered Data ONTAP 17
iSCSI SAN boot LUNspreparing for transition on RHEL hosts 52
K
known issueswhen transitioning SAN hosts to ONTAP 61
L
Linux guest operating systemspost-transition remediation for 24preparing for transition 10
Linux host DMMP devicespreparing for cutover when transitioning without afile system 31
Linux host file systemspreparing for cutover phase when transitioning onLVM devices 48transition of on LVM devices introduction 45
Linux hostsmounting logical volumes on, after transition from 7-Mode to ONTAP 49preparing for cutover phase when transitioningLUNs with mount points using DMMP devicenames 37, 43remounting DDMP devices after transition from 7-Mode to clustered Data ONTAP 38remounting mount points using alias names aftertransition 43replacing 7-Mode LUN WWID after transition ofLUNs 32
logical volumesmounting on Linux hosts after transition from 7-Mode to clustered Data ONTAP 49
LUNsreplacing 7-Mode LUN WWID on Linux hosts aftertransition of 32Solaris host data, preparing for cutover phase whentransitioning with Sun Volume Manager 90Solaris host data, preparing for cutover phase whentransitioning with ZFS file systems, 83transition of, with mount points using DMMP aliasnames introduction 40with file systems on LVM devices, testing before thecutover phase of copy-based transitions 46with file systems, preparing for cutover phase whentransitioning AIX host data LUNs 77
with file systems, preparing for cutover phase whentransitioning HP-UX host data LUNs 65with mount points using alias names, remounting onLinux host after transition 43with mount points using alias names, testing beforecutover phase of copy-based transitions 41with mount points using DMMP device names,preparing for cutover phase when transitioning onLinux hosts 37, 43
LUNs with file systemsintroduction to transitioning HP-UX host 62mounting after transition on AIX hosts 78mounting after transition on HP-UX hosts 65preparing to transition AIX host 76preparing to transition HP-UX host 62transition of on AIX hosts introduction 76
LUNs with mount points using DMMP device namestransition of, from 7-Mode to clustered Data ONTAPintroduction 33
LUNs with ZFS file systemscutover phase of copy-based transitions
Solaris 80Solaris hosts 80
LUNs, FC SAN bootpreparing for transition on RHEL hosts 51
LUNs, FCoE SAN bootpreparing for transition on RHEL hosts 51
LUNs, iSCSI SAN bootpreparing for transition on RHEL hosts 52
LUNs, ONTAProlling back to 7-Mode LUNs on RHEL hosts 94rolling back to 7-Mode LUNs on Windows hosts 95
LUNs, RDMreattaching to VMs after transition 21
LUNs, RHELverifying that they are ready for transition using theInventory Assessment Workbook 29with mount points using DDMP device names,preparing for transition using the CLI 35, 40with mount points using DDMP device names,preparing for transition using the InventoryAssessment Workbook 34
LUNs, RHEL 5verifying that they are ready for transition using theCLI 29
LUNs, SAN bootbooting from, on AIX hosts with FC/FCoEconfigurations after transition from 7-Mode toONTAP 75discovering on hosts after transition 56making them the primary boot LUN for HP-UXEmulex HBAs after transition 69preparing for the cutover phase when transitioning56, 68preparing to transition on AIX hosts with FC/FCoEconfigurations 73preparing to transition on HP-UX hosts with FCconfigurations 67testing before the cutover phase of copy basedtransitions 54testing on AIX hosts before the cutover phase ofcopy-based transitions 74transition introduction 50
Index | 103

transition on AIX hosts with FC/FCoEconfigurations introduction 73types supported for transition 51
LUNs, SAN boot with FC/FCoE configurationsintroduction to transitioning 66
LUNs, Solaris hostmounting with Solaris Volume Manager aftertransition from 7-Mode to clustered ONTAP 91preparing to transition with Sun Volume Manager 87with ZFS file systems, mounting after transitionfrom 7-Mode to clustered Data ONTAP 84
LUNs, Solaris host datapreparing to transition with ZFS file systems 79with ZFS file systems, introduction to transitioning79
LUNs, Sun Volume Manager (SVM)introduction to transitioning 86
LUNs, transitionedtesting before the cutover phase of copy-basedtransitions on ESXi hosts 14testing on AIX hosts before the cutover phase ofcopy-based transitions 74, 76testing on Windows hosts before the cutover phase58
LUNs, transitioned datatesting on HP-UX hosts before the cutover phase ofcopy-based transitions 63
LUNs, transitioned SAN boottesting on AIX hosts before the cutover phase ofcopy-based transitions 67
LVM devicespreparing for cutover phase when transitioningLinux host file systems on 48transition of Linux host file system on introduction45
M
mount pointspreparing RHEL LUNs with, for transition using theCLI 35, 40preparing RHEL LUNs with, for transition using theInventory Assessment Workbook 34transition of LUNs with, using DMMP alias nameintroduction 40transition of LUNs with, using DMMP device namesintroduction 33using DMMP device names, preparing for cutoverwhen transitioning LUNs on Linux hosts 37, 43
mount points using alias namesremounting on Linux hosts after transition 43
mountingAIX host data LUNs with file systems aftertransition from 7-Mode to clustered Data ONTAP 78HP-UX host LUNs with file systems after transitionfrom 7-Mode to clustered Data ONTAP 65Solaris host LUNs with Solaris Volume Managerafter transition from 7-Mode to clustered ONTAP 91Solaris host LUNs with ZFS file systems aftertransition from 7-Mode to clustered Data ONTAP 84
O
ONTAP LUNsrolling back to 7-Mode LUNs on RHEL hosts 94rolling back to 7-Mode LUNs on Windows hosts 95
operating systems, Linux guestpreparing for transition 10
operating systems, Windows guestpreparing for transition 13
P
post-transition remediationpreparing ESXi host for 16
post-transition remediation requirementsintroduction to, for ESXi hosts 16
pretransition informationgathering from the Inventory Assessment Workbook27
Q
QLogic HBAs, HP-UXmaking a SAN boot LUN the primary boot LUN for70
R
RDM LUNsreattaching to VMs after transition 21
RDMsreattaching to VMs using vSphere Client 22reattaching using the ESXi CLI/console 23
RDMs, staleremoving using vSphere Client 21
reattachingRDMs using the ESXi CLI/console 23
recommended settingsfor ESXi hosts after transition remediation 25
remediationHP-UX hosts introduction 62introduction to Solaris host transition 79RHEL hosts introduction 27VMware ESXi hosts introduction 9Windows hosts introduction 57
remediation requirements, post-transitionintroduction to, for ESXi hosts 16
remediation, post-transitionpreparing ESXi host for 16
remountingVMFS volumes after transition using the ESXi CLI20VMFS volumes after transition using vSphere Client19
removingstale RDMs using vSphere Client 21VM snapshots using the ESXi CLI 13
requirements, post-transition remediationintroduction to, for ESXi hosts 16
RHELtransition of DDMP devices without file systemsintroduction 28
104 | SAN Host Transition and Remediation Guide

RHEL 5 LUNsverifying that they are ready for transition using theCLI 29
RHEL 6 DDMP devicesverifying that they are ready for transition 29
RHEL CLIusing to preparing RHEL LUNs with mount pointsusing DMMP device names for transition 35, 40
RHEL hostspreparing for transition of FC or FCoE SAN bootLUNs on 51preparing for transition of iSCSI SAN boot LUNs on52remediation introduction 27rolling back ONTAP LUNs back to 7-Mode LUNs94testing DMMP devices with file systems on, beforethe cutover of copy-based transitions phase 36testing DMMP devices without file systems on,before the cutover of copy-based transitions phase 30testing LUNs with file systems on LVM devicesbefore the cutover phase of copy-based transitions 46testing LUNs with mount points using alias nameson before the cutover phase of copy-based transitions41testing SAN boot LUNs on before the cutover phaseof copy-based transitions 54
RHEL LUNsverifying that they are ready for transition using theInventory Assessment Workbook 29with mount points using DDMP device names,preparing for transition using the CLI 35, 40with mount points using DDMP device names,preparing for transition using the InventoryAssessment Workbook 34
rollingONTAP LUNs back to 7-Mode LUNs on RHELhosts 94ONTAP LUNs back to 7-Mode LUNs on Windowshosts 95
S
SAN bootsetting up ESXi hosts configured for, after transition18
SAN boot LUNsbooting from, on AIX hosts with FC/FCoEconfigurations after transition from 7-Mode toONTAP 75discovering on hosts after transition 56making them the primary boot LUN for HP-UXEmulex HBAs after transition 69making them the primary boot LUN for HP-UXQLogic HBAs after transition 70preparing for the cutover phase when transitioning56, 68preparing to transition on AIX hosts with FC/FCoEconfigurations 73preparing to transition on HP-UX hosts with FCconfigurations 67testing before the cutover phase of copy-basedtransitions 54
testing on AIX hosts before the cutover phase ofcopy-based transitions 74transition introduction 50transition of on AIX hosts with FC/FCoEconfigurations introduction 73types supported for transition 51
SAN boot LUNs with FC/FCoE configurationsintroduction to transitioning 66
SAN boot LUNs with SVM configurationsintroduction to transitioning 86
SAN boot LUNs, FCpreparing for transition on RHEL hosts 51
SAN boot LUNs, FCoEpreparing for transition on RHEL hosts 51
SAN boot LUNs, iSCSIpreparing for transition on RHEL hosts 52
SAN boot LUNs, transitionedtesting on AIX hosts before the cutover phase ofcopy-based transitions 67
SAN hostsexceptions and known issues when transitioning toONTAP 61
SAN transitionssupported ESXi versions and features using the 7-Mode Transition Tool 9
setting upESXI hosts configured for SAN boot after transition18
snapshots, VMdeleting using vSphere Client 13how to identify ones that must be removed beforetransition 13removing using the ESXi CLI 13
Solaris host data LUNspreparing to transition with ZFS file systems 79with ZFS file systems, introduction to transitioning79
Solaris hostsdata LUNs on Solaris hosts with Sun VolumeManager (SVM) before the cutover phase of copy-based transitions 88introduction to transition remediation 79introduction to transitioning host data LUNs withSun Volume Manager (SVM) 86mounting LUNs with Solaris Volume Manager aftertransition from 7-Mode to clustered ONTAP 91mounting LUNs with ZFS file systems aftertransition from 7-Mode to clustered Data ONTAP 84preparing for cutover phase when transitioning dataLUNs with Sun Volume Manager 90preparing for cutover phase when transitioning dataLUNs with ZFS file systems 83preparing to transition LUNs with Sun VolumeManager 87testing LUNs with ZFS file systems 80
stale RDMsremoving using vSphere Client 21
suggestionshow to send feedback about documentation 98
Sun Volume Managerintroduction to transitioning Solaris host data LUNs86
Index | 105

preparing for cutover phase when transitioningSolaris host data LUNs with 90preparing to transition Solaris host LUNs with 87
SVM configurationsintroduction to transitioning Solaris host data LUNs86
T
testingdata LUNs on HP-UX hosts before the cutover phaseof copy-based transitions 63DMMP devices with file systems before the cutoverphase of copy-based transitions 36DMMP devices without file systems before thecutover phase of copy-based transitions 30LUNs with file systems on LVM devices before thecutover phase of copy-based transitions 46LUNs with mount points using DMMP alias nameson RHEL hosts before the cutover phase of copy-based transitions 41SAN boot LUNs on RHEL hosts before the cutoverphase of copy-based transitions 54transitioned LUNs and ESXi host applications beforethe cutover phase of copy-based transitions 14transitioned LUNs on AIX hosts before the cutoverphase of copy-based transitions 76transitioned LUNs on Windows hosts before thecutover phase 58transitioned SAN boot LUNs on AIX hosts beforethe cutover phase of copy-based transitions 74transitioned SAN boot LUNs on HP-UX hostsbefore the cutover phase of copy-based transitions 67
testing data LUNsSolaris 88Sun Volume Manager 88
testing LUNs with ZFS file systemsSolaris 80
transitionof ESXI hosts, preparing for 9remounting RHEL 5 and RHEL 6 DMMP devicesafter transition from 7-Mode to clustered DataONTAP 38types of SAN boot LUNs supported for 51
transition phasesillustration of the 7-Mode Transition Tool 8
transition remediationintroduction for AIX hosts 73introduction for HP-UX hosts 62introduction for RHEL hosts 27introduction for Solaris hosts 79introduction for VMware ESXi hosts 9introduction for Windows hosts 57
transitioned data LUNstesting on HP-UX hosts before the cutover phase ofcopy-based transitions 63
transitioned LUNstesting before the cutover phase of copy-basedtransitions on ESXi hosts 14testing on AIX hosts before the cutover phase ofcopy-based transitions 74, 76testing on Windows hosts before the cutover phase58
transitioned SAN boot LUNstesting on AIX hosts before the cutover phase ofcopy-based transitions 67
transitioningSolaris host data LUNs with ZFS file systems,introduction to 79Solaris host LUNs with Sun Volume Manager,preparing for 87
transitionsbringing Windows hosts online after transition form7-Mode to clustered Data ONTAP 60determining whether VMFS volumes need to beremounted after 19discovering SAN boot LUNs on hosts after 56preparing Linux guest operating systems for 10preparing Windows guest operating system for 13preparing Windows hosts for 57setting up ESXi hosts configured for SAN boot after18
Twitterhow to receive automatic notification ofdocumentation changes 98
V
verifyingRHEL 5 LUNs are ready for transition using the CLI29that RHEL 6 DDMP devices are ready for transition29that RHEL LUNs are ready for transition using theInventory Assessment Workbook 29
VM snapshotsdeleting using vSphere Client 13how to identify ones that must be removed beforetransition 13removing using the ESXi CLI 13
VMFS volumesdetermining whether they need to be remounted aftertransition 19remounting after transition using the ESXi CLI 20remounting after transition using vSphere Client 19
VMsreattaching RDM LUNs to, after transition 21reattaching RDMs using vSphere Client 22reregistering after transition on non-SAN boot ESXihosts using vSphere Client 17
VMwareESXi host remediation introduction 9reconfiguration of software iSCSI initiator aftertransition from 7-Mode to clustered Data ONTAP 17
VMware ESXi hostsremediation introduction 9
volumes, logicalmounting on Linux hosts after transition from 7-Mode to clustered Data ONTAP 49
volumes, VMFSdetermining whether they need to be remounted aftertransition 19remounting after transition using the ESXi CLI 20remounting after transition using vSphere Client 19
vSphere Clientusing to delete VM snapshots 13
106 | SAN Host Transition and Remediation Guide
using to reattach RDMs to VMs 22using to remount VMFS volumes after transition 19using to reregister VMs after transition on non-SANboot ESXi hosts 17
W
Windows guest operating systemspost-transition remediation for 24preparing for transition 13
Windows hostsbringing online after transition from 7-Mode toclustered Data ONTAP 60preparing for cutover phase when transitioning 59preparing for transition from 7-Mode to clusteredData ONTAP 57remediation introduction 57
rolling back ONTAP LUNs back to 7-Mode LUNs95testing transitioned LUNs on, before the cutoverphase 58
WWIDs, 7-Mode LUNreplacing after transition of LUNs on Linux hosts 32
Z
ZFS file systempreparing to transition Solaris host data LUNs with79
ZFS file systemsintroduction to transitioning Solaris host data LUNswith 79Preparing for cutover phase when transitioningSolaris host data LUNs with 83
Index | 107