
Samsung C omm unication Manager - Index of
564
Samsung Communication Manager SCM Express Operation Manual Describes how to perform operation activities on the SCM system. It covers configuration, call service, feature, system management, and trouble-shooting operations. Document Version 13.0 June 2017 Document Number: 2600-00BVGJGA4
-
Upload
khangminh22 -
Category
Documents
-
view
3 -
download
0
Transcript of Samsung C omm unication Manager - Index of

Sam
sung C
om
munic
ation M
anager
SCM Express Operation Manual
Describes how to perform operation activities on the SCM system. It covers configuration, call service, feature, system management, and trouble-shooting operations.
Document Version 13.0 June 2017
Document Number: 2600-00BVGJGA4

© 2016 SAMSUNG Electronics Co., Ltd.
All Rights Reserved. No part of this document may be photocopied, reproduced, stored in a retrieval
system, or transmitted, in any form or by any means whether, electronic, mechanical, or otherwise
without the prior written permission of SAMSUNG Electronics Co., Ltd.
No warranty of accuracy is given concerning the contents of the information contained in this
publication. To the extent permitted by law no liability (including liability to any person by reason of
negligence) will be accepted by SAMSUNG Electronics Co., Ltd., its subsidiaries or employees for
any direct or indirect loss or damage caused by omissions from or inaccuracies in this document.
SAMSUNG Electronics Co., Ltd. reserves the right to change details in this publication without
notice.
SNMTC-v3-0312
This manual should be read and used as a guideline for properly installing and/or operating the
product. Owing to product variations across the range, any illustrations and photographs used in
this manual may not be a wholly accurate depiction of the actual products you are using.
This manual may be changed for system improvement, standardization and other technical
reasons without prior notice.
Samsung Networks documentation is available at http://www.samsungdocs.com

SCM Express Operation Manual v12.0 iii ©Samsung Proprietary and Confidential
Contents
Preface xi
Relevance ........................................................................................................................................ xi Conventions in this Document ........................................................................................................ xi New and Changed Information ....................................................................................................... xii Revision History ............................................................................................................................... xii Organization of This Document ..................................................................................................... xiii Related Documentation ................................................................................................................. xiv Personal and Product Safety ........................................................................................................... xv
Chapter 1 SCM Introduction 1 SCM Architecture ............................................................................................................................. 1
SCM .............................................................................................................................................. 1 Media Gateway ........................................................................................................................... 2 IP Phone ....................................................................................................................................... 2 SCM Administrator ...................................................................................................................... 2 Embedded Applications ............................................................................................................... 2
Internet Telephony Network ............................................................................................................ 5 Network Configuration ................................................................................................................ 5 Network Requirements ................................................................................................................ 6
Chapter 2 Configuring SCM Server 10 Connecting to SCM Administrator ................................................................................................. 10
Environment .............................................................................................................................. 10 Login .......................................................................................................................................... 10 Page Layout ............................................................................................................................... 11 Dialog Box .................................................................................................................................. 13
SCM Configuration Wizard ............................................................................................................. 14 Step 1. Configuring System ........................................................................................................ 14 Step 2. Configuring User Group ................................................................................................. 15 Step 3. Making Multiple Location and Service Group ................................................................ 17 Step 4. Configuring Trunks ......................................................................................................... 18 Step 5. Making Users and Configuring DID Routing .................................................................. 20 Step 6. Scheduling Ring Plan ...................................................................................................... 22 Step 7. Database Generation ..................................................................................................... 22 Step 8. Active-Active Configuration after Wizard ...................................................................... 23
Changing All Users Data ................................................................................................................. 27 Customer Data Import/Export ................................................................................................... 27 Phone Software Upgrade ........................................................................................................... 32 Multibatch Key Programming .................................................................................................... 34
Adding Individual User ................................................................................................................... 36 Preparing User Creation ............................................................................................................ 36 Making User Group .................................................................................................................... 36 Making Single Phone User ......................................................................................................... 41 Making Multi-Extension Phone .................................................................................................. 48 Making Multi-Phone User .......................................................................................................... 55
Adding Individual Trunk ................................................................................................................. 60 Making Routes ........................................................................................................................... 60

Contents
SCM Express Operation Manual v12.0 iv ©Samsung Proprietary and Confidential
Making LCR ................................................................................................................................ 68 Making Location Based Routing ................................................................................................ 69 Configuring Access Codes .......................................................................................................... 69 Configuring DID Routing ............................................................................................................ 70
Step of Call Processing ................................................................................................................... 71
Chapter 3 Configuring Phone and Gateway 76 Configuring Phone .......................................................................................................................... 76
Phone Installation ...................................................................................................................... 76 Upgrading Phone Software........................................................................................................ 90 Updating Phone Settings ........................................................................................................... 93 Managing Phone Settings .......................................................................................................... 97
Configuring Ubigate iBG Gateway ................................................................................................ 104 Preparing SCM Server .............................................................................................................. 104 Configuring Gateway ............................................................................................................... 106 Connecting to Network ............................................................................................................ 108 Connecting to PSTN ................................................................................................................. 110 Connecting to SCM Server........................................................................................................ 119 Updating Gateway Software ................................................................................................... 120 Supplementary Service on Survival mode ................................................................................ 121
Configuring OfficeServ 7000 Gateway ......................................................................................... 122 Connecting to Network ............................................................................................................ 122 Connecting to PSTN ................................................................................................................. 123 Connecting to SCM Server........................................................................................................ 125 Updating Gateway Software ................................................................................................... 128 Supplementary Service on Survival mode ................................................................................ 128
Configuring IPX-G500B Gateway .................................................................................................. 130 Configuring IPX-G500B ............................................................................................................ 130 Configuring SCM ...................................................................................................................... 132 Update Software ...................................................................................................................... 140 Initializing ................................................................................................................................ 142
Chapter 4 Call Service 144 System Features ........................................................................................................................... 144
Anonymous Call Reject ............................................................................................................ 144 Call Admission Control (CAC) ................................................................................................... 144 Least Cost Route (LCR) ............................................................................................................. 146 Call Restriction ......................................................................................................................... 148 Number Translation ................................................................................................................. 153 Call Button ............................................................................................................................... 160 Call Monitoring ........................................................................................................................ 160 CLI Number for Internal Call .................................................................................................... 161 CLI Number for Outbound Call ................................................................................................. 162 CLI Name for Outbound Call .................................................................................................... 163 Internal CLI Name .................................................................................................................... 163 Premium CID ............................................................................................................................ 164 CLI Service ................................................................................................................................ 165 Direct Inward Dialing (DID) Routing ........................................................................................ 166 Directory Service ...................................................................................................................... 168 Direct Trunk Selection .............................................................................................................. 169 FMS (Fixed Mobile Substitution) .............................................................................................. 170 Emergency Group .................................................................................................................... 172 History Log ............................................................................................................................... 172

Contents
SCM Express Operation Manual v12.0 v ©Samsung Proprietary and Confidential
Home Worker Support ............................................................................................................. 177 Hotel Service ............................................................................................................................ 178 PMS Interface .......................................................................................................................... 178 Hot Desking.............................................................................................................................. 179 Hot Line and Warm Line .......................................................................................................... 179 Hunt Group .............................................................................................................................. 179 Location Codec Negotiation ..................................................................................................... 182 Multiple Appearance ............................................................................................................... 184 Music On Hold.......................................................................................................................... 185 Missed Call Display .................................................................................................................. 185 Operator Group ....................................................................................................................... 186 Ring Plans ................................................................................................................................ 187 Group Call Forward .................................................................................................................. 190 Service Group Local Number .................................................................................................... 190 System Call Forward ................................................................................................................ 191 VoIP Security ............................................................................................................................ 193 Feature Services ....................................................................................................................... 196 User Authentication ................................................................................................................. 208 Boss/Secretary ......................................................................................................................... 209 Busy Lamp Field (BLF) .............................................................................................................. 211 DTMF Detection Service ........................................................................................................... 211 System Speed Dial .................................................................................................................... 214 RTP call Restriction .................................................................................................................. 214 Mline service ............................................................................................................................ 215 Caller Ring Type ....................................................................................................................... 215 System SPAM Call Block Service ............................................................................................... 215 Gateway Channel Display ........................................................................................................ 215 Default Access Code Use List ................................................................................................... 216 All Hot Desking Logout ............................................................................................................ 217 Leaving Office Class of Service ................................................................................................. 217 Trunk Redial ............................................................................................................................. 218 International Call Service ......................................................................................................... 218 International Call Inform Service ............................................................................................. 218 Deny International Call Forward/Transfer ............................................................................... 219 Display DTMF Detection Code ................................................................................................. 219 Transfer CID for VM/AA ........................................................................................................... 219 Nurse Call ................................................................................................................................. 220 Multiple SIP Account ................................................................................................................ 220 Common Route ........................................................................................................................ 221 Inter User Group Routing. ........................................................................................................ 222 Noticeboard Service ................................................................................................................. 222 Service Limitation .................................................................................................................... 224 Broad Message Service ............................................................................................................ 225 Minimum Call Limit .................................................................................................................. 226 WE VoIP Location CID .............................................................................................................. 227 Display Mobile Phone Access Network .................................................................................... 227 Tandem Representation Number............................................................................................. 227 Multicast Paging ...................................................................................................................... 228 User SBC ................................................................................................................................... 229 Account Number Modification ................................................................................................. 230 User Name Display of Other Service Group ............................................................................. 230 Analog Trunk Port Check ......................................................................................................... 230

Contents
SCM Express Operation Manual v12.0 vi ©Samsung Proprietary and Confidential
User Features ............................................................................................................................... 231 Absence .................................................................................................................................... 231 Auto Answer ............................................................................................................................ 232 Automatic Retry ....................................................................................................................... 233 Barge-In ................................................................................................................................... 234 Change Password .................................................................................................................... 235 Callback ................................................................................................................................... 235 Call Forward ............................................................................................................................. 236 Call Hold ................................................................................................................................... 240 Call Park ................................................................................................................................... 240 Call Pickup ................................................................................................................................ 241 Outbound Call Lock .................................................................................................................. 243 Call Transfer ............................................................................................................................. 243 Call Waiting ............................................................................................................................. 245 Call Intercept ............................................................................................................................ 246 Forced Call Release .................................................................................................................. 246 CLI Control................................................................................................................................ 246 Do Not Disturb (DND) .............................................................................................................. 247 Follow Me ................................................................................................................................ 248 Individual Speed Dial ............................................................................................................... 248 Intercom................................................................................................................................... 249 Language Selection .................................................................................................................. 249 Last Number Redial .................................................................................................................. 250 No Ring .................................................................................................................................... 250 Multi-Ring ................................................................................................................................ 251 Mobile Extension (MOBEX) ...................................................................................................... 252 Remote Office .......................................................................................................................... 253 Wake-Up Call ........................................................................................................................... 254 Voice Mail Integration ............................................................................................................. 254 Personal SPAM Number ........................................................................................................... 258 Pause Digit ............................................................................................................................... 259 Call Bridge ................................................................................................................................ 259 Move to Mobile........................................................................................................................ 260 NFC Service .............................................................................................................................. 261 CSTA Line Seize ........................................................................................................................ 262 PRI Malicious Call Identification (MCID) .................................................................................. 263 WE VoIP Call Record ................................................................................................................ 263 Busy Override ........................................................................................................................... 264 Dispatch Call Override ............................................................................................................. 265 PC Attendant Transfer Call Waiting ......................................................................................... 266
Wireless Enterprise Service .......................................................................................................... 267 Basic Configuration .................................................................................................................. 267 Mobile Remote Dial ................................................................................................................. 276 Mobile DISA ............................................................................................................................. 277 DID Number Service for FMC ................................................................................................... 277 Manual Handover .................................................................................................................... 277 Smart Handover ....................................................................................................................... 278 Handover by Mobile Phone...................................................................................................... 279 Smart Routing .......................................................................................................................... 280 Inter SCM Smart Routing ......................................................................................................... 281 Receiving Call in Hot Spot Zone ............................................................................................... 284 Receiving Call in mVoIP Zone ................................................................................................... 284

Contents
SCM Express Operation Manual v12.0 vii ©Samsung Proprietary and Confidential
Desk phone Simultaneous Ring Delay ...................................................................................... 285 IP Domain Based Call Restriction ............................................................................................. 285 Smart WLAN Link Configuration .............................................................................................. 285 Mobile Push Service ................................................................................................................. 293
Chapter 5 Application Features 295 Application Server Service Group ................................................................................................ 295
Configuring Application Server Service Group ......................................................................... 295 Assigning Application Server Service Group ............................................................................ 295 Active-Active Node ................................................................................................................... 297
Voice Mail ..................................................................................................................................... 298 Call Processing System Configuration ...................................................................................... 298 VM/AA Basic Mode .................................................................................................................. 302 Auto Attendant ........................................................................................................................ 303 Voice Mail ................................................................................................................................ 305 Access Manager ....................................................................................................................... 312 Administration ......................................................................................................................... 315 Voice Studio ............................................................................................................................. 317 User Service Code Table ........................................................................................................... 318 Descriptions for User Service Codes ......................................................................................... 321 To Edit Prompt ......................................................................................................................... 324
Conference ................................................................................................................................... 325 Conference Features ................................................................................................................ 325 Call Processing System Configuration ...................................................................................... 326 Application Server Service Group ............................................................................................. 327 Conference System Configuration ........................................................................................... 329 Conference Management ........................................................................................................ 331 Using Conference Features ...................................................................................................... 333 Conference History Management ............................................................................................ 335
Automatic Call Distribution (ACD) ................................................................................................ 336 Creating ACD Agents................................................................................................................ 336 Configuring ACD Group ............................................................................................................ 336 Configuring ACD Announcement ............................................................................................. 339 ACD Agent Status ..................................................................................................................... 340 ACD Statistics ........................................................................................................................... 342 ACD Agent Program ................................................................................................................. 342 ACD Wallboard ID .................................................................................................................... 342
External Application ..................................................................................................................... 343 Communicator ......................................................................................................................... 343 ACD Agent Program ................................................................................................................. 343
Chapter 6 System Management 345 Managing System Access ............................................................................................................. 345
Access Permission .................................................................................................................... 345 Access Control List ................................................................................................................... 346
Process Management ................................................................................................................... 348 SCM Start/Stop ........................................................................................................................ 348 Process Management .............................................................................................................. 348
Redundancy Management ........................................................................................................... 351 IP Address Configuration ......................................................................................................... 351 Redundancy Status .................................................................................................................. 353 Redundancy Features .............................................................................................................. 354 Active-Active and Geo-Redundancy ......................................................................................... 356

Contents
SCM Express Operation Manual v12.0 viii ©Samsung Proprietary and Confidential
System Operation......................................................................................................................... 358 Managing Configuration ......................................................................................................... 358 Managing Performance ........................................................................................................... 358 Managing Announcement ....................................................................................................... 359 Managing Individual Call ......................................................................................................... 361 Managing Database ................................................................................................................ 362 Managing Individual User ........................................................................................................ 363 Managing Maximum Calls ....................................................................................................... 364 Managing Access Permission ................................................................................................... 364
Call Detail Records (CDR) ............................................................................................................. 366 Saving Account Information in SCM ........................................................................................ 366 FTP Interoperation for Accounting System .............................................................................. 367 RADIUS Interoperation for Accounting System ........................................................................ 368 TCP Interoperation for Accounting System .............................................................................. 369 SMDR Interoperation for Old Accounting System .................................................................... 370 TCP ACK Interoperation for Accounting System....................................................................... 371 Billing Output by Call Types ..................................................................................................... 372 Billing Delete Length ................................................................................................................ 373
Statistics Reports .......................................................................................................................... 374 Call Traffic Reports................................................................................................................... 374 ACD Reports ............................................................................................................................. 413 Resource Statistics ................................................................................................................... 416 Alarm Statistics ........................................................................................................................ 417 Emergency Log ......................................................................................................................... 417
Fault Management ....................................................................................................................... 419 Profile ....................................................................................................................................... 419 Viewers .................................................................................................................................... 422 Fault History ............................................................................................................................ 423 Email Notification .................................................................................................................... 424 SMS Notification Setup ............................................................................................................ 425
Registration Management ........................................................................................................... 426 SIP Phone Registration by SIP REGISTER .................................................................................. 426 Gateway FXS Registration by SIP REGISTER ............................................................................. 427 SIP Gateway Registration by SIP REGISTER.............................................................................. 427 Endpoint Registration by SIP REGISTER ................................................................................... 428 Endpoint Registration by SIP OPTIONS .................................................................................... 428 Application Registration by SIP OPTIONS ................................................................................ 429
License Management ................................................................................................................... 430 LDAP Data Import ......................................................................................................................... 433 LDAP Server Service ..................................................................................................................... 435
Overview of the LDAP Server Service ....................................................................................... 435 LDAP Server Service ................................................................................................................. 435 Basic information for LDAP server service ............................................................................... 436
Directory Service for Mobile User. ............................................................................................... 437 Overview of the Directory Service ............................................................................................ 437 Directory Service ...................................................................................................................... 437 Presence Service ...................................................................................................................... 438 Location Service ....................................................................................................................... 439 Activation of Directory Service for Mobile User. ...................................................................... 439
Photo File Management ............................................................................................................... 440 Overview of Photo file Management ....................................................................................... 440 Photo File Management Feature ............................................................................................. 440

Contents
SCM Express Operation Manual v12.0 ix ©Samsung Proprietary and Confidential
Chapter 7 Troubleshooting Guide 442 SCM Server ................................................................................................................................... 442
SCM Hardware ......................................................................................................................... 443 Linux ......................................................................................................................................... 455 SCM Software Base .................................................................................................................. 457 SCM Administrator .................................................................................................................. 463
Call Manager Features ................................................................................................................. 469 Call Routing .............................................................................................................................. 470 Call Features ............................................................................................................................ 473 Voice Path Connection ............................................................................................................. 476 Security (TLS/sRTP) .................................................................................................................. 480 SMDR (CDR) ............................................................................................................................. 481
Application Features .................................................................................................................... 483 ACD .......................................................................................................................................... 483 Conference ............................................................................................................................... 487 VM/AA ..................................................................................................................................... 491 Interoperation with CSTA Applications .................................................................................... 494
Interoperate with Phones and Gateways .................................................................................... 497 Interoperation with Phones ..................................................................................................... 497 Interoperation with Gateways ................................................................................................. 506
Ubigate iBG Series Gateways ....................................................................................................... 508 Gateway Installation................................................................................................................ 508 SCM Interoperation Mode ....................................................................................................... 513 Survival Mode .......................................................................................................................... 518
OfficeServ 7000 Series Gateways ................................................................................................. 522 Gateway Installation................................................................................................................ 522 SCM Interoperation Mode ....................................................................................................... 526 Survival Mode .......................................................................................................................... 531
IPX-G500B Gateway ..................................................................................................................... 537 Gateway Installation................................................................................................................ 537 SCM Interoperation Mode ....................................................................................................... 538 Survival Mode .......................................................................................................................... 540
SCM Administrator ....................................................................................................................... 543 Execute SCM Administrator ..................................................................................................... 543
Appendix Acronyms 544

SCM Express Operation Manual v12.0 x ©Samsung Proprietary and Confidential
List of Figures
Figure 1. SCM Architecture ............................................................................................................................. 1 Figure 2. Internet telephonyn Architecture .................................................................................................... 5 Figure 3. Login window ................................................................................................................................. 11 Figure 4. SCM Administrator window ........................................................................................................... 12 Figure 5. Active-Active Main window ........................................................................................................... 13 Figure 6. Active-Active System viewer .......................................................................................................... 13 Figure 7. Configuring System ........................................................................................................................ 14 Figure 8. Configuring User Group ................................................................................................................. 16 Figure 9. Making Multiple Location and Service Group ................................................................................ 18 Figure 10. Configuring Trunks ......................................................................................................................... 19 Figure 11. Making Users and Configuring DID Routing ................................................................................... 21 Figure 12. Scheduling Ring Plan ...................................................................................................................... 22 Figure 13. Database Generation ..................................................................................................................... 23 Figure 14. Configuring Node ........................................................................................................................... 24 Figure 15. Configuring Link between Nodes ................................................................................................... 25 Figure 16. Configuring Database Synchronization .......................................................................................... 26 Figure 17. File Export/Import .......................................................................................................................... 27 Figure 18. Making a trunk call via SCM ........................................................................................................... 60 Figure 19. Uploading Package ......................................................................................................................... 91 Figure 20. Checking Software Version ............................................................................................................ 92 Figure 21. Upgrading Software (1) .................................................................................................................. 92 Figure 22. Upgrading Software (2) .................................................................................................................. 93 Figure 23. Automatic Upgrade Procedure ...................................................................................................... 96 Figure 24. Creating Gateway Link ................................................................................................................. 105 Figure 25. Simple network configuration for static route ............................................................................. 108 Figure 26. Configuring Slot Settings .............................................................................................................. 111 Figure 27. Configuring FXS Ports ................................................................................................................... 113 Figure 28. Configuring FXO Ports .................................................................................................................. 115 Figure 29. Configuring PRI Trunk ................................................................................................................... 116 Figure 30. Configuring MCN .......................................................................................................................... 118 Figure 31. Boss/Secretary ............................................................................................................................. 210 Figure 32. Application Server Service Group ................................................................................................ 295 Figure 33. Assigning Application Server Service Group-User ........................................................................ 296 Figure 34. Assigning Application Server Service Group-Service Group ......................................................... 296 Figure 35. Application Server Service Group-User Group ............................................................................. 297 Figure 36. Redundancy Management ........................................................................................................... 351 Figure 37. Standalone System IP Configuration ............................................................................................ 353 Figure 38. Redundant System IP Address Configuration .............................................................................. 353 Figure 39. Active-Active and Geo-Redundancy ............................................................................................. 356 Figure 40. IP Address Configuration .............................................................................................................. 357 Figure 41. Managing Configuration .............................................................................................................. 358 Figure 42. Managing Performance ................................................................................................................ 359 Figure 43. System Viewer window ................................................................................................................ 419

SCM Express Operation Manual v12.0 xi ©Samsung Proprietary and Confidential
Preface
This manual describes the characteristics, features and structure of the SCM
Express system.
This manual describes how to perform common operations on the SCM. It is
aimed at the management personnel who are responsible for managing the
following areas of operation:
Configuration Management
Call Service Management
Feature Management
System Management
Trouble shooting guide
Relevance
This manual applies to the following products/software.
Name Type
Version 6.2.0 SCM Software
Conventions in this Document
Samsung Networks product documentation uses the following conventions.
Symbols
Symbol Description
Indicates a task.
Indicates a shortcut or an alternative method.
Provides additional information.
Provides information or instructions that you should follow to avoid service failure or damage to equipment.
Provides information or instructions that you should follow to avoid personal injury or fatality.
Provides antistatic precautions that you should observe.

Preface
SCM Express Operation Manual v12.0 xii ©Samsung Proprietary and Confidential
Menu Commands
menu | command
This indicates that you must select a command on a menu, where menu is the
name of the menu, and command is the name of the command on that menu.
File Names and Paths
These are indicated by a bold typeface. For example:
Copy filename.txt into the /home/folder1/folder2/bin/ folder.
User Input and Console Screen Output Text
Input and output text is presented in the Courier font. For example,
context <designated epc-context-name>
CLI commands are presented in bold small caps. For example,
Type the RTRV-NE-STS command in the input field.
New and Changed Information
This section describes information that has been added/changed since the previous
publication of this manual.
Revised for SCM software version 6.2.0
Revision History
The following table lists all versions of this document.
Version Publication Date
1.0 June 2010
2.0 December 2012
3.0 June 2013
4.0 September 2013
5.0 April 2014
6.0 September 2014
7.0 March 2015
8.0 May 2015
9.0 August 2015
10.0 December 2015
11.0 August 2016
12.0 December 2016

Preface
SCM Express Operation Manual v12.0 xiii ©Samsung Proprietary and Confidential
Version Publication Date
13.0 June 2017
Organization of This Document
Chapter Title Description
Chapter 1 SCM Introduction This chapter describes the system overview and network environments.
Chapter 2 Configuring SCM Server This chapter describes how to configure SCM server for working.
Chapter 3 Configuring Phone and Gateway This chapter describes how to configure phones and gateways.
Chapter 4 Call Service This chapter describes how to use call service features.
Chapter 5 Application Features This chapter describes how to use the application features.
Chapter 6 System Management This chapter describes how to use the management features.
Chapter 7 Troubleshooting Guide This chapter describes how to solve troubles.
Abbreviation Abbreviation Describes the acronyms used in this manual.

Preface
SCM Express Operation Manual v12.0 xiv ©Samsung Proprietary and Confidential
Related Documentation
SCM Express System Description
SCM Express Service Manual
SCM Express Maintenance Manual

Preface
SCM Express Operation Manual v12.0 xv ©Samsung Proprietary and Confidential
Personal and Product Safety
This product safety information includes European directives, which you must
follow. If these do not apply in your country, please follow similar directives that
do apply in your country.
Electrical
The product is designed to operate from a -48 V DC supply and is therefore
classified as Safe Extra Low Voltage (SELV) equipment.
All structural parts are grounded and all input and outputs have built-in isolation
from the network. All input and output ports that connect to external power
sources are designed to meet relevant national safety requirements.
The product contains hazardous energy levels as defined by EN 60950. Care must
be taken when maintaining this equipment as injury to personnel or damage to the
equipment could result from mistakes. Maintenance should only be carried out by
trained and competent engineers who are familiar with the relevant procedures and
instructions.
Lasers
The product is fitted with optic modules rated as Class 1 radiation-emitting devices
under EN 60825-1. During installation, operation, and maintenance, never look
into the end of an optical fiber directly or by reflection either with the naked eye or
through an optical instrument. Do not operate equipment with exposed fiber
connectors-cover these with fiber cables or blanking caps. Do not remove
equipment covers during operation unless requested to do so in the documentation.
Carry out normal safety precautions when trimming fibers during installation.
Manual Handling
Care should be taken when handling equipment. Give due consideration to the
weight of the equipment, the physical capability of the individual(s) handling the
equipment, and movements such as twisting, bending and stooping, which could
lead to skeletal and muscular injuries.
Installation
Installation must be carried out by trained and competent engineers only. All
relevant safety measures should be taken to ensure equipment is not connected to
live power and transmission sources during installation. Equipment must be
correctly installed in order to meet the relevant safety standards and approval
conditions.
Each power feed to the unit requires a separate fused feed from the provided
power supply. The cable between the power distribution point and the installed
equipment must have a minimum cross-sectional area of 2.5 mm2.

Preface
SCM Express Operation Manual v12.0 xvi ©Samsung Proprietary and Confidential
Rack-mountable equipment must be placed in a standard 19-inch rack and secured
with the appropriate fixings as detailed in the installation manual.
Maintenance
Maintenance must only be carried out by a suitably trained and competent
technician. All safety instructions must be carefully observed at all times.
Equipment covers should not be removed while live power and transmission is
connected unless in a controlled environment by trained technicians.
Fire
The product is powered from a -48 V DC supply. To protect against fire, the
equipment is fused.
Environment
The product must be operated in an environment with the specified relative
humidity and ambient temperature ranges.
Keep all liquids away from the equipment as accidental spillage can cause severe
damage.
Cooling
The product cools down by its own set of cooling fans housed in a fan module.
Each fan module detects a fan that is not operating normally. LEDs on the front
panel of the fan tray provide an alarm indication in the event of fan failure.
In the event of fan failure, take urgent remedial action to restore full cooling
capacity.
Take appropriate measures to ensure that fan modules do not start spinning during
repair and maintenance procedures.
Anti-Static Precautions
The circuit boards and other modules in the product are sensitive to and easily
damaged by static electricity. If any card or sub-assembly is removed from the unit,
the following anti-static precautions must be observed at all times:
Service personnel must wear anti-static wrist straps.
Circuit boards and sub-assemblies must be placed on ground conductive mats
or in conductive bags.
All tools must be discharged to ground before use.
The anti-static wrist strap and cord must be checked at regular intervals for
their suitability for use.

Preface
SCM Express Operation Manual v12.0 xvii ©Samsung Proprietary and Confidential
Grounding
To comply with EN 60950, the equipment must be connected to a safety
grounding point via a permanent link. Grounding points are located on the product
for this purpose. Always connect the ground cable before fitting other cables. The
product must remain grounded continuously unless all connections to the power
supply and data network are all removed.
If equipment is grounded through a cabinet or rack, make sure it is done so
properly according to the installation instructions.
Power Supply Connection
The equipment is designed to be powered from a -48 V DC supply. Power
connections and installation of associated wiring must be carried out by a suitably
qualified technician.
Only devices that comply with all relevant national safety requirements should be
connected to the unit's power supply inlets. Other usage will invalidate any
approval given to this equipment.
Connection of this equipment to devices that are not marked with all relevant
national safety requirements may produce hazardous conditions on the network.
When the power supply is obtained by a rectifier/safety isolation transformer, the
supply must meet the requirements of EN 60950 providing double/reinforced
insulation between hazardous voltages and SELV/TNV circuits. Any battery must
be separated from hazardous voltages by reinforced insulation.
Indirect Connection
Before indirectly connecting any equipment to another device through a shared
power supply, ALWAYS seek advice from a competent engineer.
Devices that are not marked according to the relevant national safety standards
may produce hazardous conditions on the network.
Product Disposal
To reduce the environmental impact of products, Samsung has joined WEEE
compliance activities.
The WEEE symbol on the product indicates that the product is covered by the
European Directive 2002/96/CE for the disposal of Waste Electrical and Electronic
Equipment (WEEE). This means that the product should be disposed of separately
from the municipal waste stream via designated collection facilities appointed by
the government or the local authorities. This will help prevent potential negative
consequences for the environment and human health. Please check the terms and
conditions of the purchase contract for information about correct disposal.

Preface
SCM Express Operation Manual v12.0 xviii ©Samsung Proprietary and Confidential
Battery Disposal
The product contains a battery on the processor card. The battery should not be
disposed of with other household waste. Where marked, the chemical symbols Hg,
Cd or Pb indicate that the battery contains mercury, cadmium or lead above the
reference levels in EC Directive 2006/66. The battery incorporated in this product
is not user replaceable. For information on its replacement, please contact your
service provider. Do not attempt to remove the battery or dispose it in a fire. Do
not disassemble, crush, or puncture the battery.
End of life recycling materials information is available from Samsung.
California USA Only
This Perchlorate warning applies only to primary CR (Manganese Dioxide)
Lithium coin cells in the product sold or distributed ONLY in California USA
‘Perchlorate Material-special handling may apply, See
www.dtsc.ca.gov/hazardouswaste/perchlorate.’

SCM Express Operation Manual v12.0 1 ©Samsung Proprietary and Confidential
Chapter 1 SCM Introduction
SCM is an IP-based Private Branch Exchange (PBX) that provides Internet
telephony by controlling voice gateways and IP telephones on data networks. SCM
can connect to the existing Public Switched Telephone Network (PSTN) through
voice gateways.
The SCM system is available as SCM Express or SCM Enterprise system,
depending on the system capacity. SCM Express is a small-scale system that
includes the required application servers.
SCM Architecture
The diagram below illustrates how SCM can be implemented in a voice-and-data
network.
Figure 1. SCM Architecture
SCM
SCM performs call processing, communicating with phones, voice gateways, and
other entities on the network using the SIP protocol. It also provides
Application Management
Billing Server
NMS Server
Coloring Server
ACD Server
IVR Server
VMS Server
Conference Server
UC Server
MOH MPS VM/AA CONF
SCM
Media
Gateway
ACD Client
UC Client
SIP
PSTN
H.323 FAX Analog Phone
WiFi Phone
Administrator (Web GUI)
IP Phone IP Video Phone
WiFi AP
Soft Phone
FTP
TCP SNMP SIP
CSTA
SIP
CSTA
SIP
SIP
SIP
PRI/BRI/FXO/…
H.323 (OfficeServ Only)

Ошибка! Используйте вкладку "Главная" для применения 제목 1 к тексту, который
должен здесь отображаться. Ошибка! Используйте вкладку "Главная" для применения 제목 1 к
тексту, который должен здесь отображаться.
SCM Express Operation Manual v12.0 2 ©Samsung Proprietary and Confidential
supplementary PBX services. SCM uses the SIP protocol for call processing. SCM
performs call processing by interoperating with multiple voice gateways.
Media Gateway
The media gateway is responsible for connecting the existing telephone and
networks.
It communicates with the existing telephone network (PBX or PSTN) through the
T1, E1, and PRI interfaces as well as analog interfaces, including E & M and FXO.
The media gateway performs the conversion between PCM data and packet data. It
communicates with SCM over the standard SIP protocol.
IP Phone
IP Phone provides general telephone calls on the IP network. For providing basic
calling and added services, IP Phone communicates with SCM using the SIP
protocol (Samsung SIP Extension) that is partially extended from the standard.
The following types of IP telephones are in use, based on configuration.
IP Video Phone
Allows voice and video calls over an IP network.
Soft Phone
Soft phone runs on personal computers as a software program. It allows voice-only
calls or voice and video calls over an IP network.
Wi-Fi Phone
Wi-Fi phone connects to an IP network using the Wi-Fi protocol and allows voice
calls.
SCM Administrator
It is web-based service with a graphical user interface for managing SCM.
Administrator can use a web browser on a normal PC to access SCM and execute
various SCM services like Fault Management, Performance Management, Security
Management, Accounting Management and Subscriber Management.
Embedded Applications
Embedded applications are configured to provide additional services. Depending
on the scope and capacity of value-added services, separate servers are installed to
provide the services, or SCM can be configured to provide the services internally.
The following applications are included in the SCM Express system. The large-
scale SCM Enterprise system only includes a subset of the application servers.

Ошибка! Используйте вкладку "Главная" для применения 제목 1 к тексту, который
должен здесь отображаться. Ошибка! Используйте вкладку "Главная" для применения 제목 1 к
тексту, который должен здесь отображаться.
SCM Express Operation Manual v12.0 3 ©Samsung Proprietary and Confidential
Music On Hold (MOH)
SCM provides the on-hold tone service when a call is put on hold and the voice
announcement service in the case of errors. It also provides the standby
announcement service when a call is standing by in the internal ACD.
The MOH is also responsible for collecting the grade modification code for user
interaction and Dual-Tone Multi-Frequency (DTMF) signalling, used for DISA
user authentication.
Media Proxy Server (MPS)
Required for signalling and media (voice and video) connections when
establishing calls between phones in public IP address bandwidth and those in
private IP address bandwidth.
SCM Express includes one of the various services provided by session border
control (SBC): media proxy server (MPS). This feature is dedicated to performing
the Network Address Translation (NAT) Traversal service, which provides
conversion between public IP addresses and private IP addresses. The SCM
Enterprise system does not include the MPS feature and an external SBC server is
required.
Conference
Responsible for combining all the individual voice data in calls involving three or
more users into one data set. In a conference call, each phone is connected for a
1:1 call with the conference, but the conference combines the data from all the
different phones into one data set so the parties can hear each other.
The conference included in SCM not only provides the normal conference feature
with which the caller pages all the parties to include in the conference, but also
provides an advanced conference feature with which a conference room can be set
up and the parties can voluntarily call to enter the conference room and participate
in the conference.
The SCM system includes the meet-me conference feature in its built-in
conference, but its use requires a separate license. The conference channels are
reserved for meet-me conference as many as the licensed count. The rest of the
conference channels will be available for other kinds of conferences.
VM/AA
The voice mail service, in particular, constitutes a key component of the enterprise
communication system by allowing the calling party to be connected to the
VM/AA and leave a voice message in the called party’s mailbox. When there is a
new voice mail, the user is notified of by an indicator light on the user’s phone or
in a notification email sent to the user’s Outlook account. The user can then call
the VM/AA to listen to, reply to, send, or delete the voice mail.
The SCM Express includes the VM/AA, but its use requires a separate license.
The SCM Enterprise system requires an external VM/AA server.
Automatic Call Distribution (ACD)
Appropriately distributes the various incoming calls to agents according to their

Ошибка! Используйте вкладку "Главная" для применения 제목 1 к тексту, который
должен здесь отображаться. Ошибка! Используйте вкладку "Главная" для применения 제목 1 к
тексту, который должен здесь отображаться.
SCM Express Operation Manual v12.0 4 ©Samsung Proprietary and Confidential
statuses.
It also collects real-time call statistics on groups and agents and aggregates the
information.
SCM includes a built-in ACD that provides basic ACD features, such as basic call
distribution, and aggregates statistics on the agents. The MOH plays an
announcement or a tone for calls standing by in the ACD.

Ошибка! Используйте вкладку "Главная" для применения 제목 1 к тексту, который
должен здесь отображаться. Ошибка! Используйте вкладку "Главная" для применения 제목 1 к
тексту, который должен здесь отображаться.
SCM Express Operation Manual v12.0 5 ©Samsung Proprietary and Confidential
Internet Telephony Network
Network Configuration
SCM is a system that provides Internet telephony on an IP network. Its installation
requires special attention compared to installation of ordinary data systems.
Incorrect installation of the Internet telephony system on an IP network may result
in IP packet loss, packet delay, jitter, and other problems that can seriously affect
the quality of voice calls. Therefore, when implementing an Internet telephony
service, your network should be configured with all available QoS technologies,
providing redundancy and rapid response in the case of network disruptions. In
other words, your IP network devices must be configured for:
802.1P (CoS on LAN)
802.1Q (VLAN)
Traffic classification
Traffic shaping
802.1D (STP), 802.1w (RSTP), 802.1s (MSTP)
The following diagram illustrates the IP network structure for Internet telephony.
Figure 2. Internet telephonyn Architecture
Samsung Communication Manager
PC1
PC2
Supplicant
SIP softphone
PC3
SIP softphone
Supplicant
Authentication Sever (RADIUS)
SIP Phone SIP Phone SIP Phone Analog Phone
FAX
(Router, Switch, FW, IPS, VPN, GW)
G/W (OS7400)
(Core Switch)
DID Trunk
3026
BRANCH HQ
Giga Switch
ISDN Trunk
PSTN
WAN

Ошибка! Используйте вкладку "Главная" для применения 제목 1 к тексту, который
должен здесь отображаться. Ошибка! Используйте вкладку "Главная" для применения 제목 1 к
тексту, который должен здесь отображаться.
SCM Express Operation Manual v12.0 6 ©Samsung Proprietary and Confidential
Network Requirements
For a reliable Internet telephony service, your IP network must meet the following
requirements.
Quality of Service (QoS)
The following requirements must be met for QoS.
Packet loss rate: 0.1 % or less
Packet delay: Average 100 ms or less, maximum 200 ms or less
Jitter: 40 ms or less
The measurements should be performed as follows.
Your measurements must include the time period with the highest traffic
volume on the IP network.
You must take the measurements at least eight times a day for one week or
longer.
Your measurements must include the longest path on which the Internet
telephony service is provided.
Virtual Local Access Network (VLAN)
VLAN is a method of dividing physical switching ports into logical broadcast
domains.
In other words, the switching ports on the LAN are configured into one domain.
Within this single domain, multicast and broadcast data is transmitted without
limits.
But there are many applications that generate multicast and broadcast data on an IP
data network, including ARP, RARP, VRRP, RIP, and OSPF. VLAN is a
technology that divides this multicast and broadcast domain to reduce unnecessary
traffic.
When implementing an Internet telephony service on a VLAN, the network must
be designed to meet the following requirements.
Each VLAN must be unique in the entire network.
A single VLAN must be assigned to a single IP subnet.
A single VLAN must not have 250 or more devices. The recommended
number is 100.
Each VLAN must run its own STP. (For more information, see the section on
STP.)
Each VLAN must be assigned to a single IP address subnet. (For more
information, see the section on DHCP.)
Spanning Tree Protocol (STP)
The primary reason for using VLANs on an Internet telephone service network is

Ошибка! Используйте вкладку "Главная" для применения 제목 1 к тексту, который
должен здесь отображаться. Ошибка! Используйте вкладку "Главная" для применения 제목 1 к
тексту, который должен здесь отображаться.
SCM Express Operation Manual v12.0 7 ©Samsung Proprietary and Confidential
to prevent topological looping in layer 2. But to fundamentally eliminate the
causes of topological looping and broadcast storms in layer 2, it is important to run
802.1D (Spanning Tree Protocol), 802.1W (Rapid STP), or 802.1S (Multiple STP)
on the access group switches.
When implementing an Internet telephony service on a large-scale network, each
VLAN usually has many devices (switches, IP phones, PCs, etc.), generating a lot
of broadcast data that can potentially lead to many problems. To reduce potential
problems and ensure reliable Internet telephony service, it is necessary to have
each VLAN run its own STP so that topological looping can be prevented and only
the ports causing broadcast storms can quickly be closed.
Dynamic Host Configuration Protocol (DHCP) & Domain Name System (DNS)
DHCP is the protocol that configures initial information, such as IP address,
subnet mask, and default gateway, for the various hosts on the network. The DNS
is a server that performs IP address mapping for the hosts on the network. An IP
network runs DHCP and DNS so that there is no need to manually configure and
manage the initial configuration information, including the IP addresses of all the
hosts on the network. It also automatically processes the initial configuration
information, including IP address, whenever a host changes its location on the
network.
For effective operation of an Internet telephony service, a DHCP pool is
recommended so that each VLAN used for the Internet telephony service has a
unique IP address.
This allows easy identification and management of the devices on the Internet
telephony service network.
It is recommended that you run the DHCP lease time flexibly according to the
characteristics of the site running the Internet telephony service. In most cases, IP
phones are rarely relocated and therefore unnecessary data generation can be
eliminated by keeping the DHCP lease time at one week or longer.
Network address translation (NAT) Traversal
When recognizing that there is a network-aware application program behind the
NAT device, the NAT traversal feature obtains the external IP address and
performs port mapping in order to transfer the data from the external port of the
NAT device to the internal port used by the application program. All this is done
automatically. There is no need for the user to manually perform port mapping or
use any other mechanism.
To facilitate use of this technology in Internet telephony, SCM provides the media
proxy feature for securing communication paths between the IP phones on the
NAT network and the systems and phones on the public IP network.
As such, when it is difficult for SCM to obtain a public IP address, it can use the
port mapping configuration of the existing NAT system to obtain a private IP
address for SCM itself and provide a reliable Internet telephony service with IP
phones on the public IP network or IP phones on another NAT network.
To implement this technology, the port information below must be set to open for

Ошибка! Используйте вкладку "Главная" для применения 제목 1 к тексту, который
должен здесь отображаться. Ошибка! Используйте вкладку "Главная" для применения 제목 1 к
тексту, который должен здесь отображаться.
SCM Express Operation Manual v12.0 8 ©Samsung Proprietary and Confidential
the NAT system, and port mapping must be configured for the NAT system.
Following is a list of ports must be open when the SCM is located under NAT.
Service TCP Port UDP Port Description
General 20, 21 - FTP Server
22 - Secure Shell
23 - Telnet
80, 443 - HTTP Web Server
389 - LDAP Server
123 NTP
Provisioning - 69 TFTP Server
8088,8089 - Gateway Provisioning
- 6000 Phone upgrade from Proprietary to SIP
NMS - 161 SNMP Agent
Personal Management
8080, 9500 - Personal Assistant for Call Service
4002, 4004, 4102
- Single Sign-On, PWP for UMS/Conference
System Management
20001, 20002, 20003, 20005, 20006
- SCM Administrator
5432 - PostGRE DBMS connection
Call 5060, 5061 5060 SIP signaling
UMS 8624 - UMS Data
- 14002~14130 RTP path for UMS
25*, 143*, 993*, 587*
- Signaling for E-mail Server
3681, 3683*, 22001
- Signaling for Outlook client
2200 - UMS File Server
Conference 3333 - Call signaling for Conference
- 44000~49998 RTP path for Conference
MOH - 35000~35999 RTP path for MOH/Announcement
MPS - 40000~40799 RTP path for MPS (Media Proxy Service)
Others 6000~6127 - CSTA link for each user group
9050, 9052 - PMS link
9090, 9092, 9094
9090 Proprietary Application server link
9000, 9002, 5110
- Voice Monitoring server link
9010, 9011 - Remote Dial client link
18126, 18124 - mySingle link
18202 - Mobile Phone Service (Presence, Location Service)
10306, 2300 - CDR (Call Data Record)

Ошибка! Используйте вкладку "Главная" для применения 제목 1 к тексту, который
должен здесь отображаться. Ошибка! Используйте вкладку "Главная" для применения 제목 1 к
тексту, который должен здесь отображаться.
SCM Express Operation Manual v12.0 9 ©Samsung Proprietary and Confidential
Service TCP Port UDP Port Description
RADIUS - 1812*, 1813* RADIUS Authentication, Accounting
APC 9014 - Samsung APC interworking
Push Service 2195*, 443* - WE VoIP Push service: iOS (2195), Android (443)
Inter-SCM Service
11102 - Inter-SCM interworking
Active-Active 1122, 1124 - Active-Active Inter-system Connection
(* means that the port is a remote port)

SCM Express Operation Manual v12.0 10 ©Samsung Proprietary and Confidential
Chapter 2 Configuring SCM Server
This chapter describes the basic information configuration for using the SCM
system.
After configuring the basic information, the system can handle calls for extension
lines and trunks, which is a basic feature of the PBX.
Connecting to SCM Administrator
SCM Administrator is the SCM management program running on the Java Web
Start platform. This section describes the connection environment, login method,
and page layout of SCM Administrator.
Environment
To use the SCM Administrator normally, the following PC environment must be
prepared.
Item Software
Item Software
CPU/Memory Pentium D or higher, 1 GB DRAM or higher
Operating System Windows XP or later
JRE v6.0 update13~update45
Web Browser Microsoft Internet Explorer version 6.0, Firefox 3.5, Chrome 5.0 or later
You can download the JRE from:
http://www.oracle.com/technetwork/java/index.html
Login
When you enter <http://{System IP Address}> or <http://{System IP
Address}/admin> into the address bar of your web browser, the login page of
SCM Administrator is displayed.
If the value of ‘Root URL Owner’ in [Configuration > Miscellaneous > System
Options] was changed to ‘pwp’, you should enter <http://{System IP
Address}/admin> for connecting to SCM Administrator. <http://{System IP
Address}> url will open Personal Assistant.
The login page of SCM Administrator is displayed as illustrated below: Enter the
user ID and password to log in. SCM is shipped with a default administrator
account.

Ошибка! Используйте вкладку "Главная" для применения 제목 1 к тексту, который
должен здесь отображаться. Ошибка! Используйте вкладку "Главная" для применения 제목 1 к
тексту, который должен здесь отображаться.
SCM Express Operation Manual v12.0 11 ©Samsung Proprietary and Confidential
(User ID: admin, Password: samsung*#)
Figure 3. Login window
Connecting to SCM Administrator from remote place
You can remotely log in to SCM Administrator for programming purposes. If
SCM is using a public IP address on a public IP network, you can log in using the
same method.
If you want to access SCM Administrator remotely, you must first connect to the
private IP network and set ‘System Public IP Address’ to the public IP address of
the NAT network in the [CONFIGURATION > Miscellaneous > System
Options] menu.
The URL for connecting from remote place depends on the version of SCM.
SCM 5.0.0.0 or later
<http://{System Public IP Address}> or <http://{System Public IP
address}/admin>
SCM 4.x.x.x
<http:// {System Public IP Address}/ scm_public.jnlp>
Page Layout
The SCM Administrator page layout is as follows.

Ошибка! Используйте вкладку "Главная" для применения 제목 1 к тексту, который
должен здесь отображаться. Ошибка! Используйте вкладку "Главная" для применения 제목 1 к
тексту, который должен здесь отображаться.
SCM Express Operation Manual v12.0 12 ©Samsung Proprietary and Confidential
Figure 4. SCM Administrator window
Main Monitor: Provides the menus of SCM Administrator grouped by feature.
Menu Tree: Provides the submenus.
Main Page: Displays the setting page for the functions supported by each
menu.
System Viewer: Displays the current status of the system (system name,
active/standby, number of alarms generated, and CPU, memory, and file
system usage status).
Event Viewer: Displays the events that occurred in the system.
Message Window: Displays the results of the features executed by the user.
System Configuration in Active-Active Mode
System configuration in Active-Active mode is as follows:
Main Menu
Main Tree
System Viewer
Message
Contents
Event Viewer

Ошибка! Используйте вкладку "Главная" для применения 제목 1 к тексту, который
должен здесь отображаться. Ошибка! Используйте вкладку "Главная" для применения 제목 1 к
тексту, который должен здесь отображаться.
SCM Express Operation Manual v12.0 13 ©Samsung Proprietary and Confidential
Figure 5. Active-Active Main window
Displays the current status of the system (Master/Slave, Active/Standby)
Administrator can read and write for Master Server.
Administrator can read only for Slave server.
System Viewer
Displays the current status of the system as follows:
Figure 6. Active-Active System viewer
Administrator can change features in Normal state not in DB sync state.
Administrator can change features for Active server in Master node only
Dialog Box
In the configuration menu items are highlighted in the following colors.
Blue: Required and mandatory.
Black: Required but not mandatory.
Gray: Not required, depending on the other options used.

Ошибка! Используйте вкладку "Главная" для применения 제목 1 к тексту, который
должен здесь отображаться. Ошибка! Используйте вкладку "Главная" для применения 제목 1 к
тексту, который должен здесь отображаться.
SCM Express Operation Manual v12.0 14 ©Samsung Proprietary and Confidential
SCM Configuration Wizard
When first time login to the SCM system with an administrator account, the
Configuration Wizard windows will be starting.
When click [generate] button after enter the all required data for each of the steps,
all data are completed setting for incoming and outgoing call.
Step 1. Configuring System
This window runs one time only when first time login to the SCM system with an
administrator account.
This step can configure basic system information and license key.
Figure 7. Configuring System
Configuring SCM Basic
This step can select country and language for SCM.
Item Description
Country Please choose the country of the system
System Language Please choose the language of the system
VM/AA Please choose the mode of the setting window of the VM/AA
Time Zone It is the display time for system when selected installing SCM

Ошибка! Используйте вкладку "Главная" для применения 제목 1 к тексту, который
должен здесь отображаться. Ошибка! Используйте вкладку "Главная" для применения 제목 1 к
тексту, который должен здесь отображаться.
SCM Express Operation Manual v12.0 15 ©Samsung Proprietary and Confidential
Item Description
software. (read only)
System IP Address It is the IP address for system when selected installing SCM software. (read only)
System Public IP Address
It is the Public IP address of the SCM case of NAT environment.
Master Node It is the default primary node for users and can be read and written by Administrator.
My Node Please choose node number of this connected server
Node 0’s IP It is the IP address of Node 0.
Node 0’s Name It is the name of Node 0.
Node 1’s IP It is the IP address of Node 1.
Node 1’s Name It is the name of Node 1.
Force Write Access to DB
If it is enabled, the user features can be forced to change in unlinked state of Active-Active mode.
Entering License Key
This step can enter License key for SCM working.
After input the License Key, should click the [Submit] button for applying the
system.
Item Description
SCM User Please input License Key for use of telephone and the PC
Embedded Application Please input License Key for use of ACD and UMS
Entering Activation Key
This step can enter Activation key for SCM working.
After input the Activation Key, should click the [Submit] button for applying the
system.
Item Description
SCM Package Please input Activation Key for SCM working
Step 2. Configuring User Group
This step can configure the information minimally required for each user group.
From this window, the same steps are applied when creating new user groups.

Ошибка! Используйте вкладку "Главная" для применения 제목 1 к тексту, который
должен здесь отображаться. Ошибка! Используйте вкладку "Главная" для применения 제목 1 к
тексту, который должен здесь отображаться.
SCM Express Operation Manual v12.0 16 ©Samsung Proprietary and Confidential
Figure 8. Configuring User Group
Making User Group
This step can make name and domain of user group, location and service group.
Item Description
User Group Name It is tenant group and a similar concept. Root of all data is a user group with independent number system.
Domain Name Please input the name of the domain of SIP URI
Location Name It is the position information which a subscriber is located in. It enables different trunk call originating route selection with the same number in the same user group, and it is in the most right in priority CODEC according to the area.
Service Group Name It is sub-group of user group concept. It puts some sub-groups in one user group and can use it for various kinds of supplementary service control.
Making Common Number
This step can make operator call number and trunk access number.
Item Description
Operator Call It is access number for operator calling.
Outbound Call It is access number for outbound call via default trunk group.
Voice Mall Call It is access number for voice mail system calling.

Ошибка! Используйте вкладку "Главная" для применения 제목 1 к тексту, который
должен здесь отображаться. Ошибка! Используйте вкладку "Главная" для применения 제목 1 к
тексту, который должен здесь отображаться.
SCM Express Operation Manual v12.0 17 ©Samsung Proprietary and Confidential
Item Description
Conference Call It is feature code for add-on conference.
UMS Server Number It is virtual number for connecting voice mail system.
Conference Server Number
It is virtual number for connecting conference system.
Conference Start/End Channel
It is start and end channel number for the phone to display number when connected conference system.
Making Operator Group
The operator group uses hunt group of each ring plan. Therefore minimum a hunt
group should be made. In this step can make a hunt group.
Item Description
Group Number It is hunt group number for assigned operator group.
Member Number It is user number of hunt group member.
Step 3. Making Multiple Location and Service Group
This step can make multiple location, service group, department and position.
This step useful for multiple user data import form excel file.
In case of USA, this step is skipped.

Ошибка! Используйте вкладку "Главная" для применения 제목 1 к тексту, который
должен здесь отображаться. Ошибка! Используйте вкладку "Главная" для применения 제목 1 к
тексту, который должен здесь отображаться.
SCM Express Operation Manual v12.0 18 ©Samsung Proprietary and Confidential
Figure 9. Making Multiple Location and Service Group
Item Description
Location The Location means the real area where a user belongs to.
Service Group The Service Group is sub-group of User Group.
Position Input the job grade of the user.
Department Input the department which a user belongs to.
Step 4. Configuring Trunks
This step can make SIP trunk, Gateway and PSTN trunk.

Ошибка! Используйте вкладку "Главная" для применения 제목 1 к тексту, который
должен здесь отображаться. Ошибка! Используйте вкладку "Главная" для применения 제목 1 к
тексту, который должен здесь отображаться.
SCM Express Operation Manual v12.0 19 ©Samsung Proprietary and Confidential
Figure 10. Configuring Trunks
Configuring SIP Trunk
This step configures SIP trunk.
Item Description
Route Name Input a route name to be coupled with a sip trunk.
Location Name Input the location name where a sip trunk belonged to.
Access Number Input access number for the outbound call.
Register Type Input a register type for sip trunk.
IP Address Input the IP address of the sip trunk.
Port Input the port number of the trunk link.
User Number Input the user number for a User Info part of SIP URI.
Domain Name Input the domain name that a part of host of SIP URI contains.
Authentication User Name
Input a name used at the time of a registration.
Authentication Password
Input a password used at the time of a registration.
DNS Input an IP address of DNS server.
Send CLI Prefix Input the Outbound CLI Prefix
A-A Primary Node Input the node connected through the sip trunk.

Ошибка! Используйте вкладку "Главная" для применения 제목 1 к тексту, который
должен здесь отображаться. Ошибка! Используйте вкладку "Главная" для применения 제목 1 к
тексту, который должен здесь отображаться.
SCM Express Operation Manual v12.0 20 ©Samsung Proprietary and Confidential
Configuring Gateway
This step configures Gateway.
Item Description
Gateway Name Input the name of gateway for survival mode.
Gateway Type Input the kind of the gateway.
Gateway IP Address Input the IP address of the gateway.
Configuring PSTN Trunks
This step configures PSTN trunk and routing priority.
Item Description
Trunk Type Input trunk type.
Routing Priority Input priority of the route and priority can choose a high priority route among the trunk links.
Route Name Input the name of the route.
Access Number Input the access number of the route.
User Register Name Input the ID used at the time of a registration.
FXO Destination Input FXO call incoming number.
Outbound CLI Prefix Input Outbound CLI Prefix.
A-A Primary Node Input the node connected through the PSTN trunk.
Step 5. Making Users and Configuring DID Routing
This step can input making user number and you can configure DID routing.

Ошибка! Используйте вкладку "Главная" для применения 제목 1 к тексту, который
должен здесь отображаться. Ошибка! Используйте вкладку "Главная" для применения 제목 1 к
тексту, который должен здесь отображаться.
SCM Express Operation Manual v12.0 21 ©Samsung Proprietary and Confidential
Figure 11. Making Users and Configuring DID Routing
Making User Number
This step requires making user number and mailbox of each user type.
The count of phone is according to license and DB contents. It includes entered
user number in previous step.
Item Description
Desktop Phone It communicate with SIP protocol (Samsung’s SIP Extension) is in the extended form for basic call and a supplementary service offer by default
Soft Phone It is provided in usable software configuration in a general PC and provides for exclusive use of the voice phone or a voice and video call by an IP network.
Mobile Soft Phone It is coupled with an IP network by Wi-Fi protocol and offers a voice phone.
3rd Party SIP Phone When it appoints subscriber’s number in the telephone of the other manufacturer except Samsung.
Analog FXS Phone When it appoints it to an analog telephone port while it was connected subscriber’s number by a gateway.
Configuring DID Routing
This step can make the ring destination number table for DID inbound call from
SIP or PSTN trunk.

Ошибка! Используйте вкладку "Главная" для применения 제목 1 к тексту, который
должен здесь отображаться. Ошибка! Используйте вкладку "Главная" для применения 제목 1 к
тексту, который должен здесь отображаться.
SCM Express Operation Manual v12.0 22 ©Samsung Proprietary and Confidential
Item Description
DID Number Input DID number for inbound call
Delete When modifying DID number, it is the digit count to delete the part of the start of the DID number.
Insert When modifying DID number, it is the digit count to add the part of the start of the DID number.
Default Ring Input the default ring destination number.
RP1~RP4 Ring Input the ring plan 1~4 destination number.
Step 6. Scheduling Ring Plan
This step can schedule up to 16 ring plan easily.
Select the ring plan in left panel and then drag the wanted time in right panel.
If you redundantly assign the ring plan by RP0, the ring plan will be deleted.
Figure 12. Scheduling Ring Plan
Step 7. Database Generation
After configuring all the data, click the [Generate] button to check if the result
was successfully performed.
If the error occurs, you can re-input the data by click the [Retry] button. And
regenerate it.

Ошибка! Используйте вкладку "Главная" для применения 제목 1 к тексту, который
должен здесь отображаться. Ошибка! Используйте вкладку "Главная" для применения 제목 1 к
тексту, который должен здесь отображаться.
SCM Express Operation Manual v12.0 23 ©Samsung Proprietary and Confidential
Figure 13. Database Generation
Step 8. Active-Active Configuration after Wizard
During operation of system, Administrator can make a configuration for Active-
Active mode.
Configuring Node
Please move to [CONFIGURATION > Active/Active Redundancy > Node
Configuration].

Ошибка! Используйте вкладку "Главная" для применения 제목 1 к тексту, который
должен здесь отображаться. Ошибка! Используйте вкладку "Главная" для применения 제목 1 к
тексту, который должен здесь отображаться.
SCM Express Operation Manual v12.0 24 ©Samsung Proprietary and Confidential
Figure 14. Configuring Node
Item Description
Master Node It is the default primary node for users and can be read and written by Administrator.
My Node Please choose node number of this connected server
Node 0’s IP It is the IP address of Node 0.
Node 0’s Name It is the name of Node 0.
Node 1’s IP It is the IP address of Node 1.
Node 1’s Name It is the name of Node 1.
Force Write Access to DB
If it is enabled, the user features can be forced to change in unlinked state of Active-Active mode.
Configuring link between nodes
Please move to [CONFIGURATION > Active/Active Redundancy > Inter-
Node Link Configuration].

Ошибка! Используйте вкладку "Главная" для применения 제목 1 к тексту, который
должен здесь отображаться. Ошибка! Используйте вкладку "Главная" для применения 제목 1 к
тексту, который должен здесь отображаться.
SCM Express Operation Manual v12.0 25 ©Samsung Proprietary and Confidential
Figure 15. Configuring Link between Nodes
Item Description
Node Name It is the node name.
Proxy Server It is basically the IP address of the peer node. If another IP address is input, it will be applied.
Domain Name Enter a domain to use as the host of SIP URI.
Port It is the SIP port of the peer node.
Protocol Type It is the transport protocol type for sending SIP messages to the peer node for making a call. Can choose UDP, TCP or TLS. For setting to TCP/TLS, it is recommended to enable ‘Keep Alive’ and ‘TLS Connection’.
User Name When ‘Keep Alive’ is enabled, it is the user name for OPTIONS message.
Local Domain Specify the caller’s host name.
Keep Alive Can enable or disable ‘Keep Alive’ for link between node and node.
If it is enabled, the node will send OPTIONS messages to the peer node periodically so that checks the SIP link state.
Keep Alive Expires Specify an interval (seconds) for exchanging Keep Alive Messages
Keep Alive Timeout Specify the timeout value for expiration of Keep Alive Messages
NAT Traversal If enabled, it provides Media Proxy function.
Mutual TLS If enabled, Each node authenticates TLS connection mutually.
TLS Connection When ‘Keep Alive’ is enabled and ‘Protocol type’ is TCP/TLS, It is whether the node reuses CONNECTION or not.
If it is enabled, the node will keep and reuse CONNECTION that made through keep alive message. So processing speeds will be faster.
DNS1 Enter the IP address of 1st DNS server.
DNS2 Enter the IP Address of 2nd DNS Server.
Blacklist Expires Specify the expiration time in second from 0 to 86400.
In case of no response when it send ‘Blacklist Check Message’ to ISP, it blocking the IP address of the ISP during this expiration time.
Maximum Call Set the maximum number of simultaneous call inbound and outbound direction.
Maximum Inbound Call
Set the maximum number of simultaneous call with inbound direction.

Ошибка! Используйте вкладку "Главная" для применения 제목 1 к тексту, который
должен здесь отображаться. Ошибка! Используйте вкладку "Главная" для применения 제목 1 к
тексту, который должен здесь отображаться.
SCM Express Operation Manual v12.0 26 ©Samsung Proprietary and Confidential
Item Description
Maximum Outbound Call
Set the maximum number of simultaneous call with outbound direction.
Configuring database synchronization manually
Administrator can make database synchronization between master and slave node.
Please move to [CONFIGURATION > Active/Active Redundancy > Manual
Database Sync.].
Figure 16. Configuring Database Synchronization
Reboot slave node
Administrator can make a distance reboot for slave node. After active server of
slave node is restarted and database synchronization is done, the standby servers of
master and slave node will be restarted and occur database synchronization.
Please move to [CONFIGURATION > Active/Active Redundancy > Slave
Node Reboot].

Ошибка! Используйте вкладку "Главная" для применения 제목 1 к тексту, который
должен здесь отображаться. Ошибка! Используйте вкладку "Главная" для применения 제목 1 к
тексту, который должен здесь отображаться.
SCM Express Operation Manual v12.0 27 ©Samsung Proprietary and Confidential
Changing All Users Data
It is often necessary to change information for many subscribers simultaneously.
SCM Administrator allows changing all user’s data at one time.
Customer Data Import/Export
SCM Administrator’s data file export/import feature allows exporting information
from some of the SCM Administrator menu items into an Excel spreadsheet,
which can then be edited offline and be imported back.
When editing the Excel spreadsheet offline, you can edit the information for each
field and also add lists. SCM can be updated with any changes made in the Excel
spreadsheet.
The data file export/import feature can be executed by using the [Tool >
Customer Data Import/Export] menu in the top left corner of SCM
Administrator. The following features are available.
Figure 17. File Export/Import
It must be used in the following order.
1 In the [Tool > Customer Data Import/Export] menu, click a menu you want
to use.
A list of currently registered information is displayed.
2 Click the [Export] button and specify a name for the file to save.
3 Edit the saved file offline.

Ошибка! Используйте вкладку "Главная" для применения 제목 1 к тексту, который
должен здесь отображаться. Ошибка! Используйте вкладку "Главная" для применения 제목 1 к
тексту, который должен здесь отображаться.
SCM Express Operation Manual v12.0 28 ©Samsung Proprietary and Confidential
4 Click the [Import] button and specify the name of the file you edited offline.
5 Click the [Update] button to apply the changes to the system.
You can use the [Customer Data Import/Export] feature to change the following
information about users. When adding new information, you must use the feature
in the following order, similar to creating information. Also, when deleting
information, you must use the feature in the reverse order of the procedure below
after deleting the connection information.
Department: The department information created in the [CONFIGURATION
> User Group > Department] menu.
Single Phone User: The user information created in the [CONFIGURATION
> User > Single Phone User] menu.
User Profile: The application user information created in the
[CONFIGURATION > User > User Profile] menu.
Export
You can save a list of information currently registered in the system into an Excel
file by using the [Export] feature, which must be executed in the following order:
1 In the [Tool > Customer Data Import/Export] menu, click a menu you wish
to use.
A list of currently registered information will be displayed.
2 Click the [Export] button and specify a name of the file to save.
An Excel file will be created with the specified file name. Open the Excel file to
check whether the list of information has been exported correctly.
Import
You can import a list of information which had been exported previously as an
Excel file to the system by using the [Import] feature, which must be executed in
the following order:
1 In the [Tool > Customer Data Import/Export] menu, click a menu you wish
to use.
A list of currently registered information will be displayed.
2 Click the [Import] button and specify the name of the file to import.
3 If duplicate data exists in the system, the list of duplicate data will be
displayed in a dialog box.
4 The first column indicated as [DB] shows the information currently registered
in the system. The second column indicated as ‘Excel’ shows the information
in the Excel file. You can select fields for which to save the information.
5 The following buttons are shown in the duplicate dialog box. If there is no
duplicate data, the duplicate dialog box will not be shown and the next step
will be performed automatically.
Button Description

Ошибка! Используйте вкладку "Главная" для применения 제목 1 к тексту, который
должен здесь отображаться. Ошибка! Используйте вкладку "Главная" для применения 제목 1 к
тексту, который должен здесь отображаться.
SCM Express Operation Manual v12.0 29 ©Samsung Proprietary and Confidential
Button Description
Update The information selected in the dialog box will be updated on the data file import/export screen.
Update All The data in the Excel file will be selected for all the following items with duplicate information for updating the data file import/export screen.
Skip The current item with duplicate information will not be updated.
Skip All The duplicate data for all the following items will not be updated.
6 The information from the Excel file will be shown on the screen.
The [Select] field on the information list indicates whether the selected
information will be added or changed.
Update field Description
Indicated as [Add] This information does not exist in the system and will be added when [Update] is clicked.
Checkbox is checked
This information exists in the system and will be changed when [Update] is clicked.
Checkbox is not checked
This information exists in the system and nothing will happen when [Update] is clicked.
After performing the import feature, if you do not see the information on the
screen, check the following:
Check that the names of fields at the top of the Excel spread sheet are the same
as the data file import/export screen.
If a field’s property is combo box, check that the string in the Excel file is
within the selection range.
Update
You can apply the list of information displayed for screen on the system by using
the [Update] feature, which must be executed in the following order:
1 In the [Tool > Customer Data Import/Export] menu, click a menu you wish
to use.
A list of currently registered information will be shown.
2 To add information, click the [Import] button to show the data in the Excel
file on the screen.
3 To change the current information without adding any information, just change
the field value. If you change a field value, the checkbox in the [Select] field
for the selected information will be checked automatically.
4 If you click the [Update] button, the list of information shown on the screen
will be applied to the system.
5 If there is no error, the screen will be refreshed automatically.

Ошибка! Используйте вкладку "Главная" для применения 제목 1 к тексту, который
должен здесь отображаться. Ошибка! Используйте вкладку "Главная" для применения 제목 1 к
тексту, который должен здесь отображаться.
SCM Express Operation Manual v12.0 30 ©Samsung Proprietary and Confidential
If there are errors, the error dialog box will be displayed. The error dialog box
will show a list of information not applied to the system due to errors and
show the causes of the errors.
Reload
This reads the information from the system again and reloads the screen. Any
information previously imported or changed will disappear from the screen.
Filtering
Data on the screen can be viewed selectively using the following options.
Option Description
Update Only the information available for updating is shown.
Add Only the information available for adding is shown.
Option You can filter information by the field used as the index of each menu.
A~: Only the information with the selected field value ‘A’ is shown.
A~B (string): Only the information for which the first character of the selected field is within the specified range is shown.
A~B (number): Only the information for which the value of the selected field is within the specified range is shown.
Items
You can use the following types of information.
Department: This is the department information created in the
[CONFIGURATION > User Group > Department] menu.
Single Phone User: This is the subscriber information created in the
[CONFIGURATION > User > Single Phone User] menu.
User Profile: This is the user profile information created in the
[CONFIGURATION > User > User Profile] menu.
User Service Timer: This is the timer option’s information set in the
[CONFIGURATION > User > User Service Timer] menu.
AOM: This is the add-on module (AOM) information created in the
[CONFIGURATION > User > AOM] menu.
System Speed Dial: This is the system speed dial information created in the
[CONFIGURATION > Service > Speed Dial > System Speed Dial] menu.
Account Code: This is the account code information created in the
[CONFIGURATION > Service > DTMF Detection Service > Account
Code] menu.
Authorize Code: This is the authorize code information created in the
[CONFIGURATION > Service > DTMF Detection Service > Authorize
Code] menu.
DISA Approved CLI Number: This is the DISA approval CLI number created

Ошибка! Используйте вкладку "Главная" для применения 제목 1 к тексту, который
должен здесь отображаться. Ошибка! Используйте вкладку "Главная" для применения 제목 1 к
тексту, который должен здесь отображаться.
SCM Express Operation Manual v12.0 31 ©Samsung Proprietary and Confidential
in the [CONFIGURATION > Service > DTMF Detection Service > DISA
Approved CLI Number] menu.
ACD Agent: This is the ACD agent information created in the
[CONFIGURATION > Application > ACD > ACD Agent] menu.
CLI Routing: This is the CLI routing information created in the
[CONFIGURATION > Trunk Routing > CLI Routing] menu.
DID Routing: This is the DID routing information created in the
[CONFIGURATION > Trunk Routing > DID Routing] menu.
Room Information: This is the Room Information created in the
[CONFIGURATION > Service > Hotel Service > Room Information] menu.
Hunt Group: This is the Hunt Group Information created in the
[CONFIGURATION > Service > Group Service > Hunt Group] menu.
Paging Group: This is the Paging Group Information created in the
[CONFIGURATION > Service > Group Service > Paging Group] menu.
Pickup Group: This is the Pickup Group Information created in the
[CONFIGURATION > Service > Group Service > Pickup Group] menu.
Preset Call Forward All: This is the Preset Call Forward All Information
activated in the [CONFIGURATION > Service > Feature Service > Service
Activation] menu.
Preset Call Forward Busy: This is the Preset Call Forward Busy Information
activated in the [CONFIGURATION > Service > Feature Service > Service
Activation] menu.
Preset Call Forward No Answer: This is the Preset Call Forward No Answer
Information activated in the [CONFIGURATION > Service > Feature
Service > Service Activation] menu.
Preset Call Forward Unreachable: This is the Preset Call Forward Unreachable
Information activated in the [CONFIGURATION > Service > Feature
Service > Service Activation] menu.
Preset Call Forward DND: This is the Preset Call Forward DND Information
activated in the [CONFIGURATION > Service > Feature Service > Service
Activation] menu.
Phone Key Programming: This is the Phone Key Programming Information
created in the [CONFIGURATION > User > Phone Key Programming]
menu.
AOM Key Programming: This is the AOM Key Programming Information
created in the [CONFIGURATION > User > AOM Key Programming]
menu.
Registration Status: This is the Registration Status Information created in the
[PERFORMANCE > Registration Status > Registration Status] menu.

Ошибка! Используйте вкладку "Главная" для применения 제목 1 к тексту, который
должен здесь отображаться. Ошибка! Используйте вкладку "Главная" для применения 제목 1 к
тексту, который должен здесь отображаться.
SCM Express Operation Manual v12.0 32 ©Samsung Proprietary and Confidential
Smart WLAN Link User Profile: This is the Smart WLAN Link User Profile
Information created in the [CONFIGURATION > Wireless Enterprise >
Smart WLAN Link Configuration > Smart WLAN Link User Profile] menu.
Mobile Phone Profile: This is the Mobile Phone Profile Information created in
the [CONFIGURATION > Wireless Enterprise > Mobile Phone Profile]
menu.
Phone Software Upgrade
SCM Administrator’s phone software upgrade feature allows changing phone
software.
The phone software upgrade feature can be executed by using the [Tool > Phone
Software Upgrade] menu in the top left corner of SCM Administrator. The
following features are available.
Filtering
Data on the screen can be viewed selectively using the filtering options.
Table
Table displays the phone list which is Samsung-Desktop-Phone type.
[Upgrade State] column means the upgrade result of the last time. The upgrade
state has the following types.
Option Description
Success The phone was re-registered after upgrading.
Fail The upgrading was failed because of the following reasons:

Ошибка! Используйте вкладку "Главная" для применения 제목 1 к тексту, который
должен здесь отображаться. Ошибка! Используйте вкладку "Главная" для применения 제목 1 к
тексту, который должен здесь отображаться.
SCM Express Operation Manual v12.0 33 ©Samsung Proprietary and Confidential
Option Description
System sent Notification to phone [Phone Upgrade Max Retry Count] times but there is no response message.
System sent Notification to phone and received response message, but the phone has not re-registered by [Phone Upgrade Queuing Time].
Reserved The phone has an upgrading reservation at reserved time.
Retry System sent Notification to phone but there is no response message, so it will retry to send Notification after [Phone Upgrade Retry Delay Time].
Notified System sent Notification to phone and received response message, but the phone has not re-registered yet.
Canceled The upgrading reservation was canceled.
Version Changed Version of the phone was changed for another reason.
Ex) The phone can be restarted.
None The phone has no upgrade history.
Upgrade
Check checkboxes of the phones for upgrading and click [Upgrade] button. Only
registered phones (which registered state is ‘Reg’) can be upgraded. The phones
registered in slave system can be upgraded through SCM Administrator of slave
system.
Upgrading is processed with the following steps:
1 Confirm versions: Input the upgrade version for phone models. The initial
values are read from [CONFIGURATION > Phone Setting > Software
Upgrade Configuration].
2 Confirm upgrade: It displays the upgrade phone list and non-upgradable
phones are marked with red color. You can set upgrade start time and interval.
3 Confirm Result: SCM Administrator send upgrade message to system and it
displays the result. You can see the estimated start time, last time and time-out.
If some errors are occurred, it will be displayed.
Cancel Upgrade
Check checkboxes of the phones for canceling and click [Cancel Upgrade]
button.
Only phones which state is ‘Reserved’, ‘Retry’ or ‘Notified’ can be canceled. The
phones registered in slave system can be canceled through SCM Administrator of
slave system.
Canceling upgrade is processed with the following steps:
1 Confirm cancel upgrade: It displays the canceled phone list and non-
cancelable phones are marked with red color.
2 Confirm Result: SCM Administrator send cancel message to system and it
displays the result. If some errors are occurred, it will be displayed.

Ошибка! Используйте вкладку "Главная" для применения 제목 1 к тексту, который
должен здесь отображаться. Ошибка! Используйте вкладку "Главная" для применения 제목 1 к
тексту, который должен здесь отображаться.
SCM Express Operation Manual v12.0 34 ©Samsung Proprietary and Confidential
Multibatch Key Programming
SCM Administrator’s multibatch key programming feature allows setting
programmable keys of several phones at one time.
The multibatch key programming feature can be executed by using the [Tool >
Multibatch Key Programming] menu in the top left corner of SCM
Administrator.
The following features are available.
Filter
You can specify the group of phones. The result of selected filter is displayed in
the [Phone] frame.
Phone
You can select the filtered phones for updating key values.
Clicking the [>>] button will move all of filtered phones to right panel. Clicking
the [>] button will move the selected phones in left panel to right panel. [Detail]
checkbox is used for toggling display about phone’s detail information like User
Group, Service Group, Location and Phone Model.
Update
After inputting the values (Key Number; #, Display Name, Key, Value), click [>]
button and then the job will be added. And you can add the other job again.
If the number of programmable key on the selected phones are different, you can
set for the number of the smallest key.

Ошибка! Используйте вкладку "Главная" для применения 제목 1 к тексту, который
должен здесь отображаться. Ошибка! Используйте вкладку "Главная" для применения 제목 1 к
тексту, который должен здесь отображаться.
SCM Express Operation Manual v12.0 35 ©Samsung Proprietary and Confidential
After adding all jobs, press [Run] button for updating the key setting of the
phones.

Ошибка! Используйте вкладку "Главная" для применения 제목 1 к тексту, который
должен здесь отображаться. Ошибка! Используйте вкладку "Главная" для применения 제목 1 к
тексту, который должен здесь отображаться.
SCM Express Operation Manual v12.0 36 ©Samsung Proprietary and Confidential
Adding Individual User
This section describes the procedure for creating information for individual users
that wasn’t created section of ‘SCM Configuration Wizard’ or ‘Changing All
Users Data’ in Chapter 2.
The user can be defined single phone user and multi-line user.
Single Phone User: The phone has only one extension number. Also this
extension number can be used only in that phone.
Multi-Extension Phone: User information based on physical elements, such as
the profile of the phone.
Multi-Phone User: User information based on logical elements, such as the
extension number of the phone.
When using Multi-line, phone and user can also be assigned as M: N. In other
words, one phone can have multiple extension numbers by using the multiple
appearance features, and one extension number can be assigned to multiple phones
by using the multi-device feature.
Preparing User Creation
The followings are mandatory items for creating subscriber.
Location: Indicates the location of the user. This allows selecting different
trunk call paths using the same number within the same user group. You can
also specify the priority codec for each location.
User Group: Similar to the tenant group. A user group has its own numbering
system and forms the basic unit of all data. You can assign all the users within
the system to different groups and allow each group to use different sets of
SCM supplementary services.
Service Group: Lower-level group of the user group. Each user group can have
many subgroups, and each subgroup can be allowed to use different sets of
supplementary services.
Making User Group
User Group
User groups are the most basic units in SCM, and each user group is classified by
its host.
User group enables users to use the extension number, even though it is already
used in same SCM.
Making User Group
Administrator can create a user group in the [CONFIGURATION > User Group

Ошибка! Используйте вкладку "Главная" для применения 제목 1 к тексту, который
должен здесь отображаться. Ошибка! Используйте вкладку "Главная" для применения 제목 1 к
тексту, который должен здесь отображаться.
SCM Express Operation Manual v12.0 37 ©Samsung Proprietary and Confidential
> Creating User Group] menu.
Changing User Group
When you created user group in the [CONFIGURATION > User Group >
Creating User Group] menu, you didn’t input data that saved default value.
You can change user group using the [CONFIGURATION > User Group >
Change User Group > Information] menu.
Items Description
Name Specify a name for the user group.
Pay special attention to choosing a name, as it is used as an identifier when selecting the user group in other menus and cannot be changed.
Host Enter a domain which is used as the host of SIP URI.
Pay special attention to entering a domain, as the host cannot be changed.
Company Name Enter a name of company which the user group belongs to. This is used for Premium CID.
CDR Storage Options Specify how to create CDR data.
None: Does not create CDR data.
Local: Saves CDR data to the SCM hard disk.
FTP: Saves CDR data to a file in SCM and periodically transfers the file to a specified FTP server.
RADIUS: Transfers CDR data to the RADIUS server by using the RADIUS protocol whenever CDR data is created.
TCP: Transfers CDR data to the CDR server that is connected through TCP by using a unique method in SCM whenever CDR data is created.
TCP_SMDR: The Method to interoperate with the Accounting Server that is used for SCM V2 or OfficeServ system. (IOT mandatory)
TCP_ACK: When it is disconnect from CDR server, CDR data Will be stored inside SCM. When it is reconnect with CDR server, CDR data will be transfer to CDR server in order of occurrence
Authentication Method Authentication method used when registering a user to SCM.
Internal: Uses internal authentication in the SCM.
LDAP: Performs authentication by interoperating with an external LDAP server.
RADIUS_S1: Performs authentication by using scenario 1 of an external RADIUS server.
RADIUS_S2: Performs authentication by using scenario 2 of an external RADIUS server.
MOH ID Specify the ID of a sound source played when a call is on hold.
MOH Enable Specify whether to play the system’s sound source when a call is on hold.
When the MOH is not in use, the phone plays its own on-hold tone or remains silent when a call is on hold.

Ошибка! Используйте вкладку "Главная" для применения 제목 1 к тексту, который
должен здесь отображаться. Ошибка! Используйте вкладку "Главная" для применения 제목 1 к
тексту, который должен здесь отображаться.
SCM Express Operation Manual v12.0 38 ©Samsung Proprietary and Confidential
Items Description
Transfer Ring-back Tone An MOH is played when the caller is put on hold for a transfer.
When you page the number to which you are transferring the caller and hang up the phone, the MOH being played is changed to the ringtone. You can specify this transfer ringtone.
User Group Code When a user make a call to the users belongs to different user group, a user should dial this User Group Code and Extension Number.
CLI Number When the users of this User Group make a call, this CLI Number if configured is used as CLI for all users.
QOP (Quality of Protection)
Specify the QOP information when digest authentication is used.
Realm Specify the Realm information when digest authentication is used.
Algorithm Specify the algorithm when digest authentication is used.
LDAP Root Directory You can enter the base directory path of the LDAP server when LDAP is selected as the authentication method.
Restriction Policy Specify a restriction policy to apply to the users belonging to the user group.
A restriction policy only applies to trunk calls. You can select one of the existing restriction policies.
You can create restriction policies in the [CONFIGURATION > Routing > Restriction Policy List] menu.
Default Access Code You can set default access code for trunk call routing.
Min Digit(Default Access Code)
You can set minimum digit length to use Default Access Code.
Service Call Access Code You can set service call access code for trunk call routing.
This access code is used for default access code relating mobile service.
Media Option You can set the allowed media to the call.
RTP only: SCM don’t accept SRTP media.
SRTP only: SCM doesn’t accept RTP media to the call.
SRTP Mline offer Option This is the function that contains the 2 mline (AVP/SAVP) in the INVITE message of sRTP calls.
External Cooperation ID You can specify the SCM ID, If you want to work with the external device for special purposes, SCM is, the ID of the SCM.
Restriction User Group Specify call restrictions between user groups. The current user group is restricted from making calls to the selected user groups.
Transfer CID for VM/AA Select the CID Number which is provided to VM/AA. When VM/AA receives the Semi-Blind Transfer Call, Specify the CID Number of transferor or transferee.
Location
Location refers to the actual location of the user. You can set a different location

Ошибка! Используйте вкладку "Главная" для применения 제목 1 к тексту, который
должен здесь отображаться. Ошибка! Используйте вкладку "Главная" для применения 제목 1 к
тексту, который должен здесь отображаться.
SCM Express Operation Manual v12.0 39 ©Samsung Proprietary and Confidential
for each user and endpoint to apply call restrictions between different locations
according to the bandwidth, assign preferred Codecs within a location or between
specific locations, or select different trunk call paths for locations. Your users may
actually be in different locations, but if there is no need to apply separate call
restrictions, preferred codecs, or trunk call paths by location, we recommend that
you only create one location.
Making Location
When you created user group in the [CONFIGURATION > User Group >
Creating User Group] menu, one or more locations can be created.
Changing Location
When you created user group in the [CONFIGURATION > User Group >
Creating User Group] menu, you didn’t input data that saved default value.
You can change location using the [CONFIGURATION > Location > Location]
menu.
And you can create new location. When you create new location, the following
items are mandatory.
Item Description
Name Specify a name to identify the location.
Pay special attention to choosing a name, as it is used as an identifier when selecting the location in other menus and cannot be changed.
Bandwidth Specify the maximum available bandwidth for the location.
You can enter up to 1000000.
Intra-Location Video Codec
Select a preferred video codec for the location.
Inter-Location Video Codec
Select a preferred video codec for the other location.
Intra-Location Audio Codec
Select a preferred audio codec for the location.
Inter-Location Audio Codec
Select a preferred audio codec for the other location.
Intra-Location Forced Codec
Select an allowed single audio codec for the location.
Inter-Location Forced Codec
Select an allowed single audio codec for the other location.
Announcement Codec Select a preferred announcement codec for the location.
Service Group
A service group is a small unit in a user group and is used for applying different
service policies. Related policies include external call restriction policy, per-group
class of service settings, and routing plan for service groups.
Making Service Group
When you created user group in the [CONFIGURATION > User Group >

Ошибка! Используйте вкладку "Главная" для применения 제목 1 к тексту, который
должен здесь отображаться. Ошибка! Используйте вкладку "Главная" для применения 제목 1 к
тексту, который должен здесь отображаться.
SCM Express Operation Manual v12.0 40 ©Samsung Proprietary and Confidential
Creating User Group] menu, one or more service groups can be created.
Changing Service Group
When you created user group in the [CONFIGURATION > User Group >
Creating User Group] menu, you didn’t input data that saved default value.
You can change service group using the [CONFIGURATION > User Group >
Service Group] menu. And you can create service group.
Item Description
User Group Specify a user group to which the service group belongs. You can select one of the existing user groups.
Name Specify a name for the service group.
Pay special attention to choosing the name, as it is used as an identifier when selecting the service group in other menus and cannot be changed.
Service Group Code Specify code of service group. It indentifies service group.
CLI Number Specify CLI number.
Class of Service Specify a class of service to apply to the users belonging to the service group. You can select one of the existing Class of Service.
You can create Class of Service in the [CONFIGURATION > Service > Feature Service > Class of service] menu.
Restriction Policy Specify a restriction policy to apply to the users belonging to the service group. A restriction policy only applies to trunk calls. You can select one of the existing restriction policies.
You can create restriction policies in the [CONFIGURATION > Routing > Restriction Policy List] menu.
Dial Tone Specify a digit to create a virtual dial tone. The profile information is downloaded to the phone, allowing the phone to play a dial tone when a specified digit is entered.
Dial Plan Specify a dial plan to apply to the users belonging to the service group.
You can select one of the existing service group based dial plan.
You can create Service Group based dial tone in the [CONFIGURATION > Phone Setting > Service Group based Dial Plan] menu.
Application Server Service Group
Specify a node0’s application server service group to apply to the users belonging to the service group. You can select one of the existing Application Server Service Group.
You can create Application Server Service Group in the [CONFIGURATION > Application > Application Server Group] menu.
Node1’s App Server Service Group
Specify a node1’s application server service group to apply to the users belonging to the service group. You can select one of the existing Application Server Service Group.
You can create Application Server Service Group in the [CONFIGURATION > Application > Application Server Group] menu.
Call Recording Method You can select call recording method Conference Recording or Phone Recording.

Ошибка! Используйте вкладку "Главная" для применения 제목 1 к тексту, который
должен здесь отображаться. Ошибка! Используйте вкладку "Главная" для применения 제목 1 к
тексту, который должен здесь отображаться.
SCM Express Operation Manual v12.0 41 ©Samsung Proprietary and Confidential
Item Description
Auto Attendant Ring Plan Schedule
Specify a dial plan to apply to the users belonging to the service group for auto attendant service
CFUR Service Schedule Specify a dial plan to apply to the users belonging to the service group for CFUR service
Send Extension Number Usage
Select how to use [Send Extension Number] when a call is
setup between different service groups.
This options is worked when [Send Extension Number] is entered.
With Service Group Code
Service Group Code is prefixed to [Send Extension Number] as a calling number when a call is setup
between different service groups.
Without Service Group Code
For a call between different service groups [Send Extension Number] is used as a calling number without prefix.
Phone Recording Start Time
In case of auto record using a samsung phone, the call for a recording server can be made when the call for recording service is ringing or answered. The ‘ringing’ option is recommended when the recording server is internal VM and the recording announcement should be played.
Ringing
The call for a recording server can be made when the call for recording service is ringing.
Answer
The call for a recording server can be made when the call for recording service is answered.
Service Group MCN The called number that a user dials can be modified though Service Group MCN. It is applied per a service group that the caller belongs to. Service Group MCN can be created in the [CONFIGURATION > User Group > Service Group MCN] menu.
Making Single Phone User
Single Phone User means general phone user. Phone and User are paired on a 1:1
basis. You can specify the extension number of the phone, the authentication
method of the phone, and so on.
You can create devices using the [CONFIGURATION > User > Single Phone
User] menu.
Item Description
Basic Configuration
User Group Select a user group.
Service Group Specifies a subscriber's service group. You can select one out of pre-defined service groups.
Location Specifies the location where a subscriber is located. You can select one out of pre-defined locations.

Ошибка! Используйте вкладку "Главная" для применения 제목 1 к тексту, который
должен здесь отображаться. Ошибка! Используйте вкладку "Главная" для применения 제목 1 к
тексту, который должен здесь отображаться.
SCM Express Operation Manual v12.0 42 ©Samsung Proprietary and Confidential
Item Description
Language Specifies a language.
Extension Number Specifies the extension number of a subscriber.
Used as a separator when specifying a subscriber in another menu and it cannot be changed. Thus extra caution is required.
Extension Name Specifies a subscriber's name.
Mobile Phone Number Specify the Mobile phone number to be used to Move to Mobile service.
Use Mobile Phone Number
Specify the usage of Mobile Phone Number
None: do not use.
Ring Only: MOBEX behavior. Your phone and Mobile Phone are ringing simultaneously.
Dial Only: Mobile Remote Call behavior. Make a connection to the Mobile Voice Server; execute the Click To Dial service.
Both: Ring Only, Dial Only both services are provided.
Application User ID Input an ID of an application user.
Application Password Input a password of an application user.
Authentication User ID Enter a user ID which is used for authentication during subscriber registration.
Authentication Password Enter a password which is used for authentication during subscriber registration.
Phone Login ID Specifies a profile ID. A Samsung phone can do auto environment configuration by getting the information of a phone in SCM by using a profile ID and a password.
Phone Login Password Specifies a profile password. A Samsung phone can do auto environment configuration by getting the information of a phone in SCM by using a profile ID and a password. (mandatory if there is a profile ID)
PIN Number Specifies a password which is used when using a service such as DISA or CRU.
Make Mailbox Specifies if using mailbox
Yes: It will make a mailbox number same with extension number.
Phone Type Select a phone type.
Samsung-SIP-Phone: Select this when a subscriber's number is specified to a Samsung SIP phone.
Samsung-Soft-Phone: Select this when a subscriber's number is specified to a Samsung Softphone.
Samsung-Mobile-Phone: Select this when a subscriber's number is specified to a Samsung mobile Softphone.
Samsung-PC-operator: Select this when a subscriber's number is specified to an IP operator Softphone.
3rd-Party-SIP-Phone: Select this when a subscriber's number is specified to a 3rd party phone other than Samsung.
FXS-Phone: Select this when a subscriber's number is specified to an analog phone port which is connected to a

Ошибка! Используйте вкладку "Главная" для применения 제목 1 к тексту, который
должен здесь отображаться. Ошибка! Используйте вкладку "Главная" для применения 제목 1 к
тексту, который должен здесь отображаться.
SCM Express Operation Manual v12.0 43 ©Samsung Proprietary and Confidential
Item Description
gateway.
Phone Verification Specifies device authentication method. Device authentication is required to use multiple devices.
None: No device authentication.
IP Address: Performs authentication by using an IP address device. This is applicable only when a fixed IP address is used.
MAC Address: Performs device authentication by using the MAC address of a device. Because a Samsung phone has a MAC address in its REGISTER, you can use the information for registration.
IP Address (NAT): Performs authentication by using an IP address device for a device which is under NAT of a remote location.
MAC Address MAC Address of a device (mandatory if authentication method is MAC_ADDRESS)
IP Address IP Address of a device (mandatory if authentication method is either IP_ADDRESS or NAT_IP_ADDRESS)
Private IP Address Private IP address of a device in the NAT environment (mandatory if authentication method is NAT_IP_ADDRESS)
Use mVoIP Select the use of mVoIP
VMS Extension Number Specify extension number for VMS
A-A Primary Node Specify Primary node when Active-Active mode
A-A Dual Registration Specify dual registration enable or not when Active-Active mode.
If select dual registration enable, Phone register to both node.
Protocol
Protocol Specifies a protocol. You can select one out of UDP, TCP, or TLS.
UDP
TCP
TLS
Check Registration Protocol
Specify whether to check the protocols (UDP, TCP, TLS) when registration.
Media Select a media type that a device is going to use. Specifies the priority of an encryption algorithm for media encryption.
RTP: Does not encrypt a media.
sRTP (AES/ARIA): Encrypts media into the ARIA or AES protocol, and uses AES first.
sRTP (ARIA/AES): Encrypts media into the ARIA or AES protocol, and uses ARIA first.
sRTP (AES): Encrypts media into the AES protocol.
sRTP (ARIA): Encrypts media into the ARIA protocol.
URI Type Specifies SIP in general as URI type.
SIP
SIPS

Ошибка! Используйте вкладку "Главная" для применения 제목 1 к тексту, который
должен здесь отображаться. Ошибка! Используйте вкладку "Главная" для применения 제목 1 к
тексту, который должен здесь отображаться.
SCM Express Operation Manual v12.0 44 ©Samsung Proprietary and Confidential
Item Description
TLS Connection Specify the TLS connection type:
Normal: use TLS Full handshaking method.
Reuse: reuses the existing TLS connection established by initial Message.
Resume: use simplified handshaking method using TLS Session ID.
TLS Key Decryption Password Type
Specify TLS Key Decryption Password Type.
TLS Key Decryption Direct Password
Specify TLS Key Decryption Direct Password.
TLS Key Decryption Device ID
Specify TLS Key Decryption Device ID
TLS Key Decryption Salt Specify TLS Key Decryption Salt
TLS Key Decryption IC Specify TLS Key Decryption IC
TLS Key Decryption DX Specify TLS Key Decryption DX
MOH SIP Media Mode Specify the SDP media mode which will be send to the held side when hold.
DTMF Specifies the DTMF signaling system of a device.
RFC2833: Sends a DTMF signal in the RFC2833 protocol.
Invoice: Sends a DTMF signal together with a general voice signal.
Outband: Sends a DTMF signal in the RFC2976 protocol.
RFC2833 DTMF Payload Specifies a payload when DTMF is RFC2833.
SIP-PRACK option Select the use of SIP PRACK
Send RTCP on Hold Select the use of Send RTCP
Use InterProxy When use only TLS protocol, this options is activated. If ENABLE, it can operate with inter PROXTB.
PROXYB Index Input the PROXYB index to be used.
Number Translation
Service Group Local Number
Notify information of station name to Phone.
Service Group Local CLI Number
Short name of phone user.
Send Extension Number Specify value of Display number field in internal call.
Phone Display Name Specify Phone Display name
Extension Number
Send Extension Number
Send CLI Number When making trunk call, specify value of userinfo field.
Send CLI Name Specify value of Display name field in trunk call.
CLI for Forwarded Call Select the use of CLI for Forwarded Call
Originator
Forwarder
Forwarder with Originator Name
Display Option Specify the way that where to get Display information

Ошибка! Используйте вкладку "Главная" для применения 제목 1 к тексту, который
должен здесь отображаться. Ошибка! Используйте вкладку "Главная" для применения 제목 1 к
тексту, который должен здесь отображаться.
SCM Express Operation Manual v12.0 45 ©Samsung Proprietary and Confidential
Item Description
Normal:
(line 1) Peer number
(line 2) Reason > Divert number > Peer name
Peerinfo:
(line 1) Peer number
(line 2) Peer name
Reason:
(line 1) Blank
(line 2) Reason
Diversion:
(line 1) Divert number
(line 2) Diverted info string
Service
MOH Announcement ID Specify the sound source ID of an on-hold tone played when the user is put on hold.
Service Schedule Select the Service Schedule to provide Leaving Office Class of Service. When Service Schedule status is unset, Leaving Office Class of Service activates.
Class of Service Specifies a service level which will be applied to a subscriber.
You can select a service level from the service levels created in [Configuration > Service > Function Service > Service Level] menu.
Extension Lock Can restrict the use of a subscriber's number.
None: No restriction.
Dialing-Only: Uses a subscriber's number only for an outgoing call.
Answering-Only: Uses a subscriber's number only for an incoming call.
Both: Prevent a subscriber's number from outgoing/incoming.
Restriction Policy Specifies call restriction policy which will be applied to a subscriber. The call restriction policy is only applied to a trunk call, and you can select one out of pre-defined call restriction policies which are created in [Configuration > Trunk Configuration > Call Restriction Policy Configuration] menu.
Allow Selective Call Select selective call allow list.
Mobile Number Auto Update
Select the use of auto update mobile number when mobile phone is registered
Desk Phone Simultaneous Ring Delay
Select the use of Desk Phone Simultaneous Ring Delay.
Ping Ring Type Specify notification type.
Audio + Visual: You can be notified by phone pop-up display and ring
Audio: You can be notified by ring only
Visual: You can be notified by phone pop-up display.
None: There no any ping ring notification.

Ошибка! Используйте вкладку "Главная" для применения 제목 1 к тексту, который
должен здесь отображаться. Ошибка! Используйте вкладку "Главная" для применения 제목 1 к
тексту, который должен здесь отображаться.
SCM Express Operation Manual v12.0 46 ©Samsung Proprietary and Confidential
Item Description
Caller Ring Type If you specify a certain value of this and make a call to an extension, the extension will hear this ring type.
Use Virtual Ringback Specify whether to use ring back tone stored in the Phones.
External Ringback Tone Use
Specify whether to use External Ring Back Tone.
NONE: do not use.
Internal: only used to internal call.
External: only used to external call
Both: used to both internal and external calls.
Error Announcement Select the use of announcement when call has failed.
Account Code Use Can specify whether to enter an account code.
Force: It is mandatory to enter an account code when sending an external call.
Voluntary: It is not necessary to enter an account code when sending an external call. You may enter an account code after pressing the Account Code button if you are using a Samsung phone.
Call Monitoring Specify whether to monitor this user or not.
Call Recording Method You can select call recording method Conference Recording or Phone Recording.
Nurse Call Service Select the use of Nurse Call Service. If Enable is choosen, SCME analyzes a dialed number to get a bed and room number which is used for calling number. The pattern of dialed number is 'Bed & Room Number + Nurse Call Delimiter + Called Number.'
Nurse Call Prefix Nurse Call Prefix is inserted in front of the bed and room number. Except Nurse Call Prefix, other number translation is not applied to the calling number of Nurse Call.
Change to Multi Type Change Single Phone User to Multi-type
Call Appearance Select Multi-Device Number Type.
SCA (Single Call Appearance)
MCA (Multi Call Appearance)
User Type Select Multi-Device User Type.
Normal
Secretary
Manager
Interworking
Department Specifies a subscriber's department. You can select a department out of departments which are created in [Configuration > User Group > Department] menu.
Department information is very useful when searching for a subscriber in an application.
Position Specifies a subscriber's position. You can select a position out of positions which are created in [Configuration > User Group > Position] menu. Position information is very useful when searching for a subscriber in an application.
Directory Service Configure whether Directory Service provides or not for a user.

Ошибка! Используйте вкладку "Главная" для применения 제목 1 к тексту, который
должен здесь отображаться. Ошибка! Используйте вкладку "Главная" для применения 제목 1 к
тексту, который должен здесь отображаться.
SCM Express Operation Manual v12.0 47 ©Samsung Proprietary and Confidential
Item Description
LDAP DN Number Enter a user directory number which is used when interoperating with the LDAP server.
Application Server Service Group
Specify an application server service group to apply to the user.
Gateway Name Specifies a gateway which handles a subscriber's call in survival mode (a mode when a basic telephone service is available from a gateway which is located in the same area because communication between a subscriber's phone and SCM is lost).
mySingle Click To Dial CLI
Select CLI of desk or mobile phone number when click-to-dial application of smart phone makes a call
Origin: Desk phone number
Remote: Mobile phone number
Auto Answer by Click to Dial
If a remote device (PC) sends a calling command to SCM when remote calling (Click to Dial) service is used, SCM sends a ring to a phone. When the phone answers, it also sends a call to the phone according to a command.
At this time, it specifies whether to send a call after auto speaker phone response instead of sending a ring to a subscriber.
There may be no auto answer if the phone is not a Samsung phone.
User Account Number Specify a number of Account Code.
CMS Monitoring Specify whether to use CMS Monitoring
FMS Zone Name Specify a FMS Zone. You can select one of FMS zone created in the [CONFIGURATION] > Wireless Enterprise > FMS Zone
Phone
Phone Call History Specify save call history at phone or not
Resume after Transfer-Cancel
Select auto resume or hold when transfer cancel
Time Zone Specifies the time zone of phone.
Same as System: It will be set same with time zone of system.
Push Notification Select the use of Push Service
Use Smart WLAN Link Select the use of Smart WLAN Link Service at Mobile Phone (need to get License for Smart WLAN Link)
Input Number Display Specify display input digit
Off Hook Alarm Specify whether to use alarm in case of off-hook state for a long time.
Web Access Protocol Select the use of http/https or https for Web Access Protocol
Telnet-Access Select the use of Telnet-Access at phone
Use Wi-Fi Select the use of WiFi-Access at phone
EHS Headset Select the mode of of EHS Headset
Phone TX Gain Specify a value of Phone TX Gain.
Comfort Noise Select the use of Comfort Noise at Samsung-Desktop-Phone

Ошибка! Используйте вкладку "Главная" для применения 제목 1 к тексту, который
должен здесь отображаться. Ошибка! Используйте вкладку "Главная" для применения 제목 1 к
тексту, который должен здесь отображаться.
SCM Express Operation Manual v12.0 48 ©Samsung Proprietary and Confidential
Item Description
Use Bluetooth Select the use of Bluetooth at Phone
Use USB Select the use of USB at Phone
Use NFC Select the use of NFC at Phone
NFC Mobile Phone Name Specify NFC Mobile Phone Name
NFC Auto Login Specify use NFC Auto Login
Display Forward Number on Idle Screen
Specify whether phone will display the forward number on screen when Forward function is activated.
Hotspot Channel (Country)
Specify Hotspot Channel for Wifi configuration phone use.
CallLog for XML P-CID Specify whether to log the call of Premium CID by XML Server.
Use Syslog Specify whether to use a syslog function.
Syslog Type select the type of syslog.
Syslog Level select the log level of syslog.
Roaming Trigger Roaming Trigger Parameter for IP Phone WIFI module.
Roaming Delta Roaming Delta Parameter for IP Phone WIFI module.
Roaming Scan Period Roaming Scan Period Parameter for IP Phone WIFI module.
Phone User Password Specify the User Password of IP Phone.
Phone Administrator Password
Specify the Administrator Password of IP Phone.
Phone Telnet Password Specify the Telnet Password of IP Phone.
Phone Web User Password
Specify the Web User Password of IP Phone.
Phone Web Administrator Password
Specify the Web Administrator Password of IP Phone.
Use Headset Button Select the use of Headset button on Phone.
WEB Access Specify whether to allow access to WEB Server on IP Phone.
Use PC-VLAN Select the use of PC-VLAN function in Phone.
Making Multi-Extension Phone
Multi-Extension Phone information refers to the user’s physical elements. You can
specify the device user type, the extension number of the phone, the authentication
method of the phone, and so on. Phone authentication is required when using
multi-device, when multiple phones use one extension number.
You can create devices using the [CONFIGURATION > User > Multi-
Extension Phone] menu.
Item Description
User Group Specify a user group to which the device belongs. You can select one of the existing user groups.
Service Group Specify a service group for the user. You can select one of the service groups already defined.

Ошибка! Используйте вкладку "Главная" для применения 제목 1 к тексту, который
должен здесь отображаться. Ошибка! Используйте вкладку "Главная" для применения 제목 1 к
тексту, который должен здесь отображаться.
SCM Express Operation Manual v12.0 49 ©Samsung Proprietary and Confidential
Item Description
Location Specify the location of the user. You can select one of the existing locations.
Extension Number Specify the user’s extension number.
Pay special attention to choosing the number, as it is used as an identifier when selecting the user in other menus and cannot be changed.
Application User ID Specify a universal user ID used with applications.
Extension Name Specify a name for the phone.
Pay special attention to choosing the name, as it is used as an identifier when selecting the device in other menus and cannot be changed.
Application Password Specify a universal user Password used with applications.
PIN Number Specify a password for using services.
Authentication User ID Enter a user ID used for authentication during user registration.
Authentication Password Enter a password used for authentication during user registration.
Phone Verification Specify the device authentication method. Device authentication is required to use multi-device.
None: No device authentication.
IP Address: Authenticates the device by using the IP address.
This option is available only when using fixed IP addresses.
MAC Address: Authenticates the device by using the MAC address of the device. Every Samsung phone has a unique MAC address that can be used for this purpose.
IP Address (NAT): Authenticates the device by using the IP address when the device is on a remote NAT network.
MAC Address Enter the MAC address used for MAC address authentication.
IP Address Enter the IP address used for IP address authentication.
Private IP Address Enter the private IP address used for IP address (NAT) authentication.
Profile login ID Specify the profile ID. Samsung phones can perform automatic configuration by fetching the phone information from SCM using the profile ID and password.
Profile login Passcord Specify the profile password. Samsung phones can perform automatic configuration by fetching the phone information from SCM using the profile ID and password.
Phone Type Select a phone type.
Samsung-Desk-Phone: Select this when assigning the user’s number to a Samsung SIP phone.
Samsung-Soft-Phone: Select this when assigning the user’s number to a Samsung soft phone.
Samsung-Mobile-Phone: Select this when assigning the user’s number to a Samsung mobile soft phone.
Samsung-PC-Attendant: Select this when assigning the

Ошибка! Используйте вкладку "Главная" для применения 제목 1 к тексту, который
должен здесь отображаться. Ошибка! Используйте вкладку "Главная" для применения 제목 1 к
тексту, который должен здесь отображаться.
SCM Express Operation Manual v12.0 50 ©Samsung Proprietary and Confidential
Item Description
user’s number to an IP attendant soft phone.
3rd-Party-SIP-Phone: Select this when assigning the user’s number to a non-Samsung phone.
FXS-Phone: Select this when assigning the user’s number to the port of an analog phone connected to a gateway.
License Phone Type Select a License phone type. Samsung-Desk-Phone can be created with other phone license.
Samsung-Desk-Phone: Select this when assigning the user’s number to a Samsung SIP phone.
Samsung-Soft-Phone: Select this when assigning the user’s number to a Samsung soft phone.
Samsung-Mobile-Phone: Select this when assigning the user’s number to a Samsung mobile soft phone.
Samsung-PC-Attendant: Select this when assigning the user’s number to an IP attendant soft phone.
3rd-Party-SIP-Phone: Select this when assigning the user’s number to a non-Samsung phone.
Language Specify the language.
Mobile Phone Number Specify the Mobile phone number to be used to Move to Mobile service.
Use Mobile Phone Number
Specify the usage of Mobile Phone Number
None: do not use.
Ring Only: MOBEX behavior. Your phone and Mobile Phone are ringing simultaneously.
Dial Only: Mobile Remote Call behavior. Make a connection to the Mobile Voice Server; execute the Click To Dial service.
Both: Ring Only, Dial Only both services are provided.
Protocol Specify a protocol. You can select one UDP, TCP, or TLS.
Media Select a media type used by the device. Also, specify the priority for encryption algorithms if you are using media encryption.
RTP: No media encryption.
sRTP (AES/ARIA): Encrypts media with the ARIA and AES protocols.
AES has priority.
sRTP (ARIA/AES): Encrypts media with the ARIA and AES protocols.
ARIA has priority.
sRTP (AES): Encrypts media with the AES protocol.
sRTP (ARIA): Encrypts media with the ARIA protocol.
TLS Connection Specify the TLS connection type:
Normal: use TLS Full handshaking method.
Reuse: reuses the existing TLS connection established by initial Message.
Resume: use simplified handshaking method using TLS Session ID.
Ping Ring Type Specify notification type.

Ошибка! Используйте вкладку "Главная" для применения 제목 1 к тексту, который
должен здесь отображаться. Ошибка! Используйте вкладку "Главная" для применения 제목 1 к
тексту, который должен здесь отображаться.
SCM Express Operation Manual v12.0 51 ©Samsung Proprietary and Confidential
Item Description
Audio + Visual: You can be notified by phone pop-up display and ring
Audio: You can be notified by ring only
Visual: You can be notified by phone pop-up display.
None: There no any ping ring notification.
A-A Primary Node Specify Primary node when Active-Active mode
A-A Dual Registration Specify dual registration enable or not when Active-Active mode.
If select dual registration enable, Phone register to both node.
VMS Extension Number Specify extension number for VMS
Make mailbox If you want to use a voice mailbox, select enable.
URI TYPE Specify URI Type, usually SIP.
DTMF Specify the DTMF signaling method used by the device.
RFC2833: Sends the DTMF signal in the RFC2833 protocol.
Invoice: Sends the DTMF signal along with ordinary voice signal.
Outband: Sends the DTMF signal in the RFC2976 protocol.
RFC2833 DTMF Payload Specify the payload value when using RFC2833 DTMF.
Time Zone Specify the difference between the SCM time (reference time) and the time of each device. You can set the phone to display different time than the system time if the phone and the SCM system are in different time zones.
Department Specify the user’s department. You can select one of the departments created in the [CONFIGURATION > User Group > Department] menu. Department information is useful when searching for a user in an application.
Position Specify the user’s position. You can select one of the positions created in the [CONFIGURATION > User Group > Position] menu.
Position information is useful when searching for a user in an application.
Send CLI Number When making trunk call, specify value of userinfo field.
Service Group Local Number
Short name of phone user.
Service Group Local CLI Number
Notify information of station name to Phone.
Restriction Policy Specify a restriction policy to apply to the user. The restriction policy only applies to trunk calls. You can select one of restriction policies created in the [CONFIGURATION > Routing > Restriction Policy List] menu.
Class of Service Specify a class of service to apply to the user.
You can select one of the class of service created in the [CONFIGURATION > Service > Feature Service > Service Class] menu.
Gateway Name Specify a gateway that handles the user’s calls in survival

Ошибка! Используйте вкладку "Главная" для применения 제목 1 к тексту, который
должен здесь отображаться. Ошибка! Используйте вкладку "Главная" для применения 제목 1 к
тексту, который должен здесь отображаться.
SCM Express Operation Manual v12.0 52 ©Samsung Proprietary and Confidential
Item Description
mode (when the phone is disconnected from SCM, it connects to a gateway in the same location to provide the basic telephony services.).
Extension Lock You can restrict the use of the user’s number.
None: No restriction.
Dialing-Only: The user’s number is restricted to outgoing calls only.
Answering-Only: The user’s number is restricted to incoming calls only.
Both: The user’s number is prohibited from making outgoing and receiving incoming calls.
LDAP DN Number Enter a user directory number used when interoperating with the LDAP server.
Account Code Use You can specify whether to enter the account code.
Force: Entering the account code is mandatory when making external calls.
Voluntary: Entering the account code is not mandatory. You can voluntarily enter the account code during the call by pressing the Account Code button.
Auto Answer by Click To Dial
When using the click-to-dial service, if you send the call command from the remote device (PC) to SCM, SCM calls your phone. When you answer the call, an outgoing call is made from the phone according to your command.
If you use this option, your phone does not ring but automatically responds to the call from SCM through the speakerphone as the call is made. Automatic answering may not work for non-Samsung phones.
External Ring-back Tone Use
Specify whether to use External Ring Back Tone.
NONE: do not use.
Internal: only used to internal call.
External: only used to external call.
Both: used to both internal and external calls.
MOH Announcement ID Specify the sound source ID of an on-hold tone played when the user is put on hold.
Display Option Specify the way that where to get Display information
Normal:
(line 1) Peer number,
(line 2) Reason > Divert number > Peer name
Peerinfo:
(line 1) Peer number,
(line 2) Peer name
Reason:
(line 1) Blank,
(line 2) Reason
Diversion:
(line 1) Divert number,
(line 2) Diverted info string
Send CLI Name Specify value of Display name field in trunk call.

Ошибка! Используйте вкладку "Главная" для применения 제목 1 к тексту, который
должен здесь отображаться. Ошибка! Используйте вкладку "Главная" для применения 제목 1 к
тексту, который должен здесь отображаться.
SCM Express Operation Manual v12.0 53 ©Samsung Proprietary and Confidential
Item Description
Call Monitoring Specify whether to monitor this user or not.
Send Extension Number Specify the caller id when make a call to extension.
Use Virtual Ring back Specify whether to use ring back tone stored in the Phones.
Caller Ring Type If you specify a certain value of this and make a call to an extension, the extension will hear this ring type.
Off Hook Alarm Specify whether to use alarm in case of off-hook state for a long time.
Check Registration Protocol
Specify whether to check the protocols (UDP, TCP, TLS) when registration.
MOH SIP Media Mode Specify the SDP media mode which will be send to the held side when hold.
Application Server Service Group
Specify an application server service group to apply to the user.
CMS Monitoring Specify whether to use CMS Monitoring
FMS Zone Name Specify a FMS Zone. You can select one of FMS zone created in the [CONFIGURATION] > Wireless Enterprise > FMS Zone
User Account Code Specify a number of Account Code.
Call Recording Method You can select call recording method Conference Recording or Phone Recording.
Phone TX Gain Specify a value of Phone TX Gain.
TLS Key Decryption Password Type
Specify TLS Key Decryption Password Type.
TLS Key Decryption Direct Password
Specify TLS Key Decryption Direct Password.
TLS Key Decryption Device ID
Specify TLS Key Decryption Device ID
TLS Key Decryption Salt Specify TLS Key Decryption Salt
TLS Key Decryption IC Specify TLS Key Decryption IC
TLS Key Decryption DX Specify TLS Key Decryption DX
NFC Mobile Phone Name Specify NFC Mobile Phone Name
Phone Call History Specify save call history at phone or not
NFC Auto Login Specify use NFC Auto Login
Allow Selective Call Select selective call allow list.
Phone Display Name Specify Phone Display name
Extension Number
Send Extension Number
Use InterProxy When use only TLS protocol, this options is activated. If ENABLE, it can operate with inter PROXTB.
PROXYB Index Input the PROXYB index to be used.
Input Number Display Specify display input digit
Change to Multi Type Change Single Phone User to Multi-type
Call Appearance Select Multi-Device Number Type.
SCA (Single Call Appearance)

Ошибка! Используйте вкладку "Главная" для применения 제목 1 к тексту, который
должен здесь отображаться. Ошибка! Используйте вкладку "Главная" для применения 제목 1 к
тексту, который должен здесь отображаться.
SCM Express Operation Manual v12.0 54 ©Samsung Proprietary and Confidential
Item Description
MCA (Multi Call Appearance)
User Type When a phone is changed to Multi Type, User Type can be configured. If the phone is used as Multi Line & Multi Device with SCA, User Type must be selected among Secretary and Manager
Normal
Secretary
Manager
Error Announcement Select the use of announcement when call has failed.
Desk Phone Simultaneous Ring Delay
Select the use of Desk Phone Simultaneous Ring Delay.
CLI for Forwarded Call Select the use of CLI for Forwarded Call
Originator
Forwarder
Forwarder with Originator Name
Use mVoIP Select the use of mVoIP
Resume after Transfer-Cancel
Select auto resume or hold when transfer cancel
Telnet-Access Select the use of Telnet-Access at phone
Use Wi-Fi Select the use of Wifi-Access at phone
SIP-PRACK option Select the use of SIP PRACK for MS Lync
Comfort Noise Select the use of Comfort Noise at Samsung-Desktop-Phone
Mobile Number Auto Update
When this value is ‘Yes’, Mobile Phone Number is automatically updated when the phone registers
Send RTCP on Hold Select the use of Send RTCP for MS Lync
Web Access Protocol Select the use of http/https or https for Web Access Protocol
mySingle Click To Dial CLI
Select CLI of desk or mobile phone number when click-to-dial application of smart phone makes a call
Origin: Desk phone number
Remote: Mobile phone number
EHS Headset Select the mode of EHS Headset
Service Schedule Select the Service Schedule to provide Leaving Office Class of Service. When Service Schedule status is unset, Leaving Office Class of Service activates.
Directory Service Configure whether Directory Service provides or not for a user.
Push Notification Select the use of Push Service
Use Bluetooth Select the use of Bluetooth at Phone
Use USB Select the use of USB at Phone
Use NFC Select the use of NFC at Phone
Use Smart WLAN Link Select the use of Smart WLAN Link Service at Mobile Phone (need to get License for Smart WLAN Link)
Display Forward Number on Idle Screen
Specify whether phone will display the forward number on screen when Forward function is activated.

Ошибка! Используйте вкладку "Главная" для применения 제목 1 к тексту, который
должен здесь отображаться. Ошибка! Используйте вкладку "Главная" для применения 제목 1 к
тексту, который должен здесь отображаться.
SCM Express Operation Manual v12.0 55 ©Samsung Proprietary and Confidential
Item Description
Hotspot Channel (Country)
Specify Hotspot Channel for Wifi configuration phone use.
CallLog for XML P-CID Specify whether to log the call of Premium CID by XML Server.
Use Syslog Specify whether to use a syslog function.
Syslog Type select the type of syslog.
Syslog Level select the log level of syslog.
Roaming Trigger Roaming Trigger Parameter for IP Phone WIFI module.
Roaming Delta Roaming Delta Parameter for IP Phone WIFI module.
Roaming Scan Period Roaming Scan Period Parameter for IP Phone WIFI module.
Phone User Password Specify the User Password of IP Phone.
Phone Administrator Password
Specify the Administrator Password of IP Phone.
Phone Telnet Password Specify the Telnet Password of IP Phone.
Phone Web User Password
Specify the Web User Password of IP Phone.
Phone Web Administrator Password
Specify the Web Administrator Password of IP Phone.
Use Headset Button Select the use of Headset button on Phone.
WEB Access Specify whether to allow access to WEB Server on IP Phone.
Use PC-VLAN Select the use of PC-VLAN function in Phone.
Making Multi-Phone User
Multi-Phone User information refers the user’s logical elements. You can access
the basic information, such as the user’s phone number, and various options,
including the methods for using the services. SCM user services are provided
based on the settings included in the user information.
You can create user information using the [CONFIGURATION > User > Multi-
Phone User] menu.
Item Description
User Group Specify a user group to which the device belongs. You can select one of the existing user groups.
Service Group Specify a service group for the user. You can select one of the service groups already defined.
Location Specify the location of the user. You can select one of the existing locations.
Extension Number Specify the user’s extension number.
Pay special attention to choosing the number, as it is used as an identifier when selecting the user in other menus and cannot be changed.
Application User ID Specify a universal user ID used with applications.

Ошибка! Используйте вкладку "Главная" для применения 제목 1 к тексту, который
должен здесь отображаться. Ошибка! Используйте вкладку "Главная" для применения 제목 1 к
тексту, который должен здесь отображаться.
SCM Express Operation Manual v12.0 56 ©Samsung Proprietary and Confidential
Item Description
Name Specify a name for the phone.
Pay special attention to choosing the name, as it is used as an identifier when selecting the device in other menus and cannot be changed.
Application Password Specify a universal user Password used with applications.
PIN Number Specify a password for using services.
Mobile Phone Number Specify the Mobile phone number to be used to Move to Mobile service.
Use Mobile Phone Number
Specify the usage of Mobile Phone Number
None: do not use.
Ring Only: MOBEX behavior. Your phone and Mobile Phone are ringing simultaneously.
Dial Only: Mobile Remote Call behavior. Make a connection to the Mobile Voice Server; execute the Click To Dial service.
Both: Ring Only, Dial Only both services are provided.
Department Specify the user’s department. You can select one of the departments created in the [CONFIGURATION > User Group > Department] menu. Department information is useful when searching for a user in an application.
Position Specify the user’s position. You can select one of the positions created in the [CONFIGURATION > User Group > Position] menu.
Position information is useful when searching for a user in an application.
Send CLI Number When making trunk call, specify value of userinfo field.
Send CLI Name Specify value of Display name field in trunk call.
Service Group Local Number
Short name of phone user.
Service Group Local CLI Number
Notify information of station name to Phone.
Multi Type -
Call Appearance Select Multi-Device Number Type.
SCA (Single Call Appearance)
MCA (Multi Call Appearance)
Extension Lock You can restrict the use of the user’s number.
None: No restriction.
Dialing-Only: The user’s number is restricted to outgoing calls only.
Answering-Only: The user’s number is restricted to incoming calls only.
Both: The user’s number is prohibited from making outgoing and receiving incoming calls.
Class of Service Specify a class of service to apply to the user.
You can select one of the class of service created in the [CONFIGURATION > Service > Feature Service > Service Class] menu.

Ошибка! Используйте вкладку "Главная" для применения 제목 1 к тексту, который
должен здесь отображаться. Ошибка! Используйте вкладку "Главная" для применения 제목 1 к
тексту, который должен здесь отображаться.
SCM Express Operation Manual v12.0 57 ©Samsung Proprietary and Confidential
Item Description
Restriction Policy Specify a restriction policy to apply to the user. The restriction policy only applies to trunk calls. You can select one of restriction policies created in the [CONFIGURATION > Routing > Restriction Policy List] menu.
Gateway Name Specify a gateway that handles the user’s calls in survival mode (when the phone is disconnected from SCM, it connects to a gateway in the same location to provide the basic telephony services.).
Authentication User ID Enter a user ID which is used for authentication during subscriber registration.
Authentication Password Enter a password which is used for authentication during subscriber registration.
MOH Announcement ID Specify the sound source ID of an on-hold tone played when the user is put on hold.
Account Code Use You can specify whether to enter the account code.
Force: Entering the account code is mandatory when making external calls.
Voluntary: Entering the account code is not mandatory. You can voluntarily enter the account code during the call by pressing the Account Code button.
LDAP DN Number Enter a user directory number used when interoperating with the LDAP server.
Auto Answer by Click To Dial
When using the click-to-dial service, if you send the call command from the remote device (PC) to SCM, SCM calls your phone. When you answer the call, an outgoing call is made from the phone according to your command.
If you use this option, your phone does not ring but automatically responds to the call from SCM through the speakerphone as the call is made. Automatic answering may not work for non-Samsung phones.
External Ring-back Tone Use
Specify whether to use External Ring Back Tone.
NONE: do not use.
Internal: only used to internal call.
External: only used to external call.
Both: used to both internal and external calls.
Call Monitoring Specify whether to monitor this user or not.
Send Extension Number Specify the caller id when make a call to extension.
Use Virtual Ring back Specify whether to use ring back tone stored in the Phones.
Multi-Device Conference Join
Specify whether for multi-devices to join to same conference
Caller Ring Type If you specify a certain value of this and make a call to an extension, the extension will hear this ring type.
Application Server Service Group
Specify an application server service group to apply to the user.
Ping Ring Type Specify notification type.
Audio + Visual: You can be notified by phone pop-up display and ring
Audio: You can be notified by ring only

Ошибка! Используйте вкладку "Главная" для применения 제목 1 к тексту, который
должен здесь отображаться. Ошибка! Используйте вкладку "Главная" для применения 제목 1 к
тексту, который должен здесь отображаться.
SCM Express Operation Manual v12.0 58 ©Samsung Proprietary and Confidential
Item Description
Visual: You can be notified by phone pop-up display.
None: There no any ping ring notification.
CMS Monitoring Specify whether to use CMS Monitoring
A-A Primary Node Specify Primary node when Active-Active mode
A-A Dual Registration Specify dual registration enable or not when Active-Active mode.
If select dual registration enable, Phone register to both node.
VMS Extension Number Specify extension number for VMS
Call Recording Method You can select call recording method Conference Recording or Phone Recording.
Allow Selective Call Select selective call allow list.
Phone Display Name Specify Phone Display name
Extension Number
Send Extension Number
Error Announcement Select the use of announcement when call has failed.
Desk Phone Simultaneous Ring Delay
Select the use of Desk Phone Simultaneous Ring Delay.
CLI for Forwarded Call Select the use of CLI for Forwarded Call
Originator
Forwarder
Forwarder with Originator Name
Mobile Number Auto Update
When this value is ‘Yes’, Mobile Phone Number is automatically updated when the phone registers
mySingle Click To Dial CLI
Select CLI of desk or mobile phone number when click-to-dial application of smart phone makes a call
Origin: Desk phone number
Remote: Mobile phone number
User Account Number Specify a number of Account Code.
Service Schedule Select the Service Schedule to provide Leaving Office Class of Service. When Service Schedule status is unset, Leaving Office Class of Service activates.
Directory Service Configure whether Directory Service provides or not for a user.
Make Mailbox -
Multi-Phone Click to Dial Service
In case of click-to-dial for a multi-user, the caller can be one specific member or be selected by answering the ringing call.
One Member Only: A manager or the first member of the multi-phone user can be caller for the click to dial. And the caller makes a call automatically.
Allow Multi Members: If the caller for a click to dial service is multi-phone user, SCM makes multi-calls to multi-phones, And then the answered phone makes a call to the designated destination. The multi-members who want to receive the click-to-dial call can be assigned in [CONFIGURATION/Multi-Phone User Setting] menu.

Ошибка! Используйте вкладку "Главная" для применения 제목 1 к тексту, который
должен здесь отображаться. Ошибка! Используйте вкладку "Главная" для применения 제목 1 к
тексту, который должен здесь отображаться.
SCM Express Operation Manual v12.0 59 ©Samsung Proprietary and Confidential
Item Description
The [CONFIGURAITON/User/Multi-Phone User/Interworking/Auto Answer by Click to Dial] option
should be set to DISABLE.

Ошибка! Используйте вкладку "Главная" для применения 제목 1 к тексту, который
должен здесь отображаться. Ошибка! Используйте вкладку "Главная" для применения 제목 1 к
тексту, который должен здесь отображаться.
SCM Express Operation Manual v12.0 60 ©Samsung Proprietary and Confidential
Adding Individual Trunk
This section describes a process of creating information for trunks. The
information shown below is the mandatory requirements for trunk calls, listed in
the required order of creation.
1 Route information: This is the trunk port information for external connection
to ITSP SIP servers, gateways, and other entities that interoperate with SCM.
2 LCR information: Specifying the preferred routes that are connected to the
endpoint allows automatic selection of alternative routes and other factors.
3 LCR by location table information: You can specify different call routes
according to the caller’s location.
4 Access code information: This is the access code used for selecting trunk call
routes.
‘2.2. SCM Configuration Wizard’ according to the procedures described in the
above four kinds of information generated as a value type is linked to each other
can be stored on the base calling.
Figure 18. Making a trunk call via SCM
The diagram above illustrates the process of making a trunk call from SCM, in
which the user dials ‘9 + destination number’ to call an external phone. Upon
receiving this number, SCM removes 9, which is the access code for making
external calls, and only sends the destination number to the SIP server or the
gateway. In general, SCM is configured with a direct link for calling the SIP
server. But if the link with the SIP server is severed, the call is made through the
gateway, which is an alternative route.
Making Routes
A route means a conceptual path connected to an SIP server, a gateway, and other
entities interoperating with SCM. The route includes information on the handling
SCM Express
3026 Trunk Call: 9 + Destination Number
SIP Server
Public Telephone Network
Gateway
Direct Route
Alternative Route

Ошибка! Используйте вкладку "Главная" для применения 제목 1 к тексту, который
должен здесь отображаться. Ошибка! Используйте вкладку "Главная" для применения 제목 1 к
тексту, который должен здесь отображаться.
SCM Express Operation Manual v12.0 61 ©Samsung Proprietary and Confidential
method for outgoing/incoming calls from each external connection endpoint as
well as the number translation policy information.
You can create routes using the [CONFIGURATION > Trunk Routing >
Route] menu. The blue text items are mandatory. Route options are categorized to
6 group: Basic Configuration, SIP Registration, Additional SIP, Trunk Service,
Interworking and Number Translation.
<Route-Basic Configuration>
Item Description
Route Type Specify whether the route is used for one particular user group or shared by all user groups.
Common: Can be used by all user groups. If used for incoming calls only, additional settings are required, as number analysis is necessary to identify the user group being called.
User Group: Can be used only by one particular user group.
User Group Select a user group to which the route belongs. If route type is set to Common, the user group also must be set to Common.
Route Name Input a name of a route
Location Specify a location to which the endpoint belongs.
Register Type Specify a registration method for the endpoint.
Receive REGISTER: REGISTER is received from the endpoint for registering the endpoint.
Send REGISTER: SCM sends REGISTER to the endpoint for registration.
None: No registration is performed between the endpoint and SCM.
Port Specify a port number for the endpoint.
User Name Specify the user name to use in user info of SIP URI.
Domain Name Enter a domain to use as the host of SIP URI.
Multiple Registration If multiple registration to one ISP has to be handled, configure 'Enable'.
Multiple Registration cannot mixed with Normal Registration which is configured Multiple Registration to Disable for one ISP.
Configuration is possible only when Register Type is 'Send REGISTER'.
User Number Range Enter the called number range which is used to find receiving Rout.
'Number', '[-]' and 'X' can be entered for 'User Number Range'.
'User Number Range' has to be started with number. Range can be expressed with '[-]'. 'X' means any number.
User Number Range is supported 3 digits and the range is possible within 100.
ex) Example
0312791000: In case a called number is same to 0312791000
0312791XXX: In case a called number is starting with 0312791 and its length is 7.
031279[1-4]XXX: In case a called number is starting with 0312791, 0312792, 0312793 and 0312794 and its length is 7.
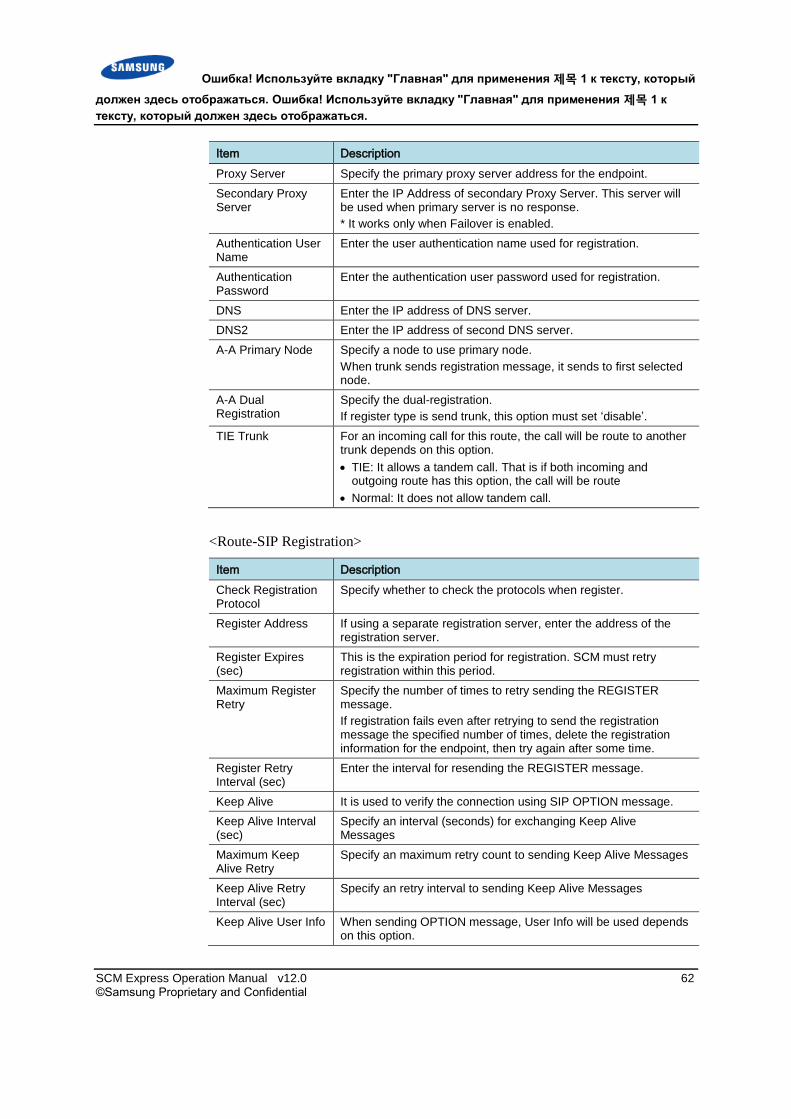
Ошибка! Используйте вкладку "Главная" для применения 제목 1 к тексту, который
должен здесь отображаться. Ошибка! Используйте вкладку "Главная" для применения 제목 1 к
тексту, который должен здесь отображаться.
SCM Express Operation Manual v12.0 62 ©Samsung Proprietary and Confidential
Item Description
Proxy Server Specify the primary proxy server address for the endpoint.
Secondary Proxy Server
Enter the IP Address of secondary Proxy Server. This server will be used when primary server is no response.
* It works only when Failover is enabled.
Authentication User Name
Enter the user authentication name used for registration.
Authentication Password
Enter the authentication user password used for registration.
DNS Enter the IP address of DNS server.
DNS2 Enter the IP address of second DNS server.
A-A Primary Node Specify a node to use primary node.
When trunk sends registration message, it sends to first selected node.
A-A Dual Registration
Specify the dual-registration.
If register type is send trunk, this option must set ‘disable’.
TIE Trunk For an incoming call for this route, the call will be route to another trunk depends on this option.
TIE: It allows a tandem call. That is if both incoming and outgoing route has this option, the call will be route
Normal: It does not allow tandem call.
<Route-SIP Registration>
Item Description
Check Registration Protocol
Specify whether to check the protocols when register.
Register Address If using a separate registration server, enter the address of the registration server.
Register Expires (sec)
This is the expiration period for registration. SCM must retry registration within this period.
Maximum Register Retry
Specify the number of times to retry sending the REGISTER message.
If registration fails even after retrying to send the registration message the specified number of times, delete the registration information for the endpoint, then try again after some time.
Register Retry Interval (sec)
Enter the interval for resending the REGISTER message.
Keep Alive It is used to verify the connection using SIP OPTION message.
Keep Alive Interval (sec)
Specify an interval (seconds) for exchanging Keep Alive Messages
Maximum Keep Alive Retry
Specify an maximum retry count to sending Keep Alive Messages
Keep Alive Retry Interval (sec)
Specify an retry interval to sending Keep Alive Messages
Keep Alive User Info When sending OPTION message, User Info will be used depends on this option.

Ошибка! Используйте вкладку "Главная" для применения 제목 1 к тексту, который
должен здесь отображаться. Ошибка! Используйте вкладку "Главная" для применения 제목 1 к
тексту, который должен здесь отображаться.
SCM Express Operation Manual v12.0 63 ©Samsung Proprietary and Confidential
Item Description
Black List Expires (sec)
Specify the expiration time in second from 0 to 86400.
In case of no response when it send ‘Blacklist Check Message’ to ISP, it blocking the IP address of the ISP during this expiration time.
Backlist Check Message
Select a type of messages.
REGISTER, OPTIONS, and INVITE messages are used. Only if there is no response, the IP address will be added to black list
DNS SRV Query Select whether to use of DNS SRV.
DNS SRV Version Specify the version of DNS SRV.
Failover When ISP server has no static IP address but domain name or has a secondary proxy server, SCM provides failover service between IP lists
Failover Type Select the interworking ISP. The specific failover flow will be applied to the trunk.
Failover Domain Name
Specify failover domain name that ISP provide.
Failover response Specify what kind of response message will be used to failover behavior.
For example, if you input 503, When SCM get response 503 message from the ISP upon request, The failover is start.
Failover Timeout (sec)
When SCM send message to ISP server, there is no response after this ‘Failover Timeout’ value, SCM send message again to the available IP address within the list of ISP Server.
So, It is valid when the IP address of ISP server is more than one.
Retry Pause Time (sec)
When it fails both sent and retry of REGISTER or OPTIONS messages, it wait as long as this retry pause time and try again.
Recovery Method When there is no response to attempts to call, select the recovery methods.
Registration: Re-register to the server that is responded.
Blacklist: IP list of no responding server
* It works when Failover is enabled.
Register Timeout (sec)
Specify the timeout value for expiration of REGISTER message.
Register in Expire (%)
Specify the point of re-registration after registration. It specifies the percentage of ‘Register Timeout’ value.
<Route-Additional SIP>
Item Description
Protocol Type Select UDP, TCP, or TLS as the protocol to use.
URI TYPE Select SIPS if the protocol is TLS. Select SIP in other cases.
TLS Connection Specify the TLS connection type:
Normal: use TLS Full handshaking method.
Reuse: reuses the existing TLS connection established by initial Message.
Resume: use simplified handshaking method using TLS Session ID.

Ошибка! Используйте вкладку "Главная" для применения 제목 1 к тексту, который
должен здесь отображаться. Ошибка! Используйте вкладку "Главная" для применения 제목 1 к
тексту, который должен здесь отображаться.
SCM Express Operation Manual v12.0 64 ©Samsung Proprietary and Confidential
Item Description
TLS Connection Reconnection
If you want to reconnect TLS connection which is configured reuse, set TLS Connection Reconnection to Enable. Then, TLS connection is refreshed once a day.
NAT Traversal If enabled, it provides Media Proxy function to this ROUTE.
Call Authentication Specify whether to allow user authentication for INVITE.
SIP P-Asserted-ID Type
Select a type of representative number.
Primary: The P-Asserted-Identity header contains the Primary number and the From header contains residential number.
Secondary: The P-Asserted-Identity header contains the residential number and the From header contains Primary number.
Use Request URI User Info
Specify whether to use the SIP Request URI when selecting the Route for outgoing call.
Contact Header Format
Select a type of Contact header in SIP message.
IP Address
Domain Name
PRACK Support Specify whether to support PRACK message.
Outgoing
o Include "Supported:100rel" in INVITE
o Send PRACK
Keep To-Tag in Response
If a target is changed by call forward or call transfer, To-Tag can be kept with this option.
Multi 183 Message Block
When SCM receives multiple 183 messages, the messages are blocked except the first-received one.
-PRACK Require Select whether to send reliable 18x response.
1 Outgoing
o Include "Require:100rel" in INVITE
2 Incoming
o Include "Require:100rel" in 1XX
MOH SIP Media Mode
Specify the media mode (Send/Receive, Send Only, and Inactive) when make a call hold to trunk side.
Refer Relay Specify whether to relay a REFER message to this trunk when a user transfer the call.
302 Response Specify whether to deliver 302 response messages.
Use InterProxy When use only TLS protocol, this options is activated. If ENABLE, it can operate with inter PROXTB.
When REGISTER Type is Receive REGISTER, it can be enabled.
PROXYB Index Input the PROXYB index to be used.
DNS Query within Call
This options is used for Broadworks Interoperability. Select 'Disable' if DNS query is not required explicitly in case Contact header in 200 OK contains domain.
<Route-Trunk Service>
Item Description
Trunk Access Code Select access code which is used for a outbound call from call log
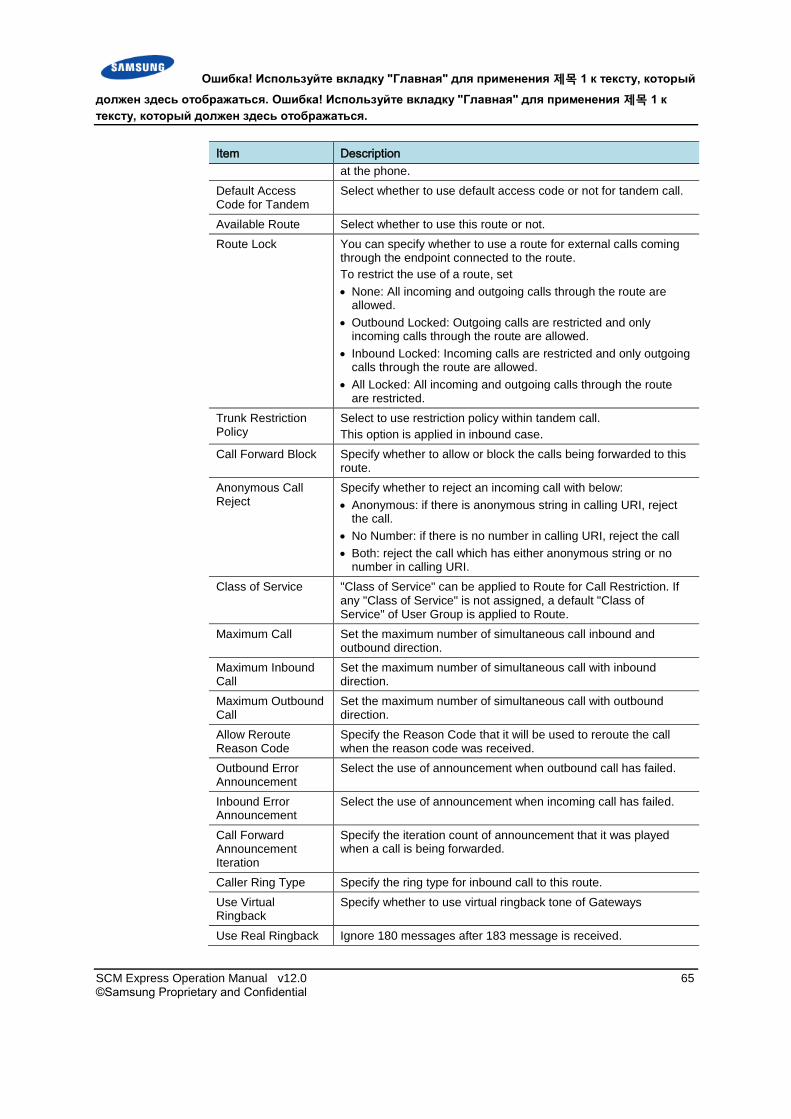
Ошибка! Используйте вкладку "Главная" для применения 제목 1 к тексту, который
должен здесь отображаться. Ошибка! Используйте вкладку "Главная" для применения 제목 1 к
тексту, который должен здесь отображаться.
SCM Express Operation Manual v12.0 65 ©Samsung Proprietary and Confidential
Item Description
at the phone.
Default Access Code for Tandem
Select whether to use default access code or not for tandem call.
Available Route Select whether to use this route or not.
Route Lock You can specify whether to use a route for external calls coming through the endpoint connected to the route.
To restrict the use of a route, set
None: All incoming and outgoing calls through the route are allowed.
Outbound Locked: Outgoing calls are restricted and only incoming calls through the route are allowed.
Inbound Locked: Incoming calls are restricted and only outgoing calls through the route are allowed.
All Locked: All incoming and outgoing calls through the route are restricted.
Trunk Restriction Policy
Select to use restriction policy within tandem call.
This option is applied in inbound case.
Call Forward Block Specify whether to allow or block the calls being forwarded to this route.
Anonymous Call Reject
Specify whether to reject an incoming call with below:
Anonymous: if there is anonymous string in calling URI, reject the call.
No Number: if there is no number in calling URI, reject the call
Both: reject the call which has either anonymous string or no number in calling URI.
Class of Service "Class of Service" can be applied to Route for Call Restriction. If any "Class of Service" is not assigned, a default "Class of Service" of User Group is applied to Route.
Maximum Call Set the maximum number of simultaneous call inbound and outbound direction.
Maximum Inbound Call
Set the maximum number of simultaneous call with inbound direction.
Maximum Outbound Call
Set the maximum number of simultaneous call with outbound direction.
Allow Reroute Reason Code
Specify the Reason Code that it will be used to reroute the call when the reason code was received.
Outbound Error Announcement
Select the use of announcement when outbound call has failed.
Inbound Error Announcement
Select the use of announcement when incoming call has failed.
Call Forward Announcement Iteration
Specify the iteration count of announcement that it was played when a call is being forwarded.
Caller Ring Type Specify the ring type for inbound call to this route.
Use Virtual Ringback
Specify whether to use virtual ringback tone of Gateways
Use Real Ringback Ignore 180 messages after 183 message is received.

Ошибка! Используйте вкладку "Главная" для применения 제목 1 к тексту, который
должен здесь отображаться. Ошибка! Используйте вкладку "Главная" для применения 제목 1 к
тексту, который должен здесь отображаться.
SCM Express Operation Manual v12.0 66 ©Samsung Proprietary and Confidential
Item Description
Use Virtual Ringback for outbound call
Specify whethere to use virtual ringback tone for outbound call.
<Route-Interworking>
Item Description
DTS Mode Specify the trunk option to use DTS Service
Send Paging On Answer Info
Select whether to send Paging On Answer Info or not.
It is used for between SCM.
Gateway Channel Display
Specify channel information in the REGISTER message from gateway.
Outbound Proxy Server
If Trunk use dual network by indirectly using SBC, specify the SBC’s IP address. It used for specific carrier purpose.
Outbound Proxy Server Type
If SBC is used with Name List, select the option as Name List.
FMS Mode Select whether to use FMS Zone Trunk or not.
It used for individual billing purpose.
Statistic Mode Specify the statistic mode for specific carrier.
Route Type Code To distinguish a VoIP trunk from normal trunks, specify a route type code in the CDR when SCM interworks with SKB.
Use 0000 for normal trunks and 00FF for a VoIP trunk.
Length of Bill Delete If you want to remain a connect number without access code of Internal type, specify the delete length.
Local Domain Specify the caller’s host name.
Option Port Update When SCM interworks MS Lync, select ‘Enable’. MS Lync uses several port number in addition to 5060.
<Route-Number Translation>
Item Description
Forced Send CLI Number
When make a call to outbound, select the caller ID below:
None: Follow the system priority. It is same as the order listed below.
Phone CLI Number: Send ‘Phone CLI Number’ as caller ID.
User CLI Number: Send ‘User CLI Number’ as caller ID.
Service Group CLI Number: Send ‘Service Group CLI Number’ as caller ID.
User Group CLI Number: Send ‘User Group CLI Number’ as caller ID
Outbound CLI Prefix + Extension Number: Send ‘Outbound CLI prefix’ with ‘Extension Number’ as caller ID.
Extension Number: Send ‘Extension Number’ as caller ID.
Outbound CLI Prefix If there is no configuration of ‘Send CLI Number’ in a user and there is only extension number, when the user make a call through this route and there is prefix, add this prefix to the

Ошибка! Используйте вкладку "Главная" для применения 제목 1 к тексту, который
должен здесь отображаться. Ошибка! Используйте вкладку "Главная" для применения 제목 1 к
тексту, который должен здесь отображаться.
SCM Express Operation Manual v12.0 67 ©Samsung Proprietary and Confidential
Item Description
extension number and send it as calling number.
Send CLI Name for User
When make a call to outbound, select the caller Name below:
User Name: send ‘User Name’ as caller name.
Send CLI Name: Send ‘Send CLI Name’ as caller name.
Send CLI Name for Inbound Call
If there is no caller name for inbound call, use below options.
None: not used.
Receive CLI Number: use caller number as caller name.
Send CLI Name for Internal Call
Specify a display name for subscriber.
Tandem call does not support this option.
CLI for Forward Call Specify the type of caller ID for the call being forwarded to new destination.
Originator: Original caller’s number and name.
Forwarder: Forwarder’s caller number and name:
Forwarder with Originator Name: Forwarder’s number and Originator’s name.
Transfer Caller ID Specify the type of caller ID for the call being transferred to new destination (Transfer Target).
Held Party Number (Transferee)
Transfer Party Number (Transferor)
Tandem Blind Transfer CLI
Within Tandem call, specify the calling number.
This option is activated in Blind-Transfer case.
Outbound Diversion Number
Select whether to use CLI Number or CLI Name in Diversion header when a user makes an outbound call. It used for individual billing purpose.
Tandem Diversion Number
Specify a number for Diversion header when a incoming call direct to outbound.
Use Anonymous Call Diversion Header
Select whether to use anonymous to Diversion header.
Anonymous URI Specify a URI type when sending an anonymous call.
Inbound DID Delete Length
Specifies the length of digits to delete from the first position of the DID number for inbound call.
Inbound CLI Delete Length
Specifies the length of digits to delete from the first position of the calling number for inbound call.
Inbound DID Insert Digits
Specifies the digits to insert from the first position of the DID number for inbound call.
Inbound CLI Insert Digits
Specifies the digits to insert from the first position of the calling number for inbound call.
Modify E.164 Format
Specify whether to use E.164 format for calling number or called number for outgoing call through this route.
Inbound MCN Specify multiple rules to modify an inbound calling number. MCN is processed before simple delete/insert number modification. Only one rule can be applied to each call.

Ошибка! Используйте вкладку "Главная" для применения 제목 1 к тексту, который
должен здесь отображаться. Ошибка! Используйте вкладку "Главная" для применения 제목 1 к
тексту, который должен здесь отображаться.
SCM Express Operation Manual v12.0 68 ©Samsung Proprietary and Confidential
Making LCR
A Least Cost Route (LCR) is a method of selecting a route when processing
outgoing trunk calls. There are three different types of LCR, as shown below.
Priority Routing
A priority routing allows automatic selection of alternative routes when the default
outgoing path becomes unavailable. Priority is assigned to the direct route and
alternative routes. When calls going out through the high-priority route fail, they
can be retried through the low-priority routes.
You can create route sequences in the [CONFIGURATION > Trunk Routing >
Priority Routing] menu. This menu is used for creating route sequences.
Item Description
User Group Specify a user group to which the route sequence belongs.
Priority Routing Name
Specify a name for the route sequence.
Pay special attention to choosing the name, as it is used as an identifier when selecting the route sequence in other menus and cannot be changed.
Route Priority Assign priority to the route.
Direct Route: Specify the top priority route.
Alternative Route1 to Alternative Route8: Select the routes according to their priority levels.
Route Name Select a route for the route priority level.
Outbound DOD Delete Length
Specifies the length of digits to delete from the first position of the called number for outbound call.
Outbound DOD Insert Digits
Specifies the digits to insert from the first position of the called number for outbound call.
Outbound CLI Delete Length
Specifies the length of digits to delete from the first position of the calling number for outbound call.
Outbound CLI Insert Digits
Specifies the digits to insert from the first position of the calling number for outbound call.
Outbound MCN Specify MCN rules for outbound call.
Time-based Routing
A time-based routing sequence contains time conditions so that each service group
can use different route sequences according to the conditions.
Load-balanced Routing
A load-balanced routing allows use of the selected routes in a specified ratio.
Calls are distributed between the routes identified as available for calls, and
therefore there is no need for configuring alternative routes.
Among the three types of LCRs, the route sequence type is used by default. For
more information on LCRs, including the setup method and route selection, see the
‘Least Cost Route (LCR) Policy’ section of ‘System Features in Chapter 4.’

Ошибка! Используйте вкладку "Главная" для применения 제목 1 к тексту, который
должен здесь отображаться. Ошибка! Используйте вкладку "Главная" для применения 제목 1 к
тексту, который должен здесь отображаться.
SCM Express Operation Manual v12.0 69 ©Samsung Proprietary and Confidential
Making Location Based Routing
A location based routing allows each location to use its own LCR. Since each
location is set with its own LCR, if you have created multiple locations, you must
set an LCR for each of the locations. If no LCR is set for a particular location, the
location is not allowed to make trunk calls.
You can create route partitions in the [CONFIGURATION > Routing >
Location Based Routing] menu. This menu is used for creating Location Based
Routing.
Item Description
User Group Select a user group to which the Location Based Routing belongs.
Location Based Routing Name
Enter a name for the Location Based Routing.
Pay special attention to choosing the name, as it is used as an identifier when selecting the route partition in other menus and cannot be changed.
Location select Select whether to use the ‘Location’. If Location selects use ‘disable’, all location can use this Location Based Routing.
Location Select a location to set the routes.
Routing Type Select a type of LCR for the location.
Time-Based Routing: Select to use a Time-Based Routing.
Priority Routing: Select to use a Priority Routing.
Load Balance Routing: Select to use a Load Balance Routing.
When you input data into a Location Based Routing, one of the following items is
mandatory, depending on the type of the LCR selected.
Item Description
Time-Based Routing Name
If the LCR type is set to Time-Based Routing, select a Time-Based Routing to use.
Priority Routing Name
If the LCR type is set to Priority Routing, select a Priority Routing to use.
Load Balance Routing Name
If the LCR type is set to Load Balance Routing, select a Load Balance Routing to use.
Configuring Access Codes
Access codes are number to be used for dialing a directly outgoing call. They are
also used for analyzing the destination numbers to determine which location-based
routes to be used for outgoing trunk calls.
You can create access codes using the [CONFIGURATION > Routing > Access
Code] menu. The following items are mandatory.
Item Description
User Group Select a user group to which the access code belongs.
Access Code Enter an access code to use when making calls to trunks instead of extension numbers.

Ошибка! Используйте вкладку "Главная" для применения 제목 1 к тексту, который
должен здесь отображаться. Ошибка! Используйте вкладку "Главная" для применения 제목 1 к
тексту, который должен здесь отображаться.
SCM Express Operation Manual v12.0 70 ©Samsung Proprietary and Confidential
Item Description
Pay special attention to choosing the code, as it is used as an identifier when selecting the access code in other menus and cannot be changed.
Number Type Select a type of access code.
The access code can be the beginning portion of the external destination number, or an internal code is used within the boundary of the SIP servers or gateways.
Normal: When the calling number for an outgoing trunk call is analyzed, the digit corresponding to the access code is deleted from the number dialed by the user, and then the call is made to the trunk.
Internal: When the calling number for an outgoing trunk call is analyzed, the digit corresponding to the access code is not deleted from the number dialed by the user and the call is made to the trunk as is.
Emergency: When the calling number for an outgoing trunk call is analyzed, only the digit corresponding to the access code from the number dialed by the user is used as the destination number, and then the call is made to the trunk.
Pattern: When analyzing the calling numbers for outgoing trunk calls, a wild card (expressed as X) is used to denote the length. The call is made to the trunk without deleting the digit corresponding to the access code from the number dialed by the user.
DTS: When the calling number for an outgoing trunk call is analyzed, the digit corresponding to the access code is not deleted from the number dialed by the users and the call is made to the trunk as is. DTS Access code can use DTS Trunk, other Trunk is not allowed.
Location Based Routing Name
Select a Location Based Routing to use with this access code.
When creating an access code, you can enter the following items optionally as
needed.
Item Description
Minimum Digit Length
This is the minimum length of the digit used for analyzing the number dialed by the user.
Maximum Digit Length
This is the maximum length of the digit used for analyzing the number dialed by the user.
Configuring DID Routing
Destination of incoming trunk calls depend on the DID number. When entering a
DID number, you can use wild cards (entered by *) to enter multiple numbers at a
time. If the called number is set to ‘B’, a translated DID number is used as the
called number.
Also the called number is set to ‘E’, a translated DID number is used as the called
number. Digit differences allow tandem call or not.

Ошибка! Используйте вкладку "Главная" для применения 제목 1 к тексту, который
должен здесь отображаться. Ошибка! Используйте вкладку "Главная" для применения 제목 1 к
тексту, который должен здесь отображаться.
SCM Express Operation Manual v12.0 71 ©Samsung Proprietary and Confidential
You can specify different called numbers for different times of the day. Time
periods are defined by ring plans.
For more information on DID number translation and assigning called numbers by
ring plans, see the ‘DID Routing’ section of ‘System Features.’ Also, for more
information on ring plans, see the ‘Ring Plan’ section of ‘System Features in
Chapter 4.’
You can assign routes by DID number using the [CONFIGURATION > Routing
> DID Routing] menu. The following items are mandatory.
Item Description
User Group Select a user group to which the calls are directed.
DID Number Enter a DID number for incoming trunk calls.
Default Destination Specify a called number to which the incoming calls with the selected DID number are directed. The default called number is used if the current ring plan is not RP1 through RP10.
When configuring DID routing, you can enter the following items optionally as
needed.
Item Description
DID Name Enter this if you want to have a DID name displayed on the called party’s phone.
Delete Length Enter the length of the digit deleted from the called number.
Insert Digit Enter the digit to insert into the called number.
MOH ID Select a MOH sound source to play when the Music on Hold service is performed for incoming trunk calls with the selected DID number.
ACD Queuing Level Specify a level of priority for this DID pattern queues in ACD.
Ring Plan Schedule Specify a Ring Plan Schedule which is used for the DID.
RP1-RP15 Destination
Enter a called number to which the incoming calls with the selected DID is directed when the current ring plan is RingPlan1 to RingPlan15.
Step of Call Processing
When new call arrives (receive INVITE), SCM handles the call with below
procedures.
Distinction of internal or external call
1 When SCM receives new INVITE, it checks whether this call is coming from
internal or external SCM gets the IP address of caller and compare it with
‘Proxy Server’ or ‘Domain Name’ (if Proxy Server or Domain name is
configured with IP address) in [CONFIGURATION > Trunk Routing >
Route] menu.
If it matches then SCM process it as external call.

Ошибка! Используйте вкладку "Главная" для применения 제목 1 к тексту, который
должен здесь отображаться. Ошибка! Используйте вкладку "Главная" для применения 제목 1 к
тексту, который должен здесь отображаться.
SCM Express Operation Manual v12.0 72 ©Samsung Proprietary and Confidential
2 SCM gets the domain and user info of P-Asserted-ID header in INVITE
message and compare these with ‘Domain Name’ and ‘User Name’ in
[CONFIGURATION > Trunk Routing > Route] menu.
If it matches then SCM process it as external call.
3 SCM gets the caller’s number and compare it with extension numbers in
[CONFIGURATION > User > Single Phone User] menu.
If it matches then SCM process it as internal call.
4 If a call is not matched one of above three cases, SCM decide it as
unauthorized access and declines the call.
Processing of Internal Call from a subscriber
When the SCM receive a call from a subscriber (internal call), it handles the call as
follows.
1 It rejects the call in case that calling restriction service was set for the
originating subscriber.
2 It connects a call to the dialed number.
Processing of External Call from a trunk
When the SCM receive a call from a trunk (external call), it handles the call as
follows.
1 First, check the IP address and/or domain name of caller. If there is no
matched route within Route List, it rejects the call.
2 If there is a matched Route and there is number translation configuration, it
performs translation of caller/called number. After this process, the translated
called number (DID) and calling number (CLI) will be used for call
processing.
3 Search the caller number with the lists of ‘CLI Number’ at the
[CONFIGURATION > Trunk Routing > CLI Routing] menu, If there is
matched number, process it as follows:
o If ‘Call Reject’ option is enabled in the matched CLI number, SCM reject
the call.
o If there is a value in ‘Name Translation’ field in the matched CLI number,
the caller name will be replaced with it.
o If there is a number in ‘RPx Destination’ fields in the matched CLI
number, the call will be destined to the number regarding on each Ring
Plan.
o If there is a number in ‘Default Destination’ field, the call will be routed to
the default destination number.
4 Search the called number with the lists of ‘DID Number’ at the
[CONFIGURATION > Trunk Routing > DID Routing] menu, If there is
matched number, process it as follows:
o If there is a number in ‘RPx Destination’ fields in the matched DID

Ошибка! Используйте вкладку "Главная" для применения 제목 1 к тексту, который
должен здесь отображаться. Ошибка! Используйте вкладку "Главная" для применения 제목 1 к
тексту, который должен здесь отображаться.
SCM Express Operation Manual v12.0 73 ©Samsung Proprietary and Confidential
number, the call will be destined to the number regarding on each Ring
Plan.
o If there is a number in ‘Default Destination’ field, the call will be routed to
the default destination number.
o If the destination value is ‘B’, the prefix with ‘Delete Length’ of DID
number will be delete and ‘Insert Digit’ value will be added instead. The
call will be route with the translated number.
o If the destination value is ‘E’, the prefix with ‘Delete Length’ of DID
number will be delete and ‘Insert Digit’ value will be added instead. The
call will be route with the translated number. The difference with ‘B’ is
that this call cannot be routed to trunk.
o The configurable types of destination number in DID routing table are
User’s Extension Number, User Group Code with User’s Extension
Number, Hunt Group Number, ACD Group Number, VM/AA Access
Number, Route Access Code with External number and UMS access
number.
Outgoing call processing
SCM route an outgoing call using the called number decided through step 2 to
step3.
1 Outgoing to extension
o It searches the called number with the lists of extensions. If there is a
matched extension number, it route the call to the extension.
o It searches the called number with the lists of combination of User Group
Code and User Group’s Extension Number. If there is a matched combined
number, it route the call to the number.
o It rejects a call when Do Not Disturb service was activated at the
extension.
2 If calling number is matched with restriction policy, it rejects the call.
3 Outgoing to trunk
o It searches the called number with the lists of Access Codes, if there is a
matched access code, it route the call to external through the Route.
4 Decision of CLI when make a call to trunk:
There are two kinds of Decision of CLI. If [CONFIGURATION > Trunk
Routing > Route > Forced Send CLI Number] is not set to ‘None’, the
designated CLI is used for CLI for the outgoing trunk call. In case
[CONFIGURATION > Trunk Routing > Route > Forced Send CLI
Number] is set to None, the priority of CLI as follows.
o It uses [CONFIGURATION > User > Multi-Extension Phone > Send
CLI Number] as CLI when route a call to trunk side.
o If there is no [CONFIGURATION > User > Multi-Extension Phone >
Send CLI Number], It uses [CONFIGURATION > User > Single

Ошибка! Используйте вкладку "Главная" для применения 제목 1 к тексту, который
должен здесь отображаться. Ошибка! Используйте вкладку "Главная" для применения 제목 1 к
тексту, который должен здесь отображаться.
SCM Express Operation Manual v12.0 74 ©Samsung Proprietary and Confidential
Phone User > Send CLI Number].
o If there is no [CONFIGURATION > User > Single Phone User > Send
CLI Number], it uses [CONFIGURATION > User Group > Service
Group > CLI Number].
o If there is no [CONFIGURATION > User Group > Service Group >
CLI Number], it uses [CONFIGURATION > User Group > Change
User Group > Information > CLI Number].
o If there is no [CONFIGURATION > User Group > Change User
Group > Information > CLI Number]. It adds [CONFIGURATION >
Trunk Routing > Route > Outbound CLI Prefix] in front of Extension
number if exist.
o If there is no configuration of all above cases, it uses just Extension
number as CLI to trunk.
5 CLI/DID Number conversion to Trunk side:
o If there is pattern with calling number type in Outbound MCN and the
Calling number of a call is matched with one of calling number patterns,
the Calling number of the call will be translated with the matched pattern.
The converted calling number will be deleted with the length of [Outbound
CID Delete Length] of [CONFIGURATION > Trunk Routing > Priority
Routing] or [CONFIGURATION > Trunk Routing > Load Balance
Routing]
o And insert the ‘Outbound CLI Insert Digits’ and send it as CLI.
If there is pattern with called number type in Outbound MCN and the Called
number of a call is matched with one of called number patterns, the Called
number of the call will be translated with the matched pattern.
The converted called number will be deleted with the length of ‘Outbound
DOD Delete Length’ of [CONFIGURATION > Trunk Routing > Priority
Routing] or [CONFIGURATION > Trunk Routing > Load Balance
Routing]
And insert the ‘Outbound DOD Insert Digits’ and send it.
6 An outgoing call may be dropped if called number was matched with
restriction policy. The call will be rejected with reason of call restriction.
7 If there is no matched route for a call, add default access code if exist as prefix
to the called number and process the steps above 3, 4, and 5.
The call that route was not specified will be dropped with reason of invalid
number.
Processing of Inter-node Call
In case SCM is set up as Active-Active configuration, it checks whether CSS
(Current Serving Server) of the calling party and the called party. The call
processing of each party is done at CSS for the party. When SCM receive new call,
SCM rejects the call if the CSS of the calling party is the peer-node SCM. The
CSS of each party can be checked in [PERFORMANCE > Registration Status].

Ошибка! Используйте вкладку "Главная" для применения 제목 1 к тексту, который
должен здесь отображаться. Ошибка! Используйте вкладку "Главная" для применения 제목 1 к
тексту, который должен здесь отображаться.
SCM Express Operation Manual v12.0 75 ©Samsung Proprietary and Confidential

SCM Express Operation Manual v12.0 76 ©Samsung Proprietary and Confidential
Chapter 3 Configuring Phone and Gateway
This chapter describes how to configure phones and gateways.
Configuring Phone
Phone Installation
Installation Type
The SMT-i5300, SMT-i5200 and SMT-i3100 series SIP phones support 3 types of
configuration methods.
Configuration Type Description
Standard User can configure all the information to register with system manually.
This mode is including following steps.
SIP server setting
SIP authentication setting
NTP server setting
Server All the information to register with system is downloaded from a Configuration server.
If the system using MAC Address authentication type, ID/Password is not mandatory.
Please contact the system administrator detail information about the phone authentication type.
PnP (Plug & Play) This feature allows a phone to be registered with the system when powered on so that it becomes available for service.
To use the ‘PnP’ mode, the PnP environment must be configured by the system administrator.
If you choose the ‘PnP’ mode, the network mode of the phone is changed to DHCP and the network setting step is skipped.
Please contact the system administrator about detail information about the ‘PnP’ mode.
Easy Installation of SMT-i3100/3105/5210/5210S/5220/5230
1 To get to the SETUP MODE unplug the power cord from the phone. Press and
hold the [*] button while you plug power back into the phone. Release the [*]
when you see Samsung in the display.
When the phone reboot is complete, the Language Menu will display. Select
the language to use and press the [Next] soft button to advance to the
Configuration Menu.

Ошибка! Используйте вкладку "Главная" для применения 제목 1 к тексту, который
должен здесь отображаться. Ошибка! Используйте вкладку "Главная" для применения 제목 1 к
тексту, который должен здесь отображаться.
SCM Express Operation Manual v12.0 77 ©Samsung Proprietary and Confidential
o The system administrator can change the language of the phone after
registered with the system.
2 Select the [1 Easy Install] Menu.
3 Select the Keypad Type.
o In case of use Korean language, select Korea, in other case select Normal.
Press the [Next] Button.
4 Select the configuration mode. The steps of the easy install menu might be
changed depending on type of the configuration mode.
Press the [Next] Button.
5 If the [Standard] configuration mode is selected, The following steps are
added.
o SIP Server: Enter the SIP server information.
o SIP Register Information: Enter the sip register information.
o Time Server: Enter the time server (NTP) URL and update interval.
Press the [Next] Button.
6 In case the [Server] configuration mode is selected, You can enter

Ошибка! Используйте вкладку "Главная" для применения 제목 1 к тексту, который
должен здесь отображаться. Ошибка! Используйте вкладку "Главная" для применения 제목 1 к
тексту, который должен здесь отображаться.
SCM Express Operation Manual v12.0 78 ©Samsung Proprietary and Confidential
ID/Password.
o If the system using MAC Address authentication type, ID/Password is not
mandatory.
o Please contact the system administrator detail information about the
configuration server address and authentication type.
Press the [Next] Button.
7 In case the [PnP] configuration mode is selected, There is nothing to do in this
step.
o Please contact the system administrator about detail information about the
PnP mode.
Press the [Next] Button.
8 Select the network mode and enter detail network information.
o If you choose the PnP configuration mode, the Network mode of the phone
is changed to DHCP and the Network Setting step is skipped in the easy
Install feature.
o If you enter the wrong information, the phone may not be registered with a
system or cannot connect to the network.
9 Enter VLAN information.
o If you enter the wrong information, the phone may not be registered with a
system or cannot connect to the network.
10 Enter 802.1x information.

Ошибка! Используйте вкладку "Главная" для применения 제목 1 к тексту, который
должен здесь отображаться. Ошибка! Используйте вкладку "Главная" для применения 제목 1 к
тексту, который должен здесь отображаться.
SCM Express Operation Manual v12.0 79 ©Samsung Proprietary and Confidential
o If you enter the wrong information, the phone may not be registered with a
system or cannot connect to the network.
11 LLDP Setting
12 All steps of the easy install is ended, press the [Yes] button to finish the easy
install. Then the phone will be restart.
o You can change the information already entered. Press the [Back] button
till the step you want, and edit the information
Easy Installation of SMT-6010/6011
1 In case the phone is not registered with the system, [Easy] button will be
displayed. Press [Easy] button, then the easy install menu will be shown.
o The system administrator can change the language of the phone after
registered with the system.
Select the Keypad Type.
o In case of use Korean language, select Korea, in other case select Normal.
Press the [Next] Button.
2 Select the configuration mode. The steps of the easy install menu might be
changed depending on type of the configuration mode.
Press the [Next] Button.

Ошибка! Используйте вкладку "Главная" для применения 제목 1 к тексту, который
должен здесь отображаться. Ошибка! Используйте вкладку "Главная" для применения 제목 1 к
тексту, который должен здесь отображаться.
SCM Express Operation Manual v12.0 80 ©Samsung Proprietary and Confidential
3 If the [Standard] configuration mode is selected, The following steps are
added.
o SIP Server: Enter the SIP server information.
o SIP Register Information: Enter the sip register information.
o Time Server: Enter the time server (NTP) URL and update interval.
Press the [Next] Button.
4 In case the [Server] configuration mode is selected, You can enter
ID/Password.
o If the system using MAC Address authentication type, ID/Password is not
mandatory.
o Please contact the system administrator detail information about the
configuration server address and authentication type.
Press the [Next] Button.
5 In case the [PnP] configuration mode is selected, there is nothing to do in this
step.
Press the [Next] Button.
o Please contact the system administrator about detail information about the
PnP mode.
6 Enter network information.
o If the [Wired] network is selected, you can choose DHCP/Static/ or
PPPoE mode.
o If you enter the wrong information, the phone may not be registered with a
system or cannot connect to the network.

Ошибка! Используйте вкладку "Главная" для применения 제목 1 к тексту, который
должен здесь отображаться. Ошибка! Используйте вкладку "Главная" для применения 제목 1 к
тексту, который должен здесь отображаться.
SCM Express Operation Manual v12.0 81 ©Samsung Proprietary and Confidential
7 In case the [Wireless] network is selected,
* Wireless mode is not supported for 6010.
o The phone will start to search AP automatically.
o Wi-Fi is only running under AC Adaptor connection.
o After select AP in the searched list, connect to Static or DHCP mode.
8 Enter VLAN information.
o If you enter the wrong information, the phone may not be registered with a
system or cannot connect to the network.
9 Enter 802.1x information
o If you enter the wrong information, the phone may not be registered with a
system or cannot connect to the network.
10 After Setting LLDP service, press the [Finish] button to finish the easy install.
Then the phone will be restart.
o You can change the information already entered. Press the [Previous]
button till the step you want, and edit the information.

Ошибка! Используйте вкладку "Главная" для применения 제목 1 к тексту, который
должен здесь отображаться. Ошибка! Используйте вкладку "Главная" для применения 제목 1 к
тексту, который должен здесь отображаться.
SCM Express Operation Manual v12.0 82 ©Samsung Proprietary and Confidential
Easy Installation of SMT-6020/6021
1 In case the phone is not registered with the system, [Easy Install] button will
be displayed. Press [Easy Install] button, then the easy install menu will be
shown.
Check a network cable and press [Next] button.
2 Select the language to use.
o The system administrator can change the language of the phone after
registered with the system.
3 Select the configuration mode. The steps of the easy install menu might be
changed depending on type of the configuration mode.
Press the [Next] Button.
4 If the [Standard] configuration mode is selected, The following steps are
added.
o SIP Server: Enter the SIP server information.
o SIP Register Information: Enter the sip register information.
o Time Server: Enter the time server (NTP) URL and update interval.
Press the [Next] Button.
5 In case the [Server] configuration mode is selected, You can enter
ID/Password.
o If the system using MAC Address authentication type, ID/Password is not

Ошибка! Используйте вкладку "Главная" для применения 제목 1 к тексту, который
должен здесь отображаться. Ошибка! Используйте вкладку "Главная" для применения 제목 1 к
тексту, который должен здесь отображаться.
SCM Express Operation Manual v12.0 83 ©Samsung Proprietary and Confidential
mandatory.
o Please contact the system administrator detail information about the
configuration server address and authentication type.
Press the [Next] Button.
6 In case the [PnP] configuration mode is selected, there is nothing to do in this
step.
Press the [Next] Button.
o Please contact the system administrator about detail information about the
PnP mode.
7 Enter network information.
o If the [Wired] network is selected, you can choose DHCP/Static/ or
PPPoE mode.
o If you enter the wrong information, the phone may not be registered with a
system or cannot connect to the network.
8 In case the [Wireless] network is selected,
* Wireless mode is not supported for 6020
o The phone will start to search AP automatically.
o Wi-Fi is only running under AC Adaptor connection.
o After select AP in the searched list, connect to Static or DHCP mode.
9 Enter VLAN information.

Ошибка! Используйте вкладку "Главная" для применения 제목 1 к тексту, который
должен здесь отображаться. Ошибка! Используйте вкладку "Главная" для применения 제목 1 к
тексту, который должен здесь отображаться.
SCM Express Operation Manual v12.0 84 ©Samsung Proprietary and Confidential
o If you enter the wrong information, the phone may not be registered with a
system or cannot connect to the network.
10 Enter 802.1x information
o If you enter the wrong information, the phone may not be registered with a
system or cannot connect to the network.
11 After Setting LLDP service, press the [Finish] button to finish the easy install.
Then the phone will be restart.
o You can change the information already entered. Press the [Previous]
button till the step you want, and edit the information.
Easy Installation of SMT-5243
1 In case the phone is not registered with the system, [Easy Install] button will
be displayed. Press [Easy Install] button, then the easy install menu will be
shown.
Check a network cable and press [Next] button.
2 Select the language to use.

Ошибка! Используйте вкладку "Главная" для применения 제목 1 к тексту, который
должен здесь отображаться. Ошибка! Используйте вкладку "Главная" для применения 제목 1 к
тексту, который должен здесь отображаться.
SCM Express Operation Manual v12.0 85 ©Samsung Proprietary and Confidential
o The system administrator can change the language of the phone after
registered with the system.
3 Select the configuration mode. The steps of the easy install menu might be
changed depending on type of the configuration mode.
Press the [Next] Button.
4 If the [Standard] configuration mode is selected, the following steps are
added.
o SIP Server: Enter the SIP server information.
o SIP Register Information: Enter the sip register information.
o Time Server: Enter the time server (NTP) URL and update interval.
Press the [Next] Button.
5 In case the [Server] configuration mode is selected, you can enter
ID/Password.
o If the system using MAC Address authentication type, ID/Password is not
mandatory.
o Please contact the system administrator detail information about the
configuration server address and authentication type.
Press the [Next] Button.

Ошибка! Используйте вкладку "Главная" для применения 제목 1 к тексту, который
должен здесь отображаться. Ошибка! Используйте вкладку "Главная" для применения 제목 1 к
тексту, который должен здесь отображаться.
SCM Express Operation Manual v12.0 86 ©Samsung Proprietary and Confidential
6 In case the [PnP] configuration mode is selected, there is nothing to do in this
step.
Press the [Next] Button.
o Please contact the system administrator about detail information about the
PnP mode.
7 Select the network mode and enter detail network information.
o If you choose the PnP configuration mode, the Network mode of the phone
is changed to DHCP and the Network Setting step is skipped in the easy
Install feature.
o If you enter the wrong information, the phone may not be registered with a
system or cannot connect to the network.
8 Enter VLAN information.
o If you enter the wrong information, the phone may not be registered with a
system or cannot connect to the network.
9 Enter 802.1x information
o If you enter the wrong information, the phone may not be registered with a
system or cannot connect to the network.
10 LLDP Setting

Ошибка! Используйте вкладку "Главная" для применения 제목 1 к тексту, который
должен здесь отображаться. Ошибка! Используйте вкладку "Главная" для применения 제목 1 к
тексту, который должен здесь отображаться.
SCM Express Operation Manual v12.0 87 ©Samsung Proprietary and Confidential
11 All steps of the easy install is ended, press the [Finish] button to finish the
easy install. Then the phone will be restart.
o You can change the information already entered. Press the [Previous]
button till the step you want, and edit the information.
Easy Installation of SMT-5343
1 In case the phone is not registered with the system, [Easy Install] button will
be displayed. Press [Easy Install] button, then the easy install menu will be
shown.
Check a network cable and press [Next] button.
2 Select the language to use.
o The system administrator can change the language of the phone after
registered with the system.
3 Select the configuration mode. The steps of the easy install menu might be
changed depending on type of the configuration mode.
Press the [Next] Button.
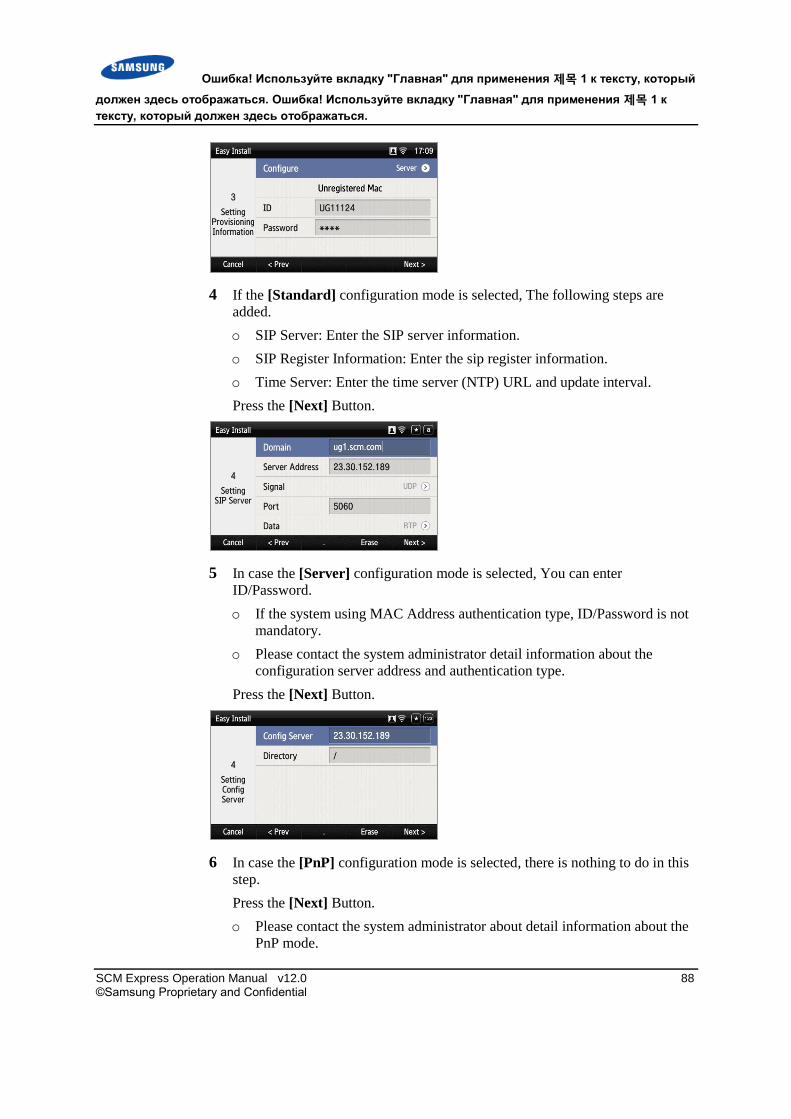
Ошибка! Используйте вкладку "Главная" для применения 제목 1 к тексту, который
должен здесь отображаться. Ошибка! Используйте вкладку "Главная" для применения 제목 1 к
тексту, который должен здесь отображаться.
SCM Express Operation Manual v12.0 88 ©Samsung Proprietary and Confidential
4 If the [Standard] configuration mode is selected, The following steps are
added.
o SIP Server: Enter the SIP server information.
o SIP Register Information: Enter the sip register information.
o Time Server: Enter the time server (NTP) URL and update interval.
Press the [Next] Button.
5 In case the [Server] configuration mode is selected, You can enter
ID/Password.
o If the system using MAC Address authentication type, ID/Password is not
mandatory.
o Please contact the system administrator detail information about the
configuration server address and authentication type.
Press the [Next] Button.
6 In case the [PnP] configuration mode is selected, there is nothing to do in this
step.
Press the [Next] Button.
o Please contact the system administrator about detail information about the
PnP mode.

Ошибка! Используйте вкладку "Главная" для применения 제목 1 к тексту, который
должен здесь отображаться. Ошибка! Используйте вкладку "Главная" для применения 제목 1 к
тексту, который должен здесь отображаться.
SCM Express Operation Manual v12.0 89 ©Samsung Proprietary and Confidential
7 Enter network information.
o If the [Wired] network is selected, you can choose DHCP/Static/ or
PPPoE mode.
o If you enter the wrong information, the phone may not be registered with a
system or cannot connect to the network.
8 In case the [Wireless] network is selected,
o The phone will start to search AP automatically.
o Wi-Fi is only running under AC Adaptor connection.
o After select AP in the searched list, connect to Static or DHCP mode.
9 Enter VLAN information.
o If you enter the wrong information, the phone may not be registered with a
system or cannot connect to the network.
10 Enter 802.1x information
o If you enter the wrong information, the phone may not be registered with a
system or cannot connect to the network.

Ошибка! Используйте вкладку "Главная" для применения 제목 1 к тексту, который
должен здесь отображаться. Ошибка! Используйте вкладку "Главная" для применения 제목 1 к
тексту, который должен здесь отображаться.
SCM Express Operation Manual v12.0 90 ©Samsung Proprietary and Confidential
11 After Setting LLDP service, press the [Finish] button to finish the easy install.
Then the phone will be restart.
o You can change the information already entered. Press the [Previous]
button till the step you want, and edit the information.
Upgrading Phone Software
When you need upgrading SIP phone software, follow the steps below.
Step 1. Preparing Software
First of all, you should copy phone software image file to your local PC.
Step 2. Uploading Package
You can upload the phone software image file using [CONFIGURATION >
Phone Setting > File Upload] menu.

Ошибка! Используйте вкладку "Главная" для применения 제목 1 к тексту, который
должен здесь отображаться. Ошибка! Используйте вкладку "Главная" для применения 제목 1 к
тексту, который должен здесь отображаться.
SCM Express Operation Manual v12.0 91 ©Samsung Proprietary and Confidential
Figure 19. Uploading Package
You can upload the phone software image file to SCM by following steps:
1 Click [Search] button.
2 Select Upgrade phone software image
3 Check Phone name in Phone Info category.
4 Click [Send] button.
The Phone software image will be sent to SCM and copied to pre-defined directory
in system automatically.
Step 3. Checking Software Version
You can check the phone software information using [CONFIGURATION >
Phone Setting > Software Upgrade Configuration] menu.

Ошибка! Используйте вкладку "Главная" для применения 제목 1 к тексту, который
должен здесь отображаться. Ошибка! Используйте вкладку "Главная" для применения 제목 1 к
тексту, который должен здесь отображаться.
SCM Express Operation Manual v12.0 92 ©Samsung Proprietary and Confidential
Figure 20. Checking Software Version
Step 4. Upgrading Software
You can upgrade the phone software using [CONFIGURATION > Phone
Setting > Upgrade Software] menu.
Following data are mandatory for upgrading phone software. Click [Apply] button
after entering all required data, then phone will reboot automatically and start
upgrade process.
Figure 21. Upgrading Software (1)
Name Description
Type Select Model Update for upgrading phone software.

Ошибка! Используйте вкладку "Главная" для применения 제목 1 к тексту, который
должен здесь отображаться. Ошибка! Используйте вкладку "Главная" для применения 제목 1 к
тексту, который должен здесь отображаться.
SCM Express Operation Manual v12.0 93 ©Samsung Proprietary and Confidential
Name Description
User Group Select user group.
Phone Name Select software upgrading phone number.
Model Name Select software upgrading phone model name.
You can use scheduled upgrade for multiple phones using this menu. Following
data should be filled out to be properly performed.
Figure 22. Upgrading Software (2)
Name Description
Type Select Model Update for upgrading phone software.
User Group Select user group.
Model Name Select software upgrading phones model name.
Update Time Select Reserve for scheduled upgrading software. If you select Now then immediately starts upgrading process.
Start Time Input starting time of upgrading software.
Start Phone Name Select starting phone number of upgrading software.
Update Count/Round Input number of phones upgrading per each round.
Interval (min) Input interval time of each upgrading round.
Updating Phone Settings
This service allows the administrator to update profiles. Service profiles, user
profiles and line profiles can be updated.
If necessary, phones can be upgraded. Multiple phones can be set for upgrades at a
specified time.
This can be configured in the [CONFIGURATION > Phone > Phone Update]
menu.
Name Description
Type Specify an update method.
The update methods are described in the Manual Phone Update section below.
User Group Specify a user group to update.

Ошибка! Используйте вкладку "Главная" для применения 제목 1 к тексту, который
должен здесь отображаться. Ошибка! Используйте вкладку "Главная" для применения 제목 1 к
тексту, который должен здесь отображаться.
SCM Express Operation Manual v12.0 94 ©Samsung Proprietary and Confidential
Name Description
Extension Number If updating only one phone, specify the extension number of the phone to update.
Phone Name If updating only one phone, specify the device name of the phone to update.
Model Name Specify the model name of the phone to update.
Update Time If updating multiple phones, specify the start option.
Now: Updated immediately.
Reserve: Updated at an appointed time.
Start Time If updating multiple phones at an appointed time, specify the start time.
Start Device Name If updating multiple phones, specify the device name of the starting phone.
Update Number If updating multiple phones, specify the number of phones to update at a time. You can set up to 40.
Interval (min) If updating multiple phones, specify the interval between updates.
Manual Phone Update
Phones can be updated manually in the following ways:
Service profile
This method sends an SIP Notify message which notifies new service settings to a
phone in a user group. Although this message is sent automatically when changing
feature codes, etc. you can have force it to be sent when necessary.
Line profile
This method forces the profile by extension number to be sent. Although this
message is sent automatically when changing automatic call forward, etc., you can
have force it to be sent when necessary.
User profile
This method forces the profile by phone name to be sent Although this message is
sent automatically mainly when changing the phone button assignment of the
phone, etc. you can have force it to be sent when necessary.
User profile User Group
This method updates all user profile of a specified model in a user group. When
this method is used, phones of the selected model are updated starting from the
start device, a specified number of phones at a time and at a specified time
interval.
Model update
This method updates a phones of a specified model. When this method is used, the
phone of the selected model is updated.
Model update user group
This method updates all phones of a specified model in a user group. When this
method is used, phones of the selected model are updated starting from the start

Ошибка! Используйте вкладку "Главная" для применения 제목 1 к тексту, который
должен здесь отображаться. Ошибка! Используйте вкладку "Главная" для применения 제목 1 к
тексту, который должен здесь отображаться.
SCM Express Operation Manual v12.0 95 ©Samsung Proprietary and Confidential
device, a specified number of phones at a time and at a specified time interval.
Reboot
This method is used simply for restarting the phone.
Reboot User Group
This method restarts all the phones in a user group at once. This method processes
40 phones each second. If you use this method to update phones, the system may
slow down due to overload. Always use the model update user group feature when
updating phones.
Automatic Phone Update
When a phone is powered up for operation, it loads the phone profile and performs
the following procedure:
1 Information such as the phone’s main version, the VLAN ID, and the upgrade
server is included in sec_boot.xml, which is first checked when the phone
starts.
The phone main version information is used for determining the need for
automatic upgrade.
2 After the phone loads sec_boot.xml, it checks sec_{macaddress}.xml. If not
found, the phone uses the profile ID and the password entered on the phone to
load sec_user_{profildID}.xml and sec_phone.xml.
3 Profiles other than sec_phone.xml contain information on the services
provided by the phone.
4 The profiles to be loaded on the phone are defined in
sec_user_{profildID}.xml.
The phone loads the specified profiles in order.
5 The phone downloads profiles in the order of sec_boot.xml > sec_phone.xml >
sec_user_{profildID}.xml.
Automatic Upgrade Procedure
SCM can automatically upgrade the phone software.
Load the package on a selected profile server and reboot the phone to have the
phone upgraded automatically.
During automatic upgrade (if the version information in sec_boot.xml is different
from the version on the phone), the phone software is automatically updated
according to the <upgrade_server> IP address and the protocol (TFTP or HTTP)
defined in sec_boot.xml.
When the update is complete, sec_boot.xml is loaded again for the rest of the
procedure.
In a large-scale SCM system, a separate profile server should be installed to reduce
load and upgrade time. (including sec_boot.xml)

Ошибка! Используйте вкладку "Главная" для применения 제목 1 к тексту, который
должен здесь отображаться. Ошибка! Используйте вкладку "Главная" для применения 제목 1 к
тексту, который должен здесь отображаться.
SCM Express Operation Manual v12.0 96 ©Samsung Proprietary and Confidential
When the phone powers on, the following procedure is performed.
The TFTP server and the upgrade server are included in SCM by default. If
necessary, you can have separate servers for these functions.
Figure 23. Automatic Upgrade Procedure
Installing Software Package in Profile Server
Software package should be installed on the profile server in the following order:
1 Save the phone software package in the root directory of a HTTP or TFTP
server to use and decompress it.
2 Open the sec_boot.tpl file included in the phone software package, edit the
phone main version, the profile server IP address, etc. and copy them to
sec_boot.xml.
3 Use the update command in the [CONFIGURATION > Phone > Phone
Update] menu to reboot the phone(s).
To use SCM as the update server, refer to '3.1.2 Upgrading Phone Software' in this
document.
Version Check
DHCP Request
DHCP Ack (Phone receive IP Information
TFTP Server Address)
Request sec_boot.xml
Get sec_boot.xml
Skip If version is not different.
Get package
Get Phone Profiles
sec_{mac}.xml sec_user_{id}.xml
sec_line_{group_line}.xml sec_service_{group}.xml
sec_aom_{aom_mac}.xml sec_dialplan.xml
REGISTER
200 OK
If Complete download.
Restart
DHCP Server
TFTP/HTTP Server
Profile server
SCM
TFTP/HTTP Upgrade Server
Down load package
Version Check

Ошибка! Используйте вкладку "Главная" для применения 제목 1 к тексту, который
должен здесь отображаться. Ошибка! Используйте вкладку "Главная" для применения 제목 1 к
тексту, который должен здесь отображаться.
SCM Express Operation Manual v12.0 97 ©Samsung Proprietary and Confidential
Managing Phone Settings
Phone Profile Information
A phone’s profile information can be viewed in the [CONFIGURATION >
Phone > Phone Profile Info] menu.
Name Description
Profile Type Shows the type of the profiles viewed.
There are service profiles and line profiles.
Profile Path Shows the location within the profile server where the files are stored.
Profile Count Shows the number of profiles created.
A service profile is applied to all phones in a user group. It includes definitions of
available services. It includes information on feature codes, etc.
A line profile is applied to each phone number. It includes definitions of features
available for each number. It includes information on call forward settings, etc.
Phone Display
You can set or change the items displayed on the phone by a preferred language.
This can be configured in the [CONFIGURATION > Phone > Phone Display]
menu.
Name Description
Key Select a feature for which the information displayed will be changed.
Language Select a language for which the information displayed will be changed.
Description Enter the information displayed by language.
Software Version
You can configure the phone version. When the settings are changed,
sec_boot.xml is changed.
This can be configured in the [CONFIGURATION > Phone > Software
Upgrade Configuration] menu.
Name Description
Phone Version
(SMT-i2205)
The version of the phone software for the package update server
Phone Version
(SMT-i2205S/D/G)
The version of the phone software for the package update server
Phone Version
(SMT-i3100/3105)
The version of the phone software for the package update server

Ошибка! Используйте вкладку "Главная" для применения 제목 1 к тексту, который
должен здесь отображаться. Ошибка! Используйте вкладку "Главная" для применения 제목 1 к
тексту, который должен здесь отображаться.
SCM Express Operation Manual v12.0 98 ©Samsung Proprietary and Confidential
Name Description
Phone Version
(SMT-i5210)
The version of the phone software for the package update server
Phone Version
(SMT-i5220)
The version of the phone software for the package update server
Phone Version
(SMT-i5220S/D/S2)
The version of the phone software for the package update server
Phone Version
(SMT-i5230)
The version of the phone software for the package update server
Phone Version
(SMT-i5243)
The version of the phone software for the package update server
Phone Version
(SMT-i5264)
The version of the phone software for the package update server
Phone Version
(SMT-i5343)
The version of the phone software for the package update server
Phone Version
(SMT-i5210S)
The version of the phone software for the package update server
Samsung Deskphone
Manager Version
The version of the phone software for the package update server
Samsung Deskphone
Manager Upgrade
Server
Choose the upgrade server location
Internal: SCM
External: other Upgrade Server
Samsung Deskphone
Manager External
Server URL
If Upgrade Server Type is ‘External’, set the External Server URL
Phone Update Protocol
This sets the protocol to use phone s/w upgrade.
Phone Update Public Zone Protocol
This sets the protocol to use phone s/w upgrade on the public IP network.
NTP Option
You can configure the secondary NTP server and the refresh time. When using
NAT, you can configure the secondary NTP used on the public IP network. When
the settings are changed, sec_user_XXX.xml is changed, and a Notify message is
sent to all phones.
This can be configured in the [CONFIGURATION > Phone > NTP Option]
menu.
Name Description
NTP Second Server If using a secondary NTP server, this sets the IP address of the NTP server.
NTP Refresh (minute) If using a secondary NTP server, this sets the time interval for updating time for the NTP server.
NTP Public Second Server
If using a secondary NTP server on the public IP network, this sets the IP address of the NTP server.

Ошибка! Используйте вкладку "Главная" для применения 제목 1 к тексту, который
должен здесь отображаться. Ошибка! Используйте вкладку "Главная" для применения 제목 1 к
тексту, который должен здесь отображаться.
SCM Express Operation Manual v12.0 99 ©Samsung Proprietary and Confidential
Name Description
NTP Public Refresh (minute)
If using a secondary NTP server on the public IP network, this sets the time interval for updating time for the NTP server.
Dial Plan
When dialing a phone number on the phone, if the number entered matches a
specified rule, the phone can be set to send a sent message immediately to SCM
without waiting for the next number or timeout. SCM can configure dial plans to
be used by phones and send them to all phones.
Dial plans can be configured in the [CONFIGURATION > Phone > Dial Plan]
menu.
Name Description
Start Timer Specify the time to wait for the first dial since the handset is lifted. In case of timeout, an error will occur.
Long Timer Specify the maximum waiting time between dials. In case of timeout, a sent message will be sent to SCM.
Short Timer Specify the minimum waiting time between dials.
End of digit Specify a digit to indicate that the last dial has been entered.
When this digit is entered, a sent message is sent to SCM immediately.
DIGIT MAP 1~150 You can set up to 96 dial plans for phones.
(Example: If a dial plan is set with 5xxx, the phone will make a call when a four-digit number starting with 5 is entered.)
Dial Tone
When dialing a phone number on the phone, if the number entered matches a
specified rule, the phone play dail tone immediately. SCM can configure dial tone
to be used by phones and send them to all phones.
Dial Tone can be configured in the [CONFIGURATION > Phone > Dial Tone]
menu.
Name Description
DIGIT TONE 1~150 Enter dial rules which are used in a phone.
e.g.) If you enter '5xxx', it means there will be an immediate playing dial tone when 4-digit with 5 as a leading figure becomes full.
SIP Options
You can configure the phone options. When the settings are changed,
sec_phone.xml is changed. This can be configured in the [CONFIGURATION >
Phone Setting > SIP Options] menu.
Name Description
Use TLS Certificate If used, TLS certification is used in signaling encryption for VoIP

Ошибка! Используйте вкладку "Главная" для применения 제목 1 к тексту, который
должен здесь отображаться. Ошибка! Используйте вкладку "Главная" для применения 제목 1 к
тексту, который должен здесь отображаться.
SCM Express Operation Manual v12.0 100 ©Samsung Proprietary and Confidential
Name Description
Download connections by SIP phones.
TLS Certificate Download Protocol
If used, the phone uses this protocol to get TLS certification from SCM server. (/tftpboot/sec_cert)
TLS Certificate Download Port
If used, the protocol uses port.
UDP Port Number Port number to use SIP UDP signal.
TCP Port Number Port number to use SIP TCP signal
TLS Port Number Port number to use SIP TLS signal
Audio RTP Start Port Number
Audio RTP start port number
Audio RTP End Port Number
Audio RTP end port number
Video RTP Start Port Number
Video RTP start port number
Video RTP End Port Number
Video RTP end port number
Use TOS If used, enable type of service.
TOS Type select TOS Type
TOS Control value Specify a number to use as TOS control value
TOS Media Value Specify a number to use as TOS control value
Lowest Retransmission Timer
Specify a number to use lowest retransmission timer value
Highest Retransmission Timer
Specify a number to use highest retransmission timer value
T4 Timer Specify a number to use T4 retransmission timer value
General request Timeout
Specify a number to use general request timer value
Register Expire Timer Specify a number to use register expire timer value
Session Expire Time Specify a number to use session expire timer value
User Expire Time Specify a number to use subscriber expire timer value
TLS Certificate Format Select Certificate Format
PEM/DER
Use TLS Encrytion Select whether to user the encrypted key
Disable/Enable
Service Options
You can configure the phone options. When the settings are changed,
sec_phone.xml is changed. This can be configured in the [CONFIGURATION >
Phone Setting > Service Options] menu.
Name Description
Use Premium CID Service
If used, the phone displays detail caller information.
Premium CID Service Specify the CID server address to connect.

Ошибка! Используйте вкладку "Главная" для применения 제목 1 к тексту, который
должен здесь отображаться. Ошибка! Используйте вкладку "Главная" для применения 제목 1 к
тексту, который должен здесь отображаться.
SCM Express Operation Manual v12.0 101 ©Samsung Proprietary and Confidential
Name Description
Address
Use VCS Service If used, the phone uses VCS service.
VCS Server Address Specify the VCS server address to connect.
VCS Server Port Number
Specify the VCS server port value
Use Presence Service If used, the phone uses presence service
Presence Server Address
Specify the presence server address to connect.
Use XML service If used, the phone uses XML service
XML server URL Specify the XML server address to connect.
Use LDAP Service If used, the phone uses LDAP service
LDAP Server URL Specify the LDAP server URL to connect.
LDAP Server Domain Specify the LDAP server domain to connect.
LDAP Server ID Specify the LDAP server ID to connect
LDAP Server Password
Specify the LDAP server password to connect
LDAP Server public URL
Specify the LDAP server public URL to connect.
Download Additional Tone Type
If used, the phone use dial tone file (download file from SCM system)
Special Tone File Folder
Specify the Dial tone file folder
Special Tone File 1-Name
Specify the Dial tone file name
Special Tone File 2-Name
Specify the Dial tone file name
Special Tone File 1-format
Specify the Dial tone file format (PCM, G729)
Special Tone File 2-format
Specify the Dial tone file format (PCM, G729)
Ring Type Priority Specify Ring Type Priority
Hotspot Channel (Country)
Specify Hotspot Channel for Wifi configuration phone use.
Phone Wallpaper Specify the Phone's Wallpaper Setting
None: none
Download Only: phone will download the wallpaper from the SCM
Download and Apply: phone will download the wallpaper from the SCM and apply the wallpaper as phone's wallpaper.
refer to 'File Upload' Menu for uploading wallpaper to SCM.
Phone Ring Specify the Phone's Ring Setting
None: none
Download Only: phone will download the ring file from the SCM
Download and Apply: phone will download the ring file from

Ошибка! Используйте вкладку "Главная" для применения 제목 1 к тексту, который
должен здесь отображаться. Ошибка! Используйте вкладку "Главная" для применения 제목 1 к
тексту, который должен здесь отображаться.
SCM Express Operation Manual v12.0 102 ©Samsung Proprietary and Confidential
Name Description
the SCM and apply the ring file as phone's basic ring.
refer to 'File Upload' Menu for uploading ring file to SCM.
Syslog Server URL Specify the Syslog Server URL where phone send log to.
Syslog Server Public URL
Specify the Syslog Server Public URL where phone send log to.
Use Line Lock Out Specify Line-Lock-Out (LLO) Function Use.
Line Lock Out ALarm Specify playing of Line-Lock-Out tone when phone is in Line-Lock_Out State.
Hook Flash Detect Time (10 ms)
Specify Hook Flash Detect Time.
Hook On Detect Time (10 ms)
Specify Hook On Detect Time.
Tone Setting
You can configure the phone tone value. When the settings are changed,
sec_phone.xml is changed. This can be configured in the [CONFIGURATION >
Phone Setting > Service Options] menu.
Name Description
Tone Type Select a tone type for which the value will be configured
Tone Frequency 1 Specify the primary frequency.
Tone Frequency 2 Specify the second frequency
First On Time Specify the first cadence on time.
First Off Time Specify the first cadence off time.
Second On Time Specify the second cadence on time.
Second Off Time Specify the second cadence off time.
Third On Time Specify the third cadence on time.
Third Off Time Specify the third cadence off time.
Phone Configuration
You can set the additional configuration used by the phone
This can be configured in the [CONFIGURATION > Phone Setting > Phone
Configuration] menu.
Name Description
User Group Select a user group
Call Log in Busy Select to whether to logging a Call in Busy
Call Log for
Group-Cll-Pickup
Select to whether to logging a Call for Group-Cll-Pickup
Call Log for
Direct-Call-Pickup
Select to whether to logging a Call for Direct-Call-Pickup
Call Log for Select to whether to logging a Call for Parked-Call-Retrieve

Ошибка! Используйте вкладку "Главная" для применения 제목 1 к тексту, который
должен здесь отображаться. Ошибка! Используйте вкладку "Главная" для применения 제목 1 к
тексту, который должен здесь отображаться.
SCM Express Operation Manual v12.0 103 ©Samsung Proprietary and Confidential
Name Description
Parked-Call-Retrieve
Call Log for
Shared-Call-Retrieve
Select to whether to logging a Call for Shared-Call-Retrieve
Input Number
Display
Select to whether to display number pressed by user during conversation
Call Log for
Redial
Select to whether to logging a Call for Redial
Display for Profile Update
Select to whether to display the changing information on Phone Screen
Channel List Select to WIFI Channel List of Phone.

Ошибка! Используйте вкладку "Главная" для применения 제목 1 к тексту, который
должен здесь отображаться. Ошибка! Используйте вкладку "Главная" для применения 제목 1 к
тексту, который должен здесь отображаться.
SCM Express Operation Manual v12.0 104 ©Samsung Proprietary and Confidential
Configuring Ubigate iBG Gateway
SCM performs voice gateway functions to access PSTN trunk and analog phone in
the enterprise network.
In addition, when the SIP phone is disconnected from SCM, the SIP phone
connected to the gateway will functioned the survival feature of the PBX.
The survival features are executed by the gateway and the IP phone and not by
SCM. Generally, it occurs when the IP network between the IP phone and SCM
experiences a trouble especially when the phone and SCM are in different
locations.
SCM usually uses Ubigate iBG series for its gateway. This chapter describes how
Ubigate iBG series to be configured as a SCM gateway.
Preparing SCM Server
To have Gateways interoperate with SCM, the following items must be configured
for SCM server.
Creating Gateway Link
You must register the Gateway to interoperate with SCM using the
[CONFIGURATION > Gateway] menu.

Ошибка! Используйте вкладку "Главная" для применения 제목 1 к тексту, который
должен здесь отображаться. Ошибка! Используйте вкладку "Главная" для применения 제목 1 к
тексту, который должен здесь отображаться.
SCM Express Operation Manual v12.0 105 ©Samsung Proprietary and Confidential
Figure 24. Creating Gateway Link
Item Description
User Group Specify a user group which will be assigned to Gateway.
Name Enter a name for Gateway.
Gateway Type Enter a model type for Gateway.
IP Address (for SIP register) Enter the IP address of Gateway for SIP registration.
IP Address (for Provision) Enter the IP address of Gateway for provision. Generally this should be same address for SIP register.
NAT If the gateway is running under NAT, Enables this option.
Public IP Address When the gateway is running under NAT, enter the public IP address of Gateway.
Survivability Users-SIP This is the list of SIP phones for survivability to allocate to the voice gateway.
When SCM creates the profile for a SIP phone, it includes the IP address and the port of the interoperating gateway in survival mode. When the SIP phone is disconnected from SCM, it sends a register message to the gateway included in the profile.
Survivability Users-FXS This is the list of FXS phones of the voice

Ошибка! Используйте вкладку "Главная" для применения 제목 1 к тексту, который
должен здесь отображаться. Ошибка! Используйте вкладку "Главная" для применения 제목 1 к
тексту, который должен здесь отображаться.
SCM Express Operation Manual v12.0 106 ©Samsung Proprietary and Confidential
Item Description
gateway. If the gateway type is Ubigate iBG, this item is not selective list.
SCM provides the survivable telephony support service, whereby, when an IP
phone is disconnected from SCM, the phone is connected to the gateway for
minimum PBX features. The survival feature really works by the gateway and the
IP phone and not by SCM. Generally, it is usually used not when there is a
problem with SCM but when the IP network between the IP phone and SCM
experiences a trouble, especially when the phone and SCM are in different
locations.
Ubigate iBG and OfficeServ 7000 series are used as gateways for SCM in order to
support both the survival mode and the SCM interoperation mode.
Survivable Telephony Mode
While a SCM is interoperating with its gateway, if the gateway recognized that the
IP network with SCM is disconnected, it uses the service profiles downloaded
from SCM for the FXS subscribers and SIP phone subscribers to continue to
provide gateway’s native call processing services.
In particular, Ubigate iBG and OfficeServ 7000 series use the SIP phone
subscriber service profile downloaded from SCM to automatically configure dial-
peer for processing incoming calls for SIP phones and authenticates SIP phones in
order to make calls and provide supplementary services.
Ubigate iBG and OfficeServ 7000 series periodically (30 seconds by default) send
Register messages to SCM. If it receives a OK response of 200 times, it enters the
SCM interoperation mode again.
Supplementary Service on Survival mode
Ubigate iBG and OfficeServ 7000 series service following features only on
survival mode.
Service Description
Call Forward Call Forward All, Busy and No Answer
Hold/Resume Call Hold/Call Resume
Transfer Consultation and Blind Transfer
DND Do Not Disturb
Conference Conference On Answer Only
Call Waiting Call Waiting
Call Pickup Direct and Group Call Pickup
MOH Music On Hold
Configuring Gateway
Following example shows the commands used when verifying the gateway
version.

Ошибка! Используйте вкладку "Главная" для применения 제목 1 к тексту, который
должен здесь отображаться. Ошибка! Используйте вкладку "Главная" для применения 제목 1 к
тексту, который должен здесь отображаться.
SCM Express Operation Manual v12.0 107 ©Samsung Proprietary and Confidential
Router# show version
Kernel : WIND version 2.6.
Boot : 1.0.7 (NORMAL Boot)
System : R2 2.0.1
Created : Apr 3 2007, 05:40:10
Bld Path : "/home1/build/release/u2rel_2.0.1/src"
By : build
SNOS class : Advanced SNOS
Including features : Security Voice
NorBoot : 1.0.7
GolBoot : 1.0.4
Slot/SubSlot Card-Type Status FPGA-Rev CPLD-Rev
----------------------------------------------------
0/- MPU-A NORMAL 0x08 0x02
0/0 WTE-2SM NORMAL N/A 0x00
0/1 FXS-4M NORMAL N/A 0x15
0/2 T1E1-1M NORMAL N/A 0x17
1/- VCU-A NORMAL N/A 0x07
1/0 FXS-4M NORMAL N/A 0x14
1/1 BRI-2U NORMAL N/A 0x0e
2/- T1E1-4 NORMAL N/A 0x0c
3/- ESG-8 NORMAL N/A 0x06
LDU-A NORMAL N/A N/A
VOP-128 NORMAL N/A 0x35
Configuring IP address
Following steps show the way to configure IP address.
Step Command Purpose
1 configure terminal
Example)
# configure terminal
To go Into global configuration mode.
2 Interface type number
Example)
/configure# interface Ethernet 0/0
To go Into interface configuration mode to configure specific interface.
3 ip address ip_address subnet_mask
Example)
/configure/interface/ethernet(0/0)# ip address 90.90.90.90 255.255.255.0
To configure a IP Address for an interface.
4 exit
Example)
/configure/interface/ethernet(0/0)# exit
To exit the current mode
Configuring Static Routes
Static routes are specified by adding and deleting route entries to and from the
route table. This section shows how to add a route entry.
Following steps show the way to add a route entry.
Step Command Purpose
1 Router# configure terminal To go Into the terminal configuration mode.
2 Router/configure# ip route [network] [mask] {address|interface}
Or
To add a routing entry

Ошибка! Используйте вкладку "Главная" для применения 제목 1 к тексту, который
должен здесь отображаться. Ошибка! Используйте вкладку "Главная" для применения 제목 1 к
тексту, который должен здесь отображаться.
SCM Express Operation Manual v12.0 108 ©Samsung Proprietary and Confidential
Step Command Purpose
Router/configure# ip route [network]/[number of bit mask] {address|interface}
To delete a route entry, just add the key word ‘no’ in front of the command that
have added it.
Following figure illustrates a simple network configuration.
Figure 25. Simple network configuration for static route
Following example shows the way to add a routing entry in the figure.
Router# configure terminal
Router/configure# ip route 165.213.100.0 255.255.255.0 165.213.89.238
or
Router# configure terminal
Router/configure# ip route 165.213.100.0/24 165.213.89.238
To delete the entry, simply add ‘no’ just as follows.
Router# configure terminal
Router/configure# no ip route 165.213.100.0 255.255.255.0 165.213.89.238
or
Router# configure terminal
Router/configure# no ip route 165.213.100.0/24 165.213.89.238
Connecting to Network
This section describes how to configure source IP address for VoIP gateway.
With this feature, you can specify the source address of SIP and H323 signaling,
and media stream-RTP/RTCP. You can assign an existing IP address on a specific
interface by the ‘bind’ command or create a new IP address by the ‘host ip-
address’ command.
The interfaces which you can bind with as the source address of VoIP signaling
and media stream are Ethernet, bundle, VLAN and virtual-access interface. The
Network 165.213.89.237
165.213.89.238
165.213.100.0/24 ip route 165.213.100.0 255.255.255.0 165.213.89.238 or ip route 165.213.100.0/24 165.213.89.238

Ошибка! Используйте вкладку "Главная" для применения 제목 1 к тексту, который
должен здесь отображаться. Ошибка! Используйте вкладку "Главная" для применения 제목 1 к
тексту, который должен здесь отображаться.
SCM Express Operation Manual v12.0 109 ©Samsung Proprietary and Confidential
‘host ip-address’ command will create a new IP address.
VoIP gateway must be shut down before setting the VoIP source address. Interface
bound with VoIP-gateway cannot be removed before VoIP-gateway unbinds the
interface.
shutdown voip-gateway
VoIP gateway must be shutdown before setting the IP address of VoIP gateway
and follows next procedures.
Step Command Purpose
1 configure terminal
Example)
# configure terminal
To go into global configuration mode.
2 voip-gateway
Example)
/configure# voip-gateway
To go into voip-gateway configuration mode.
3 shutdown
Example)
/configure/voip-gateway# shutdown
To shut down voip call services
4 exit
Example)
/configure/voip-gateway# exit
To exit the current mode
bind interface
To bind the interface for source address of VoIP signaling and media, follow next
procedures.
Step Command Purpose
1 configure terminal
Example)
# configure terminal
To go into global configuration mode.
2 voip-gateway
Example)
/configure# voip-gateway
To go into voip-gateway configuration mode.
3 bind control interface type num
Example)
/configure/voip-gateway# bind control interface ethernet 0/0
Setting source interface for SIP and H.323.
4 bind media interface type num
Example)
/configure/voip-gateway# bind media interface ethernet 0/0
Setting source interface for media-RTP/RTCP.
5 exit
Example)
/configure/voip-gateway# exit
To exit the current mode
host domain-name
VoIP gateway must have a domain name. ‘samsung.com’ or IP address form

Ошибка! Используйте вкладку "Главная" для применения 제목 1 к тексту, который
должен здесь отображаться. Ошибка! Используйте вкладку "Главная" для применения 제목 1 к
тексту, который должен здесь отображаться.
SCM Express Operation Manual v12.0 110 ©Samsung Proprietary and Confidential
should be used.
Step Command Purpose
1 configure terminal
Example)
# configure terminal
To go into global configuration mode.
2 voip-gateway
Example)
/configure# voip-gateway
To go into voip-gateway configuration mode.
3 host domain-name DOMAIN.COM
Example)
/configure/voip-gateway# host domain-name samsung.com
Setting domain name for Ubigate iBG
4 exit
Example)
/configure/voip-gateway# exit
To exit the current mode
Connecting to PSTN
Configuring Slot Setting
This section describes the configuration of Slot Setting.
Select a Gateway which you want to configure in the following window, and press
[Change] button and select change.
Select a Slot Configuration item and choose a card type properly.
Slot State indicates actual card equipment state. This state can be updated by
receiving information from the gateway.
If necessary, change following configurations for the gateway.

Ошибка! Используйте вкладку "Главная" для применения 제목 1 к тексту, который
должен здесь отображаться. Ошибка! Используйте вкладку "Главная" для применения 제목 1 к
тексту, который должен здесь отображаться.
SCM Express Operation Manual v12.0 111 ©Samsung Proprietary and Confidential
Figure 26. Configuring Slot Settings
FAX Relay
To select type of FAX relay for the gateway, use the ‘FAX relay’ menu in Slot
Setting configuration window.
T38 redundancy 0: Using T38 fax relay with redundancy number 0.
T38 redundancy 1: Using T38 fax relay with redundancy number 1.
T38 redundancy 2: Using T38 fax relay with redundancy number 2.
T38 redundancy 3: Using T38 fax relay with redundancy number 3.
Path-through g.711 U-law: Using Path-through g.711 U-law fax relay.
Path-through g.711 A-law: Using Path-through g.711 A-law fax relay.
DTMF Relay
To select type of DTMF relay for the gateway, use the ‘DTMF relay’ menu in Slot
Setting configuration window.
Inband: inband.
SIP Notify: SIP NOTIFY method.
SIP Info: SIP INFO method using named events.
SIP Info-digits: SIP INFO method using decimal number.
RFC2833: Out-of-band 2833 (RTP-NTE)
Media Type
To select type of RTP media type for the gateway, use the ‘Media Type’ menu in
Slot Setting configuration window.

Ошибка! Используйте вкладку "Главная" для применения 제목 1 к тексту, который
должен здесь отображаться. Ошибка! Используйте вкладку "Главная" для применения 제목 1 к
тексту, который должен здесь отображаться.
SCM Express Operation Manual v12.0 112 ©Samsung Proprietary and Confidential
RTP: RTP
SRTP-AES: SRTP using AES Counter Mode.
SRTP-ARIA: SRTP using ARIA counter Mode.
SRTP-ARIA-AES: SRTP using ARIA and AES.
T1/E1 Select
To select carrier-type of T1/E1 for the gateway, use the ‘T1/E1 Select’ menu in
Slot Setting configuration window. If this value is different with the gateway
configuration, the gateway will reboot to change carrier-type of T1/E1.
E1
T1
Diversion Userinfo Select
Select to whether to use the userinfo (sip:userinfo@domain) of Diversion header
as Caller ID.
disable
enable
Configuring FXS Ports
This section describes the configuration of analog FXS voice ports.
Select an FXS port which you want to configure in the following window, and
press [Change] button and select change.
Change configurations of the FXS port, in the following window you can change
items except User Group, Slot/Port and Gateway Name.
To configure this, FXS user must be configured in advance.

Ошибка! Используйте вкладку "Главная" для применения 제목 1 к тексту, который
должен здесь отображаться. Ошибка! Используйте вкладку "Главная" для применения 제목 1 к
тексту, который должен здесь отображаться.
SCM Express Operation Manual v12.0 113 ©Samsung Proprietary and Confidential
Figure 27. Configuring FXS Ports
Message Waiting Indication (MWI)
To enables/disables MWI for a specified FXS voice port, use the ‘Message
Waiting Indication’ menu in FXS port configuration window.
Disable: Disables MWI
Audible: Enables audible MWI
Visible: Enables visible MWI
CID Signal Type
To select type of caller ID for a specified FXS voice port, use the ‘CID Signal
Type’ menu in FXS port configuration window.
FSK: Using FSK type for sending and receiving the caller ID. This is the most
common setting. (default)
DTMF: Using DTMF type for sending and receiving the caller ID.
Loop Open Release
To enable/disable a supervisory disconnect signal on an FXS port, use the ‘Loop
Open Release’ menu in FXS port configuration window.
Extension Number
To set extension number of an FXS port, click the ‘Extension Number’ menu and
select a number from listed numbers.
To remove this port configuration, select the blank instead of the number.
CID Send
To enable/disable allowance of sending of caller ID information for a specified
FXS port, use the ‘CID Send’ menu in the FXS port configuration window.

Ошибка! Используйте вкладку "Главная" для применения 제목 1 к тексту, который
должен здесь отображаться. Ошибка! Используйте вкладку "Главная" для применения 제목 1 к
тексту, который должен здесь отображаться.
SCM Express Operation Manual v12.0 114 ©Samsung Proprietary and Confidential
Polarity Reverse Signal
To enable/disable battery polarity reversal function, use the ‘Polarity Reverse
Signal’ menu in the FXS port configuration window.
Call Progress Tone
To specify a regional analog voice-interface-related call progress tone, use the
‘Call Progress Tone’ menu in the FXS port configuration window.
Korea
USA/Canada
Britain
Italy
Germany
Russia
Australia
Media dial tone
iBG can play a media file instead of dial tone when a FXS user hook-off. To do
this, Administrator should upload the media file in iBG system.
Configuring FXO Ports
This section describes the configuration of analog FXO voice ports.
Select an FXO port which you want to configure in the following window, and
press [Change] button and select change.
Change configurations of the FXO port, in this window you can change items
except User Group, Slot/Port, Link State and Gateway Name.
To configure this, Route must be configured in advance.

Ошибка! Используйте вкладку "Главная" для применения 제목 1 к тексту, который
должен здесь отображаться. Ошибка! Используйте вкладку "Главная" для применения 제목 1 к
тексту, который должен здесь отображаться.
SCM Express Operation Manual v12.0 115 ©Samsung Proprietary and Confidential
Figure 28. Configuring FXO Ports
Destination Number
To select destination number of PLAR, use ‘Destination Number’ menu in FXO
port configuration window. PLARs (switched) connections enable the user to
make a call without dialing any digits for inbound calls for the port.
CID Signal Type
To select type of caller ID for a specified FXO voice port, use the ‘CID Signal
Type’ menu in FXO port configuration window.
FSK: Using FSK type for sending and receiving the caller ID. This is the most
common setting. (default)
DTMF: Using DTMF type for sending and receiving the caller ID.
Loop Open Release
To enable/disable a supervisory disconnect signal on an FXO port, use the ‘Loop
Open Release’ menu in FXO port configuration window.
Route Name
To select name of an FXO trunk, click ‘Route Name’ menu and select a route
name from listed names.
To remove this port configuration, select the blank instead of the name.
CID Receive
To enable/disable allowance of receiving of caller ID information for a specified
FXO port, use the ‘CID Receive’ menu in the FXO port configuration window.
Polarity Reverse Signal
To enable/disable battery polarity reversal function, use the ‘Polarity Reverse
Signal’ menu in the FXO port configuration window.
Disconnect: Enables Polarity Reverse Signal to detect disconnect

Ошибка! Используйте вкладку "Главная" для применения 제목 1 к тексту, который
должен здесь отображаться. Ошибка! Используйте вкладку "Главная" для применения 제목 1 к
тексту, который должен здесь отображаться.
SCM Express Operation Manual v12.0 116 ©Samsung Proprietary and Confidential
Disconnect-Answer: Enables Polarity Reverse Signal to detect disconnect and
answer.
Disable: Disables Polarity Reverse Signal detection.
Call Progress Tone
To specify a regional analog voice-interface-related call progress tone, use the
‘Call Progress Tone’ menu in the FXO port configuration window.
Korea
USA/Canada
Britain
Italy
Germany
Russia
Australia
Configuring PRI Trunk
This section describes the configuration of ISDN-PRI trunks.
Select an ISDN-PRI trunk which you want to configure in the following window,
and press [Change] button and select change.
Change configurations of the ISDN-PRI trunk, in this window you can change
items except User Group, Slot/Port and Gateway Name.
To configure this, Route must be configured in advance.
Figure 29. Configuring PRI Trunk

Ошибка! Используйте вкладку "Главная" для применения 제목 1 к тексту, который
должен здесь отображаться. Ошибка! Используйте вкладку "Главная" для применения 제목 1 к
тексту, который должен здесь отображаться.
SCM Express Operation Manual v12.0 117 ©Samsung Proprietary and Confidential
Sending Complete
To enable/disable sending complete options parameter, use ‘Sending Complete’
item in the PRI Trunk-Change window.
Switch Type
To select switch type, use ‘Switch Type’ menu in the PRI Trunk-Change window.
N12
DMS100
NTT
QSIG
DMS250
EURO
CCITT
4ESS
5ESS
AUS
Route Name
To select name of an ISDN-PRI trunk, click ‘Route Name’ menu and select a route
name from listed names.
To remove this port configuration, select the blank instead of the name.
PRI Trunk Type
To select type of PRI trunk, use ‘PRI Trunk Type’ menu in the PRI Trunk-Change
window.
TE
NT
Use Channels
To set number of channels, use ‘Use Channels’ menu in the PRI Trunk-Change
window.
Configuring MCN
This section describes the configuration of MCN for Survival Mode.
Press [Create] button to make a MCN rule for survival mode of the gateway.
MCN translates an original number into modified number when a call is incoming
or outgoing on the specific port. This works only for survival mode of the
gateway.

Ошибка! Используйте вкладку "Главная" для применения 제목 1 к тексту, который
должен здесь отображаться. Ошибка! Используйте вкладку "Главная" для применения 제목 1 к
тексту, который должен здесь отображаться.
SCM Express Operation Manual v12.0 118 ©Samsung Proprietary and Confidential
Figure 30. Configuring MCN
Fields Description
Slot/Port Select a slot/port applying the MCN rules.
Number Type Inbound/DID: Modify the DID number of inbound call.
Inbound/CLI: Modify the CLI number of inbound call.
Outbound/DID: Modify the DID number of outbound call.
Outbound/CLI: Modify the CLI number of outbound call.
Original Number Specify the digits want to be deleted from the first digit of original number.
Numeric number and asterisk (*) is available.
The digits don’t want to be modified should be configured with multiple * to represents the length. (ex. 124****)
Modified Number Specify the digits want to be added from the first digit of original number.
Numeric number and asterisk (*) is available.
The digits of * this field should be the same with the * digits of the Original Number field (ex. 5678****)

Ошибка! Используйте вкладку "Главная" для применения 제목 1 к тексту, который
должен здесь отображаться. Ошибка! Используйте вкладку "Главная" для применения 제목 1 к
тексту, который должен здесь отображаться.
SCM Express Operation Manual v12.0 119 ©Samsung Proprietary and Confidential
Connecting to SCM Server
Before setting iBG, you must configure SCM in advance. Here is the essential
information to start configuration:
IP address, port number, and transport type of SCM
Domain name
gw-uri name
FXS subscriber’s number and password
Trunk URI name if it needs to register the trunk
gw-uri is a representative name of Ubigate iBG and SCM maintains iBG as an
Endpoint.
Domain name of iBG must be same with SCM’s configuration.
Check if TCP 8088 port is being used for the management channel.
Timer values such as registration refresh timer and failure retry timer.
Other parameters such as type of DTMF relay, use of Session Timer, list of IP
phones that are maintained by iBG when in survivable telephony mode.
You should shutdown voip-gateway before configuring call-server, and the VoIP
gateway source address must be set in advance.
You can set the call server in the following ways:
Step Command Purpose
1 configure terminal
Example)
# configure terminal
To go Into global configuration mode.
2 voip-gateway
Example)
/configure# voip-gateway
To go Into voip-gateway configuration mode.
3 shutdown To shut down voip call services
4 bind control interface type num
Example)
/configure/voip-gateway# bind control interface ethernet 0/0
Setting source interface for SIP
5 bind media interface type num
Example)
/configure/voip-gateway# bind media interface ethernet 0/0
Setting source interface for media
6 host domain-name DOMAIN.COM
Example)
/configure/voip-gateway# host domain-name scme.com
Setting domain name
7 call-server ip-address ip-addr [udp|tcp|tls] [sip|sips] [expires expires] [retry retry]
Setting a SCM server IP Address.
Expire and retry timer for FXS subscribers and

Ошибка! Используйте вкладку "Главная" для применения 제목 1 к тексту, который
должен здесь отображаться. Ошибка! Используйте вкладку "Главная" для применения 제목 1 к
тексту, который должен здесь отображаться.
SCM Express Operation Manual v12.0 120 ©Samsung Proprietary and Confidential
Step Command Purpose
Example)
/configure/voip-gatway# call-server ip-address ipv4:90.90.90.100
trunks may be set.
Use voice service of SIP global configuration for transport type and URL
8 call-server ip-address ip-addr [udp|tcp|tls] [sip|sips] [expires expires] [retry retry] secondary
Example)
/configure/voip-gatway# call-server ip-address ipv4:90.90.90.101 secondary
Setting secondary SCM server IP Address.
Expires and retry timer for FXS subscribers and trunks may be set.
Use voice service SIP global configuration for transport type and uri.
9 call-server gw-uri uri [expires expires] [retry retry]
Example)
/configure/voip-gateway# call-server gw-uri iBG2016
Setting gw-uri and Ubigate iBG will register to SCM as an Endpoint.
Expires and retry timer of GW-URI may be set.
10 no shutdown Enables voip call services
11 exit
Example)
/configure/voip-gateway# exit
To exit the current mode.
Updating Gateway Software
The system contains Ubigate SNOS images. Your system already has an image on
it when you receive the system. Nevertheless, you may want to load a different
image onto the Ubigate system at some point. For example, you may want to
upgrade your software to the latest release, or you may want to use the same
SNOS release for all the Ubigate systems in a network. Different system images
contain different sets of SNOS features.
SNOS Update Procedure
Following steps presume that the storage media to save the new SNOS image is
compact flash.
1 Verify the amount of free space on the flash memory card.
2 Verify that the FTP/TFTP Server has IP Connectivity to the Router.
3 Copy the New Image onto the Flash Memory Card Through the FTP/TFTP
Server.
4 Verify SNOS image’s validation.
5 Set Boot Parameter to load the New Image On Startup.
6 Reboot the Router to load the New Image.
7 Verify the Upgraded Image Version.
Step Command Purpose
1 Router #file To go into the file mode.
2 Router /file# ls /cf0 Checking free space in compact flash.
3 Router /file#ping 90.90.90.240 Verifying Connectivity to ftp/tftp server
4 Router /file# download 90.90.90.240 Downloading from ftp server to compact flash

Ошибка! Используйте вкладку "Главная" для применения 제목 1 к тексту, который
должен здесь отображаться. Ошибка! Используйте вкладку "Главная" для применения 제목 1 к
тексту, который должен здесь отображаться.
SCM Express Operation Manual v12.0 121 ©Samsung Proprietary and Confidential
Step Command Purpose
ftpboot/mpu81/iBG2016_Advanced_2.0.1.Z /cf0/iBG2016_Advanced_2.0.1.Z type ftp
5 Router /file# ls /cf0 Checking downloaded images in compact flash
6 Router /file # version /cf0/iBG2016_Advanced_2.0.1.Z
Verifying image’s validation
7 Router /file # boot_params Changing boot file name
8 Router# show version Verify version number
Supplementary Service on Survival mode
Ubigate iBG series provide following features only on survival mode.
Service Description
Call Forward Call Forward All, Busy and No Answer
Hold/Resume Call Hold, Resume
Transfer Consultation and Blind Transfer
DND Do Not Disturb
Conference Conference On Answer Only
Call Waiting Call Waiting
Call Pickup Direct and Group Call Pickup
MOH Music On Hold

Ошибка! Используйте вкладку "Главная" для применения 제목 1 к тексту, который
должен здесь отображаться. Ошибка! Используйте вкладку "Главная" для применения 제목 1 к
тексту, который должен здесь отображаться.
SCM Express Operation Manual v12.0 122 ©Samsung Proprietary and Confidential
Configuring OfficeServ 7000 Gateway
SCM also used OfficeServ 7000 series for its gateway equipment. This chapter
describes how OfficeServ 7000 series to be configured for SCM gateway.
Connecting to Network
On the SIO screen, for connecting to OfficeServ 7000 Series, enter the ip_help
command to view a list of available commands.
Set the IP address with the ‘ip_set’ command, check the IP address with the
‘ip_config’ command, and restart OfficeServ 7000 Series with the ‘sys_reset’
command.
Example)

Ошибка! Используйте вкладку "Главная" для применения 제목 1 к тексту, который
должен здесь отображаться. Ошибка! Используйте вкладку "Главная" для применения 제목 1 к
тексту, который должен здесь отображаться.
SCM Express Operation Manual v12.0 123 ©Samsung Proprietary and Confidential
Connecting to PSTN
FXS Settings
To register an FXS phone connected to OfficeServ 7000 Series with SCM and use
it as a SIP phone, the following items must be configured for SCM and OfficeServ
7000 Series.
SCM Settings
A device must be created in the [CONFIGURATION > User > Single Phone
User] menu.
OfficeServ 7000 Series Settings
The following must be configured in the ‘5.2.13 SIP Carrier Options’ menu of
OfficeServ DM.
Name Description
SIP Carrier Name Set to SCM
SIP server Enable Enabling SIP server.
Outbound Proxy Specify the IP address or the domain name of SCM.
Alternative Outbound Proxy
Specify the IP address of Slave SCM on Active-Active configuration.
Proxy Domain Name Domain Name of SCM User Group, Please refer to [CONFIGURATION > User Group > Change User Group > Information > Host]
Regist. Per User Set to Enable.
Send CLI Table Specify a table containing the subscriber’s caller number.
Select one from Tables 1 through 4 in the ‘2.4.3 Send CLI Number’ menu of OfficeServ DM.
Dual Registration Set to Enable on Active-Active configuration
In the ‘5.2.14 SIP Users’ menu of OfficeServ DM, ‘User Name’, ‘Auth
Username’, ‘Auth Password’, and ‘Tel number’ must all be set to the extension
number of the FXS phone.
Name Description
User Name Specify the number for the extension to be registered as an subscriber. Please refer to [CONFIGURATION > User > Single Phone User > Phone Login ID]
Auth Username ID of the extension for authentication. Please refer to [CONFIGURATION > User > Single Phone User > Authentication User ID].
Auth Password Password of the extension for authentication. Please refer to [CONFIGURATION > User > Single Phone User > Authentication Password].
Tel number Specify the extension number of ‘2.8.0 Numbering Plan’ of OfficeServ DM

Ошибка! Используйте вкладку "Главная" для применения 제목 1 к тексту, который
должен здесь отображаться. Ошибка! Используйте вкладку "Главная" для применения 제목 1 к
тексту, который должен здесь отображаться.
SCM Express Operation Manual v12.0 124 ©Samsung Proprietary and Confidential
If you want to call the called party without EOD (End Of Digit), the following two
items must be configured. Tables 1 through 4 must be configured in the ‘2.4.3
Send CLI Number’ menu of OfficeServ DM. Enter the FXS phone’s extension
number in the table selected for ‘Send CLI Table’ in the ‘5.2.13 SIP Carrier
Options’ menu of OfficeServ DM.
The following must be configured in the ‘3.3.6 SCM Dial Plan’ menu of
OfficeServ DM.
Name Description
SCM Digit Enter various numbers entered by the subscriber. They can be up to 10 digits long.
Tel Length Enter the number of digits specified as the SCM digit.
Example) For an 8-digit phone number starting with 1, enter 1 for SCM Digit and 8 for Length.
To service the FXS phones with SRTP, ‘SRTP Option’ must be set to Enable in
the ‘5.2.16 MGI Options’ menu of OfficeServ DM.
Trunk Settings
To register a trunk connected to OfficeServ 7000 Series with SCM and use it as a
SIP trunk, the following items must be configured for SCM and OfficeServ 7000
Series.
SCM Settings
A route must be created in the [CONFIGURATION > Trunk Routing > Route]
menu.
A LCR route must be created in the [CONFIGURATION > Trunk Routing >
Route Sequence] and the [CONFIGURATION > Trunk Routing > Route
Partition] menu.
An access code must be created in the [CONFIGURATION > Trunk Routing >
Access Code] menu.
OfficeServ 7000 Series Settings
The following must be configured in the ‘5.2.13 SIP Carrier Options’ menu of
OfficeServ DM.
Name Description
SIP Carrier Name Set to SCM
SIP server Enable Enabling SIP server.
Outbound Proxy Specify the IP address or the domain name of SCM.
Alternative Outbound Proxy
Specify the IP address of Slave SCM on Active-Active configuration.
Proxy Domain Name Domain Name of SCM User Group. Please refer to [CONFIGURATION > User Group > Change User Group > Information > Host]
Regist. Per User Set to Enable.

Ошибка! Используйте вкладку "Главная" для применения 제목 1 к тексту, который
должен здесь отображаться. Ошибка! Используйте вкладку "Главная" для применения 제목 1 к
тексту, который должен здесь отображаться.
SCM Express Operation Manual v12.0 125 ©Samsung Proprietary and Confidential
Name Description
Trunk CLI Table Specify a table containing the called phone number to be used for incoming analog trunk calls. Select one from Tables 1 through 4 in the ‘2.4.3 Send CLI Number’ menu of OfficeServ DM.
Dual Registration Set to Enable on Active-Active configuration
The following must be configured in the ‘5.2.14 SIP Users’ menu of OfficeServ
DM.
Name Description
User Name Specify the number for the trunk group to be registered as an endpoint. Please refer to [CONFIGURATION > Trunk Routing > Route > User Name]
Auth Username ID of the endpoint for authentication. Please refer to [CONFIGURATION > Trunk Routing > Route > Authentication User Name].
Auth Password Password of the endpoint for authentication. Please refer to [CONFIGURATION > Trunk Routing > Route > Authentication Password].
Tel number Enter the called group number for the trunk. The called group number is the number specified for ‘Group Number’ in the ‘4.1.2 Trunk Groups’ menu of OfficeServ DM.
Tables 1 through 4 must be configured in the ‘2.4.3 Send CLI Number’ menu of
OfficeServ DM.
Enter the called phone number to use for incoming analog trunk calls in the table
selected for ‘Trunk CLI Table’ in the ‘5.2.13 SIP Carrier Options’ menu of
OfficeServ DM.
Connecting to SCM Server
Normal Connection Mode
To have OfficeServ 7000 Series interoperate with SCM, the following items must
be configured for SCM and OfficeServ 7000 Series.
SCM Settings
You must register a trunk route of the OfficeServ 7000 Series to interoperate with
SCM using [CONFIGURATION > Trunk Routing > Route] menu.
Item Description
Route Name Enter a name for OfficeServ 7000 Series.
Register Type Select ‘Receive REGISTER’.
Proxy Server Enter the IP address of OfficeServ 7000 Series.
Port Enter 5060.
User Name Enter the name for OfficeServ 7000 Series. Please refer to

Ошибка! Используйте вкладку "Главная" для применения 제목 1 к тексту, который
должен здесь отображаться. Ошибка! Используйте вкладку "Главная" для применения 제목 1 к
тексту, который должен здесь отображаться.
SCM Express Operation Manual v12.0 126 ©Samsung Proprietary and Confidential
Item Description
[CONFIGURATION > Gateway > Gateway Link Setting > Name].
You must register the OfficeServ 7000 Series to interoperate with SCM using the
[CONFIGURATION > Gateway > Gateway Link Setting] menu.
Item Description
User Group Specify a user group which will be assigned to OfficeServ 7000 Series.
Name Enter a name for OfficeServ 7000 Series. Please refer to [CONFIGURATION > Trunk Routing > Route > User Name].
Gateway Type Enter a type for OfficeServ 7000 Series.
IP Address Enter the IP address of OfficeServ 7000 Series.
OfficeServ 7000 Series Settings
You must register the SCM to interoperate using the ‘5.6.1 System I/O Parameter’
menu of OfficeServ DM.
Name Description
SCM Express Server > Master IP Address
Enter the IP address of SCM to interoperate.
SCM Express Server > Slave IP Address
Enter the IP address of Slave SCM to interoperate on Active-Active configuration.
The following must be configured in the ‘5.2.13 SIP Carrier Options’ menu of
OfficeServ DM.
Name Description
SIP Carrier Name Set to SCM
SIP server Enable Enabling SIP server.
Outbound Proxy Specify the IP address or the domain name of SCM.
Alternative Outbound Proxy
Specify the IP address of Slave SCM on Active-Active configuration.
Regist. Per User Set to Enable.
User Name Specify the number for the gateway to be registered as an endpoint.
Please refer to [CONFIGURATION > Trunk Routing > Route > User Name] and [CONFIGURATION > Gateway > Gateway Link Setting > Name].
Auth Username Username of the gateway for authentication. Please refer to [CONFIGURATION > Trunk Routing > Route > Authentication User Name].
Auth Password Password of the gateway for authentication. Please refer to [CONFIGURATION > Trunk Routing > Route > Authentication Password].
Dual Registration Set to Enable on Active-Active configuration

Ошибка! Используйте вкладку "Главная" для применения 제목 1 к тексту, который
должен здесь отображаться. Ошибка! Используйте вкладку "Главная" для применения 제목 1 к
тексту, который должен здесь отображаться.
SCM Express Operation Manual v12.0 127 ©Samsung Proprietary and Confidential
The following must be configured in the ‘5.2.14 SIP Users’ menu of OfficeServ
DM.
Name Description
User Name Specify the number for the gateway to be registered as an endpoint.
Please refer to [CONFIGURATION > Trunk Routing > Route > User Name] and [CONFIGURATION > Gateway > Gateway Link Setting > Name].
Auth Username Username of the gateway for authentication. Please refer to [CONFIGURATION > Trunk Routing > Route > Authentication User Name].
Auth Password Password of the gateway for authentication. Please refer to [CONFIGURATION > Trunk Routing > Route > Authentication Password].
Tel number Enter the any trunk group number for the trunk. The trunk group number is the number specified for ‘Group Number’ in the ‘Trunk Groups’ menu of OfficeServ DM.
Survivable Telephony Mode
When SCM’s gateway is interoperating with SCM, if the gateway determines that
the IP network with SCM is disconnected, it uses the service profiles downloaded
from SCM for the FXS subscribers and SIP phone subscribers to continue to
provide gateway’s native call processing services.
In particular, OfficeServ 7000 Series use the SIP phone subscriber service profile
downloaded from SCM to automatically configure dial-peer for processing
incoming calls for SIP phones and authenticates SIP phones in order to make calls
and provide supplementary services.
OfficeServ 7000 Series periodically (30 seconds by default) send Register
messages to SCM. If it receives a 200 OK response, it enters the SCM
interoperation mode again.
To provide services in the survivable telephony mode, the following must be
configured for SCM and OfficeServ 7000 Series.
SCM Settings
A list of SIP phones to be accommodated by each gateway when in survival mode
must be configured in the [CONFIGURATION > Gateway > Gateway Link
Setting] menu.
Name Description
User Group Specify a user group which is assigned to OfficeServ 7000 Series.
Name Enter a name for OfficeServ 7000 Series. Please refer to [CONFIGURATION > Trunk Routing > Route > User Name].
Gateway Type This is the type of the gateway to interoperate. Select one of the OfficeServ series.

Ошибка! Используйте вкладку "Главная" для применения 제목 1 к тексту, который
должен здесь отображаться. Ошибка! Используйте вкладку "Главная" для применения 제목 1 к
тексту, который должен здесь отображаться.
SCM Express Operation Manual v12.0 128 ©Samsung Proprietary and Confidential
Name Description
IP Address This is the IP address of the gateway to interoperate.
Survivability Users This is the list of phones to allocate to OfficeServ 7000 Series.
When SCM creates the profile for a SIP phone, it includes the IP address and the
port of the interoperating gateway in survival mode. When the SIP phone is
disconnected from SCM, it sends a register message to the gateway included in the
profile.
Database Settings for OfficeServ 7000 Series
When interoperating with SCM, OfficeServ 7000 Series download the subscriber
profile from SCM and configures a database to be used by OfficeServ 7000 Series
in survival mode. For OfficeServ 7000 Series to be able to download subscriber
profiles from SCM, SIP extension slots must be created for saving the subscriber
information. The number of SIP extension slots created must match the number of
SIP subscribers to allocate in ‘6.3.2 Virtual Card Change’ of OfficeServ DM.
Provisioning Settings for OfficeServ 7000 Series
The OfficeServ 7000 Series provisioning feature automatically download the
database from SCM, modifies it into the OfficeServ 7000 Series database format
and applies it to OfficeServ 7000 Series. To use the OfficeServ 7000 Series
provisioning feature, TCP links for provisioning must be created for both SCM
and OfficeServ 7000 Series. The settings are the same as the normal gateway
interoperation settings.
Updating Gateway Software
Store appropriate package file provided by provider in the media card of MP Card
using media card reader. (7100/7070 package needs to unzip) And then reboot
OfficeServ 7000 Series by pressing RST of MP Card.
System MP Card Package Name
OfficeServ 7400 MP40 MPEGXXX.pgm
OfficeServ 7200 MP20 MPSGXXX.pgm
OfficeServ 7100 MP10a MP10a_GXXX.zip
OfficeServ 7070 MP07 MP07_GXXX.zip
Supplementary Service on Survival mode
OfficeServ 7000 series service following features only on survival mode.
Service Description
Call Forward Call Forward All, Busy and No Answer
Hold/Resume Call Hold/Resume
Transfer Consultation and Blind Transfer
DND Do Not Disturb

Ошибка! Используйте вкладку "Главная" для применения 제목 1 к тексту, который
должен здесь отображаться. Ошибка! Используйте вкладку "Главная" для применения 제목 1 к
тексту, который должен здесь отображаться.
SCM Express Operation Manual v12.0 129 ©Samsung Proprietary and Confidential
Conference Conference On Answer Only
Call Waiting Call Waiting
Call Pickup Direct and Group Call Pickup
MOH Music On Hold

Ошибка! Используйте вкладку "Главная" для применения 제목 1 к тексту, который
должен здесь отображаться. Ошибка! Используйте вкладку "Главная" для применения 제목 1 к
тексту, который должен здесь отображаться.
SCM Express Operation Manual v12.0 130 ©Samsung Proprietary and Confidential
Configuring IPX-G500B Gateway
This chapter describes how IPX-G500B (IPX-G520/G540) to be configured for
SCM gateway and how to update software and initialize it.
Configuring IPX-G500B
You have to set IP address of IPX-G5X0 Series, IP address of SCM Express that
this gateway belongs to, the name of gateway and the sequence of IPX-
G520S/540S.
Connecting CLI
To connect CLI, please do the followings.
Connect a serial cable to the console port of gateway.
Run a terminal program on your PC and set baud rate (bps) to 38,400.
Enter ID (admin) and password (samsung) to log on.
Enter ‘cli’ and press enter.
Welcome to Samsung IPX-G500
IPT-NPU login: admin
Password:
###############################################################
# #
# #
# Samsung IPTGW-NPU #
# #
# Enter 'cli' to set basic configuration #
# #
# #
###############################################################
S A M S U N G - I P T G W
---------------------------------------------------
admin@IPT-NPU:~#
IPX-G500B (NPU) basic settings
Connect the console port 1 of IPX-G500B. (baud rate: 38,400 bps)
Enter ID and password to log on.
Enter “cli”.
Select ‘1. Setup basic configuration’.
Enter IP address, Gateway and Subnet mask of NPU according to the
instructions.
Enter IP address of GWU.

Ошибка! Используйте вкладку "Главная" для применения 제목 1 к тексту, который
должен здесь отображаться. Ошибка! Используйте вкладку "Главная" для применения 제목 1 к
тексту, который должен здесь отображаться.
SCM Express Operation Manual v12.0 131 ©Samsung Proprietary and Confidential
Enter IP address of SCM Express that is connected.
Enter the name of gateway. It should be same with gateway link settings of
SCM Express.
To apply the settings, you have to restart the system. Enter ‘yes’ to restart it,
otherwise enter ‘no’.
###### Please enter [IP/Gateway/Subnet Mask] of this NPU ######
1. Enter NPU IP Address (Enter Key : 10.251.191.154 ) :
2. Enter Gateway Address (Enter Key : 10.251.191.1 ) :
3. Enter Subnet Mask (Enter Key : 255.255.255.0 ) :
###### Please enter the IP Address of GWU ######
1. Enter GWU IP Address (Enter Key : 10.251.191.46 ) :
###### Please enter the IP Address of SCME ######
1. Enter SCME IP Address (Enter Key : 10.251.192.126 ) :
###### Please enter the name of this GW (Max 30char) ######
1. Enter Name of this GW (Enter Key : G500_default ) :
End of Configuration. To apply it, please restart the system.
Do you want to restart? (yes/no) :
IPX-G500B (GWU) basic settings
Connect the console port 2 of IPX-G500B. (baud rate: 38,400 bps)
Enter ID and password to log on.
Enter “cli”.
Select ‘1. Setup basic configuration’.
Enter IP address, Gateway and Subnet mask of GWU according to the
instructions.
Enter IP address of NPU.
To apply the settings, you have to restart the system. Enter ‘yes’ to restart it,
otherwise enter ‘no’.
###### Please enter [IP/Gateway/Subnet Mask] of this GWU ######
1. Enter GWU IP Address (Enter Key : 10.251.191.46 ) :
2. Enter Gateway Address (Enter Key : 10.251.191.1 ) :
3. Enter Subnet Mask (Enter Key : 255.255.255.0 ) :
###### Please enter the IP Address of NPU ######
1. Enter NPU IP Address (Enter Key : 10.251.191.154 ) :
End of Configuration. To apply it, please restart the system.
Do you want to restart? (yes/no) :

Ошибка! Используйте вкладку "Главная" для применения 제목 1 к тексту, который
должен здесь отображаться. Ошибка! Используйте вкладку "Главная" для применения 제목 1 к
тексту, который должен здесь отображаться.
SCM Express Operation Manual v12.0 132 ©Samsung Proprietary and Confidential
IPX-G520S/540S (ECU) basic settings
Connect the console port of IPX-G520S/540S. (baud rate: 38,400bps)
Enter ID and password to log on.
Enter “cli”.
Select ‘1. Setup basic configuration’.
Enter IP address, Gateway and Subnet mask of ECU according to the
instructions.
Enter IP address of NPU.
Enter the sequence number of ECU from 1 to 6.
To apply the settings, you have to restart the system. Enter ‘yes’ to restart it,
otherwise enter ‘no’.
###### Please enter [IP/Gateway/Subnet Mask] of this ECU ######
1. Enter ECU IP Address (Enter Key : 10.251.191.177 ) :
2. Enter Gateway Address (Enter Key : 10.251.191.1 ) :
3. Enter Subnet Mask (Enter Key : 255.255.255.0 ) :
###### Please enter the IP Address of NPU ######
1. Enter NPU IP Address (Enter Key : 10.251.192.162 ) :
1. Enter this ECU number (Enter Key : 1) :
End of Configuration. To apply it, please restart the system.
Do you want to restart? (yes/no) :
Configuring SCM
Gateway Link Setting
To add a gateway, create a new gateway link at [Configuration > Gateway >
Gateway Link Setting].

Ошибка! Используйте вкладку "Главная" для применения 제목 1 к тексту, который
должен здесь отображаться. Ошибка! Используйте вкладку "Главная" для применения 제목 1 к
тексту, который должен здесь отображаться.
SCM Express Operation Manual v12.0 133 ©Samsung Proprietary and Confidential
Name Description
User Group Specify a user group which will be assigned to Gateway
Name Enter a name for Gateway. This name should be unique and it should be same with the name configured by gateway CLI.
Gateway Type Model type for Gateway. (IPX-G500)
IP Address (for SIP register)
Enter the IP address of Gateway for SIP registration.
IP Address (for Provision) Enter the IP address of Gateway for provision. Generally this should be same address for SIP register.
NAT If the gateway is running under NAT, Enables this option.
Public IP Address When the gateway is running under NAT, enter the public IP address of Gateway.
MAC Address (0) Enter the gateway MAC address.
If it is set, it only allows the system that has this MAC address.
MAC Address (1) Do not use.
URL Do not use.
To connect OfficeServ or Ubigate web admin, enter the URL of gateway.
Gateway Reconnect Select the option whether reconnect the link between gateway and SCM or not.
Upgrade Upgrade the software of this gateway according to the

Ошибка! Используйте вкладку "Главная" для применения 제목 1 к тексту, который
должен здесь отображаться. Ошибка! Используйте вкладку "Главная" для применения 제목 1 к
тексту, который должен здесь отображаться.
SCM Express Operation Manual v12.0 134 ©Samsung Proprietary and Confidential
Name Description
upgrade settings. (Not saved)
Login IP Address (MAT) Do not use
Login Password (MAT) Do not use
Survivability Users-SIP This is the list of SIP phones for survivability to allocate to the voice gateway.
When SCM creates the profile for a SIP phone, it includes the IP address and the port of the interoperating gateway in survival mode. When the SIP phone is disconnected from SCM, it sends a register message to the gateway included in the profile.
Survivability Users-FXS This is the list of FXS phones of the voice gateway. If the gateway type is IPX-G500, this item is not selective list.
Gateway Configuration
You can configure the new gateway at [Configuration > Gateway > IPX Setting
> Configuration]. It is able to set the followings.
Profile Login ID/Password
IP Settings
Slot/Expansion Settings
Basic Configuration
<Read Only>
It shows basic informations assigned by Gateway Link Setting menu and you
cannot change it.
Name Description
User Group User Group
Gateway Name Gateway name assigned by Gateway Link Setting menu.
Gateway Type Gateway Type (IPX-G500)
Power Type Gateway Power Type

Ошибка! Используйте вкладку "Главная" для применения 제목 1 к тексту, который
должен здесь отображаться. Ошибка! Используйте вкладку "Главная" для применения 제목 1 к
тексту, который должен здесь отображаться.
SCM Express Operation Manual v12.0 135 ©Samsung Proprietary and Confidential
Name Description
IPX-G500B (Single Power)
IPX-G500BP (Dual Power)
TCP Link State TCP Link State between Gateway and SCM
Dial Plan Dial plan of selected gateway
Dial Tone Dial tone of selected gateway
<others>
Name Description
Profile Login ID Profile Login ID that is used when gateway requests provisioning to get its profiles from SCM.
Profile Login Passcode Profile Login Passcode that is used when gateway requests provisioning to get its profiles from SCM.
Survival Mode Default Route
Default Route of Survival Mode.
If user dials invalid access code in survival mode, gateway will make a call with default route.
Located Country Country the gateway is located
Country Code Country code the gateway is located.
Area Code Area code the gateway is loated
FAX Relay Fax Relay (T.38, Pass Through)
FAX Relay (Inter-Gateway)
Fax Relay between GW and GW (T.38, Pass Through)
DTMF Relay DTMF Relay(Outband, RFC2833, In Voice)
Media Type Media Type
RTP, SRTP (AES/ARIA128), SRTP (ARIA128/AES), SRTP (AES/ARIA192), SRTP (ARIA192/AES), SRTP (AES), SRTP (ARIA128), SRTP (ARIA192)
Main IP Address/Main Gateway/Main Netmask
NPU IP Address. Gateway, Subnet Mask
This should be same as NPU IP address, Gateway and Subnet mask which was set on NPU board by cli.
Sub IP Address/Sub Gateway/Sub Netmask
GWU IP Address. Gateway, Subnet Mask
This should be same as GWU IP address, Gateway and Subnet mask which was set on GWU board by cli.

Ошибка! Используйте вкладку "Главная" для применения 제목 1 к тексту, который
должен здесь отображаться. Ошибка! Используйте вкладку "Главная" для применения 제목 1 к
тексту, который должен здесь отображаться.
SCM Express Operation Manual v12.0 136 ©Samsung Proprietary and Confidential
lot Configuration
Name Description
Slot1~Slot4 Configuration Select GWU slot1~4 card type. (4FXO, 4FXS)
Selected card should be same as actual installed card. But if card is not installed yet, you should select card which is scheduled to be installed on the designated slot.
Slot1~Slot4 State (read only) Actually installed card type
Expansion1~6 Configuration Select Expansion1~6 type.
(IPX-G520S (20FXS), IPX-G540S (40FXS))
Selected Expansion should be same as actual installed Expansion. But if Expansion is not installed yet, you should select Expansion which is scheduled to be installed.
Expansion 1~6 State (read only)
Actually installed Expansion type
Expansion Private Configuration
Enter private IP addresses of expansions in this menu.

Ошибка! Используйте вкладку "Главная" для применения 제목 1 к тексту, который
должен здесь отображаться. Ошибка! Используйте вкладку "Главная" для применения 제목 1 к
тексту, который должен здесь отображаться.
SCM Express Operation Manual v12.0 137 ©Samsung Proprietary and Confidential
Name Description
Expansion1~6 Private IP Address
Expansion1~6 Private IP Address.
This IP address should be same as ECU IP address which was set on ECU board by cli.
Expansion1~6 Private Gateway
Expansion1~6 Private Gateway Address.
Expansion1~6 Private Netmask
Expansion1~6 Private Subnet mask.
Expansion1~6 Private Port Expansion1~6 Private Port number.
Create a single phone user
You should create a single phone user connected to the gateway at [Configuration
> User > Single Phone User].
“Phone type” should be “Analog-FXS-Phone”.
You have to assign “Gateway Name” at Interworking tab.
Analog phone
Assign created phone number to the port of the gateway at [Configuration >
Gateway > IPX Setting > Analog Phone].

Ошибка! Используйте вкладку "Главная" для применения 제목 1 к тексту, который
должен здесь отображаться. Ошибка! Используйте вкладку "Главная" для применения 제목 1 к
тексту, который должен здесь отображаться.
SCM Express Operation Manual v12.0 138 ©Samsung Proprietary and Confidential
Name Description
Extension Number The extension number of the analog phone.
CID Send Support CID Send Support (Enable/Disable)
CID Type The type of FSK CID (ITU-T/Bellcore)
MWI Send Support MWI Send Support (Enable/Disable)
Loop Open Release Loop Open Release feature. (Enable/Disable)
If this feature is enabled, FXS Loop will be disconnected (Power Down) for a while when the opponent hang up.
PRS Send Support PRS Send Support feature. (Enable/Disable)
If this feature is enabled, the PRS signal will be generated when the opponent answer.
Ring Type Station Ring Type (Gateway1~6 Ring)
Tx Gain The Tx gain of this extension (-4~+4 dB)
Rx Gain The Rx gain of this extension (-4~+4 dB)
Feature Tone Indicaton When Call Forward or DND or Extension Lock feature is enabled, special dial tone will be played instead of normal dial tone.
Gateway Route
You should create a route information at [Configuration > Trunk Routing >
Route].
“Register Type” should be ‘Receive REGISTER’.
“Route Name” should be same with the gateway name assigned by Gateway
Link Setting menu.

Ошибка! Используйте вкладку "Главная" для применения 제목 1 к тексту, который
должен здесь отображаться. Ошибка! Используйте вкладку "Главная" для применения 제목 1 к
тексту, который должен здесь отображаться.
SCM Express Operation Manual v12.0 139 ©Samsung Proprietary and Confidential
“Call Authentication” should be ‘Disable’ in Additional SIP tab.
FXO Route
If you have a FXO card in your gateway, you should create a route information for
the FXO at [Configuration > Trunk Routing > Route].
“Register Type” should be ‘Receive REGISTER’.
“Call Authentication” should be ‘Disable’ in Additional SIP tab.
Analog Trunk
Assign a created FXO route to the FXO port of gateway.
Name Description
Route Name The trunk route name to which this trunk belong.
Link State Current connection state of FXO.
CID Receive Support CID Receive Support (Enable/Disable)
Ring Destination Number The destination number to be rung when this trunk port detects ring signal.
PRS Receive Support Disable
Answer-Disconnect
o 1st PRS Detect: Opponent answer
o 2nd PRS Detect: Opponent hang up and the line will be released automatically.
Disconnect
o 1st PRS Detect: Opponent hang up and the line will be released automatically.
Tone Detection Disable
Busy Tone
NU/Congestion Tone
Both (Busy Tone, NU/Congestion Tone)
If selected tone is detected, the line will be released automatically.
Loop Type Short (~1 Km)
Mid (1~3 Km)

Ошибка! Используйте вкладку "Главная" для применения 제목 1 к тексту, который
должен здесь отображаться. Ошибка! Используйте вкладку "Главная" для применения 제목 1 к
тексту, который должен здесь отображаться.
SCM Express Operation Manual v12.0 140 ©Samsung Proprietary and Confidential
Name Description
Long (3 Km~)
TX Gain The Tx gain of this TRK (-4~+4 dB)
RX Gain The Rx gain of this TRK (-4~+4 dB)
Update Software
File Upload
To update gateway software, you have to upload gateway software package at
[Configuration > Gateway > IPX Setting > File Upload].
Upgrade Configuration
Enter the software version, protocol, ID, Password, etc at [Configuration >
Gateway > IPX Setting > Upgrade Configuration] to update software.

Ошибка! Используйте вкладку "Главная" для применения 제목 1 к тексту, который
должен здесь отображаться. Ошибка! Используйте вкладку "Главная" для применения 제목 1 к
тексту, который должен здесь отображаться.
SCM Express Operation Manual v12.0 141 ©Samsung Proprietary and Confidential
Upgrade
Select the gateway to update software at [Configuration > Gateway >
Gateway Link Setting]. Then press change button and popup window will
show up. Change ‘Upgrade’ to Yes and press Apply or Change button.
(Warning: This option is not saved, so if ‘Gateway Reconnect’ is Yes, it will
not upgrade gateway software)
Then the gateway will update its software and reset when it completes.

Ошибка! Используйте вкладку "Главная" для применения 제목 1 к тексту, который
должен здесь отображаться. Ошибка! Используйте вкладку "Главная" для применения 제목 1 к
тексту, который должен здесь отображаться.
SCM Express Operation Manual v12.0 142 ©Samsung Proprietary and Confidential
Check Gateway Version
After the upgrading software, you can see the changed version at [Configuration
> Gateway > IPX Setting > Version]
Initializing
To initialize all configurations of gateway, do the followings.

Ошибка! Используйте вкладку "Главная" для применения 제목 1 к тексту, который
должен здесь отображаться. Ошибка! Используйте вкладку "Главная" для применения 제목 1 к
тексту, который должен здесь отображаться.
SCM Express Operation Manual v12.0 143 ©Samsung Proprietary and Confidential
Connect the serial cable to the console port of system to initialize. (baud rate:
38,400 bps)
Enter ID and Password to log on.
Enter “cli”.
Select ‘4. Factory Reset’.
It will ask you it is sure. It will remove all configurations. Enter ‘yes’.
##################################
# #
# GW Setup Manager #
# #
##################################
1. Setup basic configuration
2. Show current configuration
3. Show version
4. Factory Reset
5. Exit
Please select the number : 4
This will clear all configurations. Do you want to continue? (yes/no) :

SCM Express Operation Manual v12.0 144 ©Samsung Proprietary and Confidential
Chapter 4 Call Service
This chapter describes the call processing services provided by SCM and how to
configure them.
SCM provides the following three types of call processing services.
System features: Determine the overall operation of the system. You can
configure a system service for the entire system or a user group.
User features: Configured for each user.
System Features
System features are performed according to the configuration of the system, not
individual user setting.
Anonymous Call Reject
The anonymous call reject service rejects anonymous incoming trunk calls without
caller IDs.
An anonymous call’s SIP message has [email protected] in the
From header.
To use the anonymous call reject service, set ‘Anonymous Call Reject’ to
Anonymous Reject in the [CONFIGURATION > Trunk Routing > Route]
Trunk Service tap.
To use the no number call reject service, set ‘Anonymous Call Reject’ to No
Number Reject. Also, to use both type rejections, set ‘Anonymous Call Reject’ to
Both Reject.
Call Admission Control (CAC)
Since system resources are limited, a service is required to set the maximum
number of calls at any one time. The Call Admission Control (CAC) service
provided by SCM includes CAC by call counts, CAC by location bandwidth, CAC
by system resources, and CAC by trunk call counts.
All CAC is independently operated by each node.
CAC Override for Emergency Call
All CAC can override for emergency call.
When the emergency call occurs, SCM drop the other call.
For using CAC override, Trunk need to configured the maximum outbound call
and maximum call.

Ошибка! Используйте вкладку "Главная" для применения 제목 1 к тексту, который
должен здесь отображаться. Ошибка! Используйте вкладку "Главная" для применения 제목 1 к
тексту, который должен здесь отображаться.
SCM Express Operation Manual v12.0 145 ©Samsung Proprietary and Confidential
CAC by Call Counts
CAC by call counts restricts calls when the maximum usage ratio set for the
maximum number of calls supported by SCM is exceeded.
If the maximum usage ratio for CAC by call counts is 100, the maximum number
of calls supported by SCM is allowed. The default maximum usage ratio for CAC
by call counts is 100.
You can view the maximum number of calls simultaneously supported by SCM
under ‘Maximum Call’ in the [CONFIGURATION > Miscellaneous > System
Capacity] menu.
You can set the maximum usage ratio for CAC by call counts under ‘Local CAC
Threshold’ in the [MANAGEMENT > Call Admission Control > Local CAC]
menu.
The number of calls allowed simultaneously by CAC by call counts is calculated
by the following formula: (Maximum Call) * (Local CAC Threshold)/100.
CAC by Location Bandwidth
The CAC by location bandwidth service restricts the calls made in excess of the
bandwidth set for each location.
When calls are made between users or endpoints in different locations, the system
calculates the bandwidth based on the codec used for the calls. Any calls
exceeding the maximum bandwidth set for each location are restricted.
You can set the maximum bandwidth for locations under ‘Bandwidth’ in the
[CONFIGURATION > Location > Location] menu.
You can view the bandwidth required for each codec under ‘Codec Bandwidth’ in
the [CONFIGURATION > Miscellaneous > System Capacity] menu. This data
cannot be changed.
You can set the maximum usage ratio for CAC by location bandwidth under
‘Bandwidth’ in the [MANAGEMENT > Call Admission Control > Location
Based CAC] menu.
CAC by Trunk Call Counts
The CAC by Trunk Call Counts service restricts calls made in excess of the
maximum trunk call count for each route.
You can restrict calls based on inbound call, outbound call, and total trunk call.
You can also ‘Maximum call’, ‘Maximum Inbound Call’, and ‘Maximum
Outbound Call’ in the [CONFIGURATION > Trunk Routing > Route] Trunk
Service tap. If you don’t set the maximum count, calls are not restricted.
CAC by System Resources
The CAC by system resources service restricts calls made in excess of the
maximum usage ratio set for the system CPU and memory.
You can restrict calls based on CPU and memory usage.
You can also check the CPU and memory usage level in the following three ways:

Ошибка! Используйте вкладку "Главная" для применения 제목 1 к тексту, который
должен здесь отображаться. Ошибка! Используйте вкладку "Главная" для применения 제목 1 к
тексту, который должен здесь отображаться.
SCM Express Operation Manual v12.0 146 ©Samsung Proprietary and Confidential
Use System Viewer in the lower-left corner of SCM Administrator.
View the real-time usage charts in the [PERFORMANCE > Main Monitor]
menu.
Use the [PERFORMANCE > Server Resources > System] menu.
You can set the maximum usage ratio for CAC by system resources under ‘CPU
Threshold for Resource Based CAC’ and ‘Memory Threshold for Resource Based
CAC’ in the [MANAGEMENT > Call Admission Control > Resource Based
CAC] menu.
Least Cost Route (LCR)
SCM performs the LCR service in various ways.
LCR by Location
The LCR by location feature allows you to assign one of the three LCR methods
(priority-based LCR, time based LCR, and Load Balance LCR) for each location
of the calling party.
You can create route partitions in the [CONFIGURATION > Trunk Routing >
Location Based Routing] menu. The following items are mandatory. This menu
is used for entering the detailed routes in the route partition.
Mandatory Item Description
User Group Select a user group to which the route partition belongs.
Location Based Routing Name
Select a route partition in which to enter the data. If you want to create new partition, select <new> and enter the route partition name.
Location Select Specify whether to select location
Disable: do not select location
Enable: specify a location mandatory.
Location Select a location to set the routes.
Routing Type Select a type of LCR for the location.
Special-Route: Select to use a special route sequence.
Normal-Route: Select to use a route sequence.
Route-Set: Select to use a route set.
One of the following items is mandatory, depending on the type of the selected
LCR type.
Mandatory Item Description
Time Based Routing Name
If the LCR type is set to Time Based Routing, select a Time Based Routing to use.
Priority Routing Name If the LCR type is set to Priority Routing, select a Priority Routing to use.
Load Balance Routing Name
If the LCR type is set to Load Balance Routing, select a Load Balance Routing to use.

Ошибка! Используйте вкладку "Главная" для применения 제목 1 к тексту, который
должен здесь отображаться. Ошибка! Используйте вкладку "Главная" для применения 제목 1 к
тексту, который должен здесь отображаться.
SCM Express Operation Manual v12.0 147 ©Samsung Proprietary and Confidential
Priority Routing
The Priority Routing feature allows automatic selection of alternative routes when
the endpoint set as the default LCR is not available for call connections. Routes are
assigned with priorities so that the route with the highest priority among those
available is selected.
You can create route sequences in the [CONFIGURATION > Trunk Routing >
Priority Routing] menu. The following items are mandatory. This menu is used
for entering the detailed routes in the route sequence.
Mandatory Item Description
User Group Select a user group to which the route sequence belongs.
Name Select a route sequence where the data is entered. If you want to create new route sequence, select <new> and enter the route sequence name.
Route Priority Assign priority to the route.
Direct Route: Specify the top priority route.
Alternative Routes 1 through 8: Select the routes according to their priority levels.
Route Name Select a route for the route priority level.
The following menu is used to change calling number or called number when
make an outgoing call through this route.
Item Description
Outbound DOD Delete Length
Specifies the length of digits to delete from the first position of the called number for outbound call.
Outbound DOD Insert Digits
Specifies the digits to insert from the first position of the called number for outbound call.
Outbound CLI Delete Length
Specifies the length of digits to delete from the first position of the calling number for outbound call.
Outbound CLI Insert Digits
Specifies the digits to insert from the first position of the calling number for outbound call.
Outbound MCN Specify MCN rules for outbound call.
Time Based Routing
The time based Routing feature allows each service group to use its own route
sequence features based on its time and rate conditions.
You can create special route sequences in the [CONFIGURATION > Trunk
Routing > Time Based Routing] menu. The following items are mandatory. This
menu is used for entering the detailed route sequences into the special route
sequence.
Mandatory Item Description
User Group Select a user group to which the time based routing belongs.
Time Based Routing Name
Select a time based routing where the data is entered. If you want to create new time-based routing, select <new> and enter the time based routing name.

Ошибка! Используйте вкладку "Главная" для применения 제목 1 к тексту, который
должен здесь отображаться. Ошибка! Используйте вкладку "Главная" для применения 제목 1 к
тексту, который должен здесь отображаться.
SCM Express Operation Manual v12.0 148 ©Samsung Proprietary and Confidential
Mandatory Item Description
Service Group Select a service group to which the time based routing belongs.
Default Route Sequence
Specify the default route sequence used when selecting routes based on the settings of the special route sequence.
You must select one of the route sequences created in the [CONFIGURATION > Routing > Route Sequence] menu.
When entering the data into the time based routing, you can enter the time
information optionally as needed. Without this information, the LCR would then
behave the same as a route sequence, defeating the purpose.
Item Description
Day Type 1~4 When LCRs are selected according to time, you can specify up to four types of days in which to reference the route sequences.
Start Time 1~4
End Time 1~4
When LCRs are selected according to time, you can specify the start time and the end time for up to four time periods in which to reference the route sequences.
Priority Routing 1~4 Specify up to four Priority Routing referenced by rate or date.
Load Balance Routing
The feature allows the use of the set routes in an equally distributed manner
according to the set ratio. Calls are distributed only between the routes identified
as available for calls, and therefore there is no need for configuring alternative
routes, as in other LCR methods.
You can create load balance routing in the [CONFIGURATION > Trunk
Routing > Load Balance Routing] menu. The following items are mandatory.
This menu is used for entering the detailed routes in the route set.
Mandatory Item Description
User Group Select a user group to which the route set belongs.
Load Balance Routing Select a load balance routing where the data will be entered. If you want to create new load balance routing, select <new> and enter the load balance routing name.
Rate Specify the default ratio in which to distribute calls between the endpoints configured in the route set. The ratio for each route can be changed in the Change menu.
Route Select a route to include in the route set.
Call Restriction
SCM supports the following three types of call restriction policies.
Extension Lock
You can restrict outgoing calls or incoming calls for users. You can also restrict
both outgoing and incoming calls. This setting is applied to all calls, whether
internal or external.
To restrict incoming calls or outgoing calls for users, set ‘Extension Lock’ in the

Ошибка! Используйте вкладку "Главная" для применения 제목 1 к тексту, который
должен здесь отображаться. Ошибка! Используйте вкладку "Главная" для применения 제목 1 к
тексту, который должен здесь отображаться.
SCM Express Operation Manual v12.0 149 ©Samsung Proprietary and Confidential
[CONFIGURATION > User > Single Phone User] menu.
NONE: No restriction is applied (all incoming/outgoing calls allowed).
Answering-only: All incoming calls are restricted (no incoming calls).
Dialing-only: All outgoing calls are restricted (no outgoing calls).
Both: All incoming calls and outgoing calls are restricted (no
incoming/outgoing calls).
Route Lock
You can specify whether to use a route for external calls coming through the
endpoint connected to the route.
To restrict the use of a route, set ‘Route Lock’ in the [CONFIGURATION >
Trunk Routing > Route] Trunk Service tap.
NONE: All incoming and outgoing calls through the route are allowed.
Outbound Locked: Outgoing calls are restricted and only incoming calls
through the route are allowed.
Inbound Locked: Incoming calls are restricted and only outgoing calls through
the route are allowed.
All Locked: All incoming and outgoing calls through the route are restricted.
Restriction Policy
Call restriction policies can be applied by analyzing the calling number or called
number when external calls are made to the users or external calls are made by the
users through the trunk.
The call restriction tables created and configured in the menu described below can
be applied to specific users, service groups, or user groups for call restriction.
If multiple call restriction policies are applied to a user, the policies are applied in
the priority of user, service group, and user group.
In Tandem call case, Trunk is restricted by incoming trunk’s restriction policy.
You can create call restriction tables in the [CONFIGURATION > Trunk
Routing > Toll Restriction List] menu.
Item Description
User Group Select a user group to which the call restriction table belongs.
Name Select a call restriction table in which the data is entered. If you want to create new toll restriction list, select <new> and enter toll restriction list name.
Restriction Digit Enter a prefix number to restrict calls. It supports longest prefix match.
Restriction Type Specify the direction of calls to restrict.
Incoming: Incoming trunk calls are restricted.
Outgoing: Outgoing trunk calls are restricted.
Both: Both the outgoing and incoming trunk calls are

Ошибка! Используйте вкладку "Главная" для применения 제목 1 к тексту, который
должен здесь отображаться. Ошибка! Используйте вкладку "Главная" для применения 제목 1 к
тексту, который должен здесь отображаться.
SCM Express Operation Manual v12.0 150 ©Samsung Proprietary and Confidential
Item Description
restricted.
Restriction Enable If you want to allow calls for number range with a prefix, set ENABLE.
You can configure time-based restriction policies in the [CONFIGURATION >
Toll Routing > Toll Restriction Policy] menu.
Item Description
User Group Select a user group to which the time-based restriction policy table belongs.
Name Enter a name for the time-based restriction policy table.
Default Restriction Name
Select a call restriction table to use outside the set time periods.
Ring Plan Schedule Select a ring plan schedule for this toll restriction policy.
RP1~15 Toll Restriction
Specify the toll restriction list to act on this ring plan.
Call Forward Restriction Policy
When calls are forwarded to external trunk, call forward restriction policy can be
applied by analyzing the called number.
The call restriction tables created and configured in the menu described below can
be applied in the [CONFIGURATION > Service > Feature Service > Class of
Service] menu.
If multiple call restriction policies are applied to a user, the policies are applied in
order by class of service for user, class of service for service group, default class of
service.
You can create call restriction tables in the [CONFIGURATION > Trunk
Routing > Toll Restriction List] menu.
Item Description
User Group Select a user group to which the call restriction table belongs.
Name Select a call restriction table in which the data is entered. If you want to create new toll restriction list, select <new> and enter toll restriction list name.
Restriction Digit Enter a prefix number to restrict calls. It supports longest prefix match.
Restriction Type Specify the direction of calls to restrict.
Incoming: Incoming trunk calls are restricted.
Outgoing: Outgoing trunk calls are restricted.
Both: Both the outgoing and incoming trunk calls are restricted.
Restriction Enable If you want to allow calls for number range with a prefix, set ENABLE.
You can configure time-based restriction policies in the [CONFIGURATION >

Ошибка! Используйте вкладку "Главная" для применения 제목 1 к тексту, который
должен здесь отображаться. Ошибка! Используйте вкладку "Главная" для применения 제목 1 к
тексту, который должен здесь отображаться.
SCM Express Operation Manual v12.0 151 ©Samsung Proprietary and Confidential
Toll Routing > Toll Restriction Policy] menu.
Item Description
User Group Select a user group to which the time-based restriction policy table belongs.
Name Enter a name for the time-based restriction policy table.
Default Restriction Name
Select a call restriction table to use outside the set time periods.
Ring Plan Schedule Select a ring plan schedule for this toll restriction policy.
RP1~15 Toll Restriction
Specify the toll restriction list to act on this ring plan.
Call Transfer Restriction Policy for Outbound call
When calls are transfered to external trunk, call transfer restriction policy can be
applied by analyzing the called number.
The call restriction tables created and configured in the menu described below can
be applied in the [CONFIGURATION > Service > Feature Service > Class of
Service] menu.
If multiple call restriction policies are applied to a user, the policies are applied in
order by class of service for user, class of service for service group, default class of
service.
You can create call restriction tables in the [CONFIGURATION > Trunk
Routing > Toll Restriction List] menu.
Item Description
User Group Select a user group to which the call restriction table belongs.
Name Select a call restriction table in which the data is entered. If you want to create new toll restriction list, select <new> and enter toll restriction list name.
Restriction Digit Enter a prefix number to restrict calls. It supports longest prefix match.
Restriction Type Specify the direction of calls to restrict.
Incoming: Incoming trunk calls are restricted.
Outgoing: Outgoing trunk calls are restricted.
Both: Both the outgoing and incoming trunk calls are restricted.
Restriction Enable If you want to allow calls for number range with a prefix, set ENABLE.
You can configure time-based restriction policies in the [CONFIGURATION >
Toll Routing > Toll Restriction Policy] menu.
Item Description
User Group Select a user group to which the time-based restriction policy table belongs.
Name Enter a name for the time-based restriction policy table.

Ошибка! Используйте вкладку "Главная" для применения 제목 1 к тексту, который
должен здесь отображаться. Ошибка! Используйте вкладку "Главная" для применения 제목 1 к
тексту, который должен здесь отображаться.
SCM Express Operation Manual v12.0 152 ©Samsung Proprietary and Confidential
Item Description
Default Restriction Name
Select a call restriction table to use outside the set time periods.
Ring Plan Schedule Select a ring plan schedule for this toll restriction policy.
RP1~15 Toll Restriction
Specify the toll restriction list to act on this ring plan.
Outside Work Restriction Policy
When user call to external number during outside work, Outside Restriction Policy
can be applied by analyzing the called number.
The call restriction tables created and configured in the menu described below can
be applied in the [CONFIGURATION > Service > Feature Service > Class of
Service] menu.
If multiple call restriction policies are applied to a user, the policies are applied in
order by class of service for user, class of service for service group, default class of
service.
You can create call restriction tables in the [CONFIGURATION > Trunk
Routing > Toll Restriction List] menu.
Item Description
User Group Select a user group to which the call restriction table belongs.
Name Select a call restriction table in which the data is entered. If you want to create new toll restriction list, select <new> and enter toll restriction list name.
Restriction Digit Enter a prefix number to restrict calls. It supports longest prefix match.
Restriction Type Specify the direction of calls to restrict.
Incoming: Incoming trunk calls are restricted.
Outgoing: Outgoing trunk calls are restricted.
Both: Both the outgoing and incoming trunk calls are restricted.
Restriction Enable If you want to allow calls for number range with a prefix, set ENABLE.
You can configure time-based restriction policies in the [CONFIGURATION >
Toll Routing > Toll Restriction Policy] menu.
Item Description
User Group Select a user group to which the time-based restriction policy table belongs.
Name Enter a name for the time-based restriction policy table.
Default Restriction Name
Select a call restriction table to use outside the set time periods.
Ring Plan Schedule Select a ring plan schedule for this toll restriction policy.
RP1~15 Toll Restriction
Specify the toll restriction list to act on this ring plan.

Ошибка! Используйте вкладку "Главная" для применения 제목 1 к тексту, который
должен здесь отображаться. Ошибка! Используйте вкладку "Главная" для применения 제목 1 к
тексту, который должен здесь отображаться.
SCM Express Operation Manual v12.0 153 ©Samsung Proprietary and Confidential
The Outside Work Restriction Policy is feature for WE VoIP only and it is used at
next case.
When user used WE VoIP is moved to external network from internal
network, the Outside Work Restriction Policy can be applied during Outside
Work Duration (hour) in [CONFIGURATION > User > Single Phone
User/Multi-Phone User] menu.
If above duration is not configured, the Outside Work Restriction Policy
cannot be applied.
The priority of Restriction Policy in Class of Service is like next.
Call Forward Restriction Policy > Call Transfer Restriction Policy > Outside
Work Restriction Policy > mVoIP Restriction Policy > IP Zone A Restriction
Policy > IP Zone B Restriction Policy > Hot Spot Restriction Policy >
Restriction Policy
Samsung APC is required to use this feature and next configuration is needed to
connecting APC.
Select a ACP to Check Mobile Access Network in [CONFIGURATION >
User Group > Change User Group > Options] menu.
Create a APC list in [CONFIGURATION > Wireless Enterprise > APC
List] menu.
This feature is available, even if there are no Samsung APC. But there are
limitations as next.
If next setting is like No use or Only outgoing call use, this feature cannot used
for Android WE VoIP.
o Network Settings > Public wifi setting
o Network Settings > mVoIP setting
Next setting is required to use WE VoIP for iOS. But battery consumption will
be faster.
o Select a Register to Check Mobile Access Network in
[CONFIGURATION > User Group > Change User Group > Options] menu.
o Specify a duration for Registration Push on Push Reg-Request Interval
(min) in [CONFIGURATION > User Group > Change User Group >
Timers] menu.
Number Translation
SCM can translate numbers for incoming calls, outgoing calls and local calls
Calling/Called Number Translation for Inbound Call
SCM provides two kinds of number translation service for the calling number and
the called number of the inbound call. The configuration is served at the

Ошибка! Используйте вкладку "Главная" для применения 제목 1 к тексту, который
должен здесь отображаться. Ошибка! Используйте вкладку "Главная" для применения 제목 1 к
тексту, который должен здесь отображаться.
SCM Express Operation Manual v12.0 154 ©Samsung Proprietary and Confidential
[CONFIGURATION > Trunk Routing > Route] Number Translation tap.
First, you can make multiple rules to convert number to number in the
[CONFIGURATION > Trunk Routing > Inbound MCN] menu. After that,
select some rules for a trunk as you want to the ‘Inbound MCN’ in the
[CONFIGURATION > Trunk Routing > Route] Number Translation tap. Only
one matching rule can be applied call by call.
Item Description
User Group Select User Group which the number translation for inbound call is defined.
Name Enter the name of Inbound MCN. When you make Inbound MCN list, you can see these Inbound MCN Names in the [CONFIGURATION > Trunk Routing > Route]. This name cannot be changed.
Number Type Select a number type to convert.
Calling Number: Number Translation is applied to the calling number of the inbound call.
Called Number: Number Translation is applied to the called number of the inbound call.
Find Digits Specifies the number replaced by another number from the first digit of the number of inbound call. 0-9, ‘*’, ‘#’, and ‘?’ is possible for Find Digits. ‘#, *’ is treated the same as the number. ‘X’ means any number.
If you want to use the Find Digits as a prefix not a full number, ‘?’ is followed the desired pattern.
‘1234’: must be ‘1234’.
‘1XX4’: all four digits starting with 1 and ending with 4.
‘1234?’: all numbers starting with ‘1234’.
‘1XX4?’: all numbers prefixed by four digits starting with 1 and ending with 4.
Any digit between ‘X’s is not allowed but duplicated ‘X’ are supported.
‘?’ is placed at the last digit of Find Digits.
‘1X3X5’: 3 is located between ‘X’ and ‘X’, so this pattern is not supported. Duplicated ‘X’ without any interrupt by other digits are possible as like ‘XX345’, ‘1XXX5’, and ‘123XX’
‘123XX???’: Multiple ‘?’ are not supported.
If the compared target number matched to several Find Digits, the most exactly matched rule is selected with number pattern and the pattern length.
The compared number is ‘12345’ and there are two Find Digits, ‘12345’ and ‘123XX’. In this case, the Find Digits, ‘12345’ is determined because it is matched with more digits.
Find Digits The compared number is ‘12345’ and there are two Find Digits, ‘123?’ and ‘123XX’. In this case, the Find Digits, ‘123XX’ is determined because it is matched with the length including pattern.
The compared number is ‘12345’ and there are two Find Digits, ‘123?’ and ‘12345?’. In this case, the Find Digits, ‘12345?’ because its matched digit length is longer.
Modified Digits Specifies the converted number by the Find Digits. 0-9, ‘*’, ‘#’, and ‘?’ can be entered to the Modified Digits. The count of ‘X’ in the Find Digits and that of the Modified Digits must be same. If you use ‘?’ in the Modified Digits, the digits corresponding to the ‘?’ in the Find Digits are reused at the Modified Digits.

Ошибка! Используйте вкладку "Главная" для применения 제목 1 к тексту, который
должен здесь отображаться. Ошибка! Используйте вкладку "Главная" для применения 제목 1 к
тексту, который должен здесь отображаться.
SCM Express Operation Manual v12.0 155 ©Samsung Proprietary and Confidential
Item Description
The compared number is ‘1234567’. The matched Find Digits is ‘123XXX7’, and the Modified Digits is ‘00XXX111’. In this case, the number is converted to ‘00456111’.
The compared number is ‘1234567’. The matched Find Digits is ‘123?’ and the Modified Digits is ’00?’. In this case, the number is converted to ‘004567’.
The compared number is ‘1234567’. The matched Find Digits is ‘123?’ and the Modified Digits is ‘00’. In this case, the number is converted to ‘00’
After the number translation by Inbound MCN, simple delete and insert to a
number is supported trunk by trunk for inbound call. If delete digits and insert
digits are configured both, the delete procedure is precedence over insert
procedure.
The number translation mentioned above is set in the [CONFIGURATION >
Trunk Routing > Route].
Item Description
Inbound DID Delete Length
Specifies the length of digits to delete from the first position of the called number for inbound call.
Inbound DID Insert Digits
Specifies the digits to insert from the first position of the called number for inbound call.
Inbound CLI Delete Length
Specifies the length of digits to delete from the first position of the calling number for inbound call.
Inbound CLI Insert Digits
Specifies the digits to insert from the first position of the calling number for inbound call.
Calling/Called Number Translation for Outbound Call
SCM provides two kinds of number translation service for the calling number and
the called number of the outbound call. The configuration is served at the
[CONFIGURATION > Trunk Routing > Priority Routing] menu or
[CONFIGURATION > Trunk Routing > Load Balance Routing] menu.
According to routing path, different number translation can be applied even if calls
direct to a same trunk route.
First, you can make multiple rules to convert number to number for outbound call
in the [CONFIGURATION > Trunk Routing > Outbound MCN] menu. After
that, select some rules for a trunk as you want to the ‘Outbound MCN’ in the
[CONFIGURATION > Trunk Routing > Priority Routing] menu or
[CONFIGURATION > Trunk Routing > Load Balance Routing] menu. Only
one matching rule can be applied call by call.
Item Description
User Group Select User Group which the number translation for outbound call is defined.
Name Enter the name of Outbound MCN.
When you make Outbound MCN list, you can see these Outbound MCN Names in the [CONFIGURATION > Trunk Routing > Priority Routing

Ошибка! Используйте вкладку "Главная" для применения 제목 1 к тексту, который
должен здесь отображаться. Ошибка! Используйте вкладку "Главная" для применения 제목 1 к
тексту, который должен здесь отображаться.
SCM Express Operation Manual v12.0 156 ©Samsung Proprietary and Confidential
Item Description
& Load Balance Routing] This name cannot be changed.
Number Type Select a number type to convert.
Calling Number: Number Translation is applied to the calling number of the outbound call.
Called Number: Number Translation is applied to the called number of the outbound call.
Find Digits Specifies the number replaced by another number from the first digit of the number of outbound call. 0-9, ‘*’, ‘#’, and ‘?’ is possible for Find Digits. ‘#, *’ is treated the same as the number. ‘X’ means any number.
If you want to use the Find Digits as a prefix not a full number, ‘?’ is followed the desired pattern.
‘1234’: must be ‘1234’.
‘1XX4’: all four digits starting with 1 and ending with 4.
‘1234?’: all numbers starting with ‘1234’.
‘1XX4?’: all numbers prefixed by four digits starting with 1 and ending with 4.
Any digit between ‘*’s is not allowed but duplicated ‘*’ are supported. ‘?’ is placed at the last digit of Find Digits.
‘1X3X5’: 3 is located between ‘X’ and ‘X’, so this pattern is not supported. Duplicated ‘X’ without any interrupt by other digits are possible as like ‘XX345’, ‘1XXX5’, and ‘123XX’
‘123XX???’: Multiple ‘?’ are not supported.
If the compared target number matched to several Find Digits, the most exactly matched rule is selected with number pattern and the pattern length.
Find Digits The compared number is ‘12345’ and there are two Find Digits, ‘12345’ and ‘123XX’. In this case, the Find Digits, ‘12345’ is determined because it is matched with more digits.
The compared number is ‘12345’ and there are two Find Digits, ‘123?’ and ‘123XX’. In this case, the Find Digits, ‘123XX’ is determined because it is matched with the length including pattern.
The compared number is ‘12345’ and there are two Find Digits, ‘123?’ and ‘12345?’. In this case, the Find Digits, ‘12345?’ because its matched digit length is longer.
Modified Digits Specifies the converted number by the Find Digits. 0-9, ‘*’, ‘#’, and ‘?’ can be entered to the Modified Digits. The count of ‘X’ in the Find Digits and that of the Modified Digits must be same. If you use ‘?’ in the Modified Digits, the digits corresponding to the ‘?’ in the Find Digits are reused at the Modified Digits.
The compared number is ‘1234567’. The matched Find Digits is ‘123XXX7’, and the Modified Digits is ‘00XXX111’. In this case, the number is converted to ‘00456111’.
The compared number is ‘1234567’. The matched Find Digits is ‘123?’ and the Modified Digits is ’00?’. In this case, the number is converted to ‘004567’.
The compared number is ‘1234567’. The matched Find Digits is ‘123?’ and the Modified Digits is ‘00’. In this case, the number is converted to ‘00’
After the number translation by Outbound MCN, simple delete and insert to a

Ошибка! Используйте вкладку "Главная" для применения 제목 1 к тексту, который
должен здесь отображаться. Ошибка! Используйте вкладку "Главная" для применения 제목 1 к
тексту, который должен здесь отображаться.
SCM Express Operation Manual v12.0 157 ©Samsung Proprietary and Confidential
number is supported according to the routing path for outbound call. If delete
digits and insert digits are configured both, the delete procedure is precedence over
insert procedure.
The number translation mentioned above is set in the [CONFIGURATION >
Trunk Routing > Priority Routing] or [CONFIGURATION > Trunk Routing
> Load Balance Routing].
Item Description
Outbound DOD Delete Length
Specifies the length of digits to delete from the first position of the called number for outbound call.
Outbound DOD Insert Digits
Specifies the digits to insert from the first position of the called number for outbound call.
Outbound CLI Delete Length
Specifies the length of digits to delete from the first position of the calling number for outbound call.
Outbound CLI Insert Digits
Specifies the digits to insert from the first position of the calling number for outbound call.
Local Based Number Translation
SCM provides number translation service for the called number of the local call.
This feature is activated in same location and user group.
It can provide when using call-forward, blind-transfer and individual-speed-dial
service.
First, you can make multiple rules to convert number to number for local call in
the [CONFIGURATION > Location > Local Based MCN] menu. After that,
select some rules for a location as you want to the ‘Local Based MCN’ in the
[CONFIGURATION > Location > Location] menu. Only one matching rule can
be applied call by call.
Item Description
Name Enter the name of Local Based MCN.
When you make Local Based MCN list, you can see these Local Based MCN Names in the [CONFIGURATION > Location > Local Based MCN].
This name cannot be changed.
Number Type Select a number type to convert. Only Called Number is allowed.
Called Number: Number Translation is applied to the called number of the local call.
Find Digits Specifies the number replaced by another number from the first digit of the number of inbound call. 0-9, ‘*’, ‘#’,’X’ and ‘?’ is possible for Find Digits. ‘#, *’ is treated the same as the number. ‘X’ means any number.
If you want to use the Find Digits as a prefix not a full number, ‘?’ is followed the desired pattern.
‘1234’: must be ‘1234’.
‘1XX4’: all four digits starting with 1 and ending with 4.
‘1234?’: all numbers starting with ‘1234’.
‘1XX4?’: all numbers prefixed by four digits starting with 1 and ending

Ошибка! Используйте вкладку "Главная" для применения 제목 1 к тексту, который
должен здесь отображаться. Ошибка! Используйте вкладку "Главная" для применения 제목 1 к
тексту, который должен здесь отображаться.
SCM Express Operation Manual v12.0 158 ©Samsung Proprietary and Confidential
Item Description
with 4.
Any digit between ‘X’s is not allowed but duplicated ‘X’ are supported.
‘?’ is placed at the last digit of Find Digits.
‘1X3X5’: 3 is located between ‘X’ and ‘X’, so this pattern is not supported. Duplicated ‘X’ without any interrupt by other digits are possible as like ‘XX345’, ‘1XXX5’, and ‘123XX’
‘123XX???’: Multiple ‘?’ are not supported.
If the compared target number matched to several Find Digits, the most exactly matched rule is selected with number pattern and the pattern length.
The compared number is ‘12345’ and there are two Find Digits, ‘12345’ and ‘123XX’. In this case, the Find Digits, ‘12345’ is determined because it is matched with more digits.
The compared number is ‘12345’ and there are two Find Digits, ‘123?’ and ‘123XX’. In this case, the Find Digits, ‘123XX’ is determined because it is matched with the length including pattern.
The compared number is ‘12345’ and there are two Find Digits, ‘123?’ and ‘12345?’. In this case, the Find Digits, ‘12345?’ because its matched digit length is longer.
Modified Digits Specifies the converted number by the Find Digits. 0-9, ‘*’, ‘#’, and ‘?’ can be entered to the Modified Digits. The count of ‘X’ in the Find Digits and that of the Modified Digits must be same. If you use ‘?’ in the Modified Digits, the digits corresponding to the ‘?’ in the Find Digits are reused at the Modified Digits.
The compared number is ‘1234567’. The matched Find Digits is ‘123XXX7’, and the Modified Digits is ‘00XXX111’. In this case, the number is converted to ‘00456111’.
The compared number is ‘1234567’. The matched Find Digits is ‘123?’ and the Modified Digits is ’00?’. In this case, the number is converted to ‘004567’.
The compared number is ‘1234567’. The matched Find Digits is ‘123?’ and the Modified Digits is ‘00’. In this case, the number is converted to ‘00’
Number Translation
Each group of users, number translation service, is the ability to convert to number
there is a certain pattern number or international number (E.164).
Number translation rules can be created in the [Configuration> User Group>
Change User Group> Number Translation].
Operator can be the length of the number translation and adjust it through the
[Minimum Number Translation Length] from [Configuration> User Group>
Change User Group> Options].
The SCM is allow one ‘+’ character and allow ‘*’ and ‘#’.
Other character is automatically deleted.
Delete Function is activated for all number.
This feature applies to the called number and calling number of all.
Following items are required for creating [Number Translation] Rule.

Ошибка! Используйте вкладку "Главная" для применения 제목 1 к тексту, который
должен здесь отображаться. Ошибка! Используйте вкладку "Главная" для применения 제목 1 к
тексту, который должен здесь отображаться.
SCM Express Operation Manual v12.0 159 ©Samsung Proprietary and Confidential
Item Description
User Group select the user group which operator wants to use a number conversion rules.
Check Digit It is the digit to compare the incoming number.
Delete Length The SCM remove digits from the number that matches the [Check Digit].
Maximum value allow 40.
Insert Digit After Delete Length, Insert Digits activated.
Maximum Insert Digit is allowed 20 digits.
Retranslation Specifies the reuse of a Number Translation Table after translated.
Retranslation feature is provided only one times.
Service Group MCN
SCM provides number translation service for the called number when a user
makes a call. The called number can be modified differently per the service group
that the caller belongs to.
Item Description
User Group select the user group which operator wants to use a number conversion rules.
Name Enter the name of Service Group MCN.
When you make Service Group MCN list, you can see these Service Group MCN Names in the [CONFIGURATION > User Group > Service Group].
This name cannot be changed.
Number Type Select a number type to convert. Only Called Number is allowed.
Called Number: Number Translation is applied to the called number of the local call.
Find Digits Specifies the number replaced by another number from the first digit of the number of inbound call. 0-9, ‘*’, ‘#’, ‘X’ and ‘?’ is possible for Find Digits. ‘#, *’ is treated the same as the number. ‘X’ means any number.
If you want to use the Find Digits as a prefix not a full number, ‘?’ is followed the desired pattern.
‘1234’: must be ‘1234’.
‘1XX4’: all four digits starting with 1 and ending with 4.
‘1234?’: all numbers starting with ‘1234’.
‘1XX4?’: all numbers prefixed by four digits starting with 1 and ending with 4.
Any digit between ‘X’s is not allowed but duplicated ‘X’ are supported.
‘?’ is placed at the last digit of Find Digits.
‘1X3X5’: 3 is located between ‘X’ and ‘X’, so this pattern is not supported. Duplicated ‘X’ without any interrupt by other digits are possible as like ‘XX345’, ‘1XXX5’, and ‘123XX’
‘123XX???’: Multiple ‘?’ are not supported.
If the compared target number matched to several Find Digits, the most exactly matched rule is selected with number pattern and the pattern length.
The compared number is ‘12345’ and there are two Find Digits, ‘12345’ and ‘123XX’. In this case, the Find Digits, ‘12345’ is determined because it is matched with more digits.

Ошибка! Используйте вкладку "Главная" для применения 제목 1 к тексту, который
должен здесь отображаться. Ошибка! Используйте вкладку "Главная" для применения 제목 1 к
тексту, который должен здесь отображаться.
SCM Express Operation Manual v12.0 160 ©Samsung Proprietary and Confidential
Item Description
The compared number is ‘12345’ and there are two Find Digits, ‘123?’ and ‘123XX’. In this case, the Find Digits, ‘123XX’ is determined because it is matched with the length including pattern.
The compared number is ‘12345’ and there are two Find Digits, ‘123?’ and ‘12345?’. In this case, the Find Digits, ‘12345?’ because its matched digit length is longer.
Modified Digits Specifies the converted number by the Find Digits. 0-9, ‘*’, ‘#’, and ‘?’ can be entered to the Modified Digits. The count of ‘X’ in the Find Digits and that of the Modified Digits must be same. If you use ‘?’ in the Modified Digits, the digits corresponding to the ‘?’ in the Find Digits are reused at the Modified Digits.
The compared number is ‘1234567’. The matched Find Digits is ‘123XXX7’, and the Modified Digits is ‘00XXX111’. In this case, the number is converted to ‘00456111’.
The compared number is ‘1234567’. The matched Find Digits is ‘123?’ and the Modified Digits is ’00?’. In this case, the number is converted to ‘004567’.
The compared number is ‘1234567’. The matched Find Digits is ‘123?’ and the Modified Digits is ‘00’. In this case, the number is converted to ‘00’
Call Button
The call button feature allows directing multiple calls to the one phone number
when the user’s number is a single device and the call waiting service is in use.
If you are using a phone with programmable buttons, such as a Samsung phone,
you can assign up to eight call buttons. If there are eight call buttons, the phone
can control up to eight calls simultaneously. If there is no call button on the phone,
it is treated as having two call buttons.
To create call buttons on the phone, set ‘Key’ to CALL in the
[CONFIGURATION > User > Phone Key Programming] menu.
Call Monitoring
SCM has the ability to route a media to the particular IP address to record the
signaling and media easily.
When users activate the call monitoring service, it redirect the media from
recording target to the specific IP address and port of media proxy inside the SCM
Express.
It makes easy for eavesdropping equipment to collect the voice call associated
with the particular IP address and ports under control of SCM.
SCM supports recording up to 100 subscribers simultaneously.
In case that the resource of media proxy is not enough, Fault event occurred to the
Administrator, and the call will be failed.
The signaling packets are delivered from SCM Express to the Monitoring

Ошибка! Используйте вкладку "Главная" для применения 제목 1 к тексту, который
должен здесь отображаться. Ошибка! Используйте вкладку "Главная" для применения 제목 1 к
тексту, который должен здесь отображаться.
SCM Express Operation Manual v12.0 161 ©Samsung Proprietary and Confidential
Equipment with specific interfaces.
In order to capture the media packets, you should place an L2 switch which has
mirroring capability between the phones and the server. So the mirroring
equipment can capture the packets from L2 switches and analyzing the media with
the signaling packets which was taken from different interface.
You can configure call monitoring in the [CONFIGURATION > Miscellaneous
> System Options] menu.
Item Description
Call Monitoring Interworking Level
Specify the level of Interworking with Call monitoring Equipments.
Disable: SCM Administrator control Call Monitoring Option for User.
User Configure: Call Monitoring Server control Call Monitoring Option for User.
SIGNALING MESSAGE: Call Monitoring Server control Call Monitoring Option for User, and SIP Message is saved in SCM.
Call Monitoring Server IP Address
Enter Call Monitoring Server’s IP Address.
Call Monitoring Server use TLS
Select Use TLS Connection Between SCM and Call Recording Server.
Administrator enables ‘Call Monitoring’ option in the [CONFIGURATION >
User > Single Phone User].
When call comes in to the user, SCM make a voice path to Media Proxy inside
SCM, SCM send signaling messages to Call Recording Server, so Call Recording
Server can mirroring the media packets.
CLI Number for Internal Call
Basically, a user makes a call by dialing Extension number within same User
Group.
Extension Number should be assigned in unique within a User Group and it used
as CLI when make a call and Destination number when finding a user.
But, exceptional cases like below, different number may be used instead of
Extension Number.
In case that a user makes a call to the users in a different User Group by
dialing just Extension number, the call will be failed. Extension Number is a
reachable number within same User Group.
When a user makes a call to the users in a different User Group, the user
should dial Extension Number followed by User Group Code. When a user
makes a call among different User Groups, both Calling and Called Number
will be displayed as ‘User Group Code + Extension Number’.

Ошибка! Используйте вкладку "Главная" для применения 제목 1 к тексту, который
должен здесь отображаться. Ошибка! Используйте вкладку "Главная" для применения 제목 1 к
тексту, который должен здесь отображаться.
SCM Express Operation Manual v12.0 162 ©Samsung Proprietary and Confidential
Within same user group, extension number is used normally, but if there is
‘Service Group Code’ in a User group, the users in same Service Group can
make a call each other just using ‘Service Group Local Number’ that is called
‘Station Number’.
In other words, Extension Number includes ‘Service Group Code’ and
‘Service Group Local Number’.
To use ‘Service Group Local Number’, create a service group and specify
‘Service Group Code’ and then assign users to the service group. Only the
Extension Numbers the prefix is starting with Service Group Code can be
assigned to the service group.
‘Service Group Local Number’ field in each User menu displays the digits
which exclude the Service Group Code from Extension Number automatically.
If there is Service Group Code, this field displays nothing. The Users within
same service group can make a call using Extension number or Service Group
Local Number.
To display CLI with not Extension Number but ‘Service Group Local
Number’, operator should configure ‘Service Group Local CLI Number’ to
‘Station Number’ in [CONFIGURATION > User > Single Phone User] or
[CONFIGURATION > User > Multi-Phone User].
If a user does not want to use Extension Number as CLI, use ‘Send Extension
Number’ instead.
‘User Group Code + Extension Number’ and ‘Service Group Local CLI
Number’ are reachable number but ‘Send Extension Number’ is not reachable
and display only, so be careful to set this field.
CLI Number for Outbound Call
Several ‘CLI Number’ are served for the outbound call to a trunk as follows.
‘CLI Number’ is a virtual number; it can be used for CLI but receiving call
with the CLI number as called number is not available. Each ‘CLI Number’
can be configured independently, but the priority is shown in the following
description.
The same CLI number can be used for multi-users assigned to a Multi-
Extension Phone even if the users have different CLI numbers for each user.
The CLI for the Multi-Extension Phone is set to ‘Send CLI Number’ in the
[CONFIGURATION> User> Multi-Extension Phone] menu.
The ‘Send CLI Number’ of Multi-Extension Phone is not set, each user can
use their own ‘Send CLI Number’. Single phone users use ‘Send CLI Number’
in the [CONFIGURATION> User> Single Phone User] menu. In the case of
multi-line users, ‘Send CLI Number’ is configured in the
[CONFIGURATION> User> Multi-Phone User] menu.
If the ‘Send CLI Number’ of a user is not set, the ‘CLI Number’ of service
group can be used. The ‘CLI Number’ is configured in the

Ошибка! Используйте вкладку "Главная" для применения 제목 1 к тексту, который
должен здесь отображаться. Ошибка! Используйте вкладку "Главная" для применения 제목 1 к
тексту, который должен здесь отображаться.
SCM Express Operation Manual v12.0 163 ©Samsung Proprietary and Confidential
[CONFIGURATION > User Group > Service Group] menu.
If the ‘Send CLI Number’ of a service group is not set, the ‘CLI Number’ of a
user group can be used. The ‘CLI Number’ is configured in the
[CONFIGURATION > User Group > Service Group] menu.
If there is no configuration for CLI number, the extension number by prefixing
the ‘Outbound CLI Prefix’ in the [CONFIGURATION> Trunk Routing>
Route] Number Translation tap can be used.
The default CLI number is the extension number without any configuration as
describes above.
The CLI number for outbound call, by default, is applied in the order mentioned
above. Depending on your needs, you can designate the CLI number type for a
specific trunk.
It is served by ‘Forced Send CLI Number’ in the [CONFIGURATION > Trunk
Routing > Route] menu. If you set the ‘Forced Send CLI Number’ to none,
outbound CLI number has priority according to the order mentioned above.
CLI Name for Outbound Call
It is a virtual calling name for outbound call at particular use. It is mainly used to
insert a number to the ‘Display Name’ in the From header of the SIP message by
the request of SIP ISP. There are two cases as described below.
Each user has ‘Send CLI Name’ in the [CONFIGURATION > User > Single
Phone User] or [CONFIGURATION > User > Multi-Phone User] menu, which
can be used for ‘Display Name’ for a specific trunk. If ‘Send CLI Name for User’
in the [CONFIGURATION > Trunk Routing > Route] Number Translation tap
set to Send CLI Name for the trunk, the ‘Send CLI Name’ of each user is used for
display name, or ‘Extension Name’ in the [CONFIGURATION > User > Single
Phone User] and [CONFIGURATION > User > Multi-Phone User] menu is
used by default.
Tandem Call means the outbound call which is originating from a trunk. To
configure the ‘Display Name’ of the tandem call, the ‘Send CLI Name for Inbound
Cal’ is provided.
If the ‘Send CLI Name for Inbound Call’ in the [CONFIGURATION > Trunk
Routing > Route] Number Translation tap set to Receive CLI Number, the
original received calling number is copied to the ‘Display Name’ regardless of the
number translation.
Internal CLI Name
It is a virtual calling name for inbound call at particular use. It is mainly used to
insert a name to verify which GW’s call.
This name displays only in subscriber and service group. This name does not
display in tandem call.

Ошибка! Используйте вкладку "Главная" для применения 제목 1 к тексту, который
должен здесь отображаться. Ошибка! Используйте вкладку "Главная" для применения 제목 1 к
тексту, который должен здесь отображаться.
SCM Express Operation Manual v12.0 164 ©Samsung Proprietary and Confidential
To use the Internal CLI Name, specify in the [CONFIGURATION > Trunk
Routing > Route] Number Translation tap [Send CLI Name for Internal Call]
menu.
Premium CID
The Premium CID service provides supplementary information about an opposite
user. Photo is provided basically and other information can be configured with the
priority.
To use Premium CID, License is necessary and each user has to set Premium CID
to Enable.
You can check the Premium CID license in the [CONFIGURATION >
Miscellaneous > Activation Key] menu, which is named Directory Service. Each
user using Premium CID is configured Premium CID option to Enable which
cannot exceed the license. If the Premium CID is out of license, it is not working.
The information provided by Premium CID is as follows.
Additional 6 Information
Location Service
Photo
Additional 6 information is configured in the [CONFIGURATION > User
Group > Change User Group > Premium CID List]. The information is
displayed according to the priority of each data whenever the phone supports this
feature.
Item Description
User Group Select a user group for which the Premium CID is provided.
Priority 1~6 Configure the supplementary information which can be up to 6.
Name: show a Name in the [CONFIGURATION > User > User Profile] menu.
Position: show a Position in the [CONFIGURATION > User > User Profile] menu.
Department: show a Department in the [CONFIGURATION > User > User Profile] menu.
Company: show a Company Name in the [CONFIGURATION > User Group > Change User Group > Information] menu.
Reserv1~Reserv4: is defined in the [CONFIGURATION > User Group > User Profile Field Name] and is configured in the [CONFIGURATION > User > User Profile] menu.
If Mobile Phone Location Service is set to Yes in the [CONFIGURATION >
User Group > Change User Group > Options], SCM include location
information to the Premium CID. Each phone can be display the location by the
Update Location (Private/Wi-Fi Hotspot/mVoIP) option in the
[CONFIGURATION > Wireless Enterprise > Mobile Phone Profile], which is
included in a profile.

Ошибка! Используйте вкладку "Главная" для применения 제목 1 к тексту, который
должен здесь отображаться. Ошибка! Используйте вкладку "Главная" для применения 제목 1 к
тексту, который должен здесь отображаться.
SCM Express Operation Manual v12.0 165 ©Samsung Proprietary and Confidential
Photo file for each user can be changed in the [CONFIGURATION > User >
User Profile]. Single photo file can be updated with Administrator, Personal Web
page and FMC Phone. In this case, the file name is changed to an application Id.
You can change a file name only. If you want to change photo files concurrently,
refer the Photo File Management chapter.
CLI Service
The Calling Line Identification (CLI) service notifies the user of the caller’s phone
number and name for incoming calls.
Calling Line Identification Presentation (CLIP)
The Calling Line Identification Presentation (CLIP) service displays the caller’s
phone number and name on the called user’s phone for incoming calls.
Calling Line Identification Restriction (CLIR)
The Calling Line Identification Restriction (CLIR) service restricts display of the
caller information for the calls made by the user.
To use the CLIR feature, click [Act] and enable ‘Caller ID Block’ in the
[CONFIGURATION > Service > Feature Service > Service Activation] menu.
If a user set with CLIR calls another user set with CLIP, the calling user’s
information is restricted to the called user, as CLIR has precedence over CLIP.
CLI Routing
The CLI routing feature allows special processing of incoming trunk calls
according to the caller number.
When entering a calling number, you can use wild cards (entered by X) to enter
multiple numbers at a time.
Incoming trunk calls with caller numbers only and without caller names can be
supported by caller name.
Incoming calls from specified callers can be rejected.
Incoming calls from specified callers can be assigned called numbers; regardless
of the called DID numbers. Called numbers can also be assigned by time period.
Time periods are defined by ring plans. For more information, see the section on
‘Ring Plans.’
You can configure CLI routing using the [CONFIGURATION > Trunk Routing
> CLI Routing] menu. The following items are specified.
Item Description
User Group Select a user group for which the CLI routing is defined.
CLI Number Enter a caller number for incoming calls given special treatment.
This is used as an identifier in the CLI routing table and cannot be changed. If necessary, you must delete it and enter it again.
Number to Name You can enter the caller’s name for the selected caller number and service the calls by the name.

Ошибка! Используйте вкладку "Главная" для применения 제목 1 к тексту, который
должен здесь отображаться. Ошибка! Используйте вкладку "Главная" для применения 제목 1 к
тексту, который должен здесь отображаться.
SCM Express Operation Manual v12.0 166 ©Samsung Proprietary and Confidential
Item Description
Call Reject Specify whether the incoming calls with the selected caller number is rejected.
ACD Queuing Level
Specify a level of priority for a call queues in ACD.
You can select between Level 0 and Level 9.
If higher the number, higher the priority and a waiting time to connect an agent is shorter.
Default Destination You can specify a called number for incoming calls from the selected caller number, regardless of the DID number if the call is received outside the time periods defined by ring plans 1 through 15 or if the called number is not specified in the ring plan.
Ring Plan Schedule
Select a ring plan schedule for this toll restriction policy.
RP1~RP15 Destination
You can specify a called number for incoming calls from the selected caller number, regardless of the DID number if the call is received within the time periods defined by ring plans 1 through 15.
Logging Specify whether to logging a SPAM Call.
It logs with three cases like normal case, with announcement case, and without announcements case.
It is often necessary to register a lot of CLI routing information at once. Using
SCM Administrator’s batch feature, you can prepare the CLI routing information
offline in an Excel spreadsheet and batch register the information with SCM.
You can batch register the CLI routing information prepared in an Excel
spreadsheet using the [Tool > Customer Data Import/Export > CLI Routing]
menu in the upper-left corner of SCM Administrator.
For more information on the Customer Data Import/Export, see the data
import/export section of ‘Changing All Users Data’ in Chapter 2.
Direct Inward Dialing (DID) Routing
The Direct Inward Dialing (DID) routing feature allows incoming trunk calls to be
directed to different called numbers according to the DID number.
When entering a DID number, you can use wild cards (entered by X) to represents
the multiple numbers at a time.
The system also performs translation of the DID number, the translated DID
number can be used as the called number.
The called number according to the DID number can be assigned with the user
number, the hunt group number, the ACD group number, and various feature
codes, including the VMS access code and access code + external number. They
can also be assigned by time period. Time periods are defined by ring plans. For
more information, see the section on ‘Ring Plans.’
You can configure DID routing using the [CONFIGURATION > Routing > DID
Routing] menu. The following items are specified.

Ошибка! Используйте вкладку "Главная" для применения 제목 1 к тексту, который
должен здесь отображаться. Ошибка! Используйте вкладку "Главная" для применения 제목 1 к
тексту, который должен здесь отображаться.
SCM Express Operation Manual v12.0 167 ©Samsung Proprietary and Confidential
Item Description
User Group Select a user group to which the calls are directed.
DID Number Enter a DID number for incoming trunk calls.
This is used as an identifier in the DID routing table and cannot be changed. If necessary, you must delete it and enter it again.
DID Name Specify a name for the DID number. The DID name makes it easy to identify the number dialed by the caller.
Default Destination Specify a called number to which the incoming calls with the selected DID number is directed when calls are received outside the time periods defined in ring plans 1 through 15 or if the called number is not specified in the ring plan.
If the called number is set to ‘B’, a translated DID number is used as the called number.
In the case of ‘E’ for the called number, tandem call is not allowed.
If the call is not termination at SCM, the call is rejected with invalid number response.
However, the tandem calls by Call Forward or Transfer is not restricted.
Delete Length DID number can be translated to be used as the called number. Here, you can specify the number of digits to delete from the first part of the DID number.
Insert Digit DID number can be translated to be used as the called number. Here, you can specify the digits to insert into the first part of the DID number.
MOH ID A specific on-hold tone can be played when incoming calls with the selected DID number are put on hold. Here, you can specify the ID of the MOH file to play for each DID number.
ACD Queuing Level
Specify a level of priority for a call queues in ACD.
You can select between Level 0 and Level 9.
If higher the number, higher the priority and a waiting time to connect an agent is shorter.
Ring Plan Schedule
Select a ring plan schedule for this toll restriction policy.
RP1~RP15 Destination
You can specify a called number to which the incoming calls with the selected DID number is directed when the calls are received within the time periods defined by ring plans 1 through 15.
If the called number is set to ‘B’, a translated DID number is used as the called number.
It is often necessary to register a lot of DID routing information at once. Using
SCM Administrator’s batch feature, you can prepare the DID routing information
offline in an Excel spreadsheet and batch register the information with SCM.
You can batch register DID routing information prepared in an Excel spreadsheet
using the [Tool > Customer Data Import/Export > CLI Routing] menu in the
upper-left corner of SCM Administrator.
For more information on the Customer Data Import/Export, see the data
import/export section of ‘Changing All Users Data’ in Chapter 2.

Ошибка! Используйте вкладку "Главная" для применения 제목 1 к тексту, который
должен здесь отображаться. Ошибка! Используйте вкладку "Главная" для применения 제목 1 к
тексту, который должен здесь отображаться.
SCM Express Operation Manual v12.0 168 ©Samsung Proprietary and Confidential
Directory Service
It provides the ability to dial by searching the number and name for the extension,
hunt group and system speed dial at the phones.
You can search directory by name or number.
When you try to search a user by number, User’s extension number, Hunt
Group number should be used.
When you try to search a user by name, User name, Hunt Group name and
System Speed dial name should be used.
When you search by number, it required at least 3 digits, search by name, it
requires at least two characters.
You should configure options for Directory Service using the
[CONFIGURATION > Phone Setting > Directory Service Control] menu.
Item Description
Use Directory Service Select option for Using Directory Service In System. This option applies for all users.
Directory Service Protocol
Select interworking Protocol between SCM and phone.
HTTP: Use HTTP Protocol
HTTPS: Use HTTPS Protocol
Directory Service HTTP Port
Select interworking Port between SCM and phone.
If you select HTTP Protocol, you must set the Port Number 80.
Otherwise, Selecting HTTPS is required Port Number 443.
You can configure Directory Service Display Option in phone using the
[CONFIGURATION > Service > Directory Service Display] menu. The
following items are specified.
Item Description
User Group It displays the User Group of a user. It will be displayed by default.
Display Name It displays the Extension name of a user. It will be displayed by default.
Display Number It displays the Extension Number of a user. It will be displayed by default.
Display Position Specify whether to display the position of a user.
Display Department Specify whether to display the department of a user.
Display Number Type Specify the type of a user. It will be displayed among User, Hunt Group, Speed Dial.
Display Mobile Number
Specify whether to display the Mobile Number of a user.
This Option is provided for user only.
Display Other User Group
Specify whether to display the Other User Group's information in search result.

Ошибка! Используйте вкладку "Главная" для применения 제목 1 к тексту, который
должен здесь отображаться. Ошибка! Используйте вкладку "Главная" для применения 제목 1 к
тексту, который должен здесь отображаться.
SCM Express Operation Manual v12.0 169 ©Samsung Proprietary and Confidential
Direct Trunk Selection
SCM supports Direct Trunk Selection (DTS) to use a specific trunk, which
provides services according to a status of the designated trunk.
To use DTS feature, the following configuration is required.
Set a feature code for ‘Direct Trunk Selection’ in the [CONFIGURATION >
Service > Feature Service > Feature Code] menu.
Check the ‘Class of Service’ for a user which uses a DTS feature. The service
permission of ‘Direct Trunk Selection’ has to be included.
Set ‘DTS Mode’ to Enable and enter ‘Access Number’ mandatorily when you
make a Route for DTS in the [CONFIGURATION > Trunk Routing >
Route] interworking tap.
A same number with an extension cannot be used for ‘Access Number’.
If you need, ‘Toll Restriction Policy’, ‘Dial Tone’ and ‘Dial Plan’ can be
applied for DTS feature.
How to use the DTS feature is described below.
A User dials to ‘DTS feature code + Access Code to select trunk’ and Enter a
called party number by DTMF after Gateway is connected. One-touch dial key
is also available if ‘DTS feature code + Access Code to select trunk + a called
party number’ pre-sets to the one-touch dial key.
To control for some user to use a DTS trunk call, apply a ‘Toll Restriction
Policy’.
For more detail about ‘Toll Restriction Policy’, refer to Restriction Policy part
of Call Restriction feature.
Account for DTS can be adjusted by setting ‘SMDR Timer’/‘SMDR Time
(sec)’ in the [CONFIGURATION > Miscellaneous > System Options]. The
connect start time is delayed 10 seconds if ‘SMDR Timer’ sets to Enable and
‘SMDR Time (sec)’ sets to 10 sec.
DTS Trunk Status LED Display Key Service Description
Idle Off Outgoing to the trunk Makes a call to the trunk.
Seize On Outgoing to the trunk Ends a call after playing an announcement for Busy state.
Incoming Blink rapidly Pickup Picks up the call
Outgoing On Outgoing to the trunk Ends a call after playing an announcement for Busy state.
Hold Blink slowly Retrieve Retrieves the hold call.
Conv On Barge-in with tone Make a conference with the call if ‘Barge-in with tone’ is permitted for the user.

Ошибка! Используйте вкладку "Главная" для применения 제목 1 к тексту, который
должен здесь отображаться. Ошибка! Используйте вкладку "Главная" для применения 제목 1 к
тексту, который должен здесь отображаться.
SCM Express Operation Manual v12.0 170 ©Samsung Proprietary and Confidential
FMS (Fixed Mobile Substitution)
Fixed Mobile Substitution (FMS) is a Zone service for a specific trunk. FMS users
which have a virtual number are mobile users in the specific zone. Although a
FMS user is not registered, the trunk calls from or to FMS users are treated as if
internal calls and a virtual extension number is used for CLI by default. Users can
make a call with the virtual extension number or the mobile number to the FMS
user.
How to work FMS call is as follows.
FMS user receives a call: When SCM receives a call with an extension number
of FMS user from a trunk or a normal user of SCM, SCM converts the called
number to mobile phone number of FMS user and makes a call to FMS trunk
which supports No.7.
FMS user makes a call: When SCM receives a call from FMS trunk which
supports No.7, SCM treats the call as if an internal call if the send CLI is an
extension number of FMS user.
The configuration is required for FMS feature as follows.
Make a Route which is connected to FMS zone in the [CONFIGURATION >
Trunk Routing > Route] Interworking tap. And then, change ‘FMS Mode’ to
Enable.
SCM is connected to FMS zone of mobile network by a FMS trunk which
supports No.7. A mobile carrier issues FMS Zone ID for each FMS zone. To
make a call to FMS zone, SCM has to use the FMS Zone ID.
If Access Code to FMS trunk is 90 and assigned FMS Zone ID is 1234, SCM
has to convert 90 to 901234. For this, Number Translation is applied to the
outgoing calls to the FMS trunk. For more detail of Number Translation, refer
Number Translation feature.
Make a FMS zone in the [CONFIGURATION > Wireless Enterprise >
FMS Zone] menu. Multiple FMS zone can be made and separate trunk has to
be assigned to each FMS zone. Trunk Routing configuration is a default
process for trunk calls.
Make a FMS user in the [CONFIGURATION > User > Single Phone User]
menu. FMS user needs ‘Mobile Phone Number’ and ‘FMS zone name’ which
the FMS user is assigned to. ‘Phone Type’ of a FMS user is FMS-Phone.
For additional configuration of the FMS gateway, usually OS7500, refer to the
manual for OS7500.
There is some limitation for a call from a FMS user.
Some user services are restricted for a FMS user because FMS user is a virtual
user which is not registered. Only ‘User Account Code’ and ‘Send CLI
Number’ can be applied. Do not change other fields discretionally.
When SCM receives a FMS call from a FMS trunk, ‘Inbound MCN’ is not
applied because a FMS call is treated as if an internal call. But ‘Outbound

Ошибка! Используйте вкладку "Главная" для применения 제목 1 к тексту, который
должен здесь отображаться. Ошибка! Используйте вкладку "Главная" для применения 제목 1 к
тексту, который должен здесь отображаться.
SCM Express Operation Manual v12.0 171 ©Samsung Proprietary and Confidential
MCN’ for the outgoing call to a FMS trunk can be supported.
At the [COFNIGURATION > Wireless Enterprise > FMS Zone], you can
configure some options about FMS and FMS Smart Routing. Refer the table
below.
Item Description
User Group Choose a user group which provides FMS zone service.
FMS Zone Name Enter FMS Zone name.
FMS Trunk Choose a trunk which is connected to FMS Zone.
FMS Default Access Code
Choose Default Access Code for FMS calls in the Access Code list.
SCM converts FMS extension to ‘FMS Default Access Code + Mobile number of the FMS user’.
Reroute FMS Call to Trunk
Set to Enable when you want to re-route the FMS call to a normal trunk if a designated response is received.
For more details, refer to FMS Smart Routing.
Reroute Trunk call to FMS
Set to Enable when you want to use FMS call as a default. If a normal trunk call to a mobile number of a user re-route to FMS trunk because of account.
For more details, refer to FMS Smart Routing.
Reroute Announcement
Set to Enable if you want to play an announcement during re-routing a FMS call to a normal trunk.
For more details, refer to FMS Smart Routing.
FMS Smart Routing
For FMS service, SCM provides two kinds of Smart Routings.
Smart Routing from FMS zone to Normal Trunk
A call to FMS user is normally routed to the FMS trunk to reach FMS Zone. If a
designated response is received, SCM re-routes the call to a normal trunk with the
mobile phone number.
The following configurations are required for smart routing from FMS zone to
normal trunk.
First of all, ‘Alternative Route N’ is required in the [CONFIGURATION >
Trunk Routing > Priority Routing] for the FMS routing. The Alternative
Route N is a normal trunk to reroute FMS call.
‘Reroute FMS call to Trunk’ in the [CONFIGURATION > Wireless
Enterprise > FMS Zone] has to set to Enable.
Enter 480 or a designated response in the ‘Allow Reroute ReasonCode’ of
[CONFIGURATION > Trunk Routing > Route].
SCM supports an announcement for smart routing from FMS zone to normal
trunk. ‘Call Forward Announcement Iteration’ in the [CONFIGURATION >
Trunk Routing > Route] Trunk Service change to a value large than 1. You
can check or change the announcement which ID is 1218 (Announcement for
Free zone to Trunk forwarding) in the [CONFIGURATION >

Ошибка! Используйте вкладку "Главная" для применения 제목 1 к тексту, который
должен здесь отображаться. Ошибка! Используйте вкладку "Главная" для применения 제목 1 к
тексту, который должен здесь отображаться.
SCM Express Operation Manual v12.0 172 ©Samsung Proprietary and Confidential
Announcement > Service Announcement].
Smart Routing from normal trunk to FMS zone
SCM re-routes the normal trunk call to FMS Zone if the called number is a mobile
phone number of a FMS User. This makes the call can avoid the trunk billing.
For smart routing from normal trunk to FMS zone, ‘Reroute Trunk call to
FMS’ has to set to Enable in the [CONFIGURATION > Wireless
Enterprise > FMS Zone].
Emergency Group
In case of emergency, if user makes a call with pre-configured emergency group
number, system automatically make a call to the members with emergency type
access code.
When a member of emergency group response the call. The system automatically
calls to the manager of the emergency group. The manager can only hear.
To use Emergency Group feature, ‘Emergency Type Access Code’ is required in
the [CONFIGURATION > Trunk Routing > Access Code] menu.
And the following Items are required in the [CONFIGURATION > Service >
Group Service > Emergency Group] menu.
Item Description
User Group Select a user group for which the emergency group will be configured
Location Select a location for which the emergency group will be configured
Group Number Enter a number for the emergency group
A user dials this number when emergency.
Group Name Specify a name for the Emergency group. The emergency group name is useful for identifying the purpose of the emergency group.
Ring Type Specify a ring type for manager’s phone in emergency
Manager Specify a manager for the Emergency group
SCM automatically dial to managers in emergency.
It can be assigned to maximum of 3 managers.
History Log
SCM provides history logging capability for the events like a SPAM call,
incoming call, paging on answer call, wakeup call, feature set, registration fail,
dispatch call etc.
You can configure Logging Service, using the [CONFIGURATION > User
Group > Change User Group > Detailed Event Logging Option] Menu.
Administrator can review logs at [Performance > Detailed History] menu.

Ошибка! Используйте вкладку "Главная" для применения 제목 1 к тексту, который
должен здесь отображаться. Ошибка! Используйте вкладку "Главная" для применения 제목 1 к
тексту, который должен здесь отображаться.
SCM Express Operation Manual v12.0 173 ©Samsung Proprietary and Confidential
Follows are detailed description of [CONFIGURATION > User Group >
Change User Group > Detailed Event Logging Option] menus.
All options should be configured, and it was disabled by default.
Item Description
User Group It displays the user group.
SPAM Call Logging Specify whether to logging the SPAM calls. It logs a call from external only.
Call Logging Specify whether to logging the incoming/outgoing/all calls from extension or trunk.
Paging On Answer Call Logging
Specify whether to logging the Paging On Answer calls.
Wakeup Call Logging Specify whether to logging the Wakeup calls.
Wakeup Set Logging Specify whether to logging the Wakeup Setting calls.
Call Block Feature Logging
Specify whether to logging the calls blocked by Cal Block feature.
ACL Block Logging Specify whether to logging the calls blocked by ACL feature.
This option is not available.
Register Fail Logging Specify whether to logging for Register Failure.
Disable: It does not logging.
Phone Only: It logging the Register failure for Phone only.
All Devices: It logging the Register failure for all devices.
Dispatch Call Logging Specify whether to logging for Dispatch Call.
Notice Board Logging The administrator can collect the notice board history by this option.
SPAM Call History
SPAM Call History feature provides a user to logging the call with specific SPAM
number from external judged as SAPM call.
You should enable the ‘SPAM Call Logging’ option of [CONFIGURATION >
User Group > Change User Group > Detailed Event Logging Option] and
[CONFIGURATION > Trunk Routing > CLI Routing] menu.
You can review the history record of SPAM call at [Performance > Detailed
Event History > Incoming Call History] menu.
Item Description
Date It displays the time when the SPAM Call event occurred.
Call Type It displays the type of a call. Reject: It just reject the call.
Announcement: It plays an announcement for SPAM Call.
Routing: Normal Case, Not SPAM Call
User Group It displays the User Group name of a user when the event occurred.
Extension It displays the Extension number of a user when the event occurred.
CLI Number It displays the CLI Number of the call from trunk when the event occurred.

Ошибка! Используйте вкладку "Главная" для применения 제목 1 к тексту, который
должен здесь отображаться. Ошибка! Используйте вкладку "Главная" для применения 제목 1 к
тексту, который должен здесь отображаться.
SCM Express Operation Manual v12.0 174 ©Samsung Proprietary and Confidential
Item Description
DID Number It displays the DID Number of the call from trunk when the event occurred.
Destination Only if call type is routing case, Called Number is displayed.
Call History
Call History feature provides a user to logging the call.
You should enable the ‘Call Logging’ option of [CONFIGURATION > User
Group > Change User Group > Detailed Event Logging Option] and
[CONFIGURATION > Service > Feature Service > Service Activation] menu.
Item Description
Call Logging Specify whether to logging an incoming call.
No Answer Only (Incoming): it logging the incoming calls not answered only
All Call (Incoming): It logging the incoming calls.
No Answer Only (Outgoing): it logging the outgoing calls not answered only
All Call (Outgoing): It logging the outgoing calls.
No Answer Only (Both): it logging the calls not answered only
All Call (Both): It logging the whole calls.
Administrator can review the history record of Incoming Call at [Performance >
Detailed Event History > Call History] menu.
Item Description
Date It displays the time when Incoming Call event occurred.
Call Type It displays the type of a call.
Abandon: A caller cancelled the call.
Answer: the call was connected.
No Answer: The call was not answered by user.
Call Failure: The call was not complete by other reason.
Direction It display the Call Attempt Direction.
Incoming: Extension receive a call
Outgoing: Extension makes a call.
User Group It displays the User Group name of a user when the event occurred.
Extension It displays the Extension number of a user when the event occurred.
CLI Number It displays the CLI Number of the call from trunk when the event occurred.
If direction is outgoing, It displays subscriber number.
DID Number It displays the DID Number of the call from trunk when the event occurred.
If direction is outgoing, It displays destination number.
Duration It displays talk duration time.
If Not Answer case, Ring time is displayed.

Ошибка! Используйте вкладку "Главная" для применения 제목 1 к тексту, который
должен здесь отображаться. Ошибка! Используйте вкладку "Главная" для применения 제목 1 к
тексту, который должен здесь отображаться.
SCM Express Operation Manual v12.0 175 ©Samsung Proprietary and Confidential
Paging On Answer Call History
Administrator can review the history record of Paging On Answer Call at
[PERFORMANCE > Detailed Event History > Paging On Answer History] menu.
Item Description
Date It display the time when Paging On Answer Call event was occurred.
Call Type It displays five call Types for Paging On Answer Call.
COMMAND: The caller of the Paging On Answer call.
NOANSWER: In case that member has no answered.
ANSWER: In case that member was answered.
BUSY: In case that member was busy.
UNREACHABLE: In case that member was unreachable.
User Group It displays the User Group name of a user when the event occurred.
Extension It displays the Extension number of a user when the event occurred.
Group Number It displays the Group Number of the Paging On Answer Group.
Ring Number It displays the members of the group who is in ringing state.
Wake-up Call History
Administrator can review the history record of wake-up set, reset and working
history at [PERFORMANCE > Detailed Event History > Wakeup Call
History] menu.
Item Description
Date It displays the time when the event occurred.
Call Type It displays three call Types for Wake-up Call.
FAIL: In case of alarm call failure.
NOANSWER: In case that a user does not answered for an alarm call.
ANSWER: In case that user answered alarm call.
User Group It displays the User Group name of a user when the event occurred.
Extension It displays the Extension number of a user when the event occurred.
Feature Set History
Administrator can review the history record of wake-up set, reset and working
history at [PERFORMANCE > Detailed Event History > Feature Set History]
menu.
Item Description
Date It displays the time when Feature Set event occurred.
Feature It displays the Types of Features.
User Group It displays the User Group name of a user when the event occurred.

Ошибка! Используйте вкладку "Главная" для применения 제목 1 к тексту, который
должен здесь отображаться. Ошибка! Используйте вкладку "Главная" для применения 제목 1 к
тексту, который должен здесь отображаться.
SCM Express Operation Manual v12.0 176 ©Samsung Proprietary and Confidential
Item Description
Event It displays the Types of events.
Method It displays who generate this event.
Index It displays the index of Wake-up call.
Destination It displays the destination number for the services like Forward All, Follow Me, and Remote Office.
Login ID It displays the Login ID of a user for this event.
Login IP It displays the Login IP Address of a user for this event.
Register Fail History
Administrator can review the history record of Register Fail at
[PERFORMANCE > Detailed Event History > Register Fail History] menu.
Item Description
Date It displays the time when the event occurred.
Device Type It displays the type of device when the event occurred.
User Group It displays the User Group name of a user when the event occurred.
Device It displays the Name of device when the event occurred.
Reason It displays the reason when the event occurred.
IP It displays the IP Address of device when the event occurred.
ID It displays the Authentication ID of device when the event occurred.
MAC It displays the MAC Address of device when the event occurred.
Dispatch Call History
Administrator can review the history record of Dispatch Call at
[PERFORMANCE > Detailed Event History > Dispatch Call History] menu.
Item Description
Start Time This item represents a starting time of dispatch call.
End Time This item represents a close time of dispatch call.
User Group This item represents the user group name of using a dispatch call.
Dispatch Call Group This item represents the group number of dispatch call.
Caller Extension This item represents the extension number who starts a dispatch call.
Result This item represents the final result of dispatch call.
Total Count This item represents the total count of following lists.
First Trial Count
Second Trial Count
Busy Count
No Answer Count
First Trial Count This item represents the number of members connected to the first number.
Second Trial Count This item represents the number of members connected to the

Ошибка! Используйте вкладку "Главная" для применения 제목 1 к тексту, который
должен здесь отображаться. Ошибка! Используйте вкладку "Главная" для применения 제목 1 к
тексту, который должен здесь отображаться.
SCM Express Operation Manual v12.0 177 ©Samsung Proprietary and Confidential
Item Description
second number.
Busy Count This item represents the number of members which is not connected due to the busy.
No Answer Count This item represents the number of members which it doesn't answer.
Application User ID This item represents the member's application user id.
Name This item represents the member's application user name.
First Number This item represents the member's first connect number.
Second Number This item represents the member's second connect number.
Final State This item represents the final state of each members within dispatch call group.
Not Connect
Connect at 1st trial
Connect at 2nd trial
User Busy
No Answer
Notice Board History
Administrator can review the history record of Notice Board at
[PERFORMANCE > Detailed Event History > Notice Board History] menu.
Item Description
Author This item represents the author, which is application user name who makes the posts.
Action This item represents a user action to the posts.
Add
Delete
Modify
Expire
Type This item represents the posts type.
Normal
Emergency
Title This item represents the posts title.
Write Time This item represents a time when the posts is made.
Start Time This item represents the starting time when the posts is noticed.
End Time This item represents the close time when the posts is noticed.
Home Worker Support
SCM provides the same user services to home workers. The services are provided
whether the home worker’s phone is connected to the public IP network or to a
private IP network within NAT (an IP router).
For a phone connected to a private IP network on NAT, the source port number
used for transmitting SIP messages must be symmetric or can be set as symmetric.

Ошибка! Используйте вкладку "Главная" для применения 제목 1 к тексту, который
должен здесь отображаться. Ошибка! Используйте вкладку "Главная" для применения 제목 1 к
тексту, который должен здесь отображаться.
SCM Express Operation Manual v12.0 178 ©Samsung Proprietary and Confidential
When SCM Is on the Public IP Network
If SCM is connected to the public IP network, services can be provided to home
workers without additional settings.
In general, if both the phones on a call are connected to the public IP network, they
exchange voice and video data (RTP/SRTP) directly. If either of the two or both
are connected to private IP networks on NATs, they exchange voice and video
data through SCM’s Media Proxy Server (MPS).
When SCM Is on a Private IP Network
If SCM is connected to a private IP network on NAT, a separate SBC system is
required. SCM Express performs some of the SBC features through a built-in
feature called MPS.
To use the MPS, set ‘System Under NAT’ to Enable and enter the public IP
address allocated to the NAT system in ‘System Public IP Address’ in the
[CONFIGURATION > System Configuration > Dynamic Configuration]
menu.
When a call is made between two home workers’ phones connected to the public
IP network outside SCM’s NAT, they exchange the voice and video data directly.
But when a call is made between a phone connected to the private IP network
inside SCM’s NAT and a home worker’s phone, the data is exchanged through the
MPS.
For phones connected on the private IP network inside SCM’s NAT but on a
different subnet with routing, you can add the free zone and subnet mask in the
[CONFIGURATION > Location > MPS Freezone] menu so that the voice and
video data can be exchanged directly without using the MPS.
Example) Entering ‘192.168.10.255’ into ‘Freezone’ and ‘255.255.255.0’ in
‘Subnet Mask’ puts the users using the ‘192.168.10.x’ subnet in the MPS-free
zone. Calls made between a phone on the same subnet as the system and a phone
in the MPS-free zone do not go through the MPS.
Lastly, for external connection endpoints, you can set the ‘NAT Traversal’ option
to Enable in the [CONFIGURATION > Routing > Endpoint Advanced
Options] menu to provide the services through the MPS.
Hotel Service
There are additional menus for hotel services.
Refer to the ‘SCM Express Hotel Service Guide’ for detailed information.
PMS Interface
SCM should interworks with PMS for hotel services.
Refer to the ‘SCM Express Hotel Service Guide’ for detailed information.

Ошибка! Используйте вкладку "Главная" для применения 제목 1 к тексту, который
должен здесь отображаться. Ошибка! Используйте вкладку "Главная" для применения 제목 1 к
тексту, который должен здесь отображаться.
SCM Express Operation Manual v12.0 179 ©Samsung Proprietary and Confidential
Hot Desking
The hot desking feature allows a user to log in from a phone shared by multiple
users.
The user can use a phone in the logged out status to enter his/her ID and password
to log in and use the phone as his/her own phone until logged out. The user can log
out when using Samsung phones’ menu. If the user leaves the phone without
logging it out, it is automatically logged out after a set period of time, preventing
unauthorized users from using the phone. The default login expiration time is 8
hours. If the user is already logged in through a phone but requests for login again
through another phone using the same user ID, the new login request is processed
by logging the previous phone out.
To use the hot desking feature, the following items must be configured.
In the [CONFIGURATION > User Group > Change User Group >
Information] menu, hot desking must be enabled in the ‘Service Permission’
section. In the [CONFIGURATION > Service > Feature Service > Service
Activation] menu, hot desking service must be enabled for the extension number
used as a hot desking phone. Here, you can enter the login expiration time in ‘Hot
Desk Expire Time (hour)’.
Hot Line and Warm Line
The hot line feature allows automatic connection to a specified number when the
handset of the selected phone is lifted. If the call is connected without delay when
the handset is lifted, it is called a hot line. If the call is automatically connected
when the handset is lifted but no number is dialed for a set period of time, it is
called a warm line.
To use the hot line feature, the following items must be configured.
In the [CONFIGURATION > User Group > Change User Group >
Information] menu, hot line must be enabled in the ‘Service Permission’ section.
In the [CONFIGURATION > Service > Feature Service > Service Activation]
menu, hot line service must be enabled for the extension number used as a hot line
phone.
Here, you can enter ‘Hot Line Expire Time’ to use the warm line service.
Hunt Group
The hunt group service directs calls received by the pilot number of a hunt group
appropriately within the hunt group using various routing methods.
When calls are received for a hunt group, the available member list excludes
members unable to receive calls because they are unavailable, are subject to
incoming call restriction policies, have logged out of the system, have user
information that is locked out, or do not have their phones connected.

Ошибка! Используйте вкладку "Главная" для применения 제목 1 к тексту, который
должен здесь отображаться. Ошибка! Используйте вкладку "Главная" для применения 제목 1 к
тексту, который должен здесь отображаться.
SCM Express Operation Manual v12.0 180 ©Samsung Proprietary and Confidential
Called parties for calls received for a hunt group are determined in the following
four ways.
Sequential
The call is always directed to the first member in the hunt group. The call is
directed to the next member only if the previous member is on the line or
unavailable.
Circular
When a call is received for the hunt group, the call is directed to the person on the
hunt group member list after the one who answered the previous call. If the
member the call is directed is on the line or unavailable, the call is re-directed to
the next member.
Parallel or Broadcast
The call is directed to all the members in the hunt group. When one of the
members answers the call, the call is canceled for all other members.
Random
The call is randomly directed to one member in the hunt group at random.
When a call is received for the hunt group, the call is directed to a selected
member.
But if the call is not answered for a specified period of time, the call is canceled
and directed to the next member randomly.
Equal
All extension numbers of members can be pilot number. And the call is distributed
sequentially starting from pilot number if pilot number is member extension.
You can create hunt groups using the [CONFIGURATION > Service > Group
Service > Hunt Group] menu. The following items are mandatory.
Item Description
User Group Select a user group for which the hunt group is defined.
Group Number Enter a pilot number used for calling the hunt group.
Group Name Specify a name for the hunt group. The hunt group name is useful for identifying the purpose of the hunt group.
Hunt Type Specify the method of determining the member to whom the incoming hunt group call is directed.
You can use one of the four methods described above.
Hunt Member Select a user to add as a member of the hunt group.
When configuring a hunt group, you can enter the following data as necessary.
Item Description
All Busy/Unavailable Destination
You can specify an alternative called number to use when the call cannot be directed to any member in the hunt group.
Member No Answer Specify a period of time during which the call must be answered

Ошибка! Используйте вкладку "Главная" для применения 제목 1 к тексту, который
должен здесь отображаться. Ошибка! Используйте вкладку "Главная" для применения 제목 1 к
тексту, который должен здесь отображаться.
SCM Express Operation Manual v12.0 181 ©Samsung Proprietary and Confidential
Item Description
Time (sec) by current ringing member in the hunt group. If the call is not answered during this period, it is directed to the next member in the hunt group.
No Answer Destination
You can specify an alternative called number to use when the call is not answered by any member in the hunt group for a specified period of time. This works in the same way as no answer call forwarding.
No Answer Time (sec)
Specify a period of time during which the call must be answered by any member in the hunt group. If the call is not answered during this period, it is directed to the specified alternative called number.
External Ringback Tone Use
Specify whether to use external ringback tone.
None: Do not use Ringback tone
Internal: Use Ringback tone only for the originating call from user
External: Use Ringback tone only for the inbound call from the trunk.
Both: User Ringback tone for both, the originating call from user and the inbound call from the trunk
External Ringback Tone Server
Select Application Server for Ringback tone.
To select Ringback tone server, make External Ringback tone Server at [CONFIGURATION > Application > Other Application Server] menu first.
Group Member Call Forward
If a member has been set the call forwarding, it is operated as follows.
Override: Member’s call forwarding is ignored and member is received a call.
Next Member: It is directed to the next number in the hunt group.
Voice Mail Server Select the application server to use when call is forwarded by no answer.
Auto Attendant Plan Schedule
Select a Ring Plan Schedule to use when call is transferred to Auto Attendant.
Maximum Waiting Call Count
If there are no idle member in hunt group, specify a max count to wait in hunt group.
If there are no idle member, the wait call is waited in hunt group during No Answer Time.
After No Answer Time, the wait call is transferred to All Busy/Unavailable Destination.
If All Busy/Unavailable Destination is blank, the wait call is disconnected.
Second External Ringback Tone Server
Select Application Server for Ringback tone. When External Ringback Tone Server was unregisterd, it is serviced.
To select Ringback tone server, make External Ringback tone Server at [CONFIGURATION > Application > Other Application Server] menu first.
‘Maximum Waiting Call Count’ is used to waited in hunt group during ‘No
Answer Time (sec)’ when there are no idle member in hunt group. ‘Maximum

Ошибка! Используйте вкладку "Главная" для применения 제목 1 к тексту, который
должен здесь отображаться. Ошибка! Используйте вкладку "Главная" для применения 제목 1 к
тексту, который должен здесь отображаться.
SCM Express Operation Manual v12.0 182 ©Samsung Proprietary and Confidential
Waiting Call Count’ is worked each SCM system based. If SCM is configured to
Active-Active system, received call is waited in hunt group of each node. It is
possible to waited incoming call to each extension group per node until ‘Maximum
Waiting Call Count’.
Hunt Group Login/Logout
You can temporarily prevent a hunt group member from receiving incoming calls
for the hunt group. If a member logs out of his or her hunt group, the member is
excluded from the available member list, and incoming hunt group calls are not
directed to the member.
If the member logs in again, he or she can receive incoming hunt group calls
normally.
To use the hunt group login/logout feature, you must set the ‘Station Group-
In/Station Group-Out’ feature code in the [CONFIGURATION > Service >
Feature Service > Feature Code] menu.
If the user dials feature code + hunt group number to set Station Group-In/Station
Group-Out, the member is logged in to or out of the selected hunt group only. If
the user only dials the feature code without a hunt group number to set Station
Group-In/Station Group-Out, the member is logged in to or out of all his or her
hunt groups.
Hunt Group Member Service
When incoming call is to the pilot number, without regard to whether the setting of
the service-call forwarding, multi-ring, the group call forwarding-hunt group
member causes the incoming call. If you change the Enable an item of 'Hunt
Group Member Services' from the menu [Configuration > User Group > Change
User Group > Options], hunt group member who setting call forwarding, multi-
ring, the group call forwarding, works as configured service for the user.
Services for these users if that will run only if the hunt group that you set
'sequential', 'distribution', 'random' except 'parallel'. If the first hunt group member
does not respond for no answer time, the call is terminated without forwarding to
next members. The hunt group members who set 'Absent', 'DND', 'lock', 'log out',
are excluded from the available list of the hunt group regardless of the setting of
'Hunt Group Member Service'.
Location Codec Negotiation
Codec negotiation takes place between two Internet phones when a call is made
between them using the SIP protocol. SCM can change codec priority by
intervening in the codec negotiation process.
You can specify the default audio codec, the default video codec, and the
announcement codec for each location in order to change the priority of the codec
list between the calling phone and the called phone.
Since codec negotiation only takes place between Internet phones, codec
negotiation priority settings cannot be forced on calling or called phones which do

Ошибка! Используйте вкладку "Главная" для применения 제목 1 к тексту, который
должен здесь отображаться. Ошибка! Используйте вкладку "Главная" для применения 제목 1 к
тексту, который должен здесь отображаться.
SCM Express Operation Manual v12.0 183 ©Samsung Proprietary and Confidential
not support the selected codec.
You can set the preferred codec for locations using the [CONFIGURATION >
Location > Location] menu.
Item Description
Name Specify a name to identify the location.
Bandwidth Specify the maximum available bandwidth for the location.
Intra-Location Video Codec
Select a video codec preferred for the Intra-location.
Inter-Location Video Codec
Select a video codec preferred for the Inter-location.
Intra-Location Audio Codec
Select an audio codec preferred for the Intra-location.
Inter-Location Audio Codec
Select an audio codec preferred for the Inter-location.
Intra-Location Forced Codec
Select specific audio codec by Administrator for the Intra-location.
Inter-Location Forced Codec
Select specific audio codec by Administrator for the Inter-location.
Announcement Codec Select an announcement codec preferred for the location.
Location Codec
You can designate Calling Location, Called Location, Video codec, Forced Audio
Codec and Audio Codec at Location codec. You can specify the default audio
codec, the default video codec, and the announcement codec for each location in
order to change the priority of the codec list between the calling phone and the
called phone. When you select forced Audio Codec, SCM sends only audio codec
in Forced Audio Codec field to the destination.
Since codec negotiation only takes place between Internet phones, codec
negotiation priority settings cannot be forced on calling or called phones which do
not support the selected codec.
You can set the preferred codec for locations using the [CONFIGURATION >
Location > Location Codec] menu.
Item Description
Calling Location Select calling location.
Called Location Select called location.
Video Codec Select a video codec preferred for the location.
Forced Audio Codec Select specific audio codec by Administrator for the location.
Audio Codec Select an audio codec preferred for the location.
Audio Codec
When SCM receives a sent message, SCM finds the default audio codec set for the
calling phone’s location in the audio codec list of the sent message and moves it to
the top-priority position of the list before resending the message. Codec
negotiation is performed as the specified audio codec is selected by the called

Ошибка! Используйте вкладку "Главная" для применения 제목 1 к тексту, который
должен здесь отображаться. Ошибка! Используйте вкладку "Главная" для применения 제목 1 к
тексту, который должен здесь отображаться.
SCM Express Operation Manual v12.0 184 ©Samsung Proprietary and Confidential
phone if it can service the codec.
This process is skipped if the default audio codec set for the location is not found
in the codec list of the sent message.
Video Codec
When SCM receives a sent message, SCM finds the default video codec set for the
calling phone’s location in the video codec list of the sent message and moves it to
the top-priority position of the list before resending the message. Codec
negotiation is performed as the specified video codec is selected by the called
phone if it can service the codec.
This process is skipped if the default video codec set for the location is not found
in the codec list of the sent message.
Announcement Codec
SCM can connect its sound source to the phone put on hold during a call and play
an on-hold tone. It can also play an announcement for the phone of the calling
party in case of call failure or any other errors.
When SCM sends a sent message for connecting the sound source to the phone for
which an on-hold tone is played while the call is put on hold or an announcement
is played for an error, SCM moves the announcement codec set for the phone’s
location to the top-priority position of the audio codec list in the sent message
before resending the message.
Codec negotiation is performed as the specified audio codec is selected by the
called phone if it can service the codec.
Default System Codec
Default System Codec menu is used to set the default value of the codec used in
Location menu. If codec is set to System Codec in Location menu, it is mean to
use the Default System Codec.
Multiple Appearance
There are the following two multiple appearance services: assigning one phone
number to multiple phones, or assigning multiple phone numbers to one phone.
These two services can be set independently or collectively.
You can configure multi-device and multi-number using the
[CONFIGURATION > User > Multi-Extension Phone] menu and the
[CONFIGURATION > User > Multi-Phone User] menu.
Multi-Device
The multi-device service assigns one user (phone number) to multiple devices
(phones).
SCM performs the service regardless of the phone being used. One phone number
can be assigned to maximum of 32 phones regardless of the phone type.

Ошибка! Используйте вкладку "Главная" для применения 제목 1 к тексту, который
должен здесь отображаться. Ошибка! Используйте вкладку "Главная" для применения 제목 1 к
тексту, который должен здесь отображаться.
SCM Express Operation Manual v12.0 185 ©Samsung Proprietary and Confidential
Multi-Number
The multi-number service assigns multiple users (phone numbers) to one device
(phone).
The service is performed collectively by SCM and by the phone. Since the phone
must be able to differentiate the lines and select them, the maximum number of
phone numbers allowed varies by the phone type. In case of SMT-i5243, the phone
with the most service capacity, up to 8 phone numbers can be assigned per phone.
Music On Hold
When a call is put on hold, SCM can connect its built-in sound source and play a
tone or music for the phone or the trunk.
To use music on hold (MOH), administrator should set ‘MOH Enable’ to ‘Enable’
and specify the ID of the sound source file in ‘MOH ID’ in the
[CONFIGURATION > User Group > Change User Group > Information] menu.
It is necessary to enable or disable MOH for each user group because there is
limited number of channels for SCM’s built-in sound source device. When there
are too many calls put on hold, the MOH may not be played for some of the calls.
In this case, it might be better not to play the MOH at all than to have the MOH
played for some calls while the MOH is not played for other calls.
To support a specific music source per each subscribers, set ‘MOH Announcement
ID’ in the [User > Single Phone User] or [User > Multi-Phone User] menu.
The MOH ID of subscriber has priority over that of user group.
Missed Call Display
Missed Call Display is a notice service to the phone to inform the call is answered
by other user. SCM can activate or de-activate the function for the Multi-Device
Calls, Hunt Group, Multi-ring calls and Pickup.
Missed Call Display by Multi-Device
Multi-Device means that several phones share single phone number. When a user
makes a call to an extension of Multi-Device, multiple phones are ringing. Set
[Missed Call by Multi-Device] in the [CONFIGURATION > User Group >
Change User Group > Options] menu to ‘Display Enable’ if you want to leave a
Missed Call Display for no-answer phones when one phone of them is answered.
Default value for the ‘Missed Call by Multi-Device’ is ‘Display Disable’.
Missed Call Display by Hunt Answer
SCM provides Missed Call Display feature for Hunt Service. How to display the
missed call depends on the Hunt Type. If Hunt Type is ‘Parallel’, Missed Call
Display is determined by Answer action according to the ‘Missed Call by Hunt
Answer’ in the [CONFIGURATION > User Group > Change User Group >
Options]. For other hunt type, for example ‘Sequential’, ‘Circular’ and ‘Random’,
Missed Call Display is determined by the option regardless of the Answer action.

Ошибка! Используйте вкладку "Главная" для применения 제목 1 к тексту, который
должен здесь отображаться. Ошибка! Используйте вкладку "Главная" для применения 제목 1 к
тексту, который должен здесь отображаться.
SCM Express Operation Manual v12.0 186 ©Samsung Proprietary and Confidential
Missed Call Display by Multi-ring Answer
When a user which activates Multi-ring service and has Multi-ring members
receives a call, the phones of the user and members are ringing. By the ‘Missed
Call by Multiring Answer’ option in the [CONFIGURATION > User Group >
Change User Group > Options], you can determine the missed call display on
the no-answer phones when one phone is answered. Default value is ‘Display
Disable’. If you want to leave the missed call play on the no-answer phones,
change the option to ‘Display Enable’.
Missed Call Display for Pickup
When a user picks up another user’s incoming call SCM does not leave a missed
call display on the original called party phone by default. If you want to display
missed call to the original called party, change ‘Missed Call for Pickup’ to
‘Display Enable’ in the [CONFIGURATION > User Group > Change User
Group > Options] menu.
Operator Group
An operator group is a special hunt group made up of members who act as
operators. Different hunt groups can be specified as operator groups by time
periods. In general, a user selected as a member of an operator group uses the
phone in parallel to a PC application or uses a PC-based soft phone.
You can configure operator groups using the [CONFIGURATION > Service >
Group Service > Operator Group] menu. When specifying an operator group,
you can select one of the hunt groups configured in the [CONFIGURATION >
Service > Group Service > Hunt Group] menu.
Item Description
User Group Select a user group for which the operator group will be defined.
Access Number Enter a pilot number used for calling the operator group.
Operator Name Specify a name for the operator group. The operator group name is useful for identifying the purpose of the operator group.
Default Operator Group
Specify a hunt group to use as the operator group when ring plans 1 through 15 are not applied.
Ring Plan Schedule Select a ring plan schedule for this toll restriction policy.
RP1~15 Operator Group
Specify a hunt group to use as the operator group when ring plans 1 through 15 are applied.
Operator Recall
When a call is transferred or parked and then directed back to the original called
party but the connection was not established, the operator recall service directs the
call back to the operator group.
Calls are redirected to the operator group in the following cases:
Reconnection failure after call transfer failure: When call transfer fails for an
incoming call for an extension number, the call is redirected to the extension
number. Here, if the call is not answered by the extension number, it is redirected
to the operator group.

Ошибка! Используйте вкладку "Главная" для применения 제목 1 к тексту, который
должен здесь отображаться. Ошибка! Используйте вкладку "Главная" для применения 제목 1 к
тексту, который должен здесь отображаться.
SCM Express Operation Manual v12.0 187 ©Samsung Proprietary and Confidential
Reconnection failure after call park: When an incoming call for an extension
number is put on hold (call park) and the call is not answered for a set period of
time, the call is redirected to the extension number. Here, if the call is not
answered by the extension number, it is redirected to the operator group.
To use operator recall, set ‘Operator Recall’ to Enable in the
[CONFIGURATION > User Group > Change User Group > Options] menu.
To use operator recall, the following time settings are required in the
[CONFIGURATION > User Group > Change User Group > Timers] menu.
Item Description
Park Recall Time (sec) When a trunk call is put on hold and if it is not answered for a set period of time, it will be redirected to the user who put it on hold. Specify this time period.
Transfer Recall Time (sec)
When a trunk call is forwarded and if it is not answered for a set period of time, it will be redirected to the user who forwarded it. Specify this time period.
Operator Recall Time (sec)
When a call is redirected to the user after it was forwarded or put on hold and if the call is not answered for a set period of time, the call is redirected to the operator group. Specify this time period.
Operator Recall Wait Time (sec)
When a call is redirected to the user after it was forwarded or put on hold and if the user is busy, the call is redirected to the operator group after waiting for a set period of time for the user to become available.
Specify this time period.
Recall Disconnect Time (sec)
If a call redirected to the operator group is not answered by any member of the operator group for a set period of time, the call is terminated.
Specify this time period.
Operator Transfer Recall
When call transfer by operator fails or the call is not answered, it is redirected to
the operator.
Calls are redirected to the operator in the following cases:
No answer by transferee: When an operator transfers a call to a user, the call is
redirected to the operator if the call is not answered during ‘Transfer Recall
Time’.
Call reject by transferee: When an operator transfers a call to a user, the call is
redirected to the operator if the transferee activates DND service.
To work Operator Transfer Recall, ‘Transfer Recall’ has to set to ‘Enable All’ or
‘Enable Operator Only’ in the [CONFIGURATION > User Group > Change
User Group > Options] menu.
Ring Plans
When processing calls on a PBX, it is often necessary to provide different services
for different days of the week or time of the day. Different services also may be

Ошибка! Используйте вкладку "Главная" для применения 제목 1 к тексту, который
должен здесь отображаться. Ошибка! Используйте вкладку "Главная" для применения 제목 1 к
тексту, который должен здесь отображаться.
SCM Express Operation Manual v12.0 188 ©Samsung Proprietary and Confidential
required for public holidays. To accommodate such needs, the services are
configured for different days of the week, different time of the day, and different
dates. But the problem is that the settings become too complicated.
SCM provides different services for different days of the week, different time of
the day, and different dates by utilizing a feature known as ring plans. SCM can be
created a ring plan schedule by maximum 300. SCM supports a total of 16 ring
plans, including the 15 ring plans (ring plans 1 through 15) which can be assigned
their own dates, days of the week and time of the day, and the default ring plan
which is used when none of the former 15 ring plans is applied.
The maximum counts of ring plan schedule are as follows.
System Capacity Count of Ring Plan Schedule
3000 User System Maximum 100
10000 User System Maximum 100
30000 User System Maximum 300
Calendar Exceptions
When User Group is created, calendars of twenty years are created by default.
Specify holidays for the year and special days for the site in the calendars.
You can make detailed calendar settings using the [CONFIGURATION > Time
Schedule > Calendar Exceptions] menu.
Item Description
User Group Select a user group for which the calendar will be changed.
Year Specify a year for which the calendar will be changed.
Day Type Specify a type of the day to set. You can use one of the following types of days.
Holiday1: Set a type 1 holiday.
Holiday2: Set a type 2 holidays.
User1: Set a special day for type 1 site.
User2: Set a special day for type 2 sites.
Date Specify a date of the day to set.
Ring Plan Schedule
A ring plan schedule is a table containing data which specifies ring plans by days
of the week, dates, and time of the day. To configure ring plan, select ring plan
which you want to set, then drag time table in the [CONFIGURATION > Time
Schedule > Ring Plan Schedule]. The ring plan schedule is used for CLI Routing,
DID Routing, Group Call Forward, and Operator Group. The default ring plan
schedule is created automatically when user group is created.
Item Description
User Group Select a user group for which the ring plan schedule will be configured.
Name Specify name of ring plan schedule.
ID Specify ID of ring plan schedule.

Ошибка! Используйте вкладку "Главная" для применения 제목 1 к тексту, который
должен здесь отображаться. Ошибка! Используйте вкладку "Главная" для применения 제목 1 к
тексту, который должен здесь отображаться.
SCM Express Operation Manual v12.0 189 ©Samsung Proprietary and Confidential
Item Description
ID is used for the ring plan override function.
Current Ring Plan Current ring plan is displayed.
Default Ring Plan Display whether or not to default ring plan scheduling of user groups.
If this is Yes, this is default ring plan schedule in user group.
Ring Plan Override
SCM provides a manual override service which allows temporary use of a
particular ring plan regardless of the current time. When using ring plan override,
you can use the override temporarily by specifying an expiration time or use it
permanently by not specifying an expiration time.
Once a permanent ring plan override is set, you can delete the ring plan override
list created in the [CONFIGURATION > Time Schedule > Ring Plan
Override] menu or change ‘Override Ring Plan’ to ‘None’ to clear the ring plan
override and use the ring plans again.
You can set ring plan override using the [CONFIGURATION > Time Schedule
> Ring Plan Override] menu.
Item Description
User Group Select a user group for which the ring plan override will be configured.
Ring Plan Schedule
Select a ring plan schedule for this toll restriction policy.
Override Ring Plan Specify a ring plan to override. You can select None or one from Ring Plan 1 through Ring Plan 15. Selecting None clears the ring plan override.
Expire Time Set the time when the ring plan override is cleared and the ring plans are put in effect again. Leaving this option empty allows the ring plan override to stay in effect permanently.
You can change the current ring plan by feature code manually. To use this
function, Ring Plan Override-Set and Ring Plan Override-Cancel feature code
must be set in [CONFIGURATION > Service > Feature Service > Feature
Code] menu.
To use ring plan override, dial next number in phone.
To set Ring Plan Override:
Ring Plan Override-Set Feature Code + Ring Plan (00~15) + Ring Plan
Schedule ID
To cancel Ring Plan Override:
Ring Plan Override-Cancel Feature Code + Ring Plan (00~15) + Ring Plan
Schedule ID
If ring plan schedule ID is not dialed, set ring plan override for default ring plan
schedule.

Ошибка! Используйте вкладку "Главная" для применения 제목 1 к тексту, который
должен здесь отображаться. Ошибка! Используйте вкладку "Главная" для применения 제목 1 к
тексту, который должен здесь отображаться.
SCM Express Operation Manual v12.0 190 ©Samsung Proprietary and Confidential
Service Schedule
A service schedule is a table containing data which specifies service plans by days
of the week, dates, and time of the day. There is a service schedule of up to 16 per
user group.
To configure service plan, select service schedule which you want to set, then drag
time table in the [CONFIGURATION > Time Schedule > Service Schedule].
The current status of service schedule can be confirmed in [CONFIGURATION
> Time Schedule > Service Schedule] menu. The service schedule is used for
system call forward.
Item Description
User Group Select a user group for which the ring plan schedule will be configured.
Service Schedule Select a service schedule.
Service Schedule Status
Display current service schedule status.
Group Call Forward
This service is used for forwarding all incoming calls for the phone in a group to
another number according to the ring plan. If Group Call Forward is activated by
feature code or by ‘Forced Forward Number’ set in the [CONFIGURATION >
Service > Group Call Forward] menu, it overrides the forward number from ring
plan. Group Call Forward can follow the ring plan only when forced Group Call
Forward is deactivated. You can check feature code for Group Call Froward in the
[CONFIGURATION > Service > Feature Service > Feature Code] menu.
Group Call Forward is configured in the [CONFIGURATION > Service >
Group Call Forward] menu.
Item Description
User Group Select a user group for which the group call forward will be configured.
Name Enter the name of group call forward.
Ring Plan Schedule Select a ring plan schedule for this toll restriction policy.
RP1 Forward Number~RP15 Forward Number
Enter the forward Number by ring plan.
Forced Forward Number
Enter the forward Number if you want to override the Forward Number by ring plan.
User Member Toll Restriction
Set to ‘Enable’ if you want to apply Toll Restriction to the members of the Call Forward Group.
Group Member Select the members for the call forward group.
Service Group Local Number
Normally, call setup is made with an extension number. Service Group Local
Number Feature provides a shorter number to call within a service group. An

Ошибка! Используйте вкладку "Главная" для применения 제목 1 к тексту, который
должен здесь отображаться. Ошибка! Используйте вкладку "Главная" для применения 제목 1 к
тексту, который должен здесь отображаться.
SCM Express Operation Manual v12.0 191 ©Samsung Proprietary and Confidential
extension number in a SCM consists of 2 parts: the service group code and the
service group local number.
Each service group local number in a service group is unique and can be used
directly without the service group code. This service group local number can have
meaning only when Service Group Code in the [CONFIGURATION > User
Group > Service Group] menu is configured. SCM provides a phone display
method for a service group local number. An extension number or a service local
number can be used for phone display.
It is configured at the service group local CLI number in the
[CONFIGURATION > User > Single Phone User] menu. This information is
provisioned to the Samsung phone and used to determine phone number display.
The followings are limitations about a service group local number.
A service group code in the [CONFIGURATION > User Group > Service
Group] menu can be changed only when no users are assigned to the service
group.
To use a service group local number, a service group code for the user must be
configured. You can check the service group local number in the
[CONFIGURATION > User > Single Phone User] menu. It is displayed
automatically.
When a user is assigned to a service group which has a service group code, the
extension number of the user has to start with the service group code. An extension
consists of the service group code and the service group local number.
A service group local number is available in the service group. When you setup a
call to other service group, use an extension number for the user.
System Call Forward
This service performs call forwarding based on the system settings regardless of
the call forwarding settings of users. The call forward feature can have limitation
by Restricted Call Forward in the [CONFIGURATION > Service > Feature
Service > Class of Service] menu. If Restricted Call Forward is enabled, call
cannot be forwarded to trunk.
Preset Call Forward All
This service performs preset call forward all based on the settings made by the
system administrator even if preset call forward all is not set by users.
When administrator sets preset call forward all for users, this feature can be used
to forward the call to the voice mail system for voice announcement, etc.
If the user has set call forwarding, the user settings have precedence over the
system call forward settings. In other words, if the user has set call forward all, the
system preset call forward preset all setting is ignored.
You can use the system preset call forward all feature by enabling ‘Preset Call
Forward All’ for selected extension numbers in the [CONFIGURATION >

Ошибка! Используйте вкладку "Главная" для применения 제목 1 к тексту, который
должен здесь отображаться. Ошибка! Используйте вкладку "Главная" для применения 제목 1 к
тексту, который должен здесь отображаться.
SCM Express Operation Manual v12.0 192 ©Samsung Proprietary and Confidential
Service > Feature Service > Service Activation] menu. If you select a service
schedule when activate the service, call be forwarded by service schedule plan.
Service schedule plan is got ‘Set’ status and ‘Unset’ status. System call forward is
working only when service schedule plan’s status is ‘Set’. Service schedule can be
configured in [CONFIGURATION > Time Schedule > Service Schedule]
menu.
Preset Call Forward Busy
This service performs call forward preset busy based on the settings made by the
system administrator even if call forward preset busy is not set by users.
When the called user is busy, this feature can be used to forward the call to the
voice mail system for voice announcement, etc.
If the user has set call forwarding, the user settings have precedence over the
system call forward settings. In other words, if the user has set call forward all or
call forward preset busy, the system call forward preset busy setting is ignored.
You can use the system call forward preset busy feature by enabling ‘Call Forward
Preset Busy’ for selected extension numbers in the [CONFIGURATION >
Service > Feature Service > Service Activation] menu. If you select a service
schedule when activate the service, call be forwarded by service schedule plan.
Service schedule plan is got ‘Set’ status and ‘Unset’ status. System call forward is
working only when service schedule plan’s status is ‘Set’. Service schedule can be
configured in [CONFIGURATION > Time Schedule > Service Schedule]
menu.
Preset Call Forward No Answer
This service performs call forward preset no answer based on the settings made by
the system administrator even if call forward preset no answer is not set by users.
When the called user does not answer a call, this feature can be used to forward the
call to the voice mail system for voice announcement, etc.
If the user has set call forwarding, the user settings have precedence over the
system call forward settings. In other words, if the user has set call forward preset
no answer, the system call forward preset no answer setting is ignored.
You can use the system call forward preset no answer feature by enabling ‘Call
Forward Preset No Answer’ for selected extension numbers in the
[CONFIGURATION > Service > Feature Service > Service Activation] menu.
If you select a service schedule when activate the service, call be forwarded by
service schedule plan. Service schedule plan is got ‘Set’ status and ‘Unset’ status.
System call forward is working only when service schedule plan’s status is ‘Set’.
Service schedule can be configured in [CONFIGURATION > Time Schedule >
Service Schedule] menu.
Preset Call Forward Unreachable
This service performs preset call Forward Unreachable based on the settings made
by the system administrator even if preset call Forward Unreachable is not set by
users.
When administrator sets preset call Forward Unreachable for users, this feature

Ошибка! Используйте вкладку "Главная" для применения 제목 1 к тексту, который
должен здесь отображаться. Ошибка! Используйте вкладку "Главная" для применения 제목 1 к
тексту, который должен здесь отображаться.
SCM Express Operation Manual v12.0 193 ©Samsung Proprietary and Confidential
can be used to forward the call to the voice mail system for voice announcement,
etc.
If the user has set call forwarding, the user settings have precedence over the
system call forward settings. In other words, if the user has set call Forward
Unreachable, the system preset call forward preset unavailable setting is ignored.
You can use the system preset call Forward Unreachable feature by enabling
‘Preset Call Forward Unreachable’ for selected extension numbers in the
[CONFIGURATION > Service > Feature Service > Service Activation] menu.
If you select a service schedule when activate the service, call be forwarded by
service schedule plan. Service schedule plan is got ‘Set’ status and ‘Unset’ status.
System call forward is working only when service schedule plan’s status is ‘Set’.
Service schedule can be configured in [CONFIGURATION > Time Schedule >
Service Schedule] menu.
Preset Call Forward DND
This service performs preset call forward DND based on the settings made by the
system administrator even if preset call forward DND is set by user.
When administrator sets preset call forward DND for users, this feature can be
used to forward the call to the voice mail system for voice announcement, etc.
If the user has set DND service and administrator has set preset call forward DND
service, incoming call is forwarded to the destination by setting of administrator.
You can use the system preset call forward DND feature by enabling ‘Preset Call
Forward DND’ for selected extension numbers in the [CONFIGURATION >
Service > Feature Service > Service Activation] menu. If you select a service
schedule when activate the service, call be forwarded by service schedule plan.
Service schedule plan is got ‘Set’ status and ‘Unset’ status. System call forward is
working only when service schedule plan’s status is ‘Set’. Service schedule can be
configured in [CONFIGURATION > Time Schedule > Service Schedule]
menu.
VoIP Security
Signaling Encryption
The signaling encryption feature encrypts signaling information required for calls
such as the SIP protocol. TLS is used in signaling encryption for VoIP connections
between SCM and SIP phones and between SCM and endpoints.
Specifications of TLS serviced by SCM are as follows:
Uses OpenSSL library and supports TLS v1.0.
AES and ARIA are supported as media encryption algorithms.
Key management method is RSA and key length is 1024 bits.
To use TLS, it must be enabled for phones and endpoints in the following ways:
You can enable TLS of a Single Phone User by setting Protocol to TLS in the

Ошибка! Используйте вкладку "Главная" для применения 제목 1 к тексту, который
должен здесь отображаться. Ошибка! Используйте вкладку "Главная" для применения 제목 1 к
тексту, который должен здесь отображаться.
SCM Express Operation Manual v12.0 194 ©Samsung Proprietary and Confidential
[CONFIGURATION > User > Single Phone User] menu.
You can enable TLS of a Multi-Extension Phone by setting Protocol to TLS in
the [CONFIGURATION > User > Multi-Extension Phone] menu.
You can enable TLS for endpoints by setting Protocol to TLS in the
[CONFIGURATION > Trunk Routing > Route] Additional SIP tap.
Signaling encryption is not used for calls between phones or endpoints enabled
with encryption and phones or endpoints not enabled with encryption.
Media Encryption
The media encryption feature provides encryption for the voice data exchanged
between the caller and the called party for calls established with signaling
encryption.
Media encryption can be enabled to calls between SIP phones or between a phone
and an endpoint by applying secure RTP (sRTP), in which case, SCM performs
signaling for sRTP.
SCM supports media encryption for calls with phones, SCM’s built-in conference
system, SCM’s built-in voice mail system, endpoints, and SCM’s built-in MOH
system.
SCM supports AES and ARIA as media encryption algorithms.
ARIA is a block encryption algorithm developed in Korea in 2003 for protection
of information for public administration services. This is used as the TLS and
sRTP encryption algorithm.
You can enable media encryption for a Single Phone User by setting ‘Media’ in
the [CONFIGURATION > User > Single Phone User] menu. You can enable
media encryption for a Multi-Extension Phone by setting ‘Media’ in the
[CONFIGURATION > User > Multi-Extension Phone] menu.
RTP: No media encryption.
sRTP (AES/ARIA128): Encrypts media into the ARIA128 or AES protocol,
and uses AES first.
sRTP (ARIA128/AES): Encrypts media into the ARIA128 or AES protocol,
and uses ARIA128 first.
sRTP (AES/ARIA192): Encrypts media into the ARIA192 or AES protocol,
and uses AES first.
sRTP (ARIA192/AES): Encrypts media into the ARIA192 or AES protocol,
and uses ARIA192 first.
sRTP (AES): Encrypts media into the AES protocol.
sRTP (ARIA128): Encrypts media into the ARIA128 protocol.
sRTP (ARIA192): Encrypts media into the ARIA192 protocol.
Media encryption is not used for calls between phones or endpoints enabled with
encryption and phones or endpoints not enabled with encryption.

Ошибка! Используйте вкладку "Главная" для применения 제목 1 к тексту, который
должен здесь отображаться. Ошибка! Используйте вкладку "Главная" для применения 제목 1 к
тексту, который должен здесь отображаться.
SCM Express Operation Manual v12.0 195 ©Samsung Proprietary and Confidential
Inter-Proxy Function
This function supports TLS performance improvement by distributing TLS
connection of phones and Gateways. When creating subscription, internal
PROXYB is assigned to each subscription automatically. The phone Protocol is
TLS and Use InterProxy value is enable, and it operate with own assigned inter
PROXYB.
The PROXYB Index of subscription is shown in following menu.
[Configuration > User > Single Phone User > Use InterProxy]
[Configuration > User > Multi-Extension Phone > Use InterProxy]
[Configuration > Trunk Routing > Route > Use InterProxy]
PROXYB is multiple instance and the number of instance depends on
specifications of subscription.
3,000 subscription: 4
30,000 subscription: 8
User can change the TLS port of Inter Proxyb using following menu
[Configuration> Miscellaneous > Inter Proxy Config]
Item Description
PROXYB Index PROXYB Instance ID. It can be configured per each PROXYB.
UDP Port Set PROXYB UDP Port.
If change, must reboot SCM.
TLS Port Set PROXYB TLS Port.
If change, must reboot SCM.
Node Name Inform node name

Ошибка! Используйте вкладку "Главная" для применения 제목 1 к тексту, который
должен здесь отображаться. Ошибка! Используйте вкладку "Главная" для применения 제목 1 к
тексту, который должен здесь отображаться.
SCM Express Operation Manual v12.0 196 ©Samsung Proprietary and Confidential
Feature Services
Class of Service
SCM allows the administrator to set privileges for each user. But setting privileges
for all the users individually is very complicated, so, it allows creating Class of
Services which includes a set of service privileges and users can be assigned to
their appropriate Class of Service.
When a user group is created, a default service group is automatically created for
the user group. If you wish to apply a different service class than the default
service class, you can create a new service class and use it.
Newly created Class of Service can be applied to user groups, service groups and
users. Service classes are applied in the priority order of users > service groups >
user groups.
Each service class can be set with different service privileges. It also supports
override levels and privacy levels, whereby a particular service is provided only if
the overriding user’s override level is higher than the privacy level of the user
being serviced.
The services involving override and privacy levels include the DND override
feature and the barge-in with/without tone feature.
You can set Class of Service in the [CONFIGURATION > Service > Feature
Service > Class of Service] menu.
Item Description
User Group Select a user group for which the service class will be configured.
Name Specify a name for the service class.
This data is used as an identifier when selecting the service class in other menus.
Override Level
Privacy Level
You can enter a level used for the barge-in with/without tone feature, etc.
The override level is applied to the user using the service and the privacy level is applied to the user provided with the service.
Available in levels 0 through 5. Higher levels have precedence over lower levels. A service is allowed only when the override level is higher than the privacy level.
Call Limitation Level
In an emergency situation, the call can be restricted by setting Call Limitation Level (Level 0~Level 5).
The priority of Call Limitation Level are as follows:
Level 5 > Level 4 > Level 3 > Level 2 > Level 1 > Level 0
If the call level is lower than Call Limitation Level, this call is limited.
For example, if the value of Call Limitation Level is level 3, all call of level 2 or level 1 or level 2 will be rejected including incoming and outgoing.
The changed policy is applied to new calls only.
Second Class of Service
-
Leaving Office Class of Service
Operator can configure the Leaving Office Class of Service for providing to user.

Ошибка! Используйте вкладку "Главная" для применения 제목 1 к тексту, который
должен здесь отображаться. Ошибка! Используйте вкладку "Главная" для применения 제목 1 к
тексту, который должен здесь отображаться.
SCM Express Operation Manual v12.0 197 ©Samsung Proprietary and Confidential
Item Description
It requires Service Schedule configuration.
Also requires to assigned the Service Schedule to Subscribers.
It provides only Restriction Policy.
Restriction Policy Specify a restriction policy to apply to the users belonging to class of service.
A restriction policy only applies to trunk calls. You can select one of the existing restriction policies.
You can create restriction policies in the [CONFIGURATION > Routing > Restriction Policy List] menu.
Call Forward Restriction Policy
Specify a call forward restriction policy to apply to the users belonging to class of service.
A call forward restriction policy only applies to trunk forwarded calls. You can select one of the existing restriction policies.
You can create restriction policies in the [CONFIGURATION > Routing > Restriction Policy List] menu.
Hot Spot Restriction Policy
Specify a Hot Spot restriction policy to apply to the users belonging to class of service.
A Hot Spot restriction policy only applies to trunk calls when subscriber located in Hot Spot zone. You can select one of the existing restriction policies.
You can create restriction policies in the [CONFIGURATION > Routing > Restriction Policy List] menu.
mVoIP Restriction Policy
Specify a mVoIP restriction policy to apply to the users belonging to class of service.
A mVoIP restriction policy only applies to trunk calls when subscriber located in mVoIP zone. You can select one of the existing restriction policies.
You can create restriction policies in the [CONFIGURATION > Routing > Restriction Policy List] menu.
IP Zone A Restriction Policy
Specify a IP Zone A restriction policy to apply to the users belonging to class of service.
A IP Zone A restriction policy only applies to trunk calls when subscriber located in IP Zone A. You can select one of the existing restriction policies.
You can create restriction policies in the [CONFIGURATION > Routing > Restriction Policy List] menu.
IP Zone B Restriction Policy
Specify a IP Zone B restriction policy to apply to the users belonging to class of service.
A IP Zone B restriction policy only applies to trunk calls when subscriber located in IP Zone B zone. You can select one of the existing restriction policies.
You can create restriction policies in the [CONFIGURATION > Routing > Restriction Policy List] menu.
Call Transfer Restriction Policy
Specify a call transfer restriction policy to apply to the users belonging to class of service.
A call transfer restriction policy only applies to trunk transfer calls. You can select one of the existing restriction policies.
You can create restriction policies in the [CONFIGURATION > Routing > Restriction Policy List] menu.
Smart Handover Type
Specify allowing type for Smart Handover function.

Ошибка! Используйте вкладку "Главная" для применения 제목 1 к тексту, который
должен здесь отображаться. Ошибка! Используйте вкладку "Главная" для применения 제목 1 к
тексту, который должен здесь отображаться.
SCM Express Operation Manual v12.0 198 ©Samsung Proprietary and Confidential
Item Description
Blank: Smart Handover function is not working.
Handover Out: Smart Handover Out function is only working.
Handover Both: All Smart Handover function is only working.
Service Permission Specify allowed/inhibited settings of individual services for the service class. To allow a service, select the checkbox of a corresponding service.
Only the services allowed in the [CONFIGURATION > User Group > User Group] menu can be set for permission.
Restriction Class Even if user group is same, the call between service groups can be restricted.
Feature Lists
The administrator can assign privileges for Class of Service or individual users for
use of the services listed below.
Service Description
Absence If enabled, when there is an incoming call, the absent announcement is played for the caller and the call is terminated.
Add-On Conference
It is including 2 types of conferences
First. Conference member is added one by one. There are Ad-hoc, Conference On Answer, Barge-In and Multi-Device Conference.
Second, conference services features related with UMS. There is Call Recording/AME.
AME If enabled, when there is an incoming call, the caller’s voice is heard over the speaker as the caller leaves a voice message, just like an answering machine. You can also press the button to start the answering machine while ringing.
Auto Answer If enabled, when there is an incoming call, the call is automatically answered in speaker mode.
Auto Record If enabled, when a call is connected, voice mail system is automatically connected for recording the call.
Auto Retry If used when the number you dialed is busy, the number is automatically redialed repeatedly.
Barge-In with Tone If used when the other person is engaged in a call, a three-way call is established.
Barge-In without Tone
If used when the other person is engaged in a call, a three-way call is established but your voice is muted.
BLF Key Create If enabled, BLF key can be created.
Callback If used when the number you dialed is busy, your phone will ring when the other person finishes the previous call. Answering the phone automatically redials the number.
Call Forward All If enabled, all incoming calls are forwarded to the number specified.
Call Forward Busy If enabled, incoming calls when busy are forwarded to the number specified.
Call Forward No Answer
If enabled, unanswered incoming calls are forwarded to another number.
Call Forward If enabled, incoming calls are forwarded to another number if the

Ошибка! Используйте вкладку "Главная" для применения 제목 1 к тексту, который
должен здесь отображаться. Ошибка! Используйте вкладку "Главная" для применения 제목 1 к
тексту, который должен здесь отображаться.
SCM Express Operation Manual v12.0 199 ©Samsung Proprietary and Confidential
Service Description
Unreachable phone being called is not registered or otherwise unavailable.
Call Bridge If enabled, FXS user can join the bridged call.
Call Park Extension If used during a call, the call is parked for an extension number.
Call Park Orbit If used during a call, the call is parked for an orbit park ID.
Call Recording If used during a call, the call conversation is recorded in voice mail.
Call Transfer This feature allows you to transfer a call.
Call Waiting If used when the number you dialed is busy, this feature allows you to wait for the called party. If there is a call waiting, the phone will alert the user through the LED, LCD or tone.
Caller ID Block If enabled, when there is an incoming call, the caller’s number is not displayed.
Caller ID Display If enabled, when there is an incoming call, the caller’s number is displayed.
Change User Name
-
Different Group Call Forward
-
Direct Trunk Selection
This feature allows you to make a outgoing call by using DTS key.
DND If enabled, when there is an incoming call, the DND announcement is played for the caller and the call is terminated.
DND Override If used when the number you dialed is in DND mode, the DND setting is ignored and the call is made.
Follow Me This feature allows you to use another phone to answer incoming calls for your phone.
Group Call Forward This service is used for forwarding all incoming calls for all the phones in one hunt group to another number.
Hot Desking This feature allows you to use any phone in any location by logging in with your user ID.
Hot Line If enabled, when you lift your handset, the phone automatically dials a specified number.
Hotel Inter-Room Call Lock
If enabled, it blocks room to room calls in Hotel environments.
Individual Speed Dial Insert/Delete
A user can register pairs of 3-digit Individual Speed Dial ID and the destination number. By dialing the IDs, the user can make a phone call to the destination.
Incoming Call Logging
If enabled, SCM keeps the incoming call logs. Incoming Call Logging Service should be activated in Service Activation Menu.
Malicious Call Trace
If used when there is a malicious call or an otherwise unwanted call, signaling will remain connected even if the caller has hung up the phone, so that the caller can be traced.
Meet-Me Conference
If the time and channel of a conference are reserved, the attendees can call into the conference room at the conference time to participate in the conference.
Move To Mobile If enabled, the call can be moved to mobile. The call conversation is continued.
Mobile Auto If enabled, the mobile can answer automatically in case of move to

Ошибка! Используйте вкладку "Главная" для применения 제목 1 к тексту, который
должен здесь отображаться. Ошибка! Используйте вкладку "Главная" для применения 제목 1 к
тексту, который должен здесь отображаться.
SCM Express Operation Manual v12.0 200 ©Samsung Proprietary and Confidential
Service Description
Answer mobile call.
Music on Hold This service plays the MOH when the call is put on hold.
Multi-ring If enabled, when there is an incoming call, multiple phones ring so that one of the phones can be used to answer the call.
Multi-Device Conference
Even if one multi-device already joined a conference, the other multi-device using same number can also join the same conference.
NFC Move to WE VoIP First
If enabled, when FMC subscriber uses NFC move service, first destination is WE VoIP.
NFC Service If enabled, the NFC services such as ‘NFC Move to Mobile’, ‘NFC Move to Desk’ and ‘NFC Pickup’ are allowed.
NFC Service for Any Mobile
-
No Use Transferee Restriction Policy
If enabled, Call transfer to external number is allowed by restriction policy of held party phone.
No Ring If enabled, when there is an incoming call, the phone does not ring but the call can be answered.
No Ring Override If enabled, incoming call is allowed, although no ring service is activated.
One-Step Conference
Conference master calls Multiple members at once. It is including Predefined Conference, Progressive Conference, Intercom Conference, Dispatch Conference, Click 2 Conference and Emergency Conference.
Outbound Call Lock
This service inhibits outgoing trunk calls. If enabled, only incoming trunk calls and extension calls are serviced.
Operator Call If enabled, operator call is allowed
Premium CID Service
If enabled, the detailed Information of caller will be shown on the callee display.
Preset Call Forward All
This service performs preset call forward all based on the settings made by the system administrator even if preset call forward all is not set by users.
Preset Call Forward Busy
This feature allows the administrator to forward incoming calls for a user without the call forward busy setting to another number when the user is busy.
Preset Call Forward No Answer
This feature allows the administrator to forward incoming calls for a user without the call forward no answer setting to another number when the user does not answer the phone.
Preset Call Forward Unreachable
This service performs preset call Forward Unreachable based on the settings made by the system administrator even if preset call Forward Unreachable is not set by users.
Preset Call Forward DND
This service performs preset call forward DND based on the settings made by the system administrator even if preset call forward DND is set by user.
Receiving Call in Hot Spot Zone
This feature is used to select the incoming Allow the WE VoIP subscribers in the Hot Spot Zone.
Receiving Call in mVoIP Zone
This feature is used to select the incoming Allow the WE VoIP subscribers in the mVoIP Zone.
Remote Office This feature allows you to answer incoming calls for your phone

Ошибка! Используйте вкладку "Главная" для применения 제목 1 к тексту, который
должен здесь отображаться. Ошибка! Используйте вкладку "Главная" для применения 제목 1 к
тексту, который должен здесь отображаться.
SCM Express Operation Manual v12.0 201 ©Samsung Proprietary and Confidential
Service Description
from another location.
Remote Extension Set
This feature allows you to set the DB of remote extension.
Restricted Call Forward
This feature allows you to exclude particular numbers from call forwarding.
Ring Plan Override This feature allows you to set ring plan manually.
Second Class of Service
-
Service After Smart Routing
If there is a service the subscriber set, you will be able to choose whether to apply the smart routing.
The service that Operator set, Call Forward, Do Not Disturb, Absense, Follow Me is belong.
Smart Routing Activate
Operator will be able to choose whether or not to use smart routing service.
Smart Routing Call Reject
It is the ability to choose to call directly to the mobile phone through the Trunk.
Subscribers that use this item will not be able to receive the smart routing service.
Smart Routing including Access Code
Operator will be able to choose whether to provide smart routing services to the number that contains the Access code.
Station Paging This feature allows paging extension numbers.
Paging On Answer If enabled, user can make a paging on answer call, The member of paging on answer group should answer to listen paging announcement.
Temporary CID Restriction
If used when making a phone call, your number is not displayed in the called party’s phone unless recovered.
Unregistered BLF On
-
Wake-Up Call If set with a time, an alarm will ring at the set time.
Deny International Call Forward/Transfer
Specify the International call Forward and Transfer block.
Conference Member Eject
Conference owner or a user which setup the conference can delete another user which is joined the conference.
Feature Codes
A user can use features in one of the following four ways:
The administrator enables a feature for the individual user.
The user enables a feature on SCM Personal Assistant.
The user presses a feature button on the phone.
The user dials a feature code from the phone.
If the user wishes to use a feature temporarily without having it configured in
advance, the user must use a feature button or a feature code.
Since SCM uses a standard protocol between phones and SCM, arbitrary feature

Ошибка! Используйте вкладку "Главная" для применения 제목 1 к тексту, который
должен здесь отображаться. Ошибка! Используйте вкладку "Главная" для применения 제목 1 к
тексту, который должен здесь отображаться.
SCM Express Operation Manual v12.0 202 ©Samsung Proprietary and Confidential
buttons cannot be created. Therefore SCM uses feature codes when configuring
features or when using features temporarily. If you press a feature button on a
Samsung phone, SCM is also designed to process the feature code assigned to the
feature button.
You can configure feature codes using the [CONFIGURATION > Service >
Feature Service > Feature Code] menu.
You must create new feature codes after the initial installation.
Item Description
User Group Select a user group for which the feature code will be configured.
Feature Code Digit Specify a number to use as the feature code.
No duplicates are allowed. Specify up to 8 digits. # is allowed only for the first part of the code. (Can be used consecutively in the first part. Examples: #, #1, #12, ##, ##2, ###34, etc)
Service Type Select a service to which the feature code will be assigned.
Minimum Digit Length Maximum Digit Length
Specify the minimum digit length and the maximum digit length for the feature code to be executed. An error will be generated if the range is exceeded.
Feature codes can be configured for the following service types. When used in
pairs-such as for enable and disable, request and cancel, and login and logout-two
feature codes are registered.
Feature Code + 1: Feature codes for enable, request, login, etc.
Feature Code + 0: Feature codes for disable, cancel, logout, etc.
Service On/Off Description
Absence 0 Cancel This feature code requests for registration or cancelation of the absence service. If the service is enabled, when there is an incoming call, the absent announcement is played for the caller and the call is terminated.
1 Set
Account Code Voluntary - - This feature code is used for entering an account code during a call.
ACD Agent Break 0 Cancel This feature code requests for setting or unsetting of an ACD agent’s break status.
1 Set
ACD Agent Login 0 Logout This feature code requests for an ACD agent’s login or logout of an ACD group.
1 Login
ACD Agent Wrap-up 0 Cancel This feature code requests for setting or unsetting of an ACD agent’s wrap-up status after an agent call.
1 Set
All Feature Clear - - This feature code requests resetting of all features assigned to your number. Call Forward, DND, Absence, Extension Lock, etc. will be cleared.
AME Enable 0 Cancel This feature code enables or disables answering machine emulation. If the service is enabled, when there is an incoming call, the caller’s voice is heard over the speaker as the caller leaves a voice message.
1 Set
AME Mode 0 Stop This feature code, when there is an incoming call, directs the call to

Ошибка! Используйте вкладку "Главная" для применения 제목 1 к тексту, который
должен здесь отображаться. Ошибка! Используйте вкладку "Главная" для применения 제목 1 к
тексту, который должен здесь отображаться.
SCM Express Operation Manual v12.0 203 ©Samsung Proprietary and Confidential
Service On/Off Description
1 Start answering machine while ringing, or stops answering machine recording of a call and directs the call to the user.
Attendant Continuous Call
- - This feature code is used for requesting a service which allows a call transferred by an IP attendant to be redirected to the IP attendant after called party hangs up the phone.
Auto Answer Mode 0 Cancel This feature code requests for registration or cancelation of a service which automatically connects incoming calls in speaker mode.
1 Set
Auto Retry 0 Cancel This feature code is used for requesting or canceling auto redials. If the service is used when the number you dialed is busy, the number is automatically redialed repeatedly.
1 Set
Barge-In with Tone - - This feature code is used for requesting the barge-in service.
If the service is used when the other person is engaged in a call, a three-way call is established.
Barge-In without Tone - - This feature code is used for requesting the barge-in without tone service. If the service is used when the other person is engaged in a call, a three-way call is established but your voice is muted.
Callback 0 Cancel This feature code is used for requesting registration or cancelation of the callback service. If the service is used when the number you dialed is busy, your phone will ring when the other person finishes the previous call.
Answering the phone automatically redials the number.
1 Set
Call Forward All 0 Cancel This feature code is used for requesting registration or cancelation of a service which forwards all incoming calls to another number.
1 Set
Call Forward Busy 0 Cancel This feature code is used for requesting registration or cancelation of a service which forwards incoming calls to another number when busy.
1 Set
Call Forward No Answer 0 Cancel This feature code is used for requesting registration or cancelation of a service which forwards incoming calls to another number when not answered.
1 Set
Call Forward Busy/NoAnswer
0 Cancel This feature code is used for requesting registration or cancelation of Call Forward Busy and Call Forward No Answer simultaneously.
1 Set
Call Forward Unreachable
0 Cancel This feature code is used for requesting registration or cancelation of a service which forwards incoming calls to another number if the phone being called is not registered or otherwise unavailable.
1 Set
Call Forward Clear All - - This feature code is used for requesting cancelation of all call forward services configured for your number.
Call Intercept - - This feature code is used for an user intercept a call after barged-in.
Call Park Extension - - This feature code is used for requesting parking of the current call for an extension number. If you dial the feature code without an extension number, the call will be parked for your number.
Call Park Orbit - - This feature code is used for requesting parking of the current call for an orbit park ID.
Call Recording - - This feature code is used for requesting recording of the current call conversation in voice mail.
Cancel Move - - This feature code is used for cancel the ringing call for ‘Move to Mobile’ or ‘Move to Number’ service.

Ошибка! Используйте вкладку "Главная" для применения 제목 1 к тексту, который
должен здесь отображаться. Ошибка! Используйте вкладку "Главная" для применения 제목 1 к
тексту, который должен здесь отображаться.
SCM Express Operation Manual v12.0 204 ©Samsung Proprietary and Confidential
Service On/Off Description
Outbound Call Lock 0 Cancel This feature code is used for requesting registration or cancelation of a service which inhibits outgoing trunk calls.
1 Set
Call Waiting 0 Cancel This feature code is used for requesting registration or cancelation of a service which allows you to wait for the called party when the number you dialed is busy.
1 Set
Change Language - - This feature code is used for requesting change of the language used for your number.
Change Password - - This feature code is used for requesting change of the password used for your number.
Conference - - This feature code is used for requesting a conference call.
Conference On Answer - - This feature code is used for requesting a service which immediately starts a three-way conference call when answered by the called party during a call.
Direct Call Pickup - - This feature code is used for requesting a service which allows you to dial into another number and answer its incoming call when the phone is ringing.
DND 0 Cancel This feature code is used for requesting for registration or cancelation of the DND service. If the service is enabled, when there is an incoming call, the DND announcement is played for the caller and the call is terminated.
1 Set
DND Override - - This feature code is used for requesting the DND override service. If the service used when the number you dialed is in DND mode, the DND setting is ignored and the call is made.
Dispatch Conference - - This feature code is used for making conference by using CSTA application. It calls multiple members at once.
Extended Alarm Reminder
0 Cancel One subscriber can have multiple wakeup calls by using this feature code. This feature is aimed to support hotel services.
1 Set
Follow Me 0 Cancel This feature code is used for requesting registration or cancelation of a service which allows you to use another phone to answer incoming calls for your phone.
1 Set
Forced Call Release - - This feature code is used for an user release the call by force after barged-in.
FXS Make Call with CW Disable
- - This feature code is used for disabling call waiting during a call which was dialed from a gateway FXS phone.
FXS Call Waiting Disable
- - This feature code is used for disabling call waiting during a call on a gateway FXS phone.
FXS make Conference Call
- - This feature code is used for requesting a conference call during a call on a gateway FXS phone.
FXS Last Member Drop - - This feature code is used for requesting deletion of the last joined attendee of a conference call on a gateway FXS phone.
Group Call Forward 0 Cancel This feature code is used to activate or deactivate the forwarding feature of a Call Forward Group.
1 Set
Group Call Pickup - - This feature code is used for requesting a service which allows you to dial into the Pickup group number of another number and answer its incoming call when the phone is ringing. If you dial the feature code without a Pickup group number, the call currently ringing for the Pickup group will be answered.

Ошибка! Используйте вкладку "Главная" для применения 제목 1 к тексту, который
должен здесь отображаться. Ошибка! Используйте вкладку "Главная" для применения 제목 1 к
тексту, который должен здесь отображаться.
SCM Express Operation Manual v12.0 205 ©Samsung Proprietary and Confidential
Service On/Off Description
Hotel COS Change - - This feature code is used for changing COS of a room phone. It is aimed to support hotel services.
Hotel Service - - This feature code is used for changing status of room.
It is aimed to support hotel services.
Hotel Staff Locate - - This feature code is used for informing the location of staff.
It is aimed to support hotel services.
Hunt Group Login 0 Out This feature code requests for login or logout for a hunt group. When there is an incoming call for the hunt group, the logged out members are excluded when determining the called party.
1 In
Intercom - - This feature code requests for the intercom service which allows one-touch dialing and automatic answering of calls between the numbers registered with the intercom feature, such as executives and secretaries.
Intercom Conference - - If user dial this feature code and hunt group number, caller and hunt group members can join conference.
And the hunt group members answer automatically.
Last Incoming Redial - - This feature code requests for redialing of the last incoming call’s CLI number.
Last Outgoing Redial - - This feature code requests for redialing of the last dialed number.
Individual Speed Dial 0 Insert This feature code is used to add an Individual Speed Dial number.
1 Delete This feature code is used to delete an Individual Speed Dial number.
Individual Speed Dial -Call
- - This feature code is used for support speed dial per subscribers.
Malicious Call Trace - - This feature code is used for requesting the malicious call trace service. If the service is used when there is a malicious call or an otherwise unwanted call, signaling will remain connected even if the caller has hung up the phone, so that the caller can be traced.
Meet Me Conference Join
- - This feature code is used for participating in a meet me conference, which is set up by reserving the time and channel of the conference and joined by calling into the conference room at the conference time.
MOBEX Call Pickup - - This feature code is used for requesting the MOBEX on desk pick up service. If the service is enabled, when the office phone and the mobile phone ring simultaneously by the multi-ring feature, you can answer the call on the mobile phone and then continue the call on the office phone.
Move to Mobile - - This feature code is used for moving the call on the desk phone to mobile phone.
Moved Call Pickup After moving the conversation to a mobile, the desk phone can pick up the call through ‘Moved Call Pickup’ soft menu. This feature code is used for supporting it.
Multi-Device Conference
- - Even if one multi-device already joined a conference, the other multi-device using same number can also join the same conference.
This feature code is used for supporting it.
Multi-ring Enable 0 Cancel This feature code registers or cancels the multi-ring service.
If the service is enabled, when there is an incoming call, multiple phones ring so that one of the phones can be used to answer the
1 Set

Ошибка! Используйте вкладку "Главная" для применения 제목 1 к тексту, который
должен здесь отображаться. Ошибка! Используйте вкладку "Главная" для применения 제목 1 к
тексту, который должен здесь отображаться.
SCM Express Operation Manual v12.0 206 ©Samsung Proprietary and Confidential
Service On/Off Description
call.
Multi-ring Member 0 Delete This feature code requests adding/removing of members to/from the multi-ring service. If the service is enabled, when there is an incoming call, multiple phones ring so that one of the phones can be used to answer the call.
1 Insert
NFC Move to Mobile - - If the desk phone supporting NFC interface is on conversation, the call can be moved to mobile through NFC tagging.
This feature code is used for supporting it.
NFC Move to Desk - - If the mobile installed Samsung NFC application (SDM) is on conversation, the call can be moved to the desk phone through NFC tagging. This feature code is used for supporting it.
NFC Pickup - - If the desk phone supporting NFC interface is ringing, the mobile installed NFC application (SDM) can answer the call instead of the ringing desk phone. This feature code is used for supporting it.
No Ring 0 Cancel This feature code requests for registration or cancelation of the no ring service. If the service is enabled, when there is an incoming call, the phone does not ring but the call can be answered.
1 Set
Outbound Call Lock 0 Cancel If this feature code is set, system does not let user make a outgoing call.
1 Set
Parked Call Retrieve - - This feature code is used for picking up a call parked for the extension number or the orbit park ID.
Predefined Conference - - This feature code is used for paging all the members registered in the conference system simultaneously for a conference.
Predefined Text Message
- - If users want to send text messages set by the administrator, user should dial this feature code with destination number.
Progressive Conference - - This feature code is used for entering numbers of multiple members in the conference system and then paging them simultaneously for a conference.
Remote Extension Lock - - This feature code is used for an IP attendant to set incoming/outgoing call lock for another extension number.
Remote Extension Set - - This feature code is used for an IP attendant to set features for another extension number.
Remote Office 0 Cancel This feature code is used to activate or deactivate the Remote Office feature.
1 Set
Ring Plan Override 0 Cancel This feature code is used to override time-based auto ring plan manually.
1 Set
Shared Call Retrieve - - This feature code is used for picking up a call parked for another phone when using multi-device.
Station Paging - - This feature code is used for requesting an extension announcement service.
Temporary CID Restriction
- - If used when making a phone call, your number is not displayed in the called party’s phone.
VM Access - - This feature code is used for dialing to access the voice mail system.
VM Administration - - This feature code is used for accessing the voice mail system and changing it settings.
VM Memo - - This feature code is used for accessing the voice mail system and

Ошибка! Используйте вкладку "Главная" для применения 제목 1 к тексту, который
должен здесь отображаться. Ошибка! Используйте вкладку "Главная" для применения 제목 1 к
тексту, который должен здесь отображаться.
SCM Express Operation Manual v12.0 207 ©Samsung Proprietary and Confidential
Service On/Off Description
leaving a message for another number or in your own mailbox.
VM Message - - This feature code is used for accessing the voice mail system and listening to messages in your mailbox.
VM Transfer - - This feature code is used for directing the current call to the voice mail system and connecting it the mailbox for another number.
Trunk Redial This feature code is used for making a new call adding prefix 0 after cancel an original call when subscriber attempts a call.
Wake-Up Call 0 Cancel This feature code requests for registration or cancelation of the wake-up call service, which, if set with a time, an alarm will ring at the set time.
1 Set
Conference Member Eject
- - This feature code requests to delete another user which is joined the conference.
Dial with ‘Conference Member Eject Feature Code + a user number to delete’.
Dispatch Call - - This feature code is used for dispatch call.
PRI MCID - - The user who receives a call with a malicious intent.can report the call through using PRI connections to the PSTN. While the user is connected to the call, the user can invoke the MCID feature by using this feature code.
Feature Activation
Those services not performed temporarily by user actions but configured in the
database can be configured by the administrator.
The administrator can change service settings for individual users using the
[CONFIGURATION > Service > Feature Service > Service Activation] menu.
Enter a user group and an extension number and press the [Search] button to
change the current settings for the user.
Select an inactive service and press the [Activate] button to activate the service.
Select an active service and press the [Deactivate] button to deactivate the service.
When activating a service, you may be required to enter additional information
depending on the service type.
Item Description
User Group Select a user group.
Extension Number Specify a user number for which the service will be activated.
Service Type Specify a service to activate.
Destination Specify a destination number if registering call forwarding, etc.
Use Notification Specify whether the phone needs to be notified of the status if registering call forwarding, etc.
Start Time Time based call forward all function’s start time.
End Time Time based call forward all function’s end time.
Service Date Specify a service date if registering wake-up call, etc.
Allow Other Ring Specify whether incoming calls when busy will be forwarded to the multi-ring members if registering multi-ring.

Ошибка! Используйте вкладку "Главная" для применения 제목 1 к тексту, который
должен здесь отображаться. Ошибка! Используйте вкладку "Главная" для применения 제목 1 к
тексту, который должен здесь отображаться.
SCM Express Operation Manual v12.0 208 ©Samsung Proprietary and Confidential
Item Description
Preset Call Forward Type
Select a type of preset call forward type.
Internal: only incoming call from internal is served.
External: only incoming call from external is served.
Both: all incoming call from internal and external is served.
Auto Record Mailbox
Specify a mailbox where the recorded files will be stored if registering auto record.
Auto Record Call Type
Specify a type of calls to auto record if registering auto record.
Internal: Incoming calls from extension numbers are automatically recorded.
External: Incoming calls from trunks are automatically recorded.
Both: Incoming calls from both extension numbers and trunks are automatically recorded.
Call Logging Select a type of call logging.
Service Schedule Select a service schedule to use preset call forward.
User Service Timers
User Service Timer can be changed in [CONFIGURATION > User > User
Service Timers] menu.
Types of service timer are as follows.
Item Description
User Group Select a user group.
Extension Number Specify a user number for which the service will be activated.
No Answer Forward Time (sec)
Specify the time period used for determining no answer when registering no answer call forward.
No Answer Preset Forward Time (sec)
Specify the time period used for determining no answer when registering no answer preset call forward.
Hot Line Delay (sec)
Specify a time period for which to wait before the preset number is automatically dialed after the handset is lifted if registering hot line.
Hot Desk Expire Time (hour)
Specify a time period for which to wait before a logged in user is automatically logged out if registering hot desk.
DeskPhone Simultaneous RingDelay(s)
Specify a time period for desk phone’s ring delay when desk phone is ringing with mobile phone or WE VoIP at the same time.
Speaker Disconnect Tone Time(sec)
Specify a time period for disconnect tone of speaker after forced auto answer service like Intercom, paging or paging on answer.
Handset Disconnect Tone Time(sec)
Specify a time period for disconnect tone of handset after forced auto answer service like Intercom, paging or paging on answer.
User Authentication
SCM performs digest authentication. It authenticates a SIP phone in different ways
when the SIP phone sends a REGISTER message. For more information on digest
authentication, see the SIP standard documents RFC3261 and REC2617.

Ошибка! Используйте вкладку "Главная" для применения 제목 1 к тексту, который
должен здесь отображаться. Ошибка! Используйте вкладку "Главная" для применения 제목 1 к
тексту, который должен здесь отображаться.
SCM Express Operation Manual v12.0 209 ©Samsung Proprietary and Confidential
Local Authentication
SCM performs internal authentication in the following order:
1 The SIP phone transmits REGISTER without authentication header to SCM.
2 SCM transmits 401 Unauthorized with challenge information to the SIP
phone.
3 SIP phone transmits REGISTER without authentication header to SCM.
4 After SCM executes Digest Authentication, it transmits 200 OK to the SIP
phone.
RADIUS Authentication
SCM supports RADIUS digest authentication and acts as a RADIUS client for
remote RADIUS authentication of users’ phones. RADIUS digest authentication is
performed in Scenario 1 and Scenario 2. Both are supported by SCM.
SCM acts as a relay between the user phone and the external RADIUS server.
Authentication is performed in the following order:
1 When SCM receives a REGISTER message from the user phone, it sends
Access-Request to the RADIUS server.
2 When SCM receives Access-Accept or Access-Reject from the RADIUS
server, it sends the authentication result to the user phone and finishes the
authentication procedure.
LDAP Authentication
SCM acts as an LDAP client for remote LDAP authentication of users’ phones. It
provides LDAP and LDAPS (LDAP over SSL) for this task.
SCM interoperates with the external LDAP server and fetches the password from
the user phone by using LDAP protocol. Authentication is performed in the
following order:
1 When SCM receives a REGISTER message including a password from the
user, it sends a Search-Request message to the LDAP server.
2 The user’s password stored in the LDAP server is received through a Search-
Result message.
3 The user phone’s password received from the LDAP server is compared with
the password received with the REGISTER message from the user phone.
SCM sends the authentication result to the user phone and finishes the
authentication procedure.
Boss/Secretary
The boss/secretary feature allows a boss and a secretary to share one user number
while using their own individual numbers and the intercom feature.
Bosses and secretaries can be connected 1:1 or M:N.

Ошибка! Используйте вкладку "Главная" для применения 제목 1 к тексту, который
должен здесь отображаться. Ошибка! Используйте вкладку "Главная" для применения 제목 1 к
тексту, который должен здесь отображаться.
SCM Express Operation Manual v12.0 210 ©Samsung Proprietary and Confidential
Figure 31. Boss/Secretary
While configuration may vary by administrators, we recommend that you
configure the feature in the following order for maximum efficiency.
1 Create a device in the [CONFIGURATION > User > Multi-Extension
Phone] menu.
o Phone Verification: Select IP Address or MAC Address for authentication
method.
o User Type: Select Manager or Secretary for device.
2 Create a user password for the manager/secretary in the [CONFIGURATION
> User > Multi-Phone User] menu.
o Call Appearance: Select SCA (SCA: Shared Call Appearance, MCA:
Multiple Call Appearance).
3 Configure intercom between the individual numbers of the manager and the
secretary in the [CONFIGURATION > Service > User Service > Intercom]
menu.
The boss/secretary feature allows the phones to share the status of the shared
line so that the users are informed of the current status of the shared line.
Example) Redirect an incoming call to the Boss
Boss and Secretary have shared the same SCA number and each has its own
private number also.
A call is incoming to the SCA number, after the Secretary answered the call,
Secretary using its private number make an intercom call to the private number of
Boss to explain who is calling to the Boss.
If the Boss wants to talk, secretary make the Boss pickup the held SCA call by
pressing SCA line button of the Boss’s Phone.
Secretary redirect the SCA call by just pressing the BLF button pre-configured
Executive Secretary
ExecutiveDesk
ExecutiveTale
Executive Meeting Room
Secretary 1 Secretary 2

Ошибка! Используйте вкладку "Главная" для применения 제목 1 к тексту, который
должен здесь отображаться. Ошибка! Используйте вкладку "Главная" для применения 제목 1 к
тексту, который должен здесь отображаться.
SCM Express Operation Manual v12.0 211 ©Samsung Proprietary and Confidential
with the private number of the Boss.
Busy Lamp Field (BLF)
SCM provides the Busy Lamp Field (BLF) service which indicates the status of a
particular service or the status of the user number using the LED on the buttons of
the phone.
To use the BLF service, you must first configure the feature to the buttons of the
phone. Buttons can be configured in the following ways:
Use the [CONFIGURATION > User > Phone Key Programming] menu to
configure the built-in buttons on the phone.
Use the [CONFIGURATION > User > AOM Key Programming] menu to
configure the buttons on the button extension box.
Fields Description
User Group Select a User Group
Phone Name Select a phone number or Mac Address of AOM
# Displays number and order of the buttons.
Display Name Specify the Name of the button. It may be displayed in BLF button depends on Phone Model.
Key Select the BLF type.
Value Specify the Extension number want to monitor.
Extension Number
Multi-phone user case, you can specify one of the extension numbers which extension number wants to monitor.
DTMF Detection Service
During a call between SIP phones on an IP PBX, all data except SIP signaling for
call connection is exchanged by the phones. Therefore, the numbers dialed for
services-except the phone number included in the INVITE message for call
connection-cannot be sent to the system using the standard protocol.
In order to receive the numbers dialed on the phone-except the INVITE message-
SCM connects the call to its built-in voice announcement system and collects the
numbers dialed on the phone according to the voice announcement.
User interaction services provided in this way include account code, call
authentication code, and DISA user authentication.
Account Code
This feature allows the user to enter his/her account code in the account
information when making an external call through the trunk. Account codes can be
entered in the following two ways.
Forced Account Code
When a trunk call is made from a phone set with forced account code input, a

Ошибка! Используйте вкладку "Главная" для применения 제목 1 к тексту, который
должен здесь отображаться. Ошибка! Используйте вкладку "Главная" для применения 제목 1 к
тексту, который должен здесь отображаться.
SCM Express Operation Manual v12.0 212 ©Samsung Proprietary and Confidential
registered account code must be entered. The account code entered will be saved
in the charging data record (CDR), which can be used for calculating call charges
for the user.
※ Entering account code is displayed with *.
Voluntary Account Code
When a trunk call is made from a phone set with voluntary account code input,
you can press the account code button and enter an account code when outbound
call connected. The account code entered will be saved in the charging data record
(CDR), which can be used for calculating call charges for the user.
You can set the account code input method of a Single Phone User under ‘Account
Code Use’ in the [CONFIGURATION > User > Single Phone User] menu.
You can set the account code input method of a Multi-Phone User under ‘Account
Code Use’ in the [CONFIGURATION > User > Single Phone User] menu.
None: No account code needs to be entered when making a trunk call.
Force: An account code registered with SCM must be entered when making a
trunk call.
Voluntary: An account code can be entered by pressing the account code
button when making a trunk call.
To use the voice announcement system for entering account codes, you should
enable the item whose service type is ‘ACC’ in the [CONFIGURATION >
Service > DTMF Detection Service > Activation] menu.
The account codes entered for forced account code input can be registered in the
[CONFIGURATION > Service > DTMF Detection Service > Account Code] menu.
When a trunk call is made on a phone set with forced account code input, actions
are performed in the following order:
1 The user dials an access code and an external number.
2 If the user’s phone is set with forced account code input, SCM connected the
call to its built-in voice announcement system.
3 The voice announcement system plays an announcement for the user to enter a
registered account code.
4 The user enters an account code as instructed. The voice announcement system
verifies that a valid account code has been entered.
5 If the account code entered is valid, SCM uses the access code received in step
(1) to select a route and makes a call for the external number specified.
6 If the account code is invalid, SCM plays an error announcement and
terminates the call.

Ошибка! Используйте вкладку "Главная" для применения 제목 1 к тексту, который
должен здесь отображаться. Ошибка! Используйте вкладку "Главная" для применения 제목 1 к
тексту, который должен здесь отображаться.
SCM Express Operation Manual v12.0 213 ©Samsung Proprietary and Confidential
Authorization Code
Those users restricted from making external calls can make external calls by
dialing the number for the built-in voice announcement system which
authenticates external calls.
To use the voice announcement system for authenticating call, you should enable
the item whose service type is ‘AUTH’ in the [CONFIGURATION > Service >
DTMF Detection Service > Activation] menu.
The number for the voice announcement system which authenticates call
authentication codes can be registered in the [CONFIGURATION > Service >
DTMF Detection Service > Service Number] menu.
The call authentication codes used for call authentication can be registered in the
[CONFIGURATION > Service > DTMF Detection Service > Authorize Code] menu.
When a user restricted from making external calls attempts to make a trunk call by
using a call authentication code, actions are performed in the following order:
Entering account code is displayed with *.
1 The user dials the number for the call authentication system.
2 SCM connects the call to the call authentication system.
3 The voice announcement system plays an announcement for the user to enter a
registered call authentication code.
4 The user enters a call authentication code as instructed. The voice
announcement system verifies that a valid call authentication code has been
entered.
5 If the call authentication code entered is valid, SCM temporarily suspends the
external call restriction set for the user.
6 The user can now dial an access code and an external number and the trunk
call will be made.
The authorize code entered will be saved in the charging data record (CDR), which
can be used for calculating call charges for the user.
DISA User Authentication
When using the Direct Inward System Access (DISA) feature, the user can call
SCM from outside to get authenticated as instructed by the voice announcement so
that he/she can make a trunk call through the system.
When there is an incoming DISA call, SCM connects the call to its built-in DISA
user authentication announcement system and plays a voice announcement for the
external caller.
To use the voice announcement system for authenticating DISA users, you should
enable the item whose service type is ‘DISA’ in the [CONFIGURATION >
Service > DTMF Detection Service > Activation] menu.

Ошибка! Используйте вкладку "Главная" для применения 제목 1 к тексту, который
должен здесь отображаться. Ошибка! Используйте вкладку "Главная" для применения 제목 1 к
тексту, который должен здесь отображаться.
SCM Express Operation Manual v12.0 214 ©Samsung Proprietary and Confidential
The number for the voice announcement system which authenticates DISA users
can be registered in the [CONFIGURATION > Service > DTMF Detection
Service > Service Number] menu.
To connect incoming DISA calls from trunks to the voice announcement system
for authenticating DISA users, set the called number to the number of the DISA
user authentication announcement system in the [CONFIGURATION > Trunk
Routing > DID Routing] menu.
SCM can allow incoming DISA calls from registered callers to use DISA calls
without user authentication. If you register caller numbers in the
[CONFIGURATION > Service > DTMF Detection Service > DISA Approved
CLI Number] menu in advance, the incoming DISA calls from the registered
caller numbers are provided with the DISA service without having to enter user
numbers or passwords.
System Speed Dial
This feature allows you to assign maximum 16-digit shortcut number to a phone
number frequently dialed not by individual users but by all users of the system or
to a lengthy phone number so that the number can be dialed just by using the
shortcut number when necessary.
You can register system speed dial numbers using the [CONFIGURATION >
Service > Speed Dial > System Speed Dial] menu.
Item Description
User Group Select a user group for which the system speed dial will be registered.
Speed ID Specify an ID for the system speed dial. The ID must be a number of two or longer digits. The ID must not be overlapped with other extension numbers and conference channel numbers.
Speed Name Specify a name for the system speed dial.
Speed Number Specify an actual phone number to be dialed by the system speed dial.
RTP call Restriction
This function limits calls that are not encrypted. This can be set by the user group.
To use this function, you should set the item whose ‘Media Option’ is ‘SRTP
Only’ in the [CONFIGURATION > User Group > Change User Group >
Information] menu.
Afer this option is changed, you should create 'phone profile' in the
[CONFIGURATION > Phone Setting > Create Phone Profile] menu and 'User
Profile User group' in the [CONFIGURATION > Phone Setting > Upgrade
Software] menu.

Ошибка! Используйте вкладку "Главная" для применения 제목 1 к тексту, который
должен здесь отображаться. Ошибка! Используйте вкладку "Главная" для применения 제목 1 к
тексту, который должен здесь отображаться.
SCM Express Operation Manual v12.0 215 ©Samsung Proprietary and Confidential
Mline service
This is the function that contains the 2 mline (AVP/SAVP) in the INVTIE message
of sRTP Calls. To use this function, you should set the item whose ‘SRTP Mline
offer option’ is 'RTP SRTP BOTH' in the [CONFIGURATION > User Group >
Change User Group > Information] menu.
After this option is changed, you should create 'phone profile' in the
[CONFIGURATION > Phone Setting > Create Phone Profile] menu and ‘User
Profile User group’ in the [CONFIGURATION > Phone Setting > Upgrade
Software] menu.
Caller Ring Type
One of the phone’s ringtones be used as Caller distinct Ring
Caller Ring Type can be changed via the Admin [CONFIGURATION > User >
Single Phone User/Multi-Phone User > Caller Ring Type] menu. If the value is
greater than that supported by the phone Caller Ring Type operates in the default
Ring
System SPAM Call Block Service
SCM provides the ability to shut off the incoming Trunk Call to the same calling
number at a specific time.
The operator must be able to use the [SPAM Call Block Service], a set of the
following items from the [CONFIGURATION > Miscellaneous > System
Options] menu.
Item Description
Maximum System SPAM Call Block Activate
Select whether to use the [SPAM Call Block Service].
Default Option value is disable.
Maximum System SPAM Call Count
It is the option to set the number of incoming Call to the same calling number to whether to allow.
count range is 3 to100.
System SPAM Call Expire Timer (Second)
It's time to keep the Block to the number that is blocked.
Timer range is 10 to 600 second.
Gateway Channel Display
GW channel display function is a function that will display information to the user
of the Channel of GW that you are using.
To use the GW channel display function, set the items in the
[CONFIGURATION > Trunk Routing > Route > Interworking].
Item Description
Gateway Channel Operator will be able to choose whether to use the GW channel

Ошибка! Используйте вкладку "Главная" для применения 제목 1 к тексту, который
должен здесь отображаться. Ошибка! Используйте вкладку "Главная" для применения 제목 1 к
тексту, который должен здесь отображаться.
SCM Express Operation Manual v12.0 216 ©Samsung Proprietary and Confidential
Item Description
Display display.
When user uses the GW channel display function, displays the name of the Trunk
and the channel information of PRI Trunk currently using.
Default Access Code Use List
‘Default Access Code Use List’ is the service to use a Default Access Code for a
specific incoming number. If you change the [Use Default Access Code Use List]
to [Yes], Routing Process is performed as follows.
This option menu is located the [CONFIGURATION > User Group > Change
User Group > Options].
1 First, Find the Default Access Code Use List using Called Number.
2 If called number exist in the Default Access Code Use List, Attach the Default
Access Code.
3 If not, using called number only.
4 Original Routing Process.
If you change the [Use Default Access Code Use List] to [No], Routing Process is
performed as follows.
1 First, Check the Called Number including Access Code.
2 If called number includes the Access Code, skip No.3 Process.
3 If called number not include the Access Code, attach the Default Access Code.
4 Original Routing Process.
For use List in the Default Access Code Use List, follows adding process is
required.
1 Adding Called Number to [CONFIGURAITON > Trunk Routing > Default
Access Code Use List].
2 Default Access Code is configured in [CONFIGURATION > User Group >
Change User Group > Options].
Mandatory Item Description
User Group Select the User Group for use a List.
Match Number SCM is compared the Called Number and the Match Number.
The Number has rules below.
0311233000
Exact Match: Check Length and all digits.
031123xxxx, 031123XXXX
Prefix Match: Check Length and prefix.
031123?
Longest Match: Check Prefix Only.

Ошибка! Используйте вкладку "Главная" для применения 제목 1 к тексту, который
должен здесь отображаться. Ошибка! Используйте вкладку "Главная" для применения 제목 1 к
тексту, который должен здесь отображаться.
SCM Express Operation Manual v12.0 217 ©Samsung Proprietary and Confidential
All Hot Desking Logout
SCM provides forced logout service to All Hot Desking user in User Group.
To use this service, operator should configured following items in
[CONFIGURATION > User Group > Change User Group > Options] menu.
Item Description
All Hot Desking Logout
Option to use “All Hot Desking Logout”.
All Hot Desking Logout Time
Specify a activation time for All Hot Desking Logout.
SCM provides “All Hot Desking Logout” service by using a configured time each day.
All Hot Desking Logout service don’t provide to specific user, who was set a value
0 “Hot Desk Expire Time (hour)” in [CONFIGURATION > User > User Service
Timers] menu.
Leaving Office Class of Service
SCM provides a leaving office class of service when users leave an office.
This class of service provides restriction policy only.
To use Leaving office class of service, operator should configure following steps.
1 Create a service schedule (users work time pattern) in [CONFIGURATION
> Time Schedule > Service Schedule] menu. Operator can create a pattern of
working hours per week.
2 Assign a service schedule to user in [CONFIGURATION > User > Single
Phone User/Multi-Phone User] menu.
Item Description
Service Schedule A service schedule is a table containing data which specifies service plans by days of the week, dates, and time of the day.
There is a service schedule of up to 32 per user group.
The service schedule is used for system call forward and Leaving Office Class of Service.
Leaving Office Class of Service is activated when Service Schedule status unset.
1 Create Toll restriction list in [CONFIGURATION > Trunk Routing > Toll
Restriction List] menu.
2 Create Toll Restriction Policy in [CONFIGURATION > Trunk Routing >
Toll Restriction Policy] using no.3.
3 Create class of service in [CONFIGURATION > Service > Feature Service
> Class of Service] menu. Then, assign restriction policy above.
4 Assign a leaving office class of service for user’s class of service.

Ошибка! Используйте вкладку "Главная" для применения 제목 1 к тексту, который
должен здесь отображаться. Ошибка! Используйте вкладку "Главная" для применения 제목 1 к
тексту, который должен здесь отображаться.
SCM Express Operation Manual v12.0 218 ©Samsung Proprietary and Confidential
Item Description
Leaving Office
Class of Service
Operator can configure the Leaving Office Class of Service for providing to user.
It requires Service Schedule configuration.
Also requires to assigned the Service Schedule to Subscribers.
It provides only Restriction Policy.
Trunk Redial
SCM provides redial feature when trunk call attempts.
SCM makes a new call adding prefix 0 after cancel an original call, when
subscriber uses Trunk Redial.
To use this service, operator need to make a feature code in [CONFIGURATION
> Service > Feature Service > Feature code] menu.
This service provides only IP-Desk Phone and communicator.
International Call Service
SCM provides International Call Service.
To use whole International Call Service, “International call prefix” configuration is
necessary.
Menu Location: [CONFIGURATION > User Group > Change User Group
> International Call Prefix].
Name Description
User Group It displays the user group.
Prefix Specifies the prefix to verify international call.
Prefix Minimum Length
Specifies the minimum length to use prefix.
International call prefix needs to match an outbound call prefix without trunk
number translation.
International Call Inform Service
SCM sends notification to operator when International Call Attempt count reaches
configured counts.
International Call Inform count and duration can configure following menu.
Menu Location: [CONFIGURAITON > Miscellaneous > System Options]
Item Description
International Call Check Count
Specify the attempt call counts, which is used for international call check. (default: 1)

Ошибка! Используйте вкладку "Главная" для применения 제목 1 к тексту, который
должен здесь отображаться. Ошибка! Используйте вкладку "Главная" для применения 제목 1 к
тексту, который должен здесь отображаться.
SCM Express Operation Manual v12.0 219 ©Samsung Proprietary and Confidential
Item Description
The input range can be from 0 to 100.
International Call Check Duration (minute)
Specify a call logging time to check international call count. (default: 1)
The input range can be from 1 to 60.
Deny International Call Forward/Transfer
SCM provides deny service when user make an international call forward or a call
Transfer.
This service needs to configure “class of service” configuration.
Menu Location: [CONFIGURATION > SERVICE > FEATURE
SERVICE > CLASS OF SERVICE]
Item Description
Deny International Call Forward/Transfer
Specify the International call Forward and Transfer block.
Display DTMF Detection Code
SCM provides a display option for code in CDR when subscriber makes a
outbound call using an account code or an authorize-code.
To use this option, following menu configuration is required.
Menu Location: [MANAGEMENT > CDR Storage Options > User Group
CDR Option]
Item Description
User Group Display User Group Name.
Display DTMF Detection Code
Specify the option to display code in [CONFIGURATION > Service > DTMF Detection] menu.
Not Display: SCM hides all DTMF Detection codes.
Account Code: SCM displays an account code.
Auth Code: SCM displays an authorize code.
Both: SCM displays an account code and an authorize code.
Transfer CID for VM/AA
SCM provides Semi-blind Transfer CID options to VM/AA.
Operator can specify the Transfer CID Number to VM/AA using following menu.
Menu Location: [CONFIGURATION > User Group > Change User Group
> Options]
Item Description
Transfer CID for Select the CID Number which is provided to VM/AA when VM/AA

Ошибка! Используйте вкладку "Главная" для применения 제목 1 к тексту, который
должен здесь отображаться. Ошибка! Используйте вкладку "Главная" для применения 제목 1 к
тексту, который должен здесь отображаться.
SCM Express Operation Manual v12.0 220 ©Samsung Proprietary and Confidential
Item Description
VM/AA receives the Semi-Blind Transfer Call.
Transferer: Use Transferer CID for VM/AA.
Transferee: Use Transferee CID for VM/AA
Nurse Call
SCM provides interoperability with Nurse Call System through GW (OS7500).
Nurse call phones are registered to SCM as FXS user. If a call is received from a
phone with Nurse call service, SCM analyzes a called number, extract ‘room and
bed number’ to display as calling cli and connect to the destination.
How to configure Delimiter
Configure ‘Nurse Call Delimiter’ in the [CONFIGURATION > User Group >
Change User Group > Options] menu. Only ‘*’ and ‘#’ are supported. Dialed
number is separated to ‘room and bed number’ and ‘destination’ by the delimiter.
How to configure Nurse Call Service
FXS user of SCM can be used for Nurse Call. To use this feature, following
configuration is necessary.
Set ‘Nurse Call Service’ to Enable in the [CONFIGUIRATION > User > Single
Phone User/Multi-Phone User] menu.
Forward Display Option
‘CLI for Forwarded call’ in the [CONFIGURATION > Trunk Routing > Route]
is not applied to nurse calls.
Number Translation
Almost number translation is not supported for nurse calls.
[CONFIGURATION > User Group < Change User Group > Number
Translation] is not applied to a nurse call.
Number Translation such as MCN for calling number is not working for a
nurse call.
Only ‘Nurse Call Prefix’ can be prefixed to the calling cli which is ‘room and
bed number’.
Multiple SIP Account
Multiple SIP Account to one ISP is supported. To use this feature, called number
range has to be assigned to each route. Under multiple SIP account, receiving route
is determined by ‘User Number Range’. If a call with unassigned called number is
received through a specific route, the call is rejected even if the call is
authenticated.
‘Multiple Registration’ and ‘User Number Range’ have to be configured in the
[CONFIGURATION > Trunk Routing > Route] menu.

Ошибка! Используйте вкладку "Главная" для применения 제목 1 к тексту, который
должен здесь отображаться. Ошибка! Используйте вкладку "Главная" для применения 제목 1 к
тексту, который должен здесь отображаться.
SCM Express Operation Manual v12.0 221 ©Samsung Proprietary and Confidential
Item Description
Multiple Registration If multiple registration to one ISP has to be handled, configure 'Enable'.
Multiple Registration cannot mixed with Normal Registration which is configured Multiple Registration to Disable for one ISP.
Configuration is possible only when Register Type is 'Send REGISTER'.
User Number Range Enter the called number range which is used to find receiving Rout.
'Number', '[-]' and 'X' can be entered for 'User Number Range'.
'User Number Range' has to be started with number. Range can be expressed with '[-]'. 'X' means any number.
User Number Range is supported 3 digits and the range is possible within 100.
ex) Example
0312791000: In case a called number is same to 0312791000
0312791XXX: In case a called number is starting with 0312791 and its length is 7.
031279[1-4]XXX: In case a called number is starting with 0312791, 0312792, 0312793 and 0312794 and its length is 7.
Common Route
Common Route is used to share a route between several user groups. Every user
group has a permission to use the common route whereas other route can be
accessed only by the user group the route belongs to. A call from the common
route can be delivered to any user group and all user group can send a call to the
route.
Following configuration is needed to use the Common Route.
‘Route Type’ and ‘User Group’ has to be set to COMMON in the
[CONFIGURATION > Trunk Routing > Route] menu.
[CONFIGURATION > Trunk Routing > Common Route Prefix] is
configured to select a user group which a call is processed based on.
When the route is used as a gateway, ‘User Group’ had to be set to COMMON
in the [CONFIGURATION > Gateway >Gateway Link Setting].
There are limitations for the common route for a gateway (REGISTER Type:
Receive Register).
‘Domain Name’ in the route configuration cannot duplicate with ‘Host’ of any
user group.
The common gateway does not support FXS users and Survival mode. It’s a
exclusive trunk gateway.

Ошибка! Используйте вкладку "Главная" для применения 제목 1 к тексту, который
должен здесь отображаться. Ошибка! Используйте вкладку "Главная" для применения 제목 1 к
тексту, который должен здесь отображаться.
SCM Express Operation Manual v12.0 222 ©Samsung Proprietary and Confidential
Inter User Group Routing.
Inter user group call is a call from a user in a user group to the other in another
user group by dialing with trunk access code. Internally routing the call without
trying through a trunk is supported.
When SCM receives a inter user group call, SCM handles the call with below
procedures
1 A user dials to ‘Trunk Access Code + DID of called party’.
2 SCM processes the routing procedure and gets a destination number to be
delivered to a trunk. SCM assumes the destination number as a DID of called
party.
3 The destination number in 2 is compared to entries in [Common Route
Prefix]. As a result, a user group is determined by the longest matching entry.
4 SCM checks [DID Routing] to find a final destination.
5 Finally, the call is connected to the party by 4.
To use Inter User Group Routing service, configure following steps.
Configure ‘Inter User Group Call’ to Internal in the [CONFIGURATION >
User Group > Change User Group > Options].
Configure Common Route Prefix in the [CONFIGURATION > Trunk
Routing > Common Route Prefix]. It’s used to determine user group.
Configure DID Routing tables in the [CONFIGURATION > Trunk Routing
> DID Routing].
There are limitations for the Inter User Group Routing service.
Trunk routing configuration has to be carefully designed so that a inter user
group call is routed internally to some suitable user by Common Route Prefix
and DID Routing.
MCN at route for incoming call is not applied when a called number is
checked for inter user group routing.
Noticeboard Service
SCM provides NoticeBoard Service to WE VoIP terminal.
WE VoIP terminal can add, modify, delete and search a notice.
SCM Administrator can manage notices totally.
To use Noticeboard service, configure following steps.
Configure ‘Directory Service Activation’ of WE VoIP terminal settings.
Configure ‘Noticeboard Service Activation’ of WE VoIP terminal settings.
Configure ‘Noticeboard Service Authority’ of WE VoIP terminal settings.

Ошибка! Используйте вкладку "Главная" для применения 제목 1 к тексту, который
должен здесь отображаться. Ошибка! Используйте вкладку "Главная" для применения 제목 1 к
тексту, который должен здесь отображаться.
SCM Express Operation Manual v12.0 223 ©Samsung Proprietary and Confidential
Management of Noticeboard Service by SCM Administrator.
Activation of Directory Service
set following items in the [CONFIGURATION > Wireless Enterprise > Mobile
Phone Profile] menu.
Item Description
Directory Service-Private (Office)
Select option for Using Directory Service when Private WiFi Network Zone register (Default: Disable)
Directory Service-Wi-Fi Hotspot
Select option for Using Directory Service when public WiFi Hotspot Network Zone register (Default: Disable)
Directory Service-mVoIP
Select option for Using Directory Service when LTE Network Zone register (Default: Disable)
Activation of Noticeboard Service
set following items in the [CONFIGURATION > Wireless Enterprise > Mobile
Phone Profile] menu.
Item Description
NoticeBoard Service-Private (Office)
Select option for Using NoticeBoard Service when Private WiFi Network Zone register (Default: Disable)
NoticeBoard Service-Wi-Fi Hotspot
Select option for Using NoticeBoard Service when public WiFi Hotspot Network Zone register (Default: Disable)
NoticeBoard Service-mVoIP
Select option for Using NoticeBoard Service when LTE Network Zone register (Default: Disable)
Authority of Noticeboard Service
set following items in the [CONFIGURATION > User > User Profile] menu.
Item Description
NoticeBoard Service Authority
Select a authority on NoticeBoard Service.
Management of Noticeboard Service by SCM Administrator
SCM Administrator can add/modify/delete and read a notice in
[CONFIGURATION > Service > Notice Board] Menu.
Operator can use Noticeboard Service according to Account Class.
Engineer Class: Create/Search/Modify/Delete
Technician Class: Create/Search
File Attachment Function
When creating notice, user can attach one image file.
Size limit is 1 MByte.

Ошибка! Используйте вкладку "Главная" для применения 제목 1 к тексту, который
должен здесь отображаться. Ошибка! Используйте вкладку "Главная" для применения 제목 1 к
тексту, который должен здесь отображаться.
SCM Express Operation Manual v12.0 224 ©Samsung Proprietary and Confidential
User Group Category for NoticeBoard.
SCM Administrator can configure the category of user group in
[CONFIGURATION > User Group > NoticeBoard Category] Menu.
Item Description
User Group User Group
Category Name Noticeboard Category Name
Category Priority Input a priority level for order of Category in Mobile Phone.
Max Notice Count.
SCM Administrator can configure the max count of notice in
[CONFIGURATION > User Group > Change User Group > Options] Menu.
Item Description
Max Count of Notice Select the Max Count of Notice per User Group
range: 0~1000
* Max count of System: 10,000
Service Limitation
The service limit is the control function about the resource which the User Group’s
use commonly.
The resource of which the restricted service is possible is Internal UMS, Internal
Conference Server, Common Trunk and Common Application Server.
The service limit for the common application server can use for following server.
3rd Party UMS Server
3rd Party Conference Server
3rd Party IVR Server
External Ringback Tone Server
Service Limitation doesn't guarantee that service can be provided.
To use Service Limitation, configure following menus.
Internal VM/AA Server Service Limitation
set following items in the [CONFIGURATION > Application > VM/AA
Server] menu.
ITEM Description
Maximum Call The administrator can set the service maximum value by user group for the Internal UMS Server.
The value can use from 0 to "Maximum Call" value.
The maximum call value is in [CONFIGURATION > Resource > System Capacity] menu.

Ошибка! Используйте вкладку "Главная" для применения 제목 1 к тексту, который
должен здесь отображаться. Ошибка! Используйте вкладку "Главная" для применения 제목 1 к
тексту, который должен здесь отображаться.
SCM Express Operation Manual v12.0 225 ©Samsung Proprietary and Confidential
Internal Conference Server Service Limitation
set following items in the [CONFIGURATION > Application > Conference
Server] menu.
ITEM Description
Maximum Call The administrator can set the service maximum value by user group for the Internal Conference Server.
The value can use from 0 to "Maximum Call" value.
The maximum call value is in [CONFIGURATION > Resource > System Capacity] menu.
Common Trunk Service Limitation
set following items in the [CONFIGURATION > Resource > Trunk Service
Limitation] menu.
ITEM Description
User Group This item indicates the name of user group.
Concurrent Service Limitation
The administrator can set the service maximum value by user group for the common route.
The value can use from 0 to "Maximum Call" value.
The maximum call value is in [CONFIGURATION > Resource > System Capacity] menu.
Common Application Service Limitation
set following items in the [CONFIGURATION > Resource > Application
Service Limitation] menu.
ITEM Description
User Group This item indicates the name of user group.
Concurrent Service Limitation
The administrator can set the service maximum value by user group for the common application server.
The value can use from 0 to "Maximum Call" value.
The maximum call value is in [CONFIGURATION > Resource > System Capacity] menu.
Broad Message Service
SCM provides Message Service to WE VoIP terminal.
There is no additional configuration after SCM installation to use message service
at WE VoIP Terminal. However, users can configure service authority relating
sending message.
Message Sending Level
User can change Broad Message Service Authority in the [Configuration > User

Ошибка! Используйте вкладку "Главная" для применения 제목 1 к тексту, который
должен здесь отображаться. Ошибка! Используйте вкладку "Главная" для применения 제목 1 к
тексту, который должен здесь отображаться.
SCM Express Operation Manual v12.0 226 ©Samsung Proprietary and Confidential
> User Profile]
ITEM Description
Text & Attach File User can send message with attached file.
Text Only User can send text message only.
No Permission User do not have authority to send message.
Broad Message History
If user set Broad Message Logging to ENABLE in the [Configuration > User
Group > Detailed Event Logging Option], user can check sending message
history in the [PERFORMANCE > Detailed Event History > Broad Message
History]
ITEM Description
Type New: Successful sending message history.
Erase: SCM leaves history when erase the message in the DB after 24 hours later.
Sender Sender user profile ID.
Message ID Message index
Target Extension Destination number. ‘|’ is separator.
Target Department Destination department. ‘|’ is separator. ‘*’is meaning recursive searching
Attach File Attached file name
Send Time History event time
Contents Message contents
Minimum Call Limit
SCM provides the way to limit a call connection by call limitation level. ‘Call
Limitation Level’ is assigned to a call by CoS. If the call limit level is lower than
that of SCM, the call is denied. The level ranges from 0 to 5 and higher number
means higher level.
Each call has a call limit level by user’s CoS. Under urgent situation, administrator
can set Minimum Call Limit to control the number of calls. For example, with the
‘LEVEL 2 ANSWER ONLY’, users with Level 0~Level 1 cannot make and
receive a call and ones with Level 2 cannot make but receive a call. Only the user
with Level 3~Level 5 is available both. Minimum Call Limit policy is applied to
new calls not connected call. SCM does not cut a call.
To use this feature following configuration is needed.
The call limit level is decided by the ‘Call Limitation Level’ in the
[CONFIGURATION > Service > Class of Server] menu.
To control the number of calls by level, ‘Minimum Call Limit’ is selected in
the [CONFIGURATION > Miscellaneous > System Options] menu.

Ошибка! Используйте вкладку "Главная" для применения 제목 1 к тексту, который
должен здесь отображаться. Ошибка! Используйте вкладку "Главная" для применения 제목 1 к
тексту, который должен здесь отображаться.
SCM Express Operation Manual v12.0 227 ©Samsung Proprietary and Confidential
WE VoIP Location CID
SCM provides the CLI Service for WE VoIP Registered Location.
Registered Location is Internal Wi-Fi, External Wi-Fi, mVoIP.
When WE VoIP User make a call, receiver can see Mobile CLI Number.
When WE VoIP user receive a call, sender who belong in SCM can see Mobile
CLI Number.
Mobile CLI Number can specify the following list.
Default: Use Default CLI Rule. (Send Extension Number/Send CLI Number)
Mobile Phone Number: Use Mobile Phone Number in “Basic Configuration”
Tab.
Office Phone Number: Use Office Phone Number in [User Profile] Menu
CellPhone Number: Use CellPhone Number in [User Profile] Menu
To use Office Phone Number and CellPhone Number, need to be configured
Office Number or Mobile Number type in [Configuration > User Group > User
Profile Field Name].
To use this feature following configuration is needed.
Specify the Mobile CLI Number-Private (office)/Wi-Fi Hotspot/mVoIP in the
[CONFIGURATION > User > Single Phone User/Multi-Phone User] menu.
Display Mobile Phone Access Network
SCM provides the access network information display of the other mobile phone.
The access network information can be displayed Wi-Fi and LTE.
Additionally, it can be displayed during a call between Mobile Subscriber.
To use this feature following configuration is needed.
Enable the “Display Mobile Phone Access Network” option in the
[CONFIGURATION > User Group > Change User Group > Options] menu.
Tandem Representation Number
SCM provides the representation number about the tandem call to CDR data when
used for incoming.
Also, it can be used for "Outbound Diversion Number" option.
This option need to be set for incoming route.
To store “Tandem Representation Number” in CDR data, following configuration
is needed.

Ошибка! Используйте вкладку "Главная" для применения 제목 1 к тексту, который
должен здесь отображаться. Ошибка! Используйте вкладку "Главная" для применения 제목 1 к
тексту, который должен здесь отображаться.
SCM Express Operation Manual v12.0 228 ©Samsung Proprietary and Confidential
Specify a "Use Billing Tandem Call" option in [Management > CDR Storage
Option > User Group CDR Option] menu.
To use this number for “Outbound Diversion Number”, following configuration is
needed.
This option need to be set for outbound route.
Specify an "Outbound Diversion Number" option in [CONFIGURATION >
Trunk Routing > Route] menu.
Multicast Paging
SCM provides the paging feature through multicast. In case of station paging
feature, 128 members are supported per one group. Because it depends on
conference channels.
In case of multicast paging, SCM supports 1000 members per one group.
To use multicast paging feature, the following items must be configured:
[CONFIGURATION > Service > Feature Service > Class of Service >
Multicast Paging] should be permitted.
[CONFIGURATION > Service > Feature Service > Feature Code >
Multicast Paging] feature code should be set.
[CONFIGURATION > Service > Group Service > Multicast Paging
Group] should be configured as below.
Item Description
User Group Select a user group for multicast paging
Group Name Enter a name for the multicast group.
Group Number Enter a number for the multicast group.
Multicast Address Multicast addresses must be in the range 224.0.0.0 to 239.255.255.255 (Class D). But Multicast addresses in the range 224.0.0.0 to 224.0.0.255, 228.228.228.228 and 228.228.228.229 are reserved for use by routing protocols and other network control traffic.
For most normal use, the IP Multicast address range 239.x.x.x is recommended.
Multicast Port Enter a port number for the multicast group. For normal use, the default value (35998) is recommended.
Multicast Codec Select the codec for the multicast call. SCM supports PCMU, PCMA and G729 for multicast paging. The default value is PCMU.
Multicast Group Member
Select member lists for the multicast group. A Samsung-Desktop-Phone only can be assigned as a multicast group member.
A multicast sender should dial the multicast paging feature code and multicast
group number at the same time. If the multicast sender dials group number only, it
can work too.

Ошибка! Используйте вкладку "Главная" для применения 제목 1 к тексту, который
должен здесь отображаться. Ошибка! Используйте вкладку "Главная" для применения 제목 1 к
тексту, который должен здесь отображаться.
SCM Express Operation Manual v12.0 229 ©Samsung Proprietary and Confidential
The limitations of multicast include:
Multicast paging is not guaranteed to be delivered to all members of the group.
If multicast member does not support IGMP Protocol or the member is located
in other subnet, the multicast paging can fail. If multicast paging has some
problem between other subnets, it is recommended to use specific network
equipment that supports multicast over different subnets.
The multicast request has the lowest priority in a Samsung-Desktop-Phone. It
means that the multicast request will be ignored if the multicast receiver is not
idle state.
The multicast request that be ignored previously because the multicast member
was not idle does not work although the member became an idle state.
The multicast member who is receiving multicast packets ignores the new
multicast request.
SCM does not allow the duplicated multicast request.
Multicast Paging does not support SRTP
The call monitoring service will not operate if the phone acts as a multicast
sender.
The multi-phones that share an extension number cannot be a multicast
receiver if the user is a multicast sender.
User SBC
Multiple SBCs for user registration are supported. SBC information such as IP
address and port is used to make profile of a user.
Create ‘User SBC’ in the [CONFIGURATION > User > User SBC].
Assigned ‘User SBC’ can be changed in the [CONFIGURATION > User >
Single User/Multi-Extension Phone].
User SBCs can be created up to 35 for each Node and maximum 2500 users can be
assigned to one User SBC.
Several User SBCs with same IP and port are supported.

Ошибка! Используйте вкладку "Главная" для применения 제목 1 к тексту, который
должен здесь отображаться. Ошибка! Используйте вкладку "Главная" для применения 제목 1 к
тексту, который должен здесь отображаться.
SCM Express Operation Manual v12.0 230 ©Samsung Proprietary and Confidential
Account Number Modification
You can designate the account number for the trunk tandem call. Specify a value
to 'CDR Representation Number' in the [CONFIGURATION > Trunk Routing
> Route] menu.
You can use the account number translation for trunk tandem call. Set 'CDR
Number Translation' to 'Enable' in the [CONFIGURATION > Trunk Routing >
Route] menu. And you can specify the billed number by calling number from the
[CONFIGURATION > Trunk Routing > CDR Number Translation] menu.
User Name Display of Other Service Group
When a call is made between users, the name and phone number are displayed in
the same service group. If the service group is different, the name display is
according to the option.
Enable/Disable the “Name Display of Other Service Group” option in the
[CONFIGURATION > User Group > Service Group] menu.
When the opposite party is different service group, if option is 'Enable', the name
is displayed. If it is 'Disable', it is not displayed.
Analog Trunk Port Check
The function checked the analog trunk is provided. To Analog Trunk Port Check
service, configure following steps.
The Analog Trunk Port Check feature code should be assigned in the
[CONFIGURATION > Service > Feature Service > Feature Code] menu.
The Override Level and Privacy Level should be configured in the
[CONFIGURATION > Service > Feature Service > Class of Service] menu. The opposite site of busy trunk call should have lower privacy level
than busy override caller’s override level.
The user can check or terminate the call by using Analog Trunk Port Check feature
in the following ways:
The user can dial the ‘Analog Trunk Port Check’ feature code + DTS number
+ ‘#’.
Or the user can press the ‘Analog Trunk Port Check’ button, and after dialing
DTS number + ‘#’.
The ‘Analog Trunk Port Check’ button should be created in the
[CONFIGURATION > User > Phone Key Programming] menu.
If you press 'Forced Release' button after pressing 'Function' button in the
barge-in without tone condition, the trunk call is terminated.

Ошибка! Используйте вкладку "Главная" для применения 제목 1 к тексту, который
должен здесь отображаться. Ошибка! Используйте вкладку "Главная" для применения 제목 1 к
тексту, который должен здесь отображаться.
SCM Express Operation Manual v12.0 231 ©Samsung Proprietary and Confidential
User Features
User features are an executed features by users.
A user features are an available service to the users with privilege for the service
which is setting by the administrator. Since setting service privileges for all the
users individually could be very complicated, Class of Service are be created with
their own set of service privileges and users are then assigned to their appropriate
Class of Service.
CoS can be applied to each user groups, service groups and users. CoS are applied
in the priority order of users > service groups > user groups.
You can set Class of Service in the [CONFIGURATION > Service > Feature
Service > Class of Service] menu.
To use a user features defined by the user in advance, you can use the feature on
SCM Personal Assistant. The user can also use a feature-including those services
used temporarily-by pressing the feature button on the phone or dialing the feature
code.
To use a feature by pressing the feature button or dialing the feature code, the
feature code must be defined in advance.
You can define feature codes using the [CONFIGURATION > Service >
Feature Service > Feature Code] menu.
For more information on feature services, see the ‘4.1.36 Feature Service’.
Absence
The absence feature is used for notifying that the user is absent. If the absence
feature is enabled, when there is an incoming call, an announcement is played to
notify the caller of the absence status and the call is terminated.
To use the absence feature, the following items must be configured.
The ‘Absence’ service must be enabled in Class of Service.
The ‘Absence-Set’ and ‘Absence-Cancel’ feature codes must be defined.
The user can register or cancel the absence feature in the following ways:
The user can dial the ‘Absence-Set’ feature code on the phone to register the
absence status.
The user can dial the ‘Absence-Cancel’ feature code on the phone to cancel the
absence status.
The user can use the [Supplementary Service] menu on SCM Personal
Assistant to register (enable) or cancel the absence feature. You can also
specify the time for enabling the absence feature.

Ошибка! Используйте вкладку "Главная" для применения 제목 1 к тексту, который
должен здесь отображаться. Ошибка! Используйте вкладку "Главная" для применения 제목 1 к
тексту, который должен здесь отображаться.
SCM Express Operation Manual v12.0 232 ©Samsung Proprietary and Confidential
Auto Answer
The auto answer feature is used when the user wishes to have his/her incoming
calls answered automatically. If the auto answer feature is enabled, when there is
an incoming call, the speaker will be turned on and the call will be answered
automatically. In case of a call from trunk, the auto answer feature can be ignored
by the trunk option, ‘Auto Answer Ignore’.
Auto Answer
To use the auto answer feature, the following items must be configured.
The ‘Auto Answer’ service must be enabled in Class of Service.
The ‘Auto Answer Mode-Set’ and ‘Auto Answer Mode-Clear’ feature codes
must be defined.
The user can register or cancel the auto answer feature in the following ways:
The user can dial the ‘Auto Answer Mode-Set’ feature code on the phone to
enable auto answer.
The user can dial the ‘Auto Answer Mode-Clear’ feature code on the phone to
disable auto answer.
The user can use the [Supplementary Service] menu on SCM Personal
Assistant to register (enable) or cancel the auto answer feature.
You can use an attention tone which is used for indicating that an incoming call
has been answered automatically. The attention tone setting is applied to all users
of the selected user group.
Auto answer attention tone can be configured in the [CONFIGURATION > User
Group > Change User Group > Options] menu.
Auto Answer Attention Tone: Specify whether to play the attention tone when
a call is answered automatically.
Auto Answer Attention Tone Count: Specify how many times the 100 ms tone
should be repeated when the auto answer attention tone is played.
Auto Answer Ignore
Auto-answered qcall can be treated without an appropriate response while the
receiver is away from his desk. To prevent the situation as previously stated, Auto
Answer Ignore feature is provided.
To use the auto answer ignore feature, the following items must be configured
The ‘Auto Answer Ignore’ service must be enabled in [CONFIGURATION >
Trunk Routing > Route: Trunk Service].
How to work is as follows.
If ‘Auto Answer Ignore’ is enable for an incoming route, calls from the route

Ошибка! Используйте вкладку "Главная" для применения 제목 1 к тексту, который
должен здесь отображаться. Ошибка! Используйте вкладку "Главная" для применения 제목 1 к
тексту, который должен здесь отображаться.
SCM Express Operation Manual v12.0 233 ©Samsung Proprietary and Confidential
to a user have to be ringing even though Auto Answer is enabled for the
receiver.
If ‘Auto Answer Ignore’ is enable for an incoming route, calls from the route
to a user via Auto Attendant service have to be ringing even though Auto
Answer is enabled for the receiver.
If ‘Auto Answer Ignore’ is enable for an incoming route, calls from the route
to a multi-ring user have to be ringing even though Auto Answer is enabled for
the receiver.
If ‘Auto Answer Ignore’ is enable for an incoming route, calls from the route
to a user via ACD group call have to be ringing even though Auto Answer is
enabled for the receiver.
If ‘Auto Answer Ignore’ is enable for an incoming route, calls from the route
to a user via hunt group call have to be ringing regardless of the value of Auto
Answer Ignore option.
Automatic Retry
When the user makes an outgoing trunk call but the called party is busy or does
not answer the call, the automatic retry service can be used to automatically redial
the number after a set period of time. If the automatic retry is enabled, the phone’s
speaker is automatically turned on at a set interval and the last dialed number is
dialed again.
To use the automatic redial feature, the following items must be configured.
The ‘Auto Retry’ service must be enabled in [CONFIGURATION > Service
> Class of Service].
The ‘Auto Retry-Set’ and ‘Auto Retry-Cancel’ feature codes must be defined
in the [CONFIGURATION > Service > Feature Service > Feature Code].
The user can register or cancel the automatic retry feature in the following ways:
When the user makes an outgoing trunk call but the called party is busy or
does not answer the call, the user can press the automatic redial button to use
the automatic redial feature. When the automatic redial button is pressed on
the phone, the phone dials the ‘Auto Retry-Set’ feature code to SCM.
When the phone dials the ‘Auto Retry-Cancel’ feature code, the automatic
redial is canceled.
When the automatic redial feature is serviced, the following three timers are
activated.
The timers required for the automatic redial feature can be configured using the
[CONFIGURATION > User Group > Change User Group> Timers] menu.
Auto Retry No Answer Time (sec): When a trunk number is redialed by
automatic retry and the called party does not answer the call, the phone waits
for this period of time before it terminates the call as an unanswered call.

Ошибка! Используйте вкладку "Главная" для применения 제목 1 к тексту, который
должен здесь отображаться. Ошибка! Используйте вкладку "Главная" для применения 제목 1 к
тексту, который должен здесь отображаться.
SCM Express Operation Manual v12.0 234 ©Samsung Proprietary and Confidential
Auto Retry Interval (sec): When a number is automatically redialed but is still
busy or does not answer, the phone waits for this period of time before it
redials the number.
Auto Retry Service Duration (min): When automatic retry continues to fail, the
phone tries for this period of time before it terminates the service.
Barge-In
This feature allows you to intrude into a user’s current call for a three-way
conference call. The call intrusion feature is also known as Barge In or Call
Override.
The call intrusion feature is providing with warning or without warning depending
on whether the user is notified that the call has been intruded into. SCM services
both types of the feature.
SCM uses its built-in conference system for three-way conference calls. Therefore,
the basic settings for using the conference system must be configured.
The administrator needs to set ‘Application Type’ to ‘Internal Conference’ in the
[CONFIGURATION > Application > Conference Server] menu to create a
connection to the built-in conference system. This conference server should be
included ‘Add-On Conference’ in service list.
To use the call intrusion feature, both ‘Override Level’ and ‘Privacy Level’ must
be defined in Class of Service. Call intrusion is allowed only when the override
level is higher than the privacy level. The override level is applied to the user
intruding and the privacy level is applied to the user being intruded into.
Barge-In with Tone
When you intrude into a call and establish a three-way conference, this service
periodically plays a tone to notify the user being intruded into that the call has
been intruded into.
To use the call intrusion feature, the following three items must be configured.
The ‘Barge-In with Tone’ service must be enabled in Class of Service.
The ‘Barge-In with Tone’ feature code must be defined in Class of Service.
The user can use the call intrusion feature in the following ways:
The user calls an extension number and if the called party is busy, the user can
press the call intrusion button to intrude into the call.
The user can dial the ‘Barge-In with Tone’ feature code + number of the user
currently in a call to intrude into the call.
Barge-In without Tone
When a three-way conference call is established by intruding into a call, the user
being intruded into is not given any notification and the intruding user’s voice is
muted so that the call can be monitored in secret.

Ошибка! Используйте вкладку "Главная" для применения 제목 1 к тексту, который
должен здесь отображаться. Ошибка! Используйте вкладку "Главная" для применения 제목 1 к
тексту, который должен здесь отображаться.
SCM Express Operation Manual v12.0 235 ©Samsung Proprietary and Confidential
To use the call intrusion without tone feature, the following three items must be
configured.
The ‘Barge-In without Tone’ service must be enabled in Class of Service.
The ‘Barge-In without Tone’ feature code must be defined in Class of Service.
The user can use the call intrusion without tone feature in the following ways:
The user calls an extension number and if the called party is busy, the user can
press the call intrusion without tone button to intrude into the call without
tone.
The user can dial the ‘Barge-In without Tone’ feature code + number of the
user currently in a call to intrude into the call without tone.
Change Password
This service provides a user can change the PIN Number which is used for
services by himself.
The Change Password Feature code must be configured.
User can dial the Change Password feature Code with previous Password once and
news password twice like below:
Example) * 33 + (old Password) + (New Password) + (New Password)
Callback
When a user calls another user but if the called party is busy or does not answer,
the caller can enable the callback feature so that when the called party becomes
available, the caller’s phone will ring, and if the caller answers the phone, the
called party’s number is redialed.
To use the callback feature, the following items must be configured.
The ‘Callback’ service must be enabled in Class of Service.
The ‘Callback-Set’ and ‘Callback-Cancel’ feature codes must be defined.
The user can register or cancel the callback feature in the following ways:
When the user calls another user but the called party is busy or does not answer the
call, the user can press the callback button to use the callback feature. When the
callback button is pressed on the phone, the phone dials the ‘Callback-Set’ feature
code to SCM.
The user can dial the ‘Callback-Cancel’ feature code on the phone to cancel
the callback feature.
When the callback feature is serviced, the following two timers are activated. The
timers required for the callback feature can be configured using the
[CONFIGURATION > User Group > Change User Group > Timers] menu.

Ошибка! Используйте вкладку "Главная" для применения 제목 1 к тексту, который
должен здесь отображаться. Ошибка! Используйте вкладку "Главная" для применения 제목 1 к
тексту, который должен здесь отображаться.
SCM Express Operation Manual v12.0 236 ©Samsung Proprietary and Confidential
Callback Ring No Answer Time (sec): When the caller is called back by the
callback feature but the caller does not answer, this call which is made to
notify the caller that the called party has now become available will be
processed as a failed call after ringing for this period of time. If the callback
notification call fails, the system waits until the called party uses the phone
and become available again.
Callback Service Duration (min): When callback is enabled, if the callback
service is not executed successfully during this period of time, the callback
service is automatically terminated.
In case a user who was set the callback feature makes or receives a call, and then
becomes an idle states, the system determines that the user becomes available for
the callback call.
If the [CONFIGURATION > User Group > Change User Group > options >
Line Seize Option] is set to [Send Message], the system only needs the hook-
off/on actions through a handset of the user’s phone.
Call Forward
When there is an incoming call, this feature is used for forwarding the call to
another number specified by the user. The call forward feature can have limitation
by Restricted Call Forward in the [CONFIGURATION > Service > Feature
Service > Class of Service] menu. If Restricted Call Forward is enabled, call
cannot be forwarded to trunk.
Call Forward All
If the call forward all feature is enabled for a user, all incoming calls for the user
are automatically forwarded to a specified number.
Even if the user has not enabled call forward all, the administrator can configure
all incoming calls for the user in specific time periods to be forwarded to another
number.
For more information, see the ‘4.1.32 Group Call Forward’.
To use the call forward all feature, the following items must be configured.
The ‘Call Forward All’ service must be enabled in Class of Service.
The ‘Call Forward All-Set’ and ‘Call Forward All-Cancel’ feature codes must
be defined.
The user can register or cancel the call forward all feature in the following ways:
The user can dial the ‘Call Forward All-Set’ feature code + destination phone
number on the phone to enable call forward all.
The user can dial the ‘Call Forward All-Cancel’ feature code on the phone to
cancel call forward all.
The user can use the [Supplementary Service] menu on SCM Personal

Ошибка! Используйте вкладку "Главная" для применения 제목 1 к тексту, который
должен здесь отображаться. Ошибка! Используйте вкладку "Главная" для применения 제목 1 к
тексту, который должен здесь отображаться.
SCM Express Operation Manual v12.0 237 ©Samsung Proprietary and Confidential
Assistant to register (enable) or cancel the call forward all feature. If call
forward is enabled on SCM Personal Assistant, the user can select two options,
time and notification. Without time configuration, call forwarding is enabled
permanently until the user disables the feature. However, if the user configures
the time, call forward is worked during the time period. The user can know
how many calls are forwarded with the notification option.
Call Forward Busy
If the call forward busy feature is enabled for a user, incoming calls for the user
while the user is busy are automatically forwarded to a specified number.
Even if the user has not enabled call forward busy, the administrator can configure
the incoming calls for the user while the user is busy to be forwarded to another
number.
For more information, see the ‘Preset Call Forward Busy’ section of ‘System Call
Forward’ in Chapter 4.
To use the call forward busy feature, the following items must be configured.
The ‘Call Forward Busy’ service must be enabled in Class of Service.
The ‘Call Forward Busy-Set’ and ‘Call Forward Busy-Cancel’ feature codes
must be defined.
The user can register or cancel the call forward busy feature in the following ways:
The user can dial the ‘Call Forward Busy-Set’ feature code + destination
phone number on the phone to enable call forward busy.
The user can dial the ‘Call Forward Busy-Cancel’ feature code on the phone to
cancel call forward busy.
The user can use the [Supplementary Service] menu on SCM Personal
Assistant to register (enable) or cancel the call forward busy feature.
Call Forward No Answer
If the call forward no answer feature is enabled for a user, the incoming calls for
the user which are not answered for a specified period of time are automatically
forwarded to a specified number.
Even if the user has not enabled call forward no answer, the administrator can
configure the incoming calls not answered by the user to be forwarded to another
number. For more information, see the ‘Preset Call Forward No Answer’ section
of ‘System Call Forward’ in Chapter 4.
You can use SCM Personal Assistant to set the time period for each user which is
used by the call forward no answer service to determine the user’s an incoming
call as an unanswered call and forward it to a specified number. If call forward no
answer is enabled by pressing the feature code on the phone, the default time of 15
seconds is used.

Ошибка! Используйте вкладку "Главная" для применения 제목 1 к тексту, который
должен здесь отображаться. Ошибка! Используйте вкладку "Главная" для применения 제목 1 к
тексту, который должен здесь отображаться.
SCM Express Operation Manual v12.0 238 ©Samsung Proprietary and Confidential
To use the call forward no answer feature, the following items must be configured.
The ‘Call Forward No Answer’ service must be enabled in Class of Service.
The ‘Call Forward No Answer-Set’ and ‘Call Forward No Answer-Cancel’
feature codes must be defined.
The user can register or cancel the call forward no answer feature in the following
ways:
The user can dial the ‘Call Forward No Answer-Set’ feature code + destination
phone number on the phone to enable call forward no answer.
The user can dial the ‘Call Forward No Answer-Cancel’ feature code on the
phone to cancel call forward no answer.
The user can use the [Supplementary Service] menu on SCM Personal
Assistant to register (enable) or cancel the call forward no answer feature.
Here, you can also specify the time period used for determining the no answer
status.
Call Forward Unavailable
If the call Forward Unreachable service enabled for a user, all incoming calls for
the user are automatically forwarded to a specified number when the user’s phone
is not registered, does not respond to signaling, or otherwise unavailable.
To use the call Forward Unreachable feature, the following items must be
configured.
The ‘Call Forward Unavailable’ service must be enabled in Class of Service.
The ‘Call Forward Unreachable-Set’ and ‘Call Forward Unreachable-Cancel’
feature codes must be defined.
The user can register or cancel the call Forward Unreachable feature in the
following ways:
The user can dial the ‘Call Forward Unreachable-Set’ feature code +
destination phone number on the phone to enable call Forward Unreachable.
The user can dial the ‘Call Forward Unreachable-Cancel’ feature code on the
phone to cancel call Forward Unreachable.
The user can use the [Supplementary Service] menu on SCM Personal
Assistant to register (enable) or cancel the call Forward Unreachable feature.
If you select a ‘CFUR service schedule’ in the [CONFIGURATION > User
group > Service group] menu, call be forwarded by service schedule plan.
Service schedule can be selected for each service group. Service schedule plan is
got ‘Set’ status and ‘Unset’ status. Call forward is working only when service
schedule plan’s status is ‘Set’. Service schedule can be configured in
[CONFIGURATION > Time Schedule > Service Schedule] menu.

Ошибка! Используйте вкладку "Главная" для применения 제목 1 к тексту, который
должен здесь отображаться. Ошибка! Используйте вкладку "Главная" для применения 제목 1 к
тексту, который должен здесь отображаться.
SCM Express Operation Manual v12.0 239 ©Samsung Proprietary and Confidential
Selective Call Forward
This service only forwards a user’s incoming calls from specified numbers.
Selective call forward can be serviced in the following two ways. If two features
are enabled both, Call Forward Restriction has precedence over Call Forward
Allowance.
Call Forward Allowance
If this feature is enabled, only the calls from specified numbers are forwarded and
calls from unspecified numbers are not forwarded.
The user can use the ‘Selective Call Forward Allowance’ menu on SCM
Personal Assistant to register a list of caller numbers to allow selective call
forward.
The administrator can use the [CONFIGURATION > Service > Selective
Service > Call Forward Allowance] menu to register a list of caller numbers
to allow selective call forward for each user.
Call Forward Restriction
If this feature is enabled, the calls from specified numbers are not forwarded and
calls from unspecified numbers are forwarded.
The user can use the [Call Forward Restriction] menu on SCM Personal
Assistant to register a list of caller numbers to restrict selective call forward.
The administrator can use the [CONFIGURATION > Service > Selective
Service > Call Forward Restriction] menu to register a list of caller numbers
to restrict selective call forward for each user.
Call Forward No Response
No response from a User
It is one of cases of Call Forward Unavailable. It is different with Call Forward No
Answer which is working after ring back tone.
If there is no response from a User within the specific time right after sending call
setup message (initial INVITE), Call Forward Unavailable service is functioning.
If Call Forwarding Unavailable service was not set, the call will be dropped with
announcements.
Administrator can configure the specific time for User at [CONFIGURATION >
User Group > Change User Group > Timers > Internal Call No Response
Time (sec)] and it is 3 seconds by default.
No Response from a Trunk
If there is no response from a Route within the specific time right after sending call
setup message (initial INVITE), Call Forward Unavailable service is functioning.
If there is no Alternative Route for the Route, the call will be dropped with
announcements.

Ошибка! Используйте вкладку "Главная" для применения 제목 1 к тексту, который
должен здесь отображаться. Ошибка! Используйте вкладку "Главная" для применения 제목 1 к
тексту, который должен здесь отображаться.
SCM Express Operation Manual v12.0 240 ©Samsung Proprietary and Confidential
Also, administrator can configure the specific time for Trunk at
[CONFIGURATION > User Group > Change User Group > Timers >
External Call No Response Time (sec)] and it is 10 seconds by default.
Call Hold
The call hold feature allows the user to park the current call and make another call
for transfer or conference and then retrieve the hold call.
If the other person on the line is handling multiple calls (including call park,
transfer, and conference), the call cannot put on hold.
Call Park
The call park feature allows the user to park the current call so that it can be
retrieved on another phone by pressing the button or the feature code.
A park ID must be entered when parking a call, so that the call can be identified
when picked up. There are the following two types of call park service depending
on the park ID input method.
Call Park Extension
The call park service can be used by using an extension number as the park ID.
Since an extension number is used as the park ID, only one call can be parked per
extension number.
To use the call park feature, the following items must be configured.
The ‘Call Park Extension’ service must be enabled in [CONFIGURATION >
Service > Class of Service] menu.
The ‘Call Park Extension’ feature code must be defined in [CONFIGURATION
> Service > Feature Code] menu.
While on a call, the user can press the park button and then dial the call park
feature code + an extension number to park the call for the extension number
entered. Or, the user can just dial the call park feature code without an extension
number to park the call for his/her own number.
Call Park Orbit
The call park orbit service can be used by using an independent orbit park number
as the park ID. Since independent numbers are used as the park ID, multiple calls
can be parked for each extension number. For Call Par Orbit, the park ID has a
range from 01~99.
Only one call can be parked with one park ID. If you want to use empty orbit park
ID, use press 00 instead of the park ID. In that case, SCM finds an empty park ID
and the call is parked with the park ID. You can check the parked ID on the
display of the phone.
Therefore, this feature is useful for users who need to park many calls, such as
operators.

Ошибка! Используйте вкладку "Главная" для применения 제목 1 к тексту, который
должен здесь отображаться. Ошибка! Используйте вкладку "Главная" для применения 제목 1 к
тексту, который должен здесь отображаться.
SCM Express Operation Manual v12.0 241 ©Samsung Proprietary and Confidential
To use the orbit park feature, the following items must be configured.
The ‘Call Park Orbit’ service must be enabled in [CONFIGURATION > Service
> Class of Service] menu.
The ‘Call Park Orbit’ feature code must be defined in [CONFIGURATION >
Service > Feature Code] menu.
While on a call, the user can press the park button and then dial the orbit park
feature code + an orbit park number to park the call for the orbit park number
entered.
Parked Call Retrieve
This feature allows a parked call to be reconnected on the phone for it had been
parked or on another phone.
To use the Parked Call Retrieve feature, the ‘Parked Call Retrieve’ feature code
must be defined in the [CONFIGURATION > Service > Feature Code] menu.
The user can dial the parked call retrieve feature code + park ID to pick up a
parked call.
Park Recall
This feature allows a parked call to be redirected to the user who parked the call if
the call is not picked up after a specified period of time.
The administrator can use ‘Park Recall Time (sec)’ in the [CONFIGURATION >
User Group > Change User Group > Timers] menu to specify the time for
which parked calls will remained parked before being redirected.
If the redirected call is not answered, the call is redirected to the operator. For
more information, see the ‘Operator Recall’ section of ‘Operator Group’ in
Chapter 4.
Call Pickup
This feature allows the user to answer another user’s incoming call. Call Pickup
can be serviced in the following two ways.
Direct Call Pickup
This feature allows you to pick up another user’s incoming call by specifying the
user’s number.
To use the direct call Pickup feature, the following items must be configured.
The ‘Direct Call Pickup’ feature code must be defined in the
[CONFIGURATION > Service > Feature Code].
The user can press the direct call Pickup feature code + the number of the user
whose phone is ringing to pick up the other user’s incoming call which is currently
ringing.
Group Call Pickup
If this feature is enabled, you can specify a call Pickup group number (instead of a

Ошибка! Используйте вкладку "Главная" для применения 제목 1 к тексту, который
должен здесь отображаться. Ошибка! Используйте вкладку "Главная" для применения 제목 1 к
тексту, который должен здесь отображаться.
SCM Express Operation Manual v12.0 242 ©Samsung Proprietary and Confidential
user number) for which an incoming call is ringing to pick up the current incoming
call for the selected group. You can also Pickup an incoming call ringing for your
own call Pickup group.
To use the group call Pickup feature, the following three items must be configured.
The ‘Group Call Pickup’ feature code must be defined in the
[CONFIGURATION > Service > Feature Code].
Call Pickup groups must be configured in the [CONFIGURATION > Service >
Group Service > Pickup Group] menu. The following data must be configured.
Item Description
User Group Select a user group for which the call Pickup group will be created.
Group Number Enter a number for the call Pickup group.
CAUTION: Group Number must not be overlapped with other station numbers and extension numbers.
Group Name Enter a name for the call Pickup group.
Ping Ring Select a notice about no-answer for an incoming call during some period.
Disable: There is no notice about no-answer call.
Enable: There is a notice about no-answer call.
Ping Ring Time (sec)
Enter time to wait to make a notice to the members about no-answer call.
Group Member Select members for the call Pickup group. A user can belong to one call Pickup group only.
The user can press the group call Pickup feature code + the number of the call
Pickup group whose phone is ringing to pick up the group’s incoming call which is
currently ringing. Or, the user can dial just the group call Pickup feature code
without a call Pickup group number to pick up the current incoming call for his/her
own call Pickup group.
Ping Ring
SCM provides Ping Ring service for Group Call Pickup. When nobody picked up
an incoming call ringing for own call Pickup Group during Ping Ring Time,
members of the Pickup Group receive a notify to let know there is a incoming call
to pickup. The Ping Ring Service set ‘Enable’ in the [CONFIGURATION >
Service > Group Service > Pickup Group] menu.
Ping Ring Time can be configured in the ‘Pickup Group’ as described below. If
there is no configuration, SCM uses Ping Ring Time in the [CONFIGURATION
> User Group > Change User Group > Timer].
Each member of Pickup Group can select a notify type for Ping Ring. It can be
configured in the ‘Ping Ring Type’ of [CONFIGURATION > User > Single
Phone User].

Ошибка! Используйте вкладку "Главная" для применения 제목 1 к тексту, который
должен здесь отображаться. Ошибка! Используйте вкладку "Главная" для применения 제목 1 к
тексту, который должен здесь отображаться.
SCM Express Operation Manual v12.0 243 ©Samsung Proprietary and Confidential
Outbound Call Lock
The Outbound Call Lock feature allows a user to request for restriction of outgoing
trunk calls from his/her own number.
To use Outbound Call Lock feature, the following items must be configured.
The ‘Outbound Call Lock’ service must be enabled in [CONFIGURATION >
Service > Feature Service > Class of Service].
The ‘Outbound Call Lock-Set’ and ‘Outbound Call Lock-Cancel’ feature
codes must be defined in the [CONFIGURATION > Service > Feature
Service > Feature Code].
The user can register or cancel the Outbound Call Lock feature in the following
ways:
The user can dial the ‘Outbound Call Lock-Set’ feature code + password to
enable call restriction.
The user can dial the ‘Outbound Call Lock-Cancel’ feature code + password to
cancel call restriction.
The user can use the [Supplementary Service] menu on SCM Personal
Assistant to register (enable) or cancel the call restrict by user feature.
The user can use the [User Information] menu on SCM Personal Assistant to
change the password entered on the phone when enabling or canceling call restrict
by user.
Call Transfer
The call transfer feature allows the user to put on hold the current call and transfer
it to another number. If call transfer fails, the call is reconnected to the user who
transferred the call.
To use the call transfer feature, the ‘Call Transfer’ service must be enabled in
[CONFIGURATION > Service > Feature Service > Class of Service].
Call Transfer Methods
The user can transfer calls in the following three ways.
Blind Transfer
This feature allows the user to transfer the call directly to another number without
hold it. Although SCM and Samsung SIP phones support blind transfer, this has
the same effect as semi-blind transfer from the user’s point of view. Therefore no
separate feature code is defined.
Semi-Blind Transfer
This feature allows the user to put on hold the current call by pressing the transfer
button, call another number, and then transfer the call by pressing the transfer
button again while the phone is ringing.

Ошибка! Используйте вкладку "Главная" для применения 제목 1 к тексту, который
должен здесь отображаться. Ошибка! Используйте вкладку "Главная" для применения 제목 1 к
тексту, который должен здесь отображаться.
SCM Express Operation Manual v12.0 244 ©Samsung Proprietary and Confidential
Consultative Transfer
This feature allows the user to put on hold the current call by pressing the transfer
button, call another number, and then transfer the call by pressing the transfer
button again after the call is established.
Transfer Recall
This feature allows the transferred call to be redirected to the user who transferred
the call when call transfer fails or when the transferred call is not answered.
The administrator can use ‘Transfer Recall Time (sec)’ in the
[CONFIGURATION > User Group > Change User Group > Timers] menu to
specify the time after which the transferred call is redirected. If the user to whom
the call is transferred does not answer the call during this period of time, the call is
redirected to the user who transferred the call.
If the redirected call is not answered, the call is redirected to the operator. For
more information, see the ‘Operator Recall’ section of ‘Operator Group’ in
Chapter 4.
Transfer Target Display for Transfer Recall
The transfer target information can be displayed on the phone that is receiving the
recalling call.
This administrator can enable this option at ‘Transfer Target Display for Recall’ in
the [CONFIGURATION > User Group > Change User Group > Options]
menu. According to the options, the transfer target information can be displayed to
all transferors, only to the operator, or only the normal user transferor.
Transfer Ring Back Tone
SCM can play MOH itself or transparently deliver the media played from remote
side to held party when blind or semi-blind transfer services.
The administrator needs to set ‘Transfer Ringback Tone’ in the
[CONFIGURATION > User Group > Change User Group > Options] menu.
Item Description
When transfer target is subscriber When transfer target is trunk
Options Use external ringback tone server
Not using external ringback tone server
Trunk side provides ringback tone
Trunk side doesn’t provides ringback tone
Internal Ringback Tone
External server plays
SCM plays ringback tone
SCM plays ringback tone
SCM plays ringback tone
MOH Music On Hold Music On Hold Music On Hold Music On Hold
External Ringback tone
External server plays
SCM plays ringback tone
Trunk plays ringback tone
SCM plays ringback tone

Ошибка! Используйте вкладку "Главная" для применения 제목 1 к тексту, который
должен здесь отображаться. Ошибка! Используйте вкладку "Главная" для применения 제목 1 к
тексту, который должен здесь отображаться.
SCM Express Operation Manual v12.0 245 ©Samsung Proprietary and Confidential
Call Log For Transfer Target
The user can transfer calls in the three ways (Blind Transfer/Semi-Blind
Transfer/Consultation Transfer). In that case, the transfer-party or held party
information remains in the call log of the transfer target. It does not depend on the
ways of transfer if the [Call Log for Transferred Party] option in the
[Configuration > User Group > Change User Group > Options] is set to ‘Held
Party’ or ‘Transfer Party’.
Call Waiting
If the call waiting feature is enabled, when there is an incoming call while the user
is already engaged, the call is not terminated as a call when busy, but instead the
user is notified that a call is waiting so that the user can park or end the previous
call and Pickup the new call.
If there is an incoming call while the user is already engaged, a brief call waiting
tone will be played for the user. If the user presses the call button to answer the
new call, the previous call is automatically parked.
If the call waiting feature is enabled for a phone, the phone can receive all the calls
it can accommodate. But if the call waiting feature is not enabled, all incoming
calls while the phone is engaged are terminated as calls when busy.
If the call waiting feature is enabled for a phone, the phone can accommodate as
many calls as the call buttons configured. If no call button is configured, all
incoming calls while the phone is engaged are treated as calls when busy.
To use the call waiting feature, the following items must be configured.
The ‘Call Waiting’ service must be enabled in Class of Service.
The ‘Call Waiting-Set’ and ‘Call Waiting-Cancel’ feature codes must be
defined.
The user can register or cancel the call waiting feature in the following ways:
The user can dial the ‘Call Waiting-Set’ feature code on the phone to register
the call waiting feature.
The user can dial the ‘Call Waiting-Cancel’ feature code on the phone to
cancel the call waiting feature.
The user can use the [Supplementary Service] menu on SCM Personal
Assistant to register (enable) or cancel the call waiting feature.
To use a ‘Call Waiting’ feature when Wireless Enterprise Services phone’s option
is ‘Ring Only' or 'Both’, it is needed a next setting.
‘Multi-ring’ feature must be activated in the [CONFIGURATION > Service
> Feature Service > Service Activation] menu.
‘Allow Other Ring’ must be enabled when ‘Multi-ring’ feature is activated.

Ошибка! Используйте вкладку "Главная" для применения 제목 1 к тексту, который
должен здесь отображаться. Ошибка! Используйте вкладку "Главная" для применения 제목 1 к
тексту, который должен здесь отображаться.
SCM Express Operation Manual v12.0 246 ©Samsung Proprietary and Confidential
Call Intercept
Call Intercept can be provided under the 3-way conference by the Barge-In
service.
A User can make 2-way call with the party which is barged in by pressing Call
Intercept soft key.
The menu ‘Call Intercept’ and ‘Forced Call Release’ will be displayed at the user
who barged-in. When the user presses ‘Intercept’ button, the opponent of barged-
in user will be dropped and the barged-in target and the user who barged-in is
directly connected.
Forced Call Release
Forced Call Release can be provided under the 3-way conference by the Barge-In
service. By pressing Force Call Release soft key, a user can make 2-way call by
releasing the party barged in.
The menu ‘Call Intercept’ and ‘Forced Call Release’ will be displayed at the user
who barged-in. When the user presses ‘Forced Call Release’ button, the barged-in
target will be dropped and the opponent of barged-in target and the user who
barged-in is directly connected.
CLI Control
Temporary CID Restriction
The temporary CID restriction feature allows the user to request that his/her
number is not shown to the called party for a particular call.
To use the temporary CID restriction feature, the following items must be
configured.
The ‘Temporary CID Restriction’ service must be enabled in Class of Service.
The ‘Temporary CID Restriction’ feature code must be defined.
When making a call, the user can dial the temporary CID restriction feature code +
called party’s phone number to request temporary CID restriction.
Distinctive Ring by CLI
The distinctive ring by CLI feature allows incoming calls to be distinguished by
ringing different rings depending on the caller numbers.
The user can use the [Distinctive Ring] menu on SCM Personal Assistant to
register a list of caller numbers for which distinctive ring by CLI will be used.
The administrator can use the [CONFIGURATION > Service > User Service >
Distinctive Ring] menu to register a list of caller numbers for which distinctive
rings will be serviced.

Ошибка! Используйте вкладку "Главная" для применения 제목 1 к тексту, который
должен здесь отображаться. Ошибка! Используйте вкладку "Главная" для применения 제목 1 к
тексту, который должен здесь отображаться.
SCM Express Operation Manual v12.0 247 ©Samsung Proprietary and Confidential
Do Not Disturb (DND)
When the Do Not Disturb (DND) feature is enabled for a user, SCM rejects all
incoming calls for the user. When there is an incoming call for a user with DND,
an announcement is played to notify the caller of the DND status and the call is
terminated.
To use the DND feature, the following items must be configured.
The ‘DND (Do Not Disturb)’ service must be enabled in Class of Service.
The ‘DND (Do Not Disturb)-Set’ and ‘DND (Do Not Disturb)-Cancel’ feature
codes must be defined.
The user can register or cancel the DND feature in the following ways:
The user can dial the ‘DND (Do Not Disturb)-Set’ feature code on the phone
to register the DND feature.
The user can dial the ‘DND (Do Not Disturb)-Cancel’ feature code on the
phone to cancel the DND feature.
The user can use the [Supplementary Service] menu on SCM Personal
Assistant to register (enable) or cancel the DND feature.
DND White List
When there is an incoming call for a user with DND, this service prevents the call
from getting rejected if the call originates from one of the caller numbers specified
in advance.
The user can use the [DND White List] menu on SCM Personal Assistant to
register a list of caller numbers to exclude from the DND service.
The administrator can use the [CONFIGURATION > Service > User Service >
DND White List] menu to register a list of caller numbers which will be excluded
from the DND service.
Item Description
User Group Select a user group for which the DND white list will be created.
Extension Number Select an extension number for which the DND white list will be created.
White List Enter the caller numbers for the DND white list.
DND Override
When there is an incoming call for a user with DND, this service allows the caller,
while listening to the DND announcement, to ignore the DND status and have
his/her call connected.
To use the DND override feature, both ‘Override Level’ and ‘Privacy Level’ must
be defined in Class of Service. DND override is allowed only when the override
level is higher than the privacy level. The override level is applied to the user
overriding DND and the privacy level is applied to the user with DND.
To use the DND override feature, the following items must be configured.

Ошибка! Используйте вкладку "Главная" для применения 제목 1 к тексту, который
должен здесь отображаться. Ошибка! Используйте вкладку "Главная" для применения 제목 1 к
тексту, который должен здесь отображаться.
SCM Express Operation Manual v12.0 248 ©Samsung Proprietary and Confidential
The ‘DND Override’ service must be enabled in Class of Service.
The ‘DND Override’ feature code must be defined.
When there is an incoming call for a user with DND, the caller, while listening to
the DND announcement, can press the DND override button to override DND and
the called party’s phone will ring. Even when the DND override feature is used,
the call may not be connected if the called party is busy or otherwise unavailable.
Follow Me
When the caller has temporarily moved to another location, this service allows the
caller to answer all incoming calls to his number by using another phone.
To use the follow me feature, the following items must be configured.
The ‘Follow Me’ service must be enabled in Class of Service.
The ‘Follow Me-Set’ and ‘Follow Me-Cancel’ feature codes must be defined.
The user can register or cancel the follow me feature in the following ways:
The user can dial the ‘Follow Me-Set’ feature code + his/her password +
his/her phone number on another phone to enable follow me.
The user can dial the ‘Follow Me-Cancel’ feature code + his/her password +
his/her phone number on another phone to cancel follow me.
If follow me is enabled, it will be shown as enabled in the [Supplementary
Service] menu on SCM Personal Assistant, where the feature can be canceled.
The user can use the [User Information] menu on SCM Personal Assistant to
change the password entered when enabling or canceling follow me.
Individual Speed Dial
This feature allows you to assign a shortcut number to a phone number frequently
dialed. The user should dial ‘Individual Speed Dial’ feature code + ‘Speed Dial
ID’.
A speed dial ID is just a one digit. SCM supports 10 individual speed dial for each
users.
To use this feature, it needs feature code configurations as follow:
‘Individual Speed Dial-Call’ feature code
‘Individual Speed Dial Number-Insert’ feature code
‘Individual Speed Dial-Delete’ feature code
To set individual speed dial using phone, user should dial ‘Individual Speed Dial
Number-Insert’ feature code and speed dial ID (0~9) and dialing number on the
phone.
To delete individual speed dial set, user should dial ‘Individual Speed Dial

Ошибка! Используйте вкладку "Главная" для применения 제목 1 к тексту, который
должен здесь отображаться. Ошибка! Используйте вкладку "Главная" для применения 제목 1 к
тексту, который должен здесь отображаться.
SCM Express Operation Manual v12.0 249 ©Samsung Proprietary and Confidential
Number-Delete’ feature code and speed dial ID (0~9) on the phone.
Intercom
When a call is made between the users for whom intercom is enabled, the call is
automatically answered through the speaker. When using the manager/secretary
feature, the intercom feature is used together.
To use the intercom feature, the following items must be configured:
An intercom number must be specified for each user using the
[CONFIGURATION > Service > User Service > Intercom] menu.
The ‘Intercom’ feature code must be defined.
A user with an intercom number can dial the intercom feature code + user number
to page the selected user for a call.
The following items must be configured in the [CONFIGURATION > Service >
User Service > Intercom] menu.
Item Description
User Group Select a user group for which the intercom will be created.
Extension Number Select an extension number for which the intercom will be created.
Name Specify a name for the intercom.
Voice Only Specify whether the call between video phones is connected with voice information only or not.
isable: Video information from calling party is delivered to the called party.
Enable: Video information from calling party is not delivered to the called party to establish a call with voice only mode
Intercom Select an extension number which will be connected with the intercom.
Language Selection
This service allows the user to change the language displayed on their phone.
The user can use the [User Information] menu on SCM Personal Assistant to
change his/her language.
The administrator can change the language of a Single Phone User by changing
‘Language’ in the [CONFIGURATION > User > Single Phone User] menu.
The administrator can change the language of a Multi-Extension Phone by
changing ‘Language’ in the [CONFIGURATION > User > Multi-Phone User]
menu.

Ошибка! Используйте вкладку "Главная" для применения 제목 1 к тексту, который
должен здесь отображаться. Ошибка! Используйте вкладку "Главная" для применения 제목 1 к
тексту, который должен здесь отображаться.
SCM Express Operation Manual v12.0 250 ©Samsung Proprietary and Confidential
Last Number Redial
The last number redial feature allows the user to redial the caller or the called party
number of the most recent call.
For Call Forward All and Multi-Ring services, the number user dialed initially will
be used as called number not the number finally reached.
The last number redial service allows redialing the called number of the last
outgoing call or the caller number of the last incoming call. The following must be
configured.
The ‘Last Outgoing Redial’ feature code must be defined in order to be able to
redial the last dialed number.
The ‘Last Incoming Redial’ feature code must be defined in order to be able to
redial the caller number of the last incoming call.
The user can use the last call redial feature in the following ways:
The user can dial the last outgoing feature code to redial the called number of
the last outgoing call.
The user can dial the last incoming redial feature code to redial the caller
number of the last incoming call.
Last Call Redial is independently operated by each node.
No Ring
The no ring feature prevents the phone from ringing when there is an incoming
call for the user. This service is useful to prevent some phones from ringing when
multiple phones are configured to ring at the same time by features such as multi-
ring and multi-device.
To use the no ring feature, the following items must be configured.
The ‘No Ring’ service must be enabled in Class of Service.
The ‘No Ring-Set’ and ‘No Ring-Cancel’ feature codes must be defined.
The user can register or cancel the no ring feature in the following ways:
The user can dial the ‘No Ring-Set’ feature code on the phone to register the
no ring feature.
The user can dial the ‘No Ring-Cancel’ feature code on the phone to cancel the
no ring feature.
The user can use the [Supplementary Service] menu on SCM Personal
Assistant to register (enable) or cancel the no ring.
The Multi-extention phone user can register or cancel the no ring feature in each
multi-line:
The ‘No Ring for Multi-Device’ service must be enabled in [Configuration >

Ошибка! Используйте вкладку "Главная" для применения 제목 1 к тексту, который
должен здесь отображаться. Ошибка! Используйте вкладку "Главная" для применения 제목 1 к
тексту, который должен здесь отображаться.
SCM Express Operation Manual v12.0 251 ©Samsung Proprietary and Confidential
User Group > Change User Group > Options].
select a multi-extention phone that you try to set a ring/no-ring/selective ring
feature in [Configuration > User > Multi-Extention Phone Setting] menu
and press the 'Change' button, it can be changed by selecting No Ring
Ring: The phone rings when it receives a call to the extension.
No Ring: The phone does not ring when it receives a call to the extension.
Users can recognize the call with the phone display and the lamp blink.
Selective Ring: The phone rings by the level of calling party. If the Override
level of calling party is higher than the Privacy level of called party, the phone
rings, otherwise it does not ring. If a calling party is a multi-device with
Secretary type or non-user party, it works same as No Ring. Override level and
Privacy level can be changed at the Class of Service menu.
Multi-Ring
If the multi-ring feature is enabled, when there is an incoming call for the user, the
call is directed to multiple phones at the same time, and when the call is answered
by one of the phones, the call is connected to the phone and the ring on other
phones are canceled.
This service is useful for incoming calls to ring the landline and the mobile phone
to ring at the same time.
To use the multi-ring feature, the following items must be configured:
The ‘Multi-Ring’ service must be enabled in Class of Service.
The ‘Multi-Ring Enable-Set’ and ‘Multi-Ring Enable-Cancel’ feature codes
must be defined.
Even if a user is set as a member on a multi-ring list, the multi-ring feature must be
enabled for the user in order to use the multi-ring feature. The user can register or
cancel the multi-ring feature in the following ways:
The user can dial the ‘Multi-Ring Enable-Set’ feature code on the phone to
enable the multi-ring feature.
The user can dial the ‘Multi-Ring Enable-Cancel’ feature code on the phone to
disable the multi-ring feature.
The administrator can add members to multi-ring lists by using the
[CONFIGURATION > Service > User Service > Multi-ring List] menu.
The user can use the feature code to add members to multi-ring lists. For the user
to add multi-ring members, the ‘Multi-Ring Member-Insert’ and ‘Multi-Ring
Member -Delete’ feature codes must be defined.
The user can add or remove multi-ring members by using feature codes in the
following ways:
The user can dial the ‘Multi-Ring Member-Insert’ feature code + phone

Ошибка! Используйте вкладку "Главная" для применения 제목 1 к тексту, который
должен здесь отображаться. Ошибка! Используйте вкладку "Главная" для применения 제목 1 к
тексту, который должен здесь отображаться.
SCM Express Operation Manual v12.0 252 ©Samsung Proprietary and Confidential
number to add a multi-ring member.
The user can dial the ‘Multi-Ring Member -Delete’ feature code + phone
number to remove a multi-ring member.
When there is an incoming call, services enabled for the master user who enabled
multi-ring will be provided, but the services enabled for the multi-ring members
will not be provided. Note that the no ring service is provided to all users.
For example, when the user number 2000 is set as a multi-ring member for the
user number 1000, if there is an incoming call for the user number 1000:
The call will be forwarded if call forwarding is enabled for the user number
1000, but the call will not be forwarded if call forwarding is enabled for the
user number 2000.
The call will be rejected if DND is enabled for the user number 1000, but the
call will not be rejected if DND is enabled for the user number 2000.
Only the user number 1000 will not ring if no ring is enabled for the user
number 1000, and only the user number 2000 will not ring if no ring is enabled
for the user number 2000.
When the master user who enabled multi-ring is busy, the incoming call is
serviced according to the ‘Allow Other Ring’ setting which is accessible through
the pop-up window when the Enable button is selected after selecting the
[CONFIGURATION > Service > Feature Service > Service Activation >
Multi-ring] menu.
Master Busy Not Allow: If the master user who enabled multi-ring is busy, the
incoming call is treated as a call when busy and is not directed to the multi-
ring members.
Always Allow: If the master user who enabled multi-ring is busy, the
incoming call is not treated as a call when busy and is directed to the multi-
ring members. When there is no multi-ring member to ring, the call is treated
as a call when busy.
Any Member Busy Not Allow: If the multi-ring master or a member is busy,
the incoming call is treated as a call when busy and is not directed to the multi-
ring members or multi-ring master.
Mobile Extension (MOBEX)
The mobile extension (MOBEX) feature allows incoming calls to be directed not
only to the landlines and mobiles phones registered with SCM but also to external
phone numbers. This is one example of the multi-ring service.
The service also allows the user to answer the call with his/her mobile phone and
then when the user returns to the office, the call can be transferred to the landline
in the office and be picked up for continued conversation.

Ошибка! Используйте вкладку "Главная" для применения 제목 1 к тексту, который
должен здесь отображаться. Ошибка! Используйте вкладку "Главная" для применения 제목 1 к
тексту, который должен здесь отображаться.
SCM Express Operation Manual v12.0 253 ©Samsung Proprietary and Confidential
MOBEX Call Pickup
This service allows the call answered with an external mobile phone by the multi-
ring feature to be transferred to the landline in the office and picked up for
continued conversation.
To use the MOBEC Call Pickup feature, the ‘Moved Call Pickup’ feature code
must be defined.
The user can dial the call Pickup on desk phone feature code on the master phone
enabled with multi-ring to pick up the call from the mobile phone.
After answering an incoming call with a mobile phone enabled with multi-ring, the
user can press the ‘Moved Call Pickup’ feature code on his/her master phone
during the call to transfer the call to the master phone.
Transfer to Mobile Phone
This service allows the user to transfer a call to an external mobile phone specified
as a multi-ring member without parking the call. It works in the same way as blind
transfer.
The user can dial press the transfer button on the master phone enabled with multi-
ring during a call to transfer the current call to the mobile phone.
To transfer a call, press the transfer button and a mobile phone number on the
master phone during the call and end the call.
Remote Office
The remote office feature allows automatic forwarding of all incoming calls for a
user to an internal number or an external number specified.
The remote office feature works in the same way as blind transfer but it is defined
for remote use. It is also similar to the follow me to destination feature but it is
different in that the calls can be forwarded to phone numbers outside the system.
To use the remote office feature, the following items must be configured.
The ‘Remote Office’ service must be enabled in Class of Service.
The ‘Remote Office-Set’ and ‘Remote Office-Cancel’ feature codes must be
defined.
The user can register or cancel the remote office feature in the following ways:
The user can dial the ‘Remote Office-Set’ feature code + the destination phone
number on the phone to register the remote office feature.
The user can dial the ‘Remote Office-Cancel’ feature code on the phone to
cancel the remote office feature.
The user can use the [Supplementary Service] menu on SCM Personal
Assistant to register (enable) or cancel the remote office feature.

Ошибка! Используйте вкладку "Главная" для применения 제목 1 к тексту, который
должен здесь отображаться. Ошибка! Используйте вкладку "Главная" для применения 제목 1 к
тексту, который должен здесь отображаться.
SCM Express Operation Manual v12.0 254 ©Samsung Proprietary and Confidential
Wake-Up Call
The wake-up call feature allows the user’s phone to ring at a wake-up time
specified by the user. If the user answers the call, an announcement is played to
notify that it is the wake-up time.
To use the wake-up call feature, the following items must be configured:
The ‘Wake-Up Call’ service must be enabled in Class of Service.
The ‘Wake-Up Call-Set’ and ‘Wake-Up Call-Cancel’ feature codes must be
defined.
The user can register or cancel the wake-up call feature in the following ways:
The user can dial the ‘Wake-Up Call-Set’ feature code + the wake-up retry
type
(1: Once/2: Repeat) + the wake-up time on the phone to enable the wake-up
call feature.
The user can dial the ‘Wake-Up Call-Cancel’ feature code + the wake-up time
(HHMM) on the phone to cancel the wake-up call feature.
The user can use the [Supplementary Service] menu on SCM Personal
Assistant to register (enable) or cancel the wake-up call feature. When
enabling wake-up call, you can also set the wake-up time and the number of
times the phone will ring.
The following items should be configured for wake-up service by operator in the
[CONFIGURATION > Service > User Service > Wake-Up Call Lists] menu.
Item Description
User Group Select a user group for which the wake-up call will be created.
Extension Number Select an extension number for which the wake-up call will be created.
Wake-Up Index If subscriber needs more than 2 wakeup services, ‘Extended Alarm Reminder’ feature can be used. This feature is aimed to support hotel service. It supports 4 wakeup services per subscriber. So there is an index (1-4) to separate which one is set or cancel.
‘1’ is a default index for wakeup feature.
Wake-Up Retry Type
Select a service count for Once or Repeat
Wake-Up Time Input wake-up ringing time. If service count is Once, should be input MMDDHHMM (Month, Date, Hour, Minute) or HHMM (Hour, Minute) type
Voice Mail Integration
SCM’s built-in voice mail system is utilized for providing the basic voice mail
services including answering machine emulation, call recording, deflection to
voice mail, and transfer to voice mail.
The administrator needs to set Application Type to ‘Internal UMS’ in the

Ошибка! Используйте вкладку "Главная" для применения 제목 1 к тексту, который
должен здесь отображаться. Ошибка! Используйте вкладку "Главная" для применения 제목 1 к
тексту, который должен здесь отображаться.
SCM Express Operation Manual v12.0 255 ©Samsung Proprietary and Confidential
[CONFIGURATION > Application > VM/AA Server] menu to create a
connection to the built-in voice mail system.
There are three services for VM/AA server. The administrator can make several
VM/AA servers. But only one service can only appoint one service.
Voice Mail: All services except for Call Recording and Auto Attendant
Call Recording
Auto Attendant
Answering machine emulation and call recording services are provided as three-
way conference calls. Since SCM utilizes its built-in conference system for
establishing three-way conference calls, the basic settings for using the conference
system must be configured.
The administrator needs to set Application Type to ‘Internal Conference’ in the
[CONFIGURATION > Application > Conference Server] menu to create a
connection to the built-in conference system. This conference server should be
included ‘Add-On Conference’ in service list.
Answering Machine Emulation (AME)
If the AME feature is enabled, when there is an incoming call, the call is
automatically answered by the voice mail system and the caller’s message is
recorded in the mailbox.
The voice mail system announcement and the caller’s voice message are heard
over the phone’s speaker.
AME Auto Start
This method allows the incoming calls to be connected to AME by configuring the
AME feature in advance.
To use the AME auto start feature, the following items must be configured:
The ‘AME’ service must be enabled in Class of Service.
The ‘AME Enable-Set’ and ‘AME Enable-Cancel’ feature codes must be
defined.
The user can register or cancel the AME auto start feature in the following ways:
The user can dial the ‘AME Enable-Set’ feature code on the phone to enable
the AME auto start feature.
The user can dial the ‘AME Enable-Cancel’ feature code on the phone to
cancel the AME auto start feature.
The user can use the [Supplementary Service] menu on SCM Personal
Assistant to register (enable) or cancel the AME auto start feature.
If the AME auto start feature is enabled, when there is an incoming call and the
call is not answered, the call forward no answer feature is used for forwarding the
call to the voice mail system to automatically start the AME.

Ошибка! Используйте вкладку "Главная" для применения 제목 1 к тексту, который
должен здесь отображаться. Ошибка! Используйте вкладку "Главная" для применения 제목 1 к
тексту, который должен здесь отображаться.
SCM Express Operation Manual v12.0 256 ©Samsung Proprietary and Confidential
AME Manual Start
This method allows the incoming calls to be connected to AME without
configuring the AME feature in advance.
To use the AME manual start feature, the following items must be configured:
The ‘AME’ service must be enabled in Class of Service.
The ‘AME Mode-Start’ and ‘AME Mode-Stop’ feature codes must be defined.
When the user’s phone rings, the user can press the ‘AME Mode-Start’ button to
process the call with call forward no answer and connect the call to the voice mail
system.
The user can press the ‘AME Mode-Stop’ button on the phone while AME is in
action, the caller will be connected to the user and AME will stop.
The Answering Machine Emulation (AME) feature allows a user to listen to a
caller leaving a message in his/her voice mail box. It operates like a home
answering machine.
AME must be allowed in Class of Service
To use AME feature, Call Forward No-Answer to Voice Mail must be set.
Feature is enabled by a programmable ‘AME Enable’ button or feature access
code.
o Toggle button ON/OFF > Red LED when ON
o Dial the assigned feature access code ‘xxx + 0/1’ 0=Off and 1=On
The optional ‘AME Mode’ button can be assigned to any programmable
button.
o When AME is enabled and a call is ringing your phone, press the ‘AME
Mode’ button to skip the call forward no-answer timer and immediately
activate the AME feature.
o To stop hearing the audio of the caller leaving a message in your mailbox:
Press the Speaker button or the ‘End’ button in the soft key menu. The
caller is still connected to your mailbox.
To speak with the caller, lift the handset or press the ‘Answer’ button
in the soft key menu. The mailbox is disconnected.
Call Recording
This feature allows the call conversation to be recorded during a call.
When call recording begins, the ‘Recording’ message will be shown on the phone
display, and the CANCEL, PAUSE, and STOP soft menus will be displayed for
use.
There are two kinds of Call Recording Method, ‘Conference Recording’ and
‘Phone Recording’. It can be configured in the [CONFIGURATION > User
Group > Service Group] and [CONFIGURATION > User > Single Phone

Ошибка! Используйте вкладку "Главная" для применения 제목 1 к тексту, который
должен здесь отображаться. Ошибка! Используйте вкладку "Главная" для применения 제목 1 к
тексту, который должен здесь отображаться.
SCM Express Operation Manual v12.0 257 ©Samsung Proprietary and Confidential
User/Multi-Phone User]. Call Recording Method of a User has a higher priority
than it of Service Group.
Conference Recording: A conference server is required for RTP mixing so that this
has limitations by conference server. When a user places a call on Hold, held party
cannot listen MOH and the display of held party is not changed to ‘Held’.
Phone Recording: Without conference server, a phone mixes RTPs and sends it to
VM server.
Auto Call Record
If call recording feature is enabled, this service automatically records calls
whenever they are started.
To use the auto call record feature, the following items must be configured:
The ‘Call Recording’ and ‘Auto Record’ services must be enabled in Class of
Service.
When a user for whom the auto call record feature is enabled is on a call, a three-
way conference call will automatically be connected to the voice mail system and
the call will be recorded.
When enabling the auto call record feature, you can specify a type of calls to
record selectively.
The call type can be changed by ‘Auto Record Type’ in the [CONFIGURATION
> Service > Feature Service > Service Activation > Auto Record] menu.
Incoming: Incoming calls are recorded.
Outgoing: Outgoing calls are recorded.
Both: Both the incoming and outgoing calls are recorded.
Manual Call Record
This feature allows the call conversation to be recorded during a call by pressing
the call record button.
To use the manual call record feature, the following items must be configured:
The ‘Call Record’ service must be enabled in Class of Service.
The ‘Call Record’ feature code must be defined.
If the user presses the ‘Call Record’ button + the mailbox number during a call, a
three-way conference call will be established with the voice mail system and the
call will be recorded in the selected mailbox. If a mailbox number is not entered,
the call will be recorded in the user’s mailbox.
Deflect to Voicemail
This service forwards allows the currently ringing call to be forwarded to the voice
mail system by using the call forward no answer feature.
The voice mail system answers the call immediately and plays the no answer

Ошибка! Используйте вкладку "Главная" для применения 제목 1 к тексту, который
должен здесь отображаться. Ошибка! Используйте вкладку "Главная" для применения 제목 1 к
тексту, который должен здесь отображаться.
SCM Express Operation Manual v12.0 258 ©Samsung Proprietary and Confidential
announcement so that the caller can leave a voice mail.
To use the deflect to voice mail feature, the ‘VM Transfer’ feature code must be
defined.
If the user presses the deflect to voice mail button on the phone which is ringing,
the call will be processed for call forward no answer and be connected to the voice
mail system.
Transfer to Voicemail
This feature allows the current call to be connected to a specified mailbox in the
voice mail system so that the caller can leave a message.
If the current call is transferred to the voice mail system by a normal method, the
voice mail system asks for the service code, mailbox number, password, etc. But if
the transfer to voice mail feature is used for transferring the call, this step is
skipped so that the caller can leave a voice message without entering anything.
To use the transfer to voice mail feature, the ‘VM Transfer’ feature code must be
defined.
When the user dials the transfer to voice mail feature code + a mailbox number
during a call and ends the call, the call will be transferred to the voice mail system
and the caller will be allowed to leave a voice mail in the selected mailbox.
Other User MWI
This feature allows to connect to the other user’s voice mail Box and verify the
other user’s MWI.
To use this feature, Other User MWI button must be created in phone. Other User
MWI button can be created in [CONFIGURATION > Users > Phone Key
Programming] menu. When created this button, input the other user’s phone
number in value field.
Personal SPAM Number
This feature allow user to configure SPAM numbers. When a call comes in from
internal or external to the user, if the number is matched with pre-configured
SPAM list then reject the call.
To use Personal SPAM Number feature, following items are required in the
[CONFIGURATION > Service > User Service > Personal SPAM Number]
menu.
Item Description
User Group Select a user group for which the Personal SPAM number will be configured
Extension Number
Specify a user number for which the service will be activated.
SPAM Number Enter the number specified as SPAM number.

Ошибка! Используйте вкладку "Главная" для применения 제목 1 к тексту, который
должен здесь отображаться. Ошибка! Используйте вкладку "Главная" для применения 제목 1 к
тексту, который должен здесь отображаться.
SCM Express Operation Manual v12.0 259 ©Samsung Proprietary and Confidential
Item Description
Activation Select ‘Enable’ or ‘Disable’ to use the Number as SPAM.
Pause Digit
In some cases, specific digits should be entered after making a call, It can be used
for authentication. These digits can be assigned in speed dial menu after pause
digits.
SCM makes a call and send digits after pause delay time. Pause delay time
depends on the number of pause digits (‘p’ or ‘P’)
In the [CONFIGURATION > User Group > Timers > Pause Delay Time], the
delay time between pause digits can be changed. And the delay time between
normal digits after pause digit can be changed in the [CONFIGURATION > User
Group > Timers > DTMF Duration Time].
This feature is served with the following services.
Hot Line
Speed Dial
Call Forward
Multi-Ring
Paging on Answer
Predefined Conference
The destination number for services should include pause digits. For the detailed
configuration for services, refer to the menus of each service.
Call Bridge
This feature allows the gateway FXS user to join the conversion of bridged user by
hook-off. After that, if bridged user is hook-off, FXS user has a continued
conversation.
If bridged user is not busy status, the gateway FXS user listens dial-tone and
makes a call.
SCM provides two type of bridge. One is Call Bridge to a user number. Another is
Call Bridge to a user phone. 'Call Bridge to a user phone' supports to bridge one of
multiple numbers assigned to one phone.
In the [CONFIGURATION > Service > Feature Service > Service Activation >
Hot Line], the bridge feature code and the bridge target should be entered.
- Call Bridge to Single Extension Number: 'Destination' has to be set to 'Bridge
feature code + destination user number'
- Call Bridge to Multi-Extension Phone: 'Destination' has to be set to 'Bridge
feature code' and 'Bridge Target Phone' has to be selected.

Ошибка! Используйте вкладку "Главная" для применения 제목 1 к тексту, который
должен здесь отображаться. Ошибка! Используйте вкладку "Главная" для применения 제목 1 к
тексту, который должен здесь отображаться.
SCM Express Operation Manual v12.0 260 ©Samsung Proprietary and Confidential
the extension number of bridged user should be entered for the gateway FXS user.
And the Hot Line Delay Time should be greater than 0.
Move to Mobile
The conversation can be continued through other phone. But there is no need to
hold the call. It is the difference between Call Transfer and Call Move.
Call Move using Soft Menu
The conversation can be continued through other phone by using soft menus
displayed on the phone.
Move to Mobile (Move to Number)
The ‘Move to Mobile’ soft menu will be displayed on the phone which is on
conversation. If a user selects the soft menu, the conversation will be
continued through the mobile phone which was set before.
In case a user selects the ‘Move to Number’ soft menu, the destination number
for Call Move should be entered. And the call will be moved to the designated
destination.
The ‘Move to Mobile’ feature code should be defined in the
[CONFIGURATION > Service > Feature Service > Feature Code] menu.
The ‘Move to Mobile’ Service should be permitted in the
[CONFIGUARTION > Service > Class of Service] menu.
Move to Multi-Device
If a multi-device is on conversation, the ‘Move to Multi-Device’ soft menu
will be displayed on the phone. And the call can be moved to the other multi-
device member, if a user selects the menu.
The ‘Move to Multi-Device’ feature code should be defined in the
[CONFIGARITON > Service > Feature Service > Feature Code] menu.
The "Move to Multi-Device" feature provides to IP-Phone.
Call Move using Programmable Button
The conversation can be continued through other phone by pressing ‘Move to
Mobile’ programmable button.
If a user press this button on conversation, the conversation will be continued
through the mobile phone which was set before.
The ‘Move to Mobile’ feature code should be defined in the [CONFIGURATION
> Service > Feature Service > Feature Code] menu.
The ‘Move to Mobile’ Service should be permitted in the [CONFIGUARTION >
Service > Class of Service] menu.
The ‘Move to Mobile’ button should be created in the [CONFIGURATION >
User > Phone Key Programming] menu.

Ошибка! Используйте вкладку "Главная" для применения 제목 1 к тексту, который
должен здесь отображаться. Ошибка! Используйте вкладку "Главная" для применения 제목 1 к
тексту, который должен здесь отображаться.
SCM Express Operation Manual v12.0 261 ©Samsung Proprietary and Confidential
Call Move using Move Key
The desk phone like SMT-i5343 supports ‘Move’ key. The conversation through
the desk phone can be moved to the other phone by pushing Move Key.
First of all, the connection between a desk phone and a mobile should be
configured for Call Move service. If the mobile name is assigned in the
[CONFIGURATION > User > Single Phone User (or Multi-Extension Phone)
> NFC Mobile Phone Name], the conversation of the desk phone can always be
moved to the mobile.
Second, the ‘NFC Service’ should be permitted in the [CONFIGURATION >
Service > Feature Service > Class of Service] menu.
Third, the ‘NFC Move to Desk’, ‘NFC Move to Mobile’ and ‘NFC Pickup’ codes
should be set in the [CONFIGURATION > Service > Feature Service >
Feature Code].
Move to Mobile
If a desk phone is on conversation, the call can be moved to the mobile phone
by using Move key.
Move to Desk
If a mobile is on conversation or is ringing, the call can be moved to the desk
phone by using Move key.
Mobile Pickup Desk Call
If a desk phone is ringing, the mobile phone can answer the call by using
Move key.
Moved Call Pickup
After moving the conversation to a mobile, the desk phone can pick up the call
through ‘Moved Call Pickup’ soft menu. Although the moved call is 3G call, it is
possible. It is the difference between ‘Moved Call Pickup’ and ‘Move to Desk’
features.
The ‘Moved Call Pickup’ codes should be set in the [CONFIGURATION >
Service > Feature Service > Feature Code].
NFC Service
NFC Auto Login
SCM gives you the ability to log in automatically through the NFC applications
that work with i53xx series phone.
The following items are set by using the NFC Auto Login.
Operator needs to be able to use the [NFC Auto Login] to [Single Phone User],
set the [NFC Auto Login] from [Configuration > User > Single Phone User]
menu.
In addition, there is a need to enable the [Hot Desking] in [Service > Feature
Service > Service Activation].

Ошибка! Используйте вкладку "Главная" для применения 제목 1 к тексту, который
должен здесь отображаться. Ошибка! Используйте вкладку "Главная" для применения 제목 1 к
тексту, который должен здесь отображаться.
SCM Express Operation Manual v12.0 262 ©Samsung Proprietary and Confidential
Item Description
NFC Auto Login Operator can choose to use the NFC Auto Login.
Operator needs to be able to use the [NFC Auto Login] to [Multi-Phone User], to
create the separate [NFC Auto Login] the [Multi-Extension Phone], set the
following options In [Configuration > User > Multi-Extension Phone] Menu.
Item Description
NFC Auto Login Operator can choose to use the NFC Auto Login.
This option must be set in to a phone that is newly created.
NFC Auto Login Phone Name
Select the phone that [NFC Auto Login] option is enabled.
This option must be set to existing phone.
CSTA Line Seize
Line seize status is considered to the CSTA event. Phone sends NORIFY message
when a status of receiver is changed and it is used to issue CSTA Event. Service
Initiated Event is delivered when the receiver is hooked off and Connection
Cleared Event is delivered when it hooked on. When a call tries in the state of
hook off, Service Initiated Event from hook off is cleared by Connection Cleared
Event and new Service Initiated Event by a call is created and other CSTA events
are followed by the call state. Temporary CSTA Call ID is used for Service
Initiated Event by hook off and Service Initiated Event by a call has a meaningful
CSTA Call ID.
To CSTA Line Seize service, configure following steps. Configurations below is
used for both CSTA Line Seize service and BLF service.
SIP Phone Configuration
‘Line Seize Option’ has to be set ‘Send Message’ in the [CONFIGURATION
> User Group > Change User Group] menu.
FXS Phone Configuration
‘FXS Line Seize Option’ has to be set ‘Enable’ in the [CONFIGURATION >
User > Single Phone User: Service] menu.
FXS Line Seize service has an effect on the performance of gateway. Refer the
Performance Guide below before user the feature.
* Gateway Performance by FXS Line Seize Usage (OX7500/1000 Line)
FXS Line Seize
Option Count
Notify Traffic Call Traffic Supported CPS Option Usage.
0 0 16 8 0 %
1000 8 8 4 100 %
500 4 12 6 50 %
250 2 14 7 25 %

Ошибка! Используйте вкладку "Главная" для применения 제목 1 к тексту, который
должен здесь отображаться. Ошибка! Используйте вкладку "Главная" для применения 제목 1 к
тексту, который должен здесь отображаться.
SCM Express Operation Manual v12.0 263 ©Samsung Proprietary and Confidential
PRI Malicious Call Identification (MCID)
The Malicious Call Identification (MCID) supplementary service allows you to
report a call of a malicious nature by requesting that SCM identify and register the
source of an incoming call in the network.
SCM supports the MCID service, which is an ISDN PRI service, when it is using
PRI connections to the PSTN. Gateway and ISDN Provider should be checked
whether this feature can support or not.
While the user is connected to the call, the user can invoke the MCID feature by
using PRI MCID feature key. The Malicious Information is displayed in the Event
Viewer.
To MCID service, configure following steps.
The PRI MCID feature code should be assigned in the [CONFIGURATION
> Service > Feature Service > Feature Code] menu.
The Malicious Call Trace has to be set in the [CONFIGURATION > Service
> Feature Service > Class of Service] menu.
The PRI MCID Key should be assigned in the [CONFIGURATION > User >
Phone Key Programming].
WE VoIP Call Record
WE VoIP can record a call conversation in voice mail during the call.
To support the feature, configure following steps.
The Call Recording and Call Recording Stop feature code should be assigned
in the [CONFIGURATION > Service > Feature Service > Feature Code]
menu.
The Recording Server should be configured in the [CONFIGURATION >
Application > VM/AA Service] menu.
The Conference Server should be configured in the [CONFIGURATION >
Application > Conference Service] menu.
The Recording Server and Conference Service should be designated in the
[CONFIGURATION > Application > Application Server Group] menu.
The Application Server Service Group should be set in the
[CONFIGURATION > User > Single Phone User/Multi-Phone User]
menu. It also can be set in the [CONFIGURATION > User Group
>Options] menu or [CONFIGURATION > User Group >Serviced Group]
menu.
The Auto Record feature can be activated in the [CONFIGURATION >
Service > Feature Service > Service Activation] menu.

Ошибка! Используйте вкладку "Главная" для применения 제목 1 к тексту, который
должен здесь отображаться. Ошибка! Используйте вкладку "Главная" для применения 제목 1 к
тексту, который должен здесь отображаться.
SCM Express Operation Manual v12.0 264 ©Samsung Proprietary and Confidential
Call Record
If a WE VoIP is on the conversation, the “RECORD (SYS)” button is shown on
the display.
If a user selects the menu, it will start to record the call. During recording the call,
“Rec” is displayed and “STOP” menu is shown on the phone. If a user selects
“STOP” menu, the call does not be recorded any more.
Auto Record
If call recording feature is enabled, this service automatically records calls
whenever they are started. The “Rec” is not displayed and “STOP” menu is only
shown on the phone. If a user selects “STOP” menu, the call does not be recorded
any more.
If the user who is activated auto record service is added to the conference, the auto
record service will not operate.
Busy Override
SCM will do their best to make a trunk call although all trunk lines are busy if the
user dials the ‘busy override’ feature code and ‘outgoing call number’
SCM will release the ongoing call made though the busy trunk and then place on
the call for busy override.
In order to release the busy call forcedly, two conditions should be satisfied.
1 Priority order
The opposite site of busy trunk call should have lower privacy level than busy
override caller’s override level.
2 Maximum Call
If the maximum call that configured in route menu is 5 and there are 5 busy
calls though the trunk, SCM try to find the longest continuous call that
satisfying with the priority order condition among 5 calls. The call will be
released forcedly.
If the maximum call is not set, SCM will check these conditions after the
outgoing call for busy override receives 486 Busy response and then make a
busy override call again. The retry count follows the Maximum Call Forward
Count in User Group Menu.
To support the feature, configure following steps.
The Busy Override should be set in the [CONFIGURATION > Service >
Feature Service > Class of Service] menu.
The Busy Override feature code should be configured in the
[CONFIGURATION > Service > Feature Service >Feature Code] menu.
The Override Level and Privacy Level should be configured in the
[CONFIGURATION > Service > Feature Service > Class of Service] menu.

Ошибка! Используйте вкладку "Главная" для применения 제목 1 к тексту, который
должен здесь отображаться. Ошибка! Используйте вкладку "Главная" для применения 제목 1 к
тексту, который должен здесь отображаться.
SCM Express Operation Manual v12.0 265 ©Samsung Proprietary and Confidential
The Class of Service can be set in the [CONFIGURATION > Trunk
Routing > Route > Trunk Service Tab] menu.
If a user want to override a tandem call, TIE Trunk should be TIE in the
[CONFIGURATION > Trunk Routing > Route > Basic Configuration
Tab] menu.
The Maximum Call can be configured in the [CONFIGURATION > Trunk
Routing > Route > Trunk Service Tab] menu.
Busy Override though Second Class of Service
When the override and privacy level are checked for determining the priority
order, the override level of Second Class of Service assigned in busy override
caller's Class of Service can be used. To support this feature, a user should dial
'Busy Override (Second COS)' feature code and ‘outgoing call number’.
The Busy Override (Second COS) feature code should be configured in the
[CONFIGURATION > Service > Feature Service >Feature Code] menu.
The Second Class of Service should be set in the [CONFIGURATION >
Service > Feature Service > Class of Service] menu.
Dispatch Call Override
A dispatch call is emergency call, therefore dispatch members should be able to
receive the call although their lines are busy. Dispatch Call Override feature can be
a good solution for this situation.
Normal calls of dispatch members will be forcibly terminated by system when
incoming dispatch call. And the members can receive the dispatch call after they
put down handset.
Also the dispatch members can listen to announcement for call termination only if
they are on a call with someone. Otherwise the call will be terminated
immediately.
This feature is offered only if the dispatch member is extension number.
In order to use this feature, two conditions should be satisfied.
The Normal Call Override should be enabled in the
[CONFIGURATION > Service > Dispatch Call > Dispatch Call Group] menu.
The DND of Dispatch Call Override should be unchecked in the
[CONFIGURATION > Service > Feature Service > Class of Service] menu.

Ошибка! Используйте вкладку "Главная" для применения 제목 1 к тексту, который
должен здесь отображаться. Ошибка! Используйте вкладку "Главная" для применения 제목 1 к
тексту, который должен здесь отображаться.
SCM Express Operation Manual v12.0 266 ©Samsung Proprietary and Confidential
PC Attendant Transfer Call Waiting
It is a feature that a PC Attendant can transfer a hold call to a busy line.
PC attendant on a call presses a transfer button to hold the other party's call. After
that, the attendant enter the target number and presses the call waiting button. And
then the hold call is transferred although transfer target is busy. Finally, the target
can receive the hold call when the target's call ended.
If the target don't answer or keep going a previous call, the hold call recalls to the
PC attendant after Call Waiting No Answer Time.
This feature is offered only if a target' number is extension number.
In order to use this feature, two conditions should be satisfied.
The Transfer Call Waiting should be configured in the
[CONFIGURATION > Service > Feature Service > Feature Code] menu.
The Call Waiting No Answer Time(sec) should be configured in the
[CONFIGURATION > User Group > Change User Group > Timers] menu.

Ошибка! Используйте вкладку "Главная" для применения 제목 1 к тексту, который
должен здесь отображаться. Ошибка! Используйте вкладку "Главная" для применения 제목 1 к
тексту, который должен здесь отображаться.
SCM Express Operation Manual v12.0 267 ©Samsung Proprietary and Confidential
Wireless Enterprise Service
Wireless Enterprise Service is the one of FMC (Fixed Mobile Convergence)
services, which offers VoIP service to the smart phone users.
This chapter describes how to configure Mobile Services Options, Mobile Phone
Profile, etc for Wireless Enterprise Services.
Basic Configuration
License Key Registration
To use Wireless Enterprise Service, a wireless enterprise solution license is
required.
The license key can be registered in the [CONFIGURATION > Miscellaneous >
License] menu or [CONFIGURATION > Miscellaneous > Activation Key]
menu
Creating the user for Wireless Enterprise Service
Creating the user for Wireless Enterprise Service is similar to how to create single
phone user.
The user configuration for Wireless Enterprise Service can be configured as
making single phone user in the [CONFIGURATION > User > Single Phone
User].
Normal Configuration is same as creating single phone user. Phone Type should
be set to Samsung-Mobile-Phone and Mobile Phone Number should be set.
In addition, Select the ‘Use Mobile Phone Number’ option.
The following describe ‘Use Mobile Phone Number’ option.
Use Mobile Phone
Number Option
Description
None Do not use the mobile phone number. Only ring to the extension.
Ring Only Both extension and mobile phone are ringing simulaneously. Multi ring service with extension and mobile phone.
Dial Only Allow a Remote Dial Service.
Both Provides a Remote Dial Service and Multi-Ring Service
Mobile Service Option
Wireless AP (Access Point) SSID (Service Set Identifier) can be configured in the
[CONFIGURATION > Wireless Enterprise > Mobile Service Options] menu.
This SSID configured must be same the SSID of WiFi Configuration in the mobile
phone.
When FMC client receives a call, ‘Wait Call/Later Call’ menu is displayed on the
FMC client UI in case that the FMC client user cannot receives that call. If the

Ошибка! Используйте вкладку "Главная" для применения 제목 1 к тексту, который
должен здесь отображаться. Ошибка! Используйте вкладку "Главная" для применения 제목 1 к
тексту, который должен здесь отображаться.
SCM Express Operation Manual v12.0 268 ©Samsung Proprietary and Confidential
FMC client user selects ‘Wait Call or Later Call’ menu on ringing, caller can listen
to the announcement and then the call is held in case of ‘Wait Call’ and is
disconnected in case of ‘Later Call’.
Wait Call/Later Call can be configured in the [CONFIGURATION > Wireless
Enterprise > Mobile Service Options > Wait Call, Later Call] menu.
In addition, a description of the settings for the Mobile service options that are
listed in the following table.
Administrators can set an item of [Configuration> Wireless Enterprise> Mobile
Service Options].
Item Description
Remote Dial Public IP Address
In the General Preferences in the Public IP address to be used at Remote Dial, this item could be the IP of the SBC. (Default: None)
Remote Dial Public Port The port of Public address used at Remote Dial, Administrator needs to Port Forwarding to 9011 port of SCME. (Default: None)
Mobile DISA Number This item is a DISA dial Phone number is calling out in the case of Remote Dial Service failure. (Default: None)
Mobile DISA Code This item is Feature CODE to use in the DISA Phone is sending to Remote Dial Service failure. (Default: None)
Mobile VMS DISA Number
This item is a VMS DISA Dial Number to connect to when you use the Remote DISA Service from the external network. (Default: None)
WE Work Server IP Address
This field, enter the Address of WE Work Server if you want to work with WE Work Server. (Default: None)
WE Work Server Port This field, enter the port of WE Work Server if you want to work with WE Work Server. (Default: 80)
WE Work Server Public IP Address
This field, enter the Public Address of WE Work Server if you want to work with WE Work Server. (Default: None)
WE Work Server Public Port
This field, enter the Public Port of WE Work Server if you want to work with WE Work Server. (Default: 80)
WE VoIP CID Server IP Address
Administrator puts the CID Server IP Address in conjunction with WE VoIP. (Default: None)
WE VoIP CID Server Port
Administrator puts the CID Server Port in conjunction with WE VoIP. (Default: 80)
WE VoIP CID Server Public IP
This field, enter the Public Address of CID Server. (Default: None)
WE VoIP CID Server Public Port
This field, enter the Public Port of CID Server (Default: 80)
WE Work Server Protocol
This field, select the Protocol of WE Work Server if you want to work with WE Work Server. (Default: HTTP)
WE VoIP CID Server Protocol
This field, select the Protocol of WE VoIP CID Server if you want to work with CID Server (Default: HTTPS)
WE VoIP CID Server Public Protocol
This field, select the Protocol of WE VoIP CID Server if you want to work with CID Server in Public Network. (Default: HTTP)
Wait Call, Later Call Administrator decide whether user want to use to use the

Ошибка! Используйте вкладку "Главная" для применения 제목 1 к тексту, который
должен здесь отображаться. Ошибка! Используйте вкладку "Главная" для применения 제목 1 к
тексту, который должен здесь отображаться.
SCM Express Operation Manual v12.0 269 ©Samsung Proprietary and Confidential
Item Description
phone when receiving WE VoIP "Wait Call, the Later Call] option. (True/False, Default: False)
Wifi Band set the Band of the AP user want to connect to. (Default: Auto)
Administrator should be careful when you can choose to 2G/5G/Auto, WE VoIP to register, AP of the frequency as it scans.
Auto Answer CLI Number
Specify the calling number that is displayed when user use the Call Move Service and Remote Dial Service.
Auto Answer Profile Number
When use the Call Move Service and Remote Dial Service, Administrator specify automatic response received calling number.
If you specify a value that is similar to the Auto Answer CLI Number, WE VoIP will automatically respond to the Call Move Service and Remote Dial Service is used.
Use 3G Call Only Select this option to the calling party via a mobile phone unconditionally WE VoIP even if they are registered. (Default: No)
3G Call Prefix If you begin with a number of specific, rather than WE VoIP, is an option that allows you to send to the mobile phone. (Default: None)
Private(Office) SSID List When Private AP’s SSID List value is not 'None', This value is used to check for the Private WiFi SSID List. (Default: None)
WiFi Hotspot SSID List When WiFi Hotspot AP’s SSID List value is not 'None', This value is used to check for the public WiFi Hotspot SSID List. (Default: None)
2.4G Channel List
5G Channel List
I will select the Channel you want to scan to WE VoIP use. Since the scan only to Channel WE VoIP use, Administrator need to be careful.
Mobile Phone Profile
The phones, which phone type is Samsung-Mobile-Phone are displayed in the
[CONFIGURATION > Wireless Enterprise > Mobile Phone Profile] menu.
The parameters related to FMC is configured in the [CONFIGURATION >
Wireless Enterprise > Mobile Phone Profile] menu.
The following items by setting default values are used except for the special site.
Item Description
Roaming Trigger Roaming Trigger Parameter for busy FMC client (Default: -70)
Comparing with the RSSI, this value is used to scanning WiFi
Roaming Delta Roaming Delta Parameter for busy FMC client (Default: 10)
When this value is more than the minimum roaming delta, FMC clients scan WiFi and Roam
Roaming Scan Period Roaming Scan Period Parameter for busy FMC client (Default: 3)
Noise Suppression RX Select whether to use FMC Client Noise Suppression RX (Default: Disable)
Noise Suppression TX Select whether to use FMC Client Noise Suppression TX (Default: Disable)

Ошибка! Используйте вкладку "Главная" для применения 제목 1 к тексту, который
должен здесь отображаться. Ошибка! Используйте вкладку "Главная" для применения 제목 1 к
тексту, который должен здесь отображаться.
SCM Express Operation Manual v12.0 270 ©Samsung Proprietary and Confidential
Item Description
AECM Select whether to use FMC Client AECM (Default: Speaker Phone)
Echo Suppression Echo Suppression (Default: Enable)
Enable Swing Free RX Select whether to use Swing Free RX (Default: Enable)
Enable Swing Free TX Select whether to use Swing Free TX (Default: Enable)
Enable CNG Comfort Noise Generation (Default: Enable)
Media Start Port FMC Client Media Start Port
Media End Port FMC Client Media End Port
Multiframe Enable Select whether to use Voice Engine Multiframe with Samsung AP (Default: Disable)
Multicast Enable Select whether to use Voice Engine Multicast with Samsung AP (Default: Disable)
TOS Media Value (DSCP)
You can set TOS (DSCP) value of RTP packets for IP header. The value controls priority of RTP packets in samsung AP/APC.
TOS Control Value (DSCP)
You can set TOS (DSCP) value of SIP packets for IP header. The value controls priority of SIP packets in samsung AP/APC.
JBC Threshold Jitter Buffer Size of Voice Engine (Default:4)
SIP Rx Port FMC Client’s Rx Port of SIP Message (Default: 5080)
SIP Rx Public Port FMC Client’s Rx Public Port of SIP Message (Default: 5080)
Node1 SIP Rx Port Node1 FMC Client’s Rx Port of SIP Message (Default: 5080)
Node1 SIP Rx Public Port
Node1 FMC Client’s Rx Public Port of SIP Message (Default: 5080)
Protocol-public network SIP Message Protocol for public network zone (Default: TLS)
TLS Connection-public network
SIP TLS Connection Mode for Public Network Zone (Default: Reuse)
Expire Time (sec)-private network
Registration Expire Time for Private WiFi Network Zone (Default:600)
Expire Time (sec)-public network
Registration Expire Time for Public Network Zone (Default:3600)
SIP Registration-WiFi Hotspot
Select whether to service for Public WiFi Hotspot Network Zone (Default: Disable)
SIP Registration-mVoIP Select whether to service for LTE Network Zone (Default: Disable)
Directory Service-Private (Office)
Select option for Using Directory Service when Private WiFi Network Zone register (Default: Disable)
Directory Service-WiFi Hotspot
Select option for Using Directory Service when public WiFi Hotspot Network Zone register (Default: Disable)
Directory Service-mVoIP
Select option for Using Directory Service when LTE Network Zone register (Default: Disable)
Presence Service-Private (Office)
Select option for Using Presence Service when Private WiFi Network Zone register (Default: Disable)
Presence Service-WiFi Hotspot
Select option for Using Presence Service when public WiFi Hotspot Network Zone register (Default: Disable)

Ошибка! Используйте вкладку "Главная" для применения 제목 1 к тексту, который
должен здесь отображаться. Ошибка! Используйте вкладку "Главная" для применения 제목 1 к
тексту, который должен здесь отображаться.
SCM Express Operation Manual v12.0 271 ©Samsung Proprietary and Confidential
Item Description
Presence Service-mVoIP
Select option for Using Presence Service when LTE Network Zone register (Default: Disable)
Location Service-Private (Office)
Select option for Using Location Service when Private WiFi Network Zone register (Default: Disable)
Location Service-WiFi Hotspot
Select option for Using Location Service when public WiFi Hotspot Network Zone register (Default: Disable)
Location Service-mVoIP Select option for Using Location Service when LTE Network Zone register (Default: Disable)
Update Location-Min Distance (m)
Enter Minimum Distance Meters for Location Service (default: 500)
Update Location-Min Period (min)
Enter Minimum Period Minutes for Location Service (default: 10)
Update Location-Forced Period(hour)
Enter a Upload Period Hour for Location Information (default: 3)
Update Location-Start Time
Enter a Service’s Start Time for Location Service (default: 08:00)
Update Location-End Time
Enter a Service’s End Time for Location Service (default: 08:00)
Voice Quality Report-Private Network
Select whether to report FMC Client Voice Quality (Private Network)
Voice Quality Report-Wi-Fi Hotspot
Select whether to report FMC Client Voice Quality (Wi-Fi Hotspot)
Voice Quality Report-mVoIP
Select whether to report FMC Client Voice Quality (mVoiP)
Voice Quality Report-MOS
MOS value-when FMC Client' MOS value is under this MOS, FMC Client will report
NoticeBoard Service-Private (Office)
Select option for Using NoticeBoard Service when Private WiFi Network Zone register (Default: Disable)
NoticeBoard Service-WiFi Hotspot
Select option for Using NoticeBoard Service when public WiFi Hotspot Network Zone register (Default: Disable)
NoticeBoard Service-mVoIP
Select option for Using NoticeBoard Service when LTE Network Zone register (Default: Disable)
Broad Message Service-Private (Office)
Select option for Using Broad Message Service when Private WiFi Network Zone register (Default: Enable)
Broad Message Service-WiFi Hotspot
Select option for Using Broad Message Service when public WiFi Hotspot Network Zone register (Default: Enable)
Broad Message Service-mVoIP
Select option for Using Broad Message Service when LTE Network Zone register (Default: Enable)
Handover RTP Quality Select RTP Quality for Handover function by Mobile (range: 10~100)
Handover RTP Check Count
Select RTP Quality Check Count for Handover function by Mobile (range: 1~100)
Mobile Service Server
For additional Mobile phone service, server configuration for that service can be
configured in the [CONFIGURATION > Wireless Enterprise > Mobile Service
Server] menu.

Ошибка! Используйте вкладку "Главная" для применения 제목 1 к тексту, который
должен здесь отображаться. Ошибка! Используйте вкладку "Главная" для применения 제목 1 к
тексту, который должен здесь отображаться.
SCM Express Operation Manual v12.0 272 ©Samsung Proprietary and Confidential
Log File Upload Server
The parameters related to log file which Mobile Phone writes.
Configured in the [CONFIGURATION > Wireless Enterprise > Mobile
Service Server > Log File Upload Server] menu.
Item Description
User Group User group to which the Log File Server belongs
Name Server name
Service Type Internal: SCME is operated as Log server. IP addr/Port are inputted automatically.
External: External Log server.
IP Address IP Address of Log Server
Port Port of Log Server
Protocol Protocol of Log Server
Public IP Address Public IP Address of Log Server
Public Port Public Port of Log Server
Public Protocol Public Protocol of Log Server
File Path Log file path (directory)
Server ID Server ftp ID. The ID should be made in SCME OS.
Server Password Server password
Logo File Upload Server
The parameters related to logo file which Mobile Phone use.
Configured in the [CONFIGURATION > Wireless Enterprise > Mobile
Service Server > Logo File Upload Server] menu.
Item Description
User Group User group to which the Logo File Server belongs
Name Server name
Service Type Internal: SCME is operated as Logo server. IP Addr and Port are inputted automatically.
External: External Log server.
IP Address IP Address of Logo Server
Port Port of Logo Server
Protocol Protocol of Logo Server
Public IP Address Public IP Address of Logo Server
Public Port Public Port of Logo Server
Public Protocol Public Protocol of Logo Server
Logo File Name Logo File Name
Logo File (Splash) Name
Logo File Name (Splash)
Logo File (Background) Name
Logo File Name (Background)

Ошибка! Используйте вкладку "Главная" для применения 제목 1 к тексту, который
должен здесь отображаться. Ошибка! Используйте вкладку "Главная" для применения 제목 1 к
тексту, который должен здесь отображаться.
SCM Express Operation Manual v12.0 273 ©Samsung Proprietary and Confidential
Photo File Upload Server
The parameters related to photo file which Mobile Phone download or upload
for directory service.
Configured in the [CONFIGURATION > Wireless Enterprise > Mobile
Service Server > Photo File Upload Server] menu.
Photo file is available in the [CONFIGURATION > User > User Profile] menu.
Item Description
User Group User group to which the Server belongs
Name Server name
Service Type Internal: SCME is operated as the photo server. IP Addr and Port are inputted automatically.
External: External photo server.
IP Address IP Address of the Server
Port Port of the Server
Protocol Protocol of the Server
Public IP Address Public IP Address of the Server
Public Port Public Port of the Server
Node1 Public Port Node1 Public Port of the Server
Public Protocol Public Protocol of the Server
Directory Service Server
The parameters related to directory service which Mobile Phone use.
Configured in the [CONFIGURATION > Wireless Enterprise > Mobile
Service Server > Directory Service Server] menu.
In addition, configure the related option in the [CONFIGURATION > Wireless
Enterprise > Mobile Phone Profile] menu for directory service activation on
Mobile phone.
Item Description
User Group User group to which the Server belongs
Name Server name
Service Type Internal: SCME is operated as the directory server. IP Addr and Port are inputted automatically.
External: External directory server.
IP Address IP Address of the Server
Port Port of the Server
Protocol Protocol of the Server
Public IP Address Public IP Address of the Server
Public Port Public Port of the Server
Node1 Public Port Node1 Public Port of the Server

Ошибка! Используйте вкладку "Главная" для применения 제목 1 к тексту, который
должен здесь отображаться. Ошибка! Используйте вкладку "Главная" для применения 제목 1 к
тексту, который должен здесь отображаться.
SCM Express Operation Manual v12.0 274 ©Samsung Proprietary and Confidential
Public Protocol Public Protocol of the Server
Presence Service Server
The parameters related to presence service which Mobile Phone use.
Configured in the [CONFIGURATION > Wireless Enterprise > Mobile
Service Server > Presence Service Server] menu.
In addition, configure the related option in the [CONFIGURATION > Wireless
Enterprise > Mobile Phone Profile] menu for presence service activation on
Mobile phone.
Check configurable presence type in the [CONFIGURATION > User Group >
Presence Field Name] menu
Item Description
User Group User group to which the Server belongs
Name Server name
Service Type Internal: SCME is operated as the presence server. IP Addr and Port are inputted automatically.
External: External presence server.
IP Address IP Address of the Server
Port Port of the Server
Protocol Protocol of the Server
Public IP Address Public IP Address of the Server
Public Port Public Port of the Server
Node1 Public Port Node1 Public Port of the Server
Public Protocol Public Protocol of the Server
Location Service Server
The parameters related to location service which Mobile Phone use.
Configured in the [CONFIGURATION > Wireless Enterprise > Mobile
Service Server > Location Service Server] menu.
In addition, configure the related option in the [CONFIGURATION > Wireless
Enterprise > Mobile Phone Profile] menu for location service activation on
Mobile phone.
Check Mobile Phone Location Service option in the [CONFIGURATION > User
Group > Change User Group > Options] menu for service activation.
Item Description
User Group User group to which the Server belongs
Name Server name
Service Type Internal: SCME is operated as the location server. IP Addr and Port are inputted automatically.
External: External location server.

Ошибка! Используйте вкладку "Главная" для применения 제목 1 к тексту, который
должен здесь отображаться. Ошибка! Используйте вкладку "Главная" для применения 제목 1 к
тексту, который должен здесь отображаться.
SCM Express Operation Manual v12.0 275 ©Samsung Proprietary and Confidential
IP Address IP Address of the Server
Port Port of the Server
Protocol Protocol of the Server
Public IP Address Public IP Address of the Server
Public Port Public Port of the Server
Node1 Public Port Node1 Public Port of the Server
Public Protocol Public Protocol of the Server
Package Upgrade Server
For mobile phone package Upgrade Function.
Configured in the [CONFIGURATION > Wireless Enterprise > Mobile
Service Server > Package Upgrade Server] menu.
Item Description
Upgrade Server Address
URL of the Upgrade Server (Directory Path)
Upgrade Server Public Address
Public URL of the Upgrade Server (Directory Path)
Node 1 Upgrade Server Address
URL of the Node 1's Upgrade Server (Directory Path)
Node 1 Upgrade Server Public Address
Public URL of the Node 1's Upgrade Server (Directory Path)
In addition, for uploading the Mobile phone package, Use the
[CONFIGURATION > Phone Setting > File Upload] menu.
Mobile Configuration
Roaming parameter of each phone model can be configured in the
[CONFIGURATION > Wireless Enterprise > Mobile Configuration >
Roaming Parameter] menu. The priority of these setting values is higher than the
setting values of each extension in Mobile Phone Profile menu.
Item Description
Roaming Trigger Roaming Trigger Parameter for busy FMC client
Comparing with the RSSI, this value is used to scanning WiFi
Roaming Delta Roaming Delta Parameter for busy FMC client
When this value is more than the minimum roaming delta, FMC clients scan WiFi and Roam
Roaming Scan Period Roaming Scan Period Parameter for busy FMC client
Codec Priority and Payload Type for FMC Client can be configured in the
[CONFIGURATION > Wireless Enterprise > Mobile Configuration > Codec
Priority] menu. Each codec does not have same codec priority. When the FMC
client supporting SILK or AMR-WB negotiates a codec with phone (example:
Desk Phone) that does not support SILK or AMR-WB, the codec negotiated is

Ошибка! Используйте вкладку "Главная" для применения 제목 1 к тексту, который
должен здесь отображаться. Ошибка! Используйте вкладку "Главная" для применения 제목 1 к
тексту, который должен здесь отображаться.
SCM Express Operation Manual v12.0 276 ©Samsung Proprietary and Confidential
PCMA or PCMU.
Parameters for SILK or ARM-WB are configured in the [CONFIGURATION >
Wireless Enterprise > Mobile Configuration > Codec Config] menu. The
following values by setting the default values is used except for special testing
purposes.
Item Description
SILK: Sampling Freq. SILK Sampling Frequency (Default: 24000)
SILK: Max Packet Time SILK Maximum Packet Time (Default: 100)
SILK: DTX Use Select whether to use SILK DTX (Default: Off)
SILK: FEC Use Select whether to use SILK FEC (Default: On)
AMR-WB: Bit Rate Select whether to use AMR-WB Bit Rate (Default: 23850)
AMR-WB: DTX Use Select whether to use AMR-WB DTX (Default: Off)
RTP Packet Interval (ms)-Private
Enter a Media Packet Interval for Private WiFi Network Zone (Default: 20)
RTP Packet Interval (ms)-WiFi Hotspot
Enter a Media Packet Interval for Public WiFi Hotspot Network Zone (Default: 20)
RTP Packet Interval (ms)-mVoIP
Enter a Media Packet Interval for Public LTE Network Zone (Default: 40)
For additional configuration of mobile, using the following menu.
[CONFIGURATION > Wireless Enterprise > Mobile Configuration >
Miscellaneous Mobile Config]
Item Description
Caller Screen Phrase-Left (Korean)
Set the Phrase on the caller screen. (left-korean)
Caller Screen Phrase-Left (English)
Set the Phrase on the caller screen. (right-english)
Caller Screen Phrase-Right (Korean)
Set the Phrase on the caller screen. (left-korean)
Caller Screen Phrase-Right (English)
Set the Phrase on the caller screen. (right-english)
Mobile Remote Dial
A WE VoIP client can make a call through SCM, even though the client is out of
WIFI network. In this case, a WE VoIP client can request the ‘Mobile Remote
Dial’ service through a data channel.
If SCM receives the request, SCM makes a 3G call to the WE VoIP first. And if
the WE VoIP answers the call, SCM makes a call to the destination which was
requested before by the WE VoIP. After the destination answers the call, SCM lets
them be connected.
The WE VoIP client can answer the 3G call automatically, if the
[CONFIGURATION > Wireless Enterprise > Mobile Service Options > Auto

Ошибка! Используйте вкладку "Главная" для применения 제목 1 к тексту, который
должен здесь отображаться. Ошибка! Используйте вкладку "Главная" для применения 제목 1 к
тексту, который должен здесь отображаться.
SCM Express Operation Manual v12.0 277 ©Samsung Proprietary and Confidential
Answer CLI Number/Auto Answer Profile Number] is configured.
The statistics information for the Mobile Remote Dial service is displayed in the
[PERFORMANCE > Statistics > System Service > Mobile Remote Dial] menu.
Mobile DISA
If the WE VoIP client who requested the Mobile Remote Dial service receives
‘fail’ response, the client can make a Mobile DISA call through 3G network
automatically.
After SCM let the DISA call be disconnected, SCM makes the 3G call for the WE
VoIP.
If the WE VoIP answers the call, SCM requests the client enter the destination
number after listening announcement. And SCM makes a call to the destination
which was entered.
After the destination answer the call, SCM lets them be connected each other.
The WE VoIP client can answer the 3G call automatically, if the
[CONFIGURATION > Wireless Enterprise > Mobile Service Options > Auto
Answer CLI Number/Auto Answer Profile Number] is configured.
In the [CONFIGURATION > Wireless Enterprise > Mobile Service Options >
Mobile DISA Number/Mobile DISA Code] menu, the ‘Mobile DISA Number’
and the ‘Mobile DISA Code' should be set.
DID Number Service for FMC
SCM provides DID number of peer to FMC user during an internal call and FMC
clients store this number in the call log. Therefore, FMC client can dial with this
number within 3G network.
Select ‘DID Number Field’ in the [CONFIGURATION > User Group > Change
User Group > Options]. Number types in the [CONFIGURATION > User
Group > User Profile Field Name] is listed up for ‘DID Number Field’. If ‘DID
Number Field’ is not selected, an extension number is stored in the call log in case
of a internal call.
Manual Handover
If the We VoIP subscriber has moved out of the WIFI network during WIFI call,
WIFI call can be switched to 3G call by manually.
When you press a ‘Switch to Mobile Phone’ button on screen during a call in WE
VoIP terminal, service will be working.
If SCM receives the request, SCM call to We VoIP subscriber through the 3G
network.
If We VoIP subscriber receives the incoming 3G call, We VoIP subscriber can be

Ошибка! Используйте вкладку "Главная" для применения 제목 1 к тексту, который
должен здесь отображаться. Ошибка! Используйте вкладку "Главная" для применения 제목 1 к
тексту, который должен здесь отображаться.
SCM Express Operation Manual v12.0 278 ©Samsung Proprietary and Confidential
connected to previous call by 3G.
Smart Handover
When the We VoIP subscriber has moved out of the WIFI network during WIFI
call, this function is used to provide continuity of currency.
Smart handover is divided into the ‘Handover-Out’ and ‘Handover-In’.
The Smart Handover-Out is that when WE VoIP subscribers move out of WIFI
network during a call, WIFI call is switched to 3G by automatically before it goes
out from the WIFI network. The Smart Handover-In is that when WE VoIP
subscribers move in of WIFI network during on Smart Handover-Out, 3G call is
switched to WIFI by automatically.
The statistics of success/failure for Smart Handover services is provided through
the SCM Administrator. It is found in the [PERFORMANCE > Statistics >
System Service > Smart Handover] menu.
The Smart Handover function is only available in WE VoIP device. So WE VoIP
configurations must be required basically. Additional setting required are as
follows.
Interworking APC
To use a Smart Handover function, TLS link should be established between SCM
Express and APC.
Maximum 24 APC can be configured and can be confirmed the current connection
status of APC in the [CONFIGURATION > Wireless Enterprise > APC List]
menu.
Item Description
User Group Select a user group for which APC will be configured
Name Specify the APC name.
IP Address Specify the APC IP Address.
Status Confirm the current connection status of APC.
Class of Service Setting
To use a Smart Handover function, creating of Class of Service is needed.
Class of Service can be set in the [CONFIGURATION > Service > Feature
Service > Class of Service] menu. When create a Class of Service, Smart
Handover Type should be set. Each type as follows.
Item Description
None Handover services are not allowed.
Handover Out by APC
Handover Out service by APC is only allowed.
Handover Both by APC
Handover Out/In service by APC is allowed.

Ошибка! Используйте вкладку "Главная" для применения 제목 1 к тексту, который
должен здесь отображаться. Ошибка! Используйте вкладку "Главная" для применения 제목 1 к
тексту, который должен здесь отображаться.
SCM Express Operation Manual v12.0 279 ©Samsung Proprietary and Confidential
Class of Service created is allocated per user in the [CONFIGURATION > User
> Single Phone User/Multi-Phone User] menu.
Other Settings
WE VoIP subscriber’s available mobile number must be configured to each user.
Mobile number can be set in the [CONFIGURATION > User > Single Phone
User/Multi-Phone User] menu.
When WE VoIP is moved in the WIFI network, Smart Handover-In is available
function after being WE VoIP registered with the SCM Express. There are needed
a Service Guard Time because registering with the SCM Express are needed a few
seconds.
So, Smart Handover-In is working after Service Guard Time.
Default Service Guard Time is 0 seconds and Service Guard Time can be changed
in the [CONFIGURATION > Miscellaneous > System Options > Smart
Handover-In Waiting Time (second)] menu.
Handover by Mobile Phone.
Class of Service Setting
To use a Handover function by Mobile, Class of Service can be set in the
[CONFIGURATION > Service > Feature Service > Class of Service] menu.
Handover Type should be set to ‘Handover by Mobile’ Type.
Item Description
Handover by Mobile(Wi-Fi to 3G)
Wi-Fi to 3G Handover service is supported by Mobile.
Handover by Mobile(Wi-Fi to LTE)
Wi-Fi to LTE Handover service is supported by Mobile.
Handover Options check by Mobile.
Mobile Phone check the RTP quality for Handover Service.
RTP options for handover set in the [CONFIGURATION > Wireless Enterprise
> Mobile Phone Profile] menu.
Handover RTP Quality
Handover RTP Check Count
Edge AP List for handover set in the [CONFIGURATION > Wireless
Enterprise > Edge AP List] menu.
If Administrator enter the Edge AP List, Mobile phone check the handover
condition only when connected the edge AP. There is no Edge AP List in SCM,
Mobile phone always check the handover condition.
Private Registrar IP Address for Mobile Phone set in the [CONFIGURATION >
Miscellaneous > System Options] menu.
For Mobile handover service, mobile phone must register to SCM though the SBC.

Ошибка! Используйте вкладку "Главная" для применения 제목 1 к тексту, который
должен здесь отображаться. Ошибка! Используйте вкладку "Главная" для применения 제목 1 к
тексту, который должен здесь отображаться.
SCM Express Operation Manual v12.0 280 ©Samsung Proprietary and Confidential
Administrator can configure the SBC IP and port number for Mobile in Private
Wifi Network.
System Private IP Address For Mobile Phone Call
SIP Private TCP/TLS/UDP Port for Mobile.
To use Smart Handover-Out, it is needed the access code for Smart Handover-Out.
The access code can be configured in the [CONFIGURATION > User Group >
Change User Group > Information > Service Call Access Code] menu.
When VoIP is moved out the WIFI network during external call, Smart Handover-
Out is working. In this case, route type must be set to TIE for Smart Handover-Out
operation. That configuration can be set in the [CONFIGURATION > Trunk
Routing > Route > TIE Trunk] menu.
Services Limitation
Smart Handover is only served basic internal/external call case. Hold call is not
served the Smart Handover.
In Active-Active system case, WE VoIP must be enabled a dual registration option
for Smart Handover operation. That configuration can be set in the
[CONFIGURATION > User > Single Phone User/Multi-Phone User] menu.
Smart Routing
Extension subscribers when dialing a mobile phone number of WeVoIP
subscriber, smart routing service is a service that analyzes the number and to call
the extension number of WeVoIP subscriber without sending it to the outgoing
trunk.
To use the smart routing service, please set the following items in [Configuration
> User Group > Change User Group > Information] menu.
Item Description
Smart Routing Activate
Operator will be able to choose whether or not to use smart routing service.
Smart Routing including Access Code
Operator will be able to choose whether to provide smart routing services to the number that contains the Access code.
Smart Routing Call Reject
It is the ability to choose to call directly to the mobile phone through the Trunk.
Subscribers that use this item will not be able to receive the smart routing service.
Service After Smart Routing
If there is a service the subscriber set, you will be able to choose whether to apply the smart routing.
The service that Operator set, Call Forward, Do Not Disturb, Absense, Follow Me is belong.
Operator can set [Smart Routing Class of Service] for the subscriber or Service
Groups or User Groups.

Ошибка! Используйте вкладку "Главная" для применения 제목 1 к тексту, который
должен здесь отображаться. Ошибка! Используйте вкладку "Главная" для применения 제목 1 к
тексту, который должен здесь отображаться.
SCM Express Operation Manual v12.0 281 ©Samsung Proprietary and Confidential
Subscriber, Service Group, the User Groups is the order of priority of Class of
Service.
If the WeVoIP subscriber has no response when receiving a call to an extension
number of WeVoIP subscriber through a smart routing service, the system can
offers a redial service to mobile phone number of the subscriber.
For use the recall service, Operator should set the [Service Call Access Code].
Smart routing services are provided only if the subscriber is registered.
Inter SCM Smart Routing
Inter SCM Smart Routing is auto-routing functionality when SCMs are connected
with peering. SCM automatically recognizes the mobile number when subscribers
are dialing to trunk
1 Route Configuration and Restriction of Inter SCM Smart Routing
SCM Peering have to be set before using Inter SCM Smart Routing (see the
section of trunk set). [Inbound Error Announcement] must be set to
DISABLE to use rerouting when Inter SCM Smart Routing Call fails.
Option to Enable/Disable Smart Routing Service at individual User Group
: [Configuration > User Group > Change User Group > Options] Smart
Routing Service
To restrict Inter SCM Smart Routing at specific access code.
: [Configuration > Inter-SCM Setting > Inter SCM Routing] delete value
of SCM
Access Code
Functionality to restrict mobile number when Inter SCM Smart Routing
: [Configuration >Trunk Routing > Smart Routing Restriction List] add
mobile number
2 Synchronization of Mobile number between SCM
For synchronization work, Central system is necessary, the SCM of rest, must
be set to Normal system. Central system plays a role in collecting the mobile
Number of Normal System.
To synchronize the mobile phone number stored in other SCMs
Please set the following items in [Configuration > Inter-SCM Setting] menu.
[My SCM Configuration]
It is the item to be set in both the Normal system the Central system.
Item Description
System Type Select the System Type
Normal: System common to the sharing of Mobile Number information between SCM

Ошибка! Используйте вкладку "Главная" для применения 제목 1 к тексту, который
должен здесь отображаться. Ошибка! Используйте вкладку "Главная" для применения 제목 1 к
тексту, который должен здесь отображаться.
SCM Express Operation Manual v12.0 282 ©Samsung Proprietary and Confidential
Item Description
Central System: It plays a role by collecting information Normal system for controlling the synchronization.
SCM ID the SCM name of my system.
Select a value from 1 to 100.
SCM Name The name of my SCM
In the case of Normal, name is the same as the name that is set in "SCM list Configuration" of the Central System.
Authentication ID The Authentication ID of my SCM
In the case of Normal, Authentication ID is the same as the Authentication ID that is set in "SCM list Configuration" of the Central System.
Authentication Password
The Authentication Password of my SCM
In the case of Normal, Authentication Password is the same as the Authentication Password that is set in "SCM list Configuration" of the Central System.
Central System Address
For a "Normal" system, enter the IP address of the Central System.
Central System TLS Port Number
For a "Normal" system, enter the TLS Port Number of the Central System.
Central System HTTPS Port Number
For a "Normal" system, enter the HTTPS Port Number of the Central System.
[SCM List Configuration]
This is an item to be set in the Central system, it is necessary to enter information
for All Normal systems are interlocked.
In Normal system, you can see the information that you entered in the Central
system.
Item Description
SCM ID For a "Central" system, the ID of normal system that works.
SCM Name For a "Central" system, Enter the Name of normal system that works.
It must be the same as the SCM Name that is set in the Normal system
This can not be set when the Normal system.
Authentication ID For a "Central" system, Enter the Authentication ID of normal system that works.
It must be the same as the Authentication ID that is set in the Normal system
This can not be set when the Normal system.
Authentication Password
For a "Central" system, Enter the Authentication Password of normal system that works.
It must be the same as the Authentication Password that is set in the Normal system

Ошибка! Используйте вкладку "Главная" для применения 제목 1 к тексту, который
должен здесь отображаться. Ошибка! Используйте вкладку "Главная" для применения 제목 1 к
тексту, который должен здесь отображаться.
SCM Express Operation Manual v12.0 283 ©Samsung Proprietary and Confidential
Item Description
This can not be set when the Normal system.
SCM Address For a "Central" system, Enter the SCM IP address of normal system that works.
This information is used only as additional information
SCM Public Address For a "Central" system, Enter the SCM Public IP address of normal system that works.
This information is used only as additional information
[Inter SCM Routing]
It is the item to be set in both the Normal system the Central system, you can set
the path for smart routing.
Item Description
User Group User Group
SCM ID ID of SCM that are linked will be displayed.
SCM Name Name of SCM that are linked will be displayed.
SCM Address IP Address of SCM that are linked will be displayed. (Information set by the Central system)
SCM Public Address Public IP Address of SCM that are linked will be displayed. (Information set by the Central system)
SCM Access Code Enter the Access code that performs smart routing.
If there is no Access code, smart routing not work.
[Database Sync.]
An item to be set by the Central system, set up the synchronization time.
In Normal system, only 'Now' option can be set.
Item Description
Schedule Type Specify the schedule type.
Day: import the data in time daily
Week: import the data in day weekly
15 Days: import the data in 15th monthly
Month: import the data in 1th monthly
Now: import the data immediately
Weekday Specify the weekday.
Time Specify the time.
[Mobile Number Search]
If you query the mobile number, it indicates that ID of the SCM a mobile phone is
stored, whether or not to allow the smart routing and extension number.
Item Description
SCM ID ID of the SCM mobile phone number has been set is displayed.

Ошибка! Используйте вкладку "Главная" для применения 제목 1 к тексту, который
должен здесь отображаться. Ошибка! Используйте вкладку "Главная" для применения 제목 1 к
тексту, который должен здесь отображаться.
SCM Express Operation Manual v12.0 284 ©Samsung Proprietary and Confidential
Item Description
SCM Name Name of the SCM mobile phone number has been set is displayed.
Mobile Number Mobile number you are looking for.
Extension Number Display the extension number of the subscribers associated with the mobile phone number.
Allow Smart Routing smart routing permission
Receiving Call in Hot Spot Zone
[Receiving Call in Hot Spot Zone] is used to select the incoming Allow the WE
VoIP subscribers in the Hot Spot Zone.
[Hot Spot Zone] means that an external Wifi network.
To use the [Receiving Call in Hot Spot Zone], need to set the following item in
the [Configuration > User Group > Change User Group > Information] menu.
Item Description
Receiving Call in Hot Spot Zone
Operator will be able to choose whether or not to use [Receiving Call in Hot Spot Zone] Service.
Operator can set [Receiving Call in Hot Spot Zone] Class of Service for the
subscriber or Service Groups or User Groups.
[Subscriber], [Service Group], [the User Groups] is the order of priority of
Class of Service.
Receiving Call in mVoIP Zone
Receiving Call in mVoIP Zone is used to select the incoming Allow the WE VoIP
subscribers in the mVoIP Zone.
[mVoIP Zone] is meaning that an external mobile data network.
To use the [Receiving Call in mVoIP Zone], need to set the following item in the
[Configuration > User Group > Change User Group > Information] menu.
Item Description
Receiving Call in mVoIP Zone
Operator will be able to choose whether or not to use [Receiving Call in mVoIP Zone] Service.
Operator can set [Receiving Call in mVoIP Zone] Class of Service for the
subscriber or Service Groups or User Groups.
[Subscriber], [Service Group], [the User Groups] is the order of priority of
Class of Service.

Ошибка! Используйте вкладку "Главная" для применения 제목 1 к тексту, который
должен здесь отображаться. Ошибка! Используйте вкладку "Главная" для применения 제목 1 к
тексту, который должен здесь отображаться.
SCM Express Operation Manual v12.0 285 ©Samsung Proprietary and Confidential
Desk phone Simultaneous Ring Delay
The WE VoIP, 3G Mobile and desk phones can ring simultaneously through multi-
ring or multi-device service. In this case, the desk phone rings first. It could let the
other phone pick up the call before WE VoIP or 3G mobile rings.
So the ‘Ring Start Time’ of the desk phone can be delayed. It operates only when
WE VoIP or 3G mobile members exist for simultaneous ring.
The [CONFIGURATION > User > Single Phone User (or Multi-Phone User)
> Desk phone Simultaneous Ring Delay] should be enabled.
The delay time can be changed in the [CONFIGURATION > User > User
Service Timers] menu. The default value is 3 seconds.
IP Domain Based Call Restriction
SCM provides call restriction service by IP address interworking with iBG SBC.
(To configure IP address, refer to iBG SBC manual.)
SCM can configure restriction policy for 2 zone (ZONE A and ZONE B) in
[CONFIGURATION > Service > Feature Service > Class of Service] menu.
Smart WLAN Link Configuration
This chapter describes the Smart WLAN Link Profile configuration for using the
Smart WLAN Link Application on Mobile Phone.
License Key Registration
To use Smart WLAN Link Application, a Smart WLAN Link license is required.
The license key can be registered in the [CONFIGURATION > Miscellaneous >
Activation Key] menu
In addition, configure the ‘Use Smart WLAN Link’ option in the
[CONFIGURATION > User > Single Phone User] menu
Create Profile
To change the Smart WLAN Link User Profile, create Smart WLAN Link Site
Profile, Smart WLAN Link Server Profile, Smart WLAN Link Network Profile
and Smart WLAN Link Management Service Profile first.
After then assign the profile to each Smart WLAN Link user.
To change a number of Smart WLAN Link user profile, use the function [Tool >
Customer Data Import/Export].
Refer to ‘2.3 Changing All Users Data’ in this Manual.
Smart WLAN Link Site Profile
The parameter of Server, Wi-Fi and Login Configuration for setup connection of
Smart WLAN Link can be configured in the [CONFIGURATION > Wireless
Enterprise > Smart WLAN Link Configuration > Smart WLAN Link Site

Ошибка! Используйте вкладку "Главная" для применения 제목 1 к тексту, который
должен здесь отображаться. Ошибка! Используйте вкладку "Главная" для применения 제목 1 к
тексту, который должен здесь отображаться.
SCM Express Operation Manual v12.0 286 ©Samsung Proprietary and Confidential
Profile] menu.
30 Server profile can be configured.
Item Description
Site Profile Info
Name
Name of Site Profile
Login Server Information
Server Address
Server Address of Login Server used to login
Login Server Information
Server Port
Server Port of Login Server used to login
Login Server Information
Public Server Address
Server Address of Login Server used to login after Primary Server Failure
Login Server Information
Public Server Port
Server Port of Login Server used to login after Primary Server Failure
Provision Server Information
Server Type
Server Type of Provision Server used to download provision file
Provision Server Information
Server Address
Server Address of Provision Server used to download provision file
Provision Server Information
Server Port
Server Port of Provision Server used to download provision file
Provision Server Information
Server Path
Server Path of Provision Server used to download provision file
Provision Server Information
Public Server Type
Server Type of Provision Server used to download provision file after Primary Server Failure
Provision Server Information
Public Server Address
Server Address of Provision Server used to download provision file after Primary Server Failure
Provision Server Information
Public Server Port
Server Port of Provision Server used to download provision file after Primary Server Failure
Provision Server Information
Public Server Path
Server Path of Provision Server used to download provision file after Primary Server Failure
Wi-Fi Information
SSID
SSID for connecting to Wi-Fi network
Wi-Fi Information
Security Mode
Security Mode for connecting to Wi-Fi network
Wi-Fi Information
Password
Password for connecting to Wi-Fi network
Login Information
Login Server
Configure Use of Login Server for User

Ошибка! Используйте вкладку "Главная" для применения 제목 1 к тексту, который
должен здесь отображаться. Ошибка! Используйте вкладку "Главная" для применения 제목 1 к
тексту, который должен здесь отображаться.
SCM Express Operation Manual v12.0 287 ©Samsung Proprietary and Confidential
Item Description
Login Information
Common Information
Configure Use of Login Common Information for User
Login Information
Common Info ID
Common Information ID for Login
Login Information
Common Info Password
Common Information Password for Login
Login Information
Device Information
Configure Use of Device Information for User
Login Information
Device Info Password
Device Information Password for Login
Smart WLAN Link Server Profile
The parameter of Server Configuration for Smart WLAN Link Service can be
configured in the [CONFIGURATION > Wireless Enterprise > Smart WLAN
Link Configuration > Wifi Server Profile] menu.
30 Server profile can be configured.
Item Description
Server Profile Information
Name
Name of Server Profile
Server Security Information
ID
ID used in Server Security Mode
Server Security Information
Password
Password used in Server Security Mode
Login Server Information
Server Address
Server Address of Login Server used to login
Login Server Information
Server Port
Server Port of Login Server used to login
Login Server Information
Public Server Address
Server Address of Login Server used to login after Primary Server Failure
Login Server Information
Public Server Port
Server Port of Login Server used to login after Primary Server Failure
Provision Server Information
Security Mode
Security Mode of Provision Server
Provision Server Information
Server Type
Server Type of Provision Server used to download provision file
Provision Server Information
Server Address
Server Address of Provision Server used to download provision file
Provision Server Information
Server Port
Server Port of Provision Server used to download provision file

Ошибка! Используйте вкладку "Главная" для применения 제목 1 к тексту, который
должен здесь отображаться. Ошибка! Используйте вкладку "Главная" для применения 제목 1 к
тексту, который должен здесь отображаться.
SCM Express Operation Manual v12.0 288 ©Samsung Proprietary and Confidential
Item Description
Provision Server Information
Server Path
Server Path of Provision Server used to download provision file
Provision Server Information
Public Type
Server Type of Provision Server used to download provision file after Primary Server Failure
Provision Server Information
Public Address
Server Address of Provision Server to download provision file after Primary Server Failure
Provision Server Information
Public Port
Server Port of Provision Server to download provision file after Primary Server Failure
Provision Server Information
Public Path
Server Path of Provision Server to download provision file after Primary Server Failure
Upgrade Server Information
Security Mode
Security Mode of Upgrade Server
Upgrade Server Information
Server Type
Server Type of Upgrade Server to download upgrade files
Upgrade Server Information
Server Address
Server Address of Upgrade Server to download upgrade files
Upgrade Server Information
Server Port
Server Port of Upgrade Server to download upgrade files
Upgrade Server Information
Server Path
Server Path of Upgrade Server to download upgrade files
Upgrade Server Information
Public Type
Server Type of Upgrade Server to download upgrade files after Primary Server Failure
Upgrade Server Information
Public Address
Server Address of Upgrade Server to download upgrade files after Primary Server Failure
Upgrade Server Information
Public Port
Server Port of Upgrade Server to download upgrade files after Primary Server Failure
Upgrade Server Information
Public Path
Server Path of Upgrade Server to download upgrade files after Primary Server Failure
Log Server Information
Security Mode
Security Mode of Log Server
Log Server Information
Server Type
Server Type of Log Server to upload log files

Ошибка! Используйте вкладку "Главная" для применения 제목 1 к тексту, который
должен здесь отображаться. Ошибка! Используйте вкладку "Главная" для применения 제목 1 к
тексту, который должен здесь отображаться.
SCM Express Operation Manual v12.0 289 ©Samsung Proprietary and Confidential
Item Description
Log Server Information
Server Address
Server Address of Log Server to upload log files
Log Server Information
Server Port
Server Port of Log Server to upload log files
Log Server Information
Server Path
Server Path of Log Server to upload log files
Log Server Information
Public Type
Server Type of Log Server to upload log files after Primary Server Failure
Log Server Information
Public Address
Server Address of Log Server to upload log files after Primary Server Failure
Log Server Information
Public Port
Server Port of Log Server to upload log files after Primary Server Failure
Log Server Information
Public Path
Server Path of Log Server to upload log files after Primary Server Failure
Smart WLAN Link Network Profile
The parameter of Network Configuration for Smart WLAN Link Service can be
configured in the [CONFIGURATION > Wireless Enterprise > Smart WLAN
Link Configuration > Wifi Network Profile] menu.
30 Server profile can be configured.
Item Description
Network Profile Info
Name
Name of Network Profile
Wi-Fi Common
SSID
SSID for connecting to Service Wi-Fi
Wi-Fi Security
Security Mode
Security Mode for connecting to Wi-Fi Network
Wi-Fi Security
EAP Method
EAP Method for connecting to Wi-Fi Network
Wi-Fi Security
Provisioning
Provisioning Mode for connecting to Wi-Fi Network
Wi-Fi Security
Phase 2 Authentication
Phase 2 Authentication for connecting to Wi-Fi Network
Wi-Fi Security
CA Certificate
CA Certificate Path for connecting to Wi-Fi Network
Wi-Fi Security
User Certificate
User Certificate Path for connecting to Wi-Fi Network
Service Information
CM Service Activation
Configure Connection Manager Service Activation
Service Information
Roaming Service Activation
Configure Roaming Service Activation

Ошибка! Используйте вкладку "Главная" для применения 제목 1 к тексту, который
должен здесь отображаться. Ошибка! Используйте вкладку "Главная" для применения 제목 1 к
тексту, который должен здесь отображаться.
SCM Express Operation Manual v12.0 290 ©Samsung Proprietary and Confidential
Item Description
Service Information
Roaming Service Method
Configure Roaming Service Method
Service Information
Roaming Service Mode
Configure Roaming Service Mode
Wi-Fi Parameter Information
Frequency Band
Frequency Band configured when Wi-Fi is connected
Wi-Fi Parameter Information
Country Rev
Country Rev configured when Wi-Fi is connected
Config WES Wi-Fi Parameter
Activation
Configure WES Wi-Fi Parameter Activation
(apply when Config 2G/5G WES Wi-Fi Parameter is not activated)
Config WES Wi-Fi Parameter
Roaming Trigger (dB)
Roaming Trigger configured when Wi-Fi is connected
(A RSSI value to start channel scanning)
Config WES Wi-Fi Parameter
Roaming Delta (dB)
Roaming Delta configured when Wi-Fi is connected
(RSSI Difference between Serving and Candidate AP that recognized as Target AP)
Config WES Wi-Fi Parameter
Roaming Scan Period (msec)
Roaming Scan Period configured when Wi-Fi is connected
(Idle period after the each channel scanning iteration)
Config WES Wi-Fi Parameter
Roaming Scan Channels
Roaming Scan Channels configured when Wi-Fi is connected
(A set of channel numbers for scanning)
Config WES Wi-Fi Parameter
Scan Channel Time (msec)
Scan Channel Time configured when Wi-Fi is connected
(1 channel scanning time)
Config WES Wi-Fi Parameter
Scan Home Time (msec)
Scan Home Time configured when Wi-Fi is connected
(The data Tx and Rx time with serving AP during channel scanning)
Config WES Wi-Fi Parameter
Scan Home Away Time (msec)
Scan Home Away Time configured when Wi-Fi is connected
(The period of consecutive channel scanning)
Config WES Wi-Fi Parameter
Scan NProbes
Scan NProbes configured when Wi-Fi is connected
(The number of probe requests for a channel scanning)
Config 2G WES Wi-Fi Parameter
Activation
Configure 2.4 GHz WES Wi-Fi Parameter Activation
Config 2G WES Wi-Fi Parameter
Roaming Trigger (dB)
Roaming Trigger configured when 2.4 GHz Wi-Fi is connected
Config 2G WES Wi-Fi Roaming Delta configured when 2.4 GHz Wi-Fi is

Ошибка! Используйте вкладку "Главная" для применения 제목 1 к тексту, который
должен здесь отображаться. Ошибка! Используйте вкладку "Главная" для применения 제목 1 к
тексту, который должен здесь отображаться.
SCM Express Operation Manual v12.0 291 ©Samsung Proprietary and Confidential
Item Description
Parameter
Roaming Delta (dB)
connected
Config 2G WES Wi-Fi Parameter
Roaming Scan Period (msec)
Roaming Scan Period configured when 2.4 GHz Wi-Fi is connected
Config 2G WES Wi-Fi Parameter
Roaming Scan Channels
Roaming Scan Channels configured when 2.4 GHz Wi-Fi is connected
Config 2G WES Wi-Fi Parameter
Scan Channel Time (msec)
Scan Channel Time configured when 2.4 GHz Wi-Fi is connected
Config 2G WES Wi-Fi Parameter
Scan Home Time (msec)
Scan Home Time configured when 2.4 GHz Wi-Fi is connected
Config 2G WES Wi-Fi Parameter
Scan Home Away Time (msec)
Scan Home Away Time configured when 2.4 GHz Wi-Fi is connected
Config 2G WES Wi-Fi Parameter
Scan NProbes
Scan NProbes configured when 2.4 GHz Wi-Fi is connected
Config 5G WES Wi-Fi Parameter
Activation
Configure 5 GHz WES Wi-Fi Parameter Activation
Config 5G WES Wi-Fi Parameter
Roaming Trigger (dB)
Roaming Trigger configured when 5 GHz Wi-Fi is connected
Config 5G WES Wi-Fi Parameter
Roaming Delta(dB)
Roaming Delta configured when 5 GHz Wi-Fi is connected
Config 5G WES Wi-Fi Parameter
Roaming Scan Period (msec)
Roaming Scan Period configured when 5 GHz Wi-Fi is connected
Config 5G WES Wi-Fi Parameter
Roaming Scan Channels
Roaming Scan Channels configured when 5 GHz Wi-Fi is connected
Config 5G WES Wi-Fi Parameter
Scan Channel Time (msec)
Scan Channel Time configured when 5 GHz Wi-Fi is connected
Config 5G WES Wi-Fi Parameter
Scan Home Time (msec)
Scan Home Time configured when 5 GHz Wi-Fi is connected
Config 5G WES Wi-Fi Parameter
Scan Home Away Time configured when 5 GHz Wi-Fi is connected

Ошибка! Используйте вкладку "Главная" для применения 제목 1 к тексту, который
должен здесь отображаться. Ошибка! Используйте вкладку "Главная" для применения 제목 1 к
тексту, который должен здесь отображаться.
SCM Express Operation Manual v12.0 292 ©Samsung Proprietary and Confidential
Item Description
Scan Home Away Time (msec)
Config 5G WES Wi-Fi Parameter
Scan NProbes
Scan NProbes configured when 5 GHz Wi-Fi is connected
Smart WLAN Link Management Service Profile
The parameter of Management Service Configuration for Smart WLAN Link
Service can be configured in the [CONFIGURATION > Wireless Enterprise >
Smart WLAN Link Configuration > Wifi Management Service Profile] menu.
30 Server profile can be configured.
Item Description
Name Name of Management Service Profile.
User Permission Configure User Permission.
ADMIN user can configure more service (Network Diagnostics/Keep Trying to Connect/Keep Wi-Fi Enabled/Auto Reset).
Lock Screen Configure Lock Screen Activation.
When user executes WifiAgent, Lock Screen Popup is displayed.
Lock Screen Password Configure Password for Lock Screen
Network Diagnostic Configure Network Diagnostic Activation.
Check Network Status and notify the result to user.
Network Diagnostic Type Configure Network Diagnostic Type
Network Diagnostic Target URL
Configure Network Diagnostic Target URL
Keep trying to connect Configure Keep trying to connect Activation.
When Provisioned Wi-Fi Network is disconnected, try to connect periodically until Wi-Fi is connected.
Keep Wi-Fi Enabled Configure Keep Wi-Fi Enabled Activation.
When Wi-Fi is disabled, Enable Wi-Fi automatically.
Auto Reset Configure Auto Reset Activation.
If provisioned Wi-Fi network connection is not available for some period, forced initial login.
Auto Reset Check Count Auto Reset Check Count
Forbid Other Connection Configure Forbid Other Connection Activation.
Forbid Wi-Fi Connection except provisioned Wi-Fi network.
Wi-Fi Frequency Band Configure Frequency Band used when Wi-Fi is enabled
Smart WLAN Link User Profile
The parameter of User Configuration for Smart WLAN Link Service can be
configured in the [CONFIGURATION > Wireless Enterprise > Smart WLAN
Link Configuration > Smart WLAN Link User] menu.
Subscriber with ‘Samsung-Mobile-Phone’ as phone type in the
[CONFIGURATION > User > Single Phone User] menu is displayed

Ошибка! Используйте вкладку "Главная" для применения 제목 1 к тексту, который
должен здесь отображаться. Ошибка! Используйте вкладку "Главная" для применения 제목 1 к
тексту, который должен здесь отображаться.
SCM Express Operation Manual v12.0 293 ©Samsung Proprietary and Confidential
automatically in this menu.
Item Description
User Group User Group
Extension Number Extension Number
Mobile Phone Number Mobile Phone Number
Model Information Model Information of Mobile Phone
Version Information Version Information of Mobile Phone
Previous Login Time Previous Login Time
Previous Logout Time Previous Logout Time
Management Service Profile
Name
Name of Management Service Profile
Server Profile
Name
Name of Server Profile for user
Network Profile 0
Name
Name of Network Profile 0 for user
Network Profile 0
Wi-Fi ID
ID for connection to Wi-Fi Network of Network Profile
Network Profile 0
Wi-Fi Anonymous ID
Anonymous ID for connection to Wi-Fi Network of Network Profile
Network Profile 0
Wi-Fi Password
Password for connection to Wi-Fi Network of Network Profile
Network Profile 1
Name
Name of Network Profile 1 for user
Network Profile 1
Wi-Fi ID
ID for connection to Wi-Fi Network of Network Profile
Network Profile 1
Wi-Fi Anonymous ID
Anonymous ID for connection to Wi-Fi Network of Network Profile
Network Profile 1
Wi-Fi Password
Password for connection to Wi-Fi Network of Network Profile
Network Profile 2
Name
Name of Network Profile 2 for user
Network Profile 2
Wi-Fi ID
ID for connection to Wi-Fi Network of Network Profile
Network Profile 2
Wi-Fi Anonymous ID
Anonymous ID for connection to Wi-Fi Network of Network Profile
Network Profile 2
Wi-Fi Password
Password for connection to Wi-Fi Network of Network Profile
Mobile Push Service
Mobile Push Service must be configured when to use the WE VoIP (iOS).
To receive a incoming call, WE VoIP must be registered to SCM but WE VoIP
(iOS) can send a register message to SCM when WE VoIP is wake up.

Ошибка! Используйте вкладку "Главная" для применения 제목 1 к тексту, который
должен здесь отображаться. Ошибка! Используйте вкладку "Главная" для применения 제목 1 к
тексту, который должен здесь отображаться.
SCM Express Operation Manual v12.0 294 ©Samsung Proprietary and Confidential
Push Service is used to request a registration to WE VoIP (iOS).
WE VoIP (Android) can be used a Mobile Push Service but it is not necessarily.
DNS Server and Firewall Configuration
To use a Push Service, DNS Server configuration must be needed in the
[CONFIGURATION > Miscellaneous > DNS Server] menu.
And TLS link must be connected between APNs Server of Apple and SCM by
using TCP 2195 port. Therefore TCP 2195 port must be opened for SCM in the
firewall.
And HTTPs link must be connected between GCM Server of Google and SCM by
using TCP 443 port. Therefore TCP 443 port must be opened for SCM in the
firewall.
Mobile Push Service Activation
Mobile Push Service can be activated in the [CONFIGURATION > Wireless
Enterprise > Mobile Push Service] menu.
If status is changed to CONNECTED after service activate, Mobile Push Service
can be used.
If status is displayed to DISCONNECTED, please check a firewall and DNS
server.
Push Service for User
If Mobile Push Service is activated for System, specify push notification per
device.
Specify the Push Notification about WE VoIP in the [CONFIGURATION >
User > Single Phone User/Multi-Extension Phone] menu.
Push Notification
Push Request
REGIST
INVITE
200/OK
ACK
Wakeup by push
WE VoIP (iOS) APNs
(Apple Push Notification Service) SCME

SCM Express Operation Manual v12.0 295 ©Samsung Proprietary and Confidential
Chapter 5 Application Features
This part describes the applications provided by SCM and how to configure them.
SCM includes a basic conference system and a basic ACD server. SCM Express
also includes an advanced conference system and a voice mail system.
Application Server Service Group
If SCM version is 3.2.4 or higher, an ‘Application Server Service Group’ should
be configured to integrate with application server.
Configuring Application Server Service Group
First of all, operates should make an Application Server Service Group using
[SCM Administrator/CONFIGURATION/Application/Application Server
Group] menu.
Figure 32. Application Server Service Group
Assigning Application Server Service Group
In order to provide a specific service using an application server, operators can
assign an Application Server Service Group in user or service group or user group
menu.
The application server specified in user menu has a higher priority than the
application server of service group or user group. And the application server of
service group has a higher priority than that of user group.
For example, if a user should be connected to application server for a specific
service, SCM first tries to fine an application server in user menu. If there is no
available application server, SCM checks an Application Server Service Group of
service group. After that, if SCM fail to find an application server in service group,
the Application Server Service Group of user group is checked. If it is also failed,

Ошибка! Используйте вкладку "Главная" для применения 제목 1 к тексту, который
должен здесь отображаться. Ошибка! Используйте вкладку "Главная" для применения 제목 1 к
тексту, который должен здесь отображаться.
SCM Express Operation Manual v12.0 296 ©Samsung Proprietary and Confidential
the call will fail.
In User Menu
In [SCM Administrator/CONFIGURATION/User/Single User] menu, operator
can assign Application Server Service Group.
Figure 33. Assigning Application Server Service Group-User
In Service Group Menu
In [SCM Administrator/CONFIGURATION/User Group/Service Group]
menu, operator can assign Application Server Service Group.
Figure 34. Assigning Application Server Service Group-Service Group
In User Group Menu
In [SCM Administrator/CONFIGURATION/User Group/Change User
Group/Options] menu, operator can assign Application Server Service Group.
Refer to above Service Group to know about differences between Application
Server Service Group and Node1’s App Server Service Group.

Ошибка! Используйте вкладку "Главная" для применения 제목 1 к тексту, который
должен здесь отображаться. Ошибка! Используйте вкладку "Главная" для применения 제목 1 к
тексту, который должен здесь отображаться.
SCM Express Operation Manual v12.0 297 ©Samsung Proprietary and Confidential
Figure 35. Application Server Service Group-User Group
Active-Active Node
If SCM version is 3.3 or higher and Active-Active mode is set, the below menu is
available.
In [SCM Administrator/Configuration/Application] menu, [VM/AA Server],
[Conference Server], [Other Application Server] needs select [A-A Primary
Node].
If application server support dual-registration, select [A-A Dual Registration]
option enable. In this case, [A-A Primary Node] is required.
Specified Primary node provides application service.
When Primary node can’t provide service, Secondary Node provides application
service.
Otherwise, If application server can’t support dual-registration, select [A-A Dual
Registration] option disable. It also [A-A Primary Node] is required.
Difference point is that Secondary Node does not provide application service call.
When Primary node does not provide application service, call is failure.
When [A-A Dual Operation] option is enabled, Application Service does not
check node.
[A-A Dual Operation] option should specify [A-A Dual Registration] enabled.

Ошибка! Используйте вкладку "Главная" для применения 제목 1 к тексту, который
должен здесь отображаться. Ошибка! Используйте вкладку "Главная" для применения 제목 1 к
тексту, который должен здесь отображаться.
SCM Express Operation Manual v12.0 298 ©Samsung Proprietary and Confidential
Voice Mail
The voice mail system is an application which interoperates with the call
processing system to play voice announcements and perform various services such
as forwarding calls to subscriber numbers (auto attendant) and allowing the caller
to leave a voice mail when the subscriber is absent. Voice Mail administration
GUI has Basic/Advanced mode.
Basic mode provides VM/AA feature partially. It does not provide Access
Manager, System Report feature.
Call Processing System Configuration
SCM’s built-in voice mail system cannot run independently of call processing.
Therefore, to use the voice mail system, the necessary settings must be made for
the call processing system.
License Key Registration
SCM Express includes a built-in voice mail system, which requires a license key
for use. The license key can be registered or viewed in the [CONFIGURATION
> Miscellaneous > License] menu.
To use the voice mail system, a separate embedded application license is required.
The license key can be registered in the [CONFIGURATION > Miscellaneous >
License] menu.
Application Server Service Group
For voice mail and record services, the user should be assigned Application Server
Service Group.
There are VM and Recording Servers in Application Server Service Group menu.
To use services using these application servers, create a Application Server
Service Group. And then, designate a Application Server Service Group in user,
service Group and user group menu. This is applied in the priority of user, service
group, and user group.
In case of Active-Active Mode, Application Server Service Group can be assigned
per node in user group and service group.
Voice Mail Server Registration
The connection information must be configured for connecting to the voice mail
system.
Voice mail system connection information can be configured in the
[CONFIGURATION > Application > VM/AA Server] menu. To use SCM’s
built-in voice mail system, ‘Application Type’ must be set to UMS.
Item Description
User Group Select a user group which will use the voice mail system.

Ошибка! Используйте вкладку "Главная" для применения 제목 1 к тексту, который
должен здесь отображаться. Ошибка! Используйте вкладку "Главная" для применения 제목 1 к
тексту, который должен здесь отображаться.
SCM Express Operation Manual v12.0 299 ©Samsung Proprietary and Confidential
Item Description
If you set User Group to COMMON, you can config application server as common type.
Application Type Specify a voice mail system type.
Internal UMS: SCM’s built-in voice mail system.
External UMS: An independent voice mail system in an external server.
3rd party UMS: A third-party voice mail system in an external server. Service provided may vary by voice mail systems.
Name Specify a voice mail system name.
Access Number Enter a phone number used for calling the voice mail system.
Location Specify a location where the voice mail system is used.
SIP URI Enter a SIP URI for VM/AA server.
Register Type Specify a registration method for VM/AA server.
None: Don’t use registration
Send Register: Send registration message to VM/AA server
Receive Register: Receive the register message from VM/AA server
Proxy Server Enter an IP address for VM/AA server
Port Enter a Port for VM/AA server
URI Type Specify SIP URI type to connect for VM/AA server
Protocol Specify SIP protocol to connect for VM/AA server
Register Expires (sec)
When Register Type value is not ‘None’, This value is used to check for expiration period for registration
User Name Enter the user name used for registration
Password Enter the user password used for registration
Keep Alive Specify the option to verify the connection using SIP OPTION message
Keep Alive Interval (sec)
Specify an interval (seconds) for exchanging Keep Alive Message
Maximum Keep Alive Retry
Specify an maximum retry count to sending Keep Alive Messages
Maximum Register Retry
Specify the number of times to retry sending the REGISTER message
Register Retry Interval (sec)
Enter the interval for resending the REGISTER message
Retry Pause Time (sec)
If the voice mail system registration is cancelled, SCM waits for the retry pause time before it retries sending the registration status check message
Keep Alive Retry Interval (sec)
Specify the interval by which SCM sends messages to the voice mail system for checking the registration status
Maximum Call Enter the maximum number of simultaneous call
Check Registration Protocol
Specify whether to check the protocols when register
Authentication Specify whether to allow user authentication
A-A Primary Node Specify a node to use primary node

Ошибка! Используйте вкладку "Главная" для применения 제목 1 к тексту, который
должен здесь отображаться. Ошибка! Используйте вкладку "Главная" для применения 제목 1 к
тексту, который должен здесь отображаться.
SCM Express Operation Manual v12.0 300 ©Samsung Proprietary and Confidential
Item Description
A-A Dual Registration
Specify the dual-registration
A-A Dual Operation Specify the dual-operation. When VM/AA server can support dual operation, All SCM connects directly to VM/AA server
Service List Specify the VM/AA server that VM/AA server can provide
Voice Mail: Voice Mail Service
Call Recording: Call Recording Service
Auto Attendant: Auto Attendant Service
Conference Server Registration
Some of the call processing features provided by SCM in interoperation with the
voice mail system, such as call recording, require that a three-way call be made
with the calling phone, the called phone and the voice mail system. SCM uses its
built-in conference system for three-way calls and no license key is required.
To use the conference system, the information for accessing the conference system
must be configured.
Conference system connection information can be configured in the
[CONFIGURATION > Application > Conference Server] menu. To use SCM’s
built-in conference system, ‘Application Type’ must be set to Internal Conference.
Item Description
User Group Select a user group which will use the conference system.
If you set User Group to COMMON, you can config application server as common type.
Application Type Specify a conference system type.
Internal Conference: SCM’s built-in conference system.
External Conference: An independent conference system in an external server.
3rd party Conference: A third-party conference system in an external server. Service provided may vary by conference systems.
Name Specify a conference system name.
Access Number Enter a phone number used for calling the conference system.
Location Specify a location where the conference system is used.
Start Channel
End Channel
Extension numbers are required to identify one conference from another. For this, a continuous range of extension numbers is applied by the start channel and the end channel.
Keep Alive Retry Interval (sec)
By default, SCM sends the OPTIONS message to the application sever every 30 seconds to check the registration status. If there is no response to the OPTIONS message, SCM retries for the keep alive retry maximum time at the keep alive retry interval. If there is still no response, the application server registration is canceled.
Retry Pause Time (sec)
If the conference system registration is canceled, SCM waits for the retry pause time before it retries sending the OPTIONS message.
Service-List Specify the type of conference services on this conference system.

Ошибка! Используйте вкладку "Главная" для применения 제목 1 к тексту, который
должен здесь отображаться. Ошибка! Используйте вкладку "Главная" для применения 제목 1 к
тексту, который должен здесь отображаться.
SCM Express Operation Manual v12.0 301 ©Samsung Proprietary and Confidential
With respect to the VM/AA features, these two services may need to be selected.
Paging: Station Paging, Paging On Answer
Add-On Conference: Add-On, COA Conferences
Service Class Settings
To use the voice mail features, the voice mail-related items must be enabled in the
service class. For more information on service classes, see the ‘4.1.36 Feature
Service’.
Service classes can be configured in the [CONFIGURATION > Service >
Feature Service > Service Class] menu. The following voice mail-related items
must be enabled.
AME: If the service permission is set, the AME feature is available. If the
AME feature is enabled, when there is an incoming call, the caller’s voice is
heard over the speaker as the caller leaves a voice message, just like an
answering machine.
Auto Record: If the service permission is set, the auto record feature is
available.
If the auto record feature is enabled, when a call is connected, voice mail is
automatically connected for recording the call.
Call Recording: If the service permission is set, the call recording feature is
available. The call recording feature records a call conversation in voice mail
during the call.
Feature Code Settings
When using features related to the voice mail system or when accessing the voice
mail system, the user can dial the feature code to have the call connected to the
voice mail system. The voice mail system uses the feature code to determine the
service type to be serviced.
The feature codes can be configured in the [CONFIGURATION > Service >
Feature Service > Feature Code] menu. The following conference-related feature
codes must be configured.
AME-Enable, AME-Disable: This feature code enables or disables answering
machine emulation. If the service is enabled, when there is an incoming call,
the caller’s voice is heard over the speaker as the caller leaves a voice
message.
AME-Manual Start, AME-Manual Stop: This feature code, when there is an
incoming call, directs the call to answering machine while ringing, or stops
answering machine recording of a call and directs the call to the user.
Call Record: This feature code is used for requesting recording of the current
call conversation in voice mail.
UMS Access: This feature code is used for dialing to access the voice mail
system.

Ошибка! Используйте вкладку "Главная" для применения 제목 1 к тексту, который
должен здесь отображаться. Ошибка! Используйте вкладку "Главная" для применения 제목 1 к
тексту, который должен здесь отображаться.
SCM Express Operation Manual v12.0 302 ©Samsung Proprietary and Confidential
VM Administration: This feature code is used for accessing the voice mail
system and changing it settings.
VM Memo: This feature code is used for accessing the voice mail system and
leaving a message for another number or in your own mailbox.
VM Message Listen: This feature code is used for accessing the voice mail
system and listening to messages in your mailbox.
VM Transfer: This feature code is used for directing the current call to the
voice mail system and connecting it the mailbox for another number.
The administrator can set a particular subscriber’s call to be recorded
automatically.
To enable the auto record feature, enable ‘Auto Record’ for ‘Service Type’ in the
[CONFIGURATION > Service > Feature Service > Service Activation] menu.
To enable the ‘Auto Record’ service, the following items must be configured as
well.
Item Description
Auto Record Mailbox Specify a mailbox where the recorded files will be stored if registering auto record.
Auto Record Call Type Specify a type of calls to auto record if registering auto record.
Internal: Incoming calls from extension numbers are automatically recorded.
External: Incoming calls from trunks are automatically recorded.
Both: Incoming calls from both extension numbers and trunks are automatically recorded.
VM/AA Basic Mode
VM/AA provides Basic/Advanced mode in the Administration GUI. Basic mode
hides the part of Open block Table menu in order to GUI menu makes simple. So
the part of feature can’t be set on the GUI. Below list is Basic mode feature list.
Refer the description of details on the next pages.
Voice Mail
o Answering Machine Emulation (AME)
o Auto Call Record
o Call Back
o Call forward to Voicemail
o Call Back Requested
o Future Delivery
o Group And Sort Message Prio to Play
o Individual Mailbox Greeting

Ошибка! Используйте вкладку "Главная" для применения 제목 1 к тексту, который
должен здесь отображаться. Ошибка! Используйте вкладку "Главная" для применения 제목 1 к
тексту, который должен здесь отображаться.
SCM Express Operation Manual v12.0 303 ©Samsung Proprietary and Confidential
o Individual Mailbox Name
o Message Delivery Options
o Message Listen Options
o Message Forward with Append
o Message Retrieve
o Message Reply
o Message Scan
o Message Skip
o Message Undelete
o One Touch Access
o Retrieve Public Caller From Mailbox
o Reminder
Auto Attendant (AA)
o Auto Attendant Route
o Automatic After Hours Answering
o Interruptible Voice Prompts
o Multi language Support
o Operator Access
o Single Digit Routing
Voice Studio-Prompt
Port Activity
Status Screen
Auto Attendant
When the auto attendant feature is enabled, the voice mail system automatically
answers the incoming call and one or more announcements are played for the
caller depending on the digit dialed by the caller before connecting the call. The
caller can dial a number to specify a particular person or a group.
The auto attendant answers the incoming call with a pre-recorded announcement
and allows the caller to select one of the several available features (including
selecting a phone number to connect, connecting to the voice mailbox, connecting
to the attendant, and accessing pre-recorded information).
Multiple Alphabetic Directory
When making a call, if the caller does not know the extension number of the
person he/she wants to call, using this feature, the caller can just enter the first few
characters of the called party and the system will find the phone number and
connect the call to the called party’s phone or voice mailbox.

Ошибка! Используйте вкладку "Главная" для применения 제목 1 к тексту, который
должен здесь отображаться. Ошибка! Используйте вкладку "Главная" для применения 제목 1 к
тексту, который должен здесь отображаться.
SCM Express Operation Manual v12.0 304 ©Samsung Proprietary and Confidential
To register a directory name, log into your mailbox and press ‘#’ to enter the
Personal Services menu.
Press ‘7’ to enter the Personal Services menu.
Press ‘3’ and use the keypad on the phone to enter your last name and first
name as your directory name. After entering the name, press ‘#’ to confirm it.
Press ‘2’ in the Personal Services menu to record your name.
When there is an incoming call, the Auto Attendant menu will play an
announcement telling the caller to enter an extension number to connect or if the
caller does not know the number, he/she can press 9 to use the directory feature.
Press ‘9’ to enter the Directory menu.
Enter the first few characters of the directory name of the extension number you
wish to connect.
If only one extension number matches the condition, the call will be connected
immediately. If there are multiple numbers, their names are played for the caller so
that the appropriate called party can be selected for connection.
Auto Attendant Route
The auto attendant route feature allows calls to be transferred according to the
number dialed by the caller. This feature is useful when the voice mail system
transfers a call to a specific subscriber or when a call is connected to the voice
mailbox.
Use the Auto Attendant menu to press an extension number to connect.
If the extension number exists, a voice announcement is played to verify the
number and then the call is transferred.
Automatic After Hours Answering
This feature allows the auto attendant to use different greetings by current time and
current mode.
Dial the voice mail system feature code to access the voice mail system and press
# + 0000 to enter the administrator mode.
Enter the password and press ‘1’ to enter the Edit Greetings menu.
Record 1001 (day main greeting) and 1002 (night main greeting). The
appropriate greetings will be used for different modes.
Holiday and Special Events
This feature plays appropriate announcements to the callers on public holidays and
the company’s special days.
The administrator can use the [VOICE MAIL > Schedule Table] menu to specify
holidays or days with special events based on schedules.
Interruptible Voice Prompts
The interruptible voice prompts feature allows the caller to select a service without
having to wait for the current voice announcement or greeting to finish.

Ошибка! Используйте вкладку "Главная" для применения 제목 1 к тексту, который
должен здесь отображаться. Ошибка! Используйте вкладку "Главная" для применения 제목 1 к
тексту, который должен здесь отображаться.
SCM Express Operation Manual v12.0 305 ©Samsung Proprietary and Confidential
You can access the next menu by pressing a digit during an announcement or a
greeting.
Multi language Support
Supports multiple languages.
You can change the service language by changing the language code in the
[VOICE MAIL > System Parameters] menu.
Operator Access
The caller can press a specific digit any time to connect to an available operator.
You can configure operator groups using the [CONFIGURATION > Service >
Group Service > Operator Group] menu.
In SCM Administrator, use the [VOICE MAIL > Open Block Table > Menu]
menu to set operator access for a specific digit. Default digit is ‘0’.
Single Digit Routing
Menu Input Processor can be configured to recognize a number for routing to a
specific routine. (For instance, it can be configured to connect the call to the
extension number 2001 for the sales department when ‘1’ is pressed.)
SCM Administrator can use the [VOICE MAIL > Open Block Table > Menu]
menu to select a menu and configure in Menu Input Processor.
Voice Mail
The voice mail feature is mainly used for allowing the caller to leave a voice mail
for the called subscriber when the subscriber is unable to answer the call. When
the call is connected to the voice mail system, the caller will be connected to the
voice mailbox either after hearing the ringback tone for some time or without
having to hear the ringback tone.
The voice mail system can play pre-recorded announcements depending on the call
status such as busy, no answer or DND and connect the call to the voice mailbox
for the caller to leave a message.
The subscriber can access his/her own voice mailbox from any location to listen to
the messages. Various options are provided for processing the messages.
Answering Machine Emulation (AME)
This feature allows the subscriber to use his/her phone’s speaker to monitor the
call being recorded in the voice mailbox. This is similar to an answering machine.
When AME is running, the caller can leave a message in the called party’s
mailbox and the called party can listen to the call being recorded. While recording,
the called party can press the ‘Stop AME’ soft button on the phone to end
recording and talk with the caller.
For more information on the AME feature, see the ‘Voice Mail Interoperation’ part
in the ‘User Features’ section.

Ошибка! Используйте вкладку "Главная" для применения 제목 1 к тексту, который
должен здесь отображаться. Ошибка! Используйте вкладку "Главная" для применения 제목 1 к
тексту, который должен здесь отображаться.
SCM Express Operation Manual v12.0 306 ©Samsung Proprietary and Confidential
Auto Record
This feature allows recording of the conversation between the caller and the called
party in the called party’s voice mailbox. Recording automatically starts when the
call starts and recording ends when the call ends. The recording can be checked in
the voice mailbox.
When the auto record feature is enabled, you can specify a mailbox in advance.
Depending on the auto record call types, you can record incoming calls only,
outgoing calls only, or both the incoming and outgoing calls.
When a call is being recorded, the ‘Recording’ message will be shown on the
screen and the subscriber can use the ‘CANCEL’, ‘PAUSE’, and ‘STOP’ soft
menus.
For more information on the AME feature, see the ‘Voice Mail Interoperation’ part
in the ‘User Features’ section.
Auto Forward
If this feature is enabled, any voice messages in the voice mailbox which are not
checked after a specified period of time are automatically forwarded to the
mailbox of another phone. The user can specify the delay time and the user can
also specify whether the forwarded messages will be deleted from the mailbox or
be left undeleted.
To use the auto forward feature, the following items must be configured in the
[VOICE MAIL > Open Block Table > MailBox] menu.
Item Description
Enable auto forward Select ‘Yes’ to use the auto forward feature.
Auto forward delay (HH:MM)
Enter the delay time (in minutes) after which the messages are forwarded.
Auto-FWD in Call Director Tab
Select a mailbox to which the messages are forwarded.
Auto Login
This feature allows you to automatically log in to a voice mail box without
entering the password and going through the authentication process.
To use the auto login feature, the following must be configured.
Administrator can set Auto Login to ‘Yes’ in General tab under the [VOICE
MAIL > Open Block Table > Extension] menu.
Auto Message Play
This feature automatically plays any new messages that have arrived in a voice
mailbox, when you log into the system. This helps minimize the operation of
selecting and playing messages.
To use the auto message play feature, the following must be configured.
Administrator can set Auto Play New Messages to ‘Yes’ in the Authentication tab
under the [VOICE MAIL > Open Block Table > MailBox] menu.

Ошибка! Используйте вкладку "Главная" для применения 제목 1 к тексту, который
должен здесь отображаться. Ошибка! Используйте вкладку "Главная" для применения 제목 1 к
тексту, который должен здесь отображаться.
SCM Express Operation Manual v12.0 307 ©Samsung Proprietary and Confidential
Broadcast
This feature allows a subscriber with administrator privileges to broadcast a voice
message to all subscribers of the system.
Administrator can set Broadcast Messages to ‘Yes’ in the Control tab under the
[VOICE MAIL > Open Block Table > MailBox] menu.
Administrator can Log in using the phone, press ‘6’ to enter the Mailbox
Management menu, press ‘9’ to select the Broadcast Messages menu, record a
message and broadcast it.
Call Back
This feature allows the subscriber, while listening to a message in the voice
mailbox, to be connected automatically to the caller of the voice message. This
works for both the extension numbers and trunks. For trunks, the phone must be
able to recognize call IDs.
To use the call back feature, log into the mailbox, listen to a message and press ‘5’
while listening to call the caller.
Call Forward to Voicemail
This feature allows incoming calls to be forwarded to the voice mailbox when the
subscriber is busy or does not answer, or allows all incoming calls to be forwarded
to the voice mailbox.
To use the call forward to voicemail feature, the following must be configured:
To enable call forward busy, in the [CONFIGURATION > Service > Service
Activation] menu, select a user group and an extension number, click the
Search button, select call forward busy and then click the Enable button.
Specify the voice mail system feature code for the phone number and click the
Enable button.
To enable call forward no answer, in the [CONFIGURATION > Service >
Service Activation] menu, select a user group and an extension number, click
the Search button, select call forward no answer and then click the Enable
button. Specify the voice mail system feature code for the phone number,
specify the time (seconds) to wait before forwarding the call as an unanswered
call, and click the Enable button.
Call Back Requested
When the caller leaves a message for the called party, the caller can select the call
back request option. When leaving a message, the caller can enter the phone
number for the called party to call back. When the subscriber listens to the
message, the subscriber is notified that call back has been requested. The
subscriber only needs to press a number to call the person who left the message.
To leave a call back request message:
Dial the voice mail system feature code to log into your voice mailbox.
Press ‘2’, enter a mailbox where you wish to leave a voice mail, and record
your message.

Ошибка! Используйте вкладку "Главная" для применения 제목 1 к тексту, который
должен здесь отображаться. Ошибка! Используйте вкладку "Главная" для применения 제목 1 к
тексту, который должен здесь отображаться.
SCM Express Operation Manual v12.0 308 ©Samsung Proprietary and Confidential
When recording finishes, press ‘4’ and select call back requested for the
delivery option.
Distribution List
This feature allows a subscriber to leave a voice message for multiple subscribers
at once. A list can not only include subscribers’ phone numbers but also other lists
which contain subscribers’ phone numbers. When you leave a message for a list,
the same message is left for all the subscribers who belong to the list.
To create a list:
Create a list using the [VOICE MAIL > Open Block Table > List] menu.
Assign members to the list.
If you send a voice mail to the list, the voice mail will be sent to the mailboxes
of all the members on the list.
External Number Notification
When there is a new voice mail in the subscriber’s mailbox, the notification is sent
to a home phone, a mobile phone or another phone registered in advance.
Set the message notification feature to ‘Yes’ in Alerts under the [VOICE MAIL >
Open Block Table > MailBox] menu.
Specify an alert phone number.
When there is a new voice mail in the mailbox, a call will be made to the specified
number.
Future Delivery
When a subscriber leaves a voice mail for another subscriber, this feature allows
the message to be sent at an appointed time in the future.
To use the future delivery feature:
Dial the voice mail system feature code to log into the voice mailbox.
Press ‘2’, enter a mailbox number for which to leave a voice mail, and record
your message.
When recording finishes, press ‘5’ to schedule the delivery time.
[#]: Immediate delivery
[1]: Some hours later (1 to 9 hours)
[2]: At the end of the current work day
[3]: At the beginning of the next work day
[4]: At a specified time on a specified day of the week
[5]: At a specified time on a specified date
Group and Sort Message Prior to Play
This feature allows the subscriber to listen to the voice messages in his/her
mailbox by grouping them into different types (urgent, call back, reply requested,
alarm message, etc.).

Ошибка! Используйте вкладку "Главная" для применения 제목 1 к тексту, который
должен здесь отображаться. Ошибка! Используйте вкладку "Главная" для применения 제목 1 к
тексту, который должен здесь отображаться.
SCM Express Operation Manual v12.0 309 ©Samsung Proprietary and Confidential
To use the group and sort message prior to play:
Log into your voice mailbox.
Press ‘11’ to listen to the messages as grouped by types.
Individual Mailbox Greeting
This feature allows the subscriber to record a greeting for his/her own mailbox.
When a caller is connected to the subscriber’s mailbox for leaving a message, the
recorded mailbox greeting will be played.
To record an individual mailbox greeting:
Log into your voice mailbox.
Press ‘5’ to record a greeting in the Individual Greeting menu.
Individual Mailbox Name
This feature allows the subscriber to record his/her name with his/her own voice
and link it to the subscriber’s personal mailbox.
Log into your voice mailbox.
Press ‘#’ to enter personal services.
Press ‘7’ to enter personal management.
Press ‘2’ to record your name.
Message Delivery Options
This feature allows you to set different options when sending a voice message.
Available options include urgent message, call back request, reply required,
confidential message, and return receipt.
Log into your voice mailbox.
Press ‘2’, enter a mailbox number for which to leave a voice mail, and record
your message.
When recording finishes, press ‘4’ to specify a message delivery option.
[1]: Urgent
[2]: Return receipt required
[3]: Call back requested
[4]: Private message
[5]: Reply required
Press ‘#’ to send the message.
Message Listen Options
These are the options used for listening to voice messages in the voice mailbox.
Available options include replay, save, delete, rewind, fast forward, and pause.
Log into your voice mailbox.
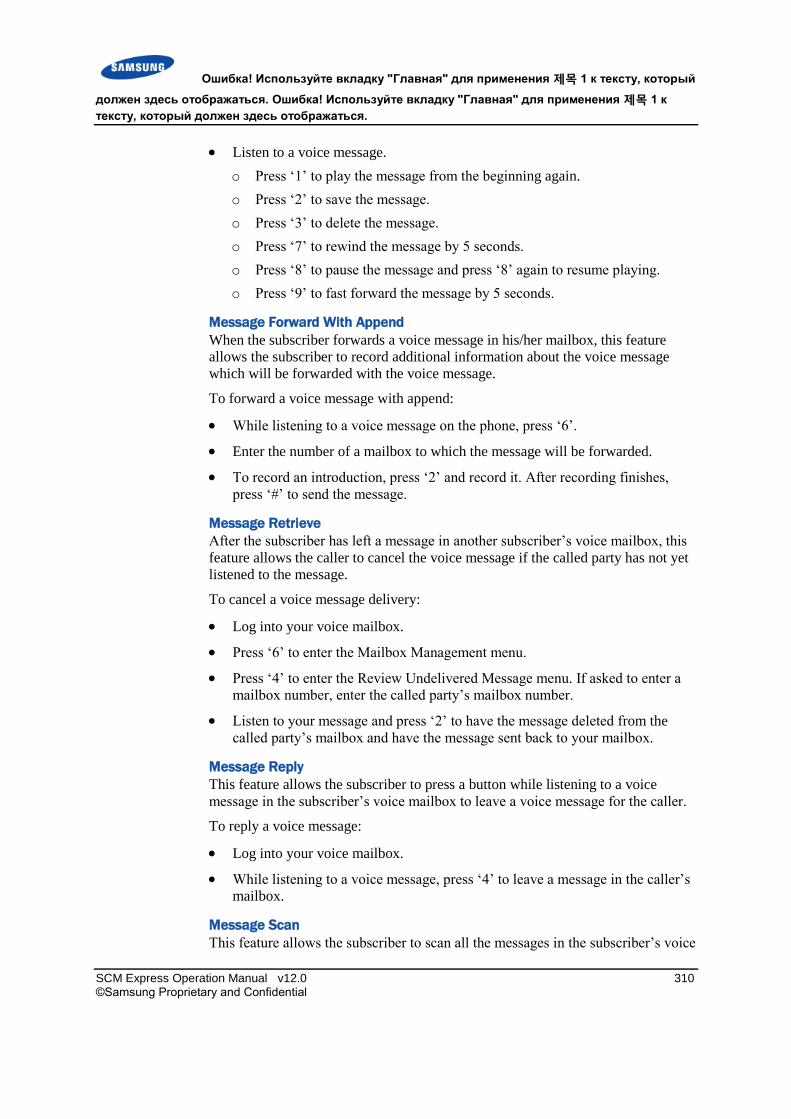
Ошибка! Используйте вкладку "Главная" для применения 제목 1 к тексту, который
должен здесь отображаться. Ошибка! Используйте вкладку "Главная" для применения 제목 1 к
тексту, который должен здесь отображаться.
SCM Express Operation Manual v12.0 310 ©Samsung Proprietary and Confidential
Listen to a voice message.
o Press ‘1’ to play the message from the beginning again.
o Press ‘2’ to save the message.
o Press ‘3’ to delete the message.
o Press ‘7’ to rewind the message by 5 seconds.
o Press ‘8’ to pause the message and press ‘8’ again to resume playing.
o Press ‘9’ to fast forward the message by 5 seconds.
Message Forward With Append
When the subscriber forwards a voice message in his/her mailbox, this feature
allows the subscriber to record additional information about the voice message
which will be forwarded with the voice message.
To forward a voice message with append:
While listening to a voice message on the phone, press ‘6’.
Enter the number of a mailbox to which the message will be forwarded.
To record an introduction, press ‘2’ and record it. After recording finishes,
press ‘#’ to send the message.
Message Retrieve
After the subscriber has left a message in another subscriber’s voice mailbox, this
feature allows the caller to cancel the voice message if the called party has not yet
listened to the message.
To cancel a voice message delivery:
Log into your voice mailbox.
Press ‘6’ to enter the Mailbox Management menu.
Press ‘4’ to enter the Review Undelivered Message menu. If asked to enter a
mailbox number, enter the called party’s mailbox number.
Listen to your message and press ‘2’ to have the message deleted from the
called party’s mailbox and have the message sent back to your mailbox.
Message Reply
This feature allows the subscriber to press a button while listening to a voice
message in the subscriber’s voice mailbox to leave a voice message for the caller.
To reply a voice message:
Log into your voice mailbox.
While listening to a voice message, press ‘4’ to leave a message in the caller’s
mailbox.
Message Scan
This feature allows the subscriber to scan all the messages in the subscriber’s voice

Ошибка! Используйте вкладку "Главная" для применения 제목 1 к тексту, который
должен здесь отображаться. Ошибка! Используйте вкладку "Главная" для применения 제목 1 к
тексту, который должен здесь отображаться.
SCM Express Operation Manual v12.0 311 ©Samsung Proprietary and Confidential
mailbox by listening to the beginning part (10 seconds) of each message.
To scan messages:
Log into your voice mailbox.
While listening to a voice message, press ‘##’ to listen to the beginning part
only and skip to the next message.
Message Skip
When listening to a message in the voice mailbox, this feature allows the
subscriber to listen to the next message without waiting for the current message to
finish.
Log into your voice mailbox.
While listening to a voice message, press ‘#’ to listen to the next message.
Message Undelete
This feature allows the subscriber to search for the messages which were
previously deleted in the voice mailbox and listen to them or save them.
Log into your voice mailbox.
Press ‘6’ to enter the Mailbox Management menu.
Press ‘3’ to select the Check Deleted Messages menu.
You can listen to the deleted messages. You can also save, copy or forward
them as you would with normal messages.
One Touch Access
This feature allows you to log into your mailbox or log in with administrator
privileges with a single button.
To enable the one touch access feature and log in with administrator privileges:
Register the ‘UMS Administration’ feature code in the [CONFIGURATION
> Subscriber > Device Key Programming] menu.
Press the key on the phone to log in with administrator privileges.
Retrieve Public Caller from Mailbox
When the subscriber logs into his/her voice mailbox, if there is a caller currently
leaving a voice message, this feature notifies this to the subscriber and allows the
subscriber to be connected to the caller. To enable this feature, the following must
be configured in SCM Administrator:
Administrator can set Answer Mailbox Caller to ‘Yes’ in the Authentication
tab under the [VOICE MAIL > Open Block Table > Extension] menu.
Reminder
The reminder feature allows the subscriber to leave a message for himself/herself.
This is useful for recording important events or information.

Ошибка! Используйте вкладку "Главная" для применения 제목 1 к тексту, который
должен здесь отображаться. Ошибка! Используйте вкладку "Главная" для применения 제목 1 к
тексту, который должен здесь отображаться.
SCM Express Operation Manual v12.0 312 ©Samsung Proprietary and Confidential
Register the ‘UMS Memo’ feature code + your mailbox number in the
[CONFIGURATION > Subscriber > Device Key Programming] menu. (If
mailbox number includes "*", UMS Memo doesn't work.)
Press the registered key and leave a message.
Access Manager
Access Manager controls how the callers are connected to individual subscribers.
A mailbox owner can specify settings to disable ringing for his/her extension
number, forward incoming calls to another extension number, or scan calls before
answering them. All these settings are valid until the time specified. You can also
enable the find me feature which allows you to call stored phone numbers to
connect to subscribers in multiple locations.
Call Blocking
While call blocking is enabled by the subscriber, the voicemail system does not
connect callers to the subscriber’s extension. Instead, the call blocking greeting
prompt is played immediately for the caller. If the call blocking greeting has not
been recorded, the voicemail system plays the subscriber’s no answer greeting. If
the no answer greeting has not been recorded either, the voicemail system plays an
announcement informing the caller that the number dialed is currently unavailable
and other options are given to the caller.
The subscriber can enable call blocking using Access Manager. After enabling call
blocking, the subscriber can set the time period for call blocking.
This feature is enabled for the following conditions:
1 For the next 1 to 9 hours as specified
2 Until the end of the current work day
3 Until the beginning of the next work day
4 Until the next specified day of the week
5 Until the specified date
Call blocking can be enabled in the following way:
Set Allow Blocking to ‘Yes’ in the Authentication tab under the [VOICE
MAIL > Open Block Table > Extension] menu to give the subscriber the
privilege to configure call blocking.
o To record a greeting, set Greeting to Basic in the Caller Option Processor
tab under the [VOICE MAIL > Open Block Table > Extension] menu.
o Log into the mailbox and press ‘4’ to select the Access Manager menu.
o Press ‘3’ to enable call blocking.
o While logged into the mailbox, press ‘5’ to enter the Personal Greeting
menu.
o Press ‘3’ to record a blocking greeting.

Ошибка! Используйте вкладку "Главная" для применения 제목 1 к тексту, который
должен здесь отображаться. Ошибка! Используйте вкладку "Главная" для применения 제목 1 к
тексту, который должен здесь отображаться.
SCM Express Operation Manual v12.0 313 ©Samsung Proprietary and Confidential
Call Forwarding
This feature directs callers to another extension number. (Directing to trunks is not
possible.) When a call is connected to an extension, the caller will hear the prompt
‘You are attempting to connect to person A in department B. This call has been
forwarded to person C.’ When the called party answers the call, the called party
will hear an announcement explaining where the call is being forwarded from.
This feature is enabled for the following conditions:
1 For the next 1 to 9 hours as specified
2 Until the end of the current work day
3 Until the beginning of the next work day
4 Until the next specified day of the week
5 Until the specified date
Call forwarding can be enabled in the following way:
Set Call Forwarding to ‘Yes’ in the Authentication tab under the [VOICE
MAIL > Open Block Table > Extension] menu to give the subscriber the
privilege to configure call forwarding.
Use your phone to log into the mailbox. Press ‘4’ to select Access Manager
and press ‘4’ again to select Call Forwarding, and then specify an extension
number for forwarding and set a duration.
When there is an incoming trunk call, the caller will be informed that the call is
being forwarded to another number and the call will be forwarded to the specified
number.
Find Me
If this feature is enabled, the voice mail system attempts to forward incoming calls
to a location specified by the subscriber. The voice mail system firstly looks for
the subscriber in the location specified by the subscriber, and then, if necessary,
calls all of the numbers specified by the subscriber until the call is answered.
This feature is enabled for the following conditions:
1 For the next 1 to 9 hours as specified
2 Until the end of the current work day
3 Until the beginning of the next work day
4 Until the next specified day of the week
5 Until the specified date
Find me can be enabled in the following way:
Set Allow Find Me and Phone Number Saving to ‘Yes’ in the Authentication
tab under the [VOICE MAIL > Open Block Table > Extension] menu.
After logging into the mailbox, press ‘#’ to enter the Personal Services menu.
Press ‘2’ to enter phone numbers to use for the find me feature. You can enter

Ошибка! Используйте вкладку "Главная" для применения 제목 1 к тексту, который
должен здесь отображаться. Ошибка! Используйте вкладку "Главная" для применения 제목 1 к
тексту, который должен здесь отображаться.
SCM Express Operation Manual v12.0 314 ©Samsung Proprietary and Confidential
up to 9 numbers.
After logging into the mailbox, press ‘4’ to enter Access Manager.
Press ‘6’ to select the Find Me menu and specify the duration for which the
feature will be enabled.
Follow Me
Any subscriber can pick up a call that is automatically forwarded to a designated
location. This is called subscriber location designation. Location designation is
possible for both extension numbers and external phone numbers.
This feature is enabled for the following conditions:
1 For the next 1 to 9 hours as specified
2 Until the end of the current work day
3 Until the beginning of the next work day
4 Until the next specified day of the week
5 Until the specified date
Follow me can be enabled in the following way:
Set Allow Alternative Numbers to ‘Yes’ in the Authentication tab under the
[VOICE MAIL > Open Block Table > Extension] menu.
After logging into the mailbox, press ‘4’ to enter Access Manager.
Press ‘1’ to specify phone numbers to connect and specify the duration for
which the feature will be enabled. Specify both extension numbers and trunk
numbers and test them repeatedly.
Hold for Busy Station
The voice mail system allows the caller to wait for the called party if the called
party is busy. If the caller selects option to wait, the voice mail system puts the
caller on hold. When there is an incoming call in addition to the already connected
call, the voice mail system parks the new call for the busy extension number,
informs the caller that he/she is put on hold because the called party is busy and
also informs the expected remaining time before getting connected.
Hold for busy station can be enabled in the following way:
Set Hold for Busy Station to ‘Yes’ in System Caller Options under the
[VOICE MAIL > Open Block Table > EClass] menu.
Multiple Personal Greetings
When the subscriber is unable to answer calls, the voice mail system answers
them.
The voice mail system uses five different reasons for the subscriber’s inability to
answer calls. Different greetings can be used for different reasons. The voice mail
system allows the subscriber to record greetings 1 to 9. The subscriber can link any
of these greetings to appropriate reasons/conditions.

Ошибка! Используйте вкладку "Главная" для применения 제목 1 к тексту, который
должен здесь отображаться. Ошибка! Используйте вкладку "Главная" для применения 제목 1 к
тексту, который должен здесь отображаться.
SCM Express Operation Manual v12.0 315 ©Samsung Proprietary and Confidential
To record multiple personal greetings, the following must be configured:
In the Authentication tab under the [VOICE MAIL > Open Block Table >
Extension] menu, set Allow Blocking to ‘Yes’ to be able to record block
greetings, set Allow Busy Greeting to ‘Yes’ to be able to record busy
greetings, and set Call Screening to ‘Yes’ to be able to record call screening
greetings.
Log into the voice mailbox and press ‘5’ to enter the Personal Greetings menu.
Record the greetings.
Park and Paging
The voice mail system provides the park and paging feature to those users who
frequently leave their desks. When the subscriber does not answer the call, the
caller can select ‘Park and Paging.’ Then, the voice mail system turns on the
speakers on all the phones in the same station paging group as the subscriber and
makes an announcement that there is an incoming call for the subscriber.
Park and paging can be enabled in the following way:
Create a conference group in the [CONFERENCE > Conference
management > Paging] menu.
Enter the number of the conference group created in the page zone in the
Overhead Page tab under the [VOICE MAIL > Open Block Table > EClass]
menu.
Set Overhead Page When Unanswered to Y in System Caller Options in
General under the [VOICE MAIL > Open Block Table > EClass] menu.
Administration
The administration feature allows administration of the system using the essential
operations data (including extension numbers, mailbox numbers, and various
messages) as well as monitoring and statistics data.
Activity Display
The activity display feature provides a simple view of the operation activities of
the voice mailbox.
To use activity display service, go to the [VOICE MAIL > Status Screen] menu.
System Report
This feature shows the usage activities of the voice mail system. To view the
system report, go to the [VOICE MAIL > View System Report] menu.
Application Report
This shows call activities for each application.
Report duration: This shows the beginning and the end of the reporting period.

Ошибка! Используйте вкладку "Главная" для применения 제목 1 к тексту, который
должен здесь отображаться. Ошибка! Используйте вкладку "Главная" для применения 제목 1 к
тексту, который должен здесь отображаться.
SCM Express Operation Manual v12.0 316 ©Samsung Proprietary and Confidential
Count: This is the total number of calls serviced by the application.
Total time connected (min): This is the total time (minutes) callers were
connected to the application.
Total caller percentage (%): This is the percentage of the callers connected to
the application out of the total number of callers.
System Report
This shows the call activities for the subscriber’s extension number.
Report Duration: This is the reporting period. This is begins on day the report
counter was last deleted and ends with the current counter.
Subs Calls: This is the total number of calls for the subscriber’s extension
number grouped by the process types (including completed, forwarded, and
rejected).
Subscriber calls: This shows how the incoming calls for the subscriber were
processed.
Tot Subs Calls: This is the total number of incoming calls for the subscriber’s
extension number.
Caller Hold Time: This is the total time (minutes) for which the subscriber had
been waiting without ending calls.
Message Status Report
This shows the call activities for external callers and mailbox subscribers.
Report Duration: This is the reporting period. This is begins on day the report
counter was last deleted and ends with today’s date.
Activity: This is the message activity by type. There are a few different
categories.
External: The first column is the total number of external callers connected to
message activities of a specific type. The second column is the percentage of
the total number of external callers out of the total number of callers (including
subscriber callers) connected to message activities of a specific type.
Subscriber: The first column is the total number of subscriber callers
connected to message activities of a specific type. The second column is the
percentage of the total number of subscriber callers out of the total number of
callers (including external callers) connected to message activities of a specific
type.
Total: This is the total number of callers connected to message activities of a
specific type.
Call Code Activity Report
This shows the system operation activities by call codes.
Report Duration: This is the reporting period. This is begins on day the report
counter was last deleted and ends with today’s date.

Ошибка! Используйте вкладку "Главная" для применения 제목 1 к тексту, который
должен здесь отображаться. Ошибка! Используйте вкладку "Главная" для применения 제목 1 к
тексту, который должен здесь отображаться.
SCM Express Operation Manual v12.0 317 ©Samsung Proprietary and Confidential
Port Utilization by Call Code: This is the list of call code types.
Calls: This is the total number of calls recorded for each call code.
Total calls (%): This is the percentage of calls for a specific call code.
Total time connected (min): This is the total time connected (minutes) for all
calls for a specific call code.
Daily Report
This shows call activities for each hour of a day.
Report Duration: This is the reporting period. This is begins on day the report
counter was last deleted and ends with today’s date.
Calls: This is the total number of incoming calls for a specific hour.
Total calls (%): This is the percentage of incoming calls during a specific hour.
Total time connected (min): This is the total time connected (minutes) for all
calls during a specific hour.
Port Number Report
This shows call activities for each port.
Report Duration: This is the reporting period. This is begins on day the report
counter was last deleted and ends with today’s date.
Calls: This is the total number of incoming calls via a specific port.
Total calls (%): This is the percentage of incoming calls via a specific port.
Total time connected (min): This is the total time connected (minutes) for all
calls via a specific port.
Weekly Report
This shows call activities for each day of a week.
Report Duration: This is the reporting period. This is begins on day the report
counter was last deleted and ends with today’s date.
Calls: This is the total number of incoming calls for a specific day of a week.
Total calls (%): This is the percentage of incoming calls for a specific day of a
week.
Total time connected (min): This is the total time connected (minutes) for all
calls for a specific day of a week.
Voice Studio
Voice Studio allows you to create, edit, or delete prompts and announcements used
by the voice mail system.
You can either dial from your phone to record your voice directly or select pre-
recorded files for use.

Ошибка! Используйте вкладку "Главная" для применения 제목 1 к тексту, который
должен здесь отображаться. Ошибка! Используйте вкладку "Главная" для применения 제목 1 к
тексту, который должен здесь отображаться.
SCM Express Operation Manual v12.0 318 ©Samsung Proprietary and Confidential
To use your phone to record:
Select Prompt/Announcement in the [VOICE MAIL > Voice Studio] menu.
Enter your phone number in the window next to the Call button and click the
Call button. The voice mail system will dial your phone. Answer your phone
and click the Create button to enter a prompt/announcement number and
create. On your phone, you will hear the prompt number entered. Press any
digit on the phone to start recording. Press ‘#’ to end recording. The prompt
file will be created.
Select a prompt/announcement and click the Change button to edit.
Select a prompt/announcement and click the Delete button to delete.
User Service Code Table
Code 1 Code 2
[11] Group New Messages
[33] Group Saved Messages
[1] Group Urgent Messages
[2] Group Callback Requests
[3] Group Reminders
[4] Group Private Messages
[6] Group Voice Only Messages
[8] Pause, Resume Menu Prompting
[9] Group a Specific Sender
[#] Play Message Inventory
[0] Play Menu Options
[*] Cancel, Return to Subscriber Menu
[1] Listen to New Messages
[3] Review Saved Messages
[1] Play Message
[11] Play Previous Message
[2] Save Message
[3] Discard Message
[4] Reply to Sender
[5] Place Call to Sender
[6] Forward a Copy of Message
[7] Rewind 5 Seconds
[8] Pause, Resume Message Playback
[9] Fast Forward 5 Seconds
[#] Skip to Next Message
[##] Scan Messages
[0] Play Menu Options
[00] Play Message Information
[*] Cancel, Return to Subscriber Menu
[2] Record & Send Messages [#] For a Directory of Subscribers
[##] To Create a Reminder

Ошибка! Используйте вкладку "Главная" для применения 제목 1 к тексту, который
должен здесь отображаться. Ошибка! Используйте вкладку "Главная" для применения 제목 1 к
тексту, который должен здесь отображаться.
SCM Express Operation Manual v12.0 319 ©Samsung Proprietary and Confidential
Code 1 Code 2
Enter the Recipient’s Number
[1] Review Recording
[2] Stop, Append to Recording
[3] Discard Recording
and Re-record
[4] Set Delivery Options
[5] Specify Future Delivery
[6] Send Message, Then Copy
[7] Rewind 5 Seconds
[8] Pause, Resume Record/Playback
[9] Fast Forward 5 Seconds
[#] Send Message, Then Exit Record
[0] Play Menu Options
[*] Cancel, Return to Subscriber Menu
[4] Access Manager [1] Follow Me
[3] Block All Calls
[4] Call Forwarding
[5] Call Screening
[6] Find Me
[7] Auto Set Night Intercept
[8] Pause, Resume Menu Prompting
[#] Play Access Coverage
[0] Play Menu Options
[*] Cancel, Return to Subscriber Menu
[5] Personal Greetings [1] Assign/Edit Primary Greeting
[2] Assign/Edit Busy Greeting
[3] Assign/Edit Blocking Greeting
[4] Assign/Edit Night Greeting
[5] Assign/Edit Call Screen Greeting
[6] Edit Only Personal Greetings
[7] Edit Only Mailbox Greetings
[8] Pause, Resume Menu Prompting
[0] Play Menu Options
[*] Cancel, Return to Subscriber Menu
[6] Mailbox Administration [1] Change Message Alert
[2] Change Pager Notification
[3] Review Deleted Messages
[4] Review Undelivered Messages
[5] Auto Play New Messages
[6] Auto Play Message Information

Ошибка! Используйте вкладку "Главная" для применения 제목 1 к тексту, который
должен здесь отображаться. Ошибка! Используйте вкладку "Главная" для применения 제목 1 к
тексту, который должен здесь отображаться.
SCM Express Operation Manual v12.0 320 ©Samsung Proprietary and Confidential
Code 1 Code 2
[8] Pause, Resume Menu Prompting
[9] Record & Send Broadcast Message
[0] Play Menu Options
[*] Cancel, Return to Subscriber Menu
Code 1 Code 2 Code 3
[8] Pause, Resume Subscriber Menu
- -
[0] Play Menu Options
- -
[#] Personal Services
[1] Review Workload -
[2] Edit Stored Telephone Numbers -
[3] Change Weekly Schedule -
[5] Place a Direct Call -
[7] Personal Administration [1] Change Password
[2] Record Name
[3] Enter Directory Name
[4] Extended Prompting
[8] Pause, Resume Menu Prompting
[0] Play Menu Options
[*] Cancel, Return to Subscriber Menu
[8] Pause, Resume Menu Prompting
-
[#] Record a Reminder -
[0] Play Menu Options -
[*] Cancel, Return to Subscriber Menu
-
[*] Exit Subscriber Menu
- -
Administrator Mode
Code 1 Code 2 Code 3
[1] To Edit Prompt [2] To Record [1] To Review
[2] To Continue & Record
[3] To Discard & Re-record
[#] To Save
[#] To Satisfy -
[*] To Cancel -

Ошибка! Используйте вкладку "Главная" для применения 제목 1 к тексту, который
должен здесь отображаться. Ошибка! Используйте вкладку "Главная" для применения 제목 1 к
тексту, который должен здесь отображаться.
SCM Express Operation Manual v12.0 321 ©Samsung Proprietary and Confidential
Descriptions for User Service Codes
[11] Group New Messages
This menu is used for new messages. After logging into the mailbox, press [11] to
select the Group New Messages menu.
[1] Group Urgent Messages: Listen to urgent messages.
[2] Group Callback Messages: Listen to messages with callback requests.
[3] Group Reminders: Listen to reminders.
[4] Group Private Messages: Listen to private messages.
[6] Group Voice Only Messages: Listen to all voice messages.
[8] Pause, Resume Menu Prompting: Pause the current listening or operation. The default
pause time is 60 seconds.
[9] Group a Specific Sender: Listen to messages from a specified caller.
[#] Play Message Inventory: Check the list of all messages in the mailbox.
[0] Play Menu Options: Check the list of all available menu items.
[*] Cancel, Return to Subscriber Menu: Cancel or go back to the parent menu.
[33] Group Saved Messages
This menu is used for saved group messages. After logging into the mailbox, press
[33] to select the Group Saved Messages menu.
[1] Group Urgent Messages: Listen to urgent messages.
[2] Group Callback Messages: Listen to messages with callback requests.
[3] Group Reminders: Listen to reminders.
[4] Group Private Messages: Listen to private messages.
[6] Group Voice Only Messages: Listen to all voice messages.
[8] Pause, Resume Menu Prompting: Pause the current listening or operation. The default
pause time is 60 seconds.
[9] Group a Specific Sender: Listen to messages from a specified caller.
[#] Play Message Inventory: Check the list of all messages in the mailbox.
[0] Play Menu Options: Check the list of all available menu items.
[*] Cancel, Return to Subscriber Menu: Cancel or go back to the parent menu.
[1] Listen to Messages
You can listen to, save, delete or forward received messages.
After logging into the mailbox, press [1] to select the Listen to Messages menu.
[1] Play Message: Listen to a new message or listen to the current message again.
[11] Play Previous Message: While listening to new messages, listen to the previous
message. If there is no previous message, the feature for [11] is unavailable.
[2] Save Message: Save the current message.
[3] Discard Message: Delete the current message.
[4] Reply to Sender: After listening to a new message, reply the caller.
[5] Place Call to Sender: Dial the callback number.
[6] Forward a Copy of Message: Forward a new message to another location.
[7] Rewind 5 Seconds: While listening to a message, rewind it five seconds.
[8] Pause, Resume Message Playback: Pause the current listening or operation. The
default pause time is 60 seconds.
[9] Fast Forward 5 Seconds: While listening to a message, fast forward it five seconds.
[#] Skip to Next Message: Skip to the next message.
[##] Scan Messages: Listen to the first 10 seconds of all new messages.
[0] Play Menu Options: Check the list of all available menu items.
[00] Play Message Information: Check the information for the current message.
[*] Cancel, Return to Subscriber Menu: Cancel or go back to the parent menu.

Ошибка! Используйте вкладку "Главная" для применения 제목 1 к тексту, который
должен здесь отображаться. Ошибка! Используйте вкладку "Главная" для применения 제목 1 к
тексту, который должен здесь отображаться.
SCM Express Operation Manual v12.0 322 ©Samsung Proprietary and Confidential
[3] Review Saved Messages
This menu is used for managing saved messages. After logging into the mailbox,
press [3] to select the Review Saved Messages menu.
[1] Play Message: Listen to a new message or listen to the current message again.
[11] Play Previous Message: While listening to new messages, listen to the previous
message. If there is no previous message, the feature for [11] is unavailable.
[2] Save Message: Save the current message.
[3] Discard Message: Delete the current message.
[4] Reply to Sender: After listening to a new message, reply the caller.
[5] Place Call to Sender: Dial the callback number.
[6] Forward a Copy of Message: Forward a new message to another location.
[7] Rewind 5 Seconds: While listening to a message, rewind it five seconds.
[8] Pause, Resume Message Playback: Pause the current listening or operation. The
default pause time is 60 seconds.
[9] Fast Forward 5 Seconds: While listening to a message, fast forward it five seconds.
[#] Skip to Next Message: Skip to the next message.
[##] Scan Messages: Listen to the first 10 seconds of all new messages.
[0] Play Menu Options: Check the list of all available menu items.
[00] Play Message Information: Check the information for the current message.
[*] Cancel, Return to Subscriber Menu: Cancel or go back to the parent menu.
[2] Record & Send Messages
This menu is used for recording messages and sending recorded messages. After
logging into the mailbox, press [2] to select the Record & Send Messages menu.
[#] For a Directory of Subscribers: Find a recipient by directory name.
[##] To Create a Reminder: Record a reminder.
Enter the Recipient’s Number
[1] Review Recording: Listen to the recorded message.
[2] Stop, Append to Recording: Stop recording, or continue recording to append to
current recording.
[3] Discard Recording and Re-record: Discard the recorded message and record it again.
[4] Set Delivery Options: Specify a message delivery option.
[1]: Urgent
[2]: Return receipt required
[3]: Call back requested
[4]: Private message
[5]: Reply required
[5] Specify Future Delivery: Message is sent at an appointed time.
[#]: Immediate delivery
[1]: Some hours later (1 to 9 hours)
[2]: At the end of the current work day
[3]: At the beginning of the next work day
[4]: At a specified time on a specified day of the week
[5]: At a specified time on a specified date
[6] Send Message, Then Copy: Send the message and then copy it to another mailbox.
[7] Rewind 5 Seconds: While listening to a message, rewind it five seconds.
[8] Pause, Resume Message Playback: Pause the current listening or operation. The
default pause time is 60 seconds.
[9] Fast Forward 5 Seconds: While listening to a message, fast forward it five seconds.
[#] Send Message, Then Exit Record: Send the message and then exit the record menu.
[0] Play Menu Options: Check the list of all available menu items.
[*] Cancel, Return to Subscriber Menu: Cancel or go back to the parent menu.
[4] Access Manager
Log into the mailbox and press [4] to select the Access Manager menu.
[1] Follow Me: Incoming calls are forwarded to another number.

Ошибка! Используйте вкладку "Главная" для применения 제목 1 к тексту, который
должен здесь отображаться. Ошибка! Используйте вкладку "Главная" для применения 제목 1 к
тексту, который должен здесь отображаться.
SCM Express Operation Manual v12.0 323 ©Samsung Proprietary and Confidential
[3] Block All Calls: Incoming calls are not connected but a recorded announcement is
played instead.
[4] Call Forwarding: Incoming calls are forwarded to another extension number for a
specified period of time.
[5] Call Screening: When there is an incoming call, the system notifies who is the
caller.
[6] Find Me: When the called party is absent, incoming calls are connected to the
multiple phone numbers specified in advance by the called party. The specified phone
numbers are dialed in the order they were entered. The called party can decide whether
to answer the call, forward it to another number, or to reject the call.
[7] Auto Set Night Intercept: Incoming calls outside the work hours are not connected
but the night greeting is played instead.
[8] Pause, Resume Message Playback: Pause the current listening or operation. The
default pause time is 60 seconds.
[#] Send Message, Then Exit Record: Send the message and then exit the record menu.
[0] Play Menu Options: Check the list of all available menu items.
[*] Cancel, Return to Subscriber Menu: Cancel or go back to the parent menu.
[5] Personal Greetings
This menu is used for managing personal greetings.
After logging into the mailbox, press [5] to select the Personal Greetings menu.
[1] Assign/Edit Primary Greeting: Edit the primary greeting.
[2] Assign/Edit Busy Greeting: Edit the busy greeting.
[3] Assign/Edit Blocking Greeting: Edit the greeting when all incoming calls are
blocked.
[4] Assign/Edit Night Greeting: Edit the night greeting.
[5] Assign/Edit Call Screen Greeting: Set caller information to be provided.
[6] Edit Only Personal Greeting: Record personal greetings.
[7] Edit Only Mailbox Greeting: Record mailbox greetings.
[8] Pause, Resume Message Playback: Pause the current listening or operation. The
default pause time is 60 seconds.
[0] Play Menu Options: Check the list of all available menu items.
[*] Cancel, Return to Subscriber Menu: Cancel or go back to the parent menu.
[6] Mailbox Administration
Log into the mailbox and press [6] to select the Mailbox Administration menu.
[1] Change Message Alert: Set the system to alert a specified phone number when there is
a new message. Select the following sub-level codes.
[1]: Enable/disable the message alert feature.
[2]: Set schedule alert.
[3]: Set urgent message alert.
[4]: Change alert number.
[2] Change Pager Notification: Set the system to alert a pager when there is a new
message. Select the following sub-level codes.
[1]: Enable/disable the alert feature.
[2]: Set schedule alert.
[3]: Set urgent message alert.
[4]: Change alert number.
[3] Review Deleted Messages: Review and/or restore deleted messages.
[4] Review Undelivered Messages: Review sent messages which are not yet checked by the
recipient. After reviewing the messages, you can cancel their delivery.
[5] Auto Play New Messages: You can set the system to play new messages each time you
log into the mailbox.
[6] Auto Play Message Information: You can set the system to play the new message
information each time you log into the mailbox.
[8] Pause, Resume Message Playback: Pause the current listening or operation. The
default pause time is 60 seconds.
[9] Record & Send Broadcast Message: Record a message and broadcast it to all mailboxes.

Ошибка! Используйте вкладку "Главная" для применения 제목 1 к тексту, который
должен здесь отображаться. Ошибка! Используйте вкладку "Главная" для применения 제목 1 к
тексту, который должен здесь отображаться.
SCM Express Operation Manual v12.0 324 ©Samsung Proprietary and Confidential
[0] Play Menu Options: Check the list of all available menu items.
[*] Cancel, Return to Subscriber Menu: Cancel or go back to the parent menu.
[#] Personal Services
After logging into the mailbox, press ‘#’ to select the Personal Services menu.
[1] Review Workload: Check reminders.
[2] Edit Stored Telephone Numbers: Save phone numbers or edit saved phone numbers.
[3] Change Weekly Schedule: Set weekly schedule.
[5] Place a Direct Call: Make a call.
[7] Personal Administration: Change general settings for the mailbox. Change password,
name, etc. Select the following sub-level codes.
[1] Change Password: Change the mailbox password.
[2] Record Name: Change the record message name.
[3] Enter Directory Name: Enter the directory name.
[4] Extended Prompting: Specify the level for playing the mailbox menu information.
[8] Pause, Resume Menu Prompting: Pause the current listening or operation. The default
pause time is 60 seconds.
[0] Play Menu Options : Check the current menu location.
[*] Cancel, Return to Services Menu : Deselect or go back to the parent menu.
[#] Record Reminder: Record a reminder.
[0] Play Menu Options: Check the list of all available menu items.
[*] Cancel, Return to Subscriber Menu: Cancel or go back to the parent menu.
To Edit Prompt
You can edit greetings by logging in with administrator privileges.
To log in with administrator privileges, dial ‘#’ + 0000 (length of the extension
number) and enter the password in the Auto Attendant menu.

Ошибка! Используйте вкладку "Главная" для применения 제목 1 к тексту, который
должен здесь отображаться. Ошибка! Используйте вкладку "Главная" для применения 제목 1 к
тексту, который должен здесь отображаться.
SCM Express Operation Manual v12.0 325 ©Samsung Proprietary and Confidential
Conference
SCM’s built-in conference supports 128 voice conference channels.
Conference Features
SCM supports basic conference features, Meet-Me conference, and paging
features.
The basic conference features and paging features are available in all SCM
editions, while the Meet-Me conference feature is available only in SCM Express.
Basic Conference
Add-On Conference
During a call (including a conference call), the call can be put on hold and a new
call is made to another attendee. If the new attendee answers the call, the
conference button can be pressed to include the new attendee in the conference.
Conference On Answer (COA)
Similar to the Add-On method, a call is made to an attendee and when the called
party answers the call, the called party is automatically included in the conference.
Predefined Conference
A list of conference attendees are registered in advance and the attendees are
paged using the conference group number. Those attendees answering the call are
automatically included in the conference.
Progressive Conference
Similar to the predefined method, the conference attendees are not registered in
advance but the attendees’ phone numbers are entered one by one according to the
interactive voice announcement. When the call is made, those attendees answering
the call are automatically included in the conference.
Intercom Conference
Initiate a conference by dialing feature code + station group number. The phones
registered in the station group answer automatically to join the conference.
Dispatch Conference
This feature is provided for the CSTA applications to initiate a conference using its
own conference group. It is not available from a phone.
Phonebook Conference
Similar to the dispatch conference, a user can initiate a conference using his/her
own conference group from a phone. The dispatch conference should be specified
prior to perform a phonebook conference, because it is handled as a kind of
dispatch conference internally.

Ошибка! Используйте вкладку "Главная" для применения 제목 1 к тексту, который
должен здесь отображаться. Ошибка! Используйте вкладку "Главная" для применения 제목 1 к
тексту, который должен здесь отображаться.
SCM Express Operation Manual v12.0 326 ©Samsung Proprietary and Confidential
Meet-Me Conference
Meet-Me Conference
A conference room is reserved, and then the conference attendees call the
conference system to enter the conference room.
When the conference moderator uses the Conference Reservation menu on PWP to
set the conference room number, password, etc. and register the conference
attendees, SCM sends an invitation mail to the conference attendees. The
conference attendees can call the conference ID at the conference time as
instructed by the invitation mail to enter the conference room.
Paging Features
Station Paging
When extension numbers are registered to a paging group number in advance, the
entire paging group can be paged. The call is automatically answered by the
phones paged so that the subscribers can listen to the moderator’s announcement.
Paging On Answer
When the telephone numbers are registered to a paging on answer group number in
advance, the entire group can be paged. When the called party answers, he can
listen to the moderator’s announcement.
Conference Member Eject
Conference Member Eject
A member joined in a conference can be deleted by another member. The feature
permission is allowed to conference owner or a user which setup the conference.
Call Processing System Configuration
SCM’s built-in conference system cannot run independently of call processing.
Therefore, to use the conference system, the necessary settings must be made for
the call processing system.
License Key Registration
A separate embedded application license key is required to use the meet me
conference feature, which allows attendees to join a conference by dialing a
conference room number reserved in advance.
The license key can be registered in the [CONFIGURATION > Miscellaneous >
License] menu.
After entering the license key, please check the Meet-Me Channels value in the
Misc Settings tab of [CONFERECE > System Configuration] menu. Out of the
total 128 voice conference channels, this number of channels are available for
meet me conferences.

Ошибка! Используйте вкладку "Главная" для применения 제목 1 к тексту, который
должен здесь отображаться. Ошибка! Используйте вкладку "Главная" для применения 제목 1 к
тексту, который должен здесь отображаться.
SCM Express Operation Manual v12.0 327 ©Samsung Proprietary and Confidential
Application Server Service Group
For services using conference server, the user should be assigned Application
Server Service Group.
There are the following application servers for conference. Application Server
Service Group consists of these application servers.
Paging Server
Meet-me Conference Server
One-Step Conference Server
Add-On Conference Server
To use services using these application servers, create a Application Server
Service Group. And then, designate a Application Server Service Group in user,
service Group and user group menu. This is applied in the priority of user, service
group, and user group.
In case of Active-Active Mode, Application Server Service Group can be assigned
per node in user group and service group.
Conference Server Registration
The connection information must be configured for the call processing system to
connect to the conference system.
Conference system connection information can be configured in the
[CONFIGURATION > Application > Conference Server] menu. To use SCM’s
built-in conference system, ‘Application Type’ must be set to Internal Conference.
Item Description
User Group Select a user group which will use the conference system.
Application Type Specify a conference system type.
Internal Conference: SCM’s built-in conference system.
External Conference: An independent conference system in an external server.
3rd party Conference: A third-party conference system in an external server. Service provided may vary by conference systems.
Name Specify a conference system name.
Access Number Enter a phone number used for calling the conference system.
Location Specify a location where the conference system is used.
Start Channel Tel Number
End Channel Tel Number
Extension numbers are required to identify one conference from another.
For this, a continuous range of extension numbers is applied by the start channel and the end channel.
Keep Alive Retry Interval (sec)
By default, SCM sends the OPTIONS message to the application sever every 30 seconds to check the registration status. If there is no response to the OPTIONS message, SCM retries for the keep alive retry maximum time at the keep alive retry interval. If there is still no response, the application

Ошибка! Используйте вкладку "Главная" для применения 제목 1 к тексту, который
должен здесь отображаться. Ошибка! Используйте вкладку "Главная" для применения 제목 1 к
тексту, который должен здесь отображаться.
SCM Express Operation Manual v12.0 328 ©Samsung Proprietary and Confidential
Item Description
server registration is canceled.
Retry Pause Time (sec) If the conference system registration is canceled, SCM waits for the retry pause time before it retries sending the OPTIONS message.
Service List Specify the type of conference services on this conference system.
Paging: Station Paging, Paging On Answer
Meet-Me Conference: Meet-Me Conference
One-Step Conference: Predefined, Progressive, Intercom, Dispatch Conferences
Add-On Conference: Add-On, COA Conferences
Service Class Settings
To use the conference features, the conference-related items must be enabled in the
service class. For more information on service classes, see the ‘4.1.36 Feature
Service’.
Service classes can be configured in the [CONFIGURATION > Service >
Feature Service > Class of Service] menu. The following conference-related
items must be enabled.
Add-On Conference: If the service permission is set, the Add-On conference
and COA, features are available.
One-Step Conference: If the service permission is set, Predefined conference,
Progressive conference, Intercom conference, and Dispatch conference
features are available.
Meet-me Conference: If the service permission is set, meet me conference
feature is available.
Station Paging: If the service permission is set, the station paging feature is
available.
Paging On Answer: If the service permission is set, the paging on answer
feature is available.
Feature Code Settings
When a user dials a conference feature code, SCM connects the call to the
conference system. The conference system uses the feature code to determine
which type of conference should be serviced.
The feature codes can be configured in the [CONFIGURATION > Service >
Feature Code] menu. The following conference-related feature codes must be
configured.
Conference: This feature code is used for starting an Add-On conference.
Conference On Answer: This feature code is used for adding a conference
participants by COA.
Predefined Conference: This feature code is used for starting a predefined

Ошибка! Используйте вкладку "Главная" для применения 제목 1 к тексту, который
должен здесь отображаться. Ошибка! Используйте вкладку "Главная" для применения 제목 1 к
тексту, который должен здесь отображаться.
SCM Express Operation Manual v12.0 329 ©Samsung Proprietary and Confidential
conference.
Progressive Conference: This feature code is used for starting a progressive
conference.
Intercom Conference: This feature code is used for starting an intercom
conference
Dispatch Conference: This feature code is used for starting a dispatch
conference from equipments through CTSA interface.
Meet Me Conference Join: This feature code is used for joining a meet-me
conference.
Station Paging: This feature code is used for starting a station paging.
Paging On Answer: This feature code is used for starting a paging on answer.
Conference System Configuration
The conference system information can be configured by clicking the
[CONFERENCE] icon in SCM Administrator.
System Configuration
Using system configuration, you can configure the essential settings for running
the conference system.
Mixer Setting Tab
You can set the audio codec information used by the conference system.
Item Description
Preferred Audio Codec Specify priority for audio codec negotiation.
Outbound Media Options
Determine to provide dual media-both RTP and SRTP-when offering SRTP
Prompt/DTMF Setting Tab
You can set the information related to the prompt used by the conference system.
Item Description
TIMEOUT You can specify the digit input waiting time when the user is instructed to enter a digit during an interactive voice announcement such as for a progressive conference.
Error Prompt Repeat Count
You can specify the retry count for digit input error when the user is instructed to enter a digit during an interactive voice announcement such as for a progressive conference.
Max DTMF Input Length You can specify the maximum digit length when the user is instructed to enter a digit during an interactive voice announcement such as for a progressive conference.
Default Language You can view the language used for voice announcement.
The language used by the conference system for voice announcement follows the language configured for

Ошибка! Используйте вкладку "Главная" для применения 제목 1 к тексту, который
должен здесь отображаться. Ошибка! Используйте вкладку "Главная" для применения 제목 1 к
тексту, который должен здесь отображаться.
SCM Express Operation Manual v12.0 330 ©Samsung Proprietary and Confidential
Item Description
announcement by the SCM.
Meet-Me Dial Number
You can save the number which will be set as telephone number to join the meet-
me conference to insert into the invitation e-mail.
This number should be exist in the DID table to be translated into the Meet-Me
Join feature code.
Misc Setting Tab
You can set the information by the conference system when reserving conferences,
etc.
Item Description
Meet-Me Channels You can view the maximum number of channels allocated for meet me conferences. This is determined by the license key entered.
Alert attendee’s in/out with sound
You can specify whether an alarm will be heard when joining or exiting conferences.
Overbooking Rate You can specify whether overbooking will be allowed when reserving conferences. Overbooking allows reserving a conference for more attendees than the number of available channels, considering those attendees who may not be able to join the conference.
Allow Early Entrance You can specify whether to allow attendees to enter the conference room even before the conference start time for a reserved conference.
If you allow early entrance, you can also specify how many minutes before the start time the attendees will be allowed in.
Sole Participant Audio Type
You can specify the type of music played when an attendee is left alone in the conference room for a reserved conference.
Tone Duration If specifying the type of music played when an attendee is left alone in the conference room for a reserved conference, you must also specify the default duration for repeating the tone.
Gain Controller Threshold (%)
You can specify the control range of audio decibel for conferences.
Jitter Buffer (msec) You can specify the size of jitter buffer of the internal conference mixer.
Paging Setup Time (sec)
You can specify the waiting time for the callee’s answer. If all the extensions answer prior to this timeout, the paging starts immediately.
History Retention Period (day)
You can set how long to keep the conference history data between 10 to 365 days. The default value is 30 days.
Alarm Configuration
You can manage the sound sources for situational sound sources.
Alarm Tone Tab
This screen is used for managing sound sources which are played for different

Ошибка! Используйте вкладку "Главная" для применения 제목 1 к тексту, который
должен здесь отображаться. Ошибка! Используйте вкладку "Главная" для применения 제목 1 к
тексту, который должен здесь отображаться.
SCM Express Operation Manual v12.0 331 ©Samsung Proprietary and Confidential
situations such as joining or exiting conference rooms. You can register new WAV
files or listen to the currently registered sound sources. If registering a tone instead
of music, you must specify the playback duration during which silence is
maintained.
Conference Management
You can configure the settings related to meet-me conferences and predefined
conferences. You can also monitor the currently running conferences.
Meet Me Reservation
You can view reservation status of meet me conference by hours. Hours with
reserved conference(s) are highlighted in different colors. Depending on the ratio
of channels reserved, if less than 50 % are reserved, it is highlighted in green >
yellow and if 50 % or more are reserved, it is highlighted in orange > red.
If you have the SCM in master-slave configuration, choose the node from the node
combo box before you proceed.
When you over the mouse over the timetable, the number of remaining channels is
displayed
You can reserve a conference and send the invitation mails by dragging a time
period with available channels and clicking the [Create] button.
Item Description
Date This is the date for which the conference will be reserved.
Title Enter a title for the conference. This is shown when querying reservation information and is saved in the conference log.
Subject Enter a subject for the conference. This is notified to the attendees when the invitation mail is sent.
Conference ID This is the conference ID used for joining the conference. Use a three-digit number from 100 to 999. Press the [Check] button to check whether the number is available.
Duration This is the conference time.
Number of Attendees Specify the number of attendees for the conference. You must enter within the range of the maximum number of invites shown on the right.
This number determines how many channels will be reserved, and there may be no more channels left for others to use. Therefore, only enter the value you will actually use.
Owner When the conference is running, only the conference owner can view the conference status on PWP.
Attendee List Select conference attendees by clicking the [Select] button. If
selecting an extension subscriber, select the attendee from the list. If selecting an external attendee, enter the name and the email address. The email address is used for sending the invitation mail.
Send Invitation letters Check this if you wish to send the invitation mail to the email addresses of the attendees.
The email field entered when reserving meet me conferences is

Ошибка! Используйте вкладку "Главная" для применения 제목 1 к тексту, который
должен здесь отображаться. Ошибка! Используйте вкладку "Главная" для применения 제목 1 к
тексту, который должен здесь отображаться.
SCM Express Operation Manual v12.0 332 ©Samsung Proprietary and Confidential
Item Description
used for sending the invitation mail. If you are not sending the invitation mail, you do not have to enter the email addresses.
If you are not sending the invitation mail, the conference owner must give separate instruction to the attendees on how to join the conference.
Password This is the password used for joining the conference.
Recurrence You can specify whether to repeat the conference. When changing the recurrence option, you must specify the recurrence period in the date item again.
Early Entrance Early entrance before the conference starts time.
Stay Locked Enable lock so that people cannot join the conference. This is useful when the conference owner does not want other attendees to join the conference.
For example, if the conference owner wants to be the first person in the conference, the owner can unlock and start the conference when he/she is available to join the conference.
After entering all the information, click the [Create] button to create a meet me
conference.
An email account is required for sending invitation mails. If a user ID and a
password is set for auth login in the [PERFORMANCE > Fault > E-mail
Notification Setup] menu in SCM Administrator, this account will be used. If the
setting is not found or invalid, a window is displayed for entering the email
information.
To allow early entrance and conference channel management, a meet me
conference must be reserved at least an hour prior to the conference start time.
To view detailed reservation information, select an hour period for which the
conference is reserved and click the [Details] button. You can change or cancel the
reservation on the Details screen.
Meet-Me Status
You can view, edit or cancel the list of currently reserved meet-me conferences in
a table.
Pre-defined
This menu will be displayed only when the Predefined Conference feature code
has been created.
You can view, create, delete, or edit conference groups for predefined conferences.
If you select a conference group ID from the list on the left, a list of the conference
owner and attendees is shown in the window on the right.
To create a new predefined conference group, click the [Create] button to be
allocated with a conference group ID and register the phone numbers of the
attendees to call for conference.
Item Description

Ошибка! Используйте вкладку "Главная" для применения 제목 1 к тексту, который
должен здесь отображаться. Ошибка! Используйте вкладку "Главная" для применения 제목 1 к
тексту, который должен здесь отображаться.
SCM Express Operation Manual v12.0 333 ©Samsung Proprietary and Confidential
Item Description
Type Select between Pre-defined and a Gateway Pre-defined. Pre-defined group can have up to 31 members while a Gateway Pre-defined group can have 59 members. To utilize a Gateway Pre-defined group, you have to configure a Gateway and a Gateway Conference Server first.
Group ID This is the ID for the newly created conference group. A four-digit number from 1000 to 9999 can be used. Click the [Check] button to check if the ID is available.
Owner This is the owner of the conference group.
Name Enter a name for the conference group. This is used for identifying the conference group when viewing the information.
Select attendees from subscribers
If selecting extension subscribers, you can search for them by their phone numbers or names and enter them as attendees. Select attendees from the search results and click the [Add] button to add them to the attendees list.
Participant List You can add attendees by searching for attendees or manually entering their names and phone numbers and then clicking the [Add] button.
To remove some of the attendees, select them on the list and click the [Remove] selected button. To remove all attendees, click the [Remove All] button.
Select the conference group ID from the list on the left and click the [Edit] or
[Delete] button to edit or delete the conference group.
Current Conference Status
The administrator can monitor the status of currently running conferences real-
time.
Here you can end a conference also.
Using Conference Features
The user can use the conference features in the following ways.
Add-On Conference
You can put the current call on hold and dial ‘Add-On conference feature code +
phone number’ on your phone to call an attendee. When the attendee answers the
call, you can dial the conference feature code to start an conference.
COA
You can put the current call on hold and dial ‘conference on answer feature code +
phone number’ on your phone to call an attendee. When the attendee answers the
call, a conference will start automatically.
Predefined Conference
You can dial ‘predefined conference feature code + conference group ID’ on your
phone to connect to the conference system. The conference system will then call
all the members registered in the conference group and the members answering the

Ошибка! Используйте вкладку "Главная" для применения 제목 1 к тексту, который
должен здесь отображаться. Ошибка! Используйте вкладку "Главная" для применения 제목 1 к
тексту, который должен здесь отображаться.
SCM Express Operation Manual v12.0 334 ©Samsung Proprietary and Confidential
call are included in the conference. Members must be defined for the conference
group.
Progressive Conference
You can dial ‘progressive conference feature code’ on your phone to connect to
the conference system and then enter the members to call as instructed by the
voice announcement of the conference system. The conference system will then
call all the members and the members answering the call are included in the
conference.
Intercom Conference
You can dial ‘Intercom conference feature code + hunt group telephone number’
on your phone to connect to the conference system. The conference system will
then call all the members registered in the hunt group and the call will be
automatically answered by the members for conference. Members must be defined
for the hunt group
Meet Me Conference
When it is the time for the meet me conference, you can dial ‘meet me conference
join feature code + conference ID’ on your phone to connect to the conference
system and the conference system will include you in the conference.
When using an external phone, you can dial the phone number for the conference
system and then dial the meet me conference join feature code + conference ID as
instructed by the voice announcement of the conference system to join the
conference.
The meet me conference’s invitation mail includes the necessary information such
as the phone number for the conference system, the meet me conference join
feature code, and the conference ID.
To join a meet me conference, the conference must be reserved and you must
know the conference id and password.
Station Paging
You can dial ‘paging + paging group telephone number’ on your phone to connect
to the conference system. The conference system will then call all the members
registered in the paging group and the call will be automatically answered by the
members for station paging. Members must be defined for the paging group.
Paging On Answer
You can dial ‘paging on answer feature code + paging on answer group telephone
number’ on your phone to connect to the conference system. The conference
system will then call all the members registered in the paging on answer group and
the call will be automatically answered by the members for paging on answer.
Members must be defined for the paging on answer group.
Conference Member Eject
A member joined in a conference can be deleted by another member. The feature
permission is allowed to conference owner or a user which setup the conference.
To delete a user of the conference, hold the conference call and dial with

Ошибка! Используйте вкладку "Главная" для применения 제목 1 к тексту, который
должен здесь отображаться. Ошибка! Используйте вкладку "Главная" для применения 제목 1 к
тексту, который должен здесь отображаться.
SCM Express Operation Manual v12.0 335 ©Samsung Proprietary and Confidential
‘Conference Member Eject Feature Code + User Number’. The user which
requests this service can know whether the service is failed or not with
announcement.
Conference History Management
Event Reports
The administrator can use the [CONFERENCE > Event Reports] menu to view
the events generated during the conference. Here, the administrator can monitor
creation and participation status of the conference real-time.
Mixer Management
The administrator can use the [CONFERENCE > Mixer Management] menu to
view the mixer status.
Select system status to view the number of currently running conferences and the
number of attendees for each conference.
Select system event to view the events generating in the mixer.
History Management
The administrator can use the [CONFERENCE > History Management] menu
to view the conference system history.
Select conference history to view the list of conferences processed by the
conference system by dates, etc.
Select system history to view history related to conference system operation and
management including conference system start and stop.
You can delete unnecessary history entries.

Ошибка! Используйте вкладку "Главная" для применения 제목 1 к тексту, который
должен здесь отображаться. Ошибка! Используйте вкладку "Главная" для применения 제목 1 к
тексту, который должен здесь отображаться.
SCM Express Operation Manual v12.0 336 ©Samsung Proprietary and Confidential
Automatic Call Distribution (ACD)
The Automatic Call Distribution (ACD) service is useful when there are more
incoming calls than the people available to answer them. If the ACD feature is
enabled, callers do not need to hear the busy tone for a long time or get delayed in
getting their calls answered. When a call is connected while the ACD group is
busy, the call is put in waiting status until an agent becomes available, and a
waiting announcement is played for the caller so that the caller can wait until an
agent answers the call.
To use the ACD feature, three sets of information must be configured. Only when
these items are configured, ACD calls can be supported with waiting when busy,
waiting announcement, agent allocation, agent distribution, etc.
Creating ACD Agents
Agent IDs are specified for each user group regardless of the system extension
number.
An agent can use any phone to login with his/her agent ID and password to have
the ACD group’s incoming calls distributed to the phone used for login.
ACD agents can be created in the [CONFIGURATION > Application > ACD >
ACD Agent] menu.
Item Description
User Group Select a user group for which the ACD agent will be created.
Agent ID Enter the user ID used by the ACD agent to log into the ACD group. This is the key data identifying each agent and must not be entered in duplicate.
Password Enter the password used by the ACD agent to log into the ACD group.
Agent Name You can enter the name of the ACD agent. This is used for easy identification of the agent and can be entered in duplicate.
Node Name Select a node name for which the ACD agent will be created.
Configuring ACD Group
The way of distributing ACD calls and the configuration for ACD call processing
are described as follow.
ACD groups can be configured in the [CONFIGURATION > Application >
ACD > ACD Group] menu.
The following sets of information can be configured for ACD groups.
ACD Group Basic Information
The basic ACD group settings such as the list of agents logging into the ACD
group and the method for distributing incoming calls to agents must be set.

Ошибка! Используйте вкладку "Главная" для применения 제목 1 к тексту, который
должен здесь отображаться. Ошибка! Используйте вкладку "Главная" для применения 제목 1 к
тексту, который должен здесь отображаться.
SCM Express Operation Manual v12.0 337 ©Samsung Proprietary and Confidential
Item Description
User Group Select a user group for which the ACD group will be created.
Name Enter a name for the ACD group. This is used for easy identification of the ACD group and can be entered in duplicate.
Group Number Enter a number to call the ACD group. This is the key data identifying each ACD group and must not be entered in duplicate with any extension number or extension group number.
Agent Select Method
When there are two or more available ACD agents, select the method for selecting an agent for call distribution.
Longest Idle Agent: When distributing an ACD group call to an agent, the call is distributed to the agent with the longest idle time.
Least Occupied Agent: When distributing an ACD group call to an agent, the call is distributed to the agent with the fewest calls since login.
Sequence Mode: Calls are distributed to the ACD group’s agents in a sequence.
Group Members Register the IDs of the agents allowed to log into the ACD group.
You can select from the agent IDs created in the [CONFIGURATION > Application > ACD > ACD Agent] menu.
ACD Overflow
When there is an incoming ACD group call, the call will be connected to an agent
if an agent is available. But if no agent is available, the call will standby for the
ACD group and the caller will continue to hear the greeting and the MOH one
after another. If no agent becomes available after a long time of waiting, the call
can be forwarded to another ACD group, etc.
You can set the following information for forwarding calls to another number, etc.
When the calls waiting for the ACD group cannot be connected because no agent
is available for a long time.
Item Description
Overflow Time (sec)
When there is an incoming call for the ACD group, the settings must be made to forward the call to another ACD group, etc. if no agent is available to answer the call or an agent connected does not answer for a long time.
Overflow Destination
You can specify the phone number to which incoming calls for the ACD group will be forwarded if not answered by any agent during ‘Next Destination Overflow Time (sec)’.
When ‘Next Destination Overflow Time (sec)’ has exceeded and the call has to be forwarded to another number, but if the number set for this item is unavailable for receiving calls, the call is terminated. If no phone number is set for this item, the call is forwarded to Operator Group.
All Busy Destination
When there is an incoming ACD group call and all agents are busy, the call can be forwarded to another ACD group, etc. without waiting. If a phone number is set for this item, the call will be forwarded immediately.
Take note that if the phone number is unavailable for receiving calls, the call will be terminated.

Ошибка! Используйте вкладку "Главная" для применения 제목 1 к тексту, который
должен здесь отображаться. Ошибка! Используйте вкладку "Главная" для применения 제목 1 к
тексту, который должен здесь отображаться.
SCM Express Operation Manual v12.0 338 ©Samsung Proprietary and Confidential
Item Description
All Logout Destination
When there is an incoming ACD group call, if no agent is logged in, the call can be forwarded to another ACD group, etc. If a phone number is set for this item, the call will be forwarded immediately. If the phone number set is unavailable for receiving calls, the call will be terminated.
Agent No Answer Time (sec)
If a call connected to an agent is not answered by the agent for a specified period of time, the call can be connected the next agent. If the agent does not answer after ‘Agent No Answer Time (sec)’, the connection is canceled and the call is connected to the next agent. This setting is necessary as situations arise whereby agents are unable to answer calls. If no other agent is available after this period of time, the phone will keep ringing.
ACD Miscellaneous Information
The following additional information can be configured for processing ACD group
calls.
Item Description
Maximum Queuing Count
Greetings and MOH are played for callers waiting for ACD groups.
Since SCM’s built-in announcement system has limited number of channels, it is necessary to limit the number of calls waiting for ACD.
You must use this item to specify the maximum number of calls allowed to wait for ACD.
Maximum Overflow Count
When forwarding an incoming ACD group call to another phone number, if the phone number is an ACD group number, you must specify the maximum number of calls allowed to be forwarded.
Queuing Wait Time (sec)
When there is an incoming ACD group call, the caller may find it strange if the greeting is played immediately. Therefore, you must specify a time period for which the caller will hear the ring-back tone before listening to the first greeting.
Minimum Greet Listen Time (sec)
When an agent becomes available while the greeting is being played, the caller may find it strange if the greeting suddenly stops and the call is connected to an agent. Therefore, you must specify a minimum time period for which the greeting will be played before connecting the call to an agent.
No Answer Wrap-Up Time (sec)
When an incoming ACD group call is connected to an agent but the agent did not answer the call and the call is connected to the next agent, the agent who became idle because he/she failed to answer the call is likely to be unable to answer the next connected call as well. Therefore, you must specify a time period during which the incoming calls for the ACD group will not be connected to the agent. Incoming ACD group calls will not be distributed to the agents who became idle because they did not answer ACD calls during this period of time.
Normal Wrap-Up Time (sec)
When an agent answers an ACD group call and ends the call, the agent needs some time to wrap up. You must specify the time period during which ACD group calls will not be connected to the agent after an ACD call.
Supervisor Number You can specify the phone number of an ACD group supervisor, whom the agents can consult for urgent matters.
This information can be downloaded for the agent program so that

Ошибка! Используйте вкладку "Главная" для применения 제목 1 к тексту, который
должен здесь отображаться. Ошибка! Используйте вкладку "Главная" для применения 제목 1 к
тексту, который должен здесь отображаться.
SCM Express Operation Manual v12.0 339 ©Samsung Proprietary and Confidential
Item Description
the supervisor can be connected with a single click.
Queuing Level-up Interval (sec)
‘ACD Queuing Level’ is incremented by one per [Queuing Level-up Interval (sec). ACD Queuing Level 0-9 is available. The higher the ‘ACD Queuing Level]’is, the shorter the queue waiting
time is.
At the time of the first incoming, ‘ACD Queuing Level’ can be set in the [CONFIGURATION > Trunk Routing > CLI Routing] and [CONFIGURATION > Trunk Routing > DID Routing].
Node Name Select a node name for which the ACD group will be created.
Call Distribution Mode
Select a call distribution mode.
Auto: Determined the call distribution mode by CSTA application’s condition.
SCM: Call is distribution by SCM.
CSTA: Call is distribution by CSTA.
Auto Attendant Plan Schedule
Select a Ring Plan Schedule to use when call is transferred to AA.
Configuring ACD Announcement
The way of connecting Greeting message for incoming ACD call can be
configured.
It sets in the [CONFIGURATION > Application > ACD > ACD Greeting
Message].
ACD Announcement
When there is an incoming call for the ACD group, the caller is allowed to listen to
the ring-back tone for a certain period of time and then the call is connected to
SCM’s announcement system for an announcement. If an agent is available at this
point, the call is connected to the agent. If no agent is available, the call will
continue to standby for the ACD group as the announcement and the MOH are
played one after another. If an agent becomes available during the announcement
or the MOH, the announcement or the MOH will stop and the call will be
connected to the available agent. The caller will hear the ring-back tone or the
MOH until the call is answered by the agent.
The following information can be configured for the announcement played for
callers waiting for the ACD group.
Item Description
First Greet Message (Available)
You can specify the ID of a first greeting to play when there is an incoming call for the ACD group and an agent is available to answer the call.
The call will be connected to an agent when the first greeting finishes playing. If no first greeting is set, the call will be connected to an agent without any announcement.
First Greet Message (All Busy)
You can specify the ID of a first greeting to play when there is an incoming call for the ACD group and no agent is available to answer the call.

Ошибка! Используйте вкладку "Главная" для применения 제목 1 к тексту, который
должен здесь отображаться. Ошибка! Используйте вкладку "Главная" для применения 제목 1 к
тексту, который должен здесь отображаться.
SCM Express Operation Manual v12.0 340 ©Samsung Proprietary and Confidential
Item Description
When the first greeting finishes playing, the MOH and the greeting will be played one after another until an agent becomes available.
First MOH ID You can specify the ID of the MOH to play after the first greeting and before the second greeting.
First Greeting Repeat
You can specify the number times to repeat the first greeting.
First MOH Duration (sec)
You can specify the period of time to play the first MOH.
Second Greeting Message 1~7
After the first greeting and the MOH are played, the second greeting and the second MOH will be played after one another until an agent become available to answer the call. You can specify the ID of a second greeting here. Second MOH is played in order (1~7).
Second MOH ID 1~7
After the first greeting and the MOH are played, the second greeting and the second MOH will be played after one another until an agent become available to answer the call. You can specify the ID of a second MOH here.
Second MOH is played in order (1~7).
Second Greeting Repeat 1~7
You can specify the number times to repeat each the second greeting.
Second MOH Duration 1~7 (sec)
You can specify the period of time to play each the second MOH.
Last Repeated Greeting Message
After all second greeting message (1-7) and all second moh (1-7) finish, if caller is still waiting for agent, SCM supports Last Repeated Greeting Message. You can specify the ID of a Last Repeated Greeting Message.
Last Repeated MOH ID
After all second greeting messages (1-7) and all second MOH (1-7) finish, if caller is still waiting for agent, SCM supports Last Repeated MOH. You can specify the ID of a Last Repeated MOH.
Last Repeated Greeting Repeat
You can specify the number times to repeat the last repeated greeting.
Last Repeated MOH Duration (sec)
You can specify the period of time to play the last repeated MOH.
Release Message If a call is disconnected without any connection to agent, SCM support a specific Release Message. You can specify the ID of a Release Message.
Release Message Repeat
You can specify the number times to repeat the release message.
ACD Agent Status
This section describes the agent status, which is used for distributing incoming
calls for ACD groups.
An agent’s status can be in one of the following three:
Logged In: The agent is available to take calls as a member of an ACD group.
Wrap-Up: The agent is wrapping up after ending an ACD group call.

Ошибка! Используйте вкладку "Главная" для применения 제목 1 к тексту, который
должен здесь отображаться. Ошибка! Используйте вкладку "Главная" для применения 제목 1 к
тексту, который должен здесь отображаться.
SCM Express Operation Manual v12.0 341 ©Samsung Proprietary and Confidential
Break: The agent is taking a break.
An agent can log in/out or register or cancel the wrap-up or break status by dialing
the feature codes.
The feature codes for registering and canceling the agent status can be created in
the [CONFIGURATION > Service > Feature Service > Feature Code] menu.
Logged In: The ‘ACD Agent Login-Login’ and ‘ACD Agent Login-Logout’
feature codes must be configured.
Wrap-Up: The ‘ACD Agent Wrap-Up-Set’ and ‘ACD Agent Wrap-Up-
Cancel’ feature codes must be configured.
Break: The ‘ACD Agent Break-Set’ and CD Agent Break-Cancel’ feature
codes must be configured.
Agents’ login status can be viewed for each ACD group in the
[CONFIGURATION > Application > ACD > ACD Group Status] menu.
Agents’ wrap-up and break status can be viewed for each ACD agent in the
[CONFIGURATION > Application > ACD > ACD Agent] menu.
Log In/Out
For an agent to be able to answer ACD group calls, the agent must log into an
ACD group.
The agent can log in by dialing ‘[ACD Agent Login-Login] feature code +
agent ID + agent password + ACD group number’ on the phone.
If an ACD group number is entered when logging in, the agent will be logged
into the selected group only. If no ACD group number is entered, the agent
will be logged into all the groups the agent belongs to.
For an agent to be unavailable to answer ACD group calls, the agent must log out
of an ACD group.
The agent can log out by dialing ‘[ACD Agent Login-Logout] feature code +
agent password + ACD group number’ on the phone.
If an ACD group number is entered when logging out, the agent will be logged
out of the selected group only. If no ACD group number is entered, the agent
will be logged out of all the groups the agent belongs to.
Wrap-up
When an agent does not answer an ACD group call and the call ends, or when the
agent answers a call and the call ends, the agent automatically enters the wrap-up
status. Although ACD group calls are not connected when an agent is in the wrap-
up status, the status indicates that the agent is busy working.
If an agent wishes to extend the time for the wrap-up status, the agent can register
the wrap-up status by dialing the ‘ACD Agent Wrap-Up-Set’ feature code.
If an agent wishes to end the wrap-up status and become available to answer ACD
group calls, the agent can cancel the wrap-up statuses by dialing the ‘ACD Agent

Ошибка! Используйте вкладку "Главная" для применения 제목 1 к тексту, который
должен здесь отображаться. Ошибка! Используйте вкладку "Главная" для применения 제목 1 к
тексту, который должен здесь отображаться.
SCM Express Operation Manual v12.0 342 ©Samsung Proprietary and Confidential
Wrap-Up-Cancel’ feature code.
Break
An agent can register the break status instead of logging out so that no ACD group
calls are connected to the agent. The break status indicates that the agent is not
busy working.
If an agent wishes to take a break, the agent can register the break status by dialing
the ‘ACD Agent Break-Set’ feature code.
If an agent wishes to end the break status and become available to answer ACD
group calls, the agent can cancel the break status by dialing the ‘ACD Agent
Break-Reset’ feature code.
ACD Statistics
SCM provides statistics on the incoming calls processed by ACD groups and ACD
calls processed by agents.
For more information on ACD statistics, see the ‘Statistics Reports’ section in
Chapter 6.
ACD Agent Program
While it is possible for ACD agents to handle ACD calls just using phones, they
can handle ACD calls more efficiently by using a dedicated agent program.
A separate license is required for using the dedicated ACD agent program. The
program supports features such as real-time monitoring of calls waiting for the
ACD group.
For more information on the ACD agent program, see the ‘External Applications’
section in Chapter 5.
ACD Wallboard ID
This menu provides ACD Wallboard ID configuration. Select CONFIGURATION
> Application > ACD > ACD Wallboard ID
Item Description
User Group Specify a user group which the ACD Wallboard ID will be created.
ID Enter the User ID used by the ACD Wallboard ID to log in
Password Enter the password used by the ACD Wallboard to log in
Node Name Specify a node name for which the ACD Wallboard ID will be created

Ошибка! Используйте вкладку "Главная" для применения 제목 1 к тексту, который
должен здесь отображаться. Ошибка! Используйте вкладку "Главная" для применения 제목 1 к
тексту, который должен здесь отображаться.
SCM Express Operation Manual v12.0 343 ©Samsung Proprietary and Confidential
External Application
Communicator
The Samsung Communicator is Unified Communications Client software running
on a client PC that takes the functionality commonly used and understood on our
telephones and puts it at your finger tips and Screens on your PC. The Samsung
Communicator can be run in three different Device Modes. The Samsung
Communicator can be a Stand-alone device when in the Soft Phone Mode, when in
UC Phone Mode it can work in connection to a UC Phone (SMT-i Series) device.
When in Desk Phone Mode, it can work in connection to SCM directly via CSTA
I/F for call control of UC Phone (SMT-i Series)
Refer to the ‘Samsung Communicator User Guide’ for detailed information.
ACD Agent Program
ACD Agent is a call center agent that enables call center agents to operate the
SCM Express system effectively and enables managing call center agents.
Agent provides all functions that can be performed by call center agents for
operating the call center.
ACD Agent Desktop is the Windows-based Client Application that resides on the
agent’s computer. With Agent ACD, you can control calls with your computer.
The ACD Agent allows you to:
Call Control
Make Calls, Answer Calls, Hang-up Call
Hold Call, Retrieve Call
Transfer Calls, Blind Transfer Call
Conference Calls
Favorites
Agents, Tel Number, ACD Group
History Call Log
ACD Incoming Call, Non-ACD Call
Monitoring
Provides the real time status information of the ACD Group where the Agent
belongs.
Number of wait calls: Currently waiting for the call distribution.
Number of Logged-in Agents

Ошибка! Используйте вкладку "Главная" для применения 제목 1 к тексту, который
должен здесь отображаться. Ошибка! Используйте вкладку "Главная" для применения 제목 1 к
тексту, который должен здесь отображаться.
SCM Express Operation Manual v12.0 344 ©Samsung Proprietary and Confidential
Longest ACD wait time (current): Waiting time of the call that has waited for
the longest time among the calls currently waiting
Number of IDLE Agents: Agents that the call distribution service has
available.
Refer to the ‘ACD Agent User Guide’ for detailed information.

SCM Express Operation Manual v12.0 345 ©Samsung Proprietary and Confidential
Chapter 6 System Management
This chapter describes the features required for system management.
Managing System Access
Access Permission
You can use SCM Administrator to control access for operators.
Use the [MANAGEMENT> Access Permission> Administrator] menu to
manage operators’ ID, password, class, login timeout, password duration, forced
password change, etc.
Class is identified with ENGINEERING, TECHNICIAN, and CUSTOMER.
Login timeout supports function which auto logout after time set if nobody use
administrator.
Password duration supports how many days login without password confirmation.
If duration is over, it should display password change dialog box.
Forced password change supports even password duration is over, administrator
can operate without password change. If set to ‘No’, operator just close password
change dialog and continuously work. But if set to ‘Yes’, close password change
dialog, it should logout SCM Administrator
Password is following these rules:
Status Description
Password Duration Default (30), Min (7), Max (999) days
Use same password with previous
Not allowed
Password length Min (6), Max (40)
Simple Password Not allowed only characters or digits (ex: abcdef, 12345)
Consecutive use Not allowed more than 4 consecutive use of a same character or digit (ex: aaaa12, 1111pass)
Same as ID Not allowed same as ID or reserved ID
Use the [MANAGEMENT > Access Permission > Terminal] menu to control
access by entering user terminal information.
Use the [MANAGEMENT > Access Permission > Log-in] menu to view status
of current users. To log out a user, select the user and click the Log Out button.

Ошибка! Используйте вкладку "Главная" для применения 제목 1 к тексту, который
должен здесь отображаться. Ошибка! Используйте вкладку "Главная" для применения 제목 1 к
тексту, который должен здесь отображаться.
SCM Express Operation Manual v12.0 346 ©Samsung Proprietary and Confidential
Access Control List
SCM provides ACL function to control access from outer side.
Administrator can configure the five types of ACL services to allow or deny
accesses.
ACL Options
Administrator can enable/disable ACL function per services like SNMP Trap
ACL, ICMP ACL, Administrator can configure the ACL options (like Port, Policy,
and Level) for each service in [Management > ACL > ACL Options] menu.
ICMP ACL
Administrator can configure policy (drop/allow) for incoming ICMP request by
specifying IP Address and Net mask.
Unauthorized SIP ACL
This option is able to protect the fraudulent sip call use of SCM. By setting it
enable, you can prevent a unauthorized SIP call from going through SCM via SIP
trunk or SIP peering. In addition, SCM blocks the unauthorized IP address, port
and protocol for specified period.
If Mobile SIP ACL Policy which is ACL option set "allow", SCM doesn't prevent
SIP message by Samsung-Mobile-Phone.
The allowed IP lists are the following.
Endpoint IP
Registered sip station IP
Application Server IP
Miscellaneous ACL IP
SIP ACL White List IP
SIP Storming
This option is able to protect the SIP burst packets from same IP address. By
setting it enable, you can prevent attacks that using abnormal sip packets from
same IP address. SCM block the detected IP address for specified period using
decision time and threshold value.
Management Port ACL
This options allows administrator control the default ports of FTP, SSH, Telnet,
WEB, and SNMP.
Administrator can configure the trusted IP Address and Net mask. If this option is
enabled in ACL option menu, only trusted configured IP Address/Net mask can
access this system.
Miscellaneous ACL
This options allows administrator control any protocol (None, TCP, and UDP),
source IP Address/Net mask, source Port, destination IP Address/Net Mask,

Ошибка! Используйте вкладку "Главная" для применения 제목 1 к тексту, который
должен здесь отображаться. Ошибка! Используйте вкладку "Главная" для применения 제목 1 к
тексту, который должен здесь отображаться.
SCM Express Operation Manual v12.0 347 ©Samsung Proprietary and Confidential
destination port, Policy (drop, allow) and Direction (Inbound, outbound).
Administrator can configure his/her own ACL rule by making combination of
those above.
It works when the Miscellaneous ACL option is set to ‘Enable’ in ACL menu like
other ACL services.
SNMP Trap ACL
Administrator can configure policy (drop/allow) for incoming SNMP Trap by
specifying IP Address, Net mask and Port.
SIP ACL White List
Administrator can configure exception list for Unauthorized SIP ACL by
specifying IP Address, Net mask and Port.

Ошибка! Используйте вкладку "Главная" для применения 제목 1 к тексту, который
должен здесь отображаться. Ошибка! Используйте вкладку "Главная" для применения 제목 1 к
тексту, который должен здесь отображаться.
SCM Express Operation Manual v12.0 348 ©Samsung Proprietary and Confidential
Process Management
SCM is a complex ecosystem of many processes (programs). Therefore, such
processes are managed by Process Manager, which performs the following
functions:
Start/stop SCM
Process management
Start/stop individual processes by administrator request
View process version information
SCM Start/Stop
Automatic SCM Start
After installing SCM, if you execute the database initialization and IP
configuration, the SCM system automatically restarts. Also when the SCM server
is turned on, SCM starts automatically.
Manual SCM Stop/Start
You can manually stop or start SCM by executing desktop icons on Linux screen.
They are ‘Start SCM’ and ‘Stop SCM’ icons.
Process Management
Process Monitoring
SCM’s Process Manager is constantly monitoring status of all processes. When a
process halts, it is automatically restarted.
If the restarted process is terminated abnormally again a number of times, Process
Manager will not restart it any more. This is because Process Manager determines
that the process will be terminated abnormally again even if it is restarted.
Process Status
A process in SCM can be in any of the status listed below. NORMAL indicates
that the process is normally running.
Status Description
NORMAL The process is running normally.
ALIVE The process is running but unable to exchange IPC messages with other processes.
WAIT The process is started but has not yet exchanged the initial heartbeat message.
FAIL The process is not running.
SYNC When SCM is configured for redundancy, data has been synchronized between standby SCM and active SCM and the standby process has

Ошибка! Используйте вкладку "Главная" для применения 제목 1 к тексту, который
должен здесь отображаться. Ошибка! Используйте вкладку "Главная" для применения 제목 1 к
тексту, который должен здесь отображаться.
SCM Express Operation Manual v12.0 349 ©Samsung Proprietary and Confidential
Status Description
stopped.
You can view the process status in the [Performance > System Management >
Process Management] menu.
Process Level (Importance)
SCM classifies processes into Critical, Major, or Normal levels depending on their
effect on the system. The table below shows management policy for each level.
Level Policy
CRITICAL The process cannot be terminated by the system administrator.
If the process is terminated abnormally, it is restarted.
In a redundant SCM system, when the process in active SCM is terminated abnormally, the system immediately switches over to standby SCM.
In a redundant SCM system, when the process in standby SCM changes status from ALIVE to NORMAL, data is synchronized between standby SCM and active SCM.
In a redundant SCM system, when the process in standby SCM changes status from WAIT to NORMAL, data is synchronized between standby SCM and active SCM.
This does not include the situation when the system is restarting and the process status changes from WAIT to NORMAL.
MAJOR The process can be terminated by the system administrator.
If the process is terminated abnormally, it is restarted.
In a redundant SCM system, when the process in active SCM is terminated abnormally, the system switches over to standby SCM after four attempts to restart the process.
In a redundant SCM system, when the process in standby SCM changes status from ALIVE to NORMAL, data is synchronized between standby SCM and active SCM.
In a redundant SCM system, when the process in standby SCM changes status from WAIT to NORMAL, data is synchronized between standby SCM and active SCM.
NORMAL The process can be terminated by the system administrator.
If the process is terminated abnormally, it is restarted.
In a redundant SCM system, when the process in active SCM is terminated abnormally, the system does not switch over.
In a redundant SCM system, when the process in standby SCM changes status from ALIVE to NORMAL, data is synchronized between standby SCM and active SCM.
In a redundant SCM system, when the process in standby SCM changes status from WAIT to NORMAL, data is synchronized between standby SCM and active SCM.
Individual Process Start/Stop
The SCM administrator can stop running processes or start stopped processes.
You can stop or start processes in the [Performance > System Management >

Ошибка! Используйте вкладку "Главная" для применения 제목 1 к тексту, который
должен здесь отображаться. Ошибка! Используйте вкладку "Главная" для применения 제목 1 к
тексту, который должен здесь отображаться.
SCM Express Operation Manual v12.0 350 ©Samsung Proprietary and Confidential
Process Management] menu.
Click the [Activate] button and select a stopped process and click the
[Activate] button to start it.
Click the [Deactivate] button and select a running process and click the
[Deactivate] button to stop it.
Viewing Process Version Information
For every process in SCM there is information on the version, date created and
time created.
You can view this information in the [Performance > System Management >
Process Version] menu.
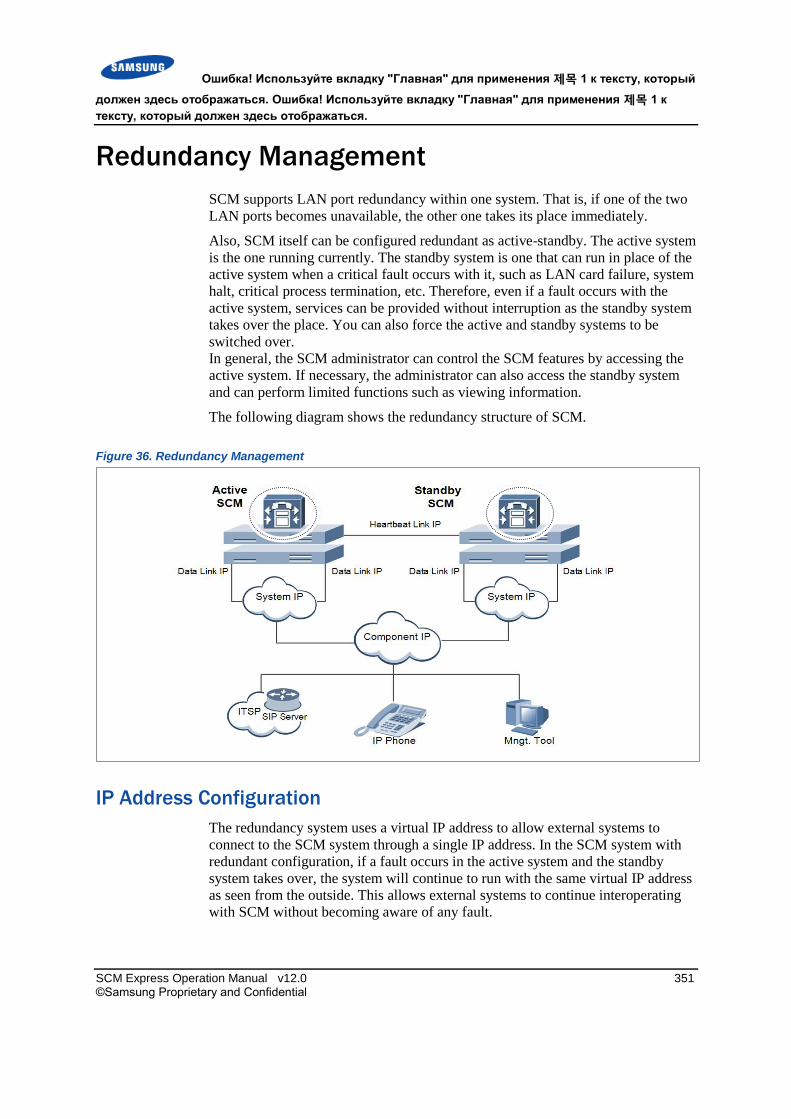
Ошибка! Используйте вкладку "Главная" для применения 제목 1 к тексту, который
должен здесь отображаться. Ошибка! Используйте вкладку "Главная" для применения 제목 1 к
тексту, который должен здесь отображаться.
SCM Express Operation Manual v12.0 351 ©Samsung Proprietary and Confidential
Redundancy Management
SCM supports LAN port redundancy within one system. That is, if one of the two
LAN ports becomes unavailable, the other one takes its place immediately.
Also, SCM itself can be configured redundant as active-standby. The active system
is the one running currently. The standby system is one that can run in place of the
active system when a critical fault occurs with it, such as LAN card failure, system
halt, critical process termination, etc. Therefore, even if a fault occurs with the
active system, services can be provided without interruption as the standby system
takes over the place. You can also force the active and standby systems to be
switched over.
In general, the SCM administrator can control the SCM features by accessing the
active system. If necessary, the administrator can also access the standby system
and can perform limited functions such as viewing information.
The following diagram shows the redundancy structure of SCM.
Figure 36. Redundancy Management
IP Address Configuration
The redundancy system uses a virtual IP address to allow external systems to
connect to the SCM system through a single IP address. In the SCM system with
redundant configuration, if a fault occurs in the active system and the standby
system takes over, the system will continue to run with the same virtual IP address
as seen from the outside. This allows external systems to continue interoperating
with SCM without becoming aware of any fault.

Ошибка! Используйте вкладку "Главная" для применения 제목 1 к тексту, который
должен здесь отображаться. Ошибка! Используйте вкладку "Главная" для применения 제목 1 к
тексту, который должен здесь отображаться.
SCM Express Operation Manual v12.0 352 ©Samsung Proprietary and Confidential
IP Address Types
There are two types of virtual IP addresses: system virtual IP addresses
(hereinafter referred to as system IP addresses) and component virtual IP addresses
(hereinafter referred to as component IP addresses).
Following is the types of IP addresses (including the virtual IP addresses) which
are managed by redundant SCM systems.
Component IP Address
This IP address exists only in redundant SCM systems.
This is the virtual IP address used for redundancy configuration of the system.
This IP address is used for actual communication with the system which
interoperates with the SCM system.
This IP address is used by the system which becomes active when the system
is switched over.
System IP Address
This is the virtual IP address used for redundancy configuration of two data
links (LAN ports).
This IP address is used for actual communication with the system which
interoperates with the SCM system when redundancy is not used.
This IP address is used for actual communication with the system which
interoperates with the SCM system.
If there are two LAN ports in the system and one of them becomes unavailable, the
other LAN port will use the system IP address.
Heartbeat Link IP Address
This is the IP address of the dedicated link used for exchanging the
redundancy status information between two redundant SCM systems.
This does not exist in non-redundant SCM systems.
Data Link IP Address
This is the actual IP address of the network interface controller.
Stand Alone System IP Configuration
The diagram below shows the IP address configuration for a non-redundant stand
alone SCM system.

Ошибка! Используйте вкладку "Главная" для применения 제목 1 к тексту, который
должен здесь отображаться. Ошибка! Используйте вкладку "Главная" для применения 제목 1 к
тексту, который должен здесь отображаться.
SCM Express Operation Manual v12.0 353 ©Samsung Proprietary and Confidential
Figure 37. Standalone System IP Configuration
Redundant System IP Address Configuration
The diagram below shows the IP address configuration for a redundant SCM
system.
Figure 38. Redundant System IP Address Configuration
Don’t change or delete any Linux system files. Don’t modify the script files
(/etc/sysconfig/network-scripts/) to change the MAC address and IP address.
Redundancy Status
A redundant system can be in one of these four modes: active, standby, active-
alone, and standby-alone.
Active Mode
The system is running and providing services.
In this mode, SCM sends and receives redundancy status information to and from
the standby SCM system via the heartbeat link.
Active System
eth 0: 1 or eth 1: 1
Data Link IP Same Network Address Area
Component IP
Standby System
eth 0: 1 or eth 1: 1
eth 0 eth 1 eth 0 eth 1
eth 2 eth 2
eth 0: 2 or eth 1: 2
Data Link IP Same Network Address Area
Heartbeat IP (Cross Cable)
Stand Alone System
eth 0 eth 1
eth 0: 1 or eth 1: 1
Data Link IP Same Network Address Area
System IP

Ошибка! Используйте вкладку "Главная" для применения 제목 1 к тексту, который
должен здесь отображаться. Ошибка! Используйте вкладку "Главная" для применения 제목 1 к
тексту, который должен здесь отображаться.
SCM Express Operation Manual v12.0 354 ©Samsung Proprietary and Confidential
Standby Mode
The system is not providing services but standing by.
In this mode, SCM sends and receives redundancy status information to and from
the active SCM system via the heartbeat link.
Active-Alone Mode
The system is running and providing services only as an active system.
In this mode, SCM does not send or receive redundancy status information to and
from the standby system SCM via the heartbeat link.
Standby-Alone Mode
The system is not providing services but standing by.
In this mode, SCM does not send or receive redundancy status information to and
from the active system SCM via the heartbeat link.
Unknown Mode
Redundancy status is unknown.
The system is currently loading and redundancy status has not yet been
determined.
Redundancy Features
SCM redundancy supports LAN interface redundancy, system redundancy, and
data synchronization.
LAN Interface Redundancy
LAN interface redundancy is a way to guarantee the system connection via LAN.
Two or more physical LAN interface cards are installed on the system. The system
constantly monitors the status of the interface cards and ensures that the system’s
IP address (system virtual IP address) always stays mapped to a working interface
card.
The LAN interface cards must provide ways to monitor their status. On Linux,
their status can be checked by Machine Independent Interface (MII).
Therefore, even when the data link is fails due to LAN interface card failure or
poor LAN cable connection, a standby data link resumes operation to provide
uninterrupted services.
System Redundancy
System redundancy is a way to prevent system service interruptions by system
faults.
The system consists of an active system and a standby system. The active system
provides services using the system’s representative IP address (component IP
address).
The standby system uses the heartbeat to monitor the active system status. Since
other network components communicate with SCM by using the component IP

Ошибка! Используйте вкладку "Главная" для применения 제목 1 к тексту, который
должен здесь отображаться. Ошибка! Используйте вкладку "Главная" для применения 제목 1 к
тексту, который должен здесь отображаться.
SCM Express Operation Manual v12.0 355 ©Samsung Proprietary and Confidential
address, if there is a fault with the active system, the standby system switches over
as the active system and continues to provide services using the component IP
address.
The standby SCM system takes over and provides uninterrupted services in the
following situations:
Both the data links have failed for the active SCM system.
A critical-level process is terminated in the active SCM system.
A major-level process is abnormally terminated repeatedly. (The system
switches over if the process is terminated four times in a row.)
When Critical memory alarm lasts during some period of time
When Critical CPU alarm lasts during some period of time
The active SCM system is down (by the power off command).
The switch-over command is executed in the [Performance > System
Management > System Switch Over] menu of the active SCM system.
When a problem occurs at Active system, Standby system must be switched to
Active status in general. But it is not switched exceptionally when it is next.
If it takes over once, it does not switchover again within 30 seconds.
It does not do redundancy change during data synchronization between Active
and Standby systems.
When Standby system cannot get the data from Active successfully, in other
words, it fails in data synchronization. it does not do redundancy change,
When the processes of the Standby system down, it does not conduct a
redundancy change.
Even if all above cases, if all interfaces are down or cable has problem in
Active System or if Active system is down, redundancy change occurs.
Data Synchronization
If SCM is configured for redundancy, the standby system must keep the same data
as the active system as to make provision for faults with the active system.
Therefore, all active processes running in SCM communicate with the standby
processes and perform data synchronization.
SCM processes perform data synchronization in the following situations:
All data is synchronized when the standby SCM restarts.
All data is synchronized when the heartbeat link went down and is restored
during operation.
All data is synchronized when the standby system’s data link went down and
is restored during operation.
When the command for restarting the standby SCM system is executed in the

Ошибка! Используйте вкладку "Главная" для применения 제목 1 к тексту, который
должен здесь отображаться. Ошибка! Используйте вкладку "Главная" для применения 제목 1 к
тексту, который должен здесь отображаться.
SCM Express Operation Manual v12.0 356 ©Samsung Proprietary and Confidential
[Performance > System Management > Standby Reboot] menu of the
active SCM system, the standby SCM restarts and all data is synchronized.
In the case of next, the SCM process automatically reboots a system, and the
information set by an operator will not be deleted.
The Standby system that it is going to be Active when Active system is down
is loading emergency DB after reboot automatically.
o Emergency DB: The DB that is backed up normally recently. It is used
when a system boot up as Active system with DB was not synchronized
successfully. The actively boot up system use emergency DB instead.
The DMB (Data Management Block) process of the Standby system is not
normal; when is downed, it perform restart Standby system, and Standby
system accepts all data from Active system.
Active-Active and Geo-Redundancy
SCM provides the feature that two SCM systems behaves like one system.
(Capacity of up to 60,000 lines) SCM can be configured to Active-Standby,
Active-Standby Quad redundant structure or Active-Active redundant and Geo-
redundant structure. One node is configured to Active-Standby or Active-alone.
Active-Active structure is configured to one master node and one slave node. Two
nodes are connected to General LAN line.
Figure 39. Active-Active and Geo-Redundancy
IP Address Configuration
SCM must set the IP address of each node in order to configure the Active-Active.
Master
SCM
Active
Standby
LAN
ITSP SIP Server
IP Phone Mngt. Tool
Slave
SCM
Component IP Component IP
Active
Standby

Ошибка! Используйте вкладку "Главная" для применения 제목 1 к тексту, который
должен здесь отображаться. Ошибка! Используйте вкладку "Главная" для применения 제목 1 к
тексту, который должен здесь отображаться.
SCM Express Operation Manual v12.0 357 ©Samsung Proprietary and Confidential
The Node0 set the IP address of the master node and Node1 set the IP address of
the slave node. When you configure Active-Active, it is only available on the
Administrator of the master node.
The Active-Active Redundancy command is executed in the
[CONFIGURATION > Active/Active Redundancy > Node Configuration]
menu of the active SCM system.
Figure 40. IP Address Configuration

Ошибка! Используйте вкладку "Главная" для применения 제목 1 к тексту, который
должен здесь отображаться. Ошибка! Используйте вкладку "Главная" для применения 제목 1 к
тексту, который должен здесь отображаться.
SCM Express Operation Manual v12.0 358 ©Samsung Proprietary and Confidential
System Operation
Managing Configuration
To view or change the system configuration, log into SCM Administrator and click
the [CONFIGURATION] icon on the main menu.
The Configuration menu contains various sub-level menu items including
Location, User Group, User, Trunk Routing, Time Schedule, Service, Application,
Phone Setting, Announcement, Miscellaneous, and Gateway.
Figure 41. Managing Configuration
Managing Performance
You can check the current SCM system performance status including CPU,
memory, and disk utilization on the right side of the main monitor. You can also
view the system and process resource usage activity using the [PERFORMANCE
> Server Resources] menu.

Ошибка! Используйте вкладку "Главная" для применения 제목 1 к тексту, который
должен здесь отображаться. Ошибка! Используйте вкладку "Главная" для применения 제목 1 к
тексту, который должен здесь отображаться.
SCM Express Operation Manual v12.0 359 ©Samsung Proprietary and Confidential
Figure 42. Managing Performance
System Resource Monitoring
SCM monitors the system resources in five second intervals and displays the
information in SCM Administrator. Also, when a specific resource’s usage
increases, alarms are generated in the order of Minor > Major > Critical to notify
the administrator of any system problems.
The system resources monitored by SCM include CPU, memory, hard disk drives,
and network cards.
Viewing System Resource Information
You can view the changes in CPU, memory, and hard disk usage in the [Fault
Management > Main Monitor] menu. You can also view CPU, memory and hard
disk usage in the System Viewer screen in the bottom left corner.
In addition, you can view detailed CPU, memory and hard disk usage as well as
network card status in the [PERFORMANCE > Server Resources > System]
menu.
If a network card stops working, it generates an alarm, which is cleared when the
problem is rectified.
Viewing Resources by Processes
You can view memory and CPU usage by processes in the [PERFORMANCE >
Server Resources > Process] menu.
Also, when a specific process’s CPU usage increases, alarms are generated in the
order of Minor > Major > Critical to notify the administrator of any system
problems.
Managing Announcement
SCM’s built-in sound source system can play voice announcements and system
tones when necessary.
Error Announcements
This service plays voice announcements when calls are not processed normally
due to errors, etc.
Click the [CONFIGURATION > Announcement > Release Announcement]

Ошибка! Используйте вкладку "Главная" для применения 제목 1 к тексту, который
должен здесь отображаться. Ошибка! Используйте вкладку "Главная" для применения 제목 1 к
тексту, который должен здесь отображаться.
SCM Express Operation Manual v12.0 360 ©Samsung Proprietary and Confidential
menu to view the list of announcements.
Select an announcement and click the [Play] button to have the selected
announcement play through the PC’s sound device.
Select an announcement and click the [Change] button to change some of the
information.
Level Policy
Language This shows the language for Release announcement.
Announcement ID
This Announcement ID is used for identifying the announcement sound source.
File Name This is the name of the announcement sound source file.
Announcement Specify whether to play the announcement for the given condition.
Interval (100 ms)
Specify the interval between announcements if the selected announcement is played multiple times.
Repeat The announcement can be played multiple times. Specify the number of times to play.
Description This describes the condition for which the announcement is played. This can be changed.
Service Announcements
Voice announcements can be played when using call processing services.
Click the [CONFIGURATION > Announcement > Service Announcement]
menu to view the list of announcements.
Select an announcement and click the [Play] button to have the selected
announcement play through the PC’s sound device.
Select an announcement and click the [Change] button to change some of the
information.
Level Policy
Language This shows the language for Service Announcement.
ID This ID is used for identifying the announcement sound source.
File Name This is the name of the announcement sound source file. Since this cannot be changed, make sure to upload a sound source file with the same name.
Description This describes the condition for which the announcement is played. This can be changed.
Music On Hold (MOH)
You can manage the system tones for the music and tones played when calls are
put on hold or forwarded. You can also register different sound sources required
for the site and service them.
Click the [CONFIGURATION > Announcement > MOH] menu to view the list
of MOH.
Select a MOH and click the [Play] button to have the selected MOH play through
the PC’s sound device.

Ошибка! Используйте вкладку "Главная" для применения 제목 1 к тексту, который
должен здесь отображаться. Ошибка! Используйте вкладку "Главная" для применения 제목 1 к
тексту, который должен здесь отображаться.
SCM Express Operation Manual v12.0 361 ©Samsung Proprietary and Confidential
Select a MOH and click the [Change] button to change some of the information.
Level Policy
MOH This shows the language for MOH
ID This ID is used for identifying the MOH sound source.
File Name This is the name of the MOH sound source file. Since this cannot be changed, make sure to upload a sound source file with the same name.
Description This describes the MOH. This can be changed.
Language Settings
SCM supports announcements in multiple languages. However, due to the
complexity of settings to configure different conditions for different languages,
only one language is serviced at a time.
The current language can be selected in the [CONFIGURATION >
Announcement > Language] menu.
Name Description
User Group This shows User Group Name. If User group is not found, COMMON is used.
Announcement Language
This Announcement Language is used for this User Group
Korea-Korean
English-America
English-British
German
Turkish
Italian
Russian
Spanish
Managing Individual Call
SCM provides a feature for viewing the information of currently processed calls.
It also allows the administrator to terminate currently processed calls by different
criteria such as unusually long calls or illegitimate calls. SCM also provides the
trace feature which allows the administrator to trace calls or protocol messages.
Call Management
You can view the currently processed calls in the [PERFORMANCE > Call
Management] menu. Click the [Search] button to view the list of currently
processed calls.
You can filter the call list displayed by entering advanced conditions such as caller
numbers, called party numbers and call durations.
Select a call from the list and click the [Delete] button to terminate the selected
call.

Ошибка! Используйте вкладку "Главная" для применения 제목 1 к тексту, который
должен здесь отображаться. Ошибка! Используйте вкладку "Главная" для применения 제목 1 к
тексту, который должен здесь отображаться.
SCM Express Operation Manual v12.0 362 ©Samsung Proprietary and Confidential
Signaling Trace
SCM supports a protocol tracing feature (SIP signaling trace) for calls.
Create a protocol trace item in the [PERFORMANCE > Call Trace] menu to
view protocol messages by call stages in Job Monitor.
Following three types of protocol tracing is supported based on the call type.
Call Trace
All messages are traced per call basis. All messages for the calls from initialization
to termination are traced.
It can be filtered by Calling Number or Called Number.
When the Real Time option is set to ‘Real Time’, the messages will be displayed
at the monitor windows in real time. ‘Call Base’ option displays the messages after
termination of the calls.
Trunk Call Trace
All messages are traced per Route basis. The messages for the specific Route from
initialization to termination are traced.
It can be filtered by User Group, Route Name and/or Direction.
IP Address Call Trace
All messages are traced per IP Address basis. All messages for the specific IP
Address from initialization to termination are traced.
It can be filtered by IP Address.
Managing Database
SCM provides a feature for backing up the database during operation.
When upgrading SCM to a newer version, you can back up the database, upgrade
the version, and then restore the database for use.
Database Usage
SCM provides a feature for displaying the current size of the database. The
maximum allowed database size, the current database size, and the free database
size are shown in KB and percentage.
You can view the database usage in the [MANAGEMENT > Database >
Database Space] menu.
Database Backup
You can configure periodical database backup to backup the database periodically
or perform an immediate database backup.
SCM also can send backuped-file to FTP server.
You can back up the database in the [MANAGEMENT > Database > Database
Backup] menu.
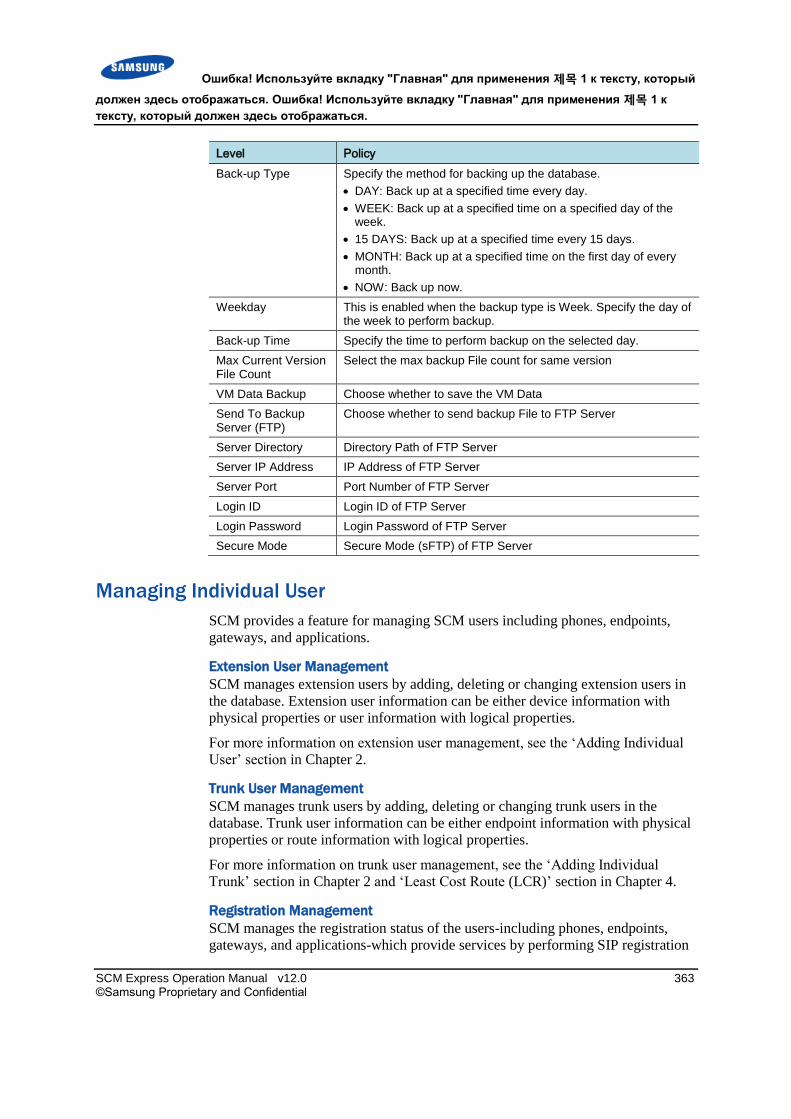
Ошибка! Используйте вкладку "Главная" для применения 제목 1 к тексту, который
должен здесь отображаться. Ошибка! Используйте вкладку "Главная" для применения 제목 1 к
тексту, который должен здесь отображаться.
SCM Express Operation Manual v12.0 363 ©Samsung Proprietary and Confidential
Level Policy
Back-up Type Specify the method for backing up the database.
DAY: Back up at a specified time every day.
WEEK: Back up at a specified time on a specified day of the week.
15 DAYS: Back up at a specified time every 15 days.
MONTH: Back up at a specified time on the first day of every month.
NOW: Back up now.
Weekday This is enabled when the backup type is Week. Specify the day of the week to perform backup.
Back-up Time Specify the time to perform backup on the selected day.
Max Current Version File Count
Select the max backup File count for same version
VM Data Backup Choose whether to save the VM Data
Send To Backup Server (FTP)
Choose whether to send backup File to FTP Server
Server Directory Directory Path of FTP Server
Server IP Address IP Address of FTP Server
Server Port Port Number of FTP Server
Login ID Login ID of FTP Server
Login Password Login Password of FTP Server
Secure Mode Secure Mode (sFTP) of FTP Server
Managing Individual User
SCM provides a feature for managing SCM users including phones, endpoints,
gateways, and applications.
Extension User Management
SCM manages extension users by adding, deleting or changing extension users in
the database. Extension user information can be either device information with
physical properties or user information with logical properties.
For more information on extension user management, see the ‘Adding Individual
User’ section in Chapter 2.
Trunk User Management
SCM manages trunk users by adding, deleting or changing trunk users in the
database. Trunk user information can be either endpoint information with physical
properties or route information with logical properties.
For more information on trunk user management, see the ‘Adding Individual
Trunk’ section in Chapter 2 and ‘Least Cost Route (LCR)’ section in Chapter 4.
Registration Management
SCM manages the registration status of the users-including phones, endpoints,
gateways, and applications-which provide services by performing SIP registration

Ошибка! Используйте вкладку "Главная" для применения 제목 1 к тексту, который
должен здесь отображаться. Ошибка! Используйте вкладку "Главная" для применения 제목 1 к
тексту, который должен здесь отображаться.
SCM Express Operation Manual v12.0 364 ©Samsung Proprietary and Confidential
with SCM and displays their current status.
For more information on registration management, see the ‘Registration
Management’ section in Chapter 6.
Authentication Management
SCM can authenticate registration of the users-including phones, endpoints,
gateways, and applications-which provide services by performing SIP registration
with SCM. Also, when an extension subscriber makes a call, SCM provides a
service for allowing the call to be made after obtaining an external server’s
authentication.
For more information on authentication management, see the ‘4.1.37 User
Authentication’.
Security Management
SCM can provide the feature for encrypting signaling and voice data for calls.
For more information on registration management, see the ‘4.1.35 VoIP Security’.
Service Allowance Management
SCM can allow each individual extension user to use different sets of features by
assigning them to service classes.
For more information on service allowance management, see the ‘4.1.36 Feature
Service’.
Managing Maximum Calls
On an IP-based PBX, it is not possible to limit the number of phones physically
connected or the number of calls made simultaneously. However, since system
resources are limited, a service is required to limit the maximum number of calls at
any one time.
SCM provides the Call Admission Control (CAC) feature which limits the
maximum number of calls allowed. The CAC service provided by SCM includes
CAC by call counts, CAC by location bandwidth, and CAC by system resources.
For more information on CAC, see the ‘4.1.2 Call Admission Control’.
Managing Access Permission
SCM provides a feature for managing SCM Administrator.
Account List
SCM manages account list of SCM Administrator. Each account is different in
grade due to account class.
Account Class
SCM Administrator basically has three account classes, Engineer, Technician and
Customer.
New account classes can be created by Engineer user. When creating a new

Ошибка! Используйте вкладку "Главная" для применения 제목 1 к тексту, который
должен здесь отображаться. Ошибка! Используйте вкладку "Главная" для применения 제목 1 к
тексту, который должен здесь отображаться.
SCM Express Operation Manual v12.0 365 ©Samsung Proprietary and Confidential
account class, you can permit or restrict View, Create, Change and Delete
operation by menu.
View permission limit menu tree and Create, Change and Delete permission
activate or deactivate operation buttons. And you can limit User Group.
Administrator Control
You can allow or drop connection from a specific IP range for Engineer users.
Basically all Engineer users are allowed.
Terminal Control
You can allow connection from a specific IP range for non-Engineer users.
Basically all non-Engineer users are not allowed.
Login Status
It displays account list in log-in state. Engineer user can force non-Engineer users
to log-out.
Operating History
SCM provides management history information for the administrator.
You can be able to account for each and see the details and content of the
summary and classification of the command that was run at a specific time, to
confirm the history of login/logout of each account.
Login History
SCM provides a history of information sessions for each administrator account.
Login time, logout time, can check the status and current IP of the terminal is
connected.

Ошибка! Используйте вкладку "Главная" для применения 제목 1 к тексту, который
должен здесь отображаться. Ошибка! Используйте вкладку "Главная" для применения 제목 1 к
тексту, который должен здесь отображаться.
SCM Express Operation Manual v12.0 366 ©Samsung Proprietary and Confidential
Call Detail Records (CDR)
Account information includes Call Detail Records (CDR) and Station Message
Detail Records (SMDR). Whenever a call starts or ends, SCM records the call
information according to the account data recording method defined for each user
group.
Account data can be recorded by Local, FTP, RADIUS, TCP or TCP_SMDR.
Names of the files saved and their directory names are determined by the recording
method used.
You can configure the account data recording method for each user group in ‘CDR
Storage Options’ under the [CONFIGURATION > User Group >Change User
Group > Information] menu.
None: No CDR data is generated.
Local: CDR data is recorded in the SCM hard disk.
File Transfer Protocol (FTP): CDR data is saved as files in SCM and
transferred to a specified FTP server at a specified interval.
Remote Access Dial in User Service (RADIUS): Each time the CDR data is
generated, it is transferred to the RADIUS server using the RADIUS protocol.
Transmission Control Protocol (TCP): Each time the CDR data is generated, it
is transferred to the CDR server connected by TCP.
TCP_SMDR: Each time the CDR data is generated, SMDR format data is
transferred to the CDR server connected by TCP.
TCP_SMDR: Each time the CDR data is generated, SMDR format data is
transferred to the CDR server connected by TCP.
TCP_ACK: SCM interoperates with the external accounting system over a
native TCP method. Whenever CDR data is generated, the CDR data is
transferred to the TCP ACK server. CDR files are also backed up in SCM.
While it is disconnected from the TCP_ACK server, it will store the data
inside the SCM. When it is connected with the TCP_ACK server, It transmits
the CDR data stored in order of occurrence and then transfers real time CDR
data. Further, after receiving the Acknowledge message from TCP_ACK
server every time data is transmitted, it sends the next message.
You must configure the required settings for each method of saving CDR files
generated.
Saving Account Information in SCM
The CDR files generated are backed up and saved in the SCM hard disk without
interoperating with any external account systems.
When saving CDR files in SCM, you can configure the required information in the
[MANAGEMENT > CDR Storage Options > Local Store] menu.

Ошибка! Используйте вкладку "Главная" для применения 제목 1 к тексту, который
должен здесь отображаться. Ошибка! Используйте вкладку "Главная" для применения 제목 1 к
тексту, который должен здесь отображаться.
SCM Express Operation Manual v12.0 367 ©Samsung Proprietary and Confidential
Name Description
CDR Local Backup Interval
When configuring CDR files to be backed up in the hard disk, specify the backup interval. All CDR files generated are moved to the backup directory and the files in the local directory are deleted at this interval. Only the CDR files not saved in the backup directory will be left in the local directory.
CDR Local Backup Lifetime
When configuring CDR files to be backed up in the hard disk, specify the number of days for which the backed up CDR files will be kept in the hard disk. At midnight every day, the system automatically deletes any backed up CDR files which have passed the specified date.
CDR Local Backup Used
Specify whether to back up the generated CDR files in the hard disk.
If enabled, the files are backed up in the /DI/CM/data/cdr/local/Backup directory.
CDR Local Create Interval
Specify the interval in minutes at which the CDR data files will be generated. New CDR files are generated at this interval. No CDR file will be generated if there is no CDR information for this period. The CDR files generated are saved in the /DI/CM/data/cdr/local directory.
FTP Interoperation for Accounting System
The CDR files generated are transferred to the external accounting system
interoperating by FTP protocol.
When interoperating with the external accounting system over FTP, you can
configure the required information in the [MANAGEMENT > CDR Storage
Options > FTP Send] menu.
Name Description
CDR FTP Backup Lifetime
When interoperating with the accounting system over FTP, the CDR files generated can be backed up in SCM even after they have been transferred by FTP. Specify the number of days for which the backed up CDR files will be kept. At midnight every day, the system automatically deletes any backed up CDR files which have passed the specified date.
CDR FTP Backup Used When interoperating with the accounting system over FTP, the CDR files generated can be backed up in SCM even after they have been transferred by FTP. If enabled, the CDR files are backed up in the /DI/CM/data/cdr/ftp/Backup directory in SCM.
CDR FTP Create Interval
When interoperating with the accounting system over FTP, specify the interval at which the CDR files are generated. New CDR files are generated at this interval. No CDR file will be generated if there is no CDR information for this period. The CDR files generated are saved in the /DI/CM/data/cdr/ftp directory.
CDR FTP Link 1/2/3/4 Directory
Specify the name of the directory in the FTP server where the files will be saved when transferring CDR files over FTP.
CDR FTP Link 1/2/3/4 IP
Specify the IP address of the FTP server when transferring CDR files over FTP.
CDR FTP Link 1/2/3/4 Specify the login name of the FTP server when transferring

Ошибка! Используйте вкладку "Главная" для применения 제목 1 к тексту, который
должен здесь отображаться. Ошибка! Используйте вкладку "Главная" для применения 제목 1 к
тексту, который должен здесь отображаться.
SCM Express Operation Manual v12.0 368 ©Samsung Proprietary and Confidential
Name Description
Login Name CDR files over FTP.
CDR FTP Link 1/2/3/4 Password
Specify the password of the FTP server when transferring CDR files over FTP.
CDR FTP Link 1/2/3/4 Port
Specify the port number of the FTP server when transferring CDR files over FTP.
CDR FTP Link 1/2/3/4 Secure
Specify whether to use Secure-FTP when transferring CDR files over FTP.
CDR FTP Link 1/2/3/4 Used
Specify whether to use FTP Server Link.
CDR FTP Transfer Interval
When interoperating with the accounting system over FTP, specify the interval (in minutes) at which the CDR files are transferred. All CDR files generated are transferred over FTP and the successfully transferred files are moved to the backup directory at this interval. Only the CDR files not transferred over FTP will be left in the local directory.
RADIUS Interoperation for Accounting System
The accounting information is send to the RADIUS server by interoperating with
the external accounting system over RADIUS protocol.
SCM compiles RADIUS Accounting-Request messages in the following format
and sends them to the RADIUS server. When a call starts, the RADIUS start
record is sent to the RADIUS server. When a call ends, the RADIUS stop record is
sent. The CDR data can be sent at the same time.
RADIUS Start Record
Attribute Name Attribute Type Description
User ID 1 SIP URI
Called-Station-ID 30 Called Number
Calling-Station-ID 31 Calling Number
Acct-Status-Type 40 START
Acct-Session-ID 44 unique Accounting ID
System ID 26 System ID
Calling-Party-Type 26 Calling Party Type
Call ID 26 Call ID for the call which is included in accounting
Setup Time 26 Call start time
RADIUS Stop Record
Attribute Name Attribute Type Description
User ID 1 SIP URI
Called-Station-ID 30 Called Number
Calling Station ID 31 Calling Number
Acct Status Type 40 STOP
Acct Session ID 44 unique Accounting ID

Ошибка! Используйте вкладку "Главная" для применения 제목 1 к тексту, который
должен здесь отображаться. Ошибка! Используйте вкладку "Главная" для применения 제목 1 к
тексту, который должен здесь отображаться.
SCM Express Operation Manual v12.0 369 ©Samsung Proprietary and Confidential
Attribute Name Attribute Type Description
System ID 26 System ID
Calling-Party-Type 26 Calling Party Type
Call ID 26 Call ID for the call which is included in accounting
Setup Time 26 Call start time
Connect Time 26 Call connect time
Disconnect Time 26 Call end time
Disconnect Cause 26 Call end reason code
When interoperating with the external accounting system over RADIUS, you can
configure the required information in the [MANAGEMENT > CDR Storage
Options > RADIUS Send] menu.
Name Description
CDR RADIUS Backup Lifetime
When interoperating with the accounting system over RADIUS and backing up CDR files in SCM, the CDR files generated can be backed up in SCM even after they have been transferred to the RADIUS server. Specify the number of days for which the backed up CDR files will be kept. At midnight every day, the system automatically deletes any backed up CDR files which have passed the specified date.
CDR RADIUS Backup Used
When interoperating with the accounting system over RADIUS, the CDR files can be backed up in SCM even after they have been transferred to the RADIUS server. If enabled, the CDR files are backed up in the /DI/CM/data/cdr/radius/Backup directory in SCM.
CDR RADIUS Create Interval
When interoperating with the accounting system over RADIUS and backing up CDR files in SCM, specify the interval (in minutes) at which the CDR files to be backed up are generated. The CDR files generated are moved to the backup directory, the files in the local directory are deleted, and CDR files with new names are generated at this interval. No CDR file will be generated if there is no CDR information for this period. The CDR files generated are saved in the /DI/CM/data/cdr/radius directory. Only the CDR files not saved in the backup directory will be left in this directory.
RADIUS Account Server IP
Specify the IP address of the RADIUS server when interoperating with the accounting system over RADIUS.
RADIUS Account Server Port
Specify the port number of the RADIUS server when interoperating with the accounting system over RADIUS.
RADIUS Account Used Specify whether the CDR data will be sent to the RADIUS server when interoperating with the accounting system over RADIUS.
TCP Interoperation for Accounting System
SCM interoperates with the external accounting system over a native TCP method.
Whenever CDR data is generated, the CDR data is transferred to the TCP server.
CDR files are also backed up in SCM.

Ошибка! Используйте вкладку "Главная" для применения 제목 1 к тексту, который
должен здесь отображаться. Ошибка! Используйте вкладку "Главная" для применения 제목 1 к
тексту, который должен здесь отображаться.
SCM Express Operation Manual v12.0 370 ©Samsung Proprietary and Confidential
When interoperating with the external accounting system over TCP, you can
configure the required information in the [MANAGEMENT > CDR Storage
Options > TCP Send] menu.
Name Description
CDR TCP Backup Lifetime (day)
When interoperating with the accounting system over TCP and backing up CDR files in SCM, the number of days for which the backed up CDR files will be kept in SCM. At midnight every day, the system automatically deletes any backed up CDR files which have passed the specified date.
CDR TCP Create Interval (minute)
When interoperating with the accounting system over TCP and backing up CDR files in SCM, specify the interval (in minutes) at which the CDR files to be backed up are generated. New CDR files are generated at this interval. No CDR file will be generated if there is no CDR information for this period. The CDR files generated are saved in the /DI/CM/data/cdr/tcp directory.
CDR TCP Link1 IP Specify the IP address of the first of the four TCP servers, to which the CDR data can be transferred when interoperating with the accounting system over TCP.
CDR TCP Link1 Used Specify whether to transfer the CDR data to the first of the four TCP servers, to which the CDR data can be transferred when interoperating with the accounting system over TCP.
CDR TCP Link2 IP Specify the IP address of the second of the four TCP servers, to which the CDR data can be transferred when interoperating with the accounting system over TCP.
CDR TCP Link2 Used Specify whether to transfer the CDR data to the second of the four TCP servers, to which the CDR data can be transferred when interoperating with the accounting system over TCP.
CDR TCP Link3 IP Specify the IP address of the third of the four TCP servers, to which the CDR data can be transferred when interoperating with the accounting system over TCP.
CDR TCP Link3 Used Specify whether to transfer the CDR data to the third of the four TCP servers, to which the CDR data can be transferred when interoperating with the accounting system over TCP.
CDR TCP Link4 IP Specify the IP address of the fourth of the four TCP servers, to which the CDR data can be transferred when interoperating with the accounting system over TCP.
CDR TCP Link4 Used Specify whether to transfer the CDR data to the fourth of the four TCP servers, to which the CDR data can be transferred when interoperating with the accounting system over TCP.
SMDR Interoperation for Old Accounting System
SCM interoperates with the accounting system of SCMv2 over a native TCP
method. Whenever CDR data is generated, the SMDR data is transferred to the
TCP server.
CDR files are also backed up in SCM.
When interoperating with the external accounting system over TCP, you can
configure the required information in the [MANAGEMENT > CDR Storage

Ошибка! Используйте вкладку "Главная" для применения 제목 1 к тексту, который
должен здесь отображаться. Ошибка! Используйте вкладку "Главная" для применения 제목 1 к
тексту, который должен здесь отображаться.
SCM Express Operation Manual v12.0 371 ©Samsung Proprietary and Confidential
Options > Old SMDR Send] menu.
Name Description
SMDR TCP Backup Lifetime (day)
When interoperating with the accounting system over TCP, send SMDR data and backing up CDR files in SCM, the number of days for which the backed up CDR files will be kept in SCM. At midnight every day, the system automatically deletes any backed up CDR files which have passed the specified date.
SMDR TCP Create Interval (minute)
When interoperating with the accounting system over TCP, send SMDR data and backing up CDR files in SCM, specify the interval (in minutes) at which the CDR files to be backed up are generated. New CDR files are generated at this interval. No CDR file will be generated if there is no CDR information for this period. The CDR files generated are saved in the /DI/CM/data/cdr/tcpSMDR directory.
SMDR TCP Link1 IP Specify the IP address of the first of the four TCP servers, to which the SMDR data can be transferred when interoperating with the accounting system over TCP.
SMDR TCP Link1 Used Specify whether to transfer the SMDR data to the first of the four TCP servers, to which the SMDR data can be transferred when interoperating with the accounting system over TCP.
SMDR TCP Link2 IP Specify the IP address of the second of the four TCP servers, to which the SMDR data can be transferred when interoperating with the accounting system over TCP.
SMDR TCP Link2 Used Specify whether to transfer the SMDR data to the second of the four TCP servers, to which the SMDR data can be transferred when interoperating with the accounting system over TCP.
SMDR TCP Link3 IP Specify the IP address of the third of the four TCP servers, to which the SMDR data can be transferred when interoperating with the accounting system over TCP.
SMDR TCP Link3 Used Specify whether to transfer the SMDR data to the third of the four TCP servers, to which the SMDR data can be transferred when interoperating with the accounting system over TCP.
SMDR TCP Link4 IP Specify the IP address of the fourth of the four TCP servers, to which the SMDR data can be transferred when interoperating with the accounting system over TCP.
SMDR TCP Link4 Used Specify whether to transfer the SMDR data to the fourth of the four TCP servers, to which the SMDR data can be transferred when interoperating with the accounting system over TCP.
TCP ACK Interoperation for Accounting System
SCM interoperates with the accounting system over a native TCP ACK method.
Whenever CDR data is generated, the CDR data is transferred to the TCP ACK
server.
CDR files are also backed up in SCM.
When interoperating with the external accounting system over TCP ACK, you can
configure the required information in the [MANAGEMENT > CDR Storage

Ошибка! Используйте вкладку "Главная" для применения 제목 1 к тексту, который
должен здесь отображаться. Ошибка! Используйте вкладку "Главная" для применения 제목 1 к
тексту, который должен здесь отображаться.
SCM Express Operation Manual v12.0 372 ©Samsung Proprietary and Confidential
Options > TCP ACK Send] menu.
Name Description
CDR TCP Ack Link1 IP Specify the IP address of the first of the four TCP ACK servers, to which the CDR data can be transferred when interoperating with the accounting system over TCP ACK.
CDR TCP Ack Link1 Used
Specify whether to transfer the CDR data to the first of the four TCP ACK servers, to which the CDR data can be transferred when interoperating with the accounting system over TCP ACK.
CDR TCP Ack Link2 IP Specify the IP address of the second of the four TCP ACK servers, to which the CDR data can be transferred when interoperating with the accounting system over TCP ACK.
CDR TCP Ack Link2 Used
Specify whether to transfer the CDR data to the second of the four TCP ACK servers, to which the CDR data can be transferred when interoperating with the accounting system over TCP ACK.
CDR TCP Ack Link3 IP Specify the IP address of the third of the four TCP ACK servers, to which the CDR data can be transferred when interoperating with the accounting system over TCP ACK.
CDR TCP Ack Link3 Used
Specify whether to transfer the CDR data to the third of the four TCP ACK servers, to which the CDR data can be transferred when interoperating with the accounting system over TCP ACK.
CDR TCP Ack Link4 IP Specify the IP address of the fourth of the four TCP ACK servers, to which the CDR data can be transferred when interoperating with the accounting system over TCP ACK.
CDR TCP Ack Link4 Used
Specify whether to transfer the CDR data to the fourth of the four TCP ACK servers, to which the CDR data can be transferred when interoperating with the accounting system over TCP ACK.
Billing Output by Call Types
This is a function that the CDR data is created by call types. To use this function,
you should set the item whose ‘use billing output’ is ‘ENABLE’ in the
[MANAGEMENT > CDR Storage Options > CDR Option] menu. And you
should set items in the [MANAGEMENT > CDR Storage Options > Set Billing
Output] menu.
Item Description
App Server Call Billing Output [App Server]
The CDR is created if Calling type (4) is application and Called Type is application (4)
App Server Call Billing Output [Service]
The CDR is created if Calling Type (4) is Application and Called Type is Service (2)
App Server Call Billing Output [Subscriber]
The CDR is created if Calling Type (4) is Application and Called Type is Subscriber (1)
All Call Billing Output Set
The CDR is created about all calls
Incoming Call Billing Output [Normal]
The CDR is created if the trunk is a normal type and call is a outgoing call

Ошибка! Используйте вкладку "Главная" для применения 제목 1 к тексту, который
должен здесь отображаться. Ошибка! Используйте вкладку "Главная" для применения 제목 1 к
тексту, который должен здесь отображаться.
SCM Express Operation Manual v12.0 373 ©Samsung Proprietary and Confidential
Item Description
Incoming Call Billing Output [TIE]
The CDR is created if the trunk is a TIE type and is call is a outgoing call
Outgoing Call Billing Output [Normal]
The CDR is created if the trunk is a normal type and call is a incoming call
Outgoing Call Billing Output [TIE]
The CDR is created if the trunk is a TIE type and call is a incoming call
Service Call Billing Output [App Server]
The CDR is created if Calling Type is Service (2) and Called Type is application (4)
Service Call Billing Output [Service]
The CDR is created if Calling Type is Service (2) and Called Type is Service (2)
Service Call Billing Output [Subscriber]
The CDR is created if Calling Type is Service (2) and Called Type is Subscriber (1)
Subscriber Call Billing Output [App Server]
The CDR is created if Calling Type is Service (1) and Called Type is application (4)
Subscriber Call Billing Output [Service]
The CDR is created if Calling Type is Service (1) and Called Type is Service (2)
Subscriber Call Billing Output [Subscriber]
The CDR is created if Calling Type is Subscriber (1) and Called Type is Subscriber (1)
Billing Delete Length
This is a function that deletes access code of trunk in the ‘connect number’ of
CDR.
To use this function, you should set ‘Length of Bill Delete’ in the [Configuration
> Trunk Routing > Route] menu

Ошибка! Используйте вкладку "Главная" для применения 제목 1 к тексту, который
должен здесь отображаться. Ошибка! Используйте вкладку "Главная" для применения 제목 1 к
тексту, который должен здесь отображаться.
SCM Express Operation Manual v12.0 374 ©Samsung Proprietary and Confidential
Statistics Reports
SCM provides statistical information for calls and alarms generated in the system
by hours, dates and months.
You can view the statistical information in the [PERFORMANCE > Statistics]
menu.
The statistical information is kept in the database for the duration specified by
‘Statistic DB Keep Up Lifetime’ in the [CONFIGURATION > Miscellaneous >
System Options] menu.
The duration for which to query the statistical information must be entered with
following conditions in the [PERFORMANCE > Statistics] menu. Minute
statistics cannot exceed 2 days, hourly statistics cannot exceed 7 days, daily
statistics cannot exceed 90 days, and monthly statistics cannot exceed 365 days.
Also, hourly statistics older than 30 days or daily statistics older than 365 days
cannot be queried.
SCM Express provides statistics on Inbound calls and Outbound calls for
individual Users. This feature is not supported by SCM Enterprise.
You can view statistics on Inbound calls and Outbound calls for individual Users
in the [PERFORMANCE > Statistics > Call-User > Calling-User] menu and in
the [PERFORMANCE > Statistics > Call-User > Called-User] menu. Only
hourly statistics is available for Inbound calls and Outbound calls for individual
Users.
Call Traffic Reports
System Statistics
Using the [PERFORMANCE > Statistics > System] menu, you can view the
following statistical information by menu items:
Internal Calls
This shows the statistical information collected when calls were attempted
between internal Users.
Item Description
Date The start time of statistics measurement
Total Total number of attempted calls.
Answer Number of answered calls
Answer % Success ratio of calls
Management Release
Number of calls released by an operator command
Failure Number of failed calls
Wrong Number Number of calls which are failed because there is no route or wrong number format.

Ошибка! Используйте вкладку "Главная" для применения 제목 1 к тексту, который
должен здесь отображаться. Ошибка! Используйте вкладку "Главная" для применения 제목 1 к
тексту, который должен здесь отображаться.
SCM Express Operation Manual v12.0 375 ©Samsung Proprietary and Confidential
Item Description
Resource Unavailable
Number of calls which are failed because of the following reasons:
Failed because it cannot find a route during routing process such as route partition, special route sequence, or route sequence after number interpretation
Failed because of restriction configuration
Failed because too much resource is required
Wrong Prefix Number of calls which are failed because of wrong prefix of a called number
User Error Number of calls which are failed because they do not receive a call signal (Setup Timeout)
Called Number Busy Number of calls which are failed because a counterpart is busy (Busy)
No Answer Number of calls which are failed because a counterpart does not answer even though there is a ring (No Answer)
Authentication Release
Number of calls which are failed because a call is not allowed due to Outbound blocking, Inbound blocking, calling CRU (Call Restriction by User), CRO (Call Restriction by Operator), authentication failure, authentication time expiration, or Call Screening, etc.
Service Release Number of calls which are failed because of the following reasons:
That is, number of calls which are failed because of service configuration.
Service Release Call DND
Service Release Call ABS
Service Release Call (Service Error)
Service privilege failure (User Deactivation)
Service Timeout
Trunk Unavailable Number of times when a trunk cannot be used because of the following reasons:
End Point Not Registration
Number of times when all the trunks are busy
All the trunks are QoS and failed for a long time even with many times of retries When the connection between a gateway and TCP is lost
User Unavailable Number of times when there is no User
Service Deny Number of times when a call is released because the ITSP Gatekeeper disconnects the connection to a gateway (e.g. deleting the endpoint of a gateway) during call.
Signaling Fault Number of times when a call is released because a phone does not support a specific function.
A call is released because there is no Empty TCS function.
A call is released because there is no function which processes the request_mode of an endpoint during fax operation.
Etc Number of times when a call is failed because of other reasons.
Total Talk Time Total talk time.
Average Talk Time Average talk time.

Ошибка! Используйте вкладку "Главная" для применения 제목 1 к тексту, который
должен здесь отображаться. Ошибка! Используйте вкладку "Главная" для применения 제목 1 к
тексту, который должен здесь отображаться.
SCM Express Operation Manual v12.0 376 ©Samsung Proprietary and Confidential
Outbound Calls
This shows the statistical information collected when internal Users attempted to
call external Users.
Item Description
Date The start time of statistics measurement
Total Total number of attempted calls.
Answer Number of answered calls
Answer % Success ratio of calls
Management Release
Number of calls released by an operator command
Failure Number of failed calls
Wrong Number Number of calls which are failed because there is no route or wrong number format.
Resource Unavailable
Number of calls which are failed because of the following reasons:
Failed because it cannot find a route during routing process such as route partition, special route sequence, or route sequence after number interpretation
Failed because of restriction configuration
Failed because too much resource is required
Wrong Prefix Number of calls which are failed because of wrong prefix of a called number
User Error Number of calls which are failed because they do not receive a call signal (Setup Timeout)
Called Number Busy Number of calls which are failed because a counterpart is busy (Busy).
No Answer Number of calls which are failed because a counterpart does not answer even though there is a ring (No Answer)
Authentication Release
Number of calls which are failed because a call is not allowed due to Outbound blocking, Inbound blocking, calling CRU (Call Restriction by User), CRO (Call Restriction by Operator), authentication failure, authentication time expiration, or Call Screening, etc.
Service Release Number of calls which are failed because of the following reasons:
That is, number of calls which are failed because of service configuration.
Service Release Call DND
Service Release Call ABS
Service Release Call (Service Error)
Service privilege failure (User Deactivation)
Service Timeout
Trunk Unavailable Number of times when a trunk cannot be used because of the following reasons:
End Point Not Registration
Number of times when all the trunks are busy
All the trunks are QoS and failed for a long time even with many times of retries

Ошибка! Используйте вкладку "Главная" для применения 제목 1 к тексту, который
должен здесь отображаться. Ошибка! Используйте вкладку "Главная" для применения 제목 1 к
тексту, который должен здесь отображаться.
SCM Express Operation Manual v12.0 377 ©Samsung Proprietary and Confidential
Item Description
When the connection between a gateway and TCP is lost
User Unavailable Number of times when there is no User.
Service Deny Number of times when a call is released because the ITSP Gatekeeper disconnects the connection to a gateway (e.g. deleting the endpoint of a gateway) during call.
Signaling Fault Number of times when a call is released because a phone does not support a specific function.
A call is released because there is no Empty TCS function.
A call is released because there is no function which processes the request_mode of an endpoint during fax operation.
Etc Number of times when a call is failed because of other reasons.
Total Talk Time Total talk time.
Average Talk Time Average talk time.
Inbound Calls
This shows the statistical information collected when external Users attempted to
call internal Users.
Item Description
Date The start time of statistics measurement
Total Total number of attempted calls.
Answer Number of answered calls
Answer % Success ratio of calls
Management Release
Number of calls released by an operator command
Failure Number of failed calls
Wrong Number Number of calls which are failed because there is no route or wrong number format.
Resource Unavailable
Number of calls which are failed because of the following reasons:
Failed because it cannot find a route during routing process such as route partition, special route sequence, or route sequence after number interpretation
Failed because of restriction configuration
Failed because too much resource is required
Wrong Prefix Number of calls which are failed because of wrong prefix of a called number
User Error Number of calls which are failed because they do not receive a call signal (Setup Timeout)
Called Number Busy Number of calls which are failed because a counterpart is busy (Busy).
No Answer Number of calls which are failed because a counterpart does not answer even though there is a ring (No Answer)
Authentication Release
Number of calls which are failed because a call is not allowed due to Outbound blocking, Inbound blocking, calling CRU (Call Restriction by User), CRO (Call Restriction by Operator), authentication failure, authentication time expiration, or Call

Ошибка! Используйте вкладку "Главная" для применения 제목 1 к тексту, который
должен здесь отображаться. Ошибка! Используйте вкладку "Главная" для применения 제목 1 к
тексту, который должен здесь отображаться.
SCM Express Operation Manual v12.0 378 ©Samsung Proprietary and Confidential
Item Description
Screening, etc.
Service Release Number of calls which are failed because of the following reasons:
That is, number of calls which are failed because of service configuration.
Service Release Call DND
Service Release Call ABS
Service Release Call (Service Error)
Service privilege failure (User Deactivation)
Service Timeout
Trunk Unavailable Number of times when a trunk cannot be used because of the following reasons:
End Point Not Registration
Number of times when all the trunks are busy
All the trunks are QoS and failed for a long time even with many times of retries
When the connection between a gateway and TCP is lost
User Unavailable Number of times when there is no User.
Service Deny Number of times when a call is released because the ITSP Gatekeeper disconnects the connection to a gateway (e.g. deleting the endpoint of a gateway) during call.
Signaling Fault Number of times when a call is released because a phone does not support a specific function.
A call is released because there is no Empty TCS function.
A call is released because there is no function which processes the request_mode of an endpoint during fax operation.
Etc Number of times when a call is failed because of other reasons.
Total Talk Time Total talk time.
Average Talk Time Average talk time.
Tandem Calls
This shows the statistical information collected when external Users attempted to
call other external Users through SCM.
Item Description
Date The start time of statistics measurement
Total Total number of attempted calls.
Answer Number of answered calls
Answer % Success ratio of calls
Management Release
Number of calls released by an operator command
Failure Number of failed calls
Wrong Number Number of calls which are failed because there is no route or wrong number format.
Resource Unavailable
Number of calls which are failed because of the following reasons:

Ошибка! Используйте вкладку "Главная" для применения 제목 1 к тексту, который
должен здесь отображаться. Ошибка! Используйте вкладку "Главная" для применения 제목 1 к
тексту, который должен здесь отображаться.
SCM Express Operation Manual v12.0 379 ©Samsung Proprietary and Confidential
Item Description
Failed because it cannot find a route during routing process such as route partition, special route sequence, or route sequence after number interpretation
Failed because of restriction configuration
Failed because too much resource is required
Wrong Prefix Number of calls which are failed because of wrong prefix of a called number
User Error Number of calls which are failed because they do not receive a call signal (Setup Timeout)
Called Number Busy Number of calls which are failed because a counterpart is busy (Busy).
No Answer Number of calls which are failed because a counterpart does not answer even though there is a ring (No Answer)
Authentication Release
Number of calls which are failed because a call is not allowed due to Outbound blocking, Inbound blocking, calling CRU (Call Restriction by User), CRO (Call Restriction by Operator), authentication failure, authentication time expiration, or Call Screening, etc.
Service Release Number of calls which are failed because of the following reasons:
That is, number of calls which are failed because of service configuration.
Service Release Call DND
Service Release Call ABS
Service Release Call (Service Error)
Service privilege failure (User Deactivation)
Service Timeout
Trunk Unavailable Number of times when a trunk cannot be used because of the following reasons:
End Point Not Registration
Number of times when all the trunks are busy
All the trunks are QoS and failed for a long time even with many times of retries
When the connection between a gateway and TCP is lost
User Unavailable Number of times when there is no User.
Service Deny Number of times when a call is released because the ITSP Gatekeeper disconnects the connection to a gateway (e.g. deleting the endpoint of a gateway) during call.
Signaling Fault Number of times when a call is released because a phone does not support a specific function.
A call is released because there is no Empty TCS function.
A call is released because there is no function which processes the request_mode of an endpoint during fax operation.
Etc Number of times when a call is failed because of other reasons.
Total Talk Time Total talk time.
Average Talk Time Average talk time.

Ошибка! Используйте вкладку "Главная" для применения 제목 1 к тексту, который
должен здесь отображаться. Ошибка! Используйте вкладку "Главная" для применения 제목 1 к
тексту, который должен здесь отображаться.
SCM Express Operation Manual v12.0 380 ©Samsung Proprietary and Confidential
Call Failures
This shows the statistical information for failed Inbound and Outbound
authentications.
Item Description
Date The start time of statistics measurement
Outgoing-Unknown Number of calls which an extension line User tries to an unknown number
Inbound-Unknown Number of calls which an external User tries to an unknown number
Dialing-Unknown Number of calls which are attempted to an unknown number
Failure Number of failed calls
Wrong Number Number of calls which are failed because there is no route or wrong number format.
Resource Unavailable
Number of calls which are failed because of the following reasons:
Failed because it cannot find a route during routing process such as route partition, special route sequence, or route sequence after number interpretation
Failed because of restriction configuration
Failed because too much resource is required
Wrong Prefix Number of calls which are failed because of wrong prefix of a called number
User Error Number of calls which are failed because they do not receive a call signal (Setup Timeout)
Called Number Busy Number of calls which are failed because a counterpart is busy (Busy).
No Answer Number of calls which are failed because a counterpart does not answer even though there is a ring (No Answer)
Authentication Release
Number of calls which are failed because a call is not allowed due to Outbound blocking, Inbound blocking, calling CRU (Call Restriction by User), CRO (Call Restriction by Operator), authentication failure, authentication time expiration, or Call Screening, etc.
Service Release Number of calls which are failed because of the following reasons:
That is, number of calls which are failed because of service configuration.
Service Release Call DND
Service Release Call ABS
Service Release Call (Service Error)
Service privilege failure (User Deactivation)
Service Timeout
Trunk Unavailable Number of times when a trunk cannot be used because of the following reasons:
End Point Not Registration
Number of times when all the trunks are busy
All the trunks are QoS and failed for a long time even with many times of retries

Ошибка! Используйте вкладку "Главная" для применения 제목 1 к тексту, который
должен здесь отображаться. Ошибка! Используйте вкладку "Главная" для применения 제목 1 к
тексту, который должен здесь отображаться.
SCM Express Operation Manual v12.0 381 ©Samsung Proprietary and Confidential
Item Description
When the connection between a gateway and TCP is lost
User Unavailable Number of times when there is no User.
Service Deny Number of times when a call is released because the ITSP Gatekeeper disconnects the connection to a gateway (e.g. deleting the endpoint of a gateway) during call.
Signaling Fault Number of times when a call is released because a phone does not support a specific function.
A call is released because there is no Empty TCS function.
A call is released because there is no function which processes the request_mode of an endpoint during fax operation.
Etc Number of times when a call is failed because of other reasons.
All Calls
This shows the statistical information for all calls.
Item Description
Date The start time of statistics measurement
Total Total number of attempted calls.
Internal Calls Number of calls between extension line Users
Internal Call (%) Percentage of calls between extension line Users
Outbound Calls Number of calls which an extension line User tries to an external User
Outbound Calls (%) Percentage of calls which an extension line User tries to an external User
Inbound Calls Number of calls which an external User tries to an extension line User
Inbound Calls (%) Percentage of calls which an external User tries to an extension line User
Tandem Calls Number of calls which an external User tries to an external User
Tandem Calls (%) Percentage of calls which an external User tries to an extension line User
Outgoing-Unknown Number of calls which an extension line User tries to an unknown number
Outgoing-Unknown (%)
Percentage of calls which an extension line User tries to an unknown number
Inbound-Unknown Number of calls which an external User tries to an unknown number
Inbound-Unknown (%)
Number of calls which an external User tries to an unknown number
Dialing-Unknown Number of calls which are attempted to an unknown number
Dialing-Unknown (%) Number of calls which are attempted to an unknown number
Failure Reason
This shows the statistical information for all failed calls.
Item Description

Ошибка! Используйте вкладку "Главная" для применения 제목 1 к тексту, который
должен здесь отображаться. Ошибка! Используйте вкладку "Главная" для применения 제목 1 к
тексту, который должен здесь отображаться.
SCM Express Operation Manual v12.0 382 ©Samsung Proprietary and Confidential
Item Description
Date The start time of statistics measurement
Wrong Number Number of calls which are failed because there is no route or wrong number format.
Resource Unavailable
Number of calls which are failed because of the following reasons:
Failed because it cannot find a route during routing process such as route partition, special route sequence, or route sequence after number interpretation
Failed because of restriction configuration
Failed because too much resource is required
Wrong Prefix Number of calls which are failed because of wrong prefix of a called number
User Error Number of calls which are failed because they do not receive a call signal (Setup Timeout)
Called Number Busy Number of calls which are failed because a counterpart is busy (Busy).
No Answer Number of calls which are failed because a counterpart does not answer even though there is a ring (No Answer)
Authentication Release
Number of calls which are failed because a call is not allowed due to Outbound blocking, Inbound blocking, calling CRU (Call Restriction by User), CRO (Call Restriction by Operator), authentication failure, authentication time expiration, or Call Screening, etc.
Service Release Number of calls which are failed because of the following reasons:
That is, number of calls which are failed because of service configuration.
Service Release Call DND
Service Release Call ABS
Service Release Call (Service Error)
Service privilege failure (User Deactivation)
Service Timeout
Trunk Unavailable Number of times when a trunk cannot be used because of the following reasons:
End Point Not Registration
Number of times when all the trunks are busy
All the trunks are QoS and failed for a long time even with many times of retries
When the connection between a gateway and TCP is lost
User Unavailable Number of times when there is no User.
Service Deny Number of times when a call is released because the ITSP Gatekeeper disconnects the connection to a gateway (e.g. deleting the endpoint of a gateway) during call.
Signaling Fault Number of times when a call is released because a phone does not support a specific function.
A call is released because there is no Empty TCS function.
A call is released because there is no function which processes the request_mode of an endpoint during fax operation.

Ошибка! Используйте вкладку "Главная" для применения 제목 1 к тексту, который
должен здесь отображаться. Ошибка! Используйте вкладку "Главная" для применения 제목 1 к
тексту, который должен здесь отображаться.
SCM Express Operation Manual v12.0 383 ©Samsung Proprietary and Confidential
Item Description
Etc Number of times when a call is failed because of other reasons.
User Group Statistics
Using the [PERFORMANCE > Statistics > UserGroup] menu, you can view the
following statistical information by menu items:
User Group-Outgoing
This shows the statistical information collected when Users of the user group
attempted to make Outbound calls.
Item Description
Date The start time of statistics measurement
User Group Name of user group for which statistics is measured
Total Total number of attempted calls
Total Internal Number of calls which are attempted to an extension number
Internal Answer Number of calls which receive an answer from an extension number
Total Outbound Total number of Outbound calls
Outbound Answer Number of Outbound calls which receive an answer
Answer % Success ratio of calls
Management Release
Number of calls which are released by an operator command
Failure Number of calls which are failed
Wrong Number Number of calls which are failed because there is no route or wrong number format.
Resource Unavailable
Number of calls which are failed because of the following reasons:
Failed because it cannot find a route during routing process such as route partition, special route sequence, or route sequence after number interpretation
Failed because of restriction configuration
Failed because too much resource is required
Wrong Prefix Number of calls which are failed because of wrong prefix of a called number
User Error Number of calls which are failed because they do not receive a call signal (Setup Timeout)
Called Number Busy Number of calls which are failed because a counterpart is busy (Busy).
No Answer Number of calls which are failed because a counterpart does not answer even though there is a ring (No Answer)
Authentication Release
Number of calls which are failed because a call is not allowed due to Outbound blocking, Inbound blocking, calling CRU (Call Restriction by User), CRO (Call Restriction by Operator), authentication failure, authentication time expiration, or Call Screening, etc.

Ошибка! Используйте вкладку "Главная" для применения 제목 1 к тексту, который
должен здесь отображаться. Ошибка! Используйте вкладку "Главная" для применения 제목 1 к
тексту, который должен здесь отображаться.
SCM Express Operation Manual v12.0 384 ©Samsung Proprietary and Confidential
Item Description
Service Release Number of calls which are failed because of the following reasons:
That is, number of calls which are failed because of service configuration.
Service Release Call DND
Service Release Call ABS
Service Release Call (Service Error)
Service privilege failure (User Deactivation)
Service Timeout
Trunk Unavailable Number of times when a trunk cannot be used because of the following reasons:
End Point Not Registration
Number of times when all the trunks are busy
All the trunks are QoS and failed for a long time even with many times of retries
When the connection between a gateway and TCP is lost
User Unavailable Number of times when there is no User.
Service Deny Number of times when a call is released because the ITSP Gatekeeper disconnects the connection to a gateway (e.g. deleting the endpoint of a gateway) during call.
Signaling Fault Number of times when a call is released because a phone does not support a specific function.
A call is released because there is no Empty TCS function.
A call is released because there is no function which processes the request_mode of an endpoint during fax operation.
Etc Number of times when a call is failed because of other reasons.
Total Talk Time Total talk time.
Average Talk Time Average talk time.
User Group-Incoming
This shows the statistical information collected when Inbound calls were
attempted for Users of the user group.
Item Description
Date The start time of statistics measurement
User Group Name of user group for which statistics is measured
Total Total number of attempted calls
Total Inbound Number of calls which an external User tries to an extension line User
Inbound Answer Number of times when an extension line User answers a call which an external User tries to the extension line User
Total Internal Number of calls which an extension line tries to an extension line User
Internal Answer Number of times when an extension line User answers a call which an extension line User tries to an extension line User
Answer % Success ratio of calls

Ошибка! Используйте вкладку "Главная" для применения 제목 1 к тексту, который
должен здесь отображаться. Ошибка! Используйте вкладку "Главная" для применения 제목 1 к
тексту, который должен здесь отображаться.
SCM Express Operation Manual v12.0 385 ©Samsung Proprietary and Confidential
Item Description
Management Release
Number of calls which are released by an operator command
Failure Number of failed calls
Wrong Number Number of calls which are failed because there is no route or wrong number format.
Resource Unavailable
Number of calls which are failed because of the following reasons:
Failed because it cannot find a route during routing process such as route partition, special route sequence, or route sequence after number interpretation
Failed because of restriction configuration
Failed because too much resource is required
Wrong Prefix Number of calls which are failed because of wrong prefix of a called number
User Error Number of calls which are failed because they do not receive a call signal (Setup Timeout)
Called Number Busy Number of calls which are failed because a counterpart is busy (Busy).
No Answer Number of calls which are failed because a counterpart does not answer even though there is a ring (No Answer)
Authentication Release
Number of calls which are failed because a call is not allowed due to Outbound blocking, Inbound blocking, calling CRU (Call Restriction by User), CRO (Call Restriction by Operator), authentication failure, authentication time expiration, or Call Screening, etc.
Service Release Number of calls which are failed because of the following reasons:
That is, number of calls which are failed because of service configuration.
Service Release Call DND
Service Release Call ABS
Service Release Call (Service Error)
Service privilege failure (User Deactivation)
Service Timeout
Trunk Unavailable Number of times when a trunk cannot be used because of the following reasons:
End Point Not Registration
Number of times when all the trunks are busy
All the trunks are QoS and failed for a long time even with many times of retries
When the connection between a gateway and TCP is lost
User Unavailable Number of times when there is no User.
Service Deny Number of times when a call is released because the ITSP Gatekeeper disconnects the connection to a gateway (e.g. deleting the endpoint of a gateway) during call.
Signaling Fault Number of times when a call is released because a phone does not support a specific function.
A call is released because there is no Empty TCS function.

Ошибка! Используйте вкладку "Главная" для применения 제목 1 к тексту, который
должен здесь отображаться. Ошибка! Используйте вкладку "Главная" для применения 제목 1 к
тексту, который должен здесь отображаться.
SCM Express Operation Manual v12.0 386 ©Samsung Proprietary and Confidential
Item Description
A call is released because there is no function which processes the request_mode of an endpoint during fax operation.
Etc Number of times when a call is failed because of other reasons.
Total Talk Time Total talk time.
Average Talk Time Average talk time.
Service Group Statistics
Using the [PERFORMANCE > Statistics > ServiceGroup] menu, you can view
the following statistical information by menu items:
Service Group-Outgoing
This shows the statistical information collected when Users of the service group
attempted to make Outbound calls.
Item Description
Date The start time of statistics measurement
Service Group Name of service group for which statistics is measured
User Group Name of a user group where a service group is belonged
Total Total number of attempted calls
Total Internal Number of calls which are attempted to an extension number
Internal Answer Number of calls which receive an answer from an extension number
Total Outbound Total number of Outbound calls
Outbound Answer Number of Outbound calls which receive an answer
Answer % Success ratio of calls
Management Release
Number of calls which are released by an operator command
Failure Number of failed calls
Wrong Number Number of calls which are failed because there is no route or wrong number format.
Resource Unavailable
Number of calls which are failed because of the following reasons:
Failed because it cannot find a route during routing process such as route partition, special route sequence, or route sequence after number interpretation
Failed because of restriction configuration
Failed because too much resource is required
Wrong Prefix Number of calls which are failed because of wrong prefix of a called number
User Error Number of calls which are failed because they do not receive a call signal (Setup Timeout)
Called Number Busy Number of calls which are failed because a counterpart is busy (Busy).
No Answer Number of calls which are failed because a counterpart does not answer even though there is a ring (No Answer)

Ошибка! Используйте вкладку "Главная" для применения 제목 1 к тексту, который
должен здесь отображаться. Ошибка! Используйте вкладку "Главная" для применения 제목 1 к
тексту, который должен здесь отображаться.
SCM Express Operation Manual v12.0 387 ©Samsung Proprietary and Confidential
Item Description
Authentication Release
Number of calls which are failed because a call is not allowed due to Outbound blocking, Inbound blocking, calling CRU (Call Restriction by User), CRO (Call Restriction by Operator), authentication failure, authentication time expiration, or Call Screening, etc.
Service Release Number of calls which are failed because of the following reasons:
That is, number of calls which are failed because of service configuration.
Service Release Call DND
Service Release Call ABS
Service Release Call (Service Error)
Service privilege failure (User Deactivation)
Service Timeout
Trunk Unavailable Number of times when a trunk cannot be used because of the following reasons:
End Point Not Registration
Number of times when all the trunks are busy
All the trunks are QoS and failed for a long time even with many times of retries
When the connection between a gateway and TCP is lost
User Unavailable Number of times when there is no User.
Service Deny Number of times when a call is released because the ITSP Gatekeeper disconnects the connection to a gateway (e.g. deleting the endpoint of a gateway) during call.
Signaling Fault Number of times when a call is released because a phone does not support a specific function.
A call is released because there is no Empty TCS function.
A call is released because there is no function which processes the request_mode of an endpoint during fax operation.
Etc Number of times when a call is failed because of other reasons.
Total Talk Time Total talk time.
Average Talk Time Average talk time.
Service Group-Incoming
This shows the statistical information collected when Inbound calls were
attempted for Users of the service group.
Item Description
Date The start time of statistics measurement
Service Group Name of service group for which statistics is measured
User Group Name of a user group
Total Total number of attempted calls
Total Inbound Number of calls which an external User tries to an extension line User
Inbound Answer Number of times when an extension line User answers a call which an external User tries to the extension line User

Ошибка! Используйте вкладку "Главная" для применения 제목 1 к тексту, который
должен здесь отображаться. Ошибка! Используйте вкладку "Главная" для применения 제목 1 к
тексту, который должен здесь отображаться.
SCM Express Operation Manual v12.0 388 ©Samsung Proprietary and Confidential
Item Description
Total Internal Number of calls which are received to an extension number
Internal Answer Number of calls answered from an extension number
Answer % Success ratio of calls
Management Release
Number of calls which are released by an operator command
Failure Number of failed calls
Wrong Number Number of calls which are failed because there is no route or wrong number format.
Resource Unavailable
Number of calls which are failed because of the following reasons:
Failed because it cannot find a route during routing process such as route partition, special route sequence, or route sequence after number interpretation
Failed because of restriction configuration
Failed because too much resource is required
Wrong Prefix Number of calls which are failed because of wrong prefix of a called number
User Error Number of calls which are failed because they do not receive a call signal (Setup Timeout)
Called Number Busy Number of calls which are failed because a counterpart is busy (Busy).
No Answer Number of calls which are failed because a counterpart does not answer even though there is a ring (No Answer)
Authentication Release
Number of calls which are failed because a call is not allowed due to Outbound blocking, Inbound blocking, calling CRU (Call Restriction by User), CRO (Call Restriction by Operator), authentication failure, authentication time expiration, or Call Screening, etc.
Service Release Number of calls which are failed because of the following reasons:
That is, number of calls which are failed because of service configuration.
Service Release Call DND
Service Release Call ABS
Service Release Call (Service Error)
Service privilege failure (User Deactivation)
Service Timeout
Trunk Unavailable Number of times when a trunk cannot be used because of the following reasons:
End Point Not Registration
Number of times when all the trunks are busy
All the trunks are QoS and failed for a long time even with many times of retries
When the connection between a gateway and TCP is lost
User Unavailable Number of times when there is no User.
Service Deny Number of times when a call is released because the ITSP Gatekeeper disconnects the connection to a gateway (e.g.

Ошибка! Используйте вкладку "Главная" для применения 제목 1 к тексту, который
должен здесь отображаться. Ошибка! Используйте вкладку "Главная" для применения 제목 1 к
тексту, который должен здесь отображаться.
SCM Express Operation Manual v12.0 389 ©Samsung Proprietary and Confidential
Item Description
deleting the endpoint of a gateway) during call.
Signaling Fault Number of times when a call is released because a phone does not support a specific function.
A call is released because there is no Empty TCS function.
A call is released because there is no function which processes the request_mode of an endpoint during fax operation.
Etc Number of times when a call is failed because of other reasons.
Management Release
Number of calls which are failed because there is no route or wrong number format.
Total Talk Time Total talk time.
Average Talk Time Average talk time.
Route Statistics
Using the [PERFORMANCE > Statistics > Route] menu, you can view the
following statistical information by menu items:
Route-Inbound
This shows the statistical information collected when Inbound calls were
attempted for internal Users through the route.
Item Description
Date The start time of statistics measurement
Route Route name for which statistics is measured
User Group User group where a route is belonged
Total Total number of call tries
Answer Number of answers
Answer % Success ratio of calls
Management Release
Number of call releases by an operator
Failure Number of failed calls
Wrong Number Number of calls which are failed because there is no route or wrong number format.
Resource Unavailable
Number of calls which are failed because of the following reasons:
Failed because it cannot find a route during routing process such as route partition, special route sequence, or route sequence after number interpretation
Failed because of restriction configuration
Failed because too much resource is required
Wrong Prefix Number of calls which are failed because of wrong prefix of a called number
User Error Number of calls which are failed because they do not receive a call signal (Setup Timeout)
Called Number Busy Number of calls which are failed because a counterpart is busy (Busy).

Ошибка! Используйте вкладку "Главная" для применения 제목 1 к тексту, который
должен здесь отображаться. Ошибка! Используйте вкладку "Главная" для применения 제목 1 к
тексту, который должен здесь отображаться.
SCM Express Operation Manual v12.0 390 ©Samsung Proprietary and Confidential
Item Description
No Answer Number of calls which are failed because a counterpart does not answer even though there is a ring (No Answer)
Authentication Release
Number of calls which are failed because a call is not allowed due to Outbound blocking, Inbound blocking, calling CRU (Call Restriction by User), CRO (Call Restriction by Operator), authentication failure, authentication time expiration, or Call Screening, etc.
Service Release Number of calls which are failed because of the following reasons:
That is, number of calls which are failed because of service configuration.
Service Release Call DND
Service Release Call ABS
Service Release Call (Service Error)
Service privilege failure (User Deactivation)
Service Timeout
Trunk Unavailable Number of times when a trunk cannot be used because of the following reasons:
End Point Not Registration
Number of times when all the trunks are busy
All the trunks are QoS and failed for a long time even with many times of retries
When the connection between a gateway and TCP is lost
User Unavailable Number of times when there is no User.
Service Deny Number of times when a call is released because the ITSP Gatekeeper disconnects the connection to a gateway (e.g. deleting the endpoint of a gateway) during call.
Signaling Fault Number of times when a call is released because a phone does not support a specific function.
A call is released because there is no Empty TCS function.
A call is released because there is no function which processes the request_mode of an endpoint during fax operation.
Etc Number of times when a call is failed because of other reasons.
Total Talk Time Total talk time.
Average Talk Time Average talk time.
Outbound Route Statistics
This shows the statistical information collected when internal Users attempted to
call external Users through the route.
Item Description
Date The start time of statistics measurement
Route Route name for which statistics is measured
User Group Name of a user group where a route is belonged
Total Total number of call tries
Answer Number of answers
Answer % Success ratio of calls

Ошибка! Используйте вкладку "Главная" для применения 제목 1 к тексту, который
должен здесь отображаться. Ошибка! Используйте вкладку "Главная" для применения 제목 1 к
тексту, который должен здесь отображаться.
SCM Express Operation Manual v12.0 391 ©Samsung Proprietary and Confidential
Item Description
Management Release
Number of call releases by an operator
Failure Number of failed calls
Wrong Number Number of calls which are failed because there is no route or wrong number format.
Resource Unavailable
Number of calls which are failed because of the following reasons:
Failed because it cannot find a route during routing process such as route partition, special route sequence, or route sequence after number interpretation
Failed because of restriction configuration
Failed because too much resource is required
Wrong Prefix Number of calls which are failed because of wrong prefix of a called number
User Error Number of calls which are failed because they do not receive a call signal (Setup Timeout)
Called Number Busy Number of calls which are failed because a counterpart is busy (Busy).
No Answer Number of calls which are failed because a counterpart does not answer even though there is a ring (No Answer)
Authentication Release
Number of calls which are failed because a call is not allowed due to Outbound blocking, Inbound blocking, calling CRU (Call Restriction by User), CRO (Call Restriction by Operator), authentication failure, authentication time expiration, or Call Screening, etc.
Service Release Number of calls which are failed because of the following reasons:
That is, number of calls which are failed because of service configuration.
Service Release Call DND
Service Release Call ABS
Service Release Call (Service Error)
Service privilege failure (User Deactivation)
Service Timeout
Route Unavailable Number of times when a trunk cannot be used because of the following reasons:
End Point Not Registration
Number of times when all the trunks are busy
All the trunks are QoS and failed for a long time even with many times of retries
When the connection between a gateway and TCP is lost
User Unavailable Number of times when there is no User.
Service Deny Number of times when a call is released because the ITSP Gatekeeper disconnects the connection to a gateway (e.g. deleting the endpoint of a gateway) during call.
Signaling Fault Number of times when a call is released because a phone does not support a specific function.
A call is released because there is no Empty TCS function.

Ошибка! Используйте вкладку "Главная" для применения 제목 1 к тексту, который
должен здесь отображаться. Ошибка! Используйте вкладку "Главная" для применения 제목 1 к
тексту, который должен здесь отображаться.
SCM Express Operation Manual v12.0 392 ©Samsung Proprietary and Confidential
Item Description
A call is released because there is no function which processes the request_mode of an endpoint during fax operation.
Etc Number of times when a call is failed because of other reasons.
Total Talk Time Total talk time.
Average Talk Time Average talk time.
Hunt Group Statistics
Using the [PERFORMANCE > Statistics > HuntGroup] menu, you can view
the following statistical information by menu items:
Incoming Hunt Group Statistics
This shows the statistical information collected when Inbound calls were
attempted for Users of the hunt group.
Item Description
Date The start time of statistics measurement
Hunt Group Name of hunt group for which statistics is measured
User Group Name of a user group
Total Total number of attempted calls
Total Inbound Number of calls which an external User tries to an extension line User
Inbound Answer Number of times when an extension line User answers a call which an external User tries to the extension line User
Total Internal Number of calls which are attempted to an extension number
Internal Answer Number of calls which receive an answer from an extension number
Answer % Success ratio of calls
Management Release
Number of calls which are released by an operator command
Failure Number of failed calls
Wrong Number Number of calls which are failed because there is no route or wrong number format.
Resource Unavailable
Number of calls which are failed because of the following reasons:
Failed because it cannot find a route during routing process such as route partition, special route sequence, or route sequence after number interpretation
Failed because of restriction configuration
Failed because too much resource is required
Wrong Prefix Number of calls which are failed because of wrong prefix of a called number
User Error Number of calls which are failed because they do not receive a call signal (Setup Timeout)
Called Number Busy Number of calls which are failed because a counterpart is busy (Busy).

Ошибка! Используйте вкладку "Главная" для применения 제목 1 к тексту, который
должен здесь отображаться. Ошибка! Используйте вкладку "Главная" для применения 제목 1 к
тексту, который должен здесь отображаться.
SCM Express Operation Manual v12.0 393 ©Samsung Proprietary and Confidential
Item Description
No Answer Number of calls which are failed because a counterpart does not answer even though there is a ring (No Answer)
Authentication Release
Number of calls which are failed because a call is not allowed due to Outbound blocking, Inbound blocking, calling CRU (Call Restriction by User), CRO (Call Restriction by Operator), authentication failure, authentication time expiration, or Call Screening, etc.
Service Release Number of calls which are failed because of the following reasons:
That is, number of calls which are failed because of service configuration.
Service Release Call DND
Service Release Call ABS
Service Release Call (Service Error)
Service privilege failure (User Deactivation)
Service Timeout
Trunk Unavailable Number of times when a trunk cannot be used because of the following reasons:
End Point Not Registration
Number of times when all the trunks are busy
All the trunks are QoS and failed for a long time even with many times of retries
When the connection between a gateway and TCP is lost
User Unavailable Number of times when there is no User.
Service Deny Number of times when a call is released because the ITSP Gatekeeper disconnects the connection to a gateway (e.g. deleting the endpoint of a gateway) during call.
Signaling Fault Number of times when a call is released because a phone does not support a specific function.
A call is released because there is no Empty TCS function.
A call is released because there is no function which processes the request_mode of an endpoint during fax operation.
Etc Number of times when a call is failed because of other reasons.
Management Release
Number of calls which are failed because there is no route or wrong number format.
Total Talk Time Total talk time.
Average Talk Time Average talk time.
User Statistics
Using the [PERFORMANCE > Statistics > User] menu, you can view the
following statistical information by menu items:
SCM Express package provides User-outgoing and User-Incoming statistics but
SCM Enterprise package does not.
User-Outgoing
This shows the statistical information collected when the User attempted to make

Ошибка! Используйте вкладку "Главная" для применения 제목 1 к тексту, который
должен здесь отображаться. Ошибка! Используйте вкладку "Главная" для применения 제목 1 к
тексту, который должен здесь отображаться.
SCM Express Operation Manual v12.0 394 ©Samsung Proprietary and Confidential
an outbound calls.
Item Description
Date The start time of statistics measurement
Subscriber User’s extension number for which statistics is measured
Service Group Name of a service group where a user is belonged
User Group Name of a user group where a service group is belonged
Total Total number of attempted calls
Total Internal Number of calls which are attempted to an extension number
Internal Answer Number of calls which receive an answer from an extension number
Total Outbound Total number of Outbound calls
Outbound Answer Number of Outbound calls which receive an answer
Answer % Success ratio of calls
Management Release
Number of calls which are released by an operator command
Failure Number of failed calls
Wrong Number Number of calls which are failed because there is no route or wrong number format.
Resource Unavailable
Number of calls which are failed because of the following reasons:
Failed because it cannot find a route during routing process such as route partition, special route sequence, or route sequence after number interpretation
Failed because of restriction configuration
Failed because too much resource is required
Wrong Prefix Number of calls which are failed because of wrong prefix of a called number
User Error Number of calls which are failed because they do not receive a call signal (Setup Timeout)
Called Number Busy Number of calls which are failed because a counterpart is busy (Busy).
No Answer Number of calls which are failed because a counterpart does not answer even though there is a ring (No Answer)
Authentication Release
Number of calls which are failed because a call is not allowed due to Outbound blocking, Inbound blocking, calling CRU (Call Restriction by User), CRO (Call Restriction by Operator), authentication failure, authentication time expiration, or Call Screening, etc.
Service Release Number of calls which are failed because of the following reasons:
That is, number of calls which are failed because of service configuration.
Service Release Call DND
Service Release Call ABS
Service Release Call (Service Error)
Service privilege failure (User Deactivation)
Service Timeout

Ошибка! Используйте вкладку "Главная" для применения 제목 1 к тексту, который
должен здесь отображаться. Ошибка! Используйте вкладку "Главная" для применения 제목 1 к
тексту, который должен здесь отображаться.
SCM Express Operation Manual v12.0 395 ©Samsung Proprietary and Confidential
Item Description
Trunk Unavailable Number of times when a trunk cannot be used because of the following reasons:
End Point Not Registration
Number of times when all the trunks are busy
All the trunks are QoS and failed for a long time even with many times of retries
When the connection between a gateway and TCP is lost
User Unavailable Number of times when there is no User.
Service Deny Number of times when a call is released because the ITSP Gatekeeper disconnects the connection to a gateway (e.g. deleting the endpoint of a gateway) during call.
Signaling Fault Number of times when a call is released because a phone does not support a specific function.
A call is released because there is no Empty TCS function.
A call is released because there is no function which processes the request_mode of an endpoint during fax operation.
Etc Number of times when a call is failed because of other reasons.
Total Talk Time Total talk time.
Average Talk Time Average talk time.
User-Incoming
This shows the statistical information collected when Inbound calls were
attempted for the User.
Item Description
Date The start time of statistics measurement
Subscriber User’s extension number for which statistics is measured
Service Group Name of a service group where a user is belonged
User Group Name of a user group
Total Total number of attempted calls
Total Inbound Number of calls which an external User tries to an extension line User
Inbound Answer Number of times when an extension line User answers a call which an external User tries to the extension line User
Total Internal Number of calls which are attempted to an extension number
Internal Answer Number of calls which receive an answer from an extension number
Answer % Success ratio of calls
Management Release
Number of calls which are released by an operator command
Failure Number of failed calls
Wrong Number Number of calls which are failed because there is no route or wrong number format.
Resource Unavailable
Number of calls which are failed because of the following reasons:
Failed because it cannot find a route during routing process

Ошибка! Используйте вкладку "Главная" для применения 제목 1 к тексту, который
должен здесь отображаться. Ошибка! Используйте вкладку "Главная" для применения 제목 1 к
тексту, который должен здесь отображаться.
SCM Express Operation Manual v12.0 396 ©Samsung Proprietary and Confidential
Item Description
such as route partition, special route sequence, or route sequence after number interpretation
Failed because of restriction configuration
Failed because too much resource is required
Wrong Prefix Number of calls which are failed because of wrong prefix of a called number
User Error Number of calls which are failed because they do not receive a call signal (Setup Timeout)
Called Number Busy Number of calls which are failed because a counterpart is busy (Busy).
No Answer Number of calls which are failed because a counterpart does not answer even though there is a ring (No Answer)
Authentication Release
Number of calls which are failed because a call is not allowed due to Outbound blocking, Inbound blocking, calling CRU (Call Restriction by User), CRO (Call Restriction by Operator), authentication failure, authentication time expiration, or Call Screening, etc.
Service Release Number of calls which are failed because of the following reasons:
That is, number of calls which are failed because of service configuration.
Service Release Call DND
Service Release Call ABS
Service Release Call (Service Error)
Service privilege failure (User Deactivation)
Service Timeout
Route Unavailable Number of times when a trunk cannot be used because of the following reasons:
End Point Not Registration
Number of times when all the trunks are busy
All the trunks are QoS and failed for a long time even with many times of retries
When the connection between a gateway and TCP is lost
User Unavailable Number of times when there is no User.
Service Deny Number of times when a call is released because the ITSP Gatekeeper disconnects the connection to a gateway (e.g. deleting the endpoint of a gateway) during call.
Signaling Fault Number of times when a call is released because a phone does not support a specific function.
A call is released because there is no Empty TCS function.
A call is released because there is no function which processes the request_mode of an endpoint during fax operation.
Etc Number of times when a call is failed because of other reasons.
Total Talk Time Total talk time.
Average Talk Time Average talk time.

Ошибка! Используйте вкладку "Главная" для применения 제목 1 к тексту, который
должен здесь отображаться. Ошибка! Используйте вкладку "Главная" для применения 제목 1 к
тексту, который должен здесь отображаться.
SCM Express Operation Manual v12.0 397 ©Samsung Proprietary and Confidential
System Service Statistics
Using the [PERFORMANCE > Statistics > System Service] menu, you can
view the following statistical information by menu items:
Mobile Remote Dial
This shows the statistical information collected when the System attempted to
make an mobile remote dial.
Item Description
Date The start time of statistics measurement
Total Total number of attempted calls
Success Number of success calls
Success % Success ratio of calls
User Release Number of calls which are released by an user
Failure Number of failed calls
Wrong Number Number of calls which are failed because there is no route or wrong number format.
Resource Unavailable Number of calls which are failed because of the following reasons:
Failed because it cannot find a route during routing process such as route partition, special route sequence, or route sequence after number interpretation
Failed because of restriction configuration
Failed because too much resource is required
Wrong Prefix Number of calls which are failed because of wrong prefix of a called number
User Error Number of calls which are failed because they do not receive a call signal (Setup Timeout)
Called Number Busy Number of calls which are failed because a counterpart is busy (Busy).
No Answer Number of calls which are failed because a counterpart does not answer even though there is a ring (No Answer)
Authentication Release Number of calls which are failed because a call is not allowed due to Outbound blocking, Inbound blocking, calling CRU (Call Restriction by User), CRO (Call Restriction by Operator), authentication failure, authentication time expiration, or Call Screening, etc.
Service Release Number of calls which are failed because of the following reasons:
That is, number of calls which are failed because of service configuration.
Service Release Call DND
Service Release Call ABS
Service Release Call (Service Error)
Service privilege failure (User Deactivation)
Service Timeout
Trunk Unavailable Number of times when a trunk cannot be used because of the following reasons:

Ошибка! Используйте вкладку "Главная" для применения 제목 1 к тексту, который
должен здесь отображаться. Ошибка! Используйте вкладку "Главная" для применения 제목 1 к
тексту, который должен здесь отображаться.
SCM Express Operation Manual v12.0 398 ©Samsung Proprietary and Confidential
Item Description
End Point Not Registration
Number of times when all the trunks are busy
All the trunks are QoS and failed for a long time even with many times of retries
When the connection between a gateway and TCP is lost
User Unavailable Number of times when there is no User.
Service Deny Number of times when a call is released because the ITSP Gatekeeper disconnects the connection to a gateway (e.g. deleting the endpoint of a gateway) during call.
Signaling Fault Number of times when a call is released because a phone does not support a specific function.
A call is released because there is no Empty TCS function.
A call is released because there is no function which processes the request_mode of an endpoint during fax operation.
Etc Number of times when a call is failed because of other reasons.
Total Talk Time Total talk time.
Average Talk Time Average talk time.
Smart Routing
This shows the statistical information collected when the System attempted to
make all smart routing.
Item Description
Date The start time of statistics measurement
Total Total number of attempted routings
Success Number of success routings
Success % Success ratio of routings
Failure Number of failed routing
Smart Routing Call Reject
When smart routing is rejected
User Unregister When unregistered
User No Response When does not answer
Smart Routing (Internal)
This shows the statistical information collected when the System attempted to
make internal smart routing.
Item Description
Date The start time of statistics measurement
Total Total number of attempted routings
Success Number of success routings
Success % Success ratio of routings
Failure Number of failed routing

Ошибка! Используйте вкладку "Главная" для применения 제목 1 к тексту, который
должен здесь отображаться. Ошибка! Используйте вкладку "Главная" для применения 제목 1 к
тексту, который должен здесь отображаться.
SCM Express Operation Manual v12.0 399 ©Samsung Proprietary and Confidential
Item Description
Smart Routing Call Reject
When smart routing is rejected
User Unregister When unregistered
User No Response When does not answer
Smart Routing (External)
This shows the statistical information collected when the System attempted to
make inter SCM smart routing.
Item Description
Date The start time of statistics measurement
Total Total number of attempted routings
Success Number of success routings
Success % Success ratio of routings
Failure Number of failed routing
Smart Routing Call Reject
When smart routing is rejected
User Unregister When unregistered
User No Response When does not answer
Smart Handover
This shows the statistical information collected when the System attempted to
make smart handover.
Item Description
Date The start time of statistics measurement
Handover-out Total Number of attempted handover-out
Success Number of success handover-out
Success % Success ratio of handover-out
Failure Number of failed handover-out
Invalid Call When handover-out is unavailable
Route Unavailable When routing for handover-out is unavailable
User Cancel When user canceled handover-out
Handover-in Total Number of attempted handover-in
Success Number of success handover-in
Success % Success ratio of handover-in
Failure Number of failed handover-in
Invalid Call When handover-in is unavailable
Service Unavailable When service type is not Handover Both
User Cancel When user canceled handover-in
Mobile Call
This shows the statistical information collected when Samsung mobile phone
attempted the make calls.

Ошибка! Используйте вкладку "Главная" для применения 제목 1 к тексту, который
должен здесь отображаться. Ошибка! Используйте вкладку "Главная" для применения 제목 1 к
тексту, который должен здесь отображаться.
SCM Express Operation Manual v12.0 400 ©Samsung Proprietary and Confidential
Item Description
Date The start time of statistics measurement
Internal Wifi Total Total number of attempted calls for Internal wifi network
Success Number of success calls for Internal wifi network
Failure Number of failed calls for Internal wifi network
External Wifi Total Total number of attempted calls for External wifi network
Success Number of success calls for External wifi network
Failure Number of failed calls for External wifi network
Mobile Total Total number of attempted calls for mobile network
Success Number of success calls for mobile network
Failure Number of failed calls for mobile network
Unknown Total Total number of attempted calls for Unknown network
Success Number of success calls for Unknown network
Failure Number of failed calls for Unknown network
Internal Wifi Success % Success ratio of calls for Internal wifi network
External Wifi Success % Success ratio of calls for External wifi network
Mobile Success % Success ratio of calls for mobile network
Unknown Success % Success ratio of calls for Unknown network
Internal Wifi External Wifi Mobile
Unknown
User Invalid Number of calls which are failed because of the following reasons:
No Route or Wrong Number Format
Wrong prefix of a called number
Do not receive a call signal (Setup Timeout)
Called Number Busy
No Answer
Authentication Release
Number of calls which are failed because a call is not allowed due to Outbound blocking, Inbound blocking, calling CRU (Call Restriction by User), CRO (Call Restriction by Operator), authentication failure, authentication time expiration, or Call Screening, etc.
Service Release Number of calls which are failed because of the following reasons:
That is, number of calls which are failed because of service configuration.
Service Release Call DND
Service Release Call ABS
Service Release Call (Service Error)
Service privilege failure (User Deactivation)
Service Timeout
Statistics Group
To use the statistics group, you need the following items are set.
Using the [CONFIGURATION > Service > Group Service > Statistics Group]
menu, you need to create a statistics group, set the following data.

Ошибка! Используйте вкладку "Главная" для применения 제목 1 к тексту, который
должен здесь отображаться. Ошибка! Используйте вкладку "Главная" для применения 제목 1 к
тексту, который должен здесь отображаться.
SCM Express Operation Manual v12.0 401 ©Samsung Proprietary and Confidential
Item Description
User Group Select the user group
Group Name Input the name of statistics group
Group Type Select the group type [Extension/Route] of statistics group
Using the [CONFIGURATION > Service > Group Service > Extension
Statistics List] menu, you need to assign statistics group to extension, set the
following data.
Item Description
Subscriber Statistics Include
Select whether to display the statistics in [User Statistics]
menus
Statistics Group Name Assign statistics group to extesntion
Using the [CONFIGURATION > Service > Group Service > Route Statistics
List] menu, you need to assign statistics group to route, set the following data.
Item Description
Statistics Group Name Assign statistics group to route
Extension Statistics Group
Using the [PERFORMANCE > Statistics > Extension Statistics Group] menu,
you can view the following statistical information by menu items:
Extension Statistics Groups-Outgoing
This shows the statistical information collected when the user in extension
statistics group attempted to make an outbound calls.
Item Description
Date The start time of statistics measurement
Statistics Group Name of a statistics group where a user is belonged
Service Group Name of a service group where a user is belonged
User Group Name of a user group where a service group is belonged
Total Total number of attempted calls
Total Internal Number of calls which are attempted to an extension number
Internal Answer Number of calls which receive an answer from an extension number
Total Outbound Total number of Outbound calls
Outbound Answer Number of Outbound calls which receive an answer
Answer % Success ratio of calls
Management Release Number of calls which are released by an operator command
Failure Number of failed calls
Wrong Number Number of calls which are failed because there is no route or wrong number format.

Ошибка! Используйте вкладку "Главная" для применения 제목 1 к тексту, который
должен здесь отображаться. Ошибка! Используйте вкладку "Главная" для применения 제목 1 к
тексту, который должен здесь отображаться.
SCM Express Operation Manual v12.0 402 ©Samsung Proprietary and Confidential
Item Description
Resource Unavailable Number of calls which are failed because of the following reasons:
Failed because it cannot find a route during routing process such as route partition, special route sequence, or route sequence after number interpretation
Failed because of restriction configuration
Failed because too much resource is required
Wrong Prefix Number of calls which are failed because of wrong prefix of a called number
User Error Number of calls which are failed because they do not receive a call signal (Setup Timeout)
Called Number Busy Number of calls which are failed because a counterpart is busy (Busy).
No Answer Number of calls which are failed because a counterpart does not answer even though there is a ring (No Answer)
Authentication Release Number of calls which are failed because a call is not allowed due to Outbound blocking, Inbound blocking, calling CRU (Call Restriction by User), CRO (Call Restriction by Operator), authentication failure, authentication time expiration, or Call Screening, etc.
Service Release Number of calls which are failed because of the following reasons:
That is, number of calls which are failed because of service configuration.
Service Release Call DND
Service Release Call ABS
Service Release Call (Service Error)
Service privilege failure (User Deactivation)
Service Timeout
Trunk Unavailable Number of times when a trunk cannot be used because of the following reasons:
End Point Not Registration
Number of times when all the trunks are busy
All the trunks are QoS and failed for a long time even with many times of retries
When the connection between a gateway and TCP is lost
User Unavailable Number of times when there is no User.
Service Deny Number of times when a call is released because the ITSP Gatekeeper disconnects the connection to a gateway (e.g. deleting the endpoint of a gateway) during call.
Signaling Fault Number of times when a call is released because a phone does not support a specific function.
A call is released because there is no Empty TCS function.
A call is released because there is no function which processes the request_mode of an endpoint during fax operation.
Etc Number of times when a call is failed because of other reasons.

Ошибка! Используйте вкладку "Главная" для применения 제목 1 к тексту, который
должен здесь отображаться. Ошибка! Используйте вкладку "Главная" для применения 제목 1 к
тексту, который должен здесь отображаться.
SCM Express Operation Manual v12.0 403 ©Samsung Proprietary and Confidential
Item Description
Total Talk Time Total talk time.
Average Talk Time Average talk time.
Extension Statistics Groups -Incoming
This shows the statistical information collected when Inbound calls were
attempted for the user in extension statistics group.
Item Description
Date The start time of statistics measurement
Statistics Group Name of a statistics group where a user is belonged
Service Group Name of a service group where a user is belonged
User Group Name of a user group
Total Total number of attempted calls
Total Inbound Number of calls which an external User tries to an extension line User
Inbound Answer Number of times when an extension line User answers a call which an external User tries to the extension line User
Total Internal Number of calls which are attempted to an extension number
Internal Answer Number of calls which receive an answer from an extension number
Answer % Success ratio of calls
Management Release Number of calls which are released by an operator command
Failure Number of failed calls
Wrong Number Number of calls which are failed because there is no route or wrong number format.
Resource Unavailable Number of calls which are failed because of the following reasons:
Failed because it cannot find a route during routing process such as route partition, special route sequence, or route sequence after number interpretation
Failed because of restriction configuration
Failed because too much resource is required
Wrong Prefix Number of calls which are failed because of wrong prefix of a called number
User Error Number of calls which are failed because they do not receive a call signal (Setup Timeout)
Called Number Busy Number of calls which are failed because a counterpart is busy (Busy).
No Answer Number of calls which are failed because a counterpart does not answer even though there is a ring (No Answer)
Authentication Release Number of calls which are failed because a call is not allowed due to Outbound blocking, Inbound blocking, calling CRU (Call Restriction by User), CRO (Call Restriction by Operator), authentication failure, authentication time expiration, or Call Screening, etc.
Service Release Number of calls which are failed because of the following

Ошибка! Используйте вкладку "Главная" для применения 제목 1 к тексту, который
должен здесь отображаться. Ошибка! Используйте вкладку "Главная" для применения 제목 1 к
тексту, который должен здесь отображаться.
SCM Express Operation Manual v12.0 404 ©Samsung Proprietary and Confidential
Item Description
reasons:
That is, number of calls which are failed because of service configuration.
Service Release Call DND
Service Release Call ABS
Service Release Call (Service Error)
Service privilege failure (User Deactivation)
Service Timeout
Route Unavailable Number of times when a trunk cannot be used because of the following reasons:
End Point Not Registration
Number of times when all the trunks are busy
All the trunks are QoS and failed for a long time even with many times of retries
When the connection between a gateway and TCP is lost
User Unavailable Number of times when there is no User.
Service Deny Number of times when a call is released because the ITSP Gatekeeper disconnects the connection to a gateway (e.g. deleting the endpoint of a gateway) during call.
Signaling Fault Number of times when a call is released because a phone does not support a specific function.
A call is released because there is no Empty TCS function.
A call is released because there is no function which processes the request_mode of an endpoint during fax operation.
Etc Number of times when a call is failed because of other reasons.
Total Talk Time Total talk time.
Average Talk Time Average talk time.
Route Statistics Groups
Using the [PERFORMANCE > Statistics > Route Statistics Groups] menu, you
can view the following statistical information by menu items:
Route Statistics Groups-Inbound
This shows the statistical information collected when Inbound calls were
attempted for internal Users through the route in route statistics group.
Item Description
Date The start time of statistics measurement
Statistics Group Name of a statistics group where a user is belonged
User Group User group where a route is belonged
Total Total number of call tries
Answer Number of answers
Answer % Success ratio of calls

Ошибка! Используйте вкладку "Главная" для применения 제목 1 к тексту, который
должен здесь отображаться. Ошибка! Используйте вкладку "Главная" для применения 제목 1 к
тексту, который должен здесь отображаться.
SCM Express Operation Manual v12.0 405 ©Samsung Proprietary and Confidential
Item Description
Management Release Number of call releases by an operator
Failure Number of failed calls
Wrong Number Number of calls which are failed because there is no route or wrong number format.
Resource Unavailable Number of calls which are failed because of the following reasons:
Failed because it cannot find a route during routing process such as route partition, special route sequence, or route sequence after number interpretation
Failed because of restriction configuration
Failed because too much resource is required
Wrong Prefix Number of calls which are failed because of wrong prefix of a called number
User Error Number of calls which are failed because they do not receive a call signal (Setup Timeout)
Called Number Busy Number of calls which are failed because a counterpart is busy (Busy).
No Answer Number of calls which are failed because a counterpart does not answer even though there is a ring (No Answer)
Authentication Release Number of calls which are failed because a call is not allowed due to Outbound blocking, Inbound blocking, calling CRU (Call Restriction by User), CRO (Call Restriction by Operator), authentication failure, authentication time expiration, or Call Screening, etc.
Service Release Number of calls which are failed because of the following reasons:
That is, number of calls which are failed because of service configuration.
Service Release Call DND
Service Release Call ABS
Service Release Call (Service Error)
Service privilege failure (User Deactivation)
Service Timeout
Trunk Unavailable Number of times when a trunk cannot be used because of the following reasons:
End Point Not Registration
Number of times when all the trunks are busy
All the trunks are QoS and failed for a long time even with many times of retries
When the connection between a gateway and TCP is lost
User Unavailable Number of times when there is no User.
Service Deny Number of times when a call is released because the ITSP Gatekeeper disconnects the connection to a gateway (e.g. deleting the endpoint of a gateway) during call.
Signaling Fault Number of times when a call is released because a phone does not support a specific function.
A call is released because there is no Empty TCS function.
A call is released because there is no function which

Ошибка! Используйте вкладку "Главная" для применения 제목 1 к тексту, который
должен здесь отображаться. Ошибка! Используйте вкладку "Главная" для применения 제목 1 к
тексту, который должен здесь отображаться.
SCM Express Operation Manual v12.0 406 ©Samsung Proprietary and Confidential
Item Description
processes the request_mode of an endpoint during fax operation.
Etc Number of times when a call is failed because of other reasons.
Total Talk Time Total talk time.
Average Talk Time Average talk time.
Route Statistics Groups-Outbound
This shows the statistical information collected when internal Users attempted to
call external Users through the route in route statistics group.
Item Description
Date The start time of statistics measurement
Statistics Group Name of a statistics group where a user is belonged
User Group Name of a user group where a route is belonged
Total Total number of call tries
Answer Number of answers
Answer % Success ratio of calls
Management Release Number of call releases by an operator
Failure Number of failed calls
Wrong Number Number of calls which are failed because there is no route or wrong number format.
Resource Unavailable Number of calls which are failed because of the following reasons:
Failed because it cannot find a route during routing process such as route partition, special route sequence, or route sequence after number interpretation
Failed because of restriction configuration
Failed because too much resource is required
Wrong Prefix Number of calls which are failed because of wrong prefix of a called number
User Error Number of calls which are failed because they do not receive a call signal (Setup Timeout)
Called Number Busy Number of calls which are failed because a counterpart is busy (Busy).
No Answer Number of calls which are failed because a counterpart does not answer even though there is a ring (No Answer)
Authentication Release Number of calls which are failed because a call is not allowed due to Outbound blocking, Inbound blocking, calling CRU (Call Restriction by User), CRO (Call Restriction by Operator), authentication failure, authentication time expiration, or Call Screening, etc.
Service Release Number of calls which are failed because of the following reasons:
That is, number of calls which are failed because of service configuration.
Service Release Call DND

Ошибка! Используйте вкладку "Главная" для применения 제목 1 к тексту, который
должен здесь отображаться. Ошибка! Используйте вкладку "Главная" для применения 제목 1 к
тексту, который должен здесь отображаться.
SCM Express Operation Manual v12.0 407 ©Samsung Proprietary and Confidential
Item Description
Service Release Call ABS
Service Release Call (Service Error)
Service privilege failure (User Deactivation)
Service Timeout
Route Unavailable Number of times when a trunk cannot be used because of the following reasons:
End Point Not Registration
Number of times when all the trunks are busy
All the trunks are QoS and failed for a long time even with many times of retries
When the connection between a gateway and TCP is lost
User Unavailable Number of times when there is no User.
Service Deny Number of times when a call is released because the ITSP Gatekeeper disconnects the connection to a gateway (e.g. deleting the endpoint of a gateway) during call.
Signaling Fault Number of times when a call is released because a phone does not support a specific function.
A call is released because there is no Empty TCS function.
A call is released because there is no function which processes the request_mode of an endpoint during fax operation.
Etc Number of times when a call is failed because of other reasons.
Total Talk Time Total talk time.
Average Talk Time Average talk time.
Phone Usage by Type Statistics
Using the [PERFORMANCE > Statistics > Phone usage by Type] menu, you
can view the following statistical information by menu items:
Internal-Outgoing Usage
This shows the statistical information collected when outbound calls were
attempted between internal Users
Item Description
Date The start time of statistics measurement
Total Total number of attempted calls.
Samsung SIP Phones Number of calls which are attempted to Samsung SIP Phones
Samsung Soft Phones Number of calls which are attempted to Samsung Soft Phones
Samsung Mobile Phones
Internal Wifi Number of calls which are attempted to Samsung Mobile Phones for Internal WIFI network
External Wifi Number of calls which are attempted to Samsung Mobile Phones for External WIFI network
Mobile Number of calls which are attempted to Samsung Mobile Phones for Mobile network

Ошибка! Используйте вкладку "Главная" для применения 제목 1 к тексту, который
должен здесь отображаться. Ошибка! Используйте вкладку "Главная" для применения 제목 1 к
тексту, который должен здесь отображаться.
SCM Express Operation Manual v12.0 408 ©Samsung Proprietary and Confidential
Item Description
Unknown Number of calls which are attempted to Samsung Mobile Phones for unknown network
Analog FXS Phones Number of calls which are attempted to Analog FXS Phones
3rd Party SIP Phones Number of calls which are attempted to 3rd Party SIP Phones
Samsung PC Attendants Number of calls which are attempted to Samsung PC Attendants
FMS Phones Number of calls which are attempted to FMS Phones
Samsung SIP Phones % Usage ratio of Samsung SIP Phone
Samsung Soft Phones % Usage ratio of Samsung Soft Phone
Samsung Mobile Phones %
Internal Wifi Usage ratio of Samsung Mobile Phone for Internal wifi network
External Wifi Usage ratio of Samsung Mobile Phone for External wifi network
Mobile Usage ratio of Samsung Mobile Phone for mobile network
Unknown Usage ratio of Samsung Mobile Phone for unknown network
Analog FXS Phones % Usage ratio of Analog FXS Phone
3rd Party SIP Phones % Usage ratio of 3rd Party SIP Phone
Samsung PC Attendants % Usage ratio of Samsung PC Attendant
FMS Phones % Usage ratio of FMS Phone
Internal-Incoming Usage
This shows the statistical information collected when Inbound calls were
attempted between Internal Users
Item Description
Date The start time of statistics measurement
Total Total number of attempted calls.
Samsung SIP Phones Number of calls which are attempted to Samsung SIP Phones
Samsung Soft Phones Number of calls which are attempted to Samsung Soft Phones
Samsung Mobile Phones
Internal Wifi Number of calls which are attempted to Samsung Mobile Phones for Internal WIFI network
External Wifi Number of calls which are attempted to Samsung Mobile Phones for External WIFI network
Mobile Number of calls which are attempted to Samsung Mobile Phones for Mobile network
Unknown Number of calls which are attempted to Samsung Mobile Phones for unknown network
Analog FXS Phones Number of calls which are attempted to Analog FXS Phones
3rd Party SIP Phones Number of calls which are attempted to 3rd Party SIP Phones
Samsung PC Attendants Number of calls which are attempted to Samsung PC Attendants
FMS Phones Number of calls which are attempted to FMS Phones
Samsung SIP Phones % Usage ratio of Samsung SIP Phone
Samsung Soft Phones % Usage ratio of Samsung Soft Phone
Samsung Mobile Internal Wifi Usage ratio of Samsung Mobile Phone for Internal wifi network

Ошибка! Используйте вкладку "Главная" для применения 제목 1 к тексту, который
должен здесь отображаться. Ошибка! Используйте вкладку "Главная" для применения 제목 1 к
тексту, который должен здесь отображаться.
SCM Express Operation Manual v12.0 409 ©Samsung Proprietary and Confidential
Item Description
Phones % External Wifi Usage ratio of Samsung Mobile Phone for External wifi network
Mobile Usage ratio of Samsung Mobile Phone for mobile network
Unknown Usage ratio of Samsung Mobile Phone for unknown network
Analog FXS Phones % Usage ratio of Analog FXS Phone
3rd Party SIP Phones % Usage ratio of 3rd Party SIP Phone
Samsung PC Attendants % Usage ratio of Samsung PC Attendant
FMS Phones % Usage ratio of FMS Phone
Outbound Usage
This shows the statistical information collected when internal Users attempted to
call external Users
Item Description
Date The start time of statistics measurement
Total Total number of attempted calls.
Samsung SIP Phones Number of calls which are attempted to Samsung SIP Phones
Samsung Soft Phones Number of calls which are attempted to Samsung Soft Phones
Samsung Mobile Phones
Internal Wifi Number of calls which are attempted to Samsung Mobile Phones for Internal WIFI network
External Wifi Number of calls which are attempted to Samsung Mobile Phones for External WIFI network
Mobile Number of calls which are attempted to Samsung Mobile Phones for Mobile network
Unknown Number of calls which are attempted to Samsung Mobile Phones for unknown network
Analog FXS Phones Number of calls which are attempted to Analog FXS Phones
3rd Party SIP Phones Number of calls which are attempted to 3rd Party SIP Phones
Samsung PC Attendants Number of calls which are attempted to Samsung PC Attendants
FMS Phones Number of calls which are attempted to FMS Phones
Samsung SIP Phones % Usage ratio of Samsung SIP Phone
Samsung Soft Phones % Usage ratio of Samsung Soft Phone
Samsung Mobile Phones %
Internal Wifi Usage ratio of Samsung Mobile Phone for Internal wifi network
External Wifi Usage ratio of Samsung Mobile Phone for External wifi network
Mobile Usage ratio of Samsung Mobile Phone for mobile network
Unknown Usage ratio of Samsung Mobile Phone for unknown network
Analog FXS Phones % Usage ratio of Analog FXS Phone
3rd Party SIP Phones % Usage ratio of 3rd Party SIP Phone
Samsung PC Attendants % Usage ratio of Samsung PC Attendant
FMS Phones % Usage ratio of FMS Phone
Inbound Usage
This shows the statistical information collected when external Users attempted to
call internal Users.

Ошибка! Используйте вкладку "Главная" для применения 제목 1 к тексту, который
должен здесь отображаться. Ошибка! Используйте вкладку "Главная" для применения 제목 1 к
тексту, который должен здесь отображаться.
SCM Express Operation Manual v12.0 410 ©Samsung Proprietary and Confidential
Item Description
Date The start time of statistics measurement
Total Total number of attempted calls.
Samsung SIP Phones Number of calls which are attempted to Samsung SIP Phones
Samsung Soft Phones Number of calls which are attempted to Samsung Soft Phones
Samsung Mobile Phones
Internal Wifi Number of calls which are attempted to Samsung Mobile Phones for Internal WIFI network
External Wifi Number of calls which are attempted to Samsung Mobile Phones for External WIFI network
Mobile Number of calls which are attempted to Samsung Mobile Phones for Mobile network
Unknown Number of calls which are attempted to Samsung Mobile Phones for unknown network
Analog FXS Phones Number of calls which are attempted to Analog FXS Phones
3rd Party SIP Phones Number of calls which are attempted to 3rd Party SIP Phones
Samsung PC Attendants Number of calls which are attempted to Samsung PC Attendants
FMS Phones Number of calls which are attempted to FMS Phones
Samsung SIP Phones % Usage ratio of Samsung SIP Phone
Samsung Soft Phones % Usage ratio of Samsung Soft Phone
Samsung Mobile Phones %
Internal Wifi Usage ratio of Samsung Mobile Phone for Internal wifi network
External Wifi Usage ratio of Samsung Mobile Phone for External wifi network
Mobile Usage ratio of Samsung Mobile Phone for mobile network
Unknown Usage ratio of Samsung Mobile Phone for unknown network
Analog FXS Phones % Usage ratio of Analog FXS Phone
3rd Party SIP Phones % Usage ratio of 3rd Party SIP Phone
Samsung PC Attendants % Usage ratio of Samsung PC Attendant
FMS Phones % Usage ratio of FMS Phone
Total Usage
This shows the statistical information for all calls.
Item Description
Date The start time of statistics measurement
Total Total number of attempted calls.
Samsung SIP Phones Number of calls which are attempted to Samsung SIP Phones
Samsung Soft Phones Number of calls which are attempted to Samsung Soft Phones
Samsung Mobile Phones
Internal Wifi Number of calls which are attempted to Samsung Mobile Phones for Internal WIFI network
External Wifi Number of calls which are attempted to Samsung Mobile Phones for External WIFI network
Mobile Number of calls which are attempted to Samsung Mobile Phones for Mobile network
Unknown Number of calls which are attempted to Samsung Mobile Phones for unknown network

Ошибка! Используйте вкладку "Главная" для применения 제목 1 к тексту, который
должен здесь отображаться. Ошибка! Используйте вкладку "Главная" для применения 제목 1 к
тексту, который должен здесь отображаться.
SCM Express Operation Manual v12.0 411 ©Samsung Proprietary and Confidential
Item Description
Analog FXS Phones Number of calls which are attempted to Analog FXS Phones
3rd Party SIP Phones Number of calls which are attempted to 3rd Party SIP Phones
Samsung PC Attendants Number of calls which are attempted to Samsung PC Attendants
FMS Phones Number of calls which are attempted to FMS Phones
Samsung SIP Phones % Usage ratio of Samsung SIP Phone
Samsung Soft Phones % Usage ratio of Samsung Soft Phone
Samsung Mobile Phones %
Internal Wifi Usage ratio of Samsung Mobile Phone for Internal wifi network
External Wifi Usage ratio of Samsung Mobile Phone for External wifi network
Mobile Usage ratio of Samsung Mobile Phone for mobile network
Unknown Usage ratio of Samsung Mobile Phone for unknown network
Analog FXS Phones % Usage ratio of Analog FXS Phone
3rd Party SIP Phones % Usage ratio of 3rd Party SIP Phone
Samsung PC Attendants % Usage ratio of Samsung PC Attendant
FMS Phones % Usage ratio of FMS Phone
Phone Registration by Type Statistics
Using the [PERFORMANCE > Statistics > Phone Registration by Type] menu,
you can view the following statistical information by menu items:
To Reg
This shows the statistical information for state change from Unreg to reg.
Item Description
Date The start time of statistics measurement
Total Total number of changed events
Samsung SIP Phones Number of events which are changed for Samsung SIP Phones
Samsung Soft Phones Number of events which are changed for Samsung Soft Phones
Samsung Mobile Phones
Internal Wifi Number of events which are changed for Samsung Mobile Phones for Internal WIFI network
External Wifi Number of events which are changed for Samsung Mobile Phones for External WIFI network
Mobile Number of events which are changed for Samsung Mobile Phones for Mobile network
Unknown Number of events which are changed for Samsung Mobile Phones for unknown network
Samsung PC Attendants Number of events which are changed for Samsung PC Attendants
3rd Party SIP Phones Number of events which are changed for 3rd Party SIP Phones
Analog FXS Phones Number of events which are changed for Analog FXS Phones
FMS Phones Number of events which are changed for FMS Phones
Samsung SIP Phones % Usage ratio of Samsung SIP Phone
Samsung Soft Phones % Usage ratio of Samsung Soft Phone
Samsung Mobile Internal Wifi Usage ratio of Samsung Mobile Phone for Internal wifi network

Ошибка! Используйте вкладку "Главная" для применения 제목 1 к тексту, который
должен здесь отображаться. Ошибка! Используйте вкладку "Главная" для применения 제목 1 к
тексту, который должен здесь отображаться.
SCM Express Operation Manual v12.0 412 ©Samsung Proprietary and Confidential
Item Description
Phones % External Wifi Usage ratio of Samsung Mobile Phone for External wifi network
Mobile Usage ratio of Samsung Mobile Phone for mobile network
Unknown Usage ratio of Samsung Mobile Phone for unknown network
Analog FXS Phones % Usage ratio of Analog FXS Phone
3rd Party SIP Phones % Usage ratio of 3rd Party SIP Phone
Samsung PC Attendants % Usage ratio of Samsung PC Attendant
FMS Phones % Usage ratio of FMS Phone
To Unreg
This shows the statistical information for state change from reg to unreg.
Item Description
Date The start time of statistics measurement
Total Total number of changed events
Samsung SIP Phones Number of events which are changed for Samsung SIP Phones
Samsung Soft Phones Number of events which are changed for Samsung Soft Phones
Samsung Mobile Phones
Internal Wifi Number of events which are changed for Samsung Mobile Phones for Internal WIFI network
External Wifi Number of events which are changed for Samsung Mobile Phones for External WIFI network
Mobile Number of events which are changed for Samsung Mobile Phones for Mobile network
Unknown Number of events which are changed for Samsung Mobile Phones for unknown network
Samsung PC Attendants Number of events which are changed for Samsung PC Attendants
3rd Party SIP Phones Number of events which are changed for 3rd Party SIP Phones
Analog FXS Phones Number of events which are changed for Analog FXS Phones
FMS Phones Number of events which are changed for FMS Phones
Samsung SIP Phones % Usage ratio of Samsung SIP Phone
Samsung Soft Phones % Usage ratio of Samsung Soft Phone
Samsung Mobile Phones %
Internal Wifi Usage ratio of Samsung Mobile Phone for Internal wifi network
External Wifi Usage ratio of Samsung Mobile Phone for External wifi network
Mobile Usage ratio of Samsung Mobile Phone for mobile network
Unknown Usage ratio of Samsung Mobile Phone for unknown network
Analog FXS Phones % Usage ratio of Analog FXS Phone
3rd Party SIP Phones % Usage ratio of 3rd Party SIP Phone
Samsung PC Attendants % Usage ratio of Samsung PC Attendant
FMS Phones % Usage ratio of FMS Phone
Registration Average
This shows the statistical information for registration average.
Item Description

Ошибка! Используйте вкладку "Главная" для применения 제목 1 к тексту, который
должен здесь отображаться. Ошибка! Используйте вкладку "Главная" для применения 제목 1 к
тексту, который должен здесь отображаться.
SCM Express Operation Manual v12.0 413 ©Samsung Proprietary and Confidential
Item Description
Date The start time of statistics measurement
Total Average Total average of registration
Samsung SIP Phones Average Average which are registered for Samsung SIP Phones
Samsung Soft Phones Average Average which are registered for Samsung Soft Phones
Samsung Mobile Phones
Internal Wifi Average
Average which are registered for Samsung Mobile Phones for Internal WIFI network
External Wifi Average
Average which are registered for Samsung Mobile Phones for External WIFI network
Mobile Average Average which are registered for Samsung Mobile Phones for Mobile network
Unknown Average
Average which are registered for Samsung Mobile Phones for unknown network
Samsung PC Attendants Average Average which are registered for Samsung PC Attendants
3rd Party SIP Phones Average Average which are registered for 3rd Party SIP Phones
Analog FXS Phones Average Average which are registered for Analog FXS Phones
FMS Phones Average Average which are registered for FMS Phones
Samsung SIP Phones % Registration ratio of Samsung SIP Phone
Samsung Soft Phones % Registration ratio of Samsung Soft Phone
Samsung Mobile Phones %
Internal Wifi Registration ratio of Samsung Mobile Phone for Internal wifi network
External Wifi Registration ratio of Samsung Mobile Phone for External wifi network
Mobile Registration ratio of Samsung Mobile Phone for mobile network
Unknown Registration ratio of Samsung Mobile Phone for unknown network
Analog FXS Phones % Registration ratio of Analog FXS Phone
3rd Party SIP Phones % Registration ratio of 3rd Party SIP Phone
Samsung PC Attendants % Registration ratio of Samsung PC Attendant
FMS Phones % Registration ratio of FMS Phone
ACD Reports
ACD Group Statistics
Using the [PERFORMANCE > Statistics > ACD Group] menu, you can view
the following statistical information by menu items:
System Summary
This shows the statistical information for all system-wide ACD calls.
Item Description
Date The start time of statistics measurement
ACD Incoming Total Total number of ACD calls
Answer Number of ACD answered calls

Ошибка! Используйте вкладку "Главная" для применения 제목 1 к тексту, который
должен здесь отображаться. Ошибка! Используйте вкладку "Главная" для применения 제목 1 к
тексту, который должен здесь отображаться.
SCM Express Operation Manual v12.0 414 ©Samsung Proprietary and Confidential
Item Description
Answer % Success ratio of ACD calls
Failure Total number of failed ACD calls
Average Wait Time Average wait time of ACD
Average Talk Time Average talk time of ACD
Normal Incoming
Total Total number of Inbound calls except ACD
Internal Number of Inbound internal calls except ACD
Inbound Number of Inbound external calls except ACD
Total Talk Time Total talk time of Inbound calls except ACD
Average Talk Time Average talk time of Inbound calls except ACD
Normal Outgoing
Total Total number of Outbound calls except ACD
Internal Number of Outbound internal calls except ACD
Outbound Number of Outbound external calls except ACD
Total Talk Time Total talk time of Outbound calls except ACD
Average Talk Time Average talk time of Outbound calls except ACD
ACD-Group Summary Statistics
This shows the statistical information for all calls for the ACD group.
Item Description
Date The start time of statistics measurement
ACD Group Name of an ACD group
User Group Name of a user group
Queuing Average Time Average ring time of ACD Queuing
Longest Time Longest ring time of ACD Queuing
Overflow In Number of ACD Overflow In
Out Number of ACD Overflow Out
Incoming Calls
Total Total number of ACD calls
Answer Number of answered ACD calls
Answer % Success ratio of ACD calls
Failure Total number of failed ACD calls
Total Wait time Total ring time of ACD
Average Wait Time Average ring time of ACD
Longest Wait Time Longest ring time of ACD
Total Talk Time Total talk time of ACD
Average Talk Time Average talk time of ACD
Longest Talk Time Longest talk time of ACD
ACD-Group Overflow Statistics
This shows the statistical information collected when overflow occurred for ACD
group.
Item Description

Ошибка! Используйте вкладку "Главная" для применения 제목 1 к тексту, который
должен здесь отображаться. Ошибка! Используйте вкладку "Главная" для применения 제목 1 к
тексту, который должен здесь отображаться.
SCM Express Operation Manual v12.0 415 ©Samsung Proprietary and Confidential
Item Description
Date The start time of statistics measurement
ACD Group Name of an ACD group
User Group Name of a user group
Overflow In Number of ACD Overflow In
Overflow Out Number of ACD Overflow Out
ACD Agent Statistics
Using the [PERFORMANCE > Statistics > ACD Agents] menu, you can view
the following statistical information by menu items:
Summary
This shows the statistical information for all agents’ calls.
Item Description
Date The start time of statistics measurement
Agent ID Agent ID
User Group Name of a user group
ACD Incoming Total Total number of ACD calls
Answer Number of answered ACD calls
Abandon Number of abandoned ACD calls
No Answer Number of no-answer ACD calls
Answer % Success ratio of ACD calls
Failure Total number of failed ACD calls
Total Wait Time Total ring time of ACD
Average Wait Time Average ring time of ACD
Longest Wait Time Longest ring time of ACD
Total Talk Time Total talk time of ACD
Average Talk Time Average talk time of ACD
Longest Talk Time Longest talk time of ACD
Normal Incoming
Total Total number of Inbound calls except ACD
Internal Number of Inbound internal calls except ACD
Outbound Number of Inbound external calls except ACD
Total Talk Time Total talk time of Inbound calls except ACD
Average Talk Time Average talk time of Inbound calls except ACD
Normal Outgoing
Total Total number of Outbound calls except ACD
Internal Number of Outbound internal calls except ACD
Outbound Number of Outbound external calls except ACD
Total Talk Time Total talk time of Outbound calls except ACD
Average Talk Time Average talk time of Outbound calls except ACD

Ошибка! Используйте вкладку "Главная" для применения 제목 1 к тексту, который
должен здесь отображаться. Ошибка! Используйте вкладку "Главная" для применения 제목 1 к
тексту, который должен здесь отображаться.
SCM Express Operation Manual v12.0 416 ©Samsung Proprietary and Confidential
Utilization
This shows the statistical information for all agents’ level of contribution.
Item Description
Date The start time of statistics measurement
Agent ID Agent ID
User Group Name of a user group
Avail % Actual working ratio except break time
Total Logged Time Displays the total log time
Total Break Time Total break time
Activity
This shows the statistical information for all agents’ activities.
Item Description
Date The start time of statistics measurement
Agent ID Agent ID
ACD Group Name of an ACD group
User Group Name of a user group
Activity Activity of an agent (Login, Logout, Break-in, Break-out)
Resource Statistics
Using the [PERFORMANCE > Statistics > Resource] menu, you can view the
following statistical information by menu items:
CPU
This shows the statistical information for CPU.
Item Description
Date The start time of statistics measurement
System Name System Name
Average User Use Average User Use
Average System Use Average System Use
Average Wait Use Average Wait Use
Average Idle Use Average Idle Use
Memory
This shows the statistical information for memory.
Item Description
Date The start time of statistics measurement
System Name System Name
Total Memory Total Memory
Free Memory Free Memory

Ошибка! Используйте вкладку "Главная" для применения 제목 1 к тексту, который
должен здесь отображаться. Ошибка! Используйте вкладку "Главная" для применения 제목 1 к
тексту, который должен здесь отображаться.
SCM Express Operation Manual v12.0 417 ©Samsung Proprietary and Confidential
Item Description
Used Swap Used Swap
Free Swap Free Swap
Average Usage Average Usage
Disk
This shows the statistical information for disk.
Item Description
Date The start time of statistics measurement
System Name System Name
Total Disk Total Memory
Used Disk Used Disk
Available Disk Available Disk
Average Usage Average Usage
Alarm Statistics
Using the [PERFORMANCE > Statistics > System Alarms] menu, you can
view the following statistical information by menu items:
This shows the statistical information for alarms, faults and status.
Item Description
Date The start time of statistics measurement
System Name of a system
Level Alarm levels (Critical, Major, Minor, Normal)
Alarm Alarm name
Count Number of alarms
Emergency Log
Using the [PERFORMANCE > Statistics > Emergency Log] menu, you can
view the following log information by menu items:
This shows the log information for emergency call.
Item Description
Date The start time of statistics measurement
Extension Extension Number
Start Time Start Time of call
End Time End Time of call
Call State Call State
Call ID Call ID
Callee Number Callee Number

Ошибка! Используйте вкладку "Главная" для применения 제목 1 к тексту, который
должен здесь отображаться. Ошибка! Используйте вкладку "Главная" для применения 제목 1 к
тексту, который должен здесь отображаться.
SCM Express Operation Manual v12.0 418 ©Samsung Proprietary and Confidential
Item Description
Manager Manager for extension

Ошибка! Используйте вкладку "Главная" для применения 제목 1 к тексту, который
должен здесь отображаться. Ошибка! Используйте вкладку "Главная" для применения 제목 1 к
тексту, который должен здесь отображаться.
SCM Express Operation Manual v12.0 419 ©Samsung Proprietary and Confidential
Fault Management
This section describes various settings and methods for handling system events.
Events are generated as alarms, faults or status whenever there is a problem with
the system or a specific status changes. You can configure the profile for such
events.
Alarms, faults and status serviced by SCM are categorized in the following way:
Event: It provides real-time monitoring of alarms, faults, status, and alarm
clear information in the SCM system
Alarm: A critical problem such as network failure or process termination has
occurred and it can be cleared.
Fault: A critical problem such as database backup failure has occurred and it
cannot be cleared.
Status: A status change, such as redundancy status change, which is not an
alarm or a fault, has occurred.
Alarm Cleared: It provides real-time monitoring of alarms generated and then
cleared in the SCM system.
In the bottom left corner of the SCM Administrator screen is the System Viewer
window which displays the number of alarms generated in the SCM system. When
an alarm is generated in SCM, the System Viewer window displays the number of
alarms generated for each level.
Figure 43. System Viewer window
Profile
An alarm profile contains detailed information for alarms, faults and status
generated in SCM. The administrator can use this information to configure how
SCM Administrator displays the alarm, fault and status information.
Alarm Profile
An alarm profile contains information on the possible types of alarms in SCM and

Ошибка! Используйте вкладку "Главная" для применения 제목 1 к тексту, который
должен здесь отображаться. Ошибка! Используйте вкладку "Главная" для применения 제목 1 к
тексту, который должен здесь отображаться.
SCM Express Operation Manual v12.0 420 ©Samsung Proprietary and Confidential
their detailed information. The table below shows information contained in an
alarm profile.
For the alarms indicated as requiring default values in the table below, the alarm
levels can be changed according to the default values. Therefore, such alarms do
not have default level values such as critical, major or minor.
Alarm Name Category Default
Level
Critical
(%)
Major
(%)
Minor
(%)
Abnormal Block State Processing Error Critical - - -
Abnormal 3rd Party Application State
Processing Error Critical - - -
CPU Over Used Resource - 100 95 80
Hard-Disk Over Used Resource - 100 95 80
Memory Over Used Resource - 100 95 80
CPU Over Used by Process Resource - 90 80 70
Network Interface Down Equipment Critical - - -
Standby System Down Equipment Critical - - -
Maximum Call QoS - 100 95 80
Maximum Subscriber QoS - 100 95 -
Gateway Connection Lost Communication Minor - - -
Location Bandwidth Used System Management - 95 90 85
Resource Based CAC System Management Major - - -
MailBox Over User (%) Resource 100 95 90
A/A Link Down Communication Critical - - -
A/A License Expired System Management Minor - - -
Recording Disk Space Used (%) Resource 95 85 75
You can view the alarm profiles in the [PERFORMANCE > Fault > Setting >
Alarm] menu. Click the [Search] button to view the alarm profile information or
click the [Change] button to change the profile.
Item Default Value Description
Name - Specify a name for the alarm.
Level - Specify the default level for the alarm.
None: The alarm has no level.
Critical: This is a critical alarm.
Major: This is a major alarm.
Minor: This is a minor alarm.
Enable Flag - Specify alert message notification when the alarm occurs.
Pop-up Flag - Specify pop-up window notification when the alarm occurs.
Audible Flag - Specify alert tone notification when the alarm occurs.
E-mail Flag Disable Specify email notification when the alarm occurs.
SMS Notify Disable Specify SMS notification when alarm occurs.

Ошибка! Используйте вкладку "Главная" для применения 제목 1 к тексту, который
должен здесь отображаться. Ошибка! Используйте вкладку "Главная" для применения 제목 1 к
тексту, который должен здесь отображаться.
SCM Express Operation Manual v12.0 421 ©Samsung Proprietary and Confidential
Item Default Value Description
Critical Threshold - This is the threshold for generating a critical level alarm.
Major Threshold - This is the threshold for generating a major level alarm.
Minor Threshold - This is the threshold for generating a minor level alarm.
Fault Profile
A fault profile contains information on the possible types of faults in SCM and
their detailed information. The table below shows information contained in a fault
profile.
Fault Name Category
DB Backup Communication
Data Sync Communication
Long Duration Call Communication
Malicious Call Claim Communication
Database Over Used Resource
CDR FTP Send Complete System Management
Phone Update Notified System Management
Switch Over by CPU Overload
Process Error
Evaluation License Expired System Management
Evaluation License Activated
System Management
Phone Upgrade Status System Management
Switch Over by Memory Over Used
Equipment
TCP Send-Q Over Used Resource
IP Conflict Detected Environment
TLS Session Disconnected Communication
A/A Node Configuration System Management
Profile Creation System Management
Evaluation License Notified System Management
A/A License Notified System Management
Sample License Activated System Management
UMS Maintenance Equipment
Stopping Port Communication
You can view the fault profiles in the [PERFORMANCE > Fault > Setting >
Fault] menu. Click the [Search] button to view the fault profile information or
click the [Change] button to change the profile.
Item Default Value Description
Name - Specify a name for the fault.
Enable Flag - Specify alert message notification when the fault occurs.

Ошибка! Используйте вкладку "Главная" для применения 제목 1 к тексту, который
должен здесь отображаться. Ошибка! Используйте вкладку "Главная" для применения 제목 1 к
тексту, который должен здесь отображаться.
SCM Express Operation Manual v12.0 422 ©Samsung Proprietary and Confidential
Item Default Value Description
E-mail Flag Disable Specify email notification when the fault occurs.
SMS Notify Disable Specify SMS notification when alarm occurs.
Status Profile
A status profile contains information on the possible types of status in SCM and
their detailed information. The table below shows information contained in a status
profile.
Status Name Category
Block State Change Equipment
HA Mode Change Equipment
Wakeup Service Communication
DB Backup Communication
Data Sync Communication
Long Duration Call Communication
Malicious Call Claim Communication
Database Over Used Resource
CDR FTP Send Complete System Management
Phone Update Notified System Management
Switch Over by CPU Overload
Process Error
UMS Maintenance Equipment
Stopping Port Communication
You can view the status profiles in the [PERFORMANCE > Fault > Setting >
Status] menu. Click the [Search] button to view the status profile information or
click the [Change] button to change the profile.
Item Default Value Description
Name - Specify a name for the status.
Enable Flag - Specify alert message notification when the status occurs.
E-mail Flag Disable Specify email notification when the status occurs.
SMS Notify Disable Specify SMS notification when alarm occurs.
Viewers
Event Viewer
Event Viewer provides real-time monitoring of alarms, faults, status, and alarm
clear information in the SCM system.
You can view Event Viewer in the [PERFORMANCE > Fault > Viewer >
Event] menu.
Event Viewer displays alarm, fault, status, and alarm clear information

Ошибка! Используйте вкладку "Главная" для применения 제목 1 к тексту, который
должен здесь отображаться. Ошибка! Используйте вкладку "Главная" для применения 제목 1 к
тексту, который должен здесь отображаться.
SCM Express Operation Manual v12.0 423 ©Samsung Proprietary and Confidential
simultaneously in the order of alarms > faults > status > alarm clear from the top.
Using the [Clear] button, you can force clear an alarm item.
Alarm Viewer
Alarm Viewer provides real-time monitoring of alarms generated in the SCM
system.
You can view Alarm Viewer in the [PERFORMANCE > Fault > Viewer >
Alarm] menu.
Alarms are highlighted in different colors depending on the levels: red for critical,
orange for major, yellow for minor, and green for normal.
Fault Viewer
Fault Viewer provides real-time monitoring of faults generated in the SCM
system.
You can view Fault Viewer in the [PERFORMANCE > Fault > Viewer > Fault]
menu.
Using the [Clear] button, you can force clear a fault item.
Status Viewer
Status Viewer provides real-time monitoring of status generated in the SCM
system.
You can view Status Viewer in the [PERFORMANCE > Fault > Viewer >
Status] menu.
Using the [Clear] button, you can force clear a status item.
Alarm Clear Viewer
Alarm Viewer provides real-time monitoring of alarms generated and then cleared
in the SCM system.
You can view Alarm Clear Viewer in the [PERFORMANCE > Fault > Viewer >
Alarm Cleared] menu.
Alarms are highlighted in different colors depending on the levels: red for critical,
orange for major, yellow for minor, and green for normal. When an alarm is
cleared, it is highlighted in green for normal level.
Fault History
This feature allows you to manage the history of faults and status information
generated in SCM.
Alarm History
You can view the alarm history in the [PERFORMANCE > Fault > History>
Alarm] menu. Select alarm history and click the [Clear] button to delete alarm
history.

Ошибка! Используйте вкладку "Главная" для применения 제목 1 к тексту, который
должен здесь отображаться. Ошибка! Используйте вкладку "Главная" для применения 제목 1 к
тексту, который должен здесь отображаться.
SCM Express Operation Manual v12.0 424 ©Samsung Proprietary and Confidential
Fault History
You can view the fault history in the [PERFORMANCE > Fault > History>
Fault] menu.
Select fault history and click the [Clear] button to delete fault history.
Status History
You can view the status history in the [PERFORMANCE > Fault > History>
Status] menu. Select status history and click the [Clear] button to delete status
history.
Email Notification
The alarm, fault, and status information generated in SCM can be notified to the
administrator by email. To allow this, the email field in the alarm profile, fault
profile or status profile must be set to Enable and the required settings for the
email server must be configured in email settings.
You can configure your email settings in the [PERFORMANCE > Fault > E-
mail Notification Setup] menu.
Item Default Value Description
SMTP Server: HostID - Specify the IP address or the host name of the SMTP server.
SMTP Server: Port 25 Specify the port number of the SMTP server.
SMTP Server: Domain - Specify the domain name of the SMTP server.
Auth Login: User ID - Specify the user login required for user authentication by the SMTP server.
Auth Login: Password - Specify the user password required for user authentication by the SMTP server.
Address: From - Specify the sender’s email address.
Address: To - Specify the recipient’s email address.
Encryption
SCM provides both basic SMTP without encryption and TLS encryption.
TLS encryption is applied to emails in case Email server supports TLS via the
Port.
No encryption is applied to emails in case Email server does not support TLS via
the Port.
Basic Authentication
GUI sends User Name and Password to E-mail Server in certification process only
when both are set in the fields. GUI does not send one of them is not set.
Therefore, User Name and Password should be set according to setting of E-mail
Sever.
In case Basic Authentication is set to ON in E-mail Server, User Name and
Password should be set in the fields.
In case Basic Authentication is set to OFF and Anonymous Users is set to

Ошибка! Используйте вкладку "Главная" для применения 제목 1 к тексту, который
должен здесь отображаться. Ошибка! Используйте вкладку "Главная" для применения 제목 1 к
тексту, который должен здесь отображаться.
SCM Express Operation Manual v12.0 425 ©Samsung Proprietary and Confidential
Permitted in E-mail Server, User Name and Password should not be set in the
fields.
SMS Notification Setup
The alarm, fault, and status information generated in SCM can be notified to the
administrator by SMS. To allow this, the SMS field in the alarm profile, fault
profile or status profile must be set to Enable and the required settings must be
configured in SMS notification settings.
You can configure your SMS notification settings in the [PERFORMANCE >
Fault > SMS Notification Setup] menu.
Item Description
From: User Group Specify the sender’s user group.
From: Extension Specify the sender’s extension.
To: User 1~10 Specify the recipient’s extension.

Ошибка! Используйте вкладку "Главная" для применения 제목 1 к тексту, который
должен здесь отображаться. Ошибка! Используйте вкладку "Главная" для применения 제목 1 к
тексту, который должен здесь отображаться.
SCM Express Operation Manual v12.0 426 ©Samsung Proprietary and Confidential
Registration Management
SCM can check the current registrations status for phones, endpoints and
applications.
You can check the registration status in the [CONFIGURATION > Resource >
System] menu. You can view the information by selecting user groups or service
groups. If none is selected, the information is displayed for all users registered in
all user groups. You can also view registration status by a registration method
selected.
Item Description
User Group Select a user group to which the user, endpoint or application belongs.
User Info Select a name for the user, endpoint or application.
IP Address Shows the IP address displayed in the contact header of the registration message.
Port Shows the port number displayed in the contact header of the registration message.
MAC Address Displays the MAC address of the phone. This information is displayed only for phones which include MAC information in the registration message.
Register Type Displays the registration method for the user, endpoint or application.
Protocol Displays the transmission protocol (TCP, UDP or TLS).
Register Type Displays the time registered.
Expires Displays the registration expiration time.
User Agent Info Displays USER-AGENT of the registration message.
Source IP Displays the source IP address of the IP packet used for sending the registration message.
Source Port Displays the source port number of the IP packet used for sending the registration message.
External Proxy Port
When registration message uses PROXYB, it shows the PROXYB port which used.
Fail Reason Displays the reason why Registration was failed.
SIP Phone Registration by SIP REGISTER
SIP Phone Registration
An SIP phone periodically sends REGISTER messages to SCM, and the messages
are authenticated by SCM. Once successfully authenticated, the SIP phone can be
viewed in the [CONFIGURATION > System Status > Registration] menu with
the registration method shown as User.
Registration Clear upon Request by SIP Phone
An SIP phone sends a REGISTER message to SCM with the Expires value set to
0.

Ошибка! Используйте вкладку "Главная" для применения 제목 1 к тексту, который
должен здесь отображаться. Ошибка! Используйте вкладку "Главная" для применения 제목 1 к
тексту, который должен здесь отображаться.
SCM Express Operation Manual v12.0 427 ©Samsung Proprietary and Confidential
When the message is received, SCM clears registration for the SIP phone.
Registration Clear upon Expire
SCM periodically checks the registration expiration time of SIP phones.
If an SIP phone does not resend a REGISTER message before the registration
expiration time, SCM waits for a period of time set by ‘Register Expire Deviation
Interval’ in the [CONFIGURATION > User Group > Change User Group >
Timers] menu before it clears the registration.
Gateway FXS Registration by SIP REGISTER
Gateway FXS Registration
A gateway FXS periodically sends REGISTER messages to SCM, and the
messages are authenticated by SCM. Once successfully authenticated, the gateway
FXS can be viewed in the [CONFIGURATION > System Status >
Registration] menu with the registration method shown as User. SCM always
response expire time with FXS Register Expire Time that is in the
[CONFIGURATION > User Group > Change User Group > Timers]
Registration Clear upon Request by Gateway FXS
A gateway FXS sends a REGISTER message to SCM with the Expires value set to
0. When the message is received, SCM clears registration for the gateway FXS.
Registration Clear upon Expire
SCM periodically checks the registration update status of gateway FXS.
If a gateway FXS does not resend a REGISTER message before the registration
expiration time, SCM waits for a period of time set by ‘Register Expire Deviation
Interval’ in the [CONFIGURATION > User Group > Change User Group >
Timers] menu before it clears the registration.
SIP Gateway Registration by SIP REGISTER
SIP Gateway Registration
An SIP gateway periodically sends REGISTER messages to SCM, and the
messages are authenticated by SCM. Once successfully authenticated, the SIP
gateway can be viewed in the [CONFIGURATION > System Status >
Registration] menu with the registration method shown as ‘EndPoint
RegReceive.’
Registration Clear upon Request by SIP Gateway
An SIP gateway sends a REGISTER message to SCM with the Expires value set
to 0. When the message is received, SCM clears registration for the SIP gateway.
Registration Clear upon Expire
SCM periodically checks the registration expiration time of SIP gateways.
If an SIP gateway does not resend a REGISTER message before the registration
expiration time, SCM waits for a period of time set by ‘Register Expire Deviation

Ошибка! Используйте вкладку "Главная" для применения 제목 1 к тексту, который
должен здесь отображаться. Ошибка! Используйте вкладку "Главная" для применения 제목 1 к
тексту, который должен здесь отображаться.
SCM Express Operation Manual v12.0 428 ©Samsung Proprietary and Confidential
Interval’ in the [CONFIGURATION > User Group > Change User Group >
Timers] menu before it clears the registration.
Endpoint Registration by SIP REGISTER
Endpoint Registration
SCM sends a REGISTER message to an endpoint. Once the message is
successfully authenticated, the endpoint is registered. The registration information
can be viewed in the [CONFIGURATION > System Status > Registration]
menu with the registration method shown as ‘EndPoint RegSend’.
Endpoint Registration Clear
SCM periodically sends REGISTER messages. If there is no response for a
message, SCM attempts to resend the message for the maximum number of times
specified.
If all resending attempts fail, registration is cleared. After clearing registration,
SCM waits for the time specified in ‘Retry Pause Time (sec)’ under the
[CONFIGURATION > Routing > Endpoint Advanced Options] menu before it
requests for registration again.
When registered, if ‘Keep Alive’ is set to Enable under the [CONFIGURATION
> Routing > Endpoint Advanced Options] menu, SCM periodically sends
OPTIONS messages.
If there is no response for an OPTIONS message, SCM attempts to resend the
message for the number of times specified by ‘Keep Alive Retry Interval (sec)’ in
the [CONFIGURATION > Routing > Endpoint Advanced Options] menu. If
all resending attempts fail, a REGISTER message is sent to verify the registration
status. Response for the REGISTER message is processed in the same way as
shown above.
If the license in the [CONFIGURATION > System Configuration > License]
menu has expired, no more REGISTER messages will be sent and registration will
be cleared by the registration expiration time.
Endpoint Registration by SIP OPTIONS
Endpoint Registration
If ‘Keep Alive’ is set to Enable under the [CONFIGURATION > Routing >
Endpoint Advanced Options] menu, SCM periodically sends OPTIONS
messages to external connection endpoints. If a 200 OK message is received as a
response to an OPTIONS message, the endpoint is registered. The registration
information can be viewed in the [CONFIGURATION > System Status >
Registration] menu with the registration method shown as ‘EndPoint Option.’
Endpoint Registration Clear
If there is no response for an OPTIONS message or if response fails, SCM
attempts to resend the message for the number of times specified by ‘Maximum

Ошибка! Используйте вкладку "Главная" для применения 제목 1 к тексту, который
должен здесь отображаться. Ошибка! Используйте вкладку "Главная" для применения 제목 1 к
тексту, который должен здесь отображаться.
SCM Express Operation Manual v12.0 429 ©Samsung Proprietary and Confidential
Keep Alive Retry’ in the [CONFIGURATION > Routing > Endpoint Advanced
Options] menu.
If all resending attempts fail, registration is cleared.
After clearing registration, SCM waits for the time specified in ‘Retry Pause Time
(sec)’ under the [CONFIGURATION > Routing > Endpoint Advanced
Options] menu before it resends the OPTIONS message.
Application Registration by SIP OPTIONS
Application Server Registration
If ‘Keep Alive’ is set to Enable under the [CONFIGURATION > Application >
Application Server] menu, SCM periodically sends OPTIONS messages to the
selected application server. If a 200 OK message is received as a response to an
OPTIONS message, the application server is registered. The registration
information can be viewed in the [CONFIGURATION > System Status >
Registration] menu with the registration method shown as ‘App Server Option.’
Application Server Registration Clear
If there is no response for an OPTIONS message or if response fails, SCM
attempts to resend the message for the number of times specified by ‘Keep Alive
Retry Interval (sec)’ in the [CONFIGURATION > Application] menu. If all
resending attempts fail, the application sever registration is cleared.
After clearing registration for the application server, SCM waits for the time
specified in ‘Retry Pause Time (sec)’ under the [CONFIGURATION >
Application > Other Application Sever] menu before it resends the OPTIONS
message.

Ошибка! Используйте вкладку "Главная" для применения 제목 1 к тексту, который
должен здесь отображаться. Ошибка! Используйте вкладку "Главная" для применения 제목 1 к
тексту, который должен здесь отображаться.
SCM Express Operation Manual v12.0 430 ©Samsung Proprietary and Confidential
License Management
License
Select CONFIGURATION > Resource > License
License key must be the MAC address of system eth0 or eth1. An operator can use
the system by entering a license key which is obtained in this page.
However, if the system is in HA mode, you must enter two license keys which are
from the MAC addresses of the two systems.
The built-in Evaluation License Key is valid for 30 days after installation.
If Active doesn’t connect with Active for continuous 30 days, the license will be
deactivated. However, If Active re-connect with Active, the license will be
activated.
If Only Evaluation License Key is exist, or If Active-Active System don’t have
connection, the event occurs every morning at 9:00.
Item Description
License Key Type Shows system type.
SCM Express-Users
SCM Express-Embedded Application
SCM Express-External Application
SCM Enterprise-Users
SCM Enterprise-Embedded Application
SCM Enterprise-External Application
License Key Enter the license key obtained from the Mac address.
MAC Address Display a MAC address which is interpreted from a license key.
License Status Display license operation status.
Samsung SIP Phones Display max. number of Samsung SIP Phones allowed in the license.
Samsung Soft Phones Display max. number of Samsung Soft Phones allowed in the license.
Samsung Mobile Phones
Display max. number of Samsung Mobile Phones allowed in the license.
Samsung PC Attendants
Display max. number of Samsung PC Attendants allowed in the license.
3rd Party SIP Phones Display max. number of 3rd Party SIP Phones allowed in the license.
Analog Phones (Gateway)
Display max. number of Analog Phones allowed in the license.
AA Availability (Master/Slave)
Display whether to allow AA
High Availability (Active/Standby)
Display whether to allow HA
Meet-Me Conference Channels
Display max. number of Meet-Me Conference Channels allowed in the license.

Ошибка! Используйте вкладку "Главная" для применения 제목 1 к тексту, который
должен здесь отображаться. Ошибка! Используйте вкладку "Главная" для применения 제목 1 к
тексту, который должен здесь отображаться.
SCM Express Operation Manual v12.0 431 ©Samsung Proprietary and Confidential
Item Description
UMS Channels Display max. number of UMS Channels allowed in the license.
Total CSTA Applications Display max. number of Total CSTA Applications allowed in the license.
Samsung Operators Display max. number of Samsung Operators allowed in the license.
Embedded ACD Agent Links
Display max. number of Embedded ACD Agent Links allowed in the license.
Communicators (Desktop)
Display max. number of Communicators(Desktop) allowed in the license.
Other CSTA Applications
Display max. number of Other CSTA Applications allowed in the license.
SIP Application Channels
Display max. number of SIP Application Channels allowed in the license.
Activation Key
Select CONFIGURATION > Resource > Activation Key
Activation key must be the MAC address of system eth0 or eth1. An operator can
use the system by entering a activation key which is obtained in this page.
However, if the system is in HA mode, you must enter two activation keys which
are from the MAC addresses of the two systems.
The built-in Sample Activation Key is valid while both license key and activation
is not inputted.
If Active doesn’t connect with Active for continuous 30 days, the license will be
deactivated. However, If Active re-connect with Active, the license will be
activated.
The priority order of license is Activation Key > Old License Key > Sample
Activation Key.
Samsung Soft Phone for Windows, Samsung FMC Phones, Samsung PC
Attendant and 3rd-Party SIP Phone can be used as Samsung SIP Phone.
Item Description
Package Name Shows package name of activation key.
Sample
SCM Server (Active-Standby)
SCM Server (Active-Active)
Activation Key Enter the activation key obtained from the Mac address.
MAC Address Display a MAC address which is interpreted from a license key.
Status Display license operation status.
Active-Active (Master/Slave)
Display whether to allow AA
High Availability (Active/Standby)
Display whether to allow HA
Samsung SIP Phones Display max. number of Samsung Mobile Phones allowed in

Ошибка! Используйте вкладку "Главная" для применения 제목 1 к тексту, который
должен здесь отображаться. Ошибка! Используйте вкладку "Главная" для применения 제목 1 к
тексту, который должен здесь отображаться.
SCM Express Operation Manual v12.0 432 ©Samsung Proprietary and Confidential
Item Description
the license.
Samsung Soft Phones
for Windows
Display max. number of Samsung Soft Phones for Windows allowed in the license.
Samsung FMC for Android
Display max. number of Samsung FMC for Android allowed in the license.
This is switchable for Samsung FMC for iPhone
Samsung FMC for iPhone
Display max. number of Samsung FMC for iPhone allowed in the license.
This is switchable for Samsung FMC for Android
Samsung PC Attendants
Display max. number of Samsung PC Attendants allowed in the license.
3rd Party SIP Phones Display max. number of 3rd Party SIP Phones allowed in the license.
Analog Phones (Gateway)
Display max. number of Analog Phones allowed in the license.
Meet-Me Conference Channels
Display max. number of Meet-Me Conference Channels allowed in the license.
VM Channels Display max. number of VM Channels allowed in the license.
SIP Application Channels
Display max. number of SIP Application Channels allowed in the license.
Embedded ACD Agent Display max. number of Embedded ACD Agents allowed in the license.
Communicator Console Display max. number of Communicator Consoles allowed in the license.
Communicators Deskphone
Display max. number of Communicators Deskphone allowed in the license.
CSTA Link Display max. number of CSTA Links allowed in the license.
Embedded Wall Board Display max. number of Embedded Wall Boards allowed in the license.
Directory Service Display max. number of Directory Service allowed in the license.
Smart WLAN Link Display max. number of Smart WLAN Link allowed in the license.
User Group Expanding (Up to 123 Group)
Display whether to allow User Group Expanding.
Broadcast Call Display whether to allow Broadcast Call.
WE VoIP Talk Display max. number of users for WE VoIP Talk allowed in the license.

Ошибка! Используйте вкладку "Главная" для применения 제목 1 к тексту, который
должен здесь отображаться. Ошибка! Используйте вкладку "Главная" для применения 제목 1 к
тексту, который должен здесь отображаться.
SCM Express Operation Manual v12.0 433 ©Samsung Proprietary and Confidential
LDAP Data Import
SCM provides importing data from external LDAP server. The following data can
be imported:
Item Description
Department Department list in [CONFIGURATION > User Group > Department]
Position Position list in [CONFIGURATION > User Group > Position]
User Profile User Profile data in [CONFIGURATION > User > User Profile] which defined in [CONFIGURATION > User Group > User Profile Field Name]
Using the [Management > LDAP Data Import], you can set the following LDAP
information by menu items:
LDAP Server
You can input external LDAP server information in [Management > LDAP Data
Import > LDAP Server].
Item Description
LDAP Server IP Specify the LDAP Server’s IP.
LDAP Server Port Specify the LDAP Server’s Port. The default value is 389.
LDAP Bind DN Specify the LDAP Server’s Bind DN for login.
LDAP Bind Password Specify the LDAP Server’s Bind Password for login.
LDAP Data Mapping
You can make mapping data of SCM and data of LDAP server in [Management >
LDAP Data Import > LDAP Data Mapping] menu.
Item Description
User Group Specify the user group for imported data.
Base DN Specify the LDAP Server’s Base DN.
Department Filter Specify the entity filter for department.
Department Attribute Specify the attribute for department.
Department Parent Attribute
Specify the attribute for department parent.
Position Filter Specify the entity filter for position.
Position Attribute Specify the attribute for position.
User Filter Specify the entity filter for user profile.
User ID Attribute Specify the attribute for user ID.
User Name Attribute Specify the attribute for user Name.
User Department Attribute
Specify the attribute for user Department.
User Position Attribute
Specify the attribute for user Position.

Ошибка! Используйте вкладку "Главная" для применения 제목 1 к тексту, который
должен здесь отображаться. Ошибка! Используйте вкладку "Главная" для применения 제목 1 к
тексту, который должен здесь отображаться.
SCM Express Operation Manual v12.0 434 ©Samsung Proprietary and Confidential
Item Description
User Profile Field Name
Specify the attribute for user Profile Field Name.
LDAP Schedule
You can import data periodically or immediately in [Management > LDAP Data
Import > LDAP Schedule] menu.
Item Description
Schedule Type Specify the schedule type.
Day: import the data in time daily
Week: import the data in day weekly
15 Days: import the data in 15th monthly
Month: import the data in 1th monthly
Now: import the data immediately
Weekday Specify the weekday.
Time Specify the time.

Ошибка! Используйте вкладку "Главная" для применения 제목 1 к тексту, который
должен здесь отображаться. Ошибка! Используйте вкладку "Главная" для применения 제목 1 к
тексту, который должен здесь отображаться.
SCM Express Operation Manual v12.0 435 ©Samsung Proprietary and Confidential
LDAP Server Service
Overview of the LDAP Server Service
LDAP server service provides that external devices linked with SCM can take user
information of SCM. The external devices can query user information registered in
SCM like as: Extension Number, Department, Position and so on.
SCM provides search function only, not changing or adding via LDAP server.
LDAP Server Service
Searching Information
LDAP server connects to the internal database of SCM and provides data to LDAP
client.
LDAP server provides the following data:
Department List
Position List
User Group List
User Information
LDAP Manager Information
For more information on each, please refer to the [SCM Express LDAP Server
Interoperability Guide] document.
LDAP Server access
LDAP server divides the user level into LDAP Manager and LDAP User for
network management and system load. And LDAP User has some limitation when
accesses to LDAP server.
You can set the level in [CONFIGURATION > User > User Profile] menu.
Items Description
LDAP Server Manager No: LDAP User (default)
Yes: LDAP Manager
LDAP Manager
User with LDAP Manager level can query all information that LDAP server
provides and there is no restriction.
LDAP User
User with LDAP User level can not get the user password.

Ошибка! Используйте вкладку "Главная" для применения 제목 1 к тексту, который
должен здесь отображаться. Ошибка! Используйте вкладку "Главная" для применения 제목 1 к
тексту, который должен здесь отображаться.
SCM Express Operation Manual v12.0 436 ©Samsung Proprietary and Confidential
Basic information for LDAP server service
Basic information for connecting to LDAP Server is as follows:
Items Description
LDAP Server port 389
Login ID When you connect to the server with manager level
Login ID: cn=‘User ID’, ou=manager, dc=scm, dc=samsung When you connect to the server with user level
Login ID: cn=‘User ID’, ou=subscriber, dc=scm, dc=samsung ‘User ID’ is [User ID] in [CONFIGURATION > User > User Profile] menu.
LoginPassword Application User Password (need to MD5 encryption.)
[Password] in [CONFIGURATION > User > User Profile]
Base DN dc=scm, dc=samsung

Ошибка! Используйте вкладку "Главная" для применения 제목 1 к тексту, который
должен здесь отображаться. Ошибка! Используйте вкладку "Главная" для применения 제목 1 к
тексту, который должен здесь отображаться.
SCM Express Operation Manual v12.0 437 ©Samsung Proprietary and Confidential
Directory Service for Mobile User.
Overview of the Directory Service
Directory service provides the user information of SCM to Mobile User.
Directory service provides the following data:
Directory Service
Presence Service
Location Service
Directory Service
SCM basically provides the user information data in [CONFIGURATION > User
> User Profile] menu to Mobile User.
Items Description
Application User ID Input a ID of a application user.
Password Input a password of a application user.
Name Input a name of a application user.
User Group Select a user group.
Extension Select a extension number.
Department Select a department.
Position Select a position.
A-A Primary Node Specify Primary Node when A-A Configuration
LDAP Server Manager If set YES, it can use all LDAP functionality
Presence Select a Presence of Phone. Phone can select a Presence also.
System Photo File Name Select a photo file name of user.
Director Select whether user is Director in user's Department.
Priority in Same Position Input a priority level in same position.
range: 0~10000 (0 is the highest priority)
Top Department in Directory Service
Select a Top Department displayed on Phone in Directory Service.
NoticeBoard Service Authority
Select a authority on NoticeBoard Service.
Office Phone Number Specifies in the [Specify Application User Field] menu,
and it is allowed to change.
Cellphone Number Specifies in the [Specify Application User Field] menu,
and it is allowed to change.
FAX Number Specifies in the [Specify Application User Field] menu,
and it is allowed to change.
E-mail Specifies in the [Specify Application User Field] menu,
and it is allowed to change.

Ошибка! Используйте вкладку "Главная" для применения 제목 1 к тексту, который
должен здесь отображаться. Ошибка! Используйте вкладку "Главная" для применения 제목 1 к
тексту, который должен здесь отображаться.
SCM Express Operation Manual v12.0 438 ©Samsung Proprietary and Confidential
For additional information of User, configure the data in [CONFIGURATION >
User Group > User Profile Field Name] menu.
Items Description
Language Select Korean or English.
Index Select index 1~20.
Name Specify name of each index. This name is displayed in [CONFIGURATION > User > User Profile] page, so input
appropriate name.
Type Specify attibute of 'Name' field.
Display on Phone Specify whether a phone display the data in directory service.
For Job Search on Mobile Phone, select ‘Job’ Type.
For Department information of User Group, configure the data in
[CONFIGURATION > User Group > Department] menu.
Items Description
User Group Select A user group for which Department will be configured.
Parent Department Specify a Parent Department.
If created a user group, automatically a department is created. Select a created department for parent department.
Department Name Specify a Department Name. This department is used in Single Phone User or Multi-Phone User or User Profile pages.
Search Parent in Directory Service.
Select whether user can search parent department in Directory Service on Phone.
Description Specify a Description of department.
For Position information of User Group, configure the data in
[CONFIGURATION > User Group > Position] menu.
Items Description
User Group Select A user group for which Position will be configured.
Position Name Specify a Position Name. This position is used in Single Phone User or Multi-Phone User or User Profile pages.
Description Specify a Description of position.
Presence Service
SCM provides the presence information of other user to Mobile User.
User can configure the presence data in [CONFIGURATION > User > User
Profile] menu to Mobile User.
Items Description
Presence Select a Presence of Phone. Phone can select a Presence also.

Ошибка! Используйте вкладку "Главная" для применения 제목 1 к тексту, который
должен здесь отображаться. Ошибка! Используйте вкладку "Главная" для применения 제목 1 к
тексту, который должен здесь отображаться.
SCM Express Operation Manual v12.0 439 ©Samsung Proprietary and Confidential
Administrator can configure the additional options of Presence in
[CONFIGURATION > User Group > Presence Field Name] Menu.
Items Description
Language Select Korean or English.
Index Select index 1~7.
Name Specify name of each index. This name is displayed in Phone, so input appropriate name.
Icon Color Specify color of presence name on Mobile Phone Screen.
Location Service
SCM provides the location information of other user to Mobile User.
Activation of Directory Service for Mobile User.
Administrator can configure the activation of Directory Service for Mobile User in
[CONFIGURATION > Wireless Enterprise > Mobile Phone Profile] Menu.

Ошибка! Используйте вкладку "Главная" для применения 제목 1 к тексту, который
должен здесь отображаться. Ошибка! Используйте вкладку "Главная" для применения 제목 1 к
тексту, который должен здесь отображаться.
SCM Express Operation Manual v12.0 440 ©Samsung Proprietary and Confidential
Photo File Management
Overview of Photo file Management
Photo File Management is provided to handle photo files used in the Directory
service and the Premium CID service. This feature supports the upload and
download of batch file and gives tools to compress, delete, adjust and sync. As
well as the size and the count of photo files which are stored in SCM can be
checked. Photo File Management is limited file processing. If you want to enter
the mapping information of a photo file and an user, use [Tool > Customer Data
Import/Export].
Photo File Management Feature
Searching Information
The count and the size of photo files which are stored in SCM can be displayed.
Photo File Management Tools
SCM provides several management tools for photo files.
Command: request the file processing for photo files.
o Compress All: Before download of photo files in SCM, execute this
command to compress files. Each compressed file is divided to 1
Gigabytes. This processing is a time-consuming job.
o Delete All: Delete all photo files in SCM.
o Adjust: Delete unused photo files. SCM check DB to check whether each
file is used of not.
o AS Sync: When AS Sync is needed, use this manual A/S Sync. SCM
clears the photo file directory of Standby System and get all files of Active
System.
Upload: SCM provides Batch job for photo files. Each photo file size is
limited to 1 Gigabytes. The file format for batch file is TAR without compress.
When A/S Sync for uploaded batch file is provided. A/A Sync is not
supported, so separate upload is need for AA System configuration. Single
Photo file can be changed in the [CONFIGURATION > User > User
Profile], Personal Web Page and in the FMC phone.
Download
Limitations
File name written by Korean is not supported.
Size of batch file for Upload is up to 1 Gigabyte at a time. This limitation is
based on the guarantee for Call Server stability. Because photo file processing
is a burden to Call Processing System, this must not be done within work time
or during data sync time.

Ошибка! Используйте вкладку "Главная" для применения 제목 1 к тексту, который
должен здесь отображаться. Ошибка! Используйте вкладку "Главная" для применения 제목 1 к
тексту, который должен здесь отображаться.
SCM Express Operation Manual v12.0 441 ©Samsung Proprietary and Confidential
When single photo file is changed, SCM supports A/S Hot Sync and A/A Hot
Sync. In case of upload of batch file, A/A Sync is not supported but A/S sync
is provided. Therefore batch file upload has to be done in the Master System
and Slave System both.

SCM Express Operation Manual v12.0 442 ©Samsung Proprietary and Confidential
Chapter 7 Troubleshooting Guide
This chapter describes troubleshooting.
SCM Server
The troubleshooting lists are following:
Type Troubleshooting List
SCM Hardware [1001] Server Fails to Boot (Before Video Output)
[1002] Connecting with External Devices
[1003] Problem with Video Output
[1004] Problem with a USB Device
[1005] Problem with a Serial I/O Device
[1006] Problem with an NIC
[1007] The System is Wet
[1008] The System is Damaged
[1009] Problem with the System Battery
[1010] Problem with the Power Supply
[1011] Problem with System Cooling
[1012] Problem with the Fan
[1013] Problem with the System Memory
[1014] Problem with the ODD
[1015] Problem with the HDD
[1016] Problem with the SAS or SAS RAID Controller
[1017] Problem with an Expansion Card
[1018] Problem with the CPU
[1019] Diagnosing the Server Hardware
Linux [1101] The Initial System Login Account Has Been Forgotten
[1102] An Error Window is Displayed After Quitting the scmWizard.
[1103] The Linux System User Password Has Been Forgotten
[1104] The Linux System Root Password Has Been Forgotten
SCM Software Base
[1201] SCM Block’s Abnormal Termination Alarm Has Occurred (Automatic Restart)
[1202] SCM Block’s Abnormal Termination Alarm Has Occurred (Terminated)
[1203] A CPU Alarm Has Occurred and is Not Cleared
[1204] A Hard Disk Alarm Has Occurred
[1205] A Memory Alarm Has Occurred
[1206] The Network Down Alarm Has Occurred
[1207] The Standby System Down Alarm Has Occurred
[1208] The Data Sync Timeout Status Message is Displayed
SCM Administrator
[1301] Administrator can’t access from a Web Browser
[1302] Administrator can’t access through NAT
[1303] Administrator Does Not Work Correctly
[1304] Cannot Install Administrator

Ошибка! Используйте вкладку "Главная" для применения 제목 1 к тексту, который
должен здесь отображаться. Ошибка! Используйте вкладку "Главная" для применения 제목 1 к
тексту, который должен здесь отображаться.
SCM Express Operation Manual v12.0 443 ©Samsung Proprietary and Confidential
Type Troubleshooting List
[1305] Administrator Does Not Run in a Web Browser
[1306] Cannot Log Into PWP with SSO
[1307] Administrator Password Has Been Forgotten
[1308] Alarms That Have Occurred Are Not Displayed in Administrator
[1309] No Email is Sent When an Alarm Occurs
[1310] Querying the System Version
[1311] Learning More About Process Diagram
[1312] Turning the Alarm Sound Off
[1313] Force Quitting SSO Agent
[1314] The Run Button is Disabled and Cannot be Pressed
[1315] Cannot Add Subscriber
[1316] Cannot Create Non-Subscriber Data
[1317] The ‘Evaluation License Expire’ Alarm Has Occurred
SCM Hardware
[1001] Server Fails to Boot (Before Video Output)
Symptoms
Server fails to boot after installing OS or changing the system hardware, and no
image or message is displayed on the console monitor.
Possible Causes
Boot device setting in the BIOS is incorrect.
The hardware change has caused a problem in the system.
Solutions
Solve the problem by carrying out the following procedures:
1 Startup the system selecting a boot device using Boot Manager.
2 Diagnose the memory in the way mentioned in section ‘[1019] Diagnosing the
Server Hardware’.
3 Identify problems from messages displayed and follow the instructions
mentioned in the ‘System Messages’ section of the Hardware Owner’s
Manual.
4 For the SCM-S700, check the message displayed on the front LCD panel
referring to the ‘LCD Status Messages (Optional)’ section of the Hardware
Owner’s Manual.
[1002] Connecting with External Devices
Symptoms
Have no idea about what to do when connecting with external devices using
cables.

Ошибка! Используйте вкладку "Главная" для применения 제목 1 к тексту, который
должен здесь отображаться. Ошибка! Используйте вкладку "Главная" для применения 제목 1 к
тексту, который должен здесь отображаться.
SCM Express Operation Manual v12.0 444 ©Samsung Proprietary and Confidential
Possible Causes
You need more information about the ports on the server.
Solutions
See the ‘Troubleshooting External Connections’ section of the Hardware Owner’s
Manual, and connect the external devices using cables as described.
[1003] Problem with Video Output
Symptoms
The monitor is connected but there is no output.
Possible Causes
No power is being supplied to the monitor.
There is a problem with the cable connected to the monitor.
There is a problem with the monitor itself.
Solutions
Solve the problem by carrying out the following procedures:
1 Check that power is being correctly supplied to the server and the monitor.
2 Check the video interface cable between the server and the monitor.
3 Diagnose the system using the way mentioned in ‘[1019] Diagnosing the
Server Hardware’.
[1004] Problem with a USB Device
Symptoms
A USB device is not recognized or does not operate.
Possible Causes
Error in BIOS settings
Error in the USB device
Error in the USB cable
Solutions
For a USB keyboard or mouse, solve the problem by carrying out the following
procedures:
1 Remove the keyboard or mouse cable and reconnect it.
2 Try different USB port in the system.
3 Try other keyboard or mouse.
For other USB device, solve the problem by carrying out the following procedures:
1 Remove the USB device from the system.

Ошибка! Используйте вкладку "Главная" для применения 제목 1 к тексту, который
должен здесь отображаться. Ошибка! Используйте вкладку "Главная" для применения 제목 1 к
тексту, который должен здесь отображаться.
SCM Express Operation Manual v12.0 445 ©Samsung Proprietary and Confidential
2 Restart the system and enter into System Setup menu by pressing <F2>.
3 Check that all USB settings are enabled in the ‘Integrated Devices’ section.
4 Start the system and connect one USB device at a time.
5 If the problem persists, replace the USB cable.
[1005] Problem with a Serial I/O Device
Symptoms
There is no serial I/O input or output.
Possible Causes
There is a problem with the serial I/O device.
There is a problem with the serial cable.
Solutions
Solve the problem by carrying out the following procedures:
1 Shut down the system. Replace the serial cable with functioning cable, and
start the system.
2 Shut down the system. Replace the device connected to the serial port with
functioning device. Start the system.
[1006] Problem with an NIC
Symptoms
The NIC is not recognized or does not operate properly.
Possible Causes
There is a problem with the NIC.
The auto negotiation setting for the NIC is incorrect.
There is a problem with the LAN cable.
There is a problem with the switch or hub to which the NIC connected.
Solutions
Solve the problem by carrying out the following procedures:
1 Diagnose the system by referring to the ‘[1019] Diagnosing the Server
Hardware’.
2 Restart the system and check the message displayed by the NIC controller.
3 Check the NIC indicator on the NIC connector.
o If the NIC link indicator is not on, check all connected cables.
o If the NIC activity indicator is not on, check whether the network driver
files have been corrupted or deleted. If possible, remove the driver files

Ошибка! Используйте вкладку "Главная" для применения 제목 1 к тексту, который
должен здесь отображаться. Ошибка! Используйте вкладку "Главная" для применения 제목 1 к
тексту, который должен здесь отображаться.
SCM Express Operation Manual v12.0 446 ©Samsung Proprietary and Confidential
and reinstall them.
The driver files are included in the kernel RPM file. You must check the current
kernel version first and then use the rpm command to reinstall the current version
of kernel.
4 If possible, use ethtool or mii-tool to modify the auto negotiation setting.
5 Try connecting the cable to another port in the switch or hub.
6 Make it sure that network cable is compatible with NIC’s connection type and
its maximum length has not been exceeded.
[1007] The System is Wet
Only a professionally trained service technician may open the system and handle
the internal devices. Before commencing the procedure below, please read the
safety instructions in the Product Information Guide provided with the server.
Symptoms
The system is wet.
Possible Causes
The system is wet.
Solutions
Contact your server vendor for service.
Check the important information and then solve the problem by carrying out the
following procedures:
1 Shut down the system and remove all connected devices and cables.
2 Open the system.
3 Remove the following devices from the system.
o Cooling shroud
o Hard drive
o Vflash SD card
o USB memory key
o NIC hardware key
o Expansion card
o Storage controller card
o iDRAC6 express card
o iDRAC6 enterprise card
o Power supply

Ошибка! Используйте вкладку "Главная" для применения 제목 1 к тексту, который
должен здесь отображаться. Ошибка! Используйте вкладку "Главная" для применения 제목 1 к
тексту, который должен здесь отображаться.
SCM Express Operation Manual v12.0 447 ©Samsung Proprietary and Confidential
o Cooling fan
o CPU and heat sink
o Memory module
4 Dry the system completely for at least 24 hours.
5 Reinstall the devices removed in step (3).
6 Close the system.
7 Reconnect the devices and cables removed in step (1).
8 Supply power to the system and perform system diagnosis by referring to the
‘[1019] Diagnosing the Server Hardware’.
[1008] The System is Damaged
Only a professionally trained service technician may open the system and handle
the internal devices. Before commencing the procedure below, please read the
safety instructions in the Product Information Guide provided with the server.
Symptoms
The system is damaged.
Possible Causes
The system has been damaged by external force or impact.
Solutions
Contact your server vendor for service.
Check the important information and then solve the problem by carrying out the
following procedures:
1 Shut down the system and remove all connected devices and cables.
2 Open the system.
3 Check that the following devices are installed correctly.
o Cooling shroud
o Hard drive
o Expansion card
o Storage controller card
o Power supply
o Cooling fan
o CPU and heat sink
o Memory module
4 Confirm that all the cables are connected correctly.

Ошибка! Используйте вкладку "Главная" для применения 제목 1 к тексту, который
должен здесь отображаться. Ошибка! Используйте вкладку "Главная" для применения 제목 1 к
тексту, который должен здесь отображаться.
SCM Express Operation Manual v12.0 448 ©Samsung Proprietary and Confidential
5 Close the system.
6 Reconnect the devices and cables removed in step (1).
7 Supply power to the system and perform system diagnosis by referring to the
‘[1019] Diagnosing the Server Hardware’.
[1009] Problem with the System Battery
Symptoms
The BIOS settings have been deleted, or the system time runs late.
Possible Causes
The battery has run out.
The system has been left powered off for a long time.
Solutions
Solve the problem by carrying out the following procedures:
1 Reset the system time in the BIOS.
2 Shut down the system, remove the power cable and leave the system for at
least one hour.
3 Connect the power cable and supply power to the system.
4 Check the BIOS time. If the time is still incorrect, replace the battery.
[1010] Problem with the Power Supply
Only a professionally trained service technician may open the system and handle
the internal devices. Before commencing the procedure below, please read the
safety instructions in the Product Information Guide provided with the server.
Symptoms
Power is not being supplied.
Possible Causes
The power supply is faulty.
Solutions
Contact your server vendor for service.
Solve the problem by carrying out the following procedures:
1 Check that the power cable is connected correctly.
2 Shut down the system, open the system, remove the power supply, and
reinstall the power supply.
3 Close the system and start the system. Check that power is being correctly
supplied.

Ошибка! Используйте вкладку "Главная" для применения 제목 1 к тексту, который
должен здесь отображаться. Ошибка! Используйте вкладку "Главная" для применения 제목 1 к
тексту, который должен здесь отображаться.
SCM Express Operation Manual v12.0 449 ©Samsung Proprietary and Confidential
[1011] Problem with System Cooling
Only a professionally trained service technician may open the system and handle
the internal devices. Before commencing the procedure below, please read the
safety instructions in the Product Information Guide provided with the server.
Symptoms
The system is overheating.
Possible Causes
There is a problem with the cooling fan.
The ambient temperature of the system is high.
Solutions
Contact your server vendor for service.
Check the important information and then correct any of the conditions below
which apply:
The system cover, cooling cover, drive blank, memory module blank, power
supply blank, or back filler bracket have been removed.
The temperature around the system is too high.
There is no ventilation of air outside the system.
The cooling fan has been removed or is not working.
[1012] Problem with the Fan
Only a professionally trained service technician may open the system and handle
the internal devices. Before commencing the procedure below, please read the
safety instructions in the Product Information Guide provided with the server.
Symptoms
The cooling fan does not work.
Possible Causes
There is a problem with the cooling fan.
Solutions
Contact your server vendor for service.
Solve the problem by carrying out the following procedures:
1 Perform system diagnosis referring to section ‘[1019] Diagnosing the Server
Hardware’ and confirm that the fan is not working.
2 Shut down the system and remove all connected devices and cables.
3 Open the system. Remove the cable connected to the fan and reconnect it.

Ошибка! Используйте вкладку "Главная" для применения 제목 1 к тексту, который
должен здесь отображаться. Ошибка! Используйте вкладку "Главная" для применения 제목 1 к
тексту, который должен здесь отображаться.
SCM Express Operation Manual v12.0 450 ©Samsung Proprietary and Confidential
4 Restart the system and check if the fan is working correctly. Shut down the
system.
5 If the fan does not work correctly, replace it with a new fan and repeat step (4).
6 If the fan works correctly, close the system.
7 Restart the system.
[1013] Problem with the System Memory
Only a professionally trained service technician may open the system and handle
the internal devices. Before commencing the procedure below, please read the
safety instructions in the Product Information Guide provided with the server.
Symptoms
There is memory failure output from the BIOS.
Possible Causes
Memory configuration is incorrect.
Memory failure has occurred.
Solutions
Contact your server vendor for service.
Check the important information and then solve the problem by carrying out the
following procedures:
1 Shut down the system and remove all devices and cables connected.
2 Leaving the power cable disconnected, press the power button and reconnect
the power cable.
3 Start the system and check whether any messages concerning memory error
are displayed on the screen.
4 Confirm that the installed memory matches with the memory setting in BIOS.
If matches, go to step (12).
5 If they do not match, shut down the system and remove all devices and cables
connected.
6 Open the system.
7 Check that the memory is installed correctly.
8 Remove the memory module from the memory bank and reinstall it.
9 Close the system.
10 Reconnect the devices and cables and start the system.
11 Check the memory installed matches the memory settings in the BIOS.
12 Shut down the system and remove all devices and cables connected.

Ошибка! Используйте вкладку "Главная" для применения 제목 1 к тексту, который
должен здесь отображаться. Ошибка! Используйте вкладку "Главная" для применения 제목 1 к
тексту, который должен здесь отображаться.
SCM Express Operation Manual v12.0 451 ©Samsung Proprietary and Confidential
13 Open the system.
14 Replace the memory module in the first DIMM socket with a memory module
of the same type and capacity.
15 Close the system.
16 Reconnect the devices and cables and start the system.
17 Repeat steps (13) through (16) for the memory module in each of the other
DIMM sockets.
[1014] Problem with the ODD
Only a professionally trained service technician may open the system and handle
the internal devices. Before commencing the procedure below, please read the
safety instructions in the Product Information Guide provided with the server.
Symptoms
A CD or DVD is not correctly recognized.
Possible Causes
The ODD is faulty.
The CD or DVD medium is damaged.
Solutions
Contact your server vendor for service.
Solve the problem by carrying out the following procedures:
1 Insert another CD or DVD and check.
2 Perform system diagnosis, referring to the ‘[1019] Diagnosing the Server
Hardware’ and check whether there is a problem with the ODD.
3 Shut down the system and remove all devices and cables.
4 Open the system. Remove the cable connected to the ODD and reconnect it.
5 Close the system and restart the system. Check that the ODD is working
correctly.
[1015] Problem with the HDD
Only a professionally trained service technician may open the system and handle
the internal devices. Before commencing the procedure below, please read the
safety instructions in the Product Information Guide provided with the server.
As the data stored in the HDD may be deleted by carrying out the following
procedures, it is strongly recommended to back up the data before proceeding.

Ошибка! Используйте вкладку "Главная" для применения 제목 1 к тексту, который
должен здесь отображаться. Ошибка! Используйте вкладку "Главная" для применения 제목 1 к
тексту, который должен здесь отображаться.
SCM Express Operation Manual v12.0 452 ©Samsung Proprietary and Confidential
Symptoms
The data stored in the HDD is damaged or corrupted.
Possible Causes
The HDD is faulty.
The controller is disabled in the BIOS.
There is a problem with the cable connecting the controller and the HDD.
Solutions
Contact your server vendor for service.
Solve the problem by carrying out the following procedures:
1 Carry out the following procedures if there is an SAS RAID controller and
RAID has been configured. (SCM-S700 only)
o Restart the system and press <Ctrl + R> to enter the setting program.
o Check that the RAID has been correctly.
o Quit the setting program and check that the system has booted correctly.
2 Check that the correct OS driver is installed for the controller card.
3 Restart the system and check that the controller is enabled in the BIOS.
4 Carry out the following procedures to check that the cable is connected
correctly inside the system.
o Shut down the system and remove the connected devices and cables.
o Open the system. See the ‘IPX-S500 Hardware Owner’s Manual’.
o Check that the cable between the HDD and the controller is connected
correctly.
o Close the system.
o Reconnect the devices and cables and start the system.
[1016] Problem with the SAS or SAS RAID Controller
Only a professionally trained service technician may open the system and handle
the internal devices. Before commencing the procedure below, please read the
safety instructions in the Product Information Guide provided with the server.
As the data stored in the HDD may be deleted by carrying out the following
procedures, it is strongly recommended to back up the data before proceeding.
This problem is only applicable to the SCM-S700.
Symptoms
Disks are not recognized by the SAS or SAS RAID controller.

Ошибка! Используйте вкладку "Главная" для применения 제목 1 к тексту, который
должен здесь отображаться. Ошибка! Используйте вкладку "Главная" для применения 제목 1 к
тексту, который должен здесь отображаться.
SCM Express Operation Manual v12.0 453 ©Samsung Proprietary and Confidential
Possible Causes
The SAS or SAS RAID controller is faulty, or there is a problem with the disk.
Solutions
Contact your server vendor for service.
Solve the problem by carrying out the following procedures:
1 Perform system diagnosis by referring to section ‘[1019] Diagnosing the
Server Hardware’ and check whether there is a problem with the SAS or SAS
RAID controller.
2 Check that the SAS or SAS RAID controller is enabled in the BIOS.
3 Restart the system and press the appropriate keys to enter the setting program.
o <CTRL + C>: SAS controller
o <CTRL + R>: SAS RAID controller
4 Check the settings and correct any errors found. Restart the system.
5 Shut down the system and remove the connected devices and cables.
6 Open the system.
7 If using an SAS RAID controller, check that the RAID components (memory
modules and battery) are installed and connected correctly.
8 Check that the cable between the SAS backplane and the SAS controller is
connected correctly.
9 Close the system.
10 Reconnect the devices and cables and start the system.
[1017] Problem with an Expansion Card
Only a professionally trained service technician may open the system and handle
the internal devices. Before commencing the procedure below, please read the
safety instructions in the Product Information Guide provided with the server.
Symptoms
The expansion card does not work.
Possible Causes
The expansion card is faulty.
The expansion card is not installed correctly.
Solutions
Contact your server vendor for service.
Solve the problem by carrying out the following procedures:
1 Shut down the system and remove the connected devices and cables.

Ошибка! Используйте вкладку "Главная" для применения 제목 1 к тексту, который
должен здесь отображаться. Ошибка! Используйте вкладку "Главная" для применения 제목 1 к
тексту, который должен здесь отображаться.
SCM Express Operation Manual v12.0 454 ©Samsung Proprietary and Confidential
2 Open the system.
3 Check that the expansion card is installed correctly.
4 Close the system.
5 Reconnect the devices and cables and start the system.
6 Shut down the system and remove the connected devices and cables.
7 Open the system.
8 Remove all expansion cards.
9 Close the system.
10 Perform system diagnosis by referring to section ‘[1019] Diagnosing the
Server Hardware’ and check whether there is a problem with the system.
11 Reinstall the expansion cards removed in step (8) one at a time, performing the
diagnosis in step (10) for each card.
[1018] Problem with the CPU
Only a professionally trained service technician may open the system and handle
the internal devices. Before commencing the procedure below, please read the
safety instructions in the Product Information Guide provided with the server.
Symptoms
The CPU does not work.
Possible Causes
CPU failure.
The CPU is not installed correctly.
Solutions
Contact your server vendor for service.
Solve the problem by carrying out the following procedures:
1 Perform system diagnosis by referring to section ‘[1019] Diagnosing the
Server Hardware’ and check whether there is a problem with the CPU.
2 Shut down the system and remove the connected devices and cables.
3 Open the system.
4 Check that the CPU and the heat sink are installed correctly.
5 Close the system.
6 Reconnect the devices and cables, and start the system.
7 Carry out the procedures below if there is more than one CPU. (SCM-S700
only)

Ошибка! Используйте вкладку "Главная" для применения 제목 1 к тексту, который
должен здесь отображаться. Ошибка! Используйте вкладку "Главная" для применения 제목 1 к
тексту, который должен здесь отображаться.
SCM Express Operation Manual v12.0 455 ©Samsung Proprietary and Confidential
o Shut down the system and remove the connected devices and cables.
o Open the system.
o Remove all CPUs except CPU1.
o Close the system.
o Reconnect the devices and cables and start the system.
o Perform system diagnosis by referring to section ‘[1019] Diagnosing the
Server Hardware’ and check whether there is a problem with the CPU.
o Exchange CPU1 with CPU2 and perform the test in step (7) again.
[1019] Diagnosing the Server Hardware
Symptoms
You wish to perform the diagnosis function to check for system faults.
Possible Causes
Not Applicable
Solutions
1 Start the system and press <F10> key on the BIOS screen.
2 In the Unified Server Configuration (UFC) main screen, click ‘Hardware
Diagnostics’ in the left menu and then click ‘Run Hardware Diagnostics.’
3 In order to diagnose the memory, execute ‘MpMemory’ in the ‘Choose An
Option’ window. As to any other device, execute ‘Run Diags.’
4 When executing ‘Run Diags’, select a testing option in the ‘Main Menu’
window.
Testing Options Function Description
Express Test Performs a quick diagnosis. No user input is necessary for the test.
Extended Test Performs an advanced diagnosis. It may take an hour or longer.
Custom Test Performs a test on selected device(s) only.
Information Displays the test results.
5 Perform the diagnosis and check the results.
6 If there is a problem with the diagnosis results, contact your vendor for
service.
Linux
[1101] The Initial System Login Account Has Been Forgotten
Symptoms
You forgot the initial login account set for the system.

Ошибка! Используйте вкладку "Главная" для применения 제목 1 к тексту, который
должен здесь отображаться. Ошибка! Используйте вкладку "Главная" для применения 제목 1 к
тексту, который должен здесь отображаться.
SCM Express Operation Manual v12.0 456 ©Samsung Proprietary and Confidential
Possible Causes
You forgot the initial login account set for the system.
Solutions
The initial login accounts set for the system are as follows.
For more information, see the ‘Installation Manual’.
Account Default Password Description
root #samsung**scm# System administrator account
admin samsung*# System installation account (for the Setup Wizard)
scm samsung*# System user account
[1102] An Error Window is Displayed After Quitting the scmWizard.
Symptoms
An error window is displayed after quitting the scmWizard.
Possible Causes
scmWizard was closed within 10 seconds from starting.
Solutions
It is normal for X Windows that an error window is displayed if scmWizard is
closed within 10 seconds from starting, and this is not a problem. However, if the
error window is displayed even though scmWizard is closed after 10 seconds from
starting, you should report the problem to the development team along with the
message shown in ‘Show Details.’
[1103] The Linux System User Password Has Been Forgotten
Symptoms
You forgot the Linux system user password.
Possible Causes
You forgot the Linux system user password.
Solutions
Carry out the procedures below to reset the user password.
1 Log into the system root account.
2 Use ‘passwd’ command to reset the user password. (Example. passwd scm)
[1104] The Linux System Root Password Has Been Forgotten
Symptoms
You forgot the Linux system root password.
Possible Causes
You forgot the Linux system root password.

Ошибка! Используйте вкладку "Главная" для применения 제목 1 к тексту, который
должен здесь отображаться. Ошибка! Используйте вкладку "Главная" для применения 제목 1 к
тексту, который должен здесь отображаться.
SCM Express Operation Manual v12.0 457 ©Samsung Proprietary and Confidential
Solutions
Carry out the procedures below to log into the single user mode and reset the root
password:
1 Restart the system.
2 When the Linux boot loader starts counting to three seconds, press the
<ENTER> key. If you do not press any key within the three seconds, the
system will boot normally.
3 After pressing the <ENTER> key, press the <e> key to enter the modification
mode.
4 Press the arrow keys to move the cursor to the position starting with ‘kernel’
and then press the <e> key again.
5 Press the <SPACE> key, enter ‘single’ and then press the <ENTER> key.
6 Press the <b> key to boot the system.
7 When the system has booted, use the ‘passwd’ command to reset the password
for the root account.
SCM Software Base
[1201] SCM Block’s Abnormal Termination Alarm Has Occurred (Automatic Restart)
Symptoms
‘Abnormal Block State’ Alarm is found in EVENT VIEWER or ALARM
HISTORY of SCM Administrator window. However, the corresponding process or
subsystem containing the process is appeared in red.
Possible Causes
A process has malfunctioned.
Solutions
When a process is abnormally terminated, the Process Manager of the SCM
automatically restarts the process. However, you should send the log and alarm
information at the time of the error to the development team in order to for them to
trace the root of the problem cause and prevent the same problem happening.
How to download the system log to local PC
1 Connect a keyboard, a mouse, and a monitor to the device.
2 Log into the system using the root account.
3 Right click on the desktop and select ‘Open Terminal.’
4 Compress the log for the active system and the standby system and move it to
the scm account as shown below.
[root@scme1 ~]# cd /DI/
[root@scme1 DI]# tar –zcvf YYYYMMDD_scmname_LOG.tar.gz CM/log HA/log ISOL/log MP/log
MPS/log etc/corefiles

Ошибка! Используйте вкладку "Главная" для применения 제목 1 к тексту, который
должен здесь отображаться. Ошибка! Используйте вкладку "Главная" для применения 제목 1 к
тексту, который должен здесь отображаться.
SCM Express Operation Manual v12.0 458 ©Samsung Proprietary and Confidential
[root@scme1 DI] mv YYYYMMDD_scmname_LOG.tar.gz ~scm/
YYYYMMDD: date (example: 20081129)
Device: name of the device (example: scme1)
5 Connect PC to the switch or hub which is connected to the SCM device.
6 Set the IP address of the PC as the same network as the system IP address of
the SCM.
For example, if the IP address of the SCM system is 20.20.20.XXX, set the IP
address of the PC to 20.20.20.123.
7 From the PC, establish a FTP connection to the SCM system, and then
download the compressed log file. (The FTP login ID is ‘scm’ and the
password is ‘samsung*#’.)
[1202] SCM Block’s Abnormal Termination Alarm Has Occurred (Terminated)
Symptoms
‘Abnormal Block State’ Alarm is found in EVENT VIEWER or ALARM
HISTORY of SCM Administrator window. And, the corresponding process or
subsystem containing the process is highlighted in red.
Possible Causes
A process has malfunctioned and has been restarted, but the process kept
malfunctioning over 4 times in a row and is no longer restarted.
Solutions
In SCM Administrator, activate the corresponding process.
1 In the [PERFORMANCE > System Management > Process Management]
menu, click the [Act] button, select the abnormally terminated process, and
click the [Act] button to load the process.
2 Send the log and alarm information to the development team.
How to download the system log to local PC
1 Connect a keyboard, a mouse, and a monitor to the device.
2 Log into the system using the root account.
3 Right-click on the desktop and select ‘Open Terminal’.
4 Compress the log for the active system and the standby system and move it to
the scm account as shown below:
[root@scme1 ~]# cd /DI/
[root@scme1 DI]# tar –zcvf YYYYMMDD_devicename_LOG.tar.gz CM/log HA/log ISOL/log
MP/log MPS/log etc/corefiles
[root@scme1 DI] mv YYYYMMDD_ devicename _LOG.tar.gz ~scm/

Ошибка! Используйте вкладку "Главная" для применения 제목 1 к тексту, который
должен здесь отображаться. Ошибка! Используйте вкладку "Главная" для применения 제목 1 к
тексту, который должен здесь отображаться.
SCM Express Operation Manual v12.0 459 ©Samsung Proprietary and Confidential
YYYYMMDD: date (example: 20081129)
Device: name of the device (example: scme1)
5 Connect PC to the switch or hub which is connected to the SCM device.
6 Set the IP address of the PC as the same network as the system IP address of
the SCM.
For example, if the IP address of the SCM system is 20.20.20.XXX, set the IP
address of the PC to 20.20.20.123.
7 From the PC, establish a FTP connection to the SCM system, and then
download the compressed log file. (The FTP login ID is ‘scm’ and the
password is ‘samsung*#’.)
[1203] A CPU Alarm Has Occurred and is Not Cleared
Symptoms
EVENT VIEWER or ALARM HISTORY in the SCM Administrator screen
displays ‘CPU OverLoad (%)’ or the ‘CPU Over Used by Process’ alarm, and the
alarm remained for a long time.
Possible Causes
A process in the Linux system or the SCM has malfunctioned and an alarm has
occurred.
Solutions
1 In the [PERFORMANCE > Server Resources > Process] menu, check
which process is hogging the CPU.
2 If a process is hogging the CPU, select the [PERFORMANCE > System
Management > Process Management] menu in SCM Administrator and then
deactivate and reactivate the process.
3 If the process hogging the CPU is not visible in SCM Administrator, or the
problem is not resolved by the procedures above, use MINICLI to restart the
SCM of the system with high CPU usage. (If you are restarting the SCM of the
active system, all calls attempted during the switchover will fail.)
4 If there is no particular process hogging the CPU, you can establish a telnet
connection to the device and execute the ‘top’ command to check which
command is hogging the CPU.
[1204] A Hard Disk Alarm Has Occurred
Symptoms
EVENT VIEWER or ALARM HISTORY in the SCM Administrator screen shows
‘Hard-Disk Over Used (%)’ alarm has occurred and the alarm still remains.

Ошибка! Используйте вкладку "Главная" для применения 제목 1 к тексту, который
должен здесь отображаться. Ошибка! Используйте вкладку "Главная" для применения 제목 1 к
тексту, который должен здесь отображаться.
SCM Express Operation Manual v12.0 460 ©Samsung Proprietary and Confidential
Possible Causes
The hard disk usage is high and an alarm has occurred.
Solutions
If you have uploaded unnecessary files to the SCM system, delete the files.
If there are core files in the system, download them to a PC and send them to the
development team. Carry out the following procedures to download the core files:
1 Log into the Linux console. Right-click on the desktop and select ‘Open
Terminal’ to create a new window.
2 Execute the command below to log into the root account:
su -
3 Execute the command below to check whether the core files exist:
ls -al /DI/etc/corefiles
4 If the core files are listed, move to the /home/scm directory in order to
download the files to the PC:
mv /DI/etc/corefiles/* /home/scm
5 Establish an FTP connection from the PC to the SCM server and download the
core files.
Core files contain information about the process status and memory usage at the
time of abnormal termination of a process. These files could be very large
depending on the processes and are one of the main reasons for excessive disk
usage.
[1205] A Memory Alarm Has Occurred
Symptoms
EVENT VIEWER or ALARM HISTORY in the SCM Administrator screen shows
‘Memory Over Used (%)’ alarm has occurred and the alarm still remains.
Possible Causes
This alarm occurs if the server system’s memory usage reaches up to a certain
level.
Solutions
In SCM Administrator, select the [PERFORMANCE > Server Resources >
Process] menu to check which processes are hogging the memory; and use the
[PERFORMANCE > System Management > Process Management] menu to
deactivate the memory-hogging processes and reactivate them.
If there are core files in the system, download them to a PC and send them to the
development team. Carry out the following procedures to download the core files.

Ошибка! Используйте вкладку "Главная" для применения 제목 1 к тексту, который
должен здесь отображаться. Ошибка! Используйте вкладку "Главная" для применения 제목 1 к
тексту, который должен здесь отображаться.
SCM Express Operation Manual v12.0 461 ©Samsung Proprietary and Confidential
1 Log into the Linux console. Right-click on the desktop and select ‘Open
Terminal’ to create a new window.
2 Execute the command below to log into the root account:
su -
3 Execute the command below to check whether the core files exist:
ls -al /DI/etc/corefiles
4 If the core files are listed, move to the /home/scm directory in order to
download the files to the PC:
mv /DI/etc/corefiles/* /home/scm
5 Establish an FTP connection from the PC to the SCM server and download the
core files.
Core files contain information about the process status and memory usage at the
time of abnormal termination of a process. These files could be very large
depending on the processes and are one of the main reasons for excessive disk
usage.
[1206] The Network Down Alarm Has Occurred
Symptoms
In SCM Administrator, the ‘Network Interface Down’ alarm has occurred in
EVENT VIEWER or ALARM HISTORY.
Possible Causes
This alarm occurs if the LAN cable connected to any of the LAN ports (eth0, eth1,
eth2) in the SCM hardware is disconnected.
Solutions
1 Check that the LAN cable for the port concerned is connected correctly.
2 Log into the Linux console.
3 Right-click on the desktop and select ‘Open Terminal’ to create a new
window.
4 Use the mii-tool command to check whether the LAN cable is connected or
not.
[1207] The Standby System Down Alarm Has Occurred
Symptoms
In SCM Administrator, the ‘Standby System Down’ alarm has occurred in EVENT
VIEWER or ALARM HISTORY in SCM Administrator.

Ошибка! Используйте вкладку "Главная" для применения 제목 1 к тексту, который
должен здесь отображаться. Ошибка! Используйте вкладку "Главная" для применения 제목 1 к
тексту, который должен здесь отображаться.
SCM Express Operation Manual v12.0 462 ©Samsung Proprietary and Confidential
Possible Causes
Both the LAN ports eth0 and eth1 in the SCM hardware are disconnected.
The LAN port eth2 in the SCM hardware is disconnected.
The standby system is not loaded.
Solutions
1 Connect a keyboard, a mouse, and a monitor to the device.
2 Log into the system using the root account.
3 Right-click on the desktop and select ‘Open Terminal.’
4 Execute mii-tool command to check whether the LAN cables are connected
correctly.
5 If the LAN cables are not connected, connect the LAN cables correctly.
6 If all the LAN cables are connected correctly, carry out the following
procedures to check whether the SCM system is loaded.
a Execute ‘telnet localhost 5555’ command to access MINICLI.
b Enter the initial password ‘samsung*#’
c scm > scm_ps command. If the SCM’s processes are not listed, it means
that the SCM system has not been loaded.)
d If the SCM system has not been loaded, execute scm_start command in
MINICLI to load the SCM system.
[1208] The Data Sync Timeout Status Message is Displayed
Symptoms
‘DATA SYNCHRONIZATION TIMEOUT’ status message is displayed in
EVENT VIEWER or ALARM HISTORY in SCM Administrator
Possible Causes
A process in the standby system has failed to synchronize data.
Solutions
In SCM Administrator, double-click the icon for the standby system in the MAIN
MONITOR screen.
In the [PERFORMANCE > System Management > Process Management]
menu, find the processes whose status is marked as ‘SYNC’ and send their
detailed information to the development team.
Send the log to the development team.

Ошибка! Используйте вкладку "Главная" для применения 제목 1 к тексту, который
должен здесь отображаться. Ошибка! Используйте вкладку "Главная" для применения 제목 1 к
тексту, который должен здесь отображаться.
SCM Express Operation Manual v12.0 463 ©Samsung Proprietary and Confidential
How to download the system log to local PC
1 Connect a keyboard, a mouse, and a monitor to the device.
2 Log into the system using the root account.
3 Right-click on the PC and select ‘Open Terminal.’
4 Compress the log for the active system and the standby system and move it to
the samsung account as shown below.
[root@scme1 ~]# cd /DI/
[root@scme1 DI]# tar –zcvf YYYYMMDD_devicename_LOG.tar.gz CM/log HA/log ISOL/log
MP/log MPS/log etc/corefiles
[root@scmv2 DI] mv YYYYMMDD_ devicename _LOG.tar.gz ~scm/
YYYYMMDD: date (example: 20081129)
Device: name of the device (example: scme1)
5 Connect PC to the switch or hub which is connected to the SCM device.
6 Set the IP address of the PC as the same network as the system IP address of
the SCM.
For example, if the IP address of the SCM system is 20.20.20.XXX, set the IP
address of the PC to 20.20.20.123.
7 From the PC, establish a FTP connection to the SCM system, and then
download the compressed log file.
8 In the [PERFORMANCE > System Management > Standby Reboot]
menu, click the Reboot button to restart the standby system.
SCM Administrator
[1301] Administrator can’t access from a Web Browser
Symptoms
SCM Administrator downloading is not performed when accessing through web
browser.
Possible Causes
When using Internet Explorer 7, direct download is restricted by the download
option settings.
Solutions
Enter the following URL in the web browser for direct access.
(http://{SCM IP Address}/scm.jnlp)

Ошибка! Используйте вкладку "Главная" для применения 제목 1 к тексту, который
должен здесь отображаться. Ошибка! Используйте вкладку "Главная" для применения 제목 1 к
тексту, который должен здесь отображаться.
SCM Express Operation Manual v12.0 464 ©Samsung Proprietary and Confidential
[1302] Administrator can’t access through NAT
Symptoms
When the SCM is located in private network, you cannot run SCM Administrator
from a PC located in public network.
Possible Causes
Since the JNLP file cannot have multiple IP addresses, if the system has been
installed inside the NAT, it is set only with an internal IP address.
Solutions
In SCM Administrator, using the [CONFIGURATION > Miscellaneous >
System Options] menu to set a public IP for the NAT environment (Set System
Public IP Address).
Then enter following URL in the web browser.
(http://{System Public IP Address For Call}/scm_public.jnlp)
[1303] Administrator Does Not Work Correctly
Symptoms
The system has been upgraded with a new package, but the new features or items
are not shown.
Possible Causes
The newly downloaded content has not been reflected in the system.
Solutions
Change the Java cache options in the Control Panel to allow new downloads.
Select [Start > Control Panel > Java > Temporary Internet Files > Settings…
> Delete Files].
[1304] Cannot Install Administrator
Symptoms
You have accessed the SCM from a web browser but a SCM Administrator does
not start.
Possible Causes
Java is not installed. To verify that Java has been installed, check that the Java icon
exists in [Start > Control Panel].
Solutions
Download and install Java SE Runtime Environment (JRE) from Java web site as
following.
(http://java.sun.com > downloads > Java SE-Java Platform > JRE)

Ошибка! Используйте вкладку "Главная" для применения 제목 1 к тексту, который
должен здесь отображаться. Ошибка! Используйте вкладку "Главная" для применения 제목 1 к
тексту, который должен здесь отображаться.
SCM Express Operation Manual v12.0 465 ©Samsung Proprietary and Confidential
[1305] Administrator Does Not Run in a Web Browser
Symptoms
You have accessed the SCM from a web browser (Firefox or Chrome) but a SCM
Administrator does not start immediately.
Possible Causes
Each browser starts Java Web starts in a different way, and your browser may
require additional steps.
Solutions
Administrator starts automatically in Internet Explorer.
For Firefox, select [Open File Dialog > Open (Java Web Start Launcher) >
OK].
For Chrome, scm.jnlp will be shown in the downloads list at the bottom of the
screen. When the download is complete, click the file to start it.
[1306] Cannot Log Into Personal Assistant with SSO
Symptoms
Cannot log into Personal Assistant Webpage with Single Sign On (SSO).
Possible Causes
The SSO module is not supported by browsers other than Internet Explorer.
Solutions
Use Internet Explorer as your browser.
[1307] Administrator Password Has Been Forgotten
Symptoms
You have forgotten the password for SCM Administrator login.
Possible Causes
The password has been incorrectly entered by user mistake (Caps lock is on or
the Shift key is pressed).
The user does not remember the correct password.
Solutions
Check whether Caps lock is on or the Shift key is pressed down, and then enter
the password again.
Log in with another administrator account and reset the password.
Request technical support.

Ошибка! Используйте вкладку "Главная" для применения 제목 1 к тексту, который
должен здесь отображаться. Ошибка! Используйте вкладку "Главная" для применения 제목 1 к
тексту, который должен здесь отображаться.
SCM Express Operation Manual v12.0 466 ©Samsung Proprietary and Confidential
[1308] Alarms That Have Occurred Are Not Displayed in Administrator
Symptoms
When an alarm occurs in SCM Administrator, no email is sent.
Possible Causes
The email sending option is turned off in alarm settings, or the email settings are
incorrect.
Solutions
In [PERFORMANCE > Fault > Setting > Alarm/Fault/Status], enable Enable
Flag for necessary items.
[1309] No Email is Sent When an Alarm Occurs
Symptoms
When an alarm occurs in SCM Administrator, no email is sent.
Possible Causes
The email sending option is turned off in alarm settings, or the email settings are
incorrect.
Solutions
1 In [PERFORMANCE > Fault > Setting > Alarm/ Fault/ Status], enable E-
mail Flag for desired items.
2 In [PERFORMANCE > Fault > E-mail Notification Setup], enter
information of SMTP Server, Auth Login, and Address and save.
[1310] Querying the System Version
Symptoms
You wish to query the system version information of the SCM installed with SCM
Administrator.
Possible Causes
Not Applicable
Solutions
See the information in [Help > About].
See the version information in [PERFORMANCE > System Management >
Process Version].
[1311] Learning More About Process Diagram
Symptoms
One or more processes are highlighted in red on the main monitor of SCM
Administrator, and you wish to know more about them.

Ошибка! Используйте вкладку "Главная" для применения 제목 1 к тексту, который
должен здесь отображаться. Ошибка! Используйте вкладку "Главная" для применения 제목 1 к
тексту, который должен здесь отображаться.
SCM Express Operation Manual v12.0 467 ©Samsung Proprietary and Confidential
Possible Causes
Not Applicable
Solutions
If a process is highlighted in red, it means that the process has a problem. Move
your mouse pointer to the highlight to view more information in a new window.
If you wish to view more detailed information, view it in [PERFORMANCE >
System Management > Process Management].
[1312] Turning the Alarm Sound Off
Symptoms
The alarm sound keeps on playing even after the issue is already notified.
Possible Causes
The alarm sound is set for continuous playback.
Solutions
Select [Main Menu > Tool > Sound] and select alarm count. Enter a number of
times to play or select disable.
[1313] Force Quitting SSO Agent
Symptoms
SSO Agent is no longer needed but keeps running and you do not know how to
quit it.
Possible Causes
Not Applicable
Solutions
Look for SSO Agent in the windows tray and right-click on it to bring up a menu.
Select ‘Quit’ on the menu to quit SSO Agent.
[1314] The Run Button is Disabled and Cannot be Pressed
Symptoms
The run button for SCM Administrator cannot be pressed.
Possible Causes
Synchronization is in progress.
You have selected a standby system.
Solutions
The button automatically becomes available when synchronization is complete.
In the main monitor screen, double-click the item marked Express to change the
system to active.

Ошибка! Используйте вкладку "Главная" для применения 제목 1 к тексту, который
должен здесь отображаться. Ошибка! Используйте вкладку "Главная" для применения 제목 1 к
тексту, который должен здесь отображаться.
SCM Express Operation Manual v12.0 468 ©Samsung Proprietary and Confidential
[1315] Cannot Add Subscriber
Symptoms
No more subscribers can be added.
Possible Causes
The maximum number specified in the license has been exceeded.
Multiple devices are set when the single device setting is used.
Mandatory values are not entered.
Solutions
Check your license. Re-purchase your license for the additional number of
subscribers not covered by your current license.
Check the device settings.
Check that the mandatory values (the items highlighted in blue on the screen)
are entered.
[1316] Cannot Create Non-Subscriber Data
Symptoms
No data can be created.
Possible Causes
Key data is entered in duplicate.
Mandatory values are not entered.
Solutions
Check that no duplicate data is entered.
Check that the mandatory values (the items highlighted in blue on the screen)
are entered.
[1317] The ‘Evaluation License Expire’ Alarm Has Occurred
Symptoms
The Evaluation License Expire alarm is displayed on the screen.
Possible Causes
The evaluation license initially installed has expired.
Solutions
Provide your vendor with the MAC address information of the device installed
with SCM, obtain a new license and enter the new license in
[CONFIGURATION > Miscellaneous > License].

Ошибка! Используйте вкладку "Главная" для применения 제목 1 к тексту, который
должен здесь отображаться. Ошибка! Используйте вкладку "Главная" для применения 제목 1 к
тексту, который должен здесь отображаться.
SCM Express Operation Manual v12.0 469 ©Samsung Proprietary and Confidential
Call Manager Features
The troubleshooting lists are following:
Type Troubleshooting List
Call Routing [2001] Cannot Make Outbound Trunk Call
[2002] Cannot Receive Inbound Trunk Calls To the Number Specified as CLI or DID
[2003] Inbound Trunk Calls Are Rejected
[2004] Cannot Connect Inbound Trunk Calls For Some Subscribers
[2005] Cannot Connect Calls From Common Endpoint
[2006] Cannot Receive Inbound Trunk Calls
[2007] Outbound Trunk Number is Different From the dialed number
[2008] External Trunk Call Forward Fails For Inbound Trunk Call
Call Features
[2101] Status Lamp For a Phone Does Not Change Correctly
[2102] Cannot Make Calls by Pressing the Keys on the Phone
[2103] Secretary Function: Status of Other Phones is Not Shown Correctly
[2104] Secretary Function: Shared Call Retrieve is Not Visible
[2105] Multiline is Not Correctly Shown on the Phone
[2106] Multi-ring is Not Played Correctly.
[2107] Cannot Call Hunt Group Numbers
Voice Path Connection
[2201] Cannot Hear On-Hold Sound Source
[2202] Announcement Language is Different to the Language Selected
[2203] Cannot Hear Announcement for Trunk Calls
[2204] Cannot Open Communication Route with Endpoint Under NAT
[2205] Cannot Register Private IP Phones When SCM is on Public IP Address
[2206] Cannot Register Phones on Another Private Network When SCM is on Private IP
Address [2207] Cannot Register Public IP Phones When SCM is on Private IP Address
[2208] SCM on Private IP Address Cannot Interoperate with Service Provider’s SIP Server
[2209] Cannot Establish Calls Between Public IP Phones and Private IP Phones
[2210] Cannot Establish Calls Between Phones on Different Private Networks
[2211] Cannot Establish Calls Between Private IP Phones and the Service Provider’s SIP Server
Security (TLS/sRTP)
[2301] Cannot Register Phones When Using TLS
[2302] Cannot Interoperate with the Service Provider’s SIP Server When Using TLS
[2303] Cannot Establish Calls Between Phones Using sRTP
[2304] Cannot Establish Calls Between Phone and Gateway Using sRTP
[2305] Cannot Establish Calls Between Phones and the Service Provider’s SIP Server Using sRTP
SMDR (CDR)
[2401] Cannot Create CDR Data
[2402] Cannot Send CDR Data via FTP

Ошибка! Используйте вкладку "Главная" для применения 제목 1 к тексту, который
должен здесь отображаться. Ошибка! Используйте вкладку "Главная" для применения 제목 1 к
тексту, который должен здесь отображаться.
SCM Express Operation Manual v12.0 470 ©Samsung Proprietary and Confidential
Type Troubleshooting List
[2403] Cannot Send CDR Data via TCP
Call Routing
[2001] Cannot Make Outbound Trunk Call
Symptoms
Outbound trunk calls fail.
Possible Causes & Solutions
Cause Solution
Access code is not set. Check that the code for trunk selection is set under [CONFIGURATION > Trunk Routing > Access Code].
Select a type according to the method of using the trunk code.
Location Based Routing is not set.
Check whether call route type setting for the location is missing under [CONFIGURATION > Routing > Location Based Routing].
Location Based Routing must be set for all locations.
Route sequence is not set.
Check that the route sequence is set under [CONFIGURATION > Trunk Routing > Priority Routing] or [CONFIGURATION > Trunk Routing > Load Balance Routing].
Trunk route lock is enabled for the trunk route.
If trunk Route Lock is enabled for the route disable it at [CONFIGURATION > Trunk Routing > Route].
The route is not created or not registered.
If the Register Type for the route is not None, check whether the registration information for the route exists under [PERFORMANCE > Registration Status].
If it does not exist, check the registration information of the route again.
[2002] Cannot Receive Inbound Trunk Calls To the Number Specified as CLI or DID
Symptoms
Inbound trunk calls are not connected to the number specified as CLI Routing or
DID Routing.
Possible Causes & Solutions
Cause Solution
Call rejection is set for the CLI.
Check Call Reject value of CLI Routing under [CONFIGURATION > Trunk Routing > CLI Routing]. This value should be Disable for call connection.
Inbound CLI is Anonymous
Change Anonymous Call Reject to Disable under [CONFIGURATION > Trunk Routing > Route].
Called number translation is set for the DID.
Check the settings for deletion length and insertion digits under [CONFIGURATION > Trunk Routing > DID Routing].

Ошибка! Используйте вкладку "Главная" для применения 제목 1 к тексту, который
должен здесь отображаться. Ошибка! Используйте вкладку "Главная" для применения 제목 1 к
тексту, который должен здесь отображаться.
SCM Express Operation Manual v12.0 471 ©Samsung Proprietary and Confidential
Cause Solution
Call forwarding service is set for the called user.
Check whether call forwarding service is set for the called user under [CONFIGURATION > Service > Feature Service > Service Activation] and disable the service.
Called Number length is over 20 digits
If Called Number Length over 20 digits, SCM reject this number.
[2003] Inbound Trunk Calls Are Rejected
Symptoms
Inbound trunk calls are rejected.
Possible Causes
A call restriction policy is set.
Solutions
Check whether a call restriction policy is applied to the called user. If no call
restriction policy is applied to the user, check whether a call restriction policy is
applied to the user’s service group or user group. Call restriction policies are
applied in the priority order of user’s call restriction policy > service group’s call
restriction policy > user group’s call restriction policy.
Following items are activated in RingPlan. After you check Ring Plan, Please
Check the top-priority call restriction policy under [CONFIGURATION >
Trunk Routing > Toll Restriction Policy] and [CONFIGURATION > Trunk
Routing > Toll Restriction Policy].
If a restriction policy is applied for the prefix of the inbound trunk call, delete it or
create a new call restriction policy and apply it to the user so that the inbound
trunk calls are not rejected.
[2004] Cannot Connect Inbound Trunk Calls for Some Users
Symptoms
Inbound trunk calls are not connected for some of the users.
Possible Causes & Solutions
Cause Solution
The called user does not exist or is not registered.
Check whether the registration information for the user is visible under [PERFORMANCE > Registration Status]. If it is not visible, check the registration information of the user again.
Check that the registration information for the user is created under [CONFIGURATION > User > Single Phone User/Multi-Phone User].
Check that usage restriction for the user is set to ‘None’ under [CONFIGURATION > User > Single Phone User/Multi-Phone User].
A call restriction policy is set for the user.
Check whether a call restriction policy is applied to the user. If no call restriction policy is applied to the user, check whether a call restriction policy is applied to the user’s service group or

Ошибка! Используйте вкладку "Главная" для применения 제목 1 к тексту, который
должен здесь отображаться. Ошибка! Используйте вкладку "Главная" для применения 제목 1 к
тексту, который должен здесь отображаться.
SCM Express Operation Manual v12.0 472 ©Samsung Proprietary and Confidential
Cause Solution
user group. Call restriction policies are applied in the priority order of user’s call restriction policy > service group’s call restriction policy > user group’s call restriction policy.
Check the top-priority call restriction policy under [CONFIGURATION > Trunk Routing > Toll Restriction List/Toll Restriction Policy].
If a restriction policy is applied for the prefix of the inbound trunk call, delete it or create a new call restriction policy and apply it to the user so that the inbound trunk calls are not rejected.
[2005] Cannot Connect Calls from Common Route
Symptoms
Calls from common route are not connected and there is no announcement.
Possible Causes
Common route prefix is not set.
Solutions
Assign the user group for each called number pattern under [CONFIGURATION
> Trunk Routing > Common Route Prefix].
[2006] Cannot Receive Inbound Trunk Calls
Symptoms
Inbound trunk calls cannot be received.
Possible Causes & Solutions
Cause Solution
The Route is not created or registered.
Check that the Route Lock is set under [CONFIGURATION > Trunk Routing > Route].
If the Route Lock is not a ‘Outbound Locked’, check whether the registration information for the Route is visible under [PERFORMANCE > Registration Status].
If it is not visible, check a configuration of the Route again.
The Route Lock is set to ‘Outbound Locked’ under [CONFIGURATION > Trunk Routing > Route].
Configure the Access Code for the outbound trunk calls under [CONFIGURATION > Trunk Routing > Access Code].
If the Route Lock is set to ‘Outbound Locked’, change to ‘None’.
The Access Code is not set.

Ошибка! Используйте вкладку "Главная" для применения 제목 1 к тексту, который
должен здесь отображаться. Ошибка! Используйте вкладку "Главная" для применения 제목 1 к
тексту, который должен здесь отображаться.
SCM Express Operation Manual v12.0 473 ©Samsung Proprietary and Confidential
[2007] Outbound Trunk Number is Different From the dialed number
Symptoms
Outbound trunk number is different from the dialed number.
Possible Causes & Solutions
Cause Solution
Access code type is set to Normal.
When ‘Normal’ is selected for the number type under [CONFIGURATION > Trunk Routing > Access Code], the
trunk code is removed from the called number.
If you want to use the dialed number as the actual called number, set the number type to Internal.
Number translation is set for the call route setting.
An OutBound MCN is set under [CONFIGURATION > Trunk Routing > Priority Routing] or [CONFIGURATION > Trunk Routing > Load Balance Routing]. You can view the number translation setting information under [CONFIGURATION > Trunk Routing > OutBound MCN (Outbound Called Number)].
[2008] External Trunk Call Forward Fails For Inbound Trunk Call
Symptoms
External call forward fails for inbound trunk call.
Possible Causes & Solutions
Cause Solution
The trunk type for the endpoint is set to Normal
Change this type to Tie for inbound trunk. If the trunk type is set to Normal under [CONFIGURATION > Trunk Routing > TIE Trunk], calls from the trunk are not allowed to go out to the trunk again.
A user with the same trunk number already exists.
Check that the registration information for the user is created under if Single phone user, [CONFIGURATION > User > Single Phone User] or if Multi-Extension phone, [CONFIGURATION > User > Multi-Extension Phone User] or if Multi phone User, [CONFIGURATION > User > Multi-Phone User]. Delete the user. User numbers and trunk numbers must be different.
Call Features
[2101] Status Lamp For a Phone Does Not Change Correctly
Symptoms
The status lamp for a phone does not change even when it is in use.
Possible Causes
There is an error with device button assignment.
Phone configuration information is not received.

Ошибка! Используйте вкладку "Главная" для применения 제목 1 к тексту, который
должен здесь отображаться. Ошибка! Используйте вкладку "Главная" для применения 제목 1 к
тексту, который должен здесь отображаться.
SCM Express Operation Manual v12.0 474 ©Samsung Proprietary and Confidential
Solutions
Check that the lamp number is correctly set under [CONFIGURATION > User >
Phone Key Programming].
Create User Profile under [CONFIGURATION > Phone Setting > Upgrade
Software] to receive the configuration information again.
[2102] Cannot Make Calls by Pressing the Keys on the Phone
Symptoms
No calls are made when the keys on the phone are pressed.
Possible Causes
The phone is not registered under [PERFORMANCE > Registration Status].
Solutions
Check that the phone is correctly registered under [PERFORMANCE >
Registration Status].
If it is not registered, register the phone again. If it is a Samsung phone, press the
[MUTE] button.
[2103] Secretary Function: Status of Other Phones is Not Shown Correctly
Symptoms
The status of other phones is not shown correctly.
Possible Causes
The phone is not registered under [PERFORMANCE > Registration
Status].
Call Appearance is not set under [CONFIGURATION > User > Multi-
Phone User].
Call Appearance is not set to SCA under [CONFIGURATION > User >
Multi-Phone User].
Configuration information of the phone is not received.
Solutions
Set Call Appearance to SCA under [CONFIGURATION > User > Multi-Phone
User].
[2104] Secretary Function: Shared Call Retrieve is Not Visible
Symptoms
Shared Call Retrieve does not work.
Possible Causes
Feature code is not set for Shared Call Retrieve under [CONFIGURATION >
Service > Feature Service > Feature Code].

Ошибка! Используйте вкладку "Главная" для применения 제목 1 к тексту, который
должен здесь отображаться. Ошибка! Используйте вкладку "Главная" для применения 제목 1 к
тексту, который должен здесь отображаться.
SCM Express Operation Manual v12.0 475 ©Samsung Proprietary and Confidential
Call Appearance is not set under [CONFIGURATION > User > Multi-
Phone User].
Call Appearance is not set to SCA under [CONFIGURATION > User >
Multi-Phone User].
Configuration information of the phone is not received.
Solutions
Add the feature code for Shared Call Retrieve under [CONFIGURATION >
Service > Feature Service > Feature Code].
Set Call Appearance to SCA under [CONFIGURATION > User > Multi-Phone
User].
[2105] Multiline is Not Correctly Shown on the Phone
Symptoms
Multiline is not correctly shown on the phone
Possible Causes
Only one user is allocated under [CONFIGURATION > User > Multi-Extension
Phone].
Configuration information of the phone is not received.
Solutions
Allocate multiple users under [CONFIGURATION > User > Multi-Extension
Phone].
Create User Profile under [CONFIGURATION > Phone Setting > Phone
Profile Information] to receive the configuration information again.
[2106] Multi-ring is Not Played Correctly.
Symptoms
Multi-ring does not play correctly.
Possible Causes
User type is not set to Multi Device under [CONFIGURATION > User > Multi-
Phone User].
Configuration information of the phone is not received.
Solutions
Set the user type to Multi Device under [CONFIGURATION > User > Multi-
Phone User].
Create User Profile under [CONFIGURATION > Phone Setting > Phone
Profile Information] to receive the configuration information again.

Ошибка! Используйте вкладку "Главная" для применения 제목 1 к тексту, который
должен здесь отображаться. Ошибка! Используйте вкладку "Главная" для применения 제목 1 к
тексту, который должен здесь отображаться.
SCM Express Operation Manual v12.0 476 ©Samsung Proprietary and Confidential
[2107] Cannot Call Hunt Group Numbers
Symptoms
Calls cannot be made to hunt group numbers.
Possible Causes
The hunt group is not created under [CONFIGURATION > Service > Group
Service > Hunt Group].
Group members for the hunt group are not assigned under
[CONFIGURATION > Service > Group Service > Hunt Group].
Solutions
Create a hunt group and assign the group members under [CONFIGURATION >
Service > Group Service > Hunt Group].
Voice Path Connection
[2201] Cannot Hear On-Hold Sound Source
Symptoms
The on-hold sound source cannot be heard.
Possible Causes
Check that MOH use is enabled for the user group.
Solutions
Select the user group and enable MOH use under [CONFIGURATION > User
Group > Change User Group > Information].
[2202] Announcement Language is Different to the Language Selected
Symptoms
The announcement language is different to the language of your country.
Possible Causes
Check that the announcement language setting is correct.
Solutions
Check the language setting under [CONFIGURATION > Announcement >
Language].
[2203] Cannot Hear Announcement for Trunk Calls
Symptoms
The announcement cannot be heard for trunk calls.

Ошибка! Используйте вкладку "Главная" для применения 제목 1 к тексту, который
должен здесь отображаться. Ошибка! Используйте вкладку "Главная" для применения 제목 1 к
тексту, который должен здесь отображаться.
SCM Express Operation Manual v12.0 477 ©Samsung Proprietary and Confidential
Possible Causes & Solutions
Cause Solution
No announcement is played for incoming trunk calls.
Enable announcement for incoming trunk calls under [CONFIGURATION > Trunk Routing > Route].
No announcement is played for outgoing trunk calls.
Enable announcement for outgoing trunk calls under [CONFIGURATION > Trunk Routing > Route].
[2204] Cannot Open Communication Route with Endpoint Under NAT
Symptoms
Communication route cannot be opened with an endpoint under NAT.
Possible Causes
Check that the Trunk Routing registration method is correct.
Solutions
Set the registration method to Send REGISTER/Receive REGISTER under
[CONFIGURATION > Trunk Routing > Route].
[2205] Cannot Register Private IP Phones When SCM is on Public IP Address
Symptoms
An NAT private IP phone cannot be registered as an SCM using a public IP
address.
Possible Causes & Solutions
Cause Solution
SCM Express (for 3000 subscribers or less) provides the NAT Traversal function, but SCM Enterprise (for 10000 subscribers or more) does not provide the NAT Traversal function.
If you cannot install SCM Express (for 3000 subscribers or less), you must install a separate SBC system.
Registration is not possible if the source port number sending the registration message and the source port number waiting for response are different.
Some SIP phones allow you to use the same source port number only if they are set to be under NAT. For such phones, you must make the settings to indicate that they are under NAT.
[2206] Cannot Register Phones on Another Private Network When SCM is on Private IP
Address
Symptoms
An NAT private IP phone cannot be registered as an SCM using an IP address of
another private network.
Possible Causes & Solutions
Cause Solution

Ошибка! Используйте вкладку "Главная" для применения 제목 1 к тексту, который
должен здесь отображаться. Ошибка! Используйте вкладку "Главная" для применения 제목 1 к
тексту, который должен здесь отображаться.
SCM Express Operation Manual v12.0 478 ©Samsung Proprietary and Confidential
Cause Solution
SCM Express (for 3000 subscribers or less) provides the NAT Traversal function, but SCM Enterprise (for 10000 subscribers or more) does not provide the NAT Traversal function.
If you cannot install SCM Express (for 3000 subscribers or less), you must install a separate SBC system.
Registration is not possible if the source port number sending the registration message and the source port number waiting for response are different.
Some SIP phones allow you to use the same source port number only if they are set to be under NAT. For such phones, you must make the settings to indicate that they are under NAT.
[2207] Cannot Register Public IP Phones When SCM is on Private IP Address
Symptoms
A public IP phone cannot be registered as an SCM using a private IP address.
Possible Causes & Solutions
Cause Solution
SCM Express (for 3000 subscribers or less) provides the NAT Traversal function, but SCM Enterprise (for 10000 subscribers or more) does not provide the NAT Traversal function.
If you cannot install SCM Express (for 3000 subscribers or less), you must install a separate SBC system.
If you are not using a separate SBC system, the SCM must be set with its own NAT Traversal.
Under [CONFIGURATION > Miscellaneous > System Options],
set System Under NAT to Enable, and enter the public IP address converted by the NAT system before the SCM in the System Public IP Address field.
[2208] SCM on Private IP Address Cannot Interoperate with Service Provider’s SIP
Server
Symptoms
The SCM in an NAT environment cannot interoperate with the service provider’s
SIP server.
Possible Causes & Solutions
Cause Solution
SCM Express (for 3000 subscribers or less) provides the NAT Traversal function, but SCM Enterprise (for 10000 subscribers or more) does not provide the NAT Traversal function.
If you cannot install SCM Express (for 3000 subscribers or less), you must install a separate SBC system.
If you are not using a separate SBC system, the SCM must be set with its own NAT Traversal.
Under [CONFIGURATION > Miscellaneous > System Options],
set System Under NAT to Enable, and enter the public IP address converted by the NAT system before the SCM in the System Public IP Address field.

Ошибка! Используйте вкладку "Главная" для применения 제목 1 к тексту, который
должен здесь отображаться. Ошибка! Используйте вкладку "Главная" для применения 제목 1 к
тексту, который должен здесь отображаться.
SCM Express Operation Manual v12.0 479 ©Samsung Proprietary and Confidential
[2209] Cannot Establish Calls Between Public IP Phones and Private IP Phones
Symptoms
Calls cannot be established between public IP phones and private IP phones.
Possible Causes & Solutions
Cause Solution
SCM Express (for 3000 subscribers or less) provides the NAT Traversal function, but SCM Enterprise (for 10000 subscribers or more) does not provide the NAT Traversal function.
If you cannot install SCM Express (for 3000 subscribers or less), you must install a separate SBC system.
If the SCM is in an NAT environment, you must enable NAT Traversal.
Under [CONFIGURATION > Miscellaneous > System Options],
set System Under NAT to Enable, and enter the public IP address converted by the NAT system before the SCM in the System Public IP Address field.
[2210] Cannot Establish Calls Between Phones on Different Private Networks
Symptoms
Calls cannot be established between phones on different private networks.
Possible Causes & Solutions
Cause Solution
SCM Express (for 3000 subscribers or less) provides the NAT Traversal function, but SCM Enterprise (for 10000 subscribers or more) does not provide the NAT Traversal function.
If you cannot install SCM Express (for 3000 subscribers or less), you must install a separate SBC system.
If the SCM is in an NAT environment, you must enable NAT Traversal.
Under [CONFIGURATION > Miscellaneous > System Options], set System Under NAT
to Enable, and enter the public IP address converted by the NAT system before the SCM in the System Public IP Address field.
If the SCM is in an NAT environment with multiple private networks (with different IP ranges), the MPS Freezone must be set to allow calls between SIP phones on different private networks.
Under [CONFIGURATION > Location > MPS Freezone], enter the IP range and
subnet mask for the private network which will not use the MPS service.
[2211] Cannot Establish Calls Between Private IP Phones and the Service Provider’s SIP
Server
Symptoms
Calls cannot be established between private IP phones and the service provider’s
SIP server.

Ошибка! Используйте вкладку "Главная" для применения 제목 1 к тексту, который
должен здесь отображаться. Ошибка! Используйте вкладку "Главная" для применения 제목 1 к
тексту, который должен здесь отображаться.
SCM Express Operation Manual v12.0 480 ©Samsung Proprietary and Confidential
Possible Causes & Solutions
Cause Solution
SCM Express (for 3000 subscribers or less) provides the NAT Traversal function, but SCM Enterprise (for 10000 subscribers or more) does not provide the NAT Traversal function.
If you cannot install SCM Express (for 3000 subscribers or less), you must install a separate SBC system.
If the SCM is in an NAT environment, you must enable NAT Traversal.
Under [CONFIGURATION > Miscellaneous > System Options], set System Under NAT
to Enable, and enter the public IP address converted by the NAT system before the SCM in the System Public IP Address field.
Registration or reception is not possible if the source port number sending the registration message and the source port number waiting for response or the INVITE message are different.
Some SIP phones allow you to use the same source port number only if they are set to be under NAT. For such phones, you must make the settings to indicate that they are under NAT.
Security (TLS/sRTP)
[2301] Cannot Register Phones When Using TLS
Symptoms
Phones cannot be registered when using TLS.
Possible Causes
You need to check the device protocol settings.
Solutions
Change the protocol list of the subscriber’s device to TLS under
[CONFIGURATION > User > Single Phone User/Muti-Extention Phone].
[2302] Cannot Interoperate with the Service Provider’s SIP Server When Using TLS
Symptoms
You cannot interoperate with the service provider’s SIP server when using TLS.
Possible Causes
You need to check the protocol settings in endpoint configuration.
Solutions
Under [CONFIGURATION > Trunk Routing > Route], select the endpoint for
the SIP server and change the protocol to TLS.
[2303] Cannot Establish Calls Between Phones Using sRTP
Symptoms
Calls cannot be established between phones using sRTP.

Ошибка! Используйте вкладку "Главная" для применения 제목 1 к тексту, который
должен здесь отображаться. Ошибка! Используйте вкладку "Главная" для применения 제목 1 к
тексту, который должен здесь отображаться.
SCM Express Operation Manual v12.0 481 ©Samsung Proprietary and Confidential
Possible Causes
You need to check the device media type settings.
Solutions
Change the media type of the subscriber’s device to sRTP under
[CONFIGURATION > User > Single Phone User/Multi-Extension Phone].
[2304] Cannot Establish Calls Between Phone and Gateway Using sRTP
Symptoms
Calls cannot be established between a phone and the gateway using sRTP.
[Possible Causes & Solution]
Cause Solution
You need to check the device media type settings.
Change the media type of the subscriber’s device to sRTP under [CONFIGURATION > User > Single Phone User/Multi-Extension Phone].
You need to check the sRTP setting for the gateway.
Enable the sRTP function for the gateway.
[2305] Cannot Establish Calls Between Phones and the Service Provider’s SIP Server
Using sRTP
Symptoms
Calls cannot be established between a phone and the service provider’s SIP server
using sRTP.
Possible Causes
You need to check the device media type settings.
Solutions
Change the media type of the subscriber’s device to sRTP under
[CONFIGURATION > User > Single Phone User/Multi-Extension Phone].
SMDR (CDR)
[2401] Cannot Create CDR Data
Symptoms
CDR data is not created.
Possible Causes
Option ‘None’ is selected for the billing data creation method.
Solutions
Change the billing data creation method for the user group from ‘None’ to another
option.

Ошибка! Используйте вкладку "Главная" для применения 제목 1 к тексту, который
должен здесь отображаться. Ошибка! Используйте вкладку "Главная" для применения 제목 1 к
тексту, который должен здесь отображаться.
SCM Express Operation Manual v12.0 482 ©Samsung Proprietary and Confidential
[2402] Cannot Send CDR Data via FTP
Symptoms
CDR is created for FTP transmission, but the CDR file cannot be sent to the FTP
charging server.
Possible Causes
The CDR FTP IP address or the password in the charging FTP configuration is
incorrect.
Solutions
Enter the CDR FTP IP address or the password in the charging FTP configuration
again and check the network connection with the FTP charging server.
[2403] Cannot Send CDR Data Via TCP
Symptoms
CDR is created for TCP transmission, but the CDR file cannot be sent to the TCP
charging server.
Possible Causes
The charging TCP link IP address in the TCP charging configuration is incorrect.
Solutions
Check the CDR TCP link IP address in the TCP charging configuration. If the
address is correct, check the network connection with the TCP server.

Ошибка! Используйте вкладку "Главная" для применения 제목 1 к тексту, который
должен здесь отображаться. Ошибка! Используйте вкладку "Главная" для применения 제목 1 к
тексту, который должен здесь отображаться.
SCM Express Operation Manual v12.0 483 ©Samsung Proprietary and Confidential
Application Features
The troubleshooting lists are following:
Type Troubleshooting List
ACD [3001] Cannot Call ACD Group
[3002] No ACD Group Announcement is Heard
[3003] Overflowing Does Not Work For ACD Group
[3004] Agent Cannot Login
[3005] Agents Cannot Hear Ring
[3006] Break is Not Set for Agent
[3007] Wrap-up is Not Set for Agent After a Call
Conference [3101] Conference Function Does Not Work
[3102] Some Conference Function Does Not Work
[3103] Meet-Me Conference Function Does Not Work
[3104] Only the Meet-Me Conference Function Works
[3105] Cannot Send Meet-Me Conference Reservation Mails
[3106] Cannot Enter Meet-Me Conference Before Start Time
[3107] Conference-Related Feature Codes Do Not Work When Changed
Voice Mail [3201] Cannot Access UMS When Logged Into Mailbox
[3202] AA Announcement is Played When Logged Into Mailbox
[3203] Cannot Register in Outlook
[3204] The Mailbox Password Has Been Forgotten
[3205] New Voice Mail is Not Emailed to the Email Account
[3206] Call Record Does Not Work
[3207] Park & Overhead Paging Function Does Not Work
[3208] When Listening to a Voice File Recorded in Voice Studio, I Hear Nothing or a Lot of Noise
[3209] Recording of Personal Greetings is Not Allowed From the Menu
Interoperates with CSTA Applications
[3301] Cannot Connect CSTA Application
[3302] Cannot Register CSTA Monitor
[3303] CSTA Events Are Not Generated
[3304] CSTA Commands Do Not Work
ACD
[3001] Cannot Call ACD Group
Symptoms
When attempting to call an ACD group number, you do not hear a ringback tone
or an ACD group announcement but you get an error.
Possible Causes
The ACD group number is not registered.

Ошибка! Используйте вкладку "Главная" для применения 제목 1 к тексту, который
должен здесь отображаться. Ошибка! Используйте вкладку "Главная" для применения 제목 1 к
тексту, который должен здесь отображаться.
SCM Express Operation Manual v12.0 484 ©Samsung Proprietary and Confidential
The ACD group number is not registered in the DID table.
In case of a call between user groups, the inter user group number is not
registered.
All of the agents of the ACD group are logged out and ‘Next Destination
When All Log-out’ is not registered.
All of the agents of the ACD group are busy or unavailable for answering calls
and ‘Next Destination When All Busy’ is not registered.
Solutions
1 In SCM Administrator, check that the group number is correctly registered
under [CONFIGURATION > Application > ACD > ACD Group].
2 In case of an incoming trunk call, check that the ACD group number is
registered under [CONFIGURATION > Routing > ACD > DID Routing].
3 If calls within a user group work but calls between different user groups do not
work, check that the inter user group number is correctly registered under
[CONFIGURATION > Application > ACD > ACD Group].
4 If all of the agents of the ACD group are logged out, check that a phone
number is specified for ‘Next Destination When All Log-out’ under
[CONFIGURATION > Application > ACD > ACD Group].
5 If all of the agents of the ACD group are busy, check that a phone number is
specified for ‘Next Destination When All Busy’ under [CONFIGURATION
> Application > ACD > ACD Group].
[3002] No ACD Group Announcement is Heard
Symptoms
When calling an ACD group, you hear a ringback tone but not the ACD
announcement.
Possible Causes
The MOH service of the system is not functioning correctly.
Announcement settings for the ACD group are incorrect.
The voice file is not functioning correctly.
Solutions
1 Check that the MOH of the system is functioning correctly. Press the [Hold]
button on the phone while on a call with another extension subscriber. Check
that the MOH is heard on the other person’s phone. If not, check that the status
for MRAB, MRMB, and MOHB blocks are correct under
[CONFIGURATION > Process > Process Version].
2 In SCM Administrator, check that ‘First Greet Message’, ‘First Wait MOH’,
‘Second Greet Message’, ‘Second Wait MOH’, ‘Greet Iteration’, ‘Wait MOH
Duration’, etc. are correctly entered under [CONFIGURATION >

Ошибка! Используйте вкладку "Главная" для применения 제목 1 к тексту, который
должен здесь отображаться. Ошибка! Используйте вкладку "Главная" для применения 제목 1 к
тексту, который должен здесь отображаться.
SCM Express Operation Manual v12.0 485 ©Samsung Proprietary and Confidential
Application > ACD > ACD Group].
3 In SCM Administrator, check that the voice file is correctly played under
[CONFIGURATION > Announcement > Service Announcement].
[3003] Overflowing Does Not Work For ACD Group
Symptoms
Calls should be forwarded to a specified number when the call forward conditions
are met for the ACD group, but calls are not forwarded and you get an error.
Possible Causes
The call forward phone number is not registered for the ACD group.
The call forward phone number is invalid.
The service is restricted for the maximum number of calls forwarded.
Solutions
1 If you wish to have incoming ACD group calls forwarded when they are
unanswered after ringing for a specified period of time, check that ‘Next
Destination Overflow Time’ and ‘Next Destination’ are entered correctly
under [CONFIGURATION > Application > ACD > ACD Group].
2 If you wish to have calls forwarded when all agents are logged out, check that
the login status of the agents is Log-out under [CONFIGURATION >
Application > ACD > ACD Group Status] and check that ‘Next Destination
When All Log-out’ is entered correctly under [CONFIGURATION >
Application > ACD > ACD Group].
3 If you wish to have calls forwarded when all agents are busy, check that ‘Next
Destination When All Busy’ is entered correctly under [CONFIGURATION
> Application > ACD > ACD Group].
4 If the call forwarding phone number is in another ACD group, the maximum
number of calls forwarded is restricted by ‘Maximum Overflow Call Count’
under [CONFIGURATION > Application > ACD > ACD Group]. Check
that the maximum number of calls is not exceeded.
[3004] Agent Cannot Login
Symptoms
Login fails when an agent attempts to log into an ACD group using the feature
code or the function key.
Possible Causes
The feature code is invalid.
The Agent ID is not registered.
The agent password is incorrect.

Ошибка! Используйте вкладку "Главная" для применения 제목 1 к тексту, который
должен здесь отображаться. Ошибка! Используйте вкладку "Главная" для применения 제목 1 к
тексту, который должен здесь отображаться.
SCM Express Operation Manual v12.0 486 ©Samsung Proprietary and Confidential
The feature code, agent ID and password have been entered in an incorrect
sequence.
The ACD group number is incorrect or the agent is not a member of the ACD
group.
You are using a multi-device or multi-line phone to login.
Solutions
1 Check that the ‘ACD Agent-Login’ feature code is correctly registered under
[CONFIGURATION > Service > Feature Service > Feature Code].
2 Check that the agent ID and password are correctly registered under
[CONFIGURATION > Application > ACD > ACD Agent].
3 Check that the numbers are entered in the sequence of: feature code + agent ID
+ password + ACD group number. The ACD group number is optional. When
the numbers are dialed as feature code + agent ID + password, and without an
ACD group number, the agent will be logged into all of their ACD groups.
When an ACD group number is entered, the agent will only be logged into that
particular ACD group.
4 Agents cannot login using multi-device or multi-line phones. Check that the
subscriber type of the phone used for login is Single Device under
[CONFIGURATION > Subscriber > Subscriber].
[3005] Agents Cannot Hear Ring
Symptoms
When calling an ACD group, the caller hears the ringback tone and the ACD
announcement, but the agent cannot hear the ring even when agents are available.
Possible Causes
Agent status is invalid.
Solutions
1 Check the login status of the agent concerned under [CONFIGURATION >
Application > ACD > ACD Group Status].
2 Check that the status of the agent is normal under [CONFIGURATION >
Application > ACD > ACD Agent]. The Wrap-up status must be Reset and
the Break status must be Reset in order to receive calls. If any of them is Set,
use the feature codes or function keys on the phone to register as Reset.
3 If the agent’s phone status is Idle, check whether the agent’s phone is engaged
in any call under [PERFORMANCE > Call Management]. If the agent’s
phone is Idle and you see its phone number on this list, you must delete the
call to return the phone to the Idle status.

Ошибка! Используйте вкладку "Главная" для применения 제목 1 к тексту, который
должен здесь отображаться. Ошибка! Используйте вкладку "Главная" для применения 제목 1 к
тексту, который должен здесь отображаться.
SCM Express Operation Manual v12.0 487 ©Samsung Proprietary and Confidential
[3006] Break is Not Set for Agent
Symptoms
When an agent attempts to use the Break function, you get an error.
Possible Causes
The agent is logged out.
The feature code is not registered in the system.
Solutions
1 Check the login status of the agent concerned under [CONFIGURATION >
Application > ACD > ACD Group Status].
2 Check that the ‘ACD Agent Break Status-Set’ feature code is correctly
registered under [CONFIGURATION > Service > Feature Service >
Feature Code].
[3007] Wrap-up is Not Set for Agent After a Call
Symptoms
When an agent has finished responding to an incoming ACD group call, or when
an agent does not answer a call, the wrap-up status should be turned on, but it is
not.
Possible Causes
Release wrap-up time is incorrectly registered.
Solutions
1 In the [CONFIGURATION > Application > ACD > ACD Group] menu,
check that the release wrap-up time is correctly registered.
2 When in wrap-up status, the agent can use the feature code or function key to
extend the wrap-up period. To enable this, check that the ‘ACD Agent Wrap-
Up Status-Set’ feature code is correctly registered under
[CONFIGURATION > Service > Feature Service > Feature Code]. When
the agent extends the wrap-up period, the system does not automatically
release this and the agent must use the feature code to release it manually.
Conference
[3101] Conference Function Does Not Work
Symptoms
Conference does not start when calling using the conference feature code or when
pressing the conference button during a call.
Possible Causes
The conference server has not been configured.

Ошибка! Используйте вкладку "Главная" для применения 제목 1 к тексту, который
должен здесь отображаться. Ошибка! Используйте вкладку "Главная" для применения 제목 1 к
тексту, который должен здесь отображаться.
SCM Express Operation Manual v12.0 488 ©Samsung Proprietary and Confidential
The application server service group has not been configured.
The feature code is changed after the conference server is created.
Solutions
In the [CONFIGURATION > Application > Conference Server] menu, select
the user group with the problem and click the [Search] button.
Check whether Internal Conference or Gateway Conference exist in the search
result. If not, create a conference server for the user group.
If a conference server has already been created, confirm the conference server
assignment form the [CONFIGURATION > Application > Application Server
Service Group] menu.
If everything is OK, select the conference server and click the [Change] button.
Verify the services are assigned properly in the Service List. Click the [Change]
button again to refresh the conference server information.
[3102] Some Conference Function Does Not Work
Symptoms
Among Add-on, One-Step, Meet-me and Paging, specific type(s) of conferences
does not work.
Possible Causes
When you create a Conference Server, you didn’t select those services from
the Service List.
The conference service(s) is not enabled for the user group.
The conference service(s) is not assigned in the Application Server Service
Group.
Solutions
1 In the [CONFIGURATION > Application > Conference Server] menu,
click the [Search] button to display the user group list and select the
Conference Server with the problem
2 Click the [Change] button to check whether the required services are selected.
o Paging: Station Paging, Paging On Answer
o Meet-Me Conference: Meet-Me
o One-Step Conference: Predefined Conference, Progressive Conference,
Intercom Conference, Dispatch Conference
o Add-On Conference: Add-On Conference, Conference On Answer
3 In the [CONFIGURATION > User Group > Change User Group >
Information] menu, click the [Search] button to display the user group list
and select the user group with the problem.
4 Click the [Detail] button to check whether each conference service is enabled.

Ошибка! Используйте вкладку "Главная" для применения 제목 1 к тексту, который
должен здесь отображаться. Ошибка! Используйте вкладку "Главная" для применения 제목 1 к
тексту, который должен здесь отображаться.
SCM Express Operation Manual v12.0 489 ©Samsung Proprietary and Confidential
o Add-On Conference: Add-On Conference, Conference On Answer,
Predefined Conference, Progressive Conference, Intercom Conference,
Dispatch Conference
o Meet-Me Conference: Meet-Me
o Station Paging: Station Paging
o Paging On Answer: Paging On Answer
5 In the [CONFIGURATION > Application > Application Server Service
Group] menu, verify that each conference server configured properly.
[3103] Meet-Me Conference Function Does Not Work
Symptoms
The number of attendees available for invitation is shown as 0.
Possible Causes
The license for Meet Me conference is not entered.
Solutions
In the [CONFERENCE > System configuration] menu, open the Misc Setting
tab and check the number of voice channels for Meet Me conferences.
If this value is 0, it means you have not registered the license for Meet Me
conference.
You need to purchase a new Meet Me Conference License and register it.
If you have already purchased a license, enter it in the [CONFIGURATION >
Miscellaneous > License] menu.
[3104] Only the Meet-Me Conference Function Works
Symptoms
Conference functions other than Meet Me conference do not work.
In the [CONFERENCE > System configuration] menu, the number of voice
channels for Meet Me conferences in the Misc Setting tab is shown as 128 (for
SCM Express).
Possible Causes
All the voice conference channels are licensed for Meet-Me conferences.
Solutions
In SCM Express, among the total of 128 voice conference channels, the number of
channels specified by your Meet-Me conference license are reserved for Meet-Me
conferences. If you have purchased and entered the Meet-Me conference license
for 128 channels, which is the total number of available channels, no other
conference functions except Meet-Me conferences will work. If you are not going
to use all of the voice conference channels for Meet-Me conferences, you should
purchase and enter your license again, taking into consideration the ratio between

Ошибка! Используйте вкладку "Главная" для применения 제목 1 к тексту, который
должен здесь отображаться. Ошибка! Используйте вкладку "Главная" для применения 제목 1 к
тексту, который должен здесь отображаться.
SCM Express Operation Manual v12.0 490 ©Samsung Proprietary and Confidential
Meet-Me conferences and other conferences.
Meet-Me Conference Reservation Mails
Symptoms
When you attempt to send invitation mails after confirming your Meet Me
conference reservation, a send failure error is displayed.
Possible Causes
Your e-mail settings are incorrect.
Solutions
In the [Performance > Fault > E-mail Notification Setup] menu, check that the
values for SMTP Server and Auth Login fields are correct.
[3106] Cannot Enter Meet-Me Conference Before Start Time
Symptoms
You cannot enter a Meet Me conference, even though you have selected the
advanced entrance option at the time of reservation.
Possible Causes
Time allowed for pre-conference entrance is set to None.
There are no more available Meet Me conference voice channels.
Solutions
In the [CONFERENCE > System configuration] menu, open the Misc Setting
tab and check the value for the time allowed for pre-conference entrance setting. If
set to None, change it to an appropriate value.
If the setting is correct, but you still cannot enter in advance, all of the Meet Me
conference voice channels are being used at the time you are trying to enter.
Although you may have made the correct settings to enter in advance, you can
enter in advance only if there are available Meet Me conference channels.
[3107] Conference-Related Feature Codes Do Not Work When Changed
Symptoms
When you change conference-related function keys after creating a conference
system server, new conference feature codes do not work.
Possible Causes
The changes are not relayed to the conference system.
Solutions
In the [CONFIGURATION > Application > Conference Server] menu, select
the user group with the problem and click the [Search] button.
Select Internal Conference from the searched list and click the [Change] button to

Ошибка! Используйте вкладку "Главная" для применения 제목 1 к тексту, который
должен здесь отображаться. Ошибка! Используйте вкладку "Главная" для применения 제목 1 к
тексту, который должен здесь отображаться.
SCM Express Operation Manual v12.0 491 ©Samsung Proprietary and Confidential
open the Conference Server-Change dialog. Click the [Change] button again to
change the conference system information.
VM/AA
[3201] Cannot Access VM When Logged Into Mailbox
Symptoms
When you press the VM feature code on the phone, you hear the announcement
‘Service is unavailable.’
Possible Causes
This problem may occur if Internal UMS is not registered in the application server.
Solutions
1 Under [CONFIGURATION > Application > Other Application Server],
select a user group and click the [Search] button to check that Internal UMS is
registered.
2 If Internal UMS is not registered, click the [Create] button to register Internal
UMS.
[3202] AA Announcement is played When Logged Into Mailbox
Symptoms
When you press the VM access feature code on the phone, you do not hear the
announcement ‘Please enter your password’.
Possible Causes
This problem occurs when a mailbox is not created when creating the subscriber.
Solutions
1 Query [VOICE MAIL > Open Block Table > Extension] and check whether
the extension number exists.
2 Query [VOICE MAIL > Open Block Table > MailBox] and check whether
the mailbox exists.
3 If not, click the [Create] button to create the extension number and mailbox.
[3203] Cannot Register in Outlook
Symptoms
When you attempt to register the Outlook Add-in after installing it, you get the
‘Failed to register’ message.
When you attempt to register the Outlook Add-in after installing it, you get the
‘IP-UMS is unavailable for this user’ message.
When you attempt to register the Outlook Add-in after installing it, you get the

Ошибка! Используйте вкладку "Главная" для применения 제목 1 к тексту, который
должен здесь отображаться. Ошибка! Используйте вкладку "Главная" для применения 제목 1 к
тексту, который должен здесь отображаться.
SCM Express Operation Manual v12.0 492 ©Samsung Proprietary and Confidential
‘Cannot access the email server’ message.
Possible Causes
The server IP address is incorrectly entered.
You attempted to register for a subscriber who does not exist, or your
application ID and password are incorrect.
The SMTP or IMAP IP address is incorrectly entered or the email password is
incorrect.
If you wish to enter domain names for SMTP and IMAP instead of IP
addresses, they must be registered in the DNS.
Solutions
1 Make sure the server IP addresses are entered correctly and try again.
2 Make sure the ID and the password are entered correctly and try again.
3 Make sure the SMTP and IMAP information is entered correctly and try again.
[3204] The Mailbox Password Has Been Forgotten
Symptoms
You attempted to login to your UMS by pressing the VM access feature code on
the phone, but cannot login because you have forgotten the password.
Possible Causes
User negligence.
Solutions
In the [VOICE MAIL > Open Block Table > MailBox] menu, select the
extension number and press the Reset User Password button in mailbox control to
reset the password to the default password.
(The user’s default password uses the default customer password registered as the
system password under the system variable menu.)
[3205] New Voice Mail is Not Emailed to the Email Account
Symptoms
You have got a new voice mail in your mailbox but an email attachment of the
voice mail is not sent to the email account you specified.
Possible Causes
Email server information is not set.
Solutions
In the [VOICE MAIL > Open Block Table > Mailbox Class] menu, select the
currently used block (usually Standard) and entered Email Server IP address in the
HOST ID field of SMTP Server tab.

Ошибка! Используйте вкладку "Главная" для применения 제목 1 к тексту, который
должен здесь отображаться. Ошибка! Используйте вкладку "Главная" для применения 제목 1 к
тексту, который должен здесь отображаться.
SCM Express Operation Manual v12.0 493 ©Samsung Proprietary and Confidential
[3206] Call Record Does Not Work
Symptoms
When you attempt to record while on a call with another extension number or with
a trunk number, recording does not start.
Possible Causes
Call recording settings are incorrect.
There are no available channels in the conference system.
Solutions
1 In the [CONFIGURATION > Application > Other Application Server]
menu, select a user group and click the [Search] button to check that Internal
Conference is created.
If not, click the Create button to create Internal Conference.
2 In the [CONFIGURATION > Application > Other Application Server]
menu, select a user group and click the [Search] button to check that Internal
UMS is created. If not, click the Create button to create Internal UMS.
3 In the [CONFIGURATION > Service > Feature Service > Feature Code]
menu, select a user group and click the [Search] button to check that the
‘Adhoc Conference’, ‘Call Record-Start’, and ‘UMS’ feature codes are
registered. If not, create them.
4 If there are no available channels in the conference system, you must wait until
a channel becomes available before you can use the call recording function.
[3207] Park & Overhead Paging Function Does Not Work
Symptoms
An incoming trunk call requested paging but the paging function does not work.
Possible Causes
Park & overhead paging function settings are incorrect.
There are no available channels in the conference system.
Solutions
1 In the [CONFIGURATION > Application > Other Application Server]
menu, select a user group and click the [Search] button to check that Internal
Conference is created.
If not, click the [Create] button to create Internal Conference.
2 In the [CONFIGURATION > Application > Other Application Server]
menu, select a user group and click the [Search] button to check that Internal
UMS is created. If not, click the [Create] button to create Internal UMS.
3 In the [CONFIGURATION > Service > Feature Service > Feature Code]
menu, select a user group and click the [Search] button to check that the

Ошибка! Используйте вкладку "Главная" для применения 제목 1 к тексту, который
должен здесь отображаться. Ошибка! Используйте вкладку "Главная" для применения 제목 1 к
тексту, который должен здесь отображаться.
SCM Express Operation Manual v12.0 494 ©Samsung Proprietary and Confidential
‘Adhoc Conference’, ‘Paging’, ‘UMS’, and ‘Parked Call Pickup’ feature codes
are registered. If not, create them.
4 If there are no available channels in the conference system, you must wait until
a channel becomes available before you can use the call recording function.
[3208] When Listening to a Voice File Recorded in Voice Studio, I Hear Nothing or a Lot
of Noise
Symptoms
You have recorded a prompt file in Voice Studio but when listening to it on the
phone, you cannot hear anything or a lot of noise.
Possible Causes
This problem occurs if a wave file of incorrect format has been registered.
Solutions
The voice mail system supports wave files in the 16 bit/8 khz/mono format. Please
change the file format and register it again.
[3209] Recording of Personal Greetings is Not Allowed From the Menu
Symptoms
When you log onto UMS on the phone and access the ‘5’ Personal Greeting
Recording menus, you do not get the greeting recording menu (busy greeting, call
block greeting, night personal greeting, etc.).
Possible Causes
Greeting recording is not allowed in Administrator.
Solutions
1 In the [VOICE MAIL > Open Block Table > Extension] menu, select the
extension number concerned.
2 In the Caller Options Processor tab, change the greeting from ‘No Greeting’ to
‘Basic’ and save.
3 To record a busy greeting, go to the [VOICE MAIL > Open Block Table >
Extension] menu. In the Authorization tab, set Busy greeting allowed to ‘Yes’
and save.
Interoperation with CSTA Applications
[3301] Cannot Connect CSTA Application
Symptoms
You cannot access the system from the CSTA application.

Ошибка! Используйте вкладку "Главная" для применения 제목 1 к тексту, который
должен здесь отображаться. Ошибка! Используйте вкладку "Главная" для применения 제목 1 к
тексту, который должен здесь отображаться.
SCM Express Operation Manual v12.0 495 ©Samsung Proprietary and Confidential
Possible Causes
There is a problem with the IP communication between the system and the
application PC.
You have attempted to connect to an incorrect CSTA port.
You have exceeded the CSTA license.
Solutions
1 Solve the problem by carrying out the following procedures:
2 Try ping the system from the application PC.
3 The system’s CSTA ports are allocated from TCP 6001 for the number of user
groups. You can check the CSTA port number for each user group in the
CSTA Port section under [CONFIGURATION > User Group > Change
User Group > Options] in SCM Administrator. Try a TCP connection to the
CSTA port listed.
4 Check that the CSTA license is correctly entered and the number is adequate
under [CONFIGURATION > Miscellaneous > License] in SCM
Administrator.
5 Log into the system with the root account, execute ‘pkill-SIGUSR1
CSTALB.exe’ and check that the license maximum in the
‘/DI/CM/log/CSTALB0.log’ file has not been reached.
=============================================================
Resource Maximum Current
----------------------------------------------------------------------------------------
--------------------
SkTCPConn(server) 00002 00002
CstaLinkInfo 00110 00000
CstaMonitorInfo 00100 00000
CstaFilterInfo 00300 00000
License 00060 00000 CSTA License
[3302] Cannot Register CSTA Monitor
Symptoms
The CSTA monitor cannot be registered.
Possible Causes
You have attempted to monitor an invalid number.
You have reached the maximum monitor number or maximum filter number
allowed in the system.
Solutions
1 Solve the problem by carrying out the following procedures:
2 Check that the number to monitor is valid.
3 Log into the system with the root account, execute ‘pkill-SIGUSR1

Ошибка! Используйте вкладку "Главная" для применения 제목 1 к тексту, который
должен здесь отображаться. Ошибка! Используйте вкладку "Главная" для применения 제목 1 к
тексту, который должен здесь отображаться.
SCM Express Operation Manual v12.0 496 ©Samsung Proprietary and Confidential
CSTALB.exe’ and check that the maximum monitor number and maximum
filter number in the ‘/DI/CM/log/CSTALB0.log’ file have not been reached.
=============================================================
Resource Maximum Current
----------------------------------------------------------------------------------------
--------------------
SkTCPConn(server) 00002 00002
CstaLinkInfo 00110 00000
CstaMonitorInfo 00100 00000 Number of Monitor
CstaFilterInfo 00300 00000 Number of Filter
License 00060 00000
[3303] CSTA Events Are Not Generated
Symptoms
The phone does not send the event messages according to its call status to the
CSTA application, even though the CSTA application is connected correctly and a
phone number is correctly registered to be monitor.
Possible Causes
The phone status is invalid and its events are not sent to the CSTA application.
Solutions
The CSTA application sends the SnapShot Device command to the phone to check
the phone status. If the phone returns an invalid SnapShot Device Response, the
system regards the phone status as invalid.
If the phone status is Idle, check whether any call is engaged for the phone number
under [PERFORMANCE > Call Management]. If the phone is Idle and you see
its phone number on this list, you must delete the call to return the phone to the
Idle status.
[3304] CSTA Commands Do Not Work
Symptoms
When a phone executes a CSTA command, the command does not function
correctly even though the CSTA application is connected correctly and a phone
number is correctly registered to be monitored.
Possible Causes
The phone’s status is invalid or it is unable to process the CSTA command.
Solutions
The system responds to any CSTA command generated by the CSTA application.
You must analyze the cause value of this response.

Ошибка! Используйте вкладку "Главная" для применения 제목 1 к тексту, который
должен здесь отображаться. Ошибка! Используйте вкладку "Главная" для применения 제목 1 к
тексту, который должен здесь отображаться.
SCM Express Operation Manual v12.0 497 ©Samsung Proprietary and Confidential
Interoperate with Phones and Gateways
The troubleshooting lists are following:
Type Troubleshooting List
Interoperate with Phones
[4001] Cannot Connect to Network
[4002] Cannot Register with Server
[4003] Cannot Register with Server When Using PNP
[4004] Registration is Done with Previous Server
[4005] Cannot Download Profile From Server
[4006] Cannot Upgrade
[4007] Call is Not Established and Noise is Heard
[4008] Cannot Make Calls
[4009] Connection is Lost While on a Call
[4010] Time Displayed is Incorrect
[4011] Service Menu is Incorrect
[4012] Supplementary Service Function Does Not Work
[4013] UC Function Does Not Work
[4014] Cannot Set Functions in Menu
[4015] Cannot Use AOM
[4016] Fonts Are Garbled
Interoperate with Gateways
[4101] Cannot Register Gateway
[4102] Gateway Does Not Fetch Profile
[4103] FXS Phone on the Gateway is Inactive
Interoperation with Phones
[4001] Cannot Connect to Network
Symptoms
You cannot connect to the network from the phone.
Possible Causes
Poor LAN cable connection
Incorrect IP settings
VLAN information error
802.1x port information not set
Solutions
1 Check that the phone’s LAN cable is connected correctly.
2 Check that the phone’s IP address is correctly set under the phone’s [Menu >
Settings > Network Information] menu.
3 If you fail to obtain a valid IP address when using DHCP, contact the system
administrator.

Ошибка! Используйте вкладку "Главная" для применения 제목 1 к тексту, который
должен здесь отображаться. Ошибка! Используйте вкладку "Главная" для применения 제목 1 к
тексту, который должен здесь отображаться.
SCM Express Operation Manual v12.0 498 ©Samsung Proprietary and Confidential
4 If the IP address is correctly set, your network connection may be affected by
VLAN or 802.1x settings. Contact the system administrator.
[4002] Cannot Register with Server
Symptoms
You cannot register the phone with the SCM server.
Possible Causes
Network error
Profile download failure
Subscriber information error
Certificate error when using TLS protocol
SCM server error
Solutions
1 Check that the network is functioning correctly.
2 Check that the profile is correctly downloaded.
a On an SMT-i5243 phone, you can check this with the ↑ icon on the
desktop and the [Menu > Settings > Network Information > Boot Log]
menu.
b Establish a telnet connection to the phone and check the downloaded
profile in the /tmp/Provision/Profiles folder.
c If the profile is not correctly downloaded, contact the system
administrator.
d If the profile is correctly downloaded, use Ethereal to identify the cause of
registration failure. (Contact the system administrator.)
e In case of an SIP 404 Not Found error, the subscriber information has not
been entered in the server.
f When using TLS protocol, registration may not be possible due to
certificate authentication failure.
3 Registration may not be possible if the SCM server is in abnormal status.
(Contact the system administrator.)
[4003] Cannot Register with Server When Using PNP
Symptoms
Server registration is not performed correctly even though using PNP.
Possible Causes
Configuration server information error

Ошибка! Используйте вкладку "Главная" для применения 제목 1 к тексту, который
должен здесь отображаться. Ошибка! Используйте вкладку "Главная" для применения 제목 1 к
тексту, который должен здесь отображаться.
SCM Express Operation Manual v12.0 499 ©Samsung Proprietary and Confidential
IP address acquisition failure
Profile download failure
Subscriber information error
Certificate error when using TLS protocol
SCM server error
Solutions
1 Configuration information must exist in the options information of DHCP in
order to use PNP correctly. (Contact the system administrator.)
2 Use Ethereal to check that configuration information exists in the option
number 43, which is a DHCP option field.
a Check that the DHCP IP address is correctly acquired.
b Check that the IP address is correctly set under the phone’s [Menu >
Settings > Network Information] menu.
3 Check that the profile is correctly downloaded.
a On an SMT-i5243 phone, you can check this with the ↑ icon on the
desktop and the [Menu > Settings > Network Information > Boot Log]
menu.
b Establish a telnet connection to the phone and check the downloaded
profile in the /tmp/Provision/Profiles folder.
c If the profile is not correctly downloaded, contact the system
administrator.
d If the profile is correctly downloaded, use Ethereal to identify the cause of
registration failure. (Contact the system administrator.)
e In case of a 404 Not Found error, the subscriber information has not been
entered in the server.
4 When using TLS protocol, registration may not be possible due to certificate
authentication failure.
5 Registration may not be possible if the SCM server is in abnormal status.
(Contact the system administrator.)
[4004] Registration is Done with Previous Server
Symptoms
Registration information has been changed but the phone is registered with the
previous information.
Possible Causes
MAC profile exists in the server.
Provisioning failure

Ошибка! Используйте вкладку "Главная" для применения 제목 1 к тексту, который
должен здесь отображаться. Ошибка! Используйте вкладку "Главная" для применения 제목 1 к
тексту, который должен здесь отображаться.
SCM Express Operation Manual v12.0 500 ©Samsung Proprietary and Confidential
Solutions
1 Even when the user changes the phone’s login information, if the MAC profile
exists in the sever, provisioning is done with the login information in the MAC
profile. Therefore, you should check whether the MAC profile exists in the
server.
2 When profile downloading fails, the phone uses the last valid registration
information for initialization. Therefore, you should check that the profile is
correctly downloaded. (See the [Menu > Settings > Network Information >
Boot Log] menu)
[4005] Cannot Download Profile from Server
Symptoms
The profile is not correctly downloaded from the SCM server.
Possible Causes
Network error
Configuration server information error
SCM server error
Subscriber information error
User mode setting
Solutions
1 Check that the network is functioning correctly.
2 Check that the configuration server information is correctly set.
a When in PNP mode, contact the system administrator.
b Check the configuration information of Easy Install.
3 If the profile is correctly downloaded, use Ethereal to identify the cause of
registration failure. (Contact the system administrator.)
a Check the TFTP/HTTP file request and file transmission process.
b Check the server information in the boot profile.
4 In case of a HTTP authentication failure, check the SCM subscriber
information.
5 When using the settings in the user mode (server type: normal), settings are
not performed by downloading the profile but the user sets the server and the
registration information, and initializes the phone. Check this setting mode.
[4006] Cannot Upgrade
Symptoms
The system administrator has performed a software upgrade but the phone is still

Ошибка! Используйте вкладку "Главная" для применения 제목 1 к тексту, который
должен здесь отображаться. Ошибка! Используйте вкладку "Главная" для применения 제목 1 к
тексту, который должен здесь отображаться.
SCM Express Operation Manual v12.0 501 ©Samsung Proprietary and Confidential
using the old software.
Possible Causes
Network status (system administrator)
Upgrade server address error (system administrator)
Upgrade server’s software package path setting error (system administrator)
Upgrade server’s software version is the same as the current phone
(user/system administrator)
Solutions
1 In case of an automatic upgrade, contact the system administrator.
2 If you are the system administrator, check the causes above in sequence.
[4007] Call is Not Established and Noise is Heard
Symptoms
When a call is connected, you hear nothing but noise.
Possible Causes
Connect negotiation failure
sRTP processing error
Multiple sources are sending RTP to the phone’s RPT port.
Faulty device
Solutions
1 Connect the phone and a PC to the hub to allow Ethereal.
2 Check the SIP message that negotiation for the codec information is correctly
performed.
3 Convert the RTP packets to audio and check whether the source voice is noisy.
(A separate tool is required for sRTP).
4 Check whether there are multiple IP addresses sending RTP to the phone’s
RTP port.
5 Check whether you get the same problem with the speaker and with the
handset.
[4008] Cannot Make Calls
Symptoms
The call screen is not displayed.
When you attempt to make a call, the call is actually not made and is
terminated.

Ошибка! Используйте вкладку "Главная" для применения 제목 1 к тексту, который
должен здесь отображаться. Ошибка! Используйте вкладку "Главная" для применения 제목 1 к
тексту, который должен здесь отображаться.
SCM Express Operation Manual v12.0 502 ©Samsung Proprietary and Confidential
Possible Causes
Network error
Server is not registered.
SCM server error
Solutions
1 Check that the registration status is normal from the phone’s idle screen.
2 Check that the network status is normal. (Ping the phone from a PC.)
3 Press the Mute key to register the phone again.
4 Try to make a call from another phone to check whether the SCM is correctly
running the service.
5 Use Ethereal to perform a packet analysis. (Contact the system administrator.)
6 Check that the SIP INVITE message is correctly sent to the server.
[4009] Connection is Lost While on a Call
Symptoms
Calls are terminated even though you did not end the call.
Possible Causes
Session timer is active.
The BYE message is received from the opposite party or the server.
Solutions
1 Connect the phone and a PC to the hub and use Ethereal to analyze the
packets.
2 Check whether the INVITE, 200 OK message includes parameters related to
session timer.
3 If session timer is in use, check whether re-invite or update messages are sent
or received before the session timer expires.
4 When the problem occurs, check whether messages such as BYE are received
or sent by the phone.
[4010] Time Displayed is Incorrect
Symptoms
Time shown by the phone is incorrect.
Possible Causes
Network error
The system’s time zone is incorrect.
The phone’s time zone is incorrect.

Ошибка! Используйте вкладку "Главная" для применения 제목 1 к тексту, который
должен здесь отображаться. Ошибка! Используйте вкладку "Главная" для применения 제목 1 к
тексту, который должен здесь отображаться.
SCM Express Operation Manual v12.0 503 ©Samsung Proprietary and Confidential
Solutions
1 Check [Menu > Settings > Application Setting > Time Zone > Time
Update].
2 If set to default, contact the system administrator.
3 If set to user, check your time zone.
[4011] Service Menu is Incorrect
Symptoms
All or part of the service menu which is called up by pressing the service key
is not displayed.
The font for the service menu is garbled.
Possible Causes
SoftMenu profile download failure
Class of service (COS) is not allowed for the phone number.
Access code for performing service does not exist.
Service is unavailable.
Text encoding in the SoftMenu profile and text encoding in the actual display
data are different.
Solutions
1 Check that SoftMenu and Service profiles are correctly downloaded during the
provisioning process.
2 If the menu for a specific service is not displayed, check whether the service is
activated and check its access code. (Contact the system administrator.)
3 Check the text encoding of the SoftMenu profile and the text encoding of the
display data.
[4012] Supplementary Service Function Does Not Work
Symptoms
When you attempt to perform a supplementary service function, it does not work.
Possible Causes
Service is unavailable for this particular phone number.
Class of service (COS) is not allowed.
Access code for performing the service does not exist.
Service is unavailable.
Processing error by the SCM server

Ошибка! Используйте вкладку "Главная" для применения 제목 1 к тексту, который
должен здесь отображаться. Ошибка! Используйте вкладку "Главная" для применения 제목 1 к
тексту, который должен здесь отображаться.
SCM Express Operation Manual v12.0 504 ©Samsung Proprietary and Confidential
Solutions
1 Check that provisioning is correctly performed.
2 Check the error message displayed on the screen when performing the service.
3 Check COS, activation of supplementary services, and access code for the
phone number performing the service.
4 Perform an Ethereal packet analysis to identify the location of the problem.
[4013] UC Function Does Not Work
Symptoms
Cannot download the VOD list.
The VOD list is downloaded but media are not played.
Cannot play Multicast Push media.
Cannot login.
Possible Causes
The phone cannot download the VCS server information during registration.
The user ID (number) is not registered in the VCS server.
The VCS server is on another subnet and IGMP (Multicast) packets cannot be
sent when going through a router (gateway).
The phone cannot download the presence server information during
registration.
Solutions
1 Check that the VCS server information is correctly set (system administrator).
2 Register the user ID in the VCS server.
3 Check the router settings.
4 Check that the presence server information is correctly set (system
administrator).
[4014] Cannot Set Functions in Menu
Symptoms
Phone function settings error
System function settings error
Possible Causes
1 Phone function settings error
a Settings cannot be saved in the phone’s current status.
b Settings are already in place and cannot be saved.

Ошибка! Используйте вкладку "Главная" для применения 제목 1 к тексту, который
должен здесь отображаться. Ошибка! Используйте вкладку "Главная" для применения 제목 1 к
тексту, который должен здесь отображаться.
SCM Express Operation Manual v12.0 505 ©Samsung Proprietary and Confidential
2 System settings error
a Network error
b No privilege
c Provisioning failure
Solutions
1 Phone function settings error
a Exit the menu and set again.
b Try setting with another value first and then change it to a desired value.
2 System function settings error
a Check the Network status.
b Contact the system administrator.
[4015] Cannot Use AOM
Symptoms
AOM is not registered with the phone in PnP mode.
Nothing happens when the AOM button is pressed.
Possible Causes
The option number 43 in the DHCP server is not set or the AOM information
is not set in the phone.
No functions are assigned to the AOM keys.
Solutions
1 Check the option number 43 in the DHCP server (system administrator).
Register the MAC of the AOM in the phone (system administrator).
2 Assign a function to each key of the AOM (system administrator).
[4016] Fonts Are Garbled
Symptoms
The font displayed on the phone’s menu is garbled.
The text displayed by the system is garbled. (Service menu, temporary service
menu, multi-purpose button information, AOM information, busy information,
etc.)
Possible Causes
1 The font displayed on the phone’s menu is garbled.
a The phone’s software temporarily failed to load the font table.
b The database file is damaged or corrupted.

Ошибка! Используйте вкладку "Главная" для применения 제목 1 к тексту, который
должен здесь отображаться. Ошибка! Используйте вкладку "Главная" для применения 제목 1 к
тексту, который должен здесь отображаться.
SCM Express Operation Manual v12.0 506 ©Samsung Proprietary and Confidential
2 The text displayed by the system is garbled.
a System text encoding type error.
b System database setting error.
Solutions
1 The font displayed on the phone’s menu is garbled.
a Restart the phone.
b Clear or delete the functions with the garbled text and reset them
(Schedule, Address book, etc.).
2 The text displayed by the system is garbled.
o Contact the system administrator.
Interoperation with Gateways
[4101] Cannot Register Gateway
Symptoms
Registration is not performed because the registration message from the gateway
and the registration message stored in the SCM are different.
Possible Causes
Registration method for endpoint in routing is incorrect.
User name, primary proxy server IP address, etc. of endpoint in the routing are
incorrect.
Solutions
Check that the registration method for endpoint in the routing is Receive
REGISTER.
Check the user name and the primary proxy server IP address.
[4102] Gateway Does Not Fetch Profile
Symptoms
The gateway does not fetch the profile to be used in survival mode or FXS.
Possible Causes
If you do not create a gateway, you can proceed with registration but the profile
will not be fetched.
Solutions
Create a gateway to use under [CONFIGURATION > Gateway].

Ошибка! Используйте вкладку "Главная" для применения 제목 1 к тексту, который
должен здесь отображаться. Ошибка! Используйте вкладку "Главная" для применения 제목 1 к
тексту, который должен здесь отображаться.
SCM Express Operation Manual v12.0 507 ©Samsung Proprietary and Confidential
[4103] FXS Phone on the Gateway is Inactive
Symptoms
A FXS phone on the gateway is not correctly registered and cannot be used.
Possible Causes
The SCM does not change the FXS subscriber information to FXS.
Solutions
In the subscriber information, change the phone type to FXS-Phone.

Ошибка! Используйте вкладку "Главная" для применения 제목 1 к тексту, который
должен здесь отображаться. Ошибка! Используйте вкладку "Главная" для применения 제목 1 к
тексту, который должен здесь отображаться.
SCM Express Operation Manual v12.0 508 ©Samsung Proprietary and Confidential
Ubigate iBG Series Gateways
The troubleshooting lists are following:
Type Troubleshooting List
Gateway Installation
[5001] Cannot Turn On Gateway
[5002] Cannot Boot Gateway
[5003] FXO Connection Alarm
[5004] FXS Port Line Lockout
[5005] ISDN Voice Port Down
[5006] T1/E1 Clock Synchronization Problem
SCM Interoperation Mode
[5101] Cannot Register iBG Gateway with SCM
[5102] Cannot Register Normal Phones with SCM
[5103] Cannot Register PRI Trunk Lines with SCM
[5104] Cannot Register Analog Trunk Lines with SCM
[5105] Cannot Dial or Receive Calls on Normal Phones
[5106] Cannot Dial or Receive Calls on PRI Trunk Lines
[5107] Cannot Dial or Receive Calls on Analog Trunk Lines
[5108] Cannot Hear Voice When on a Call with a Normal Phone or Trunk Line
[5109] Noise is Heard When Calling Normal Phones
Survival Mode [5201] Cannot Register SIP Phones with Gateway
[5202] Cannot Dial or Receive Calls on FXS Phones
[5203] Cannot Dial or Receive Calls on SIP Phones
[5204] Cannot Dial or Receive Calls on PRI Trunk Lines
[5205] Cannot Dial or Receive Calls on Analog Trunk Lines
[5206] Cannot Hear Voice When on a Call with a Normal Phone or Trunk Line
[5207] Noise is Heard when Calling Normal Phone or Trunk Line
Gateway Installation
[5001] Cannot Turn On Gateway
Symptoms
The Ubigate iBG series gateway cannot be switched on.
Possible Causes
The power cable is not connected.
The power switch is in the off position.
The Ubigate iBG series gateway’s power supply is faulty.
Solutions
1 Check the power cable and its connections.
2 Check that the power switch on the back panel of the system is in the on

Ошибка! Используйте вкладку "Главная" для применения 제목 1 к тексту, который
должен здесь отображаться. Ошибка! Используйте вкладку "Главная" для применения 제목 1 к
тексту, который должен здесь отображаться.
SCM Express Operation Manual v12.0 509 ©Samsung Proprietary and Confidential
position.
3 Contact your Ubigate iBG series gateway vendor for service.
[5002] Cannot Boot Gateway
Symptoms
The gateway is turned on but does not boot normally.
Possible Causes
The DSP card is not mounted.
The advanced system package supporting voice service does not exist.
The CF Memory card or SD memory card does not installed properly.
Solutions
1 Use the ‘show chassis’ command to check that the DSP card is mounted.
2 Use the ‘show version’ command to check that it is Advanced SNOS.
3 Use the ‘file ls’ command to check that the Advanced SNOS file is stored.
4 Use the ‘show boot_params’ command to check that boot dev is cf0 and to
check that the boot file name is the same as the Advanced SNOS file name in
/cf0/ as checked in step 3).
5 Check is the memory card installed properly.
[5003] FXO Connection Alarm
Symptoms
There is a problem with the FXO port connection and the Ubigate iBG system
generates the following event.
#Feb 09 12:00:39 error EVENT Notify that FXO port is connected when using
Loop-start only RAISE
#Feb 09 12:00:42 informational EVENT Notify that FXO port is connected when using
Loop-start only CLEAR
Possible Causes
The cable connected to the FXO port is physically disconnected or has a
connection problem.
Connection is lost because the remote port connected to the FXO port is
physically faulty, the cable is disconnected from the remote port, or the cable
is faulty.
The FXO port status has changed to the off-hook status because the voltage of
the power applied to the FXO port is too low or unstable.
Solutions
1 Check the cables on the port and check that they are connected correctly.

Ошибка! Используйте вкладку "Главная" для применения 제목 1 к тексту, который
должен здесь отображаться. Ошибка! Используйте вкладку "Главная" для применения 제목 1 к
тексту, который должен здесь отображаться.
SCM Express Operation Manual v12.0 510 ©Samsung Proprietary and Confidential
2 Check that the cable is connected correctly to the remote FXS port.
[5004] FXS Port Line Lockout
Symptoms
When the FXS port or the remote FXO port connected to the FXS port remains in
the off-hook status without call setting for 30 seconds or longer, the Ubigate iBG
system generates the following event.
*Jun 01,2007,08:30:28 #ASCC-notification: [ASCC]CCA(-/-)
CTX(14)DSP#(16)TS#(258)PORT:0/2/1::is Line-Lockout
TOP56# show voice p s
PORT CH SIG-TYPE ADMIN OPER IN STATUS OUT STATUS EC
====== == ========== ===== ==== ========= =============== ==
0/1/0 -- fxo-ls up up idle idle y
0/1/1 -- fxo-ls up up idle idle y
0/1/2 -- fxo-ls up up idle idle y
0/1/3 -- fxo-ls up up idle idle y
0/2/0 -- fxs-ls up up on-hook idle y
0/2/1 -- fxs-ls up - line-lockout line-lockout y
Possible Causes
The analog phone’s handset is in the off-hook status.
The remote FXS port connected to the FXS port is busy or abnormal.
Solutions
1 Replace the analog phone’s handset properly.
2 Check the cable connected to the FXS port and the remote port status.
[5005] ISDN Voice Port Down
Symptoms
A call is attempted on an ISDN trunk but there is a problem dialing or receiving
the call.
A test on the voice port of the trunk returns the following result:
Router# show voice-port summary
PORT CH SIG-TYPE ADMIN OPER IN STATUS OUT STATUS EC
======= == ========= ===== ==== ====================== ==
0/1/0 01 isdn-bri up down out of svc out_of_svc y
0/1/0 02 isdn-bri up down out of svc out_of_svc y
0/2/0 -- fxs-ls up up on-hook idle y
0/2/1 -- fxs-ls up up on-hook idle y
0/2/2 -- fxs-ls up up on-hook idle y
0/2/3 -- fxs-ls up up on-hook idle y
1/0:D 01 isdn-pri down - down down y
1/0:D 02 isdn-pri down - down down y
1/0:D 03 isdn-pri down - down down y
1/0:D 04 isdn-pri down - down down y
1/0:D 05 isdn-pri down - down down y
1/0:D 06 isdn-pri down - down down y
1/0:D 07 isdn-pri down - down down y

Ошибка! Используйте вкладку "Главная" для применения 제목 1 к тексту, который
должен здесь отображаться. Ошибка! Используйте вкладку "Главная" для применения 제목 1 к
тексту, который должен здесь отображаться.
SCM Express Operation Manual v12.0 511 ©Samsung Proprietary and Confidential
1/0:D 08 isdn-pri down - down down y
1/0:D 09 isdn-pri down - down down y
1/0:D 10 isdn-pri down - down down y
Possible Causes
The ISDN cable is not connected correctly.
The operator has set the ISDN bundle but did not execute the ‘no shutdown’
command at ISDN voice-port.
The network time is not synchronized with the remote system.
The ISDN bundle settings are incorrect.
Solutions
1 Execute the ‘show isdn status <bundle_name>’ command to check that the
ISDN bundle is working properly. If Layer 1 Status is not ‘ACTIVE’ but is
‘NOT ACTIVE’ as below, check the cable and the module concerned.
Router# show isdn status pri13
== USER (1/3) side configuration ==
Layer 1 Status:
NOT ACTIVE
Layer 2 Status:
NOT ACTIVE TEI MODE POINT-TO-POINT
Layer 3 Status:
0 Active Calls
2 If Layer 1 Status is ‘ACTIVE’ and Layer 2 Status is ‘NOT ACTIVE TEI
MODE POINT-TO-POINT’ or ‘NOT ACTIVE TEI MODE MULTIPOINT’,
check that your ISDN bundle settings are the same as the ISDN bundle
settings on the remote system.
Router# show isdn status pri13
== NETWORK (1/0) side configuration ==
Layer 1 Status:
ACTIVE
Layer 2 Status:
NOT ACTIVE TEI MODE POINT-TO-POINT
Layer 3 Status:
0 Active Calls
3 The frequently omitted configuration steps are:
a After setting the ISDN bundle, did you enter the ISDN voice-port settings
and execute the ‘no shutdown’ command? Voice-port does not switch up
automatically. You must enter ISDN voice-port and execute no shutdown.
b Did you set the same switch-type as the remote system?
c Did you set the ISDN side (user side or network side) corresponding to the
remote system?
d Did you set the tei-mode and values interoperating with the remote
system? (BRI only)

Ошибка! Используйте вкладку "Главная" для применения 제목 1 к тексту, который
должен здесь отображаться. Ошибка! Используйте вкладку "Главная" для применения 제목 1 к
тексту, который должен здесь отображаться.
SCM Express Operation Manual v12.0 512 ©Samsung Proprietary and Confidential
e Did you set the network synchronization time correctly?
4 If the status for layer 1 and layer 2 are both ‘ACTIVE’ but you still cannot
make calls, check the ISDN signaling message. The message exchange flow of
a normal ISDN call is shown below.
Router# debug isdn q931 pri001
18:53:04.240() -- T N (Q931,11) --
MSG : SETUP
MSGHDR : 08 01 02 05
BEARCAP : 04 03 80 90 a3
CHANID : 18 01 89
PROGIND : 1e 02 81 88
CGPTYNMB : 6c 09 00 80 37 30 30 36 30 30 30
CDPTYNMB : 70 08 80 35 35 35 33 30 30 30
18:53:04.660() -- N T (Q931,11) --
MSG: CALLPROC
MSGHDR: 08 01 82 02
CHANID: 18 01 89
18:53:04.970() -- N T (Q931,11) --
MSG: ALERTING
MSGHDR: 08 01 82 01
CHANID: 18 01 89
18:53:09.440() -- N T (Q931,11) --
MSG: CONNECT
MSGHDR: 08 01 82 07
18:53:09.440() -- T N (Q931,11) --
MSG: CONNACK
MSGHDR: 08 01 02 0f
18:53:30.880() -- T N (Q931,11) --
MSG: DISC
MSGHDR: 08 01 02 45
CAUSE: 08 02 80 90
18:53:31.260() -- N T (Q931,11) --
MSG: RELEASE
MSGHDR: 08 01 82 4d
CAUSE: 08 02 80 90
18:53:31.260() -- T N (Q931,11) --
MSG: RELCMPLT
MSGHDR: 08 01 02 5a
CAUSE: 08 02 80 90
[5006] T1/E1 Clock Synchronization Problem
Symptoms
Voice quality is bad, or fax call may fail if fax is connected to Ubigate iBG series.
Possible Causes
This problem may occur when clock synchronization is not correctly performed
between the Ubigate iBG series system and the remote system.

Ошибка! Используйте вкладку "Главная" для применения 제목 1 к тексту, который
должен здесь отображаться. Ошибка! Используйте вкладку "Главная" для применения 제목 1 к
тексту, который должен здесь отображаться.
SCM Express Operation Manual v12.0 513 ©Samsung Proprietary and Confidential
Solutions
1 Execute ‘show module userstats t1/e1 [slot/subslot/port]’ to check if CSS
count increases.
2 If so, check the clock settings.
3 Execute ‘show network-clocks’ to check that the system clock is stable.
4 Check that the clock’s source is set to the T1/E1 port. If not, use the ‘ntclk-
select t1/e1 [priority/slot/subslot/port]’ command to set the clock source to a
desired T1/E1 port.
SCM Interoperation Mode
[5101] Cannot Register iBG Gateway with SCM
Symptoms
iBG cannot be registered with the SCM.
Router# show voip gateway
VoIP Gateway Status
Gateway Admin Status : UP
Gateway Operation Status : Call-server SCM-Express mode (Not Ready)
Call-server : ipv4:165.213.6.10 UDP
Gateway name : sip:[email protected]
Keepalive : Expire timer 60s, Retry timer 10s
Gateway IP address
Binding status : ethernet 3/0, ethernet 3/0
Control IP address : ipv4:165.213.6.15
Media IP address : ipv4:165.213.6.15
Gateway Accounting
RADIUS : DISABLED
SYSLOG : DISABLED
Default domain name : scmenv.com
VoIP Protocol status
VoIP service : ENABLED
SIP service : ENABLED
H.323 service : DISABLED
VoIP Media configuration
QoS Media : ef
QoS Signal : ef
RTP Start Port : 16384, Range: 512
RTCP Interval : 5 (1-10)
Possible Causes
1 There is a problem with connection between the Ubigate iBG series gateway
and the network.
2 The SCM or the Ubigate iBG system settings are incorrect.
Solutions
1 Perform a ping test on the Ubigate iBG system and check whether the network

Ошибка! Используйте вкладку "Главная" для применения 제목 1 к тексту, который
должен здесь отображаться. Ошибка! Используйте вкладку "Главная" для применения 제목 1 к
тексту, который должен здесь отображаться.
SCM Express Operation Manual v12.0 514 ©Samsung Proprietary and Confidential
is normal. If it is not normal, check the network status and the firewall
settings.
2 Check the ‘bind IP address’, ‘gw-uri’ and ‘host domain-name’ are correct.
3 Check the ‘call-server ip-address’ is correct.
[5102] Cannot Register Normal Phones with SCM
Symptoms
Normal phones cannot be registered with the SCM.
Possible Causes
1 There is a problem with connection between the Ubigate iBG series gateway
and the network.
2 The SCM or the Ubigate iBG system settings are incorrect.
Solutions
1 Perform a ping test on the Ubigate iBG system and check whether the network
is normal. If it is not normal, check the network status and the firewall
settings.
2 Check that the iBG system contains the same subscriber information contained
in the SCM.
3 Check that the ‘register e164’ command is set for the subscriber dial-peer set
in the iBG system. Only the dial-peer with this command is registered.
[5103] Cannot Register PRI Trunk Lines with SCM
Symptoms
PRI trunk lines cannot be registered as EP with the SCM.
Possible Causes
1 There is a problem with connection between the Ubigate iBG series system
gateway and the network.
2 The SCM or the Ubigate iBG series system settings are incorrect.
Solutions
1 Perform a ping test on the Ubigate iBG series system and check whether the
network is normal. If it is not normal, check the network status and the firewall
settings.
2 Check that iBG is set with the EP information set for ‘User Name’ and
‘Outbound Address’ for the iBG trunk under [CONFIGURATION >
Routing > Endpoint] in the SCM and the same trunk information.
3 ‘User Name’ (trunk label information) set in EP must be set as trunk group-
label ‘epname’ within the iBG trunk dial-peer.
4 Check that the ‘register label’ command is set for the subscriber dial-peer set

Ошибка! Используйте вкладку "Главная" для применения 제목 1 к тексту, который
должен здесь отображаться. Ошибка! Используйте вкладку "Главная" для применения 제목 1 к
тексту, который должен здесь отображаться.
SCM Express Operation Manual v12.0 515 ©Samsung Proprietary and Confidential
in the iBG system. Only the dial-peer with this command is registered.
[5104] Cannot Register Analog Trunk Lines with SCM
Symptoms
Analog trunk lines cannot be registered as EP with the SCM.
Possible Causes
There is a problem with connection between the Ubigate iBG series system
gateway and the network.
The SCM or the Ubigate iBG series system settings are incorrect.
Solutions
1 Perform a ping test on the Ubigate iBG series system and check whether the
network is normal. If it is not normal, check the network status and the firewall
settings.
2 Check that iBG is set with the EP information set for ‘User Name’ and
‘Outbound Address’ for the iBG trunk under [CONFIGURATION >
Routing > Endpoint] in the SCM and the same trunk information.
3 ‘User Name’ (trunk label information) set in EP must be set as trunk group-
label ‘epname’ within the iBG trunk dial-peer.
4 Check that the ‘register label’ command is set for the subscriber dial-peer set
in the iBG system. Only the dial-peer with this command is registered.
[5105] Cannot Dial or Receive Calls on Normal Phones
Symptoms
Calls cannot be dialed or received by normal phones.
Possible Causes
The normal phone is not registered with the SCM.
The Ubigate iBG series system settings are incorrect.
The Ubigate iBG series system’s resources are inadequate.
The normal phone, the phone line, or the FXS card is faulty.
Solutions
1 Check whether the normal phone is registered with the SCM under
[CONFIGURATION > System Status > Registration]. If not, resolve the
problem by referring to ‘[5102] Cannot Register Normal Phones with SCM’.
2 Lift the handset of the normal phone. If you do not hear a dial tone, replace the
normal phone, the phone line, or the FXS card and try again.
3 If the opposite party cannot be called, use the debug sip dump message to
check the SIP message error number. The opposite party may be busy or may
have set DND, etc.

Ошибка! Используйте вкладку "Главная" для применения 제목 1 к тексту, который
должен здесь отображаться. Ошибка! Используйте вкладку "Главная" для применения 제목 1 к
тексту, который должен здесь отображаться.
SCM Express Operation Manual v12.0 516 ©Samsung Proprietary and Confidential
4 If you cannot receive calls, use the debug sip dump message to check that the
SIP messages are correctly received. If the messages are received but the
phone does not ring, use the ‘show dial-peer voice summary’ command to
check that the incoming dial-peer status is active.
5 Use the ‘show voice dsp’ command to check that available DSP resources are
adequate.
[5106] Cannot Dial or Receive Calls on PRI Trunk Lines
Symptoms
Calls cannot be dialed or received by PRI trunk lines.
Possible Causes
The PRI trunk line is not registered with the SCM.
The LED on the PRI card is faulty.
The Ubigate iBG series system settings are incorrect.
The remote system settings are incorrect.
Solutions
1 Check whether the PRI trunk line is registered with the SCM under
[CONFIGURATION > System Status > Registration]. If not, resolve the
problem by referring to ‘[5103] Cannot Register PRI Trunk Lines with SCM’.
2 Check the L2 LED on the PRI card. If the LED is not normal, resolve the
problem by referring to ‘[5005] ISDN Voice Port Down’ and ‘[5006] T1/E1
Clock Synchronization Problem’.
3 Check the settings of the remote system on the PRI trunk line.
[5107] Cannot Dial or Receive Calls on Analog Trunk Lines
Symptoms
Calls cannot be dialed or received by analog trunk lines.
Possible Causes
The analog trunk line is not registered with the SCM.
The Ubigate iBG series system settings are incorrect.
There is no caller ID when dialing or receiving calls on the analog trunk line.
Solutions
1 Check whether the analog trunk line is registered with the SCM under
[CONFIGURATION > System Status > Registration]. If not, resolve the
problem by referring to ‘[5104] Cannot Register Analog Trunk Lines with
SCM’.
2 Check that the analog trunk line port status is normal.

Ошибка! Используйте вкладку "Главная" для применения 제목 1 к тексту, который
должен здесь отображаться. Ошибка! Используйте вкладку "Главная" для применения 제목 1 к
тексту, который должен здесь отображаться.
SCM Express Operation Manual v12.0 517 ©Samsung Proprietary and Confidential
3 If the caller ID does not exist when dialing or receiving calls from an analog
trunk line, check the following settings.
4 If the caller ID is not received, access SCM Administrator and change
Anonymous URI to USER_URI under [CONFIGURATION > Routing >
Endpoint Advanced Options].
[5108] Cannot Hear Voice When on a Call with a Normal Phone or Trunk Line
Symptoms
Voice cannot be heard when on a call with a normal phone, a PRI trunk line, or an
analog trunk line.
Possible Causes
The network routing is incorrect.
The NAT/firewall settings are incorrect.
The sRTP setting is enabled but is not working.
Solutions
1 You may not be able to hear the voice if the IP address used for media binding
by the Ubigate iBG system on the network is used by another system.
2 In case of a complex network which is configured with additional routers
besides Ubigate, there could be a problem with RTP packet routing if a policy
for RTP packets requires them to be sent to NAT, firewalls, or other routers.
Check the network settings.
3 If you cannot hear the voice properly in calls established by sRTP, use the
show voice dsp command to check the sRTP connection and check the packet
counter changes on the Tx and Rx sides. If there is a problem with the Rx
packet counter, it means that the opposite party has a problem with sRTP
processing. Check the remote system and the remote phone.
[5109] Noise is Heard When Calling Normal Phones
Symptoms
You hear noise when calling a normal phone.
Possible Causes
The network status is unstable and the bandwidth is inadequate.
The NAT/firewall settings are incorrect.
The sRTP setting is enabled but is not working.
Solutions
1 Check that the bandwidth of the interface which transmits the RTP packets
adequately supports the bandwidth of the call. If an interface with adequate
bandwidth for just one G.729 call is set to transmit G.711 calls, the audio

Ошибка! Используйте вкладку "Главная" для применения 제목 1 к тексту, который
должен здесь отображаться. Ошибка! Используйте вкладку "Главная" для применения 제목 1 к
тексту, который должен здесь отображаться.
SCM Express Operation Manual v12.0 518 ©Samsung Proprietary and Confidential
quality will deteriorate.
2 In case of a complex network which is configured with additional routers
besides Ubigate, there could be a problem with RTP packet routing if a policy
for RTP packets requires them to be sent to NAT, firewalls, or other routers.
Check the network settings.
3 If you hear noise in calls established by sRTP, use the show voice dsp
command to check the sRTP connection and check the packet counter changes
on the Tx and Rx sides. If there is a problem with the Rx packet counter, it
means that the opposite party has a problem with sRTP processing. Check the
remote system and the remote phone.
Survival Mode
[5201] Cannot Register SIP Phones with Gateway
Symptoms
SIP phones cannot be registered with the gateway in survival mode.
Possible Causes
There is a problem with connection between the Ubigate iBG series system
gateway and the network.
The SCM or the Ubigate iBG series system settings are incorrect.
The IP address of the SIP phone is incorrect.
The SIP phone does not support redundancy.
The SIP phone is not sending the registration request.
Solutions
1 Perform a ping test on the Ubigate iBG series system and check whether the
network is normal. If it is not normal, check the network status and the firewall
settings.
2 Registration may not be possible if the IP address used by the SIP phone on
the network is used by another system. Perform a ping test on the IP address of
the SIP phone or establish a connection to the web screen of the SIP phone. If
there is a problem, change the IP address of the other system or change the IP
address of the SIP phone.
3 Select the gateway under [CONFIGURATION > Gateway] and check that
the SIP phone is selected.
4 If the iBG system is not set for ‘Gateway Name’ under the subscriber settings
of the SIP phone, set survivable gateway.
5 Execute show voip profiles to check whether the gateway has correctly
downloaded from SCM Express the subscriber information to be supported
when in survivable mode.

Ошибка! Используйте вкладку "Главная" для применения 제목 1 к тексту, который
должен здесь отображаться. Ошибка! Используйте вкладку "Главная" для применения 제목 1 к
тексту, который должен здесь отображаться.
SCM Express Operation Manual v12.0 519 ©Samsung Proprietary and Confidential
6 When switching from SCM interoperation mode to survival mode, the SIP
phone should register itself automatically with the gateway, but your SIP
phone may not support this feature. In this case, replace the SIP phone or you
have to manually change the registration information of the SIP phone to
register it with the gateway.
7 If the SIP phone keeps showing the same error screen, it means that it has not
sent out the registration request to the gateway. Reboot the SIP phone.
[5202] Cannot Dial or Receive Calls on FXS Phones
Symptoms
Calls cannot be dialed or received by normal phones in survival mode.
Possible Causes
The normal phone, the phone line, or the FXS card is faulty.
Solutions
1 Lift the handset of the normal phone. If you do not hear a dial tone, replace the
normal phone, the phone line, or the FXS card and try again.
2 Check that you are using an official build version of the Ubigate SNOS.
[5203] Cannot Dial or Receive Calls on SIP Phones
Symptoms
Calls cannot be dialed or received by SIP phones in survival mode.
Possible Causes
The SIP phone is not registered with the gateway.
The profile information is not correctly downloaded from SCM Express.
Solutions
1 Execute show sip-registrar on Ubigate. If it is not registered, resolve the
problem by referring to ‘[5201] Cannot Register SIP Phones with Gateway’.
2 Execute debug sip dump message and check the error message you get when
calls are not made.
[5204] Cannot Dial or Receive Calls on PRI Trunk Lines
Symptoms
Calls cannot be dialed or received by PRI trunk lines in survival mode.
Possible Causes
The LED on the PRI card is faulty.
The Ubigate iBG series system settings are incorrect.

Ошибка! Используйте вкладку "Главная" для применения 제목 1 к тексту, который
должен здесь отображаться. Ошибка! Используйте вкладку "Главная" для применения 제목 1 к
тексту, который должен здесь отображаться.
SCM Express Operation Manual v12.0 520 ©Samsung Proprietary and Confidential
Solutions
1 Check the L2 LED on the PRI card. If the LED is not normal, resolve the
problem by referring to ‘[5005] ISDN Voice Port Down’ and ‘[5006] T1/E1
Clock Synchronization Problem’.
2 Check that destination-pattern is correctly set for the dial-peer set to use the
port.
In survivable mode, routing is done by digit pattern instead of trunkgroup-
label.
[5205] Cannot Dial or Receive Calls on Analog Trunk Lines
Symptoms
Calls cannot be dialed or received by analog trunk lines in survival mode.
Possible Causes
The FXO card is faulty.
The Ubigate iBG series system settings are incorrect.
Solutions
1 Resolve the problem with the analog trunk card by referring to ‘[5003] FXO
Connection Alarm’ and ‘[5004] FXS Port Line Lockout’.
2 Check that destination-pattern is correctly set for the dial-peer set to use the
port.
In survivable mode, routing is done by digit pattern instead of trunkgroup-
label.
[5206] Cannot Hear Voice When on a Call with a Normal Phone or Trunk Line
Symptoms
Voice cannot be heard when on call with PRI trunk lines in survival mode.
Possible Causes
The DSP status is abnormal.
The NAT/firewall settings are incorrect.
The sRTP setting is enabled but is not working.
Solutions
1 You may not be able to hear the voice if the IP address used for media binding
by the Ubigate iBG system on the network is used by another system.
2 In case of a complex network which is configured with additional routers
besides Ubigate, there could be a problem with RTP packet routing if a policy
for RTP packets requires them to be sent to NAT, firewalls, or other routers.
Check the network settings.
3 If you cannot hear the voice properly in calls established by sRTP, use the

Ошибка! Используйте вкладку "Главная" для применения 제목 1 к тексту, который
должен здесь отображаться. Ошибка! Используйте вкладку "Главная" для применения 제목 1 к
тексту, который должен здесь отображаться.
SCM Express Operation Manual v12.0 521 ©Samsung Proprietary and Confidential
show voice dsp command to check the sRTP connection and check the packet
counter changes on the Tx and Rx sides. If there is a problem with the Rx
packet counter, it means that the opposite party has a problem with sRTP
processing. Check the remote system and the remote phone.
[5207] Noise is Heard when Calling Normal Phone or Trunk Line
Symptoms
You hear noise when calling a normal phone in survival mode.
Possible Causes
Check whether there is any loss of packets on the DSP.
Check that the network clock settings are correct.
Check the audio quality related parameter settings such as echo cancel.
Solutions
1 Use the command below to check whether there is any packet loss (drop) on
the DSP. If the LS value increases, it means that the DSP status is abnormal.
# show voice dsp pkt
---------------------------------------------------
TX-PKT RX-PKT RX-PKT
CH# VCE/ SIG/ CNO VCE/ SIG/ CNO/TOCT LS/ OS/ LT
=== ============== =================== ==========
2 Check that Echo Canceller (EC) settings are correct. The normal settings are
EC On and Non Linear Processor (NLP) On, which is NLP option 0 and EC
gain 0.
3 If the Ubigate settings are correct but the problem persists, check the network
synchronization clock of the digital trunk. The digital clock significantly
affects the audio quality.
4 If the problem persists, change the NLP option to 1. If the volume of the voice
including noise (or echo) is too high, change the EC gain value between -1 and
-5.

Ошибка! Используйте вкладку "Главная" для применения 제목 1 к тексту, который
должен здесь отображаться. Ошибка! Используйте вкладку "Главная" для применения 제목 1 к
тексту, который должен здесь отображаться.
SCM Express Operation Manual v12.0 522 ©Samsung Proprietary and Confidential
OfficeServ 7000 Series Gateways
The troubleshooting lists are following:
Type Troubleshooting List
Gateway Installation
[6001] Cannot Turn On Gateway
[6002] Cannot Boot Gateway
[6003] LAN LED on the MP Card is Off
[6004] FAN LED on the LP Card is Flashing Red
[6005] L2 LED on the PRI Card is Turned Off
[6006] Tx/Rx LED on the MGI Card is Off
[6007] Cannot Access Gateway via IT
[6008] Database is Reset When Gateway is Rebooted
SCM Interoperation Mode
[6101] Cannot Register Normal Phones with SCM
[6102] Cannot Register PRI Trunk Lines with SCM
[6103] Cannot Register Analog Trunk Lines with SCM
[6104] Cannot Dial or Receive Calls on Normal Phones
[6105] Cannot Dial or Receive Calls on PRI Trunk Lines
[6106] Cannot Dial or Receive Calls on Analog Trunk Lines
[6107] Cannot Hear Voice When on a Call with a Normal Phone or Trunk Line
[6108] Noise is Heard When Calling Normal Phones
Survival Mode [6201] Cannot Register SIP Phones with Gateway
[6202] Cannot Dial or Receive Calls on FXS Phones
[6203] Cannot Dial or Receive Calls on SIP Phones
[6204] Cannot Dial or Receive Calls on PRI Trunk Lines
[6205] Cannot Dial or Receive Calls on Analog Trunk Lines
[6206] Cannot Hear Voice When on Calls with FXS Phones
[6207] Cannot Hear Voice When on Calls with SIP Phones
[6208] Cannot Hear Voice When on Calls with Trunk Lines
[6209] Noise is Heard When Calling SIP Phones
Gateway Installation
[6001] Cannot Turn On Gateway
Symptoms
The OfficeServ 7000 gateway cannot be switched on.
Possible Causes
The power cable is not connected.
The power switch is in the off position.
The OfficeServ 7000 gateway’s power supply is faulty.
Solutions
1 Check the power cable and its connections.

Ошибка! Используйте вкладку "Главная" для применения 제목 1 к тексту, который
должен здесь отображаться. Ошибка! Используйте вкладку "Главная" для применения 제목 1 к
тексту, который должен здесь отображаться.
SCM Express Operation Manual v12.0 523 ©Samsung Proprietary and Confidential
2 Check that the power switch on the back panel of the system is in the on
position.
3 Contact your OfficeServ 7000 gateway vendor for service.
[6002] Cannot Boot Gateway
Symptoms
The gateway is turned on but does not boot normally.
Possible Causes
No media card is inserted in the MP card.
The media card exists but it does not contain the system package.
The MP card is faulty.
Solutions
1 Check that the media card is inserted in the MP card.
2 If the media card exists, check that it contains the system package.
3 Replace the MP card.
[6003] LAN LED on the MP Card is Off
Symptoms
The LAN LED on the MP card is off.
Possible Causes
The LAN cable is disconnected from the MP card.
The LAN cable connected to the MP card is disconnected from the switch.
The LAN cable is faulty.
The LAN port on the MP card is faulty.
Only the LAN LED is faulty.
Solutions
When there is a problem pinging the OS7000 system’s IP address
1 Check that the LAN cable is connected correctly to the MP card.
2 Check that the LAN cable connected to the MP card is connected correctly to
the switch.
3 Replace the LAN cable and connect the new cable.
4 Since the LAN port on the MP card is faulty, replace the MP card.
When there is no problem pinging the OS7000 system’s IP address
Since only the LAN LED on the MP card is faulty, reboot the system. If the
problem persists, replace the MP card.

Ошибка! Используйте вкладку "Главная" для применения 제목 1 к тексту, который
должен здесь отображаться. Ошибка! Используйте вкладку "Главная" для применения 제목 1 к
тексту, который должен здесь отображаться.
SCM Express Operation Manual v12.0 524 ©Samsung Proprietary and Confidential
[6004] FAN LED on the LP Card is Flashing Red
Symptoms
The FAN LED on the LP card is flashing red and the system faults once every few
days.
Possible Causes
Some of the cooling fans of the OS7000 system are not working.
Solutions
Contact your OfficeServ 7000 gateway vendor for service.
[6005] L2 LED on the PRI Card is Turned Off
Symptoms
The L2 LED on the PRI card is turned off and PRI trunk calls cannot be dialed or
received.
Possible Causes
The PRI cable is disconnected from the PRI card.
The PRI card is not set for the system.
The pins for the PRI card and the PRI cable do not match.
The PRI cable is faulty.
The PRI card is faulty.
Solutions
1 Check that the PRI cable is connected correctly to the PRI card.
2 On the DM 6.3.1 Pre-install/Reset page, check that the current type of the slot
is PRI. If not PRI type, perform pre-installation.
3 Shut down the system. Remove the PRI card and change the pin in the top
right corner of the PRI card. If the right pin and the center pin are connected,
change the position so that the center pin and the left pin are connected. (There
are 4 pairs of pins in groups of 3. Change the position of all the 4 pairs of
pins.)
4 Replace the PRI cable and perform step (3) again.
5 Replace the PRI card.
[6006] Tx/Rx LED on the MGI Card is Off
Symptoms
The Tx/Rx LED on the MGI card is off and pinging the MGI’s IP address is not
possible.
Possible Causes
The MGI cable is disconnected from the LAN card.

Ошибка! Используйте вкладку "Главная" для применения 제목 1 к тексту, который
должен здесь отображаться. Ошибка! Используйте вкладку "Главная" для применения 제목 1 к
тексту, который должен здесь отображаться.
SCM Express Operation Manual v12.0 525 ©Samsung Proprietary and Confidential
No IP address is assigned to the MGI card.
The MGI card is not set for the system.
The LAN cable is faulty.
The MGI card is faulty.
Solutions
1 Check that the LAN cable is connected correctly to the MGI card and the
switch.
2 On the DM 2.2.2 MGI Card page, check that the IP address setting is correct
for the MGI card.
3 On the DM 6.3.1 Pre-install/Reset page, check that the current type of the slot
is MGI. If not MGI type, perform pre-installation.
4 Replace the LAN cable.
5 Reboot the MGI card and check. If it remains abnormal, replace the MGI card.
[6007] Cannot Access Gateway via DM
Symptoms
The gateway cannot be accessed via DM.
Possible Causes
The IP address or the password entered in the OS7000 system for DM access
is incorrect.
Another user is accessing the system via DM.
The OS7000 system gateway is disconnected from the network.
The PC running DM is disconnected from the network.
The OS7000’s DM-related module is not working.
Solutions
1 Check the IP address or the password entered in the OS7000 system for DM
access.
2 Another user is accessing the system via DM.
3 Check the LAN cable and the network connected to the OS7000 system.
4 Perform a ping test between the PC and the OS7000 system. If the result is not
normal, check the network status and the firewall settings.
5 Reboot the OS7000 system and check whether DM connection can be
established.

Ошибка! Используйте вкладку "Главная" для применения 제목 1 к тексту, который
должен здесь отображаться. Ошибка! Используйте вкладку "Главная" для применения 제목 1 к
тексту, который должен здесь отображаться.
SCM Express Operation Manual v12.0 526 ©Samsung Proprietary and Confidential
[6008] Database is Reset When Gateway is Rebooted
Symptoms
When you turn off the gateway and turn it on again, the gateway’s database is
reset.
Possible Causes
The on/off switch of the MP card internal memory is switched off.
Solutions
1 Shut down the system. Pull out the MP card and check whether the on/off
switch in the bottom right corner of the MP card is switched off. If switched
off, switch it on.
2 If the database is reset even though the switch is in the on position, replaced
the MP card.
SCM Interoperation Mode
If there is a problem with the SCM interoperation mode service, you should first
check the following settings on OfficeServ DM.
OfficeServ DM 2.1.4 License Key
Check that the license key and the various SIP-related max counts are correctly
allocated.
OfficeServ DM 5.2.13 SIP Carrier Options
SIP server Enable: Enable
Outbound Proxy: SCM system IP or domain
Regist. Per User: Enable
Send CLI Table: When saving subscriber extension numbers, select 1 through
4 from ‘2.4.3 Send CLI Number’ of OfficeServ DM.
Trunk CLI Table: When saving called phone numbers for receiving incoming
analog trunk calls, select 1 through 4 from ‘2.4.3 Send CLI Number’ of
OfficeServ DM.
SCM Trunk Group: SIP trunk group phone number to interoperate with the
SCM
Check that the OS7000 system is in normal status
Establish a telnet (kpsw/kpsw4321) connection to the OS7400/7200 system
and enter i.
If any one of the entries is SUSPEND, the system status is not normal.
To return to the normal status, reboot the OS7400/7200 system.

Ошибка! Используйте вкладку "Главная" для применения 제목 1 к тексту, который
должен здесь отображаться. Ошибка! Используйте вкладку "Главная" для применения 제목 1 к
тексту, который должен здесь отображаться.
SCM Express Operation Manual v12.0 527 ©Samsung Proprietary and Confidential
[6101] Cannot Register Normal Phones with SCM
Symptoms
Normal phones cannot be registered with the SCM.
Possible Causes
The OS7000 system gateway is disconnected from the network.
The SCM or the OS7000 system settings are incorrect.
Solutions
1 Perform a ping test on the OS7000 system and check whether the network is
normal.
If it is not normal, check the network status and the firewall settings.
2 Check that Extension Number, Auth User ID, and Auth Password set on the
[CONFIGURATION > Subscriber > Subscriber] page and User Name,
Auth Username, and Auth Password set on the ‘5.2.14 SIP Users page of
OfficeServ DM are the same.
3 In case of a phone number of 5 digits or more, check the table in ‘2.4.3 Send
CLI Number’. The table number is set at ‘Send CLI Table’ of OfficeServ DM
‘5.2.13 SIP Carrier Options’. Check that the table contains the normal phone
number.
[6102] Cannot Register PRI Trunk Lines with SCM
Symptoms
PRI trunk lines cannot be registered as EP with the SCM.
Possible Causes
The OS7000 system gateway is disconnected from the network.
The SCM or the OS7000 system settings are incorrect.
The OS7000’s SIP module is not working.
Solutions
1 Perform a ping test on the OS7000 system and check whether the network is
normal.
If it is not normal, check the network status and the firewall settings.
2 Check that User Name, Auth User Name, and Auth Password set on the
[CONFIGURATION > Routing > Endpoint] page and User Name, Auth
Username, and Auth Password set on the ‘5.2.14 SIP Users’ page of
OfficeServ DM are the same.
3 Check that the gateway IP address for Outbound Address in
[CONFIGURATION > Routing > Endpoint] is correct.
4 Reboot the OS7000 system and check whether the PRI trunk line is registered
as EP with the SCM.

Ошибка! Используйте вкладку "Главная" для применения 제목 1 к тексту, который
должен здесь отображаться. Ошибка! Используйте вкладку "Главная" для применения 제목 1 к
тексту, который должен здесь отображаться.
SCM Express Operation Manual v12.0 528 ©Samsung Proprietary and Confidential
[6103] Cannot Register Analog Trunk Lines with SCM
Symptoms
Analog trunk lines cannot be registered as EP with the SCM.
Possible Causes
The OS7000 system gateway is disconnected from the network.
The SCM or the OS7000 system settings are incorrect.
Solutions
1 Perform a ping test on the OS7000 system and check whether the network is
normal.
If it is not normal, check the network status and the firewall settings.
2 Check that User Name, Auth User Name, and Auth Password set on the
[CONFIGURATION > Routing > Endpoint] page and User Name, Auth
Username, and Auth Password set on the ‘5.2.14 SIP Users’ page of
OfficeServ DM are the same.
3 Check that the gateway IP address for Outbound Address in
[CONFIGURATION > Routing > Endpoint] is correct.
[6104] Cannot Dial or Receive Calls on Normal Phones
Symptoms
Calls cannot be dialed or received by normal phones.
Possible Causes
The normal phone is not registered with the SCM.
The OS7000 system settings are incorrect.
The OS7000 system resources are inadequate.
The normal phone, the phone line, or the SLI card is faulty.
Solutions
1 Check whether the normal phone is registered with the SCM under
[CONFIGURATION > System Status > Registration]. If not, resolve the
problem by referring to ‘[6101] Cannot Register Normal Phones with SCM’.
2 Establish a DM connection and check the table in ‘2.4.3 Send CLI Number’ of
OfficeServ DM. The table number is set at ‘Send CLI Table’ of ‘5.2.13 SIP
Carrier Options’ of OfficeServ DM. Check that the table contains the normal
phone number.
If not, enter the number.
3 Establish a DM connection and check whether a value exists for DTMFR on
the ‘6.2.6 System Resource’ page of OfficeServ DM. If it is 0, change the D-
Board value to DTMFR on the ‘2.2.1 LCP Card’ page of OfficeServ DM.

Ошибка! Используйте вкладку "Главная" для применения 제목 1 к тексту, который
должен здесь отображаться. Ошибка! Используйте вкладку "Главная" для применения 제목 1 к
тексту, который должен здесь отображаться.
SCM Express Operation Manual v12.0 529 ©Samsung Proprietary and Confidential
4 Lift the handset of the normal phone. If you do not hear a dial tone, replace the
normal phone, the phone line, or the SLI card and try again.
[6105] Cannot Dial or Receive Calls on PRI Trunk Lines
Symptoms
Calls cannot be dialed or received by PRI trunk lines.
Possible Causes
The PRI trunk line is not registered with the SCM.
The LED on the PRI card is faulty.
The OS7000 system settings are incorrect.
Solutions
1 Check whether the PRI trunk line is registered with the SCM under
[CONFIGURATION > System Status > Registration]. If not, resolve the
problem by referring ‘[6102] Cannot Register PRI Trunk Lines with SCM’.
2 Check the L2 LED on the PRI card. If the LED is not normal, resolve the
problem by referring to ‘[6005] L2 LED on the PRI Card is Turned Off’.
3 Establish a DM connection to check that the PRI port is correctly assigned to
the trunk line group registered with the SCM on the ‘4.1.2 Trunk Groups’ page
of OfficeServ DM. Check that the PRI trunk line group number is correctly set
for Tel number in ‘5.2.14 SIP Users’ of OfficeServ DM.
[6106] Cannot Dial or Receive Calls on Analog Trunk Lines
Symptoms
Calls cannot be dialed or received by analog trunk lines.
Possible Causes
The analog trunk line is not registered with the SCM.
The OS7000 system settings are incorrect.
There is no caller ID when dialing or receiving calls on the analog trunk line.
Solutions
1 Check whether the analog trunk line is registered with the SCM under
[CONFIGURATION > System Status > Registration]. If not, resolve the
problem by referring to ‘[6103] Cannot Register Analog Trunk Lines with
SCM’.
2 Establish a DM connection to check that the analog trunk port is correctly
assigned to the trunk line group registered with the SCM on the ‘4.1.2 Trunk
Groups’ page of OfficeServ DM.
Check that the analog trunk line group number is correctly set for Tel number
in ‘5.2.14 SIP Users’ of OfficeServ DM. If the setting above is correct, check

Ошибка! Используйте вкладку "Главная" для применения 제목 1 к тексту, который
должен здесь отображаться. Ошибка! Используйте вкладку "Главная" для применения 제목 1 к
тексту, который должен здесь отображаться.
SCM Express Operation Manual v12.0 530 ©Samsung Proprietary and Confidential
the table in ‘2.4.3 Send CLI Number’ of OfficeServ DM. The table number is
set at ‘Trunk CLI Table’ of ‘5.2.13 SIP Carrier Options’ of OfficeServ DM.
Check that the table contains the called number.
3 If the caller ID does not exist when dialing or receiving calls from an analog
trunk line, check the following settings.
4 Establish a DM connection and check that the LP version is the latest under
‘2.2.0 Cabinet Information’ of OfficeServ DM.
5 On the ‘6.2.6 System Resource’ page of OfficeServ DM, check that the CI
DSP item has FREE for Value. If not, locate the D-Board on the ‘2.2.1 LCP
Card’ page of OfficeServ DM and change it to CID.
6 Check that CLI Trunk is Yes on the ‘2.6.5 Loop Trunk Data’ page of
OfficeServ DM.
7 If you still get calls without caller ID after changing all of the settings above,
connect to SCM Administrator and change Anonymous URI to USER_URI
under [CONFIGURATION > Routing > Endpoint Advanced Options].
[6107] Cannot Hear Voice When on a Call with a Normal Phone or Trunk Line
Symptoms
Voice cannot be heard when on a call with a normal phone, a PRI trunk line, or an
analog trunk line.
Possible Causes
The LED on the MGI card is faulty.
The IP address of the MGI card is incorrect.
The sRTP setting is enabled but is not working.
Solutions
1 Check the LED of the MGI card. If the LED is not normal, resolve the
problem by referring to 6.1.6. Tx/Rx LED on the MGI Card is Off.
2 You may not be able to hear the voice if the IP address used by the MGI card
on the network is used by another system. Perform a ping test on the IP
address of the MGI card or establish a telnet (mgi/mgi12345) connection. If
there is a problem, change the IP address of the other system or change the IP
address of the MGI card.
3 Establish a DM connection. If SRTP USE for MGI64/16 is Enable under
‘5.2.16 MGI Options’ of OfficeServ DM, sRTP is being used. If changing
SRTP USE to Disable allows you to hear the voice, it means there is a problem
with the sRTP processing. You should upgrade the system to the latest version.
[6108] Noise is Heard When Calling Normal Phones
Symptoms
You hear noise when calling a normal phone.

Ошибка! Используйте вкладку "Главная" для применения 제목 1 к тексту, который
должен здесь отображаться. Ошибка! Используйте вкладку "Главная" для применения 제목 1 к
тексту, который должен здесь отображаться.
SCM Express Operation Manual v12.0 531 ©Samsung Proprietary and Confidential
Possible Causes
The LED on the MGI card is faulty.
The IP address of the MGI card is incorrect.
The sRTP setting is enabled but is not working.
Solutions
1 Check the LED of the MGI card. If the LED is not normal, resolve the
problem by referring to 6.1.6. Tx/Rx LED on the MGI Card is Off.
2 There could be noise if the IP address used by the MGI card on the network is
used by another system. Perform a ping test on the IP address of the MGI card
or establish a telnet (mgi/mgi12345) connection. If there is a problem, change
the IP address of the other system or change the IP address of the MGI card.
3 Establish a DM connection. If SRTP USE for MGI64/16 is Enable under
‘5.2.16 MGI Options’ of OfficeServ DM, it is being used. If changing SRTP
USE to Disable removes the noise, it means there is a problem with the sRTP
processing. You should upgrade the system to the latest version.
Survival Mode
OfficeServ DM 2.1.4 License Key
Check that the license key and the various SIP-related max counts are correctly
allocated.
Check that the OS7000 system is in normal status
Establish a telnet (kpsw/kpsw4321) connection to the OS7400/7200 system
and enter i.
If any one of the entries is SUSPEND, the system status is not normal.
To return to the normal status, reboot the OS7400/7200 system.
[6201] Cannot Register SIP Phones with Gateway
Symptoms
SIP phones cannot be registered with the gateway in survival mode.
Possible Causes
The OS7000 system gateway is disconnected from the network.
The SCM or the OS7000 system settings are incorrect.
The IP address of the SIP phone is incorrect.
The SIP phone does not support redundancy.
The SIP phone is not sending the registration request.

Ошибка! Используйте вкладку "Главная" для применения 제목 1 к тексту, который
должен здесь отображаться. Ошибка! Используйте вкладку "Главная" для применения 제목 1 к
тексту, который должен здесь отображаться.
SCM Express Operation Manual v12.0 532 ©Samsung Proprietary and Confidential
Solutions
1 Perform a ping test on the OS7000 system and check whether the network is
normal.
If it is not normal, check the network status and the firewall settings.
2 Select the gateway under [CONFIGURATION > Gateway] and check that
the SIP phone is selected. Establish a DM connection and check that the SIP
phone information exists for User ID and Password under ‘2.7.2 SIP Phone
Information’ of OfficeServ DM.
3 If either of the above is missing, delete the IP address of the gateway under
[CONFIGURATION > Gateway] and click [Change]. About 5 seconds
later, enter the IP address again and click [Change] to register the entire
gateway information again.
4 Registration may not be possible if the IP address used by the SIP phone on
the network is used by another system. Perform a ping test on the IP address of
the SIP phone or establish a connection to the web screen of the SIP phone. If
there is a problem, change the IP address of the other system or change the IP
address of the SIP phone.
5 When switching from SCM interoperation mode to survival mode, the SIP
phone should register itself automatically with the gateway, but your SIP
phone may not support this feature. In this case, replace the SIP phone or you
have to manually change the registration information of the SIP phone to
register it with the gateway.
6 If the SIP phone keeps showing the same error screen, it means that it has not
sent out the registration request to the gateway. Reboot the SIP phone.
[6202] Cannot Dial or Receive Calls on FXS Phones
Symptoms
Calls cannot be dialed or received by normal phones in survival mode.
Possible Causes
The normal phone, the phone line, or the SLI card is faulty.
If the phone number is 5 digits or longer, it is not registered with SCM number
schedule.
The LP card status is not normal.
Solutions
1 Lift the handset of the normal phone. If you do not hear a dial tone, replace the
normal phone, the phone line, or the SLI card and try again.
2 In case of a phone number of 5 digits or longer, establish a DM connection and
check the table set as Send CLI Table under OfficeServ DM ‘5.2.13 SIP
Carrier Options’ in ‘2.4.3 Send CLI Number’ of OfficeServ DM. Check that
the table contains the normal phone number. If not, enter the number.

Ошибка! Используйте вкладку "Главная" для применения 제목 1 к тексту, который
должен здесь отображаться. Ошибка! Используйте вкладку "Главная" для применения 제목 1 к
тексту, который должен здесь отображаться.
SCM Express Operation Manual v12.0 533 ©Samsung Proprietary and Confidential
3 OfficeServ DM‘3.3.6 SCM Dial Plan’ SCM Digit: Enter the various numbers
pressed by the subscriber. Tel Length: Enter the number of digits for the
number set as SCM Digit.
Example)
1 For an 8-digit phone number starting with 1, enter 1 for SCM Digit, and 8 for
Length.
2 If any of the RUN, Rx, Tx, and FAN LEDs on the LP card does not flash
yellow, reboot the LP card.
[6203] Cannot Dial or Receive Calls on SIP Phones
Symptoms
Calls cannot be dialed or received by SIP phones in survival mode.
Possible Causes
The SIP phone is not registered with the gateway.
If the phone number is 5 digits or longer, it is not registered with SCM number
schedule.
Solutions
1 Establish a DM connection and if the Current Status is Not Registered under
‘6.2.3 SIP Phone Status’ of OfficeServ DM, resolve the problem by referring
to 6.3.1. Cannot Register SIP Phones with Gateway.
2 ‘3.3.6 SCM Dial Plan’ SCM Digit: Enter the various numbers pressed by the
subscriber. Tel Length: Enter the number of digits for the number set as SCM
Digit.
Example) For an 8-digit phone number starting with 1, enter 1 for SCM Digit, and
8 for Length.
[6204] Cannot Dial or Receive Calls on PRI Trunk Lines
Symptoms
Calls cannot be dialed or received by PRI trunk lines in survival mode.
Possible Causes
The LED on the PRI card is faulty.
The OS7000 system settings are incorrect.
Solutions
1 Check the L2 LED on the PRI card. If the LED is not normal, resolve the
problem by referring to ‘[6005] L2 LED on the PRI Card is Turned Off’.
2 Establish a DM connection to check that the PRI port is correctly assigned to
the trunk line group registered with the SCM on the ‘4.1.2 Trunk Groups’ page
of OfficeServ DM.

Ошибка! Используйте вкладку "Главная" для применения 제목 1 к тексту, который
должен здесь отображаться. Ошибка! Используйте вкладку "Главная" для применения 제목 1 к
тексту, который должен здесь отображаться.
SCM Express Operation Manual v12.0 534 ©Samsung Proprietary and Confidential
[6205] Cannot Dial or Receive Calls on Analog Trunk Lines
Symptoms
Calls cannot be dialed or received by analog trunk lines in survival mode.
Possible Causes
The OS7000 system settings are incorrect.
There is no caller ID when dialing or receiving calls on the analog trunk line.
Solutions
1 Establish a DM connection to check that the analog trunk port is correctly
assigned to the trunk line group registered with the SCM on the ‘4.1.2 Trunk
Groups’ page of OfficeServ DM. If the setting above is correct, check the table
set as Trunk CLI Table under OfficeServ DM ‘5.2.13 SIP Carrier Options’ in
‘2.4.3 Send CLI Number’ of OfficeServ DM. Check that the table contains the
called number.
2 If the caller ID does not exist when dialing or receiving calls from an analog
trunk line, check the following settings.
3 Establish a DM connection and check that the LP version is the latest under
‘2.2.0 Cabinet Information’ of OfficeServ DM.
4 On the ‘6.2.6 System Resource’ page of OfficeServ DM, check that the CI
DSP item has FREE for Value. If not, locate the D-Board on the ‘2.2.1 LCP
Card’ page of OfficeServ DM and change it to CID.
5 Check that CLI Trunk is Yes on the ‘2.6.5 Loop Trunk Data’ page of
OfficeServ DM.
[6206] Cannot Hear Voice When on Calls with FXS Phones
Symptoms
Voice cannot be heard when on a call with a normal phone in survival mode.
Possible Causes
The normal phone, the phone line, or the SLI card is faulty.
The LP card status is not normal.
Solutions
1 Lift the handset of the normal phone. If you do not hear a dial tone, replace the
normal phone, the phone line, or the SLI card and try again.
2 If any of the RUN, Rx, Tx, and FAN LEDs on the LP card does not flash
yellow, reboot the LP card.
[6207] Cannot Hear Voice When on Calls with SIP Phones
Symptoms
Voice cannot be heard when on calls with SIP phones in survival mode.

Ошибка! Используйте вкладку "Главная" для применения 제목 1 к тексту, который
должен здесь отображаться. Ошибка! Используйте вкладку "Главная" для применения 제목 1 к
тексту, который должен здесь отображаться.
SCM Express Operation Manual v12.0 535 ©Samsung Proprietary and Confidential
Possible Causes
The LED on the MGI card is faulty.
The IP address of the MGI card is incorrect.
The sRTP setting is enabled but is not working.
Solutions
1 Check the LED of the MGI card. If the LED is not normal, resolve the
problem by referring to 6.1.6. Tx/Rx LED on the MGI Card is Off.
2 You may not be able to hear the voice if the IP address used by the MGI card
on the network is used by another system. Perform a ping test on the IP
address of the MGI card or establish a telnet (mgi/mgi12345) connection. If
there is a problem, change the IP address of the other system or change the IP
address of the MGI card.
3 Establish a DM connection. If SRTP USE for MGI64/16 is Enable under
‘5.2.16 MGI Options’ of OfficeServ DM, it is being used. If changing SRTP
USE to Disable allows you to hear the voice, it means there is a problem with
the sRTP processing.
You should upgrade the system to the latest version.
[6208] Cannot Hear Voice When on Calls with Trunk Lines
Symptoms
Voice cannot be heard when on trunk calls with normal phones or SIP phones in
survival mode.
Possible Causes
The normal phone, the phone line, or the SLI card is faulty.
The LP card status is not normal.
The LED on the MGI card is faulty.
The IP address of the MGI card is incorrect.
The sRTP setting is enabled but is not working.
Solutions
1 Lift the handset of the normal phone. If you do not hear a dial tone, replace the
normal phone, the phone line, or the SLI card and try again.
2 If any of the RUN, Rx, Tx, and FAN LEDs on the LP card does not flash
yellow, reboot the LP card.
3 Check the LED of the MGI card. If the LED is not normal, resolve the
problem by referring to ‘[6006] Tx/Rx LED on the MGI Card is Off’.
4 You may not be able to hear the voice if the IP address used by the MGI card
on the network is used by another system. Perform a ping test on the IP
address of the MGI card or establish a telnet (mgi/mgi12345) connection. If

Ошибка! Используйте вкладку "Главная" для применения 제목 1 к тексту, который
должен здесь отображаться. Ошибка! Используйте вкладку "Главная" для применения 제목 1 к
тексту, который должен здесь отображаться.
SCM Express Operation Manual v12.0 536 ©Samsung Proprietary and Confidential
there is a problem, change the IP address of the other system or change the IP
address of the MGI card.
5 Establish a DM connection. If SRTP USE for MGI64/16 is Enable under
‘5.2.16 MGI Options’ of OfficeServ DM, it is being used. If changing SRTP
USE to Disable allows you to hear the voice, it means there is a problem with
the sRTP processing.
You should upgrade the system to the latest version.
[6209] Noise is Heard When Calling SIP Phones
Symptoms
Noise is heard when on calls with SIP phones in survival mode.
Possible Causes
The LED on the MGI card is faulty.
The IP address of the MGI card is incorrect.
The sRTP setting is enabled but is not working.
Solutions
1 Check the LED of the MGI card. If the LED is not normal, resolve the
problem by referring to 6.1.6. Tx/Rx LED on the MGI Card is Off.
2 There could be noise if the IP address used by the MGI card on the network is
used by another system. Perform a ping test on the IP address of the MGI card
or establish a telnet (mgi/mgi12345) connection. If there is a problem, change
the IP address of the other system or change the IP address of the MGI card.
3 Establish a DM connection. If SRTP USE for MGI64/16 is Enable under
‘5.2.16 MGI Options’ of OfficeServ DM, it is being used. If changing SRTP
USE to Disable removes the noise, it means there is a problem with the sRTP
processing. You should upgrade the system to the latest version.

Ошибка! Используйте вкладку "Главная" для применения 제목 1 к тексту, который
должен здесь отображаться. Ошибка! Используйте вкладку "Главная" для применения 제목 1 к
тексту, который должен здесь отображаться.
SCM Express Operation Manual v12.0 537 ©Samsung Proprietary and Confidential
IPX-G500B Gateway
The troubleshooting lists are following:
Type Troubleshooting List
Gateway Installation
[7001] Cannot Turn On Gateway
[7002] LAN LED on the system is Off
SCM Interoperation Mode
[7101] Cannot Register Analog Phones with SCM
[7102] Cannot Register Analog Trunk Lines with SCM
[7103] Cannot Dial or Receive Calls on Analog Phones
[7104] Cannot Dial or Receive Calls on Analog Trunk Lines
Survival Mode [7201] Cannot Dial or Receive Calls on Analog Phones
[7202] Cannot Dial or Receive Calls on SIP Phones
[7203] Cannot Dial or Receive Calls onl Analog Trunk Lines
[7204] Cannot Hear Voice When on Calls with Analog Phones
[7205] Cannot Hear Voice When on Calls with SIP Phones
[7206] Cannot Hear Voice When on Calls with Analog Trunk Lines
Gateway Installation
[7001] Cannot Turn On Gateway
Symptoms
The IPX-G500B gateway cannot be switched on.
Possible Causes
The power cable is not connected.
The power switch is in the off position.
The IPX-G500B gateway’s power supply is faulty.
Solutions
Check the power cable and its connections.
Check that the power switch of the system is in the on position.
Contact your IPX-G500B gateway vendor for service.
[7002] LAN LED on the system is Off
Symptoms
The LAN LED on the system is off.
Possible Causes
The LAN cable is disconnected from the gateway.
The LAN cable connected to the gateway is disconnected from the switch.

Ошибка! Используйте вкладку "Главная" для применения 제목 1 к тексту, который
должен здесь отображаться. Ошибка! Используйте вкладку "Главная" для применения 제목 1 к
тексту, который должен здесь отображаться.
SCM Express Operation Manual v12.0 538 ©Samsung Proprietary and Confidential
There is a problem in the LAN cable.
Solutions
Check that the LAN cable is connected correctly to the gateway.
Check that the LAN cable connected to the gateway is connected correctly to
the switch.
Replace the LAN cable and connect a new cable.
SCM Interoperation Mode
[7101] Cannot Register Analog Phones with SCM
Symptoms
Analog phones cannot be registered with the SCM.
Possible Causes
The IPX-G500B gateway is disconnected from the network.
The SCM or IPX-G500B settings are incorrect.
Solutions
Perform a ping test on the gateway system and check whether the network is
normal. If it is not normal, check the network status and the firewall settings.
Check the gateway IP setting on the [Configuration > Gateway > IPX
Setting > Configuration].
Check the phone user setting on the [Configuration > User > Single Phone
User].
Connect to the console port of IPX-G500B and run “cli”. Then check the SCM
IP address setting that is connected.
[7102] Cannot Register Analog Trunk Lines with SCM
Symptoms
Analog trunk lines cannot be registered with the SCM.
Possible Causes
The gateway is disconnected from the network.
The SCM or gateway system settings are incorrect.
Solutions
Perform a ping test on the gateway system and check whether the network is
normal. If it is not normal, check the network status and the firewall settings.
Check the gateway IP setting on the [Configuration > Gateway > IPX
Setting > Configuration].

Ошибка! Используйте вкладку "Главная" для применения 제목 1 к тексту, который
должен здесь отображаться. Ошибка! Используйте вкладку "Главная" для применения 제목 1 к
тексту, который должен здесь отображаться.
SCM Express Operation Manual v12.0 539 ©Samsung Proprietary and Confidential
Check the phone user setting on the [Configuration > User > Single Phone
User].
Connect to the console port of IPX-G500B and run “cli”. Then check the SCM
IP address setting that is connected.
[7103] Cannot Dial or Receive Calls on Analog Phones
Symptoms
Calls cannot be dialed or received by analog phones.
Possible Causes
The phone is not registered with the SCM.
The analog phone or the phone line has a problem.
If the phone is connected to the expansion, the expansion is disconnected from
the network.
Solutions
Check whether the analog phone is registered with the SCM under
[Performance > Registration Status > Registration Status]. If not, resolve
the problem by referring to [7101].
If you cannot hear a dial tone when you pick up the handset, check the RUN
LED of the system that the phone is connected. If the system is IPX-G500B,
check 2nd RUN LED is normal. In case of IPX-G520S/G540, check the
network and RUN LED of it.
[7104] Cannot Dial or Receive Calls on Analog Trunk Lines
Symptoms
Calls cannot be dialed or received by analog trunk lines.
Possible Causes
The analog trunk lines is not registered with the SCM.
The configuration for analog trunk is incorrect.
Solutions
Check whether the analog trunk lines are registered with the SCM under
[Performance > Registration Status > Registration Status]. If not, resolve
the problem by referring to [7102].
Check the DID is entered on [Configuration > Trunk Route > DID
Routing].
Check the ‘Ring Destination Number’ is set on [Configuration > Gateway >
IPX Setting > Analog Trunk].

Ошибка! Используйте вкладку "Главная" для применения 제목 1 к тексту, который
должен здесь отображаться. Ошибка! Используйте вкладку "Главная" для применения 제목 1 к
тексту, который должен здесь отображаться.
SCM Express Operation Manual v12.0 540 ©Samsung Proprietary and Confidential
Survival Mode
[7201] Cannot Dial or Receive Calls on Analog Phones
Symptoms
Calls cannot be dialed or received by analog phones in survival mode.
Possible Causes
The analog phone or phone line has a problem.
The gateway system operation is not normal.
Solutions
If you cannot hear a dial tone when you pick up the handset, replace the analog
phone or the phone lines and check again.
Check the RUN LED of the system that the phone is connected is normal. If
it’s connected to the IPX-G500B, check 2nd RUN LED.
[7202] Cannot Dial or Receive Calls on SIP Phones
Symptoms
Calls cannot be dialed or received by SIP phones in survival mode
Possible Causes
The SIP phone is not registered with the gateway.
Solutions
Perform a ping test on the OS7000 system and check whether the network is
normal. If it is not normal, check the network status and the firewall settings.
Select the gateway under [Configuration > Gateway > Gateway Link
Setting] and check that the SIP phone is selected
Registration may not be possible if the IP address used by the SIP phone on
the network is used by another system. Perform a ping test on the IP address of
the SIP phone or establish a connection to the web screen of the SIP phone. If
there is a problem, change the IP address of the other system or change the IP
address of the SIP phone.
When switching from SCM interoperation mode to survival mode, the SIP
phone should register itself automatically with the gateway, but your SIP
phone may not support this feature. In this case, replace the SIP phone or you
have to manually change the registration information of the SIP phone to
register it with the gateway.
If the SIP phone keeps showing the same error screen, it means that it has not
sent out the registration request to the gateway. Reboot the SIP phone.

Ошибка! Используйте вкладку "Главная" для применения 제목 1 к тексту, который
должен здесь отображаться. Ошибка! Используйте вкладку "Главная" для применения 제목 1 к
тексту, который должен здесь отображаться.
SCM Express Operation Manual v12.0 541 ©Samsung Proprietary and Confidential
[7203] Cannot Dial or Receive Calls on Analog Trunk Lines
Symptoms
Calls cannot be dialed or received by analog trunk lines in survival mode
Possible Causes
The phone line or FXO card has a problem.
The gateway system operation is not normal.
Solutions
Replace the phone line or FXO card and test again.
Check the RUN LED of the system that the phone is connected is normal. If
it’s connected to the IPX-G500B, check 2nd RUN LED.
[7204] Cannot Hear Voice When on Calls with Analog Phones
Symptoms
Voice cannot be heard when on a call with a analog phone in survival mode
Possible Causes
The analog phone or phone line has a problem.
The gateway system operation is not normal.
Solutions
Replace the analog phone or phone line and test again.
Check the RUN LED of the system that the phone is connected is normal. If
it’s connected to the IPX-G500B, check 2nd RUN LED.
[7205] Cannot Hear Voice When on Calls with SIP Phones
Symptoms
Voice cannot be heard when on a call with a SIP phone in survival mode
Possible Causes
The gateway system operation is not normal.
Solutions
Check the RUN LED of the system that the phone is connected is normal. If
it’s connected to the IPX-G500B, check 2nd RUN LED.
You may not be able to hear the voice if the IP address used by the gateway
system on the network is used by another system. Perform a ping test on the IP
address of the gateway. If there is a problem, change the IP address of the
other system or change the IP address of the gateway.

Ошибка! Используйте вкладку "Главная" для применения 제목 1 к тексту, который
должен здесь отображаться. Ошибка! Используйте вкладку "Главная" для применения 제목 1 к
тексту, который должен здесь отображаться.
SCM Express Operation Manual v12.0 542 ©Samsung Proprietary and Confidential
[7206] Cannot Hear Voice When on Calls with Analog Trunk Lines
Symptoms
Voice cannot be heard when on trunk calls with analog phones or SIP phones in
survival mode.
Possible Causes
The gateway system operation is not normal.
Solutions
Check the RUN LED of the system that the phone is connected is normal. If
it’s connected to the IPX-G500B, check 2nd RUN LED.
You may not be able to hear the voice if the IP address used by the gateway
system on the network is used by another system. Perform a ping test on the IP
address of the gateway. If there is a problem, change the IP address of the
other system or change the IP address of the gateway.

Ошибка! Используйте вкладку "Главная" для применения 제목 1 к тексту, который
должен здесь отображаться. Ошибка! Используйте вкладку "Главная" для применения 제목 1 к
тексту, который должен здесь отображаться.
SCM Express Operation Manual v12.0 543 ©Samsung Proprietary and Confidential
SCM Administrator
Execute SCM Administrator
When display a popup of “Your security settings have blocked downloading file”
Symptoms
Blocked downloading an execute file of SCM Administrator
Possible Causes
Security setting of browser
Solutions
1 Should allow pop-up in [Tools] of browser.
2 In [Tools > Internet Options < Security Setting tab] of browser, set the
security level to medium-high (default) and enable “File Download” in
[Custom Level > Downloads].
3 If the log-in dialog of SCM Administrator is not displayed, input the URL as
follows:
o Local Intra-net: <http://(System IP Address)/scm.jnlp>
o Remote network site: <http://(System IP Address)/scm_public.jnlp>
When display a popup of “Your security settings have blocked a signed application from
running” after launched SCM Administrator
Symptoms
Blocked a self-signed SCM Administrator
Possible Causes
Modified a java secure execution environment by user or java upgrade.
Solutions
1 In Java Control Panel > Advanced > Secure Execution Environment, check the
“Allow user to grant permissions to signed content”.
2 [Java7] In Java Control Panel > Security, change the security level to
“Medium”-or-Add the site in “Exception Site List”.

SCM Express Operation Manual v12.0 544 ©Samsung Proprietary and Confidential
Appendix Acronyms
AA Auto Attendant
AAR Automatic Alternative Routing
ACD Automatic Call Distribution
ACL Access Control List
AME Answering Machine Emulation
APC Access Point Controller
AR Alternative Route
BHCA Busy Hour Call Attempt
BLF Busy Lamp Field
CAC Call Admission Control
CDR Call Detailed Record
CID Caller Information Data
CLI Calling Line Identification
CLIR Calling Line Identification Restriction
COA Change of Address
COS Class of Service
CPS Call Per Second
CSTA Computer Supported Telephony Application
CTI Computer Telephony Interface
DID Direct Inward Dial
DISA Direct Inward System Access
DN Directory Number
DND Do Not Disturb
DOD Direct Outward Dial
DR Direct Route
DTMF Dual Tone Multi-Frequency
DTS Direct Trunk Select
FMS Fixed Mobile Substitution
FTP File Transfer Protocol
FXO Foreign Exchange Official
FXS Foreign Exchange Station
GW Gateway
ICMP Internet control message protocol
ITSP Internet Telephony Service Provider
IVR Interactive Voice Response
HTTP Hyper Text Transport Protocol
LDAP Lightweight Directory Access Protocol
MCN Modification Calling & Called Number
MCS Multimedia Conference System
MOBEX Mobile Extension

Appendix Acronyms
SCM Express Operation Manual v12.0 545 ©Samsung Proprietary and Confidential
MOH Music On Hold
MP Main Processor
MPEG Moving Picture Experts Group
MWI Message Waiting Indication
NFC Near Field Communication
NMS Network Management System
PBX Private Branch eXchange
PSTN Public Switched Telephone Network
RADIUS Remote Authentication Dial In User Service
RFC Request For Comments
RST Reset
RTP Real Time Protocol
SBC Single Board Computer
SCM Samsung Communication Manager
SIO Serial Input and Output
SIP Session Initiation Protocol
SMDR Station message detailed record
SMS Short Message Service
SNMP Simple Network Management Protocol
TCP Transmission Control Protocol
TFTP Trivial File Transfer Protocol
TLS Transport Layer Security
ToS Type of Service
UMS Unified Messaging System
VM Voice Mail
VMS Voice Mailing System
VoIP Voice over Internet Protocol
VQM Voice Quality Monitoring
WE Wireless Enterprise
WiFi Wireless Fidelity

SCM Express Operation Manual Document Version 12.0 ©2016 Samsung Electronics Co., Ltd. All rights reserved.