Sailor Moon Star Locket - Adafruit Industries
27
Sailor Moon Star Locket Created by Liz Clark https://learn.adafruit.com/sailor-moon-star-locket Last updated on 2021-11-15 08:21:17 PM EST ©Adafruit Industries Page 1 of 27
-
Upload
khangminh22 -
Category
Documents
-
view
0 -
download
0
Transcript of Sailor Moon Star Locket - Adafruit Industries
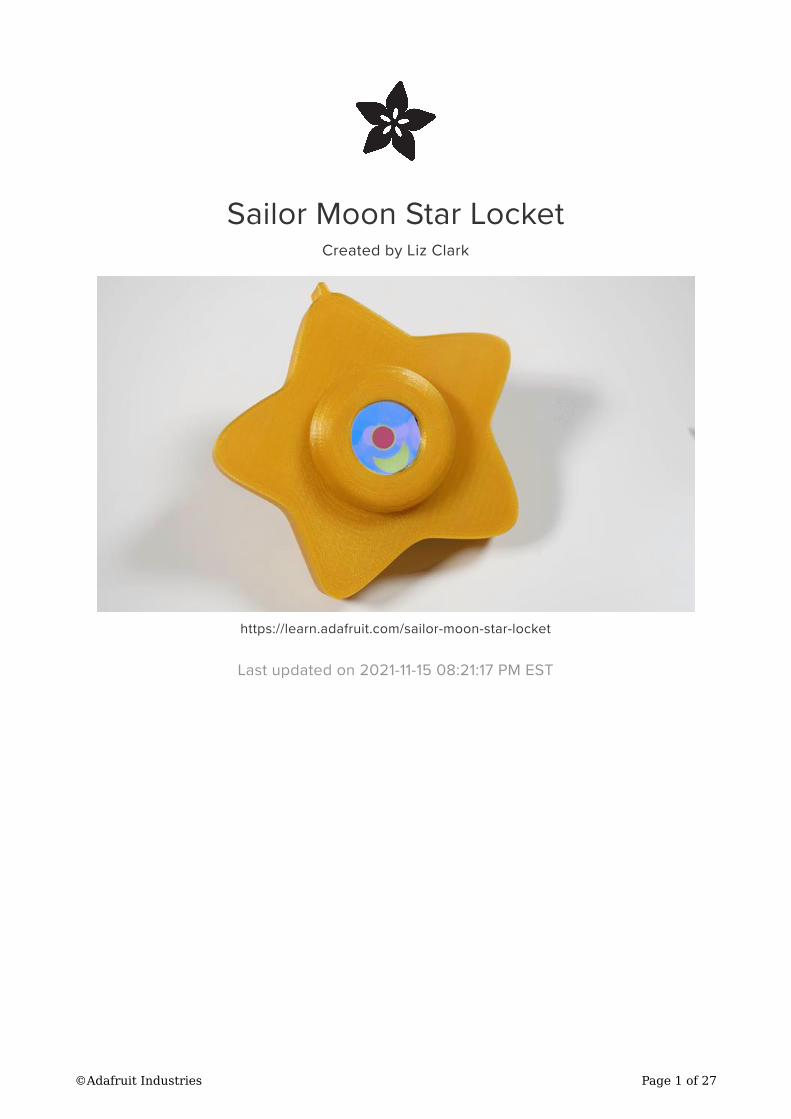
Sailor Moon Star Locket
Created by Liz Clark
https://learn.adafruit.com/sailor-moon-star-locket
Last updated on 2021-11-15 08:21:17 PM EST
©Adafruit Industries Page 1 of 27

3
4
6
6
8
9
10
13
13
13
16
18
19
19
21
21
22
23
24
25
26
Table of Contents
Overview
• Parts
CircuitPython on Circuit Playground Bluefruit
• Install or Update CircuitPython
Circuit Playground Bluefruit CircuitPython Libraries
• Installing CircuitPython Libraries on Circuit Playground Bluefruit
Code the Sailor Moon Star Locket
• Review
CircuitPython Code Walkthrough
• Import the Libraries
• The Loop
Circuit Diagram
3D Printing
• List of .STL Files
Assembly
• Mount the Circuit Playground Bluefruit
• Attach the TFT Gizmo
• Connect the Speaker
• Plug in the Battery
• Close the Case
Usage
©Adafruit Industries Page 2 of 27

Overview
Build a prop from the classic anime and manga Sailor Moon with the Circuit
Playground Bluefruit. In the series, the locket is gifted to Sailor Moon by Tuxedo Mask
and magically plays a song and shows a crescent moon rotating. Using the magic of
CircuitPython and electronics, you can recreate this effect.
The TFT Gizmo is used to add a TFT
screen and an audio amp without any
soldering.
A LiPo battery lets you display this as a
wire-free prop or make it portable as a
snazzy wearable.
The 3D printed snap-fit case gives the
illusion of a solid locket. The top frame
that sits over the Gizmo's TFT makes the
screen appear to be a circle.
©Adafruit Industries Page 3 of 27

By default, a crescent moon will rotate
around the screen. You can also press
the buttons on the back to hear a song
played through the speaker and to pause
the animation.
Parts
Circuit Playground Bluefruit - Bluetooth
Low Energy
Circuit Playground Bluefruit is our third
board in the Circuit Playground series,
another step towards a perfect
introduction to electronics and
programming. We've...
https://www.adafruit.com/product/4333
Circuit Playground TFT Gizmo - Bolt-on
Display + Audio Amplifier
Extend and expand your Circuit
Playground projects with a bolt on TFT
Gizmo that lets you add a lovely color
display in a sturdy and reliable fashion.
This PCB looks just like a round...
https://www.adafruit.com/product/4367
©Adafruit Industries Page 4 of 27

Mini Oval Speaker - 8 Ohm 1 Watt
Hear the good news! This wee
speaker is a great addition to any audio
project where you need 8 ohm
impedance and 1W or less of power. We
particularly like...
https://www.adafruit.com/product/3923
Breadboard-friendly SPDT Slide Switch
These nice switches are perfect for use
with breadboard and perfboard projects.
They have 0.1" spacing and snap in nicely
into a solderless breadboard. They're
easy to switch...
https://www.adafruit.com/product/805
JST-PH Battery Extension Cable - 500mm
By popular demand, we now have a
handy extension cord for all of our JST-
terminated battery packs (such as our
LiIon/LiPoly and 3xAAA holders). One end
has a JST-PH socket, and the...
https://www.adafruit.com/product/1131
Lithium Ion Polymer Battery Ideal For
Feathers - 3.7V 400mAh
Lithium-ion polymer (also known as 'lipo'
or 'lipoly') batteries are thin, light, and
powerful. The output ranges from 4.2V
when completely charged to 3.7V. This...
https://www.adafruit.com/product/3898
©Adafruit Industries Page 5 of 27

1 x Black Nylon Screw and Stand-off Set – M3
Thread
M3 screws
https://www.adafruit.com/product/
4685
CircuitPython on Circuit Playground
Bluefruit
Install or Update CircuitPython
Follow this quick step-by-step to install or update CircuitPython on your Circuit
Playground Bluefruit.
Download the latest version of
CircuitPython for this board via
circuitpython.org
https://adafru.it/FNK
Click the link above and download the
latest UF2 file
Download and save it to your Desktop (or
wherever is handy)
©Adafruit Industries Page 6 of 27

Plug your Circuit Playground Bluefruit
into your computer using a known-good
data-capable USB cable.
A lot of people end up using charge-only
USB cables and it is very frustrating! So
make sure you have a USB cable you
know is good for data sync.
Double-click the small Reset button in the
middle of the CPB (indicated by the red
arrow in the image). The ten NeoPixel
LEDs will all turn red, and then will all
turn green. If they turn all red and stay
red, check the USB cable, try another
USB port, etc. The little red LED next to
the USB connector will pulse red - this is
ok!
If double-clicking doesn't work the first
time, try again. Sometimes it can take a
few tries to get the rhythm right!
(If double-clicking doesn't do it, try a
single-click!)
©Adafruit Industries Page 7 of 27

You will see a new disk drive appear
called CPLAYBTBOOT.
Drag the adafruit_circuitpython_etc.uf2
file to CPLAYBTBOOT.
The LEDs will turn red. Then, the
CPLAYBTBOOT drive will disappear and
a new disk drive called CIRCUITPY will
appear.
That's it, you're done! :)
Circuit Playground Bluefruit CircuitPython
Libraries
The Circuit Playground Bluefruit is packed full of features like Bluetooth and NeoPixel
LEDs. Now that you have CircuitPython installed on your Circuit Playground Bluefruit,
you'll need to install a base set of CircuitPython libraries to use the features of the
board with CircuitPython.
©Adafruit Industries Page 8 of 27

Follow these steps to get the necessary libraries installed.
Installing CircuitPython Libraries on Circuit
Playground Bluefruit
If you do not already have a lib folder on your CIRCUITPY drive, create one now.
Then, download the CircuitPython library bundle that matches your version of
CircuitPython from CircuitPython.org.
Download the latest library bundle
from circuitpython.org
https://adafru.it/ENC
The bundle download as a .zip file.
Extract the file. Open the resulting folder.
Open the lib folder found within.
©Adafruit Industries Page 9 of 27

Once inside, you'll find a lengthy list of
folders and .mpy files. To install a
CircuitPython library, you drag the file or
folder from the bundle lib folder to the lib
folder on your CIRCUITPY drive.
Copy the following folders and files from
the bundle lib folder to the lib folder on
your CIRCUITPY drive:
adafruit_ble
adafruit_bluefruit_connect
adafruit_bus_device
adafruit_circuitplayground
adafruit_gizmo
adafruit_hid
adafruit_lis3dh.mpy
adafruit_thermistor.mpy
neopixel.mpy
Your lib folder should look like the image
on the left.
Now you're all set to use CircuitPython with the features of the Circuit Playground
Bluefruit!
Code the Sailor Moon Star Locket
Once you've finished setting up your Circuit Playground Bluefruit with CircuitPython
and its required libraries, you can add these additional libraries to the lib folder of the
Circuit Playground's CIRCUITPY drive which should appear when the board is
plugged into your computer via USB. Copy these folders:
adafruit_display_shapes
adafruit_imageload
•
•
•
•
•
•
•
•
•
•
•
©Adafruit Industries Page 10 of 27

To the CIRCUITPY flash drive /lib directory (create the directory if it doesn't exist).
Then, you can click on the Download: Project Zip link in the window below to
download the two bitmaps, .wav file and code.py file.
import timeimport displayiofrom adafruit_circuitplayground import cpimport adafruit_imageloadfrom adafruit_gizmo import tft_gizmofrom adafruit_display_shapes.circle import Circle
# setup for the Gizmo TFT
display = tft_gizmo.TFT_Gizmo()
# loading the background image
bg_bitmap, bg_palette = adafruit_imageload.load( "/clouds_bg.bmp", bitmap=displayio.Bitmap, palette=displayio.Palette)
bg_grid = displayio.TileGrid(bg_bitmap, pixel_shader=bg_palette)
# loading the crescent moon bitmap sequence
bitmap, palette = adafruit_imageload.load( "/moon_anime.bmp", bitmap=displayio.Bitmap, palette=displayio.Palette)
# makes the black background transparent so we only see the cresent moon
palette.make_transparent(0)
tile_grid = displayio.TileGrid( bitmap,
pixel_shader=palette, width=1, height=1, tile_height=120, tile_width=120, default_tile=0,)
# two circles for the center "jewel"
jewel_outline = Circle(x0=120, y0=120, r=40, fill=0xFBF236)jewel = Circle(x0=120, y0=120, r=35, fill=0xF70570)
# adding the two jewel circle elements to a group
jewel_splash = displayio.Group()jewel_splash.append(jewel_outline)
jewel_splash.append(jewel)
# making a group for the crescent moon sequence
# scale is 2 because at full 240x240 resolution image is too big
moon_group = displayio.Group(scale=2)# group to hold all of the display elements
main_group = displayio.Group()
# adding the crescent moon tile grid to the moon group
moon_group.append(tile_grid)
# adding the background to the main group
main_group.append(bg_grid)
# adding the moon group to the main group
main_group.append(moon_group)
# adding the jewel circles to the main group
main_group.append(jewel_splash)
# showing the main group on the display
display.show(main_group)
©Adafruit Industries Page 11 of 27

# tracks the tilegrid index location for the crescent moon
moon = 0# holds time.monotonic()
crescent = 0# a button debouncing
a_pressed = False# b button debouncing
b_pressed = False# tracks if music is playing
music_playing = False# tracks if animation is paused
animation_pause = False
while True: # button debouncing
if not cp.button_a and a_pressed: a_pressed = False if not cp.button_b and b_pressed: b_pressed = False # runs crescent moon animation
if not music_playing and not animation_pause: # every .8 seconds...
if (crescent + 0.8) < time.monotonic(): # the moon animation cycles
tile_grid[0] = moon # moon is the tilegrid index location
moon += 1 # resets timer
crescent = time.monotonic() # resets tilegrid index
if moon > 35: moon = 0 # if music is NOT playing and you press the a button...
if not music_playing and (cp.button_a and not a_pressed): # music begins playing and will loop
music_playing = True a_pressed = True print("music playing") # song plays once
cp.play_file("moonlight_densetsu.wav")
# music_playing state is updated
music_playing = False # if the animation IS playing and you press the b button...
if not animation_pause and (cp.button_b and not b_pressed): # the animation pauses by updating the animation_pause state
animation_pause = True b_pressed = True # debugging REPL message
print("animation paused") # if the animation is PAUSED and you press the b button...
if animation_pause and (cp.button_b and not b_pressed): # the animation begins again by updating the animation_pause state
animation_pause = False b_pressed = True # debugging REPL message
print("animation running again")
©Adafruit Industries Page 12 of 27

Review
Make sure you've followed these steps:
Loaded all the required library files and directories into the CIRCUITPY /lib direc
tory
Copied code.py to the main (root) directory of the CIRCUITPY drive
Copied the two bitmap images (moon_anime.bmp and clouds_bg.bmp) to the
main (root) directory of the CIRCUITPY drive
Copied the audio file (moonlight_densetsu.wav) to the main (root) directory of
the CIRCUITPY drive
Your Circuit Playground Bluefruit CIRCUITPY drive should look like this after you load
the libraries, two bitmaps, audio file and code.py file:
CircuitPython Code Walkthrough
Import the Libraries
The code begins by importing the libraries.
•
•
•
•
©Adafruit Industries Page 13 of 27

import timeimport displayiofrom adafruit_circuitplayground import cpimport adafruit_imageloadfrom adafruit_gizmo import tft_gizmofrom adafruit_display_shapes.circle import Circle
Setup the Display
The TFT Gizmo's display is setup.
# setup for the Gizmo TFT
display = tft_gizmo.TFT_Gizmo()
Graphics: Background and Crescent Moon
The background image and the crescent moon are imported using the adafruit_im
ageload library.
The crescent moon is a sprite sheet. This allows it to be split into a TileGrid and
iterated through so that it appears to be animated.
The background of the crescent moon is black and is made transparent using the ma
ke_transparent() function. This lets the crescent moon shape appear by itself in
front of the background image.
# loading the background image
bg_bitmap, bg_palette = adafruit_imageload.load("/clouds_bg.bmp", bitmap=displayio.Bitmap, palette=displayio.Palette)bg_grid = displayio.TileGrid(bg_bitmap, pixel_shader=bg_palette)
# loading the crescent moon bitmap sequence
bitmap, palette = adafruit_imageload.load("/moon_anime.bmp", bitmap=displayio.Bitmap, palette=displayio.Palette)# makes the black background transparent so we only see the cresent moon
palette.make_transparent(0)
tile_grid = displayio.TileGrid(bitmap, pixel_shader=palette, width = 1, height = 1, tile_height = 120, tile_width = 120, default_tile = 0)
Graphics: Center Jewel
The "jewel" in the center of the locket is made using the adafruit_display_shapes
library to create two Circles that are layered.
©Adafruit Industries Page 14 of 27

# two circles for the center "jewel"
jewel_outline = Circle(x0=120, y0=120, r=40, fill=0xfbf236)jewel = Circle(x0=120, y0=120, r=35, fill=0xf70570)
Graphics: Groups
With three different graphical elements, a few groups are created to keep them
organized. jewel_splash holds the two circles representing the jewel in the center
of the display.
# adding the two jewel circle elements to a group
jewel_splash = displayio.Group(max_size=20)jewel_splash.append(jewel_outline)
jewel_splash.append(jewel)
moon_group holds the crescent moon sprite sheet and main_group acts as the
group with all of the graphical elements.
# making a group for the crescent moon sequence
# scale is 2 because at full 240x240 resolution image is too big
moon_group = displayio.Group(scale = 2)# group to hold all of the display elements
main_group = displayio.Group()
The order in which the graphics are added to the main_group matters. First, the
background image is added, followed by the crescent moon and finally the jewel.
# adding the crescent moon tile grid to the moon group
moon_group.append(tile_grid)
# adding the background to the main group
main_group.append(bg_grid)
# adding the moon group to the main group
main_group.append(moon_group)
# adding the jewel circles to the main group
main_group.append(jewel_splash)
# showing the main group on the display
display.show(main_group)
State Machines
A few state machines are setup. Their functions are commented in the code.
# tracks the tilegrid index location for the crescent moon
moon = 0# holds time.monotonic()
crescent = 0# a button debouncing
a_pressed = False# b button debouncing
©Adafruit Industries Page 15 of 27

b_pressed = False# tracks if music is playing
music_playing = False# tracks if animation is paused
animation_pause = False
The Loop
The loop begins by debouncing the Circuit Playground Bluefruit's buttons.
while True: # button debouncing
if not cp.button_a and a_pressed: a_pressed = False if not cp.button_b and b_pressed: b_pressed = False
Animating the Crescent Moon
An if statement runs the crescent moon animation. Every .8 seconds, the tile_gr
id advances its index position, showing the next frame of the crescent moon's sprite
sheet.
# runs crescent moon animation
if not music_playing and not animation_pause: # every .8 seconds...
if (crescent + .8) < time.monotonic(): # the moon animation cycles
tile_grid[0] = moon # moon is the tilegrid index location
moon += 1 # resets timer
crescent = time.monotonic() # resets tilegrid index
if moon > 35: moon = 0
Play the Music
The you press the A button on the Circuit Playground Bluefruit, the song will begin
playing through the speaker.
if not music_playing and (cp.button_a and not a_pressed): # music begins playing and will loop
music_playing = True a_pressed = True print("music playing") # song plays once
cp.play_file("moonlight_densetsu.wav")
# music_playing state is updated
music_playing = False
©Adafruit Industries Page 16 of 27

Pause the Animation
If you want to pause the animation to admire the crescent moon, press the B button.
The crescent moon will stop rotating.
# if the animation IS playing and you press the b button...
if not animation_pause and (cp.button_b and not b_pressed): # the animation pauses by updating the animation_pause state
animation_pause = True b_pressed = True # debugging REPL message
print("animation paused")
Restart the Animation
To resume the animation, you can press the B button again and the crescent moon
will continue its orbit right where it left off.
# if the animation is PAUSED and you press the b button...
if animation_pause and (cp.button_b and not b_pressed): # the animation begins again by updating the animation_pause state
animation_pause = False b_pressed = True # debugging REPL message
print("animation running again")
©Adafruit Industries Page 17 of 27
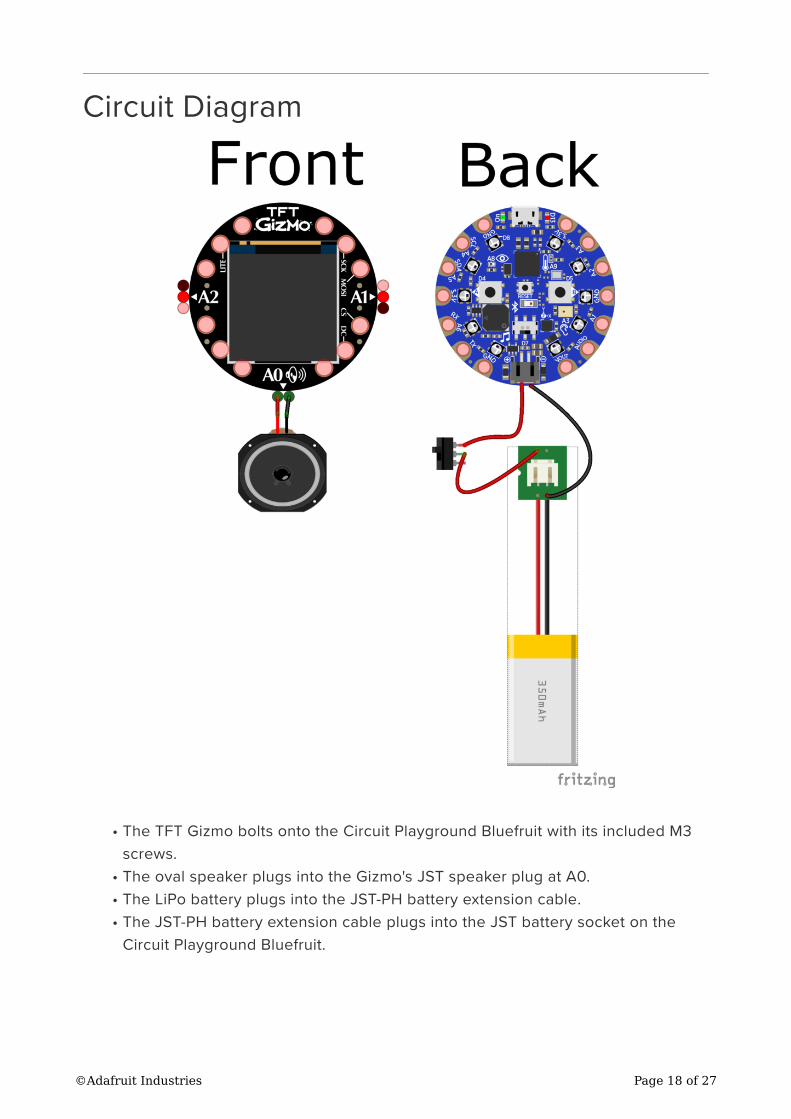
Circuit Diagram
The TFT Gizmo bolts onto the Circuit Playground Bluefruit with its included M3
screws.
The oval speaker plugs into the Gizmo's JST speaker plug at A0.
The LiPo battery plugs into the JST-PH battery extension cable.
The JST-PH battery extension cable plugs into the JST battery socket on the
Circuit Playground Bluefruit.
•
•
•
•
©Adafruit Industries Page 18 of 27

The only soldering required is for the on/
off switch. Using a JST-PH battery
extension cable, make a splice on the red
power wire. Solder each end to a
connection on a slide switch.
You could also plug a battery directly into
the Circuit Playground Bluefruit if you
wanted to completely avoid soldering.
For more details on adding on/off
switches to projects, check out this
guide by the Ruiz Brothers
https://adafru.it/vej
3D Printing
List of .STL Files
bottom_star_final.stl
lens_final.stl
top_star_final.stl
•
•
•
©Adafruit Industries Page 19 of 27

The case is made up of three 3D printed
parts that snap-fit together.
The bottom of the case has mounting
points for the Circuit Playground
Bluefruit, the oval speaker and the on/off
switch.
The bottom of the case also has button
pressers and cut-outs to access the
Gizmo TFT's mounting screws.
The .STL files and Fusion360 file are available on Thingiverse.
Download the .STL files on
Thingiverse
https://adafru.it/RBA
©Adafruit Industries Page 20 of 27
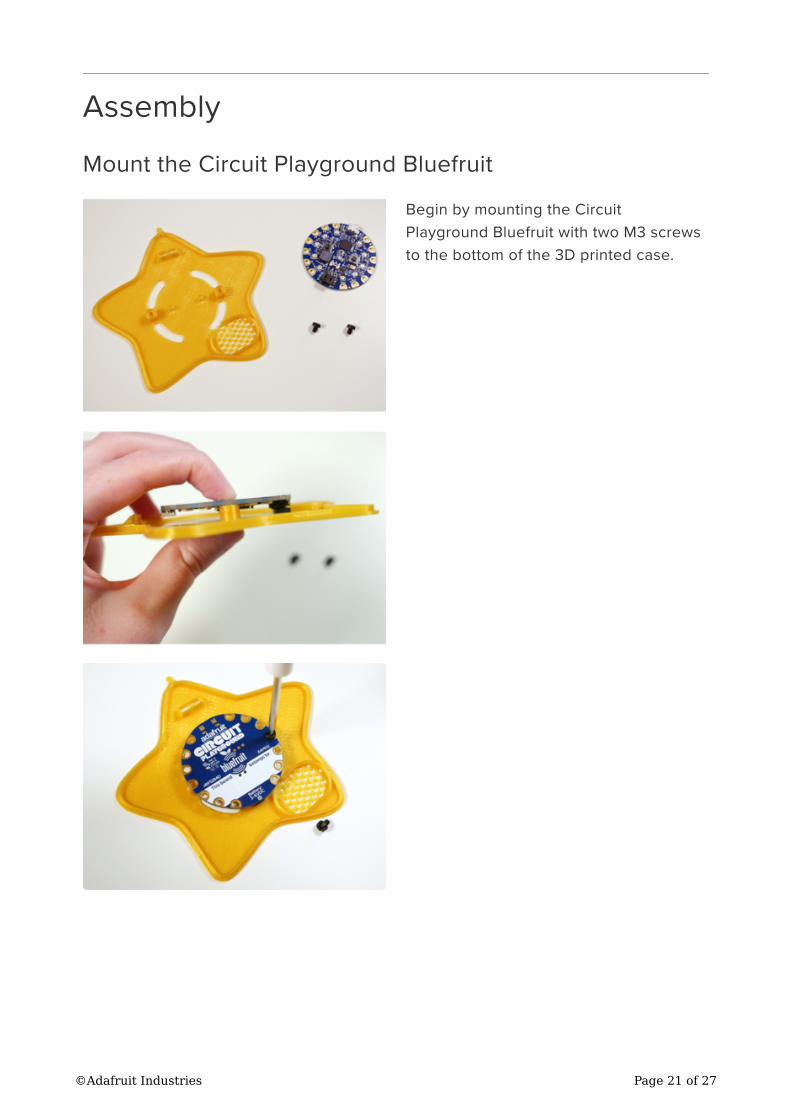
Assembly
Mount the Circuit Playground Bluefruit
Begin by mounting the Circuit
Playground Bluefruit with two M3 screws
to the bottom of the 3D printed case.
©Adafruit Industries Page 21 of 27

Attach the TFT Gizmo
Take the 12 M3 screws that are included
with the TFT Gizmo and mount the TFT
Gizmo to the Circuit Playground Bluefruit.
The holes can be accessed through the
back of the 3D printed case.
©Adafruit Industries Page 22 of 27

Connect the Speaker
Plug the oval speaker's JST connection
into the TFT Gizmo's A0 JST socket.
©Adafruit Industries Page 23 of 27

Peel off the speaker's paper to reveal the
mounting adhesive.
Press the speaker into the case's speaker
mount.
Plug in the Battery
Insert the on/off switch into the switch
mount in the bottom of the case.
©Adafruit Industries Page 24 of 27

Plug the JST battery extension cable into
the Circuit Playground Bluefruit's battery
socket.
Plug the LiPo battery into the JST battery
extension cable's socket.
Close the Case
Attach the top of the case to the bottom.
The sides have snap fit connections, so
you should feel some satisfying clicks as
you close it up.
Make sure the LiPo battery is comfortably inside the case next to the Circuit
Playground Bluefruit before closing everything up.
©Adafruit Industries Page 25 of 27

Peel off the TFT Gizmo's screen protector
and attach the case's lens.
Congratulations! You've finished the
assembly!
Usage
©Adafruit Industries Page 26 of 27

Use the on/off switch to conserve battery
when you aren't fighting evil by
moonlight.
Access the Circuit Playground Bluefruit's
buttons with the case's built-in button
pressers.
Press the A button to hear the song and
the B button to pause the animation.
The case can either stand-up on its own as a display prop or be attached to a string
with the hole at the top to be worn as a locket. Either way, after building this project
you'll be able to show-off your moon prism power.
©Adafruit Industries Page 27 of 27