Sage 50 Accounts User Guide - Making IT Happen
863
Copyright © Sage (UK) Limited, 2011. All rights reserved We have written this guide to help you to use the software it relates to. We hope it will be read by and helpful to lots of our customers and because of this it is written as general rather than specific guidance. As we have written the article, we own the content of it; this is known as “copyright” and our ownership is shown as “© Sage (UK) Limited, 2011”. This means you may not copy, modify or distribute the article (either electronically or otherwise) without asking us first. We always do our best to make sure that the information in the article is correct but due to being general guidance we don’t make any promises about the accuracy of the article’s contents for your particular needs. You should also consider taking professional advice when appropriate, for example to ensure that the results obtained from using the software comply with statutory requirements. If we refer you to non-Sage information sources (for example, HMRC’s website), this is because we want to be helpful but as we don’t have any control over the contents of those non-Sage sources we can’t accept responsibility for them. If any non-Sage trademarks are used in the article, we acknowledge the ownership of them by the relevant owner. Sage (UK) Limited North Park Newcastle upon Tyne NE13 9AA Issue date: 30/06/2011 Pbn No: 14187
-
Upload
khangminh22 -
Category
Documents
-
view
0 -
download
0
Transcript of Sage 50 Accounts User Guide - Making IT Happen

Copyright
© Sage (UK) Limited, 2011. All rights reserved
We have written this guide to help you to use the software it relates to. We hope it will be read by and helpful to lots of our customers and because of this it is written as general rather than specific guidance. As we have written the article, we own the content of it; this is known as “copyright” and our ownership is shown as “© Sage (UK) Limited, 2011”. This means you may not copy, modify or distribute the article (either electronically or otherwise) without asking us first.
We always do our best to make sure that the information in the article is correct but due to being general guidance we don’t make any promises about the accuracy of the article’s contents for your particular needs. You should also consider taking professional advice when appropriate, for example to ensure that the results obtained from using the software comply with statutory requirements.
If we refer you to non-Sage information sources (for example, HMRC’s website), this is because we want to be helpful but as we don’t have any control over the contents of those non-Sage sources we can’t accept responsibility for them. If any non-Sage trademarks are used in the article, we acknowledge the ownership of them by the relevant owner.
Sage (UK) LimitedNorth ParkNewcastle upon Tyne NE13 9AAIssue date: 30/06/2011Pbn No: 14187

Read this first
This document is the Sage 50 Accounts User Guide. It is intended to be read by all users of the Sage 50 Accounts software, and is designed to guide users through all the tasks associated with setting up, and running the system.
The guide is divided into a number of chapters, which fall into logical groups.
The first two chapters are concerned with helping you get started using the software. They are intended mainly for new users.
Welcome to Sage 50 Accounts
The first chapter describes how to set up your company in the software using ActiveSetup, how to register your software, and the support and training options available to you.
Getting Started with Sage 50 Accounts
This chapter describes how to access the software for the first time and how to use the demonstration data to get used to the way in which the system works. It also provides a guided tour of the Sage 50 Accounts desktop.
This chapter also gives you an overview of the tasks involved in setting up Sage 50 Accounts ready for use, and a description of the administrative and maintenance tasks, which need to be carried out from time-to-time to help keep it running smoothly.
The next three chapters describe how to set up Sage 50 Accounts. New users will need to carry out the tasks described in these chapters in order to provide the software with the information it needs to satisfy the accounting needs of your organisation. Existing users will carry out these tasks from time-to-time, to help keep their information up-to-date.
Setting up Sage 50 Accounts
This chapter describes how you define various system settings, preferences and defaults.
Setting up your Chart of Accounts
This chapter describes how to set up and maintain a chart of accounts.
Setting up Records
This chapter describes the tasks involved in maintaining records, including nominal accounts, bank accounts, customers and suppliers, products, and projects.
Chapters 6 to 12 cover the full range of accounting tasks. You will only need to carry out those tasks which are appropriate to your organisation. The content of each of these chapters is designed to match the way in which the functionality of the software is divided into modules.
Company Tasks
Company tasks include: prepayments and accruals, managing fixed assets, preparing Intrastat declarations and VAT returns, entering scale charges, carrying out month end and year end processing, entering journals, and clearing down and compressing old data.

Banking Tasks
Banking tasks include: recording receipts, payments, transfers, reconciling accounts, creating and processing recurring transactions, and managing petty cash.
Customer Tasks
These include: setting pricing and discounts, handling quotations and proformas, sales order processing, handling invoices, dealing with recurring transactions, receiving customer payments, and managing credit notes.
Supplier Tasks
These include: supplier pricing, processing purchase orders, entering invoices, payments, and credit notes.
Product Tasks (Stock)
These include: stock taking, recording adjustments in and out, handling shortfalls and stock returns, managing bills of materials, and allocating and issuing stock.
Project Tasks (Accounts Plus and Accounts Professional)
Project tasks include: setting up a project, applying costs, working with purchase orders, enquiries, analysis and reporting, billing the customer, and completing the project.
Reporting
Sage 50 Accounts provides a wide range of financial and management reports.
The final group of chapters describes particular tasks, which can be performed using Sage 50 Accounts but which may not be required by all companies. These include:
Support Tools
Support tools are options and utilities designed to save you time, so that you spend less time entering data and more time running your business.
Working with Foreign Currencies and Accounts
This chapter contains information on how to handle foreign currency accounts and transactions in Sage 50 Accounts, and includes the use of the Foreign Trader feature and the Foreign Bank Revaluation Wizard.

Other Sage 50 Accounts documentation
In addition to this User Guide, the following user documentation is also provided, both on your CD and in the software from the Help Menu:
Introduction to Accounts
Use this guide to explore and understand the fundamentals of double-entry bookkeeping, and learn about key accounting concepts.
Sage 50 Accounts Opening Balances
With this guide you can explore the process of entering your opening balances.
Sage 50 Accounts Credit Control
The Credit Control features within the software are fully described, providing you with all the tools to manage customer and supplier debt and optimise your cash flow.
Sage 50 Accounts for Charities
This guide explains how to tailor Sage 50 Accounts for a non-profit making organisation. It focuses particularly on fund analysis and SORP reporting.
Excel Integration
This guide aims to introduce the basic concepts of integrating Microsoft® Excel with your Sage 50 Accounts data.
Transaction Email
This guide explains how to set up, register, and use Transaction Email, which allows you to send and receive paperless invoices and orders.
Sage 50 Accounts Construction Industry Scheme (CIS)
The Sage 50 Accounts CIS module is designed for anyone, who carries out construction work in the UK as a contractor, and is registered to the Construction Industry Scheme (CIS). The guide describes the features of the CIS module, and how it is integrated with Sage 50 Accounts.
Data Import in Sage 50 Accounts
This guide explains how to import CSV and XLS files using the Data Import wizard for the following types of records: customers, suppliers, nominal ledger, stock, project records, audit trail transactions, product transactions and fixed asset records.
Sage 50 Client Manager
The Client Manager is an accountant tool, designed to exchange accounting data with users working with Sage 50 Accounts. This guide is written for accountants, and provides an overview of Accountant Link, along with detailed instruction on how to use Client Manager.
The information provided in these guides is intended to complement the material provided by this document, the main Sage 50 Accounts guide.

These documents are supplied in electronic format, as .PDF files, and are available as options from the menu displayed when you start installation of Sage 50 Accounts and, after installation, from the Help > PDF Guides menu option.
We hope you will find the documentation comprehensive. If you want to send us your comments, please email the Sage SBD Documentation Team at SageR&[email protected].

Instructions in this guide
Sage 50 Accounts is a fully Windows compatible product, which means that all the usual windows elements are used. This User Guide also uses the same terminology and instruction conventions that are used in your Windows User Guide. So, if you are familiar with Windows, you will already know how to navigate around your Sage 50 Accounts software. If you are not, the basic elements of Windows are described in this chapter.
This guide takes you through many different procedures, step-by-step, such as recording a payment or running a report. To make it easy for you to follow, these instructions are written using the following conventions. For example, a step by step procedure always starts in the same format and continues as a series of numbered steps, as shown below.
Examples
1. Select Customers > Invoice List.
Note: This instruction should be read as "select the 'abc' module from the navigation bar on the left hand side of the window and then select the 'xyz' Task or Link option".
2. Select a record you want to delete from the Records list.
3. Click Delete.
Note: If during a procedure you are asked to type specific text into a box, this text is always shown in boldface, as shown in step 3 below.
4. In the Command Line text box type d:\setup.exe and then press ENTER.
If you are required to press a specific key on the keyboard, this key is shown in CAPITAL LETTERS. You will notice that the key you needed to press in step 3 above, the ENTER key, is written in capital letters.
Italic text is generally used to refer you to other sections of the guide, for example:
5. To print your VAT Return, click Print. For more information, see Managing your VAT on page 288.


Contents
Read this first...................................................................................................iiiInstructions in this guide .................................................................................vii
Chapter 1: Welcome to Sage 50 Accounts ......................................... 1Introduction to Sage 50 Accounts....................................................................2System requirements .......................................................................................3Activating your software...................................................................................4The company setup (ActiveSetup)....................................................................5Registering Sage 50 Accounts.......................................................................21About SageCover ..........................................................................................21SageCover online support..............................................................................21Your support home page ...............................................................................22The sage.co.uk & sage.ie websites ................................................................23Sage training..................................................................................................23
Chapter 2: Getting started with Sage 50 Accounts .......................... 25Accessing Sage 50 Accounts ........................................................................26The practice data mode.................................................................................27Using Sage 50 Accounts demonstration data ................................................30The Sage 50 Accounts desktop.....................................................................31Sage 50 Accounts window types...................................................................39Using the quick search tool............................................................................58Using the search tool to find records..............................................................60Using ActiveSearch........................................................................................65Function keys ................................................................................................66Getting help ...................................................................................................68Video tutorial simulations ...............................................................................69Wizards .........................................................................................................71An overview to setting up Sage 50 Accounts .................................................72Administrative and maintenance tasks ...........................................................73
Chapter 3: Setting up Sage 50 Accounts .......................................... 97Setting the financial year ................................................................................98The configuration editor .................................................................................99Entering company preferences.....................................................................124Entering your bank defaults..........................................................................152Entering customer defaults ..........................................................................155Ageing transactions in Sage 50 Accounts ....................................................158

Sage 50 Accounts User Guide
Entering supplier defaults.............................................................................162Entering product defaults .............................................................................164Entering invoice and order defaults ..............................................................167Setting up users...........................................................................................186
Chapter 4: Setting up your Chart of Accounts ................................ 189Setting up your Chart of Accounts ...............................................................190Adding a Chart of Accounts.........................................................................193Editing and previewing your Chart of Accounts ............................................195Checking your Chart of Accounts ................................................................198Deleting a Chart of Accounts .......................................................................200Copying a Chart of Accounts .......................................................................201Nominal ledger accounts explained..............................................................201The nominal account structure.....................................................................205Control accounts .........................................................................................206Sole trader Chart of Accounts individual nominal codes ...............................210Partnership Chart of Accounts individual nominal codes ..............................214Limited Company Chart of Accounts individual nominal codes.....................215
Chapter 5: Setting up records ......................................................... 217Entering nominal records .............................................................................218Editing nominal records................................................................................222Deleting nominal records..............................................................................223Viewing nominal account activity..................................................................223Entering bank account records ....................................................................226Editing a bank record...................................................................................229Deleting a bank record.................................................................................229Planning your customer and supplier codes.................................................230Entering your customer and supplier records ...............................................231Deleting customer records ...........................................................................237Deleting supplier records .............................................................................237Setting up your product list ..........................................................................238Creating a product record ............................................................................238Editing a product record ..............................................................................243Deleting a product record ............................................................................244Setting Up project records ...........................................................................245Setting up your fixed asset records ..............................................................251
Chapter 6: Company tasks .............................................................. 257Prepayments ...............................................................................................258

Contents
Accruals ......................................................................................................261Budgeting in Sage 50 Accounts...................................................................264Working with fixed assets ............................................................................273Preparing Intrastat declarations....................................................................277Managing your VAT......................................................................................288Carrying out your Month End .......................................................................344Running the Year End ..................................................................................362Recording a journal entry .............................................................................374Clearing the Audit Trail .................................................................................384Clearing stock transactions..........................................................................389Compressing your data................................................................................389
Chapter 7: Banking tasks ................................................................. 391Recording a bank receipt .............................................................................392Recording a bank, cash or credit card payment ...........................................397Recording cash register takings ...................................................................401Recording a transfer ....................................................................................422Reconciling your bank account ....................................................................424Creating and processing recurring transactions............................................434Viewing bank transaction activity..................................................................446Managing your petty cash............................................................................448
Chapter 8: Customer tasks .............................................................. 449Pricing and discounts ..................................................................................450Customer pricing .........................................................................................451Proformas....................................................................................................483Quotations...................................................................................................483Sales order processing ................................................................................487Entering an invoice.......................................................................................523Posting an invoice........................................................................................562Dealing with recurring transactions ..............................................................564Receiving customer payments .....................................................................570Entering a credit note...................................................................................572Deductions ..................................................................................................573Deleting invoices and credit notes................................................................577Viewing customer transaction activity...........................................................578Customer refunds ........................................................................................580Sage Pay facility...........................................................................................583

Sage 50 Accounts User Guide
Chapter 9: Supplier tasks ................................................................. 601Supplier price lists........................................................................................602Processing purchase orders ........................................................................608Entering an invoice from a supplier...............................................................640Supplier payment control .............................................................................644Supplier reports ...........................................................................................650Recording supplier credit notes....................................................................650Viewing supplier transaction activity .............................................................650Supplier refunds...........................................................................................653
Chapter 10: Product tasks (stock) ................................................... 657A note on product valuation in Sage 50 Accounts........................................658Recording a stock take ................................................................................659Adjusting stock levels by recording an adjustment in or out..........................661Stock shortfall ..............................................................................................661Viewing product activity ...............................................................................664Bill of materials.............................................................................................666Recording stock returns...............................................................................672Allocating stock ...........................................................................................675Issuing allocated stock.................................................................................679
Chapter 11: Project tasks(Accounts Plus and Accounts Professional only) ........................... 681
An introduction to project costing ................................................................682Who can use project costing?......................................................................682The life cycle of a project..............................................................................683The project life cycle in Sage 50 Accounts ...................................................683Setting up project costing ............................................................................685Starting up a project ....................................................................................689Applying project costs .................................................................................696Viewing project activity.................................................................................700Working with purchase orders......................................................................703Project enquiries, analysis and reporting ......................................................705Billing your customer for a project ................................................................709Completing your project...............................................................................714
Chapter 12: Support tools ................................................................ 715Accountant Link...........................................................................................716e-Banking ....................................................................................................739Audit Assistant.............................................................................................748

Contents
Working with attachments using Document Manager ..................................760Exporting to Microsoft® Word, Excel and Outlook .......................................766Event Logging..............................................................................................772Network Setup.............................................................................................776Working with Internet Resources..................................................................776News Feeds.................................................................................................776
Chapter 13: Reporting ...................................................................... 781An introduction to reports ............................................................................782Running the audit trail report ........................................................................783Running the trial balance report ...................................................................784Running the profit and loss report ................................................................785Running the balance sheet report ................................................................786Running the quick ratio report (Accounts Plus and Accounts Professional only) ..........................................788Running the budget report ...........................................................................789Running the prior year report .......................................................................790Running the transactional-based management reports (Accounts Plus and Accounts Professional only) ..........................................791Column-based financial reports ...................................................................794Running the bank reconciliation report .........................................................795Batch reporting............................................................................................797
Chapter 14: Working with foreign currencies and accounts .......... 801The euro and other currencies .....................................................................802The countries table ......................................................................................805The foreign trader ........................................................................................806Processing in Sage 50 Accounts using the foreign trader.............................811The foreign bank revaluation ........................................................................815Viewing and changing revaluations ..............................................................817Bank Transfers involving foreign currency accounts......................................819How foreign trader affects Sage 50 Accounts ..............................................827

Sage 50 Accounts User Guide

Chapter 1
Welcome to Sage 50 AccountsIn this chapter:Introduction to Sage 50 Accounts........2
Activating your software.......................4
The company setup (ActiveSetup)........5
Registering Sage 50 Accounts...........21
About SageCover ..............................21
SageCover online support .................21
Your support home page ...................22
Sage training .....................................23
The chapter guides you through the process of setting up your company in the software using ActiveSetup.
Once you’ve created your company in Sage 50 Accounts, we look at registering the software and discuss your support and training options.

Introduction to Sage 50 Accounts
Sage 50 Accounts is the UK’s most popular small business accounting solution and is recommended by over 90% of accountants. It is designed to streamline all your accounting routines, reduce data entry and save you time. The software integrates seamlessly with other Sage products, as well as with Microsoft® Office software to create a complete business management system, offering multi-user and multi-company configurations to suit all business types.
Sage 50 Accounts will save you time and money, and is ideal if your business is growing or developing. Sage 50 Accounts will assist you in managing your business in the following areas:
Managing your Customers
As your customer base expands it is important to be responsive to their needs by having instant access to their individual details. These would include their contact details, purchase history, debt level, credit and trading terms.
Managing your Products
However complex your business, Sage 50 Accounts can help you streamline your stock management, production and order fulfilment.
Managing your Suppliers
Your suppliers can be just as important as your customers and Sage 50 Accounts provides you with everything you need to keep track of what you buy, managing your debts, and how much you are paying.
Managing your Accounts
Having full access and control over your accounts puts you in a strong position to make confident, informed decisions moving forward with the knowledge that all transactions are visible and have been fully accounted for.
Managing your Finances
Sage 50 Accounts helps you manage your finances and assists you when preparing your regular financial reports. As soon as you have entered your first transactions you can use these reports to study how your business is performing.
Managing your Business
Sage 50 Accounts is designed to help you manage your business work as efficiently as possible providing you with more control of your accounts.
Managing your Funds
Aimed at non-profit/charitable organisations to analyse funds and prepare accounts based on an accruals or receipts and payments basis. Information about funds is supplied separately to the Sage 50 Accounts User Guide in portable document format (PDF). To view this information, once Sage 50 Accounts is installed, from the Sage 50 Accounts menu bar, select Help > PDF Guides > Charities.

Welcome to Sage 50 Accounts
System requirements
Before installing Sage 50 Accounts, you should check that your PC(s) meets the following requirements:
Minimum hardware
An IBM® compatible PC with 1Ghz or equivalent processor
512MB RAM
700MB of free disk space after Microsoft Windows® has been installed
Network users only: 100Mbps network with Microsoft Windows® networking
Recommended hardware
An IBM® compatible PC with a 2 GHz or equivalent processor
1GB RAM
1GB of free disk space after Microsoft Windows® has been installed
Network users only: 1Gbps network with Microsoft Windows networking
Note: Performance is improved with higher specification PCs and networks.
Supported operating systems
Windows XP Service Pack 3
Windows Vista
Windows 7
Windows Server 2008
Windows Server 2003
Please ensure that the latest Microsoft updates are installed.
Access Sage 50 Accounts
To open Sage 50 Accounts, from the Windows desktop, double-click the Sage desktop icon.
The Activation window appears
3

Sage 50 Accounts User Guide
4
Activating your software
The first time you open Sage 50 Accounts, the Activation window appears.
On this window, to activate Sage 50 Accounts, enter your serial number and activation key.
Serial Number
Enter the Serial Number in this box. If you are a new user, you can find the Serial Number and Activation Key on the Important Information notice that came inside your software box.
If you are upgrading from an earlier version, you will either find your Serial Number and Activation Key on an Advice Note sent from Sage.

Welcome to Sage 50 Accounts
Activation Key
Enter the Activation Key in this box. If you have any problems with your Serial Number or Activation Key, existing Sage customers should select the MySage button and log into their online account to recover their information.
New Sage customers should telephone the Customer Care Helpline on 0845 111 5555. Residents of the Republic of Ireland should telephone 1890 88 20 60.
Invalid entries will result in an information message appearing.
When you have made your selection, to proceed, click Continue.
The ActiveSetup window appears.
The company setup (ActiveSetup)
After you have activated Sage 50 Accounts, the ActiveSetup window appears. The ActiveSetup is a series of windows, which capture information such as the company address, your VAT details and whether you are installing Sage 50 Accounts for the first time or upgrading from a previous version.
Before you start Sage 50 Accounts for the first time, you need the following information:
Information needed Where to find it
The name of the Chart of Accounts (COA) that best suits your company. There are several COA supplied with Sage 50 Accounts that support different business types. For example, you can choose from Sole Trader, Partnership, Limited Company, Charities, or Basic. See Chapter 4, Setting up your Chart of Accounts.
Your previous bookkeeping method or your accountant.
Company legal name and address. The company owner or your accountant.
The company's financial year start date. Your previous bookkeeping method or your accountant.
5

Sage 50 Accounts User Guide
6
Details about how to enter this information into the ActiveSetup follow.
Window 1: Welcome
You can choose from three options on the Welcome window. The option you select determines the window(s) that subsequently appear.
VAT details, if you collect VAT, sell or purchase goods from EC member states.
VAT registration number
The VAT scheme the company uses - Standard, VAT Cash Accounting or Flat Rate (UK only)
The standard VAT rate currently used
If you are using Flat Rate scheme, the percentage applicable to your business sector, including any first year discount (UK only)
Your local tax office or accountant.
The currency your company uses. Your previous bookkeeping method.

Welcome to Sage 50 Accounts
You can choose:
I would like to set up a new company:
Single User Version: Select this option if you are installing the software for the first time on the PC.
Multi-User Version: Select this option if you are installing the software for the first time and this is the PC that will hold the company data (PC1).
Use an existing company stored on your network.
Single-User Version: Select this option if you want to use data from an existing installation of Sage 50 Accounts, either on your own PC or on a networked PC. Selecting this option copies the existing data, making it available for you to use in this installation of Sage 50 Accounts.
Multi-User Version: if you use the multi-user version and this is the PC that holds the company data (PC1), select this option. Enter the drive letter and directory path to the existing data, or click Browse to search for the data on the PC.
Additional information is provided in ActiveSetup by clicking on the graphic:
Restore data from a back-up file.
Single-User Version: Use this option if you have existing data files in the form of a Sage backup. For example, you might select this option if you are reinstalling Sage 50 Accounts on a new PC, or if you are installing your new software for the first time on a PC that doesn't have an existing version of Sage 50 Accounts on it, but you have a set of data that you want to use with your new software.
Multi-User version: Within a multi-user environment, data is held in a centralised location. Consequently, if connecting PC2 to data on PC1, a restore is not required.
Note: Restoring data on PC2 also restores the data to PC1, affecting all connected PCs.
When you have made your selection, click Next.
7

Sage 50 Accounts User Guide
8
New Company - Window 2 - Network Sharing
If you are using a multi-user version Sage Accounts it is recommended that you share your software data, so that it is accessible across your network.
The ’Share this folder for all users’ check box is selected by default and the shared network path is also shown.
At this point, ensure that the defined network path is both correct, shared and accessible from all the co-user (client) PCs.
If you are not going to share the software data over a network, clear the check box.
For more information about setting up a network installation, please refer to your printed Getting Started Guide that came with your software.
When you are satisfied that your network sharing settings are correct, click Next.

Welcome to Sage 50 Accounts
New Company - Window 3 - Enter Company Details
Enter company information in the Enter Company Details window, similar to the following example:
Enter the name of your Company. This information will be saved in the Company Preferences area of the software (Settings > Company Preferences). The name you enter here will also appear on the title bar of your software.
Now enter the address of your company. This address will be added to the reports, statements, invoices and credit notes that you create. If your company has a number of offices, we recommend that you enter your main or head office address here.
Enter the country for your business. This could be important for validation of your VAT registration number.
Finally, enter your contact details, as appropriate.
When you have completed your entries, click Next.
9

Sage 50 Accounts User Guide
10
New Company - Window 4 - Select Business Type
Choose the business type which best fits your needs. Selecting a business type here creates the nominal structure upon which your Profit & Loss and Balance Sheet reports are based. This structure is called the chart of accounts.
There are various types of chart of accounts available to select from - Sole Trader, Partnership, Limited Company, and Charity.
You can choose the option - I don’t want to set up based on a business type. With this selection, only a basic record structure is created for you to build upon. If you are familiar with the software and have accounting knowledge, you may find this method quicker than choosing a specific business type, which may subsequently require amendment.
A final option - I want to use a predefined business type, allows you to load an existing Chart of Accounts, Profit and Loss and Balance Sheet supplied by your accountant. To do this, select Browse to locate and select the file from your accountant.
As you select from the list of business types, an illustration of some of the chart of accounts structure is shown in this window, to the right of your selection.
For further information on these business type options, click on the graphic:

Welcome to Sage 50 Accounts
Once you have selected the chart of accounts you want to use, click Next.
Note: ActiveSetup provides you with a navigation highlight (light blue) on the left side to show how far through the process you are. When you have completed your selection, click Next.
New Company - Window 5 - Select Financial Year
Specify the month and year in which your Financial Year starts.
If you are unsure about the dates of your current financial year, you should contact your accountant. It is important that you get this date right, as you cannot easily change it once you have started entering transactions.
Sage 50 Accounts users cannot change this date, without losing all entered transactions.
When you have made your selection, click Next.
11

Sage 50 Accounts User Guide
12
New Company - Window 6 - Select VAT Details
In this section of ActiveSetup, enter your VAT information. Indicate whether your company is VAT registered, enter your VAT Registration Number, and select whether your company uses the Standard Accounting, VAT Cash Accounting or Flat Rate VAT schemes (UK only).
Is your company VAT registered?
Indicate whether your company is registered for VAT.
Enter your VAT registration number
If your company is VAT registered, you will have a VAT registration number. Enter this number in the entry box provided. This number will be printed on the invoices and credit notes that you produce. For more information about VAT registration, please refer to the help topic:Manage your VAT > VAT Basics > VAT Registration, or refer to the HMRC guidance.
VAT Scheme
Select the VAT Scheme appropriate to your business:
Standard VAT
When using the Standard VAT Accounting scheme, you need to account for the VAT element of income when it is invoiced, not when you receive the money.

Welcome to Sage 50 Accounts
Similarly, if you buy goods from your suppliers on a credit basis, you also need to account for the VAT element of purchases, when you incur the cost, rather than when you actually make a payment.
At the end of a period, you must pay the amount of VAT collected on sales - that is, output tax, less the amount of VAT charged on purchases - input tax, to the VAT authorities.
VAT Cash Accounting
VAT Cash Accounting is a cash based accounting scheme, devised by the tax authorities to help smaller companies with their cash flow.
Using this scheme, at the end of a period you pay and reclaim VAT only on the money value that has actually been received or paid.
For users in the Republic of Ireland, the ROI VAT Cash Accounting scheme works slightly differently from the UK scheme; it allows you to calculate VAT on the money you receive from your customers and the invoices/credits you receive from your suppliers.
If your PC's Regional Options are set to English (Ireland), select the VAT Cash Accounting check box to calculate your VAT according to the ROI VAT Cash Accounting scheme. If you have any doubts about the VAT scheme you should be using, please contact your accountant.
Flat Rate - Invoice Based (UK only)
The Flat Rate scheme was introduced by HMRC to simplify VAT calculation for new and small businesses. VAT payable is calculated by multiplying the business’s gross turnover by a fixed percentage, which is varied according to trade sector. The fixed percentage is normally lower than the standard VAT percentage.
In the first year of VAT registration, businesses using the flat rate scheme can reduce the flat rate percentage for their sector by 1%, until the day before the first anniversary of VAT registration. This discount applies even if the flat rate percentage changes during the first year of VAT registration.
Under the flat rate scheme, a business must still add VAT at the normal rate, when invoicing customers - that is, an invoice for standard rated item for £1,000 must have VAT of £200 added.
In addition, under the flat rate scheme, VAT is not recoverable on purchases, with one exception. Purchase VAT can be reclaimed on a single purchase of capital expenditure goods, where the purchase amount, including VAT, is £2,000 or more.
For more information about this scheme, please refer to the HMRC guidance.
Flat Rate - Cash Based (UK only)
This is the Flat Rate equivalent of the VAT Cash Accounting scheme.
The calculation of the VAT total for a period is the gross turnover based on payment and receipt only.
Using this scheme, at the end of a period you pay VAT only on the money value that has actually been received. For more information about this scheme, please refer to the HMRC guidance.
13

Sage 50 Accounts User Guide
14
Enter your standard VAT rate
The standard VAT rate for the UK is currently 20.0%. In the ROI, the standard VAT rate is currently 21.0%. Use this entry box to set your standard VAT rate to the standard value applicable at the time of installation. This is a mandatory entry - it cannot be left at zero.
Note: The standard rate of VAT was increased to 20 per cent on 04 January 2011.
Please refer to your tax authority website for the current rate to apply UK / ROI.
Enter your Flat rate % (UK - Flat rate accounting only)
The flat rate you use depends on the business sector that you belong in. The correct sector is the one that most closely describes what your business will be doing in the coming year. For more information, please refer to HMRC information on flat rate.
Note: In the first year of VAT registration, businesses using the flat rate scheme can reduce the flat rate percentage for their sector by 1%, until the day before the first anniversary of VAT registration. This discount applies even if the flat rate percentage changes during the first year of VAT registration. It is your responsibility to manage and adjust your flat rate %.
When you have made your selections and entries, click Next.

Welcome to Sage 50 Accounts
New Company - Window 7 - Select Currency
In order to begin trading with customers and suppliers you must specify the base currency that your company uses. It is important that you select the correct base currency now. You cannot change your base currency at a later date.
Select your base currency from the drop-down list. If the base currency you want to use is not listed, select <Unlisted Currency>. You can then edit this record, once you have completed ActiveSetup.
When you have made your selection, click Next.
15

Sage 50 Accounts User Guide
16
New Company - Window 8 - Confirm Details
You have now entered all of the information required to set up your company.
Your entries and selections are summarised in this window for you to review. If you need to change any of this information, click Back.
Otherwise, to create your new company, click Create.

Welcome to Sage 50 Accounts
Existing Company - Welcome
If you decided to use company data from an existing installation of Sage 50 Accounts, either on your own PC or on a networked PC, the Welcome window changes to reflect this selection.
Use this window to enter the drive letter and directory path, to where your existing data is located. If you are unsure of the exact path, click Browse to locate the existing data.
When you select your path, the software detects and displays the corresponding company name, data version and financial year. Check this information to confirm that the correct data has been selected.
To continue, click Next.
Existing Company - Window 2 - Confirm Details
This window is very similar to that described in New Company - Window 8 - Confirm Details on page 16.
To review or change any of the details you entered, click Back. Otherwise, to complete ActiveSetup and create your company in Sage 50 Accounts, click Convert.
17

Sage 50 Accounts User Guide
18
Restore from Backup - Welcome
If you chose to restore data from a back-up file, then the Welcome window changes to reflect the selection.
You might have selected this option if you are reinstalling Sage 50 Accounts on a new PC, or if you are installing your new software for the first time on a PC that doesn't have an existing version of Sage 50 Accounts on it, but you have a set of data that you want to use with your new software.
Enter the location and file name of the back-up file that contains your existing Sage 50 Accounts data. Alternatively, if you are unsure of the exact location, to locate the file, click Browse.
Once you have selected the back-up file and location, the ActiveSetup window displays the location, where your restored company data will be created.
To proceed, click Next.
Restore from Backup - Window 2 - Confirm Details
This window is very similar to that described in New Company - Window 8 - Confirm Details on page 16.
To review or change any of the details you entered, click Back. Otherwise, to create your company, click Restore.

Welcome to Sage 50 Accounts
Failure to Restore from Backup
If the company data that you choose to restore from backup fails to convert successfully, the data is stored in a new PENDING_CONVERSION folder, located in:
C:\ProgramData\Sage\Accounts\2012\COMPANY.002\PENDING_CONVERSION
In addition, when the Select Company window appears, the company restore failure appears as ****CONVERSION FAILED ****.
1. Select the ****CONVERSION FAILED **** company.
An additional Resolve button appears in the Select Company window.
2. Click Resolve.
A message appears confirming that the conversion of the selected company data has failed.
19

Sage 50 Accounts User Guide
20
3. To undo the data conversion so that you may try the conversion again, select Rollback.
4. If you prefer to keep the partially converted company data for use in the current software version, select Preserve.
Note: When you open your partially converted company data, the data may appear incomplete.
The unconverted data is preserved in a new folder:
C:\ProgramData\Sage\Accounts\2012\COMPANY.002\PRECONVERTED_ACCDATA_20XX

Welcome to Sage 50 Accounts
Registering Sage 50 Accounts
Unless you register your Sage 50 Accounts software, you can only use your new Sage 50 Accounts for a limited period. At the end of the unregistered period you will be unable to use the software. However, all of the information you entered during this period will be unaffected.
During the unregistered period, an advisory message will appear periodically to alert you to the number of days left. To register your Sage 50 Accounts software, call one of the following telephone numbers:
About SageCover
If you are new to Sage 50 Accounts, once you have registered your software, you are entitled to receive free SageCover for a forty five day period. Your cover begins when you register your Sage product. This entitles you to unlimited assistance in registering, installing and starting to use your new software.
During this period you can contact us by calling 0845 111 5555, emailing your query to [email protected] or by visiting www.sage.co.uk. There is no limit to the amount of times you can use the SageCover service in this period.
Note: The free period of SageCover applies only to new users of Sage 50 Accounts. If you are upgrading from an earlier version of Sage 50 Accounts, you should use your existing SageCover support contract if you have any queries. If you do not have an existing SageCover agreement, you can subscribe to SageCover as detailed below.
If you want to subscribe to a full annual SageCover period, which gives you additional benefits such as discounted program upgrades, call 0800 33 66 33 if you are resident in the UK (mainland), 0800 1690315 for residents of Northern Ireland, or 1800 255300 for residents of the Republic of Ireland.
Alternatively, complete the order forms that are sent to you following registration of your Sage 50 Accounts software.
SageCover online support
If you have SageCover and access to email, you can send online queries to SageCover support. To do this, from the Sage 50 Accounts menu bar, select Help > Email Support and follow the on-screen instructions.
At www.sage.co.uk you'll find a wealth of business advice as well as tips on how to get the maximum benefit from your new software.
Mainland UK 0845 111 5555
Republic of Ireland 1890 88 20 60
21

Sage 50 Accounts User Guide
22
Business advice includes several hundred expertly written articles on topics ranging from How to write a marketing plan to How to write a contract of employment.
Your support home page
If you need to contact your Sage Support, a little bit of planning and preparation of relevant information on your software and PC, can help Support to help you more quickly and efficiently. To assist in this, your software now provides you with a Support Home Page that provides on a single screen, all relevant information relating to your software application and the PC on which you are running the software.
The Home Page is accessed from Help > About.

Welcome to Sage 50 Accounts
Your Contact Sage details are summarised at top-left on the Home Page. Your Program Details, Licence Information, Features Enabled, Configuration Information, System Details, Data Information and Online Submission Data are all summarised in separate sections.
At the top of the Support Home Page are your main controls.
To access the Sage Remote Support facility, and make use of the Sage Help Desk Support, select the Remote Support link.
Remote Support is available to all customers, depending upon the circumstances of the call and the level of support contract you have.
To send a snapshot of the Home Page screen data, select the Send to Sage link. A static HTML representation of the Homepage, together with an XML attachment is sent to Sage Support. You are prompted to add your email address.
Data items deemed high risk in terms of data protection are removed from the static HTML image and the XML attachment
Note: Before selecting Send to Sage, select Refresh to update your Home Page content.
To print your Home Page at any time, select Print. Finally, to close the Home Page, select Close.
The sage.co.uk & sage.ie websites
The Sage UK website, www.sage.co.uk or www.sage.ie for those users in the Republic of Ireland), is a valuable resource available to you 24 hours a day, seven days a week.
You can find information on our products and services, print your latest invoice from us or sign up for a free newsletter. It's a convenient place to buy Sage products, find out how to get help and advice locally from a Sage business partner and much more.
We are constantly adding new features to the website, so visit regularly to take advantage of our online services. To access the website, from your Sage 50 Accounts menu bar, select WebLinks > sage.com.
Sage training
Sage offers a portfolio of classroom training courses for all of our users, designed to enable you to make the most of your Sage software packages. Every Sage training course is written and presented by staff who know and understand Sage software.
23

Sage 50 Accounts User Guide
24
There are training centres in Birmingham, Bristol, Croydon, Glasgow, Manchester, Newcastle upon Tyne, North London, Reading, Swansea and Leeds, all offering a range of training courses every month.
For customers who prefer to study in their own time, Sage has also developed a range of self study products, including on-line training courses, interactive CD-ROMs and workbooks with practice data.
For further details about our Training products and course availability, please contact one of our sales advisors on 0800 33 66 33.

Chapter 2
Getting started with Sage 50 AccountsIn this chapter:Accessing Sage 50 Accounts ............26
The practice data mode.....................27
Using Sage 50 Accounts demonstration data...................................................30
The Sage 50 Accounts desktop.........31
Sage 50 Accounts window types.......39
Using the quick search tool................58
Using the search tool to find records..60
Using ActiveSearch............................65
Function keys ....................................66
Getting help .......................................68
Video tutorial simulations ...................69
Wizards .............................................71
An overview to setting up Sage 50 Accounts ...........................................72
Administrative and maintenance tasks ...73
Now that you have installed Sage 50 Accounts and run ActiveSetup, you are ready for a quick tour.
This chapter will help you become familiar with Sage 50 Accounts. You will find out what Sage 50 Accounts can do and you will learn about the demonstration data, a fictitious set of accounts included with Sage 50 Accounts for example purposes, along with a complete Practice Company Mode, in which you can practise using Sage 50 Accounts, without compromising your real company’s data.
This chapter also describes the layout of the Sage 50 Accounts desktop and how you use the various window types.
Finally, this chapter outlines the tasks you need to perform to prepare the system for use and describes the administrative and maintenance tasks which you will need to carry out from time-to-time.

Accessing Sage 50 Accounts
This section describes how you access and log in to Sage 50 Accounts, and how to change your user password.
Starting up Sage 50 Accounts
To access Sage 50 Accounts from your Windows desktop, double-click the Sage 50 Accounts desktop icon. The Sage Logon box is displayed.
The first time you open Sage 50 Accounts, you must log in using the default user name, MANAGER. You do not need a password. You can then set up access rights for the other users who need access to your Sage 50 Accounts data. For further information on setting up access rights, see Setting up users on page 186.
Note: To be able to set up access rights, you must log in as MANAGER.
Changing your password
Initially, the default user name, MANAGER, is created without a password. Before you start to set up data for your company, you should create a password for it. Thereafter, you should change your password regularly in order to ensure continued security.
To change your password
1. From the Sage 50 Accounts menu bar, select Settings > Change Password.
Note: If you already have a password, the Password Entry window appears asking you to enter your current password here.
The Change Password window appears.
2. In the New Password box, enter your new password.
You can use letters or numbers in your passwords, or a mixture of both. However you cannot use special characters, for example =, !, #, commas or full stops.
3. In the Confirm New Password box, enter your new password again. You cannot save this password until the entries in the New Password and Confirm New Password are the same.
4. To save your new password, click OK. To begin entering your new password again, click Discard. To exit without saving, click Cancel.

Getting started with Sage 50 Accounts
The practice data mode
When your Sage 50 Accounts software starts, you are presented with a choice of three operating modes:
Open Your Company’s Data
Open Practice Data
Open Demonstration Data
Note: By using the ’Don't show these options on start-up’ check box, you can avoid this window on subsequent occasions, if you wish.
1. Selecting the first option and then clicking OK, opens your Sage 50 Accounts software with your own company's data, and you can proceed to work on your own data.
2. However, by electing to go with the second option Open Practice Data, and then choosing OK, you are presented with the Welcome to Practice Mode window.
3. By choosing the third option and then choosing OK, the software opens with the fictitious demonstration company data - Stationery & PC Mart UK. Refer to Using Sage 50 Accounts demonstration data on page 30 for more information about this mode.
27

Sage 50 Accounts User Guide
28
The software opens in a clean state, with no customer, supplier or product records created, when you click Start Practising.
You can rehearse the various tasks and procedures, gain confidence in the various terms, methods and routines required, safe in the knowledge that you are not compromising your own real company data.
When working in Practice Mode, the Welcome window reminds you that you are in this mode.
Note: While in this mode, the Backup and Restore commands are disabled in the File menu.
When you are finished working in Practice Mode, you can switch to either your Company's data or the Demonstration Company data from the File menu.

Getting started with Sage 50 Accounts
Similarly, if you are already working in your Company's Data or Demonstration Data environments, you can return to the Practice Company environment from the File > Open route.
When you choose to return to the Practice Company environment, the software offers you two choices:
If you choose to continue with your last practice, you retain all your previously created data and settings. Where you choose to start again, you can choose the types of data to retain or reset:
Select the check boxes for the data that you wish to keep, when the Practice Company is reset, then to proceed choose OK.
29

Sage 50 Accounts User Guide
30
Using Sage 50 Accounts demonstration data
The best way to become familiar with Sage 50 Accounts is to practise! Sage 50 Accounts includes a demonstration data set for a fictitious company called Stationery & Computer Mart UK.
To access the demonstration data, from the Sage 50 Accounts menu bar, select File > Open > Open Demo Data. If Sage 50 Accounts prompts you to log in, enter the default user name MANAGER, leave the password box empty, and click OK.
Start using Sage 50 Accounts by experimenting with this demo data. Try moving around the windows and familiarise yourself with list boxes, option buttons, check boxes and the other elements of the software. Use the Search, Clear and Swap buttons on the Nominal Ledger window to see how they work and then select some records from the Nominal list. These are all activities you will use throughout Sage 50 Accounts and learning them now will be a real help later on.
As you are working through this guide, you can swap between your own company information and the demo data to practise any functions that you are unsure of. The demo data is fully interactive and you can enter information into the data set to try out the functions and work within the system. Whilst you are in the demo data set, you can do nothing that will influence your real accounts. So don’t worry and try things out.
Remember, you are not on your own. This chapter explains how to use Sage 50 Accounts on your PC, the rest of this guide explains procedures and processes with step-by-step instructions.
You also have the Sage 50 Accounts Help system at your disposal, which you can search at any time if you are stuck. Just click Help on the Sage 50 Accounts menu bar, then select the Contents and Index option from the drop-down list displayed. Alternatively, press F1 if you are stuck on a particular window.
Note: All details in the demonstration data are fictitious. Any similarities in the demonstration data with real names, addresses or other company details, past or present, is coincidental.

Getting started with Sage 50 Accounts
The Sage 50 Accounts desktop
The following pages are intended to provide you with a guided tour of the Sage 50 Accounts Desktop, describing its major features and how you use them.
Sage 50 Accounts is compatible with most Windows products. This means that it has its own main window, which you can maximise, minimise and resize, and keep open while you work on other Windows-compatible applications. When you double-click the Sage Accounts Desktop option, the Sage 50 Accounts window appears.
Note: The exact appearance of the window depends upon how you have configured your View options; see Defining your desktop view options on page 38 for details.
The navigation bar provides quick and easy access to the major functions of Sage 50 Accounts.
The view selector allows you to select what is to be displayed in the work area.
The work area is where you work within Sage 50 Accounts and where the software displays information about your data.
Tabs show the windows that are open for viewing in the work area.
This is the Sage 50 Accounts Menu Bar. Open a menu by putting the arrow over the word and clicking the mouse or Alt + underlined key.
31

Sage 50 Accounts User Guide
32
Using the navigation bar
The navigation bar, on the left hand side of the window, is the easiest way to access the major facilities provided by the Sage 50 Accounts software.
Modules
The options shown at the bottom of the navigation bar provide access to the major areas of the software. These are the Sage 50 Accounts modules:
Customers
Suppliers
Company
Bank
Products
Projects
Diary
Sage Services
The Tasks and Links panes show the major activities to be performed on the current data, in this case Company.
The options allow you to open the various Sage 50 Accounts modules.

Getting started with Sage 50 Accounts
Click the option you require to access the corresponding area of the software. When you choose a module, the options shown in the Tasks and Links area of the navigation bar change and the appropriate display is shown in the Sage 50 Accounts Work Area.
Tasks and links
The options shown in the Tasks and Links areas of the navigation bar vary, depending upon the module chosen. They provide you with access to particular functions. For example, in the Customers module, the Tasks include: New Customer, New Quotation, New Sales Order, and so on; the Links include: Project List and Invoice List.
To make a selection, simply click the option you require.
Note: Throughout this guide, where we need to describe selection of a module, followed by selection of a Task or Link option this is shown in the window: Customers > New Customer.
Using the view selector to change the view
The view selector allows you to change what is displayed in the Sage 50 Accounts work area. The options available depend upon which module you are working in, but typically they might include:
A Process Map - showing the workflow associated with the selected module.
A List display - of items appropriate to the selected module.
A Dashboard - showing key information for the selected module.
For detailed information about these window types, see Sage 50 Accounts window types on page 39. For details of how to set default view options, see Defining your desktop view options on page 38.
To make a selection, click the Change View button shown in the top right-hand corner of the work area and then select the option you require from the drop down menu displayed.
Note: Throughout this guide, the step-by-step procedures assume that you have a list window displayed.
33

Sage 50 Accounts User Guide
34
The work area
The work area is where Sage 50 Accounts displays information and where you enter your data into the software. The layout of the work area depends upon the view you have selected and type of window you are using.
For detailed information about the window types which can be displayed in the work area, see Sage 50 Accounts window types on page 39. For details of how to set default view options, see Defining your desktop view options on page 38.
Menu commands
Each option on the Sage 50 Accounts menu bar provides access to a drop-down menu. If you use other software on your PC, you will probably be familiar with drop-down menus. You can open menus and choose options using the keyboard or mouse, as described below.
Selecting menus with a mouse
Left-click when the pointer is on the menu option name, to display the pull down menu. To select an option, left-click when the mouse pointer is pointing to the option on the menu that you want.
Right-click
You can use the right button on your mouse in many areas of Sage 50 Accounts. This is known as right-click. You can use the right-click as a quick way of copying, pasting and deleting. You can also right-click in many areas to access common commands that relate to the line that you click on.
Keyboard shortcuts
Moving around the desktop
Some people prefer to use their keyboard rather than a mouse when working with their software. For frequent actions, you may find some shortcuts easier and quicker to use.
To Press
Open a module from the stack bar.
Tip: Module position in the stack bar relates to the number you choose
CTRL+key numbers 1-9
For example, if Suppliers occupies the second position in the stack bar, use CTRL+2 to open that module.
Move from the shortcut bar to the right pane.
CTRL+TAB

Getting started with Sage 50 Accounts
Moving around open windows
Move between open module tabs in the right pane.
CTRL+TAB
Move from the right pane to the shortcut bar.
CTRL+0
Close all tabs in the right pane.
CTRL+ALT+Q
Move up or down items in the left or right pane.
up arrow or down arrow
Start selected feature in the left pane.
Enter
Move to next icon or command.
Right arrow or left arrow
Start selected icon or command.
Space bar
Select list items. Space bar
Start selected feature in a process map.
Enter
To Press
Move to the next box. TAB
Move back to the previous box
Shift+TAB
Move to the last character of the last word in a box.
End
Move to the start of a select box.
Home
Move to the first character of the next word in a box.
CTRL+right arrow.
35

Sage 50 Accounts User Guide
36
Navigating through the menu and selecting commands
Menu shortcut keys are indicated in the software menus and windows by an underlined letter.
To use the shortcuts press the Alt key on your keyboard and, while keeping the key pressed, press the key corresponding to the underlined letter shown in the menu.
As an example, in the menu illustration below, press Alt and F on your keyboard to open the File menu; then, keeping the Alt key pressed, press B on your keyboard to open the Backup window.
Similarly, to select Search in the second illustration below, press Alt and R on your keyboard to open the Search window.
Move to the first character of the previous word in a box.
CTRL+left arrow.
Exit the window without saving.
ESC

Getting started with Sage 50 Accounts
Function keys
The software uses function keys to access a number of important features, including the calculator and this help system.
The features assigned to function keys are as follows:
F1 The main help file appears.
F2 The system calculator, allowing you to perform mathematical calculations and, if needed, paste the result back into a data field.
F3 Displays the Edit Item Line window when entering invoice details. Financial Controllers can also use this key to display the Edit Items Line in sales and purchase order processing.
F4 Displays the calendar, calculator or finder search list if the selected text box has any of these special buttons attached. Also, if you select a drop-down list box, pressing F4 displays the list.
F5 Calls the Currency Calculator when the cursor is in a numeric box. Calls the Spell Checker when pressed while the cursor is in a text box.
F6 The Duplicate Cell command in the Edit menu.
F7 The Insert Row command in the Edit menu.
F8 The Delete Row command in the Edit menu.
F9 The Calculate Net command button.
F11 This key launches the Windows control panel. Alternatively, you can configure this button to launch another application on your PC.
F12 By default, the F12 key launches the Report Designer. Alternatively, you can configure this button to launch another software title on your PC, or minimise your software.
37

Sage 50 Accounts User Guide
38
Defining your desktop view options
Desktop view options allow you to define:
Which of the modules will be displayed when you first access Sage 50 Accounts.
Which of the window types - dashboard, process map or ledger list, are to be displayed, when each of the modules is opened.
Whether dashboards and process maps are to be switched off globally.
To define your desktop view options
1. From the Sage 50 Accounts menu bar, select Tools > Options.
2. Click the View tab.
3. Select the options you require:
4. To save the new settings, click OK. To exit without saving your changes, click Cancel.
Initial View
Not available in Practice Mode
Use the drop down to select the module that is to be displayed, when you first access Sage 50 Accounts.
Default View For each of the modules, use the drop-down list to select which of the screen types will be displayed when the module is opened.
Turn off all dashboards Use this option to switch off all dashboards.
If you select this option, you will not be allowed to select a dashboard for any of the Default View options. If you already have a dashboard selected, this is changed to the appropriate list screen.
Turn off all process maps
Use this option to switch off all process maps.
If you select this option, you will not be allowed to select a process map for any of the Default View options. If you already have a process map selected, this is changed to the appropriate list screen.
Don’t display the Welcome Page
Use this option to remove the Welcome Page from the display.

Getting started with Sage 50 Accounts
Sage 50 Accounts window types
When you select a Task or a Link from the Sage 50 Accounts navigation bar or an option from the toolbar, a window appears in the work area of the window.
You can have several windows open at once, so you can move between one function and another without having to close each one in turn. However, only one window can be active at any one time. When you open a new window, a new tab appears in the bottom left area of the window. to move between any of the windows, click on these tabs.
In the example above, you can click any of the tabs to change the view from Supplier Process to Customers Process or the Welcome Window.
39

Sage 50 Accounts User Guide
40
Process maps
Process maps provide a diagrammatic representation of the workflow associated with a particular module.
For example, the Supplier Process, shown above, shows the process from New Purchase Order - on the left, through to Cheque List - on the right.
Each of the blocks displayed represents a function available with Sage 50 Accounts. To access one of these, click the appropriate option.
Process maps are available for the following modules:
Customers
Suppliers
To view a process map, select the appropriate option from the view selector, as described in Using the view selector to change the view on page 33.

Getting started with Sage 50 Accounts
Dashboards
Dashboard windows are used in Sage 50 Accounts as a quick way of providing you with useful information related to the module you are currently working in.
The information displayed is up-to-date at the time the dashboard is first displayed. If you have the window displayed for any length of time, you can click the Update option to refresh it.
Dashboards are available for all modules, except Diary and Bank.
To view a dashboard window, select the appropriate option from the view selector, as described in Using the view selector to change the view on page 33.
Update option. The adjacent text shows the date and time of the last update.
41

Sage 50 Accounts User Guide
42
The Welcome page
The Welcome page provides you with a central resource base, from where you can access numerous user assistance links and files. The resources are divided into three categories:
Introduction and HelpIn the top section of the window are three links to useful information:
The What should I do first? link takes you to a Getting Started screen, where you can review your initial introductory tasks in the software.
What’s New? link takes you to the What’s New? help topic, where you can review the new features in this version of Sage 50 Accounts, while the Just Practice link takes you directly to the Practice company page of this help file.
Further Information
The middle section of the Welcome page provides links to more comprehensive sources of information.
The Regular Tasks link takes you to a second launchpad window, where you can review those more complicated but regular tasks that you need to undertake.
The PDF Guides link takes you to a separate menu, where you can access the numerous PDF documents provided with the software.
This PDF menu gives you access to the numerous pdf documents provided with the software.
Note: If you encounter difficulties in opening any of the PDF documents in your browser window, please perform one of the following:
Open Adobe Reader first, then click the specific PDF document link on the PDF menu.
Configure your browser to display PDF files, as described at the Adobe Support Site.
The Help link in this section takes you directly to the first page of the software help file.

Getting started with Sage 50 Accounts
Contact Sage
The Contact Sage link provides you with the necessary details for getting in touch with Sage.
Use the Support Homepage link to review details of your software, the current software status, and how the software features are being used. You will find this information useful, when contacting Support.
Finally, select the Ask Sage link to access even more help and guidance.
43

Sage 50 Accounts User Guide
44
List windows
As you perform many of the Sage 50 Accounts functions, you can set the work area to display a list or ledger window which shows you the record or records you can work with.
To view a list window, select the appropriate option from the view selector, as described in Using the view selector to change the view on page 33.
Note: Throughout this guide, the step-by-step procedures assume that you have a list window displayed.
In some cases, you must first create these records; in others, you are given a standard set of records to work with straight away. As you create each new record, it is added to the list in code or reference order, so that you can always find the record you want quickly.
The following figure shows an example of the Customers Ledger window. .
Select one or more records by clicking on the lines you require.
Command buttons allow you to manipulate the list.
New records appear on the list automatically.
You can sort this list in any column-type order by clicking on the header range, for example Balance or Contact.
Toolbar options provide data processing options

Getting started with Sage 50 Accounts
A scroll bar appears when there are more records to be viewed than can be displayed in the list box at any one time.
Selecting a record for processing
Each ledger window displays a list of records you have added to your ledger.
When you want to work with a single record, for example if you want to make a transfer from a bank account, you can select the record from the list before you click the appropriate button from the toolbar. This saves you from selecting the record once the process window, for example the Bank Transfer window, is open.
To select a record from a ledger window, move the mouse pointer to the record in the list and left click. The selected record is highlighted in the list.
If the Enable Smart Totals option is switched on in Company Preferences, the information:
1 of xx items selected
appears at the bottom of the list, where xx is the number of records currently displayed in the ledger. In addition, when you select a record that has a balance associated with it, for example in the Customers or Bank window, the balance amount shows in the Total Amount box at the bottom of the record list.
For more information about setting up your Company Preferences, see Entering company preferences on page 124.
Selecting more than one record
There may be times when you want to process several records in succession, or print a report based on a particular selection of records. Using the same method as when selecting one record, you can click as many records in the list as you want. As you do so, each one is highlighted and becomes part of the selected set of records for processing.
Tip: You can also select the records you want by using your cursor arrows on your keyboard to scroll down or up, and pressing the SPACEBAR to select the record or records you want.
If you select several records and then click Record, for example if you want to make amendments to several records in succession, the first record highlighted in the list appears on the record window ready for processing. When you finish processing that record, you can view the next one in the selection by clicking Next. To go back to a previous record from the ones you have chosen, click Previous.
You will find it useful to be able to select several records when using the report options. You can highlight all the records you want to include in the report, before choosing the report you want to print.
If the Activate Smart Totals option is switched on in Company Preferences, as you select your records, Sage 50 Accounts shows how many records you have highlighted at the bottom of the list. In addition, Sage 50 Accounts adds together the balance on each record and displays the total balance in the Total Amount box at the bottom of the list. The balance may show as one
45

Sage 50 Accounts User Guide
46
total amount, for example on the Invoicing window, or it may display as total debit and credit amounts, such as in the Nominal Ledger.
Note: The total debit or total credit only appear on the Nominal Ledger, when it is set to use the List layout.
Deselecting records
Having highlighted a record you may want to deselect it, either because you have finished processing it or perhaps because you selected the wrong one. If you click the selected record (or use the SPACEBAR), the highlight disappears. As you deselect records, Sage 50 Accounts subtracts their balance from the Total Amount box at the bottom of the list and the figure for the number of records selected is decreased.
Using the toolbar
The main actions you can perform on the records displayed in a list window are shown on the toolbar at the top of the window. To run any of these options, left-click the appropriate icon.
When you run many of these options, a separate process window will appear for you to work in.
Command buttons
Command buttons appear in most of the Sage 50 Accounts list windows. Use these to take action once you have entered some data or selected a record to work with. Command buttons appear on virtually every window and include one or more of the following commands:
.
Save Choose the Save button to accept the data you have entered and process the information, for example make the changes in the record. Any data entry boxes on the window will be cleared for you to enter details for another record. Save does not take you out of the option.
Close Click Close to choose when you want to exit from an option. Close does not save any data you have entered so make sure you do this first, if appropriate.
Discard If you click Discard button, any data you have just entered in the data entry boxes will clear from the window for you to start again.
Note: Discard does not undo any entries you have already saved.
OK The OK button is sometimes shown instead of the Save button. The difference is that OK will not only save and process your data but will also exit the option.
Cancel The Cancel button is sometimes shown instead of the Discard button. The difference is that Cancel not only Discards your data entry or process but it also exits the option.

Getting started with Sage 50 Accounts
When there are too many buttons to display on the visible window, for example if you are using a low display resolution, a double-arrow symbol appears to the right-hand side of the command button bar. Click the arrow symbol to access the remaining available buttons:
Using the swap and clear buttons
If you have highlighted records that you no longer want selected, click Clear. Any records that were highlighted are deselected, and no records are left highlighted.
When you want to select numerous records, it may be quicker to select those records you do not want, rather than what you do want. By using the Swap button, you can change the selection to those that are not highlighted.
Click the records you don’t want selected so they are highlighted and then click the Swap button. Everything that isn’t highlighted is immediately selected, and the records you clicked on are deselected. You can swap back again using the same button. Try it out and you’ll soon be familiar with the process.
Sorting the list
You can sort the records in most Sage 50 Accounts windows by ascending, descending or alphabetical order, depending on the information in the list. Left-click on the column name to sort the records. When you close and restart Sage 50 Accounts, any sorts that you apply are remembered.
Showing more data columns in the windows
Many of the windows can show more columns of data if you maximise the window. Try it and see. If you still can’t see all of the columns a scroll bar appears, enabling you to see the additional columns.
Resizing and hiding data columns
As you become more familiar with the ledgers and windows in Sage 50,Accounts you may find that you use some data columns more than others. For example, in the Customers window, you might use the A/C and Name columns frequently for looking up a particular account but perhaps, use the Contact column less often.
47

Sage 50 Accounts User Guide
48
Using the Configurable Columns feature, you can hide certain data columns that you do not use very frequently, allowing more room on-screen for those columns that you use more often. You can also resize the columns on-screen to make the best use of the space available, according to your needs. Thus, in Customers module, you could hide the Contact column and then make the A/C and Name columns wider.
Note: You cannot hide essential columns, such as the Account Reference.
Sage 50 Accounts stores the settings you select against your user name, so you can personalise your software view without affecting other users. When you next log into the software, Sage 50 Accounts remembers your settings and displays each window as you configured it.
Alternatively, you can customise columns for all users at once, so that every user sees the same data column configuration regardless of their user name.
To do this, log in using the Manager user name, choose Tools then Options from the menu bar, and select the Use Manager account settings for column display check box. You can then set up the columns in each option of Sage 50 Accounts, as you want them to appear for all users.
To set your configurable column options
1. From the Sage 50 Accounts menu bar, select Tools > Options.
2. From the Toolbar tab, select the Configurable Columns option you require.
Allow columns to be hidden and resized
Use this option to switch on configurable columns.
See To resize a data column on page 49 and To hide or restore a data column on page 49 for details of how to hide and resize columns.
Use Manager account settings for column display
Use this option to set your column displays to be the same as those set up by the Manager user name. This option may be useful to maintain consistency between users.
Use default settings for column display
Use this option to switch off configurable columns.
If you select this option, you will not be allowed to hide columns or add further columns to display windows; the right-click functionality is disabled. You will still be allowed to resize columns. However, when the window is closed, the column widths will be reset to their default settings.
If you choose this option after having already used the configurable columns facility to define some window layouts, all windows are returned to their default settings and any columns previously hidden will be redisplayed.

Getting started with Sage 50 Accounts
3. To save the new settings, click OK. To exit without saving your changes, click Cancel.
Note: If you have upgraded from a previous version of Sage 50 Accounts, any previous configurable columns settings will have been lost during the upgrading process. You will need to reconfigure these settings.
To resize a data columnNote: If you do not have configurable columns 'switched on', any changes you make will be reset back to the default values when you close the window.
1. From the appropriate Sage 50 Accounts window, hover your mouse pointer over the label in the heading of the column you want to resize.
2. Move the mouse pointer so that it appears between the column heading labels:
When it is positioned correctly between the column headings, your mouse pointer appears as a cross with a double-headed arrow, pointing to the left and right.
3. To increase the column width, left-click and hold the button down. With the left mouse button held down, drag the mouse pointer towards the right until the column is at the width you require. Release the left mouse button.
4. To reduce the column width, left-click and hold the button down. With the left mouse button held down, drag the mouse pointer towards the left until the column is at the width you require. Release the left mouse button.
5. To reset all of the columns in the current window to their default width, right-click any column heading and select Use Defaults from the drop-down menu.
The window displays all the columns at their default width.
Note: When you select Use Defaults, any columns you have previously hidden reappear on the current window.
To hide or restore a data columnNote: If you do not have configurable columns switched on, you will not be allowed to hide and restore columns; the right-click functionality is disabled.
1. From the appropriate Sage 50 Accounts window, right-click the heading of the column you want to hide.
For example, if you want to hide the Contact column in the Customers window, select the Customers > Customer List, and right-click the Contact label at the top of the column.
49

Sage 50 Accounts User Guide
50
A drop-down list appears, displaying all the column headings that relate to the current window. The column headings that currently display in the window show a tick alongside them on the list.
2. To hide a column from the current window, left-click the column heading on the drop-down menu.
The column disappears from the window, and the item no longer shows a tick against it on the drop-down list.
Note: You cannot hide all of the columns on any window. To prevent this happening, Sage 50 Accounts does not allow you to hide the first column on the window. For example, in Customers module, you cannot hide the A/C column.
3. To restore a column to the current window, right-click a column heading that is currently displayed. The column headings menu appears. Left-click the column heading you want to display.
The column reappears on the window, and the item shows a tick against it on the drop-down menu.
4. To restore the default column settings for the window and display all the available columns, select Use Defaults from the drop-down list.
The window displays all the available columns at their default width.
Duplicating records
To save you time when you are creating new records, Sage 50 Accounts provides the facility to duplicate the details of an existing record. This is particularly useful if you need to create several customers or suppliers, for example that use many of the same account details. You can duplicate a customer, supplier, nominal, bank, product, project or fixed asset record.
Note: You cannot use the Duplicate facility to create control or bank accounts in the Nominal Ledger. When you duplicate an existing nominal record, Sage 50 Accounts automatically sets the record type to Nominal.
You can duplicate invoices, for example, if you want to create a number of invoices for the same products or services. Accounts Professional users can use the Duplicate feature to make copies of existing sales orders and purchase orders.
To duplicate a record’s details
1. From the appropriate ledger window, select the record you want to duplicate.
2. Click Duplicate.
The Record window appears, showing the details copied from the original record. For more details about what information Sage 50 Accounts copies for each record type, please refer to the Sage 50 Accounts Help system.

Getting started with Sage 50 Accounts
3. Enter an Account Reference, Nominal Code, Product Code, Project Reference or Fixed Asset Reference for the new record.
Note: You must enter a new, unique Account Reference, Nominal Code, Product Code, Project Reference, or Fixed Asset Reference. If you enter one that already exists, Sage 50 Accounts displays a warning message. To return to the record window and enter a new reference, click OK.
When duplicating a nominal record, if you enter a nominal code that falls outside the range of your current chart of accounts, Sage 50 Accounts displays the message:
This nominal code is outside the range of the chart of accounts, therefore its balance will not be reflected in your P&L and Balance Sheet reports. Either choose a different nominal code or ensure that you update the chart of accounts layout.
Click OK to return to the Nominal Record window. You can choose a different nominal code that falls within the current chart of accounts, or alternatively you must remember to amend your chart of accounts layout to include the new nominal code. For details about editing your chart of accounts, see Chapter 4, Setting up your Chart of Accounts.
4. Add or amend the details you require in each of the record’s tabs.
5. To save the new record, click Save. To discard your changes, click Discard.
6. To close the record window, click Close.
The main ledger window appears.
You have successfully duplicated the record.
Making changes to records in a batch
If you want to make identical changes to a number of records in a ledger, Sage 50 Accounts lets you make the changes once and then apply them to all the records you require.
For example, if you want to set the Terms Agreed flag on all of your customer records, you can select all of the relevant records simultaneously, and make the change only once.
Because you do not need to open and amend every record individually, this feature saves you valuable time and effort.
You can make batch record changes in Customers, Suppliers and Products. Accounts Professional users can also record changes in Fixed Assets.
To make changes to a batch of records
1. From the Customers, Suppliers, Products, or Fixed Assets window, select those records you want to modify.
2. Click Batch Changes.
The Batch Changes window appears.
51

Sage 50 Accounts User Guide
52
Note: You can only enter information into the boxes that are suitable for batch changes. Boxes and buttons that appear greyed out are unavailable. For a list of what you can change for each type of record, please refer to the Sage 50 Accounts Help system.
3. Make the changes you require.
4. Choose one of the following options:
5. To return to the main ledger window, click Close.
Save Click Save to apply changes to the selected records. A confirmation message appears:
You have chosen to make changes to multiple records. Do you want to save changes?
To confirm that you want to apply your changes, click Yes. If you do not want to apply your changes, click No to return to the main ledger window.
Alternatively, to cancel and return to the Batch Changes window, click Close.
Close To cancel your changes without applying them to the records you selected, click Close. A confirmation message appears:
Do you want to save changes?
To save the changes to all the records you selected, click Yes. If you do not want to apply your changes, to return to the main ledger window, click No. Alternatively, to cancel and return to the Batch Changes window, click Close.
Discard To discard any changes you have made and return to the main ledger window, click Discard.

Getting started with Sage 50 Accounts
Data entry windows
In Sage 50 Accounts, your data is entered onto windows. Each window is divided into small boxes into which data can be typed using the keyboard or selected from a list of choices.
There are three types of boxes:
Alphanumeric: Boxes that accept both letters and numbers, plus a few symbols such as hyphens or brackets.
Numeric: Boxes that accept only numbers.
Date: Boxes that accept and display a date.
There is a limit to the amount of information you can enter into a box. During data entry, Sage 50 Accounts ensures that you enter the right information type and amount of data in each box. So, for example, you will not be permitted to enter text in a numeric box. You will also be prevented from entering a date which is not a calendar date.
Other types validation ensure that, as far as possible, the right kind of information is entered into the appropriate box. Any deviation from the expected data may result in the input being rejected or ignored, or in the window displaying an error message.
Entering and editing data
To type data into a window, you can move the arrow-shaped pointer - the cursor - to the box where you want to enter data, at which stage the pointer changes to a vertical bar called the insertion pointer.
Move the cursor to the part of the box where you want to begin typing and left-click. If the box is blank, an insertion pointer appears at the far left of the box. If there is data already in the box, the insertion pointer appears at the same place as the cursor was positioned, when you clicked the mouse button.
The figure overleaf shows a typical data-entry window.
53

Sage 50 Accounts User Guide
54
When you click Save, a blank window appears, ready for another record. If you want to recall your last record, click the drop-down list button, represented by a downward pointing arrow, and this will give you a list, in alphanumeric order, of all the records that have been entered. Find the record reference that you want and select it with your mouse.
Find records with this button.

Getting started with Sage 50 Accounts
Moving around windows
After you have entered data within a box, you can use any of the following keys, found on your keyboard, to locate the cursor elsewhere within the box or the window:
:
Alternatively, you can use the mouse to place the cursor wherever you want and click the left mouse button to accept the location.
Editing box contents
To add characters within a box, simply place the cursor at the point you want to start typing and click the left mouse button. When you type, characters are inserted from the cursor position, displacing existing characters to the right of the cursor.
To delete all or part of the contents of a box, use one of the following methods:
To delete individual characters to the left of the cursor, use the BACKSPACE key.
To delete several characters at once, you can highlight the text using the mouse. Alternatively, you can press and keep the SHIFT button depressed while you use the right or left arrow key to select the characters you want to remove, and then press DELETE.
To delete a complete word, either highlight the word by placing the cursor over it and double-clicking the left-hand mouse button, or use CTRL+SHIFT and the right or left arrow key, to highlight the whole word and then press DELETE.
To delete a whole line on transaction entry window, place the cursor in any box on the transaction line and press F8.
To delete the entire contents of the box, use the mouse to highlight the contents of the box and then press DELETE.
TAB Move to the next box.
SHIFT+TAB Move back to the previous box.
ESC Exit the window. If any data has been entered, you will be asked to save the details.
END Move the cursor to the last character of the last word in the box.
HOME Moves the cursor to the start of the box.
CTRL+RIGHT ARROW Moves the cursor to the first character of the next word in the box.
CTRL+LEFT ARROW Moves the cursor to the first character of the previous word in the box.
55

Sage 50 Accounts User Guide
56
Using drop-down list boxes and scroll bars
You can enter some entries by selecting from a drop-down list box. These are indicated by a down-pointing arrow to the right-hand side of a box.
When you click a drop-down arrow in a list box, the software opens a list of the first few choices. To make a selection, click the option you want, and it appears in the box. If necessary, use the scroll bar to move down the full list.
Scroll bars
Windows and drop-down lists will not always be able to display all of the records or fields that can be selected. Where a window has more to display than can be shown at one time, a scroll bar appears at the right-hand side of the window, like the one shown on the drop-down list box above.
To use the scroll bar, click the up or down arrows, holding the mouse button down, to scroll the list up or down respectively. Alternatively, drag the empty box in the scroll bar up or down using the mouse.
Option buttons
Option buttons that appear in Sage 50 Accounts let you select one action, from two or more possible actions.
You select an option button by left-clicking on the required option - a dot appears in the selected option, or use the TAB key to move the cursor to the option button area, then select the button with the arrow keys.
Click this arrow for the drop-down box to appear.
Use these arrows to scroll up and down the list box to select the appropriate records.
You can only select one option button. In this example, the Top Left option is selected.

Getting started with Sage 50 Accounts
Check boxes
Check boxes let you select one or more of the actions you require from a range of actions. For example, in the Graph windows, you can show different types of transactions.
Select a check box by left-clicking on the required box - a tick appears. Alternatively, use the TAB key to move the cursor to the check box area and select on or off using the SPACE BAR. To clear a check box, repeat the procedure so that the tick does not appear in the box.
Using the calendar button
All boxes which require you to enter a date have a Calendar button attached. When you click this button a calendar appears from which you can select the date you need using your mouse.
Using the calculator button
To help you perform your calculations, a Calculator button is attached to many numeric data-entry boxes. When you click this button a mini calculator is displayed, which you can use like an everyday calculator with clicks of your mouse. The results seen on the on-screen calculator appear in the numeric data entry box.
Smart Link buttons
There are often times as you use Sage 50 Accounts, where you require additional information about an account or transaction. At the click of a button, the Smart Link feature allows you to move from the window you are working in to another window containing related data. Your account information becomes more accessible as you work.
For example, when you enter an invoice, you may want to check the customer's details. Click the arrow button alongside the account code box to go to the customer's record details.
You can select one, two or three of these check boxes at once.
When you click this button, a calendar appears from which you can select the required date.
Click this button to display a mini calculator.
Click this button to go to view the account details.
57

Sage 50 Accounts User Guide
58
The 'Drill-Down' facility
You can click a transaction listed on a customer, supplier, bank or nominal activity window to drill down into the associated order, invoice or credit note details.
The following example shows the same transaction listed on the Bank Activity window.
Using the quick search tool
On many occasions you are likely to want a quick search result from your records, without having to resort to lengthy search definition of joins, operators or fields.
In Sage 50 Accounts, the Quick Search tool provides you with a speedy method of data reduction in your various Customer, Supplier, Invoice, Sales Order, Purchase Order, Quotation, Financials, Product, Nominal and Correction lists.
In these list views you can also search on existing search query results, further refining your data reduction.
The Quick Search free text tool is located at the top of the various list views.
The Quick Search tool is not available in Bank, Fixed Assets, Projects and VAT list views.
The Quick Search entry box searches on any combination of text, number or alphanumeric entry, up to a maximum of sixty characters. Having entered your Quick Search character string and selected Find, the Quick Search tool performs a "look up" in the data fields associated with the columns in the currently displayed ledger only.
The Quick Search "look up" is based on the precise character string entered. Thus, the query "John Smith" returns records containing the full string "johnsmith" - the two words are not treated as separate entities.
Note: In the case of Customer and Supplier lists, the "look up" action also includes Registered Address. In the case of Invoicing, the "look up" action also includes Invoice Address and Delivery Address.
Click this icon to see the details that make up the transaction.

Getting started with Sage 50 Accounts
The results generated from the Quick Search are displayed in a new list view, signified by the spy glass indicator at the top right of the ledger view.
If you close the currently opened ledger, the Quick Search query results are not retained.
To clear a Quick Search query, select Clear, next to the Quick Search entry box.
Wildcard support in quick search
? This represents a single undefined character - for example, WE?001 finds WEB001 and WET001.
* This represents any number of valid characters, including spaces, after a specific value - for example, WE*001 finds WEB001, WET001, WEBSTER001, WEST WOOD001.When using * in the Search option, the text is not case sensitive. For example, entering the search "customer *" also finds records named "Customer *".
$ This represents a specific line of text anywhere in the data - for example, $WE finds WEB001, WET001, WEBSTER001, WEST WOOD001 and others such as SWEDE123 where there is a WE together.
Limitations of quick search
The following features are not supported by Quick Search
Boolean arguments
Dates within the Sales or Purchase ledger
Flags or Status
Dates - Quick Search will only return a date value, where an exact match is found - for example DD/MM/YYY
59

Sage 50 Accounts User Guide
60
Using the search tool to find records
The quick search facility provided by the Find tool is fast and sufficient for most needs. However, when you are dealing with numerous transactions of a similar nature, you need a more discerning tool to locate the transactions you are searching for.
Often it can be time-consuming to sort through numerous records to find the few that are relevant to the task you want to complete. You can use the Search function to look through your records in the Customer, Supplier, Nominal, Products, Invoicing, Sales Order Processing - Accounts Professional only, Purchase Order Processing - Accounts Professional only, and Financials windows, to find what you want. You can also run your management reports specifically on those records that you have searched for.
Note: Applying a search in the Financials window to show only specified transactions does not have any effect on reports within this module.
You can save the search requests you create to reapply them at a later date. For example, you could set up a search to show customers who are over their credit limit. You can then save this search to reapply again at regular intervals as part of your credit control procedures.
To set up a search request
1. From the appropriate window, for example, Customers, click Search.
Use the Search button

Getting started with Sage 50 Accounts
The Search window appears showing either a new search window or, if you have previously created a search request, the last search that you created.
2. If a search is already shown and you want to create a new request, click Discard.
You can now start to build your new search.
3. From the Join drop-down list, select Where.
4. From the Field drop-down list, select the field you require. This is the field where you want to search. For example, if you want to find all records with a balance less than £100 (< 100) you would choose Balance.
As you complete lines within your search, you can see the expression being built in the Expression box.
5. From the Condition drop-down list, select the condition you want to apply.
The following conditions are available:
Is Equal ToIs Not Equal ToIs Less ThanIs Greater ThanIs Less Than or Equal ToIs Greater Than or Equal ToIs Between
For example, if you want to find all records with a balance less than £100 (< 100) you would choose Is Less Than.
6. In the Value box, enter the value you want to search for.
For example, if you want to find all records with a balance less than £100 (< 100) you would enter 100.
61

Sage 50 Accounts User Guide
62
In some cases where a request cannot be assigned a numerical or text value, a drop-down list is available. For example, if you are searching for customers who are over their credit limit, a Yes/No drop-down list appears.
The value box also allows the use of wildcards. For further information, refer to the section Building your search on page 62.
7. If you want to add a second expression to your request, press the TAB key to move onto the second line.
When you add a second line, you need to decide whether you want both sections to be met. For example, you want to search for customers over their credit limit and based in Newcastle. If you want both conditions to be met you would choose And from the Join drop-down list.
If you want either condition, for example if you wanted to find all suppliers who are based in either Newcastle or Sunderland, you would choose OR.
You can then continue to enter the expression. You can enter as many lines as you need to refine your search request so that it displays the records you are looking for.
In certain circumstances, brackets may appear in a search request you create. For further information on brackets, refer to the following section.
You will also need to consider the ordering of your expressions. For further information about how to do this, refer to the following section.
8. From the Join drop-down list, select the type of join that you want to make.
9. When you have finished setting up your search, you can save it by clicking Save As.
10. To apply the search request, click Apply.
11. To view your search results, click Close.
12. To delete the Search, select Search, then click Discard, then click Apply and select Close.
Building your search
The following section outlines the options you should consider before you build your searches.
Joining expressions using And / Or
If you use the And command to link two expressions, both expressions must apply for a record to be found.
Use the Or command to link two expressions where either expression must be true for a record to be found.
As a general rule, if you are using the same field and the same condition, do not use AND to link the expression.

Getting started with Sage 50 Accounts
Using brackets
In certain circumstances, brackets may appear in the search requests you are creating. Sage 50 Accounts automatically adds the brackets for you.
The rules regarding the use of brackets are as follows:
Using wildcards
The Value box allows the use of Wildcards. Wildcards are special characters which can represent a line of text or an individual character.
The types of wildcards available are as follows:
1 If your search requests only include AND, brackets will not appear.
2 Brackets appear when OR is used to link expressions when the field chosen before and after the OR are the same.
For example: Where Account Reference Is Equal To A OR Account Reference Is Equal To B
The expression is represented as:
Where Account Reference = A OR Account Reference = B
3 If you are using both commands, AND/OR, in your expression, brackets appear if the OR is considered to be a separate filter.
For example, if you wanted to search for all suppliers with settlement days greater than 20 and a balance less than 500 and you also wanted to search for accounts where the settlement due days is equal to 30 you could set up the following request:
Where Settlement Due Days > 20 AND Balance < 500 OR Settlement Due Days = 30
The search facility assumes that the first two statements are related and therefore brackets them.
* This represents any number of valid characters (including spaces) after a specific value. For example, NE* would find all text beginning with NE.
$ This represents a specific line of text anywhere in the data. For example, $ABC finds all text that contains ABC.
? This represents a single undefined character. For example, WE?001 will find WEB001 and WET001.
63

Sage 50 Accounts User Guide
64
Ordering expressions
You must consider the order you set up your search request in order to get the correct results. Consider the following example:
You want to search for all records with a balance greater than 100 that have a postcode of NE7 or NE8. To do this the expression would be:
Where Balance > 100 AND (Postcode = NE7* OR Postcode = NE8*)
Alternatively, you can search for records that have a balance greater than 100 and have a postcode of NE7 or all records in NE8 with any balance. To do this the expression would be:
Where Account Address Line 5=NE7* AND Balance >100 OR Account Address Line 5= NE8*

Getting started with Sage 50 Accounts
Using ActiveSearch
The ActiveSearch function speeds up data entry by finding the closest matches to what you are typing and displaying them in a popup list for you to select from.
To select an item from the list use your DOWN ARROW to highlight the item you want and press ENTER, or click the item you want with your mouse.
If you have selected an item from the list you can edit what is shown. If you use the BACKSPACE key, you can delete the suggested text. You can use the LEFT ARROW and RIGHT ARROW keys to move along the line of text enabling you to edit the text.
Note: If you do not want to use the ActiveSearch, open the Settings menu, choose Company Preferences and then click Parameters. Clear the Display ActiveSearch Popup check box.
There are two types of ActiveSearch popup list:
Reference popup list
Reference popup lists are made up from the account reference data in your program, such as customer account references and nominal account codes.
For example, if you are typing into the A/C box on the Customer Record, the ActiveSearch will find the closest matches to what you are typing from within the existing customer references. You can select the account you want, or continue typing to create a new reference.
Recent items popup list
The Recent Items popup list is made up from the last thirty two items you have typed in a selected box.
For example, if you are typing in the 'Details' box within Batch Customer Invoices, the ActiveSearch will find the closest matches to what you are typing from the last thirty two Details lines that you have entered. You can then select the details you want from the list, or continue typing to enter new Details text.
You can delete an entry from the Recent Items popup list, for example if you type an item incorrectly and do not want it to appear in the list. To delete an entry, right-click it in the popup list and select Delete from the menu. Alternatively, select Delete All to delete all entries from the Recent Items popup list.
65

Sage 50 Accounts User Guide
66
Function keys
Sage 50 Accounts uses function keys in several areas to access a number of important features, including the calculator and the Help features. Several of these keys are context sensitive, meaning that they will only perform their function when you have selected an appropriate box. For example, if you are in Customer Records and your cursor is in the A/C box, pressing F4 will open the customer record list.
The various functions associated with the function keys are: :
F1 Press this key to bring up Help that relates to the particular window you are using. For example, if you are in the Customers window and press F1, the Sage 50 Accounts Help system will display assistance on the Customers function.
F2 This key brings up the calculator which you can use with the mouse, in the same way you would use a normal calculator.
F3 This key brings up the Edit Item Line window when you are entering an invoice. Accounts Professional users can also use the F3 key in Sales Order Processing and Purchase Order Processing to Pay in Full on Sales Receipts and Purchase Payments windows.
F4 This button is a shortcut to the calendar, calculator or record list, if the selected text box that you are using has any of these functions attached. Also if you select a drop-down list box, you can press F4 to display this list.
F5 If you press this key it brings up the Currency Calculator when the focus is in a numeric box. It will display the Spell Checker if the cursor is in a text box.
F6 Press this button in the appropriate window to copy data from the box immediately preceding it. For example, when entering invoice data in the Customers window, press F6 to copy the data from the box immediately above it. This speeds up the process of entering the same data.

Getting started with Sage 50 Accounts
Configuring F11 and F12
Function keys F11 and F12 are user-configurable. If required you can set them to launch an external program on your PC. Alternatively, F12 can also be configured to minimise the Sage 50 Accounts software.
To configure F11 and F12
1. From the Sage 50 Accounts menu bar, select Tools > Options and then click the Environment tab.
2. For each of the keys F11 and F12, enter the full path and the name of the .EXE file you want the key to launch.
Alternatively, for F12, click the Configure F12 as Hide Key box.
3. To save the details entered, click OK. To discard your changes, click Cancel.
F7 Using F7 inserts a blank row in a list. For example, if you need to insert a blank row for another customer invoice in the Customer Invoice window, place your cursor on an existing row, press F7 and a new blank row appears immediately above the list where your cursor rests.
F8 Press F8 to delete a row, for example, in the Customers Invoice window.
F9 Use this key in a relevant box to calculate the Net amount from any Gross tax values. For example, in the Batch Supplier Invoices window, you can enter the gross figure in the Net column and press F9, which splits the amount into a Net and VAT amount.
F11 This key launches the Windows control panel, so, for example, you could access your Internet options without having to minimise or close down your Sage 50 Accounts software. Alternatively, you can configure this button to launch another program on your PC.
F12 The F12 key launches the Report Designer. Alternatively, you can configure this button to launch another program on your PC, or minimise your Sage 50 Accounts program.
67

Sage 50 Accounts User Guide
68
Hot key shortcuts in Sage 50 Accounts
Sage 50 Accounts supports hot key shortcuts. These are indicated in the software menus and windows by an underlined letter:
To use the hot key shortcuts press the ALT key on your keyboard and, while keeping the key pressed, press the key corresponding to the underlined letter shown in the menu.
As an example, in the menu illustration above, press ALT and F on your keyboard to open the File Menu; then, keeping the ALT key pressed, press B on your keyboard to open the Backup dialog.
Similarly, to select Search in the second illustration above, press ALT and R on your keyboard to open the Search window.
Getting help
The Sage 50 Accounts Help system provides you with all of the information you need to get the most out of your Sage 50 Accounts software. To access the Help you can:
Press F1.
Press the F1 key at any point in Sage 50 Accounts. The Help topic that appears, directly relates to the actual window that is displayed on-screen. For example, click Customers and then click Record. Pressing F1 at this point displays the Help information relating to the Customer Record.
From the Sage 50 Accounts menu bar, select Help. Choose Contents and Index.

Getting started with Sage 50 Accounts
Use the Contents tab on the left side of the Sage 50 Accounts Help system to search for a Help topic.
Video tutorial simulations
Flash-based video tutorial simulations are provided for the software. These augment the written instructions that are provided in the main software F1 help file and the various PDF guides, such as this user guide.
These simulations are available online using the menu command Help > Tutorials.
69

Sage 50 Accounts User Guide
70
Note for Windows Server 2003 users: If selecting Help > Tutorials presents you with a blank window, please add http://www.sage.co.uk/files/accounts_tutorials/video_tutorial_simulations.htm to your approved list of accessible websites. You will then be able to view the Tutorial Simulations.
Rather than just watching basic software tasks in a passive way, with no interaction between the viewer and the simulation, the simulation viewer is encouraged to use their mouse and keyboard controls to progress through the simulations.
Mouse control interactionThe simulations often require you to perform a left-click action, and more occasionally, a right-click action to complete a procedure step in the simulation, and for the simulation to then continue.
This is signified by a caption with an inset mouse-click image. Read and then click in the area of the simulation, to where the caption is pointing. As you do this the area of the simulation to click becomes highlighted in green, as illustrated below.
Simulation pause - continueAt other times in the simulations, you need time to read the information shown. The simulation pauses until you are ready to continue. This is signified by a caption appended with a red right arrow. When you are ready to continue, click the red arrow. Again, the area to click will become highlighted in green.

Getting started with Sage 50 Accounts
Keyboard interactionOn other occasions, the simulation requires you to press a key on your keyboard for the simulation to continue, just as you need to in the software, in real-time.
The caption is appended to guide you in this action.
Conventional Flash Player controls
Despite the above, viewing the simulation by fast-forward scanning through the simulation, using the player control bar will still override all other simulation controls.
In this way, you can move back and forth through the simulation, giving you the freedom to locate a particular section of importance to you.
When you then play from a particular slide position, the simulation resumes, with specific user interaction, as described previously.
Wizards
The wizards in Sage 50 Accounts are specifically designed to help you complete routine or complicated procedures. A wizard takes you through the procedure you want to carry out in a logical, step-by-step process. All you have to do is follow the on-screen instructions.
You will find wizards in various places in Sage 50 Accounts, such as on the Modules menu from Sage 50 Accounts main menu bar and on the various ledger windows, throughout the software.
71

Sage 50 Accounts User Guide
72
An overview to setting up Sage 50 Accounts
You are now ready to begin entering information into your new Sage 50 Accounts software. In summary, the tasks you are advised to perform in sequence are:
Set your company defaults. Check that you have entered your company details correctly, including your financial year start date and your VAT scheme. For more information, see Chapter 3, Setting up Sage 50 Accounts.
Check your nominal account structure. This includes setting up bank accounts in Sage 50 Accounts. Sage 50 Accounts has already created a nominal account structure for you, but you should check that the structure is right for your company. At this stage you can rename your nominal accounts to suit your business, add additional accounts and delete others that you do not need. For more information, see Chapter 4, Setting up your Chart of Accounts and Chapter 5, Setting up records.
Enter your customer and supplier information. If you need to keep details of your customers and suppliers, the next stage is to enter their records and their opening balances. A customer or supplier record is like a card in a card index box. Each record holds information about a specific customer or supplier, such as an address, telephone number, contact name, credit details and so on. Depending on your business, you may need to complete both supplier and customer records or you may need only supplier details. For more information, see Chapter 5, Setting up records. Alternatively, refer to the accompanying PDF Guide - Opening Balances.
Enter your product information. If your business has stock, you should now enter your product details, including their opening balances. For more information, see Chapter 5, Setting up records and the accompanying PDF Guide - Opening Balances.
Enter the opening balances for your nominal ledger and bank accounts, in that order. Any figure listed on your opening trial balance should be entered as an opening balance against the relevant nominal account. You should enter the opening balance for your bank account after you have entered the balances of all your other nominal ledger accounts. This is the last task which you should complete in order. For more information, refer to the accompanying PDF Guide - Opening Balances.

Getting started with Sage 50 Accounts
Administrative and maintenance tasks
There are certain procedures that you should perform daily, or whenever you use Sage 50 Accounts. These routines ensure that your data is not damaged and make sure that you always have a copy of your data in case of PC errors.
This chapter show you how to check your data for errors and how to make a backup of your files. It also discusses the importance of these routines.
We’ll show you how to change your program date, a useful feature if you need to process many transactions on a certain date.
After you perform certain critical tasks that require management reporting, for example your Year End, you may not want other users adding transactions to a period that you may have already reported on. Sage 50 Accounts provides you with a Lock Date setting feature, whereby you can prevent users from posting transactions to a period before a defined date. We’ll show you how to implement this feature.
FInally, we’ll guide you through the process of restoring your data from a backup.
Changing the program date
One of the strengths of Sage 50 Accounts is that you can change the program date, for example, the day's date that you want to use to record your transactions.
Important Note: This is not your financial year start date.
This means that you don't have to run your Month End on the exact Month End date. This is the same with your Year End. Because you may have to wait for certain invoices or bills to come in before you can run a period end procedure, Sage 50 Accounts lets you change your program date to whatever date you choose.
You can also change the program date if you have a set of invoices that need to be entered with yesterday's date. When you have finished entering the invoices, you can use Change Program Date to reset the date to today's date.
Note: The date will automatically set itself to the current PC system date when you restart the software.
You can change the program date by selecting Settings > Change Program Date from the Sage 50 Accounts menu bar. The Change Program Date box (see below), appears. Here you can enter the date that you need to process your transactions.
73

Sage 50 Accounts User Guide
74
Lock Date setting
When you have performed certain critical tasks that require management reporting, for example your Year End, you may not want other users adding transactions to a period that may have already been reported on.
Sage 50 Accounts provides you with a Lock Date setting feature, whereby you can prevent others from posting transactions to a period before a defined date.
To set your Lock Date setting
1. Select Settings > Lock Date.
Note: This menu item appears if you already have access rights to Period End functions in the software.
The Lock Date Settings window appears.
2. To make the Date entry box active, select the ’Lock posting before’ check box.
The Date Entry box becomes active.
3. Select the Calendar button.
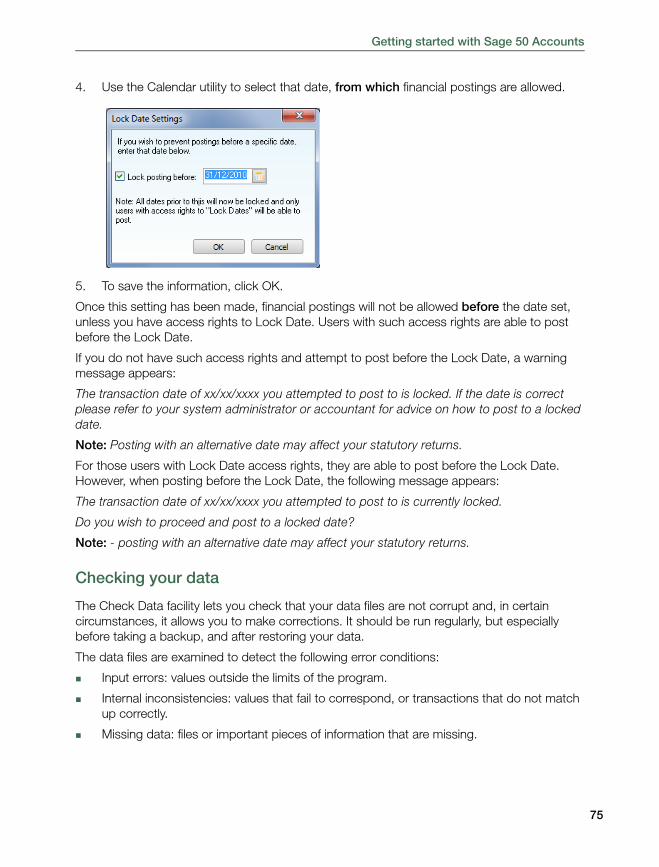
Getting started with Sage 50 Accounts
4. Use the Calendar utility to select that date, from which financial postings are allowed.
5. To save the information, click OK.
Once this setting has been made, financial postings will not be allowed before the date set, unless you have access rights to Lock Date. Users with such access rights are able to post before the Lock Date.
If you do not have such access rights and attempt to post before the Lock Date, a warning message appears:
The transaction date of xx/xx/xxxx you attempted to post to is locked. If the date is correct please refer to your system administrator or accountant for advice on how to post to a locked date.
Note: Posting with an alternative date may affect your statutory returns.
For those users with Lock Date access rights, they are able to post before the Lock Date. However, when posting before the Lock Date, the following message appears:
The transaction date of xx/xx/xxxx you attempted to post to is currently locked.
Do you wish to proceed and post to a locked date?
Note: - posting with an alternative date may affect your statutory returns.
Checking your data
The Check Data facility lets you check that your data files are not corrupt and, in certain circumstances, it allows you to make corrections. It should be run regularly, but especially before taking a backup, and after restoring your data.
The data files are examined to detect the following error conditions:
Input errors: values outside the limits of the program.
Internal inconsistencies: values that fail to correspond, or transactions that do not match up correctly.
Missing data: files or important pieces of information that are missing.
75

Sage 50 Accounts User Guide
76
Corrupt data: damaged/unreadable data files.
Invalid nominal account types.
If you have any errors in your data, you can print a report detailing these errors.
To check your data files
1. From the Sage 50 Accounts menu bar, select File > Maintenance.
The File Maintenance window appears.
2. Click Check Data.
As the files are checked, a bar displays how far the Check Data utility is progressing.
If there are no problems found, the File Maintenance Problems Report window appears informing you of this.
3. To continue, click Close.
4. If there are problems encountered, the File Maintenance Problems Report window also appears with appropriate details given. Refer to the Errors, Warnings or Comments tabs for detailed information about the problems encountered.
At the bottom of the File Maintenance Problems Report window, there is a link:

Getting started with Sage 50 Accounts
Select the link to open the Sage Data Repair Service web page. From here, details on how to repair your data can be obtained, including what recovery tool to use.
Note: You can also obtain details on how to submit data to the Sage Repair Service. Depending on the level of SageCover you have, you may be charged for this service.
5. If any errors appear during Check Data, we recommend that you try to repair them before you continue entering any more data. To repair your errors, click Recovery Tools.
Warning: Before using Recovery Tools you should take at least two backups of your data. When you select Recovery Tools, a check is made by the software of the date of the last backup. If a backup has been taken that day, you are prompted to take another backup. If a backup has not been taken that day, the Backup window appears.
The Recovery Tools facility provides you with numerous software tools to assist in the repair, when any errors are found on your data.
When Recovery Tools is selected, a window appears, containing an array of all available data fixing tool buttons:
Button Name Recovery Tool(s)
Recalculate Period Values
Salary / Purchase / Nominal / Bank account balance out by
Reset Transaction Status
SR / PP / SD / PD has an outstanding amount
Recalculate Order Allocation
Quantity allocated / on order disagrees with stock
Recalculate Project History
Recreate project transactions
Rebuild project period / total values
77

Sage 50 Accounts User Guide
78
If there is a rare occasion where these recovery tools are not successful, for example, because of data corruption, you may need to either restore to an error-free backup or send your data to Sage Technical Support - contact 0845 111 55 55 if you are a UK resident or 1890 88 20 60 for residents of the Republic of Ireland, to be repaired by the Data Repair Service.
If you need to send your data to our Data Repair Service, we will need a backup of your data before Recovery Tools has been run. You should also contact our helpline, on the same number as above, for the necessary procedural forms.
Recalculate Stock Amount in stock disagrees with history by x
Re-link stock transactions
Rebuild stock BOMs
Rebuild stock buckets
Recreate CIS History CIS fix
Recalculate Transaction History
Re-link transactions to ledgers
Re-index and Compress All
The new Re-index and Compress All utility re-indexes and compresses the following files:
Customer Ledger
Customer Delivery Addresses
Purchase Ledger
Purchase Delivery Addresses
Nominal Ledger
Bank Ledger
Invoices
Sales Orders
Purchase Orders
Projects
Project (and Project only) Transactions
Stock Ledger
Advanced Budgets
Contact Histories
Button Name Recovery Tool(s)

Getting started with Sage 50 Accounts
6. Select the Recovery Tool that is advised.
7. After it has fixed your data set, you are prompted to confirm whether you want to run Check Data again. We advise you to do this to ensure the integrity of your data.
If there are no errors, the Maintenance window appears informing you of this. Click OK or Close to continue.
Backing up your data
It is essential that you back up your data on a regular basis in case of PC malfunctions. Sage 50 Accounts provides its own backup routine, but if you want to use a different tool you can. To select a different backup tool, from the Sage 50 Accounts menu bar, select Tools > Options and then enter the details of the backup utility into the Backup tab.
If you want to use Sage 50 Accounts Backup facility, follow the instructions below.
Note: The amount of disk space required depends on how much data you have saved in your software.
Do not forget to label your disk(s) with the date and file name, and if more than one disk is used, number the disks sequentially indicating how many disks there are in total (1 of 4, 2 of 4 etc.).
Write on the label which files you have backed up - either data files, layout templates, report templates, image files or all files. This means that if you only need to restore specific files, you know which disk to use.
Note for multi-company users: You must back up each company, including your consolidated company, separately. The Backup facility will only back up the company data that you are currently using.
To back up your data
1. From the Sage 50 Accounts menu bar, select File > Backup.
2. A message appears asking you if you would like to check your data. We recommend that you check your data before you make a backup. To do this, click Yes. If you do not want to check your data, click No.
If you have chosen to check your data, a bar appears showing how the data check is progressing. When the data has been checked the File Maintenance Problems Report window appears.
If any errors appear, click Close to continue the backup. When it finishes, you should contact Sage Technical Support - call 0845 111 55 55 if you are a UK resident or 1890 88 20 60 for residents of the Republic of Ireland. SageCover members can also use the Ask a Question database, available from www.sage.co.uk, to obtain information about their errors.
79

Sage 50 Accounts User Guide
80
The Backup window appears, displaying the Backup Company tab.
The Company Details area of the window shows the name and location of the company data that is currently open in your software. If you are using a multicompany version of the software, check that the correct company name is shown here; that is, that the company you want to back up is the one you currently have open.
3. Use the Where do you want the company backed up to? section of the window to enter a location and file name for your backup.
By default, the filename for the backup is:
SageAccts [Company Name] [YYYY-MM-DD] [hh.mm.ss].001.
For example, if you back up at 16hrs 22min and 08 seconds on 18 June 2011, the filename becomes SageAccts [Company Name] [2011-06-18] [16.22.08].001. This filename format helps you to identify your backups but you can change this if you require. Use the Location box to enter or browse to the drive and folder you want to use for your backup.

Getting started with Sage 50 Accounts
Note: If you are backing up to a removable storage device, such as an USB data key, please make sure that the device is attached to your PC before you click Browse.
4. To check or change the file types included in your backup, click the Advanced Options tab.
Otherwise, click OK to proceed with the backup.
The Backup progress window appears, showing the details of the backup as it proceeds.
If you are backing up onto floppy disk you are prompted to replace each disk, as they become full.
5. When the backup is finished, a message appears to confirm that the backup has been successful. Click OK to acknowledge the message.
You have now backed up your data.
To Back Up to DVD or CD
There are several types of recordable DVD for backing up your data, the most common of which are DVD-R and DVD+R. DVD-R and DVD+R technologies are not directly compatible.
To reconcile the two competing formats, manufacturers created hybrid drives that could read both – most hybrid drives that handle both formats are labelled DVD±R and are very popular.
To back up to DVD-R or DVD+R
1. From the Sage 50 Accounts menu bar, select File > Backup.
The Backup window appears, displaying the Company Backup information.
2. Following the instructions in the topic To Back Up your Data, make a backup to a location on your hard drive (usually C:\).
3. Locate the backup file on your hard drive and use the software provided with your DVD±R drive to burn the file to a blank DVD-R or DVD+R disk.
Note: We are unable to offer specific advice or support on the procedure for burning the backup file to your DVD-R or DVD+R disk. This is because the drive is likely to use third-party software for this process. If you need help with using your DVD±R drive or its software, refer to the Help supplied with the drive or contact the manufacturer.
To back up to CD-R
1. From the Sage 50 Accounts menu bar, select File > Backup.
The Backup window appears, displaying the Company Backup information.
2. Following the instructions in the topic To Back Up your Data, make a backup to a location on your hard drive (usually C:\).
3. Locate the backup file on your hard drive and use the software provided with your CD-R drive to burn the file to a blank CD-R disk.
81

Sage 50 Accounts User Guide
82
Note: We are unable to offer specific advice or support on the procedure for burning the backup file to your CD-R. This is because the CD-R drive uses third-party software for this process. If you need help with using your CD-R drive or its software, refer to the Help supplied with the drive or contact the manufacturer.
If you are using Windows XP or later versions, you can copy the backup file to your CD-R using the My Computer option. For more information, refer to your Windows XP Help.
To back up to CD-RW
1. Insert the CD-RW disk, to which you wish to back up.
2. From the Sage 50 Accounts menu bar, select File > Backup.
The Backup window appears, displaying the Company Backup information.
3. Follow the instructions in the topic To Back Up your Data, ensuring that you select your CD-RW drive (for example, E:\ as the location for the backup.
To select files to back up using Advanced Options
1. From the Sage 50 Accounts menu bar, select File > Backup.
2. From the Backup window, click the Advanced Options tab.The Advanced Options information appears.
3. From the list shown in the File types to include in backup section of the window, select the file types you want to back up.
For example, if you have made changes to your report templates and you want to include these files in your backup, select Data Files and Report Files from the list. Alternatively, to back up all files, select the Select all files to include in backup check box.
4. Check that the details shown in the Description of backup for <Company Name> section of the window are correct. If necessary, make any changes to your file type selections, as described in step 3 above.
5. To proceed with your backup, click OK.
Note: If you want to back up your data to a CD, refer to Backup to CD on page 64.
The Backup progress window appears, showing the details of the backup as it proceeds.
6. When the backup is finished, a message appears to confirm that the backup has been successful. Click OK to acknowledge the message.
You have now backed up your data.
To view or delete your previous backups information
1. From the Sage 50 Accounts menu bar, select File > Backup.
Alternatively, you can also view this information by selecting File > Restore.

Getting started with Sage 50 Accounts
2. From the Backup or Restore window, click the Previous Backups tab.
The Backups Taken information appears, displaying the history of the backups you have made for the current company.
3. To delete a previous backup from disk, select the backup in the list and click Delete. You can use the Swap and Clear buttons to reverse or clear your selections.
Note: Deleting a previous backup from the list deletes the backup file completely from your disk, storage device or PC. You should make sure that you keep sufficient backups to help protect you against data loss.
4. To confirm that you want to delete the backup, click OK when prompted by the confirmation message.
The selected backup(s) is/are deleted from disk.
5. To close the Backup (or Restore) window, click Cancel.
Restoring your data
What does restore mean?
To restore your data means to replace your current software data files with those stored on a backup disk. This procedure permanently overwrites your current data, so you should use it with caution and always ensure you back up first.
Why might I need to restore data from a backup?
If you want to view your accounts as they were in the past, for example before you performed a procedure such as the Year End, you will need to restore from a backup taken prior to the procedure.
If you have suffered data corruption that cannot be fixed, you can restore your most recent 'good' backup.
Your accountant might have done some work on your accounts for you and supplied a backup file for you to restore.
Backing up strategies
The more sets of backups you keep, the greater protection you have against data loss. We recommend the following backup routine:
Back up at the end of each day, labelling disks Mon, Tues, Wed, Thurs and Fri. Re-use these disks weekly. This allows you to go back to any day in your current week.
Back up at the end of each week, labelling disks Week1, Week2, Week3 and Week4. Re-use these disks weekly. This allows you to go back to any week in your current month.
Back up at the end of each month, labelling disks Month1, Month2 etc. Keep these disks until the end of the year. This allows you to go back to any month in your current year.
83

Sage 50 Accounts User Guide
84
You might have sent your data to Sage to be amended, for example to have your FInancial Year End date changed, if you are using Sage 50 Accounts. You will need to restore the backup Sage returns to you.
How do I restore data from a backup?
The method you will need to use to restore your data depends on how you originally backed up the data.
If you back up using the Sage 50 Accounts Backup feature, you can restore the file by selecting File > Restore.
The Restore window consists of two tabs: Restore Company Backup and Previous Backups.
If you use your own backup tool, such as a network tape backup, you will need to follow the instructions for your selected utility in order to restore data. For more information, refer to the user assistance supplied with your chosen backup utility or contact your network administrator.
To restore backup dataImportant Note: Restoring data from a backup file permanently overwrites the current company data in Sage 50 Accounts. Make sure that you have taken a backup of your current data before you proceed with the Restore process.
1. From the Sage 50 Accounts menu bar, select File > Restore.
The Restore window appears, displaying the Restore Company Backup information.
2. In the What backup do you want to restore? section of the window, enter or browse to the filename and location of the backup you want to restore.
Note: If the file you are restoring is located on a removable storage device such as a USB data key, make sure that the device is attached to your PC before you click Browse.
3. When you have selected the file to restore, the Your backup will be restored to area of the window displays the details of the company that is currently open and of the backup you have selected. Check that this information is correct before continuing, and make changes to the selection in the What backup do you want to restore? area of the window, as described in step 2 above, if necessary.
4. To begin the restore process, click OK.
When the restore process completes, a confirmation message appears.
5. Click OK to acknowledge the confirmation message.
You have successfully restored your data.
Note: After restoring data from a backup you should use the Check Data option from the File Maintenance window to ensure that your data files are not damaged.

Getting started with Sage 50 Accounts
Correcting your data
Often mistakes are made when entering transactions. You can correct them provided the associated transaction entries have not been cleared from the audit trail. Sage 50 Accounts generates the necessary adjustments for you.
You can:
Change entries
You can change entries unless they have been disabled because of their type or how they have been processed.
Batched transactions: You can change individual transaction lines. If you delete an individual transaction belonging to the batch, the whole batch is deleted.
Foreign currency transactions: The date on this type of transaction cannot be changed.
Delete entries
You can delete entries, unless they have been VAT reconciled and need reversing.
CIS only: Once a transaction has been included in the monthly return (CIS 300), it cannot be deleted or reversed.
Reverse entries
A reversal is when an opposite transaction is generated. For example, if you reverse an invoice a credit is generated. The generated transaction is included in the next VAT return to counteract the error.
85

Sage 50 Accounts User Guide
86
The Corrections window
In this version of Sage 50 Accounts, a dedicated Corrections window has been provided, accessed using the File menu > Maintenance > Corrections command route:
When this is selected, the Corrections window appears, listing all uncleared transaction items in the audit trail.
From the list, select a transaction item and click the Edit Item or Delete Item buttons on the Corrections window toolbar, as appropriate.
It is possible that you may need to search or find the specific transaction from a very large list of transaction items. Click the Search or Find buttons in the Corrections window, as appropriate.
From the Links pane you can perform a backup. There are tutorial simulations available for viewing from the Help menu > Tutorials option, for amending and deleting transactions.
To correct a transaction
Before you correct transactions, you are strongly advised to take a backup of your data files. Please be aware there are some things you cannot correct:
The date on a foreign currency transaction.
Critical fields in a journal entry (nominal code, date, net amount).

Getting started with Sage 50 Accounts
There are two ways you can deal with journal entry errors. You can use the Reversals option from the Nominal Ledger toolbar to reverse the journal, then post a journal with the correct details. Alternatively, you can record another journal to make the appropriate amendments.
Non critical journal entry fields such as reference, details and tax code can be corrected, although correcting the tax code may have VAT Return implications.
CIS only: Transactions that have been included in the monthly return (CIS 300).
1. From the Sage 50 Accounts menu bar, select File > Maintenance > Corrections.
The Corrections window appears with all audit trail transaction items listed. Any transactions which have previously been deleted using the File Maintenance facility, appear in red. You cannot edit these transactions.
2. Select the transaction you want to correct from the list and then click Edit Item.
The Making Corrections window appears. The title caption of this window displays the number of the selected transaction and the transaction type.
87

Sage 50 Accounts User Guide
88
The window divides up the transaction details into several groupings. These can include:
Details - Reference, Bank, Description, Creation Date etc. Some of these details are editable, some are not.
Totals - Net, Tax, Paid. These are not editable from this window but can be edited in the Edit Details window.
Information Flags- Paid in full, Finance charge, Disputed, Printed, Opening balance, CIS, reconciled, Revaluation
Foreign Currency - Gross, Rate, Currency
Item List Line Details - individual items in this list can be edited, again in the Edit Details window.
3. Edit the transaction general details, as required.
4. To edit an individual item line, select the item and click Edit.
The Edit Details window appears.
Edit the item details in this window, as required.

Getting started with Sage 50 Accounts
You can edit the following information:
N/C You can change the nominal account here.
Details If you want to amend the details posted with the transaction, you can do this here.
Date The date the transaction was posted is displayed here. This date cannot be amended here. This affects the date of all linked split transactions.
Department This shows the department to which the transaction has been posted. You can amend the department number here.
Fund This selection is available if you selected the Charities Chart of Accounts during your Company setup procedure using Active Setup wizard, or you manually selected the Enable Charity\Non-Profit options check box in Company Preferences > Parameters tab. Use the drop-down button to select the Fund associated with the transaction.
Ex-Ref You can enter or amend the additional reference here.
Project Ref Use the Project Ref drop-down button to select a project reference, against which to allocate the transaction correction.
Cost Code Use the drop-down button here to select the cost code, to which the transaction correction is to be allocated.
Net This shows the net amount. You can edit or amend the net amount here.
Tax This shows the tax amount. You can edit or amend the tax amount here.
T/C Shows the tax code used for the transaction.
It can be changed. If the change affects the VAT amount, the Net and Tax boxes will need to be amended manually to reflect the tax code used.
Paid If any payment has been made, the amount appears here. This cannot be amended.
Paid in Full If this check box has been selected the transaction has been paid in full. This cannot be amended.
89

Sage 50 Accounts User Guide
90
5. When you have completed your details editing, to return to the Making Corrections window, click Close.
6. To post your amendments, click Save.
Note: If you do not want to post any amendments you have made, click Close.
A confirmation message appears.
Your software gives you a warning if it cannot post your amendment. To post your amendments, click Yes.
You have successfully edited your transaction.
To edit a batched transaction
1. From the Corrections window select the transaction you want to correct from the list, then from the Corrections window toolbar, click Edit Item.
The Making Corrections window appears. Again, the title caption of this window displays the number of the selected transaction and the transaction type.
2. Edit the transaction general details, as required. This will affect all individual items in the batch.
3. To edit an individual item line, select the item and click Edit.
The Edit Details window appears, showing all the individual item lines that make up the batched transaction.
Edit the Item Details in this window, as required.
4. From the Payment Allocations list, select the individual item you wish to amend, and click Edit. The Edit Transaction Allocation window appears.
5. In the Ref box, enter or amend the reference for this allocation.
The remaining information shown for this window is entirely dependent on the allocation type and is for information only (it cannot be amended).
6. Click Close to return to the Edit Details window.
7. Repeat steps 5 - 7, as required. Once all the required corrections have been made, click Close to return to the Edit Details window.
VAT Reconciled If this check box has been selected, the transaction has been reconciled for VAT and has appeared on a VAT return. This cannot be amended.
Payment Allocations The payments or receipts made against the transaction are displayed in the Payment Allocations list box.

Getting started with Sage 50 Accounts
8. When you have completed your details editing, click Close to return to the Making Corrections window.
9. To post your amendments, click Save.
Note: If you do not want to post any amendments you have made, click Close.
A confirmation message appears.
Your software displays a warning if it cannot post your amendment. For example, this would occur if you try to amend an allocated transaction when using the VAT Cash Accounting scheme.
10. To post your amendments, click Yes.
To reverse transactions using Corrections
1. Select File > Maintenance > Corrections.
The Corrections window appears with all audit trail transaction items listed.
Any transactions which have previously been deleted using the File Maintenance facility appear in red. You cannot edit these transactions.
2. Select the transaction you want to reverse from the list, then from the Corrections window toolbar, click Edit Item.
The Edit Details window appears.
3. If the transaction has been reconciled on the VAT Return a Reverse button appears on the Edit Details window. Click Reverse. When prompted to reverse the transaction, click Yes.
To delete transactions using Corrections
1. Select File > Maintenance > Corrections.
The Corrections window appears with all audit trail transaction items listed.
Any transactions which have previously been deleted using the File Maintenance facility appear in red. You cannot edit these transactions.
2. Select the transaction you want to delete from the list, then from the Corrections window toolbar, click Delete Item.
91

Sage 50 Accounts User Guide
92
The Deleting Transactions window appears.
The title caption of this window displays the number of the selected transaction and the transaction type.
The window divides up the transaction details into several groupings:
Details - Reference, Bank, Description, Creation Date etc. Some of these details are editable, some are not.
Totals - Net, Tax, Paid. These are not editable from this window but can be edited in the Edit Details window.
Information Flags- Paid in full, Finance charge, Disputed, Printed, Opening balance, CIS, reconciled, Revaluation
Foreign Currency - Gross, Rate, Currency
Item List Line Details - individual items in this list can be edited, again in the Edit Details window.
3. To view the details of an individual item line, select the item and click View.

Getting started with Sage 50 Accounts
The View Details window appears, listing all payment allocations for the transaction.
4. To view an individual payment allocation, select the allocation from the Payment Allocations list, and click View.
The View Payment Allocation window appears, detailing all details relating to the selected payment allocation.
5. Click Close.
6. Repeat steps 4 - 5, as required.
93

Sage 50 Accounts User Guide
94
To return to the Making Corrections window, click Close.
7. To delete the selected transaction, click Delete.
Note: If you do not want to delete the transaction, click Close.
A confirmation message appears.
8. The deleted transaction appears in the Corrections window transaction list in red, with the Details entry signifying deletion.
How Sage 50 Accounts corrects your data files
It is not possible to list all the errors that can occur, or the corrective action taken by Sage 50 Accounts. However, a few general principles underlie the Sage 50 Accounts approach.
What happens if I change the value or date of a transaction?
New postings are generated. Differences arise though if the transaction is VAT reconciled or not, as follows:
If the transaction is not VAT reconciled, it is marked as deleted, and a new copy replaces the original.
For example, when you amend the date of an invoice which is not VAT reconciled, Sage 50 Accounts creates a new transaction that is identical to the original transaction.
This new transaction is marked as deleted and given its own unique number on the audit trail. The original transaction is corrected with the new date.
If the transaction is VAT reconciled, a reversal transaction is posted and a new transaction generated.
What happens if I delete a transaction?
All deleted transactions appear in red in the Making Corrections window and the on audit trail in the Financials window.
By default, these deleted transactions are included on your reports and transaction activity list boxes. To exclude these from the Customer, Supplier activity lists, select the Exclude Deleted Transactions check box on the Parameters tab in the Company Preferences window. The deleted transactions will still appear in the Financials activity list.
What happens if I change the reference, department or details of an transaction?
The software overwrites the transaction, unless is has been VAT reconciled.
What happens if I correct the values of sales or purchase allocation?
Transactions are generated but are not allocated to the corrected transaction. To re-establish the allocation you will need to allocate the right transaction from those generated.

Getting started with Sage 50 Accounts
For example: You have a Purchase Invoice £100 allocated to a Purchase Payment £100. If you amend the Purchase Invoice to £80 the original invoice is deleted and a Purchase Invoice for £80 generated.
The Purchase Payment is adjusted to a Payment on Account for the full amount of £100. You would then use the Bank module to allocate the £80 Purchase Invoice to the Payment on Account. This would then leave a credit of £20 on the customer's account.
If you delete the transaction the original is retained but marked deleted, therefore a new transaction is not generated.
What happens if I change the VAT code?
The VAT amounts are not recalculated.
Note: You cannot change the VAT code on a VAT reconciled transaction.
The solution is to reverse the transaction to cancel the original transaction, and then enter a new one, with the correct tax code and amount.
What can I correct on a journal entry?
The department number, reference, details and tax code may be amended.
However, an amended tax code does not recalculate any VAT values. Nor does changing the non-Vatable code (T9) make the entry available for the VAT Return.
The solution is to reverse the journal and then create the journal again. This is also the solution to use if the nominal code, date or net amount are incorrect, as they cannot be changed.
How can I check that correction have been made?
Print a copy of the transaction histories and the audit trail.
What happens if I correct a bank reconciled transaction?
The bank's balance is updated.
Can I change deleted transactions in my backup?
No you cannot.
95

Sage 50 Accounts User Guide
96

Chapter 3
Setting up Sage 50 AccountsIn this chapter:Setting the financial year ....................98
The configuration editor .....................99
Entering company preferences ........124
Entering your bank defaults .............152
Entering customer defaults ..............155
Ageing transactions in Sage 50 Accounts .........................................158
Entering supplier defaults.................162
Entering product defaults.................164
Entering invoice and order defaults ..167
Setting up users ..............................186
This chapter contains all the information you need to help you set up Sage 50 Accounts to suit your business.
The Configuration Editor assists you in setting up many of your company defaults, from selecting the best Chart of Accounts for your business to setting up terms, tax codes, statuses, departments and labels that are used throughout the software.
You can find out how to enter your company preferences such as your address and contact details, and parameter settings, specific to your way of working.
This chapter also explains how to enter defaults for your customer, supplier, bank and product records, and for invoices and orders. These defaults save you time later, when creating these records.
Finally, you’ll see how to protect your accounts data by setting up access rights and passwords.
If you deal with foreign currencies you also need to set up Sage 50 Accounts accordingly. For more information see Chapter 14, Working with foreign currencies and accounts.

Setting the financial year
When you first used your software, you entered the financial year start date in ActiveSetup. We recommend that you check that you have entered the correct date now, as you cannot easily change the financial year start date after you have started entering transactions.
To check your Financial Year Start Date open the Settings menu and choose Financial Year. Your Financial Year start date appears. If you need to change the date, you should do so now.
If the date is greyed out, you have already started to enter transactions. For further information about changing your financial year start date after you have started entering transactions, type financial year into the index of the Sage 50 Accounts Help system, then double-click on changing. It is essential that you read all the information about changing your financial year start date before attempting to change the start date.
Note: If you change your Financial Year start date, all of your prior year columns, on nominal records, will be cleared.

Setting up Sage 50 Accounts
The configuration editor
The Configuration Editor allows you to set up the basic information that your company needs to get you started with your Sage 50 Accounts software.
The information that you enter here can be saved and used in future installations of Sage 50 Accounts. Accountants can set up this basic information for their clients so that defaults, such as the nominal ledger are ready to use.
The Configuration Editor consists of the following tab areas:
General
Chart of Accounts
Terms
Tax Codes
Account Status
Products
Fixed Assets - Accounts Plus and Accounts Professional versions only
Custom Fields
Dispute Reasons - Accounts Plus and Accounts Professional versions only
Credit Control
Project Costing - Accounts Plus and Accounts Professional versions only
To access the configuration editor
1. From the Settings menu, choose the Configuration option.
The Configuration Editor window appears.
2. Choose the tab required to review or modify your settings.
99

Sage 50 Accounts User Guide
10
The General Tab
When you use the Configuration Editor to set up your company defaults, you can save your settings to a template. You can then use this template to set up a new company ready to work with, or edit the template at a later date.
Use the General tab of the Configuration Editor to give your template a name, and specify where you want to store the template. You can also select the General tab to locate and open an existing template for editing.
Note: You cannot load and use a new template once you have completed and exited from ActiveSetup.
To set up your general configuration settings
1. From the Sage 50 Accounts menu bar, select Settings > Configuration.
The Configuration Editor window appears, showing the General tab.
2. Enter the following settings in the relevant boxes:
0

Setting up Sage 50 Accounts
3. To continue entering your configuration settings, see the following section.
To save the changes to your template file, click Save, or to exit without saving, click Close.
Template Name Type a name for the configuration file. You should enter a name that allows you to identify the file.
We recommend that you use a name that relates to your company or to your business type or industry sector. You can enter up to thirty characters.
Description Enter a description for the configuration file. You can enter up to two hundred and fifty two characters to describe the template that you are creating. For example, 'Configuration for Garage, revised by Smith and Sons'.
Filename If you have an existing template that has already been set up, you can choose the Browse button to find the file.
Sage has created a set of templates with information for Sole Trader, Partnership, Limited Company and Charity business types. When you click Browse, a list of these existing template files appears.
101

Sage 50 Accounts User Guide
10
The Chart of Accounts tab
The Configuration Editor enables you to set up and amend your Chart of Accounts to suit your business. You can add or modify ranges of nominal accounts to preset categories and you can set up or change individual nominal accounts. You can also specify whether an account is a standard nominal code, a control account, or a bank account.
Before you edit your chart of accounts, we recommend that you read Chapter 4, Setting up your Chart of Accounts.
The Chart of Accounts list box uses the following colour coding to differentiate between the types of nominal account:
Green Floating range
A floating range is one that could be an asset or a liability depending on the balance of the nominal accounts included in it, and so appears in both the current assets and current liabilities categories of the Chart of Accounts.
Blue Control account
Control accounts are used by Sage 50 Accounts to make double-entry postings, and include your Debtors and Creditors Control Accounts, Default Bank Accounts and VAT Control Accounts.
2

Setting up Sage 50 Accounts
Note: The Configuration Editor only allows you to create one chart of accounts for each configuration file. To set up another chart of accounts, you will need to create a separate configuration file.
For instructions about adding and editing your existing chart of accounts, see Chapter 4, Setting up your Chart of Accounts, or press F1 on the Chart of Accounts tab and read the information that appears in the Sage 50 Accounts Help system.
The Terms tab
Each time you create a new customer or supplier record, you can enter details such as the credit limit, trading terms and discount available for that account.
If you give most of your customers similar terms and conditions, or receive similar terms from many of your suppliers, you can use the Configuration Editor to set up defaults. This saves you time as you will not need to enter the same information each time you create a new record.
In addition, if your company applies credit charges to customers who do not pay on time, you can set up your finance rates here.
Red Bank account
A bank account is a nominal code that you create in the Bank module.
Pink Bank and Control account
If a bank account also appears in your list of control accounts, for example your default bank account, the Chart of Accounts list box displays it in pink.
103

Sage 50 Accounts User Guide
10
To set up your terms
1. From the Configuration Editor window, click the Terms tab.
The Terms information appears.
2. Enter your Customer Trading Terms and Supplier Trading Terms in the relevant boxes:
Credit Limit Enter the standard credit limit that you give your customers, or that your suppliers give you.
Sett. Discount If you want to offer early settlement discount, or if your suppliers offer you this facility, enter the default percentage in this box.
Payment Due Days Enter your usual credit terms - that is, the number of days that you usually give your customers to pay, or that your suppliers give you.
Sett. Due Days You can give your customers a discount for early payment, or your suppliers may offer you this discount. If payment is received within the days you enter here, you or your customer can qualify for a discount.
4

Setting up Sage 50 Accounts
3. To add a Customer Finance Rate, click Add in the Customer Finance Rates section.
You can enter the following finance rate information:
4. To amend an existing finance rate, click Edit in the Customer Finance Rate section.
5. To delete a finance rate, click Delete.
To save your changes to your template file, click Save, or to exit without saving, click Close.
To continue entering your configuration settings, see the following section.
The Tax Codes tab
Upon installation, T1 - standard rate is set to the percentage that you enter in Active Setup.
UK users
If you need to add or change VAT Codes, use the Tax Codes tab from Settings > Configuration Editor. Tax codes are used to identify the rate of VAT applied to a given transaction. You can specify up to 100 VAT rates, each one identified by a code from T0 to T99. You can then select the rates that are included in the VAT Return calculations and which relate to EC transactions.
In addition, other check boxes can be selected, for example Reverse Charge and Capital Assets for Flat Rate users.
When you install your software, Sage 50 Accounts automatically sets up the following VAT Rates for you:
T0 - zero rated transactions
T1 - standard rate
T2 - exempt transactions
T4 - sales of Goods to VAT registered customers in the EC(1)
Terms Type in up to thirty characters of text, such as '30 Days'. You can print this on your invoices or statements if required.
Date applying from Enter the date from when you want the new interest rate to apply.
Note: If a date is entered that corresponds to a Closed Ledger Date prohibited posting period, a warning message appears.
Base Rate % Enter the current base rate here.
Additional % If you want to charge interest above the current base rate, enter the additional percentage here.
105

Sage 50 Accounts User Guide
10
T5 - lower rate
T7 - zero-rated purchases of Goods from suppliers in the EC(2)
T8 - standard-rated purchases of Goods from suppliers in the EC(2)
T9 - transactions not involving VAT(3)
T20 - sales and purchases of reverse charges
T22 - sales of Services to customers in EC(1)
T23 - zero-rated purchases of Services from suppliers in EC(2)
T24 - standard-rated purchases of Services from suppliers in EC(2)
T25 - flat rate accounting scheme, purchase and sale of individual capital items > £2,000(4)
(1) This tax code can be used for VAT registered customers outside of the UK, but within the EC. The goods and the invoice must be sent to a destination in the EC. You must have the customer's VAT registration number entered on the customer record if you want to use the T4 tax code. If your customer is not VAT registered, you should use one of the standard UK VAT rates.(2) These tax codes can be used for suppliers outside of the UK but within the EC. In accordance with VAT regulations, EC VAT rate codes used for purchases are given a 'notional' rate that is linked to a UK VAT Rate. For example, the T8 or T24 tax rate for standard-rated purchases from suppliers in the EC is linked to T1, which is the standard rate of VAT in the UK.(3) These transactions are not included on the VAT Return. Sage 50 Accounts also uses T9 as the default tax code for all the routines that are non-vatable - that is, journal entries and error corrections. If you want to change the function of T9, you will need to set up another tax code that is non-vatable, for Sage 50 Accounts to use for these routines.(4) If you set up a new company using the flat rate accounting scheme, T25 is automatically set as the tax rate for the purchase and sale of individual capital items > £2,000. If T25 is already being used, the next available tax code is chosen. However, if you have converted from Standard or VAT Cash Accounting to Flat Rate Accounting, and are setting up a new company, you will need to set up T25 manually using the Tax Codes tab of the Configuration Editor.
You can add or edit tax codes. To add or edit a tax code, open the Settings menu and choose Tax Codes. Select the code you require and then click Edit.
Note: The tax codes are set up by default, but it is your responsibility to ensure that these tax codes are used correctly.
For more information about VAT, you should check the following HMRC publication notices:
Notice 700 - The VAT Guide. This is the main VAT reference guide.Notice 725 - The single market. This notice explains the way that VAT is charged and accounted for on the movement of goods within the EC single market.For more tax information and copies of Notice 700 and Notice 725, you should refer to the HMRC website.
6

Setting up Sage 50 Accounts
New ROI users installing Sage 50 Accounts for the first time
When you install with your Regional Settings set to English (Ireland), Sage 50 Accounts creates the following standard default tax codes:
Tax Code Description
T0 0% zero rated sales and purchase of goods for resale
T1 21.0% standard rated sales and purchase of goods for resale
T2 0% exempt transactions for sales and purchase of goods for resale
T3 13.5% reduced rate sales and purchase of goods for resale
T4 0% sales of Goods to VAT registered customers in EC - for resale
T5 0% exempt import of goods from suppliers in EC - for resale
T6 0% exempt import of goods from suppliers outside EC - for resale
T7 0% zero rated purchases of Goods from suppliers in EC - for resale
T8 0% standard rate purchases of Goods from suppliers in EC - for resale
T9 Non-vatable tax code
T10 0% zero rated purchase of goods for non-resale
T11 21% standard rated purchase of goods for non-resale
T12 0% exempt purchase of goods for non-resale
T13 13.5% reduced rate purchase of goods for non-resale
T14 0% zero rated export of goods to customers outside EC
T15 0% exempt import of goods from suppliers in EC - non-resale
T16 0% exempt import of goods from suppliers outside EC - non-resale
T17 0% zero rate purchases of goods from suppliers in EC - non-resale
T18 0% standard rate purchases of goods from suppliers in EC - non-resale
T19 0% zero rated purchases of goods from suppliers outside EC - resale
T20 0% reverse charges
T21 0% zero rated purchases of goods from suppliers outside EC - non-resale
107

Sage 50 Accounts User Guide
10
Note for ROI users upgrading from an existing Sage version: Upgraded users will not have the additional Tax Codes created automatically. The Purchase for resale and the Non EC check boxes are unchecked by default and the tax rate is set as blank for all upgraded Tax Codes. A comment is added to the conversion log advising customers to review their Tax Codes after upgrade.
To edit a VAT rate
1. From the Configuration Editor window, click the Tax Codes tab.
The Tax Codes information appears, listing all the VAT rates currently available for you. The list also shows whether each rate is In Use - that is, included on your Sage 50 Accounts VAT Return, and if the rate refers to transactions with EC countries.
2. To change an existing VAT Rate, select a tax code and click Edit.
T22 0% sales of services to VAT registered customers in EC
T23 0% zero rated purchases of services from suppliers in EC
T24 0% standard rate purchases of services from suppliers in EC
T25 0% reduced rate purchases of goods from suppliers in EC - resale
T26 0% reduced rate purchases of goods from suppliers in EC - non-resale
8

Setting up Sage 50 Accounts
The Edit Tax Code window appears. This window shows any basic information about the tax code that you have selected, such as the code, rate and description.
If your regional settings are set to English (Ireland), the Edit Tax Code window has a slightly different structure:
3. Enter or edit the following information:
Enter or edit the rate to be applied (as a percentage) in the Rate text box provided. You should not change this rate if it is an EC Code, as this rate does not apply.
If you want to include this tax code in your Sage 50 Accounts VAT Return, select the Include in VAT return check box. If you do not want to include transactions with this tax code in your VAT Return calculations, clear the check box.
If the rate relates to transactions with EC countries, enter the EC details in the boxes provided. Choose either EC Sales or EC Purchases, then select Goods or Services from the drop-down lists provided.
If you select the EC Code check box, then select EC Purchases from the drop-down list, a Link To drop-down list becomes active. Use this drop-down list to link to another
109

Sage 50 Accounts User Guide
11
tax code. For example, you might want a T22 sale to link to T0, T23 to link to T0 and T24 to link to T1.
To use the code for the Reverse Charge Sales List category, select the Reverse Charge check box. In addition, use the Link To drop-down list to select the theoretical VAT rate to be used on the Sales Invoice/Purchase-related elements of the Reverse Charge.
If you are using the Flat Rate Accounting scheme, and you want to use T25 or another tax code for Flat Rate purchase or sale of a Capital Asset, select the Flat Rate Capital Asset check box. The T25 rate is set to be the same as the T1 value, by default.
If you want to change the tax code description, type the text you require into the Description box.
ROI only: If the code is applicable to resale or a non-EC transaction, select the corresponding check boxes. Select from the Rate drop-down list, appropriate to your RTD requirements - Zero, Exempt, Reduced, Non-Vatable.
4. To save the details of this tax code, click OK. To exit without saving, click Cancel.
5. To apply the changes to the company that is currently open in Sage 50 Accounts, click Apply.
6. To save the changes to your template file, click Save, or to exit without saving, click Close.
To continue entering your configuration settings, see the following section.
The Account Status tab
Sage 50 Accounts helps you to manage your customer accounts by allowing you to set up a range of status settings for these accounts. You may want to set several different types of account status, to signal whether your customers are good or priority customers. You may also want to assign statuses for bad customers, or specify that a particular status on an account places that customer On Hold.
A number of account statuses are already set up for you to use, but you can edit or add to these if you require.
To edit an account status
1. From the Configuration Editor, click the Account Status tab.
0

Setting up Sage 50 Accounts
The Account Status information appears, listing all the account statuses currently available to you. The list shows a Y if a status places an account On Hold.
2. Highlight the account status you want to amend and click Edit.
Note: If you try to edit the Open account status, a message appears advising you that you cannot change the On Hold status.
The Edit Account Status window appears.
3. If you want to edit the name of the account status, type the new name into the Description box.
4. If you want to change the on hold status, select or clear the ’Marks account as On Hold’ check box as required.
5. To save your changes, click OK. Alternatively, to exit without saving, click Cancel.
6. To apply the changes to the company that is currently open in Sage 50 Accounts, click Apply.
7. To save the changes to your template file, click Save, or to exit without saving, click Close.
To continue entering your configuration settings, see the following section.
111

Sage 50 Accounts User Guide
11
The Products tab
The Products tab of the Configuration Editor allows you to manage your Product Categories. The categories you set up will be available as a drop-down list on the Sage 50 Accounts Product Record window.
Sage 50 Accounts lets you divide your products into nine hundred and ninety nine different categories for analysis and reporting purposes. For example, if you are a stationery and PC retailer, you may want to separate your sales into Paper Products, Office Supplies, PC Accessories and so on. By placing similar products into categories you can:
Create reports based on categories. For example, you can print a Product Activity report.
Use the Search option to carry out analysis within specific categories.
Update the sales and purchase prices of the product within certain categories using the Global Changes Wizard.
To report on products that belong to different categories, use the Search button on the Products window to enter the category number as a selection criterion before you run the relevant report.
You can also change the category label to a term more relevant to your business, and set up custom additional information labels to appear on all your product records.
2

Setting up Sage 50 Accounts
To edit a product category
1. From the Configuration Editor window, click the Products tab.
The Products information appears.
2. Select the category you want to amend, and click Edit.
The Edit Product Category window appears.
3. In the text box provided, enter the name for your product category.
4. To save your entry click OK, or to abandon your entry, click Cancel.
5. To apply the changes to the company that is currently open in Sage 50 Accounts, click Apply.
6. To save the changes to your template file, click Save, or to exit without saving your details, click Close.
To set up your product category label fields
1. From the Configuration Editor window, click the Products tab.
The Products information appears.
2. If you want to set up an alternative label for the Product Category box on your product records, type the name you require in the Label box.
3. To apply the changes to the company that is currently open in Sage 50 Accounts, click Apply.
113

Sage 50 Accounts User Guide
11
4. To save the changes to your template file, click Save, or to exit without saving, click Close.
To set up your product record custom fields
1. From the Configuration Editor window, click the Products tab.
The Products information appears.
2. Enter your custom field labels in the Product Custom Fields section. You can enter up to three custom field labels. The labels you enter appear on the Web tab of each of your product records.
3. To apply the changes to the company that is currently open in Sage 50 Accounts, click Apply.
4. To save the changes to your template file, click Save, or to exit without saving, click Close.
To continue entering your configuration settings, see the following section.
4

Setting up Sage 50 Accounts
The Fixed Assets tab
Accounts Plus and Accounts Professional onlySage 50 Accounts lets you divide your fixed assets into ninety nine different categories for analysis and reporting purposes. For example, you may want to set up separate categories for equipment, furniture and vehicles, which you can use on each fixed asset record you create.
Note: You can change the name of the Fixed Asset Category label, wherever it appears in Sage 50 Accounts by typing a new name in the Label box on the Fixed Assets tab of the Configuration Editor.
For more information, see Working with fixed assets on page 273.
To edit your fixed asset categories
1. From the Configuration Editor window, click the Fixed Assets tab.
The Fixed Assets information appears, listing all of the fixed asset categories currently available to you.
2. Click Edit or double-click the category that you want to add or change.
The Edit Fixed Asset Category window appears.
3. In the text box provided, type a name for your fixed asset category.
4. To save your entry click OK, or to abandon your entry, click Cancel.
115

Sage 50 Accounts User Guide
11
5. To apply the changes to the company that is currently open in Sage 50 Accounts, click Apply.
6. To save the changes, click Save, or to exit without saving, click Close.
To edit the fixed asset category labelYour company may not use fixed asset categories. It is possible to change this label so that you can enter your own analysis information on your fixed asset records. The following procedure explains how to change the label on Fixed Asset boxes, wherever they appear throughout your Sage 50 Accounts software.
1. From the Configuration Editor window, click the Fixed Assets tab.
2. Enter your new text label in the Label box.
3. To apply the changes to the company that is currently open in Sage 50 Accounts, click Apply.
4. To save the changes, click Save, or to exit without saving, click Close.
To continue entering your configuration settings, see the following section.
6

Setting up Sage 50 Accounts
The Custom Fields tab
There are some fields in the software you can rename. A meaningful name will help, when entering information into the software.
Customer and Supplier record fields
You can add three additional pieces of detail to an account. You can then use those details when generating reports to analyse your sales and purchases.
For example, you might want to record the customer type, sales representative and sales region on a Customer Record.
Alternatively, you may want to record suppliers by region and account manager.
Department field
You can use departments to analyse your sales and purchases by area. An area can represent a location, project or region.
To set up your custom fields:
1. From the Configuration Editor window, click the Custom Fields tab.
The Custom Fields information appears.
2. Enter the label names you want to use, then click Apply.
3. To save the change to your template file, click Save.
117

Sage 50 Accounts User Guide
11
The Dispute Reasons tab
Accounts Plus and Accounts Professional onlyWhen you mark a customer or supplier invoice as being in dispute, Sage 50 Accounts requires you to enter a reason code that explains why the transaction is disputed.
The Dispute Reasons tab allows you to create up to one thousand different dispute reason codes so that you can specify why an invoice is being disputed.
To set up your dispute reasons
1. From the Configuration Editor window, click the Dispute Reasons tab.
The Dispute Reasons information appears, listing all of the dispute reasons currently available.
Note: By default, only one dispute reason is available - 1 - No Reason.
2. Select the dispute reason that you want to add or change, then click Edit.
The Edit Dispute window appears.
3. In the text box provided, type a description for your dispute reason.
Note: You cannot edit dispute reason 1 - No Reason and leave the description blank. If no other reason codes exist, Sage 50 Accounts uses this as the default entry, when you dispute an item and it is important that there is always one reason code entry available for you to use.
4. To save your entry click OK, or to abandon, click Cancel.
8

Setting up Sage 50 Accounts
5. To apply the changes to the company that is currently open in Sage 50 Accounts, click Apply.
6. To save the changes, click Save, or to exit without saving click Close.
To continue entering your configuration settings, see the following section.
The Credit Control tab
If your customers do not pay after you have sent them their statement, you can use the Sage 50 Accounts Payment Reminder letters. You can choose from three different types of letter: a simple reminder, the more forceful warning, or the threat of legal action.
Using Sage 50 Accounts' Credit Control features, you can choose to automatically generate letters to send to your customers, reminding them of any outstanding invoices. The Credit Control tab of the Configuration Editor allows you to select, which of your standard or customised reports you would like to use for each type of letter.
To set up your credit control letter details
1. From the Configuration Editor window, click the Credit Control tab.
The Credit Control standard letters information appears.
2. In the Reminder Letter box, enter the path to the Sage 50 Accounts report you want to use for a simple reminder letter. If you do not know the exact path to the letter you want to use, click Browse to locate the file.
119

Sage 50 Accounts User Guide
12
3. From the Set status to drop-down list alongside the Reminder letter path, select the status code you want Sage 50 Accounts to set the customer's record to, after you send them a Reminder letter.
4. Repeat the procedure to enter a path and status code for the Statement, Warning and Legal Threat letters.
5. To apply the changes to the company that is currently open in Sage 50 Accounts, click Apply.
6. To save your entries, click Save, or to exit without saving, click Close.
This is an important step in setting up your communication history settings for your preferred letter definitions, relating to Statements, Reminder letters, Warning letters and Legal Threat letters. For more information about Credit Control Communication history, please refer to the accompanying Credit Control pdf document, available from Help menu > Credit Control.
To continue entering your configuration settings, see the following section.
The Project Costing tab
Accounts Plus and Accounts Professional onlyEach time you create a project record, details from the Project Costing tab are applied to the record. These details cover:
Project status: Used to track progress. The project status also defines whether the project, at a given status, can accept charges and whether the project record can be deleted. Sage 50 Accounts offers a list of five that you can use or amend as required.
Cost types and code: Used to track project costs including spend against budget.
Project custom fields: The labels that appear on a project record against a set of three analysis fields that can be used to categorise projects. For example, you could categorise a project by its manager, type or geographical area and then generate reports for these categories.
For more information about project costing see Chapter 11, Project tasks (Accounts Plus and Accounts Professional only).
0

Setting up Sage 50 Accounts
To set up or amend a project status, cost type, cost code or custom field
1. From the Configuration Editor window, click the Project Costing tab.
The project status list, cost types and codes as well as custom fields for projects are displayed.
2. Enter the following project settings:
121

Sage 50 Accounts User Guide
12
Project Status Use this section of the window to add, edit or delete a project status. You can add to Sage 50 Accounts' original five statuses, creating up to ninety nine.
To add a new status, click Add. Set up each status with a unique short code and a description. You can then use the Allow Postings and Allow Deletion check boxes to specify whether the status allows you to make cost postings to the project, or whether you can delete the project. You cannot set up a status with both of these check boxes selected, but you can create a status with neither box selected if you want the status to relate to projects that do not allow postings or deletion, similar to the SUSPEND status.
To edit a status, select the status in the list and click Edit.
To delete a status, select the status in the list and click Delete. You can only delete a status if no project records currently use it.Note: You cannot delete the default status. In addition, you must always retain at least one status, which will be set as the default if it is the only one remaining. You cannot delete all statuses.
If you want to change the default status, select the status you require and click Set as Default.
Project Custom Fields The Project Record contains three analysis fields that you can use to categorise projects for reporting and analysis purposes. For example, you could categorise projects by project manager, project type and geographical area.
Use the Field 1, Field 2 and Field 3 boxes in the Project Custom Fields area to set up the labels for the project record analysis fields.
2

Setting up Sage 50 Accounts
3. To save your changes click Save, or to discard your changes and exit without saving, click Close.
Cost Type Use the Cost Type section of the window to define your project cost types. You can amend or add to Sage 50's default type (Other), to establish up to ninety nine cost types.
To add a new cost type, click Add. Enter a unique description for the cost type, then click OK.
To amend the name of a cost type, select the cost type from the list and click Edit.
To delete a cost type, select the cost type in the list and click Delete. You can only delete a cost type, provided it is not linked to a cost code or set as the default cost type.
To set a cost type as the default, select the cost type and click Set as Default. Each time you create a cost code the default cost type is displayed for use with the cost code, although it can be changed.
Cost Codes Use the Cost Codes section of the window to define your project cost codes. You can add to Sage 50 Accounts' original four cost codes, creating up to ninety nine codes.
To add a new cost code, click Add. Enter a unique short code and a description for the cost code. If the default cost type is not right for this code cost, select another from the drop-down list. To save the cost code, click OK.
To amend a cost code, select the code in the list and click Edit.
To delete a cost code, select the code in the list and click Delete. You can only delete a cost code if no transactions exist that use the code.
123

Sage 50 Accounts User Guide
12
Entering company preferences
The Company Preferences facility is a very important area of the software as it affects the way your software displays information. We recommend that you read this section and enter your company preferences, before you use any of the other Sage 50 Accounts features.
Some areas of the Company Preferences facility will already contain information, taken from the data that you entered on ActiveSetup. We recommend that you check this information and enter the remaining company preferences now.
Use the Accountant tab to enter your accountant's name and address details. Sage 50 Accounts uses this information when you use Accountant Link to exchange data with your accountant. For information about entering your accountant's details and using Accountant Link, see Accountant Link on page 716.
To enter your address preferencesUse this area of the software to fill in your company address.
1. Select Settings > Company Preferences.
The Company Preferences window appears.
4

Setting up Sage 50 Accounts
2. If necessary, edit your company name and address. You can also add your company's telephone and fax numbers, email and website address, along with your DUNS Number.
The DUNS Number (Data Universal Numbering System) is a nine digit number, used to identify a business.
Use of this numbering system to identify a business is to ensure compatibility with Zanzibar, the UK Government e-purchasing portal. Every e-order and e-invoice that passes through Zanzibar must include a DUNS number.
Charities only: Enter your Charity Tax Reference in Charity No. and it appears on your Gift Aid report.
3. Accounts Professional users: If you want to use Sage 50 Accounts to produce Intrastat Supplementary Declarations information and you do not have a default company Delivery Address set up, you must set the Country to GB, or IE for users in the Republic of Ireland. Select GB or IE from the drop-down list in the Country box.
4. Enter your company's VAT registration number in the box provided.
5. If you have an Accounts Plus or Accounts Professional version of Sage 50 Accounts, you can have multiple delivery and contact addresses. For example, if your business has several offices, you can enter a delivery address for each office. Similarly, if you have several Customer or Supplier contacts, to whom you send different documentation - invoices, statements, letters, you can specify different contact addresses for each.
6. To save any changes and exit, click OK, or to exit without saving, click Cancel.
125

Sage 50 Accounts User Guide
12
To enter your label preferencesSetting your label preferences determines how your Sage 50 Accounts software displays information. This includes how you want to display addresses and additional information on your customer, supplier and product records.
1. Select Settings > Company Preferences.
The Company Preferences information appears.
2. Choose the Labels tab.
The Labels information appears.
3. To ensure that you always enter address information consistently, you can amend the labels that appear on all address data entry windows. For example, you can change the labels to Street 1, Street 2, Town, County and Postcode. This ensures that the county will always be entered on the fourth line. Therefore if you want to search for all customers in a specific county, you can search on Address Line 4. For more information about searches, Using the search tool to find records on page 60.
4. To save any changes and exit, click OK, or to exit without saving, click Cancel.
6

Setting up Sage 50 Accounts
To enter your company parametersBy setting your company parameters, you can choose from a range of options which affect how your Sage 50 Accounts software works. These options are explained in the following instructions.
1. Select Settings > Company Preferences.
2. Click the Parameters tab.
The Parameters information appears.
3. Enter the following information in the relevant section of the window:
Default Call Charge - Accounts Professional only
You can charge people for the amount of time you talk to them on the telephone. The hourly rate that you enter here is used as the default rate that can be assigned to service invoices generated from within customer records contacts tab. To read about how to charge people for telephone calls, see Invoicing from telephone calls on page 555.
127

Sage 50 Accounts User Guide
12
Display Account Status
Select this check box if you want Sage 50 Accounts to display the status of your customers and suppliers.
If you select this check box, two option buttons become available.
If you want Sage 50 Accounts to display the account status when you use the account, but allow you to continue, select Show a warning on each change. When you create or amend an invoice, credit note or order for the account, Sage 50 Accounts displays a warning message, informing you that the account is on hold. You can still create or amend the invoice, credit note or order.
If you want Sage 50 Accounts to prevent postings to accounts that are on hold, select the Stop the account option. When you try to create or amend an invoice, credit note or order for an account that is marked as on hold, Sage 50 Accounts displays a warning message advising that the account is on hold, and that you must take the account off hold before you can create or modify the transaction.
Exclude Deleted Transactions
Select this check box to exclude any transactions from your transaction activity list boxes, which have been deleted using the Error Corrections option. If you do not select this check box, deleted transactions appear in red on the activity windows. You cannot exclude them from the Financials window.
Display ActiveSearch popup
Select this check box to enable the ActiveSearch facility. The ActiveSearch facility speeds up data entry by trying to match what you are typing to records stored within Sage 50 Accounts or items that you have previously typed. For more information, see Using ActiveSearch on page 65.
Access Rights Sage 50 Accounts' Access Rights facility lets you set individual passwords for each user accessing Sage 50 Accounts. You can also restrict the options a user has access to, increasing the security of your company data. Select this check box if you want to set up access rights. For more information, see Access rights on page 186.
8

Setting up Sage 50 Accounts
Allow Negative Stock If you want Sage 50 Accounts to allow negative stock levels, select this check box. For example, a negative stock value may occur if you have not recorded recent deliveries of stock to your warehouse but have still been recording the sales to your customers.
Note: If your stock value does fall to a negative value, this will affect your product valuation reports.
Copy skeleton journal values - Accounts Plus and Accounts Professional only
If you want to be able to save the values of your skeleton Nominal Ledger Journal Entries which you make regularly, select this check box. For example, you can save your salary journal values so that you do not have to enter all the values each time you post your salary journal.
Timeslips Link - only relevant to owners of the Sage Timeslips product
If you want to import your accounting journals from your Timeslips software to your Sage 50 Accounts software, select this check box. When you have selected this check box an additional option appears on the File Import menu, enabling you to import your accounting journals from Timeslips.
Enable Reversing Journals
You can set a journal to reverse on a given date. You may find this useful if you need to account for an expense or income you have not yet received.
Similar to accruals and prepayments, except the journal deals with a single month. Accruals and prepayments meanwhile, spread the expense/income over several months.
129

Sage 50 Accounts User Guide
13
Pause outside financial Year message
When you enter a date on a transaction, the software automatically checks the date and compares this to the financial year start date. If the transaction is dated outside the current financial year - that is before or into the future, you see an outside financial year warning message.
If the date you have specified is correct, you may override the warning by choosing Yes to accept the date.
Typically, you do not run the year end procedure for a couple of months into the new year. The result is that this message appears repeatedly, and reduces productivity and can be annoying, as you have to keep selecting OK to continue.
Select this check box if you wish to pause this message for the <current financial year plus one>. The message only appears if the transaction date is in the next financial year.
If you select the check box, the message is suspended for that user only, and on that PC. Once the year-end has been run, the outside financial year message reappears, when posting to any date outside the financial year.
Example: A user has a year end of 31/12/2009, but has not yet completed the year end. The user wants to input transactions into 2009 and 2010 but keeps getting the outside financial year message for 2010 transactions.
Selecting this check box pauses the message when posting to 2010; if the user posts to 2012 they are not given the option of pausing the message. Selecting to pause this message check box allows the user to post to the current financial year 2009 and the next financial year 2010. Posting to any other year still displays the message.
When the user runs the financial year the pause is removed and the software again warns for any transaction outside the current financial year 2010.
Note: If a transaction posting date is prohibited and also outside the current financial year, only the Lock Date message appears.
0

Setting up Sage 50 Accounts
Login Check - Network versions only
If you try to logon to Sage 50 Accounts using a logon name that is already in use on another PC on the network, Sage 50 Accounts prevents the logon. You cannot logon to a company using the same logon name from more than one PC at a time.
If you want to be able to remove the logon name from the user list at the point of logging in to Sage 50 Accounts, select this check box. If you try to logon using the same logon name more than once, Sage 50 Accounts displays the message "This username is already in use. Do you want to remove this user from the request list and logon again?" You can remove the user by clicking Yes, and logon to Sage 50 Accounts as normal.
If you do not select this check box, Sage 50 Accounts displays the message:
Username is in use - the software cannot connect you at this time.
You cannot logon using this logon name until the user logs out on the other PC.
Note: If you use this facility, you must ensure that this check box is cleared on every other PC that is running Sage 50 Accounts across the network.
No Recurring entries at startup
Clear this check box if you do not want to be reminded of outstanding recurring entries, when you start your Sage 50 Accounts software.
If this check box is not selected, a message appears when you start your Sage 50 Accounts software if it detects any recurring entries that are due to be posted. Accepting the pop-up message opens the Recurring Entries window.
Enable Project Costing
Select this check box if you want to use Sage 50 Accounts' Project Costing facility.
131

Sage 50 Accounts User Guide
13
4. To save any changes and exit, click OK, or to exit without saving, click Cancel.
Enable Charity \ Non-Profit options
Select this option if you want to use Sage 50 Accounts to manage a charity or non-profit organisation.
If you selected the Charities Chart of Accounts in the Active Setup wizard, when you set up your Company in the software, this check box is already selected.
Details of the facilities available, when running Sage 50 Accounts in this way are described in the document Charities, which is provided in electronic format as a .PDF file, and can also be accessed via Help menu > PDF Guides > Charities.
Enable Smart Totals Select this check box if you want Sage 50 Accounts to display a total balance for all records selected within a ledger window, such as Customers, Nominal or Invoicing. The window also displays how many records you have selected out of the total number available, for information purposes.
Note: The number of records selected and their total balance only displays on the Nominal Ledger if it is set to use the List layout. If the Nominal Ledger is using the Analyser or Graph layout, the totals do not display.
Log Events Select this check box if you want Sage 50 Accounts to keep a record of important changes and processes in your data, such as when a user runs the year end process. For more details, see Event Logging on page 772.
2

Setting up Sage 50 Accounts
To enter your reporting preferences
1. Select Settings > Company Preferences.
The Company Preferences information appears.
2. From the Company Preferences window, click the Reporting tab.
The Reporting information appears.
3. Enter the following information in the relevant section of the window:
Print End of Report Banner
Select this to print an End of Report message at the end of all reports to indicate that the report is complete.
133

Sage 50 Accounts User Guide
13
4. To save any changes and exit, click OK, or to exit without saving, click Cancel.
Cheque lines per page - Accounts Professional and Accounts Plus only
Enter the number of lines that appear on your cheque layout here. The software uses this value to generate the correct cheque number when your remittance note runs over more than one page.
Note: If you have 12" cheque layouts, set this to 15 cheque lines per page. If you are using A4 cheque layouts, set this to 11 cheque lines per page. When you are printing your cheques, you may have to continue making adjustments to the number of cheque lines per page until your cheque layout is printed correctly.
Print Address on Stationery
Select this check box to print your name and address on all of your invoices, orders, statements and letters.
Use Data Path for Reports - Network users only
If you want your client PCs to use the reports stored on the server, select this check box. This means that all client computers are using the same set of reports.
4

Setting up Sage 50 Accounts
To set up your Accountant Link defaultsNote: The Accountant information you enter applies to the company data that is currently open in Sage 50 Accounts. If you use a multi-company version of Sage 50 Accounts, you must enter the Accountant details into each company's data individually.
1. Select Settings > Company Preferences.
2. From the Company Preferences window, click the Accountant tab.
The Accountant information appears.
3. In the Accountant Details section of the window, enter your accountant's name, address and contact details.
4. In the Accountant Link Import/Export Folders section of the window, enter the default locations you want the Accountant Link Wizard to use for importing adjustments from your accountant and exporting your data to file.
By default, Sage 50 Accounts uses Import and Export folders within your software directory. For example, if your software is installed into C:\Program Files\Sage\Accounts, the import location is:
135

Sage 50 Accounts User Guide
13
Windows XP
C:\Documents and Settings\All Users\Application Data\Sage\Accounts\2012\company.000\Imports
Windows Vista, Windows 7
C:\ProgramData\Sage\Accounts\2012\company.000\Imports
and the export location is
Windows XP
C:\Documents and Settings\All Users\Application Data\Sage\Accounts\2012\company.000\Exports
Windows Vista, Windows 7
C:\ProgramData\Sage\Accounts\2012\company.000\Exports
Note: We recommend that you use the default locations.
5. To save your changes and return to the Sage 50 Accounts desktop, click OK.
Alternatively, to return to the desktop without saving your changes, click Cancel.
To set up your Accountant Link defaults using Sage 50 Client ManagerNote: If you are using a multi-company version of Sage 50 Client Manager, the information you enter here relates to your own practice, and applies to the data for every company you use or create. You only need to enter these details once.
1. Select Settings > Company Preferences.
The Company Preferences information appears.
2. From the Company Preferences window, click the Accountant tab.
The Accountant information appears.
3. In the Accountant Details section of the window, enter your practice name, address details, email address, and agent number. Sage 50 Client Manager uses the information you enter in the SSD Agent No box, when you submit Intrastat submissions on behalf of your clients.
4. In the Accountant Link Import/Export Folders section of the window, enter the default locations you want the Accountant Link Wizard to use for importing data from your clients and exporting your adjustments to file.
5. If the data within this company is imported from a client's file, Sage 50 Client Manager clears the Dataset Source check box. If no import has taken place, Sage 50 Client Manager selects this check box. You cannot amend this setting directly.
6. To save your changes and return to the Sage 50 Accounts desktop, click OK.
Alternatively, to return to the desktop without saving your changes, click Cancel.
6

Setting up Sage 50 Accounts
To enter your budgeting method preferences
1. Select Settings > Company Preferences.
The Company Preferences information appears.
2. From the Company Preferences window, click the Budgeting tab.
The Budgeting information appears.
Do you want to track keep an eye on costs and income? Then select the budgeting method you want to use from the drop-down lists.
You can choose from:
Standard
This is budgeting by the nominal account record only.
You can view your budget, actual and previous year figures. The information can also be viewed in graphical format.
137

Sage 50 Accounts User Guide
13
If you have used this method in a previous version of Sage 50 Accounts, v12 or earlier, and you choose to use the Advanced nominal code budgeting, your current nominal budgets are transferred for you. The earlier budgets are made read only on the nominal accounts.
Advanced Budgeting
When Advanced Budgeting is selected, two things happen - the Budgeting Type drop-down becomes active, allowing you to choose from a trio of budgeting types, and the Default Chart of Accounts section also becomes active.
You can choose to select the default Chart of Accounts within Advanced Budgeting or create a specific Budgeting Chart of Accounts.
The three Advanced Budgeting options are:
Nominal Code - Advanced
This is also budgeting by nominal account record only. It is very similar to the Standard method but presented in a better way.
The extra benefits include:
View previous budget results for the past five years
Enter a budget for the next year - referred to as a forecast year
Copy the current year's values to create a budget for your forecast year - at the same time increase or decrease those figures
Department Overview - Advanced
With this method you can set up a budget for a department and analyse its costs or income by nominal category.
Nominal categories are the accounting areas used to group your nominal accounts, such as Sales, Purchases, or Overheads.
The value of all nominal accounts in a category are used to monitor what has actually happened against what was planned. If you prefer a more detailed breakdown for your budgets, see the Department In-Depth - Advanced Budgeting method below.
This method is part of the Advanced budgeting feature. Advanced budgeting provides many benefits, such as being able to view previous budget results for the past five year, or enter a budget for the next year - referred to a forecast year.
Department In-Depth - Advanced
With this method you can set up a budget for a department and analyse the cost or income by nominal account. This method gives you the most detailed analysis when it comes to budgeting.
This method is part of the Advanced budgeting feature. Advanced budgeting provides many benefits, such as being able to view previous budget results for the past five year, or enter a budget for the next year - referred to a forecast year.
8

Setting up Sage 50 Accounts
To configure your VAT preferencesVAT preferences are a range of settings that control how Sage 50 Accounts deals with all your VAT calculations, submissions and payments.
Your selections are used to configure Sage 50 Accounts, so that the software can handle all your VAT reporting requirements, in accordance with current legislation.
Access your VAT preferences
1. Settings > Company Preferences > VAT tab.
Note: Password entry is required to display the Company Preferences window.
2. In the VAT Preferences tab, set your VAT Details, ECSL preferences, e-Submission credentials and contact preferences.
Configure your VAT Details preferences
1. At the top of the VAT Details window, enter your VAT registration number.
2. Set your other VAT details, in each of the following categories:
139

Sage 50 Accounts User Guide
14
Non-Vatable Tax Code
On installation, your software automatically sets T9 as the tax code for transactions, which do not involve VAT and are not included on the VAT Return, and also for all those routines within your software that are non-vatable, for example, journal entries and error corrections.
If you want to change this default tax code, select the tax code you require from the drop-down list.
Item VAT Amendable
If you want to be able to change the VAT amount that is automatically calculated by your software when you create invoices or credit notes, select this check box. A tick appears when it is selected.
Accounts Professional users can also amend VAT amounts, when creating sales and purchase orders.
VAT Scheme
Select the VAT Scheme appropriate to your business:
Standard VAT
When using the Standard VAT Accounting scheme, you need to account for the VAT element of income when it is invoiced, not when you receive the money.
Similarly, if you buy goods from your suppliers on a credit basis, you also need to account for the VAT element of purchases, when you incur the cost, rather than when you actually make a payment.
At the end of a period, you must pay the amount of VAT collected on sales - that is, output tax, less the amount of VAT charged on purchases - input tax, to the VAT authorities.
VAT Cash Accounting
VAT Cash Accounting is a cash - based accounting scheme, devised by the tax authorities to help smaller companies with their cash flow.
Using this scheme, at the end of a period you pay and reclaim VAT only on the money value that has actually been received or paid.
Note for users in the Republic of Ireland: The Irish VAT Cash Accounting scheme works slightly differently from the UK scheme; it allows you to calculate VAT on the money you receive from your customers and the invoices/credits you receive from your suppliers.
If your computer's Regional Options are set to English (Ireland), selecting the VAT Cash Accounting check box enables you to calculate your VAT according to the Irish VAT Cash Accounting scheme.
0

Setting up Sage 50 Accounts
If you have any doubts about the VAT scheme you should be using, please contact your accountant.
Flat Rate - Invoice Based (UK only)
The Flat Rate scheme was introduced by HMRC to simplify VAT calculation for new and small businesses. VAT payable is calculated by multiplying the business’ gross turnover by a fixed percentage, which is varied according to trade sector.
The fixed percentage is normally lower than the standard VAT percentage.
Under the flat rate scheme, a business must still add VAT at the normal rate, when invoicing customers - that is, an invoice for standard rated item for £1,000 would have VAT of £200 added if the VAT rate was 20.0%.
Note: The standard rate of VAT was increased to 20 per cent on 04 January 2011.
In addition, under the flat rate scheme, VAT is not recoverable on purchases, with one exception. Purchase VAT can be reclaimed on a single purchase of capital expenditure goods, where the purchase amount, including VAT, is £2,000 or more.
For more information about this scheme, please refer to the HMRC guidance.
Flat Rate - Cash Based (UK only)
This is the flat rate equivalent of the VAT Cash Accounting scheme.
The calculation of the VAT total for a period is the gross turnover based on receipt only.
Using this scheme, at the end of a period you pay VAT only on the money value that has actually been received.
For more information about this scheme, again please refer to the HMRC guidance.
Note: If you choose to change your VAT accounting scheme using this drop-down selection, you must ensure that you first perform a VAT reconciliation on your existing scheme. This is to ensure that no VAT unreconciled transactions exist, when you then switch your VAT accounting scheme.
Flat Rate % (UK - Flat Rate Accounting only)
The flat rate you use depends on the business sector that you belong in. The correct sector is the one that most closely describes what your business will be doing in the coming year.
Note: In the first year of VAT registration, businesses using the flat rate scheme can reduce the flat rate percentage for their sector by 1%, until the day before the first anniversary of VAT registration. This discount applies even if the flat rate percentage changes during the first year of VAT registration. It is your responsibility to manage and adjust your flat rate %.
Validate VAT Numbers
Your EC Sales List submission (ECSL) requires the inclusion of your customer's country code and VAT registration number.
141

Sage 50 Accounts User Guide
14
Leave this check box selected if you want Sage 50 Accounts to validate EU VAT numbers for all EU member countries.
Enable e-VAT Submission
Select this check box if you wish to submit your VAT return and EC Sales List to HMRC over the Internet.
In order to make e-VAT submissions you will have already obtained a Government Gateway Account.
Note: This does not apply to ROI users.
If you do not wish to submit your VAT Returns online, do not select the Enable e-VAT Submissions check box. You can still make your VAT payments using the Payment button on the VAT Ledger toolbar. This will open the Bank Payment window.
Configure your EC Sales List preferences
If you are registered for VAT and supply Goods and/or Services to customers in the EC, you need to submit an EC Sales List (ECSL). The information provided on the ECSL is used in the UK and by other Member States to ensure that VAT has been correctly accounted for, on the sale of Goods and Services within the EC.
In the case of a multi-company environment, an ECSL must be submitted for each company within the group.
If you intend to submit your ECSL to HMRC online, then configure your VAT Internet Submissions in each of the EC Sales List categories.
Error Threshold
Select your Error Threshold from the drop-down list.
Your selection is required to determine whether the error tolerance setting for an ECSL submission is set to thirty or zero per cent.
A zero per cent selection signifies that you are willing to accept zero tolerance for submissions, in which case the submission is likely to be rejected, when the first error is encountered in a submission line.
Selecting thirty per cent signifies that the User is prepared for this tolerance range, where more than thirty per cent of the lines need to be deemed as having errors, for the submission to be rejected by HMRC.
The default setting, as per HMRC recommendation, is thirty per cent.
Branch Identifier
Type the three-digit number, representing the EC Sales List Branch Identifier.
The default number is 000.
This number is allocated by the HMRC National Advice Service.
Branch Postcode
Type the EC Sales List Branch Postcode.
2

Setting up Sage 50 Accounts
Configure your e-Submissions Credentials preferences
Configure your e-Submissions credentials in each of the following categories, using the same details as you used, when setting up your Government Gateway account:
User ID
Type your User ID in this entry box, defined as your Government Gateway Account Username, when you set up your account.
Password
Type your password in this entry box, defined as your Government Gateway Account password, when you set up your account.
Confirm Password
Re-type your password in this entry box, defined as your Government Gateway Account password, when you set up your account.
Configure your e-Submissions Contact Details
Configure your e-Submissions contact details in each of the following categories, using the same details as you used, when you set up your Government Gateway account:
Forename
Enter your first or given name(s) in this entry box, as defined when you set up your Government Gateway account.
Surname
Enter your last or family name in this entry box, as defined when you set up your
Government Gateway account.
Telephone
Enter your contact telephone number in this entry box, as defined when you set up your Government Gateway account.
Enter your contact email address in this entry box, as defined when you set up your Government Gateway account.
143

Sage 50 Accounts User Guide
14
Configure your HMRC Bank Account details
To modify the HMRC Bank Account details, select the HMRC Bank Account button. In the HMRC Bank Account window that appears, use the Sort code and Account number entry boxes to set your HMRC bank account details.
These bank details are only used, when the user is paying their VAT liability to HMRC, using the Sage e-banking feature.
If these details change, you can modify the Sort Code and Account Number in the HMRC Bank Details window.
Configure your EC Sales VAT Descriptions
To set your default message text that will appear on your invoices, when an EC sales tax code is used, click EC VAT Description.
The EC VAT Descriptions window appears.
Choose from one of the three available options that are listed.
From the 01 October 2007, HMRC introduced additional legislation relating to the information contained on an EC Sales invoice.
At present, when goods are sold to an EC member state, if the EC customers’ VAT registration number is obtained, then the invoice can be zero-rated for VAT purposes - that is, no VAT is charged and it is up to the EC customer to account for the VAT on their tax return. The new legislation requires descriptions to be included on the invoice, to enable the EC customer to account correctly for the notional VAT on their VAT Return.
4

Setting up Sage 50 Accounts
To Set your Sage Pay PreferencesDo you want the facility to receive pay by card payments from your customers or refunds from your suppliers, over the telephone?
You can do this by signing up for a Sage Pay Account from the Sage Pay tab, accessed from Settings > Company Preferences.
1. Click Apply now for a Sage Pay account, then complete the Online Application Form. Full help and support is available to you from within the online application form, if you run into any difficulties.
2. Once your account is set up, select the Enable Sage Pay check box at the top of the Sage Pay tab.
145

Sage 50 Accounts User Guide
14
Configure your Sage Pay Credentials
Enter your account Vendor Name, Username, Email address and Password, defined during account creation, in the Sage Pay Credentials section of the Sage Pay tab.
Configure your Sage Pay General Settings
1. Choose the receiving bank account reference from the Bank Ref drop-down list in the General Settings section of the tab. All pay by card payments will be directed to this nominated account.
Tip: Select this bank account carefully. You may find it worthwhile to set up a dedicated bank account for your Sage Pay transactions.
On a daily basis, you may have many Sage Pay transactions, which are later transferred as a single amount from your Sage Pay account to your general bank account. Using a dedicated Sage Pay account assists with subsequent bank reconciliation.
2. Each time Sage 50 Accounts is started, If you have any outstanding Pay Now payments to download and process, you can be reminded every time you start Sage 50 Accounts.
You can turn this reminder on/off by selecting/clearing the Check for payments on startup check box in the General Settings section of the Sage Pay tab. The check box is not selected, by default. To save your settings, click OK.
6

Setting up Sage 50 Accounts
Configure My Sage Pay Download Settings
Use this section to define how you match downloaded Sage Pay web transactions against customer accounts.
Match transactions against customer accounts (creating new accounts as required)If this option is selected, the Sage Pay Payment Download wizard attempts to match a customer from a downloaded transaction to an existing customer in Sage Accounts using the customer email address.
If no customer is matched with the email address, a new customer is created.
Similarly, if no email address is provided by the download, a new customer is created.
Record all transactions against the account specified below:
If you prefer to assign all downloaded Sage Pay transactions to a single, generic web sales customer, select this check box.
With this option selected, the Customer Ref drop-down becomes active.
Select the Customer Ref drop-down button, select New and create a new Company name in the Details tab of the Customer Record window that appears.
To save your Sage Pay settings, click OK.
With the completion of these steps, you now have the facility in the Customer Receipts, Bank Receipts, Supplier Refund, and Invoice task windows to access the Sage Pay - Pay by Card and Pay Deposit by Card facility for card payment over the telephone.
Note: If you have multiple companies and use Sage Pay with the payment download wizard, it is recommended that you use separate Sage Pay Vendor credentials for each of your companies. This is because the payment download wizard downloads transactions on a per Sage Pay Vendor credential basis.
If you have several companies using a single set of Sage Pay Vendor credentials, the download does not differentiate transactions for each company. The transactions are merely downloaded into the company that is open at the time of the download.
147

Sage 50 Accounts User Guide
14
To Enter your CIS preferencesCIS only
1. Select Settings Company Preferences.
2. From the Company Preferences window, click the CIS tab.
The CIS information appears.
3. Enter your CIS information in the relevant sections on the window.
4. To check or change the nominal accounts set for CIS purposes, click View/Edit Nominal Codes. To change a nominal code, choose the required code from the drop-down list.
5. To save changes and exit, click OK, or to exit without saving, click Cancel.
8

Setting up Sage 50 Accounts
You can enter the following CIS Details:
Status
This information was entered when you ran the CIS Activation Wizard. It indicates the type of business you operate. To change the status, from the drop-down list, choose the status you want to apply to your business. This information is passed to HM Revenue & Customs, when you submit electronic information to them using the software's eSubmission feature.
Unique Tax Ref
This information was entered when you ran the CIS Activation Wizard. It is sometimes referred to as UTR and is supplied by HM Revenue & Customs (HMRC).
It is found on your existing voucher (CIS23, CIS24, CIS25), and comprises the first ten digits of the tax reference field on the bottom left of the voucher. This information is passed to HMRC, when you submit electronic information to them using the software's eSubmission feature.
Employer's PAYE Ref
This information was entered when you ran the CIS Activation Wizard. It is sometimes referred to as EMPREF and is supplied by HM Revenue & Customs (HMRC).
EMPREF is also known as the PAYE Reference and can be found on the front of the payment booklet issued to every contractor. It comprises a three number office reference, a forward slash and up to ten characters or numbers. For example, 913/WZ51258.
Enter the EMPREF you want to use here. This information is passed to HMRC, when you submit electronic information to them using the software's eSubmission feature.
Accounts Office Ref
This information was entered when you ran the CIS Activation Wizard. It is sometimes referred to as AoREF and is supplied by HM Revenue & Customs (HMRC).
AoREF can be obtained from the P30B paying-in book or the letter issued in its place. It comprises a tax office number of up to three numeric characters using, where necessary leading zeros, followed by the letter P and then an alpha character.
Finally there is a series of 8 numbers. For example 131PE00045678 or 001PF23456789 This information is passed to HMRC when you submit electronic information to them using the software's eSubmission feature.
You can enter the following CIS Tax Rate:
Standard
The software sets up two tax rates for you, the standard rate and the higher rate. This is the standard tax rate. At the time of publication the standard rate is 20% (Net).
The rates are subject to change. Check the HM Revenue & Customs website for the latest information.
149

Sage 50 Accounts User Guide
15
Higher
The software sets up two tax rates for you, the standard rate and the higher rate. This is the higher tax rate. At the time of publication the higher rate is 30% (Net).
The rates are subject to change. Check the HM Revenue & Customs website for the latest information.
You can enter the following e-Submissions Credentials:
User ID
This is the User ID you received when you registered with the Government Gateway. If you entered this information when you ran the CIS Activation Wizard then your User ID is displayed here. Enter the User ID you want to use here.
This information is passed to HM Revenue & Customs, when you submit electronic information to them using the software's eSubmission feature.
Submit as an agent - Client Manager only
If you are registered with HM Revenue & Customs as an agent to submit CIS information on behalf of others, select this check box.
Password
This is the Activation PIN you received, when you registered with the Government Gateway. If you entered this information when you ran the CIS Activation Wizard then your PIN is stored here but it is masked for security. It appears as a line of asterisks.
Enter the PIN you want to use here. This information is passed to HM Revenue & Customs when you submit electronic information to them using the software's eSubmission feature.
Agent Reference - Client Manager only
If you are registered with HM Revenue & Customs (HMRC) as an agent to submit CIS information on behalf of others, enter your Agent Reference.
This information is passed to HMRC, when you submit electronic information to them using the software's eSubmission feature.
Confirm Password
Please confirm the Activation PIN you received when you registered with the Government Gateway. If you entered this information, when you ran the CIS Activation Wizard, then your PIN is stored here but it is masked for security. It appears as a line of asterisks.
Enter the PIN you want to use here. This information is passed to HM Revenue & Customs, when you submit electronic information to them using the software's eSubmission feature.
You can enter the following e-Submissions Contact Details:
Forenames
This is a contact name for your company. If you entered this information when you ran the CIS Activation Wizard then the contact's name is displayed here.
0

Setting up Sage 50 Accounts
Enter the contact name you want to use. This information is passed to HM Revenue & Customs when you submit electronic information to them using the software's eSubmission feature.
Surname
This is a contact name for your company. If you entered this information when you ran the CIS Activation Wizard then the contact's name is displayed here.
Enter the contact name you want to use. This information is passed to HM Revenue & Customs, when you submit electronic information to them using the software's eSubmission feature.
Telephone
This is a contact telephone number for your company. Enter the telephone number you want to use. If you entered this information when you ran the CIS Activation Wizard, then the telephone number is displayed here.
This information is passed to HM Revenue & Customs, when you submit electronic information to them using the software's eSubmission feature.
This is a contact email address for your company. If you entered this information, when you ran the CIS Activation Wizard, then the email address is displayed here.
Enter the email address you want to use. If you have a number of email addresses, you should enter your main contact email address here. This information is passed to HM Revenue & Customs, when you submit electronic information to them using the software's eSubmission feature.
151

Sage 50 Accounts User Guide
15
Entering your bank defaults
Use the Bank Defaults facility to set up how you want to use your banking options. For example, you can choose how you want transactions to be grouped.
To enter your bank defaults
1. Select Settings > Bank Defaults.
The Bank Defaults window appears.
2. Select the bank defaults you want to use.
Enable e-Banking Select this check box to enable the e-Banking facility.
For more information about e-Banking, see e-Banking on page 739.
Group items in Bank Rec
If you select this check box, consecutive transactions of the same type are combined as one item when shown in the Bank Reconciliation window if the reference code and date are the same. A 'Y' also appears in the Grouped? column of the Bank Reconciliation window if the transactions have been grouped.
List Payment/Receipt by split
Select this check box to display every individual transaction, when viewing invoices in the Supplier payments and customer receipts windows. If this check box is not selected, the individual transactions are grouped and only one line appears per invoice.
2

Setting up Sage 50 Accounts
3. If your business makes use of cash registers, you can also set your Cash Register bank account settings.
Create Bank Reconciliation PDF
When this check box is selected, a PDF report of the reconciliation is created automatically when the bank reconciliation is run.
Note: The check box is selected by default for new and upgraded companies
If the check box is unselected, a PDF report is not created when the reconciliation is run.
No Warning on Visa receipts
When entering a receipt on a Credit Card Account, Sage 50 Accounts warns you that you have selected a credit card account. To turn off this warning, select this check box.
Group Bank Transactions
If this check box is selected, bank transactions, such as bank payments and bank receipts, with the same reference and transaction date that are saved on the same batch entry window, are grouped together on the bank activity under one header line. To see the individual transactions that make up the header, you must use the drill-down facility. If you do not want your bank transactions to be grouped together in this way, clear this check box. When you clear the check box, each bank transaction appears on a separate line of the Bank Activity window.
Note: This facility does not work retrospectively. If you change the setting of this check box, it will only effect the transactions that you post after the setting has been changed.
Always Create Remittance
Select this check box if you want to create a remittance advice note each time you save a supplier payment. This is useful when you need to record details of exactly what you are paying for. If you do not want to create a remittance advice note for every supplier payment, clear this check box. You will still be able to request a remittance advice note from the supplier payment window.
153

Sage 50 Accounts User Guide
15
4. To save your bank defaults, click OK. To exit without saving your bank defaults, click Cancel.
To set up your Cash Register / Till Takings Bank Account default details
1. Select Settings > Bank Defaults.
The Bank Defaults window appears.
2. From the Cash Register / Till Takings Default Bank Account drop-down list, select the default bank account to be used for recording your Cash Register transactions.
By default, this is set to 1235 or, if this account is already taken, the next available code.
3. From the Cash Register / Till Takings Default Sales nominal code drop-down list, select the default sales nominal code to be used for recording your Cash Register transactions.
By default, this is set to 4000.
4. From time to time, you may discover discrepancies between your Cash Register total and your actual cash total. This needs to be accounted for by nominating a discrepancy
Bank A/C From the drop-down list, select a default Cash Register / Cash Till Takings bank account.
By default, 1235 is the account selected. If this account has already been selected for another use, then 1236 will be selected by default.
Sales nominal From the drop-down list, select a default Sales Nominal Code for your Cash Register / Till Takings. By default this is set to 4000.
Tax code From the Tax code drop-down list, select the default tax code to apply to all Cash register sales that are entered in the Bank > Cash Register window.
Discrepancies From the drop-down list, select a default Discrepancy Nominal Code for your Cash Register / Till Takings. This is used to account for any discrepancy between your Cash Register total and the money total recorded or banked.
By default this is set to 8206.
Takings are VAT inclusive
If your cash register / till takings are all VAT inclusive, then select this check box.
4

Setting up Sage 50 Accounts
nominal code. From the Discrepancy nominal code drop-down list, select a discrepancy nominal code to be used for recording such Cash Register discrepancies.
5. To save your cash register / till takings bank account default details, close the Bank Defaults window and return to the Bank Accounts window, click OK.
Your new Cash Register / Till Takings bank account is visible in the Bank list.
Entering customer defaults
Each time you create a new customer record you will be asked to enter details, such as the credit limit, terms and discount type and value.
If you give most of your customers similar terms and conditions, you can use the defaults to save you time, when creating customer records. Defaults mean that you do not have to enter the same information into each record over and over again. If you need to, you can override the defaults shown in a record. If every customer is different, do not set up your customer defaults.
To enter your customer defaults
1. Select Settings > Customer Defaults.
The Customer Defaults window appears.
2. In the Record tab, enter your customer information.
155

Sage 50 Accounts User Guide
15
Note: You can change any of these details on the customer record.
Country All customer records list the country, where the customer is based. Use the drop-down list to select the country that you want to assign to each newly created customer record.
Currency Use the Currency drop-down list to select a currency that will be assigned, by default, to each newly created customer record.
This box is greyed-out unless you are a Accounts Professional and have Foreign Trader enabled. For information about setting up and trading in multiple currencies, see Chapter 14, Working with foreign currencies and accounts.
Std. Tax Code Select a default tax code that will be assigned to all transactions that you create for this customer.
Note: If necessary, this default tax code can be changed in any transaction that is created.
Def. N/C Enter the default nominal account code that you want to be used, when you create customer records and when you generate a service or batch invoice for a customer.
Note: If necessary, this default nominal code can be changed in any service or batch invoice that you create.
Department Enter the department that you want to set as the default on each newly created customer record, or use the drop-down list to choose the department you require.
Discount % You can set a basic discount that will be applied to all customer transactions. No conditions will be used when applying the discount, it will be applied to every invoice that you enter for your customers.
You can still change the discount amount manually on each invoice if necessary. If you want to apply each discount individually, you should leave the discount amount as 0.00.
6

Setting up Sage 50 Accounts
3. Use the Statements tab to enter any standard statement descriptions that you want to apply to your invoices, credits, discounts and payments.
4. Use the Ageing tab to set the periods you want to use to monitor how long your customers have owed you money.
If you want to know more about credit control and ageing, refer to the accompanying Credit Control PDF - Help > PDF Guides.
Type - Accounts Plus & Accounts Professional only
Select from this drop-down list whether or not to set a default additional discount for your customers. If you want to give an additional discount, select the Additional Discount from the following:
No additional: Do not apply any extra discount.
Invoice Value: Select this additional discount type to apply discounts, based on the value of the invoice raised. The percentage discount that is applied is calculated from the Customer Defaults Discounts tab, where ten different value ranges can be assigned different discount rates. If you want to set up a discount based on a customer's invoice values, enter the discount structure using the Discounts tab from the Customer Defaults window.
Discount A, B, C, D, E: Select one of these quantity tables to apply additional discount based on the quantity of products bought. These tables are set up using the Discount tab of each product record.
If you have chosen to rename your quantity tables, the names that you have entered appear in this list.
Price List - Accounts Plus & Accounts Professional only
Select the default price list you require from the drop-down list.
Default Select the default account status from the drop-down list. This is the account status that will be assigned to each new customer record. You can change this in each individual customer record if necessary.
Terms Agreed Click this check box if you want the software to accept that terms have been agreed with all customers.
When you select this check box, no warning message will be displayed, in relation to terms not being agreed with a specific customer.
157

Sage 50 Accounts User Guide
15
5. Accounts Professional and Accounts Plus users: You can also enter customer discounts based on invoice values on the Discount tab.
For further information on discounting in general, see Pricing and discounts on page 450.
6. To save your customer defaults, click OK. If you do not want to save your defaults, click Cancel.
The defaults you have entered here appear on any new customer record you create.
Ageing transactions in Sage 50 Accounts
Ageing in Sage 50 Accounts deals with the length of time that your customers have to pay you. Sage 50 Accounts has three ways which you can use to set your deadlines for payment.
These are:
Calendar Monthly Ageing.
Period Ageing.
Start Period Ageing on the first day of the month after Transaction Date.
These are explained in the following sections.
You can only use one of these options for all of your customers or all of your suppliers - that is, you can have one scheme for your customers and a different one for your suppliers. You can set the type of ageing by selecting Customers > Customer Defaults, or Suppliers > Supplier Defaults, clicking the Ageing tab and selecting the type of aged setup that you require.
However, you can still change the number of days a customer has to pay you, in the individual customer record.
Calendar monthly ageing
Use this option to set up ageing on a calendar basis. This means that all of a month's transactions will be classed as outstanding on the first day of the following month.
For example: An invoice was sent out to a customer on the 15 January 2011, and was recorded into Sage 50 Accounts on the same day.
The following table shows the calendar ageing periods.
Note: Because you can change the program date in Sage 50 Accounts and because you can specify date ranges for your analyses, the first aged option is shown as Future.
8

Setting up Sage 50 Accounts
For example, if you change your program date to the 31 December 2010 and then run your aged analysis, the invoice shows up as Future, that is, it has not yet aged.
Period ageing
Use this option to set time limits based on the number of days that payment is overdue. Sage 50 Accounts sets these periods as 30, 60, 90 and 120 days but you can set any number of days you require.
For example: An invoice was sent out to a customer on the 15 January 2011, and was recorded into Sage 50 Accounts on the same day. The following table shows the ageing period.
Note: For an explanation of Future, see the previous table.
Date you run the Aged option Period the transaction shows in
Prior to 31 December 2010 (inclusive) Future
1 January 2011 to 31 January 2011 Current
1 February 2011 to 28 February 2011 Period 1
1 March 2011 to 31 March 2011 Period 2
1 April 2011 to 30 April 2011 Period 3
1 May 2011 onwards Period 4
Date you run the Aged option Period the transaction shows in
Prior to 14 January 2011 (inclusive) Future
15 January 2011 to 13 February 2011 Current
14 February 2011 to 14 March 2011 Period 1
15 March 2011 to 13 April 2011 Period 2
14 April 2011 to 13 May 2011 Period 3
14 May 2011 onwards Period 4
159

Sage 50 Accounts User Guide
16
Start period ageing on the first day of the month after transaction date
Use this option to set up ageing from the first day of the month following the transaction date Note: The transaction date is the date that you record the invoice on your Sage 50 Accounts system.
For example: An invoice was sent out to a customer on the 15 January 2011, and was recorded into Sage 50 Accounts on the same day.
The following table shows the ageing period in which the transaction is found if the Aged option is run for a selection of dates.
Date you run the Aged option Period the transaction shows in
Prior to 14 January 2011 (inclusive) Future
15 January 2011 to 29 February 2011 Current
1 March 2011 to 30 March 2011 Period 1
31 March 2011 to 29 April 2011 Period 2
30 April 2011 to 29 May 2011 Period 3
30 May 2011 onwards Period 4
0

Setting up Sage 50 Accounts
To set up your customers' aged balance defaults
1. Select Settings > Customer Defaults.
The Customer Defaults window appears.
2. From the Customer Defaults window, click the Ageing tab.
The Ageing information appears.
3. Select the type of ageing you require.
4. If you want to include transactions that are dated after the date of the report when you use the Aged option on the Customer toolbar, select the Include Future Totals in Balance check box. For example, you may want to use this option if a customer has not paid an outstanding invoice, and you want to see if they are ordering goods in the coming months.
In this way, you can put a hold on selling them more goods or services until they have settled their outstanding invoices.
To exclude these future transactions, clear this check box.
5. To save your entries and exit click OK. To exit without saving, click Cancel.
Note: You can set up your Supplier Aged Balance Defaults in the same way by selecting Settings > Supplier Defaults and clicking the Ageing tab.
161

Sage 50 Accounts User Guide
16
Entering supplier defaults
Each time you create a new supplier record, you are asked to enter details such as credit limit, terms and discount. If you have the same terms with most of your suppliers, you can use the defaults to save you time when creating supplier records. Defaults mean that you do not have to enter the same information over and over again, into each record. If you need to, you can override the defaults shown in a record. If every supplier is different, do not set up your supplier defaults.
Use the Supplier Defaults facility to set up the defaults that appear on each supplier record that you create. Within this facility, you can also set your supplier aged balance defaults. This is the time period in which you have to pay a particular supplier. For example, one supplier may expect payment within thirty days, but another may give you ninety days to pay your outstanding balances.
To enter your supplier defaults
1. Select Settings > Supplier Defaults.
The Supplier Defaults window appears.
2. Use the Record tab to enter your suppliers information. Press the F1 key to open the Sage 50 Accounts Help system for more information about your Supplier Record Defaults.
2

Setting up Sage 50 Accounts
3. Use the Ageing tab to set the defaults for your suppliers' aged balance reports. For more information about ageing and credit control, refer to the accompanying Credit Control pdf - Help > PDF Guides > Credit Control.
4. To save your entries and exit, click OK. To exit without saving, click Cancel.
The defaults you have entered here appear on any new supplier records you create. You can change these defaults on each individual supplier record if necessary.
163

Sage 50 Accounts User Guide
16
Entering product defaults
Each time you create a new product record, you need to enter details such as nominal code, department, and tax code. If you give most of your products similar details, you can enter a set of 'default' answers that will appear automatically in the new product records you create.
However, if you need to, you can change any of the details that were entered automatically for you on each product record.
If you have Accounts Plus or Accounts Professional version of Sage 50 Accounts you can also add your own descriptions to each of the product discount tabs, by default called Discount A-E, so that they are more meaningful to the way your product discounts are structured. For example, you could call them Trade, Retail, Wholesale, 10% Discount and 20% Discount.
For further information about how to do this, refer to To enter your discount tab names - Accounts Plus and Accounts Professional only on page 166.
If you do change the names on the discount tabs, these name changes appear in the following areas of your software:
Product Record Discounts tab.
Customer Record Defaults tab - Additional Discount list.
Customer Defaults Record tab - Type drop-down list.
New Customer Record wizard.
Global Changes
Sales Order Processing/Invoicing Edit Item Line window - Discount Breakdown window.
4

Setting up Sage 50 Accounts
To enter your product defaults
1. Select Settings > Product Defaults.
The Product Defaults window appears showing the Details information.
2. Enter your default information.
3. To save your product defaults, click OK. To exit without saving, click Cancel.
For more information about the entry boxes in this tab, click F1 to open the specific help topic.
165

Sage 50 Accounts User Guide
16
To enter your discount tab names - Accounts Plus and Accounts Professional only
1. Select Settings > Product Defaults.
The Product Defaults window appears.
2. Click the Descriptions tab.
3. Enter the names you want to use for each of your Discount tabs in the boxes provided.
4. To save your changes, click OK.
Your new discount names now appear in place of Discount A- E.
6

Setting up Sage 50 Accounts
Entering invoice and order defaults
If the invoices, credit notes that you produce, or proformas and quotations for users of Accounts Plus or Accounts Professional, have similar characteristics, you can enter a set of defaults for them. This means that some details will be automatically entered into your invoices, and orders for users of Accounts Professional, thus saving you time.
For example, if you regularly use the same carriage values - postage costs for your invoices, sales orders and purchase orders, you can save yourself time by entering them once in the Footer Defaults tab. These defaults are then used for each invoice and order you create but you can change them when you enter the invoice/order if required.
You can select default Print layouts, to be used with the Quick Print functionality for quotations, invoices, and sales orders - purchase orders (Sage 50 Accounts Professional only).
If you email quotations, invoices, sales or purchase orders to customers / suppliers, you can customise your preferred email layouts using the Email tab.
There are also several facilities you can use to influence when your invoices are discounted, and the type of discount that is applied. However, depending on the version of Sage 50 Accounts you have, some facilities may be unavailable.
You can also set Sage 50 Accounts to calculate discounts based on unit price as explained in How discount is calculated on page 470.
Accounts Professional users - Changing the way the discount is calculated will affect incomplete sales order.
Accounts Professional users only: You can change your settings for cash sales. You can alter the bank account used when a cash sale is recorded. You can also limit the order documentation that is automatically produced for a cash sale. You may decide you do not want a sales order, invoice or goods despatched note generated for this type of order.
Note: The order defaults within Invoice / Order Defaults are available to Accounts Professional users only. Other Sage 50 Accounts variants will only display Invoice Defaults. Also, if you are a Accounts Professional user, you can also set up defaults for your sales and purchase orders.
167

Sage 50 Accounts User Guide
16
To set up your invoice and order general defaults
1. Select Settings > Invoice & Order Defaults.
The Invoice and Order Defaults window appears, showing the General tab.
2. Use the following boxes to indicate your default details:
Invoices Default to Account Reference
This default will save you time when you are entering invoices or credit notes in the New/Edit window of the Invoicing and Order Processing functions. If you type the account reference first (A/C Ref) when you enter invoices or credit notes, select this box. If you enter Type - that is, invoice or credit note first, then do not select this box.
8

Setting up Sage 50 Accounts
Invoice Items Default to Quantity
This default will also save you time when entering invoices and credit notes. If you want Sage 50 Accounts to default to the Quantity box in the Edit Item Line window of a Product Invoice or Credit Note, as well as on a Sales or Purchase Order, then select this check box. If de-selected, Sage 50 Accounts defaults to the Description box.
Show Special Product Codes in Invoicing/SOP/POP - Accounts Professional only
Select this check box to allow you to use the special product codes available from the Invoicing, Sales Order Processing and Purchase Order Processing windows. This check box is selected by default. For more information, see A Note about special product codes on page 525.
Place Order Shortfalls on Order Automatically - Accounts Professional only
If you select this check box, then any purchase orders generated using the shortfall facility will be automatically placed on order. For more information, see Stock shortfall on page 661.
Lock Autonumber on Invoicing/SOP/POP
Use this option to ensure that you do not overwrite the automatically assigned invoice, sales order or purchase order number. If you want to be able to assign your own number to a new invoice, credit note, sales order or purchase order, deselect this check box.
Default Invoice Format
Select the type of invoice you create most frequently from this drop-down list. For example, you might use service invoices for most of the invoices you create.
When you use the invoicing facility, the type of invoice you have selected from here will already be selected for you. This saves you time when entering your invoice, as you do not have to select the correct invoice type each time.
You can choose from: product invoice, product credit, service invoice and service credit.
If you have Accounts Plus or Accounts Professional you can also choose from product proforma, product quote, service proforma and service quote.
169

Sage 50 Accounts User Guide
17
Default Sales Order Format - Accounts Professional only
Select the type of sales order you create most frequently from this drop-down list. When you use the sales order facility, the type of sales order you have selected from here will already be selected for you.
You can choose from Product Sales Order and Product Proforma (SOP).
Convert Quotes To - Accounts Professional only
Select the type of document you want to be created when a quotation is converted or marked as won.
You can choose between Invoices and Sales Orders.
EC VAT description (services)
To set your default message text that will appear on your service invoices, when an EC services sales tax code is used, click EC VAT Description.
Choose from one of the four available options that are listed, or create your own in Settings > Company Preferences > VAT tab > EC VAT Descriptions.
From 01 October 2007, HMRC introduced additional legislation relating to the information contained on an EC Sales invoice.
At present, when goods or services are sold to an EC member state, if the EC customers’ VAT registration number is obtained, then the invoice can be zero-rated for VAT purposes - that is, no VAT is charged and it is up to the EC customer to account for the VAT on their tax return.
The new legislation now requires descriptions to be included on the goods or service invoice, to enable the EC customer to account correctly for the notional VAT on their VAT Return.
Update Using Order No
This default makes it easy for you to trace your invoices if you want to see the sales order number as the transaction reference on the audit trail. If you want to see the invoice number as the reference, do not select this box.
For non-Accounts Professional users, if this box is selected, the reference will appear blank unless a number is entered manually.
0

Setting up Sage 50 Accounts
3. To save your entries and exit, click OK, or to exit without saving, click Cancel.
Update Service Invoices using the Following Text
If you check this box and enter some text in the box below it, this will override anything you type into the service invoice New/Edit window. For example, you may be entering a series of invoices for cleaning services and want cleaning to be the detail updated to the ledgers.
Update Using Customer Department
Select this check box to update your invoices and credit notes by customer department.
Purchase Order Delivery Address - Accounts Professional only
Select the delivery address that you want to use as the default for your purchase orders. Select from the customer, supplier or company default delivery address from the drop-down list.
If you choose to use the company delivery addresses, the default company address appears automatically as the delivery address on your purchase orders.
If you choose the customer or supplier delivery address, the default address for the selected customer or supplier account will be used.
Currency Exchange Rates - Accounts Professional only
If you have run the Foreign Trader Setup Wizard so that you can deal with foreign currencies, the Currency Exchange Rate box appears.
This option determines how Sage 50 Accounts updates your currency exchange rates used to calculate foreign currency transactions. Select an option from the drop-down list:
Always prompt to save exchange rate changes - you can choose if you want to update with the new exchange rate or not.
Automatically save any exchange rate changes - Sage 50 Accounts automatically updates your rates without asking.
Never save any exchange rate changes - You have to enter your rates manually.
171

Sage 50 Accounts User Guide
17
To set up your invoice and order footer defaultsIf you want to assign default carriage costs - that is, postal or transit costs, to your customers, you need to set up your footer defaults. You can also set up the nominal codes where you want the carriage charged to, and also the department.
1. Select Settings > Invoice & Order Defaults.
The Invoice and Order Defaults window appears.
2. Click the Footer Defaults tab.
3. Under invoice and sales order carriage defaults, enter the carriage net amount, nominal code and the department that you want to analyse the carriage values to.
This information is used by default on the Footer tab of your sales orders and invoices. You can change this information, when you enter the order or invoice, if required.
4. Under purchase order carriage defaults, enter the carriage net amount, nominal code and the department, against which you to analyse the carriage values.
2

Setting up Sage 50 Accounts
This information is used by default on the Footer tab of your purchase orders.
You can change this information, when you enter the order or invoice, if required.
5. To save your defaults, click OK. To exit without saving, click Cancel.
To set up your invoice and order quick print defaultsIf you want to assign default print layouts to your quotations, invoices, sales or purchase orders, use the Print tab.
1. Select Settings > Invoice & Order Defaults.
The Invoice and Order Defaults window appears.
2. Click the Quick Print tab.
3. To select a default layout for each of the following document types, click Browse:
Invoices
Sales Orders
Quotations (Invoice)
173

Sage 50 Accounts User Guide
17
Quotations (Sales Orders)
Purchase Orders
4. The Layout Selection window appears, detailing the available layouts for the chosen document type.
5. Select the preferred layout, then click OK.
6. Repeat for all the document types that you are likely to print for your customer and supplier transactions.
7. To save your defaults, click OK. To exit without saving, click Cancel.
Now that you have defined your default print layouts, you can make use of the Quick Print button in the various Quotation, Invoice, Sales Order and Purchase Order lists.
Select Quick Print to print your default print layout automatically using your default printer.
4

Setting up Sage 50 Accounts
To set up your invoice and order email defaultsIf you want to assign default email layouts to your quotations, invoices, sales or purchase orders, use the Email tab.
1. Select Settings > Invoice & Order Defaults.
The Invoice and Order Defaults window appears.
2. Click the Email tab.
3. To select a default layout for each of the following document types, click Browse:
Invoices
Sales Orders
Quotations
Purchase Orders
The Layout Selection window appears, detailing the available layouts for the chosen document type.
175

Sage 50 Accounts User Guide
17
4. Select the preferred layout, then click OK.
5. Repeat for all the document types that you email to customers / suppliers.
6. To save your defaults, click OK. To exit without saving, click Cancel.
To enter your invoice and order numbering optionsUse this facility to set up how you want your invoices and orders numbered.
1. Select Settings > Invoice & Order Defaults.
The Invoice and Order Defaults window appears.
2. Click the Options tab.
3. Enter the numbers that you want your invoice and credit notes (and sales orders, purchase orders, goods despatched notes and goods received notes for Accounts Professional users) to start from in the boxes provided.
6

Setting up Sage 50 Accounts
4. Select the option you want to use when you save your invoices/orders. If you want to save your invoice/order and then clear the window ready to enter the next invoice/order, select the Create New Invoice/Order after saving option. If you want to save your invoice/order leaving the details on the window ready for you to edit, select the Edit the last Invoice/Order after saving.
5. Accounts Professional users only: Select the options you want to use for Goods Despatched Notes (GDN) and Goods Received Notes (GRN). You can choose from three options for each:
6. To save your changes, click OK. To exit without saving, click Cancel.
Use the Discounts tab to set up the discounts that you want to apply to your customer invoices. For more information about discounts, see Pricing and discounts on page 450.
Finally, Accounts Professional users can use the Intrastat tab to set up your defaults for Intrastat reporting. For details, see To set up your Intrastat defaults on page 183.
To set up your discount defaultsAccounts Plus and Accounts Professional users, to help you choose the right settings refer to the table on page 181, which explains the effect the different defaults will have on your invoices.
Generate for all Despatches
Generate for all Received
Select this option if you want Sage 50 Accounts to generate a GDN or GRN automatically for each despatch or delivery. When you record a despatch or delivery, Sage 50 Accounts displays a prompt message, asking if you want to print the GDN or GRN now or later.
Prompt at each Despatch
Prompt at each Received
If you select this option, Sage 50 Accounts prompts you each time you record a despatch or delivery. At this prompt, you can choose whether or not to generate the GDN or GRN. If you choose not to generate the goods despatched or goods received note, Sage 50 Accounts does not store the GDN or GRN information in the Despatched or Deliveries tab of the sales or purchase order, so you cannot view or print the note later.
Do not Generate If you select this option, Sage 50 Accounts updates the sales order or purchase order and your stock level, but does not produce a GDN or GRN. If you choose Do not Generate, the GDN (or GRN) option does not appear on the Sales Order Processing (or Purchase Order Processing) toolbar, and the Despatched (or Deliveries) tab is not available within your sales (or purchase) orders.
177

Sage 50 Accounts User Guide
17
Changes to how quantity and value discounts are applied will affect new invoices and orders, it does not work retrospectively. Therefore, any transactions posted earlier will not be updated with the new discount options
1. Select Settings > Invoice & Order Defaults.
2. Click the Discounts tab.
3. Select any of the following check boxes and options:
Discount by Unit Price Select this option if you want to calculate discounts based on on the unit price of the products listed on the invoice.
8

Setting up Sage 50 Accounts
Apply Quantity / Value Discounts to - Accounts Plus and Accounts Professional only
Use the check boxes to specify when the quantity or value discounts will be applied to invoices. You can choose a single option or all options. See the three options below:
Special Prices
Select this check box to apply discounts to special prices. If this box is unchecked, value discounts will not be applied to any invoices or orders that contain special prices, and quantity discounts will not be applied to any line items using special prices.
Price List Prices
Select this check box to apply quantity discounts to your customer price list prices. If this box is not checked, value discounts will not be applied to any invoices or orders that contain price list prices, and quantity discounts will not be applied to any line items using price list prices.
Standard Prices
Invoices that include standard prices will always be discounted. This check box will always be selected by default. This means it cannot be changed.
Select whether you want the Special Price, Price List and Standard Price discounts to be applied to all customers, or only to those customers who are not included on any price lists. For a complete list of what is included, depending on the options that you choose, see the table on page 181.
Always apply value discounts to special items (S1, S2 and S3) - Accounts Plus and Accounts Professional only
Select this check box to apply discounts to any special items (transactions with a code of S1, S2 or S3) that are listed on your invoices, regardless of the other settings for applying quantity and value discounts.
179

Sage 50 Accounts User Guide
18
4. Once you have chosen the desired options, click OK to apply these defaults to all future invoices and orders.
Show Discount on Main Invoice/Order Screen
With this option enabled, two discount columns are displayed on the invoice and order entry windows (Discount and Discount %).
The columns display any discount awarded to items on an invoice/sales order and can be used to change the discount that has been applied.
If you switch the columns off you cannot quickly override the applied discounts. The discounts can still be changed but on an individual items basis.
This is done by selecting an item line then pressing F3 on the keyboard to display the Edit Item Line window, you can then amend the discount.
0

Setting up Sage 50 Accounts
Choosing defaults for quantity and invoice discounts - Accounts Plus and Accounts Professional only
Quantity discounts are always applied.
Value discounts are always applied.
Quantity discounts are applied to standard prices and price list prices only.
Value discounts are applied, provided that the transaction does not contain any special prices.
Quantity discounts are only applied to standard prices.
Value discounts are only applied if the transaction does not contain any special prices or price list prices.
181

Sage 50 Accounts User Guide
18
Quantity discounts are applied to standard prices and special prices only.
Value discounts are applied if the transaction does not contain any price list prices.
Quantity discounts are only applied to standard prices, if the customer on the invoice is not associated with a price list.
Value discounts are only applied when the customer is not attached to any price list, and the transaction does not contain any special prices.
Quantity discounts will be applied to standard prices and special prices, when the customer is not attached to a price list.
Value discounts are applied when the customer is not attached to any price list.
2

Setting up Sage 50 Accounts
To set up your Intrastat defaults
1. Select Settings > Invoice & Order Defaults.
2. Click the Intrastat tab.
The Intrastat information appears.
Note: If your company country code is set to anything other than GB or IE, the Intrastat facilities are not available.
3. If you export goods to the European Union (EU), set up your Dispatch settings by selecting Generate Intrastrat entries for Sales Orders, then from the drop-down lists, select the Terms of Delivery and Default Nature of Transaction Code (NOTC) you use regularly.
4. If you import goods from the EU, set up your Arrivals settings by selecting Generate Intrastrat entries for Purchase Orders, then from the drop-down lists, select the Terms of Delivery and Default Nature of Transaction Code (NOTC) you use regularly.
183

Sage 50 Accounts User Guide
18
Note: If required, the Terms of Delivery and NOTC codes can be changed as you generate your Intrastat Declaration.
5. To save your changes, click OK, or to exit without saving, click Cancel.
To set up your cash sales defaults - Accounts Professional only
1. Select Settings > Invoice & Order Defaults.
2. Click the Cash Sales tab.
The Cash Sales information appears.
3. Select the documents you want generated for a cash sale - sales order, goods despatched note or sales invoice.
4. To add a message to the generated invoice, select the Add message to Invoice option. In the box provided enter the text you want to appear on the invoice. For example Cash sale - Paid in full.
4

Setting up Sage 50 Accounts
Select the bank account you want the value of a cash sale applied to from the Default Cash Sales Bank Account drop-down list. You must select a base currency bank account.
You can also specify whether you always want the default cash sales bank account to be used, or whether you would prefer to choose a bank account, when a cash sale is recorded.
At installation a default cash sales bank account is set for use and the Always post to Default Cash Sales Bank Account option is enabled.
5. To save your changes, click OK. To return to the Sage 50 Accounts desktop without saving, click Cancel.
185

Sage 50 Accounts User Guide
18
Setting up users
To help you protect your sensitive financial information, Sage 50 Accounts allows you to control access to the software using passwords and access rights. You can even control access to specified areas of your accounts data, for example if you do not want users to be able to view financial statements such as the Profit and Loss report.
Setting a password is the first step towards protecting your data.
Changing your password
You can use the Change Password facility to:
Enter your company password.
Change your company password.
Change your user passwords if you are using access rights.
Access rights
The Access Rights feature lets you set individual passwords for each person who uses Sage 50 Accounts. You can even restrict which ledgers, facilities and windows each user can access. For example, you can hide nominal and bank balances from certain users.
To be able to set up your access rights, you must log in as Manager.
Note: For single-user licences, the Access Rights facility is only available if you select the Access Rights check box on the Parameters tab of Company Preferences. For multi-user licences, this facility is enabled by default.
To create a new user
1. Open the Settings menu and choose Access Rights.
2. Click New.
The Create New User window appears.
3. Enter a logon name and a password for your new user in the boxes provided.
4. Set the access you are giving the new user from the options provided.
Full Access Select this option to give the user unlimited access to all parts of Sage 50 Accounts. You can modify these options later if you want. For further information about how to do this, refer to the following section.
6

Setting up Sage 50 Accounts
5. To save the new user's details, click Save. To clear the details without saving, click Discard.
6. To exit the Create New User window, click Close.
To assign access rights
1. From the Users list on the User Access Rights window, select the user whose access rights you want to assign.
2. Click Details.
The Access Details list appears showing all of the options and menus in Sage 50 Accounts that can have access rights attached. The user's current access level for each option is also shown as full, partial or none.
3. To change the access status of any of the options, click Modules.
The Option List window appears.
4. Select each option you want to change from the list, then select whether the user is to be given full access or no access to the option. Click OK.
5. If you want to give partial access to modules within Sage 50 Accounts, select the module you require and click Dialogs.
6. Select each window you want to change from the list, then select whether the user is to be given full access or no access to the window. Click OK.
7. To return to the User Access Rights window, click Close.
No Access Select this option to give the user no access to any part of Sage 50 Accounts.
187

Sage 50 Accounts User Guide
18
8
Chapter 4
Setting up your Chart of AccountsIn this chapter:Setting up your Chart of Accounts ...190
Adding a Chart of Accounts.............193
Editing and previewing your Chart of Accounts .........................................195
If you select Current Assets or Current Liabilities, the layout is slightly modified..197
Deleting a Chart of Accounts ...........200
Copying a Chart of Accounts ...........201
Nominal ledger accounts explained .201
The nominal account structure.........205
Control accounts .............................206
Sole trader Chart of Accounts individual nominal codes .................................210
Partnership Chart of Accounts individual nominal codes .................................214
Limited Company Chart of Accounts individual nominal codes ..................215
The Chart of Accounts is a list of all the nominal accounts your company uses. It is central to your accounting system and Sage 50 Accounts uses it to form the structure of your Profit and Loss and Balance Sheet reports.
This chapter explains how to work with your Chart of accounts, from reviewing and modifying the chart you selected when you created the company data, to adding or deleting charts as you require.
You can also find out how to check your Chart of Accounts for errors, and learn about the errors that can occur when creating or modifying a chart.
If you are a non-profit making organisation please refer to the Sage 50 Accounts for Charities guide (PDF), which provides additional information. To access the guide, from the Sage 50 Accounts menu bar, select Help > PDF Guides > Charities.

Setting up your Chart of Accounts
The Chart of Accounts (COA) is a list of all the accounts that your company uses. In essence, it is how you categorise your accounting system. A Sole Trader COA is shown in Sole trader Chart of Accounts individual nominal codes on page 210.
The COA is used to produce the Profit and Loss report, the Balance Sheet report, the Budget report and the Prior Year reports. It is also used when you run your Year End. The Year End facility refers to the COA to see which accounts make up the Profit and Loss report. These are cleared down during the Year End procedure. For more information, see Running the Year End on page 362.
Sage 50 Accounts offers several COA designed for different organisations. The first time you access Sage 50 Accounts, you choose which one you would like to install. For more information, see The company setup (ActiveSetup) on page 5. To ensure the selected COA suits your business it needs to be reviewed and possibly modified. This is explained in the following sections.
Note: For those wanting to produce more than one Profit and Loss report showing a variation of business results, you can add more than one COA to achieve this.
Reviewing the COA you have installed
If you have opted to create your own nominal account structure please move on to Modifying the COA you have installed on page 191.
The COA you selected is a good base to start from but is unlikely to meet all your needs, and may need some tailoring. You need to:
Identify those nominal accounts you will not use. For example you may never use nominal accounts such as Overseas Entertainment.
Note: Some nominal accounts in the COA are classed as control accounts. These accounts cannot be deleted. For more information see Control accounts on page 206.
Identify additional nominal accounts that you want to use, over and above those that have been installed. It is possible to add new nominal accounts at any time.
Consider whether the nominal account names are suitable for your needs. You can personalise the names to make them more meaningful to you. It is possible to change the name of a nominal account at any time.

Setting up your Chart of Accounts
To review your Chart of Accounts Print the Nominal List. To do this, select Company > Nominal Ledger, then click Print List.
Using the Nominal List, identify those nominal accounts:
That can be deleted.
That need to be renamed.
Identify any gaps and decide how many nominal account you need to add to the COA.
Upgrading from an earlier version
If you are upgrading from an earlier version of Sage Accounts, then by default, your upgraded data is converted with your existing Chart of Accounts and no changes are made to the upgraded data. This means that none of the specific Sole Trader, Partnership or Limited Company nominal code changes are applied to your data.
Modifying the COA you have installed
With Sage 50 Accounts you can tailor the COA to suit your business. By editing the COA, you can add new categories or make existing categories more suitable to your line of business. For example, you can change the sales category from Product and Export Sales to the actual goods or services your company sells.
If you want to add new sections to your profit and loss report or your balance sheet you must amend your COA.
What do you want to do?
Add a Chart of Accounts. See, To add a Chart of Accounts on page 193
Edit your Chart of Accounts. See, To edit and preview your Chart of Accounts on page 195
Preview and Print your Chart of Accounts. See, Once you have completed your Chart of Accounts review and modifications, select Check to test for errors, Print to print your Chart of Accounts, and Save to save your Chart of Accounts. on page 198
Check your Chart of Accounts for errors. See, If you select Current Assets or Current Liabilities, the layout is slightly modified. on page 197
Copy a Chart of Accounts. See, Copying a Chart of Accounts on page 201
Change the name on the nominal account. See, Editing nominal records on page 222.
Delete a nominal account. See Deleting nominal records on page 223.
Change the nominal account code. See Entering nominal records on page 218
Add a nominal account. See Entering nominal records on page 218.
If you intend to add a nominal account or change a nominal account code, you need to understand how nominal codes are used in Sage 50 Accounts.
191

Sage 50 Accounts User Guide
19
The importance of nominal codes
There are a few things to be aware of, when dealing with nominal codes.
Each nominal account has a unique nominal code; you cannot create duplicate codes.
The number of digits in a code needs to be consistent.
The installed nominal codes use a four digit number. It is important that all nominal codes use the same number of digits. For example you cannot use a four digit code for some nominal accounts and a three digit code for others.
Their effect on the Profit and Loss and Balance Sheet reports.
The COA uses the codes to group nominal accounts and position them for use in the Profit and Loss and Balance Sheet reports. Each report is concerned with a different set of values linked by category type. For example, the following table shows the Profit and Loss report using values linked to categories for sales, purchases, direct expenses and overheads. Any nominal account within the ranges expected for the category type will be used.
For example, a nominal account with a code between the range of 4000 to 4999 will be used for the sales values in the Profit and Loss report.
When you add a nominal account you must ensure that the code falls within the correct category range so that values on the nominal account are picked up and used in the correct financial report.
Category typeNominal code range from
Nominal Code range to
Pro
fit a
nd L
oss
Sales 4000 4999
Purchases 5000 5999
Direct Expenses 6000 6999
Overheads 7000 9999
Taxation 9001 9001
Bal
ance
She
et
Fixed Assets 0001 0999
Current Assets 1000 1999
Current Liabilities 2000 2299
Long Term Liabilities 2300 2999
Capital & Reserves 3000 3999
2

Setting up your Chart of Accounts
If you have transferred from a previous system of bookkeeping and have decided to use your own COA, you need to set the nominal code ranges for each category type. Take care to ensure the nominal accounts needed for the each financial report fall within the correct category ranges. For more information, see The nominal account structure on page 205.
Adding a Chart of Accounts
You can add your own COA if you require, for example if modifying the default chart means making too many changes to be worthwhile, or if you require more than one chart for different areas of your business.
To add a Chart of Accounts
1. Select Company > Chart of Accounts.
2. From the Chart of Accounts window, click Add.
3. Enter the name of your new Chart of Accounts in the Name box, then click Add.
The Preview window appears, with the Profit and Loss tab selected.
193

Sage 50 Accounts User Guide
19
The Chart of Accounts is subdivided into groups termed category types.
At top-left the nominal category types that make up your Profit and Loss statement are shown, with editable Description entry boxes that allow you to customise nominal group names to suit your business.
By default, the category types for the Profit and Loss report are Sales, Purchases, Direct Expenses, Overheads and Taxation; for the Balance Sheet report they are Fixed Assets, Current Assets, Current Liabilities, Long Term Liabilities and Capital & Reserves.
In the case of your default Chart of Accounts, category accounts are automatically set up for each category type in your default layout of accounts, but you can amend these, if necessary.
As you have chosen to add a new Chart of Accounts, no category accounts have been created, so the Category Account list at bottom-left is empty.
4. Select each category in turn from the Category Type list at top-left, and for each one enter or amend the following details in the boxes provided.
Tip: To insert a line, press F7. To remove a line, press F8.
Description This is the heading for this type of category. This appears on your financial reports. You can change this if necessary.
Category Account This is the heading for each range of nominal accounts in this category, one line per range. You can define up to eighty category account ranges for each category.
For example, in your Sales category you may want to set up headings such as Home Sales, Export Sales, Product Sales, etc. You can enter up to sixty characters of text for each heading.
Low/High Use the Low and High boxes to determine the range of nominal accounts to be included for each category account.
If there is only one code in the range, enter the same number in both boxes. Where more than one nominal account belongs to a category account, enter the lowest nominal account number in the range in the Low box and the highest number in the range in the High box. The codes you enter are inclusive.
4

Setting up your Chart of Accounts
When you run your financial reports, all of the nominal accounts entered in each range will be added together to give a subtotal for the category account heading, to which they belong.
As you make your entries, the preview pane on the right, displays a refreshed preview of your Profit and Loss statement or Balance Sheet statement if you have selected the Balance Sheet tab.
5. Check you have set up the Chart of Accounts correctly. See If you select Current Assets or Current Liabilities, the layout is slightly modified. on page 197.
6. If you want to print a copy of your Chart of Accounts, click Print. Choose whether you want to print, preview, or save the information to a file, then click Run. You can also send the details using email.
7. To save your Chart of Accounts, click Save.
Editing and previewing your Chart of Accounts
Sage 50 Accounts enables you to tailor the Chart of Accounts to suit your business. By editing the Chart of Accounts, you can add in new categories or make existing categories more suitable to your line of business. For example, you can change the sales category from product and export sales to the actual items your company sells.
To edit and preview your Chart of Accounts
1. Select Company > Chart of Accounts.
Floating Nominal Accounts - in Current Assets / Current Liabilities - Balance Sheet tab only
Note: The floating nominal accounts only appear, when you are editing the current assets and current liabilities categories.
Certain nominal records shown in the balance sheet could be an asset or a liability depending on the balance. These accounts are known as floating nominal accounts. The software adds the balance of the floating nominal accounts to the correct side of the Balance Sheet automatically, when the report is generated.
In order for Sage 50 Accounts to do this, place any floating nominal accounts in the boxes provided for both the current assets and current liabilities. For example, enter Bank Account 1200 in the Current Assets and Bank Overdraft 1200 in the Current Liabilities.
When you enter a nominal account description in one category, you are prompted to copy it to the other. To do this, click Yes.
195

Sage 50 Accounts User Guide
19
2. From the Chart of Accounts window, select the COA layout you want to change and then click Edit.
The Preview window appears, with the Profit and Loss tab selected.
At top-left the main nominal groups that make up your Profit and Loss statement are shown, with editable Description entry boxes that allow you to customise nominal group names to suit your business.
3. Select each main nominal group in turn at top left, and for each one enter or amend the details in the boxes provided.
4. For each main nominal group selected, the nominal categories are shown at bottom-left, with their respective Low / High nominal range limits. You can edit these Low / High range limits to suit changes in your business practice.
As you edit the nominal group descriptions, the right-hand pane displays a refreshed preview of how your Profit and Loss statement would appear.
This is a layout preview pane and consequently, displays a x symbol, where the actual figures will appear in your finished statement.
6

Setting up your Chart of Accounts
5. Scroll to the bottom of the preview pane, and you see that there is Before and After Taxation text shown. This will only appear on the Profit and Loss statement if the 9001 Taxation value is greater than zero.
6. Select the Balance Sheet tab.
The Balance Sheet tab appears, with a similar layout of nominal groups at top left. At bottom-left, the nominal categories are shown, with their respective Low / High nominal range limits. Again, you can edit these Low / High range limits to suit changes in your business practice.
Again, as you edit the nominal group descriptions, the right-hand pane displays a refreshed preview of how your Balance Sheet statement would appear.
This is a layout preview pane and consequently, displays a x symbol, where the actual figures will appear in your finished statement.
7. If you select Current Assets or Current Liabilities, the layout is slightly modified.
197

Sage 50 Accounts User Guide
19
Below the nominal categories, there is a further list, termed "Floating" Nominal Accounts.
As described earlier, some nominal accounts, in this case Bank Account and VAT Liability, can be viewed as an asset or a liability, depending upon whether they have a debit or credit balance.
Such accounts are termed "Floating" nominal accounts. To ensure that the balance is shown on the correct side of the Balance Sheet statement, such "Floating" accounts are shown in both the Current Assets and Current Liabilities categories.
If you modify the Description for either Bank Account or VAT Liability in one of these categories, you are prompted to copy it to the other corresponding category.
8. Once you have completed your Chart of Accounts review and modifications, select Check to test for errors, Print to print your Chart of Accounts, and Save to save your Chart of Accounts.
Checking your Chart of Accounts
In Sage 50 Accounts you can check the Chart of Accounts for any errors and then print out a report detailing these errors.
To check the Chart of Accounts for any errors
1. Select Company > Chart of Accounts.
2. From the Chart of Accounts window, select the COA layout you want to check and then click Edit.
The Preview window appears.
3. Click Check.
If an information window appears informing you that no errors have been found, it means all of the nominal codes are represented correctly and you can continue to use Sage 50 Accounts.
If a print window appears, select the output - printer, preview or file that you require for the error report, then click Run. You can also send the details using email.
This report tells you of any errors within your Chart of Accounts.
8

Setting up your Chart of Accounts
Errors that can occur in the Chart of Accounts layout
The most common errors found in the Chart of Accounts are described below.
The following ranges overlap onto each other
This means that either the low number, the high number or both of the category account ranges fall within another category account range.
For example,
You need to edit the Chart of Accounts to amend the category account ranges. For further information about how to do this, refer to To edit and preview your Chart of Accounts on page 195.
One of the following ranges is enclosed within the other range
This error means the low and high numbers of one category account range fall within the low and high numbers of another.
For example,
You need to edit the Chart of Accounts to amend the category account ranges. For further information about how to do this, see To edit and preview your Chart of Accounts on page 195.
Category Account
Low High
Product Sales 4080 4099
Export Sales 4080 4100 (This is overlapping the first category account range.)
Export Sales 3050 4080 (This is overlapping the first category account range.)
Category Account
Low High
Product Sales 4000 4099
Export Sales 4010 4020 - This is enclosed within the first category account range
Export Sales 4020 4059 - This is both an overlapping and an enclosed range error
199

Sage 50 Accounts User Guide
20
Nominal code xxxx not represented in chart
This means that a Nominal Account exists in the Nominal Ledger but is not included in any of the ranges within the Chart of Accounts.
You chose to edit the Chart of Accounts and create a new category account or amend an existing one to include the new nominal code. For further information about how to do this, see To edit and preview your Chart of Accounts on page 195. Alternatively, if you are not using the nominal account, you can delete it. For more information, see Deleting nominal records on page 223.
Nominal code xxxx has been used as part of one 'floating' category, but not as part of the equivalent 'floating' category in Current Assets/Current Liabilities
When a nominal code is included in both current assets and current liabilities, Sage 50 Accounts decides which category to include it in depending on whether the code has a debit or a credit balance.
The above error message means you have a nominal code included in one floating category but not in the other. For example, you have the nominal code set up in current assets but not in current liabilities.
You need to edit the Chart of Accounts and include the nominal code in both floating categories. For further information about how to do this, refer to the following section.
The following 'floating' category range in Current Assets has no matching range in Current Liabilities
The floating category range that is entered within the Current Assets and the Current Liabilities must be the same. For example, if you have entered the Bank Account Range as 1200 - 1209 in the Current Assets, you must also enter the same range (1200 -1209) in the Current Liabilities.
Deleting a Chart of Accounts
If a Chart of Accounts is no longer in use, you can delete it from the list of charts.
Note: You cannot delete the Chart of Accounts that is set as the 'Current' chart.
To delete a Chart of Accounts
1. Select Company > Chart of Accounts.
2. From the Chart of Accounts window, select the COA you want to delete.
3. Click Delete.
A confirmation message appears.
0

Setting up your Chart of Accounts
4. To confirm that you want to delete the selected Chart of Accounts, click Yes. Sage 50 Accounts deletes the Chart of Accounts and returns to the Chart of Accounts window.
Alternatively, to cancel the deletion and return to the list of charts, click No. The Chart of Accounts you selected is not affected.
Copying a Chart of Accounts
If you wish to produce a new chart of accounts layout, based on an existing layout, you can quickly copy the layout.
1. Select Company > Chart of Accounts.
The Chart of Accounts window appears.
2. From the Chart of Accounts window, select the chart of accounts layout that you wish to copy.
3. Click Copy. A copy of your selected layout appears in the Description list.
4. To modify the layout name, click Edit. For further information about editing your Chart of Accounts, please refer to the topic Editing and previewing your Chart of Accounts on page 195.
5. To return to the Nominal Ledger window, click Close.
Nominal ledger accounts explained
All the transactions you enter into Sage 50 Accounts are put into categories. These categories are called nominal ledger accounts and are represented in Sage 50 Accounts by codes. These nominal ledger accounts act as records of where you have earned and spent money as a result of running your business. The individual nominal accounts are grouped into ranges. For example, in the default Chart of Accounts supplied with Sage 50 Accounts a rent account - default nominal code 7100, is in the Overheads range of accounts, with a default range of 7000 to 9999. This indicates rent is classed as an overhead.
Sage 50 Accounts has nine nominal account ranges:
Fixed Assets (0001 to 0999)
Current Assets (1000 to 1999)
Current Liabilities (2000 to 2299)
Long Term Liabilities (2300 to 2999)
Capital & Reserves (3000 to 3999)
Sales (4000 to 4999)
Purchases (5000 to 5999)
201

Sage 50 Accounts User Guide
20
Direct Expenses (6000 to 6999)
Overheads (7000 to 9999).
Taxation (9001)
These ranges are further categorised into four different types. These are:
1. Asset accounts, including your current and fixed assets.
2. Liability accounts, including your current and long term liabilities.
3. Income accounts, including your sales accounts.
4. Expenditure accounts, including your purchase accounts, direct expenses and overhead accounts.
It is these categories which Sage 50 Accounts uses to create your financial reports, such as your Profit and Loss and your Balance Sheet.
Sage 50 Accounts's complete default Chart of Accounts is shown in the section, Sage 50 Accounts' Sole Trader Chart of Accounts structure on page 208. This shows the categories, types and names of accounts that make up the Chart of Accounts.
.
Together, these asset and liability accounts hold all the details of where your money actually is, and in the case of liabilities, where it would have to go if you paid off loans, for example.
When you print out the details of how much money is recorded in each of your asset and liability accounts, this report is commonly called a Balance Sheet. The Balance Sheet, which you can
Asset Accounts Sage 50 Accounts uses asset accounts to store the details of the money that you own. This money may be funds in the bank (current assets) or in the form of property or a car (fixed assets).
Your asset accounts hold the monetary value of your assets, no matter what form the money is in. Another examples of an asset account automatically set up for you in Sage 50 Accounts is Office Equipment.
Liability Accounts Sage 50 Accounts keeps track of the money you owe in liability accounts. Typically, this could include the tax you need to pay, the VAT you need to pay (current liabilities) and how much is outstanding on your mortgage (long term liabilities).
Other examples of liability accounts automatically set up for you in Sage 50 Accounts include Bank Loan and Hire Purchase accounts.
2

Setting up your Chart of Accounts
print from Financials, shows your company's financial status, that is, what you own and what you owe. The difference between the two is known as your company's net worth.
When you record the money you receive and the money you pay out in Sage 50 Accounts, the transactions are 'posted' to specific nominal accounts. Let's say you receive £500. You record the money you have received as a deposit into a nominal account called, for example, your Current Bank account, so it adds to your assets. However, at the same time it is a good idea to keep track of where your money is coming from. To let you do this, Sage 50 Accounts follows the traditional practice of making a second entry of the same amount to an income account. This is the double-entry of double-entry bookkeeping!
So, when you record money you've received into Sage 50 Accounts, you don't just allocate the money into a bank account, but you also post the value of the money to one of your income accounts, such as Sales of Product A.
.
For example, if you write a cheque (for example £120) to a garage to pay for both a car repair (£100) and some petrol (£20), you would record the transaction into Sage 50 Accounts using the Bank Payments facility. This would take £120 out of your bank account, but in the payments window you would also post the same value to an expenditure account, such as Car Expenses.
So, at the end of the month or the year, you can look at your Car Expenses account and see not only the individual transactions you have made over the period, but also just how much you have spent on your car. This way you can keep track of the money you spend, and where you spend it.
The number of nominal accounts you use to keep track of your income and expenditure is up to you. The example described previously, allocated both the cost of the car repair (£100) and the petrol (£20) to one expense account, but it could easily have been two.
You could make a more precise analysis of this expenditure by splitting the expense into two expense nominal accounts, one called Car Repairs and the other Petrol Costs. For example, when you record the cheque payment, you still take £120 out of the bank account, but then split this amount, by posting £100 to the Car Repair account and £20 to the Petrol Expense account as two separate items.
Income Accounts Use income accounts to keep the details of where your money is coming from, how much you receive and when. No money is actually held in these nominal accounts, they simply record what you have received. The money is actually recorded as being placed in the bank or other asset account.
Expenditure Accounts Use the expenditure accounts to keep details of what you spend your money on, how much and when. No money is actually held in these nominal accounts, they just record the money you have spent. The money is actually recorded as being taken out of the bank or other asset account, or in the case of a loan, a liability account.
203

Sage 50 Accounts User Guide
20
This is still double-entry accounting, even though three postings have been made. As long as the debit and credit payment are the same, you can have as many postings as you like.
When you print out the details of how much money is recorded in each of your income and expenditure accounts, the report is commonly called a Profit and Loss Report. This report shows the money you have received and how much you have paid out. The surplus of income over expenditure is your profit. For more information see Running the profit and loss report on page 785.
4

Setting up your Chart of Accounts
The nominal account structure
Nominal records are structured into groups within fixed number ranges. These groups are the same ones that are used to make up Sage 50 Accounts' financial reports.
Default nominal ranges
Sage 50 Accounts' default nominal ranges are listed below, and also in the previous table. We recommend that you keep this structure. If you do not, you must be very careful to assign your new nominal records to the correct nominal range, shown below.
You can add more nominal records within these groups to improve your accounting system. For example, you could analyse your sales based on the different types of products you sell. If you sell wine you could set up nominal records for each type within the fixed range for Sales as follows:
Note: Accounts are numbered sequentially but gaps are left so that records to be added.
Warning! Care must be taken when numbering records. If a record is created out of sequence it may result in errors in your management reports.
Group From To
SalesPurchasesDirect ExpensesOverheadsFixed AssetsCurrent AssetsCurrent LiabilitiesLong Term LiabilitiesCapital & ReservesTaxation
4000500060007000000110002000230030009001
4999599969999999099919992299299939999001
White Wine SalesRed Wine SalesRose Wine SalesSparkling WineChampagne
41004110412041304140
205

Sage 50 Accounts User Guide
20
Control accounts
Control accounts are important because they allow you to see the total figures for debtors, creditors, VAT on purchases and so on, without having to add up all the balances on the individual accounts. They also allow you to check that all the individual accounts are correct. Control accounts are used by Sage 50 Accounts to make automatic double-entry postings. A number of control accounts are created automatically. The control accounts are as follows:
Debtors Control
(or sales ledger control account)
This account tells you how much you are currently owed in total by your customers. This is why it is known as the Debtors Control Account.
Any customer transactions entered into Sage 50 Accounts are posted to this account. When you post an invoice to a customer's account, the full amount of the invoice is posted to this account as a debit. If you record a customer receipt, the debtors control account is credited by the full amount of the receipt. You can only change this account code if no transactions have been entered.
Creditors Control
(or purchase ledger control account)
This account tells you how much you currently owe in total to your suppliers. This is why it is known as the Creditors Control Account.
Any supplier transactions entered into Sage 50 Accounts are posted to this account. When you post an invoice received from a supplier, the full amount of the invoice is posted to the account as a credit. If you record a supplier payment, the creditors control account is debited by the full amount of the payment. You can only change this account code if no transactions have been entered.
Default Bank This account is automatically selected, when you open the Bank module.
VAT on Sales This is the nominal account where the value of any VAT is automatically posted, when you record income that is subject to VAT.
VAT on Purchases
This is the nominal account where the value of any VAT is automatically posted, when you record payments on which you can claim VAT back.
Sales Discount If you enter a discount when you record a customer's payment, the value of the discount is posted to this account as a debit.
Purchase Discount
If you enter a discount when recording a payment to a supplier, the value of the discount is posted to this account as a credit.
Retained Earnings
This nominal account adds up the net balance of all your income and expenditure accounts, when you run the Year End process. The value received represents the surplus or loss.
6

Setting up your Chart of Accounts
Default Sales This is the Default Sales nominal account, used on invoices where there is no default n/c in the Customer / Product record.
Accruals If you have set up accruals, this is the nominal account the accruals are posted to, when you run the Month End routine.
Prepayments If you have set up prepayments, this is the nominal account where they are posted, when you run the Month End routine.
Bad Debts If you write off a bad debt using the Write Off, Refund, Return option, this is the nominal code, to which the bad debt is posted.
Mispostings This account is used in automatic error correction routines, to record any mispostings.
Suspense This is the account that automatically receives the opposite side of your opening balance postings. If you enter your opening balances from a complete Trial Balance, then the overall net effect of the postings on this account is zero.
Credit Charges If you charge interest on late payments from customers, the value is posted to this nominal account.
Exchange Rate Variance
If you are using Sage 50 Accounts to record transactions in a foreign currency, these transactions may be affected by changes in the currency exchange rates.
When this occurs, Sage 50 Accounts makes automatic corrective postings using your default Exchange Rate Variance nominal code to ensure that your accounts are in order.
VAT Liability After you have reconciled your Sage 50 Accounts VAT Return, we recommend you transfer the values from your VAT on Sales and VAT on Purchases control accounts for the current VAT period to your VAT Liability nominal account.
Manual Adjustment
Where you decide to make a manual adjustment to a particular figure on the VAT Return using the VAT Manual Adjustment window, Sage 50 Accounts records the adjustment, reason for adjustment, date, time and user name against this control account.
The default code for this account is 2204.
207

Sage 50 Accounts User Guide
20
Sage 50 Accounts' Sole Trader Chart of Accounts structure
Category, Type and Name of AccountNominal Code Range
Sales (Income)
Product SalesExport SalesSales of AssetsCredit Charges (Late Payments)Other Sales
40004100420044004900
40994199429944994999
These acco
unt catego
ries com
bine to
make up
your P
rofit and
Loss rep
ort
Purchases (Expenditure)
PurchasesPurchase ChargesStock
500051005200
509951995299
Direct Expenses (Expenditure)
LabourCommissionsSales PromotionMiscellaneous Expenses
6000610062006900
6099619962996999
Overheads
Gross WagesRent and RatesHeat, Light and PowerMotor ExpensesTravelling and EntertainmentPrinting and StationeryTelephone and Computer ChargesProfessional FeesEquipment Hire and RentalMaintenanceBank Charges and InterestDepreciation Bad DebtsGeneral ExpensesSuspense and Mispostings
700071007200730074007500755076007700780079008000810082009998
709971997299739974997549759976997799789979998099819982999999
Taxation
Taxation 9001 9001
8

Setting up your Chart of Accounts
Note: Bank Account and VAT Liability are floating accounts. For more information about this, refer to the table in To add a Chart of Accounts on page 193.
Category, Type and Name of AccountNominal Code Range
Fixed Assets (Assets)
PropertyPlant and MachineryOffice EquipmentFurniture and FixturesMotor Vehicles
00100020003000400050
00190029003900490059
These acco
unt catego
ries com
bine to
make up
your B
alance Sheet rep
ort
Current Assets (Assets)
StockDebtorsDeposits and CashCredit Card (Debtors)Bank AccountVAT Liability
100011001210125012002200
109911991239125012092209
Current Liabilities (Liabilities)
Creditors: Short TermPayroll TaxationWagesCredit Card (Creditors)Bank AccountVAT Liability
210022102220124012002200
219922192299124012092209
Long Term Liabilities (Liabilities)
Creditors: Long Term 2300 2399
Capital & Reserves (Liabilities)
CapitalReserves
30003100
30993299
209
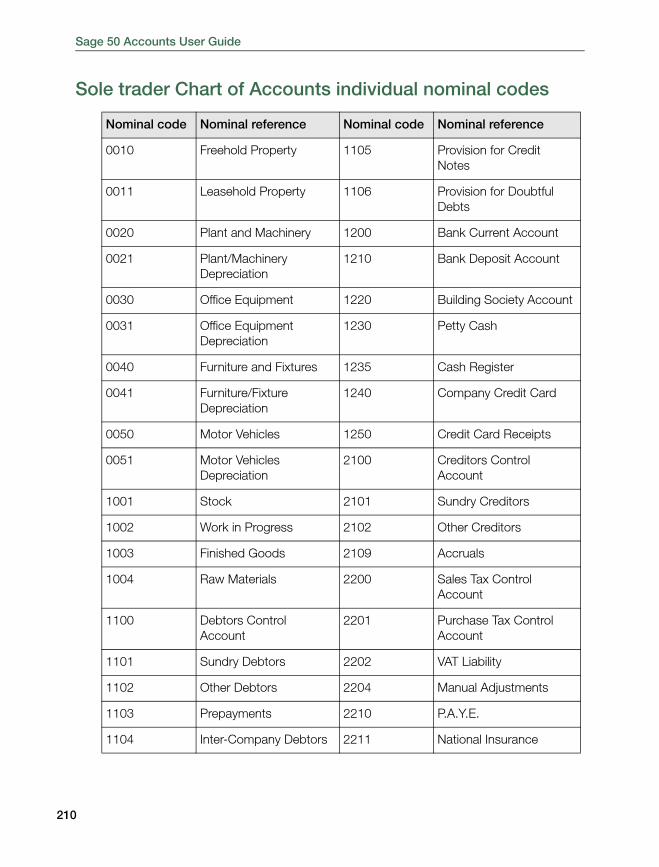
Sage 50 Accounts User Guide
21
Sole trader Chart of Accounts individual nominal codes
Nominal code Nominal reference Nominal code Nominal reference
0010 Freehold Property 1105 Provision for Credit Notes
0011 Leasehold Property 1106 Provision for Doubtful Debts
0020 Plant and Machinery 1200 Bank Current Account
0021 Plant/Machinery Depreciation
1210 Bank Deposit Account
0030 Office Equipment 1220 Building Society Account
0031 Office Equipment Depreciation
1230 Petty Cash
0040 Furniture and Fixtures 1235 Cash Register
0041 Furniture/Fixture Depreciation
1240 Company Credit Card
0050 Motor Vehicles 1250 Credit Card Receipts
0051 Motor Vehicles Depreciation
2100 Creditors Control Account
1001 Stock 2101 Sundry Creditors
1002 Work in Progress 2102 Other Creditors
1003 Finished Goods 2109 Accruals
1004 Raw Materials 2200 Sales Tax Control Account
1100 Debtors Control Account
2201 Purchase Tax Control Account
1101 Sundry Debtors 2202 VAT Liability
1102 Other Debtors 2204 Manual Adjustments
1103 Prepayments 2210 P.A.Y.E.
1104 Inter-Company Debtors 2211 National Insurance
0

Setting up your Chart of Accounts
Nominal code Nominal reference Nominal code Nominal reference
2220 Net Wages 4900 Miscellaneous Income
2230 Pension Fund 4901 Royalties Received
2300 Loans 4902 Commissions Received
2310 Hire Purchase 4903 Insurance Claims
2320 Corporation Tax 4904 Rent Income
2330 Mortgages 4905 Distribution and Carriage
3000 Capital 5000 Materials Purchased
3010 Capital Introduced 5001 Materials Imported
3050 Drawings 5002 Miscellaneous Purchases
3100 Reserves 5003 Packaging
3101 Undistributed Reserves 5009 Discounts Taken
3200 Profit and Loss Account 5100 Carriage
4000 Sales Type A 5101 Import Duty
4001 Sales Type B 5102 Transport Insurance
4002 Sales Type C 5200 Opening Stock
4009 Discounts Allowed 5201 Closing Stock
4010 Management Charges Receivable
6000 Productive Labour
4099 Flat Rate - Benefit/Cost 6001 Cost of Sales Labour
4100 Sales Type D 6002 Sub-Contractors
4101 Sales Type E 6100 Sales Commissions
4200 Sales of Assets 6200 Sales Promotions
4400 Credit Charges (Late Payments)
6201 Advertising
211

Sage 50 Accounts User Guide
21
Nominal code Nominal reference Nominal code Nominal reference
6202 Gifts and Samples 7300 Petrol and Diesel
6203 P.R. (Literature & Brochures)
7301 Vehicle Repairs and Servicing
6900 Miscellaneous Expenses
7302 Vehicle Licences
7000 Gross Wages 7303 Vehicle Insurance
7001 Directors Salaries 7304 Miscellaneous Motor Expenses
7002 Directors Remuneration 7305 Congestion Charges
7003 Staff Salaries 7306 Mileage Claims
7004 Wages - Regular 7350 Scale Charges
7005 Wages - Casual 7400 Travelling
7006 Employers N.I. 7401 Car Hire
7007 Employers Pensions 7402 Hotels
7008 Recruitment Expenses 7403 U.K. Entertainment
7009 Adjustments 7404 Overseas Entertainment
7010 SSP Reclaimed 7405 Overseas Travelling
7011 SMP Reclaimed 7406 Subsistence
7100 Rent 7500 Printing
7102 Water Rates 7501 Postage and Carriage
7103 General Rates 7502 Office Stationery
7104 Premises Insurance 7503 Books etc.
7200 Electricity 7506 Computers & Software
7201 Gas 7507 Other Office Expenses
7202 Oil 7550 Telephone and Fax
7203 Other Heating Costs 7551 Internet Charges
2

Setting up your Chart of Accounts
Nominal code Nominal reference Nominal code Nominal reference
7552 Computers & Software 7904 H.P. Interest
7553 Mobile Charges 7905 Credit Charges
7600 Legal Fees 7906 Exchange Rate Variance
7601 Audit Fees 7907 Other Interest Charges
7602 Accountancy Fees 7908 Factoring Charges
7603 Consultancy Fees 8000 Depreciation
7604 Professional Fees 8001 Plant/Machinery Depreciation
7605 Management Charges Payable
8002 Furniture/Fitting Depreciation
7606 Software Subscriptions 8003 Vehicle Depreciation
7700 Equipment Hire 8004 Office Equipment Depreciation
7701 Office Machine Maintenance
8100 Bad Debt Write Off
7702 Equipment Leasing 8102 Bad Debt Provision
7703 Leasing Costs 8200 Donations
7800 Repairs and Renewals 8201 Subscriptions
7801 Cleaning 8202 Clothing Costs
7802 Laundry 8203 Training Costs
7803 Premises Expenses 8204 Insurance
7900 Bank Interest Paid 8205 Refreshments
7901 Bank Charges 8206 Cash Register Discrepancies
7902 Currency Charges 8250 Sundry Expenses
7903 Loan Interest Paid 9001 Taxation
213

Sage 50 Accounts User Guide
21
Clearing down at Year End
If you selected Sole Trader or Partnership as your business type during ActiveSetup, at Year End, it is necessary to manually clear down the Capital Introduced and Drawings nominal accounts to the Capital nominal account. To do this:
1. Select the Company module, then from the Nominal Ledger toolbar, click Journals.
The Nominal Journals window appears.
2. Enter a reference for the clear down procedure, for example YECapitalClear1.
3. Enter a posting date; the program date appears by default.
4. Enter a debit - credit posting for the Capital Introduced nominal account (default 3010) to reduce this nominal account to a zero value.
5. Similarly, enter a debit-credit posting for the Drawings nominal account (default 3050), to reduce 3050 to a zero value.
6. Enter a posting for the Capital nominal account (default 3000), such that the Credit total for the journal balances with the Debit total of the journal.
7. When you have finished, click Save to post your journal.
Partnership Chart of Accounts individual nominal codes
In the case of the Partnership business type, the individual nominal codes are identical to that of the Sole Trader business type, except that each partner in the business has a discrete nominal account for Capital, Capital Introduced and Drawings. Thus:
3000 Capital (Partner 1)
3010 Capital Introduced (Partner 1)
3050 Drawings (Partner 1)
and
3001 Capital (Partner 2)
3011 Capital Introduced (Partner 2)
3051 Drawings (Partner 2)
Corresponding codes for additional partners can be added manually, as described in Entering nominal records on page 218.
9998 Suspense Account 9999 Mispostings Account
4

Setting up your Chart of Accounts
Note: At Year End, it is necessary to manually clear down the Capital Introduced and Drawings nominal accounts for each partner to the Capital nominal account. To do this, follow the procedure for each partner, as described above in Clearing down at Year End on page 214.
Note: If you need to change the business type from Sole Trader to Partnership, then it would be necessary to create the Capital/Capital Introduced/Drawings nominal codes for each partner.
Limited Company Chart of Accounts individual nominal codes
In the case of the Limited Company, the individual nominal codes are identical to that of the Sole Trader business type, with the following exceptions:
The category type Capital is renamed Share Capital
Nominal code 3000 is renamed Ordinary Shares
Nominal code 3010 is renamed Preference Shares
Nominal code 3050 Drawings does not exist
A new nominal code 3060 Directors Loan Accounts has been created
The nominal code 7006 has been renamed Employers NI (Non Directors)
A new nominal code 7012 Employers NI (Directors) has been created
A new nominal code 9001 Taxation has been created
Each director is required to have separate nominal codes. It is recommended that the following code structure is used:
2301 Directors Loan Accounts (Director 1)
2302 Directors Loan Accounts (Director 2)
Corresponding codes for additional Directors can be added manually, as described in Entering nominal records on page 218.
Note: If you need to change the business type from Sole Trader or Partnership to Limited Company, then it would be necessary to create/rename the nominal codes described above.
Note: At Year End, your 9001 Taxation nominal code is automatically cleared down to the 3200 Retained Earnings nominal code. This allows you to show Taxation and the calculation of Profit/(Loss) before and after Taxation:
Net Profit/(Loss) before Tax
Taxation
Net Profit/(Loss) after Tax
These three lines of text are only shown in the Profit and Loss report if the Taxation amount is not equal to zero.
215

Sage 50 Accounts User Guide
21
6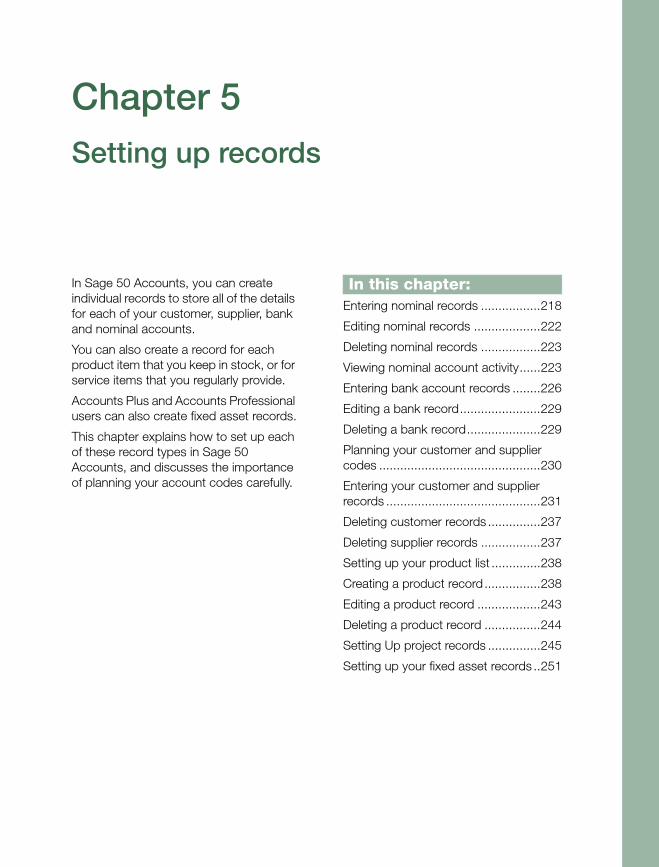
Chapter 5
Setting up recordsIn this chapter:Entering nominal records .................218
Editing nominal records ...................222
Deleting nominal records .................223
Viewing nominal account activity......223
Entering bank account records ........226
Editing a bank record.......................229
Deleting a bank record.....................229
Planning your customer and supplier codes ..............................................230
Entering your customer and supplier records ............................................231
Deleting customer records ...............237
Deleting supplier records .................237
Setting up your product list ..............238
Creating a product record................238
Editing a product record ..................243
Deleting a product record ................244
Setting Up project records ...............245
Setting up your fixed asset records ..251
In Sage 50 Accounts, you can create individual records to store all of the details for each of your customer, supplier, bank and nominal accounts.
You can also create a record for each product item that you keep in stock, or for service items that you regularly provide.
Accounts Plus and Accounts Professional users can also create fixed asset records.
This chapter explains how to set up each of these record types in Sage 50 Accounts, and discusses the importance of planning your account codes carefully.

Entering nominal records
There are a number of ways you can create a nominal record. You can:
Enter details directly into a blank nominal record. This method is described in this section.
Use the Nominal Record Wizard to guide you step-by-step through the process.
To do this, select Company > Nominal Ledger. From the Nominal Ledger toolbar, click New. The Nominal Record Wizard is displayed.
Copy an existing record's details using the Duplicate facility. For more information about this feature, see Duplicating records on page 50.
Note: You cannot use the Duplicate facility to create control or bank accounts in the Nominal Ledger. When you duplicate an existing nominal record, Sage 50 Accounts automatically sets the record type to Nominal.
To add a new nominal account record
1. Select Company > Nominal Ledger.
2. Click Record.
The Nominal Record window appears.

Setting up records
3. In the Details tab, enter the following information:
N/C You must give the new account a number. We recommend you keep within the numbering scheme set up automatically by Sage 50 Accounts for the standard set of nominal accounts. These are:
Fixed Assets range from 0001 to 0999
Current Assets range from 1000 to 1999
Current Liabilities range from 2000 to 2299
Long Term Liability range from 2300 to 2399
Capital and Reserves range from 3000 to 3999
Income Accounts range from 4000 to 4999
Purchase Accounts range from 5000 to 5999
Direct Expenses range from 6000 to 6999
Overheads range from 7000 to 9999
For example, if you are assigning a new fixed asset account, assign it a number within the fixed asset account range (0001 to 0999).
If you are creating a new nominal account that is out of your existing Chart of Accounts category ranges, when you move your cursor off the N/C box, a warning message appears telling you that you must update the Chart of Accounts.
This means that you must change your default Chart of Accounts to accommodate the new nominal accounts that you have created. You can do this by editing the Chart of Accounts. Read how to do this in Chapter 4, Setting up your Chart of Accounts.
To continue, click OK and carry on entering your nominal account information.
Name Enter an account name. This name appears on your financial reports and on the Sage 50 Accounts transaction windows, when you use this account.
Balance This box shows the current balance of this nominal account. This box is empty, when you first create a new account.
The OB button - Opening Balance, is used to enter your opening balance for this nominal account.
219

Sage 50 Accounts User Guide
22
4. If you want to, you can enter a budget for this nominal account against each month of your financial year. You would do this so you can see whether you overspend or underspend in a particular area, for example, travel expenses. To do this, click in the Budget box against each month in turn, entering the budget for this nominal account.
5. To create a new account, click Save. If you need to clear your entry and start again, click Discard. To return to the main Nominal window, click Close.
Viewing the nominal record Graphs tab
As you make transactions to and from a nominal account, the transactions automatically update the monthly balances on the Nominal Record. You can see these monthly balances in the form of a graph on the Nominal Record Graphs tab.
Note: We recommend that you do not enter your opening balances at this point but refer to the accompanying PDF Guide - Opening Balances, when you have entered all of your Customer, Supplier, Product, Nominal and Bank Records.
Account Type
This is a display only box. When you create a new nominal record, this box initially displays Control Account but clears, when you enter the nominal code you want to assign to the record. When you save the record, Sage 50 Accounts assigns the default type of Nominal Account.
Note: If you want to create a new record with the account type Bank Account, you must create it in the Bank module. For details, see Entering bank account records on page 226.
If you open an existing nominal record, the Account Type box shows Bank Account if you created this account in the Bank module, Control Account if you have added the account to your list of control accounts, or Nominal Account for any other type of nominal record - that is, neither a control account nor a bank account.
0

Setting up records
Viewing the nominal record Activity tab
Every time you record a transaction into Sage 50 Accounts, the activity is stored on the audit trail. This single list stores every transaction you have made in the order it was recorded into Sage 50 Accounts.
You can see the transaction activity of a single nominal account, at any time, by clicking the Activity tab on the nominal record. This shows the individual transactions posted to each account.
If you are viewing the activity of a bank account or reserved control account, for example the Debtors Control Account, the Activity window is split into two sections. The headers appear in the top pane, with the corresponding splits appearing in the bottom pane.
221

Sage 50 Accounts User Guide
22
Only those transactions that have not been cleared by running the Clear Audit Trail facility appear in this window. For further information on this, refer to Clearing the Audit Trail on page 384.
Using the nominal record Memo tab
Sage 50 Accounts lets you create a memo for each nominal account record, where you can add any extra information that relates to the account. The Memo tab enables you to attach electronic documents and filing system references to your records using the Document Manager functionality. For full details, see Working with attachments using Document Manager on page 760.
Editing nominal records
When you look through the nominal codes that have been created automatically, you may find some that your business will use but need renaming to make them more meaningful to you. To do this, select Company > Nominal Ledger and then click Record. Select the nominal record you want to change from the drop-down list, remove the old name and type the new name you require in its place.
2

Setting up records
Deleting nominal records
To delete nominal records that you do not need, select Company > Nominal Ledger, highlight the records you no longer require and then click Delete.
Note: You cannot delete a nominal record if it has any of the following:
Transactions associated with the nominal record.
A balance that is anything but zero.
If it is a nominal record that is also a control account.
Viewing nominal account activity
You can view a detailed transaction history, or Activity, for any nominal account.
1. From the Nominal Ledger window, select the nominal account(s), whose activity you want to view and click Activity.
Alternatively, you can open the Nominal Record and click the Activity tab to display the nominal account's transaction activity.
The Activity window appears, showing the transactions that have been made to the first account you selected.
If the account you selected is a Bank Account, or if it is the Debtors Control Account, Creditors Control Account, or the Sales or Purchase Tax Control Account, the Activity window is split into two panes:
The upper pane of the Activity window shows summary or grouped information about each transaction, one line per transaction.
The lower pane of the Activity window displays the individual items that make up each transaction. For example, if you select a sales receipt transaction in the upper pane, the lower pane shows information about the items that make up the associated invoice.
2. To filter the transactions displayed, choose the criteria you require from the following selection fields:
Show
To filter the transactions by a specific period, select the period you want to display from the Show drop-down list.
You can choose to filter the transactions by a number of financial periods; for example, you can choose to display a single calendar month's transactions, or view the activity for a financial quarter, half year, prior year or current financial year. You can also choose to show only future-dated transactions - that is, those that fall beyond the end of the current financial year.
223

Sage 50 Accounts User Guide
22
If you require, you can specify a date range, transaction type or transaction number range to display. To do this, select Custom Range from the Show drop-down list and complete the relevant boxes on the Activity Range window that appears.
Your software retains the filter you specify from the Show drop-down list and applies it the next time you view the activity. This is true for all of the Show drop-down settings, although any values you enter in the Activity Range window will not be retained.
Date
This read-only field displays the date range you selected using the Show drop-down lost. For example, if you selected Custom Range and entered the date range 01/07/2011 to 31/07/2011, these dates appear in this box.
The Activity window only displays those transactions that fall within the specified date range.
Type
If you select Custom Range from the Show drop-down list and use the Activity Range window to choose a specific type of transaction to display, this box shows which transaction type you selected.
For example, if you chose to view only bank receipts by selecting BR - Bank Receipts on the Activity Range window, this field shows BR. The Activity window now only displays bank receipt transactions dated within the specified range.
You cannot change the transaction type shown in this field directly - to change the type of transaction displayed here, you must select Custom Range from the Show drop-down list and re-select the transaction type you want to view.
O/S Only
If you selected Custom Range from the Show drop-down list and selected the Outstanding Transactions Only? check box on the Activity Range window, this check box is selected. This indicates that the Activity window is displaying only those transactions that are not yet paid or allocated.
You cannot change this setting directly here - to select or clear this box, select Custom Range from the Show drop-down list and select or clear the Outstanding Transactions Only? check box in the Activity Range window.
Trans
This box shows the transaction number range currently displayed on the Activity window.For example, if you select Custom Range from the Show drop-down list and use the Activity Range window to specify a range of transactions to view, this box shows the transaction numbers you chose.
If you do not specify a transaction range, this box displays the first and last transaction numbers from your audit trail. For example, if you have 2169 transactions on your audit trail, this box shows 1 to 2169.
4

Setting up records
You cannot change the range shown in this field directly. To change the transaction number range shown here, select Custom Range from the Show drop-down list and enter the transaction number range you want to view.
3. To print the information shown, click Print List.
4. If you selected more than one account, use Previous and Next to move between the selected records.
5. To exit the Activity window, click Close.
For more information, please refer to the Nominal > Record > To View a Nominal Account’s Activity topic in the main software Help file (F1).
225

Sage 50 Accounts User Guide
22
Entering bank account records
Bank accounts are nominal accounts but they should be created through the Bank module.
There are three ways of entering a bank account record:
You can enter details directly into a blank bank record. This method is described in this section.
You can use the Bank Record Wizard to guide you through the process step-by-step.
Note: Depending on your Sage 50 Accounts settings, when you select New Account from the Bank module, either a blank record or the Bank Record Wizard is displayed. The default is the Bank Record Wizard. For more information about this setting, refer to the Sage 50 Accounts Help system.
You can copy an existing record's details using the Duplicate facility. For more information about this feature, Duplicating records on page 50.
Your bank account can be one of three types:
Cheque Account
Sage 50 Accounts treats both banks and building societies as cheque accounts. Three cheque accounts have been set up for you: a bank current account, a bank deposit account and a building society account. Edit these banks to match your real bank accounts with their correct names and addresses.
Cash Account
A single cash account has been set up for you called Petty Cash. You can set up other cash accounts such as Shop Safe or Emergency Cash Supply.
Credit Card Account
Sage 50 Accounts lets you set up bank accounts for each of your credit cards so that you can keep track of the card payments that you make. One credit card account has already been set up for you.
Cash Register
A Cash Register account is available (1235 by default) for recording all cash register transactions.
If you want to enter more accounts, read the next section.
6

Setting up records
To enter cheque, credit card and cash accountsNote: This method assumes the Bank Record Wizard is disabled.
1. Open the Bank module, then select Record.
2. The Bank Record window appears, displaying the Account Details tab.
3. In the boxes provided, enter the following bank account details:
A/C Ref The account reference of the bank. Bank accounts are special types of nominal ledger accounts and so this code is also a nominal ledger code which appears in the Nominal Ledger window. We recommend that you use a number within the range 1200 to 1299 as Sage 50 Accounts uses this range for the bank accounts it has already set up and your financial reports are already set up for these groupings.
227

Sage 50 Accounts User Guide
22
Nominal Name A description of the bank account. This appears on the Bank Accounts window to identify the account, for example, Current Account. It also appears in the nominal ledger list of accounts.
Current Balance This is the balance of your bank account. We recommend that you do not enter your opening balances at this point but refer to the accompanying PDF Guide - Opening Balances, when you have entered all of your customer, supplier, product, nominal and bank records.
Minimum Limit Enter the amount that you do not want the balance of this account to drop below. You can also enter a negative amount here. If the balance does go below this level, the bank details are displayed in red on your Bank Accounts window.
A/C Type From the drop-down list, select the type of account you want your bank account to be. Once you have entered transactions into this account, you cannot change the account type.
A bank account can be a cheque account, cash account or a credit card account. The bank types generate different transactions types, for example, payments can be bank payment (BP), cash payment (CP) or visa payment (VP).
We recommend that you set up and use the bank accounts in Sage 50 Accounts to mirror the way you use your actual bank accounts and cash.
Currency - Accounts Professional only
Displayed if you have activated Foreign Trader. See The foreign trader on page 806.
You may select a currency description from the drop-down list. This box is for information purposes only.
If you have the Foreign Trader facility activated, this is the currency your transactions will be posted in.
8

Setting up records
4. To record your new bank account, click Save.
Editing a bank record
When you look through the bank records that have been created automatically, you will probably want to rename them and enter details specific to your accounts, so that they become more meaningful to you.
You can edit an existing bank record at any time - to do this, select the record you want to change from the list in the Bank Accounts window and click Record. Enter or amend the details as you require and click Save to record your changes.
Deleting a bank record
To delete bank records that you do not need, open the Bank module, then click Delete.
Note: You cannot delete a bank record if it has any of the following:
Transactions associated with the nominal record.
A balance that is anything but zero.
If it is a bank record that is also a control account.
No Bank Reconciliation Select this check box if you do not want to run a bank reconciliation for this account. You would usually want to reconcile your accounts to make sure your computerised accounts matched your bank statement.
However, for cash accounts such as petty cash you would select this check box, as you are unlikely to reconcile your petty cash.
Last Reconciled Date If a bank reconciliation has been performed previously, the date of the reconciliation appears in this box.
Last Reconciled Balance
If a bank reconciliation has been performed previously, the last reconciled balance appears in this box.
229

Sage 50 Accounts User Guide
23
Planning your customer and supplier codes
It is important that you plan your Customer and Supplier references. Your Customer and Supplier Records all need a reference code. We recommend you plan the codes that you want to use before you begin entering your Customer and Supplier Records.
This is important because once you have entered transactions against a Customer Record, you cannot change the account reference.
We recommend that you use codes that will be meaningful to you. You can use the first eight letters of your customer's or supplier's name. We recommend that you use both numbers and letters. This is to prevent two customers with the same name having the same code. For example, if you have a customer named Ms Smith, we suggest that you name the code SMITH01, so you can create unique codes for further customers with the same surname, for example, SMITH02, SMITH03.
Planning your codes will enable you to locate the customer or supplier you require quickly and easily. The tables below provide examples of coding. The first table shows alphanumeric codes and the second provides numeric examples.
Note: When using numeric codes make sure you use leading zeros in the number. This will keep the code sorted in the correct order.
Customer Name Account Reference
Business Exhibitions BUSI01
Business Services BUSI02
Picture Frame Ltd. PICT01
Wise Electricals WISE01
Customer Name Account Reference
Business Exhibitions 0001
Business Services 0010
Picture Frame Ltd. 0020
Wise Electricals 0100
0

Setting up records
Entering your customer and supplier records
Your Customer and Supplier records are like cards in an index box. Each record holds information about a specific customer or supplier, such as an address, telephone number, contact name, credit limit and so on. As you add your records, they appear automatically in the list on the Customers or Suppliers window.
These lists let you see the customers and suppliers you have and the amount they currently owe, or that you owe them, instantly. If records appear in red in the lists, it means that those accounts have exceeded their credit limit, allowing you to see at a glance the accounts that need your attention.
There are three ways of entering a customer or supplier record:
You can enter details directly into a blank customer or supplier record. This method is described in this section.
Remember, if you have set up your customer or supplier defaults, some details will appear automatically for each record you create. You can change these if you require.
You can use the Customer/Supplier Record Wizard to guide you through the process step-by-step.
Note: Depending on your Sage 50 Accounts settings when you select New Customer or New Supplier from the Tasks pane, either a blank record or the Customer/Supplier Record Wizard is displayed. The default is the Customer/Supplier Record Wizard. For more information about this setting refer to the Sage 50 Accounts Help system.
Finally, if a record already exists that contains much of the same information as the new record you want to set up, you can use the Duplicate option to create a copy of the original record. This option saves you time if you need to set up several records with very similar details, for example if you have a number of customers based at the same address. For more information about this feature, see Duplicating records on page 50.
To enter your customer and supplier records
1. Select Customers > New Customer or Suppliers > New Supplier.
The Customer Record or Supplier Record window appears, displaying the Details tab.
2. Use the tabs of the record window to enter your customer or supplier account details, as follows:
231

Sage 50 Accounts User Guide
23
Tab Customer Record Supplier Record
Details For both record types, use the Details tab to enter the basic account details. See the accompanying PDF Guide - Opening Balances, before you enter your customer's or supplier's opening balance.
If you have Accounts Plus or Accounts Professional, you can also enter multiple delivery and contact addresses for your customers or suppliers. If your customer or supplier has several different offices and contacts, you can enter a different delivery and contact address for each office. To do this, click Addresses & Contacts... Click New and then enter the details you require. To save the address, click OK.
Defaults For both record types, use the Defaults tab to amend the defaults that you have already set up for Sage 50 Accounts. If you make a change on this tab, it applies only to the selected customer or supplier, and does not affect the defaults you set up previously.
Reporting Password
Report Designer now provides for the creation of secure PDF documents. If a confidential customer report / document is required, involving a secure PDF document creation, then an optional password can be set for the secure PDF, using this entry box on both Customer and Supplier record Defaults tab.
If entered, the password must be between six and thirty characters in length. The password will typically be agreed with your customer / supplier counterpart.
Access rights to secure PDF documents can be set in the Access Rights module and dialog window, to restrict access.
2
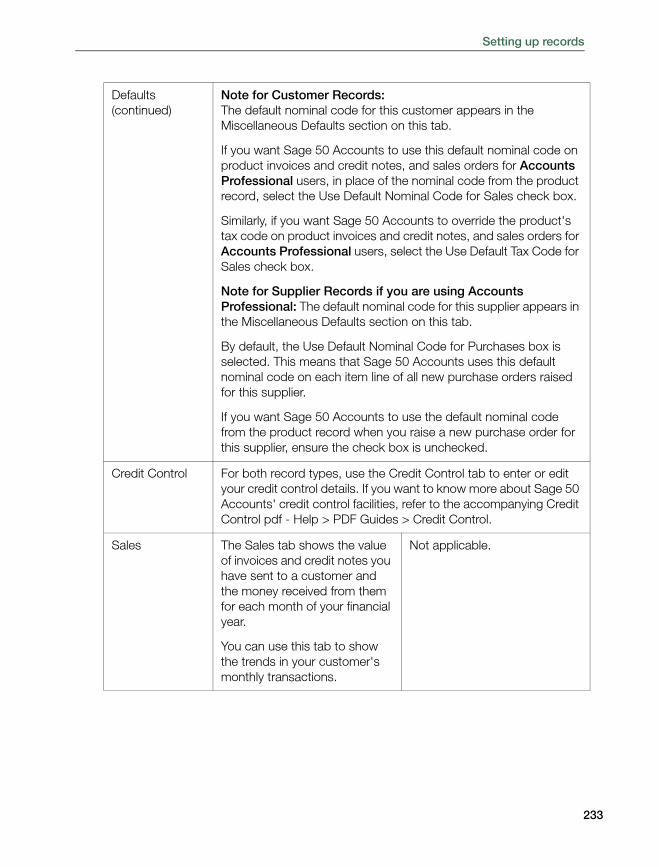
Setting up records
Defaults (continued)
Note for Customer Records:The default nominal code for this customer appears in the Miscellaneous Defaults section on this tab.
If you want Sage 50 Accounts to use this default nominal code on product invoices and credit notes, and sales orders for Accounts Professional users, in place of the nominal code from the product record, select the Use Default Nominal Code for Sales check box.
Similarly, if you want Sage 50 Accounts to override the product's tax code on product invoices and credit notes, and sales orders for Accounts Professional users, select the Use Default Tax Code for Sales check box.
Note for Supplier Records if you are using Accounts Professional: The default nominal code for this supplier appears in the Miscellaneous Defaults section on this tab.
By default, the Use Default Nominal Code for Purchases box is selected. This means that Sage 50 Accounts uses this default nominal code on each item line of all new purchase orders raised for this supplier.
If you want Sage 50 Accounts to use the default nominal code from the product record when you raise a new purchase order for this supplier, ensure the check box is unchecked.
Credit Control For both record types, use the Credit Control tab to enter or edit your credit control details. If you want to know more about Sage 50 Accounts' credit control facilities, refer to the accompanying Credit Control pdf - Help > PDF Guides > Credit Control.
Sales The Sales tab shows the value of invoices and credit notes you have sent to a customer and the money received from them for each month of your financial year.
You can use this tab to show the trends in your customer's monthly transactions.
Not applicable.
233

Sage 50 Accounts User Guide
23
Purchases Not applicable. The Purchases tab shows the value of invoices and credit notes sent by your suppliers and the money you have paid out to them for each month of your financial year.
You can use this tab to show the trends in your supplier's monthly transactions.
Orders - Accounts Professional only
Click the Orders tab to view a history of the sales orders that the selected customer has placed with you.
Double-click any of the orders in the list to view the Sales Order record.
You can also create a new invoice or sales order for this customer from this window, by clicking New Invoice or New Order.
For more information about creating new invoices and orders, see Chapter 8, Customer tasks.
Click the Orders tab to view a history of the purchase orders that you have placed with this supplier.
Double-click any of the orders in the list to view the Purchase Order record.
You can also create a new purchase order for this supplier from this window by clicking New Order, or duplicate an order by selecting it and clicking Duplicate.
For more information about creating new and duplicate purchase orders, see Chapter 9, Supplier tasks.
4

Setting up records
Projects - Accounts Plus and Accounts Professional only
If you use Sage 50 Accounts's Project Costing, click the Projects tab to view details of the projects associated with this customer.
You can also create a new project record for the selected customer by clicking the New Project button.
For full details about Project Costing, see Chapter 11, Project tasks (Accounts Plus and Accounts Professional only).
Not applicable.
Graphs For both record types, the Graphs tab shows invoices, credits and balances month by month, in a graphical form.
Activity For both record types, the Activity tab shows the transactions you have made with each customer or supplier. You can see invoices, credit notes, receipts/payments, payments on account and even cash discounts. In addition, the Activity window also shows a balance, turnover and monies received or paid.
Each line of the Activity list represents a single invoice, credit note, payment on account, discount or receipt/payment. Each line in turn is made up of one or more individual items. To see these items, click the '+' symbol at the left-hand side of the transaction line you want to view. If any of the transaction's items have been paid, then click the '+' symbol against these items to show the payment details.
The Activity tab also shows your customer's or supplier's aged balances. For further information about aged balances, refer to the accompanying Credit Control pdf, accessed from Help > PDF Guides > Credit Control.
Bank Not applicable. If you use the BACS - Bank Automated Clearing Services system to make payment transfers directly to this supplier's bank account, use the Bank tab to enter your supplier's bank account details.
235

Sage 50 Accounts User Guide
23
3. To save your new record, click Save.
To exit the record without saving, click Close, then click No to the confirmation message that appears.
Communication For both record types, you can use the Communication tab to record details of the telephone conversations, emails, faxes or letters you have, send or receive with your customers or suppliers.
Memo For both record types, the Memo tab enables you to attach electronic documents and filing system references to your records using the Document Manager functionality. For full details, see Working with attachments using Document Manager on page 760.
The Memo tab also lets you keep additional notes about each of your customers or suppliers. For example, you can make a note of the date and times you talk and write to your customers or suppliers, and you can enter reminder notes to tell your customers about new products or follow up special prices your suppliers offer you.
Each memo creates a separate text file with the extension .SLM for customer memos, or .PLM for supplier memos. These files are stored in a sub-directory of your Sage 50 Accounts software called Memo.
The customer's or supplier's account name is used as the file name, therefore a memo for the customer account SMITH01 would be stored in a file called SMITH01.SLM.
Note for network users: All Sage 50 Accounts memos are stored on the data server.
6

Setting up records
Deleting customer records
You can only delete a customer record if there are no transactions in the audit trail linked to this customer and the customer's balance is zero. If you try and delete a record that does not meet these conditions, a warning message appears, telling you that the account cannot be deleted.
To delete customer records
1. Open the Customers module, then, if appropriate, use the view selector to switch to the Customers list.
The customers are listed in the Customers window.
2. Select the customer you want to remove and then click Delete.
A confirmation message appears.
3. To confirm deletion, click Yes.
Deleting supplier records
You can only delete a supplier record if there are no transactions in the audit trail linked to this supplier and the supplier's balance is zero. Sage 50 Accounts does not let you delete a supplier record if these conditions are not met.
To delete supplier records
1. Open the Suppliers module, then, if appropriate, use the view selector to switch to the Suppliers list.
The suppliers are listed in the Suppliers window.
2. Select the supplier you want to remove and then click Delete.
A confirmation message appears.
3. To delete the account, click Yes.
237

Sage 50 Accounts User Guide
23
Setting up your product list
The product records that you enter in Sage 50 Accounts will eventually form your product list.
When you are planning your stock system, the product codes you enter need to be as descriptive as possible so that you can locate the product quickly when you are entering data or viewing a report. For more information, see the following section.
For example, a clothing manufacturer could use a stock system which detailed material type and colour.
For example:
SILK-REDSILK-GRYCOTT-BLULINE-WHI
Creating a product record
The product record holds information such as the stock item’s description, sales price, and unit of sale.
On the Activity tab of the record you can view the sales value of your products and the quantity sold. Accounts Professional users can also see the projects, to which the stock has been issued.
Each time you create a new product record, you need to enter details such as nominal code, department and tax code. If you give most of your products similar details, you can enter a set of default answers that will appear automatically in the new product records you create. However, if you need to, you can change any of these details that were entered automatically for you on each product record. See Entering product defaults on page 164.
There are three ways of entering a product record:
You can enter details directly into a blank product record. This method is described in this section.
You can use the Product Record Wizard to guide you through the process step-by-step.
To do this, select Products. From the Products toolbar, click New. The Products Record Wizard is displayed.
You can copy an existing record's details using the Duplicate facility. For more information about this feature, Duplicating records on page 50.
8

Setting up records
To enter your product records
1. Select Products > New Product.
The Product Record window appears, displaying the Details tab.
2. Use the Details tab to enter or view your main product information.
Do not enter your opening balances until you have read the accompanying PDF Guide - Opening Balances.
You can also use the pricing options to set multiple selling prices for your products. For further information about how to use the pricing options, refer to Customer pricing on page 451.
If you do not put in a nominal code of your own choice, then Sage 50 Accounts will automatically assign each product with a default code.
The only form of commodity code that HM Revenue & Customs accept are the first eight numeric characters.
An extra two digits are for TARIC (Online customs tariff database) purposes, when dealing with import duty and can be used in customised reports to show the full ten digits.
If you are using Sage 50 Accounts to produce Intrastat Supplementary Declarations information, you must make sure that your commodity code is correctly entered into the IntraStat Com. Code box.
239

Sage 50 Accounts User Guide
24
Note for Accounts Professional users upgrading from Sage 50 Accounts v11:
During the upgrade procedure, Sage 50 Accounts transfers any commodity code data that is in the correct format from the old Com. Code box to the new IntraStat Com. Code box.
If data appears in the Com. Code prior to the upgrade but it is not in the correct format, Sage 50 Accounts enters the data into the Com. Code Description box.
It is your responsibility to check all your commodity codes, and enter them into the IntraStat Com. Code box in the required format, if necessary. In addition, the Weight box now displays a 'kg' label. You should ensure that any weights you entered prior to the upgrade are correct, as you may have previously used this box for other weight measures, such as imperial pounds (lb).
3. The Memo tab enables you to attach electronic documents and filing system references to your records using the Document Manager functionality. For full details, see Working with attachments using Document Manager on page 760. You can also use the Memo tab to enter any additional product details.
4. Whenever a product is made up of other products you hold in stock, it is said to have a Bill of Materials (or BOM). This is a list of the other products or components that are needed to make up the product or product assembly.
For further information on how to use bill of materials, refer to Chapter 10, Product tasks (stock).
5. The next three tabs enable you to view information about your product sales.
Accounts Plus and Accounts Professional only: The Sales tab displays, for each month of your financial year, the sales value and quantity sold for the product you selected. The Sales tab also shows you the date of the last product invoice that was raised for this product. Use the Sales tab to set budget values and to enter prior year values for each month of your financial year, for each of your product records.
You can enter your budget values directly into the table, or you can enter the total budget allocation for the year in the Totals box. If you enter a total budget, Sage 50 Accounts divides it by twelve and enters the resulting value into each month's budget box. If there is a remainder after dividing the total by twelve, Sage 50 Accounts enters it into the box for month twelve.
The Actual figures update as you begin to enter and update invoices. Because you can compare your budget figures against actual monthly figures for both this year and for the year just ended, use this tab to keep track of how close you are to meeting your budget targets. This also shows whether your product sales are performing better than the same time last year. You can also set your cost of sales values for each month here or alternatively they will be updated automatically as you update your invoices.
Accounts Plus and Accounts Professional only: The Graphs tab displays the same information as the Sales tab but in a graphical format.
0

Setting up records
The Activity tab shows the individual transactions you have posted for your product records. You can see adjustments, goods in and out and stock transfers, as well as the current quantities in stock, on order and allocated.
6. Accounts Plus and Accounts Professional only: Quantity discount in Sage 50 Accounts is determined through product discount rate tables. Five tables are provided per product. This means that you can give five different quantity discount rates to your customers (Discounts A-E).
The product discounts you can set up are based on quantity levels and you can enter quantities for up to ten levels of discount.
For further information on setting up quantity discounts, refer to Discounts on page 469.
7. With the advances in e-commerce it has become increasingly important to advertise your products and services on the Internet. You can use the Web tab to enter information about your web shop.
You can insert an image of the product (either in a BMP, JPEG or GIF format), so that your customers can see exactly what you sell. To read how to do this, press F1 when you are on the Web tab, and read the topic To Set Up Your Product Web Details that appears in the Sage 50 Accounts Help system.
241

Sage 50 Accounts User Guide
24
.
8. To save your product record, click Save.
2

Setting up records
Editing a product record
You can edit your product records at any time to keep the details of your stock items up to date, for example if you have increased the sales price of an item.
Note: Once a record has been created, you cannot change its product code. If you enter a new product code in an existing record, the data in the record clears and a new product record is created.
To edit a product record
1. Open the Products module.
2. From the Products window, select the records you want to edit, then click Record.
The Product Record window appears, showing the details of the first product you selected from the list.
3. Make the changes you require in the boxes provided.
4. To save your entries click Save, or to clear any data you entered and start again click Discard.
5. To exit the product record and return to the Products window, click Close.
To add a bar code reader entry for a product
1. Open the Products module. If appropriate, use the view selector to switch to the Products view.
2. From the Products window, select the records you want to edit, then click Record.
The Product Record window appears, showing the details of the first product you selected from the list.
3. In the Product Details section of the Details tab, locate and select the Bar Code entry box.
4. Enter a series of alphanumeric characters (upper case), up to sixty characters in length, suitable for subsequent barcode reader usage on a Product Bar Code label (supplied) using Report Designer.
This label prints the Bar Code entry from the Product Record in Code 39 format, one of the most commonly used in Europe.
Note: Only limited examples of pre-defined Bar Codes have been provided in the Product ledger, and are provided merely, as an introduction to the feature in the software.
The Code 39 bar code supports forty three characters (upper case) plus an additional character used as a delimiter or start/stop character. This string of characters may represent a warehouse location, picking list, BOM structure or other appropriate application.
243

Sage 50 Accounts User Guide
24
For more information, please refer to officially recognised Code 39 Bar Code websites.
5. To save your entries click Save, or to clear any data you entered and start again, click Discard.
6. To exit the product record and return to the Products window, click Close.
Deleting a product record
You can only delete a product record if the following conditions apply:
The record has no outstanding transactions, for example there are no outstanding orders.
The products In Stock, On Order and Allocated balances are all zero.
The product is not a component of a Bill of Materials.
The product activity does not show any transactions. Any history on the product’s activity must be removed. For more information, see Clearing stock transactions on page 389.
To delete a product record
1. Select Products.
2. From the Products window, select the product record(s) you want to delete.
3. Click Delete.
A confirmation message appears.
4. To delete the record, click Yes. Alternatively, to cancel deletion, click No.
You can also delete a Product by opening the record of the product you require, then clicking Delete from the Product Record window.
4

Setting up records
Setting Up project records
Accounts Plus and Accounts Professional onlyThe Project Record holds all of the necessary information you need to define a project. The window breaks down the information into six main areas, which Sage 50 Accounts represents using six separate tabs:
The Details tab holds the basic information about the project, such as the status, start and end dates and site details.
The Analysis tab holds the project summary totals that you can use to help you work out how much to bill your customers and to assist with project enquiries. You can view the project's cost and revenue figures here.
The Activity tab allows you to view the transactions posted against a project, such as costs, invoices and product movements.
The Budgets tab is used to record the funds assigned to the project. Each cost code on the project record can have a budget assigned to it. The cumulative value applied to the cost codes is displayed as the total budget on the Analysis tab. As costs are applied to the project you can monitor expenditure against budget.
Note for existing users: Following upgrade, any budgets on your existing projects are assigned to the first cost code listed on the project record.
The Structure tab is used to build and maintain a project that is broken down into phases or activities made up of several project records.
The Memo tab enables you to enter text on the record, and attach document shortcuts and filing system references using the Document Manager facility.
There are four ways of creating a project, you can:
Enter details directly into a blank project record, as explained in this section.
Use the Project Record Wizard and follow the on-screen instructions.
Note: Depending on your Sage 50 Accounts settings when you select New Project from the Projects module Tasks pane, either a blank record or the Project Record Wizard is displayed. The default is the Project Record Wizard. For more information about this setting (Hide Wizard Options) refer to the Sage 50 Accounts Help system.
Use Sales Order Processing - Accounts Professional users only. When you create a new sales order containing the special product code S3 and click Save, Sage 50 Accounts displays the prompt message Would you like to create a project for this sales order?
Click Yes to open a new project record that automatically contains the customer's account details and order number. When you save the project record, the project's reference code transfers into the item line of the sales order, so that when you complete the order, create an invoice and update the ledgers, the project's activity automatically shows the invoice transaction.
245

Sage 50 Accounts User Guide
24
Use the Customer Record window. Open a customer's record and click New Project, then enter the project's details into the record that appears.
Note: Budgets and structures are applied to the project record after it has been created. All cost codes and associated cost types are applied to the project record as it is created and are made available on the Budgets tab. This is covered in Starting up a project on page 689.
To create a project recordNote: This activity assumes the Hide Wizard Options is switched on (Tools > Options).
1. Select Projects > New Project.
The Project Record window appears, showing the Details information.
2. Enter your project information in the three sections of the Details tab:
6

Setting up records
You are now ready to enter details on the Analysis tab.
Project Details Use this area of the record to enter details to identify and define the project. You must enter a unique project reference before you can save the record. You can also enter a name and description for your reference.
In the Status box, select a project status from the drop-down list. Initially, Sage 50 Accounts provides five predefined statuses for you to choose from: ACTIVE, SNAG, COMPLETED, SUSPEND and INITIAL. For details about each status, see Using project statuses on page 685.
If the project record is part of a multi-level project and you change its status, you have the option you are prompted to select whether to apply the same status to any sub-projects linked to the project record.
You can amend or create a project status in the Configuration Editor. For more information, see To set up or amend a project status, cost type, cost code or custom field on page 121.
Customer Details In the Customer Details area of the window, enter the account reference, name and order number of the customer to whom the project relates. If the project is internal, not connected with a customer or associated with several customers, leave this section empty.
You cannot link different customers to different project records for a multi-level project.
Note: If you link the project to a customer, a summary of the project information appears on the Projects tab of the Customer Record. For more information, see To view a customer's project history on page 705.
Site Details Enter the address and contact details of the site where the project is taking place, if you require.
247

Sage 50 Accounts User Guide
24
To enter project analysis details
1. Click the Analysis tab.
The Analysis information appears.
2. Enter the price quoted for the project in the Revenue Totals section of the window.
3. You can view, but not amend, the project analysis information in the remaining areas of the window, including:
Billing Totals As you create and post invoices to bill your customer for the project, the 'Billing Totals' section of the project record updates to show the date and amounts billed. For more information about billing, see Billing your customer for a project on page 709.
Revenue Totals Using the price you quote and the invoices you raise for the project, the Revenue Totals section of the window displays the profit made to date and the amount left outstanding to bill for the project.
8

Setting up records
4. If you require, enter up to three extra pieces of information relating to the project in the Analysis Types section of the window. Sage 50 Accounts uses this information for reporting purposes. You can define the Analysis Types in the Configuration Editor - for more information see To set up or amend a project status, cost type, cost code or custom field on page 121.
5. To save the project record, click Save. Alternatively, to abandon your changes without saving, click Discard.
6. To exit the Project Record window, click Close.
The Projects window appears.
You have successfully create a project record. To add budgets and a project structure see Starting up a project on page 689.
Budget Totals The Total budget is the cumulative value of budgets that have been applied to individual cost codes on the Budgets tab. The displayed value is read only.
The Actual variance shows the difference between the budget for the project and the actual costs that have been applied to it.
The effect of committed costs on the budget is included in the Total variance box. An explanation of committed costs follows.
Cost Totals This area of the window displays the actual costs that have been applied to the project as well as the date the last cost was applied.
This area also displays any committed costs associated with the project.
Committed Costs:
Accounts Plus users: These costs are the result of stock that is allocated to the project.
Accounts Professional users: These costs cover stock that is allocated to the project as well as the value of purchase order goods/services that have not yet been charged to the project.
249

Sage 50 Accounts User Guide
25
To delete a project recordYou cannot delete a project if its status does not allow deletion.
Accounts Plus and Accounts Professional users, the project record cannot be deleted if it is associated with committed costs or allocated stock.
Sub-projects linked to the record are also deleted.
1. Select the Projects module and then, if appropriate, use the view selector to switch to the Projects view.
2. From the Projects window, select the project(s) you want to delete.
3. Click Delete.
A confirmation message appears.
4. To confirm the deletion, click Yes. To cancel the deletion, click No.
You have successfully deleted your project record(s).
0

Setting up records
Setting up your fixed asset records
Accounts Plus and Accounts Professional onlyThe first time you use the Fixed Assets facility, the Fixed Assets list box is empty. As you create asset records they appear in the Fixed Assets window, one line per asset record. Scroll down the list in this window to see the assets you own, their cost, how much they have depreciated and their current book value.
Use the Record option to enter information about your assets. In the Details tab, you can enter information such as a reference, description, serial number and location for your asset.
In the Postings tab, you can enter how you want the asset to depreciate.
If you require, you can copy an existing fixed asset's details to a new record using the Duplicate facility. For more information about this feature see, Duplicating records on page 50.
To enter a fixed asset
1. Select Company > Manage Fixed Assets.
2. Click Record.
The Fixed Asset Record window appears.
251

Sage 50 Accounts User Guide
25
3. In the Details tab, enter the following details about the asset:
Before you can save this new record, you must enter the nominal ledger posting details.
4. Click the Posting tab.
The Posting information appears.
Asset Reference Every asset must be given a unique code for easy identification.
Description Use the three boxes to describe the asset.
Serial Number If your asset has a serial number, you can enter it here.
Location/Employee Use this box to enter the asset's location or the employee who is registered to use the asset.
Date Purchased Enter the date that you purchased the asset.
Note: If a future date is entered into this field it will not prevent the fixed asset from depreciating before this date. Do not create a record until you are ready for it to start depreciating.
Note: If a date is entered that corresponds to a Closed Ledger Date prohibited posting period, a warning message may appear.
Supplier A/C If you bought the asset from one of your suppliers, you can indicate that here by selecting the appropriate supplier's account code.
Assets For reporting purposes, you can categorise your fixed assets. Select the asset category required from the Asset drop-down list. For further information on categories, refer to the previous section.
2

Setting up records
5. In the boxes provided, enter the following details:
Department Enter the department that you want the depreciation transactions to be assigned to, or select the department you want to use from the drop-down list.
Balance Sheet Depreciation N/C
Enter the nominal ledger balance sheet account code that you want to use to record the depreciation postings. Every time an asset is depreciated, the amount of depreciation is posted to this account as a credit posting.
A number of depreciation accounts have already been set up for you in the Balance Sheet section of the nominal ledger, for example, 0051 Motor Vehicles Depreciation.
P&L Depreciation N/C Enter the nominal ledger account code that you want to appear in your profit and loss report to show the cost of depreciation.
Every time an asset is depreciated the value of that depreciation is added to this account code as an expense to the company (debit posting).
253

Sage 50 Accounts User Guide
25
A number of depreciation accounts have already been set up for you in the Profit and Loss section of the nominal ledger, for example, 8003 Vehicle Depreciation.
Depreciation Method Select the depreciation method that you want to apply from this drop-down list box. Once you have posted the first month's depreciation, you cannot change this depreciation method to anything other than Write Off.
Depreciation Rate Enter the annual percentage rate of depreciation. If you are calculating the depreciation using the straight line method, the value you enter here will be divided by twelve to calculate the monthly depreciation.
For example, if you want to depreciate an asset completely over four years using the straight line method, then you would enter 25 (percent) here. In this case, the asset is depreciated by 2.0833 percent each month until after four years, the book value is zero. For an item costing £10,000 this means that a depreciation of £208.33 would be posted for 48 months.
You can enter a non-depreciating fixed asset, for example, Property, by entering a zero depreciation rate here.
For more information about depreciation methods see Depreciation on page 274.
Cost Price Enter the price you paid for the asset. If you have selected to depreciate this asset by the straight line method, it is this value that is used to calculate the depreciation amount.
Book Value Enter the current book value. If the asset is brand new, this should be the same as the Cost Price. If the asset has already depreciated, you should change this to show the current value, that is, the cost price less depreciation.
If you have decided to depreciate this asset by the reducing balance method, it is this value that is used to calculate the depreciation amount.
Sage 50 Accounts automatically reduces the value by the depreciation amount when you run the Month End procedure and select the Post Depreciation option.
4

Setting up records
The following boxes are updated automatically by Sage 50 Accounts and are shown for your information only. You cannot edit them.
6. To save this fixed asset's details and posting settings, click Save. To cancel the entry and start again, click Discard.
7. To exit from the fixed asset record, click Close or use the Previous and Next buttons to move to another record.
To delete a fixed asset record
1. Select Company > Manage Fixed Assets.
2. From the Fixed Assets window, select the asset you want to delete.
Note: You can delete a fixed asset at any time.
3. Click Delete.
A confirmation message appears.
4. To delete the asset record, click Yes. If you do not want to delete the asset, click No.
Sage 50 Accounts deletes the fixed asset record.
Note: You can also delete an asset record from within the Fixed Asset Record window using the Delete button.
Once a depreciation posting has been made by the Month End routine for this asset, you will not be able to change the Cost Price or the Book Value.
Next Depreciation This box shows the value of next month's depreciation.
Depreciation to Date This shows the total amount of depreciation posted to the fixed asset record so far.
Date Last Posted This shows the date of the last depreciation transaction.
255

Sage 50 Accounts User Guide
25
6
Chapter 6
Company tasksIn this chapter:Prepayments ...................................258
Accruals ..........................................261
Budgeting in Sage 50 Accounts.......264
Working with fixed assets ................273
Preparing Intrastat declarations........277
Managing your VAT..........................288
Carrying out your Month End ...........344
Running the Year End ......................362
Recording a journal entry .................374
Clearing the Audit Trail .....................384
Clearing stock transactions..............389
Compressing your data....................389
This chapter covers the tasks contained within Sage 50 Accounts Company module.
The chapter introduces the topics of prepayments, accruals, budgeting, fixed asset handling and VAT Return preparation. It also touches on preparing your accounts for audit and running your month end and year end routines.
Also in this chapter, we look in detail at how to produce your Intrastat declarations, guide you through the processes of recording and reversing journal entries and show you how to use journals to pay your employees’ wages.

Prepayments
Accounts Plus and Accounts Professional onlyYou can use the Prepay facility in Sage 50 Accounts to set up details of invoices you pay in advance, enabling you to post prepayment journals automatically when you run the Month End process. For example, you probably pay your rent or insurance premiums in advance.
Prepayments spread the expense, so that your Profit and Loss report shows the expense shared over the number of months to which it relates, instead of one large payment in a single month.
Note: You must post the payment or invoice for the expense in the normal way, using the correct date.
To add a prepayment
1. Select Company > Nominal Ledger.
2. Click Prepay.
The Prepayments window appears.
3. In the boxes provided, enter the following prepayment details. Alternatively, click Wizard and follow the on-screen instructions.

Company tasks
The following read-only information appears at the top of the Prepayments window:
N/C Enter the relevant nominal code in this box. This will be the same nominal code you will post the bank payment or purchase invoice to.
For example, if you are setting up a prepayment for rent, you would use the nominal account for Rent, 7100.
Details Enter a description for the prepayment. This appears on the audit trail.
Dept If you want your prepayment to be assigned to a specific department, for reporting purposes, enter or select the department you require.
Prepayment N/C
The Prepayment nominal code, as set up in the control accounts, appears for you automatically. You can change this if necessary.
Value Enter the total net value of the prepayment here.
Months Enter the number of months over which the prepayment is to be spread. You can enter any number from 2 to 12.
Monthly Amount
This display-only box shows the monthly amount which is posted when you run the Month End and select the Post Prepayments option. You cannot change this.
Sage 50 Accounts calculates this value automatically by dividing the value of the prepayment by the number of months over which the prepayment is to be spread.
Post This box shows the number of payments which have already been posted using the month end post prepayments option for this prepayment.
You cannot change these details.
N/C This shows the name of the nominal account you have entered for this prepayment.
PRP This shows the name of the Prepayment nominal account you have entered for this prepayment.
Current Item This shows the number of the Prepayment entry in the list which is being added or amended.
No Of Items As you make new entries, this box is automatically updated.
259

Sage 50 Accounts User Guide
26
4. To save your prepayment details, click Save. To exit without saving, click Close.
Note: No accounting is done as a result of saving the prepayment details. Sage 50 Accounts only posts the prepayment journal entries when you run the Month End and select the Post Prepayments option.
Example of the postings made for a prepayment
A prepayment of £300 is made once every three months in advance for rent, and the cost is to be accounted for over the three month period.
In Month 1, you manually post a bank payment to your Rent nominal code for £300.00. Your Prepayment is set up to post £100 per month when you run the Month End and select the Post Prepayment option.
As part of the Month End routine for Month 1, Sage 50 Accounts automatically posts a reversal to clear the balance of £300.00 on the Rent nominal code and transfer it to the Prepayments account before posting the first prepayment journal entry.
Sage 50 Accounts makes the following postings over the three months: .
After the three months, your Rent nominal code shows the accumulated balance of £300.00 for the quarter, and your Prepayment account shows a zero balance.
Transaction Debit Credit
Month 1 Prepayment Reverse
Month 1 Prepayment 1
300.001103 Prepayment A/C
100.007100 Rent Account
300.007100 Rent Account
100.001103 Prepayment A/C
Month 2 Prepayment 2 100.007100 Rent Account
100.001103 Prepayment A/C
Month 3 Prepayment 3 100.007100 Rent Account
100.001103 Prepayment A/C
0

Company tasks
Accruals
Accounts Plus and Accounts Professional onlyYou can use the Accruals facility in Sage 50 Accounts to set up details of invoices you pay in arrears, enabling you to post accrual journals automatically when you run the Month End process.
For example, you probably pay your telephone, gas and electricity bills in arrears. Accruals spread the expense, so that your Profit and Loss report shows the expense shared over the number of months to which it relates instead of one large payment in a single month.
Note: You must post the payment or invoice for the expense in the normal way, using the correct date.
To set up an accrual
1. Select Company > Nominal Ledger.
2. Click Accrual.
The Accruals window appears.
3. In the boxes provided enter your accrual details. Alternatively, click Wizard and follow the on-screen instructions.
261

Sage 50 Accounts User Guide
26
The following information is shown at the top of the accruals window, but cannot be edited:
N/C Enter the same nominal account code as the one which you will post the bank payment or purchase invoice to when you receive it.
For example, if you are setting up an accrual for a telephone bill, and will post your purchase invoices to the Telephone nominal account 7502, enter the nominal account code 7502 in this box.
Details Enter a description for the accrual. This appears on the audit trail.
Dept If you want to assign this transaction to a department for reporting purposes, enter the department number here.
Accrual N/C The accrual nominal code, as set up in the Control Accounts, appears automatically. You can change this if required.
Value Enter an estimate of the total net value of the accrual here.
Months Enter the number of months over which the accrual will be spread. You can enter any number from 2 to 12.
Monthly Amount This box shows the monthly amount which is posted when you run the Month End and select the Post Accruals option. You cannot change these details.
Sage 50 Accounts calculates this value automatically by dividing the value of the accrual by the number of months over which the accrual is to be spread.
Post This box shows the number of accruals which have already been posted using the Month End Posting Accruals option for this accrual. You cannot change this.
N/C This shows the name of the nominal account you have entered for this accrual.
ACR This shows the name of the accrual nominal account you have entered for this accrual.
Current Item This shows the number of the entry in the list which is being added or amended.
No of Items As you make new entries, this box is automatically updated.
2

Company tasks
4. To accept your accrual details, click Save. To exit without saving, click Close.
Note: No accounting is done as a result of saving the accrual details. Sage 50 Accounts only posts journal entries when you run the Month End and select the Post Accruals option.
For more information see Carrying out your Month End on page 344.
Example of the postings made for an accrual
If you estimate that your quarterly telephone bill will be £300, you can set up an accrual to spread the cost over the three months of the quarter.
Your Accrual is set up to post £100 per month when you run the Month End and select the Post Accruals option. Sage 50 Accounts makes the following postings over the three months:
As part of the Month End routine for Month 3, Sage 50 Accounts automatically posts a reversal to clear the accumulated balance of £300.00 on the Telephone nominal code and the Accrual account. You must now manually post a Bank Payment to your Telephone nominal code for the actual value of the telephone bill.
Transaction Debit Credit
Month 1 Accrual 1 100.007502 Telephone
100.002109 Accrual A/C
Month 2 Accrual 2 100.007502 Telephone
100.002109 Accrual A/C
Month 3 Accrual 3
Month 3 Accrual Reversal
100.007502 Telephone
300.002109 Accrual A/C
100.002109 Accrual A/C
300.007502 Telephone
263

Sage 50 Accounts User Guide
26
Budgeting in Sage 50 Accounts
You can use the software to keep an eye on a range of business costs. Budgets can be set up for:
Nominal codes
You can use the Standard budgeting, a basic budgeting feature you can use to view your budget, actuals and previous years figures.
Alternatively, you can opt to use Advanced budgeting that includes up to five years historical figures and is designed to improve budget set up.
Departments
This is part of the Advanced budgeting feature. You can choose to analyse the department budget by nominal categories such as Sales, Purchases or Overheads. Alternatively, you can analyse the budget against a nominal code.
Products - Accounts Plus and Accounts Professional only
You can view your budget, actuals and previous year figures at the same time. The actuals are automatically updated for you when invoices, sales orders or credit notes are generated.
Projects - Accounts Plus and Accounts Professional only
A budget can be set up for a project on the project record. As costs are applied to the project you can track project costs including spend against budget.
Nominal account budgets
This is the Standard budgeting method in Sage 50 Accounts. With this budgeting method you can set budget values for each month of your financial year for each of your nominal accounts.
You can compare these figures against actual monthly figures for both this year and for the year just ended.
This means that you can keep track of how close you are to meeting your budget targets, and see whether your business is performing better or worse than at the corresponding time last year.
You can amend your nominal account budget values at any time by using the Global Changes feature from the Tools menu.
Note: When you run a year end you also have the option to move the actuals values for the year just ended to the budgets for the coming year. This sets the budget values to be what really happened in each month of the year just ended.
You can also add a percentage increase to your budget values, so that your budget values for this year are greater than your actuals for last year.
You may prefer to take advantage of Advanced budgeting.
4

Company tasks
To set up your nominal account budgets
1. Select the nominal account or accounts you require, from the Nominal Ledger window.
2. From the Nominal Ledger toolbar, click Record.
3. The Nominal Record window appears showing details of the account you selected.
4. The analysis table contains three columns, which show for each month of your financial year the following: Actuals, Budgets and Prior Year.
In the Budgets column, enter your budget values for each month, or you can enter the total budget allocation for the year in the Totals box. If you enter the annual total, Sage 50 Accounts automatically divides this total equally between the twelve months.
You can amend your nominal account budget values by using the Global Changes feature from the Tools menu.
B/F stands for Brought Forward items. These are transaction items that are dated in the previous financial year.
The row labelled Future displays the totals of any transactions that have already been entered for your next financial year.
5. To save your budget values click Save, or to clear the boxes and re-enter a new account code, click Discard. To return to the main Nominal Ledger window, click Close.
Department budgets
Department budgets are an excellent way to keep an eye on costs and income to assess the profitability of departments in your business. You can check these figures on an annual basis as well as a month by month basis.
Not just limited to departments, they can be used to track any area of your business such as:
Business locations such as Newcastle, Leeds and Manchester to track what is spent against budget.
Regional sales or funds to track income against set targets.
All budgetary information is managed in your base currency.
What can I do with department budgets?
View the budget figures against your actual results.
Change a budget.
Enter a budget for the next year, referred to as the forecast year.
Copy current year budget values to the next year. At the same time increase or decrease the copied values.
View previous budget results - for the past five years.
265

Sage 50 Accounts User Guide
26
Add information to the department record, either as notes or attachments.
Generate various budget reports including a Profit and Loss or Balance Sheet report for each department budget.
To use department budgets
Consider a Chart of Accounts just for budgeting
Do you only want to see the nominal accounts you are interested in when setting up budgets and reporting on them? Then create a Chart of Accounts just for budgeting.
Decide how you want to track the budget
Standard
Budgeting by nominal account record only.
You can view your budget, actual and previous year figures. The information can also be viewed in graphical format.
If you have used this method in a previous version of Sage 50 Accounts - v12 or earlier, and you choose to use the Advanced nominal code budgeting, your current nominal budgets are transferred for you. The earlier budgets are made read only on the nominal accounts.
Nominal Code - Advanced
Budgeting by nominal account record only. Very similar to the Standard method but presented in a better way.
Extra benefits include:
View previous budget results for the past five years.
Enter a budget for the next year - referred to as a forecast year.
Copy the current year's values to create a budget for your forecast year. At the same time increase or decrease those figures.
Department Overview - Advanced
With this method you can set up a budget for a department and analyse its costs or income by nominal category.
Nominal categories are the accounting areas used to group your nominal accounts, such as Sales, Purchases, or Overheads.
The value of all nominal accounts in a category are used to monitor what has actually happened against what was planned. If you prefer a more detailed breakdown for your budgets, see Department In-Depth - Advanced Budgeting in the main Help.
This method is part of the Advanced budgeting feature. Advanced budgeting provides many benefits, such as being able to view previous budget results for the past five year, or enter a budget for the next year - referred to a forecast year.
6
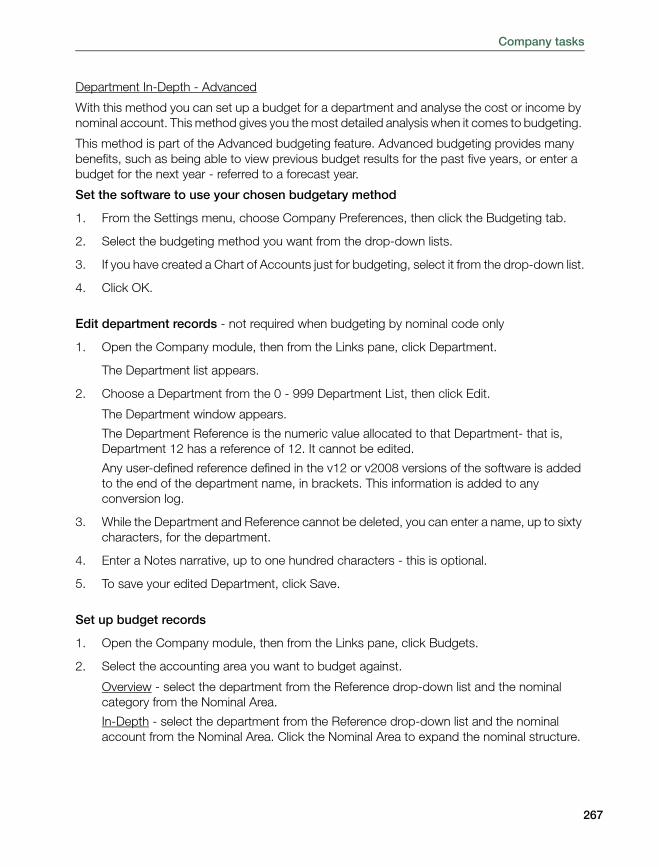
Company tasks
Department In-Depth - Advanced
With this method you can set up a budget for a department and analyse the cost or income by nominal account. This method gives you the most detailed analysis when it comes to budgeting.
This method is part of the Advanced budgeting feature. Advanced budgeting provides many benefits, such as being able to view previous budget results for the past five years, or enter a budget for the next year - referred to a forecast year.
Set the software to use your chosen budgetary method
1. From the Settings menu, choose Company Preferences, then click the Budgeting tab.
2. Select the budgeting method you want from the drop-down lists.
3. If you have created a Chart of Accounts just for budgeting, select it from the drop-down list.
4. Click OK.
Edit department records - not required when budgeting by nominal code only
1. Open the Company module, then from the Links pane, click Department.
The Department list appears.
2. Choose a Department from the 0 - 999 Department List, then click Edit.
The Department window appears.
The Department Reference is the numeric value allocated to that Department- that is, Department 12 has a reference of 12. It cannot be edited.
Any user-defined reference defined in the v12 or v2008 versions of the software is added to the end of the department name, in brackets. This information is added to any conversion log.
3. While the Department and Reference cannot be deleted, you can enter a name, up to sixty characters, for the department.
4. Enter a Notes narrative, up to one hundred characters - this is optional.
5. To save your edited Department, click Save.
Set up budget records
1. Open the Company module, then from the Links pane, click Budgets.
2. Select the accounting area you want to budget against.
Overview - select the department from the Reference drop-down list and the nominal category from the Nominal Area.
In-Depth - select the department from the Reference drop-down list and the nominal account from the Nominal Area. Click the Nominal Area to expand the nominal structure.
267

Sage 50 Accounts User Guide
26
Nominal code - find and select the nominal account you want by clicking on the Nominal Area to expand the nominal structure.
3. Using a Chart of Accounts just for budgeting? Select the layout from the Chart of Accounts drop-down list.
4. Add information about the budget in Notes (optional).
5. Enter the budget in the Total Budget box. The software distributes the amount evenly across the twelve months in the Monthly Breakdown table. Amend those individual monthly values to suit.
Alternatively, enter a budget value for each month into the table.
6. Click Save.
Assign a department
Assign a department to transactions as they are recorded in Sage 50 Accounts, for example when entering invoices and orders etc.
Care is needed at that point to assign the transaction to the correct department record. If you do not assign a department the program uses Department 0.
Monitor the budget
Other than generating reports, you can also monitor budgets using the:
Budget record:
To view the actual values against the planned budget for the current year, open the budget record and view the actuals against the budget.
To view historical budgets, use the Year drop-down.
Activity feature:
To view the transactions that make up the actuals for a department. You can choose the data range you are interested and print the results.
If you are budgeting by department, select Company > Departments > Activity.
If you are budgeting only by nominal code, click Company > Nominal Ledger > Activity.
Departments window
To view the revenue and expenses to date for a department.
8

Company tasks
Generate budget reports
Important: If you deal with foreign currencies, run the Foreign Bank Revaluation Wizard before you generate a report.
Department Reports
1. Click Company > Department.
2. Select the department from the list you want to report on. Click Reports.
The Report Browser appears, listing all available departmental report folders, and their respective reports.
3. Select the report you want from the list then click New.
The Report Wizard appears. Follow the instructions provided, and the report will open in Report Designer.
To see the difference between the budget and your actual figures, generate a variance report. Click Company > Variance, and then follow the above instructions.
Department Profit and Loss
1. Click Company > Department.
2. Select the department you want to report on from the list. Click P and L.
3. Choose where you want to send the report to, then click Run.
4. To limit the data range in the report, use the boxes in the Criteria Values window, then click OK. The report opens in Report Designer.
Department Balance Sheet
1. Click Company > Department.
2. Select the department you want to report on from the list. Click Balance.
3. Choose where you want to send the report to, then click Run.
4. To limit the data range in the report, use the boxes in the Criteria Values window, then click OK. The report opens in Report Designer.
269

Sage 50 Accounts User Guide
27
Keeping department budgets up-to-date
What happens if I change a department's name?
The department's name is updated. The change does not affect your budget values.
Can I Change the budget method?
It may be possible to change your budget method. If it is possible your current budgets are transferred to the new method.
Use the table illustration below to check if you can.
Product budgets
To view or edit a product budget:
1. Open the Products module, then, if appropriate, use the view selector to switch to the Products view.
2. Now select one or more of the product records displayed in the list box, then click Record. The details of the first product you selected from the list box appear on the product record.
3. Click the Sales tab.
The Sales information appears showing two tables of sales figures, one showing the Sales Value of the product, and the other showing the Qty Sold.
The row labelled Late Adj shows any transactions from the previous Financial Year which have not yet been cleared.
0

Company tasks
The row labelled Future displays the totals of any transactions that have been entered for your next financial year.
The Date of Last Sale box shows the date of the last product invoice that was raised for this product.
If you selected more than one product record, use the Next and Previous buttons to scroll between product records.
4. To return to the Products window, click Close.
Sales Value Budget
You can enter your budget values directly into this table, or you can enter the total budget allocation for the year in the Totals box.
If you enter a total, your software divides it by twelve and enters the resulting value in each month's budget box.
If there is a remainder after dividing the total by twelve, your software enters it into the box for month twelve.
Quantity Sold Budget
This column displays the budgeted sales that you had planned to sell in that month.
Project budgets
A budget can be set up for a project on the project record. As costs are applied to the project you can track project costs including spend against budget.
To assign a project budget
1. From the Projects window, select the project(s) you require and click Record.
The Project Record window appears, showing the Details information.
2. Click the Budgets tab.
The budget information displays all cost codes set up in Sage 50 Accounts.
3. Select the Budget column for each cost code and enter the budget value.
4. To save your entries click Save, or to clear any data and start again click Discard.
5. To exit the Project Record window, click Close.
271

Sage 50 Accounts User Guide
27
To view project costs and compare to budget
1. From the Projects window click Enquiry.
2. Select the project record you want from the Project Reference drop-down list.
The project’s cost and budgetary information appears.
Alternatively, from the Projects window select the project record, click the record's Analysis tab and then click the arrow to the right of Actual cost.
3. To see a breakdown of the project’s costs from cost types to cost codes, down to transaction level, first double click the project name. The costs and budgets for the cost types are displayed.
For a further breakdown, select a value and then double-click. The costs and budgets for the cost codes associated with the cost type are displayed. Use the Cost Type drop-down list to view costs and budgets at cost code level for another cost type.
To enquire down to transaction level, select the cost code and then double-click. Use the Cost Code drop-down list to view transactions for other cost codes.
To include committed costs in various calculations, select the Include committed costs in variances option.
Note: Selecting information from a drop-down list always displays rolled up figures for the project.
4. To generate a copy of the displayed information, click Print List.
5. Click Close to exit.
For further information refer to the Budgeting - Projects topics in the main software help.
2

Company tasks
Working with fixed assets
Fixed assets are those assets which your business intends to keep for longer than a year. Examples of fixed assets include property, office equipment and motor vehicles.
To work with fixed assets in Sage 50 Accounts open the Company module, then from the Task pane, click Manage Fixed Assets.
In the Fixed Assets window, you can enter the details of your fixed assets, put in details about their depreciation and also dispose of them.
Entering your fixed asset records, which includes entering how you want them to be depreciated, is explained in Setting up your fixed asset records on page 251.
The next section outlines the depreciation methods that Sage 50 Accounts uses.
273

Sage 50 Accounts User Guide
27
Depreciation
Depreciation is the reduction of the Book value due to wear and tear, or because of a reduction in the resale value. For example, if the asset is new, the book value is the same as the cost price. If the asset is not new, the book value is the cost price, minus the depreciation. Depreciation of your fixed assets over time reduces their book value, reduces the profit to your company and increases the loss.
The Fixed Assets facility allows you to keep a record of this depreciation and make sure that your company's Profit and Loss and Balance Sheet accounts are updated with accurate monthly depreciation values.
Sage 50 Accounts offers two accepted methods of depreciating assets and also gives you the ability to write-off the asset at any time - that is, to depreciate the asset to zero.
Note: Sage 50 Accounts only makes automatic depreciation postings as part of the Month End routine. In order to post automatic depreciation journals, you must run this routine at the end of each month and select the Post Depreciation check box. For more information, see Carrying out your Month End on page 344.
Depreciation methods in Sage 50 Accounts
You can depreciate your fixed assets using one of two methods in Sage 50 Accounts:
The Straight-Line method
The Reducing Balance method
Read the following sections for more information about each depreciation method.
The straight-line method
This method depreciates an asset by a fixed percentage every month until the asset value is reduced to zero. The fixed percentage is calculated from the original cost price of the asset.
For example, if you enter an asset with a cost price of £10,000 and you want this to be depreciated over a four year period then you would enter 25 percent as the annual depreciation rate. Every month, the same amount will be depreciated from the asset's value until it is reduced to zero. This is shown in the following table:
Cost Price Dep. Rate Dep. Amount New Book Value
Year 1 £10,000 25% £2,500 £7,500
Year 2 £10,000 25% £2,500 £5,000
Year 3 £10,000 25% £2,500 £2,500
Year 4 £10,000 25% £2,500 £0
4

Company tasks
Note: Sage 50 Accounts is designed to depreciate your assets every month, so in the case shown previously, the annual depreciation rate of 25 percent is divided by twelve to give a monthly depreciation rate of 2.0833 percent. At the end of each year this monthly rate amounts to 25 percent of depreciation.
The reducing balance method
This method depreciates the value of an asset by a fixed percentage each year just like the straight-line method but this fixed percentage is applied each time to the new reduced book value of the asset. Theoretically, the book value will never reach zero, but for all practical purposes, the write off value of an asset is reached by using a realistic percentage.
For example, if you have an asset worth £10,000 which is to be depreciated at the rate of 25 percent a year, the annual depreciation calculation using the reduced balance method is as follows:
You can see from this example that, in comparison to the straight line method, the reducing balance method takes longer to depreciate an asset using the same annual depreciation rate. For example, after four years at 25% the asset has been written off by the straight-line method but has a remaining book value of £3,165 in the example above.
Note: Because Sage 50 Accounts calculates the depreciation every month the annual rate of depreciation is calculated as a reducing balance monthly. In the example above, the first annual depreciation amount of £2,500 will occur, but the first month will show a greater value of depreciation than the next and so on.
Writing off fixed assets
You can write off your assets when they no longer have any value. When you write off your assets, the book value is reduced to zero and it is written off in your accounts. You can find the write off option from within the Fixed Asset Record, on the Posting tab in the Depreciation Method box - see To enter a fixed asset on page 251.
Book Value
Dep. Rate Dep. Amount New Book Value
Year 1 £10,000 25% £2,500 £7,500
Year 2 £7,500 25% £1,875 £5,625
Year 3 £5,625 25% £1,406 £4,219
Year 4 £4,219 25% £1,054 £3,165
275

Sage 50 Accounts User Guide
27
Selling fixed assets
If you have sold your fixed asset, you can use the Fixed Asset Disposal Wizard to make all the necessary postings to record the sale of the asset.
To run the Fixed Asset Disposal Wizard, open the Company module, then from the Tasks pane, click Manage Fixed Assets. From the Fixed Assets toolbar, click Disposal.
Note: If you are using the Flat Rate Accounting scheme, remember that you cannot claim back the VAT on purchases. However, you can claim back the VAT on capital purchases of £2000 or more, including VAT. Use the T25 tax code to record this. If you then dispose of the fixed asset, you must charge VAT at the full standard rate, not at your flat rate percentage.
Creating fixed asset categories
Sage 50 Accounts lets you divide your fixed assets into ninety nine different categories for analysis and reporting purposes. For example, you may want to set up separate categories for equipment, furniture and vehicles, which you can use on each fixed asset record you create.
You can set up your fixed assets categories from the Fixed Assets tab on the Configuration Editor.
For more information, see The Fixed Assets tab on page 115.
6

Company tasks
Preparing Intrastat declarations
Intrastat is the system for collecting statistics on the physical trade in goods - that is, the actual movement of goods, between the Member States of the European Union (EU). It has been in operation since the beginning of the Single Market on 1st January 1993, and replaced customs declarations as the source of trade statistics within the EU. The requirements of Intrastat are similar in all Member States of the EU.
Note: The supply of services is excluded from Intrastat. Only movements which represent physical trade in goods are covered by Intrastat.
Intrastat is closely linked with the VAT system. Businesses who are not registered for VAT and private individuals who move goods within the EU have no obligations under the Intrastat system.
When your import and/or export trade to the EU exceeds a certain level, known as the assimilation threshold, you are required by law to submit certain details of your trade to HM Revenue & Customs. The forms used to submit this information are called Supplementary Declarations, or SDs.
Sage 50 Accounts helps you to complete your SDs by identifying EU transactions and using them to generate the information you need to submit. You can then transfer the figures that Sage 50 Accounts produces onto the official Supplementary Declarations forms.
For further information about all aspects of Intrastat, please refer to HM Revenue & Customs’ Notice 60, The Intrastat General Guide.
Before you start using Sage 50 Accounts to confirm your Intrastat dispatches and arrivals, you need to set up your Instrastat defaults. For information on how to do this, see To set up your Intrastat defaults on page 183.
Confirming your Intrastat dispatches
When you deliver a sales order to your customer, Sage 50 Accounts shows a status of Part or Complete in the Despatched column on the Sales Order Processing window. You can now include these items on your Intrastat Dispatches declaration. Using the Intrastat facilities, Sage 50 Accounts searches your sales orders for qualifying items and displays them in a list, ready for you to confirm the entries for your declaration.
Note: For products to appear on the Intrastat Dispatches Confirmation (SOP) window, the following criteria must be met:
You must have enabled Intrastat Declarations. For more information, see To set up your Intrastat defaults on page 183.
The Country Code that appears on your company Delivery Address must be GB, or IE for users in the Republic of Ireland. If you do not have a company Delivery Address set up, then the Country Code on your default company address details must be GB, or IE for users in the Republic of Ireland. You can set up your company Delivery Address and default company address details in Company Preferences (Settings > Company Preferences).
277

Sage 50 Accounts User Guide
27
The Product Tax Code on the sales order must be T4m or your designated EC Sales tax code, if different.
The Country Code of the delivery address on the sales order must be that of an EU member. For a full list of EU member countries and their corresponding Country Codes, please refer to the Sage 50 Accounts Help system.
The product must have a valid Intrastat Commodity Code present on the product record. For more details about the commodity code, see Creating a product record on page 238.
To confirm your Intrastat dispatches
1. Open the Company module, then from the Tasks pane, click Prepare Intrastat Return.
A Confirm box appears.
2. Select Sales Orders and then click OK.
Note: The Intrastat facility is only available if the Generate Intrastat Entries for Sales Orders check box is selected in the Intrastat tab of Invoice and Order Defaults. For more information, see To set up your Intrastat defaults on page 183.
The Intrastat Dispatches Confirmation (SOP) window appears.
8

Company tasks
The Intrastat Dispatches Confirmation (SOP) window displays the following information:
For the period This is the date that will appear on your Summary Declarations report. The current program date appears here automatically, but you can change this if you require.
Note: If a date is entered that corresponds to a Lock Date prohibited posting period, a warning message may appear.
Order No Displays the number of the sales order to which the item belongs.
Product Code Shows the product code of the item, as it appears on the sales order.
Description The product's description appears here.
Quantity Delivered Shows the quantity of this item that have been dispatched for the order. You can amend this if you require.
NOTC The Nature of Transaction Code (NOTC) indicates the type of transaction made. For example, a sale resulting in a change in the legal ownership of goods uses NOTC 10. For a list of commonly-used NOTCs, please refer to the Sage 50 Accounts Help system.
You can amend the NOTC here if you require.
Delivery Terms Shows the three-character delivery terms code. Refer to the Sage 50 Accounts Help system for details of the available codes. You can amend the code if you require.
Note: If the value of your dispatches or arrivals exceeds £14 million, you must also specify the contract delivery terms on your SD. Like the Intrastat assimilation threshold, the delivery terms threshold may change annually. However, unlike the assimilation threshold, you will only be required to begin declaring delivery terms at the start of the next calendar year, not during the month in which the threshold was exceeded.
Net Mass kg A requirement depending on the Commodity Code used (every commodity code requires either net mass or supplementary units, or in some cases both).
Displays the net weight of the item, rounded up to the nearest kilogram. You can amend this if you require.
279

Sage 50 Accounts User Guide
28
3. Check the details of each item to make sure that you want to include it in the Intrastat return. If items appear that you do not want to include, select the item and press the F8 function key on your keyboard to delete it.
Note: HM Revenue & Customs require that your Supplementary Declarations for Dispatches should also include returns from Purchase Order Processing. As Sage 50 Accounts does not include these automatically in Sales Order Processing, you need to add Purchase Order Processing returns manually if you want to include them in your declaration. For further information, refer to HM Revenue & Customs Notice 60, section 7.2.
4. When you are happy that the items in the list are correct and should appear on the Intrastat Dispatches return, click Generate.
A confirmation message appears:
The items on this Intrastat Confirmation window will now appear on the Supplementary Declarations reports. Which type of report would you like to produce?
5. Choose which type of Supplementary Declarations report you want to produce from the following:
Goods Value Shows the value of the item rounded up to the nearest pound (or euro). Sage 50 Accounts displays this in your company's base currency - £ for UK users or € for users in the Republic of Ireland.
The value includes any related freight or insurance charges where they form part of the invoice for the goods. You can amend the value if you require.
Country To Displays the two-letter country code of the country to which you are dispatching the item. You can view a full list of EU country codes in the Sage 50 Accounts Help system.
Supp Units Displays the Supplementary Units for the item. This is a requirement depending on the commodity code used. Every commodity code requires either net mass or supplementary units, or both.
If the item requires Supplementary Units, you must enter this information here manually.
Item Delivery Status Displays whether the item has a dispatched status of Complete or Part. Only items that have been delivered appear in this list.
0

Company tasks
Note: When you produce the Supplementary Declarations report, Sage 50 Accounts stores a copy of it in your data in a folder named Intrastat Archive. You can view this at any time, for example if your original report is lost, damaged or queries by HM Revenue & Customs. For details about how to view archived declarations, see To view an archived Intrastat declaration report on page 282.
6. To close the Supplementary Declarations report window and return to the previous window, click Close.
The sales orders that contain items included in the Supplementary Declarations report display Part or Complete in the Intrastat column.
You have now produced your Supplementary Declarations for Intrastat Dispatches.
CSV If you choose CSV, Sage 50 Accounts produces your Supplementary Declarations information in the form of a comma-separated value (CSV) file. For more information about the structure of the CSV file, please refer to the Sage 50 Accounts Help system.
You can submit the CSV file electronically or via the Internet to HM Revenue & Customs. Further details about electronic submission of your Intrastat data are available from the HM Revenue & Customs website.
When you click the CSV button, the report appears. Select Save As to save the report, and specify where you want to save the CSV file.
Paper-based If you do not want to submit your Supplementary Declarations report electronically to HM Revenue & Customs, you can produce a paper-based report. You can use this report to help you to complete the official Supplementary Declarations form.
Note: You cannot submit the report Sage 50 Accounts produces to HM Revenue & Customs - you must transfer the information onto the official form (C1501). You can request copies of the form you need from HM Revenue & Customs, or you can download it from their website.
281

Sage 50 Accounts User Guide
28
To view an archived Intrastat declaration report
1. From the Sage 50 Accounts menu bar, select File > Open > Report.
The Open window appears.
2. Locate the Intrastat Archive folder. This is stored within your Sage 50 Accounts data directory.
For example, if your Sage 50 Accounts software is installed into the default directory, the path to the archive folder is:
Windows XP
C:\Documents and Settings\All Users\Application Data\Sage\Accounts\2012\company.000\ACCDATA\Intrastat Archive.
Windows Vista and Windows 7
C:\ProgramData\Sage\Accounts\2012\company.000\ACCDATA\Intrastat Archive
3. Select the Intrastat Archive folder and click Open.
4. Locate the archive file you want to display. Sage 50 Accounts names the archived report files using the type of report (dispatches or arrivals), the date and time you produced the report, and the file type of the report you originally produced - CSV, or .datareport for the paper-based report. For example, if you produce a paper-based report for Intrastat Dispatches on 22 March 2011 at 15.39, Sage 50 Accounts saves the report using the file name Dispatches SD 22032011 1539.datareport.
Note: You can only view .datareport reports - that is, the paper-based report, in this way. To view an archived CSV report, you must open the file from the Intrastat Archive folder in a program such as Microsoft® Excel.
5. Select the file and click Open.
Sage 50 Accounts displays the archived report, ready for you to print or check as you require.
6. To close the archived report and return to the Sage 50 Accounts desktop, click Close.
Confirming your Intrastat arrivals
When you record full or part delivery of a purchase order, Sage 50 Accounts shows a status of Part or Complete in the Delivered column on the Purchase Order Processing window. You can now include these items on your Intrastat Arrivals declaration. Using the Intrastat option, Sage 50 Accounts searches your purchase orders for qualifying products and displays them in a list, ready for you to confirm the entries for your declaration.
Note: For products to appear on the Intrastat Arrivals Confirmation (POP) window, the following criteria must be met:
2

Company tasks
You must have enabled Intrastat Declarations. For more information, see To set up your Intrastat defaults on page 183.
The Country Code that appears on your company Delivery Address must be GB, or IE for users in the Republic of Ireland. If you do not have a company Delivery Address set up, then the Country Code on your default company address details must be GB, or IE for users in the Republic of Ireland. You can set up your company Delivery Address and default company address details in Company Preferences (Settings > Company Preferences).
The Product Tax Code on the purchase order must be an EC Purchase Tax Code.
The Country Code of the supplier on the purchase order must be that of an EU member. For a full list of EU member countries and their corresponding Country Codes, please refer to the Sage 50 Accounts Help system.
The product must have a valid Intrastat Commodity Code present on the product record. For more details, please see Creating a product record on page 238.
To confirm your Intrastat arrivals
1. Open the Company module, then the Tasks pane, click Prepare Intrastat Return.
A Confirm box appears.
2. Select Purchase Orders and then click OK.
Note: The Intrastat facility is only available if the Generate Intrastat entries for Purchase Orders check box is selected in the Intrastat tab of Invoice and Order Defaults. For more information, see To set up your Intrastat defaults on page 183.
The Intrastat Arrivals Confirmation (POP) window appears.
283

Sage 50 Accounts User Guide
28
The Intrastat Arrivals Confirmation (POP) window displays the following information:
For the period This is the date that will appear on your Supplementary Declarations report.
The current program date appears here automatically, but you can change this if you require.
Note: If a date is entered that corresponds to a Lock Date prohibited posting period, a warning message may appear.
Order No Displays the number of the purchase order to which the item belongs.
Product Code Shows the product code of the item, as it appears on the purchase order.
Description The product's description appears here.
Quantity Received Shows the quantity of this item that have been received for the order. You can amend this if you require.
NOTC The Nature of Transaction Code (NOTC) indicates the type of transaction. For example, a purchase resulting in a change in the legal ownership of goods uses NOTC 10. For a list of commonly-used NOTCs, please refer to the Sage 50 Accounts Help system.
You can amend the NOTC here if you require.
Delivery Terms Shows the three-character delivery terms code. Refer to the Sage 50 Accounts Help system for details of the available codes. You can amend the code if you require.
Note: If the value of your dispatches or arrivals exceeds £14 million, you must also specify the contract delivery terms on your SD. Like the Intrastat assimilation threshold, the delivery terms threshold may be changed annually.
However, unlike the assimilation threshold, you will only be required to begin declaring delivery terms at the start of the next calendar year, not during the month in which the threshold was exceeded.
4

Company tasks
3. Check the details of each item to make sure that you want to include it in the Intrastat return. If items appear that you do not want to include, select the item and press the F8 function key on your keyboard to delete it.
Note: HM Revenue & Customs require that your Supplementary Declarations for Arrivals should also include returns from Sales Order Processing. As Sage 50 Accounts does not include these automatically in Purchase Order Processing, you need to add Sales Order Processing returns manually if you want to include them in your declaration. For further information, refer to HM Revenue & Customs Notice 60, section 7.2.
4. When you are happy that the items in the list are correct and should appear on the Intrastat Arrivals return, click Generate.
A confirmation message appears:
Net Mass kg A requirement depending on the Commodity Code used (every commodity code requires either net mass or supplementary units, or in some cases both).
Displays the net weight of the item, rounded up to the nearest kilogram. You can amend this if you require.
Goods Value Shows the value of the item rounded up to the nearest pound (or euro). Sage 50 Accounts displays this in your company's base currency - £ for UK users or € for users in the Republic of Ireland.
The value includes any related freight or insurance charges where they form part of the invoice for the goods. You can amend the value here if you require.
Country From Displays the two-letter country code of the country from which you receive the item. You can view a full list of EU country codes in the Sage 50 Accounts Help system.
Supp Units Displays the Supplementary Units for the item. This is a requirement depending on the commodity code used (every commodity code requires either net mass or supplementary units, or in some cases both).
If the item requires supplementary units, you must enter this information here manually.
Item Delivery Status Displays whether the item has a delivered status of Complete or Part. Only items that have been delivered appear in the list.
285

Sage 50 Accounts User Guide
28
The items on this Intrastat Confirmation window will now appear on the Supplementary Declarations reports. Which type of report would you like to produce?
5. Choose which type of Supplementary Declarations report you want to produce from the following:
Note: When you produce the Supplementary Declarations report, Sage 50 Accounts stores a copy of it in your data in a folder named Intrastat Archive. You can view this at any time, for example if your original report is lost, damaged or queried by HM Revenue & Customs. For details about how to view archived declarations, see To view an archived Intrastat declaration report on page 282.
6. To close the Supplementary Declarations report window and return to the main Purchase Order Processing window, click Close.
You have now produced your Supplementary Declarations for Intrastat Arrivals.
CSV If you choose CSV, Sage 50 Accounts produces your Supplementary Declarations information in the form of a comma-separated value (CSV) file. For more information about the structure of the CSV file, please refer to the Sage 50 Accounts Help system.
You can submit the CSV file electronically or via the Internet to HM Revenue & Customs. Further details about electronic submission of your Intrastat data are available from the HM Revenue & Customs website.
When you click the CSV button, the report appears. Select Save As to save the report, and specify where you want to save the CSV file.
Paper-based If you do not want to submit your Supplementary Declarations report electronically to HM Revenue & Customs, you can produce a paper-based report. You can use this report to help you to complete the official Supplementary Declarations form.
Note: You cannot submit the report Sage 50 Accounts produces to HM Revenue & Customs - you must transfer the information onto the official form (C1500). You can request copies of the form you need from HM Revenue & Customs, or download it from their website (www.hmrc.gov.uk).
6

Company tasks
Managing your VAT
The VAT Return check list
Preparation:
Ensure that your VAT settings and preferences have been set up
Post all outstanding transactions for the VAT period including recurring transactions
Back up your data
If required: calculate your fuel scale charges - not applicable to Flat Rate Accounting
Print the appropriate day book reports
Generate:
Calculate - include unreconciled transactions
Check and analyse Return box totals
If required: make manual adjustments
Print VAT Return reports
Reconcile
Submit and Pay
Clear VAT control accounts
Submit the Return
Make payment
Republic of Ireland only - Submit your Return of Trading Details
Optional Steps
If required: generate your Sage 50 Accounts EC Sales List
If required: Republic of Ireland - generate your VIES Return
If required: generate your Sage 50 Accounts Reverse Charge Sales List
287

Sage 50 Accounts User Guide
28
The VAT window
1. Open the Company module, then from the Tasks pane, click Manage VAT.
The VAT window appears.
From the VAT window you can create and review all VAT elements related to your business. All VAT-related tasks can be undertaken using the VAT window toolbar.
Note: The Submit Return and HMRC Receipts buttons are only visible if you have Enabled e-Submissions in your Company Preferences VAT tab.
For users in the Republic of Ireland, the VAT window toolbar looks like this:
If you are a user in the ROI, please refer to the specific VAT return help topic (F1) topic for standard VAT or VAT Cash Accounting schemes.
The VAT window work area lists all previously created VAT Returns, EC Sales and Reverse Charge Sales Lists.
For further information about producing an ROI VIES Return, please refer to If required - ROI - to generate a VIES Return on page 337.
For further information about producing your ROI Return of Trading Details, please refer to ROI - To generate a Return of Trading Details (RTD) on page 326.
Note: If you have upgraded from a previous version, then those VAT Returns that you have saved in that version will not be visible in the VAT window. To view these, select File > Open > VAT Archive.
Each Return listed is shown with the Period to which it applies, the Amount, a Status flag of Submitted, Pending or N/A, as appropriate, and a Y/N Paid indicator.
Note: The Status column will only be displayed if you have previously selected the Enable e-VAT Submissions check box in the Company Preferences VAT tab.
2. To view any previously completed Return, highlight it in the list and click View.
The Return is displayed as Read Only, and can be printed, drilled-down into and closed. All other options are unavailable.
3. To print out the VAT window listing, click Print List.
4. To delete a highlighted VAT Return, EC Sales List or RC Sales List in the list, click Delete.
8

Company tasks
Note: A warning message will prompt you to check your current backup status. Remember that your VAT records, like all your business records, must be kept for at least six years to comply with both company and tax legislation.
VAT settings and preferences
VAT preferences are a range of settings that control how Sage 50 Accounts deals with all your VAT calculations, submissions and payments.
Your selections are used to configure Sage 50 Accounts, so that the software can handle all your VAT reporting requirements, in accordance with current legislation.
To configure your VAT preferences
1. Click Settings > Company Preferences > VAT tab.
2. Note: Password entry is required to display the Company Preferences window.
289

Sage 50 Accounts User Guide
29
3. In the VAT Preferences tab that appears, set your VAT Details, EC Sales List preferences, e-Submission Credentials and Contact Details. For detailed information on the various entry box categories on this tab, please refer to the Manage your VAT > VAT Preferences > To Configure your VAT Preferences topic in the main software help file (F1).
Configure your VAT details preferencesAt the top of the VAT Details window, enter your VAT registration number. For further information about this, please refer to the Manage your VAT > VAT Basics > VAT Registration Validation topic in the main software help file (F1).
Set your other VAT details as follows:
Non-Vatable Tax Code
On installation, your software automatically sets T9 as the tax code for transactions, which do not involve VAT and are not included on the VAT Return, and also for all those routines within your software that are non-vatable, for example journal entries and error corrections.
If you want to change this default tax code, from the drop-down list, select the tax code you require.
Item VAT Amendable
If you want to be able to change the VAT amount which is automatically calculated by your software, when you create invoices or credit notes, select this check box.
Accounts Professional users can also amend VAT amounts when creating sales and purchase orders.
VAT Scheme
Select the VAT Scheme appropriate to your business:
Standard VAT
When using the Standard VAT Accounting scheme, you need to account for the VAT element of income when it is earned, not when you receive the money.
Similarly, if you buy goods from your suppliers on a credit basis, you also need to account for the VAT element of purchases, when you incur the cost, rather than when you actually make a payment.
At the end of a period, you must pay the amount of VAT collected on sales - that is, output tax, less the amount of VAT charged on purchases - input tax, to the VAT authorities.
VAT Cash Accounting
VAT Cash Accounting is a cash - based accounting scheme, devised by the tax authorities to help smaller companies with their cash flow.
Using this scheme, at the end of a period you pay and reclaim VAT only on the money value that has actually been received or paid.
Note for users in the Republic of Ireland: The Irish VAT Cash Accounting scheme works slightly differently from the UK scheme; it allows you to calculate VAT on the money you receive from your customers and the invoices/credits you receive from your suppliers.
0

Company tasks
If your computer's Regional Options are set to English (Ireland), selecting the VAT Cash Accounting check box enables you to calculate your VAT according to the Irish VAT Cash Accounting scheme.
Flat Rate - Invoice Based (UK only)
The Flat Rate scheme was introduced by HMRC to simplify VAT calculation for new and small businesses. VAT payable is calculated by multiplying the business’ gross turnover by a fixed percentage, which is varied according to trade sector.
The fixed percentage is normally lower than the standard VAT percentage.
Under the flat rate scheme, a business must still add VAT at the normal rate, when invoicing customers - that is, an invoice for standard rated item for £1,000 would have VAT of £200 added if the VAT rate was 20.0%.
Note: The standard rate of VAT was increased to 20 per cent on 04 January 2011.
In addition, under the flat rate scheme, VAT is not recoverable on purchases, with one exception. Purchase VAT can be reclaimed on a single purchase of capital expenditure goods, where the purchase amount, including VAT, is £2,000 or more.
For more information about this scheme, please refer to the HMRC guidance.
Flat Rate - Cash Based (UK only)
This is the flat rate equivalent of the VAT Cash Accounting scheme.
The calculation of the VAT total for a period is the gross turnover based on receipt only.
Using this scheme, at the end of a period you pay VAT only on the money value that has actually been received.
For more information about this scheme, again please refer to the HMRC guidance.
Note: If you choose to change your VAT accounting scheme using this drop-down selection, you must ensure that you first perform a VAT reconciliation on your existing scheme. This is to ensure that no VAT unreconciled transactions exist, when you then switch your VAT accounting scheme.
Flat Rate % (UK - Flat Rate Accounting only)
The flat rate you use depends on the business sector that you belong in. The correct sector is the one that most closely describes what your business will be doing in the coming year.
Note: In the first year of VAT registration, businesses using the flat rate scheme can reduce the flat rate percentage for their sector by 1%, until the day before the first anniversary of VAT registration. This discount applies even if the flat rate percentage changes during the first year of VAT registration. It is your responsibility to manage and adjust your flat rate %.
Validate VAT Numbers
Your EC Sales List submission (ECSL) must include your customer's country code and VAT registration number.
Leave this check box selected if you want Sage 50 Accounts to validate EU VAT numbers for all EU member countries.
291

Sage 50 Accounts User Guide
29
Enable e-VAT Submission
If you wish to submit your VAT return and EC Sales List to HMRC over the Internet, select this check box. In order to make e-VAT submissions you must obtain a Government Gateway Account.
Note: This does not apply to ROI users.
If you do not wish to submit your VAT returns online, do not select the Enable e-VAT Submissions check box. You can still make your VAT payments using the Payment button on the VAT window toolbar. This will open the Bank Payment window.
Configure your EC Sales List preferencesIf you are registered for VAT and supply Goods and/or Services to customers in the EC, you need to submit an EC Sales List. The information provided on the EC Sales List is used in the UK and by other Member States to ensure that VAT has been correctly accounted for, on the sale of Goods and Services within the EC.
In the case of a multi-company environment, an EC Sales List (ECSL) must be submitted for each company within the group.
If you intend to submit your EC Sales List to HMRC online, then configure your VAT Internet Submissions in each of the following categories:
Error Threshold
Select either 30% or 0% Error Threshold from the drop-down list provided.
Your selection is required to determine whether the error tolerance setting for an ECSL submission is set to 30% or 0%.
A zero per cent selection signifies that the User is willing to accept zero tolerance for submissions, in which case the submission will be rejected, when the first error is encountered in a submission line.
Selecting 30% signifies that the User is prepared for a 30% tolerance range, where more than 30% of the lines will need to be deemed as having errors, for the submission to be rejected by HMRC.
The default setting, as per HMRC recommendation, is 30%.
Branch Identifier
Type the three-digit number, representing the EC Sales List Branch Identifier.
The default number is 000.
This number is allocated by the HMRC National Advice Service.
Branch Post Code
Type the EC Sales List Branch Postcode. This is an alphanumeric entry of up to eight characters. This is blank by default.
2

Company tasks
Configure your e-Submissions Credentials preferencesConfigure your e-Submissions credentials in each of the following categories, using the same details as you used, when setting up your Government Gateway account:
User ID
Type your User ID in this entry box, defined as your Government Gateway Account Username, when you set up your account.
Password / Confirm Password
Type your password in these entry boxes, defined as your Government Gateway Account password, when you set up your account.
Submit as an Agent (Client Manager only)
Click the Submit as an agent check box to enable the Agent Ref field. Enter your Agent Reference details in this field.
Configure your e-Submissions Contact DetailsConfigure your e-Submissions contact details in each of the following categories, using the same details as you used, when you set up your Government Gateway account:
Forenames
Enter your first or given names in this entry box, as defined when you set up your Government Gateway account.
Surnames
Enter your last or family name in this entry box, as defined when you set up your Government Gateway account.
Telephone
Enter your contact telephone number in this entry box, as defined when you set up your Government Gateway account.
Enter your contact email address in this entry box, as defined when you set up your Government Gateway account.
293

Sage 50 Accounts User Guide
29
Configure your HMRC bank account detailsThese bank details are only used, when VAT liability is paid to HMRC, using the Sage e-banking feature.
If these details change, you can modify the Sort Code and Account Number using the HMRC Bank Account window. To open the HMRC Bank Account window, select the HMRC Bank Account button
Configure your EC Sales VAT Descriptions
From the 01 October 2007, HMRC introduced additional legislation relating to the information contained on an EC sales invoice.
At present, when goods and / or services are sold to an EC member state, if the EC customers’ VAT registration number is obtained, then the invoice can be zero-rated for VAT purposes - that is, no VAT is charged and it is up to the EC customer to account for the VAT on their tax return. The new legislation requires descriptions to be included on the invoice, to enable the EC customer to account correctly for the notional VAT on their VAT Return.
To set your default message text that will appear on your invoices, when an EC sales tax code is used, click EC VAT Description.
The EC VAT Descriptions window appears.
4

Company tasks
Three default descriptions are provided, and a further four additional messages can be created. With the exception of No description, which is read only, all default messages can be amended.
Choose from one of the available options that are listed.
Your selected description will be included on the EC Sales invoice.
Entering scale charges
Accounts Plus and Accounts Professional onlyFuel Scale Charges are taxes levied in relation to expenditure on fuel used for private purposes. These charges are now dependent upon the carbon dioxide (CO2) emissions band, defined for the specific car engine.
To post your Scale Charges, from the Sage 50 Accounts menu bar, select Modules > Wizards > Scale Charges. Follow the on-screen instructions to complete posting the scale charges.
Note: If you are using the Flat Rate Accounting Scheme, you do not have to pay any fuel scale charges, since you are not reclaiming VAT on the purchase of the fuel. The Scale Charges wizard is therefore unavailable from the toolbar and Modules > Wizards, if you are using the Flat Rate Accounting scheme.
For full instruction on fuel scale charges, please refer to the main software help file - F1 on your keyboard. Alternatively, refer to the Company > Tasks pane > VAT Reconciliation Guide.
To calculate your VAT Return
1. Open the Company module, then from the Tasks pane, click Manage VAT. From the Value Added Tax Return window, click VAT Return.
Note: The alternative navigation route of Company > Financials > VAT is also available.
2. Enter the VAT Period dates For the period and To. These dates are inclusive, for example, any transactions logged on these dates are included in the VAT Return.
Although there is a check box to include previously reconciled VAT transactions, it is generally recommended that you do not include these transactions.
Note: If you are using the Flat Rate Accounting Scheme, the trade sector Flat Rate % that you set during your setup procedure or in Settings > Company Preferences > VAT tab is shown - read only, below the For the period / To date boxes.
3. To calculate the totals for your VAT Return, click Calculate.
Sage 50 Accounts searches through the audit trail and totals all the VAT transactions, within the period you specified.
295

Sage 50 Accounts User Guide
29
It also searches for any transactions that are dated before the period specified but have not previously been reconciled. If any unreconciled transactions are found, you are told how many and asked if you want to include them or not.
If you wish to include these transactions in your VAT Return, click Yes, if you do not, click No. If you choose not to include them, they remain as unreconciled transactions and the message will appear again when you next run your VAT Return.
It is generally recommended that you do include these previously unreconciled transactions.
Your VAT totals are automatically entered for you into the appropriate VAT Return total boxes, in the Value Added Tax Return window.
Note: If you are using the Flat Rate Accounting Scheme, when you click Calculate, a Benefit/Cost button becomes active. To view whether the Flat Rate Accounting scheme is of benefit to you, relative to the corresponding Standard or VAT Cash Accounting scheme, click Benefit/Cost.
The Benefit/Cost window appears, detailing Standard VAT Sales / Purchase VAT totals, the resulting Standard VAT Liability, along with the comparable Flat Rate VAT Liability.
If you are operating the Flat Rate - Cash Based scheme, the corresponding VAT Cash Accounting totals appear. The difference between the Standard and Flat Rate Liability is also shown as a Benefit/Cost value.
If a Benefit value is shown, the Flat Rate Accounting Scheme is of benefit to you. If a Cost value is shown, the scheme is costing you and is of disadvantage to you, relative to the Standard Accounting or VAT Cash Accounting Scheme, as appropriate.
Later, when you transfer your VAT Liability using the VAT Transfer wizard, you need to transfer your VAT Liability to the VAT Liability account - 2202 by default, and the Benefit/Cost to the Flat Rate - Benefit/Cost nominal account- 4099 by default.
Note for Flat Rate Accounting Scheme Users: When using the flat rate schemes to calculate your VAT Return, it is possible that the flat rate Benefit/Cost may take your gross receipts (turnover for the year) below or over the tax return reporting thresholds for "short return" or "3 line account" types of tax return reporting. These types of tax returns involve the provision of only limited tax return information to HMRC.
6

Company tasks
If this is the case, it is recommended that you exercise caution and prudence before considering using these limited types of tax return. To avoid any possible unsatisfactory tax return consequences, it is generally recommended that the type of tax return you provide to HMRC is based on your gross receipts before any flat rate reduction.
Changing from Flat Rate Scheme
If the Flat Rate Accounting Scheme proves to be of cost to you, relative to the corresponding Standard Accounting or VAT Cash Accounting Scheme, and you decide to change to an alternative scheme, you can do this without first reconciling, provided:
You change from the Flat Rate - Invoice Based Accounting Scheme to Standard Accounting Scheme only
or
You change from Flat Rate - Cash Based Accounting Scheme to VAT Cash Accounting Scheme only
For any other scheme combination, you need to clear any unreconciled transactions first before you change your VAT Accounting Scheme.
How your VAT Return is calculated
As soon as you click Calculate, Sage 50 Accounts searches through the audit trail for VAT transactions. The boxes on the Value Added Tax Return window are then automatically updated with the appropriate values. These values are calculated on the basis of the tax codes you assigned for each transaction.
These tax codes are set up in the Configuration Editor - Settings > Configuration.
Your software includes in the VAT Return only those transactions that have not yet been reconciled and fall within the period you specify. However, if necessary, you can include reconciled transactions, and/or unreconciled transactions that are dated before the specified period.
For full details on how Sage 50 Accounts calculates your UK or Republic of Ireland VAT Return using the Standard VAT or VAT Cash Accounting scheme, please refer to the various VAT topics, located in the Manage your VAT > VAT Return Generation folder in the main software help file (F1).
297

Sage 50 Accounts User Guide
29
The UK VAT Return - Standard VAT Accounting Scheme
The VAT Return is made up of nine boxes which represent the various VAT charges from all of the transactions that you have entered into Sage 50 Accounts.
Box 1 - VAT due in this period on sales
This box contains the VAT charged on all your sales transactions. Credit notes are deducted. This represents the total VAT due in this period on Sales.
To see a list of the transaction types and tax codes that your software uses to calculate this value, click the figure in Box 1.
Box 2 - VAT due in this period on EC acquisitions
This represents the VAT due this period on acquisition of goods from EC member states. It is calculated applying the UK standard rate on T8 transactions.
To see a list of the transaction types and tax codes that your software uses to calculate this value, click the figure in Box 2.
Box 3 - Total VAT due (sum of boxes 1 and 2)
This box displays the sum of the values calculated in Boxes 1 and 2. It represents the total VAT that you owe for this period before the deduction of VAT on purchases.
Box 4 - VAT reclaimed in this period on purchases
This represents the amount of VAT that you can reclaim for purchases and other inputs. This includes the value calculated for EC acquisitions in Box 2.
To see a list of the transaction types and tax codes that your software uses to calculate this value, click the figure in Box 4.
Box 5 - Net VAT to be paid to Customs, or reclaimed by you
This is the difference between Box 3 and Box 4.
8

Company tasks
If the value in Box 3 (Total VAT due) is greater than the value in Box 4 (VAT reclaimed in this period on purchases), the difference appears as a positive figure in Box 5. This represents the total amount of VAT that you must pay for this period.
If the value in Box 3 (Total VAT due) is less than the value in Box 4 (VAT reclaimed in this period on purchases), the difference appears as a negative figure in Box 5. This represents the total amount of VAT that you can claim back as a rebate for this period.
Box 6 - Total value of sales, excluding VAT
This is the total value of sales, excluding VAT. This includes all exports to other countries, both EC and non-EC members. It also includes the value in Box 8.
To see a list of the transaction types and tax codes that your software uses to calculate this value, click the figure in Box 6.
Box 7 - Total value of purchases, excluding VAT
This represents the total value of all purchases excluding VAT. This includes all imports from both EC and non-EC countries. It also includes the value in Box 9.
Click the figure in Box 7 to see a list of the transaction types and tax codes that your software uses to calculate this value, click the figure in Box 7.
Box 8 - Total value of EC sales, excluding VAT
This represents the total value of all sales of goods to EC member states, excluding VAT.
To see a list of the transaction types and tax codes that your software uses to calculate this value, click the figure in Box 8.
Box 9 - Total value of EC purchases, excluding VAT
This represents the total value of all purchases of goods from EC member states, excluding VAT.
To see a list of the transaction types and tax codes that your software uses to calculate this value, click the figure in Box 9.
299

Sage 50 Accounts User Guide
30
The UK VAT Return - VAT Cash Accounting Scheme
The VAT Return is made up of nine boxes which represent the various VAT charges from all of the transactions that you have entered into Sage 50 Accounts.
Box 1 - VAT due in this period on sales
This contains the VAT charged on all your receipts. This represents the total VAT due in this period on your sales.
To see a list of the transaction types and tax codes that your software uses to calculate this value, click the figure in Box 1.
Box 2 - VAT due in this period on EC acquisitions
This represents the VAT due in this period on acquisitions of goods from EC member states. It is calculated applying the UK standard rate on T8 transactions.
To see a list of the transaction types and tax codes that your software uses to calculate this value, click the figure in Box 2.
Box 3 - Total VAT due (sum of boxes 1 & 2)
This box displays the sum of the values calculated in Boxes 1 and 2. It represents the total VAT that you owe for this period.
Box 4 - VAT reclaimed in this period on purchases
This represents the amount of VAT that you can reclaim for payments and other inputs. This includes the value calculated for EC acquisitions in Box 2.
To see a list of the transaction types and tax codes that your software uses to calculate this value, click the figure in Box 4.
Box 5 - Net VAT to be paid to Customs, or reclaimed by you
This is the difference between Box 3 and Box 4.
If the value in Box 3 (Total VAT due) is greater than the value in Box 4 (VAT reclaimed in this period on purchases), the difference appears as a positive figure in Box 5.
0

Company tasks
This represents the total amount of VAT that you must pay for this period.
If the value in Box 3 (Total VAT due) is less than the value in Box 4 (VAT reclaimed in this period on purchases), the difference appears as a negative figure in Box 5.
This represents the total amount of VAT that you can reclaim as a rebate for this period.
Box 6 - Total value of sales, excluding VAT
This is the total value of receipts, excluding VAT. This includes all exports to other countries, both EC and non-EC members. Box 6 also includes the value of T4 EC invoices and credit notes. It also includes the value in Box 8.
To see a list of the transaction types and tax codes that your software uses to calculate this value, click the figure in Box 6.
Box 7 - Total value of purchases, excluding VAT
This represents the total value of all payments, excluding VAT. This includes all imports from both EC and non-EC countries. It also includes the value in Box 9.
Click the figure in Box 7 to see a list of the transaction types and tax codes that your software uses to calculate this value, click the figure in Box 7.
Box 8 - Total value of EC sales, excluding VAT
This represents the total value of all invoice receipts of goods from EC member states, excluding VAT.
To see a list of the transaction types and tax codes that your software uses to calculate this value, click the figure in Box 8.
Box 9 - Total value of EC purchases excluding VAT
This represents the total value of all purchases of goods to EC member states, excluding VAT.
To see a list of the transaction types and tax codes that your software uses to calculate this value, click the figure in Box 9.
301

Sage 50 Accounts User Guide
30
The UK VAT Return - Flat Rate - Invoice Based Accounting Scheme
The VAT Return is made up of nine boxes which represent the various VAT charges from all of the transactions that you have entered into Sage 50 Accounts.
The calculation of the totals for the Flat Rate Accounting Scheme differs from the Standard Accounting and VAT Cash Accounting Schemes.
The Box 6 total shown is a gross figure, inclusive of VAT.
Box 1 - VAT due in this period on sales
This box shows the VAT due on all your sales transactions plus any VAT from the sale of capital items, on which you have previously claimed purchase tax.
The value shown is based on the gross turnover including VAT that is shown in Box 6 multiplied by the Flat Rate %, as indicated in the Flat Rate % information box, above the individual box totals.
To this is added any VAT charged on the sales of capital assets, which were previously claimed for in terms of purchase VAT on items over £2000 (T25).
To see a list of the transaction types and tax codes that your software uses to calculate this value, click the figure in Box 1.
T20 and T24 transactions are included in this total.
Box 2 - VAT due in this period on EC acquisitions
This represents the VAT due this period on acquisitions from EC member states.
2

Company tasks
Box 3 - Total VAT due (sum of boxes 1 and 2)
This box displays the sum of the values calculated in Boxes 1 and 2. It represents the total VAT that you owe for this period.
Box 4 - VAT reclaimed in this period on purchases
This represents the amount of VAT that you can reclaim for purchases and other inputs. This includes the value calculated for EC acquisitions in Box 2.
Since the Flat Rate Accounting Scheme does not involve reclaiming VAT on purchases, this box is usually zero, unless you have made a single purchase of capital items, costing more than £2000 including VAT (T25).
However, T20 and T24 transactions are included in this total.
Box 5 - Net VAT to be paid to the tax authorities, or reclaimed by you
This is the difference between Box 3 and Box 4.
In the case of the Flat Rate Accounting Scheme, this is usually the total in Box 3, since Box 4 is usually zero.
Box 6 - Total value of sales, excluding VAT
The figure shown is the gross turnover - that is, including VAT.
The figure includes the gross turnover plus the value of any sale of assets, previously purchased as a capital item (T25 net amount), while using the Flat Rate Scheme.
To see a list of the transaction types and tax codes that your software uses to calculate this value, click the figure in Box 6.
T0, T1 (gross), T2, T4, T5 (gross), Sales Discount (SD), T20 and T22 net amounts are included in this total, along with T23 and T24 purchase net amounts.
Box 7 - Total value of purchases, excluding VAT
This represents the total value of all purchases excluding VAT.
This is usually zero unless you have made a single purchase of capital items, costing more than £2000, including VAT, and you are claiming the purchase tax in Box 4.
T7, T8, T20, T23 and T24 transactions are included in this total.
Box 8 - Total value of EC sales, excluding VAT
This represents the total value of all sales of goods to EC member states, excluding VAT. In addition, it includes the net value of any sale of assets.
To see a list of the transaction types and tax codes that your software uses to calculate this value, click the figure in Box 8.
303

Sage 50 Accounts User Guide
30
Box 9 - Total value of EC purchases, excluding VAT
This represents the total value of all purchases of goods from EC member states, excluding VAT.
To see a list of the transaction types and tax codes that your software uses to calculate this value, click the figure in Box 9.
T7 and T8 transactions are included in this total.
The UK VAT Return - Flat Rate - Cash Based Accounting Scheme
Box 1 - VAT due in this period on sales
This box shows the VAT due on all your sales transactions plus any VAT from the sale of capital items, on which you have previously claimed purchase tax.
The value shown is based on the gross turnover including VAT that is shown in Box 6 multiplied by the Flat Rate %, as indicated in the Flat Rate % information box, above the individual box totals.
To this is added any VAT charged on the sales of capital assets, which were previously claimed for in terms of purchase VAT on items over £2000 (T25).
To see a list of the transaction types and tax codes that your software uses to calculate this value, click the figure in Box 1.
T20 and T24 transactions are included in this total.
4

Company tasks
Box 2 - VAT due in this period on EC acquisitions
This represents the VAT due this period on acquisition of goods from EC member states.
Box 3 - Total VAT due (sum of boxes 1 and 2)
This box displays the sum of the values calculated in Boxes 1 and 2. It represents the total VAT that you owe for this period.
Box 4 - VAT reclaimed in this period on purchases
This represents the amount of VAT that you can reclaim for purchases and other inputs. This includes the value calculated for EC acquisitions in Box 2.
Since the Flat Rate Accounting Scheme does not involve reclaiming VAT on purchases, this box is usually zero, unless you have made a single purchase of capital items, costing more than £2000 including VAT (T25).
However, T20 and T24 transactions are included in this total.
Box 5 - Net VAT to be paid to the tax authorities, or reclaimed by you
This is the difference between Box 3 and Box 4.
In the case of the Flat Rate Accounting Scheme, this is usually the total in Box 3, since Box 4 is usually zero.
Box 6 - Total value of sales, excluding VAT
The figure shown is the gross turnover - that is, including VAT.
The figure includes the gross turnover plus the value of any sale of assets, previously purchased as a capital item (T25 net amount), while using the Flat Rate Scheme.
To see a list of the transaction types and tax codes that your software uses to calculate this value, click the figure in Box 6.
T0, T1 (gross), T2, T4, T5 (gross), Sales Discount (SD), T20 and T22 net amounts are included in this total, along with T23 and T24 purchase net amounts.
Box 7 - Total value of purchases, excluding VAT
This represents the total value of all payments, excluding VAT. This includes all imports from both EC and non-EC countries. It also includes the value in Box 9.
This is usually zero unless you have made a single purchase of capital items, costing more than £2000, including VAT, and you are claiming the purchase tax in Box 4.
T7, T8, T20, T23 and T24 transactions are included in this total.
Box 8 - Total value of EC sales, excluding VAT
This represents the total value of all invoice receipts (T4) to EC member states, excluding VAT. In addition, it includes the net value of any sale of assets.
To see a list of the transaction types and tax codes that your software uses to calculate this value, click the figure in Box 8.
305

Sage 50 Accounts User Guide
30
Box 9 - Total value of EC purchases, excluding VAT
This represents the total value of all purchase payments to EC member states, excluding VAT.
To see a list of the transaction types and tax codes that your software uses to calculate this value, click the figure in Box 9. T7 and T8 transactions are included in this total.
The ROI VAT Return - Standard VAT Accounting Scheme
The Republic of Ireland VAT Return is made up of ten boxes, which represent the various VAT charges from all of the transactions that you have entered into Sage 50 Accounts.
T1 - VAT due in this period on sales
T1 is split into three sections:
Box 1:
VAT charged on supplies of goods and services within the ROI.
To see a list of the transaction types and tax codes that your software uses to calculate this value, click the figure in Box 1.
Box 2:
VAT due on purchases made within the EU (credits are deducted).
To see a list of the transaction types and tax codes that your software uses to calculate this value, click the figure in Box 2 t.
Box 3:
Total VAT on sales. This is the sum of Boxes 1 and 2.
6

Company tasks
T2 VAT reclaimed in this period on purchases
Box 4:
This represents the tax reclaimable on purchases and other inputs including acquisitions from the EU.
T3 Net Payable (Excess of T1 over T2)
Box 5:
This is calculated as the difference between Boxes 3 and 4. If the value in Box3 (T1) exceeds the amount in Box 4 (T2), the difference appears in Box 5. This value represents the total amount of VAT you owe to the tax authorities for this period.
Note: If the value in Box 4 (T2) exceeds the amount in Box 3 (T1), the value shown in Box 5 is zero and the difference appears in Box 6 to show the amount of VAT you can reclaim from the tax authorities for this period.
T4 Net Repayable (Excess of T2 over T1)
Box 6:
This is calculated as the difference between Boxes 3 and 4.
If the value in Box 4 (T2) exceeds the amount in Box 3 (T1), the difference appears in Box 6. This value represents the total amount of VAT that you can reclaim from the tax authorities for this period.
E1 Total Goods and Services TO other EU countries
Box 7:
This represents the total value of all sales of goods to other EU member states, excluding VAT.
To see a list of the transaction types and tax codes that your software uses to calculate this value, click the figure in Box 7.
E2 Total Goods and Services FROM other EU countries
Box 8:
This represents the total value of all purchases of goods from other EU member states, excluding VAT.
To see a list of the transaction types and tax codes that your software uses to calculate this value, click the figure in Box 8.
Total value of sales, excluding VAT
Box 9:
This is the total value of all sales excluding VAT. This includes export sales to all countries, both EU and non-EU.
To see a list of the transaction types and tax codes that your software uses to calculate this value, click the figure in Box 9.
307

Sage 50 Accounts User Guide
30
Total value of purchases, excluding VAT
Box 10:
This represents the total value of all purchases excluding VAT. This includes all imports from both EU and non-EU countries.
To see a list of the transaction types and tax codes that your software uses to calculate this value, click the figure in Box 10.
The ROI VAT Return - VAT Cash Accounting Scheme
The Republic of Ireland VAT Return is made up of ten boxes which represent the various VAT charges from all of the transactions that you have entered into Sage 50 Accounts.
T1 - VAT due in this period on sales
T1 is split into three sections:
Box 1:
VAT charged on money received for goods and services.
To see a list of the transaction types and tax codes that your software uses to calculate this value, click the figure in Box 1.
Box 2:
VAT charged on purchases made within the EU (credits are deducted).
To see a list of the transaction types and tax codes that your software uses to calculate this value, click the figure in Box 2.
8

Company tasks
Box 3:
Total VAT on sales. This is the sum of Boxes 1 and 2.
T2 VAT reclaimed in this period on purchases
Box 4:
This represents the tax reclaimable on purchases and other inputs including acquisitions from the EU.
To see a list of the transaction types and tax codes that your software uses to calculate this value, click the figure in Box 4.
T3 Net Payable (Excess of T1 over T2)
Box 5:
This is calculated as the difference between Boxes 3 and 4. If the value in Box3 (T1) exceeds the amount in Box 4 (T2), the difference appears in Box 5. This value represents the total amount of VAT you owe to the tax authorities for this period.
Note: If the value in Box 4 (T2) exceeds the amount in Box 3 (T1), the value shown in Box 5 is zero and the difference appears in Box 6 to show the amount of VAT you can reclaim from the tax authorities for this period.
T4 Net Repayable (Excess of T2 over T1)
Box 6:
This is calculated as the difference between Boxes 3 and 4.
If the value in Box 4 (T2) exceeds the amount in Box 3 (T1), the difference appears in Box 6. This value represents the total amount of VAT that you can reclaim from the tax authorities for this period.
E1 Total Goods and Services TO other EU countries
Box 7:
This represents the total value of all sales of goods to other EU member states, excluding VAT.
To see a list of the transaction types and tax codes that your software uses to calculate this value, click the figure in Box 7.
E2 Total Goods and Services FROM other EU countries
Box 8:
This represents the total value of all purchases of goods from other EU member states, excluding VAT.
To see a list of the transaction types and tax codes that your software uses to calculate this value, click the figure in Box 8.
309

Sage 50 Accounts User Guide
31
Total value of sales, excluding VAT
Box 9:
This is the total value of all sales excluding VAT. This includes export sales to all countries, both EU and non-EU.
To see a list of the transaction types and tax codes that your software uses to calculate this value, click the figure in Box 9.
Total value of purchases, excluding VAT
Box 10:
This represents the total value of all purchases excluding VAT. This includes all imports from both EU and non-EU countries.
To see a list of the transaction types and tax codes that your software uses to calculate this value, click the figure in Box 10.
Checking your VAT Return
You need to check your VAT Return to see if it is correct. If your VAT Return does not agree with the net closing balance of the VAT control accounts, it could be because you have entered a transaction with an incorrect date.
Note: If you are using VAT Cash Accounting or Flat Rate Accounting schemes, your VAT Return will not agree with the net closing balance of your VAT control accounts.
The procedure for checking your VAT Return is different, depending upon the VAT scheme you are running. Follow the procedure that applies to your VAT scheme.
Note: The balance of your VAT Return should agree with the balance of your VAT Control Accounts. If you make a manual adjustment to your Return, then these two balances will not agree. Your VAT control accounts should agree with the VAT Return before any manual adjustments are made.
To check your VAT Return using the Standard VAT scheme
1. Print your Detailed VAT report from the Print VAT Return window.
2. Select Company > Nominal Ledger, then click Reports.
3. From the Reports Browser window, select the Nominal Activity Reports folder, then print the Nominal Activity Report, using the date range of your VAT Return, and the nominal account range of your VAT on Sales and VAT on Purchases Control Accounts. By default this is 2200 to 2201 by default, if you haven't changed it.
4. Check that the balance in box 5 on your VAT Return agrees with the net closing balance of your VAT on Sales and VAT on Purchases Control Accounts.
If this does not agree, check the following:
0

Company tasks
Does either the VAT on Sales or VAT on Purchases control account total include a value for a tax code which is not included on your VAT Return? For example, by default T9 is not included on your VAT Return.
When you ran your VAT Return, did Sage 50 Accounts find any transactions which were outside of the date range but which had not yet been included on your VAT Return? If so, did you ask to include these transactions on this VAT Return? For example, this could happen if a transaction has been posted with an incorrect date.
After reconciling the last quarter’s VAT Return, did you post the clear down journals correctly - that is, using the correct date?
Have you posted VAT incorrectly?
If your answer to any of these questions is yes, this could be the discrepancy. Correct the discrepancy and then re-check your figures to see if your balances agree now.
5. If you still have a discrepancy, print the following reports and use these to help you to find the discrepancy:
Audit Trail Detailed Report. Items on the audit trail which are marked with an 'N' in the V (VAT) column are included when you calculate your VAT Return.
Items which are marked with an 'R' have already been included on your VAT Return and have been reconciled for VAT so these are not included in this VAT Return.
Items marked with a dash are not included in your VAT Return; for example, transactions which have been entered with a T9 tax code.
Customers Day Book Reports.
Suppliers Day Book Reports.
6. If you still have a discrepancy, print the Day Books for your Bank, Cash and Credit Card Receipts and Payments and use these reports to try to find the error.
7. If you still cannot find the discrepancy, print out the journal day books and use these to try and find the error.
To check your VAT Return using VAT Cash Accounting
1. Print your Detailed VAT report from the Print VAT Return window.
2. Select Company > Financials, then click Audit.
3. Print the Audit Trail Detailed report. Items on the audit trail, which are marked with an 'N' in the V (VAT) column are included when you calculate your VAT Return.
Items which are marked with an 'R' have already been included on your VAT Return, and have been reconciled for VAT so these are not included in this VAT Return.
4. Using the same date range as your VAT Return, print the following reports.
Nominal Ledger Day Book report.
311

Sage 50 Accounts User Guide
31
From the Bank Accounts window, click Reports. From the Report Browser window, open the Customer Reports folder > Customer Receipts Day Book report, and Supplier Reports folder > Supplier Payments Day Book report if you are using the UK VAT Cash Accounting scheme.
From the Report Browser window, print all of your payment and receipt Day Book reports.
If you are using the Irish VAT Cash Accounting scheme, from the Suppliers window, click Reports. From the Report Browser window, print your Day Book Reports > Supplier Invoices Day Book and Supplier Credits Day Book reports.
5. Use these reports to check that the totals on your VAT Return are correct.
To check your VAT Return using Flat Rate - Invoice Based Accounting
1. Print your Detailed VAT report from the Print VAT Return window.
2. Select Company > Nominal Ledger, then click Reports.
3. From the Reports Browser window, select the Nominal Activity Reports folder, then print the Nominal Activity Report, using the date range of your VAT Return, and the nominal account range of your VAT on Sales and VAT on Purchases Control Accounts. By default this is 2200 to 2201 by default, if you haven't changed it.
4. Using the same date range as your VAT Return, print the following reports.
Audit Trail Detailed Report. Items on the audit trail which are marked with an 'N' in the V (VAT) column are included when you calculate your VAT Return.
Items which are marked with an 'R' have already been included on your VAT Return and have been reconciled for VAT so these are not included in this VAT Return.
Items marked with a dash are not included in your VAT Return; for example, transactions which have been entered with a T9 tax code.
Flat Rate Customers Day Book Reports.
Flat Rate Suppliers Day Book Reports.
5. If you still have a discrepancy, print the Flat Rate Day Books for your Bank, Cash and Credit Card Receipts and Payments and use these reports to try to find the error.
If you still cannot find the discrepancy, print out the journal day books and use these to try and find the error.
To check your VAT Return using Flat Rate - Cash Based Accounting
1. Print your Detailed VAT report from the Print VAT Return window.
2. Select Company > Financials, then click Audit.
3. Print the Audit Trail Detailed report. Items on the audit trail, which are marked with an 'N' in the V (VAT) column are included when you calculate your VAT Return.
2

Company tasks
Items which are marked with an 'R' have already been included on your VAT Return, and have been reconciled for VAT so these are not included in this VAT Return.
4. Using the same date range as your VAT Return, print the following reports.
Flat Rate Nominal Ledger Day Book report.
From the Bank Accounts window, click Reports. From the Report Browser window, open the Customer Reports folder > Flat Rate Customer Receipts Day Book report, and Supplier Reports folder > Flat Rate Supplier Payments Day Book report.
From the Report Browser window, print all of your payment and receipt Flat Rate Day Book reports.
5. Use these reports to check that the totals on your VAT Return are correct.
To analyse the VAT Totals
1. From the Value Added Tax Return window, choose each of the Total boxes (1,2,4,6,7,8,9), in turn to analyse the VAT Totals.
2. As an example, choose Box 1.
The VAT Breakdown - VAT due on Sales list box appears. Each line of the list box shows, for each of the VAT codes (T/C) included in the total’s calculation, the total VAT value or the net value, depending on which total button you selected, accumulated by each type of transaction.
Any manual adjustments that have been made, which relate to the Total concerned are shown below the tax code list. The table will show the VAT values before and after the manual adjustments. The adjustment will be minus (-) signed if the adjustment reduced the total VAT figure.
You can print the information from this list box by printing the Summary VAT report from the VAT Return window.
3. You can see the individual transactions that make up these totals by double-clicking the total you require.
A VAT Breakdown - Transaction list box now appears, showing the individual VAT transactions that make up the transaction type total for the selected Tax Code.
Click the Print List button in this list box to obtain a detailed VAT breakdown.
4. To return to the VAT Breakdown list box, click Close.
5. To return to the Value Added Tax Return window, click Close.
313

Sage 50 Accounts User Guide
31
To make manual adjustments to the VAT totals
To make adjustments to a calculated VAT Return:
1. From the Value Added Tax Return window, click Adjustments.
The VAT Manual Adjustments window appears displaying the Calculated VAT totals.
Alongside the Calculated column there is an editable Adjustment column, in which you can enter manual adjustments for boxes 1, 2, 4, 6, 7, 8, and 9.
2. To open the VAT Manual Adjustments list box, click on the drill button in an adjustment cell of choice. You can also double click or use F3, if you prefer.
3. Enter a reason in the Reason cell for making the adjustment. To move to the Adjustment value cell, press TAB.
Note: You must enter a reason for adjustment in order to enter an amount.
4

Company tasks
4. Enter an Adjustment value. An adjustment can be positive or negative.
If necessary, add multiple adjustments, along with a reason for each. Sage 50 Accounts records the adjustment, along with the date, time and the originator.
Note: If an adjustment is entered for a period that corresponds to a Lock Date prohibited posting period, a warning message may appear.
5. When you are satisfied with the adjustments and explanations given, click Save to close the list box, then click Close in the VAT Manual Adjustments window to return to the Value Added Tax Return window.
Tip: In the Value Added Tax Return window, if you decide that you are not happy with the VAT calculations so far, and you would like to start the VAT Return calculation again, click Clear to clear all entries, including the adjustments.
6. To modify the adjustment you have just made, choose the Adjustment button again to edit.
Note: If you make an adjustment but then close the Return without Reconciling, the adjustment will not be saved.
The default Control Accounts nominal code for manual adjustments is 2204. If you encounter any difficulties with the nominal code for Manual Adjustments, refer to the Edit or View your Control Accounts help topic (F1).
To print the VAT Return reports
1. After producing your VAT Return, click Print from the Value Added Tax Return window.
The VAT Return Report window appears.
2. Select the type of report you require from, VAT Return, Summary, Detailed or Adjustments - where you have made manual adjustment to your VAT Totals.
315

Sage 50 Accounts User Guide
31
3. To indicate the type of output that you require, select the appropriate option button from Printer, Preview, File or Email.
4. To generate the report, click Run or to exit the Print VAT Report window without printing, click Cancel.
You can print the following reports:
VAT Return This gives you a printed copy of your software's VAT Return.
Summary This report shows an analysis of VAT by code with totals relating to the boxes on the VAT Return form.
Detailed This report prints in the same format as the Summary report, including a list of all transactions included in the VAT Return.
Adjustments Selecting the Adjustments report will provide you with a list of any Adjustments applied, if any have been made.
6

Company tasks
To reconcile and archive a VAT Return
1. From the Value Added Tax Return window, select Reconcile. When you reconcile, Sage 50 Accounts flags the VAT transactions that were included in the VAT Return with an R.
You can see whether or not a transaction has been flagged as reconciled by looking at the VAT column in the audit trail.
Transactions in the audit trail that have been reconciled with the VAT Return and with your bank statements can be removed from this report by the Period End function - Clear Audit Trail.
Once these transactions have been removed, they cannot be included in any future VAT Return calculations.
2. When you click Reconcile, the VAT Return is also archived in full. A confirmation message appears, prompting you to confirm whether or not to flag all the VAT transactions. To flag the transactions, click Yes.
A progress bar appears, while reconciliation is taking place.
The Reconciled and Archived VAT Return is then listed on the VAT Window list. It is listed with a Return Number (Rtn No.), the Period covered by the return, the amount, and a Status of Pending. This status denotes that the return has yet to be submitted.
Note: If for some reason, you do not select Reconcile but select Close instead, the software prompts you to confirm:
Do you want to reconcile this return?
This saves the return and marks the transactions as reconciled (?)
Reconcile / Don't Reconcile
Reconcile - marks the transactions as reconciled, saves and closes the return
Don't Reconcile - Closes the return without saving /marking the transactions as reconciled
3. If you are happy with the figures on the return, then it is generally recommended that you select Reconcile.
Archive locations
Customers in the Republic of IrelandThe VAT return is saved as an Irish Revenue XML VAT3 file, in a VAT3 sub-folder of the VATRtns main archive.
Windows XP
C:\Documents and Settings\All Users\Application Data\Sage\Accounts\2012\Company.000\VATRtns\<year>\VAT3
Vista, Windows 7
C:\ProgramData\Sage\Accounts\2012\Company.000\VATRtns\<year>\VAT3
317

Sage 50 Accounts User Guide
31
Those customers in the Republic of Ireland, who have previously archived Sage 50 Accounts VAT Return XML files, in a previous version of the software, for instance, will not have the corresponding Irish Revenue XML files for VAT3 submission.
In such instances, the archived file should be re-opened and then re-archived, in order to create the Irish Revenue XML file for VAT3 submission.
Handling late transactions
Sometimes you find that you receive an invoice from a supplier for a particular VAT period, after you have completed that return. Obviously, the software needs to pick up these transactions, when you run your next VAT Return.
On running the next VAT Return, the software not only checks for transactions in the current period, but will also tell you of transactions that have not been VAT reconciled from previous periods, for example late transactions. The software gives a warning message on running the VAT Return when this happens.
If we include these transactions, this will avoid the Control Account and VAT Return disagreeing because of late transactions.
Note: If the software warns of late transactions, under tax regulations you must print off a separate list of the late transactions.
Handling future transactions
Standard VAT Accounting and Flat Rate - Invoiced Based Schemes (UK)
You can enter future transactions and when you run the VAT Return they will not be picked up. However, these transactions are included on the balance of the Control Accounts, therefore causing a difference when reconciling the two.
To make sure that the difference is caused by the future dated transactions, run the Activity for the future period only.
Clearing your VAT control accounts
After you have reconciled your Sage 50 Accounts VAT Return, we recommend you transfer the values from your VAT on Sales and VAT on Purchases control accounts for the current VAT period to your VAT Liability nominal account.
Standard VAT Accounting and Flat Rate - Invoiced Based Schemes (UK)
We strongly recommend that when you are satisfied that the balance of the VAT control accounts are accurate, you make the accounts zero as at the end of the month or quarter. This way, it will always be zero at the beginning of the following month, so if you do make a mistake you will only have to check back through one month's transactions.
You can clear your VAT Control accounts in two ways. Firstly, by using the VAT Transfer Wizard; to start the wizard, select Modules > Wizards > VAT Transfer. Please refer to the Manage VAT >
8

Company tasks
Transfer your VAT Liability topics in the main software help file (F1) for full details on the VAT Liability Transfer Wizard. Secondly, by manually posting journals. Either process will achieve the same result.
For example:
If the balance on your VAT accounts are as follows:
2200 VAT in Sales 5000 Cr2201 VAT on Purchases 3500 Dr
The VAT Transfer Wizard would post the following journals (or you would do it manually):
2200 VAT on Sales 5000 Dr2202 VAT Liability Account 5000 Cr2201 VAT on Purchases 3500 Cr2202 VAT Liability Account 3500 Dr
The value you transfer to the VAT Liability account is cleared either when you make a payment to the tax authorities or when you receive a refund from them (see the notes in the following section).
Note: All the above transactions would be posted with the non-vatable tax code (T9 by default).
Flat Rate accounting scheme users only: You need to transfer the Sales and Purchase Tax to the VAT liability accounts as described above. To view the financial benefit/cost of using the scheme in the VAT Return window, relative to the Standard Accounting scheme, in the VAT return window with the VAT Return loaded, click Benefit/Cost.
If a Benefit value is shown, the Flat Rate Accounting is of benefit to you, relative to the comparable Standard Accounting Scheme or VAT Cash Accounting Scheme.
If a Cost value is shown, the Flat Rate Scheme is costing you and is of a disadvantage to you, relative to the comparable Standard Accounting Scheme or VAT Cash Accounting Scheme.
This financial benefit/cost is required to be posted as a profit / loss to the P&L.
Consequently, when you open the VAT Transfer wizard, you are presented with both the VAT Liability Account and Flat Rate - Benefit/Cost nominal accounts selection - 2202 and 4099 by default. On the subsequent windows of the wizard, the respective Sales Tax, Purchase Tax and Benefit/Cost amounts are automatically entered for you, as shown in your VAT Return and Benefit/Cost window.
Submission - sign up for a Government Gateway account
To use e-VAT submissions, you need to have a Government Gateway account. If you do not have a Government Gateway account, you can sign up for one at:
https://online.hmrc.gov.uk/registration
When you receive your User ID and Activation PIN, you must activate these within twenty eight days from the date shown on your Activation PIN letter. If you do not you will have to repeat the registration process. Your letter will explain how to activate your registration.
319

Sage 50 Accounts User Guide
32
You use your User ID and Activation PIN, when setting up e-Submissions preferences.
Making an e-VAT submission
During the setting of your VAT Preferences, you will have chosen whether or not to enable e-VAT Submission. If you have enabled e-VAT submission and entered all required e-VAT submission credentials, then this section does apply to you.
Note: Since 01 April 2010, newly registered businesses or businesses with a turnover in excess of £100,000 have been required to file their VAT returns online and pay electronically.
1. Open the Company module, then from the Tasks pane, click Manage VAT.
The VAT window appears.
2. Choose the VAT Return / EC Sales List required. To submit a VAT Return or Sales List, it must have a Status of Pending or Partial (ECSL only).
3. Highlight the VAT Return / EC Sales List from the VAT Window list and click Submit Return.
4. At this point, if any of your Company VAT Preferences e-Submission credentials has not been completed correctly, a Submission Incomplete list box appears, detailing error or omission.
5. If your Company VAT Preferences e-Submission credentials are satisfactory the Sage Internet Submissions wizard appears to guide you through your e-Submission.
The Sage Internet Submissions wizard
Window 1 - Important Notice
The Important Notice window indicates clearly that you are about to submit your VAT Return electronically to the Government Gateway. The submission process is irreversible and you are advised that penalty / prosecution could follow if false statements are made.
A Click Here link invites you to view the information relating to data captured by Sage during your submission process to HMRC.
Data Captured by Sage
This window lists the summary file data elements submitted to Sage (UK) Limited, when any e-Submission is made to HMRC using Sage software. The data is used for licence validation, troubleshooting problems and statistical analysis. No personal data is submitted to Sage.
When you are ready, click Continue.
0

Company tasks
Window 2 - Check your Details
Your VAT Preferences e-Submission credentials are displayed. These should based upon the information that you used, when setting up your Government Gateway account.
When you are satisfied that the credentials is correct, click Submit to send your information to HMRC.
Window 3 - Submitting
Your e-Submission progress is displayed in this window. Various messages may appear above the progress bar, signifying submission progress, delays, retries, all dependant upon submission activity to the Government Gateway.
When submission is complete, the Window 5 - Finished appears.
Window 4 - Finished
When a submission has been successfully completed, a successful submission reply is received from HMRC. The VAT window returns list Status column is updated from Pending to Submitted, against the specific Return submitted.
To view and print the details of the HMRC reply in Window 6 - Submission Succeeded, click the link.
Click Close to complete the e-Submission process.
Window 5 - Submission Succeeded
Details of the HMRC response are shown including Correlation ID, Submission Date/Time and the Message content.
The window also indicates where an encrypted version of the file is stored on your PC.
To complete the e-Submission process, click Close.
Window 6 - Submission Log (Unsuccessful Submission)
If the submission is unsuccessful, the HMRC response provides a tabulated listing of the Error Code assigned to the submission failure, the Location of the error step in the VAT XML declaration and a brief description of the error.
To view HMRC receipts
When you make a successful VAT Return / EC Sales List e-Submission to HMRC, the HMRC receipt is saved to your Sage Accounts program folder in a sub-folder. To view these receipts:
1. Open the Company module, then from the Tasks pane, click Manage VAT.
The VAT window appears
2. Highlight the VAT Return / EC Sales List required. To view a HMRC receipt, the selected VAT Return or Sales List must have a Status of Submitted.
3. Click the HMRC Receipts button on the VAT window toolbar. The HMRC receipt is then displayed as a PDF file.
321

Sage 50 Accounts User Guide
32
Where the submission is unsuccessful, the HMRC receipt provides a tabulated listing of the Error Code assigned to the submission failure, the Location of the error step in the VAT XML declaration a brief description of the error and the stored location of the HMRC Receipt file.
To make a VAT payment
Making an off-line VAT payment to HMRC
1. If you have to make a payment, select the specific VAT Return in the VAT window list and click the Payment button on the VAT window toolbar.
2. In the Bank Payments window that appears, many of the boxes will be pre-populated with the specific VAT Return information and the amount to pay. Complete the Bank Payments window entries and save the transaction.
3. Send the VAT Return form you completed, together with your payment, to the tax authorities. You should now record your payment from your software’s bank account.
If you need to reclaim VAT, send the VAT Return form you completed to the relevant tax authorities. When you receive this money, you will need to record it into the appropriate bank account within the Bank module.
Entering an online VAT payment to HMRC with e-Banking enabled
1. Open the Company module, then from the Tasks pane, click Manage VAT.
The VAT window appears.
2. In the VAT Tab of the Settings > Company Preferences window, ensure that the Enable e-VAT Submission check box is selected.
3. To enable e-Banking, from the Settings Menu choose Bank Defaults. The Bank Default window appears. Select the Enable e-Banking check box, then click OK.In addition, ensure that you have set up your electronic banking facility correctly.
4. Choose the VAT Return for which you want to make an online payment. The status of the return must be Submitted but Not Paid.
5. Click the Payment button on the VAT window toolbar.
The HMRC Payments window appears.
6. To set your HMRC Payment window settings for the various categories, press F1 on your keyboard to open the relevant help page and use the help notes provided.
2

Company tasks
7. Click Save once you are satisfied that all box entries are correct and complete. Sage 50 Accounts posts a bank payment with a T9 tax code to Financials. This appears in the Financials Window.
Making a VAT payment to HMRC using e-Banking
1. Open the Bank module.
2. From the Bank Accounts window, select the bank account you are using to pay HMRC, and then click e-Payments. The Send Payment window appears, displaying all outstanding supplier and HMRC payments for the selected bank account.
3. Highlight the HMRC payment(s) requiring payment then click Send. The Payment Confirmation From information box appears, displaying the number and value of payments to be made.
To view where the payment will be made, click Show Details.
4. To confirm the payments to be made, click OK. The information is transferred from Sage 50 Accounts to a file, ready for your bank software to use.
Sage e-Banking / UK Payment Account setting within the HMRC Payments Window
When you complete Step 4 above, the VAT window is updated and the VAT Return Paid box is shown as Y instead of N.
Sage e-Banking / Payment from NON-UK A/C setting within the HMRC Payments Window
Even if e-Banking has been enabled, you will not be able to post these HMRC transactions using e-Banking. Attempts to do so will generate a system message:
You have selected to make Payment to a NON –UK A/C. Please note than you will not be able to make this payment via the Sage e-Banking module. Please use another payment method to make this payment to HMRC.
323

Sage 50 Accounts User Guide
32
HMRC bank accounts
HMRC operates two bank accounts for receiving VAT payments - one for receiving payment from a UK bank account, and a second account for receiving VAT payments from a non-UK bank account. Details of these two accounts are as follows:
HMRC Bank Account for VAT Payment from UK Bank Accounts
Bank of England
Threadneedle Street
LONDON
EC2R 8AH
Sort Code: 08-32-00
Account No: 11963155
Account name: HMRC VAT
HMRC Bank Account for VAT Payment from NON- UK Bank Accounts
Bank of England
Threadneedle Street
LONDON
EC2R 8AH
IBAN Number: GB03BKEN10000052055000
BIC Code: BKENGB33
Account name: HMCE VAT
HMRC have now changed their bank account details for the VAT payment from UK bank accounts. These bank details are only used, when the user is paying their VAT liability to HMRC, using the Sage e-banking feature.
Whenever these details change, you can modify the Sort Code and Account Number in the HMRC Bank Details section of the VAT tab in your Company Preferences. For more information about this, please refer to the topic To configure your VAT preferences on page 139.
4

Company tasks
ROI - To generate a Return of Trading Details (RTD)
Important Note for ROI users upgrading from an existing Sage version: To use the Return of Trading Details feature, it is necessary to utilise the new ROI tax code structure, as detailed in The Tax Codes tab on page 105. Upgraded users will not have the additional Tax Codes created automatically. The Purchase for resale and the Non EC check boxes are unchecked by default and the tax rate is set as blank for all upgraded Tax Codes. A comment is added to the conversion log advising customers to review their Tax Codes after upgrade.
In the Republic of Ireland, all VAT registered traders are required to submit an annual return of trading details on a specific form: - RTD EUR. This form was introduced by the Revenue Commissioners as part of an administration simplification process.
The form is required to be completed, giving a breakdown of the supply of goods and services, imports and deductible inputs at the various tax rates that apply during the financial year. This includes all ROI, Intra-EU and overseas trade transactions.
At this time, the form is issued by the Collector General, and is pre-printed with a trader’s VAT number, the taxable period and the VAT rate in force during the year. It is possible that in the future, online submission of the annual return will become mandatory.
In this release of Sage 50 Accounts, a specifically designed RTD window has been provided for ROI users, to assist in their manual completion of the RTD EUR form.
To access this window, an RTD toolbar button has been added to the ROI user VAT Return window toolbar.
1. From the VAT window toolbar, click RTD.
325

Sage 50 Accounts User Guide
32
The Return of Trading Details window appears with your Company Name and VAT Registration Number already pre-populated.
The RTD window appearance is similar to the paper-based RTD EUR form and has the same values box structure.
You can transfer the totals information across to the RTD EUR paper form easily, without confusion.
The four columns of box values in the window are:
Value of Supplier Goods and Services
This column of boxes covers the value of goods & services supplied. The values are broken down by VAT rate and are included in the relevant rate box.
Value of Acquisitions from EU countries
This column of boxes covers the value of Intra EU acquisitions of goods (where VAT has not been charged) and imported parcels (where VAT has not been charged). The breakdown by VAT rate into the different boxes is based on the VAT rate applicable in Ireland to the goods acquired.
Value of stock for resale
This column of box values covers the value of all stock that has been purchased for resale. The breakdown by VAT rate into the different box values is based on the VAT rate applicable in Ireland to the goods.
6

Company tasks
Value of other deductible goods
This column of box values covers the value of goods purchased that are not to be resold but where VAT paid can be claimed as an input credit. The values are broken down by VAT rate and included in the relevant rate box. The breakdown by VAT rate into the different boxes is based on the VAT rate applicable in Ireland to the goods.
2. Enter the For the period / to dates, corresponding to the trading year being reported on.
3. Select Calculate.
Note: If you select a date that has already been reported on, a warning message appears advising you of this.
The software searches for all VAT reconciled transactions in the defined period, and produces appropriate totals for each value box in the RTD window.
All boxes in the Return of Trading Details window become populated with read only values.
4. To analyse any of the boxes except the grand total boxes at the bottom of the window, left-click on a selected box.
An Annual Return of Trading Details Transactions window appears giving a list breakdown of the selected box value.
5. To return to the Return of Trading Details window, select Close.
6. Review and assess all of the box totals. If required, to print off a copy of the calculated RTD, select Print.
7. Carefully copy each of the box totals on the Return of Trading Details window to the corresponding entry box on your RTD EUR paper form.
8. When you have copied all box totals required, to save your RTD form details, select Save.
327

Sage 50 Accounts User Guide
32
The Return of Trading Details window is cleared of information. To close the Return of Trading Details window, select Close.
Your saved RTD return is listed in the VAT window.
Any transaction included in an RTD Return is not flagged specifically, so you can run an RTD calculation for a period repeatedly if you wish. However, a software message does appear, advising that the RTD Return has already been run for the period.
9. To view an existing RTD return, select the RTD return from the VAT window list, then click View.
8

Company tasks
Tax codes making up each column box total on the RTD window
RTD box prefix Default tax codes included in box value
E3 T2
D4 T4 + T14 + T22 +T23
D1 T0 + T20
C5 N/A
AC5 T3
P1 T1 + T24
B5 N/A
E4 T5 + T6 + T15 + T16
D2 T7 + T17 + T19 + T21
C6 N/A
AC6 T25 + T26
P2 T8 + T18
B6 N/A
E5 T2 + T5 + T6
J1 T0 + T7 + T19
H5 N/A
AH5 T3 + T25
R1 T1 + T8
G5 N/A
E6 T12 + T15 + T16
J2 T10 + T17 + T20 + + T21 + T23
H6 N/A
AH6 T13 + T26
R2 T11 + T18 + T24
G6 N/A
329

Sage 50 Accounts User Guide
33
ECSL - VIES VAT changes from 01 January 2010
From 01 January 2010, the rules relating to EC Sales List VAT 101 reporting (VIES in the Republic of Ireland) will be changing.
The principal changes are:
EC Sales List submissions will include the sale of Services.
The submission will be a combined return for both Goods and Services.
Where the value of Goods supplied exceeds £70,000 per quarter, the combined Goods and Services submission will be made monthly.
To deal with these changes three new tax codes have been created to identify the sale and purchase of EC Services.
EC services tax codes T22 sales of Services to customers in EC - this is the Services equivalent of the T4 Sales
of EC Goods tax code.
T23 zero-rated purchases of Services from suppliers in EC - this is the Services equivalent of the T7 zero-rated purchases of EC Goods tax code.
T24 standard-rated purchases of Services from suppliers in EC - this is the Services equivalent of the T8 standard-rated purchases of EC Goods tax code.
If required - to generate an EC Sales List
If you are registered for VAT and supply Goods and / or Services to VAT registered customers in the EC, you need to submit an EC Sales List. The information provided on the EC Sales List is used in the UK and by other Member States to ensure that VAT has been correctly accounted for, on the sale of Goods and Services within the EC.
In the case of a multi-company environment, an EC Sales (ECSL) must be submitted for each company within the group.
If your supply of Goods and Services to the EC exceeds £70,000 in the last four quarters, you will need to make monthly EC Sales List submissions.
1. Select Modules > Company, then from the Tasks pane, click Manage VAT.
2. From the VAT window toolbar, click EC Sales.
The EC Sales List window appears. The company name, VAT Registration Number and Branch Identifier boxes are pre-populated with the information entered in the VAT Settings and Preferences set up stages.
3. Enter the Period from / to dates, and select the appropriate reporting Period Ref.
0

Company tasks
Note: Select your reporting period with care. Your Period from date is important in defining the quarter that you are reporting on - that is, selecting a February Period from date defines a February - April quarter, selecting an August Period from date defines an August - October quarter, and so on. You can select monthly or quarterly returns.
4. Select Calculate.
All relevant EC transactions during the defined period are listed.
Note: Included in these transactions are those where the customer registered address account is in the UK but delivery has been made to an EC delivery address.
Each customer is shown with the following details:
Customer's country code
VAT registration number
Total value of supplies - this is split for each VAT Registration Number into Sales Type - Goods or Services
A Period ref signifying the reporting period
A read-only pence (p) column signifying the pence setting in the value column
Indicator - 0 (business to business transaction for Goods), 2 (triangulation transaction) or 3 (business to business transaction for Services)
Submitted - in which the submitted status of each transaction is shown
Note: the submitted status may be Blank (Not Submitted), Successful (Submitted and Accepted by HMRC), Partial (Re submitted) or Rejected (Submitted and Rejected by HMRC).
5. Use the drill-down button, double-click or use F3 in the Value column boxes to display the EC Sales List - Transaction window to examine in detail, the transactions that make up the return.
The EC Sales Lists totals are the net amounts of SI minus SC transactions using the T4, T7, T8, T22, T23, T24 tax codes for the selected period. This is the same for customers on either standard VAT or VAT cash accounting.
6. If a transaction is triangulated select the Triangulated check box against that transaction. To save any changes to triangulation setting, click Save and then Close to return to the EC Sales List window.
7. If you are not satisfied with the list, click Clear.
8. When you are satisfied with the list details, click Save. Your new EC Sales List return is added to the VAT window list, with a status of Pending (not submitted).
Note: If for some reason, you do not select Save but select Close instead, the software prompts you to confirm:
331

Sage 50 Accounts User Guide
33
Do you want to save this return?
Yes / No / Cancel
Yes - Saves and Closes
No - Discards changes and closes return
Cancel - returns the user to the return
It is generally recommended that you select Save.
Note: The Pending (not submitted) status will only be visible if e-Submissions has been enabled in your Company Preferences - VAT Settings.
When you click Save, if your EC Sales List contains any transaction entries with a blank or incomplete boxes, the software will remove those customers from the list and displays a message advising of this.
Any submitted EC Sales List with blank customer VAT Registration Number entries present, will be rejected by HMRC.
It is recommended that you review your EC Sales List for any such incidence and resolve them before saving.
9. To print your ECSL return, click Print and then choose from the Report/Output print options offered. To generate your print-out, click Run.
Note: The EC Sales List groups customers by VAT Registration Number. This means that if you have two customers that are owned by the same parent company, and therefore, they have the same VAT Registration Number, their transactions will be grouped together on the EC Sales List, as a single entry.
10. To close the EC Sales List window, click Close.
What are Triangulation transactions?
In the trading context, Triangulation is the term used to describe a chain of intra-EC supplies of Goods and Services, involving three parties.
However, instead of the goods physically passing from one party to the other, they are delivered directly from the first to the last party in the chain.
For example:
2

Company tasks
A UK company receives an order from a customer in Germany. However, to fulfil the order the UK supplier has to the purchase the goods from their supplier that is based in France.
To save time and delivery costs, the goods are delivered from France to Germany but the invoice to the German customer is from the UK company.
As the goods do not enter the UK, an indicator (“2”) is placed on the EC Sales List to show that the sale was part of a triangulation transaction.
EC Sales Lists for Services
This topic summarises the imminent changes in the scope relating to EC Sales Lists reporting. For details on generating an EC Sales List, please refer to the To Generate
From 01 January 2010, the rules relating to EC Sales List VAT 101 reporting (VIES in the Republic of Ireland) will be changing.
The principal changes are:
EC Sales List submissions will include the sale of Services
The submission will be a combined return for both Goods and Services
Where the value of Goods supplied exceeds £70,000 for the last four quarters, the combined Goods and Services submission will be made monthly
To deal with these changes in Sage 50 Accounts, three new tax codes have been created to identify the sale and purchase of EC Services.
EC Services tax codes
T22 sales of Services to customers in EC - this is the Services equivalent of the T4 Sales of EC Goods tax code
T23 zero-rated purchases of Services from suppliers in EC - this is the Services equivalent of the T7 zero-rated purchases of EC Goods tax code
T24 standard-rated purchases of Services from suppliers in EC - this is the Services equivalent of the T8 standard-rated purchases of EC Goods tax code
The effect of the new tax codes on the UK VAT Return
The VAT Return Box Totals and Reports affected by these new tax codes are summarised in the tables below:
Sales
Tax Code
Affected VAT Return Box Totals
Standard VAT
VAT Cash Accounting
Flat Rate - Invoice Based
Flat Rate - Cash Based
T4 Box 6, Box 8 Invoice Invoice Invoice Invoice
333

Sage 50 Accounts User Guide
33
Purchases
Note: The inclusion of T24 standard rated purchases of services from suppliers in EC in the Box 1 and Box 6 totals, is to account for the notional VAT on both sides of the VAT ledger, so that the net VAT liability is zero.
The effect of the new tax codes on the Republic of Ireland VAT Return
The VAT Return Box Totals and Reports affected by these new tax codes are summarised in the tables below:
Sales
T22 Box 6 Invoice Invoice Invoice Invoice
Tax Code
Affected VAT Return Box Totals
Standard VAT
VAT Cash Accounting
Flat Rate - Invoice Based
Flat Rate - Cash Based
T7 Box 7, Box 9 Invoice Invoice Invoice Invoice
T8 Box 2, Box 4
Box 7, Box 9
Invoice Invoice Invoice Invoice
T23 Box 6, Box 7 Invoice Invoice Invoice Invoice
T24 Box 1, Box 4,
Box 6, Box 7
Invoice Invoice Invoice Invoice
Tax Code
Affected VAT Return Box Totals
Standard VAT VAT Cash Accounting
T4 Box E1, Box 9 Invoice Payment
T22 Box 9 Invoice Payment
Tax Code
Affected VAT Return Box Totals
Standard VAT
VAT Cash Accounting
Flat Rate - Invoice Based
Flat Rate - Cash Based
4

Company tasks
Purchases
Tax Code
Affected VAT Return Box Totals
Standard VAT VAT Cash Accounting
T7 Box E2, Box 10 Invoice Invoice
T8 Box 2, Box T2
Box E2, Box 10
Invoice Invoice
T23 Box 9, Box 10 Invoice Invoice
T24 Box 1, Box T2,
Box 9, Box 10
Invoice Invoice
335

Sage 50 Accounts User Guide
33
If required - ROI - to generate a VIES Return
1. Open the Company module, then from the Tasks pane, click Manage VAT.
The VAT window appears.
2. From the VAT window toolbar, click VIES Return.
The VIES Return window appears. The company name and VAT Registration Number are pre-populated with the information entered in the VAT Settings and Preferences set up stages.
3. Enter the Period from / to dates, and select the appropriate reporting Period Ref.
Note: Select your reporting period with care. Your Period from date is important in defining the quarter that you are reporting on - that is, selecting a February Period from date defines a February - April quarter, selecting an August Period from date defines an August - October quarter, and so on.
4. Select Calculate.
All relevant EC transactions during the defined period are now listed. Each customer is shown with the following details:
Country Code
VAT Registration Number
Value of supplies of Goods and Services - this is split for each VAT Registration Number into Sales Type - Goods or Services
A Period ref signifying the reporting period
Flag - the flag entry signifies the triangulation status of the transaction No Flag (business to business transaction for Goods), T (triangulation transaction) or S (business to business transaction for Services)
5. Use the drill button in the Value column boxes to display the VIES Return - Transaction window to examine in detail, the transactions that make up the return.
6. The VIES Return totals are the net amounts of SI (Sales Invoices) minus SC (Sales Credits) transactions using the T4 and T22 tax codes for the selected period. This is the same for customers on either standard VAT or VAT cash accounting.To save any changes to this window, click Save and then Close to return to the VIES Return window.
6

Company tasks
7. If you are not satisfied with the list, to remove the VIES Return details and recalculate, click Clear.
8. Finally, when you are satisfied with the list details, click Save. Your new VIES Return is added to the VAT window list.
Note: When you click Save, if your VIES Return contains any transaction entries with a blank or incomplete fields, Sage 50 Accounts removes those customers from the list and displays a message advising of this.
Any submitted VIES Return with blank customer VAT Registration Number entries present, will be rejected by Revenue On-Line Service.
It is recommended that you review your VIES Return for any such incidents and resolve them before saving.
Note: If for some reason, you do not select Save but select Close instead, the software prompts you to confirm:
Do you want to save this return?
Yes / No / Cancel
Yes - Saves and Closes
No - Discards changes and closes return
Cancel - returns the user to the return
It is generally recommended that you select Save.
9. To print your VIES return, click Print and then choose from the Report/Output print options offered. Finally, to generate your print-out, click Run.
10. To close the VIES Return window, click Close.
337

Sage 50 Accounts User Guide
33
If required - to generate a Reverse Charge Sales List (UK only)
If your business involves the sale of goods that are affected by the MTIC/Carousel Fraud Reverse Charge legislation, you need to generate and submit a Reverse Charge Sales List to HMRC.
Why is a Reverse Charge Sales List needed?
VAT carousel fraud, also known as Missing Trader Intra Community Fraud (MTIC), occurs when certain specified goods pass between traders into the United Kingdom, and then out again via EU countries, and on each occasion the goods are sold, the VAT is not paid to HMRC.
To combat this, HMRC introduced new legislation, from 1 June 2007. Under this legislation, if you are supplying any of the specified goods and the invoice value for the goods is greater than £5,000, then you will not charge or collect output tax.
Similarly, if you are purchasing more than £5,000 of the specified goods from a VAT-registered business, then you should not be charged VAT. However, you must account for the notional reverse charge VAT that is printed on the invoice.
In this way, you will report the notional output and input tax on the same VAT return. The aim of introducing this new reverse charge reporting is to minimise the exposure of HMRC to any tax loss.
In addition to recording the notional reverse charge, affected businesses will have to submit a Reverse Charge Sales List (RCSL) with each VAT return.
To generate a Reverse Charge Sales List
1. Select Modules > Company, then from the Tasks pane, click Manage VAT.
2. From the VAT window toolbar, click Reverse Charge.
The Reverse Charge Sales List window appears. The company name, VAT Registration Number and Branch Identifier boxes are pre-populated with the information entered in the VAT Settings and Preferences set up stages.
3. Proceed to enter the For the period / to dates, for up to a 12 month period) and then click Calculate.
After a moment, the Reverse Charge Sales List window is updated, showing total reverse charge-related sales for each monthly period, defined by the date range entered.
8

Company tasks
4. To view the detailed transaction history for any of the totals shown, click the cell drill-down button, double-click or use F3 to display the Reverse Charge Sales List - Transaction list box for that period.
5. If you are not satisfied with the list, to remove the return details and recalculate, click Clear.
6. When you are satisfied with the list details, click Save. Your new Reverse Charge Sales List return is added to the VAT window list, with a status of N/A.
Note: The Status N/A indication will only be visible if e-Submissions has been enabled in your Company Preferences - VAT Settings.
Note: If for some reason, you do not select Save but select Close instead, the software prompts you to confirm:
Do you want to save this return?
Yes / No / Cancel
Yes - Saves and Closes
No - Discards changes and closes return
Cancel - returns the user to the return
It is generally recommended that you select Save.
When you click Save, if your Reverse Charge Sales List contains any transaction entries with a blank or incomplete boxes, the software will display a warning message advising that any submitted Reverse Charge Sales List with blank customer VAT Registration Number entries present, will be rejected by HMRC.
It is recommended that you review your Reverse Charge Sales List for any such incidence and resolve them before saving.
If the Save process is successful, your Reverse Charge Sales List appears in the VAT Return list and is also saved as a csv file. An information message appears with the Save location of the csv file.
7. To print your Reverse Charge Sales List return, click Print and then choose from the Report/Output print options offered. Finally, to generate your print-out, click Run.
Note: The Reverse Charge Sales List groups customers by VAT Registration Number. This means that if you have two customers that are owned by the same parent company, and therefore, they have the same VAT Registration Number, their transactions will be grouped together on the Reverse Charge Sales List, as a single entry.
8. Finally, to close the Reverse Charge Sales List window, click Close.
Note: You can choose which VAT tax code to use for Reverse Charge Transactions. By default it is set to T20. In addition, you can nominate the theoretical VAT rate to apply to both the Sales Invoice/Purchase Order-related elements in order to balance the reverse charge transaction.
339

Sage 50 Accounts User Guide
34
For more information about how to change these codes, please refer to Add or Edit a VAT Rate in the main software help file (F1).
View the RCSL transaction breakdown
1. When you calculate your Reverse Charge Sales List for the period defined, any totals for the month periods are displayed with a drill-down button, adjacent to the total.
2. Click the drill-down button. The Reverse Charge Sales List - Transactions window appears, providing a full breakdown of the monthly total.
3. Review the transaction breakdown for customer account reference, product details, and Invoice number reference.
To view a previous VAT Return
1. Open the Company module, then from the Tasks pane, click Manage VAT, then choose a Return from the VAT window.
2. Click View.
The Value Added Tax Return window appears with the full VAT breakdown for the period. The return is displayed as Read Only, and can be printed, submitted online, drilled-down into and closed but with all other options inactive.
Note: If you have upgraded from a previous version, then those VAT returns that you have saved in that version will not be visible in the VAT window. To view these, select File Menu > Open > VAT Archive.
0

Company tasks
VAT audit reports
Sage 50 Accounts includes a full suite of reports to help you to prepare for a visit from your VAT office and a tax inspection.
VAT audit reports required for a VAT inspection using Standard VAT Accounting
If you are using the Standard VAT scheme, the reports that you will require for a VAT tax inspection are:
The Nominal Activity report - this details the transaction histories for the Sales and Purchase Tax Control Accounts
Day Book Reports from each ledger for the current trading period, including:
Day Books: Nominal Ledger
Day Books: Customer Invoices (Detailed)
Day Books: Customer Credits (Detailed)
Day Books: Supplier Invoices (Detailed)
Day Books: Supplier Credits (Detailed)
Day Books: Bank Payments (Detailed)
Day Books: Cash Payments (Detailed)
Day Books: Credit Card Payments (Detailed)
Day Books: Bank Receipts (Detailed)
Day Books: Cash Receipts (Detailed)
Day Books: Credit Card Receipts (Detailed)
VAT audit reports required for a VAT inspection using the VAT Cash Accounting Scheme
If you are using a VAT Cash Accounting scheme, the reports that you will require for a VAT tax inspection are:
The Day Book Reports from each ledger for the current trading period, including
Day Books: Nominal Ledger
Day Books: Customer Receipts (Detailed)
Day Books: Supplier Payments (Detailed) (for users operating on the UK VAT Cash Accounting scheme)
Day Books: Bank Payments (Detailed)
Day Books: Cash Payments (Detailed)
Day Books: Credit Card Payments (Detailed)
341

Sage 50 Accounts User Guide
34
Day Books: Bank Receipts (Detailed), Day Books: Cash Receipts (Detailed)
Day Books: Credit Card Receipts (Detailed)
If you are based in the Republic of Ireland and using the Irish VAT Cash Accounting scheme, you will also need the Day Books: Supplier Invoices (Detailed) and Day Books: Supplier Credits (Detailed) reports.
VAT audit reports required for a VAT inspection using Flat Rate - Invoice Based Accounting
If you are using the Flat Rate - Invoice Based VAT scheme, the reports that you will require for a VAT tax inspection are:
The Nominal Activity report - this details the transaction histories for the Sales Tax Control Account
Day Book Reports from each ledger for the current trading period, including:
Day Books: Nominal Ledger
Day Books: Customer Invoices (Detailed)
Day Books: Customer Credits (Detailed)
Day Books: Bank Receipts (Detailed)
Day Books: Cash Receipts (Detailed)
Day Books: Credit Card Receipts (Detailed)
VAT audit reports required for a VAT inspection using the Flat Rate - Cash Based Accounting Scheme
If you are using the Flat Rate - Cash Based VAT scheme, the reports that you will require for a VAT tax inspection are:
The Day Book Reports from each ledger for the current trading period, including
Day Books: Nominal Ledger
Day Books: Customer Receipts (Detailed)
Day Books: Bank Receipts (Detailed), Day Books: Cash Receipts (Detailed)
Day Books: Credit Card Receipts (Detailed)
2

Company tasks
Carrying out your Month End
At the end of each month you should run the Month End procedure. This lets you see how your business has performed over the last month. It also lets you prepare your Sage 50 Accounts data for the next accounting month.
Month End check list
Follow these steps to run your Month End.
Change your program date to the Month End date. For further information about how to do this, refer to Changing the program date on page 73.
Ensure that you have posted all of your transactions for the current month.
Accounts Professional only: If you are using foreign currency bank accounts, you should make sure that you have posted your bank revaluation journals. This is to ensure that your balance sheet is a true reflection of the value of your foreign currency. To do this, select Modules > Wizards > Foreign Bank Revaluation Wizard, and then follow the instructions displayed on screen.
Process your recurring entries. For further information about how to do this, refer to Creating and processing recurring transactions on page 434.
Accounts Professional and Accounts Plus only: Set up any new prepayments and/or accruals. For further information about how to do this, refer to Prepayments on page 258.
Accounts Professional and Accounts Plus only: Set up any new fixed assets depreciation. For further information about how to do this, refer to Working with fixed assets on page 273.
(Optional) Reconcile all of your bank accounts. For further information about how to do this refer to Reconciling your bank account on page 424.
(Optional) Post your opening and closing stock, for your profit and loss and balance sheet reports. For more information, see Posting opening and closing stock on page 350.
Back up your data and label it as Before Month End (Month & Year). For further information about how to do this, refer to Backing up your data on page 366.
Run the Month End procedure. For further information about how to do this, refer to Lock date setting on page 347.
Note: Double check that you have changed the program date to the Month End date. If you have not changed it and you carry out this step your accounts will be incorrect.
343

Sage 50 Accounts User Guide
34
Back up your data and label it as After Month End (Month & Year). For further information about how to do this, refer to Backing up your data on page 366.
(Optional) Remove your stock transactions.Note for Accounts Professional and Accounts Plus users: Before clearing your stock transactions, ensure that you have printed your Product Activity, Product Profit and Product Valuation reports. Do not print these reports after clearing stock transactions, otherwise you will bring in the deleted transactions.For further information about this, refer to Clearing your stock transactions on page 357.
(Optional) Remove all fully paid and reconciled transactions from the audit trail. It is important to stress that Clear Audit Trail is only an optional task, and unless you are certain that you no longer need transactional information up to a specific date, you should not clear the audit trail.For example, would you ever need to query a customer or supplier activity? If so, how far back would this go? You should consider this before clearing the audit trail. For further information about how to do this, refer to Clearing the Audit Trail on page 384.
If you have cleared your stock transactions and audit trail, back up your data and label it as After Month End - after clear transactions (Month & Year).
(Optional) Set your Lock Date, so that users can only post transactions from a date after the Month End that you have just completed.
For further guidance and assistance on performing your month end:
1. Open your Company module.
2. From the Tasks pane, select Manage Month End.
4

Company tasks
The Month End Guide appears, which takes you through the procedure step by step, with links to specific software functions.
345

Sage 50 Accounts User Guide
34
Changing the program date
One of the strengths of Sage 50 Accounts is that you can change the program date, for example the day's date that you want to use to record your transactions.
Important Note: This is not your financial year start date.
This means that you don't have to run your Month End on the exact Month End date. This is the same with your Year End. Because you may have to wait for certain invoices or bills to come in before you can run a period end procedure, You can change your program date to whatever date you choose.
When you have finished, you can use Change Program Date to reset the date to today's date.
Note: The date will automatically set itself to the correct date when you restart the software.
You can change the program date by selecting Settings > Change Program Date. The Change Program Date box (see below), appears. Here you can enter the date that you need to run your month end.
Lock date setting
When you have performed certain critical tasks that require management reporting, for example your Year End, you may not want other others adding transactions to a period that may have already been reported on.
Sage 50 Accounts provides you with a Lock date setting feature, whereby you can prevent users from posting transactions to a period before a defined date.
To set your Lock date
1. Select Settings > Lock Date.
Note: This menu item appears if you already have access rights to Period End functions in the software.
6

Company tasks
The Lock Settings window appears.
2. To make the Date entry box active, select the Lock posting before check box.
The Date Entry box becomes active.
3. Select the Calendar button.
4. Use the Calendar utility to select that date, from which financial postings are allowed.
5. To save the information, click OK.
Once this setting has been made, financial postings will not be allowed before the date set, unless you have access rights to Lock Date. Users with such access rights are able to post before the Lock Date.
Warning messages
If a user attempts to post (save) a financial transaction, where the posting date is before the date set, a software warning message appears with the following options:
If the user does not have access rights to Lock Date they are informed that they are attempting to post to a prohibited date. They will not able to proceed with the posting.
If the user does have access rights to Lock Date they are informed that they are attempting to post to a prohibited date. They are able to override the message and continue posting the transaction.
Note: If the posting date is prohibited and also outside the current financial year, only the Lock Date message appears.
347

Sage 50 Accounts User Guide
34
A late entry transaction report is available, which details those transactions that have been allowed to be posted prior to the Lock date. This report is available from Company > Financials > Reports > Transaction Reports > Late Entry Transactions.
Running the Month End
Use the Month End process to clear down the month to date turnover figures on all of your customer and supplier records. If you are using Accounts Plus or Accounts Professional you can also use the Month End to process your prepayments, accruals and depreciation values.
You can post transactions for the next accounting period before closing the current month. Any transactions with a date that is in a future period will be put in the relevant monthly total on the nominal record. After completing the Month End, you can also post transactions for any previous accounting period, and the correct period total will be updated in the nominal record.
To run the Month End
1. Select Tools > Period End > Month End.
The Month End window appears.
2. Use the following check boxes to indicate which Month End postings you want to make.
Clear Turnover Figures
Select this check box to set your month to date turnover figures to zero on each customer and supplier record window.
8

Company tasks
Post Prepayments - Accounts Plus and Accounts Professional only
If you have set up any prepayments, select this check box to post them.
Post Accruals - Accounts Plus and Accounts Professional only
If you have set up any accruals, select this check box to post them.
Post Depreciation - Accounts Plus and Accounts Professional only
If you have set up any fixed assets, select this check box to post the monthly depreciation values for each of your fixed assets.
3. If you have previously activated and set your Lock Date (Settings > Lock Date), you will see a Disable posting before date entry box in the Month End window, with your previously selected date displayed.
You can, if you choose, modify this date now.
4. To proceed with your Month End, click OK.
A Confirmation message appears.
5. Click Yes to complete your Month End procedure.
You have now completed the month-end procedure.
Posting opening and closing stock
Sage 50 Accounts includes a wizard to help you post your opening and closing stock figures. To run the wizard, select Modules > Wizards > Open Closing Stock Wizard.
You can also do it manually. If you want to post your opening and closing stock journals manually, select Company > New Journal and follow the guidelines below.
When you calculate your gross profit it is very important to use your cost of sales figure and not your purchases. Consider the following example:
Your company buys stock for £10,000 therefore your purchases are £10,000.
Your company then sells half of its stock for £10,000 therefore your sales are £10,000.
If your gross profit was calculated as sales less purchases then your company would appear to have made no profit at all even though you still have £5,000 worth of stock left. Therefore, the cost of sales needs to be calculated to give the true profit.
The cost of the sales value can be calculated using the following formula.
COST OF SALES = OPENING STOCK plus PURCHASES less CLOSING STOCK
Sage 50 Accounts will automatically calculate your cost of sales for you and then produce accurate net and gross profits if you enter the following journal entries.
349

Sage 50 Accounts User Guide
35
To prepare to enter your opening and closing stock values
1. Check that your Nominal Ledger Chart of Accounts includes:
Note: These nominal accounts are automatically included in Sage 50 Accounts' default Chart of Accounts.
2. Find out your opening stock balance in your 1001 Stock account.
To enter the stock values for month oneNote: You would complete this step when you run your first Month End.
1. In the first month of your financial year, clear the stock figure in the 1001 Stock account and transfer it to the 5200 Opening stock account by posting the following journal entry.
Note: If you are just beginning to trade and have no stock at the beginning of the financial year go to step 2.
CREDIT the 1001 Stock account with the full value of your opening stock at the start of the financial year.
DEBIT the 5200 Opening Stock account with the full value of your opening stock at the start of the financial year.
2. At the end of the first month, enter your closing stock value for the month by posting the following journal entry.
Important Note: It is very important that the date you enter is within the first month.
CREDIT the 5201 Closing stock with the closing stock value.
DEBIT the 1001 Stock account with the closing stock value.
To enter the stock values for month twoNote: You would complete this step the second time you run a Month End.
1. At the beginning of month two, clear the values in the Closing stock and Stock account by posting the following journal entry.
Important Note: It is very important that the date you enter is within the second month.
CREDIT the 1001 Stock account with the previous closing stock value.
DEBIT the 5201 Closing stock account with the previous closing stock value.
1001 Stock Balance Sheet
5200 Opening Stock Profit & Loss
5201 Closing Stock Profit & Loss
0

Company tasks
2. At the end of this month, enter the new closing stock value for the month by posting the following journal entry.
CREDIT the 5201 Closing stock account with the new closing stock value.
DEBIT the 1001 Stock account with the new closing stock value.
Important Note: It is essential that the journal entries in steps 1 and 2 are posted within the same month.
To enter the stock values for month threeNote: You would complete this step the third time you run a Month End.
1. At the beginning of month three, clear the values in the Closing stock and Stock account by posting the following journal entry.
Note: It is very important that the date you enter is within the third month.
CREDIT the 1001 Stock account with the previous closing stock value.
DEBIT the 5201 Closing stock account with the previous closing stock value.
2. At the end of this month, enter the new closing stock value for the month by posting the following journal entry.
CREDIT the 5201 Closing stock account with the new closing stock value.
DEBIT the 1001 Stock account with the new closing stock value.
Note: It is essential that the journal entries in steps 1 and 2 are posted within the same month.
To enter the stock values for subsequent monthsNote: You would complete this step for the other Month End routines you run.
1. At the start of each month you must clear the values in the Closing stock and Stock accounts.
2. At the end of each month you must enter the new closing stock for the month in the Closing stock account and Stock account.
Note: The dates for posting the journal entries for steps 1 and 2 must be within the same month to enable correct monthly profit and loss accounts to be calculated.
You are now able to produce profit and loss accounts which show the true profit or loss for the month and year to date.
The following example shows three months trading. The example cost of sales figures appear in the month to date column of the profit and loss account.
At the beginning of the financial year the stock was valued at £1000.
351

Sage 50 Accounts User Guide
35
Month 1
Post the following journal entry:
At the end of the first month the closing stock value was £4000. Post the following journal entry:
The purchases for the first month were £10,000. The cost of sales can then be calculated.
The opening stock figure is taken from the Opening stock account 5200. The closing stock figure is taken from the Closing stock account 5201.
COST OF SALES = OPENING STOCK plus PURCHASES less CLOSING STOCK
COST OF SALES = 1000 + 10,000 - 4000
Therefore cost of sales is equal to £7000.
Month 2
At the beginning of month two post the following journal entry to clear the closing stock value from month one:
At the end of month two post the following journal entry to enter the closing stock value:
N/C Name T/C Debit Credit
1001 Stock T9 1000
5200 Opening Stock T9 1000
N/C Name T/C Debit Credit
1001 Stock T9 4000
5201 Closing Stock T9 4000
N/C Name T/C Debit Credit
1001 Stock T9 4000
5201 Closing Stock T9 4000
N/C Name T/C Debit Credit
5201 Closing Stock T9 10000
1001 Stock T9 10000
2

Company tasks
The purchases for the second month were £20,000. The cost of sales can then be calculated.
For the second and subsequent months the opening stock figure is taken as the value of the 5201 Closing stock account debit, therefore equal to £4000 for month two. The closing stock figure is taken as the 5201 Closing stock account credit, £10,000 for month two.
COST OF SALES = OPENING STOCK + PURCHASES - CLOSING STOCK
COST OF SALES = 4000 + 20,000 - 10,000
Therefore cost of sales is equal to £14,000.
Month 3
At the beginning of month three post the following journal entry to clear the closing stock value from month two:
At the end of month three post the following journal entry to enter the closing stock value for month three:
The purchases for the third month were £35,000. The cost of sales can then be calculated as follows.
COST OF SALES = OPENING STOCK + PURCHASES - CLOSING STOCK COST OF SALES = 10,000 + 35,000 - 6000
Therefore the cost of sales is equal to £39,000.
N/C Name T/C Debit Credit
1001 Stock T9 10000
5201 Closing Stock T9 10000
N/C Name T/C Debit Credit
1001 Stock T9 6000
5201 Closing Stock
T9 6000
353

Sage 50 Accounts User Guide
35
Posting monthly accruals
If you are expecting an invoice from one of your suppliers - a purchase invoice but you have not received it before you are ready to perform the Month End procedure, you can accrue the value of this invoice so that it appears in your Profit and Loss Account and Balance Sheet.
This means that these reports will be accurate for the month you are completing. After you have completed your Month End and when you receive the invoice in the next month, you can then reverse the accrual and post the invoice correctly.
Use journal entries to post your monthly accruals, and make sure you enter the correct date and values, and nominal codes if you are not using the defaults, each time.
To post your monthly accruals using journal entries
1. Select Company > New Journal.
The Nominal Ledger Journals window appears.
2. Enter the correct date for your accrual, for example the date that should appear on your purchase invoice.
3. Enter the following details for your journal entry in the boxes provided.
4. When you are sure that you have entered the correct date and figures, click Save.
You have posted your monthly accruals and can now complete your Month End.
After you have completed your Month End procedures and have received the purchase invoice in the next month, you should then reverse the accrual and post the invoice correctly.
To reverse your monthly accruals and post your invoice correctly - Accounts Plus and Accounts Professional onlyNote for Accounts users: To reverse your monthly accruals and post your invoice correctly, you will have to manually reverse the journal. To do this repeat steps one to four from the preceding section and reverse the debit and credit postings in step three, for example where you posted a debit, post a credit and vice versa. After you have done this go to step 8 in this section.
1. Select Company > Nominal Ledger.
N/C Name Details T/C Debit Credit
5000 Purchases Monthly Accrual T9 Debit
2109 Accruals Monthly Accrual T9 Credit
4

Company tasks
2. Click Reversals.
You are prompted to print your Nominal Ledger Day Book report and to make a backup of your data. We recommend you follow this advice, so that you have a copy of your original data before you process the reversal.
To print the Nominal Ledger Day Book, click Print Now and select the range and output you want to use for your Day Book from the Criteria window. After you have selected the range and output to use for your Day Book report, you are returned to the Nominal Reversals window.
3. To back up your data, click Backup Now and complete the backup procedure.
When you have completed your backup, click OK to continue.
The Transaction Range window appears.
4. Specify the transactions you want to display, by entering a transaction number range or date range in the boxes provided.
5. To continue with the reversal procedure, click OK.
If matching transactions are found, the Nominal Reversals window appears listing the matches. If no matches are found, a message appears informing you of this.
6. Highlight the items that you want to reverse, and then click Reverse.
Note: The total debit and total credit amounts must be equal.
If the selected items balance, a confirmation window appears, showing the transactions you have selected to reverse. You cannot change the information shown here.
7. If the information shown is correct and you are sure that you want to reverse this journal, click Save.
If the information is incorrect, click Cancel to return to the Nominal Reversals window.
The reversal journals are posted to the audit trail with the original journal transaction date, a reference of REVERSE and details of Reversal of Original Transaction Number.
You have now reversed your monthly accruals and can now post your purchase invoice correctly. To do this, continue with the steps below.
8. Select Suppliers > Batch Invoice.
9. For each invoice item (or whole invoice), enter the following details one line at a time.
A/C Enter the account code of the supplier you have received the invoice from here.
Date Enter the date that appears on your purchase invoice here.
355

Sage 50 Accounts User Guide
35
10. To accept your entries, click Save. The details are 'posted' instantly to update the Nominal Ledger and the relevant supplier's details.
11. To exit the Batch Supplier Invoices window and return to the Suppliers window, click Close.
Clearing your stock transactions
The Clear Stock function can be run as part of the Month End and Year End routines. It is a way of clearing down transactions from your Product Activity prior to a specified date. This way you can decide how long you keep individual transactions on your system.
Accounts Plus and Accounts Professional only: Before you run the Clear Stock function, you should print your Product Valuation and Product Activity reports. The Retrospective Product Valuation report may not show the correct valuation after running the Clear Stock function.
Note: When you clear your stock, the individual transactions are removed from each product record leaving any adjustments in (AI) and movements in (MI) which are brought forward in full as opening balances, showing the quantity used.
To clear your stock
1. Make sure you have at least one backup of your data before running the Clear Stock function. For more information, see Backing up your data on page 366.
2. From the Sage 50 Accounts menu bar, select Tools > Period End > Clear Stock.
A warning message appears.
3. To continue, click Yes.
Ref You can enter a reference for your invoice if you want to.
Ex Ref You can enter an additional reference here.
N/C Enter the nominal code you want to post this invoice to, for example, the Purchases nominal code.
Dept Enter a department code here if you want to assign the transaction to a department for analysis purposes.
Details Enter the details of the purchase invoice here.
Net Enter the net amount of the invoice here.
T/C Enter the tax code for your invoice.
VAT The VAT amount is calculated automatically for you and entered here.
6

Company tasks
The Clear Stock window appears.
4. In the Date box, enter the date up to which transactions are to be cleared.
5. To clear the stock, click OK.
Printing your product reports
Accounts Plus and Accounts ProfessionalYou should print out the following reports:
1. From the Products window, select the products you wish to report on.
2. Click Reports.
The Report Browser window appears, listing all available product report folders, and their respective reports.
3. Double-click the folder for the type of report that you want to run, for example Product Budget Reports.
The selected folder opens to display the available reports.
4. Click on the report you want to run.
Product Activity (PRDHIST.report) This shows the product's detailed history.
Product Profit (PRDPROF.report) - Accounts Plus and Accounts Professional only
This shows if your products have sold at a profit.
Product Valuation (PRDVALUE.report) - Accounts Plus and Accounts Professional only
This shows how much your stock is worth.
357

Sage 50 Accounts User Guide
35
5. From the Report Browser toolbar, click Edit, Print, Preview, or File or Email, as required.
6. Depending on which report you selected, the Criteria window may appear. This includes only those criteria that are appropriate to the report selected.
To accept the criteria details and run the report, click OK.
If you want to add the report to your Favourites, select the report, then click Add Favourite.
The report Favourites status is then signified in the list by blue text.
Repeat this procedure for the other Product Reports.
Clearing the Audit Trail
Clearing the audit trail removes fully paid and fully reconciled transactions from your audit trail up to a date that you choose. This means that you have fewer transactions to work with, which makes tasks such as printing reports and taking backups quicker.
For full details about clearing your audit trail, see Clearing the Audit Trail on page 384.
Handling late entries
On occasions, purchase invoices are received after you have completed your Month End procedures in Sage 50 Accounts. These transactions are called late entries.
There are two ways you can deal with these late entry transactions.
If you know the values of these invoices and you have not finalised your Profit and Loss, Balance Sheet and VAT Return for the month, you can accrue the values to process later. When you receive the invoice next month, you can reverse the accrual and post the invoice correctly. For more information, see Posting monthly accruals on page 355.
If you have finalised your Profit and Loss, Balance Sheet and VAT Return and then subsequently receive an invoice, post this invoice as a late entry. For further information about how to do this, refer to the next section.
We would strongly recommend that the tax point date is unchanged when posting the late invoice, otherwise you may have difficulty reconciling your VAT Return with your local tax office.
Note: As a result of posting late entry journals, you may find that your retrospective aged reports may not reconcile with the figures on your Creditors Control account.
8

Company tasks
Posting late entries
If you have already completed your Month End procedures and finalised your Profit and Loss, Balance Sheet and VAT Return for the month, then subsequently receive an invoice, you need to post this transaction as a late entry. Posting a transaction as a late entry consists of:
1. Posting the purchase invoice using the correct tax point date, for example the same date that appears on the original purchase invoice.
2. Posting a journal entry to remove the late purchase invoice value from last month’s accounts.
3. Posting a journal entry for the value of the purchase invoice using a date in your current month. This means the value of this invoice is recorded in your current month's financial reports.
To post your purchase invoice
1. Select Suppliers > Batch Invoice.
The Batch Supplier Invoices window appears.
2. For each invoice item or whole invoice, fill in the details.
3. To accept your entries click Save. The details are posted instantly to update the Nominal Ledger and the relevant supplier's details.
4. To exit the Batch Supplier Invoices window and return to the Suppliers window, click Close.
You have now posted the late purchase invoice you have received. You should now post a journal entry to remove the value of this purchase invoice from last month's accounts.
To post a journal entry to remove the late purchase invoice value from last month's accounts
1. Select Company > New Journal.
The Nominal Ledger Journals window appears.
2. Enter the correct date, for example enter the same date you used when you posted the late purchase invoice.
3. Enter the following details similar to the following example:
N/C Name Details T/C Debit Credit
5000 Purchases Late Invoice T9 Credit
2201 Purchases Tax Control Late Invoice T9 Credit
2100 Creditors Control Late Invoice T9 Debit
359

Sage 50 Accounts User Guide
36
4. When you are sure you have entered the correct date and figures click Save.
You have now posted the late entry adjustment to remove the value of the late purchase invoice from your previous month's accounts, for example the month you have just completed. You should now post a journal entry to record this value in your current month's account.
To post a journal entry to record the value of the late purchase invoice into your current month's accounts
1. Select Company > New Journal.
The Nominal Ledger Journals window appears.
2. Enter the correct date, for example enter a date in your current month.
3. Enter the details similar to the following example.
4. When you are sure you have entered the correct date and figures, click Save.
You have now recorded the value of the late purchase invoice in your current month's accounts. The next time you run your financial reports for your current month, this value will be included.
N/C Name Details T/C Debit Credit
5000 Purchases Late Invoice T9 Debit
2201 Purchase Tax Control Late Invoice T9 Debit
2100 Creditors Control Late Invoice T9 Credit
0

Company tasks
Running the Year End
The Year End facility in Sage 50 Accounts takes care of all of your financial Year End accounting. You may not want to run your Year End on the Year End date. You may want to wait for a short period of time after the Year End has passed, in order to receive your last invoices. When you are ready, you can change the program date to the Year End date, then run your Year End.
Before running the Year End procedure, take a backup of your data. This useful because you can compare the data to see how your business is performing annually.
When you run your Year End, there are likely to be transactions that have been entered for the new financial year, so the balances of your income (your Sales accounts) and expenditure (your Purchases, Direct Expenses and Overheads) accounts are unlikely to be zeroed out.
For more information, see Sole trader Chart of Accounts individual nominal codes on page 210.
The balances are transferred into the Retained Earnings account (3200, by default), so they are ready to accept transactions for the new financial year. In addition to this and for each account, the Actual balances are moved to the Prior Year balances. You can also update the budget values.
Run your Year End process to:
Transfer the balances from your profit and loss accounts to your retained earnings account.
Carry the balances from your balance sheet accounts forward to the new financial year.
Update the audit trail with the Year End journals that are automatically posted.
Update the nominal records with the prior year figures and any future transactions.
Update the product record to transfer sales values and quantity sold to the prior year boxes.
Transfer customer and supplier YTD values to the Prior YTD boxes.
Increment the financial year start date by one.
An outline of the steps you are asked to complete in the Year End process is shown in the following section.
361

Sage 50 Accounts User Guide
36
Year End checklist
Check for Chart of Accounts errors - Company > COA > Edit > Check. For more information, see If you select Current Assets or Current Liabilities, the layout is slightly modified. on page 197.
(Optional) Run your month end, choosing not to clear the audit trail - Tools menu > Period End > Month End. For more information, see Carrying out your Month End on page 344.
Note: If you use month end to post monthly prepayment, accrual or depreciation journals, you must complete the Month End function for Month 12 before running the Year End.
Take two backups and label them 'Before Year End (Month & Year)' - File menu > Backup. For further information on taking a backup, see Backing up your data on page 366.
Check that your program date is set to your Year End date - Settings menu > Change Program Date. For further information about how to do this, see Changing the program date on page 73.
Ensure you have processed any final adjustments for this financial year.
For sole trader/partnership businesses, manually clear down the Capital Introduced and Drawings nominal accounts to the Capital nominal account - Company > Journals.
Print the following reports, if required:
Trial Balance, Profit and Loss, Balance Sheet, Aged analysis reports for debtors and creditors, Statements for customers and banks, Day Books for customers, suppliers, banks and nominal, Activity reports on all ledgers, Audit Trail Budget Analysis report, Prior Year Analysis report, Product Valuation (Accounts Plus and Accounts Professional), and Product Profit Reports (Accounts Plus and Accounts Professional).
Run your accounts Year End - Tools menu > Period End > Year End. For further information about how to do this, refer to Running the Accounts Year End on page 367.
Take a backup and label it After Year End - File menu > Backup. For further information about how to do this, see Backing up your data on page 366.
Check that your financial year start date is correct - Settings > Financial Year. For further information about how to do this, refer to Checking the financial year start date setting on page 373.
Print your post Year End reports - Company > Financials > Reports. We recommend that you print the Year End Journals, Brought Forward Trial Balance and any activity reports you require.
2

Company tasks
(Optional) Clear your audit trail - Tools menu > Period End > Clear Audit Trail. For further information about how to do this, refer to Clearing the Audit Trail on page 384.
Remove any unwanted customer, supplier, nominal, bank and product records. For further information about how to do this, refer to Chapter 5, Setting up records.
Run the Compress facility to reclaim disk space used by deleted records - File menu > Maintenance > Compress Data. For further information about how to do this, see Compressing your data on page 389.
Note: You may not achieve much compression if you do not run Clear Audit Trail.
(Optional) Set your Lock Date, so that others can only post transactions from a date, later than the Year End that you have just completed - Settings > Lock Date.
For further guidance and assistance on performing your year end:
1. Open your Company module.
2. From the Tasks pane, select Manage Year End.
363

Sage 50 Accounts User Guide
36
The Month End Guide appears, which takes you through the procedure step by step, with links to specific software functions.
4

Company tasks
Backing up your data
Use the Backup facility to take a backup of your Sage 50 Accounts data files. Sage 50 Accounts will automatically back up your data files to drive C:\ You can change the backup destination and select which files you want to back up if required. For example, you can back up all your files, your report and/or layout templates, or just your data files. Before running your Year End, we recommend that you back up all of your files.
To back up your data
1. From the Sage 50 Accounts menu bar, select File > Backup.
2. A message appears asking you if you would like to check your data. We recommend that you check your data before you back up. To do this, click Yes. If you do not want to check your data, click No.
If you have chosen to check your data, a bar appears showing how the data check is progressing. When the data has been checked the File Maintenance Problems Report window appears.
If any errors appear during Check Data, we recommend that you try to repair them before you continue entering any more data. To repair your errors, click Recovery Tools.
The Recovery Tools facility provides you with numerous software tools to assist in the repair, when any errors are found on your data.
When Recovery Tools is selected, a window appears, containing an array of all available data fixing tool buttons.
If there is a rare occasion where this routine is not successful (for example, because of data corruptions), you will need to either restore to an error-free backup or send your data to Sage Technical Support (contact 0845 111 55 55 if you are a UK or Northern Ireland resident or 1890 88 20 60 for residents of the Republic of Ireland) to be repaired by the Data Repair Service. If you need to send your data to our Data Repair Service, we will need a backup of your data before the Fix option has been run. You should also contact our helpline (on the same number as above) for the necessary procedural forms.
3. The Previous Backups tab shows the Date, Time and File Name of previous backups made. The Filename column includes the backup path used.
Alternatively, enter the drive, directory and file name you require in the boxes provided. By default the backup path defaults to the last path, if available.
Note: Be careful that you don't overwrite existing backups that you want to keep - if you want to keep old backups, use different file names each time.
4. To select the type of data that you want to back up from, click the Advanced Options tab and click the Type check boxes required.
5. To proceed with the backup, click OK. If you do not want to continue with the backup, click Cancel.
365

Sage 50 Accounts User Guide
36
6. If you have chosen to overwrite an existing backup, a warning message appears informing you of this. To overwrite the file, click Yes. If you do not want to overwrite the file, click No.
The Backup window appears, showing the details of the backup as it proceeds.
When the backup is finished, a message box appears telling you whether the backup has been successful. Click OK to acknowledge this message.
Note (e-Banking users only): The e-Banking files that you import to and export from your banking software are not backed up as part of the Sage 50 Accounts backup routine.
Running the Accounts Year End
The Year End process takes care of all of your financial Year End accounting.
Note: Before running the Year End process, make sure you have completed all of your month end procedures first. When you have done this, take another backup.
To prepare for your Year End, run your month end procedure choosing not to clear the audit trail. When you are sure that your month end figures are correct, change your program date to your Year End date. You are now ready to run your Year End.
Note: The Year End applies to all Chart of Accounts.
To run your Year End
1. From the Sage 50 Accounts menu bar, select Tools > Period End > Year End.
6

Company tasks
The Year End window appears.
When you run your Year End, there are likely to be transactions that have been entered for the new financial year, so the balances on all of your profit and loss nominal accounts accounts are unlikely to be zeroed out.
2. If you budget using nominal accounts and departments and want the program to set up budget figures for the coming year, select the Nominal & Departmental Budgets Copy Current Year Budgets option.
Choose the figures you want the software to use. To increase or decrease those values, enter a percentage change in the Percentage Change box.
3. If you budget against your product records and want the software to set up budget figures for the coming year select the Stock Budgets Copy Current Year Budgets option.
Choose the figures you want the software to use. To increase or decrease those values, enter a percentage change in the Percentage Change box.
4. In the Year End Journals date box, enter the date you want to appear on your Year End journals. Your financial Year End date appears here automatically, but you can change this if you want to.
It is assumed that you want to keep last year’s data for purposes of comparison. Accordingly, the Archive Company Data before Year End check box is selected by default. The archived company data is made read-only.
367

Sage 50 Accounts User Guide
36
5. An updated Audit Trail report is produced for you to view the Year End postings. Select the type of output you require: either Printer or File.
6. If you have previously activated and set your Lock Date (Settings > Lock Date), you will see a ’Lock posting before date’ entry box in the Year End window, with your previously selected date displayed.
You can, if you choose, change this date.
7. To carry out the procedure, click OK.
A confirmation message appears.
8. To continue with your Year End, click OK.
When your Year End completes, a warning message appears reminding you to change your Program Date back to the correct date.
After you have entered the correct date, click OK.
Accounts Professional and Accounts Plus users can now clear down their stock records if required. See Clearing your stock transactions on page 357.
Historical data analysis
This facility lets you take a snapshot of your company data just before you run the Year End. It lets you compare this years data with last years, the year before, and so on. For example, you can run and compare profit and loss and balance sheet reports from one year to the next, to see how your company is doing. You can compare the datasets as often as you like and whenever you like.
Important Note: The archived data is not the same as a data backup. Your archived data is read-only - you cannot restore and use this data in the event of data corruption!
In addition to being able to conduct analysis and run different reports on archived data, you will also have other columns on all of your nominal records. These columns will show your prior year archived data sets totals. So, you can quickly see how different sectors of your company are doing compared to previous years. For more information, see Entering nominal records on page 218.
To archive your data
It is presumed that you want to keep last year’s data for purposes of comparison. Accordingly, in the Year End window, the Archive Company Data before Year End check box is selected by default. The archived company data is made read-only.
1. Set any other options in the Budgets, Postings and Output To areas of the window as part of your Year End procedure.
2. Click OK.
8

Company tasks
A confirmation message appears, recommending that you run the Check Data facility. We recommend that you run the Check Data facility and correct any problems that are highlighted. For more information about the Check Data facility, see Checking your data on page 75.
3. Click Yes to check your accounting data.
After the Check Data process has finished, and you have corrected any errors that have been listed, the Archive Company window appears.
4. Enter the following details in the Archive Company window:
Path to Archive This displays the data path where the archive will be saved. You cannot change the location of this data path.
If you installed Sage 50 Accounts in the default directory, the archive path will be:
Microsoft® Windows XP
C:\Documents and Settings\All Users\Application Data\Sage\Accounts\2012\company.000\Archive
Microsoft® Windows Vista / Windows 7
C:\Programdata\Sage\Accounts\2012\Company.000\Archive
Description Enter a description that will help you identify the archive at a later date. The default Description includes the current year.
Archive Folder The name displayed here is the name of the folder where the archive will be saved. As a default, the folder name is based on the current financial year, however you can enter a new folder name if necessary.
For example, if the name entered in this box is 2010 and you have installed Sage 50 Accounts in the default directory, the full archive path is:
Microsoft® Windows XP
C:\Documents and Settings\All Users\Application Data\Sage\Accounts\2012\company.000\Archive\2010
Microsoft® Windows Vista / Windows 7
C:\Programdata\Sage\Accounts\2012\Company.000\Archive\2010
Note: Each archive must be held in a unique folder. If you attempt to save an archive file using an existing folder, a warning message appears.
369

Sage 50 Accounts User Guide
37
5. To continue with the archive click OK. To cancel the archive and return to the Year End window, click Cancel.
To view an existing company archive
1. From the Sage 50 Accounts menu bar, select File > Open > Company Archive.
Note: If you have a two or multi-company version of Sage 50 Accounts, each company will have its own archive list.
2. Select the company archive that you want to view and then click Open.
You can now analyse and report on the data contained in the archive, as you normally would in Sage 50 Accounts. Some functions will be unavailable.
Note: You cannot modify an opened archive. Activities such as the creation of new customers, suppliers, nominal accounts, products, banks, and invoices are not possible. Also, it is not be possible to post or otherwise modify transactions or to process recurring entries.
Accounts Professional users only: A new report is created so that you can view your Profit & Loss with your prior year values, taken from your archived company data.
3. When you have finished looking at your archived data, you will want to return to your company data. From the Sage 50 Accounts menu bar, select File > Open > Company and then select the company whose data you require.
The archived company data closes and your current (live) accounting data reappears.
To remove an existing company archive
1. From the Sage 50 Accounts menu bar, select File > Open > Company Archive.
The Company Archives window appears.
2. Select the company archive that you want to remove, then click Remove Company.
Sage 50 Accounts removes the archived company data.
Note: Before you remove a company from the list, ensure that you have proper authority to remove the company from the list, and that all other users of the software are not still using that company data.
Conversion of company archives
If you need to convert company archives from previous versions to the current version of your software, you need to perform a conversion of those archives.
Archive Date This displays the current program date. You cannot change this date.
0

Company tasks
To convert company archives
1. From the Sage 50 Accounts menu bar, select File > Open > Company Archive.
The Company Archives window appears.
2. If only one company archive appears in the list of archived data, select that company, then click Convert/Open.
3. If several unconverted archives are listed, to convert all the archives, click Convert All.
4. If any of the multiple conversions is unsuccessful, two new columns are added to the Company Archives window - Conversion Log and Check Data Problems Report.
5. To view either of these reports, select the corresponding drill-down button in either of these columns.
6. If conversion is successful, no reports or logs are generated, and thus no drill-down button is shown.
If company archive conversion fails
If the company data that you choose to restore from backup fails to convert successfully, the data is stored in a new PENDING_CONVERSION folder, located in:
C:\ProgramData\Sage\Accounts\2012\COMPANY.002\PENDING_CONVERSION
In addition, when the Select Company window appears, the company restore failure appears as ****CONVERSION FAILED ****.
1. Select the ****CONVERSION FAILED **** company.
An additional Resolve button appears in the Select Company window.
2. Click Resolve.
A message appears confirming that the conversion of the selected company data has failed.
3. To undo the data conversion so that you may try the conversion again, select Rollback.
4. If you prefer to keep the partially converted company data for use in the current software version, select Preserve.
Note: When you open your partially converted company data, the data may appear incomplete.
The unconverted data is preserved in a new folder:
C:\ProgramData\Sage\Accounts\2012\COMPANY.002\PRECONVERTED_ACCDATA_20XX
371

Sage 50 Accounts User Guide
37
Checking the financial year start date setting
To check your financial year is correct, from the Sage 50 Accounts menu bar, select Settings > Financial Year. Check that the month and year are correct for your new financial year.
Note: If you change your Financial Year start date, all of your prior year columns (on nominal records) are cleared.
2

Company tasks
Recording a journal entry
The journal is used for recording non-regular transactions. These include:
Entering opening figures of a new business (i.e. opening balances).
Depreciation of fixed assets.
Error corrections in your accounts.
Purchase and sale of fixed assets.
Writing off bad debts.
The journal is also important because it acts as a record of the non-regular transaction, like a note book, to help you remember what the non-regular transactions were for.
You can also use journal entries to make transfers between any of your nominal account types: Asset, Liability, Income or Expense. However beware, when using journal entries, you must adhere to strict double-entry bookkeeping principles; for every debit total, there must be a corresponding balancing credit. This does not mean that for every single debit item you must post a single credit item. For example, you can post several debits but one balancing credit, and vice versa. As long as the net difference between your postings is zero, for instance the total value of credits equals the total value of debits, you can post the journal entry.
For example, you would use journal entries to record the payment of staff wages. This is explained in more detailed in the section, Paying wages using journal entries on page 379.
To make a journal entry
1. Select Company > New Journal
The Nominal Ledger Journals window appears. A journal comprises of a batch of individual debit and credit transactions. To follow double-entry bookkeeping principles, the values of the credit transaction must equal the value of the debit transaction. Each line of the journal entry table represents a single transaction, and there must be at least two transactions in the journal.
Note: You can use the Print List button on the Nominal Ledger Journals window to print what is displayed. You may want to do this if you want to manually tick off the journals that you have posted.
373

Sage 50 Accounts User Guide
37
2. The boxes at the top of the journal show the following batch details:
3. In the transaction table, enter the following transaction details, one line per transaction:
Note: You can use the Print List button on the Nominal Ledger Journals window to print what appears. You may want to do this if you want to manually tick off the journals that you have posted.
Reference Enter a unique reference for the transfer, using up to thirty characters.
Date The system date appears automatically. You can change this if necessary.
Balance As you enter transactions, the box automatically updates to show the difference remaining between the Debit and Credit totals.
N/C Enter the nominal account that you want to post this transaction to. If required, use the drop-down button to choose the nominal code from the nominal account list or to create a new account.
Name The name of the nominal account you have entered appears here automatically. You cannot edit this box.
4

Company tasks
Accounts Plus and Accounts Professional users: If you use this journal entry regularly, you can save it as a skeleton, so that you can re-create it quickly and easily. For more information about skeleton journals, type 'skeletons' in the index of the Sage 50 Accounts Help system.
4. To post your journal, click Save or to clear the window and enter new data, click Discard.
5. To return to the Nominal Ledger window, click Close.
Reversing nominal journals
Accounts Plus and Accounts Professional onlyIf you have posted a journal entry incorrectly, you can use the Reversals facility to remove the journal. You can then re-enter the journal correctly.
For example, if you have posted a journal with the incorrect date, you can reverse the journal and then re-enter the information with the correct date.
To reverse a journal entry
1. Select Company > Nominal Ledger.
2. Click Reversals.
Dept If you want to analyse this transaction to a department, enter the department number here.
Details Enter a description for the transaction of up to sixty characters.
T/C Enter an appropriate VAT Code for the transaction. Journals are usually a movement of funds between accounts that do not involve VAT. The default non-vatable tax code as set up on the Company Preferences' VAT tab appears here automatically.
Whatever code you use, Sage 50 Accounts will not calculate the VAT for you or post VAT to the VAT Control Account. If you want to include VAT in this journal, enter the VAT element as a separate line, with the appropriate debit or credit to the appropriate VAT Control Account (sales or purchases) and a relevant tax code.
Debit Each transaction can either be a debit or a credit (not both). Enter any debit value here.
Credit Each transaction can either be a debit or a credit (not both). Enter any credit value here.
375

Sage 50 Accounts User Guide
37
You are prompted to print your Nominal Ledger Day Book report and to make a backup of your data. We recommend that you print your Day Book and take a backup of your data so that you have a copy of your original data before you process the reversal.
3. To print the Nominal Ledger Day Book, click Print Now and select the range and output you want to use for your Day Book from the Criteria window. After you have selected the range and output to use for your Day Book report, you are returned to the Nominal Reversals window.
4. To backup your data, click Backup Now and complete the backup procedure. For further information about backing up your data, refer to Backing up your data on page 366.
When you have completed your backup, the Nominal Reversals window appears.
5. Click OK.
The Transaction Range window appears.
6. Enter the following information:
Note: You can find the details in the Nominal Ledger Day Book that you printed in step 2.
7. To continue with the reversal procedure, click OK.
If no transactions are found with the details you have entered, a message appears. Click OK to return to the Transaction Range window.
If matching transactions are found, the Nominal Reversals window appears listing all of the posted journal entries that match the transaction range criteria.
Transaction Range From and To
Enter the transaction number range that you want to use to find the journal entry you want to reverse.
Date Enter the date that you posted the original journal entry here.
Reference If you know the reference that you used to post the journal entry, enter it here.
Department If you have posted the journal entry against specific department, enter it here.
6

Company tasks
8. Highlight the items that you want to reverse.
Note: The total debit and total credit amounts must be equal.
9. Click Reverse.
Tip: If the journal you are looking for is not displayed in the list, you may have used the wrong transaction range or date. To enter the correct details, click Range then click OK to return to the Nominal Reversals window.
If the selected items do not balance, a message appears informing you that your debits and credits must be equal before the journal can be reversed. Click OK and make your selections again.
If the selected items do balance a confirmation window appears, showing the transactions you have selected to reverse. You cannot change the information shown here.
10. If the information shown is correct and you are sure that you want to reverse this journal, click Save.
If the information is incorrect, click Cancel to return to the Nominal Reversals window.
The reversal journals are posted to the audit trail with the original journal transaction date, a reference of REVERSE and details of Reversal of Tran. xx, where xx is the number of the reversed transaction. You have now completed the journal reversal and should re-enter the original journal using the correct details.
Tip: To look at the reversals you have made, run the Day Books: Nominal Journal Reversal Report from the Report Browser Nominal Reports facility.
377

Sage 50 Accounts User Guide
37
Paying wages using journal entries
When you pay your staff, you need to update your accounts to include the payments you have made for wages and deductions. First, you need to post the salary journal entry to your nominal ledger to keep your trading accounts correct. You then need to record your bank payments to update your bank balance.
To prepare to post your salary journals
1. Select Company > Nominal Ledger.
The Nominal Ledger window appears.
Check that your Nominal Ledger Chart of Accounts includes the net wages, PAYE, pension fund and national insurance/PRSI nominal account codes in the balance sheet section of the layout of accounts. For more information, see Chapter 4, Setting up your Chart of Accounts.
The default for these nominal account codes are:
2210 PAYE
2211 National Insurance
Note: Users in the Republic of Ireland can change the name of this account to PRSI. For more information, see Chapter 4, Setting up your Chart of Accounts.
2212 Tax Credits Funding (if applicable)
2214 Student Loans (if applicable)
2215 Attachments (if applicable)
2216 Deductions (if applicable)
2220 Net Wages
2230 Pension Fund
Check that your Nominal Ledger Chart of Accounts includes nominal accounts codes for gross pay, employer's NI and employer's pension in the profit and loss section of the layout of accounts. For more information, see Chapter 4, Setting up your Chart of Accounts.
The defaults for these nominal account codes are:
7000 Gross Wages
7001 Directors Salaries
7002 Directors Remuneration
7006 Employer's NI
7007 Employer's Pension
7010 SSP Reclaimed
7011 SMP Reclaimed
Note: If you need to edit or create a Chart of Accounts or the nominal account codes, refer to Chapter 4, Setting up your Chart of Accounts and Chapter 5, Setting up records.
8

Company tasks
2. Make a note of the totals from your payroll run, for example the money that you have paid, for the period to be posted for PAYE, net wages, total National Insurance/PRSI contributions - that is, employer and employee national insurance/PRSI contributions, employer's National Insurance/PRSI contributions, gross wages, any employer and employee pension contributions and SSP/SMP reclaimed, if applicable.
To post your salary journals
1. Select Company > New Journal.
The Nominal Ledger Journals window appears.
2. Enter a reference and the date of your payroll run then post the journal entry as shown in the following table:
.
Debit Credit
7000 Gross Wages(Total gross wages including adjustments, SSP and SMP)
Debit
7006 Employers NI(Total employer's NI contributions)
Debit
2220 Net wages(Total net wages i.e. total of employees' take home pay)
Credit
2210 PAYE(Total PAYE deducted)
Credit
2210 PAYE (Tax Credit amount) Note: If you receive Tax Credit Funding, this Debit amount should be posted to the Tax Credit Funding account. If you do not already have a Tax Credit Funding account, we suggest using a nominal code in the Current Liability section of the Balance Sheet. For example, 2212.
Debit
2211 National Insurance/PRSI(Total employer and employee national insurance/PRSI contributions). Note: If you receive an employee or employer National Insurance rebate, the value should be posted to this nominal code as a debit.
Credit
2214 Student Loans (if applicable)(Total of Student Loans deductions made)
Credit
379

Sage 50 Accounts User Guide
38
Note for Accounts Plus and Accounts Professional users: You can recall the standard skeleton salary journal, by choosing Recall and selecting the file salary.njr, or you can save your own skeleton so you can re-create it quickly and easily. For more information about skeleton journals, type skeletons in the index of the Sage 50 Accounts Help system.
3. To save your journal entry details, click Save.
Note: You will only be able to save the journal entry when the balance displayed is equal to zero.
4. To exit the Nominal Ledger Journals window, click Close.
You have posted your salary journal entry to your nominal ledger and should now record the bank payments for the net wages, PAYE, national insurance and pension, if applicable.
2215 Attachments (if applicable)(total of Attachments deducted from employees' net pay)
Credit
2216 Deductions(Total of remaining employee deductions, excluding Attachments and Student Loans)
Credit
If your Payroll includes pensions you need to post the following transactions.
2230 Pension(Total employer and employee pension contributions)
Credit
7007 Employers Pension(Total employer's pension contributions)
Debit
If your payroll includes SSP or SMP you need to post the following transactions:
7010 SSP Reclaimed(Total SSP reclaimed)
Credit
7011 SMP Reclaimed(Total SMP reclaimed)
Credit
2211 National Insurance/PRSI(Total SSP/SMP reclaimed)
Debit
0

Company tasks
To record the bank payment for your wages
1. Select Bank > New Payment.
The Bank Payments window appears.
2. Enter the details into the Bank Payments window as follows: :
3. To record your bank payments for employee wages, click Save.
You have recorded the bank payments for your wages.
To record the bank payment to HM Revenue & Customs - or the Revenue Commissioners
1. Select Bank > New Payment.
The Bank Payments window appears.
2. Use the drop-down list to choose the name of the bank you require. Select the bank name and then click OK.
3. Check the date that you sent your contributions to HM Revenue & Customs or Revenue Commissioners is correct. Enter the nominal code for PAYE (2210) and the amount in the Net column. Finally, enter the non-vatable tax code; T9 by default.
Bank From the drop-down list, choose the required bank account.
Date The program date is automatically entered for you to. Change this if required.
Ref Enter a unique reference, of up to thirty characters. For example, the cheque number.
N/C From the drop-down list, choose the nominal code for Net Wages - by default 2220.
Department If you want to analyse this transaction to a department, enter the department number here.
Details Enter any details you require here; up to sixty characters.
Net Enter a value for the net wages.
T/C Enter the non-vatable tax code here; T9 by default.
Tax This shows the amount of tax. This will be zero when you have selected the non-vatable tax code; T9 by default.
381

Sage 50 Accounts User Guide
38
4. On the following line of the Bank Payments window enter the Bank Account name again.
Tip: Use the F6 function key to copy information from above.
5. Enter the nominal code for National Insurance/PRSI (2211), the amount of National Insurance/PRSI and finally the non-vatable tax code; T9 by default.
Note: Users in the Republic of Ireland can change the name of this account to PRSI. For more information, see Chapter 4, Setting up your Chart of Accounts.
6. Choose the Save button to record your bank payments for your contributions to the Revenue Accounts Office (or Revenue Commissioners).
7. You have recorded the bank payment sent to the Revenue & Customs (or Revenue Commissioners).
To record the bank payment to the pension company
1. Select Bank > New Payment.
The Bank Payments window appears.
2. Use the drop-down list to choose the name of the bank you require. Select the bank name and then click OK.
3. Check the date you sent your contributions is correct. Enter the Pension Fund nominal code (2230) and the amount of contribution and the non-vatable tax code; T9 by default.
4. To post your bank payments for your contributions to your pension company, click Save.
You have now recorded the bank payment sent to the pension company.
You have now completed the process for recording your wages payments in Sage 50 Accounts.
2

Company tasks
Clearing the Audit Trail
It is important to stress that Clear Audit Trail is an optional task, and unless you are certain that you no longer need transactional information up to a specific date, you should not clear the audit trail.
For example, would you ever need to query a customer or supplier activity? If so, how far back would this go? You should consider this before clearing the audit trail.
Clearing the audit trail removes fully paid and reconciled transactions from your audit trail up to a date that you choose, and stores them in your data files. This means that you have fewer live transactions to work with, which speeds up tasks such as printing reports and backing up your data.
Note: The Clear Audit Trail process is irreversible, and means that removed transactions no longer appear on the audit trail, transactional reports or activity windows. It is therefore essential that you back up your data prior to clearing the audit trail, and print copies of your audit trail, day books, activity and VAT Return reports.
When Clear Audit Trail removes transactions, Sage 50 Accounts posts journal entries to the nominal codes that the transactions were linked to. This ensures that the balances on your nominal ledger are the same before and after clearing the audit trail. Sage 50 Accounts uses the Clear Audit Trail date as the date for these journals. The journals display the details Opening Balance, and appear at the end of your audit trail when the Clear Audit Trail routine is complete.
After clearing your audit trail, you can view details of the deleted transactions using Sage 50 Accounts Cleared Audit Trail reports. To view these reports, select Company > Financial Reports > Report Browser, and then open the Cleared Audit Trail Reports folder.
Note: If you choose to archive your company data when you run your next year end, the archive includes the removed transactions and clears them from the current data into the company archive. In order to view details of cleared transactions after archiving your data, you must open the relevant company archive and then run the audit trail report you require.
To summarise, Clear Audit Trail:
Removes all fully paid, allocated and reconciled transactions from the audit trail, provided that they are posted on or before the date you specify. For full details of the criteria Clear Audit Trail uses to remove transactions, refer to the following section.
Carries forward as outstanding items any unreconciled and/or unallocated transactions that are dated before or on the date you specify.
Carries forward as outstanding items any customer and supplier transactions that are dated after the date you specify.
Posts an opening balance journal to each nominal ledger and bank account for the value of all removed transactions.
Does not affect any transactions that are dated after the date you specify, or that are dated before the date you specify but are not fully paid/allocated and reconciled.
383

Sage 50 Accounts User Guide
38
Criteria for clearing transactions
Clear Audit Trail removes transactions up to and including the date you specify, providing they meet all of the following criteria:
Transactions must be fully paid and/or allocated. These transactions display Y in the Paid column in the Financials window.
Bank transactions must be flagged as reconciled with the appropriate bank account. These transactions display 'R' in the Bank column in the Financials window. Alternatively, bank transactions must be flagged as not requiring reconciliation - these items display '-' in the Bank column.
Transactions with VAT must be fully reconciled on the VAT Return. These transactions display 'R' in the VAT column on the Financials window.
If a transaction does not meet all of the above criteria, Clear Audit Trail does not remove it.
To clear your audit trail
1. From the Sage 50 Accounts menu bar, select Tools > Period End > Clear Audit Trail.
The Clear Audit Trail Wizard appears.
Important Note: ALL transactions that are linked together must meet ALL of the above criteria before Clear Audit Trail can remove any of them. That is, every transaction in a chain must be dated on or prior to the date you specify, fully paid and/or allocated, fully bank reconciled (where applicable) and fully VAT reconciled (where applicable). If any transaction in a chain does not meet one or more of these criteria, then Clear Audit Trail cannot remove any of the linked transactions.
Examples of linked transactions are a sales invoice and its corresponding sales receipt, or two purchase invoices paid off by a purchase credit note and a purchase payment.
4

Company tasks
The wizard lists the reports you should print before proceeding to clear the audit trail.
Note: Because Clear Audit Trail removes transactions and is irreversible, you will not be able to print these reports for cleared transactions after the process is complete. It is important that you print these reports now:
Audit Trail
Monthly Day Books
Sales, Purchase and Nominal Activity
VAT Return reports
2. If you have not printed your reports, click Cancel to exit the wizard and print them now. You will need to start the wizard again from step 1.
Alternatively, if you have printed your reports, to continue, click Next.
The Select Date window appears.
385

Sage 50 Accounts User Guide
38
3. Enter the date that you want to remove fully paid and reconciled transactions up to. Remember that this date is inclusive.
Caution: If there is any possibility that you may need any of the transactional information in the future, choose this date with care.
Important: It is essential that you back up your data before you clear the audit trail, as the process is permanent and irreversible.
If you do not have at least one current backup of your data, click Backup Now. The Backup window appears. Click Yes to check your data before backing up, then select the location and file types to back up, and click OK. When the Backup process is complete, Sage 50 Accounts returns you to the Clear Audit Trail wizard.
4. If you have already made your pre-Clear Audit Trail backups, click Next to proceed.
Note: If you select a date that is before a Lock Date that you have already set, you are prompted to confirm that you wish to proceed.
6

Company tasks
The Confirm Date window appears.
5. Confirm that the date you want to clear transactions up to and including, is correct.
If the date shown is not correct, click Back to return to the previous screen and enter the correct date.
If the date shown is correct, click Next to begin the Clear Audit Trail procedure. A progress bar appears, showing that Clear Audit Trail is processing. When the process is complete, the Review Transactions window appears.
This window displays how many transactions have been removed, and allows you to view the details of the cleared transactions.
6. To view a list of the removed transactions when the process is complete, select the I would like to view details of the removed transactions check box.
7. To complete the Clear Audit Trail process and close the wizard, click Exit.
If you selected the I would like to view details of the removed transactions check box, the Audit Trail Historic List report appears, showing details of the removed transactions. You can print or save this report is you require.
The Sage 50 Accounts desktop appears.
You have successfully cleared your audit trail.
387

Sage 50 Accounts User Guide
38
Clearing stock transactions
The Clear Stock facility can be used as part of the Month End and Year End routines. It is a way of clearing down transactions from your Product History prior to a specified date.
For full details about how to clear your stock transactions, see Clearing your stock transactions on page 357.
Compressing your data
If you have deleted your Customer, Supplier, Nominal, Bank and Product Records, use the Compress Data facility to return the unused disk space as free space. We recommend that you use this facility if you have deleted a large volume of data.
To compress your data files
1. Ensure you have taken at least one backup of your data.
2. From the Sage 50 Accounts menu bar, select File > Maintenance.
3. Click Compress.
The Compress Data Files window appears.
4. To compress all data files, select the Compress All Data Files check box.
If you clear this check box, you can select the particular data files that you want to compress.
5. To continue with the compression, click Compress. To exit without compressing, click Close.
8

Company tasks
389

Sage 50 Accounts User Guide
39
0
Chapter 7
Banking tasksIn this chapter:Recording a bank receipt .................392
Recording a bank, cash or credit card payment ..........................................397
Recording cash register takings .......401
Recording a transfer ........................422
Reconciling your bank account ........424
Creating and processing recurring transactions.....................................434
Viewing bank transaction activity .....446
Managing your petty cash................448
This chapter contains information on the tasks included in Sage 50 Accounts Bank module. It discusses all the activities you’ll need to perform when working with your bank accounts.
In this chapter, we guide you through recording payments and receipts and show you how to process a transfer of funds between accounts. We’ll also introduce the process of reconciling your bank accounts in Sage 50 Accounts with your actual bank statements.
Later, we discuss how to create and process regular transactions, such as standing orders and direct debits, using Recurring Entries, along with viewing bank transaction activity.
Finally, the chapter covers how to handle petty cash transactions, such as expenses, in Sage 50 Accounts.
This chapter assumes you have set up your bank accounts. For information about this see Entering bank account records on page 226.

Recording a bank receipt
Use Bank > New Receipt to record any money you receive that does not go to pay invoices you have sent. For example, you can record;
Bank interest.
Dividends received.
Money received for an insurance claim.
Money received from a grant.
Tip: The Bank Receipts facility is often used by cash businesses, for example, newsagents, bars and restaurants, where customers pay at the time of purchasing and no invoice is raised.
You can record details of this money received in one or more of the different nominal accounts. By allocating your income to different accounts you can see at a glance the different sources of your money and how much you are receiving from each source. For example, you would record money you received from an insurance claim to the nominal code 4903 (Insurance Claims).
The window that appears for you to enter your receipts is the same, whatever the type of bank account that you select; Cheque Account, Cash Account, or Credit Card Account. However, each type of account records a different transaction type onto the audit trail.
Make sure when you are dealing with credit card receipts that you have selected the correct credit card bank account.
To record money you have received
1. Select Bank > New Receipt.
The Bank Receipts window appears.
2. For each receipt, enter the following details one line at a time:

Banking tasks
Bank Enter the bank account you require, or use the drop-down list to choose the bank account required.
Date The program date is entered for you automatically, but you can change this as required.
Tip: If you have several receipts to enter with the same date, why not change the program date, see page 73.
Ref Enter a reference here for this receipt. For example, enter a cheque number or a deposit number. You will find this very useful when you reconcile your bank accounts.
N/C Enter a nominal account code for the income to be posted to, or use the drop-down button to select from the list of available codes. You can create a new account code here if necessary.
Dept Enter the department that you want this transaction to be analysed to.
Details Describe the income transaction here for your reference.
Net If you are not concerned with VAT analysis, you can simply enter the gross amount in this box. If you need to record VAT you will normally enter the net amount of the receipt. However, you can enter either the net or gross amount here, according to how you want Sage 50 Accounts to calculate VAT.
If you enter the gross amount here, you can calculate the VAT amount and the corresponding net amount by choosing the Calculate Net button. The net amount box is then changed to reflect the true net amount. Each time you enter a value in the net amount box, the analysis total is updated at the foot of the column.
T/C A tax code has already been entered for you that has been copied from the tax code set up as your Customer's Default. If required, you can change this to whichever VAT code is appropriate for this payment item, for example T0 to T99.
Tax This box displays the amount of VAT automatically calculated from the Net amount and the tax code. If you entered a zero-rated VAT code (for example, T0) then the VAT amount will be zero.
393

Sage 50 Accounts User Guide
39
3. If you calculated the batch totals manually before you started entering them in Sage 50 Accounts, check your totals against those shown on the Bank Receipts window. These are:
Other boxes displayed on your window show the following information:
Notes for users of Accounts Professional: If you are using Foreign Trader and have set up foreign bank accounts, the Currency and the Exchange Rate are displayed as well as the standard information listed in this procedure.
4. To accept your entries, click Save. The details are posted instantly to update the appropriate nominal and bank accounts, and the Bank Receipts window clears.
If you don't want to save this batch, click Discard to clear the data and start again. The Discard button does not however cancel any batch entries you have already saved.
5. To exit the Bank Receipts window, click Close.
Net Total This shows the total of the amounts entered in the Net column.
Tip: This box is not labelled but appears below the item lines under the Net column.
Tax Total This shows the totals of the amounts entered in the Tax column.
Tip: This box is not labelled but appears below the item lines under the Tax column.
Total This shows the net total added to the tax total to give the gross total.
Bank The name of the bank account automatically appears in this box when you enter the bank account code.
N/C Name The name of the nominal ledger account automatically appears in this box when you enter the nominal account code.
Tax Rate This is the tax rate for the tax code that you selected.
4

Banking tasks
Memorising and recalling bank receipts
Accounts Plus and Accounts Professional onlyIf you make the same bank receipts frequently you can save the batch of receipts as a template, which you can load each time you want to post them, for example, if you receive regular interest payments on your savings.
You can then change the date and any receipt values or add any additional information you need. Not only does this save you time, it also reduces the possibility of errors being made as you enter the data.
To memorise a batch of bank receipts
1. Enter your bank receipts, as you would do normally; see Recording a bank receipt on page 392.
Alternatively you can use a different method. From the Sage 50 Accounts menu bar, select Edit > Memorise.
2. Click Memorise.
Note: You cannot memorise an empty template. If you try to memorise an empty template, a message appears informing you that there are no transactions to memorise.
The Memorise window appears.
3. Select the directory where you want to store your bank receipt template, for example in your INVOICES directory, and then enter a filename for your template.
4. To save the template, click Save. If you do not want to save the template, click Cancel.
If the filename already exists, you are prompted to overwrite the contents of the template. If you want to do this click Yes. If you do not want to overwrite the existing template, click No and enter a different filename.
You have now memorised your bank receipt template and the Bank Receipts window reappears.
5. If you do not want to post the bank receipts, for example if you are waiting for additional information, click Discard.
If you do want to post the batch entry, click Save.
To recall a batch of bank receipts
1. Select Bank > New Receipt.
2. From the Bank Receipts window, click Recall.
Alternatively you can use a different method. From the Sage 50 Accounts menu bar, select Edit > Recall.
395

Sage 50 Accounts User Guide
39
Note: If you have already entered information into the batch data entry window, you are prompted that if you continue, the information that you have already entered will be lost. To overwrite the information, click Yes.
The Recall window appears.
3. Select the directory where your bank receipt template is stored, for example in your INVOICES directory, and then locate the filename for your template.
4. To load the template, click Open. If you do not want to recall the template, click Cancel.
The template appears in the batch data entry window and shows the saved data.
Note: If you have tried to load a template that was not created using the option you are currently using, a message appears informing you that you must select a different filename. For example, you cannot load a bank payment template in the Bank Receipt window.
5. Make any changes to the bank receipts and then save the batch.
You have now recalled the bank receipts template.
6

Banking tasks
Recording a bank, cash or credit card payment
Use Bank > New Payment, to record all bank payments you make that do not involve a supplier account. For example, you can record payments you have made from your bank, cash or credit card accounts for petrol, donations and so on.
All you need to do to keep track of where your money goes, is select the bank, cash or credit card account you want to pay from and enter the payments in the transaction entry window that appears. Sage 50 Accounts takes care of the accounting procedures for you.
Each payment can be made up of many individual transactions, each one posted to a different nominal account if required. This feature is very useful if you want to analyse where your money is going.
Note: Credit card transactions are totally separate from other payments that you process. They must not be confused. You should keep a separate record of these transactions by using a different bank account, for example Company Credit Card payments.
To record bank payments
1. Select Bank > New Payment.
The Bank Payments window appears.
397

Sage 50 Accounts User Guide
39
2. For each payment, enter the following details one line at a time.
Bank Enter the bank account you are paying from, or use the drop-down list to choose the bank account required.
Date The program date is entered for you automatically but you can change this as required.
Tip: If you have several payments to enter with the same date, you can save time by changing the program date, see page 73.
Ref Enter a reference here for this payment, if required. This appears on the audit trail next to the transaction.
N/C Enter a nominal account code for the payment to be posted to, or use the drop-down button to select from the list of available codes. You can create a new account code here if necessary.
Dept Enter the department code here. The transaction will be included, when analysing by department at a later date.
Project Reference - Accounts Plus and Accounts Professional only
If you have created projects, the payment can be assigned to a project if required, by entering the project’s reference code or choosing the project from the drop-down list.
Cost Code - Accounts Plus and Accounts Professional only
If you have selected a project reference for the payment, the relevant cost code should be entered here.
Details Describe the payment transaction here, for example Motor Expenses.
Net If you are not concerned with VAT analysis, you can simply enter the gross amount in this box. If you need to record VAT you will normally enter the net amount of the payment.
However, you can enter either the net or gross amount here, according to how you want Sage 50 Accounts to calculate VAT.
8

Banking tasks
3. If you calculated the batch totals manually before you started entering them in Sage 50 Accounts, check your totals against those shown on the Bank Payments window. These are:
Other boxes displayed on your window show the following information:
If you enter the gross amount here, you can instruct Sage 50 Accounts to calculate the VAT amount and the corresponding net amount by clicking Calc. Net. The box is then changed to reflect the true net amount.
Each time you enter a value in the net amount box, the batch total is updated at the foot of the column.
T/C A tax code has already been entered for you. This has been copied from the tax code set up as your Supplier's default. If required, change this VAT code to one that is appropriate for this payment item, for example T0 to T99.
Tax This box displays the amount of VAT automatically calculated from the Net amount and the tax code. If you entered a zero-rated VAT code, for example T0, then the VAT amount will be zero.
Net Total This shows the total of the amounts entered in the Net column.
Tip: This box is not labelled but appears below the item lines under the Net column.
Tax Total This shows the totals of the amounts entered in the Tax column.
Tip: This box is not labelled but appears below the item lines under the Tax column.
Total This shows the net total added to the tax total to give the gross total.
Bank The name of the bank account automatically appears in this box when you enter the bank account code.
N/C The name of the nominal ledger account automatically appears in this box when you enter the nominal account code.
Tax Rate This is the tax rate for the tax code you selected.
399

Sage 50 Accounts User Guide
40
Notes for Accounts Professional users only: If you are using Foreign Trader and have set up foreign bank accounts, the currency and the exchange rate are displayed as well as the standard information.
4. To accept your entries, click Save. The details are posted instantly to update the appropriate nominal account and the bank account, and the Bank Payments window clears.
If you do not want to save this batch, click Discard to clear the data and start again. The Discard button does not cancel any batch entries you have already saved.
5. To exit the Bank Payments window, click Close.
0

Banking tasks
Recording cash register takings
Your business may make use of a cash register / till to record receipts of cash and card payments. This type of transaction allows for the sale, supply and payment to happen at the same time.
A Cash Register sale can include details of the sale and the method of payment used - that is, cash, cheque or card, the price and VAT (if applicable).
The following procedures guide you through the process in Sage 50 Accounts.
Before recording your cash register / till takings, first set up your Cash Register / Till Takings Bank Defaults, as described in To set up your Cash Register / Till Takings Bank Account Default Details on page 115.
To adjust your cash register / till takings bank account details
1. Open the Bank module.
The Bank Accounts window appears. Your new Cash Register / Till Takings bank account is visible in the Bank list.
2. Select the Cash Register / Till Takings bank account.
If required, you can further refine your Cash Register bank account settings, as described in To enter cheque, credit card and cash accounts on page 227.
Note: When reviewing the 1235 Cash Register account details, the opening balance should be regarded as your Float, and you will find that the No Bank Reconciliation check box is cleared and not available.
401

Sage 50 Accounts User Guide
40
To record receipts into the cash register / till takings bank account
1. Open the Bank module, then from the Tasks pane click Cash Register.
If you chose not to select the ’Takings are VAT-inclusive’ check box in your bank defaults, the VAT-exclusive Cash Register window appears. Enter the net price first, exclusive of VAT, and the software then calculates the VAT, based on the tax code selected.
If you chose to select the ’Takings are VAT-inclusive’ check box in your bank defaults, the VAT-inclusive Cash Register window appears. Enter the Gross price, inclusive of VAT, and the software then calculates the Net and VAT values, based on the tax code selected
2

Banking tasks
In both cases, these are batch entry windows, allowing you to enter multiple cash register transactions from your till roll.
2. For each receipt, enter the details, one line at a time.
3. If you calculate the batch totals manually before you start entering them in Sage 50 Accounts, check your totals against the total shown on the Cash Register window.
4. When you enter the Method on each transaction line, you are offered a choice of payment methods. Select one of the payment methods in the list. You can choose from:
Cash
Cheque
Card
Bank Transfer
As you enter each transaction the Payment total and Actual takings boxes are updated.
5. If discrepancies are found between the Sales Value from receipts and the value of takings in the till, a Discrepancy amount can be entered into the Cash Register record using the Discrepancy entry button.
403

Sage 50 Accounts User Guide
40
This opens the Discrepancy window, where you can enter an Overpayment or Shortfall amount.
Any discrepancy amount entered then appears in the Discrepancy entry box in the Cash Register window.
6. To accept your entries, click Save. The details are posted to the nominal ledger and the bank account.
If you do not want to save this batch, click Discard to clear the data and start again. The Discard button does not cancel any batch entries you have already saved.
If you only know the gross value of a transaction, enter it in the Net entry box, then click Calc. Net. The Net and Tax values will then automatically entered, according to the T/C selected.
7. To exit the Cash Register window, click Close.
The following information appears automatically at the top of the window:
You can enter the following bank receipts information:
Account This appears as 1235 Cash Register, as defined in your Bank Defaults - Cash Register Settings.
Nominal name This is the sales nominal code that you select in the N/C column, for the Item Line currently being entered.
Tax Rate This is the default tax rate that you selected in your Bank Defaults - Cash Register Settings.
Date Today’s date will be entered for you automatically but you can change this if required.
If you have several receipts to enter with the same date, after you have entered the first, remember that F6 will duplicate the line.
Ref Enter a reference here for this receipt, for example a month-day number.
You will find this very useful when you reconcile your bank accounts.
N/C The default sales nominal code appears here. If required, use the drop-down list to select from the available codes.
You can create a new account code here, if necessary.
4

Banking tasks
Dept If required, enter a department, for transaction analysis purposes.
Method Select the method of payment for the transaction from the Method drop-down list.
Payment methods include:
Cash
Cheques
Card
Bank Transfer
Details Describe the income transaction here for your reference.
Gross (VAT-inclusive only)
Enter the gross amount of the receipt here.
Each time you enter a value in the amount box, the analysis total is updated at the foot of the column.
Note: You can access the currency calculator from this text box by pressing F5.
Net (VAT-exclusive only) Enter the net amount of the receipt here.
Each time you enter a value in the amount box, the analysis total is updated at the foot of the column.
Note: You can access the currency calculator from this text box by pressing F5.
T/C This is the VAT or tax code for this transaction.
The default tax code is automatically entered, based on your Bank Defaults - Cash Register Settings.
If required, change this code to another appropriate code.
Tax (VAT-exclusive only) This box displays the amount of VAT automatically calculated from the Net amount and the tax code.
If you entered a zero-rated VAT code, for example T0, then the VAT amount will be zero.
You can change this amount if you selected the Item VAT Amendable check box in your Company Preferences.
405

Sage 50 Accounts User Guide
40
Dealing with cash surplus / shortfall between till receipts and cash till takingsWhen entering Cash Register takings, you may become aware of discrepancies between the Sales Value from receipts and the value of money takings in the till, for example wrong cheque details but the sales amount is correct.
You can record these discrepancies from within the Cash Register window.
1. As you are completing a Cash Register entry, you become aware of a discrepancy between the sales value of the receipts, and the value of the till takings. From within the Cash Register window, click the Discrepancy button.
The Discrepancy window appears.
2. Complete the various entry boxes, as appropriate. You can make the following entries:
There is an overpayment of
If the value (money in till) of the till takings exceeds the sales value of the till receipts - that is, an overpayment, select this option from the drop-down list.
Enter an amount in the adjacent entry box.
There is a shortfall of If the value (money in till) of the sales value of the till receipts exceeds the value of the till takings - that is, a shortfall, select this option from the drop-down list.
Enter an amount in the adjacent entry box.
Amount Enter the amount of the overpayment or shortfall in this entry box.
Reference Enter a reference for the discrepancy, meaningful to you or the cash register concerned.
6

Banking tasks
3. To close the Discrepancy window and return to the Cash Register window, click OK. Your Discrepancy amount appears in the Discrepancy box in the Cash Register window. Your Discrepancy amount has not yet been saved. Only when you click Save in the Cash Register window will all your entries be saved, including your Discrepancy amount.
This discrepancy posting does not reduce the value of sales but does reduce the value in the cash register / till. It is charged as an expense to Overheads. Any discrepancy posting will use the Non-Vatable tax code - usually T9.
When the discrepancy is posted, the following transactions take place:
This posting will not reduce the value of sales but will reduce the value in the till and charge it as an expense to Overheads.
Date Enter a date for the discrepancy finding. The program date is entered, by default.
Transaction Type Nominal Code Notes
JC / JD Cash Register 1235 JC if the discrepancy is a shortfall or a JD if the discrepancy is an overpayment
JC / JD Cash Register Discrepancies 8206
JD if the discrepancy is a shortfall or a JC if the discrepancy is an overpayment
407

Sage 50 Accounts User Guide
40
Transfer monies from the Cash Register account to a chosen bank account, when cash is deposited at the bankWhen you actually deposit your cash register takings at the bank, you will need to record in Sage 50 Accounts the transfer of the monies from the Cash Register account to your chosen bank account.
1. Open the Bank module, then from the Tasks pane, click Deposit Cash.
The Deposit Cash window appears.
The Deposit Cash window lists all unreconciled transactions for the Cash Register Bank Account.
Note: Because this option transfers money between accounts, no VAT is involved.
8

Banking tasks
2. In the top section of the Deposit Cash window, the following items are shown:
3. Make your entries and selections in the Transfer to, Date, Ref and Description entry boxes.
Item Default Entry Notes
Account from: 1235 - Cash Register This box is read only
Balance Account Balance This is the balance of the cash register
Account to: Blank From a drop-down list of bank accounts, select the account into which you have deposited your cash register takings at the bank.
Date Program Date Adjust as required
Reference Blank Enter a reference for the depositing of your cash register takings
Description Cash Register Deposit Adjust as required
409

Sage 50 Accounts User Guide
41
4. The main section of the Deposit Cash window consists of a batch selection grid, detailing all the unreconciled Cash Register transactions in the Cash Register bank account.
The following items are shown:
Item Default Entry Notes
Include check box Unchecked Select the check boxes of all transactions that have been deposited at the bank
Date Transaction Date Read only
Type Transaction Type Read only
Ref Transaction Ref Read only
Ex Ref Transaction Type - Cash, Cheque, Card, Bank Transfer
Read only
Details Transaction Details Read only
Payment Gross Value This will show as 0.00 if the transaction entered was a receipt. This entry is Read only.
Receipt Gross Value This will show as 0.00 if the transaction entered was a payment. This entry is Read only.
Total 0.00 This is the total of the selected transactions (Receipts minus Payments)
Float Adjustment 0.00 This can be adjusted using the Float adjustment button.
Deposit Total 0.00 Total minus Float Adjustment
0

Banking tasks
5. Review all the transactions shown and select those check boxes of all transactions that have been deposited at the bank.
To clear the check boxes and start again, click Clear. If you need to invert all your selections, click Swap.
6. To increase or decrease the Cash Register Float, as required, click the Float adjustment button.
The Cash Register 1235 A/C current balance is defined as the current float. You can enter a value to either increase or decrease the float. This value will be subtracted from or added to the total value of selected transactions.
As an example:
7. In the Deposit Cash window, click the Float adjustment button.
The Float Adjustment window appears.
8. Enter a value to increase Float by £15.00, then to close the Float Adjustment window and return to the Deposit Cash window, click OK.
The Float Adjustment entry is updated to reflect your adjustment.
9. When you are satisfied that all deposited transactions have been selected, and any Float adjustment is complete, to process the transfer, click Save. To re-enter the data, click Discard. To exit from the window, click Close.
1235 Opening Balance (Float) £100.00
Value of selected transactions in Deposit Cash window
£500.00
Required Float Adjustment £15.00 increase
Amount to transfer from 1235 Cash Register account
£485.00
Adjusted Float £115.00
411

Sage 50 Accounts User Guide
41
When the transfer is posted, the following transactions take place:
What if I wish to retain some monies that are already recorded in the Deposit Cash window?
1. Locate the Cash Register transaction(s) in the Deposit Cash window list.
2. Select the check boxes of those transactions.
3. In the Deposit Cash window, click the Float adjustment button.
The Float Adjustment window appears.
4. Enter a value to increase Float by the same amount as those transactions that you selected in Step 2.
5. To close the Float Adjustment window and return to the Deposit Cash window, click OK.
The Float Adjustment entry is updated to reflect your adjustment.
There is no net change in the Deposit Cash balance but the Float figure has increased by the amount that you have retained.
Note: If you use your cash register to pay incidental purchase expenses, for example buying stationery, whereby money from the register / till is used for the purchase, follow the procedure described in Recording a bank, cash or credit card payment on page 397, ensure that the Bank Account entered in the Bank Payments window is the 1235 Cash Register account. The transaction will later appear in the Deposit Cash window as a payment.
Similarly, if an occasion arises where you receive monies into your cash register that has come from a non-cash register transaction, follow the New Receipt procedure described in Recording a bank receipt on page 392, again ensuring that the Bank Account entered in the Bank Receipts window is the 1235 Cash Register account. The transaction will later appear in the Deposit Cash window as a receipt.
Transaction Type Nominal Code Notes
JC 1235 - the Default Cash Register Account
JD if the deposit total is negative
JD The chosen Deposit Cash Account
JC if the deposit total is negative
2
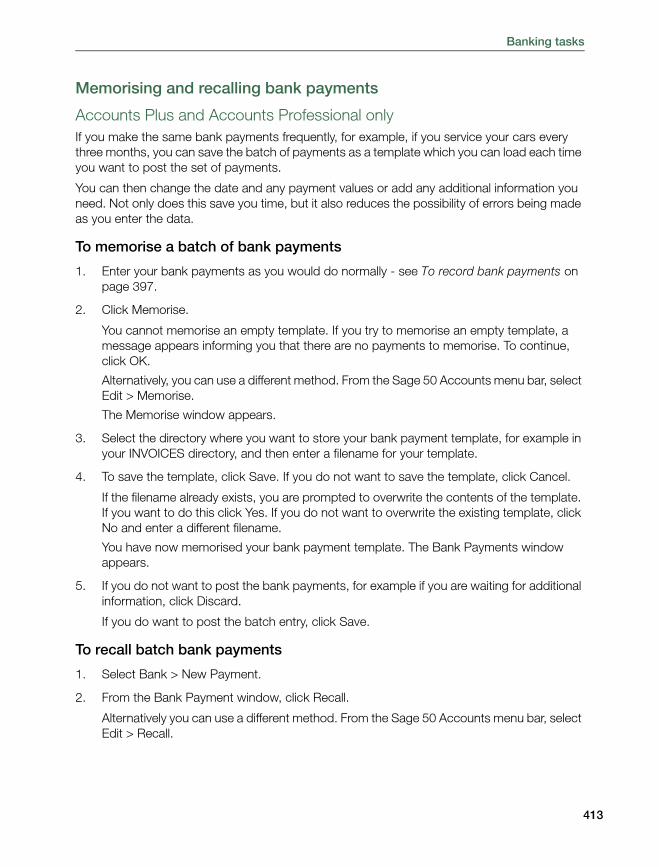
Banking tasks
Memorising and recalling bank payments
Accounts Plus and Accounts Professional onlyIf you make the same bank payments frequently, for example, if you service your cars every three months, you can save the batch of payments as a template which you can load each time you want to post the set of payments.
You can then change the date and any payment values or add any additional information you need. Not only does this save you time, but it also reduces the possibility of errors being made as you enter the data.
To memorise a batch of bank payments
1. Enter your bank payments as you would do normally - see To record bank payments on page 397.
2. Click Memorise.
You cannot memorise an empty template. If you try to memorise an empty template, a message appears informing you that there are no payments to memorise. To continue, click OK.
Alternatively, you can use a different method. From the Sage 50 Accounts menu bar, select Edit > Memorise.
The Memorise window appears.
3. Select the directory where you want to store your bank payment template, for example in your INVOICES directory, and then enter a filename for your template.
4. To save the template, click Save. If you do not want to save the template, click Cancel.
If the filename already exists, you are prompted to overwrite the contents of the template. If you want to do this click Yes. If you do not want to overwrite the existing template, click No and enter a different filename.
You have now memorised your bank payment template. The Bank Payments window appears.
5. If you do not want to post the bank payments, for example if you are waiting for additional information, click Discard.
If you do want to post the batch entry, click Save.
To recall batch bank payments
1. Select Bank > New Payment.
2. From the Bank Payment window, click Recall.
Alternatively you can use a different method. From the Sage 50 Accounts menu bar, select Edit > Recall.
413
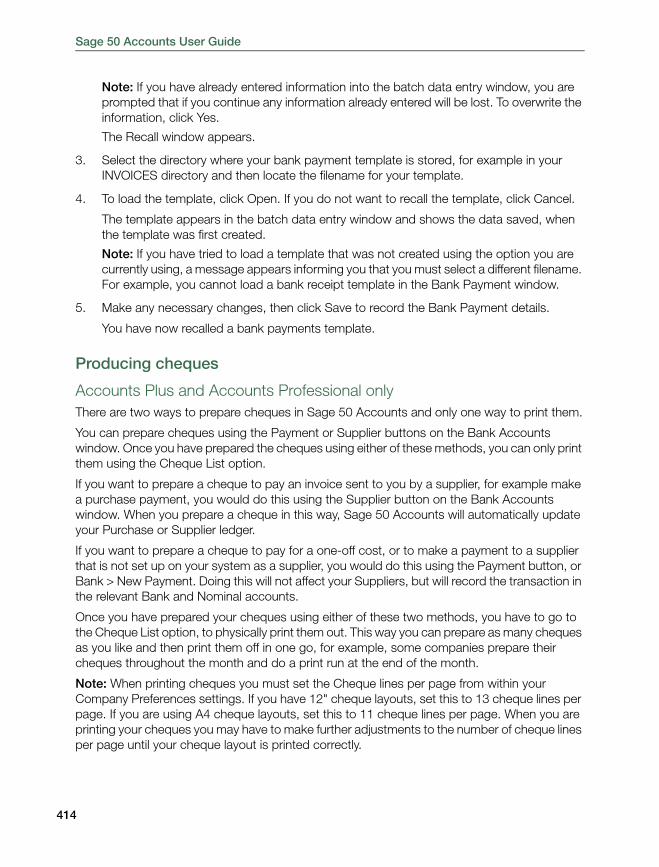
Sage 50 Accounts User Guide
41
Note: If you have already entered information into the batch data entry window, you are prompted that if you continue any information already entered will be lost. To overwrite the information, click Yes.
The Recall window appears.
3. Select the directory where your bank payment template is stored, for example in your INVOICES directory and then locate the filename for your template.
4. To load the template, click Open. If you do not want to recall the template, click Cancel.
The template appears in the batch data entry window and shows the data saved, when the template was first created.
Note: If you have tried to load a template that was not created using the option you are currently using, a message appears informing you that you must select a different filename. For example, you cannot load a bank receipt template in the Bank Payment window.
5. Make any necessary changes, then click Save to record the Bank Payment details.
You have now recalled a bank payments template.
Producing cheques
Accounts Plus and Accounts Professional onlyThere are two ways to prepare cheques in Sage 50 Accounts and only one way to print them.
You can prepare cheques using the Payment or Supplier buttons on the Bank Accounts window. Once you have prepared the cheques using either of these methods, you can only print them using the Cheque List option.
If you want to prepare a cheque to pay an invoice sent to you by a supplier, for example make a purchase payment, you would do this using the Supplier button on the Bank Accounts window. When you prepare a cheque in this way, Sage 50 Accounts will automatically update your Purchase or Supplier ledger.
If you want to prepare a cheque to pay for a one-off cost, or to make a payment to a supplier that is not set up on your system as a supplier, you would do this using the Payment button, or Bank > New Payment. Doing this will not affect your Suppliers, but will record the transaction in the relevant Bank and Nominal accounts.
Once you have prepared your cheques using either of these two methods, you have to go to the Cheque List option, to physically print them out. This way you can prepare as many cheques as you like and then print them off in one go, for example, some companies prepare their cheques throughout the month and do a print run at the end of the month.
Note: When printing cheques you must set the Cheque lines per page from within your Company Preferences settings. If you have 12" cheque layouts, set this to 13 cheque lines per page. If you are using A4 cheque layouts, set this to 11 cheque lines per page. When you are printing your cheques you may have to make further adjustments to the number of cheque lines per page until your cheque layout is printed correctly.
4

Banking tasks
To prepare your cheques using the Supplier optionUse this option to pay an invoice sent to you by a supplier - that is, make a purchase payment. When you prepare a cheque in this way, Sage 50 Accounts will automatically update your Purchase or Supplier ledger.
1. Open the Bank module, then, if appropriate, use the view selector to switch to the Bank Accounts view.
2. Select the bank account from where you want to pay your supplier, and then click Supplier.
The Supplier Payment window appears. This also displays the name of the selected bank account (on the title bar of the window).
Note: The top half of the window looks like a cheque.
3. To filter the transactions displayed, choose All, Due or Date Range from the Show drop-down list:
All: All transactions for the Payee selected appear in the Supplier Payment list.
Due: All those transactions that are due for payment for the selected supplier, appear in the Supplier Payment list.
Date Range: Selecting this option results in the From / To date selections functions to become active. Select the date range required. The transactions list will be updated to reflect the date range chosen
415

Sage 50 Accounts User Guide
41
4. Enter the following details:
5. Allocate the money paid to the individual invoice items displayed in the item table by entering a value in the Payment box of each. You can part pay an invoice item or pay it off in full, but you cannot allocate more than the full value of the item.
If you are paying an item in full, click on the item's Payment box then click Pay in Full. The amount needed to pay the item in full is then entered for you automatically.
Continue allocating in this way until the amount in the Analysis Total box equals the amount you are paying to your supplier.
6. If you have been given any discount against an invoice item, then enter the discount amount, not the percentage amount, in the Discount box. For example, this may have been
Payee Enter the account code of the supplier you want to pay, or use the drop-down list to select from the list of available codes. You can create a new supplier account here if necessary. All items that you have been invoiced for by that supplier and which are not fully paid, as well as payments you have made on account and credit notes, appear automatically in the table.
Date The program date is entered for you automatically. Type in the date you made the payment if this is different. Use the Calendar button to enter the date.
Cheque Number Leave this box blank because Sage 50 Accounts will automatically generate these cheque numbers.See step 5 in To print your cheques using Cheque List on page 419.
Cheque Total
Note: This box is not labelled, but appears where you would normally enter the sum of the cheque.
You can enter the amount of the cheque in two ways.
Firstly, you can enter it manually, by placing your cursor in the box and typing in the sum you want to pay. You can then click Automatic, which will then allocate the value of the cheque to the invoices in the order they are displayed. Your bank balance will also be automatically reduced by the total amount on the cheque.
Secondly, you can enter the amounts you want to pay per invoice. This way you enter the value in each Payment box and Sage 50 Accounts will automatically put the total in the cheque and reduce your bank balance accordingly (see step 4).
6

Banking tasks
offered to you for early payment. The amount shown in the Payment column is reduced by the value of the discount entered.
If you have selected not to create remittance information for each supplier payment within your Bank Defaults and you want to print a remittance advice note, click Create Remittance. This saves the remittance information. To print your remittance advice note and cheque, follow the instructions given in the following section.
If you have selected to create remittance information for each supplier payment within your Bank Defaults, the Create Remittance button does not appear. To print your remittance advice note and cheque, follow the instructions given in the following section.
7. To save your payment details, click Save.
To prepare your cheques using the Payment optionUse this option to prepare cheques for one-off payments. Using this option does not affect your Suppliers, but will record the transaction in the relevant Bank and Nominal accounts.
1. Select the Bank module and then, if appropriate, use the view selector to switch to the Bank Accounts view.
2. Select the bank account from where you want to pay, and then click Payment.
The Bank Payments window appears. This also displays the name of the selected bank account.
.
417

Sage 50 Accounts User Guide
41
3. Enter the following details:
Bank Enter the bank account you want to make the payment from. If the bank account selected is not a cheque account - that is, it is a cash or credit card, a warning appears when you click Print Cheque. If you are entering several items, you must select the same bank account for each item to generate the cheque, each individual cheque needs to be entered separately.
Date The program date is entered for you automatically, but you can change this if required.
Ref You can enter a reference here for this payment, but any values entered in this column will be overwritten when the cheque is printed with the automatically generated cheque number from the cheque printing option.
N/C Enter here a nominal account code for the payment to be posted to, or use the drop-down list to select from the list of available codes. You can create a new account code here if necessary.
Dept Enter the department code here. The transaction will be included when analysing by department at a later date.
Project Reference - Accounts Plus and Accounts Professional only
If you have created projects, the payment can be assigned to a project if required, by entering the project’s reference code or choosing the project from the drop-down list.
Cost Code - Accounts Plus and Accounts Professional only
If you have selected a project reference for the payment, the relevant cost code should be entered here.
Details Describe the payment transaction here, for example Motor Expenses.
Net Enter the net amount for the bank payment here.
Each time you enter a value in the amount column, the batch total is updated at the foot of the column.
T/C By default, the tax code listed in the Supplier Defaults is listed here. If you have not changed the supplier defaults, the tax code T1 is entered automatically. You can change this if required.
8

Banking tasks
4. To print a cheque for this bank payment, click Print Cheque.
The Cheque window appears.
5. From the Payee drop-down list, select the supplier you want to make the cheque payable to. If you do not have a supplier record, type the name you require in the box provided, and enter the supplier address if required.
6. To save your bank payment to enable you to print the cheque using the Cheque option, click Save.
7. To return to the Bank Accounts window, click Close.
8. To print your cheques automatically, click Cheques and follow the instructions given in the next section.
To print your cheques using Cheque ListAfter preparing your cheques, you now can print them using the Cheque List facility. Some companies choose to prepare all their cheques as they go and print them off in one go - a print run.
1. Open the Bank module, then from the toolbar, click Cheques.
The Print Cheques window appears, displaying all the cheques for the highlighted bank account that have been prepared using the Payments and Suppliers options but have not been printed before and have blank references.
Note: When printing cheques you must set the Cheque lines per page option from within your Company Preferences settings. When you are printing your cheques you may have to make further adjustments to the number of cheque lines per page until your cheque layout is printed correctly.
Tax This box displays the amount of VAT, automatically calculated from the Net amount and the tax code. If you entered a zero-rated VAT code, for example T0, then the VAT amount will be zero.
419

Sage 50 Accounts User Guide
42
Note: You can use the Print List button to print what is displayed. This can help you when you are manually ticking off the cheques that you have printed.
2. To select a different bank account use the Bank A/C Ref drop-down list.
3. If you want to restrict the transactions that appear to a certain date range, select the Date Range check box and enter the date range you require in the From and To boxes.
4. If you want to include cheques that have already been printed, select the Show Printed Items check box. If you have already printed a cheque, it appears in a different colour in the Print Cheques window and a 'Y' appears in the Printed column.
Note: If you are certain that you will not want to reprint cheques, you can completely remove all printed and allocated cheques from the list by choosing the Purge button. Use this button with care!
5. The starting cheque number is automatically entered for you. The first time you use this facility, the cheque number 100001 is allocated by default. You can change this number so it is the same number on the blank cheque that is going to be printed if you require. The cheque number is automatically updated for you, when you print your cheques.
If a cheque has already been printed and allocated a cheque number, the cheque number appears in the Cheque column.
6. Select the transactions you want to print cheques for.
7. Click Print Cheques. If you have not selected any transactions the software warns you that cheques will be printed for all listed transactions. To continue, click Yes, and print cheques
0

Banking tasks
for all of the listed transactions. To abandon and select the individual transactions that you want to print cheques for, click No.
The Cheque Layouts window appears.
8. From the Cheque Layouts window, select the layout you require and click Run.
Layouts that conform to APACS best practice for cheque printing are provided (SECREM12, SECREMA4 AND SECCHQDT). These layouts offer better protection against cheque fraud than existing layouts by printing the full amount in words without spaces: **FORTYTHREETHOUSANDFIVEHUNDREDANDFORTYPOUNDS10P**.
The remaining layouts print the values for thousands, hundreds, pounds and pence to separate boxes on the cheques.
Note: Your cheque stationery must match the layout you choose.
Your cheques are printed and a message appears asking you to confirm that they have all printed correctly.
9. If your cheques have printed correctly, each cheque is given a reference number, starting with the Starting Cheque Number and incrementing by one for the next cheque. When all of your cheques have been given a reference, the next cheque number is stored with the bank record.
Note: If your remittance note spans over more than one page, only the final page contains the printed cheque, cheques on previous pages of the remittance are voided using a series of 'xxxx's.
421

Sage 50 Accounts User Guide
42
Recording a transfer
If you want to record the transfer of money from one bank account to another you can do this either by making a journal entry (see Recording a journal entry on page 374), or by selecting Bank > Record Transfer.
For example, you can use the Bank Transfer facility to record money you have taken from your current account that you have used to top up your petty cash. Accounts Professional users can also record transfers between non-base currency accounts, provided that you've activated Foreign Trader. Sage 50 Accounts uses the exchange rates set up in your Currency table to calculate the overall exchange rate for the transfer.
Alternatively, if you make bank transfers on a regular basis, you can set up a recurring entry. For more information, see To enter a journal recurring entry on page 442.
To make a bank transfer
1. Select Bank > Record Transfer.
The Bank Transfer window appears.
2. In the boxes provided, enter the following transfer details:
From Enter the bank account code of the bank from which the money is being transferred. Use the drop-down list to select from the bank account list.
2

Banking tasks
3. To process the transfer, click Save, to re-enter the data click Discard and/or to leave the window click Close.
Bank transfers involving foreign currency accounts
Accounts Professional onlyIf you have activated Foreign Trader so that you can work with accounts in difference currencies, Sage 50 Accounts Professional allows you to enter bank transfers between base and non-base currency accounts. You can also post transfers between two non-base currency bank accounts.
For full details about dealing with inter-currency bank transfers, see Bank Transfers involving foreign currency accounts on page 819.
To Enter the bank account code of the bank you want to receive the money. Use the drop-down list to select the bank code from the bank account list.
Reference Type a reference to be recorded for this transaction in the audit trail. For example, you can enter a cheque number.
Department If you want your transaction to be analysed to a specific department, enter the department number here.
Date Today's date is entered for you automatically but you can change this if required.
Description Type a description of up to sixty characters for easy reference.
Amount / Payment Value
Enter the value you want to transfer.
Exchange Rate - Accounts Professional only
If you have run the Foreign Trader Setup Wizard to use foreign currencies in Sage 50 Accounts, you can enter your currency exchange rate here.
423

Sage 50 Accounts User Guide
42
Reconciling your bank account
Bank reconciliation is the process of matching your PC bank records with the statement from your bank.
We recommend that you reconcile your bank accounts, when you receive your statement from the bank. By reconciling regularly, you will not have too many transactions to check and you will not have to make as many adjustments for possible interest charges or overdraft payments.
There are two ways to reconcile your bank accounts. You can use e-Banking see e-Banking on page 739. Or, as described in this section, you can manually reconcile your bank accounts. Regardless of which method you choose, bank reconciliation is a formal check of the bank records you keep against the bank statement(s) you receive from the financial organisation(s) you deal with.
You don’t have to reconcile any of your bank accounts if you don’t want to. However, it is good practise to do so ensuring:
Your bank records are accurate and complete.
Charges and/or interest applied to your account are identified and adjustments made to account for these.
Erroneous transactions are identified, which can then be disputed with the financial organisation you deal with.
Missing transactions can be added to your bank records to bring them up to date.
What bank reconciliation offers
You can save a history of bank reconciliations.
You can apply a reference to each bank reconciliation to correspond to the relevant bank statement used.
You can view past reconciliations stored in the history.
You can make your matched bank transactions correspond the those in your bank statement by repositioning transactions.
You can put a bank reconciliation on hold, save what you have done and return to finish the job later. The next time you access bank reconciliation you can choose to:
Open the bank reconciliation as it was left. Recently recorded transactions up to and including the date associated with the bank reconciliation are made available for reconciliation.
Throw the bank reconciliation away and start again.
You can send the information displayed during reconciliation, matched and unmatched transactions, to Excel for further analysis.
4

Banking tasks
What do I need?
Latest bank statement(s) you have received.
The bank record you want to reconcile enabled for reconciliation.
To reconcile your bank statement
1. Open the Bank module, then from the toolbar, click Reconcile.
The Statement Summary window appears.
2. Select the bank you want to reconcile from the drop-down list.
3. Use the Statement Summary window to record information shown on your bank statement. You can enter the following statement information:
425

Sage 50 Accounts User Guide
42
Statement Reference Enter a statement reference. This entry box is a mandatory entry and is recorded on the Bank Reconciliation PDF, when it is created during reconciliation.
Note: The PDF is only created if the Create Bank Reconciliation PDF check box has been selected in your Bank Defaults settings.
The Statement Reference entry box is automatically populated with a suggested reference that has a specific structure.
For example, 1200 2010-01-11 01 representing Bank 1200, Year 2010, Month 01, Day 11 and a number, in this case 01, representing the first statement reference entered.
However, you can enter any reference you like, for example your bank statement reference.
Statement (End) Date The current system date appears. You can change this date to the date on your bank statement so that only those transactions up to and including the date are available for reconciliation. The date cannot be blank.
Ending Balance If this is the first time the bank account is to be reconciled the account’s opening balance is displayed, otherwise the reconciled balance from the previous reconciliation is displayed. Enter the balance shown on your bank statement.
If your account is overdrawn, to record a negative amount place a minus at the beginning of the value.
Interest Earned Amount Amount: If your bank statement shows interest earned, enter the amount. The amount is committed to the bank account when transactions are reconciled and appears as a bank receipt.
Date: Enter the date the interest was applied to your account.
NC: From the drop-down list, select a nominal account you want to post the interest to.
Tax Code: From the drop-down list, select a tax code you wish to apply to the Interest Earned Amount. This is set to T2 (0%) by default.
6

Banking tasks
4. When you have entered your statement information, click OK.
The Bank Reconciliation window appears.
Account Charges Amount: If any bank charges appear on your statement, enter an amount for charges. The amount is committed to the bank account when reconciliation is reconciled and appears as a bank payment.
This amount is added to the reconciliation as a fixed amount, which cannot be split into separate charges. If you have several charges you want to record separately, add them using an adjustment.
Date: Enter the date the charges were applied to your account.
NC: From the drop-down list, select a nominal account you want to post the charge to.
Tax Code: From the drop-down list, select a tax code you wish to apply to the Bank Charges amount. This is set to T2 (0%) by default.
427

Sage 50 Accounts User Guide
42
All unreconciled transactions, up to and including the Statement (End) Date, are listed in the top half of the Bank Reconciliation window - the Unmatched Items section.
An opening balance appears in the lower area of the window - the Matched Against Statement section. If this is the first time the bank account is to be reconciled the account’s opening balance appears, otherwise the reconciled balance from the previous reconciliation appears. It is displayed for information purposes only, it cannot be removed or changed.
The height of the upper and lower sections can be adjusted by dragging the horizontal splitter bar up or down, as required. The columns displayed in both panes are completely configurable - that is, right-click on a column header cell and select the columns to be displayed from the menu that appears.
Any account charges or interest earned that have been recorded using the Statement Summary window appear in the lower - Matched Against Statement area of the window. They cannot be moved into the Unmatched items area. To remove them click Edit, then set the charge/interest amount to zero on the displayed Statement Summary window and click OK. Confirm this action by clicking OK when prompted.
Depending on your Sage 50 Accounts settings, transactions may be grouped and displayed as one transaction (see Entering your bank defaults on page 152). Grouped transactions are indicated by the letter 'Y' in the Grouped column. See hints and tips at the end of this section that explain how to view this column.
5. Work through your bank statement one line at a time. Match a transaction on your bank statement to a transaction in the Unmatched items area.
Select the item to be matched, then click Match.
The item is removed from the top Unmatched pane, and appears in the lower Matched pane.
As you move transactions the Matched Balance and Difference values change automatically.
Transactions are positioned in the lower - Matched Against Statement pane in the order in which they are moved into the area. Any transaction within this area that is associated with a negative bank balance appears red.
To move a transaction from the lower - Matched Against Statement pane to the Unmatched upper pane, left-click on the transaction, then click Unmatch.
Once you become proficient in the reconciling procedure, you can speed up the process by selecting multiple transactions to match / unmatch.
6. To add a transaction to your bank records - bank receipt / payment, customer receipt / refund, supplier payment refund, click Adjust.
Caution: You cannot delete adjustments from the reconciliation.
The Adjustment window appears.
8

Banking tasks
7. Select an Adjustment type, appropriate to the adjustment you wish to make, then click OK.
Note: The Adjustment types available vary, according to user access rights. If full user access rights are available, Bank Payment adjustment is selected, by default.
The corresponding Receipts, Payments or Refunds window appears.
To record a Bank Payment adjustment, follow the procedure described in Recording a bank, cash or credit card payment on page 397.
To record a Bank Receipt adjustment, follow the procedure described in Recording a bank receipt on page 392.
To record a customer refund adjustment, follow the procedure described in To post a customer refund on page 580.
To record a customer receipt adjustment, follow the procedure described in To record a customer receipt on page 570.
To record a Supplier Payment adjustment, follow the procedure described in To record a supplier payment on page 644.
To record a Supplier Refund adjustment, follow the procedure described in To post a supplier refund on page 653.
8. When you save your Receipts / Payments or Refund adjustment and close the corresponding window, the adjustment is displayed in the lower - Matched Against Statement area of the Bank Reconciliation window.
9. To change the position of a transaction in the lower - Matched Against Statement area, select a transaction and then click up and down arrows to reposition the transaction within the list.
At any time, you can select Print to print all the details of your reconciliation window including the header information, the unmatched items list, the matched items list and the footer information, as a single document. Similarly, you can select Send to Excel to display all this information in Microsoft® Excel.
429

Sage 50 Accounts User Guide
43
10. Once you are satisfied you have completed the reconciliation, all transactions are selected, the 'Statement Balance' = 'Matched Balance' and the 'Difference' balance is zero, click Reconcile.
Note: If the difference is not zero after clicking Reconcile, a warning appears with the option to enter an adjustment, ignore the difference or cancel and return to the reconcile window. For further information about these options, see below.
A Processing - Please Wait progress window appears, signifying that the reconciliation process is taking place. When the reconciliation process is complete, the Bank Reconciliation window closes.
The transactions are marked as reconciled, displayed as 'R' in the audit trail, and they will not re-appear for reconciliation again. A history of the reconciliation is stored in PDF format if you applied a statement reference to the reconciliation.
Note: This is also dependent on whether the Create Bank Reconciliation PDF check box is selected in Bank Defaults.
If the end and matched balances are not equal you can choose to:
Investigate and rectify the problem. Remember, you can put the bank reconciliation on hold and return to finish it later. Any transactions you add to Sage 50 to rectify the problem will be made available for reconciliation provided their date does not exceed the reconciliation’s Statement (End) Date. To put the bank reconciliation on hold, click Save and then, when prompted to do so, click OK. If you put the reconciliation on hold, when you next open the bank reconciliation window you are given the option of using the saved statement or discarding it to start the reconciliation again.
Use the Nominal Activity Report to investigate the problem. This report lists all the transactions that have been made to and from the bank, both reconciled and those that have not been reconciled. To do this, from the Company module, select Nominal Ledger > Reports > Report Browser > Nominal Activity Reports. Select the criteria for the bank account you are reconciling.
Save the reconciliation with a known discrepancy.
The bank reconciliation is saved as usual, however the next time you reconcile the bank account the opening balance displayed for the bank will be in doubt.
Enter an adjustment.
0

Banking tasks
Hints and tips
Selecting transactions: Instead of using your mouse to select each line of your statement, you can use the arrow keys to scroll up and down, and use the SPACEBAR to select each line. Press Return on the keyboard to move selected transactions into the Matched Against Statement area.
You can sort unmatched items by clicking on any of the column headings in that area.
You can hide or display columns in the Unmatched items area. The Date, Payment and Receipts columns always appear. You can choose to hide or display the No, Type, Details, Ref and Grouped columns. To do this right-click a column heading and then select the columns’ behaviour from the displayed menu.
Swap: Use this to select or clear multiple transactions.
Clear: If you have highlighted the wrong transaction in the Unmatched items area, to remove the selection click Clear. This will clear all highlighted transactions.
Find: Use this to search for transactions - unmatched items only. You can search for transactions by transaction number, account reference, details, reference, date and net amount.
Print: Use this to generate a copy of the matched and unmatched transactions displayed during reconciliation.
History: To view a previous bank reconciliation click View History and select the reconciliation you are interested in from the list of PDFs.
Calculators and calendars: These are found to the right of many data entry boxes and can be used to enter information.
431

Sage 50 Accounts User Guide
43
Printing and exporting your Bank Reconciliation
At any time during bank reconciliation, you can print the current state of your bank reconciliation, or send it to Microsoft® Excel. You may find this to be useful, if you need to follow up any anomaly in your bank statement or your current bank reconciliation.
To print the current bank reconciliation:
1. From your Bank Reconciliation window, click Print.
A Print window appears, where you can define your print settings.
2. When you have established your print settings, click OK.
Your selected print output is generated, with both Matched and Unmatched lists presented.
To send your current bank reconciliation to Microsoft® Excel:
1. From your Bank Reconciliation window, click Send to Excel.
Microsoft® Excel then opens, with both your Unmatched and Matched reconciliation lists presented.
2

Banking tasks
Printing a bank statement report
You can print a statement for any or all of your Sage 50 Accounts bank accounts any time you want, showing all of your reconciled payments and receipts. This means that your Sage 50 Accounts bank statements should match your actual bank statements.
Note: The Sage 50 Accounts bank statement shows the dates the transactions were given when entered into Sage 50 Accounts, whereas your actual bank statement shows the dates the transactions were processed at the bank. Use the Statement facility to print a report in bank statement form.
To print a bank statement:
1. Select Bank > Statement.
The Print Output window appears.
2. Choose the type of print out you require and then click Run.
The Criteria window appears.
3. Enter a date range.
This has a default of a From date of 01/01/80 and a To date which is the program date.
If you accept these defaults, all reconciled transactions up to today's date are included in the report. You can change these dates so that only transactions within a specific date range are included, for example, a week or a month. To change the dates, click on the From and To boxes, and edit the date as required.
4. If required, enter a range in the Bank Ref boxes to select the banks that you want to produce statements for.
Note: If a bank account is highlighted on the bank list, transactions for that account will be displayed.
5. To accept the settings and print the statement, click OK. To exit without running the bank statement, click Cancel.
433

Sage 50 Accounts User Guide
43
Creating and processing recurring transactions
Sage 50 Accounts lets you record the regular payments that you make every month, such as direct debits and standing orders. These are known as recurring entries. All you need to do is add these recurring entry details into the Recurring Entries facility, then every day, week or month, on your command, Sage 50 Accounts is updated with these transaction details.
Explaining recurring entries
Recurring entries are those payments that you make regularly, such as direct debits and standing orders.
Within Sage 50 Accounts you can enter recurring entries for different time periods. For example, you can enter daily, weekly, monthly and quarterly recurring entries.
You can enter recurring entries against customer and supplier accounts. For example, you would set this up if you were paying a supplier by instalments.
You can also enter recurring entries against nominal accounts. For example, you can enter a recurring entry for bills that you pay on a regular basis.
You can also use the Recurring Entries facility, to set up transfers between your bank accounts that you make on a regular basis.
The Recurring Entries window lists all of your recurring entries. From here you can add, edit and delete these entries. You can add the following types of recurring entry:
Bank/Cash/Credit Card Payment
You would use this option to record regular payments from your bank accounts (see the next section).
Bank/Cash/Credit Card Receipt
You would use this option to record the receipt of money from someone else into your bank account, petty cash or credit card (see the next section).
Bank/Cash/Credit Card Transfer
You would use this option to transfer money between your bank accounts (see the next section).
Customer Payment on Account
Use this option to record the receipt of money from a customer to your accounts. For more information, see To enter a customer payment on account recurring entry on page 438.
Supplier Payment on Account
Use this option to record the payment of money from your accounts to a supplier. For more information, see To enter a supplier payment on account recurring entry on page 440.
4

Banking tasks
You can also view your recurring entries before you post them so that you can make any last minute changes.
Follow the instructions below for the type of recurring entry that you want to add.
To enter a bank/cash/credit card recurring entry
1. Select Bank > New Recurring Transaction.
The Add/Edit Recurring Entry window appears.
Journal Debit
Journal Credit
You would use these options in a similar way to the previous option, to transfer money between nominal codes. For more information, see To enter a journal recurring entry on page 442.
435

Sage 50 Accounts User Guide
43
2. In the boxes provided, enter the following transaction details for each recurring entry.
Transaction Type From the drop-down list select the type of transaction that you want to post.
You can select one of three bank recurring entries from the list of recurring entries available:
Bank/Cash/Credit Card PaymentBank/Cash/Credit Card ReceiptBank/Cash/Credit Card Transfer
Bank A/C If you are entering a bank payment or receipt recurring entry, enter the bank account nominal code that you want the recurring entry to be posted to.
If you are entering a bank transfer recurring entry, enter the bank account nominal code of the bank you are transferring from.
Nominal Code
('Bank A/C To' if you are setting up a transfer)
If you have chosen to enter a bank payment or a receipt recurring entry, enter the nominal code of the account where you want the recurring entry posted to.
If you have chosen to post a bank transfer recurring entry, enter the bank account nominal code that you want to transfer the money to.
Transaction Ref Enter a reference for the recurring entry transaction here.
Transaction Details Enter some text to describe the transaction. This text appears in the audit trail.
Department If you want to assign this transaction to a department for reporting purposes, enter the department number here.
Every Enter the frequency of the recurring entry here. This can be a number of days, weeks or months. For example, you could enter 14 days, 5 weeks or 3 months.
6

Banking tasks
Total Required Postings If you know the number of postings you need to make, for example, if you are paying off a loan over 24 months, enter the number here. This automatically updates the Finish Date.
Note: You cannot change the number shown in the Total Required Postings box to a number that is less than the number of postings that have already been made.
For example, if the recurring entry has already been posted five times and you try to change the Total Required Posting to three, a message appears informing you that you must enter a value greater than the number of postings already made. Click OK to continue.
Start Date Enter the date that you want to start posting the recurring entry. The date defaults to the program date but you can change this if required.
Finish Date This box updates automatically if you have entered a value in the Total Required Postings.
If you have not entered a value in Total Required Postings, the Finish Date is not calculated. For example, you would not enter a total number of postings for a rent payment, as you would expect this payment to continue into the foreseeable future. In this case no Finish Date would be calculated and the recurring entry would continue to be posted until you suspend posting or delete the recurring entry.
The box is updated to read Perpetual.
Last Posted This box shows the date the recurring entry was last posted. You cannot change this date.
Note: The box remains blank until you have saved and processed the recurring entry for the first time.
Suspend Posting If you want to suspend the posting of a recurring entry, select this check box. For example, if there is a dispute, you can suspend the posting of the recurring entry until it has been resolved.
437

Sage 50 Accounts User Guide
43
3. To save your new recurring entry, click OK. To exit without saving, click Cancel.
The Bank Accounts window appears.
4. To view a list of your recurring entries click Recurring Transaction List, then to return to the Bank accounts window, click Close.
To enter a customer payment on account recurring entry
1. Select Bank > New Recurring Transaction.
The Add/Edit Recurring Entry window appears.
2. In the boxes provided, enter the following transaction details for each recurring entry.
Net Amount/Amount Enter the net amount of the transaction in the Net Amount box.
Note: If you do not post a recurring entry for the same amount each time, enter zero here.
Tax Code Enter the tax code you require here.
VAT The VAT element of the transaction appears automatically for you. You can change this if required.
Transaction Type Select the Customer Payment On Account transaction type.
Bank A/C Enter the bank account nominal code that you want the recurring entry to be posted to.
Customer A/C Enter the customer account code that you want to post your recurring entry against.
Transaction Ref Enter a reference for the recurring entry transaction here.
Department If you want to assign this transaction to a department for reporting purposes, enter the department number here.
Every Enter the frequency of the recurring entry here. For example, you could enter 14 days, 5 weeks or 3 months.
Total Required Postings If you know the number of postings you need to make, for example if your customer is paying off a debt in 12 repayments, enter the number here. This automatically updates the Finish Date.
8

Banking tasks
Start Date Enter the date that you want to start posting the recurring entry. The date defaults to the program date but you can change this if required.
Finish Date This box updates automatically if you have entered a value in the Total Required Postings. If you have not entered a value in Total Required Postings, the Finish Date is not calculated.
For example, you would not enter a total number of postings for a long-term service agreement, as you would expect this payment to continue into the foreseeable future. In this case, no Finish Date would be calculated and the recurring entry would continue to be posted until you suspend the posting or delete the recurring entry.
The box is updated to read Perpetual.
Last Posted This box shows the date the recurring entry was last posted. You cannot change this date.
Note: The box remains blank until you have saved and processed the recurring entry for the first time.
Suspend Posting If you want to suspend the posting of a recurring entry, select this check box. For example, if there is a dispute, you can suspend the posting of the recurring entry until it has been resolved.
Net Amount'/'Amount If you are using the Standard Accounting or Flat Rate - Invoice Based VAT schemes, enter the gross amount of the transaction in the Amount box.
If you are using the VAT Cash Accounting or Flat Rate - Cash Based schemes, enter the net amount of the transaction in the Net Amount box.
Note: If you do not post a recurring entry for the same amount each time, enter zero here.
439

Sage 50 Accounts User Guide
44
3. To save your new recurring entry, click OK. To exit without saving, click Cancel.
The Bank Accounts window appears
4. To view a list of your recurring entries click Recurring Entries List, then to return to the Bank Accounts window, click Close.
To enter a supplier payment on account recurring entry
1. Select Bank > New Recurring Transaction.
The Add/Edit Recurring Entry window appears.
2. In the boxes provided, enter the following transaction details for each recurring entry.
Tax Code If you are using the Standard Accounting or Flat Rate - Invoice Based VAT schemes, the Tax Code box does not appear, as the recurring entry is posted against the non-vatable tax code set up in your Company Preferences.Note: If you change from the Standard VAT scheme to the VAT Cash Accounting scheme, you are prompted to make sure that you change your customer or supplier payment on account recurring entries to include VAT information.
If you are using the VAT Cash Accounting or Flat Rate - Cash Based VAT schemes, enter the tax code you require here.
VAT If you are using the Standard Accounting or Flat Rate - Invoice Based VAT schemes, the VAT box does not appear as the recurring entry is posted against the non-vatable tax code set up in your Company Preferences.
If you are using the VAT Cash Accounting or Flat Rate - Cash Based VAT schemes, the VAT element of the transaction appears automatically for you.
Transaction Type Select the Supplier Payment On Account transaction type.
Bank A/C Enter the bank account nominal code that you want the recurring entry to be posted from.
Supplier A/C Enter the supplier account code that you want to post your recurring entry against.
Transaction Ref Enter a reference for the recurring entry transaction here.
0

Banking tasks
Department If you want to assign this transaction to a department for reporting purposes, enter the department number here.
Every Enter the frequency of the recurring entry here. For example, you could enter 14 days, 5 weeks or 3 months.
Total Required Postings
If you know the number of postings you need to make, for example if you are paying off a loan over twenty four months, enter the number here. This automatically updates the Finish Date.
Start Date Enter the date that you want to start posting the recurring entry. The date defaults to the program date but you can change this if required.
Finish Date This box updates automatically if you have entered a value in the Total Required Postings.
If you have not entered a value in Total Required Postings, the Finish Date is not calculated. For example, you would not enter a total number of postings for a rent payment, as you would expect this payment to continue into the foreseeable future. In this case no Finish Date would be calculated and the recurring entry would continue to be posted until you suspend posting or delete the recurring entry.
The box is updated to read Perpetual.
Last Posted This box shows the date the recurring entry was last posted. You cannot change this date.
Note: The box remains blank until you have saved and processed the recurring entry for the first time.
Suspend Posting If you want to suspend the posting of a recurring entry, select this check box. For example, if there is a dispute, you can suspend the posting of the recurring entry until it has been resolved.
441

Sage 50 Accounts User Guide
44
3. To save your new recurring entry, click OK. To exit without saving, click Cancel.
The Bank Accounts window appears.
4. To view a list of your recurring entries, click Recurring Transactions List, then to return to the Bank Accounts window, click Close.
To enter a journal recurring entry
1. Select Bank > New Recurring Transaction.
The Add/Edit Recurring Entry window appears.
2. In the boxes provided, enter the following transaction details for each recurring entry.
Net Amount/Amount If you are using the Standard Accounting or Flat Rate - Invoice Based VAT schemes, enter the gross amount of the transaction in the Amount box.
If you are using the VAT Cash Accounting or Flat Rate - Cash Based schemes, enter the net amount of the transaction in the Net Amount box.
Note: If you do not post a recurring entry for the same amount each time, enter zero here.
Tax Code If you are using the Standard Accounting or Flat Rate - Invoice Based VAT schemes, the Tax Code box does not appear as the recurring entry is posted against the non-vatable tax code set up in your Company Preferences.
Note: If you change from the Standard Accounting or Flat Rate - Invoice Based VAT schemes to the VAT Cash Accounting scheme at some point in the future, you are prompted to make sure that you change your customer or supplier payment on account recurring entries to include VAT information.
If you are using the VAT Cash Accounting or Flat Rate - Cash Based schemes, enter the tax code you require here.
VAT If you are using the Standard Accounting or Flat Rate - Invoice Based VAT schemes, the VAT box does not appear as the recurring entry is posted against the non-vatable tax code set up in your Company Preferences.
If you are using the VAT Cash Accounting or Flat Rate - Cash Based schemes, the VAT element of the transaction appears automatically for you.
2

Banking tasks
Note: Make sure that the total value of your credits and debits balances. If your journal entries do not balance, Sage 50 Accounts displays an error message on processing the recurring entries.
Transaction Type Select from the following transaction type options:
Journal CreditJournal Debit
Nominal Code Enter the nominal account code that you want to post your journal recurring entry to.
Transaction Ref Enter a reference for the recurring entry transaction here.
Transaction Details Enter some text to describe the transaction. This text appears in the audit trail.
Department If you want to assign this transaction to a department for reporting purposes, enter the department number here.
Every Enter the frequency of the recurring entry here. For example, you could enter 14 days, 5 weeks or 3 months.
Total Required Postings If you know the number of postings you need to make, for example if you are paying off a loan over twenty four months, enter the number here. This automatically updates the Finish Date.
Start Date Enter the date that you want to start posting the recurring entry. The date defaults to the program date but you can change this if required.
Finish Date This box updates automatically if you have entered a value in the Total Required Postings.
If you have not entered a value in Total Required Postings, the Finish Date is not calculated. For example, you would not enter a total number of postings for a rent payment, as you would expect this payment to continue into the foreseeable future. In this case no Finish Date would be calculated and the recurring entry would continue to be posted until you suspend posting or delete the recurring entry.
The box is updated to read Perpetual.
443

Sage 50 Accounts User Guide
44
3. To save your new recurring entry, click Save. To exit without saving, click Cancel.
The Bank Accounts window appears
4. To view a list of your recurring entries click Recurring Entries List, then to return to the Bank Accounts window click close.
To process your monthly recurring entriesIf you have any outstanding recurring entries, you will be reminded every time you start Sage 50 Accounts. To post the transactions, click Yes. To use Sage 50 Accounts without posting them, click No.
Note: You can turn this reminder off by selecting the No Recurring Entries at Startup check box within your Company Preferences (Settings > Company Preferences).
1. Select Bank > New Recurring Transaction.
2. To process recurring entries, click Process.
The Process Recurring Entries window appears.
If any recurring entries are found that are past their finish date, a message appears informing you of this and also saying that they will not be included in the list.
3. The program date automatically appears in the 'Show Due Entries Up To box. You can change this if you want to change the recurring entries that are shown in the Process Recurring Entries window.
4. You can amend some of the recurring entry details, depending upon the type of transactions. The values you can amend are shown below: Y = can edit, N = cannot edit
Last Posted This box shows the date the recurring entry was last posted. You cannot change this date.
Note: The box remains blank until you have saved and processed the recurring entry for the first time.
Suspend Posting If you want to suspend the posting of a recurring entry, select this check box. For example, if there is a dispute, you can suspend the posting of the recurring entry until it has been resolved.
Net Amount Enter the net amount of the transaction in the Net Amount box.
Note: If you do not post a recurring entry for the same amount each time, enter zero here.
Tax Code Enter the tax code you require here.
4

Banking tasks
Transaction Type
Net Amount
Due Date
Tax Code VAT Amount
BP/CP/VP Y Y Y Y
BR/CR/CR Y Y Y Y
JC/JD Y Y Y N
PA Y Y Standard VAT - N
Flat Rate - Invoice Based - N
VAT Cash Accounting - Y
Flat Rate - Cash Based - Y
N
N
Y
Y
SA Y Y Standard VAT - N
Flat Rate - Invoice Based - N
VAT Cash Accounting - Y
Flat Rate - Cash Based - Y
N
N
Y
Y
JC/JD (Bank Transfer)
Y Y N N
445

Sage 50 Accounts User Guide
44
5. To update Sage 50 Accounts with all of the recurring entries that are shown, click Post. If you do not want to post your recurring entries, click Cancel.
Note: You cannot post a recurring entry with a zero value. A message appears informing you if any of the recurring entries you have chosen to post have a zero value. Click OK and edit the recurring entry to include a value or to suspend the posting for the current period.
If you try to post a recurring entry that is dated outside of the current financial year, a message appears asking you if you want to continue. To post the recurring entry outside of the current financial year, click Yes. If you do not want to continue, click No.
Viewing bank transaction activity
You can view a detailed transaction history, or activity, for all of a bank’s transactions.
1. From the Bank Record window, click the Activity tab.
The activity information appears, showing the transactions that have been made to your selected account. Each transaction is listed for the selected bank account, one line per transaction.
2. To see the individual items that make up each line, select the transaction in the upper pane to display its component parts in the lower pane.
For example, if a sales receipt (SR) transaction appears in the list in the upper pane, select it to view the details of the invoices to which it is allocated in the lower pane.
3. To filter the transactions displayed, choose the criteria you require from the following selection fields:
Show
To filter the transactions by a specific period, select the period you want to display from the Show: drop-down list. You can choose to filter the transactions by calendar month.
Alternatively, you can show only those transactions that you have reconciled to your bank statement, or only those you have yet to reconcile.
Finally, you can set a date range, transaction number range or select a transaction type to view by selecting the Custom Range option from the menu and entering your selections in the Activity Range window that appears.
Your software retains the filter you specify from this menu and applies it the next time you view the activity. This is true for all of the Show: drop-down list settings, although the values you enter in the Activity Range window will not be retained.
Date
This read-only box displays the date range you selected using the Show drop-down list. For example, if you selected Custom Range and entered the date range 01/07/2011 to 31/07/2011, these dates appear in this box.
6

Banking tasks
The Activity window only displays those transactions that fall within the specified date range.
Type
If you select Custom Range from the Show drop-down list and use the Activity Range window to choose a specific type of transaction to display, this box shows which transaction type you selected.
For example, if you chose to view only bank receipts by selecting BR - Bank Receipts on the Activity Range window, this field shows 'BR'. The Activity window now only displays bank receipt transactions dated within the specified range.
You cannot change the transaction type shown in this field directly - to change the type of transaction displayed here, you must select Custom Range from the Show: drop-down list and re-select the transaction type you want to view.
O/S Only
If you selected Custom Range from the Show: drop-down list and selected the Outstanding Transactions Only? check box on the Activity Range window, this check box is selected. This indicates that the Activity window is displaying only those transactions that are not yet paid or allocated.
You cannot change this setting directly here - to select or clear this box, select Custom Range from the Show: drop-down list and select or clear the Outstanding Transactions Only? check box in the Activity Range window.
Trans
This field shows the transaction number range currently displayed on the Activity window.For example, if you select Custom Range from the Show: drop-down list and use the Activity Range window to specify a range of transactions to view, this box shows the transaction numbers you chose.
If you do not specify a transaction range, this box displays the first and last transaction numbers from your audit trail. For example, if you have 2169 transactions on your audit trail, this field shows '1 to 2169'.
You cannot change the range shown in this field directly. To change the transaction number range shown here, select Custom Range from the Show: drop-down list and enter the transaction number range you want to view.
4. To print the information shown, click Print List.
5. To exit the Bank Record and return to the main Bank Accounts window, click Close.
For more information, please refer to the Bank > Record > To View a Bank’s Transaction Activity topic in the main software help file (F1).
447

Sage 50 Accounts User Guide
44
Managing your petty cash
Most companies use petty cash for a variety of uses, from readily available cash for everyday purchases, to travelling expenses for business trips. Setting up your petty cash account is straightforward and is easy to maintain in Sage 50 Accounts. A petty cash account is already set up in the bank accounts list for you to use.
When you take money out of your company's current account for your petty cash tin, you must record it in your accounts. You can do this by making a bank transfer, using Bank > Record Transfer. For full details on how to do this, see To make a bank transfer on page 422.
Alternatively, if you make bank transfers on a regular basis, you can set up a recurring entry, for example, if you want to set up a recurring entry of £100 a week from your current account to your petty cash tin. For further information about how to do this, refer to To enter a bank/cash/credit card recurring entry on page 435.
Recording expenses
If you, or a member of staff, have been on a business trip, you will want to record your business expenses in your accounts. You can do this by recording each receipt to the appropriate nominal code, for example, your food bills to the Subsistence account (7406) or perhaps to the UK Entertainment nominal code (7403) if you have been entertaining clients, and your travelling expenses to the Travelling nominal code (7400).
Normally, you would take your expenses from your petty cash account.
An expense is recorded as a payment. For full details on how to do this, see To record bank payments on page 397.
8

Chapter 8
Customer tasksIn this chapter:Pricing and discounts ......................450
Customer pricing .............................451
Proformas........................................483
Quotations.......................................483
Sales order processing ....................487
Entering an invoice...........................523
Posting an invoice............................562
Dealing with recurring transactions ..564
Receiving customer payments .........570
Entering a credit note.......................572
Deductions ......................................573
Deleting invoices and credit notes....577
Viewing customer transaction activity.....578
Customer refunds ............................580
Sage Pay facility...............................583
This chapter contains information on the tasks included in the Customers module. It discusses all the activities you’ll need to perform when working with your customer accounts, from creating a quotation through to recording your customers’ payments.
In this chapter, we look at the sales order cycle in detail, from the creation of an order, through allocation of stock, to despatch and completion. We also guide you through invoice production, including how to set up recurring transactions, and checking the profit you’ll make from an invoice as you create it.
Later, the chapter shows you how to enter the payments you receive from your customers, dealing with deductions, helps you to create a credit note, along with viewing customer transaction history, dealing with customer refunds and payments using the Pay by Card facility.
This chapter assumes you have set up your customer records. For details on how to do this see Chapter 5, Setting up records.

Pricing and discounts
As a business, you will know the importance of setting your prices at the right level for your customers. You can use Sage 50 Accounts to create price lists for your customers and suppliers as well as set up a number of different types of discount.
You can set up a good customer discount. With this method of discounting, you can for example, give discounts to customers who settle their bills before the due date.
Sage 50 Accounts Plus and Accounts Professional users can also set up discounts for bulk purchases, or for total order values. For example, you can give a customer a 5% discount for sales over £100, and 10% off for sales over £500. You can also set up price lists for specific groups of customers, and choose how these prices are edited and updated. It is also possible to set up special prices for individual customers that buy specific products.
With the variety of pricing and discount features in Sage 50 Accounts, it is important that you decide how you want to use them. Even after you have set up your discounts and started posting transactions you can still alter your prices, the price discounts and how they are applied.
Both pricing and discounts are affected by Sage 50 Accounts settings, see Entering invoice and order defaults on page 167.
Note: Discounts and special pricing cannot be used with Transaction Email.

Customer tasks
Customer pricing
Sage 50 Accounts applies a price to each item during invoice entry or order entry. It does this by checking an item’s price information held in the product record. An item’s price information includes:
A sales price: The standard price an item can be sold for as recorded in the product record.
A pricing structure - Accounts Plus and Accounts Professional: Used to apply an alternative price to an item when dealing with certain customers. In a pricing structure you can have:
A Special Customer Price if you have agreed a special price for a stock item with one customer.
Price Lists, which are used to set a price for products or services for a group of customers. For example, you could set up a retail price list for the majority of your customers, and a trade price list for your business customers. Prices can be fixed, or related to the sales or cost price of your stock items. Accounts Professional users can set up foreign currency price lists for overseas customers.
There is also the Supplier Price List for Accounts Professional users only. This type of list can be set up for each supplier, with the facility to import the price list from a text file. The supplier's price list will be in the supplier's own currency.
Which price is applied to a sales invoice or sales order?
451

Sage 50 Accounts User Guide
45
Using customer price lists
Accounts Plus and Accounts Professional onlyThere may be times when you want to sell your products or services to different groups of customers at a different price. This is done using price lists, which associate products at a given price to a group of customers.
Price lists can be copied. Product and price information from an existing price list is copied to the new price list. However, the associated customers are not copied, they must be added to the new price list to complete it. This is a great way to quickly create a new price list based on existing information.
To create a new price list
1. Select Customers > Price List.
The Price Lists window appears, showing any existing price lists.
2. Click New.
Note: You can also create a new customer price list using Products > Price Lists. Click New from the Price Lists window.
The New Price List window appears.
3. Enter a name and description for your new price list.
2

Customer tasks
Foreign Currency Users only: If you are using foreign currencies and want to set up a price list for customers or products in a specific currency, select that currency from the Currency drop-down list. Only customers and products that use the selected currency can be added to your new Price List. If you are not using foreign currencies, the Currency box displays the system's base currency and cannot be edited.
You are now ready to add products to your price list.
To add products to your price list
1. Select Customers > Price List.
The Price Lists window appears, showing any existing price lists.
2. From the Price Lists window, highlight the price list that you want to add products to and click Edit.
3. If it is not selected already, click the Associated Products tab.
This shows the products already attached to the selected price list. If no products have been attached to the price list, this list will be empty.
4. Click Add.
The Add Products window appears.
453

Sage 50 Accounts User Guide
45
5. Select the product(s) that you want to add to your price list.
Tip: You can select more than one product. To do this hold the CTRL key down and select the products you require. If you want to select a range of products, hold the SHIFT key down and select the range you require.
6. Select the Calculation Method you want to apply from the drop-down list.
The following methods are available for calculating your prices:
7. In the Value box enter the fixed price, value or percentage depending upon the calculation method you have chosen.
Note: If you have chosen to use the Standard Sales Price calculation method, this box is not available.
The following calculation methods are available:
Fixed Price This allows you to enter a direct price for the product. The amount entered in the Value box will be the price used in the price list. The list price of this product will not change even if the sales price changes on the product record.
Standard Sales Price This method uses the standard sales price from the product record.
Decrease Sales Price by %
This method calculates and deducts the percentage from the standard sales price.
Decrease Sales Price by Value
This method deducts the value entered from the standard sales price.
Note: You cannot use this method on foreign currency price lists or for foreign currency customers.
Mark Up % on Cost Price
This method calculates and adds the percentage mark-up onto the cost price.
Mark Up Value on Cost Price
This method adds the value mark-up entered to the cost price. As your cost price changes, the special sales price will also change by the amount entered in the Value box.
Note: You cannot use this method on foreign currency price lists or for foreign currency customers.
Increase Sales Price by %
This method increases the percentage from the standard sales price.
4
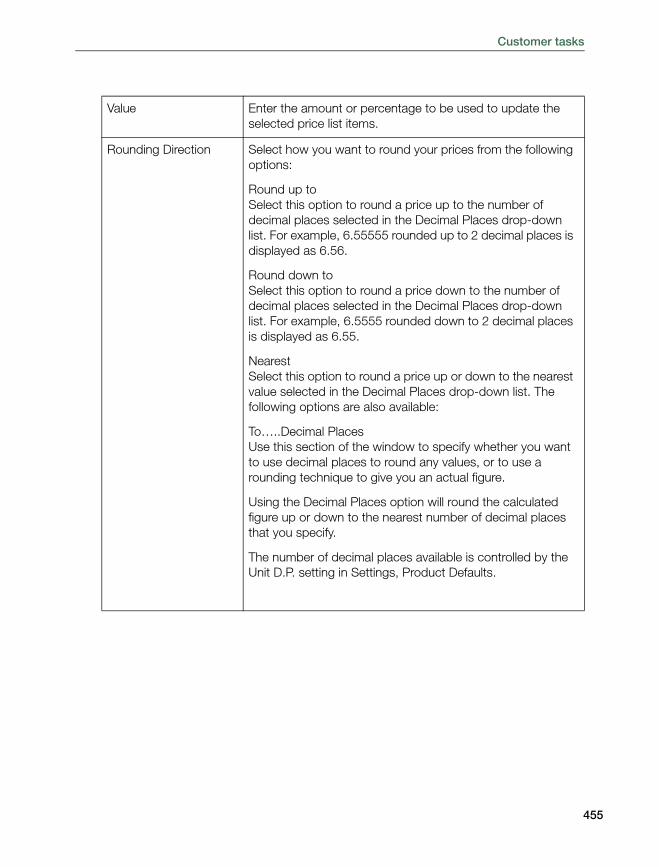
Customer tasks
Value Enter the amount or percentage to be used to update the selected price list items.
Rounding Direction Select how you want to round your prices from the following options:
Round up to Select this option to round a price up to the number of decimal places selected in the Decimal Places drop-down list. For example, 6.55555 rounded up to 2 decimal places is displayed as 6.56.
Round down to Select this option to round a price down to the number of decimal places selected in the Decimal Places drop-down list. For example, 6.5555 rounded down to 2 decimal places is displayed as 6.55.
Nearest Select this option to round a price up or down to the nearest value selected in the Decimal Places drop-down list. The following options are also available:
To…..Decimal PlacesUse this section of the window to specify whether you want to use decimal places to round any values, or to use a rounding technique to give you an actual figure.
Using the Decimal Places option will round the calculated figure up or down to the nearest number of decimal places that you specify.
The number of decimal places available is controlled by the Unit D.P. setting in Settings, Product Defaults.
455

Sage 50 Accounts User Guide
45
8. To add the product and pricing details to the price list and return to the Edit Price List window, click OK.
9. Select the method that you want to use to recalculate prices on your price lists by using one of the following Recalculate Prices Details options:
For example;
£13.4567 rounded down to 2 decimal places = £13.45.
£13.4567 rounded up to 2 decimal places = £13.46.
or
Multiples of…..plus adjustment…..Instead of rounding prices by the number of decimal places, you can select the 'Multiples of' option to round your prices to psychologically important points, such as £9.99 instead of £10.00.
For example, you may specify the rounding amount so that each price ends in 99 pence, so that £13.4567 rounded down to multiples of 0.50, plus an adjustment -0.01 = £12.99.
Recalculate Price List prices whenever Product prices change
Select this check box if you want prices to be automatically recalculated when a product sales or cost price changes. This will only affect prices that are based on the sales or cost price of a product.
Foreign Currency Users only: If you are editing a price list that has been created using a currency that is different to your base currency, the option changes to 'Recalculate Price List prices whenever Exchange Rate or Product prices change'.
6

Customer tasks
10. Click Save to update your price lists with any changes that you have specified.
Alternatively, click Close to save any changes and exit from the Edit Price List window.
You have now updated the products area of your price list. You can add as many products to the price list as you need. You are now ready to add customers to your price list.
To add customers to your price list
1. Select Customers > Price List.
The Price Lists window appears, showing any existing price lists.
2. From the Price Lists window, highlight the price list that you want to add customers to and click Edit.
3. Click the Customers tab.
4. To add a customer to your price list, click Add.
The Add Customers window appears showing all of the customer records listed in your Sage 50 Accounts software.
Only recalculate Price List Prices on selection of the Recalculate Prices button
If you want your price list prices to stay the same, regardless of changes to product cost and sales prices, select this check box. This option is useful if you want to decide when to change your price list prices, rather than having them track the product sales or cost price.
If your product prices change on the product records, you must return to this window and click Recalculate Prices.
When you click Recalculate Prices, the Recalculate Prices Preview window appears. The Recalculate Prices Preview window displays the current and newly discounted prices for the selected products. You should check the displayed details to make sure they are correct, and then click Save to change the product prices on the price lists.
457

Sage 50 Accounts User Guide
45
The Add Customers list shows the customer account reference, the customer name, whether the customer already belongs to a price list and the price list reference. If the customer does not belong to a price list, the Price List column is left blank.
Note for Accounts Professional users only: If you have activated the Foreign Trader facility by running the Foreign Trader Wizard, select the currency of the new price list from the Currency drop-down list. Only those customers who use the same currency as the currency that you have selected are displayed.
5. Select the customers that you want to add to the price list and click OK.
Note: If you have selected a customer that already appears on another price list, a message appears asking you if you want to associate the selected customer with the selected price list. If you click Yes, the selected customer will be moved to the new price list. If you click Yes to All, all of your customers will be moved to the new price list. If you click No, the selected customer will not be moved. If you click No to All, none of the selected customers will be moved. You can check which price list a customer belongs to by viewing the Price List column in the Add Customers window.
6. Click OK to add that customer record to the Price List.
The customer record is added to the price list.
Now that you have created a price list you can add customers and products to the existing price list, change product prices and delete price lists that you no longer require.
8

Customer tasks
To copy a customer price list
1. Select Customers > Price List.
The Price Lists window appears, showing any existing price lists.
2. Select the price list you want to copy and click Copy.
The Copy Price List window appears.
3. Enter a unique name for the price list. The description can be changed until the price list is saved.
4. Click Save.
5. Click the Products Associated tab and amend the displayed information, where required. Refer to the information on page 453 to help you.
6. Click Customers and add customers to the price list. Refer to the information on page 457 to help you.
7. Click Save and to return to the Price Lists window, click Close.
459

Sage 50 Accounts User Guide
46
Importing product prices onto a customer price list
Accounts Plus and Accounts Professional onlyYou can import updated product prices onto any customer price list that is set up in Sage 50 Accounts. You can also use the import process to add new products onto a customer price list, as long as the related product records exist in Sage 50 Accounts. The details you import must be in a comma separated value (CSV) format or in a text (TXT) file.
When you import details onto a customer price list, Sage 50 Accounts makes the following assumptions:
The process imports the product reference and price.
Sage 50 Accounts ignores any data (on the same line) following the price.
The software treats the first line of the import file as a heading and ignores it, providing there is only text content.
The price is in the currency held on the price list.
For example, your CSV file may look like this:
“Product Ref”, “Price”“BOARD001”, 20“BOX002”, 22.00, “with waterproof coating”“BOOKS001”, 7.99, “signed, limited edition”
In this example, Sage 50 Accounts does not import the column headings on the first line ('Product Ref' and 'Price'), nor the additional text 'with waterproof coating' and 'signed, limited edition'.
Note: When you import product prices onto a customer price list, Sage 50 Accounts automatically sets the calculation method for the product price as 'Fixed Price', as it cannot determine what calculation method has been used for the price. Sage 50 Accounts reads the cost price and sales price from the Product Record and calculates the profit margin accordingly.
To import product prices onto a customer price list
1. Select Customers > Price List.
The Price Lists window appears, showing any existing price lists.
Alternatively, you can select Products > Price Lists.
2. From the Price Lists window, select the price list you want to import details into and click Edit.
The Edit Price List window appears, showing the Associated Products information.
Alternatively, to create a new price list to import details into, click New and enter a name and description for your price list, for further information about this, please refer to To create a new price list on page 452.
3. Click Import.
0

Customer tasks
The Import Customer Price List window appears, displaying the 'Price List Name', 'Currency' and 'Description' of the price list.
Note: Sage 50 Accounts assumes that any prices you import are in the same currency as the price list. For example, if you import a product with a price of 20.00 to a euro price list, and your base currency is pound sterling, the price imports as €20.00, not £20.00 converted into euros. The Confirm Price List Import window shows the currency symbol associated with the price list you are updating.
4. Enter the directory and file name of the customer price list details file that you want to import.
If you do not know the exact location or name of the price list file, click Browse to locate the file.
5. Click Continue to proceed with the import process.
The Confirm Price List Import window appears, displaying the following information about the file you are importing:
Number of items in current price list
Displays the number of products that currently belong to the selected price list. You cannot amend this.
Valid items in import file Shows the number of items that Sage 50 Accounts can successfully import from the file you select. You cannot amend this value directly, although you can increase the number of valid items by correcting import errors displayed in the Warnings column. For more information, see Warnings, later in this table.
461

Sage 50 Accounts User Guide
46
Invalid items in import file
Shows the number of items that create import errors and cannot be imported. You cannot amend this value directly, although you can decrease the number of invalid items by correcting import errors displayed in the Warnings column. For more information, see Warnings later in this table.
Line Shows the position of this product line within the CSV or TXT file you are importing. You cannot change this.
Stock Code Displays the stock code held in the import file. You can amend this if you require.
Current Price Reads the sales price currently held on the price list. If the product does not yet appear on a price list, Sage 50 Accounts displays the sales price held on the product record. The currency symbol shown indicates the currency of the price list.You cannot change the Current Price.
Proposed Price Reads the product price from the file you are importing, and displays it in the price list's currency. You can change this if you require.
2

Customer tasks
Warnings This column displays errors and warnings about the items you are importing. You cannot amend these.
Sage 50 Accounts displays import errors in red. Examples of errors are:
Product code not recognised.
There are two prices being imported for this product. See Line xx.
Invalid price supplied for this product.
If errors are present, then the import of those products cannot proceed. The Invalid items in import box summarises the number of items containing errors.
You must correct the errors in the import file before you try to import those items. If you correct an error and the associated item imports successfully, the Invalid items in import file value decreases, and the Valid items in import file value increases.
Sage 50 Accounts displays import warnings in black. Examples of warnings are:
Product code exists and the current list price of x.xx will be overwritten.
Warnings provide additional information but do not stop the import process.
463

Sage 50 Accounts User Guide
46
6. Select or clear the following import options as you require:
'Remove all items from the Price List prior to importing'.
If you select this option, Sage 50 Accounts removes all products currently associated with the price list before proceeding with the import.
For example, if you have a price list containing 600 products, and you import a file containing 150 updated prices, Sage 50 Accounts updates the prices of those 150 products and removes the remaining 450 items from the price list.
If you do not select this option, Sage 50 Accounts checks the list of products on the price list, and if a price exists, it updates it. If the product you are importing does not exist on the price list, Sage 50 Accounts adds it.
For example, if you have a price list containing 1000 products, and you import a file containing amended prices for 250 of those products, Sage 50 Accounts updates only those 250 prices and leaves the remaining 750 unchanged. Alternatively, if you have a price list containing 400 products, and you import a file containing 50 products that do not currently belong to that price list, Sage 50 Accounts adds those 50 products to the list and leaves the original 400 products unchanged.
'Hide warnings, errors will still be displayed'.Select this check box if you want the Import process to filter out any warnings and display only errors in the 'Warnings' column. If you do not select this check box, Sage 50 Accounts displays both errors and warnings in the 'Warnings' column.
7. To remove a line from the list so that it is not included in the Import process, select the line and click Delete Line.
8. To save any changes you make in the list back to the original CSV or TXT import file, click Save. Alternatively, to save your amendments to a new import file, click Save As and specify a file name and location for the new file.
9. To continue with the import process and apply the price changes to your data, click Apply.
Note: Items displaying errors will not import. You must correct the errors before you can successfully import these items.
If you are importing a large volume of data, a status bar appears, showing the progress of the import process.
Once the import is complete, the Associated Products information appears.
You have successfully imported your product price information.
4

Customer tasks
Setting special customer prices
Accounts Plus and Accounts Professional onlySometimes you may want to give a particular customer a special price for one of your products or services.
You can set up special prices for your customers using the Pricing Structure facility, which is available in the Products module.
To enter a special customer price
1. Select the Products module and then, if appropriate, use the view selector to switch to the Products view.
2. From the Products window, highlight the product you want to set a special customer price for and click Record.
3. From the Product Record window, click Pricing Structure and then Add. Select Special Customer Price from the prompt.
The New Price window appears.
4. Select a customer for the special price using the A/C Reference drop-down.
465

Sage 50 Accounts User Guide
46
5. From the Calculation Method drop-down list, select the method you want to use to calculate the special customer price.
The following methods are available for calculating your prices:
6. In the Value box enter the fixed price, value or percentage amount depending upon the calculation method you have chosen.Note: If you have chosen to use the Standard Sales Price calculation method, this box is not available
The following calculation methods are available:
Fixed Price This allows you to enter a direct price for the product. The amount entered in the Value box will be the price used in the price list. The list price of this product will not change even if the sales price changes on the product record.
Standard Price This method uses the standard sales price from the product record.
Decrease Sales Price by %
This method calculates and deducts the percentage from the standard sales price.
Decrease Sales Price by Value
This method deducts the value entered from the standard sales price.
Note: You cannot use this method on foreign currency price lists or for foreign currency customers.
Mark Up % on Cost Price
This method calculates and adds the percentage mark-up onto the cost price.
Mark Up Value on Cost Price
This method adds the value mark-up entered to the cost price. As your cost price changes, the special sales price will also change by the amount entered in the Value box.
Note: You cannot use this method on foreign currency price lists or for foreign currency customers.
Increase Sales Price by %
This method increases the percentage from the standard sales price.
Value Enter the amount or percentage to be used to update the selected price list items.
Rounding Direction Select how you want to round your prices from the following options:
6

Customer tasks
Round up to Select this option to round a price up to the number of decimal places selected in the Decimal Places drop-down list. For example, 6.55555 rounded up to 2 decimal places is displayed as 6.56.
Round down to Select this option to round a price down to the number of decimal places selected in the Decimal Places drop-down list. For example, 6.5555 rounded down to 2 decimal places is displayed as 6.55.
Nearest Select this option to round a price up or down to the nearest value selected in the Decimal Places drop-down list. If you select the Nearest option, the following options become available:
To…..Decimal PlacesUse this section of the window to specify whether you want to use decimal places to round any values, or to use a rounding technique to give you an actual figure.
Using the Decimal Places option will round the calculated figure up or down to the nearest number of decimal places that you specify, the number of decimal places available is dictated by the Unit D.P. setting which can be amended in Settings, Product Defaults. For example;
£13.4567 rounded down to 2 decimal places = £13.45.
£13.4567 rounded up to 2 decimal places = £13.46.
or
Multiples of…..plus adjustment…..
Instead of rounding prices by the number of decimal places, you can select the 'multiples of’ option to round your prices to psychologically important points, such as £9.99 instead of £10.00.
For example, you may specify the rounding amount so that each price ends in 99 pence, so that £13.4567 rounded down to multiples of 0.50, plus an adjustment -0.01 = £12.99.
467

Sage 50 Accounts User Guide
46
The Pricing details are displayed in the Pricing Details area of the window.
Foreign currency price lists only: If you are creating price lists that use foreign currencies, the preview window will show the base currency and foreign currency figures. Due to rounding calculations, it is possible that the Profit Margin % column may differ between each row.For example: Values rounded to 2 decimal places, exchange rate at 1 = 1.559300:
7. To save your special customer price, click Save.
8. To return to the Pricing Structure click Close.
You have now set up your special customer price. If you decide that you need to change the price, you can edit it. If you no longer need the special customer price, you can remove it.
To print a price list
1. Select Customers > Price List.
The Price Lists window appears, showing any existing price lists.
2. Select the price list that you want to print and click Print.
The Criteria window appears.
3. Select the stock codes and specify the number of records to display in the price list report.
Note: To display all records, leave the selection criteria as they appear.
CurrencyProductCost
Prod-uctSales
Price List PriceProfitValue
Profit
%Current New
Euro 15.59 20.27 18.24 22.86 7.27 31.80
Pound Sterling 10.00 13.00 11.70 14.66 4.66 31.79
8

Customer tasks
4. Select one of the following options:
5. Click OK to generate the printed price list.
6. Click Close to close the Price List report and return to the Price Lists window.
Discounts
There are several types of discounts you can use. Most can be set up so that they are automatically applied to an invoice to speed up invoice entry. As you create the invoice the awarded discount can be altered if it is not quite right.
Accounts Professional users can also use and automate discounts to influence orders, quotations and proformas.
The different discounts
Good Customer Discount: You can set a discount for all of your customers, this discount is automatically added to any other discounts that you have set up.
Early Settlement Discount: If you want to offer discounts for early payment of invoices, you can with Sage 50 Accounts. Qualifying periods, for example, 15 days, along with corresponding discounts can be set up.
Quantity Discounts: Accounts Plus and Accounts Professional users can set up progressive discounts for bulk purchases (for example, 5% off if a customer buys more than 10 items, 10% if they buy more than 50 items).
Invoice Value Discounts: As an alternative to Quantity Discounts, Accounts Plus and Accounts Professional versions also support progressive value discounts. You can offer a range of discounts against total order or invoice value (for example, 5% off the invoice value if a customer spends more than £100, 10% if they spend more than £500).
Printer Choose Printer to print the selected price list immediately.
Preview Select this option to view the price list on-screen. Use this option to check whether it is the right report, or to view how the price list looks before you actually print it.
File Use this option to save the price list as a file. You can then use the file on another PC running Sage 50 Accounts, or to take a backup of the Price List report for future reference. The Price List is saved with a file extension .datareport.
Email Use this option if you are using Microsoft® Outlook as your email software and you want to send the Price List report using email.
469

Sage 50 Accounts User Guide
47
In addition to all of these types of discount, you can apply a one-off price reduction or manual discount, during invoice entry.
If the prices that you charge for your products and services change frequently and you prefer greater flexibility when giving discounts, this is the simplest discounting method that can be applied to individual invoices or sales orders.
How discount is calculated
Discounts, with the exception of early settlement, are calculated as follows:
(Unit Sales Price - Discount Amount) x Quantity
For example, a customer buys 40 units at £9.99, with a 20 percent discount. The sum is (9.99 x 40) - 20% = £319.68
You can change the way the discount is calculated so that the discount is calculated by unit price.
(Unit Sales Price - Discount Amount) x Quantity. The sum is (9.99 - 20%) x 40 = £319.60
This difference is due to the point at which rounding is applied to the values.
To set Sage 50 Accounts to calculate discount based on unit price see Entering invoice and order defaults on page 167.
How discounts are applied to invoices/orders
Sage 50 Accounts gives you complete control over how discounts are applied. This is done by setting discounts on individual customer records.
Accounts Plus and Accounts Professional users can also use settings from product records (see page 476) and customer defaults (see page 479) to award quantity and invoice discounts during sales order entry and invoice entry. Invoice and order defaults can also be set to add further control (see Entering invoice and order defaults on page 167).
When you create an invoice or order, Sage 50 Accounts automatically applies the pricing and discounting structures that you have set up. At that point the you can then change the total discount awarded by applying a one-off discount (manual discount).
The illustration overleaf shows an invoice awarded a 5% discount from the customer’s record.
0

Customer tasks
Good customer discount
You may have particular customers with whom you have a good business relationship. For example, they may buy in larger volumes or more frequently than your other customers. In this case, you can choose to set up a good customer discount.
The good customer discount is the standard type of discount that you can apply. When it is set up, the discount value is applied to the full net value of an invoice, or sales order if you are using the Accounts Professional version of Sage 50 Accounts, and is added to any other discount that is also applied.
To apply a good customer discount, you must set it up on the customer record. This discount will be applied to all invoices that are entered for that particular customer. For example, if you enter a 2 percent discount, every invoice that you send to the customer will be discounted by 2 percent. If other discounts are also being applied, this discount amount is added to them.
You can enter a standard discount in two ways:
Note: Early settlement discount is displayed in the Footer Details tab.Only the VAT amount is affected by this discount.
471

Sage 50 Accounts User Guide
47
If you give the same discount to most of your customers, you can enter a discount in your Customer Defaults. For further information about entering customer defaults, see Entering customer defaults on page 155.
If you want to assign a discount percent to each of your customers individually, you can use the Defaults tab from the Customer Record to enter the discount. For further information about setting up a customer record, see Entering your customer and supplier records on page 231. For information on setting up a good customer discount, refer to the following section.
To set up a good customer discount
1. Open the Customers module, then if appropriate, use the view selector to switch to the Customers view.
2. From the Customers window, select the customer you require, then click Record.
3. Click the Defaults tab.
4. Enter the discount rate you want to apply in the Disc % box.
A discount of this percentage rate will now be automatically applied to all invoices/orders you generate for this customer.
2

Customer tasks
Note: You can also see this discount on the item line of the invoice. To do this select an item line on an invoice and Press F3, the Edit Item Line window appears.
5. Click Save.
You have now entered your good customer discount.
Early settlement discount
It is easier to manage the cash flow of a business if your customers settle their outstanding invoices promptly. By setting up early settlement discounts, you may encourage your customers to pay their debts earlier.
A settlement discount is calculated on the net value of a customer invoice, after all other discounts have been applied. This net amount on the invoice, including the settlement discount, is displayed in the Footer Details tab.
When you create an invoice for a customer who qualifies for a settlement discount, the settlement discount is automatically applied to calculate the VAT amount shown. The net amount is not reduced by the settlement discount at this stage. Although you have created and sent the invoice out, you are not sure that the customer will pay before the time has expired for the early settlement. Therefore the discount only shows on the VAT amount.
To set up a settlement discount for a customer
1. Select the Customers module and then, if appropriate, use the view selector to switch to the Customers view.
2. From the Customers window, select the customer that you require, then click Record.
3. Click the Credit Control tab.
473

Sage 50 Accounts User Guide
47
4. In the Sett. Due Days box, enter the number of days within which payment should be made to qualify for an early settlement discount.
5. In the Sett. Discount box, enter the percentage discount you want to apply.
6. Click Save to record the discount details.
Irish early settlement discounts
If the Regional Settings on your PC have been set up as English (Ireland), the early settlement discount is calculated using the Irish Early Settlement Discount scheme.
When using the Irish Early Settlement Discount scheme, the tax is calculated before the discount is deducted from an invoice. On your invoices, the full net and tax amounts are displayed. However, you can still view the settlement discount value on the Footer tab, or when you print the invoice.
See how the Irish settlement discount is applied in the following scenario:
Tax rate of 21.0%,
Early settlement discount of 10%,
Settlement period of 30 days.
4

Customer tasks
Your invoice lists the following values:
€100.00 net €21.00 tax€200.00 net €42.00 taxTotal net = €300.00Total tax = €63.00
The invoice will also show the discount available to the customer:
Payment due within 30 days
Early Settlement Discount of 10% available if you settle within 30 days
With Early Settlement Discount, pay only €333.00
In this example, the discounted figure is calculated by applying the 10% discount to the net amount (€30.00). This amount is then subtracted from the original gross amount.
The invoice will also show the settlement discount being offered, and the amount that would be payable if the invoice is paid within the settlement discount period.
When the invoice is posted, the following entries are made to your accounts system:
Once the invoice is paid (within the discount period), the following entries are made:
Debit Credit
Debtors Account 363.00
Sales Tax 63.00
Sales 300.00
Debit Credit
Debtors Account 363.00
Bank Account 333.00
Discount 030.00
475

Sage 50 Accounts User Guide
47
Discounting by quantity of product sold
Accounts Plus and Accounts Professional onlyFrom the Product record it is possible to set up five different quantity discount rates to give your customers. These are additional discounts, applied on top of all the other discounts that you have set up. For example, you may want to set up a discount for retail customers, one for wholesale and one for trade, so that each of these customer types pays different prices for the same product.
Quantity discounts in Sage 50 Accounts are determined through product discount rate tables.
You can apply one of these five product discounts as the Additional Discount default for your customers, do this within Settings, Customer Defaults. You can also allocate one of these to a customer when you create or edit the customer record.
Note: You can amend the names shown on each of the discount tabs so that they are more meaningful for your business. This is done using Products > Product Defaults.
The product discounts you can set up are based on quantity levels and you can enter quantities, for up to ten levels of discount.
If you use a standard set of discounts for your products, for example, for retail customers, you can set up Discount A on each product record to be your retail discount. You can then enter the levels of discount on your first product's Discount A tab. Then, copy this discount structure, using the Copy Discount button on the main Products window, to the Discount A tab of each of your other product records. This means, that you only have to set your levels of discount once.
Similarly, you can set up Discount B to be your wholesale discount. If you enter this structure on one product record, you can then copy it to every other product record it applies to.
You can only copy from one product's discount tab to another product's discount tab, if the letter of each discount tab is the same. For example, you can copy a product's Discount B to another product's Discount B, but you cannot copy Discount B to Discount C.
Note: On copying discounts in this fashion, all discounts in columns A-E will be copied between product records.
To set up a discount structure for your product record
1. Select the Products module and then, if appropriate, use the view selector to switch to the Products view.
2. From the Products window, select the product (or products) that you want to set up discounts for, and then click Record.
3. Click the Discount tab.
6

Customer tasks
The discounts information appears.
You can sub-divide each of the five discounts on each individual product record to ten different levels of discount.
If you want to copy a discount structure that you have already set up on another product record, click Copy Matrix.
Note: If you have chosen to rename the Discount tabs A-E, the names that you have entered appear here.
4. Choose each discount tab in turn, to set up the discount structures for Discounts A-E as required. In the Discount table on each discount tab, enter the following discount details, one line per level of discount, as required.
Quantity Enter the quantity of the product required for a customer to qualify for a discount. Sage 50 Accounts only lets you enter quantities in ascending order, with the smallest quantity as level one.
Discount % Enter the discount (as a percentage) that a customer receives for purchasing this quantity of the product.
477

Sage 50 Accounts User Guide
47
5. When you have finished entering your discounts, to save your entries, click Save, or to clear any data you entered and start again, click Discard.
6. To exit the product record and return to the Products window, click Close.
7. Next, you must access the relevant Customer Record and apply the discount. To do this, choose the Defaults tab from the Customer Record and select the discount you want to apply from the Additional Disc drop-down list in the Pricing & Discounting section of the window.
8. To save the changes, click Save.
Value This is automatically calculated for you by Sage 50 Accounts and is the sale price of the product, less the percentage discount you entered.
8

Customer tasks
Discounting by invoice value
Accounts Plus and Accounts Professional onlyThis discount is set up as part of your Customer Defaults.
You can set up ten different discount rates that you can apply to different values of invoice or order. For example, you could add 1 percent extra discount for every £1000 invoiced. So, if a customer bought £2000 worth of goods, the customer would receive a 2 percent discount and so on until £10,000 when the customer would receive 10 percent discount.
The discount by invoice value is calculated as follows:
(Unit Sales Price x Quantity) - Discount
The additional discount rate is applied to the full net value of the invoice, ignoring any VAT charged and other discounts applied.
To set up discounting by invoice value
1. Select Customers > Customer Defaults.
The Customer Defaults window appears.
2. Click the Discount tab and enter your discount values.
Note: If you want to set this discount to all of your new customer records, click the Record tab and from the Type drop-down list, select Invoice Value. This will apply the discounts
Enter your discounts in these boxes.
479

Sage 50 Accounts User Guide
48
that you set in step 2 to all your new customer records. If you do not want your discounts applied globally, this drop-down box should read No additional.
3. Click OK to add these discount values as defaults. To exit without saving, click Cancel.
4. To set the discount on a customer’s record from the main desktop, select the Customers module. If appropriate, use the view selector to switch to the Customers view and then select the customer you require from the list of customer records in the Customer window.
5. Click Record.
6. Click the Defaults tab.
7. From the Additional Disc drop-down list, select Invoice Value.
8. Click Save.
Now, whenever you raise an order or an invoice for this customer, the appropriate discount rate in your customer defaults will be applied, depending on the value of the invoice.
0

Customer tasks
Applying a one-off discount
This is a manual discount that you can apply to individual items during invoice or sales order entry.
You can use a manual discount to override any discounts awarded to items from your discounting structure, such as a 'good customer' discount. This means you can increase any discount awarded to an item when creating the invoice/sales order, or even decrease it.
To apply a manual discountNote: To enable the Discount columns you must ensure 'Show Discount on Main Invoice/Order Screen' is ticked in Invoice and Order Defaults > Discounts.
1. During invoice entry, on the item line, enter the discount you want to apply.
You can enter the amount you want to award as a discount in the Discount column. Alternatively, you can enter a percentage discount in the Discount % column.
2. To copy the discount from the item line above to the one you are entering, press F6 in either the Discount or Discount % column.
3. Alternatively, you can apply a manual discount to an item by selecting the item and then press F3 on your keyboard.
The Edit Item Line window appears.
481

Sage 50 Accounts User Guide
48
4. Enter the discount you want to offer in the Discount % box and then click OK to accept the changes, or to exit without saving the changes, click Cancel.
2

Customer tasks
Proformas
Accounts Plus and Accounts Professional onlyYou will usually use a proforma for a new customer or a large order, for example, where you want the customer to pay before they receive the goods.
You create proformas in the same way as sales orders or invoices. For further information, see Sales order processing on page 487 and Entering an invoice on page 523.
When you receive payment for a proforma, you need to convert the proforma to a sales order or an invoice. You can then update the Customer Record and stock levels with the invoice details.
Quotations
Accounts Plus and Accounts Professional onlyMany businesses submit quotations in the hope of attracting new business. When the customer accepts the quotation, you will convert it to a sales order or an invoice.
When you create a quotation in Sage 50 Accounts it is given a status of Open. From this point it may become:
Won - A quotation automatically becomes Won when you convert it to an order or invoice.
Lost - A quotation becomes Lost when you amend it and mark it as such. The status of a Lost quotation can be amended to make it Open again.
Expired - A quotation automatically becomes Expired after it has been Open for a time-out period longer than you specify. An expired quotation can become Open again, if you amend the expiry date.
Creating a new quotation
Note: Before you start to work with quotations you need to specify whether, when converted, a quotation will generate a sales order or an invoice. See Entering invoice and order defaults on page 167 for details.
Use Customers > New Quotation to create quotations. The Quotation window appears.
The window shown is very similar to that which you use to create invoices and credit notes or sales orders, depending upon your Invoice and Order Defaults settings, with the following differences:
The Type is automatically set to Quote or Quote SOP, and cannot be changed.
An Expiry box is included to enable you to set an expiry date for the quotation.
For details of how to use this window, see To create a new product invoice or credit note on page 526 or To create a sales order on page 489.
483

Sage 50 Accounts User Guide
48
Maintaining quotations
To maintain your quotations, select Customers > Quotations List. The Quotations window appears.
Use the drop-down at the top of the list to filter the quotations shown. You can choose:
All Quotes
Quotes Won
Quotes Lost
Open Quotes
Expired Quotes
Maintenance tasks may include:
Editing a quotation. For details, see To edit a quotation on page 485.
Changing the status of a quotation. For details see To change the status of a quotation on page 485.
Allocating stock. For details, see To allocate stock to a quotation - Accounts Professional only on page 485.
Amend stock allocation. For details, see To convert a quotation to an invoice or sales order on page 485.
4

Customer tasks
Converting a quotation to an invoice or sales order. For details, see To convert a quotation to an invoice or sales order on page 485.
Removing a quotation from the list. For details see To remove a quotation from the list on page 486.
To edit a quotation
1. Select the quotation you want to change on the Quotations window.
2. Click New/Edit.
The Quotation window appears. For more information on this, see Creating a new quotation on page 483.
Note: If you edit a quotation which has been won and converted to a sales order or to an invoice, the Sales Order or Invoice window appears, as appropriate.
To change the status of a quotation
1. Select the quotation you want to change on the Quotations window.
2. Right-click, then select the Set as option you require for the new status from the menu displayed.
Note: Alternatively, if you want to mark a selected quotation as lost, click the Lost button on the toolbar.
You are prompted to confirm the change of status.
3. Click Yes or No, as appropriate.
Note: To reactivate an expired quotation that has a status of Invalid, you should edit the quotation, as described in the previous section and set the Expiry date to some time in the future.
To allocate stock to a quotation - Accounts Professional only
1. On the Quotations window, select the open quotation to which you want to allocate stock.
2. Click Allocate in the Tasks List on the Navigation Bar.
From this point, the procedure is the same as allocating stock to a sales order. For more information on this, see Allocating stock to sales orders on page 512.
Note: You are only allowed to allocate stock to a quotation if the Type column on the Quotations window indicates that the quotation will be converted to a sales order if won. For details of how to use the Invoice and Order Defaults window to set your conversion option, see Entering invoice and order defaults on page 167.
To convert a quotation to an invoice or sales order
1. On the Quotations window, select the open quotation(s) you want to convert.
485

Sage 50 Accounts User Guide
48
2. Click Convert.
You are prompted to confirm the conversion.
3. Click Yes or No, as appropriate.
Note: The quotation is converted to a sales order or to an invoice, depending upon its Type. Quotations are numbered in sequence with your sales orders or invoices, as appropriate.
To remove a quotation from the list
1. On the Quotations window, select the quotation to be removed from the list.
2. Click Delete.
You are prompted to confirm the deletion.
3. Click Yes or No, as appropriate.
To quick print a quotation for a customer
1. On the Quotations window, select the quotation to be removed from the list.
2. Click Quick Print.
The selected quotation is printed using the default print layout that you have previously defined in your Invoice & Order Quick Print defaults, see To set up your invoice and order quick print defaults on page 173. If you have not set a default layout, a software advisory message informs you that this is the case.
Note: If you do not select a quotation from the quotations list, a Confirm message appears:
This will print ALL quotations. Do you want to continue?
3. Click Yes or No, as appropriate.
To email a quotation from the list to a customer
1. Select Customers, then from the Links pane, click Quotations List.
The Quotations window appears.
1. From the Quotations List, select the quotation(s) to be emailed.
2. Click Email.
The software generates an email, using the default layout that you have previously defined in your Invoice & Order email defaults, see To set up your invoice and order email defaults on page 175. If you have not set a default layout, a software advisory message informs you that this is the case.
Note: If you do not select a quotation from the quotations list, a Confirm message appears:
This will email ALL quotations. Do you want to continue?
3. Click Yes or No, as appropriate.
6

Customer tasks
Sales order processing
Accounts Professional onlySales orders are requests for your goods, received from your customers. Sales Order Processing enables you to keep track of the items your customers are ordering. Sales Order Processing lets you:
Create the order
Allocate stock against the order
Record the despatch of stock
Produce an invoice to send to a customer
Note: In a similar way to invoicing, if you are dealing with one-off orders, you can give your sales order special product codes. For more information, see A Note about special product codes on page 525.
You can also use the Sales Order Processing facilities to enter your sales order proformas.
The sales order life cycle
Creating the sales order is only the first step in the order cycle. The other steps are outlined below and explained in the following sections. Depending upon how you save your sales orders, you might not have to complete all of the stages of the cycle as Sage 50 Accounts will do some of it for you automatically.
1. Converting quotations and proformas into sales orders. An order may begin life as a quotation or a proforma.For more information on converting a quotation, see To convert a quotation to an invoice or sales order on page 485.
2. Creating the order.For more information, see Creating a sales order on page 488.
3. Saving the order.For more information, see Saving your sales order on page 509.
4. Printing your sales order.For more information, see Printing your sales order on page 510.
5. Allocating the stock.For more information, see Allocating stock to sales orders on page 512.
6. Despatching the stock.For more information, see Despatching sales orders on page 514.
7. Print the invoice.For more information, see Completing the sales order cycle on page 522.
487

Sage 50 Accounts User Guide
48
8. Update the ledgers.For more information, see Posting an invoice on page 562.
Dealing with cash sales
Orders differ in the length of time they take to complete. Some orders are completed immediately at the point of sale, particularly when dealing with over the counter sales. The customer picks the goods, pays immediately and takes the goods. In Sage 50 Accounts this type of sale is dealt with as a cash sale.
Rather than record each part of the sales order process as complete, from stock allocation through to ledger update, the whole order life cycle can be automated by choosing the Cash Sales option when you are creating the sales order.
Note: There must be sufficient stock levels to satisfy the whole order. If you have set Sage 50 Accounts to allow negative stock the order will go though regardless of stock levels.
The order documentation produced for a cash sale can be limited to only those documents you need. See Entering invoice and order defaults on page 167. Depending on these settings you are prompted to select the right layout for the generated documents - sales order, invoice and goods despatched note.
To complete the order a sales receipt is generated and allocated to it. If the order contains goods assigned to different tax codes and you use VAT Cash Accounting or Flat Rate - Cash Based schemes, Sage 50 Accounts generates a sales receipt for each tax code used.
Note: A cash sale can only be recorded to a base currency bank account. At installation a default cash sales bank account is created and set for use by cash sales. See Entering invoice and order defaults on page 167. Also, a cash sale cannot be recorded for a customer with an account record set for foreign currency.
Creating a sales order
You can create a sales order using Customers > New Sales Order. This opens the Product Sales Order window, which is made up of six tabs: Details, Order Details, Footer Details, Payment Details, Despatched and Invoices.
Use the Details tab to enter your main sales order details, including customer account details, items and quantities ordered. For further information about how to do this, see Creating a sales order on page 488.
Use the Order Details tab to enter or amend the delivery address and details, which are applicable to the sales order. For further information about how to do this, see To enter the order details for your sales order on page 499.
Use the Footer Details tab to enter carriage charges, settlement terms and global details to relate to the whole order. For further information about how to do this, see To enter your sales order footer details on page 502.
8

Customer tasks
Use the Payment Details tab to record any payments made against the order. For further information about how to do this, see To enter your sales order payment details on page 505.
Use the Despatched tab to view, print or reprint goods despatched notes associated with the order. For more information on how to do this, see To view despatch information for a sales order on page 507.
Use the Invoices tab to see details about invoice details associated with the order.
To save you time when entering your sales orders, you can use the Duplicate facility to copy an existing order. This is useful if you need to create many sales orders with the same details. For more information about duplicating orders, please see To duplicate a sales order on page 510.
Note: If enabled, the status bar shows the number of the last sales order you created.
To create a sales order Select Customer > New Sales Order.
The Product Sales Order window appears, showing the Details tab by default.
Note: To enable the Discount columns you must ensure ’Show Discount on Main Invoice/Order Screen’ is ticked in Settings > Invoice and Order Defaults > Discounts tab.
489

Sage 50 Accounts User Guide
49
Tip: For information about recurring sales orders, see Dealing with recurring transactions on page 564.
To enter details of the sales order In the boxes provided, enter the following order header details.
Type From the Type drop-down list, select the type of sales order that you want to create. You can create an order or proforma.
Order No. When you create a new sales order, <Auto Number> appears in this box. Sales order numbers are not assigned until the order has been saved. If you want to edit an existing sales order, type the order number of the sales order that you want to edit, here.
The first time you create and save a sales order, it will be assigned the number '1'. Each time you create and save a sales order, the order number is increased by one. If you want to start numbering your orders at a particular number, you must change the numbering sequence in your Invoice and Order Defaults (see Entering invoice and order defaults on page 167).
Date The current program date appears here automatically but you can change this, if necessary. Use the Calendar to enter a different date or type directly into the box.
Inv. Ref. When you update the sales order to match an existing invoice, the last invoice number relating to the sales order appears.
A/C Enter the customer account reference here. If you enter an existing account reference, the customer's name and address appear automatically. If you enter an account code that is not already set up, the drop-down list appears. You can then select the account you require or click New to create a new customer record.
Note: If you have selected the Display Account Status check box in the Company Preferences window (Settings > Company Preferences), Sage 50 Accounts gives you a warning if the customer account you have selected has been put on hold.
If the Show warning on each change option is selected, click OK on the warning message to continue to enter the order.
If the Stop the account option is selected, you must take the account off hold before you can create the order. Click OK to continue.
0

Customer tasks
Note: If you select a customer account that is based in the UK but also has an EC delivery address, you need to choose where the invoice is to be sent.
If the invoice is sent to the UK address, VAT should be charged in the normal way. If the invoice is to be sent to the EC delivery address, then the invoice should be T4 zero rated.
Accordingly, when you select a customer account that is based in the UK but also has an EC delivery address, a software message appears:
You have selected a customer who has an EC delivery address. Do you wish this address to also be used for the invoice address?
Select Yes / No, as appropriate. A check box is available on the message, if you wish your selection to be followed again on other occasions in the future.
This choice is available if you are creating quotations, sales orders or invoices.
Item No. This shows the number of the item that is currently highlighted. For example, if there are ten item lines and the cursor is currently on the second line, this box shows Item 2 of 10.
Rate You can enter your currency exchange rate here. This only appears if you have set up Foreign Trader.
491

Sage 50 Accounts User Guide
49
To add goods/services to the order
1. Enter the product items that you have sold, one line of the order per product, entering the details as follows:
Product Code Enter the product code you require here. You can use the drop-down button to search and select from your existing product records. If you enter an unknown product code you are given the list of existing products to select from. If necessary, you can create a new product record and select this for inclusion in the sales order.
In addition to the normal product codes, you can also enter special product codes.
Note: You cannot change the product code on a sales order if the order shows an allocated or despatched quantity for that product.
If you open an existing order that contains products with allocated or despatched quantities, the product code is not enabled, and you cannot change it using the drop-down list, or by overtyping.
In order to change the product code on an order if it has an allocated quantity, you must first reverse the allocation using the Amend option.
If a product shows a despatched quantity, you must reverse the despatch manually, taking the customer and stock into account where appropriate, and re-enter an order as you require.
Description The description of your product is entered here automatically and is taken from the Product Record window, but you can change this if required. When your cursor moves to the Description box, an Edit button appears. Use the button or press F3 to apply one-off product details. For more information, see To edit the goods/services (sales order item line) on page 494.
Quantity Enter the quantity of stock that your customer has ordered.
Price The unit price from the product record appears here. If a special product code, for example S1, has been entered, the value entered in the Edit Item Line window appears here. You can amend these values if necessary.
2

Customer tasks
2. Continue to enter the remaining lines of your sales order.
To enter your order details such as delivery address see To enter the order details for your sales order on page 499.
To enter any carriage or settlement details, see To enter your sales order footer details on page 502.
Discount Displays the amount the item has been reduced by as a result of discounts that have been awarded such as a good customer discount.
You can change the amount by keying in a new discount amount. Alternatively, with the item line selected you can press F3 to open the Edit Item Line where you can amend the discount.
Discount % Displays the total percentage discount that the customer receives. The total can be made up of good customer, quantity or invoice value discounts.
You can change the discount by keying in a new discount percentage. Alternatively with the item line selected you can press F3 to open the Edit Item Line where you can amend the discount.
Note: The Discount and Discount % columns only appear if Sage 50 Accounts is set to do this. See Entering invoice and order defaults on page 167.
Net The net value is calculated automatically. This value cannot be changed.
VAT The VAT amount appears here automatically. This value cannot be changed.
Tax Breakdown List
The Tax Breakdown List box shows the tax information, grouped by tax code, for the items entered in the order.
Totals These two boxes show the Net and VAT totals of the invoice.
Carriage These two boxes show the Net and VAT totals of any carriage costs applied to the order.
Gross The total value of your order appears here.
Euro If you have entered currency details into your Sage 50 Accounts program, the total value of the order appears here, in euro.
493

Sage 50 Accounts User Guide
49
To enter payment details against the sales order see To enter your sales order payment details on page 505. These are then updated to the customer's account when the sales order is saved.
If you do not want to add any order or footer details to this sales order, save the order. See To finish the order on page 506.
Note: If you are viewing or editing existing orders, you can highlight the relevant orders you want to view or edit from the Sales Order Processing window (Customers > Sales Order List). When you call up the order using the New/Edit button you can then use the Next and Previous button to browse through your chosen orders.
To edit the goods/services (sales order item line)Use this function to increase the detail which is included in your records. You can assign a nominal code to your sales orders so you can increase the analysis and reporting options that you can use on them. For example, you can see the products that are most commonly sold to a particular customer, at a later date. You can also see what discounts have been set up for this product.
1. Select Customers > New Sales Order.
The Product Sales Order window appears, showing the Details tab.
2. Enter your sales order details.
When your cursor moves to the 'Description' box, an Edit button appears.
3. Click the Edit button (or press F3).
The Edit Item Line window appears.
Some of the boxes on the Edit Item Line window are already filled, with information taken from the product and customer records.
4

Customer tasks
4. In the boxes in the Details area, enter the following details:
5. In the boxes provided in the Values area, enter the following details:
Product Code This box automatically displays the product code you have chosen. You cannot edit this entry.
Units This defaults to the setting within the product record. However, you can enter your own description.
Description You can amend an existing product description, or enter your own if none was entered previously, using up to sixty characters.
Comment 1 and Comment 2
These two boxes, each of up to sixty characters, can be used to add additional text to the description.
Quantity The quantity displayed on the Sales Order Details tab appears here but you can override this if necessary. If you have selected the Allow Negative Stock check box on the Company Preferences window (Settings > Company Preferences>), Sage 50 Accounts gives you a warning if you do not have enough stock, unless it is set as a non-stock item in the product record.
495

Sage 50 Accounts User Guide
49
6. In the boxes provided in the Posting Details area, enter the following details:
Unit Price This is the sales price per unit that is taken from the product record. You may amend it for this sales order if necessary. If you enter the gross amount here, you can make Sage 50 Accounts calculate the VAT amount and the corresponding net amount by clicking Calc Net.
Discount % The discount entered here is the total percentage of discount that the customer receives, as set up on the Customer Record Defaults tab. You can amend this if you require. To see how this discount is made up, click Discounts. The Discount Breakdown window appears.
Discount This shows the value of the discount that the customer will receive, based on the percentage of discount above. You can amend this if you want.
Net This box displays the net value for the current item. It is calculated by multiplying the quantity by the net unit price, including any discount. You cannot amend this value.
VAT This box displays the amount of VAT calculated for this item according to the default VAT code from the product record. If you have selected the Override product tax code in invoicing check box on the customer record, the customer's default tax code is used to calculate the VAT.
You can edit this value if you have selected the Item VAT Amendable check box in the VAT tab of the Company Preferences (Settings > Company Preferences).
Nominal Code If you have added a product to the order, the defaults set on the customer’s record, see To enter your customer and supplier records on page 231, dictate which nominal code is suggested for use. This is either the nominal code from the product record or from the customer’s record.
If you have added a special product code, the nominal code from the customer’s record appears here.
You can also change the displayed nominal code if required. The code entered here will be used, when you generate an invoice from this sales order.
6

Customer tasks
You can enter the nominal code in one of two ways. You can either analyse each item of the order to an appropriate nominal account, or you can analyse the whole order to one nominal ledger account.
If you want to transfer individual items on the order separately to the nominal ledger, then you need to include a nominal code entry for every item on the order. You may amend the nominal account that is displayed here if necessary. If you are not sure which nominal codes are available, use the drop-down button to display a list of possible nominal accounts from which you may select.
If you want to analyse the whole order to just one nominal code, any code entered in this box will be overwritten by the entry you make for Nominal Account in the Global area of the Sales Order Footer tab.
If you analyse your order to one nominal account, when you update the ledgers with details from the product invoice that is generated from this sales order, only one line will appear on the audit trail.
Tax Code This is the default tax code for the product. If you have selected the Use Default Tax Code for Sales check box on the customer record, the customer's default tax code appears here.
You can either analyse the VAT on each item of the sales order to its appropriate VAT rate code, or you can analyse the whole order to just one code. You can only analyse the whole order to one VAT code if you are also analysing it to one nominal code.
If you want to analyse each item of the order separately, select the VAT rate code you require from the drop-down list box for each item line. If you want to analyse the whole order to just one VAT code, any code entered in this box will be overwritten by the entry you make for Tax Code in the Global area of the Sales Order Footer tab. If you analyse your order to one code, when you update the ledgers with details from the product invoice that is generated from this sales order, only one line will appear on the audit trail.
497

Sage 50 Accounts User Guide
49
Department This shows the default department for the product record.
Like the nominal and tax codes described above, department numbers can be entered by line item or for the order transaction as a whole. You can only analyse the whole order to one department if you are also analysing it to one nominal code.
If you want to analyse the order across departments for each line item, then each item must have its own department number. You may amend this if necessary. If you want to analyse the entire order to one department number, any department entered in this box will be overwritten by the entry you make for Department in the Global area of the Sales Order Footer tab.
8

Customer tasks
7. View the following Item Status information:
8. If Project Costing is enabled in Sage 50 Accounts and you enter the special product code S3 on your sales order, an additional Project Details section appears on the Edit Item Line window. If you want to assign this order to a project, select the project you require from the Project Ref drop-down list.
9. If you want to view a breakdown of the discounts that have been applied to this item, click Discounts.
10. If you want to view the different price lists or special customer prices that are available for the selected product, click Price List.
11. To save your sales order item line entries click OK, or if you want to exit without saving click Cancel.
To enter the order details for your sales order
1. From within the appropriate sales order, click the Order Details tab.
If you are amending an existing sales order, select the order you require from the Product Sales Orders window and then click New/Edit.
The Order Details information appears. Some of the boxes are already filled for you, with information taken from the customer record.
Allocated Sage 50 Accounts automatically enters the quantity of stock that is currently allocated for this product.
Despatched Sage 50 Accounts automatically enters the quantity of stock that has been despatched.
To Deliver Sage 50 Accounts automatically enters the quantity still left to deliver here.
Intrastat Shows the number of items that have been Intrastat confirmed.
Note: This box only appears if you have enabled Intrastat reporting in Invoice and Order Defaults. For more information, see To set up your Intrastat defaults on page 183.
499

Sage 50 Accounts User Guide
50
You can enter or amend any entries here, but the changes you make will be applicable to this sales order only. No changes are saved to the customer record.
2. In the boxes provided in the Order Details area, enter or edit the following details:
Delivery Address The customer's default delivery address appears here. You can edit this address directly by typing into the box. Alternatively, you can select a different address from the list of company, customer or supplier delivery addresses by clicking Change.
The Tax Code box displays the default tax code assigned to the company delivery address.
Note: If there is no default delivery address, the box will be left blank for you to enter the delivery address of your choice.
Note: If you select a customer account that is based in the UK but also has an EC delivery address, you need to choose where the invoice is to be sent.
0

Customer tasks
If the invoice is sent to the UK address, VAT should be charged in the normal way. If the invoice is to be sent to the EC delivery address, then the invoice should be T4 zero rated.
Accordingly, when you select a customer account that is based in the UK but also has an EC delivery address, a software message appears:
You have selected a customer who has an EC delivery address. Do you wish this address to also be used for the invoice address?
Select Yes / No, as appropriate. A check box is available on the message, if you wish your selection to be followed again on other occasions in the future.
This choice is available if you are creating quotations, sales orders or invoices.
Customer Order No. Enter your customer's order number here.
Customer Tel. No. Your customer's telephone number appears here automatically. You can change this if required.
Customer Contact The name of the person you set up as the contact on the customer record appears here automatically. If you want, you can change this to record the name of the person who placed this particular sales order.
Order Taken By Enter the name of the person who took the order here. If you are using the Access Rights to restrict access to Sage 50 Accounts functionality, your Logon Name appears here.
Notes Enter up to three lines of notes that relate to the whole order. For example, you could record any special delivery requirements.
DUNS Number The DUNS Number (Data Universal Numbering System) is a nine digit number, used to identify a business.
Use of this numbering system to identify a business is to ensure compatibility with Zanzibar, the UK Government e-purchasing portal.
Every e-order and e-invoice that passes through Zanzibar must include a DUNS number.
501

Sage 50 Accounts User Guide
50
3. The boxes in the Sales Order Status area show the following details:
To enter your sales order footer details
1. From within the appropriate sales order, click the Footer Details tab.
Note: If you are amending an existing sales order, first select the order you require from the Sales Orders window then click New/Edit and then click the Footer Details tab.
The Footer Details information appears. Some of the boxes are already filled for you, with information taken from the Customer Record and from your Invoice and Order Defaults settings.
2. In the boxes provided, enter the following carriage charges, or leave them blank if you are not charging for carriage.
Allocation When you allocate stock to this sales order, Sage 50 Accounts automatically enters the allocation status of the order here.
Despatch This shows the status of the order when you deliver the products.
Due If necessary, you can enter an estimated despatch date for the sales order here. This is for reporting purposes only. Use the Calendar button to help you select the date you require.
2

Customer tasks
3. In the boxes provided, enter the following Settlement Terms, or leave blank if not applicable.
Net Enter the amount of the carriage item - that is, excluding VAT. Use the Calculator button to help you calculate the amount to enter.
If you have chosen to enter a default net carriage charge in your Invoice and Order Defaults, the default net carriage charge appears automatically for you. You can edit this, if required.
Tax Code From the drop-down list, select the VAT code you require for carriage.
VAT This shows the amount of VAT calculated according to the rate specified in the Tax Code box.
You can only amend this if you have selected the Item VAT Amendable check box in the VAT tab of the Company Preferences (Settings > Company Preferences).
Gross This shows the gross amount of carriage to be paid - that is, the net plus VAT in total.
N/C Enter the reference for the nominal code to which the carriage value will be analysed. You can use the drop-down button to display a list of nominal accounts from which to choose.
Note: If you have chosen to enter a default nominal code to analyse your carriage to in your Invoice and Order Defaults, the default nominal code appears automatically for you. You can edit this if required.
Department If you want to analyse the carriage to a department, enter the department you require here, or select it from the drop-down list.
Note: If you have chosen to enter a default department to analyse your carriage to in your Invoice and Order Defaults, the default department appears automatically for you. You can edit this if required.
Consign. No You can enter a consignment number here.
Courier Select the courier you are using to despatch the order from this drop-down list box.
Days If necessary, enter the number of days during which early settlement discount applies to this sales order. This box defaults to the number specified in the Settlement Due Days box on the customer record.
503

Sage 50 Accounts User Guide
50
4. In the boxes provided, enter any conditions you want to apply globally - that is, to all of the items listed on the sales order. If you analyse your order globally, only one line will be added to the audit trail when the product invoice that is created for this sales order is updated. The global entries you make are only activated if you make an entry in the N/C box in the Global area.
Discount % If appropriate, enter the percentage of settlement discount that you want to offer in this box. This box defaults to the percentage specified as Sett. Discount on the customer record.
Amount This is the actual value of the discount given. You cannot edit this value.
Note: This value does not include the settlement discount already applied to the VAT.
Total This is the Gross amount of the order less the settlement discount amount.
N/C If you want to analyse the entire net value of the order to just one nominal account, enter the nominal code in this box.
Use the drop-down button to display a list of nominal accounts from which to select.
When you enter a nominal code in this box, you activate the whole of the global area. This means that the sales order will be analysed automatically to whatever entries you make in the N/C, Details, Tax Code and Department boxes in the Global area.
Details Details should be entered to accompany the posting to the nominal ledger if the sales order is to be analysed to one nominal code only. You can enter up to sixty characters. This text appears on your reports.
Tax Code To analyse the whole order to one VAT code, enter the code in this box or select one from the drop-down list.
Department If you want to analyse the entire order to just one department, enter the department you require here or select it from the drop-down list. If you do not specify a department, the audit trail will be updated with a department number of zero.
Note: Any entries you make in the Global area will override any you have already set up using the Product Item Line window, provided that you have made an entry in the Global N/C box.
4

Customer tasks
To enter your sales order payment detailsNote: If you are recording a cash sale there is no need to enter payment details as Sage 50 Accounts does this for you.
1. From within the appropriate sales order, click the Payment Details tab.
The Payment Details information appears. You cannot add a payment detail after you have saved a sales order as it will not post retrospectively.
2. In the boxes provided, enter the following payment details:
Note for VAT Cash Accounting or Flat Rate - Cash Based scheme users: If the payment exceeds the order value the tax liability of the overpayment must be dealt with. Sage 50 Accounts records an overpayment as a payment on account.
Payment Ref Enter a reference here that relates to the payment.
Bank Account Enter the nominal code of the bank account that you want the money to be debited to - that is, paid into.
Payment Amount Enter the payment amount to be posted to the customer account. Use the Calculator button to help calculate the amount.
505

Sage 50 Accounts User Guide
50
Before the order is saved Sage 50 Accounts prompts you to apply a tax code to the overpayment. The default tax code from the customer’s record is suggested for use but you can select another from the drop-down. Alternatively you can cancel, return to the order and amend the payment to match the order value.
You have now completed the payment details for your sales order. The payment information entered here is posted to the audit trail as a sales payment on account (SA) when you save the sales order.
To finish the order
1. To check the profit of the order, click Profit. For an explanation of this function, type Profit Check in the Sage 50 Accounts Help system’s index and select the topic To Use the Invoice Profit Check Option.
2. To commit the order to Sage 50 Accounts you have a number of choices depending on how far the order is processed.
If the order has been concluded and payment received, provided it is not a foreign currency payment, click Cash Sale.
Stock is allocated to the order, it is marked as despatched, an invoice created and ledgers are updated automatically for you. A sales receipt is generated and allocated to the order. The order is marked complete.
Depending on your cash sales settings, you may be prompted to select the bank account you want the value of the sale applied to. You must select a base currency bank account. You may also be prompted to print the generated order documents - sales order, goods despatched note, sales invoice.
If the order has been despatched, click Complete. Stock is allocated to the order and it is marked as despatched. An invoice is generated and ready to be printed and updated to the customer’s account. Prompts to print the sales order are displayed.
If the order is pending and you want a printed copy of the order now, click Print. The order is saved and a printed copy generated.
If the order is pending and you want to save it for later printing, allocating and despatching, click Save.
Alternatively you can clear the entries you have made and start again, click Discard. To exit without saving the order by clicking Close.
Depending on your Sage 50 Accounts setting, the window either clears ready for you to enter a new order or the order information remains displayed for you to edit. For more information see Entering invoice and order defaults on page 167.
Note: If you use this sales order regularly, you can save it as a skeleton sales order, so you can recall the saved sales order quickly and easily. To do this click Memorise (you then have to give it a file name and a description). For more information, see To create a recurring transaction on page 564.
6

Customer tasks
To view despatch information for a sales orderNote: The Despatched tab does not appear if your GDN Options in Invoice and Order Defaults are set to Do not generate. For more information, see To enter your invoice and order numbering options on page 176.
1. From within the appropriate sales order, click the Despatched tab.
The despatch information for the sales order appears.
You can view the following information:
Order Status The status of the sales order appears here automatically. This may be Full, Part, Cancelled or blank. If the status is blank, the order is either complete, or it has no stock allocated to it.
Despatch Status This box shows the despatch status of the order and can be Part or Complete. If you have not yet despatched any items for this order, this box is blank.
507

Sage 50 Accounts User Guide
50
2. To view individual goods despatched notes, select the note you want to view from the list and click View. The Goods Despatched Notes window appears, showing the goods despatched note details. You cannot change any of this information.
3. If you want to print (or reprint) individual goods despatched notes, select the note you want to print from the list and click Print GDN.
The Preview window appears, showing the goods despatched note details. You can print, save or email the note from this window. Click Close to return to the Despatched tab.
4. To exit and return to the Sales Order Processing window, click Close.
Invoice Status If you have raised an invoice for this sales order, a 'Y' appears in this box. If you have not yet raised an invoice, an 'N' appears here.
Complete If the order is complete, a 'Y' appears in this box. If the order is not yet complete, an 'N' appears here.
Due Date You can enter an estimated despatch due date in this box.
Note: If the status of the sales order is Complete, you cannot change this date.
Intrastat Displays the Intrastat declarations status of the order. This can be blank - the order is not Intrastat confirmed, Complete - the order has been fully Intrastat confirmed, or Part - only some items on the order have been Intrastat confirmed.
Note: This box only appears if Intrastat reporting is enabled in Invoice and Order Defaults. For more information, see To set up your invoice and order general defaults on page 168.
GDN. No This column shows the goods despatched note number that Sage 50 Accounts automatically assigns to each despatch.
Customer GDN No. If you entered a customer's goods despatched note number for reference purposes, it appears here.
Date This column displays the date that you despatched the goods to the customer.
Printed? Displays a 'Y' if you have printed the GDN, or an 'N' if you have not. The column is blank if you have yet to print a GDN.
8

Customer tasks
To view your sales order invoice details
1. Select Customers > Sales Order List.
2. From the Sales Order Processing window, select the sales order you require and then click New/Edit.
3. From the Product Sales Order window, click the Invoices tab.
The invoices associated with the selected sales order are listed.
4. Select the invoice from the list and click View.
The invoice details are displayed.
Completing your sales order if it has already been despatched
If your order has already been despatched to the customer, you can choose to complete the order. This will print your sales order, allocate stock to it and mark the order as despatched.
To complete your order
1. Select Customers > Sales Order List.
2. From the Sales Order Processing window, select the sales order you require, then click Complete.
You are prompted to confirm that you want to complete your order. To continue, click Yes.
If for any reason your order cannot be fully allocated or despatched, Sage 50 Accounts provides you with a list of possible causes. You are then prompted to print your sales order. The order will be marked as completed or part completed depending upon whether Sage 50 Accounts has been able to completely allocate the stock or partially allocate the stock.
If your order has only been part-despatched, an invoice will be created for the stock that has been despatched. When you have more stock available, you can simply choose to complete the order to despatch the remaining stock.
If your order has been fully despatched, an invoice is created for all of the stock.
If your order has not been despatched, or is only part completed, follow the procedure in Allocating stock to sales orders on page 512.
Saving your sales order
To save an order without immediately printing, allocating or despatching it, click Save. If you want to more instructions about how to print your sales orders, see Printing your sales order on page 510.
If you want to allocate your sales orders, see Allocating stock to sales orders on page 512.If you want to despatch your sales orders, see Despatching sales orders on page 514.
509

Sage 50 Accounts User Guide
51
Note: You cannot despatch your sales orders until you have allocated stock to the order.
Duplicating a sales order
To save you time when entering your sales orders, you can use the Duplicate facility to copy an existing order. This is useful if you need to create many sales orders with the same details.
To duplicate a sales order
1. Select Customers > Sales Order List.
2. From the Sales Order Processing window, select the sales order you require and then click Duplicate.
The Sales Order window appears, displaying the Details information.
Note: Sage 50 Accounts makes an exact copy of the original order, regardless of whether any prices have changed since you created the order. You should check all item prices carefully, and make any changes manually before you save the order.
3. If you manually number your orders as you create them, type the order number you require in the Order No. box.
If you use the Autonumber facility to automatically number your sales orders as you create them, you cannot overtype the <Autonumber> text that appears in the Order No. box. Sage 50 Accounts assigns the next available number to the duplicated sales order when you save it.
4. Check that the details in each tab of the order are correct and make any amendments you require.
5. To save the new order, click Save. To exit without saving, click Discard.
6. To close the order and return to the Sales Order Processing window, click Close.
The Sales Order Processing window appears.
The new sales order appears in the list on the Sales Order Processing window, ready to be printed, allocated and despatched.
Printing your sales order
Use the Print facilities to print a copy of your sales order. You can print as many copies of your sales order as you need.
To quick print a sales order
1. Select Customers > Sales Order List.
2. From the Sales Order Processing window, select the sales order you require and then click Quick Print.
0

Customer tasks
The selected sales order is printed using the default print layout that you have previously defined in your Invoice & Order Print defaults, see To set up your invoice and order quick print defaults on page 173. If you have not set a default layout, a software advisory message informs you that this is the case.
Note: If you do not select a sales order from the sales order list, a Confirm message appears:
This will print ALL sales orders. Do you want to continue?
3. Click Yes or No, as appropriate.
You are now ready to allocate stock to your sales order.
Note: You can choose to print your sales order in a batch - that is, to print all of the orders in one go. Alternatively, you can select the sales orders you want to print off individually.
Emailing your sales order
Use the Email button quickly email a sales order to the customer. You can email selected sales orders or all sales orders in the sales order list.
To email a sales orderFor Customers in the Republic of Ireland: Special legislation exists in the Republic of Ireland regarding VAT requirements when sending and receiving invoices and orders by email. For information, view the notice on the Revenue website at:
http://www.revenue.ie/en/tax/vat/leaflets/vatguide_2008.pdf.
Alternatively, you can obtain a copy of the notice from your Revenue Office.
1. Select Customers, then from the Links pane, click Sales Order List.
The Sales Order Processing window appears.
2. From the sales order list, select the sales order(s) to be emailed.
3. Click Email.
The software generates an email, using the default layout that you have previously defined in your Invoice & Order email defaults, see To set up your invoice and order email defaults on page 175. If you have not set a default layout, a software advisory message informs you that this is the case.
Note: If you do not select a sales order from the sales order list, a Confirm message appears:
511

Sage 50 Accounts User Guide
51
You do not have any items selected in the list - Choosing the option will email ALL orders. Are you sure you want to continue?
Click Yes or No, as appropriate.
Allocating stock to sales orders
After you have created a sales order, you must allocate stock to it. There are three ways in which you can allocate stock, depending on your circumstance.
If the order has been despatched and you have chosen to complete the order, the stock is automatically allocated for you. This is explained in Completing your sales order if it has already been despatched on page 509.
Alternatively, you can let Sage 50 Accounts allocate your stock automatically. You may want to use this facility if you have received an order from a trusted customer and want to allocate the relevant stock - that is, the stock has been reserved. For further information, refer to the following section.
Allocating your stock manually gives you greater control over your stock allocation. For example, if you only have ten stock items left in your stores and you receive two orders for ten items each, you can manually allocate five items to each customer and tell them they will get the remaining five items when you get them in stock. For more information, see Manually allocating stock to your sales orders on page 513.
To allocate sales orders automaticallySage 50 Accounts automatically allocates as much stock as possible to your orders. Sage 50 Accounts automatically makes the following adjustments for each product that you have allocated stock for:
The free stock level decreases
The allocated stock increases
Note: If you only want to make a part allocation, see Manually allocating stock to your sales orders on page 513.
1. Select Customers > Sales Order List.
2. From the Sales Order Processing window, select the sales orders you require and then click Allocate.
A confirmation message appears asking you to confirm that you want to allocate the full quantity of stock for each order.
To allocate stock to the sales order, click Yes.
If you do not have enough stock to allocate, a message appears listing the reasons why this might occur.
3. Click OK.
2

Customer tasks
The Sales Order Processing window reappears showing an Allocated status of Full if you had sufficient stock, or Part if you did not, for each selected order.
The next step in the order cycle is to record the despatch of the stock to your customer. For further information about how to do this, see Despatching sales orders on page 514.
Manually allocating stock to your sales orders
You can use Sage 50 Accounts to manually allocate stock to your orders.
Sage 50 Accounts automatically makes the following adjustments for each product that you have allocated stock for:
The free stock level decreases
The allocated stock increases
To allocate sales orders manually
1. Select Customers > Sales Order List.
2. From the Sales Order Processing window, select the sales orders you require and then click Amend.
3. In the Allocated column, enter the quantity of stock you want to allocate against each product item.
4. To save your changes, click Close.
Amending the allocation of stock
If you have allocated stock to a sales order but have not yet despatched it all, you can amend the allocation. You may want to do this to prioritise orders. To do this, select the order you require and from the Sales Order Processing toolbar, click Amend. In the Allocated column, amend the quantity of stock you want to allocate against each product item.
Sage 50 Accounts automatically makes the following adjustments for each product allocation that you have increased:
The free stock level decreases
The allocated stock increases
Sage 50 Accounts automatically makes the following adjustments for each product allocation that you have decreased:
The free stock level increases
The allocated stock decreases
To amend stock allocation
1. Select Customers > Sales Order List.
513

Sage 50 Accounts User Guide
51
2. From the Sales Order Processing window, select the sales orders you require and then click Amend.
3. In the Allocated column, amend the quantity of stock you want to allocate against each product item.
Dealing with low stock
If you have run out, or are running low on stock, you can use the Shortfall facility to automatically generate purchase orders for the stock that you require.
For full details about using the Shortfall facility, see Stock shortfall on page 661.
Despatching sales orders
When you have allocated your stock to your sales order you are ready to record the despatch of the order.
If you have chosen to complete the order, the stock is automatically recorded as despatched for you. For more information, see Completing your sales order if it has already been despatched on page 509.
There are three other ways of recording the despatch of the goods. The method you choose will depend on the amount of traceability you require and the number of items that you despatch. The three methods are:
Use the Goods Despatched Notes (GDN) facility to record the despatch of goods automatically. The advantage of using the GDN facility is that it provides you with maximum traceability, as you can view all of the goods despatched notes for an order. For further information about how to do this, refer to the following section.
Use the Despatch facility to automatically record the complete deliveries of stock for the sales orders you select. When you use the Despatch facility, Sage 50 Accounts assumes that you are despatching the complete order. For further information about how to do this, see Manually recording sales order despatches on page 522.
If you are not despatching the whole order, you can manually record the delivery of the stock you are sending. For more information, see Manually recording sales order despatches on page 522.
Sage 50 Accounts automatically makes the following adjustments for each product you despatch:
The In Stock level is decreased by the quantity of the despatch.
The Allocated stock level is decreased by the quantity of the despatch.
A GO - Goods Out adjustment is made for the quantity of the despatch.
4

Customer tasks
Recording delivery of goods using Goods Despatched Notes
The Goods Despatched Notes (GDN) facility provides a quick and easy way of recording the despatches you make for your sales orders. You can use this facility to record despatches against more than one sales order at the same time.
Sage 50 Accounts keeps a record of the goods despatched notes that link to each sales order, enabling you to keep track of your despatches.
Before you start using Goods Despatched Notes
Before you start using Goods Despatched Notes, you should set up your GDN Options in Invoice and Order Defaults. The behaviour of the GDN, Despatch and Amend facilities depends on the settings you enter for these defaults.
Option 1: Generate for all despatches (Default)
Goods Despatched Notes window
If you set your GDN Options to Generate for all despatches (Default), the following message appears every time you click Save in the Goods Despatched Notes window:
Note: If you do not want to see this message each time you print a despatch note, and you will always choose the same answer, select the Do not show this message again check box.
Click Print Now to display the Sales Order Processing Delivery Note Printing window. Choose the layout you require from the list, then from the Report Browser toolbar, click Edit, Print, Preview, or File or Email, as required. Alternatively, to print your goods despatched note later, click Print Later. You can print the note at any time from the Despatched tab of the sales order.
Sales Order Processing window
If you set your GDN Options to Generate for all despatches (Default), the following message appears every time you click Despatch in the Sales Order Processing window:
515

Sage 50 Accounts User Guide
51
If you want to produce a delivery note AND update your stock levels and order status, click Yes. The following message appears:
Click Print Now to display the Sales Order Processing Delivery Note Printing window. Choose the layout you require from the list, then from the Report Browser toolbar, click Edit, Print, Preview, or File or Email, as required. Alternatively, to print your goods despatched note later, click Print Later. You can print the note at any time from the Despatched tab of the sales order.
If you want to print a delivery note WITHOUT updating your stock levels and order status, click No. The Sales Order Processing Delivery Note Printing window appears. Choose the layout you require from the list, then from the Report Browser toolbar, click Edit, Print, Preview, or File or Email, as required.
Option 2: Prompt at each despatch
Goods Despatched Notes window
If you set your GDN Options to Prompt at each despatch, the following message appears every time you click Save in the GDN window:
6

Customer tasks
Note: If you do not want to see this message each time you print a despatch note, and you will always choose the same answer, select the ’Do not show this message again’ check box.
Click Print Now to display the Sales Order Processing Delivery Note Printing window. Choose the layout you require from the list, then from the Report Browser toolbar, click Edit, Print, Preview, or File or Email, as required. Alternatively, to print your goods despatched note later, click Print Later. You can print the note at any time from the Despatched tab of the sales order.
Sales Order Processing window
If you set your GDN Options to Prompt at each despatch, the following message appears every time you click Despatch in the Sales Order Processing window:
If you want to generate a goods despatched note AND update your stock levels and order status, select the 'Generate Goods Despatch Note(s)' check box and click Yes. The following message appears:
517

Sage 50 Accounts User Guide
51
Click Print Now to display the Sales Order Processing Delivery Note Printing window. Choose the layout you require from the list, then from the Report Browser toolbar, click Edit, Print, Preview, or File or Email, as required. Alternatively, to print your goods despatched note later, click Print Later. You can print the note at any time from the Despatched tab of the sales order.
If you want to update your stock levels and order status WITHOUT generating a goods despatched note, leave the Generate Goods Despatched Note(s)? check box clear and click Yes. Sage 50 Accounts updates your stock levels and order status and creates an invoice for the despatched goods.
If you want to generate a goods despatched note WITHOUT updating your stock levels or order status, click No. The Sales Order Processing Delivery Note Printing window appears. Choose the layout you require from the list, then from the Report Browser toolbar, click Edit, Print, Preview, or File or Email, as required. Note: Printing a despatch note in this way does not store goods despatched note details on the Despatched tab of the order.
Option 3: Do not generate
If you set your GDN Options to ’Do not generate’, Sage 50 Accounts does not produce a goods despatched note for any despatch, and the GDN option does not appear on the Sales Order Processing toolbar.
To use Goods Despatched Notes
1. Select Customers > Sales Order List.
2. From the Sales Order Processing window, select the sales orders you want to despatch goods for and then click GDN.
Note: You can only use the Goods Despatched Notes option for sales orders that have stock allocated to them. This means that the sales orders you select must show a status of Part or Full in the Allocated column. If you select an order that has no stock allocated to it, the following message appears:
There is no stock allocated to order(s)
3. Click OK to return to the Sales Order Processing window and allocate stock to the order or choose an alternative order.
The Goods Despatched Notes window appears.
8

Customer tasks
4. Enter the date and customer details in the boxes provided:
GDN No. The Goods Despatched Note number appears here automatically. You cannot change this number.
If you want to change the number that your goods despatched notes start from, you can do so in Invoice and Order Defaults. For more information, see To enter your invoice and order numbering options on page 176.
Date Despatched By default, the program date appears here. You can change this if you require.
Customer’s Ref You can enter the customer's reference here. You can later use this as a cross-reference check between the goods that you despatch and your customer receives.
Customer A/C Ref From the drop-down list, select the customer you are sending a delivery to. Only those customers associated with the sales orders you select appear in the list.
Note: You cannot type directly into this box.
519

Sage 50 Accounts User Guide
52
5. When you select the customer you are sending a delivery to, the following information appears:
6. To save the goods despatched note information, click Save.
7. Depending on your GDN Options settings, a prompt message may appear. Produce your goods despatched note as you require, according to the message or options that appear.
Order No. Your Sage 50 Accounts sales order number appears here.
Product Code The product code of each item on the sales order appears here.
Part No. If the product record contains a part number for this item, Sage 50 Accounts displays it here.
Details This shows the item description as it appears on the sales order. If you did not enter an item description on the sales order, this column remains blank.
Ordered This column displays the total quantity of the item that appears on the sales order.
To Despatch Shows the number of items that still need to be delivered, that is, the quantity of this item still outstanding on the sales order.
This Despatch If you want to record the complete delivery of all the items on the goods despatched note, click Despatch All. Selecting Despatch All enters the To Despatch value into the This Despatch column for all items on the order. When you save the goods despatched note, the order status changes to Complete.
If you are delivering only part of an order, enter the quantity of items that you are delivering here. When you save the goods despatched note, the order status changes to Part.
Note: You cannot enter a quantity greater than the quantity displayed in the To Despatch column. If you try to enter a This Despatch quantity that is greater than the quantity to despatch, Sage 50 Accounts automatically changes the value to the figure shown in the To Despatch column.
Total Quantity Despatched
This box shows the total of the This Despatch column, that is, the number of items you are despatching.
0

Customer tasks
For full details, refer to the section Before you start using Goods Despatched Notes on page 515.
8. If you do not want to save the goods despatched note information, click Discard. The Goods Despatched Note window clears, ready for you to re-enter the details or return to the Sales Order Processing window.
9. To return to the Sales Order Processing window, click Close.
You have now recorded your good despatched note for the selected customer. Repeat the procedure above for the remaining customers, to whom you have despatched goods.
The Despatched Tab
When you have recorded a delivery of goods using the GDN facility, Sage 50 Accounts updates the Despatched tab on the sales order with information relating to the despatch. This provides you with the ability to trace when you despatched the goods. From the Despatched tab, you can also view or print the goods despatched notes. For more information about the Despatched tab, see To view despatch information for a sales order on page 507.
Note: The Despatched tab is not available if your GDN Options in Invoice and Order Defaults are set to ’Do not generate’. For details, see To enter your invoice and order numbering options on page 176.
Recording sales order despatches
Use the Despatch facility to record the complete deliveries of stock to your customers for the sales orders you select.
To despatch sales orders
1. Select Customers > Sales Order List.
2. From the Sales Order Processing window, select the sales orders that you want to process and click Despatch.
3. Depending on your GDN Options settings, a message may appear. Produce your goods despatched note as you require, according to the message or options that appear. For full details, refer to section Before you start using Goods Despatched Notes on page 515.
For each order or part order that you despatch, Sage 50 Accounts prints a goods despatched note (if you request one), creates a product invoice and updates the stock level for each product on the order.
521

Sage 50 Accounts User Guide
52
Manually recording sales order despatches
You can use the Amend facility to record complete or part despatches for your sales orders.
To record a sales order despatch manually
1. Select Customers > Sales Order List.
2. From the Sales Order Processing window, select the order(s) you require and click Amend.
The Amend Allocations window appears showing the details of the first sales order you selected.
3. When you originally allocated stock to this order, Sage 50 Accounts automatically entered the quantity of stock outstanding for each product in the This Despatch column.
If you want to record a part despatch of the order, amend the quantity in the This Despatch column.
4. To update the product records with the delivery details, click Despatch.
5. Depending on your GDN Options settings, a prompt message may appear. Produce your goods despatched note as you require, according to the message or options that appear. For full details, refer to section Before you start using Goods Despatched Notes on page 515.
6. To return to the Sales Order Processing window, click Close.
Completing the sales order cycle
When your sales order is complete - that is, you have allocated and despatched all stock associated with the order, you need to print the invoice(s) created from the order and update your ledgers with the invoice details.
Any invoices related to sales orders appear in the Invoicing window, ready for you to print and update. For details about how to update your ledgers, see Posting an invoice on page 562.
To quick print your invoice
1. Select Customers > Invoice List.
2. From the list of invoices, select those that you want to print and then click Quick Print.
The selected invoice is printed using the default print layout that you have previously defined in your Invoice & Order Print defaults, see To set up your invoice and order quick print defaults on page 173. If you have not set a default layout, a software advisory message informs you that this is the case.
2

Customer tasks
Note: If you do not select an invoice from the invoice list, a Confirm message appears:
This will print ALL invoices. Do you want to continue?
3. Click Yes or No, as appropriate.
You have now printed the invoice. Now you must update the customer and nominal ledger so that the customer's account balance is amended to reflect the sale of goods. Using the update function also adds the value for the sale of goods to the Debtors Control account.
Deleting a sales order
If you want to, you can delete cancelled or completed orders. This will free up disk space on your PC, when you compress your data.
Before you delete any orders, back up your data. For more information, see Backing up your data on page 366.
To delete completed or cancelled orders
1. Back up your data. For details on how to back up your data, see To back up your data on page 366.
Note: Keep this backup until your Year End.
2. Select Customers > Sales Order List.
3. From the Sales Order Processing window, select the sales orders that you want to delete and click Delete.
A confirmation message appears asking you to confirm that you want to delete the order(s).
Note: When you delete sales orders, Sage 50 Accounts also deletes any goods despatched notes associated with the orders. You should make sure that you no longer need the goods despatched note information before you confirm deletion of the orders.
4. To continue to delete the orders, click Yes.
Note: If you have deleted a large number of sales orders, we recommend that you compress your data to free up disk space. For further information about how to do this, refer to the Sage 50 Accounts Help system.
You have now deleted the sales order.
Entering an invoice
Sage 50 Accounts gives you all the functions you need to produce invoices and credit notes for your products and services.
You can enter your invoices or credit notes that you have produced manually and already sent out to your customers. Sage 50 Accounts enables you to enter these in groups at one session,
523

Sage 50 Accounts User Guide
52
known as batch invoices or credit notes. You can also produce invoices or credit notes that you want to print out and send to your customers.
Users of Accounts Plus or Accounts Professional can also create proformas. Other invoicing functions, like mixed product and service invoices, are only available to users of Accounts Professional.
Invoicing in Sage 50 Accounts is directly linked to your Customer, Product, Project and Nominal accounts, so when you produce an invoice or credit note, all of these accounts are automatically updated.
Creating invoices
This method produces printed invoices to send to your customers, for goods or services. You create the invoice using Customers > New Invoice. Accounts Plus and Accounts Professional users can also create proformas.
The Invoice window appears, which is made up of four tabs: Details, Order Details, Footer Details and Payment Details.
Use the Details tab to enter your main invoice, credit note or proforma details, including customer account details, items and quantities. For further information about how to do this, see To create a new product invoice or credit note on page 526.
Use the Order Details tab to enter or amend the delivery address and details which are applicable to the invoice, credit note or proforma. For further information about how to do this, see To enter order details for your invoice or credit note on page 543.
Use the Footer Details tab to enter carriage charges, settlement terms and global details to relate to the whole invoice, credit note or proforma. For further information about how to do this, see To enter your invoice or credit note footer details on page 546.
Use the Payment Details tab to record any payments made against the invoice or proforma. For further information about how to do this, see To enter your invoice payment details on page 549.
Note: When you create a credit note, it appears in red on the Invoicing window.
To save you time when entering your invoices or credit notes you can enter a series of defaults. For example, you can set up a default to select the type of invoice you create most often and then when you click New Invoice or New Credit the window that appears will already show the type of invoice you want to create. For further information about how to do this, see Entering invoice and order defaults on page 167.
Another time-saving feature is the facility to duplicate an existing invoice or credit note. This is particularly useful if you need to create many invoices for the same products or services. For more information about duplicating invoices and credit notes, see To duplicate an invoice or credit note on page 551.
Accounts Plus and Accounts Professional only: Sage 50 Accounts lets you save the details of any product or service invoice you create, as a skeleton invoice so that you can use it again
4

Customer tasks
without having to enter all of the information again. This is very useful for those invoices that you create regularly. When you load your skeleton, all the details that you saved appear automatically in the boxes in the invoice window. For further information about skeleton invoices, type Skeleton Invoice in the Sage 50 Accounts Help system's Index.
In addition to creating skeleton invoices, you can also set up recurring invoices and orders if you bill customers for regular product or service sales, or if you place frequent orders for products or services with the same supplier. For more information about setting up and processing recurring invoices or orders, see Dealing with recurring transactions on page 564.
Note: The status bar shows the number of the last invoice or credit note you created.
When you have created your invoices and credit notes, you must decide when you want Sage 50 Accounts to update the sales and nominal ledgers with the transaction details. For details, see Posting an invoice on page 562.
A Note about special product codes
Normally you would set up a series of codes for your products and services that you regularly produce invoices or credit notes for. (See Creating a product record on page 238 for more information.)
However, sometimes you may need to produce invoices or credit notes for a product or service that you have no code for, that is, a one-off. In these cases you can choose a special product code that Sage 50 Accounts has already set up.
The following special product codes are available from the product code drop-down list when you create an order:
M Message Lines
Use this to add additional lines of description to the product or any comments you want to add.
S1 Special Product Item Tax Chargeable
Use the S1 code for product items that use the standard VAT code (T1) where no Product Record exists in Sage 50 Accounts.
S2 Special Product Item Zero-Rated
Use the S2 code for product items that are zero-rated for VAT (T0) where no Product Record exists in Sage 50 Accounts.
S3 Special Service Item Tax Chargeable - Accounts Professional only
Use the S3 code for adding service items to product invoices and sales orders. It uses the standard VAT code (T1).
Note: This code is not available in purchase order processing.
Tip: If the special product codes do not appear in the product code list, select Customers > Invoice & Order Defaults. Select the Show special product codes in Invoicing check box.
525

Sage 50 Accounts User Guide
52
To create a new product invoice or credit note
1. Select Customers > New Invoice.
The Invoice window appears, showing the Details tab.
2. Select the type and format you require from the relevant drop-down lists. For example, to create a product invoice, select Invoice from the Type drop-down list and Product from the Format drop-down list.
Note: If you are using Accounts Professional or Accounts Plus, you can also choose to create proformas.
3. Enter your invoice or credit note header details:
6

Customer tasks
Inv. No.Crd. No.
When you create a new invoice or credit note, <Auto Number> appears in this box. Invoice or credit note numbers are not assigned until you save the invoice or credit note. If you want to edit an existing invoice or credit note, or create an invoice or credit note with a specific number, type the number you require here.
The first time you create and save an invoice or credit note, Sage 50 Accounts assigns it with the number 1. Each time you create and save an invoice or credit note, the invoice/credit note number is increased by one. If you want to start numbering your invoices or credit notes at a particular number, you must change the numbering sequence in your Invoice and Order Defaults. For further information about how to do this, refer to To set up your invoice and order general defaults on page 168.
Date Enter the date of the invoice or credit note here. You can use the Calendar button to enter your date or you can type the date directly into this box.
Order No. You can enter your own order number here, or leave it blank. If you enter a number in here and want to be able to see that number on the audit trail instead of the invoice number, select Customers > Invoice / Order Defaults and select the Update Using Order No box.
If you have Accounts Professional and have generated an invoice using Sales Order Processing, an order number automatically appears in this box. You can change it but we recommend you keep the number so you can match up the sales order with the invoice. For more information, see Despatching sales orders on page 514.
527

Sage 50 Accounts User Guide
52
4. Enter the product information, one line of the invoice or credit note per product.
A/C Enter the customer account reference you want to assign the invoice or credit note to. You can use the drop-down button to enter the customer account reference or you can type directly into the box.
Note: If you have selected Display Account Status in Company Preferences, a warning message appears if the customer account you have selected is on hold.
If the Show warning on each change option is selected in Company Preferences (Settings > Company Preferences), click OK on the warning message to continue to enter the invoice or credit note.
If the Stop the account option is selected in Company Preferences (Settings > Company Preferences), you must take the account off hold before you can create the invoice or credit note. Click OK to continue.
Item No. This shows the number of the product item that is currently selected on the invoice or credit note. For example, if there are ten item lines and the cursor is currently on the second line, this box shows 2 of 10.
Rate - Accounts Professional only
This box only appears if your base currency is not the same as the customer's currency.
You can enter your currency exchange rate here.
Product Code Enter the product code of the item you are invoicing or crediting. You can use the drop-down list to locate the product code or you can type directly into this box.
You can also select the special product codes from the product code list. For further information about the special product codes, see A Note about special product codes on page 525. If you use the special product codes the Edit Item Line window appears automatically. For further information about what to enter here, refer to the section To enter product item line details on page 531.
8

Customer tasks
Description The item’s description, as it appears on the Product Record, displays automatically when you enter the product code. You can change this if you require.
If you want to enter any one-off product details, click the Edit button from the Description box or press F3. For further information about entering one-off product details, see To enter product item line details on page 531.
Quantity Enter the quantity of the product that you are invoicing or crediting here. If the item has a quantity in stock, Sage 50 Accounts enters one unit of the product automatically. If there are no items in stock, a zero appears. If you have already entered a quantity on the Edit Item Line window, it appears here automatically.
If you have Accounts Professional and are editing an invoice that was generated from a sales order, the quantity that was entered on the sales order appears here. You can change this if you require.
If you do not have enough stock for the quantity you have entered, a warning appears.
Price The unit price from the Product Record appears here. If you are using a special product code, the value you enter in the Edit Item Line window appears here. You can change these values if necessary.
Discount Displays the amount the item has been reduced by as a result of discounts that have been awarded such as a good customer discount.
You can change the amount by keying in a new discount amount. Alternatively with the item line selected you can press F3 to open the Edit Item Line where you can amend the discount.
Discount % Displays the total percentage discount that the customer receives. The total can be made up of good customer, quantity or invoice value discounts.
You can change the discount by keying in a new discount percentage. Alternatively with the item line selected you can press F3 to open the Edit Item Line where you can amend the discount.
Note: The Discount and Discount % columns are only displayed if Sage 50 Accounts is set to do this. See Entering invoice and order defaults on page 167.
529

Sage 50 Accounts User Guide
53
5. Continue to enter your remaining product lines.
You can now enter any order details such as the delivery address. For further information about how to do this, refer to the section To enter order details for your invoice or credit note on page 543.
If you want to enter any carriage or settlement details, for example, if you want to charge your customers for postal costs or provide discount for early settlement, refer to the section To enter your invoice or credit note footer details on page 546.
You can also enter payment details for an invoice, for example, if you want to include a payment reference or choose a bank account from which to debit. For further information about how to do this, see To enter your invoice payment details on page 549.
If you are an Accounts Plus or Accounts Professional user, you can calculate the profit you are making on this invoice by clicking Profit. For further information about how to do this, see To use the invoice profit check on page 560.
6. To save the invoice, click Save. If you have chosen the Create a new Invoice/Order after saving (Default) option in the Options tab of Invoice and Order Defaults, the window clears ready for you to enter a new invoice or credit note. Alternatively, if you have chosen the Edit
Net Sage 50 Accounts calculates the net value automatically. You cannot edit this.
VAT The VAT amount appears here automatically. You can only edit this amount if you have selected the ’Item VAT Amendable’ check box within the Parameters tab of Company Preferences (Settings > Company Preferences). If this option is selected, you can edit the VAT amount within the Edit Item Line window.
Tax Breakdown List
This list box breaks down all of the VAT on the invoice or credit note into the separate tax codes. As you enter a new line on the invoice or credit note, Sage 50 Accounts automatically recalculates the values. The list shows, for each tax code used, the code, rate, description, net and VAT.
Total These two boxes show the Net and VAT totals of the invoice or credit note.
Carriage These two boxes show the Net and VAT totals of any carriage costs you apply to the invoice or credit note. You can enter carriage information on the Footer Details tab.
Gross The total value of the invoice or credit note appears here.
Euro If you have entered currency details into Sage 50 Accounts, the total value (in euro) of the invoice or credit note appears here.
0

Customer tasks
the last Invoice/Order after saving option, the invoice or credit note information remains displayed for you to edit.
To print the invoice or credit note straight away, click Quick Print.
Important Note for Irish Users: Special legislation exists in the Republic of Ireland regarding VAT requirements when sending and receiving invoices and orders by email. For information, view the notice on the Revenue website at http://www.revenue.ie/en/tax/vat/leaflets/vatguide_2008.pdf.
Alternatively, you can obtain a copy of the notice from your Revenue Office.
To clear the entries you have made and start again, click Discard.
7. To return to the main Invoicing window, click Close.
Note: If you are viewing or editing existing invoices or credit notes, you can highlight all the relevant invoices you want to view or edit from the Invoicing window. When you click New/Edit, Sage 50 Accounts displays the first invoice or credit note in the selection and you can use the Next and Previous button to browse through your selected records.
To enter product item line detailsUse this function to increase the detail that is included in your records. You must assign a nominal code to your product item lines so you can increase your analysis on them. For example, to see the turnover for the different types of services you provide, at a later date. You can also view or alter the discounts that have been set up for this product.
Note: Item line details are a breakdown of the item on the invoice or credit note.
1. From the Invoice or Credit Note window, click the Edit button in the Description box or press F3.
The Edit Item Line window appears.
Note: You cannot edit the item line until some detail has been entered.
531

Sage 50 Accounts User Guide
53
2. Enter your item line details.
Product Code This shows the product code of the product selected on the invoice or credit note. You cannot change this.
Units Enter the unit type here. For example, you may sell items by the sheet or roll.
Description The product description as entered on the Product Record appears here. You can change this if you require, but any changes you make here do not affect the description on the Product Record.
Comment 1 and Comment 2
You can enter any additional comments you may have regarding the product items here.
Order Reference If the invoice was generated from a sales order, the sales order reference appears here. You cannot edit this information.
This information is used exclusively by Transaction Email.
2

Customer tasks
Order Line Reference
This shows this item's position on the invoice. This number is only used by Transaction Email.
Quantity Enter the quantity of the product that you want to add to the invoice or credit note.
Unit Price The sales price, taken from the Product Record, appears here. You can amend this if you require. You can enter a gross amount here, then click Calc. Net to split the gross into the net and VAT amounts.
Discount % This box shows the total discount in percent that the customer receives. You can change this if you require.
Accounts Plus and Accounts Professional only: To see a breakdown of how this discount is made up, click Discounts.
Discount This shows the value of the discount that the customer will receive based on the discount percentage. You can change this if you require.
Net This box displays the net value for the current item. Sage 50 Accounts calculates this by multiplying the quantity by the net unit price, including any discount. You cannot amend this value.
VAT This box shows the amount of VAT calculated for this item according to the default tax code held on the Product Record.
If you have selected the Override Product Tax Code in Invoicing check box on the Customer Record, the customer's default tax code is used to calculate the VAT.
If you have selected the Item VAT Amendable check box in the VAT tab of Company Preferences, (Settings > Company Preferences), you can edit this value.
533

Sage 50 Accounts User Guide
53
Nominal Code The defaults set on the customer’s record dictate which nominal code is suggested for use, see To enter your customer and supplier records on page 231. This is either the nominal code from the product record or from the customer’s record.
If you are using a special product code, the nominal code from the customer’s record appears here.
You can analyse your invoices or credit notes to the nominal ledger in two ways. You can either analyse each item of the invoice or credit note to an appropriate nominal account, or treat the whole invoice as one posting to the nominal ledger.
If you want individual items on the invoice or credit note to transfer separately to the nominal ledger, then you need to include a nominal code entry for every item on the invoice. You can amend the default nominal code if you require. If you are not sure which nominal codes are available, use the drop-down list to select from a list of nominal accounts.
If you want to analyse the whole invoice or credit note to just one nominal code, the Nominal Code you enter in the Global area of the Footer Details tab overrides any code that appears here. If you analyse your invoice to one nominal code, only one line will appear on the audit trail for this invoice or credit note.
Tax Code This is the default tax code for the product. If you have selected the Use Default Tax Code for Sales check box on the customer record, the customer's default tax code appears here.
Like the nominal code described above, you can either analyse each line of the invoice or credit note to its appropriate VAT code, or you can analyse the whole invoice or credit note to just one VAT code. You can only analyse it to one VAT code if you are also analysing the invoice or credit note to one nominal code.
4

Customer tasks
If your product item is a special service item (S3), the Product Item Line window only displays those boxes that are appropriate to that type of item.
For no-charge service items (code M) an Item Line Message window appears, enabling you to add a description and two lines of comments.
If you want to analyse each line of the invoice separately, select the VAT code you require from the drop-down list.
If you want to analyse the whole invoice or credit note to just one VAT code, any code entered in this box will be overwritten by the entry you make for Tax Code in the Global area of the Footer Details tab.
If you analyse your invoice to one code, only one line will appear on the audit trail for this invoice or credit note.
Note: A global tax code will only apply if a global nominal code is also entered.
Department This is the default department for the product.
Like the nominal and tax codes described above, department numbers can be entered by line item or for the invoice transaction as a whole. You can only analyse the whole invoice or credit note to one department if you are also analysing it to one nominal code.
If you want to analyse the invoice or credit note across departments for each line item, then each item must have its own department number. You may amend this department number if you require.
If you want to update using the department on the customer record, you will need to ensure the Update using Customer Department setting, held within Invoice & Order defaults, has been selected.
If you want to analyse the whole invoice or credit note to just one department number, any department entered here will be overwritten by the entry you make for Department in the global area of the Footer Details tab.
Note: A global department will only apply if a global nominal code is also entered.
Line Information Enter any additional information about the item line in this box.
535

Sage 50 Accounts User Guide
53
For information about these special codes, see A Note about special product codes on page 525.
3. Accounts Plus and Accounts Professional only: If Project Costing is enabled in Sage 50 Accounts and you enter the special product code S3 on a Product Invoice, an additional 'Project Details' section appears on the Edit Item Line window. If you want to assign this invoice or credit note to a project, select the project you require from the Project Ref drop-down list.
4. Accounts Plus and Accounts Professional only: If you want to view a breakdown of the discounts that have been applied to an item on this invoice or credit note, click Discounts.
5. If you want to view the different price lists or special customer prices that are available for the selected product, click Price Lists.
To save the item line and return to the Invoice or Credit Note window, click OK. To return to the Invoice or Credit Note window without saving, click Cancel.
To create a service invoice or credit note
1. Select Customer > New Invoice.
The Invoice window appears, showing the Details tab.
2. Select the type and format you require from the relevant drop-down lists. For example, to create a service invoice, select Invoice from the Type drop-down list and Service from the Format drop-down list.
6

Customer tasks
Note: If you are using Accounts Professional or Accounts Plus, you can also choose to create proformas.
3. Enter your invoice or credit note header details:
Inv. No.Crd. No.
When you create a new invoice or credit note, <Auto Number> appears in this box. Invoice and credit note numbers are not assigned until you save the invoice or credit note. If you want to edit an existing invoice or credit note, or create an invoice or credit note with a specific number, type the number you require here.
The first time you create and save an invoice or credit note, Sage 50 Accounts assigns it with the number 1. Each time you create and save an invoice or credit note, the invoice or credit note number is increased by one.
If you want to start numbering your invoices and credit notes at a particular number, you must change the numbering sequence in your Invoice and Order Defaults. For further information about how to do this, refer to the section To set up your invoice and order general defaults on page 168.
Date Enter the tax point date of the invoice or credit note here. You can use the Calendar button to enter your date or you can type the date directly into this box.
Order No You can enter a reference code of your own choice here or leave this box blank.
A/C Enter the customer account reference you are allocating the invoice or credit note to. You can use the drop-down button to enter the customer account reference code or you can type directly into the box.
Note: If you have selected Display Account Status in Company Preferences, a warning message appears if the customer account you have selected is on hold.
If the Show warning on each change option is selected in Company Preferences (Settings > Company Preferences), click OK on the warning message to continue to enter the invoice or credit note.
If the Stop the account option is selected in Company Preferences (Settings > Company Preferences), you must take the account off hold before you can create the invoice or credit note. Click OK to continue.
537

Sage 50 Accounts User Guide
53
4. Enter the service information, one line of the invoice or credit note per service.
Item No. This shows the number of the service item that is currently selected on the invoice or credit note. For example, if there are ten item lines and the cursor is currently on the second line, this box shows 2 of 10.
Rate - Accounts Professional only
This box appears if your base currency is different from the currency on the customer record.
You can enter your currency exchange rate here.
Details Enter any details regarding the service you are providing here. If you want to edit the service details press F3. For further information about entering service details, refer to the section To enter service item line details on page 540.
Amount Enter the unit price for the service here.
Discount Displays the amount the item has been reduced by as a result of discounts that have been awarded, such as a good customer discount.
You can change the amount by keying in a new discount amount. Alternatively with the item line selected you can press F3 to open the Edit Item Line, where you can amend the discount.
Discount % Displays the total percentage discount that the customer receives. The total can be made up of good customer, quantity or invoice discounts.
You can change the discount by keying in a new discount percentage. Alternatively with the item line selected you can press F3 to open the Edit Item Line where you can amend the discount.
Note: The Discount and Discount % columns are only displayed if Sage 50 Accounts is set to do this. See Entering invoice and order defaults on page 167.
Net Sage 50 Accounts calculates the net value automatically. You cannot edit this.
8

Customer tasks
5. Continue to enter your remaining service items.
You can enter your order details such as the delivery address. For further information about how to do this, refer to the section To enter order details for your invoice or credit note on page 543.
If you want to enter any carriage or settlement details, see To enter your invoice or credit note footer details on page 546.
You can enter payment details against an invoice. For further information about how to do this, see To enter your invoice payment details on page 549.
6. To save the invoice or credit note, click Save. If you have chosen the Create a new Invoice/Order after saving (Default) option from the Options tab of Invoice & Order Defaults, the window clears ready for you to enter a new invoice or credit note. If you have chosen the Edit the last Invoice/Order after saving option, the invoice or credit note information remains displayed for you to edit.
To clear the entries you have made and start again, click Discard.
To print the invoice or credit note straight away, click Quick Print.
To exit without printing the invoice or credit note, click Close.
VAT This box shows the amount of VAT calculated for this item using the customer's default tax code, as it appears on the Customer Record. If you have selected the Item VAT Amendable check box in the VAT tab of Company Preferences (Settings > Company Preferences), you can edit this value.
Tax Breakdown List
This list box breaks down all of the VAT on the invoice or credit note into the separate tax codes. As you enter a new line on the invoice or credit note, Sage 50 Accounts automatically recalculates the values. The list shows, for each tax code used, the code, rate, description, net and VAT.
Total These two boxes show the Net and VAT totals of the invoice or credit note.
Carriage These two boxes show the Net and VAT totals of any carriage costs applied to the invoice or credit note. You can enter carriage information in the Footer Details tab.
Gross The total value of the invoice or credit note appears here.
Euro If you have entered currency details into your Sage 50 Accounts program, the total value (in euros) of the invoice or credit note appears here.
539

Sage 50 Accounts User Guide
54
Note: If you are viewing or editing existing invoices or credit notes, you can select all the records you want to view or edit from the Invoicing window. When you click New/Edit, Sage 50 Accounts opens the first invoice or credit note in the selection, and you can use the Next and Previous buttons to browse through your chosen records.
To enter service item line detailsUse this function to increase the detail which is included in your invoices and credit notes. You must assign a nominal code to the service item line. You can select a different nominal code so that you can increase your analysis on them. For example, to see your most frequent service or services supplied to a particular customer, at a later date. You can also view or alter the discounts that you have set up for this service.
1. From the Invoice or Credit Note window, click the Edit button in the Details box or press F3.
The Edit Item Line window appears.
2. Enter your item line details.
Description Service Item appears here automatically. This is the first line of the details for this service item. You can change this if you require.
Details The details that you entered in the Service Invoice or Credit Note window appear here.
You can also enter additional text onto this item line, if you require extra text to explain more about the item line.
If the invoice was generated from a sales order, the sales order reference appears in the Order Reference box. You cannot edit this information here. This information is used exclusively by Transaction Email.
The Order Line Reference shows this item's position on the invoice. This number is only used by Transaction Email.
Quantity/Hours Enter a quantity of service items or the number of hours worked here.
Unit Price Enter the unit price for the service. If you charge by the hour, this would be the price per hour. You can enter a gross amount here, then click Calc. Net to split the gross into the net and VAT amounts.
0

Customer tasks
Discount % This box shows the total discount in percent that the customer receives. You can change this if you require.
Accounts Plus and Accounts Professional only: To see a breakdown of how this discount is made up, click Discounts.
Discount This shows the value of the discount that the customer receives based on the discount percentage. You can change this if you require.
Net This box displays the net value for the current service item. It is calculated by multiplying the Quantity/Hours by the net unit price, including any discount. You cannot amend this value.
VAT This box shows the amount of VAT calculated for this item according to the default VAT code from the Customer Record. If you have selected the Item VAT Amendable check box in the VAT tab of Company Preferences (Settings > Company Preferences), you can edit this value.
Nominal Code The nominal code from the Customer Record appears here automatically. You can change this if you require.
You can analyse your invoice or credit note to the nominal ledger in two ways. You can either analyse each item of the invoice or credit note to an appropriate nominal account, or treat the whole invoice or credit note as one posting to the nominal ledger.
If you want individual items on the invoice to transfer separately to the nominal ledger, then you need to include a nominal code entry for every item on the invoice or credit note.
You can amend the default nominal code if you require. If you are not sure which nominal codes are available, open the drop-down list to select from a list of nominal accounts.
If you want to analyse the whole invoice or credit note to just one code, the Nominal Code you enter in the Global section of the Footer Details tab overrides any code entered in this box.
If you analyse your invoice or credit note to one nominal account, only one line will appear on the audit trail for this invoice/credit note.
541

Sage 50 Accounts User Guide
54
Tax Code This is the default tax code for the customer.
Like the nominal code described above, you can either analyse each line of the invoice or credit note to its appropriate VAT code, or you can analyse the whole invoice or credit note to just one VAT code. You can only analyse it to one VAT code if you are also analysing the invoice or credit note to one nominal code.
If you want to analyse each line of the invoice or credit note separately, select the VAT code you require from the drop-down list.
If you want to analyse the whole invoice or credit note to just one VAT code, the Tax Code you enter in the Global section of the Footer Details tab overrides any code entered in this box. If you analyse your invoice or credit note to one code, only one line will appear on the audit trail for this invoice or credit note.
Note: A global Tax Code will only apply if you also enter a global Nominal Code.
Department This is the default department for the customer.
Like the nominal and tax codes described above, department numbers can be entered by line item or for the invoice or credit transaction as a whole. You can only analyse the whole invoice or credit note to one department if you are also analysing it to one nominal code.
If you want to analyse the invoice or credit note across departments for each line item, then each item must have its own department number. You may amend this department number if necessary.
If you want to analyse the entire invoice or credit note to one department number, any department entered here will be overwritten by the entry you make for Department in the global area of the Footer Details tab.
Note: A global Department will only apply if a global nominal code is also entered.
Line Information If you want to enter any additional information about the item, enter it in this box.
2

Customer tasks
3. Accounts Plus and Accounts Professional only: If you want to view a breakdown of the discounts that have been applied to items on this invoice or credit note, click Discounts. To save the item line and return to the Invoice or Credit Note window, click OK. To return to the Invoice or Credit Note window without saving, click Cancel.
To enter order details for your invoice or credit noteUse this function to fill in the details of your order, for example, your customer’s delivery address, their telephone number, and who the order was taken by.
1. From the invoice or credit note window, click the Order Details tab.
The order details information appears. Some of the boxes are already filled in for you with information taken from the Customer Record. Any amendments you make in this window will only be applicable to this invoice or credit note, the Sales Order section cannot be amended.
Note: No changes are saved to the Customer Record from here.
Project Ref - Accounts Plus and Accounts Professional only
If you use Project Costing, an additional Project Details section appears on the Edit Item Line window. If you want to assign this invoice or credit note to a project, select the project you require from the Project Ref drop-down list.
543

Sage 50 Accounts User Guide
54
2. In the boxes provided, enter or edit the following details: '
Delivery Address The customer's default delivery address appears here automatically. You can edit this address directly by typing into the box. Alternatively, you can select a different delivery or contact address from the list of company, customer or supplier delivery and contact addresses.
The Tax Code box displays the default tax code assigned to the company delivery address.
Note: If there is no default delivery address, the box will be left blank for you to enter the delivery address of your choice. Alternatively, you can select a delivery address from the Delivery Address window by choosing the Change button.
Note: If you select a customer account that is based in the UK but also has an EC delivery address, you need to choose where the invoice is to be sent.
If the invoice is sent to the UK address, VAT should be charged in the normal way. If the invoice is to be sent to the EC delivery address, then the invoice should be T4 zero rated.
Accordingly, when you select a customer account that is based in the UK but also has an EC delivery address, a software message appears:
You have selected a customer who has an EC delivery address. Do you wish this address to also be used for the invoice address?
Select Yes / No, as appropriate. A check box is available on the message, if you wish your selection to be followed again on other occasions in the future.
This choice is available if you are creating quotations, sales orders or invoices.
Customer Order No. Enter your customer's order number here.
Customer Tel. No. Your customer's telephone number appears here automatically. You can change this if required.
4

Customer tasks
You have now completed the order details for your invoice or credit note.
You can continue to enter any carriage or settlement details. For further information about how to do this, see To enter your invoice or credit note footer details on page 546.
3. To save the invoice or credit note for printing in a batch at a later date, click Save. If you have chosen to create new invoices/orders on saving from the Invoice / Order Defaults, the window clears ready for you to enter a new invoice. If you have chosen to edit the saved invoice from the Invoice / Order Defaults, the invoice information remains displayed for you to edit.
To print the invoice or credit note straight away, click Quick Print.
To clear the entries you have made and start again, click Discard. To exit the Invoice or Credit Note window, click Close.
Customer Contact The name of the person you set up as the contact on the Customer Record appears automatically. If you want to record the name of another contact for this particular invoice or credit note, you can enter it here.
Order Taken By Enter the name of the person who took the order here. If you are using Access Rights to restrict access to the functionality in Sage 50 Accounts, your user name appears here.
Notes Enter up to three lines of text here, which will relate to the invoice or credit note. For example, you can record any special delivery requirements or record a reason why the credit note is being issued.
DUNS Number The DUNS Number (Data Universal Numbering System) is a nine digit number, used to identify a business.
Use of this numbering system to identify a business is to ensure compatibility with Zanzibar, the UK Government e-purchasing portal.
Every e-order and e-invoice that passes through Zanzibar must include a DUNS number.
Order No. - Accounts Professional only
If this invoice was created from a sales order, the number of the sales order appears here. Click the yellow arrow to open the Sales Order record.
Date - Accounts Professional only
If this invoice was created from a sales order, the date of the sales order appears here.
Status - Accounts Professional only
The Status box shows whether the Sales Order Despatched status is Complete or Part.
545

Sage 50 Accounts User Guide
54
To enter your invoice or credit note footer detailsIf you want to assign the carriage costs, for example, postal or transit costs to your customers, you will need to set up your footer details. You can set up the nominal codes where you want the carriage charged to, and also the department.
1. From the invoice or credit note window, click the Footer Details tab.
The Footer Details window appears. Some of the boxes are already filled in for you, with information taken from the Customer Record.
2. In the boxes provided, enter the following carriage charges, or leave the boxes blank if you are not charging for carriage.
Net Enter the value of the carriage, excluding VAT. Use the Calculator button to help you calculate the amount to enter.
Note: If you have chosen to enter a default net amount for your carriage in your Invoice and Order Defaults, the net amount appears automatically for you. You can edit this if required.
Tax Code From the drop-down list, select the VAT code you require for your carriage item.
6

Customer tasks
3. In the boxes provided, enter the following settlement terms (or leave blank if not applicable).
VAT This shows the amount of VAT calculated, according to the rate specified in the 'T/C' box.
You can only amend this if you have selected the ’Item VAT Amendable’ check box in the VAT tab of the Company Preferences (Settings > Company Preferences).
Gross This shows the gross amount of carriage to be paid - the net plus VAT amounts.
N/C Enter the account reference for the nominal code to which the carriage value will be analysed. You can use the drop-down list to display a list of nominal accounts from which to choose.
Note: If you have chosen to enter a default nominal code to analyse your carriage to in your Invoice and Order Defaults, the default nominal code appears automatically for you. You can edit this if required.
Department If you want to analyse the carriage to a department, enter the number here or select one from the drop-down list.
Note: If you have chosen to enter a default department to analyse your carriage to in your Invoice and Order Defaults, the default department appears automatically for you. You can edit this if required.
Consign. No Enter the consignment number of your order here.
Courier If you are using a courier to deliver your order, select the courier you are using from the drop down list. If you have Internet access, you can use the Launch button to access your courier’s website and check on the delivery status of your order.
Days Enter the number of days during which early settlement discount applies to this invoice/credit note, if any. This box defaults to the number specified on the Customer Record.
Amount This is the actual value of the discount given.
Discount % If appropriate, enter the percentage of settlement discount that you are giving to your customer in this box. This box defaults to the percentage specified on the Customer Record.
547

Sage 50 Accounts User Guide
54
4. In the boxes provided, enter any conditions you want to apply globally - that is, to the whole invoice or credit note.
Note: If you analyse your invoice or credit note globally, only one line will be added to the audit trail. Carriage will always be updated to the Audit Trail on a separate line.
If you want to analyse your invoice or credit note per line, leave this section blank.
You have now completed the footer details for your invoice or credit note.
If you are entering an invoice, you can also enter any payment details. For further information about how to do this, see To enter your invoice payment details on page 549.
5. To save the invoice or credit note for later printing in a batch, click Save. If you have chosen to create new invoices/orders on saving from the Invoice and Order Defaults, the window clears ready for you to enter a new invoice. If you have chosen to edit the saved invoice from the Invoice and Order Defaults, the invoice information remains displayed for you to edit.
To print the invoice or credit note straight away, click Quick Print.
Total This amount is the gross value of items - that is, net plus VAT, including any carriage costs and is shown on the invoice/credit note/order itself.
N/C If you want to analyse the entire net value of the invoice or credit note to just one nominal account, enter the nominal code in this box. You can use the drop-down list to select a nominal account.
When you enter a nominal code in this box, you activate the whole of the global area. This means that the invoice or credit note will be analysed automatically to whatever entries you have made in the N/C, Details, Tax Code and Dept. boxes in the Global area.
Details Details should be entered to accompany the posting to the nominal ledger if the invoice or credit note is to be analysed to one nominal code only. You can enter up to sixty characters. This will appear on your reports.
Tax Code To analyse the whole invoice or credit note to one VAT code, enter the code in this box or select one from the drop-down list.
Department. If you want to analyse the entire invoice or credit note to just one department, enter the department you require in this box or choose one from the drop-down list. If no department is required, leave as department number 0 (zero).
8

Customer tasks
To clear the entries you have made and start again, click Discard. To exit the Invoice or Credit Note window, click Close.
To enter your invoice payment detailsUse this function to enter details, such as the bank account, where you want to record the money going into and the payment reference, so you can find the particular receipt easily on the audit trail. The payment reference will also go onto the customer's account.
Note: This function is not available when creating credit notes.
1. From the Invoice window, click the Payment Details tab.
The payment details information appears.
2. You can either allocate the payment you have received to this invoice, or you can post it to the customer's account and allocate it to an invoice later. Select the option you require.
549

Sage 50 Accounts User Guide
55
3. In the boxes provided, enter the following payment details:
Select the option button you require:
Payment Already Received
Select this option if you wish to indicate that a deposit / part payment has already been received.
Selecting this option will display the deposit but will not post a receipt transaction.
Post as Payment on Account
Select this option if you wish to post the payment to the customer’s account, and allocate it later.
If you select this option button, use Customer > Receive Payment to allocate it.
Allocate Payment to Invoice
Select this option button to allocate the customer’s payment to this invoice.
Post as Payment on Account
Select this option if you want to post the payment to the customer's account, and allocate it later.
If you select this option, use the Customer Receipts option to allocate it.
Allocate Payment to Invoice
Select this option to allocate the customer's payment to this invoice. When this invoice is posted, using the Update option, the payment will be recorded and deducted from the invoice total.
If the amount prepaid is the full amount of the invoice, the payment will be allocated to the invoice automatically. If the payment is more than the invoice amount, the surplus amount will be posted as a payment on account. If the payment is less than the invoice amount, the invoice will be part paid.
Payment Ref Enter a reference here that relates to the payment.
Bank Account Enter here the nominal code of the bank account that you want the money to be debited to - that is, paid into.
Payment Amount Enter the payment amount here.
0

Customer tasks
When this invoice is posted, using the Update option, the payment will be recorded and deducted from the invoice total. If the amount prepaid is the full amount of the invoice, the payment will be allocated to the invoice automatically.
If the payment is more than the invoice amount, the surplus amount will be posted as a payment on account. If the payment is less than the invoice amount, the invoice will be part paid.
Accounts Professional users only: If you have updated this invoice from a sales order that contains payment details, this window displays a note informing you that a payment on account has already been posted for the sales order.
You can post another payment on account or allocate a payment to the invoice. For example, if your customer paid a deposit against the sales order you could post a payment on account against the sales order, then post a second payment on account or allocate a payment against the invoice for the outstanding balance.
Note for VAT Cash Accounting users or Flat Rate - Cash Based users: If the payment exceeds the invoice value the tax liability of the overpayment must be dealt with. Sage 50 Accounts records an overpayment as a payment on account.
Before the invoice is saved Sage 50 Accounts prompts you to apply a tax code to the overpayment. The default tax code from the customer’s record is suggested for use but you can select another from the drop-down.
Alternatively you can cancel, return to the invoice and amend the payment to match the order value.
You have now completed the payment details for your invoice.
4. You can save or print the invoice.
To save the invoice for later printing in a batch, click Save. If you have chosen to create new invoices/orders on saving from the Invoice and Order Defaults, the window clears ready for you to enter a new invoice. If you have chosen to edit the saved invoice from the Invoice and Order Defaults, the invoice information remains displayed for you to edit.
To print the invoice straight away, click Quick Print.
To clear the entries you have made and start again, click Discard. To exit the invoice window click Close.
Duplicating invoices and credit notes
To save you time when entering your invoices and credit notes, you can use the Duplicate facility to copy existing records. This is useful if you need to create many invoices or credit notes with the same details.
To duplicate an invoice or credit note
1. Select Customers > Invoice List.
551

Sage 50 Accounts User Guide
55
2. From the Invoice window, select the invoice or credit note you require and then click Duplicate.
The Invoice or Credit Note window appears, displaying the Details information.
Note: Sage 50 Accounts makes an exact copy of the original invoice or credit note, regardless of whether any prices have changed since you created it. You should check all item prices carefully, and make any changes manually before you save the invoice or credit note.
3. If you manually number your invoices or credit notes as you create them, type the number you require in the Inv. No. or Crd. No. box.
If you use the Autonumber facility to automatically number your invoices and credit notes as you create them, Sage 50 Accounts assigns the next available number to the duplicated invoice or credit note when you save it.
4. Check that the details in each tab of the invoice or credit note are correct, and make any amendments you require.
5. To save the new invoice or credit note, click Save. To exit without saving, click Discard.
6. To close the invoice or credit note and return to the Invoicing window, click Close.
The new invoice or credit note appears in the list on the Invoicing window, ready to be printed and updated.
Create a credit note directly from an invoice
In this version of Sage 50 Accounts, an effort has been made to improve the speed and efficiency of payment processing. One area that has been highlighted is the need to provide you with the facility of creating a customer credit directly from an invoice.
To create a credit note directly from the Invoicing window
1. Open the Customers module, then from the Links pane, select Invoice List.
2. From the Invoicing window, select the specific Product Invoice from the list, against which you now wish to issue a credit.
3. At the bottom of the Invoicing window, click Credit.
Note: The Credit button is only active if an invoice is selected. The Credit button is visible but disabled if a Credit or Proforma is selected.
The Product Credit from Invoice <xx> window appears, displaying duplicate details of the invoice selected.
2

Customer tasks
4. Review and edit the details of the credit to be given, including the amount if necessary, then to save the Product Credit, click Save.
A confirmation message appears, prompting you to confirm that you want to update the ledgers, and allocate this credit to the selected invoice.
If No is selected, the Credit is saved but not updated or allocated. If Yes is selected, the Credit Note is saved, the Credit Note is updated to the Ledgers, and is then allocated to the invoice.
5. To update and allocate the credit, click Yes.
A confirmation message appears, advising that the credit note has been updated and allocated to the selected invoice. To continue, click OK.
The Product Credit window closes, and a Credit Note is created and listed in the Invoicing window, highlighted in red.
The current program date is used as the allocation date.
6. Now select Company > Financials.
Note that the credit note has been posted as a Sales Credit SC.
Entering batch invoices
This method is intended for recording invoices that you have produced and sent to your customers that do not need printed documents. The term batch means that you can enter as many invoices you like at the same time.
If you want to record customer invoices that you have already sent out, use the Batch Invoice option from within the Customers window. The amount of detail you enter per invoice is up to you, but we recommend that you enter each item on your invoice as a separate line. This makes it easier for you to identify what the invoice was for at a later date. However, you can enter the whole invoice as one line if you want to.
553

Sage 50 Accounts User Guide
55
When you enter several invoice items from the same invoice, we recommend you give each one the same account code, date and reference, as these will then be grouped together and listed as the items that make up a single invoice. For example, when you examine a customer's activity, a single invoice will be shown as one line, however if you double-click this line, the individual items that make up that invoice total will then be shown.
Note: If you do not include a reference, the transactions will not be grouped.
4

Customer tasks
Invoicing from telephone calls
Accounts Professional onlyThe Communications tab from the Customer Record enables you to record details of telephone conversations you have with your customers. If you charge for your time, you can create an invoice directly from here to charge for the time you have spent on telephone calls.
Note: Make sure you have set up the default call charge rate before using this facility. To do this, select Settings > Company Preferences > Parameters tab. Enter the hourly rate you want to charge in the Default Call Charge box.
Note: You cannot invoice on non-base currency accounts.
To record a telephone call and create an invoice
1. Select the Customers module and then, if appropriate, use the view selector to switch to the Customers view.
2. Select the customer you require and click Record.
3. Click the Communications tab.
555

Sage 50 Accounts User Guide
55
4. Click New.
The Customer Communications History window appears with the Communications Details tab shown.
5. Select the Spoke to drop-down list and choose a contact.
The Contact Address and Telephone details are shown.
6. Select the Telephone button next to the Telephone number.
7. When the telephone is answered by your customer, click Start.
The system begins timing the duration of your telephone call.
8. When the call ends, click Stop.
The length of the call appears in the Duration box.
9. To create an invoice, click Invoice.
The Communication - Invoice Details window appears.
6

Customer tasks
10. Enter the following information:
Details Enter the Details you want to appear on the invoice here.
Hours Enter the number of hours you want to charge for.
Hourly Rate Enter the hourly rate you are charging for this service, the rate initially defaults to the rate set up in Company Preferences.
Tax Code From the drop-down list, select the VAT code you require for your service.
N/C Enter the nominal code that you want the invoice posted to.
Ref Enter a reference here. This enables you to trace the invoice you are creating in the audit trail.
Date The program date appears automatically. You can change this if required.
Dept If you want the invoice to be assigned to a particular department enter it here.
557

Sage 50 Accounts User Guide
55
11. When you have entered your invoice details, click Save.
A confirmation message appears.
12. Click Yes to create the invoice.
Creating mixed product and service invoices
Accounts Professional onlyYou can create single invoices or orders to include both the products that you sell and for the services that you provide. This means that you do not have to send two invoices/orders to the same customer: one representing the products you have sold and the other representing the service provided charges for labour.
You can also create a single order for the products that you want to buy and the services that you want to use. For more information, see Processing purchase orders on page 608.
To create a mixed product and service invoice
1. Select Customers > New Invoice.
The Invoice window appears, showing the Details tab.
2. Select the type and format of the invoice you require from the drop-down lists. To create a mixed product and service invoice, select Invoice from the Type drop-down list and Product from the Format drop-down list.
3. Enter your product invoice lines as you would do normally. For further information, see To create a new product invoice or credit note on page 526.
4. If you want to enter a service item for a service that you provide that you have not created a Product Record for, select S3 from the Product Code drop-down list.
The Edit Item Line window appears.
5. Complete the Edit Item Line window as you would do normally for your service items. For further information, see To enter service item line details on page 540.
6. To save your service item to the invoice, click OK. If you do not want to save the service item to the invoice, remove the item using function key F8 and click Cancel.
You can now enter your order details such as delivery address. For further information, see To enter order details for your invoice or credit note on page 543.
EC VAT Desc. This drop-down list is only active if an EC member state customer is the subject of the communication.
Choose from one of the four available message texts to appear on your invoices, when an EC sales tax code is used.
8

Customer tasks
If you want to enter any carriage or settlement details, see To enter your invoice or credit note footer details on page 546.
You can also enter payment details against the invoice. For further information, see To enter your invoice payment details on page 549.
7. To save the invoice, click Save. If you have chosen to create new invoices/orders on saving from the Invoice and Order Defaults, the window clears ready for you to enter a new invoice. If you have chosen to edit the saved invoice from the Invoice and Order Defaults, the invoice information remains displayed for you to edit.
To print the invoice straight away, click Quick Print.
Important Note for Irish Users: Special legislation exists in the Republic of Ireland regarding VAT requirements when sending and receiving invoices and orders by email.
For information, view the notice on the Revenue website at: http://www.revenue.ie/en/tax/vat/leaflets/vatguide_2008.pdf.
Alternatively, you can obtain a copy of the notice from your Revenue Office.
To clear the entries you have made and start again, click Discard.
Emailing your invoice
Use the Email button quickly email an invoice to the customer. You can email selected invoices or all invoices in the invoice list.
To email an invoice
1. Select Customers, then from the Links pane, click Invoice List.
The Invoicing window appears.
2. From the Invoicing List, select the invoice(s) to be emailed.
3. Click Email.
The software generates an email, using the default layout that you have previously defined in your Invoice & Order email defaults, see To set up your invoice and order email defaults on page 175. If you have not set a default layout, a software advisory message informs you that this is the case.
Note: If you do not select an invoice from the Invoice List, a Confirm message appears:
You do not have any items selected in the list - Choosing the option will email ALL invoices. Are you sure you want to continue?
4. Click Yes or No, as appropriate.
559

Sage 50 Accounts User Guide
56
Invoice profit check
You can now check the profit you are making as you enter your product invoices and sales orders.
Note: The profitability is calculated using the cost price from the product record. It is not based on the First In First Out (FIFO) method of product valuation. If you want to produce reports that take into account the FIFO method you should use the profit reports accessed from the Products window.
To use the invoice profit check
1. Select Customers > Invoice List (or Customers > Sales Order List for Accounts Professional users).
2. Double click the invoice/sales order you require then click Profit. You may need to expand the Invoice or Sales window to see the Profit button clearly.
The Sales Profit Analysis window appears.
The Sales Profit Analysis window shows the following information:
Note: The Sales Profit Analysis window does not show any information for S1, S2, S3 and M item lines.
Product Code This shows the product code as entered on the invoice/sales order.
Description This shows the description as entered on the invoice/sales order.
0

Customer tasks
3. To return to your invoice or sales order, click Close.
To print this information, click Print.
Sales Price This shows the total net amount as entered on the invoice/sales order.
This column is also totalled to show the sum of all invoice/sales order sales prices.
Cost Price This shows the total cost price for this invoice or order line. It is equal to the cost price from the Product Record multiplied by the quantity entered on the invoice/sales order.
This column is also totalled to show the sum of all invoice/sales order cost prices.
Profit Value This shows the sales price minus the cost price.
This column is also totalled to show the sum of all profit values.
Profit % This is the percentage profit for the invoice/sales order item line. It is equal to the profit divided by the sales price and then multiplied by 100.
This column is also totalled to show the overall profit in percent for the selected invoice/sales order. The total profit percentage is calculated as Totalled Profit divided by the Totalled Sales Price, multiplied by 100.
561

Sage 50 Accounts User Guide
56
Posting an invoice
When you have created an invoice or credit note in Sage 50 Accounts, you can use the Update facility to transfer the invoice or credit note details to the customer, nominal and product (if appropriate) records. For example, when you update your ledgers your stock details are also updated, therefore you will know how much free stock is available.
Accounts Professional only: If you have posted an invoice using sales order processing, your stock levels are automatically updated when the sales order is despatched.
To update your ledgers
1. Select Customers > Invoice List.
2. From the Invoicing window, select the invoices you want to update the ledger with.
If no records are selected, all non-posted invoices/credit notes will be updated.
3. Click Update.
The Update Ledgers window appears.
4. Select the type of output you require for your report from the option buttons available.
5. To update your ledgers, click OK.
If you selected to print the report, the Windows Print window appears. Use this to select which pages to print and change your printer settings if required.
If you selected to preview the report, the Preview window appears showing the first page of the report. If you are satisfied with the report, you can send it directly to the printer by choosing the Print option from the bottom of the window.
6. If you selected to output the report to a file, the File Save As window appears. Select a directory in which to store the file and enter the filename in the File Name box. You can also select the type of the file you want to create. Using the Save File as Type drop-down list box, select either Sage 50 Accounts Report Data format (.datareport), text file format (.TXT), HTML (.HTM), Comma Separated Value (.CSV) or PDF file (.PDF).
2

Customer tasks
To mark a customer invoice as disputed
Accounts Plus and Accounts Professional only
1. From the Customers window, select the account you want to work with, then click Dispute.
Alternatively, from the Chase Debt window, select the account you want, then click Dispute.
The Disputed Items window appears. It shows the selected account number and name and lists the transactions relating to the selected account.
Tip: To view a different account click the A/C drop-down, and select the account you want from the displayed list.
2. Choose the transaction(s) that you want to mark as disputed, then click Dispute.
The Details window appears, prompting you to select a reason to explain why the item is in dispute
Note: You can set up or amend reason codes in the Configuration Editor - see Chapter 3, The Dispute Reasons tab.
3. Choose the reason code you require, then click OK.
The transaction now displays a ’d’ in the Disputed? column, and the reason for the dispute in the Dispute Reason column.
Alternatively, to return to the list of transactions, without marking the item as disputed, click Cancel.
4. To record your changes, click Save. If you do not want to save the changes, click Discard.
5. To return to the Customers or Chase Debt window, click Close.
Note: To remove a dispute flag from an item, follow steps 1 to 3 above. When you click Dispute for an item, which is already marked as disputed, the ’d’ and the reason are both removed.
563

Sage 50 Accounts User Guide
56
Dealing with recurring transactions
If you bill your customers for regular product sales or services, you can use Sage 50 Accounts Recurring Transactions feature to create these invoices automatically. Accounts Professional users can also set up recurring entries for regular sales orders and purchase orders.
When you have created your invoices or orders using the Recurring Transactions feature, you can then go on to process them in the usual way, for example, update your invoices to your ledgers or allocate stock to your sales orders.
You can set up your recurring transactions for different time periods, including daily, weekly, monthly and annually.
Note: The following procedures apply to recurring invoices, sales orders and purchase orders. Throughout these sections, we will refer to invoices and orders as transactions.
To create a recurring transaction
1. Make one of the following selections:
Customers > New Sales Order
Customers > New Invoice
2. Enter your invoice or order details.
For more information about entering invoices, see To create a new product invoice or credit note on page 526 or To create a service invoice or credit note on page 536.
For more information about entering orders, see To create a sales order on page 489 and To create a purchase order on page 609.
3. Click Memorise.
The Memorise window appears.
4

Customer tasks
4. In the Details section, enter a Reference and Description for your recurring transaction.
5. Enter the following Frequency details for your recurring transaction:
Note: You must make sure that the transaction you are creating shows Invoice or Order in the Type box, and that it meets all of the following criteria:
It contains a valid customer account reference, or supplier account reference for a purchase order
Every Enter a frequency for your recurring transaction. You can post your recurring transactions by multiples of days, weeks, months or years.
For example, to post a recurring transaction once each month, type 1 in the first box, and choose Month(s) from the drop-down list in the second box.
Total Required Enter the total number of recurring transactions to post. For example, to post a monthly transaction once each month for a year, type 12 in this box. If you want to post an indefinite number of entries, enter 0 (zero).
Start Date Enter the date to use for the first posting of this recurring transaction.
Finish Date The finish date shows the date on which this recurring transaction will stop, based on the Start Date and Total Required details you enter. You cannot edit this information.
Note: If the Total Required is set to zero, then the Finish Date box shows Perpetual.
Last Processed The Last Processed box shows the date this recurring transaction was last processed. For a new recurring transaction, this box is blank. You cannot edit this information.
Suspended? If you want to suspend the posting of the recurring transaction, select this check box.
Note: If you suspend a recurring transaction, it does not appear in the list when you process your recurring entries. If you later unsuspend a transaction that has been suspended for several processing periods, the Process Recurring Entries window shows all of the suspended entries, and allows you to choose which of the entries you want to post.
565

Sage 50 Accounts User Guide
56
It contains at least one item
If the customer or supplier is a foreign currency account, it has an exchange rate set.
If any of these criteria are not met, then the Frequency details are not available. Instead, the following window appears:
If you want to set up a recurring transaction, click Cancel on this window, and make sure you enter all the required details in the Invoice or Order window.
Alternatively, you can memorise the transaction as a skeleton, without frequency details. For more information on skeleton transactions, type Skeleton in the Sage 50 Accounts Help system’s Index.
6. To save your recurring transaction and return to the Invoice or Order window, click Save. To exit without saving, click Cancel.
To process your recurring transactionsIf you have any outstanding recurring transactions, you will be reminded every time you start Sage 50 Accounts. Click Yes to post the transactions or click No to use Sage 50 Accounts without posting them.
Note: You can turn this reminder off by selecting the No Recurring Entries at Startup check box within the Parameters tab of Company Preferences, accessed from Settings > Company Preferences.
1. Make one of the following selections:
Customers > Sales Order List
Customers > Invoice List
Suppliers > Purchase Order List
6

Customer tasks
2. Click Recurring.
3. From the Memorised Invoices, Memorised Sales Orders or Memorise Purchase Orders window, click Process.
The Process Recurring Entries window appears.
4. If you do not want to process a listed recurring entry, remove the tick from the Include check box.
Note: If you choose not to process a recurring transaction and clear the Include check box, Sage 50 Accounts displays asking if you want to update the last post date for any excluded transactions. If you have any transactions listed in the Process Recurring Entries windows that do not have a tick in the Include column, and you don't want to process the transaction at this time, click No.
The transaction will appear in the list the next time you process any recurring transactions. You may choose to do this when, for example, you are unsure whether you should process a transaction as the customer or supplier account is currently on hold.
5. Click Process to produce your recurring transactions. Sage 50 Accounts processes the selected entries and then displays the message Processing Complete.
Alternatively, click Cancel to return to the Memorised Invoices, Sales Orders or Purchase Orders window without processing any recurring transactions. Sage 50 Accounts displays the message - Are you sure you wish to exit? No recurring transactions will be posted.
Note: Processing your recurring transactions creates the invoice, sales order or purchase order in the relevant ledger, but does not carry out any further processing, such as updating invoices to the ledgers or allocating stock to sales orders. You will need to complete the processing of the transaction in the usual way.
567

Sage 50 Accounts User Guide
56
6. Click OK to close the Processing Complete message, or click Yes to confirm that you want to exit without processing any recurring transactions.
7. To close the Memorised Invoices, Sales Orders or Purchase Orders window, click Cancel.
To view or edit a recurring transaction frequency
1. Make one of the following selections:
Customers > Sales Order List
Customers > Invoice List
Suppliers > Purchase Order List
2. Click Recurring.
3. From the Memorised Invoices, Memorised Sales Orders or Memorised Purchase Orders window, select the entry whose frequency you want to view or edit.
4. Click Frequency.
5. You can amend the following frequency details:
6. To save the frequency details, click Save. To close without saving, click Cancel.
7. To return to the previous window, click Cancel.
Every Enter a frequency for your recurring transaction. You can post your recurring transactions by multiples of days, weeks, months or years. For example, to post a recurring transaction once each month, type 1 in the first box, and choose Month(s) from the drop-down list in the second box.
Total Required Enter the total number of recurring transactions to post. For example, to post a monthly transactions once each month for a year, type 12 in this box. If you want to post an indefinite number of entries, enter 0 (zero).
Note: You cannot change the number shown in the Total Required box to a number that is less than the number of postings that have already been made.
Start Date Enter the date to use for the first posting of this recurring transaction.Note: the start date cannot be edited once the recurring transaction has been processed.
Suspended? If you want to suspend the posting of the recurring transaction, select this check box.
8

Customer tasks
To delete a recurring transaction
1. Make one of the following selections:
Customers > Sales Order List
Customers > Invoice List
Suppliers > Purchase Order List
2. Click Recurring.
3. From the Memorised Invoices, Memorised Sales Orders or Memorised Purchase Orders window, select the entry you want to delete.
4. Click Delete.
A confirmation message appears - Are you sure you wish to delete the selected recurring entry?
5. To delete the entry, click Yes. To cancel, click No.
6. To return to the previous window, click Close.
569

Sage 50 Accounts User Guide
57
Receiving customer payments
Use Sage 50 Accounts to record the money that you receive from customers for invoices that you have sent them.
You can pay in full, or part pay, any or all of the invoice items and show discounts allowed. When you receive payment of an invoice, it is good practice to record receipt of the payment as soon as possible. This keeps you up to date on how much you are owed by your customers and keeps your Sage 50 Accounts bank account up to date. If a payment has been received that is greater than the outstanding invoices, you can enter a 'payment on account'. The customer can then use this payment on account to pay future invoices.
To record a customer receiptNote: You can also use the Customer Receipts wizard to guide you through the process of recording your customer receipts. The Customer Receipts wizard takes you step by step through the entire process.
1. Select Customers > Receive Payment.
The Customer Receipt window appears. The name of the selected account is also displayed.
2. If appropriate, select the bank account you require.
0

Customer tasks
3. In the A/C box enter the account code of the customer you require. All items that you have invoiced the selected customer which are not fully paid, appear automatically in the item table. If there are no outstanding transactions, no items are displayed.
4. Enter the receipt Date, Reference and Amount.
Note: Accounts Professional users who are working with a foreign currency customer will also have a Rate If you have set up foreign currencies to use in your software, by running the Foreign Trader Setup Wizard, this additional box will be displayed.
This box displays the current exchange rate to be used for this transaction. You can edit this exchange rate here.
If you are using Access Rights in your software, but you do not have access rights assigned for the foreign trading functionality, this box is read-only.
5. Allocate the money received, and entered in the Amount box, to the individual invoice items displayed in the item table. To do this, enter a value in the Receipt box of an invoice item.
You can part pay an invoice item or pay it off in full, but you cannot allocate more than the full value of the item. If you are paying an item in full, click on the item’s Receipt box then click Pay in Full. The amount needed to pay the item in full is then entered for you automatically. Continue allocating the money received against invoice items until the amount in the Analysis Total box equals that which you have received.
Note: If the amount shown in the Analysis Total box is less than the amount you entered as received in the Amount box, then the difference can be put on account. If you have already set up a Sage Pay account, you can use the Pay by Card payment facility by clicking the Pay by Card button.
6. To process the customer receipt, click Save. To clear the window and start again, click Discard. To exit from the window, click Close.
You can enter the following receipt information:
Date:
The system date will be entered automatically for you but you can change this if required. Alternatively, use the Calendar button to select a different date.
Amount:
You can specify this box in one of two ways. Enter the gross amount of the receipt in this box. If known, the bank balance box shown at the bottom of the window will either increase or decrease in value by the amount you enter, depending on whether it is an invoice or credit note.
Alternatively, leave the box blank and it will be updated as you select invoices that have been paid in full. If you choose the latter, you will be unable to amend the amount box directly - only by altering the allocations back to zero.
Note: You can access the currency calculator from this text box by pressing F5.
Reference:
Enter the cheque number or other reference for the receipt, using up to thirty characters.
571

Sage 50 Accounts User Guide
57
Entering a credit note
Use Customers > New Credit to create your credit notes. The Invoice window appears. Select either Product or Service from the Format drop-down list, depending on the type of credit note you want to produce.
Use this facility to create a credit note to send to one of your customers. For example, if a customer returns some of your products, you need to send them a credit note to the value of those products.
The Product Credit and Service Credit windows comprise three tabs: Details, Order Details and Footer Details. Creating a credit note follows the same rules used to create an invoice. For full details see To create a new product invoice or credit note on page 526.
Posting your credit note
In order to update your nominal, sales and product records, if applicable, with details of the credit notes you produce, you must use the Update facility. For example, when you update your ledgers your stock details are updated, therefore you will know how much free stock is available.
For information about using the Update option, see Posting an invoice on page 562.
Entering batch credit notes
This method is intended for recording credit notes that you have produced and sent to your customers that do not need printed documents. The term batch means that you can enter as many credit notes you like at the same time.
Enter batch credit notes follows the same rules used to enter batch invoices. For full details see Create a credit note directly from an invoice on page 552.
Memorising and recalling batch invoices and credit notes
You can use the Memorise and Recall facilities to record batched invoices or credit notes that you use regularly, or to save a batch of transactions without posting them, so that you can make amendments later.
For more details about the Memorise and Recall facilities, see Memorising and recalling batch invoices and credit notes on page 641.
2

Customer tasks
Deductions
Accounts Plus and Accounts Professional onlyWith Sage 50 Accounts, you now have the freedom to record, display and print a net value discount or deposit, arranged with your customers, on invoices, sales orders, credit notes, quotations or pro-formas.
Net value discounts
To create a net value discount on an invoice, credit note, quotation or sales order:
1. Open the Customers module, then from the Tasks list click New Invoice, New Credit, New Sales Order or New Quotation, as appropriate.
2. Create your Customer and Product Item lines, as described in the help topic: Invoicing > Product Invoices > To Enter or Edit Product Item Line Details
3. In the Deduction section of the Details Tab, select Net Value Discount from the Deduction Type drop-down list. The Edit Item Line window appears.
4. Enter a Description/Details narrative to include information related to the net value discount.
5. Now enter a Discount value (Disc) and then click TAB. The relative percentage discount (Discount %) is displayed automatically.
Alternatively, enter a Discount percentage and the relative discount value is displayed automatically.
6. To close the Edit Item Line window, click OK. The item line is displayed in red in the deduction section of the Details Tab and the invoice VAT and Gross values are recalculated.
Note: When you print an invoice or order with a net value discount, the net value discount is printed as the final item line in the body of the invoice.
Note: When an invoice that has a net value discount applied to it is created, both the invoice and net value discount detail, become read-only - that is, further amendments cannot be made to the invoice.
Deposits
Create a deposit on a quotation or sales order
1. Create your quotation / sales order in the normal manner, completing the Details Tab header entries and the product item lines, for which you are quoting.
573

Sage 50 Accounts User Guide
57
2. Focus on the Less Deposit section at the bottom of the Details Tab. To add deposit details, click the smart link button, as illustrated below.
3. Now enter the Payment Details in the boxes provided. Enter the deposit from the customer in the Payment Amount entry box of the Payment Details section.
To receive the deposit by online payment, click the Pay by Card button, adjacent to the Payment Amount entry box. The Sage Pay website is then accessed by an Internet Browser window.
Follow the website prompts to complete the Sage Pay transaction.
4. In the Payment Type section select one of the available option buttons, depending on whether or not a deposit payment has already been made.
Payment Already Received
Select this option if you wish to indicate that a deposit / part payment has already been received.
Selecting this option will disable the Pay by Card button.
Post as Payment on Account (SA)
Select this option if you wish to post the payment to the customer’s account, and allocate it later. If you select this option button, use Customer > Receive Payment to allocate it.
A deposit entered on the payments tab with a SA posted can be paid online using the Pay by Card facility.
5. Click the Details Tab. The deposit is displayed in the footer section of the details tab and the amount due.
6. When you have completed the quotation / sales order, click the Save button.
If you selected the Payment on Account (SA) option on the Payment Details tab, a Payment on Account (SA) is posted, when you click Save.
Create a deposit on an invoice
1. Create your invoice in the normal manner (see Invoicing > Product Invoices > To Add or Edit Product Invoice Details in the main help - F1), completing the Details Tab header entries and the product item lines you are quoting for.
4

Customer tasks
2. Focus on the Less Deposit section at the bottom of the Details Tab. To add deposit details, click the smart link button:
3. Now enter the Payment Details in the boxes provided. Enter the deposit from the customer in the Payment Amount entry box of the Payment Details section.
To receive the deposit by online payment, click the Pay by Card button, adjacent to the Payment Amount entry box. The Sage Pay website is then accessed by an Internet Browser window.
Follow the website prompts to complete the Sage Pay transaction.
Note: The Pay by Card button adjacent to the Payment Amount entry box is disabled if:
The Bank Account chosen is not the nominated account for Pay by Card.
The Payment Type option chosen is Payment already received.
The Payment Type option chosen is Allocate Payment to Invoice (SR).
To enter a deposit on an invoice, three possible routines are available:
Enter a deposit on an Invoice and allocate payment as a SR
1. Create your invoice in the normal manner, completing the Details Tab header entries and the product item lines you are invoicing.
2. Focus on the Less Deposit section at the bottom of the Details Tab. Click the Smart Link button to switch to the Payment Details Tab.
3. Enter the deposit on the Payments tab and select the SR option button.
The deposit is then displayed in the footer section of the details tab.
The amount due - invoice gross less deposit, is also displayed.
4. When you have completed all invoice details, save the invoice. At this point, the SR transaction is not posted.
5. When the invoice is updated a Sales Receipt (SR) is posted, and the Ex Ref field of the SR contains the Invoice number prefixed with Inv.
The SR is automatically allocated to the invoice.
Enter a deposit on an Invoice as a SA and select to create the deposit now
1. Create your invoice in the normal manner, completing the Details Tab header entries and the product item lines you are invoicing.
2. Click the Smart Link button to switch to the Payment Details Tab.
575

Sage 50 Accounts User Guide
57
3. Enter the deposit on the Payments tab and select the SA option button.
The deposit is displayed in the footer section of the details tab, along with the outstanding amount due - invoice gross less deposit.
4. Now save the invoice. A message appears, requiring you to either create a payment on account now or later, when the invoice is updated.
5. Select the Create the payment on account now option.
A Payment on Account (SA) is posted, the Ex Ref field of the SA will contain the Invoice number prefixed with Inv.
Later, when the invoice is updated to the ledgers, no further payment transactions will be created.
Enter a deposit on an Invoice and choose whether to create the deposit now or later.
1. Create your invoice in the normal manner, completing the Details Tab header entries and the product item lines you are invoicing.
2. Click the Smart Link button to switch to the Payment Details Tab.
3. Enter the deposit on the Payments tab and select the SA option button.
The deposit is displayed in the footer section of the details tab, along with the outstanding amount due - invoice gross less deposit.
4. Now save the invoice. A message appears, requiring you to either create a payment on account now or later, when the invoice is updated.
5. Select the On Update option.
The payment transaction is not created at this time.
6. Later, the user selects to update the invoice. A Payment on Account (SA) is posted, and the Ex Ref field of the SA contains the Invoice number prefixed with Inv.
6

Customer tasks
Deleting invoices and credit notes
You may delete invoice or credit note records from the list displayed in the Invoicing window. However, if an invoice or credit note has already been posted to the ledgers, deleting the record will not reverse the postings made.
To delete an invoice or credit note
1. Select Customer > Invoice List.
2. From the Invoicing window, select the record(s) you want to delete.
3. Click Delete.
A message appears requesting confirmation that you want to delete the chosen invoice or credit note record(s).
4. If you are sure you wish to delete the selected records, click Yes. Sage 50 Accounts removes the records from the list.
Alternatively, to cancel deletion, click No. The records remain selected in the list.
After you have deleted invoice or credit note records from the Invoicing window, you should use the Compress Files option in order to remove the deleted records from the data files and conserve disk space. For further information, see Compressing your data on page 389.
577

Sage 50 Accounts User Guide
57
Viewing customer transaction activity
You can view a detailed transaction history, or 'activity', for any customer.
1. From the Customers window select the customer(s), whose activity you want to view and click Activity.
Alternatively, you can open the Customer Record and click the Activity tab to display the customer's transaction activity.
The Activity window appears showing the transactions associated with the first customer you selected.
The upper pane of the Activity window shows summary or grouped information about each transaction, one line per transaction.
The lower pane of the Activity window displays the individual items that make up each transaction. For example, if you select an invoice that has been paid, this pane shows both the individual items that make up the invoice and the associated sales receipt details.
The total amount you are owed by the selected customer is also shown, grouped by age, in the boxes at the bottom of the window. For example, if you use period ageing and your first ageing period is 30 - 59 days, the customer's debt that is less than 30 days old is shown in the Current total box.
2. To filter the transactions displayed, choose the criteria you require from the following selection fields:
Show
To filter the transactions by a specific period, select the period you want to display from the Show drop-down list. You can choose to filter the transactions by your ageing periods, such as 30, 60 and 90 days, or display only those transactions that fall within the current financial year.
Alternatively, you can set a date range, transaction number range or select a transaction type to view by selecting the Custom Range option from the list and entering your selections in the Activity Range window that appears.
Your software retains the filter you specify from this list and applies it the next time you view the activity. This is true for all of the Show: drop-down list settings, although the values you enter in the Activity Range window will not be retained.
Date
This read-only box displays the date range you selected using the Show drop-down list. For example, if you selected Custom Range and entered the date range 01/07/2011 to 31/07/2011, these dates appear in this box.
The Activity window only displays those transactions that fall within the specified date range.
8

Customer tasks
Type
If you select Custom Range from the Show drop-down list and use the Activity Range window to choose a specific type of transaction to display, this box shows which transaction type you selected.
For example, if you chose to view only sales invoices by selecting SI - Sales Invoices on the Activity Range window, this field shows SI. The Activity window now only displays sales invoice transactions within the specified date range.
You cannot change the transaction type shown in this field directly - to change the type of transaction displayed here, you must select Custom Range from the Show drop-down list and re-select the transaction type you want to view.
O/S Only
If you selected Custom Range from the Show drop-down list and selected the Outstanding Transactions Only? check box on the Activity Range window, this check box is selected. This indicates that the Activity window is displaying only those transactions that are not yet paid or allocated.
You cannot change this setting directly here - to select or clear this box, select Custom Range from the Show drop-down list and select or clear the Outstanding Transactions Only? check box in the Activity Range window.
Trans
This box shows the transaction number range currently displayed on the Activity window.For example, if you select Custom Range from the Show drop-down list and use the Activity Range window to specify a range of transactions to view, this box shows the transaction numbers you chose.
If you do not specify a transaction range, this box displays the first and last transaction numbers from your audit trail. For example, if you have 2169 transactions on your audit trail, this field shows '1 to 2169'.
You cannot change the range shown in this box directly. To change the transaction number range shown here, select Custom Range from the Show drop-down list and enter the transaction number range you want to view.
3. To print the information shown, click Print List.
4. If you selected more than one customer, use the Previous and Next buttons to move between the selected customer records.
5. To view another customer’s transactions, enter that customer’s reference in the A/C box or use the drop-down selector to find the account.
Note: This only applies if you used the Activity option from the Customers toolbar to view the Activity window, as described in step 1.
6. To exit the Activity window, click Close.
For further information, please refer to Customers > Record > To View a Customer’s Transaction Activity in the main program help (F1).
579

Sage 50 Accounts User Guide
58
Customer refunds
Use the Customer Refund option to record money you have paid out to your customers. Examples of when you might need to do this include times when you have refunded money to a customer, or when a cheque has been returned.
The Customer Refund option generates an SP transaction, which you can allocate to sales credits (SC) or sales payments on account (SA) using Customers > Receive Payment, or in Bank > Customers.
To post a customer refund
1. Open the Customers module, then click Customer Refund.
The Customer Refund window appears.
2. Enter the details for your customer refund in the boxes provided.
3. To print a cheque for the payment, click Print Cheque.
The Cheque window appears.
4. Enter the payee - that is, the customer, information for the cheque and click Save. This stores the details of the cheque, ready to be printed from the Cheque List option in Bank.
5. If you use departments to analyse your transactions and want to assign a department to this transaction, click the Dept. button and select the department you want to use.
6. If you make a mistake and want to clear the details you have entered and start again, to clear the window, click Discard.
7. To save the Customer Refund details and post the transaction, click Save.
8. To close the Customer Refund window and return to the Customers window, click Close.
You can enter the following customer refund information:
Bank A/C Ref Enter the reference of the bank account you want to record the customer refund from. Your software's default bank account appears here automatically but you can change this, if required.
Payee Enter your customer's account reference here. Alternatively, select the account you require from the drop-down list.
0

Customer tasks
Tax Code - VAT Cash Accounting and Flat Rate - Cash Based scheme users only
If you are operating on the VAT Cash Accounting or Flat Rate - Cash Based scheme, enter the tax code you want to use for this refund here.
It is important that you enter the correct tax code here, so that your software can calculate the correct net/tax breakdown, and so that any subsequent payment on account or credit postings can be allocated to this transaction.
Rate - Accounts Professional only
If the bank account you selected is set up as a foreign currency account, the exchange rate set on the account record appears here. You can change this if you need to.
Note: If you set an exchange rate that differs from the rate set up for this currency in your Currencies list, a confirmation message appears to ask if you want to update the rate held in your Currencies list.
If you want to update your Currencies list with the new exchange rate, click Yes. If you want to leave the rate in your Currencies list as it currently appears, click No.
Date Enter the date you want to appear on the customer refund.
Amount Enter the gross (total) amount of the customer refund here.
Note for users operating on VAT Cash Accounting or Flat Rate - Cash Based schemes: Sage 50 Accounts uses the Tax Code entered for this transaction to break this total down into net and VAT amounts.
Cheque No If you have paid your customer by cheque, enter the cheque number here.
This appears as a reference on the saved transaction and can be a useful reminder, when you are reconciling your bank account to your statement.
581

Sage 50 Accounts User Guide
58
To allocate the refund to an outstanding credit note or payment on account
1. If you select a Payee where there are existing outstanding and unallocated credit notes or payments on account, the grid below the main part of the Customer Refund window, becomes populated with the details of these transactions.
The Type column shows whether the item listed is a Sales Credit or a Payment on Account.
2. Enter the total amount to refund the Payee in the top section of the window.
3. Enter the value to refund against each SC or SA item in the Refund column, then TAB to the next entry. Alternatively, to enter the full amount, click Refund in Full. The next Refund entry is selected automatically.
4. When all Refund entries have been made, to allocate the amounts to the selected SC / SA transactions, click Save. A Sales Payment (SP) transaction is created, and allocated against any selected SC / SA transaction.
Notes:
The amount allocated against each line cannot exceed the total refund value entered in the top half of the window. If this occurs, the amount entered is set to the amount available, and a warning message appears:
'Refund amount exceeds the amount outstanding'
Where the amount entered in the top section exceeds the sum of the refunds allocated to each line, a message appears:
'There is an unallocated refund of £x.xx. Do you want to post an unallocated refund?
Yes / No'
If a total value is not entered in the top half of the window, it is automatically calculated form the individual values entered in the Refund column.
The current program date is used as the allocation date. Although it is unlikely, some reconciliation issues could occur if the original SC / SA transaction dates are later than the program date. Please be aware of this, when using this feature.
2

Customer tasks
Sage Pay facility
Where you wish to receive card payments from your customers, you can now interact directly with the Sage Pay website, staying within the Sage 50 Accounts environment. You can also download your Sage Pay transactions from the Sage Pay website into your Sage Accounts software, recording transactions and automatically creating new customers and invoices.
Sage Pay provides you with a Pay by Card facility on various quotation, invoice, and sales order transaction windows.
Note: To use Sage Pay, for the collection of online or over the phone payments, you need a Sage Pay account and a merchant bank account. If you have any questions call us on 0845 111 445, or if calling from Ireland 1800 22123. Or if you prefer, email us at [email protected].
To set your Sage Pay facility
To enable the facility in Sage 50 Accounts you need to sign up for a Sage Pay Account.
1. To access this preference window, click Settings > Company Preferences, then click the Sage Pay tab.
The Company Preferences > Sage Pay tab appears.
583

Sage 50 Accounts User Guide
58
2. Click the Apply now for a Sage Pay account link and complete the Online Application Form.
Full help and support is available to you from within the online application form, if you run into any difficulties.
3. Once your account is set up, select the Enable Sage Pay check box at the top of the Sage Pay tab.
Configure your Sage Pay Credentials
Enter your account Vendor Name, Username, Email address and Password, defined during account creation, in the Sage Pay Credentials section of the Sage Pay tab.
Configure your Sage Pay General Settings
1. Choose the receiving bank account reference from the Bank Ref drop-down list in the General Settings section of the tab. All pay by card payments will be directed to this nominated account.
Tip: Select this bank account carefully. You may find it worthwhile to set up a dedicated bank account for your Sage Pay transactions.
On a daily basis, you may have many Sage Pay transactions, which will later be transferred as a single amount from your Sage Pay account to your general bank account. Using a dedicated Sage Pay account assists with subsequent bank reconciliation.
2. Each time Sage 50 Accounts is started, If you have any outstanding Pay Now payments to download and process, you can be reminded every time you start Sage 50 Accounts.
You can turn this reminder on/off by selecting/clearing the Check for payments on startup check box in the General Settings section of the Sage Pay tab. The check box is not selected, by default.
4

Customer tasks
Configure your Sage Pay download settings
Use this section to define how you match downloaded Sage Pay web transactions against customer accounts.
Match transactions against customer accounts (creating new accounts as required)
If this option is selected, the Sage Pay Payment Download wizard attempts to match a customer from a downloaded transaction to an existing customer in Sage Accounts using the customer email address.
If no customer is matched with the email address, a new customer is created.
Similarly, if no email address is provided by the download, a new customer is created.
Record all transactions against the account specified below:
If you prefer to assign all downloaded Sage Pay transactions to a single, generic web sales customer, select this check box.
With this option selected, the Customer Ref drop-down becomes active.
585

Sage 50 Accounts User Guide
58
Select the Customer Ref drop-down button, select New and create a new Company name in the Details tab of the Customer Record window that appears.
To save your Sage Pay settings, click OK.
With the completion of these steps, you will now have the facility in the Customer Receipts, Bank Receipts, Supplier Refund, and Sales Order/Invoice task windows to access the Sage Pay - Pay by Card facility for card payment over the Internet.
Note: If you have multiple companies and use Sage Pay with the payment download wizard, it is recommended that you use separate Sage Pay Vendor credentials for each of your companies. This is because the payment download wizard downloads transactions on a per Sage Pay Vendor credential basis.
If you have several companies using a single set of Sage Pay Vendor credentials, the download does not differentiate transactions for each company. The transactions are merely downloaded into the company that is open at the time of the download.
Customer receipts - receive payment using Pay by Card
1. Open the Bank or Customers module, then from the Tasks pane, click Receive Payment. The Customer Receipt window appears.
Tip: If you have already set up a Sage Pay Account, the Pay by Card button is visible in the lower left corner of the Customer Receipt window.
2. From the Bank drop-down list, choose the required bank account.
Note: To activate the Pay by Card facility, the account selected must be the same as that nominated, when you set up your Sage Pay Preferences. A Sage 50 Accounts Information Message will advise you if this is not the case.
3. From the Customer Details Account drop-down list, choose a customer account.
4. Select the transaction number and enter an amount to be paid in the Receipt column.
You have numerous payment receipt options available including Pay by Card.
5. Click Pay by Card.
The Sage Pay website is then accessed by an Internet Browser window.
6. Follow the website prompts to complete the Sage Pay transaction.
6

Customer tasks
Have you set a Closed Ledger date?: If you have already set your Closed Ledger date to prevent postings before a specific date, and your Sage Pay download contains transactions before that date, a software message prompts you to confirm that postings are to be downloaded with a transaction date before the Closed Ledger date. If you do not have access rights to Closed Ledger date, the download will fail.
Bank receipts - enter money using Pay by Card
1. Open the Bank module, then from the Tasks pane, click New Receipt.
The Bank Receipts window appears.
Tip: If you have already set up a Sage Pay Account, the Pay by Card button is visible in the lower left corner of the Bank Receipts window.
2. From the Bank drop-down list, choose the required bank account.
Note: To enable the Pay by Card facility, the account selected must be the same as that nominated, when you set up your Sage Pay Preferences. A Sage 50 Accounts Information Message will advise you if this is not the case, when you click Pay by Card.
3. Select the N/C Nominal Ledger account code, the Fund, Project Ref and Details information and Net, T/C and Tax details, as required.
4. Repeat Step 3 for any other Bank Receipt entry lines. The sum of all the entries is displayed below the Receipts table.
5. Click Pay by Card.
The Sage Pay website is then accessed by an Internet Browser window.
6. Follow the website prompts to complete the Sage Pay transaction.
Invoicing - receive a Pay by Card deposit against a quotation
Accounts Plus and Accounts Professional only
The Pay Deposit by Card payment facility can be used for deposits, paid against a quotation.
1. Open the Customers module, then from the Links pane, click Quotations List.
2. Click New/Edit on the Quotations toolbar.
The Product Quote SOP window appears.
Tip: If you have already set up a Sage Pay Account, the Pay by Card button is visible in the lower left corner of the window.
3. From the A/C drop-down list, choose a customer account, then select a a product code and quantity.
4. Click the Payment Details tab. Select the appropriate Bank Account Code from the Bank Account drop-down list.
587

Sage 50 Accounts User Guide
58
Note: To activate the Pay Deposit by Card option, the account selected must be the same as that nominated, when you set up your Sage Pay Preferences. A Sage 50 Information Message will advise you if this is not the case.
5. Enter the deposit amount to be paid in the Payment Amount entry box.
6. Do not make any option selection in the Payment Type section of the Payment Details tab. Leave the selection+ as Payment on Account (SA).
Select this option if you wish to post the payment to the customer’s account, and allocate it later. If you select this option button, use Customer > Receive Payment to allocate it.
7. Click the Pay Deposit by Card button, adjacent to the Payment Amount entry box.
The Sage Pay website is then accessed by an Internet Browser window.
8. Follow the website prompts to complete the Sage Pay transaction.
Invoicing - receive Pay by Card payment on product/service invoices
The Pay by Card / Pay Deposit by Card payment facility can be used for full payment or deposits, paid against a product or service invoice.
To receive a full payment against a product/service invoice
1. Open the Customers module, then from the Links pane, click Invoice List or create a new invoice. Double click on a specific non-posted invoice from the list displayed. The Product / Service Invoice window appears.
Tip: If you have already set up a Sage Pay Account, the Pay by Card button is visible in the lower left corner of the window.
2. Click the Payment Details tab.
3. Click the Pay by Card button at the bottom of the Payment Details tab.
The Sage Pay website is then accessed by an Internet Browser window.
4. Follow the website prompts to complete the Sage Pay transaction.
To receive a Pay Deposit by Card against a product/service invoice
1. Open the Customers module, then from the Links pane, click Invoice List. Double-click on a specific non-posted invoice from the list displayed. The Product/Service Invoice window appears.
Tip: If you have already set up a Sage Pay Account, the Pay by Card button is visible in the lower left corner of the window.
2. Click the Payment Details tab. From the Bank Account drop-down list choose the appropriate Bank Account Code.
8

Customer tasks
Note: To activate the Pay by Card option, the account selected must be the same as that nominated, when you set up your Sage Pay Preferences.
3. Enter the deposit amount to be paid in the Payment Amount entry box.
4. Do not make any option selection in the Payment Type section of the Payment Details tab. Leave the selection as Post as Payment on Account (SA).
5. Click the Pay Deposit by Card button, adjacent to the Payment Amount entry box.
The Sage Pay website is then accessed by an Internet Browser window.
6. Follow the website prompts to complete the Sage Pay transaction.
Sales Orders - receive Pay by Card payment
Accounts Professional only
The Pay by Card / Pay Deposit by Card option can be used for full payments and deposits, paid against a sales order.
To receive a full Pay by Card payment against a sales order
1. Open the Customers module, then from Links pane, click Sales Order List. Double-click on the specific order from the list displayed. The Product Sales Order window is displayed.
2. Click the Cash Sales button at the bottom of the Payment Details tab. The software requests that you confirm that you wish to complete the order as a cash sale. Click Yes.
3. The software now prompts you to choose online or offline cash sales payment. To choose online payment, click Yes.
The Sage Pay website is then accessed by an Internet Browser window.
4. Follow the website prompts to complete the Sage Pay transaction.
To receive a Pay by Card deposit against a sales order
1. Open the Customers module, then from Links pane, click Sales Order List. Double-click on the specific order from the list displayed. The Product Sales Order window is displayed.
2. Select the Payment Details tab and from the Bank Account drop-down list, choose the appropriate Bank Account Code.
Note: To activate the Pay by Card option, the account selected must be the same as that nominated, when you set up your Sage Pay Preferences. A Sage 50 Accounts Information Message will advise you if this is not the case.
3. Enter the deposit amount to be paid in the Payment Amount entry box.
4. Do not make any option selection in the Payment Type section of the Payment Details tab. Leave the selection as Post as Payment on Account (SA).
589

Sage 50 Accounts User Guide
59
5. Click the Pay Deposit by Card button, adjacent to the Payment Amount entry box.
The Sage Pay website is then accessed by an Internet Browser window.
6. Follow the website prompts to complete the Sage Pay transaction.
Completing transactions on the Sage Pay website
IntroductionWhen you select Pay by Card in the software, the Sage Pay website opens in an Internet Browser window.
Window 1 - Transaction Overview
1. Review the transaction details presented in the overview.
2. To continue, click Proceed. To close the Browser window, click Cancel.
Window 2 - Please Enter your Billing Details
1. Enter the billing details, making sure that all required entry boxes are completed, as indicated by red asterisk.
Note: For those customers without a Postcode, enter NA in the Postcode entry box. In the case of customers in the ROI without a Postcode, the corresponding entry should be 000.
Note: Pay by Card transactions are subject to a payment minimum of 1 and a maximum of 100,000.
2. To proceed, click Pay Now.
Window 3 - Select Payment MethodSelect the card icon, by which payment is to be made.
The Enter Card Details window appears automatically.
Note: If you wish to abort the payment process at this stage, click Cancel.
Window 4 - Enter card detailsThe card details window requires all card front details to be recorded, along with the Security Code, located on the back of the card.
1. Enter the full card number, located on the front of the card, into the Card Number box. Ensure that you type the number without spaces or other separators.
2. Enter the Firstname and then Surname, as they appear on the card.
3. Depending on the card, optionally enter the Valid From date, located on the front of the card, in the box provided. Type in MMYY format.
0

Customer tasks
4. Enter the Expiry date, located on the front of the card, in the box provided. Type in MMYY format.
5. Enter the CV2 Number, located on the back of the card. This typically consists of the extra three security digits on the card signature strip. In the case of American Express cards, there are four digits required.
6. The Billing Address boxes are pre-populated with details, taken from the Billing Details window. Modify these details, as required.
7. For specific card types, additional card details may need to be entered. These may include the Issue Number. This must be typed exactly as it appears in the card. For example, some cards have Issue Number 4, while others show Issue Number 04.
Note: For some Solo/Switch cards, the Issue Number does not appear on the card.
8. Once all details have been entered and you are satisfied that all details are correct, to continue, click Proceed.
9. Depending upon the card type, a verification window may appear, requiring card details and verification password to be entered.
Window 5 - Summary windowIn this Summary window, the Transaction and Card Details are presented for your review.
If you want to cancel the transaction, or you notice errors in the details, click Cancel.
If you are satisfied that all details for the transaction are correct, click Proceed.
Window 6 - FinishIf the transaction is successful, you are advised that payment has been taken.
If the transaction is not successful, a transaction aborted message appears. Possible reasons for the transaction failure are suggested.
The Sage Pay payment download wizard
IntroductionOnce you have set up your Sage Pay account and defined your Sage Pay preferences - see To Set your Sage Pay Preferences on page 145, you are then able to:
Download payment transactions that have been processed using the Pay Now functionality in the software
Download all your Sage Pay web transactions into the software
Note: It is important to realise that after the second window of the wizard, you cannot cancel the procedure. The wizard process must be followed to completion. This is because once the data has been downloaded, closing the wizard results in the downloaded data being lost.
591

Sage 50 Accounts User Guide
59
1. Ensure that you have enabled Sage Pay, set up your Sage Pay preferences, and have full access to Bank > Dialogs > Sage Payments access rights.
2. Open the Bank module, then from the Tasks pane, click Download Payments.
Your system checks to confirm that your Sage Pay Username and password have been entered correctly in your Sage Pay preferences. If not, a message appears advising you of this and the Payment Download Wizard does not appear.
If the Username and password are entered correctly, the Welcome window of the Sage Pay Payment Download wizard appears.
Note: If you have multiple companies and use Sage Pay with the payment download wizard, it is recommended that you use separate Sage Pay Vendor credentials for each of your companies. This is because the payment download wizard downloads transactions on a per Sage Pay Vendor credential basis.
If you have several companies using a single set of Sage Pay Vendor credentials, the download does not differentiate transactions for each company. The transactions are merely downloaded into the company that is open at the time of the download.
Have you set a Closed Ledger date?: If you have already set your Closed Ledger date to prevent postings before a specific date, and your Sage Pay download contains transactions before that date, a software message prompts you to confirm that postings are to be downloaded with a transaction date before the Closed Ledger date. If you do not have access rights to Closed Ledger date, the download will fail.
Window 1 - WelcomeThis Welcome window summarises the purpose of the wizard, which is to guide you through the downloading of your Pay Now Sage Pay transactions, or your Sage Pay web transactions.
You are advised that this wizard process is not reversible. It is recommended that you take a backup of your data before proceeding through the wizard.
1. To perform a backup of your data, select Backup on this Welcome window of the wizard.
2. If you only need to download your Pay Now payment transactions, select the Pay Now Wizard option.
Alternatively, if you wish to download your Sage Pay web transactions into the software, select the My Sage Pay Download Wizard.
3. To continue, click Next.
2

Customer tasks
Pay Now wizardWhen you click Next on the Welcome window of the wizard, a software request is sent to Sage Pay. Upon receipt and processing of the request by Sage Pay, a list of sales receipts is downloaded from Sage Pay.
If there are payments available to download, the Payments Received window appears.
Where there are no payments to be downloaded, the Finish window appears, advising that no payment data is available for download.
Pay Now wizard window 2
In the Payments Received window of the wizard, all downloaded payment data from Sage Pay appears, detailing customer A/C, invoice no, the amount and transaction date.
Note: For payments made from Letters and Statements, the Invoice No entry is blank. For Invoice payments, the Invoice No. entry is the Invoice Reference.
Note: On this second window you are advised that after you select Next, you cannot Cancel out of the wizard.
1. To print the downloaded data, click Print.
2. Select the required check box, to either:
Always create payments on account
or
Automatically allocate all payments to invoices, where possible
By default, the Always create payments on account check box is selected.
Choosing to create payments on account, rather than the automatic allocation option, gives you maximum control over payment allocation, for those cases where there is no invoice number recorded, an overpayment or a payment from a letter or statement.
If you are confident that all payments are clearly related to invoices, then choose the second option for quickest processing.
3. After selecting the appropriate check box, to allocate the payment data, click Next.
Using VAT Cash Accounting or the UK Flat rate - cash based VAT scheme? The Payment on Account window of the wizard appears.
Using Standard VAT Accounting or the UK Flat rate - invoiced based VAT scheme? The Finish window appears.
Pay Now wizard window 3 - Payments on Account - cash based VAT schemes only
In the Payments on Account window, since not all payments can be allocated automatically, the outstanding amounts appear as payments on account, and require a tax code to be made for each entry. Please note that T1 is allocated by default.
Using the drill-down button in each Tax Analysis entry box, the Payments window appears, where you can select the Tax Code to be applied. Repeat this step for all payments on account listed.
593

Sage 50 Accounts User Guide
59
To allocate your payments, click Next.
The Finish window appears.
Pay Now wizard window 4 - Finish
The Finish window summarises the results of the allocation process. The number of payments allocated successfully are listed, along with a list of those payments not allocated, due to customer account not being recognised or invoice number not found to be correct. These payments need to be entered manually later.
If no payments were available for download, this is also summarised.
To close the wizard, click Finish.
This completes the Pay Now Payment Download wizard.
The results of payment allocation is as follows:
The creation of a Sales Receipt (SR)
The SR is dated according to the Sage Pay receipt date
The SR is allocated to the related Sales Invoice (SI)
Where the SI is no longer outstanding, a Sales on Account (SA) is created
Where the payment value is greater than the outstanding amount on the SI, an SR is created for the outstanding amount, and an SA is created for the remainder
In the case of payments on letters and statements, they are allocated to all outstanding and undisputed SI transactions, oldest first. Any surplus is posted as an SA.
My Sage Pay download wizardWhen you select the My Sage Pay Download Wizard on the Welcome window for the first time, a download transactions from: selection box appears. The current system date appears, which you can choose to amend.
Subsequently, this date selection box does not appear.
To continue, click Next.
A software request is sent to Sage Pay. Upon receipt and processing of the request by Sage Pay, a list of web sales transactions is downloaded from Sage Pay.
If there are payments available to download, the next Wizard window appears.
Where there are no web transactions to be downloaded, you are advised that no payment data is available for download.
4

Customer tasks
My Sage Pay download wizard - window 2 - Matched
Note: This window only appears if you selected the Match transactions against customer accounts (creating new accounts as required) in your Sage Pay download preferences.
This window lists all customers who have been matched by the software. Matching is achieved where the email address provided during the web sale corresponds to an email address on a customer account in the software.
The email address can be matched to any of the email addresses recorded within a customer record, including those within Addresses and Contacts.
The email address must be an exact match but is case-insensitive.
Once matching is achieved, the following information is listed:
Customer Name
Email Address
Total Value
No. of Trans(actions)
Customer A/C
595

Sage 50 Accounts User Guide
59
You can amend a Customer A/C chosen by the matching by clicking in the Customer A/C entry box. The Customers A/C - Name window appears. Select another A/C, as required.
To create a new customer account in this window, click New.
When you have reviewed all your matched transactions, and made any necessary amendments, to continue, click New.
The Unmatched window of the wizard appears.
My Sage Pay download wizard - window 3 - Unmatched
Note: This window only appears if you selected the Match transactions against customer accounts (creating new accounts as required) in your Sage Pay download preferences.
Those transactions that could not be matched with an existing customer account in the software, are listed in this window.
6

Customer tasks
The unmatched transactions are listed with the following details:
Customer Name
Email Address
Total Value
No. of Trans(actions)
Customer A/C - blank and inactive initially
New check box - selected by default
The New check box signifies whether or not you wish a new customer account to be set up for the transaction. If left checked, upon completion of the wizard a new customer account is created.
If you deselect the check box the Customer A/C box becomes active.
You can now select an existing Customer A/C if you wish by clicking in the Customer A/C entry box. The Customers A/C - Name window appears. Select another A/C, as required.
When you have fully reviewed your Unmatched transactions, to continue, click Next.
My Sage Pay download wizard - window 4 - Finish
This final window provides you with a summary of the downloading and matching process. The number of transactions downloaded and new accounts created is summarised.
When ready, to complete the process, click Finish.
Once Finish is selected, any new accounts and invoices are created. An audit trail of all the transactions downloaded, matching details and accounts created is provided for you to review.
Details of the customer record creation process following download
When a new customer account is created from the downloaded information, the following criteria are followed:
The customer name is taken from the Customer Name entry in Sage Pay.
The customer reference is taken from the first eight characters of the customer name. If the reference taken using this criterion already exists, then the last character is replaced by a number, for example JOHNSMI1.
The registered address is taken from the billing address in Sage Pay. A delivery address is stored when a delivery address differs to the billing address.
The email address is taken from the email used in Sage Pay, upon completion of the web sale.
Terms agreed are taken from the customer defaults.
Details of the invoice creation process following download
When the wizard closes, a single invoice for each transaction and item purchased is entered as an invoice line.
597

Sage 50 Accounts User Guide
59
If the downloaded transaction contains a product reference that is matched in the product ledger of the software, then this product is added to the invoice in the normal manner.
If no matching product is located in the product ledger a S1 is created on the invoice. In the case where there is no VAT element, a S2 is created.
The product description is used to populate the item line description.
If the downloaded transaction contains a value but no product description, the same process is followed, except that the item line description is left blank.
The invoices created are not posted automatically. This is to allow you to amend the invoices, before posting to the ledgers, as required.
When updating the invoices, the software manages stock levels and posts the invoice and payment together, allocating as per current functionality.
Note: If you do not manage stock levels in the software, make sure that you allow negative stock by selecting:
Settings > Company Preferences > Parameters tab > Others> Allow Negative Stock check box.
In the invoices created, the Order Details tab > Order Taken By entry box is automatically populated with the entry Sage Pay.
Invoice payment details
In the Payment Details tab of the invoice, the payment is posted as a Sales Receipt, to be allocated against the invoice, when updating. The Payment Amount and Payment Type entries are read only.
The Bank Account used is the default Sage Pay account, defined in the Company Preferences > Sage Pay tab settings.
Details of how downloaded "empty basket" transactions are VAT treated
Cases may exist where a website payment is made by a customer, where no items have been purchased.
An example of this would be where a customer makes an account payment on an outstanding balance but no purchases are recorded against the payment.
The payment transaction is downloaded, as described previously. In such cases, the software then assigns a T0 tax code against the transaction.
If required, the tax code in the resulting invoice created for the "empty basket" transaction can still be changed before updating.
Treatment of non-UK Sage Pay customer transactions
Downloading of non-base currency transactions - this is not available.
Foreign customer creation - If you are using My Sage Pay protocol v2.2.3, your Sage Accounts software populates the Country drop-down list, within the customer record. This is not available in previous versions of the protocol, and in such instances, all new customer accounts are created with UK as the Country.
8

Customer tasks
Creation of invoices - Sage Accounts creates invoices for non-UK customers using the same tax treatment as UK customers. If there are specific aspects of the transaction relating to EC/non-EC based customers, registered or delivery addresses in the UK or outside the UK, you need to deal with this on an individual transaction basis.
Audit report - When this report runs, you are informed that x number of transactions were not in the base currency. Access My Sage Pay to obtain information for these transactions. The audit report also contains information on the invoices created for customers based outside the UK, and advises you that the tax treatment of these invoices needs reviewing.
How to deal with Sage Pay charges
There are two administration charges associated with the Sage Pay facility:
A monthly fee for using your Sage Pay Account
An administration transaction charge for the total period (daily) Pay by Card transactions
It is recommended that you deal with the monthly account fee as a recurring bank payment.
At the end of a daily transaction period, your total Pay by Card transactions for that day will have an administration charge subtracted from that total.
It is recommended that you reconcile this administration charge as a bank charge, related to your specified Pay by Card bank account.
599

Sage 50 Accounts User Guide
60
0
Chapter 9
Supplier tasksIn this chapter:Supplier price lists............................602
Processing purchase orders ............608
Entering an invoice from a supplier...640
Supplier payment control .................644
Supplier reports ...............................650
Recording supplier credit notes........650
Viewing supplier transaction activity .650
Supplier refunds...............................653
This chapter contains information on the tasks contained within the Suppliers module. It discusses all the activities you’ll need to perform when working with your supplier accounts, from creating a supplier record to making a payment to a supplier.
The purchase order cycle is covered in full, from creating a new order, through placing stock on order, to delivery and completion.
We’ll also show you how to enter the invoices and credit notes you receive from your suppliers, guide you through the process of recording the payments you make, view a supplier’s transaction activity and deal with supplier refunds.
This chapter assumes you have created your supplier records. For full details see Entering your customer and supplier records on page 231.

Supplier price lists
Accounts Professional onlyYou can create and maintain a list of prices for the products that you buy from a single supplier. If you buy the same product from a number of different suppliers, you can compare supplier prices. You can then use the price lists to buy at the most competitive price. If you buy products from a supplier who uses a different currency, you can maintain prices for those products in the supplier's own currency.
When you create a purchase order, the price of each product is taken from the supplier's price list.
If the selected supplier is using a currency other than your base currency, the price list also shows the exchange rate and price in the base currency.
You can copy price lists. With the exception of the supplier all the information from an existing price list is copied to the new price list. As you copy the list you can then choose which supplier you want to associate the list with. This is a great way to quickly create a new price list based on existing information.
To add or edit a supplier price listNote: You can import a price list from a file provided by your supplier. For more information about importing supplier price lists, see Importing supplier price lists on page 604.
1. Open the Suppliers module.
2. If necessary, switch to the Suppliers View.
3. Choose a supplier from the list, then click Price List.
Note: You cannot select more than one supplier at a time. You must set up each price list individually.
The Supplier Price List window appears. The window displays the supplier name, description, currency and the date the list was last updated, taken from the supplier record.
If you have run the Foreign Trader Setup Wizard so that you can use foreign currencies, the Supplier Price List window also displays the exchange rate.
4. Click Add Items.
The Add Products window appears. This window displays all products that are listed in your Sage 50 Accounts system.
5. Select the products that you want to add to the selected supplier's price list.
6. To add the highlighted products to the price list, click OK.
The Add Products window closes and returns you to the Supplier Price List window. The products you selected appear in the window. You now need to enter the product’s purchase price.
7. Select the Purchase Price column for the first product in the list.

Supplier tasks
8. Enter the product purchase price. You can either enter the price manually, or click the calculator button to the right of the column and use the pop-up calculator to enter the value.
9. To save the price list details and return to the Supplier window, click Close.
Alternatively, to print a copy of the supplier price list, click Print.
To import a supplier price list from a file, click Import. For more information, see To import a saved supplier price list on page 604.
To export the price list details into Microsoft® Excel, click Send To.
To remove the selected product from the Supplier Price List window, click Delete.
To copy a supplier price listNote: You can only copy a supplier price list from the Products module, not the Suppliers module.
1. Select Products, then from the Tasks pane select Price Lists.
The Price Lists window appears with all existing price lists shown.
2. Select a supplier price list you want to copy, then click Copy.
The Supplier Price List window appears.
3. Select a supplier for the price list using the Name drop-down list.
603

Sage 50 Accounts User Guide
60
The name of the supplier is applied to the price list description. It cannot be changed.
4. Click Save.
5. Amend the displayed information, where required. Refer to the information on page 602 to help you.
6. Click Save, then to close the Supplier Price List window, click Close.
Importing supplier price lists
Accounts Professional users onlyYou can import any supplier price list that you have saved previously, or that your supplier may have sent to you. These supplier price lists must have been saved in a comma separated value (CSV) or text (TXT) format.
When you import a supplier price list file, the following assumptions are made:
The Product Reference and Purchase Price are imported.
Any data on the same line, following the price is ignored.
The first line of the import file will be treated as a heading and will be ignored.
The purchase price is in the currency recorded on the supplier record.
For example, your CSV file may look like this:
Product Ref, PriceBOARD001, 20BOX002, 22.00, with waterproof coatingBOOKS001, 7.99, signed, limited edition
In this example, the column headings on the first line- Product Ref, Price, and the additional text, with waterproof coating and signed, limited edition, will not be imported.
To import a saved supplier price list
1. Select Suppliers > Supplier List.
2. Select a supplier from the list, then click Price List.
Note: You cannot select more than one supplier at a time.
The Supplier Price List window appears, displaying the supplier account reference, name and base currency.
If you are using foreign currencies, and the Supplier Price List that is due to be imported is using a currency other than your base currency, the exchange rate is also displayed.
3. Click Import.
The Import Supplier Price List window appears.
4

Supplier tasks
If you have not previously saved a price list for this supplier, a message appears advising you that you must save the price list before adding any products. Click Yes to save or No to close back to the Supplier Price List window.
4. Enter the directory and file name of the supplier price list details file that you want to import.
If you do not know the exact location or name of the price list file, click Browse to locate the file.
5. To proceed with the import process, click Continue.
The Confirm Supplier Price List Import window appears, displaying information about the file you are importing:
Number of items in current price list
Displays the number of products that currently belong to the selected price list. You cannot amend this.
Valid items in import file Shows the number of items that Sage 50 Accounts can successfully import from the file you select. You cannot amend this value directly, although you can increase the number of valid items by correcting import errors displayed in the Warnings column. For more information, see Warnings later in this table.
Invalid items in import file
Shows the number of items that create import errors and cannot be imported. You cannot amend this value directly, although you can decrease the number of invalid items by correcting import errors displayed in the Warnings column. For more information, see Warnings later in this table.
Line Shows the position of this product line within the CSV or TXT file you are importing. You cannot change this.
Stock Code Displays the stock code held in the import file. You can amend this if you require.
Current Price Reads the purchase price currently held on the price list. If the product does not yet appear on a price list, Sage 50 Accounts displays the purchase price held on the product record. The currency symbol shown indicates the currency of the price list.
You cannot change the Current Price.
Proposed Price Reads the product price from the file you are importing, and displays it in the price list's currency. You can change this if you require.
605

Sage 50 Accounts User Guide
60
6. Select or clear the following import options as you require:
Remove all items from the Price List prior to importing.
If you select this option, Sage 50 Accounts removes all products currently associated with the price list before proceeding with the import.
For example, if you have a price list containing six hundred products, and you import a file containing one hundred and fifty updated prices, Sage 50 Accounts updates the prices of those one hundred and fifty products and removes the remaining four hundred and fifty items from the price list.
If you do not select this option, Sage 50 Accounts checks the list of products on the price list, and if a price exists, it updates it. If the product you are importing does not exist on the price list, Sage 50 Accounts adds it.
For example, if you have a price list containing 1000 products, and you import a file containing amended prices for 250 of those products, Sage 50 Accounts updates only those 250 prices and leaves the remaining 750 unchanged. Alternatively, if you have a price list containing 400 products, and you import a file containing 50 products that do not
Warnings This column displays errors and warnings about the items you are importing. You cannot amend these.
Sage 50 Accounts displays import errors in red text. Examples of errors are:
Product code not recognised.
There are two prices being imported for this product.
Invalid price supplied for this product.
If errors are present, then the import of those products cannot proceed. The Invalid items in import box summarises the number of items containing errors. You must correct the errors in the import file before you try to import those items. If you correct an error and the associated item imports successfully, the Invalid items in import file value decreases, and the Valid items in import file value increases.
Sage 50 Accounts displays import warnings in black. Examples of warnings are:
Product code exists and the current list price of x.xx will be overwritten.
Warnings provide additional information but do not stop the import process.
6

Supplier tasks
currently belong to that price list, Sage 50 Accounts adds those 50 products to the list and leaves the original 400 products unchanged.
Hide warnings, errors will still be displayed.
Select this check box if you want the Import process to filter out any warnings and display only errors in the Warnings column.
If you do not select this check box, Sage 50 Accounts displays both errors and warnings in the Warnings column.
7. To remove a line from the list so that it is not included in the Import process, select the line then click Delete Line.
8. To save any changes you make in the list back to the original CSV or TXT import file, click Save. Alternatively, to save your amendments to a new import file, click Save As and specify a file name and location for the new file.
To return to the Supplier Price List window without importing any supplier price list details, click Cancel.
9. To continue with the import process and apply the prices to your data, click Apply.
Note: Items displaying errors will not import. You must correct the errors before you can successfully import these items.
If you are importing a large volume of data, a status bar appears, showing the progress of the import process.
Once the import is complete, the Supplier Price List window and the price list information appear.
607

Sage 50 Accounts User Guide
60
Processing purchase orders
Accounts Professional onlyPurchase orders are the orders that you place with your suppliers. The Purchase Order Processing facility lets you keep track of all of the products that you buy. Sage 50 Accounts lets you create and print orders to send to your suppliers.
The Purchase Order Processing facility is directly linked to your product records so the orders you produce automatically update your records with the order details.
Purchase Order Processing also integrates with projects. An order can be placed for a single project or several projects at the same time. When goods or services are ordered for a project the project reference can be applied to the order to link the goods on order with the project. This automates the allocation of stock and application of costs to the project at each stage of the purchase order life cycle.
To successfully complete each stage, the status of the linked project must accept postings, otherwise Sage 50 Accounts regards the project as closed. For more information see Using project statuses on page 685.
The purchase order life cycle
Creating the purchase order.For further information about this, refer to the following section.
Saving your purchase order.For further information about this, see Saving your purchase order on page 627.
Printing your purchase order.For further information about this, see Printing your purchase order on page 627.
Placing the goods 'on order'.For further information about this, see Putting purchase orders 'on order' on page 628.
Recording the delivery of the goods.For further information about this, see Recording delivery of goods on page 629.
Creating an invoice from the order.For further information about this, see Creating purchase invoices from your purchase orders on page 640.
Deleting the order.For further information about this, see Deleting a purchase order on page 639.
8

Supplier tasks
Creating a new purchase order
You can create a purchase order using Suppliers > New Purchase Order. This opens the Product Purchase Order window, which consists of four tabs: Details, Order Details, Footer Details and Deliveries.
Use the Details tab to enter your main purchase order details, including supplier account details, items and quantities ordered. For further information about how to do this, please refer to the following section.
Use the Order Details tab to enter or amend the delivery address and other details which apply to the purchase order. For further information about how to do this, see To enter the order details for your purchase order on page 619.
Use the Footer Details tab to enter carriage charges and settlement terms. For further information about how to do this, see To enter your purchase order footer details on page 621.
Use the Deliveries tab to view, print or reprint goods received notes associated with the order. For more information on how to do this, see To view delivery information for a purchase order on page 624.
You can also produce purchase orders from within the Check BOM facility (see step 3 of To check a component's availability on page 668).
You can also create a new purchase order from within the Products module. For details about how to do this, refer to the Sage 50 Accounts Help system.
To save you time when entering purchase orders, you can use the Duplicate facility to copy an existing order. This is useful if you need to create many purchase orders with the same details. For more information about duplicating orders, see To duplicate a purchase order on page 626.
Note: The status bar shows the number of the last purchase order you created.
To create a purchase order
1. Select Suppliers > New Purchase Order.
The Product Purchase Order window appears, showing the Details tab.
609

Sage 50 Accounts User Guide
61
2. In the boxes provided, enter the following details for your purchase order.
Order No. When you create a new purchase order, <Auto Number> appears in this box. Order numbers are not assigned until the purchase order has been saved. If you want to edit an existing order, type the order number of the purchase order that you want to edit here.
The first time you create and save an order, it will be assigned the number 1. Each time you create and save an order, the order number is increased by one.
If you want to start numbering your orders at a particular number, you must change the numbering sequence in your Invoice and Order Defaults. For further information about how to do this, see To set up your invoice and order general defaults on page 168.
Date The current program date appears here automatically but you can change this as required. Use the Calendar button to enter a different date or type the date you require directly into the box.
Ref You can enter an additional reference here if required.
0

Supplier tasks
A/C Enter the supplier account reference here. If you enter an existing account reference, or use the drop-down button to select one from the pop-up list, the supplier's name and address appear.
If you enter an account code that is not already set up, the drop-down list appears. You can then either select another account or create a new one using the New button.
If you have selected the Display Account Status check box in Company Preferences, Sage 50 Accounts gives you a warning if the supplier account you have selected has been put on hold on the supplier record.
If the Show warning on each change option is selected, to continue to enter the order, click OK on the warning message.
If the Stop the account option is selected, you must take the account off hold before you can create the order. To continue, click OK.
Item No. This shows the number of the item that is currently highlighted. For example, if there are ten item lines and the cursor is currently on the second line, this box shows 'Item 2 of 10'.
Project Ref Displayed if project costing is switched on. If the order is for a project you can enter the project reference here to link the order with the project. The reference is automatically applied to each order line, where it can then be changed (see, To enter purchase order item line details on page 615). If the order is for several projects you may find it quicker to leave this box blank.
If you cannot remember the project reference, use the drop-down list to search and select from the project records; you have the option to view the records by project structures or a simple project list. If you enter an unknown project code you are given the list of existing projects to select from. It is possible to create a new project from here by clicking New from the list of projects displayed.
Note: To successfully create the order, the project status must allow postings. See Using project statuses on page 685
611

Sage 50 Accounts User Guide
61
3. Enter the product items you want to purchase, one line of the purchase order per product. When dealing with an order for several projects, record the goods/services for each project on a separate order line. Projects that require the same product must have there own separate order line.
Cost Code Displayed if project costing is switched on. If the order is for a project, enter the cost code to be used to apply the value of the goods. The cost code is automatically applied to each order line, where it can then be changed (see To enter purchase order item line details on page 615). If the order uses several cost codes you may find it quicker to leave this box blank.
If you cannot remember the cost code, use the drop-down list to search and select from the cost codes. If you enter an unknown cost code you are given the list of existing cost codes to select from.
Note: If you change the project reference or cost code after adding order lines, you can choose to apply the change to each order line. Sage 50 Accounts will prompt you.
Rate This only shows if you have set up the foreign currency functionality by running the Foreign Trader Setup Wizard, and you have selected a foreign supplier account. You can enter your currency exchange rate here.
Product Code Enter the product code you require. If you cannot remember the code number, use the drop-down button to search and select from the product records. If you enter an unknown product code you are given the list of existing products to select from. If necessary, you can create a new product record to add the product to the purchase order.
When you enter an existing product code, and then press TAB to go to the next box, Sage 50 Accounts automatically fills in the details for the rest of the purchase order based on the re-order quantity and cost price as set up on the product record. You can change these if necessary.
Note: You cannot change the product code on a purchase order if the order shows an on-order or delivered quantity for that product. If you open an existing order that contains products with on-order or delivered quantities, the product code is not enabled, and you cannot change it using the drop-down list, or by overtyping.
2

Supplier tasks
In order to change the product code on an order if it has an on-order quantity, you must first reverse the on-order status using the Amend option. If a product shows a delivered quantity, you must reverse the delivery manually, taking the supplier and stock into account where appropriate, and re-enter an order as you require.
In order to use these special codes they must first be enabled. To do this, from the Sage 50 Accounts menu bar, select Settings, then Invoice and Order defaults. Ensure that the check box for Show Special Product Codes in Invoicing/SOP/POP has been selected.
In addition to the normal product codes you can also enter special product codes, where:
S1 = Special product item, tax chargeable.
S2 = Special product item, tax zero-rated.
S3 = Special Service Item, tax chargeable.
M = Non-product item with additional message but no price or VAT amount.
Use the message box - that is, the M product code, to add any text into the main body of the purchase order.
Description The description of your product is entered here automatically from the product record, but you can change this if required.
When your cursor moves to the Description box, an Edit button appears. Use this button or press F3 to apply one-off product details. For further information about how to do this, refer to the procedure To enter purchase order item line details on page 615.
Quantity Enter the quantity of stock you want to order. Sage 50 Accounts automatically displays the Re-Order Quantity, as set up in the product record. You can change this if necessary.
Price The last cost price from the product record appears here. If a special product code has been entered, the value entered in the Edit Item Line window appears here. You can amend these values if necessary.
Net The net value is calculated automatically and cannot be edited.
VAT The VAT amount appears here automatically and cannot be edited.
613

Sage 50 Accounts User Guide
61
4. Continue to enter all the lines of product items on the purchase order that you require.
You can now enter your order details, such as where you want the goods to be delivered. For more information, see To enter the order details for your purchase order on page 619.
If you want to enter any carriage charges or settlement details, see To enter your purchase order footer details on page 621.
5. When you are ready to save your purchase order, you have three choices. These are explained briefly in this step. If you need more information, refer to the following section.
To save the order for later printing, putting on order and recording delivery in a batch, click Save.
If you have chosen to create new invoices/orders on saving from the Invoice and Order Defaults, the window clears ready for you to enter a new order.
If you have chosen to edit the saved order from the Invoice and Order Defaults, the order information remains displayed for you to edit.
To print the purchase order straight away, click Quick Print.
If you have already received the products for this purchase order, click Complete.
To clear the entries you have made and start again, click Discard.
If you use this purchase order regularly, you can save it as a skeleton purchase order, so you can recall and reuse the purchase order, to do this click the Memorise button. For more information, see To create a recurring transaction on page 564.
6. To exit the Product Purchase Order window click Close.
Note: If you are viewing or editing existing orders, you can highlight all the relevant orders you want to view or edit from the Invoicing window, then when you call up the order using the New/Edit button you can use the Next and Previous button to browse through your chosen orders.
To enter purchase order item line detailsUse this function to increase the detail which is included in your records. You can assign a nominal code to your purchase orders so that you can analyse your purchase orders at a later date. For example, to see which products you buy most often. You can also see what discounts have been set up for this product.
Totals These two boxes show the Net and VAT totals of the order.
Carriage These two boxes show the Net and VAT totals of any carriage costs applied to the order.
Gross The total value of the order appears here.
Euro If you have entered currency details, the total value (in euros) of the order appears here.
4

Supplier tasks
1. Select Suppliers > Purchase Order List.
2. From the Purchase Order Processing toolbar, click New/Edit.
The Product Purchase Order window appears, showing the Details tab.
3. Enter your purchase order details. When your cursor moves to the Description box, an Edit button appears.
4. Click the Edit button, or press F3.
The Edit Item Line window appears.
615

Sage 50 Accounts User Guide
61
Some of the boxes on the Product Edit Item Line window are already filled for you, with information taken from the product and supplier records.
5. In the boxes provided in the Product Details area, enter or view the following details:
6. In the boxes provided in the Values area, enter the following details:
Product Code This box automatically displays the product code you have chosen. You cannot edit this entry.
Units Enter the unit type here. For example, you may sell items by sheet or roll.
Description You can amend an existing product description, or enter your own.
Comment 1 and Comment 2
These two boxes, each of up to sixty characters, can be used to add additional text to the description.
Quantity The quantity entered on the Details tab appears here, but you may change this if necessary. The value you enter here appears automatically in the Quantity box on the Details tab.
Unit Price This is the cost price per unit that is taken from the product record. You can change it for this purchase order. If you enter the gross amount here, you can instruct Sage 50 Accounts to calculate the VAT amount and the corresponding net amount by clicking Calc. Net.
Discount % The discount entered here is the total percentage of discount that the supplier gives you, as set up on the Supplier Record Defaults tab. You can change this if required.
Discount This shows the value of the discount that the supplier will give, based on the percentage of discount above. You can change this if required.
Net This box displays the net value for the current item. It is calculated by multiplying the quantity by the net unit price, including any discount. You cannot change this value.
6

Supplier tasks
7. In the boxes provided in the 'Posting Details' area, enter the following details:
8. If you want to give your purchase orders a reference to link them to a particular job for analysis purposes, you can enter a reference in the Additional Information area of the window.
9. Project Information is displayed if project costing is enabled. If you are recording an order for a project enter the following details:
VAT This box displays the amount of VAT calculated for this item according to the default VAT code from the Product Record. If you have selected the Override Product Tax Code In Purchases check box on the Supplier Record, the supplier's default tax code is used to calculate the VAT.
You can change this value if you have selected the Item VAT Amendable check box in the VAT tab of Company Preferences (Settings > Company Preferences).
Nominal Code The defaults set on the supplier’s record (see To enter your customer and supplier records on page 231) dictate which nominal code is suggested for use. This is either the nominal code from the product record or from the supplier’s record.
If you are using a special product code, the nominal code from the supplier’s record appears here.
You can also change the displayed nominal code if required.
The nominal code entered here will be used when you generate a purchase invoice for the purchase order.
Tax Code This is the default tax code for the product. If you have selected the Use Default Tax Code for Purchases check box on the supplier record, the supplier's default tax code appears here.
Department This shows the default department for the product record.
617

Sage 50 Accounts User Guide
61
10. View the following item status information:
Project Ref If a project reference has been entered on the order’s Details tab then the reference is displayed here. If this is a new order it can be changed. You can use the drop-down list to search and select from the project records.
If you enter an unknown product reference, you are given the list of existing projects to select from. It is possible to create a new project from here by clicking New from the list of projects displayed. The project status must allow postings. See Using project statuses on page 685.
If you are dealing with an existing order, the project reference can only be changed if the total quantity on the order line is outstanding. If you change the project reference the committed costs of the projects involved are adjusted.
Cost Code If a cost code has been entered on the order’s Details tab then it is displayed here. If this is a new order it can be changed. You can use the drop-down list to search and select from the cost codes. If you enter an unknown cost code you are given the list of existing products to select from.
If you are dealing with an existing order, the cost code can only be changed if the total quantity on the order line is outstanding. If you change the cost code the committed costs of the cost codes involved are adjusted.
On-Order Sage 50 Accounts automatically enters the quantity ordered here.
Delivered Sage 50 Accounts automatically enters the quantity of this product that has been delivered to-date here.
To Deliver Sage 50 Accounts automatically enters the quantity still left to deliver here.
Intrastat Shows the number of items that have been Intrastat confirmed.
Note: This box only appears if you have selected the Generate Intrastat entries for Purchase Orders check box in Invoice and Order Defaults. For more information, see To set up your Intrastat defaults on page 183.
8

Supplier tasks
11. To save your Purchase Order Item Line entries click OK, or if you want to exit without saving click Cancel.
To enter the order details for your purchase order
1. From the Product Purchase Order window, click the Order Details tab.
If you are amending an existing purchase order, access the order. To do this select Suppliers > Purchase Order List. From the Purchase Order Processing window highlight the order you wish to amend and then click the New/Edit button.
The Order Details information appears.
2. In the boxes provided, enter or amend the following details:
Delivery Address The default company delivery address appears here automatically. You can edit this address directly by typing into the box. Alternatively, click Change to select a different address from the list of company delivery address, customer delivery address or supplier delivery address.
619

Sage 50 Accounts User Guide
62
You have now completed the order details for your purchase order.
If you want to enter any carriage or settlement details, refer to the following section. If this is an order for a project and you want to charge the delivery costs to the project, do not record carriage charges on the Footer Details of the order as the charge cannot be split across multiple projects or cost codes.
Alternatively, for each project you want to charge, add the charge or charges to the order using an order line with a S1 code.
If you want to enter any delivery information or view any goods received notes, see To view delivery information for a purchase order on page 624.
3. If you do not want to add any footer details to this purchase order, you have the choice of sending it directly to a printer, recording the delivery of it straight away or saving it for later printing, putting on order and recording delivery.
You may use an address other than your main company address, if your main address is an office, but you have a warehouse elsewhere. Then your purchases could be delivered directly to your warehouse.
Note: You can change the delivery address that appears by default, to be either the default company, customer or supplier delivery address. To do this, select Settings > Invoice & Orders Defaults. Select the type of delivery address you want to appear by default on your purchase orders from the Purchase Order Delivery Address drop-down list.
Supplier Order No. You can enter your supplier's order number or order reference here, using up to thirty characters.
Supplier Tel. No. Your supplier's telephone number as set up on the Supplier Record appears here automatically. You can change this if you require.
Supplier Contact The name of the person you set up as the contact on the supplier's record appears here. If you want to record the name of another contact for this particular purchase order, you can enter it here.
Order Taken By Enter here the name of the person who placed the order. If you are using Access Rights to restrict access to Sage 50 Accounts functionality, your Logon Name appears here.
Notes Enter up to three lines of notes here, which will relate to the whole order, for example, to record any special delivery requirements.
0

Supplier tasks
To save the order for later printing, putting on order and recording delivery in a batch, click Save. If you have chosen to create new invoices/orders on saving from the Invoice & Order Defaults, the window clears ready for you to enter a new order. If you have chosen to edit the saved order from the Invoice & Order Defaults, the order information remains displayed for you to edit.
To print the purchase order straight away, click Quick Print.
If you have already received the products for this purchase order, click Complete.
If you use this purchase order regularly, you can save it as a skeleton purchase order, so you can recall and reuse the purchase order, to do this click the Memorise button. For more information, see To create a recurring transaction on page 564.
4. To clear the entries you have made and start again, click Discard.
5. To exit the Product Purchase Order window click Close.
To enter your purchase order footer details
1. From the Product Purchase Order window, click the Footer Details tab.
If you are amending an existing purchase order, access the order. To do this select Suppliers > Purchase Order List. From the Purchase Order Processing window highlight the order you wish to amend, then click the New/Edit button.
The Footer Details information appears.
621

Sage 50 Accounts User Guide
62
2. In the boxes provided, enter the following carriage charges, or leave blank if you are not being charged for carriage.
3. In the boxes provided, enter the following settlement terms, or leave blank if not applicable.
Net Enter the amount of the carriage item - that is, excluding VAT. Use the Calculator button to help you calculate the amount to enter.
Note: If you have chosen to enter a net carriage amount in the Invoice / Order Defaults, the default net amount appears automatically for you. You can edit this if required.
Tax Code From the drop-down list, select the VAT code you require for carriage.
VAT This shows the amount of VAT calculated according to the rate specified in the Tax Code box. Use the Calculator button to help you calculate the amount to enter.
You can only amend this if you have selected the Item VAT Amendable check box in the VAT tab of the Company Preferences ( Settings > Company Preferences > VAT tab).
Gross This shows the gross amount of carriage to be paid - that is, the net plus VAT in total, and cannot be amended.
N/C Enter the reference for the nominal code to which the carriage value will be analysed. You can use the drop-down list to select a nominal account.
Note: If you have chosen to enter a default nominal code to analyse your carriage in the Invoice and Order Defaults, the default nominal code appears automatically for you. You can edit this if required.
Department If you want to analyse the carriage to a department, enter the department you require here or select it from the drop-down list.
Note: If you have chosen to enter a default department to analyse your carriage to in your Invoice and Order Defaults, the default department appears automatically for you. You can edit this if necessary.
Consign No. You can enter a consignment number here.
Courier Select the Courier you are using to despatch the order from this drop-down list.
Note: Courier information is held in Settings > Internet Resources.
2

Supplier tasks
You have now completed the footer details for your purchase order.
If you want to enter any delivery information or view any goods received notes, refer to the following section.
4. You can save or print your purchase order.
You have the choice of sending your order directly to a printer, recording the delivery of it straight away, or saving it for later, putting on order and recording delivery.
To save the purchase order for later printing, putting on order and recording delivery in a batch, click Save.
If you have chosen to create new invoices/orders on saving from the Invoice and Order Defaults, the window clears ready for you to enter a new order.
If you have chosen to edit the saved order from the Invoice and Order Defaults, the order information remains displayed for you to edit.
To save and print the purchase order straight away, click Quick Print.
If you have already received the products for this purchase order, click Complete.
To clear the entries you have made and start again, click Discard.
If you use this purchase order regularly, you can save it as a skeleton purchase order, so you can recall and reuse the purchase order, to do this click the Memorise button. For more information, see To create a recurring transaction on page 564.
5. To exit without saving, click Close.
Days Enter the number of days during which early settlement discount applies to this order, if any. This box defaults to the number specified on the supplier record.
Discount % Enter the percentage of settlement discount that you have been offered for this purchase order here. This box defaults to the percentage specified on the Supplier record.
Amount This is the actual value of the discount given.
Note: This value does not include the settlement discount already applied to the VAT
Total This is the Gross amount of the order less the settlement discount amount.
623

Sage 50 Accounts User Guide
62
To view delivery information for a purchase orderNote: The only information that can be entered via this window is the Due Date.
1. Select Suppliers > Purchase Order List.
2. From the Purchase Order Processing window, highlight the required orders and click the New/Edit button.
3. Click the Deliveries tab.
Note: The Deliveries tab does not appear if your GRN Options in Invoice and Order Defaults are set to ’Do not generate’. For more information, see To enter your invoice and order numbering options on page 176.
The delivery information for the selected order appears.
4

Supplier tasks
4. View your deliveries information:
5. If you want to view individual goods received notes, select the note you want to view from the list and click View. The Goods Received Note window appears showing the goods received note details. You cannot change any of this information.
6. If you want to print individual goods received notes, select the note you want to print from the list and click Print GRN. You will see a preview of GRN with options to print, save or email. To return to the Deliveries tab, click Close.
7. To exit and return to the Purchase Order Processing window, click Close.
Order Status The status of the order appears automatically. The status can be On-Order, Cancelled or the status can be left blank if the order has been completed or if it has not yet been placed on order.
Delivery Status This shows the delivery status of the order and can be Part, Complete or if no items have been delivered, this box will be left blank.
Invoice Status If an invoice has been raised, a 'Y' appears in this box. If an invoice has not been raised, an 'N' appears in this box.
Complete If the order has been completed a 'Y' appears in this box. If the order has not been completed, an 'N' appears.
Due Date You can enter an estimated delivery due date. This cannot be changed after the order has been completed.
Intrastat Displays the Intrastat declarations status of the order. This can be blank - the order is not Intrastat confirmed, Complete - the order has been fully Intrastat confirmed, or Part - only some items on the order have been Intrastat confirmed.
Note: This box only appears if you have enabled Intrastat reporting in Invoice and Order Defaults. For more information, see To set up your Intrastat defaults on page 183.
GRN. No This column shows the goods received note number that has been assigned within Sage 50 Accounts.
Supplier GRN. No
If you have entered a supplier goods received note, when you recorded the delivery of the goods, the goods received note number appears here.
Date This shows the date the goods were delivered.
625

Sage 50 Accounts User Guide
62
Duplicating a purchase order
To save you time when entering your purchase orders, you can use the Duplicate facility to copy an existing order. This is useful if you need to create several orders with the same details.
To duplicate a purchase order
1. Select Suppliers > Purchase Order List.
2. From the Purchase Order Processing window, select the order you want to copy.
3. Click Duplicate.
The Purchase Order window appears, displaying the Details information.
Note: Sage 50 Accounts makes an exact copy of the original order, regardless of whether any prices have changed since you created the order. You should check all item prices carefully, and make any changes manually before you save the order.
4. If you manually number your orders as you create them, type the order number you require in the Order No. box.
If you use the Autonumber facility to automatically number your purchase orders as you create them and you have selected to lock the Autonumber for SOP/POP in Settings> Invoice and Order Defaults, you cannot overtype the <Autonumber> text that appears in the Order No. box. Sage 50 Accounts assigns the next available number to the duplicated purchase order when you save it.
5. Check that the details in each tab of the order are correct, and make any amendments you require.
6. To save the new order, click Save. To exit without saving, click Discard.
7. To close the order and return to the Purchase Order Processing window, click Close.
The Purchase Order Processing window appears.
The new purchase order appears in the list on the Purchase Order Processing window, ready to be printed and delivered.
Completing your purchase order if it has already been delivered
If your order has already been delivered, you can choose to complete the order.
To complete your purchase order
1. Select Suppliers > Purchase Order List.
2. From the Purchase Order Processing window, select the order you want to complete, click the New/Edit button.
The Purchase Order Window appears.
6

Supplier tasks
3. Click Complete.
Sage 50 Accounts saves the purchase order, completes the order and then records the delivery of the stock for it immediately. When the order is linked to a project, the goods - Stock Item, are automatically allocated to the project and the costs applied. Actual costs are applied at different stages depending on the type of item ordered:
Stock item: Actual cost are applied when stock items are issued to the project.
Non-stock and Service items: Actual costs are applied when an invoice is recorded for the purchase order.
If your order has not been delivered, but you want to put it on order, follow the steps in Putting purchase orders 'on order' on page 628.
Saving your purchase order
To save your purchase order, from within the Product Purchase Order window, click Save. When you are ready to print your purchase order, see Printing your purchase order on page 627.
If you want to place your goods on order, see Putting purchase orders 'on order' on page 628.
If you want to record the delivery of the order, see Recording delivery of goods on page 629.
Printing your purchase order
Use this facility to print a copy of one or more saved purchase orders.
You can print a batch of purchase orders at once, or you can print the purchase orders one at a time by selecting only those you want to print.
To quick print your purchase order
1. Select Suppliers > Purchase Order List.
2. Select the purchase order(s) you want to print from the Purchase Order Processing window.
3. Click Quick Print.
The selected purchase order is printed using the default print layout that you have previously defined in your Invoice & Order Print defaults, see To set up your invoice and order quick print defaults on page 173. If you have not set a default layout, a software advisory message informs you that this is the case.
627

Sage 50 Accounts User Guide
62
Note: If you do not select a purchase order from the purchase order list, a Confirm message appears:
This will print ALL purchase orders. Do you want to continue?
4. Click Yes or No, as appropriate.
Emailing your purchase order
Use the Email button quickly email a sales order to the supplier. You can email selected purchase orders or all purchase orders in the purchase order list.
Important Note for Irish Users: Special legislation exists in the Republic of Ireland regarding VAT requirements when sending and receiving invoices and orders by email. For information, view the notice on the Revenue website at http://www.revenue.ie/en/tax/vat/leaflets/vatguide_2008.pdf. Alternatively, you can obtain a copy of the notice from your Revenue Office.
To email a purchase order
1. Select Suppliers, then from the Links pane, click Purchase Order List.
The Purchase Order Processing window appears.
2. From the list of purchase orders, select the purchase(s) to be emailed.
3. Click Email.
The software generates an email, using the default layout that you have previously defined in your Invoice & Order email defaults, see To set up your invoice and order email defaults on page 175. If you have not set a default layout, a software advisory message informs you that this is the case.
Note: If you do not select a purchase order from the purchase order list, a Confirm message appears:
You do not have any items selected in the list - Choosing the option will email ALL orders. Are you sure you want to continue?
Click Yes or No, as appropriate.
Putting purchase orders 'on order'
After you have created a purchase order you must put it on order, before you can record any deliveries for it. This updates the on order levels for each of the appropriate product records. If the order has been placed for a project, then the cost of the goods or services is calculated and applied to the project as committed costs.
If you have already received the order, you can choose to complete the order. For further information, see Completing your purchase order if it has already been delivered on page 626.
If you want to put your batched orders on order, use the Order button. For further information about how to do this, refer to the following section.
8

Supplier tasks
Alternatively, you can use the Amend facility to manually put your purchase orders on order. This updates the on order levels for each of the appropriate product records. To put your order on order manually, select the order you require, click Amend and then Order.
When you have placed your purchase orders on order you are then ready to record the delivery of the goods. For more information, see Recording delivery of goods on page 629.
To put purchase orders 'on order'
1. Select Suppliers > Purchase Order List.
2. Select the purchase order or orders you require from the Purchase Order Processing window, then click Order.
The Confirm window appears displaying the message, Do you want to print the purchase order for the selected items?
3. To print the purchase order, click Yes. To continue without printing, click No.
The Confirm window appears again, prompting you to confirm that you want to put the selected orders on order.
4. To put the orders on order, click Yes.
The Purchase Order Processing window reappears showing each selected purchase order with a status of On Order.
Recording delivery of goods
When you have placed your purchase order on order you are ready to record the delivery of the order.
If the order has been placed for a project, goods (stock items) recorded as received, are automatically allocated the project. Although the goods are recorded into stock they are excluded from free stock quantity for the stock item. This has no effect on committed costs.
If you have chosen to complete the order, the stock is automatically recorded as delivered. For further information about how to do this, refer to the section Completing your purchase order if it has already been delivered on page 626.
There are three other ways of recording the delivery of your goods. The method you choose will depend on the amount of traceability you require and the number of items that have been delivered. The three methods are:
Use the Goods Received Notes facility to record the delivery of goods automatically. The advantage of using the Goods Received Notes facility is that it provides you with maximum traceability as you can view all of the Goods Received Notes for an order. For further information about how to do this, refer to the following section.
Use the Deliver facility to automatically record the complete deliveries of stock for the purchase orders you have selected. When you use the Deliver facility, Sage 50 Accounts
629

Sage 50 Accounts User Guide
63
assumes that you have received the complete order. For further information about how to do this, see Recording purchase order deliveries on page 638.
If you have not received your whole order, you can manually record the delivery of the stock you have received. For more information, see Manually recording purchase order deliveries on page 638.
Recording delivery of goods using Goods Received Notes
The Goods Received Notes (GRN) facility provides a quick and easy way of recording the deliveries you have received. You can also record deliveries against more than one purchase order at the same time.
Sage 50 Accounts keeps a record of the goods received notes that are raised against each purchase order, enabling you to see when the items were delivered.
Before you start using Goods Received Notes
Before you start using Goods Received Notes, you should set up your GRN Options in Settings > Invoice and Order Defaults (see Entering invoice and order defaults on page 167 for more details). The behaviour of the GRN, Deliver and Amend options depends on the settings you enter for these defaults.
0

Supplier tasks
Option 1: Generate for all received (default)
Goods Received Notes window:
If you set your GRN Options to Generate for all received (Default), the following message appears every time you click Save in the Goods Received Notes window:
Note: If you do not want to see this message each time you print a goods received note, and you will always choose the same answer, select the Do not show this message again check box.
Click Print Now to generate the goods received note and display it, ready for printing, in the Preview window. Alternatively, to print your goods received note later, click Print Later. You can print the note at any time from the Deliveries tab of the purchase order.
Amend and Purchase Order Processing windows:
If you set your GRN Options to Generate for all received (Default), the following message appears every time you click Deliver in the Amend window or the main Purchase Order Processing window:
If you want to produce a goods received note AND update your stock levels and order status, click Yes. The following message appears:
631

Sage 50 Accounts User Guide
63
To generate the goods received note and display it, ready for printing, in the Preview window, click Print Now. Alternatively, to print your goods received note later, click Print Later. You can print the note at any time from the Deliveries tab of the purchase order.
If you do not want to produce a goods received note or update your stock levels and order status, click No.
Option 2: Prompt at each received
Goods Received Notes window:
If you set your GRN Options to Prompt at each received, the following message appears every time you click Save in the Goods Received Notes window:
Note: If you do not want to see this message each time you print a goods received note, and you will always choose the same answer, select the Do not show this message again check box.
To generate the goods received note and display it, ready for printing, in the Preview window, click Print Now. Alternatively, to print your goods received note later, click Print Later. You can print the note at any time from the Deliveries tab of the purchase order.
2

Supplier tasks
Amend and Purchase Order Processing windows:
If you set your GRN Options to Prompt at each received, the following message appears every time you click Deliver in the Amend window or the main Purchase Order Processing window:
If you want to generate a goods received note AND update your stock levels and order status, select the Generate Goods Received Note(s) check box and click Yes. The following message appears:
To generate the goods received note and display it, ready for printing, in the Preview window, click Print Now. Alternatively, to print your goods received note later, click Print Later. You can print the note at any time from the Deliveries tab of the purchase order.
If you want to update your stock levels and order status WITHOUT generating a goods received note, leave the ’Generate Goods Received Note(s)?’ check box clear and click Yes. Sage 50 Accounts updates your stock levels and order status with the details of the delivery.
If you do not want to generate a goods received note or update your stock levels and order status, click No.
Option 3: Do not generate
If you set your GRN Options to Do not Generate, Sage 50 Accounts does not produce a goods received note for any delivery, and the Delivery Tab does not appear on the Purchase Order Processing window.
633

Sage 50 Accounts User Guide
63
To use Goods Received Notes
1. Select Suppliers > Purchase Order List.
2. From the Purchase Order Processing window, select the orders you have received goods for.
3. From the Purchase Order Processing toolbar, click GRN.
Note: You can only use the Goods Received Notes facility for purchase orders that have a status of On-Order. If you select an order that does not have a status of On-Order, a warning message appears. Click OK to return to the Purchase Order Processing window and place the goods on order or choose an alternative order.
The Goods Received Notes window appears.
4. Enter the date and use the drop-down lists to display the outstanding order you want to work with.
GRN No. The Goods Received Notes number appears here automatically. You cannot change this number.
Date Received The program date appears here automatically. You can change this if required.
4

Supplier tasks
5. The following information appears for filtered outstanding order. Where an order contains several order lines, the individual order lines appear.
Supplier GRN No. You can enter the supplier's goods received note or delivery note number here as a reference.
Supplier A/C Ref From the drop-down list, select the supplier you have received a delivery from. Only those suppliers associated with the purchase orders you have selected are shown in this list.
Note: You cannot type directly into this box.
Project Reference From the drop-down list, select the project you have received a delivery for. Outstanding purchase orders for the project are displayed in the list.
Order No. The Sage 50 Accounts purchase order number appears here.
Product Code The product code appears here.
Part No. If you have entered a supplier part number for this product in the Product Record, it appears here.
Details This shows the item description as entered on the purchase order. If you have not entered an item description on the order, this column remains blank.
Project Ref The project reference from the order is displayed, this indicates the project the goods will be allocated to. You can assign the goods to a different project by changing the project reference, provided the order line has not been part delivered.
Changing the project reference updates the order line and the committed costs of the projects involved.
Cost Code The cost code from the order is displayed, this is the cost code used to apply the committed costs of the goods when the order was placed. The cost code can be change provided the order line has not been part delivered.
Changing the cost code updates the order line and the committed costs of the cost codes involved.
Ordered This shows the total quantity ordered on the purchase order.
635

Sage 50 Accounts User Guide
63
6. To save the goods received note, click Save.
Depending on your GRN Options settings, a message may appear. Produce your goods received note as you require, according to the message or options that appear. For full details, refer to section Before you start using Goods Received Notes on page 630.
7. If you do not want to save the goods received note information, click Discard. The Goods Received Notes window clears, ready for you to re-enter the details or return to the Purchase Order Processing window.
8. To return to the Purchase Order Processing window, click Close.
You have now recorded your goods received note for the selected supplier. Repeat the procedure above for the remaining suppliers that you have received a delivery from.
The Deliveries tab
When you have recorded the receipt of goods using the GRN facility, Sage 50 Accounts updates the Deliveries tab (on the purchase order) with GRN information. This provides you with the ability to trace when the goods were received and also the other items that arrived with them. It also shows whether the goods or services relate to a project and the cost codes used to apply the order value to the project involved.
From the Deliveries tab, you can also view or print the goods received notes. See To view delivery information for a purchase order on page 624 for more details.
To Deliver This column shows the number of items that still have to be delivered, that is, the outstanding items from the purchase order.
Received If you want to record the complete delivery of all the items on the goods received note, click Receive All. This enters the To Deliver value into the Received column for all items. The order status will be changed to Complete when you save the goods received note.
If you have received part of an order, enter the quantity of items that have been delivered here. The order status will be changed to Part when you save the goods received note.
Note: You cannot enter a quantity greater than the quantity displayed in the To Deliver column. If you try to enter a received quantity that is greater than the quantity to deliver, the figure will automatically be changed to the figure shown in the To Deliver column.
Total Quantity Received
This shows the total of all items received.
6

Supplier tasks
Note: The Deliveries tab is not available if your GRN Options in Invoice and Order Defaults are set to Do not generate. For more information, see To enter your invoice and order numbering options on page 176.
637

Sage 50 Accounts User Guide
63
Recording purchase order deliveries
Use the Deliver facility to record the complete deliveries of stock to your business, for the purchase orders you select.
To record purchase order deliveries
1. Select Suppliers > Purchase Order List.
2. From the Purchase Order Processing window, select the purchase orders that you want to process, and click Deliver.
3. Depending on your GRN Options settings, a message may appear. Produce your goods received note as you require, according to the message or options that appear. For full details, refer to section Before you start using Goods Received Notes on page 630.
The Purchase Order Processing window reappears showing a Delivered status of Complete for each delivered purchase order.
Manually recording purchase order deliveries
You can use the Amend facility to record complete or part deliveries for your purchase orders.
To record a purchase order delivery manually
1. Select Suppliers > Purchase Order List.
2. From the Purchase Order Processing window, select the order you want to record a delivery for and click Amend.
The Amend Deliveries window appears showing the details of the first purchase order you have selected.
3. When you originally put this order On-Order, Sage 50 Accounts automatically entered the quantity of stock outstanding for each product in the This Delivery column.
If you want to record a part delivery, amend the quantity in the This Delivery column.
4. To update the product records with delivery details, click Deliver.
5. Depending on your GRN Options settings, a message may appear. Produce your goods received note as you require, according to the message or options that appear. For full details, refer to section Before you start using Goods Received Notes on page 630.
6. To return to the Purchase Order Processing window, click Close.
The Purchase Order Processing window appears, displaying the updated On-Order and Delivered statuses.
8

Supplier tasks
Deleting a purchase order
If you want to, you can delete cancelled or completed orders. This will free up disk space on your PC, when you compress your data.
Before you delete any orders, back up your data. For more information, see Backing up your data on page 79.
For information on how to delete completed or cancelled orders, see To delete completed or cancelled orders on page 523, substituting Sales Order Processing with Purchase Order Processing, and sales orders with purchase orders throughout.
639

Sage 50 Accounts User Guide
64
Entering an invoice from a supplier
Depending on the version of Sage 50 Accounts you have, you can enter invoices you receive from your suppliers into Sage 50 Accounts in two ways.
Accounts Professional user: If you receive an invoice as a result of a purchase order you have processed in Sage 50 Accounts, you can update the details of the purchase order directly to your ledgers, using the Update button, to show the invoice transaction on your supplier and nominal accounts.
Alternatively, if you receive an invoice from a supplier that is not connected to a purchase order in Sage 50 Accounts, you can enter it as a batch transaction through Suppliers. This method also enables you to enter several invoice transactions in one go.
Creating purchase invoices from your purchase orders
Accounts Professional onlyYou can use the Update facility to create purchase invoices directly from your purchase orders. This saves you time as you do not have to re-enter the details of your purchase order.
It is possible to change the purchase order update information. However, when dealing with orders for stock items (goods) that are linked to a project, the project reference and cost code of the original order are not displayed during update and therefore cannot be changed. In this instance the value of the goods have already been applied to the project as committed costs.
The committed costs are converted to actual costs for the project when the stock items are issued to the project. However, the project reference and cost code of a project order for Non-Stock and Service Items are displayed and can be changed before update. Changes will affect the committed costs and actual costs of the projects involved.
Note: You can update part delivered orders. If an order has been part delivered, an invoice will be created for the part of the order that has been delivered. When the complete order has been delivered, you can update again and another invoice will be created for the remaining items. Your supplier ledger is also updated.
Recording an invoice from a supplier
Use Suppliers > Batch Invoice to record any invoices you have received from your suppliers.
Note: No printed document is produced. The amount of detail you enter per invoice is up to you, but we recommend that you enter each item on your invoice as a separate line. This makes it easier for you to identify what the invoice was for at a later date. However, you can enter the whole invoice as one line if you want to.
0

Supplier tasks
When you enter several invoice items from the same invoice, we recommend you give each one the same account code, date and reference, as these will then be grouped together and listed as the items that make up a single invoice. For example, when you examine a supplier’s activity, a single invoice will be shown as one line, however if you double-click this line, the individual items that make up that invoice total will then be shown.
Note: If you do not include a reference, the transactions will not be grouped.
Memorising and recalling batch invoices and credit notes
Accounts Plus and Accounts Professional onlyYou can use the memorise and recall facilities in two ways:
To record batched invoices that you use regularly, to save you from having to re-enter information. For example, if you regularly purchase the same product or service from a supplier, you can use the memorise and recall function to save you time.
To save a batch of invoices or credit notes without posting, so that you can make amendments later. For example, if you are part way through entering a batch of invoices but you need to check some information, you can save the batch without posting and then come back to it later when you have all of the information.
To memorise a batch of invoices/credit notes, from within the Batch Invoices/Credit Notes window, click Memorise, add a filename for the invoices/credit notes, and click Save.
To recall a batch of invoices/credit notes, from within the Batch Invoices/Credit Notes window, click Recall, select the file to be recalled and click Open.
641

Sage 50 Accounts User Guide
64
Use the Memorise or Recall buttons from within the Invoice/Credit facility in the Suppliers (or Customers) window.
2

Supplier tasks
To mark a supplier transaction as disputed
Accounts Plus and Accounts Professional only
1. From the Suppliers window, select the account you want to work with, then click Dispute.
Alternatively, from the Manage Payments window, select the account, then click Dispute.
The Disputed Items window appears. It shows the Account Number and Name of the account selected and all transactions relating to the selected account.
Tip: To view a different account, click the A/C drop-down and select the account you want from the displayed list.
2. Choose the transaction(s) that you want to mark as disputed, then click Dispute.
The Details window appears, prompting you to select a reason to explain why the item is in dispute.
Note: You can set up or amend reason codes in the Configuration Editor - see Chapter 3, The Dispute Reasons tab.
3. Choose the reason code you require, then click OK.
The transaction now displays a ’d’ in the Disputed? column, and the reason for the dispute in the Dispute Reason column.
Alternatively, to return to the list of transactions, without marking the item as disputed, click Cancel.
4. To record your changes, click Save. If you do not want to save the changes, click Discard.
5. To return to the Suppliers or Manage Payments window, click Close.
Note: To remove a dispute flag from an item, follow steps 1 to 3 above. When you click Dispute for an item, which is already marked as disputed, the ’d’ and the reason are both removed.
643

Sage 50 Accounts User Guide
64
Supplier payment control
Sage 50 Accounts provides a number of options when dealing with payments to your suppliers. You can choose to make payments to several suppliers at the same time or just make the one supplier payment.
Sage 50 Accounts can suggest the payments you should make to your priority suppliers. There are also several reports that work out the money you owe to your suppliers.
Making a payment to a supplier
Use Suppliers > Make Payment, to record the money that you pay to your suppliers against invoices that you have received. You can pay in full, or part pay, any or all of the invoice items and show discounts received. You can also allocate credit notes that you have received from your suppliers, against the invoice items and enter payments that you have made on account.
When you pay an invoice, it is good practice to record the payment as soon as possible. This keeps you up to date on how much you owe your suppliers, it keeps your Sage 50 Accounts bank account up to date, and means you are not likely to pay the same invoice twice.
You can pay your suppliers' invoices from any of your bank accounts.
To record a supplier payment
1. Select Suppliers > Make Payment.
The Supplier Payment window appears.
Note: The top half of the window looks like a cheque.
4

Supplier tasks
2. Enter the following details:
Bank A/C Ref Choose the Bank Account from which you would like to pay your supplier.
Payee Enter the account code of the supplier you want to pay, or use the drop-down list to select the supplier. You can create a new supplier account here if necessary. All items that you have been invoiced for by that supplier and which are not fully paid, as well as payments you have made on account and credit notes, appear automatically in the table.
Date The program date is entered for you automatically. Type in the date you made the payment if this is different. Use the Calendar button to enter the date.
Cheque. No If you have already paid by cheque, type the cheque number here. This will be a very useful identifier when you come to reconcile your bank accounts.
Note: If you have chosen to use online payments with the selected supplier, the Cheque. No box shows a reference of (BACS).
Accounts Plus and Accounts Professional only: If you want to use the Cheques facility to generate your cheques automatically, leave this reference blank.
Rate - Foreign Trader users only
If you are using Foreign Trader, you can enter your currency exchange rate here.
This box is only displayed if you have selected a supplier who uses a non-base currency.
Cheque Total
Note: This box is not labelled, but appears where you would normally enter the sum of the cheque.
You can enter the amount of the cheque in two ways.
Firstly, you can enter it manually, by placing your cursor in the box and typing in the sum you want to pay. You can then click Automatic, which allocates the value of the cheque to the invoices in the order they are displayed. Your bank balance is automatically reduced by the total amount on the cheque.
Secondly, you can enter the amounts you want to pay per invoice. This way, you enter the value in each Payment box and Sage 50 Accounts automatically puts the total in the cheque and reduce your bank balance accordingly.
645

Sage 50 Accounts User Guide
64
3. Allocate the money paid to the individual invoice items displayed in the item table by entering a value in the Payment box of each. You can part pay an invoice item or pay it off in full, but you cannot allocate more than the full value of the item.
If you are paying an item in full, click the item's Payment box then click Pay in Full. The amount needed to pay the item in full is then entered for you automatically.
Continue allocating in this way until the amount in the Analysis Total box equals the amount you are paying to your supplier.
4. If you have been given any discount against an invoice item, then enter the discount amount, not the percentage amount, in the Discount box. For example, this may have been offered to you for early payment. The amount shown in the Payment column is reduced by the value of the discount entered.
If you have selected not to always create remittance information for each supplier payment within your Bank Defaults and you want to print a remittance advice note, click Create Remittance. This creates the remittance information. To print your remittance advice note, follow the instructions given in the following section.
If you have selected to always save remittance information for each supplier payment within your Bank Defaults, the Create Remittance button does not appear. To print your remittance advice note, follow the instructions given in the following section.
5. To save your payment details, click Save.
To print a supplier remittance advice noteUse this facility to print out a remittance note that you want to send to a supplier. This is a list of all the invoices that you are paying with the money - that is, the cheque, you are sending.
1. Select the Bank module, then, if appropriate, use the view selector to switch to the Bank Accounts view.
2. Select the bank account you require from the list and then click Remittance.
The Print Bank Remittances window appears listing the remittance information including remittance index number, date, bank account reference, supplier code, name, amount, cheque number and whether the remittance has been printed and the number of items paid for by the supplier payment.
6

Supplier tasks
3. To restrict the list of transactions that appear, select the Date Range check box and enter the dates you require in the From and To boxes.
4. If you want to include remittances that have already been printed, select the Show Printed Items check box. If you have already printed a remittance, a 'Y' appears in the Printed column.
Note: If you are certain that you will not want to reprint remittances, you can completely remove all printed remittances from the list by clicking Purge. Use this button with care!
5. Select the remittance that you want to print and click Print.
Note: If no remittances have been selected, you are prompted to print all remittances. If you want to print all remittances, click Yes. If you do not want to print all remittances, click No and select the remittances you require from the list.
The Remittance Advice Printing window appears.
6. From the Layout list box, select the remittance layout and the output type you require and click Run.
Your remittances are now printed.
647

Sage 50 Accounts User Guide
64
Suggested payments
Sage 50 Accounts Suggested Payments feature helps you to keep track of your creditors and decide which of your supplier debts you should pay first.
When you use Suggested Payments, a prioritised list of the suppliers that you should pay appears. The accounts of those suppliers set as Priority Suppliers are placed first in the list with the highest outstanding balance first. The accounts of the remaining suppliers follow, placed in order of the amount outstanding.
When you click Suggest, Sage 50 Accounts suggests a value for you to pay each supplier, starting at the top of the list. If you re-sort the list before you click Suggest, for example to display the outstanding amounts in date order, Sage 50 Accounts still suggests payments for your suppliers in the order that they appear.
When you choose to make a payment from the Suggested Payments list, Sage 50 Accounts displays the Supplier Payments window. The supplier's account, invoice and payment information appears in the window automatically, ready for you to check and save the payment.
If you require, you can modify the suggested payment amount for any supplier. You can also print the list of suggested payments using the Print List button.
When you make a payment to a supplier using Suggested Payments, Sage 50 Accounts resets the supplier's credit position to Good, and reduces any promised payments by the amount you pay.
For further details on the Suggested Payments feature, please refer to the accompanying Sage 50 Accounts Credit Control PDF document, accessible from Help > PDF Guides.
Batch supplier payments
Accounts Professional onlyUse the Batch facility from the Bank Accounts window to list all outstanding transactions across all supplier accounts. You can choose to pay all transactions in full, individual transactions in full or even part pay transactions and allocate discounts received. If you have made a lot of payments on the same day, you can use this facility to enter the data as quickly as possible, without having to open each individual supplier account.
To record a batch supplier payment
1. Select the Bank module and then, if appropriate, use the view selector to switch to the Bank Accounts view.
2. Select the bank account you want to make the payments from.
3. From the Bank Accounts toolbar, click Batch.
The Batch Purchase Payments window appears listing all outstanding transactions across all supplier accounts.
8

Supplier tasks
Foreign Trader users: Only those supplier accounts using the same base currency as the selected bank account are listed.
If any transactions are in dispute, a warning message appears and they are marked with a 'd' in the Batch Purchase Payments window.
Note: You can use the Print List button to print what is displayed. This can help you when you are manually ticking off the purchase payments that you have paid.
4. There are three ways of making the batch purchase payment:
To pay all outstanding transactions from your selected bank account, click Pay All.
To pay individual transactions, select each transaction in turn and then click Pay in Full.
To part-pay a transaction, enter the amount you want to pay in the Payment column.
Note: You can access the currency calculator from this box by pressing F5.
The total of all payments made appears in the Total box.
5. If you need to apply any additional discount to any of the payments you have entered, type the value into the Discount column.
6. If you want to assign your payments to a particular department, click Dept. In the Transaction Department window that appears, enter the department number you want to use, or select a department from the drop-down list.
7. If you want to save your batch purchase payments click Save, otherwise you can clear the payments and start again by clicking Discard, or to return to the Bank Accounts window, click Close.
649

Sage 50 Accounts User Guide
65
Supplier reports
A series of supplier reports are provided to help you to keep track of the money your company owes, including:
Aged creditors analysis
There are several variations of this report ranging from a summary reports to detailed reports. You can use these reports to see how long you have held debts with your supplier and to decide which supplier you need to pay first.
Supplier invoices within settlement terms
This report looks at the settlement due days and the early settlement discount percentage as set on the Supplier Record's Credit Control tab. The report shows the date you must pay your supplier by in order to qualify for the discount and also how much money can be saved by paying early.
Recording supplier credit notes
Use Suppliers > Batch Credit to log any credit notes you have received from your suppliers.
Note: No printed document is produced. The amount of detail you enter per credit note is up to you, but we recommend you enter every item of the credit note as a separate line. You can, however, simply enter one line per credit note if you want.
Viewing supplier transaction activity
1. From the Suppliers window select the suppliers, whose activity you want to view and click Activity.
Alternatively, you can open the Supplier Record and click the Activity tab to display the supplier's transaction activity.
The Activity window appears showing the transactions associated with the first supplier you selected.
The upper pane of the Activity window shows summary or grouped information about each transaction, one line per transaction.
The lower pane of the Activity window displays the individual items that make up each transaction. For example, if you select an invoice that has been paid, the pane shows both the individual items that make up the invoice and the associated purchase payment details.
The total amount the selected supplier owes you is also shown, grouped by age, in the boxes at the bottom of the window. For example, if you use ageing periods of 30,
0

Supplier tasks
60 and 90 days, the total debt to your supplier that is less than 30 days old appears in the Current total box.
2. To filter the transactions displayed, choose the criteria you require from the following selection fields:
Show
To filter the transactions by a specific period, select the period you want to display from the Show drop-down list.
You can choose to filter the transactions by your ageing periods, such as 30, 60 and 90 days, or display only those transactions that fall within the current financial year.
Alternatively, you can set a date range, transaction number range or select a transaction type to view by selecting the Custom Range option from the menu and entering your selections in the Activity Range window that appears.
Your software retains the filter you specify from this menu and applies it the next time you view the activity. This is true for all of the Show drop-down list options, although the values you enter in the Activity Range window will not be retained.
Date
This read-only box displays the date range you selected using the Show drop-down list. For example, if you selected Custom Range and entered the date range 01/07/2011 to 31/07/2011, these dates appear in this box.
The Activity window only displays those transactions that fall within the specified date range.
Type
If you select Custom Range from the Show drop-down list and use the Activity Range window to choose a specific type of transaction to display, this box shows which transaction type you selected.
For example, if you chose to view only purchase invoices by selecting PI - Purchase Invoices on the Activity Range window, this field shows 'PI'. The Activity window now only displays purchase invoice transactions within the specified date range.
You cannot change the transaction type shown in this field directly - to change the type of transaction displayed here, you must select Custom Range from the Show drop-down list and re-select the transaction type you want to view.
O/S Only
If you selected Custom Range from the Show drop-down list and selected the Outstanding Transactions Only? check box on the Activity Range window, this check box is selected. This indicates that the Activity window is displaying only those transactions that are not yet paid or allocated.
You cannot change this setting directly here - to select or clear this box, select Custom Range from the Show drop-down list and select or clear the Outstanding Transactions Only? check box in the Activity Range window.
651

Sage 50 Accounts User Guide
65
Trans
This field shows the transaction number range currently displayed on the Activity window.For example, if you select Custom Range from the Show drop-down list and use the Activity Range window to specify a range of transactions to view, this box shows the transaction numbers you chose.
If you do not specify a transaction range, this box displays the first and last transaction numbers from your audit trail. For example, if you have 2169 transactions on your audit trail, this field shows '1 to 2169'.
You cannot change the range shown in this field directly. To change the transaction number range shown here, select Custom Range from the Show drop-down list and enter the transaction number range you want to view.
3. To print the information shown, click Print List.
4. If you selected more than one supplier, use the Previous and Next buttons to move between the selected supplier records.
5. To view another supplier’s transactions, enter that supplier’s reference in the A/C box or use the drop-down selector to find the account.
Note: This only applies if you used the Activity option from the Suppliers toolbar to view the Activity window, as described in step 1.
6. To exit the Activity window, click Close.
For further information, please refer to the Suppliers > Record> View supplier transaction activity help topic.
2

Supplier tasks
Supplier refunds
Use the Supplier Refund option to record money you have received from a supplier. Examples of when you might use this option include refunds received, a cheque that has been returned, or a returned deposit.
The Supplier Refund option generates a PR transaction, which you can allocate to purchase credits (PC) or purchase payments on account (PA) using Suppliers > Make Payment, or in Bank > Suppliers.
To post a supplier refund
1. Open the Suppliers module, then from the Tasks pane, click Supplier Refund.
The Supplier Refund window appears.
2. Enter the details for your supplier refund in the boxes provided.
3. If you use departments to analyse your transactions and want to assign a department to this transaction, click Dept. and select the department you want to use.
4. If you make a mistake and want to clear the details you have entered and start again, to clear the window, click Discard.
5. To save the Supplier Refund details and post the transaction, click Save.
6. To close the Supplier Refund window and return to the Suppliers window, click Close.
You can enter the following supplier refund information:
Bank A/C Ref Enter the reference of the bank account you want to record the supplier refund into. Your software's default bank account appears here automatically but you can change this, if required.
Payer Enter your supplier's account reference here. Alternatively, select the account you require from the drop-down list.
Tax Code (VAT Cash Accounting and Flat Rate - Cash Based scheme users only)
If you are operating on the VAT Cash Accounting or Flat Rate - Cash Based schemes, enter the tax code you want to use for this refund here.
It is important that you enter the correct tax code here, so that your software can calculate the correct net/tax breakdown, and so that any subsequent payment on account or credit postings can be allocated to this transaction.
653

Sage 50 Accounts User Guide
65
Rate (Accounts Professional only)
If the bank account you selected is set up as a foreign currency account, the exchange rate set on the account record appears here. You can change this if you need to.
Note: If you set an exchange rate that differs from the rate set up for this currency in your Currencies list, a confirmation message appears to ask if you want to update the rate held in your Currencies list.
If you want to update your Currencies list with the new exchange rate, click Yes. If you want to leave the rate in your Currencies list as it currently appears, click No.
Date Enter the date you want to appear on the supplier refund.
Amount Enter the gross (total) amount of the supplier refund here.
Note for users operating on VAT Cash Accounting or Flat Rate - Cash Based schemes: Sage 50 Accounts uses the Tax Code entered for this transaction to break this total down into net and VAT amounts.
Cheque No Enter the cheque number here.
This appears as a reference on the saved transaction and can be a useful reminder, when you are reconciling your bank account to your statement.
4

Supplier tasks
To receive a supplier refund by Pay by Card
To activate the Pay by Card option, the account selected must be the same as that nominated, when you set up your Sage Pay Preferences.
To receive the Supplier Refund using card payment over the telephone, click Pay by Card. The payment amount shown in the first window of the wizard is taken from the Amount field in the Supplier Refund Window.
Note: The Pay by Card button will only be available if you have already set up a Sage Pay Account.
The Sage Pay Wizard then guides you through the receipt of the Pay by Card supplier refund.
To allocate the refund to an outstanding credit note or payment on account
1. If you select a Payer, where there are existing outstanding and unallocated credit notes or payments on account, the grid below the main part of the Supplier Refund window, becomes populated with the details of these transactions.
The Type column shows whether the item listed is a Purchase Credit or a Payment on Account.
2. Enter the total amount being refunded from the Payer in the top section of the window.
3. Enter the value to refund against each PC or PA item in the Refund column, then TAB to the next entry. Alternatively, to enter the full amount, click Refund in Full.
The next Refund entry is selected automatically.
4. When all Refund entries have been made, to allocate the amounts to the selected PC / PA transactions, click Save.
A Purchase Payment (PP) transaction is created, and allocated against any selected PC / PA transaction.
Notes:
The amount allocated against each line cannot exceed the total refund value entered in the top half of the window. If this occurs, the amount entered is set to the amount available, and a warning message appears:
'Refund amount exceeds the amount outstanding'
Where the amount entered in the top section exceeds the sum of the refunds allocated to each line, a message appears:
655

Sage 50 Accounts User Guide
65
'There is an unallocated refund of £x.xx. Do you want to post an unallocated refund? Yes / No'
If a total value is not entered in the top half of the window, it is automatically calculated form the individual values entered in the Refund column.
The current program date is used as the allocation date. Although it is unlikely, some reconciliation issues could occur if the original PC / PA transaction dates are later than the program date. Please be aware of this, when using this feature.
6

Chapter 10
Product tasks (stock)In this chapter:A note on product valuation in Sage 50 Accounts .........................................658
Recording a stock take ....................659
Adjusting stock levels by recording an adjustment in or out.........................661
Stock shortfall..................................661
Viewing product activity ...................664
Bill of materials.................................666
Recording stock returns...................672
Allocating stock ...............................675
Issuing allocated stock.....................679
This chapter describes Sage 50 Accounts advanced stock features.
Read this chapter to find out about running a stock take, how to carry out stock transfers, how to adjust your stock also view the product activity.
This chapter assumes that you have already created your product records. For full details about how to set up records for all the products and/or services you sell, see Creating a product record on page 238.

A note on product valuation in Sage 50 Accounts
For the purposes of the selling of stock, Sage 50 Accounts uses a First In First Out (FIFO) method of product valuation.
For example:
12th January - buy 10 items at £15.00 each.20th January - buy 20 items at £16.50 each.29th January - sell 13 items.
When you value the stock using the FIFO method you have 17 items remaining at a cost price of £16.50 each. The 10 items purchased on the 12th January have been sold along with 3 of the items purchased on the 20th January.

Product tasks (stock)
Recording a stock take
You can use the Stock Take facility to make adjustments to your stock levels after you have completed a stock take. All you need to do is enter the current stock levels for your products and Sage 50 Accounts makes all of the necessary adjustments for you.
You can also save your stock take details to a file that you can open at a later date, to continue with the stock take, or to view the adjustments that you previously made.
We recommend that you enter all of your stock take details before you process any transactions that alter your stock levels. This is because your stock details may change between the date that the last stock date was saved and the next time it is re-opened.
To run a stock take
1. Open the Products module.
2. Select the products that you are recording a stock take for.
Tip: If you are recording a stock take for all of your products, use the Swap button to select all products.
3. From the Tasks pane, click Record Stock Take.
Alternatively, click Stk Take from the Products toolbar.
The Stock Take window appears.
Note: You can use the Print List button to print what is displayed. This is useful if you want to manually tick off products on the list.
The Stock Take window displays the following information:
659

Sage 50 Accounts User Guide
66
4. To post the new stock levels to your product records, click Save. If you do not want to record your entries, click Discard.
If you have Accounts Plus or Accounts Professional, you can save your stock take record without posting the amendments to the product records. To do this, click Memorise, enter a filename, and click Save. To open the file, click Recall from the Stock Take window, select the stock take file you require, and click Open.
Product Code The product code of the selected item appears in this box.
Do not enter non stock or service items here, as these do not have any stock levels.
Details The description of the product code you have selected appears here automatically.
Date The program date appears here for you automatically, but can be amended.
Ref The reference STK TAKE appears automatically for you. You can change this to suit your own requirements if necessary.
Actual Enter the actual number of the selected product item you currently have in stock here.
Note: If you post your stock levels with an actual value of zero, Sage 50 Accounts assumes you have zero quantity in stock and makes the necessary adjustments. It is therefore important to make sure that you do not enter zero or leave the Actual box blank by mistake, when you post your stock details.
Cost Price The cost price appears here automatically.
In stock The amount of the product item Sage 50 Accounts currently has recorded as in stock, appears here.
Adjustment The adjustment figure is the difference between the In stock and the Actual figure. If you currently have more items in stock than was previously recorded in Sage 50 Accounts, this appears as a positive value. If you have fewer items, the adjustment figure appears as a negative value.
0

Product tasks (stock)
Adjusting stock levels by recording an adjustment in or out
From the Products module, select Record Adjustment In to record product adjustments to increase the available stock level for movements for which you have not raised either a purchase order (if you have Accounts Professional) or a credit note.
For example, you may use Record Adjustment In to amend your In Stock quantities if items have been returned into stock without a credit note being issued for them.
Use Record Adjustment Out to record adjustments to decrease your In Stock balance, for movements for which you have not raised either a sales order, if you have Accounts Professional, or a product invoice.
For example, you may use this facility to amend your In Stock quantity if items have been issued from stock but without invoices being raised by you for them.
Stock shortfall
Accounts Plus and Accounts Professional onlyYou can use the Stock Shortfall facility to see if your stock levels have fallen below the re-order level that you have set.
Accounts Professional users only: If there is a shortfall on any of the items, you can automatically create purchase orders for the items that are running low.
We recommend that you use the Shortfall facility in the following way:
1. Run the Shortfall facility for the required products.
2. From the Product Shortfall Generator window, print the information shown in the window by clicking Print List.
3. Check with your suppliers to make sure that they can meet your delivery requirements - that is, quantity, price and time. Make a note against each product code on the Product Shortfall report of the supplier who will be providing the product and also make a note of the price.
4. Accounts Professional users only: From within the Shortfall window, select the products that you order from the same supplier and create an order, for each supplier in turn.
661

Sage 50 Accounts User Guide
66
To use the stock shortfall facility
1. Select Products.
2. Select the products that you want to check on.
3. From the Tasks pane, click Check For Shortfall.
Note: If you want to check the stock levels for all of your products, use the Swap button to select all products from the main Product window.
The Product ShortFall Generator window appears showing any of the selected products that have a Free/On Order quantity that is less than or equal to the re-order level on the Product record.
4. The following information appears:
Product Code This shows the product code as saved on the product record.
Description This shows the product description.
Note: If you have not entered a description for your product, this column remains blank.
Supplier If the product has a default supplier associated with it on the product record, the supplier code appears here.
2
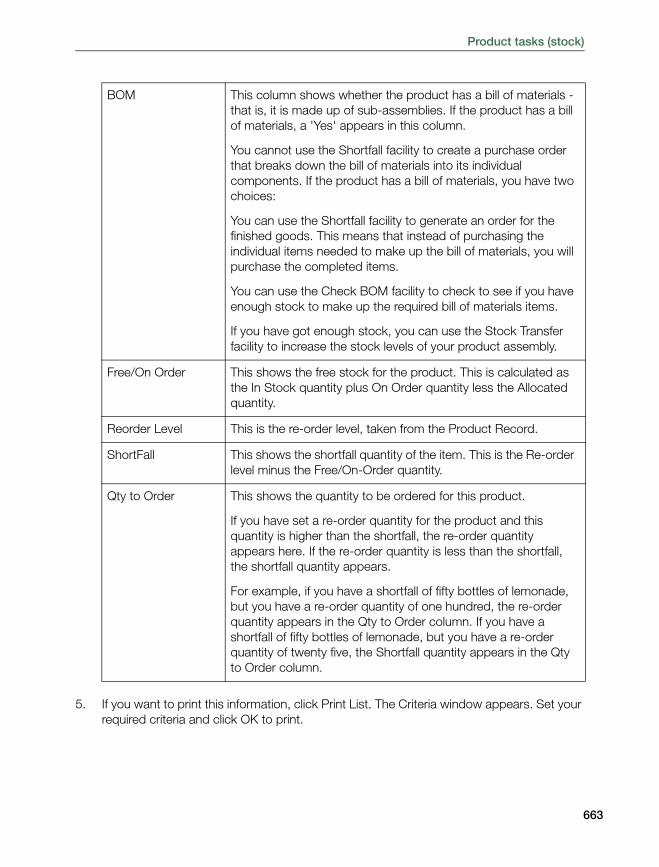
Product tasks (stock)
5. If you want to print this information, click Print List. The Criteria window appears. Set your required criteria and click OK to print.
BOM This column shows whether the product has a bill of materials - that is, it is made up of sub-assemblies. If the product has a bill of materials, a 'Yes' appears in this column.
You cannot use the Shortfall facility to create a purchase order that breaks down the bill of materials into its individual components. If the product has a bill of materials, you have two choices:
You can use the Shortfall facility to generate an order for the finished goods. This means that instead of purchasing the individual items needed to make up the bill of materials, you will purchase the completed items.
You can use the Check BOM facility to check to see if you have enough stock to make up the required bill of materials items.
If you have got enough stock, you can use the Stock Transfer facility to increase the stock levels of your product assembly.
Free/On Order This shows the free stock for the product. This is calculated as the In Stock quantity plus On Order quantity less the Allocated quantity.
Reorder Level This is the re-order level, taken from the Product Record.
ShortFall This shows the shortfall quantity of the item. This is the Re-order level minus the Free/On-Order quantity.
Qty to Order This shows the quantity to be ordered for this product.
If you have set a re-order quantity for the product and this quantity is higher than the shortfall, the re-order quantity appears here. If the re-order quantity is less than the shortfall, the shortfall quantity appears.
For example, if you have a shortfall of fifty bottles of lemonade, but you have a re-order quantity of one hundred, the re-order quantity appears in the Qty to Order column. If you have a shortfall of fifty bottles of lemonade, but you have a re-order quantity of twenty five, the Shortfall quantity appears in the Qty to Order column.
663

Sage 50 Accounts User Guide
66
6. Accounts Professional users only: If you want to create a purchase order, select the products you want to include on the order, and click Create Order.
The Product Purchase Order window appears showing the products and quantities from the Product Shortfall Generator window.
7. Accounts Professional users only: If the selected products have the same default supplier, the supplier reference appears in the A/C Ref box. If they do not have the same default supplier, the A/C Ref box will be left blank and you should enter the supplier you want to use.
8. Accounts Professional users only: If you want to save your purchase order, click Save.
Note: If you have selected the Place Order Shortfalls on Order Automatically check box from the Invoice and Order Defaults window, your orders will be placed on order.
You are returned to the Product ShortFall Generator window. The window now shows recalculated shortfalls based on the products you have placed on order.
If you do not want to save the order, click Discard and the Product Purchase Order window clears for you to enter your own purchase order details.
Note: You can also choose to Print or Complete the order while you are in the Product Purchase Order window. Once you have printed or completed the purchase order, Sage 50 Accounts returns you to the Product ShortFall Generator.
9. To exit the Product ShortFall Generator, click Close.
Viewing product activity
You can view a detailed transaction history, or activity, for any product. Use the Activity option on the Products window to view the individual transactions you have posted for your product records. You can see adjustments, goods in and out and stock transfers, as well as the current quantities in stock, on order and allocated.
Alternatively you can choose the Activity tab from the Product Record window to view your product transactions.
You can open a transaction's associated invoice or order document from the Activity window, provided that one exists in your software. For example, to view the invoice that is linked to a GO (Goods Out) transaction, select the transaction and click the grey arrow symbol in the Ref. column to display the original invoice on screen.
You can restrict the transactions displayed on the Activity window using various selection boxes that appear at the top of the window. For example, you can display only those transactions dated within a certain month, or specify a date range to view. The software remembers what you select. The next time you view the Activity window the same filter is applied, except for the date.
1. From the Products window, select the product(s) you want to view and click Activity. Alternatively, open the Product Record and click the Activity tab.
4

Product tasks (stock)
The Product Activity window appears, showing activity for the first product.
2. To filter the transactions displayed, choose the criteria you require from the following:
Show
To filter the transactions by a specific calendar month, select the month you want to display from the Show drop-down list.
Alternatively, you can set a date range, or select a transaction type to view by selecting the Custom Range option from the drop-down list and entering your selections in the Activity Range window that appears.
Your software retains the filter you specify from this menu and applies it the next time you view the activity. This is true for all of the Show drop-down list options, although the values you enter on the Activity Range window will not be retained.
Date
This read-only box displays the date range you selected using the Show drop-down list. For example, if you selected Custom Range and entered the date range 01/07/2011 to 31/07/2011, these dates appear in this box.
The Activity window only displays those transactions that fall within the specified date range.
Type
If you select Custom Range from the Show drop-down list and use the Activity Range window to choose a specific type of transaction to display, this box shows which transaction type you selected.
For example, if you chose to view only adjustment in transactions by selecting AI - Adjustments In on the Activity Range window, this field shows 'AI'. The Activity window now only displays adjustment in transactions that are dated within the specified date range.
You cannot change the transaction type shown in this box directly - to change the type of transaction displayed here, you must select Custom Range from the Show drop-down list and re-select the transaction type you want to view.
3. To print the information shown, click Print List.
4. If you selected more than one product, use the Previous and Next buttons to move between the selected records.
5. To view another product's transactions, enter the product's reference in the Product Code box or use the drop-down selector to find the record.
Note: This only applies if you used the Activity option from the Products toolbar to view the Activity window, as described in step 1.
6. To exit the Activity window, click Close.
For more information, please refer to the Products > Activity > To View a Product’s Activity topic in the main program help file (F1).
665

Sage 50 Accounts User Guide
66
Bill of materials
Accounts Plus and Accounts Professional onlyWhenever a product is made up of other products you hold in stock, it is said to have a Bill of Materials or BOM. This is a list of the other products or components that are needed to make up the product or product assembly.
For example, a toolkit is a product assembly which consists of the following components - a tool box, a spanner set and a screwdriver.
Toolkit (Product Assembly)
Tool box (Component)
Spanner Set (Component)
Screwdriver (Component)
In this toolkit example, the spanner set could itself consist of two different spanners. It would be called a sub-assembly of the main assembly.
Toolkit (Product Assembly)
Spanner Set (Sub-Assembly)
Spanner A (Component)
Spanner B (Component)
In Sage 50 Accounts each product assembly, sub-assembly and component should be set up as a separate product record.
Before creating a Bill of Materials you should:
Create the individual component product records.
Plan the bill of materials on paper first, working from the lowest level of the assembly.
To set up a bill of materials for a product
1. Open the Products module.
2. From the Products window, select the product you want to set up a bill of materials for - that is, for the product assembly, then click Record.
3. From the Product Record window, click the BOM tab.
The bill of materials information appears.
6

Product tasks (stock)
4. In the BOM table, enter the following bill of material details, one line per component. Sage 50 Accounts lets you enter a maximum of fifty components per product assembly.
Product Code Enter a product code for the component.
Note: You must enter a different code to that of the assembly code.
Assembly Level This shows how many levels of components and sub-assemblies there are below this particular component.
Note: You cannot edit the displayed information.
Link Level This is the number of assemblies or sub-assemblies to which this component belongs. Each product can be a component for more than one assembly or sub-assembly. Sage 50 Accounts automatically creates a link count for each component on the Bill of Materials, which shows the number of assemblies, to which it belongs.
Note: You cannot edit the displayed information.
667

Sage 50 Accounts User Guide
66
The following information is shown on the bottom left of the window, but cannot be edited. Note: This read only information relates to the product record and is different to the column descriptions explained in the previous step that relate to the component.
5. To save your entries click Save, or to clear any data you entered and start again, click Discard.
To calculate how many of these product assemblies you can currently make up, taking into account the stock levels of each component, click Refresh on the BOM tab of the product assembly record.
The number you can make up appears in the Available to Makeup box. If the product assembly consists of many different components, the process of calculation may be slow as Sage 50 Accounts has to search through each individual product record.
6. To exit the product record and return to the Products window, click Close.
Checking a bill of materials
Accounts Plus and Accounts Professional onlyUse the Check BOM facility to see if you have enough stock available to make up a quantity of an assembly you have set up on the BOM tab. If you do not have enough, the name of the component and the number you require appears.
To check a component's availability
1. Select Products > Check BOM.
Description This shows the description of the product component, as set up on its product record.
Note: You cannot edit the displayed information.
Quantity Enter the quantity of this component required for this product assembly.
Assembly Level This is the number of levels of components and sub-assemblies below the product assembly.
For example, if a product assembly consists of two components and one sub-assembly and that sub assembly itself consists of three components, the level for the product assembly is two.
Link Level This is the number of assemblies or sub-assemblies to which this product assembly belongs.
8

Product tasks (stock)
The Check Stock Makeup window appears.
2. From the Product drop-down list, select the code of the assembly you want to check the availability of.
Note: If the selected product does not contain a sub-assembly, a message appears informing you of this fact. Select a new product to check for that component's availability.
The description of this assembly appears in the description box. You cannot edit this.
3. In the Qty Req box, enter the number of assemblies you want to make and click Check.
If you do not have enough of a component to make up the required number of assemblies, a message box appears confirming the quantities available. Click OK and the names of the components and the number you are short of appear automatically.
Accounts Professional users only: From here, you can create a purchase order for the products you are short of, or for any of the products shown in the Check Stock Makeup window. Click the items you want to order and click Create Order. The Product Purchase Order window appears, showing your chosen products. From here, the steps are the same as creating a purchase order. For more information on this, see Creating a new purchase order on page 609.
If you have enough to make up the required quantity, a message box appears to tell you that you have enough components in stock. To return to the Check Stock Makeup window, click OK.
4. If you want to print out the component availability report, click Print and click OK.
5. To exit from the Check Stock Makeup window, click Close.
669

Sage 50 Accounts User Guide
67
Recording a stock transfer
Accounts Plus and Accounts Professional onlyUse the Transfer facility when you want to increase the In Stock quantity of product assemblies using components which are currently in stock. The product assemblies are set up using the BOM facility.
When you use the Product Transfers facility, Sage 50 Accounts automatically calculates the cost price of each product assembly for you, by adding the cost price for each of the components.
To make a stock transfer
1. Open the Products module.
2. From the Products window, select the products that you are entering transfers for.
3. Click Transfer.
The Stock Transfers window appears.
0

Product tasks (stock)
4. In the boxes provided, enter the following details for each transfer, one line per transfer:
The following values appear but cannot be edited:
5. To save your entries click Save, or to clear any data you entered and start again, click Discard.
Sage 50 Accounts informs you if you do not have sufficient stock to make your transfer and advises you to run Check BOM. To clear the message, click OK.
6. To exit and return to the Products window, click Close.
Product Code Enter the code for the product assembly - that is, the finished product item. You can only enter a code for a product which you have already set up to be a product assembly using the BOM facility.
Details The name of the product code appears here automatically, but you can change it if necessary.
Date Today's date appears here automatically, but you can change this if required.
Ref. Enter a reference for the transfer here.
Quantity Enter the quantity of the finished product to be added to the In stock balance.
In stock This value shows the current In stock quantity of this product.
On order - Accounts Professional only
If you have placed a purchase order on order for this product, the quantity ordered appears here.
Allocated - Accounts Plus and Accounts Professional only
This shows the quantity of the stock which is currently allocated to projects, or manually allocated for general use.
671

Sage 50 Accounts User Guide
67
Recording stock returns
Accounts Plus and Accounts Professional onlyUse the Stock Returns facility to record damaged or faulty goods that have been returned to you, or that you are returning to your supplier.
There are three stock transaction types:
(DI) Damages In - These represent goods being returned to you as damaged or faulty. Because the goods are faulty or damaged, the Quantity in Stock, Sales Value or Sales Quantity Figures are not updated when you post stock returns.
(DO) Damages Out - These represent goods that you are returning to your supplier for repair, replacement etc. Because the goods are being returned for repair or replacement, the Quantity in Stock, Sales Value or Sales Quantity figures are not updated when you post stock returns.
(WO) Write Off - This transaction type can be used for transactions being written off. This type of transaction makes an adjustment to the stock levels. This is the equivalent of an adjustment out.
Note: If you have selected a product code to be a non-stock or service item, you cannot use the Stock Returns facility for these items.
To record a stock return
1. Select Products.
2. From the Products window, select the products that you are recording a stock return for.
3. Click Returns.
The Stock Returns window appears.
2

Product tasks (stock)
4. Enter the following details:
Code From the drop-down list, select the product code of the item that is being returned.
Description The description of the product appears here. This is the description that appears on the product record. You cannot change this description.
Type From this drop-down list, select the type of return you are making. There are three stock transaction types:
(DI) Damages In(DO) Damages Out(WO) Write Off
Ref Enter a reference for this stock return.
Date The program date appears here for you automatically. You can change this if required.
Reason Enter a description of the reason why the goods have been returned. For example, you could enter Scratched or Product Recall.
Quantity Enter the quantity of goods that have been returned here.
673

Sage 50 Accounts User Guide
67
5. To post the stock returns, click Save. If you do not want to record your entries, click Discard.
If you have Accounts Plus or Accounts Professional, you can save your stock returns record without posting the amendments. To do this, click Memorise, enter a filename and click Save. You can then post the amendments the next time you open the file. To open this file, from the Stock Returns window, click Recall, select the file, and click Open.
4

Product tasks (stock)
Allocating stock
Accounts Plus and Accounts Professional onlyYou can choose to manually allocate stock items. You cannot allocate non-stock or service items for general use or project use.
Stock can also be allocated to a project by means of a purchase order. Both manual and purchase order stock allocations affect the committed costs applied to the project. For more information about purchase orders, see Working with purchase orders on page 703.
Manufacturing users can also allocate stock to a works order.
When recording a stock allocation the amount of stock available is displayed as Free Stock. The amount you allocate cannot exceed the free stock quantity, unless you have Sage 50 Accounts set to allow negative stock. As allocated stock items are excluded from free stock, they cannot be used by other processes, such as sales order allocation.
Manual and purchase order stock allocations are maintained on a stock allocation list. This list does not include sales order allocations. You can use the list to view current stock allocations and make changes. There are a few points to consider:
You can only amend the quantity of an allocation - you cannot amend any other details.
A manual allocation quantity can be increased provided that the new quantity does not exceed the amount of free stock, unless you have Sage 50 Accounts set to allow negative stock. However, an allocation resulting from a purchase order cannot be increased.
An allocation can be removed or its quantity reduced. This results in an increase in free stock. If the allocation is associated with a project, the committed costs for the project are reduced accordingly.
Normally, stock allocations are settled when they are issued. See Issuing allocated stock on page 679.
675

Sage 50 Accounts User Guide
67
To allocate stock
1. Open the Products module, then from the Tasks pane, click Make Allocations.
The Allocations window appears.
2. Select Allocate stock and click OK.
3. The Stock Allocation window appears.
6

Product tasks (stock)
4. Enter the stock allocation details:
5. To print a copy of the stock information you have entered, click Print List.
6. To save the stock allocation click Save. If you want to clear the allocation and start again click Discard, or to exit without saving the stock allocation click Close.
Product Code Enter the product you want to allocate. You can use the drop-down list to search for and select a product record. Note: You cannot allocate non-stock or service items.
Details The product’s description appears here automatically. You can change this if you require.
Date The current program date appears here automatically, but you can change this if necessary.
Ref. Enter a reference you want to apply to the stock allocation here.
Project Ref To allocate the stock to a project, enter the project reference here. You can use the drop-down list to search for and select a project record.
Cost Code If you are allocating the stock to a project, enter the cost code you want the value of the stock applied to when it is issued. You can use the drop-down list to search for and select a cost code.
Qty To Allocate Enter the quantity of stock you want to allocate. Unless you have Sage 50 Accounts set to allow negative stock, the quantity to allocate cannot exceed the free stock amount.
Free Stock This shows the amount of stock available for allocation and is calculated as actual stock minus allocated stock. This read-only column is for information purposes only.
On Order This shows the quantity of stock you are waiting to receive from outstanding purchase orders. This read-only information is for information purposes only.
677

Sage 50 Accounts User Guide
67
To view, amend or remove a stock allocation
1. Select Products > Make Allocations.
The Allocations window appears.
2. Select View/Amend Allocations, then click OK.
The Amend Allocations window appears showing all stock allocations.
3. To filter the displayed allocations use the Product Code and Project Reference drop-down lists at the top of the window.
4. To change an allocation quantity, enter the revised quantity in the Quantity Allocated column.
For a manual allocation the quantity cannot exceed Free Stock unless Sage 50 Accounts is set to allow negative stock. For a purchase order allocation, the quantity cannot be increased.
Note: You can only change the quantity of a stock allocation. If any of the details are incorrect, such as a wrong project reference or cost code, remove the allocation by entering a quantity of zero, then create a new stock allocation with the correct details.
5. To remove a stock allocation, enter zero in the quantity allocated column.
6. To generate a copy of the stock allocation information you have entered, click Print List.
7. To save the stock allocation click Save. If you want to clear the allocation and start again click Discard, or to exit without saving the stock allocation, click Close.
8

Product tasks (stock)
Issuing allocated stock
Accounts Plus and Accounts Professional onlyWhether the stock has been allocated manually or through a purchase order, to conclude the stock allocation it must be issued.
Issuing stock updates your stock records and stock allocation records. When issuing an allocation associated with a project, the value of the issued stock is applied as a cost to the project; this is an actual cost. The committed costs for the project are reduced accordingly.
Note: The First In First Out (FIFO) method is used to calculate the value of stock issued. This means the cost price of the oldest stock is used to calculate the cost of stock. Stock valuations and stock activity are also use the FIFO costing method.
A stock allocation can be issued in full or part. For any stock that is issued Sage 50 Accounts generates an Adjustment Out. This type of transaction is displayed as an 'AO' on the project record, product record and their related audit trails.
There are some rules you need to follow when issuing allocated stock:
You can only issue stock to a project provided the status of the project permits postings. For more information see Using project statuses on page 685.
You cannot change the details of a stock allocation, such as the project reference or cost codes, during a stock issue.
A stock issue cannot exceed the allocation amount, regardless of the negative stock setting.
To issue allocated stock to a project
1. Select Products > Make Allocations.
The Allocations window appears.
2. Select Issue Allocations, and click OK.
The Issue Allocation window appears showing all stock allocations.
679

Sage 50 Accounts User Guide
68
3. To filter the displayed allocations use the Product Code and Project Reference drop-down lists at the top of the window.
4. Record the issue date. The current program date is displayed automatically, but you can change this if necessary.
5. Enter the amount you want to release for a stock item in its Quantity to Issue column.
Alternatively, to issue all stock allocations, click Issue All.
6. To generate a copy of the stock allocation information you have entered, click Print List.
7. To issue the stock, click Save. If you want to clear the information and start again click Discard, or to exit without saving the stock issue, click Close.
0

Chapter 11
Project tasks(Accounts Plus and Accounts Professional only)In this chapter:An introduction to project costing ....682
Who can use project costing?..........682
The life cycle of a project .................683
The project life cycle in Sage 50 Accounts .........................................683
Setting up project costing ................685
Starting up a project ........................689
Applying project costs .....................696
Viewing project activity.....................700
Working with purchase orders .........703
Project enquiries, analysis and reporting705
Billing your customer for a project ....709
Completing your project...................714
Sage 50 Accounts Project Costing provides the features you need to maintain accurate details about projects and helps you to track and evaluate costs. Understanding the costs and their breakdown helps you to manage projects more efficiently and make them more cost-effective.
In this chapter you will learn how to use Project Costing to create and manage projects and their associated costs, and how to bill customers for work carried out. You can also find out how to view project activity and analyse your cost information.

An introduction to project costing
The overall objectives of a project costing process are to manage your projects, and to give you total control and a thorough understanding of your project costs. With a good understanding and better control of your costs, you can potentially reduce costs and so increase your revenue and profit and improve the productivity of your business.
Using Project Costing, you can enter and monitor all of the costs associated with each project. This means you know exactly how much it costs your business to complete a project, and how much to charge your customer to ensure that your business makes a profit. You can also avoid costly overruns by tracking expenditure.
Ultimately, Project Costing helps you to manage your projects more efficiently, to estimate for future projects more accurately and to determine your most profitable types of project.
Who can use project costing?
During the 1930s large companies in the USA developed job costing as a business practice. It did not become widely used by British companies until the 1950s. Nowadays, it is a fundamental part of any successful business.
Whether you are a sole trader or a large organisation, a good costing process gives you the ability to focus on your profitability by enabling you to monitor and evaluate your business costs.
All types of businesses use project costing, from tradesmen such as plumbers and electricians operating their own businesses, to larger companies engaged in construction or manufacturing. You do not have to be a large business to use a project costing system - you just have to be a business that wants to increase profitability by developing a true understanding of your business costs.
You can also use project costing to track non-profitable or in-house projects.

Project tasks (Accounts Plus and Accounts Professional only)
The life cycle of a project
In the real business world, the project costing cycle begins when you receive an enquiry regarding a job or project.
If you do not know the cost or sales value of the project, you need to estimate it. You can then produce an estimate for the project by calculating, for example, the value of materials, labour, machine time and other expenses required to complete the project.
When you have decided upon an estimate, you can send a quotation to your customer. If the customer accepts the quotation, they place an order and you can begin work on the project.
As the job starts, your business incurs costs in the form of purchase invoices, payments and stock issues.
You may then begin to bill your customer as you carry out work on the project, or when the project is complete.
As the project progresses or when it is complete, you might need to analyse your costs to date, compare the amount you budgeted for the project against your actual costs or respond to a customer enquiry.
When you finish work on the project, it reaches the end of the life cycle.
The next section explains how Sage 50 Accounts Project Costing handles each stage of this life cycle.
The project life cycle in Sage 50 Accounts
Sage 50 Accounts Project Costing begins at the point in the project cycle where your customer has accepted the quotation or estimate you gave them, and placed an order for the project or confirmed that they want to go ahead with it. The following diagram shows how Sage 50 Accounts Project Costing follows the life cycle of the project.
Some activities in the life cycle may be irrelevant to the way you work. If this is the case, simply skip that section in the cycle.
683

Sage 50 Accounts User Guide
68
Project Life Cycle Project Costing Task
When your customer accepts your quotation and places an order, or you start a new internal project, create a Project Record. See To create a project record on page 246.
Record the costs that the project incurs:
To record time sheets information for work carried out, or to make an adjustment, create a Project Charge. See To record a project only cost on page 696.
To record stock usage, post a Stock Issue or Stock Return. See To record a stock issue or return to a project on page 698.
To record goods/services that have been paid for and affect your supplier or bank accounts, make a Cost Posting. See Recording the cost of goods purchased from a supplier on page 699.
To record goods/services ordered for the project, create a Purchase Order. See Processing purchase orders on page 608.
As the project progresses and you want to analyse cost and revenue information or require a progress update, view the project's Activity or print a Report.See, Project enquiries, analysis and reporting on page 705.
You need to send an invoice to your customer for part or all of the project. View the project's Billing analysis information and raise an Invoice. See Billing your customer for a project on page 709.
When you finish the project, mark the project record as Complete.For more information, see To mark a project as completed on page 714.
Start Up Project
Apply Costs
Enquiries & Analysis
Bill Project
Project Completion
4

Project tasks (Accounts Plus and Accounts Professional only)
Setting up project costing
When you first install Sage 50 Accounts, Project Costing is enabled. The elements needed to build and work with projects are made available and screens display the boxes and icons specifically for project costing.
If you cannot see the icons and boxes in the windows that appear, then it is likely that your Project Costing has been switched off. You must switch it back on to use Project Costing. Project Costing is enabled within Company Preferences on the Parameters tab. For more information see Entering company preferences on page 124.
Project Costing offers a number of support features that will be beneficial when setting up and running projects.
Project status: Used to track progress. The project status also sets rules to control whether the project at a given status can accept charges or whether it can be deleted.
Cost types and code: Used to track project costs including spend against budget.
Project custom fields: The labels that appear on a project record against a set of three analysis fields that can be used to categorise projects. For example, you could categorise a project by its manager, type or geographical area, then generate reports for these categories. To set up custom fields see To set up or amend a project status, cost type, cost code or custom field on page 121.
Resources: Used to apply costs to a project, primarily used to record labour costs.
Using project statuses
The project status helps track progress. By default, Sage 50 Accounts offers a set of five project statuses, which are detailed in the following table:
You can amend or add to these project statuses to suit your business. For each status, you can enter a short code and description and specify whether the status allows you to make cost postings to the project and whether you can delete the project record.
Status Code Definition Make Postings? Delete Record?
ACTIVE Active Yes No
SNAG Completed, open Yes No
COMPLETED Completed, closed No Yes
SUSPEND Suspended No No
INITIAL Pre-acceptance Yes No
685

Sage 50 Accounts User Guide
68
When you create a new project record, Sage 50 Accounts automatically assigns the status that is set as the default in the Configuration Editor. When you first use Project Costing, the default status is ACTIVE, but you can change this if you require.
To find out how to create and amend a project status, see To set up or amend a project status, cost type, cost code or custom field on page 121.
As a project advances, you can change its status to reflect the project's stage in the life cycle. For example, when a project is in progress, you need to make cost and billing postings to it, but don't want to delete it. At this stage, the status should be ACTIVE, or a similar status that allows postings and prevents deletion. When the project is complete, however, you don't need to make any further postings to it but may want to delete the record, so you can change the status to COMPLETE. For details about how to change a record's status, see To change a project's status on page 695.
Using cost types and codes to monitor project costs
A cost type categorises and labels an activity or resource, such as labour or materials. A cost code breaks down the costs of the activity further, for example plumbing or bricklaying.
On its own a cost type is worthless. For it to be of use it must be linked to a cost code. A cost type can be linked to many cost codes, however a cost code can only link to the one cost type. For example the cost type Labour can be linked to cost codes for bricklaying, plumbing and plastering.
When Sage 50 Accounts is first installed it creates the cost type Other. It also creates four cost codes: LAB (Labour Charges), MAT (Material Charges), OHD (Overheads) and MIX (Mixed). The 'Other' cost type is automatically linked to these cost codes. If you are an existing user the 'Other' cost type is automatically linked to the cost codes you have set up.
Sage 50 Accounts applies every cost code and associated cost type to a project record as it is created. Budgets can then be set up for the project against each cost code. For more information about using project records, see Starting up a project on page 689.
When costs are applied to the project it is the cost code that is recorded for the charge, not the cost type. As the project progresses you can analyse the costs applied to the project for each cost type - project activity. See Project enquiries, analysis and reporting on page 705.
The level of detail you use for your cost types and codes is entirely up to you, and depends on the degree of cost analysis you want to achieve.
To find out how to create and amend cost types and codes, see To set up or amend a project status, cost type, cost code or custom field on page 121.
6

Project tasks (Accounts Plus and Accounts Professional only)
Resources
Carrying out work on a project requires people, such as your company's staff or outside contractors, the use of materials, machines and other means to complete the project or job. Each of these components, including the people, contributes to the progress of the project and incurs costs.
Project Costing uses the term resources to denote any entity whose costs can be allocated to a project. When you apply a project charge - see page 696, you can specify what resources the project uses. For example, you may primarily apply a project charge to record time sheets information for labour costs incurred. In this case, the resource is the contractor or member of staff who carried out the work.
Before you can use a resource to apply a project charge, you must set up your resources list.
You can create as many resources as you require. Each resource must have a unique reference. Other details include a name, unit of measure, cost rate, and cost code, all of which are optional.
When you record a project charge you can then select the resource you want to use. The resource information is used to calculate a total cost for the charge but this can be overridden as you record the charge.
To create or amend a resource
1. Open the Projects module, then from the Tasks pane, click Manage Resources.
The Resources window appears.
2. To add a new resource to the list, click Add. The Add Resource window appears.
Alternatively, to amend an existing resource, select the resource in the list and click Edit. The Edit Resource window appears.
3. If you are adding a new resource, enter a unique reference and a name to describe it.
If you are amending an existing resource, you can change its name but not its reference.
4. Enter or amend the Unit of measure for the resource (optional).
5. Enter or amend the Cost Rate for the resource (optional).
6. Use the drop-down list to select the cost code you want the resource charge applied to (optional).
7. To save your changes, click OK. To discard your changes and exit without saving, click Cancel.
8. To close the Resources window, click Close.
The Projects window appears.
You have successfully created or amended a resource.
687

Sage 50 Accounts User Guide
68
To delete a resource
1. Select Projects > Manage Resources.
The Resources window appears.
2. From the list of resources, select the resource you want to delete.
3. Click Delete.
A confirmation message appears.
4. To confirm the deletion, click Yes. Sage 50 Accounts deletes the resource.
Alternatively, to cancel the deletion, click No.
5. To close the Resources window, click Close.
The Projects window appears.
You have successfully deleted a resource.
8

Project tasks (Accounts Plus and Accounts Professional only)
Starting up a project
To manage a project in Sage 50 Accounts you start by creating a project record (see Setting Up project records on page 245). The project record is used to set the price quoted for the job and the budget that has been assigned to it. Project costs are then applied to the project record as the project progresses.
Projects can link to customer records. When there is a link, the Project tab on the customer’s record displays the details of associated projects.
A project can consist of a single project record with costs managed at one level. Alternatively a project can consist of several project records that can be managed at multiple levels. In this case each level can represent a phase or activity within the overall project. By splitting the project down, you can manage the costs associated with each phase or activity against the allocated budget as well as manage costs for the project as a whole.
To create a multi-level project you need to link project records together to form a project structure. An example of a project structure is illustrated in To build and maintain a multi-level project on page 692.
There are some rules to consider when managing a multi-level project:
All project records in the structure must be linked to the same customer, or not have a customer assigned to any.
A customer linked to the project can be changed on the project record at the top of the project structure.
A project record can only be associated with one project structure, that is one overall project.
A project record can be placed at any level within the structure.
There is a maximum of ten levels within a project structure.
A project record can be moved to a different level within the structure. Any associated sub-project records are also moved.
A project record may be moved to another project structure. Any costs are moved from the original project to the new project structure.
Project costs are applied to the relevant project record (level).
If you change the status of a project record you have the option to apply the same status its sub-projects.
A project record can be deleted from a structure, provided the status of the record and of its sub-project records allows deletion. Any associated sub-project records are also deleted.
The following sections explain how to use the project records to view information, manage budgets and multi-level projects.
689

Sage 50 Accounts User Guide
69
To view a project's activity
1. Select the Projects module and then, if appropriate, use the view selector to switch to the Projects view.
2. Select the project you require and click Record.
3. From the Project Record window, click the Activity tab.
Alternatively, from the Projects window, select the project, whose activity you want to view and click Activity.
4. Enter the transaction range or date range you want to view the transaction activity for in the Activity Date Range window, and click OK.
The transaction information for the first project you selected appears.
0

Project tasks (Accounts Plus and Accounts Professional only)
The Activity window displays the transactions you have posted against this project. You can see the following transaction types, one line per transaction:
Stock allocations are not displayed as a project activity. For information about stock allocations, see Chapter 10, Allocating stock.
5. To see the costs for a multi-level project select the Include Rolled Up Transactions check box.
The costs for any sub-projects are displayed indicating the project record they have been applied to.
6. To select another range of transactions to view, click the Range button and enter the new details in the Activity Date Range window.
7. If you selected more than one project record before opening the Activity, you can move between the activity information for each of the project records using the Previous and Next buttons.
8. To print the transaction information, click Print List.
9. To exit the Project Record or Activity window, click Close.
The Projects window appears.
You have now viewed your project's Activity details.
CCCD
Costing CreditCosting Debit
These transactions display Project Only Cost postings.
AIAO
Adjustment InAdjustment Out
Your project activity displays these types of transaction when you post Stock Postings to the project.
PIPCBP
Purchase InvoicePurchase CreditBank Payment
When you make a Cost Posting to the project, these appear on the activity as PI, PC or BP transaction types.
SISC
Sales InvoiceSales Credit
These transaction types represent Billing transactions created when you enter and update an invoice or credit note for the project.
691

Sage 50 Accounts User Guide
69
To assign a project budget
1. Select the Projects module and then, if appropriate, use the view selector to switch to the Projects view.
2. Select the project(s) you require and click Record.
The Project Record window appears, showing the Details information.
3. Click the Budgets tab.
The budget information displays all cost codes set up in Sage 50 Accounts.
4. Select the Budget column for each cost code and enter the budget value.
5. To save your entries click Save, or to clear any data and start again click Discard.
6. To exit the Project Record window, click Close.
The Projects window appears.
You have successfully applied budgets to your project record.
To build and maintain a multi-level project
1. Select the Projects module and then, if appropriate, use the view selector to switch to the Projects view.
2. Select the project record you require and click Record.
2

Project tasks (Accounts Plus and Accounts Professional only)
The Project Record window appears, showing the Details information.
3. Click the Structure tab.
The project record and any sub-projects are displayed. Note: Project records at a higher level in the structure are not shown.
4. Use the following to establish the project structure:
Add Existing Adds an existing project record to the project structure. All projects that are not part of the open structure are displayed. Select the project record you want to add then click OK.
Messages are displayed if you select a project record that is part of another project structure or linked to a different customer.
Note: Use the View Type drop-down list to choose how projects are displayed. You can select a structure view that shows the projects by name or by reference, or a simple list view. Sage 50 Accounts remembers the view type you choose and continues to display projects in this view until you change it.
693

Sage 50 Accounts User Guide
69
Note: You can resize the columns displayed in the grid. You can also choose to display or hide the Start Date and End Date columns. To do this, select the column heading and right-click, then choose the settings you want to use from the displayed menu.
5. To save the information click Save, or to clear any data and start again click Discard.
6. To exit the Project Record window, click Close.
The Projects window appears.
You have successfully established a multi-level project structure.
Add New Quickly builds project records and adds them to the structure.Click New, then enter a unique project reference and a description, and click OK.
The new project record is added as a sub-project to the source project record. The status, start and end dates are copied from the source record. The project record is associated to the a customer's record, if an association was present in the project record.
Arrows (graphic) Change the position of a project record within the structure. Select the project record and then click the arrow to move the record within the structure.
Note: There are a maximum of ten levels to a project structure.
View Type The structure view can be displayed leading with the project name or alternatively the project reference. Use the drop-down list to select the view you prefer.
Expand All Displays all sub-project records associated with the structure.
Collapse All Rolls up all project records so that sub-projects are no longer visible.
Remove Removes a project record, its costs and sub-projects from the structure. The project records are only removed from the structure, they are not deleted from Sage 50 Accounts.
Analysis for Displays a summary of the costs for the project record.
To see the effect of costs from sub-projects select the Rolled up totals check box.
4

Project tasks (Accounts Plus and Accounts Professional only)
To add memo information to a project record
1. Select the Projects module and then, if appropriate, use the view selector to switch to the Projects view.
2. Select the project(s) you require and click Record.
The Project Record window appears, showing the Details information.
3. Click the Memo tab.
The memo information appears, displaying the Attachments and Memo panes.
4. In the upper Attachments pane, use the Document Manager functionality to add, view or delete shortcuts to electronic documents, or enter filing system references. For more information, see Working with attachments using Document Manager on page 760.
5. Enter or edit text in the memo pad as you require. The text automatically wraps around onto the next line as you type.
6. To save your entries click Save, or to clear any data and start again click Discard.
7. To exit the Project Record window, click Close.
The Projects window appears.
You have successfully entered memo information onto your project record.
To change a project's status
Note: If the project record is part of a multi-level project and you change its status, you have the option to apply the same status to any sub-projects linked to the project record.
1. Select the Projects module then, if appropriate, use the view selector to switch to the Projects view.
2. Select the project(s) you want to amend and click Record.
The Project Record window appears, showing the Details information.
3. From the Status drop-down list, select the status you require.
4. To save your entries click Save, or to clear any data and start again, click Discard.
5. To exit the Project Record window, click Close.
The Projects window appears.
You have successfully changed the project's status.
695

Sage 50 Accounts User Guide
69
Applying project costs
Projects can incur a variety of costs by drawing on physical items such as materials or non-physical items such as labour.
There are a number of ways to apply costs to a project. You can record:
A project charge to cover labour costs, or make adjustments to the costs of a project. See Recording project charges on page 696.
A stock issue to account for the goods you have taken out of stock for use on the project. See Recording the cost of a stock issue on page 698.
You can also set aside stock for a project. See Allocating stock on page 675.
A supplier invoice to account for goods you have bought for the project, which you do not hold in stock. See Recording the cost of goods purchased from a supplier on page 699.
A purchase order to link the goods or services required to the project. This automates the allocation of stock and application of costs from the order to the project. See Working with purchase orders on page 703.
Note: To be able to apply costs to a project, the project must be set up with a status that allows postings. For more information see To set up or amend a project status, cost type, cost code or custom field on page 121.
Recording project charges
Project charges can be used to record a number of costs.
Labour costs, using the number of hours' work and the hourly rate shown on time sheets submitted by a contractor.
Costs that do not affect your accounts or stock, such as costs involving non-stock or service items.
Adjustments or corrections to other costs for the project.
Project charges appear on the project activity as CD transactions, and do not update your financial audit trail or stock history.
If you need to reverse a project charge, for example if you post an invoice to the wrong project but do not need to reverse the invoice to correct your accounts, use the New Credits facility. These reversals appear as CC transactions on the project activity, and do not affect your audit trail or stock.
To record a project only costNote: These instructions explain how to post a cost to your project. If you want to post a credit transaction, replace New Charges with New Credits.
1. Select the Projects module and then, if appropriate, use the view selector to switch to the Projects view.
6

Project tasks (Accounts Plus and Accounts Professional only)
2. Select the project(s) you want to post a project only cost for.
3. Select New Charges.
The Project Charges window appears, displaying the reference of the project(s) you selected.
4. Enter the details of the cost in the boxes provided, one line per cost.
Notes: You must enter a Cost Code for the cost. If you do not enter a Cost Code, Sage 50 Accounts displays an error message when you try to save the cost.
When you select a Resource for the cost, Sage 50 Accounts automatically fills in the default Rate as it is set up in the Resources List. When you then enter a Quantity, Sage 50 Accounts calculates the cost and displays it in the Total Cost column. You can change the Cost Code and default Rate for the resource, if you require.
5. To save your entries click Save, or to clear the data without saving click Discard.
6. To return to the Projects window, click Close.
697

Sage 50 Accounts User Guide
69
Recording the cost of a stock issue
Stock postings enable you to record stock issued to your projects, or to put returned or unused products from a project back into stock. These postings display on the project's activity as an AI or AO transaction type.
Note: If you use the Clear Stock option as part of your Month End or Year End routine, Sage 50 Accounts removes transactions from the Product Activity, up to and including the date you specify. However, if stock transactions link to a project that is still active, Clear Stock does not remove these transactions from your data completely. Instead, the details of these transactions remain on your project's activity so that the history for that project is complete.
When using stock for a project, you should remember that Sage 50 Accounts uses the FIFO (first in, first out) method of stock control. When you issue stock to a project, Sage 50 Accounts uses the oldest stock first. This means that if you purchase stock specifically for a project, for example at a special price, Sage 50 Accounts will only use this stock if it is the oldest for that product, otherwise it will use whatever stock already existed on the product record. If you want to use the stock purchased especially for the project, you must record a project charge to adjust the difference between the standard stock price and the project's stock price.
Remember! In Project Costing, stock issues are a COST to your project. This differs to transactions that issue stock in other areas of Sage 50 Accounts, such as Invoicing, which result in income for your company.
To record a stock issue or return to a project
1. Select Products.
2. From the Products window, select the products you want to enter adjustments for.
Note: You can only post stock issues or returns for products that are set up as Stock items. For Non-Stock and Service items, you should post a project charge. For more information, see Recording project charges on page 696.
3. If you want to post a stock issue, click Record Adjustment Out. If you want to post a stock return, click Record Adjustment In.
The Stock Adjustments Out or Stock Adjustments In window appears.
4. In the boxes provided, enter the adjustment details, one line per adjustment.
Note: To ensure that the adjustment shows as a stock issue or return on the project activity, you must enter the reference of the project record in the Project Ref column. In addition, the project that you select must be set up with a status that allows postings.
5. To print a record of these product adjustments, click Print List.
6. To save your entries, click Save. To clear any data you entered and start again, click Discard.
7. To exit and return to the Products window, click Close.
8

Project tasks (Accounts Plus and Accounts Professional only)
Recording the cost of goods purchased from a supplier
Cost postings allow you to post transactions that affect both your project activity and your accounts. For example, if you purchase stock for a project and your supplier invoices you for the goods, you need to post a purchase invoice that shows both on the supplier activity and on the project record.
You can post purchase invoices, purchase credits and bank payments to a project. Cost postings show on the project's activity as a PI, PC or BP transaction type.
Note: You cannot make a Cost Posting for a specific quantity, as there is no Quantity column available on the Supplier Invoice, Supplier Credit or Bank Payment window. This means that if you post a purchase invoice or credit or a bank payment using a project reference to link the transaction to a particular project, the transaction does not display a quantity on the project's activity. If you need a transaction involving a quantity to affect both your project and your accounts, you should post your purchase invoice or credit, or your bank payment, without a project reference. You then need to create a Project Only Cost to post the cost to the project, including the quantity.
To apply a supplier invoice or credit the project
1. Select Suppliers and then use the view selector to switch to the Supplier List view.
2. From the Suppliers window, select the supplier account(s) that you want to record the invoice or credit against.
3. Click Invoice or Credit.
The Batch Supplier Invoices or Batch Supplier Credits window appears.
4. For each invoice or credit, enter the details one line at a time.
5. To allocate the invoice or credit to a project as a cost posting, enter the project's reference in the Project Ref column.
6. Enter a valid cost code for the invoice or credit in the Cost Code column.
7. To accept your entries click Save. The details are posted instantly to update the Nominal Ledger, the relevant supplier's details and the project you specify.
If you do not want to save this batch, then click Discard to clear the data and start again.
8. To exit the Batch Supplier Invoices or Batch Supplier Credits window and return to the Suppliers window, click Close.
For full details about the data you can enter on the Batch Supplier Invoices or Batch Supplier Credits window, see Entering an invoice from a supplier on page 640 or Recording supplier credit notes on page 650.
699

Sage 50 Accounts User Guide
70
To apply a bank payment to a project
1. Select Bank > New Payment.
The Bank Payments window appears.
2. Enter the details for each payment, one line at a time.
3. To allocate the bank payment against a project as a cost posting, enter the project's reference in the Project Ref column.
4. Enter a valid cost code for the payment into the Cost Code column.
5. To accept your entries, click Save. Sage 50 Accounts posts the details to update the nominal ledger, the bank account and the project you specify.
If you do not want to save this batch, click Discard to clear the data and start again.
6. To exit the Bank Payments window, click Close.
For full details about the data you can enter on the Bank Payments window, see Recording a bank, cash or credit card payment on page 397.
Viewing project activity
You can view a detailed transaction history, or activity, for any project.
Note: Stock allocations are not displayed as part of the project activity.
1. From the Project Record window, click the Activity tab.
Alternatively, from the Projects window, select the projects, whose activity you want to view, then click Activity.
The transaction information for the first project you selected appears, displaying the transactions you have posted against this project.
2. To see the costs for a multi-level project, choose the Include Rolled Up Transactions check box.
The costs for any sub-projects are displayed indicating the project record, to which they have been applied.
3. To filter the transactions displayed, choose the criteria you require from the following selection fields:
Show
To filter the transactions by a specific calendar month, select the month you want to display from the Show drop-down list.
Alternatively, you can specify a date range, transaction number range or transaction type to display by selecting Custom Range from this list and completing the relevant fields on the Activity Range window that appears.
0

Project tasks (Accounts Plus and Accounts Professional only)
Your software retains the filter you specify from this menu and applies it the next time you view the activity.
This is true for all of the Show drop-down list options, although any values you enter on the Activity Range window will not be retained.
Date
This read-only box displays the date range you selected using the Show drop-down list.
For example, if you selected Custom Range and entered the date range 01/07/2011 to 31/07/2011, these dates appear in this box.
The Activity window only displays those transactions that fall within the specified date range.
Type
If you select Custom Range from the Show drop-down list and use the Activity Range window to choose a specific type of transaction to display, this box shows which transaction type you selected.
For example, if you chose to view only adjustment in transactions by selecting AI - Adjustments In on the Activity Range window, this box shows 'AI'.
The Activity window now only displays adjustment in transactions that are dated within the specified date range.
You cannot change the transaction type shown in this field directly - to change the type of transaction displayed here, you must select Custom Range from the Show drop-down list and re-select the transaction type you want to view.
O/S Only
If you selected Custom Range from the Show drop-down list and selected the Outstanding Transactions Only? check box on the Activity Range window, this check box is selected.
This indicates that the Activity window is displaying only those transactions that are not yet paid or allocated.
You cannot change this setting directly here - to select or clear this box, select Custom Range from the Show drop-down list and select or clear the Outstanding Transactions Only? check box in the Activity Range window.
Trans.
This box shows the transaction number range currently displayed on the Activity window.
For example, if you select Custom Range from the Show drop-down list and use the Activity Range window to specify a range of transactions to view, this box shows the transaction numbers you chose.
If you do not specify a transaction range, this box displays the first and last transaction numbers from your project audit trail. For example, if you have 2169 transactions on your project audit trail, this field shows 1 to 2169.
701

Sage 50 Accounts User Guide
70
You cannot change the range shown in this field directly. To change the transaction number range shown here, select Custom Range from the Show drop-down list and enter the transaction number range you want to view.
4. If you selected more than one project record before opening the Activity, you can move between the activity information for each of the project records using the Previous and Next buttons.
5. To print the transaction information, click Print List.
6. To exit the Project Record or Activity window, click Close.
For more information, please refer to the Projects > Activity > To view project activity topic in the main software help file (F1).
2

Project tasks (Accounts Plus and Accounts Professional only)
Working with purchase orders
Accounts Professional onlyPurchase Order Processing integrates with Project Costing to link orders with projects. On completion of each stage of the purchase order life cycle, updates are automatically made.
Stock allocation: The ordered goods (stock items) are set aside for the project, when they are recorded as received. The free stock quantity for stock items excludes the allocated stock. This improves stock control and reduces the potential of stock shortages. Stock allocated to a project can be viewed. See Allocating stock on page 675. Goods received is not performed for orders requiring non-stock or service items.
Committed costs: The value of the ordered goods or service being applied to the project when the order is placed on-order. Committed costs are generated for all item types - stock, non-stock, service item, and refers to the value of goods or services that have been requested but not yet charged to the project. Generating and tracking committed costs gives an accurate evaluation of all costs when comparing project spend to budget.
Create Order
On-Order
Goods Received
Invoice
Order Complete
Stock Allocation(automated)
Stock Issued(allocation record
reduced)
Committed costsapplied to project
Actual costsapplied to projectCommitted costsfor the projectreduced
stock itemnon-stock orservice item
=Actual costsapplied to projectCommitted costsfor the projectreduced
=
=
703

Sage 50 Accounts User Guide
70
Actual Costs: The value of the goods or service being applied to the project. This is where the committed costs are converted to actual costs. This occurs at different at times for the various types of stock - that is, stock item, non-stock, service item.
Stock items: The committed costs are converted and applied as an actual cost to the project when the allocated stock is issued.
Non-stock and service items: The committed costs are converted and applied to the project when the invoice for the order is generated.
The value of both committed and actual costs of a project can be viewed. For more information, see To view project costs and compare to budget on page 706.
4

Project tasks (Accounts Plus and Accounts Professional only)
Project enquiries, analysis and reporting
Project Costing has several features that help you to track projects, analyse costs and revenue, and respond to customer enquiries about the progress of a project. You can:
View individual project costs - transactions.
There are two ways to do this. You can view the transactions for a specific project record, see To view a project's activity on page 690. Alternatively you can search for transactions by date range or transaction type. To do this, use Activity from the Projects window.
As well as the analysis features available within Project Costing, there is a tab on the Customer Record that displays details of every project associated with a customer. This tab allows you to see each project's summary information at a glance and links directly back to the Project Record. See, To view a customer's project history on page 705.
View project costs and compare to budget.
This can be done for a single project managed using the one project record or for a multi-level project that uses several project records.
A variance is displayed that can indicate either an overspend or surplus on budget. You can drill-down project costs to view the costs specifically by cost type, cost code and finally down to individual transactions. You can choose to include committed costs when comparing costs to budgets.
Generate reports
In addition to the Project Activity, Project Costing includes a Reports option that provides many useful analysis reports. For example, you can run a report to analyse costs by project or by cost code. Other reports enable you to view revenue information, look at a list of projects by status, or check profitability. For a complete list of the reports available, refer to the Sage 50 Accounts Help system.
To view a customer's project history
1. Select Customers and then use the view selector to switch to the Customer List view.
2. From the Customers window, select the customer(s) whose project information you want to view.
3. Click Record.
The Customer Record window appears, showing the Details information.
4. Click the Projects tab.
The Projects information appears.
705

Sage 50 Accounts User Guide
70
The Projects tab displays a summary for every project currently linked to this customer, one line per project. For each project, you can view the status, price quoted, cost to date, billed to date and outstanding to bill details. You cannot change any of this information here.
5. To create a new project for this customer, click New Project. Enter the details of the project in the Project Record window and click Save.
6. To exit the Customer Record window, click Close.
The Customers window appears.
To view project costs and compare to budget
1. Select Projects, then from the Tasks pane, select Project Enquiry.
The Project Enquiry window appears.
2. Select the project record you want from the Project Reference drop-down list.
The project’s cost and budgetary information appears.
Alternatively, from the Projects window select the project record, click the record's Analysis tab and then click the arrow to the right of Actual cost.
6

Project tasks (Accounts Plus and Accounts Professional only)
3. Use the following to display information when the project record is part of a project structure.
4. To see a breakdown of the project’s costs from cost types to cost codes, down to transaction level, first double-click the project name. The costs and budgets for the cost types appear.
View Type The structure view can be displayed leading with the project name or alternatively the project reference. Use the drop-down list to select the view you prefer.
Include committed costs in variances
Select this check box to see the effect of committed costs on your budget variances.
Print List Generates a printed copy of the displayed information.
Expand All Displays the sub-project records associated with the structure. Alternatively, click the plus sign to the right of the project name.
Collapse All Rolls up all project records so that the sub-projects are no longer visible.
707

Sage 50 Accounts User Guide
70
To see a further breakdown, select a cost type and then double-click. The costs and budgets for the cost codes associated with the cost type are displayed. Use the Cost Type drop-down list to view costs and budgets at cost code level for another cost type.
To enquire down to transaction level, select the cost code and then double-click. Use the Cost Code drop-down list to view transactions for other cost codes.
To include committed costs in the variance calculation, select the Include committed costs in variances option.
Note: Selecting information from a drop-down list always displays rolled up figures for the project.
5. To generate a copy of the displayed information, click Print List.
6. Click Close to exit.
8

Project tasks (Accounts Plus and Accounts Professional only)
Billing your customer for a project
As your project progresses, you may want to start sending invoices to your customer for the work carried out so far. Alternatively, you may prefer to wait until the project is complete and then bill your customer for the total amount on a single invoice.
Project Costing does not automatically bill your customers for projects. However, the Analysis tab of the Project Record displays information that helps you to calculate how much you should bill your customer. You can also use Project Costing's reports to assist you.
When you know how much you need to bill you can:
Create a service invoice, or a product invoice containing the special product code S3, to send to your customer. If you need to credit your customer, for example if they return goods, you can raise a service credit note, or a product credit note containing the special product code S3 that you can allocate to the project.
When you post the invoice or credit note to your ledgers, Sage 50 Accounts updates the project's activity and Analysis tab. Billing transactions display on the project's activity as SI or SC transaction types.
Record the amount you want to bill your customers without producing an invoice. This method uses customer batch invoice entry, where many invoices can be recorded at the same time. When you save the batch invoice, Sage 50 Accounts immediately applies the values to the project, customer and nominal records.
Note for Accounts Professional users: If you create project records directly from Sales Order Processing, from an order containing the special product code S3, enter the project's reference into the S3 item line so that Sage 50 Accounts can transfer it to the invoice, when you complete the order. This means that when you update the invoice to the ledgers, the SI transaction links to the project automatically. This is particularly useful where you need to invoice your customer exactly the amount of the initial order.
Calculating how much to invoice your customer using fixed price billing
Use the following information from the Billing Totals and Revenue Totals areas of the project record's Analysis tab to work out how much you need to invoice your customer:
Price quoted - the price you originally estimated for the project or job. You may have agreed this with your customer as a quote, or simply entered it into the record as a guideline for your own reference.
Total billed - the total value of invoices entered and updated so far for this project.
Outstanding to bill - Sage 50 Accounts calculates this as the price quoted less the total billed to date.
Compare the price quoted and the total billed values with the outstanding to bill amount, to see how much you should raise an invoice for.
709

Sage 50 Accounts User Guide
71
For example:
Price quoted = £1000.00
Total billed = £700.00
Outstanding to bill = £300.00
You can see that, to date, you have invoiced your customer £700.00. Using the quoted price of £1000.00, this means that there is still £300.00 to bill for the project. You can now enter your final invoice for the project for the value of £300.00.
If the actual costs for a project exceed your original estimated costs, you may want to increase the price quoted. If you agreed a price for the project with a customer before commencing work, then changing your quote will be difficult or impossible. However, if you only use the price quoted information for your own reference, you can increase this value to cover your increased costs. Sage 50 Accounts can then recalculate the amount outstanding to bill accordingly.
Important Note: If you use customer discounts
If you have a good business relationship with a customer, you may offer them a standard discount, which applies to all goods or services they purchase from you, irrespective of the quantity of goods or value of the invoice. This discount appears on the Defaults tab of the Customer Record as a percentage amount.
When you create an invoice for a customer with a good customer discount set up on their record, Sage 50 Accounts applies the discount and reduces the invoice total. This means that when you raise an invoice to bill this type of customer for a project, the final value of the invoice does not match the amount you intended to bill.
For example:
The Analysis tab of the project shows that there is £100.00 outstanding to bill. You decide to enter a service invoice for £100.00, the full amount outstanding.
The Defaults tab of the Customer Record displays a 10% discount for the customer you are billing. So, when you create an invoice for £100.00, Sage 50 Accounts applies the 10% discount and the invoice total becomes £90.00.
If you update this invoice, the project record shows that you have billed an additional £90.00, and that £10.00 remains outstanding to bill.
If you continue by invoicing the remaining £10.00, Sage 50 Accounts again applies the 10% discount so that the total invoice amount reduces to £9.00. When you update the invoice, the Analysis tab of the project shows that there is still £1.00 to bill.
You can see that with the customer discount in place, the amount outstanding to bill never reaches £0.00, but simply reduces further each time you update an invoice.
To prevent this situation from occurring, you must remove the discount from the invoice when you create it, BEFORE you update it. To do this, edit each item line of the invoice and remove any discount shown in the Disc % box. Make sure that the Disc % and Discount boxes both
0

Project tasks (Accounts Plus and Accounts Professional only)
display 0.00 and click OK. When you update the invoice, Sage 50 Accounts updates the project with the full amount that you intended to bill.
For details about editing the item line of an invoice, see To enter service item line details on page 540.
Calculating how much to invoice your customer using time and materials billing
Project Costing includes a suite of reports that you can use to help you to calculate how much you should bill your customer if you use Time and Materials billing. However, you must work out your invoice amounts manually, as Sage 50 Accounts does not deal with this type of billing automatically.
To help you to calculate your billing amounts, we recommend that you keep your own records of invoices and costs to date throughout the duration of each project.
To create an invoice or credit note for a projectNote: If you create your projects from Sales Order Processing and bill your customer for the exact amount of the original order, you do not need to create the invoice manually. The project reference transfers to the invoice when you complete the sales order, and the invoice posts to your project, when you update it to your ledgers.
1. Select Customers > New Invoice.
The Invoice window appears, showing the Details information.
2. Select the type and format you require from the relevant drop-down lists. You can create a service invoice or credit note for your project, or you can set up a product invoice or credit note using the special product code S3.
3. Enter your invoice or credit note header details, such as the date and customer reference, in the boxes provided.
4. Enter the details of the service item or the S3 product code onto the first line of the invoice or credit note, and press F3 on your keyboard to open the Edit Item Line window.
5. Enter the item line details.
To ensure that the invoice or credit note affects the project when you update it to your ledgers, enter the project's reference into the box provided in the Project Details section of the window.
Note: If you select a project that is set up with a status that does not allow postings, the following message appears:
The status of this project does not allow postings
711

Sage 50 Accounts User Guide
71
Check that the project reference is the one you require, and that the status on its record is correct. You can change the project status to one that allows postings if necessary - for more information see To change a project's status on page 695.
6. To accept the item line details, click OK.
7. Continue to enter any further items to the invoice or credit note, one line per item.
8. To save the invoice or credit note, click Save, or to clear the entries and start again, click Discard.
9. To return to the Customer Process window, click Close.
For full details about creating invoices and credit notes, see Entering an invoice on page 523 and Entering a credit note on page 572.
Now that you have created the invoice or credit note for your customer, you need to update it so that its details transfer to the customer, nominal and project records. See the next section for details on how to do this.
To update the invoice or credit note to the project record
1. Select Customers > Invoice List.
2. From the Invoicing window, select the invoice(s) or credit note(s) you want to update.
3. Click Update.
The Update Ledgers window appears.
4. Select the output you require for your report from the option buttons available.
5. To update your ledgers and project record, click OK.
Note: When you update invoices or credit notes, Sage 50 Accounts updates your customer and nominal ledgers as well as the project record.
6. Print, view or save your Update Ledgers report, depending on which option you selected in step 3.
The updated invoice(s) or credit note(s) display Yes in the Posted column.
The project activity displays an SI or SC transaction for the amount you billed or credited. In addition, Sage 50 Accounts updates the Billing Totals section of the project record's Analysis tab with the date and value of the invoice or credit note you updated.
For full details about updating invoices and credit notes to your ledgers, see Posting an invoice on page 562.
To enter batch customer invoices or credit notes
1. Select Customers > Batch Invoice.
The Batch Customer Invoices window appears.
2

Project tasks (Accounts Plus and Accounts Professional only)
2. Enter the item line details such as the customer’s account reference, the invoice date and the project you want to update.
Note: If you select a project that is set up with a status that does not allow postings a warning is displayed. Check that the project reference is the one you require, and that the status on its record is correct. You can change the project status to one that allows postings if necessary - for more information see To change a project's status on page 695.
3. Continue to enter any further items to the invoice, one line per item.
4. To save the invoice click Save, or to clear the entries and start again, click Discard.
5. To return to the Customer Process window, click Close.
For more details about batch invoice entry see, Memorising and recalling batch invoices and credit notes on page 572.
713

Sage 50 Accounts User Guide
71
Completing your project
The final stage in the life cycle is the completion of a project.
When you have finished work on a project and signed it off, you no longer need to make cost or revenue postings to it. To ensure that you do not make any further postings to the project, and to indicate that it is complete, you need to change the record's status. The project then shows as complete on your reports and on the customer's record.
If after a time you no longer require analysis information from a completed project, you may want to delete its record. Changing the project status to Completed allows you to delete the record.
To mark a project as completed
1. Select the Projects module and then, if appropriate, use the view selector to switch to the Projects view.
2. Select the project you want to mark as complete.
3. Click Record.
The Project Record window appears.
4. In the Project Details area of the window, select Completed from the Status drop-down list.
5. To save your changes, click Save, or to exit without saving, click Discard.
6. To exit the Project Record window, click Close.
The Projects window appears.
You have now completed your project.
4

Chapter 12
Support toolsIn this chapter:Accountant Link...............................716
e-Banking ........................................739
Audit Assistant.................................748
Working with attachments using Document Manager .........................760
Exporting to Microsoft® Word, Excel and Outlook............................................766
Event Logging..................................772
Network Setup ................................776
Working with Internet Resources .....776
News Feeds ....................................776
The tasks and tools explained in this chapter are designed to save time, so you spend less time entering data and more time running your business.
The chapter explains how to use Accountant Link, a powerful feature that allows you to send your data to your accountant and continue working on it while your accountant reviews it and makes adjustments. The chapter also introduces e-Banking, a tool that enables you to pay suppliers online and reconcile your bank statements electronically.
We’ll also show you how to prepare your accounts for audit using the Audit Assistant.
You’ll learn how to attach files to your records using Document Manager. The chapter then introduces other useful tools such as the ability to export and import information, log important events in your data, set up prepayments and accruals, work with Internet resources and News Feeds.

Accountant Link
Whether you are new to Sage 50 Accounts or an experienced user, the likelihood is that you use a professional accountant at certain times during your financial year. For example, you may require assistance at year end, or when you need to produce a VAT return.
If you are an accountant in practice, working with your clients can mean time-consuming site visits, or taking a backup of your client's data, thus restricting their use of Sage 50 Accounts until you have completed your adjustments.
Developed with both business users and accountants in mind, Sage 50 Accounts Accountant Link makes the process of exchanging data much more efficient and secure. Both types of user can use Accountant Link, and, as a business user, you can continue to work on your own accounts, whichever stage of the process you are at.
This section explains how Accountant Link works, looks at how it can benefit your company, and takes you through setting up and using the feature.
What is Accountant Link?
The majority of Sage 50 Accounts users are small to medium-sized companies, who use Sage 50 Accounts to manage their day-to-day accounts. Most of these users, however, retain the services of an external accountant to assist at times such as the end of a financial year, or to help when they need to produce legal documents such as the VAT Return.
Sage 50 Accounts incorporates the Accountant Link feature, which permits companies and accountants to exchange data more quickly, securely and cost-effectively, and enables the accountant to make the necessary amendments to the data while their client continues to process in their own copy of Sage 50 Accounts.
The accountant can then send any adjustments back to their client for them to apply to their data. Accountant Link includes a built-in mechanism that logs the changes the user makes to their data while the accountant processes the accounts, keeping both users informed of any significant changes that might affect the reconciliation of the adjustments.
Accountant Link guides both the company and the accountant through the relevant stages of the process. The diagram on the following page illustrates the different stages of the Accountant Link, and shows that there are two distinct parts to the process; the company side and the accountant side:

Support tools
To correspond with the two sides of the process, Accountant Link functions in two forms:
The company side, present in all variants of Sage 50 Accounts, enables the business user to export data, send it to their accountant, record material changes and import the accountant's adjustments.
Accountant Link contains the functions you need to exchange data with your accountant. See Using Accountant Link with Sage 50 Accounts, Accounts Plus or Accounts Professional on page 718 for information.
The accountant side, available in the Client Manager variant of Sage 50 Accounts, allows the accountant to import the user's data, record adjustments, export the adjustments to file and send it back to their client, ready for the user to apply the changes.
If you are an accountant using Sage 50 Client Manager, Accountant Link guides you through the processes you need to exchange data with your clients. For more information, see Using Accountant Link with Sage 50 Client Manager on page 730.
Important Note: For both Bank and VAT Reconciliation, both the accountant and the client must be using the same version of Sage 50 Accounts. For example, both parties must be using Sage 50 Accounts 2011 or both parties must be using Sage 50 Accounts 2012.
717

Sage 50 Accounts User Guide
71
Using Accountant Link with Sage 50 Accounts, Accounts Plus or Accounts Professional
At times throughout your financial year, you are likely to need your accountant to help you with certain processes, such as your month or year end, or preparing your VAT Return. Alternatively, your accountant may ask to see your data to check your books and make any necessary changes.
Accountant Link enables you to export your data to a secure file, send it to your accountant using email or post, and continue to work in Sage 50 Accounts while your accountant checks and amends your data. Because you do not need to stop processing while you wait for your accountant's adjustments, there is little disruption to your business and so you save time and money.
After you export your data and send it to your accountant, Sage 50 Accounts records any changes you make to your data that might affect the reconciliation of your accountant's adjustments. These changes are called material changes, and you can view or print a list of them at any time, and add comments if you require. Your accountant may ask for a copy of the material changes before they send you their adjustments.
Your accountant then exports the adjustments made to your data to a secure file, and sends it back for you to import. Accountant Link helps you to apply the accountant's adjustments to your data to bring it up to date. At this point, Sage 50 Accounts stops recording material changes.
Accountant has two options:
Export accounts data to a file
This section of Accountant Link appears when you choose to export your accounts data to a file from the Select Action window. Use this section to guide you through the process of exporting your data to a secure, password-protected file. At this stage, Sage 50 Accounts starts to record the material changes you make to your data.
The Export section of Accountant Link also enables you to email your exported data to your accountant.
To find out how to use the Export section, see Exporting your accounts data to file to send to your accountant on page 719. For more information about material changes, see Recording material changes to your data on page 722.
8

Support tools
Import Adjustments and Narratives from a file
This section of Accountant Link shows you how to import the adjustments file that your accountant sends you. Accountant Link then guides you through the process of applying the adjustments to your data, using the Comments and Adjustments window.
For more details about importing and applying your accountant's adjustments, see Importing and applying your accountant's adjustments on page 725.
Note: Before you begin using Accountant Link, you should set up your Accountant Link defaults. For details about how to do this, see To set up your Accountant Link defaults on page 135.
Exporting your accounts data to file to send to your accountant
Exporting your data using Accountant Link produces an encrypted file to which you can apply your own password for added security. Sage 50 Accounts compresses the file, reducing the size of the data so that you can send it to your accountant by email. This means that your accountant can receive and start working on your data almost immediately.
Accountant Link connects the export and send procedures together, providing a logical way of performing the two related tasks.
When you export your data to file, Sage 50 Accounts begins to record material changes that you make to your data. For more information, see Recording material changes to your data on page 722.
To export your accounts data to file and send to your accountant
1. From Company > Tasks pane, select Accountant Link.
The Select Action window of Accountant Link appears.
719

Sage 50 Accounts User Guide
72
2. Select the Export option, then to continue, click Next.
The Export file window appears.
If you have already exported data to a file to send to your accountant, but have not yet imported your accountant's adjustments, an information message appears:
If you want to export again, click Yes. If you do not want to export again, click No.
Note: If you proceed with the export, you will not be able to import any adjustments that your accountant makes to your original export file. If you are unsure, we recommend that you cancel the export and consult your accountant.
To cancel the message, click Cancel.
If you have not previously exported data to file, or if you have completed your prior exchange with your accountant by importing the adjustments file, the Export file window appears:
0

Support tools
Enter a password and comment you want to use for the export file. If required, select Browse to save your accounts data file with a different filename and location from the default filename and location already entered.
Note: Your password must contain at least eight characters.
3. To proceed, click Export.
A progress window appears, displaying the progress of the export process. When the process is complete, the File exported window appears.
From this window, you can choose to navigate to the exported file location, or proceed to email the exported accounts data file to your accountant by email.
721

Sage 50 Accounts User Guide
72
4. To email your exported accounts data file to your accountant now, select the Email file option, then click Exit.
If you have more than one profile set up in Microsoft® Outlook, the Choose Profile window appears. Select the Microsoft® Outlook profile you want to use and click OK.
A Microsoft® Outlook email message appears. Sage 50 Accounts inserts the export file into the message as an attachment and sets the subject of the message to your company name, followed by Sage Accounts Data.
5. Enter the email address you want to send the file to, make any amendments you require to the email message, then click Send.
6. Accountant Link closes and your Sage 50 Accounts desktop appears.
You have successfully exported your accounts data and sent the exported file to your accountant as an email attachment.
Recording material changes to your data
Accountant Link allows you to continue to work on your accounts after you send exported data to your accountant. This can mean that you make changes to your data that make it difficult to reconcile any adjustments that your accountant sends back to you. For example, you might delete nominal codes, post transactions into the period covered by the exported data or reverse posted transactions. Sage 50 Accounts calls these material changes.
When you successfully create an export file containing your accounts data, Sage 50 Accounts generates a new file to record your material changes. During the time between creating your export file and importing your accountant's adjustments, Sage 50 Accounts uses this file to record what it considers to be material changes to the data. To show that it is recording material changes, Sage 50 Accounts displays Recording in the status bar:
Before you import your accountant's adjustments, you can view and print the material changes record to use as a guide when you perform the reconciliation, or to send to your accountant. For more information, see To view the material changes record on page 724.
Posting a material change
When you try to save a material change, Sage 50 Accounts displays a confirmation message:
2

Support tools
If you want to commit all material changes to your data and do not want the prompt to appear each time, select the Don't ask me this again while I'm working in this dataset check box, and to save the material change, click Yes. Every time you make a material change, Sage 50 Accounts records the change automatically, without prompting you.
Alternatively, to cancel without recording the material change, click No.
The Material Changes record
Sage 50 Accounts stores all your material changes in a file, allowing you to view a record of the changes at any time.
The Material Changes window is split into two tabs, Comments and Material. The Comments tab allows you to enter explanatory comments about the material changes you make to your data, which you can then print and send to your accountant. The Material tab (see below) displays a summary of the significant changes you make to your data following the export. You can enter comments for individual changes in the Change Details section of the Material tab. Again, you can print this list and send it to your accountant.
723

Sage 50 Accounts User Guide
72
To view the material changes record
1. From the Sage 50 Accounts menu bar, select View > Material Changes.
Note: Material Changes is only available if you have exported data to send to your accountant, but not yet imported and applied the accountant's adjustments.
The Material Changes window appears, open at the Comments tab.
2. To add comments to the Material Changes record, click into the text box on the Comments tab and type the information you require.
3. To view a summary of your material changes, click the Material tab.
4. To print the Comments or Material information, click Print List at the bottom of the relevant tab.
5. To stop recording material changes to your data, click Cancel.
A confirmation message appears, advising you that you should inform your accountant if you want to stop recording your material changes. If you are certain that you want to stop recording the changes you make to your data, click Yes to confirm and close the Material Changes window. Alternatively, click No or Cancel to return to the Material Changes window and continue to record material changes.
6. To exit from the Material Changes window, click Close.
The Sage 50 Accounts desktop appears.
4

Support tools
Importing and applying your accountant's adjustments
When your accountant has completed their adjustments and sent a corrections file back to you, you must import it into Sage 50 Accounts and apply the adjustments to bring your data up to date.
Adjustments fall into two major groups:
Adjustments
When you import the adjustments file, you can apply these alterations to the accounts automatically from the Comments and Adjustments window. Examples of automatic adjustments include journals and journal reversals.
Narratives
Your accountant records narratives in the form of instructions for you to make changes that Sage 50 Accounts cannot apply automatically. When you import the adjustments file, the Comments and Adjustments window displays these narratives, and you must follow the instructions to apply the changes manually. Examples include running the month end or year end process.
The Import Adjustments and Narratives From A File section of Accountant Link guides you through the Import process, and links directly into the Comments and Adjustments window, ready for you to apply the adjustments and narratives to your data.
Refer to the following sections to learn about the Comments and Adjustments window, and to see how to apply the changes.
Note: Depending on the number and type of adjustments and narratives, the import process could require significant time and attention. We strongly recommended that you set aside sufficient time to complete the entire import process in one single uninterrupted session, rather than staging the process over several sessions.
The Comments and Adjustments window
When you import your accountant's adjustments and narratives file, Sage 50 Accounts displays all the adjustments in the Comments and Adjustments window, ready for you to apply the changes.
The Comments tab allows you to view and print any text your accountant entered for the adjustments and narratives, for example explanatory information that you need to read before you start to apply the changes.
The Adjustments tab displays a summary of the adjustments and narratives you need to apply to your data, including a brief description and the type of adjustment, and shows any comments your accountant entered for individual adjustments in the Adjustment Details section of the window:
725

Sage 50 Accounts User Guide
72
Use this window to apply the adjustments and narratives to your data. The adjustments and narratives appear in the order in which you must apply them to your data.
The following sections describe how to import your accountant's adjustments and narratives file, and how to use the Comments and Adjustments window to apply the changes.
6

Support tools
To import the adjustments and narratives file from your accountant
1. From Company > Tasks pane, select Accountant Link.
The Select Action window of Accountant Link appears.
2. Select the Import option and click Next.
The Choose file window appears.
3. In the Import box, type the location and name of the adjustments and narratives file you want to import. Alternatively, click Browse to find the file you require.
727

Sage 50 Accounts User Guide
72
4. Enter the password associated with the file, then click Next to continue.
Note: Accountant Link checks the file you are importing against the company data that is currently open in Sage 50 Accounts. If the companies differ, an information message appears:
The accountants adjustments file you have chosen to import does not match the company that is currently open. Please open the correct company or choose another file.
To return to Accountant Link, and ensure that you are importing the correct file, click OK. If the file is the one you require, to exit Accountant Link, click Cancel, open the correct Sage 50 Accounts company data, and restart the import procedure from step 1.
If the file you are importing matches the company data that is currently open, the import proceeds and the Comments and Adjustments window appears.
You have now imported your accountant's adjustments and narratives file. For details about how to apply the adjustments to your data, refer to the following section.
To apply your accountant's adjustments and narratives to your dataNote: This section assumes that you have already followed the instructions in the preceding section, To import the adjustments and narratives file from your accountant on page 727. If you have not yet done this, go back to the previous section and ensure that you import your accountant's adjustment and narratives file so that you can access the Comments and Adjustments window used in this section.
1. From the Comments tab of the Comments and Adjustments window, read any comments your accountant recorded about the adjustments you need to make.
If you require, you can print the list of comments by clicking Print List at the bottom of the window.
2. Click the Adjustments tab.
The Adjustments information appears, displaying a list of adjustments and narratives.
3. To print the list of adjustments and narratives, click Print List at the bottom of the window.
4. To start applying the adjustments and narratives to your data, click Begin.
Sage 50 Accounts selects the first adjustment in the list.
If the adjustment is an automatic one, Sage 50 Accounts applies the adjustment to your data and selects the Applied check box.
If the adjustment is a manual one, you must apply the adjustment to the data yourself. When you have made the change, select the I have completed this task check box in the Adjustment Details section of the window.
5. Click Next to continue to the next adjustment in the list. As before, if the next adjustment is automatic, Sage 50 Accounts applies the change to your data and selects the Applied check box. If the next adjustment is manual, you must apply the change and select the I have completed this task check box before continuing.
8

Support tools
Alternatively, if the next item is the first in a group of automatic adjustments, click Continue to apply all of them. Sage 50 Accounts applies all of the automatic adjustments in the group, selects their Applied check boxes, and selects the next manual adjustment in the list.
For example, the following adjustments appear in the list:
If you start by clicking Next, Sage 50 Accounts selects adjustment number 1. Because it is a manual adjustment, you must apply it manually and select the I have completed this task check box before continuing. If you click Next to continue, Sage 50 Accounts applies adjustment number 2 and selects the Applied check box, as this is an automatic adjustment. Sage 50 Accounts then selects adjustment number 3, and waits for you to click Next or Continue before applying the change.
If you start by clicking Continue, Sage 50 Accounts selects adjustment number 1, and you must apply the manual change and select the I have completed this task check box. If you then proceed by clicking Continue, Sage 50 Accounts applies adjustments number 2 and 3 and selects the Applied check box, as these are automatic adjustments. Sage 50 Accounts then selects adjustment number 4 and waits for you to apply the adjustment.
6. Continue to apply the adjustments and narratives until the Applied check box displays a tick for every item.
7. To exit from the Comments and Adjustments window, click Close.
The Sage 50 Accounts desktop appears.
You have successfully applied your accountant's adjustments and narratives to your data.
No Summary Type Applied
1 Create Customer Manual No
2 Nominal Journal Automatic No
3 Nominal Reversal Automatic No
4 Batch Invoice Manual No
729

Sage 50 Accounts User Guide
73
Using Accountant Link with Sage 50 Client Manager
In order to check and finalise a client's data, or to assist with processing, for example at year end, you often need to visit the client's business personally to obtain the data files, or alternatively ask the client to send a backup copy to you.
Working on a backup of your client's data may mean that they have to stop processing in Sage 50 Accounts until you return the amended data to them. This can cause considerable disruption to their business, as the client may be unable to process any accounts data for weeks at a time. In addition, exchanging data via backup is not ideal as there is the risk of the files becoming lost or damaged.
The Accountant Link feature enables you to exchange data with your clients more quickly and securely, and lessens the restrictions on your clients by allowing them to continue processing while you work on your copy of their data. Accountant Link can reduce the need for personal visits to your clients, saving you time and potentially reducing your costs.
When you need to work on the accounts data, your client uses Accountant Link to export it to a compressed, password-protected file and email it to you. Accountant Link in Sage 50 Client Manager enables you to import this file, and then records the adjustments you make to the data, together with any explanatory text you enter.
As your client continues to process, their copy of Sage 50 Accounts keeps a record of any changes that might affect the reconciliation of your adjustments. At any time, you can ask your client to print a copy of the material changes record and send it to you. When you complete your adjustments, use Accountant Link to export the data to a file and send it back to your client, ready for them to apply your adjustments.
Accountant Link consists of two sections. Each section guides you through a specific part of the Accountant Link process. The two sections are:
Import Accounts Data From A File
Use this section of Accountant Link to import the data file that your client sends to you for adjustment. At this stage, Sage 50 Client Manager starts to record the adjustments you make to the data.
Export Adjustments and Narratives To A File
This section of Accountant Link appears when you choose to export your adjustments to a file that is subsequently forwarded to your client. Use this section to guide you through the process of exporting your adjustments to a secure, password-protected file. At this stage, Sage 50 Client Manager stops recording the adjustments you make to the data.
To find out how to use the Export section of Accountant Link, see Exporting your adjustments and narratives to file on page 736. For more information about adjustments, see Recording adjustments on page 733.
Note: Before you begin using Accountant Link, you should set up your Accountant Link defaults. For details about how to do this, see To set up your Accountant Link defaults using Sage 50 Client Manager on page 136.
0

Support tools
Importing your client's accounts data from a file
When your clients send data to you for amendment or finalisation, you must import it into Sage 50 Client Manager before you can start to make the necessary adjustments. The Select Action section of the Accountant Link Wizard guides you through the Import process.
When you import accounts data from a file, Sage 50 Client Manager begins to record adjustments that you make to the data. For more information, see Recording adjustments on page 733.
To import your client's accounts data
1. From Company > Tasks pane, select Accountant Link.
The Select Action window of Accountant Link appears.
2. Select the Import option and click Next.
The Choose file window appears.
731

Sage 50 Accounts User Guide
73
3. In the Import box, type the location and name of the accounts file you want to import. Alternatively, click Browse to find the file you require.
4. Enter the password associated with the file and click Import to proceed.
If you are using a single company installation of Sage 50 Client Manager, Accountant Link displays the following message:
This is a single company version of Sage 50 Accounts. Importing a dataset will overwrite the existing company dataset. Do you still wish to proceed to overwrite the company dataset?
To confirm that you want to proceed with the import, click OK.
Alternatively, to cancel the import, for example if you want to return to the Sage 50 Client Manager desktop and back up the current data, click Cancel, then to exit to the desktop, click Cancel on Accountant Link.
If you have previously imported this company's data but have not yet exported your adjustments and narratives to file to send to your client, Sage 50 Client Manager displays a confirmation message advising you that if you import the data again, you will lose any adjustments you have made so far.
If you are sure that you want to import the data again, to proceed, click Yes. Sage 50 Client Manager clears the adjustments record and continues with the import.
Alternatively, to cancel, click No. Sage 50 Client Manager cancels the import process and returns you to the wizard. To exit Accountant Link and return to the desktop, click Cancel.
When the import is complete, the File imported window appears.
2

Support tools
From this window, select whether or not to check the imported data file.
5. To check the data for errors, select the Check data now option, then click Finish.
The File Maintenance window appears and the Check Data procedure begins. If no errors are found, the Check Complete window appears indicating this. If there are problems, the File Maintenance Problems Report window appears. If any errors are found, it is recommended that you follow the Recovery Tools procedure before proceeding. For more information about using Recovery Tools for your data errors, please refer to your F1 help file.
Once your Check Data is complete and you close your File Maintenance windows, Accountant Link closes and the Sage 50 Client Manager desktop appears.
You are now ready to start recording adjustments on the imported data. Refer to the following section for more information.
Recording adjustments
After you import your client's data, Accountant Link allows you to make adjustments to the accounts. You can also enter text that indicates to your client that they may need to apply certain changes manually, or to explain why you have made an alteration.
Adjustments fall into two main groups: adjustments, which Sage 50 Accounts applies to your client's data automatically, and narratives, which are changes that the user must apply manually. For example, if you post or reverse a journal entry, Sage 50 Client Manager records the change as an adjustment that your client can apply to their data automatically. If you process a financial year end, this appears as a narrative that your client must replicate manually.
733

Sage 50 Accounts User Guide
73
When you successfully import a file containing your client's accounts data, Sage 50 Client Manager generates a new file to record your adjustments and narratives. During the time between importing the file and exporting your adjustments and narratives, Sage 50 Client Manager uses this file to record the changes you make to the data. To show that it is recording adjustments, Sage 50 Accounts displays Recording in the status bar:
Before you export your amendments, you can view and print the adjustments and narratives record at any time. See To view the comments and adjustments record on page 736.
Posting an adjustment
When you try to save an adjustment, Sage 50 Client Manager displays a confirmation message:
If you want to commit all adjustments to this set of data and do not want the prompt to appear each time, select the Don't ask me this again while I'm working in this dataset check box and click Yes to save the adjustment. Every time you make an adjustment to this set of data, Sage 50 Client Manager records the change automatically without prompting you.
Alternatively, to cancel without recording the adjustment, click No.
The Comments and Adjustments record
Sage 50 Client Manager stores all your adjustments and narratives in a file, allowing you to view a record of the changes at any time.
The Comments tab allows you to enter explanatory comments about the adjustments you make to the data, which you or your client can print for reference.
4

Support tools
The Adjustments tab displays a summary of the adjustments and narratives you make in your client's data following the import. If you want to add comments to individual adjustments, use the Adjustment Details section of the Adjustments tab:
Again, you can print this list if you require.
735

Sage 50 Accounts User Guide
73
To view the comments and adjustments record
1. From the Sage 50 Accounts menu bar, click View and select Comments and Adjustments.
The Comments and Adjustments window appears, open at the Comments tab.
2. To add comments to the Comments and Adjustments record, click into the text box on the Comments tab and type the information you require.
3. To view a summary of your adjustments and narratives, click the Adjustments tab.
4. To print the Comments or Adjustments information, click Print List at the bottom of the relevant tab.
5. To exit from the Comments and Adjustments window, click Close.
The Sage 50 Accounts desktop appears.
Exporting your adjustments and narratives to file
When you have completed your adjustments and you are satisfied with the accounts, you need to export the amended data to file so that you can send it back to your client.
Exporting data using Accountant Link produces a compressed file to which you can apply your own password for added security, and send to your client by email. This means that your client can receive your adjustments electronically, and import and apply the changes at a time that is convenient to their business.
Accountant Link connects the export and send procedures together, providing a logical way of performing the two related tasks.
When you export your adjustments and narratives to file, Sage 50 Client Manager stops recording adjustments and reverts to standard behaviour.
To export your adjustments and narratives to file and send to your client
1. From Company > Tasks pane, select Accountant Link.
The Select Action window of Accountant Link appears.
6

Support tools
2. Select the Export option, then click Next.
The Export file window appears.
3. Enter the file name, password and comment you want to use for the export file.
Note: Your password must contain at least eight characters.
4. To proceed, click Export.
A progress bar appears, followed by the File exported window.
737

Sage 50 Accounts User Guide
73
From this window, you can choose to navigate to the file, using Windows Explorer, or send your exported adjustments file to your client by email.
5. To email your exported adjustments file to your client now, click Next.
If you have more than one profile set up in Microsoft® Outlook, the Choose Profile window appears. Select the Microsoft® Outlook profile you want to use and click OK.
A Microsoft® Outlook email message appears, automatically displaying the company's email address as it appears in Company Preferences. Sage 50 Accounts inserts the export file into the message as an attachment, and sets the subject of the message to Sage Adjustments and Narratives Export.
6. Make any amendments you require to the email message and click Send.
Accountant Link closes and the Sage 50 Accounts desktop appears.
You have successfully exported your adjustments and narratives and sent the exported file to your client as an email attachment.
Accountant Link and Sage Pay
When an accountant imports customers data using Client Manager, where the customer has activated Sage Pay, the Pay by Card and Pay Deposit by Card buttons will be disabled throughout the software.
If an accountant is using the software, the Sage Pay facility will be available. The Pay by Card and Pay Deposit by Card button disabling is only implemented, when data is imported using the Client Manager wizard.
8

Support tools
e-Banking
If you have access to electronic banking facilities with your bank, you can use Sage 50 Accounts e-Banking facility to make electronic payments and to reconcile your bank accounts online.
For more information about e-Banking, visit the Sage website at http://www.sage.co.uk.
Introduction to e-Banking
Sage 50 Accounts’ e-Banking facility allows you to:
Make e-payments so that you can pay your suppliers directly from your actual bank account.
Check your online bank statement against the bank statement generated by your Sage 50 Accounts software.
Import transactions sent by your bank, so that you can reconcile your bank transactions with your Sage 50 Accounts records.
Note: Before you can start using the e-Banking function, you must first contact your bank. They will provide you with their software, which will enable you to use the Sage e-Banking function. Most major banks have software that is compatible with your Sage accounting product.
Once you have contacted your bank and installed their banking software, you must set up Sage 50 Accounts to enable the e-Banking facility.
To enable e-Banking
1. From the Sage 50 Accounts menu bar, select Settings > Bank Defaults.
The Bank Defaults window appears.
2. To enable e-Banking, select the Enable e-Banking check box and click OK.
You have now enabled your e-Banking facility.
3. Select the Bank module.
You are prompted to enter your e-Banking Serial Number and Activation Key. You can find these on the sticker sheet entitled Important Information, that is included within your software packaging.
4. Enter your e-Banking Serial Number and Activation Key in the boxes provided and click OK.
You are now ready to enter banking details and configure your Sage 50 Accounts software.
Configuring your e-Banking facility
To configure the e-Banking facility you must first make sure that your bank details match those required by your banking software.
739

Sage 50 Accounts User Guide
74
To add bank details and configure your bank account
1. Select the Bank module and then, if appropriate, use the view selector to switch to the Bank Accounts view.
2. Select the bank account that you want to make e-payments from and/or reconcile using the e-Reconcile facility, then click Record.
3. From the Bank Record window, click the Bank Details tab.
4. Enter your bank details.
Note: The sort code and account number must match those on the file to be imported from your bank.
5. Select the online bank service that you use from the Bank Type drop-down list.
6. Click Configure.
The Sage e-Banking Configuration window for the selected bank type appears. The information required to configure this facility depends on the bank type you have selected.
7. Enter the following information:
Note: Some options may not be available depending on the banking software you are using and whether you have selected the Override Common Directory check box.
8. Click OK to save the changes you have made.
Common Directory
This is the directory where the electronic payment and statement data is stored. The default directory (C:\) appears automatically. You can change this if required.
If you do not want to use the common directory, select the Override Common Directory check box. If the check box is selected, all of the Statement Reconciliation Service and Payment File Option boxes must be completed.
Statement Reconciliation Service
This is the directory where the statement files from your banking software are stored. Sage 50 Accounts will use these files in order to compare your online bank accounts with the bank accounts in your Sage 50 Accounts software. The default file directory appears automatically. You can change this if required.
Payment File Options
This is the directory, file name and extension of the file that is used by the e-Payments facility for your online banking software. The default directory appears automatically. You can change this if required. You can also change the file extension and file identifier.
0

Support tools
After clicking OK the Bank Details window appears. Click Save to close the Bank record and save the changes to the record.
The e-Banking facilities are now available from the Bank Accounts window. For further information about using the e-Payments option, refer to the next section. For further information about using e-Reconcile, refer to Using the e-Reconcile facility on page 743.
Using the e-Payments facility
The e-Payments facility works by creating a file that your bank's online banking software can use to pay your suppliers directly from your actual bank account.
Before you can begin using the e-Payments facility, you must do the following:
1. Enable the e-Banking software. For further information about how to do this, refer to the section, e-Banking on page 739.
2. Make sure that you have entered your bank account details. For further information about how to do this refer to Configuring your e-Banking facility on page 739.
3. Edit the supplier records that you want to pay using e-Payments, so that they can accept online payments. For further information about how to do this, refer to Entering supplier bank details on page 741.
Entering supplier bank details
If you want to use the e-Payments facility to pay your suppliers, you must edit your supplier records so that they can accept electronic payments. For further information about how to do this, refer to the next section.
To edit your supplier's bank details
1. Open the Suppliers module.
2. Switch to the suppliers View.
3. Select the suppliers that you want to pay using the e-Payments facility and then click Record.
The first selected supplier's record appears.
4. Click the Bank tab.
5. Enter the Account Name, Sort Code, Account Number and BACS Ref, as required by your banking software. You must ensure this information is entered correctly, otherwise your e-Payments will not be posted.
6. Select the Online Payments check box.
7. To save your changes and clear the supplier record information, click Save.
741

Sage 50 Accounts User Guide
74
8. Repeat steps 4 to 7 for each of your selected suppliers.
You can now use the e-Payments option to pay your suppliers.
To enter a purchase payment using e-Banking Note: To update the e-Payments window and send payments using e-Banking, you need
to enter your purchase payments in the Bank’s Supplier Payments option. If the Online Payments check box is selected in the supplier’s record, the reference BACS appears automatically in the Cheque No. box when you make a payment to that supplier. When you save the payment, Sage 50 Accounts transfers it to the e-Payments window.
For more information about setting up your supplier records to accept online payments, see To edit your supplier's bank details on page 741.
For details about how to post a purchase payment in Sage 50 Accounts, see To record a supplier payment on page 644.
To transfer payments using the e-Payments option
1. Select the Bank module and then, if appropriate, use the view selector to switch to the Bank Accounts view.
2. From the Bank Accounts window, select the bank account you have configured for making payments to your suppliers, and then click e-Payments.
The Send Payments window appears, displaying all outstanding payments for the selected bank account, for suppliers who are set up to use online payments.
3. If you want to restrict the transactions that appear, to a certain date range, select the Date Range check box and enter the date range you require in the From and To boxes.
4. Select the transactions that you want to send to your bank from the Send Payments window.
5. Click Send.
The transfer of information between Sage 50 Accounts and your bank account begins. A confirmation window appears showing you the number and value of the payments. For further details about the transactions, click Show Details.
6. To continue with the payments, click OK. To keep a record of this e-Payment, click Print to open the e-Payment details in Microsoft® Notepad. Select the File menu and select the Print option.
The information is transferred to a file which you can then use with your banking software. The file is saved to the directory you selected when you configured your bank account.
Note: If there are any problems with transferring your e-payments, you are prompted to view an error log. The error log lists reasons why your e-payments transfer has not been successful. We recommend that you read the error log and make any corrections that are necessary.
2

Support tools
Using the e-Reconcile facility
Sage 50 Accounts uses a file created by your banking software which allows you to check your online statement against your Sage 50 Accounts statement.
Before you can reconcile your accounts you need to:
1. Enable the e-Banking software. For further information about how to do this, refer to e-Banking on page 739.
2. Prepare your bank accounts for online reconciliation by completing the details on the Bank Details tab (on the Bank Record). For further information about how to do this, refer to Configuring your e-Banking facility on page 739.
3. Import your bank transactions. For further information about how to do this, refer to the next section.
Importing e-Banking transactions
Before you can reconcile your bank transactions, you must import your bank data. Your banking software saves this data into a file on your PC. You must import this file so that you can compare the transactions from your banking software with those on Sage 50 Accounts.
To import e-Banking transactions
1. Select the Bank module and then, if appropriate, use the view selector to switch to the Bank Accounts view.
2. From the Bank Accounts window, select the bank account you require and click e-Reconcile.
The Amend Bank Statement Details window appears.
3. Enter the Statement End Date and Statement End Balance and then click OK.
The Reconciliation window appears.
4. Open the File menu and choose Import Bank Transactions.
The Open window for the selected bank appears. The left side of the window displays the files on your PC and the right side displays the bank statement files.
5. From the left panel, open the folder where your bank data is saved.
The bank files for the selected bank account are displayed in the right-hand panel.
6. From the right panel, select the bank file you want to import and click Open.
The Reconciliation window appears showing your imported transactions. The total number of transactions that you have imported appears at the bottom of the window. You are now ready to reconcile your bank account.
743

Sage 50 Accounts User Guide
74
Reconciling your bank account
There are two ways of reconciling your online bank statement against your Sage 50 Accounts statement: using the automatic options or by reconciling manually.
We recommend that you use both. You should use the automatic options to match the majority of the transactions and then use the manual option to complete the reconciliation.
There are three stages to reconciling transactions
As you match transactions, they are highlighted as follows:
To automatically reconcile your bank statement using the e-Reconcile option
1. Import your e-Banking transactions. For more information about how to do this, refer to the previous procedure.
2. Select the Bank module and then, if appropriate, use the view selector to switch to the Bank Accounts view.
3. From the Bank Accounts window, select the bank account you require and click e-Reconcile.
4. Enter the following information in the boxes provided:
Matching This will match the two transactions together, similar to allocating transactions.
Confirm It is necessary to confirm your agreement with the matches that have taken place.
Reconcile This will mark the transactions as reconciled.
Yellow Transactions are not matched or confirmed.
Blue This is the last selected transaction and is not matched or confirmed.
Green Transactions are matched but not confirmed.
Grey Transactions are matched and confirmed.
Statement End Date Enter the date that you want to reconcile up to.
Statement End Balance
Sage 50 Accounts automatically enters the closing balance from your last reconciliation here. You should now enter the closing balance of your actual bank statement.
4

Support tools
5. Click OK.
The Reconciliation window appears displaying the imported bank transactions in the top panel and the Sage 50 Accounts transactions in the bottom panel.
6. The Reconciliation window now shows the following information:
Bank Transactions To /Sage Transactions To
Select a date in the Bank Transactions To and Sage Transactions To boxes to restrict the transactions that appear.
Note: The Bank Transaction To box shows the date you entered as the Statement End Date but you can change it here if required.
No /Tran No The No column, in the top half of the window, displays the transaction number in your bank account. The Tran No column, in the bottom half of the window, displays the transaction number in your Sage 50 Accounts software.
Ref This displays the transaction reference code that has been entered for both your bank and Sage 50 Accounts transactions.
Type In the list of Sage 50 Accounts transactions there is an additional list labelled Type. This displays the type of transaction. For example, BP represents a Bank Payment, SR represents a Sales Receipt and JC represents a Journal Credit.
Date This shows the date that the transactions were entered onto the system.
Details This displays any additional details that were entered when the transaction was created.
Payments If the transaction is a payment, the amount appears here.
Receipts If the transaction is a receipt, the amount appears here.
Match With When a transaction has been matched, this shows the number of transaction(s) that were matched against it.
Conf? This shows if the match has been confirmed. Initially set to N, once the match has been confirmed it will change to Y.
Rec Amount This shows the amount matched against the transaction.
Opening Balance This is the statement balance brought forward from the last reconciliation. It should reflect the opening balance on the statement.
745

Sage 50 Accounts User Guide
74
7. Click Match Full, to match any transactions that have the same reference and amount, and then click Confirm.
8. Click Match Amounts to match transactions that have the same amounts. Once you are happy with the matches that have been highlighted, click Confirm.
9. Click Match Refs to match transactions that share the same reference. When you are happy with the matches that have been highlighted, click Confirm.
10. To begin the automatic reconciliation process, click Reconcile.
A confirmation message appears.
11. To confirm that you want to reconcile the transactions, click Yes.
If you still have transactions to reconcile, follow the instructions below.
To manually reconcile your bank statement using the e-Reconcile option
1. From either the Sage 50 Accounts transactions or the bank transaction list, select the transaction that you want to reconcile.
2. From the opposite list, select the transaction or transactions that you want to reconcile against the transaction selected in step 1.
3. Click Match Manual.
Continue manually matching transactions as required.
Book Balance at Date
This is the balance of the Sage 50 Accounts bank account up to the date entered on the Amend Bank Statement Details window. It represents the balance of reconciled and unreconciled items up to this date.
Difference Displays the difference between the transactions you have selected to reconcile and the Statement End Balance. When you have selected all of your transactions this should be zero unless you have to make adjustments for transactions not yet entered on your Sage 50 Accounts software, for example, bank charges.
Uncleared Items This is the value of transactions not yet matched for reconciliation, up to the date entered on the bank reconciliation window.
Reconciled Balance Shows the value of the reconciled transactions in your Sage 50 Accounts program.
Statement End Balance
Shows the balance from your bank statement, as entered in the Amend Bank Statement Details window in step 4.
6

Support tools
Note: If you want to automatically confirm the matches when you use the Match Manual option, from the menu bar select Tools > Options. Select the Automatically Confirm Manual Matches check box.
4. If you have not chosen to automatically confirm matches, click Confirm.
5. When you are happy that you have completed the matching, click Reconcile.
A confirmation message appears.
6. To confirm that you want to reconcile the transactions, click Yes.
You have now completed your reconciliation.
747
Sage 50 Accounts User Guide
74
Audit Assistant
Use the Audit Assistant feature to help you to accurately assess and prepare for any forthcoming audits of your accounts and ensure that you are following best accounting practice.
The Audit Assistant allows you to check for a number of common errors in your accounts data. Any transactions that may cause problems in an audit will be displayed on-screen.
The Audit Assistant also includes a suite of VAT audit reports that have been approved by HM Revenue & Customs.
To verify your Sage 50 Accounts software for VAT discrepancies
1. Select Company > Prepare for Audit.
The Verify System window appears. This allows you to run one of four different audit checks on your Sage 50 Accounts transactions.
2. Select one of the following options:
Check Accounts System for potential Audit queries, for example possible duplicate transactions.
Select this option to check your sales and purchase transactions for possible errors. This option allows you to specify the tax code that you use as the standard rate of tax for your sales and purchase transactions. Once you run this option, any transactions within a specified date range that could be queried are displayed along with the reason that they are listed.
For more information about running this feature, see the topic To check your accounts system for potential audit queries on page 749.
For more information about the Accounts System Check window that appears after running this option, see The Accounts System Check window on page 752.
Run VAT Audit Check on Accounts System for possible tax queries, for example high VAT-rated transactions.
This option allows you to check the tax thresholds and tax rates of your sales and purchase transactions. Once you have chosen this option, you can then set up the VAT check to analyse the VAT amounts and rate of tax for transactions posted within a specified date range. This allows you to set up your own checks, so whether you are a small company, or an established company with a number of offices, you can set up the thresholds to reflect your company's sales and purchases.
For more information about running this feature, see the topic To run the VAT audit check on page 753.
Show All Accounts Verification and VAT Audit Reports - to report on individual areas.
Select this option to run any of the Account Verification and VAT Audit reports. These reports display audit information about any of the transactions recorded in Sage 50 Accounts.
8

Support tools
For more information about running this feature, see the topic To view the Account Verification and VAT Audit reports on page 757.
Check VAT Values on Transactions for possible errors.
Use this option to check the VAT amounts on transactions posted within a specified date range. Running this option checks and reports on any transactions, where the tax amount entered on the transaction is not equal to the expected tax amount.
The expected tax amount is calculated from the tax code list. If the VAT amount has been altered manually, the transaction will be displayed on the Check VAT Values list.
Note: The expected VAT amount takes into account any settlement discounts and any specified rounding tolerances that have been previously specified.
For more information about running this feature, see the topic To check your VAT values on page 758.
To check your accounts system for potential audit queries
1. Open the Company module, then from the Tasks pane, click Prepare for Audit.
The Verify System window appears.
2. Select the Check Accounts System for Potential Audit Queries option, and click OK.
The Accounts Verification Settings window appears.
3. Select the settings that you want to apply in the Accounts Verification Settings window.
Identify possible duplicate transactions
Select this check box to list duplicate transactions on your Sage 50 Accounts system. If this option is selected, Sage 50 Accounts compares transaction types, dates, values and account references. If any transactions are found with the same details, the transactions appear with the transaction with the earliest audit trail number being listed first.
Note: When transactions are displayed after running this check, you should check that the listed invoices have been issued against matching credit notes. If they do match you can write these two transactions off. These will not be displayed the next time you run the Accounts System Check.
Identify Invoices not updated and / or printed within 14 days‘
Select this check box to highlight any invoices that have not been updated or printed, fourteen days after the date that appears on the invoice in Sage 50 Accounts.
749

Sage 50 Accounts User Guide
75
Identify Sales and Purchase Payments on Account not using non-vatable Tax Code
Sales receipts on account and purchase payments on account are usually posted using the non-vatable tax code - tax code T9 if you are using the default tax codes. Select the check box to identify any sales receipt on account or purchase payment on account that has been posted using a different tax code.
Note: You should only select this check box if you are using the Standard VAT Accounting or Flat Rate - Invoice Based schemes.
Identify Sales and Purchase Transactions not using Standard Rated Tax Code
Sales and purchase invoices are usually posted using the standard rate of tax - code T1 if you are using the default tax codes. Select the check box to identify any sales or purchase transactions that have been posted using a different tax code.
Identify EC Sales Transactions posted to Customer Accounts with no VAT Registration Number
Select this check box to highlight any EC sales transactions posted to customer accounts with no VAT Registration number.
Note: For more information about tax codes, you should check the following HMRC publication notices:
Notice 700 - The VAT Guide. This is the main VAT reference guide.
Notice 725 - The single market. This notice explains the way that VAT is charged and accounted for on the movement of goods within the EC single market.
For copies of Notice 700 and Notice 725, you should refer to the HMRC website, www.hmrc.gov.uk. You can access this website from your Sage accounts software, by opening the WebLinks menu and selecting HM Revenue and Customs.
0

Support tools
4. To continue, click OK.
The Date Range window appears.
5. Enter the date range you want to run the check for.
6. To continue, click OK.
The Accounts System Check window appears, showing all transactions that have been flagged for further investigation. For more information about running this feature, see the topic The Accounts System Check window on page 752.
From here you can also print the contents of the window by clicking Print. Alternatively, you can export the details to Microsoft® Excel by clicking Send To.
Identify EC Purchase Transactions posted to Supplier Accounts with no VAT Registration Number
Select this check box to highlight any EC purchase transactions posted to supplier accounts with no VAT Registration number.
Note: For more information about EC tax codes, you should check the following HMRC publication notices:
Notice 700 - The VAT Guide. This is the main VAT reference guide.
Notice 725 - The single market. This notice explains the way that VAT is charged and accounted for on the movement of goods within the EC single market.
For copies of Notice 700 and Notice 725, you should refer to the HMRC website, www.hmrc.gov.uk. You can access this website from your Sage accounts program, by opening the WebLinks menu and choosing HM Revenue and Customs.
Identify Purchase Orders that have been delivered but not invoiced
Select this check box to highlight any purchase order that has been delivered but not invoiced. This allows you to account for payments or invoices that you pay in arrears.
751

Sage 50 Accounts User Guide
75
The Accounts System Check window
The Accounts System Check window appears after you have run the Accounts Verification Settings window. This window displays any transactions identified using the criteria you specify on the Accounts Verification Settings window.
The window displays the following information:
Date Range From: Shows the From date you entered in the Date Range window. You can change this here if you require.
To: Shows the To date you entered in the Date Range window. You can change this here if you require.
Refresh Click this button to update the transaction information in the Accounts System Check window if you change the dates in the Date Range From and/or To boxes.
No Displays the Audit Trail number that was assigned to the transaction when it was first posted.
Inv/Ord No. Displays the invoice or order number of any invoices, sales orders or purchase orders found.
Type Displays the type of transaction, for example, SI = Sales Invoice and PA = Purchase Payment On Account.
Ref Displays the reference that was entered when the transaction was created for audit trail transactions and shows the customer or supplier account reference for invoices and orders.
Account Displays the customer or supplier account code assigned to the transaction for sales and purchase transactions, or the nominal code for journal entries. For invoices and orders, this column shows the customer or supplier account name.
Net Displays the net amount of the transaction.
Tax Displays the tax amount of the transaction.
T/C Displays the tax code assigned to the transaction.
Comment Displays the reason why the transaction was listed in the Accounts System Check window.
2

Support tools
To run the VAT audit check
1. Select Company, then from the Tasks pane, click Prepare for Audit.
2. Select the Run VAT Audit Check on Accounts System for Possible Tax Queries option and click OK.
The VAT Audit Check Settings window appears.
From this window, you can set the options to filter out any transactions that do not meet your tax criteria. You can select any, or all, of the following options from three tabs: Sales Analysis, Purchase Analysis and Financials Analysis.
3. Select the check boxes for the audits that you want to run, and enter any VAT thresholds in the relevant boxes.
Sales Analysis tab:
Identify Sales Invoices and Receipts where the tax code is non-vatable or not in use.
Select this check box to view all sales invoices and receipts that have a non-vatable tax code, or a tax code that is not flagged as In Use in your accounts. Sales invoices and receipts normally have a tax code that appears on your VAT Return associated with them, so this check will ensure that any sales invoices or receipts that have been raised with a non-vatable tax code have been done so on purpose.
Identify Sales Invoices and Receipts where VAT Rate is less than XX% and Tax amount is not equal to zero, and sales credits where VAT Rate is more than XX% and Tax amount is not equal to zero.
Select this check box to check your sales invoices, sales receipts and sales credits with a specified VAT Rate with a tax amount that is not equal to zero.
Identify Sales Credits where Net Amount equals zero and VAT amount is over XXXX.
753

Sage 50 Accounts User Guide
75
Select this check box if you want the VAT Audit to identify any Sales Credits with a net amount of zero and a tax amount above a given threshold. Then, specify the amount of tax that the transaction must have before it is listed in the checking process in the relevant box.
Identify EC Sales transactions to Customer accounts with no VAT Registration Number.
Select this check box if you want the VAT Audit to identify any transactions for sales within the EC, that have been posted to any customer accounts that do not have a VAT Registration number. You may choose to exclude this option, if you do not sell to customers outside of the UK.
Identify EC Sales transactions to non-EU and UK Customers.
Select this check box if you want the VAT Audit to check for any sales transactions using your EC Sales tax code that are posted to customers whose Country Code relates to a non-EU country, or to UK customers.
For a list of EU members, refer to the Sage 50 Accounts Help system.
Purchase Analysis tab:
Identify Purchase transactions where VAT amount is over XXXX.
Select this check box if you want the VAT Audit to include any purchase transactions where the VAT amount is over a specified amount. Specify this amount in the relevant box. If any transactions meet the settings that you specified they will be listed in the VAT Audit Check window.
Identify Purchase Invoices and Payments where VAT Rate is more than XX% and Purchase Credits where VAT Rate is less than XX% and VAT Amount is over XXXX.
Select this check box to search for purchase invoices, bank payments and purchase credits that have VAT Rate over or under an amount that you specify, and a VAT amount over a specified amount. Enter the VAT Rates and VAT amount in the relevant boxes. If any transactions meet the settings that you specify, they are listed in the VAT Audit Check window.
Identify Purchase Credits where VAT amount equals zero and Net amount is over XXXX.
Select this check box if you want the VAT Audit to include purchase credit transactions where the VAT amount equals zero, but the net amount is over a specified value. Enter the net VAT amount in the relevant box. If any transactions meet the settings that you specify, they are listed in the VAT Audit Check window.
Identify EC Purchase transactions from non-EU and UK Suppliers.
Select this check box if you want the VAT Audit to check for any purchase transactions using your EC Purchases tax codes that are posted to suppliers whose Country Code relates to a non-EU country, or to UK suppliers.
For a list of EU members, refer to the Sage 50 Accounts Help system.
4

Support tools
Financials Analysis tab:
Identify Journal Transactions posted to VAT Accounts.
Select this check box if you want to search for any journal transactions posted to your VAT accounts. Enter your VAT Liability nominal code in the relevant box.
Identify Forward Posted Taxable Transactions.
Select this check box if you want to search for transactions posted with a vatable tax code where the transaction date is ahead of the actual posting date.
Identify Journal Transactions where Tax Code is not non vatable.
Select this check box if you want to search for journal transactions posted with a vatable tax code.
4. To continue, click OK.
The Date Range window appears.
5. Enter the date range you want to run the check for.
6. To continue, click OK.
The VAT Audit Check window appears showing any transactions that fall into the categories that you set in step 3. For more information about this window, see The VAT Audit Check window on page 756.
755

Sage 50 Accounts User Guide
75
The VAT Audit Check window
If you select the Run VAT Audit Check on Accounts System option, the VAT Audit Check window appears.
The window displays the following information:
Date Range From: Shows the From date you entered in the Date Range window. You can change this here if you require.
To: Shows the To date you entered in the Date Range window. You can change this here if you require.
Refresh Click this button to update the transaction information in the VAT Audit Check window if you change the dates in the Date Range From and/or To boxes.
No Displays the Audit Trail number that was assigned to the transaction when it was first posted.
Type Displays the type of transaction, for example, SI = sales invoice and PA = purchase payment on account.
Account Displays the customer or supplier account code assigned to the transaction.
Ref Displays the reference the transaction was posted with.
Nominal Displays the nominal code to which the transaction is posted.
Details Displays the details the transaction was posted with.
Date Posted Displays the date on which the transaction was posted into the Sage 50 Accounts software.
Net Displays the net amount of the transaction.
Tax Displays the tax amount of the transaction.
T/C Displays the tax code assigned to the transaction.
Comment Displays the reason why the transaction is listed in the VAT Audit Check window. For more information about the comments that may appear, please refer to the Sage 50 Accounts Help system.
6

Support tools
To view the Account Verification and VAT Audit reports
1. Select Company > Prepare for Audit.
2. Select the Show all Accounts verification and VAT audit reports option and click OK.
The Report Browser window appears
This window lists all of the reports that can be used to check and trace transactions and their VAT amounts.
3. Choose the layout you require from the list, then from the Report Browser toolbar, click Edit, Print, Preview, or File or Email, as required.
757

Sage 50 Accounts User Guide
75
To check your VAT values
1. Select Company > Prepare for Audit.
2. Select the Check VAT Values on Transactions for Possible Errors option, and click OK.
The Date Range window appears.
3. Enter the date range you want to run the check for.
4. Click OK to continue.
The Check VAT Values window appears. This window displays any transaction on your accounting system where the tax amount is not equal to the expected tax amount.
The Check VAT Values list shows the following details:
VAT Rounding Tolerance %
Enter a percentage figure here.
Depending on the different decimal placings that you use throughout your Sage 50 Accounts system, the VAT values on your transactions may differ slightly. These transactions will be picked up by the VAT Audit Check.
By setting a percentage tolerance value you can account for these rounding differences.
Date Range From:
Shows the From date you entered in the Date Range window. You can change this if you require.
To: Shows the To date you entered in the Date Range window. You can change this if you require.
Refresh Click this button to update the information in the Check VAT Values window if you change the VAT Rounding Tolerance, Date Range From and/or To boxes.
No. This column displays the transaction number as listed on the Audit Trail.
Type This shows the transaction type code, for example, SC = Sales Credit and PI = Purchase Invoice.
Account This column displays the account reference for the transaction.
Nominal This column displays the nominal code to which the transaction has been posted.
Details This displays the details that were entered onto the transaction, when it was first created.
8

Support tools
5. Click Recalculate to re-check your accounts for any new transactions posted since you ran the Check VAT Values for possible errors option, for example, if you are working on a multi-user version of Sage 50 Accounts.
To export the information from the Check VAT Value window into Microsoft® Excel, click Send To.
To print a list of the transactions that are displayed on the Check VAT Values window, click Print.
6. Click Close to return to the main Financials window.
Date This column shows the date that was entered onto the transaction.
Ref This column shows the reference that was used to identify this transaction.
Net This shows the net amount for the transaction.
Tax This shows the VAT amount for the transaction.
Estimated Tax This column shows the tax amount that is expected by Sage 50 Accounts, calculated from the transaction’s net amount and the tax code. This allows you to see transactions where the actual tax and estimated tax amounts differ.
T/C This column displays the tax code that was entered onto this transaction.
759

Sage 50 Accounts User Guide
76
Working with attachments using Document Manager
When you deal with your customers, suppliers and bank in everyday business, it is likely that you communicate in a number of different ways. It is likely that in the course of a day, you will deal with letters, statements, telephone calls, emails and faxes, and any number of other types of documents.
Sage 50 Accounts Document Manager enables you to organise the contact and document information for all your accounts by allowing you to link electronic and paper documents to their associated records. The feature uses Windows Explorer functionality that you may already be familiar with, so you can start using it straight away.
Using the Memo tab in the record window, you can manage your documents by attaching shortcuts and filing system references to the 'Attachments' section. You can also add free text to the record using the 'Memo' section of the window, allowing you to record important notes or contact information for each record. You can even add copies of the statements and letters you produce from Sage 50 Accounts to the records they relate to.
The Memo tab
The Memo tab appears on Customer, Supplier, Nominal, Bank, Product and Project records.
To access the Memo tab, open the appropriate record and click Memo. The Memo tab appears, displaying two panes containing the attachments and memo information.
0

Support tools
The upper Attachments pane contains the attachment shortcuts and filing system references. For further information about using the Attachments pane, refer to the following sections.
The lower Memo pane lets you enter notes about the record or its attachments as free text, and also displays information from the record's existing Memo file, if one is present, for example if you are upgrading from an earlier version of Sage 50 Accounts or Instant Accounts. There is no limit to the amount of text you can enter into the Memo pane.
Note: If you do not have existing Memo files, for example if you are installing Sage 50 Accounts for the first time or if you have not used Memos before, then each record has a blank Memo file ready for you to use.
In addition to the two panes, three buttons appear along the bottom of the Memo pane. These are New Attachment, Delete Attachment and Properties. For details about using the New Attachment and Delete Attachment buttons, see the following sections.
The Properties button only appears active if you select one or more attachments. Clicking Properties displays the properties for the selected attachment, allowing you to change attributes such as the shortcut name, target path or associated program for the file. You can also view, but not amend, other details such as the file size and location of the shortcut's target.
Note: You can also access an attachment's properties by right-clicking the attachment and choosing Properties from the drop-down menu.
Working with the Attachments pane
The Attachments pane at the top of the Memo tab utilises much of the standard Windows functionality. This allows you to work with attachments in a way that you may already be familiar with, enabling you to:
Change the appearance of the window, by viewing the Attachments pane as Large Icons, Small Icons, List, Details or Thumbnails. The first time you access the Memo tab, your Windows Explorer settings determine the default view of the Attachments pane. To change the view in use, make sure that no items are selected and right-click the Attachments pane. Choose View, then select the view you want to use.
Resize, sort, re-order and hide columns, as you can in Windows Explorer. To hide or view columns, right-click a column heading and select the names of the columns you want to view from the drop-down menu.
Double-click the shortcut attachments to open them using the program associated with each file type in Windows. For example, double-clicking the shortcut to a .doc file opens the document in Microsoft® Word.
View the Attachments pane in the Windows web view format, displaying a summary of a selected attachment's details in the left hand side of the Attachments pane. The web view is enabled by default, but you can switch it off in Windows Explorer's Folder Options.
Use Windows Shortcut menus, accessed by right-clicking the Attachments pane or by right-clicking an attachment shortcut. The menus give you quick access to various
761

Sage 50 Accounts User Guide
76
standard Windows functionality, such as the ability to arrange icons or create a new folder, shortcut or document, or to open, print or copy an attachment.
Drag and drop items from Windows Explorer into the Attachments pane, or from the Attachments pane into Windows Explorer. Dragging an item into the Attachments pane moves the item into Sage 50 Accounts data folder so that it is no longer available from its original location.
Cut, copy and paste items into or from the Attachments pane. The functionality works here as it does in Windows - copying and pasting a file into the Attachments pane leaves the file in its present location, but cutting and pasting the file removes it from its original folder.
For further information on any of the Windows functionality used in the Memo tab, refer to your Microsoft® Windows user documentation.
To add a shortcut to a record using Document Manager
1. From the appropriate record window, click the Memo tab.
The Memo information appears, displaying the Attachments and Memo panes.
2. Click Add Attachment.
The Add New Attachment window appears.
3. Select Electronic attachment and click OK.
The New Shortcut window appears.
4. In the File Location section of the window, enter the location of the file you want to create an attachment for. If you are not sure of the path to the file, click Browse to locate the file.
5. In the Attachment Type section of the window, select the attachment method you want to use from the following:
2

Support tools
6. To save your changes and attach the document to the record, click OK.
To discard your changes and exit without attaching the document to the record, click Cancel.
The Memo window appears.
Note: You can also add a new shortcut to a record's Memo tab by right-clicking in the Attachments pane (make sure that no attachment is selected) and selecting New - Shortcut. Follow the steps in the Create Shortcut wizard to create your shortcut.
To add a filing system reference to a record using Document Manager
1. From the appropriate record window, click Memo.
The Memo information appears, displaying the Attachments and Memo details.
2. Click Add Attachment.
The Add New Attachment window appears.
3. Select Filing System Reference and click OK.
The Create New Filing System Reference window appears.
Leave the file in its current location
This option is selected by default. If you choose this option, Sage 50 Accounts creates a shortcut to the file you select. The file is not affected in any way and remains in its present location.
Copy the file into the Sage 50 Accounts data folder
If you choose this option, the software makes a copy of the original file into the Sage 50 Accounts data folder. The file is not affected and remains in its present location.
Move the file into the Sage 50 Accounts data folder
If you choose this option, the software takes the file from its present location and moves it into the Sage 50 Accounts data folder. The file no longer exists in its original location.
Note: If you choose to move the file into the Sage 50 Accounts data folder, and later delete the attachment from the record's Memo tab, Sage 50 Accounts deletes the file from its data folder. This means that the file no longer exists on your PC.
763

Sage 50 Accounts User Guide
76
4. In the Filing System Reference Location section of the window, enter the location where your paper document is stored, for example your filing cabinet. The location you enter here appears in the Comment column when you return to the Memo tab, for your reference.
5. In the Filing System Reference Name section of the window, enter the name that you want to show in the Memo tab for this attachment.
6. To save your changes and attach the filing system reference to the record, click OK.
To discard your changes and exit without attaching the filing system reference to the record, click Cancel.
The Memo window appears.
Note: You can also add a new filing system reference to a record's Memo tab by right-clicking in the Attachments pane - make sure that no attachment is selected, and selecting New - Filing System Reference. The Create New Filing System Reference window appears ready for you to complete as detailed in steps 4 to 6 above.
To delete an attachment from a record using Document Manager
1. From the appropriate record window, click the Memo tab.
The Memo information appears, displaying the Attachments and Memo details.
2. In the Attachments pane, select the attachment(s) you want to delete from the record.
3. Click Delete Attachment.
A confirmation message appears: Are you sure you want to send (file name) to the Recycle Bin?
4

Support tools
Note: If you moved files into your Sage 50 Accounts data directory when you created electronic attachments, then deleting the attachment removes the file from the data folder and it no longer exists on your PC.
4. To confirm that you want to delete the attachment(s), click OK. Sage 50 Accounts deletes the attachment(s) and returns you to the Memo window.
5. Alternatively, to cancel and return to the Memo window without deleting the attachment(s), click Cancel.
765

Sage 50 Accounts User Guide
76
Exporting to Microsoft® Word, Excel and Outlook
You can export a range of information from Sage 50 Accounts to Microsoft® Word, Excel and Outlook. You can find out what you can export and how, in the Sage 50 Accounts Help system by typing Word, Excel or Outlook into the Help’s index.
In this version of Sage 50 Accounts, the Microsoft® Office integration has been brought together under a single menu command:
Sending your customer and supplier contacts to Microsoft® Outlook
You can send your customer and supplier contact information stored in your Sage 50 Accounts software to Microsoft® Outlook. This saves you time, as you do not have to enter your contacts in two places.
Your Diary module data is fully integrated with Microsoft® Outlook, enabling you to:
export Diary events to Microsoft® Outlook
import Microsoft® Outlook appointments into your Diary
export your Diary contacts to Microsoft® Outlook
Diary - import / export contacts and appointments
1. Open the Diary module.
The Diary module appears.
2. To import / export Appointments and Contacts using Microsoft® Outlook, from the file menu choose Office Integration > Microsoft® Outlook Import / Export Wizard.
The Welcome window of the Sage 50 Calendar Import / Export Wizard appears.
6

Support tools
Window 1 - Welcome
Option 1 - Import Outlook Diary Events
1. Choose Import Outlook Appointments to update your Credit Control Diary with your Microsoft® Outlook appointments.
Note: Microsoft® Outlook 2000 or later must be installed in order to complete the wizard successfully.
2. To continue, click Next.
The Options window appears.
767

Sage 50 Accounts User Guide
76
3. Use the From and To Date Calendar drop-down buttons to choose a date range for your Microsoft® Outlook import action.
4. To continue, click Import.
Your software proceeds with the import / export of your appointments / contacts, as defined in the wizard, the wizard closes and you are returned to the Diary window.
Note: Any imported Microsoft® Outlook appointments appear in your Diary view with an event label of None. Similarly, any exported Diary events from Sage 50 Accounts, appear in Microsoft® Outlook, again with an appointment/event label of None.
Option 2: Export Diary Events to Outlook
1. Choose Export Diary Events to Outlook to update your Microsoft® Outlook Calendar with those events already defined in your Credit Control Diary.
Note: Microsoft® Outlook 2000 or later must be installed in order to complete the wizard successfully.
2. To continue, click Next.
The Options window appears.
3. Use the From and To Date Calendar drop-down buttons to choose a date range for your Copy Diary Events action.
4. To continue, click Export.
Your software exports your selected Diary Events and you are returned to the Diary window.
Note: Any exported Credit Control Diary Events appear in Microsoft® Outlook with an event label of None.
8

Support tools
Option 3: Export Contacts to Outlook
1. Choose Export Contacts to Outlook to update your Microsoft® Outlook Contacts with your Sage 50 Accounts Customers and Suppliers Contacts list.
Note: Microsoft® Outlook 2000 or later must be installed in order to complete the wizard successfully.
2. To continue, click Next.
The Options window appears.
3. Select the Both, Sales or Purchase Ledgers options to define those Contacts folders that you wish to export into the Microsoft® Outlook Contacts directory.If appropriate, click the Change Folder button to change your Outlook folder settings.
4. To continue, click Export.
Your software proceeds with the export of your contacts, as defined in the wizard, the wizard closes and you are returned to the Diary window.
Note: If problems are encountered during the export, the software returns you to the Options Window 2. Click Change Folder to load the Outlook folders and modify the folder structure.
769

Sage 50 Accounts User Guide
77
Sending an eMail message using Microsoft® Outlook
You can send an email message to a recipient directly from the Sage 50 Accounts desktop without having to minimise or close your software to access Microsoft® Outlook.
To send a message to an email recipient, from the Sage 50 Accounts menu bar, select File > Send and then select Message to Mail Recipient. Select the Microsoft® Outlook profile you want to use, if requested, and a new, blank email message appears, ready for you to enter your recipient details and message text. Click Send to send the message and return to your Sage 50 Accounts desktop.
Sending data to Microsoft® Word
You can send data from certain windows and lists within Sage 50 Accounts to Microsoft® Word. You can then edit and format the data to create reports to suit your own individual business requirements. You can choose to send your data to a new document or send the data to a Word document that is already open, or you can choose to send the information as a mail merge.
To do this, use the Office Integration > Contents to Microsoft® Word command path, from the File Menu.
0

Support tools
Sending data to Microsoft® Excel
You can send data from certain windows and lists within Sage 50 Accounts to Microsoft® Excel. You can then edit and format the data to create reports to suit your own individual business requirements. As the data within Excel will not affect your Sage 50 Accounts data, you can customise your reports and experiment with different scenarios. To do this, from within the window you want to send to Excel, from the Sage 50 Accounts menu bar, select File > Office Integration > Contents to Microsoft® Excel.
Note: If you encounter problems sending large amounts of data from Sage 50 Accounts to Microsoft® Excel, you should try reducing the amount of data you send. To do this, use the Search facility to act as a filter on the list. For more information about applying searches to your data, refer to Working with attachments using Document Manager on page 760.
Excel integrated reporting for Sage 50 Accounts
Sage 50 Accounts automatically installs an Excel database driver and a set of Sage Functions, Data Ranges and Workbooks for use within Excel. Together, these components form the powerful Excel Integrated Reporting for Sage 50 Accounts feature.
Excel Integrated Reporting for Sage 50 Accounts enables you to access and manipulate Sage accounts data in Microsoft® Excel to suit your needs. It can save you time when generating reports, spreadsheets, graphs or whatever analysis format you need.
Anyone who is familiar with Microsoft® Excel will soon feel at home using Excel Integrated Reporting for Sage 50 Accounts. For full details about the features and benefits of Excel Integrated Reporting, see the separate guide Excel Integration that is supplied as a PDF file with your Sage 50 Accounts application. To access the guide, from the Sage 50 Accounts menu bar, select Help > PDF Guides > Excel Integration.
771

Sage 50 Accounts User Guide
77
Event Logging
Event Logging enables you to keep a record of important events that occur within your data. For example, when a user performs a Year End or reconciles transactions for VAT, Sage 50 Accounts makes important and often irreversible changes to your data files. Storing the details of these types of events in a log allows you to see who made the change, on what PC, and when.
When you activate Event Logging, Sage 50 Accounts records many different types of events. As well as the Year End and VAT Reconciliation processes mentioned above, the log also stores details of events such as the backing up and restoring of data and data file errors, period end changes, through to changing tax codes on records or exporting data using Accountant Link.
As well as viewing the Event Log, you can print the list of events if you require. You can increase or decrease the size of the log file any time you choose, perhaps to reduce the size if disk space becomes limited on your PC. You can also delete individual items from the log.
Note: When you install Sage 50 Accounts, Event Logging is enabled by default, and is set up to record critical events only.
To enable Event LoggingNote: To enable or switch off Event Logging, you must log into Sage 50 Accounts with the MANAGER user name and password. This facility is not available to any other users.
1. Select Settings > Company Preferences.
2. Click the Parameters tab.
The Parameters information appears.
3. To activate Event Logging, select the Log Events check box in the Others section of the window.
Alternatively, if you want to switch off Event Logging, clear the Log Events check box.
Note: When you install Sage 50 Accounts, Event Logging is activated by default.
4. To save your changes, click OK.
The Sage 50 Accounts desktop appears.
2

Support tools
To view or configure the Event LogNote: To view or configure the Event Log, you must log into Sage 50 Accounts with the MANAGER user name and password. This facility is not available to any other users. If you are logged into Sage 50 Accounts with the MANAGER details and cannot access the Event Logging option in File Maintenance, check that the 'Log Events' check box is selected in Settings > Company Preferences.
1. From the Sage 50 Accounts menu bar, select Tools > Event Log.
The Event Log window appears.
The Event Log displays one line of information for each event stored in the file. The details shown include the type of event, the date and time that the event occurred, and the details of the user name and PC that performed the action.
2. To print the list of events, click Print List.
3. To delete an event, select the event in the list and click Delete.
Note: You can select multiple events to delete, if you require. You should make sure that you want to delete all the events you select before you click Delete.
A confirmation message appears. Click Yes to confirm that you want to delete the selected event(s), or click No to cancel.
4. To change the configuration of your Event Log file, click Settings.
The Settings window appears.
773

Sage 50 Accounts User Guide
77
Use the Settings window to view the following settings:
Log File Size Use this section of the Settings window to view the current size of your Events Log file and to amend the maximum file size if you require. For example, if you are running out of disk space on your PC, you can reduce the size of the Events Log file.
Note: If you enter a Maximum Log File Size that is smaller than the Current Log File Size, Sage 50 Accounts displays a warning message advising that some of your oldest events will be deleted from the file. To continue, click Yes, or to cancel, click No and enter a different Maximum File Size.
Logging Level Control Use this section of the window to specify the type of events you want to log by selecting the relevant check boxes. You can choose from 0 - Critical Events, 1 - Errors, 2 - Warnings and 3 - Information.For example, procedures such as fixing data errors or rebuilding data files are Critical Events. If you only want the Events Log to store details of this type of action, select only the 0 - Critical Events check box.
4

Support tools
5. To save your changes to the Settings window, click OK. Alternatively, to exit without saving, click Cancel.
6. To exit from the Events Log window, click Close.
The File Maintenance window appears.
7. To return to the Sage 50 Accounts desktop, click Close.
8. You have now viewed your Events Log.
775

Sage 50 Accounts User Guide
77
Network Setup
For all information relating to your Network Setup, please refer to your printed Getting Started Guide that came with your software.
Working with Internet Resources
If your business regularly uses couriers to deliver goods or if you use credit checking bureaus to assess customer credit risks and you are connected to the Internet, you can enter their website details using Internet Resources. To do this, from the Sage 50 Accounts menu bar, select Settings > Internet Resources. Once you have entered their details, you can link to the courier or credit bureau web sites directly from Sage 50 Accounts.
More information about Internet Resources can be found in the Sage 50 Accounts Help system by pressing F1 on you keyboard.
News Feeds
The Sage RSS News Feeds facility allows you to keep in touch with updates on the Sage ripostes.
RSS is a family of web feed format, used to publish frequently updated content such as blog entries, news headlines or podcasts. An RSS document, which is termed a feed, web feed or channel, contains either a summary of content from an associated web site or the full text.
RSS initials are used to refer to various feed formats, notably Really Simple Syndication (RSS 2.0), RDF Site Summary (RSS1 1.0 and 0.90) and Rich Site Summary (RSS 0.91), and a typical RSS news update message contains article headlines, links and descriptions that are automatically updated as the website is updated.
6

Support tools
How do I register for RSS Feeds from Sage?The Confirm News Feeds Registration screen is displayed automatically the first time you start the program. This shows a list of the RSS feeds currently available from Sage.
By default, you are registered to obtain updates from all of the available feed sources. If you do not want to receive news updates from a particular source, simply clear the corresponding check box.
How am I informed of an RSS news update?When a news update is received from one of your selected RSS feed sources, a pop-up alert message is displayed briefly in the bottom right hand corner of your screen.
After a few seconds the message fades out, but an orange RSS update image remains on the status bar. The colour of this image changes to grey once you have read all of the outstanding news updates.
You can also define how long the pop-up alert message is displayed when an update is received.
Viewing RSS news updates - the news feeds window
Each time an RSS news update is received, a pop-up alert message is displayed, for a short time, in the bottom right hand corner of the screen. If you click on the title of the pop-up alert, this automatically opens the News Feeds screen and displays the corresponding message text.
If the pop-up message fades out before you get a chance to click on it, you can view any of the news updates you have received by following the steps described below.
1. From the News Feeds menu, click View Feeds. Alternatively, you can click on the RSS updates image on the status bar.
The News Feeds window appears.
777

Sage 50 Accounts User Guide
77
2. From the Select a news feed to display messages from drop-down list, choose the feed source you want to look at. Any feed sources with unread messages are shown in bold in this list; any feed sources that you are not currently registered with are shown in grey.
A list of the messages received from your selected feed source is displayed, with the most recent messages at the top of the list and those which you have not yet read shown in bold.
3. To view a particular message, select it in the list.
The message text is shown in the lower part of the screen.
Each message will typically provide a summary of the website update. The message will also contain a Read More link, which you can click on to go to the website and view full details of the update.
Configuring news feeds
The News Feed Settings allow you to define how often a particular feed source will be checked for updates. It also allows you to enable and disable updates from individual feed sources.
To configure your news feeds:
1. From the News Feeds menu click View Feeds.
The News Feeds window appears.
2. Select the feed source you want to work on, using the Select a news feed to display messages from drop-down list.
Note: Any feed sources that you are not registered with or which you have disabled are shown in grey. You can select any of these to enable them; see below for details.
3. Click Configure Feed.
The Feed Configuration window appears.
4. Specify the settings you require for the selected feed source.
Update Frequency
This is how often, in minutes, the specified feed source should be checked for news updates.
Enabled
This indicates whether or not you are currently registered to receive news from the selected feed source.
To register with the feed source, check this box. To stop receiving updates, clear this box.
Set as Default
Use this button to have the currently selected feed source shown automatically when the News Feeds window is displayed.
8

Support tools
5. To save your changes, click OK.
Defining news feed settings
The News Feed Settings allow you to define:
How long the pop-up alert is displayed when a new update message is received.
Whether to display a pop-up alert.
To define your news feeds settings:
1. From the News Feeds menu choose View Feeds.
The News Feeds window appears.
2. Click Settings.
The News Feeds Settings window is displayed.
3. Specify your required settings for pop-up alerts.
Display a popup alert
If you do not want a pop-up alert message to be displayed when a new update message is received, clear this check box.
Automatically hide the alert after
The length of time pop-up alert messages will be displayed, in seconds. After this time, the message fades out.
Note: If you switch off alert pop-ups, by clearing the Display a popup alert box, you will not be able to make an entry in this box.
If you need to specify proxy settings:
1. From the Tools menu, click Internet Options.
The Internet Options window appears.
By default, the software will use your browser settings, and this is the recommended option.
2. If you wish to modify these settings, after consulting your network administrator, click the Use proxy server option.
3. Enter your Proxy Server details and, if required, enter your Domain, username and password details.
4. To save your proxy settings, click OK.
779

Sage 50 Accounts User Guide
78
0
Chapter 13
ReportingIn this chapter:An introduction to reports ................782
Running the audit trail report ............783
Running the trial balance report .......784
Running the profit and loss report ....785
Running the balance sheet report ....786
Running the quick ratio report (Accounts Plus and Accounts Professional only).....788
Running the budget report ...............789
Running the prior year report ...........790
Running the transactional-based management reports (Accounts Plus and Accounts Professional only) .............791
Column-based financial reports .......794
Running the bank reconciliation report ...795
Batch reporting................................797
Sage 50 Accounts provides you with a range of reports which you can print at any time. You can select specific ranges of transactions to be included on each report and you can see the report on-screen, print it out, save it to a file or email it to someone.
This chapter explains in more detail some of the reports you might be asked to print out in other chapters of this guide.

An introduction to reports
Reports are a very important area of the Sage 50 Accounts software. There are a number of places where you can access the reports. Each module has its own set of reports. So, if you wanted to see your Customer Activity report, you can go into Customers, then click Reports and choose the appropriate one. Likewise, the Company module has your Balance Sheet Report and Profit and Loss reports. There are numerous reports available for each module. To view the reports for each module, from the module main toolbar, click Reports.
You can change the layouts of the reports to suit your own needs, and save them so you can use them again. You can do this using the Report Designer.
You can change the layouts of the reports to suit your own needs, and save them so you can use them again. You can do this using the Report Designer, accessed from Tools menu > Report Designer. Also, refer to the Report Designer help file, available in your Program Files\Common Files\Sage Report Designer 2007 folder as SageReportDesignerhelp.chm.
Note: If you change the reports, you must save them under a different filename. For example, Customer Activity (Detailed) is called CSTACTD.report, so if you want to change the layout or personalise the report, in Report Designer, you must call it something else, for example, CUSACDET.report.
When you click Reports within a module, the Report Browser appears, listing all available product report folders, and their respective reports.

Reporting
Running the audit trail report
Every time you enter a transaction into Sage 50 Accounts the details are stored in a list called an audit trail. This is a complete record of your transaction activities and is often requested by auditors during their investigations.
Click the Audit button in the Financials window to examine the audit trail in more detail and to output the information to either the printer, preview screen, file or an email. You can print a brief, summary or detailed Audit Trail report that shows varying degrees of detail. You can also print a report showing deleted transactions.
You should use this to regularly print out a listing of the audit trail for reference purposes. We recommend that you print a copy of your audit trail on a monthly basis.
Note: This is just a snapshot of the beginning of the report. The report continues beyond the limits of this screen shot.
To access the audit trail report
1. Select Company > Financials.
The Financials window appears.
2. Click Audit.
783

Sage 50 Accounts User Guide
78
3. Choose the Audit Trail Type and the Output you require and click Run.
The Criteria window appears.
4. Enter the criteria you want to use for the report, and click OK.
Running the trial balance report
This report shows the current debit or credit balance for all nominal accounts that have a balance. Unused nominal accounts are not listed. Use the Trial button in the Financials window to give you a Trial Balance report showing a simple listing of balances held in all of your nominal ledger accounts. You can run this report for any month.
Note: This is just a snapshot of the beginning of the report. The report continues beyond the limits of this screen shot.
To access the trial balance report
1. Select Company > Financials.
2. Click Trial.
The Print Output window appears.
3. Select the output you require and click Run.
The Criteria window appears.
4

Reporting
4. Choose the period that you want to run the report for, and click OK.
Running the profit and loss report
Your Profit and Loss report shows you whether or not your company is trading profitably. You can produce a Profit and Loss report for the current month or for any range of consecutive months within your current financial year.
The standard Profit and Loss report shows the balances of each of your income and expenditure nominal ledger accounts grouped into categories. These are sub-totalled to show sales, purchases, direct expenses and overheads. The amount of gross profit and net profit made is also shown.
Note: This is just a snapshot of the beginning of the report. The report continues beyond the limits of this screen shot.
To access the profit and loss report
1. Select Company > Financials.
2. Click P and L.
The Print Output window appears.
3. Select the output you require and click Run.
785

Sage 50 Accounts User Guide
78
The Criteria window appears.
4. Choose the period that you want to run the report for, and click OK.
Note: When you set up your company in the software, if you set your business type as Limited company, at Year End, your 9001 Taxation nominal code is automatically cleared down to the 3200 Retained Earnings nominal code. This allows you to show Taxation and the calculation of Profit/(Loss) before and after Taxation:
Net Profit/(Loss) before Tax
Taxation
Net Profit/(Loss) after Tax
These three lines of text are only shown in the Profit and Loss report if the Taxation amount is not equal to zero.
You can modify your Profit and Loss statement layout by editing your Chart of Accounts. For more information about this, refer to Editing and previewing your Chart of Accounts on page 195.
Running the balance sheet report
A Balance Sheet shows what your company owns - your assets, and what it owes - your liabilities. For example, motor vehicles or property, bank accounts, debtors, creditors, or cash accounts. The difference between the assets and the liabilities is often known as a company's net assets - that is, net worth.
These net assets take the form of capital which is made up of the funds that are financing the company's operations. Capital can be made up of several sources of funds such as the capital that has been introduced by the owner, share capital, directors' loans and retained funds from each year's profit or loss after tax.
6

Reporting
Note: This is just a snapshot of the beginning of the report. The report continues beyond the limits of this screen shot.
To access the balance sheet report
1. Select Company > Financials.
2. Click Balance.
The Print Output window appears.
3. Select the output you require and click OK.
The Criteria window appears.
4. Choose the period that you want to run the report for, and click OK.
787

Sage 50 Accounts User Guide
78
You can modify your Balance Sheet statement layout by editing your Chart of Accounts. For more information about this, refer to Editing and previewing your Chart of Accounts on page 195.
Running the quick ratio report (Accounts Plus and Accounts Professional only)
The Quick Ratio report shows you the current liquidity of your company, based upon the data available. By comparing the debit and credit balances, the software will show the net balance. You can edit the Quick Ratio report to include the nominal accounts you want to compare.
.
To access the quick ratio report
1. Select Company > Financials.
2. Click Ratio.
The Quick Ratio window appears.
3. To remove a nominal account that you do not want included in the comparison, select it in the list, and click Delete. A confirmation message appears; click Yes to confirm the deletion, or click No to cancel.
Repeat for all nominal codes you want to remove. If you want to save the changes to the list for each time you run the Quick Ratio report, click Save. Alternatively, click Print to
8

Reporting
produce the report without saving the changes to the list and click No when prompted to save the changes.
The Print Output window appears.
4. Select the output you want to use and click Run.
The Criteria window appears.
5. Choose the period that you want to run the report for, and click OK.
Running the budget report
This report shows the current values in your sales, purchases, direct expenses and overhead accounts for both the month you specify and the year-to-date in the order and groupings that have been set up in the chart of accounts.
The monthly budget values that you entered on the Nominal Ledger Record of each account are also shown, and the actual and budget values are compared to show the amount of difference between the two.
In addition, each category heading is also calculated as a percentage of the total sales figure, as a ratio.
.
Note: This is just a snapshot of the beginning of the report. The report continues beyond the limits of this screen shot.
789

Sage 50 Accounts User Guide
79
To access the budget report
1. Select Company > Financials.
2. Click Variance.
The Print Output window appears.
3. Select the output you require and click Run.
The Criteria window appears.
4. Choose the period that you want to run the report for, and click OK.
Running the prior year report
This report shows the current values in your sales, purchases, direct expenses and overhead account codes in the order and groupings that have been set up in your chart of accounts. The report details your trading activities for both the current month, or alternatively the period specified, and the year-to-date.
The previous year's balances for the specified month and year-to-date are shown and compared with the actuals to show the amount of difference - that is, variance, between the two. In addition, each group total is calculated as a percentage of the total sales figure, as a ratio.
Note: This is just a snapshot of the beginning of the report. The report continues beyond the limits of this screen shot.
0

Reporting
To access the prior year report
1. Select Company > Financials.
2. Click Prior Yr.
The Print Output window appears.
3. Select the output you require and click Run.
The Criteria window appears.
4. Choose the period that you want to run the report for, and click OK.
Running the transactional-based management reports (Accounts Plus and Accounts Professional only)
The transactional-based management reports enable you to produce reports to give you the exact information you need to monitor your business performance. For example, you can run reports for specific departments to see how they are performing. You can also monitor trading progress for any accounting period, even by day or by week. This added flexibility gives you much greater control over the information you produce, making it easier for you to make decisions that are vital to your business.
The following transactional-based management reports are available for you to run:
Transactional Balance Sheet.
Transactional Profit and Loss.
Transactional Trial Balance.
Note: If you have run the Clear Audit Trail procedure, you cannot run any transaction-based management reports for the period you have cleared.
How the transactional-based management reports generate information
The transactional-based management reports look similar to existing period based management reports. The difference is in the way that the figures are calculated.
The existing versions use a monthly range to generate reports. For example, when running the existing profit and loss report, if you choose to run for the month range 4 to 7, the following figures are obtained:
The current period contains totals from months 4 to 7.
The year-to-date figure contains the totals up to month 7.
If you choose to run the existing balance sheet report for the month range 4 to 7 the following figures are obtained:
791

Sage 50 Accounts User Guide
79
The current period contains totals from months 4 to 7.
The year-to-date figures contain the totals up to month 7 plus the brought forward figures.
The profit and loss summary shows the total from the Profit and Loss report. This does not include any brought forward figures.
The Previous Year Adjustment shows the brought forward figures.
The transactional-based reports can be built for any date range. The figures are generated from the audit trail. The reports still need to group transactions into the following areas:
Brought Forward Figures.
Current Period Figures.
Year To Date Figures.
There are two ways of obtaining these figures:
You can use the date. The system uses the start of the financial year to determine if an item is brought forward.
Alternatively, you can use the transaction number. By entering the first transaction number of the financial year, the system can determine if an item is brought forward.
If you want to use the date to determine your figures, you must set the following criteria when running your report:
Clear the Group by Tran Number check box, for the Profit and Loss and Balance Sheet reports only.
Enter the date range you require in the Transaction Date From and To boxes.
If you want to use the transaction number to determine your figures, you must set the following criteria when running your report:
Select the Group by Tran Number check box, for the Profit and Loss and Balance Sheet reports only.
Enter your first transaction number of the current financial year in the First Transaction of the Year box. Any transaction numbers lower than this value are treated as brought forward figures.
Enter the transaction numbers for the current range in the Transaction Number From and To boxes. From the values you enter here, the current period and year-to-date figures can be generated.
Note: If you have selected the Group by Tran Number check box, any date ranges you enter have no effect on the figures that are generated for your report. Only the transaction numbers determine the figures that are generated.
To run the transactional balance sheet report
1. Select Company > Financials.
2. Click Reports.
2

Reporting
The Report Browser window appears, listing all available financial report folders, and their respective reports.Open the appropriate reports folder, in this case, Balance Sheet Reports.
3. Select the Balance Sheet Reports > Transactional Balance Sheet report from the list of reports.
4. From the Report Browser toolbar, click Edit, Print, Preview, or File or Email, as required.
The Criteria window appears.
5. Set the following criteria as required:
6. When you have set the criteria you want to apply, to run the report, click OK.
You have now generated your Transactional Balance Sheet report.
You can also generate a Transactional Profit and Loss report and a Transactional Trial Balance.
Chart of Accounts From this drop-down list, select the chart of accounts layout that you want to use to produce this report.
Group by Tran Number Select this check box to run your report for a transaction range. If you want to run the report for a date range, you must ensure that this check box is cleared.
Transaction Date If you have not selected the Group by Tran Number check box, enter the transaction date range you want to run the report for in the From and To range boxes.
First Transaction of the Year
If you have selected the Group by Tran Number check box, enter the transaction number of the first transaction posted in your current financial year.
Transaction Number If you have selected the Group by Tran Number check box, enter the transaction range in the From and To boxes.
Department You can run your transactional reports for specific departments. If you want to produce your reports for specific departments, enter the range in the From and To boxes provided.
Note: If you have selected the Group by Tran Number check box, any date ranges you enter have no effect on the figures that are generated for your report. Only the transaction numbers determine the figures that are generated.
793

Sage 50 Accounts User Guide
79
Column-based financial reports
With this version of Sage 50 Accounts, column based reports are available to you, which are designed to provide you with improved financial reporting.
The reports contain a drill functionality, allowing you to drill from a summary report to a detailed report containing transactions details.
Several Profit and Loss reports and one new Balance Sheet report are available with the drill down functionality:
These are most easily accessed using the Company > Financials > Reports > Report Browser > Management Analysis Reports navigation route.
1. When you double-click any of these reports the report preview window appears.
2. As you move your pointer over the preview period totals, the available drill-down functionality is signified by a change in the pointer shape.
3. When you see this pointer shape, click to display the Drill Down details window with the selected totals breakdown displayed.
4

Reporting
Running the bank reconciliation report
This is a retrospective bank reconciliation report, providing you with details of the most recent bank reconciliation, using a layout that resembles an actual bank statement. This report provides you with:
Header Information - this includes Bank Account Ref, Bank Account Name, Currency and the Reconciliation Period From / To.
Reconciliation Details - these can include:
An opening balance, which is the value of all transactions marked as reconciled. It has a reconciliation date before the From Date, or a blank reconciliation date plus any opening balances.
A transaction list sorted by reconciliation date, then by reconciliation number. This list includes Reconciliation Date, Transaction Number, Transaction Date, Reference, Details, Payment Value, Receipt Value and a Running total of bank balance.
Closing Balance, that is the value of all transactions reconciled on or before the To Date.
Footer Information - this can include Book Balance at the reconciliation date and the Value of unreconciled items, that is the Book balance minus the Closing balance. This last item is drillable. When drilled, a corresponding Unreconciled Transactions Report appears.
To run the retrospective bank reconciliation report:
1. Bank > Reports.
The Report Browser appears.
2. From the left pane of the Report Browser, select the Reconciled Transaction Reports folder.
3. From the list that appears in the right pane, double-click the Retrospective Bank Reconciliation BANKSTATRECD.report.
The Criteria window appears.
4. Set the following criteria as required:
From here, you can select to limit the number of transactions you preview. Enter a number of transactions you wish to preview in the Limit Preview Results box. If you leave the value as 0 all of the transactions are listed. Click OK to accept the criteria details and run the report.
Reconciliation Date Enter the transaction date range you want to run the report for in the From and To range boxes.
795

Sage 50 Accounts User Guide
79
To run the unreconciled bank transactions report:
1. Bank > Reports.
The Report Browser appears.
2. Select the Reconciled Transaction Reports folder in the left pane of the Report Browser.
3. From the list that appears in the right pane, double-click the Unreconciled Bank Transactions BANKSTATUNRECD.report.
4. Follow the same procedure for running the Retrospective Bank Reconciliation report.
6

Reporting
Batch reporting
In this release of Sage 50 Accounts, a batch reporting feature has been provided, whereby the user can create new batch reports, to include reports from any area of the software.
Creating a batch report
1. To access the Batch Report Design window, use the File menu > Batch Report command path.
The Batch Report Design window appears.
2. In the Name and Description entry boxes, enter a name and general description for your Batch Report.
797

Sage 50 Accounts User Guide
79
3. Expand and browse the report folders in the Available Reports pane, on the left-hand side of the window, to locate the reports that you wish to include in the batch report.
4. Choose a report to include in your Batch Report.
5. To include the chosen report in the Batch Report, click Add.
Your chosen report now appears in the Selected Reports pane on the right-hand side of the window.
6. Repeat steps 3 to 5, until you have included all reports required.
7. To save your batch report, click Save. To save your batch report under a different filename, click Save As.
The Save As window appears.
8. Enter a file name for your batch report, then click Save.
Your new batch report is saved in .batchreport format.
9. To return to your Sage 50 Accounts work area, close the Batch Report Design window.
8

Reporting
Running a batch report
1. To access the Batch Reports window, use the Tools menu > Batch Reporting command path.
The Report Browser window appears, listing all available batch reports.
2. Select a batch report from the list shown.
3. From the Report Browser toolbar, click Print, Preview, or File or Email, as required.
The Criteria window may appear. This includes only those criteria that are appropriate to the report selected.
From here, you can select to limit the number of transactions you preview. Enter a number of transactions you wish to preview in the Limit Preview Results box.
If you leave the value as 0, all of the transactions will be listed.
4. To accept the criteria details and run the report, click OK.
If you want to add the batch report to your Favourites, select the report, then click Add Favourite.
The report Favourites status is then signified in the list by blue text.
799

Sage 50 Accounts User Guide
80
0
Chapter 14
Working with foreign currencies and accountsIn this chapter:The euro and other currencies .........802
The countries table ..........................805
The foreign trader ............................806
Processing in Sage 50 Accounts using the foreign trader .............................811
The foreign bank revaluation ............815
Viewing and changing revaluations ..817
Bank Transfers involving foreign currency accounts .........................................819
How foreign trader affects Sage 50 Accounts .........................................827
This chapter contains information on how to handle foreign currency accounts and transactions in Sage 50 Accounts.
In this chapter, the process of how to set up currencies and exchange rates is described. The Foreign Trader feature is introduced, and you are guided through setting it up for the first time. The procedure is then described for processing foreign currency transactions in Sage 50 Accounts, including producing invoices and orders, recording payments and receipts and setting up foreign currency price lists.
Later, the chapter discusses how to use foreign bank accounts and explores the implications of multiple currencies on bank transfers. We’ll also help you to use the Foreign Bank Revaluation Wizard.

The euro and other currencies
Sage 50 Accounts makes it easy for your business to record payments and receipts in other currencies, including the euro. To do this you must first set up the exchange rates for the foreign currencies that you trade in. After you have done this, you can enter the foreign currency amounts.
For example, while entering a supplier invoice, press F5 when you are entering the net amount (or click the calculator button in the net column) and click CC.
This will bring up the currency calculator, which will convert your foreign currency values into your base currency.
Note: Your base currency is fixed as a result of your choice in the ActiveSetup Wizard (or if you upgraded, your new Sage 50 Accounts detected your original base currency from your records).
If you accept payment in more than one currency, you have to set up your defaults to handle the conversions. The three examples below set out common scenarios.
Note: Because the exchange rate fluctuates, you will have to agree a rate set a time, for example open or close of the day's trading, with your customers to enter an up-to-date exchange rate. For up-to-date exchange rates, we recommend looking in the Business and Trade section of www.hmrc.gov.uk.
To enter foreign currency exchange rates
1. From the Sage 50 Accounts menu bar, select Settings > Currencies.
The Currencies window appears.
2. Select the appropriate currency and enter the exchange rate.
Note: Because the exchange rate fluctuates, you will have to agree a rate or set a time, for example, open or close of the day's trading, with your customers to enter an up-to-date exchange rate. For up-to-date exchange rates, we recommend looking in the Business and Trade section of the HMRC website www.hmrc.gov.uk.
You have now fixed the exchange rate between the currency of your choice and your base rate.
Repeat this process for all the currencies that you deal with.

Working with foreign currencies and accounts
A UK business accepting payments in pound sterling and in euro
1. From the Sage 50 Accounts menu bar, select Settings > Currencies.
The Currencies window appears.
2. Select euro and enter the exchange rate for euro into Pound Sterling in the Exchange rate box.
3. To save and close, click Close.
You have now fixed the exchange rate between euro and Pound Sterling.
A Republic of Ireland business accepting payment in euro and pound sterlingIf you are a business in the Republic of Ireland, working in euros, you should have chosen euro in the ActiveSetup Wizard as your base currency. If you also accept payment in Pound Sterling (or any other currency), follow these instructions.
1. From the Sage 50 Accounts menu bar, select Settings > Currencies.
The Currencies window appears.
2. Select Pound Sterling and enter the exchange rate for Pound Sterling into euro.
You have now fixed the exchange rate between euro and Pound Sterling.
803

Sage 50 Accounts User Guide
80
A UK business accepting payment in South African rand and US dollars
1. From the Sage 50 Accounts menu bar, select Settings > Currencies.
The Currencies window appears.
2. Choose US Dollar from the list and enter the exchange rate for US Dollars into Pound Sterling.
3. Repeat step 2 for the South African Rand.
You have now fixed the exchange rate for South African Rand and US Dollars.
Once you have set up your currency defaults, you can calculate your base currency value from the foreign currency by using the currency calculator. To do this press F5, whenever you are in any box that requires a currency value, for example net or price boxes.
4

Working with foreign currencies and accounts
The countries table
The Countries table lists all countries, together with their respective country codes. Sage 50 Accounts uses this information for Intrastat reporting purposes.
If a country joins or leaves the EU, the Countries table allows you to amend the current EU Members list so that you can keep your country list up to date.
You can add a further fourteen countries to the list. Unlike countries that are installed with Sage 50 Accounts, you can change the names of added countries. However, regardless of whether a country has been supplied with Sage 50 Accounts or has been added at a later date, it cannot be deleted.
To set up your countries information
1. From the Sage 50 Accounts menu bar, select Settings > Countries.
The Countries table appears.
The table shows three columns, containing the country name, country code and a check box which indicates whether or not the country is an EU member.
2. To set up a country as an EU member, for example if a new country joins the EU and needs to be taken into account for Intrastat reporting, select the check box in the EU Member column alongside the country you require.
3. To remove a country from the list of EU members, for example if a country leaves the EU and should no longer be taken into account for Intrastat reporting, clear the check box in the EU Member column alongside the country you require.
4. To add a country to the list, click Add. The Add/Edit Country Details window is displayed.
Enter a unique name for the country. If the country is a member of the EU, select the EU Member check box.
The country code is automatically generated for you. Countries added to the list are identified by their two character code, which always begins 'Q'.
5. To save your changes and return to the Sage 50 Accounts desktop, click OK. Alternatively, to close the Countries table without saving your changes, click Cancel.
The Sage 50 Accounts desktop reappears.
You have now set up your Countries information.
805

Sage 50 Accounts User Guide
80
The foreign trader
Accounts Professional onlyNote: You cannot use this facility if you are using VAT Cash Accounting or Flat Rate - Cash Based Schemes.
The Foreign Trader facility within Sage 50 Accounts lets you:
Keep a record of foreign currency bank accounts.
Keep customer and supplier records in a foreign currency.
Record invoices, credit notes, orders, proformas and quotations in a foreign currency.
Record customer receipts and supplier payments in different currencies.
The section on the next page explains the steps you have to take to set up your Foreign Trader facility.
Setting up the foreign trader
The following points outline the tasks you need to complete in order to set up Sage 50 Accounts to work with foreign currencies:
Run the Foreign Trader Setup.
Enter your foreign exchange rates for all currencies that you deal with on the Currencies window.
Set up any new bank accounts that will accept payments in a foreign currency.
Note: If you use your high street bank to make payments in pound sterling, euro and US dollars, you must set up three separate bank accounts in your Sage 50 Accounts software to accept each currency.
Set up any new customer accounts.
Note: As with the bank accounts in the previous step, if you deal with a customer who pays in a number of different currencies, you must set up a separate customer account for each currency that the customer deals in.
Set up any new supplier accounts.
Note: As with the bank accounts in the earlier step, if you deal with a supplier who pays you in a number of different currencies, you must set up a separate supplier account for each currency that this supplier deals in.
The following sections explain how to complete each of these steps.
6

Working with foreign currencies and accounts
To activate the foreign traderCaution: You cannot turn off Foreign Trader once you have set it up using the Foreign Trader Setup.
1. From the Sage 50 Accounts menu bar, select Modules > Wizards > Foreign Trader Setup.
Note: If you have already run the Foreign Trader Setup for the current company or if you are on the VAT Cash Accounting or Flat Rate - Cash Based schemes, this menu option is not available. If you have a multi-company licence you can run this setup with each new company you set up.
2. Click Next on the Welcome window.
The Currency Revaluation information window appears.
Enter a Currency Revaluation nominal code. For an explanation of nominal codes, see Entering nominal records on page 218. This is the nominal code that will be used to record the value of currency fluctuations, which are a factor when dealing with foreign currencies.
For example, as a result of dealing with foreign currency you may receive under or overpayments from your customers, or underpay or overpay your suppliers. These under or overpayments will be posted to the Currency Revaluation nominal code.
Note: If you already have a 7906 code in use for something else - that is, if you are an existing user of Sage 50 Accounts, you must enter a different account number.
Note: Your Currency Revaluation code must be in the Overheads section of the chart of accounts. For an explanation of chart of accounts sections, see Entering nominal records on page 218.
807

Sage 50 Accounts User Guide
80
For examples of currency fluctuations and what they mean to you, for example, if you gain or lose money, type exchange rates in the Index tab of the Sage 50 Accounts Help system (F1), and choose revaluations.
3. Next, select an Exchange Rate Update Method from the Update method drop-down list.
The options in this drop-down list help you to update your currency records with the up-to-date exchange rates. If you want Sage 50 Accounts to automatically update your currency records each time you use a new exchange rate, choose the option Automatically save any exchange rate changes to currency record.
If you want to be prompted before any exchange rates are saved to the currency record, choose the option Always prompt to save exchange rate changes. If you never want to save exchange rate changes to the currency record, choose the option Never save any exchange rate changes.
Note: You can change your exchange rate update method later, if you require. To do this, select Customers > Invoice / Order Defaults, and select the method you want to use from the section at the bottom of the window.
4. Click Next.
The Finish window appears.
5. To complete the setup, click Finish. To change any of your options, click Back.
You have now successfully set up your Foreign Trader facility.
8

Working with foreign currencies and accounts
Checking or amending your invoice and order defaults
Before you start using the Foreign Trader, you must ensure that your Invoice and Order Defaults are set up to update your currency exchange rates as you require. You initially choose this setting from the Exchange Rate Update Method drop-down list in the Foreign Trader Setup but you may want to check or change this at a later date.
To check or amend your invoice and order defaults
1. Select Customers > Invoice / Order Defaults.
The Invoice and Order Defaults window appears.
2. From the Currency Exchange Rates drop-down list, select the setting you require from the following options. The setting you choose affects how, and if, the exchange rate in the Currencies window is updated if you change the rate on an individual transaction:
3. To save your changes, click OK, or to exit without saving click Cancel.
The Sage 50 Accounts desktop appears.
You have now checked or amended your Invoice and Order Defaults settings.
Always prompt to save exchange rate changes
If you select this option, Sage 50 Accounts displays a warning message each time you change an exchange rate in an invoice or order, asking if you would like to save the amended exchange rate to the Currency record. This is the default setting.
Unless you have a specific reason to choose a different update method, we recommend that you select this option.
Automatically save any exchange rate changes to currency record
If you select this option, Sage 50 Accounts automatically saves any changes you make to an exchange rate back to the Currency record, without displaying a confirmation message.
Never save any exchange rate changes
Select this option if you do not want Sage 50 Accounts to save any exchange rate changes you make back to the Currency record. If you select this option and you want to make changes to the exchange rate for a currency, you must do it manually in the Currency record.
809

Sage 50 Accounts User Guide
81
Setting up or checking your currency settings
Once you have activated the Foreign Trader, you must check or set up your Currencies. You must set up exchange rates for each of the foreign currencies you trade in.
To set up or amend your currency settings, follow the instructions in The euro and other currencies on page 802.
Setting up foreign currency bank accounts
When you set up a foreign bank account, Sage 50 Accounts shows you how much money you have in the foreign currency and also how much that represents in your base currency.
You must set up as many foreign currency bank accounts as you have foreign currencies. For example, if you trade in euro, pound sterling and yen you need to create three accounts.
Note: Once you have entered transactions into a bank account, you cannot delete the record, nor can you change its currency.
Once you have set up your new foreign currency bank accounts, you can then work with them as you would any other bank accounts.
Note: If there are transactions on an existing bank record, you cannot change its currency. To change an existing record into a non-base currency account, you must create a new account and set its currency as you require. If there is a balance on the existing account that you want to carry over on the new account, you will need to transfer the balance to the new foreign currency account. For more information, see Bank Transfers involving foreign currency accounts on page 819
Setting up foreign currency customers and suppliers
Before you start using the Foreign Trader, you must check or amend the currencies applied to your Customer and Supplier Records.
Note: If you have upgraded to Sage 50 Accounts from a version in which you did not use Foreign Trader and you had customer or supplier records set up in a foreign currency, the upgrade process sets the currency on these accounts to your base currency.
We recommend that you complete all the transactions on these accounts in base currency and then close them off. You can then open a new customer or supplier account in the foreign currency of your choice and use this to produce all of your foreign currency invoices, orders and reports.
For more information about creating and editing customer and supplier records, see Chapter 5, Setting up records.
0

Working with foreign currencies and accounts
Processing in Sage 50 Accounts using the foreign trader
Accounts Professional onlyNow that you’ve set up the Foreign Trader, you can use Sage 50 Accounts to process customer, supplier, bank and bank transfers in foreign currencies.
The following sections explain how to process using Foreign Trader.
Producing invoices, credit notes and orders for a foreign currency account
Once you have activated the Foreign Trader, Sage 50 Accounts allows you to create invoices, credit notes and orders for your customers and suppliers in the currency stored on their record. For example, if you have created a record for a customer account that trades with you in Yen, you can now create an invoice for that customer in their own currency, Yen.
You produce invoices, credit notes and orders for foreign currency accounts in the usual way and enter the header details you require, such as the Type, Format and Date. When you select a customer or supplier account that has a foreign currency associated with it, a Rate box appears beneath the customer’s or supplier’s address details. This box displays the symbol of the currency associated with the selected record, and shows the exchange rate for that currency as it appears in your Currencies list. You can change the exchange rate here if you require.
In addition to the Rate box, all values on the invoice, credit note or order now display in the customer’s or supplier’s currency. This applies to the individual item lines, the Total Net and Total VAT amounts, and the Carriage and Gross values. Finally, the invoice, credit note or order displays the overall total in your base currency.
For full details about creating invoices, credit notes and orders, refer to Chapter 8, Customer tasks and Chapter 9, Supplier tasks.
Entering batch invoices and credit notes for foreign currency accounts
You can record batch invoices and credit notes for your customers and suppliers in the currency that appears on their record. For example, if a supplier based in France sends you an invoice in euro, you can enter the invoice directly into Sage 50 Accounts for the actual euro values shown on the invoice, providing you have set up a record using euro for this supplier.
You enter a batch invoice or credit note for a foreign currency customer or supplier as usual. When you select a foreign currency account from the A/C drop-down list, the Exchange Rate box at the top of the window becomes active. The appropriate currency symbol and exchange rate, as set up in your Currencies list, are displayed. You can change the exchange rate here if you require.
In addition to the Exchange Rate box, the Net, VAT and Total values on the window now display in the customer’s or supplier’s currency.
811

Sage 50 Accounts User Guide
81
For full details about entering batch invoices and credit notes, see Chapter 8, Customer tasks and Chapter 9, Supplier tasks.
Recording bank receipts and payments for a foreign currency bank account
If you make a payment from or lodge a receipt into one of your foreign currency bank accounts, Sage 50 Accounts allows you to record this directly onto the account in the actual currency the transaction took place in.
To make a payment or receipt from or to a foreign currency bank account, select Bank > New Payment or Bank > New Receipt.
The Bank Payments or Bank Receipts window appears.
Select the account you require from the drop-down list, and click OK.
The Bank Payments or Bank Receipts window includes an Exchange Rate box. This displays the exchange rate currently set up in your Currencies list for the currency associated with the selected bank account. You can change this here if you want to use a different exchange rate for this transaction.
In addition to the Exchange Rate box, the Net, Tax and Total values also display in the selected bank account’s currency.
For full details about entering bank payments and receipts, see Recording a bank receipt on page 392 and Recording a bank, cash or credit card payment on page 397.
Recording customer receipts and supplier payments for foreign currency accounts
When you process sales invoices and orders in the customer’s own currency, you are likely to receive payment from them in the same currency. Similarly, if a supplier sends you an invoice in a foreign currency, you might want to pay them in the same currency.
Sage 50 Accounts allows you to enter customer receipts and supplier payments in the account’s own currency. For example, if a customer pays an invoice in US Dollars, you can record the US Dollar amount directly into the corresponding dollar bank account.
Note: The bank account you use to record the receipt or payment must use the same currency as the customer or supplier record.
To enter a foreign currency customer receipt or supplier payment, select the bank you want to use to record the transaction from the accounts listed in the Bank Accounts window and click Customer or Supplier, depending on the type of transaction you want to record. From the A/C drop-down list, select the account reference of the customer or supplier.
When you select the account you want to use, the exchange rate set up for the currency associated with the customer or supplier appears in the Rate box. You can change the rate shown here if you require.
2

Working with foreign currencies and accounts
In addition to the exchange rate, the Customer Receipt or Supplier Payment window now displays the Amount, Receipt (or Payment), Discount and Analysis Total values in the currency associated with the customer or supplier.
For full details about entering customer receipts, see Receiving customer payments on page 570. For information about entering supplier payments, refer to Making a payment to a supplier on page 644.
Foreign currency price lists
Once you have activated the Foreign Trader, you are able to set up Customer and Supplier Price Lists in the customer’s or supplier’s associated currency.
When creating a price list for a customer, you can select the currency you want to use for the price list from the Currency drop-down list in the New Customer Price List window. When you select a currency, only those customers who use that currency are available for you to select on the Customers tab.
As you add products to the price list, Sage 50 Accounts converts the Sales Price and Cost Price held on the product record from your base currency using the exchange rate set up in your Currencies list, and displays them in the customer’s currency. The List Price also displays in the customer’s own currency.
For a supplier price list, select the supplier you want to set up a price list for and click Price List. The currency assigned to the selected supplier appears automatically in the Currency box, and you cannot change this. As you add products to the price list, enter the Purchase Prices in the supplier’s own currency. Sage 50 Accounts automatically converts the value you enter into your base currency and displays it as the Base Equivalent value.
For full details about working with Price Lists, see Customer pricing on page 451 and Supplier price lists on page 602
Automatic revaluation postings
If you are using Sage 50 Accounts to record transactions in a foreign currency, these transactions may be affected by changes in the currency exchange rates.
For example, you send an invoice to a customer for €200.00. At the time you raise the invoice, the exchange rate is 1.60798, giving a base currency equivalent value of £124.38. The customer then pays the invoice in two parts: the first payment, for €150.00, is subject to an exchange rate of 1.72945, giving a base currency equivalent of £86.73; the second payment of €50.00 is subject to an exchange rate of 1.62433, giving a base currency equivalent of £30.78.
In this example, the total amount you receive from the customer is £117.51 - a difference of £6.87 from the original invoice value. In other words, you have been underpaid by £6.87 due to exchange rate fluctuations.
When this occurs, Sage 50 Accounts makes automatic corrective postings to ensure that your accounts are in order. In the example above, Sage 50 Accounts automatically posts a Sales
813

Sage 50 Accounts User Guide
81
Credit (SC) for the underpayment amount, using your default Exchange Rate Variance nominal code and the reference REVAL.
Examples of where automatic revaluation postings might occur due to exchange rate fluctuations are:
Under - or overpayment of a sales invoice entered in a foreign currency.
Under - or overpayment of a purchase invoice entered in a foreign currency.
Differences in the balance on foreign bank accounts following the use of the Foreign Bank Revaluation Wizard. The wizard and its associated revaluation postings are explained in more detail in the following section.
4

Working with foreign currencies and accounts
The foreign bank revaluation
Accounts Professional onlyUse the Foreign Bank Revaluation during the Month End or Year End procedure to ensure that there are no discrepancies in your accounts due to exchange rate fluctuations.
For example, a balance of €5000 at an exchange rate of 1.653450 = £3023.98. However at your Month End the exchange rate may have risen to 1.752908. In this case the €5000 is now only worth £2852.40 (a difference of £171.58).
If these discrepancies are not corrected, your Financial Reports will display incorrect figures.
Note: You cannot run foreign bank revaluation if you have not already run the foreign trader setup.
To run the foreign bank revaluation
1. From the Sage 50 Accounts menu bar, select Modules > Wizards > Foreign Bank Revaluation.
The Foreign Bank Revaluation window appears, displaying the Select Account window.
In this first window you need to specify the currency and accounts to be revalued.
2. Use the drop-down list to select which of the foreign currencies you use is to be revalued.
From the list of available accounts, select the account(s) you want to revalue, then to continue, click Next.
The Update Values window appears.
815

Sage 50 Accounts User Guide
81
3. Select the revaluation date required.
Note: The revaluation date cannot be in the future.
Enter the new exchange rate you want to apply and optionally, specify the department.
4. To continue, click Next.
The Check Values window appears, showing the date, revised balance and balance amount to be posted.
6

Working with foreign currencies and accounts
5. Check that the details are correct, then to complete the revaluation, click Post.
Sage 50 Accounts automatically corrects any differences caused by fluctuations in the exchange rate by posting revaluation journals to the relevant accounts. For more information about the revaluation journals, refer to the following section.
If the exchange rate you used for the revaluation does not match the current exchange rate set for the currency, a warning message appears and Sage 50 Accounts offers you the opportunity to update the currency exchange rate. Click Yes.
The Sage 50 Accounts desktop appears
You have now completed the Foreign Bank Revaluation.
Tip: Use the Day Books: Foreign Bank Revaluations report to print a list of revaluation journals. From the Company module, select Nominal Ledger > Reports > Day Book Reports > Day books: Foreign Bank Revaluations.
Viewing and changing revaluations
Accounts Professional onlyThe Revaluations tab on the Bank Record window provides you with a listing of the past revaluations that have been carried out on an account. You can also make changes to these revaluations.
Although the Foreign Bank Revaluation requires you to confirm the revaluation details entered before Sage 50 Accounts makes any changes to your accounts, there may be times when you need to make subsequent manual changes to revaluations that you have carried out using the wizard.
These manual changes may include:
Adjusting the exchange rate used in a revaluation. See To adjust a revaluation on page 817.
Reversing a revaluation made in error. See To reverse a revaluation on page 818.
To adjust a revaluation
1. Select the Bank module and then, if appropriate, use the view selector to switch to the Bank Accounts view.
2. Select the foreign currency bank account you require.
3. Click Record.
4. Click the Revaluations tab.
A list of existing revaluation dates and exchange rates appears.
Note: This tab only appears for foreign currency bank accounts.
5. Click Show Balances.
817

Sage 50 Accounts User Guide
81
The information shown for each revaluation is updated to include the account balance in the foreign currency and the balance values, before and after the revaluation in the base currency.
The other buttons on the tab are also activated.
6. Select the revaluation you want to adjust, then click Edit.
7. Make the changes required to the rate.
8. To complete the adjustment, click OK.
Sage 50 Accounts automatically adjusts the revaluation details, and creates and posts the appropriate journals to the relevant accounts.
To reverse a revaluation
1. Select the Bank module and then, if appropriate, use the view selector to switch to the Bank Accounts view.
2. Select the foreign currency bank account you require.
3. Click Record.
4. Click the Revaluations tab.
A list of existing revaluation dates and exchange rates appears.
Note: This tab only appears for foreign currency bank accounts.
5. Click Show Balances.
The information shown for each revaluation is updated to include the account balance in the foreign currency and the balance values before and after the revaluation in the base currency.
The other buttons on the tab are also activated.
6. Select the revaluation you want to reverse, then click Reverse.
Sage 50 Accounts automatically reverses the revaluation, and creates and posts the appropriate journals to the relevant accounts.
8

Working with foreign currencies and accounts
Bank Transfers involving foreign currency accounts
Accounts Professional onlyThe Bank Transfer facility allows you to record the transfer of funds from one bank account to another.
In Accounts Professional you can use the Transfer facility to record transfers between base and non-base currency accounts, or even between two non-base currency accounts. Sage 50 Accounts uses the exchange rates set up in your Currencies table to calculate the overall exchange rate for the transfer.
The following sections explain how to make a transfer involving one or more foreign currency bank accounts, and the effects of changing the values on the Transfer window, once Sage 50 Accounts has calculated the exchange rate and amounts required.
To make a bank transfer between base and non-base currency accounts
1. Select Bank > Record Transfer.
The Bank Transfer window appears.
2. In the boxes provided, enter the following transfer details:
From This box shows the account code and name of the bank currently selected on the Bank Account window, if any. If you want to change this, enter an alternative code or use the drop-down button to select from the bank account list.
To Enter the bank account code of the bank you want to receive the money. Use the drop-down button to select the bank code from the bank account list.
Reference Type a reference to be recorded for this transaction in the audit trail. For example, you can enter a cheque number.
Department If you want your transaction to be analysed to a specific department, enter the department number here.
Date The program date is entered for you automatically but you can change this if required.
Description Type a description of up to sixty characters for easy reference.
Payment Value Enter the value you want to transfer.
Exchange Rate If Foreign Trader is enabled, this box displays the exchange rate between the currencies of the Account From and Account To.
819

Sage 50 Accounts User Guide
82
3. To process the transfer, click Save, to re-enter the data click Discard and/or to leave the window click Close.
To make a bank transfer between non-base currency accounts
1. Select Bank > Record Transfer.
The Bank Transfer window appears.
2. In the boxes provided, enter the following transfer details:
From This box shows the account code and name of the bank currently selected on the Bank Account window, if any. If you want to change this, enter an alternative code or use the drop-down button to select from the bank account list.
To Enter the account reference of the non-base currency account you want to transfer money to. You can use the drop-down list to choose the account you want to use.
Reference Type a reference to record in the audit trail for this transaction. For example, you can enter a cheque or BACS number.
Department If you use departmental analysis, enter the department for the transaction here.
Date The program date is entered here for you automatically, but you can change this if you require.
Description Type a description of up to sixty characters for your reference.
Payment Value Enter the value of the money you want to transfer from the Account from bank account. Sage 50 Accounts displays this value in that bank account's currency.
0

Working with foreign currencies and accounts
Receipt Value In this box, Sage 50 Accounts calculates the value of the money you are transferring into the Account to bank account. To calculate this value, Sage 50 Accounts uses the Payment Value figure, together with the exchange rate it calculates from the rates set in your Currency table for the two currencies involved.
For example, say your base currency is set to pound sterling, and you want to transfer money from a US dollar account to a euro bank account.
In your Currency table, the following exchange rates are set up:
US dollar to pound sterling = 1.600000Euro to pound sterling = 1.520000
Sage 50 Accounts calculates the US dollar to euro exchange rate as follows:
This value, 0.950000, appears in the Exchange Rate box.
Continuing the example, say you want to transfer USD $1000.00 to the euro account. Using the exchange rate calculated above:
$1000.00 x 0.950000 = €950.00
So €950.00 appears in the 'Receipt Value' box.
Note: If you subsequently change the value in the Exchange Rate box, the Receipt Value changes accordingly. For more information, see Changing the values on the bank transfer window on page 823.
1.5200001.600000---------------------- 0.950000=
821

Sage 50 Accounts User Guide
82
Note: If you need to change any of the details on the Bank Transfer window at this stage, Sage 50 Accounts may need to recalculate the values and/or make adjustment postings when you save the transaction. For more information on this, see Changing the values on the bank transfer window on page 823.
3. To process the transfer, click Save. To re-enter the data click Discard and/or to leave the window, click Close.
Exchange Rate Here, Sage 50 Accounts shows the exchange rate it calculates for this transfer using the rates set in the Currency table for the two currencies involved. You can amend the exchange rate if you require, for example if you have agreed a fixed exchange rate for the transfer.
See the previous example for details about how Sage 50 Accounts calculates the exchange rate for the transfer.
Notes: If no values appear in the Currency table, Sage 50 Accounts cannot calculate the exchange rate for the transfer and so it appears as zero. If you try to save a transfer with a zero exchange rate, the following message appears:
No Exchange Rate has been entered. You must enter a value for the Exchange Rate before attempting to post transactions.
To continue with the transfer, click OK and enter an exchange rate.
Changing the exchange rate may result in differences between the base rate journal entries for the transfer. For more information on how Sage 50 Accounts deals with such changes, see Changing the values on the bank transfer window on page 823.
2

Working with foreign currencies and accounts
Changing the values on the bank transfer window
When you first enter the details for your non-base currency bank transfer, Sage 50 Accounts performs a number of calculations to work out the value of the transfer transactions. For example, if you enter details of the bank accounts you are transferring money from and to and enter a Payment Value to show how much money you are transferring from the first account, Sage 50 Accounts uses this information to calculate the exchange rate and receipt value for the transfer.
If you then change any of the details, Sage 50 Accounts must recalculate some of the transfer values. The program makes these changes according to the order in which you make changes to the data. In some cases, these changes mean that Sage 50 Accounts needs to post adjusting transactions along with the transfer journals, to make sure that the entries balance.
The information that follows shows how the changes you make affect your transfer, and what information messages Sage 50 Accounts displays on the Bank Transfer window in each scenario.
Scenario 1
You enter the From and To accounts.
Sage 50 Accounts calculates the exchange rate using the values in the Currency table for the two currencies involved. The figures in the Payment Value and Receipt Value boxes remain at 0.00.
For your information, the note on the Bank Transfer window reads: The exchange rate for this transfer has been calculated using the rates in the Currency table. Your bank may use a different rate for the transfer. You may also incur bank charges for this transaction.
Scenario 2
You enter the From, To accounts and Payment Value.
Sage 50 Accounts calculates the exchange rate using the values in the Currency table for the two currencies involved. It then uses this exchange rate and the Payment Value you entered to calculate the Receipt Value.
For your information, the note on the Bank Transfer window reads: The exchange rate for this transfer has been calculated using the rates in the currency table. Your bank may use a different rate for the transfer. You may also incur bank charges for this transaction.
Scenario 3
You enter the From, To accounts and Receipt Value.
Sage 50 Accounts calculates the exchange rate using the values in the Currency table for the two currencies involved. It then uses this exchange rate and the Receipt Value you entered to calculate the Payment Value.
For your information, the note on the Bank Transfer window reads: The exchange rate for this transfer has been calculated using the rates in the currency table. Your bank may use a different rate for the transfer. You may also incur bank charges for this transaction.
823

Sage 50 Accounts User Guide
82
Scenario 4
You enter the From, To accounts and Payment Value. You then change the exchange rate manually.
Initially, Sage 50 Accounts calculates the exchange rate using the values in the Currency table for the two currencies involved. It then uses this exchange rate and the Payment Value you entered to calculate the Receipt Value.
When you manually change the exchange rate, Sage 50 Accounts recalculates the Receipt Value using the new rate.
For your information, the note on the Bank Transfer window reads: You have changed the exchange rate for this transfer. Please check that the payment and receipt amounts are correct before continuing with this transfer. Your bank may use a different rate for the transfer. You may also incur bank charges for this transaction.
If the new exchange rate means that the base currency values of the journal entries for the transfer do not match, Sage 50 Accounts automatically posts a balancing journal entry for the difference to your Revaluation account.
For example:
Say your base currency is pound sterling and you want to transfer money from a US dollar account to a euro account.
The exchange rates set up in your Currency table are as follows:
US dollar to pound sterling = 1.600000Euro to pound sterling = 1.520000
Sage 50 Accounts calculates the US dollar to euro exchange rate as follows:
1.000000 x 1.520000 = 0.9500001.600000
This value, 0.950000, appears in the Exchange Rate box.
Continuing the example, say you want to transfer USD $100.00 to the euro account. Using the exchange rate calculated above:
$100.00 x 0.950000 = €95.00
So €95.00 appears in the Receipt Value box.
The value of the journal entries posted to your audit trail is £62.50 for both entries ($100.00 = £62.50 and €95.00 = £62.50, using the exchange rates set up in your Currency table).
You then change the exchange rate to 0.970000. Sage 50 Accounts recalculates the Receipt Value as €97.00. Using the exchange rate set up in your Currency table, this equates to £63.82. This means that your journal credit (£62.50) does not equal the journal debit (£63.82) by an amount of £1.32. Sage 50 Accounts posts this difference to the Revaluation account as a journal credit, using the details Foreign Bank Transfer Revaluation Journal for Transaction xxxx, for your reference.
4

Working with foreign currencies and accounts
Scenario 5
You enter the From, To accounts and Receipt Value. You then change the exchange rate manually.
Initially, Sage 50 Accounts calculates the exchange rate using the values in the Currency table for the two currencies involved. It then uses this exchange rate and the Receipt Value you entered to calculate the Payment Value.
When you manually change the exchange rate, Sage 50 Accounts recalculates the Payment Value using the new rate.
For your information, the note on the Bank Transfer window reads: You have changed the exchange rate for this transfer. Please check that the payment and receipt amounts are correct before continuing with this transfer. Your bank may use a different rate for the transfer. You may also incur bank charges for this transaction.
If the new exchange rate means that the values of the base rate journal entries for the transfer do not match, Sage 50 Accounts automatically posts a balancing journal entry for the difference to your Revaluation account. For more details, see the example in Scenario 4 above.
Scenario 6
You enter the From, To accounts and Payment Value. You then change the Payment Value.
Initially, Sage 50 Accounts calculates the exchange rate using the values in the Currency table for the two currencies involved. It then uses is exchange rate and the Payment Value you entered to calculate the Receipt Value.
If you then change the Payment Value, Sage 50 Accounts recalculates the exchange rate from the new Payment Value and the calculated Receipt Value.
For your information, the note on the Bank Transfer window reads: The exchange rate for this transfer has been calculated using the payment and receipt amounts. Your bank may use a different rate for the transfer. You may also incur bank charges for this transaction.
Scenario 7
You enter the From, To accounts and Payment Value. You then change the Receipt Value.
Initially, Sage 50 Accounts calculates the exchange rate using the values in the Currency table for the two currencies involved. It then uses this exchange rate and the Payment Value you entered to calculate the Receipt Value.
If you then change the Receipt Value, Sage 50 Accounts recalculates the exchange rate using the Payment Value and the new Receipt Value.
For your information, the note on the Bank Transfer window reads: The exchange rate for this transfer has been calculated using the payment and receipt amount. Your bank may use a different exchange rate for the transfer. You may also incur bank charges for this transaction.
If the new exchange rate means that the values of the base rate journal entries for the transfer do not match, Sage 50 Accounts automatically posts a balancing journal entry for the difference to your Revaluation account.
825

Sage 50 Accounts User Guide
82
For example:
Say your base currency is pound sterling and you want to transfer money from a US dollar account to a euro account.
The exchange rates set up in your Currency table are as follows:
US dollar to pound sterling = 1.600000Euro to pound sterling = 1.520000
Sage 50 Accounts calculates the US dollar to euro exchange rate as follows:
1.000000 x 1.520000 = 0.9500001.600000
This value, 0.950000, appears in the Exchange Rate box.
Continuing the example, say you want to transfer USD $100.00 into the euro account. Using the exchange rate calculated above:
$100.00 x 0.950000 = €95.00
So €95.00 appears in the Receipt Value box.
The value of the journal entries posted to your audit trail is £62.50 for both entries ($100.00 = £62.50 and €95.00 = £62.50, using the exchange rates set up in your Currency table).
You then change the Receipt Value to €90.00. Sage 50 Accounts recalculates the exchange rate as 0.900000.
Using the exchange rate set up in your Currency table, €90.00 equates to £59.21. This means that your journal credit (£62.50) does not equal the journal debit (£59.21) by an amount of £3.29. Sage 50 Accounts posts this difference to the Revaluation account as a journal debit, using the details Foreign Bank Transfer Revaluation Journal for Transaction xxxx for your reference.
Scenario 8
You enter the From, To accounts and Payment Value. You then change the Account From details.
Initially, Sage 50 Accounts calculates the exchange rate from the values in the Currency table for the two currencies involved. It then uses this exchange rate and the Payment Value you entered to calculate the Receipt Value.
If you then change the Account From details, Sage 50 Accounts recalculates the exchange rate from the Currency table, and calculates the new Payment Value from the existing Receipt Value and the new exchange rate.
For your information, the note on the Bank Transfer window reads: The exchange rate for this transfer has been calculated using the rates in the currency table. Your bank may use a different rate for the transfer. You may also incur bank charges for this transaction.
6

Working with foreign currencies and accounts
Scenario 9
You enter the From, To accounts and Payment Value. You then change the Account To details.
Initially, Sage 50 Accounts calculates the exchange rate from the values in the Currency table for the two currencies involved. It then uses this exchange rate and the Payment Value you entered to calculate the Receipt Value.
If you then change the Account To details, Sage 50 Accounts recalculates the exchange rate from the Currency table, and calculates the new Receipt Value from the existing Payment Value and the new exchange rate.
For your information, the note on the Bank Transfer window reads: The exchange rate for this transfer has been calculated using the rates in the currency table. Your bank may use a different rate for the transfer. You may also incur bank charges for this transaction.
How foreign trader affects Sage 50 Accounts
Note: Once you activate the Foreign Trader option, it cannot be switched off.
Changes to the Customer and Supplier Records and New Wizards
If you create a new customer or supplier record, the default currency and credit limit is taken from the Customer or Supplier Defaults. To edit the defaults, click Customers > Customer Defaults or Suppliers > Supplier Defaults.
The Balance field on the customer records and supplier records, located on Details tab, displays the account balance using that account's currency. The appropriate currency code and symbol is used.
If you create a new Customer or Supplier record using a currency other than the base currency, you must enter an exchange rate, when you enter the opening balances.
Changes to the Bank Accounts and New Wizard
The Bank Record displays the balance in the selected bank's currency. This is calculated from the foreign currency values that you entered on the transaction record. The balance also appears separately in the base currency.
The Bank Accounts window displays the bank balance using both the base currency and the bank account's foreign currency.
You can choose to display the date a foreign bank account was last revalued in the Bank Accounts list. To do this, right click any of the column headings in the Bank Accounts window and select Last Revalued from the menu that is displayed.
If you create a new bank account using a currency other than the base currency, you must enter an exchange rate when you enter the opening balances.
Credit Charge Wizard
You can only use the base currency when you use Credit Charge Wizard.
To post a Credit Charge to a Customer account, you must raise a Batch Invoice.
827

Sage 50 Accounts User Guide
82
Write Off, Refund, Returns Wizard
You cannot use this wizard to process refunds, returns or write offs for customer or supplier accounts that do not use the base currency. You must process manual refunds, returns or write offs, for any accounts that are not using the base currency.
Customer Contacts
You cannot use the Invoice options from within the Contacts tab on the customer record if the customer record has a non-base currency assigned to it.
If you want to raise a Contact invoice, it must be created as a Service Invoice though the Invoicing option.
Bank Transfers
If you process a bank transfer while using the Foreign Trader functionality, the following changes take place:
The currency assigned to the Bank Account From and Bank Account To fields are read only - that is, you cannot change the information in these fields.
The Amount field displays the amount of the transfer in the currency of the bank that is listed in the Bank Account From field.
The Exchange Rate box is disabled if both of the selected banks are set to use the base currency.
If either of the banks are using a different currency to your base currency, the Bank Transfer option defaults to the exchange rate entered in the Currencies list. This can be edited if required.
The postings made by a Bank Transfer are:
Base Currency Bank - Either a Journal Credit or a Journal Debit is posted to the Base Currency Bank Account, with the Base Currency value.
Non Base Currency Bank Account - Either a Journal Credit or a Journal Debit is posted to the non Base Currency Bank Account with the Base Currency value.
Bank Recurring Entries
You cannot set up a recurring entry for a bank account that uses a currency, other than the base currency. Recurring entries for these accounts must be posted manually.
Bank Reconciliation
The Bank Reconciliation window displays the transaction details for the selected bank account using the currency in the relevant currency.
If you process using the Adjustment option, you can specify the current exchange rate.
Nominal Journal Entry
If you are using the Foreign Trader option, you cannot post a journal entry to a non-base currency bank account.
8

Working with foreign currencies and accounts
If you need to reverse a journal that has been posted automatically by your software, such as a bank transfer, you must use the Nominal Reversal option.
Global Changes Wizard
You can only use a base currency on the Global Changes Wizard for customer or supplier accounts. Any changes to these accounts using a currency, other than the base currency, must be made manually.
Contra Entries
You are unable to post Contra Entries against non-base currency accounts.
Any Contra Entries for non-base currency accounts must be posted manually.
File Import
You can import foreign currency sales invoices, sales credits, purchase invoices and purchase credits.
Fixed Asset Disposal Wizard
You cannot use the Fixed Asset Disposal wizard for bank accounts that do not use the base currency.
Corrections
When you amend a non Base currency transaction, you can only amend the following non-critical fields:
Details, Reference, Bank Rec., Date, Bank Rec Flag, Dept, Ex.Ref.
This is to avoid possible discrepancies on the customer or supplier accounts, caused by amending critical fields.
829

Sage 50 Accounts User Guide
83
0
Index
A
Access Rightsassign 187create 186enable 128full access 186logon names 186new user 186no access 187password 186
Access to Line 50 26Account
bad debt 207control 206credit card 226fixed asset 251nominal 218nominal activity 223nominal structure 205petty cash 226status 110
Account From 422, 819Account Reference 230Account To 423, 819Account Type
control 206floating 195
Account Typesbank 226
Accountant 718Accountant Link
adjustments and narratives 733apply adjustments and
narratives 728comments and adjustments
record 734export accounts data to file 718–719export adjustments and
narratives 736export adjustments and narratives to
file 730import accounts data from file 730import adjustments and
narratives 719, 725, 727import client’s data from a file 731introduction 716material changes 722material changes record 723pay by card 738set up preferences 135–136view comments and
adjustments 725with Client Manager 730
Accounting Schemesspecifying 6
Accountscash 226
Accrual N/C 262Accruals
add 261control account 207late invoices 355month end 355monthly accruals 355postings
example of 263wizard 261
ActiveSearchdisplay 128using 65
ActiveSetup Wizardoverview 5
Activitynominal 221product 241project 684, 690, 700viewing nominal account 223

Sage 50 Accounts User Guide
viewing product 664Actual 660Adding
customers to price list 457products to price list 453
Addresscompany delivery addresses 125preferences 124website 23
Adjustmentsin 698out 698stock level 661
Adjustments and Narrativesapply 728comments and adjustments
record 734export 736import 725, 727posting 734recording 733
Aged Balance Defaultssetting up customer 161setting up supplier 162
Aged Balancessupplier defaults 162
Ageingcalendar monthly 158period ageing 159
Allocatingamending (non sales order
allocation) 678amending (sales order
allocation) 513stock manually (non sales order) 675stock manually (sales order) 512–
513stock to a quotation 485viewing (non sales order
allocation) 678Allow Negative Stock 129Alphanumeric Codes 230
Always Create Remittances 153Amending
stock allocation 675Arrows 56Assembly Level 667Asset Accounts 202Asset Category 252Assign
project budgets 271Audit Assistant
account verification 757accounts system check window 752check accounts system 749check VAT values 758introduction 748VAT audit check 753, 756VAT audit reports 757verify VAT discrepancies 748
Audit Trailclearing 384–385report 783
AVS Validation 591
B
Back Upadvanced options 82previous backups 82restore 84to CD 81
Backing Updata 79, 366strategies 83
Bad Debtscontrol account 207
Balance Sheet 202, 786Balance Sheet Depreciation N/C 253Bank
adding records 227cash account 226cheque account 226credit card account 226

Index
defaults 152record 226
Bank Accountcreating a new 227
Bank Accounts 226hmrc 325
Bank Defaultsalways create remittances 153enable e-banking 152group items in bank
reconciliation 152list payment/receipt by split 152no warning on visa receipts 153
Bank Paymentfor projects 700memorising 413recalling 413
Bank Paymentshmrc 325
Bank Receiptsmemorising 395memorising and recalling 395recalling 395
Bank Reconciliation 432e-reconcile 743group items in bank
reconciliation 152manual reconciliation 424no bank reconciliation 229reports 432, 795when to reconcile 424
Bank Records 227Bank Statements
printing 433Bank Transfers 422, 820Bar Code 243Batch
memorising bank payments 413memorising bank receipts 395memorising credit notes 641memorising invoices 641printing of sales orders 510
recalling bank payments 413recalling bank receipts 395recalling credit notes 641recalling invoices 641supplier credit notes 650
Batch Optionbank accounts window 648
Batch Paymentsmemorising and recalling 413templates 413
Batch Reports 797Bill of Materials 666
available to makeup 668component availability 668entering 666
Billingfixed price 709for projects 248, 684, 709time and materials 711
Billsaccruals 261
BOM 663, 666, 668Book Value 254, 274Box Contents 55Brackets
use of 63Budget
project 120, 245, 249, 685–686, 692, 706
report 789Budgeting 137, 264
department 265–266nominal accounts 264–266projects 271
Buttonscalculator 57calendar 57function keys 66
C
Calculate

Sage 50 Accounts User Guide
vat return 298Calculate Net 67Calculating prices 454, 466Calculation Methods
decrease sales price by % 454, 466decrease sales price by value 454,
466fixed price 454, 466mark up % on cost price 454, 466mark up value on cost price 454, 466standard price 454, 466
Calculator 66Calculator Button 57Calendar 66Calendar Button 57Calendar Monthly Ageing 158Call Charge Rate
setting the default 127Cancel 46Carousel Fraud 339, 341Cash Accounts 226Cash Businesses 392Cash Sale 488
recording 489settings 167, 184
Categoriesfixed assets 276
CDback up 81
Changingchart of accounts 195financial year 98password 26, 186program date 73, 347
Chargesfor time 555
Chart of Accountsadding 193categories 194copying layout 201default 208editing 195
errors 199tailoring 191
Check BOM 668Check Boxes 57Check Stock Makeup 669Checking
component availability 668data 75
Cheque Layouts 134Cheque Lines Per Page 134, 414Cheques 414CIS
preferences 148setting up 148
Clear 47Clearing
audit trail 385stock transactions 357vat control accounts 319
Close 46Closed Ledger Date 347Closed ledger date 74COA
clearing down 214limited company 215partnership 214sole trader 210
Coding 230Column-Based Reports 794Columns
hiding 47resizing 47
Command Buttons 46Comments and Adjustments
import 725view 725view record 734
Committed Costs (Projects) 703Commodity Code 240Common Directory 740Company
address 124

Index
parameters 127preferences 124, 135–136
Configurable columns 48options 48
Configuration Editoraccount status tab 110chart of accounts tab 102credit control tab 119custom fields tab 117dispute reasons tab 118fixed assets tab 115general tab 100introduction 99products tab 112project costing tab 120tax codes tab 105terms tab 103
Contact - Time Biller 556Contacts
charging for time 555creating service invoices 555
Control Accountsaccruals 207bad debts 207clearing VAT 319credit charges 207creditors control 206debtors control 206default bank 206default sales account 207introduction 206mispostings 207prepayments 207purchase discount 206retained earnings 206sales discount 206suspense 207vat on purchases 206vat on sales 206
Converting a Quotation 485Copy Data Button 66Copy Skeleton Journal Entries 129
CopyingCOA layout 201customer price list 459invoices 551purchase orders 626records 50sales orders 510supplier price list 603
Correctingdata files 94
Correctionsoverview 85
Cost Codes 686Cost Postings
bank payment 700in life cycle 684projects 699supplier invoice 699
Cost Types 120, 123, 685–686Countries
setting up 805Create
bank accounts 226bank receipt 392bank record 227bank transfer 422, 819–820batch supplier payment 648bill of materials 666cash sales order 489cheques 419customer price list 452data backups 79discount structure 476fixed asset categories 115fixed asset record 251good customer discount 472invoice from contacts 555journal entry 374nominal record 218prepayment 258product invoice 526product record 239

Sage 50 Accounts User Guide
project record 246project resources 687purchase orders 609sales orders 489search 60service invoice 536special customer price 465supplier payment 644supplier price list 602
Creatingchart of accounts 193
Creating a New Quotation 483Creating New Accounts 227Credit Card Accounts 226Credit Charges
control account 207Credit Control
aged creditors analysis 650reminder letters 119suggested payments 648supplier invoices within
settlement 650Credit Limit 155Credit Note
footer details 546order details 543red 524service item line details 540
Creditors Control 206Ctrl 55Currency Calculator 66Currency Revaluation Nominal Code 807Current Assets 202Current Liabilities 202Cursor 53Custom Fields 117Customer
defaults 155deleting records 237good customer discount 471invoicing contacts 555price lists 452
refunds 580transaction activity 578
customer 563Customer Codes
planning 230Customer Defaults 155Customer Price Lists
importing 460introduction 452
Customer Recordsdeleting 237entering 231projects tab 705
Customer Support 21Customers 563CV2 Validation 591
D
Damages In 672Damages Out 672Dashboards 41Data
backing up 79checking 75correcting 85, 94file maintenance 85fixing 77, 366restore 84restoring 83
Data Entry Screen 53Data Entry Windows 53Data Repair Service 77, 366Date Dependence 73Debtors Control 206Decrease Sales Price by % 454, 466Decrease Sales Price by value 454, 466Deduction
net value discount 573Deductions 573Default Chart of Accounts 208Defaults

Index
bank 152bank account 206call charge rate 127customer 155invoice and order 168print layouts 173product 164sales account 207supplier 162
Delete 55Delete Row 67Deleting
customer records 237nominal records 223sales order 523supplier records 237transactions 91
Delivery Addressescompany 125
Demonstration data 30Departments 265–266, 270Deposit
payment 587quotation 587
Deposits 573invoicing 574quote 573sales order 573
Depreciation 274dep‘n to date 255next dep‘n 255non-depreciating 254posting tab 252rate 254reducing balance method 275
Depreciation Method 254Desktop layout 31Desktop views 38Despatching
sales orders 514Direct Debits 434
Discard 46Discount by Quantity 476Discount Methods 454, 466Discount Tab Names 166Discounts
by quantity 476by unit price 167, 470for early settlement 473for quantity sold 476for special customers 465good customer 471invoice value 479manual 481standard 471
Discounts on Products 164Display Account Status 128Display ActiveSearch Popup 128Dispute Reasons 118Disputed 643Disputes 563Dividends
recording 392Document Manager
add filing system reference 763add shortcut 762attachments pane 761overview 760project record 695
Donationsrecording 397
Double-Entry Bookkeeping 203Drill To Reports 794Drill-Down 58Drop-Down Boxes 56Drop-Down Menus 34Duplicate
invoice 551purchase order 626records 50sales order 510

Sage 50 Accounts User Guide
E
E-Bankingautomatically reconciling 744configuring 739enabling 152entering your supplier bank
details 741importing transactions 743making e-Payments 742manually reconciling 746reconciling 744setting up 739setting up your bank account 740statement end balance 744statement end date 744using e-Payments 741using e-Reconcile 743
e-Bankingvat payment 324
ECSLgenerate 331preferences 139, 290triangulation transaction 331triangulation transactions 333
Edit Item Line 66Editing 270
batched transaction split 90budgets 270chart of accounts 195nominal records 222stock allocation 513
Email Support 21Enable E-Banking 152Enable Project Costing 131, 685End 55Enquiry
project budgets 272project costs 272
Enterbudgets 266project budget 271
Enteringaddress preferences 124bank account records 226bank defaults 152bill of materials 666budgets 266cash account 226cash sale 489chart of accounts 193company parameters 127credit card accounts 226customer defaults 155early settlement discount 473fixed asset categories 276fixed asset records 251good customer discount 472label preferences 126manual search 60nominal records 208price lists 452, 602product defaults 164product records 238quantity discount structure 476reporting preferences 133special customer prices 465stock returns 672supplier defaults 162total discount 481
Entering and Editing Data 53E-Payments
enable e-Banking 152entering your supplier bank
details 741making e-payments 742using 741
E-Reconcile 744automatically reconciling 744confirm 744highlighted transactions 744importing transactions 743manually reconciling 746matching 744

Index
reconcile 744statement end balance 744statement end date 744
Error Correctionsdata errors 85transactions 91
Errorsaudit assistant 749
Esc 55E-Submissions
credentials 290e-Submissions 139, 321–322, 342
credentials 139Euro 802e-VAT 322–323, 342Event Logging
configure event log 773enable 772view event log 773
Excelexporting to 766
Exchange Ratesentering 802
Exclude Deleted Transactions 128Expenditure Accounts 202–203Expenses 448Export Accounts Data to File 719Exporting
bank reconciliation 432to Word, Excel and Outlook 766
Expressionsordering 64
F
F1 to F12 66FIFO 658File Maintenance
corrections 85, 94delete transactions 91
Finance Ratescredit charges account 207
Financial Reportsaudit trail 783balance sheet 786budget report 789prior year 790profit and loss report 785quick ratio report 788transactional based management
reports 791trial balance report 784
Financial Year 264changing 98, 373nominal account budgets 264
Financialscolumn-based reports 794
Fix Data 77, 366Fixed Asset Categories
creating 276editing 115
Fixed Asset Records 251Fixed Assets
asset accounts 202categories 276records 251sale of 276
Fixed Price 454, 466Flat Rate
box totals - cash based 305box totals - invoice based 303capital goods 110cash based 13, 141flat rate % 14, 141invoice based 13, 141T25 106
Floating Nominal Accounts 195Foreign Bank Revaluation Wizard
to run 815Foreign Currency
bank transfers 820overpayments 807underpayments 807
Foreign Currency Accounts

Sage 50 Accounts User Guide
revaluation 817Foreign Currency Exchange Rates 802Foreign Trader
how it affects data 827setup 806to activate 807wizard 807
Free/On-Order 663Fuel Expenses
recording 397Function Keys 66
configuring F11 and F12 67user-configurableF1 to F12
configuring F11 and F12 67
G
Generating Chequesusing Cheque List 419
Global Changesnominal account budgets 264–265
Good Customer Discounts 471Goods Despatched Notes
despatched tab 521overview 515printing 521viewing 521
Goods Received Notesdeliveries tab 636overview 630printing 636
Group Bank Transactions 153Group Items in Bank Reconciliation 152
H
Helpcustomer support 21email support 21F1 66getting 68
online support 21sage.com 23training 23website 23wizard 71
Help Centre 39Hide
data columns 49Home 55
I
Importbudgets 264client’s data from a file 731customer price lists 460e-banking transactions 743product prices 460
Include Future Totals in Balance 161Income Accounts 202–203Insert Row 67Instalments 434Internet Resources 776Intrastat
arrivals 282commodity code 240country code 125defaults 183delivery terms 279, 285dispatches 277nature of transaction code 279, 285purchase orders 282sales orders 277supplementary declarations 277view archived report 282weight 240
Inv. No. 527Invoice
copying 551duplicating 551emailing 559footer details 546

Index
for a project 711mixed product and service 558order details 543payment details 549product invoice 526product item line details 531projects 684service invoice 536service item line details 540update ledgers 562value discounts 479
Invoice and Order Defaults 168entering 167footer defaults 172, 175Intrastat 183numbering options 176print defaults 173
Invoicingdeposit 588deposits 573–574emailing 559net value discounts 573pay by card 588
Invoicing From Contacts 555Irish Revenue
vat3 318Irish Tax Codes 108, 326Issuing
stock allocation 679Item Line Details 531
J
Journal 374Journal Entry
create 374recurring entries 442reverse 376skeleton 376
K
Keyboard 34Keyboard shortcuts 34
L
Label Preferences 126Last Posted 437, 444Late Entries
handling 359month end 359posting 360
Late Invoiceshandling 359monthly accruals 355
Ledgerupdate 562
Letterscredit control 119
Liability Accounts 202Limited Company COA 215Link Level 667Links and Tasks 33List Payment/Receipt by split 152List windows 44Log Events 132, 772Login Check 131Login Restrictions 131Long Term Liabilities 202Low/High 194
M
Maintaining Quotations 484Making Bank Transfers 820Making Journal Entries 374Mark Up % on Cost Price 454, 466Mark Up Value on Cost Price 454, 466Material Changes
posting 722

Sage 50 Accounts User Guide
recording 722view record 723
Memorisingbank payments 413bank receipts 395batch credit notes 641batch invoices 641
Memosdocument manager 760
Menu Options 34Message Lines 525Mispostings
control account 207Mixed Product and Service
invoice and orders 558Monitor
budgets 264, 266project budgets 272project costs 272
Month End 344checklist 344clear stock 357explained 344late entries 359–360monthly accruals 355product reports 358
Mouse 34MTIC Fraud 339, 341Multi Level Projects 245, 689, 692
N
N/C 219Navigation Bar 32Navigation Groups 32Net Amount/Amount 438Net Value Discount 573Net Value Discounts 573New Bank Account 227News Feeds 776
configuring 778settings 779
No Warning on Visa Receipts 153Nominal
activity 223activity tab 221bank account records 226budgets 264floating accounts 195graphs tab 220memo tab 222
Nominal Accountbudgets 264–265
Nominal Codes 192Nominal Defaults 205Nominal Journals
reversing 376Nominal Ledger Accounts
explained 201Nominal Record
adding 218Nominal Records
code 192Non-Depreciating Fixed Asset 254NOTC
nature of transaction code 279Numeric Codes 230
O
OK 46Online Support 21Option Buttons 56Order
mixed product and service 558purchase order 608purchase order cycle 608sales order cycle 487
Order No. 527Order of Lists 44Ordering the List 47Outlook
exporting to 766

Index
P
P&L Depreciation N/C 254Partnership COA 214Password 26
changing 186Pay All 649Pay by Card 586
accountant link 738avs and cv2 591customer receipts 586deposit 587invoicing 588sales orders 589set sage pay 583wizard 591
Pay in Full 649Paying by Instalments 434Payment File Options 740Payment on Account 570Payments
accruals 261batch bank 413
Payments From Customersrecording 570
Period Ageing 158–159Petrol
recording expenses 397Petty Cash 448Planning
nominal account structure 205Post 259Posting
late entries 360Preferences
budgeting 137cis 148sage pay 145vat 139
Prepayment N/C 259Prepayments
add 258
control account 207posting
example of 260Previewing COA 198Price Lists
adding customers 457adding products 453copy customer price list 459copy supplier price list 603create 452printing 468
Pricingdecrease sales price by % 454, 466decrease sales price by value 454,
466fixed price 454, 466mark up % on cost price 454, 466mark up value on cost price 454, 466standard price 454, 466
Pricing Optioncustomer price lists 452special customer pricing 465supplier price lists 602
Print Address on Stationery 134Print End of Report Banner 133Printing 432
bank reconciliation 432price lists 468remittances 646
Prior Year Report 790Process maps 40Process Recurring Entries 444Producing Cheques 414Product 270
activity 664activity report 358allocation (non sales order) 675allocation (sales order) 512bill of materials 666categories 113category labels 113clear stock transactions 357

Sage 50 Accounts User Guide
component availability 668custom fields 114defaults 164levels 659profit report 358records 238returns 672sales table 270shortfall 661transfers 670valuation report 358
Product Activity Report 358Product Categories
creating 112Product Code 528Product Codes
advice 238Product Defaults
entering 164–165Product Discounts 164Product Invoice
create 526item line details 531
Product Invoices 526Product Levels 661Product List
setting up 238Product Profit Report 358Product Records
activity tab 241bom 240details tab 239discount tab 241entering 238graphs tab 240memo tab 240pricing 239quantity discount 241sales tab 240web tab 241
Product Transfers 670Products
amending allocation 513Profit and Loss Report 204, 785Profit Value 561Proformas 483Program Date
changing 73, 347Project Charge
in life cycle 684introduction 696
Project Costingintroduction 682project life cycle 683
Project Only Coststimesheets 696
Project Recordanalysis tab 248deleting 250memo tab 695overview 245
Projectsactivate 685activity 684, 690, 700allocating stock 675billing 248, 684, 709budgets 245, 249, 271–272, 686,
692, 705committed costs 703completing 684, 714cost codes 686cost postings 684, 699cost types 120, 123, 685–686costs 272create record 246enquiries and analysis 705fixed price billing 709introduction 682invoice 711invoicing 684life cycle 683linked to purchase orders 703managing budgets 271multi level 245, 689, 692

Index
project charge 684, 696record 245, 684, 700reports 684resources 687set up cost codes 121set up statuses 121setting budgets 271stock issue 684stock postings 698structures 245, 689, 692time and materials billing 711timesheets 684
Purchasediscount account 206
Purchase Invoicesfor accruals 355for projects 699from purchase orders 640received after month end 359
Purchase Order Deliveries Tab 636Purchase Orders 608
batched delivery 638copying 626creating 609creating purchase invoices from 640deliveries tab 636delivery details 624duplicating 626emailing 628footer details 621goods received notes 630Intrastat 282item line details 615linked to projects 703manual delivery 638order cycle 608order details 619placing on order 629printing batches 627recording delivery 629saving 627
Purchase Payment 414, 644
Q
Quantity Discountproduct records 241
Quantity Discount Structure 476Quantity to Order 663Quick Ratio Report 788Quotations 483
allocating stock 485changing details editing 485changing status 485converting 485creating 483expired 485maintaining 484
quotationsemailing 486
R
RCSL 339, 341transaction breakdown 341
Recallingbank payments 413bank receipts 395batch credit notes 641batch invoices 641
Reconcilinge-banking 744manual reconciliation 424
Recordingcash sales 488–489dividends 392grant monies 392insurance monies 392money received 392non-regular transactions 374
Recording Moneypaid to your suppliers 644
Recordsbank 227

Sage 50 Accounts User Guide
fixed assets 251nominal 218product 238
Recurring Entriesbank/cash/credit card 435customer payment on account 438journal 442supplier payment on account 440types of 434
Recurring Invoices 564Recurring Purchase Orders 564Recurring Sales Orders 564Red Credit Note 524Reference Codes 230Refunds
customer 580supplier 653
Remittance Advice Notes 646Re-order
stock 661Re-Order Level 663Reports 432
aged creditors analysis 650audit trail 783balance sheet 786bank reconciliation 795batch 799budget 789column-based 794drill to 794preferences 133prior year 790product 358product activity 358product profit 358product valuation 358profit and loss 785projects 684quick ratio 788transactional based
management 791trial balance 784
reports 432Reports Required for VAT Inspection 342–343Reset practice company 29Resize
data columns 49Resources
creating 687deleting 688overview 687projects 687
Restoreback up data 84overview 83view previous backups 82
Restoringdata 83
Retained Earnings 206Revaluation of Foreign Currency Accounts
foreign bank revaluation wizard 815manual adjustments 817
Reversejournal entry 376
Reverse Charge 341csv file 339
Reverse Charge Sales List 339Right-Click 34ROI Return of Trading Details 326RSS News Feeds 776
configuring 778settings 779
RTD return 326
S
Sage Pay 145, 586customer receipts 586wizard 591
SageCover 21Sale of Fixed Assets 276Sales Discount Account 206

Index
Sales orderemailing 511
Sales Order Despatched Tab 521Sales Orders 487
allocating 512batch printing 510cash sale 488completing 509copying 510creating 488–489deleting 523deliveries tab 521despatch details 489, 507despatching 514details tab 488, 524duplicating 510footer details 488, 502, 524goods despatched notes 515Intrastat dispatches 277invoice details 489, 509item line details 494order cycle 487order details 488, 499, 524pay by card 589payment details 489, 505, 524printing 510saving 509stock allocation 513
Save 46Saving
VAT returns 318Saving Time 715Scale Charges 296Scroll Bars 56Search 60
and/or 62creating a search manually 60how to use the 62joining expressions 62ordering expressions 64using brackets 63using wildcards 63
Selecting Menus 34Selecting Records 44Service Invoice
creating 536item line details 540
Service Invoices 536Service Item Lines 540Setting
account status 110address preferences 124bank defaults 152bill of materials 666company parameters 127customer defaults 155customer price lists 452depreciation 251early settlement discounts 473financial year 98good customer discounts 471Intrastat defaults 183invoice value discounts 479label preferences 126passwords 186program date 73, 347quantity discounts 476reporting preferences 133special customer prices 465standard discounts 471supplier defaults 162supplier price lists 602
Settingspreferences 139vat preferences 290
Shift+Tab 55Shortcut Keys 66Shortfall
stock 661Show Due Entries Up To 444Showing Data Columns 47Smart Totals 132Sole Trader COA 210Sorting Lists 44

Sage 50 Accounts User Guide
Space Bar 57Special Customer Prices 465
entering 465Standard Budgeting 264Standard Discounts 471Standard Price 454, 466Standing Orders 434Starting Up Line 50 26Statement End Balance 744Statement End Date 744Statement Reconciliation Service 740Statements Tab 157Status
changing project 695Stock
activity 241allocation (non sales order) 675allocation (sales order) 512amending allocation (non sales
order) 678amending allocation (sales
order) 513clear transactions 357component availability 668defaults 164issuing an allocation 679levels 659product activity report 358product profit report 358product valuation 358records 238shortfall 661transfers 670
Stock Issue 684Stock Levels 661Stock Postings
projects 698Stock Returns
damages in 672damages out 672write off 672
Stock Shortfall
stock levels 661Stock Transfer
make 670Suggested Payments 648Supplier
price lists 602refunds 653transaction history 650
supplier 643Supplier Aged Balances
setting up supplier 162Supplier Codes
planning 230Supplier Defaults
ageing tab 163record tab 162
Supplier Payment on Account 440Supplier Payment Window 644Supplier Payments 644
recording 644Supplier Price Lists 602
importing 604overview 602
Supplier Remittances 646Supplier Reports 483Suppliers 643
disputes 643Suspend Posting 437, 444Suspense
control accounts 207Swap 47
T
Tab 55Tasks and Links 33Tax Breakdown List 530Tax Code Setup 105Tax Codes 105Tax Rates
cis 148Tax Total 399

Index
Technical Support 21Telephone Calls
invoicing for 555setting up default charge 127
Telephone Charge Default 127Time
invoicing for 555Timesheets
for projects 684, 696Timeslips Link 129Toolbar 46Total Discounts 481Total Required Postings 437, 443Tour of Line 50 25Track
project budgets 272project costs 272
Training 23Transaction Activity
customer 578supplier 650
Transactional Based Management Reports 791Transactions
amending 90product 270
Transferbank 820product 670stock 670
Trial Balancereport 784
Triangulation 333
U
Unit Price Discount 167, 470Update
ledgers 562User Assistance Centre 39User-configurable Function Keys 67Using Windows 39
V
Valuationproduct report 358
VATanalyse 314archive 318calculating 296flat rate - cash based 13, 141, 292flat rate - invoice based 13, 141, 292flat rate % 141flat rate capital goods 110hmrc bank accounts 325ledger 289manual adjustments 315offline payment 323online 342online payment 323payment 324preferences 139, 290T25 106tasks 289totals 315
VAT Audit Check 753, 756VAT Audit Reports
audit assistant 757overview 342
VAT Cash AccountingEI 309UK VAT return 301, 305
VAT Control Accountsclearing 319
VAT Discrepancies 748VAT on Purchases 206VAT on Sales 206VAT Reconciliation
EI standard VAT 307EI VAT cash accounting 309standard VAT 299UK VAT cash accounting 301, 305
VAT Registration Number 125VAT Return

Sage 50 Accounts User Guide
analyse 314calculating 296calculation 298checking 311ei standard vat scheme 307future transactions 319irish republic 318late transactions 319manual adjustment 315overview 299preferences 290printing 316republic of ireland 307saving 318standard VAT scheme 299, 311totals 314uk cash accounting 301, 305vat cash accounting 312–313view previous 341
VAT Window 289VAT3
file access in Vista 318View
hmrc responses 322VAT archive 318
View Options 38View Selector 33Viewing 636
customers 578goods despatched notes 521nominal accounts 223previous VAT returns 289products 664project activity 700project budgets 272project costs 272
project costs to budget 705stock 664stock allocation 675suppliers 650transactions 578, 650
Views 33
W
Wagesjournal entries 379processing 379
Website Address 23Welcome Page 42Welcome Window 39Wildcards 63Windows 55Windows Control Panel 67Wizard
submissions 321Wizards 71
ActiveSetup 5Word
exporting to 766Work Area 34
X
XML File 318
Y
Year Endchecklist 363