Restore-Assembly-Manual.pdf - Garage Organization
16
-
Upload
khangminh22 -
Category
Documents
-
view
1 -
download
0
Transcript of Restore-Assembly-Manual.pdf - Garage Organization

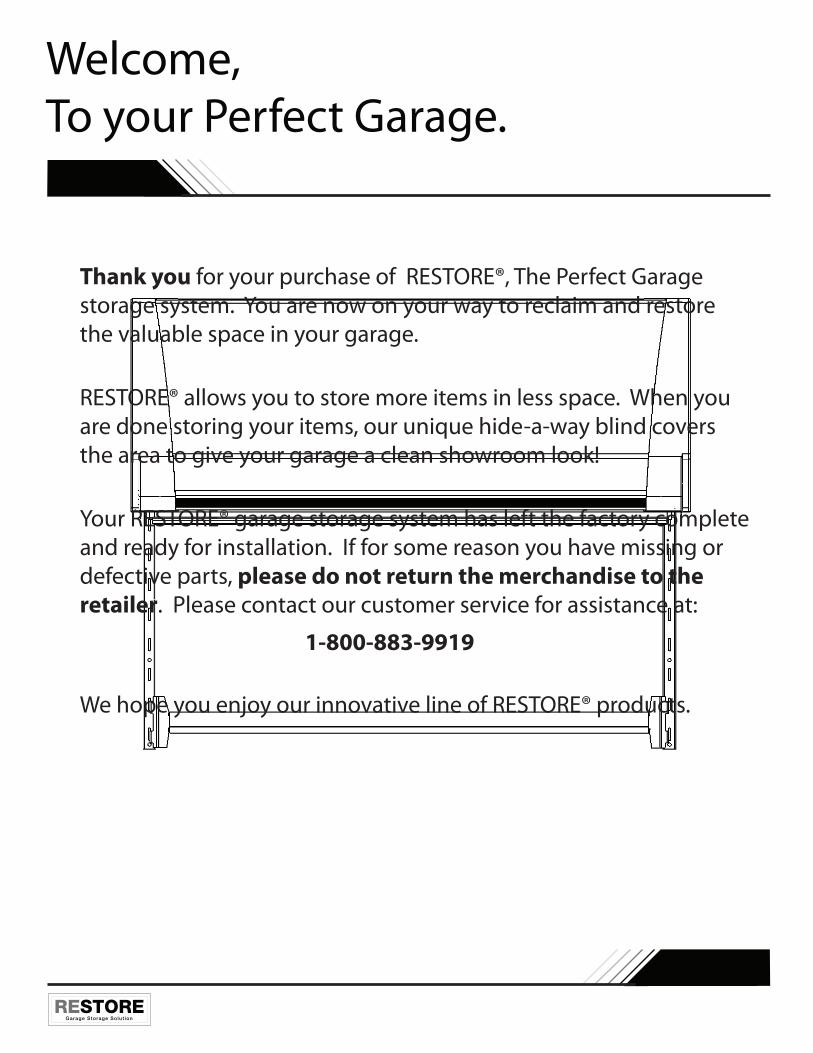
Welcome,To your Perfect Garage.
Thank you for your purchase of RESTORE®, The Perfect Garagestorage system. You are now on your way to reclaim and restorethe valuable space in your garage.
Your RESTORE® garage storage system has left the factory completeand ready for installation. If for some reason you have missing or defective parts, please do not return the merchandise to the retailer. Please contact our customer service for assistance at:
1-800-883-9919
We hope you enjoy our innovative line of RESTORE® products.
RESTORE® allows you to store more items in less space. When you are done storing your items, our unique hide-a-way blind covers the area to give your garage a clean showroom look!

Note: If you are missing parts, please do not return to the retailer. The store your purchased this productfrom does not carry parts. Please call us at 1-800-883-9919 and we will send you replacement parts.
Required Tools
Hook Carrier
Gas Assisted DoorLift
Hook Carrier Bracket
Blind
Cabinet BottomPanel
Right SidePanel
Left SidePanel
Cabinet TopPanel
Cabinet Door
Blind SkirtPanel
Inner SupportPanel
Back Panel
Blind Bracket
Cabinet Bracket
Upright
1
1
1
1
6
4
4
6
1
1
1
1
2
1
1
1
2
2
2
2
2
1
Part/Number Image ImagePart/NumberQty. Qty.
Upper Connector
Wall MountBracket
Joint Lock
Joint Pin
Hook CarrierCover
Wood Screw
#20 Bolt
#20 Bolt Long
#20 Nut
Washer
#4 Screw
#6 Anchor Screw
Plastic Anchor
20
20
23
10
10
12
A
B
C
D
E
F
G
5/16“
4#20 Long Bolt Nut
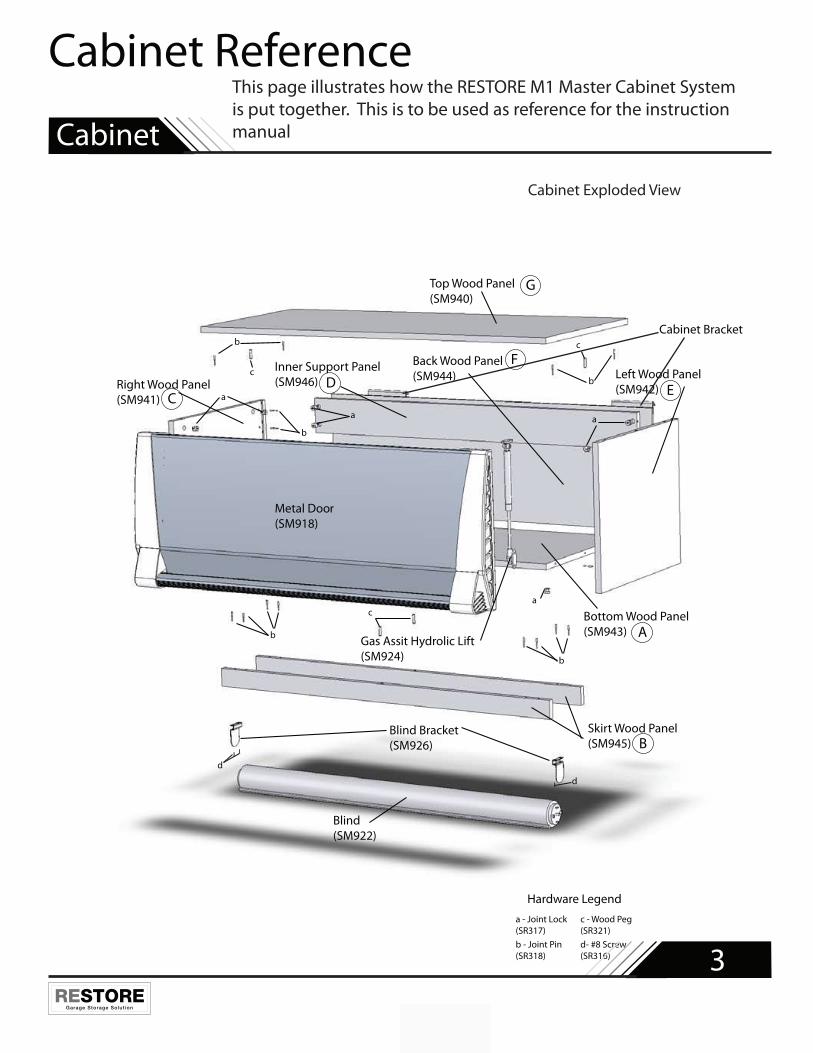
Top Wood Panel(SM940)
Right Wood Panel(SM941)
Left Wood Panel(SM942)
Bottom Wood Panel(SM943)
Back Wood Panel(SM944)
Skirt Wood Panel(SM945)
Inner Support Panel(SM946)
d- #8 Screw(SR316)
a - Joint Lock(SR317)b - Joint Pin(SR318)
c - Wood Peg(SR321)
Gas Assit Hydrolic Lift(SM924)
Metal Door(SM918)
Blind(SM922)
Blind Bracket(SM926)
b
a
a a
ac
c
c
d
d
b
b
b
b
Hardware Legend
D
F
B
C E
A
G
Cabinet
Cabinet Reference
Cabinet Exploded View
This page illustrates how the RESTORE M1 Master Cabinet Systemis put together. This is to be used as reference for the instructionmanual
3
Cabinet Bracket

Cabinet
Cabinet Reference
d- #8 Screw(SR316)
a - Joint Lock(SR317)b - Joint Pin(SR318)
c - Wood Peg(SR321)
Hardware Legend
Right Wood Pannel(SM941)Gas Assit Hydrolic Lift
(SM924)
Left Wood Pannel(SM942)
Top Wood Pannel(SM940)
Metal Dorr(SM918)
Back Wood Pannel(SM944)
Bottom Wood Pannel(SM943)
Inner Support Pannel(SM946)
Cabinet Bracket(SM913)
Blind(SM922)
Blind Bracket(SM926) Skirt Wood Pannel
(SM945)
a
a
a
b
bb
c
c
c
d
A
B
G
F
E
D
C
M1 Master Cabinet Exploded View
This page illustrates how the RESTORE M1 Master Cabinet Systemis put together. This is to be used as reference for the instructionmanual
4

Cabinet
Cabinet Reference
Wood Cabinet(SM925)
Metal Door(SM918)
Wall Bracket(SM911)
Upper Connector(SM912)
Upright(SM914)
Upright Bracket Left/ Right(SM917/SM916)
Hook Carrier(SM915)
Plastic Carrier Cover(SM923)
#20 Nut(SR314)
#10 Nut(SR312)
#20 Bolt(SR313)
#10 Bolt(SR311) Wood Screw
(SR315)
M1 Master Cabinet System Exploded View
This page illustrates how the RESTORE M1 Master Cabinet Systemis put together. This is to be used as reference for the instructionmanual
5

Cabinet
Cabinet Assembly
Requirements:
6
STEP 4
C
A
C
If you need technical support please call us at 1-800-883-9919
STEP 3
A
BB
STEP 2
Place the joint lock to the two skirt panels.Make sure the arrows on the lock facetowards the hole on the top of the panel.
Place the two skirt panels to the bottom panel.Turn the lock clockwise to lock and tightenthe panels together.
Secure the joint locks to the bottom paneland the joint pins and wood pegs to the left panel only.
B
B
B
A
A
STEP 1
Secure joint pins and wood pegs onto thebottom panel.
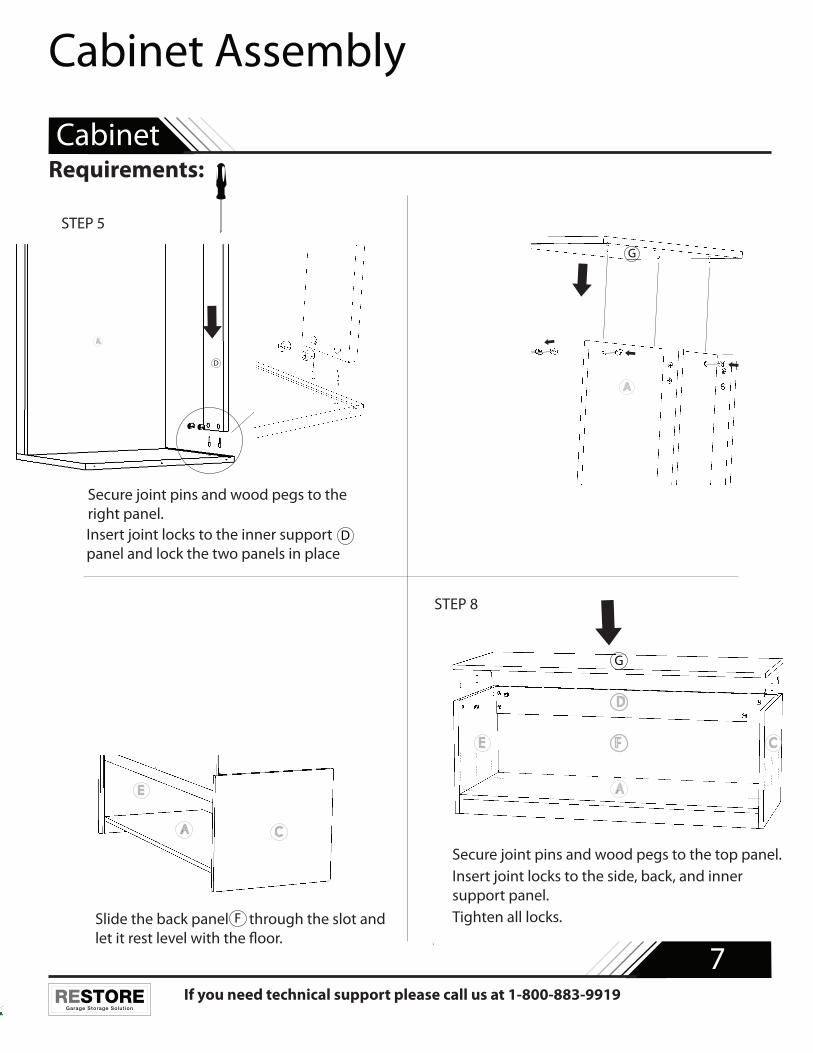
STEP 7
Slide the back panel through the slot and
A
E
C
F
F
STEP 6
Secure joint pin and wood pegs to the left panel.Insert joint locks to inner support and bottom pannel.Attach left panel to the inner supportand bottom panel. Tighten all joint locks.
G
G
AD
STEP 5
Secure joint pins and wood pegs to the right panel.Insert joint locks to the inner supportpanel and lock the two panels in place
D
A
D
Cabinet
Cabinet Assembly
Requirements:
7
STEP 8
Secure joint pins and wood pegs to the top panel.Insert joint locks to the side, back, and innersupport panel.Tighten all locks.
G
E CF
A
D
If you need technical support please call us at 1-800-883-9919

Cabinet
Cabinet Assembly
Requirements:
8If you need technical support please call us at 1-800-883-9919
STEP 12
Connect the other end of the lift to the doorwith #4 screws.Detach the gas assist head plate from the mainassembly.
STEP 11
Attach the gas assisted lift plate to the cabinet body with #4 screws.Than secure the piston body to the gas assisted lift plate.
“Click”
STEP 10
Secure the cabinet door hinge to the cabinet bodywith #4 screw
Place the cabinet on its back
STEP 9

Cabinet
Cabinet Assembly
Requirements:
9If you need technical support please call us at 1-800-883-9919
STEP 14
Secure the cabinet bracket with #20 long bolt and #20 nutto the back panel and the inner support panel.Please make sure the #20 nut is secured to the inside ofthe cabinet and washers are placed where hardwaremakes contact with the wood.
STEP 13
Secure #4 screws through the back panel, into the bottom panel
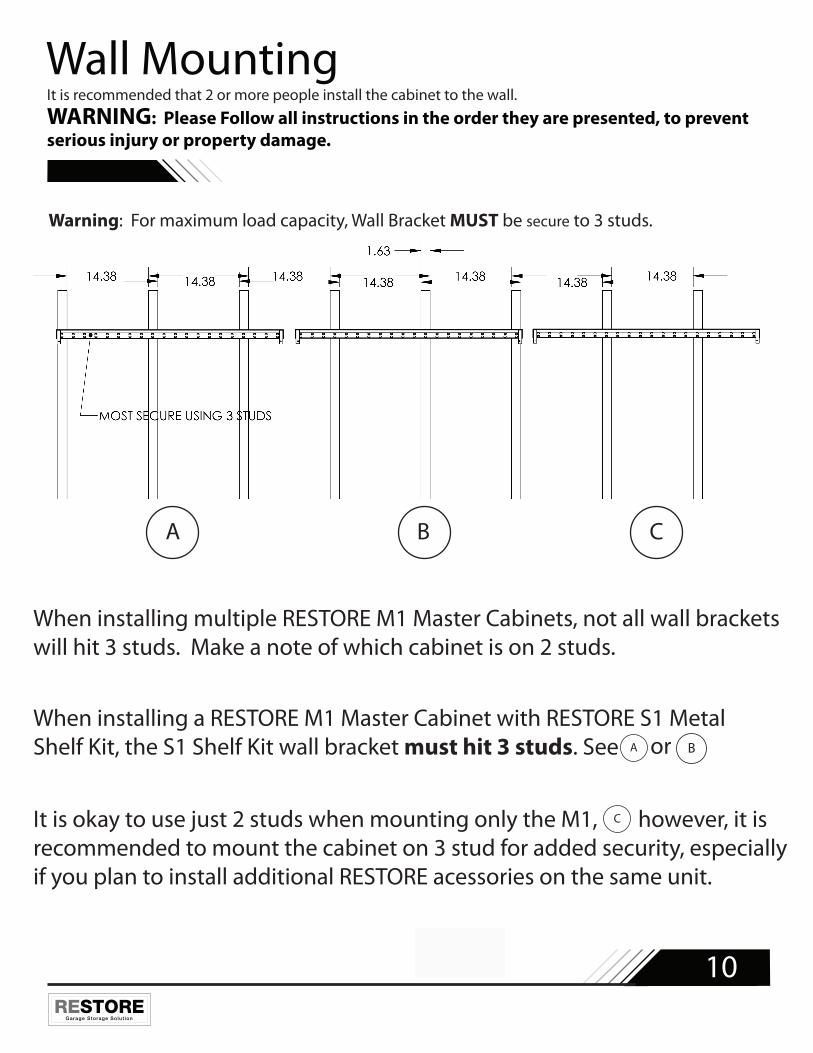
Wall MountingWARNING: Please Follow all instructions in the order they are presented, to prevent serious injury or property damage.
It is recommended that 2 or more people install the cabinet to the wall.
A B C
A B
When installing a RESTORE M1 Master Cabinet with RESTORE S1 MetalShelf Kit, the S1 Shelf Kit wall bracket must hit 3 studs. See or
It is okay to use just 2 studs when mounting only the M1, however, it is recommended to mount the cabinet on 3 stud for added security, especiallyif you plan to install additional RESTORE acessories on the same unit.
When installing multiple RESTORE M1 Master Cabinets, not all wall bracketswill hit 3 studs. Make a note of which cabinet is on 2 studs.
C
Warning: For maximum load capacity, Wall Bracket MUST be secure to 3 studs.
10

Wall Mounting
Requirements:
11
WARNING: Please Follow all instructions in the order they are presented or serious injury or even death may occur.
It is recommended that 2 or more people are used to install cabinet to the wall.
Wall
Floor
Ceiling
If you need technical support please call us at 1-800-883-9919
STEP 4
Slide upper connectors to the wall bracket
STEP 3
Wood screws
Drywall Anchors
Note: Use two wood screws per studand at least one anchor between stud.
STEP 2
of the wood studs. Mark the center of the stud.
WoodStud
WoodStud
Find and mark 3 studs
STEP 1
5-6ft.

Wall Mounting
Requirements:
12
WARNING: Please Follow all instructions in the order they are presented or serious injury or even death may occur.
It is recommended that 2 or more people are used to install cabinet to the wall.
If you need technical support please call us at 1-800-883-9919
STEP 8
Lift the cabinet, (with two people) and make sure the wall bracket and the cabinet bracket hooks together.
STEP 7
Attach the hook carrier assembly to desired heightand secure it to the middle stud with two wood screws
STEP 6
Take the upright bracket and connect them to thehook carrier using four #20 nut and bolts
STEP 5
x2
Line up the uprights with the upper connectorand the wall bracket and use the #20 nut and bolt tosecure it all together.

Wall Mounting
Requirements:
13
WARNING: Please Follow all instructions in the order they are presented or serious injury or even death may occur.
It is recommended that 2 or more people are used to install cabinet to the wall.
If you need technical support please call us at 1-800-883-9919
STEP 10
Secure the blind bracket with #4 screw.Place the blind into the blind bracket.
bracket before installing.
2 in
STEP 9
Drill two wood screws into the stud from theinside of the cabinet.
Wall Mounting
Requirements:
14
WARNING: Please Follow all instructions in the order they are presented or serious injury or even death may occur.
It is recommended that 2 or more people are used to install cabinet to the wall.
If you need technical support please call us at 1-800-883-9919
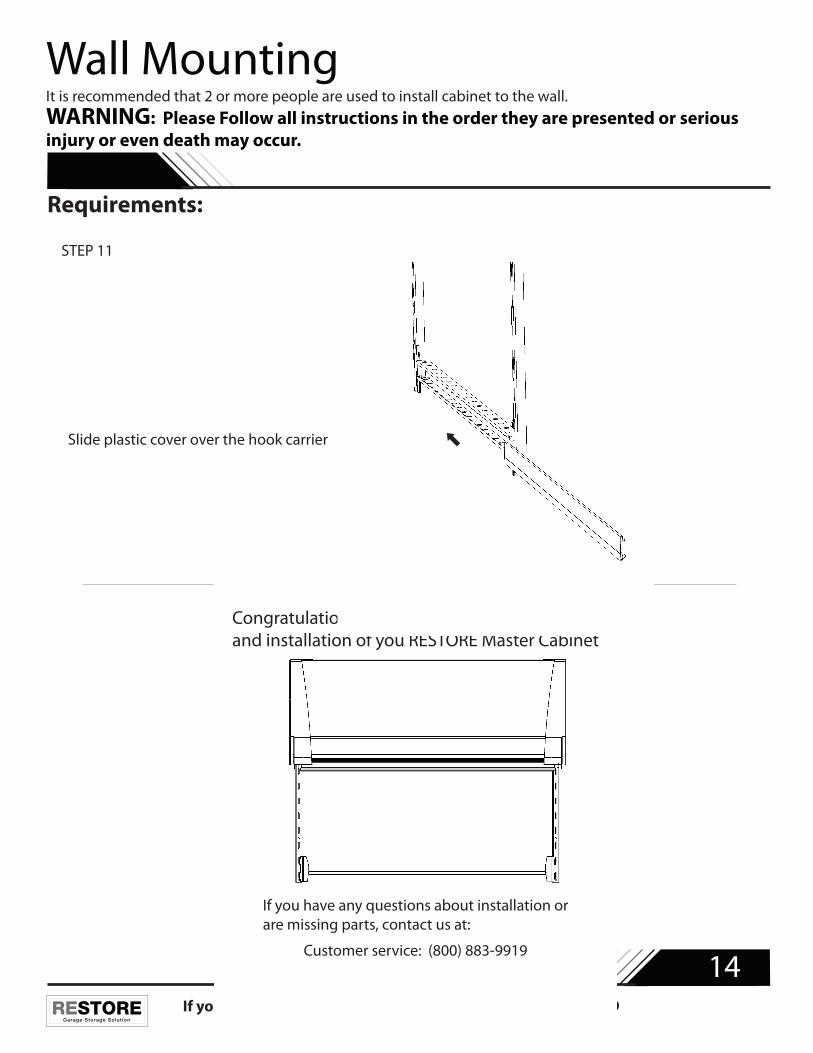
Congratulations on successfully assembling and installation of you RESTORE Master Cabinet
If you have any questions about installation orare missing parts, contact us at:
Customer service: (800) 883-9919
STEP 11
Slide plastic cover over the hook carrier

AUTOMOTIVE INNOVATIONS INC., Totowa, NJ 07512aii-usa.com
All Rights ReservedRS420