![CIVIL CASES] [FRESH (FOR ADMISSION) - CRIMINAL CASES]](https://static.fdokumen.com/doc/165x107/633739bdd63e7c790105b19d/civil-cases-fresh-for-admission-criminal-cases-1682892728.jpg)
RECORD TEST CASES WITH SELENIUM IDE - WordPress.com
21
1 RECORD TEST CASES WITH SELENIUM IDE 1. Introduction .............................................................................................................................................................. 2 1.1. Test Automation for Web Applications ................................................................................................................ 2 1.2. Introducing Selenium ............................................................................................................................................ 2 2. Selenium IDE ............................................................................................................................................................. 4 2.1. Introduction .......................................................................................................................................................... 4 2.2. Installing the IDE ................................................................................................................................................... 4 2.3. Opening the IDE .................................................................................................................................................... 5 2.4. IDE Features .......................................................................................................................................................... 6 2.5. Building Test Cases ................................................................................................................................................ 8 2.5.1. Recording .......................................................................................................................................................... 8 2.5.2. Adding Verifications and Asserts With the Context Menu ............................................................................... 9 2.5.3. Editing ............................................................................................................................................................... 9 2.6. Running Test Cases ............................................................................................................................................. 10 2.7. Using Base URL to Run Test Cases in Different Domains .................................................................................... 11 2.8. Selenium Commands – “Selenese” ..................................................................................................................... 11 2.9. Script Syntax........................................................................................................................................................ 12 2.10. Test Suites ....................................................................................................................................................... 12 2.11. Commonly Used Selenium Commands ........................................................................................................... 12 2.12. Assertion or Verification? ............................................................................................................................... 13 2.13. Locating Elements ........................................................................................................................................... 13 2.13.1. Locating by Identifier ...................................................................................................................................... 13 2.13.2. Locating by Id .................................................................................................................................................. 14 2.13.3. Locating by Name............................................................................................................................................ 14 2.13.4. Locating by XPath ............................................................................................................................................ 14 2.13.5. Locating Hyperlinks by Link Text ..................................................................................................................... 15 2.13.6. Locating by DOM ............................................................................................................................................. 15 2.13.7. Locating by CSS ............................................................................................................................................... 16 2.14. Matching Text Patterns ................................................................................................................................... 16 2.15. How to loop tests in Selenium IDE? ................................................................................................................ 17 2.15.1. Add file .js........................................................................................................................................................ 17 2.15.2. How to loop..................................................................................................................................................... 20 Reference........................................................................................................................................................................ 21
-
Upload
khangminh22 -
Category
Documents
-
view
0 -
download
0
Transcript of RECORD TEST CASES WITH SELENIUM IDE - WordPress.com

1
RECORD TEST CASES WITH SELENIUM IDE
1. Introduction .............................................................................................................................................................. 2
1.1. Test Automation for Web Applications ................................................................................................................ 2
1.2. Introducing Selenium ............................................................................................................................................ 2
2. Selenium IDE ............................................................................................................................................................. 4
2.1. Introduction .......................................................................................................................................................... 4
2.2. Installing the IDE ................................................................................................................................................... 4
2.3. Opening the IDE .................................................................................................................................................... 5
2.4. IDE Features .......................................................................................................................................................... 6
2.5. Building Test Cases ................................................................................................................................................ 8
2.5.1. Recording .......................................................................................................................................................... 8
2.5.2. Adding Verifications and Asserts With the Context Menu ............................................................................... 9
2.5.3. Editing ............................................................................................................................................................... 9
2.6. Running Test Cases ............................................................................................................................................. 10
2.7. Using Base URL to Run Test Cases in Different Domains .................................................................................... 11
2.8. Selenium Commands – “Selenese” ..................................................................................................................... 11
2.9. Script Syntax ........................................................................................................................................................ 12
2.10. Test Suites ....................................................................................................................................................... 12
2.11. Commonly Used Selenium Commands ........................................................................................................... 12
2.12. Assertion or Verification? ............................................................................................................................... 13
2.13. Locating Elements ........................................................................................................................................... 13
2.13.1. Locating by Identifier ...................................................................................................................................... 13
2.13.2. Locating by Id .................................................................................................................................................. 14
2.13.3. Locating by Name ............................................................................................................................................ 14
2.13.4. Locating by XPath ............................................................................................................................................ 14
2.13.5. Locating Hyperlinks by Link Text ..................................................................................................................... 15
2.13.6. Locating by DOM ............................................................................................................................................. 15
2.13.7. Locating by CSS ............................................................................................................................................... 16
2.14. Matching Text Patterns ................................................................................................................................... 16
2.15. How to loop tests in Selenium IDE? ................................................................................................................ 17
2.15.1. Add file .js ........................................................................................................................................................ 17
2.15.2. How to loop ..................................................................................................................................................... 20
Reference ........................................................................................................................................................................ 21

2
1. Introduction
1.1. Test Automation for Web Applications
- Many, perhaps most, software applications today are written as web-based applications to be run in an Internet browser. Many organizations are using some form of Agile methodology.
- Test automation is frequently becoming a requirement for software projects.
- Test automation means using a software tool to run repeatable tests against the application to be tested. For regression testing this provides that responsiveness.
- There are many advantages to test automation.
Most are related to the repeatability of the tests and the speed at which the tests can be executed.
There are a number of commercial and open source tools available for assisting with the development of test automation.
- It is not always advantageous to automate test cases. There are times when manual testing may be more appropriate.
1.2. Introducing Selenium
- Selenium is possibly the most widely-used open source tool for assisting with the development of test automation. It is suitable for web applications run on different browsers and platforms.
- Selenium is not just a single tool but a suite of software, each catering to different testing needs of an organization. It has four components. Each has a specific role.
Selenium Integrated Development Environment (IDE)
Selenium Remote Control (RC) or Selenium 1
Selenium WebDriver or Selenium 2
Selenium Grid
At the moment, Selenium RC and WebDriver are merged into a single framework to form Selenium 2. Selenium 1, by the way, refers to Selenium RC.

3
How Selenium works from IDE to RC or Grid
4
- Choosing your Selenium tool:
Many people get started with Selenium IDE. Using the IDE you can create simple tests quickly, sometimes within seconds.
To effectively use Selenium you will need to build and run your tests using either Selenium 2 or Selenium 1 in conjunction with one of the supported programming languages.
2. Selenium IDE
2.1. Introduction
- This is the tool you use to develop your Selenium test cases.
- It’s an easy-to-use Firefox plug-in and is generally the most efficient way to develop test cases.
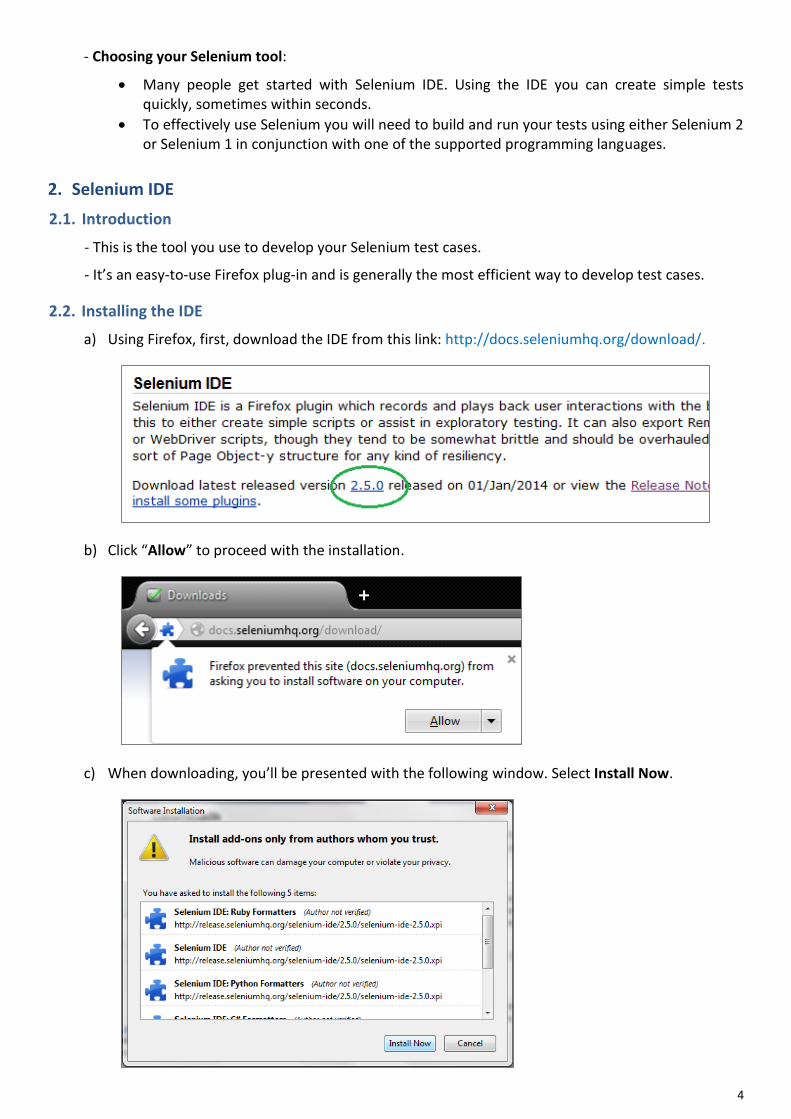
2.2. Installing the IDE
a) Using Firefox, first, download the IDE from this link: http://docs.seleniumhq.org/download/.
b) Click “Allow” to proceed with the installation.
c) When downloading, you’ll be presented with the following window. Select Install Now.

5
d) Then, click Restart Now.
e) After Firefox reboots you will find the Selenium-IDE listed under the Firefox Tools menu.
2.3. Opening the IDE
- There are two ways to open:
Select it from the Firefox Tools menu.
Or use hot key: Ctrl + Alt + S.
- Selenium IDE should launch as shown below:

6
2.4. IDE Features
- Menu Bar
File: has options for Test Case and Test Suite (suite of Test Cases).
Edit: copy, paste, delete, undo, and select all operations for editing the commands in your
test case.
Options: allows the changing of settings.
Help: is the standard Firefox Help menu; only item on this menu - UI - Element Documentation - pertains to Selenium IDE.
- Toolbar
Speed Control: controls how fast your test case runs.
Run All: Runs the entire test suite when a test suite with multiple test cases is loaded.
Run: Runs the currently selected test. When only a single test is loaded this button and the Run All button have the same effect.
Pause/Resume: Allows stopping and re-starting of a running test case.
Step: Allows you to “step” through a test case by running it one command at a time. Use for debugging test cases.
Apply Rollup Rules: This advanced feature allows repetitive sequences of Selenium commands to be grouped into a single action. Detailed documentation on rollup rules can be found in the UI-Element Documentation on the Help menu.
Record: Records the user’s browser actions.

7
- Test Case Pane
Your script is displayed in the test case pane.
The Command, Target, and Value entry fields display the currently selected command along with its parameters.
- Log/Reference/UI-Element/Rollup Pane
Log: Show error messages and information massages when running the test case.
Reference: Display documentation on the current command.
UI-Element and Rollup: Detailed information on these two panes (which cover advanced features) can be found in the UIElement Documentation on the Help menu of Selenium-IDE.

8
2.5. Building Test Cases
2.5.1. Recording
a) Open Selenium IDE and browser. We start at the page https://www.google.com.vn/ for example.
b) Verify if the red button is selected. If not, click it. c) Type something in search box, ex: “wikipedia” and click button Search. d) Now you can see the Selenium record some commands.
e) Click the first result “Wikipadia”. f) In the next page, click on “English”. g) Click File > Save Test Case > Type a name > Click Save.

9
h) Now, just try to run it. Move the green circle to Slow to easy follow. Click on button . i) This is the result of this test case:
j) That is the simple example about recording test case.
2.5.2. Adding Verifications and Asserts With the Context Menu
a) Now, we try to verify and assert with context menu. Right click on the space, choose option like this (verifyTitle …):
b) The test case will add one more command. Just run again and see the result.
2.5.3. Editing
- You can insert Command or Comment by right click on the table and choose that menu.
- Try to insert a new command.
a) Right click on the last blank row. b) Select Insert New Command.

10
c) Enter some information like this:
d) Then, click button Select to add. e) Run Test Case again and see the result.
- You also edit the Command/Comment, Target or Value. Simply select the line to be changed and edit it using the Command, Target, and Value fields.
2.6. Running Test Cases
The IDE allows many options for running your test case. You can run a test case all at once, stop and start it, run it one line at a time, run a single command you are currently developing, and you can do a batch run of an entire test suite. Execution of test cases is very flexible in the IDE.
Run a Test Case
Click the Run button to run the currently displayed test case.
Run a Test Suite
Click the Run All button to run all the test cases in the currently loaded test suite.
Stop and Start
The Pause button can be used to stop the test case while it is running. The icon of this button then changes to indicate the Resume button. To continue click Resume.

11
Stop in the Middle
You can set a breakpoint in the test case to cause it to stop on a particular command. This is useful for debugging your test case. To set a breakpoint, select a command, right-click, and from the context menu select Toggle Breakpoint.
Start from the Middle
You can tell the IDE to begin running from a specific command in the middle of the test case. This also is used for debugging. To set a startpoint, select a command, right-click, and from the context menu select Set/Clear Start Point.
Run Any Single Command
Double-click any single command to run it by itself. This is useful when writing a single command. It lets you immediately test a command you are constructing, when you are not sure if it is correct. You can double-click it to see if it runs correctly. This is also available from the context menu.
2.7. Using Base URL to Run Test Cases in Different Domains
- For example, the test case below would be run against http://news.portal.com/about.html:
- This same test case with a modified Base URL setting would be run against http://beta.news.portal.com/about.html:
2.8. Selenium Commands – “Selenese”
- Selenium commands, often called selenese, are the set of commands that run your tests. A sequence of these commands is a test script.
- The Command Reference lists all the available commands, reference this link: http://release.seleniumhq.org/selenium-core/1.0.1/reference.html.
- A command tells Selenium what to do. Selenium commands come in three “flavors”: Actions, Accessors, and Assertions.

12
a. Actions are commands that generally manipulate the state of the application. They do things like “click this link” and “select that option”. Many Actions can be called with the “AndWait” suffix, e.g. “clickAndWait”.
b. Accessors examine the state of the application and store the results in variables, e.g. “storeTitle”. They are also used to automatically generate Assertions.
c. Assertions are like Accessors, but they verify that the state of the application conforms to what is expected. Examples include “make sure the page title is X” and “verify that this checkbox is checked”.
2.9. Script Syntax
- Selenium commands are simple. They consist of the command and two parameters. For example:
verifyText //div//a[2] Login
- The parameters are not always required. It depends on the command. Here are a couple more examples:
goBackAndWait
verifyTextPresent Welcome to My Home Page
type id=phone (555) 666-7066
type id=address1 ${myVariableAddress}
- Parameters vary, however they are typically:
a locator for identifying a UI element within a page.
a text pattern for verifying or asserting expected page content
a text pattern or a selenium variable for entering text in an input field or for selecting an option from an option list.
2.10. Test Suites
- A test suite is a collection of tests. Often one will run all the tests in a test suite as one continuous batch-job.
- When using Selenium-IDE, test suites also can be defined using a simple HTML file. The syntax again is simple. An HTML table defines a list of tests where each row defines the filesystem path to each test. An example tells it all.
<html>
<head>
<title>Test Suite Function Tests - Priority 1</title>
</head>
<body>
<table>
<tr><td><b>Suite Of Tests</b></td></tr>
<tr><td><a href="./Login.html">Login</a></td></tr>
<tr><td><a href="./SearchValues.html">Test Searching for Values</a></td></tr>
<tr><td><a href="./SaveValues.html">Test Save</a></td></tr>
</table>
</body>
</html>
- A file similar to this would allow running tests all at once, one after another, from the Selenium IDE.
2.11. Commonly Used Selenium Commands
To conclude our introduction of Selenium, we’ll show you a few typical Selenium commands. These are probably the most commonly used commands for building tests.
13
open: opens a page using a URL.
click/clickAndWait: performs a click operation, and optionally waits for a new page to load.
verifyTitle/assertTitle: verifies an expected page title.
verifyTextPresent: verifies expected text is somewhere on the page.
verifyElementPresent: verifies an expected UI element, as defined by its HTML tag, is present on the page.
verifyText: verifies expected text and its corresponding HTML tag are present on the page.
verifyTable: verifies a table’s expected contents.
waitForPageToLoad: pauses execution until an expected new page loads. Called automatically when clickAndWait is used.
waitForElementPresent: pauses execution until an expected UI element, as defined by its HTML tag, is present on the page.
2.12. Assertion or Verification?
- Choosing between “assert” and “verify” comes down to convenience and management of failures.
Effectively an “assert” will fail the test and abort the current test case.
Whereas a “verify” will fail the test and continue to run the test case.
- The best use of this feature is to logically group your test commands, and start each group with an “assert” followed by one or more “verify” test commands. An example follows:
Command Target Value
open /download/
assertTitle Downloads
verifyText //h2 Downloads
assertTable 1.2.1 Selenium IDE
verifyTable 1.2.2 June 3, 2008
verifyTable 1.2.3 1.0 beta 2
2.13. Locating Elements
2.13.1. Locating by Identifier
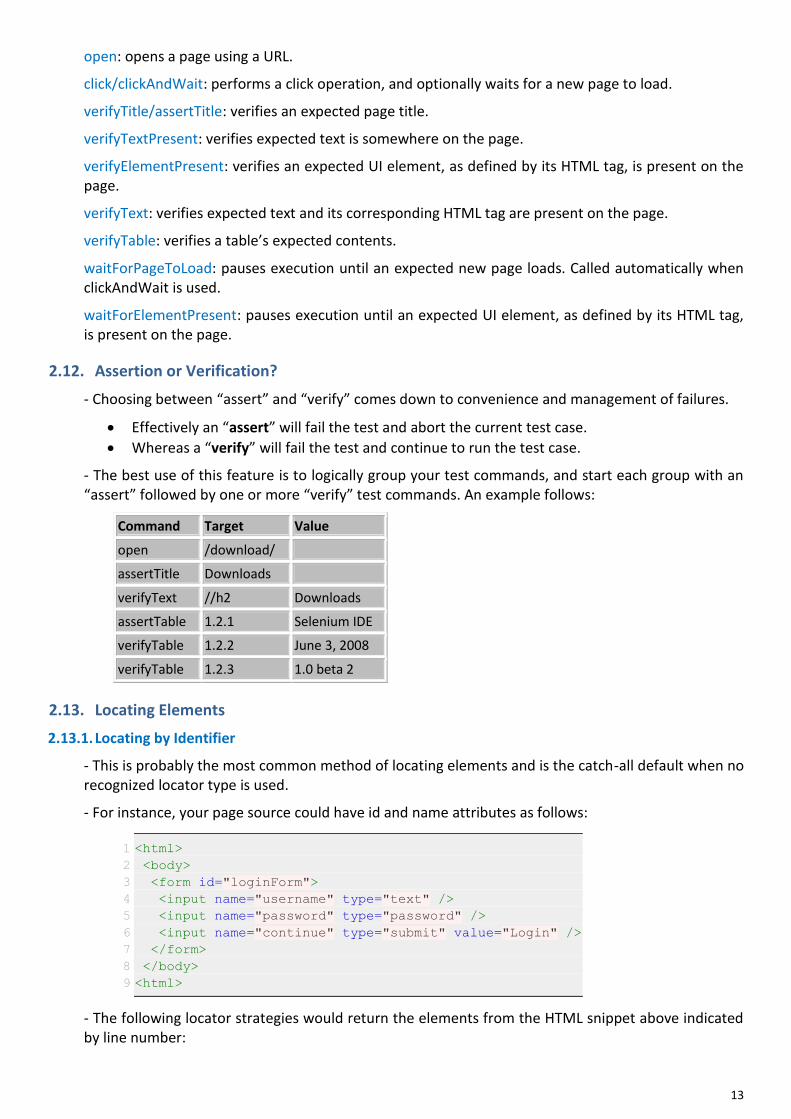
- This is probably the most common method of locating elements and is the catch-all default when no recognized locator type is used.
- For instance, your page source could have id and name attributes as follows:
1
2
3
4
5
6
7
8
9
<html>
<body>
<form id="loginForm">
<input name="username" type="text" />
<input name="password" type="password" />
<input name="continue" type="submit" value="Login" />
</form>
</body>
<html>
- The following locator strategies would return the elements from the HTML snippet above indicated by line number:

14
identifier=loginForm (3)
identifier=password (5)
identifier=continue (6)
- Since the identifier type of locator is the default, the identifier= in the first three examples above is not necessary.
2.13.2. Locating by Id
- This type of locator is more limited than the identifier locator type, but also more explicit. Use this when you know an element’s id attribute.
1
2
3
4
5
6
7
8
9
10
<html>
<body>
<form id="loginForm">
<input name="username" type="text" />
<input name="password" type="password" />
<input name="continue" type="submit" value="Login" />
<input name="continue" type="button" value="Clear" />
</form>
</body>
<html>
id=loginForm (3)
2.13.3. Locating by Name
- The name locator type will locate the first element with a matching name attribute.
1
2
3
4
5
6
7
8
9
10
<html>
<body>
<form id="loginForm">
<input name="username" type="text" />
<input name="password" type="password" />
<input name="continue" type="submit" value="Login" />
<input name="continue" type="button" value="Clear" />
</form>
</body>
<html>
name=username (4)
name=continue value=Clear (7)
name=continue Clear (7)
name=continue type=button (7)
2.13.4. Locating by XPath
- XPath is the language used for locating nodes in an XML document. As HTML can be an implementation of XML (XHTML), Selenium users can leverage this powerful language to target elements in their web applications.
- Since only xpath locators start with “//”, it is not necessary to include the xpath= label when specifying an XPath locator.
1
2
3
4
5
6
7
8
9
10
<html>
<body>
<form id="loginForm">
<input name="username" type="text" />
<input name="password" type="password" />
<input name="continue" type="submit" value="Login" />
<input name="continue" type="button" value="Clear" />
</form>
</body>
<html>

15
xpath=/html/body/form[1] (3) - Absolute path (would break if the HTML was changed only slightly)
//form[1] (3) - First form element in the HTML
xpath=//form[@id='loginForm'] (3) - The form element with attribute named ‘id’ and the value ‘loginForm’
xpath=//form[input/@name='username'] (3) - First form element with an input child element with attribute named ‘name’ and the value ‘username’
//input[@name='username'] (4) - First input element with attribute named ‘name’ and the value ‘username’
//form[@id='loginForm']/input[1] (4) - First input child element of the form element with attribute named ‘id’ and the value ‘loginForm’
//input[@name='continue'][@type='button'] (7) - Input with attribute named ‘name’ and the value ‘continue’ and attribute named ‘type’ and the value ‘button’
//form[@id='loginForm']/input[4] (7) - Fourth input child element of the form element with attribute named ‘id’ and value ‘loginForm’
2.13.5. Locating Hyperlinks by Link Text
- This is a simple method of locating a hyperlink in your web page by using the text of the link. If two links with the same text are present, then the first match will be used.
1
2
3
4
5
6
7
<html>
<body>
<p>Are you sure you want to do this?</p>
<a href="continue.html">Continue</a>
<a href="cancel.html">Cancel</a>
</body>
<html>
link=Continue (4)
link=Cancel (5)
2.13.6. Locating by DOM
- Since only dom locators start with “document”, it is not necessary to include the dom= label when specifying a DOM locator.
1
2
3
4
5
6
7
8
9
10
<html>
<body>
<form id="loginForm">
<input name="username" type="text" />
<input name="password" type="password" />
<input name="continue" type="submit" value="Login" />
<input name="continue" type="button" value="Clear" />
</form>
</body>
<html>
dom=document.getElementById('loginForm') (3)
dom=document.forms['loginForm'] (3)
dom=document.forms[0] (3)
document.forms[0].username (4)
document.forms[0].elements['username'] (4)
document.forms[0].elements[0] (4)
document.forms[0].elements[3] (7)

16
2.13.7. Locating by CSS
- CSS (Cascading Style Sheets) is a language for describing the rendering of HTML and XML documents. CSS uses Selectors for binding style properties to elements in the document. These Selectors can be used by Selenium as another locating strategy.
1
2
3
4
5
6
7
8
9
10
<html>
<body>
<form id="loginForm">
<input class="required" name="username" type="text" />
<input class="required passfield" name="password" type="password" />
<input name="continue" type="submit" value="Login" />
<input name="continue" type="button" value="Clear" />
</form>
</body>
<html>
css=form#loginForm (3)
css=input[name="username"] (4)
css=input.required[type="text"] (4)
css=input.passfield (5)
css=#loginForm input[type="button"] (7)
css=#loginForm input:nth-child(2) (5)
2.14. Matching Text Patterns
Regular Expression Patterns
PATTERN MATCH
. any single character
[ ] character class: any single character that appears inside the brackets
* quantifier: 0 or more of the preceding character (or group)
+ quantifier: 1 or more of the preceding character (or group)
? quantifier: 0 or 1 of the preceding character (or group)
{1,5} quantifier: 1 through 5 of the preceding character (or group)
| alternation: the character/group on the left or the character/group on the right
( ) grouping: often used with alternation and/or quantifier
Example:
Command Target Value
click link=regexp:Film.*Television Department
verifyTitle regexp:.*Film.*Television.*

17
2.15. How to loop tests in Selenium IDE?
If you need to perform the same repetitive task on a bunch of nodes you can script the operation.
2.15.1. Add file .js
a) Use an editor and copy the following code as JavaScript (*.js) and name it (ex: loop-seleniumIDE.js) or download from:
https://drive.google.com/file/d/0B0xTKZHqvT0lamRaTkNuT0JIcXc/edit?usp=sharing.
var gotoLabels= {};
var whileLabels = {};
// overload the original Selenium reset function
Selenium.prototype.reset = function() {
// reset the labels
this.initialiseLabels();
// proceed with original reset code
this.defaultTimeout = Selenium.DEFAULT_TIMEOUT;
this.browserbot.selectWindow("null");
this.browserbot.resetPopups();
}
/*
* --- Initialize Conditional Elements --- *
* Run through the script collecting line numbers of all conditional elements
* There are three a results arrays: goto labels, while pairs and forEach pairs
*
*/
Selenium.prototype.initialiseLabels = function()
{
gotoLabels = {};
whileLabels = { ends: {}, whiles: {} };
var command_rows = [];
var numCommands = testCase.commands.length;
for (var i = 0; i < numCommands; ++i) {
var x = testCase.commands[i];
command_rows.push(x);
}
var cycles = [];
var forEachCmds = [];
for( var i = 0; i < command_rows.length; i++ ) {
if (command_rows[i].type == 'command')
switch( command_rows[i].command.toLowerCase() ) {
case "label":
gotoLabels[ command_rows[i].target ] = i;
break;
case "while":
case "endwhile":
cycles.push( [command_rows[i].command.toLowerCase(), i] )
break;
case "foreach":
case "endforeach":
forEachCmds.push( [command_rows[i].command.toLowerCase(), i] )
break;
}
}

18
var i = 0;
while( cycles.length ) {
if( i >= cycles.length ) {
throw new Error( "non-matching while/endWhile found" );
}
switch( cycles[i][0] ) {
case "while":
if( ( i+1 < cycles.length ) && ( "endwhile" == cycles[i+1][0] ) ) {
// pair found
whileLabels.ends[ cycles[i+1][1] ] = cycles[i][1];
whileLabels.whiles[ cycles[i][1] ] = cycles[i+1][1];
cycles.splice( i, 2 );
i = 0;
} else ++i;
break;
case "endwhile":
++i;
break;
}
}
}
Selenium.prototype.continueFromRow = function( row_num )
{
if(row_num == undefined || row_num == null || row_num < 0) {
throw new Error( "Invalid row_num specified." );
}
testCase.debugContext.debugIndex = row_num;
}
// do nothing. simple label
Selenium.prototype.doLabel = function(){};
Selenium.prototype.doGotoLabel = function( label )
{
if( undefined == gotoLabels[label] ) {
throw new Error( "Specified label '" + label + "' is not found." );
}
this.continueFromRow( gotoLabels[ label ] );
};
Selenium.prototype.doGoto = Selenium.prototype.doGotoLabel;
Selenium.prototype.doGotoIf = function( condition, label )
{
if( eval(condition) ) this.doGotoLabel( label );
}
Selenium.prototype.doWhile = function( condition )
{
if( !eval(condition) ) {
var last_row = testCase.debugContext.debugIndex;
var end_while_row = whileLabels.whiles[ last_row ];
if( undefined == end_while_row ) throw new Error( "Corresponding 'endWhile' is not
found." );
this.continueFromRow( end_while_row );
19
}
}
Selenium.prototype.doEndWhile = function()
{
var last_row = testCase.debugContext.debugIndex;
var while_row = whileLabels.ends[ last_row ] - 1;
if( undefined == while_row ) throw new Error( "Corresponding 'While' is not found." );
this.continueFromRow( while_row );
}
Selenium.prototype.doPush= function(value, varName)
{
if(!storedVars[varName]) {
storedVars[varName] = new Array();
}
if(typeof storedVars[varName] !== 'object') {
throw new Error("Cannot push value onto non-array " + varName);
} else {
storedVars[varName].push(value);
}
}
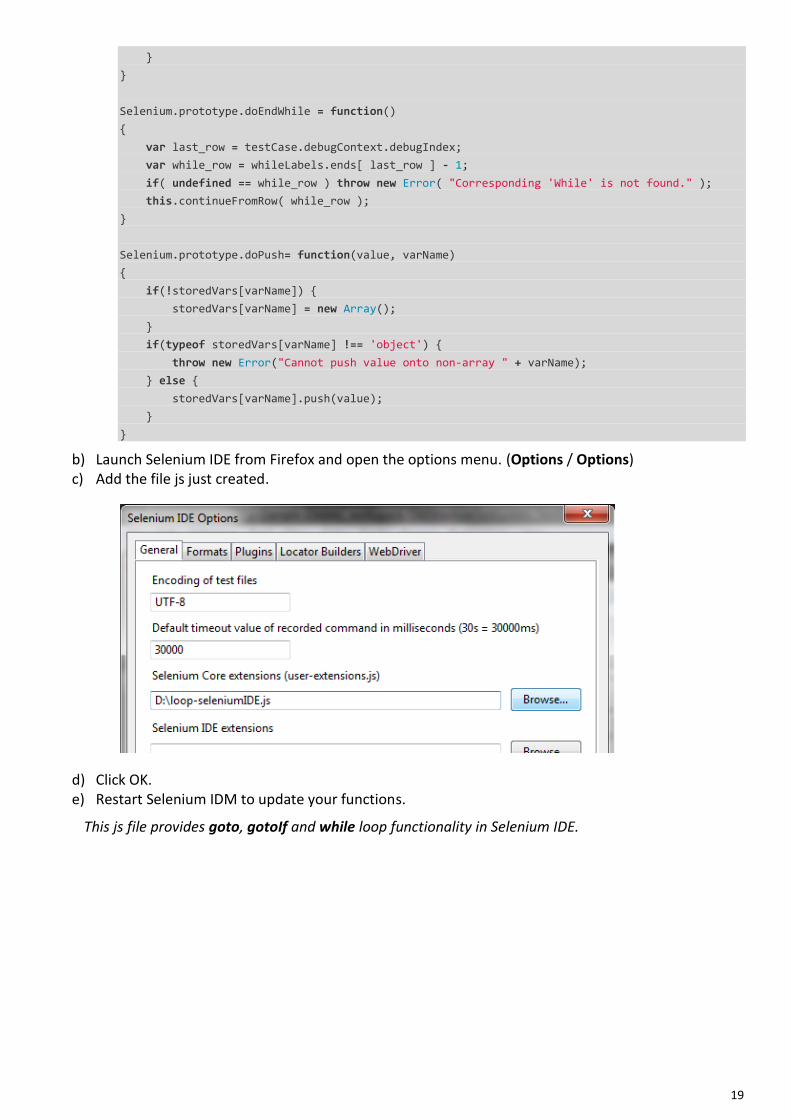
b) Launch Selenium IDE from Firefox and open the options menu. (Options / Options) c) Add the file js just created.
d) Click OK. e) Restart Selenium IDM to update your functions.
This js file provides goto, gotoIf and while loop functionality in Selenium IDE.

20
2.15.2. How to loop
a) This is example test cases.
b) Click on tag Source.
c) Insert the following code into 1.
<tr> <td>getEval</td> <td>storedVars['y'] = 5;</td> <td></td> </tr> <tr> <td>store</td>

21
<td>-1</td> <td>x</td> </tr> <tr> <td>label</td> <td>top</td> <td></td> </tr> <tr> <td>getEval</td> <td>storedVars['x'] = ${x} + 1 ;</td> <td></td> </tr> <tr> <td>echo</td> <td>Running iteration ${x} of ${y}.</td> <td></td> </tr>
d) Insert the following code into 2.
<tr> <td>gotoIf</td> <td>${x} < ${y}-1</td> <td>top</td> </tr>
e) Click on tab Table, you will see some change in the command table.
f) Run it and see the result. Your tests will repeat 5 times as the below image. g) Change 5 to another number to set how many times these cases repeat.
Note: To set it loop forever, change 1 to 0 as the above image.
Reference
[1] Selenium Documentation: http://docs.seleniumhq.org/docs/
[2] Introduction to Selenium: http://guru99.com/introduction-to-selenium.html
[3] Automating boring tasks with Selenium IDE: http://www.computerminds.co.uk/automating-boring-tasks-selenium-ide