
Integrated Development Environment (IDE) Guide - Infineon ...
Upload
khangminh22Category
view
4download
0


NetBeansIDE8Cookbook

TableofContents
NetBeansIDE8Cookbook
Credits
AbouttheAuthors
AbouttheReviewers
www.PacktPub.com
Supportfiles,eBooks,discountoffers,andmore
WhySubscribe?
FreeAccessforPacktaccountholders
Preface
Whatthisbookcovers
Whatyouneedforthisbook
Whothisbookisfor
Conventions
Readerfeedback
Customersupport
Downloadingtheexamplecode
Downloadingthecolorimagesofthisbook
Errata
Piracy
Questions
1.UsingNetBeansProjects
Introduction
CreatingaJavaapplication
Gettingready
Howtodoit…
Howitworks…
There’smore…
CreatingaMavenapplication
Gettingready

Howtodoit…
Howitworks…
There’smore…
InvokingMavengoals
InvokingcustomMavengoals
UsingadifferentinstallationofMaven
UsingMavenprojects
Gettingready
Howtodoit…
Howitworks…
There’smore…
CreatingaFree-Formapplication
Gettingready
Howtodoit…
Howitworks…
There’smore…
UsingadifferentversionofAnt
Creatingalibrary
Gettingready
Howtodoit…
Howitworks…
There’smore…
ImportinganEclipseproject
Gettingready
Howtodoit…
Howitworks…
There’smore…
SynchronizingEclipse
ErrorswhenimportingEclipseprojects
2.JavaDevelopmentwithNetBeans
Introduction

Creatingapackage
Howtodoit…
Howitworks…
There’smore…
TheFilesexplorer
Automaticcreationofpackages
Creatingaclass
Gettingready
Howtodoit…
Howitworks…
Creatinganinterface
Gettingready
Howtodoit…
Howitworks…
There’smore…
Runningafile
Gettingready
Howtodoit…
Howitworks…
There’smore…
Debuggingaclass
Gettingready
Howtodoit…
Howitworks…
There’smore…
Conditionalbreakpoints
Otherwaystocheckvariablecontent
Differentkindsofdebuggableapplications
Debuggingtheapplicationratherthanaclass
Formattingthecode
Gettingready

Howtodoit…
Howitworks…
Collapsingandexpandingcodefolds
Gettingready
Howtodoit…
Howitworks…
There’smore…
Togglingcomments
Gettingready
Howtodoit…
Howitworks…
Fixingandorganizingimports
Gettingready
Howtodoit…
Howitworks…
There’smore…
Creatingfileheaders
Gettingready
Howtodoit…
There’smore…
ChangingthelookandfeelofNetBeans
Gettingready
Howtodoit…
Howitworks…
There’smore…
3.NetBeansProductivity
Introduction
Creatingaconstructor
Gettingready
Howtodoit…
Howitworks…
There’smore…
Creatingalogger
Gettingready
Howtodoit…
CreatingatoString()method
Gettingready
Howtodoit…
There’smore…
Creatingaproperty
Gettingready
Howtodoit…
Howitworks…
There’smore…
Overridingamethod
Gettingready
Howtodoit…
Howitworks…
Renamerefactoring
Gettingready
Howtodoit…
Howitworks…
There’smore…
Moverefactoring
Gettingready
Howtodoit…
There’smore…
Copyrefactoring
Gettingready
Howtodoit…
There’smore…
Deleterefactoring

Gettingready
Howtodoit…
Howitworks…
There’smore…
Changeparametersrefactoring
Gettingready
Howtodoit…
There’smore
Pullup/pushdownrefactoring
Gettingready
Howtodoit…
Howitworks…
There’smore…
Pulluprefactoring
Extractinterfacerefactoring
Gettingready
Howtodoit…
There’smore…
Extractingsuperclasses
Encapsulatefieldsrefactoring
Gettingready
Howtodoit…
Howitworks…
There’smore…
ReplacingaconstructorwiththeFactorypattern
Gettingready
Howtodoit…
Howitworks…
There’smore…
ReplacingconstructorswiththeBuilderpattern
4.DevelopingDesktopApplicationswithNetBeans

Introduction
CreatingaSwingapplication
Gettingready
Howtodoit…
Howitworks…
There’smore…
Addingcomponentstoaform
Gettingready
Howtodoit…
Howitworks…
There’smore…
Creatingmenus
Gettingready
Howtodoit…
There’smore…
Creatingdialogs
Gettingready
Howtodoit…
Howitworks…
There’smore…
Creatingtoolbars
Gettingready
Howtodoit…
Howitworks…
Respondingtoevents
Gettingready
Howtodoit…
Howitworks…
There’smore…
BuildingadistributableapplicationfromNetBeans
Gettingstarted
Howtodoit…
Howitworks…
There’smore…
5.NetBeansEnterpriseApplicationDevelopment
Introduction
AddingWildFlysupporttoNetBeans
Gettingready
Howtodoit…
Howitworks…
AddingTomEEsupporttoNetBeans
Gettingready
Howtodoit…
Howitworks…
Creatingawebapplication
Gettingready
Howtodoit…
Howitworks…
There’smore
CreatingawebapplicationwithJSFsupport
Gettingready
Howtodoit…
Howitworks…
There’smore
AddingJSFsupporttoawebapplication
Gettingready
Howtodoit…
Howitworks…
There’smore
CreatingaJSFcompositecomponent
Gettingready
Howtodoit…

Howitworks…
There’smore
CreatinganEJB
Gettingready
Howtodoit…
Howitworks…
There’smore
WhatEJBsaredeployed?
CreatingaMessageDrivenEJB
Gettingready
Howtodoit…
Howitworks…
There’smore
Creatingatimer
Gettingready
Howtodoit…
Howitworks…
There’smore
CreatingaRESTwebservice
Gettingready
Howtodoit…
Howitworks…
There’smore
UsingtheChromeConnector
Gettingready
Howtodoit…
There’smore
6.ManagingDatabaseswithNetBeans
Introduction
ConnectingtoJavaDB
Gettingready

Howtodoit…
Howitworks…
There’smore…
RegisteringandmanagingaMySQLServer
Gettingready
Howtodoit…
Howitworks…
There’smore…
Creatingdatabases
Runningtheadministrationtool
ConnectingtoMicrosoftSQLServerandOracle
Gettingready
Howtodoit…
Howitworks…
There’smore…
ConnectingtoanOracledatabase
ConnectingtoPostgreSQL
Gettingready
Howtodoit…
Howitworks…
There’smore…
Connectinganddisconnecting
ManagingaSQLdatabase
Gettingready
Howtodoit…
Howitworks…
There’smore…
Viewingdata
Creatingindexes
Inserting,deleting,andamendingdatagraphically
Exportingschemas

ConnectingtoMongoDB
Gettingready
Howtodoit…
Howitworks…
There’smore…
TheMongoDBshell
7.NetBeansJavaFX
Introduction
CreatingaJavaFXapplication
Gettingready
Howtodoit…
Howitworks…
There’smore…
CreatingalluserinterfacesinFXML
Manuallycreatingcontrollers
GraphicaleditingofFXMLfiles
Gettingready
Howtodoit…
Howitworks…
There’smore…
StylingaJavaFXapplicationwithCSS
Gettingready
Howtodoit…
Howitworks…
CreatingandusingaJavaFXcustomcontrol
Gettingready
Howtodoit…
There’smore…
Deployingaself-containedapplication
Gettingready
Howtodoit…

There’smore…
8.NetBeansMobileDevelopment
Introduction
AddingmobilesupporttoNetBeans
Gettingready
Howtodoit…
Howitworks…
There’smore…
CreatinganMIDPapplication
Gettingready
Howtodoit…
Howitworks…
There’smore…
AddingAndroidsupporttoNetBeans
Gettingready
Howtodoit…
Howitworks…
There’smore…
CreatinganAndroidapplication
Gettingready
Howtodoit…
Howitworks…
9.VersionControl
Introduction
InitializingaGitrepository
Gettingready
Howtodoit…
Howitworks…
There’smore…
InitializingaMercurialrepository
CloningaGitrepository

Gettingready
Howtodoit…
Howitworks…
There’smore…
CloningaMercurialrepository
Updatingtoaspecificrevision
CheckingoutfromaSubversionrepository
Gettingready
Howtodoit…
Howitworks…
There’smore…
ImportingfilesintoaSubversionrepository
UsingCVSfromwithinNetBeans
Gettingthehistoryofafile
Gettingready
Howtodoit…
There’smore…
Committingandpushingcodechanges
Gettingready
Howtodoit…
There’smore…
Managingnewfiles
CreatingaDiffpatch
Gettingready
Howtodoit…
There’smore…
ApplyingaDiffpatch
Branchingarepository
Gettingready
Howtodoit…
There’smore…
10.NetBeansTestingandProfiling
Introduction
InstallingJUnitsupportintoNetBeans
Gettingready
Howtodoit…
Howitworks…
CreatingaJUnittestforanexistingclass
Gettingready
Howtodoit…
Howitworks…
There’smore…
CreatingaJUnittest
Gettingready
Howtodoit…
Howitworks…
There’smore…
CreatingaJUnittestsuite
Gettingready
Howtodoit…
Howitworks…
There’smore…
Runningtests
Gettingready
Howtodoit…
Howitworks…
There’smore…
CreatingaTestNGunittest
Gettingready
Howtodoit…
Howitworks…
Profilinganapplication

Gettingready
Howtodoit…
There’smore…
11.UsingExternalWebServices
Introduction
GettingalistofDeliciousbookmarks
Gettingready
Howtodoit…
Howitworks…
There’smore…
AddingaDeliciousbookmark
Gettingready
Howtodoit…
Howitworks…
There’smore…
GettingalistofrecentphotosonFlickr
Gettingready
Howtodoit…
Howitworks…
There’smore…
GeocodingwithGoogleMaps
Gettingready
Howtodoit…
Howitworks…
Verifyingane-mailaddresswithStrikeIron
Gettingready
Howtodoit…
Howitworks…
There’smore…
AddinganadditionalwebserviceintoNetBeans
Gettingready

Howtodoit…
Howitworks…
There’smore…
12.ExtendingNetBeans
Introduction
CreatingaNetBeansmodule
Gettingready
Howtodoit…
Howitworks…
PackagingaNetBeansmodulefordeployment
Gettingready
Howtodoit…
Howitworks…
There’smore…
Index


NetBeansIDE8Cookbook


NetBeansIDE8CookbookCopyright©2014PacktPublishing
Allrightsreserved.Nopartofthisbookmaybereproduced,storedinaretrievalsystem,ortransmittedinanyformorbyanymeans,withoutthepriorwrittenpermissionofthepublisher,exceptinthecaseofbriefquotationsembeddedincriticalarticlesorreviews.
Everyefforthasbeenmadeinthepreparationofthisbooktoensuretheaccuracyoftheinformationpresented.However,theinformationcontainedinthisbookissoldwithoutwarranty,eitherexpressorimplied.Neithertheauthors,norPacktPublishing,anditsdealersanddistributorswillbeheldliableforanydamagescausedorallegedtobecauseddirectlyorindirectlybythisbook.
PacktPublishinghasendeavoredtoprovidetrademarkinformationaboutallofthecompaniesandproductsmentionedinthisbookbytheappropriateuseofcapitals.However,PacktPublishingcannotguaranteetheaccuracyofthisinformation.
Firstpublished:May2011
Secondedition:October2014
Productionreference:1201014
PublishedbyPacktPublishingLtd.
LiveryPlace
35LiveryStreet
BirminghamB32PB,UK.
ISBN978-1-78216-776-1
www.packtpub.com
CoverimagebyFaizFattohi(<[email protected]>)


CreditsAuthors
DavidSalter
RhawiDantas
Reviewers
RitwikGhoshal
PetrHejl
TusharJoshi
JonathanLermitage
HrushikeshZadgaonkar
CommissioningEditor
MaryJasmineNadar
AcquisitionEditor
NikhilKarkal
ContentDevelopmentEditor
GovindanK
TechnicalEditors
TanviBhatt
SiddhiRane
CopyEditors
RoshniBanerjee
JanbalDharmaraj
AlfidaPaiva
LaxmiSubramanian
ProjectCoordinator
ShipraChawhan
Proofreaders
PaulHindle
ChrisSmith
Indexers
MonicaAjmeraMehta

PriyaSane
ProductionCoordinators
ManuJoseph
KomalRamchandani
ShantanuN.Zagade
CoverWork
ShantanuN.Zagade


AbouttheAuthorsDavidSalterisanenterprisesoftwaredeveloperandarchitectwhohasbeendevelopingsoftwareprofessionallysince1991.HisrelationshipwithJavagoesrightbacktothebeginning,usingJava1.0forwritingdesktopapplicationsandappletsforinteractivewebsites.HehasbeendevelopingenterpriseJavaapplicationsusingbothJavaEE(andJ2EE)andopensourcesolutionssince2001.Hewrotethebook,Seam2.xWebDevelopment,PacktPublishing,andco-authoredthebook,BuildingSOA-BasedCompositeApplicationUsingNetBeansIDE6,PacktPublishing.
Firstandforemost,Iwouldliketothankmywifeandfamilyforputtingupwithmymanyhoursatthecomputerwhilewritingthisbook.Specialthanksandlovetomywifeforallherencouragementandsupport.
I’dalsoliketosaythankstoallthepeopleatPacktPublishingforhelpingmewiththisbook.ThankyouNikhilforyourencouragementfromthebeginning.ThanksalsotoKinjalandGovindanforyourhardworkhelpingmetocompletethebook.
Finally,thankstoeveryonewhohasworkedonNetBeanstomakeittheproductitistoday.Withoutyou,thisbookwouldnotexist.
RhawiDantasisasoftwareengineerfromRecife,Brazil,withseveralyearsofJavadevelopmentexpertise,focusedmainlyonserver-sidedevelopment.HehasaBachelor’sdegreeinInformationSystemsandiscurrentlydoinghisMastersinSoftwareSystemsfromTampereUniversityofTechnology.HeisalsocertifiedasSCJP,SCWCD,andSCSNI.
Thisisasmallthankyoutothethreemostimportantwomeninmylife:SôniaDantas,PaulaMäkinen-Dantas,andMariaDantas.Iwouldalsoliketothanktheworkofmyeditors,speciallyJovitaPintoandRogerD’Souza,andallofthereviewersfortheirvaluablecontribution.


AbouttheReviewersRitwikGhoshalisaseniorsecurityanalystatOracleCorporation,responsibleforOracleSoftwareandHardwareSecurityAssurance.Hisprimaryworkareasareoperatingsystemsanddesktopvirtualization,alongwithdevelopingvulnerabilitymanagementandtrackingtools.BeforecomingtoOraclein2010,whenthecompanyacquiredSunMicrosystems,hehadworkedatSunasapartofSunsecurityengineeringteamandSolaristeamsince2008.AtOracle,hecontinuestoberesponsibleforallSunMicrosystemsproductsandOracleLinuxandvirtualizationproducts.HeearnedaBachelor’sdegreeinComputerScienceandEngineeringin2008fromHeritageInstituteofTechnologyinKolkata,India.
I’mheavilyindebtedtomyparentsandSaraETavernerfortheircontinuoushelpandsupport.
PetrHejlworksasasoftwaredeveloperatOracleCorporation.HeisanexperiencedJavadevelopercontributingtotheNetBeansIDEinvariousareas,suchasJavaEE,JavaScript,andthecoreinfrastructure.
Hisprofessionalinterestscenteronmultithreading,APIdesign,andcodequality.Inhisfreetime,hecreatedandstillmaintainstheopensourceCheckstyleBeansplugin,integratingtheCheckstyletoolintotheNetBeansIDE.
HeholdsaMaster’sdegreeinComputerSciencefromtheCzechTechnicalUniversityinPrague.
I’dliketothankmyfamily,TerezaandMatěj,foralltheirlove,help,andsupport.
JonathanLermitageisa30-year-oldprogrammerfromFrance.Hehasworkedfor5yearswiththeJavaSOAandBPMecosystemforamedium-sizedcompany.Now,heisworkingforoneoftheEuropeane-businessleadersinordertomodernizetheirJavaEEproducts.Also,heiscontinuinghiseducationinordertobecomeanengineerinscientificcomputing,hisfirstpassion.
Hewrotethebook,InstantJRebel,PacktPublishing.HealsoworkedasatechnicalrevieweronInstantNetBeansIDEHow-to,PacktPublishing,abookwrittenbyAtulPalandurkar.
Livingwithacomputingfanaticisnoteasyeveryday,soIthankmymarvelousgirlfriendforallherpatienceandencouragement.
HrushikeshZadgaonkarisaseniorsoftwareengineeratPersistentSystems.HehascompletedBEfromRCOEM,Nagpur,andMSfromBirlaInstituteofTechnologyandScience,Pilani,inComputerScience.HeisaNetBeansCertifiedAssociateandhasworkedontheNetBeansplatform.HewasaMicrosoftStudentPartnerandhasbeenconstantlyworkingondistinctdomainssuchas.NET,Android,iOS,andautomationinRobotiumextensively.
Heisanauthorofthebook,RobotiumAutomatedTestingbyAndroid,PacktPublishing.HeisalsoasemifinalistoftheTouchandTabletAccessibilityAwardorganizedaspartofImagineCup2010.

Hehasseveralpaperspublishedinvariousinternationaljournals.Hisleisureactivitiesincludeblogging,readingarticles,playingtabla,guitar,andsportssuchasCricket,Football,andSnooker.
Youcancontacthimat<[email protected]>andyoucanfollowhimonTwitterat@MsWizKid.
Iwouldliketothankmymother,BharatiZadgaonkar,andwife,ArtiZadgaonkar,fortheircontinuoushelpandencouragement.


www.PacktPub.com

Supportfiles,eBooks,discountoffers,andmoreYoumightwanttovisitwww.PacktPub.comforsupportfilesanddownloadsrelatedtoyourbook.
DidyouknowthatPacktofferseBookversionsofeverybookpublished,withPDFandePubfilesavailable?YoucanupgradetotheeBookversionatwww.PacktPub.comandasaprintbookcustomer,youareentitledtoadiscountontheeBookcopy.Getintouchwithusat<[email protected]>formoredetails.
Atwww.PacktPub.com,youcanalsoreadacollectionoffreetechnicalarticles,signupforarangeoffreenewsletters,andreceiveexclusivediscountsandoffersonPacktbooksandeBooks.
http://PacktLib.PacktPub.com
DoyouneedinstantsolutionstoyourITquestions?PacktLibisPackt’sonlinedigitalbooklibrary.Here,youcanaccess,read,andsearchacrossPackt’sentirelibraryofbooks.

WhySubscribe?FullysearchableacrosseverybookpublishedbyPacktCopyandpaste,print,andbookmarkcontentOndemandandaccessibleviawebbrowser

FreeAccessforPacktaccountholdersIfyouhaveanaccountwithPacktatwww.PacktPub.com,youcanusethistoaccessPacktLibtodayandviewnineentirelyfreebooks.Simplyuseyourlogincredentialsforimmediateaccess.


PrefaceNetBeansIDEistheonlyIDEthatcanbedownloadedalongsideJavaitself.ItsupportsallofthelateststandardssuchasJavaSE8,JavaEE7,andJavaME8,providingacomprehensivesetofdevelopmenttoolsforthemodern-dayJavadeveloper.
Thisbookprovidesawide-rangingsetofrecipesthatcanhelpyoutodevelopbetterapplicationsandbecomemoreproductiveinyourwork.FromthestarttotheendofaJavaproject’sdevelopmentlifecycle,thisbookshowshowtoperformmanydifferenttaskswiththeNetBeansIDE,discoveringmobile,desktop,andenterpriseJavaalongtheway.
Thebookispackedwithover75practicalrecipesspecificallydesignedtomaximizedeveloperproductivitywithNetBeans.Eachrecipeisfullyexplained,providingclearstepsandexamplesthroughout.Inadditiontotherecipes,therearemanydifferenttechniquesandtipsincluded,allofwhichwillallowyoutoprogresstobecominganeffectiveNetBeansIDEuser.

WhatthisbookcoversChapter1,UsingNetBeansProjects,takesyouthroughtheprocessofcreatingJavaprojects.Inthischapter,youwilllearnhowtouseApacheANT,Maven,andNetBeansitselfforcreatingprojects,alongwithdetailsonhowtoimportprojectsfromEclipse.
Chapter2,JavaDevelopmentwithNetBeans,teachesyouhowtouseNetBeanseffectively.HavingcreatedJavaprojectsinthepreviouschapter,youwilllearnhowtocreateclasses,packages,andinterfaces.YouwilllearnhowtorunanddebugthecodeandhowtoefficientlymanagetheJavacode.
Chapter3,NetBeansProductivity,explainsthedifferenttechniquesthatNetBeansoffersforcodeeditingandrefactoring.YouwillseehowtousethemanydifferentrefactoringtoolsinNetBeansalongwithshortcutstoquicklyimplementstandardcode.
Chapter4,DevelopingDesktopApplicationswithNetBeans,showsyouhowtodevelopdesktopSwingapplicationsanddeploythemoutsideofNetBeans.
Chapter5,NetBeansEnterpriseApplicationDevelopment,teachesyouhowtointegratedifferentJavaEEapplicationsserversintoNetBeansandhowtocreateJavaEEwebandEJBapplications.
Chapter6,ManagingDatabaseswithNetBeans,describeshowtoconnecttodifferentdatabasessuchasOracleandMySQL.YouwillalsoseehowtomanagedatabasesfromwithinNetBeansandhowtorunadhocSQLqueriesagainstthem.
Chapter7,NetBeansJavaFX,teachesyouhowtocreateanddeployJavaFXapplications.You’llalsolearnhowtointegrateOracle’sSceneBuilderintoNetBeansallowingyoutostyleJavaFXapplications.
Chapter8,NetBeansMobileDevelopment,explainshowtoaddJavaMEsupportintoNetBeansandhowtodevelopMIDPandAndroidapplications.
Chapter9,VersionControl,explainstheproceduresnecessaryforworkingwithrevisioncontrolsystemssuchasGitandSubversion.Youwilllearnmanydifferenttechniquesrequiredsuchascloningrepositories,checkinginfiles,andreviewingprojectchanges—allfromwithinNetBeans.
Chapter10,NetBeansTestingandProfiling,describeshowtotestJavaapplicationswithinNetBeansusingJUnitandTestNG.Afterlearninghowtowritetestsforapplications,youwilllearnhowtoprofiletheirCPUandmemoryusage.
Chapter11,UsingExternalWebServices,showshowtoinvokeexternalthird-partywebservicessuchasFlickrandtheGoogleGeocodingAPIdirectlyfromwithinNetBeans.You’lllearnhowconsumingawebserviceisassimpleasdragging-and-droppingitintoanapplication.
Chapter12,ExtendingNetBeans,describeswhattodointheraresituationwhenNetBeansdoesn’tprovideallofthefunctionalityyouneed.YouwilllearnhowtowriteaNetBeanspluginandhowtodistributeittootherNetBeansusers.


WhatyouneedforthisbookTocompletetherecipeswithinthisbook,youwillneedtodownloadandinstallNetBeansIDE8.NetBeansisprovidedinthreedifferentdownloadbundles:JavaSE,JavaEE,andtheAllbundle.SomeoftherecipesinthisbookrequirespecificversionsofNetBeansduetothetechnologiesused.Forexample,theJavaEEorAllversionofNetBeansisrequiredfortherecipesexplainingJavaEEconceptsandtechniques.Foreachrecipe,theversionofNetBeansthatisrequiredisspecified.
EachofthedifferentdownloadbundlesofNetBeanscanbedownloadedfromhttps://netbeans.org/downloads.


WhothisbookisforThisbookisintendedforJavadevelopersofanylevelwhoareusingNetBeansandwanttolearnhowtogetthemostoutoftheIDE.LearningNetBeanseffectivelywillhelptoprovideafirmfoundationforyourapplicationdevelopmentactivities.
ThisbookassumessomeknowledgeofJavadevelopmentanddoesnottrytoteachJavaprogramming.


ConventionsInthisbook,youwillfindanumberofstylesoftextthatdistinguishbetweendifferentkindsofinformation.Herearesomeexamplesofthesestyles,andanexplanationoftheirmeaning.
Codewordsintext,databasetablenames,foldernames,filenames,fileextensions,pathnames,dummyURLs,userinput,andTwitterhandlesareshownasfollows:“EnsurethattheBookMarks.javafileisopenforediting.”
Ablockofcodeissetasfollows:
publicstaticvoidmain(String[]args){
List<String>l=newArrayList<String>();
l.add("Hello");
l.add("World");
}
Whenwewishtodrawyourattentiontoaparticularpartofacodeblock,therelevantlinesoritemsaresetinbold:
<htmlxmlns="http://www.w3.org/1999/xhtml"
xmlns:h="http://xmlns.jcp.org/jsf/html"
xmlns:f="http://xmlns.jcp.org/jsf/core">
Anycommand-lineinputoroutputiswrittenasfollows:
netbeans--lafcom.sun.java.swing.plaf.motif.MotifLookAndFeel
Newtermsandimportantwordsareshowninbold.Wordsthatyouseeonthescreen,inmenusordialogboxesforexample,appearinthetextlikethis:“ExpandingtheprojectwithintheProjectsexplorerdisplaysalistofSourcePackageswithintheprojectandLibrariesusedbytheproject.”
NoteWarningsorimportantnotesappearinaboxlikethis.
TipTipsandtricksappearlikethis.


ReaderfeedbackFeedbackfromourreadersisalwayswelcome.Letusknowwhatyouthinkaboutthisbook—whatyoulikedormayhavedisliked.Readerfeedbackisimportantforustodeveloptitlesthatyoureallygetthemostoutof.
Tosendusgeneralfeedback,simplysendane-mailto<[email protected]>,andmentionthebooktitleviathesubjectofyourmessage.
Ifthereisatopicthatyouhaveexpertiseinandyouareinterestedineitherwritingorcontributingtoabook,seeourauthorguideonwww.packtpub.com/authors.


CustomersupportNowthatyouaretheproudownerofaPacktbook,wehaveanumberofthingstohelpyoutogetthemostfromyourpurchase.

DownloadingtheexamplecodeYoucandownloadtheexamplecodefilesforallPacktbooksyouhavepurchasedfromyouraccountathttp://www.packtpub.com.Ifyoupurchasedthisbookelsewhere,youcanvisithttp://www.packtpub.com/supportandregistertohavethefilese-maileddirectlytoyou.

DownloadingthecolorimagesofthisbookWealsoprovideyouaPDFfilethathascolorimagesofthescreenshots/diagramsusedinthisbook.Thecolorimageswillhelpyoubetterunderstandthechangesintheoutput.Youcandownloadthisfilefromhttps://www.packtpub.com/sites/default/files/downloads/7761OS_ColoredImages.pdf.

ErrataAlthoughwehavetakeneverycaretoensuretheaccuracyofourcontent,mistakesdohappen.Ifyoufindamistakeinoneofourbooks—maybeamistakeinthetextorthecode—wewouldbegratefulifyouwouldreportthistous.Bydoingso,youcansaveotherreadersfromfrustrationandhelpusimprovesubsequentversionsofthisbook.Ifyoufindanyerrata,pleasereportthembyvisitinghttp://www.packtpub.com/submit-errata,selectingyourbook,clickingontheerratasubmissionformlink,andenteringthedetailsofyourerrata.Onceyourerrataareverified,yoursubmissionwillbeacceptedandtheerratawillbeuploadedonourwebsite,oraddedtoanylistofexistingerrata,undertheErratasectionofthattitle.Anyexistingerratacanbeviewedbyselectingyourtitlefromhttp://www.packtpub.com/support.

PiracyPiracyofcopyrightmaterialontheInternetisanongoingproblemacrossallmedia.AtPackt,wetaketheprotectionofourcopyrightandlicensesveryseriously.Ifyoucomeacrossanyillegalcopiesofourworks,inanyform,ontheInternet,pleaseprovideuswiththelocationaddressorwebsitenameimmediatelysothatwecanpursuearemedy.
Pleasecontactusat<[email protected]>withalinktothesuspectedpiratedmaterial.
Weappreciateyourhelpinprotectingourauthors,andourabilitytobringyouvaluablecontent.

QuestionsYoucancontactusat<[email protected]>ifyouarehavingaproblemwithanyaspectofthebook,andwewilldoourbesttoaddressit.


Chapter1.UsingNetBeansProjectsInthischapter,wewillcoverthefollowingrecipes:
CreatingaJavaapplicationCreatingaMavenapplicationUsingMavenprojectsCreatingaFree-FormapplicationCreatingalibraryImportinganEclipseproject

IntroductionTheNetBeansIDEisafree,opensource,Java-basedIntegratedDevelopmentEnvironment(IDE)thatisusedtheworldovertodevelopJava,PHP,C/C++,HTML,andotherapplications.
OneofthefirsttaskswhenusingNetBeansistocreateprojectsorlibrariesorimportprojectsfromEclipse.Inthischapter,wewilldiscusshowtocreatedifferenttypesofprojectsbasedondifferentbuildtools(NetBeans,Maven,andAnt),howtocreateclasslibraries,andhowtoimportbothexistingEclipseandMavenprojects.
Tofollowtherecipesinthischapter,youcanuseanyoftheJavaNetBeansdownloadbundles(JavaSE,JavaEE,andAll).AlloftheseNetBeansversionscanbedownloadedfromhttps://netbeans.org/downloads/.


CreatingaJavaapplicationCreatingaJavaapplicationusingtheNetBeansstandardprojectformatisthesimplestwaytostartdevelopingJavaapplicationswithNetBeans.
ThisrecipeshowshowtocreateaJavaapplicationusingtheNetBeansprojectformat.TheNetBeans8,JavaSEversionwasusedforthisrecipe.IfyouareusingadifferentversionofNetBeans,youmayhavemoreprojecttypesavailableforselectionwhilecreatingaproject.

GettingreadyTogetstarted,ensurethatoneoftheJavabundlesofNetBeans(JavaSE,JavaEE,ortheAllbundle)isrunning.Youneednothaveanyprojectscreatedtostartthisrecipe.

Howtodoit…1. ClickonFileandthenclickonNewProject….2. Ontheresultantdialog,selecttheJavacategoryandtheJavaApplicationproject,as
showninthefollowingscreenshot:
3. ClickonNext.4. Ontheresultantdialog,enterMyFirstAppintheProjectNamefieldandensurethata
sensibleprojectlocationisspecifiedintheProjectLocationfield.5. EnsurethatCreateMainClassisselectedandenter
com.davidsalter.cookbook.myfirstapp.MainastheCreateMainClassname.
TipNetBeanswillautomaticallysuggestaCreateMainClassnamemyfirstapp.MyFirstAppusingtheprojectnameforboththepackageandclassnames.ThebestpracticeforJavapackagenamingistouseyourcompanies’reversedInternetdomainnamefollowedbysomeidentificationforyourapplication.Hence,thecom.davidsalter.cookbook.myfirstapppackagenameisagoodchoiceofapackagename.Withoutusingreversedomainnamesforpackages,it’seasytoseehowdifferentpeoplecouldcreatepackagesallwiththesamename,leadingtonamecollisions.
TheNewJavaApplicationwizardisshowninthefollowingscreenshot:


Howitworks…CreatingaJavaapplicationusingtheNewJavaApplicationwizardcreatesanewNetBeansprojectthatisvisiblewithintheProjectsexplorerwithinthemainNetBeanswindow,asshowninthefollowingscreenshot:
ExpandingtheprojectwithintheProjectsexplorerdisplaysalistofSourcePackageswithintheprojectandLibrariesusedbytheproject.Forafreshlycreatedproject,theSourcePackagesnodewilldisplayonly<defaultpackage>iftheuserdidnotselecttheCreateMainClassoptionatthetimeofprojectcreation.IftheCreateMainClassoptionwasselected,aswedidinthisrecipe,thenthepackagestructureusedforthemainclasswillbedisplayedwithinthehierarchy.

There’smore…Whilecreatinganewproject,NetBeansprovidestheCreateMainClassoption.Ifthisoptionisselected,thenthenameofaclasscanbespecifiedintowhichNetBeanswillcreateamainmethod.
WithintheNewJavaApplicationwizard,theuserhastheUseDedicatedFolderforStoringLibrariesoption.Whenthisoptionisselected,NetBeanswillcreatealibfolder(usuallywithintheproject’sstructure)inwhichalllibrariesusedbytheprojectareplaced.ThisoptionisusefulwhenthedeveloperwishestosharetheprojectwithotherpartiesorwantstobuildtheprojectoutsideofNetBeans,forexample,withinaContinuousIntegrationenvironment.Asallofthelibrariesusedbytheprojectarestoredwithinthesamelocation,additional(oftencomplex)configurationisnotrequiredtoaccessanyprojectdependencies.
WhenprojectsarecreatedusingtheNewJavaApplicationwizard,Antisusedasthebuildtoolfortheprojectandastandardbuildfile(build.xml)iscreatedattherootoftheproject,withabuildimplementationAntfile(build-impl.xml)createdwithinthenbprojectfolderoftheproject.It’snotrecommendedthatyoueditthecontentsofthebuild-impl.xmlfiledirectly;itisnotusuallyrequiredforadevelopertomodifyanyofthesebuildscripts.Ifyouwishtooverrideanyofthetargetswithinthebuild-impl.xmlfile,theyshouldbedefinedwithinthebuild.xmlfile.Anypropertiesthatyouwanttochangefromwithinthebuild-impl.xmlfileshouldbedefinedwithintheproject.propertiesfile.
OpeningtheFilesexplorershowsallofthefileswithintheproject.Theprojectbuildfilescanbeseenandselectedforediting(ifrequired)fromwithinthiswindow,asshowninthefollowingscreenshot:
Manyofthepropertiesdefinedwithintheproject.propertiesfilecanalsobeeditedwithintheIDEbyright-clickingontheprojectineithertheProjectsorFilesexplorerand

selectingthePropertiesoption.


CreatingaMavenapplicationManyJavadevelopersfindthatMavenprovidessuperiorbuildandprojectmanagementtoolsthatIDEsdonotoffer.TheNetBeansIDEthereforeofferstheabilitytocreateandmanageMavenprojectsdirectlyfromwithintheIDE,thusofferingthebestcombinationoftools.ThisrecipeshowshowtocreateaMavenprojectfromwithintheNetBeansIDE.

GettingreadyTogetstarted,ensurethatoneoftheJavabundlesofNetBeans(JavaSE,JavaEE,ortheAllbundle)isrunning.Youdonothavetohaveanyprojectscreatedtostartthisrecipe.

Howtodoit…1. ClickonFileandthenclickonNewProject….2. Ontheresultantdialog,selecttheMavencategoryandtheProjectfromArchetype
project,asshowninthefollowingscreenshot:
3. ClickonNext.4. IntheSearchfield,entermaven-archetype-quickstartandthenselectitinthe
KnownArchetypesfield,asshowninthefollowingscreenshot:

5. ClickonNext.6. Ontheresultantdialog,enteraprojectname,groupID,version,andpackage,as
showninthefollowingscreenshot:
7. ClickontheFinishbuttontocreatetheproject.

Howitworks…NetBeanscomesbundledwithacopyofMaventhatisusedtocreateandmanageprojects.ThecurrentversionofMavenbundledwithNetBeans8isversion3.0.5.ThisversionnumbercanbecheckedbynavigatingtoTools|OptionsfromtheNetBeansmainmenu.(OntheMac,thisscreenisaccessedbynavigatingtoNetBeans|Preferences.)Ontheresultingdialog(showninthefollowingscreenshot),clickonJavaandthenselecttheMaventabtoseetheversionofMavenbundledwithNetBeans:
AswhencreatingaJavaprojectusingtheNewProjectwizard,whenaMavenprojecthasbeencreated,itisautomaticallyopenedwithintheProjectsexplorer.Thelistofnodesavailablewithintheproject,however,dependsuponthetypeofMavenprojectcreated.FormostMavenprojecttypes(inMaventerms,thesearecalledarchetypes),theSourcePackages,TestPackages,Dependencies,TestDependencies,JavaDependencies,andProjectFilesnodeswillbecreatedasshowninthefollowingscreenshot:

WithintheProjectFilesnode,wehavethepom.xmlfilethatwascreatedbytheNewProjectwizard.Thepom.xmlfilecanbeopenedbydouble-clickingonitwithintheprojecthierarchy,orbyright-clickingontheprojectandselectingtheOpenPOMmenuoption.Inadditiontoediting,theNetBeanspom.xmleditorwindowsallowustodisplayagraphofalltheartefactsusedbytheMavenproject.Thiscanbeveryusefulwhentryingtoidentifywhatdependenciesexistwithinaproject.NetBeansalsoprovidesanEffectivetabonthepom.xmleditor.Thiswindowshowstheinheritedinformationandprovidesacompleteviewofwhatthepom.xmlfilelookslike,includinglistinganypluginsusedbyMaven.
IfwelookintheOutputwindowaftertheprojecthasbeencreated,wecanseethatthebundledcopyofMavenhasbeenusedtocreateaMavenproject.

There’smore…Mavenusesasetofexecutablegoalstomanagethelifecycleofaproject.Thesegoalscanbechainedtoeachothertoperformasetofprojectmanagementtasks.
Forexample,theinstallgoalistypicallyusedtobuildaproject,whereasthecleangoalistypicallyusedtocleanaproject.Ifadeveloperwantedtocleanandthenbuildaproject,he/shewouldtypicallyexecutethesegoalssequentiallyonthecommandlinebyrunningtheMavencleaninstallgoalstogether.
Thecommandlineisnotsouserfriendly,sofortunatelyNetBeansallowsustomanagethesegoalsinamuchnicerfashion.Right-clickonaMavenprojectwithintheProjectsexplorerandselectProperties.Ontheresultantdialog,selecttheActionsnodetoseeandedittheMavengoalsthatareexecutedfordifferentNetBeansactions(Buildproject,Cleanproject,Testproject,andsoon),asshowninthefollowingscreenshot:
ThesegoalsaremappedtothestandardNetBeansIDEprojectbuildoptions.So,forexample,right-clickingonaprojectandselectingBuildwillexecutetheMaveninstallgoal.
Forthemostcommonproject-relatedtasks(build,clean,test,andsoon),developerscanthereforeusethestandardNetBeansbuttonandkeyboardshortcuts.
InvokingMavengoalsWithintheNavigatorexplorer,alistofcommonlyusedgoalsisdisplayed.Double-clickingonanyofthesegoalswillexecuteitagainstthecurrentproject.TogglingShowhelpgoalsandShowlifecycleboundgoalsdeterminesthesetofgoalsthatareshownin

theNavigatorexplorer:
InvokingcustomMavengoalsSometimes,whenusingMaven,adeveloperwillwanttorunadditionalgoalsoutsidethenormalbuild/test/deploygoals.Thesewouldinclude,forexample,runningcodeanalysisagainstaproject.NetBeansallowsbothglobalandcustomgoalstobedefined,whichcaneasilybeexecutedagainstaproject.
Todefineaglobalgoal,selectToolsandthenselecttheOptionsmenuitem.OntheOptionsdialogbox,selectJavaandthenselecttheMaventab.Ontheresultantdialog,clickontheEditGlobalCustomGoalDefinitions…button.
OntheGlobalMavenGoaldefinitionsdialog,actionscanbeaddedandremoved.Foreachaction,aspecificMavengoal(orgoals)canbedefined.
Toexecuteanyoftheseglobalgoalsagainstaproject,right-clickontheprojectintheProjectsexplorerandselecttheCustommenuoption.Alloftheglobalgoalsthathavebeendefinedwillbeavailablehereforexecutionagainsttheproject.
Customgoalscanbedefinedonaperprojectbasis.Todefinecustomgoals,right-clickontheprojectandselectCustomandthenselecttheGoals…menuoption.CustomgoalscanbestoredwithinaprojectbyselectingtheRememberascheckbox.Unlikeglobalgoals,customgoalsarestoredwithinaprojectandarethereforedistributedwiththeprojectwhenitissuppliedtootherpeople.
UsingadifferentinstallationofMavenIfyouwishtouseadifferentversionofMaventhantheonebundledwithNetBeans,youcanselecttheversiontousefromtheMavenproperties.YoumaywishtouseadifferentversionofMavenifyoualreadyhaveadifferentversionofMaveninstalledoutsideofNetBeans,oryouhavealocalcopyofMaventhatisdifferentlyconfiguredespeciallyforyourenvironment.
SelectToolsandthenselecttheOptionsmenuitemfromthemainNetBeansmenu.OntheOptionsdialog,selectJavaandthenclickontheMaventab.UndertheMavenHome

drop-downlist,selecttheBrowse…optionandchoosetheinstallationofMaventhatyouwishtouse.


UsingMavenprojectsGiventheopennatureoftheJavaplatform,itisquitecommonforJavadeveloperstoworkonprojectsthatwerenotcreatedwithinNetBeans,orthatdonotemploytheNetBeansprojectstructure.
OneofthemostcommonJavabuildandmanagementtoolisMaven(seetheCreatingaMavenapplicationrecipeformoreinformationonMaven),andassuchagrowingnumberofprojectsarecreatedusingit.Theseincludebothsinglemoduleprojects(whereasingle.jarfileisgenerated)andcomplexmultimoduleprojects(whichmayinclude.war,.ear,.jar,andmore!).
ThisrecipeshowshowaMavenprojectcanbeloadedwithinNetBeansandsubsequentlymanagedviatheNetBeansuserinterface.

GettingreadyTocompletethisrecipe,youneedaMavenprojectonyourlocalmachine.ItdoesnotmatterwhethertheprojectisasingleormultimoduleMavenproject.

Howtodoit…1. ClickonFileandthenonNewProject….2. Ontheresultantdialog,selecttheMavencategoryandselecttheProjectwith
ExistingPOMproject.3. ClickonNext.4. ClickontheFinishbutton.5. UsingtheOpenProjectwindow,browsetothetop-levelpom.xmlfilefortheproject
andclickonOpenProject.6. TheMavenprojectwillnowbeloadedandwillbeshownintheProjectsexplorer.

Howitworks…LoadingandusingaMavenprojectinNetBeansisaneasywaytoutilizethepowerofMavenwiththeconvenienceofNetBeans.
TipAfterloadingaMavenprojectintoNetBeansinthisway,theprojectstillremainsintactasaMavenproject.YoucanstillusetheprojectoutsideofNetBeansasastandardMavenproject.
WhenaMavenprojectisloadedintoNetBeans,theproject’siconintheProjectsexplorerindicatesthatthisisaMavenproject.OpeninguptheprojectnodeforamultimoduleMavenprojectwillshowallthechildMavenmodules.Right-clickingonachildmoduleandselectingtheOpenPOMoptionopensthechildmoduleasatop-levelprojectthatcanthenbemanaged(build,test,debug,andsoon)asastandardMavenproject.

There’smore…InadditiontousingtheNewProjectwizard,MavenprojectscanalsobeopenedsimplybygoingtoFile|OpenProjectfromtheNetBeansmainmenu.


CreatingaFree-FormapplicationFormanyprojects,ApacheAntisusedasthebuildtool(AntisusedastheinternalbuildtoolforNetBeansprojects).ItisnotuncommonfortheseprojectstohavecustomAntbuildscriptsthatareusedtobuild,test,anddeploytheprojects.
Ratherthanhavingtoamendthestructureofexistingprojects,NetBeansprovidesthefacilitytocreateaFree-Formproject.InaFree-Formproject,NetBeansinvokesAnttargetstoperformbuildoptions.
TheAntscriptusedinthesetypesofprojectsmustbemanagedindependentlyofNetBeans,andanychangesrequiredtothebuildproceduremustbedirectlydefinedwithintheprojects’buildscript.
NoteFree-FormprojectsareonlyrecommendedwhenanexistingAntprojecthasafixedstructure,butthedeveloperwantstouseNetBeansforfurtherdevelopmentoftheproject.Forsmallerprojects,creatinganewNetBeansprojectoraMavenprojectmaybeabetteroption.
ThisrecipeshowshowtocreateaFree-FormprojectfromwithintheNetBeansIDEbyimportinganexistingAntproject.

GettingreadyThisrecipeassumesthatyouhaveanexistingJavaprojectthatusesAntasthebuildtoolandshowsyouhowtoimporttheprojectintoaNetBeansFree-Formproject.

Howtodoit…1. ClickonFileandthenclickonNewProject….2. Ontheresultantdialog,selecttheJavacategoryandselecttheJavaFree-Form
Projectproject,asshowninthefollowingscreenshot:
3. ClickonNext.4. BrowsefortheAntproject’slocation.NetBeansshouldthenparsethebuild.xmlfile
fortheprojectandpopulatetheBuildScript,ProjectName,andProjectFolderoptions.
5. ClickonNext.6. FiveNetBeansactionsarenowshown(BuildProject,CleanProject,Generate
Javadoc,RunProject,andTestProject).SelecttheAnttargetsfortheseprojectactions.IfthereisnoAntbuildtargetforaspecificaction(forexample,theAntbuildscripthasnoabilitytogenerateJavadoc),thenleavetheactionblank.
7. ClickonNext.8. EnterSourcePackageFoldersandTestPackageFoldersfortheproject.Aswith
thepreviousstage,NetBeanswillattempttoworkoutthesevaluesfromthebuild.xmlfile.
9. ClickonNext.10. Ifthereareanyadditionalclasspathentriesrequired,specifythemasJavaSources
Classpath.11. ClickonNext.12. FromtheOutputJARsofFoldersContainingCompiledClassesfield,selectthe
foldersthatcontainthecompiledclassesor.jarfiles.13. IfanyJavadocisgeneratedduringthebuildprocess,enterthelocationinthe
JavadocOutputfield.

14. ClickonFinishforNetBeanstocreatetheFree-Formproject.

Howitworks…WhenaFree-Formprojectiscreated,NetBeanscreatesaspecialtypeofprojectthatusesacustomAntscripttobuildtheproject.ThisprojectcanhavethesourcecodestoredwhereveritisdefinedbytheAntscriptanddoesnothavetofollowthecodelayoutguidelinesofNetBeans.
AswithothertypesofprojectscreatedwithinNetBeans,oncetheprojectiscreated,itisopenedandshownintheProjectsexplorer,asshowninthefollowingscreenshot:
AslongastherelevantmappingsweredefinedcorrectlybetweenNetBeansactionsandtheAnttargets,thedevelopercanbuild,clean,run,test,andgenerateJavadocfromwithintheIDEusingthestandardmenuitemsandkeyboardshortcuts.
Selectingthebuild.xmlfilewithintheProjectsexplorershowsalloftheAnttargetsthathavebeendefinedwithinthefile.Double-clickingonanyofthesewillrunthetarget.
NoteItisimportanttonotethatanychangesmadetotheprojectsettingsviaNetBeans,forexample,addingextradependenciestotheprojectoradditionalsourceroots,willnotaffectthewaytheprojectisbuild.Theprojectisbuiltexactlyasdefinedwithinthebuild.xmlfile.Thiscansometimesleadtoconfusion;forexample,NetBeansmayshowthattherearenomissingdependenciesforaproject,buttheprojectitselfwillnotbuildduetomissingdependencies.ItisimportanttorememberthatitistheAntfileitself(notNetBeans)thatdefineshowtheprojectisbuilt.

There’smore…Asstatedintheprevioussection,it’simportanttorememberthat,withFree-Formprojects,theprojectisbuiltbyAntasdefinedwithinthebuild.xmlfile.Anychangestotheproject’smetadatawithinNetBeanswillnotaffecthowtheprojectisbuilt.
Toaddextrasourcenodestoaprojectortoaddadditionaldependencies,itisimportantthatthesearefirstdefinedwithinthebuild.xmlfileandthenaddedattheNetBeansprojectlevel.ThisisachievedwithinNetBeansbyright-clickingonaFree-FormprojectandselectingProperties.Theresultingdialogboxallowsalloftheconfigurationoptionsdefinedattheprojectcreationtobemodified.
UsingadifferentversionofAntNetBeansisbundledwithaversionofAnt.ThisenablesdeveloperstouseAntfromwithinNetBeanswithouthavingtoinstallaseparatecopy.
IfyouwishtouseadifferentversionofAntwithinFree-Formprojects,thiscanbeconfiguredbyselectingToolsandthenclickingonOptionsfromthemainNetBeansmenu.OntheOptionsdialogbox,selectJavaandthenselecttheAnttab.
WithinthisOptionsdialogbox,adifferentversionofAntcanbespecifiedtogetherwithanyclasspathorpropertiesrequiredtobuildyourprojects.
NoteToquicklychangebacktothedefaultversionofAntsuppliedwithNetBeans,clickontheAntHomeDefaultbuttonwithintheJavasectionoftheOptionsdialogbox.


CreatingalibraryWhendevelopinglargeapplications,it’softennecessarytoutilizethird-partylibraries.Sometimes,third-partylibrariescanbedistributedassourcecodethatcanbedroppedintoanapplication,butmoreoften,theyaredistributedasasetof.jarfiles.
NetBeanscomesbundledwithseveralclasslibraries(suchasHibernate,Spring,andTestNG),butitalsoallowsdeveloperstocreatetheirownsetsofclasslibrariesthatcanbeeasilyaddedtoprojects.
ThisrecipeshowshowtocreateanewlibrarywithinNetBeansthatcanthenbesubsequentlyusedbyNetBeansprojects.ThisrecipedoesnotinvolvewritinganyJavacode,butdescribestheprocedureofcreatingalibraryfromexistingcodethatotherNetBeansprojectscanthenreference.

GettingreadyThisrecipeassumesthatyouhaveathird-partylibrarywhichisprovidedasasetofoneormore.jarfilesthatyouwishtousewithinaNetBeansproject.
Ifyoudonothaveasuitablethird-partylibrary,asamplelibraryisprovidedasapartofthedownloadbundleforthisbook.
TipDownloadingtheexamplecode
YoucandownloadtheexamplecodefilesforallPacktbooksyouhavepurchasedfromyouraccountathttp://www.packtpub.com.Ifyoupurchasedthisbookelsewhere,youcanvisithttp://www.packtpub.com/supportandregistertohavethefilese-maileddirectlytoyou.

Howtodoit…1. ClickonToolsandthenclickonLibrariesontheNetBeansmainmenu.TheAnt
LibraryManagerdialogisdisplayedasshowninthefollowingscreenshot:
2. ClickontheNewLibrary…button.3. EnterthenameofthelibrarytobecreatedintotheLibraryNamefieldasshownin
thefollowingscreenshot:
4. ClickontheOKbuttontocreatethelibrary.5. Thelibraryhasnowbeencreatedandgivenanameasspecifiedinstep3.Thisname

isdisplayedintheLibraryNamefield.Now,weneedtoaddsomecontenttothelibrary.
6. ClickontheAddJAR/Folderbutton.7. UsingtheBrowseJAR/Folderdialogbox,selecta.jarfileorfoldercontainingthe
third-partylibrarycontentthatyouwishtoaddtotheNetBeanslibrary.8. Repeatstep7foranyadditional.jarfilesorfoldersthatyouwishtoaddtothe
library.9. ClickontheOKbuttontocompletecreationofthelibrary.

Howitworks…AclasslibraryinNetBeansisaneasywaytoaddasetof.jarfilesorfolderstotheclasspath.Whenaclasslibraryhasbeendefinedasdetailedinthisrecipe,itcanbeaddedtoaprojectbyright-clickingontheproject’sLibrariesnodewithintheProjectsexplorerandselectingAddLibrary….NetBeanswillthenappendthe.jarfilesandfoldersfromthelibraryintotheproject’sclasspathatbothcompiletimeandruntime(iftheprojectisrunnable).

There’smore…Inadditiontoaddingclasslibrariestoaprojecttoextendtheclasspath,itisalsopossibletoreferenceprojectsfromaNetBeansproject.Ifforexample,youhaveaNetBeansprojectthatcreatesa.jarfile,thiscanbeaddedintotheclasspathofadifferentNetBeansprojectbyright-clickingontheLibrariesnodeintheProjectsexplorerandselectingAddProject….Thebuildartifactsfromthisselectedprojectwillthenbeaddedtotheclasspathoftheoriginalproject.


ImportinganEclipseprojectIfyouwishtoworkalongsideEclipse,NetBeansletsyouusetheProjectImportfunctionality.
ThisfunctionalitywillimportoneormoreprojectscreatedbytheEclipseIDEsimplybyspecifyingtheworkspaceinwhichtheyarehoused.

GettingreadyAvalidEclipseprojectwithsourcesanddependenciesmustbeusedinordertocontinuewiththisrecipe.

Howtodoit…1. ClickonFileandthenclickonImportProjectandEclipseProject….2. IntheImportEclipseProjectwindow,selectImportProjectsfromWorkspace.3. ClickontheBrowse…button.AnOpendialogboxwillpopupfromwhereyoucan
selecttheworkspace.4. Afterselectingavalidworkspaceproject,clickontheNextbutton.5. IntheProjectstoImportsection,selecttheprojectsyouwanttoimport.6. SelectStoreNetBeansprojectdatainsideEclipseprojectfolders.7. ClickontheFinishbutton.

Howitworks…Byselectingtheworkspacelocation,NetBeanswillthenanalyzeandconvertthemetadatacreatedbyEclipse.ThefollowingscreenshotshowstheImportEclipseProjectwindow:
Theprojectstructure,alongwiththedependencies,willbeavailableforNetBeansusage.ItisimportanttonoticethatNetBeanswillnotchangethewaytheEclipseprojectbehaves.
OnselectingtheStoreNetBeansprojectdatainsideEclipseprojectfoldersoption,NetBeanswillcreateitsownstructureinsidetheEclipsefolderstructure.SelectthisoptionifyouwanttodistributetheNetBeansprojectdirectoryinaversioncontrolsystem.ThisensuresthatthelibrariesandconfigurationfilesusedbyEclipseandNetBeansarethesame.
ThefollowingscreenshotshowstheProjectstoImportsection:

ItisalsopossibletouseNetBeanswithoutplacingitsconfigurationfilesinsideEclipse’sworkspace.Ifthisisthedesiredoutcome,thenselectCreateimportedNetBeansprojectsinaseparatelocationandthenclickonBrowsetoselectthefolderwhereNetBeansconfigurationswillexist.
TheimportedEclipseprojectswillthenbeplacedontheProjectstabontheleft-handside.
IntheThere’smore…section,thereisalistofsomeerrorsthatmightoccurwhileimportinganEclipseproject.

There’smore…Now,let’stalkaboutsomeotheroptionsaswellassomepiecesofgeneralinformationthatarerelevanttothistask.
SynchronizingEclipseWithmultipledevelopersworkingonaproject,itiscommonthatchangestoaprojecthappenfromtimetotime.Whenthishappens,NetBeanscanresynchronizetheprojectsbyselectingImportProjectandthenResynchronizeEclipseProjectsfromthemainFilemenu.
Afterfollowingthesesteps,theclasspathsofalltheprojectsimportedintoEclipsewillbeinsync.However,changestoyourlocalprojectwillnotbesynchronizedback.Thisway,NetBeansensuresthatthelocalconfigurationswillnotdamagetheparentproject.
ErrorswhenimportingEclipseprojectsWhenimportingEclipseprojects,someimportingerrorsmightcomeup.Manyoftheseerrorsarenotspecifictoourrecipe,butthefollowingnotesmightcomeinhandywhiledevelopingfutureprojects.Someoftheerrorsareasfollows:
ResolveMissingServerProblem
Thiserrorissolvedbyjustright-clickingontheprojectnodeandbrowsingtothefolderwheretheserverisinstalled.
ResolveReferenceProblems
Thiserroroccurswhenlibrariesaremissingfromtheprojectclasspath.Solvingthisisverysimilartosolvingthemissingserverproblem.Right-clickontheprojectnodeandselectResolveReferenceProblem,andthenselectthefolderwherethelibraryis.Sometimes,youmayhavetocreatelibrariestoaddtotheproject.Ifyouareunsureonhowtocreatelibraries,checkouttheCreatingalibraryrecipediscussedearlierinthischapter.
EclipseplatformforProjectNamecannotbeused.ItisaJREandtheNetBeansprojectrequiresaJDK.NetBeanswillusethedefaultplatform.
ThiserroroccurswhentheEclipseprojectisconfiguredwithaJREinsteadofJDK.Tosolvethis,clickonToolsandselectJavaPlatforms.TheJavaPlatformManagerdialogwillbeshown.ClickonAddPlatform…andfromtheoptions,selectthecorrectJavaplatformonwhichtheapplicationisbeingdeveloped.


Chapter2.JavaDevelopmentwithNetBeansInthischapter,wewillcoverthefollowingrecipes:
CreatingapackageCreatingaclassCreatinganinterfaceRunningafileDebuggingaclassFormattingthecodeCollapsingandexpandingcodefoldsTogglingcommentsFixingandorganizingimportsCreatingfileheadersChangingthelookandfeelofNetBeans

IntroductionInthischapter,wewilllookatusingtheNetBeansIDEforJavadevelopmentandseewhatoptionsareavailabletoassistinaJavadeveloper’sdailyroutine.
Wewillstartbylookingathowtocreateclasses,packages,andinterfaces.Wewilllookathowtorunindividualfilesandprojectsandalsohowtodebugthem.
Wewillthenlookatcodemanagementandseehowwecanorganizethecodemoreeffectivelyusingcodefoldsandhowwecantogglecomments,fiximports,anddefinefileheaders.
Finally,we’lltakealookathowwecancustomizethelookandfeelofNetBeansinordertohelpusbemorecomfortablewiththeIDE.ThemorecomfortablewearewiththeIDE,themoreproductivewe’llbe.


CreatingapackageEverythingisbetterwhenorganized.Withthisinmind,wewillcheckhowtocreatepackagesusingtheIDE.
Besidesbeingmoreorganized,itisabadcodingpracticetoleaveallclassesinthesamepackageorintherootpackage.

Howtodoit…First,wewillneedtocreateanewproject,sopleaserefertotherecipesinChapter1,UsingNetBeansProjects,forcreatingJavaprojects.Whennamingtheproject,enterCreatingPackages.WhentheProjectsexplorershowstheCreatingPackagesproject,expandtheCreatingPackagesnodeifnotyetexpanded.Whencreatingtheproject,itisnotnecessarytocreateamainclass.
Now,wewillcreateapackageforoursourcecodewiththefollowingsteps:
1. WithintheProjectsexplorer,expandtheCreatingPackagesnode(ifnotyetexpanded)andtheSourcePackagesnodewithinit.
2. Right-clickonthe<defaultpackage>node.3. SelectNewandthenclickonJavaPackage….4. InthePackageNametextfield,enter
com.davidsalter.cookbook.creatingpackages.gui.5. LeavetheLocationsetasSourcePackages.6. ClickonFinish.
AnewemptypackagewillbeshownrightundertheSourcePackagesnode.
Finally,addapackageforourunittestsourcecodewiththefollowingsteps:
7. ExpandtheTestPackagesnode(ifnotyetexpanded).
TipIftheTestPackagesnodeisnotshown,right-clickontheCreatingPackagesnodewithintheProjectsexplorerandcreateanewfoldercalledTest.TheTestPackagesnodewithintheprojectwillthenbedisplayedcorrectly.
8. Right-clickonTestPackages.9. SelectNewandthenclickonJavaPackage….10. InthePackageNametextfield,type
com.davidsalter.cookbook.creatingpackages.gui.11. LeavetheLocationsetasTestPackages.12. ClickonFinish.
Anewemptytestpackagenamedcom.davidsalter.cookbook.creatingpackages.guiisshownbeneaththeTestPackagesnode.
Thefinalsetupshouldlooklikethefollowingscreenshot:


Howitworks…Thisrecipeshowstwowaysofcreatingapackage:one,byclickingonthedesiredfolderdestinationwherethepackagewillreside,andtheother,byclickingwheretherootnodeofthepackagewillbe.
Byright-clickingon<defaultpackage>,NetBeanswillunderstandthatwewishtocreateapackageunderthecurrentoneandwillautomaticallyappendthefullpathofthepackagesinthePackageNamefield.Thedeveloperthenneedstoonlytypetherestofthepath.Thissavesalotoftimewhentheprojectgrowsandnestedpackagesstarttospread.
Thesecondoptionistoright-clickdirectlyonthedesirednodeinthePackagesexplorer.Inourexample,wearecreatingapackageundertheTestPackagesnode.Right-clickingontheTestPackagesnodewilltriggeracleanpackagenameanditisuptothedevelopertodecidewhatthefullpathisgoingtobe.

There’smore…ItisalsopossibletocreatepackagesintheFilesexplorerwithanewclasscreationwizard.
TheFilesexplorerBynavigatingtotheFilesexplorer,itispossibletoseehowtheprojectstructureisorganized,similartotheProjectsexplorer.Itisalsopossibletocreateapackageusingthisviewbyfollowingthesamestepsdescribedpreviously.
TheFilesexplorerdiffersfromtheProjectsexplorerinthesensethatthefilesarepresentedastheyexistinthefilesystem.TheProjectsview,ontheotherhand,presentsthefilesastheyareorganizedfromtheprojectperspective.
AutomaticcreationofpackagesItisalsopossibletocreatepackageswhenanewJavasourcefileiscreatedbytheIDE.
Whencreatingnewsourcefilesandnewtestclasses,NetBeanswillautomaticallycreatetherelevantpackageforthefileintheprojectifitdoesnotalreadyexist.Ifthefilebeingcreatedisatestclass,NetBeanswillcreatethepackageunderneaththeTestPackagesnode.Otherwise,thepackagewillbecreatedunderneaththeSourcePackagesnode.


CreatingaclassOneofthemostrepetitivetasksinsoftwaredevelopmentiscreatingclasses.Onceagain,withNetBeanswizards,creationofclassesisveryeasyandstraightforward.

GettingreadyItisnecessarytohaveaprojectinordertocreateaclass;so,ifyouareunsureonhowtodothis,pleasechecktherecipesinChapter1,UsingNetBeansProjects.Tohelpfollowthisrecipe,whencreatingaproject,enterCreatingClassesastheprojectname.Whencreatingtheproject,ensuretheCreateMainClassoptionisnotselected.

Howtodoit…WhentheProjectsexplorershowstheCreatingClassesproject,expandtheCreatingClassesnodeifnotyetexpandedandperformthefollowingsteps:
1. Right-clickontheCreatingClassesproject,andselectNewandJavaClass….2. OntheNewJavaClasswindow,typeRecipeundertheClassNamefield.3. OnthePackageselection,entercom.davidsalter.cookbook.creatingclasses.4. ClickonFinish.
WecanseetheNewJavaClasswindowinthefollowingscreenshot:

Howitworks…Theclassiscreatedrelativetothepathoftheitemweright-clickon.Havingsaidthat,thisexampleshowsthatitisalsopossibletocreatepackagesduringclasscreation.
TheclasscreatedbyNetBeansisaverybasicone.NetBeanshasaddedcommentsandpackagename,alongwiththeclassdeclaration.


CreatinganinterfaceAgooddevelopmentpracticeistouseinterfacestogrouptogetherrelatedfunctions.Codingtoaninterfaceallowsadevelopertoeasilyswitchtheimplementationtoanotherdefinedbyaninterfaceandhelpstokeepthecontractbetweencodemodules.
AninterfacedefinesasetofrelatedmethodsthathavenobodiesthataJavaclasscanthenimplement.NetBeansallowsustocreateanemptyinterfaceinasimilarfashiontocreatinganemptyclassasdescribedintheCreatingaclassrecipeearlierinthischapter.

GettingreadyItisnecessarytohaveaprojectinordertocreateaninterface;so,ifyouareunsureonhowtodothis,pleasechecktherecipesinChapter1,UsingNetBeansProjects.Tohelpfollowthisrecipe,whencreatingaproject,enterCreatingInterfacesastheprojectname.

Howtodoit…WhentheProjectsexplorershowstheCreatingInterfacesproject,expandtheCreatingInterfacesnodeifnotyetexpanded.
Let’snowcreateaninterface:
1. Right-clickontheCreatingInterfacesproject,andselectNewandJavaInterface….
2. OntheNewJavaInterfacewindow,typeBookundertheClassNamefield(NetBeansdisplaysthetitleofthefieldasClassNameeventhoughweareactuallycreatinganinterface).
TipInsomeprogramminglanguages,thebestpracticeistoprefixinterfaceswithacapitalItoindicatethatafileisindeedaninterface.InJava,thispracticeisnotascommonasinotherlanguagesandgenerallyinterfacesarenamedafternounssuchasCarorUser.ImplementingclassesusuallyusespecificinstancesoftheinterfacenamesuchasSportsCarorManager.It’sapersonalpreferenceonwhetheryouprefixclasseswithanI;however,inthisbook,IdonotprefaceinterfaceswithanI.
3. InthePackagesection,entercom.davidsalter.cookbook.creatinginterfaces,asshowninthefollowingscreenshot:
4. ClickonFinish.
WehavenowcreatedablankinterfacecalledBook.EdittheBook.javafilebydouble-clickingonitintheProjectsexplorerandaddthefollowingtwomethodsignaturestotheinterface:
intgetNumberPages();

voidread();
Theinterfacenowhastwomethodsdefinedwithinit.Aninterface,however,isnotmuchusewithoutaclassthatimplementsit,solet’simplementtheBookinterfacewiththefollowingsteps:
1. Clickonthelinedefiningtheinterfacesothatalightbulbisdisplayedintheleft-handsidemargin.
2. ClickonthelightbulbsothattheImplementInterfacehintisdisplayed,asshowninthefollowingscreenshot:
3. ClickontheImplementInterfacehinttodisplaytheImplementInterfacedialog.4. EntertheClassNamefieldasPaperbackandleavethePackageNamefieldasitis.5. ClickonOK.

Howitworks…AnewJavaclasscalledPaperbackwillnowbecreatedthatimplementstheBookinterface.
Amethodiscreatedwithintheclassforeachofthemethodsdefinedwithintheinterface.EachofthemethodsintheclassthrowsanUnsupportedOperationExceptiontoindicatethatnocodehasbeenwrittenforthemethodyet—itisuptothedevelopertofullyimplementthemethodbodies.

There’smore…Afterimplementinganinterface,agrayIinacircleisdisplayednexttoallofthemethodsintheinterfacethathaveanimplementation.ClickingonthiswillopenuptheimplementationoftheinterfaceintheJavaeditor.Similarly,whenlookingatanimplementationofaninterface,agreenIinacircleisdisplayednexttothemethodname.ClickingonthiswillopenuptheinterfacefilewithintheJavaeditor,asshowninthefollowingscreenshot:


RunningafileOncewehavecreatedsomecodeasapartofourapplication,thenextstageistorunthecode.NetBeansallowsdeveloperstoruneitherafile(withamainmethod)oraproject.Inthisrecipe,we’llseehowthiscanbeachieved.

GettingreadyItisnecessarytohaveaprojectinordertorunafile.Ifyouareunsureonhowtocreateaproject,pleasechecktherecipesinChapter1,UsingNetBeansProjects.Tohelpfollowthisrecipe,whencreatingaproject,enterRunningFilesastheprojectnameandensurethattheCreateMainClassoptioncalledcom.davidsalter.cookbook.runningfiles.RunningFilesisselected.

Howtodoit…1. Right-clickontheRunningFilesproject,andselectNewandJavaClass….2. OntheNewJavaClasswindow,typeApplicationundertheClassNamefield.3. Onthepackageselection,entercom.davidsalter.cookbook.runningfiles.4. EdittheApplication.javafileandaddamainmethod:
publicstaticvoidmain(String[]args){
System.out.println("ThisiscalledfromApplication");
}
Thereshouldnowbetwofileswithintheprojectthathaveamainmethodwithinthem,Application.javaandRunningFiles.java.
5. Right-clickontheApplication.javafileintheProjectsexplorerandselectRunFile.
NoticethattheApplication.javafileisexecutedwiththeprintlnstatementweaddedinstep4beingdisplayedintheOutputwindow.
6. EdittheRunningFiles.javafileandchangethemainmethodto:
publicstaticvoidmain(String[]args){
System.out.println("ThisiscalledfromRunningFiles");
}
7. RuntheprojectbyclickingontheRunmenuoptionandthentheRunProjectmenuoptionorbypressingF6.
NoticethattheRunningFiles.javafileisexecutedwiththeprintlnstatementweaddedinstep6beingdisplayedintheOutputwindow.
Howitworks…Inthisrecipe,we’veshownhowyoucaneitherrunafileorarunaproject.Whenrunningafile,theJavaclassthatisselectedtoberunisexecutedaslongasithasamainmethodinit.
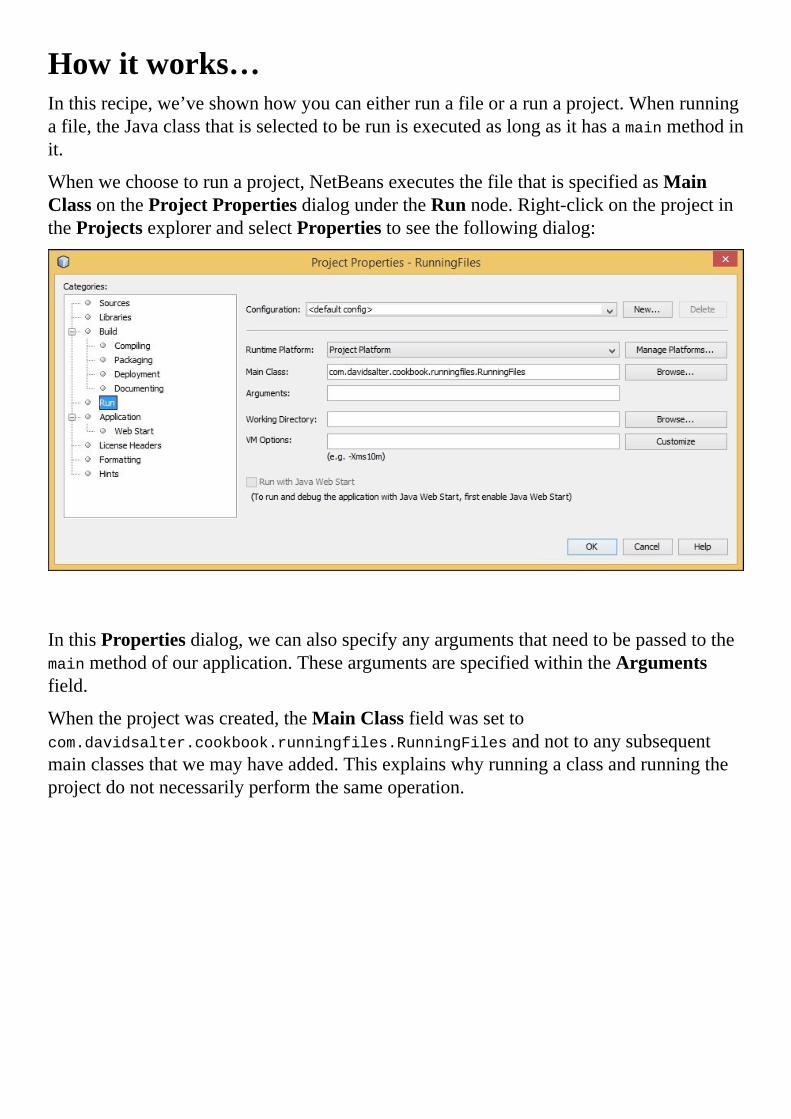
Whenwechoosetorunaproject,NetBeansexecutesthefilethatisspecifiedasMainClassontheProjectPropertiesdialogundertheRunnode.Right-clickontheprojectintheProjectsexplorerandselectPropertiestoseethefollowingdialog:
InthisPropertiesdialog,wecanalsospecifyanyargumentsthatneedtobepassedtothemainmethodofourapplication.TheseargumentsarespecifiedwithintheArgumentsfield.
Whentheprojectwascreated,theMainClassfieldwassettocom.davidsalter.cookbook.runningfiles.RunningFilesandnottoanysubsequentmainclassesthatwemayhaveadded.Thisexplainswhyrunningaclassandrunningtheprojectdonotnecessarilyperformthesameoperation.

There’smore…IfwehaveaprojectwithmorethanoneMainClasswithinit,wecanusetheProjectPropertiesdialogtoselecttheclassthatwillbeexecutedwhenF6ortheRunProjectoptionisselected.ClicktheBrowse…buttonnexttotheMainClassinputontheProjectPropertiesdialog.Ontheresultantdialog,alistofallthemainclasseswithinaprojectisshown.SelecttheonethatyouwishtouseasMainClassfortheproject.WecanseetheBrowseMainClasseswindowinthefollowingscreenshot:
InadditiontocreatingablankJavaclassandthenaddingamainmethodintoitmanually,NetBeansprovidesawizardtoautomaticallycreateanewclasswithamainmethodinit.Thisisachievedbyright-clickingonaprojectandselectingNewandthenOtherandthenselectingJavafromthelistofcategoriesandNewMainClassasthefiletype.
Inthisrecipe,we’veseenhowamainclasscanbeexecutedfromwithinNetBeans.Lateroninthisbook,we’llseehowawebprojectandamobileprojectcanbeexecuted.


DebuggingaclassItispossibletosetbreakpointsandwatchesinNetBeansand,onexecution,checkwhatthevalueofagivenvariableorobjectis.
TheNetBeansdebuggeralsoletsthedeveloperfollowmethodcallsandexecutecodeonelineatatimegivingafine-grainedvisualizationonhowthecodeisrunning.
ThisisoneofthefeatureswhereNetBeansshinesincomparisontootherIDEs;so,withoutfurtherado,let’sdivein.NetBeanshasalreadyincludedmanyoftheplugins,performancetools,andserversthatareusedforeasingtheprocessofsetupanddebugging.

GettingreadyWewillbeusingaJavaApplicationprojectforthisexample.Sincewearejustshowcasingthecapabilitiesofthedebugger,wewon’tbeusinganythingcomplicated;so,anormalJavaApplicationprojectwillsuffice.Ifyou’reunsureonhowtocreateone,pleasechecktheCreatingaJavaapplicationrecipeofChapter1,UsingNetBeansProjects.
WearealsogoingtoneedaJavaclass.IftheCreatingaJavaapplicationrecipewasused,thenamainclassisalreadygeneratedandthatonecanbeusedforourexample.Ifaprojectalreadyexists,thenitispossibletofollowtheCreatingaclassrecipeinordertogetacleanclassfortheworktoproceed.Theautomaticallygeneratedclasswillbeourmainclass,sotheclassnametouseforthecleanclassisHowToDebug.java.
IftheCreatingaJavaapplicationrecipeisfollowed,theprojectnameshouldbeHowToDebugwiththemainclassbeingcalledcom.davidsalter.cookbook.howtodebug.HowToDebug.java.Alloftheotherdefaultsettingpresentonthewizardsshouldbeleftuntouched.

Howtodoit…Wewillneedanotherclasstodemonstratehowtosetupbreakpointsinotherobjects.Forthis,performthefollowingsteps:
1. Right-clickonSourcePackages,undertheHowToDebugproject,selectNewandJavaClass….
2. OntheNewJavaClasswindow,typePersonundertheClassNamefield.3. Onpackageselection,clickonthedropdownandselect
com.davidsalter.cookbook.howtodebug.4. ClickonFinish.
ThePerson.javafilewillshowupontheJavaeditor.
InsidethePersonclassdeclaration,write:
intage;
Stringname;
Now,let’srefactorourclassbyencapsulatingthefields:
1. Right-clickonthePersonclassinsidetheJavaeditor.2. SelectRefactorandthenclickonEncapsulateFields….3. ThenclickonSelectAllandRefactor.Gettersandsettersfortheageandname
instancevariableswillbeaddedtoPerson.javaandthevariableswillhavethevisibilitymodifierssettoprivate.
4. OpenHowToDebug.java.Insidethemainmethod,enterthefollowinglinesofcode:
Personperson1=newPerson();
Personperson2=newPerson();
person1.setName("David");
person1.setAge(21);
person2.setName(null);
person2.setAge(32);
Itisnotagoodpracticetosetvariableswithnullvalues,butforthepurposeofthisexample,wewilldoitthisonetime.
Wewillnowuseawatchtoobserveaspecificvariable’svalue.Awatchisexactlywhatthenamesays,it“watches”aspecificvariablefortheentirelifetimeoftheapplicationanddisplaysitsvalueintheVariablesview.
Toaddawatch,simply:
1. Selecttheperson1variable.2. Therearetwowaystoaddawatch:Onthetopbar,clickonDebugandthenselect
NewWatch…orpressCtrl+Shift+F7(Command+Shift+F7onaMac)andclickonOK,asshowninthefollowingscreenshot.Theperson1variablewillbeaddedtotheVariablesview.

Forourfirstbreakpoint,clickontheleft-handsidebar,wherethelinenumbersareplaced,specificallyonthefollowingline:
person2.setName(null);
Abreakpointwillbeaddedtothesidebarandalongpinklinewillspecifythebreakpointlocation,asshowninthefollowingscreenshot:
Then,addanotherbreakpoint,butthistimetoPerson.java.Addthebreakpointtotheline:
this.age=age;
Thislineishighlightedinthefollowingscreenshot:

Finally,let’sdebugourexample.OpenHowToDebug.javaandpressCtrl+Shift+F5(Command+Shift+F5onaMac).
TipInsteadofusingkeyboardshortcuts,afilecanbedebuggedbyselectingtheDebugoption
andthenDebugFilemenuoption,orbyclickingontheDebugProjectbutton( )inthetoolbar.

Howitworks…Uponthedebugmodeexecution,NetBeansstopstheexecutionatthefirstbreakpoint.
ThebreakpointtellsNetBeanstotemporarilyhalttheprogramandletthedeveloperexaminethecontentsofvariablesandwatchesatthatpoint.
Inourexample,NetBeanswilllooklikethefollowingscreenshot:
Itispossibletoseeourwatch,shownwithabluediamondicon,andalsothenormalvariables,shownwithagreenlozenge.Itispossibletoexpandthewatchorvariablestocheckthecontentsofanobjectatruntime.
Theexecutionpointishighlightedingreen.Tojumponelineofcodeintheexecution,pressF8.Tocontinue,pressF5;NetBeanswillresumethedebuggingprocessuntilanotherbreakpointisfound,atwhichpointtheexecutionwillonceagainstopsothatthedevelopercanhaveanotherchancetoexaminetheexecution.Inourexample,theexecutionwillcontinueuntilthePersonclass’ssetmethodforageisreached.Tocontinuewiththeexecution,justpressF5onemoretimeandtheprogramexecutionwillcontinueuntiltheend,sincewedonothaveanyotherbreakpoints.
Toremoveabreakpoint,simplyclickonitanditwilldisappear.
There’smore…WhatifIwantabreakpointwhenmyvariablereachesacertainvalue?Watchesaretoocomplicated,istheresomethingeasier?DoesNetBeansdebugothertypesofapplications?CanIdebugapplicationsratherthanmainclasses?
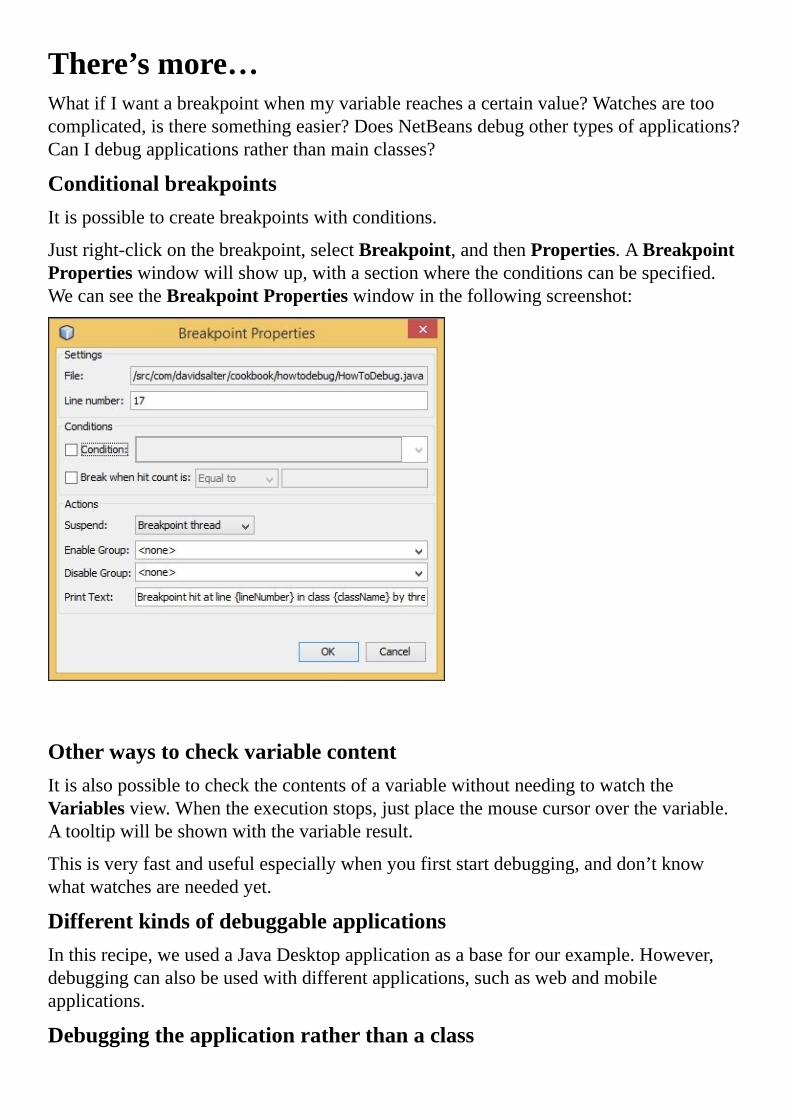
ConditionalbreakpointsItispossibletocreatebreakpointswithconditions.
Justright-clickonthebreakpoint,selectBreakpoint,andthenProperties.ABreakpointPropertieswindowwillshowup,withasectionwheretheconditionscanbespecified.WecanseetheBreakpointPropertieswindowinthefollowingscreenshot:
OtherwaystocheckvariablecontentItisalsopossibletocheckthecontentsofavariablewithoutneedingtowatchtheVariablesview.Whentheexecutionstops,justplacethemousecursoroverthevariable.Atooltipwillbeshownwiththevariableresult.
Thisisveryfastandusefulespeciallywhenyoufirststartdebugging,anddon’tknowwhatwatchesareneededyet.
DifferentkindsofdebuggableapplicationsInthisrecipe,weusedaJavaDesktopapplicationasabaseforourexample.However,debuggingcanalsobeusedwithdifferentapplications,suchaswebandmobileapplications.
Debuggingtheapplicationratherthanaclass

Intheearlierdiscussion,weshowedhowtodebugafilebypressingCtrl+Shift+F5.Thisisanexcellentwayfordebuggingclasseswithamainmethodinthem.Forotherapplicationtypes,suchaswebapplications,thereisnomainmethodandsoaclasscannotbedebuggedonitsown.Inthiscase,theapplicationcanbedebuggedratherthanaclass.
Tostartdebugginganapplicationratherthanaclass,pressCtrl+F5insteadofCtrl+Shift+F5.
Whendebugginganapplicationwithasinglemainmethod,theoptiontodebugaclassandtheoptiontodebugtheapplicationwillbothoperateidentically.


FormattingthecodeOncewe’vewrittenandrun/debuggedsomeofourcode,it’sgenerallyagoodideatocheckthatthecodefollowssomelayoutguidelines.
Inthisrecipe,we’llseehowwecanquicklyandeasilyformatthecodesothatallofourcodehasastandardlayoutmakingiteasierforusandotherstoread.

GettingreadyItisnecessarytohaveaprojectinordertoformatthecodewithinit.Ifyouareunsureonhowtocreateaproject,pleasechecktherecipesinChapter1,UsingNetBeansProjects.Tohelpfollowthisrecipe,whencreatingaproject,enterFormattingCodeastheprojectnameandensurethattheoptiontocreateamainclasscalledcom.davidsalter.cookbook.formattingcode.FormattingCodeisselected.

Howtodoit…1. ExpandtheSourcePackagesnodewithintheFormattingCodeprojectandselectthe
FormattingCode.javaclasstobeeditedintheJavacodeeditor.2. Edittheemptymainmethodintheclasstohavethefollowingcontents(notethatthe
layoutofthecodehereisdeliberatelybadwitheachlinestartinginthefirstcolumnoftheeditor):
publicstaticvoidmain(String[]args)
{
for(inti=0;i<10;i++)
{
System.out.println("i="+i);
}
}
3. Right-clickinthecodeeditorandselectFormat.4. ThecodeintheeditorwindowwillnowbeformattedaccordingtotheJavacode
guidelines.Forexample,youcanseethateachlineisnowindentedcorrectlyandtheopeningbracesymbols,{,havebeenplacedattheendofthefirstlineoftheblocktheybelongtoratherthanbeingonlinesontheirown.

Howitworks…NetBeansmaintainsalistofcodeformattingrulesthatcanbeappliedtodifferentfiletypes.WhentheFormatactionisinvoked,theseformattingrulesareappliedtothecurrentlyopenfile.
Theformattingrulesincludeoptionssuchaswheretoplacebraces,howtoaligncodeandtheorderofmembersinaclass.Alloftheseformattingrulescanbecustomizedifthedefaultisnottoyourliking.Tocustomizetheformattingrules,selectToolsandthenOptionsfromthemainmenu.OntheOptionsdialog,selecttheEditoroptionandtheFormattingtab.
Project-specificformattingrulescanbedefinedbyright-clickingonaprojectandselectingProperties.OntheFormattingsectionofthePropertiesdialog,theusercanselecttouseGlobaloptions,ortoUseprojectspecificoptions.
AshortcutforformattingafileispressingAlt+Shift+Fratherthanright-clickingonthefileandselectingFormat.


CollapsingandexpandingcodefoldsWhenyou’vewrittenalotofcode,it’susefultobeabletogroupsectionsofcodetogetherthatcanbecollapsedandexpandedatwill.Codefoldsallowyoutohidesectionsofcodetomakethecodethatyouarelookingateasiertounderstand.NetBeansallowsanyamountofcodetobedefinedwithinacodefold,andindeedautomaticallygeneratescodefoldsforcomments,classes,andmethodsaswillbeseeninthisrecipe.

GettingreadyItisnecessarytohaveaprojectwithsomeJavacodewithinitinordertoseecodefoldsinaction.Ifyouareunsureonhowtocreateaproject,pleasechecktherecipesinChapter1,UsingNetBeansProjects.Tohelpfollowthisrecipe,whencreatingaproject,enterCodeFoldsastheprojectnameandensurethattheoptiontocreateamainclasscalledcom.davidsalter.cookbook.codefolds.CodeFoldsisselected.

Howtodoit…1. ExpandtheSourcePackagesnodewithintheCodeFoldsprojectandselectthe
CodeFolds.javaclasstobeeditedintheJavacodeeditor.2. Edittheemptymainmethodintheclasstohavethefollowingcontent:
publicstaticvoidmain(String[]args){
inttotal=0;
intmaximumCount=10;
for(inti=0;i<maximumCount;i++){
total+=i;
}
System.out.println("Total:"+total);
}
3. ExaminethecodeintheJavaeditorandyouwillseethatthereisaminussign,-,intheleft-handsidemarginatthestartofthemainmethodindicatingthestartofacodefold.Thecodefoldcontinuestotheendofthemethod.
4. Editthecode,andenclosetheforstatementblockwithinacodefoldasshowninthefollowingcode:
//<editor-folddesc="Basicsummingalgorithm.">
for(inti=0;i<maximumCount;i++){
total+=i;
}
//</editor-fold>
5. Themainmethodshouldnowlooklikethefollowingscreenshot:
6. Clickon–inthebordertocollapsethecodefoldasshowninthefollowingscreenshot:


Howitworks…Addingan<editor-fold>elementaroundasectionofcodewithintheNetBeanseditorallowsthecodetobecollapsedandexpandedusingthe+and–buttonsintheleft-handsidemargin.
Ifadescriptionforacodefoldisrequired,thenthedescattributeofthe<editor-fold>elementcanbeusedtoholdthatdescription.Whenthecodeiscollapsed,thedescriptionisdisplayedwithintheeditor.Ifnodescriptionisspecified,thenthefirstlineofthecodefoldtogetherwiththenumberoflinescollapsedisdisplayedinsteadofadescription.
Bydefault,whenafileisopenedupwithintheJavaeditor,allofthecodefoldsaredisplayedinanexpandedfashion.Ifyouhavesomecodethatyouwishtobecollapsedwhenthefileisopenedup(perhapsthiscouldbesomevariabledeclarationsorinitializationcode),thenthiscanbeachievedbyaddingthedefaultstate="collapsed"attributeontoa<editor-fold>element.NetBeansallowsyoutodefinebothadescriptionandadefaultcollapsedstateonapieceofcode.

There’smore…ClickingonViewandtheCodeFoldsmenuitemdisplaysamenushowingalloftheoperationsthatcanbeperformedagainstcodefoldswithinthecurrentlyopenfile.Thismenushowsoptionsforcollapsingthecurrentfold,collapsingallfolds,collapsingonlyJavadocfolds,andsoon.


TogglingcommentsWhenwritingcode,itissometimesusefultocommentoutcodetoseewhateffectitwillhaveonarunningapplicationwhilestillkeepingtheoriginalcode.NetBeansprovidesaneasywaytocommentoutandremovecommentsfrommultiplelinesofcodeasseeninthisrecipe.

GettingreadyTocompletethisrecipe,youneedtohaveaNetBeansprojectwithsomeJavacodeinitthatcanbecommentedout.Ifyoudonothaveasuitableproject,youcancreateoneusinganyoftherecipesinChapter1,UsingNetBeansProjects,ofthisbook.

Howtodoit…1. Usingthemouse,clickonasinglelineofcodewithinaJavasourcefile.2. PressCtrl+Shift+C.3. Notethatthecommentingstateofthelineyouhaveselectedistoggled.Thatis,if
youselectedanuncommentedlineofcodeitwillnowbecommentedout.Ifyouselectedacommentedoutlineofcode,itwillnownotbecommented.
4. Usingthemouse,highlightseverallinesofcodewithinaJavasourcefile.5. PressCtrl+Shift+C.6. Notethatthecommentingstateofthelinesthatyouhaveselectedisagaintoggled
justlikeinstep3.

Howitworks…PressingCtrl+Shift+Conaline,orasetoflineswillcommentout/removecommentsfromtheselectedline(s).
Becarefulwhencommentingoutsectionsoflinesthatincludebothcommentedanduncommentedlineswithinthem.Intheseinstances,togglingofcommentsmaynotnecessarilyoccuronaline-by-linebasisasthefirstpressofCtrl+Shift+Cwillcommentoutallofthelinesthatareselectedeveniftheyarealreadycommentedout.Youwillseethatsomelinesarethereforecommentedouttwice.Subsequently,pressingCtrl+Shift+Cwillundothecommentingthathasjustbeenperformed.
AnalternativekeycombinationtoCtrl+Shift+CisCtrl+/.Bothofthesekeycombinationsperformthesameaction.


FixingandorganizingimportsWithanythingmorethanaverybasicapplication,adeveloperneedstoimportotherpackagesintotheirclassesforthemtofunctioncorrectly.Thisquicklyleadstoanumberofimportstatementsatthetopofaclassfile.NetBeansoffersfacilitiestoautomaticallyaddimportstatements(fiximports),inordertosavedevelopertime,andtheabilitytotidyuptheimportstatements(organizeimports).

GettingreadyItisnecessarytohaveaprojectwithvalidJavasourcecodeinordertofixandorganizeimports.Ifyouareunsureonhowtocreateaproject,pleasechecktherecipesinChapter1,UsingNetBeansProjects.Tohelpfollowthisrecipe,whencreatingaproject,enterUsingImportsastheprojectnameandensurethattheoptiontocreateamainclasscalledcom.davidsalter.cookbook.usingimports.UsingImportsisselected.

Howtodoit…1. ExpandtheUsingImportsproject,andopentheUsingImports.javaclassfor
editing.2. EditthemainmethodinUsingImports.javatobeasfollows:
publicstaticvoidmain(String[]args){
List<String>l=newArrayList<String>();
l.add("Hello");
l.add("World");
}
3. NotethattheJavatypesListandArrayListareunderlinedinredtoindicatethatanerrorhasoccurredhereinthesourcecode.Thereasonfortheerrorhereisthattheclasseshavenotbeendefinedbytheirrespectivepackagesbeingimported.
4. PressCtrl+Shift+I(orclickonSourcefromthemainmenuandthenclickonFixImports)toopenuptheFixAllImportsdialog:
5. EnsurethattheimportforArrayListisjava.util.ArrayListandtheimportforListisjava.util.List(thesearethedefaultoptions,butnoticethatthereisalsoajava.awt.Listclass—thisisnotwhatweintendinthisinstance).
6. ClickontheOKbutton.
Atthispoint,theFixAllImportsdialogwillcloseandyouwillseethattheimportstatementsforArrayListandListhavebeenaddedtothetopoftheUsingImportsclass.
Inadditiontofixingtheimportstatementsinaclassfile,NetBeanscanalsoorganizetheimportswiththefollowingsteps:
1. EdittheUsingImports.javafileandswaptheorderoftheimportssothattheimportforjava.util.Lististhefirstimportstatement.
2. ClickontheSourcemenuandthentheOrganizeImportsoption.
YouwillnowseeinthesourcecodewindowthatNetBeanshasorganizedtheimportstatementsintoalphabeticalorderagainwiththeimportstatementfor

java.util.ArrayListbeingfirst.

Howitworks…WhenselectingtoOrganizeImports,NetBeanswillordertheimportsintoalphabeticalorderandperformanyotherorganizationasdefinedbythecodeformattingrules.Forexample,ifmorethanthreeimportsaremadefromthesamepackage,NetBeanscanbeconfiguredtoreplaceallimportsfromthatpackagewithastarimport(importpackage.*).TheimportorganizationrulescanbedefinedwithintheNetBeansoptions.Toaccesstheseoptions,selectToolsandthenOptionsmenuitem.SelecttheEditoroptionandthentheFormattingtabchoosingImportsasthecategoryonthistab.
PerformingaFixImportsoptionwillnotonlyaddanymissingimports,itwillalsoorganizetheimportsasiftheOrganizeImportsactionhadbeenperformed.

There’smore…Importscanautomaticallybeorganizedwhenafileissaved.Toenablethisoption,clickToolsandthenOptionsfromthemainNetBeansmenu.SelecttheEditoroptionandthentheOnSavetab.EnsurethattheOrganizeImportscheckboxischeckedtoorganizetheimportsinafileandthattheRemoveUnusedImportscheckboxischeckedtoremoveanyunnecessaryimportstatements,asshowninthefollowingscreenshot:
WhenalineofcodeistypedintoaJavaclassfile,NetBeansparsesthelinetodetermineifanyadditionalclassesneedtobeimportedintothecurrentclass.TheseadditionalclassesdeterminewhichimportsareaddedtoaclassusingtheFixImportsaction.Inadditiontofixingalloftheimportsinoneoperation,eachsourcelinethatrequiresanimporthasalightbulbdisplayedintheleft-handsidemargin.Clickingonthelightbulbwiththeleftmousebuttonwilldisplayalistofhintsonhowtofixanyerrorsonthecurrentline.Includedinthislistoffixesistheabilitytoindividuallyaddmissingimportstatements.


CreatingfileheadersWhenwritingopensourcesoftware,orclosedsourcesoftwarethatbelongstoaspecificcompanyorperson,itisveryusefultoaddaheadertoafilethatconsists,ataminimum,ofthelicensetermsforthefile.NetBeanscomespreconfiguredwiththemajorlicensetermsthatcanbeautomaticallyappliedtothebeginningoffiles,butalsoallowscustomheaderstobedefined.

GettingreadyItisnecessarytohaveaprojectwithvalidJavasourcecodeinordertodefinefileheadersastheyaredefinedonaper-projectbasis.Ifyouareunsureonhowtocreateaproject,pleasechecktherecipesinChapter1,UsingNetBeansProjects.Tohelpfollowthisrecipe,whencreatingaproject,enterUsingHeadersastheprojectnameandensurethatamainclassisnotcreated.
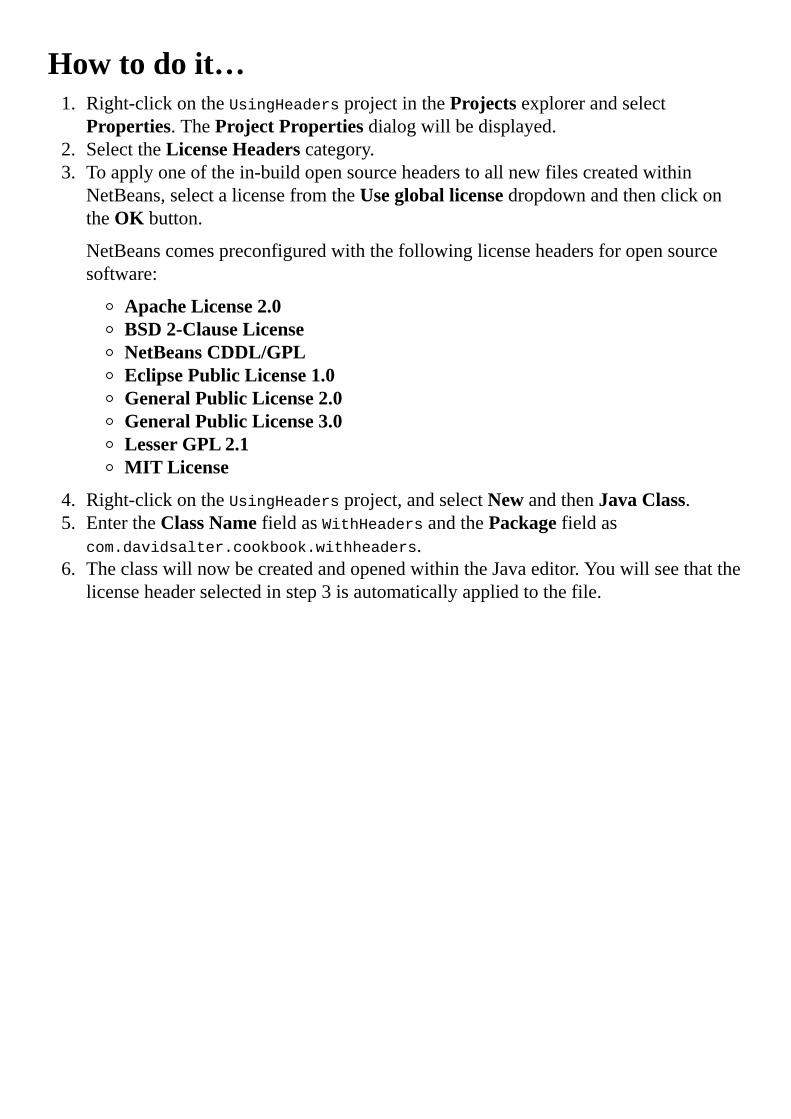
Howtodoit…1. Right-clickontheUsingHeadersprojectintheProjectsexplorerandselect
Properties.TheProjectPropertiesdialogwillbedisplayed.2. SelecttheLicenseHeaderscategory.3. Toapplyoneofthein-buildopensourceheaderstoallnewfilescreatedwithin
NetBeans,selectalicensefromtheUsegloballicensedropdownandthenclickontheOKbutton.
NetBeanscomespreconfiguredwiththefollowinglicenseheadersforopensourcesoftware:
ApacheLicense2.0BSD2-ClauseLicenseNetBeansCDDL/GPLEclipsePublicLicense1.0GeneralPublicLicense2.0GeneralPublicLicense3.0LesserGPL2.1MITLicense
4. Right-clickontheUsingHeadersproject,andselectNewandthenJavaClass.5. EntertheClassNamefieldasWithHeadersandthePackagefieldas
com.davidsalter.cookbook.withheaders.6. TheclasswillnowbecreatedandopenedwithintheJavaeditor.Youwillseethatthe
licenseheaderselectedinstep3isautomaticallyappliedtothefile.

There’smore…Inadditiontousingthestandardopensourcelicenseheaders,customfileheaderscanbeused.OntheProjectPropertiesdialog,selectingtheEditgloballicensesbuttonallowsthedevelopertoeditandaddtothecollectionofpredefinedlicenseheaders.
Ifalicensefileisstoredalongsidetheprojectasafile,thenthiscanbeusedasthedefaultfileheaderbyselectingtheUseprojectlocationoptionwithintheProjectPropertiesdialog.


ChangingthelookandfeelofNetBeansJavaprovidesasetofdifferentLookandFeelstylesthatcanbeappliedtoapplications.TheseLookandFeelstyleschangethewaythatuserinterfacecomponentsaredisplayedwithintheapplication(thelook)andhowtheybehave(thefeel).JavaprovidesnativeLookandFeelcomponents(forexample,onWindowsoronMacOSX)aswellascustom-styledcomponents.AdditionalLookandFeelstylescanbedesignedinadditiontotheonesprovidedbydefaultwithJava.

GettingreadyTochangethelookandfeelofNetBeans,nospecificprojectsarerequiredtobeloaded.AllthatisrequiredisarunningcopyofNetBeans.
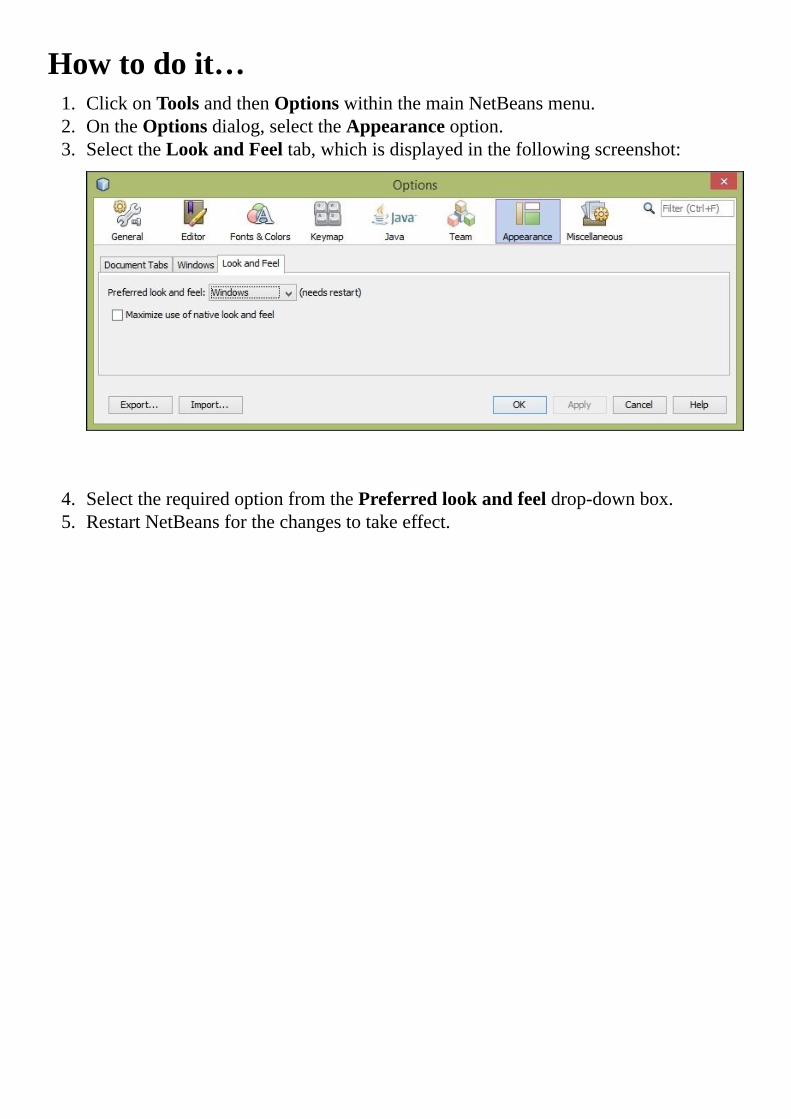
Howtodoit…1. ClickonToolsandthenOptionswithinthemainNetBeansmenu.2. OntheOptionsdialog,selecttheAppearanceoption.3. SelecttheLookandFeeltab,whichisdisplayedinthefollowingscreenshot:
4. SelecttherequiredoptionfromthePreferredlookandfeeldrop-downbox.5. RestartNetBeansforthechangestotakeeffect.

Howitworks…SpecifyingthelookandfeelwithintheNetBeansoptionschangesthedefaultlookandfeelthatisusedwhenNetBeansstartsup.ThisisthereasonthatarestartofNetBeansisrequiredafterchangingthelookandfeel.Atstartuptime,NetBeansinvokesthestandardJavaUIManagerclasstosettheapplicationlookandfeel.

There’smore…WhenselectingtheLookandFeeltabviatheOptionsdialog,selectingMaximizeuseofnativelookandfeelensuresthatNetBeansusesthemaximumnumberofnativecontrolsavailabletotheJavaruntime.
InadditiontochangingthelookandfeelofNetBeansviatheapplication’suserinterfaceasdescribedbythisrecipe,itisalsopossibletochangethelookandfeelviathecommandlineorviatheNetBeansstartupoptions.Whenthelookandfeelischangedviathecommandline,itisnotpossibletooverridethiswithintheapplicationasdescribedbythisrecipe.
Tochangelookandfeelviathecommandline,startNetBeanswiththe–lafparameterspecifyingthefullclassnametothelookandfeelrequired.Forexample,tostartNetBeansusingtheMotiflookandfeel,startNetBeansas:
netbeans--lafcom.sun.java.swing.plaf.motif.MotifLookAndFeel
NoteNoticethedouble-signrequiredheretospecifytheLookandFeelparameterisbeingpassedtoNetBeans.Ifasingle–signisused,thelookandfeelwillnotbechanged.
TochangethelookandfeelviatheNetBeansconfigurationoptions,editthenetbeans.conffilelocatedwithintheNetBeansinstallationandaddthe–lafoptionintothenetbeans_default_optionsparameteras:
netbeans_default_options="--lafjavax.swing.plaf.metal.MetalLookAndFeel
-J-client-J-Xss2m-J-Xms32m-J-XX:PermSize=32m-J-
Dnetbeans.logger.console=true-J-ea-J-Dapple.laf.useScreenMenuBar=true-J-
Dapple.awt.graphics.UseQuartz=true-J-Dsun.java2d.noddraw=true-J-
Dsun.java2d.dpiaware=true-J-Dsun.zip.disableMemoryMapping=true-J-
Dnetbeans.extbrowser.manual_chrome_plugin_install=yes"
NoteFordetailsonthedifferentLookandFeelclassesthatareavailable,checkouthttp://docs.oracle.com/javase/tutorial/uiswing/lookandfeel/plaf.html.


Chapter3.NetBeansProductivityInthischapter,wewillcoverthefollowingrecipes:
CreatingaconstructorCreatingaloggerCreatingatoString()methodCreatingapropertyOverridingamethodRenamerefactoringMoverefactoringCopyrefactoringDeleterefactoringChangeparametersrefactoringPullup/pushdownrefactoringExtractinterfacerefactoringEncapsulatefieldsrefactoringReplacingaconstructorwiththeFactorypattern

IntroductionInthefirsttwochapters,welookedathowtocreateprojectsandhowtocreateJavaartifacts(classes,packages,andsoon).
Inthischapter,we’llmoveonandshowhowNetBeanscanimprovedeveloperproductivitybydescribingsomedifferentshortcutsforgeneratingcode.We’llgenerateconstructors,loggers,toString()methods,andproperties.
Afterlookingattheseshortcuts,we’llseesomeofthedifferenttypesofcoderefactoringthatcanbeachievedwithNetBeans.


CreatingaconstructorWhencreatingaclassthatmaintainsanystate(thatisalmostanyclassthathasclassmembers),itcanbeveryusefultocreateaconstructorthatcanperformanyrequiredinitialization.
Creatingconstructorsisnottricky;however,NetBeansprovidesahandyshortcuttosavetimeandincreasedeveloperproductivity.

GettingreadyFirstwewillneedtocreateanewproject,sopleaserefertotherecipesinChapter1,UsingNetBeansProjects,forcreatingJavaprojects.Tohelpfollowthisrecipe,whencreatingaproject,enterCreatingConstructorsastheprojectname.

Howtodoit…WhentheProjectsexplorershowstheCreatingConstructorsproject,expandtheCreatingConstructorsnodeifitisnotalreadyexpanded.
Wewillnowcreateanemptyclassandshowhowconstructorscanbeaddedtoitwiththefollowingsteps:
1. Right-clickontheCreatingConstructorsproject,andselectNewandJavaClass….
2. OntheNewJavaClassdialog,typeShapeundertheClassNamefield.3. OnthePackageselection,enter
com.davidsalter.cookbook.refactor.creatingconstructors.4. ClickonFinishandthenewclasswillbecreatedandopenedintheeditor.5. Right-clickwithinthebodyoftheclassandselectInsertCode….6. Onthepop-upGeneratewindow,clickonConstructor….
Atthisstage,thepop-upGeneratewindowwillcloseandyouwillseethatablankconstructorhasbeenaddedtotheShapeclass.SinceNetBeanshasnoknowledgeofwhatwewanttodowiththeconstructor,ithasleftitsimplementationempty.
Let’snowaddsomemembervariablestotheclassandshowhowNetBeanscanmakeaconstructorthatwillallowustosetthesevariables.
7. WithintheShapeclass,addthefollowingcodeimmediatelybeforetheShape()constructor:
intnumberOfSides;
floatarea;
8. Right-clickwithinthebodyoftheclassandselectInsertCode….9. Onthepop-upGeneratewindow,clickonConstructor….
Unlikethefirsttimewechosetoinsertaconstructor,thistimeNetBeanshasdisplayedtheGenerateConstructordialog:
10. OntheGenerateConstructordialog,checkthenumberOfSides:intfield,leavingthearea:floatfieldunchecked.
11. ClickonGenerate.

12. TheGenerateConstructordialogwillnowcloseandanewconstructorwillbeaddedtotheShape.javaclass.Thenewconstructorwilllooklikethefollowingcode:
publicShape(intnumberOfSides){
this.numberOfSides=numberOfSides;
}

Howitworks…Whencreatingaconstructor,NetBeansfirstcheckstoseeifthereareanymembervariableswithintheclass.Iftherearenone,thenablankdefaultconstructorwillbecreatedfortheclass.If,however,therearemembervariableswithintheclass,NetBeansprovidesthedeveloperwiththeoptionofchoosingwhichmembervariablescanbeinitializedaspartoftheconstructor.
Creatingaconstructorinthiswaycanbeperformedmultipletimesifyouwishtoinitializedifferentvariableswithdifferentconstructors.Ifyoufindyourselfcreatingmultipledifferentconstructors,itmay,however,beanindicationthatyouneedtorethinkyourdesignoftheclass.

There’smore…Insteadofright-clickingwithinthebodyofaclassandselectingInsertCode…,theshortcutkeyAlt+Insertcanbeused.


CreatingaloggerWhendevelopingcode,itcanbeusefultooutputloginformationeithertotheterminal,ormoreusefullyinthecaseofwebapplications,toalogfile.NetBeansallowsdeveloperstoeasilymakeuseofloggerswithinclassesbycreatingaloggermemberwithinaclass.

GettingreadyFirstwewillneedtocreateanewproject,sopleaserefertotherecipesinChapter1,UsingNetBeansProjects,forcreatingJavaprojects.Tohelpfollowthisrecipe,whencreatingaproject,enterCreatingLoggersastheprojectnameandensurethatamainclasscalledcom.davidsalter.cookbook.creatingloggers.CreatingLoggersiscreated.

Howtodoit…WhentheProjectsexplorershowstheCreatingLoggersproject,expandtheCreatingLoggersnodeifnotyetexpandedandperformthefollowingsteps:
1. Double-clickontheCreatingLoggers.javaclassfilewithintheProjectsexplorertoopenitforediting.
2. Right-clickwithinthebodyoftheclassandselectInsertCode….3. Onthepop-upGeneratewindow,clickonLogger….
Atthisstage,thepop-upGeneratewindowwillcloseandaloggerwillbeaddedtotheendoftheclasstogetherwiththerelevantimportstatementatthebeginningoftheclass.Thefollowingstatementwillbeadded:
privatestaticfinalLoggerLOG=
Logger.getLogger(CreatingLoggers.class.getName());
NoteFormoreinformationofJavalogging,checkoutOracle’sJavaLoggingTechnologypageathttp://docs.oracle.com/javase/7/docs/technotes/guides/logging/.
Nowthatwehavecreatedaloggerwithinaclass,informationcanbesenttothelogger.
4. ChangethebodyofthemainmethodwithintheCreatingLoggers.javafiletobe:
LOG.warning("Thisisawarning");
LOG.info("Thisisinformation");
5. RunthemainclassbypressingShift+F6andnoticethattheloginformationisoutputtotheOutputwindow.


CreatingatoString()methodAusefultechniquetoaiddebuggingJavaapplicationsistoaddatoString()methodontoaclasssothatusefulinformationcanbeoutputtohelpdescribetheclass.Typically,atoString()implementationwouldoutputanyIDthatanobjecthastogetherwiththedescriptionoftheobject.NetBeansprovidesfacilitiestoallowdeveloperstoeasilyaddandcustomizetoString()methodswithinclasses.

GettingreadyFirstwewillneedtocreateanewproject,sopleaserefertotherecipesinChapter1,UsingNetBeansProjects,forcreatingJavaprojects.Tohelpfollowthisrecipe,whencreatingaproject,enterCreatingToStringastheprojectnameandensurethatamainclasscalledcom.davidsalter.cookbook.creatingtostring.CreatingToStringiscreated.

Howtodoit…ToshowhowtocreateatoString()methodwithinNetBeansandhowtodefinetheimplementationofthemethod,let’sfirstaddaPersonclassthatcouldrepresentapersoninadatabasetablewiththefollowingsteps:
1. Right-clickontheCreatingToStringproject,andselectNewandJavaClass….2. OntheNewJavaClassdialog,typePersonastheClassNamefield.3. InthePackagesection,selectcom.davidsalter.cookbook.creatingtostring.4. ClickonFinish.5. AddthefollowingasthebodyofthePersonclass:
privateintid;
privateStringfirstName;
privateStringlastName;
publicPerson(intid,StringfirstName,StringlastName){
this.id=id;
this.firstName=firstName;
this.lastName=lastName;
}
6. Right-clickwithinthebodyoftheclassandselectInsertCode….7. Onthepop-upGeneratewindow,selecttoString….NetBeanswillnowdisplaythe
GeneratetoString()dialog:
8. Checktheid,firstName,andlastNamefieldstobeincludedinthetoString()implementation.
9. ClickonGenerate.
UponclickingtheGeneratebutton,theGeneratetoString()dialogwillcloseandthePerson.javaclasswillbeupdatedwithanewtoString()methodthatoutputstheselectedfields—inthiscase,id,firstName,andlastName.
Let’snowwritesomecodethatshowsthismethodinoperation.
10. Double-clickontheCreatingToString.javafilewithintheProjectsexplorertoopenitupforediting.

11. Addthefollowingasthebodyofthemainmethod:
Personperson=newPerson(1,"David","Salter");
System.out.println(person.toString());
12. PressShift+F6torunthemainclassandnoticethetoString()method’soutputintheOutputwindow,whichwilldisplaythefollowingoutput:
run:
Person{id=1,firstName=David,lastName=Salter}
BUILDSUCCESSFUL(totaltime:1second)

There’smore…ThisrecipeshowshowatoString()methodcaneasilybeaddedtoaclass.Itshouldbenoted,however,thatonlyonetoString()methodcanbeaddedtoaclassusingthistechnique.IfyouattempttoaddatoString()methodtoaclassthatalreadyimplementsthemethod,thenthepop-upGeneratewindowwillnotshowthetoString()option.


CreatingapropertyInthisrecipe,we’llseehowwecancreatepropertiesdirectlywithinaclasswithouthavingtofirstaddfieldstotheclassandthenaddaccessorsforthefields.

GettingreadyFirstwewillneedtocreateanewproject,sopleaserefertotherecipesinChapter1,UsingNetBeansProjects,forcreatingJavaprojects.Tohelpfollowthisrecipe,whencreatingaproject,enterCreatingPropertiesastheprojectnameandensurethatamainclasscalledcom.davidsalter.cookbook.creatingproperties.CreatingPropertiesiscreated.

Howtodoit…Toshowhowtocreatepropertieswithinaclass,let’sfirstcreateaclasstorepresentacustomerandthenaddsomepropertiestotheCustomerclass:
1. Right-clickontheCreatingPropertiesproject,andselectNewandJavaClass….2. OntheNewJavaClassdialog,typeCustomerastheClassNamefield.3. OnthePackageselection,clickonthedropdownandselect
com.davidsalter.cookbook.creatingproperties.4. ClickonFinish.5. AblankCustomerclasswillnowbecreatedandopenedintheNetBeansJavaeditor
forediting.6. Right-clickonthebodyoftheCustomerclassandclickonInsertCode….7. Onthepop-upGeneratewindow,clickonAddProperty….TheAddProperty
dialogwillnowbedisplayed:
8. EnteridintheNamefieldandlongintheTypefield.9. EnsureGenerategetterisselected.10. ClickonOK.
TheAddPropertydialogwillnowclose.Examinethegeneratedcodeandyouwillsee

thatanidpropertyhasbeencreatedwithapublicgetter.Theidfieldismarkedasprivate.
Let’saddacustomer’snamefieldtotheclasswiththefollowingsteps:
1. Right-clickonthebodyoftheCustomerclassandclickonInsertCode….2. Onthepop-upGeneratewindow,clickonAddProperty….TheAddProperty
dialogwillnowbedisplayed.3. EnternameintheNamefieldandStringintheTypefield.4. EnsureGenerategetterandsetterisselected.5. ClickonOK.
TheAddPropertydialogwillnowclose.Examinethegeneratedcodeagainandyouwillseethatanamepropertyhasbeenaddedwithapublicgetterandsetter.Thenamefieldis,again,markedasprivate.

Howitworks…Whenspecifyingthedetailsofthenewpropertytobecreated,theAddPropertydialogshowswhatthegeneratedcodewilllooklikeinaPreviewsectioninthelowerhalfofthedialog.

There’smore…Whengeneratingproperties,thevisibilitycanbesettoeitherprivate,package,protected,orpublic.Thedefaultoptionisprivate.
TheTypedropdownselectionshowsthebasicJavatypesthatpropertiesmaytake(String,int,float,andsoon).Ifyouwishtocreateapropertyofanyothertype,clickontheBrowse…buttonandusetheFindTypedialogtofindtheappropriatetype.
Thedefaultvalueofanypropertycanbesetbyspecifyingthevalueinthefieldtotherightof=atthetopofthedialog.Ifthepropertyisintendedtobeanarray,ensuretheIndexedfieldischecked.
IfyouarecreatingaJavaBeanproperty,youcanusetheBoundandGeneratePropertyChangeSupportcheckboxesasappropriate.


OverridingamethodObject-orienteddevelopmenthasbeenshowntobeagooddevelopmentpractice.Oneoftheprincipalaspectsofobject-orienteddevelopmentistheabilitytooverrideclasses.Thisisdefiningamethodinasubclassthathasthesamesignatureasthatinasuperclass.InJava,allclassesarederivedfromjava.lang.Object.
Inthisrecipe,we’llshowhowNetBeansprovidestoolstoallowdeveloperstoeasilyoverridesuperclassmethodswithinasubclass.

GettingreadyFirstwewillneedtocreateanewproject,sopleaserefertotherecipesinChapter1,UsingNetBeansProjects,forcreatingJavaprojects.Tohelpfollowthisrecipe,whencreatingaproject,enterOverridingMethodsastheprojectnameandensurethatamainclasscalledcom.davidsalter.cookbook.overridigmethods.OverridingMethodsiscreated.
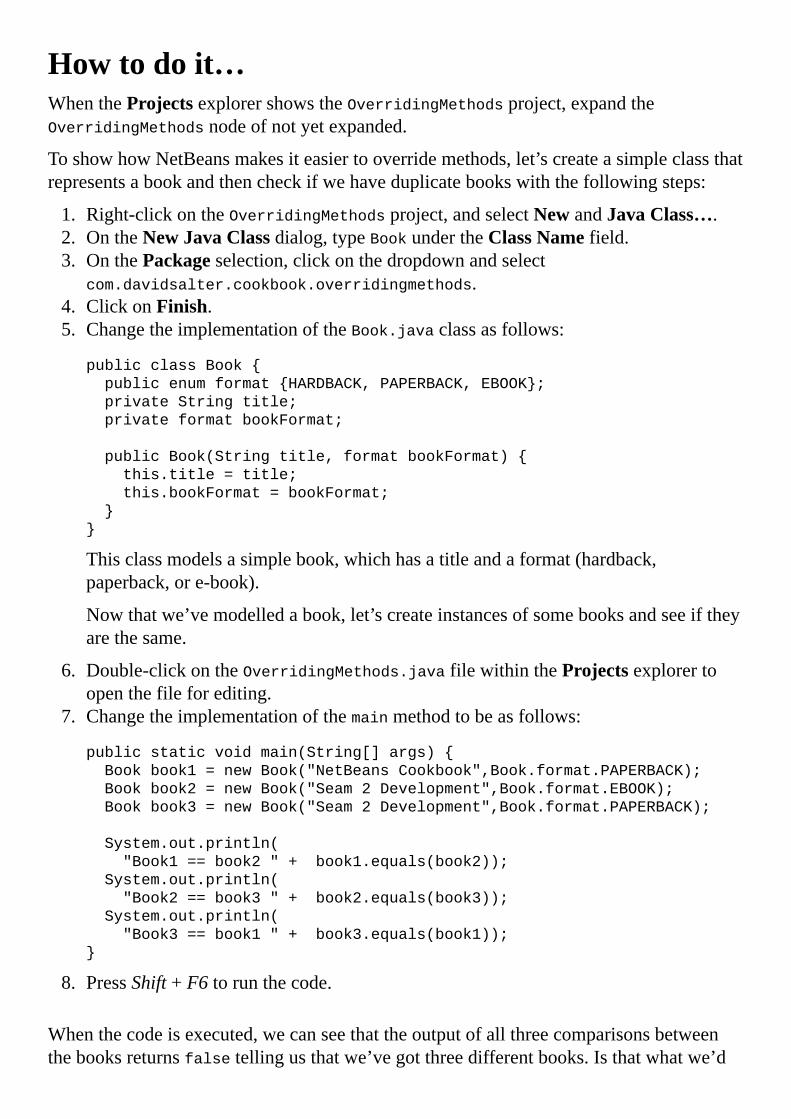
Howtodoit…WhentheProjectsexplorershowstheOverridingMethodsproject,expandtheOverridingMethodsnodeofnotyetexpanded.
ToshowhowNetBeansmakesiteasiertooverridemethods,let’screateasimpleclassthatrepresentsabookandthencheckifwehaveduplicatebookswiththefollowingsteps:
1. Right-clickontheOverridingMethodsproject,andselectNewandJavaClass….2. OntheNewJavaClassdialog,typeBookundertheClassNamefield.3. OnthePackageselection,clickonthedropdownandselect
com.davidsalter.cookbook.overridingmethods.4. ClickonFinish.5. ChangetheimplementationoftheBook.javaclassasfollows:
publicclassBook{
publicenumformat{HARDBACK,PAPERBACK,EBOOK};
privateStringtitle;
privateformatbookFormat;
publicBook(Stringtitle,formatbookFormat){
this.title=title;
this.bookFormat=bookFormat;
}
}
Thisclassmodelsasimplebook,whichhasatitleandaformat(hardback,paperback,ore-book).
Nowthatwe’vemodelledabook,let’screateinstancesofsomebooksandseeiftheyarethesame.
6. Double-clickontheOverridingMethods.javafilewithintheProjectsexplorertoopenthefileforediting.
7. Changetheimplementationofthemainmethodtobeasfollows:
publicstaticvoidmain(String[]args){
Bookbook1=newBook("NetBeansCookbook",Book.format.PAPERBACK);
Bookbook2=newBook("Seam2Development",Book.format.EBOOK);
Bookbook3=newBook("Seam2Development",Book.format.PAPERBACK);
System.out.println(
"Book1==book2"+book1.equals(book2));
System.out.println(
"Book2==book3"+book2.equals(book3));
System.out.println(
"Book3==book1"+book3.equals(book1));
}
8. PressShift+F6torunthecode.
Whenthecodeisexecuted,wecanseethattheoutputofallthreecomparisonsbetweenthebooksreturnsfalsetellingusthatwe’vegotthreedifferentbooks.Isthatwhatwe’d

expect?Well,it’sprobablynotwhatwe’dexpect,butit’swhatwe’vewrittensofar.
Aswe’recomparingourbookswiththedefaultequalsmethod,Javaisusingtheequalsimplementationfromthejava.lang.Objectbaseclass.Thisimplementationbasicallysaysthatifthetwoobjectscomparedarethesame,thenreturntrue,otherwisereturnfalse.Inourexamplehere,wehavethreedistinctobjects,sothebaseequals()comparisonwillalwaysreturnfalse.
Fortunately,it’seasytofixourcodeandmakeitbehaveasexpected.Allweneedtodoisoverridethedefaultequals()methodwiththefollowingsteps:
1. Double-clickontheBook.javaclasswithintheProjectsexplorertoopentheclassforediting.
2. Right-clickwithinthebodyoftheclassandselectInsertCode….3. Onthepop-upGeneratewindow,selectOverrideMethod….NetBeanswillnow
displaytheGenerateOverrideMethodsdialog,asshowninthefollowingscreenshot:
4. Ensurethattheequals(Objectobj):booleanmethodisselectedandalltheothermethodsareunselected.
5. ClickonGenerate.
TheGenerateOverrideMethodsdialogwillnowcloseandablankimplementationfortheequals()methodwillbeaddedtotheclass.
6. Double-clickontheOverridingMethods.javaclasswithintheProjectsexplorertoopenitforediting.
7. Changetheimplementationofthegeneratedequals()methodtobeasfollows:
@Override
publicbooleanequals(Objectobj){
if(objinstanceofBook){
returntitle.equalsIgnoreCase(((Book)obj).title);
}else{
returnfalse;
}
}

8. PressShift+F6toruntheapplication.
Runningtheapplicationnowshowsthatwehavetwodistinctbooksmadeupfromtwopaperbacksandonee-book.

Howitworks…Whenusingthewizardtooverridemethods,NetBeansdisplaysalistofallthemethodswithintheclassthatcanbeoverridden.Iftheclassisnotexplicitlyderivedfromanyotherclass,thenonlythebasemethodsonjava.lang.Objectthatcanbeoverriddenaredisplayed.Iftheclass,however,extendsanotherclassinyourproject,thenanymethodsinyourclasshierarchythatcanbeoverriddenarealsoshownwithinthewizard.


RenamerefactoringSometimes,whendevelopingapplications,adeveloper’sfirstchoiceofanameforapackage,class,ormember,andsoon,isn’tthebestchoice.NetBeansallowsdeveloperstoeasilychangethenameoftheseobjectsusingtheRenamerefactoringwizard.Thiswizardiscleverenoughtochangeboththenameoftheselectedobjectandanyreferencestoitthroughouttheproject’scodebase.

GettingreadyFirstwewillneedtocreateanewproject,sopleaserefertotherecipesinChapter1,UsingNetBeansProjects,forcreatingJavaprojects.Wewillusethesameprojectforalltherefactoringrecipesinthischapter.Whennamingtheproject,enterRefactoringintheProjectNamefieldandensurethatamainclasscalledrefactoring.Refactoringiscreated.WhentheProjectsexplorershowstheRefactoringproject,expandtheRefactoringnodeifnotyetexpanded.

Howtodoit…Firstoff,wewillrenametheinitialpackagethatwascreatedwiththeprojectusingthefollowingsteps:
1. ExpandtheSourcePackagesnode(ifnotyetexpanded).2. Right-clickonrefactoring.3. SelectRefactorandthenRename….4. IntheRenamerefactoringdialog,entercom.davidsalter.cookbook.refactorin
theNewNamefield.5. ClickonRefactor.
AprogressbarwillbrieflybeshownontheRenamerefactoringdialogshowingtheprogressoftherefactoringandthenthedialogwillautomaticallyclosewhentherefactoringhascompleted.Whentherefactoringhasbeencompleted,youwillnotethattheSourcePackagesnodeintheProjectsexplorernowshowsthatthepackagenamehasbeenchangedtocom.davidsalter.cookbook.refactorasspecifiedinstep4.IfyouedittheRefactoring.javafilewithinthisproject,youcanseethatthepackagenameofthisclasshasalsobeenmodifiedaccordingly.
Now,let’saddsomecodetotheRefactoringclassandthenshowhowwecanrenameitwiththefollowingsteps:
1. OpentheRefactoring.javafileforeditingbydouble-clickingonitwithintheProjectsexplorer(ifthefileisnotalreadyopen).
2. Wearegoingtousethisclassforprintingoutenvironmentvariables,soRefactoringprobablyisn’tthebestnamefortheclass.Right-clickontheclassnameRefactoringonthelinewheretheclassisdefined(thatis,onthelinethatstartspublicclassRefactoring).
3. SelectRefactorandthenRename….4. OntheRenameClassRefactoringdialog,enterEnvironmentPrinterintheNew
Namefield.5. ClickonRefactor.6. Noticehowboththefilenameandtheclassnamehavebeenupdatedwiththisnew
name.7. EdittheEnvironmentPrinter.javaclasssothatitlookslikethis:
publicclassEnvironmentPrinter{
publicstaticvoidmain(String[]args){
EnvironmentPrinterep=newEnvironmentPrinter();
ep.print("JAVA_HOME");
}
publicvoidprint(Stringenv){
StringenvVariableValue=System.getenv(env);
System.out.println(envVariableValue);
}
}

8. PressShift+F6torunthefileandnotethatthevalueoftheJAVA_HOMEenvironmentvariableisdisplayedwithintheOutputwindow.
ThecodewehavewrittenworksasexpectedandprintsouttheenvironmentvariableJAVA_HOMEintheOutputwindow.We’restillnotentirelyhappywiththecode,however,asthenameoftheparametertotheprint()methodshouldprobablybeabitmoredescriptive.Let’schangeittoenvironmentVariableNamewiththefollowingsteps:
1. Right-clickontheparameternameenvwithinthelinepublicvoidprint(Stringenv).
2. SelectRefactorandthenRename….3. OntheRenameenvdialog,enterenvironmentVariableNameintheNewName
field.4. ClickonRefactor.
TheparameternameisnowrefactoredtoenvironmentVariableName.Youcanseethattheuseofthisvariablewithinthemethodhasalsobeenupdatedtousethenewname.Thenewprint()methodshouldlooklikethefollowingcode:
publicvoidprint(StringenvironmentVariableName){
StringenvVariableValue=System.getenv(environmentVariableName);
System.out.println(envVariableValue);
}

Howitworks…Whenrefactoring,NetBeanshastheabilitytochangevariable,class,interface,andpackagenamesusingasimplewizard.Thepowerofrefactoring,however,comeswiththeabilitytochangereferencestorefactoredobjectsaswellastheoriginalobject.Wesawthatinthepreviousexample,wherewechangedthenameofaparameterinamethodandsawthatthereferencestotheparameterwithinthemethodalsochanged.
NetBeanscannotonlyperformRenamerefactoringataclasslevel,butthroughoutanentireproject.Soforexample,ifyourenameaclass,everyreferencetotheclassthroughouttheprojectisalsochanged.

There’smore…ToshortcutRenamerefactoring,simplyclickontheobjecttorename(class,variable,package,andsoon)withintheeditorwindowandpressCtrl+R.Ifthescopeoftheobjectbeingrenamedislocalandcannotaffectanyotherobjectintheproject(forexample,renamingalocalvariable),thenanin-placeeditorwillbedisplayedonthescreenratherthantheRenamerefactorwizard.Allthelocalinstancesoftheobjectwillberenamedasthenewnameistypedin.
Ifthescopeofanobjectbeingrenamedcanpossiblyaffectotherpartsofaproject,thentheRenamerefactorwizardisdisplayed.Asrenaminganobjectofthistypecanhaverepercussionsacrossthewholeofaproject,thePreviewbuttonallowsthedevelopertoseeapreviewofallthefilesthatwouldbechangediftherefactoringwasperformed.Thiscanbeparticularlyusefulwhenrenamingaffectslargepartsofaproject.
TipIngeneral,whenrefactoringafile(usinganytypeofrefactoring,notjustRenamerefactoring),it’sagoodpracticetoensurethattheentireprojectcanbecompiledbeforeproceedingwiththerefactoring.Iftheprojectcannotbecompiled,thenunexpectedresultsmayoccurwhenrefactoring.
Ifafilehasbeenmodifiedandyoustarttorefactorsomeofthecontentsofthefile,thenthefilewillbesavedbeforetheRenamerefactoringdialogisdisplayed.


MoverefactoringInthepreviousrecipe,wesawhowit’spossibletorenamevariousartifactsofaJavaproject.Sometimes,however,we’venamedourobjectscorrectly,butwe’veputtheminthewrongplace!NetBeansallowsdeveloperstoperformaMoverefactorwhereclassmemberscanbemovedtodifferentclassesorclassescanbemovedtodifferentprojectsand/orpackages.

GettingreadyFirstwewillneedaJavaprojecttoperformsomeMoverefactoring.Wewillusethesameprojectfromtheprecedingrecipe,Renamerefactoring,andsoensurethatyouhavetheprojectopenfromtheendofthatrecipe.Ifyouhavenotfollowedthatrecipe,theprojectisavailablefromthecodedownloadbundleundertheMoveRefactorfolderinChapter3.WhentheProjectsexplorershowstheRefactoringproject,expandtheRefactoringnodeifnotyetexpanded.

Howtodoit…1. OpentheEnvironmentPrinter.javafileforeditingfromtheProjectsexplorerby
double-clickingonthefilename.2. Whenwelookatthisfile,wecanseethatthereisamain()methodintheclass.This
probablyshouldbeplacedinitsownfile,solet’screateafileforthemainmethodandthenmoveitinthere.
3. Right-clickonthecom.davidsalter.cookbook.refactorpackageintheRefactoringproject,andselectNewandJavaClass….
4. OntheNewJavaClasswindow,typeMainundertheClassNamefield.5. OnthePackageselection,ensurethatcom.davidsalter.cookbook.refactoris
chosenasthenewPackagename.6. ClickonFinish.
AnewclasscalledMain.javahasnowbeencreatedwithinthecom.davidsalter.cookbook.refactorpackage.WewillnowusetheMoverefactoringtomovethepublicstaticvoidmain()methodintothenewclasscreatedwiththefollowingsteps:
1. OpentheEnvironmentPrinter.javafilefromtheProjectsexplorerbydouble-clickingontheJavasourcefile.
2. Right-clickwithinthemainkeywordthatdeclaresthemain()methodontheclassandselectRefactorandthenselectMove….
3. TheMoveMemberswindowisnowdisplayedasshowninthefollowingscreenshot:

4. IntheToClasssection,selectMainastheclasswearegoingtomovemembersto.5. IntheMemberstobemovedsection,ensurethatonlythemain(String[]args)
methodisselected.6. ClickontheRefactorbutton.7. TheMoveMembersrefactorwindowwillnowcloseandtherefactoringwillbe
completed.
Aftertherefactoringhasbeencompleted,youcanseethattheMain.javafilehasthemain()methodinitandtheEnvironmentPrinter.javafileonlyhasaprint()methodwithinit.

There’smore…Whenmovingmembers,thevisibilityofthemovedmemberscanbealteredbyspecifyingtheVisibilitysectionontheMoveMembersdialog.Thisallows,forexample,publicmethodstobemovedtoadifferentclassandautomaticallymadeprivate.
Javadoccanbemodifiedtoreferencenewclassnameswhenmovingmemberstoadifferentclass.ThisisachievedbyensuringtheUpdateoptionisselectedundertheJavaDocsectionontheMoveMembersdialog.
Ifrequired,theoriginalimplementationofamethodcanbeleft,delegatingfunctionalitytoanewclassmethod.Inthiscase,thenewmethodiscalledfromtheoldmethod,withboththenewandoldmethodsexisting.Here,themethodhasbeenmoved,buttheoriginalmethodstillexiststocallthenewone.ThistechniqueisaccomplishedbyselectingtheKeeporiginalmethod(s)anddelegatetothemovedmethodoption.Withthisoption,theoriginalmethodcanbemarkedasdeprecatedbycheckingtheDeprecatetheoldmethod(s)option.
WhenperformingaMoverefactoronclassesfromonepackagetoanother,ashortcutistosimplydragtheclassfromitssourcepackageintheProjectsexplorertothedestinationpackage.Upondroppingtheclassinthedestinationpackage,theMoveClassrefactoringdialogwillbedisplayedallowingtherefactortobecompleted.


CopyrefactoringOccasionallywhenwritingcode,youmaywanttocopyaclassfromonepackagetoanother.TheNetBeansCopyrefactoringwizardallowsthistobeeasilyachieved.

GettingreadyFirstwewillneedaJavaprojecttoperformsomeCopyrefactoring.Wewillusethesameprojectfromtheearlierrecipe,Renamerefactoring,andsoensurethatyouhavetheprojectopenfromtheendofthatrecipe.Ifyouhavenotfollowedthatrecipe,theprojectisavailablefromthecodedownloadbundleundertheMoveRefactorfolderinChapter3.WhentheProjectsexplorershowstheRefactoringproject,expandtheRefactoringnodeifnotyetexpanded.

Howtodoit…ToperformaCopyrefactor,weneedtohaveadestinationpackageintowhichwecancopyaclass.Firstwewillcreateanemptypackageandthenwewillmakeacopyofaclassintothispackage.Tocreateanemptypackage,performthefollowingsteps:
1. Right-clickonthecom.davidsalter.cookbook.refactorpackageintheProjectsexplorerandselectNewandthenJavaPackage….
2. Entercom.davidsalter.cookbook.refactor.copiedclassesinthePackageNamefield.
3. ClickonFinish.
Wehavenowcreatedablankpackage,solet’susetheNetBeansCopyrefactoringtooltocopytheMain.javaclassintothispackagewiththefollowingsteps:
1. Double-clickontheMain.javafileintheProjectsexplorertoopenthefileforediting.
2. Right-clickwithinthebodyoftheclassandselectRefactorandthenCopy….3. TheCopyClassrefactoringdialogisnowshown.EnterCopyOfMainintheNew
Namefield.4. FromtheToPackagesection,select
com.davidsalter.cookbook.refactor.copiedclasses.5. ClickonRefactor.6. TheCopyClassrefactordialogwillnowcloseandtheCopyrefactoringwillbe
completed.
AftertheCopyClassrefactoringdialoghasclosed,noticethatthenewCopyOfMainclasshasbeencreatedinsidethecom.davidsalter.cookbook.refactor.copiedclassespackage.Theoriginalclass(com.davidsalter.cookbook.refactor.Main)hasnotbeenmodified.

There’smore…Apartfromcopyingclassestodifferentpackages,theCopyClassrefactoralsoallowsclassestobecopiedtodifferentprojects.ThisisachievedbyselectingadifferentprojectintheCopyClassdialog.Thecurrentprojectisalwaysselectedasthedefaultdestinationprojectinthisdialog.
Classescanalsobecopiedtodifferentlocationswithinaproject.Forexample,aclasscouldbecopiedfromtheSourcePackagesnodeofaprojectintotheTestPackageslocation.
WhenperformingaCopyrefactoronclassesfromonepackagetoanother,ashortcutistosimplydragtheclassfromitssourcepackageintheProjectsexplorertothedestinationpackagewhileholdingdowntheCtrlkey.Upondroppingtheclassinthedestinationpackage,theCopyClassrefactoringdialogwillbedisplayedallowingtherefactortobecompleted.
OnefinalshortcutforCopyrefactoringistoright-clickonaclasswithintheProjectsexplorerandselecttheCopymenuoption.Right-clickingonasubsequentpackageprovidesthePasteandRefactorCopy…menuitems.


DeleterefactoringAfterwritingcodeforawhile,it’sacommonpracticetoreviewwhatyou’vewritten.Atthatpoint,youmaydecidethatyouwanttodeletesomeofthecodeasit’snolongerneeded.Deletingcode,however,canbedangerous,especiallyonlargerprojects,asyoudon’talwaysknowhowmanyreferencesyouhavetothecodetodeleteandwheretheyare.
Fortunately,NetBeansprovidesaSafelyDeleterefactor.

GettingreadyFirstwewillneedaJavaprojecttoperformsomesafedeleterefactoring.Wewillusethesameprojectfromtheearlierrecipe,Renamerefactoring,andsoensurethatyouhavetheprojectopenfromtheendofthatrecipe.Ifyouhavenotfollowedthatrecipe,theprojectisavailablefromthecodedownloadbundleundertheMoveRefactorfolderinChapter3.WhentheProjectsexplorershowstheRefactoringproject,expandtheRefactoringnodeifnotyetexpanded.

Howtodoit…Toshowanexampleofsafelydeleting,we’regoingtocreateaninterfaceandthenimplementtheinterface.Whenwesubsequentlyattempttodeletetheinterface,NetBeanswillwarnusthattheinterfaceisstillinuse.Wewillperformthefollowingsteps:
1. Right-clickonthecom.davidsalter.cookbook.refactoringpackageintheProjectsexplorerandselectNewandthenJavaPackage….
2. Entercom.davidsalter.cookbook.refactor.safedeleteinthePackageNamefield.
3. ClickonFinish.4. Right-clickonthecom.davidsalter.cookbook.refactor.safedeletepackageand
selectNewandthenJavaInterface….5. EnterVehicleintheClassNamefield.6. FromthePackagesection,select
com.davidsalter.cookbook.refactor.safedelete.7. TheVehicle.javafilewillnowbeopenedforediting.Changethedefinitionofthe
interfacetobe:
publicinterfaceVehicle{
voiddrive();
}
8. Ahint(displayedasalightbulb, )willnowbedisplayedinthemarginnexttothedefinitionoftheVehicleinterface.Clickonthelightbulbandfromthepop-uphint,selectImplementInterface.
9. OntheImplementInterfacedialog,enterCarintheClassNamefieldandleavethePackageNamefieldasthedefaultsettingofcom.davidsalter.cookbook.refactor.safedelete.
10. ClickonOK.
We’venowcreatedaninterfaceandaclassthatimplementstheinterface.Let’sseehowNetBeanswillwarnuswhenwetrytodeletesomethingthat’sinuseelsewherewiththefollowingsteps:
1. Right-clickontheVehicle.javafilewithinthecom.davidsalter.cookbook.refactor.safedeletepackageandselectRefactorandthenSafelyDelete….
2. TheSafelyDeletedialogwillbedisplayed.ClickontheRefactorbutton.3. Afterafewmoments,alistoferrorswillbeshownintheSafelyDeletedialog
showingthattherearereferencestotheselectedelementelsewhereintheproject.

4. ClickontheShowUsagesbuttontoseealistofallplaceswithintheprojectwheretheVehicleinterfaceisused.

Howitworks…WhenperformingtheSafelyDeleterefactor,NetBeanschecksthroughallthesourcefileswithintheprojecttoseeiftheselectedelementexists.Ifitdoesnotexist,thenthedeleterefactoringcancontinueandtheselectedelementwillbedeleted.
Ifreferencestotheselectedelementarefound,theyareshownwithintheUsageswindowwherethedeveloperisgiventheopportunitytoreruntheSafelyDeleterefactoriftheyarehappythatnoneoftheusesareimportant.WecanseetheRerunSafelyDeleteoptioninthefollowingscreenshot:

There’smore…TheSafelyDeleterefactorcanalsobemadetosearchthroughcommentsinthecodebyselectingSearchInCommentsonthefirstpageoftheSafelyDeletedialog.
ThekeyboardshortcutforperformingasafedeleteisAlt+Delete.


ChangeparametersrefactoringSupposewe’vewrittenamethodandwewanttochangethesignatureofit.Perhaps,wedidn’toriginallyenvisionwhatparameterswewouldneedtopassintoamethod,orperhapswe’repassingtoomanyparametersandwanttochangethemethodsignaturetotakeaclassthatwillrepresentallourparametersinstead.TheNetBeansChangeMethodParameters…refactorhelpsusinthesesituations.

GettingreadyFirstwewillneedaJavaprojectsothatwecanchangetheparametersofamethod.Wewillusethesameprojectfromtheearlierrecipe,Renamerefactoring,andsoensurethatyouhavetheprojectopenfromtheendofthatrecipe.Ifyouhavenotfollowedthatrecipe,theprojectisavailablefromthecodedownloadbundleundertheMoveRefactorfolderinChapter3.WhentheProjectsexplorershowstheRefactoringproject,expandtheRefactoringnodeifnotyetexpanded.

Howtodoit…Toshowanexampleofchangingtheparametersofamethod,we’regoingtocreateamethodwithaspecifiedsignatureandthenusetheNetBeansrefactoringtoolstochangethemethodsignaturewiththefollowingsteps:
1. Right-clickonthecom.davidsalter.cookbook.refactorpackageintheProjectsexplorerandselectNewandthenJavaPackage….
2. Entercom.davidsalter.cookbook.refactor.parametersinthePackageNamefield.
3. ClickonFinish.4. Right-clickonthecom.davidsalter.cookbook.refactor.parameterspackageand
selectNewandthenJavaClass….5. EnterAuditintheClassNamefield.6. FromthePackagedropdown,select
com.davidsalter.cookbook.refactor.parameters.7. ClickonFinish.8. EditthecontentsoftheAudit.javafile,changingtheclasstobedefinedasfollows:
publicclassAudit{
privatevoidauditLogin(StringloginName){
//Auditalogintothedatabase.
}
}
We’venowcreatedaclassthatcouldformthebasicsofauditinguserloginstoasystem.WhatifwedecidewewanttoaudittheIPaddressthatauserlogsinfrom?We’vealsonoticedthattheauditingmethodisprivatesoexternalclassescan’tcallit—wereallyneedthemethodtobepublic.Let’snowusethemethodparametersrefactoringtofixtheseissueswiththefollowingsteps:
1. Right-clickontheauditLoginmethodandclickonRefactorandtheChangeMethodParameters….
2. TheChangeMethodParametersdialogwillnowbeshown:

3. ClickontheAddbuttontoaddanewparametertothemethod.4. EnterStringasthenewTypeparameter.5. EnteripAddressasthenewNameparameter.6. EnternullasthenewDefaultValueparameter.7. OntheAccessselection,changethevaluefromprivatetopublic.8. ClickonRefactor.
TheChangeMethodParametersdialogwillnowclose.InspectingtheAudit.javaclassshowsthatthemethodsignaturehasbeenchangedsothattheauditLogin()methodisnowpublicandtakestwoparameters,loginNameandipAddress.
TheChangeMethodParametersrefactoringisusefulwhenyourcodeismorecomplexandthemethodbeingchangediscalledfrommultipleplaceswithinyourcodebase.Whenyouchangemethodparameters,theyarechangedwhereverthemethodiscalledwithinyourcode,withanynewparameterstakingadefaultvalueasspecifiedwithintheChangeMethodParametersdialog.

There’smoreInadditiontochangingmethodparameters,theReturnTypeandNamefieldsofthemethodcanalsobechanged.
SelectingtheGenerateJavadocforThisMethodoptionwillcausebasicJavadocinformationtobeaddedtothemethodshowingtheparametersandreturntypesforthemethod.IfJavadocalreadyexistsforthemethod,thentheUpdateExistingJavadocofThisMethodoptionisoffered.
Thisrefactoringalsoofferstheabilitytoleavetheexistingmethodasitisandcreateanewmethodthatiscalledfromtheoriginal.Toachievethis,ensurethattheCreateNewMethodandDelegatefromExistingMethodoptionischecked.


Pullup/pushdownrefactoringPullupandpushdownrefactoringrelatestotheabilitytomovemethodsandmembersofaclassupintoasuperclass,ordownintoasubclass.

GettingreadyFirstwewillneedaJavaprojectsothatwecanperformsomepullup/pushdownrefactoring.Wewillusethesameprojectfromtheearlierrecipe,Renamerefactoring,andsoensurethatyouhavetheprojectopenfromtheendofthatrecipe.Ifyouhavenotfollowedthatrecipe,theprojectisavailablefromthecodedownloadbundleundertheMoveRefactorfolderinChapter3.WhentheProjectsexplorershowstheRefactoringproject,expandtheRefactoringnodeifnotyetexpanded.

Howtodoit…Let’sconsiderwehaveaclasstorepresentaVehicleandaderivedclassthatrepresentsasportscar.We’llmodelthosetwoclassesinJavaandshowhowtomovepropertiesbetweenthetwoclasseswiththefollowingsteps:
1. Right-clickonthecom.davidsalter.cookbook.refactorpackageintheProjectsexplorerandselectNewandthenJavaClass….
2. EnterVehicleintheClassNamefield.3. FromthePackageselection,ensurecom.davidsalter.cookbook.refactor.pullup
isselected.4. TheVehicleclasswillnowbecreatedandopenedforediting.Changethecontents
oftheclasstobeasfollows:
publicclassVehicle{
protectedfloatmilesPerGallon;
protectedBooleansportsMode;
}
5. Right-clickonthecom.davidsalter.cookbook.refactor.pulluppackageintheProjectsexplorerandselectNewandthenJavaClass….
6. EnterSportsCarintheClassNamefield.7. FromthePackageselection,ensurecom.davidsalter.cookbook.refactor.pullup
isselected.8. TheSportsCarclasswillnowbecreatedandopenedforediting.Changethe
SportsCarimplementationsothatitextendstheVehicleclass.
WehavenowwrittenanoutlineforaSportsCarclassthatextendstheVehicleclasswiththeextendskeyword.TheVehiclebaseclasshasasportsModefieldwithinit.Thisdoesn’treallymakesenseasSportsModeshouldbeapropertyoftheSportsCarclassandnotofagenericVehicleclass.Let’sfixthatnowwiththefollowingsteps:
1. Double-clickontheVehicle.javafilewithintheProjectsexplorertoopenitupforediting.
2. Right-clickonthesportsModefieldandselectRefactorandthenPushDown….3. ThePushDowndialogwillnowbeshown,whichlistsallthemembersinthecurrent
classthatcanbepusheddowntoanysubclasses.4. EnsurethatthesportsMode:Booleanoptionischecked.5. ClickonRefactor.6. ThePushDownrefactoringdialogwillnowcloseandtherefactoringwillbe
completed.

Howitworks…AfterpushingdownthesportsModefield,wecanexaminethesourcecodefortheVehicleandSportsCarclasses.WecanseethatsportsModehasbeenpusheddownintotheSportsCarclasswhereitbelongs,andhasbeenremovedfromthebaseVehicleclass.

There’smore…Ifwehavemorethanonesubclasswhenwearepushingmembers,clickingontheRefactorbuttonwillmovetheselectedmembersintoallofthesubclasses.Ifweonlywanttomovethememberintocertainsubclasses,clickonthePreviewbuttonbeforeclickingonRefactor.Thiswillthenshowahierarchyofallthesubclassesthatthememberswillbepushedtofromwhichyoucanchoosetoonlypushtocertainsubclassesandnotall.
PulluprefactoringPulluprefactoringfollowsthesameprocedureaspushdownrefactoringexceptthatmembersarepulledupfromsubclassesintothesuperclass.Toperformpulluprefactoring,right-clickonthemembertopullupandclickonRefactorandthenPullUp….ThePullUprefactoringdialogallowsachoiceofmemberstobepulleduptogetherwithaDestinationSupertypefield—thedestinationthatthemembersarepulledto.


ExtractinterfacerefactoringExtractinganinterfacefromaclassisausefultechniquewhenyouhavemanyobjectsthathavesimilarbehaviorandyouwanttoimposeacontractonyourobjectsstatingthattheymustallimplementthesamesetofmethods.
Ifyouhaveaclassandwishtoextractaninterfacefromit,NetBeansExtractInterfacerefactoringallowsthistobeeasilyachieved.

GettingreadyFirstwewillneedaJavaprojectsothatwecanextractaninterfacefromaclass.Wewillusethesameprojectfromtheearlierrecipe,Renamerefactoring,andsoensurethatyouhavetheprojectopenfromtheendofthatrecipe.Ifyouhavenotfollowedthatrecipe,theprojectisavailablefromthecodedownloadbundleundertheMoveRefactorfolderinChapter3.WhentheProjectsexplorershowstheRefactoringproject,expandtheRefactoringnodeifnotyetexpanded.

Howtodoit…Let’sassumethatwehaveasetofclassesforloadinganddrawingdifferenttypesofrasterimages:.png,.bmp,.jpg,andsoon.Eachofourclasseshastheabilitytoload/savethefileanddrawthefile.Lookingatthesemethods,itwouldseemthattheabilitytoloadandsaveimageswouldberequiredforallfiletypesandwouldmakeagoodcandidateforaninterface.Drawingdifferentfiletypeswouldalsobeagoodcandidateforadifferentinterface.
Let’screatetheoutlineofthePngImageclassandextractsomeinterfacesfromitwiththefollowingsteps:
1. Right-clickonthecom.davidsalter.cookbook.refactorpackageandselectNewandthenJavaClass….
2. EnterPngImageintheClassNamefield.3. Entercom.davidsalter.cookbook.refactor.extractinterfaceinthePackage
field.4. ThePngImageclasswillnowbecreatedandopenedforediting.Changethecontents
oftheclasstobeasfollows:
publicclassPngImage{
publicbooleanload(Stringfile){
returntrue;
}
publicbooleansave(Stringfile){
returntrue;
}
publicbooleandraw(intwidth,intheight){
returntrue;
}
}
We’venowcreatedaclass,solet’sproceedandextractbothPersistableandDrawableinterfacesfromitwiththefollowingsteps:
1. Right-clickonthebodyofthePngImage.javaclassandselectRefactorandthenExtractInterface….
2. TheExtractInterfacedialogwillnowbeshown:
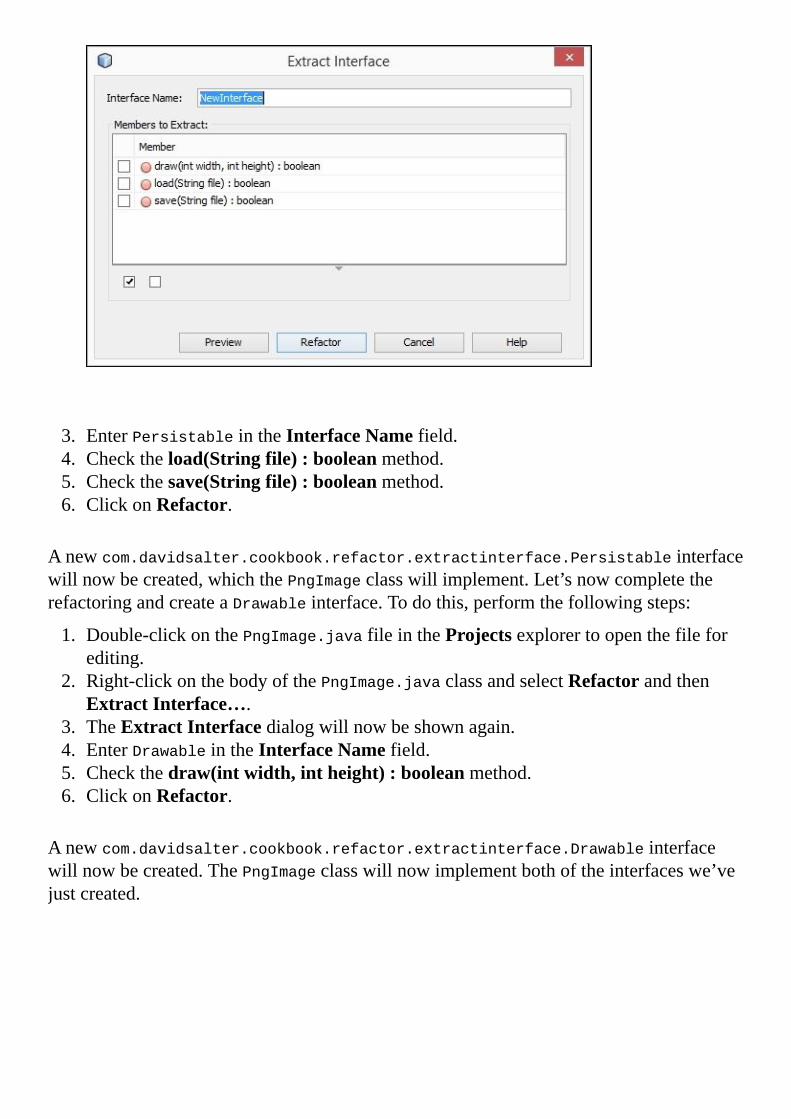
3. EnterPersistableintheInterfaceNamefield.4. Checktheload(Stringfile):booleanmethod.5. Checkthesave(Stringfile):booleanmethod.6. ClickonRefactor.
Anewcom.davidsalter.cookbook.refactor.extractinterface.Persistableinterfacewillnowbecreated,whichthePngImageclasswillimplement.Let’snowcompletetherefactoringandcreateaDrawableinterface.Todothis,performthefollowingsteps:
1. Double-clickonthePngImage.javafileintheProjectsexplorertoopenthefileforediting.
2. Right-clickonthebodyofthePngImage.javaclassandselectRefactorandthenExtractInterface….
3. TheExtractInterfacedialogwillnowbeshownagain.4. EnterDrawableintheInterfaceNamefield.5. Checkthedraw(intwidth,intheight):booleanmethod.6. ClickonRefactor.
Anewcom.davidsalter.cookbook.refactor.extractinterface.Drawableinterfacewillnowbecreated.ThePngImageclasswillnowimplementbothoftheinterfaceswe’vejustcreated.

There’smore…Whenextractinginterfacesfromclasses,NetBeansofferstheabilitytopreviewthechangesthatwillbemadetooursourcecodebeforetherefactoringiscompleted.Toperformthis,clickonthePreviewbuttoninsteadoftheRefactorbutton.
ExtractingsuperclassesInadditiontoextractinginterfacesfromclasses,NetBeansprovidestheabilitytoextractsuperclassesfromtheexistingclasses.Thisrefactoringisachievedbyright-clickingwithinthebodyofaclassandselectingRefactorandthenExtractSuperclass….
Extractingasuperclassoperatesinasimilarfashiontoextractinganinterface.Thedifferencewiththisrefactoringisthatwhenextractingasuperclass,theoriginalclasswillbechangedtoextendthesuperclassusingtheextendskeyword.Whenextractinganinterface,theoriginalclasswillbechangedtoimplementtheinterfacebyusingtheimplementskeyword.
Whendefiningasuperclass,therefactoringwizardgivesustheabilitytodefineclassesasabstractornot,givingfullcontroloverthemethodsthatarecreatedinthesuperclass.WecanseetheExtractSuperclassdialoginthefollowingscreenshot:


EncapsulatefieldsrefactoringEncapsulationprovidesawayofhidingmembersofaclass,andrestrictingtheiraccess,sothatpotentiallyanobject’smemberscanonlybemanipulatedbytheobjectitself.Encapsulationisoneofthekeystonesofobject-orienteddevelopment.

GettingreadyFirstwewillneedaJavaprojectsothatwecanencapsulatesomefieldswithinaclass.Wewillusethesameprojectfromtheearlierrecipe,Renamerefactoring,andsoensurethatyouhavetheprojectopenfromtheendofthatrecipe.Ifyouhavenotfollowedthatrecipe,theprojectisavailablefromthecodedownloadbundleundertheMoveRefactorfolderinChapter3.WhentheProjectsexplorershowstheRefactoringproject,expandtheRefactoringnodeifnotyetexpanded.

Howtodoit…Let’sassumewe’remodellinganapplicationinamobileapplicationstore.Wemightwanttomodelanapplicationthatwouldhavename,author,andcostproperties.Ourapplicationobjectmayalsohavealistofreviews.First,let’screateaJavaclassthatimplementsallofthesefieldswiththefollowingsteps:
1. Right-clickonthecom.davidsalter.cookbook.refactorpackageandselectNewandthenJavaClass….
2. EnterApplicationintheClassNamefield.3. Entercom.davidsalter.cookbook.refactor.encapsulationinthePackagefield.4. ClickonFinish.5. TheJavaclass,Application.java,isnowcreatedandisopenedwithinNetBeansfor
editing.Changethecontentsofthisclasstoread:
packagecom.davidsalter.cookbook.refactor.encapsulation;
importjava.util.ArrayList;
importjava.util.List;
publicclassApplication{
publicStringname;
publicStringauthor;
publicList<String>reviews=newArrayList<String>();
publicfloatcost;
}
Thisbasicclassfulfilsallourrequirementsdescribedearlier,butisn’taverygoodimplementation.AnyotherclasswithinthesystemcanchangetheApplicationclass’sproperties—clearlywedon’twantthis.
6. Right-clickonthebodyoftheApplication.javafileandselectRefactorandthenEncapsulateFields….TheEncapsulateFieldsdialogwillbedisplayed:

7. ChecktheCreateGetteroptions,getName,getAuthor,getReviews,andgetCost.8. DonotcheckanyoftheCreateSetteroptionsasthesewillbesetbytheclass’s
constructor.9. ClickonRefactor.10. Right-clickonthebodyoftheclass,selectInsertCode…,andonthepop-up
Generatedialog,clickonConstructor….11. OntheCreateConstructordialog,checkname:String,author:String,andcost:
float.12. ClickonGenerate.
Ourclassisnearlycompletenow.Itallowsthename,author,andcostpropertiestobesetonlyduringtheconstructor(arguably,weshouldaddmethodstoallowthenameandcosttobechanged,butwewillignorethatforthisexample).We’vealsoimplementedgettersforalloftheclass’sproperties.Allweneedtodonowisaddamethodtoaddareview.
Addingareviewisadifferentprocessfromsettingotherpropertiessuchasnameorcostbecausethereviewsarestoredinanarray.Ifweallowedcallerstosetthereviewspropertydirectly,theycouldaddorremovethereviewslistandwewouldn’thaveanygoodencapsulationforthereviewsthemselves.Toovercomethisproblem,weneedtoaddasinglemethodthataddsareviewintothereviewslist.Wecanachievethiswiththefollowingstep:

1. ModifytheApplication.javaclassandaddthefollowingmethodtothebottomoftheclass:
publicvoidaddReview(Stringreview){
this.reviews.add(review);
}

Howitworks…TheNetBeansEncapsulateFieldsrefactoringallowsthedevelopertoaddgettersandsetterstoanyorallofthepropertieswithinaclass.Ashasbeenseeninthisrecipe,encapsulatingafieldallowsdeveloperstowritemorerobustcode;however,caremustbetaken.Encapsulatingarraysorobjectswithinaclassmustbeconsideredcarefullybeforebeingimplemented.Remembertoensurethatthearrayorobjectitselfcan’tbemodified,butwhatitrepresentscanbe.

There’smore…Whencreatingaccessors,theInsertPointdropdownspecifieswhereinthecodetheaccessorsareadded.ThiscanbeasFirstMethodorLastMethodorafter/beforeanyotheraccessors.Accessorscanbesortedinpairs,inalphabeticorder,orwithgettersbeforesetters.CheckouttheSortByfieldtoperformthis.
ThevisibilityoffieldscanbechangedbysettingtheFields’Visibilitydropdowntoprivate,protected,orpublic.Similarly,theaccessors’visibilitycanbesetbymodifyingtheAccessors’Visibilitydropdown.
ThefieldencapsulationrefactoringcanalsogenerateJavadocfortheaccessors.DefaultcommentscanbegeneratedortheJavadocfromthefieldsthemselvescanbecopiedoverintotheaccessors.


ReplacingaconstructorwiththeFactorypatternAgooddevelopmentpracticecanbetousefactorymethodsinsteadofclassconstructors.Factorymethodscanbemoredescriptivethanconstructorsandcanperformadditionalfunctionalityoverconstructorssuchasreturningimmutableobjectsorobjectsthatimplementacertaininterface.

GettingreadyFirstwewillneedaJavaprojectsothatwecanreplaceaclassconstructorwithafactorymethod.Wewillusethesameprojectfromtheearlierrecipe,Renamerefactoring,andsoensurethatyouhavetheprojectopenfromtheendofthatrecipe.Ifyouhavenotfollowedthatrecipe,theprojectisavailablefromthecodedownloadbundleundertheMoveRefactorfolderinChapter3.WhentheProjectsexplorershowstheRefactoringproject,expandtheRefactoringnodeifnotyetexpanded.

Howtodoit…Supposewearewritingagameandwanttoimplementdifferentlevels.Increasinglevelsofthegamecouldbemorecomplexthanthepreviouslevelsbuteachleveloffersaconstantsetofchallengesandobjectives.WecouldeasilyrepresentthiswithabasicmodelofaGameLevelclass,whichtakesanintegerdifficultyasaconstructorparameter.Wecouldthenrefactortoreplacetheconstructorwithafactorytomakethecodemorerobust.Infact,let’sdojustthat!
1. Right-clickonthecom.davidsalter.cookbook.refactorpackageandselectNewandthenJavaClass….
2. EnterGameLevelintheClassNamefield.3. InthePackageselection,entercom.davidsalter.cookbook.refactor.factory.4. ClickonFinish.5. TheGameLevelclasswillnowbecreatedandopenedforediting.Changethecontents
oftheclasstobeasfollows:
publicclassGameLevel{
privateintdifficulty;
publicGameLevel(intdifficulty){
this.difficulty=difficulty;
}
}
Thissimpleclassnowrepresentsagamelevelthathasdifferingdegreesofdifficulty.Let’snowchangetheconstructortousetheFactorypatternwiththefollowingsteps:
1. Right-clickonthebodyoftheconstructorintheGameLevel.javaclassandselectRefactorandthenReplaceConstructorwithFactory….
2. TheReplaceConstructorWithFactorydialogwillnowbedisplayed:
3. EnterlevelWithDifficultyintheFactoryMethodNamefield.4. ClickonRefactor.5. TheReplaceConstructorWithFactorydialogwillnowcloseandtherefactoring
willbeappliedtotheGameLevel.javaclass.

Howitworks…Uponrefactoringaconstructorintoafactory,thenewfactorymethodiscreatedthatinstantiatestheGameLevelclassandreturnsittothecaller.TheoriginalconstructorfortheclassismarkedasprivatetostopcallersdirectlyinstantiatingtheGameLevelclass.TheupdatedcodeoftheGameLevelclassis:
publicclassGameLevel{
publicstaticGameLevellevelWithDifficulty(intdifficulty){
returnnewGameLevel(difficulty);
}
privateintdifficulty;
privateGameLevel(intdifficulty){
this.difficulty=difficulty;
}
}
Lookingatthiscode,wecanimmediatelyseethatthenameofthefactorymethodisalotmoremeaningfulthanthenameoftheconstructorwithitssingleparameter.
YoucanalsoimaginehowitwouldbeeasytocreateacachedlookupofallthelevelsavailablewithinthegameandreturnalevelfromcachewithinthefactorymethodratherthaninstantiatinganewGameLeveleachtimethefactorymethodiscalled.Inarealgame,itwouldbeeasytobelievethatconstructingGameLevelcouldbeanexpensivetaskintermsofCPUperformanceandtime.SinceGameLevelisessentiallyimmutable,there’snoneedtoinstantiateanewoneeachtimeitisrequested.ReturningGameLevelfromcachewouldbeamuchmoreoptimizedtask.

There’smore…SometimestheFactorypatternisnotthebestwaytoinstantiateanobject—wemaywishtousertheBuilderpatterninstead.
ReplacingconstructorswiththeBuilderpatternIfaconstructorbecomesmorecomplexthanafewparameters,ormultipleoperationsarerequiredtocreateanobject,thentheBuilderpatterncanbeusedtocreateobjectsinsteadoftheFactorypattern.
NetBeanscanapplytheBuilderpatterntoclassesenablingconstructorstobereplacedwithaBuilderpatternimplementation.ToreplaceaconstructorwithaBuilderpattern,right-clickonthebodyofaconstructorandselectRefactorandthenReplaceConstructorwithBuilder….TheReplaceConstructorWithBuilderdialogwillbedisplayed:


Chapter4.DevelopingDesktopApplicationswithNetBeansInthischapter,wewillcoverthefollowingrecipes:
CreatingaSwingapplicationAddingcomponentstoaformCreatingmenusCreatingdialogsCreatingtoolbarsRespondingtoeventsBuildingadistributableapplicationfromNetBeans

IntroductionTheJavaSwingAPIisacompleteGUItoolkitthatprovidesmanydifferentclassesthatallowdeveloperstobuildcomplexuserinterfaces.SwingisbasedontheModel-View-Controller(MVC)pattern,whichallowsdatatobedecoupledfromGUIcontrolsandthereforeencouragesdeveloperstowritemoremaintainablecode.
ThismayallsoundverycomplicatedtodeveloperswhoarenewtoSwing,butfortunately,oneofthegreateststrengthsofNetBeansisthepowerfulSwingGUIbuilder,alsoknownasMatisse.MatissehidesalotofthecomplexityofSwingdevelopmentasitwritesalotoftheSwingplumbingcodeforyou.
TipForacomprehensiveoverviewofSwing,checkoutthearticle,ASwingArchitectureOverview,athttp://www.oracle.com/technetwork/java/architecture-142923.html.
NetBeansusesJava’sSwingasthedefaultframeworkandwithit,it’spossibleto:
CreateanddesigncomplexGUIapplicationsDrag-and-dropcomponentsfromaPalettecomponentDesignbeautiful-lookingapplicationsPreviewthechangesbeforecompilingBinddatastraightfromthedatabasetoyourcomponent
Andit’spossibletodomuchmore.
Besidesbeingtotallyfree,theSwingGUIbuilderletsthedeveloperconcentrateoncoding.
Inthepreviouschapters,welearnedhowtocreateprojectsandhowtobecomeproductiveindevelopingJavaapplicationswithNetBeans.Inthischapter,we’llstartwiththebasicsbycreatingasimpleJavaSwingdesktopapplication.We’llthenbuildonthatbyaddingcontrolsandtoolbarsandotherGUIcomponents.
IfyouhaveusedpreviousversionsofNetBeans,youmayhaveseenreferencestotheSwingApplicationFramework(asimpleSwingframeworkthatdefinedcommoninfrastructurefordesktopapplications).AsofNetBeans7.1,supportfortheSwingApplicationFrameworkwasdroppedfromtheNetBeansIDEastheframeworkwaswithdrawnbytheJCP.Inthischapter,wewillbeconcentratingpurelyondevelopingSwingapplicationswithNetBeans.
TipInsteadoftheSwingApplicationFramework,developerscannowusetheNetBeansPlatform(https://netbeans.org/features/platform)todevelopRichClientPlatform(RCP)applications.TolearnmoreaboutRCPdevelopmentusingtheNetBeansPlatform,checkoutthebookathttps://www.packtpub.com/application-development/netbeans-platform-69-developers-guide.

Withinthischapter,we’llseehowtodevelopasimpledesktopGUIapplicationtoviewthecontentsof.jarfiles.Thefinalproductwilllooklikethefollowingscreenshot:


CreatingaSwingapplicationWithNetBeans8.0,creatingadesktopapplicationisverysimilartocreatingastandardconsoleapplicationasshowninChapter1,UsingNetBeansProjects.TocreateaSwingapplication,weneedtofirstcreateablankJavaapplicationandthenaddaJFramederivedclasstotheapplicationthatwillactasthemainframefortheapplication.Oncewe’vecreatedaframe,wecansetitstitleandgiveitaniconandwewillgetabasicJavadesktopapplication.
Let’sseehowthatcanbeachieved.
TipFormoreinformationaboutJFramesandhowtousetop-levelcontainers,checkouthttp://docs.oracle.com/javase/tutorial/uiswing/components/toplevel.html.

GettingreadyTocompletethisrecipe,we’llbeusingtheJavaSENetBeansIDEdownloadbundle.TheJavaEEorAllbundlescouldalsobeused,butwewillnotbeusinganyoftheirfeaturesinthisrecipe.
Youneednothaveanyprojectsopentostartthisrecipe.

Howtodoit…Firstoff,we’llcreateablankJavaapplicationthatwecanaddourframeintowiththefollowingsteps:
1. ClickonFileandthenNewProject….2. Ontheresultantdialog,selecttheJavacategoryandJavaApplicationastheproject.3. ClickonNext.4. EntertheProjectNamefieldasJarViewer.5. EntertheProjectLocationfield.(Thedefaultlocationwillmostlikelybecorrect.)6. EnsureCreateMainClassischeckedandenter
com.davidsalter.cookbook.jarviewer.MainastheMainClassname,asshowninthefollowingscreenshot:
7. ClickonFinish.
NetBeanshasnowcreatedablankapplicationwithasinglemainclassinit.
Let’screateaGUIframeforourapplicationandopenitwhentheapplicationislaunchedwiththefollowingsteps:
1. Right-clickontheSourcePackagesnodeintheProjectsexplorerandselectNewandthenJFrameForm….
2. EntertheClassNamefieldasMainFrame.3. EnterthePackagefieldascom.davidsalter.cookbook.jarviewer.gui,asshownin
thefollowingscreenshot:

4. ClickonFinish.
NetBeanswillnowcreateaMainFrameclassforusandopenitforGUIeditingasshowninthefollowingscreenshot:
Inthecenterofthescreen,wecanseethatablankformhasbeencreatedwithnocomponentsonit.TodesignGUIs,wedragcomponentsfromthePalettesectionattheright-handsideofthemainwindowontotheform,layingthemoutinthedesignwewant.
We’lllookataddingcontrolstoaforminalaterrecipe.Fornow,let’ssetourapplication’s

titleandgiveitaniconsothatitstartstolooklikeaproperGUIapplication,usingthefollowingsteps:
1. ClickontheMainFrame.javadesignsurfaceinthecenteroftheNetBeansIDEwindow.The[JFrame]-Propertiesexplorershouldnowbedisplayed.
2. LocatethetitlepropertyandenterJarFileViewer,asshowninthefollowingscreenshot:
3. Fromtheassetsfolderofthecodedownloadbundleforthischapter,locatethefolder_explore.pngfileanddragitontothecom.davidsalter.cookbook.jarviewer.guipackageintheProjectsexplorer.ThiswilladdthefileintotheNetBeansprojectsothatwecanreferenceitfromwithinourapplication.TheProjectsexplorerforourprojectisshowninthefollowingscreenshot:
4. ClickonthedesignsurfacefortheMainFrame.javaclassagainandlocatetheiconImageproperty.
5. Clickonthe…button( )fortheiconImagepropertytoopenupthepropertyeditorwindow.
6. SelecttheSetForm’siconImagepropertyusingfieldasCustomcode.7. EnterthecustomcodewithintheForm.setIconImageeditas:

new
javax.swing.ImageIcon(getClass().getResource("/com/davidsalter/cookbook
/jarviewer/gui/folder_explore.png")).getImage()
The[JFrame]-iconImagewindowisshowninthefollowingscreenshot:
8. ClickontheOKbuttontosettheiconImageproperty.
We’venowcreatedthebasicsforourdesktopapplication.ThefinalstepistowireuptheMainclasstoinstantiatetheframewhentheapplicationisexecuted.
9. Double-clickonMain.javawithintheProjectsexplorertoopenitforediting.10. ChangethemainmethodwithinMain.javatoread:
publicstaticvoidmain(String[]args){
java.awt.EventQueue.invokeLater(newRunnable(){
publicvoidrun(){
newMainFrame().setVisible(true);
}
});
}
11. PressF6toruntheapplication.
TipWhencreatingaJFrameclass,NetBeansactuallycreatesamainmethodwithintheJFrameclass;so,thereisnoneedtocreateaseparateJavaclasstoimplementthemainmethod.WehavecreatedaseparateMainclasswithinthisrecipetoshowhowtodisplayaJFramewithinanapplication.

Howitworks…Inthisrecipe,we’vecreatedthefirstofourSwingcomponents—aMainFrame.javaclassthatextendsJFrame.
WhenthisfileisopenedwithinNetBeans,ithasthreeviews:
SourceDesignHistory
Thesethreeviewsaredisplayedinthefollowingscreenshot:
TheSourceviewallowsustoseetheJavasourcecodethattheclassiscomposedof.Thiscodeisamixtureofautomaticallygeneratedcodeandcustomcodethathasbeenaddedbythedeveloper.
TheNetBeansGUIdesignercreatesallthecodeforustoinstantiateaformandinitializeallthecomponentsonit,includingtheirlayout,size,andotherproperties.CodetousethebasicpropertiesthatweenteredwithinthePropertieswindow(suchastheframe’stitle)isalsoautomaticallygeneratedforus.Anycustomcodethatweenterforproperties(suchastheframe’siconImageproperty)isautomaticallyaddedintothegeneratedcode.
WhenwelookatthecodeforaGUIcomponent,wecanseethatsectionsofthecodeareineditorfoldsthathaveagreybackground.ThesesectionsofcodearetheonesthatareautomaticallygeneratedbyNetBeansandcannotbeeditedwithintheJavaeditor.It’sveryimportantnottotrytoeditthesesectionsofcodeinaneditorexternaltoNetBeansasthiswillalmostalwaysstopNetBeansfromsubsequentlybeingabletoedittheGUIcomponentgraphically.
TipIfyouwanttoeditthecustomcodethatyouhaveaddedasacomponent’sproperty,thenyouneedtoselectthecustomcodeeditorfromthePropertieswindowratherthanattemptingtoeditthesourcecodedirectly.NetBeanswillnotallowthecustomcodetobedirectlyeditedwithintheJavaeditor.
TheDesignviewshowsthelayoutofallthecomponentsontheframe.Wewillseemoreofthisinthenextrecipe.Fornow,we’lljustnotethatthisistheareawherewedragcontrolstobuildupourGUI.
TheHistoryviewshowsallthechangesthatwehavemadetothecomponent,similartothehistorywemayseewhenviewingthehistoryofafilewithinasourcecodecontrolsystemsuchasGitorSubversion.UsingtheHistoryview,wecanreverttotheearlierchangeswemadetothedesignofaform.

There’smore…WhencreatingaJFrameformwithinaproject,NetBeansautomaticallyaddsamainmethodintothenewclass.IfyourapplicationonlyhasoneJFramewithinitandyou’renotlikelytodoanyotherprocessingatapplicationstartup,thenthiscanbeaconvenientwaytoautomaticallycreateamain()methodforyourapplication.
ForeachJavaGUIclasscreatedbyNetBeans,acorrespondingXMLfilewillbecreatedthathasthe.formextension.Inthisrecipe,wecreatedaJavaclasscalledMainFrame.java.NetBeansautomaticallycreatedafilecalledMainFrame.forminthesamedirectoryondisktogoalongwiththisfile.NetBeansstoresallofitsinternaldatawithinthis.formfile;so,it’sveryimportantnottodeleteoreditthesefilesmanually.Don’tworrythough,whenyoudistributeanapplication,these.formfilesdonotneedtobedistributedwiththeapplication.TheyareonlyrequiredwhiledevelopingwithinNetBeans.


AddingcomponentstoaformInthepreviousrecipe,wesawhowtomakeadesktopGUIapplication.Inthisrecipe,we’llseehowwecanaddcomponentsontoaformandhowwecanpreviewtheformatthedesigntime.
TipFormoreinformationonusingdifferentSwingcomponents,checkouthttp://docs.oracle.com/javase/tutorial/uiswing/components/index.html.

GettingreadyTocompletethisrecipe,weneedtohavetheJarViewerprojectthatwascreatedintheCreatingaSwingapplicationrecipe.Ifyouhavenotcompletedthisrecipe,thesourcecodeisavailablewiththecodedownloadbundleforthischapter.

Howtodoit…1. EnsurethattheJarViewerprojectisopeninNetBeansanddouble-clickonthe
MainFrame.javaclasstoopenitforediting.2. FromthePalettesection,dragaLabelcomponentontotheform’sdesignsurface
snappingittothetop-leftsideoftheform.Whendraggingthelabelontotheform,youwillseeahorizontalandverticaldottedlinewhenthelabelisatthepreferreddistancefromthetopcorner.Dropthelabelatthispointasshowninthefollowingscreenshot:
3. Right-clickonthedroppedlabelonthedesignsurfaceandselectChangeVariableName….
4. EntertheNewNamefieldasjarLabel.
TipSomedevelopersliketouseHungariannotationforcontrolnamesinGUIstohelpdistinguishthetypesofcomponentsthatarebeingaddedtoaform,forexample,lblJarLabel.Throughoutthisbookhowever,I’venotusedHungariannotationtodistinguishvariabletypesasthecompilercandothisforme.Formoreinformation,aboutHungariannotation,checkouthttp://en.wikipedia.org/wiki/Hungarian_notation.
5. LocatethetextpropertywithinthejarLabel[JLabel]–Propertieswindow.SetthepropertyvaluetobeJarFile.
6. ThetextdisplayedforthelabelontheformwillnowchangetoreadJarFile.7. FromthePalettesection,dropaButtoncomponentontotheformatthetopright.
JustlikewhendroppingtheLabelcomponentinstep2,theguidelineswillbedisplayedontheformindicatingthatthebuttonhasbeensnappedtothetop-rightsideoftheform.
8. Right-clickonthedroppedbuttononthedesignsurfaceandselectChangeVariableName….
9. EntertheNewNamefieldasviewButton.

10. Right-clickonthebuttononcemoreandselectEditText.11. Thetextdisplayedonthebuttonwillbecomeeditable.EnterthetextViewandpress
theReturnkey.12. FromthePalettesection,dragaPanelcomponentontotheform,snappingittothe
leftandbottomoftheform.Dragthepaneltotherighttoadditionallysnapittotheright-handsideoftheformaswell.
13. Dragtheheightofthepaneltobe16.14. Right-clickonthepanelandselectChangeVariableName….15. EntertheNewNamefieldasstatusPanel.16. LocatetheborderpropertyforthepanelwithinthestatusPanel[JPanel]–
Propertieswindow.17. Clickonthe…button( )toopentheborderpropertywindow.18. SelectBevelBorderfromtheAvailableBorderssection.19. SelectLoweredastheTypefield,asshowninthefollowingscreenshot:
20. ClickonOK.21. FromthePalettesection,dragaLabelcomponentontostatusPanelaligningitwith
thebottom-leftsideofthepanel.22. Right-clickonthelabelandselectChangeVariableName….23. EntertheNewNamefieldasstatusLabel.24. LocatethetextpropertywithinthestatusLabel[JLabel]–Propertieswindowand
deletethepropertyvaluesothatnovalueisset.

25. FromthePalettesection,dragaTextFieldcomponentontotheform’sdesignsurface.SnaptheTextFieldcomponenttothetopoftheformandtheright-handsideofthejarLabellabel.
26. DragtheTextFieldcomponenttotherightandsnapittotheleft-handsideoftheviewButtoncomponent.
27. Right-clickonthetextfieldandselectChangeVariableName….28. EntertheNewNamefieldasjarName.29. LocatethetextpropertywithinthejarName[JTextField]–Propertieswindowand
deletethepropertyvaluesothatnovalueisset.30. FromthePalettesection,dragaListcontrolontotheform,snappingittotheleft-
handsideoftheformandtothebottomofthejarLabelcomponent.31. DragtheListcontroltotherightandsnapittotheright-handsizeoftheform.32. DragtheListcontroltothebottomandsnapittothetopofthestatusPanel
component.33. Right-clickontheListcontrolandselectChangeVariableName….34. EntertheNewNamefieldasjarEntries.
Wehavenowcompletedthedesignofourform.Thecompletedformshouldlooklikethefollowingscreenshot:
Wecouldnowrunourapplicationtoseewhatitlookslike;however,NetBeansprovidesanexcellentdesign-timetoolthatallowsustopreviewtheformwithoutrunningtheapplication.
TipOnasmallapplication,thereisn’tmuchbenefitinpreviewingformsatdesigntime,butasyourapplicationgrows,thisabilitycanrapidlyincreaseyourproductivity.
35. ClickonthePreviewDesignbuttonatthetopofthedesignsurface.NetBeanswillopenapreviewversionoftheform.Resizetheformandnotethatallofthecontrolsontheformcorrectlyresizewiththeform,asshowninthefollowingscreenshot:


Howitworks…WhendesigningformswithinNetBeans,thereisavastarrayofcomponentsthatareavailablewithinthePalettesectionthatcanbesimplydragged-and-droppedontothedesignsurface.
Wecanaddcontrols(suchaslabels,buttonsandlists,andsoon),Swingfillers,Swingmenus,orevenotherSwingwindows(filechoosersandcolorchoosers,andsoon).WecanevenaddAWTcomponentsorourowncustom-definedBeans.WecanseethePalettewindowinthefollowingscreenshot:
Witheachcontrolweadd,wecanchoosetoeitheradditatagivensizeontheform,orsnapittoothercontrols/edgesoftheformthusprovidingtheabilityforcontrolstoproperlyresizewhentheformisresized.
Notonlycanweaddcontrolsontoaform,butwecanalsoaddcontrolsintoothercontrols.WesawhowtoaddJPanelandthendropJLabelinsideittomakeamorecomplicatedcontrol.
Foreachcontrolthatweaddtotheform,there’sacorrespondingsetofpropertiesthatcanbesetforthecontrol.Aswe’veseenpreviously,thesepropertiescanbesetatthedesigntimeassimplevalues,orcanbeimplementedascustomcodesnippets.

There’smore…Wecanalsowritecustomcodethatcanbetriggeredatdifferenttimesduringacomponent’slifecycle.OntheCodetabofacomponent’sPropertieswindow,wecanspecifyalifecycleevent(suchasPre-CreationCodeorPost-CreationCode)togetherwiththecustomcodetorun.Thiscanbeveryusefulifwewish,forexample,toinitializecomponentsonaformwhentheyarecreated.
UsingtheBindingtab,wecanalsobindcomponentpropertieswithotherJavaBeanscomponents,so,forexample,wecouldautomaticallyupdateaprogressbarbaseduponsomeexternalaction.
Ifyoulookatmanydesktopapplications,you’llseethatmanycomponentssuchasbuttonshaveashortcutassigned—thesearegenerallyreferredtoasamnemonic.Forexample,abuttonlabelledClosewillinvariablybedisplayedasClose(notetheunderlinedC)indicatingthatpressingAlt+Cwillhavethesameeffectasclickingonthebutton.WecaneasilydefinethesekeyboardmnemonicsinNetBeansbysettingthemnemonicpropertyofacomponent.
Inthisrecipe,wecreatedaJLabelthatdescribedanothercomponent(wecreatedtheJLabelwiththetextJarFile,whichdescribedJTextFieldnexttoit).Toaidaccessibility,it’sagoodpracticetosetthelabelForpropertyonaJLabeltodescribewhichcomponentitisthelabelfor.Thiscangreatlyenhancetheperformanceofscreenreadersandotheraccessibilitysoftware.
Wait,whatifwewanttoaddmorecomplexcomponentssuchastoolbarsormenustoourapplication?
Fortunately,thisisasimpleprocedurewhenusingNetBeans.
Inthenextrecipe,we’lltakealookataddingmenusintoourapplication.Insubsequentrecipes,we’llshowhowtoaddtoolbarsandthenseehowtouseeventstowireupallofthesecomponents.
TipIfyouwanttoseesomemoreexamplesofGUIformswithinNetBeans,checkouttheprovidedsampleapplications.Whencreatinganewproject,selectSamplesandthenJavafromtheCategorieslist.Thethreesampleprojects,AnagramGame,GUIFormExamples,andClientEditor,providefurtherexamplesofusingtheNetBeansGUIeditor.


CreatingmenusNowthatwe’vecreatedabasicGUIforourapplication,let’saddamenustructuresothatwecanclosetheapplicationeasilyandviewtheapplication’sAboutbox.

GettingreadyTocompletethisrecipe,weneedtohavetheJarViewerprojectthatwascreatedintheAddingcomponentstoaformrecipe.Ifyouhavenotcompletedthisrecipe,thesourcecodeisavailablewiththecodedownloadbundleforthischapter.

Howtodoit…Toaddamenutoanapplication,weneedtohavethemainformoftheapplicationopenforeditinginthedesignview.Wethendrag-and-dropamenubarandmenuitemsfromthePalettesectionontotheform.Let’sseehowthatcanbeachievedwiththefollowingsteps:
1. Double-clickontheMainFrame.javafilewithintheProjectsexplorertoopenitforediting.EnsuretheDesigntabisselectedforeditingthedesignsurfaceoftheclass.
2. FromthePalettesection,dragaMenuBarcontrolanywhereontothedialog’ssurface,asshowninthefollowingscreenshot:
NotethattheFileandEditmenushavebeenaddedtothedialognow,buttheyhavenomenuitemsinthem.Inourapplication,wewantaFilemenuandaHelpmenusothatwecanaddtheoptions,File|ExitandHelp|About.Let’snowdeletetheEditmenuandaddtherequiredmenuitemswiththefollowingsteps:
1. Right-clickontheEditmenuintheMainFrame.javaclassandselectDelete.2. Right-clickontheFilemenuandselectChangeVariableName….3. EntertheNewNamefieldasfileMenu.4. FromthePalettesection,dragaMenucontrolontotheexistingMenuBar
component.ThenewmenuwillinitiallyhavethenamejMenu1.5. Right-clickonthejMenu1menuandselectEditText.6. Inthein-placeeditor,typethenewmenunameasHelpandpresstheReturnkey.7. Right-clickontheHelpmenuandselectChangeVariableName….8. EntertheNewNamefieldashelpMenu.9. FromthePalettesection,dragaMenuItemcontrolanddropitontotheFilemenu.
ThenewmenuitemwillinitiallyhavethenamejMenuItem1.10. Right-clickonthemenuitemjMenuItem1andselectEditText.11. Inthein-placeeditor,typethenewmenunameasExitandpresstheReturnkey.12. Right-clickontheExitmenuitemandselectChangeVariableName….13. EntertheNewNamefieldasexitMenuItem.

14. FromthePalettesection,dragaMenuItemcontrolanddropitontotheHelpmenu.ThenewmenuitemwillinitiallyhavethenamejMenuItem1.
15. Right-clickonthemenuitemjMenuItem1andselectEditText.16. Inthein-placeeditor,typethenewmenunameasAboutandpresstheReturnkey.17. Right-clickontheAboutmenuitemandselectChangeVariableName….18. EntertheNewNamefieldasaboutMenuItem.
Nowthatwe’veaddedallofthemenuitemsontoourform,wejustneedtosettheacceleratorkeyfortheExitmenu.Theacceleratorkeyisthekeyboardcombinationthatwillactasashortcutforthemenuitem.Typically,inWindows,Alt+F4isusetocloseanapplication.OnaMacintosh,thekeyboardshortcutisusuallycmd+Q.Let’sperformthefollowingsteps:
1. ClickontheExitmenuitem.2. IntheexitMenuItem[JMenuItem]–Propertieswindow,clickonthe…button
nexttotheacceleratorproperty.3. IntheexitMenuItem[JMenuItem]–acceleratordialog,clickintheKeyStroke
textboxandthenpressF4.4. SelecttheAltbutton.
TipIfyou’reusingaMac,makesurethatyouselectcmd+QasyouracceleratorkeyinsteadofAlt+F4.
Theacceleratordefinitiondialogisshowninthefollowingscreenshot:
5. ClickonOKtosettheacceleratorkeyandclosethedialog.6. ClickonthePreviewDesignbuttontoseehowthemenuwilllookwhenthe
applicationisexecuted.

There’smore…UsingtheNetBeansGUIeditor,we’veseenhowwecaneasilycreatemenustructuresbydraggingtheappropriateentriesfromthePalettesectionontoaform.
Inadditiontosettingmenuitemacceleratorkeys,wecanalsosetgraphicsformenuitemsthatwillappeartotheleftofthemenutext.Thiscanbeachievedbysettingtheiconproperty.
WecanalsosettooltipsformenuitemsbysettingthetoolTipTextproperty.Menuitemtooltipsarethendisplayedwhenthemouseishoveredoveramenuitem.
Ifyouruntheapplicationnow,youmayspotthatclickingonthemenusdoesnothingatthemoment.Intherecipe,Respondingtoevents,we’llseehowtomakethemenuitemsworkfully.


CreatingdialogsInthepreviousrecipe,wesawhowtoaddmenustoaform.WeaddedamenuthatwillallowustodisplayanAboutboxforourapplication.Sofar,we’venotcreatedanydialogsthough.
Inthisrecipe,we’llseehowtocreatedialogs.

GettingreadyTocompletethisrecipe,weneedtohavetheJarViewerprojectthatwascreatedintheCreatingmenusrecipe.Ifyouhavenotcompletedthisrecipe,thesourcecodeisavailablewiththecodedownloadbundleforthischapter.

Howtodoit…1. Right-clickonthecom.davidsalter.cookbook.jarviewer.guipackageinthe
ProjectsexplorerandselectNewandthenOther….2. IntheNewFiledialog,selectSwingGUIFormsunderCategoriesandOK/
CancelDialogSampleFormfromtheFileTypessection.3. ClickonNext.4. EntertheClassNamefieldasAboutDialogandensurethePackagesectionissetto
com.davidsalter.cookbook.jarviewer.gui.5. ClickonFinish.
AnewblankdialogwillnowbecreatedwithOKandCancelbuttonsonitasshowninthefollowingscreenshot:
Wedon’twanttheOKbutton,solet’sdeletethatandthenaddsomeinformationtothedialogwiththefollowingsteps:
1. Right-clickontheOKbuttonandselectDelete.2. LocatethetextpropertyfortheCancelbuttonandsetittoreadClose.3. UsingthetechniqueswelearnedintheAddingcomponentstoaformrecipe,change
thedesignoftheformtolooklikethefollowingscreenshot:
TipTocreateanimageandtextonthedialog,simplydropaLabelcontrolandsetitsiconandtextproperties.
4. Sincewe’recreatingadialog,wewanttogiveitafixedsize.Clickonthedialog’sbackgroundandthenensuretheresizableattributeisnotcheckedonthe[JDialog]–

Propertieswindow.5. PreviewthedesignofthedialogbyclickingonthePreviewDesignbutton.
Howitworks…WhencreatingthedialogwiththeNewFilewizard,weselectedtocreatesimpleJDialogwithOKandCancelbuttonsonit.Doingthis,NetBeansautomaticallywireduptheOKandCancelbuttonstoclosethedialog(although,welaterdeletedtheOKbuttonbecausewedidn’twantit).
TipWecouldhavejustcreatedaJDialogform,butthenwewouldn’thaveautomaticallygotOKandCancelbuttonsadded;so,wewouldhaveneededtodosomeextraworktoaddtherequiredbuttons.
Whencreatingdialogs,NetBeansprovidestheopportunitytocreatedifferenttypesofdialogs.TheseareallbasedupontheJDialogform,butwithadditionalcontrolsandlayoutsaddedontothemtosaveadditionaltime.Irecommendyoutoexperimentwiththesedifferenttypesofdialogsothatyouwillknowwhichonebestsuitsyourneedsinthefuture.
Addingcomponentsontoadialogisexactlythesameprocedureasaddingcomponentsontoamainform.Checkouttherecipe,Addingcomponentstoaform,earlierinthischapterformoredetails.

There’smore…IfyouwanttotryoutadialogfromarunningexecutablecodeinsteadofpreviewingitfromwithinNetBeans,youcansimplyright-clickontheclasswithintheProjectsexplorerandclickonRunFile.NetBeansaddsamain()methodintoeachJDialogclassthatitcreatessothatyoucanrunthedialogindependentlyfromyourapplicationtogetagoodindicationofhowitwilllookwhenrunning.
We’venowcreatedadialog,intherecipe,Respondingtoevents,we’llseehowwecaninvokethedialoganddisplayitonthescreen.


CreatingtoolbarsThefinalstageofdesigningtheGUIforourapplicationistoaddatoolbarwithabuttononit.Clickingonthebuttononthetoolbarwillcausethecontentsofselected.jarfilestobedisplayed.

GettingreadyTocompletethisrecipe,weneedtohavetheJarViewerprojectthatwascreatedintheCreatingdialogsrecipe.Ifyouhavenotcompletedthisrecipe,thesourcecodeisavailablewiththecodedownloadbundleforthischapter.
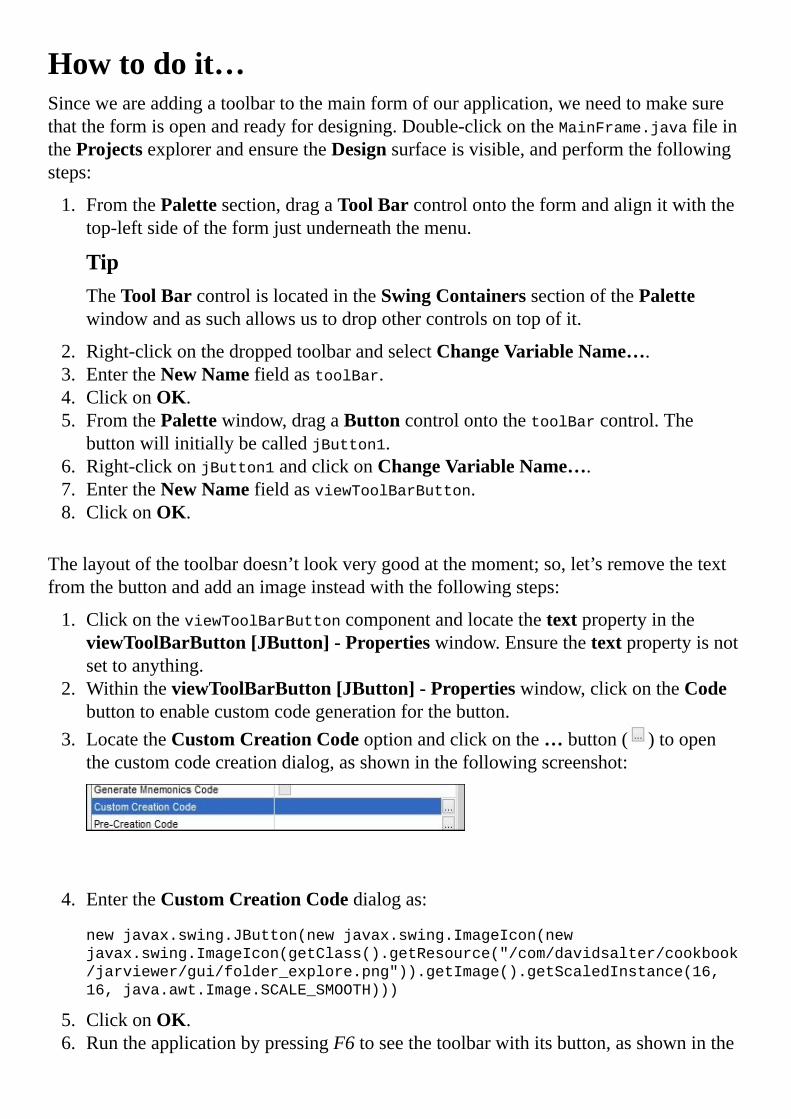
Howtodoit…Sinceweareaddingatoolbartothemainformofourapplication,weneedtomakesurethattheformisopenandreadyfordesigning.Double-clickontheMainFrame.javafileintheProjectsexplorerandensuretheDesignsurfaceisvisible,andperformthefollowingsteps:
1. FromthePalettesection,dragaToolBarcontrolontotheformandalignitwiththetop-leftsideoftheformjustunderneaththemenu.
TipTheToolBarcontrolislocatedintheSwingContainerssectionofthePalettewindowandassuchallowsustodropothercontrolsontopofit.
2. Right-clickonthedroppedtoolbarandselectChangeVariableName….3. EntertheNewNamefieldastoolBar.4. ClickonOK.5. FromthePalettewindow,dragaButtoncontrolontothetoolBarcontrol.The
buttonwillinitiallybecalledjButton1.6. Right-clickonjButton1andclickonChangeVariableName….7. EntertheNewNamefieldasviewToolBarButton.8. ClickonOK.
Thelayoutofthetoolbardoesn’tlookverygoodatthemoment;so,let’sremovethetextfromthebuttonandaddanimageinsteadwiththefollowingsteps:
1. ClickontheviewToolBarButtoncomponentandlocatethetextpropertyintheviewToolBarButton[JButton]-Propertieswindow.Ensurethetextpropertyisnotsettoanything.
2. WithintheviewToolBarButton[JButton]-Propertieswindow,clickontheCodebuttontoenablecustomcodegenerationforthebutton.
3. LocatetheCustomCreationCodeoptionandclickonthe…button( )toopenthecustomcodecreationdialog,asshowninthefollowingscreenshot:
4. EntertheCustomCreationCodedialogas:
newjavax.swing.JButton(newjavax.swing.ImageIcon(new
javax.swing.ImageIcon(getClass().getResource("/com/davidsalter/cookbook
/jarviewer/gui/folder_explore.png")).getImage().getScaledInstance(16,
16,java.awt.Image.SCALE_SMOOTH)))
5. ClickonOK.6. RuntheapplicationbypressingF6toseethetoolbarwithitsbutton,asshowninthe

followingscreenshot:
TipThisisagoodexampleofwhereclickingonthePreviewDialogbuttondoesnotshowanaccuraterepresentationoftheform.Sinceweaddedthecustomcodetocreatethetoolbarbutton,NetBeansdoesnotknowhowtogenerateapreviewofthebuttonandsonotoolbarbuttonisdisplayed.

Howitworks…Atoolbarissimplyacontainer(muchlikethemainapplicationframe)thatcanhaveadditionalcomponentsplacedinsideit.Tocreateatoolbar,weaddedabuttoninsidethecontainer.
Typically,toolbarshavenotextbutarerepresentedbyimages.Sincewehadanimagewithinoutproject,itmadesensetousethat.
Theimagethatwehaveusedpreviouslyhoweveristoobigtobeusedasastandardimageforatoolbarbuttonhencethecustomcreationcodeforthebutton.
Thiscustomcreationcodeloadstheimagefilefromtheapplication’sclasspathandresizesittoa16x16image,whichisthensetintothebutton.
Inthenextrecipe,Respondingtoevents,we’llseehowtomakethebuttonrespondtoclickevents.


RespondingtoeventsSofar,we’vedesignedaSwingdesktopapplication.We’veaddedsomecontrolsontoaform,addedamenusystem,andaddedatoolbar.Atthemoment,there’snofunctionalitybehindthecontrolsandmenuitems.
ThenextstepafterdesigningaSwingdesktopapplicationistoaddbehaviorstoit.
InSwing,thisisdonebyimplementingeventlisteners.Firstly,wemustregisterspecificobjects,theeventlisteners,ontoSwingcomponentsinordertoperformadeterminedtask.Whenaneventistriggered,theSwingcomponentpassesthistothelistenerstohandletheactionaccordingtowhatwasimplemented.
TherearemultiplekindsofeventsinSwingthatincludemouse,focus,key,andwindowevents.
Foramoredetailedviewofeventlisteners,visithttp://download.oracle.com/javase/tutorial/uiswing/events/intro.html.

GettingreadyTocompletethisrecipe,weneedtohavetheJarViewerprojectthatwascreatedintheCreatingtoolbarsrecipe.Ifyouhavenotcompletedthisrecipe,thesourcecodeisavailablewiththecodedownloadbundleforthischapter.

Howtodoit…Thefirstbehaviorthatwe’lladdtoourapplicationistomakethecontrolsontheformworkcorrectly.Thatis,ifwetypeinavalid.jarfilenameandclickontheViewbutton,weshouldseewhatthecontentsofthe.jarfileare.Performthefollowingstepstocheckthis:
1. Double-clickontheMainFrame.javaclasswithintheProjectsexplorertoopenitupforediting.EnsuretheDesigntabisselectedforeditingthedesignsurfaceoftheclass.
2. ClickontheViewbuttonwithintheMainFrame.javadesigner.Thiswillallowustoedittheeventsforthebutton.
3. LocatetheviewButton[JButton]–PropertieswindowandclickontheEventsbutton,asshowninthefollowingscreenshot:
4. Clickonthedownarrow( )totherightoftheactionPerformedeventlistener.5. Apop-uptooltipwillbedisplayedshowingthedefaultnameforthiseventlisteneras
viewButtonActionPerformed.Clickonthistooltiptocreatetheeventhandler,asshowninthefollowingscreenshot:
6. ThedesignwindowfortheformwillnowcloseandtheJavasourcecodewindowforMainFram.javawillbeopenedatthenewlycreatedeventhandler,asshowninthefollowingscreenshot:

7. ReplacethebodyoftheviewButtonActionPerformed()methodwiththefollowingcode:
statusLabel.setText("ParsingJARfile");
try{
DefaultListModelmodel=newDefaultListModel();
ZipInputStreamzip=newZipInputStream(new
FileInputStream(jarName.getText()));
for(ZipEntryentry=zip.getNextEntry();
entry!=null;
entry=zip.getNextEntry()){
model.addElement(entry.getName());
}
jarEntries.setModel(model);
statusLabel.setText("Entriesfound:"+model.size());
}catch(IOExceptionioe){
statusLabel.setText("Entriesfound:0");
JOptionPane.showMessageDialog(this,ioe.getLocalizedMessage(),"Oops-
anerroroccurred",JOptionPane.ERROR_MESSAGE);
}
NoteWeshouldreallybeclosingtheZipInputStreamclassproperlyhereifanexceptionoccurstoavoidany.jarlockingproblems.Forbrevity,thishasbeenomittedfromthiscode.
Thiscodetakesthenameofthe.jarfilewewishtoviewandopensaZipInputStreaminstanceforthefile.ASwingDefaultTableModelinstanceiscreatedandanentryisaddedtoitforeachZipEntryinstancewithinZipInputStream.
ThetablemodelisthensetonthejarEntriescomponent.
Ifanyerrorsoccurduringparsingthefile,anerrormessageboxisdisplayed.
TipFormoreinformationaboutSwingListandListModel,checkoutTheJavaTutorial,HowtoUseLists,athttp://docs.oracle.com/javase/tutorial/uiswing/components/list.html.
Thenextstageinaddingbehaviorstoourapplicationistorespondtothemenuoptions.IntheCreatingmenusrecipe,weaddedthemenuoptions,File|ExitandHelp|About.Foraddingbehaviorstoourapplication,performthefollowingsteps:
1. IntheNavigatorwindow,clickontheexitMenuItemnode,whichisshowninthefollowingscreenshot:

TipWhenworkingwithauserinterfacethathasalotofcontrolsonit,theNavigatorwindowcanbeinvaluableinhelpingyoutoselectindividualcontrolsforeditingtheirproperties.Sometimes,locatingacontrolviatheNavigatorwindowcanbealoteasierthanclickingonthecontrolwithinthemaindesignsurface,especiallywhenacontrolhasnotext!
2. ClickonthedownarrowtotherightoftheactionPerformedeventhandler.3. Apop-uptooltipwillbedisplayedshowingthedefaultnameforthiseventhandleras
exitMenuItemActionPerformed.Clickonthistooltiptocreatetheeventhandler.4. ReplacethebodyoftheexitMenuItemActionPerformedmethodwiththefollowing
line:
System.exit(0);
5. ClickontheDesignbuttontogobacktothedesignsurfacefortheclass.6. IntheNavigatorwindow,clickontheaboutMenuItemnode.7. ClickonthedownarrowtotherightoftheactionPerformedeventhandler.8. Apop-uptooltipwillbedisplayedshowingthedefaultnameforthiseventhandleras
aboutMenuActionPerformed.Clickonthistooltiptocreatetheeventhandler.9. ReplacethebodyoftheaboutMenuItemActionPerformedmethodwiththefollowing
lines:
AboutDialogdialog=newAboutDialog(this,true);
dialog.setVisible(true);
Finally,weneedtoaddbehaviortothetoolbarbuttonsothatitperformsthesameactionastheViewbutton.Todothis,performthefollowingsteps:
1. ClickontheDesignbuttontogobacktothedesignsurfacefortheclass.2. IntheNavigatorwindow,clickontheviewToolBarButtonnode.3. ClickonthedownarrowtotherightoftheactionPerformedeventhandlerinthe

viewToolBarButton[JButton]–Propertieswindow.4. Apop-uptooltipwillbedisplayedshowingthedefaultnameforthiseventhandleras
viewToolBarButtonActionPerformed.Clickonthetooltiptocreatetheeventhandler.
Atthispoint,we’vegotadecisiontomakebecauseboththetoolbarbuttonandtheViewbuttonperformthesamefunctionality.Weobviouslydon’twanttotypethesamecodeintobothactionhandlers,sowhatshouldwedo?
Let’srefactorthecodeweaddedintheviewButtonActionPerformedhandleroutintoaseparatemethodcalledparseJarFile()andthencallthismethodfrombothactionhandlerswiththefollowingsteps:
1. Usingthemouse,selectallofthetextinsidetheviewButtonActionPerformedmethod.
TipDon’tselectthelinewiththemethodsignatureorthelastlinecontainingonly}astheselineareautomaticallygeneratedbyNetBeansandwewon’tbeallowedtorefactorthese!
2. Right-clickonthecodeandselectRefactor,andthenIntroduceandthenMethod….
3. IntheIntroduceMethoddialog,entertheNamefieldasparseJarFile,asshowninthefollowingscreenshot:
4. ClickonFinish.5. LocatetheviewToolBarButtonActionPerformedmethodandreplacethebodyofthe
methodwith:
parseJarFile();
We’venowaddedthefunctionalitytoourapplicationtoallowittoread.jarfilesandshowustheircontents.YoucannowruntheapplicationbypressingF6.Enteravalid.jarfileintotheJarFilefieldandclickontheViewbuttontoseethecontentsofthe

.jarfile,asshowninthefollowingscreenshot:

Howitworks…WhenweclickedontheactionPerformedeventwithinthePropertieswindowfortheViewbutton,NetBeanscreatedusanemptymethodcalledviewButtonActionPerformed()inwhichweplacedoureventhandler.
Whatwedidn’tseeisthatNetBeansalsoautomaticallyaddedanactionlistenertotheviewButtoncomponentsothatthismethodwouldbeinvokedatthecorrecttime.
IfwelookatthesourcecodefortheMainFrame.javaclass,wecanseethatthereisamethodcalledinitComponents()thatiscollapsedbydefault.NetBeansaddsallcomponentinitializationwithinthismethod.ThisisanautomaticallygeneratedmethodandcannotbeediteddirectlywithintheJavaeditor;ratheritscontentsarecreatedbasedupontheproperties,bindings,andeventsthatwedefineatdesigntime.
DiggingintotheinitComponents()method,wecanfindthecodethataddstheactionlistener,asshowninthefollowingscreenshot:
TipWhenlookingthroughtheautomaticallygeneratedcode,wecanseewhyit’sagoodideatouseanamingmechanismforcontrolsandnotjustusethedefaultnamesofjList1,jButton1,andsoon.
NetBeansaddedsimilarcodefortheothereventhandlersthatweadded.Ifyouexpandtheautogeneratedcodefortheclass,youwillseeactionlistenershavebeencreatedforalltheeventswe’veaddedinthisrecipe.
TipInlargerprojectswithmorecomplexGUIformsanddialogs,it’sagoodpracticetotrytokeeptheamountofthecustomcodeaddedintoaformoradialogtoaminimum.Bykeepingtheimplementationofaformandthelogicbehinditseparate,wecaneasilyrefactor,andchangetheformsappearance,withoutaffectingmajorpartsofourapplication.

There’smore…WhenweaddedtheeventhandlerfortheactionPerformedevent,wechosethedefaultnameforthehandlerasviewButtonActionPerformed.Whatifwedon’twanttochoosethedefaultname,butinsteadprefersomethingshorterlikeviewButtonPressed?
Clickingthe…buttontotherightofeacheventopensuptheHandlerswindowforthespecificevent.Fromwithinthiswindow,wecancreatenewhandlersgivingthemthenamesthatwewant,wecanremovetheexistinghandlers,orwecanrenametheexistinghandlers.WecanseetheHandlerswindowinthefollowingscreenshot:
TipIfyouwanttoquicklyaccessthecodeforaneventhandler,thenclickonthehandler’snamewithintheEventssectionofthePropertieswindow.NetBeanswillthenopenupthecodeeditorforyouatthecorrectplace.
InadditiontoeditingandcreatingeventsviathePropertieswindowforacomponent,youcanquicklycreate/editeventhandlersbyright-clickingonacomponentandselectingEventsandthentheeventhandleryouwishtocreate/edit,asshowninthefollowingscreenshot:


BuildingadistributableapplicationfromNetBeansWhenwe’vedevelopedourapplication,wewanttogetitoutoftheIDEandintoourcustomer’shandsassoonaspossible.Fortunately,NetBeansmakesitveryeasytocreateanexecutable.jarfilethatwecandistributetoourcustomers.

GettingstartedTocompletethisrecipe,weneedtohavetheJarViewerprojectthatwascreatedintheRespondingtoeventsrecipe.Ifyouhavenotcompletedthisrecipe,thesourcecodeisavailablewiththecodedownloadbundleforthischapter.

Howtodoit…WhenNetBeansbuildsanexecutable.jarfileforadesktopGUIapplication,itaddsallthenecessaryreferencestoanyexternallibrariesthatarerequiredandbundlesthosewiththeapplication.SinceourJarViewerapplicationdoesn’tuseanythird-partydependencies,let’saddoneontheassumptionthatourapplicationdoesuseit.We’lladdtheJavaDBdrivertoourproject,asit’spossibletoseethatatsomepointinthefuturewemaywanttoadddatabasefunctionalitytotheapplication,withthefollowingsteps:
1. Right-clickontheLibrariesnodefortheprojectwithintheProjectsexplorerandclickonAddLibrary….TheAddLibrarywindowisshowninthefollowingscreenshot:
2. FromthelistofAvailableLibraries,clickonJavaDBDriver.3. ClickonAddLibrary.
ThelibraryhasnowbeenaddedtotheJarViewerprojectandwillbeincludedintheproject’sdistribution.
Let’snowcreatethatdistributionwiththefollowingsteps:
1. Right-clickontheproject’srootnode(JarViewer)intheProjectsexplorerandselectCleanandBuild.
2. Theprojectwillnowgetbuilt.ExaminetheOutputwindowandnoticethatNetBeanstellsushowtoruntheapplicationfromthecommandline:
TorunthisapplicationfromthecommandlinewithoutAnt,try:
java-jar"C:\NetBeansProjects\JarViewer\dist\JarViewer.jar"

3. OpenuptheFilesexplorerandexpandthedistnode,asshowninthefollowingscreenshot:
4. Notethatthe.jarfileforourprojectislocatedunderneaththedistfolder.5. Notealsothedist/libfolderthatincludesallthird-partylibrariesthatwehave
referenced.6. Todistributeourapplication,wenowonlyneedtotakeacopyofeverything
underneaththedistfolderandprovideittoourcustomers.

Howitworks…Whenbuildingtheapplication,NetBeanscreatesaMANIFEST.MFfilewithintheMETA-INFfolderofthearchive.TheMANIFEST.MFfilefortheapplicationcreatedinthisrecipeisshowninthefollowingscreenshot:
Thisfilecontainsalloftheinformationrequiredtorunthe.jarfilefromthecommandline.Allofthisinformationisautomaticallygeneratedfromtheprojectproperties:
Class-Path:Thisreferencesallofthethird-partylibrariesthatweneedtousesothattheycanbelocatedatruntimeMain-Class:Thisspecifiesthemainclasstorunwhenthearchiveisexecuted

There’smore…Whencreatinga.jararchive,it’simportanttonotethatonly.jarfilesarecopiedtothedist/libfolder.Ifyouhaveothertypesoffilesontheclasspaththatareusedbyyourapplication,forexample,imagefiles,thesewillnotbecopiedintothedistfolderandwillnotbeavailablefordeployedapplications.
Doesthatmeanthecustomiconwespecifiedforourapplicationwillnotbeavailableinthedistribution?
Fortunately,ourcustomiconwillbeavailablewithinthedistributionasweaddedtheimagefiledirectlyintothesourcefolderoftheapplication.Youmayrememberthatwhenweloadedtheimage,weloadeditfromtheclasspathnotfromthefilesystem.
TipIfyouwanttomakea.exefileforyourapplicationratherthandistributingitasa.jarfile,considerthird-partyproductssuchasLaunch4j.Launch4jisanopensourceproductthatwrapsa.jarfilewitha.exefilegivingcontrolovertheJREsettingsusedwhenlaunchingtheapplication.Checkouthttp://launch4j.sourceforge.netforfurtherdetails.


Chapter5.NetBeansEnterpriseApplicationDevelopmentInthischapter,wewillcoverthefollowingrecipes:
AddingWildFlysupporttoNetBeansAddingTomEEsupporttoNetBeansCreatingawebapplicationCreatingawebapplicationwithJSFsupportAddingJSFsupporttoawebapplicationCreatingaJSFcompositecomponentCreatinganEJBCreatingaMessageDrivenEJBCreatingatimerCreatingaRESTwebserviceUsingtheChromeConnector

IntroductionJavaEEisaremarkabletechnologyforallthatitcanaccomplish,butinearlierversions,itwascriticizedforbeingoverlycomplicatedandverbose.
MuchofthiscriticismwasjustifiedforthefactthatJavaEEreliedheavilyonXML-basedconfiguration,requiringmanyinterfacesandexceptions,andpresentingdeveloperswithmanyhurdlestofacewhenusingit.TechnologiessuchasHibernateandSpringemerged,andgainedmuchattractionsimplybecausetheysoughttoaddressthosecomplexities.
WiththeintroductionofJavaEE5,thecoreplatformonceagaingainedtheupperhand,tyingtogetherthesameformulathathelpedcatapultHibernateandSpringintodevelopers’favor.Annotationswerebroughtintotonedowntheverbosityofcode,alongwiththereductionofcheckedexceptions,POJOprogramming,introductionofJSF,enhancementsinEJBQLandApplicationContainer,andsimplificationofSessionBeans.
SessionBeansareJavaobjectsthatperformamultitudeofoperationsbutaremainlyusedformanagingtransactionaldata.WithJavaEE7,SessionBeanscanbeeitherStateless,Stateful,orSingletonbeans:
StatefulSessionBeansmaintainaconversationalstatefortheentireclientsession.StatelessSessionBeansdonotmaintainaconversationalstate.Thesebeansaremaintainedinmemoryforaslongastheclientrequesttakesandafterthat,thestateisnolongerkeptinmemory.SingletonSessionBeansareguaranteedtoonlyhaveoneinstancewithinanapplicationandexistfortheentirelifeoftheapplication.
TheideaofsimplifyingdevelopmentcontinuesinJavaEE7.JavaEE7hasthreemainaims,asfollows:
Increasedeveloperproductivitybyrequiringlessboilerplatecodeandusingmoreannotations/lessXMLProvidebetterHTML5supportwiththelikesofJSONprocessing,RESTandWebSocketsMeetenterprisedemandswiththenewbatch,concurrencyandsimplifiedJMSAPIs
InJavaEE7,someoftheheavyweight,outdatedtechnologiesandAPIssuchasJAXR,EJB2.xEntityBeans,andJavaEEApplicationDeployment,havebeenmarkedaspruned,eitherforlowusagebydevelopers,orfornotbeingentirelyimplementedbythevendorsthatchosetocreatetheapplicationcontainers.Ontopofthat,performanceenhancementsfordeploymentandresourcesused,suchasJavaEEwebprofiles,wereaddedsothatdeveloperswhodonotutilizetheentireJavaEEstackcandeployapplicationsbasedonlyonwhattheyuse,enablingamuchmorelightweightapplication.


AddingWildFlysupporttoNetBeansManyyearsago,JBossreleaseditsfirstapplicationserver,theJBossapplicationserver.TheJBossapplicationserverwasdevelopedasanopensourcesoftwareupuntilversion7,whenitwasredevelopedandrenamedWildFly8.WildFly8isoneofthemostusedopensourceJavaEEapplicationserversavailable.Version8fullysupportsboththeJavaEE7fullandwebprofilesmakingitoneoftheselectfewapplicationserversthatfullysupportstheJavaEE7fullplatform.
WildFlyisbuiltontopofmanyopensourceprojectssuchasHibernateforpersistence,Weldforcontextsanddependencyinjection,andMojarraforJavaServerFaces.
WildFlyprovidesbothweb-basedandcommand-line-basedmanagementtoolstogetherwithfullMavensupportformanagingprojectdeployments.ThesetoolsallowNetBeanstoprovidefullcontroloverWildFlywhendevelopingJavaEEapplications.
AstandaloneandadomainmodeofWildFlyareprovidedwiththedistribution.ThestandalonemodeismostlikelywhatdeveloperswilluseduringapplicationdevelopmentasitprovidesasingleapplicationserverinstancerunningwithinasingleJVM.ThedomainmodeallowsWildFlytorunacrossmultipleJVMswhileprovidingsynchronizationofapplicationsandsettingsacrossdifferentJVMs.Inthisrecipe,we’lldiscussthestandalonemodeofWildFly.
BeforeweseehowtoinstallWildFlysupportwithinNetBeans,let’sfirsttakealookathowtoinstallWildFlyandtakeaquicklookaroundWildFly’sapplicationstructure.
InstallingWildFlyisaverystraightforwardprocess.Simplydownloadthedistributionfromtheproject’sdownloadsite(http://wildfly.org/downloads)andunzip/untaritintoalocaldirectory.
ForeachreleaseofWildFly,thefullEE7-certifiedapplicationserver,aminimalisticcoredistributionandtheapplicationserversourcecodecanbedownloaded.EnsurethatyoudownloadthefullJavaEE7-certifiedserver:

TipWildFlyisprovidedundertheLGPLv2.1license,sopleaseensurethatyouhavereadthelicense(http://www.gnu.org/licenses/lgpl-2.1.html)beforeusingthesoftware.
Onceunzipped/untarred,theWildFlydirectorystructurewilllooklikethefollowingscreenshot:
Let’stakealookatwhatthesedifferentdirectoriesmeaninWildFly:
Directory Description
appclient Configurationfilesusedbytheapplicationclientcontainer
bin Managementscriptsincludingthosetostartuptheapplicationserver
docs ExampleconfigurationfilestogetherwithXMLschemadefinitions
domainConfigurationfilesanddeploymentsforthedomainmodeconfiguration
modulesModules(additional.jarfiles)requiredbytheapplicationserver,forexample,databasedriversorJSONproviders
standalone Configurationfilesanddeploymentsforthestandalonemodeconfiguration
welcome-
contentContentsforthedefaulthomepagefortheapplicationserver
Onceyou’veinstalledWildFly,youneedtolearnhowtostarttheapplicationserver.TostartWildFly,openacommandprompt(oraterminalifrunningonLinux/MacOSX),changethedirectorytotherootinstallationofWildFly,andexecuteoneofthefollowingcommands:
IfrunningonWindows,usethiscommand:bin\standalone.batIfrunningonLinux/MacOSX,usethiscommand:./bin/standalone.sh
ThefollowingscreenshotshowsWildFlystartingupinaWindowscommandshell:

TostopWildFly,pressCtrl+Cwithinthecommand/terminalwindow.Nowthatwe’vehadabriefoverviewofWildFly,let’sseehowtointegrateitintoNetBeans.

GettingreadyToaddWildFlyasanapplicationserverwithinNetBeans,it’spreferabletoberunningtheJavaEEdownloadbundleofNetBeanssothatadditionalpluginsotherthanWildFlydonotneedtobeinstalled.
It’srecommendedtousethelatestversionofeitherJava7orJava8forbothNetBeansandWildFly,soifyouhaven’tgotoneofthoseinstalledyet,youcaninstalleitherofthemfrom
http://www.oracle.com/technetwork/java/index.html

Howtodoit…Performthefollowingsteps:
1. EnsurethatNetBeansisrunning,andthenclickonToolsandthenPluginsfromthemainmenu.
2. ClickontheAvailablePluginstab.Noticethatthenumberinbracketsattheendofthetabnameshowsthenumberofavailablepluginsasshowninthefollowingscreenshot:
3. LocatetheWildFlyApplicationServerpluginandchecktheInstallcheckboxnexttoit.
4. ClickontheInstallbutton.5. TheNetBeansIDEplugininstallerwillnowbedisplayedshowingthattheWildFly
applicationserverpluginistobeinstalled.6. ClickonNext,acceptthelicenseagreement,andthenclickonInstall.7. Whenprompted,selectRestarttheIDENowtocompletetheinstallationofthe
plugin.
NetBeanswillnowrestartwiththeWildFlypluginsuccessfullyinstalled.ThefinalstageistoaddaWildFlyserverinstanceintoNetBeanssothatwecanstartdevelopingapplicationsagainstit.Performthefollowingsteps:
1. ClickonToolsandthenclickonServersfromthemainmenu.TheNetBeansServersdefinitiondialogwillnowbedisplayed:

2. ClickontheAddServerbutton.3. OntheAddServerInstancedialog,selectWildFlyApplicationServerasshownin
thefollowingscreenshot:
4. ClickonNext.5. EntertheServerLocationfieldasthehomedirectorywhereyoupreviouslyinstalled
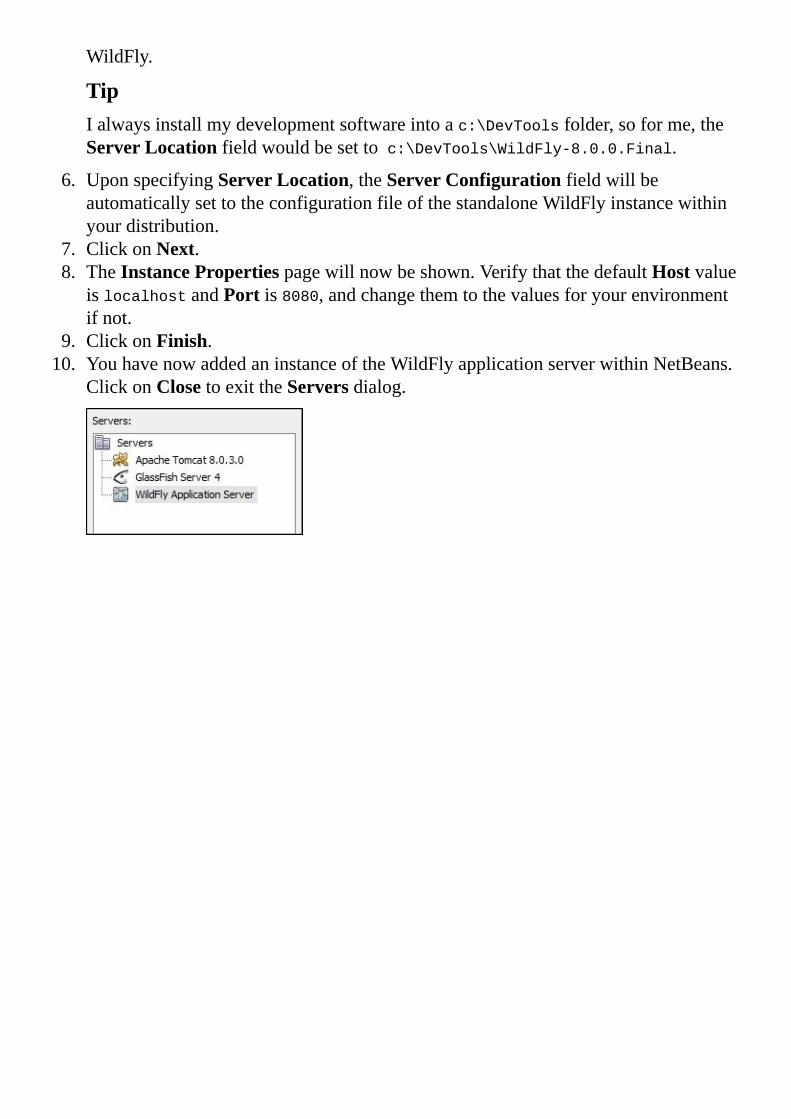
WildFly.
TipIalwaysinstallmydevelopmentsoftwareintoac:\DevToolsfolder,soforme,theServerLocationfieldwouldbesettoc:\DevTools\WildFly-8.0.0.Final.
6. UponspecifyingServerLocation,theServerConfigurationfieldwillbeautomaticallysettotheconfigurationfileofthestandaloneWildFlyinstancewithinyourdistribution.
7. ClickonNext.8. TheInstancePropertiespagewillnowbeshown.VerifythatthedefaultHostvalue
islocalhostandPortis8080,andchangethemtothevaluesforyourenvironmentifnot.
9. ClickonFinish.10. YouhavenowaddedaninstanceoftheWildFlyapplicationserverwithinNetBeans.
ClickonClosetoexittheServersdialog.

Howitworks…We’venowsuccessfullyaddedaninstanceofWildFlyintoNetBeans,buthowdowecontroltheserver?IfwelocatetheServicesexplorer,theServersnodedisplaysalistofallapplicationserversregisteredwithinNetBeansincludingournewlyregisteredWildFlyinstance.Right-clickingontheserverdisplaysacontextmenuthatallowstheservertobestarted(instandard,debugorprofilingmodes),stopped,orrestarted.Wecanviewtheserverlog,whichdisplaystherunningWildFlyconsoleoutputintotheNetBeansOutputwindow.ThiscanbeespeciallyusefulforexaminingdebugmessagesandWildFlylogmessageswhiledebuggingapplications.
LocatedwithintheWildFlyapplicationservernodeontheServicesexplorer,wecanalsoseewhatEnterpriseApplications,EJBs,andwebmodulesaredeployed.Fromhere,wecanalsostopandundeploythem.
Wecanalsoseewhatresourcesaredeployedtotheapplicationserver,whethertheyaredatasources,JMSresources,ormailsessions.ThecurrentversionoftheNetBeanspluginallowsustoviewtheseresources,butnoteditthem.
Viewingtheapplicationserverpropertiesallowsustospecifytheconfigurationfilethatdefinestheapplicationserverinstance(although,you’llprobablyneverneedtochangethat).WecanalsochangetheVMoptionsthatareusedtostarttheapplicationserver.ThedefaultJVMsettings(-Xms128m-Xmx512m-XX:MaxPermSize=256m)areprobablysufficientformostsmallapplications,butmayneedmodifyingforlargerapplications.

JVMsettingssuchasthesewillonlytakeeffectuponrestartingtheserver.


AddingTomEEsupporttoNetBeansTomEEisaJavaEE6webprofilecompatibleapplicationserverbasedupontheApacheTomcatservletcontainer.
TomEEstartedoutbeinganintegrationbetweenOpenEJB(alightweightEJBcontainer)andTomcat,andhasnowgrowntoincludealloftheJavaEE6webprofilefeaturessuchasCDI,EJB,andBeanvalidation.AllofthesefeaturesareprovidedwithinTomEEviadifferentApacheproducts.Forexample,ApacheOpenWebBeansprovidestheimplementationofCDI,ApacheOpenEJBprovidestheimplementationforEJB,andApacheBValprovidestheimplementationofBeanvalidation.
NetBeans8providesnativesupportforTomEEwithouttheneedforinstallingadditionalplugins.ThisfunctionalitywasnotavailablewithNetBeans7.4andearlier.InstallingTomEEsupportintoNetBeans,therefore,isamatterofregisteringanewserverinstance.Beforewelookatthat,let’stakeaquicklookathowtoinstallaTomEEserver.
InstallingTomEEisverysimilartoinstallingWildFlyasseeninthepreviousrecipe,AddingWildFlysupporttoNetBeans.
ToinstallTomEE,downloadadistributionfromhttp://tomee.apache.org/downloads.html,andunzip/untaritintoyourpreferredlocation.
Onceunzipped,theTomEEdirectorystructurewilllooklikethefollowingscreenshot:

Ifyou’veeverusedApacheTomcat,you’llinstantlyrecognizethisasthesamedirectorystructurethatTomcatuses—TomEEisbaseduponTomcatafterall!
We’llnotgoovertheinstallation/directorystructureofTomEEanyfurtherhere,asit’sverysimilartoTomcat.Forfurtherdetails,checkouttheTomEEdocumentationathttp://tomee.apache.org/documentation.html.

GettingreadyTocreateaTomEEinstancewithinNetBeans,it’spreferabletoberunningtheJavaEEdownloadbundleofNetBeanssothatadditionalpluginsdonotneedtobeinstalled.
It’srecommendedtousethelatestversionofeitherJava7orJava8forbothNetBeansandTomEE,soifyouhaven’tgotoneofthoseinstalledyet,youcaninstalleitherofthemfrom:
http://www.oracle.com/technetwork/java/index.html

Howtodoit…Performthefollowingsteps:
1. ClickontheServicesexplorerandexpandtheServersnode:
2. Right-clickontheServersnodeandselectAddServerfromthepop-upcontextmenu.
3. OntheAddServerInstancedialog,selectServerasApacheTomcatorTomEE:
4. ClickonNext.5. OntheAddServerInstancepage,specifyServerLocationasthedirectoryinto
whichyouunzipped/untarredtheTomEEdistribution.
TipIalwaysinstallmydevelopmentsoftwareintoac:\DevToolsfolder,soforme,theServerLocationfieldwouldbesettoc:\DevTools\Apache-TomEE-WebProfile-1.7.0.

6. EnterUsernameasadmin.Thisuserwillbecreated,iftheydonotexist,toperformmanagementtasksagainsttheTomEEserver.
7. EnteravalueforPassword.8. ClickonFinish.

Howitworks…We’venowsuccessfullycreatedaTomEEinstancewithinNetBeans.Now,wecanmanagetheserverinafashionsimilartohowwemanagedWildFlyapplicationserversasdetailedinthepreviousrecipe,AddingWildFlysupporttoNetBeans.
Right-clickingonanApacheTomEEserverwithintheServicesexplorerletsusmanagetheserverproperties.
Fromhere,wecanchangethemanagementusercredentialsorchangetheportsthatareusedbytheserver.OntheStartuptab,wecandefineDebuggerTransportdetailinghowwecanconnecttotheservertodebugourapplications.
WecandefineJVMoptionsanddeploymenttimeouts,whichcanbeusefultochangewhendeployinglargerapplications.


CreatingawebapplicationInthepreviousrecipes,AddingWildFlysupporttoNetBeansandAddingTomEEsupporttoNetBeans,wesawhowtocreateandmanageinstancesofWildFlyandTomEE,respectively.
Inthisrecipe,we’llseehowtocreatewebapplicationsanddeploythemagainstourchosenapplicationserver.Forthisrecipe,we’lluseTomEE.
TipNetBeanssupportsbothAntandMavenforcreatingwebapplications.Inthisrecipe,we’llcreateaprojectusingNetBeansbuilt-inAntprojectsupport.

GettingreadyTocompletethisrecipe,youneedtohaveavalidinstallationofTomEEconfiguredwithinNetBeans.Ifyoudonothavethis,followtheearlierrecipe,AddingTomEEsupporttoNetBeans.

Howtodoit…Performthefollowingsteps:
1. ClickontheFilemenuandselectNewProject.2. OntheNewProjectdialog,selectJavaWebfromtheCategorieslistandthenWeb
ApplicationfromtheProjectslist.3. ClickonNext.4. EntertheProjectNamefieldasFirstWebApp.5. ClickonNext.6. OntheServerandSettingspageoftheNewWebApplicationwizard,selectyour
TomEEinstanceasServer.
7. ClickontheFinishbutton.
NetBeanshasnowcreatedablankwebapplicationwithasingleindex.jspfilewithinit.Let’sseehowwecandeployandruntheapplication,andthenmakechangestoit:
1. Right-clickontheFirstWebAppprojectwithintheProjectsexplorerandclickonRun.
2. TheapplicationwillnowbedeployedtoTomEEwiththeapplicationserverbeingautomaticallystartedifitisnotalreadyrunning.Thedefaultsystembrowserwillbeopenedandtheapplicationwillberunwithinit:

Asseeninthepreviousstep,NetBeansautomaticallydeployswebapplicationswhentheyareexecutedfromwithintheIDE.Inordertoincreasedeveloperproductivity,NetBeanswillalsoautomaticallydeploythewebapplicationwhenwemakechangestothefiles:
1. Ensurethattheindex.jspfileisopenforediting.2. Locatethe<h1>tagandchangeitscontentsfromHelloWorld!toHellofromour
firstWebApplication!.3. PressCtrl+S(Cmd+SonMacOSX)tosavethefile.4. Refreshthebrowserandnoticethatthewebpagehasbeenupdated.

Howitworks…WhendeployinganapplicationonTomEE,NetBeanscreatesaconfigurationdescriptorfilewiththesamenameastheapplicationanddeploysittoTomEE.
INFO:DeployingconfigurationdescriptorC:\DevTools\apache-tomee-
webprofile-1.7.0\conf\Catalina\localhost\FirstWebApp.xml
Fromthisconfigurationdescriptor,TomEEisabletodeploythewebapplicationasanexploded.wararchive,whichsavesdeploymenttime,especiallyforlargerprojects.

There’smoreWhatifwewanttoseeexactlywhatrequestswe’vemadetoTomEEsothatwecanperformdebuggingorcheckoutloadperformance?TomEEallowsustoviewalltheHTTPrequestsmadetotheapplicationserver.Thisisdisabledbydefault,butcanbeeasilyenabledbyviewingtheserverpropertiesandcheckingtheEnableHTTPMonitorcheckbox.
Onceyou’vechangedtheserverpropertiestoenabletheHTTPmonitor,you’llneedtorestartTomEEforthechangestotakeeffect.Thiscaneasilybeachievedbyright-clickingontheTomEEinstancewithintheServicesexplorerandselectingtheRestartoption.

Whenrunninganapplication,NetBeanscanbeconfiguredtoopenaspecificbrowser.Thedefaultoptionistoopentheoperatingsystem’sdefaultbrowser,whichinmanycases,willbethemostsuitableoption.Itispossible,however,tochangethebrowserthatisopened.ThisisachievedbyeditingtheprojectpropertiesandchangingtheBrowseroptionundertheRuncategory.OptionsareavailabletoviewusinganybrowsersthatyouhaveinstalledonyourcomputerorbyusingtheNetBeans-embeddedWebkitbrowser.Forthosedoingmobiledevelopment,thechoiceisavailabletouseanAndroidemulatororanAndroiddevice.
InadditiontotheHTTPServerMonitorthatisprovidedwiththeTomcat/TomEEsupport,NetBeansprovidesaNetworkMonitorthatcanbeusedinconjunctionwiththeembeddedWebkitbrowser.
TheNetworkMonitorlogsanyfailedwebrequests,includingfailedRESTrequests,andcanthereforebeusefulwhendiagnosingAJAXapplicationstoexaminewhenrequestsfail.


CreatingawebapplicationwithJSFsupportIntheCreatingawebapplicationrecipe,wesawhowtocreateabasicJSPwebapplicationandintroducedtheconceptsbehindcreating,deploying,andrunningawebapplication.
Inthisrecipe,we’lltakethingsalittlefurtherandshowhowtocreateaJavaServerFaces(JSF)webapplicationandrunitontheWildFlyapplicationserver.Thisrecipeisn’tintendedtobeathoroughtutorialonJSF,althoughwewillgothroughthebasics.
We’llcreateaJSFapplicationthatasksforournameandthenwelcomesustotheapplication.We’llseehowNetBeanshelpsusmakethedevelopmenteasier.

GettingreadyTocompletethisrecipe,weneedtohavearunninginstanceoftheNetBeansJavaEEbundle,togetherwithalocalinstallationoftheWildFly8applicationserver.WeneedtohavetheWildFly8plugininstalledintoNetBeans.SeetheAddingWildFlysupporttoNetBeansrecipeforfurtherdetails.

Howtodoit…Performthefollowingsteps:
1. ClickontheFilemenu,selectNew,andthenNewProject….2. OntheNewProjectdialog,selectJavaWebfromtheCategorieslist,andthenWeb
ApplicationfromtheProjectslist.3. ClickonNext.4. EntertheProjectNamefieldasHelloJSF.5. ClickonNext.6. OntheServerandSettingspageoftheNewWebApplicationwizard,selectyour
WildFlyinstanceasServerandensurethatJavaEEVersionissettoJavaEE7Web.
7. ClickontheNextbutton.8. OntheFrameworksselectionpage,checkJavaServerFacesasaselected
framework.9. ClickonFinish.

10. Double-clickontheindex.xhtmlfilewithintheProjectsexplorertoopenitupwithintheHTMLeditingwindow.
11. Deletethedefaulttext,HellofromFacelets.12. Right-clickbetweenthe<h:body>and<h:/body>tagsandselectInsertCode…
fromthecontextmenu.13. OntheGeneratepop-upwindow,clickonJSFForm.Thecontentsofthe<h:body>
tagwillnowbeupdatedtoincludea<f:view>tagcontaininga<h:form>tagasshown:
<h:body>
<f:view>
<h:form>
</h:form>
</f:view>
</h:body>
14. Insertthefollowingmarkupbetweenthe<h:form>and</h:form>tags:
<h:panelGridcolumns="3">
<h:outputTextvalue="Hello.Whatisyourname?"/>
<h:inputTextid="name"value="#{helloBean.name}"/>
<h:commandButtonaction="#{helloBean.sayHello}"
value="Hello"/>
</h:panelGrid>
We’venowcreatedasimpleinputJSFpagethatdisplayssomeoutputtext,asksforsomeinput,andthenhasabuttonthatcanbeclickedtosubmittheinput.

Let’snowcreateanoutputpagethatcanechotheinputthattheusertypes,asfollows:
1. Right-clickontheWebPagesnodeintheProjectsexplorer,clickonNew,andthenclickonOther.
2. IntheNewFiledialog,selectJavaServerFacesfromtheCategorieslist,andJSFPagefromthelistofFileTypes.
3. ClickonNext.4. EntertheFileNamevalueashello.
TipIt’stemptingheretoenterFileNameashello.xhtmlinsteadofjusthello.Youmust,however,omitaddingthesuffixtothefilenameasthisisautomaticallyaddedbyNetBeans.Otherwise,NetBeanswillcreateafilecalledhello.xhtml.xhtml.
5. EnsurethattheoptionspecifiesFaceletsinsteadofJSPFile.6. ClickonFinish.7. Thenewhello.xhtmlfilewillnowbeopenedforediting.Replacethedefaultbody
ofHellofromFaceletswith:
Hi,<h:outputTextvalue="#{helloBean.name}"/>
We’venowcreatedalloftheviewsforourJSFapplication,allweneedtodonowiscreateaJSFbackingbeanthatcantakeourinputandforwarditontotheoutputpage.Performthefollowingsteps:
1. Right-clickontheSourcePackagesnodeoftheHelloJSFapplicationandclickonNew,andthenclickonOther.
2. IntheNewFiledialog,selectJavaServerFacesfromtheCategorieslistandJSFManagedBeanfromthelistofFileTypes.
3. ClickonNext.4. EntertheClassNamevalueasHelloBeanandthePackagevalueas
com.davidsalter.hellojsf.

TipNoticethatthebeaniscreatedwithadefaultName,thesameasClassName(capitalizedascamelCasehowever),andthedefaultScopeofthebeanissettorequest.
5. ClickonFinish.6. TheHelloBean.javafilewillnowbeopenedforediting.Replacethebodyofthe
classwiththefollowingcode:
privateStringname;
publicHelloBean(){
}
publicStringsayHello(){
return"hello.xhtml";
}
publicStringgetName(){
returnname;
}
publicvoidsetName(Stringname){
this.name=name;
}
TheHelloBean.javaclasshasoneproperty,name,withcorrespondinggettersandsetters.Thereisonemethod,sayHello(),whichisinvokedwhenthebuttonisclickedonourform.ThismethodtellsJSFtorenderthehello.xhtmlviewwhenitiscalled.
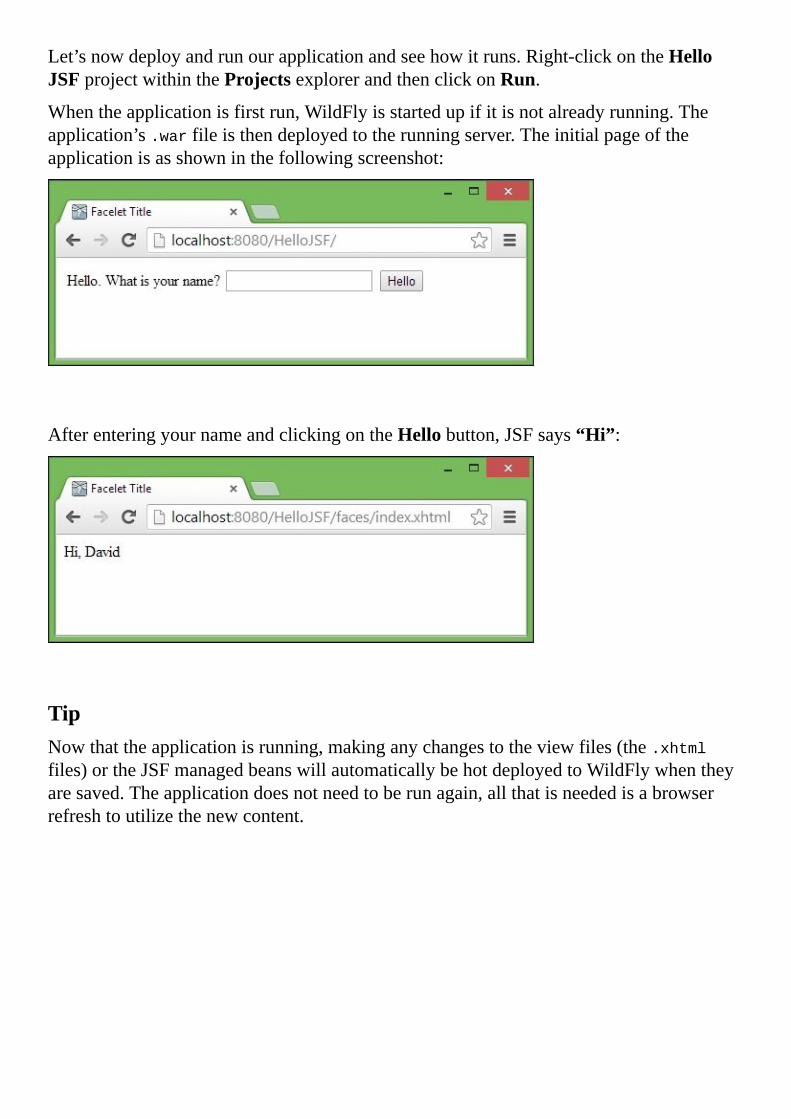
Let’snowdeployandrunourapplicationandseehowitruns.Right-clickontheHelloJSFprojectwithintheProjectsexplorerandthenclickonRun.
Whentheapplicationisfirstrun,WildFlyisstartedupifitisnotalreadyrunning.Theapplication’s.warfileisthendeployedtotherunningserver.Theinitialpageoftheapplicationisasshowninthefollowingscreenshot:
AfterenteringyournameandclickingontheHellobutton,JSFsays“Hi”:
TipNowthattheapplicationisrunning,makinganychangestotheviewfiles(the.xhtmlfiles)ortheJSFmanagedbeanswillautomaticallybehotdeployedtoWildFlywhentheyaresaved.Theapplicationdoesnotneedtoberunagain,allthatisneededisabrowserrefreshtoutilizethenewcontent.

Howitworks…WhenwecreatedaJSFapplication,thereweretwoaspectsthatwedeveloped.Wedevelopedacoupleofviewpages(index.xhtmlandhello.xhtml)andamanagedJSFbean(HelloBean).
Fortheviewpages,weusedtheFaceletstechnology.FaceletsisthedefaultviewtechnologyusedwithJavaServerFaces2andhastakenoverfromtheuseofJSPwithinJavaServerFaces1.xapplications.JSPisnowconsideredalegacytechnology.
FaceletsisapowerfultemplatingsystemthatallowsdeveloperstouseanyoftheJSFcomponentsandcreatetemplate-basedwebpages.Template-basedwebpagesallow,forexample,alayoutpagetobedevelopedthathasaheaderandafooterandapieceofcontentinbetweenthetwo.Withtemplating,wecanusealayoutpagethatdefinesallofthelayoutoutsideofthemaincontentsothatwecanconcentrateonlyonthemaincontent.Ifwelaterdecidethatwewishtochangethelayouttoaddasidebar,forexample,wejustneedtochangethetemplateandnotallofthepageswehavedeveloped.
Faceletsallowstheuseofdifferentcomponentlibraries.Theselibrariesmustberegisteredviaataglibraryinthe<html>definitionofafile.ThetwostandardlibrariesforHTMLandformsareprovidedwiththeJSFruntime.WhenwecreatedaJSFpageinthisrecipe,wetoldFaceletsaboutthesetwolibrariesbydefiningthehandftaglibrariesinthe<HTML>definition,asfollows:
<htmlxmlns="http://www.w3.org/1999/xhtml"
xmlns:h="http://xmlns.jcp.org/jsf/html"
xmlns:f="http://xmlns.jcp.org/jsf/core"
>
Byreferencingthesetaglibraries,wewereabletoreferenceanyofthecomponentswithinthehandftaglibraries(suchas<h:outputText/>and<f:view/>).
FormoreinformationregardingFacelets,checkouttheOracledocumentationat:
http://docs.oracle.com/javaee/7/tutorial/doc/jsf-facelets.htm
Toperformsomeprocessing,wecreatedaJSFmanagedbean.ThisissimplyaPOJOwiththe@ManagedBeanannotationappliedtoit.Wealsoappliedthe@RequestScopedannotationtothebeansothatthelifecycleofthebeanistiedtoanHTTPrequest.ThebeanisthereforeinitializedeverytimeanHTTPrequestismade.Withinthemanagedbean,wecreatedasinglemembertoholdthenameenteredbytheuserandasinglemethod(sayHello)thatreturnedtheaddressoftheFaceletspagetorenderwhenthebuttonwaspressedontheform.
Tolinktheviewandthemanagedbean,weusedexpressionlanguage.Herewelinktheinputboxtothenamepropertyofthemanagedbeanasfollows:
<h:inputTextid="name"value="#{helloBean.name}"/>
WealsolinkthebuttonactiontothesayHellomethodinthebeanasfollows:
<h:commandButtonaction="#{helloBean.sayHello}"value="Hello"/>

There’smoreHowdidJSFknowwhatpagetodisplayfirst,andhowdiditknowtouse.xhtmlasthefileextensionforFaceletsviews?
Whenwecreatedtheproject,weusedtheNetBeansdefaultsandallowedNetBeanstocreatesomedefaultconfigurationwithintheweb.xmlfilefortheproject.
TheFacesservletwasdefinedwithaURLpatternsetto/faces/*:
<servlet>
<servlet-name>FacesServlet</servlet-name>
<servlet-class>javax.faces.webapp.FacesServlet</servlet-class>
<load-on-startup>1</load-on-startup>
</servlet>
<servlet-mapping>
<servlet-name>FacesServlet</servlet-name>
<url-pattern>/faces/*</url-pattern>
</servlet-mapping>
AllJSFrequestsgothroughtheFacesservletasthisiswhatenablesthelifecycleofFaceletscomponents.Withoutthismapping,Faceletswouldjustnotwork!Thismappingstatesthatanyrequestto/faces/*willbeexecutedviatheFacesservlet.Soforexample,/faces/index.xhtmlwouldcausetheindex.xhtmlfiletobeprocessedasaJSFFaceletsfile.
NetBeansalsoconfiguredthedefaultpageoftheapplicationtobefaces/index.xhtml:
<welcome-file-list>
<welcome-file>faces/index.xhtml</welcome-file>
</welcome-file-list>
ThisspecifiesthedefaultpagethatwillbeopenedwhentherootURLoftheapplicationisaccessed.
WhatifIwantedtouseaCDIbeanoranEJBinsteadoftheJSFmanagedbean.CouldIdothat?
Yes,it’sentirelypossibletouseadifferenttypeofamanagedbeanasthebackingbeanforJSFpages.WithJavaEE7,CDIbeansareverycommonandcanbeusedinterchangeablywithJSFmanagedbeans.EJBscanalsobeusedasbackingbeansifrequired,buttheyprovideagreateroverheadastheyareconsideredmoreheavyweight(eventhoughtheyarestillessentiallyPOJOs)thanJSFbackingbeansorCDIbeans.
Agoodruleofthumbittousethelightestbeanpossibleforarequiredsituationandonlymovetothenexthigherlevelofbeanwhenrequired.
So,forasimpleapplication,aJSFManagedbeanissufficient.Itallowsustoreceivedatafromthewebpageandthenupdatethewebpagewithsomeresults.Wedon’treallyneedanythingmorecomplex.
Ifwefindthatweneedtostartinjectingbeansintootherresources,thenaCDImanagedbeanmakessense.WecaninjectEJBsintoCDIbeansifweneedtoperformany

processingwithinthebean.
Ifwefindthatweneedtomakeourbackingbeanstransactional(oneofthekeyaspectsofEJBs),thenwecouldconsiderusinganEJBasabackingbean.
TipStartwiththesimplestpossibletypeofbeanandonlyincreasecomplexitywhenneeded.
WhatifIwanttoperformvalidationoninputfields?DoesJSFallowthat?Itcertainlydoes.WecaneitherusetheBeanValidationAPItoperformvalidationwithinourmodel,orwecanperformJSFvalidationwithintheview.
Tooutputerrormessagestotheview,wecanusethe<h:message/>tagtooutputamessageforasingleelement,orthe<h:messages/>tagtooutputalistofalltheerrormessageswithintheform:
<h:inputTextvalue="#{cc.attrs.editValue}"id="inputText"/>
<h:messagefor="inputText"/>
UsingtheBeanValidationAPI,wecanaddannotationsontofieldsthatwillbevalidatedbeforebeingacceptedbytheJSFruntime.BeanValidationprovidesmanyannotationstoperformvalidation,andevenallowscustomvalidatorstobewritten.Someofthemorecommonvalidationsareasfollows:
@NotNull:Thespecifiedfieldvaluemustnotbenull@Min:Thespecifiedfieldvaluemustbeatleastthatspecifiedbytheconstraint@Max:Thespecifiedfieldvaluemustbeatmostthatspecifiedbytheconstraint@Past:Thespecifiedfieldvaluedatemustbeadateinthepast@Pattern:Thespecifiedfieldvaluemustmatchthatspecifiedbyaregularexpression@Size:Thesizeofthefieldvaluemustbebetweenthespecifiedlimits
FormoreinformationonBeanValidation,checkoutthewebsitehttp://beanvalidation.org.
WithJSFvalidation,wecanperformasimilartasktoBeanValidation,butinsteadusingJSFtags.ValidationisperformedwithintheValidationphaseofaJSFcomponent’slifecycle.Aswithbeanvalidation,JSFallowscustomvalidatorstobewritten.SomeofthestandardJSFvalidatorsare:
<f:validateLength/>:Thesizeofthefieldvaluemustbebetweenthespecifiedlimits<f:validateLongRange/>:Therangeofalongintegermustbebetweenthespecifiedlimits<f:validateDoubleRange/>:Therangeofadoublemustbebetweenthespecifiedlimits


AddingJSFsupporttoawebapplicationIfyou’vecreatedawebapplicationandlaterdecidethatyouwishtoaddJSFsupporttoit,NetBeansprovidesthefacilitytoeasilyaddJSFsupporttogetherwithsupportforpopularJSFcomponentlibraries.
Inthisrecipe,we’llshowhowtoaddJSFsupporttoabasicwebapplicationandhowtoaddsupportforthePrimeFacescomponentlibrary.

GettingreadyTocompletethisrecipe,wewillneedtohaveaJavaEEwebapplicationthathasnotpreviouslybeenconfiguredwithJSFsupport.Thatistosay,we’venotreferencedanyJSFsupportintheapplication’sweb.xml,andthedefaultviewtechnologyfortheapplicationissomethingotherthanFacelets.
Ifyouareunsureonhowtocreatesuchanapplication,followtheCreatingawebapplicationrecipeearlierinthischapter.Whencreatingtheapplication,ensurethattheprojectnameisAddingJSFandthatWildFlyisselectedasServer.

Howtodoit…Performthefollowingsteps:
1. Right-clickontheAddingJSFprojectnodewithintheProjectsexplorerandclickonProperties.
2. ClickonFrameworksfromwithintheCategorieslisttoshowalltheframeworksusedbytheapplication.Atpresent,thislistisempty.
3. ClickontheAdd…buttontodisplaytheAddaFrameworkdialogasshowninthefollowingscreenshot:
4. ClickonJavaServerFacestoselectitastheframeworktoaddandthenclickontheOKbutton.
5. TheAddaFrameworkdialogwillnowcloseandJavaServerFaceswillbelistedwithinUsedFrameworks.

ThedefaultJSFURLmappingwithNetBeansgeneratedprojectsistorenderthe.xhtmlfilesattheURLof/faces/*.xhtml.Ifyoudon’tlikethismapping,itcanbeeasilychanged.AnotherpopularmappingURL,forexample,is*.jsf.
Let’snowchangetheconfigurationsothatJSFpagesareservedviathe*.jsfURLmappingandthenaddthePrimeFacescomponentlibrarytoourapplication.Performthefollowingsteps:
1. ClickontheConfigurationtabwithinJavaServerFacesConfiguration.2. ChangeJSFServletURLPatternfrom/faces/*to*.jsf.
TipIfyouenteraninvalidURLpatternhere,suchas*,thenNetBeanswillwarnyouthatthepatternisinvalid.
3. ClickontheComponentstabtoshowthelistofJSFcomponentlibrariesthatcanbeaddedtotheproject:
4. CheckthePrimeFacescomponententry.
TipIfthisisthefirsttimethatyouhaveusedPrimeFaceswithinNetBeans,youmayencounteranerrormessagestatingJSFlibraryPrimeFacesnotsetupproperly:

SearchingvalidPrimeFaceslibrary.Pleasewait….ThiserrormessageindicatesthataNetBeanslibraryforPrimeFaceshasnotyetbeencreated.PrimeFacesis,however,distributedwithNetBeans,soNetBeansiscleverenoughtoknowthisandwillcreatethelibraryforyou.Youjustneedtowaitafewsecondsforthelibrarytobecreatedbeforethiserrormessagedisappears.
5. ClickontheOKbuttontocompleteaddingJSFsupport,togetherwiththePrimeFacescomponentlibrary,intotheapplication.
6. Right-clickontheAddingJSFprojectwithintheProjectsexplorerandselectRuntodeployandexecutetheapplication.
Theapplicationwillnowlaunchinyourdefaultbrowser.NoticethelinkonthepagetoPrimeFaces—clickonittoseeademonstrationofwhatPrimeFacescando.
Howitworks…WhenweaddJSFsupporttotheapplication,NetBeanswillautomaticallyaddsomeXMLconfigurationtotheproject’sweb.xmlfile.
TheFacesservletwasaddedandconfiguredtoserveJSFpagesviathe*.jsfpattern,asfollows:
<servlet>
<servlet-name>FacesServlet</servlet-name>
<servlet-class>javax.faces.webapp.FacesServlet</servlet-class>
<load-on-startup>1</load-on-startup>
</servlet>
<servlet-mapping>
<servlet-name>FacesServlet</servlet-name>
<url-pattern>*.jsf</url-pattern>
</servlet-mapping>
Additionally,JSFwasconfiguredintothedevelopmentmodeinordertohelpuswhiledeveloping:
<context-param>
<param-name>javax.faces.PROJECT_STAGE</param-name>
<param-value>Development</param-value>
</context-param>
Finally,thewelcomefilefortheapplicationwasconfiguredtobeindex.jsf:
<welcome-file-list>
<welcome-file>index.jsf</welcome-file>
</welcome-file-list>
TodemonstratePrimeFaces,NetBeansaddedanewpage,welcomePrimefaces.xhtmltotheproject.ThispageshowshowtoreferencethePrimeFacesnamespacewithintheFaceletsfileandshowssomeofthedifferentlayoutfeaturesavailablewithinPrimeFacesalongwithlinkstoPrimeFacesdemonstrationanddocumentation.


There’smoreWhenaddingJSFcomponentlibraries,wehadtheoptionofaddingPrimeFaces,ICEfaces,orRichFaces.NetBeansonlydistributesthePrimeFaceslibrary,soifyouwishtouseeitherICEfacesorRichFaces,youwillneedtodownloadtherelevantdistributionforthelibrary.Oncedownloaded,clickontheMore…buttononthecomponentsconfigurationscreen,nexttoyourselectedlibrary,tocreatethelibraryandconfigureitwithinyourprojects.
WhatifIwanttouseadifferentJSFcomponentlibrary?Well,thatcanbeachievedinNetBeansalso.Simplydownloadthecomponentlibraryyouwishtouse,createaNetBeanslibraryforitandthenaddthelibrarytotheproject.SeetheCreatingalibraryrecipeinChapter1,UsingNetBeansProjects,forfurtherdetailsonhowtoachievethis.
WhatifIwanttouseadifferentversionofJSFthanissuppliedwithmyapplicationserver,ormyapplicationserverdoesn’tbundleJSFwithit?OntheLibrariestabwithintheJSFconfiguration,wecanselecttouseaversionofJSFthatisshippedwiththeapplicationserver,useoneoftheNetBeansregisteredJSFlibraries,orwecancreateanewJSFlibraryandusethat.
TipWhenaddingJSFsupporttoawebapplication,youneedtothinkcarefullyaboutwhatversionofJSFtouse.Mostoften,unlesstherearespecificreasons,theversionprovidedwiththeapplicationserverwillbethebestchoice.SomeapplicationserversallowyoutochoosetheversionofJSFtouse,whereasothersforceyoutousetheprovidedversion.Onceyou’vespecifiedaversionofJSFtouse,youcan’tchangeitwithoutremovingtheJSFsupportandthenaddingitagain.


CreatingaJSFcompositecomponentJSFisarichcomponent-basedframework,whichprovidesmanycomponentsthatdeveloperscanusetoenrichtheirapplications.WesawinapreviousrecipehowdifferentvendorsprovideadditionalJSFtoolkitssuchasPrimeFaces,RichFaces,andIcefacesthatallprovideadditionalcomponentsabovethosethatareprovidedwiththebaseJSFcomponents.
JSF2alsoallowscompositecomponentstobeeasilycreated,whichcanthenbeinsertedintootherJSFpagesinasimilarwaytoanyotherJSFcomponentssuchasbuttonsandlabels.
Inthisrecipe,we’llseehowtocreateacustomcomponentthatdisplaysaninputlabelandasksforcorrespondinginput.IftheinputisnotvalidatedbytheJSFruntime,we’llshowanerrormessage.Thecomponentisgoingtolooklikethis:
ThecustomcomponentisbuiltupfromthreedifferentstandardJSFcomponents.Ontheleft,wehavea<h:outputText/>componentthatdisplaysthelabel.Next,wehavea<h:inputText/>component.Finally,wehavea<h:message/>component.PuttingthesethreecomponentstogetherlikethisisaveryusefulpatternwhendesigninginputformswithinJSF.

GettingreadyTocompletethisrecipe,youwillneedtohaveaworkinginstallationofWildFlythathasbeenconfiguredwithinNetBeans.Ifyouareunsurehowtoachievethis,checktheAddingWildFlysupporttoNetBeansrecipeearlierinthischapter.
WewillbeusingtheEnterprisedownloadbundleofNetBeansasthisincludesallofthetoolsweneedtocompletetherecipewithouthavingtodownloadanyadditionalplugins.

Howtodoit…Firstofall,weneedtocreateawebapplicationandthencreateaJSFcompositecomponentwithinit.Performthefollowingsteps:
1. ClickonFileandthenNewProject….2. SelectJavaWebfromthelistofCategoriesandWebApplicationformthelistof
Projects.3. ClickonNext.4. EntertheProjectNamevalueasCompositeComp.5. ClickonNext.6. EnsurethatAddtoEnterpriseApplicationissetto<None>,Serverissetto
WildFlyApplicationServer,JavaEEVersionissettoJavaEE7Web,andContextPathissetto/CompositeComp.
7. ClickonNext.8. ClickonthecheckboxnexttoJavaServerFacesasweareusingthisframeworkfor
thisrecipe.9. AllofthedefaultJSFconfigurationsarecorrect,soclickontheFinishbuttonto
createtheproject.10. Right-clickontheCompositeCompprojectwithintheProjectsexplorerandclick
onNewandthenOther….11. IntheNewFiledialog,selectJavaServerFacesfromthelistofCategoriesandJSF
CompositeComponentfromthelistofFileTypes.12. ClickonNext.13. OntheNewJSFCompositeComponentdialog,entertheFileNamevalueas
inputWithLabelandchangethefoldertoresources\cookbook.

14. ClickonFinishtocreatethecustomcomponent.
InJSF,customcomponentsarecreatedasFaceletsfilesthatarestoredwithintheresourcesfolderofthewebapplication.Withintheresourcesfolder,multiplesubfolderscanexist,eachrepresentinganamespaceofacustomcomponent.Withineachnamespacefolder,individualcustomcomponentsarestoredwithfilenamesthatmatchthecompositecomponentnames.
WehavejustcreatedacompositecomponentwithinthecookbooknamespacecalledinputWithLabel.
Withineachcompositecomponentfile,therearetwosections:aninterfaceandanimplementation.TheinterfacelistsalloftheattributesthatarerequiredbythecompositecomponentandtheimplementationprovidestheXHTMLcodetorepresentthecomponent.
Let’snowdefineourcomponentbyspecifyingtheinterfaceandtheimplementation.Performthefollowingsteps:
1. TheinputWithLabel.xhtmlfileshouldbeopenforediting.Ifnot,double–clickonitwithintheProjectsexplorertoopenit.
2. Forourcompositecomponent,weneedtwoattributestobepassedintothecomponent.Weneedthetextforthelabelandtheexpressionlanguagetobindtheinputboxto.Changetheinterfacesectionofthefiletoread:
<cc:interface>
<cc:attributename="labelValue"/>
<cc:attributename="editValue"/>
</cc:interface>
3. Torenderthecomponent,weneedtoinstantiatea<h:outputText/>tagtodisplaythelabel,a<h:inputText/>tagtoreceivetheinputfromtheuser,anda<h:message/>tagtodisplayanyerrorsthatareenteredfortheinputfield.Changetheimplementationsectionofthefiletoread:
<cc:implementation>
<style>
.outputText{width:100px;}
.inputText{width:100px;}
.errorText{width:200px;color:red;}
</style>
<h:panelGridid="panel"columns="3"columnClasses="outputText,
inputText,errorText">
<h:outputTextvalue="#{cc.attrs.labelValue}"/>
<h:inputTextvalue="#{cc.attrs.editValue}"id="inputText"/>
<h:messagefor="inputText"/>

</h:panelGrid>
</cc:implementation>
4. Clickonthelightbulbontheleft-handsideoftheeditorwindowandacceptthefixtoaddtheh=http://xmlns.jcp.org/jsf/htmlnamespace.
We’venowsuccessfullycreatedacompositecomponent.Let’snowcreateaninputpagethatusesthiscomponenttoaskforsomeinformationfromtheuser.Performthefollowingsteps:
1. Double-clickontheindex.xhtmlpagewithintheProjectsexplorertoopentheapplication’shomepageforediting.
2. Weneedtoaddareferencetothecompositecomponent’snamespacewithinthe<html/>sectionofthefilesothattheJSFcomponentscanbeusedcorrectly.Changethe<html>definitiontoread:
<htmlxmlns="http://www.w3.org/1999/xhtml"
xmlns:h="http://xmlns.jcp.org/jsf/html"
xmlns:cookbook="http://xmlns.jcp.org/jsf/composite/cookbook">
3. WecannowreferencethecompositecomponentfromwithintheFaceletspage.Addthefollowingcodeinsidethe<h:body>codeonthepage:
<h:formid="inputForm">
<cookbook:inputWithLabellabelValue="Forename"editValue="#
{personController.person.foreName}"/>
<cookbook:inputWithLabellabelValue="LastName"editValue="#
{personController.person.lastName}"/>
<h:commandButtontype="submit"value="Submit"action="#
{personController.submit}"/>
</h:form>
ThiscodeinstantiatestwoinstancesofourinputWithLabelcompositecontrolandbindsthemtopersonController.Wehaven’tgotoneofthoseyet,solet’screateoneandaclasstorepresentaperson.Performthefollowingsteps:
1. CreateanewJavaclasswithintheproject.EnterClassNameasPersonandPackageascom.davidsalter.cookbook.compositecomp.
2. ClickonFinish.3. AddmemberstotheclasstorepresentforeNameandlastName:
privateStringforeName;
privateStringlastName;
4. UsetheEncapsulateFieldsrefactoringtogenerategettersandsettersforthesemembers.
5. ToallowerrormessagestobedisplayediftheforeNameandlastNamevaluesareinputtedincorrectly,wewilladdsomeBeanValidationannotationstotheattributesoftheclass.AnnotatetheforeNamememberoftheclassasfollows:
@NotNull
@Size(min=1,max=25)
privateStringforeName;
6. AnnotatethelastNamememberoftheclassasfollows:
@NotNull
@Size(min=1,max=50)
privateStringlastName;
7. UsetheFixImportstooltoaddtherequiredimportsfortheBeanValidationannotations.
8. CreateanewJavaclasswithintheproject.EnterClassNameasPersonControllerandPackageascom.davidsalter.cookbook.compositecomp.
9. ClickonFinish.10. WeneedtomakethePersonControllerclassan@Namedbeansothatitcanbe
referencedviaexpressionlanguagefromwithinJSFpages.11. AnnotatethePersonControllerclassasfollows:
@Named
@RequestScoped
publicclassPersonController{
12. WeneedtoaddaPersoninstanceintoPersonControllerthatwillbeusedtotransferdatafromtheJSFpagetothenamedbean.WewillalsoneedtoaddamethodontothebeanthatwillredirectJSFtoanoutputpageafterthenameshavebeenentered.
13. AddthefollowingtothePersonControllerclass:
privatePersonperson=newPerson();
publicPersongetPerson(){
returnperson;
}
publicvoidsetPerson(Personperson){
this.person=person;
}
publicStringsubmit(){
return"results.xhtml";
}
14. Thefinaltaskbeforecompletingourapplicationistoaddaresultspagesowecanseewhatinputtheuserentered.ThisoutputpagewillsimplydisplaythevaluesofforeNameandlastNamethathavebeenentered.
15. CreateanewJSFpagecalledresultsthatusestheFaceletssyntax.16. Changethe<h:body>tagofthispagetoread:
<h:body>
YouEntered:
<h:outputTextvalue="#{personController.person.foreName}"/>
<h:outputTextvalue="#{personController.person.lastName}"/>
</h:body>

Theapplicationisnowcomplete.Deployandruntheapplicationbyright-clickingontheprojectwithintheProjectsexplorerandselectingRun.
Notethattwoinstancesofthecompositecomponenthavebeencreatedanddisplayedwithinthebrowser.
ClickontheSubmitbuttonwithoutenteringanyinformationandnotehowtheerrormessagesaredisplayed:
EntersomevalidinformationandclickonSubmit,andnotehowtheinformationenteredisechoedbackonasecondpage.

Howitworks…CreatingcompositecomponentswasanewfeatureaddedtoJSF2.CreatingJSFcomponentswasaverytediousjobinJSF1.x,andthedesignersofJSF2thoughtthatthemajorityofcustomcomponentscreatedinJSFcouldprobablybebuiltbyaddingdifferentexistingcomponentstogether.Asitisseeninthisrecipe,we’veaddedtogetherthreedifferentexistingJSFcomponentsandmadeaveryusefulcompositecomponent.
TipIt’susefultodistinguishbetweencustomcomponentsandcompositecomponents.Customcomponentsareentirelynewcomponentsthatdidnotexistbefore.TheyarecreatedentirelyinJavacodeandbuildintoframeworkssuchasPrimeFacesandRichFaces.Compositecomponentsarebuiltfromexistingcomponentsandtheirgraphicalviewisdesignedinthe.xhtmlfiles.

There’smoreWhencreatingcompositecomponents,itmaybenecessarytospecifyattributes.Thedefaultoptionisthattheattributesarenotmandatorywhencreatingacustomcomponent.Theycan,however,bemademandatorybyaddingtherequired="true"attributetotheirdefinition,asfollows:
<cc:attributename="labelValue"required="true"/>
Ifanattributeisspecifiedasrequired,butisnotpresent,aJSFerrorwillbeproduced,asfollows:
/index.xhtml@11,88<cookbook:inputWithLabel>Thefollowingattribute(s)
arerequired,butnovalueshavebeensuppliedforthem:labelValue.
Sometimes,itcanbeusefultospecifyadefaultvalueforanattribute.Thisisachievedbyaddingthedefault="…"attributetotheirdefinition:
<cc:attributename="labelValue"default="Pleaseenteravalue"/>


CreatinganEJBEnterpriseJavaBeans(EJBs)areserver-sidemanagedclassesintendedtoprovidebusinessfunctionalitytoapplications.SinceJavaEE5,EJBshavebeenmademuchsimplerandmorelightweight.
EJBsnolongerhavetobedefinedbyXMLdescriptors,butaredefinedusingJavaannotationsinstead.ThisallowsEJBstobedevelopedmorequicklyandprobablymoreimportantly,tobefullytestableoutsideoftheapplicationserver.
InJavaEE7,therearefourtypesofEJB.TheyareStateless,Stateful,Singleton,andMessageDrivenEJBs.J2EEalsohadEntitybeansusedformodelingdata,butthesehavebeendeprecatedsinceJavaEE5tobereplacedwithPOJOsandJPA.
StatelessEJBs,astheirnamesuggest,maintainnostate.WhenarequestismadefromaclienttoobtainanEJB,theapplicationserverreturnsonefromapoolofEJBs.TheclientmayormaynotgetthesameEJBonsubsequentrequests.
AStatefulEJBontheotherhand,maintainsitsstate,soeverytimearequestismadeforanEJBofaparticulartype,thesameEJBissuppliedtotheclient.StatefulEJBsarethereforeusefulwhenaclientneedstorememberinformationbetweeninvocations.TheclassicexampleofusingStatefulEJBsistoimplementashoppingcart.Inawebapplication,theHTTPprotocolmaintainsnostatesoStatefulEJBscanbeusedtomaintaininformationwithintheapplicationserverbetweenHTTPrequests.
ASingletonEJBhasglobalstatesharedacrosstheentireJVM.TheapplicationserverguaranteesthatthereisonlyoneinstanceofaSingletonbeanwithintheJVMandcanprovideathreadsafeaccesstoitsdata.
MessageDrivenBeansarebuiltontopoftheJavaMessageService(JMS)APIandlistenforeventstooccurbeforebeingtriggered.Theyaretypicallyusedforprocessinglong-runningasynchronouseventsorforsendingdatatomultipleclientswhereeachclientcanbelisteningtoaJMSqueueortopic.
FormoreinformationonJavaEE7EJBs,checkouttheOracleJavaEE7EnterpriseBeansTutorialathttp://docs.oracle.com/javaee/7/tutorial/doc/ejb-intro.htm.
Inthisrecipe,we’regoingtoshowhowtocreateStatelessandStatefulEJBsandshowhowtoinvokethem.Inthenextrecipe,CreatingaMessageDrivenEJB,we’llseehowtocreateMessageDrivenEJBs.

GettingreadyForthisrecipe,wewillusetheWildFlyapplicationservertogetherwiththeEnterprisedownloadbundleofNetBeans.EnsurethatyouhaveaworkinginstallationofWildFlyconfiguredwithinNetBeansbeforestartingthisrecipe.IfyouneedtoconfigureWildFlywithinNetBeans,checkouttheAddingWildFlysupporttoNetBeansrecipeearlierinthischapter.

Howtodoit…TodeployEJBstotheapplicationserver,weneedtocreateaNetBeansprojectthatwillhosttheEJBs.EJBscanbedeployedeitherwithinanEnterpriseArchive(EAR)file,orwithinaWebapplicationArchive(WAR)file.Forthisrecipe,we’llbedeployingourEJBsina.warfiletogetherwithaServlet,whichwillactastheclientbyinvokingtheEJB.
TipForalotofapplicationtypes,the.wararchiveisagoodchoicefordeploymentasanyincludedEJBsareco-locatedwithwebresourcessuchasServletsorJSFpages.Formoreflexibility,EJBscanbeseparatedfromthewebapplicationcodeanddeployedasaJavaarchivewithinan.earfile.The.earfilescancontainmultiplestandardJavaarchivesaswellasmultiple.warfiles.Thisthereforeenablesgreaterflexibilityfordeployment,butcomesatthecostofgreatercomplexity.
Performthefollowingsteps:
1. ClickonFileandthenNewProject…2. SelectJavaWebfromthelistofCategoriesandWebApplicationfromthelistof
Projects.3. ClickonNext.4. EnterProjectNameasEJBQuote.5. ClickonNext.6. EnsureAddtoEnterpriseApplicationisunselected,ServerissettoWildFly
ApplicationServer,JavaEEVersionissettoJavaEE7Web,andContextPathissetto/EJBQuote.
7. ClickonFinish.
We’venowcreatedanemptywebproject.Let’saddanEJBtotheprojectthatwillprovideuswithrandomquotes.Performthefollowingsteps:
1. Right-clickontheSourcePackagesnodefortheEJBQuoteprojectwithintheProjectsexplorerandclickonNew,andthenclickonOther….
2. IntheNewFiledialog,selectEnterpriseJavaBeansfromthelistofCategoriesandSessionBeanfromthelistofFileTypes.
3. ClickonNext.4. EnterEJBNameasQuoteBean.5. EnterthePackagenameascom.davidsalter.cookbook.quote.6. SelectSessionTypeasSingleton.7. ChecktheLocaltick-boxasshowninthefollowingscreenshot:

8. ClickonFinish.
TheNewSessionBeandialogwillnowcloseandNetBeanswillcreateanewSingletonSessionBeanalongwithalocalinterfaceforthebean.
Wenowneedtoaddbusinesslogictoourbeantoreturnaquotetocallers.Performthefollowingsteps:
1. EnsurethattheQuoteBean.javafileisopenforeditingandright-clickwithinthebodyoftheclassandselectInsertCode….
2. OntheGeneratepop-upwindow,clickonAddBusinessMethod….3. TheAddBusinessMethoddialogwillnowopen,wherewecandefinemethod
signaturesforbusinessmethodswithinEJBs.4. EnterNameasgetQuoteandReturnTypeasjava.lang.String.5. Sincewe’reusingalocalinterfacetoimplementourEJB,ensurethattheUsein
InterfaceoptionissettoLocalasshowninthefollowingscreenshot:

6. ClickonOK.
ThegetQuotebusinessmethodisnowcreatedwithintheQuoteBean.javaclass.Let’snowimplementthemethod.Performthefollowingsteps:
1. EnsurethattheQuoteBean.javafileisopenforediting.2. OurQuoteBeanclassisgoingtomaintainalistofquotesandreturnarandomoneto
callers.Wethereforeneedtoinitializethelistofquoteswithinthebean.Addthe@StartupannotationtotheclassdefinitionsothattheEJBwillbestartedupassoonasitisdeployed.Theclassdefinitionshouldnowlooklike:
@Startup
@Singleton
publicclassQuoteBeanimplementsQuoteBeanLocal{
3. Wenowneedtoaddaprivatemembertotheclasstomaintainalistofquotes,andinitializeitafterthebeanisconstructed.AddthefollowingcodeintotheQuoteBean.javaclass:
privateList<String>quotes;
@PostConstruct
voidinitialize(){
quotes=newArrayList<String>();
quotes.add("Alwayscatchexceptions.");
quotes.add("Didyoumakethatfieldfinal?");

quotes.add("RemembertoimplementatoString()method.");
}
4. Finally,weneedtoimplementthegetQuote()methodthatreturnsarandomquotetothecaller.ChangethegetQuote()methodtoread:
@Override
publicStringgetQuote(){
Randomrand=newRandom();
returnquotes.get(rand.nextInt(quotes.size()));
}
5. Addtherequiredimportstotheclasssothattheentireclassreadsasfollows:
packagecom.davidsalter.cookbook.quote;
importjava.util.ArrayList;
importjava.util.List;
importjava.util.Random;
importjavax.annotation.PostConstruct;
importjavax.ejb.Singleton;
importjavax.ejb.Startup;
@Startup
@Singleton
publicclassQuoteBeanimplementsQuoteBeanLocal{
privateList<String>quotes;
@PostConstruct
voidinitialize(){
quotes=newArrayList<String>();
quotes.add("Alwayscatchexceptions.");
quotes.add("Didyoumakethatfieldfinal?");
quotes.add("RemembertoimplementatoString()method.");
}
@Override
publicStringgetQuote(){
Randomrand=newRandom();
returnquotes.get(rand.nextInt(quotes.size()));
}
}
Nowthatwe’vecreatedanEJB,let’screateaservletthatcaninvoketheEJBandreturnrandomquotestous.Performthefollowingsteps:
1. Right-clickontheEJBQuotenodewithintheProjectsexplorerandselectNewandthenOther….
2. IntheNewFiledialog,selectWebfromtheCategorieslistandServletfromthelistofFileTypes.
3. ClickonNext.4. EnterClassNameasQuoteServletandPackageas
com.davidsalter.cookbook.quote.

5. ClickonNext.6. EnsurethatAddinformationtodeploymentdescriptor(web.xml)ischeckedand
clickonFinish.7. Theservletclasswillnowbecreatedandopenedforediting.Addareferencetothe
EJB’slocalinterfaceatthetopoftheclass:
@EJB
privateQuoteBeanLocalquoteBean;
8. Locatethelinewithintheclassthatbeginswithout.println("<h1>ServletQuoteServlet…andreplaceitwith:
out.println(quoteBean.getQuote());
9. Fixanyimportswiththeclasssothatthejavax.ejb.EJBpackageisincluded.
We’venowcompletedtheapplication,sodeployandruntheapplicationbyrightclickingontheQuoteServlet.javafileintheSourcePackagesnodeoftheProjectsexplorerandselectingtheRunoption.NetBeanswillaskforconfirmationofanyqueryparameters.Sincetherearenone,clickonOKtolaunchyourdefaultbrowserandruntheservlet.
Refreshyourbrowserafewtimestogetsomegoodadvice.

Howitworks…Inthisrecipe,wefirstcreatedanEJBthatimplementedalocalinterface.Wedon’thavetoimplementinterfacestodefineEJBs,butitsgoodpracticetodoso.
TodefineaSingletonEJB,[email protected]@StartupannotationtocausetheEJBtostartassoonasitwasdeployed.
Sincewe’reusingalocalinterfaceforthebean,thebeanclassmustimplementthelocalinterface.ThebasicdefinitionofourSingletonbeanwastherefore:
@Startup
@Singleton
publicclassQuoteBeanimplementsQuoteBeanLocal{
InEJB3,alocalinterfaceisjustaplainoldinterface,butitmustbeannotatedwiththe@Localannotation.Thisiswhatdifferentiatesalocalinterfacefromaremoteinterface(whichisannotatedwith@Remote):
@Local
publicinterfaceQuoteBeanLocal{
ToaddbusinesslogictotheEJB,weusedtheinsertcodeoptionwithintheNetBeanseditorwindow.WhenaddingbusinesslogictoanEJB,thiswizardcreatesboththenewmethodthatwearecreatinganditsinterfacedefinition.Thatistosay,boththeinterfaceandtheEJBclassareupdated.Eventhoughwe’reusinginterfaces,wedon’tneedtoedittwofilesasthisisalltakencareofforusbyNetBeans.
ToallowustoperformsomeinitializationontheEJB,weannotatedamethodwiththe@PostConstructannotation.ThismethodiscalledaftertheEJBisinjectedintoclients,soisusedasaplacetoperforminitialization.
SincewecreatedanEJBwithonlyalocalinterface,it’sonlypossibletoaccessitfromwithinthelocalJVM,hencemakingacalltoitfromwithinaservletthatisalsorunninginsidethesameJVM.Ifwe’dcreatedtheEJBtoimplementa@Remoteinterface,thenwewouldhavebeenabletoaccesstheEJBfromoutsideoftheapplicationserver,fromastandaloneclient,orfromadifferentapplicationserver.
Intheservlet,wereferencedthelocalinterfacefortheEJBusingthe@EJBannotation.ThisinjectstheEJBintotheservletclassandallowsustouseitwithouthavingtocreateanewinstanceoftheclasswhenwewanttouseit.
Whenwecreatedtheservlet,weallowedNetBeanstoaddinformationtothedeploymentdescriptorfilesothatwecouldseethetypeofinformationaddedtothisfile.Thisisold-schoolservletcreationastheservletisregisteredwiththeapplicationserverviaXMLinsteadofviaannotations:
<servlet>
<servlet-name>QuoteServlet</servlet-name>
<servlet-class>com.davidsalter.cookbook.quote.QuoteServlet</servlet-
class>

</servlet>
<servlet-mapping>
<servlet-name>QuoteServlet</servlet-name>
<url-pattern>/QuoteServlet</url-pattern>
</servlet-mapping>
Inthenextrecipe,CreatingaMessageDrivenEJB,we’llseehowtodefineaservletusingannotationsinsteadofXML.

There’smoreInthisrecipe,wesawhowtocreateaSingletonsessionbean.WhatifwewantedtocreateaStatefulsessionbean,oraStatelesssessionbean?Well,theprocedureforcreatingthoseisexactlythesameasthatoutlinedwithinthisrecipeexceptthatontheNewSessionBeandialog,weneedtochooseeitherStatelessorStatefulinsteadofSingleton.
WhatEJBsaredeployed?AfterEJBsaredeployedtoWildFly,wecangetalistofwhathasbeendeployedviatheServersnodewithintheServicesexplorer.
ThisviewlistsalloftheEJBmodulesthataredeployedandalloftheEJBsthataredeployedwithineachmodule.


CreatingaMessageDrivenEJBAMessageDrivenEJBisaspecialtypeofEJBthatisresponsibleforlisteningtomessagessenttoJMSqueuesandactinguponthem.MessageDrivenEJBsprovideaneasywayofinterfacingwithJMSqueuesandmakefulluseofJavaannotationstodefinequeuesettings.
Inthisrecipe,we’llseehowwecansendamessagetoaJMSqueuehostedonWildFly,andthenhowaMessageDrivenBeanwillrespondtothemessage.

GettingreadyInordertocompletethisrecipe,weneedtohaveaninstanceofWildFlyinstalledlocallyandconfiguredwithinNetBeans.WewillbeusingtheEnterprisedownloadbundleofNetBeansasthisprovidesallofthenecessarypluginsrequiredtoworkwithEJBs.
TosendmessagestoaJMSqueue,wefirstneedtocreatethequeuewithinWildFly.
SincetheWildFlypluginforNetBeanscan’tcurrentlycreatemessagequeues,we’llneedtocreateamessagequeueusingtheWildFlycommand-lineinterface.
StartWildFlyfromNetBeanswithintheServicesexplorer.
TheWildFlyCLIislocatedwithintheWildFly\binfolder,soopenacommandprompt(orterminal),changetotheWildFly\binfolderofyourlocaldistributionandstarttheCLI:jboss-cli.bat(forWindowsusers)or./jboss-cli.sh(forMacOSXandLinuxusers).
OncetheCLIhasstarted,youneedtoconnecttotherunninginstanceofWildFly.ThisisachievedwiththeconnectcommandwiththeCLI:
[disconnected/]connect
Nowthatwe’reconnectedtoWildFly,executethefollowingcommandtocreateamessagequeuecalledcookbookQueue:
[standalone@localhost:9990/]jms-queueadd–queue-address=cookbookQueue–
entries=java:/jms/queue/cookbookQueue
OncethequeuehasbeenaddedviatheCLI,wecanverifythatithasbeendeployedcorrectlybyopeninguptheJMSDestinationsnodewithintheWildFlyApplicationServernodeintheServicesexplorer:

Howtodoit…Performthefollowingsteps:
1. ClickonFileandthenNewProject….2. IntheNewProjectdialog,selectJavaWebfromthelistofCategories,andWeb
ApplicationfromthelistofProjects.3. ClickonNext.4. EnterProjectNameasMessageBeans.5. ClickonNext.6. EnsurethatAddtoEnterpriseApplicationisnotset,andthattheServerissetto
WildFlyApplicationServer,JavaEEVersionissettoJavaEE7Web,andtheContextPathissetto/MessageBeans.
7. ClickonFinish.8. Right-clickontheMessageBeansprojectwithintheProjectsexplorerandclickon
NewandthenOther….9. IntheNewFiledialog,selectEnterpriseJavaBeansfromthelistofCategoriesand
Message-DrivenBeanfromthelistofFileTypes.10. ClickonNext.11. IntheNewMessage-DrivenBeandialog,specifyEJBNameas
CookbookQueueListenerBeanandthePackagenameascom.davidsalter.cookbook.messagebeans.
12. SelectthecookbookQueuequeuefromthedropdownbytheServerDestinationsradiobutton.
13. ClickontheNextbutton.14. TheActivationConfigPropertiesdialogwillnowbeshown.Sincewedon’tneedto
changeanyofthedefaultshere,clickonFinish.

AbasicMessageDrivenBeanhasnowbeencreatedbyNetBeans.Let’saddsomebasicloggingtothebeansothatwecanseewhatmessagesaresenttoit.Performthefollowingsteps:
EnsurethattheCookbookQueueListenerBean.javafileisopenforediting,andchangetheonMessage()methodtothefollowing:
@Override
publicvoidonMessage(Messagemessage){
try{
if(messageinstanceofTextMessage){
TextMessagetxtMessage=(TextMessage)message;
System.out.println("I'vegotamessage:"+
txtMessage.getText());
}
}catch(JMSExceptione){
thrownewRuntimeException(e);
}
}
TipThisisaverysimplisticimplementationofwhattodowhenaMessageDrivenBeanreceivesamessage,butitdoesshowhowtogetthetextcontentsoutofTextMessageandthatweneedtobecatchingJMSExceptionsjustincaseofanyruntimeerrors.
That’sallweneedtodotodefineaMessageDrivenBean.Let’snowcreateaservletthatwillpostmessagestothebean.Performthefollowingsteps:
1. Right-clickontheMessageBeansprojectwithintheProjectsexplorerandselectNewandthenOther….
2. IntheNewFiledialog,selectWebfromtheCategorieslistandServletfromthelist

ofFileTypes.3. ClickonNext.4. InClassName,enterSendMessageServletandinthePackagename,enter
com.davidsalter.cookbook.messagebeans.5. ClickonNext.6. Inthisrecipe,wearenotgoingtodefinetheservletviatheweb.xmlfile,soclickon
Finish.NetBeanswillregistertheservletviaannotationsinsteadofXML.
AservletcalledSendMessageServlethasnowbeencreatedandopenedwithinNetBeansforediting.Let’schangetheservletsothatitsendsamessagetoourmessagequeuewhentheservletisinvoked.Performthefollowingsteps:
1. InjectareferencetoJMSContextandthemessagequeueintotheservletbyaddingthefollowingcodetothebeginningoftheSendMessageServletclass:
@Inject
privateJMSContextcontext;
@Resource(mappedName="java:/jms/queue/cookbookQueue")
privateQueuequeue;
2. SendamessagetothemessagequeuebychangingtheprocessRequest()methodbodytoread:
response.setContentType("text/html;charset=UTF-8");
Stringmessage="Messagesentat:"+newDate();
context.createProducer().send(queue,message);
try(PrintWriterout=response.getWriter()){
out.println("<!DOCTYPEhtml>");
out.println("<html>");
out.println("<head>");
out.println("<title>ServletSendMessageServlet</title>");
out.println("</head>");
out.println("<body>");
out.println("<p>"+message+"</p>");
out.println("</body>");
out.println("</html>");
}
AsweareusingContextsandDependencyInjection(CDI),weneedtoaddabeans.xmlfileintoourproject;otherwise,@Injectwillnotresolvecorrectlyandthecontextvariablewillbesettonull.Performthefollowingsteps:
1. Right-clickontheMessageBeansprojectwithintheProjectsexplorerandclickonNewandthenOther….
2. SelectContextsandDependencyInjectionfromthelistofCategoriesandbeans.xml(CDIConfigurationFile)fromthelistofFileTypes.
3. ClickonNext.

4. ClickonFinishtocreatethefile.
Theapplicationisnowcomplete,sowecanrunitandtestitout.Right-clickontheSendMessageServlet.javafileintheProjectsexplorerandthenselectRunFile.AswehavenorequestparameterstoaddtotheURL,clickonOKtolaunchyourdefaultbrowserandinvoketheservlet.
Thedefaultbrowserwillnowopen.Openthehttp://localhost:8080/MessageBeans/SendMessageServletURLtoaccesstheservletandsendamessagetothemessagequeue.
Thedateandtimeofthemessagewillbedisplayedinthebrowser,asshowninthefollowingscreenshot:
ThedateandtimeofthemessagewillalsobeshownintheWildFlyApplicationServerOutputwindow,asshowninthefollowingscreenshot:

Howitworks…ThefirsttaskinthisrecipewastocreateaMessageDrivenBean.InJavaEE7,aMessageDrivenBeanissimplyaPOJOthatisannotatedwiththe@MessageDrivenannotation.OurMessageDrivenBeanwasannotatedasfollows:
@MessageDriven(activationConfig={
@ActivationConfigProperty(propertyName="destinationLookup",
propertyValue="cookbookQueue"),
@ActivationConfigProperty(propertyName="destinationType",
propertyValue="javax.jms.Queue")
})
TheseannotationsdeclaretheMessageDrivenBeanaswellasstatingthatthebeanwilllistentoajavax.jms.QueueandthatthecookbookQueuequeuewillbecalled.
Ifwe’dwantedtolistentoatopicinstead,wewouldsimplyhavespecifieddestinationTypeasjavax.jms.Topic.
TipAmessagesenttoaJMSqueuewillbereceivedbyonlyonelistener.OnlyoneMessageDrivenBeancanreceiveamessagesenttoaqueue.Atopic,ontheotherhand,worksmorelikeapublish/subscribemodelwhereamessagesenttoatopiccanbereceivedbyzeroormorelisteners.
WithinMessageDrivenBeans,messagesaredeliveredtotheonMessage()method.Inourimplementation,wecheckedtoseeifthemessagewasofthetypeTextMessage(wehadforeknowledgethatitwouldalwaysbeofthistype!)andifitwas,wecastthereceivedmessageintoTextMessageandthenextractedthemessageusingthe.getText()method.
TosendamessagetotheMessageDrivenBean,weusedCDItomakethingsaloteasier.WeinjectedaJMSContextintoaservlet.Weinjectedareferencetoourqueueintotheservletaswellusingthe@Resourceannotationtospecifythequeuewewantedtouse.Finally,wesentatextmessagebycallingthecontext.createProoducer().send()method.

There’smoreWhatifwewantedtosendmorethanasimpletexttoamessagequeue?Isthatpossible?Itcertainlyis.Thesend()methodoftheJMSProducerclassallowsustosendaMap,aMessage,aSerializable,orabyte[]aswellassendingaString.IfwearetosendobjectsofthesetypestotheMessageDrivenBean,thenwemustrememberthatthetypeofmessagereceivedbytheOnMessage()methodwillbeeitherBytesMessage,MapMessage,ObjectMessage,orStreamMessage.Forfurtherinformationaboutsendingdifferenttypesofmessages,checkouttheOracleMessagedocumentationathttp://docs.oracle.com/javaee/7/api/javax/jms/Message.html.
ManuallyinjectingJMSContextandQueueinvolvedtoomuchtyping!CanNetBeansmakethisanyeasier?Itcertainlycan.Right-clickingwithinthebodyofaclass(forexampleinasessionbean)andselectingtheInsertcode…menuitemprovidestheoptiontoSendJMSMessage….Fromthisdialog,wecanspecifyqueuesandtopicstosendmessagestoandthenautomaticallygeneratetherequiredcode.


CreatingatimerWhendevelopingEnterpriseapplications,itcanbeusefultoperformoperationsatspecifictimesoftheday,oratspecificregularintervals,forexample,every12hours,orthelastdayofeverymonth.
IntheUnixworld,thisisanalogoustothecronconceptwheresystemadministratorscandefinetasksthatrununderagivenschedule.
InJavaEE7,wehavetheconceptoftimersthatcanrunJavacodeatpredefinedintervals.

GettingreadyTocompletethisrecipe,weneedtohaveavalidinstanceofWildFlyinstalledandconfiguredwithinNetBeans.WewillbeusingtheEnterprisedownloadbundleofNetBeansasthisprovidesallthefeaturesweneedtocompletethisrecipewithouthavingtodownloadanyadditionalplugins.

Howtodoit…Performthefollowingsteps:
1. ClickonFileandthenNewProject.2. IntheNewProjectdialog,selectJavaWebfromthelistofCategoriesandWeb
ApplicationfromthelistofProjects.3. ClickonNext.4. EnterProjectNameasTimers.5. ClickonNext.6. EnsurethatAddtoEnterpriseApplicationissetto<None>,Serverissetto
WildFlyApplicationServer,JavaEEVersionissettoJavaEE7Web,andContextPathissetto/Timers.
7. ClickonFinish.8. Right-clickontheTimersprojectintheProjectsexplorerandclickonNewandthen
clickonOther….9. OntheNewFiledialog,selectEnterpriseJavaBeansfromthelistofCategories
andTimerSessionBeanfromthelistofFileTypes.10. ClickonNext.11. EnterEJBNameasTimerBeanandthePackagenameas
com.davidsalter.cookbook.timers.12. ChangeMethodscheduletothefollowing:
dayOfWeek="*",month="*",hour="*",dayOfMonth="*",year="*",
minute="*",second="*/10",persistent=false
13. ClickonFinish.
That’sallisthereforcreatingatimer.Right-clickontheTimersprojectwithintheProjectsexplorerandselectDeploy.WatchintheWildFlyApplicationServerOutputWindowandnotethatatimermessageisexecutedevery10secondsasdefinedwithinourtimerschedule.

Howitworks…Creatingatimerisassimpleascreatingasessionbeanandaddingan@Scheduleannotationtoamethodinthebean:
@Schedule(dayOfWeek="*",month="*",hour="*",dayOfMonth="*",year
="*",minute="*",second="*/10",persistent=false)
Atimercanbecreatedasasessionbeanorasingletonbean,butasasingletonbeanhasonlyoneinstancewithintheJVM,itmaybeabetterchoiceforatimerasit’sguaranteedtoonlyrunoneinstanceofthetimeratthegivenschedule.
ThescheduleforatimertakesseveralparameterstodefinethescheduleasseenintheTimerBean.javaclass:
second Thenumberofsecondsintherange0through59
minute Thenumberofminutesintherange0through59
hour Thenumberofhoursintherange0through23
dayOfWeek Thedayoftheweekintherange0through7,orthevaluesSun,Mon,Tue,Wed,Thu,Fri,Sat
dayOfMonthThedayofthemonthintherange1through31and-1through-31.ThespecialcaseLastmeansthelastdayofthemonthandnegativenumbersmeandaysbeforetheendofthemonth.
monthThemonthintherange1through12,orthevaluesJan,Feb,Mar,Apr,May,Jun,Jul,Aug,Sep,Oct,Nov,Dec
year Theyearintheformatyyyy
info Anycustominformationtobesenttotheschedule,forexampleaschedulename

There’smoreWhatifIwanttoexecuteamethodatmultipleschedules?DoIneedtocreatemultipletimers?No,notatall.
Torunamethodatmultipleschedules,annotatethemethodwiththe@[email protected],simplydefinemultiple@Scheduleannotationswithin,forexample:
@Schedules({
@Schedule(…),
@Schedule(…)})
WhatifIwantmytimertobepersistentacrossrebootsoftheapplicationserver?Thiscanbeachievedbysettingthepersistentparameterofthe@Scheduleannotationtobetrue.
TipBecarefulwhensettingatimertobepersistent.Asthetimerstateispersistedwhentheserverisoffline,itismandatedtorunanymissediterationsoftheschedulewhentheapplicationisbroughtbackonline.Ifthisisnotwhatyourequire,don’tsetyourtimerstobepersistent.


CreatingaRESTwebserviceWiththeadventofmodernwebapplicationdevelopment,REST-basedwebserviceshavebecomeapopularmethodofsendingdatafromapplicationserverstoclients.ManyJavaScriptframeworks,suchasAngularJS,havebeendevelopedthatmakecallingREST-webservicesasimpleandconvenientwayofgettingdata.
RESTwebservicesusedifferentHTTPmethods(GET,PUT,DELETEforexample)toperformdifferentoperations.GETistypicallyusedforretrievingdata,whereasPUTisusedforstoringdata.
Well-designedRESTwebservicesaremodeledsuchthat“readingtheURL”explainswhattherequestisfor.Forexample,aGETrequesttothehttp://localhost/Travel/busroute/1URLwouldreturninformationaboutbusroutenumber1,whereasaPUTrequesttothesameURLwouldindicatethatbusroute1istobestoredwithintheapplicationserverviathedatauploadedtotheserverwiththerequest.
Toretrieveinformationaboutallofthebusroutes,aGETrequestwouldbemadetothehttp://localhost/Travel/busroute/allURL.
Inthisrecipe,we’llseehowNetBeanscanhelpustodevelopREST-basedwebserviceslikethese.

GettingreadyTocompletethisrecipe,youwillneedtohaveavalidinstallationofWildFlycorrectlyconfiguredwithinNetBeans.Ifyouareunsurehowtoachievethis,pleaserefertotheAddingWildFlysupporttoNetBeansrecipeearlierinthischapter.
WewillbeusingtheEnterprisedownloadbundleofNetBeansasthisincludesallofthenecessarytoolstocompletetherecipewithouthavingtodownloadanyadditionalplugins.
Inthisrecipe,wewillcreateawebservicethatreturnsinformationaboutbooks.Wewillimplementawebservicetogetinformationaboutasinglebookandanotherwebservicetogetinformationaboutallthebooks.

Howtodoit…Performthefollowingsteps:
1. ClickonFileandthenclickonNewProject….2. IntheNewProjectdialog,selectJavaWebfromtheCategorieslistandWeb
ApplicationfromthelistofProjects.3. ClickonNext.4. EnterProjectNameasBookService.5. ClickonNext.6. EnsurethattheAddToEnterpriseApplicationoptionissetto<None>,Serveris
settoWildFlyApplicationServer,JavaEEVersionissettoJavaEE7Web,andContextPathissetto/BookService.
7. ClickonFinish.8. Right-clickontheBookServicenodewithintheProjectsexplorerandclickonNew
andthenclickonOther….9. SelectWebServicesfromthelistofCategoriesandRESTfulWebServicefrom
PatternsinthelistofFileTypes.10. ClickonNext.11. EnsurethatSimpleRootResourceisselectedasRESTfulwebservicedesign
pattern.
12. ClickonNext.13. OntheSpecifyResourceClassespage,enterResourcePackagesas
com.davidsalter.cookbook.bookservice.14. EnterPathasbook.15. EnterClassNameasBookResource.16. Selectapplication/jsonasMIMEType.

17. ClickonFinish.
We’venowcreatedthebasicstructureforourwebservice;let’snowcreateaclasstorepresentabookandimplementthewebservicesothatitcanreturndetailsaboutthebooktoclients.Performthefollowingsteps:
1. Right-clickontheSourcePackagesnodewithintheBookServiceprojectandclickonNewandthenclickonOther….
2. OntheNewFiledialog,selectJavafromtheCategorieslistandJavaClassfromthelistofFileTypes.
3. ClickonNext.4. EnterBookasClassName.5. Entercom.davidsalter.cookbook.bookserviceasthePackagename.6. ClickonFinish.7. Inourrepresentationofabook,abookhasattributesISBN,name,andauthor,allof
whicharestrings.AddthefollowingcodetotheBook.javaclasstodefinetheseattributes:
privateStringname;
privateStringauthor;
privateStringisbn;
8. UsetheEncapsulateFieldsrefactoringtocreategettersandsettersforboththeattributes.Ifyouareunsureonhowtoperformthisrefactoring,checkouttheEncapsulatefieldsrefactoringrecipeinChapter3,NetBeansProductivity.
9. Usethegenerateconstructorcodegenerationtocreateaconstructorthattakesaname,anauthor,andanISBNnumberasparameters.Ifyouareunsurehowtoperformthisrefactoring,checkouttheCreatingaconstructorrecipeinChapter3,NetBeansProductivity.
10. Oncecomplete,theBook.javaclassshouldlooklike:
publicclassBook{
privateStringname;
privateStringauthor;
privateStringisbn;
publicBook(Stringname,Stringauthor,Stringisbn){
this.name=name;
this.author=author;
this.isbn=isbn;
}
publicStringgetName(){
returnname;
}
publicvoidsetName(Stringname){
this.name=name;
}

publicStringgetAuthor(){
returnauthor;
}
publicvoidsetAuthor(Stringauthor){
this.author=author;
}
publicStringgetIsbn(){
returnisbn;
}
publicvoidsetIsbn(Stringisbn){
this.isbn=isbn;
}
}
11. Double-clickontheBookResource.javafilefromwithintheProjectsexplorertoopenitupforediting.
12. DefinealistintheBookResource.javaclassthatwillholdalistofallourbooks(normally,wewouldgetourlistofbooksformadatabase,butinthisinstance,we’reholdingalistofbooksinmemory).AddthefollowingtotheBookResourceclass:
privateList<Book>books;
13. ChangetheconstructoroftheBookResourceclasstoinitializethelistofbooksbyamendingtheconstructortothefollowing:
publicBookResource(){
books=newArrayList<Book>();
books.add(newBook("MobyDick","HermanMelville","1"));
books.add(newBook("APrincessofMars","EdgarRice
Burroughs","2"));
}
14. AddamethodtoreturnabookbaseduponitsISBNnumber,asfollows:
@GET
@Path("{isbn}")
@Produces("application/json")
publicBookgetBook(@PathParam("isbn")Stringisbn){
for(Bookbook:books){
if(book.getIsbn().equals(isbn))
returnbook;
}
thrownewWebApplicationException(404);
}
15. Addamethodtoreturnallofthebooksinthecatalog,asfollows:
@GET
@Produces("application/json")
@Path("all")
publicList<Book>getBooks(){
returnbooks;
}

Finally,wewanttochangetheURLofourwebservicesoitismappedto/BookService/Catalog/book.ThedefaultimplementationgeneratedbyNetBeansisat/BookService/webresources/book.Performthefollowingsteps:
1. Double–clickontheApplicationConfig.javaclasswithintheBookServiceproject.2. [email protected]:
@javax.ws.rs.ApplicationPath("Catalog")
Theapplicationisnowcomplete.Deployandruntheapplicationbyright-clickingontheBookServiceprojectwithintheProjectsexplorer,andthenclickingonRun.
Browsehttp://localhost:8080/BookService/Catalog/book/allandyouwillseeallofthebooksthatwedefinedearlierlistedintheJSONformat.
Browsehttp://localhost:8080/BookService/Calalog/book/1andyouwillsee“MobyDick”listedintheJSONformat.
Finally,browseaninvalidISBNreferenceathttp://localhost:8080/BookService/Catalog/book/3andyouwillseetheHTTP404errorpageindicatingthatthebookwasnotfound.
TipFordevelopersonWindows,I’drecommendusingabrowserotherthanInternetExplorerfordebuggingJSONreturnedfromwebservicesasInternetExplorerdoesn’tdisplayJSONcorrectly.IrecommendusingGoogleChromewiththeJSONViewplugininstalled,asthisallowsJSONtobeviewedinareadableformatwiththeabilitytoexpandandclosenodeswithinaJSONdocument.

Howitworks…WhenwecreatedourBookResourceclassforservinginformationaboutbooks,NetBeansautomaticallyannotatedtheclasswiththe@Path("book")annotation:
@Path("book")
publicclassBookResource{
ThisannotationdeclaredthelastpartoftheURLforourbookserviceas/BookService/Catalog/book.AnyattemptstoaccessthisURLarethenpassedtotheBookResourceclassforhandling.
WeannotatedthegetBook()methodwithan@Pathannotationandalsoannotatedoneoftheparametersofthemethodwiththe@PathParam("isbn")annotation,asfollows:
@GET
@Path("{isbn}")
@Produces("application/json")
publicBookgetBook(@PathParam("isbn")Stringisbn){
The@PathannotationidentifiestheclassasbeingabletohandleURLswithanadditionalparameterattheendcalledisbn.Therefore,whenweaccessaURLofthe/BookService/Catalog/book/isbnpattern,theisbnparameterismappedtoanyparameterswithinthegetBook()[email protected],thislastparameterintheURLismappedtotheisbnparameterofthegetBook()method.
Inasimilarfashion,weannotatedthegetBooks()methodwiththe@Path("all")annotation,asfollows:
@GET
@Produces("application/json")
@Path("all")
publicList<Book>getBooks(){
Thisannotationhasnoparameters(thereisnothinginside{}brackets)soallrequeststo/BookService/Catalog/book/allwillbehandledbythismethod.
Whenwesearchedforabookanddidnotfindit,wereturnedWebApplicationException(404)totheclient.ThisreturnsaHTTP404—NotFounderrormessage.Thisisthestandarderrormessagethatisreturnedtobrowserswhenaresourceisnotfound.Typically,itisreturnedtobrowserswhenapagecannotbefound,butisalsousedwithinRESTfulwebservicestoindicatethatanentitycouldnotbefound.

There’smoreWhatifIwanttoreturnsomethingotherthanJSONfrommywebservices?WhenwecreatedtheRESTfulwebservice,NetBeansgaveusanoptiontospecifytheMIMETypeoftheresponse.Wechoseapplication/jsonasthatiswhatiscommonlyusedwhendevelopingwebsites.
If,however,you’redevelopingRESTfulwebservicesthatperhapsaren’tgoingtobeconsumedbyawebsiteorthewebsitetechnologyyou’reusingrequiresadifferentformat,thenNetBeanscanbeconfiguredtosendrepliesinadifferentformat.
Whencreatingthewebservice,4differentMIMEtypesareavailable;theyareasfollows:
application/xml
application/json
text/plain
text/html
IndividualmethodswithinaRESTclasscanbeconfiguredtorespondwithdifferentMIMEtypesbyaddingthe@ProducesannotationtoamethodandspecifyingtheMIMETypetoreturn.Forexample:
@GET
@Produces("application/xml")
@Path("all")
publicList<Book>getBooks(){
WhatifIwanttocreateaRESTfulwebserviceforexistingentitiesthatIhave?Isthereawaytoachievethis?Certainly!WhencreatingaRESTfulwebservice,selecttheoptionRESTfulWebServicesfromentityclasses.Thisprovidesyouwithalistofentitieswithinyourapplication(classesannotatedwith@Entity)fromwhichNetBeanscancreatewebservices.
CanIeasilyseewhatRESTfulwebservicesI’vecreated?WithinNetBeans,projectsthathaveRESTfulwebserviceswithinthemhaveanadditionalnode,RESTfulWebServiceswithintheProjectsexplorer.ExpandingthisnodegiveapreviewofalltheRESTfulservicesavailablewithintheproject.


UsingtheChromeConnectorTheChromeConnectorallowsanadditionallevelofintegrationbetweenNetBeansandtheGoogleChromebrowser.
TwowayDOMqueryingisprovidedsuchthatifaDOMelementisclickedwithinthebrowser,itisshownwithinNetBeansandinthesamewayiftheuserclicksonaDOMelementinNetBeans,thatelementisselectedwithinthebrowser.
TheChromeConnectorcanchangethesizeofthebrowserwindowtohelpdeveloperswhenwritingapplicationsformultipleplatforms.Forexample,thebrowsercanbesettothesizeofatabletorasmartphonesothatthelayoutofawebapplicationcanbeexaminedfordifferentdevices.
ForHTML5projects,theChromeConnectorallowschangestobeautomaticallyupdatedwithinthebrowsersowheneverchangesaremadeandsavedwithinNetBeans,theyareautomaticallyupdatedinthebrowser.Unfortunately,thisfunctionalityisnotpresentforJSFpages.

GettingreadyTocompletethisrecipe,weneedtohaveavalidinstallationofWildFlyconfiguredwithinNetBeans.WewillbeusingtheJavaEEdownloadbundleofNetBeansasthisprovidesallofthetoolsnecessarytocompletethisrecipe.
Finally,sincewe’regoingtobeinvestigatingtheChromeConnector,wewilluseasampleapplicationthatisprovidedwiththedownloadbundleforthisbook.ThiswillallowustoseesomeofthefeaturesoftheConnector.

Howtodoit…Performthefollowingsteps:
1. Fromthedownloadbundleforthisbook,locatetheprojectChapter5\Todo.ClickonFileandthenclickonOpenProject.BrowsetheChapter5folderofthedownloadbundleandopentheTodoproject.
NoteTheTodoprojectisasimpleTodolistthatshowsmanyofthefeaturesofaJavaEE7application.We’renottooworriedaboutthefeatureshere,butabouthowtheprojectwillinteractwiththeChromeConnector.TheTodoapplicationusesJSFasitsviewtechnologywithTwitterBootstrapprovidingthestylingfortheapplication.
2. ToruntheapplicationusingtheChromeConnector,clickonthedownarrownextto
theglobe( )withinthetoolbar.3. FromtheBrowserselectionwindow,clickonChromewithintheWithNetBeans
Connectorcategory.
4. NetBeansisnowconfiguredtoruntheapplicationusingtheChromeConnector.Right-clickontheTodoapplicationwithintheProjectsexplorerandclickonRun….
5. SincewehaveyettoinstalltheChromeConnector,NetBeanswillshowawarningdialogstatingthatweneedtogototheChromestoreandinstallthepluginintotheChromebrowser.

6. ClickontheGotoChromeWebStorebuttontolaunchthestore:
7. InChrome,clickontheaddbutton( )toinstalltheChromeConnector.8. IntheConfirmNewExtensiondialog,clickontheAddbuttontoallowthe
extensiontobeaddedtoChrome.9. GobacktoNetBeansandclickontheRe-RunProjectbuttontolaunchtheproject
withtheChromeConnectorenabled:

10. TheTodoapplicationwillnowbeopenedwithinChrome.Anotificationmessageindicatesthat“NetBeansConnector”isdebuggingthistab.Atthetop-rightoftheaddressbar,theNetBeanslogoisdisplayedindicatingthatintegrationwithNetBeansisenabled.Donotclosethistabduringdebugging,ortheNetBeansConnectorwillshutdownandyouwillneedtostartthedebuggingprocedureagain.
Nowthatwe’vegottheconnectorinstalled,let’sseehowwecanchangethesizeofthebrowserwindowtomimicthatofdifferentdevices.Performthefollowingsteps:
1. ClickontheNetBeanslogoatthetoprightofthebrowserwindow.Inthepop-updialog,clickonSmartphonePortrait.Notehowthebrowserwindowchangesthesizeto320x480pixels:

2. NotonlycantheChromeConnectorchangethebrowserwindowsizetomatchthatofdifferentdevices,italsoprovidestwo-wayDOMquerying.
3. ClickontheNetBeanslogowithinthebrowseraddressbar.4. Ontheresultingdialog,clickonInspectinNetBeansMode.5. HoverthemouseovertheCreateNewTaskbuttonandnotehowtheDOM
informationfortheobjectisdisplayed:
6. ClickontheCreateNewTaskbuttonwithinChromeandnotehowthebuttonisselectedwithintheBrowserDOMwithinNetBeans:

7. Hoverthemousecursoroverthediv.jumbotronelementwithintheBrowserDOMexplorerinNetBeansandnotehowthecorrespondingelementishighlightedwithinChrome.

There’smoreWhenrunninganHTML5project,changesmadetoHTMLpagesareautomaticallyupdatedwithinthebrowserwhenthepageissaved.Thebrowserdoesnotneedtoberefreshedtodisplayupdatedcontent,allthatisrequiredisforthepagetobesavedwithinNetBeans.TheChromeConnectorthenautomaticallyforcesthebrowsertorefreshthepage.
TipInadditiontotheChromeConnector,theChromeDeveloperToolsprovidedwithinChromeitselfprovideexcellentdebugginganddiagnostictools.ThisallowstheDOMtobequeried,customJavaScripttobeexecuted,andcanshowallnetworktrafficthatisperformedwhileallowingthedevelopertoinvestigatewhatissentandreceivedoneachrequest.TheChromeDeveloperToolscanalsobeusedforperformancemonitoringshowingthetimetakenforresourcestodownload.ThecombinationoftheChromeConnectorandtheChromeDeveloperToolsisanexcellenttoolforenterpriseandwebdevelopers.


Chapter6.ManagingDatabaseswithNetBeansInthischapter,wewillcoverthefollowingrecipes:
ConnectingtoJavaDBRegisteringandmanagingaMySQLServerConnectingtoMicrosoftSQLServerandOracleConnectingtoPostgreSQLManagingaSQLdatabaseConnectingtoMongoDB

IntroductionDatabasescanbeoneofthemostfundamentalpartsofapplications,whethertheyarelargeorsmall.Theycanalso,unfortunately,beforgottenandthoughtofasunimportantpartsofsystems.
Fortunately,NetBeansprovidesexcellenttoolingforconnectingtodatabasesallowingdeveloperstocreatetablesandviewsandrunSQLstatementsagainstawidevarietyofdatabases.
Inthischapter,we’lltakealookathowtoconnecttosomeopensourcedatabasesandevensomeproprietaryones.
We’lllookatmakingconnectionstoJavaDB(alsoknownasApacheDB)aswellasMySQLandPostgreSQL.Fromthecommercialworld,we’lllookathowtomakeconnectionstoMicrosoftSQLServerandOracle—twoofthemainheavyweightcontendersinenterprisedatatechnologies.
Whenwe’veseenhowtoconnecttothesedatabases,we’llseehowNetBeanscanhelpaJavadevelopertowriteandexecuteSQL.
Finally,we’lltakealookattheworldofNoSQLdatabases.We’llseehowwecanconnecttoMongoDBfromwithinNetBeans.


ConnectingtoJavaDBJavaDBisadistributionoftheApacheDerbydatabaseprovidedbyOracleCorporation.ItprovidesafullyANSI-compliantSQLdatabasethatcanberunaseitheranembeddeddatabaseoranetworkserver.
JavaDBhasasmallfootprint(approximately2.6MB)yetprovidesadvancedfeaturessuchastransactions,storedprocedures,andXA(two-phasecommit)transactions.
DuetothefactthatJavaDBissmall,itisprovidedwiththeJDKandthatitcanbeexecutedasanembeddeddatabase,itisidealforusewithinanapplicationthatdoesnotneedthepoweroflargerdatabasessuchasOracleorMicrosoftSQLServer.Itisalsoidealtouseasadatabaseforintegrationtestingofcodemodules.
FromJava7onwards,JavaDBhasbeensuppliedasstandardwiththeJDK;so,noadditionaldownloadsarerequired.
ForfurtherinformationaboutJavaDB,visittheOraclesiteat:
http://www.oracle.com/technetwork/java/javadb/overview/index.html
ForfurtherinformationonApacheDerby,visittheApacheDBsiteat:
http://db.apache.org/derby/

GettingreadyIfyouareusingJava7onwards,JavaDBissuppliedwithyourinstallationoftheJDK.
IfyouhaveinstalledGlassFishwithinNetBeans,orareusingtheEnterprisedownloadbundleofNetBeans,thenJavaDBwillalreadybeconfiguredtorunasanetworkserver.Ifnot,theneverythingthatisrequiredtoconnectNetBeanstoJavaDBisincludedwithyourJDKinstallation.
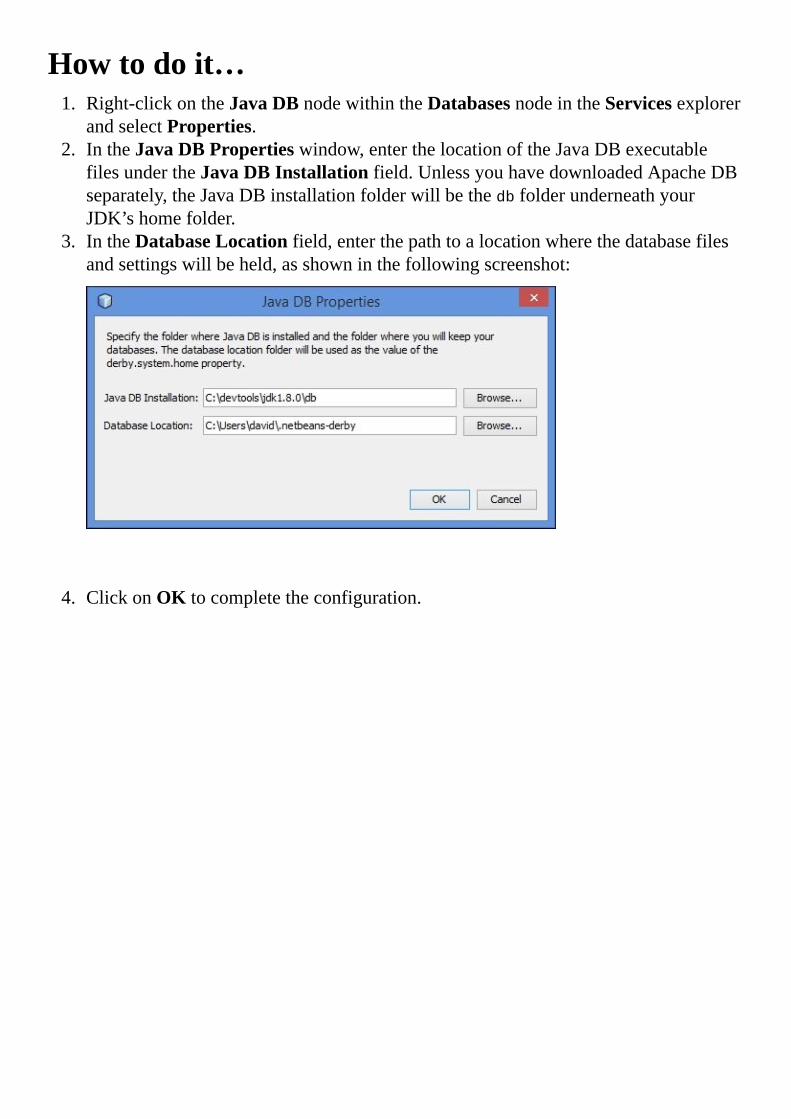
Howtodoit…1. Right-clickontheJavaDBnodewithintheDatabasesnodeintheServicesexplorer
andselectProperties.2. IntheJavaDBPropertieswindow,enterthelocationoftheJavaDBexecutable
filesundertheJavaDBInstallationfield.UnlessyouhavedownloadedApacheDBseparately,theJavaDBinstallationfolderwillbethedbfolderunderneathyourJDK’shomefolder.
3. IntheDatabaseLocationfield,enterthepathtoalocationwherethedatabasefilesandsettingswillbeheld,asshowninthefollowingscreenshot:
4. ClickonOKtocompletetheconfiguration.

Howitworks…SpecifyingthelocationoftheJavaDBinstallationandthelocationinwhichtostoredatabaseconfigurationfilesprovidesNetBeanswithalltheinformationrequiredtoruntheJavaDBasanetworkserver.Tostarttheserver,right-clickontheJavaDBnodewithintheServicesexplorerandselectStartServer.NetBeanswillstarttheserverandprovidethefollowingconfirmationtotheOutputwindowthattheserverhasstarted:
TueApr2220:41:05BST2014:ApacheDerbyNetworkServer-10.10.1.2-
(1495037)startedandreadytoacceptconnectionsonport1527
Tostoptheserver,right-clickontheJavaDBnodewithintheServicesexplorerandselectStopServer.

There’smore…InadditiontoregisteringaJavaDBserverwithinNetBeans,wecanalsocreatenewdatabasesthatcanthenbeconnectedtoviaJDBC.
Tocreateadatabase,right-clickontheJavaDBnodewithintheServicesexplorerandselecttheCreateDatabase…option.Enteradatabasename,alongwithausernameandpassword,tocreateanewdatabase,asshowninthefollowingscreenshot:
Onceadatabasehasbeencreated,NetBeansconnectstoitandfetchestheschemafromtheserver.AnewdatabaseconnectionisplacedwithintheDatabasesnodeoftheServicesexplorer.


RegisteringandmanagingaMySQLServerMySQLisanOracleCorporationproduct,whichwaspreviouslyaSunMicrosystemsproduct,andaMySQLAbsproductbeforethat.Itisoneofthemostfamousopensourcerelationaldatabasemanagementsystems,RDBMS,intheworld.ThecodeisavailableundertheGPLlicense.
Itisusedbymanycompanies,suchasNokia,Facebook,andGoogle,foritsrobustnessandforbeingfreeforuse.
GettingreadyForthisrecipe,wewilluseMySQLversion5.6.17andMySQLGUITools.
InstallationandconfigurationofMySQLServerandcomponentsontotheoperatingsystemisbeyondthescopeofthisrecipe.WhatwewilllearnhereishowtoconfigureMySQLwithNetBeanssothattheintegrationbetweendatabaseandIDEcanbeachieved.
Inthisrecipe,wewillassumethatthedatabaseisinstalledlocallyandthepasswordischosenbytheuser.
TipFormoreinformationanddownloads,visitthefollowinglinkforthedatabase:http://dev.mysql.com/downloads/
AndforMySQLWorkbench,visithttp://dev.mysql.com/downloads/tools/workbench/.

Howtodoit…WiththeIDEopen,performthefollowingsteps:
1. NavigatetotheServicesexplorerwindowandexpandtheDatabasessection.2. Right-clickonDatabasesandselectRegisterMySQLServer…,asshowninthe
followingscreenshot:
3. UnderBasicProperties,NetBeans,bydefault,enterslocalhostastheServerHostNamefieldand3306astheServerPortNumberfield.IfyourMySQLinstanceisnotrunningwiththesedefaults,changethemhere.
4. EnsurethattheAdministrationUserNameandAdministrationPasswordfieldsthatyouconfiguredforyourMySQLinstanceareenteredcorrectly.
TheMySQLServerPropertieswindowshouldlookmoreorlesslikethefollowingscreenshot:
5. ClickontheAdminPropertiestab.6. EnterthepathtotheMySQLadministrationtool(tomanageMySQLgraphically,
enterthepathtotheMySQLWorkbench)underthePath/URLtoadmintoolfield.7. EnterthepathstotheMySQLstartandstopcommandsunderthePathtostart
commandandPathtostopcommandfields,asshowninthefollowingscreenshot:

8. ClickonOK.9. AMySQLServernodeisaddedunderneaththeDatabasesnodewithintheServices
explorer.

Howitworks…TheBasicPropertiestabcontainstheminimuminformationrequiredtoconnecttoaMySQLServer.Thisisallthatisneededfortheconnectiontowork.TheinformationrequiredtobettercontroltheMySQLServerisontheAdminPropertiestab.TheStartandStopcommandsandpathfortheMySQL-relatedtoolsarealsoincludedinthesubmenu,whichcanbeaccessedbyright-clickingontheMySQLServernode.
Uponregistration,therearetwowaysofcheckingwhethertheMySQLServerisconnectedornot:
IftheMySQLServernodecannotbeexpanded,itmeansthatitisnotconnectedIftheMySQLServernodedisplays(disconnected),itmeansthatitisnotconnected
OncetheMySQLServernodeisexpanded,NetBeanswillshowalistofalldatabasescreatedwithintheserver.Right-clickingonadatabaseandselectingConnect…addsadatabaseconnectionwithintheDatabasesnodethatallowsdatabasetables,views,andsoontobemanaged.

There’smore…WanttocreatedatabasesandruntheadministrationtoolfromwithinNetBeans?You’vecometotherightplace.
CreatingdatabasesTocreatedatabasesonaregisteredMySQLServerinstance,simply:
1. Right-clickontheMySQLServernodeandselectCreateDatabase….2. ACreateMySQLDatabasewindowwillaskforNewDatabaseNameand
providestheGrantFullAccessTooptiontograntfullaccesstoaspecifieduser.EntertheappropriatenameforanewdatabaseandclickonOK.
3. AnewdatabasewillbecreatedandanewJDBCconnectionwillbeaddedtotheDatabasesnode,asshowninthefollowingscreenshot:
RunningtheadministrationtoolToruntheMySQLadministrationtool,itisnecessarytoconfigureNetBeanswiththecorrectpath.Ifunsurehowtodothis,refertothebeginningofthisrecipe,underMySQLServerProperties,intheAdminPropertiestab.
TipForgraphicalmanagementofMySQL,theMySQLWorkbenchcanbeconfiguredhereastheMySQLadministrationtool.MySQLWorkbenchisincludedwithdownloadsforMySQLServer,orcanbedownloadedasanadditionaloption.
Withtheconfigurationinplace,performthefollowingsteps:
1. NavigatetotheServicesexplorerandexpandtheDatabasesnode.2. Right-clickontheMySQLServernode.3. ClickonRunAdministrationTool.
TipThetechniquesdescribedinthisrecipeapplyequallytoMariaDB,whichisadrop-inreplacementforMySQL.MoreinformationonMariaDBcanbefoundathttps://mariadb.org.


ConnectingtoMicrosoftSQLServerandOracleNowthatwe’velookedatsomeopensourcedatabases,let’stakealookatsomeofthecommercialdatabasesthatwecanconnecttoandmanagefromwithinNetBeans.
First,let’slookatMicrosoftSQLServer.
ItmayseemstrangetalkingaboutMicrosoftproductswhenwe’reintegratingwithNetBeans;however,MicrosoftSQLServerisoneofthemorepopulardatabasesavailableandprovidesexcellenttoolsfordevelopers,allowingthemtodefine,debug,andprofiletheirSQL.

GettingreadyMicrosoftSQLServerisavailableinmanydifferentversions,rangingfromthesimpleLocalDB,throughSQLServerExpressuptoSQLServerEnterprise.SQLServerisrenownedforitspower,yetthefriendlinessofthetoolsthataresuppliedwithit.
SQLServeroriginallystartedoutasSybase,butthelatestversionisSQLServer2014.Inthisrecipe,wewillbeinterfacingwithSQLServer2014Express.
TipFormoreinformationonSQLServer,visithttp://www.microsoft.com/en-us/server-cloud/products/sql-server/.
InstallingSQLServerisoutsideofthescopeofthisrecipe;wewill,however,concentrateonshowinghowtoconnecttoSQLServerfromwithinNetBeans.
ToconnecttoSQLServerfromwithinNetBeans,weneedtouseaJDBCdriver.SQLServerJDBCdriversarenotsuppliedwithNetBeans—theyneedtobedownloadedfromMicrosoft.YoucandownloadtheJDBCdriversfromhttp://msdn.microsoft.com/en-US/sqlserver/aa937724/.
ThelatestJDBCdriversprovidesupportforSQLServer2012.However,thesearethelatestdriversanddependinguponyourneeds,willworkwithSQLServer2014.
TipManyothercompaniesprovideJDBCdriversforSQLServer;however,IrecommendusingtheofficialMicrosoftdriversasIfindtheyworkbetterinproductionenvironments.OneofthedownsidesoftheMicrosoftJDBCdriversisthattheycannotconnecttotheLocalDBeditionofSQLServerasLocalDBrequiresclientstoconnectvianamedpipes.TheMicrosoftSQLServerdriversrequireclientconnectionstobeviaTCP/IPandthereforeanyversionofSQLServerfromExpressupwardsiscompatiblewiththeofficialdrivers.
Onceyou’veinstalledSQLServerExpressanddownloadedandinstalledtheMicrosoftJDBCdriversforSQLServer,wecanbeginwithourproject.

Howtodoit…NavigatetotheServicesexplorerandperformthefollowingsteps:
1. Right-clickontheDatabasesnodeandselectNewConnection….2. SincetherearenoSQLServerdriverssuppliedwithNetBeans,weneedtocreatea
newdriver.FromtheDriverdrop-downmenu,selectNewDriver….3. OntheNewJDBCDriverdialog,clickontheAdd…buttonandlocatethe
sqljdbc4.jarfilethatyoudownloadedwiththeSQLServerJDBCdriverdownload.TheDriverClassandNamefieldswillbeautomaticallypopulatedbyNetBeansqueryingthedriverfile,asshowninthefollowingscreenshot:
4. ClickontheOKbuttontocreatethenewdriver.5. YouwillnowbereturnedtotheNewConnectionWizarddialogwheretheDriver
fieldissettoMicrosoftSQLServer2005.
TipDon’tworrythatthedriverreferstoMicrosoftSQLServer2005—it’sjustaname!
6. ClickontheNextbutton.
Thenextstepistoenterbasicdatabaseconnectioninformation.
Notethatthefollowinginformationisnotsetinstoneandyoumighthavechangeditwheninstallingandconfiguringthedatabase.However,ifallthedefaultswereused,itislikelythattheinformationisthesameaspresentedhere:
1. Enterthefollowingconnectioninformation:
DriverName:MicrosoftSQLServer2005Host:localhostPort:1433Database:LeavethisblankInstanceName:\SQLEXPRESS

UserName:saPassword:Thepasswordthatwasenteredduringinstallation
2. Nowthateverythinglooksmoreorlesslikethefollowingscreenshot,noticethepatternofJDBCURL.TheJDBCURLfieldfollowsthestandardnamingschemeofcommencingwithjdbc:followedbythedatabasetype.TheURLthencontainsdetailsaboutthehost,theinstancename,andtheportnumbertoconnecttothedatabaseon.TheNewConnectionWizarddialogisshowninthefollowingscreenshot:
3. ClickontheNextbutton.4. IntheSelectSchemadropdown,selectdbo.5. ClickontheFinishbuttontocreatethenewconnectiontoSQLServer.
Howitworks…Unlikepreviousdatabaseswehaveconnectedto,thisisthefirstdatabaseconnectionthatwehavedefinedwithinthiscookbookthatrequiresanexternal.jarfiletoconnectproperly.
ThisisbecauseNetBeansdoesnotprovidetheSQLServerJDBC.jar(sqljdbc4.jar)filebydefault.Youwillnotfindthis.jarfilewithinNetBeans,orwithinaMavenrepository,asitisproprietarytoMicrosoftCorporation.
Asshownintheregistrationprocedure,afterenteringtherequiredinformation,theJDBCURLisoftheformat:jdbc:sqlserver://localhost\\SQLEXPRESS:1433
ThisconnectionstringshowsthatweareconnectingtoanSQLServerinstancecalledSQLEXPRESSrunningonport1433.ThisisthedefaultportforaSQLServerdatabase.
Whenregisteringthedatabase,NetBeansvalidatestheenteredinformationtoensureaccesstothedatabaseisavailable.Thisensuresthatnomisconfigureddatabaseisgoingtobeusedandpreventstheuserfromusingamisconfiguredconnection.TheconnectioncanalsobetestedwhileinputtingconnectiondetailsbypressingtheTestConnectionbutton.
WhentheFinishbuttonisclicked,NetBeansconnectstotheSQLServerdatabaseandfetchesexistingschemasfromtheserver.AnewdatabaseconnectionisplacedwithintheDatabasesnodeoftheServicesexplorer.

There’smore…WhatifwewantedtoconnecttoOracleinsteadofMSSQLServer?CanwedothatwithNetBeans?
ConnectingtoanOracledatabaseWithNetBeans,it’sstraightforwardtoconnecttoanOracledatabase.TheprocedureforconnectingtoOracleisalmostidenticaltothatforconnectingtoMicrosoftSQLServer.ForOracle,it’snecessarytousetheJDBCdrivernamedojdbc7.jar.ThisdriverisprovidedwithOracleinstallations,butcanalsobedownloadedfromhttp://www.oracle.com/technetwork/database/features/jdbc/index.html.
TipWhenchoosinganOracleJDBCdriver,itcanbeusefultoknowthenamingschemeOracleusesforitsdrivers.Oracledriversaregenerallynamedojdbc<jdk_version>.jar,soforexample,ojdbc7.jaristhedriverfiletousewithJava7.Oraclealsoproducesdriverfilesthatcontaindebuginformation.Theseallhavethesuffix,_g,soforexample,ojdbc6_g.jaristhedebugdriverfiletousewithJava6.
ToconfigureOracle,whenselectingthedriverontheNewConnectionWizarddialog,selectOracleThinasthedriverandthenaddtheojdbc7.jardriver,asshowninthefollowingscreenshot:
OntheCustomizeConnectionpageoftheNewConnectiondialog,thefollowinginformationshouldbeusedtoconnecttoOracle:
DriverName:OracleThin(ServiceName)Host:localhostPort:1521Service:orclUserName:systemPassword:Thepasswordthatwasenteredduringinstallation

Afterenteringallofthisinformation,theJDBCURLforOracleisofthefollowingformat:jdbc:oracle:thin:@//localhost:1521/orcl
WhatifmyOracledatabaseconnectionrequiresmetouseTNS?CanIusethistoconnectfromNetBeans?Certainly!Whenconfiguringanewconnection,specifyOracleThin(TNSName(v10.2.0.1.0orlater))asDriverName.TheoptionisthenpresentedtoentertheTNSNamefieldforconfigurationratherthantheServicefield.


ConnectingtoPostgreSQLPostgreSQLisacross-platformobject-relationaldatabasesystemthat,likeMySQL,isalsoopensourceandfree.ItissupportedandusedbyaconsortiumofcompaniessuchasRedHat,Skype,andHP.AswithMySQL,PostgreSQLfeaturesaGUIformanagementactivities—pgAdmin.
SettingupPostgreSQLwithNetBeansisnotasstraightforwardaswithMySQL,butNetBeansstillcomeswiththeappropriateJDBCdriver,sodon’tworry,it’sstillnotrocketscience.

GettingreadyForthisrecipe,wewillbeusingPostgreSQLversion9.3.2andpgAdminIII.
InstallationandconfigurationofPostgreSQLandcomponentsontotheoperatingsystemisbeyondthescopeofthisrecipe.WhatwillbelearnedhereishowtoconfigurePostgreSQLwithNetBeanssothatintegrationbetweenthedatabaseandNetBeanscanbeachieved.
Inthisrecipe,wewillassumethatthedatabaseisinstalledlocallyandthatthepasswordhasbeenchosenbytheuser.
ItisnecessarytohaveanexistingdatabaseinPostgreSQLforthisrecipetowork;wewillassumethatthenameofthedatabaseiscookbook.

Howtodoit…WithNetBeansopenandPostgreSQLrunning,performthefollowingsteps:
1. NavigatetotheServicesexplorer,right-clickontheDatabasesnode,andselectNewConnection….
2. IntheNewConnectionWizarddialog,selectPostgreSQLfromtheDriverdropdownandclickonNext.
3. EnterthefollowinginformationtodefinethePostgreSQLconnection:
Host:127.0.0.1Port:5432Database:cookbookUserName:postgresPassword:Enterthepostgresuser’spassword
TheNewConnectionWizarddialogforthePostgreSQLconnectionisdisplayedinthefollowingscreenshot:
4. ClickontheNextbutton.5. OntheChooseDatabaseSchematab,clickontheSelectSchemadropdownand
choosepublic.6. ClickonFinish.7. APostgreSQLJDBCconnectionnodeisaddedtotheDatabasesnodeasshownin
thefollowingscreenshot:
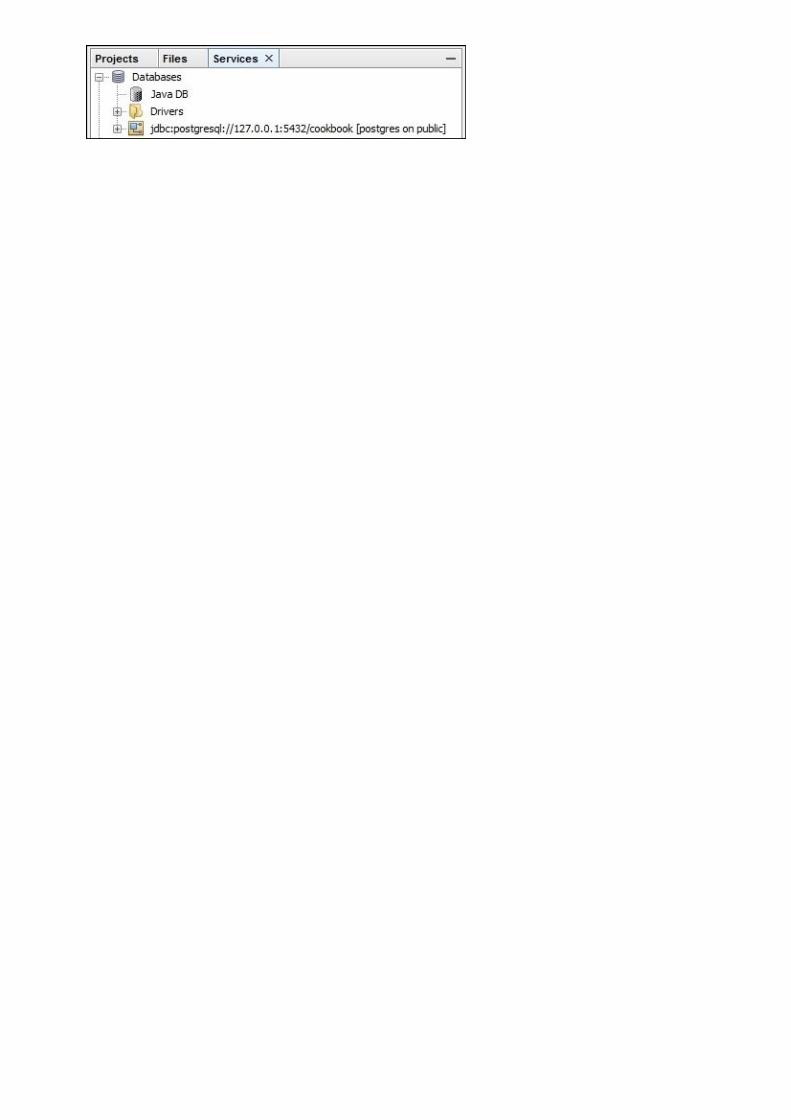

Howitworks…NetBeansvalidatestheenteredinformationtoaccessthedatabase.Thisensuresthatnomisconfigureddatabaseisgoingtobeusedandpreventstheuserfromusingamisconfiguredconnection.TheconnectioncanalsobetestedwhileinputtingconnectiondetailsbyclickingontheTestConnectionbutton.
WhentheFinishbuttonisclicked,NetBeansconnectstothePostgreSQLdatabaseandfetchesexistingdatabasesfromtheserver.AnewdatabaseconnectionisplacedwithintheDatabasesnodeoftheServicesexplorer.

There’smore…HowcanauserconnectanddisconnectfromaPostgreSQLdatabasefromwithinNetBeans?
ConnectinganddisconnectingItispossibletoconnectanddisconnectfromadatabaseusingtheServicesexplorer.
Simplyright-clickonthedesiredconnectionandselectConnect…,inthecaseofthedatabasebeingdisconnected;selectDisconnectifitisconnected,asshowninthefollowingscreenshot:


ManagingaSQLdatabaseInthepreviousrecipes,we’veseenhowtoconnecttoavarietyofbothopensourceandcommercialrelationaldatabases.Connectingtoadatabaseisallwellandgood(afterall,it’swhatwedoinourapplications),butweneedtobeabletoeasilycreatetablesandviews,andeasilyrunSQLqueriesagainstourdatabasestoseewhatdatawehaveinthem.
Inthisrecipe,we’llseehowwecanperformthesetypesofactions.

GettingreadyWe’llbemanagingaJavaDBinstanceinthisrecipeasJavaDBisoneoftheeasiestdatabasestoconfigureandconnecttofromwithinNetBeans.
Ifyou’venotgotaJavaDBconnectedandconfiguredwithinNetBeans,thenpleaserefertotheearlierrecipe,ConnectingtoJavaDB,toseehowtoconnect.WhencreatinganewJavaDBdatabase,nameitcookbookandspecifytheusernametoconnecttothedatabaseasAPP.

Howtodoit…NavigatetotheDatabasesnodewithintheServicesexplorerandperformthefollowingsteps:
1. Right-clickonthecookbookdatabaseunderneaththeJavaDBnodeandselectConnect….IftheJavaDBnetworkserverisnotrunning,itwillbestarted.
2. AconnectionwillbemadetotheJavaDBdatabasecalledcookbook.ThisisaccessedfromwithintheDatabasesnode,asshowninthefollowingscreenshot:
TipNotethatwhenadatabaseisnotconnected,thedisconnectedicon( )isdisplayednexttotheconnectionnameinsteadoftheconnectedicon( ).
3. Beforewecaninsertanydataintothedatabase,wemustfirstmakeatable.ExpandtheJavaDBconnectionnodeandtheAPPnodewithinittoseesubnodes,Tables,Views,andProcedures,asshowninthefollowingscreenshot:
4. Right-clickontheTablesnodeandselectCreateTable….5. TheCreateTabledialogwillbedisplayed.EntertheTablenamefieldasTASKS.6. ClickontheAddcolumnbuttonandcreatethefollowingcolumnsonebyone:
Name Type Size Default Constraints
TASK_ID INTEGER Primarykey,Unique,Index
TASK_NAME VARCHAR 25
TASK_COMPLETED BOOLEAN false
TASK_DUE DATE Null
7. Oncecompleted,theCreateTabledialogshouldlooklikethefollowingscreenshot:

8. ClickontheOKbuttontocreatethetable.9. ThetablewillnowbecreatedandwillbeshownwithintheTablesnodeinthe
Servicesexplorer.10. ExpandtheTASKSnodeandnoticehowthecolumnsandindexesforthetableare
available.
TipTheprimarykeyforthistablehasbeendeclaredasanautoincrementingidentityfieldthatcanstoreintegervalues.Atpresent,NetBeansdoesnotallowcolumnstobecreatedasidentitycolumnswithinJavaDB,soifthisisrequired,thenthetablemustbecreatedviaSQLandnotviatheCreateTabledialog.
Nowthatwe’vecreatedatable,let’sinsertsomedataintoitwiththefollowingsteps:
1. Right-clickontheTASKSnodeandselectExecuteCommand….2. AnewSQLwindowwillbeopenedintowhichwecantypeSQLcommands.3. EnterthefollowingcodeintotheSQLwindow:
insertintoTASKS(TASK_ID,TASK_NAME)values(1,'ReadCookbook');
insertintoTASKS(TASK_ID,TASK_NAME)values(2,'Eatsandwich');
insertintoTASKS(TASK_ID,TASK_NAME,TASK_DUE)values(3,'Dosome
programming','2015-03-01');
TipIt’sagoodpointtonotethatSQLfilescanbesavedwithinaprojectsothatifyou’vegotsomeSQLthatyouregularlyneedtorun,youcanquicklyandeasilyaccessitatalaterdate.
4. Clicktoplacethemousecursoranywherewithinthefirstinsertstatementasshowninthefollowingscreenshot:

5. ClicktheRunStatementbutton( ).ThiswillexecutethestatementthatiscurrentlyselectedandnottheentirecontentsoftheSQLwindow.
6. Right-clickontheTASKStablewithintheServicesexplorerandselectViewData….7. AnewSQLwindowwillopenwheretheSQLisalreadyenteredasselect*from
APP.TASKS;.8. TheSQLstatementwillbeexecutedautomaticallyshowingthedatabeneaththe
querywindow.9. NavigatebacktotheoriginalSQLwindow.10. CommentouttheoriginalSQLstatementthatwehavealreadyexecutedby
appending–tothebeginningoftheline.ThefirstSQLstatementshouldnowread:
--insertintoTASKS(TASK_ID,TASK_NAME)values(1,'ReadCookbook');
11. ClickontheRunSQLbutton( ).ThiswillexecutealloftheSQLcodethatiscurrentlywithintheSQLwindow.Inthisinstance,thiswillbethefinaltwoSQLstatementsthatwehavedefined.
12. NavigatebacktotheSQLwindowthatcontainstheselect*fromAPP.TASKS;SQLstatementandclickontheRunSQLbutton.
13. Notehowtherearenowthreerowsstoredinthedatabaseasshowninthefollowingscreenshot:

Howitworks…Inthisrecipe,we’veseenhowwecanconnecttoadatabasewithinNetBeansviaJDBC.Inthisinstance,thedatabasewasJavaDB;however,theprocedureisthesameforanydatabase.
Onceconnectedtothedatabase,weusetheCreateTabledialogtoallowustographicallydefinetheschemaforasimpletable.WenotedthattherearesomerestrictionswithinNetBeanswithregardstocreatingtablesinJavaDB(namelythatwecan’tcreateidentityfieldsviatheGUI).
ExecutingSQLstatementsiseasilyaccomplishedusingeithertheRunStatementorRunSQLcommands.WhenmorethanoneSQLcommandisspecified,eachcommandneedstobeseparatedbyasemicolon,;,sothatNetBeansknowswhereonecommandendsandanotherbegins.
Finally,wesawthat,notonlycanweexecuteSQLstatementsthatdon’treturnresults,wecanalsoexecuteSQLstatementsthatreturnresults.Notonlythat,butwecaneasilyseetheresultsinanicelyformattedpagedtable.

There’smore…NetBeansprovidesevenmorefeaturesthanwe’veseenformanipulatingdatawithinadatabase.
ViewingdataWhatifwe’vegotatablewithalotofcolumnsinitandweonlywishtoviewsomeofthosecolumns?Right-clickingonatableandselectingViewData…returnsallofthecolumnsforthetable.Isitpossibletoviewonlyafewcolumns?
Itcertainlyis!Insteadofright-clickingonthetableandselectingViewData…,simplyselectthecolumnstoview(pressCtrlwhileclickingonacolumnnameformultiselect)andthenchooseViewData….
CreatingindexesCreatingatablewithnoindexesisprobablygoingtogiveusperformanceheadacheswhenwestartgettinglargerdatasets.Fortunately,NetBeansallowsustoeasilycreatecustomindexesonatable.Simplyright-clickontheIndexesnodeandselectAddIndex….TheAddIndexdialogallowsanindexnametobespecifiedalongwiththecolumnstobepartoftheindexandwhethertheindexinuniqueornot.ThefollowingscreenshotdisplaystheAddIndexdialog:
Inserting,deleting,andamendingdatagraphicallyWesawinthisrecipehowwecanuseSQLtoinsertdataintotables.Sometimes,however,itcanbeusefultoeasilyinsertordeletedatafromatable,oreveneditexistingdata.HowcanNetBeanshelpushere?
Whenviewingadataset,someadditionaloptionsareavailableforeditingdata.ClickingontheInsertRecordbutton( )displaysaformallowingallofthefieldsforoneormorerowstobedefinedgraphically.ThesenewrowscanthenbeinserteddirectlyintothedatabaseortheSQLcanbeselectedandmanuallyexecutedagainstthedatabase.
Ifwedon’tneedsomedatainthedatabase,thenclickingontheDeleteSelectedRecordsbutton( )willdoasthenamesays,anddeletetherowsthatareselectedinthedataset

viewer.
Wecanalsoeditdatawithinadatasetviewerbydouble-clickingonthecellwewishtoeditandthensimplyspecifyingthenewvalueofthedata.
Alloftheseoperationsareundertransactionalcontrol,sotokeep(commit)anychangeswemakegraphically,weneedtoclickontheCommitRecord(s)button( ).Conversely,tothrowaway(rollback)anyeditswemake,weneedtoclickontheCancelEditsSelectedRecord(s)button( ).
Finally,ifwesimplywishtodeletealloftherowswithinatable,wecanclickontheTruncateTablebutton( ).
ExportingschemasSo,we’vefinallywrittenanapplication,andwewanttotakeacopyofthedatabaseschema,perhapssothatwecandeployittoanotherserver,orpassittoacolleagueforthemtolookat.Howcanweachievethat?
Right-clickingonatablewithintheTablesnodeintheServicesexplorerprovidesaGrabStructureoption.ThissavesthestructureofatableawayintoabinaryfilethatcanlaterbeloadedintoNetBeansusingtheRecreateTableoption—againontheright-clickmenufromatable.


ConnectingtoMongoDBMongoDBisaNoSQLdatabasethatallowsJSON-styledocumentstobestoredwithinit,ratherthanthetraditionaltablesandrowsthatarelationaldatabaseuses.ThenameMongoDBcomesfromthewordhumongous,givinganindicationofthesizeofdatathatcanbestoredwithinMongoDB,asitisnotuncommontostorebillionsofdocumentswithinMongoDB.
MongoDBisusedbylargecorporationssuchasLinkedIn,SalesForce,andEA.
ForfurtherinformationaboutMongoDB,visittheprojectsiteathttp://www.mongodb.com.

GettingreadyTocompletethisrecipe,itisnecessarytohaveaninstanceofMongoDBtoconnectto,however,installationofMongoDBisoutsidethescopeofthisrecipe.
Inthisrecipe,wewillassumethatMongoDBisinstalledlocally,althoughbychangingconnectiondetails,thisrecipewillworkequallywellforremoteMongoDBservers.

Howtodoit…MongoDBsupportisnotincludedwithinNetBeansbydefault;so,first,wemustadditwiththefollowingsteps:
1. ClickonToolsandthenPluginsformtheNetBeansmainmenutoopentheNetBeansPluginsdialog.
2. SelecttheAvailablePluginstabandchecktheInstallcheckboxfortheNBMongoplugin,asshowninthefollowingscreenshot:
3. ClickontheInstallbuttontocommenceinstallationoftheplugin.4. NetBeanswillconfirminstallationoftheNBMongoplugin.ClickonNext.5. ReadandacceptthelicenseagreementandthenclickontheInstallbuttonto
completeinstallationoftheplugin.6. Thepluginwillnowbeinstalled.ClickonFinishwheninstallationiscompleteand
thenclickonClosetoexitthePluginsdialog.7. AnewoptionwithintheServicesexplorerisnowavailableforconnectingto
MongoDB.ClickontheServicesexplorertoseetheMongoDBoption,asshowninthefollowingscreenshot:
Nowthatwe’veaddedMongoDBsupportintoNetBeans,let’screateaconnectiontoaMongoDBserverwiththefollowingsteps:
1. Right-clickontheMongoDBnodewithintheServicesexplorerandselecttheNewConnectionoption.
2. TheNewMongoDBConnectiondialogwillbedisplayed.3. EntertheNamefieldasMongoCookbookandtheMongoURIfieldas
mongodb://localhost/cookbook.4. ClickonOKtoaddthenewconnection.5. AnewoptionisaddedintotheServicesexplorerforthespecifiedMongoDB;
however,NetBeansisnotyetconnectedtoMongoDB.Right-clickontheMongoCookbooknodeunderneathMongoDBwithintheServicesexplorerandselectConnect.

6. TheconnectiontoMongoDBisestablishedandthecookbookdatabasecreatedisshown:
Let’snowcreateacollectionwithinMongoDBandaddsomedatatoitwiththefollowingsteps:
1. Right-clickonthecookbooknodewithintheServicesexplorerandselectAddCollection.
2. IntheAddCollectiondialog,entertheCollectionnamefieldasBooksandclickonOK,asshowninthefollowingscreenshot:
3. ABookscollectionisnowdisplayedwithintheServicesexplorerunderneaththecookbookdatabase.
4. Right-clickontheBookscollectionandselecttheOpenmenuoption.TheBookscollectionwillnowbeopenedwithinanewwindowtitledcookbook.Books,asshowninthefollowingscreenshot:

5. ClickontheAddDocument( )buttontoinvoketheAddnewdocumentdialog.6. OntheAddnewdocumentdialog,enterthedocumentas:
{
Name:"NetBeansCookbook",
Author:"DavidSalter"
}
WewillhavetheAddnewdocumentdialogasshowninthefollowingscreenshot:
7. ClickontheOKbuttontostorethedocument.8. ThelistofDocumentsstoredwithinthecollectionisupdatedtoreflectthenewly
addeddocument,asshowninthefollowingscreenshot:

Howitworks…Inthisrecipe,wesawhowtoinstallMongoDBsupportintoNetBeansviaathird-partyplugincalledNBMongo.Formoreinformationaboutthisplugin,visithttp://plugins.netbeans.org/plugin/52638/nbmongo.
Whenconnectingtothedatabase,wespecifiedadatabasenamewithintheMongoDBconnectionURI.Thisdatabasewasthenlazilycreatedwhenweaddedacollectiontoit.IfweneedtocustomizetheMongoDBconnectionURI,wecanclickontheBrowsebuttonontheNewMongoDBConnectiondialog.Thisallowsustospecifyitemssuchashostname,port,credentials,anddatabaseoptions.
AfterconnectingtoMongoDB,weaddedasimpledocumenttothedatabase.ThedocumentwasasimpleJSONdocumentcontainingtwofields,nameandauthor.Ofcourse,addingonlytwofieldslikethisdoesnotshowoffthebenefitsofaNoSQLdatabase,butshowshoweasyitistostoredocumentsfromwithinNetBeans.
Finally,wesawhowNetBeanswilleasilylistoutthedocumentsinacollectionforus.NetBeanspagesthesedocumentsforusinsteadofproducingonelonglistofallthedocumentswithinacollection.

There’smore…Inadditiontoaddingandselectingdocuments,theMongoDBpluginallowsustoeditanddeletedocumentswithinacollection—justaswe’dexpecttodowithatraditionalrelationaldatabase.WecanimportandevenexportcollectionsasJSONfilessothattheycanbeusedoutsideofMongoDB.
Whenviewinglistsofdocuments,wecanmodifythecriteria,projection,andsortorderingoftheresultsetdirectlyfromwithintheresultswindow.Ifyou’renotfamiliarwithMongoDB,pleaseconsulttheMongoDBmanualathttp://docs.mongodb.org/manual/formoreinformationontheseoperations.
TheMongoDBshellWhatifIwanttoperformsomeadvancedoperationthat’sonlyavailablefromwithintheMongoDBshell?CanIdothatfromwithinNetBeans?Youcertainlycan!
Right-clickingonadatabasewithinaMongoDBconnectionintheServicesexplorerprovidestheoptiontoopenMongoShell.Toenablethisoption,thepathtotheMongoDBshellexecutablefirstneedstobespecified.ThispathisspecifiedwithintheMiscellaneoussectionoftheNetBeansOptionsdialog,asshowninthefollowingscreenshot:


Chapter7.NetBeansJavaFXInthischapter,wewillcoverthefollowingrecipes:
CreatingaJavaFXapplicationGraphicaleditingofFXMLfilesStylingaJavaFXapplicationwithCSSCreatingandusingaJavaFXcustomcontrolDeployingaself-containedapplication

IntroductionJavaFXisasoftwaretoolkitgearedarounddevelopingrichGUI-basedapplications.ItwasfirstintroducedatJavaOnein2007andhasmostrecentlybeenreleasedasJavaFXVersion8aspartoftheJava8release.
JavaFXusedtobeaseparateinstallationfromJava,butasofJDK7u6,JavaFXhasbeenbundledwithboththeJavaJDKandJRE.
ThelongtermstrategyforJavaFXissurelytoreplaceSwingasthedominantGUIdevelopmentenvironmentforJavadevelopersasitprovidesawealthofGUIcomponentsandprovidesdevelopersthefacilitytoeasilycreatenewcomponents.JavaFXpromotestheseparationofuserinterfaceandapplicationcodebyemployingFXMLfilesfordevelopingtheuserinterface.FXMLfilesallowuserinterfacestobedevelopedwithanXMLformatstructureoutsideofJavacodethatcanbestyledbydesignersusingstandardCSS.
JavaFXapplicationscanbeexecutedasstandalonenativeapplications(forexample,.exefilesonWindowsor.appfilesonMacOSX),orcanbelaunchedviaJavaWebStartorbyembeddingwithinawebpage.
Thesedeploymentstrategies,alongwiththeadvanceddesignandlayouttoolsforGUIs,makeJavaFXanexcellentchoicefordevelopingmodernGUI-basedapplications.
FormoreinformationonJavaFX,checkoutOracle’sinformationpageathttp://www.oracle.com/technetwork/java/javase/overview/javafx-overview-2158620.html.


CreatingaJavaFXapplicationInthisrecipe,we’llseehowwecanuseNetBeanstocreateaJavaFXapplication.We’llcreatetwowindows;oneofthesewillbedevelopedinJavacodeandthesecondwillbedevelopedusingFXML.

GettingreadyTocompletethisrecipe,youcanuseeithertheJavaSEorJavaEEversionofNetBeans.
YoumusthaveJDK7u6orhigherinstalledtobeabletodevelopandrunJavaFXapplications.

Howtodoit…1. ClickonFileandthenNewProject….2. SelectJavaFXfromtheCategorieslistandJavaFXApplicationfromthelistof
Projects.3. ClickonNext.4. EntertheProjectNamefieldasWelcomeToFX.Ensureavalidprojectlocationis
specified.EnsureCreateApplicationClassisselectedascom.davidsalter.cookbook.welcometofx.WelcomeToFX.
5. ClickonFinish.
AblankJavaFXapplicationwillnowbecreatedforyou.Tocheckthateverythingisinstalledcorrectly,runtheapplication.YoushouldseeawindowwithaSay‘HelloWorld’buttonwithinit,asshowninthefollowingscreenshot:
NowthatwehavevalidatedthatwecanrunJavaFXapplications,let’schangetheapplicationtoaskforourname.We’llthendisplayanFXML-designedwindowandseehowwecandevelopJavaFXapplicationsusingbothJavacodeandFXML.Todothis,performthefollowingsteps:
1. Double-clickontheWelcomeToFX.javafilefromtheProjectsexplorertoopenitupforediting.
2. Changethestart(StageprimaryStage)methodtoread:
@Override
publicvoidstart(StageprimaryStage){
primaryStage.setTitle("HelloWorld!");
GridPanegridPane=newGridPane();
gridPane.setAlignment(Pos.CENTER);
gridPane.setHgap(15);
gridPane.setVgap(15);
gridPane.setPadding(newInsets(20));
LabelhelloLabel=newLabel("Hello");
gridPane.add(helloLabel,0,0);
LabelnameLabel=newLabel("What'syourname?");
gridPane.add(nameLabel,0,1);
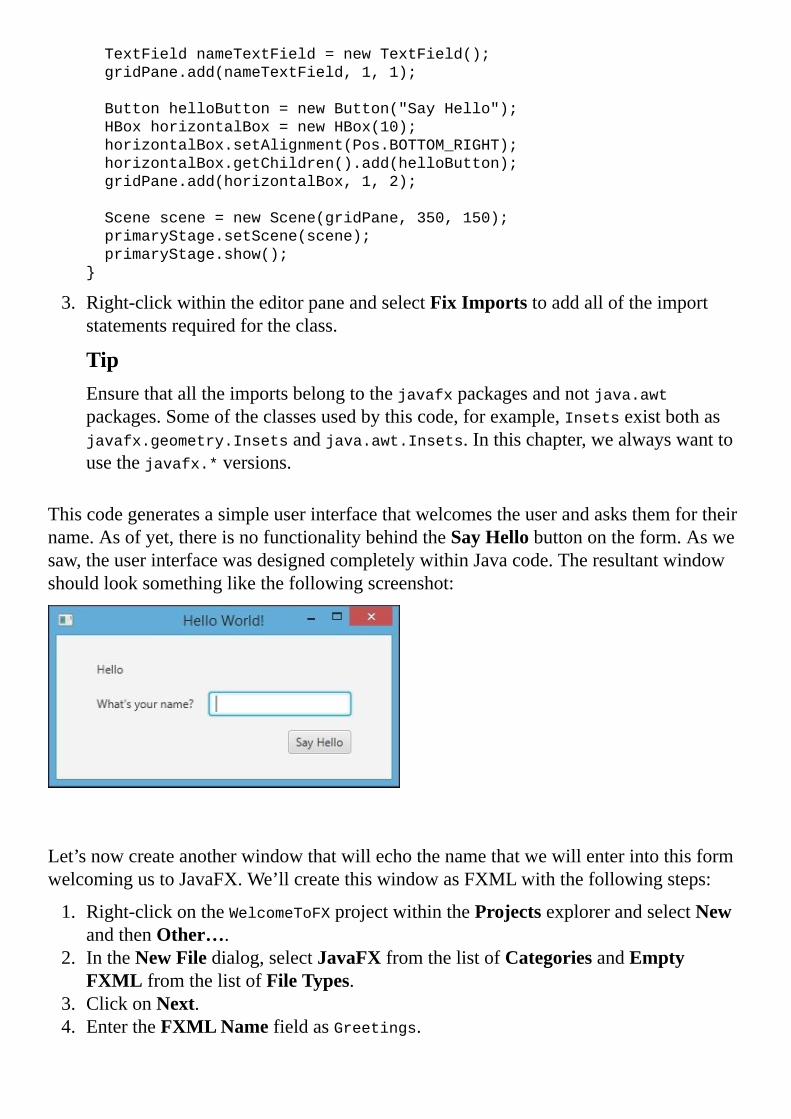
TextFieldnameTextField=newTextField();
gridPane.add(nameTextField,1,1);
ButtonhelloButton=newButton("SayHello");
HBoxhorizontalBox=newHBox(10);
horizontalBox.setAlignment(Pos.BOTTOM_RIGHT);
horizontalBox.getChildren().add(helloButton);
gridPane.add(horizontalBox,1,2);
Scenescene=newScene(gridPane,350,150);
primaryStage.setScene(scene);
primaryStage.show();
}
3. Right-clickwithintheeditorpaneandselectFixImportstoaddalloftheimportstatementsrequiredfortheclass.
TipEnsurethatalltheimportsbelongtothejavafxpackagesandnotjava.awtpackages.Someoftheclassesusedbythiscode,forexample,Insetsexistbothasjavafx.geometry.Insetsandjava.awt.Insets.Inthischapter,wealwayswanttousethejavafx.*versions.
Thiscodegeneratesasimpleuserinterfacethatwelcomestheuserandasksthemfortheirname.Asofyet,thereisnofunctionalitybehindtheSayHellobuttonontheform.Aswesaw,theuserinterfacewasdesignedcompletelywithinJavacode.Theresultantwindowshouldlooksomethinglikethefollowingscreenshot:
Let’snowcreateanotherwindowthatwillechothenamethatwewillenterintothisformwelcomingustoJavaFX.We’llcreatethiswindowasFXMLwiththefollowingsteps:
1. Right-clickontheWelcomeToFXprojectwithintheProjectsexplorerandselectNewandthenOther….
2. IntheNewFiledialog,selectJavaFXfromthelistofCategoriesandEmptyFXMLfromthelistofFileTypes.
3. ClickonNext.4. EntertheFXMLNamefieldasGreetings.

TipRemember,whencreatinganewfileofaknowntype,wedon’tneedtoenterthefileextension(.fxmlinthiscase)asNetBeanswillautomaticallyadditforus.
5. EnterthePackagefieldascom.davidsalter.cookbook.welcometofx.6. ClickonNext.7. OntheNewEmptyFXMLpage,checktheUseJavaControlleroption.8. EnsurethedefaultoptionoftheCreateNewcontrollerisselectedwiththe
ControllerNamefieldnamedGreetingsControllerandthePackagefieldnamedcom.davidsalter.cookbook.welcometofx,asshowninthefollowingscreenshot:
9. ClickonNext.10. OntheCascadingStyleSheetNameandLocationpage,ensurethattheUse
CascadingStyleSheetsoptionisnotselected.WewillseeinalaterrecipehowtostyleJavaFXusingCSS.
11. ClickontheFinishbuttontocreatetheFXMLpage.12. Double-clickontheGreetings.fxmlfilewithintheProjectsexplorertoopenitup
forediting.13. Changethecontentsofthefiletoread:
<?xmlversion="1.0"encoding="UTF-8"?>
<?importjavafx.scene.control.*?>
<?importjavafx.scene.layout.*?>
<AnchorPaneid="AnchorPane"prefHeight="150.0"prefWidth="350.0"
xmlns:fx="http://javafx.com/fxml/1"
xmlns="http://javafx.com/javafx/2.2"
fx:controller=

"com.davidsalter.cookbook.welcometofx.GreetingsController">
<children>
<GridPanelayoutX="75.0"layoutY="35.0">
<children>
<Labeltext="Hi"GridPane.columnIndex="0"GridPane.rowIndex="0"
/>
<Labelfx:id="name"text="..yournamehere.."
GridPane.columnIndex="0"GridPane.rowIndex="1"/>
</children>
<columnConstraints>
<ColumnConstraintshgrow="SOMETIMES"minWidth="10.0"
prefWidth="100.0"/>
<ColumnConstraintshgrow="SOMETIMES"minWidth="10.0"
prefWidth="100.0"/>
</columnConstraints>
<rowConstraints>
<RowConstraintsminHeight="10.0"prefHeight="30.0"
vgrow="SOMETIMES"/>
<RowConstraintsminHeight="10.0"prefHeight="30.0"
vgrow="SOMETIMES"/>
<RowConstraintsminHeight="10.0"prefHeight="30.0"
vgrow="SOMETIMES"/>
</rowConstraints>
</GridPane>
</children>
</AnchorPane>
14. ThisFXMLfilesimplycreatesagridandthenaddstwolabelsintothegrid.ThefirstlabelsaysHiandthesecondwillshowthenameenteredwithinthewindowwecreatedearlier.
Sincewewanttodynamicallychangewhat’sshowninthiswindow(wewanttodisplaytheuser’snameintheLabeltagidentifiedasfx:id="name"),weneedtoaddsomecodetothecontrollerclasstomanagethis.
15. Double-clickontheGreetingsController.javafilewithintheProjectsexplorertoopenthefileforediting.
16. Addaprivatemembertostoretheinputtednameasfollows:
@FXML
privateLabelname;
17. Addapublicmethodtostorethename:
publicvoidsetName(Stringname){
this.name.setText(name);
}
18. FixanyimportsusingtheFixImportstool.
TipWhenfixingimports,rememberthatsomeoftheJavaFXclasseshavethesamenamesasclassesinthejava.awtpackages.Ensureyouimportthecorrectjavafxpackagesratherthanjava.awtpackages.

Nowthatwe’vecreatedascreentogetsomeinputfromtheuser,andascreentoshowtheinputbacktotheuser,weneedtowirethetwoscreenstogethersothatthegreetingspageisshownwhentheuserclicksonthebuttononthefirstwindowwiththefollowingsteps:
1. Double-clickontheWelcomeToFX.javafilewithintheProjectsexplorertoopenupthefileforediting.
2. ImmediatelybeforeinstantiatingtheSceneclass(threelinesfromthebottomofthestartmethod),insertthefollowingcode:
helloButton.setOnAction(newEventHandler<ActionEvent>(){
@Override
publicvoidhandle(ActionEventevent){
try{
FXMLLoaderloader=new
FXMLLoader(getClass().getResource("Greetings.fxml"));
Stagestage=newStage(StageStyle.DECORATED);
stage.setScene(newScene((Pane)loader.load()));
GreetingsControllercontroller=loader.
<GreetingsController>getController();
controller.setName(nameTextField.getText());
stage.show();
}catch(IOExceptionex){
Logger.getLogger(WelcomeToFX.class.getName()).log(Level.SEVERE,
null,ex);
}
}
});
ThiscodeaddsaneventhandlerontohelloButton,whichwhenclicked,loadsthewindowthatisdefinedbyGreetings.fxmlandshowsit.
3. Again,right-clickwithinthecodeeditingwindowandselecttheFixImportsmenuoptiontofixthefile’simportstatements.
4. PressF6toruntheapplication.EnteranameinresponsetothequestionWhatisyourname?andclickontheSayHellobuttontobegreeted.

Howitworks…Inthisrecipe,wesawhowtocreateaJavaFXapplicationandhowtocreateuserinterfacesbothusingJavacodeandusingFXML.
WecodedaJavaFXwindowusingpureJavaandthenwecreatedawindowusingFXML.Neitherofthesewindowshadmuchstylingonthem.We’llseeinalaterrecipe,StylingaJavaFXapplicationwithCSS,howwecanstyleJavaFXapplicationsusingCSS.
TipWhendynamicallyloadingFXMLfilesusingtheFXMLLoaderclass,it’sagoodpracticetocatchjava.lang.IllegalStateExceptionsasthesewillbethrownwithaLocationisnotsetmessageiftheFXMLfilecannotbefoundandloaded.
OneofthemainbenefitsofdesigninguserinterfacesinFXMListhatitcompletelyseparatestheuserinterfacefromtheapplicationcodethusallowingdesignersmorecontrolovertheUIandUXofanapplication.Wesaw,however,thattheNetBeanseditorforFXMLfilesisjusttheplainoldNetBeanstexteditor.UnlessyoucanrememberallofthesyntaxtoFXML,youprobablywon’tbetooproductivewritingFXMLthisway.Inthenextrecipe,GraphicaleditingofFXMLfiles,we’llseehowwecanenhancetheFXMLeditingabilitieswithinNetBeansandbringthemuptopar,oreventobetterthanthoseprovidedforSwingapplications.

There’smore…WhatifIonlywanttocreateapplicationsusingFXML?IsitpossibletocreateaJavaFXApplicationclasswithoutcodinganyuserinterfaceinJava?
CreatingalluserinterfacesinFXMLItcertainlyis!WhencreatingaprojectfromtheNewProjectwizard,selectJavaFXfromthelistofCategoriesandJavaFXFXMLApplicationfromthelistofProjects.
IfyouprefertouseMavenasyourbuildtool,you’llbepleasedtoknowyoucanalsocreateJavaFXapplicationsusingMaven.SimplyselectMavenfromtheCategorieslistontheNewProjectwizardandthenJavaFXApplicationfromthelistofProjects.ThiswillcreateanapplicationreadyfordevelopinguserinterfacesinFXMLbydefault.
ManuallycreatingcontrollersWhencreatingFXMLfiles,wesawinthisrecipehowtocreateJavacontrollerclasses.WhathappensifIforgottocreateacontroller?DoIhavetomanuallycreateacontrollerandthenwireituptotheFXMLfile?
Fortunately,NetBeanshelpsinthisregard.TocreateacontrollerandlinkituptotheFXMLfile,simplyright-clickonanFXMLfilewithintheProjectsexplorerandselecttheMakeControlleroption.NetBeanswillthencreateablankcontrollerclassandwillalsoaddthefx:controllerattributeintotheFXMLfileautomaticallywiringthetwotogether.


GraphicaleditingofFXMLfilesInthepreviousrecipe,CreatingaJavaFXapplication,wesawhowtocreateJavaFXapplicationsusingbothJavacodeandthemoredesignerfriendlyFXML.
WesawthatthebasiceditingfacilityforFXMLfileswithinNetBeansisnotmuchmorethanatexteditor.Inthisrecipe,we’llseehowtousetheJavaFXSceneBuildertoprovideafirst-ratedesigntoolforJavaFXapplications.
SceneBuilderisOracle’sJavaFXvisuallayouttoolandisavailableasaseparatedownloadfromJavaforWindows,MacOSX,andLinux.

GettingreadyTocompletethisrecipe,you’llneedtohaveeithertheJavaSE,ortheJavaEEversionofNetBeans8installedtogetherwithaminimumofJDK7u6installed.
Youwillalsoneedtheapplicationwedevelopedinthepreviousrecipe,CreatingaJavaFXapplication.Ifyouhavenotcompletedthisrecipe,thecompleteapplicationisavailablewithinthecodedownloadbundleforthischapter.

Howtodoit…Beforestarting,ensurethatNetBeansiscloseddownsothatintegrationwithSceneBuildercanbecompletedwiththefollowingsteps:
1. ToenablegraphicaleditingofFXMLfiles,weneedtoinstallOracle’sSceneBuilderapplication.SceneBuilderintegratesseamlesslywithNetBeansbyallowingFXMLfilestobeeditedautomaticallywhentheyareopenedwithinNetBeans.
TipFormoreinformationaboutSceneBuilder,includingearlyaccesstothenextrelease,checkouthttp://www.oracle.com/technetwork/java/javase/downloads/javafxscenebuilder-info-2157684.html.
2. DownloadJavaFXSceneBuilderVersion2.0fromhttp://www.oracle.com/technetwork/java/javase/downloads/sb2download-2177776.html.
3. Runtheinstallertoinstalltheproduct.Theinstallershouldrunthroughveryquicklyandinstalltheproductwithoutaskingforanyuserinput.
4. LaunchNetBeansandopentheWelcomeToFXproject.5. ExpandtheSourcePackagesnodeanddouble-clickontheGreetings.fxmlfile.6. ThefilewillnowbeopenedautomaticallywithinSceneBuilderinsteadofwithin
NetBeans’texteditor,asshowninthefollowingscreenshot:

7. TheFXMLfilecannowbeeditedgraphicallyinasimilarfashiontoeditingSwingfileswithinNetBeans.SinceSceneBuilderisworkingonthesamefileasNetBeans,whenthefileissavedinSceneBuilder,itisautomaticallyusedwhentheapplicationisexecutedinNetBeans.

Howitworks…ThestandardinstallationofNetBeansallowsFXMLfilestobeeditedwithinatexteditor.WhenOracle’sSceneBuilderproductisinstalled,itsetsupareferencetotheinstallationlocationwithinNetBeanssothatdouble-clickingonanFXMLfileopensthefilewithinSceneBuilder.
ThelocationofSceneBuilderisconfiguredwithinNetBeanswithintheJavasectionoftheOptionswindow.SelectToolsandthenOptionsfromthemainmenutoaccesstheoptionswindow.Fromthere,selecttheJavacategoryandtheJavaFXtab,asshowninthefollowingscreenshot:

There’smore…WhenSceneBuilderisinstalledandconfiguredwithinNetBeans,itisstillpossibletoeditFXMLfilesdirectlywithinatexteditorifrequired.
ToeditafiledirectlywithinNetBeans,right-clickonanFXMLfileandselecttheEditoption.Right-clickingonafileandselectingOpenwillperformthesameactionasdouble-clickingthefile,thatis,itwillopenthefilewithinSceneBuilder.


StylingaJavaFXapplicationwithCSSOneofthebenefitsofJavaFXapplicationsisthattheiruserinterfacescanbedesignedratherthandeveloped.Thisistypicallyajobdonebyadesignerratherthanadeveloper.Assuch,it’sagoodpracticetoplacealloftheapplicationstylingoutsideofJavacodewithinaCSSfile.
It’spossibletostyleaJavaFXapplicationwithinJavacodebysettingfontsandcolorsandlayoutpadding(wesawanexampleofsettingpaddingonelementswithintheCreatingaJavaFXapplicationrecipe)withintheJavacode,butobviously,thismakesitmoredifficulttomakestylechangestoanapplication.
Inthisrecipe,we’llseehowwecanapplyCSSchangesprimarilytoFXMLfiles.We’llalsoshowhowCSScanbeappliedtoJavafilesforthosethatarecuriousabouthowtodothis.

GettingreadyTocompletethisrecipe,you’llneedtohaveeithertheJavaSE,ortheJavaEEversionofNetBeans8installedtogetherwithaminimumofJDK7u6installed.
Youwillalsoneedtheapplicationwedevelopedinthepreviousrecipe,CreatingaJavaFXapplication.Ifyouhavenotcompletedthisrecipe,thecompleteapplicationisavailablewithinthecodedownloadbundleforthischapter.

Howtodoit…EnsurethatNetBeansisopenandthattheWelcomeToFXprojectisloaded.
ThefirststageinstylinganFXMLfileistoreferenceastylesheetthatwillcontainallofthestylinginformationwiththefollowingsteps:
1. Right-clickontheGreetings.fxmlfileandselectEdittoopenthefileforeditingwithinNetBeansratherthaninSceneBuilder(seetheGraphicaleditingofFXMLfilesrecipe,formoredetailsoninstallingSceneBuilder).
2. TouseCSSstylingwithinanFXMLfile,wemustreferencetheCSSfilethatwewishtousedirectlywithintheFXMLfileitself.Immediatelybeforethe</AnchorPane>tag,addthefollowingcode:
<stylesheets>
<URLvalue="@style.css"/>
</stylesheets>
3. Thistellstheruntimethatthestyle.cssfilehasgotallthestylinginformationforthisFXMLfile.The@prefixinfrontofthefilenameindicatesthatthestyle.cssfileisstoredinthesamelocationastheFXMLfile.
4. InordertousetheURLtag,weneedtoaddareferencetotheappropriateJavalibrary,namelyjava.net.*,asanimportstatementforthefile.
5. Addthefollowingimportstatementwiththeexistingimportstatementsatthetopofthefile:
<?importjava.net.*?>
Nowthatwe’vereferencedastylesheet,weneedtodefinethestylesheetandanyassociatedstyleswithinusingthefollowingsteps:
1. Right-clickonthecom.davidsalter.cookbook.welcometofxpackagewithintheProjectsexplorerandselectNewandthenOther….
2. OntheNewFiledialog,selectOtherfromthelistofCategoriesandCascadingStyleSheetfromthelistofFileTypes.
3. ClickonNext.4. EntertheFileNamefieldasstyleandclickontheFinishbuttontocreatethefile.5. Thestyle.cssfileshouldbeautomaticallyopenedwithinNetBeansforediting.6. Thefirststylingwearegoingtoaddisabackgroundcolortothewindow.Addthe
followingintotheCSSfile:
.root{
-fx-background-color:linear-gradient(blue,gray);
}
7. Thisstylesetsthebackgroundcolortobealineargradientbetweenthecolorsblueandgray.Youcanseethattheselectorisprefixedwith.indicatingthatthestyleisfortherootclassratherthanforanobjectwithanIDofroot.
Tip

The.rootstyle,asitsnamesuggests,isappliedtotherootnodeoftheSceneclass’sinstance.AsallthecontrolswithinaSceneclassarestoredinahierarchyunderneaththerootnode,anystylesappliedtothe.rootclassareautomaticallyappliedtoallcontrolswithintheform.The.rootclassisthereforeagoodplacetoaddanystylesthatareconsistentacrossallobjectsonaform.
8. Let’snowaddastyletoalllabelsontheform.Addthefollowingcodetotheendofthestyle.cssfile:
.label{
-fx-font-size:20px;
-fx-text-fill:yellow;
}
9. Aswiththepreviousstyle,thestyleisprefixedwith.indicating,inthiscase,thatallelementsofthelabelclassaretohaveafontsizeof20pixelsandaretobedisplayedinyellow.
10. Let’snowoverridethatruleforthenamefieldthatwehaveontheform.Addthefollowingstyletotheendofthestyle.cssfile:
#name{
-fx-font-size:30px;
}
11. Youcanseethatthisselectorisdifferentfromthepreviousselectorsthatwedefined,asitbeginswitha#prefixinsteadofa.prefix.Thisindicatesthatthestyleshouldbeappliedonlytoobjectsthathavefx:idofname.Inourcase,thisisthelabelthatdisplaystheuser’sname.
TipAtthispoint,youmaybewonderinghowyoucanfindoutthenamesofalltheCSSstylesthatcanbeappliedtonodeswithinJavaFX.Well,youcangetafullCSSreferenceguidefromOracleathttp://docs.oracle.com/javafx/2/api/javafx/scene/doc-files/cssref.html.
12. Nowthatwe’vemadesomechangestoCSS,let’sruntheapplicationandseehowit’sbeenstyled.PressF6toruntheapplication.EnteranameandclickontheSayHellobutton.Theresultantwindowshouldlooksomethinglikethefollowingscreenshot:

Sofarwe’veseenhowtostyleFXMLfilesusingCSS.Rememberthatwesaidwe’dtakealookathowtostyleJava-codedwindowsaswell?We’lldoitwiththefollowingsteps:
1. Double-clickontheWelcomeToFX.javafilewithintheProjectsexplorertoopenitforediting.
2. Withinthestart()method,addthefollowingcodeimmediatelybeforethecalltoprimaryStage.show():
scene.getStylesheets().add(WelcomeToFX.class.getResource("style.css").t
oExternalForm());
3. ThislineloadsthestylesheetfilefromtheclasspathandregistersitforuseagainsttheSceneclass.
TipWhenusingJavacodeinsteadofFXMLtodefineuserinterfaces,youcanstilluseallthesameCSSselectorsforstyledefinition.ALabeltagisaLabeltagirrespectiveofwhetherit’sdefinedinFXMLorJavacode.
WhenusingJavacode,however,weusethe.setId()methodtosetanode’sID(inFXML,weusethefx:idattribute).
So,tosettheIDofnameLabel,wewouldcodethisas:
nameLabel.setId("name");
4. SavethefileandpressF6toruntheapplication.Thefirstwindowshouldlooksomethinglikethefollowingscreenshot:

Howitworks…CascadingstylesheetsarethestandardwayofdefiningwebpageandwebapplicationstylingontheInternet.CSSisalsothewaytostyleJavaFXapplications.Eachscenecanhaveoneormorestylesheetsassociatedwithit,whichcanthenbereferencedfromFXMLorfromwithintheJavacode.


CreatingandusingaJavaFXcustomcontrolLikeanygoodcomponent-basedframework,JavaFXallowsdeveloperstocreatecustomcomponentsthatcanbeusedwithinthedevelopertoolsjustlikeanyofthebuilt-incomponents.
Inthisrecipe,we’llseehowtocreateacustomJavaFXcomponentandthenseehowitcanbeusedfromwithinJavacodeandalsofromwithinFXML.Thecustomcomponentwillbeatextstringandaninputboxthatcanberepeatedlyusedforaskingforasinglepieceofinformation.Thecustomcomponentwilllooklikethefollowingscreenshot:

GettingreadyTocompletethisrecipe,you’llneedtohaveeithertheJavaSE,ortheJavaEEversionofNetBeans8installedtogetherwithaminimumofJDK7u6installed.
Howtodoit…Beforecreatingacustomcomponent,let’screateabasicJavaFXapplicationsothatwecanhostthecomponentwearegoingtocreatewiththefollowingsteps:
1. CreateanewemptyJavaFXApplicationwiththefollowingdetails:
ProjectName:FXCustomComponentCreateApplicationClass:com.davidsalter.cookbook.fxcomponent.FXCustomComponent
TipIfyou’rehavingtroublecreatingaJavaFXapplication,seetheCreatingaJavaFXapplicationrecipeearlierinthischapter.
2. CustomcomponentsaretypicallywritteninFXML;so,let’snowcreateanFXMLpagewithacontrollerthatcanrepresentthecustomcontrol.Right-clickontheSourcePackagesnodeoftheFXCustomComponentprojectandselectNewandthenOther….
3. OntheNewFiledialog,selectJavaFXfromthelistofCategoriesandEmptyFXMLfromthelistofFileTypes.
4. ClickonNext.5. EntertheFXMLNamefieldasCustomInputandthePackagefieldas
com.davidsalter.cookbook.fxcomponent.custom.6. ClickonNext.7. ChecktheUseJavaControllercheckboxandchangetheControllerNamefieldto
beCustomInput.
TipWe’vechangedthenameofthecontrollerfromthedefaultnamingschemeof<fxml>ControllertoCustomInput(withouttheappendedwordController)asCustomInputwillnowbethenameofourcustomcontrol.Wedon’thavetodothis,butCustomInputisabetternameforacustomcontrolthanCustomInputController.
8. ClickonFinishtocreatetheFXMLfileanditscontroller.9. WenowwanttoedittheFXMLfiletextuallyinNetBeans,soright-clickonthe
CustomInput.fxmlfileandselectEdit.
TipIfyoudon’thaveSceneBuilderinstalled,youcansimplydouble-clickonthefiletoopenitupinNetBeans.Seetherecipe,GraphicaleditingofFXMLfiles,forfurtherinformationaboutSceneBuilder.
10. ChangethecontentsoftheCustomInput.fxmlfiletoread:
<?xmlversion="1.0"encoding="UTF-8"?>
<?importjavafx.geometry.*?>
<?importjavafx.scene.control.*?>

<?importjavafx.scene.layout.*?>
<fx:roottype="javafx.scene.layout.HBox"alignment="CENTER"
xmlns:fx="http://javafx.com/fxml/1"
xmlns="http://javafx.com/javafx/2.2">
<children>
<Labelfx:id="label"text="Label"HBox.hgrow="ALWAYS">
<HBox.margin>
<Insetsright="8.0"/>
</HBox.margin>
</Label>
<TextFieldfx:id="text"prefWidth="100.0"/>
</children>
<padding>
<Insetsbottom="8.0"left="8.0"right="8.0"top="8.0"/>
</padding>
</fx:root>
11. ThisFXMLfileisverysimilartothosethatwe’veseenbefore.WecanseethatthereisaLabelandTextFieldtagseachofwhichhaveanfx:idattributeoflabelandtextrespectively.Thereisalsoasmallamountofpaddingappliedtothecontroltospacetheindividualcomponentsoutandmakethemmorereadable.What’snew,however,isthattherootnodeoftheFXMLfileisnow<fx:root>insteadofalayouttype.The<fx:root>tagisusedwhencreatingcustomcontrolstosettherootcomponentofthecontrolhierarchydirectlyviacode.Thisallowsustoexplicitlysetthecontrollerofthecomponent.
12. You’llalsonoticethatwearen’tsettingthecontrollerwithintheFXMLfile.Thisisbecausewe’regoingtosetthecontrollerforthecustomcomponentwithintheJavacodeinthenextstep.
TipIfwesetthecontrollerwithintheFXMLfile,badthingshappen!Tryitforyourselfandseebyaddinganfx:controllerattributetothefx:rootelement.
WhenloadingtheFXMLfile,JavaFXwoulddetectthepresenceofacontrollerclassandtrytoinstantiateit.ThiswouldthencausetheFXMLfiletobeloaded,atwhichpointJavaFXwoulddetectthepresenceofacontrollerclassandtrytoinstantiateitrepeatedly.
13. Double-clickontheCustomInput.javafiletoopenitupforeditingandchangethebodyoftheclasstobe:
publicclassCustomInputextendsHBox{
@FXMLprivateLabellabel;
@FXMLprivateTextFieldtext;
publicCustomInput(){
FXMLLoaderloader=new
FXMLLoader(getClass().getResource("CustomInput.fxml"));
loader.setRoot(this);
loader.setController(this);

try{
loader.load();
}catch(IOExceptionex){
Logger.getLogger(CustomInput.class.getName()).log(Level.SEVERE,null,
ex);
thrownewRuntimeException(ex);
}
}
publicStringgetLabel(){
returnlabelProperty().get();
}
publicvoidsetLabel(Stringvalue){
labelProperty().set(value);
}
publicStringPropertylabelProperty(){
returnlabel.textProperty();
}
publicStringgetText(){
returntextProperty().get();
}
publicvoidsetText(Stringvalue){
textProperty().set(value);
}
publicStringPropertytextProperty(){
returntext.textProperty();
}
}
14. Lookingatthiscode,wecanagainseealotofsimilaritieswiththecodethatwe’vewrittenbefore.We’vecreatedtwoprivateinstancemembersofLabelandTextFieldtagsandannotatedthemwiththe@FXMLannotation.ThisprovidesthelinkbetweentheobjectsdeclaredwithintheFXMLfileandtheJavacodethatbacksthem.We’vealsocreatedaconstructorfortheclassthatloadstheFXMLfileandthensetstheclassasthecontrollerandtherootofthecustomcomponent.Thisisessentialforcreatingcustomcomponents.
15. Eachofthemembersthatwe’vecreatedontheformhasanassociatedStringPropertypropertydefinedforit.TheseusetheJavaBeantechniqueforcreatingpropertiessothatthecustomcomponentcanbequeriedbyreflectionandalistofitspropertiesobtained.ThisallowscodecompletionandJavadoctooltipstobedisplayedwhenusingthecustomcontrolatalaterdate.
16. ThefinalthingtonoteaboutthisclassisthatitextendstheHBoxclassasthedefaultlayoutforthecontrol.ThistiesinwiththedefaultlayoutthatwedefinedwithintherootcomponentoftheCustomInput.fxmlfile:
<fx:roottype="javafx.scene.layout.HBox"
Nowthatwe’vedoneeverythingnecessarytocreateacustomcontrol,let’sseehow

wecanaccessitfromwithintheJavacode.
TipIfyouwanttolearnmoreaboutJavaFXprogramming,checkouttheOracleJavaFXtutorialsathttp://docs.oracle.com/javase/8/javase-clienttechnologies.htm.
17. Double-clickontheFXCustomComponent.javafilefromwithintheProjectsexplorertoopenthefileforediting.
18. Atthetopofthestart()method,createaninstanceoftheCustomInputcontrolwehavejustdefined:
CustomInputinput=newCustomInput();
input.setLabel("Whatisyourname?");
19. ChangetherootcomponenttobeVBoxinsteadofStackPanelandaddthenewinputcomponentintoit:
VBoxroot=newVBox();
root.setAlignment(Pos.CENTER);
root.getChildren().add(input);
root.getChildren().add(btn);
20. Finally,changethebuttoneventhandlertoprintoutthecontentsofthetextboxinthecustomcontrol.Changetheeventhandlertoread:
@Override
publicvoidhandle(ActionEventevent){
System.out.println(input.getText());
}
21. FixtheimportsontheFXCustomComponent.javaclassandthenpressF6toruntheapplication.Theapplicationshouldlooksomethinglikethefollowingscreenshot:
22. EnteranameandthenclickontheSay‘HelloWorld’buttonandnotethattheinputtednameisdisplayedintheNetBeansoutputwindow.

There’smore…Intheprevioussection,wesawhowtoinstantiateacustomcomponentwithintheJavacode,butwhatifwewanttoinstantiateitviaFXML?
ToinstantiateacustomcontrolwithinFXML,wejustneedtocreateatagwiththenameofthecustomcontrolandthensetpropertiesonitjustlikeanyothercontrol.Forexample,thecodewewroteinstep19oftheprecedinglistwouldbelikethefollowingcodewithinFXML:
<VBox>
<children>
<CustomInputlabel="Whatisyourname"></CustomLabel>
<Button…></Button>
</children>
</VBox>
Whatifwewantedtostyleacustomcontrol?Canwedothat?Wecertainlycan!Wecanuseexactlythesametechniquesthatweusedintherecipe,StylingaJavaFXapplicationwithCSS,tostylecustomcomponents.Thisiswheremultiplestylesheetswouldcomeinparticularlyusefulaswecoulduseonestylesheetforthebasic,stockcustomcomponentstyling,andthenhaveaseparateoneforeachapplicationorscenewithinourapplication.


Deployingaself-containedapplicationAswe’veseeninthepreviousrecipesinthischapter,NetBeans,inconjunctionwithSceneBuilderprovidesfirst-ratetoolsfordevelopingJavaFXapplications.Developingapplicationsisonlyonestageinthedevelopmentcycle,andweneedtobeabletodeployourapplicationstocustomersaftertheyhavebeendeveloped.
NetBeansprovidestoolstoallowJavaFXapplicationstobepackagedasself-containedapplicationsthatincludeanylibrariesusedbytheapplicationaswellasacompletecopyoftheJREusedfordevelopment.Self-containedapplicationscanbepackagedwithnativeinstallersandeasilydistributedtocustomers.
Inthisrecipe,we’llseehowwecancreateaself-containedapplicationandpackageitupforinstallationusingInnoSetupfromJRSoftware.
ThisrecipeisprimarilyaimedatdevelopersusingWindowsastheiroperatingsystem;however,NetBeansprovidestoolsforMacOSXandLinuxdevelopersasdiscussedattheendoftherecipe.

GettingreadyTocompletethisrecipe,you’llneedtohaveeithertheJavaSE,ortheJavaEEversionofNetBeans8installedtogetherwithaminimumofJDK7u6installed.
Youwillalsoneedtheapplicationwedevelopedinthepreviousrecipe,StylingaJavaFXapplicationwithCSS.Ifyouhavenotcompletedthisrecipe,thecompleteapplicationisavailablewithinthecodedownloadbundleforthischapter.

Howtodoit…EnsurethatNetBeansisnotloadedasweneedtomakechangestothesystem’spathenvironmentvariable.IfwemakechangestothiswhileNetBeansisrunning,thechangeswillnottakeeffectwithinNetBeans.
1. DownloadtheInnoSetupinstallerfromhttp://www.jrsoftware.organdinstallitontoyourdevelopmentPC.InnoSetupisafreeinstallerforWindowsapplicationsthatcanbeusedinbothopensourceandcommercialapplications.We’llnotgointodetailsabouthowtouseInnoSetuphereasthatcouldtakeaentirebookonitsown.Fortunately,NetBeanstakescareofalloftheinteractionwithInnoSetupforus.
2. OnceInnoSetuphasbeeninstalled,weneedtoaddthepathtotheInnoSetupinstallationfoldertoourpath.Accesstheenvironmentvariablesforyoursystem,asshowninthefollowingscreenshot:
3. Onceyouhaveaccessedtheenvironmentvariables,amendthePathsystemvariableandappendtheinstallationdirectoryofInnoSetuptoit.ThisisusuallyC:\ProgramFiles(x86)\InnoSetup5,asshowninthefollowingscreenshot:

4. Oncewe’veamendedthePathenvironmentvariable,wecanstartNetBeansandopentheWelcomeToFXproject.
5. Thefirststeptocreatingaself-containedapplicationistoenablenativepackaging.Right-clickontheWelcomeToFXprojectwithintheProjectsexplorerandselectProperties.
6. OntheProjectPropertieswindow,selectDeploymentfromthelistofCategoriesandchecktheEnableNativePackagingoption,asshowninthefollowingscreenshot:
7. Beforecreatingaself-containedapplication,let’sfirstgivetheapplicationanameandanauthor.
8. WithintheProjectPropertieswindow,selectApplicationfromthelistofCategories.

9. ChangetheTitlefieldtobeWelcomeToJavaFxandtheVendorfieldtobeDavidSalter.ThesefieldswillnowbeusedastheapplicationnameandstartscreengroupnamewithinWindows.
10. ClickonOKtoenableNetBeanstocreatenativepackagesfortheapplication.11. Right-clickontheWelcomeToFXprojectwithintheProjectsexplorerandnotethata
newmenuitemPackageasisnowavailable,asshowninthefollowingscreenshot:
12. Withinthismenu,thereareseveraldifferentoptions:
AllArtifacts:CreateallinstallationpackagesaswellastheapplicationdistributablefilesAllInstallers:CreatebothanMSIinstallerpackageanda.exeinstallerpackageImageOnly:Createthedistributablefiles,butdonotcreateanyinstallersEXEInstaller:Createa.exeinstalleronlyusingInnoSetupMSIInstaller:Createa.msiinstalleronlyusingWix
13. First,let’screateanImageOnlypackage.FromthePackageasmenu,selecttheImageOnlyoption.
14. NetBeanswillnowcreateanimageonlypackage,whichisonewithoutanyinstallers.Whenthepackageiscreated,aBUILDSUCCESSFULmessagewillbeshownwithintheOutputwindow,asshowninthefollowingscreenshot:
15. ClickontheFilesexplorertoshowallthefileswithintheprojectandexpandthebundlesnodeunderthedistfolder,asshowninthefollowingscreenshot:

16. Withinthebundlesfolderunderthedistfolder,youcanseethereisafolderfortheapplicationcalledWelcometoJavaFx.Insidethatfolder,thereisafoldercalledappthatcontainsthecompiledversionofourapplicationasa.jarfile.TheruntimefoldercontainsacompleteJREcopiedfromourdevelopmentmachine—thisisthesameJREthatweusedwhenrunningtheapplicationduringdevelopmentsoit’sguaranteedtobethecorrectversion.Youcanalsoseethatanative.exefilehasbeencreatedalongwithaniconforthefile.
17. BrowsetothisfolderyourselfinWindowsExplorerandlaunchthe.exefiletoverifythattheapplicationwillnowrunasanative.exefile.
Nowthatwe’veseenthatNetBeansiscapableofcreatingaself-containedapplicationfromaJavaFXproject,let’screateaninstallerfortheapplication.
18. Right-clickontheWelcomeToFXprojectwithintheProjectsexplorerandselectPackageasandEXEInstaller.
19. Thistime,thebuildprocesswilltakealittlelongerasit’sbuildinganinstallationpackageusingInnoSetup.
20. Whenthebuildiscompleted,expandthebundlesnodeunderthedistfolderfortheWelcomeToFXprojectwithintheFilesexplorer,asshowninthefollowingscreenshot:
21. Thistime,wecanseethatthereisonlyasinglefilewithinthebundlesfolder.Thistime,it’sa.exeinstallerfortheapplication.LocatetheWelcomeToJavaFx-1.0.exefilewithinWindowsExploreranddouble-clickonittoinstallacopyoftheapplication.Verifyagainthatit’stheapplicationwedevelopedearlierandthatalinktotheapplicationhasbeenaddedtotheWindowsStartscreen,asshowninthefollowingscreenshot:


There’smore…WhatifIwanttocreatea.msiinstallerinsteadofa.exeinstaller?CanIdothat?
NetBeansallows.msiinstallerstobecreatedviatheWixinstallerpackage.Tocreate.msipackages,therefore,weneedtofollowasimilarproceduretothatabove.WeneedtodownloadandinstallWixandthensetthesystem’sPathenvironmentvariabletohaveanentryforWixinit.Typically,WixisinstalledintotheC:\ProgramFiles(x86)\WixToolsetv3.8\bindirectory.
FormoreinformationaboutWix,checkoutthehttp://wixtoolset.orgsite.
Onceinstalled,theapplicationusesthedefaultJavalogoasitsicon.CanIapplymyownbrandingtotheinstaller?Theapplication’siconcaneasilybechangedviaDeploymentintheProjectPropertieswindow.Here,youcanchangetheapplication’siconandsplashscreenimagetothosemoresuitableforyourapplication.ThefollowingscreenshotdisplaystheIconandSplashImagedialog:
Idon’tuseWindowsfordevelopingJavaFXapplications.IuseMacOSXand/orLinux.DoesNetBeansprovideanytoolsforme?
OnMacOSX,NetBeansprovidesthefacilitytocreate.dmgpackagesinsteadof.exe/.msipackages.OnLinux,theabilitytocreate.debpackagesisavailable.


Chapter8.NetBeansMobileDevelopmentInthischapter,wewillcoverthefollowingrecipes:
AddingmobilesupporttoNetBeansCreatinganMIDPapplicationAddingAndroidsupporttoNetBeansCreatinganAndroidapplication

IntroductionWiththeadventofsmartphonesandtablets,mobiledevelopmenthashadarenaissance.Youjustneedtolookatthenumberofmobileapplicationsthatareavailableforthemajorsmartphonesandfeaturephonestoseehowpopularmobiledevelopmentis.
It’snotonlyonmobilephonesandtabletsthatJavaMEisused.It’salsooneofthemajorplayersinembeddedtechnology(runningondevicessuchasRaspberryPi),inBlu-rayplayers,TVs,andsmartcards.
Inthischapter,we’llseehowwecanaddmobilesupporttoNetBeanssothatwecandevelopapplicationsforthesetypesofdevices.Inparticular,we’lllookatcreatingapplicationsforMobileInformationDeviceProfile(MIDP)andAndroiddevices.


AddingmobilesupporttoNetBeansNetBeans8isnotprovidedinadownloadableconfigurationthatisexplicitlyavailableforthemobileapplicationdeveloper.ThenearestpreconfigureddownloadistheAllbundle,whichincludesalloftheNetBeanstoolsrangingfromthoseforthemobiledevelopertoallofthetoolsrequiredforanenterprisedeveloper.Clearly,there’saneedforthemobiledevelopertobeabletoinstallonlythepluginstheyrequirewithouttheneedforadditionalunnecessaryplugins.
Fortunately,it’sastraightforwardtasktoaddmobiledevelopmentsupporttothesmallestNetBeansdistribution—theJavaSEdownload,asshowninthisrecipe.

GettingreadyTocompletethisrecipe,youneedtohavedownloadedandinstalledeithertheJavaSEorJavaEEdownloadbundlesofNetBeans.

Howtodoit…ThefirststepinaddingmobiledevelopmentsupportintoNetBeansistodownloadasuitableJavaMESDK.Let’snowdownloadtheJavaME3.4SDKandconfigureitwithinNetBeansusingthefollowingsteps:
1. BrowsetotheJavaMEdownloadpageanddownloadtheJavaMESDK3.4.
TipTheJavaMEdownloadpagecanbefoundathttp://www.oracle.com/technetwork/java/javame/javamobile/download/sdk/index.html
2. OncetheJavaMESDKhasbeendownloaded,executethesetupapplicationandinstallitinalocationofyourchoice.TheonlyoptionduringinstallationistochoosethelocationinwhichyouwanttoinstalltheSDK.Takeanoteofthisdirectoryaswewillneeditlateron.
3. AfterinstallingtheJavaMESDK,launchNetBeanssothatwecanconfiguremobiledevelopmentsupport.
4. ClickonToolsandthenPluginsfromthemainNetBeansmenu.5. WithinthePluginsdialog,clickontheAvailablePluginstab.6. Withinthistab,locatetheMobilityandVisualMobileDesignerpluginsandselect
themforinstallation,asshowninthefollowingscreenshot:
7. ClickontheInstallbuttontobegintheinstallationprocessfortheplugins.NetBeanswillnowidentifytheplugindependenciesandmarkthemalsoforinstallation.
8. ClickonNexttodisplaythelicenseagreementforthenewplugins.9. Readandacceptthelicenseagreement,andthenclickonInstalltoaddtheMobility
pluginsintoNetBeans.10. NetBeanswillnowneedtorestarttocompletetheinstallation.ClickonFinishto
restartNetBeans.
NetBeanswillnowrestartwiththeMobilitypluginsinstalled.WenowneedtoaddareferencetotheJavaMESDKinNetBeanssothatwecancreateJavaMEapplications,withthefollowingsteps:
1. ClickonToolsandthenJavaPlatformsfromthemainNetBeansmenu.2. TheJavaPlatformManagerdialogwillbedisplayed,showingthatonlytheJava

SEplatformisinstalled.3. ClickontheAddPlatform…buttontoallowaJavaMEplatformtobeadded.4. IntheAddJavaPlatformdialog,selecttheplatformtypeasJavaMECLDC
PlatformEmulator,asshowninthefollowingscreenshot:
5. ClickonNext.6. NetBeanswillnowdisplaytheChoosedirectorytosearchforplatformsdialog.
SelectthedirectoryinwhichyouinstalledtheJavaMESDKinstep2andclickontheOpenbutton.
7. NetBeanswillconfirmthefolderselection.ClickonNexttobeginsearchingforJavaMEplatformsinthespecifieddirectory.
8. NetBeanswillnowtakeafewsecondstosearchwithinthespecifiedfolderforJavaMESDKinstallations.Whenaplatformisdetected,itwillbedisplayed,providingdetailsoftheplatform,asshowninthefollowingscreenshot:

9. ClickonFinishtoaddtheJavaMEplatform.10. TheJavaPlatformManagerdialogwillnowshowthenewlyaddedJavaME
platform:
11. ClickontheClosebuttontocompletetheprocedure.

Howitworks…AddingsupportforJavaMEdevelopmentinNetBeanswasathree-stageprocess.First,wehadtodownloadanappropriateJavaMESDK.Forthisrecipe,wedownloadedtheJavaME3.4SDK.WethenaddedsupportformobiledevelopmentintoNetBeansbyaddingtheMobilityplugin.ThispluginishostedonthestandardNetBeansupdatecenters,soitcouldbeeasilyinstalledwithoutanyadditionalconfiguration.
WhentheMobilitypluginswereinstalled,theyprovidedtheabilitywithinNetBeanstoaddaJavaMECLDCPlatformEmulator.Withouttheseplugins,wewouldonlyhavebeenabletodefineJavaSE8platformswithinNetBeans.ThesepluginsalsoprovideuswithallofthewizardsnecessarytocreateJavaMEapplications.We’llseemoreofthoseinthenextrecipe.

There’smore…Whatifwewanttodevelopapplicationsforadifferentmobileplatform,forexample,Nokia’sAsharangeofphones?
DevelopingforadifferentmobileSDKrequiresmanyofthesamestepsasshowninthisrecipe.Cruciallythough,wewouldneedtodownloadtheappropriatemobileSDK(fortheAsha,forexample)andinstallthatlocallyonourPC.AfterinstallingtheSDK,wewouldneedtoadditasaplatformwithinNetBeans,asshowninthisrecipe.Afterthis,wecouldstartdevelopingmobileapplicationsfortheplatform.


CreatinganMIDPapplicationInthisrecipe,wewillusetheMIDPastheprofileforamobileapplication.
MIDPisthebest-knownJavaMEprofile,andprovidescorefunctionalitythatwillrunacrossmanydevices,givingapplicationsmoreportability.

GettingreadyTocompletethisrecipe,youwillneedtorunNetBeans8withaddedmobilesupport.IfyouhavenotaddedmobilesupportinNetBeans,checkoutthepreviousrecipe.

Howtodoit…First,wemustcreateanewJavaMEprojectwiththefollowingsteps:
1. ClickonFileandthenNewProject…fromthemainapplicationmenu.2. IntheNewProjectdialog,selectJavaMEfromthelistofCategoriesandMobile
ApplicationfromthelistofProjects.3. EnterintheProjectNamefieldMyMIDPApp.Leavetheotheroptionswiththeir
defaultvaluesandclickonNext.4. SelectOracleJava(TM)PlatformMicroEditionSDK3.4asEmulatorPlatform.
TheDevice,DeviceConfiguration,andDeviceProfilefieldscanbechangedhere,butthedefaultsaresuitableinthisinstance,asshowninthefollowingscreenshot:
5. ClickonFinishtocreatetheapplication.

Howitworks…ThefolderstructurecreatedbyNetBeansforaJavaMEprojectisratherextensive.TheprojectiscreatedwithanAntbuildfile,whichalreadyincludesseveraltargets.Ontopofthat,the.propertiesfilesarecreatedfortheconvenienceofthedeveloper.
Tohaveaccesstoallofthefilesshowninthefollowingscreenshot,itisnecessarytobuildtheproject.Todothis,right-clickontheprojectandselectBuild.
NetBeansthencreatestheMidlet.javafile,whichisourmainclassfordevelopingwithJavaME.
ItispossibletoeditthecodeinaMIDletJavafileindifferentways.
IfaMIDletiscreatedasaplainJavaclass,itcanonlybeeditedintheSourceview.However,ifaVisualMIDletclassiscreated,itcanbeeditedintheSource,Screen,Flow,andAnalyzerviews.AVisualMIDletiscreatedbyselectingVisualMIDletfromtheFileTypeslistwhencreatingafile.AplainJavaMIDletiscreatedbydefaultwhenaJavaMEprojectiscreated.VisualMIDleteditingisprovidedbytheVisualMIDletdesignerplugin.ThedifferentviewsforeditingaVisualMIDletareasfollows:
Source:Thisiswherethedevelopercanwritethecode.Byclickingonit,theviewchangestotheJavacodeeditor,whereitispossibletoseethecodegeneratedbyNetBeans(thegrayed-outandcommentedparts)andtheuser-editablecode.ThisisverysimilartoeditingSwing-generatedcode.Screen:ThisallowsthedevelopertobuildtheUIgraphicallybydragging-and-droppingcomponentsfromthePalettewindow—muchlikecreatingaSwingorJavaFXuserinterface.Flow:Thisletsthedevelopercreateandbuildtheflowbetweenwindowsandaddbehaviors,intheformofcommands,tothecomponentsfromthePalettewindow.Thisisshowninaveryuser-friendlyandgraphicalwaytothedeveloper,andisverysimilartoUMLdiagrams.

Analyzer:Sinceeverybitofmemorycountsinmobileapplications,thisviewisresponsibleforanalyzingthecodeforunusedcomponents,screens,orresourcesthatmightbeleftonourmobiledevice.
Torunamobileapplication,simplyright-clickontheprojectandselectRun.Theappropriatemobileemulatorwilllaunchwiththeapplicationrunningwithinit.

There’smore…Onprojectcreation,wecanselectthedevicewearedesigningourapplicationforandwillbedeployingiton.
ThedevicecanbeselectedatprojectcreationtimeontheDefaultPlatformSelectionpagewithintheNewMobileApplicationwizard.
Onanexistingproject,thetargetdevicecanbechangedwithintheproject’spropertieswindowwiththefollowingsteps:
1. Right-clickontheprojectwithintheProjectsexplorerandselectProperties.2. ClickonPlatformfromwithintheCategorylist,andthelistofavailabledevicesis
shownundertheDevicedropdown,asshowninthefollowingscreenshot:
ThefunctionofOptionalPackagesselectedintheprecedingscreenshotistoenablefeaturesintheJavaMEapplicationthatwouldotherwisenotbesupported.Forexample,theContentHandlerAPIletsapplicationsexecuteotherregisteredapplicationsbyaURL.
TolearnmoreabouttheavailableAPIswithinJavaME,pleaserefertohttp://docs.oracle.com/javame.

Alternatively,whentesting,itispossibletoselectthedevicepriortorunningtheapplication.Right-clickontheprojectnodeandselectRunWith…,andyouwillbepresentedwiththeQuickProjectRundialog:


AddingAndroidsupporttoNetBeansTheAndroidplatformisoneofthemostpopularsmartphoneandtabletplatformstodevelopforatthemoment.
DevelopedbyGoogle,theAndroidplatformcontainsmanydifferentAPIs,bothinsideandoutsideoftheGoogleecosphere.Forexample,AndroidprovideslocationservicesandcanalsobeintegratedwithGoogleMaps.
Fortunately(fortheJavadeveloper),AndroidapplicationsarewritteninJava,whichisthencompiledintoAndroid’sproprietarybytecodetorunontheDalvikvirtualmachine(insteadoftheusualJavaVirtualMachinethatJavadevelopersareusedto).
FormoreinformationaboutAndroidandAndroiddevelopment,checkouthttp://www.android.comandhttp://developer.android.com.
SinceAndroidapplicationsareessentiallywritteninJava,wecaninstallaplugincalledNBAndroidtoallowustodevelopandtestAndroidapplications,allfromwithinNetBeans.FormoreinformationaboutNBAndroid,checkoutthewebsiteathttp://www.nbandroid.org.

GettingreadyTocompletethisrecipeandenableAndroidsupportwithinNetBeans,weneedtohaveeithertheJavaSE,JavaEE,orAllbundleofNetBeans8installed.WealsoneedtohavedownloadedandinstalledtheAndroidSDK.
TheAndroidSDKcanbedownloadedfromhttp://developer.android.com/sdk/index.html.

Howtodoit…1. TheNBAndroidprojectisnotdistributedviathestandardNetBeansUpdateCenters,
soweneedtoaddtheNBAndroidUpdateCenterintoNetBeans.ClickonToolsandthenPluginsfromthemainNetBeansmenu.
2. ClickontheSettingstab,andthenclickontheAddbuttontoaddanewUpdateCenter.
3. EntertheNamefieldasNBAndroidandtheURLfieldashttp://nbandroid.org/updates/updates.xml,asshowninthefollowingscreenshot:
4. ClickonOKtoaddtheUpdateCenter.5. ClickontheAvailablePluginstabandselectAndroidfromthelistofavailable
plugins,asshowninthefollowingscreenshot:
6. ClickonInstalltoinstalltheNBAndroidplugin.7. TheNetBeansIDEInstallerdialogwillnowbeshown,confirmingthattheAndroid
pluginisbeinginstalled.ClickonNext.8. Readthelicenseagreement,andifyouagreetoit,clickontheIacceptthetermsin
allofthelicenseagreementscheckboxandthenclickonInstalltocontinue.9. ClickonCloseonthePluginsdialogtocompletetheinstallationprocessforthe
NBAndroidplugin.
Nowthatwe’veinstalledtheNBAndroidpluginintoNetBeans,weneedtoconfigureitsothatwecandevelopAndroidapplications.Wecanachievethiswiththefollowingsteps:

1. ClickonToolsandthenOptionsfromthemainNetBeansmenu.2. OntheOptionsdialog,clickontheMiscellaneousoptionandthenontheAndroid
tab.3. EnterthelocationforyourAndroidSDKundertheSDKLocationfield,asshownin
thefollowingscreenshot:
4. ClickonOKtocompletetheconfigurationoftheAndroidSDK.

Howitworks…Inthisrecipe,weaddedacustomUpdateCenterinNetBeans,allowingustoinstalltheNBAndroidpluginand,therefore,AndroiddevelopersupportinNetBeans.
TheNBAndroidpluginallowsustospecifyanAndroidSDKtousewhendevelopingapplications.ThepluginprovideswizardsthatcanbeusedforcreatingAndroidapplications(we’llseethoseinthenextrecipe)andenhancestheXMLtexteditorswheneditingAndroidXMLfiles.
WhendevelopingforAndroid,differentversionsoftheAndroidSDKcanbeconfiguredusingtheAndroidSDKManager(SDKManager.exe)application.Thesecanthenbeselectedviatheproject’spropertiesdialoginNetBeansasthetargetSDKforapplications,asshowninthefollowingscreenshot:

There’smore…TheNBAndroidpluginthatwe’veseensofarisprovidedfreeofchargeandprovidesfacilitiesforcreatingAndroidapplicationswithinNetBeans.
AnadditionalplugincalledNBAndroidExtensionsisalsoavailablefromtheNBAndroidproject.Thispluginisavailableonasubscriptionbasis,butprovidesadditionalfacilitiesforNetBeansdevelopers,themostimportantbeingtheabilitytoprovideaGUIlayoutpreview.
Formoreinformationonthisadditionalplugin,checkouthttp://nbandroid.org/wiki/index.php/NBAndroid-ext.


CreatinganAndroidapplicationInthisrecipe,we’llseehowwecanusetheNBAndroidplugintocreateabasicAndroidapplication.

GettingreadyTocompletethisrecipe,you’llneedtouseanyversionofNetBeans8.You’llneedtohavedownloadedandconfiguredtheAndroidSDKonyourmachine.Finally,you’llneedtohaveinstalledtheNBAndroidpluginasdescribedinthepreviousrecipe.

Howtodoit…TocreateanAndroidapplication,performthefollowingsteps:
1. ClickonFileandthenonNewProject…fromthemainNetBeansmenu.2. SelectAndroidfromthelistofCategoriesandAndroidProjectfromthelistof
Projects.3. ClickonNext.4. OntheNewAndroidApplicationdialog,entertheProjectNamefieldas
HelloAndroid,andthePackageNamefieldascom.davidsalter.cookbook.android.
5. SelectthelatestAndroidplatformwithinthelistofplatforms(Android4.4.2,asshowninthefollowingscreenshot).
6. ClickonFinishtocreatetheapplication.7. Double-clickonthemain.xmlfilelocatedunderHelloAndroid\res\layouttoopenit
upforediting.Thisfilecontainsthedefinitionofthescreenlayoutoftheapplication.8. ChangetheTextViewnodetothefollowingcode:
<TextView
android:layout_width="fill_parent"
android:layout_height="wrap_content"
android:text="NetBeansRocks!!"
/>
9. Right-clickontheHelloAndroidprojectandselectRuntostarttheAndroidemulatorandlaunchtheapplicationwithinit.Theresultantdialogwilllooklikethefollowingscreenshot:


Howitworks…Inthisrecipe,wesawhowtheNBAndroidprovidesAndroidapplicationsupportwithinNetBeans,allowingAndroidapplicationstobecreated.
FormoreinformationonhowtodevelopfortheAndroidplatform,checkouthttp://developer.android.com.


Chapter9.VersionControlInthischapter,wewillcoverthefollowingrecipes:
InitializingaGitrepositoryCloningaGitrepositoryCheckingoutfromaSubversionrepositoryGettingthehistoryofafileCommittingandpushingcodechangesCreatingaDiffpatchBranchingarepository

IntroductionWithallbutthesmallestprojects,goodsourcecodemanagementisessential.Sourcecodemanagementallowsmultipledeveloperstoworktogetheronprojectswhethertheyareworkingonthesamepieceoffunctionalityorcompletelydisparatepartsofthesystem.
Probably,themostcommonsourcecodecontrolsystematpresentisGit.Withinthischapter,we’llseehowwecanmanageGitrepositoriesfromwithinNetBeansallowingustoperformallofthecommonversioncontrolactionssuchasbranching,committing,andmerging.
Don’tworry,though,ifyoudon’tuseGit—thischapterincludesrecipesforMercurial,Subversion,andCVSaswell.Toaiddevelopersswitchbetweendifferentversioncontrolsystems,NetBeanshasbeendevelopedsothatalltheincludedversioncontrolfunctionalityisverysimilar,ifnotthesameacrosssystems.So,forexample,ifyouknowhowtocheckafileintoSubversionwithinNetBeans,youknowhowtocheckitintoGit.


InitializingaGitrepositoryInitializingaGitrepositoryisoftenoneofthefirsttasksthatisperformedwhenstartinganewproject.Initializingarepositorycreatesthelocalrepositoryandallowslocalsourcecontrolactionstobeperformedsuchascheckingincodeandviewingafile’shistory.
Inthisrecipe,we’llseehowNetBeansallowsustoinitializeaGitrepositoryforaspecificprojectandhowthisgivesusbenefitsoverusingtheGitcommand-linetools.

GettingreadyYoucanuseanyoftheJavadownloadbundlesofNetBeans(JavaSE,JavaEE,ortheAllbundle)tocompletethisrecipeastheyallhaveGitsupportbuiltintoNetBeans.
WewillbeinitializingtheJarViewerprojectthatwecreatedinChapter4,DevelopingDesktopApplicationswithNetBeans,soifyoudidnotcompletetherecipesinthatchapter,youwillneedtolocatetheJarViewerprojectfromthecodedownloadbundleforthisbook.

Howtodoit…ToinitializeaGitrepository,performthefollowingsteps:
1. Right-clickontheJarViewerprojectwithintheProjectsexplorerandclickonVersioningandInitializeGitRepository….
2. TheInitializeaGitRepositorydialogwillnowbeshownconfirmingtherootpaththattherepositorywillbecreatedin,asshowninthefollowingscreenshot:
3. ClickontheOKbuttontoinitializetherepository.

Howitworks…InitializingaGitrepositorywithinNetBeansperformstwotasks:
InitializingtherepositoryAddingtheinitialprojectfilestothenewlycreatedrepository
Initializingtherepositoryisthesameasexecutingthegitinitcommandfromacommandlinewithintherootfolderoftheproject.ThiscommandcreatesalocalGitrepositorywithintheprojectfilesandcreatesahiddenfoldercalled.gitinwhichalloftherepositoryfilesarestored.ThisfolderisnotvisiblefromwithinNetBeans.If,however,weopenupWindowsExplorer(orFinderontheMac),wecanseethatthisfolderhasbeencreated,asshowninthefollowingscreenshot:
ThesecondstageofinitializingtherepositorywithinNetBeansistoaddalloftheprojectfilesintotherepository.Thisistheequivalentofusingthegitaddcommand.
WhenaddingaprojectintoanewGitrepositorythroughtheInitializeGitRepositoryoption,NetBeansonlyaddssourcefilesintotheproject.Anyprivatefiles,orbuild-relatedfilesarenotaddedforinclusionintotherepository.Thisisoneofthemajorbenefitsofinitializingarepositorythiswayoverinitializingandaddingfilesmanuallyusingthegitcommand.
AfteraprojecthasbeeninitializedwithinGit,differentcolorcodesandiconsaredisplayedwithintheProjectsexplorertoshowthestatusoffiles.
Newlyaddedfoldersthathavenotbeencommittedhaveacylindricalicon( )nexttothemtoindicatethattheycontainnewlyaddedfiles.Newlyaddedfilesthemselvesaredisplayedingreen.Filesthathavebeenexcludedfromtherepository,forexample,buildfilesaredisplayedingray,asshowninthefollowingscreenshot:

We’llmakechangestothefileswithinthisprojectinthesubsequentrecipesinthischapterandseehowtheiconschangewhenwedeleteormodifyfiles.

There’smore…Inmanyrespects,MercurialandGitaresimilarsourcecodecontrolsystems,althoughinrecentyears,Githasbecomethemorepopularofthetwo.NetBeans,however,providestoolstoallowMercurialrepositoriestobeinitializedinasimilarfashiontoGitrepositories.
InitializingaMercurialrepositoryToinitializeaMercurialrepository,however,theMercurialtoolsneedtobefirstinstalledontoyourcomputer.Ifyou’venotgottheMercurialtoolsinstalled,youcandownloadthemfromhttp://mercurial.selenic.com.
TipAquickwaytocheckifyouhavetheMercurialtoolsinstalledcorrectlyistoopenacommandpromptorterminalsessionandexecutethehgcommand.IfyouhaveMercurialinstalledcorrectly,youshouldseealistofcommandsthatMercurialsupports.Ifit’snotinstalledcorrectly,you’llseeanerrorindicatingthatthehgcommandcouldnotbefound.Inthiscase,youeitherneedtoinstallMercurialoraddittoyoursystempath.
Onceyou’vegotMercurialinstalled,youcaninitializeaMercurialrepositoryusingthesamestepsmentionedinthisrecipeforGitrepositoriesexceptthat,intheinitialstep,youwouldright-clickontheprojectandselectVersioningandthenInitializeMercurialRepository…insteadofInitializeGitRepository….


CloningaGitrepositoryInthepreviousrecipe,InitializingaGitrepository,wesawhowtocreateanewlocalGitrepository.Thisisausefultechniquewhenstartingnewprojects;however,mostofthetimewearen’tstartingnewprojects,butareinsteadworkingonexistingprojects.
Inthisrecipe,we’llseehowtocloneaGitrepositorysothatwecanworkonaprojectthatisalreadystoredinthesourcecontrol.
GettingreadyYoucanuseanyoftheJavadownloadbundlesofNetBeans(JavaSE,JavaEE,ortheAllbundle)tocompletethisrecipeastheyallhaveGitsupportbuiltintoNetBeans.
Tocompletethisrecipe,youwillneedtocreateaforkoftheJarViewerrepositoryonGitHub.Aforkisessentiallyyourowncopyofarepositorythatyoucanmakechangestowithoutaffectingtheoriginalproduct.
TipWithGit,itispossibletoclonebothremoterepositories(suchasonGitHub)andrepositoriesthatarestoredonthelocalfilesystem.AlocalGitrepositoryfunctionsexactlythesameasaremoteGitrepository.
Theprocessofforkingrepositoriesisintegraltohowmanyopensourceprojectswork.Tomakeafixtoaproject,aforkisfirstmade,whichcreatesyourowncopyoftheGitrepository.Thecodecanthenbefixedandcommittedontheforkedrepositorybeforeissuingapullrequest.Apullrequestindicatestotheowneroftheoriginalrepositorythatsomenewchangeshavebeenmadeinaforkedrepositorythatwe’dlikecommittingtothemainrepository.UsingGitandGitHub,thisprocessisverystraightforward.
Inthisrecipe,wewillbecloningyourpersonalforkofthecookbook-jarviewerprojectcreatedinChapter4,DevelopingDesktopApplicationswithNetBeans.We’llseehowtocreatetheforkonGitHubandthenhowtocloneitintoNetBeans.
Tocompletethisrecipe,youwillneedanaccountwithGitHub.FormoreinformationaboutGitHubandtocreateanaccountthere,visithttp://www.github.com.

Howtodoit…Thefirststepincompletingthisrecipeistocreateaforkofthecookbook-jarviewerprojectonGitHub.Wecanachievethiswiththefollowingsteps:
1. Navigatetohttp://github.comandlogintoyouraccount.2. Navigatetothecookbook-jarviewerprojectbybrowsingto
http://github.com/doobrie/cookbook-jarviewer.3. Atthetoprightofthepage,youwillseetheForkbutton(showninthefollowing
screenshot).Clickonthisbuttontocreateyourowncopyoftherepositoryonyouraccount.
4. ItwillnowtakeGitHubafewmomentstoforktherepository.TheforkedrepositorywillhaveaURLofhttps://github.com/<your-username>/cookbook-jarviewer.jar.
Nowthatwe’veforkedthecookbook-jarviewerproject,let’sseehowwecancloneitintoNetBeanswiththefollowingsteps:
1. ClickonthemainNetBeansTeammenu,thenclickonGit,andfinallyonClone….2. TheCloneRepositorydialogwillbeshown.EntertheRepositoryURLfieldas
https://github.com/<your-username>/cookbook-jarviewer.jarrememberingtochange<your-username>toyourGitHubusername.
3. EnteryourGitHubusernameandpasswordintotheUserandPasswordfields,asshowninthefollowingscreenshot:

TipIfyouareusingaproxyservertoconnecttotheInternet,youmayneedtoconfigurethatwithinNetBeansbeforecontinuing.ClickingontheProxyConfiguration…buttonontheCloneRepositorypageallowsaproxyservertobeconfigured.
4. ClickontheNextbutton.5. Alistofremotebranchestoclonewillbedisplayed.Thisrepositoryonlyhasone
branch,calledmaster.EnsurethebranchischeckedandclickonNext.6. TheDestinationDirectorypagewillnowbeshownconfirmingtheinformationwe
haveenteredsofarinthewizard,asshowninthefollowingscreenshot:
7. EnsuretheScanforNetBeansProjectsafterClonecheckboxisselected.Whenthischeckboxisselected,NetBeanswilllookforNetBeansprojectsinaclonedrepositoryandwillprovidetheuserwithaneasyoptiontoopenanythatarefound.ClickonFinishtoclonetherepository.
8. AconfirmationdialogwillbeshownwhenthecloningprocesshascompletedshowingthatNetBeanshasfoundaNetBeansprojectwithintherepository.ClickontheOpenProjectbuttontoopentheproject,asshowninthefollowingscreenshot:


Howitworks…CloningaGitrepositoryisaveryusefultechniquefortakingacopyofaremoterepositoryontoyourlocaldevelopmentmachine.
CloningarepositoryfromwithinNetBeansissimilartoperformingthegitclonecommandfromacommandline;however,NetBeanshasthefacilitytoscantheclonedrepositoryforNetBeansprojects,whichcanthenbeeasilyopened.
Inthisrecipe,weclonedaGitHubrepository;however,wedon’thavetoclonerepositoriesonGitHub.ThesameprocedureworksforcloningrepositoriesonBitBucketoranyotherGit-hostedrepository.

There’smore…Inthepreviousrecipe,InitializingaGitrepository,wesawthatwhenaprojectisintegratedwithaSourceCodeControlSystem(SCCS)suchasGit,differentcolorsandiconsareusedtovisuallyshowthestatusoffiles.
Sincewe’vejustclonedarepositoryandnotmadeanychangestoit,weshouldn’texpecttoseetheiconontheproject( )indicatingthatfileshavebeenchanged.
Ifwelookattheproject,however,wecanseethattheiconispresentnexttotheprojectnameindicatingthatsomethinghaschanged.Expandingalloftheprojectnodes,wecanseethatnofileshavebeenchangedthough,asshowninthefollowingscreenshot.Sowhythendoweseethisicon?
IfweopenuptheFilesexplorer,wecanseethatNetBeanshasaddedafilecalled.gitigore.Openingupthisfile,wecanseethatitcontainsasingleline:
/nbproject/private/
ThisfiletellsGittoignorethecontentsoftheprivatefolderlocatedinthenbprojectfolderwithintheprojectandnottocommitanythingwithinthisfolderintosourcecontrol.Thisisaveryusefulfeaturetostopprivatefilesfrombeingcommittedandthereforevisibletootherusers.
ThisfileisdisplayedingreenwithintheFilesexplorerasit’sanewfilethathasn’tyetbeenaddedintotherepository.
CloningaMercurialrepositoryInthisrecipe,welookedatcloningaGitrepository.WhathappensifwewanttocloneaMercurialrepositoryinstead?BothGitandMercurialsupportdistributed(offline)repositories,socanNetBeanshelpushere?
NetBeanscancertainlyhelpuswhenusingMercurialinsteadofGit.TouseMercurial,however,requiresanextrastepthatisnotrequiredforusingGit.Beforewecanuse

MercurialfromwithinNetBeans,weneedtoensurethatwehaveinstalledtheMercurialtoolsfromhttp://mercurial.selenic.comandaddedthemtothesystemspath,asNetBeansexecutesthesecommandstoprovideMercurialfunctionality.
Oncewe’veinstalledMercurialsupport,wecanclickontheTeammenuitemfromwithinthemainNetBeansmenu.WethenchooseMercurialandthenCloneOther…toaccesstheCloneExternalRepositorydialog.Fromthereon,wecanspecifyconnectiondetailstoaremoteMercurialrepositoryandcheckprojectsoutandthenopenthemwithinNetBeans.
UpdatingtoaspecificrevisionSometimeswhenworkingwitharepository,wedon’twanttogetthelatestfiles(thelastcommitperformedontherepository).NetBeansallowsustogetaspecificrevisionfromarepositoryoncewehaveclonedit.
Tocheckoutaspecificrevision,right-clickontheprojectwithintheProjectsexplorerandclickonGit,thenonCheckout,andfinallyonCheckoutRevision….NetBeanswillthendisplaytheCheckoutSelectedRevisiondialogfromwhichwecanchooseaspecificrevisiontocheckout.


CheckingoutfromaSubversionrepositoryInthepreviousrecipe,CloningaGitrepository,wesawhowtoclonearemoteGitrepositorysothatwecouldmakechangestoit.Inthisrecipe,we’llshowhowtocheckoutaSubversionrepository.SubversionworksdifferentlyfromGit,inthatwhenfilesarecheckedoutfromSubversion,theyarestoredlocallywiththerepositorybeingstoredsomewhereonaserver.InSubversion,thereisnolocalrepositorylikethereisinGit.ThismeansthatwithGit,youcanperformSCCSoperationsoffline.WithSubversion,theseoperationsmustbeperformedonline.Thesedifferencesthereforeexplainwhywedon’tcloneaSubversionrepository,instead,wecheckoutfilesfromaSubversionrepository.

GettingreadyYoucanuseanyoftheJavadownloadbundlesofNetBeans(JavaSE,JavaEE,ortheAllbundle)tocompletethisrecipeastheyallhaveSubversionsupportbuiltintoNetBeans.
Tocompletethisrecipe,wewillbecheckingoutacopyoftheJarViewerapplicationfromChapter4,DevelopingDesktopApplicationswithNetBeans,fromaSubversionrepositoryhostedonGoogleCode.FormoreinformationaboutGoogleCodeandhowtocreatehostedprojectsthere,checkouthttps://code.google.com/hosting.

Howtodoit…1. ClickonTeam,thenonSubversion,andfinallyonCheckout…fromthemain
NetBeansmenu.2. TheCheckoutdialogwillbedisplayed.EntertheRepositoryURLfieldas
https://cookbook-jarviewer-svn.googlecode.com/svn/trunk.3. Sincepubliccommitaccesshasnotbeengrantedtothisrepository,leavetheUser
andPasswordfieldsblank.Ifyouweretocheckoutarepositorytowhichyouhadcommitaccess(oronethatsimplyrequiresauthenticationtocheckoutcode),youwouldentertheusernameandpasswordhere.TheCheckoutdialogisshowninthefollowingscreenshot:
4. ClickonNext.5. OntheFolderstoCheckoutpage,NetBeansprovidesconfirmationaboutthe
repositorythatisbeingcheckedout.TheRepositoryFolder(s)fielddefaultstotrunkindicatingthatthemaintrunkbranchfromtherepositoryistobecheckedout.TheRepositoryRevisionfieldissettoHEADmeaningthatthelatestversionoftrunkwillbecheckedout.EnsuretheScanforNetBeansProjectsafterCheckoutcheckboxischecked,asshowninthefollowingscreenshot:

6. ClickontheFinishbuttontocheckouttheproject.7. Afterafewmoments,NetBeanswillindicatethatthecheckoutwascompleted
successfully.ClickontheOpenProjectbuttontoopenthecheckedoutproject.

Howitworks…CheckingoutaprojectfromwithinNetBeansisasimilarprocesstoperformingthesvncocommandfromthecommandline.NetBeansconnectstotheremoteSubversionrepositoryandchecksouttherequiredfolderandrevisionusingthesuppliedcredentials.
Ifwenowright-clickontheprojectoranyfileswithintheprojectfromtheProjectsexplorer,wecanseethataSubversionmenuitemhasbeenadded.WecanaccessalloftheSubversionfunctionalityfromthismenu.

There’smore…WheninteractingwithSubversion,itcansometimesmatterwhatversionoftheSubversionclientisusedforcommunicatingwiththeserver.Bydefault,NetBeansusestheJavaHLbindings.ThisisaJavaAPIbuiltontopofthenativeSubversionclientfilesandgenerallyprovidesthebestexperienceforcommunicatingwithSubversion.
IfadifferentversionoftheSubversionclientisrequired,however,thiscanbeconfiguredwithintheTeamsectionoftheNetBeansOptionsmenu.Withinthispage,PreferredClientforSubversioncanbeconfiguredasCLI.SelectingthisoptionallowsaspecificversionoftheSubversionclienttobespecifiedandusedforallcommunicationbetweenNetBeansandtheSubversionserver.
ThefinaloptionistouseSvnKit.ThisisapureJavaimplementationoftheSubversionclientlibrariesandwillgivebetterperformancethantheCLIoption,butnotasgoodastheJavaHLoption.
IfyoudonothavetospecifyacertainversionoftheSubversionclienttocommunicatewithyourSubversionserver,itisbesttoleavethePreferredClientoptionatitsdefaultsettingofJavaHL,asshowninthefollowingscreenshot:
ImportingfilesintoaSubversionrepositoryInthisrecipe,wesawhowtocheckoutfilesfromaSubversionrepository,butisthereanywaythatNetBeanscanhelpustostoretheinitialfileswithinaSubversionrepository?Fortunately,thereis.
Fromanopenproject(thatisnotstoredinSubversion),simplyright-clickontheprojectintheProjectsexplorerandselecttheVersioningandthenselecttheImportintoSubversionRepository…menuoptions.
OntheImportdialog,entervaluesintheRepositoryURL,User,andPasswordfields.CompletethewizardbyenteringtheinitialcommitmessageandtheNetBeansprojectwillbestoredwithinaSubversionrepository.WecanseetheImportdialoginthefollowingscreenshot:

Inmanyrespects,SubversionisanaturalreplacementfortheCVSsourcecodecontrolsystem.BothSubversionandCVSrequireonlineaccesstorepositoriesasneitherofthemhastheconceptoflocaldistributedrepositorieslikeGitandMercurial.SubversionprovidesbenefitsoverCVSthough,mainlyintermsofatomiccommits,whichCVSdoesnotsupport.OneofthemajordownsidesofCVSisthatcommitsarenotatomic,soifsomethinggoeswronginthemiddleofacommit,therepositorycanbeleftinanunstablestate.Subversionovercomesthisproblembyensuringthatallcommitsareatomic,thatiseithereverythingiscommittedinonestep,ornothingiscommittedatall.
UsingCVSfromwithinNetBeansCVSisarelativelyoldsourcecodecontrolsystem,andassuch,supportfromithasbeenremovedfromthebaseNetBeansproduct.CVSsupportcan,however,beeasilyaddedviaaNetBeansplugins.ClickonToolsandthenPluginstoopenthePluginsdialog.OnthelistofAvailablePlugins,theCVSpluginprovidessupportforCVS.SelectthepluginandclickontheInstallbuttontoaddCVSsupporttoNetBeans.
OnceCVSsupporthasbeenaddedintoNetBeans,itcanbeaccessedinasimilarfashiontohowweusedSubversionearlierinthisrecipe.
WecanimportaprojectintoCVSbyright-clickingontheprojectandselectingVersioningandthentheImportintoCVSRepository…menuoption.TheprocedureisalmostidenticaltothatofimportingintoaSubversionrepository.
Similarly,wecancheckoutfromaCVSrepositorybyselectingtheTeamoptionandthenCVSandfinallytheCheckout…menuoptionfromthemainNetBeansmenu.Again,theprocedureisalmostidenticaltothatofcheckingoutfromaSubversionrepository.


GettingthehistoryofafileSofarwe’veseenhowtoinitializesourcecoderepositoriesandhowwecangetaworkingcopyforustodevelopagainst.
Inthisrecipe,we’lluseNetBeanstoqueryaGitrepositorysothatwecanviewthehistoryoffileswithinit.We’llconcentrateonGitwithinthisrecipeasitisprobablyoneofthemostwidelyusedsourcecodecontrolsystemsatthemoment.Youcanapplytheprinciplesforothertypesofrepositoryasthegeneralproceduresarethesame.

GettingreadyTocompletethisrecipe,we’llneedtohaveclonedthecookbook-jarviewerrepositoryfromGitHubasdescribedintheearlierrecipe,CloningaGitrepository.
EnsurethatthisprojectisopenwithinNetBeansbeforestartingthisrecipe.

Howtodoit…Wecanviewthehistoryoffileswiththefollowingsteps:
1. ExpandtheJarViewerprojectwithintheProjectsexplorersothattheSourcePackagesnodeofcom.davidsalter.cookbook.jarviewerisopened.
2. Right-clickontheMain.javafileandselectGitandthenShowHistory.3. Thehistoryforthefileisnowdisplayed.Lookingatthehistoryview,youcansee
thattwocommitshavebeenmadetothefile.Eachcommitislistedalongwithitsidentifier(430c537and3098371),adescriptionforthecommit,theauthor,andthedatethecommitwasperformed,asshowninthefollowingscreenshot:
Iftherearealotofcommits,andwewishtosearchforaspecificone,wecanusethefieldsatthebottomofthehistorywindowtonarrowthesearchdownbycommitdescription,author,branch,anddatespan.
4. EnterthetextfileheaderintotheMessageeditboxandclickontheSearchbutton.
5. Notehowthehistoryhasbeenfilteredtoonlydisplayentriesmatchingtheinputcriteria.

Oncewe’veviewedthehistoryofafile,wecanalsoseewhatchangesweremadetothefileduringaspecificcommit.Wecanalsoperformseveralactionsonapreviouscommitsuchastaggingorrevertingthecommitwiththefollowingsteps:
1. Clickontheplusbutton( )attheleftofthefilehistorywithanIDof430c537.2. Thehistorylinewillexpandshowingseveraloptions:DifftoPrevious,Checkout
430c537,TagCommit,ExportCommit…,andRevertCommit….Theyaredescribedasfollows:
DifftoPrevious:ThisoptioncomparesthespecifiedversionofthefilewiththepreviousversionCheckout:ThisoptionchecksoutthespecifiedversionoftherepositoryintothelocalworkingcopyTagCommit:ThisoptionaddsasourcecontroltagtothespecifiedversionExportCommit:ThisoptioncreatesaDifffileofthecommitandsavesittothediskRevertCommit:Thisoptionrevertsthechangesmadeinthespecifiedcommittothatstatewhichthefilewasinbeforethecommitwasmade
Alltheseoptionsaredisplayedinthefollowingscreenshot:
3. ClickontheDifftoPreviouslinktoviewthedifferencesofthefiletothepreviousversionofthefile.Theresultantdialogisdisplayedinthefollowingscreenshot:

4. Anyadditionstoafilearedisplayedwithabluebackground,whileanymodificationstoafileareshownwithagreenbackground.
Sofarwe’veseenhowwecanviewthedifferencesbetweenfilesthathavebeencommittedtotherepository.NetBeansalsoallowsustoseethechangesthathavebeenmadetoaprojectsinceitwaslastcommittedwiththefollowingsteps:
1. Double-clickontheMain.javafiletoopenitforediting.2. UsetheInsertCode…refactoringtoinsertaloggerintothefileandthenlogastart
messageimmediatelyafterthedefinitionofthemain()method:
LOG.info("Startingapplication:"+args.length+"arguments.");
3. Notethatwhereverwe’vechangedthefile,NetBeanshasaddedagreenbandintheleftmargintoindicatethelinesthathavechanged,asshowninthefollowingscreenshot:
4. Right-clickontheJarViewernodewithintheProjectexplorerandclickonGitandthenonShowChanges.
5. TheoutputwindowisopenedshowingthattheMain.javafilehasbeenmodified.6. ClickontheOpenDiffbutton( )toshowwhatchangeshavebeenmadetothefile.
Afiledifferenceswindowsimilartotheoneshownpreviouslyisdisplayedshowing

whatchangeshavebeenmadetothefile.

There’smore…Inthisrecipe,weshowedyouhowtoviewthehistoryforafilebyright-clickingonitwithintheProjectsexplorerandselectingtheHistoryoption.AshortcuttothisoperationistoclickontheHistorybuttonatthetopofafilewhenitisopenwithintheeditor.UponselectingtheHistorytab,wearepresentedwiththeoptionoffilteringthehistorytoshoweitherlocalchanges,orchangesthathavebeencommittedtoGit.Usingbothoftheseoptionsprovidesapowerfultoolformanagingthehistoryoffiles.WecanseetheHistorytabinthefollowingscreenshot:
Inthisrecipe,wesawhowtoviewthehistoryforafileandhowtoshowwhatchangesweremadetothefileoverthepreviousversion.Whatifwewantedtoshowallthechangesinacommitthough,andnotjustthechangesmadetoasinglefile?
NetBeansallowsthehistoryfortheentireprojecttobeshownbyright-clickingontherootnodeoftheprojectintheProjectsexplorerandselectingGitandthenShowHistory.NetBeansthenshowsthehistorysearchscreenasshownpreviously,butdoesnotperformthesearchuntilsomecriteriahavebeenenteredandtheSearchbuttonhasbeenclicked.


CommittingandpushingcodechangesInthepreviousrecipe,Gettingthehistoryofafile,wemadeachangetoafileundersourcecontrolsothatwecouldseehowNetBeanscouldshowusthedifferencesthatwe’dmadetoourlocalcode.
Inthisrecipe,we’llseehowwecancommitthesechangesbacktosourcecontrolonourlocalGitrepositoryandthenhowwecanpushthechangesbacktotheremoterepository.

GettingreadyTocompletethisrecipe,youwillneedtohavecompletedthepreviousrecipe,Gettingthehistoryofafile,sothattherearelocalchangestotherepository.It’spossibletocompletethisrecipebymakingyourownchangestothelocalcode;however,thedescriptionsinthisrecipemaynotthenmatchexactlywithyourcodebase.

Howtodoit…1. Right-clickontherootnodeoftheJarViewerprojectwithintheProjectsexplorer
andclickonGitandthenonCommit….2. TheCommitdialogwillnowbedisplayed.EnterAddedstartuplogginginthe
CommitMessagefield.EnsureyourGitHube-mailaddressisspecifiedintheAuthorandCommitterfields,asshowninthefollowingscreenshot:
3. ClickontheCommitbuttontocommitthechangestotherepository.
NetBeanswillnowcommitanychangedfilestothelocalGitrepository.Ifyouwishtoverifythis,checkoutthehistoryfortheproject.Ifyouneedhelpwiththis,checkouttheprecedingrecipe,Gettingthehistoryofafile.NotehowanyofthefilesthatwerechangedlocallyarenolongerdisplayedinbluewithintheProjectsexplorer,andanyblueorgreenmarkinginthegutterwheneditingafilehavealsobeenremovedasthelocalfileisnowthesameasthefileinthelocalGitrepository.
WithGit,whenwe’vemadechangestoalocalrepository,wecanpushthechangestotheremoterepositorysothattheyareavailableforeveryonetoclonewiththefollowingsteps:
1. Right-clickontheJarViewerrootnodewithintheProjectsexplorerandselectGit,thenRemote,andthenPush….
2. ThePushtoRemoteRepositorydialogwillbedisplayed:

3. Sinceweoriginallyclonedaremoterepository,NetBeansknowswheretopushthelocalrepositoryto.TheSelectConfiguredGitRepositoryLocationoptionshouldbeautomaticallyselected.Ifyouwishtopushtoadifferentremoterepository,oryouhaveinitializedalocalrepositorywithoutcloningaremoterepository,thenenterthedetailsundertheSpecifyGitRepositoryLocationoption.
4. ClickonNext.5. NetBeanswillshowalistofLocalBranchesthataretobepushed.Onthispage,
NetBeanswillindicatethatweareupdatingthemasterbranch(aswehavenotcreatedanyotherbranches).ClickonNext.
6. NetBeanswillnowshowalistofRemoteBranchesthatwillbeupdated.Again,asthereisonlyonebranchontheremoterepository,thisisallthatwillbedisplayed.
7. ClickonFinishtopushthelocalrepositorytotheremoterepository.

There’smore…Whenweareabouttocommitfilestoarepository,it’sgoodpracticetofirstperformanupdateprocedure,sothatweknowthatweareworkingontheverylatestcodeandwewillminimizechancesofcodeconflictswhencommittingcode.Performinganupdategetsthelatestcodebasefromtherepositoryandmergesitintoourcodebaseflaggingupanyconflictsthatwewillneedtoresolve.Whenwe’reinasituationwherewearehappywithourcode,it’salsogoodpracticetorunanyteststhatwemayhavebeforecommittingtotherepository(we’lldiscusstestinginChapter10,NetBeansTestingandProfiling).Whenwe’veupdatedtothelatestcodeandrunourtests,weshouldbeconfidentthatcommittingourcodewillnotbreakanyothercodewithintheproject.
ManagingnewfilesWhenwecommitfilestoarepository,howdoesNetBeanshandlenewfilesthatwe’veaddedtotheproject?DoweneedtomanuallyaddthemtoGit?
WhenweaddnewfilesintoaprojectviatheNetBeansNewFilewizard,thefilesareautomaticallyflaggedwithinGittobeaddedtothelocalrepositorynexttimeacommitisperformed.IfwehaveaddedfilesoutsideofNetBeansintotheprojectstructure,however,weneedtomanuallyflagthemtobeaddedtoGit.Thisisachievedbyright-clickingonthefileinquestionandchoosingGitandthentheAddoption.


CreatingaDiffpatchWhenworkingonprojectsthatarehostedinSubversionorCVS,it’softennecessarytocreateaDiffpatchandsubmitthistoprojectowners.ADiffpatchdetailsallofthechangesmadebetweentwocodebases,withalloftheinformationbeingheldwithinasinglefile.
CreatingaDiffpatchisparticularlycommoninopensourceprojectswhereauserdoesnothavecommitrights,butwishestosubmitapatchorapieceofnewfunctionalitytoaproject.
Inthisrecipe,we’llshowhowtouseNetBeanstocreateaDiffpatchforchangesmadetoalocallycheckedoutSubversionrepository.

GettingreadyTocompletethisrecipe,youwillneedtohavecompletedthepreviousrecipe,CheckingoutfromaSubversionrepository,sothatwehavealocalrepositorytomakechangestoandsothatwecancreateaDifffileforthesechanges.
EnsurethattheJarViewerprojectcheckedoutfromSubversionisopenwithinNetBeansbeforeproceedingwiththisrecipe.

Howtodoit…InordertocreateaDiffpatch,wefirstneedtomakesomechangestotheprojectsothatitisdifferenttotheremoterepositorywiththefollowingsteps:
1. Double-clickontheMain.javafiletoopenitforediting.2. UsetheInsertCode…refactoringtoinsertaloggerintothefileandthenlogastart
messageimmediatelyafterthedefinitionofthemain()method:
LOG.info("Startingapplication:"+args.length+"arguments.");
3. Nowthatwe’vemadesomechangessothatourlocalcopyoftherepositoryisdifferentfromtheremoterepository,wecancreateaDifffile.
4. Right-clickontheJarViewerrootnodewithintheProjectsexplorerandselectSubversion,thenPatches,andthenExport.
5. OntheExportDiffPatchdialog,selectafilenametosavetheDiffpatchandthenclickontheOKbuttontocreatetheDiffpatch.
TipAlthoughyoucanuseanyfileextensionwhencreatingDiffpatches,thestandardfileextensioniseither.diffor.patch.
6. TheDiffpatchwillbecreatedandopenedwithinNetBeansshowingallthechangesmadetotheproject.

There’smore…IfyouonlywanttocreateaDiffpatchforasinglefilewithinNetBeans,youcanselecttheTeammenuandthenDiffandtheDiffFilesmenuoption.ThisDiffFilesoptionwillcausealistoffilesthathavechangedfromtheremoterepositorytobedisplayed.Clickingonanyofthefilesshowsagraphicalrepresentationofwhathaschangedinthatfile.Thisisveryeasytofollowandmakesviewingthechangestoaparticularfileveryeasy.ClickingontheTextualtabwillshowthechangesforthespecifiedfileintheDiffformat,asshowninthefollowingscreenshot:
Right-clickingonanychangedfileandselectingExportDiffPatchwillcreateaDiffpatchforthespecifiedfileonlyandnotforallthefilesthathavechanged.
ApplyingaDiffpatchTheoppositeofcreatingaDiffpatchisapplyingaDiffpatchtoaproject.IfyoureceiveaDiffpatch,andwishtoapplyittoaproject,thiscaneasilybeperformedwithNetBeans.
Right-clickontherootnodeoftheprojectfromwithintheProjectsexplorerandclickonSubversion,thenPatches,andthenApplyDiffPatch….NetBeanswillthenaskforaDiffpatchfiletobeselected.Uponselectingthefile,NetBeanswillattempttoapplyittothecurrentproject.TheOutputwindowwillshowthestatusofapplyingthepatchandwhetherithassucceededorfailed(mostlikelybecauseNetBeanscannotcorrectlyperformacomplexmerge).NetBeanswillalsoshowbothaGraphicalandTextualresultofamergesothatyoucanseeexactlywhatpartsoftheDiffpatchhavebeenappliedandtowhatfiles.


BranchingarepositoryWhenmultiplepeopleareworkingonaproject,thereisusuallymorethanonepieceofdevelopmentbeingperformedatasingletime.It’sagoodpracticetoonlycommitproduction-readycodetothetrunkormasterbranchesofarepository,soweneedsomewhereelsetocommitcodethatwe’venotfinishedwith.Thisiswherebranchingandbranchescomesin.
Abranchisaseparatedevelopmentstreamthathasbeentakenfromthemaster/trunkbranchatacertainpointoftime,usuallywiththeintentionofcompletingaspecificpieceoffunctionality,whetherit’sabugfixoranewfeature.
Withinthisrecipe,we’llshowhowtocreateabranchwithinaGitrepository,althoughtheprocedureisthesameforothertypesofrepositories.

GettingreadyTocompletethisrecipe,we’llneedtohaveclonedthecookbook-jarviewerrepositoryfromGitHubasdescribedintheearlierrecipe,CloningaGitrepository.
EnsurethatthisprojectisopenwithinNetBeansbeforestartingthisrecipe.

Howtodoit…1. Right-clickontheJarViewernodewithintheProjectsexplorerandselectGit,then
Branch/Tag,andthenCreateBranch….2. TheCreateBranchdialogwillbedisplayed.EnterBug911intheBranchName
field.3. ClickontheCheckoutCreatedBranchcheckboxsothatitischecked,asshownin
thefollowingscreenshot:
4. ClickontheCreatebutton.
Thenewbranchwillbecreatedandcheckedout.Anycommitstocodewillnowbeappliedtothisnewbranchandnotcommittedtothemaster/trunkbranch.
Oncewe’vemadechangestoabranch,andcompletedapieceofdevelopment,weusuallywanttomergethebranchbackintothemaster/trunksothatitisavailableforothers.Let’smakeachangetotheprojectnowandthenmergethisbackintothemasterwiththefollowingsteps:
1. ChangetheMain.javafilesothattheLOGstatementusesamessagetemplateratherthanconcatenatingstrings:
LOG.log(Level.INFO,"Startingapplication:{0}arguments.",
args.length);
2. CommitthischangetothebranchusingtheCommitoptionwithinNetBeans(remember,we’restillonabugbranchatthemomentandnotonthemasterbranch).
3. Right-clickontheJarViewernodewithintheProjectsexplorerandselectGit,thenBranch/Tag,andthenswitchtothemasterbranch.Notehowthechangeswe’vejust

madetothefilehavenowdisappearedbecausewe’veswitchedtothemasterbranchandhaven’tmergedthechangesintoityet.
4. Right-clickontheJarViewernodewithintheProjectsexplorerandselectGit,thenBranch/Tag,andthenMergeRevision….
5. TheMergeRevisiondialogwillnowbedisplayed.ClickontheSelectbuttontoselectarevisiontomergeintomaster.
6. Fromthelistofbranches,selecttheLocalbranchBug911.ClickontheSelectbuttontoselectthebranchformerging,asshowninthefollowingscreenshot:
7. ClickontheMergebuttontomergethechangesintomaster.

There’smore…Insteadofcreatingbranches,wecanalsomaketagswithinarepository.Atagisessentiallyalabelwhosepurposeistoidentifyaspecificlocationwithinarepository,forexample,aspecificrelease.CommonnamesfortagscouldbenamessuchasRelease_1_0_0orBeta_1.Creatingatagwithinarepositoryisasimilarprocesstocreatingabranch(atagisessentiallyanuneditablebranchsotagsandbranchessharealotincommon).Tocreateatag,selecttheBranch/TagmenuoptionandthenCreateTag….Tagscanbemanaged(deleted)fromtheManageTagsdialogthatisaccessiblebyselectingtheBranch/TagmenuoptionandthenbyselectingManageTags….


Chapter10.NetBeansTestingandProfilingInthischapter,wewillcoverthefollowingrecipes:
InstallingJUnitsupportintoNetBeansCreatingaJUnittestforanexistingclassCreatingaJUnittestCreatingaJUnittestsuiteRunningtestsCreatingaTestNGtestandtestsuiteProfilinganapplication

IntroductionInrecentyears,writingtestsforapplicationshasbecomeamuchmorewidelyusedpractice.Inmanyways,thisisduetotheriseofopensourcesoftwareandtheneedtoprovethatsoftwarewillfunctionasexpected.
Insoftwaredevelopment,therearenowmanydifferentunittestingframeworks,manyofwhicharebaseduponthexUnitarchitecture.Thisarchitecture,originallydefinedbyKentBeckinthelate1990s,definesabasicsetofcomponentstoruntests.
xUnitspecifiesthattestsareexecutedbyatestrunner,whichisresponsibleforrunningallofthenecessarytestsandgeneratingresultsindicatingeitherthesuccessorfailureofeachtest.Eachtestisdefinedasaseparatetestcase.Foreachtestcase,wedefineanumberofassertionsthatmustequatetotrueforthetesttobesuccessful.
Torunatest,anynumberofpreconditionsneedtobedefined.InxUnit,thesearecalledtestfixtures.Whentherearemultipletestcasesthatrequirethesametestfixtures,thesearegroupedtogetherintoatestsuite.
IntheworldofJavasoftwaredevelopment,JUnitandTestNGarethetwomostcommontestingframeworks,bothofwhichfollowthexUnitarchitecture.Inthischapter,we’lldiscusshowtousebothJUnitandTestNGwithinNetBeans.
Inadditiontolookingatunittesting,we’lltakealookatprofilingandperformancetesting.We’llseehowNetBeans’internalprofilercanbeusedtomonitorapplicationperformance.


InstallingJUnitsupportintoNetBeansSinceVersion7ofNetBeans,JUnithasnotbeenincludedwiththestandardinstallationofNetBeans.JUnitusestheCommonPublicLicense,andassuch,cannotbeinstalledbydefaultwithfreshinstallsofNetBeans.
YoumayhavenoticedwheninstallingNetBeansthatyouareaskedpartwaythroughtheinstallationifyouwishtoinstallJUnitsupport.ToinstallJUnitsupportduringinstallation,youmustagreetotheJUnitlicenseagreement.
IfyoudidnotinstallJUnitduringNetBeansinstallation,thisrecipewillshowyouhowtoinstallJUnitsupport.TheJUnitLicenseAgreementpageofNetBeansIDEInstallerisshowninthefollowingscreenshot:

GettingreadyTocompletethisrecipe,youmustuseeithertheJavaSE,JavaEE,orAllNetBeansdownloadbundle.Additionally,thisrecipeassumesthatJUnitwasnotinstalledwithNetBeans.

Howtodoit…ToinstallJUnitsupport,performthefollowingsteps:
1. ClickonToolsandthenPluginsfromthemainNetBeansmenubar.2. OnthePluginsdialog,selecttheAvailablePluginstab.3. LocatetheJUnitpluginandchecktheInstallcheckbox,asshowninthefollowing
screenshot:
4. ClickontheInstallbutton.5. TheNetBeansIDEInstallerdialogwillbedisplayedconfirmingthattheJUnit
pluginistobeinstalled.ClickontheNextbutton.6. Readandacceptthelicenseagreement,thenclickontheInstallbuttontocontinue
theinstallation.7. ClickontheFinishbuttontocompleteinstallation.

Howitworks…WithNetBeans8,JUnitsupportisavailableasaNetBeanspluginthatcanbedownloadedandinstalledviatheNetBeansPluginsoption.InstallingtheplugindoesnotrequirearestartofNetBeans,butdoesinstallandactivateallofthefunctionalityrequiredtowriteandrunJUnittests.Inthenextrecipe,CreatingaJUnittestforanexistingclass,we’llseehowtowriteJUnittestswithinNetBeans.


CreatingaJUnittestforanexistingclassNetBeansprovidesfacilitiestoeasilycreateJUnittests.Inthisrecipe,we’llseehowwecancreatetestsforanexistingclass.We’llinitiallycreateanewlibraryprojectwithinNetBeansandcreateaverysimpleclasstodosomebasicmath.We’llthenseehowtouseNetBeanstocreatetestsforthelibrary.

GettingreadyTocompletethisrecipe,youneedtoensurethatyouhaveinstalledtheJUnitsupportintoNetBeansasdescribedinthepreviousrecipe,InstallingJUnitsupportintoNetBeans.

Howtodoit…TocreateaJUnittestforanexistingclass,performthefollowingsteps:
1. ClickonFileandthenNewProject….CreateanewJavaClassLibraryprojectcalledCalculator.Ifyouareunsureofthestepsnecessarytocreatethisproject,checkouttheCreatingalibraryrecipeinChapter1,UsingNetBeansProjects,ofthisbook.
2. CreateanewclasscalledCalculatorinthecom.davidsalter.cookbook.testingpackage.Changethebodyoftheclasstoread:
publicclassCalculator{
publicintadd(intx,inty){
returnx+y;
}
publicdoubledivide(doublex,doubley){
returnx/y;
}
}
3. Nowthatwe’vecreatedaverysimpleclass,wecancreateatestforit.Notethatwehavenomainmethodinourclasslibrary,sowecan’tsimplyruntheclasstoseehowitbehaves.
4. Right-clickontheCalculatornodewithintheProjectsexplorerandclickonNewandthenOther….
5. IntheNewFiledialog,selectUnitTestsfromthelistofCategoriesandTestForExistingClassfromthelistofFileTypes.
6. ClickonNext.7. OntheNewTestforExistingClassdialog,clickontheBrowse…buttonandselect
theClassToTestfieldasCalculator.java,asshowninthefollowingscreenshot:

8. LeaveallthedefaultsettingsastheyareandclickonFinishtocreatethetestclass.

Howitworks…Creatinganewtestforanexistingclassisasimplewaytoautomaticallycreatestubtestmethodsforanexistingclass.Thisisusefulforwritingtestsaftertheclasshasbeenwritten.
TipIfyou’reafanoftest-drivendevelopment(TDD),youmaybewonderingifit’spossibletocreatetestsbeforeclassesarecreatedasthatistheworkingpracticeforTDD.Don’tworry,NetBeansprovidesawayforcreating“blank”tests.We’llseethisinthenextrecipe,CreatingaJUnittest.FormoreinformationonTDD,checkouthttp://en.wikipedia.org/wiki/Test-driven_development.
Whencreatingatestforanexistingclass,NetBeansaskeduswhichclasswe’dliketowritetestsfor.Alistofalltheclasseswithintheprojectwasdisplayedforustochoosefrom.
Afterchoosingaclass,wecanseethatNetBeansgeneratedatestclasswiththesamenameastheclassundertest,butwiththesuffixTest.Inourexample,wecreatedatestclasscalledCalculatorTestfromtheapplicationCalculatorclass.
TipIt’susefultomaintainthisnamingschemewhencreatingadditionalclassesasNetBeansusesthispatternfortestclassdiscoveryandexecution.
NetBeansautomaticallyspecifiedthelocationofthetestclassaswithintheTestPackagesnodeoftheproject.ThisnodeisclearlyshownwithintheProjectsexplorer,asshowninthefollowingscreenshot:
Theideabehindstoringtestclassesseparatelywithinaprojectistwofold:
TestclassescanbekeptentirelyseparatefromapplicationclassesmakingiteasiertofindanddistinguishtestandapplicationcodeTestclassescanbecompiledseparatelyfromapplicationclassesanddonotneedtobedistributedwithreleasecode
ThenextinformationrequiredforcreatingaclasswastospecifyMethodAccessLevels.

Welefttheseatthedefaultvalues(allchecked).Theselevelsdictatewhethertestsarecreatedforthedifferentaccesslevelmethodsinthesourceclass.Forexample,wecandecidetogeneratetestsonlyforpublicmethodswithinaclassandnotgeneratetestsforprotectedorpackageorprivatemethods.Thedefaultoptionistocreatetestmethodsforallmethodsfoundinthesourceclass.
Nexttothis,wecanspecifywhatcodeistobegenerated(again,wechosethedefaultoptionofhavingalloptionsselected).Wecanchoosetogeneratecodeforthefollowingoptions:
TestInitializer:Thiscreatesamethodthatiscalledbeforeeachinstanceofthetestclassiscreated.InJUnitterms,[email protected]:Thiscreatesamethodthatiscalledaftereachinstanceofthetestclasshasbeenexecuted.InJUnitterms,[email protected]:Thiscreatesasetupmethodthatisinvokedbeforeeachtestwithinthetestclass.InJUnitterms,[email protected]:Thiscreatesateardownmethodthatisinvokedaftereachtestwithinthetestclass.InJUnitterms,[email protected]:ThistellsNetBeanstocreateatestmethodforeachmethoddefinedwithinthesourceclass(takingintoaccountthemethodaccesslevel).InourCalculatorTest.javaclassthatwecreatedinthisrecipe,wecanseethattwomethods,testAdd()andtestDivide(),werecreatedcorrespondingtotheadd()anddivide()methodsintheCalculatorclass.
ThefinaloptionsprovidedbyNetBeansweretogenerateJavadocCommentsandSourceCodeHints.GeneratingJavadocaddsstandardcommentsbeforeeachmethodinthetestclass,whereas,thesourcecodehintsoptionaddsto-docommentsintothecodeindicatingwherethetestneedsfillingout.
Ifwelookatthetestthatwasgeneratedfortheadd()method,wecanseehowNetBeanshastriedtowriteatestfortheaddfunctionalitywiththefollowingcode:
@Test
publicvoidtestAdd(){
System.out.println("add");
intx=0;
inty=0;
Calculatorinstance=newCalculator();
intexpResult=0;
intresult=instance.add(x,y);
assertEquals(expResult,result);
//TODOreviewthegeneratedtestcodeandremovethedefaultcallto
fail.
fail("Thetestcaseisaprototype.");
}
Withinthecode,wecanseethatthetestcreatesanewinstanceoftheCalculatorclass(sometimes,referredtoastheSystemUnderTest(SUT)).Theadd()methodisinvokedandtheassertion,assertEquals,iscalledtocheckthattheresultfrominvokingtheadd()methodisthesameastheexpectedresult.Clearly,NetBeansdoesn’tknowwhattheadd()

methodissupposedtodo;so,acommentisaddedindicatingthatweneedtoreviewtheassertion.Thetestisthenconfiguredtofailirrespectiveoftheresults.
Tomakethisintoausefultestrequiresveryfewchangesascanbeseenintheworkingofthefollowingcode:
@Test
publicvoidtestAdd(){
intx=4;
inty=5;
Calculatorinstance=newCalculator();
intexpResult=9;
intresult=instance.add(x,y);
assertEquals(expResult,result);
}
Allthat’sneededinthisinstancetomakethetestusefulistosetupsomeinputstotheSUTanddefinetheexpectedresults.Inthiscase,validatingthatadding4and5gives9.

There’smore…InadditiontocreatingtestsforclassesusingtheNewFilewizard,itisalsopossibletocreatetestsforaclassdirectlyfromwithintheProjectsexplorer.Tocreateorupdateasetoftestsforaclassinthisway,locatetheclasstobetestedwithintheProjectsexplorerandright-clickonit.Onthepop-upmenu,selectToolsandthentheCreate/UpdateTestsoption.AndthenselecttheCodeGenerationoptionsasrequired,asshowninthefollowingscreenshot:


CreatingaJUnittestForsometypesofdevelopment,forexample,TDD,thebestpracticefortestingistowritethetestbeforewritingthefunctionalityfortheapplication.Thisallowsthedevelopertothinkcarefullyaboutthearchitectureoftheapplication,andhelpstoensurebettertestcoverage.
NetBeanshelpsinthisareabyallowingdeveloperstocreatetestclassesthatarenotbaseduponexistingapplicationcode(thisistheoppositeofwhatwesawinthepreviousrecipe,CreatingaJUnittestforanexistingclass,wheretheapplicationcodealreadyexisted).
Inthisrecipe,we’llseehowtocreateabasicJUnittestclass.

GettingreadyTocompletethisrecipe,youneedtoensurethatyouhaveinstalledtheJUnitsupportintoNetBeansasdescribedintheearlierrecipe,InstallingJUnitsupportintoNetBeans.
You’llalsoneedthesampleprojectwecreatedinthepreviousrecipe,CreatingaJUnittestforanexistingclass.Ifyouhavenotcompletedthatrecipe,theprojectisavailableaspartofthecodedownloadbundleforthebook.

Howtodoit…PerformthefollowingstepstocreateaJUnittest:
1. Right-clickontheTestPackagesnodeoftheCalculatorprojectwithintheProjectsexplorerandclickonNewandthenOther….
2. IntheNewFiledialog,selectUnitTestsfromthelistofCategoriesandJUnitTestfromthelistofFileTypes.
3. ClickonNext.4. IntheClassNamefield,enterCalculatorUnitTest.5. EnsuretheLocationdropdownissettoTestPackagesandenterthePackagefield
ascom.davidsalter.cookbook.testing.6. UncheckalloptionsunderGeneratedCodeandGeneratedCommentssothata
blankJUnittestclassiscreated,asshowninthefollowingscreenshot:
7. ClickonFinishtocreatethetestclass.
Nowthatwe’vecreatedtheskeletonforatestcase,let’saddatestmethodintoittotesttheCalculatorclasswedefinedearlier.
8. EnsuretheCalculatorUnitTest.javaclassisopenforeditingandaddthefollowingmethodtotheclass:
@Test
publicvoidtestAddNumbers(){
Calculatorcalc=newCalculator();
assertEquals("Invalidaddition",10,calc.add(2,8));

}
Thiscodeusesthe@TestannotationtodeclarethatthetestAddNumbers()methodisaJUnittestmethod.ThemethodcreatesaninstanceoftheSUTandthenusesJUnit’sassertEqualsmethodtocheckthatthecalc.add(2,8)methodreturnsthevalue10.Ifthisvalueisnotreturned,theerrormessageInvalidadditionwillbeloggedtothetestoutput.
TipJUnitsupportsmanydifferentassertions,includingassertArrayEquals,assertEquals,assertFalse,assertNotNull,assertNotSame,assertNull,assertSame,assertThat,andassertTrue.Thegeneralformatofeachofthesemethodsisassert(Stringmessage,Objectexpected,Objectresults);however,themessageparameterisoptional.Althoughthisparametercanbemissedout,it’srecommendedtoadditsothattestfailurescanbemoreeasilyrecognized.

Howitworks…Inthisrecipe,wecreatedaJUnittestcasewithoutanyforeknowledgeoftheSUT.ThisisausefulpatternwhenperformingTDD.
WeusedtheNetBeanswizardtocreateablanktestcaseforus.Ablanktestcaseisessentiallyapublicclasswithnomethodsinit;however,it’slocatedwithintheTestPackagessectionoftheprojectratherthanwithintheSourcePackagessection.
Tocreateatest,wecreatedamethodandannotateditwiththe@Testannotation.WethenusedaJUnitassert*methodtocheckthatourSUTwasgeneratingthecorrectresults.
LookingattheCalculatorUnitTest.javaclass,you’llnoticethattheJUnitassertionsareallstaticimports.Thisallowsunqualifiedaccesstotheassertmethodssowecancall:
assert(…);
Insteadof:
org.junit.assert.assert(…);

There’smore…Inthisrecipe,weidentifiedatestmethodwiththe@Testannotation.JUnitallowsacoupleofparameterstobespecifiedwiththisannotationtochangetheexpectedbehaviorofthetest.
Ifweareexpectingthatatestmethodmustcompletewithinacertainamountoftime,wecanaddthetimeoutparametertotheannotation.Forexample:
@Test(timeout=5000)
Thiswoulddeclarethatthetestmustcompletewithin5000milliseconds;otherwise,itwillhavedeemedtohavefailed.
Similarly,ifweexpectthatatestmethodwillthrowanexception,wecanaddtheexpectedparametertotheannotation.Forexample:
@Test(expected=java.io.IOException.class)


CreatingaJUnittestsuiteAJUnittestsuiteisaconvenientwayofspecifyingasetoftestcasesandtheorderinwhichtheyshouldrun.
WithinJUnit,the@Suiteannotationisusedtospecifywhichtestcasesarewithinthesuite.JUnitusestheSuitetestrunnertoruntheclasses.

GettingreadyTocompletethisrecipe,youneedtoensurethatyouhaveinstalledtheJUnitsupportintoNetBeansasdescribedintheearlierrecipe,InstallingJUnitsupportintoNetBeans.
You’llalsoneedthesampleprojectwecreatedinthepreviousrecipe,CreatingaJUnittest.Ifyouhavenotcompletedthatrecipe,theprojectisavailableaspartofthecodedownloadbundleforthebook.

Howtodoit…PerformthefollowingstepstocreateaJUnittestsuite:
1. Right-clickontheTestPackagesnodewithintheCalculatorprojectintheProjectsexplorerandclickonNewandthenOther….
2. IntheNewFiledialog,selectUnitTestsfromthelistofCategoriesandTestSuitefromthelistofFileTypes.
3. ClickonNext.4. EntertheClassNamefieldasCalculatorTestSuite.EnsuretheLocationfieldis
settoTestPackagesandenterthePackagefieldascom.davidsalter.cookbook.testing.
5. UnchecktheoptionsunderGeneratedCodeandGeneratedComments,asshowninthefollowingscreenshot:
6. ClickonFinishtocreatethetestsuite.

Howitworks…Inthisrecipe,wecreatedatestsuitecalledCalculatorTestSuiteandaddedittothecom.davidsalter.cookbook.testingpackage.Thebodyofthegeneratedtestsuiteclassisasshowninthefollowingcode:
@RunWith(Suite.class)
@Suite.SuiteClasses(
{com.davidsalter.cookbook.testing.CalculatorUnitTest.class,
com.davidsalter.cookbook.testing.CalculatorTest.class
})
publicclassCalculatorTestSuite{
}
Lookingatthecode,wecanseethatNetBeanshascreatedapublicclasscalledCalculatorTestSuiteandannotateditwiththe@RunWith(Suite.class)annotation.ThisistheJUnitwayofdeclaringatestsuite.
[email protected]({…,…})annotation.Thisannotationdefineswhichclassesarepartofthetestsuite.Inthiscase,NetBeanstookalistofallthetestclasseswithinthepackagewecreatedthesuiteinandaddedthemtothesuite.Aswehadtwotestclasses,boththesewereaddedtothesuite.
Whenrunningthesuite,JUnitwillruntheclassesintheorderthattheyarespecifiedwithinthe@Suite.SuiteClassesannotation.
YouwillnotethattheCalculatorTestSuiteclasshasnobodyasitisessentiallyaplaceholdertellingJUnithowtoconstructthetestsuite.WithintheNewTestSuitewizard,however,thereistheoptiontoaddtestinitializersandfinalizersintothetestsuitedefiningcodethatcanberunoutsideoftheindividualtestfixturesthemselves.

There’smore…If,atalaterdate,wecreatemoretestclasses,wecanaddthesemanuallytothe@Suite.SuiteClassesannotationtoaddtheclassestothetestsuite.Thisis,however,amanualprocess.


RunningtestsInthepreviousfewrecipes,we’veseenhowtocreateJUnittestsfromscratchandbaseduponexistingclasses.We’vealsoseenhowtocreateatestsuitethatdefinesasetoftestsandtheorderinwhichtheycanbeexecuted.
Inthisrecipe,we’llseehowwecanrunallofthosetestswithinNetBeansandseethereportingofthetestswe’verun.
NetBeansprovidesseveralwaystoruntestsandtestsuites.We’lllookatallofthesetechniqueswithinthisrecipe.

GettingreadyTocompletethisrecipe,youneedtoensurethatyouhaveinstalledtheJUnitsupportintoNetBeansasdescribedintheearlierrecipe,InstallingJUnitsupportintoNetBeans.
You’llalsoneedthesampleprojectwecreatedinthepreviousrecipe,CreatingaJUnittestsuite.Ifyouhavenotcompletedthatrecipe,theprojectisavailableaspartofthecodedownloadbundleforthebook.

Howtodoit…EnsurethattheCalculatorprojectisopenwithinNetBeans.Toruntestsandtestsuites,performthefollowingsteps:
1. Right-clickontheCalculatorUnitTest.javaclasswithintheTestPackagesnodeandclickonTestFile.
2. NetBeanswillfindallofthetestslocatedwithintheCalculatorUnitTest.javaclassandrunthem.Theresultsofthetests(inthiscase,thereisonlyonetest)willbeshownintheTestResultswindow,asshowninthefollowingscreenshot:
3. NetBeansshowsa100.00%greenbarindicatingthat100percentofthetestshavepassed.Greatgoingsofar!
4. Right-clickontheCalculatorTest.javaclasswithintheTestPackagesnodeandclickonTestFile.
5. Asbefore,NetBeanswillfindallofthetestslocatedwithinthespecifiedclassandrunthem.Inthiscase,therearetwotests,oneofwhichpassesandtheotherofwhichfails,asshowninthefollowingscreenshot:
6. NetBeansnowshowsa50.00%greenbaranda50.00%redbarindicatingthathalfofthetestsinthetestrunhavefailed.Wecanalsoseeanytestoutput(suchasthatgeneratedbycallstoSystem.out.println)displayedwithintheright-handsidewindowofthetestresults.
7. Expandthecom.davidsalter.cookbook.testing.CalculatorTestnodewithintheTestResultswindow,asshowninthefollowingscreenshot:

8. IntheTestResultswindow,wecanseethatthetestDividemethodhasfailed.Itwasexpectingaresultof0.0,butfoundaresultofNaN(NotaNumber).
9. Double-clickonthelinebeginningtestDivideFailedwithintheTestResultsexplorerandNetBeanswillopentheappropriatetestclassforusandtakeustotheassertionthatfailed.
10. WecanseethatthetestDividemethodhasfailedbecauseitwasjustastubmethodgeneratedforusbytheNewTestforExistingClasswizard.Let’sfixthetestDivide()methodbychangingittoread:
@Test
publicvoidtestDivide(){
System.out.println("divide");
doublex=10.0;
doubley=2.0;
doubledelta=0.0001;
Calculatorinstance=newCalculator();
doubleexpResult=5.0;
doubleresult=instance.divide(x,y);
assertEquals("Divisionnotcorrect",expResult,result,delta);
}
TipNotethattheassertEqualsmethodthatweareusinginthisexamplehasanadditionaldeltaparameterattheend.Thisisrequiredduetotheinaccuraciesthatmayoccurwhenperformingfloatingpointarithmetic.Thisparametersaysthatiftheexpectedresultandtheactualresultaredifferentbyanamountsmallerthandelta,thentheyareconsideredtobethesame.
11. Sincewe’veonlyfixedonetestwithintheclass,wedon’tnecessarilyneedtorunallofthetestswithinit.Let’sjustrunthetestDivide()methodtestagain.Right-clickwithinthebodyofthetestDivide()methodandselectRunFocussedTestMethod.
12. NetBeanswillrunonlythetestDivide()methodanda100.00%greenbarwillbedisplayedwithintheTestResultswindowindicatingthatwewrotethetestcorrectly!

Howitworks…RunningJUnittestswithinNetBeansisastraightforwardprocess.Wecanrunallofthetestswithinaclassbyright-clickingontheclasswithintheTestPackagesnodeandselectingtheTestFileoption.
TipPressingCtrl+F6orselectingtheRunFileoptionwillalsoruntestsontheselectedfile.
Runningatestsuitefollowsthesameprocedure—right-clickonthetestsuiteclassandselecttheTestFileoption.
WithintheTestResultswindow,severaloptionsareavailabletohelpustonavigateandmanagetestruns.Theyareexplainedinthefollowingtable:
Option Description
Rerunallthetestsfromthelasttestrun
Rerunallthefailedtestsfromthelasttestrun
ShowallpassedtestsintheTestResultswindow
ShowallfailedtestsintheTestResultswindow
ShowerrorsintheTestResultswindow
ShowabortedtestsintheTestResultswindow
ShowskippedtestsintheTestResultswindow
Movetothepreviousfailure
Movetothenextfailure
AlwaysopentheTestResultswindow
AlwaysopenanewtabintheTestResultswindow

There’smore…NetBeansalsoprovidestheoptiontorunalltestswithinapackage.Toperformthisoperation,right-clickonapackagewithintheTestPackagesnodeandselectTestPackage.
Torunallthetestsforaproject,simplyselectRunfromthemainmenuandthentheTestProjectmenuitem.
Ifyourtests/codearen’trunningasexpected,NetBeansprovidestheoptiontodebugtests.InsteadofselectingTestFileorRunFocusedTestMethod,selectthedebugvariant,DebugFileorDebugFocusedTestMethod.YoucanthenusealloftheNetBeansdebuggingfunctionalitytohelpfixyourcode/tests.


CreatingaTestNGunittestTestNGisanotherpopularJavatestingframeworkthatwasinspiredbyearlyversionsofJUnitthatdidnotuseannotations.TestNGisdescribedasmorepowerfulandeasiertousethanJUnit.Formoredetailsaboutthis,checkouttheproject’shomepageathttp://testng.org.

GettingreadyTocompletethisrecipe,you’llneedthesampleprojectwecreatedintheearlierrecipe,CreatingaJUnittestsuite.Ifyouhavenotcompletedthatrecipe,theprojectisavailableaspartofthecodedownloadbundleforthebook.

Howtodoit…EnsuretheCalculatorprojectisopenwithinNetBeans.Performthefollowingstepstocompletethisrecipe:
1. Right-clickontheTestPackagesnodewithintheProjectsexplorerandselectNewandthenOther….
2. IntheNewFiledialog,selectUnitTestsfromthelistofCategoriesandTestNGTestCasefromthelistofFileTypes.
3. ClickonNext.4. EntertheClassNamefieldasCalculatorTestNGTest.EnsuretheLocationfieldis
settoTestPackagesandenterthePackagefieldascom.davidsalter.cookbook.testing.
5. CheckalloftheGeneratedCodeoptionsandtheGeneratedCommentsoption.6. ClickonFinishtocreatethetestcase.7. AddthefollowingtesttotheCalculatorTestNGTest.javaclass:
@Test
publicvoidtestAdd(){
intx=4;
inty=5;
Calculatorinstance=newCalculator();
intexpResult=9;
intresult=instance.add(x,y);
assertEquals(expResult,result);
}
8. FixtheimportsontheclassusingtheFixImportsrefactoring(note,usetheorg.testngpackagesinsteadoftheorg.junitpackages).
9. Right-clickontheCalculatorTestNGTest.javaclassandselectTestFile.NotehowthetestisexecutedandshowsresultsinasimilarfashiontowhenrunningtheJUnittests.

Howitworks…CreatingandrunningaTestNGtestandtestsuiteworksexactlythesamewayascreatingandrunningaJUnittestsuite.
Whentestingapackageorrunningallthetestsforaproject,NetBeanswillrunalltestsirrespectiveofwhethertheyareJUnitorTestNGtests.Youcantrythisoutbyrunningallofthetestsinthecom.davidsalter.cookbook.testingpackageorbyselectingRunandthentheTestProjectmenuitem.


ProfilinganapplicationNetBeansprovidesthefacilitiestoprofilebothlocalandremoteapplications.Profilingallowsyoutogetaviewofthethreads,CPU,andmemoryusageofyourapplication.Thiscanbeveryusefulwhentrackingdownmemoryleaksorapplicationbottlenecksthatarecausingapplicationstorunslowly.
Inthisrecipe,we’lladdanextramethodtotheCalculatorclasswedefinedearlierinthischapterandseehowitfareswhenprofiled.

GettingreadyTocompletethisrecipe,you’llneedthesampleprojectwecreatedintheearlierrecipe,CreatingaJUnittestsuite.Ifyouhavenotcompletedthatrecipe,theprojectisavailableaspartofthedownloadbundleforthebook.
Howtodoit…Toprofileourapplication,performthefollowingsteps:
1. Double-clickontheCalculator.javafileandaddthefollowingmethodtoit;thiswillcalculatethefactorialofanumberrecursively:
publiclongfactorial(intx){
if(x<=1){
return1;
}else{
Calculatorcalc=newCalculator();
return(x*calc.factorial(x-1));
}
}
2. Sincewe’reprofilinganapplication,weneedtoaddamainmethodtoourprojectsothatwehavesomethingtoprofile.UsetheNewFilewizardtocreateanewJavaMainClass(thisislocatedwithintheJavacategory).CreatethemainclassMainandplaceitinthecom.davidsalter.cookbook.testingpackage.
3. ChangethecontentsofthemainmethodinMain.javatoread:
publicstaticvoidmain(String[]args){
Calculatorcalculator=newCalculator();
longx=calculator.factorial(20);
System.out.println("x!="+x);
}
Nowthatwe’vecreatedasimpleapplicationthatperformssomemath,let’sprofilethememoryoftheapplication.
4. ClickonProfileonthemainNetBeansmenuandthenclickonProfileProject.TheProfileCalculatordialogwillbedisplayed:

5. ClickontheMemoryprofilerbuttonattheleftofthedialogandchecktheAdvanced(instrumented)radiobutton.Thiswillallowustoseememoryusageforallcodethatiscalledbyourapplication.
6. ClickontheRunbutton.7. TheapplicationwillnowrunwhileNetBeansprofilesexecutionofthecode.8. Whentheapplicationhascompleted,adialogwillbedisplayedstatingthe
applicationhasfinishedexecutionandaskingDoyouwanttotakeasnapshotofthecollectedresults?.ClickonYes.
9. Amemorysnapshotwindowwillnowbedisplayedshowingwhatclassesareallocatedtoobjectsduringtheapplication’sexecution.Thepercentageofbytesallocatedalongwiththenumberofbytesallocatedandtheobjectsallocatedisshowninthefollowingscreenshot:

10. Atthebottomofthememorysnapshotwindow,thereisafilterthatallowsthememorysnapshotlisttobefiltereddown.EnterthenameCalculatorintothefilterboxandpressEnter.
11. Thememorysnapshotwindowwillbecontainonlyoneentry—forourcalculatorclass,asshowninthefollowingscreenshot:
12. Clickontheclosebuttontoclosethememorysnapshotwindow,andwhenprompted,savetheresultssnapshot.ThisisnowshownwithintheProfilerexplorer.Wecandouble-clickonthesnapshotatanytimetoviewitagain.TheSavedSnapshotssectionisshowninthefollowingscreenshot:
13. Lookingatthisentry,wecanseethatweallocated20objectsduringtheexecutionofourcode.Thisseemsabitexcessive,sodouble-clickonthelinewithinthememorysnapshottoopenuptheCalculatorclass.Lookingattheclass,wecanseethatweinstantiateaCalculatorobjecteverytimewecallthefactorial()method.Thisisn’tnecessary.Changetheelseclausewithinthefactorial()methodtoread:
return(x*factorial(x-1));
14. Profiletheapplicationagain,andfiltertoshowonlytheCalculatorclassagain.Notethistime,howonlyoneobjectisallocated—apotentiallysignificantsavingoverthepreviousexecution.
15. Clickonthelastbuttononthesnapshotwindow( ).Thisbuttonallowsustocomparethecurrentmemorywithasavedmemorysnapshot.
16. TheSelectSnapshottoComparedialogwillbedisplayed.SelecttheprevioussnapshotandclickontheOKbuttontocomparethememorysnapshots.
17. Asbefore,filtertheviewtocontainonlytheCalculatorclass.Notethistimethatthereporttellsusthatinitiallyweallocated19moreobjectsthaninoursubsequent

run.

There’smore…Inadditiontoprofilingmemory,wecanalsoprofiletheCPUusageandmonitortheapplication’sperformance.
Monitoringtheapplicationisusefulwhenwehavemultiplethreadsrunningasitshowsushowmanythreadswereallocatedandhowlongtheyranfor,asshowninthefollowingscreenshot:
MonitoringCPUusageshowsushowmuchCPUtimeisspentwithineachmethodofourapplication.WhenstartingupmonitoringCPUusagewecanspecifywhichclassesweareinterestedinlookingat,soforexample,whenrunningwithinanapplicationserver,weonlylookattheCPUoverheadofourownclassesandnotthatoftheapplicationserver.ThefollowingscreenshotshowsanexampleofprofilingtheCPUusagetimeintheexampleapplicationwecreatedearlier:
ProfilingtheCPUusagealsogivesusanindicationofthehotspots,thatis,theCPUintensiveareasofourapplication.Thiscanbeinvaluablewhentrackingdownperformancebottlenecksinanapplication.


Chapter11.UsingExternalWebServicesInthischapter,wewillcoverthefollowingrecipes:
GettingalistofDeliciousbookmarksAddingaDeliciousbookmarkGettingalistofrecentphotosonFlickrGeocodingwithGoogleMapsVerifyingane-mailaddresswithStrikeIronAddinganadditionalwebserviceintoNetBeans

IntroductionWiththeubiquitousnatureoftheInternetinthemodernworld,softwaredevelopersarehavingtobuildconnectedapplicationsmoreandmorefrequently.It’snotenoughtohavestandaloneapplicationsnowadays.Customersaredemandingapplicationsthatcantalktoothersystemsandthatcanminedatafrommultiplesources,bringingdatatogetherasvaluableinformation.
Notlongago,XMLwasconsideredtheanswertoanyintegrationproblemwithSOAPwebservicesbeinghailedasthepreferredintegrationmechanism.DespiteSOAP’sclaimstobe“simple”,REST-basedAPIshavebecomeincreasinglycommon,withthemgenerallyofferinganeasierintegrationsolutionthanSOAP-basedwebservices.OneofthemajoradvantagesofREST-basedwebservicesistheirabilitytoreturnJSONdatathatcanbeconsumeddirectlybyJavaScript-basedAPIs.
Fortunately,NetBeansprovidesdeveloperswithanabstractionaboveallofthesetechnologiesandaJava-centricapproachtoinvokingwebservices.Whetherit’ssomethingcomparativelysimplesuchasvalidatingane-mailaddressorsearchingforonlinepurchasesonAmazon,NetBeansprovidesrapidaccesstomanydifferentwebservices.


GettingalistofDeliciousbookmarksDelicious(http://delicious.com)isafreeonlineserviceallowinguserstomaintaincollectionsofbookmarksthatcanbetaggedandsharedwithothermembersofthecommunity.Notonlycanbookmarksbetaggedandshared,butDeliciousprovidesfacilitiestodiscovernewbookmarksbaseduponanindividualuser’sinterests.
NetBeansintegrateswiththeDeliciouswebservices,providingrapidaccesstomanagebothDeliciouspostsandtheirassociatedtags.
Inthisrecipe,we’llseehowwecangetalistofallthebookmarksthatwe’vestoredinDeliciousbasedonqueryingforaspecifictag.

GettingreadyTocompletethisrecipe,you’llneedaDeliciousaccount.CreatingaDeliciousaccountisfreeandeasy.Headonovertohttp://www.delicious.comandcreateanaccountifyouhaven’tgotonealready.
Onceyou’vecreatedaDeliciousaccount,let’scontinueandcreateastandaloneconsoleapplicationtodisplayourbookmarks.
YoucanuseeithertheJavaEEorAlldownloadbundleofNetBeanstocompletethisrecipe.
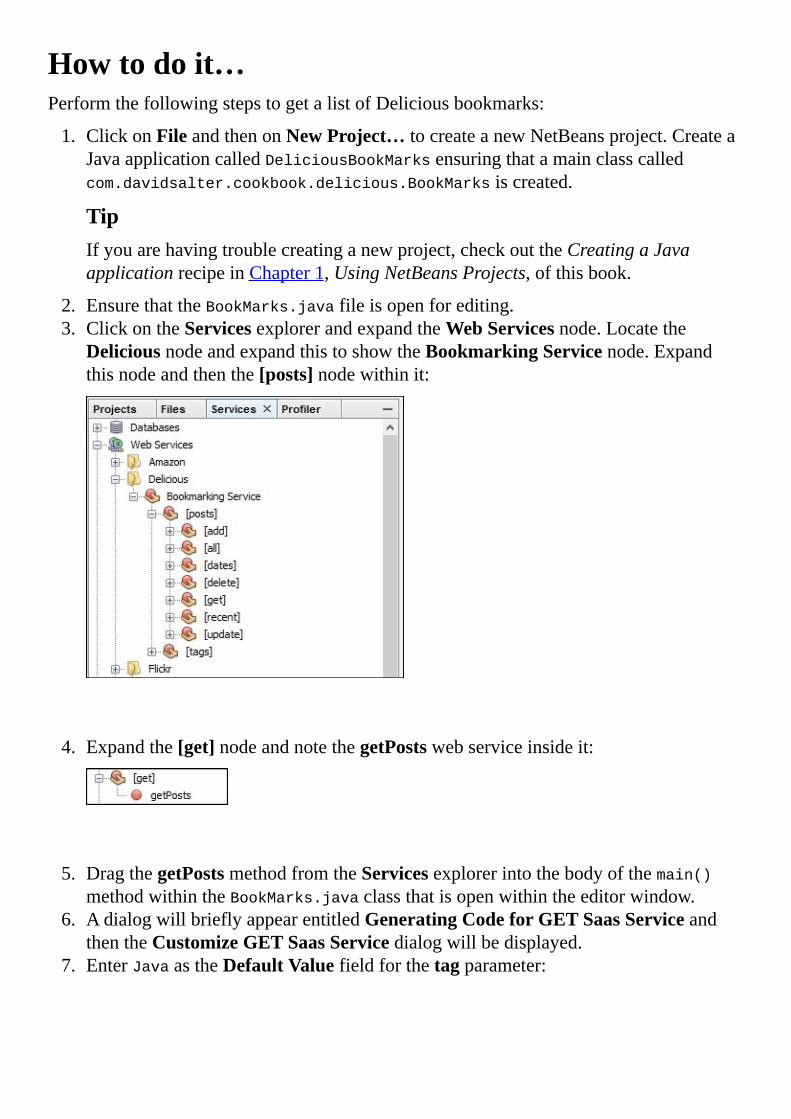
Howtodoit…PerformthefollowingstepstogetalistofDeliciousbookmarks:
1. ClickonFileandthenonNewProject…tocreateanewNetBeansproject.CreateaJavaapplicationcalledDeliciousBookMarksensuringthatamainclasscalledcom.davidsalter.cookbook.delicious.BookMarksiscreated.
TipIfyouarehavingtroublecreatinganewproject,checkouttheCreatingaJavaapplicationrecipeinChapter1,UsingNetBeansProjects,ofthisbook.
2. EnsurethattheBookMarks.javafileisopenforediting.3. ClickontheServicesexplorerandexpandtheWebServicesnode.Locatethe
DeliciousnodeandexpandthistoshowtheBookmarkingServicenode.Expandthisnodeandthenthe[posts]nodewithinit:
4. Expandthe[get]nodeandnotethegetPostswebserviceinsideit:
5. DragthegetPostsmethodfromtheServicesexplorerintothebodyofthemain()methodwithintheBookMarks.javaclassthatisopenwithintheeditorwindow.
6. AdialogwillbrieflyappearentitledGeneratingCodeforGETSaasServiceandthentheCustomizeGETSaasServicedialogwillbedisplayed.
7. EnterJavaastheDefaultValuefieldforthetagparameter:

8. ClickonOK.9. NetBeanswillnowaddtherelevantfilestotheprojectallowingtheDeliciousweb
servicetobeinvoked.10. EdittheBookMarks.javaclassandaddthefollowingcodeasthelaststatement
withintheif{}statement:
for(Postpost:resultObj.getPost()){
System.out.println(post.getDescription());
System.out.println(post.getHref());
}
11. PressF6toruntheapplication.12. NetBeanswilldisplayaUserAuthenticationdialogfortheDeliciouswebservices.
EnteryourDelicioususernameandpasswordandclickonSubmit.13. AnybookmarksthatyouhavetaggedwithJavawillnowbelistedwithintheOutput
windowofNetBeans:

Howitworks…WhenusingNetBeanstocreateconnectionstotheDeliciouswebservices,severalhelperclassesarecreatedwithintheprojectthatallowthewebservicestobecalled:
GeneralpurposeRESTconnectionandresponsehandlerclassesarecreatedwithintheorg.netbeans.saaspackages.ClassesdesignedspecificallytoinvoketheDeliciousbookmarkingservicearecreatedwithintheorg.netbeans.saas.deliciouspackage.
Toqueryforalistofbookmarks,theDeliciousBookmarkingService.getPostsmethodisinvokedtakingparametersthatdefinethetypesofbookmarksreturned.Inourexample,wequeriedforallpoststhatweretaggedwiththewordJava.
ToaccessthedocumentationfortheDeliciouswebservices,right-clickontheBookmarkingServicenodewithintheDeliciousgroupintheServicesexplorerandselectViewAPIDocumentation.ThiswillopenthedefaultsystembrowseranddisplaytheDeliciousAPIhelppages.

There’smore…WhenqueryingtheDeliciouswebservices,anauthenticationdialogisshowneverytimeaskingforusernameandpasswordcredentials.Insteadofenteringthesecredentialseachtimetheapplicationisexecuted,theycanbestoredwithinthedeliciousbookmarkingserviceauthenticator.propertiesfilethatisstoredwithintheorg.netbeans.saas.deliciouspackage.Thisisasimplepropertiesfilethatusestheusernameandpasswordkeystostorelogincredentials.
TipYoumustremembertoexcludethisfilefromsourcecontrolifyouenterDeliciouscredentialsintoit.ThisfileisnotencryptedandallowsanyonewithaccesstothefiletoseeyourDelicioususernameandpassword.


AddingaDeliciousbookmarkInthisrecipe,we’llseehowwecanstoreabookmarkwithintheDelicioussocialbookmarksharingsystem.IfyouarenotfamiliarwithDelicious,youshouldreadthepreviousrecipe,GettingalistofDeliciousbookmarks.

GettingreadyTocompletethisrecipe,you’llneedaDeliciousaccount.CreatingaDeliciousaccountisfreeandeasy.Headonovertohttp://www.delicious.comandcreateanaccountifyouhaven’tgotonealready.
Onceyou’vecreatedaDeliciousaccount,let’scontinueanduseNetBeanstostorelinkswithintheservice.
Thisrecipebuildsupontheapplicationcreatedinthepreviousrecipe,GettingalistofDeliciousbookmarks.Ifyouhavenotcompletedthisrecipe,youcangetthesourcecodefromthecodedownloadbundleforthischapter.
YoucanuseeithertheJavaEEorAlldownloadbundleofNetBeanstocompletethisrecipe.

Howtodoit…PerformthefollowingstepstoaddaDeliciousbookmark:
1. CreateanewJavaMainClasscalledStoreBookMark.javawithinthecom.davidsalter.cookbook.deliciouspackage.
2. OpentheServicesexplorerandnavigatetoWebServices|Delicious|BookmarkingService|[posts]|[add].
3. LocatetheaddPostswebserviceanddragitintothebodyoftheStoreBookMark.mainmethodwithintheJavatexteditingwindow.TheaddPostswebserviceisshowninthefollowingscreenshot:
4. TheCustomizeGETSaasServicedialogwillbedisplayed.5. SpecifythefollowingdefaultvaluesforInputParameters:
url:http://www.packtpub.com/netbeans-ide-8-cookbook/bookdescription:NetBeans8CookBooktags:Java,NetBeans
WecanseetheCustomizeGETSaasServicedialoginthefollowingscreenshot:
6. ClickontheOKbutton.7. NetBeanswillnowaddthecodetoaddabookmarkintotheStoreBookMark.java
class.

8. Right-clickontheStoreBookMark.javaclasswithintheProjectsexplorerandselectRunFile.
9. EnteryourDeliciouscredentialswhenrequested.10. ThenewbookmarkwillnowbeaddedtoDelicious.11. OpenyourbrowserandlogintoyourDeliciousaccounttoseethenewbookmark
youhavestored,asshowninthefollowingscreenshot:

Howitworks…Whenwedragged-and-droppedtheaddPostswebserviceontoourclass,NetBeanscorrectlyestablishedthatthehelperclassesrequiredtoinvoketheDeliciouswebserviceswerealreadyaddedtoourproject.You’llrememberthatthesehelperclasseswereaddedtotheprojectautomaticallyinthepreviousrecipe,GettingalistofDeliciousbookmarks,whenweinitiallydraggedthegetPostswebserviceintoourcode.
TostoreabookmarkwithinDelicious,NetBeansinvokedtheDeliciousBookmarkingService.addPosts()methodpassingintheinformationspecifiedontheCustomizeGETSaasServicedialog.
ToaccessthedocumentationfortheDeliciouswebservices,right-clickontheBookmarkingServicenodewithintheDeliciousgroupintheServicesexplorerandselectViewAPIDocumentation.ThiswillopenthedefaultsystembrowseranddisplaytheDeliciousAPIhelppages.

There’smore…IfwewanttochecktheresponsecodeofacalltoanyoftheDeliciouswebservices(andwhywouldn’twe!),wecanquerythereturnedobjectfromthecall.
Inthisexample,theaddPosts()methodreturnsaRestResponseobject,whichhasagetResponseCode()method.ThismethodshouldreturnanHTTP200statuscodeifeverythingissuccessful.Anyothercodewouldbeanindicationthatsomethinghasnotgoneasexpected.
TipForadiscussionontheavailableHTTPstatuscodes,checkouttheURLhttp://www.w3.org/Protocols/rfc2616/rfc2616-sec10.html.
InadditiontostoringbookmarksonDelicious,andqueryingthem(asshowninthepreviousrecipe,GettingalistofDeliciousbookmarks),wecanalsodeleteandupdatebookmarksbydraggingtheappropriatewebserviceintoourcodeandcustomizingtheinputparameters.Wecanalsomanagethetagsthatweusetoclassifybookmarksbydraggingtheequivalenttagmanagementwebserviceintoourcode.


GettingalistofrecentphotosonFlickrFlickr(http://flickr.com)isanonlinephotosharingsitethatallowsmemberstostoreandsharephotosonline.
WithFlickr,youcansearchorbrowsephotocollections.Youcantagphotosbaseduponlocation,title,cameratype(andmore)allowingeasyretrievalatalaterdate.
NetBeansintegrateswiththeFlickrwebservices,providingrapidaccesstomanagebothphotosandtheirassociatedtaggeddata.
Inthisrecipe,we’llseehowwecangetalistofthemostrecentphotosuploadedtoFlickr.

GettingreadyTocompletethisrecipe,you’llneedaFlickraccount.CreatingaFlickraccountisfreeandeasy.Headonovertohttp://www.flickr.comandcreateanaccountifyouhaven’tgotonealready.You’llneedaFlickraccounttoaccesstheFlickrwebservices.
Onceyou’vecreatedaFlickraccount,let’scontinueandcreateastandaloneconsoleapplicationtoquerythelatestphotosuploadedtoFlickr.
YoucanuseeithertheJavaEEorAlldownloadbundleofNetBeanstocompletethisrecipe.

Howtodoit…TogetalistofrecentphotosonFlickr,performthefollowingsteps:
1. ClickonFileandthenonNewProject…tocreateanewNetBeansproject.CreateaJavaApplicationcalledFlickrRecentPhotosensuringthatamainclasscalledcom.davidsalter.cookbook.flickr.FlickrRecentPhotosiscreated.
TipIfyouarehavingtroublecreatinganewproject,checkouttheCreatingaJavaapplicationrecipeinChapter1,UsingNetBeansProjects,ofthisbook.
2. EnsurethattheFlickrRecentPhotos.javafileisopenforediting.3. ClickontheServicesexplorerandexpandtheWebServicesnode.LocatetheFlickr
nodeandexpandthistoshowthePhotoServicenode.Expandthisnodeandthenthe[services]and[rest]nodeswithinit,asshowninthefollowingscreenshot:
4. Locatethephotos_recentlyUpdatedwebserviceunderneaththeFlickrwebservicesanddragitintothemainmethodoftheFlickrRecentPhotos.javaclass.
5. TheCustomizeGETSaasServicedialogwillbedisplayed.Enterthefollowinginformationintothedialog:
min_date:1388534400extras:Rainper_page:10page:1
6. ClickontheOKbutton.7. NetBeanswillnowaddthecodetotheFlickrRecentPhotos.javaclasstoobtaina
listofphotosupdatedsinceJanuary1,2014(thatistheequivalenttotheUNIXtimestamp1388534400)thataretaggedwiththekeywordRain.Asinglepageofresultswillbereturnedwithamaximumof10photos.
8. Now,let’schangetheFlickrRecentPhotos.javaclasssothatitprintsoutthetitlesofallthephotosreturnedfromthewebservice.Modifythebodyoftheif{}statementtoread:
flickr.photoservice.flickrresponse.RspresultObj
=result.getDataAsObject(flickr.photoservice.flickrresponse.Rsp.class);
for(Rsp.Photos.Photophoto:
resultObj.getPhotos().getPhoto()){

System.out.println(photo.getTitle());
}
9. ThiscodeloopsthroughthereturnedphotosfromtheFlickrwebservicecallandprintsoutthetitleofeachpost.
10. ToinvoketheFlickrwebservices,weneedtospecifyourapplicationkeyandsecretkey.LogintoyourFlickraccountandbrowsetohttps://www.flickr.com/services/apps/create/.Fromthere,youcanrequestanAPIkey.Followtheonscreeninstructionstorequestakey.YouwillthenbeprovidedwithaKeyandthecorrespondingSecret.
11. BackinNetBeans,edittheorg.netbeans.saas.flickr.flickrphotoserviceauthenticator.propertiesfile,enteringtheAPIKeyandSecretvaluesyouhavejustgotfromFlickr,asshowninthefollowingscreenshot:
12. ThatshouldbeenoughtorunourapplicationandqueryFlickrforourrecentlyaddedphotos.Unfortunately(orisitfortunately),theFlickrAPIrequiresSSLaccesstoanyofitsservices.ThisobviouslyhelpspreventsecurityissueswhenpassingkeysacrosstheInternet.TheNetBeanscodetoaccessFlickr,however,usesHTTPinsteadofHTTPS,soweneedtomakeasmallmodificationtotheNetBeansgeneratedfilestoallowthemtouseHTTPSinsteadofHTTP.
13. EdittheFlickrPhotoServiceAuthenticator.javaclass.Searchandreplaceallinstancesofhttpwithhttps.Thereshouldbethreeinstancestochange.
14. Now,edittheFlickrPhotoService.javaclass.Searchandreplaceallinstancesofhttpwithhttps.Thereshouldbeonlyoneinstancetoreplace.
15. We’venowmadeallthechangesnecessarytoruntheapplication.PressF6toruntheapplication.
16. AFlickrAuthorizationDialogwillbedisplayedshowingaURLthatmustbeaccessedtoallowyourapplicationtoaccessFlickr.CopythisURLandpasteitintoyourbrowsertoauthorize.Whenyou’veauthorizedinthebrowser,clickontheOKbutton,asshowninthefollowingscreenshot:
17. Thetitlesofthe10mostrecentimagesyouhaveuploadedtoFlickrmatchingour

searchcriteriawillnowbedisplayedwithintheNetBeansconsole.

Howitworks…WhenweaddedtheFlickrwebservicestoourNetBeansproject,NetBeansautomaticallycreatedthenecessaryclassestointeractwiththewebservices,doingmuchofthehardworkforus.
Theorg.netbeans.saas.RestConnectionandorg.netbeans.saas.RestResponseclassesarethestandardclassesthatNetBeanscreatesforconsuminganyREST-basedwebservice.
Specifically,theorg.netbeans.saas.flickr.FlickrPhotoServiceandorg.netbeans.saas.flickr.FlickrPhotoServiceAuthenticatorclassesweregeneratedforinteractingwithFlickr.WithintheFlickrPhotoServiceclass,wecanseethatthereisasinglephotosRecentlyUpdatedmethodthatqueriesauser’sFlickraccountandreturnsalistofrecentlyupdatedphotos.IfweweretoinvokemoreFlickrwebservices,thenadditionalmethodswouldbeaddedintothisclass.Asthenamesuggests,theFlickrPhotoServiceAuthenticatorclassdealswithuserauthenticationagainstFlickr.
Onefinalpointofnoteisthat,whenqueryingFlickr,wehadtouseaUNIXtimestampinsteadofamoretraditionaldateformat.ThisissimplyduetotherequirementsoftheFlickrAPI.
TipFormoreinformationaboutUNIXtimestamps,checkoutthisarticleonWikipediaathttp://en.wikipedia.org/wiki/Unix_time.
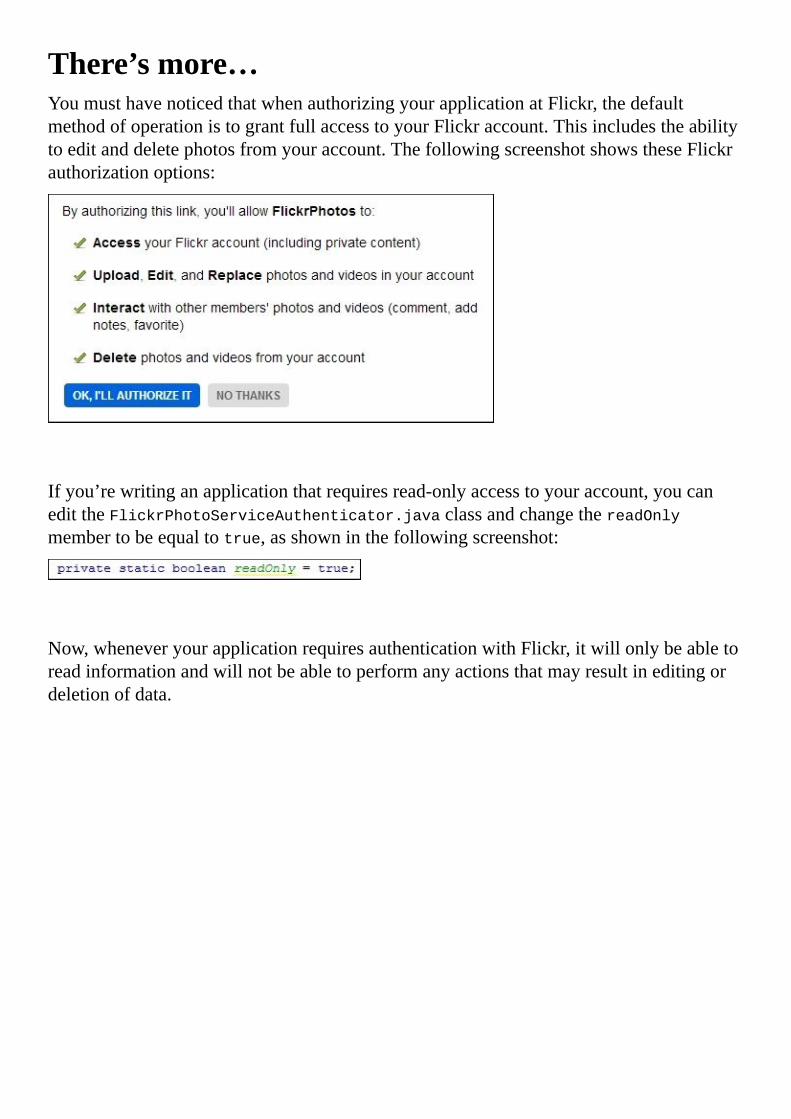
There’smore…YoumusthavenoticedthatwhenauthorizingyourapplicationatFlickr,thedefaultmethodofoperationistograntfullaccesstoyourFlickraccount.Thisincludestheabilitytoeditanddeletephotosfromyouraccount.ThefollowingscreenshotshowstheseFlickrauthorizationoptions:
Ifyou’rewritinganapplicationthatrequiresread-onlyaccesstoyouraccount,youcanedittheFlickrPhotoServiceAuthenticator.javaclassandchangethereadOnlymembertobeequaltotrue,asshowninthefollowingscreenshot:
Now,wheneveryourapplicationrequiresauthenticationwithFlickr,itwillonlybeabletoreadinformationandwillnotbeabletoperformanyactionsthatmayresultineditingordeletionofdata.

GeocodingwithGoogleMapsGeocodingistheprocessofconvertingplacenamesoraddressesintopositionalcoordinates,returninganyothersalientinformationalongtheway.Oncecoordinatesforaplaceorlandmarkareknown,thelocationcanbeeasilyrepresentedonamapprovidingeasy-to-useinformationtoconsumers.
Google,asoneofthepremieremappingserviceproviders,suppliesaGeocodingAPIthatcanbeinvokeddirectlyfromwithinNetBeansbysimplydragging-and-droppingthewebserviceintoanappropriateJavaclass.
MoreinformationonGoogleGeocoding,includinglicenseterms,dataformats,andgeneralinformationabouttheAPIcanbefoundathttps://developers.google.com/maps/documentation/geocoding/.
Inthisrecipe,we’llseehowwecanconvertalocationnameintomoreusefulinformationincludingpositionallatitudeandlongitude.

GettingreadyTocompletethisrecipe,you’llneedaGoogleaccountandaGoogleAPIkeythatallowsgeocoding.Allthesearefreetoobtain,butcheckouttheGooglelicensingconditionsbeforecreatinganaccountandAPIkey.
ToobtainanAPIkey,navigatetohttps://code.google.com/apis/consoleandcreateanewproject(thisissimplysothatanAPIkeycanbecreated—yourapplicationisnotstoredonGoogle’sserversanywhere).Fortheapplication,ensureyouactivatetheGeocodingAPIsothatakeyisgenerated,asshowninthefollowingscreenshot:
ClickingontheCredentialstabforyourapplicationwillthengiveyouaccesstoyourpublicAPIkey.Theresultantwindowwilllooklikethefollowingscreenshot:
Onceyou’vecreatedaGoogleaccountandaprojectthathasaccesstotheGeocodingAPI,let’scontinueandcreateastandaloneconsoleapplicationthatcangeocodeaplacenameandprovideusefulinformation(includinglocation)abouttheplace.
YoucanuseeithertheJavaEEorAlldownloadbundleofNetBeanstocompletethisrecipe.

Howtodoit…Toconvertalocationnameintomoreusefulinformation,performthefollowingsteps:
1. ClickonFileandthenonNewProject…tocreateanewNetBeansproject.CreateaJavaapplicationcalledGeocodingensuringthatamainclasscalledcom.davidsalter.cookbook.geocoding.Geocodingiscreated.
TipIfyouarehavingtroublecreatinganewproject,checkouttheCreatingaJavaapplicationrecipeinChapter1,UsingNetBeansProjects,ofthisbook.
2. EnsurethattheGeocoding.javafileisopenforediting.3. ClickontheServicesexplorerandexpandtheWebServicesnode.Locatethe
GooglenodeandexpandthistoshowtheGeocodingServicenode.Expandthisnodeandthenthe[geo]nodewithinit,asshowninthefollowingscreenshot:
4. LocatethegeocodewebserviceunderneaththeGeocodingServicewebservicesanddragitintothemainmethodoftheGeocoding.javaclass.
5. TheCustomizeGETSaasServicedialogwillbedisplayed.Enterthefollowinginformationintothedialog:
q:trafalgarsquare,londonoutput:json
WecanseetheCustomizeGETSaasServicedialoginthefollowingscreenshot:

6. ClickontheOKbutton.7. NetBeanswillnowaddthecodetotheGeocoding.javaclasstoquerytheGoogle
GeocodingserviceandtoretrieveinformationaboutTrafalgarSquareinLondoninaJSONformat.
8. Weneedtochangethegeneratedcodewithinthemain()methodwithintheGeocoding.javaclassinordertoseetheresultsoftheAPIcall.Sincewe’renotretrievingXML,wecansimplycheckthereturnresponsecodeandprintouttheresponseasastringifSuccessisreturned.ModifytheGeocoding.main()methodtoreadasfollows:
publicstaticvoidmain(String[]args){
try{
Stringq="trafalgarsquare,london";
Stringoutput="json";
RestResponseresult=GoogleGeocodingService.geocode(q,output);
if(result.getResponseCode()==200){
System.out.println("TheSaasServicereturned:
"+result.getDataAsString());
}
}catch(Exceptionex){
ex.printStackTrace();
}
}
9. AswhencallingmostAPImethods,weneedtospecifytheAPIkeythatweobtainedfromGoogleallowingaccesstotheGeocodingAPI.Edittheorg.netbeans.saas.google.googlegeocodingauthenticator.propertiesfileandenteryourGoogleAPIkey,asshowninthefollowingscreenshot:
Ifweweretoruntheapplicationnow,we’dexpecttoseelotsofinformation,includinglatitudeandlongitude,aboutTrafalgarSquareinLondon.Unfortunately,ifweruntheapplication,wegetanHTMLerrorresultstatingthatGooglecan’tprocesstherequest,asshowninthefollowingscreenshot:

ThiserroroccursbecauseGooglehasslightlychangedtheAPIendpointforitsgeocodingwebservices.Asaresult,weneedtomodifytheorg.netbeans.saas.google.GoogleGeocodingService.javaclassthatwasautomaticallygeneratedforusbyNetBeanswiththefollowingsteps:
1. Opentheorg.netbeans.saas.google.GoogleGeocodingService.javaclassforeditingbydouble-clickingonitwithintheProjectsexplorer.
2. Changethegeocodemethodtoreadasfollows:
publicstaticRestResponsegeocode(Stringq,Stringoutput)throws
IOException{
StringapiKey=GoogleGeocodingServiceAuthenticator.getApiKey();
String[][]pathParams=newString[][]{};
String[][]queryParams=newString[][]{{"address",q},
{"key",""+apiKey+""},
{"output",output}};
RestConnectionconn=new
RestConnection("https://maps.googleapis.com/maps/api/geocode/json",
pathParams,queryParams);
sleep(1000);
returnconn.get(null);
}
3. Nowthatwe’vewrittensomecodetoquerytheGooglegeocodingwebserviceandoutputtheresultstotheOutputwindow,wecanruntheapplicationandcheckouttheresults.PressF6toruntheapplication.Wewillgettheoutputasshowninthefollowingscreenshot:

4. IfwescrolltowardsthebottomoftheOutputwindow,wecanseethattheinformationforlatitudeandlongitudeisretrievedforourchosenlocation.

Howitworks…WhenweaddedtheGoogleGeocodingwebservicestoourNetBeansproject,NetBeansautomaticallycreatedthenecessaryclassestointeractwiththewebservicesdoingmuchofthehardworkforus.
Theorg.netbeans.saas.RestConnectionandorg.netbeans.saas.RestResponseclassesarethestandardclassesthatNetBeanscreatesforconsuminganyREST-basedwebservice.
Specifically,theorg.netbeans.saas.google.GoogleGeocodingServiceandorg.netbeans.saas.google.GoogleGeocodingServiceAuthenticatorclassesweregeneratedforinteractingwithGoogle’sGeocodingAPI.
Withintheorg.netbeans.saas.google.GoogleGeocodingServiceclass,thereisasinglegeocode()method.SinceGooglehasslightlymodifiedtheRESTendpointforitsgeocodingwebservice,wehadtomodifytheNetBeansautogeneratedcodetotakethisintoaccount.TheunderlyingRESTendpointforGoogleGeocodingishttps://maps.googleapis.com/maps/api/geocode/json.
Theorg.netbeans.saas.google.googlegeocodingserviceauthenticator.propertiesfileiswherewestoredourprivateAPIkeythatprovidesaccesstotheGoogleGeocodingAPI.
TipFormoreinformationaboutGeocodinganditsusesandissues,checkoutthearticleonWikipediaathttp://en.wikipedia.org/wiki/Geocoding.


Verifyingane-mailaddresswithStrikeIronStrikeIronisaData-as-a-Service(DaaS)providerthatoffersmanysolutionsfordatavalidation.Forexample,itoffersservicestovalidatee-mailaddresses,postaladdresses,andtelephonenumbers.
StrikeIronisapaid-forservice;however,itoffersfreetrialsofallofitsAPIssoyoucanevaluatethembeforedecidingwhethertoproceed.
MoreinformationonStrikeIronandonitsDaaSofferingcanbefoundathttp://www.strikeiron.com.InformationabouttheStrikeIronEmailVerificationservicecanbefoundathttp://www.strikeiron.com/product-list/email/email-verification.
Inthisrecipe,we’llseehowwecanvalidateane-mailaddressusingStrikeIron.

GettingreadyTocompletethisrecipe,you’llneedaStrikeIronaccount.CreatingaStrikeIronaccountisfreeofchargeandprovidesyoufreetrialaccesstoallofStrikeIron’sservices.YoucancreateaStrikeIronaccounttoaccessafreetrialofitse-mailvalidationwebservicesathttp://offers.strikeiron.com/email-verification-hygiene-1.
Onceyou’vecreatedaStrikeIronaccountandhaveausernameandpassword,let’scontinueandcreateastandaloneconsoleapplicationthatcanvalidateane-mailaddress.
YoucanuseeithertheJavaEEorAlldownloadbundleofNetBeanstocompletethisrecipe.

Howtodoit…Tovalidateane-mailaddressusingStrikeIron,performthefollowingsteps:
1. ClickonFileandthenonNewProject…tocreateanewNetBeansproject.CreateaJavaapplicationcalledEmailValidatorensuringthatamainclasscalledcom.davidsalter.cookbook.email.EmailValidatoriscreated.
TipIfyouarehavingtroublecreatinganewproject,checkouttheCreatingaJavaapplicationrecipeinChapter1,UsingNetBeansProjects,ofthisbook.
2. EnsurethattheEmailValidator.javafileisopenforediting.3. ClickontheServicesexplorerandexpandtheWebServicesnode.Locatethe
StrikeIronnodeandexpandthistoshowtheEmailVerificationv5service.ExpandthisnodeandtheEmailVerificationSoapnodewithinit,asshowninthefollowingscreenshot:
4. LocatetheVerifyEmailwebserviceunderneaththeEmailVerificationv5webservicesanddragitintothemainmethodoftheEmailValidator.javaclass.
5. TheCustomizeVerifyEmailSaasServicedialogwillbedisplayed.Enterthefollowinginformationintothedialog:
userID:YourStrikeIronuserIDpassword:YourStrikeIronpasswordemail:iaminvalid@nowheretimeout:15
WecanseetheCustomizeVerifyEmailSaasServicedialoginthefollowingscreenshot:

6. ClickontheOKbutton.7. NetBeanswillnowaddthecodetotheEmailValidator.javaclasstoquerythee-
mailaddressweentered(iaminvalid@nowhere).8. Weneedtochangethegeneratedcodewithinthemain()methodwithinthe
EmailValidator.javaclassinordertoseetheresultsoftheAPIcall.Immediatelyafterthecalltoport.verifyEmail(…),addthefollowingcode:
System.out.println(verifyEmailResult.value.getServiceStatus().getStatus
Description());
9. We’venowenteredalloftheinformationweneed,sopressF6toruntheapplicationandvalidatethee-mailaddress.
10. Theapplicationwilllaunch,andamessagewillbedisplayedintheOutputwindowindicatingthatthee-mailaddresshasaninvaliddomainname(showninthefollowingscreenshot)—StrikeIronistellingusthatthee-mailaddressisinvalid:
Now,let’schangethecodesowecanseewhathappenswhenwetrytovalidateavalide-mailaddresswiththefollowingsteps:
1. EdittheEmailValidator.javaclassandchangetheemailvariabletocontainyoure-mailaddress.So,forexample,[email protected],changetheemailvariabletoread:

2. PressF6toruntheapplicationagain,andnotethatthistimeStrikeIronhassuccessfullyvalidatedthee-mailaddress:

Howitworks…Whenvalidatinge-mailaddresseswiththeStrikeIrontools,NetBeanscreatesfivevariablestoholdtheinputparameterstoStrikeIron:
unregisteredUserEmail:ThisvariableisahangoverfromwhenStrikeIronusedtoallowunregisteredusersaccesstoitsAPIbyspecifyingane-mailaddress.Thisfieldisbestleftempty.userID:ThisisyouruserIDprovidedbyStrikeIron.Mostprobably,thiswillbethee-mailaddressthatyouregisteredwithatStrikeIron.password:ThisisyourAPIpasswordthatwasgeneratedforyoubyStrikeIronwhenyoucreatedanaccount.email:Thisisthee-mailaddressthatyouwishtovalidate.timeout:ThisisthetimeoutperiodinsecondsforqueryingtheStrikeIronwebservices.Thishastobewithintherangeof15to120fortheAPIcalltosucceed.
UnlikethepreviousrecipeswhereNetBeanscreatedspecificclassesforinteractingwithRESTendpoints,NetBeanshasusedJAX-WSinthisrecipetoquerytheSOAPwebserviceswehavecalled.ClassesrepresentingtheentitiesusedbythewebservicesaredefinedwithintheEmailVerification.jarlibrarythatNetBeanshasautomaticallycreatedandaddedtoourproject.
TipFormoreinformationonJAX-WS,checkoutthedocumentationathttps://jax-ws.java.net/.
NetBeansautomaticallygeneratedcodetoinstantiatethewebservice(com.strikeiron.EmailVerificationservice)andtheport(com.strikeiron.EmailVerificationSoapport)forustoinvokewebserviceoperations.
Wetheninvokedthewebserviceoperationtoverifytheprovidede-mailaddress(port.verifyEmail(..)).
Finally,wecheckedtheresultofthewebservicecalltoestablishwhetherthee-mailaddresswasvalidornot.WedidthisbycheckingthestatusDescriptionfieldofthewebserviceresult.

There’smore…Sofar,we’vewrittencodetoquerytheStrikeIronservicestovalidatee-mailaddresses.Whatifwejustwanttoquicklytestawebservicewithoutwritinganycode?Canthisbedone?
Itcertainlycan.IfweexpandthenodeundertheEmailVerificationv5webserviceintheServicesexplorerandthenright-clickontheVerifyEmailwebservice(ratherthandraggingitintoaclass),wegettheTestMethodoption.SelectingthisoptioncausestheTestWebServiceMethoddialogtobedisplayedwherewecanenterdifferentdataforthedifferentwebserviceparametersandgetrapidfeedbackonhowthewebserviceworks.TheTestWebServiceMethoddialogisshowninthefollowingscreenshot:
Inadditiontoverifyinge-mails,StrikeIronprovidesmanyotherdataandvalidationservices,allofwhichcanbeinvokedandtestedinasimilarfashiontotheEmailValidationv5webservicedescribedearlier.Thisisshowninthefollowingscreenshot:


AddinganadditionalwebserviceintoNetBeansInthischapter,we’velookedatrecipesthatshowhowtoconsumedifferentwebserviceseasily,allfromwithinNetBeansbysimplydragging-and-droppingthewebserviceintoanappropriateJavaclass.NetBeansissuppliedwitheasyaccesstoawidevarietyofdifferentwebservicesfromAmazon,Delicious,Flickr,Google,StrikeIron,WeatherBug,Zillow,andZvents.
Althoughthisisahugenumberofwebservices,therearenumerousothersthataren’tincludedbydefaultwithintheServicesexplorerwithinNetBeans.
Inthisrecipe,we’llseehowwecanaddnewwebservicesintotheServicesexplorersothatwecanthendrag-and-droptheseintoNetBeansclasses,therebyeasilyconsumingthewebservicesfromtheclientcode.

GettingreadyTocompletethisrecipe,we’llbeaccessingthewebservicesdefinedathttp://webservicex.net.Specifically,we’llbeaddingtheStockQuotewebserviceintoNetBeansandthentestingthatitworkscorrectly.
WebserviceX.NETisafreecollectionofwebservicescoveringawiderangeoftopicssuchasstockquotes,globalweather,andaddressverification.Afulllistofservicescanbefoundathttp://www.webservicex.net/WS/wscatlist.aspx.
Youdon’tneedtocreateanaccounttousetheWebserviceX.NET.
YoucanuseeithertheJavaEEorAlldownloadbundleofNetBeanstocompletethisrecipe.

Howtodoit…Performthefollowingstepstoaddanewwebservice:
1. EnsuretheServicesexplorerisselectedandthenright-clickontheWebServicesnode.Apop-upmenuwillbedisplayedwiththeAddWebService…andCreateGroupoptions,asshowninthefollowingscreenshot:
2. ClickonAddWebService….TheAddWebServicedialogwillbedisplayed.Onthisdialog,wemustentertheWSDLforthewebservicethatweareaddingtoNetBeas.
3. IntheURLfield,enterthevaluehttp://www.webservicex.net/stockquote.asmx?WSDL,asshowninthefollowingscreenshot:
4. ClickonOK.5. Afterafewseconds,thenewwebservicewillbedisplayedasthelastentry
underneaththeWebServicesnodewithintheServicesexplorer:

Nowthatwe’veaddedthewebserviceintoNetBeans,let’squicklytestthatit’sworkingcorrectlywiththefollowingsteps:
1. Expandthestockquote-asmxnodeunderneathWebServicesintheServicesexplorer.
NoteIfyouhavetheOutputwindowopenwhileexpandingthestockquote.asmxnode,youwillseealotofoutputgeneratedfromNetBeansasitloadstheWSDLforthewebserviceandgeneratesthenecessaryartifactstoinvokethewebservice.ReadingthisoutputgivesagoodindicationofwhatNetBeanshastodotoenableustoeasilyinvokethewebservice.
2. ExpandtheStockQuoteSoapwebserviceandright-clickontheGetQuoteoperationwithin.Fromthepop-upmenu,selecttheTestMethodoption.
3. TheTestWebServiceMethoddialogwillbedisplayed,solet’sfindoutthevalueofOraclestock.
4. EntertheValuefieldasORCL.ThisisthestockmarketsymbolforOracleCorporation.
5. ClickontheSubmitbutton.6. Afterafewseconds,theResultsfieldwillbepopulatedwiththeresultsoftheweb
servicecall,asshowninthefollowingscreenshot:
7. ClickontheXMLcodedisplayedwithintheValuefieldtodisplayadialogboxthatshowsalloftheXMLcode.ReadingtheXMLcode,wecanseethatatthetimeofthiswritingtheOraclestockwasworth$40.33ashare,asshowninthefollowingscreenshot:


Howitworks…WhenweaddawebservicereferenceintoNetBeans,wemustspecifyeithertheRESTresourcefortheservice,ortheservice’sdescriptionfile(WSDLorWADL).Inthisrecipe,wespecifiedaWSDLforaSOAP-basedwebservice.
NetBeansgaveustheoptionofspecifyingaPackageNamefieldwhendefiningtheWSDL;however,wedeliberatelyleftthisblanksothatthedefaultpackagenamewouldbeused.ThepackagenameisthatoftheJavaclassesthatNetBeansautomaticallycreates(usingJAX-WSinthisexample)forinvokingthewebservice.Ifnopackagenameisspecified,thenNetBeanscalculatesonebasedontheURLoftheWSDLfile.So,thepackagenameforWebserviceX.NET’sStockQuotewebserviceisnet.webservicex.
TipIfweareplanningonusingmorethanonewebservicefromthesameprovider,itwouldbeusefultospecifythepackage;thus,forexample,wecouldhavenet.webservice.stockforthestockserviceandperhapsnet.webservicex.weatherfortheweatherservice.

There’smore…Ifatanytime,theWSDLforthewebservicechanges,wecanright-clickonthewebservice(stockquote-asmxinthisrecipe)andselecttheRefreshoption.ThiswillcauseNetBeanstore-readtheWSDLandregeneratetheclientclassesforinvokingthewebservice.
WecanalsoviewtheWSDLforawebservicebyright-clickingonthewebserviceandselectingtheViewWSDLoption.
Finally,ifwenolongerwishtousethewebservice,wecandeleteitfromtheServicesexplorerbyright-clickingonthewebserviceandselectingtheDeleteoption.
IfwehaveaddedalotofwebservicesintotheServicesexplorer,itcanbeusefultogroupthemsothattheycaneasilybefoundwhenrequired.Thiscanbeachievedbyright-clickingontheWebServicesnodeandselectingtheCreateGroupmenuoption.Afterselectingthisoption,NetBeansallowsustospecifyanewnameforagroup(basically,anemptynodeunderneaththeWebServicesnode).Uponcreatingthegroup,wecandraganyexistingwebservicesintothegroup,allowingustocategorizethemfurther.Forfurtherclassification,NetBeansallowsustocreategroupswithingroupssothatahierarchyofwebservicescanbespecified.


Chapter12.ExtendingNetBeansInthischapter,wewillcoverthefollowingrecipes:
CreatingaNetBeansmodulePackagingaNetBeansmodulefordeployment

IntroductionNetBeansisafullyfledgedIDEthatprovidesmanyfeaturestoaidinadeveloper’sday-to-dayactivitieswhendevelopingapplications.
WetakesomeofthefeaturesavailablewithinNetBeansforgranted,suchastheabilitytoloadandsaveJavasourcefiles.Themajorityofthesefeaturesareprovided,bydefault,withastandardinstallationofNetBeans.Wedon’tneedtoinstallanyextrapluginsorcomponentstogetthedesiredfunctionality.ThisalladdsuptoNetBeansbeinganexcellentfeature-richIDE.
Somefeaturesthatwe,asdevelopers,usedailyarenotprovidedasstandardwithNetBeansandhavetobeinstalledseparatelyviatheNetBeansplugincenter.SomeofthesepluginsaredevelopedbytheNetBeansteam,whereasothersarecontributedviathird-partydevelopers.Forexample,theWildFlypluginthatallowsJavaEEdeveloperstomanageanddeploytotheWildFlyapplicationserverwasnotdevelopedbyNetBeans,butwascontributedtotheNetBeansplugincenterandhelpstoadvancethefunctionalityprovidedbytheIDE.
TipTheWildFlypluginwasnotprovidedasstandardwithNetBeans8,butduetoitspopularity,hasbeenincludedwithNetBeans8.0.1andhigher.
InadditiontobeingacomprehensiveIDEformultiplelanguagedevelopment,NetBeansisalsoaplatformthatcanactasabasisfordevelopingcomplexSwing-basedapplications.WhenusingNetBeansasaplatform,manybasicplumbingtasksaretakencareofautomatically,suchaswindowmanagementandconnectingapplicationlogictomenuoptionsandtoolbarbuttons.
Inthisfinalchapter,we’lltakealookathowwecandevelopadditionalpluginsforNetBeansandhowwecanpackagethemupfordeploymentbyotherusers.ExtendingNetBeansisamassivetopicthatwarrantsanentirebook,sowe’lljustbescratchingthesurfaceofit,showingthesortofthingsthatcanbedonetoextendNetBeans.
TipFormoreinformationontheNetBeansplatform,andthetypesofmodulesthatcanbedeveloped,checkouttheplatformdocumentationathttps://netbeans.org/features/platform/all-docs.html.


CreatingaNetBeansmoduleTheNetBeansIDEhasbeendevelopedinafashionthatallowsthird-partydeveloperstowriteadditionalplugins(sometimescalledmodules),whichcanprovideadditionalfunctionalityfortheNetBeansIDE.Oncewritten,thesepluginsareusuallypublishedattheNetBeansPluginCenter,wheretheycanbediscoveredbyotherNetBeansusers.
Inthisrecipe,we’llshowhowtowriteaNetBeansCodeGeneratorpluginthatwillallowustoeasilyaddthebasicsofaJUnittestintoaJavaclass.ThepluginwillbeinvokedbypressingAlt+InsertforthecodegenerationoptionwithinNetBeans.

GettingreadyNospecialstepsarerequiredbeforecompletingthisrecipe.
AnyversionofNetBeans(JavaSE,JavaEE,ortheAllbundle)canbeusedtoperformthisrecipe.

Howtodoit…TocreateaNetBeansmodule,performthefollowingsteps:
1. ClickonFileandthenNewProject…toopentheNewProjectdialog.2. SelectNetBeansModulesfromthelistofCategoriesandModulefromthelistof
Projects.ClickonNext.3. EntertheProjectNamefieldasAddUnitTest.EnsurethattheStandaloneModule
optionisselectedwithDevelopmentIDEastheNetBeansPlatform,asshowninthefollowingscreenshot:
4. ClickonNext.5. OntheBasicModuleConfigurationpageoftheNewModuledialog,enterthe
CodeNameBasefieldascom.davidsalter.cookbook.codegenerator.ChangetheModuleDisplayNamefieldtoAddUnitTest(wearejustaddingspacesheretomakeitmorereadable).EnsurethattheLocalizingBundlefieldisautomaticallyupdatedtocom/davidsalter/cookbook/codegenerator/Bundle.propertiesafterwehavemadethesechanges,asshowninthefollowingscreenshot:

6. ClickonFinish.7. AnewmoduleprojectwillnowbecreatedbyNetBeans.Notehowthisprojecthasa
differenticonfromotherprojectswehavecreatedsofarwithinthisbook.ThisnewiconrepresentsaNetBeansmoduleprojectratherthanaJavaprojectoraJavawebproject,asshowninthefollowingscreenshot:
Nowthatwe’vecreatedanemptymoduleproject,weneedtoaddsomefunctionalityintoitsothatwecanquicklyaddatestintoourJavacode.Let’sdothatnowwiththefollowingsteps:
1. Right-clickontheAddUnitTestprojectwithintheProjectsexplorerandselectNewandthenOther….
2. SelectModuleDevelopmentfromthelistofCategoriesandCodeGeneratorfromthelistofFileTypes,asshowninthefollowingscreenshot:

3. ClickonNext.4. TheNewCodeGeneratordialogwillbedisplayed.Enterthefollowinginformation
intothisdialog:
ClassName:AddUnitTestPackage:com.davidsalter.cookbook.codegeneratorMimeType:text/x-java
5. ClickonFinish.6. TheNewCodeGeneratordialogwillnowclose.
Inordertomodifyaclassviaourplugin(sothatwecaninsertanewtestmethod),weneedtospecifythatwewillbereferencingtheNetBeansJavaSource,JavacAPIWrapper,andUtilitiesAPImodules.Let’sdothatnowwiththefollowingsteps:
1. Right-clickontheAddUnitTestprojectwithintheProjectsexplorerandselectProperties.TheProjectPropertiesdialogwillbedisplayed.
2. SelectLibrariesfromthelistofCategories,asshowninthefollowingscreenshot:

3. ClickontheAddbuttonwithintheModuleDependenciessectiontoopentheAddModuleDependencydialog.
4. SelecttheJavaSource,JavacAPIWrapper,andUtilitiesAPImodulesandclickontheOKbutton,asshowninthefollowingscreenshot:

5. ThelistofModuleDependenciesusedbytheprojectwillnowbeupdatedtoincludetheJavaSource,JavacAPIWrapper,andUtilitiesAPImodules,JavacAPIWrapper,andUtilitiesAPImodules,asshowninthefollowingscreenshot:
6. ClickontheOKbuttontoclosethepropertiesdialog.
We’venowcreatedanemptycodegenerationmodulewithinourNetBeansmodule.Let’snowdefinethenamethatisdisplayedforourmoduleintheAlt+InsertGeneratepop-upmenuandthenwritethecodethatwilladdanemptyJUnittestintoourcodewiththefollowingsteps:
1. EnsurethattheAddUnitTest.javafileisopenforeditingwithinNetBeans.2. LocatethemethodnamegetDisplayName()(atoraroundline39).Modifythe
returnedstringtoreadJUnitTest…,asshowninthefollowingscreenshot:
3. Locatetheinvoke()method(atoraroundline47).Changethecontentsofthismethodtoread:
publicvoidinvoke(){
try{
CancellableTasktask=newCancellableTask<WorkingCopy>(){
@Override
publicvoidcancel(){
}
@Override
publicvoidrun(WorkingCopyworkingCopy)throwsException{
workingCopy.toPhase(Phase.RESOLVED);
CompilationUnitTreecompilationUnitTree=
workingCopy.getCompilationUnit();
TreeMakertreeMaker=workingCopy.getTreeMaker();
for(TreetypeDecl:compilationUnitTree.getTypeDecls()){
if(Tree.Kind.CLASS==typeDecl.getKind()){
ClassTreeclazz=(ClassTree)typeDecl;
ModifiersTreemethodModifiers=
treeMaker.Modifiers(Collections.<Modifier>singleton(Modifier.PUBLIC),

Arrays.asList(treeMaker.Annotation(treeMaker.Identifier("Test"),
Collections.EMPTY_LIST)));
StringmethodName="testAbc";
StringmethodBody="{fail(\"Testnotwrittenyet\");}";
TypeElementtypeElement=
workingCopy.getElements().getTypeElement("java.lang.Exception");
ExpressionTreethrowsClause=
treeMaker.QualIdent(typeElement);
MethodTreenewMethod=treeMaker.Method(methodModifiers,
methodName,treeMaker.PrimitiveType(TypeKind.VOID),
Collections.<TypeParameterTree>emptyList(),
Collections.EMPTY_LIST,
Collections.<ExpressionTree>singletonList(throwsClause),
methodBody,null);
ClassTreemodifiedClazz=treeMaker.addClassMember(clazz,
newMethod);
workingCopy.rewrite(clazz,modifiedClazz);
}}
}
};
Documentdoc=textComp.getDocument();
JavaSourcejavaSource=JavaSource.forDocument(doc);
ModificationResultresult=javaSource.runModificationTask(task);
result.commit();
}catch(Exceptione){
Exceptions.printStackTrace(e);
}
}
We’venowaddedallthecodenecessarytomodifyanyopenJavasourcefileandinsertatestmethodintoit.Let’srunthecodeandseehowitworkswiththefollowingsteps:
1. Right-clickontheAddUnitTestprojectwithintheProjectsexplorerandselectRun.
2. NetBeanswillbuildthemoduleandanewinstanceofNetBeanswillbestartedup.3. WithinthisnewinstanceofNetBeans,createasimpleJavaprojectwithamain
methodclassinit.Thenameoftheprojectandclassareunimportantasthisisjustatestprojecttoseehowourpluginworks.
4. Right-clickwithinthesourceforaJavafileandselectInsertCode….TheGeneratepopupisdisplayedwithournewJUnitTest…optionwithinit,asshowninthefollowingscreenshot:

5. SelecttheJUnitTest…optionandnotehowablankJUnittestisaddedintotheclassmethods,asshowninthefollowingscreenshot:

Howitworks…Inthisrecipe,wecreatedaNetBeansmodulethatplugsintotheInsertCode…menuoptionallowingustoquicklyaddthebasicsofaJUnittestintoaJavaclass.
WestartedoffbycreatingaNetBeansmoduleandtargetingitatthedevelopmentIDE.ThismeansthatthemoduleiscompiledagainsttheartefactsprovidedbytheIDEthatthepluginiscurrentlybeingdevelopedin.Inmycase,thisistheAlldistributionofNetBeans8.0.Forthemodule,wedefinedadisplaynameandabasepackage.Alocalizationbundlewascreatedforusautomatically,althoughwedidn’tusethisspecificallyinthisrecipeinordertokeepacomplexexamplemoreunderstandable.
WethenusedtheNewFilewizardtoaddaCodeGeneratorclassintothemodule.ACodeGeneratorclassisastandardJavaclassthatimplementstheorg.netbeans.spi.editor.codegen.CodeGeneratorinterface.It’sthefactthatweimplementthisinterfaceanddefinethemethodswithinitthatallowsNetBeanstodynamicallylocateourpluginatruntimeandaddit’sfunctionalityintoNetBeansasthoughit’spartofthedefaultproduct.
TheCodeGeneratorinterfaceisdefinedasshowninthefollowingcode:
publicinterfaceCodeGenerator{
@MimeLocation(subFolderName="CodeGenerators")
publicstaticinterfaceFactory{
publicList<?ExtendsCodeGenerator>create(Lookuplkp);
}
publicStringgetDisplayName();
publicvoidinvoke();
}
Let’stakealookathowweimplementedthesemethods.
WhencreatingtheCodeGenerator,wewereaskedtospecifyaMIMEtype.AMIME(MultipurposeInternetEmailExtension)typesimplyrepresentsthetypeofafilejustasitdoeswithe-mailattachments.TherearemanydifferentMIMEtypessuchastext/plainforatextualfileorimage/pngfora.pnggraphicsfile.Wechosetext/x-javaasthisistheMIMEtypeforaJavasourcecodefile.NetBeanstookthisinformationandaddeditintotheFactoryclassitcreatedforus.
TipFormoreinformationonMIMEtypes,checkouthttp://en.wikipedia.org/wiki/MIME.
ThefollowingisascreenshotoftheFactoryclass:

ThisMIMEtypespecifiesthattheCodeGeneratorthatwearecreatingworksonallJavasourcefiles.WecouldhaveuseddifferentMIMEtypes,forexample,text/htmlhadwewantedtomakeourCodeGeneratorworkonHTMLfiles.
ThenextmethodintheCodeGeneratorinterfaceisgetDisplayName().Thismethoddeterminesthetextthatwillbedisplayedwithinthepop-upmenuwhentheInsertCode…optionisselected.ThefollowingisascreenshotofthegetDisplayName()method:
Finally,weimplementedtheinvoke()methodoftheCodeGeneratorinterface.Itisthismethodthatgetscalledwheneverthecodegenerationoptionsisinvoked.Thefollowingisascreenshotoftheinvoke()method:
Withinthismethod,weinstantiatedaCancellableTaskclasstoperformthemodificationoftheJavasourcecode.
InsidetheCancellableTaskclass,weusedseveraloftheNetBeansAPIstoensurethat

wewereattemptingtomodifyaclass.Wethencreatedanewmethod,andaddeda@Testannotationtoitandadefaultbody.WeaddedthenewmethodintotheclasstreeandrewrotethesourcefortheclasssothatNetBeanswasawareofourchanges.
Finally,wegrabbedareferencetoJavaSourcefromthecurrentlyopendocumentandthenexecutedthetask,committingitwhencompleted.Ifanyerrorsoccurredduringprocessing,wesimplydisplayedthestacktrace.
TipFormoreinformationontheNetBeansPlatformAPIs,checkoutthedocumentationathttp://bits.netbeans.org/dev/javadoc/.


PackagingaNetBeansmodulefordeploymentAswe’veseeninthepreviousrecipe,NetBeansprovidesuswiththeabilitytoextendthefunctionalityoftheIDEbycreatingnewmodules.NetBeansmodulesarestoredas.nbmfiles(whichareessentiallyzippedarchives),whichcanthenbeuploadeddirectlytotheNetBeanspluginportal,orcanbedistributedviaothertechniquestootherdevelopers.
Inthisrecipe,we’llshowwhatweneedtodotoamoduleprojecttoallowustocreateadistributableNetBeansmodule.

GettingreadyTocompletethisrecipe,you’llneedtheAddJUnitTestprojectcreatedearlierinthischapterintheCreatingaNetBeansmodulerecipe.Ifyouhavenotcompletedthatrecipe,thesourcecodeisavailableaspartofthecodedownloadbundleforthisbook.

Howtodoit…TocreateadistributableNetBeansmodule,performthefollowingsteps:
1. ThefirststagewhengettingaNetBeansmodulereadyfordeploymentistospecifythelicensethatthemodulewillbedeployedunder.Weneedtostorethelicensewithinatextfileintheprojectsothatanyonewhogetsacopyofourmodulecanseethelicenseconditions.Right-clickontheSourcePackagesnodeoftheAddUnitTestprojectwithintheProjectsexplorerandcreateanewblankfilecalledlicense.txt.SincethismoduleisavailableundertheApache2license,enterthatintothelicense.txtfile.
TipTheApache2licenseboilerplatetextisavailableaspartofthecodedownloadbundleforthischapter.TheApache2licensecanbefoundonlineathttp://www.apache.org/licenses/LICENSE-2.0.InformationabouttheApacheSoftwareFoundationcanbefoundathttp://www.apache.org.
2. Nowthatwe’veaddedalicensefiletotheproject,wecanconfiguretheprojectpropertiesreadyforbuildingthemodule.Right-clickontheAddUnitTestprojectwithintheProjectsexplorerandselectProperties.
3. OntheProjectPropertiesdialog,selecttheDisplaycategoryandenterthefollowinginformation:
DisplayName:AddUnitTestDisplayCategory:TestingToolsShortDescription:QuicklyaddanemptyJUnittestintoyourcodeLongDescription:AddJUnitTestsallowsthedevelopertoquicklyaddaJUnittestintotheircodeviatheInsertCodeoptionwithin
theNetBeanscodeeditorwindow.
ShowinPluginManager:Ensurethisoptionischecked
WecanseeourProjectPropertiesdialoginthefollowingscreenshot:

TipAlwaysensurethattheShowinPluginManageroptionischeckedduringdevelopment;otherwise,you’llfinditverydifficulttouninstallamoduleonceyou’veinstalledit!
4. SelecttheAPIVersioningcategoryandensuretheSpecificationVersionfieldissetto1.0.
5. SelecttheBuildcategoryandthenPackagingandenterthefollowinginformation:
License:ClickonBrowse…andselectthesrc/license.txtfileHomePage:http://www.packtpub.com/netbeans-ide-8-cookbook/bookAuthor:DavidSalter
WecanseeourProjectPropertiesdialoginthefollowingscreenshot:

6. ClickonOKtostoretheprojectproperties.7. We’venowdefinedallofthemetadataneededtopackageourplugin,solet’s
generatethe.nbmfile.8. Right-clickontheAddUnitTestprojectwithintheProjectsexplorerandclickon
CreateNBM.9. NetBeanswillnowtakeafewsecondstocompileandpackagethemodule.10. ClickontheFilesexplorerandexpandtheAddUnitTestandbuildnodes.The
com-davidsalter-cookbook-codegenerator.nbmmodulefilehasbeengeneratedwithinthebuildfolderoftheproject,asshowninthefollowingscreenshot:
Howitworks…Whengeneratingapackagedmodule,NetBeanscreatesa.nbmfile.Thisfileisa.ziparchivelikemanyotherJavadeploymentfiles(.jarand.warfilesforexample).The.nbmfilehasthefollowingfolders/fileswithinit:
Info/info.xml:Thiscontainsmetadataaboutthemodulesuchasitslicense,theproject’shomepage,andauthor.META-INF/MAINFEST.MF:Thiscontainsinformationaboutthetoolsthatcreatedthemodulefile.netbeans.config.Modules:Thiscontainsinformationaboutwhetherthemoduleisenabledandwhetheritneedsarestartuponloading.Thepathtothemodule’s.jarfileissuppliedwithinhere.netbeans.modules:Thiscontainscompressedversionsofthecompiledmodule’s.jarfiles.

There’smore…UsingtheNetBeanspluginmechanism(selectingToolsandthePluginsoptionfromthemainmenu),wecanaddthe.nbmfileintoarunninginstanceofNetBeanstotestitout.Notethatalloftheinformationweenteredabouttheplugin(authorname,URL,version,andplugindescription)areallshownwithinthepluginmanager,asshowninthefollowingscreenshot:
TipIt’sbesttotestyourpluginsthoroughlyusingthetechniquesshownintheCreatingaNetBeansmodulereciperatherthancreatinga.nbmfileandloadingitintoyourdevelopmentIDE.Ifyourplugincrashes,forexample,orevenworse,temporarilybreaksNetBeans,itsbestifthisisdonetoastandaloneinstanceratherthanyourdevelopmentinstance.
Sowhat’snext?I’vecreatedaplugin,howcanIletotherusersknowaboutit?Whenyou’vecompleteddevelopmentandtestingofyourownplugins,youcandeploythemtotheNetBeansPluginPortalathttp://plugins.netbeans.org.ThefollowingscreenshotdisplaysthewelcomescreenoftheNetBeansPluginPortal:
ByloggingintotheNetBeansPluginPortal,youcanuploadyourpluginandcategorizeitsothatotherdeveloperscaneasilyfindit.
SubmittingyourplugintotheNetBeansPluginPortalisthefirststeptoincreasingawarenessofyourpluginandallowingotherdeveloperstouseit.Toprovidetheoptimalexperiencetousers,andallowyourpluginstobediscoverabledirectlywithinNetBeansitself,youneedtosignyourpluginsandensurethattheypassthepluginqualitycriteria.
Signingapluginisarelativelystraightforwardtask,butmustbecompletedfromthecommandpromptratherthaninsideNetBeansitself.Theprocedureis:
1. OpenacommandpromptorterminalandchangedirectorytotheNetBeansproject.2. Executethefollowingcommandtocreateakeystore,answeringallthequestions
askedduringexecution:
keytool-genkey-storepass<password>-alias<yourname>-keystore
nbproject/private/keystore
3. Edittheproject.propertiesfilelocatedinthenbprojectfoldertoreferencethekeystore:
keystore=nbproject/private/keystore
nbm_alias=<yourname>
4. Edittheplatform-private.propertiesfilelocatedatnbproject/privatetocontain:
storepass=<password>
5. Rebuildthemoduleanditwillbesigned.
Onceyourpluginshavebeensignedandpassedthequalitycriteria,theythenbecomediscoverabledirectlywithinNetBeansitself,soyounolongerhavetodistribute.nbmfilesmanually.
Fulldetailsofthequalitycriteriarequiredforpluginscanbefoundathttp://wiki.netbeans.org/PluginPortalQualityCriteria.
IndexA
add()method/Howitworks…addPosts()method/There’smore…administrationtool
running/RunningtheadministrationtoolAnalyzer,VisualMIDlet/Howitworks…Android
URL/AddingAndroidsupporttoNetBeansAndroidapplication
creating/CreatinganAndroidapplication,Howtodoit…Androiddevelopment
URL/AddingAndroidsupporttoNetBeansAndroidplatform
URL/Howitworks…AndroidSDK
URL/GettingreadyAndroidsupport
adding,toNetBeans/AddingAndroidsupporttoNetBeans,Howtodoit…,Howitworks…,There’smore…
AngularJS/CreatingaRESTwebserviceAntbuildfile/Howitworks…Apache2license
URL/Howtodoit…ApacheDerby
URL/ConnectingtoJavaDBAPIkey
URL/GettingreadyAPIs
URL/There’smore…application
debugging/Debuggingtheapplicationratherthanaclassprofiling/Profilinganapplication,Howtodoit…,There’smore…
archetypesabout/Howitworks…
assertions/Introduction

BBeanValidation
URL/There’smorebreakpoints
creating,withconditions/ConditionalbreakpointsBuilderpattern
constructors,replacingwith/ReplacingconstructorswiththeBuilderpattern

CcamelCase/Howtodoit…ChangeMethodParametersrefactoring
about/Howtodoit…ChromeConnector
using/UsingtheChromeConnector,Howtodoit…,There’smoreclass
creating/Creatingaclass,Howitworks…debugging/Debuggingaclass,Howtodoit…,Howitworks…
Class-Pathabout/Howitworks…
codeformatting/Formattingthecodeformatting,rules/Howitworks…
codechangescommitting/Committingandpushingcodechanges,Howtodoit…,There’smore…pushing/Committingandpushingcodechanges,Howtodoit…,There’smore…newfiles,managing/Managingnewfiles
codefoldscollapsing/Collapsingandexpandingcodefolds,Howtodoit…,There’smore…expanding/Collapsingandexpandingcodefolds,Howtodoit…,There’smore…
CodeGeneratorinterfaceabout/Howitworks…
commentstoggling/Togglingcomments,Howitworks…
componentsadding,toform/Addingcomponentstoaform,Howtodoit…,Howitworks…,There’smore…
conditionalbreakpoints/Conditionalbreakpointsconstructor
creating/Creatingaconstructor,Howtodoit…,There’smore…constructors
replacing,withfactoryrefactoring/ReplacingaconstructorwiththeFactorypattern,Howtodoit…,There’smore…replacing,withBuilderpattern/ReplacingconstructorswiththeBuilderpattern
ContextsandDependencyInjection(CDI)/Howtodoit…controllers
creating/Manuallycreatingcontrollerscookbook-jarviewerproject
URL/Howtodoit…cron/CreatingatimerCSS
JavaFXapplication,stylingwith/StylingaJavaFXapplicationwithCSS,Howtodoit…,Howitworks…
CSSreferenceguideURL/Howtodoit…
customMavengoalsinvoking/InvokingcustomMavengoals
CVSused,fromwithinNetBeans/UsingCVSfromwithinNetBeans

Ddata
viewing/Viewingdatainserting/Inserting,deleting,andamendingdatagraphicallydeleting/Inserting,deleting,andamendingdatagraphicallyamending/Inserting,deleting,andamendingdatagraphically
Data-as-a-Service(DaaS)/Verifyingane-mailaddresswithStrikeIrondatabases
about/Introductioncreating/Creatingdatabases
debuggableapplicationstypes/Differentkindsofdebuggableapplications
DeliciousURL/GettingalistofDeliciousbookmarks
Deliciousbookmarkadding/AddingaDeliciousbookmark,Howtodoit…,There’smore…
Deliciousbookmarks,listobtaining/GettingalistofDeliciousbookmarks,Howtodoit…,Howitworks…,There’smore…
deltaparameter/Howtodoit…deployment
NetBeansmodule,packagingfor/PackagingaNetBeansmodulefordeployment,Gettingready,Howtodoit…,Howitworks…,There’smore…
Designviewabout/Howitworks…
dialogscreating/Creatingdialogs,Howtodoit…,Howitworks…
differentversion,Antusing/UsingadifferentversionofAnt
DiffFilesoption/There’smore…Diffpatch
creating/CreatingaDiffpatch,Howtodoit…,There’smore…applying/ApplyingaDiffpatch
distributableapplicationbuilding,fromNetBeans/BuildingadistributableapplicationfromNetBeans,Howtodoit…,Howitworks…

Ee-mailaddress
verifying,withStrikeIron/Verifyingane-mailaddresswithStrikeIron,Howtodoit…,Howitworks…,There’smore…
Eclipsesynchronizing/SynchronizingEclipse
Eclipseprojectimporting/ImportinganEclipseproject,Howtodoit…,Howitworks…Eclipse,synchronizing/SynchronizingEclipseerrordialogs/ErrorswhenimportingEclipseprojects
EJBcreating/CreatinganEJB,Howtodoit…,Howitworks…StatelessEJB/CreatinganEJBStatefulEJB/CreatinganEJBSingletonEJB/CreatinganEJBMessageDrivenbeans/CreatinganEJBdeploying/WhatEJBsaredeployed?
emailvariable/Howitworks…EmailVerification.jarlibrary/Howitworks…EnterpriseArchive(Ear)/Howtodoit…errordialogs,Eclipseproject
ResolveMissingServerProblem/ErrorswhenimportingEclipseprojectsResolveReferenceProblems/ErrorswhenimportingEclipseprojectsJREconfiguration,insteadofJDK/ErrorswhenimportingEclipseprojects
eventlistenersabout/RespondingtoeventsURL/Respondingtoevents
eventsrespondingto/Respondingtoevents,Howtodoit…,Howitworks…,There’smore…
existingclassJUnittest,creatingfor/CreatingaJUnittestforanexistingclass,Howtodoit…,Howitworks…
extractinterfacerefactoringabout/Extractinterfacerefactoring,Howtodoit…,There’smore…
F<f$validateDoubleRange/>/There’smore<f$validateLength/>/There’smore<f$validateLongRange/>/There’smoreFacelets/Howitworks…factoryrefactoring
constructors,replacingwith/ReplacingaconstructorwiththeFactorypattern,Howitworks…,There’smore…
fieldsrefactoringencapsulating/Encapsulatefieldsrefactoring,Howtodoit…,Howitworks…
filerunning/Runningafile,Howtodoit…,Howitworks…,There’smore…
fileheaderscreating/Creatingfileheaders,There’smore…
filesimporting,intoSubversionrepository/ImportingfilesintoaSubversionrepository
Filesexplorer/TheFilesexplorerFlickr
URL/GettingalistofrecentphotosonFlickrFlickrPhotoServiceAuthenticatorclass/Howitworks…Flickrwebservices
URL/Howtodoit…Flow,VisualMIDlet/Howitworks…fork,cookbook-jarviewerproject
creating/Howtodoit…form
components,addingto/Addingcomponentstoaform,Howtodoit…,Howitworks…,There’smore…
Free-Formapplicationcreating/CreatingaFree-Formapplication,Gettingready,Howtodoit…,Howitworks…differentversionofAnt,using/UsingadifferentversionofAnt
FXMLuserinterfaces,creating/CreatingalluserinterfacesinFXML
FXMLfilesgraphicalediting/GraphicaleditingofFXMLfiles,Howtodoit…,Howitworks…

G.getText()method/Howitworks…GenerateJavadocforThisMethodoption/There’smoregeocoding
about/GeocodingwithGoogleMapsURL/GeocodingwithGoogleMaps
GeocodingURL/Howitworks…
getBook()method/Howitworks…getDisplayName()method/Howitworks…getQuote()method/Howtodoit…GETrequest/CreatingaRESTwebservicegetResponseCode()method/There’smore…gitcommand/Howitworks…GitHub
URL/GettingreadyGitrepository
initializing/InitializingaGitrepository,Howitworks…Mercurialrepository,initializing/InitializingaMercurialrepositorycloning/CloningaGitrepository,Gettingready,Howtodoit…,Howitworks…,There’smore…Mercurialrepository,cloning/CloningaMercurialrepositoryspecificrevision,updating/Updatingtoaspecificrevision
GoogleMapsgeocodingwith/GeocodingwithGoogleMaps,Gettingready,Howtodoit…,Howitworks…

Hhgcommand/InitializingaMercurialrepositoryhistory,file
obtaining/Gettingthehistoryofafile,Howtodoit…historyline,options
DifftoPrevious/Howtodoit…Checkout/Howtodoit…TagCommit/Howtodoit…ExportCommit/Howtodoit…RevertCommit/Howtodoit…
Historyviewabout/Howitworks…
hostedprojects,creatingURL/Gettingready
HTTP404-NotFounderrormessage/Howitworks…HTTPstatuscodes
URL/There’smore…Hungariannotation
URL/Howtodoit…

Iimports
fixing/Fixingandorganizingimports,Howtodoit…organizing/Howitworks…,There’smore…
indexescreating/Creatingindexes
InnoSetupabout/Deployingaself-containedapplication
InnoSetupinstallerURL/Howtodoit…
installation,Mavenusing/UsingadifferentinstallationofMaven
IntegratedDevelopmentEnvironment(IDE)/Introductioninterface
creating/Creatinganinterface,Howtodoit…methods/Howtodoit…
isbnparameter/Howitworks…
JJavaapplication
creating/CreatingaJavaapplication,Gettingready,Howtodoit…,Howitworks…,There’smore…
JavaDBconnectingto/ConnectingtoJavaDB,Howitworks…,There’smore…about/ConnectingtoJavaDBURL/ConnectingtoJavaDB
JavaEEabout/Introduction
JavaEE7EJBsURL/CreatinganEJB
JavaFXabout/IntroductionURL/Introduction
JavaFXapplicationcreating/CreatingaJavaFXapplication,Howtodoit…,Howitworks…userinterfaces,creatinginFXML/CreatingalluserinterfacesinFXMLcontrollers,creating/Manuallycreatingcontrollersstyling,withCSS/StylingaJavaFXapplicationwithCSS,Howtodoit…,Howitworks…
JavaFXcustomcontrolcreating/CreatingandusingaJavaFXcustomcontrol,Howtodoit…,There’smore…using/CreatingandusingaJavaFXcustomcontrol,Howtodoit…,There’smore…
JavaFXprogrammingURL/Howtodoit…
JavaFXSceneBuilderVersion2.0URL/Howtodoit…
JavaloggingURL/Howtodoit…
JavaMEdownloadpageURL/Howtodoit…
JavaMEprojectcreating/Howtodoit…
JavaMessageService(JMS)/CreatinganEJBJavaScript/CreatingaRESTwebserviceJavaServerFaces(JSF)/CreatingawebapplicationwithJSFsupportJAX-WS
URL/Howitworks…JBoss
about/AddingWildFlysupporttoNetBeans

JDBCdriversURL/Gettingready
JFramesURL/CreatingaSwingapplication
JMSqueuesabout/CreatingaMessageDrivenEJB
JPA/CreatinganEJBJSFbackingbean/Howtodoit…JSFcompositecomponent
creating/CreatingaJSFcompositecomponent,Howtodoit…,Howitworks…
JSFsupportwebapplication,creatingwith/CreatingawebapplicationwithJSFsupport,Howtodoit…,Howitworks…,There’smoreadding,towebapplication/AddingJSFsupporttoawebapplication,Howtodoit…,Howitworks…,There’smore
JSONViewplugin/Howtodoit…JUnitsupport
installing,intoNetBeans/InstallingJUnitsupportintoNetBeans,Gettingready,Howitworks…
JUnittestcreating,forexistingclass/CreatingaJUnittestforanexistingclass,Howtodoit…,Howitworks…creating/CreatingaJUnittest,Howtodoit…,Howitworks…
JUnittestsuitecreating/CreatingaJUnittestsuite,Howitworks…

Llibrary
creating/Creatingalibrary,Howtodoit…listofrecentphotos,Flickr
obtaining/GettingalistofrecentphotosonFlickr,Howtodoit…,There’smore…
loggercreating/Creatingalogger,Howtodoit…
lookandfeelstyle,NetBeanschanging/ChangingthelookandfeelofNetBeans,Howitworks…,There’smore…

MMain-Class
about/Howitworks…MariaDB
URL/RunningtheadministrationtoolMatisse
about/IntroductionMavenapplication
creating/CreatingaMavenapplication,Howtodoit…,Howitworks…,There’smore…Mavengoals,invoking/InvokingMavengoalscustomMavengoals,invoking/InvokingcustomMavengoalsdifferentinstallation,usingofMaven/UsingadifferentinstallationofMaven
Mavengoalsinvoking/InvokingMavengoals
Mavenprojectsusing/UsingMavenprojects,Howitworks…
menuscreating/Creatingmenus,Howtodoit…,There’smore…
Mercurialrepositoryinitializing/InitializingaMercurialrepositorycloning/CloningaMercurialrepository
MercurialtoolsURL/InitializingaMercurialrepository,CloningaMercurialrepository
MessageDrivenbeans/CreatinganEJBMessageDrivenEJB
creating/CreatingaMessageDrivenEJB,Gettingready,Howtodoit…,Howitworks…,There’smoreabout/CreatingaMessageDrivenEJB
methodoverriding/Overridingamethod,Howtodoit…,Howitworks…
MicrosoftSQLServerconnectingto/ConnectingtoMicrosoftSQLServerandOracle,Gettingready,Howtodoit…,Howitworks…
MIDPapplicationcreating/CreatinganMIDPapplication,Howitworks…,There’smore…
MIME(MultipurposeInternetEmailExtension)about/Howitworks…
MIMEtypesURL/Howitworks…
MobileInformationDeviceProfile(MIDP)/Introductionmobilesupport
adding,toNetBeans/AddingmobilesupporttoNetBeans,Howtodoit…,How

itworks…Model-View-Controller(MVC)pattern/Introductionmodules
about/CreatingaNetBeansmoduleMongoDB
connectingto/ConnectingtoMongoDB,Howtodoit…,Howitworks…URL/ConnectingtoMongoDBshell/TheMongoDBshell
MongoDBmanualURL/There’smore…
MongoDBshell/TheMongoDBshellMySQLServer
registering/RegisteringandmanagingaMySQLServer,Howtodoit…,There’smore…databases,creating/Creatingdatabasesadministrationtool,running/Runningtheadministrationtool

N.nbmfile
Info/info.xml/Howitworks…META-INF/MAINFEST.MF/Howitworks…netbeans.config.Modules/Howitworks…netbeans.modules/Howitworks…
namedpipes/GettingreadyNBAndroid/AddingAndroidsupporttoNetBeansNBAndroidExtensions
about/There’smore…URL/There’smore…
NBMongoURL/Howitworks…
NetBeansURL/Introductionlookandfeel,changing/ChangingthelookandfeelofNetBeans,There’smore…distributableapplication,buildingfrom/BuildingadistributableapplicationfromNetBeans,Howtodoit…,Howitworks…WildFlysupport,addingto/AddingWildFlysupporttoNetBeans,Howtodoit…,Howitworks…TomEEsupport,addingto/AddingTomEEsupporttoNetBeans,Gettingready,Howtodoit…,Howitworks…mobilesupport,addingto/AddingmobilesupporttoNetBeans,Howtodoit…,Howitworks…Androidsupport,addingto/AddingAndroidsupporttoNetBeans,Howtodoit…,Howitworks…,There’smore…CVS,usingfrom/UsingCVSfromwithinNetBeansJUnitsupport,installinginto/InstallingJUnitsupportintoNetBeans,Gettingready,Howitworks…about/Introduction,Introductionwebservice,addinginto/AddinganadditionalwebserviceintoNetBeans,Howtodoit…,There’smore…
NetBeansIDEabout/Introduction
NetBeansmodulecreating/CreatingaNetBeansmodule,Howtodoit…,Howitworks…packaging,fordeployment/PackagingaNetBeansmodulefordeployment,Gettingready,Howtodoit…,Howitworks…,There’smore…
NetBeansPlatformURL/Introduction
NetBeansPlatformAPIsURL/Howitworks…

NetBeansPluginPortalURL/There’smore…
NetworkMonitor/There’smorenewfiles
managing/Managingnewfiles

Ooptions,codegeneration
TestInitializer/Howitworks…TestFinalizer/Howitworks…TestClassInitializer/Howitworks…TestClassFinalizer/Howitworks…DefaultMethodBodies/Howitworks…
options,TestResultswindowused,formanagingtestruns/Howitworks…,There’smore…
Oracleconnectingto/ConnectingtoMicrosoftSQLServerandOracle,Gettingready,Howtodoit…,Howitworks…
Oracledatabaseconnectingto/ConnectingtoanOracledatabaseURL/ConnectingtoanOracledatabase
OracledocumentationURL/Howitworks…
OracleMessagedocumentationURL/There’smore

P@Pathannotation/Howitworks…package
creating/Creatingapackage,Howitworks…,There’smore…adding,forunittestsourcecode/Howtodoit…Filesexplorer/TheFilesexplorerautomaticcreation/Automaticcreationofpackages
parametersrefactoring/Changeparametersrefactoring,Howtodoit…,There’smore
passwordvariable/Howitworks…pgAdmin
about/ConnectingtoPostgreSQLPlatformdocumentation
URL/IntroductionPOJOs/CreatinganEJBPostgreSQL
connectingto/ConnectingtoPostgreSQL,Howtodoit…,Howitworks…connecting/Connectinganddisconnectingdisconnecting/Connectinganddisconnecting
PrimeFaces/AddingJSFsupporttoawebapplicationproperty
creating/Creatingaproperty,Howtodoit…,There’smore…pruned/Introductionpulluprefactoring
about/Pulluprefactoringpushdownrefactoring
about/Pullup/pushdownrefactoring,Howtodoit…,There’smore…PUT/CreatingaRESTwebservice

Qqualitycriteria,plugins
URL/There’smore…
R.rootstyle/Howtodoit…refactoring
renaming/Renamerefactoring,Howtodoit…,There’smore…moving/Moverefactoring,Howtodoit…,There’smore…copying/Copyrefactoring,Howtodoit…,There’smore…deleting/Deleterefactoring,Howtodoit…,Howitworks…,There’smore…parametersrefactoring,changing/Changeparametersrefactoring,Howtodoit…,There’smorepushdownrefactoring/Gettingready,Howtodoit…,There’smore…pulluprefactoring/Pulluprefactoringextractinterfacerefactoring/Extractinterfacerefactoring,Howtodoit…,There’smore…fieldsrefactoring,encapsulating/Encapsulatefieldsrefactoring,Howtodoit…,There’smore…
repositorybranching/Branchingarepository,Howtodoit…,There’smore…
REST-basedwebservicesadvantages/Introduction
RESTendpoint,GoogleGeocodingURL/Howitworks…
RESTwebservicecreating/CreatingaRESTwebservice,Howtodoit…,Howitworks…,There’smoreMIMEtypes/There’smore
RichClientPlatform(RCP)/Introduction

[email protected]({…,…})annotation/Howitworks…@Suiteannotation/CreatingaJUnittestsuiteSceneBuilder
URL/Howtodoit…schemas
exporting/ExportingschemasScreen,VisualMIDlet/Howitworks…self-containedapplication
deploying/Deployingaself-containedapplication,Howtodoit…,There’smore…
send()method/There’smoreSessionBeans
about/IntroductionStatefulSessionBeans/IntroductionStatelessSessionBeans/IntroductionSingletonSessionBeans/Introduction
SingletonEJB/CreatinganEJBSingletonSessionBeans/IntroductionSource,VisualMIDlet/Howitworks…SourceCodeControlSystem(SCCS)/There’smore…sourcecodemanagement
about/IntroductionSourceview
about/Howitworks…specificrevision
updatingto/UpdatingtoaspecificrevisionSQLdatabase
managing/ManagingaSQLdatabase,Howtodoit…,There’smore…data,viewing/Viewingdataindexes,creating/Creatingindexesdata,inserting/Inserting,deleting,andamendingdatagraphicallydata,amending/Inserting,deleting,andamendingdatagraphicallydata,deleting/Inserting,deleting,andamendingdatagraphicallyschemas,exporting/Exportingschemas
SQLServerURL/Gettingready
StatefulEJB/CreatinganEJBStatefulSessionBeans/IntroductionStatelessEJB/CreatinganEJBStatelessSessionBeans/IntroductionStrikeIron
e-mailaddress,verifyingwith/Verifyingane-mailaddresswithStrikeIron,

Howtodoit…,Howitworks…,There’smore…URL/Verifyingane-mailaddresswithStrikeIronabout/Verifyingane-mailaddresswithStrikeIron
Subversionrepositorycheckingout/CheckingoutfromaSubversionrepository,Howtodoit…,There’smore…files,importinginto/ImportingfilesintoaSubversionrepositoryCVS,usingwithinNetBeans/UsingCVSfromwithinNetBeans
Suitetestrunner/CreatingaJUnittestsuitesuperclasses
extracting/ExtractingsuperclassesSwing
about/IntroductionSwingapplication
creating/CreatingaSwingapplication,Howtodoit…,Howitworks…SwingApplicationFramework
about/IntroductionSwingcomponents
URL/AddingcomponentstoaformSystemUnderTest(SUT)/Howitworks…

T@Testannotation/Howtodoit…tags/There’smore…testcase/Introductiontestclasses
storing/Howitworks…TestDrivenDevelopment(TDD)
about/Howitworks…URL/Howitworks…
testfixtures/IntroductionTestNG
about/CreatingaTestNGunittestURL/CreatingaTestNGunittest
TestNGunittestcreating/CreatingaTestNGunittest,Howtodoit…,Howitworks…
testrunner/Introductiontests
running/Runningtests,Howtodoit…,There’smore…testsuite/IntroductionTheJavaTutorial
URL/Howtodoit…timeoutvariable/Howitworks…timer
creating/Creatingatimer,Howtodoit…,There’smoreTimerBean.javaclass
second/Howitworks…minute/Howitworks…hour/Howitworks…dayOfWeek/Howitworks…dayOfMonth/Howitworks…month/Howitworks…year/Howitworks…info/Howitworks…
TomEEinstalling/AddingTomEEsupporttoNetBeansURL/AddingTomEEsupporttoNetBeans
TomEEdocumentationURL/AddingTomEEsupporttoNetBeans
TomEEsupportadding,toNetBeans/AddingTomEEsupporttoNetBeans,Gettingready,Howtodoit…,Howitworks…
toolbarscreating/Creatingtoolbars,Howtodoit…,Howitworks…

toString()methodcreating/CreatingatoString()method,Howtodoit…,There’smore…

UUNIXtimestamps
URL/Howitworks…unregisteredUserEmailvariable/Howitworks…userIDvariable/Howitworks…userinterfaces
creating,inFXML/CreatingalluserinterfacesinFXML

Vvalidations
@NotNull/There’smore@Min/There’smore@Max/There’smore@Past/There’smore@Pattern/There’smore@Size/There’smore
variablecontentchecking/Otherwaystocheckvariablecontent
VisualMIDletediting/Howitworks…Source/Howitworks…Screen/Howitworks…Flow/Howitworks…Analyzer/Howitworks…
Wwatch
adding/Howtodoit…webapplication
creating/Creatingawebapplication,Gettingready,Howtodoit…,There’smorecreating,withJSFsupport/CreatingawebapplicationwithJSFsupport,Howtodoit…,Howitworks…,There’smoreJSFsupport,addingto/AddingJSFsupporttoawebapplication,Howtodoit…,Howitworks…,There’smore
WebapplicationArchive(War)/Howtodoit…webservice
adding,intoNetBeans/AddinganadditionalwebserviceintoNetBeans,Howtodoit…,There’smore…
webservicesURL/Gettingready
WebserviceX.NETabout/GettingreadyURL/Gettingready
WildFlyabout/AddingWildFlysupporttoNetBeansinstalling/AddingWildFlysupporttoNetBeansURL/AddingWildFlysupporttoNetBeans
WildFly8about/AddingWildFlysupporttoNetBeans
WildFlydirectoriesappclient/AddingWildFlysupporttoNetBeansbin/AddingWildFlysupporttoNetBeansdocs/AddingWildFlysupporttoNetBeansdomain/AddingWildFlysupporttoNetBeansmodules/AddingWildFlysupporttoNetBeansstandalone/AddingWildFlysupporttoNetBeanswelcome-content/AddingWildFlysupporttoNetBeans
WildFlylicenseURL/AddingWildFlysupporttoNetBeans
WildFlypluginabout/Introduction
WildFlysupportadding,toNetBeans/AddingWildFlysupporttoNetBeans,Howtodoit…,Howitworks…
WixURL/There’smore…
workbench

URL/Gettingready

XxUnit
about/Introduction
Copyright © 2022 FDOKUMEN