Kentico CMS Cookbook
32
Kentico CMS Cookbook August Edition Kentico CMS Cookbook Version 1.0 June 2012 Edition
-
Upload
khangminh22 -
Category
Documents
-
view
5 -
download
0
Transcript of Kentico CMS Cookbook

Kentico CMS Cookbook
August Edition
Kentico CMS Cookbook
Version 1.0
June 2012 Edition

Kentico CMS Cookbook
June 2012 Edition
2
Table of Content
FOREWORD ................................................................................................................................ 3
KENTICO CMS COOKBOOK ......................................................................................................... 5
RECIPE 1 EXITING SAFE MODE ............................................................................................................. 5 RECIPE 2 DISPLAY CURRENT DATE ......................................................................................................... 8 RECIPE 3 ENABLING THE DESIGN TAB FOR AN ASPX TEMPLATE .................................................................. 9 RECIPE 4 ENHANCE AVAILABILITY OF ON-LINE MARKETING ACTIVITIES ........................................................ 12 RECIPE 5 SELECT MULTIPLE DOCUMENT TYPES ...................................................................................... 17 RECIPE 6 ADD NEW USER .................................................................................................................. 19 RECIPE 7 CHANGE DEFAULT BEHAVIOUR OF THE ENTER KEY ..................................................................... 21 RECIPE 8 DELETE INACTIVE CONTACTS ................................................................................................. 25 RECIPE 9 DETERMINE LOCATION OF CODE RENDERED ON A PAGE .............................................................. 28 RECIPE 10 DISPLAY CURRENT DOCUMENT NAME ................................................................................... 30
HAVE A RECIPE TO SUBMIT? .................................................................................................... 32
ADDITIONAL KENTICO CMS RESOURCES ................................................................................... 32

Kentico CMS Cookbook
June 2012 Edition
3
Foreword
A cookbook is a common kitchen reference that contains
a set of recipes. Recipes contain instructions and a list of
ingredients that when combined together hopefully
produce a unique taste sensation. Chefs the world over
use them as a base to deliver a fantastic culinary
experience that tantalizes the taste buds and makes you
want more. I don’t expect that Kentico CMS will
provide the actual cooking feature anytime soon. But,
the intent of this first edition cookbook has the same
idea, to provide high quality recipes that any chef can
use to deliver tantalizing and useful websites.
Families have a way of collecting and sharing recipes. As someone finds a new recipe or
serves up something tasty at a holiday meal they share it with the rest of the family. I like
to think of this as the Kentico family cookbook. You’ll undoubtedly notice that this first
edition of the cookbook contains only a few recipes. Well like a crazy cousin, someone
has to start writing down and sharing the recipes. The goal of the cookbook is to have
everyone interested contribute to the evolution of the recipe list. This edition was
designed to provide some basic recipes that the Kentico family can use to gain additional
knowledge and information. But like all good recipe books, it will need to be updated and
refined.
My role in this is to act a lot like the crazy cousin – sampling recipes to see how they
taste. In other words, an editor and fact checker. I want to ensure that the Kentico CMS
Cookbook contains only the tastiest recipes using the highest quality ingredients. That,
and hopefully provide some of my own recipes along the way. We encourage and ask
everyone in the community to participate and provide their own recipes. Our plan is to
continually improve and regularly release new Kentico CMS Cookbook editions. We
hope that you will become a part of its usage and provide additional topics and tips that
make it even better.
A little about how we approached the structuring of this first edition. Each recipe is
designed to provide quick and easy recipe cards that you can instantly use to review and
apply the information.

Kentico CMS Cookbook
June 2012 Edition
4
All recipes contain the following sections.
Section name Description
Recipe Short descriptive name of the recipe.
Chef Name of the person and their company that
submitted the recipe.
Version Kentico CMS version this recipe has been
tested against.
Problem Short description of the problem the recipe
is designed to solve.
Solution The solution to the problem.
Discussion Discussion of the solution.
See also Additional resources for information.
The recipe contents are definitely not final, but we needed to start somewhere. What do
you think is missing or should be changed?
If you would like to contribute or have any comments or recipe requests please don’t
hesitate to email me at [email protected].
Until the next edition – enjoy the first edition of the Kentico CMS culinary treats!
Thanks,
Thom Robbins
Kentico CMS Cookbook Editor

Kentico CMS Cookbook
June 2012 Edition
5
Kentico CMS Cookbook
Recipe 1 Exiting Safe Mode
1.0 Chef
Juraj Ondrus, Kentico Customer Care Manager, Kentico CMS
1.1 Version
Kentico CMS Version 6
1.2 Problem
In CMS Desk you see the message An error occurred processing the controls. The page is now in safe mode Close the safe mode and try to reload the page content. See event log for
details. as shown in the following screenshot.
1.3 Solution
Uncheck the Display web part content checkbox or modify the page template web part XML.
Uncheck the Display web part content checkbox: On the page where you received An error occurred processing the controls. The page is now in safe mode. Close the safe mode and try to reload the page content. See event log for the error details. Uncheck the Display web part content checkbox as shown in the following screenshot.

Kentico CMS Cookbook
June 2012 Edition
6
Modify the page template web part XML:
1. Log into Site manager, select the Development tab and then click the Page
templates menu option as shown in the following screenshot.
2. In the list of page templates select the page template that contains the web
part as shown in the following screenshot.

Kentico CMS Cookbook
June 2012 Edition
7
3. In the Page templates screen select the Web parts tab as shown in the
following screenshot.
4. In the Web parts tab in the Web part configuration section modify or remove
the XML web part settings as shown in the following screenshot.

Kentico CMS Cookbook
June 2012 Edition
8
1.4 Discussion
This error occurs when you configure a web part or run custom code that prevents page
processing. When this occurs, Kentico CMS defaults to Safe mode. This mode ensure
that the page is still displayed but attempts to buffer the user from problematic code or
web parts that may cause processing issues. If you aren’t sure what may be causing the
error the first thing to do is review the error details in the Event log.
When a page is displayed in Safe mode, there are two options that can be used to recover
the page. The first is to uncheck the Display web part content option which depending on
the error may enable access to web part configuration options. The second is to modify
the page template web part XML.
1.5 See also
Safe mode on Design tab
Recipe 2 Display current date
2.0 Chef
Thom Robbins, Kentico CMS Cookbook Editor, Kentico CMS
2.1 Version
Kentico CMS Version 6
2.2 Problem
You want the current date displayed in a web part.
2.3 Solution
Use the {%CurrentDate%} macro expression.
2.4 Discussion
The {%CurrentDate%} variable is a macro expression that resolves into a string
representing the current server system date.

Kentico CMS Cookbook
June 2012 Edition
9
In CMS Desk on the Page tab within an Editable text web part enter the text Today’s date
is {%CurrentDate%}, and then select Save as shown in the following screenshot.
In the View mode panel click the Preview button to view the resolved macro as shown in
the following screenshot.
2.5 See also
K# and Kentico EMS – Part 1
K# and Kentico EMS – Real World Examples
Recipe 3 Enabling the Design tab for an ASPX Template
3.0 Chef
Thom Robbins, Kentico CMS Cookbook Editor, Kentico CMS
3.1. Version
Kentico CMS Version 6
3.2 Problem
You want to add CMS Desk Design tab to an ASPX page template.

Kentico CMS Cookbook
June 2012 Edition
10
3.3 Solution
When creating the ASPX page template in Visual Studio use the
CMSPagePlaceholder control and then when registering the page template in the
Template type dropdown select ASPX + Portal page.
Use the CMSPagePlaceHolder control: <cms:CMSPagePlaceholder ID="plcZones" runat="server"> <LayoutTemplate> ... <cms:CMSWebPartZone ID="zoneCenter" runat="server" /> ... </LayoutTemplate> </cms:CMSPagePlaceholder>
Cooking note
The CMSPortalManager control is also required for portal engine functionality. This control is usually placed on the master page set for the template.
Select the template type ASPX + Portal page:
3.4 Discussion
One of the drawbacks of ASPX page templates is the need for manual modification for
design changes. Adding the CMSPagePlaceholder control enables page areas that may
be edited directly in the CMS Desk Design tab.

Kentico CMS Cookbook
June 2012 Edition
11
Cooking note
If you have any pages using the older CMSPageManager control. This control is obsolete and does not support web parts and widget zones. Before using this recipe you must first replace the control.
When creating the ASPX page in Visual Studio add the following code to the page.
<asp:Content ID="Content1" ContentPlaceHolderID="plcMain" Runat="Server"> <cms:CMSPagePlaceholder ID="plcZones" runat="server"> <LayoutTemplate> <table width="100%" cellspacing="0" cellpadding="0"> <tr valign="top"> <td width="50%"> <cms:CMSWebPartZone ID="zoneLeft" runat="server" /> </td> <td width="50%"> <cms:CMSWebPartZone ID="zoneRight" runat="server" /> </td> </tr> </table> </LayoutTemplate> </cms:CMSPagePlaceholder> </asp:Content>
When you are registering the page template in Site manager in the Template type
dropdown select the ASPX + Portal page as shown in the following screenshot.
With a new page created in CMS Desk based on the ASPX template you can now see
the Design tab is displayed as shown in the following screenshot.

Kentico CMS Cookbook
June 2012 Edition
12
Recipe 4 Enhance availability of On-line marketing activities
4.0 Chef
Zdenek Strach, Technical Leader, Kentico CMS
4.1 Version
Kentico CMS Version 6 (SP1)
4.2 Problem
You need to make on-line marketing activities available sooner than the default.
4.3 Solution Modify the Process activity log scheduler service or add CMSLogActivityImmediatelyToDB key to the Kentico CMS Web.config.
Modify the Process activity log scheduling service
1. Log into Site manager, select the Settings tab, and then select the System
menu option as shown in the following screenshot.

Kentico CMS Cookbook
June 2012 Edition
13
2. In the System screen in the Scheduler panel check the Use external service and
in the Service scheduler interval enter the execution seconds, and then select
Save as shown in the following screenshot.

Kentico CMS Cookbook
June 2012 Edition
14
3. In Site manager select the Administration tab, select Scheduled tasks option
and for the Process activities log scheduled task click the Edit (pencil) icon as
shown in the following screenshot.
4. In the Task properties screen in the Task interval section set the required
interval and then click OK as shown in the following screenshot.

Kentico CMS Cookbook
June 2012 Edition
15
5. In the Task properties screen validate the User external service is checked as
shown in the following screenshot.
6. From the Windows start select the Kentico CMS 6.0 menu options, select
Kentico CMS Utilities and then click Kentico Service Manager 6 as shown in the
following screenshot.

Kentico CMS Cookbook
June 2012 Edition
16
7. In the Kentico Service Manager 6 application install the Kentico CMS Scheduler
(KenticoCMS6) service and then select Start as shown in the following
screenshot.
Add CMSLogActivityImmediatelyToDB key to the Kentico CMS Web.config In the Kentico CMS Web.config file in the AppSetting section add the following key.
<add key="CMSLogActivityImmediatelyToDB" value="true" />
4.4 Discussion
By default new marketing activities are logged into temporary storage on the server file
system. On a regular interval these files are processed and the stored data is moved into
the database. For many scenarios modifying the Process activity scheduler service offers
the best approach. Updating the Web.config key will bypass the creation of temporary
files and update the database directly with new marketing activities. This will increase the
availability of new marketing activities. The downside is that logging activities directly to
the database may cause performance issues on high-traffic sites.
4.5 See also
How to process On-line marketing activities faster

Kentico CMS Cookbook
June 2012 Edition
17
Recipe 5 Select multiple document types
5.0 Chef
Ivana Tomanickova, Support Engineer, Kentico CMS
5.1 Version
Kentico CMS Version 6
5.2 Problem
You need to select multiple document types from the Content tree
5.3 Solution
Use the CMS.TreeEngine.TreeProvider class and in the SelectNodes method provide
the ClassNames parameter.
SelectNodes Method:
SelectNodes(siteName, aliasPath, cultureCode, combineWithDefaultCulture, classNames, where, orderBy, maxRelativeLevel, selectOnlyPublished, relationshipWithNodeGuid, relationshipName, relatedNodeIsOnTheLeftSide, topN, columns)
5.4 Discussion
The CMS.TreeEngine.TreeProvider class provides methods for management of the tree
structure. The SelectNodes method is used to select specific content items from the
content tree. The following code will select CMS.Article and CMS.News document types
into a dataset that contains two tables.
// Using CMS.TreeEngine; // Using CMS.CMSHelper; TreeProvider tree = new TreeProvider(CMSContext.CurrentUser); DataSet nodes = tree.SelectNodes("CorporateSite", "/%", "en-US", true, "cms.Article;cms.News", "", "NodeName ASC");
Kentico CMS Cookbook
June 2012 Edition
18
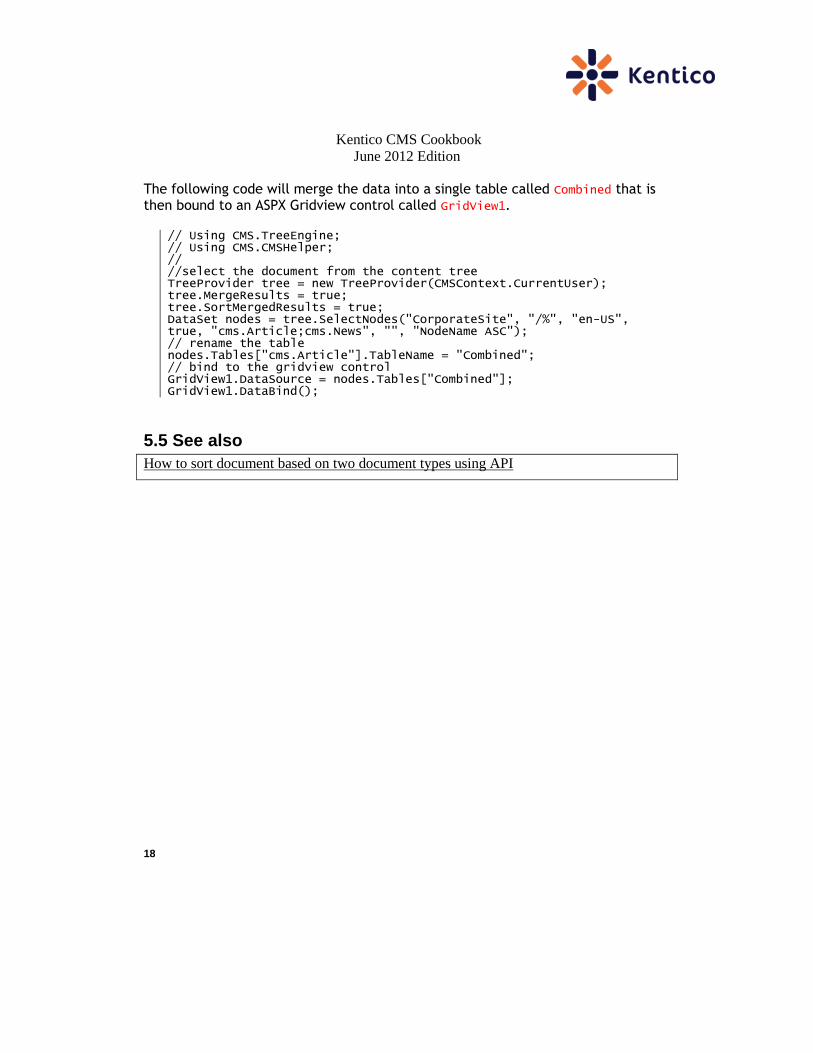
The following code will merge the data into a single table called Combined that is then bound to an ASPX Gridview control called GridView1.
// Using CMS.TreeEngine; // Using CMS.CMSHelper; // //select the document from the content tree TreeProvider tree = new TreeProvider(CMSContext.CurrentUser); tree.MergeResults = true; tree.SortMergedResults = true; DataSet nodes = tree.SelectNodes("CorporateSite", "/%", "en-US", true, "cms.Article;cms.News", "", "NodeName ASC"); // rename the table nodes.Tables["cms.Article"].TableName = "Combined"; // bind to the gridview control GridView1.DataSource = nodes.Tables["Combined"]; GridView1.DataBind();
5.5 See also
How to sort document based on two document types using API

Kentico CMS Cookbook
June 2012 Edition
19
Recipe 6 Add new user
6.0 Chef
Thom Robbins, Kentico CMS Cookbook Editor, Kentico CMS
6.1 Version
Kentico CMS Version 6
6.2 Problem
You need to add a new user to a Kentico CMS site.
6.3 Solution
Create a CMS.SiteProvider.Userinfo class, populate with the new user information
and then update the CMS.SiteProvider.UserInfoProvider class.
Creating a CMS.SiteProvider.Userinfo class:
CMS.SiteProvider.UserInfo user = new CMS.SiteProvider.UserInfo();
Update the CMS.SiteProvider.UserInfoProvider class:
CMS.SiteProvider.UserInfoProvider.SetUserInfo(CMS.SiteProvider.Userinfo); CMS.SiteProvider.UserInfoProvider.SetPassword(CMS.SiteProvider.Userinfo, “Password”); CMS.SiteProvider.UserInfoProvider.AddUserToSite(CMS.SiteProvider.Userinfo.UserName, “Site name”);

Kentico CMS Cookbook
June 2012 Edition
20
6.4 Discussion
The CMS.SiteProvider.Userinfo is a data container for user information. Once
populated this class is applied to the CMS.SiteProvider.UserInfoProvider class to
create the new user. The following code will create a new user named Michael Johnson
and then assign a password and site.
// Using statement added to top // using CMS.SiteProvider; // // // Create UserInfo Object UserInfo user = new UserInfo(); // Set user properties user.UserName = "Michael"; user.FirstName = "Michael"; user.LastName = "Johnson"; user.FullName = "Michael Johnson"; user.Email = "Michael [email protected]"; user.Enabled = true; user.PreferredCultureCode = "en-us"; // Create new user CMS.SiteProvider.UserInfoProvider.SetUserInfo(user); // Set the password CMS.SiteProvider.UserInfoProvider.SetPassword(user,"Password1"); // Add the user to the Corporate Site CMS.SiteProvider.UserInfoProvider.AddUserToSite(user.UserName, "CorporateSite");

Kentico CMS Cookbook
June 2012 Edition
21
Recipe 7 Change default behaviour of the Enter key
7.0 Chef
Edward Hillard, Support Engineer, Kentico CMS
7.1 Version
Kentico CMS Version 6
7.2 Problem
You need to change the default behaviour of the enter key in the CK Editor.
7.3 Solution
In Visual Studio Solution Explorer edit the ~\CMSAdminControls\CKeditor\config.js
file, change the config.entermode setting and then restart the application.
config.entermode settings:
Option Description
CKEDITOR.ENTER_P Creates a new <p> tag
CKEDITOR.ENTER_DIV Creates a new <div> block
CKEDITOR.ENTER_BR Creates a new <br> tag
7.4 Discussion
In the WYSIWYG editor the default behaviour for the Enter key is to generate a line
break <br>. In a blog post you can validate this behaviour by pressing the Enter key and
then selecting the Source button as shown in the following screenshot.

Kentico CMS Cookbook
June 2012 Edition
22
In the Kentico CMS web project in the Solution Explorer click the CMSAdminControls
folder, then expand the CKEditor folder and then double click the config.js file as shown in
the following screenshot.

Kentico CMS Cookbook
June 2012 Edition
23
At approximately line 10 is the config.entermode setting that is responsible for the default
<br> tag as shown in the following screenshot.
Change the config.entermode property to CKEDITOR.ENTER_P and then select Save
(ctrl+s) as shown in the following screenshot.
Cooking note
This recipe changes the default UI files. It is important to keep a note of these changes as they may be overwritten during an upgrade or installation.
Restart the application, clear the application cache and depending on your browser
clear the cache. In a blog post you can validate this changed behaviour by pressing the
Enter key and then selecting the Source button as shown in the following screenshot.

Kentico CMS Cookbook
June 2012 Edition
24
Cooking note
You can restart the application and clear the application cache from Site Manager
by selecting the Administration tab, then select the System menu and General tab.
7.5 See also
CK Editor Enter Mode

Kentico CMS Cookbook
June 2012 Edition
25
Recipe 8 Delete inactive contacts
8.0 Chef
Vitezslav Janecek, Senior Developer, Kentico CMS
8.1 Version
Kentico CMS Version 6 (SP1)
8.2 Problem
You need to delete inactive contacts from the contact module.
8.3 Solution
Modify the On-Line marketing settings and then schedule the Delete inactive contacts
scheduled task.
Modify On-line marketing settings
1. Log into Site Manager, select the Settings tab and then select On-line
marketing as shown in the following screenshot.

Kentico CMS Cookbook
June 2012 Edition
26
2. In On-line marketing settings in the Delete inactive contacts panel update the
appropriate setting and then select Save as shown in the following screenshot.
Delete inactive contacts settings.
Field Description
Delete inactive contacts When selected site contacts are included in
the Delete inactive contacts scheduled task
execution.
Last activity older than(days) Contacts with activity older than the
specified number of days are deleted.
Contact created before (days) Contacts created before the specified
number of days are deleted.
Contact last logon before (days) Contacts with a logon before the specified
number of days are deleted.
Contact last modified before (days) Contacts last edited before the specified
number of days are deleted.
Contact merged before (days) Contacts merged into another contact
before the specified number of days are
deleted.

Kentico CMS Cookbook
June 2012 Edition
27
Merged into site contact only If selected all contacts merged into another
contact are deleted.
Merged into Global contact only If selected all contacts merged into a global
contact are deleted.
Contact is anonymous If selected all anonymous contacts are
deleted.
Delete inactive contacts scheduled task
1. Log into Site Manager, select the Administration tab, click Scheduled tasks
and then click the Edit (pencil) icon for the Delete inactive contacts task as
shown in the following screenshot.
2. In the Task properties screen for the Task interval section set the scheduled
interval and then select OK as shown in the following screenshot.

Kentico CMS Cookbook
June 2012 Edition
28
8.4 Discussion
Contacts are automatically created whenever a user visits your site. Based on your
business requirements and lead scoring rules you may remove out of date contacts. In
On-line marketing settings, if Delete inactive contacts is not selected, site contacts will
only be removed if they are deleted manually. When multiple conditions are set, only
those contacts that fulfill all selected parameters are removed. You can set different
parameters for different sites or enable deleting on some sites and turn it off on others.
The globally scheduled Delete inactive contacts task runs a separate deleting process for
each site that has the Delete inactive contacts checked. The scheduled task is predefined to
run on a weekly basis. It runs in a separate thread and the actual process of deleting
contacts runs on SQL server reducing the load on your web server.
8.5 See also
Delete inactive contacts
Recipe 9 Determine location of code rendered on a page
9.0 Chef
Edward Hillard, Support Engineer, Kentico CMS
9.1 Version
Kentico CMS Version 6
9.2 Problem
You need to identify the location of a page within CMS Desk or Site manager using
Firefox.
9.3 Solution
In Firefox with a CMS Desk or Site Manager page displayed right click, in the pop-up
menu select This frame and then select View Frame Info as shown in the following
screenshot.

Kentico CMS Cookbook
June 2012 Edition
29
9.4 Discussion Many modern browsers including Firefox allow the easy identification of a current
page. In Firefox, while viewing the CMS Desk New User screen, right click and then
select This Frame and then click View Frame Info as shown in the following screenshot.

Kentico CMS Cookbook
June 2012 Edition
30
This displays the Frame info screen and you can see that
~/CMSModules/Membership/Pages/Users/user_new.aspx is the currently displayed page as shown in the following screenshot.
9.5 See also
How to find the location of the code for a page used in the user interface
Recipe 10 Display current document name
10.0 Chef
Thom Robbins, Kentico CMS Cookbook Editor, Kentico CMS
10.1 Version
Kentico CMS Version 6
10.2 Problem
You want to display the current document name in a web part.

Kentico CMS Cookbook
June 2012 Edition
31
10.3 Solution
Use the {%CurrentDocument.DocumentName%} macro expression.
10.4 Discussion
The {%CurrentDocument.DocumentName%}variable is a macro expression that resolves
into a string representing the current document name
In CMS Desk on the Page tab within an Editable text web part enter the text This
document is {%CurrentDocument.DocumentName%}, and then select Save as shown in the
following screenshot.
In the View mode panel click the Preview button to view the resolved macro as shown in
the following screenshot.

Kentico CMS Cookbook
June 2012 Edition
32
Have a recipe to submit?
If you have a recipe to add to the next edition of the Kentico CMS Cookbook or simply
have a recipe request please contact [email protected].
Thanks to all recipe contributors and reviewers to the Kentico CMS Cookbook August
Edition.
Additional Kentico CMS Resources Kentico CMS Documentation http://devnet.kentico.com/Documentation.aspx
Kentico CMS Knowledge Base http://devnet.kentico.com/Knowledge-
Base.aspx
Kentico CMS Videos http://devnet.kentico.com/Videos.aspx
Kentico CMS Forums http://devnet.kentico.com/Forums.aspx
Kentico CMS Training http://www.kentico.com/Training