Ratings. Confidence. Installation and Users Guide - Telos Alliance
120
® Ratings. Confidence. Installation and Users Guide Soſtware Version 2.3 Manual Rev v2.3 • July 2019 p/n 1490-00108-004 TelosAlliance.com
-
Upload
khangminh22 -
Category
Documents
-
view
0 -
download
0
Transcript of Ratings. Confidence. Installation and Users Guide - Telos Alliance

®
Ratings. Confidence.
Installation and Users Guide
Software Version 2.3
Manual Rev v2.3 • July 2019
p/n 1490-00108-004
TelosAlliance.com

Voltair Installation and User’s Guide Version 2.3 • July 2019
Voltair® Installation and Users Guide© 2019 TLS Corp. All rights reserved.
About 25-Seven Systems®25-Seven Systems specializes in audio technologies and products that address the unique problems of radio broadcasters, networks and content providers. The company was launched in 2004 by a group of veteran broadcasters with extensive audio experience and a significant portfolio of intellectual property. 25-Seven joined The Telos Alliance® in 2012. Its products are designed and built in the United States.
NOTICES AND CAUTIONSCAUTION:
The installation and service instructions in this manual are for use by qualified personnel only. To avoid electric shock, do not perform any servicing other than that contained in the operating instructions unless you are qualified to do so. Refer all servicing to qualified personnel
This instrument has an autoranging line voltage input. Ensure the power voltage is within the specified range of 100-240v. The ~ symbol, if used, indicates an alternating current supply.
This symbol, wherever it appears, alerts you to the presence of uninsulated, dangerous voltage inside the enclosure – voltage which may be sufficient to constitute a risk of shock.
This symbol, wherever it appears, alerts you to important operating and maintenance instructions. Read the manual.
CAUTION: HAZARDOUS VOLTAGESThe instrument power supply incorporates an internal fuse. Hazardous voltages may still be present on some of the primary parts even when the fuse has blown. If fuse replacement is required, replace fuse only with same type and value for continued protection against fire.

Voltair Installation and User’s Guide Version 2.3 • July 2019
WARNING:The product’s power cord is the primary disconnect device. The socket outlet should be located near the device and easily accessible. The unit should not be located such that access to the power cord is impaired. If the unit is incorporated into an equipment rack, an easily accessible safety disconnect device should be included in the rack design.
To reduce the risk of electrical shock, do not expose this product to rain or moisture. This unit is for indoor use only.
This equipment requires the free flow of air for adequate cooling. Do not block the ventilation openings on the rear and sides of the unit. Failure to allow proper ventilation could damage the unit or create a fire hazard. Do not place the units on a carpet, bedding, or other materials that could interfere with any panel ventilation openings.
If the equipment is used in a manner not specified by the manufacturer, the protection provided by the equipment may be impaired.
USA CLASS A COMPUTING DEVICE INFORMATION TO USER. WARNING:This equipment generates, uses, and can radiate radio-frequency energy. If it is not installed and used as directed by this manual, it may cause interference to radio communication. This equipment complies with the limits for a Class A computing device, as specified by FCC rules, part 15, subpart j, which are designed to provide reasonable protection against such interference when this type of equipment is operated in a commercial environment. Operation of this equipment in a residential area is likely to cause interference. If it does, the user will be required to eliminate the interference at the user’s expense. Note: objectionable interference to tv or radio reception can occur if other devices are connected to this device without the use of shielded interconnect cables. FCC rules require the use of shielded cables.
CANADA WARNING:“This digital apparatus does not exceed the Class A limits for radio noise emissions set out in the radio interference regulations of the Canadian department of communications.”
“Le présent appareil numérique n’émet pas de bruits radioélectriques dépassant les limites applicables aux appareils numériques (de Class A) prescrites dans le règlement sur le brouillage radioélectrique édicté par le ministère des communications du Canada.”
CE CONFORMANCE INFORMATION:This device complies with the requirements of the EEC council directives:
n 93/68/EEC (CE MARKING)
n 73/23/EEC (SAFETY – LOW VOLTAGE DIRECTIVE)
n 89/336/EEC (ELECTROMAGNETIC COMPATIBILITY)
Conformity is declared to those standards: EN50081-1, EN50082-1.

Voltair Installation and User’s Guide Version 2.3 • July 2019
Trademarks and LicensesVoltair and 25-Seven are trademarks of TLS Corp. Arbitron, Nielsen, Arbitron PPM, Portable People Meter, PPM, Nielsen Audio and related trademark are the property of the Nielsen Company. All other trademarks are the property of their respective holders.
All versions, claims of compatibility, trademarks, etc. of hardware and software products not made by 25-Seven which are mentioned in this manual or accompanying material are informational only. 25-Seven makes no endorsement of any particular product for any purpose, nor claims any responsibility for operation or accuracy. We reserve the right to make improvements or changes in the products described in this manual which may affect the product specifications, or to revise the manual without notice.
This document and its content are copyrighted by 25-Seven and TLS Corporation and may not be copied, reproduced, or distributed in any form without expressed written permission.
Certain libraries are licensed to You under the terms of the GNU General Public License, Version 2 (“GNU GPL”). Telos is not allowed to sub-license these libraries to You as You are deemed to have Your own direct license from the original licensee. Telos does not modify these libraries in any way. Telos hereby offers to You, upon Your request and for the actual costs of materials and shipping, all source code and object code files for all such GNU libraries contained in the Software. Copyright (C) 1989, 1991 Free Software Foundation, Inc., 59 Temple Place, Suite 330, Boston, MA 02111-1307 USA. Everyone is permitted to copy and distribute verbatim copies of this license document, but changing it is not allowed.
UpdatesFeatures and operations of Voltair are determined largely by software. 25-Seven Systems strives to provide the most stable and feature-rich software available. We encourage you to check for software updates from time to time by visiting our website or by contacting us directly.
FeedbackWe welcome feedback on any aspect of our products or this manual. In the past, many good ideas from users have made their way into software revisions or new products. Please contact us with your comments or suggestions.
Voltair Installation and User’s Guide Version 2.3 • July 2019
We support you…By Phone/Fax
You may reach our 24/7 Support Team in emergencies by calling +1 216-622-0247. For billing questions or other non-emergency technical questions, call +1 216-241-7225 between 9:00 AM to 5:00 PM USA Eastern Time, Monday through Friday.
By EmailNon-emergency technical support is available at [email protected].
By WebThe 25-Seven Web site has a variety of information that may be useful for product selection and support. The URL is TelosAlliance.com/25-Seven
SERVICEYou must contact Telos Alliance before returning any equipment for factory service. We will need your unit’s serial number, located on the back of the unit. We will issue a return authorization number, which must be written on the exterior of your shipping container. Please do not include cables or accessories unless specifically requested by the Technical Support Engineer. Be sure to adequately insure your shipment for its replacement value. Packages without proper authorization may be refused. US customers, please contact 25-Seven Technical Support at +1-216-622-0247. All other customers should contact local representative to make arrangements for service.
Warranty
For the latest Telos Alliance warranty, visit: telosalliance.com/warranty
Register your productRegister your product today to get the full benefits of our warranty, support, and product updates. telosalliance.com/product-registration/
25-Seven Systems | The Telos Alliance
1241 Superior Ave. Cleveland, OH 44114 USA
+1 (216) 241-7225 | [email protected]
+1-216-622-0247 (24/7 technical support)

TABLE OF CONTENTS | VI
Voltair Installation and User’s Guide Version 2.3 • July 2019
®
Ratings. Confidence.
Background and Overview ....................................................................1Voltair and Your Ratings .......................................................................................................... 1
Ratings, Programming, and Flying Blind .............................................................................................3
How Voltair Can Benefit You ......................................................................................................................4
How Voltair helps you get more control over encoding performance ........................5
Benefiting From Voltair ...........................................................................................................6
Monitoring & Analyzing PPM Encoding ..............................................................................................6
Confidence Display.................................................................................................................................7
Real-time Spectral Display ........................................................................................................................10
Analyzing Listening Environments .......................................................................................................11
Encoding Enhancement ...............................................................................................................................11
Making Informed Programming Decisions ...................................................................................... 12
Producing PPM-Compatible Content .................................................................................................. 13
INSTANT GRATIFICATION ......................................................................15Voltair Quick Hookup Guide ................................................................................................. 15
Installation ......................................................................................................................................................... 15
Calibration and Setup .................................................................................................................................. 18
Start Using Voltair! ........................................................................................................................................22

TABLE OF CONTENTS | VII
Voltair Installation and User’s Guide Version 2.3 • July 2019
Getting the Best Results from Voltair ...................................................23Best practices: installation .................................................................................................... 23
Give Voltair a well-controlled signal .....................................................................................................23
Routing Voltair and EAS .............................................................................................................................24
General Purpose Input/Output [GPIO] ...............................................................................................25
Operational Best Practices .................................................................................................... 26
Calibration is vital! .........................................................................................................................................26
Analyze PPM codes accurately ................................................................................................................27
Adding Environments .........................................................................................................................27
Pre-testing program elements ........................................................................................................28
Using Voltair for monitoring, analysis, and data capture ..........................................................29
Using the Real Time Analyzer ..................................................................................................................32
Using Voltair with Omnia .................................................................................................................33
Web remote access ................................................................................................................................33
Using Voltair Enhancement ................................................................................................... 34
Enhancement needn’t be “Set and Forget” ...............................................................................34
Finding the Best Enhancement Levels ...............................................................................................34
Test Strategy: Voltair Enhancement and Your Signal ........................................................35
Burying the randomness ...................................................................................................................36
Doing the Test .........................................................................................................................................36
Finding optimum Enhancement Levels ....................................................................................37
Operation Details ................................................................................39Front Panel Controls .....................................................................................................................................39
About Bypass ....................................................................................................................................................39
LCD Screen........................................................................................................................................................ 40
Voltair’s Function Screens .......................................................................................................................... 41
Main Screen ....................................................................................................................................................... 41
Encoding Failure Warning ................................................................................................................42
Confidence Display...............................................................................................................................42

TABLE OF CONTENTS | VIII
Voltair Installation and User’s Guide Version 2.3 • July 2019
Decode Interval Display ................................................................................................................... 45
Parameter Settings .............................................................................................................................. 45
General JOG Wheel and ESCAPE button behavior: .......................................................... 46
Real Time Analysis Display (RTA) .................................................................................................47
Enhancing Screen ...........................................................................................................................................48
Test Enhancement Switching functions ...................................................................................48
System Screen ................................................................................................................................................. 49
Entering text in Voltair...................................................................................................................... 50
Network Screen ...............................................................................................................................................52
Clock Screen ......................................................................................................................................................54
Calibrate Screen ..............................................................................................................................................55
Status Screen ....................................................................................................................................................55
Testing Individual Program Elements ................................................................................. 56
Browser-based Remote Control ...........................................................57Logging in ...........................................................................................................................................................58
Functions and Access Levels ................................................................................................................... 59
Additional Control Functions ................................................................................................................. 60
History Data Retrieval .........................................................................67Logging in for real-time and historic data ...........................................................................68
Voltair control language ............................................................................................................................ 69
Installation ..........................................................................................71Rear panel connections ...............................................................................................................................72

TABLE OF CONTENTS | IX
Voltair Installation and User’s Guide Version 2.3 • July 2019
Troubleshooting and Updates .............................................................78Calibration issues ................................................................................................................... 78
How to Verify Calibration ......................................................................................................................... 79
Frequent Calibrations ................................................................................................................................. 79
Confidence Measurement issues ...........................................................................................80
Other issues ...................................................................................................................................................... 80
Software Updates ...................................................................................................................80
Contacting Us… ....................................................................................................................... 81
Using Voltair with Omnia ....................................................................82Omnia.9 Specifics ............................................................................................................................................82
Omnia.11 Specifics ...........................................................................................................................................87
Voltair M: Monitoring for PPM encoding .............................................92Using Voltair M ................................................................................................................................................93
Installation notes ..................................................................................................................................93
Calibration notes .................................................................................................................................. 95
Controls and LCD Screen .......................................................................................................................... 95
Browser-based Remote Control ............................................................................................................. 96
Licensing and History ........................................................................................................................ 96
Utilities and Information ................................................................................................................. 96
Real-time data and downloads via telnet ..........................................................................................97
GPIO ......................................................................................................................................................................97

TABLE OF CONTENTS | X
Voltair Installation and User’s Guide Version 2.3 • July 2019
About Calibration ................................................................................89
Exploring the PPM Ecosystem ...........................................................100PPM Overview ...................................................................................................................... 100
Understanding Audio Watermarking ................................................................................ 100
Programming Content ..........................................................................................................101
Panelists’ Environments ...................................................................................................... 102
Into the Future… ................................................................................................................... 102
Customer Support Contact Information .............................................103
Technical Specifications .....................................................................104
Warranty ...........................................................................................106

BACkgrOuNd ANd OvErviEw | 1
Voltair Installation and User’s Guide Version 2.3 • July 2019
Background and OverviewVoltair and Your Ratings
It’s all about your listeners. Your people, your programming, your gear… everything you do is focused on building and retaining your audience. That’s how you stay in business.
There’s a direct link between Nielsen’s reports about the size and composition of your audience, and your station’s revenue. Nielsen bases these reports on listener panels, where each panelist represents many people in your market.
In PPM® markets, audiences are measured by panelists wearing portable meters. These meters listen for digital codes hidden in your station’s audio. The codes, called “watermarks”, are unique for each station. They’re both generated from your program audio, and hidden beneath it. Thousands of codes are created in the course of an hour, and this massive redundancy helps assure that these codes are picked up by the meters. Error correction algorithms are supposed to fill in the blanks when codes are missing or weak.
But no system is perfect. An inherent trade-off exists between how robust a code can be—that is, how well it can be picked up under normal listening situations—and its audibility. We also know now that not all programming encodes equally well. Different announcers or songs have different sonic properties. Silence never encodes. Some formats, such as Talk, may provide fewer opportunities for robust encoding when compared with denser music formats. In addition, some noisy listening situations (such as driving in rush-hour traffic) can interfere with codes being heard by the meters. Panelists might be enjoying your station, but if their meters don’t register your code, you won’t get credit for them.
If your codes aren’t detected, “edit rules” attempt to fill in the gaps. These rules are a form of error correction based on statistics, and may or may not be successful. More codes let these paint a more complete picture, so it’s obviously best to have your codes arrive properly in the first place.
In other words, it’s an ecosystem: every aspect of your programming, the PPM encoder, panelists’ listening environments, their meters, and subsequent data editing all have to work correctly for ratings to be accurate. There are so many variables and random elements that nobody can claim the ratings system has perfect accuracy, all the time.
For most stations, income is directly related to these ratings. With so much riding on a few panelists, every code and every meter needs to count.
That’s why we created Voltair.

BACkgrOuNd ANd OvErviEw | 2
Voltair Installation and User’s Guide Version 2.3 • July 2019
Voltair is designed to give you more confidence that your station is actually getting the end-to-end PPM system performance that Nielsen intended, so you get the ratings you’ve earned.
nVoltair displays how well your programming encodes, moment by moment. You can see the effects of programming changes—even different songs or announcers—in real time.
nVoltair applies advanced signal processing to enhance the robustness of your station’s codes. Having robust codes means PPM meters in the field are more likely to detect them.
Voltair includes automatic support for scientifically structured tests of how well its signal processing correlates with meter count. You do these tests on your own, comparing controlled changes in Voltair processing with the data in your station’s Nielsen reports1. Learn more about Toggle Testing later in this manual.
nVoltair lets you instantly compare your unencoded signal, the output of the Nielsen Encoder, and your Voltair Enhanced signal. You can even listen to codes by themselves2.
nVoltair’s optional Data Capture and Extraction tools let you do even more precise analysis:
n They give you continuous reports of ratings confidence. You can determine how well individual songs and segments, announcers, and even promos and ads are encoding. You’ll gain fresh insight into how programming decisions affect successful encoding.
n These reports include encoding confidence numbers for actual listening environments you select, both with and without Voltair’s advanced signal processing. This helps you find the best settings both for Voltair, and for any other processing that can affect encoding.
n Data can be sent to your computer in real-time. Or you can recall detailed confidence histories from earlier that day, or from any previous period when Voltair was connected.
n You can examine raw data from Voltair’s deep internal history files, have Voltair generate Excel spreadsheets with graphs of encoding confidence for the periods selected, or export comma-separated-value lists of raw data recorded every 4.8 seconds for your own analysis.
n For ultimate understanding of your ratings picture, you can correlate Voltair’s reports with your program logs and with ratings numbers as delivered by Nielsen. You’ll get real-world confirmation of how your programming decisions affect your numbers.
1 Your station’s competitive information never leaves your control. You never have to trust anyone else with your data, and can judge for yourself how well voltair is working.
2 These functions are normally locked out, so they can’t be accidentally put on-air. read more about them on page 36.

BACkgrOuNd ANd OvErviEw | 3
Voltair Installation and User’s Guide Version 2.3 • July 2019
As you use Voltair to help get credit for all the ratings you’ve earned…
nYou’ll be able to monitor the health of your station’s encoding in real time, so you’ll always know that function is running optimally.
nYou’ll be able to simulate how different listening environments affect the strength of encoding, using your broadcast signal. This information can help you fine-tune programming and processing for different dayparts.
nYou’ll get more confidence in the end-to-end watermarking performance for your station. You’ll understand how programming decisions can affect this accuracy.
nVoltair even warns you when encoding has failed, either because of program limita-tions such as silence, or because of Encoder hardware issues. You can set how long a ‘dark period’ is tolerable based on your own programming.
Voltair doesn’t increase the number of your listeners. But it helps give you confidence your listeners are correctly counted.
Ratings, Programming, and Flying BlindRadio ratings has been called “a game of inches:” winners and losers can be decided by the thinnest of margins.
Station management teams have always carefully monitored listener data, and tailored their programming to maximize ratings and revenue. But since the introduction of electronic measurement, this tailoring has gotten much more pronounced. Program directors report making more dramatic changes than ever before. Some formats have fallen from favor, dayparts have been moved, local breaks have been reduced, and programming clocks have become more rigid in response to the precise quarter-hour boundaries of PPM credit. Imaging and other elements of a station’s sound have been designed with hopes of the station being recognized by more panelists’ meters. Engineering decisions like processing and airchain device order have been changed in service to PPM
But with ratings provided on a delayed basis, many efforts to optimize programming for maximum code credit have been trial and error. Program directors have had little insight into which efforts are helping, and why.
Voltair gives you reliable, confirmable measurements of how well your station’s programming is encoding in the real world. It gives you new tools to drive ratings and revenue.

BACkgrOuNd ANd OvErviEw | 4
Voltair Installation and User’s Guide Version 2.3 • July 2019
How Voltair Can Benefit You25-Seven has been following PPM since its launch. We’ve spoken with program directors and engineers around the world, getting their perspectives on the overall system architecture, and on the results of their optimization efforts.
But we didn’t just gather impressions. For years, 25-Seven has been working actively to design radio programming and air-chain products that work within the PPM system.3 The head of our research and development team, Dr. Barry Blesser, is considered one of the founders of digital audio technology. Blesser, a former President of the AES and professor at M.I.T., invented the first commercial digital reverb product for EMT in 1976. He has been a technical and management consultant for more than 40 years, and is recognized for contributions to a wide range of professional disciplines, including audio signal processing, auditory perception, pattern recognition, and architectural acoustic analysis.4
In developing Voltair, we were also able to apply the collective expertise of our colleagues in The Telos Alliance. Their knowledge of audio processing, coding technology, and ancillary data streams relates directly to audio watermarking.
After reviewing the data that Arbitron, Nielsen and others have made public, we did our own exhaustive research into watermarking and the nature of the PPM system itself. Our experts uncovered the variables that contribute to system integrity. We’re a broadcast-oriented company, so we developed Voltair to give broadcasters the tools to monitor and analyze these variables.
Voltair provides real data to inform your technical and programming decisions.
What we foundYour audio signal’s technical details affect encoding reliability. The spectral and temporal characteristics of your programming constantly influence code creation and transmission. They determine how well the system can inject identifying codes, and ultimately, how well your station is recognized by panelists’ meters. Some audio content works well within this system; some other content does not.5 We found the rules behind these differences.
3 25-Seven’s Precision delay has a unique watermark Safe Mode that protects the integrity of PPM codes during delay builds and exits.
4 in 2006, MiT Press published Blesser’s book Spaces Speak, Are You Listening? Experiencing Aural Architecture.5 Some broadcasters believe that talk shows are a common cause of weak encoding. The reality is more com-
plex: music can have encoding issues; some voices are friendlier to the system than others; and the coding of virtually all programming can be made stronger.

BACkgrOuNd ANd OvErviEw | 5
Voltair Installation and User’s Guide Version 2.3 • July 2019
A panelist’s physical location affects how the system works. Acoustic environments have wide variability. Some may interfere with watermark data even when listeners can hear your programming. People might be enjoying your signal in a car, a restaurant, or a living room. But each of those environments has a different effect on how well codes are received. In challenging cases, where poorly encoding audio combines with a hostile acoustic environment, your station may not be getting the credit it deserves. We learned how these effects work.
As with any complex system there are outlying cases, unanticipated properties, changes in behavior, and seemingly random events that influence the entire PPM ecosystem. The variety of stations, formats, markets and listener demographics contribute to this complexity, and to the difficulty of optimizing performance.
How Voltair helps you get more control over encoding performanceTo address this tremendous variability, we needed to simultaneously account for:
n the highly complex interactions among encoding and decoding hardware;
n the audio properties of actual program content; and
n real-world acoustic environments.
We developed a totally new and powerful set of tools to help you manage the consequences of these interactions.
Operating transparently in your air-chain, Voltair addresses the underlying issues. It analyzes the robustness of your encoding. It measures the effect of panelists’ listening environments on your station’s codes. It uses advanced audio signal processing to enhance the detectability of these codes.
With our optional Data Capture and Extraction features6, you can apply sophisticated and more precise analysis of all this data, in real-time or for past periods, and correlate it with program logs and ratings reports.
You can make informed decisions to improve end-to-end ratings reliability.
n You can compensate for changes in programming material and listening environments during different dayparts and program types.
n You can balance “code-friendly” and “code-unfriendly” program elements within each quarter-hour, to get the best combination of listener entertainment and encoding reliability.
n You can make creative decisions based on your understanding of the audience, predict the decisions’ effects on measurement, and compensate elsewhere in the quarter-hour if desired. You’ll be able to fine-tune your programming while staying confident about how much of your audience will be credited.
6 Page 68.

BACkgrOuNd ANd OvErviEw | 6
Voltair Installation and User’s Guide Version 2.3 • July 2019
Voltair can also be used off-line to identify how well new content will support robust encoding. Programming elements—songs, liners, spots, even jingle packages—can be created and tested to see how well they support watermarking. You can evaluate auditory artifacts from the encoding process, by instantly switching between your original program stream, the unmodified output from the encoder, and Voltair-enhanced codes while off-line. You can even listen to the raw codes, without any programming, as they’re being generated.
Benefiting From VoltairMonitoring & Analyzing PPM Encoding
It’s vital to know that your watermarking system is working properly. Common wisdom in radio today is, “If you aren’t encoding, you might as well be off the air”.
We would add “decoding” to this equation. PPM is more than Nielsen’s box in your airchain; it’s the complete ecosystem. Technical factors including the encoder, portable meter, acoustic environment, signal processing, and program characteristics all influence what the results will be.
Nielsen’s encoders offer little information about their status, and absolutely no information about the quality of encoding. An encoder’s front panel LED will light green when it’s seen a single code pass through in the last few minutes, and its remote readout can reflect some error conditions.7 Nielsen also offers a separate, off-air Encoding Monitor, which can listen to your signal and close a relay if it sees several minutes with no watermarked content.
These failure indicators give you only a coarse “yes/no” reading of basic code transmission. They can’t help you understand and analyze how each subtle difference in your programming can affect encoding reliability. They don’t try to predict what panelists’ meters will be able to detect in the real world.
Failure indicators just aren’t enough for a competitive station that monitors every aspect of its operation, and that needs real tools to measure quality of service.
Voltair fills that need. It uses multiple methods to measure encoding performance. It presents this information in a convenient dashboard of useful information, gives you a rapid warning if code generation has failed8, and allows optional detailed analysis of your encoding history.
7 Encoding status is not directly accessible for remote monitoring. However, relay outputs permit remote monitoring when the encoder is in bypass mode and, as a result, not encoding. The encoder will automatically enter bypass mode when it detects a problem, such as a high temperature warning or hardware failure, and warn you of this condition via a separate relay output.
8 You can set how many seconds of code silence are necessary before triggering this alarm, to compensate for programs with long pauses.
BACkgrOuNd ANd OvErviEw | 7
Voltair Installation and User’s Guide Version 2.3 • July 2019
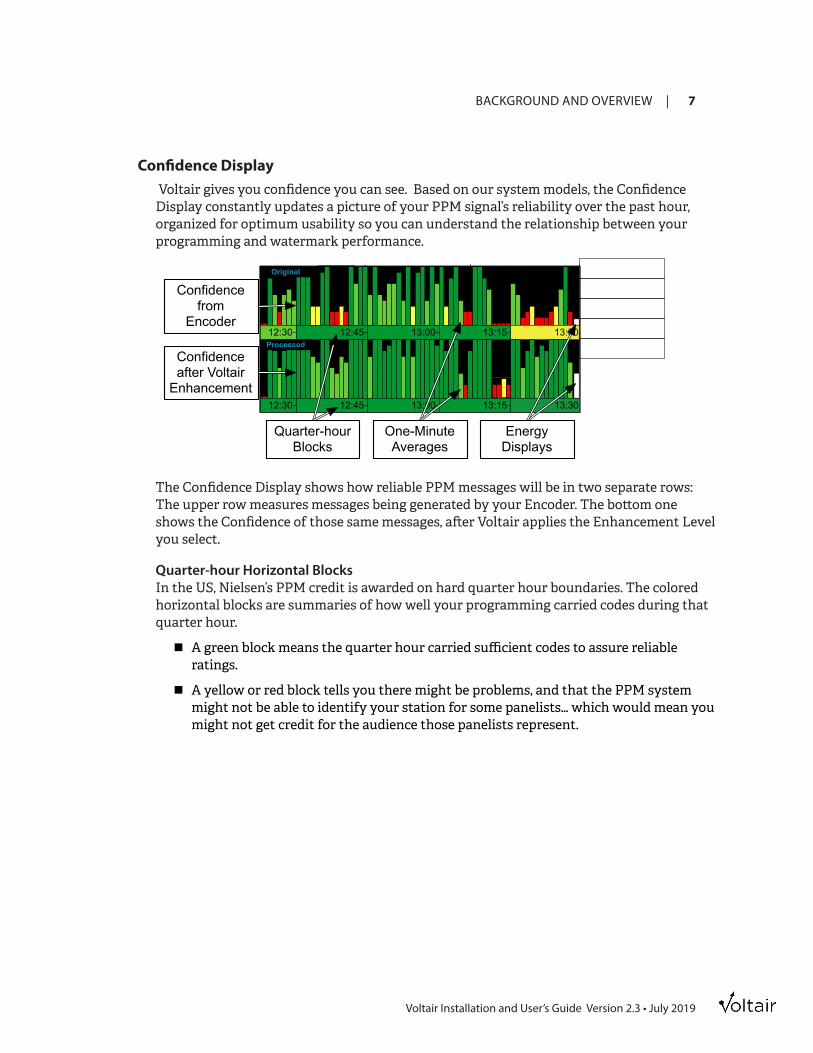
Confidence Display Voltair gives you confidence you can see. Based on our system models, the Confidence Display constantly updates a picture of your PPM signal’s reliability over the past hour, organized for optimum usability so you can understand the relationship between your programming and watermark performance.
Voltair: Main Screen
ENTER to switch display between Confidence and Real Time Analysis
DECODE INTERVAL
Original: 01:47
Processed: 00:04
Enhancement: 12 Environment: Vehicle
Process: Adaptive Env. Level: -20 dB
13:30
13:30
12:30
12:30
12:45
12:45
13:00
13:00
13:15
13:15
Original
Processed
Display
Adjust
System
Network
Clock
Calibrate
Status
Voltair: Main Screen
ENTER to switch display between Confidence and Real Time Analysis
DECODE INTERVAL
Original: 00:28
Processed: 00:04
Enhancement: 17 Environment: Vehicle
Process: Adaptive Env. Level: -9 dB
13:30
13:30
12:30
12:30
12:45
12:45
13:00
13:00
13:15
13:15
Original
Processed
Display
Adjust
System
Network
Clock
Calibrate
Status
Quarter-hour Blocks
One-MinuteAverages
Confidence from
Encoder
Confidence after Voltair
Enhancement
EnergyDisplays
The Confidence Display shows how reliable PPM messages will be in two separate rows: The upper row measures messages being generated by your Encoder. The bottom one shows the Confidence of those same messages, after Voltair applies the Enhancement Level you select.
Quarter-hour Horizontal BlocksIn the US, Nielsen’s PPM credit is awarded on hard quarter hour boundaries. The colored horizontal blocks are summaries of how well your programming carried codes during that quarter hour.
nA green block means the quarter hour carried sufficient codes to assure reliable ratings.
nA yellow or red block tells you there might be problems, and that the PPM system might not be able to identify your station for some panelists… which would mean you might not get credit for the audience those panelists represent.

BACkgrOuNd ANd OvErviEw | 8
Voltair Installation and User’s Guide Version 2.3 • July 2019
One-minute Vertical AveragesThe multiple vertical bars display 1-minute average confidence for every minute in the hour gone by. These are short enough to let you evaluate many individual program elements, such as songs or stopsets9.
nA full height green bar indicates sufficient codes were generated during the minute, so there’ll be very high confidence of successful decoding.
nA very short red vertical bar tells you there wasn’t enough of the right kind of signal energy during that minute. There weren’t enough reliable codes to properly identify your station.
n Short red bars may indicate that a minute’s programming didn’t have the right spectral and temporal characteristics to support normal encoding. Or there could have been very low audio levels or dead air.
n Either way, a short red bar says you should have low confidence that enough codes were generated to get you credit for that minute.
Various heights between these maximum and minimum levels show intermediate confidence values. The resulting graph gives you a detailed map of encoding confidence over time.
Voltair provides two Energy Meters, as white bars on the extreme right of each graph. They’re more than simple program volume meters. The upper one shows the presence and encoding potential of your audio in the required spectral range. The lower one shows this potential with Voltair enhancement.
The Energy Meters respond quickly to program changes, giving you an immediate sense of encoding possibility. But they can’t incorporate the more deliberate and accurate measurements shown in the confidence graphs, because PPM is a serial data system and complete messages take time to form. Use the Energy Meters as a fast, continuous guide to whether your signal meets the minimum levels for successful encoding.
9 if you want to evaluate even shorter elements, use our optional data Capture and Extraction feature. it gives you separate raw confidence readings for both the Encoder output and voltair’s enhanced codes at 4.8 second intervals—that’s an extra 25 readings per minute—in real-time or for any other broadcast period you specify. These are the basic data voltair uses to algorithmically assemble its one-minute and fifteen-minute Confidence Averages. They can’t be used in isolation, but there are techniques for measuring very short elements such as sweepers using an off-line voltair.

BACkgrOuNd ANd OvErviEw | 9
Voltair Installation and User’s Guide Version 2.3 • July 2019
Decode Interval DisplayThese two counters show the amount of time, in minutes and seconds, since the last successfully decoded PPM message. Each flashes green and restarts from 00:00 whenever a complete message is successfully decoded from your program stream.
Continuously short timings are good: they mean your programming is carrying a lot of reliable messages. The display will be green.
Longer times between restarts mean your programming isn’t supporting PPM codes well. The display changes to yellow if ten seconds have gone by with no messages; to red if thirty seconds have gone by. While there may be exceptions, chances are your station won’t be identified by the PPM system during those times.
Because the Interval Display is constantly updating, it can provide more detailed information than Voltair’s minute-wide graph bars. This gives you an immediate comparison of the encodability of different types of programming10.
Decode Interval is based on a running model of ongoing messages, so it can be a quick guide to message reliability. It doesn’t give you the algorithmic analysis displayed on the one-minute bars and fifteen-minute blocks.
Environmentally-influenced Listener Simulations If everyone listened to your station using headphones, the signal would go straight from the receiver into human ears. If they also used an adapter, it could go to a portable meter as well. But most listening is done with speakers, and in a variety of acoustic environments. Whether a listener is driving their car, attending a sports event, or sitting at the dentist’s office, ambient noise is a factor that can affect code reception by portable meters.
To help you simulate the impact of different acoustic spaces, we apply acoustic modeling of specified environments to the watermark signal being analyzed. Voltair includes custom recordings of typical noisy locations. You can select an appropriate one, and adjust its relative level. (Of course, this recorded noise doesn’t get into your air signal. It’s introduced internally for simulation and evaluation, then discarded.)
If enabled, all of Voltair’s confidence readings are interpreted through the real-world Environment Type and Level you’ve selected for listeners’ current situation.
10 voltair’s optional data Capture and Extraction lets you can see complete reset and confidence information for every 4.8 seconds you’ve been broadcasting. You can select a real-time readout, or specify any past broadcast period. There are also decode interval outputs on voltair’s back panel: three separate outputs let you know when one minute, two minutes, and five minutes have gone by with no decoded messages; a fourth sends an alarm after a user-specified period of no messages because of dead air or programming that doesn’t support PPM codes.

BACkgrOuNd ANd OvErviEw | 10
Voltair Installation and User’s Guide Version 2.3 • July 2019
Putting It TogetherVoltair’s front panel11 shows you how well your audio has encoded for the past hour:
n with your programming,
n in your audience’s typical environment,
n with and without Voltair enhancement.
Real-time Spectral Display
RTABoxed.pdf
There is a direct relationship between your program’s spectral energy in a critical range, and whether PPM’s encoder can generate usable codes for your broadcast. While there are other equally important factors12, your signal must provide a good volume between roughly 1 kHz and 3 kHz. Having a lot of energy across this critical range is essential to system reliability.
The real-time spectral display monitors the input to your PPM encoder. It shows program volume levels across the critical region, as a constantly updating display with peak and average readings. It can help you identify problems in your programming, and shows the PPM-relevant effects of some external processing in your signal chain. There’s more about this processing in the Installation section of this manual.
11 Or remote front panel: You can log into voltair’s password-protected web server from any connected computer. You can even show the full Confidence display on the Pd’s desk, while the CE’s computer is showing real-time analysis of the relevant signal spectrum!
12 Such as: crucial durations of specific 68 Hz bands in milliseconds, specific classes of signals over a 4.8 second window, and statistical factors. Plus, of course, the effect of the listening environment. As we said, it took a lot of investigation to develop voltair’s analysis functions.

BACkgrOuNd ANd OvErviEw | 11
Voltair Installation and User’s Guide Version 2.3 • July 2019
Analyzing Listening EnvironmentsWatermark detection can be compromised by ambient sounds at panelists’ locations. Noise can interfere with a meter’s ability to recognize your codes, even if the noise isn’t loud enough to stop humans from enjoying your program. In this way, the panelists’ environments can create an unintended technical bias. If nearby noise makes it impossible for their meters to identify your station, this bias could impact the credit due to your station for legitimate listening.
For example: a panelist may be sitting in a restaurant with hard, reflective walls while other diners are chatting and clanking dishes. Your station could be playing in the restaurant at a reasonable level; customers could be happily hearing your program (and commercials). But the watermarking codes in your signal could be totally overwhelmed by that restaurant’s noise.
Voltair computes its measurements based on environmental conditions you specify. This capability lets you build interactive models of how well your programming is encoding for different listening environments.
This way, your enhancement decisions can include whether panelists’ meters are likely to give you credit when they’re in a real, noisy world. Such simulations can give you more insights into the effects of your programming and processing decisions, telling you more than what you’d get with sterile “headphone” listening conditions.
Voltair uses custom field recordings, edited for usefulness13. They can be adjusted to noise levels between -60 dB and +10 dB. While higher levels of environmental interference make it harder for panelists’ meters to detect codes, that may reflect how your audience is listening. Voltair gives you the tools to simulate it.
Encoding EnhancementVoltair gives you a tool to compensate for real-world listening conditions. To solve this complex technical problem, we had to rely on the disciplines of audio processing, coding technology, ancillary data streams, and content delivery.
The result? Voltair incorporates an extremely smart and fast adaptive processing engine with finely tuned software, which can continuously detect and enhance the watermarking codes generated by your Nielsen encoder. This improves encoding strength and thus decoding reliability. Voltair helps improve the likelihood of code reception in challenging environments, without altering or otherwise compromising the integrity of your unique watermark signal.
To the human ear, watermark codes are noise. To the “ears” of a portable meter, your programming and any environmental sounds are noise, and codes are the signal. Since humans and meters are listening to the same material, there’s an inherent trade-off between the strength of watermark codes and their audibility to your audience.
13 As we said earlier, these recordings never get introduced to your program stream. They’re just applied internally, as a sophisticated way to fine-tune voltair’s analysis of your code’s reliability.

BACkgrOuNd ANd OvErviEw | 12
Voltair Installation and User’s Guide Version 2.3 • July 2019
Voltair helps you manage this balance between signal and noise. You control the multiple, sophisticated processes of Voltair’s enhancer with a single knob. You can use Voltair’s Confidence Display and analysis tools to identify content that doesn’t support optimal encoding performance, and then give it the right level of enhancement for your listeners.
There’s a lot more about choosing appropriate Enhancement levels starting on page 40.
Think of Voltair as an Omnia for your watermark system14. Like the transmitter processor, it makes the signal stronger without changing the actual content. But running too much processing can have an audible effect, and so can running Voltair with too much Enhancement. Of course Voltair processes audio using totally different principles internally: watermarking codes are nothing like normal radio programming, and the intent is to keep them hidden rather than increase their psychoacoustic loudness. But the danger of audibility is similar, and it changes with different kinds of programming and listening situations.
To counter this, Voltair’s enhancement levels can be controlled by your automation system or timer-based remote through GPIO connections. You can automatically program different processing for different dayparts.
Does Voltair Enhancement really work?You can test it for yourself.
Voltair provides ways, using GPIO connections or its own internal test facility, to cycle through different Enhancement levels on a regular basis throughout the day. When you get your station’s ratings report from Nielsen, you can compare these different levels against raw meter counts or AQH listenership. You do this on your own, in the privacy of your own station.
A ratings change might reflect an actual change in audience, rather than issues with code reliability affecting meters. But by doing this test over a period of days, and applying proper controls, you can rule out day-to-day variations. We believe you’ll quickly see a pattern emerge, showing exactly how Voltair’s processing helps your station get credit for the listeners you have.
Making Informed Programming DecisionsMaintaining the reliability of watermark systems used to be one of the more obscure parts of a successful radio operation. Now, Voltair can give you greater confidence that meters tuned to your station will be captured. It can help you understand how watermarking works, and it can provide a new way to analyze your operation. Voltair can be part of your station’s strategy to drive ratings and revenue, and it may increase your odds of success. But please be aware, if your station doesn’t have a good product—if programming, listeners, and a decent signal aren’t in place—Voltair won’t magically make up for these fundamental pillars of broadcast success.
14 Or other brand of transmitter processor. The analogy still holds, though Omnia processing includes presets specially designed to work with voltair.

BACkgrOuNd ANd OvErviEw | 13
Voltair Installation and User’s Guide Version 2.3 • July 2019
Voltair’s most significant impact on your station may be how it guides your programming decisions for optimal encoding performance.
As we’ve discussed, not all audio content encodes equally well. Some songs, air talents, and broadcast formats provide less opportunity for encoding to succeed.
But assuming that “all talk radio is PPM poison” or “jazz doesn’t encode as well as rock” shouldn’t make you throw away material that could serve and build an audience. There can be elements within those categories that don’t affect PPM confidence, and ways to balance others for a consistent and reliably measured program. In other words, you could increase your listenership with carefully chosen programming, rather than reject viable formats out-of-hand.
The key is measuring encodability in a scientific way. You can’t guess how specific content will support PPM. The only things you can take as axiomatic are that pure, loud white noise encodes very well, and dead air doesn’t encode at all. For everything else, the actual encodability will depend on multiple, interacting dynamic factors.
Voltair’s Confidence Display gives you real measurements. You’ll know how robust your station’s actual PPM codes are, no matter how they’re affected by your content. You’ll know which content creates better watermarking energy, and how your watermarks fare in typical listening environments.
If you add the optional Data Capture and Extraction feature, you can analyze this reliability as Excel spreadsheets and graphics, correlate it with your program logs, and compare the result with your ratings data when received from Nielsen.
You can apply this knowledge to make better decisions about songs, talents, programs and formats. You can manage your program clocks and broadcast schedule better, balancing content that supports strong watermarks, and using Voltair enhancement where it’ll do the most good.
With Voltair, you guess less and know more.
Producing PPM-Compatible ContentVoltair is as appropriate in the PD’s office and production studios as it is in the air chain, and can be used off-line to evaluate program elements.15
Insights into the encodability of songs, production bits and even talents’ voices can provide valuable guidance when producing or choosing material. You can be as creative as you want, and then measure whether your choices might inadvertently hurt your ratings.
You can also evaluate existing content assets, and check them under different listening environments. This helps you make better scheduling and enhancement decisions. You can even test multiple styles of promos or spots, or different delivery techniques for your air talents, and see which are likely to perform best.
15 To properly analyze encoding confidence, a voltair needs to be connected to a watermark encoder. So you’ll need both devices for off-line evaluation of material. But since voltair can be completely remote controlled, you can use a spare voltair / Encoder pair for program segment evaluation while it’s sitting in your processing rack for standby use.

BACkgrOuNd ANd OvErviEw | 14
Voltair Installation and User’s Guide Version 2.3 • July 2019
Think of it as the best of two worlds:
Voltair lets you create and program based on your own creativity, taste, and broadcast experience…
and still stay confident about how those choices are likely to affect your station’s encoding.

iNSTANT grATiFiCATiON | 15
Voltair Installation and User’s Guide Version 2.3 • July 2019
INSTANT GRATIFICATION16
Voltair Quick Hookup Guide
This section explains, very briefly, how to get Voltair up and running in your airchain.
Voltair is a versatile device, with other setup options we couldn’t include here. So these instructions might not be best for your specific setup. More information can be found in the Installation chapter of this manual. . Details on remote controlling Voltair via web browser or GPIO may be found in the Remote Control section. .
Similarly, this chapter has only generalities about Voltair operation. Optimum settings and interpretation depend on your program material and station’s goals. There are full discussions elsewhere about operational settings, the Confidence Display ), and using optional Data Capture and Extraction . For more about the overall watermarking environment, see “Exploring the PPM Ecosystem, later in the manual. .
In other words, we urge you to read—or at least scan—the rest of this manual. You’ll learn the best ways to use Voltair in your station, and how to get the most reliable ratings possible.
Installation1. Choose analog or digital Voltair
Voltair is completely digital inside, of course. These two designations refer to Voltair’s input and output connections: either AES/EBU digital audio, or balanced +4 dBu (nominal) analog audio.
The connection method must match your Nielsen Encoder. Either both Voltair and the Encoder must use analog jacks, or both must use digital.
There must be a direct cable connection between Voltair and the Encoder. Any intervening electronics, such as a Digital-to-Analog (DAC) or Analog-to-Digital (ADC) converter or an active router, can introduce variable latencies that interfere with proper functionality.
If you must convert between analog and digital in your plant, do it before Voltair’s main input, or after its main output. Don’t interrupt the wiring between Voltair and Encoder, described in step 3 below.
16 we designed this section for those who of you who like dessert first. Please go back when you’re finished, and read the more nutritious part of this manual.

iNSTANT grATiFiCATiON | 16
Voltair Installation and User’s Guide Version 2.3 • July 2019
2. Give it a homeMount Voltair in a rack with appropriate power and ventilation.
For easiest installation and operation, Voltair should be physically close to your Studio Grade (“PPM”) Encoder, EAS encoder, and your Telos Omnia or other airchain loudness processor.
3. Connect Voltair to the EncoderRun appropriate cables between Voltair’s XLR Encoder connectors and the Input and Output of your Nielsen PPM Encoder. If your plant is mono with analog connections, use just the Left channel.
AnalogVoltair
AnalogInternalsRearPanel.pdf. Captions are for internal reference only and won’t be printed.
Digital Voltair
DigitalInternalsRearPanel.pdf
Some analog Nielsen Encoders include a “High / 600” termination switch at their inputs. This selects whether the inputs are bridging (10kΩ impedance), or apply a 600Ω load. If your Encoder has this switch, you’ll get the best results and most accurate gain staging by setting it to 600.
4. Put it in your air chainHow you connect the Voltair and Encoder pair with other equipment in your transmitter chain, such as processors, can have a major effect on watermarking integrity.
Most effectiveMost stations use multi-band dynamics processors to boost perceived loudness and create a signature sound. These processors can also help the PPM system, by boosting spectral energy between 1 kHz and 3 kHz17.
17 The frequencies are approximate, and other important factors such as temporal distribution have a major influence on watermark success.

iNSTANT grATiFiCATiON | 17
Voltair Installation and User’s Guide Version 2.3 • July 2019
Newer Omnias and some other loudness processors have an insert or patch point. This lets you interrupt the connection between the unit’s audio processing and its final clipper and stereo generator. If you insert the Voltair / Encoder combination at this point and carefully tune Voltair’s enhancement, you can get the most reliable encoding for your program material. Specific instructions for Omnia processors and presets can be found in the “Using Voltair with Omnia” chapter.
OptionalOther Processors
TransmitterProcessor
InsertPoint
Out In
Optional EAS Encoder
ToTransmitter
Voltair
PPMEncoder
FromStudio
SimpleHookupWInsert.pdf
You may also choose to put your EAS Encoder after Voltair in the same insert loop (gray background in the drawing). This assures that emergency signals won’t be affected by any processing18.
Alternative HookupIf your processor doesn’t have an insert point, you can put Voltair and its Encoder ahead of its input.
TransmitterProcessor
Optional EAS Encoder
VoltairPPM Encoder
FromStudio
ToTransmitter
OptionalOther Processors
SimpleHookupNoInsert.pdf
18 voltair’s processing does not affect EAS data bursts, and won’t affect downstream relay stations. However, watermark encoders may react to the alert tone and can cause distortion.

iNSTANT grATiFiCATiON | 18
Voltair Installation and User’s Guide Version 2.3 • July 2019
The Encoder’s functionality can be somewhat sensitive to input levels, however, and this scheme won’t give the encoder protection if studio levels vary widely. So if your installation doesn’t have a transmitter processor insert point available, urge your operators to avoid extended periods of low levels. If you’re using an additional compressor or gain-riding device ahead of the main loudness processor as part of your signature sound, put Voltair between it and the main processor. In an ideal situation, the airchain’s signal flow should be Loudness Processor » Voltair (with its PPM Encoder) » EAS Encoder » transmitter.
These are unity gain, nominal level devicesBoth Voltair and the PPM Encoder are designed to operate with standard levels: between +4 dBu and +8 dBu nominal for an analog setup, or between -20 dBFS and -12 dBFS for a digital one. Operating at other levels can add noise or distortion, and sacrifice coding integrity.
Test the wiring by leaving Voltair turned off and sending your normal signal through to the transmitter. When Voltair is off (or in Bypass mode), it uses relays to route its input directly to the Encoder, and the Encoder output directly to Voltair’s output jack. So signal should flow, and the Encoder should continue to add its PPM codes to your program.
5. Add the other connectionsConnect Voltair’s Network jack to an appropriate data network. This connection is used to synchronize Voltair’s clock to an NTP server , for browser-based remote control , for optional Data Capture and Extraction, and for maintenance. It doesn’t carry IP-based audio.
Voltair will attempt to register with your network’s router via DHCP. If your network uses some other scheme, setup instructions are in the Operations section. Once Voltair is on your network, we recommend changing its default passwords for security.
The GPIO connector provides basic control, presets, and warnings when there is low confidence in your encoding. Details are in the GPIO section. .
For the time being, leave Voltair’s 9-pin Encoder Bypass Monitor disconnected. It’s designed to mate with a matching Bypass Monitor jack on the Nielsen encoder. But there are operational considerations, and in many situations Voltair’s built-in alarms will tell you more about the Encoder performance.
Calibration and SetupVoltair must be calibrated for the specific PPM Encoder it’s attached to. Each encoder has slightly different characteristics, and without this calibration, Voltair’s functions cannot work properly: you won’t be able to analyze or enhance your station’s watermarking codes successfully.
The calibration process is automatic, and takes about five minutes. Voltair will send specialized test signals into your Encoder and measure the result. During this time, both Voltair and the Encoder are functioning but offline: they get bypassed, no PPM codes are generated, and your program signal gets sent directly to the transmitter.

iNSTANT grATiFiCATiON | 19
Voltair Installation and User’s Guide Version 2.3 • July 2019
After calibration, Voltair puts both devices back online. Voltair can then measure encoding confidence, and you can apply whatever level of Enhancement you select.
Complete calibration instructions appear in a few pages, as Item #8 of the setup procedure.
Recalibration is generally required only if you replace Encoders. But this includes if you replace your station’s primary Encoder with its backup unit: even if your backup encoder carries the same identification codes, it requires a fresh calibration. You may also want to use the Calibration function if you are concerned about your encoder’s audio quality; during this process, Voltair evaluates the encoder for noise and distortion.
Front PanelMost Voltair operations, including Calibration, are controlled from the front panel19.
JOGPress to Confirm
Menus
BYPASS ButtonESCAPE ButtonOn-screen Help
frontPanelWheel.pdf
The JOG wheel can be turned to scroll through menus and fields on the screen, highlighting each. It’s also a button: if you press it, it acts as a Confirmation button to select the highlighted menu or screen area. Once you’ve Confirmed a selection, turning JOG will scroll you through its possible options.
The ESCAPE button returns you to next higher level. If you’ve been entering values in a field, it stores the value, exits the field, and takes you back to selecting other fields in the area. If you’ve been selecting fields, it takes you back to selecting menus on the right side of the screen.
The BYPASS button releases relays to completely take Voltair out of the circuit. In bypass, Voltair’s input is routed to the Encoder, and the Encoder’s output is routed to the transmitter.
There is a power switch on the rear panel, but in normal operation you’ll never touch it. Turning off the power also releases the bypass relays.
19 Most functions can also be controlled from a password-protected web browser. . A few functions require transferring files to or from voltair, and must be done with a connected computer.

iNSTANT grATiFiCATiON | 20
Voltair Installation and User’s Guide Version 2.3 • July 2019
6. Power upTurn Voltair on. After an initial boot sequence of approximately 30 seconds, the front panel LCD will look like one of these two pictures:
uncalibrated.pdf, screenNoAudio.pdf. Both on same line.
The screen on the left will appear if this particular Voltair has never been calibrated for any Encoder. The screen on the right appears if this Voltair has been calibrated elsewhere, either for testing or because the Voltair has been moved from another installation.
If the screen on the right appears, Voltair may appear to be processing audio properly. You might also see a large flashing ENCODING FAILURE warning if there is no program audio. In either case, Voltair doesn’t know you’ve attached it to a different Encoder. Press the front panel BYPASS button, and continue to the next step.
7. Check for mono or stereoIn mono analog stations, Voltairs must be wired using the left channel only for correct operation. In mono digital stations, the left channel of the AES/EBU interleaved signal should be used. In both analog and digital installations, Voltair must be properly configured for mono or stereo before use.
Turn JOG to select System from the menu on the left side of the LCD. Press the wheel to Enter the screen, and press it again to edit the Audio Mode setting.20
configureScreenv2b6.pdf
20 if it doesn’t work this way, you might have inadvertently pressed some other button while installing. Turning the unit off and on again will get you back to this point. Full navigation instructions start on page 43.

iNSTANT grATiFiCATiON | 21
Voltair Installation and User’s Guide Version 2.3 • July 2019
Turn the wheel to select either Stereo or Mono (A only). If this is not set correctly, analog systems may exhibit additional noise, and digital Encoders might not even generate codes.
While you’re looking at this screen, verify that Voltair Program Output is set to Enhanced Audio. This is the default, but it may have been changed if someone unlocked the program output via Voltair’s web interface (page 66).
Press ESCAPE twice to save your choice and return to menu selection.
8. CalibrateThis automated function is the most important step before you can successfully use Voltair.
Make sure the PPM Encoder is set for normal operation, and that the Encoder is not in Bypass mode. Use JOG to select Voltair’s Calibrate menu, and you’ll see a message “PRESS WHEEL to calibrate Voltair”.
Calibrate1stScreen.pdf
Press JOG to initiate, or turn the Wheel to select some other menu item. If you press JOG from this menu, a warning dialog will appear.
calibrateWarning.pdf
Press JOG to start the pre-calibration check, or ESCAPE to cancel21. If you press JOG, Voltair and your Encoder will be taken out of the airchain and Voltair will test the cables linking it to the Encoder. You can continue to broadcast without PPM codes while this is going on.
Voltair then waits for your final confirmation. Press JOG again to start. A progress bar tracks calibration, which takes about five minutes. It is important not to interrupt the calibration process. When the process is finished, Voltair begins analyzing and enhancing your PPM codes.
21 Pressing CANCEL puts voltair into Bypass mode. voltair shouldn’t be used until Calibration has been completed.

iNSTANT grATiFiCATiON | 22
Voltair Installation and User’s Guide Version 2.3 • July 2019
You can check that Calibration is complete on the Status screen. Highlight the bottom entry on the menu on the right, and press JOG. The Calibration date should show today’s date. If you have just finished Calibrating and the wrong date appears, check the Clock screen and make sure you’ve set the clock or configured Network Time Protocol.
Some common wiring or operational errors, such as reversed analog channels, polarity errors in balanced wiring, or leaving the Encoder in its own Bypass mode, will cause calibration to fail22. Most of these are detected automatically, and hints for fixing them will appear on Voltair’s screen. Correct them and try again. If calibration continues to fail, check your setup. Then contact Voltair support.
9. Start Using Voltair!Once Voltair is calibrated, it’s now ready to measure watermark encoding confidence, with or without compensation for listener environments. It’s ready to enhance your codes to assure best performance. It’s even ready to use off-line to evaluate new songs or other program elements for friendliness to the PPM ecosystem.
If you’re not sure of all the things Voltair can do, go back to the Overview .
If you’re ready to start using it, turn the page.
22 if calibration is interrupted because of a power failure or other unexpected event, voltair might not realize that fact after power returns. Essentially, the machine will behave as if you’ve just installed it from another location, and proper operation is impossible. go back to the first step of Calibration and Setup, and try again.

gETTiNg THE BEST rESuLTS FrOM vOLTAir | 23
Voltair Installation and User’s Guide Version 2.3 • July 2019
Getting the Best Results from Voltair
This chapter is about Best Practices: It’s what we’ve learned from users’ experiences, from our research into the PPM ecosystem, and from our own knowledge of Voltair’s design and software. It’s presented as tips and a few short essays that can guide operation, and everything is aimed at your getting the best results.
We believe that as you use Voltair according to this guide, you’ll learn that “best results” means better ways to manage both Voltair and your programming for the most reliable PPM meter responses possible... and you’ll see how having more reliable watermarking can ultimately mean more consistent encoding, to help make sure you get the ratings credit your station has earned.
These Best Practices are organized into sections:
nInstallation (below)
nOperation Measuring Watermark Confidence Adjusting Enhancement Levels
nPassive Operation and Monitoring PPM Codes Measuring Effectiveness in the Real World The last section lets you verify and fine-tune Voltair using controlled, scientifi-cally designed experiments with your programming, your audience, and your ratings reports… all conducted within the privacy of your own station.
Best practices: installationThis manual includes basic and detailed installation instructions. Those are important, and should be read first.
Give Voltair a well-controlled signalVoltair’s wide dynamic range and broad frequency response won’t degrade high-quality broadcast programming. However, the PPM system responds best to programming with a consistent signal that has reasonably high loudness within its critical band. Give your Encoder more signal with these characteristics, and Voltair will have more codes to evaluate and process.
Most stations already have loudness processors in their airchains, to assure a consistent and loud signal. If you can, take advantage of this processing for Voltair and the Encoder as well:
nIn AM stations or other installations where the processor sends an audio-frequency signal (with no pilots or subcarriers) to a transmitter or server, put the Voltair/Encoder chain after the processor. Let it see the fully modulated signal you’re sending to your audience.

gETTiNg THE BEST rESuLTS FrOM vOLTAir | 24
Voltair Installation and User’s Guide Version 2.3 • July 2019
In FM stations, however, the processor usually includes a composite stereo generator for the transmitter. Voltair and the PPM Encoder can’t deal with a composite signal, and must be placed ahead of the stereo generator.
nTelos Omnia 9 and 11, and some other brands of loudness processor, include an Insert Point. This taps the audio output of internal audio processing, just before the final clipper and stereo generator.
n If your processor has this feature, use it: Feed Voltair the Insert Point’s output, and send Voltair’s output back to the Insert’s input. Instructions for Omnia are at the end of this manual; otherwise, consult the processor’s documentation.
nIf your FM station has a very conservative loudness profile, you may be using a combination of audio baseband processors, and a separate stereo generator. In that case, place Voltair between the final processor and the stereo generator.
nIf you’re using a loudness processor with composite output but that doesn’t have an insert point, you’ll have to make a choice:
n You can put a slow-riding automatic gain control device ahead of Voltair and the encoder, and feed Voltair’s output to the loudness processor. If that extra device affects short-term loudness, it may fight some factory presets in the loudness processor. Let your ears be your guide.
n You may already be pre-processing ahead of the final loudness processor, as part of your station’s signature sound. In that case, put Voltair and its encoder between the pre-processors and final loudness processor.
nIf you can’t put Voltair after some kind of gain control device, levels may occasionally be too soft for the Encoder to work effectively. Instruct your operators to keep a care-ful eye on levels: too soft a signal can affect the encoder, keeping it from generating codes that Voltair can evaluate or process. It can help, in this case, to give operators a remote Timed Code Failure or Decode Interval warning light. These are easily wired to Voltair’s GPIO port .
Routing Voltair and EASEmergency Alert System notifications are audible tones generated by an EAS Encoder, when triggered by an emergency.
There is nothing in Voltair that can interfere with the computer data at the start and end of an EAS signal, and transferred to text displays and character generators. Our tests and user experience has confirmed this.
However, the most recognizable part of an EAS signal is a long legacy alert tone, used primarily to get humans’ attention. This has frequencies that can trigger the Nielsen Encoder to generate PPM codes. If that happens and Voltair enhances the PPM codes, the combination can sound like a distortion of the alert tone23. Some EAS receivers might depend on that tone, even though it’s not part of the data spec. We couldn’t identify any like that in our tests, but theoretically and assuming certain analog filter designs, the distortion could affect their operation.
23 which sounds ugly enough without any help.

gETTiNg THE BEST rESuLTS FrOM vOLTAir | 25
Voltair Installation and User’s Guide Version 2.3 • July 2019
We recommend:
n Install your EAS Encoder after Voltair in the air chain24. That way, neither Voltair nor the PPM Encoder it’s wrapped around will have any effect on the alert message.
n Wire a relay bypass around Voltair, triggering it from the GPIO “message sending” port on your EAS Encoder. This will automatically bypass both Voltair and its connected Nielsen Encoder.
We don’t recommend using Voltair’s internal bypass as the sole protection during EAS messages. While that function completely bypasses Voltair, it leaves the Nielsen Encoder in the circuit, and some EAS receivers might be sensitive to the codes being generated. Use the other solutions instead: putting the EAS Encoder after Voltair; or wiring an external relay around the Voltair/PPM Encoder combination, and setting it to activate during tests and alerts.
GPIO ConnectionsVoltair includes logic-level control inputs and outputs, on a rear-panel DB25 connector. See the rear panel –GPIO section for wiring details and functional pinouts.
GPIO InputsnVoltair’s GPIO system includes inputs with triggers to set Enhancement to one of
three predetermined levels or toggle a Bypass condition. If you connect them to your automation system:
n You can use these Enhancement presets to change the amount of processing for different program segments or dayparts.
n You can use these presets to cycle through different levels constantly, at preset intervals, as an aid to evaluating Voltair’s effectiveness. Be aware Voltair will do this kind of test cycling automatically if you want, and not tie up your automation. Instructions are in the “Using Voltair Enhancement” section.
nEnhancement presets can be wired to a simple remote control in your operations center or air studio, to temporarily boost Voltair Enhancement during short segments of low confidence (such as a newscast or fundraiser during music programming).
24 if you’re using an insert Point on your processor, the EAS Encoder can be in series with voltair’s Transmitter Output and the Processor’s insert return.

gETTiNg THE BEST rESuLTS FrOM vOLTAir | 26
Voltair Installation and User’s Guide Version 2.3 • July 2019
GPIO OutputsVoltair’s GPIO outputs can alert operators to problems, and trigger events.
nThe three Decode outputs can drive remote indicators in your control room, to warn operators when programming isn’t supporting PPM codes. They can then take corrective action: raising levels, playing pre-recorded code-friendly elements, or whatever else is necessary.
nThe Decode outputs can also be wired to your automation system, to log weak code conditions.
nThe Encoding Failure Alarm output can send an alert when there haven’t been any codes for a predetermined period. You can adjust its “grace period” between zero and sixty seconds : This way, it can be set long enough that it doesn’t trigger during natural silences in some program material.
nThe three Enhancement Level outputs can drive external software, to log level changes you might be triggering with an automation system for later comparison with ratings reports25.
nThe Bypass output can alert you if Voltair has been put into the Bypass state (wheth-er triggered by an error condition or by operator action).
Operational Best PracticesVoltair is a powerful system. Using it properly can make a big difference in watermarking success. The most important thing you can do, after making sure Voltair is calibrated for the specific Encoder it’s wired to, is pay attention to the Enhancement Setting.
Calibration is vital!It’s possible to fool a new machine into thinking it’s been calibrated, and it’s easy to forget that you must do a new Calibration whenever you change the Encoder. Remember:
n Without calibration, confidence analysis will be unpredictably skewed.
n Without calibration, enhancement will be inefficient at best. In extreme cases, lack of calibration can even add artifacts to your programming.
n Do the calibration procedure as covered earlier in the manual. It takes only five minutes. When it’s done, you’ll be able to make more accurate judgments of watermark reliability with your programming, and be able to enhance watermark codes when desired.
Calibration takes both Voltair and the Encoder out of your airchain for those five minutes, so you may wish to perform calibration in the overnight hours. If that’s unacceptable, use your backup Encoder temporarily while you take Voltair and your main Encoder off-line for calibration. Calibrate the pair, and then put both the main Encoder and Voltair in your airchain.
25 This logging also happens automatically inside voltair. You can capture it with a network connection to port 8259 , or download it as Excel workbooks (which also include a lot of other useful data) or detailed CSv files with our optional data Capture and retrieval feature.

gETTiNg THE BEST rESuLTS FrOM vOLTAir | 27
Voltair Installation and User’s Guide Version 2.3 • July 2019
Read more about what happens during calibration in the “About Calibration” section near the end of this manual.
nDon’t forget to re-calibrate any time you change the Encoder. This includes if you have to replace your main Encoder with a backup unit: even if the backup has the same Nielsen station identification code, separate calibration is still necessary.
nIf you’re using a digital (AES/EBU) Voltair, you must recalibrate after changing the input sample rate. It’s rare for a facility to change the airchain sample rate, so this may never come up. But be aware a lot of gear—including Voltair and your Encoder—can be affected by a sample rate change.
nYou can check the most recent calibration date and time, on the second line of the Status screen. You’ll find more additional information about the last calibration, includ-ing Encoder status and distortion, on the INFORMATION tab of the Web interface .
Analyze PPM codes accuratelyYou can use the multicolor Confidence Display to see:
n Instant readings of potential code energy
n Quick-responding timers noting how long it’s been since the last successfully decoded message
n One-minute averages of past code message confidence, both before and after Voltair Enhancement, so you can evaluate individual program segments
n Quarter-hour summaries of whether meters are likely to have recognized your station during each AQH period
n A large, flashing ENCODING FAILURE warning if a pre-set time has gone by without any codes.
Read about Confidence Display features in the Operational Details section.
Adding EnvironmentsEnvironments are a simulation of what happens when panelists’ meters are exposed to noise in the real world. While nobody can guarantee these reflect the actual noises your panelists face, the feature does allow you to simulate a model of a listener.
Environmental noise and noise levels can affect watermark codes differently, and the codes themselves depend on your programming. So you can use Voltair’s Environment settings to get a real feel for how well your codes will hold up to different listening situations.

gETTiNg THE BEST rESuLTS FrOM vOLTAir | 28
Voltair Installation and User’s Guide Version 2.3 • July 2019
Environment Level controlIt’s impossible to guess how much noise an individual meter will be exposed to. Unlike Voltair’s decibel-calibrated Environment Level control, real environments are constantly changing. Noise sources are random, and panelists change position relative to the noise source, their radio, and reflective surfaces. So you can’t say “a panelist will face a constant 24 dB of noise” with any hope of accuracy.
nThe best use for the Environment Level control is to scale the Confidence readings. After you’ve set an appropriate Environment type:
n If the Decode Interval timers are resetting to zero too frequently, and all you see is full-height green bars, you can bias the readings with some noise to “bring up the contrast”. Raise the noise level until resets happen less frequently. That’ll scale the Confidence readings down, so you can see smaller differences.
n If the Decode Interval timers are red and seldom resetting, you might be applying too much noise and biasing Voltair’s analysis too far down to read easily. Lower the noise level, so that resets are more frequent and you can see Confidence differences easily.
n You can also make this kind of adjustment by looking at the one-minute vertical Confidence bars, though you’ll have to wait a couple of minutes after each adjustment to see the changes.
Remember: Environmental noise is only a simulation used within Voltair’s analysis engine. It never affects your program stream and won’t leak into your programming.
nSince the Environment type and level do affect Confidence Analysis, you can’t compare two different sets of Confidence numbers that were derived with different environment types and levels.
Pre-testing program elementsVoltair normally monitors and enhances watermark codes in your airchain. But you can also use it offline to see how well individual songs, production pieces, and other elements will encode. This will help you choose elements that support robust encoding, and distribute them throughout your format clock.
nIf you have a back-up Voltair, use it in the PD’s office or Production Room while it’s not on-air. Calibrate it to your back-up PPM Encoder, and the pair will be ready for you to swap into your airchain when necessary.
nWhile you can’t insert a conventional or AOIP router between Voltair and its Encoder, you can hardwire the pair together, and reassign Voltair’s input and output through a router when necessary. Voltair will take its hardwired Encoder with it.
n Both your main and back-up Voltair / Encoder pairs can be in a rack room. The PD or production manager can control the offline one remotely, using Voltair’s built-in Web remote control.

gETTiNg THE BEST rESuLTS FrOM vOLTAir | 29
Voltair Installation and User’s Guide Version 2.3 • July 2019
Use a long-enough testYou can’t just play a promo or a song through an offline Voltair and get a valid Confidence rating for it. PPM codes can depend on critical timing issues between the program material and the Encoder’s clock. During normal programming, Voltair analyzes messages over a number of minutes. Shorter program pieces—even full-length songs—are rarely long enough to discern a pattern for code reliability.
nIf you want to test short program elements offline, loop them. Assemble at least fifteen minutes’ worth of repetitions of each element, and run the loop as a single test. Average the result. This works even for very short sweepers and other imaging elements; just be prepared to loop them many times.
nFor best results, put a minute of white noise at the head of your test loop, about 10 dB below nominal volume. This will let each test start at the same confidence level, for easier comparisons.
Note: while Voltair can use an offline Encoder to test a program’s ability to support codes offline, you can’t pre-record the codes or Voltair’s Enhancement of them. The PPM system requires that codes be generated by your station’s Encoder in real-time, while the program is running.
Using Voltair for monitoring, analysis, and data captureIn some operations or under some circumstances, you may wish to use Voltair as a purely passive tool for monitoring watermarking quality, while eliminating any chance that Voltair is altering the air signal.
In other situations, you may wish to quickly switch and compare your unencoded program source with the output of Nielsen’s PPM Encoder or Voltair’s Enhancement. Under some circumstances, you might even wish to monitor just the codes as they’re being generated by Nielsen’s encoder—without any of the program material that normally masks it.
The Program Output selector in Voltair’s System screen lets you do all these things.
The selector is normally locked in the Enhanced Audio position for safety, and the choice is grayed out. In order to access the other output modes, you have to log in to Voltair’s Web Interface from a computer on your network. Go to the UTILITIES tab and click Switch Voltair program output… in the Maintenance section.

gETTiNg THE BEST rESuLTS FrOM vOLTAir | 30
Voltair Installation and User’s Guide Version 2.3 • July 2019
3/26/16, 12:30 PMVoltair™ System
Page 1 of 1http://192.168.2.12/system.html
Connected to unit “Voltair” as user “voltairweb” Logout
CONTROL HISTORY LICENSES INFORMATIONUTILITIES
These are various maintenance utilities.
System Software UpgradesCopy upgrade package to Voltair…View or switch running Voltair version…
Logs
The following links will download a log package for Telos technical support:
Last 5 days (6MB)Last 30 days (35MB)All (could be very large)
MaintenanceSwitch Voltair program output from locked to unlocked…(CAUTION)Decommission Voltair, deleting all settings… (CAUTION)Switch encoding from Layer 1 to Layer 2… (CAUTION)
Firmware version 2.3 ©2016 by 25-Seven Systems, The Telos Alliance. All Rights Reserved
HISTORYCONTROL LICENSES INFORMATION
3/26/16, 12:30 PMVoltair™ System
Page 1 of 1http://192.168.2.12/system.html
Connected to unit “Voltair” as user “voltairweb” Logout
CONTROL HISTORY LICENSES INFORMATIONUTILITIES
These are various maintenance utilities.
System Software UpgradesCopy upgrade package to Voltair…View or switch running Voltair version…
Logs
The following links will download a log package for Telos technical support:
Last 5 days (6MB)Last 30 days (35MB)All (could be very large)
MaintenanceSwitch Voltair program output from locked to unlocked…(CAUTION)Decommission Voltair, deleting all settings… (CAUTION)Switch encoding from Layer 1 to Layer 2… (CAUTION)
Firmware version 2.3 ©2016 by 25-Seven Systems, The Telos Alliance. All Rights Reserved
A warning page will appear, where you must confirm your choice.
After the program output has been unlocked, go to Voltair’s front panel System screen to select the desired Voltair Program Output.
3/26/2016 Voltair™ Internal Interface
http://192.168.2.12/ 1/1
Voltair: Configure System
JOG to change value; ESCAPE when done
Audio Mode: Mono (A only)
System Name: Voltair
Voltair Program Output: Enhanced Audio
"voltairweb" Password: voltair
"voltairview" Password: voltair
Encoding Fail Grace Period: 5 seconds
Display
Adjust
Enhancing
System
Network
Clock
Calibrate
Status
The Program Output selector has four choices:

gETTiNg THE BEST rESuLTS FrOM vOLTAir | 31
Voltair Installation and User’s Guide Version 2.3 • July 2019
nEnhanced Audio: Signal flows from Voltair’s input to the PPM Encoder, is processed according to Voltair’s Enhancement setting, and is sent to Voltair’s Transmitter XLR output. This is Voltair’s normal operating mode. Locking the program output will return Voltair to this mode.
nStudio Input: The program signal at Voltair’s Input XLR connector is routed directly to the Transmitter Output XLR connector. It also goes to the PPM Encoder, and from the Encoder to Voltair’s Enhancement and Analysis engines to let you evaluate code potential… but those functions do not reach the output connector. During this mode, Voltair’s output equals your program input, and does not carry any PPM encoding. A NOT ENCODING warning appears at the top of all Voltair screens.
nEncoded Audio: The program signal is sent to the Encoder, and the Encoder’s output is routed both to Voltair’s Transmitter Output XLR and to Voltair’s internal Enhance-ment and Analysis engines for evaluation. But Enhancement never gets to the Output XLR: what appears on that connector is identical to the output of Nielsen’s Encoder. During this mode, Voltair’s output equals the Encoder’s output, and Voltair will have no effect on your broadcast audio26. A NOT ENHANCING warning appears at the top of all Voltair screens.
nRaw Tones: Your program signal is sent to the Encoder, which continues to generate the codes that are normally masked by your programming. But Voltair strips the programming out, leaving just the bare watermark tones that are used by Panelists’ meters. Voltair’s internal Enhancement and Analysis engines continue to operate, but just the watermark tones appear on the Voltair output; this is in case you want to evaluate and analyze them. The NOT ENCODING warning appears at the top of all Voltair screens, because even though codes are being generated, they’re not being mixed with program. The output is computer codes only: nothing you’d ever want to play for human listeners.
n Since code generation is highly dependent on program characteristics, this can be a way to check whether your signal is supporting codes at all.
n The Raw Tones signal is computer beeps and boops27. It shouldn’t be broadcast. These tones are designed to be hidden under your programming, and are much softer than normal programming. You’ll probably need to boost your monitor amplifier to hear them. Broadcasters’ ears tend to be sensitive and trainable. We’ve noticed that once someone learns to hear and understand the PPM tones’ structure, it becomes much easier for them to hear the tones in mixed audio—even when those tones are no louder than they’d been before the user started listening critically. It can be very hard to ‘unlearn’ this extra perception when you want to evaluate how typical listeners will hear your station.
26 You can use this mode when you have to absolutely guarantee that voltair is doing nothing to your broad-cast PPM signal, but still want to take advantage of voltair’s analysis functions.
27 Not a technical term. More precisely, you’ll hear up to ten simultaneous frequency-shift-keyed sine waves, depending on how the Encoder is reacting to your program material.

gETTiNg THE BEST rESuLTS FrOM vOLTAir | 32
Voltair Installation and User’s Guide Version 2.3 • July 2019
Some users have noticed a pattern in the codes, repeating slightly faster than every five seconds. These are the complete PPM data words that identify your station. If they’re not being generated, Panelists’ meters will not recognize your station.
Program Output Switching is silent and instantaneous, so you can compare what the Encoder and Voltair’s Enhancement are adding to your signal. Switching can be controlled from Voltair’s front panel, or remotely from its Web interface.
When you’re finished using this feature, we recommend you go back to the Utilities page on the Web interface and switch back to Locked mode.
Using the Real Time AnalyzerVoltair’s RTA is designed specifically for seeing how a program’s spectral distribution is likely to affect watermark creation.
PPM codes, by design, are generated between roughly 1 kHz and 3 kHz. The encoder looks at ten separate bands within this range, and generates codes only in the bands with sufficient energy.
Not all bands need to have energy at the same time. Messages can be distributed across the range, following specific rules. But the more bands that are active, the more codes that are generated. It’s these codes that Voltair analyzes and enhances.
Timing is also critical. Energy in a given band must exist for a certain minimum duration. Short spikes of sound don’t support encoding, no matter what their frequency.
Obviously, Voltair’s analysis engine has to look at a lot of factors. But Voltair’s RTA can give you a quick sense of approximately how well your signal supports PPM. The red line holds peak signal levels for a moment, so you can see their frequencies. The blue area is instant-reading, so you can determine approximately how long sounds exist at a given frequency.
nYou’ll soon notice a few general characteristics. Don’t be satisfied with our summaries below: keep watching the RTA and Decode Interval meters, to get a real-time sense of how your programming supports PPM codes.
n Spectrally dense material (such as many pop music formats) often have a lot of energy across this range. Since musical notes are often sustained, they can keep the individual bands active long enough that many codes can be developed.
n Acoustic jazz and some other instrumental music formats aren’t as dense across the range, but do have sustained notes. So they can support at least some of the smaller bands and generate a few codes.
n The human voice does not have a lot of energy in this range. While much depends on the voice and delivery style, in general only the consonants have very wide energy patterns… and they don’t last for a long time. Sustained singing can have energy in specific individual bands, but which bands get activated depends on the vowel and singing style.

gETTiNg THE BEST rESuLTS FrOM vOLTAir | 33
Voltair Installation and User’s Guide Version 2.3 • July 2019
Using Voltair with OmniaThe loudness processor in your airchain might have presets that can boost average energy in the PPM range.
nIf you’re using an Omnia 9 or 11, get the latest software.
n It includes an insert point, so that Voltair can take advantage of your station’s signature processing audio processing. Voltair’s output then goes back into Omnia for final clipping and stereo generation.
Telos Alliance colleagues at our Omnia division work with us, as we continue to research and develop ways to help optimize the watermarking ecosystem.
For more details, see the “Using Voltair with Omnia” section, later in the manual. .
Web remote accessBoth Voltair’s Full Web and View-Only access levels can be accessed simultaneously, over the same network. In fact, Voltair supports multiple logins for each access level.
n Producers can be given View-Only access to monitor code generation without giving them control over Voltair’s parameters. They’ll be able to see the Confidence Display on their desktops, or even on most smartphone browsers, but not make changes.
n Multiple View-Only users can switch freely between Confidence Display and RTA without affecting other users or Voltair operation.
n At the same time, your PD can have Full Web access, with control over the Encoding Level.
n While this is going on, the CE can be using Full Web access to check Voltair’s operating status and licensing, and even get ready to update its software28.
28 Be aware that switching to any new software will disable voltair processing for 40 seconds. Your PPM Encoder will still be putting codes in your programming, but voltair won’t be analyzing or enhancing them. when the software switching process is over, voltair automatically returns to its previous operational state.

gETTiNg THE BEST rESuLTS FrOM vOLTAir | 34
Voltair Installation and User’s Guide Version 2.3 • July 2019
Using Voltair EnhancementSee the discussion of Voltair Enhancement earlier in the manual.
Don’t Enhance while the PPM Encoder is in BypassIf the Encoder is bypassed from its front panel or because of hardware failure, and no codes are being generated, Voltair Enhancement may try to enhance tiny program details instead. In some circumstances this could lead to audible distortion in your program stream29.
The converse is not true: There’s no technical problem if you run the Nielsen Encoder while Voltair is in Bypass. Of course you won’t get any Confidence Analysis or Enhancement during this time, but a bypassed Voltair disappears completely from the audio chain.
nYou can use a 9-pin cable to have your Voltair go into Bypass whenever its Encoder is in bypass (check the GPIO section). That section also includes a warning: if you’re running a digital plant at a sample rate other than 48 kHz, and aren’t confident about the stability of your AES/EBU bit stream, read it before using this cable.
Enhancement needn’t be “Set and Forget”Different enhancement levels can be appropriate during different dayparts (more Enhancement to compete with traffic noises during rush hour; less for a purer signal during overnights). By the same token, a high level may be perfectly appropriate during a talk show, but you can dial it down for a music show.
nTake advantage of the three preset Enhancement Levels that can be triggered by GPIO. Connect them to your automation system, and you can program level changes throughout your broadcast day.
Finding the Best Enhancement LevelsModest amounts of Voltair enhancement can make a real difference in encoding success, particularly with hard-to-encode programming and in marginal or noisy circumstances.
On the other hand, very high levels of enhancement may have an audible effect when heard in quieter surroundings. Some listeners with critical ears may notice what seems like a primitive reverb, or a distortion when added to pure tones. What they’re actually hearing is Nielsen’s PPM data codes, normally hidden under programming. Too much enhancement can make these codes perceptible to sensitive ears, possibly annoying some listeners.
nAs you use Voltair and see the relationship between Confidence and Enhancement on your programming, you’ll get an understanding of the tradeoffs between possible audibility and reliable ratings.
nYou can conduct scientifically controlled tests of Enhancement levels using your actual ratings reports. Details are in the next section.
29 it can’t affect meter count and your ratings, because we’re talking about the PPM Encoder being in Bypass: Panelists’ meters can’t see you at all when the Encoder is in that mode.

gETTiNg THE BEST rESuLTS FrOM vOLTAir | 35
Voltair Installation and User’s Guide Version 2.3 • July 2019
Sometimes, letting a little bit of audible watermarking “break through” and become perceptible may be acceptable.
n Consider a talk show during drive time. Some hosts’ or guests’ voices might not support consistent encoding, and road noises can keep a panelist’s meter from hearing your codes. Voltair enhancement helps both situations, and it’s less likely your listeners will hear any artifacts under the sound of traffic.
n On the other hand, broadcast the same program during late night hours and it’s not likely to be heard in traffic. You may choose to lower the enhancement, with just enough to help the voices while letting listeners experience a purer sound.
As we warned in the section on Environments: If you’re trying to compare the ratings confidence of two different program segments, make sure they were both generated with the same Enhancement settings.
Test Strategy: Voltair Enhancement and Your SignalHow much enhancement is the right amount? This section outlines a rigorous way to find out.
Remember: Voltair processing does not create listeners. It doesn’t invent phantom panelists with phantom meters, or somehow steal meters from other stations’ listeners. What it does do is help make sure that if a panelist is listening to your air, their meter will recognize your station.
We believe that—all other things being equal—if more meters register your station, you’ll get higher ratings.
You don’t have to take our word for this. Or anybody else’s. You can test its effectiveness with your programming, using your ratings reports, in the privacy of your own station.
The problem with raw comparisonsIn theory—that is, if you ignore everything you know about broadcasting—it should be easy to correlate Enhancement levels with Nielsen’s reports of meters seeing your station. You’d try a few different levels, and look for differences when the report arrives.
The real world is too random for that.
Audience size can go up and down because of news events, station promotions, changes at other stations, the weather, and other factors we might not even be able to identify. So you can’t necessarily tell whether a boost in the number of meters is because of Voltair, or something else.
At the same time, watermarking reliability goes up and down. It depends on whether a program’s elements support sufficient codes, and on what kind of noises are present in a panelist’s environment. This is simple physics.

gETTiNg THE BEST rESuLTS FrOM vOLTAir | 36
Voltair Installation and User’s Guide Version 2.3 • July 2019
Burying the randomnessBut you can compensate for these random changes! All you need to do is:
n Limit your testing to only two or three Enhancement Levels at a time.
n Cycle through those levels often and frequently, increasing the likelihood each will be affected equally by different program elements.
n Conduct this test over a long period, so transitory audience and environment effects are averaged out.
n Make a note of every change, so you can compare when it happened with your Ratings report.
n Do some number crunching when you’re done, to discover correlations.
Voltair can automate the switching and logging. It can even load the numbers into an Excel spreadsheet or CSV file, for you to correlate with your program logs and Ratings report30.
Every Voltair gives you the tools to see exactly how well it’s working!
Doing the TestDecide which two or three Enhancement levels you want to test, and set them as High, Low, and optionally Medium presets on the Enhancing screen.
n Testing widely different levels can give you dramatic results. But it also means that some of your programming won’t be getting much Enhancement when the Low value is being tested.
n Choosing levels that are incrementally close together lets you evaluate subtle changes, and is best for fine-tuning Voltair operation.
Set the Test Enhancement Switching and timing on the bottom two lines of the Enhancing screen.
n Five- and ten-minute settings can be roughly correlated with minute-by-minute meter counts, though we’ve found differences between real time (as noted by Voltair’s NTP-synchronized clock) and time reported by unsynchronized Encoders and meters.
n 15-minute intervals can be correlated with AQH, and may be the most useful timing.
n Slower changes can be good for testing full programs and dayparts.
Test for as long as is practical: longer tests will do a better job of averaging over random changes in the audience. Turn on skip midnight to avoid testing the same Enhancement level against the same position within a quarter hour on subsequent days.
30 Automatic test switching is built into every voltair. downloadable Excel and CSv spreadsheets require voltair’s data Capture and retrieval option. if you don’t have the option, you can use voltair’s gPiO port to create a log in your automation system.

gETTiNg THE BEST rESuLTS FrOM vOLTAir | 37
Voltair Installation and User’s Guide Version 2.3 • July 2019
When the test is done, download a file from Voltair’s History tab (page 68) or a switching log from your automation system. Add the data you get from Nielsen, and look at the results.
nIf you’re downloading an .xlsx or CSV from the History tab, you can use Excel or another spreadsheet program to correlate Voltair’s Confidence analysis with Nielsen’s report of meters responding. Knowing this relationship can be helpful when using Voltair’s Confidence Display to evaluate ongoing programming.
Finding optimum Enhancement LevelsThe benefits of Voltair Enhancement are not necessarily linear.
n At low to moderate levels, depending on the program material, more Enhancement usually translates to more meters being able to recognize your station.
n At higher levels, you can approach a “saturation” point: most panelists’ meters will be able to identify you, but a few may be in circumstances that make them very difficult to reach.
In the latter case, adding more Enhancement might add noticeable artifacts to your signal, without increasing your meter count.
Working with Enhanced CBETIn November 2015, after Voltair’s widespread adoption raised industry concerns about Nielsen’s original encoding scheme, the measurement company introduced Enhanced CBET [eCBET] coding. Nielsen encoders apply eCBET at a much higher level than the original CBET codes31, and the coding itself can sound like distortion with some program material.
Extreme Voltair enhancement, at levels that might be appropriate for conventional CBET, can make eCBET codes even more obvious in your signal stream. The result is coding that’s extremely robust, but that can also sound bad to some critical listeners.
The “right” amount of processing for either CBET or eCBET depends both on your specific programming and on your specific audience: for some programs and dayparts, more enhancement can be justified to counteract noisier listening situations with a more distracted audience; for other programming and dayparts, you may prefer gentler coding and a purer audio signal.
31 Our experience is eCBET sounds similar to conventional CBET that’s been processed with voltair enhance-ment levels between 10 and 15.

gETTiNg THE BEST rESuLTS FrOM vOLTAir | 38
Voltair Installation and User’s Guide Version 2.3 • July 2019
Test for yourself!Telos Systems’ Director of Research, Dr. Barry Blesser, developed an elegant way for you to determine ideal Voltair enhancement levels using your own programming, encoder, and Ratings reports.
In brief, it involves running the tests above and graphing the result, with numbers of meters responding as the vertical axis, and Enhancement levels as the horizontal. Then draw a trend line.
Results may look something like our sample. There’s a relatively straight line between points A and B, where increasing the enhancement also increases the number of meters responding.
But it levels off at C, because there just aren’t that many more panelists who could be hearing your signal.
In this case, the optimum Enhancement level will be just before point C.
Dr. Blesser described his method with much more detail in a presentation at NAB 2015. We’ve posted the video at http://www.telosalliance.com/support/Monitoring-for-Ratings.
nYou can do similar tests with Ratings instead of Meters, and with Confidence instead of Enhancement.

OPErATiON dETAiLS | 39
Voltair Installation and User’s Guide Version 2.3 • July 2019
Operation DetailsHere’s how you use Voltair’s front panel controls and LCD screen for normal operation in your station.
JOG Wheel
BYPASS ButtonESCAPE ButtonLCD ScreenfrontPanelFullWidthCallouts.pdf
Front Panel ControlsThe JOG Wheel can be turned to navigate among menu items and fields, pressed to focus on a screen area, and turned to change a selected field’s value32, or enter text. The ESCAPE button can be used to exit a field and save its value, or to exit a screen area and go back to the menu.
The BYPASS button can be pressed to remove Voltair from the signal chain. It releases a pair of relays, hard-wiring Voltair’s studio input directly to your Encoder, and the Encoder’s output directly to Voltair’s transmitter output.
Pressing BYPASS again will restore Voltair operation if you have manually started a Bypass state. Be aware that Voltair also goes into Bypass if it detects a problem, and during Calibration. You won’t be able to restore operation until you’ve fixed the problem or completed Calibration.
About BypassVoltair’s relay bypass system provides maximum fail-safe protection against power loss or catastrophic hardware failures, and is engineered to guard against dead or unencoded air.
Bypass can be manually triggered using the BYPASS switch on the front of the unit, remotely triggered using Input #1 on the unit’s 25-pin GPIO connector (page 79, or synchronized with its Encoder’s Bypass function through a 9-pin cable.
Bypass disconnects Voltair if the power fails, patching your Encoder directly into the airchain.
A watchdog circuit within Voltair will trigger Bypass if either of its internal processors fail, or under unusual hardware conditions such as a power surge or overheating conditions.
32 These operations are different if you’re controlling voltair from a password-protected browser: Click the computer’s mouse to choose a menu item or field, use the up and down arrow keys to select a value for the field, and press the computer’s Escape key to confirm when you’re done.

OPErATiON dETAiLS | 40
Voltair Installation and User’s Guide Version 2.3 • July 2019
LCD ScreenThis is Voltair’s “Dashboard”, where you use various screens to control operation and monitor PPM confidence. A few features are common to every screen:
ScreenWithCallouts
The Screen’s Name (such as Voltair: Main Screen) has two parts. The first word, in white letters, is the identifying name for this Voltair. You can assign a unique name from the System screen, which can be helpful if you have many Voltairs on a network. The second part of the Screen Name (in black letters) identifies that Screen’s function.
You select which screen is active, by scrolling through the Menu on the right of the LCD.
The Menu lets you choose screens with different monitoring or control functions. Scroll through the choices with the JOG wheel, and then confirm your choice by pressing the wheel33.
Every screen has a dynamic Help area along the bottom. Help messages are context-sensitive and will change depending on what you’re doing. The messages are sometimes shortened to fit on one line, but their meanings are always obvious.
33 if turning JOG selects other fields in the middle or top of the screen, rather than menu items, it means your voltair is in Adjustment mode. Press ESCAPE to get back to the Menu.

OPErATiON dETAiLS | 41
Voltair Installation and User’s Guide Version 2.3 • July 2019
Voltair’s Function ScreensEach of Voltair’s Screens displays or lets you control a different function. During normal operation, you’ll probably leave it on the Main screen most of the time34. The others are for maintenance and system monitoring.
Main ScreenChoosing either Display or Adjust on the menu shows a Main Screen:
Voltair: Main Screen
ENTER to switch display between Confidence and Real Time Analysis
DECODE INTERVAL
Original: 01:47
Processed: 00:04
Enhancement: 12 Environment: Vehicle
Process: Adaptive Env. Level: -20 dB
13:30
13:30
12:30
12:30
12:45
12:45
13:00
13:00
13:15
13:15
Original
Processed
Display
Adjust
System
Network
Clock
Calibrate
Status
Voltair: Main Screen
ENTER to switch display between Confidence and Real Time Analysis
DECODE INTERVAL
Original: 00:28
Processed: 00:04
Enhancement: 17 Environment: Vehicle
Process: Adaptive Env. Level: -9 dB
13:30
13:30
12:30
12:30
12:45
12:45
13:00
13:00
13:15
13:15
Original
Processed
Display
Adjust
System
Network
Clock
Calibrate
Status
Voltair: Main Screen
ENTER to switch display between Confidence and Real Time Analysis
DECODE INTERVAL
Original: 00:28
Processed: 00:04
Enhancement: 17 Environment: Vehicle
Process: Adaptive Env. Level: -9 dB
13:30
13:30
12:30
12:30
12:45
12:45
13:00
13:00
13:15
13:15
Original
Processed
Display
Adjust
System
Network
Clock
Calibrate
StatusPRESS WHEEL to switch display between Confidence and Real Time Analys
Decode Interval
ParameterSettings
ConfidenceDisplay
MainScreen.pdf
n If you’ve chosen Display, you can press JOG to switch between the Confidence Display (discussed below) and a Real Time Spectral Analysis of your signal.
n If you’ve chosen Adjust, you can press JOG to change the Enhancement and Environment parameters. When you’re finished setting these parameters on the Adjust screen, go back to the Display screen to guard against accidental changes.
When Voltair is in BYPASS mode, this screen changes to a Message board. You can still use the menu system, but the Confidence Display and Real Time Analysis aren’t available.
34 Some stations have their processor racks visible to casual visitors. in that case, you can leave voltair’s display on something less informative to competitors, such as the Clock screen.

OPErATiON dETAiLS | 42
Voltair Installation and User’s Guide Version 2.3 • July 2019
Encoding Failure Warning
If Voltair’s analysis engine receives no valid codes over a preset time, a flashing red ENCODING FAILURE message will appear on the Main Screen, and Pin 3 of the GPIO will be pulled low. The condition is also reported on the Status Screen and written to Voltair’s history log; a NotEncoding message is available for real time monitoring over IP.
Encoding Failures can be the result of hardware or setup problems. But they can also happen naturally when program elements don’t have enough energy to support codes; for example, during an extended silence in a live event or with some badly equalized deep voices.
Since codes can be sporadic under normal programming, it takes a while to determine that they’re completely missing (as opposed to normal pauses). Voltair needs between 15 and 30 seconds to detect the complete absence of PPM codes and send an alarm.
Some formats can have even longer periods that don’t support codes, so Voltair lets you add an additional grace period before the alarm is triggered. Set Encoding Fail Grace Period in the System Screen. The time is adjustable in five second increments up to one minute.
As soon as valid codes reappear, the Failure message goes away.
Confidence DisplayWhen the Main Screen is showing the Confidence Display, you can see how robust your station’s watermarking codes have been over the past hour. It displays code confidence, both with and without the level of Voltair Enhancement you were using at that time, measured through the Environment you’d set.
There are two complete sets of Confidence graphics. The top row measures codes the way they’re received from your Encoder. The bottom row measures those same codes, but after they’ve been processed with Voltair Enhancement.

OPErATiON dETAiLS | 43
Voltair Installation and User’s Guide Version 2.3 • July 2019
15-minute Horizontal BlocksThe colored horizontal blocks labeled by time-of-day (12:30, 12:45, etc.) summarize how strong your codes were during each quarter hour. Nielsen awards credit based on firm quarter-hour boundaries, so these can help you think within that context. You can use it for evaluating long program segments or how your formats change during the day.35
The blocks will be in one of four colors, each with a specific meaning:
nDark and light green blocks mean the quarter hour carried sufficient codes. Dark green is better.
nYellow blocks tell you there might be problems. Your programming wasn’t supporting watermarking codes well at that time, and meters might not be able to identify your station for some panelists.
nRed means it’s unlikely that many meters (in the selected environment, during that quarter hour) will identify your station. This can happen during some talk program-ming and other difficult-to-encode material.
Red can also happen if there are technical issues, such as the Encoder being in bypass mode or your console not sending a loud enough signal for it to generate robust watermarks. So review the installation and Best Practices section of this manual before making a panic change in your programming.
The blocks may be different colors on the upper and lower halves of the display, depending on how you’ve set Voltair Enhancement. They display algorithmically analyzed data over the quarter hour, and small differences can trigger a color change.
A gray-shaded bar appears when not enough of a 15-minute period has yet passed to fully evaluate the period’s confidence.
One-minute Vertical AveragesThe multiple vertical bars show the average confidence for every minute of the past hour. This interval is short enough to let you evaluate many individual program elements, such as songs or stopsets36.
Like the Horizontal Blocks, there are separate sets (“Original”) for the Encoder’s output and (“Processed”) for Voltair’s Enhanced codes, and both sets are measured through the Environment you had set for that minute. They also follow the same color code as the Horizontal Blocks. In addition, they may be displayed at ten different heights.
The height of each bar represents more than a raw average of codes received during the minute; it actually shows the number of complete multi-code messages, as the PPM system is likely to discover them.
35 Blocks can be displayed in AM/PM or 24-hour formats, as set on the Clock menu screen.36 if you want to capture these measurements on an even shorter basis, or hold onto them for later comparison
with ratings reports, use our optional data Capture and Extraction feature. it gives you confidence readings at 4.8 second intervals, either as they are happening, or for any broadcast period that’s gone by.

OPErATiON dETAiLS | 44
Voltair Installation and User’s Guide Version 2.3 • July 2019
The same warnings apply to short bars as to red quarter-hour blocks: they could represent gaps of specific spectral and temporal characteristics in your programming, or problems with the Encoder, or operational issues such as very low levels or dead air. Examine all these factors, and review Best Practices in this manual.
If there are no technical or operational issues preventing successful watermarking, you might need to just dial up the level of Voltair Enhancement. In some cases, very short red bars might be telling you to look at the program format as well.
The resulting graph gives you a detailed map of encoding confidence over time.
StripesThe Vertical Average area might show a dark block with diagonal stripes, instead of the vertical bars. This indicates times when Voltair was not processing, because it’s been manually bypassed or put into Calibrate mode.
If you change the clock, it clears the Confidence DisplayVoltair’s internal clock is more than a passive set of numbers on the front panel. It’s used for computing code reliability, in ways we’ve developed that work with ratings services’ time-based analysis of panelists’ meters.
Therefore, time-of-day is an important factor. If you manually change the clock, new data won’t correlate with values previously stored in memory. Voltair won’t be able to process the data correctly. So it starts over and clears the Confidence Display37, writes the new data to memory as it occurs, and uses that to draw new horizontal blocks and vertical bars. These scroll in from the right edge of the display area.
The best way to keep Voltair’s clock accurate is to use a Network Time Protocol server, such as the one 25-Seven maintains for its customers. Details about this NTP and manual clock adjustment are on page 59.
Voltair continuously saves operational and Confidence data in history files, and these are not erased when you clear the clock. If you want to retrieve ongoing data—or data from any previous period when Voltair was running—use our Data Capture and Extraction option.
Energy MetersThe two white vertical bars, to the extreme right of the Confidence Display, measure instantaneous code energy. These are much more than simple volume meters. The upper one shows the strength of what your encoder is generating at that moment; the lower one shows the strength of codes as Enhanced by Voltair.
The Energy Meters give you an immediate sense of how strongly watermark coding can be sent at that moment. But remember, PPM is a serial data system: individual codes have to be sustained for a specific time, and it takes multiple codes to make a message. The instant-reading Energy Meters can’t reflect the longer-term analysis used by Voltair’s confidence engine.
37 if you want to save the Confidence display before changing the clock, log in from a connected web browser and screen-capture or print the page in your computer.

OPErATiON dETAiLS | 45
Voltair Installation and User’s Guide Version 2.3 • July 2019
Use the Energy Meters as a fast indication of whether a particular moment of your programming can support individual codes, not a comprehensive prediction of how successfully your station will be identified by the PPM ecosystem.
If the Energy Meters show strong levels but the Confidence Display doesn’t indicate successful encoding, Voltair might not be properly calibrated to its PPM Encoder. This can also happen if your signal doesn’t have enough extended energy to support entire messages, such as during talk shows with sporadic pauses.
Decode Interval DisplayThese show the amount of time, in minutes and seconds, since Voltair was confident your PPM codes would be received by a majority of panelists’ meters. Each timer flashes green and restarts from 00:00 whenever a complete and reliable message is detected in your program stream. In a theoretically perfect system, this would occur every 4.8 seconds that you’re on the air. That’s not likely to happen with real-world programming.
nContinuously short timings are good: they mean your programming is carrying a lot of reliable messages. The display will stay green.
nLonger times mean your programming isn’t supporting watermarking codes as well. The display changes to yellow when ten seconds have gone by with no messages, and to red if thirty seconds have gone by. It’s less likely your station will be identified by panelists’ meters during those times. If the decode interval does not reset for several minutes, you should investigate your audio chain and program content.
nBecause the Interval Display is constantly updating, it can provide more detailed information than Voltair’s minute-wide graph bars. This gives you an immediate comparison of the encodability of different types of programming.
There are also three separate Decode Interval control outputs on Voltair’s back panel38. You can use them to send external warnings to operators, or to start other functions. These rear-panel outputs monitor the signal including any Voltair Enhancement you’ve set. They trigger when one minute, two minutes, and five minutes have gone by with no decoded messages.
Parameter SettingsThese display your settings for Voltair Enhancement, and let you see how your station’s encoding will perform under different Environment types and levels.
n If Display is highlighted at the top of the Menu area on the right side of the LCD, the parameters are read-only. This protects them from accidental changes.
n To change a setting, turn the JOG wheel to select Adjust on the menu, then press the wheel. The rest of the menu will turn dark, and one of the Main Screen parameters will be highlighted.
38 Control outputs and inputs are logic level and opto-isolated, on a dB-25 connector. wiring details can be found later in this manual.

OPErATiON dETAiLS | 46
Voltair Installation and User’s Guide Version 2.3 • July 2019
General JOG Wheel and ESCAPE button behavior39:
Turn the JOG wheel to select the parameter you want to change, and press the wheel to edit its value. Now you can turn the wheel to adjust the parameter or scroll through its options.
When you’ve got that parameter the way you want it:
Press ESCAPE to save that setting. Then JOG to select other parameters on this screen.
Or press ESCAPE twice to leave Adjustment mode. The full menu will be highlighted once again, and the JOG wheel can be used to select any menu entry.
EnhancementVoltair analyzes the PPM signals your Encoder hides under program audio, and applies advanced signal processing to make them stronger. Enhancement levels can be set from 0 (original code level, with no enhancement) to 24 (a lot of processing).
If you change the Enhancement level and it snaps right back to a previous setting, Test Enhancement Switching may have been enabled in the Enhancing screen40. This function automatically cycles through pre-set levels, for long-term tests to correlate Voltair’s Enhancement with your station’s ratings reports. There’s more about this feature on page 54. Another possibility is that one of the Enhancement Level Preset GPIO inputs is being held to a logic Low.
Choosing the right Enhancement level is not trivial. It depends on your programming and station goals. See page “Using Voltair Enhancement” for a discussion.
By adjusting Enhancement slowly, and seeing its effect on Voltair’s Confidence Display, you can begin to get a sense of the best setting for specific program material. You can also conduct a scientifically structured test of Enhancement levels: details are in the “Testing Strategy” section.
Three different Enhancement levels can be preset through Voltair’s Enhancing menu, and triggered by logic-level inputs on the rear panel. This can help you apply different enhancements for different dayparts, or install a remote switch for difficult program elements.
39 These controls have additional functions when you’re entering text on the LCd. 40 Or a gPiO Preset Level pin is being held in a logic-low state.

OPErATiON dETAiLS | 47
Voltair Installation and User’s Guide Version 2.3 • July 2019
EnvironmentRatings success has to include a full understanding of the PPM ecosystem. Codes don’t magically fly from the Encoder to panelists’ meters; they have to survive the noisy environments where panelists might be listening. Different noises, such as the clatter of dishes or the roar of a stadium crowd, affect watermark codes in different ways. Voltair gives you a way to compensate for a listener’s environment when doing its Confidence measurements.
Environments supplied with Voltair include:
n Sports: Crowd noise and chanting as experienced in an open arena
n Restaurant: Background conversations, plate and other associated noise in a reverberant space
n Vehicle: Low frequency road noise, traffic noise, wind noise
n Kitchen: Pots, pans and kids in a live, reverberant space
n None: Direct connection, as if a panelist were using a headphone adapter with their meter. Also appropriate for listening to nearby receivers in quiet situations, such as a clock radio in a bedroom.
You can adjust the simulation level between -60 dB and +10 dB, with 0 dB representing noises that are essentially as loud as the station’s programming. We included the positive values because, even when the noise is louder than station programming, listeners may still be able to understand speech or pick out familiar songs41.
Environment settings should reflect your understanding of your audience during a particular daypart.
Real Time Analysis Display (RTA)The presence of continuous energy in roughly the 1 kHz – 3 kHz range is one of the most important factors contributing to successful code generation. Many music styles have this energy; much spoken word does not. But you can’t rely on generalities: Within a specific style, some songs can be very friendly to PPM encoding while others are antagonistic; voice encoding may depend as much on the delivery style and pacing as on the talent’s ‘pipes’.
So we give you a spectral meter. When you’ve selected Display on the menu, pressing JOG replaces the Confidence Display with an RTA. Pressing it again toggles back.
RTAcropped.pdf
41 Human hearing is very clever that way.

OPErATiON dETAiLS | 48
Voltair Installation and User’s Guide Version 2.3 • July 2019
This is more than the simple spectrum display you might find on a boombox or mp3 software; it measures energy at specific frequencies used by the PPM system. The blue area is an instant-reading meter. The red line freezes Peak values and holds them for a second, to make them readable.
As you work with the RTA, you’ll begin to recognize patterns in your program elements. Generally, speech will have higher energy toward the lower frequencies and the lines will show more vertical movement while talent is talking. Music—depending on the style—will be more evenly distributed; the lines will be more stable as notes are sustained. While there are other factors as well, signals that display with high and consistent lines will have a better possibility of encoding.
Enhancing Screen
This screen lets you set three different Enhancement Preset levels. Presets can be triggered from your automation system or a remote control, by pulling GPIO pins low. Presets are also used for Test Enhancement Switching (below). Each one of the three Presets can be set to an Enhancement level between 0 and 2442.
Test Enhancement Switching functionsThese let you cycle through preset Enhancement levels on a regular basis, ranging from every five minutes to every two hours, as an aid to objective, scientifically structured tests of Voltair Enhancement on code reliability and your ratings.
Test Enhancement Switching requires an accurate clock, so Voltair should be connected to a Network Time Protocol source. It also requires that you know precisely when each Enhancement change occurred. This is written to Voltair’s internal history files, and can be accessed through the optional Data Retrieval and Extraction feature43.
Switching is seamless and doesn’t disrupt your program audio. You set up a test by using two choices on the System Screen.
42 The High, Medium, and Low names are for your convenience. There’s no requirement that any given level is higher or lower than any other.
43 You can also set up Enhancement tests using your station’s automation system to trigger presets. voltair will still write these changes to its history file. But you may also log and retrieve them with your automation system.

OPErATiON dETAiLS | 49
Voltair Installation and User’s Guide Version 2.3 • July 2019
Test Enhancement Switching This turns the function on and off, and lets you select two-level or three-level testing. If you choose Low/Medium/High, Voltair will cycle through all three Enhancement Level Presets you’ve set in the middle of this screen. If you choose Low/High, it uses only those two presets.
When Test Enhancement is Enabled, it takes control of Enhancement Level away from the main screen’s parameter settings. You may try to set other levels, but they’ll immediately revert to the level determined by the test.
If you set Test Enhancement Switching to Disable, the function is turned off. You can then change the Enhancement level in real-time, using the Parameter Setting area on the Main screen44.
Switch Enhancement Every…This sets how long each preset level will be applied, before automatically switching to the next. Choose 5 minutes, 10 minutes, 15 minutes, 20 minutes, 30 minutes, 60 minutes, or 120 minutes.
You can also select skip midnight for each of these times, for additional control of test conditions: this ‘skips’ one level change, and starts each new day with the same level that had been used at the end of the previous day. As this change ripples through the day, each period gets a different Enhancement than had been applied to that period yesterday. This helps you isolate Voltair’s contribution to your meter count, from any possible effects due to position within a quarter-hour.
System ScreenHere is where you set Voltair’s basic configuration.
Scroll to System on the menu. This screen will appear:
SystemScreen2b6.pdf
Press JOG, and you can scroll through the various settings. Press the wheel when you’re on one you wish to change.
44 Or you can set up tests from your automation system, using gPiO triggers to change the Enhancement level on a timed basis.

OPErATiON dETAiLS | 50
Voltair Installation and User’s Guide Version 2.3 • July 2019
Audio ModeUse this to enable or disable the right (channel B) XLRs connectors of an analog Voltair, and the right interleaved AES/EBU channel on a digital Voltair, depending on whether its being used in stereo or mono.
This is a critical setting, because PPM codes occupy a “phantom center” in a stereo field. AM mono stations, and FM talk stations that broadcast exclusively in mono, should use the mono setting for most reliable operation. Unlike most other equipment, you can’t just use one channel of a stereo pair and call it “mono”: that upsets the relationship between programming and codes.
System NameThe name you set here will appear at the top of each screen, both on the LCD and on connected computers. Use it to identify machines in a facility that has multiple Voltairs in a rack or being controlled over the same network.
Entering text in VoltairSelect the System menu item and press JOG to enter the Configure System screen, if you haven’t done so already.
When you first enter the screen, the Mode: Stereo configuration line is highlighted. Turn JOG to select the System Name or Password you want to change, and press it to enter that item.
Names and passwords can be any length up to 20 characters. Upper and lower case letters, numerals, and punctuation – (hyphen) _ (underscore) and . (period) are allowed. Spaces are not: names and passwords must be continuous.
You choose the character you want from a scrolling list. The last character in the list is a blank. It doesn’t work as a space, but as a specialized delete key:
n When [blank] is hit in the scrolling list, it erases every letter that follows it in the word; if you then scroll to a different character on the list, those letters come back.
n If you press ESCAPE while [blank] is selected, it stores the shorter word.
Use [blank] for fixing mistakes, or when replacing a long name or password with a shorter one.
Here’s the general procedure: When you press JOG on an item, the first letter of the item is highlighted. Scroll to select the character you want to use, then press the wheel to confirm it and move to the next letter. When you’re done, ESCAPE to save the new name.

OPErATiON dETAiLS | 51
Voltair Installation and User’s Guide Version 2.3 • July 2019
Or step-by-step: Let’s say we’ve selected System Name, and want to change it from Voltair to FM_Air…
User Action Screen looks like Notes
Press JOG Selects first letter position
Turn JOG Scroll until desired character shows
Press JOG Sets that letter, moves to next position
Turn, press, turn… As above, to complete name
ESCAPE Saves name and exits. JOG now selects other lines on the screen.
To correct errors:
(existing) This is what you want to change.
Press JOG, press JOG, etc.…
Advance to letter thatxx should be changed. Replace it with something else. The letters that follow won’t be affected.
All screenshots in the table are from AlphaEntry.tif
If you ESCAPE after changing a letter to something else, the other letters aren’t affected and the new version is stored.
If you ESCAPE while [blank] is showing, the letters that follow it are also erased; the new shorter name is stored.
You can also change the System Name from a connected web browser. Letters and numbers are provided by the keyboard; [blank] is provided by the space bar and works like the front-panel version. The list of usable characters is the same.
The main difference is that on a computer, you select a field by pointing and clicking, and then you can enter text from the keyboard. There’s more about browser control on page 64.

OPErATiON dETAiLS | 52
Voltair Installation and User’s Guide Version 2.3 • July 2019
Voltair Program OutputThis setting is grayed and locked to Enhanced Audio, unless you’ve unlocked it for special monitoring.
voltairweb and voltairview PasswordsThese offer separate protection for the two different levels of remote operation. These levels are described in the section on browser control. Full Web Access appears on the screen as voltairweb. View-Only Access appears as voltairview. Use voltairweb or voltairview as the login names, when you want to access this remote operation.
The factory default password is voltair for both levels. We recommend changing each to a different password as soon as you’ve put the unit on a network.
Encoding Fail Grace PeriodThis sets how long Voltair will wait, during periods when there’s absolutely no code activity, before posting the Encoding Failure warning on screen, and triggering a contact closure.
Network Screen This screen tells Voltair how to communicate with your data network for remote control, maintenance, and synchronization with a Network Time Protocol clock. Its appearance depends on how you’ve set the first line (DHCP). You change that setting by using JOG and ENTER, just as you do on other screens.
DHCP: EnabledWith DHCP (Dynamic Host Configuration Protocol) Enabled, Voltair gets its network settings automatically from your router. In that mode, the Configure Network screen looks like this:
NetworkDHCPOn.pdf
The address fields are disabled when DHCP is on, because those addresses are determined by your router and you can’t change them.

OPErATiON dETAiLS | 53
Voltair Installation and User’s Guide Version 2.3 • July 2019
If you want to control Voltair from a network-connected browser, you’ll need to know the IP Address your router assigned. It can be found on the Status screen.
DHCP: DisabledIf Disabled is selected in the DHCP field, the Configure Network screen looks like this:
NetworkDHCPOFF.tif
You’ll need to set the four number lines manually:
n IP Address: A unique network address for Voltair.
n Subnet Mask: A subdivision of an IP network that will include Voltair
n Gateway: The router or proxy server that shuffles data between networks. In simpler networks, this will often be 255.255.255.0.
n DNS: A constantly updating Internet service that translates readable domain names to numeric IP addresses.
Services that access the Internet, such as Network Time Protocol, require valid Gateway and DNS settings.
Each number in the IP Address, Gateway, and DNS lines are separate fields; Subnet Mask is a single field with preset choices. Navigate to a field with JOG, press the wheel to enter it, and JOG to the desired number. Then you can press the wheel again if you want to jump to the next field on the line, or ESCAPE to save the data and navigate to another line.
DHCP or not?If DHCP is enabled, Voltair’s IP address may change when you restart. This affects how users log in for remote control. If DHCP is disabled, you need to manually enter valid numbers on the four lines; these numbers will depend on how your network is being administered45.
45 it gets complicated. if you’re not sure what’s best in your station, contact your iT department. Many small business networks use dHCP and never worry about addresses.

OPErATiON dETAiLS | 54
Voltair Installation and User’s Guide Version 2.3 • July 2019
Clock Screen Voltair’s clock must be accurate for successful confidence metering, as well as for accurate Test Enhancement Switching and reports with the optional Data Capture and Extraction feature. Turn the JOG wheel to highlight the Clock menu, and then press the wheel to enter the page.
Clock.pdf
You can use Network Time Protocol to automatically set the date and time, or you can disable NTP and set them manually. If you’re Enabling NTP, you must provide a valid server address. It can be our default server at ntp.25-seven.com, or a different master clock your station prefers.When you first enable NTP, Voltair contacts the server specified on the screen. Then it synchronizes with the server’s clock. The process takes slightly less than a minute. You can check NTP login and synchronization status on the Status screen.
Whether or not you’re using NTP, you can specify time zone, automatic Daylight Savings, and standard (1:35 PM) or 24-hour (13:35) time display. The JOG wheel, ESCAPE button, and fields work as you’d expect from other screens.

OPErATiON dETAiLS | 55
Voltair Installation and User’s Guide Version 2.3 • July 2019
Calibrate Screen This screen carries text messages to help you initiate the Calibration process.
Voltair must be calibrated to the specific Nielsen Encoder you’re using, so this operation should be done when you install or move the Voltair or the encoder. This also complicates matters if you want to access multiple Encoders through a passive patchbay: you’ll have to calibrate each time you change the patching46.
Calibration is a five-minute automatic process. It takes both Voltair and your Encoder out of your airchain during the process, and then restores them when it’s complete. Full instructions are in the Calibration and Setup section.
Status Screen statusScreenV2c.pdf
This lets you check Voltair’s status and operational state. The screen reports changes in real-time. It’s also read-only; to change the NTP and IP settings, you’ll have to go to their specific screens.
The Calibration date and time are set automatically during calibration (see previous section). If the process is aborted because of some unforeseen event, such as a power outage, this data can get out of sync. Power-cycle the unit, and calibrate again.
The IP Address should be noted if you plan to log in remotely; it’s where you’ll point your browser. This address is displayed correctly, regardless of whether you’re using DHCP or not. The Mask, a number that follows the IP Address, is used for network configuration.
The MAC Address identifies Voltair’s networking hardware, and is unique for each system. You may need this to enable security features on your network router.
46 voltair requires a “copper connection”: direct electrical continuity between the Encoder and itself. A conven-tional plug-and-jack patchbay supports this. But don’t use an electronic router or switcher, or an audio-over-iP setup. These introduce latency that can make voltair analysis and Enhancement impossible.

OPErATiON dETAiLS | 56
Voltair Installation and User’s Guide Version 2.3 • July 2019
The GPIO Inputs are for testing remote controls and automation system interfaces. These six characters report logic levels on individual pins of the rear panel DB-25 connector, and change from 0 to 1 while being triggered.
Encoding Status reports if there’s an Encoding Failure, after the Grace Period has passed.
Encode Layer refers to the PPM protocols used in your market. All US radio markets use Layer 1. If you’re running Voltair in a different country, your local standard might be Layer 2. If calibration fails repeatedly on one layer, try using the other.
Temperature and Version are used for maintenance.
Testing Individual Program ElementsYou can use an off-line Voltair and Encoder to evaluate songs, sweepers, or other short content.
This can be a good use for spare hardware you may be keeping for emergencies. The standby Voltair and Encoder can be in your rack room or transmitter location, ready for on-air use; during its downtime, the Program Director or producer can run Voltair remotely from their office or studio, with any standard computer.
A few considerations for this kind of use:
n PPM ratings can look at a full quarter-hour block. A single song—even one five minutes long—won’t give Voltair enough data for a proper statistical analysis of just that element. Assemble a loop with at least fifteen minutes of the test material, preceded by a minute of pink noise at normal program level. When you’re testing, back-time the noise so that content starts within a few seconds of a quarter-hour block.
n You can use Voltair and its paired Encoder for off-line analysis of programs and elements, but you should never use it to pre-record PPM codes for later playback. Nielsen includes a timecode stamp as part of the code that Voltair Enhances, and checks that code against real time when analyzing meter data. Codes must only be added in real-time.
n There must be a direct cable connection between Voltair and its Encoder, and Voltair has to be calibrated for its specific Encoder hardware. But you can route Voltair’s Studio input and Transmitter output to other locations via audio router, audio over IP, or any other way you want. So sending the audio you want to evaluate across a facility—or even to a remote site—isn’t a problem47.
47 But audio quality might be an issue. Psychoacoustic compression schemes (like mp3) can remove details that the PPM encoder is listening for. if you’re shipping audio to a remote voltair / Encoder pair via AiOP or other packet system, use the highest quality the system will support.

BrOwSEr-BASEd rEMOTE CONTrOL | 57
Voltair Installation and User’s Guide Version 2.3 • July 2019
Browser-based Remote Control
Almost all of Voltair’s front-panel functions can be controlled remotely, by logging into its password-protected server from a computer. Voltair’s Confidence Display and RTA can also be monitored on tablets or smart phones.
Voltair supports three different kinds of Access:
nFront Panel Access uses Voltair’s LCD, JOG wheel, and buttons. It does everything required for normal operation. Full details are in the previous chapter.
n Some maintenance functions require a keyboard and hard drive on a connected computer, and don’t appear on the Front Panel.
n Full Web Access lets you control a remote version of the front panel, using the web browser in any networked computer. It’s password-protected for security.
n Normal on-air operating functions, Enhancement and Confidence Analysis settings, and basic system configuration are accessible from the browser. The user interface is almost identical to Voltair’s front panel, except keyboard and mouse are used instead of the JOG wheel.
n Network-critical functions, such as assigning passwords, must be done from Voltair’s front panel. This is for security and to prevent accidental disconnection.
n Updating Voltair firmware, installing optional licenses, and downloading Confidence History spreadsheets all require a connected computer. These functions aren’t available at Voltair’s front panel.
n Calibration cannot be started remotely, and must be initiated at Voltair’s Front Panel. This is to prevent accidental activation.
n Some factory support situations may require you to be connected with Full Web Access while you talk to our technical team.
nView-Only Web Access uses a web browser to mirror the LCD’s Confidence and Real Time Analysis displays. It’s intended for operators and management who want an ongoing view of how well the system is performing.
n This access level can be used on many smart phones and tablets, as well as on full computers.
n View-Only does not give the user any control over Voltair. Settings cannot be changed.
n View-Only and Full Web Access can have different passwords, both programmed from Voltair’s front panel. You can restrict Full Access control to engineering and station management, while letting producers and programmers view PPM Confidence in real-time and over the past hour.
There’s a summary of available functions by access level after the discussion of logging in.

BrOwSEr-BASEd rEMOTE CONTrOL | 58
Voltair Installation and User’s Guide Version 2.3 • July 2019
Logging in The procedure is the same for Full Web and View-Only Access. The only difference is the user name and password, which changes depending on the access level you want.
1. Point your browser to Voltair’s IP address. This appears on the front panel’s Status screen. If you have multiple Voltairs on your network, each will have a different address.
StatusIPAddressV2c.pdf
The Mask number, which appears after the IP Address, is for system maintenance and not used during log-ins.
2. After your browser contacts Voltair, it displays an authentication request.
VoltairWebLoginPassword.tif
A. If you want to use Full Web Access, enter voltairweb as the user. Then enter the password you’d assigned for Full Web on the front panel’s System screen.
B. If you want to use View-Only Access, enter voltairview as the user. Then enter its password. These user names (voltairweb or voltairview) must be entered as all lower-case, exactly as shown here and on the System screen. Passwords are set by you on the Front Panel System screen. You can use upper- or lower-case, numerals, and some punctuation, but they must be entered exactly as you set them. Passwords can (and probably should) be different for the two access levels.
After you’ve entered the user name and password, the computer will finish logging in and you can use Voltair remotely. When you’re finished, you can log out using the button on the upper right corner of your browser’s screen.

BrOwSEr-BASEd rEMOTE CONTrOL | 59
Voltair Installation and User’s Guide Version 2.3 • July 2019
Access System RequirementsA single Voltair will support multiple remote users, in any combination of access levels and functions. You can have Full Web Access running in the operations center and engineering shop, View-Only showing its RTA spectral display to the program producer, and another View-Only showing PPM Confidence graphs on the General Manager’s phone. All functions work in real-time, and parameter changes made on one computer or the front panel are reflected on every other screen.
You can also have more than one Voltair running on the same data network. Make sure they have different IP addresses48, and access each with their specific IP address. If you’ve assigned a machine name (such as FM_Voltair), it will show up at the top its remote pages.
Full Web and View-Only Access run as dynamic web pages from Voltair’s internal server. They are standards-compliant, so virtually any modern web browser on any current computer or mobile operating system will work.
Functions and Access LevelsThis table summarizes what you can control or view at each of the three access levels.
FRONT PANEL FULL WEB ACCESS VIEW ONLY ACCESS
Login Name none required voltairweb voltairview
Login Password none required passwords are set by you, using Voltair’s front panel
Keyboard/Mouse no required optional (suitable for smart phones)
FUNCTIONS
Display Screen Full Full; adjust parameter by clicking with mouse
Full
Adjust Screen Full no
Enhancing Screen Full Full no
System Screen Full Limited: no audio mode or passwords no
Network Screen Full no no
Clock Screen Full Full no
Calibrate Screen Full no no
Status Screen Full Full no
Bypass Mode Button On-screen Button no
ADDITIONAL FUNCTIONS (see below)
Available Tabs none All Control, History, information
Update Software no Yes no
Maintenance Logs and Settings no Yes no
Download Confidence SpreadsheetA no License required; download any day in machine’s history
complete status summary on separate screens Full on one page, via tab
48 if you’re using dHCP , this happens automatically.A License options can also include real-time access to system status, settings, and raw confidence
data every 4.8 seconds via Telnet connection.

BrOwSEr-BASEd rEMOTE CONTrOL | 60
Voltair Installation and User’s Guide Version 2.3 • July 2019
Additional Control FunctionsBoth Full Web Access and View-Only can do more than just mirror Voltair’s front panel LCD. Both feature tabs across the top of their web pages. You can click them for additional functions.
Tabs.pdf
CONTROL tabThis shows a live picture of Voltair’s Front Panel LCD. Menus and specific screen functions vary according to access level, as described in the first part of the chart above.
Since your computer has a mouse and keyboard, but doesn’t have a JOG Wheel, we made navigation on these screens a lot more computer-like:
nTo choose from the menu on the right side of the screen, point to the item name and click.
nTo set any parameter that can be adjusted from the front panel, point to the parame-ter field on the screen, and click. This enters the field.
n If the parameter is normally set by scrolling through possible values (such as the Enhancement Level or Environment Name), use the up- and down- arrow keys to increment though the list49.
n If the parameter requires an alphanumeric entry (such as machine name or the URL of a time server), just start typing. Use the left- and right- arrow keys to navigate through the name, if necessary.
n When you’re finished entering something, press Escape ESC on your keyboard to save it. Or use the mouse to select anything else on that screen, or click a menu item for other screens. Those actions will also save the setting.
nTo toggle between Confidence Display and RTA on the Main screen, click the Toggle Display button at the top of the menu. That item appears only when you’re on the Main screen.
nTo toggle Bypass mode, click the Turn bypass ON or Turn bypass OFF button below the menus50.
49 depending on your browser, this might also rock the page up or down slightly. ignore it.50 Only one of those two buttons will show at a time. For obvious reasons.

BrOwSEr-BASEd rEMOTE CONTrOL | 61
Voltair Installation and User’s Guide Version 2.3 • July 2019
Menus and the Bypass button appear only during Full Web Access. The Toggle Display button is available for both access levels.
Voltair’s other tabs present other functions as web pages and forms, in a style that’s intuitive to any computer user. You can click on links, type data in fields, and use the DELETE key to correct mistakes.
UTILITIES tabThis tab is available only for Full Web Access, and lets you perform system maintenance.
System Software Upgrades
The following instructions apply when upgrading from Voltair version 1.5 or higher. If you’re upgrading from an earlier version, contact Telos for more information.
n Copy upgrade package to Voltair lets you upload new firmware releases. Clicking this function takes you to a page where you can select the firmware package on your computer, copy it to Voltair, and then install it. The new software won’t be activated, however, until you do the next function:
n View or switch running Voltair version lets you manage current and previous firmware releases. You can switch to the latest version, revert to a previous version if there’s ever a reason, and erase obsolete versions from Voltair’s internal storage.
Switching firmware versions takes about 40 seconds. To avoid dead air, put Voltair into Bypass before you switch. Voltair automatically returns to run mode as soon as switching is complete.
Logs
Voltair keeps internal track of operating parameters and software conditions, so you may be asked to download and forward them during a support call. They’re not in human-readable form, so there’s no point downloading them otherwise.
Maintenance n Switch Voltair Program Output… lets you unlock the output for special audio
monitoring conditions, or lock it again for normal operation.
n Decommission Voltair erases all user settings, licenses, and Confidence history. These can’t be recovered, and you’ll have to start from scratch.
n Switch Encoding to Layer… lets you set Voltair’s watermark recognition protocols for PPM standards in different countries. In the US, this should be left on Layer 1. Contact your dealer for instructions in other markets.

BrOwSEr-BASEd rEMOTE CONTrOL | 62
Voltair Installation and User’s Guide Version 2.3 • July 2019
HISTORY tabIf you have a license for optional Data Capture and Extraction, this tab lets you download an Excel .xlsx spreadsheet or comma-separated value file for any day that Voltair has been running.
CONTROL UTILITIES HISTORY LICENSES INFORMATION
Confidence History Spreadsheets
This page gives you access to historical confidence spreadsheets. Choose a type of spreadsheet, then click on aday to download a spreadsheet with that day's historical confidence data.
Type of spreadsheet file to download: Quarter-hour column chart
July, 2015: 31, 30, 29, 28, 27, 26, 25, 24, 23, 22, 21, 20, 19, 18, 17, 16, 15, 14, 13, 12, 11, 10, 09, 08, 07, 0603, 02, 01
June, 2015: 30, 29, 28, 27, 26, 25, 24, 23, 22, 21, 20, 19, 18, 17, 16, 15, 14, 13, 12, 11, 10, 09, 08, 07, 06, 0503, 02, 01
May, 2015: 31, 30, 29, 28, 27, 26, 25, 24, 23, 22, 21, 20, 19, 18, 17, 16, 15, 14, 13, 12, 11, 10, 09, 08, 07, 0604, 03, 02, 01
April, 2015: 30, 29, 28, 27, 26, 25, 24, 23, 22, 21, 20, 19, 18, 17, 16, 15, 14, 13, 12, 11, 10, 09, 08, 07, 06, 0503, 02, 01
March, 2015: 31, 30, 29, 28, 27, 26, 25, 24, 23, 22, 21, 20, 19, 18, 17, 16, 15, 14, 13, 12, 11, 10, 09, 08, 07, 04, 03, 02, 01
February, 2015: 28, 27, 26, 25, 24, 23, 22, 21, 20, 19, 18, 17, 16, 15, 14, 13, 12, 11, 10, 09, 08, 07, 06, 05, 0402, 01
January, 2015: 31, 30, 29, 28, 27, 26, 25, 24, 23, 22, 21, 20, 19, 18, 17, 16, 15, 14, 13, 12, 11, 10, 09, 08, 0705, 04, 03, 02, 01
December, 2014: 31, 30, 29, 28, 27, 26, 25, 24, 23, 22, 21, 20, 19, 18, 16
Firmware version 2.0b7 ©2015 by 25-Seven Systems, The Telos Alliance. All Rights Reserved
Voltair™ History http://suitable.dyndns.org:14080/history.html
1 of 1 7/31/15 1:41 PM
Connected to unit “Voltair” as user “voltairweb” Logout
UTILITIESCONTROL LICENSES INFORMATION
HistoryTab.pdf
Available days are listed by month, most recent ones being at the top of the list. Click on a day, and your browser downloads a file called Voltair_MachineName_History_Date with an xlsx or csv extension. The filename is the same no matter which Type of file you choose, so if you’re grabbing multiple versions of the same date’s history, you should change the file names to keep them identifiable.
The Confidence numbers include the effect of any Environment type and level you’ve set.

BrOwSEr-BASEd rEMOTE CONTrOL | 63
Voltair Installation and User’s Guide Version 2.3 • July 2019
The Type of Spreadsheet lets you select from a pull-down menu with six possible file layouts:
Minute-by-minute spreadsheet11223344556677889910101111121213131414151516161717181819192020212122222323242425252626272728282929303031313232333334343535
AA BB CC DD EE FF GG HH II
Original Enhanced Original Enhanced00:01 1 1 1 2300:02 1 0.5 1 2300:03 1 0.5 1 2300:04 1 0.8 1 2300:05 1 0.5 1 2300:06 1 0.6 1 2300:07 1 0.4 1 2300:08 1 0.4 1 2300:09 1 1 1 2300:10 1 1 1 2300:11 1 1 1 2300:12 1 1 1 2300:13 1 0.5 1 2300:14 1 0.5 1 2300:15 1 0.6 1 1 1 2500:16 1 0.9 1 2500:17 1 0.7 1 2500:18 1 0.7 1 2500:19 1 0.8 1 2500:20 1 0.5 1 2500:21 1 0.6 1 2500:22 1 0.5 1 2500:23 1 1 1 2500:24 1 1 1 2500:25 1 1 1 2500:26 1 1 1 25
Voltair(Confidence(ExportUnitC"K257_FM"
DataCfromC2015K07K15FirmwareC2.0
Initial(configuration:EnhancementCLevel:C23
EnvironmentCName:C"None"EnvironmentCLevel:CK16dB
EnhanceCLevel Notes
TimeChh:mm
RunningC(1=yesC0=no)
ConfidenceC(0K1)1Cminute 15Cminute
HistBwXls.pdf
Minute-by-minute color-coded spreadsheet11223344556677889910101111121213131414151516161717181819192020212122222323242425252626272728282929303031313232333334343535
AA BB CC DD EE FF GG HH II
Original Enhanced Original Enhanced00:01 1 0.4 1 2500:02 1 0.3 1 2500:03 1 0.5 1 2500:04 1 0.4 1 2500:05 1 0.4 1 2500:06 1 0.5 1 2500:07 1 0.2 1 2500:08 1 0.1 0.8 2500:09 1 0.3 1 2500:10 1 0.1 0.7 2500:11 1 0.5 1 2500:12 1 0.3 1 2500:13 1 0.5 1 2500:14 1 0.3 1 2500:15 1 0.3 1 0.4 1 2300:16 1 0.2 1 2300:17 1 0.2 0.8 2300:18 1 0.3 1 2300:19 1 0.1 0.4 2300:20 1 0.3 0.9 2300:21 1 0.2 1 2300:22 1 0.1 0.6 2300:23 1 0.2 1 2300:24 1 0.2 1 2300:25 1 0.2 1 2300:26 1 0.3 1 23
Voltair(Confidence(ExportUnitC"W257FAM1"
DataCfromC2015F06F15FirmwareC2.0
Initial(configuration:EnhancementCLevel:C25
EnvironmentCName:C"Vehicle"EnvironmentCLevel:CF15dB
EnhanceCLevel Notes
TimeChh:mm
RunningC(1=yesC0=no)
ConfidenceC(0F1)1Cminute 15Cminute
HistColXls.pdf
Minute-by-minute column charts11223344556677889910101111121213131414151516161717181819192020212122222323242425252626272728282929303031313232333334343535363637373838393940404141424243434444454546464747484849495050515152525353545455555656575758585959606061616262636364646565666667676868
AA BB CC DD EE FF GG HH II
Voltair(Confidence(ExportUnit8"Mix257_1"
Data8from82015B07B15Firmware82.0
Initial(configuration:Enhancement8Level:825
Environment8Name:8"None"Environment8Level:8B16dB
0.08
0.28
0.48
0.68
0.88
1.08
00:158 00:308 00:458 01:008
Confidence(per(Minute:(00:00(to(01:00(
Processed( Original(
0.08
0.28
0.48
0.68
0.88
1.08
10:158 10:308 10:458 11:008
Confidence(per(Minute:(10:00(to(11:00(
Processed( Original(
0.08
0.28
0.48
0.68
0.88
1.08
15:158 15:308 15:458 16:008
Confidence(per(Minute:(15:00(to(16:00(
Processed( Original(
11223344556677889910101111121213131414151516161717181819192020212122222323242425252626272728282929303031313232333334343535363637373838393940404141424243434444454546464747484849495050515152525353545455555656575758585959606061616262636364646565666667676868
AA BB CC DD EE FF GG HH II
Voltair(Confidence(ExportUnit8"Mix257_1"
Data8from82015B07B15Firmware82.0
Initial(configuration:Enhancement8Level:825
Environment8Name:8"None"Environment8Level:8B16dB
0.08
0.28
0.48
0.68
0.88
1.08
00:158 00:308 00:458 01:008
Confidence(per(Minute:(00:00(to(01:00(
Processed( Original(
0.08
0.28
0.48
0.68
0.88
1.08
10:158 10:308 10:458 11:008
Confidence(per(Minute:(10:00(to(11:00(
Processed( Original(
0.08
0.28
0.48
0.68
0.88
1.08
15:158 15:308 15:458 16:008
Confidence(per(Minute:(15:00(to(16:00(
Processed( Original(
HistMinGrfXls.pdf

BrOwSEr-BASEd rEMOTE CONTrOL | 64
Voltair Installation and User’s Guide Version 2.3 • July 2019
Quarter-hour column chart1122334455667788991010111112121313141415151616171718181919202021212222232324242525262627272828
AA BB CC DD EE FF GG HH
Voltair(Confidence(ExportUnit7"GeoffAir_1"
Data7from72015@[email protected]
Initial(configuration:Enhancement7Level:725
Environment7Name:7"None"Environment7Level:7@16dB
0.07
0.27
0.47
0.67
0.87
1.07
01:007
02:007
03:007
04:007
05:007
06:007
07:007
08:007
09:007
10:007
11:007
12:007
13:007
14:007
15:007
16:007
17:007
18:007
19:007
20:007
21:007
22:007
23:007
24:007
Confidence(per(QH(for(2015=07=15(
Processed( Original(
HistQtrXls.pdf
After you’ve opened an .xlsx file, you can use it like a standard Excel spreadsheet:
n select the data for any daypart you want to examine,
n edit or format the data or layout any way you want, or
n add data from a ratings service or other source for comparison.
Times displayed are in hours and minutes on a 24-hour clock, with 00:01 reporting the results from the first minute after midnight.
Confidence is displayed in tenths of a unit between 0.0 and 1.0. The number is derived from statistical analysis of multiple PPM data channels during the period shown.
n 1.0 shows very high confidence that codes will be heard by all panelists’ meters under the conditions you’ve set.
n A confidence of 0.0 means that no codes were detected during the period, usually indicating dead air or the PPM Encoder being set to Bypass.
n Confidence bars in the spreadsheet are linear and represent the steps between 0 and 1. You can read each one’s specific value on the Excel graph by holding the mouse over a bar.
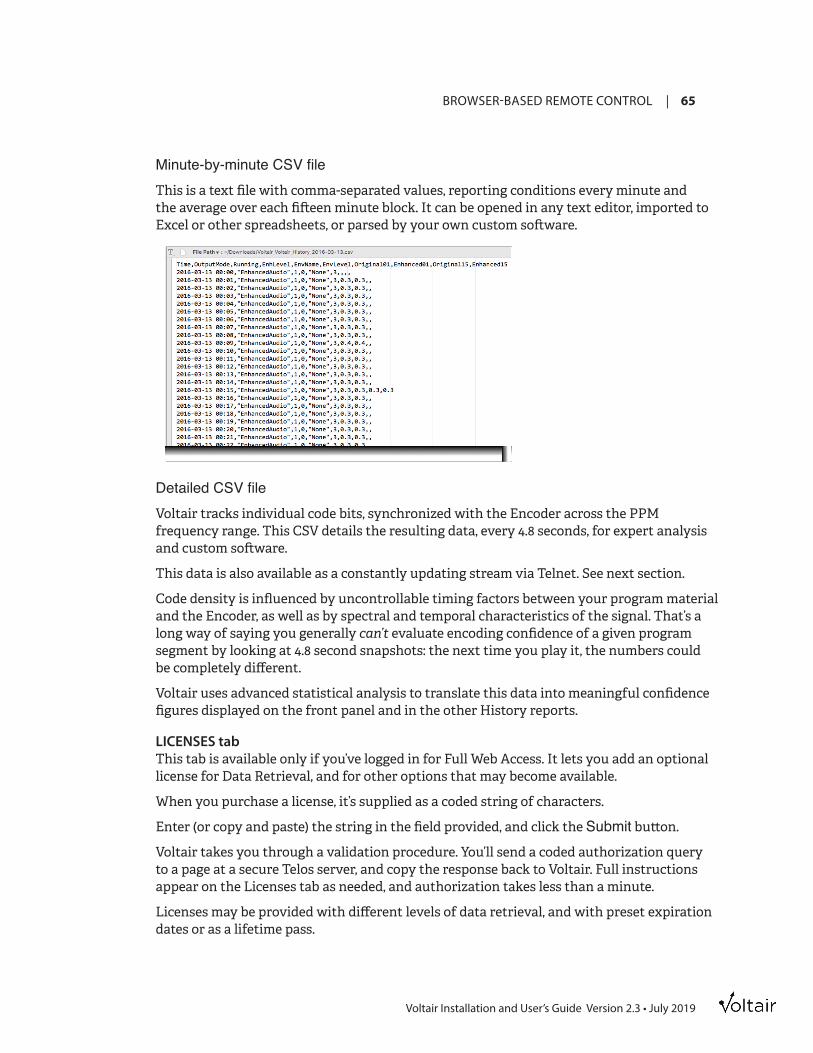
BrOwSEr-BASEd rEMOTE CONTrOL | 65
Voltair Installation and User’s Guide Version 2.3 • July 2019
Minute-by-minute CSV fileThis is a text file with comma-separated values, reporting conditions every minute and the average over each fifteen minute block. It can be opened in any text editor, imported to Excel or other spreadsheets, or parsed by your own custom software.
Detailed CSV fileVoltair tracks individual code bits, synchronized with the Encoder across the PPM frequency range. This CSV details the resulting data, every 4.8 seconds, for expert analysis and custom software.
This data is also available as a constantly updating stream via Telnet. See next section.
Code density is influenced by uncontrollable timing factors between your program material and the Encoder, as well as by spectral and temporal characteristics of the signal. That’s a long way of saying you generally can’t evaluate encoding confidence of a given program segment by looking at 4.8 second snapshots: the next time you play it, the numbers could be completely different.
Voltair uses advanced statistical analysis to translate this data into meaningful confidence figures displayed on the front panel and in the other History reports.
LICENSES tabThis tab is available only if you’ve logged in for Full Web Access. It lets you add an optional license for Data Retrieval, and for other options that may become available.
When you purchase a license, it’s supplied as a coded string of characters.
Enter (or copy and paste) the string in the field provided, and click the Submit button.
Voltair takes you through a validation procedure. You’ll send a coded authorization query to a page at a secure Telos server, and copy the response back to Voltair. Full instructions appear on the Licenses tab as needed, and authorization takes less than a minute.
Licenses may be provided with different levels of data retrieval, and with preset expiration dates or as a lifetime pass.

BrOwSEr-BASEd rEMOTE CONTrOL | 66
Voltair Installation and User’s Guide Version 2.3 • July 2019
Licenses are attached to a specific Voltair, not to the user or station. If you decommission Voltair from the Utilities tab, the license is lost and cannot be recovered.
History data is stored internally whenever Voltair is running; even if the machine has not yet been authorized for Data Capture and Extraction. After you add the license, you can retrieve data for any day.
INFORMATION tabThis displays all Voltair settings and presets, date and time of last calibration, network and hardware identification, running temperature, and firmware version. In addition, it provides a quick check of Encoder status and distortion level.
The information is available in separate screens on Voltair’s Front Panel, but this tab displays them all in one place. Information can be copied for pasting elsewhere, and the whole page can be printed or captured to PDF for your records.

HiSTOrY dATA rETriEvAL | 67
Voltair Installation and User’s Guide Version 2.3 • July 2019
History Data Retrieval
Voltair maintains a detailed internal history of its operation. This file is updated once per second. It includes:
n The Confidence level of complete PPM messages received, at periods of 4.8 seconds, 1 minute, and 15 minutes.
n Confidence measured for both the Encoder output and Voltair Enhancement.
n Confidences measured through the Environment as set by the user.
n Changes in Enhancement level, Environment name and Environment level.
n Whether or not Voltair is processing audio.
n Some other operational records that can be useful in case of problems.
Histories are filed with the current date, are continually updated, and previous days’ logs are saved for as long as Voltair is in service51.
If your Voltair is licensed for Data Retrieval and Extraction, you can download some of this data for your own analysis. Unlike Voltair’s History spreadsheets, this Data Retrieval:
n Lets you see continuous, ongoing data. New raw confidence readings have much finer granularity than is possible with a History spreadsheet52.
n Lets you download individual hours as well as full days.
n Requires some computer skills. Retrieval is via a Telnet connection or similar network connection.
n Will require filtering.
The last requirement is because you get a lot of raw data, some of which may not be helpful for normal analysis. Most users find themselves writing simple programs to sort through all this.
51 They use an efficient format, and voltair has a lot of internal storage space. we estimate the system can hold about fifty years of old logs.
52 Just remember, this is raw data and hasn’t been given voltair’s algorithmic Confidence analysis. The data is also subject to random influences, such as sync issues between the start of a sound and the Encoder’s internal clock. Because of this, multiple trials with identical short material are likely to produce different raw data.

HiSTOrY dATA rETriEvAL | 68
Voltair Installation and User’s Guide Version 2.3 • July 2019
Access LevelsVoltair’s optional Data Retrieval and Extraction licenses determine what kind of data can be retrieved. Each higher level of license will also access the data available with lower levels.
UnlicensedIf this Voltair has not had any licenses installed, you can still use basic Data Retrieval to verify operation. Historic and on-going reports show Enhancement Level, Environment Name and Level, and any changes to operational status (such as the system entering Bypass mode).
The basic unlicensed mode can provide real-time data for monitoring system health, whether you’re controlling one Voltair or dozens of them.
Even if this Voltair is not licensed, it is still writing complete history files whenever it’s running53. You can buy a license tomorrow, and retrieve yesterday’s (or last month’s, or last year’s) data.
Enhanced Confidence LicenseThis license adds Confidence Now data, updated every 4.8 seconds, and Decode Interval resets so you can analyze their timing. Both are written for both the Encoder’s output and Voltair Enhancement.
Logging in for real-time and historic dataVoltair communicates its history via TCP port 8259. If you’re using a Linux or Windows command line or Mac Terminal app, you can start a session with telnet [Voltair IP address] 8259.
You should see this response.
Connected to [Voltair IP address].
Escape character is ‘^]’.
!Welcome to Voltair “Voltair”, firmware 2.3
Then you can issue commands.
53 Some data will not get written until voltair is running Firmware version 2.0 or higher.

HiSTOrY dATA rETriEvAL | 69
Voltair Installation and User’s Guide Version 2.3 • July 2019
Voltair control languageThe language consists of messages sent by the controller (that’s you on your computer) or Voltair. Each message from the controller results in a single message sent by Voltair. In addition, the Voltair may asynchronously send messages to indicate specific events. The controller is not expected to respond to these messages.
All messages are composed of lines, each of which is low ASCII characters terminated by an optional <CR>[ASCII 13] and a mandatory <LF>[ASCII 10]. Lines sent by Voltair end with <CR><LF> . Voltair treats <LF> as ending a line, and ignores incoming <CR>.
Each message to Voltair must be a single line. Messages from Voltair may be single or multi-line. Messages are never interleaved; Voltair will only begin sending a message once the previous message has been completely sent. Each Voltair message is sent in a single burst, with no significant delays between characters. Messages from the controller can contain arbitrary delays between characters; that is, they can be typed by humans who need to look up language rules while they’re typing.
Voltair ResponsesVoltair does not echo your commands. If you want to see what you’re typing, you’ll need to use your terminal’s echo function; this is turned on by default if you’re using telnet.
If Voltair is reporting events, it may continue reporting while you’re giving a command. This may be confusing, but it’s not an error: terminating the controller line will have the desired result.
Voltair will not respond to a command until <LF> is received.
Responses from Voltair begin with a result character:
n ! This message is the last line (often the only line) of a response to a successful command
n – This line is part of a multi-line response to a successful command
n ? This message says the last command is unsuccessful or not understood
n @ This message is asynchronous output, not a response to the immediately preceding command
Voltair responses end with <CR><LF>.

HiSTOrY dATA rETriEvAL | 70
Voltair Installation and User’s Guide Version 2.3 • July 2019
Permitted CommandsA command is a single line consisting of a command word and an optional argument list, terminated by <CR><LF> or just <LF>.
Commands and individual arguments are separated by spaces, and the language is case-sensitive.
If there is an error in a message, Voltair responds with ? [error message] <CR><LF>.
A line feed by itself, or a line that consists of just <CR><LF>, will result in !
An empty command (just a <LF> or <CRLF>) will result in a “!”
Command Description Voltair response
Enable Enables live, asynchronous reporting of [ar-gument] data. The only currently supported argument is all, which enables full reporting subject to licensing.
!enable all
Voltair then reports once per second, with whatever data is available at its license levelB.
Disable Disables asynchronous reporting of the specified data. The only argument in current software is all.
!disable all ”.
Get Gets the current value of the specified data. If desired, more than one argument can be specified in a single command.
Argument: replayCatalog get replayCatalog= YYYY MM DD,YYYY MMDD,... where the dates are those available which have saved data
Argument: rights !get rights= XXXX, where “XXXX” is none , standardData or enhancedData
Replay Display all the data for a specified date. Dates must be in the format of, and listed by, a replayCatalog. You can add a two-digit hour (in 24-hour format) after the date, and Voltair will limit the response to that hour.
Voltair immediately responds with a series of lines describing the date and time being reported, the identification of each reported state, and its value.
Each line begins with –, except the final line begins with!
help If no arguments, then lists all valid commands. !commands are: enable disable get replay help; for more info type “help” and the command
If a single command is given as an argument, gives detailed help on that command. (example help replay)
(example)
!replay: play back data on given date (argument in YYYYMMDD format)
Data appears as a series of lines describing the operating parameters and output mode, and time-stamped confidence values every second.
B You can pause execution, and send another command, by issuing Control-C.

iNSTALLATiON | 71
Voltair Installation and User’s Guide Version 2.3 • July 2019
Installation
Voltair comes in versions with either AES/EBU digital, or balanced +4 dBu analog, connections. The connection type must be matched to the Nielsen Studio Grade Encoder that Voltair will be used with.
Voltair must “wrap around” its Encoder, with a direct cable connection between these units. Anything else in the circuit between Voltair and Encoder—digital/analog converter, routing system, AoIP network—can add latency that stops Voltair from working properly.
These arrangements work:
ProgramSignal
Encoder
ProgramSignal
ToTransmitter
Encoder
ToTransmitter
Analog Wiring Digital WiringConverter
AOIP Network orConventional Audio Router
InstallTheseWork.pdf
These arrangements don’t work:
ProgramSignal
ToTransmitter
ProgramSignal
ToTransmitter
Encoder
AOIP
Net
wor
k or
Conv
entio
nal A
udio
Rou
ter
Analog Wiring Digital WiringConverter
InstallDontWork.pdf
Installation may temporarily disable your airchain. Voltair includes failsafe bypass relays: if it’s not turned on or power is disconnected, the relays de-energize: Program signal is sent directly to the Encoder, and the Encoder’s output is sent directly to the transmitter.
If your station’s final loudness processor includes an insert point, that may be the best place to connect Voltair.

iNSTALLATiON | 72
Voltair Installation and User’s Guide Version 2.3 • July 2019
Complete installation procedure can be found in the Installation section. Voltair must be calibrated for the specific Encoder it’s connected to. If you change Encoders, you’ll have to re-calibrate. If you change the master sample rate in a digital installation, you’ll also have to recalibrate.
In analog installations, make sure that cables have consistent polarity. Mono analog installations should use only the Left channel inputs and outputs on Voltair; mono digital installations should use the Left channel of the AES/EBU interleaved signal. Stereo installations should be checked to make sure that left and right channels aren’t swapped on the way to the Encoder or back. Phase or channel errors will cause Calibration to fail.
Voltair also includes a 9-pin jack for connection to the Encoder’s Bypass Monitor jack. This may be connected to automatically put Voltair into Bypass mode when the Encoder isn’t functioning, but there may be issues in certain installations. See the warning in a few pages.
Rear panel connections
Power inlet and switch
Program Audio Input
To / FromPPM Encoder
To Transmitter Loudness Processor
Ethernet to Network
9-pin Bypass from Encoder
GPIO
Analog Voltair
Digital Voltair
RearPanelsComplete.pdf
Analog audio connectionsVoltair is wired for line-level balanced analog audio with XLR connectors. Like almost all other modern equipment, pin 2 is hot, pin 3 is return, and pin 1 is ground. The connection scheme is unterminated or “bridging”, but if your Encoder has a 600Ω termination switch, leave it turned on.

iNSTALLATiON | 73
Voltair Installation and User’s Guide Version 2.3 • July 2019
Digital audio connectionsVoltair is wired for AES/EBU digital audio, balanced, 110Ω impedance with XLR connectors. Like almost all other modern equipment, pin 2 is hot, pin 3 is return, and pin 1 is ground. If your plant puts AES/EBU on unbalanced BNC connectors, you may use 75Ω transformer adapters.
Voltair defaults to 48 kHz sample rate operation, but automatically adjusts to 32 kHz or 44.1 kHz inputs with no operator intervention, passing the same sample rate to the encoder. If the digital input is removed, Voltair reverts to its default rate.
If you change the sample rate, both Voltair and the Encoder have to adjust. This will momentarily put the Encoder into Bypass mode.
Changing the sample rate can affect delicate timings within the system. You must recalibrate Voltair after a sample rate change.
Audio levelsVoltair and the Encoder both operate as unity-gain devices, and there is no level adjustment. Nominal analog level is +4 dBu, with 20 dB headroom. Nominal digital level is either -20 dBFS or -12 dBFS, with headroom up to –.25 dBFS.
The Nielsen Encoder works best with consistent levels that are near or above nominal. The Voltair/Encoder pair should be installed in an insert loop of your airchain’s loudness processor54, follow a separate level-riding device ahead of the loudness processor or transmitter, or be very carefully monitored by your master control operator.
Ethernet connectionThe 100M/1G LAN connector provides access to Voltair’s internal Web server for remote control, and connects to NTP servers. Connect to your router or nearby switch with standard Ethernet Category 5 or higher cable, using an RJ-45 connector. This is standard for most modern computerized gear.
Voltair supports auto MDI-X, and you can use a straight or crossover cable. Details are provided later in this manual.
Encoder Bypass MonitorThe DB9 female connector on the rear of Voltair matches a DB-9 male connector on the back of Nielsen’s Studio Grade Encoder. If you connect a straight-through cable between them, Voltair will sense when the Encoder is going into Bypass mode.
When Voltair encounters any problems, including an Encoder bypass signal via DB-9, it goes into Error Recovery mode for safety: Voltair bypasses itself as a safety feature, and waits for an operator to check the condition, Once everything is clear, the operator should press BYPASS (or trigger it from a GPIO or Web Full Access connection) to restart Voltair operation.
54 Setup hints for using voltair with the insert loop of Omnia 9 and 11 processors are on page 86.

iNSTALLATiON | 74
Voltair Installation and User’s Guide Version 2.3 • July 2019
Because of Voltair’s Error Recovery, it does not automatically resume operation if the Encoder starts up again. You’ll have to reset it by triggering BYPASS.
We recommend using the DB-9 connection with all analog installations.
It may cause problems with a few digital installations, however. If you’re running at 32 kHz or 44.1 kHz sampling and the AES/EBU bitstream going to Voltair has drop outs, these may force Voltair to its default sample rate of 48 kHz. The Nielsen Encoder has to restart when it encounters a sample rate change, so it goes into Bypass. If the Encoder’s Bypass state is sent to Voltair via DB-9, this triggers Error Recovery mode. After the Encoder restarts, normal watermark codes start flowing into your program stream; Voltair’s bypass relays sends them to the transmitter. But Voltair processing will remain turned off until the operator resets it by pressing BYPASS on the front panel or Web connection, or triggering the Bypass input on Voltair’s GPIO connection.
Bottom line: If you’re running a digital installation at 32 kHz or 44.1 kHz sample rate, and you have reason to believe the input to Voltair might be intermittent, do not use the 9-pin connection between Voltair and the Encoder.
Voltair works fine without this cable in place.
Encoder Bypass Monitor pinouts on Voltair’s rear panel:
pin Signal pin signal
1 Chassis Ground 6 Chassis Ground
2 Chassis Ground 7 Encode Mode
3 Logic Ground 8 Chassis Ground
4 Bypass Mode 9 Chassis Ground
5 Chassis Ground
Electrical characteristics are the same as Voltair’s GPIO (next page).
When the Encoder is in Bypass, it connects pin 4 to pin 3, and lets pin 7 float. When the Encoder is running, it connects pin 7 to pin 3, and lets pin 4 float.

iNSTALLATiON | 75
Voltair Installation and User’s Guide Version 2.3 • July 2019
GPIO (25-Pin DB25)Six parallel control inputs and eight parallel control outputs appear on a female DB-25 connector. Pin assignment is as follows:
input pin signal Notes
1 25 Voltair Bypass Toggles Voltair bypass mode, equivalent to front panel button
2 12 Enter Low Enhancement Sets Enhancement equal to Low setting on System page
3 24 Enter Medium Enhance-ment Sets Enhancement equal to Medium setting on System page
4 11 Enter High Enhance-ment Sets Enhancement equal to High setting on System page
5 23reserved For future software versions
6 10
Inputs should be pulled low momentarily to activate. Connect inputs 2, 3 and 4 to an automation system to change Enhancement at different dayparts, or to test Voltair’s effectiveness using Test Enhancement Swaps driven from your automation system55.
output pin signal Notes
1 19 Voltair Bypass Indicates Voltair is in Bypass
2 6 Decode >= 1 Decode interval is greater than one minute
3 18 Decode >= 2 Decode interval is greater than two minutes
4 5 Decode >= 5 Decode interval is greater than five minutes
5 17 Enhancement= Low
Enhancement level now equals the Low setting on System page
6 4 Enhancement= Medium Enhancement level now equals the Medium setting on System page
7 16 Enhancement= High
Enhancement level now equals the High setting on System page
8 3 Not Encoding Alarm There is a user-adjustable “grace period” before alarm triggers (page 55)
Outputs are held low for as long as operational state exists. You can connect outputs 2, 3 and 4 to your automation system for logging of Automatic Enhancement Swap tests.
55 These tests can be driven internally by voltair if desired. Complete details on this kind of testing can be found under the “Finding the Best Enhancement Level” section.

iNSTALLATiON | 76
Voltair Installation and User’s Guide Version 2.3 • July 2019
other pins Designation
1, 9, 14,15, 21, 22 no connection
2, 20 Ground
7 output common
8 +5 VDC 200 mA Max
13 input common
Inputs and outputs are opto-isolated for easy interface to other equipment. A +5v supply and ground are also brought out to the DB-25 for simple remote controls using pushbuttons and LED status readouts. The supply can provide 200 mA, more than adequate for 8 LEDs and 6 logic inputs. Total draw should not exceed this value. This supply is protected by an internal, self-resetting thermal circuit breaker. If this breaker should trip, power off and allow several minutes for it to reset.
nInputs require at least 6 mA flowing from the input common (pin 13) and the individu-al input circuit pin.
nOutputs can carry up to 25 mA, up to 30 V DC per channel, between the individual output circuit pin and output common (pin 7).
Simplified schematic of control arrangement, with basic pushbutton control and LED readout:
Use the jumpers shown as thick gray lines for simple pushbutton and LED remote. * indicates individual DB-25 pins for separate inputs and outputs, as per the tables.56
56 Although typically not necessary with most digital logic inputs, a 10k pull up resistor between voltair’s internal +5v logic supply (dB-25 Pin 8) and the desired status output pin may be required with certain broad-cast remote controls where an analog metering input is used as a digital status input.

iNSTALLATiON | 77
Voltair Installation and User’s Guide Version 2.3 • July 2019
AC PowerConnect to 60 cycle source between 100 and 240 volts. Voltair is internally fused at 5 Amp, but will typically draw much less: peaks of about 100 watts on startup, and 50 watts when running.
When you turn Voltair ON, it goes through a startup procedure of about 30 seconds. The system’s fans will run at high speed during startup, but then slow down to normal operating level. Multiple cooling fans help ensure the processing systems stay at optimal operating temperature, insuring a long life, and significantly lowering risk of heat related device failures.

TrOuBLESHOOTiNg ANd uPdATES | 78
Voltair Installation and User’s Guide Version 2.3 • July 2019
Troubleshooting and Updates
Voltair is solidly built, with rigorously tested hardware and software and collective years of successful run time. Nonetheless, no electronic equipment is immune from occasional problems. These pages will help you identify which ones can be fixed quickly and locally, and which require your contacting us.
In an emergency, you can reach our Support Team anytime, by calling +1 216-622-0247.
Voltair has an extensive internal logging system, engineered to ensure system integrity and help us get to the bottom of any problem quickly. When contacting customer support, you may be instructed how to retrieve log files so they may be emailed to us for analysis.
For billing questions or other non-emergency technical questions, email [email protected] or call +1 216-241-7225 between 9:00 AM - 5:00 PM USA Eastern Time, weekdays. There’s full contact information at the end of this chapter, and at the end of this manual.
Calibration issuesIf you have any problems successfully calibrating please check the following items:
nMake sure both the PPM Encoder and Voltair are plugged in, and that Voltair is powered on (switch on rear panel, adjacent to IEC connector)
nMake sure the PPM Encoder is not in Bypass
nCheck that audio cabling to and from encoder is correctly installed: no channel flipping, no unbalanced cabling, no polarity reversals.
nMake sure there are no electronics between Voltair and the Encoder. It must be an uninterrupted cable connection. Analog/Digital converters or signal routers intro-duce latency that makes Voltair operation impossible.
nMake sure that Audio Mode is correctly set to Mono or Stereo.nMake sure that Voltair is configured for the correct PPM Encode Layer: US
broadcasters should use Layer 1; other countries may have different standards.nDigital Voltair connections should be 32 kHz, 44.1 kHz, or 48 kHz sampling; 2-channels
interleaved AES/EBU; 16- or 24-bit; 110Ω balanced XLR wiring.
nA few settings may also be necessary on the Nielsen Encoder:
n Digital PPM Encoders must have their input selector set to XLR.
n Some Analog Encoders may have a termination switch. Set this to 600 Ω
If Voltair reports cable problems during calibration, and cables have been checked with no errors found, it’s possible Voltair is in an unstable state because of an interrupted calibration. If so, power-cycle both the Encoder and Voltair. Then recalibrate.

TrOuBLESHOOTiNg ANd uPdATES | 79
Voltair Installation and User’s Guide Version 2.3 • July 2019
If all the above seem correct but calibration still fails after several attempts, try switching to a different encoder (for example, replace your Primary unit with its Backup). Voltair verifies Encoder audio performance during Calibration: if a specific Encoder won’t Calibrate, check Voltair’s screen for information57.
If you can’t calibrate your Voltair to any encoder, call customer support for assistance.
How to Verify CalibrationHere’s how to test whether Voltair and your PPM Encoder are working together properly.
nCalibrate Voltair to the Encoder.
nTake the Voltair / Encoder out of your active airchain, but keep them wired together.
nFeed Voltair White Noise, at or slightly below nominal input level. In stereo installa-tions, make sure the noise is going to both channels.
nWith this signal present:
n The Energy meter should show a strong consistent level;
n The Confidence meter should start painting full green bars on both Original and Processed displays;
n The Decode Interval should be resetting every 4.8 seconds; and
n The RTA should show a consistent level across its spectrum.
If this is not the case, try Calibrating again. If the problem persists, there may be trouble with your PPM Encoder or wiring.
Frequent CalibrationsIf you need to calibrate Voltair frequently, the Encoder might have problems. Check the INFORMATION tab on the Web interface to see if the last Calibration indicated an Encoder issue.
Switch to a backup Encoder, calibrate to the backup, and see if it’s more stable.
It is possible that your Encoder’s internal noise or clock may slowly change over time as hardware ages. Recalibrating your Voltair and Encoder as part of periodic or annual maintenance regimen will do no harm.
57 Any piece of electronic equipment has components that can drift over time, and drifting within an encoder may cause timing or noise issues.

TrOuBLESHOOTiNg ANd uPdATES | 80
Voltair Installation and User’s Guide Version 2.3 • July 2019
Confidence Measurement issuesIf you’re seeing low confidence on material that normally encodes well, and you’ve determined that the Voltair / Encoder pair is calibrated:
nSee if you have the Environment Level turned to a very high setting
nTry setting Environment to NonenMake sure the PPM Encoder is not in bypass
nSee if the Mono / Stereo setting has been changed.
nMake sure Voltair and the Encoder are seeing a loud enough signal. Inadequate levels at Voltair might be hidden by extra gain elsewhere in the signal chain.
nMake sure the source material is high quality. Some data compression algorithms, particularly low-bitrate mp3, can produce audio that’s hard to encode.
nIn analog installations, make sure cables are correctly installed: channels aren’t flipped, all wiring is properly balanced, and the polarity is consistent.
nIn digital installations, see if the sample rate has changed. If so, you must recalibrate.
nSee if anyone has changed the Encoder. If so, you must recalibrate.
nConsider the possibility that PPM Encoder performance may have changed in some way (because of software updates or component aging). If so, you must recalibrate.
Other issues nIf Voltair goes into Bypass for unexplained reasons, check if the GPIO or 9-pin
Encoder Bypass connector is getting falsely triggered. The keyed Bypass switch on some Encoder hardware has been known to become intermittent; if this happens, it can force the Encoder into Bypass. So if Voltair reports a failure, check your Encoder’s LCD screen to see if it’s operating properly.
nIf Voltair seems to keep changing its own Enhancement level, particularly after you’ve manually changed it, make sure Test Enhancement Switching has not been enabled.
nIf Voltair keeps restarting, check power cables and AC sources.
Software UpdatesSoftware UpdatesFrom time-to-time, 25-Seven will release software updates. These will be available via our web site or emailed by customer support. Please check our website regularly, or fill out your Warranty card to get on our mailing list for upgrade and update information.

TrOuBLESHOOTiNg ANd uPdATES | 81
Voltair Installation and User’s Guide Version 2.3 • July 2019
Contacting Us…By Phone/Fax
You can reach our 24/7 Support Team in emergencies by calling +1 216-622-0247. For billing questions or other non-emergency technical questions, call +1 216-241-7225 between 9:00 AM to 5:00 PM USA Eastern Time, Monday through Friday.
By EmailNon-emergency technical support is available at [email protected].
By WebThe Telos Web site has a variety of information that may be useful for product selection and support. The URL is http://www.TelosAlliance.com. See the 25-Seven section for Voltair news and updates.

uSiNg vOLTAir wiTH OMNiA | 82
Voltair Installation and User’s Guide Version 2.3 • July 2019
Using Voltair with Omnia
Research indicates encoding performance can be significantly enhanced if processed audio (as compared to an unprocessed board feed) is used at the input of Voltair. Omnia engineers have worked closely with the Voltair team to develop signal flows and presets that support strong watermark encoding.
If you’re using Omnia.9 or Omnia.11, connect the Voltair / Encoder pair to the processor’s insert point. Then follow one of these setups.
Omnia.9 Insert Point Make sure your Omnia.9 is running the latest software. As of this writing, it’s V3.15.36, but you should check the Omnia website at www.telosalliance.com for even newer versions. If you’re updating, install the latest version of NfRemote before installing the main software. Full instructions are on the website.
If you’re running a version earlier than V0.52.73, don’t try to update directly to the current software. Instead, update to V0.52.73 first. Then you can install the most modern software.
Normally, Omnia.9 uses completely independent processing paths for analog FM and HD-1 audio. Beginning with V3.15.23 software (and continuing in V3.15.36) it is possible to configure Omnia.9 so that a common processing core is used ahead of the insert point with separate final (“back end”) processing for FM (clipper) and HD (limiter). This lets you share a single Voltair/Encoder combination for both analog FM and HD-1.
Please note this feature is only for analog FM with HD-1 operation. Analog AM requires vastly different treatment from Analog HD, so it’s not possible for them to share a common Omnia .9 processing core.
For AM operations, the insert point is available only in the analog path.
Using the insert point feature requires the use of one unused physical analog or AES digital output (to send audio from Omnia.9 to the encoder/Voltair side chain) and one unused analog or AES digital input (to return the encoded/enhanced audio back into Omnia.9 for final clipping).

uSiNg vOLTAir wiTH OMNiA | 83
Voltair Installation and User’s Guide Version 2.3 • July 2019
It is also necessary to route the signal properly within the Omnia.9 software as follows:
STEP 1: Select a Send OutputNavigate to the Home > System > I/O Options > Main Outputs menu. Choose “FM Pre-final L/R” as the source for the selected output. In the example below, this is “Main FM Out 1”. Set the output level to “0.0” (unity gain).
Om9SendOut.pdf
STEP 2: Select a Return Input Navigate to the Home > System > I/O Options > FM Options > Insert menu. Choose the selected input source in the “Insert Source” dropdown menu. In the example below, this is “Main Digital”. Do not set the “Insert Mode” control to “On” just yet, as doing so without selecting an input source will interrupt audio!
Om9ReturnInput.pdf

uSiNg vOLTAir wiTH OMNiA | 84
Voltair Installation and User’s Guide Version 2.3 • July 2019
STEP 3: Set the Input GainNavigate to the Home > System > I/O Options > Source Adjustment menu and ensure that the “Input Gain” for the selected return input is set to “0.0” (unity gain).
Om9InputGain.pdf
STEP 4: Turn On the Insert ModeReturn to the Home > System > I/O Options > FM Options > Insert menu and set the “Insert Mode” to “On.”
Om9InsertModeOn.pdf

uSiNg vOLTAir wiTH OMNiA | 85
Voltair Installation and User’s Guide Version 2.3 • July 2019
STEP 5: Adjust Input Levels, Output Levels, and Meter DelayThe initial settings of “0.0” for both output and input gain will be satisfactory in most cases but can be adjusted if necessary.
When the “Insert Mode” control is turned on, an additional set of meters labeled “Insert” will appear in the processing meters display window. These levels should be equal to those of the “Output” meters.
Because of the additional latency introduced by the encoder, it will be necessary to delay Omnia.9’s processing meters so that they stay in time with the audio. To do so, click on any display window (which brings up the Display Settings menu) and advance the “Delay” control until the meters and audio are in sync. This adjustment affects ONLY the meters and not the on-air audio.
Om9MeterDelay.pdf.
A Word About PresetsUsing Omnia.9’s insert point feature will yield better encoding results when compared to using unprocessed audio to feed Voltair. However, encoding success depends upon a multitude of factors including the choice of processing presets, and some presets have a greater positive impact than others.
When it comes to choosing a preset (or modifying a factory preset to create your own custom sound) there are many factors that influence the decision. These include the station’s format, the “flavor” and overall loudness of a given radio market, the intended audience, and the personal preferences of the program director, engineer, and other staff.
The ability of a given preset to enhance encoding to a greater or lesser degree is yet another factor to consider.
We have tested all of the factory presets in the current version of the Omnia.9 software (V3.15.36). We have also tested and listed some new presets that will be included in upcoming software versions, so bear in mind that not every listed preset will be present on your unit at this time.

uSiNg vOLTAir wiTH OMNiA | 86
Voltair Installation and User’s Guide Version 2.3 • July 2019
Those that show the most positive impact on encoding include58:
n Big Bottom
n Celeste
n Empire State of Processing
n Eruption 2.0
n Kinesthesium
n LEIFF
n Massive Ego
n Northridge FM
n NYC Attack of the Camclones
n Plutonium FM
n Radium
n Studio 54
n The Blitz
n Upsidasium
n Uranium-238.
Your program content may encode just as well with a different preset, so if you are happy with your current settings or you like the sound of a preset not listed here, we encourage you to use Voltair to measure and monitor the results on your station with your content before making any changes.
58 This is not to say that other presets will not provide significant and sufficient enhancement or should be avoided, nor does it suggest that only these presets should be chosen when using voltair and Omnia.9 together. rather, these are the presets that performed best in a controlled environment using test content known to be difficult to encode.

uSiNg vOLTAir wiTH OMNiA | 87
Voltair Installation and User’s Guide Version 2.3 • July 2019
Omnia.11 Insert PointLike Omnia.9, the Omnia.11 processor (running V1.6 software59) also provides a dedicated patch point for sending audio that has been dynamically processed (post multi-band compressors and limiters) but not subject to any final clipping or pre-emphasis.
Customers using a full Livewire network can utilize Livewire to send and return the pre-processed audio to and from the Voltair / Encoder pair. From Omnia’s point of view, Voltair is connected as a side chain.
Customers who do not have a full Livewire network can utilize the patch point by adding an Axia xSwitch and xNode to send audio to the Voltair / Encoder side chain. Any unused analog or AES input can be employed for the return audio from the side chain.
This block diagram shows the full signal path:
O11_Voltair_New_Block.png
At this writing, Omnia 11 version 3.0 has just been released. Version 3.0 allows unused analog or AES IO to be used for the insert point in addition to Xnode patch point capabilities in V1.6 and later versions (described below). This provides even greater flexibility for studio configuration. More importantly, V3.0’s optional G-Force Dynamics Engine has some of the most effective presets we’ve built to date for utilizing insert points with encoders.
The following section describes Insert point use with a Livewire connection. For the latest information utilizing unused analog or AES IO for the insert point, please consult Omnia 11 V3.0 documentation.
59 running v1.6 or later, and vastly expanded with new v3.0. Please check-in with Omnia Support for latest developments regarding Omnia.11 and voltair best practices

uSiNg vOLTAir wiTH OMNiA | 88
Voltair Installation and User’s Guide Version 2.3 • July 2019
Step 1: Set Up the Axia xNodeImportant: Before proceeding, ensure that all Ethernet and audio connections shown have been made and appropriate IP addresses have been set in all devices per their user manuals.
Please note that while this method supports the use of either an analog or an AES/EBU return from the side chain, using the AES/EBU I/O will provide more consistency and repeatability from one installation to another as you do not have to deal with resistor value drift in analog audio gear – and levels are important!
Navigate to the Axia Node’s webpage interface and select “Destinations” under “Advanced Options”.
Set the “Destination Channel/Address” to the channel number you will also set in the Omnia.11 for Livewire Output #2 (see below).
Set the “Output Gain” for this destination (the one feeding the Voltair/encoder combo). We suggest naming this destination “To Voltair.” Click “Apply”.
OmXNode_Dest.pdf
Changing to the “Sources” settings on the xNode, make sure that the input that is accepting the “Output to Transmitter” output of Voltair is also set to “0.0 dB” and the Mode is set to “Live Stereo”. We suggest naming this source “From Voltair”. Click “Apply” and note the Channel number of this Source.
OXnode_Source.pdf

uSiNg vOLTAir wiTH OMNiA | 89
Voltair Installation and User’s Guide Version 2.3 • July 2019
Step 2: Set Up Omnia.11’s Livewire SettingsWe recommend using the “Livewire2” input and output for the standard Insert Points.
Navigate to the Omnia.11’s Setup > Livewire and set the “Output #2 Channel” to a convenient channel number not used anywhere else on the Livewire network. Normally, these channel numbers are based on the last octet of the unit’s IP address. In the below example, the last octet of this Omnia.11’s IP is “175” so the channel number assigned to Output #2 is 17502.
Click on the “Enable” button (it should turn green) and then click “Apply”.
Set or select this channel number in the “Destinations” page of the xNode (see previous page).
Set the “Input #2” channel number to match the xNode “Source” channel established in the previous step. We used Channel 12301 in the example. Click “Apply”.
O11_LW_Setup.pdfStep 3: Set Up Omnia.11’s Output Menu Settings
Step 3: Set Up Omnia.11’s Output Menu SettingsNavigate to the Output Menu > Basic Tab on Omnia.11. In the “Livewire 2” section, set the “Output Selection” to “PP” (patch point) and the “Livewire 2 Level Master” control to “12.0dBFS”.
LivewireOutputScreenCropped.

uSiNg vOLTAir wiTH OMNiA | 90
Voltair Installation and User’s Guide Version 2.3 • July 2019
Step 4: Set Up Omnia.11’s Input Menu SettingsNavigate to the Input Menu > Basic Tab and ensure the “Livewire 2 Input Level” is set to “0.0dB”.
Input_options_screen
Step 5: Configure Omnia.11’s Insert (Patch Point) Menu SettingsNavigate to the Input Menu > Advanced Tab and set both “Patch Return Source” and “Patch Send” to “Livewire 2”. This sets the second Livewire output as the send path to the encoder/Voltair side chain and sets the second Livewire input as the return path for the encoded and enhanced watermarked signal.
Om11PatchPoint.pdf.
Before placing Omnia.11 into service, verify that this setup works as expected. In the metering pane containing the Dorrough Loudness Monitor, click the “Detail” tab to view the advanced meters and tools that will help ensure proper gain settings within the patch point environment.
To begin the test, turn on the “Patch Tone” switch to send a test tone to the patch outputs at the standard -12dBFS operating level. The “Patch Return”, “Patch Return Zoom”, and “Patch Send” should all read -12dB. If there are any discrepancies in meter readings, double check that the Omnia.11’s patch outputs are properly set and the gain of the Livewire xNodes are set to “0dB” on all inputs and outputs.

uSiNg vOLTAir wiTH OMNiA | 91
Voltair Installation and User’s Guide Version 2.3 • July 2019
If analog xNodes are being used, be sure to set the output termination to “600 ohms”.
Note that when the Patch Tone is activated, any equipment in the side chain path including the encoder and Voltair will be removed from service to allow the tone test to be performed at any time without fear of placing the tone on the air.
Remember to turn off the Patch Tone after testing!
A Word About the “Patch Out Level” ControlSome highly customized presets can have mix levels that produce an output significantly higher than the -12dB standard reference. The “Patch Out Level” control can be used to compensate for these presets and deliver proper levels within the patch point environment. The intention of this control is to maintain peak headroom on the Livewire or AES link and prevent digital overload of the external digital links.
When adjusting the Patch Out Level, Omnia.11 will automatically compensate for the level difference on the return, maintaining the proper clipper drive as set in the original preset.

vOLTAir M: MONiTOriNg FOr PPM ENCOdiNg | 92
Voltair Installation and User’s Guide Version 2.3 • July 2019
Voltair M: Monitoring for PPM encodingVoltair M is a special version of Voltair, designed for monitoring your station’s actual encoding performance. It has all of Voltair’s sophisticated analysis tools, including the ability to simulate different listening environments. It supports real-time displays on its front panel or via secure Web interface, alarm triggering via GPIO, and downloadable reports of your station’s coding history.
nVoltair M is for monitoring only. It’s doesn’t change the output of your Encoder. It isn’t capable of Enhancement, and doesn’t attempt to correct any limitations that may be in the PPM system.
Voltair M doesn’t pre-process program audio before sending it to the Encoder, and it doesn’t alter audio coming out of the Encoder. This means it’s an absolutely neutral device, strictly for analyzing PPM watermarking.
nOn the other hand, Voltair M provides a full suite of monitoring functions. You can use it to see precisely how well your program stream—or individual elements—is supporting PPM.
nVoltair M can be field-upgraded to full Voltair functionality. Consult [email protected] for details.

vOLTAir M: MONiTOriNg FOr PPM ENCOdiNg | 93
Voltair Installation and User’s Guide Version 2.3 • July 2019
Using Voltair MMany of Voltair M’s operations are identical to Voltair, and you can use the relevant sections of this manual as a guide to them. This table summarizes the differences.
VOLTAIR M NOTES
Installation Identical See notes below.
Calibration Identical Calibration is essential! See note below.
Initial Setup Similar System functions are identical to Voltair, except Enhancement is not available.Best Practices Similar
Controls and displays Similar Full-height Confidence Display, rather than stacked Original and Enhanced Displays.
Setup and Adjustments Similar Most functions are the same; see below for specific menu differences
Enhancing Screen N/A Screen does not appear, since Voltair M doesn’t perform Enhancement.
Output Modes N/A No Program Output control: Voltair M’s output equals the Encoder output at all timesC.
Encoding Failure Warnings Identical Front panel, web, and GPIO are supported.
GPIO control SimilarAll functions supported except Enhancement
Browser-based Control Similar
Data Retrieval No license required! All Voltair M units are factory-licensed for full data access and retrieval. All historic and real-time functions are supported.Data via telnet Identical
Installation notesVoltair M does not modify your Encoder’s signal. But in order to accurately track watermark codes as they’re being generated, it has to compare the input and output of your Encoder. For that reason, you must connect your encoder through Voltair M—the same way you’d connect a Voltair that has Enhancement functions.
This drawing shows proper installation.
Encoder
Voltair MTo
TransmitterProgramSignal
C if you need to monitor the signal going into your Encoder, use the Encoder’s Bypass switch. Of course you won’t be encoding while in that mode.

vOLTAir M: MONiTOriNg FOr PPM ENCOdiNg | 94
Voltair Installation and User’s Guide Version 2.3 • July 2019
Do not install Voltair M with splitters or routers:
ProgramSignal
Splitteror
Router ToTransmitter
Splitteror
Router
Voltair M’s Transmitter output is identical to your Encoder’s output. There’s no reason to split signals using passive devices or a router. Routers can introduce timing differences that make analysis inaccurate or even impossible, and splitters can cause level or filtering effects that harm your audio.
In addition, splitting your program feed to both Voltair M and the Encoder will make Calibration impossible. Voltair M sends a carefully designed sequence of test signals to the Encoder during Calibration, and uses the result both for PPM analysis and to report distortion or other problems with the Encoder.
You can verify that Voltair M is passing your Encoder’s output without any changes, by pressing Voltair M’s BYPASS and comparing the result with the Encoder’s output. Bypassing uses a relay to connect Voltair M’s output directly to its input, totally disconnecting the internal circuitry.
Voltair M can’t analyze watermarks when it’s disconnected this way, so release Bypass mode (by pressing the button again) after you’ve done this verification.
For more information consult Quick Hookup Guide, Installation Details, and Best Practices sections.
Using an Insert PointWe have found that in most cases, the watermarking process performs better when input audio has been conditioned by a modern Transmitter Processor. If you have a processor with an Insert Point, connect the Voltair M and Encoder through it.
This manual includes specific instructions for using the Insert Point in Omnia.9 and Omnia.11. Other manufacturers’ processors may include similar capability.
The Insert Point in modern processors comes before the final limiter. If your station is aggressively pursuing loudness, this architecture is important: Nielsen’s Encoder adds its codes to the program stream, and in extreme cases without protection, this causes over-modulation. Having a final limiter after the Voltair M – Encoder pair can prevent this problem.

vOLTAir M: MONiTOriNg FOr PPM ENCOdiNg | 95
Voltair Installation and User’s Guide Version 2.3 • July 2019
Calibration notesCalibration must be done before Voltair M can analyze your signal.
Voltair M must be calibrated to the specific Encoder it’s wired to. Manufacturing differences and component aging can cause variations among Encoders. If you change encoding hardware—even swapping your primary unit for a backup—you must re-calibrate.
See page 100 for a complete discussion of calibration.
Controls and LCD ScreenVoltair M’s front panel controls work the same way as Voltair’s. See Operation Details earlier in this manual.
The Main Function Screen is slightly different, since there’s no Enhancing to display or control:
Voltair: Main Screen
PRESS WHEEL to switch display between Confidence and Real Time Analysis
DECODE
INTERVAL 00:04 Environment: Vehicle Env. Level: -12 dB
14:00 14:15 14:30 14:45 15:00
Confidence
Display
Adjust
System
Network
Clock
Calibrate
Status
Screen’s Name Menu
Help Message
The Decode Interval and Confidence Displays behave exactly like the “Original” part of Voltair’s Main Screen. The Confidence One-minute Average vertical bars and Quarter Hour blocks are taller, but their relative calibration and color codes are the same as Voltair’s.
The Encoding Failure Warning and Real-time Analyzer are identical to Voltair’s.
Voltair M Program Output can be set on the System screen to Encoded Audio, Studio Input, or Raw Tones when properly enabled. It cannot be set to Enhanced Output.
Since Voltair M doesn’t process audio, there are no adjustments or menu for Enhancement, Enhancement Presets, or Test Enhancement Switching.
All other front panel menu functions are the same.
3 if you need to monitor the signal going into your Encoder, use the Encoder’s Bypass switch. Of course you won’t be encoding while in that mode.

vOLTAir M: MONiTOriNg FOr PPM ENCOdiNg | 96
Voltair Installation and User’s Guide Version 2.3 • July 2019
Browser-based Remote ControlVoltair M web login, access levels, and functions are similar to those on Voltair. The only differences are where Enhancement functions aren’t supported.
The color scheme is also slightly different, as a reminder that you’re accessing Voltair M:
Licensing and HistoryYou probably won’t need to load anything in the LICENSES tab: Voltair M comes with a permanent license to export enhanced confidence data. No additional license needs to be installed. This tab is implemented so you can check the serial number of your license, and in case additional functions are licensable in the future.
Downloaded HISTORY files can reflect only the confidence data as measured from the Encoder; there isn’t any Enhanced confidence to report. The Processed column is missing from .xlsx and .csv numeric spreadsheets; .xlsx graphs show a single bar for Encoder output, rather than stacked bars for Original and Processed.
Utilities and InformationThese tabs function identically to those on Voltair’s Web remote control. To verify that you’re working with Voltair M, check the firmware version at the bottom of the Web interface page or on one of these tabs: Voltair M firmware numbers end with the letter M.
Updating your unit requires a Voltair M firmware update package. Standard (non-M) Voltair updates will not load. If your Voltair M has been upgraded to full Voltair functionality, you must still use the Voltair M update package: in this case, it will perform the full Voltair update. (This is because Voltair hardware is commissioned at time of manufacture.) Contact Telos for more detailed information regarding upgraded Voltair M.

vOLTAir M: MONiTOriNg FOr PPM ENCOdiNg | 97
Voltair Installation and User’s Guide Version 2.3 • July 2019
Real-time data and downloads via telnetThis function and its control language are identical to those on Voltair.
GPIOVoltair M parallel remote control inputs and outputs are identical to those on Voltair, except Enhancement functions are not implemented:
n input pins 11, 12, and 24 do not set Enhancement levels;
n output pins 4, 16, and 17 do not report Enhancement settings.
Other GPIO functions and wiring are described in the GPIO / Remote section.
Everything elseWe’ve made Voltair M’s operation as close as possible to Voltair’s. Other sections of this manual—including installation details, best practices, troubleshooting, support, and the description of the PPM Ecosystem—apply to both units.

ABOuT CALiBrATiON | 98
Voltair Installation and User’s Guide Version 2.3 • July 2019
About Calibration
Each PPM Encoder has a unique encoding signature belonging to its assigned broadcast station. To function correctly, Voltair must be paired to a specific PPM Encoder and successfully synchronized to it through a calibration process. Since multiple encoders assigned to a single station can have slightly different characteristics, you must recalibrate whenever you change encoders.
The calibration process takes about five minutes, with percent of completion indicated by a progress meter. During calibration, the attached PPM Encoder is bypassed and watermarking is suspended. Program audio will pass through unaffected. The calibration process should not be interrupted by pressing Escape or Bypass.
No “partial credit” is given if Calibration is ended prematurely. We recommend calibrating during non-peak hours, and allowing the process to complete: a full calibration cycle must take place before Voltair can be used.
When to CalibrateWhen you power up Voltair for the first time, you will be prompted to perform an initial calibration. At the conclusion of the first successful calibration, you should not have to recalibrate unless you move your Voltair to a different PPM Encoder, or change the sample rate of a digital Voltair/Encoder pair.
If you connect your Voltair to a different station’s PPM Encoder without recalibrating, or install a Voltair that had been used with another Encoder, the unit will appear to function. But Confidence Measurements and Enhancement will not work properly.
In no way can Voltair be calibrated to one Encoder, then moved to another Encoder without recalibration!

ABOuT CALiBrATiON | 99
Voltair Installation and User’s Guide Version 2.3 • July 2019
Calibrating in the AirchainDuring calibration Voltair routes program audio through its input stages, but bypasses its main processor and the PPM Encoder. This suspends watermarking. For best practice, we recommend patching your backup PPM Encoder into the airchain during calibration so ratings are not impacted. After about five minutes, when calibration is complete, you can re-patch the primary Voltair/Encoder pair into the airchain.
If your backup encoder is not available and you have to calibrate the primary PPM Encoder in the live airchain, we recommended this process only be done at off- peak times (generally, overnights between 9 PM and 6 AM). Please be aware that calibrating a PPM Encoder in the airchain may set off a confidence monitor alarm.
Once Voltair successfully calibrates, it will automatically switch to its main screen and begin operation.
If you are calibrating a digital Voltair, you must supply a stable AES digital signal to Voltair’s input, running at your house sample rate. Calibration is sensitive to sample rate changes, and Voltair must be calibrated using your facility’s default clock rate to assure optimal performance.
If you are using a digital Voltair and Encoder, and need to change your house sample rate, you must recalibrate Voltair.

EXPLOriNg THE PPM ECOSYSTEM | 100
Voltair Installation and User’s Guide Version 2.3 • July 2019
Exploring the PPM Ecosystem
PPM OverviewIn 2006, Arbitron® introduced Portable People Meter® (PPM®) technology to broadcasters. Following its acquisition by Nielsen® in September 2013, Arbitron was rebranded Nielsen Audio®.
PPM uses a proprietary audio watermarking technology that embeds ID codes in broadcast streams. This ambitious system is deployed in major markets in the United States and several other countries to gather data and establish metrics about radio listening habits.
The PPM system includes hardware Studio Grade Encoders (SGE) that stations place in airchains of their analog and HD Radio broadcasts (as well as their Internet streams, if they choose) to insert the watermark into their content.
At the other end, PPM metering devices are worn or carried by members of the public referred to as panelists. The meters are designed to detect and log data on the audio watermarking codes in audio programming to which they are exposed.
Data collected from meters are uploaded to Nielsen, aggregated, interpreted and published in the form of ratings. These ratings are the opinion and property of Nielsen, and access to them is provided by subscription.
Understanding Audio WatermarkingThe PPM data injected into your broadcast audio is a watermark.60 Audio watermarking takes many forms, has been around for decades, and borrows its name from paper watermarks on books, stamps and currency. Watermarks, engineered to be as undetectable and tamper-proof as possible, serve as a method of authentication and data communications.
Watermarking is now commonly used in Digital Rights Management (DRM) for copyrighting software, audio and video content, and to control and track its distribution. All these systems, from the oldest to the most modern, use some form of masking to hide the watermarks.61
In the analog audio realm, the process of encoding injects hidden signals into the audio in a way that the ear cannot easily detect; new sounds are masked by the original audio signal. The masking process often takes place in real time based on the sonic properties of the incoming audio. During periods of dense audio, high-energy signals can be injected and still remain concealed. During moments of silence, nothing can be injected without being audible. Intermediate watermarking levels may be usable as the audio varies between loud and silent.
60 This discussion is provided to give voltair users background information only. we’ve thoroughly investigated the PPM system and know how it behaves, but specifics of the internal operation belong to Nielsen and they may treat them as proprietary.
61 Audio watermarking may be thought of as the aural equivalent of steganography, where added images are concealed within other pictures.

EXPLOriNg THE PPM ECOSYSTEM | 101
Voltair Installation and User’s Guide Version 2.3 • July 2019
Even the best audio watermarking technology has an inherent trade-off between encode reliability and audio quality. The higher the watermarking energy received at the decoder, the more robust the system. But the masking phenomenon is subject to variation across populations: higher watermarking energy may “break through” the masking audio for some listeners, and be audible to them. Conversely, the quieter the tones, the less likely they will break through, but the more fragile and less reliable the decoding becomes.
In a watermark system, the injected audio contains symbols or sounds with unique information. Since individual codes are dependent upon the presence of proper masking signal, it’s common to inject many codes and repeat the message many times. This data redundancy increases the likelihood that the intended message will be conveyed.
Once successfully encoded, the watermarked audio is generally transmitted and received somewhere else, so a separate process can extract the information; in radio ratings, that means broadcast audio must be picked up by a radio somewhere near a panelist’s meter62. The meter ideally acts as a decoding device, detecting the watermark symbols buried under the broadcast signal. When enough symbols are successfully decoded, they are assembled into a complete message.
Many factors can degrade this decoding process, including the fidelity of the audio path, background noise levels, acoustic properties of the space, and placement of the decode device relative to the playback loudspeaker.
In summary, audio watermarking relies on
n the ability to hide an information signal within the audio program,
n the ability to transmit the audio program to the decoder without significant degradation,
n and the ability of the decoder to extract the message from the audio program.
Programming ContentMany radio professionals believe that certain audio source materials encode better than others. As discussed above, watermarking relies on a masking technique in which codes are buried in the audio. Some types of audio may not have the characteristics required to allow masking. If there is insufficient audio energy in the frequency spectrum that the watermarking process uses, there is no place to hide the codes. With insufficient encoding, PPM may not give a panelist credit for listening to the station.
Different styles of music may interact with PPM in a way that biases the system. Hard rock is generally observed to produce strong watermarking, while smooth jazz produces comparatively weaker watermarking energy.63 One cannot, however, rely on these generalizations of encodability between similar pieces of musical content.
62 in the PPM ecosystem, the intent is for the meter to listen to the same radios and other audio devices as the panelist that carries or wears it. Nielsen provides each panelist with a special adapter to support headphone listening.
63 we’ve found one sample of irish music that produces absolutely no watermarking energy.

EXPLOriNg THE PPM ECOSYSTEM | 102
Voltair Installation and User’s Guide Version 2.3 • July 2019
Male and female speech, whether live in the studio or called in via telephone, may result in very weak watermarking when compared to continuous music. There is a possibility that on-air talent—even stars with large actual audiences—may suffer ratings penalties because their voices are a mismatch to the watermark algorithms and are not encoded well. But again, you can’t make broad assumptions about which voices will have low encodability.
Voltair examines real-time signals for the characteristics that enable masking. It provides almost instant confidence about your programming’s ability to carry watermarking64.
Panelists’ EnvironmentsAs we’ve discussed previously, the PPM ecosystem is complex and comprised of many inter-related parts. Station personnel tend to think of the pieces that are located at the station, i.e. program source, audio processing, PPM Encoder, and transmitter as the full system. While these elements determine what arrives at the listener’s radio, they are just a part of a larger broadcast ecosystem.
An equally important and overlooked element in the equation is the listener’s acoustic environment. Varying environments may have a huge impact on whether the watermark codes survive to provide ratings credit. This often obscure aspect of the system consists of the panelist’s environment; acoustic effects based on the locations of the radio, meter, and reflective walls; and the extraneous noise of the environment. In other words, you can’t just deliver encoded content to a radio and assume nearby meters will detect it.
From a meter’s perspective, the ideal listening situation would be a panelist with a hard-wired connection between their radio and their meter. Nielsen provides a headset adapter for this purpose. In the real world, hooking up the adapter can be inconvenient; most programmers believe it’s rarely used.
More typically, the listening environment is an open space; it can be as varied as an automobile with road and traffic noise, a kitchen with cooking noise and a crying baby, or a sports bar or restaurant with a lot of background chatter. In such environments, watermarking leaves the radio but might not arrive at the PPM meter with sufficient energy to be detectable. Further complicating the environmental factor is that panelists may move around during the day, listening in different locations on different radios.
Voltair provides a way to estimate the effects of common environments on watermark confidence.
Into the Future…We at 25-Seven Systems, and our Telos Alliance colleagues working on Omnia, continue to research the PPM watermarking system, and design ways to optimize its performance in real-world broadcast operations.
Consult our website for the latest developments.
64 it isn’t truly instant. Processing takes some machine cycles, and our algorithm provides averaging to coun-teract errors related to synchronization between the audio signal, the Encoder’s internal clock, and the actual time of day as reported by a Network Time Server. But it is accurate to say you get approximate readings within a few seconds; ongoing confidence measurements begin flowing about a minute after the start of a program.

CuSTOMEr SuPPOrT CONTACT iNFOrMATiON | 103
Voltair Installation and User’s Guide Version 2.3 • July 2019
Customer Support Contact InformationWe support you…
By Phone/FaxYou may reach our 24/7 Support Team in emergencies by calling +1 216-622-0247. For billing questions or other non-emergency technical questions, call +1 216-241-7225 between 9:00 AM to 5:00 PM USA Eastern Time, Monday through Friday.
By EmailNon-emergency technical support is available at [email protected].
By WebThe Telos Web site has a variety of information that may be useful for product selection and support. The URL is http://www.TelosAlliance.com. Refer to the 25-Seven section for Voltair specific information.
FeedbackWe welcome feedback on any aspect of our products or this manual. In the past, many good ideas from users have made their way into software revisions or new products. Please contact us with your comments or suggestions.
UpdatesFeatures and operations of Voltair are determined largely by software. 25-Seven Systems strives to provide the most stable and feature-rich software available. We encourage you to check for software updates from time to time by visiting our website or by contacting us directly.

TECHNiCAL SPECiFiCATiONS | 104
Voltair Installation and User’s Guide Version 2.3 • July 2019
Technical SpecificationsWe are constantly working to improve our products. Specifications and features are subject to change without notice
ANALOG LINE INPUTS:nInput Impedance: >40 k ohms, balanced
nNominal Input Range: +4 dBu
nInput Headroom: 20 dB above nominal input
nA/D Conversions: 24-bit, Delta-Sigma, 256x oversampling
ANALOG LINE OUTPUTS:nOutput Source Impedance: <50 ohms balanced
nOutput Load Impedance: 600 ohms, minimum
nNominal Output Level: +4 dBu
nMaximum Output Level: +24 dBu
nD/A Conversions: 24-bit, Delta-Sigma, 256x oversampling
DIGITAL AUDIO INPUTS AND OUTPUTSnReference Level: +4 dBu (-20 dB FSD)
nImpedance: 110 Ohm, balanced
nSignal Format: AES3 (AES/EBU)
nAES3 Input Compliance: 24-bit with sample rate conversion
nAES3 Output Compliance: 24-bit
nDigital Reference: Input
nInternal Sampling Rate: 48 kHz
nInput Sample Rate: 32 kHz, 44.1 kHz or 48 kHz
nOutput Sample Rate: matches Input Sample Rate
FREQUENCY RESPONSEnAny input to any output: +/- 0.5 dB, 20 Hz to 20 kHz
DYNAMIC RANGEnAnalog Inputs to Analog Outputs 108dB referenced to Full Scale, 111dB A-weighted
nDigital Inputs to Digital Outputs 120dB
nBe aware, some Encoders may have a lower dynamic range. This is a problem that ex-ists whether or not you’re using Voltair, but does affect the total system performance.

TECHNiCAL SPECiFiCATiONS | 105
Voltair Installation and User’s Guide Version 2.3 • July 2019
TOTAL HARMONIC DISTORTION + NOISEnAnalog Input to Analog Output: < 0.005%, 1 kHz, +18dBu input, +18dBu output
nDigital Input to Digital Output: < 0.0003%, 1 kHz, -20dBFs
CROSSTALK ISOLATION, STEREO SEPARATION AND CMRRnAnalog Line channel to channel isolation: 90dB minimum, 20Hz to 20kHz
nAnalog Line Input CMRR: 80dB minimum, 20Hz to 20kHz
POWER SUPPLY AC INPUTnAuto-ranging supply, 100VAC to 240VAC, 50 Hz to 60 Hz
nIEC receptacle, internal fuse, on/off switch
nPower consumption: 55 Watts
OPERATING TEMPERATURESn0 degree C to +40 degree C, <90% humidity, no condensation
DIMENSIONS AND WEIGHTnChassis Dimensions (ex protrusions):
19” (48.2 cm) wide 3.5” (8.9 cm) height 11.75” (30 cm) depth
nChassis Weight: 14.5 lbs. (6.57 kg)
nShipping Dimensions & Weight: Contact customer support

wArrANTY | 106
Voltair Installation and User’s Guide Version 2.3 • July 2019
Warranty
Telos Alliance Limited Warranty
For the latest Telos Alliance warranty, visit: telosalliance.com/warranty

This page intentionally blank

This page intentionally blank

This page intentionally blank

Connect with 25-Seven Systems
1241 Superior Avenue Cleveland OH 44114 USA
Main office: +1.216.241.7225 • 24/7 Tech Support: +1.216.622.0247 • Fax: +1.216.241.4103
Email: [email protected] • www.TelosAlliance.com
© 2016 TLS Corp., All Rights Reserved. M16/1/14001 PN: 1490-00108-004---USER MANUAL: VOLTAIR