Quilted nest and liner - ARC Craft Guild
13
Quilted nest and liner 1 | Page of 12 © 2020 Piccolo Studio www.piccolostudio.com.au This tutorial has been written for the Animal Rescue Craft Guild. You will be able to find further guidance and support as well as other patterns in their Facebook group. Before we begin: Quilted nests are a fantastic alternative to a crochet version. They can be more easily washed and dried for use and feature a removeable liner to keep the outer nest clean. Interfacing will keep them sturdy but still soft enough for delicate babies. 4 sizes templates and fabric requirements have been included for some basic nest sizes however I cannot stress enough that you can make your own simply and easily using a plate as a template. If making your own from a template, simply follow these simple instructions to get the necessary dimensions to complete the nest (read through the pattern first so this all makes better sense): • Once you have selected your template simply measure it across the diameter (width) and enter that value into the online calculator below to work out the circumference of the circle. https://www.omnicalculator.com/math/circumference • Once you have worked out the circumference of your circle, add an extra 13cm (5”) to account for the length your strip will need to be to create the wall. The height of the wall will be half the diameter plus 1 ½ cm (½”) to allow for seams. Eg – your circle template measures 40cm (16”) across. Using the calculator above we know the circumference is approx. 126cm (51”). So, our strip to make the wall needs to be 56” long and 8.5” high to attach to the quilted bottom circle. Note: Cut the strip wider and longer before quilting to allow for shrinkage as you go • If you use a fabric thicker than quilting cotton for your nest (eg drill or denim) you may not need to interface the fabric before quilting. • It is so much easier to quilt a square slightly larger than our cut circle will be and then cut your shape out once all quilting is done. The instructions below will help you through this part. This also means that all quilting lines will be properly encased in your seams. I highly recommend you keep this same approach for your wall of the nest as well – cutting your strip longer and wider prior to quilting and then trimming to size once quilted. This will waste some fabric but give a better quality and easier sew in the end. With every nest you send make sure you add 4-5 liners, this means that the nests can remain in use while the carers are washing them.
-
Upload
khangminh22 -
Category
Documents
-
view
0 -
download
0
Transcript of Quilted nest and liner - ARC Craft Guild

Quilted nest and liner
1 | P a g e o f 1 2 © 2020 Piccolo Studio
www.piccolostudio.com.au
This tutorial has been written for the Animal Rescue Craft Guild. You will be able to find further guidance
and support as well as other patterns in their Facebook group.
Before we begin: Quilted nests are a fantastic alternative to a crochet version. They can be more easily washed and dried for
use and feature a removeable liner to keep the outer nest clean. Interfacing will keep them sturdy but still
soft enough for delicate babies.
4 sizes templates and fabric requirements have been included for some basic nest sizes however I cannot
stress enough that you can make your own simply and easily using a plate as a template.
If making your own from a template, simply follow these simple instructions to get the necessary
dimensions to complete the nest (read through the pattern first so this all makes better sense):
• Once you have selected your template simply measure it across the diameter (width) and enter
that value into the online calculator below to work out the circumference of the circle.
https://www.omnicalculator.com/math/circumference
• Once you have worked out the circumference of your circle, add an extra 13cm (5”) to account for
the length your strip will need to be to create the wall. The height of the wall will be half the
diameter plus 1 ½ cm (½”) to allow for seams.
Eg – your circle template measures 40cm (16”) across. Using the calculator above we know the
circumference is approx. 126cm (51”). So, our strip to make the wall needs to be 56” long and 8.5”
high to attach to the quilted bottom circle.
Note: Cut the strip wider and longer before quilting to allow for shrinkage as you go
• If you use a fabric thicker than quilting cotton for your nest (eg drill or denim) you may not need to
interface the fabric before quilting.
• It is so much easier to quilt a square slightly larger than our cut circle will be and then cut your
shape out once all quilting is done. The instructions below will help you through this part. This also
means that all quilting lines will be properly encased in your seams. I highly recommend you keep
this same approach for your wall of the nest as well – cutting your strip longer and wider prior to
quilting and then trimming to size once quilted. This will
waste some fabric but give a better quality and easier sew
in the end.
With every nest you send make sure you add 4-5 liners,
this means that the nests can remain in use while the
carers are washing them.

Quilted nest and liner
2 | P a g e o f 1 2 © 2020 Piccolo Studio
www.piccolostudio.com.au
Fabric requirements:
6” 8” 10” 12”
Nest
Quilting cotton
7” square (x2) 3” x 21” (x2)
9” square (x2) 4” x 30” (x2)
11” square (x2) 4 ½” x 35” (x2)
13” square (x2) 5” x 41” (x2)
Wadding 8” square (x2) 4” x 22” (x 2)
10” square (x2) 5” x 31” (x2)
12” square (x2) 5 ½” x 36” (x2)
14” square (x2) 6” x 42” (x2)
Iron on interfacing
(light weight)
7” square (x2) 3” x 21” (x2)
9” square (x2) 4” x 30” (x2)
11” square (x2) 4 ½” x 35” (x2)
13” square (x2) 5” x 41” (x2)
Liner Flannel or
similar 7” square 5” x 21”
9” square 6” x 30”
11” square 6 ½” x 35”
13” square 7” x 41”
Fabric Notes: Liners should be 100% natural fibres – no polyester, synthetics or fabrics that have plastic or glitter.
Breathability and softness are the priority. Flannelette, light cotton or jersey is recommended. Flannel is
recommended for animals in cooler areas or through winter. The liner in this tutorial is made using a
secondhand cotton flannel sheet.
Quilted nests in this tutorial are made from 100% quilting cotton, 100% cotton wadding and iron on
interfacing. Please reuse and recycle where you can and reduce the impact on the environment. Thicker
fabrics will mean interfacing will not need to be used.
PLEASE PRE-WASH ALL FABRIC BEFORE STARTING THIS
PROJECT

Quilted nest and liner
3 | P a g e o f 1 2 © 2020 Piccolo Studio
www.piccolostudio.com.au
Instructions:
If using my provided templates, open the selected PDF template and print, setting the print scale at 100%
and making sure the box “Scale to Fit” isn’t checked. The 1” test square on Page 1 will help to ensure the
printing has been done correctly.
Cutting the top and left side of each pattern page layout as per image below
Tape the pattern together lining up edges and the shape (don’t forget to put tape on the back too).
Cut out the circle you would like to work with.
Note: If planning on making a series of different sized nests simply cut from large to small to make the post
of your template and to save on printing.

Quilted nest and liner
4 | P a g e o f 1 2 © 2020 Piccolo Studio
www.piccolostudio.com.au
CREATING THE NEST
Take your cut squares and strips of fabric and interface the back using a light iron on interfacing (thick
fabrics like drill or denim will not need interfacing).
Place your interfaced fabrics on top of your wadding and, using a longer stitch length, quilt as desired. I
quilted lines approximately ¼” apart to add structure and stability to the nest.

Quilted nest and liner
5 | P a g e o f 1 2 © 2020 Piccolo Studio
www.piccolostudio.com.au
Take your 2 quilted squares and cut out your circle for the
base of the nest. You can use either the provided templates or
make your own as described above.
Trim your strips of extra wadding to the size stated in the fabric
requirements table, or from your own calculations.
Take one of the cut circles and place right side up on the machine. Take a quilted strip and place it on top
of the circle, right sides together. Leaving a 3” tail at the beginning slowly attach the strip to the base
taking care as you move around the circle. Stop around 3-4” from the start.

Quilted nest and liner
6 | P a g e o f 1 2 © 2020 Piccolo Studio
www.piccolostudio.com.au
Overlap your two tails and mark a point where they overlap
within the space left on the circle. Make sure you mark both
tails and the point on the circle where they overlap.
Using a ruler, draw lines across both tails from your marked
point.
Carefully line up your drawn lines and stitch along it, making sure to lock stitches beginning and end. Cut
off excess.

Quilted nest and liner
7 | P a g e o f 1 2 © 2020 Piccolo Studio
www.piccolostudio.com.au
Finish attaching to the circle using the mark drawn to line up
your seam.
Your nest outer shell will now look like this. DO NOT TURN RIGHT SIDE OUT.
Repeat the process with your second circle and strip so you have both an outer and inner shell. Turn your
inner shell RIGHT SIDE OUT.

Quilted nest and liner
8 | P a g e o f 1 2 © 2020 Piccolo Studio
www.piccolostudio.com.au
Place the inner shell inside the other shell RIGHT SIDES TOGETHER. Slightly offset your seams to allow for
ease of attaching by reducing bulk.
Stitch around the top of your shells leaving a 2-3” gap for turning.
Quilted nest and liner
9 | P a g e o f 1 2 © 2020 Piccolo Studio
www.piccolostudio.com.au
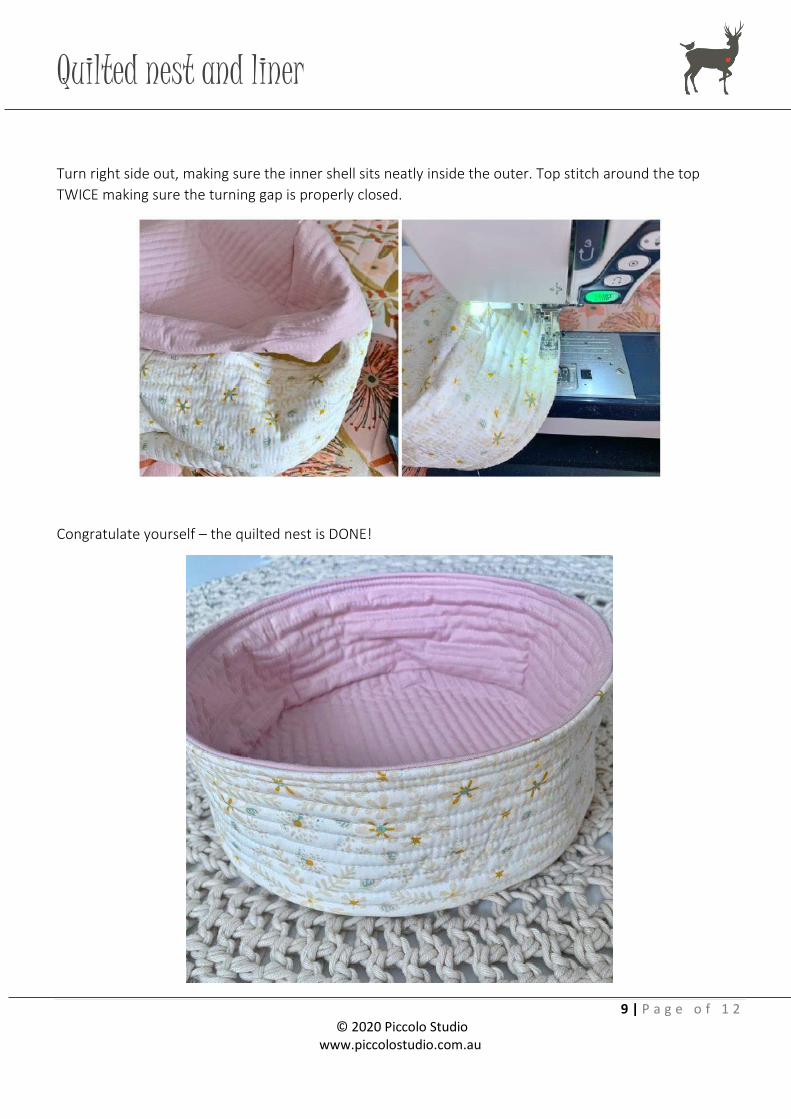
Turn right side out, making sure the inner shell sits neatly inside the outer. Top stitch around the top
TWICE making sure the turning gap is properly closed.
Congratulate yourself – the quilted nest is DONE!

Quilted nest and liner
10 | P a g e o f 1 2 © 2020 Piccolo Studio
www.piccolostudio.com.au
CREATING THE REMOVEABLE LINER
The removeable liner creates a system where mess can be quickly
cleaned up without needing to wash the entire nest. Making 4-5
ensures the carer can keep washing better under control.
Take your strip of fabric and mark a line 1” from the top.
Using your iron fold the top of the strip down to the drawn line and press. Fold over again and press to
create a neat hem. Stitch down.

Quilted nest and liner
11 | P a g e o f 1 2 © 2020 Piccolo Studio
www.piccolostudio.com.au
Place your liner circle RIGHT SIDE UP on the machine. Take a quilted strip and place it on top of the circle,
right sides together. Leaving a 3” tail at the beginning slowly attach the strip to the base taking care as you
move around the circle. Stop around 3-4” from the start.
Overlap your two tails and mark a point where they overlap within
the space left on the circle. Make sure you mark both tails and the
point on the circle where they overlap.
Using a ruler, draw lines across both tails from your marked point.

Quilted nest and liner
12 | P a g e o f 1 2 © 2020 Piccolo Studio
www.piccolostudio.com.au
Carefully line up your drawn lines and stitch along it, making sure to lock stitches beginning and end. Cut
off excess.
Finish attaching to the circle using the mark drawn to line up your
seam.
Overlock or zig zag stitch the raw edges.

Quilted nest and liner
13 | P a g e o f 1 2 © 2020 Piccolo Studio
www.piccolostudio.com.au
Your liner is now finished. Place inside your quilted nest and fold down.
Fine print: This tutorial has been created by Sarah Scott of Piccolo Studio and is intended for personal use only. The
pattern must not be reproduced, distributed or sold in part or whole in any form. Please credit Piccolo
Studio as the original creator of the tutorial at time of sale and in any online promotion. Piccolo Studio
reserves the right to change or end this policy at any time. Please do not share photos of this tutorial but
rather links or the entire PDF. This stops people missing parts of instructions and getting confused
Completed nests can be sent to:
Nicole Blums
c/- The Rescue Collective
4/55 Tenby St
MOUNT GRAVATT QLD 4122
AUSTRALIA