
Quentin Charatan Aaron Kans Featuring JavaFX Fourth Edition
719
Texts in Computer Science Java in Two Semesters Quentin Charatan Aaron Kans Featuring JavaFX Fourth Edition
-
Upload
khangminh22 -
Category
Documents
-
view
1 -
download
0
Transcript of Quentin Charatan Aaron Kans Featuring JavaFX Fourth Edition

Texts in Computer Science
Java in Two Semesters
Quentin Charatan Aaron Kans
Featuring JavaFX
Fourth Edition

Texts in Computer Science
Series editors
David Gries, Department of Computer Science, Cornell University, Ithaca, NY,USAOrit Hazzan, Faculty of Education in Science and Technology, Technion—IsraelInstitute of Technology, Haifa, Israel

More information about this series at http://www.springer.com/series/3191

Quentin Charatan • Aaron Kans
Java in Two SemestersFeaturing JavaFX
Fourth Edition
123

Quentin CharatanUniversity of East LondonLondon, UK
Aaron KansUniversity of East LondonLondon, UK
ISSN 1868-0941 ISSN 1868-095X (electronic)Texts in Computer ScienceISBN 978-3-319-99419-2 ISBN 978-3-319-99420-8 (eBook)https://doi.org/10.1007/978-3-319-99420-8
Library of Congress Control Number: 2018961214
1st edition: © The McGraw-Hill Companies 20022nd edition: © McGraw-Hill Education (UK) Limited 20063rd edition: © McGraw-Hill Education (UK) Limited 20094th edition: © Springer Nature Switzerland AG 2019This work is subject to copyright. All rights are reserved by the Publisher, whether the whole or partof the material is concerned, specifically the rights of translation, reprinting, reuse of illustrations,recitation, broadcasting, reproduction on microfilms or in any other physical way, and transmissionor information storage and retrieval, electronic adaptation, computer software, or by similar or dissimilarmethodology now known or hereafter developed.The use of general descriptive names, registered names, trademarks, service marks, etc. in thispublication does not imply, even in the absence of a specific statement, that such names are exempt fromthe relevant protective laws and regulations and therefore free for general use.The publisher, the authors and the editors are safe to assume that the advice and information in thisbook are believed to be true and accurate at the date of publication. Neither the publisher nor theauthors or the editors give a warranty, express or implied, with respect to the material contained herein orfor any errors or omissions that may have been made. The publisher remains neutral with regard tojurisdictional claims in published maps and institutional affiliations.
This Springer imprint is published by the registered company Springer Nature Switzerland AGThe registered company address is: Gewerbestrasse 11, 6330 Cham, Switzerland

To AlexiQuentin Charatan
To WendyAaron Kans

Preface
Accompanying Web site: https://www.springer.com/book/9783319994192.As with previous editions, this book is designed for university students taking a
first module in software development or programming, followed by a second, moreadvanced module. This book uses Java as the vehicle for the teaching of pro-gramming concepts—design concepts are explained using the UML notation. Thetopic is taught from first principles and assumes no prior knowledge of the subject.
This book is organized so as to support two twelve-week, one-semester modules,which might typically comprise a two-hour lecture, a one-hour seminar, and a one-or two-hour laboratory session. The outcomes at the start of each chapter highlightits key learning objectives, the self-test questions at the end of each chapter ensurethat the learning objectives for that chapter have been met, while the programmingexercises that follow allow these learning objectives to be applied to completeprograms. In addition to these exercises and questions, a case study is developed ineach semester to illustrate the use of the techniques covered in the text to develop anon-trivial application. Lecturers who teach on modules that run for fewer thantwelve weeks in a semester could treat these case studies as a self-directed studentlearning experience, rather than as taught topics.
The approach taken in this book is ideal for all students including those enteringuniversity with little or no background in the subject matter, perhaps coming frompre-degree courses in other disciplines, or perhaps returning to study after longperiods away from formal education. It is the authors’ experience that such studentshave enormous difficulties in grasping the fundamental programming concepts thefirst time round and therefore require a simpler and gentler introduction to thesubject that is presented in most standard texts.
This book takes an integrated approach to software development by coveringsuch topics as basic design principles and standards, testing methodologies, and theuser interface, as well as looking at detailed implementation topics.
In the first semester, considerable time is spent concentrating on the fundamentalprogramming concepts such as declarations of variables and basic control struc-tures, methods and arrays, prior to introducing students to classes and objects,inheritance, graphics, and event-driven programming.
The second semester covers more advanced topics such as interfaces, exceptions,collection classes from the Java collections framework, advanced graphics,
vii

file-handling techniques, packages, the implementation of multi-threaded programs,socket programming, and processing collections using streams.
The fourth edition achieves three main goals. Firstly, it incorporates all the veryuseful feedback on the third edition that we have received from students andlecturers since its publication. Secondly, it includes many new questions and pro-gramming exercises at the end of the chapters. Finally, it includes new material tobring it completely up to date with the current developments in the field—in par-ticular a number of key developments that were introduced in Java 8 which,according to OracleTM, is “the most significant re-engineering of the language sinceits launch.”
One key feature of this new edition is that all graphical user interface devel-opments are based on JavaFX, rather than the Swing Technology used in previouseditions. JavaFX allows for the creation of sophisticated modern graphical inter-faces that can run on a variety of devices and is now Oracle’s preferred technologyfor building such interfaces, having decided that Swing will no longer be devel-oped. JavaFX therefore plays a very significant role throughout the new text, andthree new chapters are devoted to it.
Other key developments arising from Java 8 that have been incorporated into thenew text include lambda expressions, which allow us to simplify developmentconsiderably by passing functions as arguments to methods, and the new StreamAPI, a technology that allows us to process collections in a very concise, declarativestyle of programming.
In addition to the above key changes, we also introduce techniques to improvethe robustness of code—in particular the Optional class for dealing with emptyvalues and the try-with-resources construct to ensure resources such as files aresafely closed before exiting methods.
As well as adding these new features, some existing chapters have undergonesignificant enhancements. The Java Collections Framework chapter, for example,has been expanded to include a comprehensive section on the sort methodsavailable in various classes and interfaces in Java. The coverage of generics has alsobeen considerably expanded and the packages chapter now introduces the Hiber-nate ORM technology for accessing remote databases.
The accompanying Web site (see URL above) contains all the codes from thetextbook and a guide on how to install and use the NetBeans™ Java IDE, as well asa collection of other useful resources.
We would like to thank our publisher, Springer, for the encouragement andguidance that we have received throughout the production of this book. Addi-tionally, we would especially like to thank the computing students of the Universityof East London for their thoughtful comments and feedback and Steven Martin forhis help and advice. For support and inspiration, special thanks are due once againto our families and friends.
London, UK Quentin CharatanAaron Kans
viii Preface

Contents
Part I Semester One
1 The First Step . . . . . . . . . . . . . . . . . . . . . . . . . . . . . . . . . . . . . . . . . 31.1 Introduction . . . . . . . . . . . . . . . . . . . . . . . . . . . . . . . . . . . . . 31.2 Software . . . . . . . . . . . . . . . . . . . . . . . . . . . . . . . . . . . . . . . . 41.3 Compiling Programs . . . . . . . . . . . . . . . . . . . . . . . . . . . . . . . 41.4 Programming in Java . . . . . . . . . . . . . . . . . . . . . . . . . . . . . . . 51.5 Integrated Development Environments (IDEs) . . . . . . . . . . . . . 61.6 Java Applications . . . . . . . . . . . . . . . . . . . . . . . . . . . . . . . . . 81.7 Your First Program . . . . . . . . . . . . . . . . . . . . . . . . . . . . . . . . 10
1.7.1 Analysis of the “Hello World” Program . . . . . . . . . . 111.7.2 Adding Comments to a Program . . . . . . . . . . . . . . . 13
1.8 Output in Java . . . . . . . . . . . . . . . . . . . . . . . . . . . . . . . . . . . 141.9 Self-test Questions . . . . . . . . . . . . . . . . . . . . . . . . . . . . . . . . 161.10 Programming Exercises . . . . . . . . . . . . . . . . . . . . . . . . . . . . . 17
2 Building Blocks . . . . . . . . . . . . . . . . . . . . . . . . . . . . . . . . . . . . . . . . 192.1 Introduction . . . . . . . . . . . . . . . . . . . . . . . . . . . . . . . . . . . . . 192.2 Simple Data Types in Java . . . . . . . . . . . . . . . . . . . . . . . . . . 192.3 Declaring Variables in Java . . . . . . . . . . . . . . . . . . . . . . . . . . 212.4 Assignments in Java . . . . . . . . . . . . . . . . . . . . . . . . . . . . . . . 232.5 Creating Constants . . . . . . . . . . . . . . . . . . . . . . . . . . . . . . . . 252.6 Arithmetic Operators . . . . . . . . . . . . . . . . . . . . . . . . . . . . . . . 252.7 Expressions in Java . . . . . . . . . . . . . . . . . . . . . . . . . . . . . . . . 272.8 More About Output . . . . . . . . . . . . . . . . . . . . . . . . . . . . . . . . 302.9 Input in Java: The Scanner Class . . . . . . . . . . . . . . . . . . . . . . 312.10 Program Design . . . . . . . . . . . . . . . . . . . . . . . . . . . . . . . . . . 352.11 Self-test Questions . . . . . . . . . . . . . . . . . . . . . . . . . . . . . . . . 362.12 Programming Exercises . . . . . . . . . . . . . . . . . . . . . . . . . . . . . 38
3 Selection . . . . . . . . . . . . . . . . . . . . . . . . . . . . . . . . . . . . . . . . . . . . . 413.1 Introduction . . . . . . . . . . . . . . . . . . . . . . . . . . . . . . . . . . . . . 413.2 Making Choices . . . . . . . . . . . . . . . . . . . . . . . . . . . . . . . . . . 42
ix

3.3 The ‘if’ Statement . . . . . . . . . . . . . . . . . . . . . . . . . . . . . . . . . 433.3.1 Comparison Operators . . . . . . . . . . . . . . . . . . . . . . . 463.3.2 Multiple Instructions Within an ‘if’ Statement . . . . . 47
3.4 The ‘if…else’ Statement . . . . . . . . . . . . . . . . . . . . . . . . . . . . 493.5 Logical Operators . . . . . . . . . . . . . . . . . . . . . . . . . . . . . . . . . 513.6 Nested ‘if…else’ Statements . . . . . . . . . . . . . . . . . . . . . . . . . 533.7 The ‘switch’ Statement . . . . . . . . . . . . . . . . . . . . . . . . . . . . . 55
3.7.1 Grouping Case Statements . . . . . . . . . . . . . . . . . . . . 563.7.2 Removing Break Statements . . . . . . . . . . . . . . . . . . 57
3.8 Self-test Questions . . . . . . . . . . . . . . . . . . . . . . . . . . . . . . . . 593.9 Programming Exercises . . . . . . . . . . . . . . . . . . . . . . . . . . . . . 61
4 Iteration . . . . . . . . . . . . . . . . . . . . . . . . . . . . . . . . . . . . . . . . . . . . . 654.1 Introduction . . . . . . . . . . . . . . . . . . . . . . . . . . . . . . . . . . . . . 654.2 The ‘for’ Loop . . . . . . . . . . . . . . . . . . . . . . . . . . . . . . . . . . . 67
4.2.1 Varying the Loop Counter . . . . . . . . . . . . . . . . . . . . 704.2.2 The Body of the Loop . . . . . . . . . . . . . . . . . . . . . . 724.2.3 Revisiting the Loop Counter . . . . . . . . . . . . . . . . . . 76
4.3 The ‘while’ Loop . . . . . . . . . . . . . . . . . . . . . . . . . . . . . . . . . 774.4 The ‘do…while’ Loop . . . . . . . . . . . . . . . . . . . . . . . . . . . . . . 794.5 Picking the Right Loop . . . . . . . . . . . . . . . . . . . . . . . . . . . . . 834.6 The ‘break’ Statement . . . . . . . . . . . . . . . . . . . . . . . . . . . . . . 844.7 The ‘continue’ Statement . . . . . . . . . . . . . . . . . . . . . . . . . . . . 864.8 Self-test Questions . . . . . . . . . . . . . . . . . . . . . . . . . . . . . . . . 884.9 Programming Exercises . . . . . . . . . . . . . . . . . . . . . . . . . . . . . 91
5 Methods . . . . . . . . . . . . . . . . . . . . . . . . . . . . . . . . . . . . . . . . . . . . . 955.1 Introduction . . . . . . . . . . . . . . . . . . . . . . . . . . . . . . . . . . . . . 955.2 Declaring and Defining Methods . . . . . . . . . . . . . . . . . . . . . . 965.3 Calling a Method . . . . . . . . . . . . . . . . . . . . . . . . . . . . . . . . . 985.4 Method Input and Output . . . . . . . . . . . . . . . . . . . . . . . . . . . 995.5 More Examples of Methods . . . . . . . . . . . . . . . . . . . . . . . . . . 1035.6 Variable Scope . . . . . . . . . . . . . . . . . . . . . . . . . . . . . . . . . . . 1075.7 Method Overloading . . . . . . . . . . . . . . . . . . . . . . . . . . . . . . . 1095.8 Using Methods in Menu-Driven Programs . . . . . . . . . . . . . . . 1125.9 Self-test Questions . . . . . . . . . . . . . . . . . . . . . . . . . . . . . . . . 1155.10 Programming Exercises . . . . . . . . . . . . . . . . . . . . . . . . . . . . . 117
6 Arrays . . . . . . . . . . . . . . . . . . . . . . . . . . . . . . . . . . . . . . . . . . . . . . . 1196.1 Introduction . . . . . . . . . . . . . . . . . . . . . . . . . . . . . . . . . . . . . 1196.2 Creating an Array . . . . . . . . . . . . . . . . . . . . . . . . . . . . . . . . . 1206.3 Accessing Array Elements . . . . . . . . . . . . . . . . . . . . . . . . . . . 1246.4 Passing Arrays as Parameters . . . . . . . . . . . . . . . . . . . . . . . . . 1296.5 Varargs . . . . . . . . . . . . . . . . . . . . . . . . . . . . . . . . . . . . . . . . 131
x Contents
6.6 Returning an Array from a Method . . . . . . . . . . . . . . . . . . . . 1346.7 The Enhanced ‘for’ Loop . . . . . . . . . . . . . . . . . . . . . . . . . . . 1376.8 Some Useful Array Methods . . . . . . . . . . . . . . . . . . . . . . . . . 139
6.8.1 Array Maximum . . . . . . . . . . . . . . . . . . . . . . . . . . . 1396.8.2 Array Summation . . . . . . . . . . . . . . . . . . . . . . . . . . 1416.8.3 Array Membership . . . . . . . . . . . . . . . . . . . . . . . . . 1416.8.4 Array Search . . . . . . . . . . . . . . . . . . . . . . . . . . . . . 1426.8.5 The Final Program . . . . . . . . . . . . . . . . . . . . . . . . . 143
6.9 Multi-dimensional Arrays . . . . . . . . . . . . . . . . . . . . . . . . . . . 1486.9.1 Creating a Two-Dimensional Array . . . . . . . . . . . . . 1486.9.2 Initializing Two-Dimensional Arrays . . . . . . . . . . . . 1496.9.3 Processing Two-Dimensional Arrays . . . . . . . . . . . . 1506.9.4 The MonthlyTemperatures Program . . . . . . . . . . . . . 151
6.10 Ragged Arrays . . . . . . . . . . . . . . . . . . . . . . . . . . . . . . . . . . . 1556.11 Self-test Questions . . . . . . . . . . . . . . . . . . . . . . . . . . . . . . . . 1586.12 Programming Exercises . . . . . . . . . . . . . . . . . . . . . . . . . . . . . 161
7 Classes and Objects . . . . . . . . . . . . . . . . . . . . . . . . . . . . . . . . . . . . 1637.1 Introduction . . . . . . . . . . . . . . . . . . . . . . . . . . . . . . . . . . . . . 1637.2 Classes as Data Types . . . . . . . . . . . . . . . . . . . . . . . . . . . . . . 1637.3 Objects . . . . . . . . . . . . . . . . . . . . . . . . . . . . . . . . . . . . . . . . . 1657.4 The Oblong Class . . . . . . . . . . . . . . . . . . . . . . . . . . . . . . . . . 1667.5 The OblongTester Program . . . . . . . . . . . . . . . . . . . . . . . . . . 1717.6 Strings . . . . . . . . . . . . . . . . . . . . . . . . . . . . . . . . . . . . . . . . . 173
7.6.1 Obtaining Strings from the Keyboard . . . . . . . . . . . . 1737.6.2 The Methods of the String Class . . . . . . . . . . . . . . . 1747.6.3 Comparing Strings . . . . . . . . . . . . . . . . . . . . . . . . . 1767.6.4 Entering Strings Containing Spaces . . . . . . . . . . . . . 178
7.7 Our Own Scanner Class for Keyboard Input . . . . . . . . . . . . . . 1797.8 The Console Class . . . . . . . . . . . . . . . . . . . . . . . . . . . . . . . . 1817.9 The BankAccount Class . . . . . . . . . . . . . . . . . . . . . . . . . . . . . 1827.10 Arrays of Objects . . . . . . . . . . . . . . . . . . . . . . . . . . . . . . . . . 1857.11 The ArrayList Class . . . . . . . . . . . . . . . . . . . . . . . . . . . . . . . 1887.12 Self-test Questions . . . . . . . . . . . . . . . . . . . . . . . . . . . . . . . . 1907.13 Programming Exercises . . . . . . . . . . . . . . . . . . . . . . . . . . . . . 192
8 Implementing Classes . . . . . . . . . . . . . . . . . . . . . . . . . . . . . . . . . . . 1958.1 Introduction . . . . . . . . . . . . . . . . . . . . . . . . . . . . . . . . . . . . . 1958.2 Designing Classes in UML Notation . . . . . . . . . . . . . . . . . . . 1968.3 Implementing Classes in Java . . . . . . . . . . . . . . . . . . . . . . . . 198
8.3.1 The Oblong Class . . . . . . . . . . . . . . . . . . . . . . . . . . 1988.3.2 The BankAccount Class . . . . . . . . . . . . . . . . . . . . . . 202
8.4 The static Keyword . . . . . . . . . . . . . . . . . . . . . . . . . . . . . . . . 2058.5 Initializing Attributes . . . . . . . . . . . . . . . . . . . . . . . . . . . . . . . 208
Contents xi

8.6 The EasyScanner Class . . . . . . . . . . . . . . . . . . . . . . . . . . . . . 2098.7 Passing Objects as Parameters . . . . . . . . . . . . . . . . . . . . . . . . 2098.8 Collection Classes . . . . . . . . . . . . . . . . . . . . . . . . . . . . . . . . . 211
8.8.1 The Bank Class . . . . . . . . . . . . . . . . . . . . . . . . . . . 2118.8.2 Testing the Bank Class . . . . . . . . . . . . . . . . . . . . . . 217
8.9 The Benefits of Object-Oriented Programming . . . . . . . . . . . . 2238.10 Self-test Questions . . . . . . . . . . . . . . . . . . . . . . . . . . . . . . . . 2238.11 Programming Exercises . . . . . . . . . . . . . . . . . . . . . . . . . . . . . 227
9 Inheritance . . . . . . . . . . . . . . . . . . . . . . . . . . . . . . . . . . . . . . . . . . . 2359.1 Introduction . . . . . . . . . . . . . . . . . . . . . . . . . . . . . . . . . . . . . 2359.2 Defining Inheritance . . . . . . . . . . . . . . . . . . . . . . . . . . . . . . . 2369.3 Implementing Inheritance in Java . . . . . . . . . . . . . . . . . . . . . . 2379.4 Extending the Oblong Class . . . . . . . . . . . . . . . . . . . . . . . . . . 2419.5 Method Overriding . . . . . . . . . . . . . . . . . . . . . . . . . . . . . . . . 2459.6 Abstract Classes . . . . . . . . . . . . . . . . . . . . . . . . . . . . . . . . . . 2509.7 Abstract Methods . . . . . . . . . . . . . . . . . . . . . . . . . . . . . . . . . 2539.8 The final Modifier . . . . . . . . . . . . . . . . . . . . . . . . . . . . . . . . 2579.9 The Object Class . . . . . . . . . . . . . . . . . . . . . . . . . . . . . . . . . . 2579.10 The toString Method . . . . . . . . . . . . . . . . . . . . . . . . . . . . 2589.11 Wrapper Classes and Autoboxing . . . . . . . . . . . . . . . . . . . . . . 2599.12 Self-test Questions . . . . . . . . . . . . . . . . . . . . . . . . . . . . . . . . 2609.13 Programming Exercises . . . . . . . . . . . . . . . . . . . . . . . . . . . . . 264
10 Introducing JavaFX . . . . . . . . . . . . . . . . . . . . . . . . . . . . . . . . . . . . 26510.1 Introduction . . . . . . . . . . . . . . . . . . . . . . . . . . . . . . . . . . . . . 26510.2 A Brief History of Java Graphics . . . . . . . . . . . . . . . . . . . . . . 26610.3 JavaFX: An Overview . . . . . . . . . . . . . . . . . . . . . . . . . . . . . . 26710.4 2D Graphics: The SmileyFace Class . . . . . . . . . . . . . . . . . . . . 26910.5 Event-Handling in JavaFX: The ChangingFace Class . . . . . . . 27510.6 Some More 2D Shapes . . . . . . . . . . . . . . . . . . . . . . . . . . . . . 28110.7 An Interactive Graphics Class . . . . . . . . . . . . . . . . . . . . . . . . 28210.8 A Graphical User Interface (GUI) for the Oblong Class . . . . . 28510.9 Containers and Layouts . . . . . . . . . . . . . . . . . . . . . . . . . . . . . 288
10.9.1 More About HBox and VBox . . . . . . . . . . . . . . . . . 28810.9.2 GridPane . . . . . . . . . . . . . . . . . . . . . . . . . . . . . . . . 29010.9.3 StackPane . . . . . . . . . . . . . . . . . . . . . . . . . . . . . . . . 29110.9.4 FlowPane and BorderPane . . . . . . . . . . . . . . . . . . . 292
10.10 Borders, Fonts and Colours . . . . . . . . . . . . . . . . . . . . . . . . . . 29310.10.1 Borders . . . . . . . . . . . . . . . . . . . . . . . . . . . . . . . . . 29410.10.2 Fonts . . . . . . . . . . . . . . . . . . . . . . . . . . . . . . . . . . . 29510.10.3 Colours . . . . . . . . . . . . . . . . . . . . . . . . . . . . . . . . . 296
10.11 Number Formatting . . . . . . . . . . . . . . . . . . . . . . . . . . . . . . . . 29710.12 A Metric Converter . . . . . . . . . . . . . . . . . . . . . . . . . . . . . . . . 299
xii Contents

10.13 Self-test Questions . . . . . . . . . . . . . . . . . . . . . . . . . . . . . . . . 30210.14 Programming Exercises . . . . . . . . . . . . . . . . . . . . . . . . . . . . . 303
11 Case Study—Part 1 . . . . . . . . . . . . . . . . . . . . . . . . . . . . . . . . . . . . . 30711.1 Introduction . . . . . . . . . . . . . . . . . . . . . . . . . . . . . . . . . . . . . 30711.2 The Requirements Specification . . . . . . . . . . . . . . . . . . . . . . . 30811.3 The Design . . . . . . . . . . . . . . . . . . . . . . . . . . . . . . . . . . . . . . 30811.4 Implementing the Payment Class . . . . . . . . . . . . . . . . . . . . . . 31011.5 The PaymentList Class . . . . . . . . . . . . . . . . . . . . . . . . . . . . . 313
11.5.1 Javadoc . . . . . . . . . . . . . . . . . . . . . . . . . . . . . . . . . 31711.5.2 Code Layout . . . . . . . . . . . . . . . . . . . . . . . . . . . . . 319
11.6 Testing the PaymentList Class . . . . . . . . . . . . . . . . . . . . . . . . 32011.7 Implementing the Tenant Class . . . . . . . . . . . . . . . . . . . . . . . 32811.8 Implementing the TenantList Class . . . . . . . . . . . . . . . . . . . . . 33011.9 Self-test Questions . . . . . . . . . . . . . . . . . . . . . . . . . . . . . . . . 33411.10 Programming Exercises . . . . . . . . . . . . . . . . . . . . . . . . . . . . . 334
12 Case Study—Part 2 . . . . . . . . . . . . . . . . . . . . . . . . . . . . . . . . . . . . . 33512.1 Introduction . . . . . . . . . . . . . . . . . . . . . . . . . . . . . . . . . . . . . 33512.2 Keeping Permanent Records . . . . . . . . . . . . . . . . . . . . . . . . . 33512.3 Design of the Hostel Class . . . . . . . . . . . . . . . . . . . . . . . . . . 33612.4 Design of the GUI . . . . . . . . . . . . . . . . . . . . . . . . . . . . . . . . 33812.5 Designing the Event-Handlers . . . . . . . . . . . . . . . . . . . . . . . . 34112.6 Implementing the Hostel Class . . . . . . . . . . . . . . . . . . . . . . . . 34412.7 Testing the System . . . . . . . . . . . . . . . . . . . . . . . . . . . . . . . . 35012.8 What Next? . . . . . . . . . . . . . . . . . . . . . . . . . . . . . . . . . . . . . 35312.9 Self-test Questions . . . . . . . . . . . . . . . . . . . . . . . . . . . . . . . . 35412.10 Programming Exercises . . . . . . . . . . . . . . . . . . . . . . . . . . . . . 354
Part II Semester Two
13 Interfaces and Lambda Expressions . . . . . . . . . . . . . . . . . . . . . . . . 35713.1 Introduction . . . . . . . . . . . . . . . . . . . . . . . . . . . . . . . . . . . . . 35713.2 An Example . . . . . . . . . . . . . . . . . . . . . . . . . . . . . . . . . . . . . 35813.3 Interfaces . . . . . . . . . . . . . . . . . . . . . . . . . . . . . . . . . . . . . . . 35913.4 Inner Classes . . . . . . . . . . . . . . . . . . . . . . . . . . . . . . . . . . . . 36413.5 Anonymous Classes . . . . . . . . . . . . . . . . . . . . . . . . . . . . . . . 36413.6 Lambda Expressions . . . . . . . . . . . . . . . . . . . . . . . . . . . . . . . 368
13.6.1 The Syntax of Lambda Expressions . . . . . . . . . . . . . 36913.6.2 Variable Scope . . . . . . . . . . . . . . . . . . . . . . . . . . . . 37113.6.3 Example Programs . . . . . . . . . . . . . . . . . . . . . . . . . 37113.6.4 Method References—The Double Colon
Operator . . . . . . . . . . . . . . . . . . . . . . . . . . . . . . . . . 37413.7 Generics . . . . . . . . . . . . . . . . . . . . . . . . . . . . . . . . . . . . . . . . 376
Contents xiii

13.7.1 Bounded Type Parameters . . . . . . . . . . . . . . . . . . . . 37913.7.2 Wildcards . . . . . . . . . . . . . . . . . . . . . . . . . . . . . . . . 382
13.8 Other Interfaces Provided with the Java Libraries . . . . . . . . . . 38313.9 Polymorphism and Polymorphic Types . . . . . . . . . . . . . . . . . . 385
13.9.1 Operator Overloading . . . . . . . . . . . . . . . . . . . . . . . 38513.9.2 Method Overloading . . . . . . . . . . . . . . . . . . . . . . . . 38513.9.3 Method Overriding . . . . . . . . . . . . . . . . . . . . . . . . . 38513.9.4 Type Polymorphism . . . . . . . . . . . . . . . . . . . . . . . . 386
13.10 Self-test Questions . . . . . . . . . . . . . . . . . . . . . . . . . . . . . . . . 38613.11 Programming Exercises . . . . . . . . . . . . . . . . . . . . . . . . . . . . . 391
14 Exceptions . . . . . . . . . . . . . . . . . . . . . . . . . . . . . . . . . . . . . . . . . . . . 39314.1 Introduction . . . . . . . . . . . . . . . . . . . . . . . . . . . . . . . . . . . . . 39314.2 Pre-defined Exception Classes in Java . . . . . . . . . . . . . . . . . . 39414.3 Handling Exceptions . . . . . . . . . . . . . . . . . . . . . . . . . . . . . . . 395
14.3.1 Claiming an Exception . . . . . . . . . . . . . . . . . . . . . . 39814.3.2 Catching an Exception . . . . . . . . . . . . . . . . . . . . . . 401
14.4 The ‘finally’ Clause . . . . . . . . . . . . . . . . . . . . . . . . . . . . . . . . 40314.5 The ‘Try-with-Resources’ Construct . . . . . . . . . . . . . . . . . . . . 40614.6 Null-Pointer Exceptions . . . . . . . . . . . . . . . . . . . . . . . . . . . . . 40814.7 The Optional Class . . . . . . . . . . . . . . . . . . . . . . . . . . . . . . . . 41014.8 Exceptions in GUI Applications . . . . . . . . . . . . . . . . . . . . . . . 41314.9 Using Exceptions in Your Own Classes . . . . . . . . . . . . . . . . . 416
14.9.1 Throwing Exceptions . . . . . . . . . . . . . . . . . . . . . . . 41714.9.2 Creating Your Own Exception Classes . . . . . . . . . . . 419
14.10 Documenting Exceptions . . . . . . . . . . . . . . . . . . . . . . . . . . . . 42114.11 Self-test Questions . . . . . . . . . . . . . . . . . . . . . . . . . . . . . . . . 42214.12 Programming Exercises . . . . . . . . . . . . . . . . . . . . . . . . . . . . . 423
15 The Java Collections Framework . . . . . . . . . . . . . . . . . . . . . . . . . . 42715.1 Introduction . . . . . . . . . . . . . . . . . . . . . . . . . . . . . . . . . . . . . 42715.2 The List Interface and the ArrayList Class . . . . . . . . . . . . . . . 428
15.2.1 Creating an ArrayList Collection Object . . . . . . . . . . 42915.2.2 The Interface Type Versus the Implementation
Type . . . . . . . . . . . . . . . . . . . . . . . . . . . . . . . . . . . 43015.2.3 List Methods . . . . . . . . . . . . . . . . . . . . . . . . . . . . . 431
15.3 The Enhanced for Loop and Java Collections . . . . . . . . . . . . . 43415.4 The forEach Loop . . . . . . . . . . . . . . . . . . . . . . . . . . . . . . . . . 43515.5 The Set Interface and the HashSet Class . . . . . . . . . . . . . . . . . 436
15.5.1 Set Methods . . . . . . . . . . . . . . . . . . . . . . . . . . . . . . 43715.5.2 Iterating Through the Elements of a Set . . . . . . . . . . 43815.5.3 Iterator Objects . . . . . . . . . . . . . . . . . . . . . . . . . . . 440
xiv Contents

15.6 The Map Interface and the HashMap Class . . . . . . . . . . . . . . 44315.6.1 Map Methods . . . . . . . . . . . . . . . . . . . . . . . . . . . . . 44415.6.2 Iterating Through the Elements of a Map . . . . . . . . . 446
15.7 Using Your Own Classes with Java’s Collection Classes . . . . . 44715.7.1 The Book Class . . . . . . . . . . . . . . . . . . . . . . . . . . . 44815.7.2 Defining an equals Method . . . . . . . . . . . . . . . . . . . 45015.7.3 Defining a hashCode Method . . . . . . . . . . . . . . . . . 45015.7.4 The Updated Book Class . . . . . . . . . . . . . . . . . . . . . 452
15.8 Developing a Collection Class for Book Objects . . . . . . . . . . . 45315.9 Sorting Objects in a Collection . . . . . . . . . . . . . . . . . . . . . . . 456
15.9.1 The Collections.sort and Arrays.sort Methods . . . . . 45615.9.2 The Comparable<T> Interface . . . . . . . . . . . . . . . . . 45815.9.3 The Comparator<T> Interface . . . . . . . . . . . . . . . . . 459
15.10 Self-test Questions . . . . . . . . . . . . . . . . . . . . . . . . . . . . . . . . 46315.11 Programming Exercises . . . . . . . . . . . . . . . . . . . . . . . . . . . . . 465
16 Advanced JavaFX . . . . . . . . . . . . . . . . . . . . . . . . . . . . . . . . . . . . . . 46916.1 Introduction . . . . . . . . . . . . . . . . . . . . . . . . . . . . . . . . . . . . . 46916.2 Input Events . . . . . . . . . . . . . . . . . . . . . . . . . . . . . . . . . . . . . 470
16.2.1 Mouse Events . . . . . . . . . . . . . . . . . . . . . . . . . . . . . 47016.2.2 Key Events . . . . . . . . . . . . . . . . . . . . . . . . . . . . . . 473
16.3 Binding Properties . . . . . . . . . . . . . . . . . . . . . . . . . . . . . . . . . 47716.4 The Slider Class . . . . . . . . . . . . . . . . . . . . . . . . . . . . . . . . . . 47916.5 Multimedia Nodes . . . . . . . . . . . . . . . . . . . . . . . . . . . . . . . . . 482
16.5.1 Embedding Images . . . . . . . . . . . . . . . . . . . . . . . . . 48316.5.2 Embedding Videos . . . . . . . . . . . . . . . . . . . . . . . . . 48616.5.3 Embedding Web Pages . . . . . . . . . . . . . . . . . . . . . . 489
16.6 Cascading Style Sheets . . . . . . . . . . . . . . . . . . . . . . . . . . . . . 49116.7 Self-test Questions . . . . . . . . . . . . . . . . . . . . . . . . . . . . . . . . 49616.8 Programming Exercises . . . . . . . . . . . . . . . . . . . . . . . . . . . . . 497
17 JavaFX: Interacting with the User . . . . . . . . . . . . . . . . . . . . . . . . . 49917.1 Introduction . . . . . . . . . . . . . . . . . . . . . . . . . . . . . . . . . . . . . 49917.2 Drop-Down Menus . . . . . . . . . . . . . . . . . . . . . . . . . . . . . . . . 50017.3 Context (Pop-Up) Menus . . . . . . . . . . . . . . . . . . . . . . . . . . . . 50317.4 Combo Boxes . . . . . . . . . . . . . . . . . . . . . . . . . . . . . . . . . . . . 50717.5 Check Boxes and Radio Buttons . . . . . . . . . . . . . . . . . . . . . . 50917.6 A Card Menu . . . . . . . . . . . . . . . . . . . . . . . . . . . . . . . . . . . . 51317.7 The Dialog Class . . . . . . . . . . . . . . . . . . . . . . . . . . . . . . . . . 51817.8 Self-test Questions . . . . . . . . . . . . . . . . . . . . . . . . . . . . . . . . 52417.9 Programming Exercises . . . . . . . . . . . . . . . . . . . . . . . . . . . . . 525
Contents xv
18 Working with Files . . . . . . . . . . . . . . . . . . . . . . . . . . . . . . . . . . . . . 52718.1 Introduction . . . . . . . . . . . . . . . . . . . . . . . . . . . . . . . . . . . . . 52718.2 Input and Output . . . . . . . . . . . . . . . . . . . . . . . . . . . . . . . . . . 52818.3 Input and Output Devices . . . . . . . . . . . . . . . . . . . . . . . . . . . 52818.4 File-Handling . . . . . . . . . . . . . . . . . . . . . . . . . . . . . . . . . . . . 530
18.4.1 Encoding . . . . . . . . . . . . . . . . . . . . . . . . . . . . . . . . 53018.4.2 Access . . . . . . . . . . . . . . . . . . . . . . . . . . . . . . . . . . 531
18.5 Reading and Writing to Text Files . . . . . . . . . . . . . . . . . . . . . 53118.6 Reading and Writing to Binary Files . . . . . . . . . . . . . . . . . . . 53918.7 Reading a Text File Character by Character . . . . . . . . . . . . . . 54118.8 Object Serialization . . . . . . . . . . . . . . . . . . . . . . . . . . . . . . . . 54218.9 Random Access Files . . . . . . . . . . . . . . . . . . . . . . . . . . . . . . 54418.10 Self-test Questions . . . . . . . . . . . . . . . . . . . . . . . . . . . . . . . . 54918.11 Programming Exercises . . . . . . . . . . . . . . . . . . . . . . . . . . . . . 550
19 Packages . . . . . . . . . . . . . . . . . . . . . . . . . . . . . . . . . . . . . . . . . . . . . 55319.1 Introduction . . . . . . . . . . . . . . . . . . . . . . . . . . . . . . . . . . . . . 55319.2 Understanding Packages . . . . . . . . . . . . . . . . . . . . . . . . . . . . 55319.3 Accessing Classes in Packages . . . . . . . . . . . . . . . . . . . . . . . . 55519.4 Developing Your Own Packages . . . . . . . . . . . . . . . . . . . . . . 55819.5 Package Scope . . . . . . . . . . . . . . . . . . . . . . . . . . . . . . . . . . . 55919.6 Running Applications from the Command Line . . . . . . . . . . . 56019.7 Deploying Your Packages . . . . . . . . . . . . . . . . . . . . . . . . . . . 56319.8 Adding External Libraries . . . . . . . . . . . . . . . . . . . . . . . . . . . 564
19.8.1 Accessing Databases Using JDBC . . . . . . . . . . . . . . 56419.8.2 Accessing Databases Using Hibernate . . . . . . . . . . . 568
19.9 Self-test Questions . . . . . . . . . . . . . . . . . . . . . . . . . . . . . . . . 57419.10 Programming Exercises . . . . . . . . . . . . . . . . . . . . . . . . . . . . . 575
20 Multi-threaded Programs . . . . . . . . . . . . . . . . . . . . . . . . . . . . . . . . 57720.1 Introduction . . . . . . . . . . . . . . . . . . . . . . . . . . . . . . . . . . . . . 57720.2 Concurrent Processes . . . . . . . . . . . . . . . . . . . . . . . . . . . . . . . 57820.3 Threads . . . . . . . . . . . . . . . . . . . . . . . . . . . . . . . . . . . . . . . . 57820.4 The Thread Class . . . . . . . . . . . . . . . . . . . . . . . . . . . . . . . . . 58020.5 Thread Execution and Scheduling . . . . . . . . . . . . . . . . . . . . . 58220.6 Synchronizing Threads . . . . . . . . . . . . . . . . . . . . . . . . . . . . . 58420.7 Thread States . . . . . . . . . . . . . . . . . . . . . . . . . . . . . . . . . . . . 58520.8 Multithreading and JavaFX . . . . . . . . . . . . . . . . . . . . . . . . . . 587
20.8.1 The Task Class . . . . . . . . . . . . . . . . . . . . . . . . . . . 58720.8.2 The Service Class . . . . . . . . . . . . . . . . . . . . . . . . 59020.8.3 Automating the ChangingFace Application . . . . . . . 59120.8.4 Running a Task in the Background . . . . . . . . . . . . . 59420.8.5 Animation Using a Series of Images . . . . . . . . . . . . 596
xvi Contents

20.9 Self-test Questions . . . . . . . . . . . . . . . . . . . . . . . . . . . . . . . . 59920.10 Programming Exercises . . . . . . . . . . . . . . . . . . . . . . . . . . . . . 600
21 Advanced Case Study . . . . . . . . . . . . . . . . . . . . . . . . . . . . . . . . . . . 60321.1 Introduction . . . . . . . . . . . . . . . . . . . . . . . . . . . . . . . . . . . . . 60321.2 System Overview . . . . . . . . . . . . . . . . . . . . . . . . . . . . . . . . . 60421.3 Requirements Analysis and Specification . . . . . . . . . . . . . . . . 60421.4 Design . . . . . . . . . . . . . . . . . . . . . . . . . . . . . . . . . . . . . . . . . 60621.5 Enumerated Types in UML . . . . . . . . . . . . . . . . . . . . . . . . . . 60821.6 Implementation . . . . . . . . . . . . . . . . . . . . . . . . . . . . . . . . . . . 609
21.6.1 Implementing Enumerated Types in Java . . . . . . . . . 60921.6.2 The Runway Class . . . . . . . . . . . . . . . . . . . . . . . . . 61121.6.3 The Plane Class . . . . . . . . . . . . . . . . . . . . . . . . . . . 61221.6.4 The Airport Class . . . . . . . . . . . . . . . . . . . . . . . . . . 616
21.7 Testing . . . . . . . . . . . . . . . . . . . . . . . . . . . . . . . . . . . . . . . . . 62421.8 Design of the JavaFX Interface . . . . . . . . . . . . . . . . . . . . . . . 62521.9 The TabPane Class . . . . . . . . . . . . . . . . . . . . . . . . . . . . . . . . 62621.10 The AirportFrame Class . . . . . . . . . . . . . . . . . . . . . . . . . . . . 62821.11 Self-test Questions . . . . . . . . . . . . . . . . . . . . . . . . . . . . . . . . 63821.12 Programming Exercises . . . . . . . . . . . . . . . . . . . . . . . . . . . . . 639
22 The Stream API . . . . . . . . . . . . . . . . . . . . . . . . . . . . . . . . . . . . . . . 64122.1 Introduction . . . . . . . . . . . . . . . . . . . . . . . . . . . . . . . . . . . . . 64122.2 Streams Versus Iterations: Example Program . . . . . . . . . . . . . 64322.3 Creating Streams . . . . . . . . . . . . . . . . . . . . . . . . . . . . . . . . . . 64622.4 Intermediate Operations . . . . . . . . . . . . . . . . . . . . . . . . . . . . . 64822.5 Operations for Terminating Streams . . . . . . . . . . . . . . . . . . . . 652
22.5.1 More Examples . . . . . . . . . . . . . . . . . . . . . . . . . . . 65222.5.2 Collecting Results . . . . . . . . . . . . . . . . . . . . . . . . . . 654
22.6 Concatenating Streams . . . . . . . . . . . . . . . . . . . . . . . . . . . . . 65622.7 Infinite Streams . . . . . . . . . . . . . . . . . . . . . . . . . . . . . . . . . . . 65622.8 Stateless and Stateful Operations . . . . . . . . . . . . . . . . . . . . . . 65722.9 Parallelism . . . . . . . . . . . . . . . . . . . . . . . . . . . . . . . . . . . . . . 65822.10 Self-test Questions . . . . . . . . . . . . . . . . . . . . . . . . . . . . . . . . 65922.11 Programming Exercises . . . . . . . . . . . . . . . . . . . . . . . . . . . . . 659
23 Working with Sockets . . . . . . . . . . . . . . . . . . . . . . . . . . . . . . . . . . . 66123.1 Introduction . . . . . . . . . . . . . . . . . . . . . . . . . . . . . . . . . . . . . 66123.2 Sockets . . . . . . . . . . . . . . . . . . . . . . . . . . . . . . . . . . . . . . . . . 66223.3 A Simple Server Application . . . . . . . . . . . . . . . . . . . . . . . . . 66323.4 A Simple Client Application . . . . . . . . . . . . . . . . . . . . . . . . . 66823.5 Connections from Multiple Clients . . . . . . . . . . . . . . . . . . . . . 673
Contents xvii

23.6 A Client–Server Chat Application . . . . . . . . . . . . . . . . . . . . . 67623.7 Self-test Questions . . . . . . . . . . . . . . . . . . . . . . . . . . . . . . . . 68623.8 Programming Exercises . . . . . . . . . . . . . . . . . . . . . . . . . . . . . 686
24 Java in Context . . . . . . . . . . . . . . . . . . . . . . . . . . . . . . . . . . . . . . . . 68924.1 Introduction . . . . . . . . . . . . . . . . . . . . . . . . . . . . . . . . . . . . . 68924.2 Language Size . . . . . . . . . . . . . . . . . . . . . . . . . . . . . . . . . . . 690
24.2.1 Pointers . . . . . . . . . . . . . . . . . . . . . . . . . . . . . . . . . 69024.2.2 Multiple Inheritance . . . . . . . . . . . . . . . . . . . . . . . . 691
24.3 Language Reliability . . . . . . . . . . . . . . . . . . . . . . . . . . . . . . . 69424.3.1 Aliasing . . . . . . . . . . . . . . . . . . . . . . . . . . . . . . . . . 69524.3.2 Overriding the clone Method . . . . . . . . . . . . . . . . . . 69724.3.3 Immutable Objects . . . . . . . . . . . . . . . . . . . . . . . . . 70024.3.4 Using the clone Method of the Object Class . . . . . . . 70124.3.5 Copy Constructors . . . . . . . . . . . . . . . . . . . . . . . . . 70324.3.6 Garbage Collection . . . . . . . . . . . . . . . . . . . . . . . . . 704
24.4 The Role of Java . . . . . . . . . . . . . . . . . . . . . . . . . . . . . . . . . . 70624.5 What Next? . . . . . . . . . . . . . . . . . . . . . . . . . . . . . . . . . . . . . 70624.6 Self-test Questions . . . . . . . . . . . . . . . . . . . . . . . . . . . . . . . . 70724.7 Programming Exercises . . . . . . . . . . . . . . . . . . . . . . . . . . . . . 708
Index . . . . . . . . . . . . . . . . . . . . . . . . . . . . . . . . . . . . . . . . . . . . . . . . . . . . . . 709
xviii Contents

Part ISemester One
1The First Step
Outcomes:
By the end of this chapter you should be able to:
• explain the meaning of the terms software, program, source code, programcode;
• distinguish between application software and system software;• explain how Java programs are compiled and run;• provide examples of different types of java applications;• write Java programs that display text on the screen;• join messages in output commands by using the concatenation (+) operator;• add comments to programs.
1.1 Introduction
Like any student starting out on a first programming module, you will be itching todo just one thing—get started on your first program. We can well understand that,and you won’t be disappointed, because you will be writing programs in this veryfirst chapter. Designing and writing computer programs can be one of the mostenjoyable and satisfying things you can do, although it can seem a little daunting atfirst because it is like nothing else you have ever done. But, with a bit of perse-verance, you will not only start to get a real taste for it but you may well findyourself sitting up till two o’clock in the morning trying to solve a problem. Andjust when you have given up and you are dropping off to sleep, the answer pops intoyour head and you are at the computer again until you notice it is getting lightoutside! So if this is happening to you, then don’t worry—it’s normal!
However, before you start writing programs we need to make sure that youunderstand what we mean by important terms such as program, software, code andprogramming languages.
© Springer Nature Switzerland AG 2019Q. Charatan and A. Kans, Java in Two Semesters, Texts in Computer Science,https://doi.org/10.1007/978-3-319-99420-8_1
3

1.2 Software
A computer is not very useful unless we give it some instructions that tell it what todo. This set of instructions is called a program. Programs that the computer can usecan be stored on electronic chips that form part of the computer, or can be stored ondevices like hard disks, CDs, DVDs, and USB drives (sometimes called memorysticks), and can often be downloaded via the Internet.
The word software is the name given to a single program or a set of programs.There are two main kinds of software:
• Application software. This is the name given to useful programs that a usermight need; for example, word-processors, spreadsheets, accounts programs,games and so on. Such programs are often referred to simply as applications.
• System software. This is the name given to special programs that help thecomputer to do its job; for example, operating systems (such as UNIX™ orWindows™, which help us to use the computer) and network software (whichhelps computers to communicate with each other).
Of course software is not restricted simply to computers themselves. Many oftoday’s devices—from mobile phones to microwave ovens to games consoles—relyon computer programs that are built into the device. Such software is referred to asembedded software.
Both application and system software are built by writing a set of instructions forthe computer to obey. Programming, or coding, is the task of writing theseinstructions. These instructions have to be written in a language specially designedfor this purpose. These programming languages include C++, Visual Basic,Python and many more. The language we are going to use in this book is Java. Javais an example of an object-oriented programming language. Right now, that phrasemight not mean anything to you, but you will find out all about its meaning as weprogress through this book.
1.3 Compiling Programs
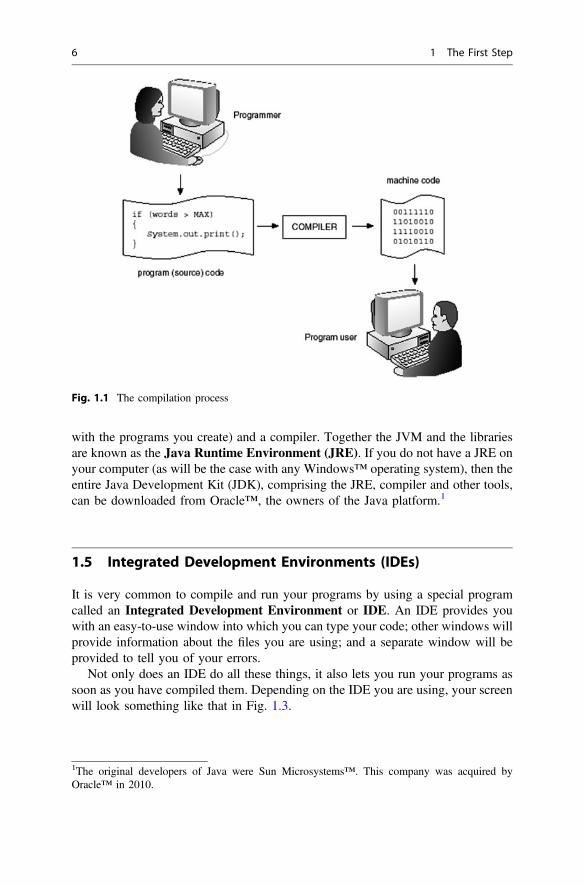
Like most modern programming languages, the Java language consists ofinstructions that look a bit like English. For example, words such as while and if arepart of the Java language. The set of instructions written in a programming lan-guage is called the program code or source code.
Ultimately these instructions have to be translated into a language that can beunderstood by the computer. The computer understands only binary instructions—that means instructions written as a series of 0s and 1s. So, for example, themachine might understand 01100111 to mean add. The language of the computer isoften referred to as machine code. A special piece of system software called acompiler translates the instructions written in a programming language into
4 1 The First Step

machine instructions consisting of 0s and 1s. This process is known as compiling.Figure 1.1 illustrates how this process works for many programming languages.
Programming languages have a very strict set of rules that you must follow. Justas with natural languages, this set of rules is called the syntax of the language.A program containing syntax errors will not compile. You will see when you startwriting programs that the sort of things that can cause compiler errors are theincorrect use of special Java keywords, missing brackets or semi-colons, and manyothers. If, however, the source code is free of such errors the compiler will suc-cessfully produce a machine code program that can be run on a computer, asillustrated.
Once a program has been compiled and the machine code program saved, it canbe run on the target machine as many times as necessary. When you buy a piece ofsoftware such as a game or a word processor, it is this machine code program thatyou are buying.
1.4 Programming in Java
Before the advent of Java, most programs were compiled as illustrated in Fig. 1.1.The only problem with this approach is that the final compiled program is suitableonly for a particular type of computer. For example, a program that is compiled fora PC will not run on a Mac™ or a UNIX™ machine.
But this is not the case with Java. Java—and nowadays many other languages—isplatform-independent. A Java program will run on any type of computer.
How is this achieved? The answer lies in the fact that any Java program requiresthe computer it is running on to also be running a special program called a JavaVirtual Machine, or JVM for short. This JVM is able to run a Java program for theparticular computer on which it is running.
For example, you can get a JVM for a PC running Windows™; there is a JVMfor a MAC™, and one for a Unix™ or Linux™ box. There is a special kind of JVMfor mobile phones; and there are JVMs built into machines where the embeddedsoftware is written in Java.
We saw earlier that conventional compilers translate our program code intomachine code. This machine code would contain the particular instructions appro-priate to the type of computer it was meant for. Java compilers do not translate theprogram into machine code—they translate it into special instructions called Javabyte code. Java byte code, which, like machine code, consists of 0s and 1s, containsinstructions that are exactly the same irrespective of the type of computer—it isuniversal, whereas machine code is specific to a particular type of computer. The jobof the JVM is to translate each byte code instruction for the computer it is running on,before the instruction is performed. See Fig. 1.2.
There are various ways in which a JVM can be installed on a computer. In thecase of some operating systems a JVM comes packaged with the system, along withthe Java libraries, or packages, (pre-compiled Java modules that can be integrated
1.3 Compiling Programs 5
with the programs you create) and a compiler. Together the JVM and the librariesare known as the Java Runtime Environment (JRE). If you do not have a JRE onyour computer (as will be the case with any Windows™ operating system), then theentire Java Development Kit (JDK), comprising the JRE, compiler and other tools,can be downloaded from Oracle™, the owners of the Java platform.1
1.5 Integrated Development Environments (IDEs)
It is very common to compile and run your programs by using a special programcalled an Integrated Development Environment or IDE. An IDE provides youwith an easy-to-use window into which you can type your code; other windows willprovide information about the files you are using; and a separate window will beprovided to tell you of your errors.
Not only does an IDE do all these things, it also lets you run your programs assoon as you have compiled them. Depending on the IDE you are using, your screenwill look something like that in Fig. 1.3.
Fig. 1.1 The compilation process
1The original developers of Java were Sun Microsystems™. This company was acquired byOracle™ in 2010.
6 1 The First Step

The IDE shown in Fig. 1.3 is NetBeans™, a very commonly used compiler forJava—another widely used IDE is Eclipse™. Instructions for installing and usingan IDE are on the website (see preface for details).
It is perfectly possible to compile and run Java programs without the use of anIDE—but not nearly so convenient. You would do this from a command line in aconsole window. The source code that you write is saved in the form of a simpletext file which has a .java extension. The compiler that comes as part of the JDKis called javac.exe, and to compile a file called, for example, MyPro-gram.java, you would write at the command prompt:
Fig. 1.2 Compiling Java programs
1.5 Integrated Development Environments (IDEs) 7

javac MyProgram.java
This would create a file called MyProgram.class, which is the compiled file inJava byte code. The name of the JVM is java.exe and to run the program youwould type:
java MyProgram
To start off with however, we strongly recommend that you use an IDE such asNetBeans™ or Eclipse™.
1.6 Java Applications
As we explained in Sect. 1.2, Java applications can run on a computer, on suchdevices as mobile phones and games consoles, or sometimes can be embedded intoan electronic device. In the last case you would probably be unaware of the fact thatthe software is running at all, whereas in the former cases you would be seeing
File information windows
Menu for carrying out tasks such as compiling, running and saving your programs
Console output window
Error message
Code window where you type in your Java source code
Fig. 1.3 A typical Java IDE screen
8 1 The First Step

output from your program on a screen and providing information to your programvia a keyboard and mouse, via a touch screen, or via a joystick or game controller.
The screen that provides output from your program, and prompts you to enterinformation, is known as the user interface. There are two principal types of userinterface:
• text based;• graphics based.
With text based user interfaces, information is displayed simply as text—with nopictures. Text based programs make use of the keyboard for user input. Text basedprograms are known as console applications. If you are using an IDE, the consolewindow is usually integrated into the IDE as you saw in Fig. 1.3. However, if youare running a program from the command prompt you will see a window similar tothat shown in Fig. 1.4.
You are probably more accustomed to running programs that have a graphicaluser interface (GUI). Such interfaces allow for pictures and shapes to be drawn onthe screen (such as text boxes and buttons) and make use of the mouse as well asthe keyboard to collect user input. An example of a GUI is given in Fig. 1.5.
Eventually we want all your programs to have graphical interfaces, but theseobviously require a lot more programming effort to create than simple consoleapplications. So, for most of the first semester, while we are teaching you thefundamentals of programming in Java, we are going to concentrate on getting theprogram logic right and we will be sticking to console style applications. Once youhave mastered these fundamentals, however, you will be ready to create attractivegraphical interfaces before the end of this very first semester.
Fig. 1.4 A Java console application
1.6 Java Applications 9

1.7 Your First Program
Now it is time to write your first program. Anyone who knows anything aboutprogramming will tell you that the first program that you write in a new languagehas always got to be a program that displays the words “Hello world” on the screen;so we will stick with tradition, and your first program will do exactly that!
When your program runs you will see the words “Hello world” displayed. Thetype of window in which this is displayed will vary according to the particularoperating system you are running, and the particular compiler you are using.
The code for the “Hello world” program is written out for you below.
Fig. 1.5 A graphical application
HelloWorldpublic class HelloWorld{
public static void main(String[] args){
System.out.println ("Hello world");}
}
10 1 The First Step

1.7.1 Analysis of the “Hello World” Program
Let’s start with the really important bit—the line of code that represents theinstruction display “Hello world” on the screen. The line that does this looks likethis:
System.out.println("Hello world");
This is the way we are always going to get stuff printed on a simple text screen;we use System.out.println (or sometimes System.out.print, asexplained below) and put whatever we want to be displayed in the brackets. Theprintln is short for “print line” by the way. You won’t understand at this stagewhy it has to be in this precise form (with each word separated by a full stop, andthe actual phrase in double quotes), but do make sure that you type it exactly as yousee it here, with an upper case S at the beginning. Also, you should notice thesemi-colon at the end of the statement. This is important; every Java instruction hasto end with a semi-colon.
Now we can consider the meaning of the rest of the program. The first line,which we call the header, looks like this:
The first, and most important, thing to pay attention to is the word class. Wenoted earlier that Java is referred to as an object-oriented programming language.Now, the true meaning of this will start to become clear in Chap. 7—but for thetime being you just need to know that object-oriented languages require the pro-gram to be written in separate units called classes. The simple programs that we arestarting off with will contain only one class (although they will interact with otherclasses from the “built-in” Java libraries). We always have to give a name to a classand in this case we have simply called our class HelloWorld.
When choosing a name for a class, you can choose any name as long as:
• the name is not already a keyword in the Java language (such as static,void);
• the name has no spaces in it;• the name does not include operators or mathematical symbols such as + and −;• the name starts either with a letter, an underscore (_), or a dollar sign ($).
So, the first line tells the Java compiler that we are writing a class with the nameHelloWorld. However, you will also have noticed the word public in front of
public class HelloWorld
1.7 Your First Program 11

the word class; placing this word here makes our class accessible to the outsideworld and to other classes—so, until we learn about specific ways of restrictingaccess (in the second semester) we will always include this word in the header.A public class should always be saved in a file with the same name as theclass itself—so in this case it should be saved as a file with the name HelloWorld.java.
Notice that everything in the class has to be contained between two curlybrackets (known as braces) that look like this {}; these tell the compiler where theclass begins and ends.
There is one important thing that we must emphasize here. Java is case-sensitive—in other words it interprets upper case and lower case characters as two com-pletely different things—it is very important therefore to type the statements exactlyas you see them here, paying attention to the case of the letters.
The next line that we come across (after the opening curly bracket) is this:
This looks rather strange if you are not used to programming—but you will seethat every application we write is going to contain one class with this line in it. InChap. 7 you will find out that this basic unit called a class is made up of, amongother things, a number of methods. You will find out a lot more about methods inChap. 5, but for now it is good enough for you to know that a method contains aparticular set of instructions that the computer must carry out. Our HelloWorldclass contains just one method and this line introduces that method. In fact it is avery special method called a main method. Applications in Java must alwayscontain a class with a method called main: this is where the program begins.A program starts with the first instruction of main, then obeys each instruction insequence (unless the instruction itself tells it to jump to some other place in theprogram). The program terminates when it has finished obeying the final instructionof main.2
So this line that we see above introduces the main method; the programinstructions are now written in a second set of curly brackets that show us wherethis main method begins and ends. At the moment we will not worry about thewords public static void in front of main, and the bit in the bracketsafterwards (String[] args)3—we will just accept that they always have to bethere; you will begin to understand their significance as you learn more about
public static void main(String[] args)
2In Chap. 10 you will learn to create graphics programs with a package called JavaFX, and in thecase of JavaFX applications you will see that in some instances it is possible to run a JavaFXapplication without a main method.3In fact, if you left out the words in brackets your program would still compile—but it wouldn’t dowhat you wanted it to do!
12 1 The First Step

programming concepts. The top line of a method is referred to as the methodheader and words such as public and static, that are part of the Java lan-guage, are referred to as keywords.4
As we have said, we place instructions inside a method by surrounding themwith opening and closing curly brackets. In Java, curly brackets mark the beginningand end of a group of instructions. In this case we have only one instruction insidethe curly brackets but, as you will soon see, we can have many instructions insidethese braces.
By the way, you should be aware that the compiler is not concerned about thelayout of your code, just that your code meets the rules of the language. So wecould have typed the method header, the curly brackets and the println com-mand all on one line if we wished! Obviously this would look very messy, and it isalways important to lay out your code in a way that makes it easy to read and tofollow. So throughout this book we will lay out our code in a neat easy-to-readformat, lining up opening and closing braces.
1.7.2 Adding Comments to a Program
When we write program code, we will often want to include some comments tohelp remind us what we were doing when we look at our code a few weeks later, orto help other people to understand what we have done.
Of course, we want the compiler to ignore these comments when the code isbeing compiled. There are different ways of doing this. For short comments weplace two slashes (//) at the beginning of the line—everything after these slashes, upto the end of the line, is then ignored by the compiler.
For longer comments (that is, ones that run over more than a single line) weusually use another approach. The comment is enclosed between two specialsymbols; the opening symbol is a slash followed by a star (/*) and the closingsymbol is a star followed by a slash (*/). Everything between these two symbols isignored by the compiler. The program below shows examples of both types ofcomment; when you compile and run this program you will see that the commentshave no effect on the code, and the output is exactly the same as that of the originalprogram.
4You will notice that we are using bold courier font for Java keywords.
1.7 Your First Program 13

In Chap. 11 you will learn about a special tool called Javadoc for documentingyour programs. In that chapter you will see that in order to use this tool you mustcomment your classes in the Javadoc style—as you will see, Javadoc commentsmust begin with /** and end with */.
1.8 Output in Java
As you have already seen when writing your first program, to output a message onto the screen in Java we use the following command:
System.out.println(message to be printed on screen);
For example, we have already seen:
This prints the message “Hello world” onto the screen. There is in fact analternative form of the System.out.println statement, which uses System.out.print. As we said before, println is short for print line and the effect ofthis statement is to start a new line after displaying whatever is in the brackets. Youcan see the effect of this below—we have adapted our program by adding anadditional line.
HelloWorld – with comments// this is a short comment, so we use the first method public class HelloWorld{
public static void main(String[] args){
System.out.println("Hello world");}
/* this is the second method of including comments – it is more convenient to use this method here, because the comment is longer and goes over more than one line */}
System.out.println("Hello world");
HelloWorld – with an addi onal linepublic class HelloWorld{
public static void main(String[] args){
System.out.println("Hello world"); // notice the use of println System.out.println("Hello world again!");
}}
14 1 The First Step

When we run this program, the output looks like this:
Hello worldHello world again!
Now let’s change the first System.out.println to System.out.print:
Now our output looks like this:
Hello worldHello world again!
You can see that the output following the System.out.print statementdoesn’t start on a new line, but follows straight on from the previous line.
By the way, if you want a blank line in the program, then you can simply useprintln with empty brackets:
Messages such as “Hello world” are in fact what we call strings (collections ofcharacters). In Java, literal strings like this are always enclosed in speech marks. Weshall explore strings in depth in Chap. 7. However, it is useful to know now howseveral strings can be printed on the screen using a single output command.
In Java, two strings can be joined together with the plus symbol (+). When usingthis symbol for this purpose it is known as the concatenation operator. Forexample, instead of printing the single string “Hello world”, we could have joinedtwo strings, “Hello” and “world”, for output using the following command:
Note that spaces are printed by including them within the speech marks(“Hello ”), not by adding spaces around the concatenation operator (which has noeffect at all).
HelloWorld – adapted to show the effect of using print instead of printlnpublic class HelloWorld{
public static void main(String[] args){
System.out.print("Hello world"); // notice the use of 'print'System.out.println("Hello world again!");
} }
System.out.println();
System.out.println("Hello " + "world");
1.8 Output in Java 15

1.9 Self-test Questions
1. Explain the meaning of the following terms:
• program;• software;• application software;• system software;• machine code;• source code;.• embedded software;• compilation;• Java byte code;• Java virtual machine;• integrated development environment;
2. Explain how Java programs are compiled and run.
3. Describe two different ways of adding comments to a Java program.
4. What is the difference between using System.out.println and System.out.print to produce output in Java?
5. What, precisely, would be the output of the following programs?
(a)public class Question5A{
public static void main(String[] args) {
System.out.print("Hello, how are you? "); System.out.println("Fine thanks.");
} }
(b)public class Question5B{
public static void main(String[] args) {
System.out.println("Hello, how are you? "); System.out.println("Fine thanks.");
} }
16 1 The First Step

6. Identify the syntax errors in the following program:
public class{
public Static void main(String[] args) {
system.out.println( I want this program to compile) }
1.10 Programming Exercises
1. If you do not have access to a Java IDE go to the accompanying website andfollow the instructions for installing an IDE. You will also find instructions onthe website for compiling and running programs.
2. Type and compile the Hello World program. If you make any syntax errors, thecompiler will indicate where to find them. Correct them and re-compile yourprogram. Keep doing this until you no longer have any errors. You can then runyour program.
3. Make the changes to the Hello World program that are made in this chapter, theneach time re-compile and run the program again.
4. Type and compile the program given in self test question 6 above. This programcontained compiler errors that you should have identified in your answer to thatquestion. Take a look at how the compiler reports on these errors then fix themso that the program can compile and run successfully.
5. Write a program that displays your name, address and telephone number, eachon separate lines.
6. Adapt the above program to include a blank line between your address andtelephone number.
(c)
public class Question5C{
public static void main(String[] args) {
System.out.println("1 + 2 " + "+ 3" + " = 6"); }
}
1.9 Self-test Questions 17

7. Write a program that displays your initials in big letters made of asterisks. Forexample:
* * * * * * ***** * *
* * * * ** * * *
Do this by using a series of println commands, each printing one row ofasterisks.
18 1 The First Step

2Building Blocks
Outcomes:
By the end of this chapter you should be able to:
• distinguish between the eight built-in primitive types of Java;• declare and assign values to variables;• create constant values with the keyword final;• use the input methods of the Scanner class to get data from the keyboard;• design the functionality of a method using pseudocode.
2.1 Introduction
The Hello world program that we developed in Chap. 1 is of course very simpleindeed. One way in which this program is very limited is that it has no data to workon. All interesting programs will have to store data in order to give interestingresults; what use would a calculator be without the numbers the user types into addand multiply? For this reason, one of the first questions you should ask whenlearning any programming language is “what types of data does this language allowme to store in my programs?”
2.2 Simple Data Types in Java
We begin this topic by taking a look at the basic types available in the Javalanguage. The types of value used within a program are referred to as data types. Ifyou wish to record the price of a cinema ticket in a program, for example, this valuewould probably need to be kept in the form of a real number (a number with a
© Springer Nature Switzerland AG 2019Q. Charatan and A. Kans, Java in Two Semesters, Texts in Computer Science,https://doi.org/10.1007/978-3-319-99420-8_2
19

decimal point in it). However, if you wished to record how many tickets have beensold you would need to keep this in the form of an integer (whole number). It isnecessary to know whether suitable types exist in the programming language tokeep these items of data.
In Java there are a few simple data types that programmers can use. These simpletypes are often referred to as the primitive types of Java; they are also referred to asthe scalar types, as they relate to a single piece of information (a single realnumber, a single character etc.).
Table 2.1 lists the names of these types in the Java language, the kinds of valuethey represent, and the exact range of these values.
As you can see, some kinds of data, namely integers and real numbers, can bekept as more than one Java type. For example, you can use the byte type, theshort type or the int type to hold integers in Java. However, while each numericJava type allows for both positive and negative numbers, the maximum size ofnumbers that can be stored varies from type to type.
For example, the type byte can represent integers ranging only from −128 to127, whereas the type short can represent integers ranging from −32,768 to32,767. Unlike some programming languages, these ranges are fixed no matterwhich Java compiler or operating system you are using.
The character type, char, is used to represent characters from a standard set ofcharacters known as the Unicode character set. This contains nearly all the char-acters from most known languages. For the sake of simplicity, you can think of thistype as representing any character that can be input from your keyboard.
Finally, the boolean type is used to keep only one of two possible values:true or false. This type can be useful when creating tests in programs. Forexample, the answer to the question “have I passed my exam?” will either be eitheryes or no. In Java a boolean type could be used to keep the answer to thisquestion, with the value true being used to represent yes and the value false torepresent no.
Table 2.1 The primitive types of Java
Java type Allows for Range of values
byte Very small integers −128 to 127
short Small integers −32,768 to 32,767
int Big integers −2,147,483,648 to 2,147,483,647
long Very big integers −9,223,372,036,854,775,808 to9,223,372,036,854,775,807
float Real numbers ±1.4 * 10−45 to 3.4 * 1038
double Very big realnumbers
±4.9 * 10−324 to 1.8 * 10308
char Characters Unicode character set
boolean True or false Not applicable
20 2 Building Blocks

2.3 Declaring Variables in Java
The data types listed in Table 2.1 are used in programs to create named locations inthe computer’s memory that will contain values while a program is running. Thisprocess is known as declaring. These named locations are called variables becausetheir values are allowed to vary over the life of the program.
For example, a program written to develop a computer game might need a pieceof data to record the player’s score as secret keys are found in a haunted house. Thevalue held in this piece of data will vary as more keys are found. This piece of datawould be referred to as a variable. To create a variable in your program you must:
• give that variable a name (of your choice);• decide which data type in the language best reflects the kind of values you wish
to store in the variable.
What name might you choose to record the score of the player in our computergame?
The rules for naming variables are the same as those we met when discussing therules for naming classes in the previous chapter. However, the convention in Javaprograms is to begin the name of a variable with a lower case letter (whereas theconvention is to start class names with an upper case letter). We could just pick aname like x, but it is best to pick a name that describes the purpose of the item ofdata; an ideal name would be score.
Which data type in Table 2.1 should you use if you wish to record a player’sscore? Well, since the score would always be a whole number, an integer typewould be appropriate. There are four Java data types that can be used to holdintegers (byte, short, int and long). As we said before, the only differenceamong these types is the range of values that they can keep. Unless there is specificreason to do otherwise, however, the int type is normally chosen to store integervalues in Java programs. Similarly, when it comes to storing real numbers we willchoose the double type rather than the float type.
Once the name and the type have been decided upon, the variable is declared asfollows:
dataType variableName;
where dataType is the chosen primitive type and variableName is the chosenname of the variable. So, in the case of a player’s score, the variable would bedeclared as follows:
int score;
2.3 Declaring Variables in Java 21

Figure 2.1 illustrates the effect of this instruction on the computer’s memory. Asyou can see, a small part of the computer’s memory is set aside to store this item.You can think of this reserved space in memory as being a small box, big enough tohold an integer. The name of the box will be score.
In this way, many variables can be declared in your programs. Let’s assume thatthe player of a game can choose a difficulty level (A, B, or C); another variablecould be declared in a similar way.
What name might you give this variable? An obvious choice would be dif-ficulty level but remember names cannot have spaces in them. You could usean underscore to remove the space (difficulty_level) or start the second wordwith a capital letter to distinguish the two words (difficultyLevel). Both arewell-established naming conventions in Java. Alternatively you could just shortenthe name to, say, level; that is what we will do here.
Now, what data type in Table 2.1 best represents the difficulty level? Since thelevels are given as characters (A, B and C) the char type would be the obviouschoice. At this point we have two variables declared: one to record the score andone to record the difficulty level.
Finally, several variables can be declared on a single line if they are all of thesame type. For example, let’s assume that there are ghosts in the house that hit outat the player; the number of times a player gets hit by a ghost can also be recorded.We can call this variable hits. Since the type of this variable is also an integer, itcan be declared along with score in a single line as follows:
Fig. 2.1 The effect of declaring a variable in Java
int score;char level;
int score, hits; // two variables declared at oncechar level ; // this has to be declared separately
22 2 Building Blocks
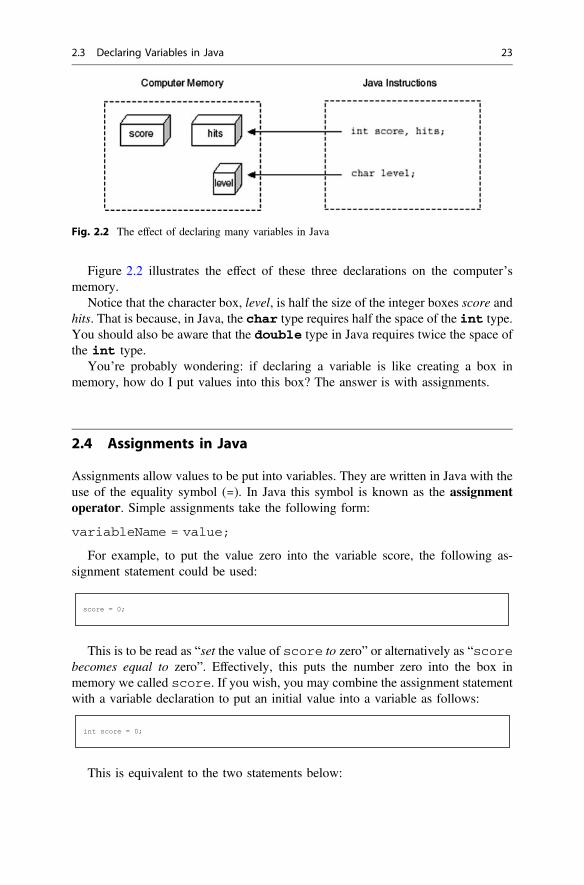
Figure 2.2 illustrates the effect of these three declarations on the computer’smemory.
Notice that the character box, level, is half the size of the integer boxes score andhits. That is because, in Java, the char type requires half the space of the int type.You should also be aware that the double type in Java requires twice the space ofthe int type.
You’re probably wondering: if declaring a variable is like creating a box inmemory, how do I put values into this box? The answer is with assignments.
2.4 Assignments in Java
Assignments allow values to be put into variables. They are written in Java with theuse of the equality symbol (=). In Java this symbol is known as the assignmentoperator. Simple assignments take the following form:
variableName = value;
For example, to put the value zero into the variable score, the following as-signment statement could be used:
This is to be read as “set the value of score to zero” or alternatively as “scorebecomes equal to zero”. Effectively, this puts the number zero into the box inmemory we called score. If you wish, you may combine the assignment statementwith a variable declaration to put an initial value into a variable as follows:
This is equivalent to the two statements below:
Fig. 2.2 The effect of declaring many variables in Java
score = 0;
int score = 0;
2.3 Declaring Variables in Java 23

Although in some circumstances Java will automatically put initial values intovariables when they are declared, this is not always the case and it is betterexplicitly to initialize variables that require an initial value.
Notice that the following declaration will not compile in Java:
int score = 2.5;
Can you think why?The reason is that the right-hand side of the assignment (2.5) is a real number.
This value could not be placed into a variable such as score, which is declared tohold only integers, without some information loss. In Java, such information loss isnot permitted, and this statement would therefore cause a compiler error.
You may be wondering if it is possible to place a whole number into a variabledeclared to hold real numbers. The answer is yes. The following is perfectly legal:
double someNumber = 1000;
Although the value on the right-hand side (1000) appears to be an integer, it canbe placed into a variable of type double because this would result in no infor-mation loss. Once this number is put into the variable of type double, it will betreated as the real number 1000.0.
Clearly, you need to think carefully about the best data type to choose for aparticular variable. For instance, if a variable is going to be used to hold wholenumbers or real numbers, use the double type as it can cope with both. If thevariable is only ever going to be used to hold whole numbers, however, thenalthough the double type might be adequate, use the int type as it is specificallydesigned to hold whole numbers.
When assigning a value to a character variable, you must enclose the value insingle quotes. For example, to set the initial difficulty level to A, the followingassignment statement could be used:
char level = 'A';
Remember: you need to declare a variable only once. You can then assign valuesto it as many times as you like. For example, later on in the program the difficultylevel might be changed to a different value as follows:
int score;score = 0;
24 2 Building Blocks

char level = 'A'; // initial difficulty level// other Java instructions level = 'B'; // difficulty level changed
2.5 Creating Constants
There will be occasions where data items in a program have values that do notchange. The following are examples of such items:
• the maximum score in an exam (100);• the number of hours in a day (24);• the mathematical value of p (approximately 3.1416).
In these cases the values of the items do not vary. Values that remain constantthroughout a program (as opposed to variable) should be named and declared asconstants.
Constants are declared much like variables in Java except that they are precededby the keyword final. Once they are given a value, then that value is fixed andcannot later be changed. Normally we fix a value when we initialize the constant.For example:
final int HOURS = 24;
Notice that the standard Java convention has been used here of naming constantsin upper case. Any attempt to change this value later in the program will result in acompiler error. For example:
final int HOURS = 24; // create constantHOURS = 12; // will not compile!
2.6 Arithmetic Operators
Rather than just assign simple values (such as 24 and 2.5) to variables, it is oftenuseful to carry out some kind of arithmetic in assignment statements. Java has thefour familiar arithmetic operators, plus a remainder operator, for this purpose. Theseoperators are listed in Table 2.2.
2.5 Creating Constants 25

You can use these operators in assignment statements, much like you might usea calculator. For example, consider the following instructions:
int x; x = 10 + 25;
After these instructions the variable x would contain the value 35: the result ofadding 10 to 25. Terms on the right-hand side of assignment operators (like10 + 25) that have to be worked out before they are assigned are referred to asexpressions. These expressions can involve more than one operator.
Let’s consider a calculation to work out the price of a product after a sales taxhas been added. If the initial price of the product is 500 and the rate of sales tax is17.5%, the following calculation could be used to calculate the total cost of theproduct:
double cost;cost = 500 * (1 + 17.5/100);
After this calculation the final cost of the product would be 587.5.By the way, in case you are wondering, the order in which expressions such as
these are evaluated is the same as in arithmetic: terms in brackets are calculatedfirst, followed by division and multiplication, then addition and subtraction. Thismeans that the term in the bracket (1 + 17.5/100) evaluates to 1.175, not 0.185, asthe division is calculated before the addition. The final operator (%) in Table 2.2returns the remainder after integer division (this is often referred to as the modu-lus). Table 2.3 illustrates some examples of the use of this operator together withthe values returned.
As an illustration of the use of both the division operator and the modulusoperator, consider the following example.
Table 2.2 The arithmeticoperators of Java
Operation Java operator
Addition +
Subtraction –
Multiplication *
Division /
Remainder %
Table 2.3 Examples of themodulus operator in Java
Expression Value
29 % 9 2
6 % 8 6
40 % 40 0
10 % 2 0
26 2 Building Blocks

A large party of 30 people is going to attend a school reunion. The functionroom will be furnished with a number of tables, each of which seats four people.
To calculate how many tables of four are required, and how many people will beleft over, the division and modulus operators could be used as follows:
int tablesOfFour, peopleLeftOver;tablesOfFour = 30/4; // number of tablespeopleLeftOver = 30%4; // number of people left over
After these instructions the value of tablesOfFour will be 7 (the result ofdividing 30 by 4) and the value of peopleLeftOver will be 2 (the remainderafter dividing 30 by 4). You may be wondering why the calculation for ta-blesOfFour (30/4) did not yield 7.5 but 7. The reason for this is that there are, infact, two different in-built division routines in Java, one to calculate an integeranswer and another to calculate the answer as a real number.
Rather than having two division operators, however, Java has a single divisionsymbol (/) to represent both types of division. The division operator is said to beoverloaded. This means that the same operator (in this case the division symbol)can behave in different ways. This makes life much easier for programmers as thedecision about which routine to call is left to the Java language.
How does the Java compiler know which division routine we mean? Well, itlooks at the values that are being divided. If at least one value is a real number (asin the product cost example), it assumes we mean the division routine that calcu-lates an answer as a real number, otherwise it assumes we mean the division routinethat calculates an answer as a whole number (as in the reunion example).1
2.7 Expressions in Java
So far, variable names have appeared only on the left-hand side of assignmentstatements. However, the expression on the right-hand side of an assignmentstatement can itself contain variable names. If this is the case then the name does notrefer to the location, but to the contents of the location. For example, the assignmentto calculate the cost of the product could have been re-written as follows:
double price, tax, cost; // declare three variablesprice = 500; // set pricetax = 17.5; // set tax ratecost = price * (1 + tax/100); // calculate cost
1To force the use of one division routine over another, a technique known as type casting can beused. We will return to this technique in later chapters.
2.6 Arithmetic Operators 27

Here, the variables price and tax that appear in the expression
price * (1 + tax/100)
are taken to mean the values contained in price and tax respectively. Thisexpression evaluates to 587.5 as before. Notice that although this price happens tobe a whole number, it has been declared to be a double as generally prices areexpressed as real numbers.
There is actually nothing to stop you using the name of the variable you areassigning to in the expression itself. This would just mean that the old value of thevariable is being used to calculate its new value. Rather than creating a newvariable, cost, to store the final cost of the product, the calculation could, forexample, have updated the original price as follows:
price = price * (1 + tax/100);
Now only two variables are required, price and tax. Let’s look at this as-signment a bit more closely.
When reading this instruction, the price in the right-hand expression is to be readas the old value of price, whereas the price on the left-hand side is to be read as thenew value of price.
You might be wondering what would happen if we used a variable in the righthand side of an expression before it had been given a value. For example, look atthis fragment of code:
double price = 500;double tax;cost = price * (1 + tax/100);
The answer is that you would get a compiler error telling you that you weretrying to use a variable before it has been initialized.
You will find that one very common thing that we have to do in our programs isto increase (or increment) an integer by 1. For example, if a variable x has beendeclared as an int, then the instruction for incrementing x would be:
28 2 Building Blocks

x = x + 1;
In fact, this is so common that there is a special shorthand for this instruction,namely:
x++;
The ‘++’ is therefore known as the increment operator. Similarly there exists adecrement operator, ‘− −’.
Thus:
x− −;
is shorthand for:
x = x – 1;
It is possible to use the increment and decrement operators in expressions. Wewill show you a couple of examples of this here, as you might easily come acrossthem in other texts. However, we will not be using this technique in the remainderof this book, because we think it can sometimes be confusing for new programmers.If x and y are ints, the expression:
y = x++;
means assign the value of x to y, then increment x by 1.However the expression:
y = ++x;
means increment x by 1, then assign this new value to y. The decrement operatorcan be used in the same way.
While we are on the subject of shortcuts, there is one more that you might comeacross in other places, but which, once again, we won’t be using in this text:
y += x;
is shorthand for:
y = y + x;
The code fragments we have been writing so far in this chapter are, of course,not complete programs. As you already know, to create a program in Java you mustwrite one or more classes. In the example that follows, we write a class, Find-Cost, where the main method calculates the price of the product.
2.7 Expressions in Java 29

FindCost// a program to calculate the cost of a product after a sales tax has been added
public class FindCost{
public static void main(String[] args){
double price, tax; price = 500; tax = 17.5; price = price * (1 + tax/100);
}}
What would you see when you run this program? The answer is nothing! Thereis no instruction to display the result on to the screen. You have already seen how todisplay messages onto the screen. It is now time to take a closer look at the outputcommand to see how you can also display results onto the screen.
2.8 More About Output
As well as displaying messages, Java also allows any values or expressions of theprimitive types that we showed you in Table 2.1 to be printed on the screen usingthe same output commands. It does this by implicitly converting eachvalue/expression to a string before displaying it on the screen. In this way numbers,the value of variables, or the value of expressions can be displayed on the screen.For example, the square of 10 can be displayed on the screen as follows:
System.out.print(10*10);
This instruction prints the number 100 on the screen. Since these values areconverted into strings by Java they can be joined onto literal strings for output.
For example, let’s return to the party of 30 people attending their school reunionthat we discussed in Sect. 2.6. If each person is charged a fee of 7.50 for theevening, the total cost to the whole party could be displayed as follows:
System.out.print("cost = " + (30*7.5) );
Here the concatenation operator (+), is being used to join the string, “cost = ”,onto the value of the expression, (30 * 7.5). Notice that when expressions like 30 *7.5 are used in output statements it is best to enclose them in brackets. This wouldresult in the following output:
cost = 225.0
30 2 Building Blocks

Bear these ideas in mind and look at the next version of FindCost, which wehave called FindCost2; the program has been re-written so that the output isvisible.
FindCost2// a program to calculate and display the cost of a product after sales tax has been added
public class FindCost2{
public static void main(String[] args){
double price, tax; price = 500; tax = 17.5; price = price * (1 + tax/100); // calculate cost// display results System.out.println("*** Product Price Check ***");System.out.println("Cost after tax = " + price);
}}
This program produces the following output:
*** Product Price Check ***Cost after tax = 587.5
Although being able to see the result of the calculation is a definite improvement,this program is still very limited. The formatting of the output can certainly beimproved, but we shall not deal with such issues until later on in the book. Whatdoes concern us now is that this program can only calculate the cost of productswhen the sales tax rate is 17.5% and the initial price is 500!
What is required is not to fix the rate of sales tax or the price of the product but,instead, to get the user of your program to input these values as the program runs.
2.9 Input in Java: The Scanner Class
Java provides a special class called Scanner, which makes it easy for us to write aprogram that obtains information that is typed in at the keyboard. Scanner isprovided as part of what is known, in Java, as a package. A package is a collectionof pre-compiled classes—lots more about that in the second semester! TheScanner class is part of a package called util. In order to access a package weuse a command called import. So, to make the Scanner class accessible to thecompiler we have to tell it to look in the util package, and we do this by placingthe following line at the top of our program:
import java.util.Scanner;
2.8 More About Output 31

Sometimes you might come across an import statement that looks like this:
import java.util.*;
This asterisk means that all the classes in the particular package are madeavailable to the compiler. Although using the asterisk notation is perfectlyacceptable, nowadays it is considered better practice to specify only those classesthat we need, as in the first statement, as this clarifies precisely which classes arebeing used within a program—so that is what we will do in this text.
As long as the Scanner class is accessible, you can use all the input methodsthat have been defined in this class. We are going to show you how to do this now.Some of the code might look a bit mysterious to you at the moment, but don’t worryabout this right now. Just follow our instructions for the time being—after a fewchapters, it will become clear to you exactly why we use the particular format andsyntax that we are showing you.
Having imported the Scanner class, you will need to write the followinginstruction in your program:
Scanner keyboard = new Scanner(System.in);
What we are doing here is creating an object, keyboard, of the Scannerclass. Once again, the true meaning of the phrase creating an object will becomeclear in the next few chapters, so don’t worry too much about it now. However, youshould know that, in Java, System.in represents the keyboard, and by associ-ating our Scanner object with System.in, we are telling it to get the input fromthe keyboard as opposed to a file on disk or a modem for example. Just to note that,like a variable, you can choose any name for this object, but we have chosen theobvious name here—keyboard.
The Scanner class has several input methods, each one associated with adifferent input type, and once we have declared a Scanner object we can use thesemethods. Let’s take some examples. Say we wanted a user to type in an integer atthe keyboard, and we wanted this value to be assigned to an integer variable calledx. We would use the Scanner method called nextInt; the instruction wouldlook like this:
x = keyboard.nextInt();
32 2 Building Blocks
In the case of a double, y, we would do this:
y = keyboard.nextDouble();
Notice that to access a method of a class you need to join the name of the method(getInt or getDouble) to the name of the object (keyboard) by using thefull-stop. Also you must remember the brackets after the name of the method.
What about a character? Unfortunately this is a little bit more complicated, asthere is no nextChar method provided. Assuming c had been declared as acharacter, we would have to do this:
c = keyboard.next().charAt(0);
You won’t understand exactly why we use this format until Chap. 7—for nowjust accept it and use it when you need to.
Let us return to the haunted house game to illustrate this. Rather than assigning adifficulty level as follows:
char level; level = 'A';
you could take a more flexible approach by asking the user of your program to inputa difficulty level while the program runs. Since level is declared to be a charactervariable, then, after declaring a Scanner object, keyboard, you could write thisline of code:
level = keyboard.next().charAt(0);
Some of you might be wondering how we would get the user to type in stringssuch as a name or an address. This is a bit more difficult, because a string is not asimple type like an int or a char, but contains many characters. In Java aString is not a simple data type but a class—so to do this you will have to waituntil Chap. 7 where we will study classes and objects in depth.
Let us re-write our previous program that calculated the cost of an item after tax;this time the price of the product and the rate of sales tax are not fixed in theprogram, but are input from the keyboard. Since the type used to store the price andthe tax is a double, the appropriate input method is nextDouble, as can be seenbelow.
2.9 Input in Java: The Scanner Class 33

FindCost3import java.util.Scanner; // import the Scanner class from the util package
/* a program to input the initial price of a product and then calculate and display its cost after tax has been added */
public class FindCost3{
public static void main(String[] args ) {
Scanner keyboard = new Scanner(System.in); // create Scanner object double price, tax;System.out.println("*** Product Price Check ***");System.out.print("Enter initial price: "); // prompt for input price = keyboard.nextDouble(); // input method called System.out.print("Enter tax rate: "); // prompt for input tax = keyboard.nextDouble(); // input method called price = price * (1 + tax/100); // perform the calculation System.out.println("Cost after tax = " + price);
}}
Note that, by looking at this program code alone, there is no way to determinewhat the final price of the product will be, as the initial price and the tax rate will bedetermined only when the program is run.
Let’s assume that we run the program and the user interacts with it as follows2:
*** Product Price Check ***Enter initial price: 1000Enter tax rate: 12.5Cost after tax = 1125.0
You should notice the following points from this test run:
• whatever the price of the computer product and the rate of tax, this programcould have evaluated the final price;
• entering numeric values with additional formatting information, such as cur-rency symbols or the percentage symbol, is not permitted;
• after an input method is called, the cursor always moves to the next line.
The programs we are looking at now involve input commands, output com-mands and assignments. Clearly, the order in which you write these instructionsaffects the results of your programs. For example, if the instructions to calculate thefinal price and then display the results were reversed as follows:
System.out.println("Cost after tax = " + price);price = price * (1 + tax/100);
2We have used bold italic font to represent user input.
34 2 Building Blocks
the price that would be displayed would not be the price after tax but the pricebefore tax! In order to avoid such mistakes it makes sense to design your code bysketching out your instructions before you type them in.
2.10 Program Design
Designing a program is the task of considering exactly how to build the software,whereas writing the code (the task of actually building the software) is referred to asimplementation. As programs get more complex, it is important to spend time onprogram design, before launching into program implementation.
As we have already said, Java programs consist of one or more classes, eachwith one or more methods. In later chapters we will introduce you to the use ofdiagrams to help design such classes. The programs we have considered so far,however, have only a single class and a single method (main), so a class diagramwould not be very useful here. We will therefore return to this design technique aswe develop larger programs involving many classes.
At a lower level, it is the instructions within a method that determine the be-haviour of that method. If the behaviour of a method is complex, then it will also beworthwhile spending time on designing the instructions that make up the method.When you sketch out the code for your methods, you don’t want to have to worryabout the finer details of the Java compiler such as declaring variables, addingsemi-colons and using the right brackets. Very often a general purpose “codinglanguage” can be used for this purpose to convey the meaning of each instructionwithout worrying too much about a specific language syntax.
Code expressed in this way is often referred to as pseudocode. The following isan example of pseudocode that could have been developed for the main method ofFindCost3 program:
BEGINDISPLAY program titleDISPLAY prompt for priceENTER priceDISPLAY prompt for taxENTER taxSET price TO price * (1 + tax/100)DISPLAY new price
END
Note that these pseudocode instructions are not intended to be typed in andcompiled as they do not meet the syntax rules of any particular programminglanguage. So, exactly how you write these instructions is up to you: there is no fixedsyntax for them. However, each instruction conveys a well-understood program-ming concept and can easily be translated into a given programming language.When you read these instructions you should be able to see how each line would becoded in Java.
2.9 Input in Java: The Scanner Class 35

Wouldn’t it be much easier to write your main method if you have pseudocodelike this to follow? In future, when we present complex methods to you we will doso by presenting their logic using pseudocode.
2.11 Self-test Questions
1. What would be the most appropriate Java data type to use for the followingitems of data?
• the maximum number of people allowed on a bus;• the weight of a food item purchased in a supermarket;• the grade awarded to a student (for example ‘A’, ‘B’ or ‘C’).
2. Explain which, if any, of the following lines would result in a compiler error:
int x = 75.5; double y = 75;
3. Which of the following would be valid names for a variable in Java?
• ticket• cinema ticket• cinemaTicket• cinema_ticket• void• Ticket
4. Identify and correct the errors in the program below, which prompts for theuser’s age and then attempts to work out the year in which the user was born.
import java.util.Scanner;
public class SomeProg{
public static void main (String[] args){
Scanner keyboard = new Scanner(System.in); final int YEAR; int age, bornIn;System.out.print(How old are you this year? ); age = keyboard.nextDouble(); bornIn = YEAR – age;System.out.println("I think you were born in " + BornIn);
}}
36 2 Building Blocks
5. What is the final value of z in the following program?
public class SomeProg{
public static void main (String[] args){
int x, y, z; x = 5;y = x + 2; x = 10; z = y * x;
} }
6. What would be the final output from the program below if the user entered thenumber 10?
import java.util.Scanner;
public class Calculate{
public static void main(String[] args ){
Scanner keyboard = new Scanner(System.in); int num1, num2; num2 = 6;System.out.print("Enter value ");num1 = keyboard.nextInt(); num1 = num1 + 2; num2 = num1 / num2;System.out.println("result = " + num2);
}}
7. Use pseudocode to design a program that asks the user to enter values for thelength and height of a rectangle and then displays the area and perimeter of thatrectangle.
8. The program below was written in an attempt to swap the value of two vari-ables. However it does not give the desired result:
/* This program attempts to swap the value of two variables - it doesn't give the desired result however! */
import java.util.Scanner;
public class SwapAttempt{
public static void main(String[] args) {
// declare variablesint x, y; // enter valuesSystem.out.print("Enter value for x "); x = keyboard.nextInt(); System.out.print("Enter value for y "); y = keyboard.nextInt();
// code attempting to swap two variablesx = y;y = x;
//display resultsSystem.out.println("x = " + x);System.out.println("y = " + y);
} }
2.11 Self-test Questions 37

(a) Can you see why the program doesn’t do what we hoped?(b) What would be the actual output of the program?(c) How could you modify the program above so that the values of the two
variables are swapped successfully?
2.12 Programming Exercises
1. Implement the FindCost3 program from this chapter.
2. Implement the programs from self-test questions 4, 5, 6 and 8 above in order toverify your answers to those questions.
3. Implement the rectangle program that you designed in self-test question 7.
4. The following pseudocode has been arrived at for a program that convertspounds to kilos (1 kilo = 2.2 lb).
BEGINPROMPT for value in poundsENTER value in poundsSET value to old value ÷ 2.2DISPLAY value in kilos
END
Implement this program, remembering to declare any variables that arenecessary.
5. An individual’s Body Mass Index (BMI) is a measure of a person’s weight inrelation to their height. It is calculated as follows:
• divide a person’s weight (in kg) by the square of their height (in meters)Design and implement a program to allow the user to enter their weight andheight and then print out their BMI.
6. A group of students has been told to get into teams of a specific size for theircoursework. Design and implement a program that prompts for the number ofstudents in the group and the size of the teams to be formed, and displays howmany teams can be formed and how many students are left without a team.
38 2 Building Blocks

7. Design and implement a program that asks the user to enter a value for theradius of a circle, then displays the area and circumference of the circle.
Note that the area is calculated by evaluating pr2 and the circumference byevaluating 2pr. You can take the value of p to be 3.1416—and ideally youshould declare this as a constant at the start of the program.3
3Of course you will not be able to use the Greek letter p as a name for a variable or constant. Youwill need to give it a name like PI.
2.12 Programming Exercises 39

3Selection
Outcomes:
By the end of this chapter you should be able to:
• explain the difference between sequence and selection;• use an if statement to make a single choice in a program;• use an if…else statement to make a choice between two options in a program;• use nested if…else statements to make multiple choices in a program;• use a switch statement to make multiple choices in a program.
3.1 Introduction
One of the most rewarding aspects of writing and running a program is knowingthat you are the one who has control over the computer. But looking back at theprograms you have already written, just how much control do you actually have?Certainly, it was you who decided upon which instructions to include in yourprograms but the order in which these instructions were executed was not underyour control. These instructions were always executed in sequence, that is one afterthe other, from the beginning to the end of the main method. You will soon find thatthere are numerous instances when this order of execution is too restrictive and youwill want to have much more control over the order in which instructions areexecuted.
© Springer Nature Switzerland AG 2019Q. Charatan and A. Kans, Java in Two Semesters, Texts in Computer Science,https://doi.org/10.1007/978-3-319-99420-8_3
41
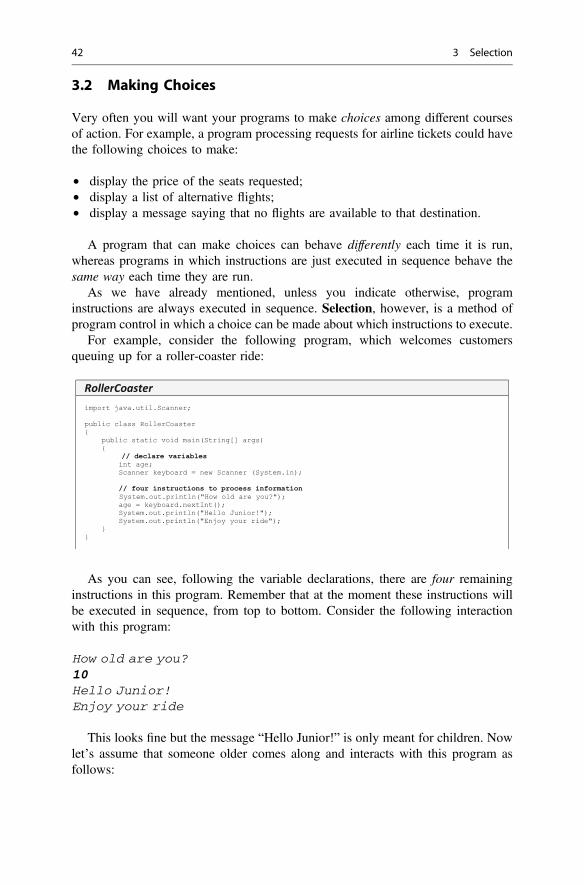
3.2 Making Choices
Very often you will want your programs to make choices among different coursesof action. For example, a program processing requests for airline tickets could havethe following choices to make:
• display the price of the seats requested;• display a list of alternative flights;• display a message saying that no flights are available to that destination.
A program that can make choices can behave differently each time it is run,whereas programs in which instructions are just executed in sequence behave thesame way each time they are run.
As we have already mentioned, unless you indicate otherwise, programinstructions are always executed in sequence. Selection, however, is a method ofprogram control in which a choice can be made about which instructions to execute.
For example, consider the following program, which welcomes customersqueuing up for a roller-coaster ride:
As you can see, following the variable declarations, there are four remaininginstructions in this program. Remember that at the moment these instructions willbe executed in sequence, from top to bottom. Consider the following interactionwith this program:
How old are you?10Hello Junior!Enjoy your ride
This looks fine but the message “Hello Junior!” is only meant for children. Nowlet’s assume that someone older comes along and interacts with this program asfollows:
RollerCoasterimport java.util.Scanner;
public class RollerCoaster{
public static void main(String[] args){
// declare variablesint age;Scanner keyboard = new Scanner (System.in);
// four instructions to process informationSystem.out.println("How old are you?");age = keyboard.nextInt();System.out.println("Hello Junior!");System.out.println("Enjoy your ride");
} }
42 3 Selection

How old are you?45Hello Junior!Enjoy your ride
The message “Hello Junior!”, while flattering, might not be appropriate in thiscase! In other words, it is not always appropriate to execute the followinginstruction:
What is required is a way of deciding (while the program is running) whether ornot to execute this instruction. In effect, this instruction needs to be guarded so thatit is only executed when appropriate. Assuming we define a child as someoneunder 13 years of age, we can represent this in pseudocode as follows:
In the above, we have emboldened the lines that have been added to guard the“Hello Junior!” instruction. The emboldened lines are not to be read as additionalinstructions; they are simply a means to control the flow of the existing instructions.The emboldened lines say, in effect, that the instruction to display the message“Hello Junior!” should only be executed if the age entered is under 13.
This, then, is an example of the form of control known as selection. Let’s nowlook at how to code this selection in Java.
3.3 The ‘if’ Statement
The particular form of selection discussed above is implemented by making use ofJava’s if statement. The general form of an if statement is given as follows:
System.out.println("Hello Junior!");
DISPLAY “How old are you?”
ENTER age
IF age is under 13
BEGIN
DISPLAY "Hello Junior!"
END
DISPLAY "Enjoy your ride"
if ( /* a test goes here */ ){
// instruction(s) to be guarded go here}
3.2 Making Choices 43

As you can see, the instructions to be guarded are placed inside the braces of theif statement. A test is associated with the if statement. A test is any expressionthat produces a result of true or false. For example x > 100 is a test as it is anexpression that either gives an answer of true or false (depending upon the value ofx). We call an expression that returns a value of true or false a booleanexpression, as true and false are boolean values. Examples of tests ineveryday language are:
• this password is valid;• there is an empty seat on the plane;• the temperature in the laboratory is too high.
The test must follow the if keyword and be placed in round brackets. When thetest gives a result of true the instructions inside the braces of the if statement areexecuted. The program then continues by executing the instructions after the bracesof the if statement as normal. If, however, the if test gives a result of false theinstructions inside the if braces are skipped and not executed.
We can rewrite the RollerCoaster program by including an appropriate ifstatement around the “Hello Junior!” message with the test (age < 13) as follows:
Now the message “Hello Junior!” will only be executed if the test (age < 13) istrue, otherwise it will be skipped (see Fig. 3.1).
Let’s assume we run the above program with the same values entered as whenrunning the previous version. First, the child approaches the ride:
How old are you?10Hello Junior!Enjoy your ride
In this case, the if statement has allowed the “Hello Junior!” message to bedisplayed as the age entered is less than 13. Now the adult approaches the ride:
RollerCoaster2import java.util.Scanner;
// This program is an example of the use of selection in a Java program
public class RollerCoaster2{
public static void main(String[] args){ int age;Scanner keyboard = new Scanner (System.in);System.out.println("How old are you?");age = keyboard.nextInt();if (age < 13) // test controls if the next instruction is executed{
System.out.println("Hello Junior!");} System.out.println("Enjoy your ride");
} }
44 3 Selection

How old are you?45Enjoy your ride
In this case the if statement has not allowed the given instruction to be executedas the associated test was not true. The message is skipped and the program con-tinues with the following instruction to display “Enjoy your ride”.
In this program there was only a single instruction inside the if statement.
When there is only a single instruction associated with an if statement, the bracescan be omitted around this instruction, if so desired, as follows:
The compiler will always assume that the first line following the if test is theinstruction being guarded. For clarity, however, we will always use braces aroundinstructions.
Fig. 3.1 The if statement allows a choice to be made in programs
age = keyboard.nextInt();if (age < 13) {
System.out.println("Hello Junior!"); // single instruction inside 'if' } System.out.println("Enjoy your ride");
age = keyboard.nextInt();if (age < 13) System.out.println("Hello Junior!"); // braces can be omitted around this lineSystem.out.println("Enjoy your ride");
3.3 The ‘if’ Statement 45

3.3.1 Comparison Operators
In the example above, the “less than” operator (<) was used to check the value ofthe age variable. This operator is often referred to as a comparison operator as it isused to compare two values. Table 3.1 shows all the Java comparison operatorsymbols.
Since comparison operators give a boolean result of true or false they areoften used in tests such as those we have been discussing. For example, consider atemperature variable being used to record the temperature for a particular day of theweek. Assume that a temperature of 18° or above is considered to be a hot day. Wecould use the “greater than or equal to” operator (� ) to check for this as follows:
You can see from Table 3.1 that a double equals (= =) is used to check forequality in Java and not the single equals (=), which, as you know, is used forassignment. To use the single equals is a very common error! For example, to checkwhether an angle is a right angle the following test should be used:
To check if something is not equal to a particular value we use the exclamationmark followed by an equals sign (! =). So to test if an angle is not a right angle wecan have the following:
if (temperature >= 18) // test to check for hot temperature{
// this line executed only when the test is trueSystem.out.println("Today is a hot day!");
}
if(angle == 90)// note the use of the double equals{
System.out.println("This IS a right angle");}
if (angle != 90) {
System.out.println("This is NOT a right angle");}
Table 3.1 The comparisonoperators of Java
Operator Meaning
¼ = Equal to
! = Not equal to
< Less than
> Greater than
� Greater than or equal to
� Less than or equal to
46 3 Selection

3.3.2 Multiple Instructions Within an ‘if’ Statement
You have seen how an if statement guarding a single instruction may or may notbe implemented with braces around the instruction. When more than one instruc-tion is to be guarded by an if statement, however, the instructions must be placedin braces. As an example, consider once again the program we presented in theprevious chapter that calculated the cost of a product.
Now assume that a special promotion is in place for those products with aninitial price over 100. For such products the company pays half the tax. Theprogram below makes use of an if statement to apply this promotion, as well asinforming the user that a tax discount has been applied. Take a look at it and thenwe will discuss it.
Now, the user is still always prompted to enter the initial price and tax as before:
FindCost3import java.util.Scanner; // import the Scanner class from the util package
/* a program to input the initial price of a product and then calculate and display its cost after tax has been added */
public class FindCost3{
public static void main(String[] args ){
Scanner keyboard = new Scanner(System.in); // create Scanner object double price, tax;System.out.println("*** Product Price Check ***");System.out.print("Enter initial price: "); // prompt for input price = keyboard.nextDouble(); // input method called System.out.print("Enter tax rate: "); // prompt for input tax = keyboard.nextDouble(); // input method called price = price * (1 + tax/100); // perform the calculation System.out.println("Cost after tax = " + price);
}}
FindCostWithDiscountimport java.util.Scanner;
public class FindCostWithDiscount{
public static void main(String[] args ){
double price, tax;Scanner keyboard = new Scanner(System.in);System.out.println("*** Product Price Check ***");System.out.print("Enter initial price: ");price = keyboard.nextDouble();System.out.print("Enter tax rate: ");tax = keyboard.nextDouble();// the following 'if' statement allows a selection to take placeif (price > 100) // test the price to see if a discount applies{
// these two instructions executed only when the test is trueSystem.out.println("Special Promotion: We pay half your tax!");tax = tax * 0.5;
} // the remaining instructions are always executedprice = price * (1 + tax/100);System.out.println("Cost after tax = " + price);
} }
3.3 The ‘if’ Statement 47

The next two instructions are then placed inside an if statement. This means theymay not always be executed:
Notice that if the braces were omitted in this case, only the first instruction wouldbe taken to be inside the if statement—the second statement would not be guardedand so would always be executed!
With braces around both instructions, they will be executed only when the test(price > 100) returns a boolean result of true. So, for example, if the user hadentered a price of 150 the discount would be applied; but if the user entered a price of50 these instructions would not be executed and a discount would not be applied.
Regardless of whether or not the test was true and the instructions in the ifstatement executed, the program always continues with the remaining instructions:
Here is a sample program run when the test returns a result of false and thediscount is not applied:
*** Product Price Check ***Enter initial price: 20Enter tax rate: 10Cost after tax = 22.0
In this case the program appears to behave in exactly the same way as theoriginal program. Here, however, is a program run when the test returns a result oftrue and a discount does apply:
*** Product Price Check ***Enter initial price: 1000Enter tax rate: 10Special Promotion: We pay half your tax!Cost after tax = 1050.0
42
System.out.print("Enter initial price: "); price = keyboard.nextDouble();System.out.print("Enter tax rate: "); tax = keyboard.nextDouble();
if (price > 100){
System.out.println("Special Promotion: We pay half your tax!");tax = tax * 0.5;
}
price = price * (1 + tax/100);System.out.println("Cost after tax = " + price);
48 3 Selection

3.4 The ‘if…else’ Statement
Using the if statement in the way that we have done so far has allowed us to buildthe idea of a choice into our programs. In fact, the if statement made one of twochoices before continuing with the remaining instructions in the program:
• execute the conditional instructions, or• do not execute the conditional instructions.
The second option amounts to “do nothing”. Rather than do nothing if the test isfalse, an extended version of an if statement exists in Java to state an alternativecourse of action. This extended form of selection is the if…else statement. Asthe name implies, the instructions to be executed if the test evaluates to false arepreceded by the Java keyword else as follows:
This is often referred to as a double-branched selection as there are twoalternative groups of instructions, whereas a single if statement is often referred toas a single-branched selection. The program below, DisplayResult, illustratesthe use of a double-branched selection.
This program checks a student’s exam mark and tells the student whether or nothe or she has passed (gained a mark greater than or equal to 40), before displaying agood luck message on the screen. Let’s examine this program a bit more closely.
if ( /* test goes here */ ) {
// instruction(s) if test is true go here} else{
// instruction(s) if test is false go here}
DisplayResult
import java.util.Scanner;
public class DisplayResult{
public static void main(String[] args){
int mark;Scanner keyboard = new Scanner(System.in);System.out.println("What exam mark did you get? ");mark = keyboard.nextInt();if (mark >= 40){
// executed when test is trueSystem.out.println("Congratulations, you passed");
} else{
// executed when test is falseSystem.out.println("I'm sorry, but you failed");
} System.out.println("Good luck with your other exams");
} }
3.4 The ‘if…else’ Statement 49

Prior to the if…else statement the following lines are executed in sequence:
Then the following condition is tested as part of the if…else statement:
(mark >= 40)
When this test is true the following line is executed:
When the test is false, however, the following line is executed instead:
Finally, whichever path was chosen the program continues by executing thelast line:
The if…else form of control has allowed us to choose from two alternativecourses of action. Here is a sample program run:
What exam mark did you get?52Congratulations, you passedGood luck with your other exams
Here is another sample run where a different course of action is chosen.
What exam mark did you get?35I’m sorry, but you failedGood luck with your other exams
44
int mark;Scanner keyboard = new Scanner(System.in);System.out.println("What exam mark did you get? "); mark = keyboard.nextInt();
System.out.println("Congratulations, you passed");
System.out.println("I'm sorry, but you failed");
System.out.println("Good luck with your other exams");
50 3 Selection

3.5 Logical Operators
As we’ve already pointed out, the test in an if statement is an expression thatproduces a boolean result of true or false. Often it is necessary to join two ormore tests together to create a single more complicated test.
As an example, consider a program that checks the temperature in a laboratory.Assume that, for the experiments in the laboratory to be successful, the tempera-ture must remain between 5 and 12 °C. An if statement might be required asfollows:
The test should check if the temperature is safe. This involves combining twotests together:
1. check that the temperature is greater than or equal to 5 (temperature >= 5)2. check that the temperature is less than or equal to 12 (temperature <= 12)
Both of these tests need to evaluate to true in order for the temperature to besafe. When we require two tests to be true we use the following symbol to join thetwo tests:
&&
This symbol is read as “AND”. So the correct test is:
Now, if the temperature were below 5 the first test (temperature >= 5)would evaluate to false giving a final result of false; the if statement wouldbe skipped and the else statement would be executed:
UNSAFE: RAISE ALARM!!
If the temperature were greater than 12 the second part of the test (tempera-ture <= 12) would evaluate to false also giving an overall result of false andagain the if statement would be skipped and the else statement would beexecuted.
However, when the temperature is between 5 and 12 both tests would evaluate totrue and the final result would be true as required; the if statement would thenbe executed instead:
if ( /* test to check if temperature is safe */ ) {
System.out.println ("TEMPERATURE IS SAFE!");} else{
System.out.println("UNSAFE: RAISE ALARM!!");}
if (temperature >= 5 && temperature <= 12)
3.5 Logical Operators 51

TEMPERATURE IS SAFE!
Notice that the two tests must be completely specified as each needs to return aboolean value of true or false. It would be wrong to try something like thefollowing:
This is wrong as the second test (<= 12) is not a legal boolean expression.Symbols that join tests together to form longer tests are known as logical opera-tors. Table 3.2 lists the Java counterparts to the three common logical operators.
Both the AND and OR operators join two tests together to give a final result.While the AND operator requires both tests to be true to give a result of true,the OR operator requires only that at least one of the tests be true to give a resultof true. The NOT operator flips a value of true to false and a value of falseto true. Table 3.3 gives some examples of the use of these logical operators.
As an example of the use of the NOT operator(!), let us return to the tem-perature example. We said that we were going to assume that a temperature ofgreater than 18° was going to be considered a hot day. To check that the day is not ahot day we could use the NOT operator as follows:
Table 3.2 The logical operators of Java
Logical operator Java counterpart
AND &&
OR ||
NOT !
// wrong! second test does not mention 'temperature'! if (temperature >= 5 && <= 12)
if (!(temperature > 18) ) // test to check if temperature is not hot{
System.out.println("Today is not a hot day!");}
Table 3.3 Logical operators: some examples
Expression Result Explanation
10 > 5 && 10 > 7 true Both tests are true
10 > 5 && 10 > 20 false The second test is false
10 > 15 && 10 > 20 false Both tests are false
10 > 5 || 10 > 7 true At least one test is true (in this case both tests are true)
10 > 5 || 10 > 20 true At least one test is true (in this case just one test is true)
10 > 15 || 10 > 20 false Both tests are false
! (10 > 5) false Original test is true
! (10 > 15) true Original test is false
52 3 Selection

Of course, if a temperature is not greater than 18° then it must be less than orequal to 18°. So, another way to check the test above would be as follows:
3.6 Nested ‘if…else’ Statements
Instructions within if and if…else statements can themselves be any legal Javacommands. In particular they could contain other if or if…else statements.This form of control is referred to as nesting. Nesting allows multiple choices to beprocessed.
As an example, consider the following program, which asks a student to enter hisor her tutorial group (A, B, or C) and then displays on the screen the time of thesoftware lab.
As you can see, nesting can result in code with many braces can become difficultto read, even with our careful use of tabs. Such code can be made easier to read bynot including the braces associated with all the else branches, as in the secondversion of the timetable program shown below:
if (temperature <= 18) // this also checks if temperature is not hot{
System.out.println("Today is not a hot day!");}
Timetableimport java.util.Scanner;
public class Timetable{
public static void main(String[] args){
char group; // to store the tutorial groupScanner keyboard = new Scanner(System.in);System.out.println("***Lab Times***"); // display headerSystem.out.println("Enter your group (A,B,C)");group = keyboard.next().charAt(0);
// check tutorial group and display appropriate timeif (group == 'A') {
System.out.print("10.00 a.m"); // lab time for group A} else{
if (group == 'B') {
System.out.print("1.00 p.m"); // lab time for group B} else{
if (group == 'C') {
System.out.print("11.00 a.m"); // lab time for group C} else{
System.out.print("No such group"); // invalid group}
} }
} }
3.5 Logical Operators 53

This program is a little bit different from the ones before because it includessome basic error checking. That is, it does not assume that the user of this programwill always type the expected values. If the wrong group (not A, B or C) is entered,an error message is displayed saying “No such group”.
Error checking like this is a good habit to get into.There is one other point to notice here. The program is set up so that only the
upper case letters, ‘A’, ‘B’ and ‘C’ are accepted as valid. If the user were to enter ‘a’for example then “No such group” would be displayed. Can you think how to fixthis? You will have the opportunity to do that in the programming exercises at theend of the chapter.
This use of nested selections is okay up to a point, but when the number ofoptions becomes large the program can again look very untidy. Fortunately, thistype of selection can also be implemented in Java with another form of control: aswitch statement.
TimetableVersion2import java.util.Scanner;
public class TimetableVersion2{
public static void main(String[] args){
char group; // to store the tutorial groupScanner keyboard = new Scanner(System.in);System.out.println("***Lab Times***"); // display headerSystem.out.println("Enter your group (A,B,C)");group = keyboard.next().charAt(0);
if (group == 'A'){
System.out.println("10.00 a.m");} else if (group == 'B'){
System.out.println("1.00 p.m");} else if(group == 'C'){
System.out.println("11.00 a.m");} else{
System.out.println("No such group");}
} }
// valid groups checked aboveelse // if this 'else' is reached, group entered must be invalid{
System.out.println("No such group"); // error message}
54 3 Selection

3.7 The ‘switch’ Statement
Our next program, TimetableWithSwitch, behaves in exactly the same wayas the previous program but using a switch instead of a series of nested if…else statements allows a neater implementation. Take a look at it and then we’lldiscuss it.
As you can see, this looks a lot neater. The switch statement works in exactlythe same way as a set of nested if statements, but is more compact and readable.A switch statement may be used when
• only one variable is being checked in each condition (in this case every con-dition involves checking the variable group);
• the check involves specific values of that variable (e.g. ‘A’, ‘B’) and not ranges(for example � 40).
As can be seen from the example above, the keyword case is used to precede apossible value of the variable that is being checked. There may be many casestatements in a single switch statement. The general form of a switch statementin Java is given as follows:
TimetableWithSwitchimport java.util.Scanner;
public class TimetableWithSwitch{
public static void main(String[] args){
char group;Scanner keyboard = new Scanner(System.in);System.out.println("***Lab Times***");System.out.println("Enter your group (A,B,C)");group = keyboard.next().charAt(0);switch(group) // beginning of switch{
case 'A': System.out.println("10.00 a.m.");break;
case 'B': System.out.println("1.00 p.m.");break;
case 'C': System.out.println("11.00 a.m.");break;
default: System.out.println("No such group");} // end of switch
} }
switch(someVariable){ case value1: // instructions(s) to be executed
break; case value2: // instructions(s) to be executed
break; // more values to be tested can be added default: // instruction(s) for default case}
3.7 The ‘switch’ Statement 55

where
• someVariable is the name of the variable being tested. This variable is mostcommonly of type int or char.
• value1, value2, etc. are the possible values of that variable.• break is a command that forces the program to skip the rest of the switch
statement.• default is an optional (last) case that can be thought of as an “otherwise”
statement. It allows you to code instructions that deal with the possibility ofnone of the cases above being true.
The break statement is important because it means that once a matching case isfound, the program can skip the rest of the cases below. If it is not added, not onlywill the instructions associated with the matching case be executed, but also all theinstructions associated with all the cases below it. Notice that the last set ofinstructions does not need a break statement as there are no other cases to skip.
3.7.1 Grouping Case Statements
There will be instances when a particular group of instructions is associated withmore than one case option. As an example, consider the time table again. Let’sassume that both groups ‘A’ and ‘C’ have a lab at 10.00 a.m. The following switchstatement would process this without grouping case ‘A’ and ‘C’ together:
While this will work, both case ‘A’ and case ‘C’ have the same instructionassociated with them:
Rather than repeating this instruction, the two case statements can be combinedinto one as follows:
// groups A and C have labs at the same timeswitch(group){ case 'A': System.out.println("10.00 a.m.");
break; case 'B': System.out.println("1.00 p.m.");
break;case 'C': System.out.println("10.00 a.m.");
break; default: System.out.println("No such group");}
System.out.println("10.00 a.m.");
56 3 Selection

In the example above a time of 10.00 a.m. will be displayed when the group iseither ‘A’ or ‘C’. The example above combined two case statements, but there isno limit to how many such statements can be combined.
3.7.2 Removing Break Statements
In the examples above we have always used a break statement to avoid executingthe code associated with more than one case statement. There may be situationswhere it is not appropriate to use a break statement and we do wish to execute thecode associated with more than one case statement.
For example, let us assume that spies working for a secret agency are allocateddifferent levels of security clearance, the lowest being 1 and the highest being 3.A spy with the highest clearance level of 3 can access all the secrets, whereas a spywith a clearance of level of 1 can see only secrets that have the lowest level ofsecurity. An administrator needs to be able to view the collection of secrets that aspy with a particular clearance level can see. We can implement this scenario byway of a switch statement in the below. Take a look at it and then we willdiscuss it.
You can see that there is just a single break statement at the end of case 1.
// groups A and C have been processed togetherswitch(group){ case 'A': case 'C': System.out.println("10.00 a.m.");
break; case 'B': System.out.println("1.00 p.m.");
break; default: System.out.println("No such group");}
SecretAgents
import java.util.Scanner;
public class SecretAgents{
public static void main(String[] args){
int security;Scanner keyboard = new Scanner(System.in);System.out.println("***Secret Agents***");System.out.println("Enter security level (1,2,3)");security = keyboard.nextInt();switch(security) // check level of security{
// level 3 securitycase 3: System.out.println("The code to access the safe is 007."); // level 2 securitycase 2: System.out.println("Jim Kitt is really a double agent."); // level 1 securitycase 1: System.out.println("Martinis in the hotel bar may be poisoned.");
break; // necessary to avoid error message belowdefault: System.out.println("No such security level.");
} }
}
3.7 The ‘switch’ Statement 57

If the user entered a security level of 3 for example, the println instructionassociated with this case would be executed:
However, as there is no break statement at the end of this instruction, theinstruction associated with the case below is then also executed:
We have still not reached a break statement so the instruction associated withthe next case statement is then executed:
Here we do reach a break statement so the switch terminates. Here is asample test run:
***Secret Agents***Enter security level (1, 2, 3)3The code to access the safe is 007.Jim Kitt is really a double agent.Martinis in the hotel bar may be poisoned.
Because the security level entered is 3 all secrets can be revealed. Here isanother sample test run when security level 2 is entered:
***Secret Agents***Enter security level (1, 2, 3)2Jim Kitt is really a double agent.Martinis in the hotel bar may be poisoned.
case 3: System.out.println("The code to access the safe is 007."); case 2: System.out.println("Jim Kitt is really a double agent."); case 1: System.out.println("Martinis in the hotel bar may be poisoned."); break; // the only break statement
case 3: System.out.println("The code to access the safe is 007.");
System.out.println("Jim Kitt is really a double agent.");
System.out.println("Martinis in the hotel bar may be poisoned."); break; // the only break statement
58 3 Selection

Because the security level is 2 the first secret is not revealed.The last break statement is necessary as we wish to avoid the final error message
if a valid security level (1, 2 or 3) is entered. The error message is only displayed ifan invalid security level is entered:
***Secret Agents***Enter security level (1, 2, 3)8No such security level.
3.8 Self-test Questions
1. Explain the difference between sequence and selection.
2. When would it be appropriate to use
• an if statement?• an if…else statement?• a switch statement?
3. Consider the following Java program, which is intended to display the cost of acinema ticket. Part of the code has been replaced by a comment:
Replace the comment so that children under the age of 14 get half price tickets.
4. Consider the following program:
import java.util.Scanner;
public class CinemaTicket{
public static void main(String[] args){
double price = 10.00;int age;Scanner keyboard = new Scanner(System.in);System.out.print("Enter your age: ");age = keyboard.nextInt();// code to reduce ticket price for children goes hereSystem.out.println("Ticket price = " + price);
} }
3.7 The ‘switch’ Statement 59

What would be the output from this program if
(a) the user entered 10 when prompted?(b) the user entered 20 when prompted?(c) the braces used in the if statement are removed, and the user enters 10 when
prompted?(d) the braces used in the if statement are removed, and the user enters 20 when
prompted?
5. Consider the following program:
What would be the output from this program if
(a) the user entered 10 when prompted?(b) the user entered 20 when prompted?
import java.util.Scanner;
public class Colours{
public static void main(String[] args) {
int x;Scanner keyboard = new Scanner(System.in);System.out.print("Enter a number: ");x = keyboard.nextInt();if (x > 10)
{ System.out.println("Green");System.out.println("Blue");
} System.out.println("Red");
} }
import java.util.Scanner;
public class Colours2{
public static void main(String[] args){
int x;Scanner keyboard = new Scanner(System.in);System.out.print("Enter a number: ");x = keyboard.nextInt();if (x > 10){
System.out.println("Green");} else{
System.out.println("Blue");} System.out.println("Red");
} }
60 3 Selection

6. Consider the following program:
What would be the output from this program if
(a) the user entered 1 when prompted?(b) the user entered 2 when prompted?(c) the user entered 3 when prompted?(d) the user entered 10 when prompted?(e) the break statements were removed from the switch statement and the
user entered 3 when prompted?(f) the default were removed from the switch statement and the user
entered 10 when prompted?
3.9 Programming Exercises
1. Design and implement a program that asks the user to enter two numbers andthen displays the message “NUMBERS ARE EQUAL”, if the two numbers areequal and “NUMBERS ARE NOT EQUAL”, if they are not equal.
Hint: Don’t forget to use the double equals (= =) to test for equality.
2. Adapt the program developed in the question above so that as well as checkingif the two numbers are equal, the program will also display “FIRST NUMBERBIGGER” if the first number is bigger than the second number and display“SECOND NUMBER BIGGER” if the second number is bigger than the first.
3. Design and implement a program that asks the user to enter two numbers andthen guess at the sum of those two numbers. If the user guesses correctly acongratulatory message is displayed, otherwise a commiseration message isdisplayed along with the correct answer.
import java.util.Scanner;
public class Colours3
{ public static void main(String[] args)
{ int x;Scanner keyboard = new Scanner(System.in);System.out.print("Enter a number: ");x = keyboard.nextInt();switch (x){
case 1: case 2: System.out.println("Green"); break;case 3: case 4: case 5: System.out.println("Blue"); break;default: System.out.println("numbers 1-5 only");
} System.out.println("Red");
} }
3.8 Self-test Questions 61

4. Implement the DisplayResult program from Sect. 3.4 which processed anexam mark, and then adapt the program so that marks of 70 or above areawarded a distinction rather than a pass.
5. In programming Exercise 5 of the previous chapter you were asked to calculatethe BMI of an individual. Adapt this program so that it also reports on whetherthe BMI is in a healthy range, or if it indicates the person is underweight oroverweight, using the following table:
6. Write a program to take an order for a new computer. The basic system costs375.99. The user then has to choose from a 38 cm screen (costing 75.99) or a43 cm screen (costing 99.99). The following extras are optional.
The program should allow the user to select from these extras and then displaythe final cost of the order.
7. (a) Implement the TimetableVersion2 program (Sect. 3.6) so that itaccepts both upper case and lower case letters for the group.
(b) Adapt the TimetableWithSwitch program (Sect. 3.7) in the same way.
8. Consider a bank that offers four different types of account (‘A’, ‘B’, ‘C’and ‘X’). The following table illustrates the annual rate of interest offered foreach type of account.
Design and implement a program that allows the user to enter an amount ofmoney and a type of bank account, before displaying the amount of money that
BMI Classification
<18.5 Underweight
18.5—24.9 Healthy
>24.9 Overweight
Item Price
Antivirus software 65.99
Printer 125.00
Account Annual rate of interest (%)
A 1.5
B 2
C 1.5
X 5
62 3 Selection

can be earned in one year as interest on that money for the given type of bankaccount. You should use the switch statement when implementing this pro-gram.
Hint: be careful to consider the case of the letters representing the bankaccounts. You might want to restrict this to, say, just upper case. Or you couldenhance your program by allowing the user to enter either lower case or uppercase letters.
9. Consider the bank accounts discussed in Exercise 8 again. Now assume thateach type of bank account is associated with a minimum balance as given in thetable below:
Adapt the switch statement of the program in Exercise 8 above so that theinterest is applied only if the amount of money entered satisfies the minimumbalance requirement for the given account. If the amount of money is below theminimum balance for the given account an error message should be displayed.
Account Minimum balance
A 250
B 1000
C 250
X 5000
3.9 Programming Exercises 63

4Iteration
Outcomes:
By the end of this chapter you should be able to:
• explain the term iteration;• repeat a section of code with a for loop;• repeat a section of code with a while loop;• repeat a section of code with a do…while loop;• select the most appropriate loop for a particular task;• use a break statement to terminate a loop;• use a continue statement to skip an iteration of a loop;• explain the term input validation and write simple validation routines.
4.1 Introduction
So far we have considered sequence and selection as forms of program control. One ofthe advantages of using computers rather than humans to carry out tasks is that theycan repeat those tasks over and over again without ever getting tired.With a computerwe do not have to worry about mistakes creeping in because of fatigue, whereashumans would need a break to stop them becoming sloppy or careless when carryingout repetitive tasks over a long period of time. Neither sequence nor selection allowsus to carry out this kind of control in our programs. As an example, consider a programthat needs to display a square of stars (five by five) on the screen as follows:
* * * * ** * * * ** * * * ** * * * ** * * * *
© Springer Nature Switzerland AG 2019Q. Charatan and A. Kans, Java in Two Semesters, Texts in Computer Science,https://doi.org/10.1007/978-3-319-99420-8_4
65

This could be achieved with five output statements executed in sequence, asshown in below in a program which we have called DisplayStars:
DisplayStarspublic class DisplayStars{
public static void main (String[] args){
System.out.println("*****"); // instruction to display one rowSystem.out.println("*****"); // instruction to display one rowSystem.out.println("*****"); // instruction to display one rowSystem.out.println("*****"); // instruction to display one rowSystem.out.println("*****"); // instruction to display one row
}}
While this produces the desired result, the program actually consists just of thefollowing instruction to print out one row, but repeated 5 times:
System.out.println("*****"); // this instruction is written 5 times
Writing out the same line many times is somewhat wasteful of our precious timeas programmers. Imagine what would happen if we wanted a square 40 by 40!
Rather than write out this instruction five times we would prefer to write it outonce and get the program to repeat that same line another four times. Somethinglike:
public class DisplayStars{
public static void main (String[] args){
// CARRY OUT THE FOLLOWING INSTRUCTION 5 TIMESSystem.out.println("*****");
} }
Iteration is the form of program control that allows us to instruct the computerto carry out a task several times by repeating a section of code. For this reason thisform of control is often also referred to as repetition. The programming structurethat is used to control this repetition is often called a loop; we say that the loopiterates a certain number of times. There are three types of loop in Java:
• for loop;• while loop;• do…while loop.
We will consider each of these in turn.
66 4 Iteration

4.2 The ‘for’ Loop
If we wish to repeat a section of code a fixed number of times (five in the exampleabove) we would use Java’s for loop. For example, the program below re-writesDisplayStars by making use of a for loop. Take a look at it and then we willdiscuss it:
DisplayStars2
public class DisplayStars2{
public static void main (String[] args){
for(int i = 1; i <= 5; i++) // loop to repeat 5 times{
System.out.println("*****"); // instruction to display one row}
} }
As you can see there are three bits of information in the header of the for loop,each bit separated by a semi-colon:
for(int i = 1; i <= 5; i++) // three bits of information in the brackets{
System.out.println("*****");}
All three bits of information relate to a counter. A counter is just anothervariable (usually integer) that has to be created. We use it to keep track of howmany times we have been through the loop so far. In this case we have called ourcounter i, but we could give it any variable name—often though, simple names likei and j are chosen.
Let’s look carefully at how this for loop works. First the counter is initialized tosome value. We have decided to initialize it to 1:
for(int i = 1; i <= 5; i++) // counter initialized to 1{
System.out.println("*****");}
Notice that the loop counter i is declared as well as initialized in the header ofthe loop. Although it is possible to declare the counter variable prior to the loop,declaring it within the header restricts the use of this variable to the loop itself. Thisis often preferable.
The second bit of information in the header is a test, much like a test whencarrying out selection. When the test returns a boolean value of true the looprepeats; when it returns a boolean value of false the loop ends. In this case the
4.2 The ‘for’ Loop 67

counter is tested to see if it is less than or equal to 5 (as we wish to repeat this loop 5times):
for(int i = 1; i <= 5; i++) // counter tested{
System.out.println("*****");}
Since the counter was set to 1, this test is true and the loop is entered. Wesometimes refer to the instructions inside the loop as the body of the loop. As withif statements, the braces of the for loop can be omitted when only a singleinstruction is required in the body of the loop—but for clarity we will always usebraces with our loops. When the body of the loop is entered, all the instructionswithin the braces of the loop are executed. In this case there is only one instructionto execute:
for(int i = 1; i <= 5; i++){
System.out.println("*****"); // this line is executed}
This line prints a row of stars on the screen. Once the instructions inside thebraces are complete, the loop returns to the beginning where the third bit ofinformation in the header of the for loop is executed. The third bit of informationchanges the value of the counter so that eventually the loop test will be false. Ifwe want the loop to repeat 5 times and we have started the counter off at 1, weshould add 1 to the counter each time we go around the loop:
for(int i = 1; i <= 5; i++) // counter is changed{
System.out.println("*****");}
After the first increment, the counter now has the value of 2. Once the counterhas been changed the test is examined again to see if the loop should repeat:
for(int i = 1; i <= 5; i++) // counter tested again{
System.out.println("*****");}
This test is still true as the counter is still not greater than 5. Since the test istrue the body of the loop is entered again and another row of stars printed. Thisprocess of checking the test, entering the loop and changing the counter repeats
68 4 Iteration

until five rows of stars have been printed. At this point the counter is incremented asusual:
for(int i = 1; i <= 5; i++) // counter eventually equals 6{
System.out.println("*****");}
Now when the test is checked it is false as the counter is greater than five:
for(int i = 1; i <= 5; i++) // now the test is false{
System.out.println("*****");}
When the test of the for loop is false the loop stops. The instructions insidethe loop are skipped and the program continues with any instructions after the loop.
Now that you have seen one example of the use of a for loop, the general formof a for loop can be given as follows:
for( /* start counter */ ; /* test counter */ ; /* change counter */) {
// instruction(s) to be repeated go here}
Be very careful that the loop counter and the test achieve the desired result. Forexample, consider the following test:
for(int i = 1; i >= 10; i++) // something wrong with this test!{
// instruction(s) to be repeated go here}
Can you see what is wrong here?The test to continue with the loop is that the counter be greater than or equal to
10 (i >= 10). However, the counter starts at 1 so this test is immediately false!Because this test would be false immediately, the loop does not repeat at all andit is skipped altogether!
Now consider this test:
for(int i = 1; i >= 1; i++) // something wrong with this test again!{
// instruction(s) to be repeated go here}
4.2 The ‘for’ Loop 69

Can you see what is wrong here?The test to continue with the loop is that the counter be greater than or equal to 1
(i >= 1). However, the counter starts at 1 and increases by 1 each time, so this testwill always be true! Because this test would be true always, the loop will neverstop repeating when it is executed!
As long as you are careful with your counter and your test, however, it is a veryeasy matter to set your for loop to repeat a certain number of times. If, forexample, we start the counter at 1 and increment it by 1 each time, and we need tocarry out some instructions 70 times, we could have the following test in the forloop:
for(int i = 1; i <= 70; i++) // this loop carries out the instructions 70 times{
// instruction(s) to be repeated goes here}
4.2.1 Varying the Loop Counter
The DisplayStars2 program illustrated a common way of using a for loop;start the counter at 1 and add 1 to the counter each time the loop repeats. However,you may start your counter at any value and change the counter in any way youchoose when constructing your for loops.
For example, we could have re-written the for loop of the above program sothat the counter starts at 0 instead of 1. In that case, if we wish the for loop to stillexecute the instructions 5 times the counter should reach 4 and not 5:
// this counter starts at 0 and goes up to 4 so the loop still executes 5 timesfor(int i = 0; i <= 4; i++) {
System.out.println("*****");}
Another way to ensure that the counter does not reach a value greater than 4 is toinsist that the counter stays below 5. In this case we need to use the “less than”operator (<) instead of the “less than or equal to” operator (<=):
// this loop still executes 5 timesfor(int i = 0; i < 5; i++) {
System.out.println("*****");}
70 4 Iteration

We can also change the way we modify the counter after each iteration.Returning to the original for loop, we would increment the counter by 2 each timeinstead of 1. If we still wish the loop to repeat 5 times we could start at 2 and get thecounter to go up to 10:
// this loop still executes 5 timesfor(int i = 2; i <= 10; i = i+2) // the counter moves up in steps of 2{
System.out.println("*****");}
Finally, counters can move down as well as up. As an example, look at thefollowing program that prints out a countdown of the numbers from 10 down to 1.
Countdownpublic class Countdown{
public static void main(String[] args){
System.out.println("*** Numbers from 10 to 1 ***");System.out.println();for (int i=10; i >= 1; i--) // counter moving down from 10 to 1{
System.out.println(i);}
} }
Here the counter starts at 10 and is reduced by 1 each time. The loop stops whenthe counter falls below the value of 1. Note the use of the loop counter inside theloop:
System.out.println(i); // value of counter 'i' used here
This is perfectly acceptable as the loop counter is just another variable. However,when you do this, be careful not to inadvertently change the loop counter within theloop body as this can throw the test of your for loop off track! Running theCountdown program gives us the following result:
*** Numbers from 10 to 1 ***
109
8
7
6
4.2 The ‘for’ Loop 71

5
4
3
21
4.2.2 The Body of the Loop
The body of the loop can contain any number and type of instructions, includingvariable declarations, if statements, switch statements, or even another loop!For example, the DisplayEven program below modifies our Countdown byincluding an if statement inside the for loop so that only the even numbers from10 to 1 are displayed:
DisplayEvenpublic class DisplayEven{
public static void main(String[] args) {
System.out.println("*** Even numbers from 10 to 1 ***");System.out.println();for(int i=10; i >= 1; i--) // loop through the numbers 10 down to 1
{ // body of the loop contains in ‘if’ statementif (i%2 == 0) // check if number is even
{ System.out.println(i); // number displayed only when it is checked to be even
} } } }
You can see that the body of the for loop contains within it an if statement.The test of the if statement checks the current value of the loop counter ‘i’ to seeif it is an even number:
for(int i=10; i >= 1; i--){
if (i%2 == 0) // use the modulus operator to check the value of the loop counter {
System.out.println(i); } }
An even number is a number that leaves no remainder when divided by 2, so weuse the modulus operator (%) to check this. Now the loop counter is displayed onlyif it is an even number. Running the program gives us the obvious results:
72 4 Iteration
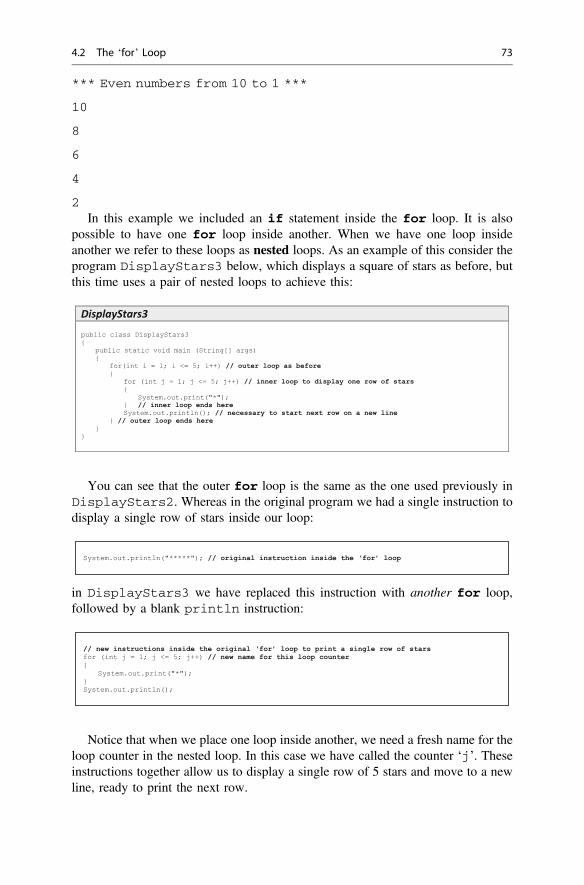
*** Even numbers from 10 to 1 ***
10
8
6
4
2In this example we included an if statement inside the for loop. It is also
possible to have one for loop inside another. When we have one loop insideanother we refer to these loops as nested loops. As an example of this consider theprogram DisplayStars3 below, which displays a square of stars as before, butthis time uses a pair of nested loops to achieve this:
DisplayStars3
public class DisplayStars3{
public static void main (String[] args) {
for(int i = 1; i <= 5; i++) // outer loop as before {
for (int j = 1; j <= 5; j++) // inner loop to display one row of stars {
System.out.print("*");} // inner loop ends hereSystem.out.println(); // necessary to start next row on a new line
} // outer loop ends here } }
You can see that the outer for loop is the same as the one used previously inDisplayStars2. Whereas in the original program we had a single instruction todisplay a single row of stars inside our loop:
System.out.println("*****"); // original instruction inside the ‘for’ loop
in DisplayStars3 we have replaced this instruction with another for loop,followed by a blank println instruction:
// new instructions inside the original ‘for’ loop to print a single row of starsfor (int j = 1; j <= 5; j++) // new name for this loop counter{
System.out.print("*");} System.out.println();
Notice that when we place one loop inside another, we need a fresh name for theloop counter in the nested loop. In this case we have called the counter ‘j’. Theseinstructions together allow us to display a single row of 5 stars and move to a newline, ready to print the next row.
4.2 The ‘for’ Loop 73

Let’s look at how the control in this program flows. First the outer loop counteris set to 1:
for(int i = 1; i <= 5; i++) // outer loop counter initialized{
for (int j = 1; j <= 5; j++) {
System.out.print("*"); }
System.out.println();}
The test of the outer loop is then checked:
for(int i = 1; i <= 5; i++) // outer loop counter tested{
for (int j = 1; j <= 5; j++) {
System.out.print("*"); }
System.out.println();}
This test is found to be true so the body of the outer loop is executed. First theinner loop repeats five times:
for(int i = 1; i <= 5; i++) {
for (int j = 1; j <= 5; j++) // this loop repeats 5 times {
System.out.print("*"); }
System.out.println();}
The inner loop prints five stars on the screen as follows:
*****
After the inner loop stops, there is one more instruction to complete: the com-mand to move the cursor to a new line:
for(int i = 1; i <= 5; i++) {
for (int j = 1; j <= 5; j++) {
System.out.print("*"); }
System.out.println(); // last instruction of outer loop}
74 4 Iteration

This completes one cycle of the outer loop, so the program returns to thebeginning of this loop and increments its counter:
for(int i = 1; i <= 5; i++) // counter moves to 2{
for (int j = 1; j <= 5; j++) {
System.out.print("*"); }
System.out.println();}
The test of the outer loop is then checked and found to be true and the wholeprocess repeats, printing out a square of five stars as before.
DisplayStars3 displayed a five by five square of stars. Now take a look atthe next program and see if you can work out what it does. Look particularly at theheader of the inner loop:
DisplayShape
public class DisplayShape{
public static void main (String[] args){
for(int i = 1; i <= 5; i++) // outer loop controlling the number of rows {for (int j = 1; j <= i; j++) // inner loop controlling the number of stars in one row{
System.out.print("*");} System.out.println();
} }
}
You can see this is very similar to the previous program, except that in thatprogram the inner loop displayed 5 stars each time. In this case the number of starsis not fixed to a number, but to the value of the outer loop counter i:
for(int i = 1; i <= 5; i++) // outer loops controls the number of rows{
// inner loop determines how many stars in each rowfor (int j = 1; j <= i; j++) // inner loop displays ‘i’ number of stars
{ System.out.print("*");
} System.out.println();
}
The first time around this loop the inner loop will display only 1 star in the rowas the i counter starts at 1. The second time around this loop it will display 2 starsas the i counter is incremented, then 3 stars. Eventually it will display 5 stars thelast time around the loop when the outer i counter reaches 5. Effectively this meansthe program will display a triangle of stars as follows:
4.2 The ‘for’ Loop 75

** ** * ** * * ** * * * *
4.2.3 Revisiting the Loop Counter
Before we move on to look at other kinds of loops in Java it is important tounderstand that, although a for loop is used to repeat something a fixed number oftimes, you don’t necessarily need to know this fixed number when you are writingthe program. This fixed number could be a value given to you by the user of yourprogram, for example. This number could then be used to test against your loopcounter. The program below modifies DisplayStars3 by asking the user todetermine the size of the square of stars.
DisplayStars4
import java.util.Scanner;
public class DisplayStars4{
public static void main(String[] args){
int num; // to hold user responseScanner keyboard = new Scanner(System.in);// prompt and get user responseSystem.out.println("Size of square?");num = keyboard.nextInt();// display squarefor(int i = 1; i <= num; i++) // number of rows fixed to 'num'{
for (int j = 1; j <= num; j++) // number of stars in a row fixed to 'num'{
System.out.print("*");} System.out.println();
} }
}
In this program you cannot tell from the code exactly how many times the loopswill iterate, but you can say that they will iterate num number of times—whateverthe user may have entered for num. So in this sense the loop is still fixed. Here is asample run of DisplayStars4:
Size of square?7* * * * * * ** * * * * * ** * * * * * ** * * * * * ** * * * * * ** * * * * * ** * * * * * *
76 4 Iteration

Here is another sample run:
Size of square?3* * ** * ** * *
4.3 The ‘while’ Loop
Much of the power of computers comes from the ability to ask them to carry outrepetitive tasks, so iteration is a very important form of program control. The forloop is an often used construct to implement fixed repetitions.
Sometimes, however, a repetition is required that is not fixed and a for loop isnot the best one to use in such a case. Consider the following scenarios, forexample:
• a racing game that repeatedly moves a car around a track until the car crashes;• a ticket issuing program that repeatedly offers tickets for sale until the user
chooses to quit the program;• a password checking program that does not let a user into an application until he
or she enters the right password.
Each of the above cases involves repetition; however, the number of repetitionsis not fixed but depends upon some condition. The while loop offers one type ofnon-fixed iteration. The syntax for constructing this loop in Java is as follows:
while ( /* test goes here */ ) {
// instruction(s) to be repeated go here}
As you can see, this loop is much simpler to construct than a for loop; as thisloop is not repeating a fixed number of times, there is no need to create a counter tokeep track of the number of repetitions.
When might this kind of loop be useful? The first example we will explore is theuse of the while loop to check data that is input by the user. Checking input datafor errors is referred to as input validation.
4.2 The ‘for’ Loop 77

For example, look back at the program DisplayResult in the last chapter,which asked the user to enter an exam mark:
System.out.println("What exam mark did you get?");mark = keyboard.nextInt();if (mark >= 40)// rest of code goes here
The mark that is entered should never be greater than 100 or less than 0. At thetime we assumed that the user would enter the mark correctly. However, goodprogrammers never make this assumption!
Before accepting the mark that is entered and moving on to the next stage of theprogram, it is good practice to check that the mark entered is indeed a valid one. If itis not, then the user will be allowed to enter the mark again. This will go on until theuser enters a valid mark.
We can express this using pseudocode as follows:
PROMPT for markENTER markKEEP REPEATING WHILE mark < 0 OR mark > 100BEGIN
DISPLAY error message to userENTER mark
END// REST OF PROGRAM HERE
The design makes clear that an error message is to be displayed every time theuser enters an invalid mark. The user may enter an invalid mark many times so aniteration is required here.
However, the number of iterations is not fixed as it is impossible to say howmany, if any, mistakes the user will make.
This sounds like a job for the while loop.
System.out.println("What exam mark did you get?");mark = keyboard.nextInt();while (mark < 0 || mark > 100) // check for invalid input{
// display error message and allow for re-inputSystem.out.println("Invalid mark: Re-enter!");mark = keyboard.nextInt();
} if (mark >= 40)// rest of code goes here
The program below shows the whole of the DisplayResult rewritten toinclude the input validation. Notice how this works–we ask the user for the mark; ifit is within the acceptable range, the while loop is not entered and we move past itto the other instructions. But if the mark entered is less than zero or greater than 100we enter the loop, display an error message and ask the user to input the mark again.This continues until the mark is within the required range.
78 4 Iteration

DisplayResult2
import java.util.Scanner;
public class DisplayResult2{
public static void main(String[] args){
int mark;Scanner keyboard = new Scanner(System.in);System.out.println("What exam mark did you get?");mark = keyboard.nextInt();// input validationwhile (mark < 0 || mark > 100) // check if mark is invalid{
// display error messageSystem.out.println("Invalid mark: please re-enter");// mark must be re-enteredmark = keyboard.nextInt();
} // by this point loop is finished and mark will be validif (mark >= 40){
System.out.println("Congratulations, you passed");} else{
System.out.println("I'm sorry, but you failed");} System.out.println("Good luck with your other exams");
} }
Here is a sample program run:
What exam mark did you get?
101
Invalid mark: please re-enter
−10
Invalid mark: please re-enter
10
I’m sorry, but you failed
Good luck with your other exams
4.4 The ‘do…while’ Loop
There is one more loop construct in Java that we need to tell you about: the do…while loop.
The do…while loop is another variable loop construct, but, unlike the whileloop, the do…while loop has its test at the end of the loop rather than at thebeginning.
The syntax of a do…while loop is given below:
4.3 The ‘while’ Loop 79

do{
// instruction(s) to be repeated go here} while ( /* test goes here */ ); // note the semi-colon at the end
You are probably wondering what difference it makes if the test is at the end orthe beginning of the loop. Well, there is one subtle difference. If the test is at the endof the loop, the loop will iterate at least once. If the test is at the beginning of theloop, however, there is a possibility that the condition will be false to begin with,and the loop is never executed. A while loop therefore executes zero or moretimes whereas a do…while loop executes one or more times.
To make this a little clearer, look back at the while loop we just showed youfor validating exam marks. If the user entered a valid mark initially (such as 66), thetest to trap an invalid mark (mark < 0 || mark > 100) would be false and theloop would be skipped altogether. A do…while loop would not be appropriatehere as the possibility of never getting into the loop should be left open.
When would a do…while loop be suitable? Well, any time you wish to code anon-fixed loop that must execute at least once. Usually, this would be the case whenthe test can take place only after the loop has been entered.
To illustrate this, think about all the programs you have written so far. Once theprogram has done its job it terminates—if you want it to perform the same taskagain you have to go through the whole procedure of running the program again.
In many cases a better solution would be to put your whole program in a loopthat keeps repeating until the user chooses to quit your program. This would involveasking the user each time if he or she would like to continue repeating the program,or to stop.
A for loop would not be the best loop to choose here as this is more usefulwhen the number of repetitions can be predicted. A while loop would be difficultto use, as the test that checks the user’s response to the question cannot be carriedout at the beginning of the loop. The answer is to move the test to the end of theloop and use a do…while loop as follows:
char response; // variable to hold user responsedo // place code in loop{
// program instructions go hereSystem.out.println("another go (y/n)?");response = keyboard.next().charAt(0); // get user reply
} while (response == 'y' || response == ‘Y’); // test must be at the end of the loop
Notice the test of the do…while loop allows the user to enter either a lowercase or an upper case ‘Y’ to continue running the program:
80 4 Iteration

while (response == 'y' || response == 'Y');
As an example of this application of the do…while loop, the program belowamends the FindCost3 program of Chap. 2, which calculated the cost of aproduct, by allowing the user to repeat the program as often as he or she chooses.
FindCost4
import java.util.Scanner;
public class FindCost4{
public static void main(String[] args){
double price, tax;char reply;Scanner keyboard = new Scanner(System.in);do{
// these instructions as beforeSystem.out.println("*** Product Price Check ***");System.out.print("Enter initial price: ");price = keyboard.nextDouble();System.out.print("Enter tax rate: ");tax = keyboard.nextDouble();price = price * (1 + tax/100);System.out.println("Cost after tax = " + price);
// now see if user wants another goSystem.out.println();System.out.print("Would you like to enter another product(y/n)?: ");reply = keyboard.next().charAt(0);System.out.println();
} while (reply == 'y' || reply == 'Y');}
}
Here is sample program run:
*** Product Price Check ***Enter initial price: 50Enter tax rate: 10Cost after tax = 55.0Would you like to enter another product (y/n)?: y
*** Product Price Check ***Enter initial price: 70Enter tax rate: 5Cost after tax = 73.5
Would you like to enter another product (y/n)?: Y
*** Product Price Check ***Enter initial price: 200Enter tax rate: 15
4.4 The ‘do…while’ Loop 81

Cost after tax = 230.0
Would you like to enter another product (y/n)?: n
Another way to allow a program to be run repeatedly using a do…while loopis to include a menu of options within the loop (this was very common in the daysbefore windows and mice). The options themselves are processed by a switchstatement. One of the options in the menu list would be the option to quit and thisoption is checked in the while condition of the loop. The program below is areworking of the time table program of the previous chapter using this technique.
TimetableWithLoopimport java.util.Scanner;
public class TimetableWithLoop{
public static void main(String[] args){
char group, response;Scanner keyboard = new Scanner(System.in);System.out.println("***Lab Times***");do // put code in loop{
// offer menu of options System.out.println(); // create a blank line System.out.println("[1] TIME FOR GROUP A");System.out.println("[2] TIME FOR GROUP B");System.out.println("[3] TIME FOR GROUP C");System.out.println("[4] QUIT PROGRAM");System.out.print("enter choice [1,2,3,4]: ");response = keyboard.next().charAt(0); // get responseSystem.out.println(); // create a blank lineswitch(response) // process response{
case '1': System.out.println("10.00 a.m ");break;
case '2': System.out.println("1.00 p.m ");break;
case '3': System.out.println("11.00 a.m ");break;
case '4': System.out.println("Goodbye ");break;
default: System.out.println("Options 1-4 only!");}
} while (response != '4'); // test for Quit option}
}
Notice that the menu option is treated as a character here, rather than an integer.So option 1 would be interpreted as the character ‘1’ rather than the number 1, forexample. The advantage of treating the menu option as a character rather than anumber is that an incorrect menu entry would not result in a program crash if thevalue entered was non-numeric. Here is a sample run of this program:
***Lab Times***
[1] TIME FOR GROUP A[2] TIME FOR GROUP B[3] TIME FOR GROUP C[4] QUIT PROGRAM
82 4 Iteration

enter choice [1,2,3,4]: 2
1.00 p.m
[1] TIME FOR GROUP A[2] TIME FOR GROUP B[3] TIME FOR GROUP C[4] QUIT PROGRAMenter choice [1,2,3,4]: 5
Options 1-4 only!
[1] TIME FOR GROUP A[2] TIME FOR GROUP B[3] TIME FOR GROUP C[4] QUIT PROGRAMenter choice [1,2,3,4]: 1
10.00 a.m
[1] TIME FOR GROUP A[2] TIME FOR GROUP B[3] TIME FOR GROUP C[4] QUIT PROGRAMenter choice [1,2,3,4]: 3
11.00 a.m
[1] TIME FOR GROUP A[2] TIME FOR GROUP B[3] TIME FOR GROUP C[4] QUIT PROGRAM enter choice [1,2,3,4]: 4
Goodbye
4.5 Picking the Right Loop
With three types of loop to choose from in Java, it can sometimes be difficult todecide upon the best one to use in each case, especially as it is technically possibleto pick any type of loop to implement any type of repetition! For example, whileand do…while loops can be used for fixed repetitions by introducing your owncounter and checking this counter in the test of the loop. However, it is always best
4.4 The ‘do…while’ Loop 83

to pick the most appropriate loop construct to use in each case, as this will simplifythe logic of your code. Here are some general guidelines that should help you:
• if the number of repetitions required can be determined prior to entering theloop—use a for loop;
• if the number of repetitions required cannot be determined prior to entering theloop, and you wish to allow for the possibility of zero iterations—use a whileloop;
• if the number of repetitions required cannot be determined before the loop, andyou require at least one iteration of the loop—use a do…while loop.
4.6 The ‘break’ Statement
In the previous chapter we met the break statement when looking at switchstatements. Here for example is a switch statement from the previous chapter thatprocessed a student’s timetable:
switch(group){
case 'A': System.out.print("10.00 a.m ");break; // terminates switch
case 'B': System.out.print("1.00 p.m ");break; // terminates switch
case 'C': System.out.print("11.00 a.m ");break; // terminates switch
default: System.out.print("No such group");}
Here the break statement allowed the switch to terminate without processingthe remaining cases. The break statement can also be used with Java’s loops toterminate a loop before it reaches its natural end. For example, consider a programthat allows the user a maximum of three attempts to guess a secret number. This isan example of a non-fixed iteration—but the iteration does have a fixed upper limitof three.
We could use any of the loop types to implement this. If we wished to use a forloop, however, we would need to make use of the break statement. Take a look atthe following program that does this for a secret number of 27:
84 4 Iteration

SecretNumberimport java.util.Scanner;
// This program demonstrates the use of the ‘break’ statement inside a ‘for’ loop
public class SecretNumber{
public static void main(String[] args) {
Scanner keyboard = new Scanner (System.in);final int SECRET = 27; // secret numberint num; // to hold user's guessboolean guessed = false; // so far number not guessed
System.out.println("You have 3 goes to guess the secret number");System.out.println("HINT: It is a number less than 50!");System.out.println();
// look carefully at this loopfor (int i= 1; i <= 3; i++) // loop repeats 3 times
{ System.out.print("Enter guess: ");num = keyboard.nextInt();// check guessif (num == SECRET) // check if number guessed correctly
{ guessed = true; // record number has been guessed correctlybreak; // exit loop
} }
// now check to see if the number was guessed correctly or not if (guessed)
{ System.out.println("Number guessed correctly");
} else
{ System.out.println("Number NOT guessed");
} } }
The important part of this program is the for loop. You can see that it has beenwritten to repeat three times:
for (int i= 1; i <= 3; i++) // loop executes 3 times{
System.out.print("Enter guess: ");num = keyboard.nextInt();// code here to check the guess
}
Each time around the loop the user gets to have a guess at the secret number. Weneed to do two things if we determine that the guess is correct. Firstly, set aboolean variable to true to indicate a correct guess. Then, secondly, we need toterminate the loop, even if this is before we reach the third iteration. We do so byusing a break statement if the guess is correct:
4.6 The ‘break’ Statement 85

for (int i= 1; i <= 3; i++) {
System.out.print("Enter guess: ");num = keyboard.nextInt();if (num == SECRET) // check if number guessed correctly
{ guessed = true; // record number has been guessed correctlybreak; // exit loop even if it has not yet finished three iterations
} }
Here is a sample program run:
You have 3 goes to guess the secret numberHINT: It is a number less than 50!Enter guess: 49Enter guess: 27Number guessed correctly
Here the user guessed the number after two attempts and the loop terminatedearly due to the break statement. Here is another program run where the user failsto guess the secret number:
You have 3 goes to guess the secret numberHINT: It is a number less than 50!
Enter guess: 33Enter guess: 22Enter guess: 11Number NOT guessed
Here the break statement is never reached so the loop iterates three timeswithout terminating early.
4.7 The ‘continue’ Statement
Whereas the break statement forces a loop to terminate, a continue statementforces a loop to skip the remaining instructions in the body of the loop and tocontinue to the next iteration. As an example of this here is a reminder of the earlierprogram that displayed the even numbers from 10 down to 1:
86 4 Iteration

DisplayEven – a reminderpublic class DisplayEven{
public static void main(String[] args) {
System.out.println("*** Even numbers from 10 to 1 ***");System.out.println();for(int i=10; i >= 1; i--) // loop through the numbers 10 down to 1
{ // body of the loop contains in ‘if’ statementif (i%2 == 0) // check if number is even
{ System.out.println(i); // number displayed only when it is checked to be even
} } } }
Here the body of the loop displayed the loop counter if it was an even number.An alternative approach would have been to skip a number if it was odd and moveon to the next iteration of the loop. If the number is not skipped then it must beeven, so can be displayed. This is what we have done in the following program:
DisplayEven2
public class DisplayEven2{
public static void main(String[] args) {
System.out.println("*** Even numbers from 10 to 1 ***");System.out.println();for(int i=10; i>=1; i--)
{ if (i%2 != 0) // check if number is NOT even
{ continue; // skips the rest of this iteration and moves to the next iteration
} System.out.println(i); // even number only displayed if we have not skipped this iteration
} } }
The if statement checks to see if the number is odd (not even). If this is the casethe rest of the instructions in the loop can be skipped with a continue statement,so the loop moves to the next iteration:
if (i%2 != 0) // check if number is NOT even{
continue; // skips the rest of the loop body and moves to the next iteration} System.out.println(i); // this line only executed if this iteration is not skipped
The last println instruction is only executed if the number is even and theiteration has not been skipped. Of course, the result of running this program will bethe same as the result of running the original program.
4.7 The ‘continue’ Statement 87

4.8 Self-test Questions
1. Consider the following program:
public class IterationQ1{
public static void main(String[] args) {
for(int i = 1; i <= 4; i++) {
System.out.println("YES"); }
System.out.println("OK"); } }
(a) How many times does this for loop repeat?(b) What would be the output of this program?
2. Consider the following program:
public class IterationQ2{
public static void main(String[] args) {
for(int i = 1; i < 4; i++) {
System.out.println("YES");System.out.println("NO");
} System.out.println("OK");
} }
(a) How many times does this for loop repeat?(b) What would be the output of this program?
3. Consider the following program:
import java.util.Scanner;
public class IterationQ3{
public static void main(String[] args) {
int num;Scanner keyboard = new Scanner(System.in);
System.out.print("Enter a number: ");num = keyboard.nextInt();
for(int i= 1; i< num; i++) {
System.out.println("YES");System.out.println("NO");
} System.out.println("OK");
} }
88 4 Iteration

(a) What would be the output of this program if the user entered 5 whenprompted?
(b) What would be the output of this program if the user entered 0 whenprompted?
4. Consider the following program
public class IterationQ4{
public static void main(String[] args) {
for(int i=1; i<=15; i= i +2) {
System.out.println(i); } } }
(a) How many times does this for loop repeat?(b) What would be the output of this program?(c) What would be the consequence of changing the test of the loop to
(i >= 15)?
5. Consider the following program:
public class IterationQ5{
public static void main(String[] args) {
for(int i=5; i>=2; i--) {
switch (i) {
case 1: case 3: System.out.println("YES"); break;case 2: case 4: case 5: System.out.println("NO");
} }
System.out.println("OK"); } }
(a) How many times does this for loop repeat?(b) What would be the output of this program?(c) What would be the consequence of changing the loop counter to (i++)
instead of (i−−)
6. What would be the output from the following program?
public class IterationQ6{
public static void main(String[] args) {
for(int i=1; i <= 3; i++) {
for(int j=1; j <= 7; j++) {
System.out.print("*"); }
System.out.println(); } } }
4.8 Self-test Questions 89

7. Examine the program below that aims to allow a user to guess the square of anumber that is entered. Part of the code has been replaced by a comment:
import java.util.Scanner;
public class IterationQ7{
public static void main(String[] args) {
int num, square;Scanner keyboard = new Scanner(System.in);System.out.print("Enter a number ");num = keyboard.nextInt();System.out.print("Enter the square of this number ");square = keyboard.nextInt();// loop to check answerwhile (/* test to be completed */)
{ System.out.println("Wrong answer, try again");square = keyboard.nextInt();
}System.out.println("Well done, right answer");
} }
(a) Why is a while loop preferable to a for loop or a do…while loophere?
(b) Replace the comment with an appropriate test for this loop.
8. What would be the output of the following program?
public class IterationQ8{
public static void main(String[] args) {
for(int i=1; i<=10; i++) {
if (i > 5) {
break; }
System.out.println(i); } } }
9. What would be the output of the following program?
public class IterationQ9{
public static void main(String[] args) {
for(int i=1; i<=10; i++) {
if (i <= 5) {
continue; }
System.out.println(i); } } }
90 4 Iteration

4.9 Programming Exercises
1. Implement a few of the programs from this chapter, and then implement theprograms from the self-test questions above in order to verify your answers tothose questions.
2. (a) Modify the DisplayEven program from Sect. 4.2.2 so that the programdisplays the even numbers from 1 to 20 instead of from 10 down to 1.
(b) Modify the program further so that the user enters a number and the pro-gram displays all the even numbers from 1 up to the number entered by theuser.
(c) Modify the program again so that it identifies which of these numbers areodd and which are even. For example, if the user entered 5 the programshould display something like the following:
1 is odd2 is even3 is odd4 is even5 is odd
3. Write a program that makes use of nested for loops to display the followingshapes:
(a) * * * * * ** * * * * ** * * * * *
(b) * * ** * ** * * * * * * * ** * * * * * * * ** * ** * *
Hint: make use of an if…else statement inside your for loops.(c) * * * *
* * ** **
4.9 Programming Exercises 91
6. (a) Using a for loop, write a program that displays a “6 times” multiplicationtable; the output should look like this:
1 � 6 = 62 � 6 = 123 � 6 = 184 � 6 = 245 � 6 = 306 � 6 = 367 � 6 = 428 � 6 = 489 � 6 = 5410 � 6 = 6011 � 6 = 6612 � 6 = 72
(b) Adapt the program so that instead of a “6 times” table, the user chooseswhich table is displayed
(c) Modify the program further by making use of a while loop to carry outsome input validation that ensures that the user enters a number that is neverless than 2. If a number less than 2 is entered an error message should bedisplayed and the user is asked to enter another number.
(d) Finally, make use of a do…while loop so that the user is asked to enter ‘y’or ‘n’ to indicate if they wish to run the program again. Ideally the programshould run again if the user enters ‘y’ or ‘Y’.
7. Implement the program DisplayStars4 from Sect. 4.2.3 (which allows theuser to determine the size of a square of stars) and then
(a) adapt it so that the user is allowed to enter a size only between 2 and 20;(b) adapt the program further so that the user can choose whether or not to have
another go.
8. Modify programming Exercise 7, from Sect. 2.12, that caries out some calcu-lations related to a circle as follows:
(a) Add input validation to ensure that the radius entered is always non-negative(b) Provide a menu interface for this program. For example:
[1] Set radius[2] Display radius[3] Display area[4] Display perimeter[5] Quit
92 4 Iteration

9. Consider a vending machine that offers the following options:
[1] Get gum[2] Get chocolate[3] Get popcorn[4] Get juice[5] Display total sold so far[6] Quit
Design and implement a program that continuously allows users to select fromthese options. When options 1–4 are selected an appropriate message is to bedisplayed acknowledging their choice. For example, when option 3 is selected thefollowing message could be displayed:
Here is your popcorn
When option 5 is selected, the number of each type of item sold is displayed. Forexample:
3 items of gum sold2 items of chocolate sold6 items of popcorn sold9 items of juice sold
When option 6 is chosen the program terminates. If an option other than 1–6 isentered an appropriate error message should be displayed, such as:
Error, options 1-6 only!
4.9 Programming Exercises 93

5Methods
Outcomes:
By the end of this chapter you should be able to:
• explain the meaning of the term method;• declare and define methods;• call a method;• explain the meaning of the terms actual parameters and formal parameters;• devise simple algorithms with the help of pseudocode;• identify the scope of a particular variable;• explain the meaning of the term polymorphism;• declare and use overloaded methods.
5.1 Introduction
As early as Chap. 1 we were using the term method. There you found out that amethod is a part of a class, and contains a particular set of instructions. So far, allthe classes you have written have contained just one method, the main method. Inthis chapter you will see how a class can contain not just a main method, but manyother methods as well.
Normally a method will perform a single well-defined task. Examples of themany sorts of task that a method could perform are calculating the area of a circle,displaying a particular message on the screen, converting a temperature fromFahrenheit to Celsius, and many more. In this chapter you will see how we cancollect the instructions for performing these sorts of tasks together in a method.
You will also see how, once we have written a method, we can get it to performits task within a program. When we do this we say that we are calling the method.When we call a method, what we are actually doing is telling the program to jump
© Springer Nature Switzerland AG 2019Q. Charatan and A. Kans, Java in Two Semesters, Texts in Computer Science,https://doi.org/10.1007/978-3-319-99420-8_5
95

to a new place (where the method instructions are stored), carry out the set ofinstructions that it finds there, and, when it has finished (that is, when the methodhas terminated), return and carry on where it left off.
So in this chapter you will learn how to write a method within a program, how tocall a method from another part of the program and how to send information into amethod and get information back.
5.2 Declaring and Defining Methods
Let’s illustrate the idea of a method by thinking about a simple little program. Theprogram prompts the user to enter his or her year of birth, month of birth and day ofbirth; each time the prompt is displayed, it is followed by a message, consisting of acouple of lines, explaining that the information entered is confidential. This isshown in the program below. The program would obviously then go on to do otherthings with the information that has been entered, but we are not interested in that,so we have just replaced all the rest of the program with a comment.
DataEntryimport java.util.Scanner;
public class DataEntry{
public static void main(String[] args) {
Scanner keyboard = new Scanner(System.in);
int year, month, day;
// prompt for year of birthSystem.out.println("Please enter the year of your birth");
// display confidentiality messageSystem.out.println("Please note that all information supplied is confidential");System.out.println("No personal details will be shared with any third party");
// get year from useryear = keyboard.nextInt();
// prompt for month of birthSystem.out.println("Please enter the month of your birth as a number from 1 to 12");
// display confidentiality messageSystem.out.println("Please note that all information supplied is confidential");System.out.println("No personal details will be shared with any third party");
// get month from usermonth = keyboard.nextInt();
// prompt for day of birthSystem.out.println("Please enter the day of your birth as a number from 1 to 31");
// display confidentiality messageSystem.out.println("Please note that all information supplied is confidential");System.out.println("No personal details will be shared with any third party");
// get day from userday = keyboard.nextInt();
// more code here } }
96 5 Methods

You can see from the above program that we have had to type out the two linesthat display the confidentiality message three times. It would be far lesstime-consuming if we could do this just once, then send the program off towherever these instructions are stored, and then come back and carry on with whatit was doing. You will probably have realized by now that we can indeed do this—by writing a method. The job of this particular method will be simply to display theconfidentiality message on the screen. We need to give our method a name so thatwe can refer to it when required, so let’s call it displayMessage. Here is how itis going to look:
static void displayMessage(){
System.out.println("Please note that all information supplied is confidential");System.out.println("No personal details will be shared with any third party");
}
The body of this method, which is contained between the two curly brackets,contains the instructions that we want the method to perform, namely to display twolines of text on the screen. The first line, which declares the method, is called themethod header, and consists of three words—let’s look into each of these a bitmore closely:
static
You have seen this word in front of the main method many times now.However, we won’t be explaining its meaning to you properly until Chap. 8. Fornow, all you need to know is that methods that have been declared as static(such as main) can only call other methods in the class if they too are static.So, if we did not declare displayMessage as static and tried to call itfrom the main method then our program would not compile.
void
In the next section you will see that it is possible for a method to send back orreturn some information once it terminates. This particular method simplydisplays a message on the screen, so we don’t require it to send back anyinformation when it terminates. The word void indicates that the method doesnot return any information.
displayMessage()
This is the name that we have chosen to give our method. You can see that thename is followed by a pair of empty brackets. Very soon you will learn that it ispossible to send some information into a method—for example, some valuesthat the method needs in order to perform a calculation. When we need to dothat we list, in these brackets, the types of data that we are going to send in; here,however, as the method is doing nothing more that displaying a message on thescreen we do not have to send in any data, and the brackets are left empty.
5.2 Declaring and Defining Methods 97

5.3 Calling a Method
Now that we have declared and defined our method, we can make use of it. Theidea is that we get the method to perform its instructions as and when we need it todo so—you have seen that this process is referred to as calling the method. To call amethod in Java, we simply use its name, along with the following brackets, whichin this case are empty. So in this case our method call, which will be placed at thepoint in the program where we need it, looks like this:
Now we can rewrite our DataEntry program, replacing the appropriate linesof code with the simple method call. The whole program is shown below:
You can see that the method itself is defined separately after the main method—although it could have come before it, since the order in which methods are pre-sented doesn’t matter to the compiler. When the program is run, however, it alwaysstarts with main. The overall result is of course that this program runs in exactlythe same way as the previous one.
We should emphasize again here that when one method calls another method,the first method effectively pauses at that point, and the program then carries out theinstructions in the called method; when it has finished doing this, it returns to theoriginal method, which then resumes. In most of the programs in this chapter it will
displayMessage();
DataEntry2import java.util.Scanner;
public class DataEntry2{
public static void main(String[] args) {
Scanner keyboard = new Scanner(System.in);
int year, month, day;
System.out.println("Please enter the year of your birth");displayMessage(); // call displayMessage methodyear = keyboard.nextInt();
System.out.println("Please enter the month of your birth as a number from 1 to 12");displayMessage(); // call displayMessage methodmonth = keyboard.nextInt();
System.out.println("Please enter the day of your birth as a number from 1 to 31");displayMessage(); // call displayMessage methodday = keyboard.nextInt();
// more code here }
// the code for displayMessage methodstatic void displayMessage()
{ System.out.println("Please note that all information supplied is confidential");System.out.println("No personal details will be shared with any third party");
} }
98 5 Methods

be the main method that calls the other method. This doesn’t have to be the case,however, and it is perfectly possible for any method to call another method—indeed, the called method could in turn call yet another method. This would resultin a number of methods being “chained”. When each method terminates, the controlof the program would return to the method that called it.
You can see an example of a method being called by a method other than mainin Sect. 5.6.
5.4 Method Input and Output
We have already told you that it is possible to send some data into a method, andthat a method can send data back to the method that called it. Now we will look intothis in more detail.
In order to do this we will use as an example a program that we wrote in Chap. 2.Here is a reminder of that program:
The line that calculates the new price, with the sales tax added, is this one:
Let’s create a method that performs this calculation—in a real application thiswould be very useful, because we might need to call this method at various pointswithin the program, and, as you will see, each time we do so we could get it to carryout the calculation for different values of the price and the tax. We will need a wayto send in these values to the method. But on top of that, we need to arrange for themethod to tell us the result of adding the new tax—if it didn’t do that, it wouldn’t bemuch use!
FindCost3 - a reminderimport java.util.Scanner;
/* a program to input the initial price of a product and then calculate and display its cost after tax has been added */
public class FindCost3{
public static void main(String[] args) {
Scanner keyboard = new Scanner(System.in);double price, tax;System.out.println("*** Product Price Check ***");System.out.print("Enter initial price: ");price = keyboard.nextDouble();System.out.print("Enter tax rate: ");tax = keyboard.nextDouble();price = price * (1 + tax/100);System.out.println("Cost after tax = " + price);
} }
price = price * (1 + tax/100);
5.3 Calling a Method 99

The method is going to look like this:
First, take a careful look at the header. You are familiar with the first word,static, but look at the next one; this time, wherewe previously saw thewordvoid,we now have the word double. As we have said, this method must send back—orreturn—a result, the new price of the item. So the type of data that the method is toreturn in this case is adouble. In fact what we are doing here is declaring amethod oftype double. Thus, the type of a method refers to its return type. It is possible todeclare methods of any type—int, boolean, char and so on.
After the type declaration, we have the name of the method, in this case addTax—and this time the brackets aren’t empty. You can see that within these bracketswe are declaring two variables, both of type double. The variables declared in thisway are known as the formal parameters of the method. Formal parameters arevariables that are created exclusively to hold values sent in from the calling method.They are going to hold, respectively, the values of the price and the tax that aregoing to be sent in from the calling method (you will see how this is done in amoment). Of course, these variables could be given any name we choose, but wehave called them priceIn and taxIn respectively. We will use this conventionof adding the suffix In to variable names in the formal parameter list throughoutthis book.
Now we can turn our attention to the body of the method, which as you can see,in this case, consists of a single line:
The word return in a method serves two very important functions. First it endsthe method—as soon as the program encounters this word, the method terminates,and control of the program jumps back to the calling method. The second functionis that it sends back a value. In this case it sends back the result of the calculation:
priceIn * (1 + taxIn/100)
You should note that if the method is of type void, then there is no need toinclude a return instruction—the method simply terminates once the lastinstruction is executed.
static double addTax(double priceIn, double taxIn){
return priceIn * (1 + taxIn/100);}
return priceIn * (1 + taxIn/100);
100 5 Methods

Now we can discuss how we actually call this method and use its return value.The whole program appears below:
The line in main that calls the method is this one:
First, we will consider the items in brackets after the method name. As youmight have expected, there are two items in the brackets—these are the actualvalues that we are sending into our method. They are therefore referred to as theactual parameters of the method. Their values are copied onto the formal pa-rameters in the called method. This process, which is referred to as passing pa-rameters, is illustrated in Fig. 5.1.
FindCost4public class FindCost4{
public static void main(String[] args ){
Scanner keyboard = new Scanner(System.in);double price, tax;
System.out.println("*** Product Price Check ***");
System.out.print("Enter initial price: ");price = keyboard.nextDouble();System.out.print("Enter tax rate: ");tax = keyboard.nextDouble();
price = addTax(price, tax); // call the addTax methodSystem.out.println("Cost after tax = " + price);
}
static double addTax(double priceIn, double taxIn){
return priceIn * (1 + taxIn/100);}
}
price = addTax(price, tax);
Fig. 5.1 Passing parameters from one method to another method
5.4 Method Input and Output 101

You might have been wondering how the program knows which values in theactual parameter list are copied onto which variables in the formal parameter list.The answer to this is that it is the order that is important—you can see this fromFig. 5.1—the value of price is copied onto priceIn; the value of tax is copiedonto taxIn. Although the variable names have been conveniently chosen, thenames themselves have nothing to do with which value is copied to which variable.
You might also be wondering what would happen if you tried to call the methodwith the wrong number of variables. For example:
The answer is that you would get a compiler error, because there is no methodcalled addTax that requires just one single variable to be passed into it.
You can see then that the actual parameter list must match the formal parameterlist exactly. Now this is important not just in terms of the number of variables, butalso in terms of the types. For example, using actual values this time instead ofvariable names, the following method call would be perfectly acceptable:
However, the one below would cause a compiler error:
The reason, of course, is that addTax requires two doubles, not a doubleand a char.
We can now move on to looking at how we make use of the return value of amethod.
The addTax method returns the result that we are interested in, namely the newprice of the item. What we need to do is to assign this value to the variable price.As you have already seen we have done this in the same line in which we calledthe method:
price = addTax(price);
price = addTax(187.65, 17.5);
price = addTax(187.65, 'c');
price = addTax(price, tax);
102 5 Methods

A method that returns a value can in fact be used just as if it were a variable ofthe same type as the return value! Here we have used it in an assignmentstatement—but in fact we could have simply dropped it into the printlnstatement, just as we would have done with a simple variable of type double:
5.5 More Examples of Methods
Just to make sure you have got the idea, let’s define a few more methods. To startwith, we will create a very simple method, one that calculates the square of anumber. When we are going to write a method, there are four things to consider:
• the name that we will give to the method;• the inputs to the method (the formal parameters);• the output of the method (the return value);• the body of the method (the instructions that do the job required).
In the case of the method in question, the name square would seem like asensible choice. We will define the method so that it will calculate the square of anynumber, so it should accept a single value of type double. Similarly, it will returna double.
The instructions will be very simple—just return the result of multiplying thenumber by itself. So here is our method:
Remember that we can choose any names we want for the input parameters; herewe have stuck with our convention of using the suffix In for formal parameters.
To use this method in another part of the program, such as the main method, isnow very easy. Say, for example, we had declared and initialized two variables asfollows:
System.out.println("Cost after tax = " + addTax(price, tax));
static double square(double numberIn){
return numberIn * numberIn;}
double a = 2.5;double b = 9.0;
5.4 Method Input and Output 103

Let’s say we wanted to assign the square of a to a double variable x and thesquare of b to a double variable y. We could do this as follows:
After these instructions, x would hold the value 6.25 and y would hold thevalue 81.0.
For our next illustration we will choose a slightly more complicated example.We will define a method that we will call max; it will accept two integer values, andwill return the bigger value of the two (of course, if they are equal, it can return thevalue of either one). It should be pretty clear that we will require two integerparameters, and that the method will return an integer. As far as the instructions areconcerned, it should be clear that an if…else statement should do the job—if thefirst number is greater than the second, return the first number, if not return thesecond. Here is our method:
You should note that in this example we have two return statements, eachpotentially returning a different value—the value that is actually returned is decidedat run-time by the values of the variables firstIn and secondIn. Remember, assoon as a return statement is reached the method terminates.
Working out how to write the instructions for this method was not too hard a job.In fact it was so simple, we didn’t bother to design it with pseudocode. However,there will be many occasions in the future when the method has to carry out a muchmore complex task, and you will need to think through how to perform this task.A set of instructions for performing a job is known as an algorithm—commonexamples of algorithms in everyday life are recipes and DIY (Do-It-Yourself)instructions. Much of a programmer’s time is spent devising algorithms for par-ticular tasks, and, as you saw in Chap. 2, we can use pseudocode to help usdesign our algorithms. We will look at further examples as we progress throughthis chapter.
Let’s develop one more method. There are many instances in our programminglives where we might need to test whether a number is even or odd. Let’s provide amethod that does this job for us. We will call our method isEven, and it will
x = square(a);y = square(b);
static int max(int firstIn, int secondIn){
if(firstIn > secondIn) {
return firstIn; }
else {
return secondIn; } }
104 5 Methods

report on whether or not a particular number is an even number. The test will beperformed on integers, so we will need a single parameter of type int. The returnvalue is interesting—the method will tell us whether or not a number is even, so itwill need to return a value of true if the number is even or false if it is not.So our return type is going to be boolean. The instructions are quite simple todevise—again, an if…else statement should certainly do the job. But how canwe test whether a number is even or not? Well, an even number will give aremainder of zero when divided by 2. An odd number will not. So we can use themodulus operator here. Here is our method:
Actually there is a slightly neater way we could have written this method. Theexpression:
numberIn % 2 == 0
will evaluate to either true or false—and we could therefore simply havereturned the value of this expression and written our method like this:
It is interesting to note that the calling method couldn’t care less how the calledmethod is coded—all it needs is for it to do the calculation correctly and return thedesired value. This is something that will become very significant when we look atmethods that call methods of other classes later in this semester.
A method that returns a boolean value can be referred to as a booleanmethod. In Chap. 3 you came across boolean expressions (expressions thatevaluate to true or false) such as:
temperature > 10
or
y == 180
static boolean isEven(int numberIn){
if(numberIn % 2 == 0) {
return true; }
else {
return false; } }
static boolean isEven(int numberIn){
return (numberIn % 2 == 0);}
5.5 More Examples of Methods 105

Because boolean methods also evaluate to true or false (that is, theyreturn a value of true or false) they can—as with boolean expressions—beused as the test in a selection or loop.
For example, assuming that a variable called number had been declared as anint, we could write something like:
or
To test for a false value we simply negate the expression with the notoperator (!):
Before we leave this section, there is one thing we should make absolutelyclear—a method cannot change the original value of a variable that was passed to itas a parameter. The reason for this is that all that is being passed to the method is acopy of whatever this variable contains. In other words, just a value. The methoddoes not have access to the original variable. Whatever value is passed is copied tothe parameter in the called method. We will illustrate this with a very simpleprogram indeed:
if(isEven(number)){
// code here}
while(isEven(number)){
// code here}
if(!isEven(number)){
// code here}
ParameterDemo
public class ParameterDemo{
public static void main(String[] args){
int x = 10; demoMethod(x);System.out.println(x);
}
static void demoMethod(int xIn){
xIn = 25;System.out.println(xIn);
} }
106 5 Methods
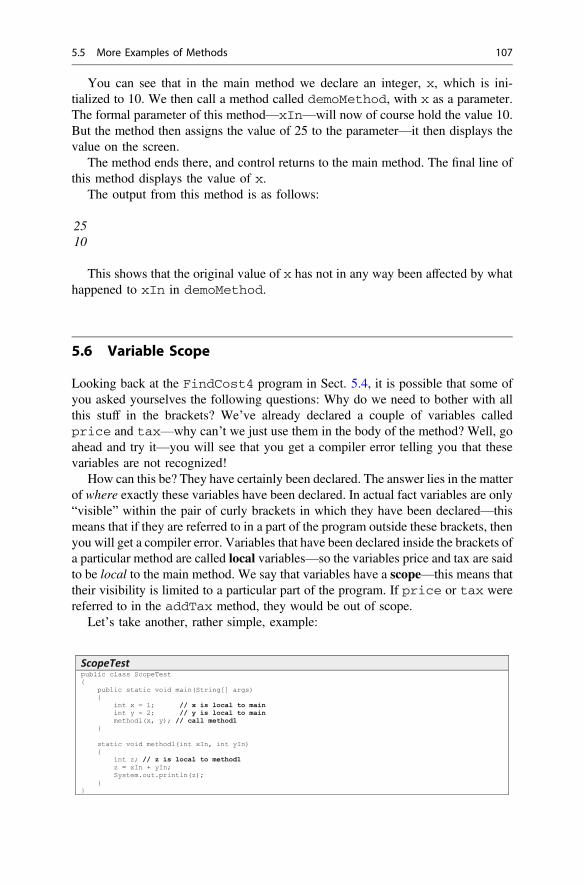
You can see that in the main method we declare an integer, x, which is ini-tialized to 10. We then call a method called demoMethod, with x as a parameter.The formal parameter of this method—xIn—will now of course hold the value 10.But the method then assigns the value of 25 to the parameter—it then displays thevalue on the screen.
The method ends there, and control returns to the main method. The final line ofthis method displays the value of x.
The output from this method is as follows:
2510
This shows that the original value of x has not in any way been affected by whathappened to xIn in demoMethod.
5.6 Variable Scope
Looking back at the FindCost4 program in Sect. 5.4, it is possible that some ofyou asked yourselves the following questions: Why do we need to bother with allthis stuff in the brackets? We’ve already declared a couple of variables calledprice and tax—why can’t we just use them in the body of the method? Well, goahead and try it—you will see that you get a compiler error telling you that thesevariables are not recognized!
How can this be? They have certainly been declared. The answer lies in the matterof where exactly these variables have been declared. In actual fact variables are only“visible” within the pair of curly brackets in which they have been declared—thismeans that if they are referred to in a part of the program outside these brackets, thenyou will get a compiler error. Variables that have been declared inside the brackets ofa particular method are called local variables—so the variables price and tax are saidto be local to the main method. We say that variables have a scope—this means thattheir visibility is limited to a particular part of the program. If price or tax werereferred to in the addTax method, they would be out of scope.
Let’s take another, rather simple, example:
ScopeTestpublic class ScopeTest{
public static void main(String[] args){
int x = 1; // x is local to mainint y = 2; // y is local to mainmethod1(x, y); // call method1
}
static void method1(int xIn, int yIn){
int z; // z is local to method1z = xIn + yIn;System.out.println(z);
} }
5.5 More Examples of Methods 107

In this program the variables x and y are local to main. The variable z is localto method1. The variables xIn and yIn are the formal parameters of method1.This program will compile and run without a problem, because none of the vari-ables is referred to in the wrong place.
Imagine, however, that we were to rewrite this program as we have done below:
As the comments indicate, the lines in bold will give rise to compiler errors, asthe variables referred to are out of scope.
It is interesting to note that, since a method is completely unaware of what hasbeen declared inside any other method, you could declare variables with the samename inside different methods. The compiler would regard each variable as beingcompletely different from any other variable in another method which simply hadthe same name. So, for example, if we had declared a local variable called x inmethod1, this would be perfectly ok—it would exist completely independentlyfrom the variable named x in main.
To understand why this is so, it helps to know a little about what goes on whenthe program is running. A part of the computer’s memory called the stack isreserved for use by running programs. When a method is called, some space on thestack is used to store the values for that method’s formal parameters and its localvariables. That is why, whatever names we give them, they are local to theirparticular method. Once the method terminates, this part of the stack is no longeraccessible, and the variables effectively no longer exist. And this might help you tounderstand even more clearly why the value of a variable passed as a parameter to amethod cannot be changed by that method.
Before we move on, it will be helpful if we list the kinds of variables that amethod can access:
• a method can access variables that have been declared as formal parameters;• a method can access variables that have been declared locally—in other words
that have been declared within the curly brackets of the method;
ScopeTest2
// this program will give rise to two compiler errors
public class ScopeTest2{
public static void main(String[] args) {
int x = 1; // x is local to mainint y = 2; // y is local to mainmethod1(x, y); // call method1System.out.println(z); // this line will cause a compiler error as z is local to method1
}
static void method1(int xIn, int yIn) {
int z; // z is local to method1z = x + y; // this line will cause a compiler error as x and y are local to mainSystem.out.println(z);
} }
108 5 Methods

• as you will learn in Chap. 8, a method has access to variables declared asattributes of the class (don’t worry—you will understand what this means ingood time!).
A method cannot access any other variables.
5.7 Method Overloading
You have already encountered the term overloading in previous chapters, in con-nection with operators. You found out, for example, that the division operator (/)can be used for two distinct purposes—for division of integers, and for division ofreal numbers. The + operator is not only used for addition, but also for concate-nating two strings. So the same operator can behave differently depending on whatit is operating on—operators can be overloaded.
Methods too can be overloaded. To illustrate, let’s return to the max method ofSect. 5.5. Here it is again:
As you will recall, this method accepts two integers and returns the greater of thetwo. But what if we wanted to find the greatest of three integers? We would have towrite a new method, which we have shown below. We are just showing you theheader here—we will think about the actual instructions in a moment:
You can see that we have given this method the same name as before—but thistime it has three parameters instead of two. And the really clever thing is that wecan declare and call both methods within the same class. Both methods have thesame name but the parameter list is different—and each one will behave differently.In our example, the original method compares two integers and returns the greaterof the two; the second one, once we have worked out the algorithm for doing this,
static int max(int firstIn, int secondIn){
if(firstIn > secondIn) {
return firstIn; }
else {
return secondIn; } }
static int max(int firstIn, int secondIn, int thirdIn){
// code goes here}
5.6 Variable Scope 109

will examine three integers and return the value of the one that is the greatest of thethree. When two or more methods, distinguished by their parameter lists, have thesame name but perform different functions we say that they are overloaded.Method overloading is actually one example of what is known as polymorphism.Polymorphism literally means having many forms, and it is an important feature ofobject-oriented programming languages. It refers, in general, to the phenomenon ofhaving methods and operators with the same name performing different functions.You will come across other examples of polymorphism in later chapters.
Now, you might be asking yourself how, when we call an overloaded method,the program knows which one we mean. The answer of course depends on theactual parameters that accompany the method call—they are matched with theformal parameter list, and the appropriate method will be called. So, if we made thiscall somewhere in a program:
then the first version of max would be called—the version that returns the bigger oftwo integers. This, of course, is because the method is being called with two integerparameters, matching this header:
However, if this call, with three integer parameters, were made:
then it would be the second version that was called:
int x = max(3, 5);
static int max(int firstIn, int secondIn)
int x = max(3, 5, 10);
static int max(int firstIn, int secondIn, int thirdIn)
One very important thing we have still to do is to devise the algorithm for thissecond version. Can you think of a way to do it? Have go at it before reading on.
One way to do it is to declare an integer variable, which we could call result,and start off by assigning to it the value of the first number. Then we can considerthe next number. Is it greater than the current value of result? If it is, then we shouldassign this value to result instead of the original value. Now we can consider thethird number—if this is larger than the current value of result, we assign its value toresult. You should be able to see that result will end up having the value of thegreatest of the three integers. It is helpful to express this as pseudocode:
110 5 Methods

Here is the code:
The following program illustrates how both versions of our max method can beused in the same program:
SET result TO first numberIF second number > resultBEGIN
SET result TO second numberENDIF third number > resultBEGIN
SET result TO third numberENDRETURN result
static int max(int firstIn, int secondIn, int thirdIn){
int result;result = firstIn;if(secondIn > result)
{ result = secondIn;
} if(thirdIn > result)
{ result = thirdIn;
} return result;
OverloadingDemopublic class OverloadingDemo{
public static void main(String[] args) {
int maxOfTwo, maxOfThree;maxOfTwo = max(2, 10); // call the first version of maxmaxOfThree = max(-5, 5, 3); // call the second version of maxSystem.out.println(maxOfTwo);System.out.println(maxOfThree);
}
// this version of max accepts two integers and returns the greater of the two static int max(int firstIn, int secondIn)
{ if(firstIn > secondIn)
{ return firstIn;
} else
{ return secondIn;
} }
// this version of max accepts three integers and returns the greatest of the three static int max(int firstIn, int secondIn, int thirdIn)
{ int result;result = firstIn;if(secondIn > result)
{ result = secondIn;
} if(thirdIn > result)
{ result = thirdIn;
} return result;
} }
5.7 Method Overloading 111

As the first call to max in the main method has two parameters, it will callthe first version of max; the second call, with its three parameters, will callthe second version. Not surprisingly then the output from this program lookslike this:
105
It might have occurred to you that we could have implemented the secondversion of max (that is the one that takes three parameters) in a different way. Wecould have started off by finding the maximum of the first two integers (using thefirst version of max), and then doing the same thing again, comparing the result ofthis with the third number.
This version is an example of how we can call a method not from the mainmethod, but from another method.
Some of you might be thinking that if we wanted similar methods to deal withlists of four, five, six, or even more numbers, it would be an awful lot of work towrite a separate method for each one—and indeed it would! But don’t worry—inthe next chapter you will find that there is a much easier way to deal with situationslike this.
5.8 Using Methods in Menu-Driven Programs
In Chap. 4 we developed a program that presented the user with a menu of choices;we pointed out that this was a very common interface for programs before the daysof graphics. Until we start working with graphics later in the semester, we will usethis approach with some of our more complex programs.
Here is a reminder of that program:
static int max(int firstIn, int secondIn, int thirdIn){
int step1, result;step1 = max(firstIn, secondIn); // call the first version of maxresult = max(step1, thirdIn); // call the first version of max againreturn result;
}
112 5 Methods

In this program, each case statement consisted of a single instruction(apart from the break), which simply displayed one line of text. Imagine, though,that we were to develop a more complex program in which each menu choiceinvolved a lot of processing. The switch statement would start to get very messy,and the program could easily become very unwieldy. In this situation, confiningeach menu option to a particular method will make our program far moremanageable.
The next program, CircleCalulation is an example of such a program.The program allows a user enter the radius of a circle and then enables the area andcircumference of the circle to be calculated and displayed. Four menu options areoffered. The first allows the user to enter the radius. The second displays the area ofthe circle, and the third the circumference. The final option allows the user to quitthe program.
Study it carefully, and then we will point out some of the interesting features.
TimetableWithLoop - a reminderimport java.util.Scanner;
public class TimetableWithLoop{
public static void main(String[] args){
char group, response;Scanner keyboard = new Scanner(System.in);System.out.println("***Lab Times***");do // put code in loop{
// offer menu of options System.out.println(); // create a blank line System.out.println("[1] TIME FOR GROUP A");System.out.println("[2] TIME FOR GROUP B");System.out.println("[3] TIME FOR GROUP C");System.out.println("[4] QUIT PROGRAM");System.out.print("enter choice [1,2,3,4]: ");response = keyboard.next().charAt(0); // get responseSystem.out.println(); // create a blank lineswitch(response) // process response{
case '1': System.out.println("10.00 a.m ");break;
case '2': System.out.println("1.00 p.m ");break;
case '3': System.out.println("11.00 a.m ");break;
case '4': System.out.println("Goodbye ");break;
default: System.out.println("Options 1-4 only!");}
} while (response != '4'); // test for Quit option}
}
5.8 Using Methods in Menu-Driven Programs 113

CircleCalcula onimport java.util.Scanner;
/* This program demonstrates how methods can be used in a menu-driven program */
public class CircleCalculation{public static void main(String[] args){
Scanner keyboard = new Scanner(System.in);
/* The variable below is local to the main method; if the value is needed by another method,it must be passed in as a parameter */
double radius = -999; // initialize with a dummy value to show that nothing has been enteredchar choice; // to store menu choicedo{
System.out.println();System.out.println("*** CIRCLE CALCULATIONS ***");System.out.println();System.out.println("1. Enter the radius of the circle");System.out.println("2. Display the area of the circle");System.out.println("3. Display the circumference of the circle");System.out.println("4. Quit");System.out.println();System.out.println("Enter a number from 1 - 4");System.out.println();choice = keyboard.next().charAt(0);switch(choice){
case '1' : radius = option1(); // call method option1break;
case '2' : option2(radius); // call method option2break;
case '3' : option3(radius); // call method option3break;
case '4' : break;default : System.out.println("Enter only numbers from 1 - 4");
System.out.println();}
} while(choice != '4');}
// option1 gets the user to enter the radius of the circlestatic double option1(){
double myRadius; // local variableScanner keyboard = new Scanner(System.in);System.out.print("Enter the radius of the circle: ");myRadius = keyboard.nextDouble();return myRadius;
}
// option2 calculates and displays the area of the circlestatic void option2(double radiusIn){
if(radiusIn == -999){
System.out.println("Radius has not been entered");}else{
double area; // local variablearea = 3.1416 * radiusIn * radiusIn; // calculate the area System.out.println("The area of the circle is: " + area);
}}
// option3 calculates and displays the circumference of the circlestatic void option3(double radiusIn){
if(radiusIn == -999){
System.out.println("Radius has not been entered");}else{
double circumference; // local variablecircumference = 2 * 3.1416 * radiusIn; // calculate the circumference System.out.println("The circumference of the circle is: " + circumference);
}}
}
114 5 Methods

There are no new programming techniques in this program; it is the design that isinteresting. The comments are self-explanatory; so we draw your attention only to afew important points:
• The radius is initialized with a “dummy” value of −999. This allows us to checkif the radius has been entered before attempting to perform a calculation.
• Choosing menu option 1 causes the method option1 to be called—the valueof the radius entered by the user is returned.
• Choosing menu option 2 causes the method option2 to be called. The radiusof the circle is sent in as a parameter. After using the dummy value to check thata value for the radius has been entered, the area is then calculated and displayed.
• Choosing menu option 3 causes the method option3 to be called. This issimilar to option2, but for the circumference instead of the area.
• Choosing option 4 causes the program to terminate—this happens because thebody of the while loop executes only while choice is not equal to 4. If it isequal to 4, the loop is not executed and the program ends. The associated casestatement consists simply of the instruction break, thus causing the program tojump out of the switch statement.
• You can see that we have had to declare a new Scanner object in each methodwhere it is needed—now that you understand the notion of variable scope, youshould understand why we have had to do this.
5.9 Self-test Questions
1. Explain the meaning of the term method.
2. What would be the output of the following program?
public class SomeApp{
public static void main(String[] args){ method1();
System.out.println(“England”); method2();
System.out.println(“Ireland”);}
static void method1(){
System.out.println(“Wales”);}
static void method2(){
System.out.println(“Scotland”); method1();}
}
5.8 Using Methods in Menu-Driven Programs 115

3. Consider the following program:
(a) By referring to this program:
(i) Distinguish between the terms actual parameters and formalparameters.
(ii) Explain what is meant by a method’s return type.
(iii) Explain the meaning of the terms polymorphism and methodoverloading.
(b) What would be displayed on the screen when this program was run?
(c) Explain, giving reasons, the effect of adding either of the following lines intothe main method:
(i) System.out.println(myMethod(3));
(ii) System.out.println(myMethod(3, 5.7, 10));
4. What would be displayed on the screen as a result of running the followingprogram?
public class MethodsQ3 {
public static void main(String[] args) {
System.out.println(myMethod(3, 5));System.out.println(myMethod(3, 5, 10));
}
static int myMethod(int firstIn, int secondIn, int thirdIn) {
return firstIn + secondIn + thirdIn; }
static int myMethod(int firstIn, int secondIn) {
return firstIn - secondIn; } }
public class MethodsQ4 {
public static void main(String[] args) {
int x = 3;int y = 4;System.out.println(myMethod(x, y));System.out.println(y);
}
static int myMethod(int firstIn, int secondIn) {
int x = 10;int y; y = x + firstIn + secondIn;return y;
} }
116 5 Methods

5. What would be displayed on the screen as a result of running the followingprogram?
public class MethodsQ5 { public static void main(String[] args)
{ int x = 2;int y = 7;System.out.println(myMethod(x, y));System.out.println(y);
}
static int myMethod(int a, int x) {
int y = 20;return y - a - x;
} }
5.10 Programming Exercises
1. Implement the programs from the self-test questions in order to verify youranswers.
2. For one of the programming exercises in Chap. 2, you wrote a program thatconverted pounds to kilograms. Rewrite this program, so that the conversiontakes place in a separate method which is called by the main method.
3. In the exercises at the end of Chap. 2 you were asked to write a program thatcalculated the area and perimeter of a rectangle. Re-write this program so thatnow the instructions for calculating the area and perimeter of the rectangle arecontained in two separate methods.
4. (a) Design and implement a program that converts a sum of money to a differentcurrency. The amount of money to be converted, and the exchange rate, areentered by the user. The program should have separate methods for:
• obtaining the sum of money from the user;
• obtaining the exchange rate from the user;
• making the conversion;
• displaying the result.
(b) Adapt the above program so that after the result is displayed the user is askedif he or she wishes to convert another sum of money. The program continuesin this way until the user chooses to quit.
5. (a) Write a menu-driven program that provides three options:
• the first option allows the user to enter a temperature in Celsius and displaysthe corresponding Fahrenheit temperature;
5.9 Self-test Questions 117
• the second option allows the user to enter a temperature in Fahrenheit anddisplays the corresponding Celsius temperature;
• the third option allows the user to quit.The formulae that you need are as follows, where C represents a Celsius tem-perature and F a Fahrenheit temperature:
F ¼ 9C5
þ 32
C ¼ 5ðF � 32Þ9
(b) Adapt the above program so that the user is not allowed to enter a tem-perature below absolute zero; this is −273.15C, or −459.67F.
118 5 Methods

6Arrays
Outcomes:
By the end of this chapter you should be able to:
• create arrays;• use for loops to process arrays;• use an enhanced for loop to process an array;• use arrays as method inputs and outputs;• use arrays to send a variable number of arguments to a method;• develop routines for accessing and manipulating arrays;• distinguish between one-dimensional arrays and multi-dimensional arrays;• create and process two-dimensional arrays;• create ragged arrays.
6.1 Introduction
In previous chapters we have shown you how to create variables and store data inthem. In each case the variables created could be used to hold a single item of data.How, though, would you deal with a situation in which you had to create andhandle a very large number of data items?
An obvious approach would be just to declare as many variables as you need.Declaring a large number of variables is a nuisance but simple enough. Forexample, let’s consider a very simple application that records seven temperaturereadings (one for each day of the week):
© Springer Nature Switzerland AG 2019Q. Charatan and A. Kans, Java in Two Semesters, Texts in Computer Science,https://doi.org/10.1007/978-3-319-99420-8_6
119

public class TemperatureReadings{
public static void main(String[] args){
// declare 7 variables to hold readingsdouble temperature1, temperature2, temperature3, temperature4, temperature5,
temperature6, temperature7;// more code will go here
}}
Here we have declared seven variables each of type double (as temperatureswill be recorded as real numbers). So far so good. Now to write some code thatallows the user to enter values for these temperatures. Getting one temperature iseasy (assuming we have created a Scanner object, keyboard), as shown below:
System.out.println("max temperature for day 1 ?"); temperature1 = keyboard.nextDouble();
But how would you write the code to get the second temperature, the thirdtemperature and all the remaining temperatures? Well, you could repeat the abovepair of lines for each temperature entered, but surely you’ve got better things to dowith your time!
Essentially you want to repeat the same pair of lines seven times. You alreadyknow that a for loop is useful when repeating lines of code a fixed number oftimes. Maybe you could try using a for loop here?
for (int i=1; i<=7; i++){
// what goes here?}
This looks like a neat solution, but the problem is that there is no obviousinstruction we could write in the for loop that will allow a value to be entered intoa different variable each time the loop repeats. As things stand there is no wayaround this, as each variable has a distinct name.
Ideally we would like each variable to be given the same name (tempera-ture, say) so that we could use a loop here, but we would like some way of beingable to distinguish between each successive variable. In fact, this is exactly what anarray allows us to do.
6.2 Creating an Array
An array is a special data type in Java that can be thought of as a container to storea collection of items. These items are sometimes referred to as the elements of thearray. All the elements stored in a particular array must be of the same type but there
120 6 Arrays

is no restriction on which type this is. So, for example, an array can be used to holda collection of int values or a collection of char values, but it cannot be used tohold a mixture of int and char values.
Let’s look at how to use arrays in your programs. First you need to know how tocreate an array. Array creation is a two-stage process:
1. declare an array variable;2. allocate memory to store the array elements.
An array variable is declared in much the same way as a simple variable exceptthat a pair of square brackets is added after the type. For example, if an array was tohold a collection of integer variables it could be declared as follows:
int[] someArray;
Here a name has been given to the array in the same way you would name anyvariable. The name we have chosen is someArray. If the square brackets weremissing in the above declaration this would just be a simple variable capable ofholding a single integer value only. But the square brackets indicate this variable isan array allowing many integer values to be stored.
So, to declare an array temperature containing double values, you wouldwrite the following:
double[] temperature;
At the moment this simply defines temperature to be a variable that can belinked to a collection of double values. The temperature variable itself is saidto hold a reference to the array elements. A reference is a variable that holds alocation in the computer’s memory (known as a memory address) where data isstored, rather than the data itself. This illustrated in Fig. 6.1.
Computer Memory
double[] temperature;
Java instructions
temperature
Fig. 6.1 The effect on computer memory of declaring an array reference
6.2 Creating an Array 121

At the moment the memory address stored in the temperature reference isnot meaningful as the memory that will eventually hold the array elements has notbeen allocated yet. This is stage two.
What information do you think would be required in order to reserve enoughspace in the computer’s memory for all the array elements?
Well, it would be necessary to state the size of the array, that is the maximumnumber of elements required by the array. Also, since each data type requires adifferent amount of memory space, it is also necessary to state the type of eachindividual array element (this will be the same type used in stage one of the arraydeclaration). The array type and size are then put together with a special newoperator. For example, if we required an array of 10 integers the following would beappropriate.
The new operator creates the space in memory for an array of the given size andelement type.1
someArray = new int[10];
We will come back to look at this new operator when looking at classes andobjects in the next chapter. Once the size of the array is set it cannot be changed, soalways make sure you create an array that is big enough for your purpose.Returning to the temperature example above, if you wanted the array to hold seventemperatures you would allocate memory as follows:
temperature = new double[7];
Let’s see what effect the new operator has on computer memory by looking atFig. 6.2.
As can be seen from Fig. 6.2, the array creation has created seven continuouslocations in memory. Each location is big enough to store a value of type double.The temperature variable is linked to these seven elements by containing theaddress of the very first element. In effect, the array reference, temperature, islinked to seven new variables. Each of these variables will automatically have someinitial value placed in them. If the variables are of some number type (such as intor double) the value of each will be initially set to zero; if the variables are of typechar their values will be set initially to a special Unicode value that represents anempty character; if the variables are of boolean type they will each be set initiallyto false.
1Of course this size should not be a negative value. A negative value will cause an error in yourprogram. We will discuss these kinds of errors further in Chap. 14.
122 6 Arrays
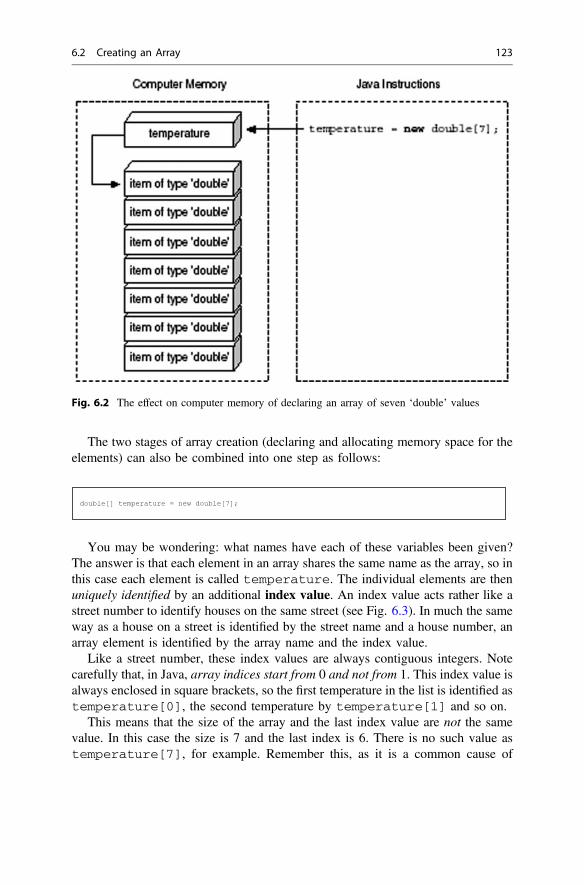
The two stages of array creation (declaring and allocating memory space for theelements) can also be combined into one step as follows:
double[] temperature = new double[7];
You may be wondering: what names have each of these variables been given?The answer is that each element in an array shares the same name as the array, so inthis case each element is called temperature. The individual elements are thenuniquely identified by an additional index value. An index value acts rather like astreet number to identify houses on the same street (see Fig. 6.3). In much the sameway as a house on a street is identified by the street name and a house number, anarray element is identified by the array name and the index value.
Like a street number, these index values are always contiguous integers. Notecarefully that, in Java, array indices start from 0 and not from 1. This index value isalways enclosed in square brackets, so the first temperature in the list is identified astemperature[0], the second temperature by temperature[1] and so on.
This means that the size of the array and the last index value are not the samevalue. In this case the size is 7 and the last index is 6. There is no such value astemperature[7], for example. Remember this, as it is a common cause of
Fig. 6.2 The effect on computer memory of declaring an array of seven ‘double’ values
6.2 Creating an Array 123

errors in programs! If you try to access an invalid element such as temperature[7], the following program error will be generated by the system:
java.lang.ArrayIndexOutOfBoundsException
This type of error is called an exception. You will find out more about exceptionsin the second semester but you should be aware that, very often, exceptions willresult in program termination.
Usually, when an array is created, values will be added into it as the programruns. If, however, all the values of the array elements are known beforehand, thenan array can be created without the use of the new operator by initializing the arrayas follows:
double[] temperature = {9, 11.5, 11, 8.5, 7, 9, 8.5} ;
The initial values are placed in braces and separated by commas. The compilerdetermines the length of the array by the number of initial values (in this case 7).Each value is placed into the array in order, so temperature[0] is set to 9,temperature[1] to 11.5 and so on. This is the only instance in which all theelements of an array can be assigned explicitly by listing out the elements in a singleassignment statement.
Once an array has been created, elements must be accessed individually.
6.3 Accessing Array Elements
Once an array has been created, its elements can be used like any other variable ofthe given type in Java. If you look back at the temperature example, initializing thevalues of each temperature when the array is created is actually quite unrealistic. Itis much more likely that temperatures would be entered into the program as it runs.Let’s look at how to achieve this.
Fig. 6.3 Elements in an array are identified in much the same way as houses on a street
124 6 Arrays

Whether an array is initialized or not, values can be placed into the individualarray elements. We know that each element in this array is a variable of typedouble. As with any variable of a primitive type, the assignment operator can beused to enter a value.
The only thing you have to remember when using the assignment operator withan array element is to specify which element to place the value in. For example, toallow the user of the program to enter the value of the first temperature, thefollowing assignment could be used (again, assuming the existence of a Scannerobject, keyboard):
temperature[0] = keyboard.nextDouble();
Note again that, since array indices begin at 0, the first temperature is not atindex 1 but index 0.
Array elements could also be printed on the screen. For example, the followingcommand prints out the value of the sixth array element:
System.out.println(temperature[5]); // index 5 is the sixth element!
Note that an array index (such as 5) is just used to locate a position in the array;it is not the item at that position.
For example, assume that the user enters a value of 25.5 for the first temperaturein the array; the following statement:
System.out.println("temperature for day 1 is " + temperature[0]);
would then print out the message:
temperature for day 1 is 25.5
Statements like the println command above might seem a bit confusing atfirst. The message refers to “temperature for day 1” but the temperature that isdisplayed is temperature[0]. Remember though that the temperature at indexposition 0 is the first temperature! After a while you will get used to this indexingsystem.
As you can see from the examples above, you can use array elements in exactlythe same way you can use any other kind of variable of the given type. Here are afew more examples:
6.3 Accessing Array Elements 125

temperature[4] = temperature[4] * 2;
This assignment doubles the value of the fifth temperature. The following ifstatement checks if the temperature for the third day was a hot temperature:
if (temperature[2] >= 18){
System.out.println("it was hot today");}
So far so good, but if you are just going to use array elements in the way youused regular variables, why bother with arrays at all?
The reason is that the indexing system of arrays is in fact a very powerfulprogramming tool. The index value does not need to be a literal number such as 5 or2 as in the examples we have just shown you; it can be any expression thatevaluates to an integer.
More often than not an integer variable is used, in place of a fixed index value,to access an array element. For example, if we assume that i is some integervariable, then the following is a perfectly legal way of accessing an array element:
System.out.println(temperature[i]); // index is a variable
Here the array index is not a literal number (like 2 or 5) but the variable i. Thevalue of i will determine the array index. If the value of i is 4 then this will displaytemperature[4], if the value of i is 6 then this will display temperature[6], and so on. One useful application of this is to place the array instructionswithin a loop (usually a for loop), with the loop counter being used as the arrayindex. For example, returning to the original problem of entering all seven tem-perature readings, the following loop could now be used:
for(int i = 0; i<7; i++) // note, loop counter runs from 0 to 6{
System.out.println("enter max temperature for day "+(i+1));temperature[i] = keyboard.nextDouble(); // use loop counter
}
126 6 Arrays

Note carefully the following points from this loop:
• Unlike many of the previous examples of for loop counters that started at 1,this counter starts at 0. Since the counter is meant to track the array indices, 0 isthe appropriate number to start from.
• The counter goes up to, but does not include, the number of items in the array.In this case this means the counter goes up to 6 and not 7. Again this is becausethe array index for an array of size 7 stops at 6.
• The println command uses the loop counter to display the number of thegiven day being entered. The loop counter starts from 0, however. We would notthink of the first day of the week as being day 0! In order for the message to bemore meaningful for the user, therefore, we have displayed (i + 1) rather than i.
Effectively the following statements are executed by this loop:
System.out.println("enter max temperature for day 1 "); 1st time round looptemperature[0] = keyboard.nextDouble();
System.out.println("enter max temperature for day 2 "); 2nd time round looptemperature[1] = keyboard.nextDouble();
//as above but with indices 2–5 3rd–6th time round loop
System.out.println("enter max temperature for day 7 "); 7th time round loop temperature[6] = keyboard.nextDouble();
You should now be able to see the benefit of an array. This loop can be mademore readable if we make use of a built-in feature of all arrays that returns thelength of an array. It is accessed by using the word length after the name of thearray. The two are joined by a full stop. Here is an example:
System.out.print("number of temperatures = ");System.out.println(temperature.length); // returns the size of the array
which displays the following on to the screen:
number of temperatures = 7
Note that length feature returns the size of the array, not necessarily thenumber of items currently stored in the array (which may be fewer). This attributecan be used in place of a fixed number in the for loop as follows:
6.3 Accessing Array Elements 127

for (int i = 0; i < temperature.length, i++){
// code for loop goes here}
To see this technique being exploited, look at the program below to see thecompleted TemperatureReadings program, which stores and displays themaximum daily temperatures in a week.
TemperatureReadingsimport java.util.Scanner;
public class TemperatureReadings{
public static void main(String[] args){
Scanner keyboard = new Scanner(System.in);// create arraydouble[] temperature;temperature = new double[7];// enter temperaturesfor (int i = 0; i < temperature.length; i++){
System.out.println("enter max temperature for day " + (i+1));temperature[i] = keyboard.nextDouble();
}// display temperaturesSystem.out.println(); // blank lineSystem.out.println("***TEMPERATURES ENTERED***");System.out.println(); // blank linefor (int i = 0; i < temperature.length; i++){
System.out.println("day "+(i+1)+" "+ temperature[i]);}
}}
Note how length was used to control the two for loops. Here is a sampletest run.
enter max temperature for day 1 12.2enter max temperature for day 2 10.5enter max temperature for day 3 13enter max temperature for day 4 15enter max temperature for day 5 13enter max temperature for day 6 12.5enter max temperature for day 7 12
***TEMPERATURES ENTERED***
day 1 12.2day 2 10.5day 3 13.0day 4 15.0day 5 13.0day 6 12.5day 7 12.0
128 6 Arrays
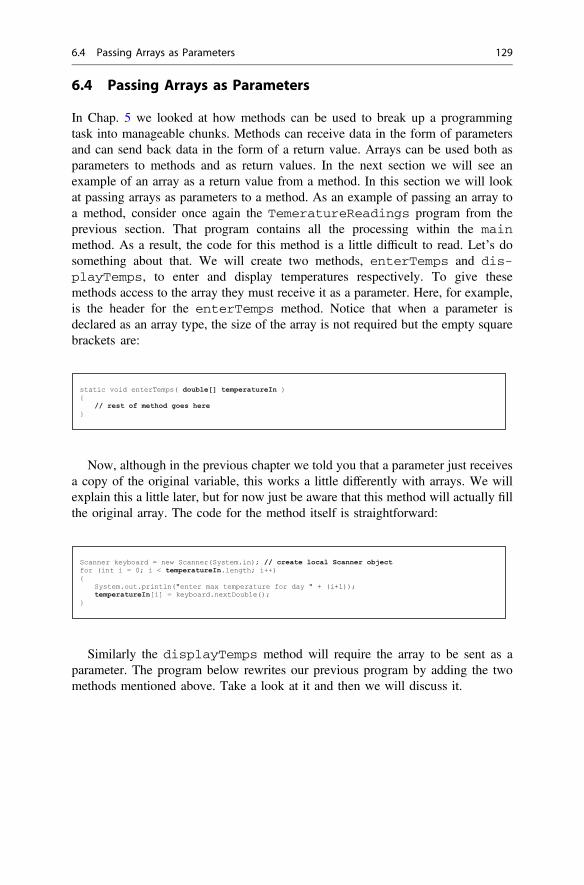
6.4 Passing Arrays as Parameters
In Chap. 5 we looked at how methods can be used to break up a programmingtask into manageable chunks. Methods can receive data in the form of parametersand can send back data in the form of a return value. Arrays can be used both asparameters to methods and as return values. In the next section we will see anexample of an array as a return value from a method. In this section we will lookat passing arrays as parameters to a method. As an example of passing an array toa method, consider once again the TemeratureReadings program from theprevious section. That program contains all the processing within the mainmethod. As a result, the code for this method is a little difficult to read. Let’s dosomething about that. We will create two methods, enterTemps and dis-playTemps, to enter and display temperatures respectively. To give thesemethods access to the array they must receive it as a parameter. Here, for example,is the header for the enterTemps method. Notice that when a parameter isdeclared as an array type, the size of the array is not required but the empty squarebrackets are:
static void enterTemps( double[] temperatureIn ){
// rest of method goes here}
Now, although in the previous chapter we told you that a parameter just receivesa copy of the original variable, this works a little differently with arrays. We willexplain this a little later, but for now just be aware that this method will actually fillthe original array. The code for the method itself is straightforward:
Scanner keyboard = new Scanner(System.in); // create local Scanner objectfor (int i = 0; i < temperatureIn.length; i++){
System.out.println("enter max temperature for day " + (i+1));temperatureIn[i] = keyboard.nextDouble();
}
Similarly the displayTemps method will require the array to be sent as aparameter. The program below rewrites our previous program by adding the twomethods mentioned above. Take a look at it and then we will discuss it.
6.4 Passing Arrays as Parameters 129

TemperatureReadings2import java.util.Scanner; public class TemperatureReadings2{
public static void main(String[] args){
double[] temperature;temperature = new double[7]; enterTemps(temperature); // call methoddisplayTemps(temperature); // call method
}// method to enter temperatures static void enterTemps(double[] temperatureIn){
Scanner keyboard = new Scanner(System.in); for (int i = 0; i < temperatureIn.length; i++){
System.out.println("enter max temperature for day " + (i+1)); temperatureIn[i] = keyboard.nextDouble();
}}
// method to display temperatures static void displayTemps(double[] temperatureIn){
System.out.println();System.out.println("***TEMPERATURES ENTERED***"); System.out.println(); for (int i = 0; i < temperatureIn.length; i++){
System.out.println("day "+(i+1)+" "+ temperatureIn[i]);}
}}
Notice that when sending an array as a parameter, the array name alone isrequired:
public static void main(String[] args){
double[] temperature;temperature = new double[7];enterTemps(temperature); // array name sent in displayTemps(temperature); // array name sent in
}
Now let us return to the point we made earlier. You are aware that, in the case ofa simple variable type such as an int, it is the value of the variable that is copiedwhen it is passed as a parameter. This means that if the value of a parameter isaltered within a method, the original variable is unaffected outside that method. Thisworks differently with arrays.
As we said earlier, the enterTemps method actually fills the original array.How can this be? The answer is that in the case of arrays, the value sent as aparameter is not a copy of each array element but, instead, a copy of the arrayreference. In other words, the location of the array is sent to the receiving methodnot the value of the contents of the array. Now, even though the receiving parameter(temperatureIn) has a different name to the original variable in main(temperature), they are both pointing to the same place in memory so both aremodifying the same array! This is illustrated in Fig. 6.4: Sending the array referenceto a method rather than a copy of the whole array is a very efficient use of thecomputer’s resources, especially when arrays become very large.
130 6 Arrays

6.5 Varargs
Look back at the displayTemps method given in Sect. 6.4 above. By declaringthe parameter to be an array of double values, the displayTemps method isable to work with any number of double values contained in the given arrayparameter:
static void displayTemps(double[] temperatureIn) // can accept an array of any size{
// code to display temperatures goes here
}
In our TemperatureReadings2 program we created an array of size 7, butwe could have created an array of any size—for example an array of size 365 foreach day of the year. This displayTemps method would still correctly receivethis data and display all temperatures, irrespective of the size of an array.
Very closely related to the idea of sending an array to a method is a Java featurecalled varargs, which is short for variable arguments. Just like sending an array,the varargs feature allows us to send a variable number of data items to a method,as long as each item is of the same type, without having to fix the number of dataitems in any way. We can re-write the displayTemps header by using thevarargs syntax as follows:
Java Instructions
main(String[] args){
// create local arraytemperature = new double[7];// call methodenterTemps(temperature);
// more code here}
// method receives array referenceenterTemps(double[] temperatureIn){
// code here using temperatureIn}
Computer Memory
temperature
item of type double
item of type double
item of type double
item of type double
item of type double
item of type double
item of type double
temperatureIn
Fig. 6.4 The effect on computer memory of passing an array as a parameter
6.5 Varargs 131

static void displayTemps(double... temperatureIn) // note the varargs syntax{
// code to display temperatures goes here}
As you can see, instead of using the array syntax of square brackets (double[]) we use the varargs syntax (double…)—as you can see this consists of anellipsis (three consecutive dots). This indicates that a variable number (zero ormore) of double values will be sent to the method. The code inside the methodremains the same as the varargs parameter, temperatureIn in this case, isimplicitly converted into an array within the method.
static void displayTemps(double... temperatureIn) // temperatureIn converted to an array{
// code inside the method remains the sameSystem.out.println();System.out.println("***TEMPERATURES ENTERED***"); System.out.println(); for (int i = 0; i < temperatureIn.length; i++) {
System.out.println("day "+(i+1)+" "+ temperatureIn[i]);}
}
You may be thinking, if varargs is just another notation for sending an array ofvalues, why not just stick to array syntax? Well, while the code for the methodremains the same we are given more flexible ways of calling this method. We cansend an array as before, but we can also send individual values if we wish. TheDisplayTemperaturesWithVarargs program below illustrates this. Take alook at it and then we will discuss it.
DisplayTemperaturesWithVarargspublic class DisplayTemperaturesWithVarargs{
public static void main(String[] args){
double[] temperature = {7.5, 8.2, 7.7, 11.3, 10.75}; // create array with 5 readingsSystem.out.println("Sending Array");displayTemps(temperature); // call method with a single arraySystem.out.println();System.out.println("Sending individual items");displayTemps(7.5, 8.2, 7.7, 11.3, 10.75); // call method with 5 individual readingsdisplayTemps(9.9); // call method with 1 value onlydisplayTemps( ); // call method with no values
}
// method to display temperatures using varargsstatic void displayTemps(double... temperatureIn){
System.out.println();System.out.println("***TEMPERATURES***"); System.out.println("Number of temperatures: "+ temperatureIn.length); // count items// display temperaturesfor (int i = 0; i < temperatureIn.length; i++){
System.out.println(temperatureIn[i]+ " ");}
}}
132 6 Arrays

You can see, in the main method, we have initialised an array with five tem-perature readings:
double[] temperature = {7.5, 8.2, 7.7, 11.3, 10.75};
Our displayTemps method has been written to accept a varargs collection ofvalues:
// method to display temperatures using varargsstatic void displayTemps(double... temperatureIn){
// code to display temperatures goes here}
One way to call this method is with the array of five temperatures we created:
displayTemps(temperature); // call method with a single array
However, we can also send individual values to a varargs parameter rather thanusing an array. To illustrate we have called the displayTemps method with thesame values that were in our array, but sent as individual values rather than storedin an array:
displayTemps(7.5, 8.2, 7.7, 11.3, 10.75); // call method with 5 individual readings
We can send any number of values in this way, including a single value or novalues at all:
displayTemps(9.9); // call method with 1 value onlydisplayTemps( ); // call method with no values
Here is a program run to clarify the results:
Sending Array
***TEMPERATURES***Number of temperatures: 57.58.27.711.310.75
6.5 Varargs 133

Sending individual items
***TEMPERATURES***Number of temperatures: 57.58.27.711.310.75
***TEMPERATURES***Number of temperatures: 19.9
***TEMPERATURES***Number of temperatures: 0
Notice that if you wish to send additional parameters to a method as well as avarargs parameter, the varargs parameter must come last in the parameter list. So,for example, the following method header would not compile:
// this method header will cause a compiler errorstatic void someMethd(int... varargParam, int param2) {
// code to for method goes here}
Here we have two parameters, a vararg collection of integers, varagsParam,and a single integer parameter, param2. This will cause a compiler error as thevarargs parameter should be the last parameter in the list. The correct methodheader is given as follows:
// this method header will not cause a compiler errorstatic void someMethd(int param1, int... varargParam) {
// code to for method goes here}
6.6 Returning an Array from a Method
Amethod can return an array as well as receive arrays as parameters. As an example,let us reconsider the enterTemps method from the TemperatureReading2program of Sect. 6.4 again. At the moment, this method accepts an array as aparameter and fills this array with temperature values. Since this method fills the
134 6 Arrays

original array sent in as a parameter, it does not need to return a value—its returntype is therefore void:
static void enterTemps(double[] temperatureIn){
// code to fill the parameter, 'temperatureIn', goes here}
An alternative approach would be not to send an array to this method but,instead, to create an array within this method and fill this array with values. Thisarray can then be returned from the method:
// this method receives no parameters but returns an array of doubles
static double[] enterTemps(){
Scanner keyboard = new Scanner(System.in);// create an array within this method double[] temperatureOut = new double[7];// fill up the array created in this method for (int i = 0; i < temperatureOut.length; i++){
System.out.println("enter max temperature for day " + (i+1));temperatureOut[i] = keyboard.nextDouble();
}// send back the array created in this method return temperatureOut;
}
As you can see, we use square brackets to indicate that an array is to be returnedfrom a method:
static double[] enterTemps()
The array itself is created within the method. We have decided to call this arraytemperatureOut:
double[] temperatureOut = new double[7];
After the array has been filled it is sent back with a return statement. Noticethat, to return an array, the name alone is required:
6.6 Returning an Array from a Method 135

return temperatureOut;
Now that we have changed the enterTemps method, we need to revisit theoriginal main method also. It will no longer compile now that the enterTempsmethod has changed:
// the original 'main' method will no loger compile!public static void main(String[] args){
double[] temperature = new double[7];enterTemps(temperature); // this line will now cause a compiler error !!displayTemps(temperature);
}
The call to enterTemps will no longer compile as the new enterTempsdoes not expect to be given an array as a parameter. The correct way to call themethod is as follows:
enterTemps(); // this method requires no parameter
However, this method now returns an array. We really should do somethingwith the array value that is returned from this method. We should use the returnedarray value to set the value of the original temperature array:
// just declare the 'temperature' array but do not allocate it memory yet double[] temperature;// 'temperature' array is now set to the return value of 'enterTemps' temperature = enterTemps();
As you can see, we have not sized the temperature array once it has beendeclared. Instead the temperature array will be set to the size of the arrayreturned by enterTemps, and it will contain all the values of the array returnedby enterTemps. The complete program, TemperatureReadings3, is shownbelow:
136 6 Arrays

TemperatureReadings3import java.util.Scanner; public class TemperatureReadings3{
public static void main(String[] args){
double[] temperature ; temperature = enterTemps(); // call new version of this methoddisplayTemps(temperature);
}
// method to enter temperatures returns an array static double[] enterTemps(){
Scanner keyboard = new Scanner(System.in); double[] temperatureOut = new double[7]; for (int i = 0; i < temperatureOut.length; i++){
System.out.println("enter max temperature for day " + (i+1)); temperatureOut[i] = keyboard.nextDouble();
}return temperatureOut;
}
// this method is unchanged static void displayTemps(double[] temperatureIn){
System.out.println();System.out.println("***TEMPERATURES ENTERED***"); System.out.println();for (int i = 0; i < temperatureIn.length; i++){
System.out.println("day "+(i+1)+" "+ temperatureIn[i]);}
}}
This program behaves in exactly the same way as the previous one, so whicheverway you implement enterTemps is really just a matter of preference.
6.7 The Enhanced ‘for’ Loop
As you can see from the examples above, when processing an entire array a loop isrequired. Very often, this will be a for loop. With a for loop, the loop counter isused as the array index within the body of the loop. In the examples above, the loopcounter was used not only as an array index but also to display meaningful mes-sages to the user. For example:
for(int i = 0; i < temperature.length; i++){
System.out.println("day " + (i+1) + " " + temperature[i]);}
Here the loop counter was used to determine the day number to display on thescreen, as well as the index of an array element. Very often, when a for loop isrequired, the only use made of the loop counter is as an array index to access all theelements of the array consecutively. Java provides an enhanced version of the forloop especially for this purpose.
6.6 Returning an Array from a Method 137

Rather than use a counter, the enhanced for loop consists of a variable that,upon each iteration, stores consecutive elements from the array.2 For example, if wewished to display on the screen each value from the temperature array, theenhanced for loop could be used as follows:
/* the enhanced for loop iterates through elements of an array without the needfor an array index */
for (double item : temperature) // see discussion below{
System.out.println(item);}
In this case we have named each successive array element as item. The loopheader is to be read as “for each item in the temperature array”. For thisreason the enhanced for loop is often referred to as the for each loop. Notice thatthe type of the array item also has to be specified. The type of this variable isdouble as we are processing an array of double values. Remember that this isthe type of each individual element within the array.
You should note that the variable item can be used only within the loop, wecannot make reference to it outside the loop. Within the body of the loop we cannow print out an array element by referring directly to the item variable rather thanaccessing it via an index value:
System.out.println(item); // 'item' is an array element
This is a much neater solution than using a standard for loop, which wouldrequire control of a loop counter in the loop header, and array look up within thebody of the loop.
You will remember, from Sect. 6.5, that varargs parameters are implicitly turnedinto arrays when they are received. So the enhanced for loop can also be used withsuch parameters. Here, for example, is the displayTemps method of theDisplayTemperaturesWithVarargs program, from Sect. 6.5, re-writtenwith an enhanced for loop:
// method to display temperatures using varargsstatic void displayTemps(double... temperatureIn)// temperaturenIn implictly convereted to array{
// previous code here
// dipslay items using enhanced for loopfor (double item: temperatureIn){
System.out.println(item+ " ");}
}
2The enhanced for loop also works with other classes in Java, which act as alternatives to arrays.We will explore some of these classes in Chap. 15.
138 6 Arrays

Be aware that the enhanced for loop should not be used if you wish to modifythe array items. Modifying array items with such a loop will not cause a compilererror, but it is unsafe as it may cause your program to behave unreliably. So youshould use an enhanced for loop only when:
• you wish to access the entire array (and not just part of the array);• you wish to read the elements in the array, not modify them;• you do not require the array index for additional processing.
Very often, when processing an array, it is the case that these three conditionsapply. In the following sections we will make use of this enhanced for loop whereappropriate.
6.8 Some Useful Array Methods
Apart from the length feature, an array does not come with any useful built inroutines. So we will develop some of our own methods for processing an array. Wewill use a simple integer array for this example. Here is the outline of the programwe are going to write in order to do this:
import java.util.Scanner;
public class SomeUsefulArrayMethods{
public static void main (String[] args){
Scanner keyboard = new Scanner(System.in);int[] someArray; // declare an integer array// ask user to determine size of array System.out.println("How many elements to store?");int size = keyboard.nextInt();// size array now someArray = new int[size];
// call methods here}// methods to process an array here
}
As you can see, we have delayed the second stage of array creation here until theuser tells us how many elements to store in the array. Now to some methods.
6.8.1 Array Maximum
The first method we will develop will allow us to find the maximum value in anarray. For example, we may have a list of scores and wish to know the highest scorein this list. Finding the maximum value in an array is a much better approach than
6.7 The Enhanced ‘for’ Loop 139

the one we took in Chap. 5, where we looked at a method to find the maximum oftwo values and another method to find the maximum of three values. This arraymethod can instead be used with lists of two, three, four or any other number ofvalues. The approach we will use will be similar to the max method we developedin Chap. 5 for finding the maximum of three values. Here is the pseudocode again.
SET result TO first numberIF second number > resultBEGIN
SET result TO second numberENDIF third number > resultBEGIN
SET result TO third numberENDRETURN result
Here, the final result is initialized to the first value. All other values are thencompared with this value to determine the largest value. Now that we have an array,we can use a loop to process this comparison, rather than have a series of many ifstatements. Here is a suitable algorithm:
SET result TO first value in arrayLOOP FROM second element in array TO last element in arrayBEGIN
IF current element > resultBEGIN
SET result TO current elementEND
ENDRETURN result
This method will need the array that it has to search to be sent in as a parameter.Also, this method will return the maximum item so it must have an integer returntype.
static int max (int[] arrayIn){
int result = arrayIn[0]; // set result to the first value in the array
// this loops runs from the 2nd item to the last item in the array for (int i = 1; i < arrayIn.length; i++){
if(arrayIn[i] > result){
result = arrayIn[i]; // reset result to new maximum}
}return result;
}
140 6 Arrays

Notice we did not use the enhanced for loop here, as we needed to iterate fromthe second item in the array rather than through all items, and the standard forloop gives us this additional control.
6.8.2 Array Summation
The next method we will develop will be a method that calculates the total of all thevalues in the array. Such a method might be useful, for example, if we had a list ofdeposits made into a bank account and wished to know the total value of thesedeposits. A simple way to calculate the sum is to keep a running total and add thevalue of each array element to that running total. Whenever you have a runningtotal it is important to initialize this value to zero. We can express this algorithmusing pseudocode as follows:
SET total TO zeroLOOP FROM first element in array TO last element in arrayBEGIN
SET total TO total + value of current elementENDRETURN total
This method will again need the array to be sent in as a parameter, and willreturn an integer (the value of the sum), giving us the following:
static int sum(int[] arrayIn){
int total = 0;for (int currentElement : arrayIn){
total = total + currentElement;}return total;
}
Notice the use of the enhanced for loop here—as we need to iterate through allelements within the array.
6.8.3 Array Membership
It is often useful to determine whether or not an array contains a particular value.For example, if the list were meant to store a collection of unique student IDnumbers, this method could be used to check if a new ID number already existsbefore adding it to the list. A simple technique is to check each item in the list oneby one, using a loop, to see if the given value is present. If the value is found theloop is exited. If the loop reaches the end without exiting then we know the item isnot present. Here is the pseudocode:
6.8 Some Useful Array Methods 141
LOOP FROM first element in array TO last element in arrayBEGINIF current element = item to findBEGIN
EXIT loop and RETURN trueEND
ENDRETURN false
Notice in the algorithm above that a value of false would be returned only ifthe given item is not found. If the value is found, the loop would terminate withoutreaching its end and a value of true would be returned.
Here is the Java code for this method. We need to ensure that this methodreceives the array to search and the item being searched for. Also the method mustreturn a boolean value:
static boolean contains(int[] arrayIn, int valueIn){
// enhanced 'for' loop used here for (int currentElement : arrayIn){if (currentElement == valueIn)
{return true; // exit loop early if value found
}}return false; // value not present
}
6.8.4 Array Search
One of the most common tasks relating to a list of values is to determine theposition of an item within the list. For example, we may wish to know the positionof a job waiting in a printer queue.
How will we go about doing this?Just as we did when devising the contains algorithm, we will need to use a
loop to examine every item in the array. Inside the loop we check each item one at atime and compare it to the item we are searching for.
What do we do if we find the item we are searching for? Well, we are interestedin its position in the array so we just return the index of that item.
Now we need to decide what we do if we reach the end of the loop, havingchecked all the elements in the array, without finding the item we are searching for.This method needs to return an integer regardless of whether or not we find an item.What number shall we send back if the item is not found? We need to send back a
142 6 Arrays

value that could never be interpreted as an array index. Since array indices willalways be positive numbers we could send back a negative number, such as −999,to indicate a valid position has not been found.
Here is the pseudocode:
LOOP FROM first element in array TO last element in arrayBEGINIF current element = item to findBEGIN
EXIT loop and RETURN current indexEND
ENDRETURN -999
This approach is often referred to as a linear search. Here is the Java code forthis method. Once again we need to ensure that this method receives the array tosearch and the item being searched for. This method must return an integer value:
static int search (int[] arrayIn, int valueIn){
// enhanced 'for' loop should not be used here!for (int i=0; i < arrayIn.length; i++){
if (arrayIn[i] == valueIn){
return i; // exit loop with array index}
}return -999; // indicates value not in list
}
Notice, in this case, we could not use the enhanced for loop. The reason for thisis that we required the method to return the array index of the item we are searchingfor. This index is best arrived at by making use of a loop counter in a standard forloop.
6.8.5 The Final Program
The complete program for manipulating an array is now presented below. The arraymethods are accessed via a menu. We have included some additional methods herefor entering and displaying an array:
6.8 Some Useful Array Methods 143

SomeUsefulArrayMethodsimport java.util.Scanner;
// a menu driven program to test a selection of useful array methods
public class SomeUsefulArrayMethods{
public static void main (String[] args){
char choice;Scanner keyboard = new Scanner(System.in);int[] someArray; // declare an integer arraySystem.out.print("How many elements to store?: ");int size = keyboard.nextInt();// size the arraysomeArray = new int [size];// menudo{
System.out.println();System.out.println("[1] Enter values");System.out.println("[2] Find maximum");System.out.println("[3] Calculate sum");System.out.println("[4] Check membership");System.out.println("[5] Search array");System.out.println("[6] Display values");System.out.println("[7] Exit");System.out.print("Enter choice [1-7]: ");choice = keyboard.next().charAt(0);System.out.println();// process choice by calling additional methodsswitch(choice){
case '1': fillArray(someArray);break;
case '2': int max = max(someArray);System.out.println("Maximum array value = " + max); break;
case '3': int total = sum(someArray);System.out.println("Sum of array values = " + total); break;
case '4': System.out.print ("Enter value to find: ");int value = keyboard.nextInt();boolean found = contains(someArray, value);if (found){
System.out.println(value + " is in the array");}else{
System.out.println(value + " is not in the array");}break;
case '5': System.out.print ("Enter value to find: ");int item = keyboard.nextInt();int index = search(someArray, item);if (index == -999) // indicates value not found{
System.out.println ("This value is not in the array");}else{
System.out.println ("This value is at array index " + index);}break;
case '6': System.out.println("Array values");displayArray(someArray);break;
}} while (choice != '7');System.out.println("Goodbye");
}
// additional methods
// fills an array with valuesstatic void fillArray(int[] arrayIn){
Scanner keyboard = new Scanner (System.in);for (int i = 0; i < arrayIn.length; i++){
System.out.print("enter value ");arrayIn[i] = keyboard.nextInt();
}}
144 6 Arrays

// checks if a given item is contained within the arraystatic boolean contains (int[] arrayIn, int valueIn){
// enhanced 'for' loop used herefor (int currentElement : arrayIn){
if (currentElement == valueIn){
return true; // exit loop early if value found}
}return false; // value not present
}
/* returns the position of an item within an array or -999 if the value is not present within the array */static int search (int[] arrayIn, int valueIn){
for (int i = 0; i < arrayIn.length; i++){
if (arrayIn[i] == valueIn){
return i;}
}return -999;
}
// displays the array values on the screenstatic void displayArray(int[] arrayIn){
System.out.println();// standard 'for' loop used here as the array index is requiredfor (int i = 0; i < arrayIn.length; i++){
System.out.println("array[" + i + "] = " + arrayIn[i]);}
}}
// returns the total of all the values held within an arraystatic int sum (int[] arrayIn){
int total = 0;for (int currentElement : arrayIn){
total = total + currentElement;}return total;
}
// returns the maximum value in an arraystatic int max (int[] arrayIn){
int result = arrayIn[0]; // set result to the first value in the array// this loops runs from the 2nd item to the last item in the arrayfor (int i=1; i < arrayIn.length; i++){
if (arrayIn[i] > result){
result = arrayIn[i]; // reset result to new maximum}
}return result;
}
Here is a sample program run:
How many elements to store?: 5
[1] Enter values[2] Find maximum[3] Calculate sum[4] Check membership[5] Search array[6] Display values[7] Exit
6.8 Some Useful Array Methods 145

Enter choice [1-7]: 1
enter value 12enter value 3enter value 7enter value 6enter value 2
[1] Enter values[2] Find maximum[3] Calculate sum[4] Check membership[5] Search array[6] Display values[7] ExitEnter choice [1-7]: 2
Maximum array value = 12
[1] Enter values[2] Find maximum[3] Calculate sum[4] Check membership[5] Search array[6] Display values[7] ExitEnter choice [1-7]: 3
Sum of array values = 30
[1] Enter values[2] Find maximum[3] Calculate sum[4] Check membership[5] Search array[6] Display values[7] Exit Enter choice [1-7]: 4
Enter value to find: 10
10 is not in the array
[1] Enter values[2] Find maximum[3] Calculate sum[4] Check membership[5] Search array
146 6 Arrays

[6] Display values[7] ExitEnter choice [1-7]: 4
Enter value to find: 7
7 is in the array
[1] Enter values[2] Find maximum[3] Calculate sum[4] Check membership[5] Search array[6] Display values[7] ExitEnter choice [1-7]: 5
Enter value to find: 7This value is at array index 2
[1] Enter values[2] Find maximum[3] Calculate sum[4] Check membership[5] Search array[6] Display values[7] ExitEnter choice [1-7]: 6
Array values
array[0] = 12array[1] = 3array[2] = 7array[3] = 6array[4] = 2
[1] Enter values[2] Find maximum[3] Calculate sum[4] Check membership[5] Search array[6] Display values[7] ExitEnter choice [1-7]: 7
Goodbye
6.8 Some Useful Array Methods 147

6.9 Multi-dimensional Arrays
In the temperature reading example we used at the beginning of this chapter weused an array to hold seven temperature readings (one for each day of the week).Creating an array allowed us to use loops when processing these values, rather thanhaving to repeat the same bit of code seven times—once for each different tem-perature variable.
Now consider the situation where temperatures were required for the four weeksof a month. We could create four arrays as follows:
double[] temperature1 = new double [7]; // to hold week 1 temperaturesdouble[] temperature2 = new double [7]; // to hold week 2 temperaturesdouble[] temperature3 = new double [7]; // to hold week 3 temperaturesdouble[] temperature4 = new double [7]; // to hold week 4 temperatures
How would the temperatures for these four months be entered? The obvioussolution would be to write four loops, one to process each array. Luckily there is asimpler approach—create a multi-dimensional array.
A multi-dimensional array is an array that has more than one index. So far, thearrays that we have shown you have had only one index—for this reason they arevery often referred to as one-dimensional arrays. However, an array may have asmany indices as is necessary (up to the limit of the memory on your machine). Inthis particular example we need two indices to access a temperature reading (one forthe week number the other for the day number). If we required temperatures foreach month of the year we may require three indices (one for the month number,one for the week number and one for the day number) and so on. The number ofdimensions an array has corresponds to the number of indices required. Usually, nomore than two indices will ever need to be used. An array with two indices is calleda two-dimensional array.
6.9.1 Creating a Two-Dimensional Array
To create a two-dimensional (2D) array, simply provide the size of both indices.In this example we have four lots of seven temperatures:
double [][] temperature ; // declares a 2D arraytemperature = new double [4][7]; // creates memory for a 4 by 7 array
148 6 Arrays

As you can see, this is very similar to creating a one-dimensional array exceptthat we have two pairs of brackets for a two-dimensional array. For largerdimensions we can have more pairs of brackets, 3 pairs for 3 dimensions, 4 for 4dimensions and so on. In this example we have chosen to treat the first index asrepresenting the number of weeks (4) and the second representing the number ofdays (7), but we could have chosen to treat the first index as the number of days andthe second as the number of weeks.
While you would think of a one-dimensional array as a list, you would probablyvisualize a two-dimensional array as a table with rows and columns (althoughactually it is implemented in Java as an array of arrays). The name of each item in atwo-dimensional array is the array name, plus the row and column index (seeFig. 6.5).
Note again that both indices begin at zero, so that the temperature for the thirdweek of the month and the sixth day of the week is actually given as temper-ature[2][5].
6.9.2 Initializing Two-Dimensional Arrays
As with one-dimensional arrays, it is possible to declare and initialize amulti-dimensional array with a collection of values all in one instruction. With aone-dimensional array we separated these values by commas and enclosed thesevalues in braces. For example:
// this array of integers is initialized with four valuesint[] a1DArray = { 11, -25, 4, 77};
12.5
15.2
14.0
13.212.2
11.9
13.2
14.0
11.8
11.8
12.2
12.7 12.4
13.0
14.7
14.5
11.0
13.0
13.2
9.75 12.711.8 11.9 13.013.5
14.0 14.3 11.9
day index
0 1 2 3
0
1
2
3
4 5 6
weekindex
this value is temperature[2][5]
Fig. 6.5 To access an element in a 2D array requires both a row and a column index
6.9 Multi-dimensional Arrays 149

This creates an array of size 4 with the given elements stored in the given order.A similar technique can be used for multi-dimensional arrays. With atwo-dimensional array the sets of values in each row are surrounded with braces asabove, then these row values are themselves enclosed in another pair of braces.A two-dimensional array of integers might be initialized as follows, for example:
// this creates a 2 dimensional array with two rows and four columnsint[][] a2DArray = {
{ 11, -25, 4, 77}, {-21, 55, 43, 11}
};
This instruction creates the same array as the following group of instructions:
int[][] a2DArray = new int[2][4]; // size array// initialize first row of valuesa2DArray[0][0] = 11;a2DArray[0][1] = -25;a2DArray[0][2] = 4;a2DArray[0][3] = 77;// initialize second row of valuesa2DArray[1][0] = -21;a2DArray[1][1] = 55;a2DArray[1][2] = 43;a2DArray[1][3] = 11;
As with one dimensional arrays, however, it is not common to initializetwo-dimensional arrays in this way. Instead, once an array has been created, valuesare added individually to the array once the program is running.
6.9.3 Processing Two-Dimensional Arrays
With the one-dimensional arrays that we have met we have used a single for loopto control the value of the single array index. How would you process atwo-dimensional array that requires two indices?
With a two-dimensional array, a pair of nested loops is commonly used toprocess each element—one loop for each array index. Let’s return to thetwo-dimensional array of temperature values. We can use a pair of nested loops,one to control the week number and the other the day number. As with the exampleof the one-dimensional array of TemperatureReadings programs in previoussections, in the following code fragment we’ve started our day and week counters at1, and then taken 1 off these counters to get back to the appropriate array index:
150 6 Arrays

// create Scanner object for user inputScanner keyboard = new Scanner (System.in);
// the outer loop controls the week rowfor (int week = 1; week <= temperature.length; week++){
// the inner loop controls the day columnfor (int day = 1; day <= temperature[0].length; day++){
System.out.println("enter temperature for week " + week + " and day " + day);
// as array indices start at zero not 1, we must take one off the loop counters temperature[week-1][day-1] = keyboard.nextDouble();
}}
Notice that in a two-dimensional array, the length attribute returns the lengthof the first index (this is, what we have visualized as the number of rows):
// here, the length attribute returns 4 (the number of rows)for (int week = 1; week <= temperature.length; week++)
The number of columns is determined by obtaining the length of a particularrow. In the example below we have chosen the first row but we could have chosenany row here:
// the length of a row returns the number of columns (7 in this case)for (int day = 1; day <= temperature[0].length; day++)
Here we have used a pair of nested loops as we wish to process the entiretwo-dimensional array. If, however, you just wished to process part of the array(such as one row or one column) then a single loop may still suffice. In the nextsection we present a program that demonstrates this.
6.9.4 The MonthlyTemperatures Program
The program below provides the user with a menu of options. The first optionallows the user to enter the temperature readings for the 4 weeks of the month. Thesecond option allows the user to display all these readings. The third option allowsthe user to display the reading for a particular week (for example all the temper-atures for week 3). The final option allows the user to display the temperatures for aparticular day of the week (for example all the readings for the first day of eachweek). Take a look at it and then we will discuss it.
6.9 Multi-dimensional Arrays 151

public class MonthlyTemperatures{
public static void main(String[] args){
Scanner keyboard = new Scanner (System.in);char choice;
double[][] temperature = new double[4][7]; 11 etgcvg 4F cttc{11 qhhgt ogpwdo{
System.out.println();System.out.println("[1] Enter temperatures");System.out.println("[2] Display all");System.out.println("[3] Display one week");System.out.println("[4] Display day of the week");System.out.println("[5] Exit");System.out.print("Enter choice [1-5]: ");choice = keyboard.next().charAt(0);System.out.println();11 rtqeguu ejqkeg d{ ecnnkpi cffkvkqpcn ogvjqfuswitch(choice){
case '1': enterTemps(temperature);break;
case '2': displayAllTemps(temperature);break;
case '3': displayWeek(temperature);break;
case '4': displayDays(temperature);break;
case '5': System.out.println ("Goodbye");break;
default: System.out.println("ERROR: options 1-5 only!");}
} while (choice != '5');}
11 ogvjqf vq gpvgt vgorgtcvwtgu kpvq vjg 4F cttc{ tgswktgu c pguvgf nqqrstatic void enterTemps(double[][] temperatureIn){
Scanner keyboard = new Scanner (System.in);11 vjg qwvgt nqqr eqpvtqnu vjg yggm pwodgtfor (int week = 1; week <= temperatureIn.length; week++){
11 vjg kppgt nqqr eqpvtqnu vjg fc{ pwodgtfor (int day = 1; day <= temperatureIn[0].length; day++){
System.out.println("enter temperature for week " + week + " and day " + day);temperatureIn[week-1][day-1] = keyboard.nextDouble();
}}
}
MonthlyTemperaturesimport java.util.Scanner;
11 ogvjqf vq fkurnc{ cnn vgorgtcvwtgu kp vjg 4F cttc{ tgswktgu c pguvgf nqqrstatic void displayAllTemps(double[][] temperatureIn){
System.out.println();System.out.println("***TEMPERATURES ENTERED***");11 vjg qwvgt nqqr eqpvtqnu vjg yggm pwodgtfor (int week = 1; week <= temperatureIn.length; week++){
11 vjg kppgt nqqr eqpvtqnu vjg fc{ pwodgtfor (int day = 1; day <= temperatureIn[0].length; day++){
System.out.println("week " +week+" day "+day+": "+ temperatureIn[week-1][day-1]);}
}}
11 ogvjqf vq fkurnc{ vgorgtcvwtgu hqt c ukping yggm tgswktgu c ukping nqqrstatic void displayWeek(double[][] temperatureIn)
System.out.print("Enter week number (1-4): ");week = keyboard.nextInt();11 kprwv xcnkfcvkqp< yggm pwodgt ujqwnf dg dgvyggp 3 cpf 6while (week<1 || week > 4){
System.out.println("Inavlid week number!!");System.out.print("Enter again (1-4 only): ");week = keyboard.nextInt();
}
{Scanner keyboard = new Scanner (System.in);int week;11 gpvgt yggm pwodgt
152 6 Arrays

11 fkurnc{ vgorgtcvwtgu hqt ikxgp yggmSystem.out.println();System.out.println("***TEMPERATURES ENTERED FOR WEEK "+week+"***");System.out.println();11 yggm pwodgt ku hkzgf uq nqqr tgswktgf vq rtqeguu fc{ pwodgtu qpn{for (int day = 1; day <= temperatureIn[0].length; day++){
System.out.println("week "+week+" day "+day+": "+ temperatureIn[week-1][day-1]);}
}
// ogvjqf vq fkurnc{ vgorgtcvwtgu hqt c ukping fc{ qh gcej yggm tgswktgu c ukping nqqrstatic void displayDays(double[][] temperatureIn){
Scanner keyboard = new Scanner (System.in);int day;11 gpvgt fc{ pwodgtSystem.out.print("Enter day number (1-7): ");day = keyboard.nextInt();11 kprwv xcnkfcvkqp< fc{ pwodgt ujqwnf dg dgvyggp 3 cpf 9while (day<1 || day > 7){
System.out.println("Inavlid day number!!");System.out.print("Enter again (1-7 only): ");day = keyboard.nextInt();
}11 fkurnc{ vgorgtcvwtgu hqt ikxgp fc{ qh vjg yggmSystem.out.println();System.out.println("***TEMPERATURES ENTERED FOR DAY "+day+"***");System.out.println();11 fc{ pwodgt ku hkzgf uq nqqr tgswktgf vq rtqeguu yggm pwodgtu qpn{for (int week = 1; week <= temperatureIn.length; week++){
System.out.println("week "+week+" day "+day+": " + temperatureIn[week-1][day-1]);}
}}
Here you can see that the first menu option contains the code we have justdiscussed for entering values into a two-dimensional array. Notice how you pass atwo-dimensional array to a method. As with a one-dimensional array you do notrefer to the size of the array, just its dimensions:
/* As with a standard 1D array, to pass a 2D array to a method the number of dimensions needs to be indicated but not the size of these dimensions */
static void enterTemps(double[][] temperatureIn){
// code for entering temperatures goes here}
This method uses a pair of nested loops as we wish to process the entiretwo-dimensional array. Similarly, when we wish to display the entire array we use apair of nested loops to control the week and day number:
// method to display all temperatures in the 2D array requires a nested loop static void displayAllTemps(double[][] temperatureIn){
System.out.println();System.out.println("***TEMPERATURES ENTERED***"); // the outer loop controls the week numberfor (int week = 1; week <= temperatureIn.length; week++){
// the inner loop controls the day numberfor (int day = 1; day <= temperatureIn[0].length; day++){
System.out.println("week " +week+" day "+day+": "+ temperatureIn[week-1][day-1]);
}}
}
6.9 Multi-dimensional Arrays 153

However, when we need to display just one of the dimensions of an array we donot need to use a pair of loops. For example, the displayWeek method, thatallows the user to pick a particular week number so that just the temperatures forthat week alone are displayed, just requires a single loop to move through the daynumbers, as the week number is fixed by the user:
// method to display temperatures for a single week requires a single loop static void displayWeek(double[][] temperatureIn){
Scanner keyboard = new Scanner (System.in);int week;// enter week numberSystem.out.print("Enter week number (1-4): ");week = keyboard.nextInt();// input validation: week number should be between 1 and 4while (week<1 || week > 4){
System.out.println("Inavlid week number!!");System.out.print("Enter again (1-4 only): ");week = keyboard.nextInt();
}// display temperatures for given weekSystem.out.println();System.out.println("***TEMPERATURES ENTERED FOR WEEK "+week+"***"); System.out.println();// week number is fixed so loop required to process day numbers onlyfor (int day = 1; day <= temperatureIn[0].length; day++){
System.out.println("week "+week+" day "+day+": "+temperatureIn[week-1][day-1]);
}}
First the user enters the week number:
System.out.print("Enter week number (1-4): ");week = keyboard.nextInt();
We will use this week number to determine the value of the first index whenlooking up temperatures in the array, so we need to be careful that the user inputs avalid week number (1–4) as invalid numbers would lead to an illegal array indexbeing generated. We have used a while loop here to implement this inputvalidation:
// input validation: week number should be between 1 and 4while (week<1 || week > 4){
System.out.println("Inavlid week number!!");System.out.print("Enter again (1-4 only): ");week = keyboard.nextInt();
}
154 6 Arrays

Once we get past this loop we can be sure that the user has entered a valid weeknumber. For example, assume that we have filled the 2D array with the tempera-tures given in Fig. 6.5. Now assume that the user calls the option to display oneweek’s temperature, and chooses week 2. This is illustrated in Fig. 6.6.
Since array indices in Java begin at zero, the week index (1) is determined bytaking one off the week number entered by the user (2). All we need to do now is toiterate through all the day numbers for that week by using a single for loop:
// week number is fixed by the user so a single loop is required to process day numbers only
for (int day = 1; day <= temperatureIn[0].length; day++){
System.out.println("week "+ week +" day " + day + ": " + temperatureIn[week-1][day-1]);
}
The displayDays method works in a similar way but with the day numberfixed and the week number being determined by the for loop.
6.10 Ragged Arrays
In the examples of two-dimensional arrays discussed so far, each row of the arrayhad the same number of columns. Each row of the two-dimensional tempera-ture array, for example, had 7 columns and each row of a2DArray had 4columns. Very often this will be the case. However, very occasionally, it may benecessary for rows to have a variable number of columns. A two-dimensional array
12.5
15.2
14.0
13.212.2
11.9
13.2
14.0
11.8
11.8
12.2
12.7 12.4
13.0
14.7
14.5
11.0
13.0
13.2
9.75 12.711.8 11.9 13.013.5
14.0 14.3 11.9
day index
0 1 2 3
0
1
2
3
4 5 6
week index
temperatures for week 2
Fig. 6.6 To access temperatures for a single week, the week index remains fixed and the dayindex changes
6.9 Multi-dimensional Arrays 155

with a variable number of columns is called a ragged array. For example, here ishow we might declare and initialize a two-dimensional array of characters with avariable number of columns for each row:
// this creates a 2 dimensional array with a variable number of columnschar[][] animals = {
{‘M’, ‘O’, ‘N’, ‘K’, ‘E’, ‘Y’}, // 6 columns{‘C’, ‘A’, ‘T’ }, // 3 columns{‘B’, ‘I’, ‘R’, ‘D’} // 4 columns
};
Figure 6.7 illustrates the array created after this initialization.To declare such an array without initialization, we need to specify the number of
rows first and leave the number of columns unspecified. In the example above wehave 3 rows:
// columns left unspecifiedchar[][] animals = new char[3][];
Now, for each row we can fix the appropriate size of the associated column. Inthe example above the first row has 6 columns, the second row 3 columns and thelast row 4 columns:
animals[0] = new char[6]; // number of columns in first rowanimals[1] = new char[3]; // number of columns in second rowanimals[2] = new char[4]; // number of columns in third row
You can see clearly from these instructions that Java implements atwo-dimensional array as an array of arrays. When processing ragged arrays youmust be careful not to use a fixed number to control the number of columns. Theactual number of columns can always be retrieved by calling the length attribute
‘C’ ‘A’
0
1
2
0 1 2 3 4 5
‘T’
‘M’ ‘O’ ‘N’ ‘K’ ‘E’ ‘Y’
‘B’ ‘I’ ‘R’ ‘D’
Fig. 6.7 The array ‘animals’ is a ragged array
156 6 Arrays

of each row. For example the following instructions would display the number ofcolumns for each row:
System.out.println(animals[0].length); // displays 6System.out.println(animals[1].length); // displays 3System.out.println(animals[2].length); // displays 4
The program below uses a pair of nested loops to display the animals array:
RaggedArray
public class RaggedArray{
public static void main(String[] args){
// initialize ragged arraychar[][] animals = {
{'M', 'O', 'N', 'K', 'E', 'Y'}, // 6 columns{'C', 'A', 'T' }, // 3 columns{'B', 'I', 'R', 'D'} // 4 columns
};
for (int row = 0; row < animals.length; row++) //row number is fixed{
for (int col = 0; col < animals[row].length; col++) // column number is variable{
System.out.print(animals[row][col]); // display one character}System.out.println(); // new line after one row displayed
}}
}
Notice how the inner loop, controlling the column number, instead of beingfixed to the length of one particular row, will vary each time depending upon thecurrent row number:
for (int row = 0; row < animals.length; row++) {
// column number is variable and is determined by current row numberfor (int col = 0; col < animals[row].length; col++) {
System.out.print(animals[row][col]); }System.out.println();
}
As expected this program produces the following output when run:
MONKEYCATBIRD
6.10 Ragged Arrays 157

6.11 Self-test Questions
1. When is it appropriate to use an array in a program?
2. Consider the following explicit creation of an array:
int[] someArray = {2,5,1,9,11};
(a) What would be the value of someArray.length?
(b) What is the value of someArray[2]?
(c) What would happen if you tried to access someArray[6]?
(d) Create the equivalent array by using the new operator and then assigningthe value of each element individually.
(e) Write a standard for loop that will double the value of every item insomeArray.
(f) Explain why, in this example, it would not be appropriate to use anenhanced for loop.
(g) Use an enhanced for loop to display the values inside the array.
(h) Modify the enhanced for loop above so that only numbers greater than 2are displayed.
3. Look back at the program TemperatureReadings3 from Sect. 6.6, whichread in and displayed a series of temperature readings. Design and write thecode for an additional method, wasHot, which displays all days that recordedtemperatures of 18° or over.
4. Assume that an array has been declared in main as follows:
int[] javaStudents;
This array is to be used to store a list of student exam marks. Now, for each ofthe following methods, write the code for the given method and the instructionin main to call this method:
(a) A method, enterExamMarks, that prompts the user to enter some exammarks (as integers), stores the marks in an array and then returns this array.
(b) A method, increaseMarks, that accepts an array of exam marks andincreases each mark by 5.
(c) A method, allHavePassed, that accepts an array of exam marks andreturns true if all marks are greater than or equal to 40, and falseotherwise.
158 6 Arrays

5: (a) Describe the varargs feature of Java.
(b) Re-write the contains method below, from Sect. 6.8.5, to make use ofthis varargs feature:
static boolean contains(int[] arrayIn, int valueIn){
// enhanced 'for' loop used here for (int currentElement : arrayIn){if (currentElement == valueIn)
{return true; // exit loop early if value found
}}return false; // value not present
}
(c) Give examples of different ways in which you could call this re-writtencontains method now that you have used varargs.
6. Consider the following array declaration, to store a collection of student grades.
char [][] grades = new char[4][20];
Grades are recorded for 4 tutorial groups, and each tutorial group consists of 20students.
(a) How many dimensions does this array have?
(b) What is the value of grades.length?
(c) What is the value of grades[0].length?
(d) Write the instruction to record the grade ‘B’ for the first student in the firsttutorial group.
7. Consider the following scenarios and, for each, declare the appropriate array:
(a) goals: an array to hold the number of goals each team in a league scoresin each game of a season. The league consist of 20 teams and a seasonconsists of 38 games.
(b) seats: an array to record whether or not a seat in a theatre is booked or not.There are 70 rows of seats in the theatre and each row has 20 seats.
6.11 Self-test Questions 159

8. Consider the MonthlyTemperatures program of Sect. 6.9.4. Write anadditional method, max, that returns the maximum temperature recorded in thegiven two-dimensional array.
Hint: look back at the algorithm for finding the maximum value in a one-dimensional array in Sect. 6.8.1
9. Consider an application that records the punctuality of trains on a certain route.
(a) Declare a 2D array, late, to hold the number of times a train on this routewas late for each day of the week, and for each week of the year.
(b) Write a fragment of code that adds up the total number of days in the yearwhen a train was late more than twice in a given day.
10. A magic word square is a square in which a word can be formed by readingeach row and each column. For example, the following is a 4 by 4 magic wordsquare:
‘P’ ‘R’ ‘E’ ‘Y’
‘L’ ‘A’ ‘V’ ‘A’
‘O’ ‘V’ ‘E’ ‘R’
‘T’ ‘E’ ‘N’ ‘D’
(a) Declare and initialize a 2D array, magicSquare, to hold the wordsillustrated above.
(b) Write a method, displayRow, that accepts the magicSquare array anda row number and displays the word in that row.
(c) Write a method, displayColumn, that accepts the magicSquare arrayand a column number and displays the word in that column.
11. (a) Distinguish between a regular 2D array and a ragged array.
(b) Write instructions to create a ragged 2D array of integers, called tri-angle, that has the following form:
160 6 Arrays

(c) Write a fragment of code to find the largest number in the trianglearray.
6.12 Programming Exercises
1. Implement the program TemperatureReadings3 from Sect. 6.6, whichread in and displayed a series of temperature readings for a given week. Now
(a) implement the wasHot method that you designed in self-test question 3above;
(b) add a final instruction into the main method that calls this wasHotmethod.
2. Implement the program SomeUsefulArrayMethods from Sect. 6.8.5,which manipulates an array of integers, then
(a) re-write the contains method using varargs syntax as discussed in selftest question 5 above;
(b) add an additional method to return the average from the array of integers(make use of the sum method to help you calculate the average);
(c) add one more method to display on the screen all those values greater thanor equal to the average.
3. Implement a program for entering and displaying student scores that tests youranswers to self-test question 4 above.
6.11 Self-test Questions 161

4. Implement the MonthlyTemperatures program from Sect. 6.9.4, whichread in and displayed temperature readings for four weeks of a month. Now
(a) implement the max method that you designed in self-test question 8 above;
(b) add a final instruction into the main method that calls this max method.
5. Design and implement a magic word square program that allows you to test youranswers to self-test question 10 above. The program should initialize the wordsquare given in the question and then use the methods displayRow anddisplayColumn to display all the words in the magic word square.
6. Design and implement a program that allows the user to enter into an array theprice of 5 products in pounds sterling. The program should then copy this arrayinto another array but convert the price of each product from pounds sterling toUS dollars. The program should allow the user to enter the exchange rate ofpounds to dollars, and should, when it terminates, display the contents of botharrays. Once again, make use of methods in your program to carry out thesetasks.
7. Amend the program in Exercise 6 above so that
(a) the user is asked how many items they wish to purchase and the arrays arethen sized accordingly;
(b) the total cost of the order is displayed in both currencies.
8. Design and implement a program that allows you to test your answers toself-test question 11 above. The program should allow the user to enter numbersinto the ragged triangle array and then find the largest number in the array asdiscussed in the question.
162 6 Arrays

7Classes and Objects
Outcomes:
By the end of this chapter you should be able to:
• explain the meaning of the term object-oriented;• explain and distinguish between the terms class and object;• create objects in Java;• call the methods of an object;• use a number of methods of the String class;• create and use arrays of objects;• create an ArrayList and make use of the add and get methods of this class.
7.1 Introduction
In the 1990s it became the norm for programming languages to use special con-structs called classes and objects. Such languages are referred to as object-orientedprogramming languages. In this chapter and the next one we will explain what ismeant by these terms, and show you how we can exploit the full power ofobject-oriented languages like Java.
7.2 Classes as Data Types
So far you have been using data types such as char, int and double. These aresimple data types that hold a single piece of information. But what if we want avariable to hold more than one related piece of information? Think for example of abook—a book might have a title, an author, an ISBN number and a price—or a
© Springer Nature Switzerland AG 2019Q. Charatan and A. Kans, Java in Two Semesters, Texts in Computer Science,https://doi.org/10.1007/978-3-319-99420-8_7
163

student might have a name, an enrolment number and marks for various subjects.Types such as char and int can hold a single piece of information only, andwould therefore be completely inadequate for holding all the necessary informationabout a book or a student. An array would also not do because the different bits ofdata will not necessarily be all of the same type. Earlier languages such as C andPascal got around this problem by allowing us to create a type that allowed morethan one piece of information to be held—such types were known by various namesin different languages, the most common being structure and record.
Object-oriented languages such as Java and C++ went one stage further how-ever. They enabled us not only to create types that stored many pieces of data, butalso to define within these types the methods by which we could process that data.For example a book ‘type’ might have a method that adds tax to the sale price; astudent ‘type’ might have a method to calculate an average mark.
Do you remember that in the exercises at the end of Chap. 2 you wrote a littleprogram that asked the user to provide the length and height of a rectangle, and thendisplayed the area and perimeter of that rectangle? In Chap. 5 you were asked toadapt this program so that it made use of separate methods to perform the calcu-lations. Such a program might look like this:
Can you see how useful it might be if, each time we wrote a program dealingwith rectangles, instead of having to declare several variables and write methods tocalculate the area and perimeter of a rectangle, we could just use a rectangle ‘type’to create a single variable, and then use its pre-written methods? In fact youwouldn’t even have to know how these calculations were performed.
This is exactly what an object-oriented language like Java allows us to do. Youhave probably guessed by now that this special construct that holds both data andmethods is called a class. You have already seen a class as the basic unit which
RectangleCalculationsimport java.util.Scanner;
public class RectangleCalculations{
public static void main(String[] args) {
double length, height, area, perimeter;Scanner keyboard = new Scanner(System.in);System.out.print("What is the length of the rectangle? "); // prompt for lengthlength = keyboard.nextDouble(); // get length from userSystem.out.print("What is the height of the rectangle? "); // prompt for heightheight = keyboard.nextDouble(); // get height from userarea = calculateArea(length, height); // call calculateArea methodperimeter = calculatePerimeter(length, height); // call calculatePerimeter methodSystem.out.println("The area of the rectangle is " + area); // display areaSystem.out.println("The perimeter of the rectangle is " + perimeter); // display perimeter
}
// method to calculate area static double calculateArea(double lengthIn, double heightIn)
{ return lengthIn * heightIn;
}
// method to calculate perimeterstatic double calculatePerimeter(double lengthIn, double heightIn)
{ return 2 * (lengthIn + heightIn);
} }
164 7 Classes and Objects

contains our main method and any other additional methods. Now we can also useclasses to define new ‘types’.
You can see that there are two aspects to a class:
• the data that it holds;• the tasks it can perform.
In the next chapter you will see that the different items of data that a class holdsare referred to as the attributes of the class; the tasks it can perform, as we haveseen, are referred to as the methods of the class—you have seen in Chap. 5 how wedefine methods. However, in Chap. 5, the methods were called only from within theclass itself. Now we are going to see how to call the methods of another class. Infact you have already been doing this without quite realizing it—because you have,since the second chapter, been calling the methods of the Scanner class!
7.3 Objects
In order to use the methods of a class you need to create an object of that class. Tounderstand the difference between classes and objects, you can think of a class as ablueprint, or template, from which objects are generated, whereas an object refers toan individual instance of that class. For example, imagine a system that is used by abookshop. The shop will contain many hundreds of books—but we do not need todefine a book hundreds of times. We would define a book once (in a class) and thengenerate as many objects as we want from this blueprint, each one representing anindividual book.
This is illustrated in Fig. 7.1.In one program we may have many classes, as we would probably wish to
generate many kinds of objects. A bookshop system might have books, customers,suppliers and so on. A university administration system might have students,courses, lecturers etc.
Object-oriented programming therefore consists of defining one or more classesthat may interact with each other.
We will now illustrate all of this by creating and using objects of predefinedclasses—defined either by ourselves or defined by the Java developers and providedas a standard part of the Java Development Kit. We are going to start by consideringthe example we discussed in Sect. 7.2 where we proposed a single “type” that dealtwith calculating the area and perimeter of a rectangle. We are in fact not going tocall our new class Rectangle, but Oblong. The reason for this is that there arein fact more than one Rectangle classes defined in the “built-in” Java libraries;now, while it is perfectly possible to have more than one class with the same name,it is better to avoid any possible confusion at this stage. In Chap. 19, you will learnhow to avoid naming conflicts, but for now it is better to call our new class by aunique name.
7.2 Classes as Data Types 165
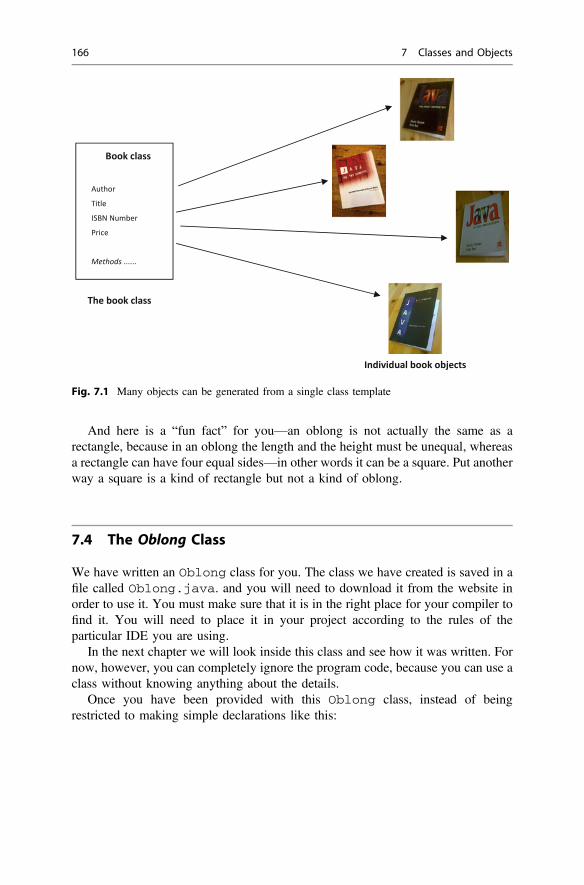
And here is a “fun fact” for you—an oblong is not actually the same as arectangle, because in an oblong the length and the height must be unequal, whereasa rectangle can have four equal sides—in other words it can be a square. Put anotherway a square is a kind of rectangle but not a kind of oblong.
7.4 The Oblong Class
We have written an Oblong class for you. The class we have created is saved in afile called Oblong.java. and you will need to download it from the website inorder to use it. You must make sure that it is in the right place for your compiler tofind it. You will need to place it in your project according to the rules of theparticular IDE you are using.
In the next chapter we will look inside this class and see how it was written. Fornow, however, you can completely ignore the program code, because you can use aclass without knowing anything about the details.
Once you have been provided with this Oblong class, instead of beingrestricted to making simple declarations like this:
Book class
Author
Title
ISBN Number
Price
Methods ......
The book class
Individual book objects
Fig. 7.1 Many objects can be generated from a single class template
166 7 Classes and Objects

you will now be able to make declarations like:
You can see that this line is similar to a declaration of a variable; however whatwe are doing here is not declaring a variable of a primitive type such as int, butdeclaring the name of an object (myOblong) of the class (Oblong)—effectivelywe have created a new type, Oblong.
You need to be sure that you understand what this line actually does; all it doesin fact is to create a variable that holds a reference to an object, rather than theobject itself. As explained in the previous chapter, a reference is simply a name fora location in memory. At this stage we have not reserved space for our newOblong object; all we have done is named a memory location myOblong, asshown in Fig. 7.2.
Now of course you will be asking the question “How is memory for the Oblongobject going to be created, and how is it going to be linked to the referencemyOblong?”.
As we have indicated, an object is often referred to as an instance of a class; theprocess of creating an object is referred to as instantiation. In order to create anobject we use a very special method of the class called a constructor.
The constructor is a method that always has the same name as the class. Whenyou create a new object this special method is always called; its function is toreserve some space in the computer’s memory just big enough to hold the requiredobject (in our case an object of the Oblong class).
As we shall see in the next chapter, a constructor can be defined to do otherthings, as well as reserve memory. In the case of our Oblong class, the constructorhas been defined so that every time a new Oblong object is created, the length andthe height are set—and they are set to the values that the user of the class sends in.So every time you create an Oblong object you have to specify its length and itsheight at the same time. Here for example is how you would call the constructor andcreate an oblong with length 7.5 and height 12.5:
int x;
Oblong myOblong;
Computer Memory
Oblong myOblong;
Java instructions
myOblong
Fig. 7.2 Declaring an object reference
7.4 The Oblong Class 167

This is the statement that reserves space in memory for a new Oblong. Usingthe constructor with the keyword new, reserves memory for a new Oblong object.Now, in the case of the Oblong class, the people who developed it (in this case itwas us!) defined the constructor so that it requires that two items of data, both oftype double, get sent in as parameters. Here we have sent in the numbers 7.5 and12.5. The location of the new object is stored in the named location myOblong.This is illustrated in Fig. 7.3.
Now every time we want to refer to our new Oblong object we can use thevariable name myOblong.
As is the case with the declaration and initialization of simple types, Java allowsus to declare a reference and create a new object all in one line:
There are all sorts of ways that we can define constructors (for example, in aBankAccount class we might want to set the overdraft limit to a particular valuewhen the account is created) and we shall see examples of these as we go along.You have of course already seen another example of this, namely with theScanner class:
myOblong = new Oblong(7.5, 12.5);
Oblong Oblong;
myOblong = new Oblong(7.5, 12.5);
Computer Memory Java Instructions
This is the space for the new
Oblong object
myOblong(location of
object is stored here)
Fig. 7.3 Creating a new object
Oblong myOblong = new Oblong(7.5, 12.5);
Scanner keyboard = new Scanner(System.in);
168 7 Classes and Objects

You can understand now how this line creates a new Scanner object, key-board, by calling the constructor. The parameter that we are sending in, System.in, represents a keyboard object and by using this parameter we are associating thenew Scanner object with the keyboard.
You will see in the next chapter that when a class is written we make sure that noprogram can assign values to the attributes directly. In this way the data in the classis protected. Protecting data in this way is known as encapsulation. The only wayto interact with the data is via the methods of the class.
This means that in order to use a class all we need to know are details about itsmethods: their names, what the methods are expected to do, and also their inputsand outputs.1 In other words you need to know what parameters the methodrequires, and its return type. Once we know this we can interact with the class byusing its methods—and it is important to understand that the only way we caninteract with a class is via its methods.
Table 7.1 lists all the methods of our Oblong class with their inputs and outputs—including the constructor.
As far as our Oblong class is concerned we have, as expected, provided twomethods which will return values for the area and perimeter of the oblongrespectively. However, the class wouldn’t be very useful if we did not have somemeans of giving values to the length and height of the oblong. As you have seen wedo this initially via the constructor, but we might also want to be able to changethese values during the course of a program. We have therefore provided methodscalled setLength and setHeight so that we can write values to the attributes.It is very likely that we will want to display these values—we have thereforeprovided methods to return, or read, the values of the attributes. These we havecalled getLength and getHeight.
You have used methods of the Scanner class on many occasions, for example:
You can see that in order to call a method of one class from another class we usethe name of the object (in this case keyboard) together with the name of themethod (nextInt) separated by a full stop (often referred to as the dot operator).
In the case of the Oblong class, we might, for example, call the setLengthmethod with a statement such as:
x = keyboard.nextInt();
myOblong.setLength(5.0);
1A list of a method’s inputs and outputs is often referred to as the method’s interface—though thisshould not be confused with the user interface, the meaning of which we described in the firstchapter.
7.4 The Oblong Class 169

In Chap. 5, when we called the methods from within a class, we used the nameof the method on its own. In actual fact, what we were doing is form of shorthand.When we write a line such as
we are actually saying call demoMethod, which is a method of this class. In Javathere exists a special keyword this. The keyword this is used within a classwhen we wish to refer to an attribute of the class itself, rather than an attribute ofsome other class. The line of code above is actually shorthand for:
As your programming skills advance, you will find that there are occasions whenyou actually have to use the this keyword, rather than simply allowing it to beassumed.
Table 7.1 The methods of the Oblong class
Method Description Inputs Output
Oblong The constructor Two items of data, both of typedouble, representing the lengthand height of the oblongrespectively
Notapplicable
setLength Sets the value ofthe length of theoblong
An item of type double None
setHeight Sets the value ofthe height of theoblong
An item of type double None
getLength Returns the lengthof the oblong
None An itemof typedouble
getHeight Returns the heightof the oblong
None An itemof typedouble
calculateArea Calculates andreturns the area ofthe oblong
None An itemof typedouble
calculatePerimeter Calculates andreturns theperimeter of theoblong
None An itemof typedouble
demoMethod(x);
this.demoMethod(x);
170 7 Classes and Objects

You should be aware of the fact that, just as you cannot use a variable that hasnot been initialized, you cannot call a method of an object if no storage is allocatedfor the object; so watch out for this happening in your programs—it would cause aproblem at run-time. In Java, when a reference is first created without assigning it toa new object in the same line, it is given a special value of null; a null valueindicates that no storage is allocated. We can also assign a null value to areference at any point in the program, and test for it as in the following example:
In the next section we will write a program that creates an Oblong object andthen uses the methods described in Table 7.1 to interact with this object.
7.5 The OblongTester Program
The following program shows how the Oblong class can be used by another class,in this case a class called OblongTester. Study the program code and then wewill discuss it.
Oblong myOblong; // at this point myOblong has a null valuemyOblong = new Oblong(5.0, 7.5); // create a new Oblong object with length 5.0 and height 7.5
// more code goes here
myOblong = null; // re-assign a null valueif(myOblong == null) // test for null value{
System.out.println("No storage is allocated to this object");}
OblongTesterimport java.util.Scanner;
public class OblongTester{
public static void main(String[] args){
Scanner keyboard = new Scanner(System.in);
// declare two variables to hold the length and height of the Oblong as input by the user double oblongLength, oblongHeight;
// declare a reference to an Oblong objectOblong myOblong;
// now get the values from the userSystem.out.print("Please enter the length of your Oblong: ");oblongLength = keyboard.nextDouble();System.out.print("Please enter the height of your Oblong: ");oblongHeight = keyboard.nextDouble();
// create a new Oblong objectmyOblong = new Oblong(oblongLength, oblongHeight);
/* use the various methods of the Oblong class to display the length, height, area and perimeter of the Oblong */
System.out.println("Oblong length is " + myOblong.getLength());System.out.println("Oblong height is " + myOblong.getHeight());System.out.println("Oblong area is " + myOblong.calculateArea());System.out.println("Oblong perimeter is " + myOblong.calculatePerimeter());
} }
7.4 The Oblong Class 171

Let’s analyse the main method line by line. After creating the new Scannerobject, the method goes on to declare two variables:
As you can see, these are of type double and they are going to be used to holdthe values that the user chooses for the length and height of the oblong.
The next line declares the Oblong object:
After getting the user to enter values for the length and height of the oblong wehave this line of code:
Here we have called the constructor and sent through the length and height asentered by the user.
Now the next line:
This line displays the length of the oblong. It uses the method of Oblong calledgetLength, and as we said in the previous section to do this we use the dotoperator to separate the name of the object and the name of the method.
The next three lines are similar:
We have called the getHeight method, the calculateArea method andthe calculatePerimeter method to display the height, area and perimeter ofthe oblong on the screen.
You might have noticed that we haven’t used the setLength andsetHeight methods—that is because in this program we didn’t wish to changethe length and height once the oblong had been created—but this is not the last youwill see of our Oblong class—and in future programs these methods will come inuseful.
Now we can move on to look at using some other classes. The first is not one ofour own, but the built-in String class provided with all versions of Java.
double oblongLength, oblongHeight;
Oblong myOblong;
myOblong = new Oblong(oblongLength, oblongHeight);
System.out.println("Oblong Length is " + myOblong.getLength());
System.out.println("Oblong height is " + myOblong.getHeight());System.out.println("Oblong area is " + myOblong.calculateArea());System.out.println("Oblong Perimeter is "+ myOblong.calculatePerimeter());
172 7 Classes and Objects

7.6 Strings
You know from Chap. 1 that a string is a sequence of characters—like a name, aline of an address, a car registration number, or indeed any meaningless sequence ofcharacters such as “h83hdu2&e£8”. Java provides a String class that allows us touse and manipulate strings.
As we shall see in a moment, the String class has a number of constructors—but in fact Java actually allows us to declare a string object in the same way as wedeclare variables of simple type such as int or char. You should remember ofcourse that String is a class, and starts with a capital letter. For example we couldmake the following declaration:
and we could then give this string a value:
We could also do this in one line:
We should bear in mind, however, that this is actually just a convenient way ofdeclaring a String object by calling its constructor, which we would do like thiswith exactly the same effect:
You should be aware that the String class is the only class that allows us tocreate new objects by using the assignment operator in this way.
7.6.1 Obtaining Strings from the Keyboard
In order to get a string from the keyboard, you should use the next method ofScanner. However, a word of warning here—when you do this you should notenter strings that include spaces, as this will give you unexpected results. We willshow you in the next section a way to get round this restriction.
Below is a little program that uses the Java String class. Some of you mightfind it amusing (although others might not!).
String name;
name = "Quentin";
String name = "Quentin";
String name = new String("Quentin");
7.6 Strings 173

One thing to notice in this program is the way in which the + operator is usedfor two very different purposes. It is used with strings for concatenation—forexample:
"Hello" + name
It is also used with numbers for addition—for example:
age + 1
Notice that we have had to enclose this expression in brackets to avoid anyconfusion:
Here is a sample run from the above program:
What is your name? AaronWhat is your age? 15
Hello AaronWhen I was your age I was 16
7.6.2 The Methods of the String Class
The String class has a number of interesting and useful methods, and we havelisted some of them in Table 7.2.
StringTestimport java.util.Scanner;
public class StringTest{
public static void main(String[] args){
Scanner keyboard = new Scanner(System.in);String name; // declaration of a Stringint age;System.out.print("What is your name? ");name = keyboard.next(); // the 'next' method is for String inputSystem.out.print("What is your age? ");age = keyboard.nextInt();System.out.println();System.out.println("Hello " + name);// now comes the joke!!System.out.println("When I was your age I was " + (age + 1));
} }
System.out.println("When I was your age I was " + (age + 1));
174 7 Classes and Objects

Table 7.2 Some String methods
Method Description Inputs Output
length Returns the length of the string None An item oftype int
charAt Accepts an integer and returns the characterat that position in the string. Note thatindexing starts from zero, not 1! You havebeen using this method in conjunction withthe next method of the Scanner class toobtain single characters from the keyboard
An itemof typeint
An item oftype char
substring Accepts two integers (for example m and n)and returns a copy of a chunk of the string.The chunk starts at position m and finishes atposition n-1. Remember that indexing startsfrom zero. (Study the example below.)
Twoitems oftype int
AStringobject
concat Accepts a string and returns a new stringwhich consists of the string that was sent injoined on to the end of the original string
AStringobject
AStringobject
toUpperCase Returns a copy of the original string, allupper case
None AStringobject
toLowerCase Returns a copy of the original string, alllower case
None AStringobject
compareTo Accepts a string (say myString) andcompares it to the object’s string. It returnszero if the strings are identical, a negativenumber if the object’s string comes beforemyString in the alphabet, and a positivenumber if it comes later
AStringobject
An item oftype int
equals Accepts an object (such as a String) andcompares this to another object (such asanother String). It returns true if theseare identical, otherwise returns false
An objectof anyclass
Abooleanvalue
equalsIgnoreCase Accepts a string and compares this to theoriginal string. It returns true if the stringsare identical (ignoring case), otherwisereturns false
AStringobject
Abooleanvalue
startsWith Accepts a string (say str) and returnstrue if the original string starts with strand false if it does not (e.g. “hello world”starts with “h” or “he” or “hel” and so on)
AStringobject
Abooleanvalue
endsWith Accepts a string (say str) and returnstrue if the original string ends with strand false if it does not (e.g. “hello world”ends with “d” or “ld” or “rld” and so on)
AStringobject
Abooleanvalue
trim Returns a String object, having removedany spaces at the beginning or end
None AStringobject
7.6 Strings 175

There are many other useful methods of the String class which you can lookup. The following program provides examples of how you can use some of themethods listed above; others are left for you to experiment with in your practicalsessions.
A sample run:
Enter a string without spaces: EuropeThe length of the string is 6The character at position 3 is rCharacters 2 to 4 are uroEurope was the string enteredThis is upper case: EUROPEThis is lower case: europe
7.6.3 Comparing Strings
When comparing two objects, such as Strings, we should do so by using amethod called equals. We should not use the equality operator (==); this shouldbe used for comparing primitive types only. If, for example, we had declared twostrings, firstString and secondString, we would compare these in, say, anif statement as follows:
StringMethodsimport java.util.Scanner;
public class StringMethods{
public static void main(String[] args){
Scanner keyboard = new Scanner(System.in);// create a new stringString str;// get the user to enter a stringSystem.out.print("Enter a string without spaces: ");str = keyboard.next();// display the length of the user's stringSystem.out.println("The length of the string is " + str.length());// display the third character of the user's stringSystem.out.println("The character at position 3 is " + str.charAt(2));// display a selected part of the user's stringSystem.out.println("Characters 2 to 4 are " + str.substring(1,4));// display the user's string joined with another stringSystem.out.println(str.concat(" was the string entered"));// display the user's string in upper caseSystem.out.println("This is upper case: " + str.toUpperCase());// display the user's string in lower caseSystem.out.println("This is lower case: " + str.toLowerCase());
} }
if(firstString.equals(secondString)){
// more code here}
176 7 Classes and Objects

Using the equality operator (==) to compare strings is a very common mistakethat is made by programmers. Doing this will not result in a compilation error, but itwon’t give you the result you expect! The reason for this is that all you are doing isfinding out whether the objects occupy the same address space in memory—whatyou actually want to be doing is comparing the actual value of the string attributesof the objects.
Notice that an object of type String can also be used within a switchstatement to check to see if it is equal to one of several possible String values.The simple StringCheckWithSwitch program below illustrates this by givinga meaning for three symbols on a game controller for a particular game:
Here is a sample run from the program:
Enter the symbol(square/circle/triangle)triangleJUMP
Here is another sample run from the program:
Enter the symbol(square/circle/triangle)squareATTACK
The String class also has a very useful method called compareTo. As youcan see from Table 7.2 this method accepts a string (called myString forexample) and compares it to the string value of the object itself. It returns zero if thestrings are identical, a negative number if the original string comes beforemyString in the alphabet, and a positive number if it comes later.
The program below provides an example of how the compareTo method isused.
StringCheckWithSwitch
import java.util.Scanner;
public class StringCheckWithSwitch{
public static void main(String[] args){
Scanner keyboard = new Scanner (System.in);String symbol;// get symbol from userSystem.out.println("Enter the symbol(square/circle/triangle)");symbol = keyboard.next();// use String object in switchswitch(symbol){
case "square": System.out.println("ATTACK"); break;case "circle": System.out.println("BLOCK"); break;case "triangle": System.out.println("JUMP"); break;default: System.out.println("Invalid Choice");
}}
}
7.6 Strings 177

Here is a sample run from the program:
Enter a String: helloEnter another String: goodbyegoodbye comes before hello in the alphabet
You should note that (as with the equals method) the compareTo method iscase-sensitive—upper-case letters will be considered as coming before lower-caseletters (their Unicode value is lower). If you are not interested in the case of the letters,you should convert both strings to upper (or lower) case before comparing them.
If all you are interested in is whether the strings are identical, it is easier to usethe equals method. If the case of the letters is not significant you can useequalsIgnoreCase.
7.6.4 Entering Strings Containing Spaces
As we mentioned above there is a problem with using the next method ofScanner when we enter strings that contain spaces. If you try this you will seethat the resulting string stops at the first space, so if you enter the string “Helloworld” for example, the resulting string would actually be “Hello”.
To enter a string that contains spaces you need to use the method nextLine.Unfortunately however there is also an issue with this. If the nextLine method isused after a nextInt or nextDouble method, then it is necessary to create aseparate Scanner object (because using the same Scanner object will make
StringComparisonimport java.util.Scanner;
public class StringComparison{
public static void main(String[] args){
Scanner keyboard = new Scanner(System.in);String string1, string2;int comparison;
// get two strings from the userSystem.out.print("Enter a String: ");string1 = keyboard.next();System.out.print("Enter another String: ");string2 = keyboard.next();
// compare the stringscomparison = string1.compareTo(string2);if(comparison < 0) // compareTo returned a negative number{
System.out.println(string1 + " comes before " + string2 + " in the alphabet");} else if(comparison > 0) // compareTo returned a positive number{
System.out.println(string2 + " comes before " + string1 + " in the alphabet");} else // compareTo returned zero{
System.out.println("The strings are identical");}
} }
178 7 Classes and Objects

your program behave erratically). So, if your intention is that the user should beable to enter strings that contain spaces, the best thing to do is to declare a separateScanner object for string input. This is illustrated below:
Here is a sample run from this program:
Enter a double: 3.4Enter an integer: 10Enter a string: Hello world
You entered:Double: 3.4Integer: 10String: Hello world
7.7 Our Own Scanner Class for Keyboard Input
It might have occurred to you that using the Scanner class to obtain keyboardinput can be a bit of a bother.
• it is necessary to create a new Scanner object in every method that uses theScanner class;
• there is no simple method such as nextChar for getting a single character likethere is for the int and double types;
• as we have just seen there is an issue when it comes to entering strings con-taining spaces.
StringExample2import java.util.Scanner;
public class StringExample2{
public static void main(String[] args) {
double d;int i;String s;Scanner keyboardString = new Scanner(System.in); // Scanner object for string inputScanner keyboard = new Scanner(System.in); // Scanner object for all other types of inputSystem.out.print("Enter a double: ");
d = keyboard.nextDouble();System.out.print("Enter an integer: ");
i = keyboard.nextInt();System.out.print("Enter a string: ");
s = keyboardString.nextLine(); // use the Scanner object reserved for string inputSystem.out.println();System.out.println("You entered: ");System.out.println("Double: " + d);System.out.println("Integer: " + i);System.out.println("String: " + s);
} }
7.6 Strings 179

To make life easier, we have created a new class which we have calledEasyScanner. In the next chapter we will “look inside” it to see how it is written—in this chapter we will just show you how to use it. The methods of EasyScannerare described in Table 7.3.
To make life really easy we have written the class so that we don’t have to createnew Scanner objects in order to use it (that is taken care of in the class itself)—and we have written it so that you can simply use the name of the class itself whenyou call a method (you will see how to do this in the next chapter). The followingprogram demonstrates how to use these methods.
You can see from this program how easy it is to call the methods, just by usingthe name of the class itself—for example:
In the next chapter you will see how it is possible to do this.Here is a sample run:
Enter a double: 23.6You entered: 23.6
Table 7.3 The inputmethods of the EasyScannerclass
Java type EasyScanner method
int nextInt()
double nextDouble()
char nextChar()
String nextString()
EasyScannerTesterpublic class EasyScannerTester { public static void main(String[] args) { System.out.print("Enter a double: "); double d = EasyScanner.nextDouble(); // to read a double System.out.println("You entered: " + d); System.out.println();
System.out.print("Enter an integer: "); int i = EasyScanner.nextInt(); // to read an int System.out.println("You entered: " + i); System.out.println();
System.out.print("Enter a string: "); String s = EasyScanner.nextString(); // to read a string System.out.println("You entered: " + s); System.out.println();
System.out.print("Enter a character: "); char c = EasyScanner.nextChar(); // to read a character System.out.println("You entered: " + c); System.out.println(); } }
double d = EasyScanner.nextDouble();
180 7 Classes and Objects
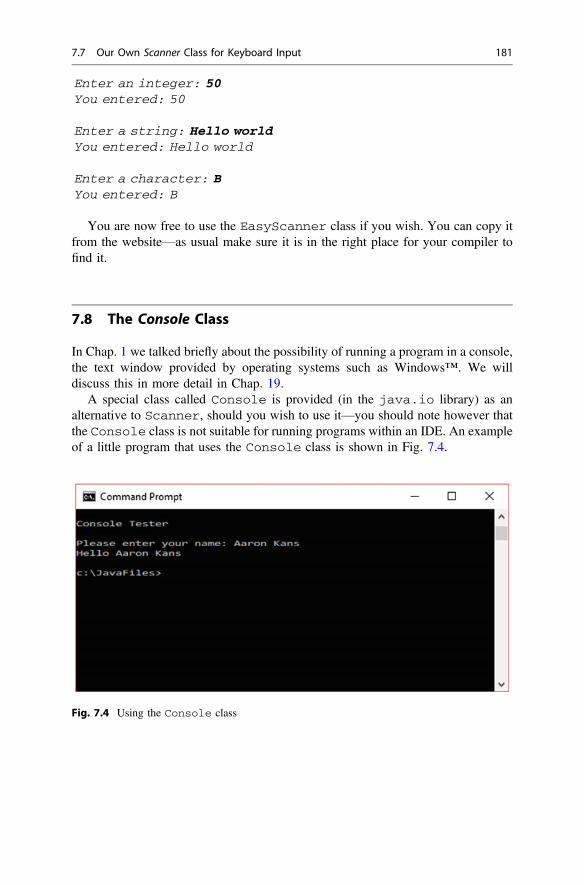
Enter an integer: 50You entered: 50
Enter a string: Hello worldYou entered: Hello world
Enter a character: BYou entered: B
You are now free to use the EasyScanner class if you wish. You can copy itfrom the website—as usual make sure it is in the right place for your compiler tofind it.
7.8 The Console Class
In Chap. 1 we talked briefly about the possibility of running a program in a console,the text window provided by operating systems such as Windows™. We willdiscuss this in more detail in Chap. 19.
A special class called Console is provided (in the java.io library) as analternative to Scanner, should you wish to use it—you should note however thatthe Console class is not suitable for running programs within an IDE. An exampleof a little program that uses the Console class is shown in Fig. 7.4.
Fig. 7.4 Using the Console class
7.7 Our Own Scanner Class for Keyboard Input 181

The program below shows how keyboard input is obtained with the Consoleclass:
You can see from the example in Fig. 7.4 that there is no problem entering astring containing spaces; if, however, you wanted to use the Console class forentering doubles or ints, you would have to enter a string and then convert thisto the desired type. You will find out how to do this in Chap. 10.
7.9 The BankAccount Class
We have created a class called BankAccount, which you can download. Thiscould be a very useful class in a real world application—for example as part of afinancial control system. Once again you do not need to look at the details of howthis class is coded in order to use it. You do need to know, however, that the classholds three pieces of information—the account number, the account name and theaccount balance. The first two of these will be String objects and the final onewill be a variable of type double.
The methods are listed in Table 7.4.The methods are straightforward, although you should pay particular attention to
the withdraw method. Our simple BankAccount class does not allow for anoverdraft facility, so, unlike the deposit method, which simply adds the specifiedamount to the balance, the withdraw method needs to check that the amount to bewithdrawn is not greater than the balance of the account; if this were to be the casethen the balance would be left unchanged. The method returns a boolean value toindicate if the withdrawal was successful or not. A boolean value of true wouldindicate success and boolean value of false would indicate failure. Thisenables a program that uses the BankAccount class to check whether the with-drawal has been made successfully. You can see how this is done in the programthat follows, which makes use of the BankAccount class.
ConsoleTester// demonstration of the console class for keyboard input
import java.io.Console;
public class ConsoleTester{
public static void main(String[] args){
System.out.println();System.out.println("Console Tester"); System.out.println();Console con = System.console();String name; // declaration of a Stringname = con.readLine("Please enter your name: "); // allow user to enter nameSystem.out.println("Hello " + name); // display a message to the user
} }
182 7 Classes and Objects

Table 7.4 The methods of the BankAccount class
Method Description Inputs Output
BankAccount A constructor. It accepts two strings andassigns them to the account number andaccount name respectively. It also sets theaccount balance to zero
TwoStringobjects
Notapplicable
getAccountNumber Returns the account number None An item oftypeString
getAccountName Returns the account name None An item oftypeString
getBalance Returns the balance None An item oftypedouble
deposit Accepts an item of type double and addsit to the balance
An item oftypedouble
None
withdraw Accepts an item of type double andchecks if there are sufficient funds to makea withdrawal. If there are not, then themethod terminates and returns a value offalse. If there are sufficient funds,however, the method subtracts the amountfrom the balance and returns a value oftrue
An item oftypedouble
An item oftypeboolean
BankAccountTesterimport java.util.Scanner;
public class BankAccountTester { public static void main(String[] args) { Scanner keyboard = new Scanner(System.in); double amount; boolean ok;
BankAccount account1 = new BankAccount("99786754","Susan Richards");
System.out.print("Enter amount to deposit: "); amount = keyboard.nextDouble(); account1.deposit(amount); System.out.println("Deposit was made"); System.out.println("Balance = " + account1.getBalance()); System.out.println();
System.out.print("Enter amount to withdraw: "); amount = keyboard.nextDouble(); ok = account1.withdraw(amount); // get the return value of the withdraw method if(ok) { System.out.println("Withdrawal made"); } else { System.out.println("Insufficient funds"); } System.out.println("Balance = " + account1.getBalance()); System.out.println(); } }
7.9 The BankAccount Class 183

The program creates a BankAccount object and then asks the user to enter anamount to deposit. It then confirms that the deposit was made and shows the newbalance.
It then does the same thing for a withdrawal. The withdraw method returns aboolean value indicating if the withdrawal has been successful or not, so we haveassigned this return value to a boolean variable, ok:
Depending on the value of this variable, the appropriate message is thendisplayed:
Two sample runs from this program are shown below. In the first the withdrawalwas successful:
Enter amount to deposit: 1000Deposit was madeBalance = 1000.0
Enter amount to withdraw: 400Withdrawal madeBalance = 600.0
In the second there were not sufficient funds to make the withdrawal:
Enter amount to deposit: 1000Deposit was madeBalance = 1000.0
Enter amount to withdraw: 1500Insufficient fundsBalance = 1000.0
ok = account1.withdraw(amount);
if(ok){ System.out.println("Withdrawal made"); }else{ System.out.println("Insufficient funds"); }
184 7 Classes and Objects

7.10 Arrays of Objects
In Chap. 6 you learnt how to create arrays of simple types such as int and char.It is perfectly possible, and often very desirable, to create arrays of objects. There,are, however, some important issues that we need to be aware of. We will illustratethis with a new version of the BankAccountTester from the previous section.In BankAccountTester2, instead of creating a single bank account, we havecreated several bank accounts by using an array. Take a look at the program, andthen we will explain the important issues to you:
The first line of the main method looks no different from the statements that yousaw in the last chapter that created arrays of primitive types:
However, what is actually going on behind the scenes is slightly different. Theabove statement does not set up an array of BankAccount objects in memory;instead it sets up an array of references to such objects (see Fig. 7.5).
At the moment, space has been reserved for the three BankAccount referencesonly, not the three BankAccount objects. As we told you earlier, when a refer-ence is initially created it points to the constant null, so at this point each ref-erence in the array points to null.
This means that memory would still need to be reserved for individualBankAccount objects each time we wish to link a BankAccount object to thearray. We can now create new BankAccount objects and associate them withelements in the array as we have done with these lines:
BankAccountTester2public class BankAccountTester2{
public static void main(String[] args){
// create an array of referencesBankAccount[] accountList = new BankAccount[3];// create three new accounts, referenced by each element in the arrayaccountList[0] = new BankAccount("99786754","Susan Richards");accountList[1] = new BankAccount("44567109","Delroy Jacobs");accountList[2] = new BankAccount("46376205","Sumana Khan");
// make various deposits and withdrawalsaccountList[0].deposit(1000);accountList[2].deposit(150);accountList[0].withdraw(500);
// print details of all three accountsfor(BankAccount item : accountList){
System.out.println("Account number: " + item.getAccountNumber());System.out.println("Account name: " + item.getAccountName());System.out.println("Current balance: " + item.getBalance());System.out.println();
} }
}
BankAccount[] accountList = new BankAccount[3];
7.10 Arrays of Objects 185

Three BankAccount objects have been created; the first one, for example, hasaccount number of “99786754” and name “Susan Richards”, and the reference ataccountList[0] is set to point to it. This is illustrated in Fig. 7.6.
Once we have created these accounts, we make some deposits and withdrawals.
Look carefully at how we do this. To call a method of a particular array element,we place the dot operator after the final bracket of the array index. This is madeclear below:
Notice that in this case when we call the withdraw method we have decidednot to check the boolean value returned.
It is not always necessary to check the return value of a method and you mayignore it if you choose.
Fig. 7.5 The effect on computer memory of creating an array of objects
accountList[0] = new BankAccount("99786754","Susan Richards");accountList[1] = new BankAccount("44567109","Delroy Jacobs");accountList[2] = new BankAccount("46376205","Sumana Khan");
accountList[0].deposit(1000);accountList[2].deposit(150);accountList[0].withdraw(500);
accountList[0].deposit(1000);
returns a BankAccount
object
calls a BankAccount
method
accountList[0].withdraw(500); // return value not checked
186 7 Classes and Objects

Having done this we display the details of all three accounts. As we are ac-cessing the entire array, we are able to use an enhanced for loop for this purpose;and since we are dealing with an array of BankAccount objects here, the type ofthe items is specified as BankAccount.
As you might expect, the output from this program is as follows:
Account number: 99786754Account name: Susan RichardsCurrent balance: 500.0
Fig. 7.6 Objects are linked to arrays by reference
for(BankAccount item : accountList) // type of items is BankAccount{
System.out.println("Account number: " + item.getAccountNumber());System.out.println("Account name: " + item.getAccountName());System.out.println("Current balance: " + item.getBalance());System.out.println();
}
7.10 Arrays of Objects 187

Account number: 44567109Account name: Delroy JacobsCurrent balance: 0.0
Account number: 46376205Account name: Sumana KhanCurrent balance: 150.0
7.11 The ArrayList Class
When you studied arrays in Chap. 6, it might have occurred to you that workingwith arrays can sometimes seem a bit cumbersome. That is because arrays are whatwe could term a “low-level” construct, which means that they mirror quite closelythe workings of the computer itself, and match the way that data is stored inmemory. As computer programmers it is vital that you have an understanding ofarrays and how they work; however in modern day computing it is not uncommonfor a programming language to provide higher level classes whose methods arecloser to how we do things in real life; these classes deal with low level detail“behind the scenes”, thus enabling the user to keep such detail at arms length.
One example of higher level classes are known as collection classes. Theseclasses allow the programmer to deal with collections such as simple lists (like theBankAccount list from the previous section) with methods that will simply add anew item to the end of the list or easily remove an item from a particular position.
Collection classes are examples of classes known as generic classes. There aresome quite advanced concepts involved in understanding generic classes, so mostof this is left until the second semester. In particular we will examine collectionclasses in depth in Chap. 15. However, here we are going to introduce you to onesuch collection class called ArrayList (which resides in the java.utillibrary) and provide you with just enough information to get you started.
You will see in the program that follows that there is some new notationinvolved. This is because when we declare an object of a collection class we need toindicate the type of object that it will hold, so you will see declarations like this:
ArrayList<BankAccount> accountList;
The type of object held is indicated within the angle brackets; so ac-countList will hold a list of BankAccounts. Similarly, if you wanted todeclare an ArrayList object called names which was to hold Strings, youwould do so like this:
ArrayList<String> names;
188 7 Classes and Objects

The program below, BankAccountTester3, rewrites Bank-AccountTester2 using an ArrayList instead of an array.
As you can see the full declaration of accountList is as follows:
When we call the constructor of a generic class we don’t need to re-state the typeof object held, so the angle brackets are left empty (this is sometimes referred to as a“diamond”). The compiler infers the type from the first part of the declaration—thisis an example of type inference (more about this in Chap. 13).
The other thing you will notice is that we don’t need to specify how many itemsan ArrayList will hold. It expands and contracts dynamically as we add andremove items.
To add items to the list we use the add method of ArrayList, which takes asa parameter the object that we are adding:
To make deposits and withdrawals, we need to retrieve the individual items thatwe require. We do this with the get method of ArrayList, which takes as aparameter the particular index (starting with zero, as with arrays):
BankAccountTester3import java.util.ArrayList;
public class BankAccountTester3 { public static void main(String[] args) {
// create an array of references ArrayList<BankAccount> accountList = new ArrayList<>();
// create three new accounts, referenced by each element in the array accountList.add(new BankAccount("99786754","Susan Richards")); accountList.add(new BankAccount("44567109","Delroy Jacobs")); accountList.add(new BankAccount("46376205","Sumana Khan"));
// make various deposits and withdrawals accountList.get(0).deposit(1000); accountList.get(2).deposit(150); accountList.get(0).withdraw(500);
// print details of all three accounts for(BankAccount item : accountList) { System.out.println("Account number: " + item.getAccountNumber()); System.out.println("Account name: " + item.getAccountName()); System.out.println("Current balance: " + item.getBalance()); System.out.println(); } } }
ArrayList<BankAccount> accountList = new ArrayList<>();
accountList.add(new BankAccount("99786754","Susan Richards"));accountList.add(new BankAccount("44567109","Delroy Jacobs"));accountList.add(new BankAccount("46376205","Sumana Khan"));
accountList.get(0).deposit(1000);accountList.get(2).deposit(150);accountList.get(0).withdraw(500);
7.11 The ArrayList Class 189

Finally we display the items—the enhanced for loop works nicely with classessuch as ArrayList, so the code for displaying the bank accounts is the same as inthe original program:
One final word about collection classes such as ArrayList. These classescannot be used to hold primitive types such as int and double. But don’tworry—there is a way around this using what are known as wrapper classes. Thesewill be introduced to you in Chap. 9.
7.12 Self-test Questions
1. Examine the program below and then answer the questions that follow:
(a) By referring to the program above distinguish between a class and an object.
(b) By referring to the program above explain the purpose of the constructor.
(c) By referring to the program above explain how you call the method of oneclass from another class.
(d) What output would you expect to see from the program above?
2. (a) Write the code that will create two BankAccount objects, acc1 andacc2. The account number and account name of each should be set at thetime the object is created.
(b) Write the lines of code that will deposit an amount of 200 into acc1 and100 into acc2.
for(BankAccount item : accountList) {
System.out.println("Account number: " + item.getAccountNumber());System.out.println("Account name: " + item.getAccountName());System.out.println("Current balance: " + item.getBalance());System.out.println();
}
public class SampleProgram{
public static void main(String[] args) {
Oblong oblong1 = new Oblong(3.0, 4.0);Oblong oblong2 = new Oblong(5.0, 6.0);System.out.println("The area of oblong1 is " + oblong1.calculateArea());System.out.println("The area of oblong2 is " + oblong2.calculateArea());
} }
190 7 Classes and Objects

(c) Write the lines of code that attempt to withdraw an amount of 150 fromacc1 and displays the message “WITHDRAWAL SUCCESSFUL” if theamount was withdrawn successfully and “INSUFFICIENT FUNDS” if itwas not.
(d) Write a line of code that will display the balance of acc1.
(e) Write a line of code that will display the balance of acc2.
3. In what way does calling methods from the EasyScanner class differ fromcalling methods from the other classes you have met (BankAccount,Oblong, String and Scanner)?
4. Consider the following fragment of code that initializes one string constant witha password (“java”) and creates a second string to hold the user’s guess for thepassword. The user is then asked to enter their guess:
(a) Write a line of code that uses the EasyScanner class to read the guessfrom the keyboard.
(b) Write the code that displays the message “CORRECT PASSWORD” if theuser entered the correct password and “INCORRECT PASSWORD” if not.
5. How do arrays of objects differ from arrays of primitive types?
6. (a) Declare an array called rooms, to hold three Oblong objects. EachOblong object will represent the dimensions of a room in an apartment.
(b) The three rooms in the apartment have the following dimensions:Add three appropriate Oblong objects to the rooms array to representthese 3 rooms.
(c) Write the line of code that would make use of the rooms array to displaythe area of room 3 to the screen.
7. Repeat the previous question using and ArrayList instead of an array.
String final PASSWORD = “java”; // set passwordString guess; // to hold user’s guessSystem.out.print(“Enter guess: “);
room 1 room 2 room 35.2m
4.7m
5.2m
5.7m
8.1m
5.0 m
7.12 Self-test Questions 191

7.13 Programming Exercises
In order to tackle these exercises make sure that the classes Oblong, Bank-Account and EasyScanner have been copied from the website and placed inthe correct directory for your compiler to access them.
1: (a) Implement the program given in self-test question 1 and run it to confirmyour answer to part (d) of that question.
(b) Adapt the program above so that the user is able to set the length and heightof the two oblongs. Make use of the EasyScanner class to read in theuser input.
2. Consider a program to enter and confirm a suitable code name for an agent.Declare two string objects, called codeName and confirm and then
(a) Prompt to get the user to enter a suitable name into the codeName string;
(b) Use a while loop to ensure that the string entered is greater than 6 char-acters in length, if it is not print “INVALID CODENAME” and ask the userto re-enter a code name;
(c) Once a valid code name has been entered ask the user to re-enter the codename into the confirm string and then use an if else statement to ensurethat the string entered matches the original code name; if it does, print amessage “CODE NAME CONFIRMED” otherwise print a message saying“CODE NAME MIS-MATCH”;
(d) Use the charAt method to ensure that the code name ends with an ‘X’character;
(e) Finally use the startsWith method to ensure that, as well as beinggreater than 6 characters in length, the code name entered also starts with thewords “Agent”.
3. Adapt the StringComparison program from Sect. 7.6.3, which comparestwo strings, in the following ways:
(a) Rewrite the program so that it ignores case;
(b) Rewrite the program, using the equals method, so that all it does is to testwhether the two strings are the same;
(c) Repeat (b) using the equalsIgnoreCase method;
(d) Use the trim method so that the program ignores leading or trailing spaces.
4. Design and implement a program that performs in the following way:
192 7 Classes and Objects

• When the program starts, two bank accounts are created, using names andnumbers which are written into the code;
• The user is then asked to enter an account number, followed by an amount todeposit in that account;
• The balance of the appropriate account is then updated accordingly—or if anincorrect account number was entered a message to this effect is displayed;
• The user is then asked if he or she wishes to make more deposits;
• If the user answers does wish to make more deposits, the process continues;
• If the user does not wish to make more deposits, then details of both accounts(account number, account name and balance) are displayed.
5. Write a program that creates an array of Oblong objects to represent thedimensions of rooms in an apartment as described in self test question 6. Theprogram should allow the user to:
• Determine the number of rooms;
• Enter the dimensions of the rooms;
• Retrieve the area and dimensions of any of the rooms.
6. Repeat the previous question making use of the ArrayList class.
7.13 Programming Exercises 193

8Implementing Classes
Outcomes:
By the end of this chapter you should be able to:
• design classes using the notation of the Unified Modeling Language (UML);• write the Java code for a specified class;• explain the difference between public and private access to attributes and
methods;• explain the meaning of the term encapsulation;• explain the use of the static keyword;• pass objects as parameters;• develop their own collection classes in Java;• identify the advantages of object-oriented programming.
8.1 Introduction
This chapter is arguably the most important so far, because it is here that you aregoing to learn how to develop the classes that you need for your programs. You arealready familiar with the concept of a class, and the idea that we can create objectsthat belong to a class; in the last chapter you saw how to create and use objects, andyou saw how we could use the methods of a class without knowing anything abouthow they work.
In this chapter you will look inside the classes you have studied to see how theyare constructed, and how you can write classes of your own. We start with theOblong class.
© Springer Nature Switzerland AG 2019Q. Charatan and A. Kans, Java in Two Semesters, Texts in Computer Science,https://doi.org/10.1007/978-3-319-99420-8_8
195

8.2 Designing Classes in UML Notation
In the last chapter you saw that a class consists of:
• a set of attributes (the data);• a set of methods that can access or change those attributes.
When we design a class we must, of course, consider what data the class needsto hold, and what methods are needed to access that data. The Oblong class thatwe develop here will need to hold two items of data—the length and the height ofthe oblong; these will have to be real numbers, so double would be the appro-priate type for each of these two attributes. You have already seen the methods thatwe provided for this class in Table 7.1 in the previous chapter.
When we design classes, it is very useful to start off by using a diagrammaticnotation. The usual way this is done is by making use of the notation of the UnifiedModeling Language (UML).1 In this notation, a class is represented by a boxdivided into three sections. The first section provides the name of the class, thesecond section lists the attributes, and the third section lists the methods. The UMLclass diagram for the Oblong class is shown in Fig. 8.1.
You can see that the UML notation requires us to indicate the names of theattributes along with their types, separated by a colon.
In the last chapter we introduced you to the concept of encapsulation orinformation-hiding. This is the technique of making attributes accessible only to themethods of the same class, and it is this feature of object-oriented languages that hascontributed to object-orientation becoming the standard way of programming intoday’s world. By restricting access in this way, programmers can keep the data intheir classes “sealed off” from other classes, because they are the ones in control ofhow it is actually accessed.
Class nameOblong
-length : double-height : double
+Oblong(double, double)+getLength() : double+getHeight() : double+setLength(double)+setHeight(double)+calculateArea() : double+calculatePerimeter() : double
Attributes
Methods
Fig. 8.1 The design of theOblong class
1Martina Seidl et al., UML @Classroom, An Introduction to Object Oriented Modeling, Springer2015.
196 8 Implementing Classes

The way our Oblong class has been set up means that you cannot directly usethe length and height attributes in another program. If you want to find out thearea of the oblong in, say, the main method of another program then you can’t dothis by accessing the length and height data directly, because access to theseattributes is denied.
Instead we would, as you know, call the calculateArea method of theOblong object. We design our classes like this because doing so means thatno-one can inadvertently change the values of length and height—our data iskept secure. If access to these attributes were not restricted in this way, then thelength and height data could inadvertently be changed. Instead we limit accessof the Oblong class to its methods. This is illustrated in Fig. 8.2.
The plus and minus signs that you can see in the UML diagram in Fig. 8.1 are allto do with this idea of encapsulation; a minus sign means that the attribute ormethod is private—that is, it is accessible only to methods within the same class.A plus sign means that it is public—it is accessible to methods of other classes.Normally we make the attributes private, and the methods public, in this wayachieving encapsulation. You will see how it is done in a Java class in the nextsection.
Now let’s consider the notation for the methods. You can see from the diagramthat the parameter types are given in brackets—for example:
+setLength(double)
Here you can see that the setLength method requires one double parameter (inthis case the new length value). The return types are placed after the brackets,preceded by a colon—for example:
Program
calculateArea
Data
main
Oblong object
Fig. 8.2 Encapsulation requires data be kept hidden inside an object
8.2 Designing Classes in UML Notation 197

+getLength() : double
Here you can see that the getLength method returns a value of type double (inthis case the current value of the private length attribute).
Where there is no return type, nothing appears after the brackets, as in thesetlength and setHeight methods.
The first method, Oblong, is the constructor. As we know the constructoralways has the same name as the class, and in this case it requires two parameters oftype double:
+Oblong(double, double)You should note that a constructor never has a return type. In fact you will see
later that in Java we don’t even put the word void in front of a constructor; if wedid the compiler would think it was a regular method.
As you saw in the previous chapter, we have provided our Oblong class withmethods for reading and writing to the attributes—and it is conventional to beginthe name of such methods with get- and set-respectively. However, it is notalways the case that we choose to supply methods such as setLength andsetHeight, which allow us to change the attributes. Sometimes we set up ourclass so that the only way that we can assign values to the attributes is via theconstructor. This would mean that the values of the length and height could beset only at the time a new Oblong object was created, and could not be changedafter that. Whether or not you want to provide a means of writing to individualattributes depends on the nature of the system you are developing and should bediscussed with potential users. However, we believe that it is a good policy toprovide write access to only those attributes that clearly require to be changedduring the object’s lifetime, and we have taken this approach throughout this book.In this case we have included “set” methods for length and height because weare going to need them in Chap. 10.
8.3 Implementing Classes in Java
8.3.1 The Oblong Class
Now that we have the basic design of the Oblong class we can go ahead and writethe Java code for it. We present the code here—when you have had a look at it wewill discuss it.
198 8 Implementing Classes

Let’s take a closer look at this. The first line declares the Oblong class:
Next come the attributes. An Oblong object will need attributes to hold valuesfor the length and the height of the oblong, and these will be of type double. Thedeclaration of the attributes in the Oblong class took the following form in ourUML diagram:
-length : double-height : double
The Oblong classpublic class Oblong { // the attributes private double length; private double height;
// the methods
// the constructor public Oblong(double lengthIn, double heightIn) { length = lengthIn; height = heightIn; }
// this method allows us to read the length attribute public double getLength() { return length; }
// this method allows us to read the height attribute public double getHeight() { return height; }
// this method allows us to write to the length attribute public void setLength(double lengthIn) { length = lengthIn; }
// this method allows us to write to the height attribute public void setHeight(double heightIn) { height = heightIn; }
// this method returns the area of the Oblong public double calculateArea() { return length * height; }
// this method returns the perimeter of the Oblong public double calculatePerimeter() { return 2 * (length + height);
}}
public class Oblong
8.3 Implementing Classes in Java 199

In Java this is implemented as:
As you can see, attributes are declared like any other variables, except that theyare declared outside of any method, and they also have an additional word in frontof them—the word private, corresponding to the minus sign in the UMLnotation. In Java, this keyword is used to restrict the scope of the attributes tomethods of this class only, as we described above.
You should note that the attributes of a class are accessible to all the methods ofthe class—unlike local variables, which are accessible only to the methods in whichthey are declared.
Figure 8.1 made it clear which methods we need to define within our Oblong class.First comes the constructor. You should recall that it has the same name as the class,and, unlike any other method, it has no return type—not even void! It looks like this.
The first thing to notice is that this method is declared as public. Unlike theattributes, we want our methods to be accessible from outside so that they can becalled by methods of other classes.
In our class we are defining the constructor so that when a new Oblong object iscreated (with the keyword new) then not only do we get some space reserved inmemory, but some other stuff occurs also; in this case two assignment statements areexecuted. The first assigns the value of the parameter lengthIn to the lengthattribute, and the second assigns the value of the parameter heightIn to the heightattribute. We are sticking to our naming convention for attributes here by appending theword ‘In’ to them, but of course you can use any names for your parameters. Rememberonce again that the attributes are visible to all the methods of the class.
When we define a constructor like this in a class it is termed a user-defined2
constructor. If we don’t define our own constructor, then one is automaticallyprovided for us—this is referred to as the default constructor. The default con-structor takes no parameters and when it is used to create an object—for example ina line like this:
private double length; private double height;
public Oblong(double lengthIn, double heightIn) { length = lengthIn; height = heightIn; }
Oblong myOblong = new Oblong();
2Here the word user is referring to the person writing the program, not the person using it!
200 8 Implementing Classes

then all that happens is that memory is reserved for the new object—no otherprocessing takes place. Any attributes will be given initial values according to therules that we give you later in Sect. 8.5.
One more thing about constructors: once we have defined our own constructors, thisdefault constructor is no longer automatically available. If we want it to be availablethen we have to re-define it explicitly. In the Oblong case we would define it as:
You can see that just like regular methods, constructers can be overloaded, andwe can define several constructors in one class. When we create an object it will beclear from the parameter list which constructor we are referring to.
Now let’s take a look at the definition of the next method, getLength. Thepurpose of this method is simply to send back the value of the length attribute. Inthe UML diagram it was declared as:
+getLength() : double
In Java this becomes:
Once again you can see that the method has been declared as public (indicatedby the plus sign in UML), enabling it to be accessed by methods of other classes.
The next method, getHeight, behaves in the same way in respect of theheight attribute.
Next comes the setLength method:
+setLength(double)
We implement this as:
This method does not return a value, so its return type is void. However, it doesrequire a parameter of type double that it will assign to the length attribute. Thebody of the method consists of a single line which assigns the value of lengthInto the length attribute.
The next method, setHeight, behaves in the same way in respect of theheight attribute.
public Oblong() {}
public double getLength() { return length; }
public void setLength(double lengthIn) { length = lengthIn; }
8.3 Implementing Classes in Java 201

After this comes the calculateArea method:
+calculateArea() : double
We implement this as:
Once again there are no formal parameters, as this method does not need anydata in order to do its job; it returns a double. The actual code is just one line,namely the statement that returns the area of the oblong, calculated by multiplyingthe value of the length attribute by the value of the height attribute.
The calculatePerimeter method is similar and thus the definition of theOblong class is now complete.
One important thing to note here. Unlike some of the methods we developed inChap. 5, the methods that we have defined here deal only with the basic func-tionality of the class—they do not include any routines that deal with input oroutput. That is because the methods of Chap. 5 were only being used by the class inwhich they were written—but now our methods will be used by other classes thatwe cannot as yet predict. So when developing a class we should always strive torestrict our methods to the essential functions that define the class (in this case, forexample, calculating the area and perimeter of the oblong), and to exclude anythingthat is concerned with the input or output functions of a program. If we do this, thenour class can be used in any sort of application, regardless of whether it is a simpleconsole application like the ones we have developed so far, or a complex graphicalapplication like the ones you will come across later in this book.
8.3.2 The BankAccount Class
The UML class diagram for the BankAccount class, which we used in theprevious chapter, is shown in Fig. 8.3.
public double calculateArea() { return length * height; }
BankAccount
-accountNumber : String-accountName : String-balance : double
+BankAccount (String, String)+getAccountNumber() : String+getAccountName() : String+getBalance() : double+deposit(double)+withdraw(double) : boolean
Fig. 8.3 The design of BankAccount class
202 8 Implementing Classes

You will notice here that accountNumber and accountName are declared asStrings; it is perfectly possible for the attributes of one class to be objects of anotherclass.
We can now inspect the code for this class:
Now that we are getting the idea of how to define a class in Java, we do not needto go into so much detail in our analysis and explanation.
The first three lines declare the attributes of the class, and are as we would expect:
private String accountNumber; private String accountName; private double balance;
8.3 Implementing Classes in Java 203

Now the constructor:
You can see that when a new object of the BankAccount class is created, theaccountName and accountNumber will be assigned the values of theparameters passed to the method. In this case, the balance will be assigned thevalue zero; this makes sense because when someone opens a new account there is azero balance until a deposit is made.3
The next three methods, getAccountNumber, getAccountName andgetBalance, are all set up so that the values of the corresponding attributes(which of course have been declared as private) can be read.
After these we have the deposit method:
This method does not return a value; it is therefore declared to be of type void.It does however require that a value is sent in (the amount to be deposited), andtherefore has one parameter—of type double—in the brackets. As you wouldexpect with this method, the action consists of adding the deposit to the balanceattribute of the BankAccount object.
Now the withdraw method:
public BankAccount(String numberIn, String nameIn) { accountNumber = numberIn; accountName = nameIn; balance = 0; }
public void deposit(double amountIn) { balance = balance + amountIn; }
public boolean withdraw(double amountIn) { if(amountIn > balance) { return false; // no withdrawal was made } else { balance = balance – amountIn; return true; // money was withdrawn successfully } }
3You would be right in thinking that the balance attribute would automatically be assigned a valueof zero if we did not specifically do that here. However it is good practice always to ensure thatvariables are initialized with the values that we require—particularly because in many otherprogramming languages attributes are not initialized as they are in Java.
204 8 Implementing Classes

The amount is subtracted only if there are sufficient funds—in other words if theamount to be withdrawn is no bigger than the balance. If this is not the case then avalue of false is returned and the method terminates. Otherwise the amount issubtracted from the balance and a value of true is returned. The return type of themethod therefore is boolean.
8.4 The static Keyword
You have already seen the keyword static in front of the names of methods insome Java classes. A word such as this (as well as the words public andprivate) is called a modifier. A modifier determines the particular way a class,attribute or method is accessed.
Let’s explore what this static modifier does. Consider the BankAccountclass that we discussed in the previous section. Say we wanted to have an additionalmethod which added interest, at the current rate, to the customer’s balance. It wouldbe useful to have an attribute called interestRate to hold the value of the currentrate of interest. But of course the interest rate is the same for any customer—and if itchanges, we want it to change for every customer in the bank; in other words forevery object of the class. We can achieve this by declaring the variable as static.An attribute declared as static is a class attribute; any changes that are made to itare made to all the objects in the class. The way this is achieved is by the programcreating only one copy of the attribute and making it accessible to all objects.
It would make sense if there were a way to access this attribute without referenceto a specific object; and so there is! All we have to do is to declare methods such assetInterestRate and getInterestRate as static. This makes amethod into a class method; it does not refer to any specific object. As you will seein our next program, BankAccountTester2, we can call a class method byusing the class name instead of the object name.
BankAccount2
-accountNumber : String-accountName : String-balance : double-interestRate : double
+BankAccount2 (String, String)+getAccountNumber() : String+getAccountName() : String+getBalance() : double+deposit(double)+withdraw(double) : boolean+setInterestRate(double)+getInterestRate() : double+addInterest()
Fig. 8.4 The design of theBankAccount2 class
8.3 Implementing Classes in Java 205
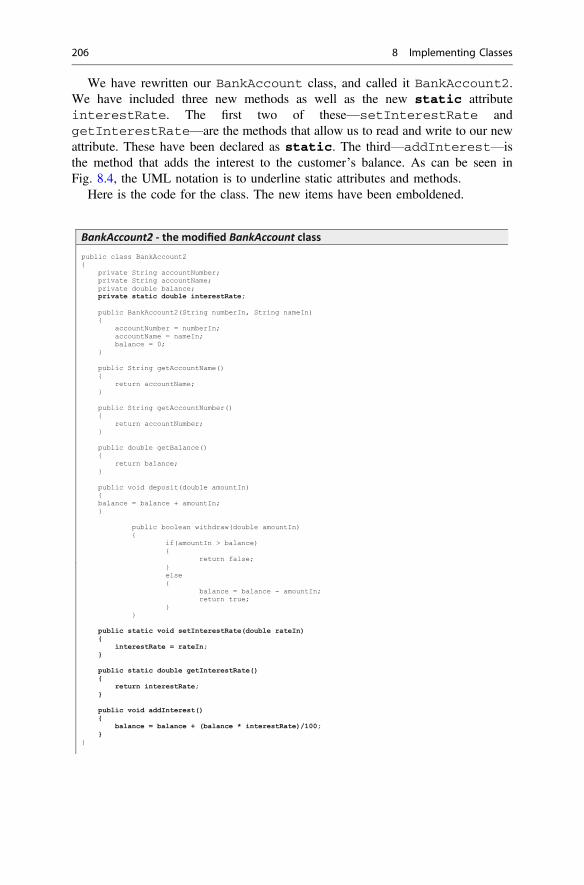
We have rewritten our BankAccount class, and called it BankAccount2.We have included three new methods as well as the new static attributeinterestRate. The first two of these—setInterestRate andgetInterestRate—are the methods that allow us to read and write to our newattribute. These have been declared as static. The third—addInterest—isthe method that adds the interest to the customer’s balance. As can be seen inFig. 8.4, the UML notation is to underline static attributes and methods.
Here is the code for the class. The new items have been emboldened.
BankAccount2 - the modified BankAccount classpublic class BankAccount2 { private String accountNumber; private String accountName; private double balance;
private static double interestRate; public BankAccount2(String numberIn, String nameIn) { accountNumber = numberIn; accountName = nameIn; balance = 0; }
public String getAccountName() { return accountName; }
public String getAccountNumber() { return accountNumber; }
public double getBalance() { return balance; }
public void deposit(double amountIn) { balance = balance + amountIn; }
public boolean withdraw(double amountIn) { if(amountIn > balance) { return false; } else { balance = balance - amountIn; return true; } }
public static void setInterestRate(double rateIn) { interestRate = rateIn; } public static double getInterestRate() { return interestRate; } public void addInterest() { balance = balance + (balance * interestRate)/100; } }
206 8 Implementing Classes

The following program, BankAccountTester2, uses this modified versionof the BankAccount class.
Take a closer look at the first four lines of the main method of the aboveprogram. We have created two new bank accounts which we have called ac-count1 and account2, and have assigned account numbers and names to themat the time they were created (via the constructor). We have then deposited amountsof 1000 and 2000 respectively into each of these accounts.
Now look at the next line:
This line sets the interest rate to 10. Because setInterestRate has beendeclared as a static method, we have been able to call it by using the class nameBankAccount2. Because interestRate has been declared as a staticattribute this change is effective for any object of the class. Therefore, when we addinterest to each account as we do with the next two lines:
we should expect it to be calculated with an interest rate of 10, giving us newbalances of 1100 and 2200 respectively.
BankAccount2.setInterestRate(10);
account1.addInterest(); account2.addInterest();
8.4 The static Keyword 207

This is exactly what we get, as can be seen from the output below:
Account number: 99786754Account name: Gayle ForcewindInterest Rate 10.0Current balance: 1100.0
Account number: 99887776Account name: Stan Dandy-LiverInterest Rate 10.0Current balance: 2200.0
Class methods can be very useful indeed and we shall see further examples ofthem in this chapter. Of course, we have always declared our main method, andother methods within the same class as the main method, as static—becausethese methods belong to the class and not to a specific object.
8.5 Initializing Attributes
Looking back at the BankAccount2 class in the previous section, some of youmight have been asking yourselves what would happen if we called thegetInterestRate method before the interest rate had been set using thesetInterestRate method. In fact, the answer is that a value of zero would bereturned. This is because, while Java does not give an initial value to local variables(which is why you get a compiler error if you try to use an uninitialized variable),Java always initializes attributes. Numerical attributes such as int and doubleare initialized to zero; boolean attributes are initialized to false and objects areinitialized to null. Character attributes are given an initial Unicode value of zero.
Despite the above, it is nonetheless good programming practice always to givean initial value to your attributes, rather than leave it to the compiler. One very goodreason for this is that you cannot assume that every programming language ini-tializes variables in the same way—if you were using C++, for example, the initialvalue of any variable is completely a matter of chance—and you won’t get acompiler error to warn you! In the BankAccount2 class, it would have done noharm at all to have initialized the interestRate variable when it was declared:
In fact, one technique you could use is to give the interestRate attributesome special initial value (such as a negative value) to indicate to the user of thisclass that the interest rate had not been set. You will see another example where thistechnique can be used in question 2 of the programming exercises.
private static double interestRate = 0;
208 8 Implementing Classes

8.6 The EasyScanner Class
In the previous chapter we used a class called EasyScanner that could makekeyboard input a lot easier. We have now covered all the concepts you need inorder to understand how this class works. Here it is:
You can see that we have made every method a static method, so that we cansimply use the class name when we call a method. For example:
You can see that the nextString method uses the nextLine method of theScanner class—but as a new Scanner object is created each time the method iscalled there is no problem about using it after a nextInt or a nextDoublemethod as there is with nextLine itself.
We will use the EasyScanner class later, in Sect. 8.8.2.
8.7 Passing Objects as Parameters
In Chap. 5 it was made clear that when a variable is passed to a method it is simplythe value of that variable that is passed—and that therefore a method cannot changethe value of the original variable. In Chap. 6 you found out that in the case of an
The EasyScanner classimport java.util.Scanner;
public class EasyScanner { public static int nextInt() { Scanner keyboard = new Scanner(System.in); int i = keyboard.nextInt(); return i; }
public static double nextDouble() { Scanner keyboard = new Scanner(System.in); double d = keyboard.nextDouble(); return d; }
public static String nextString() { Scanner keyboard = new Scanner(System.in); String s = keyboard.nextLine(); return s; }
public static char nextChar() { Scanner keyboard = new Scanner(System.in); char c = keyboard.next().charAt(0); return c; } }
int number = EasyScanner.nextInt();
8.6 The EasyScanner Class 209

array it is the value of the memory location (a reference) that is passed and con-sequently the value of the original array elements can be changed by the calledmethod.
What about objects? Let’s write a little program (ParameterTest) to test thisout.
The output from this program is as follows:
Account Number: 1Account Name: Ann T DoteBalance: 2500.0
You can see that the deposit has successfully been made—in other words theattribute of the object has actually been changed. This is because what was sent to themethod was, of course, a reference to the original BankAccount object, testA-ccount. Thus accountIn is a copy of the testAccount reference and so pointsto the original object and invokes that object’s methods. So the following line of code:
calls the deposit method of the original BankAccount object.You might think this is a very good thing, and will make life easier for you as a
programmer. However, you need a word of caution here. It is very easy inadver-tently to allow a method to change an object’s attributes, so you need to take care—more about this in the second semester.
ParameterTestpublic class ParameterTest { public static void main(String[] args) { // create new bank account BankAccount testAccount = new BankAccount("1", "Ann T Dote"); test(testAccount); // send the account to the test method System.out.println("Account Number: " + testAccount.getAccountNumber()); System.out.println("Account Name: " + testAccount.getAccountName()); System.out.println("Balance: " + testAccount.getBalance()); }
// a method that makes a deposit in the bank account static void test(BankAccount accountIn) { accountIn.deposit(2500); } }
accountIn.deposit(2500);
210 8 Implementing Classes

8.8 Collection Classes
In Chap. 7 we introduced you to the idea of a collection class—a class which holdsa collection of objects. We showed you how to use the ArrayList class to hold acollection of objects of a specific type, and how to use a couple of ArrayListmethods.
Methods of Java’s collection classes are of course not tailored to any specifictype. A method such as remove, for example, requires us to send in a reference tothe object to be removed. Normally, however, we would reference an object such asa bank account by a unique field such as an account number—so any program usingan ArrayList would need to first search the list to find the object we want, andthen to remove it.
While this approach would work perfectly well, it would be a lot more conve-nient if we could tailor our collection classes so that they provided the specificmethods that we need. For example, in the case of a list of bank accounts it wouldbe useful to deposit or withdraw funds from a specific account referenced by itsaccount number, or to remove an account with a particular number.
We can do this quite easily by creating our own collection class with an attributewhich is itself a collection, such as ArrayList. We have done this below; wehave called our collection class Bank.
8.8.1 The Bank Class
When one object itself consists of other objects, this relationship is called aggre-gation. This association, represented in UML by a diamond, is often referred to as apart-of relationship. For example, the association between a car and the passengersin the car is aggregation. Composition (represented by a filled diamond) is aspecial, stronger, form of aggregation whereby the “whole” is actually dependenton the “part”. For example, the association between a car and its engine is one ofcomposition, as a car cannot exist without an engine. A collection class is animplementation of the aggregation relationship.
The association between the container object, Bank, and the contained object,BankAccount, is shown in the UML diagram of Fig. 8.5.
Fig. 8.5 The Bank object can contain many BankAccount objects
8.8 Collection Classes 211

The asterisk at the other end of the joining line indicates that the Bank objectcontains zero or more BankAccount objects. The design for the Bank class isnow given in Fig. 8.6.
As can be seen in Fig. 8.6, the class will have a single attribute, list, which isa collection of BankAccounts. Here we have decided to use an ArrayList ofBankAccount objects to store this collection:
-list: ArrayList <BankAccount>
There are seven methods, which are described below:
-search(String) : intThis is what we can term a helper method; it will be declared as private (notethe minus sign in the UML notation), because it is not intended for it to be called byother classes. It accepts a String representing the account number. It then returnsthe index of the account with that account number in the ArrayList. If theaccount number does not exist, then a “phoney” index (−999) will be returned toindicate failure.
+getTotal(): intThis method simply returns the total number of accounts currently in the system.
Bank
-list: ArrayList <BankAccount>
-search(String) : int+getTotal() : int+getItem(String) : BankAccount+addAccount(String, String) : boolean+depositMoney(String, double) : boolean+withdrawMoney(String, double) : boolean+removeAccount(String) : boolean
Fig. 8.6 The design of the Bank class
212 8 Implementing Classes

+getItem(String): BankAccount
This method receives a String representing an account number, and returns theBankAccount with that account number.
If the account number is not valid, a null value will be returned.
+addAccount(String, String): boolean
This method receives two strings representing the account number and namerespectively, and adds an account with these details to the list of accounts. If anaccount with this number already exists, the new account will not be added and themethod will return a value offalse. However, if the operation has been completedsuccessfully a value of true is returned.
+depositMoney(String, double) : boolean
Accepts a String, representing the account number of a particular account, and anamount of money which is to be deposited in that account. Returns true if thedeposit was made successfully, or false otherwise (no such account number).
+withdrawMoney(String, double) : boolean
Accepts a String, representing the account number of a particular account, and anamount of money which is to be withdrawn from that account. Returns true if thewithdrawal was made successfully, or false otherwise. The reason for thewithdrawal not taking place could be that there is no such account number or thatthere are insufficient funds. In this version of Bank, the method does not indicatewhich of these reasons caused the failure—that is left for you as an end of chapterexercise.
+removeAccount(String) : boolean
Accepts a String, representing an account number, and removes that accountfrom the list. Returns true if the account was removed successfully, or falseotherwise (no such account number).
The code for the Bank class is presented below. Take a careful look at it, thenwe will discuss it.
8.8 Collection Classes 213

The Bank classimport java.util.ArrayList;
public class Bank {
ArrayList<BankAccount> list = new ArrayList<>();
// helper method to find the index of a specified account private int search(String accountNumberIn) { for(int i = 0; i <= list.size() - 1; i++) { BankAccount tempAccount = list.get(i); // find the account at index i String tempNumber = tempAccount.getAccountNumber(); // get account number if(tempNumber.equals(accountNumberIn)) // if this is the account we are looking for { return i; // return the index } } return -999; }
// return the total number of items public int getTotal() { return list.size(); }
// return an account with a particular account number public BankAccount getItem(String accountNumberIn) { int index = search(accountNumberIn); if(index != -999) // check that account exists { return list.get(index); } else { return null; // no such account } }
// add an item to the list public boolean addAccount(String accountNumberIn, String nameIn) { if(search(accountNumberIn) == -999) // check that account does not already exist { list.add(new BankAccount(accountNumberIn, nameIn)); // add new account return true; } return false; }
// deposit money in a specified account public boolean depositMoney(String accountNumberIn, double amountIn) { BankAccount acc = getItem(accountNumberIn); if(acc != null) { acc.deposit(amountIn); return true; // indicate success } else { return false; // indicate failure } }
// withdraw money from a specified account public boolean withdrawMoney(String accountNumberIn, double amountIn) { BankAccount acc = getItem(accountNumberIn); if(acc != null && acc.getBalance() >= amountIn) { acc.withdraw(amountIn); return true; // indicate success } else { return false; // indicate failure } }
// remove an account public boolean removeAccount(String accountNumberIn) { int index = search(accountNumberIn); // find index of account if(index != -999) // if account exists account { list.remove(index); return true; // remove was successful } else { return false; // remove was unsuccessful } } }
214 8 Implementing Classes

As you can see, we have declared and initialized a single attribute, anArrayList which will hold BankAccount objects.
Now the methods. Firstly the search method, which is declared as privatebecause it is there only to assist other methods of the class, rather than to beaccessed by other classes:
You have seen something like this before in Chap. 6 when we searched aninteger array—you can see we are using the same technique of sending back a“dummy” value if the account number is not valid.
On each iteration of the loop the account at that index is retrieved using the getmethod of ArrayList and assigned to a BankAccount object, tempAc-count. The account number of tempAccount is then assigned to a Stringvariable tempNumber. This is compared with the account number that has beeninput. If the account number matches, the loop returns the index of that item andterminates. Otherwise, the loop continues to the end of the list (determined by usingthe size method of ArrayList). The method then returns the dummy value of−999, indicating that no item with that account number exists.
The next method simply returns the total number of items currently in the list,again using the size method of ArrayList:
Next we have a method to retrieve an account with a particular account number:
ArrayList<BankAccount> list = new ArrayList<>();
private int search(String accountNumberIn) { for(int i = 0; i <= list.size() - 1; i++) { BankAccount tempAccount = list.get(i); 11"hkpf"vjg"ceeqwpv"cv"kpfgz"k String tempNumber = tempAccount.getAccountNumber(); 11"igv"ceeqwpv"pwodgt if(tempNumber.equals(accountNumberIn)) 11"kh"vjku"ku"vjg"ceeqwpv"yg"ctg"nqqmkpi"hqt" { return i; 11"tgvwtp"vjg"kpfgz } } return -999; }
public int getTotal() { return list.size(); }
public BankAccount getItem(String accountNumberIn) { int index = search(accountNumberIn); if(index != -999) // check that account exists { return list.get(index); } else { return null; // no such account } }
8.8 Collection Classes 215

Here you can see how we utilize our searchmethod—we use it to find the indexof the account with the given account number, then we check that the index is notequal to −999 (in other words that the account exists), and as long it is a valid indexwe return the relevant account. If the index is not valid a null value is returned.
Now we come to the addAccount method:
Once again we use the search method, this time to check that an account withthis number does not already exist—so we are hoping that search returns a value−999. If this is the case we use the add method of ArrayList to add a newBankAccount object, which we create from the account number and accountname that are received as parameters to the method—the method then returnstrue, indicating success.
Should the account already exist, a value of false is returned, indicating thatno new account was added.
Now for the depositMoney method.
The method receives the account number of the account in which we wish toplace the money, and the amount to be deposited. We retrieve the correct accountwith the getItem method that we developed earlier. We check that this is not anull value, and if all is well we use the deposit method of BankAccount todeposit the money, and return a value of true, to indicate success. If the accountreturned was null, that indicates that there was no account with the accountnumber in question, and in that case a value of false is returned.
The withdrawMoney method is similar except that we need to have anadditional check in the if statement to see whether or not there were sufficientfunds for the withdrawal to go ahead:
public boolean depositMoney(String accountNumberIn, double amountIn) { BankAccount acc = getItem(accountNumberIn); if(acc != null) { acc.deposit(amountIn); return true; // indicate success } else { return false; // indicate failure } }
public boolean addAccount(String accountNumberIn, String nameIn) { if(search(accountNumberIn) == -999) // check that account does not already exist { list.add(new BankAccount(accountNumberIn, nameIn)); // add new account return true; } return false; }
216 8 Implementing Classes

As we mentioned above, the method could be improved if there were a way todetermine whether the withdrawal was declined because there was no such accountor because there were insufficient funds. This is left for the exercises at the end ofthe chapter.
Finally we have the method that removes an account:
As you can see, we make use of the remove method of ArrayList, whichremoves an item at a particular index. The index is found by calling the searchmethod as before, and as before we first test to make sure the account exists; if itdoes, then the account is removed and a value of true is returned—if not themethod returns a value of false.
It is worth considering how much more complex it would have been to removean item from the collection if we had used an array rather than an ArrayList.Since the array might be only partially full, we would have to introduce a variableto keep track of the position of the last item in the array. Then all the itemsfollowing the one to be removed would have to be shuffled along by one position inorder to overwrite the given item. Finally, we would need to make sure when anynew item is added, it is added to the end of the reduced array, so we would have toreduce the ‘end-of-array’ variable by 1. That’s rather a lot of work we don’t need todo now we have used an ArrayList and can do all that with just one call to itsremove method!
8.8.2 Testing the Bank Class
The program below, BankApplication uses the Bank class—notice that weare using our new EasyScanner class here.
public boolean removeAccount(String accountNumberIn) { int index = search(accountNumberIn); // find index of account if(index != -999) // if account exists account { list.remove(index); return true; // remove was successful } else { return false; // remove was unsuccessful } }
public boolean withdrawMoney(String accountNumberIn, double amountIn) { BankAccount acc = getItem(accountNumberIn); if(acc != null && acc.getBalance() >= amountIn) { acc.withdraw(amountIn); return true; // indicate success } else { return false; // indicate failure } }
8.8 Collection Classes 217

218 8 Implementing Classes

You are familiar with this sort of menu-driven program, so there is not too muchto say about it, except to observe that this is probably the first example of anapplication which, although not all that complex, could actually be thought of as thekind of application that could be used in a real business environment. Of course, inthe outside world such applications are much more sophisticated than this, but theyare, in principle, not too different from the sort of thing we have just done. Noticethat our application involves a number of classes that we have written ourselves,and have pulled together to form a single application.
8.8 Collection Classes 219

It is worth drawing attention to the way that the program makes use of some ofthe features of the Bank class that we incorporated into the BankApplication.For example, in option1 (and similarly in other methods) we make use of the factthat the addAccount method of Bank returns true if the new account wassuccessfully added, and false otherwise:
In a similar way, in option5, we use the fact that the getItem methodreturns null if the account was not found:
206
boolean success = bankIn.addAccount(number, name); if(success) { System.out.println("Account added"); }else{ System.out.println("Account number already exists"); }
if(account != null) { System.out.println("Account number: " + account.getAccountNumber()); System.out.println("Account name: " +account.getAccountName()); System.out.println("Balance: " + account.getBalance()); System.out.println(); }else{ System.out.println("No such account"); }
We end this chapter with an example program run from BankApplication,followed by a few ideas on how our application could be improved.
1. Create new account2. Remove an account3. Deposit money4. Withdraw money5. Check account details6. Quit
Enter choice [1–6]: 1
Enter account number: 63488965Enter account name: Mary Land–CookiesAccount added
1. Create new account2. Remove an account3. Deposit money4. Withdraw money5. Check account details6. Quit
220 8 Implementing Classes

Enter choice [1–6]: 1
Enter account number: 98654322Enter account name: Laura NorderAccount added
1. Create new account2. Remove an account3. Deposit money4. Withdraw money5. Check account details6. Quit
Enter choice [1–6]: 1
Enter account number: 12347890Enter account name: Gary Baldi–BiscuitsAccount added
1. Create new account2. Remove an account3. Deposit money4. Withdraw money5. Check account details6. Quit
Enter choice [1–6]: 3
Enter account number: 12347890Enter amount to deposit: 1500Money deposited
1. Create new account2. Remove an account3. Deposit money4. Withdraw money5. Check account details6. Quit
Enter choice [1–6]: 2
Enter account number: 98654322Account removed
8.8 Collection Classes 221

1. Create new account2. Remove an account3. Deposit money4. Withdraw money5. Check account details6. Quit
Enter choice [1–6]: 5
Enter account number 55566777No such account
1. Create new account2. Remove an account3. Deposit money4. Withdraw money5. Check account details6. Quit
Enter choice [1–6]: 5
Enter account number 12347890Account number: 12347890Account name: Gary Baldi–BiscuitsBalance: 1500.0
1. Create new account2. Remove an account3. Deposit money4. Withdraw money5. Check account details6. Quit
Enter choice [1–6]: 6
We should point out that for our application to be useful to any organization, itwould need to be able to store the account information even after the applicationterminates. However, before you are able to achieve this you will have to wait untilthe second semester, where you will find out how to create files to hold permanentrecords.
222 8 Implementing Classes

8.9 The Benefits of Object-Oriented Programming
In this chapter and the previous one you have seen how to create classes and usethem as data types in your programs. You have seen how the process of buildingclasses enables us to hide data within a class. Programming languages based onclasses and objects—in other words object-oriented languages—have brought anumber of benefits, and are now the standard. Below we have summarized some ofthe benefits that this has brought us.
• As we have demonstrated, the ability to encapsulate data within a class hasenabled us to build far more secure systems.
• The object-oriented approach makes it far easier for us to re-use classes againand again. Having defined a BankAccount class or a Student class forexample, we can use them in many different programs without having to write anew class each time. In the next chapter you will also see how it is possible torefine existing classes to meet additional needs by the technique known asinheritance. If systems can be assembled from re-usable objects, this leads tofar higher productivity.
• With the object-oriented approach it is possible to define and use classes whichare not yet complete. They can then be extended without upsetting the operationof other classes. This greatly improves the testing process. We can easily buildprototypes without having to build a whole system before testing it and lettingthe user of the system see it.
• The object-oriented approach makes it far easier to make changes to systemsonce they have been completed. Whole classes can be replaced, or new classescan easily be added.
• The object-oriented way of doing things is a far more “natural” approach. Webase our programs on objects that exist in the real world—students, bankaccounts, customers and so on.
• The modular nature of object-oriented programming improves the wholedevelopment process. The modular approach means that the old methodologieswhereby systems were first analysed, then designed, and then implemented andtested were able give way to new methods whereby these processed were farmore integrated and systems were developed far more rapidly.
8.10 Self-test Questions
1. In question 7 of the programming exercises at the end of Chap. 2 you wrote aprogram that calculated the area and circumference of a circle. Now consider aclass that we could develop for this purpose; we have called it Circu-larShape. Here is the UML design:
8.9 The Benefits of Object-Oriented Programming 223

(a) Distinguish between attributes and methods in this class.(b) Explain what it meant by the term encapsulation, how it is recorded in this
UML diagram and how it is implemented in a Java class.(c) For each method in the CircularShape class, determine
• the number of parameters;• the type of any parameters;• the return type;• the equivalent method header in Java.
(d) Add an additional method into this UML diagram, calculateDiame-ter, which calculates and returns the diameter of the circle.
(e) Write the Java code for the calculateDiameter method.
2. The UML diagram below represents the design for a Student class.
CircularShape
-radius : double
+CircularShape(double)+setRadius(double)+getRadius( ) : double+calculateArea() : double+calculateCircumference() : double
Student
-studentNumber : String -studentName : String -markForMaths : int -markForEnglish : int -markForScience : int -fee: double
+Student(String, String) +getNumber() : String +getName() : String +enterMarks(int, int, int) +getMathsMark() : int +getEnglishMark() : int +getScienceMark() : int +calculateAverageMark() : double +getFee(): double +setFee(double)
224 8 Implementing Classes

You can see that students have a name, a number, some marks for subjects theyare studying and the fee. Methods are then provided to process this data.
(a) What is indicated by the fact that certain attributes and methods have beenunderlined?
(b) Write the Java code for the parts of the class that have been underlined.
3. Consider the following class:
(a) What would be the output from the following program?
(b) What would be the output from the following program?
public class SomeClass { private int x;
public SomeClass( ) { x = 10; }
public SomeClass(int xIn) { x = xIn; }
public void setX(int xIn) { x = xIn; }
public int getX() { return x; } }
public class Test1 { public static void main(String[] args) { SomeClass myObject = new SomeClass(); System.out.println(myObject.getX()); } }
public class Test2 { public static void main(String[] args) { SomeClass myObject = new SomeClass(5); System.out.println(myObject.getX()); } }
8.10 Self-test Questions 225

(c) Explain why the following program would not compile.
(d) What would be the output from the following program?
4. Consider the Bank program from Sect. 8.8.1.
(a) Adapt the withdrawMoney method so that it distinguishes the two reasonswhy the method might fail—namely that there is no account with the givenaccount number, or there is not enough money in the account to make awithdrawal.
A boolean method would no longer suffice as there is more then one pos-sibility. One solution would be for the method to return an integer—perhaps 1for success, −1 to indicate that the method failed because there was no suchaccount number, and −2 to indicate that it failed because there were insufficientfunds.
(b) Adapt the BankApplication program from Sect. 8.8.2 so that option 4 nowuses the new version of withdrawMoney.
5. Identify some of the reasons why the object-oriented approach has become thenorm for programming.
public class Test3 { public static void main(String[] args) { SomeClass myObject = new SomeClass(5, 8); System.out.println(myObject.getX()); } }
public class Test4 { public static void main(String[] args) { int y = 20; SomeClass myObject = new SomeClass(5); System.out.println(myObject.getX()); test(y, myObject); System.out.println(y); System.out.println(myObject.getX()); }
static void test(int z, SomeClass classIn) { z = 50; classIn.setX(100); } }
226 8 Implementing Classes

8.11 Programming Exercises
1: (a) Implement the CircularShape class that was discussed in self-testquestion 1 above.
(b) Add the calculateDiameter method into this class as discussed inself-test question 1d and 1e above.
(c) Write a program to test out your class. This program should allow the userto enter a value for the radius of the circle, and then display the area,circumference and diameter of this circle on the screen by calling theappropriate methods of the CircularShape class.
(d) Modify the tester program above so that once the information has beendisplayed the user is able to reset the radius of the circle. The area, cir-cumference and diameter of the circle should then be displayed again.
2: (a) Write the code for the Student class discussed in self-test question 2above. You should note that in order to ensure that a double is returnedfrom the calculateAverageMark method you should specificallydivide the total of the three marks by 3.0 and not simply by 3 (look back atChap. 2 to remind yourself why this is the case).
Another thing to think about is what you choose for the initial values of themarks. If you chose to give each mark an initial value of zero, this could beambiguous; a mark of zero could mean that the mark simply has not beenentered—or it could mean the student actually scored zero in the subject!Can you think of a better initial value?
You can assume that the fees for the student are set initially to 3000.
(b) Write a tester class to test out your Student class; it should create two orthree students (or even better an ArrayList of students), and use themethods of the Student class to test whether they work according to thespecification.
3. A system is being developed for use in a store that sells electrical appliances.A class called StockItem is required for this system. An object of theStockItem class will require the following attributes:
• a stock number;
• a name;
• the price of the item;
• the total number of these items currently in stock.
The first three of the above attributes will need to be set at the time aStockItem object is created—the total number of items in stock will be set tozero at this time. The stock number and name will not need to be changed afterthe item is created.
8.11 Programming Exercises 227

The following methods are also required:
• a method that allows the price to be re-set during the object’s lifetime;
• a method that receives an integer and adds this to the total number of itemsof this type in stock;
• a method that returns the total value of items of this type in stock; this iscalculated by multiplying the price of the item by the number of items instock;
• methods to read the values of all four attributes.
The design of the StockItem class is shown in the following UML diagram:
(a) Write the code for the StockItem class.(b) Consider the following program, which uses the StockItem class, and
in which some of the code has been replaced by comments:
Replace the comments with appropriate code.
SStockItem
-stockNumber : String-name : String-price : double-totalStock : int
+StockItem(String, String, double)+setPrice(double)+increaseTotalStock(int)+getStockNumber() : String+getName() : String+getTotalStock() : int+getPrice() : double+calculateTotalPrice() : double
import java.util.Scanner; public class TestProg { public static void main(String[] args) { Scanner keyboard = new Scanner(System.in); Scanner keyboardString = new Scanner(System.in); String tempNumber; String tempName; double tempPrice;
System.out.print("Enter the stock number: "); tempNumber = keyboardString.nextLine(); System.out.print("Enter the name of the item: "); tempName = keyboardString.nextLine(); System.out.print("Enter the price of the item: "); tempPrice = keyboard.nextDouble();
// Create a new item of stock using the values that were entered by the user // Increase the total number of items in stock by 5 // Display the stock number // Display the total price of all items in stock } }
228 8 Implementing Classes

(c) i. A further attribute, salesTax, is required. The value of this attributeshould always be the same for each object of the class. Write the dec-laration for this attribute.
ii. Provide a class method, setSalesTax, for this class—it should receivea double and set the value of the sales tax to this value.
iii. Write a line of code that sets the sales tax for all objects of the class to 10without referring to any particular object.
4. The class shown below keeps track of a pressure sensor in a laboratory.
When a Sensor object is created using the first constructor, the initial pressureis set to zero. When it is created using the second constructor it is set to the valueof the parameter.
The pressure should not be set to a value less than zero. Therefore, if the inputparameter to the setPressure method is a negative number, the pressureshould not be changed and a value of false should be returned. If the pressureis set successfully, a value of true should be returned.
(a) Write the code for the Sensor class.
(b) Develop a SensorTester program to test the Sensor class.
5. Consider a class that keeps track of the temperature within an incubator.The UML diagram is shown below:
When an Incubator object is created, the temperature is initially set to 5°.
Incubator
-temperature : int +MAX : int +MIN : int
+Incubator( ) +getTemperature( ) : int +increaseTemperature(boolean) +decreaseTemperature(boolean)
Sensor
-pressure: double
+Sensor () +Sensor (double) +setPressure(double) : boolean +getPressure( ) : double
8.11 Programming Exercises 229

The increaseTemp method increases the temperature by 1, and the de-creaseTemp method decreases the temperature by 1. However, the temper-ature must never be allowed to rise above a maximum value of 10 nor fall belowa minimum value of −10. If an attempt is made to increase or decrease thetemperature so it falls outside this range, then an alarm must be raised; themethods in this case should not increase or decrease the temperature but shouldreturn a value of false, indicating that the alarm should be raised. If thetemperature is changed successfully, however, a value of true is returned.
(a) Write the code for the Incubatotor class.
(b) Develop a IncubatorTester program to test the Incubator class.
6. Implement the changes to the Bank class and the BankApplication pro-gram suggested in question 4 of the self-test questions. The source code for theBank class and the BankApplication class can be downloaded from thewebsite.
7: (a) In programming Exercise 6 of the last chapter you were asked to develop aprogram to process a collection of rooms in an apartment. Now consider acollection class, Apartment, for this purpose. The Apartment classwould store a collection of Oblong objects, where each Oblong objectrepresents a particular room in the apartment. The UML diagram depictingthe association between the Apartment class and the Oblong class isshown below:
The single attribute of the Apartment class consists of a collection ofOblong objects, rooms, which makes use of an ArrayList.
AApartment Oblong
-rooms : ArrayList <Oblong> -length: double-height: double
*+Oblong(double, double)
+add(Room) +getLength() : double+getRoomArea(int):double +getHeight() : double+getRoomLength(int):double +setLength(double)+getRoomHeight(int):double +setHeight(double)
+calculateArea():double+calculatePerminiter():double
230 8 Implementing Classes

The methods of the Apartment class are described below:
+add(Room) : booleanAdds the given room to the list of rooms.
+getRoomArea(int) : doubleReturns the area of the given room number sent in as a parameter. If aninvalid room number is sent in as a parameter this method should send backsome dummy value (for example −999).
+getRoomLength(int) : doubleReturns the length of the given room number sent in as a parameter. If aninvalid room number is sent in as a parameter this method should send backsome dummy value (for example −999).
+getRoomHeight(int) : doubleReturns the height of the given room number sent in as a parameter. If aninvalid room number is sent in as a parameter this method should send backsome dummy value (for example −999).
Implement the Apartment class.(b) Develop an ApartmentTester program to test the Apartment class.
8. Consider a scenario in which a university allows lecturers to borrow equipment.The equipment is available for use 5 days a week and for 7 periods during eachday. When the equipment is booked for use, the details of the booking (roomnumber and lecturer name) are recorded. When no booking is recorded, theequipment is available for use.
(a) Create a Booking class defined in the UML diagram below:
(b) Now a TimeTable class is defined to process these bookings. Its UMLdiagram is given below:
BBooking
-room : String
-name : String
+Booking(String, String)
+getRoom() : String
+getName() : String
8.11 Programming Exercises 231

As you can see, the attribute of this class is a two-dimensional array ofBooking objects. The methods of this class are defined below:
+TimeTable(int, int)A constructor that accepts the number of days per week and number ofperiods per day and sizes the timetable accordingly.
You should note that initially all elements in the array will of course have anull value—a null value will represent an empty slot.
+makeBooking(int, int, Booking) : booleanAccepts the booking details for a particular day and period and, as long asthis slot is not previously booked and the day and period numbers are valid,updates the timetable accordingly. Returns true if the booking wasrecorded successfully and false if not.
+cancelBooking(int, int) : booleanCancels the booking details for a particular day and period. Returns falseif the given slot was not previously booked or the day and period numberare invalid, and true if the slot was cancelled successfully.
+isFree(int, int) : booleanAccepts a day and period number and returns true if the day and periodnumbers are valid and the given slot is free, and false otherwise.
+getBooking(int, int) : BookingAccepts a day and period number and returns the booking for the given slotif the day and period number are valid and the slot has been booked ornull otherwise.
TimeTable
-times: Booking[][]
+TimeTable(int, int)+makeBooking(int, int, Booking) : boolean+cancelBooking(int, int) : boolean+isFree(int, int) : boolean+getBooking(int, int) : Booking+numberOfDays() : int+numberOfPeriods() : int
232 8 Implementing Classes
+numberOfDays() : intReturns the number of days associated with this timetable.
+numberOfPeriods() : intReturns the number of periods associated with this timetable.Implement this class in Java.
(c) Write a suitable tester for this class.
9. Add some additional methods such as nextByte and nextLong to theEasyScanner class.
8.11 Programming Exercises 233

9Inheritance
Outcomes:
By the end of this chapter you should be able to:
• explain the term inheritance;• design inheritance structures using UML notation;• implement inheritance relationships in Java;• distinguish between method overriding and method overloading;• explain the term type cast and implement this in Java;• explain the use of the abstract modifier when applied to classes and
methods;• explain the use of the final modifier, when applied to classes and methods;• describe the way in which all Java classes are derived from the Object class.
9.1 Introduction
One of the greatest benefits of the object-oriented approach to software develop-ment is that it offers the opportunity for us to reuse classes that have already beenwritten—either by ourselves or by someone else. Let’s look at a possible scenario.Say you wanted to develop a software system and you have, during your analysis,identified the need for a class called Employee. You might be aware that acolleague in your organization has already written an Employee class; rather thanhaving to write your own class, it would be easier to approach your colleague andask her to let you use her Employee class.
So far so good, but what if the Employee class that you are given doesn’t quitedo everything that you had hoped? Perhaps your employees are part-timeemployees, and you want your class to have an attribute like hourlyPay, or
© Springer Nature Switzerland AG 2019Q. Charatan and A. Kans, Java in Two Semesters, Texts in Computer Science,https://doi.org/10.1007/978-3-319-99420-8_9
235

methods like calculateWeeklyPay and setHourlyPay, and these attributesand methods do not exist in the Employee class you have been given.
You may think it would be necessary to go into the old class and start messingabout with the code. But there is no need, because object-oriented programminglanguages provide the ability to extend existing classes by adding attributes andmethods to them. This is called inheritance.
9.2 Defining Inheritance
Inheritance is the sharing of attributes and methods among classes. We take aclass, and then define other classes based on the first one. The new classes inheritall the attributes and methods of the first one, but also have attributes and methodsof their own. Let’s try to understand this by thinking about the Employee class.
Employee
-number : String -name : String
+Employee(String, String) +setName(String) +getNumber() : String+getName() : String
PartTimeEmployee
-hourlyPay : double
+PartTimeEmployee(String, String, double) +setHourlyPay(double) +getHourlyPay() :double+calculateWeeklyPay(int) :double
Fig. 9.1 An inheritancerelationship
236 9 Inheritance

Say our Employee class has two attributes, number and name, a user-definedconstructor, and some basic get- and set-methods for the attributes. We nowdefine our PartTimeEmployee class; this class will inherit these attributes andmethods, but can also have attributes and methods of its own. We will give it oneadditional attribute, hourlyPay, some methods to access this attribute and oneadditional method, calculateWeeklyPay.
This is illustrated in Fig. 9.1 which uses the UML notation for inheritance,namely a triangle.
You can see from this diagram that an inheritance relationship is a hierarchicalrelationship. The class at the top of the hierarchy—in this case the Employee class—is referred to as the superclass (or base class) and the PartTimeEmployee asthe subclass (or derived class).
The inheritance relationship is also often referred to as an is-a-kind-of rela-tionship; in this case a PartTimeEmployee is a kind of Employee.
9.3 Implementing Inheritance in Java
The code for the Employee class is shown below:
Employeepublic class Employee{
private String number;private String name;public Employee(String numberIn, String nameIn)
{ number = numberIn;name = nameIn;
}
public void setName(String nameIn) {
name = nameIn; }
public String getNumber() {
return number; }
public String getName() {
return name; } }
There is nothing new here, so let’s get on with our PartTimeEmployee class.We will present the code first and analyse it afterwards.
9.2 Defining Inheritance 237

PartTimeEmployeepublic class PartTimeEmployee extends Employee // this class is a subclass of Employee{
private double hourlyPay; // this attribute is unique to the subclass
// the constructorpublic PartTimeEmployee(String numberIn, String nameIn, double hourlyPayIn)
{ super(numberIn, nameIn); // call the constructor of the superclasshourlyPay = hourlyPayIn;
}
// these methods are also unique to the subclasspublic double getHourlyPay()
{ return hourlyPay;
}
public void setHourlyPay(double hourlyPayIn) {
hourlyPay = hourlyPayIn; }
public double calculateWeeklyPay(int noOfHoursIn) {
return noOfHoursIn * hourlyPay; } }
The first line of interest is the class header itself:
public class PartTimeEmployee extends Employee // this class is a subclass of Employee
Here we see the use of the keyword extends. Using this word in this waymeans that the PartTimeEmployee class (the subclass) inherits all the attributesand methods of the Employee class (the superclass). So although we haven’tcoded them, any object of the PartTimeEmployee class will have, for example,an attribute called name and a method called getNumber.A PartTimeEmployee is now a kind of Employee.
But can you see a problem here? The attributes have been declared as privatein the superclass so although they are now part of our PartTimeEmployee class,none of the PartTimeEmployee class methods can directly access them—thesubclass has only the same access rights as any other class!
There are a number of possible ways around this:
1. We could declare the original attributes as public—but this would take awaythe whole point of encapsulation.
2. We could use the special keyword protected instead of private. Theeffect of this is that anything declared as protected is accessible to themethods of any subclasses. There are, however, two issues to think about here.The first is that you have to anticipate in advance when you want your class tobe able to be inherited. The second problem is that it weakens your efforts toencapsulate information within the class, since, in Java, protected attributesare also accessible to any other class in the same package (you will find outmuch more about the meaning of the word package in Chap. 19).
238 9 Inheritance

The above remarks notwithstanding, this is a perfectly acceptable approach touse, particularly in situations where you are writing a class as part of a discreteapplication, and you will be aware in advance that certain classes will need to besubclassed. You will see an example of this in Sect. 9.5.Incidentally, in a UML diagram a protected attribute is indicated by a hashsymbol, #.
3. The other solution, and the one we will use now, is to leave the attributes asprivate, but to plan carefully in advance which get- and set-methods weare going to provide.
After the class header we have the following declaration:
private double hourlyPay;
This declares an attribute, hourlyPay, which is unique to our subclass—butremember that the attributes of the superclass, Employee, will be inherited, so infact any PartTimeEmployee object will have three attributes.
Next comes the constructor. We want to be able to assign values to the numberand name at the time that the object is created, just as we do with an Employeeobject; so our constructor will need to receive parameters that will be assigned tothe number and name attributes.
But wait a minute! How are we going to do this? The number and nameattributes have been declared as private in the superclass—so they aren’taccessible to objects of the subclass. Luckily there is a way around this problem.We can call the constructor of the superclass by using the keyword super. Lookhow this is done:
public PartTimeEmployee(String numberIn, String nameIn, double hourlyPayIn){
super(numberIn, nameIn); // call the constructor of the superclasshourlyPay = hourlyPayIn;
}
After calling the constructor of the superclass, we need to perform one more task—namely to assign the third parameter, hourlyPayIn, to the hourlyPayattribute. Notice, however, that the line that calls super has to be the first one—ifwe had written our constructor like this it would not compile:
/* This version of the constructor would not compile - the call to super has to be the first instruction */
public PartTimeEmployee(String numberIn, String nameIn, double hourlyPayIn){
hourlyPay = hourlyPayIn;super(numberIn, nameIn); // this call should have been the first instruction!
}
9.3 Implementing Inheritance in Java 239

The remaining methods of PartTimeEmployee are new methods specific tothe subclass:
public double getHourlyPay(){
return hourlyPay;} public void setHourlyPay(double hourlyPayIn){
hourlyPay = hourlyPayIn;} public double calculateWeeklyPay(int noOfHoursIn){
return noOfHoursIn * hourlyPay;}
The first two provide read and write access respectively to the hourlyPayattribute. The third one receives the number of hours worked and calculates the payby multiplying this by the hourly rate. Th program below demonstrates the use ofthe PartTimeEmployee class.
PartTimeEmployeeTesterimport java.util.Scanner;public class PartTimeEmployeeTester{
public static void main(String[] args){
Scanner keyboard = new Scanner(System.in);Scanner keyboardString = new Scanner(System.in);String number, name;double pay; int hours;PartTimeEmployee emp;
// get the details from the userSystem.out.print("Employee Number? ");number = keyboardString.nextLine();System.out.print("Employee's Name? ");name = keyboardString.nextLine();System.out.print("Hourly Pay? ");pay = keyboard.nextDouble();System.out.print("Hours worked this week? ");hours = keyboard.nextInt();
// create a new part-time employeeemp = new PartTimeEmployee(number, name, pay);
// display part-time employee's details, including the weekly paySystem.out.println();
// the next two methods have been inhreted from the Employee classSystem.out.println(emp.getName());System.out.println(emp.getNumber());
System.out.println(emp.calculateWeeklyPay(hours));}
}
Here is a sample test run:
Employee Number? A103456Employee’s Name? Mandy LifeboatsHourly Pay? 15.50Hours worked this week? 20
240 9 Inheritance
Mandy LifeboatsA103456310.0
We can now move on to look at another inheritance example; let’s choose theOblong class that we developed in the last chapter.
9.4 Extending the Oblong Class
We are going to define a new class called ExtendedOblong, which extends theOblong class. First, let’s remind ourselves of the Oblong class itself.
The Oblong class – a reminderpublic class Oblong{
// the attributesprivate double length;private double height;
// the methods
// the constructorpublic Oblong(double lengthIn, double heightIn)
{ length = lengthIn;height = heightIn;
}
// this method allows us to read the length attributepublic double getLength()
{ return length;
}
// this method allows us to read the height attributepublic double getHeight()
{ return height;
}
// this method allows us to write to the length attributepublic void setLength(double lengthIn)
{ length = lengthIn;
}
// this method allows us to write to the height attributepublic void setHeight(double heightIn)
{ height = heightIn;
}
// this method returns the area of the Oblongpublic double calculateArea()
{ return length * height;
}
// this method returns the perimeter of the Oblongpublic double calculatePerimeter()
{ return 2 * (length + height);
} }
9.3 Implementing Inheritance in Java 241

The original Oblong class had the capability of reporting on the perimeter andarea of the oblong. Our extended class will have the capability of sending back astring representation of itself composed of a number of symbols such as asterisks—for example:
***************
Now at first glance you might think that this isn’t a string at all, because itconsists of several lines. But if we think of the instruction to start a new line as justanother character—which for convenience we could call <NEWLINE>—then ourstring could be written like this.
*****<NEWLINE>*****<NEWLINE>*****
In Java we are able to represent this <NEWLINE> character with a special characterthat looks like this:
‘\n’
This is one of a number of special characters called escape characters, whichare always introduced by a backslash (\). Another useful escape character is ‘\t’which inserts a tab.1
Our ExtendedOblong class will need an additional attribute, which we willcall symbol, to hold the character that is to be used to draw the oblong. We willalso provide a setSymbol method, and of course we will need a method thatsends back the string representation. We will call this method draw. The newconstructor will accept values for the length and height as before, but will alsoreceive the character to be used for drawing the oblong.
The design is shown in Fig. 9.2.Now for the implementation. As well as those aspects of the code that relate to
inheritance, there is an additional new technique used in this class—this is thetechnique known as type casting. Take a look at the complete code first—then wecan discuss this new concept along with some other important features of the class.
1You would also have to place a backslash in front of a double quote (\”), a single quote (\’) oranother backslash (\\) if you wanted any of these to be output as part of a string. This is because thecompiler would interpret these as having a special meaning such as terminating the string.
242 9 Inheritance

ExtendedOblongpublic class ExtendedOblong extends Oblong{
private char symbol;
// the constructorpublic ExtendedOblong(double lengthIn, double heightIn, char symbolIn){
super(lengthIn, heightIn);symbol = symbolIn;
}
public void setSymbol(char symbolIn){
symbol = symbolIn;}
public String draw(){
String s = new String(); // start off with an empty stringint l, h;
/* in the next two lines we type cast from double to integer so that we are able to count howmany times we print the symbol */l = (int) getLength();h = (int) getHeight();for (int i = 1; i <= h; i++){
for (int j = 1; j <= l; j++){
s = s + symbol; // add the symbol to the string} s = s + '\n'; // add the <NEWLINE> character
} return s; // return the string representation
} }
ExtendedOblong
-symbol : char
+ExtendedOblong(double, double, char) +setSymbol(char)
+draw() : String
Oblong
-length : double-height : double
+Oblong(double, double)+setLength(double)+setHeight(double) +getLength() : double+getHeight() : double+calculateArea() : double+calculatePerimeter() : double
Fig. 9.2 The Oblong hierarchy
9.4 Extending the Oblong Class 243

So let’s take a closer look at all this. After the class header—which extends theOblong class—we declare the additional attribute, symbol, and then define ourconstructor:
public ExtendedOblong(double lengthIn, doubleheightIn, char symbolIn){
super(lengthIn, heightIn);symbol = symbolIn;
}
Once again we call the constructor of the superclass with the keyword super.After the constructor comes the setSymbol method—which allows the symbol tobe changed during the oblong’s lifetime—and then we have the draw method,which introduces the new concept of type casting:
public String draw(){
String s = new String(); // start off with an empty stringint l, h;l = (int) getLength();h = (int) getHeight();for (int i = 1; i <= h; i++)
{ for (int j = 1; j <= l; j++)
{ s = s + symbol; // add a symbol to end of the string
} s = s + '\n'; // add a new line to the string
} return s;
}
Inspect the code carefully—notice that we have declared two local variables oftype int. In order to understand the purpose of these two variables, l and h, weneed to explore this business of type casting, which means forcing an item tochange from one type to another.
The draw method is going to create a string of one or more rows of stars orcrosses or whatever symbol is chosen. Now the dimensions of the oblong aredefined as doubles. Clearly our draw method needs to be dealing with wholenumbers of rows and columns—so we must convert the length and height of theoblong from doubles to ints. There will obviously be some loss of precisionhere, but that won’t matter in this particular case.
As you can see from the above code, type casting is achieved by placing the newtype name in brackets before the item you wish to change. This is illustrated inFig. 9.3.
The following program uses the ExtendedOblong class. It creates an oblongof length 10 and height 5, with an asterisk as the symbol; it then draws the oblong,changes the symbol to a cross, and draws it again.
244 9 Inheritance

ExtendedOblongTesterpublic class ExtendedOblongTester{
public static void main(String[] args) {
ExtendedOblong extOblong = new ExtendedOblong(10.2,5.3,'*');System.out.println(extOblong.draw());extOblong.setSymbol('+');System.out.println(extOblong.draw());
} }
The output from this program is shown below:
**************************************************
++++++++++++++++++++++++++++++++++++++++++++++++++
9.5 Method Overriding
In Chap. 5 you were introduced to the concept of polymorphism—the idea that wecan have different methods and operators with the same name, but whose behaviouris different. You saw in that chapter that one way of achieving polymorphism wasby method overloading, which involves methods of the same class having the samename, but being distinguished by their parameter lists.
l = (int) getLength();
this converts thedouble value to
an int value
method returns a double
Fig. 9.3 Type casting
9.4 Extending the Oblong Class 245

Now we are going to explore another way of achieving polymorphism, namelyby method overriding. In order to do this we are going to extend the Bank-Account class that we developed in the previous chapter. You will recall that theclass we developed there did not provide any overdraft facility—the withdrawmethod was designed so that the withdrawal would take place only if the amount tobe withdrawn did not exceed the balance.
Now let’s consider a special account which is the same as the original account,but allows holders of the account to be given an overdraft limit and to withdrawfunds up to this limit. We will call this account GoldAccount. Since a Gold-Account is a kind of BankAccount, we can use inheritance here to design theGoldAccount class. In addition to the attributes of a BankAccount, aGoldAccount will need to have an attribute to represent the overdraft limit, andshould have get- and set-methods for this attribute. As far as the methods areconcerned, we need to reconsider the withdraw method. This will differ from theoriginal method, because, instead of checking that the amount to be withdrawn doesnot exceed the balance, it will now check that the amount does not exceed the totalof the balance plus the overdraft limit. So what we are going to do is to re-write—oroverride—the withdraw method in the subclass.
The UML diagram for the BankAccount class and the GoldAccount classappear in Fig. 9.4. You will notice that we have made a small change to the originalBankAccount class. The balance attribute has a hash sign (#) in front of it insteadof a minus sign. You will remember from our previous discussion that this meansaccess to the attribute is protected, rather than private. The reason why wehave decided to make this change is explained below.
You will also notice that the withdraw method appears in both classes—this,of course, is because we are going to override it in the subclass.
You might already be thinking about how to code the withdraw method in theGoldAccount class. If you are doing this, you will probably have worked out thatthis method is going to need access to the balance attribute, which of course wasdeclared as private in the BankAccount class, and (for good reason) was notprovided with a set-method.
When we developed the BankAccount class in Chap. 8, we developed it as astand-alone class, and we didn’t think about how it might be used in a largerapplication where it could be refined. Had we known about inheritance at that pointwe might have given the matter a little more thought, and realised that it would beuseful if any sub-classes of BankAccount that were developed in the future hadaccess to the balance attribute. As we explained in Sect. 9.3, we can achieve thatby declaring that attribute as protected instead of private. That is what wehave done here. The version of BankAccount that we are going to use in this
246 9 Inheritance
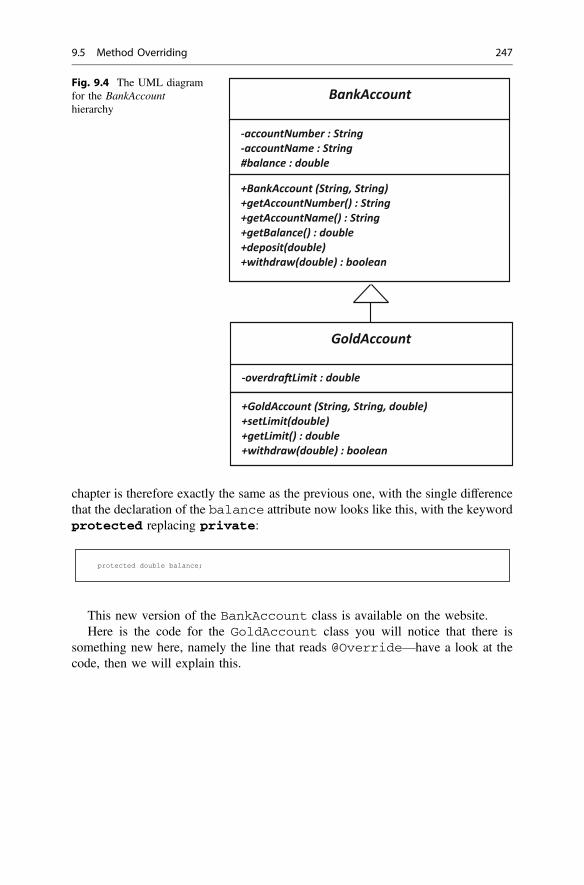
chapter is therefore exactly the same as the previous one, with the single differencethat the declaration of the balance attribute now looks like this, with the keywordprotected replacing private:
protected double balance;
This new version of the BankAccount class is available on the website.Here is the code for the GoldAccount class you will notice that there is
something new here, namely the line that reads @Override—have a look at thecode, then we will explain this.
BankAccount
-accountNumber : String-accountName : String#balance : double
+BankAccount (String, String)+getAccountNumber() : String+getAccountName() : String+getBalance() : double+deposit(double) +withdraw(double) : boolean
GoldAccount
-overdra Limit : double
+GoldAccount (String, String, double)+setLimit(double)+getLimit() : double+withdraw(double) : boolean
Fig. 9.4 The UML diagramfor the BankAccounthierarchy
9.5 Method Overriding 247

GoldAccountpublic class GoldAccount extends BankAccount{
private double overdraftLimit;
public GoldAccount(String numberIn, String nameIn, double limitIn) {
super(numberIn, nameIn);overdraftLimit = limitIn;
}
public void setLimit(double limitIn) {
overdraftLimit = limitIn; }
public double getLimit() {
return overdraftLimit; }
@Overridepublic boolean withdraw(double amountIn)
{ if(amountIn > balance + overdraftLimit) // the customer can withdraw up to the overdraft limit
{ return false; // no withdrawal was made
} else
{ balance = balance - amountIn; // balance is protected so we have direct access to itreturn true; // money was withdrawn successfully
} } }
The thing that we are interested in here is the withdraw method. As we havepointed out this is introduced with @Override. This is an example of a Javaannotation. Annotations begin with the @ symbol, and always start with an uppercase letter. Although it is not mandatory that we include this annotation, it is verygood practice to do so. Its purpose is to inform the compiler that we are overriding amethod from the superclass. This helps us to avoid making the common error of notgiving the overridden method exactly the same name and parameter list as themethod it is supposed to be overriding. Without the annotation, this would escapethe notice of the compiler, and you would have simply written a new method. Butwith the annotation included you would get a compile error if the method headingsdid not match.
As far as the method itself is concerned, the test in the if statement differs fromthe original method in the BankAccount class (as shown below), in order to takeaccount of the fact that customers with a gold account are allowed an overdraft:
withdraw method in BankAccount class withdraw method in GoldAccount class
public boolean withdraw(double amountIn){
if(amountIn > balance) {
return false; }
else {
balance = balance - amountIn;return true;
} }
public boolean withdraw(double amountIn){
if(amountIn > balance + overdraftLimit) {
return false; }
else {
balance = balance - amountIn;return true;
} }
248 9 Inheritance

When we dealt with method overloading in Chap. 5 we told you that themethods with the same name within a class are distinguished by their parameterlists. In the case of method overriding, the methods have the same parameter list butbelong to different classes—the superclass and the subclass. In this case they aredistinguished by the object with which they are associated. We illustrate this in theprogram below.
OverridingDemopublic class OverridingDemo{
public static void main(String[] args) {
boolean ok;//declare a BankAccount objectBankAccount bankAcc = new BankAccount("123", "Ordinary Account Holder");//declare a GoldAccount objectGoldAccount goldAcc = new GoldAccount("124", "Gold Account Holder", 500);
bankAcc.deposit(1000);goldAcc.deposit(1000);
ok = bankAcc.withdraw(1250); // the withdraw method of BankAccount is calledif(ok)
{ System.out.print("Money withdrawn. ");
} else
{ System.out.print("Insufficient funds. ");
} System.out.println("Balance of " + bankAcc.getAccountName() + " is " + bankAcc.getBalance());System.out.println();
ok = goldAcc.withdraw(1250); // the withdraw method of GoldAccount is calledif(ok)
{ System.out.print("Money withdrawn. ");
} else
{ System.out.print("Insufficient funds. ");
} System.out.println("Balance of " + goldAcc.getAccountName() + " is " + goldAcc.getBalance());System.out.println();
} }
In this program we create an object of the BankAccount class and an object ofthe GoldAccount class (with an overdraft limit of 500), and deposit an amount of1000 in each:
BankAccount bankAcc = new BankAccount("123", "Ordinary Account Holder");GoldAccount goldAcc = new GoldAccount("124", "Gold Account Holder", 500);bankAcc.deposit(1000);goldAcc.deposit(1000);
Next we attempt to withdraw the sum of 1250 from the BankAccount objectand assign the return value to a boolean variable, ok:
ok = bankAcc.withdraw(1250);
9.5 Method Overriding 249

The withdraw method that is called here will be that of BankAccount,because it is called via the BankAccount object, bankAcc.
Once this is done we display a message showing whether or not the withdrawalwas successful, followed by the balance of that account:
if(ok){
System.out.print("Money withdrawn. ");} else{
System.out.print("Insufficient funds. ");} System.out.println("Balance of " + bankAcc.getAccountName() + " is " + bankAcc.getBalance());
Now the withdraw method is called again, but in this case via the Gold-Account object, goldAcc:
ok = goldAcc.withdraw(1250);
This time it is the withdraw method of GoldAccount that will be called,because goldAcc is an object of this class. The appropriate message and thebalance are again displayed.
The output from this program is shown below:
Insufficient funds. Balance of Ordinary Account Holderis1000.0
Money withdrawn. Balance of Gold Account Holder is -250.0
As we would expect, the withdrawal from BankAccount does not take place—the balance is 1000, and since there is no overdraft facility a request to withdraw1250 is denied.
In the case of the GoldAccount, however, a withdrawal of 1250 would resultin a negative balance of 250, which is allowed, because it is within the overdraftlimit of 500.
9.6 Abstract Classes
Let’s think again about our Employee class. Imagine that our business expands,and we now employ full-time employees as well as part-time employees.A full-time employee object, rather than having an hourly rate of pay, will have an
250 9 Inheritance

annual salary. It might also need a method that calculates the monthly pay (bydividing the annual salary by 12).
Figure 9.5 shows the structure of an employee hierarchy with the two types ofemployee, the full-time and the part-time employee.
Notice how the two subclasses contain the attributes and methods appropriate tothe class. If you think about this a bit more, it will occur to you that any employeewill always be either a full-time employee or a part-time employee. There is nevergoing to be a situation in which an individual is just a plain old employee! So usersof a program that included all these classes would never find themselves creatingobjects of the Employee class. In fact, it would be a good idea to prevent peoplefrom doing this—and, as you might have guessed, there is a way to do so, which isto declare the class as abstract. Once a class has been declared in this way itmeans that you are not allowed to create objects of that class. In order to make ouremployee class abstract all we have to do is to place the keyword abstract in theheader:
public abstract class Employee
The Employee class simply acts a basis on which to build other classes. Now,if you tried to create an object of the Employee class you would get a compilererror.
FullTimeEmployee-annualSalary : double
+FullTimeEmployee(String, String, double)+setAnnualSalary(double)+getAnnualSalary() : double+calculateMonthlyPay () : double
-hourlyPay : double
+PartTimeEmployee(String,String, double)+setHourlyPay(double)+getHourlyPay() : double+calculateWeeklyPay(int) : double
PartTimeEmployee
Employee-number : String-name : String
+Employee(String, String) +setName(String) +getNumber() : String +getName() : String
Employee-number : String-name : String
Fig. 9.5 An inheritance relationship showing the superclass Employee and the subclassesFullTimeEmployee and PartTimeEmployee
9.6 Abstract Classes 251

We have already seen the code for Employee and PartTimeEmployee;Here is the code for the FullTimeEmployee class:
FullTimeEmployeepublic class FullTimeEmployee extends Employee{
private double annualSalary;
public FullTimeEmployee(String numberIn, String nameIn, double salaryIn){
super(numberIn,nameIn);annualSalary = salaryIn;
}
public void setAnnualSalary(double salaryIn){
annualSalary = salaryIn;}
public double getAnnualSalary(){
return annualSalary;}
public double calculateMonthlyPay(){
return annualSalary/12;}
}
As we said before, an inheritance relationship is often referred to as an “is-a-kind-of” relationship. A full-time employee is a kind of employee, as is a part-timeemployee. Therefore an object that is of type PartTimeEmployee is also of typeEmployee—an object is the type of its class, and also of any of the superclasses inthe hierarchy.
Let’s see how this relationship works in a Java program. Imagine a methodwhich is set up to receive an Employee object. If we call that method and send ina FullTimeEmployee object or a PartTimeEmployee object, either isabsolutely fine—because both are kinds of Employee. We demonstrate this in theprogram that follows:
EmployeeTesterpublic class EmployeeTester{
public static void main(String[] args) {
FullTimeEmployee fte = new FullTimeEmployee("A123", "Ms Full-Time", 25000);PartTimeEmployee pte = new PartTimeEmployee("B456", "Mr Part-Time",30);testMethod(fte); // call testMethod with a full-time employee objecttestMethod(pte); // call testMethod with a part-time employee object
}
static void testMethod(Employee employeeIn) // the method expects to receive an Employee object {
System.out.println(employeeIn.getName()); } }
In this program testMethod expects to receive an Employee object. It callsthe getName method of Employee in order to display the employee’s name.
252 9 Inheritance

In the main method, we create two objects, one FullTimeEmployee andone PartTimeEmployee:
FullTimeEmployee fte = new FullTimeEmployee("A123", "Ms Full-Time", 25000); PartTimeEmployee pte = new PartTimeEmployee("B456", "Mr Part-Time",30);
We then call testMethod twice—first with FullTimeEmployee objectand then with the PartTimeEmployee object:
testMethod(fte); // call testMethod with a full-time employee objecttestMethod(pte); // call testMethod with a part-time employee object
The method accepts either object, and calls the getName method. The output is,as expected:
Ms Full-TimeMr Part-Time
9.7 Abstract Methods
In the last program we conveniently gave our objects the names “Ms Full-Time”and “Mr Part-Time” so that we could easily identify them in our output. In fact, itwouldn’t be a bad idea—particularly for testing purposes—if every Employeetype actually had a method that returned a string telling us the kind of object wewere dealing with. Adding such a method—we could call it getStatus—wouldbe simple. For the FullTimeEmployee the method would look like this:
@Overridepublic String getStatus(){
return "Full-Time";}
Notice that we have included the @Override annotation, even though it is notcompulsory to do so.
9.6 Abstract Classes 253

For the PartTimeEmployee, getStatus would look like this:
@Overridepublic String getStatus(){
return "Part-Time";}
It would be very useful if we could say to anyone using any of the Employeetypes, that we guarantee that this class will have a getStatus method. That way,a developer could, for example, write a method that accepts an Employee object,and call that object’s getStatus method, even without knowing anything elseabout the class.
As you have probably guessed, we can guarantee it! What we have to do is towrite an abstract method in the superclass—in this case Employee. Declaringa method as abstract means that any subclass is forced to override it—otherwisethere would be a compiler error. So in this case we just have to add the followingline into the Employee class:
public abstract String getStatus();
You can see that to declare an abstract method, we use the Java keywordabstract, and we define the header, but no body—the actual implementation isleft to the individual subclasses. Of course, abstract methods can only bedeclared in abstract classes—it wouldn’t make much sense to try to declare anobject if one or more of its methods were undefined.
Now, having defined the abstract getStatus method in the Employeeclass, if we tried to compile the FullTimeEmployee or the PartTimeEm-ployee class (or any other class that extends Employee) without including agetStatus method we would be unsuccessful.
Once we have added the different getStatus methods into the Employeeclasses, we could re-write our EmployeeTester program from the previoussections using the getStatus method in testMethod. We have done this withEmployerTester2 below:
EmployeeTester2public class EmployeeTester2{
public static void main(String[] args) {
FullTimeEmployee fte = new FullTimeEmployee("A123", "Ms Full-Time", 25000);PartTimeEmployee pte = new PartTimeEmployee("B456", "Mr Part-Time",30);testMethod(fte); // call testMethod with a full-time employee objecttestMethod(pte); // call testMethod with a part-time employee object
}
static void testMethod(Employee employeeIn) // the method expects to receive an Employee object {
System.out.println(employeeIn.getStatus()); } }
254 9 Inheritance

In the above program it was clear at the time the program was compiled whichversion of getStatus was being referred to. The first time that the testermethod is called, a FullTimeEmployee object is sent in, so the getStatusmethod of FullTimeEmployee is called; the second time that the testermethod is called, a PartTimeEmployee object is sent in, so the getStatusmethod of PartTimeEmployee is called. But now have a look at the nextprogram (where, incidentally, we have made use of our EasyScanner class forinput).
EmployeeTester3public class EmployeeTester3{
public static void main(String[] args){
Employee emp; // a reference to an Employeechar choice;String numberEntered, nameEntered; double salaryEntered, payEntered;System.out.print("Choose (F)ull-Time or (P)art-Time Employee: ");choice = EasyScanner.nextChar();
System.out.print("Enter employee number: ");numberEntered = EasyScanner.nextString();
System.out.print("Enter employee name: ");nameEntered = EasyScanner.nextString();
if(choice == 'F' || choice == 'f'){
System.out.print("Enter annual salary: ");salaryEntered = EasyScanner.nextDouble();
// create a FullTimeEmployee objectemp = new FullTimeEmployee (numberEntered, nameEntered, salaryEntered);
} else{
System.out.print("Enter hourly pay: ");payEntered = EasyScanner.nextDouble();
// create a PartTimeEmployee objectemp = new PartTimeEmployee (numberEntered, nameEntered, payEntered);
} testMethod(emp); // call tester with the object created
}
static void testMethod(Employee employeeIn){
System.out.println(employeeIn.getStatus());}
}
In this program, we call testMethod only once, and allow the user of theprogram to decide whether a FullTimeEmployee object is sent in as aparameter, or a PartTimeEmployee object. You can see that at the beginning ofthe program we have declared a reference to an Employee:
Employee emp;
Although Employee is an abstract class, it is perfectly possible to declare areference to this class—what we would not be allowed to do, of course, is to createan Employee object. However, as you will see in a moment, we can point this
9.7 Abstract Methods 255

reference to an object of any subclass of Employee, since such objects, likeFullTimeEmployee and PartTimeEmployee, are kinds of Employee.
You can see that we request the employee number and name from the user, andthen ask if the employee is full-time or part-time. In the former case we get theannual salary and then create a FullTimeEmployee object which we assign tothe Employee reference, emp.
if(choice == 'F' || choice == 'f'){
System.out.print("Enter annual salary: ");salaryEntered = input.nextDouble();
// create a FullTimeEmployee objectemp = new FullTimeEmployee (numberEntered, nameEntered, salaryEntered);
}
In the latter case we request the hourly pay and then assign emp to a newPartTimeEmployee object:
else{
System.out.print("Enter hourly pay: ");payEntered = input.nextDouble();
// create a PartTimeEmployee objectemp = new PartTimeEmployee (numberEntered, nameEntered, payEntered);
}
Finally we call the testMethod with emp:
testMethod(emp);
The getStatus method of the appropriate Employee object will then becalled.
Here are two sample runs from this program:
Choose (F)ull-Time or (P)art-Time Employee: FEnter employee number: 123Enter employee name: RobertsonEnter annual salary: 23000Full-Time
Choose (F)ull-Time or (P)art-Time Employee: PEnter employee number: 876Enter employee name: AdebayoEnter hourly pay: 25Part-Time
256 9 Inheritance

As you can see, we do not know until the program is run whether thegetStatus method is going to be called with a FullTimeEmployee objector a PartTimeEmployee object—and yet when the getStatus method iscalled, the correct version is executed.
The technique which makes it possible for this decision to be made at run-time isquite a complex one, and differs slightly from one programming language to another.
9.8 The final Modifier
You have already seen the use of the keyword final in Chap. 2, where it was usedto modify a variable and turn it into a constant. It can also be used to modify a classand a method. In the case of a class it is placed before the class declaration, like this:
public final class SomeClass{
// code goes here}
This means that the class cannot be subclassed. In the case of a method it is usedlike this:
public final void someMethod(){
// code goes here}
This means that the method cannot be overridden.
9.9 The Object Class
One of the very useful things about inheritance is the is-a-kind-of relationship thatwe mentioned earlier. For example, when the ExtendedOblong class extendedthe Oblong class it became a kind of Oblong—so, we can use Extended-Oblong objects with any code written for Oblong objects. When the Part-TimeEmployee class extended the Employee class it became a kind ofEmployee. We have seen in Sect. 9.6 that, in Java, if a method of some classexpects to receive as a parameter an object of another class (say, for example,Vehicle), then it is quite happy to receive instead an object of a subclass ofVehicle—this is because that object will be a kind of Vehicle.
In Java, every single class that is created is in fact derived from what we mightcall a special “super superclass”. This super superclass is called Object. So everyobject in Java is in fact a kind of Object. Any code written to accept objects of typeObject can be used with objects of any type.
9.7 Abstract Methods 257

9.10 The toString Method
In the previous chapter you saw a menu-driven program, BankApplication,which provided an option to display the details of a particular bank account—andthis option of course made use of the get-methods of the Bank class.
If this were to be a real-world application, then—as you will see from our casestudy—there would be an extensive period of testing. In order to test an application,it would be very useful if we had a way of simply displaying all the informationabout an object without having to invoke a lot of individual methods each time.
We are able to do this by making use of a method called toString whichbelongs to the Object class, and is therefore inherited by all classes, and can beoverridden for each individual class.
The System.out.print and println methods are overloaded, and have aversion which simply accepts a whole object as a parameter, and then displayswhatever has been defined in the object’s toString method.
For example, we could add the following method to our BankAccount class:
@Overridepublic String toString() { return "Name: " + accountName + '\n' + "Account number: " + accountNumber + '\n' + "Balance: " + balance; }
We can test this out with a little program—notice how the println method iscalled simply with the name of the object:
ToStringDemopublic class ToStringDemo{
public static void main(String[] args){
BankAccount acc = new BankAccount("12345678", "Patel");System.out.println(acc);
} }
The output from this program would be:
Name: PatelAccount number: 12345678Balance: 0.0
And if you are wondering what happens if we haven’t overridden the toStringmethod, the answer is that the output is simply the name of the class and its locationin memory. So the above program would have given us something like:
BankAccount@15db9742
258 9 Inheritance

9.11 Wrapper Classes and Autoboxing
We mentioned previously that collection classes such as ArrayList cannot beused to hold simple types such as int or char. However it is not uncommon thatyou would want to be able to do exactly that. Well, there is no need to worry—Javaprovides a very simple means of doing this.
To understand how it works you need to know about wrapper classes. For everyprimitive type, Java provides a corresponding class—the name of the class issimilar to the basic type, but begins with a capital letter—for example Integer,Character, Float, Double. They are called wrappers because they “wrap” aclass around the basic type. So an object of the Integer class, for example, holdsan integer value. In future chapters you will find that these classes also containsome other very useful methods.
We could declare a list of integers by using the Integer class with the fol-lowing statement:
ArrayList<Integer> myList = new ArrayList<>();
One way of storing an integer value such as 37 in this array would be as follows:
myList.add(new Integer(37));
The constructor of the Integer class accepts a primitive value and creates thecorresponding Integer object—here we have created an Integer object fromthe primitive value 37, and this is now stored in the array.
Java, however, allows us to make use of a technique known as autoboxing. Thisinvolves the automatic conversion of a primitive type such as an int to an object ofthe appropriate wrapper class. This allows us to do the following, which as you cansee is much simpler:
myList.add(37);
Java also allows us to make use of a technique called unboxing, which convertsfrom the wrapper class back to the primitive type—so to assign the first item in thelist to an integer x, we would simply write:
int x = myList.get(0);
Exactly the same technique would be used to store other primitive types such aschar and double.
9.11 Wrapper Classes and Autoboxing 259

9.12 Self-test Questions
1. Below is a UML diagram for an inheritance relationship between two classes—Vehicle and SecondHandVehicle.
(a) By referring to the diagram, explain the meaning of the term inheritance.
(b) What do you think might be the function of each of the constructors?
(c) What do you think might be the reason for the fact that in the Vehicleclass there is a set-method for the value attribute, but not for the otherthree?
(d) Write the header for the SecondHandVehicle class.
2. (a) Consider the following classes and arrange them into an inheritance hier-archy using UML notation:
Circle Shape Square FilledCircle
260 9 Inheritance

(b) Write the top line of the class declaration for each of these classes whenimplementing them in Java.
(c) Explain what effect the abstract modifier has on a class and identifywhich, if any, of the classes above could be considered as abstract classes?
3. Consider once again an application to record the reading of a pressure sensor asdiscussed in programming exercise 4 of the previous chapter. Now assume aSafeSensor class is developed that ensures that the pressure is never setabove some maximum value. A SafeSensor is a kind of Sensor. The UMLdesign is given below:
Sensor
-pressure : double
+Sensor () +Sensor (double) +setPressure(double): boolean +getPressure( ): double
SafeSensor
-max: double+SafeSensor (double) +SafeSensor (double, double) +setPressure(double): boolean +getMax( ): double
The SafeSensor class has two constructors. The first sets the maximum safevalue to the given parameter and the actual value of the sensor reading to 10.The second constructor accepts two parameters, the first is used to set themaximum safe value and the second is used to set the initial value for thereading of the sensor.The setPressure method is redefined so that only safe values (values nogreater than the safe maximum value and no less than zero) are set.
(a) In the example above, distinguish between method overriding and methodoverloading.
(b) Below is one attempt at the Java code for the first SafeSensor con-structor. Identify why it will not compile.
9.12 Self-test Questions 261

(c) Here is another attempt at the Java code for the first SafeSensor con-structor. Identify why it will not compile.
(d) Write the correct code for the first SafeSensor constructor.
4. By referring to the BankAccount class of Sect. 9.5, distinguish betweenprivate, public and protected access.
5. How are all classes in Java related to the Object class?
6. Explain, with an example, the term type cast.
7. (a) Consider the following definition of a class called Robot:
// THIS WILL NOT COMPILE!!public SafeSensor(double maxIn){
max = maxIn;pressure = 10;
}
// THIS WILL NOT COMPILE!!public SafeSensor(double maxIn){
max = maxIn;super();
}
public abstract class Robot{
private String id;private int securityLevel;private int warningLevel = 0;
public Robot(String IdIn, int levelIn){
id = IdIn;securityLevel = levelIn;
}
public String getId(){
return id;}
public int getSecurityLevel(){
return securityLevel;}
public abstract void calculateWarningLevel();}
262 9 Inheritance

(i) The following line of code is used in a program that has access to theRobot class:
Explain why this line of code would cause a compiler error.
(ii) Consider the following class:
Explain why any attempt to compile this class would result in a compiler error.
8. What is the effect of the final modifier, when applied to both classes andmethods?
9. Look back at the EmployeeTester class from Sect. 9.6. What do you thinkwould happen if you replaced this line of testMethod:
with the following line?
Give a reason for your answer.
Robot aRobot = new Robot("R2D2", 1000);
public class CleaningRobot extends Robot{
public String typeOfCleaningFluid;
public CleaningRobot(String IdIn, int levelIn, String fluidIn){
super(IdIn, levelIn);typeOfCleaningFluid = fluidIn;
}
public String getTypeOfCleaningFluid(){
return typeOfCleaningFluid;}
}
System.out.println(employeeIn.getName());
System.out.println(employeeIn.getAnnualSalary());
9.12 Self-test Questions 263

9.13 Programming Exercises
1. (a) Copy the ExtendedOblong class from the website, then implement theExtendedOblongTester from Sect. 9.4. You will, of course, need toensure that the Oblong class itself is accessible to the compiler.
(b) Modify the ExtendedOblongTester program so that the user is able tochoose the symbol used to display the oblong.
2. (a) Implement the SafeSensor class of self-test question 3. You will need toensure that the Sensor class itself is accessible to the compiler.
(b) Write a tester class to test the methods of the SafeSensor class.
3. (a) Implement the Vehicle and the SecondHandVehicle classes ofself-test question 1.You should note that:
• the calculateAge method of Vehicle accepts an integer repre-senting the current year, and returns the age of the vehicle as calculatedby subtracting the year of manufacture from the current year;
• the hasMultipleOwners method of SecondHandVehicleshould return true if the numberOfOwners attribute has a valuegreater than 1, or false otherwise.
(b) Write a tester class that tests all the methods of the SecondHandVehicleclass.
4. Write a menu-driven program that uses an ArrayList to hold Vehicles.The menu should offer the following options:
1. Add a vehicle2. Display a list of vehicle details3. Delete a vehicle4. Quit
264 9 Inheritance
10Introducing JavaFX
Outcomes:
By the end of this chapter you should be able to:
• briefly describe the history of graphics programming in Java;• explain the structure and life cycle of a JavaFX application;• produce 2D graphical shapes in JavaFX;• build an interactive graphics application in JavaFX using common components
such as buttons, textfields and labels;• program a JavaFX control to listen for events using a lambda expression;• make use of a variety of different JavaFX containers;• create borders, fonts and colours;• format decimal numbers so that they appear in an appropriate form in a
graphics application.
10.1 Introduction
At last it is time to learn about graphics programming. In this chapter you will startto move away from that rather uninteresting text screen you have been using andbuild attractive windows programs for input and output.
In order to do this you are going to be using the Java graphics package known asJavaFX. This package provides all the graphics tools and components that youneed to produce the sort of graphical interfaces that we have all become used to inmodern day applications.
© Springer Nature Switzerland AG 2019Q. Charatan and A. Kans, Java in Two Semesters, Texts in Computer Science,https://doi.org/10.1007/978-3-319-99420-8_10
265
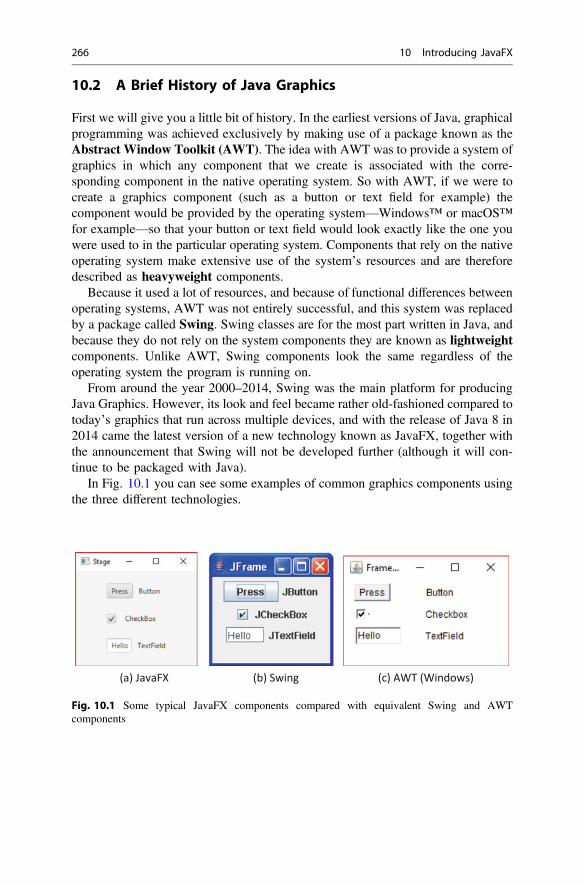
10.2 A Brief History of Java Graphics
First we will give you a little bit of history. In the earliest versions of Java, graphicalprogramming was achieved exclusively by making use of a package known as theAbstract Window Toolkit (AWT). The idea with AWT was to provide a system ofgraphics in which any component that we create is associated with the corre-sponding component in the native operating system. So with AWT, if we were tocreate a graphics component (such as a button or text field for example) thecomponent would be provided by the operating system—Windows™ or macOS™for example—so that your button or text field would look exactly like the one youwere used to in the particular operating system. Components that rely on the nativeoperating system make extensive use of the system’s resources and are thereforedescribed as heavyweight components.
Because it used a lot of resources, and because of functional differences betweenoperating systems, AWT was not entirely successful, and this system was replacedby a package called Swing. Swing classes are for the most part written in Java, andbecause they do not rely on the system components they are known as lightweightcomponents. Unlike AWT, Swing components look the same regardless of theoperating system the program is running on.
From around the year 2000–2014, Swing was the main platform for producingJava Graphics. However, its look and feel became rather old-fashioned compared totoday’s graphics that run across multiple devices, and with the release of Java 8 in2014 came the latest version of a new technology known as JavaFX, together withthe announcement that Swing will not be developed further (although it will con-tinue to be packaged with Java).
In Fig. 10.1 you can see some examples of common graphics components usingthe three different technologies.
(c) AWT (Windows)(a) JavaFX (b) Swing
Fig. 10.1 Some typical JavaFX components compared with equivalent Swing and AWTcomponents
266 10 Introducing JavaFX

10.3 JavaFX: An Overview
In this book we will be using JavaFX exclusively for our graphics applications. Sofirst, some terminology. Firstly, you need to know that a JavaFX program isreferred to as an application. Your JavaFX class will extend the Applicationclass, for which you need the following import statement:
import javafx.application.Application
The top-level window in which the application runs is called a stage—normallythis will be a window such as you see in Fig. 10.1a—but if, as you can do withmany JavaFX applications, you run the program in full-screen mode, then thescreen becomes the stage. Some applications can be made to run in a browser, inwhich case the browser is the stage. The contents of the stage—the graphic itself—is called a scene, and is often referred to as a scene graphic. The items that make upthe scene are referred to as nodes. They are very commonly the kind of componentsthat allow interaction with the user, such as buttons, text fields, labels and checkboxes, which are often referred to collectively as controls. They can also be 2D or3D graphics shapes. But nodes can also be containers. Containers are componentsthat hold other nodes, and each container arranges the nodes in a particular way—for example, vertically, horizontally, in a grid, or stacked one on top of the other.Normally, we wouldn’t see the container, but it is perfectly possible to put a borderaround it if we want to. Importantly, containers can contain other containers, so wecan develop a hierarchy in our scene. We normally place a single top level node inour scene, and this is referred to as the root node. We use the terms parent andchildren for the containing and contained nodes respectively.
Figure 10.2 should make this clear. Here we have a sample scene in which theroot node is a VBox—this is a container that arranges its child nodes vertically. Wehave given it a black border so that you can see it. The VBox has three children—aTextField, a Label and an HBox, around which we have again put a border.As you can probably guess, an HBox is similar to a VBox, but arranges its childnodes horizontally. In this case it has three child nodes which are Buttons. All ofthese components will become familiar to you as you proceed through this chapter—in particular you will see how we have made extensive use of the VBox andHBox to construct our scene graphics.
VBox(root node)
HBox
Stage
Scene
Fig. 10.2 A hierarchical scene
10.3 JavaFX: An Overview 267
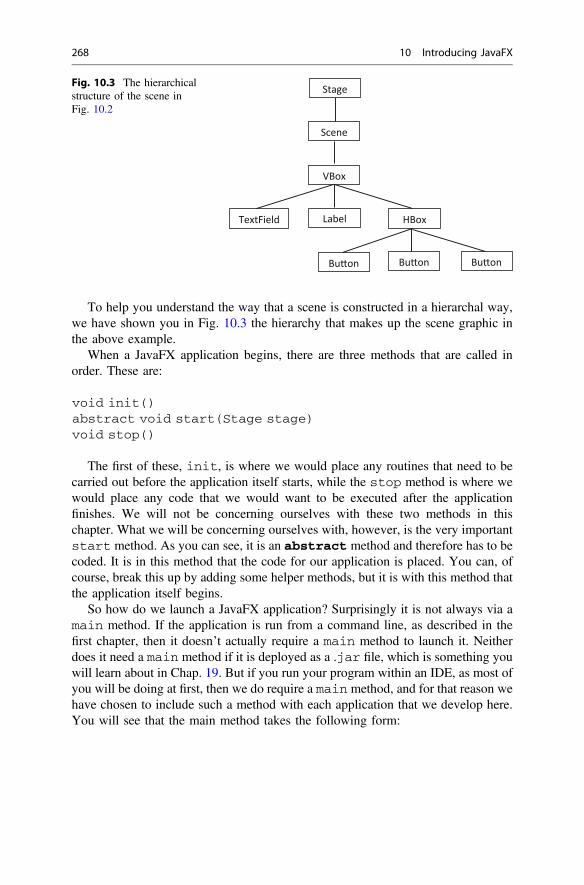
To help you understand the way that a scene is constructed in a hierarchal way,we have shown you in Fig. 10.3 the hierarchy that makes up the scene graphic inthe above example.
When a JavaFX application begins, there are three methods that are called inorder. These are:
void init()abstract void start(Stage stage)void stop()
The first of these, init, is where we would place any routines that need to becarried out before the application itself starts, while the stop method is where wewould place any code that we would want to be executed after the applicationfinishes. We will not be concerning ourselves with these two methods in thischapter. What we will be concerning ourselves with, however, is the very importantstart method. As you can see, it is an abstract method and therefore has to becoded. It is in this method that the code for our application is placed. You can, ofcourse, break this up by adding some helper methods, but it is with this method thatthe application itself begins.
So how do we launch a JavaFX application? Surprisingly it is not always via amain method. If the application is run from a command line, as described in thefirst chapter, then it doesn’t actually require a main method to launch it. Neitherdoes it need a main method if it is deployed as a .jar file, which is something youwill learn about in Chap. 19. But if you run your program within an IDE, as most ofyou will be doing at first, then we do require a main method, and for that reason wehave chosen to include such a method with each application that we develop here.You will see that the main method takes the following form:
Label HBoxTextField
VBox
Stage
Scene
Bu on Bu on Bu on
Fig. 10.3 The hierarchicalstructure of the scene inFig. 10.2
268 10 Introducing JavaFX

As you can see the main method calls the application’s launch method, andpasses to it any arguments received by the main method itself.
The launch method is a static method, and we can use it to launch aJavaFX application from another program. It is overloaded to accept the name ofthe compiled .class file as its first parameter. If we wanted a program called, say,LaunchApplication to run an application called MyApp, we would do it likethis:
So now that you know how a JavaFX application is structured, and you areaware of the sequence in which its methods are called, we can go on to develop ourfirst graphics application.
10.4 2D Graphics: The SmileyFace Class
Our first graphics application is going to create a smiley face, as shown in Fig. 10.4.
public static void main(String[] args) { launch(args); }
import javafx.application.Application;
class LaunchApplication { public static void main(String[] args) { Application.launch(MyApp.class, args); } }
Fig. 10.4 The Smiley Faceapplication
10.3 JavaFX: An Overview 269

Although it is a rather simple application, in that there is no user interaction, itnonetheless introduces many new concepts. In particular it shows you how to createa scene, to add items to the scene, and to add the scene to a stage. It also introducesyou to 2D graphics, which enables you to draw two-dimensional shapes such ascircles, lines, ellipses, rectangles and arcs. Here we draw circles for the face andeyes, and an arc for the mouth. You will also see how to create text which you canconfigure using different colours and fonts.
As explained in the previous section, we have included a main method whichlaunches the application. The complete code is shown below:
SmileyFaceimport javafx.application.Application; import javafx.scene.Group; import javafx.scene.Scene; import javafx.scene.paint.Color; import javafx.scene.shape.Arc; import javafx.scene.shape.ArcType; import javafx.scene.shape.Circle; import javafx.scene.text.Font; import javafx.scene.text.Text; import javafx.stage.Stage;
public class SmileyFace extends Application {
@Override public void start(Stage stage) {
// create and configure the main circle for the face Circle face = new Circle(125, 125, 80); face.setFill(Color.YELLOW); face.setStroke(Color.RED);
// create and configure the circle for the right eye Circle rightEye = new Circle(86, 100, 10); rightEye.setFill(Color.YELLOW); rightEye.setStroke(Color.BLUE);
// create and configure the circle for the left eye Circle leftEye = new Circle(162, 100, 10); leftEye.setFill(Color.YELLOW); leftEye.setStroke(Color.BLUE);
// create and configure a smiling mouth Arc mouth = new Arc(125, 150, 45, 35, 0, -180); mouth.setFill(Color.YELLOW); mouth.setStroke(Color.BLUE); mouth.setType(ArcType.OPEN);
// create and configure the text Text caption = new Text(80, 240, "Smiley Face"); caption.setFill(Color.BLUE); caption.setFont(Font.font("Verdana", 15));
// create a group that holds all the features Group root = new Group(face, rightEye, leftEye, mouth, caption);
// create and configure a new scene Scene scene = new Scene(root, 250, 275, Color.YELLOW);
270 10 Introducing JavaFX

There are a number of new concepts here. First, let’s take a look at the importclauses, which show you that all of our classes come from a package calledjavafx, which as you can see has many subpackages including scene andstage.
Now look at the class header:
As we explained, all JavaFX programs run as an application, and we thereforehave to extend the Application class. Application requires you to code thestart method, which we talked about in the previous section. Let’s take a look atit now, starting with the header:
When start is called, it is automatically sent an object of the Stage class,which will be the main container for our graphic.
The first thing we do within the start method is to create and configure themain circle for the face:
// add the scene to the stage, then set the title stage.setScene(scene); stage.setTitle("Smiley Face");
// show the stage stage.show(); }
public static void main(String[] args) { launch(args); }
}
import javafx.application.Application; import javafx.scene.Group; import javafx.scene.Scene; import javafx.scene.paint.Color; import javafx.scene.shape.Arc; import javafx.scene.shape.ArcType; import javafx.scene.shape.Circle; import javafx.scene.text.Font; import javafx.scene.text.Text; import javafx.stage.Stage;
public class SmileyFace extends Application
public void start(Stage stage)
Circle face = new Circle(125, 125, 80); face.setFill(Color.YELLOW); face.setStroke(Color.RED);
10.4 2D Graphics: The SmileyFace Class 271

The Circle class, which resides in a the javafx.scene.shape library,has a number of constructors (which you can look up on the Oracle™ site). Theconstructor we are using here takes three parameters of type double.
The first two of these parameters represent, respectively, the x and y positions ofthe centre of the circle (with respect to the top left hand corner of the parent node),measured in pixels. The third parameter represents the radius of the circle, also inpixels. You will see later that we have chosen our initial scene to be 250 � 275pixels, so that our circle with its centre at (125, 125) will be horizontally centred,but will leave enough vertical room for a caption.
We have used two other methods of Circle, namely setFill and set-Stroke, to set the fill colour and line colour of the circle. To each of these we havepassed a pre-defined attribute of the Color class (note the American spelling),which resides in javafx.scene.paint. In Sect. 10.10 you will find how tocreate your own colours if you want to—but the paint library provides a great manycolours that you can use, and which you can look up—or which you can choosefrom the list of suggestions that your IDE will make after pressing the full stop.
In a similar manner we draw the right eye and the left eye:
You might be wondering how we decided upon the exact position in which todraw these circles. In theory it is possible to calculate exactly where you wanteverything to be on a graphic—but often it is easier (and actually quite good fun)simply to make an estimate and see how it looks, then change the values until youare happy. That’s what we did here. We strongly recommend that once you havegot the application up and running, you play about with the different values toexplore what they do. This is the best way to become familiar with all of thegraphics objects.
Now we come to the smiling mouth, which is a little more complicated.
Circle rightEye = new Circle(86, 100, 10); rightEye.setFill(Color.YELLOW); rightEye.setStroke(Color.BLUE);
Circle leftEye = new Circle(162, 100, 10); leftEye.setFill(Color.YELLOW); leftEye.setStroke(Color.BLUE);
Arc mouth = new Arc(125, 150, 45, 35, 0, -180); mouth.setFill(Color.YELLOW); mouth.setStroke(Color.BLUE); mouth.setType(ArcType.OPEN);
272 10 Introducing JavaFX

Creating an object of the Arc class draws part (or all) of an ellipse. The con-structor we have used is specified on the Oracle™ website like this:
The names of the parameters mostly speak for themselves. The first two rep-resent the position of the centre of the ellipse. The next two are the horizontal andvertical radii respectively. startAngle represents the angle at which we startdrawing the arc. The only confusing name is the last one, length, which repre-sents the size of the angle through which the arc is drawn. Figure 10.5 should makeit clear.
In our case we have chosen the radii to give us an arc of an ellipse which issomewhat wider than it is high. We have chosen a start angle of 0° and you willnotice that the value of the final angle (the length parameter) is set to −180. Thenegative sign indicates that this angle is formed by moving from the start angle inan a clockwise direction (so that the mouth is smiling). A positive sign indicates ananticlockwise direction (as, for example, in Fig. 10.5).
The next lines of code set the fill colour and line colour (referred to as the strokecolour) of the mouth. The final line of code selects the type of arc we want, which inthis case is ArcType.OPEN. Two other types exist (ArcType.CHORD andArcType.ROUND), and these are demonstrated in Sect. 10.6.
The next thing we do is to add a caption:
Arc(double centreX, double centreY, double radiusX, double radiusY, double startAngle, double length)
Text caption = new Text(80, 240, "Smiley Face"); caption.setFill(Color.BLUE); caption.setFont(Font.font("Verdana", 15));
centreY
radiusX
lengthstartAngle
centreX
radiusY
Fig. 10.5 The Arc class
10.4 2D Graphics: The SmileyFace Class 273

For this purpose we are creating an instance of the Text class, which resides injavafx.scene.text. The constructor takes three parameters—two doublesand a String. The first two are used to position the text (they are the co-ordinatesof the beginning of the String), and the final one holds the value of the text itself.
We have gone on to set the colour, using the setFill method, and then wehave set the font, with the setFont method. There will be more in Sect. 10.10 onhow to create your own fonts, but for now you can just look at the syntax to seehow we select the name and size of the font—in this case “Verdana”, 15 points.
Now that we have defined all of our features we want them to stay together as agroup. We can do this with the Group class from the javafx.scene package.This class acts like an invisible container—it is very useful when we have alreadydefined the position of our shapes (as we have done here), so we don’t have toworry any further about how they will be laid out within the container:
We are using the convention of naming the first node that we add to our sceneroot, as it is the root node. In this case it is the only node. We have created ournew scene like this:
Here we have chosen to use the constructor that allows us to set the size (widthand height) of the initial scene, together with the background colour. If you don’tset these values initially, the Scene class (and other graphics components) havemany set-methods such as setMinWidth and setMaxHeight that you cancode later.
Now all that remains to complete the start method is to add the scene to thestage, set the title, and finally make the stage visible, which we do by calling itsshow method:
As we mentioned before, we have included a main method (and will continue todo so) in order that you can run the application in any environment.
Group root = new Group(face, rightEye, leftEye, mouth, caption);
Scene scene = new Scene(root, 250, 275, Color.YELLOW);
stage.setScene(scene); stage.setTitle("Smiley Face"); stage.show();
public static void main(String[] args) { launch(args); }
274 10 Introducing JavaFX

10.5 Event-Handling in JavaFX: The ChangingFace Class
The SmileyFace class that we developed in the last section was “passive” anddidn’t involve any interaction with the user. In practice of course, graphics appli-cations will normally require input from the user in the form of clicking a button,entering text and so on.
Controls such as buttons need to respond when the user performs some actionsuch as clicking a mouse. The way this works is that in response to the userperforming such an action, the control generates an Event object. This object issent to an EventHandler which we attach to a particular control and supply itwith the instructions for what to do when the action occurs. There are many actionsthat the user could perform, such as pressing a key, dragging a mouse and so on, butin this chapter we will concern ourselves only with a simple mouse-click on abutton.
Our first application will modify our SmileyFace class and turn it into aChangingFace class that can change its mood so it can be sad as well as happy.We are going to add a couple of buttons, as shown in Figs. 10.6 and 10.7.
You can see that we have now changed our title and caption from “Smiley Face”to “Changing Face”—because when we have finished we will be able to click onthe Frown button and get the face to look like the one you see in Fig. 10.7. Clickingthe Smile button will get the face to smile again.
The code for our class is shown below. There are quite a lot of new concepts andtechniques here, so we will discuss it in detail once you have had a look at it.
Fig. 10.6 TheChangingFace class (stillsmiling)
10.5 Event-Handling in JavaFX: The ChangingFace Class 275

ChangingFaceimport javafx.application.Application; import javafx.scene.Group; import javafx.scene.Scene; import javafx.scene.control.Button; import javafx.scene.layout.Background; import javafx.scene.layout.HBox; import javafx.scene.layout.VBox; import javafx.scene.paint.Color; import javafx.scene.shape.Arc; import javafx.scene.shape.ArcType; import javafx.scene.shape.Circle; import javafx.scene.text.Font; import javafx.scene.text.Text; import javafx.stage.Stage; import javafx.geometry.Pos;
public class ChangingFace extends Application {
@Override public void start(Stage stage) {
// create and configure the main circle for the face Circle face = new Circle(125, 125, 80); face.setFill(Color.YELLOW); face.setStroke(Color.RED);
// create and configure the circle for the right eye Circle rightEye = new Circle(86, 100, 10); rightEye.setFill(Color.YELLOW); rightEye.setStroke(Color.BLUE);
// create and configure the circle for the left eye Circle leftEye = new Circle(162, 100, 10); leftEye.setFill(Color.YELLOW); leftEye.setStroke(Color.BLUE);
// create and configure a smiling mouth (this is how it will start) Arc mouth = new Arc(125, 150, 45, 35, 0, -180); mouth.setFill(Color.YELLOW); mouth.setStroke(Color.BLUE); mouth.setType(ArcType.OPEN);
// create and configure the text Text caption = new Text(68, 240, "Changing Face"); caption.setFill(Color.BLUE); caption.setFont(Font.font ("Verdana", 15));
// create a group that holds all the features Group group = new Group(face, rightEye, leftEye, mouth, caption);
// create a button that will make the face smile Button smileButton = new Button("Smile");
// create a button that will make the face frown Button frownButton = new Button("Frown");
// create and configure a horizontal container to hold the buttons HBox buttonBox = new HBox(10); buttonBox.setAlignment(Pos.CENTER);
//add the buttons to the horizontal container buttonBox.getChildren().addAll(smileButton, frownButton);
// create and configure a vertical container to hold the button box and the face group VBox root = new VBox(10);
276 10 Introducing JavaFX
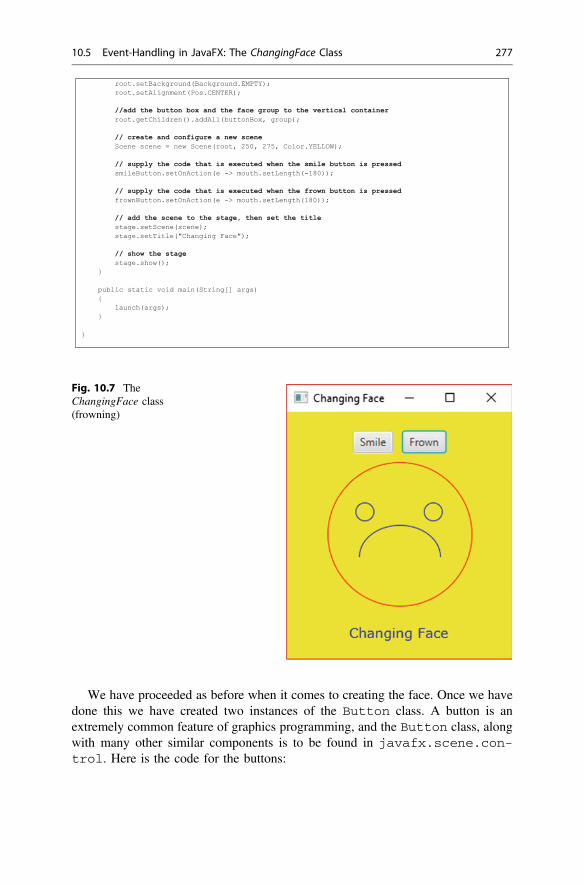
We have proceeded as before when it comes to creating the face. Once we havedone this we have created two instances of the Button class. A button is anextremely common feature of graphics programming, and the Button class, alongwith many other similar components is to be found in javafx.scene.con-trol. Here is the code for the buttons:
root.setBackground(Background.EMPTY); root.setAlignment(Pos.CENTER);
//add the button box and the face group to the vertical container root.getChildren().addAll(buttonBox, group);
// create and configure a new scene Scene scene = new Scene(root, 250, 275, Color.YELLOW);
// supply the code that is executed when the smile button is pressed smileButton.setOnAction(e -> mouth.setLength(-180));
// supply the code that is executed when the frown button is pressed frownButton.setOnAction(e -> mouth.setLength(180));
// add the scene to the stage, then set the title stage.setScene(scene); stage.setTitle("Changing Face");
// show the stage stage.show(); }
public static void main(String[] args) { launch(args); }
}
Fig. 10.7 TheChangingFace class(frowning)
10.5 Event-Handling in JavaFX: The ChangingFace Class 277

You can see that we have used a version of the constructor that allows us to setthe text that appears on the button. You can also use the setText method ofButton for this purpose.
Having created our two buttons, we now go on to create a container to holdthem:
We have created an instance of an HBox. As we mentioned earleir, this is acontainer that arranges the contained nodes horizontally. The constructor we haveused takes a parameter that sets the distance between the items, in this case 10pixels. We have then gone on to use its setAlignment method, into which wesend a pre-defined constant, an attribute of the Pos class which is found in thepackage javafx.geometry. The constant we have chosen is Pos.CENTER inorder to centre the components that the HBox contains. There are a number of otheroptions, and these are demonstrated in Sect. 10.9.1.
Having created our HBox, we need to add our buttons to it. We do this by callinga method of HBox, called getChildren, which returns a list of all the childnodes. This list has two methods for adding the nodes: the add method will add asingle item, and addAll a list of items. As we need to add two buttons, we haveused the latter:
So now have an HBox containing our buttons and a Group containing theshapes that make up our face. We need to organize these so that the face is placedvertically below the buttons, so we use a VBox which lines the items up vertically,just as the HBox does horizontally. We have given the name root to this instanceof VBox, because this will be the root node that we add to our scene.
Button smileButton = new Button("Smile");
Button frownButton = new Button("Frown");
HBox buttonBox = new HBox(10); buttonBox.setAlignment(Pos.CENTER);
buttonBox.getChildren().addAll(smileButton, frownButton);
VBox root = new VBox(10); root.setBackground(Background.EMPTY); root.setAlignment(Pos.CENTER); root.getChildren().addAll(buttonBox, group);
278 10 Introducing JavaFX

You will notice that we have done something else here, which is to add an emptybackground to the VBox—this is so that the yellow colour of the scene isn’t hidden.
Now we can add the HBox containing the buttons, and the group containing theface, to the VBox. We then add this VBox to the scene graphic:
We are almost ready to take the final step of adding the scene to the stage.Almost but not quite! There is one really vital thing we have to do, which is to
enable the buttons to respond when they are pressed, and to provide the code thattells the buttons what to do when this happens. At the beginning of this section weexplained that a control can be programmed to generate an Event object inresponse to some action taken by the user. The type of Event that we are interestedin here is called an ActionEvent, which is the one that handles a simplemouse-click. We need to add an EventHandler to each button, which means itwill generate the ActionEvent as soon as the mouse is clicked. Effectively weare programming our button to “listen out” for a mouse-click.
EventHandler has a method called handle, and it is the code for thismethod that we need to supply in order that the button knows what to do when themouse is clicked.
Now, you might think that all this sounds rather complicated—but we are inluck! Java 8 has furnished us with two things that mean our code for doing all thisstuff is very simple. The code for doing this for each button is shown below. Itcontains some new syntax, which we will explain once you have had a look at it:
You can see that a Button has a method called setOnAction. This anexample of what is known as a convenience method, a feature of JavaFX. Itcertainly is convenient because it means that all we have to do in order to add anEventHandler is to supply the code it needs for its handle method. Mostcontrols have these convenience methods, all starting with setOn-. Other exam-ples that you will come across in the second semester are setOnMouseMovedand setOnKeyTyped, as well as many others.
You can see that the code (which looks rather unfamiliar because of the - >notation) is sent directly into themethod. This is the other thing that we have been ableto do as a result of innovations in Java 8. The code that you see is called a lambdaexpression. Lambda expressions allow us to simply send in some code to a method asan argument, just as wewouldwith a value of a primitive type likeint, or an object ofa class like String.
root.getChildren().addAll(buttonBox, group); Scene scene = new Scene(root, 250, 275, Color.YELLOW);
smileButton.setOnAction(e -> mouth.setLength(-180)); frownButton.setOnAction(e -> mouth.setLength(180));
10.5 Event-Handling in JavaFX: The ChangingFace Class 279
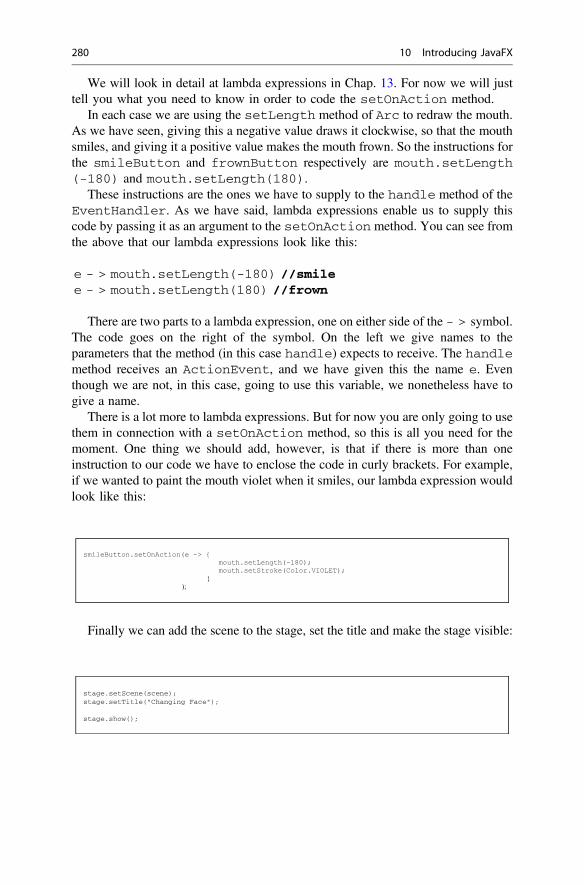
We will look in detail at lambda expressions in Chap. 13. For now we will justtell you what you need to know in order to code the setOnAction method.
In each case we are using the setLength method of Arc to redraw the mouth.As we have seen, giving this a negative value draws it clockwise, so that the mouthsmiles, and giving it a positive value makes the mouth frown. So the instructions forthe smileButton and frownButton respectively are mouth.setLength(-180) and mouth.setLength(180).
These instructions are the ones we have to supply to the handle method of theEventHandler. As we have said, lambda expressions enable us to supply thiscode by passing it as an argument to the setOnAction method. You can see fromthe above that our lambda expressions look like this:
e - > mouth.setLength(-180) //smilee - > mouth.setLength(180) //frown
There are two parts to a lambda expression, one on either side of the - > symbol.The code goes on the right of the symbol. On the left we give names to theparameters that the method (in this case handle) expects to receive. The handlemethod receives an ActionEvent, and we have given this the name e. Eventhough we are not, in this case, going to use this variable, we nonetheless have togive a name.
There is a lot more to lambda expressions. But for now you are only going to usethem in connection with a setOnAction method, so this is all you need for themoment. One thing we should add, however, is that if there is more than oneinstruction to our code we have to enclose the code in curly brackets. For example,if we wanted to paint the mouth violet when it smiles, our lambda expression wouldlook like this:
Finally we can add the scene to the stage, set the title and make the stage visible:
smileButton.setOnAction(e -> { mouth.setLength(-180); mouth.setStroke(Color.VIOLET); } );
stage.setScene(scene); stage.setTitle("Changing Face");
stage.show();
280 10 Introducing JavaFX

10.6 Some More 2D Shapes
Before we move away from 2D graphics, we will draw your attention to a somemore shapes that will increase your repertoire.
We have shown a few examples in Fig. 10.8.You can see that we have experimented with different colours, and with using
the setFill and setStroke methods.The rectangle that you see in the top left-hand corner was created with the
following code:
Rectangle rectangle = new Rectangle(50, 50, 50, 100);
In this constructor, the first two parameters (all of which are of type double)represent the x and y co-ordinates of the top left hand corner, and the next tworepresent the width and height of the rectangle respectively.
The line underneath was created using the following constructor:
Line line = new Line(50, 180, 80, 250);
Fig. 10.8 Some more 2D shapes
10.6 Some More 2D Shapes 281

The first two parameters are the x and y co-ordinates of the start position, and thelast two are the co-ordinates of the end position.
The ellipse that you see in the top right hand corner was drawn simply bycreating an Arc and drawing the line through an angle of 360°. In our previousexamples you saw the effect of choosing ArcType.OPEN for our arc type. Thetwo arcs you see on the bottom row show the effect of choosing ArcType.CHORDand ArcType.ROUND respectively.
All of the above shapes reside in javafx.scene.shape. You can check outthe many other constructors and methods of these and other shapes on the Oracle™website.
10.7 An Interactive Graphics Class
Most common applications involve controls (buttons, check boxes, text fields andso on) rather than graphical shapes. The next class—which we have called PushMe—is going to have controls that allow the user to input information via a graphicsscreen. The program isn’t all that sophisticated, but it introduces the basic elementsthat you need to build interactive graphics classes.
This application allows the user to enter some text and then, by clicking on abutton, to see the text that was entered displayed below the button. You can seewhat it looks like in Fig. 10.9.
Before pushing the bu on
A er pushing the bu on
Fig. 10.9 The PushMe class
282 10 Introducing JavaFX

As usual we will show you the code first and discuss it afterwards:
The box into which we type our text is called a TextField. This allows us totype in one line of text:
You can see that we have set the maximum width of our TextField to 250—if we had not done this, it would simply have filled the width of its parent container.You might want to explore a similar class, TextArea, that allows you to addseveral rows of text—you will see an example of this in the next section.
PushMe
import javafx.application.Application; import javafx.geometry.Pos; import javafx.scene.Scene; import javafx.scene.control.Button; import javafx.scene.control.Label; import javafx.scene.control.TextField; import javafx.scene.layout.VBox; import javafx.scene.paint.Color; import javafx.scene.text.Font; import javafx.stage.Stage;
public class PushMe extends Application {
@Override public void start(Stage stage) {
// create and configure a text field for user entry TextField pushMeTextField = new TextField(); pushMeTextField.setMaxWidth(250);
// create and configure a label to display the output Label pushMeLabel= new Label(); pushMeLabel.setTextFill(Color.RED); pushMeLabel.setFont(Font.font("Arial", 20));
// create and configure a label which will cause the text to be displayed Button pushMeButton = new Button(); pushMeButton.setText("Type something in the box then push me"); pushMeButton.setOnAction(e -> pushMeLabel.setText("You entered: " + pushMeTextField.getText()));
// create and configure a VBox to hold our components VBox root = new VBox(); root.setSpacing(10); root.setAlignment(Pos.CENTER);
//add the components to the VBox root.getChildren().addAll(pushMeTextField, pushMeButton, pushMeLabel);
// create a new scene Scene scene = new Scene(root, 350, 150);
//add the scene to the stage, then configure the stage and make it visible stage.setScene(scene); stage.setTitle("Push Me"); stage.show(); }
public static void main(String[] args) { launch(args); }
}
TextField pushMeTextField = new TextField(); pushMeTextField.setMaxWidth(250);
When the button is pressed, the text entered will be displayed underneath thebutton on a Label. As its name suggests, its purpose is simply to display somechosen text. We have created and configured it with the following lines of code:
10.7 An Interactive Graphics Class 283

Next we have the code for the Button:
We have already seen how to create and code a button, so this should be familiarto you. Look carefully a the lambda expression, which is explained in Fig. 10.10.
Having done all this, we create and configure a VBox, add the three components,and then add the VBox to the scene.
Finally we add the scene to the stage, then add a title and make it visible.
Label pushMeLabel= new Label(); pushMeLabel.setTextFill(Color.RED); pushMeLabel.setFont(Font.font("Arial", 20));
Button pushMeButton = new Button(); pushMeButton.setText("Type something in the box then push me"); pushMeButton.setOnAction(e -> pushMeLabel.setText("You entered: " + pushMeTextField.getText()));
Use the getText method of TextField to read thecurrent text, then append this to an introductory String
e -> pushMeLabel.setText("You entered: " + pushMeTextField.getText())
Use the setText method of Label to display the message
Fig. 10.10 The lambda expression explained
VBox root = new VBox(); root.setSpacing(10); root.setAlignment(Pos.CENTER);
root.getChildren().addAll(pushMeTextField, pushMeButton, pushMeLabel);
Scene scene = new Scene(root, 350, 150);
stage.setScene(scene); stage.setTitle("Push Me"); stage.show();
284 10 Introducing JavaFX

10.8 A Graphical User Interface (GUI) for the Oblong Class
Up till now,whenwewanted towrite programs that utilize our classes,we havewrittentext-based programs. Inmost cases, however, youwill bewanting to a create graphicaluser interface (GUI) for your classes. Let’s do this for the Oblong class that wedeveloped inChap. 8. The sort of interfacewe are talking about is shown in Fig. 10.11.
Here is the code for the GUI:
OblongGUI
import javafx.application.Application; import javafx.geometry.Pos; import javafx.scene.Scene; import javafx.scene.control.Button; import javafx.scene.control.Label; import javafx.scene.control.TextArea; import javafx.scene.control.TextField; import javafx.scene.layout.HBox; import javafx.scene.layout.VBox; import javafx.scene.paint.Color; import javafx.scene.text.Font; import javafx.stage.Stage;
public class OblongGUI extends Application {
// create an object of the Oblong class as an attribute private Oblong testOblong = new Oblong(0, 0);
@Override public void start(Stage stage) {
// create and configure text fields for input TextField lengthField = new TextField(); lengthField.setMaxWidth(50);
TextField heightField = new TextField(); heightField.setMaxWidth(50);
// create and configure a non-editable text area to display the results TextArea display = new TextArea(); display.setEditable(false); display.setMinSize(210,50); display.setMaxSize(210,50);
// create and configure Labels for the text fields Label lengthLabel = new Label("Length"); lengthLabel.setTextFill(Color.RED); lengthLabel.setFont(Font.font("Arial", 20));
Label heightLabel= new Label("Height"); heightLabel.setTextFill(Color.RED); heightLabel.setFont(Font.font("Arial", 20));
// create and configure a button to perform the calculations Button calculateButton = new Button(); calculateButton.setText("Calculate"); calculateButton.setOnAction( e -> {
// check that fields are not empty if(lengthField.getText().isEmpty() || heightField.getText().isEmpty()) { display.setText("Length and height must be entered"); } else {
//convert text input to doubles and set the length and height of the Oblong testOblong.setLength(Double.parseDouble(lengthField.getText())); testOblong.setHeight(Double.parseDouble(heightField.getText()));
// use the methods of Oblong to calculate the area and perimeter display.setText("The area is: " + testOblong.calculateArea() + "\n" + "The perimeter is: " + testOblong.calculatePerimeter()); } } );
// create and configure an HBox for the labels and text inputs HBox inputComponents = new HBox(10);
10.8 A Graphical User Interface (GUI) for the Oblong Class 285

In order to connect a GUI to a class, we create an object of that class within theGUI class—and as you can see that is what we have done here. We have declaredan attribute, testOblong, which we have initialized as a new Oblong with alength and height of zero (since the user hasn’t entered anything yet):
After this we declare the graphics components; the only one of these that youhave not yet come across is the TextArea, which is the large text area that you seein Fig. 10.8, where the area and perimeter of the oblong will be displayed. As youcan see, it is a useful component for entering and displaying text, although this timewe are using it only to display text, not to enter it. We have declared and configuredit as follows:
Fig. 10.11 A GUI for theOblong class
inputComponents.setAlignment(Pos.CENTER); inputComponents.getChildren().addAll(lengthLabel, lengthField, heightLabel, heightField);
// create and configure a vertical container to hold all the components VBox root = new VBox(25); root.setAlignment(Pos.CENTER); root.getChildren().addAll(inputComponents, calculateButton, display);
// create a new scene and add it to the stage Scene scene = new Scene(root, 350, 250); stage.setScene(scene); stage.setTitle("Oblong GUI"); stage.show(); }
public static void main(String[] args) { launch(args); }
}
private Oblong testOblong = new Oblong(0,0);
TextArea display = new TextArea(); display.setEditable(false); display.setMinSize(210,50); display.setMaxSize(210,50);
286 10 Introducing JavaFX

We have prevented the possibility of entering text by the use of the setE-ditable method, and we have given it a fixed size by calling both the set-MinSize and setMaxsize methods.
The only other thing we need to draw your attention to is the lambda expressionthat we have sent into the setOnAction method of the calculate button.
The first thing that we do here is to check that something has actually beenentered. We do this by reading the String that is currently in the TextField bycalling its getText method, and then calling the isEmpty method of String.
If either one of the fields is empty then an error message is displayed; otherwisewe continue with the task. We could have, if we had wanted to, done some moreinput validation—for example we could have checked that zeros or negativenumbers hadn’t been entered. Or, if we wanted to be very strict about the definitionof “oblong”, we could have checked that the two adjacent sides were not equal.These are left as exercises at the end of the chapter.
If there is no error, we use the setLength and setHeight methods ofOblong to set the length and the height of testOblong to the values entered.However, these methods expect to receive doubles—but the getText method ofTextField, which we use to see what has been entered, returns a String!
We must therefore perform a conversion. To do this we use the parseDoublemethod of the Double class—one of the wrapper classes you learnt about inChap. 8. parseDouble takes a String and converts it to a double:
It might have occurred to you that if the String did not contain a number, thenthis would cause a problem. We will show you how we deal with this sort of errorin Chap. 14.
calculateButton.setOnAction( e -> {
// check that fields are not empty if(lengthField.getText().isEmpty() || heightField.getText().isEmpty()) { display.setText("Length and height must be entered"); } else {
//convert text input to doubles and set the length and height of the Oblong testOblong.setLength(Double.parseDouble(lengthField.getText())); testOblong.setHeight(Double.parseDouble(heightField.getText()));
// use the methods of Oblong to calculate the area and perimeter display.setText("The area is: " + testOblong.calculateArea() + "\n" + "The perimeter is: " + testOblong.calculatePerimeter()); } } );
testOblong.setLength(Double.parseDouble(lengthField.getText())); testOblong.setHeight(Double.parseDouble(heightField.getText()));
10.8 A Graphical User Interface (GUI) for the Oblong Class 287

You should note that had we wanted to convert the Strings to ints, we wouldhave used the parseInt method of the Integer class.
Incidentally, if you want to do this the other way round and convert a doubleor an int to a String you can do so simply by concatenating it onto an emptyString, as shown in the examples below:
or:
If you take a look at the rest of the code you will see that we have arranged ouritems by using an HBox to hold the labels and fields for input so they are lined uphorizontally, and then used a VBox to line this up vertically with the button and thedisplay area. This is something you should be getting used to by now, so we canmove on to the next section where we explain more about how to use these boxes, aswell as other containers, each of which lays out the components in a different way.
10.9 Containers and Layouts
You have already seen how much we can achieve just with an HBox and a VBox—we have found these containers to be very versatile, and for simple applications youcan do an enormous amount just with these two containers. So we start this sectiontelling you a bit more about what we can do with these, and then we go on to showyou some other containers with different layout policies.
10.9.1 More About HBox and VBox
In Fig. 10.12 you can see twelve VBoxes (although they could have been HBoxesbecause each one contains only one component), organized in four groups of three.We have drawn a border around each one and coloured the background (we willshow you how to do this in a moment). Each box contains a Button—the pres-ence of the border shows the effect of setting the alignment to different values.
You will recall that the only alignment we have seen so far is Pos.CENTER, butthere are 11 others that we can choose from. Most are self-explanatory—but thethree on the right need a little explanation. Pos.BASELINE_LEFT, Pos.BASELINE_CENTER and Pos.BASELINE_RIGHT place the component in the
or:String s = "" + 3;
String s = "" + 3.12;
288 10 Introducing JavaFX

lowest position available, and are most relevant to text fields where we want the textto appear at the bottom of a window—as in a chat application, for example. In ourdiagram we have set our boxes to have a top inset, and the buttons are thenpositioned accordingly.
To set some insets on a component we use the setPadding method, with astatement such as this:
box.setPadding(new Insets(10, 20, 10, 20));
The parameters to the Insets constructor are all doubles, and define theinsets for the top, right, bottom and left insets respectively. A single parameterwould set all four insets to the same value.
Here box could be any component such as a VBox or HBox, or a Button,Label or TextField for example, as all these inherit the setPadding methodfrom a higher level class.
We also promised to show you how to create a border and background colour.To get the black borders that you see in the diagram we did the following:
This does seem to be a rather complicated process, but if you study it you caneasily see what’s going on. The setBorder method requires an object of the classBorder. To create this we have to send the constructor an object of Border-Stroke, which requires four arguments. The argument names should speak forthemselves, except perhaps for ConerRadii, which determines the roundness ofthe corners; in this example a value of zero produces square corners. To achieve thebackground colour we did this:
box.setBorder(new Border(new BorderStroke(Color.BLACK, BorderStrokeStyle.SOLID, new CornerRadii(0),new BorderWidths(2))));
Fig. 10.12 Aligning nodes
10.9 Containers and Layouts 289

Again, although it looks complicated at first sight, it isn’t hard to work out whatis actually going on.
All of these border and background classes reside in javafx.scene.layout.
We will do some more work on borders and colours in Sect. 10.10.
10.9.2 GridPane
A GridPane is a very useful container. As its name suggests, it lays out thecomponents in a matrix of rows and columns, as shown in Fig. 10.13.
The following lines of code would create a GridPane object, and configure itto position the components in the centre of each cell, and to leave a 10 pixel verticalgap (the gap between rows) and a 5 pixel horizontal gap (the gap betweencolumns).
The really good thing about a GridPane is its flexibility—it is sized dynam-ically as you insert the components, as are the individual cells. For example wecould insert a Button, myButton, to the above GridPane object as follows:
pane.add(myButton, columnIndex, rowIndex);
columnIndex and rowIndex are ints—we start counting from zero, so thefollowing line of code would add the button in column 4, row 6:
Fig. 10.13 Using aGridPane
GridPane pane = new GridPane(); pane.setAlignment(Pos.CENTER); pane.setVgap(10); pane.setHgap(5);
box.setBackground(new Background(new BackgroundFill(Color.LIGHTYELLOW, new CornerRadii(0), new Insets(0))));
290 10 Introducing JavaFX

pane.add(myButton, 3, 5);
Because of its flexibility, GridPane can be very versatile and will allow you tocreate quite complex presentations—the best thing you can do, as usual, is to trysome experiments of your own.
10.9.3 StackPane
A StackPane, as its name suggests, stacks components on top of each other. InFig. 10.14 we have created three different coloured rectangles, each one smallerthan the previous one, and added them to the StackPane from largest to smallest.
The components are added as before by calling the getChildren methodinherited by StackPane. Here we have chosen to align them in the centre of thepane. You can see that there is a lot of potential here for drawing interesting shapes,and as before you should conduct your own experiments.
There is another very useful way in which we can utilize this container, bycreating several items each the same size and stacking them one on top of the other.We can then choose which one is visible, so that the stack behaves like a pack ofcards. In this way we can create a series of screens which could, for example, beforms that need to be filled in progressively. We will show you an example of thisin Chap. 17.
Fig. 10.14 Using aStackPane
10.9 Containers and Layouts 291

10.9.4 FlowPane and BorderPane
As we explained in Sect. 10.2, prior to the existence of JavaFX the principalpackage for producing graphics in Java was Swing. With Swing, the way that acontainer arranged its components (its layout policy) was determined by associatinga particular layout manager with it. Two of the most common of these wereFlowLayout and BorderLayout. As you have already seen, JavaFX works byproviding different containers, each with its own layout policy—and with theexistence of VBox and HBox, flow layout and border layout policies are not asuseful as they were in the days of Swing. However, two containers that producesimilar results to these are nonetheless provided in JavaFX—these are FlowPaneand BorderPane.
A FlowPane operates by arranging the items in a row, in the order that theywere added, starting a new row when necessary. If the window is resized, thecomponents move about accordingly, as shown in Fig. 10.15.
As with the VBox and HBox, nodes are added to a FlowPane object by callingthe getChildren method and then using add or addAll.
The BorderPane operates by dividing the window into five regions calledTop, Bottom, Left, Right, Center, as shown in Fig. 10.16.
If we use a BorderPane the components don’t get moved around when thewindow is resized, as you can see from Fig. 10.17.
To add an item called myButton, for example, to the top region of a Bor-derPane named pane, we would do the following:
pane.setTop(myButton);
Before resizing
A er resizing
Fig. 10.15 The effect of resizing when using FlowPane
292 10 Introducing JavaFX

Similarly, for the other regions BorderPane has methods setBottom,setLeft, setRight and setCenter.
10.10 Borders, Fonts and Colours
You have already seen examples of how we can place borders around componentsand how we can determine the colour of text and background, and define differentfonts. In this section we will give you a few more pointers as to how to enhanceyour applications with these features.
A er resizingBefore resizing
Fig. 10.17 The effect of resizing when using BorderPane
Top
Le Center Right
Bo om
Fig. 10.16 The BorderPane layout strategy
10.9 Containers and Layouts 293

10.10.1 Borders
In Fig. 10.18 we see six buttons all with different border styles.Youwill recall from Sect. 10.9.1 that in order to place a border round a component
such as a button we use the setBordermethod—this requires an object of the classBorder, which in turn is created with an object of the class BorderStroke.
So, for example, for the first button (button1) we created the followingBorderStroke:
We then applied this to our button:
BorderStroke stroke1 = new BorderStroke(Color.BLACK, BorderStrokeStyle.SOLID, new CornerRadii(0), new BorderWidths(6)
button1.setBorder(new Border(stroke1));
Fig. 10.18 Examples of border styles
Fig. 10.19 Titled panes
294 10 Introducing JavaFX

One further effect is to create a titled border as shown in Fig. 10.19.To do this we use a TitledPane, which is actually a control class, and resides
in the package javafx.scene.control. The pane comes with a downwardarrow that allows you to collapse the pane, as you see in the second box inFig. 10.19. If you want a title only for decorative purposes you can turn this featureoff as in the first box. In each case a VBox was added to the pane; other nodes couldthen be added to the VBox.
The code for creating the first pane is as follows:
As you can see, the last line turns off the collapsible feature.
10.10.2 Fonts
Figure 10.20 shows some different font examples.In our example we have applied our fonts to various Text objects. To achieve
this we used the setFont method of Text—controls such as Button also havea setFont method.
There are two ways of doing this. Firstly we can use the font method of Font.In our first example, assuming the Text object is called caption1, we wouldhave written:
VBox box1 = new VBox(); box1.setMinSize(100, 75); TitledPane firstPane = new TitledPane("Pane 1", box1); firstPane.setCollapsible(false);
Fig. 10.20 Font examples
Font font1 = Font.font ("Verdana", FontWeight.BOLD, FontPosture.ITALIC, 12); caption1.setFont(font1);
10.10 Borders, Fonts and Colours 295
There are a number of different versions of the font method which you canlook up on the Oracle™ website.
The other way of doing this is to create a new font with one of two constructors.The first requires only the font size (a double) and uses the default system font.The second requires the name of the font and the size. Our fifth example inFig. 10.20 was achieved like this:
Underlining is done by using the setUnderline method of a component.
10.10.3 Colours
You have seen how the JavaFX Color class has a great many predefined colours.However we can, if we wish, create our own colours. Those of you who have studiedsome elementary physics will know that there are three primary colours, red, greenand blue1; all other colours can be obtained by mixing these in different proportions.
Mixing red, green and blue in equal intensity produces white light; the colour weknow as black is in fact the absence of all three. Mixing equal amounts of red andgreen (and no blue) produces yellow light; red and blue produce a mauvish colourcalled magenta; and mixing blue and green produces cyan, a sort of turquoise.
The Color class has a method called rgb which allows us to specify theintensity of each of the primary colours, red, green, blue respectively. The intensityfor each colour can range from a minimum of zero to a maximum of 255. So thereare 256 possible intensities for each primary colour, and the total number of dif-ferent colours available to us is therefore 256 � 256 � 256, or 16,777,216.
As an example, you could create the following colour:
You could then, for example, set the text colour of a button, button1, like this:
This particular combination produces a kind of orange—you should experimentwith different values.
Font font5 = new Font("Calibri", 40);
Color color1 = Color.rgb(200, 100, 50);
button1.setTextFill(color1);
1Don’t confuse this with the mixing of coloured paints, where the rules are different. In the case ofmixing coloured lights (as on a computer monitor) we are dealing with reflection of light—in thecase of paints we are dealing with absorption, so the primary colours, and the rules for mixing, aredifferent. For paints the primary colours are red, blue and yellow.
296 10 Introducing JavaFX

10.11 Number Formatting
We are now going to tell you about a technique that is not specifically related toJavaFX, but is something you will often want to use in your graphics applications.We frequently need our numerical output to appear in a suitable format—forexample with no more than two numbers after the decimal point—or perhaps withexactly two numbers after the decimal point. In order to do this we make use of theDecimalFormat class that resides in the java.text package. We would needthe following import statement:
Once you have access to this class you can create DecimalFormat objects inyour program. These objects can then be used to format decimal numbers for you.The DecimalFormat constructor has one parameter, the format string. Thisstring instructs the object on how to format a given decimal number. Some of theimportant elements of such a string are given in Table 10.1.
In the example in the next section we are going to create the following Dec-imalFormat object:
Here the DecimalFormat object, df, is being informed on how to format anydecimal numbers that may be given to it, as shown in see Fig. 10.21.
Having created a DecimalFormat object, we could then create a String, s,from a double, d, as follows:
import java.text.DecimalFormat;
Table 10.1 SpecialDecimalFormat characters
Character Meaning
. Insert a decimal point
, Insert a comma
0 Display a single digit
# Display a single digit or empty if no digit present
DecimalFormat df = new DecimalFormat("0.0#");
String s = df.format(d);
10.11 Number Formatting 297

The program below shows some examples:
The output from the above program is as follows:
4,376.794376.794376.8004376.78630004,376.7863
In the next chapter you will see how a similar technique can be used to outputnumbers as a particular currency.
NumberFormatExampleimport java.text.DecimalFormat;
public class NumberFormatExample { public static void main(String[] args) { double number = 4376.7863;
DecimalFormat df1 = new DecimalFormat("###,##0.0#"); DecimalFormat df2 = new DecimalFormat("###000.00"); DecimalFormat df3 = new DecimalFormat("00.0"); DecimalFormat df4 = new DecimalFormat("000000.00000"); DecimalFormat df5 = new DecimalFormat("000,000.00####");
System.out.println(df1.format(number)); System.out.println(df2.format(number)); System.out.println(df3.format(number)); System.out.println(df4.format(number)); System.out.println(df5.format(number)); } }
"0.0#"
Always display at least one digit a er the
decimal point
Always display at least one digit before the decimal
point
Fig. 10.21 A format String used with the DecimalFormat class
298 10 Introducing JavaFX

10.12 A Metric Converter
Our final example in this chapter is a practical application that pulls togethereverything that we’ve learnt so far about JavaFX. Most of the world uses the metricsystem; however, if you are in the United Kingdom as we are, then you will still beonly halfway there—sometimes using kilograms and kilometres, sometimes poundsand miles. Of course if you are in the USA (and you are not a scientist or anengineer) you will still be using the old imperial values for everything. Some mightsay it’s time that the UK and the USA caught up with the rest of the world! But untilthat happens this little program, which converts back and forth from metric toimperial, is going to be very handy.
We will be building a MetricConverter class. Figure 10.22 shows what weare going to achieve.
The application will have a VBox at its root—this VBox will hold three HBoxes,one for each row that you see in Fig. 10.22. Each row requires two Buttons whichwill perform the calculations in either direction; these two Buttons will be heldtogether in a VBox.
The code for the MetricConverter class is now presented; it looks quitelong, but most of it is just more of what you already know. Take a look at the codeand then we will draw your attention to a few points.
MetricConverter
import java.text.DecimalFormat; import javafx.application.Application; import javafx.geometry.Pos; import javafx.scene.Scene; import javafx.scene.control.Button; import javafx.scene.control.Label; import javafx.scene.control.TextField; import javafx.scene.layout.HBox; import javafx.scene.layout.VBox; import javafx.stage.Stage;
public class MetricConverter extends Application {
@Override public void start(Stage stage) { DecimalFormat df = new DecimalFormat("0.0#"); // see discussion in previous section
// first the components for converting back and forth from inches to centimetres
// create input fields, and labels to show the units TextField cmText = new TextField(); Label cmLabel = new Label("Cm"); TextField inchText = new TextField(); Label inchLabel = new Label("Inches");
// create buttons to perform the calculations Button cmToInchButton = new Button(" ===> "); Button inchToCmButton = new Button(" <=== ");
10.12 A Metric Converter 299

// create a VBox to hold the buttons VBox inchCmButtons = new VBox(); inchCmButtons.getChildren().addAll(cmToInchButton, inchToCmButton);
// create an HBox to hold all the items for the first row HBox inchCmPanel = new HBox(10); // compound container inchCmPanel.getChildren().addAll(cmText, cmLabel, inchCmButtons, inchText, inchLabel); inchCmPanel.setAlignment(Pos.CENTER);
// next the components for converting back and forth from miles to kilometres
// create input fields, and labels to show the units TextField kmText = new TextField(); Label kmLabel = new Label("Km"); TextField mileText = new TextField(); Label mileLabel = new Label("Miles "); // extra spaces make all labels the same length
// create buttons to perform the calculations Button kmToMileButton = new Button(" ===> "); Button mileToKmButton = new Button(" <=== ");
// create a VBox to hold the buttons VBox mileKmButtons = new VBox(); mileKmButtons.getChildren().addAll(kmToMileButton, mileToKmButton);
// create an HBox to hold all the items for the second row HBox mileKmPanel = new HBox(10); mileKmPanel.getChildren().addAll(kmText, kmLabel, mileKmButtons, mileText, mileLabel); mileKmPanel.setAlignment(Pos.CENTER);
// finally the components for converting back and forth from pounds to kilograms
// create input fields, and labels to show the units TextField kgText = new TextField(); Label kgLabel = new Label("Kg "); // extra spaces make all labels the same length TextField poundText = new TextField(); Label poundLabel = new Label("Lb "); // extra spaces make all labels the same length
// create buttons to perform the calculations Button kgToPoundButton = new Button(" ===> "); Button poundToKgButton = new Button(" <=== ");
// create a VBox to hold the buttons VBox poundKgButtons = new VBox(); poundKgButtons.getChildren().addAll(kgToPoundButton, poundToKgButton);
// create an HBox to hold all the items for the third row HBox poundKgPanel = new HBox(10); poundKgPanel.getChildren().addAll(kgText, kgLabel, poundKgButtons, poundText, poundLabel); poundKgPanel.setAlignment(Pos.CENTER);
// create a VBox to hold all three rows VBox root = new VBox(10); root.getChildren().addAll(inchCmPanel, mileKmPanel, poundKgPanel); root.setAlignment(Pos.CENTER);
// write the code for the buttons cmToInchButton.setOnAction( e -> { String s = new String(cmText.getText()); double d = Double.parseDouble(s); d = d / 2.54; s = df.format(d); inchText.setText(s); } );
inchToCmButton.setOnAction( e -> { String s = new String(inchText.getText());
300 10 Introducing JavaFX
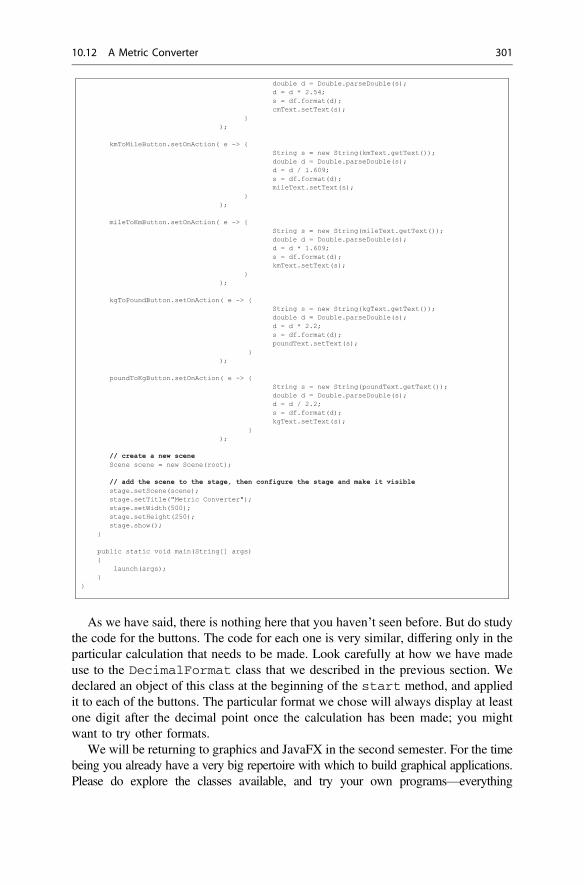
As we have said, there is nothing here that you haven’t seen before. But do studythe code for the buttons. The code for each one is very similar, differing only in theparticular calculation that needs to be made. Look carefully at how we have madeuse to the DecimalFormat class that we described in the previous section. Wedeclared an object of this class at the beginning of the start method, and appliedit to each of the buttons. The particular format we chose will always display at leastone digit after the decimal point once the calculation has been made; you mightwant to try other formats.
We will be returning to graphics and JavaFX in the second semester. For the timebeing you already have a very big repertoire with which to build graphical applications.Please do explore the classes available, and try your own programs—everything
double d = Double.parseDouble(s); d = d * 2.54; s = df.format(d); cmText.setText(s); } );
kmToMileButton.setOnAction( e -> { String s = new String(kmText.getText()); double d = Double.parseDouble(s); d = d / 1.609; s = df.format(d); mileText.setText(s); } );
mileToKmButton.setOnAction( e -> { String s = new String(mileText.getText()); double d = Double.parseDouble(s); d = d * 1.609; s = df.format(d); kmText.setText(s); } );
kgToPoundButton.setOnAction( e -> { String s = new String(kgText.getText()); double d = Double.parseDouble(s); d = d * 2.2; s = df.format(d); poundText.setText(s); } );
poundToKgButton.setOnAction( e -> { String s = new String(poundText.getText()); double d = Double.parseDouble(s); d = d / 2.2; s = df.format(d); kgText.setText(s); } );
// create a new scene Scene scene = new Scene(root);
// add the scene to the stage, then configure the stage and make it visible stage.setScene(scene); stage.setTitle("Metric Converter"); stage.setWidth(500); stage.setHeight(250); stage.show(); }
public static void main(String[] args) { launch(args); } }
10.12 A Metric Converter 301

you need is on the Oracle™ site. The more you try things out, the more you will learnand the more you will become familiar with what is available. And of course the morefun you will have!
10.13 Self-test Questions
1. Briefly describe the history of graphics programming in Java.
2. What is the name of the three methods that are called when a JavaFX applicationis launched? what is the purpose of each?
3. Which containers have been used in the following two scene graphics?
Fig. 10.22 The metric converter
(a) (b)
302 10 Introducing JavaFX

4. Describe how the following containers lay out the nodes that they contain:
10.14 Programming Exercises
1. Implement a few of the programs that we have developed in this chapter, andexperiment with different settings in order to change some the features—forexample size, colour, position and so on.
2. Consider some changes or additions you could make to the PushMe class. Forexample, pushing the button could display your text in upper case—or it couldsay how many letters it contains. Maybe you could add some extra buttons.
3. The application shown below produces a triangle:
See if you can write the code to produce this triangle using three lines. Wesuggest the following vertices:
(100, 70) (100, 250) (400, 250).
4. Below you see an application called ColourChanger which produces thefollowing graphic in which two buttons can be used to change the backgroundcolour:
(a) a VBox; (b) an HBox (c) a GridPane (d) a StackPane
(e) a FlowPane (f) a BorderPane
10.13 Self-test Questions 303

Write the code for this application.
5. Add some additional features to the MetricConverter—for example Cel-sius to Fahrenheit or litres to pints.
6. Look back at the final version of the Incubator class that you wrote inprogramming Exercise 5 of Chap. 8. Now you can create a graphical userinterface for it, instead of a text menu. A suggested interface is shown below:
7. Below is a variation on the ChangingFace class, which has three possiblemoods!
Rewrite the original code to produce this new design.
304 10 Introducing JavaFX

Hint: The easiest way to achieve the “thinking” mouth is to set the radiusattribute of Arc to zero.A more difficult approach would be to draw a line, but then you wouldhave to create three different mouths, and each time check which wasthe current mouth, remove that, and add the mouth you require. It isperfectly possible to do this because the list of nodes returned by thegetChildren method has methods named contains and removeas well as the add and addAll methods that you are used to.
8. Look back at the OblongGUI that we developed in Sect. 10.8. Modify the codeso that as well as checking that the values have been entered, it also checks thatthe values entered are not zero, and that the length and height are not equal.
10.14 Programming Exercises 305

11Case Study—Part 1
Outcomes:
By the end of this chapter you should be able to:
• describe each stage of the software development process;• design a complete application using UML;• implement a detailed UML design in Java;• document their code using Javadoc comments;• distinguish between unit testing and integration testing;• test individual program units by creating suitable drivers;• document their test results professionally using a test log.
11.1 Introduction
The process of developing software requires us to carry out several tasks. They canbe summarized as follows:
• analysis and specification: determining what the system is required to do(analysis) and writing it down in a clear and unambiguous manner(specification);
• design: making decisions about how the system is to be built in order to meetthe specification;
• implementation: turning the design into an actual program;• testing: ensuring that the system has been implemented correctly to meet the
original specification;• installation: delivering and setting up the completed system;• operation and maintenance: running the final system and reviewing it over
time—in light of changing requirements.
© Springer Nature Switzerland AG 2019Q. Charatan and A. Kans, Java in Two Semesters, Texts in Computer Science,https://doi.org/10.1007/978-3-319-99420-8_11
307
Rather than completely finishing one task before beginning the next,object-oriented languages like Java encourage systems to be developed a little bit ata time. So, for example, we can build one class and test it (maybe in the presence ofthe client) before moving onto the next, rather than waiting for the whole system tobe developed before testing and involving the client.
In this and the following chapter we will demonstrate this process by developinga case study that will enable you to get an idea of how a commercial system can bedeveloped from scratch; we start with an informal description of the requirements,and then specify and design the system using UML notation and pseudocode wherenecessary. From there we go on to implement our system in Java. Java applications,such as this, typically consist of many classes working together. When testing forerrors we will start with a process of unit testing (testing individual classes) fol-lowed by integration testing (testing classes that together make up an application).
The system that we are going to develop will keep records of the residents of astudent hostel. In order not to cloud your understanding, we have simplified things,keeping details of individuals to a minimum, and keeping the functionality fairlybasic; you will have the opportunity to improve on what we have done in thepractical exercises at the end of the next chapter.
11.2 The Requirements Specification
The local university requires a program to manage one of its student hostels, whichcontains a number of rooms, each of which can be occupied by a single tenant whopays rent on a monthly basis. The program must keep a list of tenants and theirmonthly payments. The information held for each tenant will consist of a name, aroom number and a list of all the payments a tenant has made (month and amount)for one year. The program must allow the user to add and delete tenants, to displaya list of all tenants, to record a payment for a particular tenant, and to display thepayment history of a tenant.
11.3 The Design
The two core classes required in this application are Tenant (to store the details ofa tenant) and Payment (to store the details of a payment). We have made a numberof design decisions about how the system will be implemented, and these are listedbelow:
308 11 Case Study—Part 1

*
Hostel
TenantList
+TenantList(int)+addTenant(Tenant): boolean +removeTenant (int) : boolean +getTenant(int) : Tenant +search(int) : Tenant +isEmpty() : boolean +isFull () : boolean +getTotal() : int +toString(): String
-tList: ArrayList<Tenant>+MAX: int
-pList: ArrayList<Payment>+MAX: int
PaymentList
+PaymentList(int)+addPayment(Payment): boolean +getPayment(int) : Payment +calculateTotalPaid() : double +isFull(): boolean +getTotal(): int +toString(): String
*
Payment
-month : String-amount : double
+Payment(String, double) +getMonth() : String +getAmount() : double +toString(): String
Tenant
-name : String-room : int -payments : PaymentList +MAX : int
+Tenant : (String , int)+makePayment(Payment) +getName() : String +getRoom() : int +getPayments() : PaymentList +toString(): String
Application
Fig. 11.1 The design of the student hostel system
11.3 The Design 309

• instances of the Tenant class and instances of the Payment class will each beheld in a separate collection class, PaymentList and TenantListrespectively;
• the collection classes PaymentList and TenantList both make use of anArrayList;
• the Hostel class, which will hold the TenantList, will also act as thegraphical interface for the system.
The design of the system is shown in Fig. 11.1. In this design there are twoarrows from one class to another. In UML these represent associations. An asso-ciation is a link from objects of one class to objects of another class. For example, acustomer might have one or more accounts; a student might have one or moretutors. The simplest form of association is a one-to-one relationship whereby asingle instance of one class is associated with a single instance of another class—forexample a purchase transaction and an invoice. You have already come acrossinheritance and aggregation—these are special examples of association.
In our example, the associations represented by the arrows are one-to-oneassociations—a Tenant requires a single instance of a PaymentList and aHostel requires a single instance of a TenantList.
The Hostel class itself has not yet been designed and this will be left until thenext chapter where we consider the overall system design and testing; for thisreason it has been drawn with a dotted line, but we can see it is a graphics class as itinherits from the JavaFX Application class.
In order to implement this application we should start with those classes that donot depend on any other, so that they can be unit tested in isolation. For example,we should not start by implementing the Tenant class as it requires the Pay-mentList class to be implemented first. You can see from the associations inFig. 11.1 that the only class that does not require any other class for its imple-mentation is the Payment class.
11.4 Implementing the Payment Class
Throughout this case study we will make use of the Javadoc style of comments(that we briefly mentioned back in Chap. 1) to document our classes. We willdiscuss how to read and write Javadoc comments in more detail in the nextsection.
The code for the Payment class is shown below.
310 11 Case Study—Part 1

As you can see, this class is fairly simple and does not require much explanation.Note that we have overridden the toString method (hence the @Override tag)to provide a convenient way of printing a Payment object (as discussed in Chap. 9).
Before incorporating this class into a larger program you would to test if it wasworking reliably. Eventually, when this class is incorporated into the final programwe will have a JavaFX Hostel class to run the application, but we need to test thisclass before an entire suite of classes has been developed. As we said before, testingan individual class in this way is often referred to as unit testing.
In order to unit test this class we will need to implement a separate classespecially for this purpose. This new class will contain a main method and it willact as a driver for the original class. A driver is a special program designed to do
Payment/** Class used to store details of a single payment in a hostel * @author Charatan and Kans * @version 6th April 2018 */ public class Payment { private String month; private double amount;
/** Constructor initialises the payment month and the amount paid * @param monthIn: month of payment * @param amountIn: amount of payment */ public Payment(String monthIn, double amountIn) { month = monthIn; amount = amountIn; }
/** Reads the month for which payment was made * @return Returns the month for which payment was made */ public String getMonth() { return month; }
/** Reads the amount paid * @return Returns the amount paid */ public double getAmount() { return amount; }
@Override public String toString() { return "(" + month + ", " + amount + ")"; }
}
@Override public String toString() {
return "(" + month + " : " + amount + ")"; // a convenient way of displaying attributes}
11.4 Implementing the Payment Class 311

nothing except exercise a particular class. If you look back at all our previousexamples, this is exactly how we tested individual classes. Initially you shouldgenerate an object from the given class. Once an object has been generated we canthen test that object by calling its methods. When testing your class by generatingobjects and calling methods, you will want to display results on the screen, such asthe data stored within your object. We could access this data by calling theappropriate get methods:
This will display the expected output:
Month: JanuaryAmount: 175.0
While having multiple output statements like this might be necessary in the finalapplication, it is a rather cumbersome way of retrieving information from an objectduring the testing phase—when you will not be so concerned with the format of theoutput. This is where we can make use of the toString method we provided inthe Payment class to display all attributes of the class in one print statement. Hereis a modified tester:
Running this program will produce the following result:(January : 175.0)You can see the Payment object is displayed in the format given in our
toString method. From this example, you can see how useful the toStringmethod is. Now let’s move on to the more interesting parts of this system. This
public class PaymentTester {
public static void main(String[ ] args) { Payment p1 = new Payment ("January", 175);
// code to interrogate object data System.out.println("Month: " + p1.getMonth());
System.out.println("Amount: " + p1.getAmount()); } }
PaymentTester// a very simple driver program that makes use of the toString method
public class PaymentTester {
public static void main(String[ ] args) { Payment p1 = new Payment ("January", 175); // create object to test
System.out.println(p1); // this will call the toString method in our Payment class } }
312 11 Case Study—Part 1

system requires us to develop two kinds of list, a PaymentList and aTenantList. Both make use of ArrayList to store the respective collections.A TenantList requires a PaymentList class to be developed first, so let’sstart by looking at this PaymentList class.
11.5 The PaymentList Class
The design of the PaymentList class is similar to a collection class that weshowed you in Chap. 8—the Bank class. Both classes make use of an ArrayListto store a collection of objects. The main difference between the two classes is thatin the Bank class the contained type was BankAccount, whereas in the Pay-mentList class the contained type is Payment. Also, we have included aconstant MAX, to allow us to record the maximum number of payments we wouldlike to record in our list. As MAX is a constant it has been given public visibility (+).Figure 11.2 provides a reminder of the design of the PaymentList class.
As you can see, as well as a constructor, there are methods to add a new paymentto the list, to check if the list is full and to count the total number of payments madeso far. There are also methods to get a payment based on a position number and tocalculate the total payments made so far. Finally, once again we have included atoString method for ease of testing. Take a look at the code for the Pay-mentList class below before we discuss it—once again we are using theJavadoc style of comments which will be fully explained in the next section.
-pList: ArrayList<Payment>+MAX: int
PaymentList
+PaymentList(int)+addPayment(Payment): boolean +isFull(): boolean +getTotal(): int +getPayment(int) : Payment +calculateTotalPaid() : double +toString(): String
*Payment
Fig. 11.2 The design of the PaymentList collection class
11.4 Implementing the Payment Class 313

PaymentListimport java.util.ArrayList;
/** Collection class to hold a list of Payment objects * @author Charatan and Kans * @version 4th April 2018 */ public class PaymentList {
// attributes private ArrayList<Payment> pList; public final int MAX;
/** Constructor initialises the empty payment list and sets the maximum list size * @param maxIn: The maximum number of payments in the list */ public PaymentList(int maxIn) { pList = new ArrayList<>(); MAX = maxIn; }
/** Checks if the payment list is full * @return Returns true if the list is full and false otherwise */ public boolean isFull() { return pList.size()== MAX; }
/** Gets the total number of payments * @return Returns the total number of payments currently in the list */ public int getTotal() { return pList.size(); }
/** Adds a new payment to the end of the list * @param pIn: The payment to add * @return Returns true if the object was added successfully and false otherwise */ public boolean addPayment(Payment pIn) { if(!isFull()) { pList.add(pIn); return true; } else { return false; } }
/** Reads the payment at the given position in the list * @param positionIn: The logical position of the payment in the list * @return Returns the payment at the given logical position in the list * or null if no payment at that logical position */ public Payment getPayment(int positionIn) {
//check for valid logical position if (positionIn <1 || positionIn > getTotal()) {
// no object found at given position return null; } else {
// take one off logical position to get ArrayList position return pList.get(positionIn - 1); } }
/** Calculates the total payments made by the tenant * @return Returns the total value of payments recorded */ public double calculateTotalPaid() { double totalPaid = 0; // initialize totalPaid
// loop through all payments for (Payment p: pList) {
// add current payment to running total totalPaid = totalPaid + p.getAmount(); } return totalPaid; }
@Override public String toString() { return pList.toString(); } }
314 11 Case Study—Part 1

Firstly you can see that we have imported the ArrayList class from thejava.util package:
We make use of the ArrayList class to store a collection of payments in thepList attribute. In addition to this attribute we have a public constant valueMAX to record the maximum number of payments that we can record:
The constructor, as well as initialising the ArrayList attribute pList, setsthe value for MAX via a parameter (maxIn) sent to the constructor:
Now let’s take a look at the remaining methods of this class. Firstly, we have anisFull method. The pList will be full when its size is equal to the value of ourconstant MAX:
You can see that the size method of ArrayList has been used to check thenumber of items currently in the pList.
The addPayment method makes use of isFull to check if there is space inour pList before adding a new Payment object. A boolean value is returned toindicate success or failure:
import java.util.ArrayList;
// attributes private ArrayList<Payment> pList; public final int MAX;
/** Constructor initialises the empty payment list and sets the maximum list size * @param maxIn: The maximum number of payments in the list */ public PaymentList(int maxIn) { pList = new ArrayList<>(); MAX = maxIn; }
public boolean isFull() {
return pList.size()== MAX; // use the size method of ArrayList}
public boolean addPayment(Payment pIn) {
if(!isFull()) // ok to add Payment {
pList.add(pIn); return true; } else { return false; // Payment not added to a full list } }
11.5 The PaymentList Class 315

The sizemethod of ArrayList that we met earlier is used again to implementthe getTotal method, which returns the total number of payments made so far:
The getPayment method makes use of getTotal to check that the validityof the parameter positionIn. The positionIn parameter is the logicalposition of a payment in the list, which should be a number between 1 and the totalnumber of items in the list. If an invalid position is sent the null value is returned,otherwise the payment at the associated ArrayList position is returned:
Next, the calculateTotalPaid method computes the sum of all paymentsin the list. This calculateTotalPaid method uses a standard algorithm forcomputing sums from a list of items. We met such an algorithm in Sect. 6.8.2 ofthis book. This algorithm can be expressed in pseudocode as follows:
Since the loop in this algorithm is just reading the items in the payment list, itcan be implemented in Java with the use of an enhanced for loop:
Finally, we have overridden the toString method again to allow the paymentlist to be displayed as a single String. This may seem like quite a challengingtask when dealing with a collection of objects. Maybe we need to loop through the
public int getTotal() {
return pList.size(); }
public Payment getPayment(int positionIn) {
//check for invalid logical position if (positionIn <1 || positionIn > getTotal()) {
// no object to return at the position return null; } else {
// take one off logical position to get ArrayList position return pList.get(positionIn - 1); } }
SET totalPaid TO 0 LOOP FROM first item in list TO last item in list BEGIN SET totalPaid TO totalPaid + amount of current payment END return totalPaid
public double calculateTotalPaid() {
double totalPaid = 0; // initialize totalPaid// loop through all payments
for (Payment p: pList) {
// add current payment to running total totalPaid = totalPaid + p.getAmount(); } return totalPaid; // return sum}
316 11 Case Study—Part 1

list and join all the payments together to form a single String? Luckily, we do nothave to go to such lengths as the ArrayList class has a toString method builtin! So all we need to do is call the toString method of the ArrayList attributehere:
If we assume we have three payment objects in the payment list, say (“Jan” :310), (“Feb” : 280) and (“March” : 310), the toString method of ArrayListwould return a String that looks as follows:
[(“Jan” : 310), (“Feb” : 280), (“March” : 310)]
As you can see, the toString method of ArrayList calls the toStringmethod of the contained items, separates them by commas and encloses the wholelist in a pair of square brackets.
We will make use of this toString method during the testing of the Pay-mentList class, but first let’s have a closer look at the Javadoc comments thatwe have included in the PaymentList class and the Javadoc tool itself.
11.5.1 Javadoc
Oracle’s Java Development Kit contains a tool, Javadoc, which allows you togenerate documentation for classes in the form of HTML files. In order to use thistool you must comment your classes in the Javadoc style. As we mentioned inChap. 1, Javadoc comments must begin with /** and end with */. Javadoccomments can also contain ‘tags’. Tags are special formatting markers that allowyou to record information such as the author of a piece of code. Table 11.1 givessome commonly used tags in Javadoc comments.
The @author and @version tags are used in the Javadoc comments for theclass as a whole. You can see examples of these tags at the top of the Pay-mentList class:
When Javadoc comments run over several lines, as in the example above, it iscommon (though not necessary) to begin each line with a leading asterisk.
@Override public String toString() {
return pList.toString(); // call toString of ArrayList
}
/** Collection class to hold a list of Payment objects * @author Charatan and Kans * @version 4th April 2018 */ public class PaymentList {
// attributes and methods go here }
11.5 The PaymentList Class 317
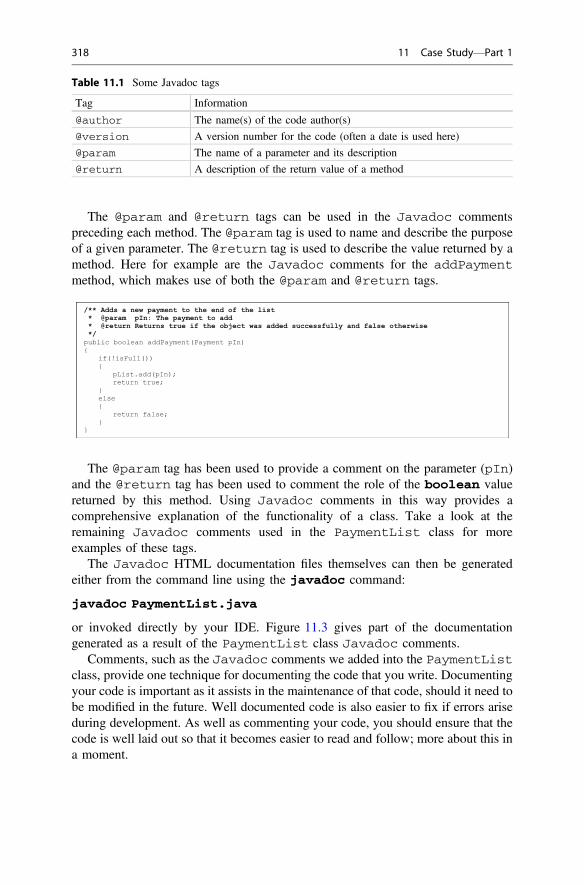
The @param and @return tags can be used in the Javadoc commentspreceding each method. The @param tag is used to name and describe the purposeof a given parameter. The @return tag is used to describe the value returned by amethod. Here for example are the Javadoc comments for the addPaymentmethod, which makes use of both the @param and @return tags.
The @param tag has been used to provide a comment on the parameter (pIn)and the @return tag has been used to comment the role of the boolean valuereturned by this method. Using Javadoc comments in this way provides acomprehensive explanation of the functionality of a class. Take a look at theremaining Javadoc comments used in the PaymentList class for moreexamples of these tags.
The Javadoc HTML documentation files themselves can then be generatedeither from the command line using the javadoc command:
javadoc PaymentList.java
or invoked directly by your IDE. Figure 11.3 gives part of the documentationgenerated as a result of the PaymentList class Javadoc comments.
Comments, such as the Javadoc comments we added into the PaymentListclass, provide one technique for documenting the code that you write. Documentingyour code is important as it assists in the maintenance of that code, should it need tobe modified in the future. Well documented code is also easier to fix if errors ariseduring development. As well as commenting your code, you should ensure that thecode is well laid out so that it becomes easier to read and follow; more about this ina moment.
Table 11.1 Some Javadoc tags
Tag Information
@author The name(s) of the code author(s)
@version A version number for the code (often a date is used here)
@param The name of a parameter and its description
@return A description of the return value of a method
/** Adds a new payment to the end of the list * @param pIn: The payment to add * @return Returns true if the object was added successfully and false otherwise */ public boolean addPayment(Payment pIn) { if(!isFull()) {
pList.add(pIn); return true;
} else { return false; } }
318 11 Case Study—Part 1

11.5.2 Code Layout
Consistent and clear indentation is important to improve the readability of yourprograms. Look at the example programs that we have presented to you and noticethe care we have taken with our indentation. We are following two simple rules allthe time:
• keep braces lined up under the structure to which they belong;• indent, by one level, all code that belongs within those braces.
For example, look again at the addPayment method of the PaymentListclass:
Fig. 11.3 Javadoc documentation generated for the PaymentList class
11.5 The PaymentList Class 319

Notice how these rules are applied again with the braces of the inner if…elsestatements:
11.6 Testing the PaymentList Class
As we have said before, it is always important to test classes in order to ensure thatthey are functioning correctly before moving on to the rest of the development.Whereas the testing of the Payment class was an example of unit testing, testingthis PaymentList class is an example of integration testing as it requires thePaymentList class working in conjunction with the Payment class.
To test the PaymentList class we need a driver that not only creates aPaymentList object, but also creates payments to add to this list.
We have quite a few methods to test in our PaymentList class, so we need tospend some time considering how we will go about testing these methods. Forexample, it would make sense to limit the size of our PaymentList so that we
public boolean addPayment(Payment pIn) { if(!isFull()) { pList.add(pIn); return true; } else { return false; } }
matching opening andclosing braces lined up
code within braces indented
if(!isFull()) {
pList.add(pIn); return true; }
matching opening andclosing braces lined up
code within braces indented
320 11 Case Study—Part 1

can quickly fill up our list to check the isFull method. Here is one possible teststrategy:
1. limit the size of the PaymentList to a relatively small number (say 4) usingthe PaymentList constructor;
2. add two payments to this list, say (“Jan”, 310) and (“Feb”, 280) using theaddPayment method;
3. display the list (using the toString method) to check the items have beenadded successfully;
4. check to see if the isFull method returns false;5. add two more payments to this list, say (“March”, 310) and (“April”, 300) using
the addPayment method;6. display the list (using the toString method) to check the items have been
added successfully;7. check to see if the isFull method returns true;8. get details of one of the payments made (say the second payment) using the
getPayment method.9. attempt to retrieve a payment at an invalid position (say 5);
10. display the total number of payments made so far (using the getTotalmethod);
11. display the total of the payments made so far (using the calcu-lateTotalPaid method);
12. attempt to add another payment to this full list using the addPaymentmethod.
Notice that the test strategy should ensure that all methods of the class are testedand all possible routes through a method are tested. So, for example, as well asensuring that the isFull method is called ensure we provide a scenario where themethod should return true and provide a scenario where the method should returnfalse.
Once a strategy is chosen, the test results should be logged in a test log. A testlog is a document that records the testing that took place during system develop-ment. Each row of the test log associates an input with an expected output. If theoutput is not as expected, reasons for this error have to be identified and recorded inthe log.
Figure 11.4 illustrates a suitable test log to document the testing strategy wedeveloped above.
Test logs such as this should be devised before the driver itself (and may even bedeveloped before the class we are testing has been developed). The test log can thenbe used to prompt the development of the driver. As you can see by looking at thetest in Fig. 11.4, we assume that the driver is a menu driven program.
11.6 Testing the PaymentList Class 321

TEST LOG
Purpose: To test the PaymentList class
Run Number: Date: Action Expected Output Pass/ Fail Reason for
failure - Prompt for size of list
Enter 4 Display menu of options Select ADD option Prompt for Payment detailsEnter “Jan”, 310 Display menu of optionsSelect ADD option Prompt for Payment to addEnter “Feb”, 280 Display menu of optionsSelect DISPLAY option Message
[(Jan : 310.0), (Feb : 280.0)]
Display menu of optionsSelect IS FULL option Message “list is NOT full”
Display menu of optionsSelect ADD option Prompt for Payment to addEnter “March”, 310 Display menu of optionsSelect ADD option Prompt for Payment to addEnter “April”, 300 Display menu of optionsSelect DISPLAY option Message
[(Jan : 310.0), (Feb : 280.0), (March : 310.0), (April : 300.0)]
Display menu of optionsSelect IS FULL option Message
“list is full”
Display menu of optionsSelect GET PAYMENToption
Prompt for position to retrieve
Enter 2 Message(Feb : 280.0)
Display menu of optionsSelect GET PAYMENToption
Prompt for position to retrieve
Enter 5 MessageINVALID PAYMENT NUMBER
Display menu of optionsSelect GET TOTALoption
Message4
Display menu of optionsSelect CALCULATE TOTAL PAID option
Message1200.0
Display menu of optionsSelect ADD option Prompt for Payment to addEnter “May”, 310 Message
Error – list full message
Display menu of optionsSelect EXIT option Program terminates
Fig. 11.4 Test log for the PaymentList class
322 11 Case Study—Part 1

The PaymentListTester program is one possible driver we could developin order to process the actions given in this test log:
PaymentListTester
public class PaymentListTester {
public static void main(String[] args) { char choice; int size; PaymentList list; // declare PaymentList object to test
// get size of list System.out.print("Size of list? "); size = EasyScanner.nextInt(); list = new PaymentList(size); // create object to test
// menu do {
// display options System.out.println(); System.out.println("[1] ADD"); System.out.println("[2] DISPLAY"); System.out.println("[3] IS FULL"); System.out.println("[4] GET PAYMENT"); System.out.println("[5] GET TOTAL"); System.out.println("[6] CALCULATE TOTAL PAID"); System.out.println("[7] Quit"); System.out.println(); System.out.print("Enter a choice [1-7]: ");
// get choice choice = EasyScanner.nextChar(); System.out.println();
// process choice switch(choice) { case '1': option1(list); break; case '2': option2(list); break; case '3': option3(list); break; case '4': option4(list); break; case '5': option5(list); break; case '6': option6(list); break; case '7': System.out.println("TESTING COMPLETE"); break; default: System.out.print("1-7 only"); } } while (choice != '7'); }
// ADD static void option1(PaymentList listIn) {
// prompt for payment details System.out.print("Enter Month: "); String month = EasyScanner.nextString(); System.out.print("Enter Amount: "); double amount = EasyScanner.nextDouble();
// create new Payment object from input Payment p = new Payment(month, amount);
// attempt to add payment to list boolean ok = listIn.addPayment(p); // value of false sent back if unable to add if (!ok)// check if item was not added { System.out.println("ERROR: list full"); } }
// DISPLAY static void option2(PaymentList listIn) { System.out.println("ITEMS ENTERED"); System.out.println(listIn); // calls toString method of PaymentList }
// IS FULL static void option3(PaymentList listIn) { if (listIn.isFull()) { System.out.println("list is full"); } else { System.out.println("list is NOT full"); } }
// GET PAYMENT static void option4(PaymentList listIn) {
// prompt for and receive payment number System.out.print("Enter payment number to retrieve: ");
11.6 Testing the PaymentList Class 323

We are now in a position to run the driver and check the actions documented inthe test log:
Size of list? 4
[1] ADD[2] DISPLAY[3] IS FULL[4] GET PAYMENT[5] GET TOTAL[6] CALCULATE TOTAL PAID[7] Quit
Enter a choice [1-7]: 1
Enter Month: Jan
Enter Amount: 310
[1] ADD[2] DISPLAY[3] IS FULL[4] GET PAYMENT[5] GET TOTAL[6] CALCULATE TOTAL PAID[7] Quit
Enter a choice [1-7]: 1
Enter Month: Feb
Enter Amount: 280
[1] ADD[2] DISPLAY[3] IS FULL[4] GET PAYMENT
int num = EasyScanner.nextInt(); // retrieve Payment object form list
Payment p = listIn.getPayment(num); // returns null if invalid position if (p != null)// check if Payment retrieved { System.out.println(p); // calls toString method of Payment } else { System.out.println("INVALID PAYMENT NUMBER"); // invalid position error } }
// GET TOTAL static void option5(PaymentList listIn) { System.out.print("TOTAL NUMBER OF PAYMENTS ENTERED: "); System.out.println(listIn.getTotal()); }
// GET TOTAL PAID static void option6(PaymentList listIn) { System.out.print("TOTAL OF PAYMENTS MADE SO FAR: "); System.out.println(listIn.calculateTotalPaid()); } }
324 11 Case Study—Part 1

[5] GET TOTAL[6] CALCULATE TOTAL PAID[7] Quit
Enter a choice [1-7]: 2
ITEMS ENTERED
[(Jan : 310.0), (Feb : 280.0)]
[1] ADD[2] DISPLAY[3] IS FULL[4] GET PAYMENT[5] GET TOTAL[6] CALCULATE TOTAL PAID[7] Quit
Enter a choice [1-7]: 3
list is NOT full
[1] ADD[2] DISPLAY[3] IS FULL[4] GET PAYMENT[5] GET TOTAL[6] CALCULATE TOTAL PAID[7] Quit
Enter a choice [1-7]: 1
Enter Month: March
Enter Amount: 310
[1] ADD[2] DISPLAY[3] IS FULL[4] GET PAYMENT[5] GET TOTAL[6] CALCULATE TOTAL PAID[7] Quit
Enter a choice [1-7]: 1
Enter Month: April
Enter Amount: 300
[1] ADD[2] DISPLAY[3] IS FULL[4] GET PAYMENT[5] GET TOTAL
11.6 Testing the PaymentList Class 325

[6] CALCULATE TOTAL PAID[7] Quit
Enter a choice [1-7]: 2
ITEMS ENTERED
[(Jan : 310.0), (Feb : 280.0), (March : 310.0), (April :300.0)]
[1] ADD[2] DISPLAY[3] IS FULL[4] GET PAYMENT[5] GET TOTAL[6] CALCULATE TOTAL PAID[7] Quit
Enter a choice [1-7]: 3list is full
[1] ADD
[2] DISPLAY[3] IS FULL[4] GET PAYMENT[5] GET TOTAL[6] CALCULATE TOTAL PAID[7] Quit
Enter a choice [1-7]: 4
Enter payment number to retrieve: 2(Feb : 280.0)
[1] ADD[2] DISPLAY[3] IS FULL[4] GET PAYMENT[5] GET TOTAL[6] CALCULATE TOTAL PAID[7] Quit
Enter a choice [1-7]: 4
Enter payment number to retrieve: 5
INVALID PAYMENT NUMBER
[1] ADD[2] DISPLAY[3] IS FULL[4] GET PAYMENT[5] GET TOTAL
326 11 Case Study—Part 1

[6] CALCULATE TOTAL PAID[7] Quit
Enter a choice [1-7]: 5
TOTAL NUMBER OF PAYMENTS ENTERED: 4
[1] ADD[2] DISPLAY[3] IS FULL[4] GET PAYMENT[5] GET TOTAL[6] CALCULATE TOTAL PAID[7] Quit
Enter a choice [1-7]: 6
TOTAL OF PAYMENTS MADE SO FAR: 1200.0
[1] ADD[2] DISPLAY[3] IS FULL[4] GET PAYMENT[5] GET TOTAL[6] CALCULATE TOTAL PAID
[7] Quit
Enter a choice [1-7]: 1
Enter Month: May
Enter Amount: 310ERROR: list full
[1] ADD[2] DISPLAY[3] IS FULL[4] GET PAYMENT[5] GET TOTAL[6] CALCULATE TOTAL PAID[7] Quit
Enter a choice [1-7]: 7TESTING COMPLETE
You have seen menu driven tester programmes such as this before so we will notdiscuss it in any detail. Note that our EasyScanner class has been used in thistester for ease of keyboard input. For example:
// get size of list System.out.print("Size of list? "); size = EasyScanner.nextInt(); // EasyScanner used to simplify keyboard input
11.6 Testing the PaymentList Class 327

Also, notice how the display method of our PaymentListTester (option 2on the menu) displays the PaymentList object using the toString method wediscussed earlier:
The output from this method gives us the ArrayList values in the format wediscussed earlier, for example:
ITEMS ENTERED[(Jan : 310.0), (Feb : 280.0), (March : 310.0), (April :
300.0)]
If unexpected results are produced during testing, you should stop and identifythe cause of the error in the class that you are testing. Both the cause of the error andhow the error was fixed should be documented in the test log. The driver can thenbe run again with a fresh test log and this process should continue until all resultsare delivered as predicted. In this case, however, the results were as expected, so wecan now move on to developing the rest of our system. We have two more classesto look at Tenant and TenantList. Before we look at the TenantList classwe need to implement the Tenant class.
11.7 Implementing the Tenant Class
As you can see from the UML diagram of Fig. 11.1, the Tenant class containsfour attributes:
• name;• room;• payments;• MAX.
The first two of these represent the name and the room of the tenant respectively.The third attribute, payments, is to be implemented as a PaymentList objectand the last attribute, MAX, is to be implemented as a static class attribute. TheMAX attribute will also be implemented as a constant as we are assuming thattenants make a fixed number of payments in a year (twelve—one for each month).Since class constants cannot be modified, it makes sense to allow them to bedeclared as public. Below is the code for the Tenant class.
// DISPLAY static void option2(PaymentList listIn) {
System.out.println("ITEMS ENTERED"); System.out.println(listIn); // calls toString method of PaymentList}
328 11 Case Study—Part 1

Tenant/** Class used to record the details of a tenant * @author Charatan and Kans * @version 6th April 2018 */ public class Tenant { private String name; private int room; private PaymentList payments; public static final int MAX = 12;
/** Constructor initialises the name and room number of the tenant * and sets the payments made to the empty list * @param nameIn: name of tenant * @param roomIn: room number of tenant */ public Tenant(String nameIn, int roomIn) { name = nameIn; room = roomIn; payments = new PaymentList(MAX); }
/** Records a payment for the tenant * @param paymentIn: payment made by tenant */ public void makePayment(Payment paymentIn) { payments.addPayment(paymentIn); // call PaymentList method }
/** Reads the name of the tenant * @return Returns the name of the tenant */ public String getName() { return name; }
/** Reads the room of the tenant * @return Returns the room of the tenant */ public int getRoom() { return room; }
/** Reads the payments of the tenant * @return Returns the payments made by the tenant */ public PaymentList getPayments() { return payments; }
@Override public String toString() { return name+", "+room +", "+payments; } }
11.7 Implementing the Tenant Class 329

The Javadoc comments should be sufficient documentation for you to followthe code in this class. Note how the Javadoc comments for the constructorincludes two @param tags, as the constructor has two parameters. Also, it is worthnoting that the payments attribute, being of type PaymentList, can respond toany of the PaymentList methods we discussed in Sect. 11.5. The makePay-ment method illustrates this by calling the addPayment method ofPaymentList:
We will leave the testing of this class and the next TenantList class asexercises for you as end of chapter programming exercises.
11.8 Implementing the TenantList Class
The TenantList class is a collection class to hold our Tenant objects. Onceagain we use an ArrayList to store this collection and have a MAX constant to fixan upper limit on the number of tenants our hostel can accommodate. A reminder ofthe design of the TenantList class is given in Fig. 11.5.
Most of the methods of the TenantList class should be familiar to you fromthe PaymentList collection classed that we discussed earlier. We will just take acloser look at two methods that were not mirrored in the PaymentList class,namely the remove and search methods. Let’s start with the search method.Here is a reminder of its UML interface:
TenantList
+TenantList(int) +addTenant(Tenant): boolean +removeTenant (int) : boolean +getTenant(int) : Tenant +search(int) : Tenant +isEmpty() : boolean +isFull () : boolean +getTotal() : int +toString(): String
-tList: ArrayList<Tenant>+MAX: int
* Tenant
Fig. 11.5 The design of the TenantList collection class
public void makePayment(Payment paymentIn) {
payments.addPayment(paymentIn); // call PaymentList method}
330 11 Case Study—Part 1

search (int): Tenant
The integer parameter represents the room number of the tenant that this method issearching for. The tenant returned is the tenant living in that particular room; if notenant is found in that room then null is returned. Here is a suitable algorithm forfinding a tenant, expressed in pseudocode:
This is similar to the algorithm we looked at for searching an array in Sect. 8.8.1except that we return the given item in the list rather than its index. This algorithmrequires a loop to search through the tenants in the list and an enhanced for loop isa good way to do this:
Now let’s look at the removeTenant method. The UML interface for thismethod is as follows:
removeTenant(int): boolean
Here the integer parameter represents the room number of the tenant that is to beremoved from the list and the boolean return value indicates whether or not sucha tenant has been removed successfully.
The previous search method can be used here to determine if a tenant exists inthat particular room (a value of null will be returned if no such tenant exists). Ifsuch a tenant does exist it can be removed from the list using the remove method
public Tenant search(int roomIn) { for(Tenant currentTenant: tList)// enhanced for loop to serach through the list of tenants {
// find tenant with given room number if(currentTenant.getRoom() == roomIn) { return currentTenant; } } return null; // no tenant found with given room number }
LOOP FROM first tenant in list TO last tenant in list BEGIN IF current tenant’s room number = room to locate BEGIN return current tenant END END return null
11.8 Implementing the TenantList Class 331

of ArrayList and a boolean value of true can be returned, otherwise aboolean value of false can be returned. Here is the code:
The complete code for the TenantList class is now presented below. TheJavadoc comments provided should now provide sufficient explanation of eachpart of this class.
{ tList = new ArrayList<>(); MAX = maxIn; }
/** Adds a new Tenant to the list * @param tIn The Tenant to add * @return Returns true if the tenant was added successfully and false otherwise */ public boolean addTenant(Tenant tIn) { if(!isFull()) { tList.add(tIn); return true;
TenantListimport java.util.ArrayList;
/** Collection class to hold a list of tenants * @author Charatan and Kans * @version 6th April 2018 */ public class TenantList { private ArrayList<Tenant> tList; public final int MAX;
/** Constructor initialises the empty tenant list and sets the maximum list size * @param maxIn The maximum number of tenants in the list */ public TenantList(int maxIn)
public boolean removeTenant(int roomIn) { Tenant findT = search(roomIn); // call search method if (findT != null) // check tenant is found at given room {
tList.remove(findT); // remove given tenant return true; } else { return false; // no tenant in given room } }
332 11 Case Study—Part 1

} else { return false; } }
"1,,"Tgoqxgu"vjg"vgpcpv"kp"vjg"ikxgp"tqqo"pwodgt"""""",""Brctco"tqqoKp"Vjg"tqqo"pwodgt"vq"qh"vjg"vgpcpv"vq"tgoqxg"""""",""Btgvwtp"Tgvwtpu"vtwg"kh"vjg"vgpcpv"ku"tgoqxgf"uweeguuhwnn{"qt"hcnug"qvjgtykug"""""",1" public boolean removeTenant(int roomIn) { Tenant findT = search(roomIn); 11"ecnn"ugctej"ogvjqf if (findT != null) 11"ejgem"vgpcpv"ku"hqwpf"cv"ikxgp"tqqo { tList.remove(findT); 11"tgoqxg"ikxgp"vgpcpv return true; } else { return false; 11"pq"vgpcpv"kp"ikxgp"tqqo } }
1,,"Ugctejgu"hqt"vjg"vgpcpv"kp"vjg"ikxgp"tqqo"pwodgt"""""",""Brctco"tqqoKp"Vjg"tqqo"pwodgt"vq"ugctej"hqt"""""",""Btgvwtp"Tgvwtpu"vjg"vgpcpv"kp"vjg"ikxgp"tqqo"qt"pwnn"kh"pq"vgpcpv"kp"vjg"ikxgp"tqqo"""""",1" public Tenant search(int roomIn) { for(Tenant currentTenant: tList) { // find tenant with given room number if(currentTenant.getRoom() == roomIn) { return currentTenant; } } return null; // no tenant found with given room number }
1,,"Tgcfu"vjg"vgpcpv"cv"vjg"ikxgp"rqukvkqp"kp"vjg"nkuv"""""",""Brctco""""""rqukvkqpKp"Vjg"nqikecn"rqukvkqp"qh"vjg"vgpcpv"kp"vjg"nkuv"""""",""Btgvwtp"""""Tgvwtpu"vjg"vgpcpv"cv"vjg"ikxgp"nqikecn"rqukvkqp"kp"vjg"nkuv"""""",""""""""""""""qt"pwnn"kh"pq"vgpcpv"cv"vjcv"nqikecn"rqukvkqp"""""",1" public Tenant getTenant(int positionIn) { if (positionIn<1 || positionIn>getTotal()) 11"ejgem"hqt"xcnkf"rqukvkqp { return null; 11"pq"qdlgev"hqwpf"cv"ikxgp"rqukvkqp } else {
11"tgoqxg"qpg"hto"nqikecn"rqkvkqp"vq"igv"Cttc{Nkuv"rqukvkqp" return tList.get(positionIn -1); } }
1,,"Tgrqtvu"qp"yjgvjgt"qt"pqv"vjg"nkuv"ku"gorv{"""""",""Btgvwtp"Tgvwtpu"vtwg"kh"vjg"nkuv"ku"gorv{"cpf"hcnug"qvjgtykug""""",1" public boolean isEmpty() { return tList.isEmpty(); }
"1,,"Tgrqtvu"qp"yjgvjgt"qt"pqv"vjg"nkuv"ku"hwnn"""""",""Btgvwtp"Tgvwtpu"vtwg"kh"vjg"nkuv"ku"hwnn"cpf"hcnug"qvjgtykug"""""",1 public boolean isFull() { return tList.size()== MAX; }
1,,"Igvu"vjg"vqvcn"pwodgt"qh"vgpcpvu""""""",""Btgvwtp"Tgvwtpu"vjg"vqvcn"pwodgt"qh"vgpcpvu"ewttgpvn{"kp"vjg"nkuv""""""",1" public int getTotal() { return tList.size(); }
"BQxgttkfg" public String toString() { return tList.toString(); } }
11.8 Implementing the TenantList Class 333

All that remains for us to do to complete our case study in the next chapter is todesign, implement and test the Hostel class which will not only keep track of thetenants but will also act as the graphical user interface for the system.
11.9 Self-test Questions
1. Describe the class associations given in the UML design of Fig. 11.1.
2. Produce suitable Javadoc comments for the Oblong class from Chap. 8.
3. The test log of Sect. 11.5.3 did not include checks for the getItem andgetTotal methods of the PaymentList class. It also did not include acheck that attempts to add to a full list and remove from an empty list would fail.Modify the test log to include these checks.
4. Develop test logs for testing the Tenant and TenantList classes.
5. Identify the benefits of adding a toString method into your classes and thenwrite a suitable toString method for the Bank class from Chap. 8.
11.10 Programming Exercises
You will need to copy the entire suite of classes that make up the student hostelsystem and the Bank and BankApplication classes from the website.
1. Modify and then run the driver given in Program 11.2 in light of the changesmade to the test log in self-test question 3 above.
2. Develop suitable drivers to test the Tenant and TenantList classes.
3. Use the test logs you developed in self-test question 5 and the drivers youdeveloped in Exercise 2 above to test the Tenant and TenantList classes.
4. Incorporate the toString method into the Bank class from Chap. 8 youdeveloped in self-test question 4 above then modify and run theBankApplication tester program from the same chapter to test make use ofthis toString method.
334 11 Case Study—Part 1

12Case Study—Part 2
Outcomes:
By the end of this chapter you should be able to:
• design an attractive graphical user interface;• use pseudocode to design event handling routines;• implement the design in Java using a variety of JavaFX components;• devise a testing strategy for a complete application and carry out the necessary
steps to implement that strategy.
12.1 Introduction
In the previous chapter we designed and developed the core classes required toimplement the functionality of our Student Hostel System. We now go on develop agraphical user interface for this application.
12.2 Keeping Permanent Records
In practice, an application such as the Student Hostel System would not be much useif we had no way of keeping permanent records—in other words, of saving a file todisk. However, reading and writing files is something that you will not learn untilyour second semester. So, in the meantime, in order to make it possible to keep apermanent record of your data, we have created a special class for you to use; wehave called this class TenantFileHandler. This class (along with the rest ofthe files from this case study) can be found on the accompanying website.
© Springer Nature Switzerland AG 2019Q. Charatan and A. Kans, Java in Two Semesters, Texts in Computer Science,https://doi.org/10.1007/978-3-319-99420-8_12
335

The TenantFileHandler class has two static methods: the first,saveRecords, needs to be sent two parameters, an integer value indicating thenumber of rooms in the hostel, and a TenantList, which is a reference to the listto be saved; the second, readRecords, requires only a reference to aTenantList so that it knows where to store the information that is readfrom the file.
The readRecords method will be called when the application starts (so thismethod call will therefore be coded into the start method of the JavaFX appli-cation), and the saveRecords method will be called when we finish the appli-cation (and will therefore be coded into the event-handler of a “Save and Quit”button). The user can of course exit without saving by clicking the cross-hairs, justin case, for any reason, the user should want to abandon any changes.
12.3 Design of the Hostel Class
In Fig. 11.1 of the previous chapter we presented the Hostel class as part of theStudent Hostel application design, but did not give any design details for this class.Let’s consider this Hostel class now. Figure 12.1 is a reminder of the importantclasses in the UML diagram and also includes some key attributes and methods.
As you can see, the Hostel class requires a single instance of the Tenant-List collection class we developed in Chap. 11. In Fig. 12.1 this instance isrecorded as the private list attribute in the Hostel class.
Application
Hostel
TenantList -list: TenantList-noOfRooms: int
+start(Stage)-getNumberOfRooms():int
Fig. 12.1 The initial design of the Hostel class
336 12 Case Study—Part 2
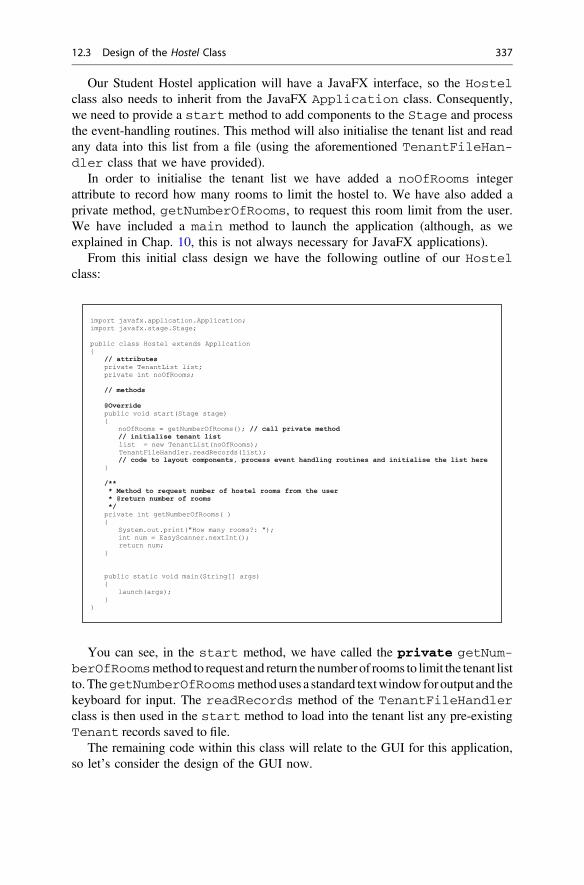
Our Student Hostel application will have a JavaFX interface, so the Hostelclass also needs to inherit from the JavaFX Application class. Consequently,we need to provide a start method to add components to the Stage and processthe event-handling routines. This method will also initialise the tenant list and readany data into this list from a file (using the aforementioned TenantFileHan-dler class that we have provided).
In order to initialise the tenant list we have added a noOfRooms integerattribute to record how many rooms to limit the hostel to. We have also added aprivate method, getNumberOfRooms, to request this room limit from the user.We have included a main method to launch the application (although, as weexplained in Chap. 10, this is not always necessary for JavaFX applications).
From this initial class design we have the following outline of our Hostelclass:
You can see, in the start method, we have called the private getNum-berOfRoomsmethod to request and return the number of rooms to limit the tenant listto. ThegetNumberOfRoomsmethoduses a standard textwindow for output and thekeyboard for input. The readRecords method of the TenantFileHandlerclass is then used in the start method to load into the tenant list any pre-existingTenant records saved to file.
The remaining code within this class will relate to the GUI for this application,so let’s consider the design of the GUI now.
import javafx.application.Application;import javafx.stage.Stage;
public class Hostel extends Application{
// attributesprivate TenantList list;private int noOfRooms;
// methods@Overridepublic void start(Stage stage)
{ noOfRooms = getNumberOfRooms(); // call private method// initialise tenant listlist = new TenantList(noOfRooms);TenantFileHandler.readRecords(list);// code to layout components, process event handling routines and initialise the list here
}
/*** Method to request number of hostel rooms from the user* @return number of rooms*/private int getNumberOfRooms( )
{ System.out.print("How many rooms?: ");int num = EasyScanner.nextInt();return num;
}
public static void main(String[] args){
launch(args);}
}
12.3 Design of the Hostel Class 337

12.4 Design of the GUI
There will be two aspects to the design of the graphical interface. Firstly, we need todesign the visual side of things; then we need to design the algorithms for ourevent-handling routines so that the buttons do the jobs we want them to, like addingor displaying tenants.
Let’s start with the visual design. We need to choose which graphics compo-nents we are going to use and how to lay them out. One way to do this is to make apreliminary sketch such as the one shown in Fig. 12.2.
It should be clear which JavaFX components we will be using here. We have aselection of buttons on our GUI (Fig. 12.3).
The remaining components are Labels (“Hostel Application”, “Room” “Name”,“Month” and “Amount”) and TextFields (for the five single-row boxes) orTextAreas (for the two multiple-row boxes).
In the examples you saw in Chap. 10, you saw that we created our visualcomponents within our start method. This made sense as the algorithms for ourbutton event handlers (which needed access to these components) were also con-tained within the start method. In this application, however, we would expect tohave much more complicated algorithms for our button event handlers, so we willstructure things a little differently. In this Hostel class we will implement ourevent handlers in a series of private methods (one for each button).
Hostel Application
Room Name
Add Tenant Display Tenants Remove Tenant Save and Quit
Room Month Amount
Room Name1 Bill Tin-Closet2 Dan Druff3 Sue Nora Later
1
Make Payment List Payments
Month AmountJAN £200.00FEB £175.00
Total paid so far : £375.00
Fig. 12.2 Preliminary design of the Hostel GUI
338 12 Case Study—Part 2
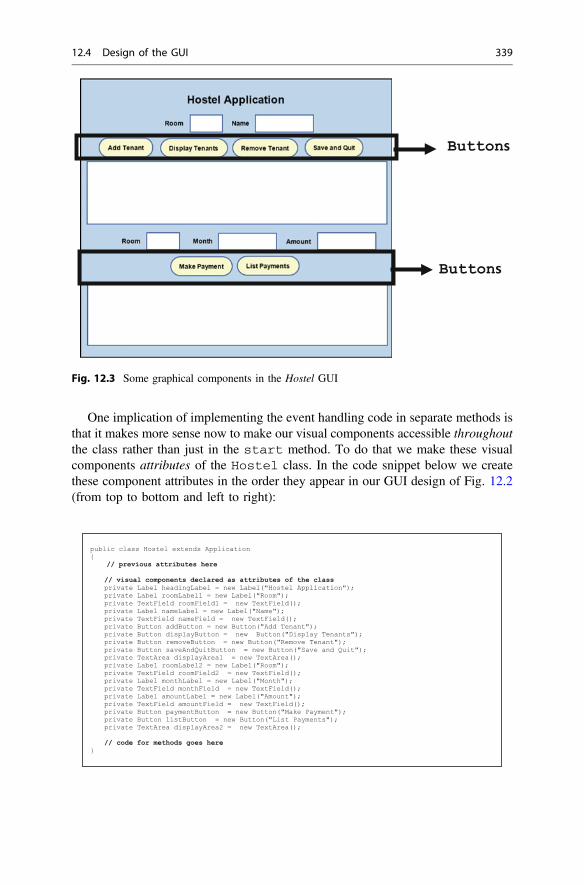
One implication of implementing the event handling code in separate methods isthat it makes more sense now to make our visual components accessible throughoutthe class rather than just in the start method. To do that we make these visualcomponents attributes of the Hostel class. In the code snippet below we createthese component attributes in the order they appear in our GUI design of Fig. 12.2(from top to bottom and left to right):
Buttons
Buttons
Fig. 12.3 Some graphical components in the Hostel GUI
public class Hostel extends Application{
// previous attributes here// visual components declared as attributes of the classprivate Label headingLabel = new Label("Hostel Application");private Label roomLabel1 = new Label("Room");private TextField roomField1 = new TextField();private Label nameLabel = new Label("Name");private TextField nameField = new TextField();private Button addButton = new Button("Add Tenant");private Button displayButton = new Button("Display Tenants");private Button removeButton = new Button("Remove Tenant");private Button saveAndQuitButton = new Button("Save and Quit");private TextArea displayArea1 = new TextArea();private Label roomLabel2 = new Label("Room");private TextField roomField2 = new TextField();private Label monthLabel = new Label("Month");private TextField monthField = new TextField();private Label amountLabel = new Label("Amount");private TextField amountField = new TextField();private Button paymentButton = new Button("Make Payment");private Button listButton = new Button("List Payments"); private TextArea displayArea2 = new TextArea();
// code for methods goes here }
12.4 Design of the GUI 339

Now let’s turn to the layout of these components. We will use a mixture ofHBoxes and a VBox to organise our layout (see Fig. 12.4).
As always, we use the start method to organise our layout:
We have created the four HBoxes given in Fig. 12.4 and then added the relevantcomponents, we then do the same for the VBox. Finally, we add the VBox to theScene.
Eventually we will also customise the look of our visual components (by settingfonts and borders for example) when we present the complete code for this class.But now let’s turn our attention to designing the event-handlers for the buttons onour GUI.
HBox
HBox
VBox
HBox
HBox
Fig. 12.4 Organizing the Hostel GUI with HBoxes and a VBox
public void start(Stage stage){
// previous code here// create four HBoxesHBox roomDetails = new HBox (10);HBox tenantButtons = new HBox(10);HBox paymentDetails = new HBox(10);HBox paymentButtons = new HBox(10);// add components to HBoxesroomDetails.getChildren().addAll(roomLabel1, roomField1, nameLabel, nameField);tenantButtons.getChildren().addAll(addButton, displayButton, removeButton, saveAndQuitButton);paymentDetails.getChildren().addAll( roomLabel2, roomField2, monthLabel, monthField,
amountLabel, amountField);paymentButtons.getChildren().addAll(paymentButton, listButton);// create VBoxVBox root = new VBox(10);// add components to VBoxroot.getChildren().addAll( headingLabel, roomDetails, tenantButtons, displayArea1,
paymentDetails, paymentButtons, displayArea2);// add the VBox to the SceneScene scene = new Scene(root, Color.LIGHTBLUE);
// rest of start method here}
340 12 Case Study—Part 2

12.5 Designing the Event-Handlers
As you saw in Fig. 12.2, there are six buttons that need to be coded so that theyrespond in the correct way when pressed:
• the “Add Tenant” button;• the “Display Tenants” button;• the “Remove Tenant” button;• the “Save and Quit” button;• the “Make Payment” button;• the “List Payments” button.
As always, we will use the setOnAction method of each button to processthese button clicks, but (as we said in the previous section) we will place the codefor the event-handlers in separate private methods and call these methods fromour lambda expressions:
We have summarized below the task that each button’s event-handler methodmust perform, and then gone on to design our algorithms using pseudocode.
The Add Tenant Button
The purpose of this button is to add a new Tenant to the list. The values entered inroomField1 and nameField must be validated; first of all, they must not beblank; second, the room number must not be greater than the number of roomsavailable (or less than 1!); finally, the room must not be occupied. If all this is okay,then the new tenant is added (we will make use of the addTenant method ofTenantList to do this) and a message should be displayed in displayArea1.We can express this in pseudocode as follows:
public void start(Stage stage){
// previous code here// call private methods for button event handlersaddButton.setOnAction(e -> addHandler());displayButton.setOnAction(e -> displayHandler() );removeButton.setOnAction( e -> removeHandler());paymentButton.setOnAction( e -> paymentHandler());listButton.setOnAction( e -> listHandler());saveAndQuitButton.setOnAction( e -> saveAndQuitHandler());
// rest of start method here}
// private event handler methods here
12.5 Designing the Event-Handlers 341

The Display Tenants Button
Pressing this button will display the full list of tenants (room number and name) indisplayArea1.
If all the rooms are vacant a suitable message should be displayed; otherwise thelist of tenants’ rooms and names should appear under appropriate headings as canbe seen in Fig. 12.2. This can be expressed in pseudocode as follows:
The Remove Tenant Button
Clicking on this button will remove the tenant whose room number has beenentered in roomField1.
As with the Add Tenant button, the room number entered must be validated; ifthe number is a valid one then the tenant is removed from the list (we will make useof the remove method of TenantList to do this) and a confirmation message isdisplayed. The pseudocode for this event-handler is given as follows:
read roomField1read nameFieldIF roomField1 blank OR nameField blank
display blank field error in displayArea1ELSE IF roomField1 value < 1 OR roomField1 value > noOfRooms
display invalid room number error in displayArea1ELSE IF tenant found in room
display room occupied error in displayArea1ELSEBEGIN
add tenantblank roomFieldblank nameFielddisplay message to confirm success in displayArea1
END
IF list is emptydisplay rooms empty error in displayArea1
ELSEBEGIN
display header in displayArea1LOOP FROM first item TO last item in listBEGIN
append tenant room and name to displayArea1END
END
read roomField1IF roomField1 blank
display blank field error in displayArea1ELSE IF roomField1 value < 1 OR roomField1 value > noOfRooms
display invalid room number error in displayArea1ELSE IF no tenant found in room
display room empty error in displayArea1ELSEBEGIN
remove tenant from listdisplay message to confirm success in displayArea1
END
342 12 Case Study—Part 2
The List Payment Button
This button records payments made by an individual tenant whose room number isentered in roomField2. The values entered in roomField2, monthFieldand amountField must be validated to ensure that none of the fields are blank,that the room number is a valid one and, if so, that it is currently occupied.
If everything is okay then a new payment record is added to that tenant’s list ofpayments (we will make use of the makePayment method of PaymentList todo this) and a confirmation message is displayed in displayArea2. This designis expressed in pseudocode as follows:
The List Payments Button
Pressing this button causes a list of payments (month and amount) made by thetenant whose room number is entered in roomField2 to be displayed indisplayArea2.
After validating the values entered, each record in the tenant’s payment list isdisplayed. Finally, the total amount paid by that tenant is displayed (we will makeuse of the calculateTotalPaid method of PaymentList to do this). Thepseudocode is given as follows:
read roomField2read monthFieldread amountFieldIF roomField2 blank OR monthField blank OR amountField blank
display fields empty error in displayArea2ELSE IF roomField2 value < 1 OR roomField2 value > noOfRooms
display invalid room number error in displayArea2ELSE IF no tenant found in room
display room empty error in displayArea2ELSEBEGIN
create payment from amountField value and monthField valueadd payment into list display message to confirm success in displayArea2
END
read roomField2IF roomField2 blankdisplay room field empty error in displayArea2ELSE IF roomField2 value < 1 OR roomField2 value > noOfRooms
display invalid room number error in displayArea2ELSE IF no tenant found in room
display room empty error in displayArea2ELSEBEGIN
find tenant in given roomget payments of tenantIF payments = 0
display no payments error in displayArea2ELSEBEGIN
display header in displayArea2LOOP FROM first payment TO last paymentBEGIN
append amount and month to displayArea2ENDdisplay total paid in displayArea2blank monthFieldblank amountField
ENDEND
12.5 Designing the Event-Handlers 343

The Save and Quit Button
Pressing this button causes all the records to be saved to a file (here we make use ofthe saveRecords method of the TenantFileHandler class that we talkedabout in Sect. 12.2); it then closes the application, terminating the program.
It will only contain a few lines of code and we have therefore not writtenpseudocode for it.
12.6 Implementing the Hostel Class
The complete code for the Hostel class now appears below. When you see thecode, you should notice that we have utilized the NumberFormat class (which isto be found in the java.text package) to print the amounts in the local currency.Also note the use of two constants, WIDTH and HEIGHT, to help size our visualcomponents and the parseInt method of the Integer class to convert the roomvalues, entered as text, into integer values. We have also enhanced our visualcomponents by making use of borders and backgrounds as discussed in Chap. 10.
Study the code and the comments carefully (in particular compare theevent-handling code to the pseudocode we presented in the previous section) tomake sure you understand it and we will explain the new concepts to you after that.
Hostelimport java.text.NumberFormat;import javafx.application.Application;import javafx.application.Platform;import javafx.geometry.Insets;import javafx.geometry.Pos;import javafx.scene.Scene;import javafx.scene.control.Button;import javafx.scene.control.Label;import javafx.scene.control.TextArea;import javafx.scene.control.TextField;import javafx.scene.layout.Background;import javafx.scene.layout.BackgroundFill;import javafx.scene.layout.Border;import javafx.scene.layout.BorderStroke;import javafx.scene.layout.BorderStrokeStyle;import javafx.scene.layout.BorderWidths;import javafx.scene.layout.CornerRadii;import javafx.scene.layout.HBox;import javafx.scene.layout.VBox;import javafx.scene.paint.Color;import javafx.scene.text.Font;import javafx.stage.Stage;import javafx.scene.control.TextInputDialog;
1,,IWK"hqt"vjg"Jquvgn"crrnkecvkqp,Bcwvjqt"Ejctcvcp"cpf"Mcpu,Bxgtukqp"9vj"Crtkn"423:,1
public class Hostel extends Application{
11"vjg"cvvtkdwvgu
private int noOfRooms;private TenantList list;11"YKFVJ"cpf"JGKIJV"qh"IWK"uvqtgf"cu"eqpuvcpvu"private final int WIDTH = 800;private final int HEIGHT = 500;11"xkuwcn"eqorqpgpvuprivate Label headingLabel = new Label("Hostel Application");private Label roomLabel1 = new Label("Room");private TextField roomField1 = new TextField();private Label nameLabel = new Label("Name");private TextField nameField = new TextField();private Button addButton = new Button("Add Tenant");
344 12 Case Study—Part 2

paymentDetails.getChildren().addAll( roomLabel2, roomField2, monthLabel, monthField,amountLabel, amountField);
paymentButtons.getChildren().addAll(paymentButton, listButton);11"etgcvg"XDqzVBox root = new VBox(10);11"cff"cnn eqorqpgpvu"vq"XDqzroot.getChildren().addAll( headingLabel, roomDetails, tenantButtons, displayArea1,
paymentDetails, paymentButtons, displayArea2);11"etgcvg"vjg"uegpgScene scene = new Scene(root, Color.LIGHTBLUE);
11"ugv"hqpv"qh"jgcfkpiFont font = new Font("Calibri", 40);headingLabel.setFont(font);
11"ugv"cnkipogpv"qh"JDqzguroomDetails.setAlignment(Pos.CENTER);tenantButtons.setAlignment(Pos.CENTER);paymentDetails.setAlignment(Pos.CENTER);paymentButtons.setAlignment(Pos.CENTER);// set alignment of VBoxroot.setAlignment(Pos.CENTER);
11"ugv"okpkowo"cpf"oczkowo"ykfvj"qh"eqorqpgpvu"roomField1.setMaxWidth(50);roomField2.setMaxWidth(50);
roomDetails.setMinWidth(WIDTH);roomDetails.setMaxWidth(WIDTH);
tenantButtons.setMinWidth(WIDTH);tenantButtons.setMaxWidth(WIDTH);
paymentDetails.setMinWidth(WIDTH);paymentDetails.setMaxWidth(WIDTH);
paymentButtons.setMinWidth(WIDTH);paymentButtons.setMaxWidth(WIDTH);
root.setMinSize(WIDTH, HEIGHT);root.setMaxSize(WIDTH, HEIGHT);
displayArea1.setMaxSize(WIDTH - 80, HEIGHT/5);displayArea2.setMaxSize(WIDTH - 80, HEIGHT/5);
stage.setWidth(WIDTH);stage.setHeight(HEIGHT);
private Button displayButton = new Button("Display Tenants");private Button removeButton = new Button("Remove Tenant");private Button saveAndQuitButton = new Button("Save and Quit");private TextArea displayArea1 = new TextArea();private Label roomLabel2 = new Label("Room");private TextField roomField2 = new TextField();private Label monthLabel = new Label("Month");private TextField monthField = new TextField();private Label amountLabel = new Label("Amount");private TextField amountField = new TextField();private Button paymentButton = new Button("Make Payment");private Button listButton = new Button("List Payments"); private TextArea displayArea2 = new TextArea();
BQxgttkfg1,,"Kpkvkcnkugu"vjg"uetggp",""Brctco"uvcig<"""Vjg"uegpg)u"uvcig",1public void start(Stage stage){
noOfRooms = getNumberOfRooms(); 11"ecnn"rtkxcvg"ogvjqf11"kpkvkcnkug"vgpcpv"nkuvlist = new TenantList(noOfRooms);TenantFileHandler.readRecords(list);
11"etgcvg"hqwt"JDqzguHBox roomDetails = new HBox (10);HBox tenantButtons = new HBox(10);HBox paymentDetails = new HBox(10);HBox paymentButtons = new HBox(10);11"cff"eqorqpgpvu"vq"JDqzguroomDetails.getChildren().addAll(roomLabel1, roomField1, nameLabel, nameField);tenantButtons.getChildren().addAll( addButton, displayButton, removeButton,
saveAndQuitButton);
12.6 Implementing the Hostel Class 345

1,,,"Ogvjqf"vq"tgswguv"pwodgt"qh"jquvgn"tqqou"htqo"vjg"wugt","Btgvwtp"pwodgt"qh"tqqou,1private int getNumberOfRooms(){
TextInputDialog dialog = new TextInputDialog();dialog.setHeaderText("How many rooms?");dialog.setTitle("Room Information Request");
String response = dialog.showAndWait().get(); return Integer.parseInt(response);
}
11"gxgpv"jcpfngt"ogvjqfu
private void addHandler(){
String roomEntered = roomField1.getText();String nameEntered = nameField.getText();// check for errorsif(roomEntered.length()== 0 || nameEntered.length()== 0) {
displayArea1.setText ("Room number and name must be entered");}else if(Integer.parseInt(roomEntered)< 1 || Integer.parseInt(roomEntered)>noOfRooms){
displayArea1.setText ("There are only " + noOfRooms + " rooms");}else if(list.search(Integer.parseInt(roomEntered)) != null){
displayArea1.setText("Room number " + Integer.parseInt(roomEntered) + " is occupied");} else 11"qm"vq"cff"c"Vgpcpv{
Tenant t = new Tenant(nameEntered,Integer.parseInt(roomEntered));list.addTenant(t);roomField1.setText("");nameField.setText("");displayArea1.setText("New tenant in room " + roomEntered + " successfully added");
} }
11"ewuvqokug"vjg"xkuwcn"eqorqpgpvu
11"ewuvqokug"vjg"XDqz"dqtfgt"cpf"dcemitqwpfBorderStroke style = new BorderStroke(Color.BLACK, BorderStrokeStyle.SOLID,
new CornerRadii(0), new BorderWidths(2) );root.setBorder(new Border (style));root.setBackground(Background.EMPTY);
11"ewuvqokug dwvvqpuaddButton.setBackground(new Background(new BackgroundFill(Color.LIGHTYELLOW,
new CornerRadii(10), Insets.EMPTY)));displayButton.setBackground( new Background(new BackgroundFill(Color.LIGHTYELLOW,
new CornerRadii(10), Insets.EMPTY)));removeButton.setBackground(new Background(new BackgroundFill(Color.LIGHTYELLOW,
new CornerRadii(10), Insets.EMPTY)));saveAndQuitButton.setBackground( new Background(new BackgroundFill(Color.LIGHTYELLOW,
new CornerRadii(10), Insets.EMPTY)));paymentButton.setBackground( new Background(new BackgroundFill(Color.LIGHTYELLOW,
new CornerRadii(10), Insets.EMPTY)));listButton.setBackground( new Background(new BackgroundFill(Color.LIGHTYELLOW,
new CornerRadii(10), Insets.EMPTY)));
11"ecnn"rtkxcvg"ogvjqfu"hqt"dwvvqp"gxgpv"jcpfngtuaddButton.setOnAction(e -> addHandler());displayButton.setOnAction(e -> displayHandler() );removeButton.setOnAction( e -> removeHandler());paymentButton.setOnAction( e -> paymentHandler());listButton.setOnAction( e -> listHandler());saveAndQuitButton.setOnAction( e -> saveAndQuitHandler());
11"eqphkiwtg"vjg"uvcig"cpf"ocmg"vjg"uvcig"xkukdngstage.setScene(scene);stage.setTitle("Hostel Applicaton");stage.setResizable(false); 11 ugg"fkuewuukqp"dgnqystage.show();
346 12 Case Study—Part 2

private void paymentHandler(){
String roomEntered = roomField2.getText();String monthEntered = monthField.getText();String amountEntered = amountField.getText();11"ejgem"hqt"gttqtuif(roomEntered.length()== 0 || monthEntered.length()== 0 || amountEntered.length()== 0){
displayArea2.setText("Room number, month and amount must all be entered");}else if(Integer.parseInt(roomEntered) < 1 || Integer.parseInt(roomEntered)>noOfRooms){
displayArea2.setText("Invalid room number");}else if(list.search(Integer.parseInt(roomEntered)) == null){
displayArea2.setText("Room number " + roomEntered + " is empty");}else 11"qm"vq"rtqeguu"rc{ogpv{
Payment p = new Payment(monthEntered,Double.parseDouble(amountEntered));list.search(Integer.parseInt(roomEntered)).makePayment(p);displayArea2.setText("Payment recorded");
} }
private void listHandler(){
int i;String roomEntered = roomField2.getText();11"ejgem"hqt"gttqtuif(roomEntered.length()== 0){
displayArea2.setText("Room number must be entered");}else if(Integer.parseInt(roomEntered) < 1 || Integer.parseInt(roomEntered) > noOfRooms){
displayArea2.setText("Invalid room number");}else if(list.search(Integer.parseInt(roomEntered)) == null){
displayArea2.setText("Room number " + Integer.parseInt(roomEntered) + " is empty");}
public void displayHandler(){
int i;if(list.isEmpty()) 11"pq"tqqou"vq"fkurnc{{
displayArea1.setText("All rooms are empty");}else 11"fkurnc{"tqqou{
displayArea1.setText("Room" + "\t" + "Name" + "\n");for(i = 1; i <= list.getTotal(); i++ ){
displayArea1.appendText(list.getTenant(i).getRoom()+ "\t\t"+ list.getTenant(i).getName() + "\n");
} }
}
private void removeHandler(){
String roomEntered = roomField1.getText();11"ejgem"hqt"gttqtuif(roomEntered.length()== 0){
displayArea1.setText("Room number must be entered");}else if(Integer.parseInt(roomEntered) < 1 || Integer.parseInt(roomEntered)>noOfRooms){
displayArea1.setText("Invalid room number");}else if(list.search(Integer.parseInt(roomEntered))== null){
displayArea1.setText("Room number " + roomEntered + " is empty");}else 11"qm"vq"tgoqxg"Vgpcpv{
list.removeTenant(Integer.parseInt(roomEntered));displayArea1.setText("Tenant removed from room " + Integer.parseInt(roomEntered));
}
12.6 Implementing the Hostel Class 347

Before we complete our examination of the Hostel application we just drawyour attention to a few new features.
Firstly, we ask the user for the number of rooms in the hostel by calling thehelper method getNumberOfRooms:
This makes use of a class that we will not actually come across until Chap. 17—the TextInputDialog class. This class provides a really useful way to getinformation from the user during the running of a JavaFX application. However, asit involves a few advanced concepts we won’t deal with it in detail until semestertwo. For now, if you want to use it, you can just copy what we have done here. Theresult is shown in Fig. 12.5.
Next, as mentioned above, one new feature we made use of is the Num-berFormat class. This class is similar to DecimalFormat that you met inChap. 10, except that it is designed specifically to convert decimal numbers andconvert them into local currency formats. The getCurrencyInstance picks up
else 11"qm"vq"nkuv"rc{ogpvu{
Tenant t = list.search(Integer.parseInt(roomEntered));PaymentList p = t.getPayments();if(t.getPayments().getTotal() == 0){
displayArea2.setText("No payments made for this tenant");}else{
1, Vjg"PwodgtHqtocv"encuu"ku"ukoknct"vq"vjg"FgekocnHqtocv"encuu"vjcv"yg"wugfrtgxkqwun{0Vjg"igvEwttgpe{Kpuvcpeg"ogvjqf"qh"vjku"encuu"tgcfu"vjg"u{uvgo"xcnwgu"vq"hkpf"qwv"
yjkej"eqwpvt{"yg"ctg"kp."vjgp"wugu"vjg"eqttgev"ewttgpe{"u{odqn",1NumberFormat nf = NumberFormat.getCurrencyInstance();String s;displayArea2.setText("Month" + "\t\t" + "Amount" + "\n");for(i = 1; i <= p.getTotal(); i++ ){
s = nf.format(p.getPayment(i).getAmount());displayArea2.appendText("" + p.getPayment(i).getMonth() + "\t\t\t" + s + "\n");
}displayArea2.appendText("\n" + "Total paid so far : " +
nf.format(p.calculateTotalPaid()));monthField.setText("");amountField.setText("");
}}
}
private void saveAndQuitHandler(){
TenantFileHandler.saveRecords(noOfRooms,list);Platform.exit();
}
public static void main(String[] args){
launch(args);}
private int getNumberOfRooms(){
TextInputDialog dialog = new TextInputDialog();dialog.setHeaderText("How many rooms?");dialog.setTitle("Room Information Request");
String response = dialog.showAndWait().get(); return Integer.parseInt(response);
}
348 12 Case Study—Part 2

the correct location by interrogating the system and it then returns an appropriateformat object:
This object’s format method can then be used to take decimal numbers andformat them as local currency values. So the following expression:
would take a decimal number and, as we are in the United Kingdom, would formatthe number to two decimal places with a pound sterling symbol (£).
Finally, notice how we configure the stage before making it visible:
You can see we have used a new stage method here called setResizable.This method takes a boolean parameter and giving it a value of false ensuresthe user cannot resize the window. We thought that would be a good idea as wehave gone to such lengths in the code to size our window and the componentswithin it (using our WIDTH and HEIGHT constants)! One implication of anon-resizable window is that the maximise icon of the window will be greyed out.The final running JavaFX GUI can be seen now in Fig. 12.6.
Before concluding this case study we shall consider how to test the application toensure that it conforms to the original specification.
Fig. 12.5 Getting thenumber of rooms by using atext input dialog
// generate a NumberFormat objectNumberFormat nf = NumberFormat.getCurrencyInstance();
nf.format(p.calculateTotalPaid())
stage.setScene(scene);stage.setTitle("Hostel Applicaton");stage.setResizable(false); // stop the user resizing the stage windowstage.show();
12.6 Implementing the Hostel Class 349

12.7 Testing the System
If you look back at the Hostel class you can see that much of the event-handlingcode is related to the validation of data entered from the graphical interface. Muchof the testing for such a system will, therefore, be geared around ensuring suchvalidation is effective.
Amongst the types of validation we need to test is the display of suitable errormessages when input text fields are left blank, or when inappropriate data has beenentered into these text fields. Of course, as well as input validation, we also need totest the basic functionality of the system. Figure 12.7 is one possible test log thatmay be developed for the purpose of testing the Hostel class.
We include a few sample screen shots produced from running the Student HostelApplication against this test log in Figs. 12.8, 12.9 and 12.10. We will leave thecomplete task of running Student Hostel Application against the test log as a pro-gramming exercise at the end of this chapter.
Fig. 12.6 The Hostel GUI running in a non-resizable window
350 12 Case Study—Part 2

TEST LOG
Purpose: To test the Hostel class
Run Number: Date:
Action Expected Output Pass/ Fail Reason for failure
Request for how many rooms
Enter 5 Fire up the JavaFX GUI
Display tenants "Empty list" message
Add tenant: Patel, Room Number blank "Blank field" message
Add tenant: blank, Room Number 1 "Blank field" message
Add tenant: Patel, Room Number 1 Confirmation message
Add tenant: Jones, Room Number 6 Error message: There are only 5 rooms
Add tenant: Jones, Room Number 1 Error Message: Room 1 is occupied
Add tenant: Jones, Room Number 2 Confirmation Message
Display tenants ROOM NAME
1 Patel
2 Jones
List payments, Room Number 1 "Empty list" message
Make payment: Room blank, Month
January, Amount 100 "Blank field" message
Make Payment: Room 1, Month
blank, Amount 100 "Blank field" message
Make payment: Room 1, Month
January, Amount blank "Blank field" message
Make payment: Room 1, Month
January, Amount 100 Confirmation message
Make payment: Room 1, Month
February, Amount 200 Confirmation message
List payments: Room Number blank "Blank field" message
List payments, Room Number 1 MONTH AMOUNT
January £100
February £200
Total paid so far £300
List payments: Room Number 2 "Empty list" message
List payments: Room Number 5 "Room Empty" message
Remove tenant: Room Number blank "Blank field" message
Remove tenant: Room Number 1 Confirmation Message
Display tenants 2 Jones
List payments: Room Number 1 "Room Empty" message
Fig. 12.7 A test log to ensure the reliability of the Hostel class
12.7 Testing the System 351

Fig. 12.8 Error messages are produced in displayArea1. In this case an attempt is made to add atenant without filling in the roomField
Fig. 12.9 The displayArea1 is also used to display a list of tenants entered
352 12 Case Study—Part 2
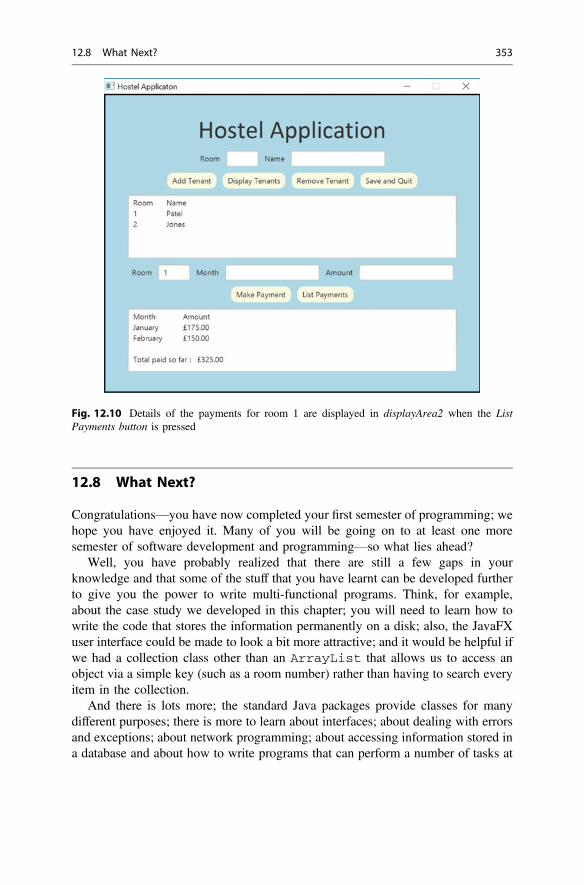
12.8 What Next?
Congratulations—you have now completed your first semester of programming; wehope you have enjoyed it. Many of you will be going on to at least one moresemester of software development and programming—so what lies ahead?
Well, you have probably realized that there are still a few gaps in yourknowledge and that some of the stuff that you have learnt can be developed furtherto give you the power to write multi-functional programs. Think, for example,about the case study we developed in this chapter; you will need to learn how towrite the code that stores the information permanently on a disk; also, the JavaFXuser interface could be made to look a bit more attractive; and it would be helpful ifwe had a collection class other than an ArrayList that allows us to access anobject via a simple key (such as a room number) rather than having to search everyitem in the collection.
And there is lots more; the standard Java packages provide classes for manydifferent purposes; there is more to learn about interfaces; about dealing with errorsand exceptions; about network programming; about accessing information stored ina database and about how to write programs that can perform a number of tasks at
Fig. 12.10 Details of the payments for room 1 are displayed in displayArea2 when the ListPayments button is pressed
12.8 What Next? 353

the same time. As well finding out more about the standard Java packages, there ismore to learn about how to deploy your own programs as packages.
Does all this sound exciting? We think so—and we hope that you enjoy yournext semester as much as we have enjoyed helping you through this one.
12.9 Self-test Questions
1. Referring to the examples in this chapter and the previous chapter, explain thedifference between unit testing and integration testing.
2. Use pseudocode to design the event handling routine for a search button.Clicking on the button should display the name of the tenant in the room enteredin the roomField text box. The name is to be displayed in displayArea1.If no tenant is present in the given room, an error message should be displayedin displayArea1.
3. Modify the screen design in Fig. 12.1 to include the search button discussedin the question above.
4. How else might you improve the application developed in this case study?
12.10 Programming Exercises
You will need to copy the entire suite of classes that make up the student hostelsystem from the accompanying website.
1. Run the Hostel application against the test log given in Fig. 12.7.
2. Modify the Hostel class by adding the search button you considered inself-test questions 2 and 3 above.
3. Make any additions to the Hostel class that you considered in self-testquestion 4 above. For example you might want to include additional validationto ensure that negative money values are never accepted for payments.
354 12 Case Study—Part 2

Part IISemester Two

13Interfaces and Lambda Expressions
Outcomes:
By the end of this chapter you should be able to:
• explain what is meant by the term interface in Java;• create and use their own interfaces;• implement inner classes and anonymous classes;• explain the purpose and the importance of lambda expressions in Java;• describe the syntax of lambda expressions, and utilize these expressions in a
variety of contexts;• create and use generic classes and interfaces;• create generic classes and interfaces containing upper bounded parameters;• utilize wildcards in conjunction with generic types;• describe how a programming language can support polymorphic types;• summarize the ways in which polymorphism can be achieved in Java.
13.1 Introduction
Welcome back to the second semester of our programming course. We spent thefirst semester laying the foundations you would need to develop programs in Java.During that time you came a long way. You learnt about the idea of variables,control structures, methods and arrays, and then went on to develop your ownclasses and extend these classes using inheritance. Finally you developed appli-cations consisting of many classes working closely together and interacting withusers via attractive graphical interfaces. Along the way you also learnt about theUML notation and testing strategies. At the beginning of that semester you prob-ably didn’t expect to come as far as you have. Well, the second semester might lookequally challenging but, with some help from us along the way, you can lookforward to new and more advanced challenges.
© Springer Nature Switzerland AG 2019Q. Charatan and A. Kans, Java in Two Semesters, Texts in Computer Science,https://doi.org/10.1007/978-3-319-99420-8_13
357

In the first semester, until we developed our case study, the applications wecreated were fairly simple, consisting for the most part of only one or two classes.In reality, applications that are developed for commercial and industrial use com-prise a large number of classes, and are developed not by one person, but by a team.Members of the team will develop different modules which can later be integratedto form a single application. When groups of programmers work together in thisway, they often have to agree upon how they will develop their own individualclasses in order for them to be successfully integrated later. In this chapter we willsee how these agreements can be formalized in Java programs by making use of aspecial kind of class called an interface. We will then move on to the subject oflambda expressions, which we introduced in Chap. 10. The introduction of lambdaexpressions in the release of Java 8 was a very significant addition to the language—and in this chapter you will see just how useful they can be.
13.2 An Example
It is a very common occurrence that the attributes of a class should be allowed totake only a particular set of values. Think, for example, of the BankAccount classthat we developed in the last semester. It is likely that the account number should berestricted to numbers that contain, say, precisely eight digits. Similarly, a Cus-tomer class might require that the customer number comprises a letter followed byfour digits. In some cases there are constraints that exist not because we choose toimpose them, but because they occur “naturally”—in the Oblong class, forexample, it would make no sense if an object of this class were to have a length orheight of zero or less.
In such cases, every effort must be made when developing the class to preventinvalid values being assigned to the attributes. Constructors and other methodsshould be designed so that they flag up errors if such an attempt is made—and oneof the advantages of object-oriented programming languages is precisely that theyallow us to restrict access to the attributes in this way.
The above remarks notwithstanding, it is the case that in industrial sized projects,classes will be very complex and will contain a great many methods. It is thereforepossible that a developer will overlook a constraint at some point, and allow objectsto be created that break the rules. It might therefore be useful if, for testing pur-poses, every object could contain a method, which we could call check, that couldbe used to check the integrity of the object.
In a particular project, people could be writing test routines independently of thepeople developing the modules, and these routines will be calling the checkmethod. We need, therefore, to be able to guarantee that every object contains sucha check method.
358 13 Interfaces and Lambda Expressions

You learnt in Chap. 9 that the way to guarantee that a class has a particularmethod is for that class to inherit from a class containing an abstract method—when a class contains an abstract method, then any subclass of that class isforced to override that method—if it does not do so, a compiler error occurs.
In our example, we need to ensure that our classes all have a check method thattests an object’s integrity, so one way to do this would be to write a class as follows:
Now all our classes could extend Checkable and would compile successfullyonly if they each had their own check method.
While this would work, it does present us with a bit of a problem. What wouldhappen, for example, if our Oblong class were going to be part of a graphicalapplication and needed to extend another class such as Application? Thiswould be problematic, because, in Java, a class is not allowed to inherit from morethan one superclass. Inheriting from more than one class is known as multipleinheritance and is illustrated in Fig. 13.1.
One reason that multiple inheritance is disallowed is that it can easily lead toambiguity, and hence to programming errors. Imagine for example that the twosuperclasses shown in Fig. 13.1 both contained a method of the same name—whichversion of the method would be inherited by the subclass?
Luckily, there is a way around this, because Java allows a kind of lightweightinheritance, made possible by a construct known as an interface.
13.3 Interfaces
An interface is a special class that contains abstract methods. When we want aclass to inherit the methods of an interface we use the word implements, ratherthan extends. Just as with inheritance, once a class implements an interface it hasthe same type as that interface, as well as being of the type of its own class. So, for
Checkablepublic abstract class Checkable{
public abstract boolean check();}
Fig. 13.1 Multipleinheritance—not allowed inJava
13.2 An Example 359

example, if a class implements EventHandler, then any object of that class is akind of EventHandler—in other words it is of type EventHandler, as well asbeing of the type of its own class.
The Java libraries, particularly those associated with graphical applications,contain a great many interfaces. And it is perfectly possible for us to write our owninterfaces as we will do in a moment when we turn our Checkable class into aninterface.
Figure 13.2 shows the UML notation for the implementation of interfaces—youcan see that interfaces are marked with the <<interface>> tag, and that a circle isused to indicate a class implementing an interface.
As can be seen in Fig. 13.2, while it is possible to inherit from only one class, itis perfectly possible to implement any number of interfaces. In this case Some-OtherClass extends SomeClass and implements SomeInterfaceand SomeOtherInterface—because the methods are abstract they are notactually coded in the interface and this means that the problems with multipleinheritance that we described earlier do not arise.
Prior to the release of Java 8 an interface could contain only abstractmethods—but now an interface can also contain static methods and defaultmethods. Regular classes have always been permitted to have static methods (asyou have seen before in Chap. 8)—now they can be included in interfaces too.A default method is a new concept specifically to be used in interfaces, ifrequired. A default method is a regular method with a complete implementationand so is automatically inherited by all classes that implement the interface (thoughthe implementing class may override this implementation if it chooses). Addingdefault methods into interfaces means that additions can be made to an interfacewithout every class that implements the previous version of that interface having tochange (as would be the case if we added new abstract methods to an interface).
<<interface>>SomeOtherInterface
+someOtherMethod(int)
<<interface>>SomeInterface
+someMethod():int
SomeClass
SomeOtherClass
Fig. 13.2 A class can inherit from only one superclass, but can implement many interfaces
360 13 Interfaces and Lambda Expressions

We will meet interfaces with static and default methods in later chapters, butin this chapter we will focus on interfaces with abstract methods only.
As with inheritance, a class is obliged to override all the abstract methods of theinterfaces that it implements. By implementing an interface we are guaranteeingthat the subclass will have certain methods.
So, in cases where we need a class such as Checkable in which all themethods are abstract (apart from any static methods) we don’t create aclass—instead we create an interface.
Let’s turn our Checkable class into an interface. The code looks like this:
Notice the word interface instead of class—and notice also that we don’thave to declare our method as abstract, because by definition all non-staticmethods of an interface are abstract.
Let’s make the Oblong class from Chap. 8 checkable by defining a sub-classthat implements the Checkable interface. We will need to override the con-structor, and of course to code the check method. The class will now look likethis:
You can see that the class now implements our Checkable interface:
The check method, which the class is forced to override (note the use of the@Override annotation), returns a value of true if the attributes are both greaterthan zero, and false otherwise:
The Checkable interfacepublic interface Checkable{
public boolean check();}
CheckableOblongpublic class CheckableOblong extends Oblong implements Checkable{
//override the constructorpublic CheckableOblong(double lengthIn, double heightIn){
super(lengthIn, heightIn);}
@Overridepublic boolean check() // the check method of Checkable must be overridden{
// the length and height must both be greater than zeroreturn getLength() > 0 && getHeight() > 0;
} }
public class CheckableOblong extends Oblong implements Checkable
13.3 Interfaces 361

Other classes can implement the Checkable interface in a similar way. Do youremember the BankAccount class that we developed in Chapt. 8? One of theattributes was the account number. In reality, an account number would need toobey certain rules—the most common one in the UK is that the account numbershould contain digits only and that it should comprise exactly eight digits. Let’screate a CheckableBankAccount class which checks to see if this rule isupheld.
You can see here how, in the check method, we check firstly that the stringcontains exactly eight characters, and then check if every character is a digit bymaking use of the isDigit method of the Character class.
In the Checker class below we create five objects—two Checkableblongobjects and three CheckableBankAccount objects. In each case the first objectis valid, but the others break the rules that we have set for these two classes.
You should notice that in each case the object—whether it is an oblong or a bankaccount—is of type Checkable (as well as being a type of the particular class).This is because both CheckableOblong and CheckableBankAccountimplement the Checkable interface.
@Overridepublic boolean check() // the check method of Checkable must be overridden{
return length > 0 && height > 0;}
CheckableBankAccountpublic class CheckableBankAccount extends BankAccount implements Checkable{
// override the constructorpublic CheckableBankAccount(String numberIn, String nameIn){
super(numberIn, nameIn);}
@Overridepublic boolean check(){
// check that the account number is exactly 8 characters longif(getAccountNumber().length() != 8) {
return false;}
// check that the account number contains only digitsfor(int i=0; i <= 7; i++){
if(!Character.isDigit(getAccountNumber().charAt(i))){
return false;}
}return true;
} }
362 13 Interfaces and Lambda Expressions

As you can see, we send the five objects in turn into a method calledcheckValidity which calls the object’s check method and returns aString—either “valid” or “invalid”; we append this to an initial string and thewhole message is displayed.
The checkValidity method accepts a parameter of type Checkable—andof course both the CheckableOblong objects and the three Check-ableBankAccount objects are of type Checkable because they both imple-ment the Checkable interface.
As expected, the output from the program is as follows:
oblong1 is validoblong2 is invalidaccount1 is validaccount2 is invalidaccount3 is invalid
Implementing an interface is rather like making a contract with the user of aclass—it guarantees that the class will have a particular method or methods. In theabove case, a developer will know that any object that implements Checkablewill have a check method. This enables the developer to write methods such ascheckValidity that expect to receive an object of type Checkable, in thecertain knowledge that the object—whether it is a CheckableOblong,CheckableBankAccount, or any other class that implements this interface—will have a method called check.
Checkerpublic class Checker{ public static void main(String[] args){ // create two oblongsCheckableOblong oblong1 = new CheckableOblong(10, 8); // validCheckableOblong oblong2 = new CheckableOblong(0, 8); // invalid: first argument is zero// create three bank accountsCheckableBankAccount account1 = new CheckableBankAccount("12345678", "Smith"); // validCheckableBankAccount account2 = new CheckableBankAccount("S1234567", "Patel"); // invalid: account number
// must contain digits onlyCheckableBankAccount account3 = new CheckableBankAccount("1234567", "Adewale"); // invalid: account number
// must be 8 characters long
// send objects to the checkValidity method System.out.println("oblong1 is " + checkValidity(oblong1));System.out.println("oblong2 is " + checkValidity(oblong2));
System.out.println("account1 is " + checkValidity(account1));System.out.println("account2 is " + checkValidity(account2));System.out.println("account3 is " + checkValidity(account3));
}
private static String checkValidity(Checkable objectIn) // receives any Checkable object{ if(objectIn.check()) // call the check method{
return "valid";} else{
return "invalid";}
} }
13.3 Interfaces 363
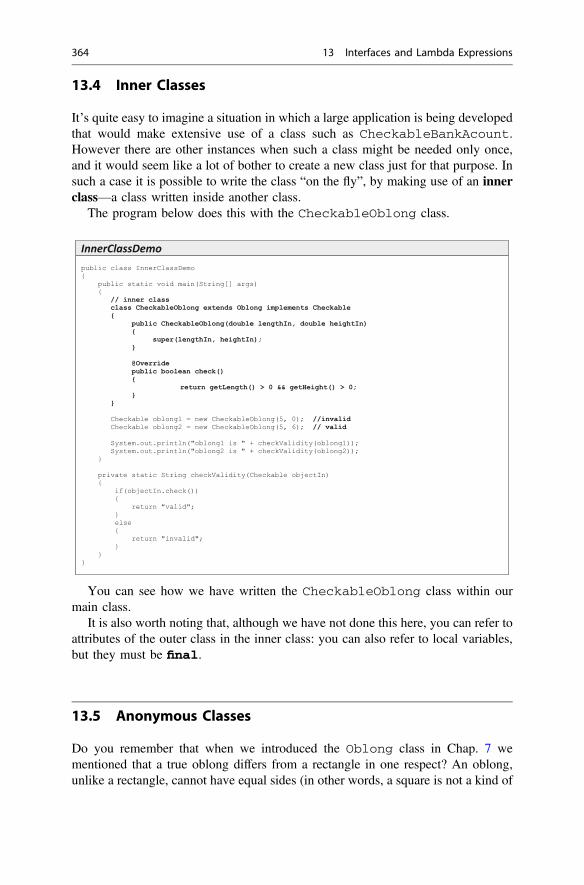
13.4 Inner Classes
It’s quite easy to imagine a situation in which a large application is being developedthat would make extensive use of a class such as CheckableBankAcount.However there are other instances when such a class might be needed only once,and it would seem like a lot of bother to create a new class just for that purpose. Insuch a case it is possible to write the class “on the fly”, by making use of an innerclass—a class written inside another class.
The program below does this with the CheckableOblong class.
You can see how we have written the CheckableOblong class within ourmain class.
It is also worth noting that, although we have not done this here, you can refer toattributes of the outer class in the inner class: you can also refer to local variables,but they must be final.
13.5 Anonymous Classes
Do you remember that when we introduced the Oblong class in Chap. 7 wementioned that a true oblong differs from a rectangle in one respect? An oblong,unlike a rectangle, cannot have equal sides (in other words, a square is not a kind of
InnerClassDemopublic class InnerClassDemo{
public static void main(String[] args){
// inner classclass CheckableOblong extends Oblong implements Checkable{
public CheckableOblong(double lengthIn, double heightIn){
super(lengthIn, heightIn);} @Overridepublic boolean check() {
return getLength() > 0 && getHeight() > 0;}
}Checkable oblong1 = new CheckableOblong(5, 0); //invalidCheckable oblong2 = new CheckableOblong(5, 6); // validSystem.out.println("oblong1 is " + checkValidity(oblong1));System.out.println("oblong2 is " + checkValidity(oblong2));
}
private static String checkValidity(Checkable objectIn){
if(objectIn.check()){
return "valid";} else{
return "invalid";}
} }
364 13 Interfaces and Lambda Expressions

oblong). So another test that we might want to perform on an oblong is to check thatits sides are not equal. It would seem rather unnecessary to have to write a wholenew class for this, and in fact there is a more flexible way of doing it. We can createan anonymous class. Have a look at the program below, then we will explainwhat’s going on here.
We have declared an Oblong of length 8 and height 8—it therefore passesour original test (that both the length and height are greater than zero) but fails thesecond test (that the length and height are unequal).
Now we have the following:
AnonymousClassDemoVersion1public class AnonymousClassDemoVersion1{
public static void main(String[] args){
// create a test oblongOblong testOblong = new Oblong (8,8);
/* declare an object of an anonymous class that checks that an oblong's lengthand height are greater than zero */
Checkable checkableObject1 = new Checkable(){
@Overridepublic boolean check(){
return testOblong.getLength() > 0 && testOblong.getHeight() > 0;}
};
/* declare an object of an anonymous class that checks that an oblong's lengthand height are not equal */
Checkable checkableObject2 = new Checkable(){
@Overridepublic boolean check() {
return testOblong.getLength() != testOblong.getHeight();}
};
// this checks that the sides are greater than zeroSystem.out.println("checkableObject1 is " + checkValidity(checkableObject1));
// this checks that the length and height are not equalSystem.out.println("checkableObject2 is " + checkValidity(checkableObject2));
}
private static String checkValidity(Checkable objectIn){
if(objectIn.check()){
return "valid";} else{
return "invalid";}
} }
Checkable checkableObject1 = new Checkable(){
@Overridepublic boolean check(){
return testOblong.getLength() > 0 && testOblong.getHeight() > 0;}
};
13.5 Anonymous Classes 365

Here we have declared an object, checkableObject1, which is of typeCheckable, but which doesn’t belong to any named class. It is an object of ananonymous class, as defined between the braces. Effectively we have defined a class“as we go”—all we need for this class is its check method (because it is of typeCheckable). You can see that this method checks, as before, that both length andheight are greater than zero. You will notice that we have been able to refer totestOblong, which was declared in the outer class.
After this we have gone on to declare another object, checkableObject2,also of type checkable:
Here, however the code for the check method is different. We are nowchecking for the second of our criteria—namely that the length and height of theoblong are not the same.
Now we can send both these objects to the checkValidity method:
As expected, we get the following output:
checkableObject1 is validcheckableObject2 is invalid
Before moving on, we should point out that it is not actually necessary to declarea named object as we have done in the previous program. We can declare our objectas part of the call to the method we are sending it to. The program that followsdemonstrates how this is done.
Checkable checkableObject2 = new Checkable(){
@Overridepublic boolean check(){
return testOblong.getLength() != testOblong.getHeight();}
};
// this tests that the sides are greater than zeroSystem.out.println("checkableObject1 is " + checkValidity(checkableObject1));
// this tests that the length and height are not equalSystem.out.println("checkableObject2 is " + checkValidity(checkableObject2));
366 13 Interfaces and Lambda Expressions

As you can see, the first call to checkValidity looks like this:
We send in a new Checkable object, at the same time defining the anonymousclass to which the object belongs. The next call is the same apart from the code forthe check method.
If you think about it, all we are really interested in here is the check method—so effectively what we are doing is sending the code for this method tocheckValidity by defining an anonymous class.
You will probably agree that although this is a very useful thing to be able to do(because we can change our method each time), it does seem a bit cumbersome, andthe code doesn’t look very elegant. If only there was a way to simply send a blockof code to a method, instead of having to send a whole object!
System.out.println("oblong is " + checkValidity(new Checkable(){
@Overridepublic boolean check(){
return oblong.getLength() > 0 && oblong.getHeight() > 0;
} }
))
AnonymousClassDemoVersion2public class AnonymousClassDemoVersion2{
public static void main(String[] args){
// create a test oblongOblong oblong = new Oblong (8,8);
// this checks that the sides are greater than zeroSystem.out.println("oblong is " + checkValidity(new Checkable()
{ @Overridepublic boolean check(){
return oblong.getLength() > 0 && oblong.getHeight() > 0; }
} ));
// this checks that the length and height are not equalSystem.out.println("oblong is " + checkValidity(new Checkable()
{ @Overridepublic boolean check(){
return oblong.getLength() != oblong.getHeight(); }
} ));
}
private static String checkValidity(Checkable objectIn){
if(objectIn.check()){
return "valid";} else{
return "invalid";}
} }
13.5 Anonymous Classes 367

Well, with the advent of Java 8, that’s is exactly what we can do. And you haveprobably already worked out that the mechanism that we use for this is called alambda expression. You have already had some experience with such expressionswhen you learnt about creating graphics programs with JavaFX in Chap. 10. Butnow it is time to explore lambda expressions in greater depth.
13.6 Lambda Expressions
In the program below, LambdaDemo, the anonymous classes of the previousexample have been replaced by lambda expressions. As you have already seen, wecan use a lambda expression to send the code for a particular method to anothermethod. Here we send the code for the check method of checkable to thecheckValidity method. You will notice that the format of the lambdaexpression used here is a little different to the format we saw in Chap. 10. Have alook at it, then we will explain it.
The first lambda expression looks like this:
LambdaDemo
public class LambdaDemo{
public static void main(String[] args){
// create a test oblongOblong testOblong = new Oblong (8,8);
// this checks that the sides are greater than zeroSystem.out.println("oblong is " + checkValidity(() ->
{ return testOblong.getLength() > 0 && testOblong.getHeight() > 0;
} ));
// this checks that the length and height are not equalSystem.out.println("oblong is " + checkValidity(() ->
{ return testOblong.getLength() != testOblong.getHeight();
} ));
}
private static String checkValidity(Checkable objectIn){
if(objectIn.check()){
return "valid";} else{
return "invalid";}
} }
() -> { return testOblong.getLength() > 0 && testOblong.getHeight() > 0;
}
368 13 Interfaces and Lambda Expressions

The difference between this and the expressions you saw in Chap. 10 is thatinstead of a variable name on the left of the arrow, we now have a pair of emptybrackets. The reason we have done this is because the check method does notrequire any arguments. There are in fact a number of different formats to lambdaexpressions and we will tell you about them shortly. Before we do that, we will saya little more about how this all works, and the importance of this feature of Javawhich was introduced with Java 8.
Lambda expressions can be used to send a block of code to any method thatexpects to receive a functional interface as a parameter. A functional interface isan interface that contains only one abstract method. Checkable is a functionalinterface for example, as it contains a single abstract method—check. The blockof code supplied in the lambda expression—which is the code for the abstractmethod—might be used just once, as we saw in the above program, or many timesas we saw in the examples in Chap. 10 where a button can be pressed whenever theuser chooses.
Languages that are based on blocks of code being sent to methods are calledfunctional languages—examples being Lisp, Clojure and Scala. And while it is trueto say that the introduction of lambda expressions hasn’t put Java in the sameleague as these, it has certainly given Java some of the same capabilities.
The Java APIs provide a great many interfaces, many of which are concernedwith graphics programming. Interfaces also play a very important role in the col-lection classes that you will learn more about in Chap. 15 and in multi-threadedprogramming which you will study in Chap. 20.
13.6.1 The Syntax of Lambda Expressions
You have already seen how lambda expressions are formed, with the instructions onthe right side of the arrow, and the parameters on the left.
As we explained in Chap. 10, the code on the right can be a single statement(without the semi-colon), or a number of statements, enclosed in braces with asemi-colon at the end of each statement.
An example of the first might look like this:
Whereas an example of the second could look like this:
() -> System.out.println(“Hello”)
() -> {System.out.println(“Hello”);System.out.println(“Goodbye”);
}
13.6 Lambda Expressions 369

So, what about the left-hand side of the arrow? You have seen, as in the abovetwo examples, that if the code for the particular method of the interface does notrequire parameters, then we simply place empty brackets in front of the arrow.
In Chap. 10, you saw that when a single parameter is required, we give thatparameter a name and place it in front of the arrow. So, for example we might have:
We don’t have to specify a type for str, because the compiler will infer thisfrom the header of the abstract method. This is another example of typeinference, which you first encountered in Chap. 7.
If there is more than one parameter, then we would list them in brackets. Forexample:
On occasion, you might find that for some reason the compiler is unable to inferthe types of the variables, and you get a compiler error. To fix this you can simplyplace the type name in front of the variable name:
There is one thing to watch out for when writing lambda expressions. If yourcode consists of a single return statement you will get a compiler error if you usethe single line format without the semi-colon. For example, the following wouldgive you an error:
There are two ways you can avoid this error. Firstly you should note that if thereis a single expression on the right of the arrow, java will evaluate this and return thevalue. So the above expression could be written as:
str -> System.out.println(“Hello ” + str)
(x, y) -> {int z;z = x + y;System.out.println(“Sum = ” + z);
}
(int x, int y) -> {int z;z = x + y;
System.out.println(“Sum = ” + z); }
x -> return 2 * x
x -> 2 * x
370 13 Interfaces and Lambda Expressions

Alternatively you could enclose the statement in braces and write:
13.6.2 Variable Scope
Lambda expressions can access the attributes of the enclosing class. They also haveaccess to any parameters that are passed to a method that encloses the expressionand to the local variables of that method. However in the case of parameters andlocal variables, the lambda expression cannot change the value of these—in otherwords they must be final, or effectively final.1
13.6.3 Example Programs
In this section we will develop a few simple programs to show the various ways thatlambda expressions can be written and utilized.
In each of the programs that follow we will refer to a functional interface calledTestInterface that will contain one abstract method called test. We willre-define the header for this method in each of the programs.
For the first of our programs the test method will look like this:
The following program uses this version:
We call a method called testMethod, which expects to receive an object oftype TestInterface. We are able simply to send the code for the test method asa lambda expression, which, since test does not require any parameters, has openbrackets in front of the arrow. There is only one line of code, so we can managewithout any braces.
x -> {return 2 * x;
}
public void test();
LambdaSyntaxDemo1public class LambdaSyntaxDemo1{
public static void main(String[] args){
testMethod(() -> System.out.println("Hello ")); }
static void testMethod(TestInterface testObjectIn){
testObjectIn.test();}
}
1A variable or parameter is said to be effectively final if its value is not changed after itsinitialization.
13.6 Lambda Expressions 371

The output from this program is simply:
Hello
The next program shows the change in syntax when more than one line of codeis required.
The output from this program is of course:
For our next program we will change the test method of TestInterface tothe following:
The method now receives a parameter of type String. It also returns aString, and we have used this in the version of testMethod in our nextprogram shown below.
LambdaSyntaxDemo2public class LambdaSyntaxDemo2{
public static void main(String[] args){
testMethod( () -> {System.out.print("Hello "); System.out.println("world");
} );
}
static void testMethod(TestInterface testObjectIn){
testObjectIn.test();}
}
Hello world
public String test(String stringIn);
LambdaSyntaxDemo3public class LambdaSyntaxDemo3{
public static void main(String[] args){
testMethod( str -> {str = "Hello " + str;return str;
} );
}
static void testMethod(TestInterface testObjectIn){
String output = testObjectIn.test("world"); // test now requires a String argumentSystem.out.println(output);
} }
372 13 Interfaces and Lambda Expressions

As you can see, because test now requires an input, we have named the argumentto this method on the left-hand side of the arrow. Our lambda expression looks likethis:
testMethod now calls test with the argument “world”. test obeys theinstructions sent to testMethod, and produces the following output:
For our final example we will change the header for the test method to thefollowing:
Now test accepts two ints. We have used this version in our next program:
Because test now requires two arguments, we place these in brackets in frontof the arrow:
As we mentioned before, we don’t have to specify the types for x and y, but wecould do so as follows, without changing the way the program works:
str -> {str = "Hello " + str;return str;
}
Hello world
public void test(int firstNumber, int secondNumber);
LambdaSyntaxDemo4public class LambdaSyntaxDemo4{
public static void main(String[] args){
testMethod( (x, y) -> System.out.println("The sum is " + (x + y)) );}
static void testMethod(TestInterface testObjectIn){
testObjectIn.test(10, 5);}
}
(x, y) -> System.out.println("The sum is " + (x + y))
(int x, int y) -> System.out.println("The sum is " + (x + y))
13.6 Lambda Expressions 373

testMethod calls test with arguments of 10 and 5, so the output is:
Before we leave this section, it is worth making one thing absolutely clear. Whilelambda expressions enable us to effectively send a block of code, what we areactually doing is sending an object which is a type of functional interface, and thecode we send is the code for its abstract method. In LambdaSyntaxDemo4 above,for example, we could have written the instructions in the main method like this:
And of course, before we had lambda expressions, we would have to have usedan anonymous class:
13.6.4 Method References—The Double Colon Operator
It is sometimes the case that a lambda expression does nothing more than referencea method of an existing class. To illustrate this, consider the following interface:
Now consider the following program that uses this interface:
The sum is 15
TestInterface t = (x, y) -> System.out.println("The sum is " + (x + y));testMethod(t);
TestInterface t = new TestInterface() {
public void test(int x, int y) {
System.out.println("The sum is " + (x + y)); }
};testMethod(t);
DoubleColonInterfacepublic interface DoubleColonInterface{
public void test(String s);}
MethodReferencepublic class MethodReference{
public static void main(String[] args){
testMethod(str -> System.out.println(str));}
static void testMethod(DoubleColonInterface testObjectIn){
testObjectIn.test("Hello world");}
}
374 13 Interfaces and Lambda Expressions

All that the lambda expression does is to call the println method of Sys-tem.out, with whatever parameter is specified when test is called. In cases suchas this, a notation exists that can simplify the code. This uses a double colon toreference the method, as shown below:
This does exactly the same as the previous lambda expression—it calls theprintln method of System.out with argument suppled to the test method.
Let’s look at one more example. We will change the interface we are using asfollows:
Now look at this program:
Here we are using the sqrt (square root) function of Java’s Math class. Thedouble colon replaces the following lambda expression:
In both cases, of course, the program will output 0.5.The double colon notation is particularly useful when we are processing streams,
as explained in Chap. 22.
DoubleColonDemopublic class DoubleColonDemo {
public static void main(String[] args){
testMethod(System.out::println);}
static void testMethod(DoubleColonInterface testObjectIn){
testObjectIn.test("Hello world");}
}
DoubleColonInterfacepublic interface DoubleColonInterface{
public double test(int i);}
DoubleColonDemo2public class DoubleColonDemo2{
public static void main(String[] args){
testMethod(Math::sqrt);}
static void testMethod(DoubleColonInterface testObjectIn){
System.out.println(testObjectIn.test(25));}
}
testMethod(i -> Math.sqrt(i));
13.6 Lambda Expressions 375

13.7 Generics
Do you remember in Chap. 7 that we introduced the ArrayList class, and brieflyexplained that this class is an example of a generic class? We went on to use thisclass in our case study in Chaps. 11 and 12.
The topic of generics is a very important one. A generic class (or interface) hasattributes and methods whose types are not defined within the class, but are left tothe user to decide upon when an object of the class is declared. Effectively we aresending a type into a class (or interface) and for this reason we often refer to genericclasses and interfaces as parameterized types.
This is best illustrated by way of an example. Below we have created a verysimple generic class—it has only one attribute, together with a set- and a get-method.
The angle brackets after the class name indicate that this is a generic class. The Tin these brackets indicates that there will be a single type chosen by the user, and wewill refer to this type as T throughout the definition. You can think of it as aplace-marker for whatever type is chosen by the user of this class. You will also seein one of the examples that follow that we can indicate more than one type in thebrackets—so we could have, for example:
In our SimpleGenericClass you can see that the single attribute, value, isdeclared as being of type T. Also, as we would expect, the set-method has aparameter of type T and the get-method returns an object of type T. You shouldnote that the types have to be objects of a class—primitive types such as int ordouble can’t be used here, so you would have to use the equivalent wrapperclasses such as Integer and Double.
SimpleGenericClasspublic class SimpleGenericClass<T> // the angle brackets indicate that this is a generic class{
private T value;
public void setValue(T valueIn){
value = valueIn;}
public T getValue(){
return value;}
}
public class AnotherGenericClass<T, U, V>
376 13 Interfaces and Lambda Expressions

There follows a short program that uses this class.
You can see that we have declared three objects of type Sim-pleGenericClass, each time choosing a different type for its attribute andmethods—in the third case we have used our own Oblong class. Notice also thatin the first case we have to use the wrapper class Double, rather than theprimitive type.
When calling the constructor of the class, we have left the angle brackets empty:
The empty brackets (sometimes referred to as the diamond) can be used in caseswhere it is easy for the compiler to work out what type of arguments are required;here, for example, it is apparent from the type declaration. This is another exampleof type inference.
We have then gone on to use the setValue method to give a value to theattribute for each object we created. Note that in the first case the argument of 10.0(a double) is automatically type cast to Double.
In the last three statements we use getValue to return the object. In the firsttwo examples we can display the value without having to call a method of theobject (println is set up to automatically print the value of a Double or aString). In the final example we display the area of the Oblong, using thecalculateArea method.
The output from this program is:
TestGenericClasspublic class TestGenericClass{
public static void main(String[] args){
SimpleGenericClass<Double> example1 = new SimpleGenericClass<>();SimpleGenericClass<String> example2 = new SimpleGenericClass<>();SimpleGenericClass<Oblong> example3 = new SimpleGenericClass<>();
example1.setValue(10.0);example2.setValue("Hello");example3.setValue(new Oblong(5, 3));
System.out.println(example1.getValue());System.out.println(example2.getValue());System.out.println(example3.getValue().calculateArea());
} }
SimpleGenericClass<Double> example1 = new SimpleGenericClass<>();
10.0Hello15.0
13.7 Generics 377

Collection classes and graphics classes make extensive use of generic interfaces,rather than classes. We could, for example, define a generic functional interface asfollows:
You can see that an object of type SimpleGenericInterface wouldrequire three types, which are referred to in the definition as T, U and V. The singleabstract method returns an object of type T and receives objects of type Uand V.
Very often, however, we don’t need to define our own functional interface,because Java provides us with a number of such interfaces “out of the box”.Some of these are listed in Table 13.1. Most often these reside in the java.util.function package. Some of these also contain static methods,which you can look up on the Oracle™ site.
The two programs that follow demonstrate how we can use one of the aboveinterfaces—Function. In the first one we do this by declaring an anonymousclass, while in the second we do the same thing much more neatly with a lambdaexpression. In both cases the output is:
In both programs you can see how we have pattern-matched Integer,String to the types in the interface definition, T, R.
SimpleGenericInterfacepublic interface SimpleGenericInterface<T, U, V>{
public T doSomething(U firstValue, V secondValue);}
Table 13.1 Some common functional interfaces
Functional interface Abstract method name Parameter types Return type
Supplier<T> get none T
Consumer<T> accept T void
BiConsumer<T, U> accept T, U void
Function<T, R> apply T R
BiFunction<T, U, R> apply T, U R
UnaryOperator<T> apply T T
BinaryOperator<T, T> apply T, T T
Predicate<T> test T boolean
BiPredicate<T, U> test T, U boolean
You entered 10
378 13 Interfaces and Lambda Expressions

Notice that in the program above we do not need to include the word return inthe lambda expression as the code consists of a single return statement.
Before we move on there is one more thing to mention. If one of the types of ourgeneric class or interface refers to the return type of a method, it is possible that wemight want that method not to return any value—in other words to be of typevoid. A special class, Void, exists for this purpose. Void is simply a placeholderused to represent the keyword void. The method in this case would be defined sothat a null value is returned. So a generic type such as Task<V> could beinstantiated with, for example, Task<Integer>, Task<Double> or Task<Void>. You will see an example of this in Chap. 20.
13.7.1 Bounded Type Parameters
When we develop a generic class we are somewhat limited as to the methods wecan provide. For example, if we were hoping that the class were going to hold 3Dgeometrical shapes, we might want whatever types we were dealing with to havemethods such as calculateSurfaceArea, calculateVolume etc. If wetried to reference these in our generic methods we would get a compiler error,because a class which is simply declared as being of type T will not have thesemethods until we know what T is.
Luckily there is a way around this. We can declare our unknown type with anupper bound. This means that we specify that the types have to be a particulartype, or a derivative of that type. For example, classes such as Integer, Double
TestGenericInterfaceVersion1import java.util.function.Function;
public class TestGenericInterfaceVersion1{
public static void main(String[] args){
Function<Integer, String> t = new Function <Integer, String>(){
@Overridepublic String apply(Integer i){
return "You entered " + i;}
};System.out.println(t.apply(10));
} }
TestGenericInterfaceVersion2import java.util.function.Function;
public class TestGenericInterfaceVersion2{
public static void main(String[] args){
Function<Integer, String> str = i -> "You entered " + i ;
System.out.println(str.apply(10));}
}
13.7 Generics 379

and Float are in fact all subclasses of a superclass called Number. We couldspecify that the type must be Number, or a sub-type of Number such asInteger, Double, Float etc.
We will develop an example to show you how we do this. Firstly, we are going todefine two classes to represent the 3D shapes sphere and cuboid. The JavaFXlibraries already contain shapes of this type, and, although it is perfectly possible tohave classes in different packages with the same name (more about this in Chap. 19),we will avoid any confusion and call our classes Ball and Brick. Both of theseclasses are going to implement the following interface:
Our Ball and Brick classes below implement this interface, and use theappropriate formula in each case for calculating the volume.2
The Calculatable interfacepublic interface Calculatable{
public double calculateVolume();}
Ballpublic class Ball implements Calculatable{
private double radius;
public Ball (double radiusIn){
radius = radiusIn;}
@Overridepublic double calculateVolume(){
// uses the constant PI and the method pow from the java.Math packagereturn (4 * Math.PI * Math.pow(radius, 3))/3;
}}
Brickpublic class Brick implements Calculatable{
private double length;private double width;private double height;
public Brick (double lengthIn, int widthIn, int heightIn){
length = lengthIn;width = widthIn;height = heightIn;
}
@Overridepublic double calculateVolume(){
return length * width * height;}
}
2Just in case you have forgotten your high school maths, the formula for calculating the volume ofa sphere is 4
3pr3.
380 13 Interfaces and Lambda Expressions

Now we’ll develop a class, VolumeComparison, that can be used to comparethe volumes of two solids. It will be a generic class that will hold two solid objectsthat implement Calculatable; our class will compare their volumes using thecalculateVolume method. Our intention is that the two items can be anyobjects that implement Calculatable, and do not have to be specified until theVolumeComparison class is instantiated.
The VolumeComparison class is presented below. You will notice that thereis something new in the class header. Study the code and then we will explainwhat’s going on.
Take a look at the header:
You can see that each of the type parameters contains the words extendsCalculatable. Using extends in this context means that the types can be anysubtype of the class or interface that follows—in this case Calculatable. Ourtypes now have an upper bound—any types or subtypes of this bound will beaccepted.
Because both attributes will hold Calculatable objects, we have been ableto use the object’s calculateVolume method in the code for thecompareVolume method of our class.
The program below, ComparisonTester, tests out our VolumeCompar-ison class. You can see how we have been able to create an object of this classwith a Ball and a Brick respectively—and of course we could have chosen tocompare any objects that implement our Calculatable interface.
VolumeComparisonpublic class VolumeComparison<T extends Calculatable, S extends Calculatable> {
T first;S second;
public VolumeComparison(T firstIn, S secondIn){
first = firstIn;second = secondIn;
}
public int compareVolume(){
if(first.calculateVolume() < second.calculateVolume()){
return -1;} else if(first.calculateVolume() > second.calculateVolume()){
return 1;} else{
return 0;}
} }
public class VolumeComparison<T extends Calculatable, S extends Calculatable>
13.7 Generics 381

13.7.2 Wildcards
We have developed a program called WildCardTester which you see below. Itmakes use of the SimpleGenericClass that we developed earlier in this sec-tion, and also utilises the BankAccount class and CheckableBankAccountclass that we developed in Sect. 13.4. The line in bold gives rise to a compiler error.
Can you see what’s wrong here? The helper method expects to receive an objectof SimpleGenericClass<BankAccount>. So object1 is fine, butobject2 is of type SimpleGenericClass<CheckableBankAccount>.The parameter of the receiving method is very specific—a Sim-pleGenericClass<BankAccount> object is required.
We can fix this with a wildcard, which uses the? symbol. This is a mechanismfor making the variable less restrictive. The way we do it is shown below:
ComparisonTesterpublic class ComparisonTester{
public static void main(String[] args){
Ball ballObject = new Ball(10);Brick brickObject = new Brick(10, 10, 10);
VolumeComparison<Ball, Brick> comparison = new VolumeComparison<>(ballObject, brickObject);
switch(comparison.compareVolume()){
case -1: System.out.println("The second object has a larger volume");break;
case 1: System.out.println("The first object has a larger volume");break;
case 0: System.out.println("The volumes are the same");}
}
}
WildCardTester - Incorrectpublic class WildcardTester{
public static void main(String[] args){
SimpleGenericClass<BankAccount> object1 = new SimpleGenericClass<>();SimpleGenericClass<CheckableBankAccount> object2 = new SimpleGenericClass<>();
object1.setValue(new BankAccount("12345678", "Smith"));object2.setValue(new CheckableBankAccount("87654321", "Jones"));
helper(object1);helper(object2); // this line causes the compiler error
}
static void helper(SimpleGenericClass<BankAccount> objectIn) // this causes an error{
System.out.println(objectIn.getValue().getAccountName());}
}
382 13 Interfaces and Lambda Expressions
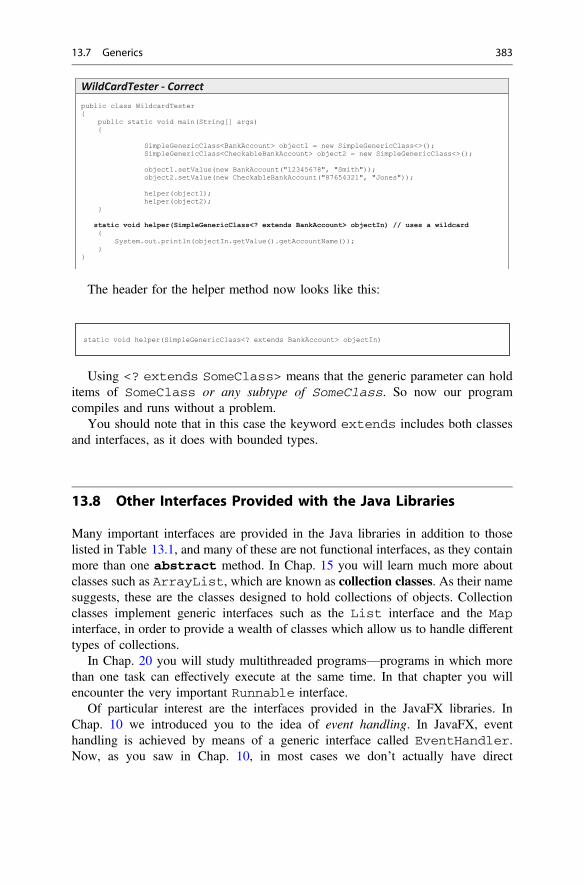
The header for the helper method now looks like this:
Using <? extends SomeClass> means that the generic parameter can holditems of SomeClass or any subtype of SomeClass. So now our programcompiles and runs without a problem.
You should note that in this case the keyword extends includes both classesand interfaces, as it does with bounded types.
13.8 Other Interfaces Provided with the Java Libraries
Many important interfaces are provided in the Java libraries in addition to thoselisted in Table 13.1, and many of these are not functional interfaces, as they containmore than one abstract method. In Chap. 15 you will learn much more aboutclasses such as ArrayList, which are known as collection classes. As their namesuggests, these are the classes designed to hold collections of objects. Collectionclasses implement generic interfaces such as the List interface and the Mapinterface, in order to provide a wealth of classes which allow us to handle differenttypes of collections.
In Chap. 20 you will study multithreaded programs—programs in which morethan one task can effectively execute at the same time. In that chapter you willencounter the very important Runnable interface.
Of particular interest are the interfaces provided in the JavaFX libraries. InChap. 10 we introduced you to the idea of event handling. In JavaFX, eventhandling is achieved by means of a generic interface called EventHandler.Now, as you saw in Chap. 10, in most cases we don’t actually have direct
WildCardTester - Correctpublic class WildcardTester{
public static void main(String[] args){
SimpleGenericClass<BankAccount> object1 = new SimpleGenericClass<>();SimpleGenericClass<CheckableBankAccount> object2 = new SimpleGenericClass<>();
object1.setValue(new BankAccount("12345678", "Smith"));object2.setValue(new CheckableBankAccount("87654321", "Jones"));
helper(object1);helper(object2);
}
static void helper(SimpleGenericClass<? extends BankAccount> objectIn) // uses a wildcard{
System.out.println(objectIn.getValue().getAccountName());}
}
static void helper(SimpleGenericClass<? extends BankAccount> objectIn)
13.7 Generics 383

involvement with this interface, because it is hidden from us by conveniencemethods such as setOnAction. Nonetheless, it is important that we know what isgoing on behind the scenes, not least because—as you will see in Chap. 16—thereare times when we will not be able to use convenience methods.
If you cast your mind back to the PushMe class of Chap. 10, you will rememberthat the code for the setOnAction method was as follows:
Had we not been able to use a convenience method we would have needed to usea method called addEventHandler.
addEventHandler requires two parameters, of type EventType andEventHandler respectively.
The interface EventHandler is a functional interface, with a single ab-stract method handle. This method will contain the instructions that tell thebutton what to do when the event occurs.
In our case we would declare an object of type EventHandler as follows:
As you can see, EventHandler is a generic interface and requires us to tell itthe type of objects it will be dealing with. In this case it will be an ActionEvent—this is the event that occurs when a button is pushed. At present there is only onetype of ActionEvent, which is ActionEvent.ACTION, so that will be ourfirst parameter. In Chap. 16 you will see that for other events, such as MouseE-vent, there are many types available such as MouseEvent.MOUSE_PRESSED,MouseEvent.MOUSE_RELEASED, MouseEvent.MOUSE_MOVED and so on,although in most cases we once again won’t have to worry about them, as con-venience methods are available for each one.
Notice that we have been able to use a lambda expression to send the code forthe handle method, as EventHandler is a functional interface.
So now we can write the code for adding the EventHandler as follows:
Of course this could have been done in one line, without declaring the handlerobject first, but doing it as we have should have made clear exactly what ishappening.
pushMeButton.setOnAction(e -> pushMeLabel.setText("You entered: " + pushMeTextField.getText()));
EventHandler<ActionEvent> handler = e -> pushMeLabel.setText("You entered: " + pushMeText.getText());
pushMeButton.addEventHandler(ActionEvent.ACTION, handler);
384 13 Interfaces and Lambda Expressions

13.9 Polymorphism and Polymorphic Types
In this chapter we have seen how an object can have a number of different types. Aswell as being the type of its own class, it is also the type of any superclasses in theclass hierarchy, and the type of any interfaces that it implements. You will recallthat we have used the term polymorphism to refer to the phenomenon wherebymethods and operators can have the same name, but exhibit different behaviour.A language like Java that allows objects to be of more than one type is said tosupport polymorphic types.
In general, polymorphism is an important feature of object-oriented languages,and it is worth our while spending a little more time summarizing the different waysin which polymorphism can be achieved.
13.9.1 Operator Overloading
We have seen several examples of operators that are overloaded, and that cantherefore behave differently depending upon the type of data they are manipulating.The + operator, for example, can be used for the concatenation of strings as well asfor addition. The division operator, /, can be used for integer division as well as fordivision of real numbers. The particular function performed is determined by theoperands. It should be noted that Java, as opposed to some other languages, doesnot allow the user to overload operators.
13.9.2 Method Overloading
We are now very familiar with this type of polymorphism, whereby severalmethods in a class have the same name and are distinguished by their parameterlists. This is particularly useful for defining a number of different constructors, andyou will find many examples in the Java libraries where a number of constructorsare provided for a particular class. Just one of many examples is the String classwhere, among others, a constructor is provided with no parameters to create anempty string, and a constructor is provided that accepts a string value in order toinitialize the new String object.
13.9.3 Method Overriding
As we have seen, method overriding is a way of achieving polymorphism byredefining a method of a class within a subclass. Here methods are distinguished notby their parameter lists but by the object with which they are associated. As wehave described in this and previous chapters, this is made even more powerful byhaving the ability to define abstract methods and therefore guaranteeing theexistence of these methods further down the hierarchy.
13.9 Polymorphism and Polymorphic Types 385

13.9.4 Type Polymorphism
Type polymorphism refers to the technique by which values of different types canbe handled in a uniform way. Examples of this are the System.out.print andthe System.out.println methods which are set up to accept objects of manydifferent types—int, char, double, String and so on. This is achieved, ofcourse, by defining many different (overloaded) methods. In this way it is possiblefor a single method to appear to accept an object of any type. This is known asparametric polymorphism.
Another way to create a method that accepts more than one type was demon-strated in the EmployeeTester program of Sect. 9.6, where a method was set upto accept an object of type Employee. We saw there how it was possible to callthis method and send in objects of any subclass of Employee such as Full-TimeEmployee or PartTimeEmployee. Because objects of a subclass are ofthe same type as the superclass, a method can effectively receive parameters ofmore than one type. As we saw, the behaviour of methods of these classes might bedifferent, and hence this can be regarded as a kind of polymorphism—this is knownas subtype polymorphism.
13.10 Self-test Questions
1. Consider the UML design below of a class called MyClass.
Write the header of the MyClass class.
2. Consider the following interface, called SomeInterface:
MyClass
<<interface>>Testable
<<interface>>Checkable
TopClass
public interface SomeInterface{
public double SomeMethod(double x);}
386 13 Interfaces and Lambda Expressions

The following class is developed as shown below:
Explain why this class will not compile, and explain how it should be amendedin order to rectify the problem.
3. What is meant by a functional interface? Explain how lambda expressions areused in conjunction with functional interfaces.
4. A lambda expression is characterized by the arrow symbol ->. What is placedthe left of this symbol, and what is placed to the right?
5. Consider the following interface:
Now consider the following program:
As its name suggests, this program gives rise to a compiler error. Can you seewhy?
6. In order to tackle this exercise make sure that the classes Oblong andBankAccount have been copied from the website and placed in the correctdirectory for your compiler to access them.
The Testable interfacepublic interface Testable{
public void test();}
WontCompilepublic class WontCompile{
public static void main(String[] args){
int x = 2;
helper( () -> {x = x * 2;System.out.println(x);
} );
}
static void helper(Testable objectIn){
objectIn.test();}
}
public class SomeClass implements SomeInterface{
private double y;
public double SomeMethod(int x) {
return 2.5 * x; } }
13.10 Self-test Questions 387

Now consider the following Resetable interface:
The reset method takes no parameters and returns no value. The intention ofthe reset method is to reset the object data to some basic initial value. Forexample, an Oblong object might be reset by having both sides set to 1.
(a) Write the code for the Resetable interface.
(b) Write a tester program to check the Testable interface. An outline ofthe tester is given below:
7. (a) Write the code for an interface, Computable, which has a single method,compute, that accepts two doubles and returns a double:
<<interface>>Resetable
reset()
Outline of a TestResetable program
public class TestResetable{
public static void main(String[] args){
// create an Oblong object and BankAccount Object
// Make a deposit into the BankAccount object
/* call the resetObject method with a lambda expression that setsthe length and height of the Oblong to 1 */
/* call the resetObject method with a lambda expression that setsthe balance of the BankAccount object to zero. You can't do this directly because there is no setBalance method - but you canwithdraw the total amount that is in the account */
/* display the length and height of the oblong (which should nowbe 1) and the balance of the bank account (which should now be zero) */
}
// write a resetObject method as follows:
static void resetObject(Resetable objectIn){
objectIn.reset();}
}
<<interface>>Computable
+compute(double, double):double
388 13 Interfaces and Lambda Expressions

(b) Consider the following program; a lambda expression has been replaced bya comment:
Replace the comment with a lambda expression that causes the computemethod to return the sum of the two doubles it receives, and then test outyour program with some different values in the printResult method.
(c) Change the lambda expression so that it performs other calculations such assubtraction or multiplication.
8. Explain, with examples, what is meant by the following terms, and how they areimplemented in Java:
(a) generic class;
(b) upper bound;
(c) wildcard.
9. (a) Adapt the code for the Computable interface that you developed inquestion 7 so that it is generic interface, that is not restricted to dealing withdoubles only.
(b) Rewrite the TestComputable program from question 7 (b) so that it usesyour generic interface with number types other than double. Don’t forgetyou will have to use the wrapper classes such as Double and Integer.
(c) Adapt your generic interface so it is restricted to accepting only Numbertypes (remember that classes such as Integer, Float and Double areall sub-types of Number).
10. Consider the following two classes:
public class TestComputable{
public static void main(String[] args){
Computable comp = // lambda expresion here ; printResult(comp);
}
public static void printResult(Computable compIn){
System.out.println(compIn.compute(10, 5));}
}
13.10 Self-test Questions 389
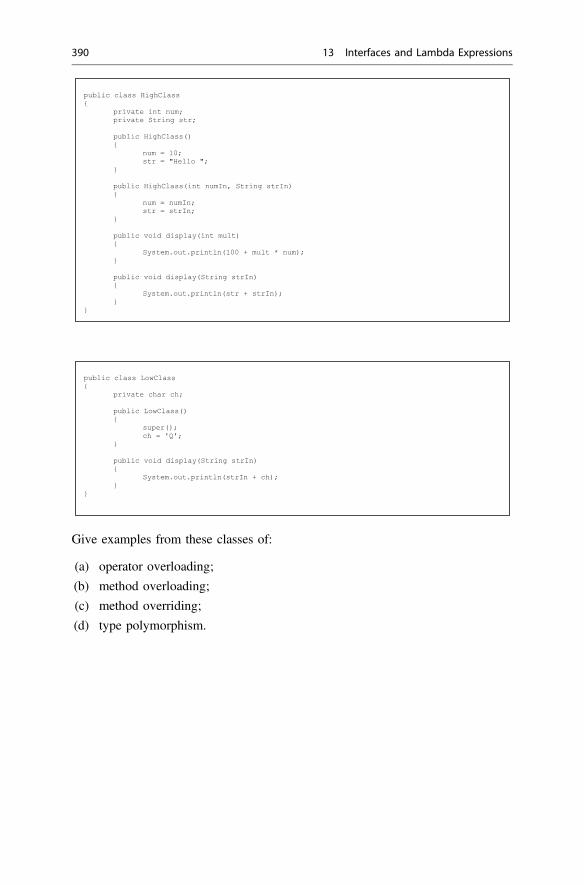
Give examples from these classes of:
(a) operator overloading;
(b) method overloading;
(c) method overriding;
(d) type polymorphism.
public class HighClass{
private int num;private String str;
public HighClass() {
num = 10;str = "Hello ";
}
public HighClass(int numIn, String strIn) {
num = numIn;str = strIn;
}
public void display(int mult) {
System.out.println(100 + mult * num); }
public void display(String strIn) {
System.out.println(str + strIn); } }
public class LowClass{
private char ch;
public LowClass() {
super();ch = 'Q';
}
public void display(String strIn) {
System.out.println(strIn + ch); } }
390 13 Interfaces and Lambda Expressions

13.11 Programming Exercises
1. Implement a few of the programs from this chapter in order to make sure thatyou fully understand the concepts involved.
2. A Customer class is being developed for a small business. The suggested codefor this class is shown below:
The owner of the business requires that the customer ID must comprise a singleletter followed by exactly 3 numbers.
(a) Create a CheckableCustomer class that inherits from the Customerclass and implements the Checkable interface that we developed inSect. 13.3. The class will override the check method according to theabove rule.
(b) Adapt the Checker program from Sect. 13.3 so that it now checks thevalidity of a CheckableCustomer object, according to the above rule.
(c) Adapt the InnerClassDemo program from Sect. 13.4 so that Check-ableCustomer is now specified as an inner class.
(d) Adapt the AnonymousClassDemoVersion1 and Anony-mousClassDemoVersion2 programs from Sect. 13.5 so that ananonymous class is used instead of an inner class to check the validity of aCustomer Object.
(e) Finally, adapt program LambdaDemo program from Sect. 13.6 to use alambda expression to check the validity of a Customer object.
public class Customer {
private String customerId;private String name;private double creditLimit;
public Customer(String IdIn, String nameIn, double limitIn) {
customerId = IdIn;name = nameIn;creditLimit = limitIn;
}
public String getCustomerId() {
return customerId; }
public String getName() {
return name; }
public double getCreditLimit() {
return creditLimit; }
public void setCreditLimit(double limitIn) {
creditLimit = limitIn; } }
13.11 Programming Exercises 391

3. Implement the Resetable interface and the TestResetable class fromself-test question 6.
4. Implement the Computable interface and the test classes you developed inself-test question 7.
5. Implement the generic version of the above classes as described in self-testquestion 9.
6. In Sect. 13.7 the program TestGenericInterfaceVersion2 demon-strated the use of one of the out-of-the-box interfaces (Function) listed inTable 13.1. Design and implement some more programs to demonstrate the useof some of the other functions listed in that table.
392 13 Interfaces and Lambda Expressions

14Exceptions
Outcomes:
By the end of this chapter you should be able to:
• explain the term exception;• distinguish between checked and unchecked exception classes in Java;• claim an exception using a throws clause;• throw an exception using a throw command;• catch an exception in a try…catch block;• use a finally block or a try-with-resources construct to deal with clean-up
issues;• use the Optional class to avoid NullPointerException errors;• define and use their own exception classes.
14.1 Introduction
One way in which to write a program is to assume that everything proceedssmoothly and as expected—users input values at the correct time and of the correctformat, files are never corrupt, array indices are always valid and so on. Of coursethis view of the world is very rarely accurate. In reality, unexpected situations arisethat could compromise the correct functioning of your program.
Programs should be written that continue to function even if unexpected situa-tions should arise. So far we have tried to achieve this by carefully constructed ifstatements that send back error flags, in the form of boolean values, whenappropriate. However, in some circumstances, these forms of protection againstundesirable situations prove inadequate. In such cases the exception handlingfacility of Java must be used.
© Springer Nature Switzerland AG 2019Q. Charatan and A. Kans, Java in Two Semesters, Texts in Computer Science,https://doi.org/10.1007/978-3-319-99420-8_14
393

14.2 Pre-defined Exception Classes in Java
An exception is an event that occurs during the life of a program which could causethat program to behave unreliably. You can see that the events we described in theintroduction fall into this category. For example, accessing an array with an invalidindex could cause that program to terminate.
Each type of event that could lead to an exception is associated with apre-defined exception class in Java. When a given event occurs, the Java run-timeenvironment determines which exception has occurred and an object of the givenexception class is generated. This process is known as throwing an exception.
These exception classes have been named to reflect the nature of the exception.For example, when an array is accessed with an illegal index an object of theArrayIndexOutOfBoundsException class is thrown.
All exception classes inherit from the base class Throwable which is found inthe java.lang package. These subclasses of Throwable are found in variouspackages and are then further categorized depending upon the type of exception.For example, the exception associated with a given file not being found(FileNotFoundException) and the exception associated with an end of filehaving been reached (EOFException) are both types of input/output exceptions(IOException), which reside in the java.io package. Figure 14.1 illustratespart of this hierarchy.
Fig. 14.1 A sample of Java’s pre-defined exception class hierarchy
394 14 Exceptions

As you can see from Fig. 14.1, there are two immediate subclasses ofThrowable: Exception and Error. The Error class describes internalsystem errors that are very unlikely ever to occur (so called “hard” errors). Forexample, one subclass of Error is VirtualMachineError where some errorin the JVM has been detected. There is little that can be done in the way of recoveryfrom such errors other than to end the program as gracefully as possible. All otherexceptions are subclasses of the Exception class and it is these exceptions thatprogrammers deal with in their programs. The Exception class is further sub-divided. The two most important subdivisions are shown in Fig. 14.1,IOException and RuntimeException.
The RuntimeException class deals with errors that arise from the logic of aprogram. For example, a program that converts a string into a number, when thestring contains non-numeric characters (NumberFormatException) or acces-ses an array using an illegal index (ArrayIndexOutOfBoundsException).
The IOException class deals with external errors that could affect the pro-gram during input and output. Such errors could include, for example, the keyboardlocking, or an external file being corrupted.
Since nearly every Java instruction could result in a RuntimeExceptionerror, the Java compiler does not flag such instructions as potentially error-prone.Consequently these types of errors are known as unchecked exceptions. It is left tothe programmer to ensure that code is written in such a way as to avoid suchexceptions; for example, checking an array index before looking up a value in anarray with that index. Should such an exception arise, it will be due to a programerror and will not become apparent until runtime.
The Java compiler does, however, flag up those instructions that may generateall other types of exception (such as IOException errors) since the programmerhas no means of avoiding such errors arising. For example, an instruction to readfrom a file may cause an exception because the file is corrupt. No amount ofprogram code can prevent this file from being corrupt. The compiler will not onlyflag such an instruction as potentially error-prone, it will also specify the exactexception that could be thrown. Consequently, these kinds of errors are known aschecked exceptions. Programmers have to include code to inform the compiler ofhow they will deal with checked exceptions generated by a particular instruction,before the compiler will allow the program to compile successfully.
14.3 Handling Exceptions
Consider a simple program that allows the user to enter an aptitude test mark at thekeyboard; the program then informs the user if he or she has passed the test andbeen allowed on a given course. We could use the nextInt method (from eitherour EasyScanner class, or the original Scanner class) to allow the user to enterthis mark. However, in order to show you how exceptions can be dealt with in yourprograms, we will not take this approach—instead we will devise our own class,
14.2 Pre-defined Exception Classes in Java 395

TestException, that will contain a class method called getInteger. Beforewe do that, here is the outline of the main application:
Now let’s look at an outline for the TestException class.The getInteger method must allow the user to enter an integer at the key-
board and then return that integer. There are many ways we could try and read aninteger from the keyboard. As we have said, rather than make use of the nextIntmethod in the Scanner class, the approach we will take here will be to use a ratherlow-level method called read in the System.in object. So far we have used theSystem.out object to display information on the screen, but we have notexplored the System.in object. This object is an object of the InputStreamclass that you will find out more about in Chap. 18.
You will remember from Chap. 2 that each character on the keyboard is rep-resented by a Unicode number. For countries in which the standard westernalphabet is used, the lower case letters ‘a’ through to ‘z’ are represented by theUnicode values 97 through to 122 inclusive. Special characters also have Unicodevalues. For example, the carriage return character has a Unicode value 13. TheInputStream class provides a read method that is a bit like the next methodof the Scanner class, except that it treats the string as a series of Unicodenumbers. Each number is considered to be of type byte, so that the string itself is anarray of bytes. Figure 14.2 illustrates the effect of the read method when someoneenters the word “hello” at the keyboard.
public class TestException{
// this method is declared 'static' as it is a class methodpublic static int getInteger(){
// code for method goes here}
}
Fig. 14.2 The ‘read’ methodstores characters entered at thekeyboard as an array of bytes
396 14 Exceptions

Notice that the array of bytes is not returned as a value but instead sent as aparameter. Also note that the new-line character is given a Unicode value of 10.
The getInteger method will first have to take this array of bytes and convertit into a String. Luckily a version of the String constructor returns a Stringobject from an array of bytes. We then remove any trailing spaces at the end of theString; this can be done with the String method trim as follows:
Now, finally, we have to convert this string into an integer. We can use theparseInt method of the Integer class to do this:
Our TestException class now looks like this:
Unfortunately, as things stand, this class will not compile. The cause of the erroris in the getInteger method, in particular the way we used the read method ofSystem.in. Whenever this method is used, the Java compiler insists that we bevery careful. To understand this better, take a look at the header for this readmethod, taken from the Java language specification, in particular the part we haveemboldened:
Up until now you have not seen a method header of this form. The wordsthrows IOException are the new bits in this method header. In Java this isknown as a method claiming an exception.
byte [] buffer = new byte[512]; // declare a large byte arraySystem.in.read(buffer); // characters entered stored in arrayString s = new String (buffer); // make string from byte arrays = s.trim(); // trim string
int num = Integer.parseInt(s); // converts string to an 'int'
// this is a first attempt, it will not compile!public class TestException{
public static int getInteger(){
byte [] buffer = new byte[512];System.in.read(buffer);String s = new String (buffer);s = s.trim();int num = Integer.parseInt(s);return num; // send back the integer value
} }
public int read (byte[] b) throws IOExcep on
14.3 Handling Exceptions 397

14.3.1 Claiming an Exception
The term claiming an exception refers to a given method having been marked toindicate that it will pass on an exception object that it might generate. So the termthrows IOException means that the method could cause an input/outputexception in your program. The type of error that could take place while data isbeing read includes the loss of a network connection or a file being corrupted, forexample.
Remember, when an exception occurs, an exception object is created. This is anunwanted object that could cause your program to fail or behave unpredictably, andso should be dealt with and not ignored. Rather than dealing with this exceptionobject within the read method, the Java people decided it would be better if callersof this method dealt with the exception object in whatever way they felt wassuitable. In effect, they passed the error on to the caller of the method (seeFig. 14.3).
As the type of exception generated (IOException) is not a subclass ofRuntimeException, it is an example of a checked exception. In other words,the compiler insists that if the read method is used, the programmer deals with thisexception in some way, and does not just ignore it as we did originally. That is whywe had a compiler error initially. There are always two ways to deal with anexception:
1. deal with the exception within the method;2. pass on the exception out of the method.
The developers of the read method decided to pass on the exception, so nowour getInteger method has to decide what to do with this exception. In a whilewe will show you how to deal with an exception within a method, but for now wewill just make our getInteger method pass on the exception too. We do this bysimply adding a throws clause to our method:
Fig. 14.3 The ‘throws’ clause can be added to a method header to indicate that the method maygenerate an exception
398 14 Exceptions

Notice that, as the IOException class is in the io package, we now need thefollowing import statement at the top of this class:
Now that the getInteger method has claimed the IOException, it willcompile as we have not just ignored the exception, we have made a consciousdecision to pass the exception on to any method that calls this getIntegermethod. Now, let’s think about developing our aptitude test program.
Can you see what the problem with this program is? Well, this program will notcompile now as themainmethodmakes a call to ourgetIntegermethod, and thismethod may now throw an IOException! The mainmethod now has to deal withthis exception and not just ignore it. For the time being, to keep the compiler happy,we will just let the main method throw this exception as well. Here is the code:
import java.io.IOException;public class TestException{
// adding this throws clause will allow this method to compilepublic static int getInteger() throws IOException{
// as before}
}
import java.io.IOException;
// something wrong here!public class AptitudeTest{
public static void main (String[] args){
int score;System.out.print("Enter aptitude test score: ");score = TestException.getInteger(); // calling class method// test score here
} }
AptitudeTestimport java.io.IOException;public class AptitudeTest{
// this main method will throw out any IOExceptionspublic static void main (String[] args) throws IOException
{ int score;System.out.print("Enter aptitude test score: ");// the 'getInteger' method may throw an IOExceptionscore = TestException.getInteger();if (score >= 50)
{ System.out.println("You have a place on the course!");
} else
{ System.out.println("Sorry, you failed your test");
} } }
14.3 Handling Exceptions 399

Dealing with the exception in the way we have is not a very good idea. We haveeffectively continually passed on the exception object until it gets thrown out of ourprogram to the operating system. This may cause the program to terminate whensuch an exception occurs. Before we deal with this problem let us show you a testrun. Take a look at it as something very interesting happens.
Enter aptitude test score: 12wjava.lang.NumberFormatException: 12wat java.lang.Integer.parseInt(Integer.java:418)at java.lang.Integer.parseInt(Integer.java:458)at TestException.getInteger(TestException.java:10)at AptitudeTest.main(AptitudeTest.java:11)
As you can see, when asked to enter an integer, the user inadvertently added acharacter into the number (12w). This has led to an exception being generated andthrown out of our program. Again, looking at the output generated, you can see thatwhen an exception is generated in this way the Java system gives you quite a lot ofinformation. This information includes the name of the method that threw theexception, the class that the method belongs to, the line numbers in the source fileswhere the error arose, and the type of exception that was thrown. Such informationis referred to as the stack trace of the exception.
Look at the name of the exception that is thrown. It’s not the one we were worriedabout, IOException, but NumberFormatException. This exception is raisedwhen trying to convert a string into a number when the string contains non-numericcharacters, as we were trying to do in this case within our getInteger method:
Why didn’t the compiler warn us about this when we first used the parseIntmethod in our implementation of getInteger? Well, the reason is that theexception that could arise (NumberFormatException) is a subclass of Run-timeException and so is unchecked!
Notice that run-time exceptions do not need to be claimed in method headers inorder for them to be thrown. For example, although the following is valid in Java, itis not necessary to claim the NumberFormatException in the header.
public static int getInteger() throws IOException {
// some code hereint num = Integer.parseInt(s); /* will cause a NumberFormatException
if string s contains non-numeric characters*/}
/* multiple exceptions can be claimed in the method header as follows by separating exception names with commas. However run-time exceptions do not need to be claimed in this way */
public static int getInteger() throws IOException, NumberFormatException{
// some code here}
400 14 Exceptions

The way we have dealt with exceptions so far has not been very effective. Asyou can see from the test run of program 14.1, continually throwing exceptions upto the calling method does not really solve the problem. It may keep the compilerhappy, but eventually it means exception objects will escape from your programsand cause them to terminate. Instead, it is better at some point to handle anexception object rather than throw it. In Java this is known as catching anexception.
14.3.2 Catching an Exception
One route for an exception object is out of the current method and up to the callingmethod. That’s the approach we used in the previous section. Another way out foran exception object, however, is into a catch block. Once an exception object istrapped in a catch block, and that block ends, the exception object is effectivelyterminated. In order to trap the exception object in a catch block you mustsurround the code that could generate the exception in a try block. The syntax forusing a try and catch block is as follows:
There are a few things to note before we show you this try…catch idea inaction. First, any number of lines could be placed within the try block, and morethan one of them could cause an exception. If none of them causes an exception thecatch block is missed and the lines following the catch block are executed. Ifany one of them causes an exception the program will leave the try block and lookfor a catch block that deals with that exception.
Once such a catch clause is found, the statements within it will be executedand the program will then continue with any statements that follow the catchclause—it will not return to the code in the try clause. Look carefully at the syntaxfor the catch block:
try{
// code that could generate an exception} catch (Exception e) // type of exception must be specified as a parameter{
// action to be taken when an exception occurs} // other instructions could be placed here
catch (Exception e){
// action to be taken when an exception occurs}
14.3 Handling Exceptions 401

This looks very similar to a method header. You can see that the catch blockheader has one parameter: an object, which we called e, of type Exception.Since all exceptions are subclasses of the Exception class, this will catch anyexception that should arise. However, it is better to replace this exception class withthe specific class that you are catching so that you can be certain which exceptionyou have caught. As there may be more than one exception generated within amethod, there may be more than one catch block below a try block—eachdealing with a different exception. When an exception is thrown in a try block, thecatch blocks are inspected in order—the first matching catch block is the onethat will handle the exception.
Within the catch block, programmers can, if they choose, interrogate theexception object using some Exception methods, some of which are listed inTable 14.1.
With this information in mind we can deal with the exceptions in the previoussection in a different way. All we have to decide is where to catch the exceptionobject. For now we will leave the getInteger method as it is, and catchoffending exception objects in the main method of the AptitudeTest2 pro-gram. Take a look at it and then we will discuss it.
Table 14.1 Some methods of the Exception class
Method Description
printStackTrace Prints (onto the console) a stack trace of the exception
toString Returns a detailed error message
getMessage Returns a summary error message
AptitudeTest2import java.io.IOException;
public class AptitudeTest2{
public static void main (String[] args){
try {
int score;System.out.print("Enter aptitude test score: ");// getInteger may throw IOException or NumberFomatExceptionscore = TestException.getInteger();if (score >= 50)
{ System.out.println("You have a place on the course!");
} else
{ System.out.println("Sorry, you failed your test");
} }
// if something does goes wrong!catch (NumberFormatException e)
{ System.out.println("You entered an invalid number!");
} catch (IOException e)
{ System.out.println(e); // calls toString method
} // even if no exception thrown/caught, this line will be executedSystem.out.println("Goodbye");
} }
402 14 Exceptions

Notice that by catching an offending exception object there is no need to passthat object out of the method by raising that exception in the method header. Sincewe catch the IOException here, the throws IOException clause can beremoved from the header of main. In this program we have chosen to print out anerror message if an IOException is raised (by implicitly calling the toStringmethod), whereas we have chosen to print our own message if a NumberFor-matException is raised. Now look at a sample test run of the program:
Enter aptitude test score: 12wYou entered an invalid number!Goodbye
As you can see the user once again entered an invalid integer, but this time theprogram did not terminate. Instead the exception was handled with a clear messageto the user, after which the program continued to operate normally.
14.4 The ‘finally’ Clause
From the previous sections you can see that three courses of action may now takeplace in a try block:
1. the instructions within the try block are all executed successfully;2. an exception occurs within the try block; the try block is exited and a
matching catch block is found for this exception;3. an exception occurs within the try block; the try block is exited but no
matching catch block is found for this exception, so the exception is thrownfrom the method.
It may be the case that, no matter which of these courses of action take place,you wish to execute some additional instructions before the method terminates.Often such a scenario arises when you wish to carry out some clean-up code, suchas closing a file or a network connection that you have opened in the try block.We will see some examples of these scenarios in later chapters. The finally clauseallows us to do this. The syntax for the finally clause is as follows:
try{
// code that could generate an exception} catch (Exception e) /* if one or more 'catch' clauses are specified,
they must be given before the 'finally' clause */{
// action to be taken when an exception occurs} finally{
// cleanup code can go here}
// other instructions could be placed here
14.3 Handling Exceptions 403

Notice that when catch clauses are specified, the finally clause must comedirectly after such clauses. If no such catch clauses are specified, the finallyclause must follow directly after the try clause. Now, when the code in the tryblock is executed the following three courses of action can take place:
1. the instructions within the try block are all executed successfully; if there areany catch blocks specified they are skipped and the code in the finally blockis executed, followed by any code after the finally block;
2. an exception occurs within the try block; the try block is exited and amatching catch block is found for this exception, after which the code in thefinally block is executed, followed by any code after the finally block;
3. an exception occurs within the try block; the try block is exited but nomatching catch block is found for this exception so the code in the finallyblock is executed—after which the method terminates and the appropriateexception is thrown by the given method.
We will use a very simple example of closing a Scanner resource as a way todemonstrate how the finally clause works under the three scenarios outlined above.
We have seen many examples of creating Scanner objects. Scanner objectspoint to a resource, in our case this resource has been the keyboard (System.in).We would not ordinarily close this resource as this would be closed automaticallyonce the program terminates, but in the ClosingAResourceUsingFinallyprogram below we will close it explicitly in a finally clause. Take a look at thecode and then we will discuss it.
ClosingAResourceUsingFinallyimport java.util.Scanner;
public class ClosingAResourceUsingFinally{
public static void main(String[] args){
Scanner keyboard = new Scanner (System.in); // open a Scanner resourcetry
{ System.out.println("START TRY");String[] colours = {"RED","BLUE","GREEN"}; // initialise arraySystem.out.print("Which colour? (1,2,3): ");String pos = keyboard.next(); // next line could throw NumberFormatExceptionint i = Integer.parseInt(pos);// next line could throw ArrayIndexOutOfBoundsExceptionSystem.out.println(colours[i-1]);System.out.println("END TRY");
} // include a catch only for ArrayIndexOutOfBoundsExceptioncatch(ArrayIndexOutOfBoundsException e)
{ System.out.println("ENTER CATCH ");System.out.println(e);
}// this block will always be executedfinally
{ System.out.println("ENTER FINALLY");keyboard.close(); // Scanner resource closedSystem.out.println("Scanner CLOSED");
} System.out.println("Goodbye");
} }
404 14 Exceptions

Most of this code should be self-explanatory. Notice that we have provided acatch block for the ArrayIndexOutOfBoundsException but we have notprovided a catch block for the NumberFormatException, so such anexception would be thrown from main should it arise. Also, notice that we dis-played messages to indicate when we are in each of the try, catch and finallyblocks. Finally, notice how we close a Scanner resource, in the finally block ofcode, by calling the Scanner object’s close method:
Here is one test run:
START TRYWhich colour? (1,2,3): 2BLUEEND TRYENTER FINALLYScanner CLOSEDGoodbye
Here the user enters a valid colour number, so the try block completes suc-cessfully. The catch block is skipped and the finally block is executed, whichcloses the Scanner resource. Following the finally block the last “Goodbye”instruction is executed.
Here is another test run:
START TRYWhich colour? (1,2,3): 4ENTER CATCHjava.lang.ArrayIndexOutOfBoundsException: 3ENTER FINALLYScanner CLOSEDGoodbye
Here the user enters an invalid colour number, the try block does not completeas an ArrayIndexOutOfBoundsException is thrown. A matching catchblock is found for this exception and executed. Upon completion of this catchblock the program continues with the code in the finally block, which closes theScanner resource. Following the finally block the last “Goodbye” instruction isexecuted.
// this block will always be executedfinally{
System.out.println("ENTER FINALLY");keyboard.close(); // Scanner resource closedSystem.out.println("Scanner CLOSED");
}
14.4 The ‘finally’ Clause 405

Here is the last test run:
START TRYWhich colour? (1,2,3): 2cENTER FINALLYScanner CLOSEDException in thread “main” java.lang.NumberFormatException:For input string: “2c”at java.lang.NumberFormatException.forInputString(NumberFormatException.java:48)at java.lang.Integer.parseInt(Integer.java:456)at java.lang.Integer.parseInt(Integer.java:497)atClosingAResourceUsingFinally.main(ClosingAResourceUsingFinally.java:11)
In this case, the user entered an invalid number causing a NumberFor-matException—so the try block did not complete successfully. However,there is no catch block provided for this exception. Without a finallyclause this would have led to program termination immediately as the exceptionescapes from main. We have a finally clause, however, which closes theScanner resource. The program then terminates with the offending exception(NumberFormatException).
These three test runs match the three scenarios we identified for the try/catch/finally blocks earlier. You will notice from the three test runs above that, if theinstructions inside the finally clause were written as normal below the catchclause (without putting them into a finally block), the first two test runs wouldhave produced exactly the same result. This is because code following a catchblock is always executed if no exception is thrown, or if an exception is thrown anda matching catch clause is found and executed. Only in scenario three, when anexception is thrown and no matching catch is found (perhaps because no catchclauses were specified), does the finally clause really make a difference to pro-gram flow.
You may well come across the third scenario when developing your programs,and we shall see examples in later chapters, so the finally clause could be used herefor clean-up code. Using the finally clause in scenarios one and two is optional.
14.5 The ‘Try-with-Resources’ Construct
In the previous section we saw how a finally clause can be used to close a resourcebefore exiting a program. In the test runs ofClosingAResourceUsingFinallywe saw that, once the finally code is executed, any uncaught exception is reported
406 14 Exceptions

(NumberFormatException in the test runs of Sect. 14.4). However, you shouldnote that if the code in thefinally clause itself throws an exception it is this exceptionthat is thrown from the method rather than the original offending exception. Theclose method of Scanner, for example, would itself throw an IOException ifthe systemwas unable to close the Scanner resource. This is not ideal as the originalexception is probably more appropriate to report.
One of the more recent developments in Java allows for us to avoid writing fi-nally clauses to close a resource, but instead adapt the try clause for this purpose.This is known as try-with-resources. The try-with-resources clause automaticallycloses a specified resource (or resources) for us and suppresses any exceptions thatmight arise from doing so, leaving any original uncaught exceptions free to bereported. The program below re-writes theClosingAResourceUsingFinallyprogram to make use of this try-with-resources clause. Take a look at it and then wewill discuss it.
You can see that, when using a try-with-resources clause, we include theresource declaration (in this case the creation of a Scanner object) in roundbrackets straight after the try keyword:
ClosingAResourceUsingTryWithResourcesimport java.util.Scanner;
public class ClosingAResourceUsingTryWithResources{
public static void main(String[] args) {
try (Scanner keyboard = new Scanner (System.in)) // open a Scanner resource here {
System.out.println("START TRY");String[] colours = {"RED","BLUE","GREEN"}; // initialise arraySystem.out.print("Which colour? (1,2,3): ");String pos = keyboard.next(); // next line could throw NumberFormatExceptionint i = Integer.parseInt(pos);// next line could throw ArrayIndexOutOfBoundsExceptionSystem.out.println(colours[i-1]);System.out.println("END TRY");
} // include a catch only for ArrayIndexOutOfBoundsExceptioncatch(ArrayIndexOutOfBoundsException e)
{ System.out.println("ENTER CATCH ");System.out.println(e);
} // we have removed the finally clauseSystem.out.println("Goodbye");
} }
try (Scanner keyboard = new Scanner (System.in)) // Scanner resource created in brackets{
// previous code as before}
14.5 The ‘Try-with-Resources’ Construct 407

This Scanner resource is now treated as an object whose scope is thetry block.
If code in the try block completes, with no exception occurring, the givenresource (our Scanner object keyboard in this case) is automatically closed. Ifan exception does occur during the try block, the given resource is still auto-matically closed, whether or not that exception is caught. Unlike a finally block,however, if an exception is thrown from the try block but not caught and anexception is then also thrown by the close method of the given resource, theexception thrown by the close method is suppressed and the original uncaughtexception from the try block is reported.
So, in the example above, if a NumberFormatException occurs that has nocatch block and closing the Scanner resource also throws an IOException,the IOException is suppressed and the NumberFormatException isthrown.
Note, we can create any object (or objects) within the try-with-resourcesbracket as long its type is a class that implements the Closeable (or Auto-Closeable) interfaces. Classes that implement these interfaces all include aclose method. Scanner is one example of such a class. We will see furtherexamples Chap. 18 when we study file-handling.
14.6 Null-Pointer Exceptions
One of the most common exception types you will come across when programmingis the dreaded NullPointerException. This is an example of an uncheckedRuntimeException and is a very common cause of program errors. It occurswhen we try to call the method of an object, but the object itself contains a nullvalue rather than valid object data. As a very simple example, consider thefollowing instructions that make use of our BankAccount class of Chap. 8:
Here the BankAccount object reference, acc1, is set to the null value. Weshould not call any methods on this object as it is not yet referencing a validBankAccount object. However, we have then made an attempt to call thegetAccountNumber method on this object reference and, consequently, theprogram will throw a NullPointerException.
While we are unlikely to make such obvious errors as the one demonstratedabove, null values can find their way into your programs in very subtle ways andNullPointerExceptions can then easily arise.
BankAccount acc1 = null; // BankAccount reference set to nullSystem.out.println(acc1.getAccountName()); // ‘getAccountName’ will cause a NullPointerException
408 14 Exceptions

Think back to the Bank collection class of Sect. 8.8.1, for storing a collection ofBankAccount objects. Here is a reminder of its getItem method that retrieves aBankAccount object given its account number.
You can see that, if the given account number exists in the list, the associatedBankAccount object is returned:
If, however, if no such account exists a null value is returned to indicate this:
Now consider the following simple program that adds two BankAccountobjects to the Bank collection class and then asks the user to enter an accountnumber to search for:
// returns the account assciated with a particular account numberpublic BankAccount getItem(String accountNumberIn){
int index = search(accountNumberIn);if(index != -999) // check that account exists{
return list.get(index); // return valid BankAccount object} else{
return null; // no such account so return null value}
}
if(index != -999) // check that account exists{
return list.get(index); // return valid BankAccount object}
389
else{
return null; // no such account so return null value}
NullPointerDemopublic class NullPointerDemo{
public static void main(String[] args) {
// create Bank collectionBank myBank = new Bank();// add two BankAccount objectsmyBank.addAccount("001", "Aaron");myBank.addAccount("002", "Quentin");// request user for account numberSystem.out.print("Enter account number to search for: ");String account = EasyScanner.nextString(); // we are using our EasyScanner class here// retrieve account name accociated with this account number// this may throw a NullPointerException!System.out.println(myBank.getItem(account).getAccountName());
} }
14.6 Null-Pointer Exceptions 409

Here is a sample program where the user enters a valid account number tosearch for:
Enter account number to search for: 001Aaron
Once a valid account number is entered, “001” in this case, the appropriateaccount name (“Aaron”) is displayed.
Here is a sample program run with an invalid account number entered:
As you can see, in this case, having entered an invalid account number (“003”) aNullPointerException is thrown. Here is the offending instruction:
The problem here is that, as we have seen, the getItem method (highlighted inbold) does not return a valid BankAccount object but, instead, a null valuewhen the given account number is not present in the list. Consequently, the attemptto get the account number via the getAccountNumber fails with aNullPointerException then thrown.
Of course, we can avoid this error by using an if statement to check for a nullvalue and only call thegetAccoutNumbermethod if we do not have anull value:
While this would work, unfortunately very often these if checks are notincluded and potential NullPointerExceptions can remain. To deal with thisproblem, Java has recently introduced the Optional class to better deal with suchNullPointerExceptions.
14.7 The Optional Class
The Optional class is essentially a wrapper class that can contain the value of agiven type, or it can contain null. The best way to see how this Optional classworks is to use it in an example, so let’s re-write the getItem method in ourBank collection class to make use of this new class.
Enter account number to search for: 003Exception in thread "main" java.lang.NullPointerException
at NullPointerDemo.main(NullPointerDemo.java:15)
System.out.println(myBank.getItem(account).getAccountName());
if (myBank.getItem(account) != null) // add a check for non-null value{
System.out.println(myBank.getItem(account).getAccountName()); // safe to call method}
410 14 Exceptions

Firstly, the Optional class resides in the util folder, so we will need thefollowing import statement at the top of our Bank class:
Now, here is the new getItem method; take a look at it and then we willdiscuss it:
Firstly, you can see that the return type is no longer just BankAccount, but anOptional value that could contain a BankAccount—the generics mechanismis used to fix the contained type:
We should point out here that changing the getItem method in this way wouldmean that we would also have to change the deposit and withdraw methods,both of which call getItem; we do this by using the get method of Optional,as explained below.
The Optional return type makes it clear to anyone using this class that thevalue being returned could contain a BankAccount or it could contain null,whereas a return type of BankAccount would not have made this clear.
Now, when we wish to return a BankAccount object we wrap it up inside anOptional value using the Optional class method of as follows:
import java.util.Optional;
public class Bank{
// code for Bank class goes here}
//note the Optional return typepublic Optional<BankAccount> getItem(String accountNumberIn){
int index = search(accountNumberIn);if(index != -999) // check that account exists{
return Optional.of(list.get(index)); // send valid Optional value} else{
return Optional.empty(); // send empty(null) Optional value}
}
// Optional return type may contain a BankkAccount or nullpublic Optional<BankAccount> getItem(String accountNumberIn){
// code for getItem here}
if(index != -999) // check that account exists{
return Optional.of(list.get(index)); // send valid Optional value}
14.7 The Optional Class 411

To indicate no BankAccount object can be found we wrap up a null valueinside an Optional value using the Optional class method empty as follows:
Programmers are no longer able to treat the returned value as a BankAccountobject. It is now an object of type Optional<BankAccount>. So, for example,the following instruction from our NullPointerDemo program will no longercompile:
Since getItem now returns an Optional<BankAccount> object we areno longer able to call a BankAccount method such as getAccountNumber,and attempting to do so raises a compiler error.
So how do we avoid this compiler error? One approach would be to check if avalid value has been returned. We can use the isPresent method of theOptional class, that returns true if a valid object is returned and falseotherwise, on the object returned:
Now can retrieve the BankAccount object before we call the getAccount-Name method. We can use the get method of the Optional class to do this:
There is also another method we can use called ifPresent. This receives anobject of the functional interface Consumer, which you came across in Chap. 13.It is one of the “out-of-the-box” interfaces and was described in Table 13.1. Itsabstract method, accept, receives a single parameter (of whatever type is chosenfor the generic interface) and its return type is void. We can therefore callifPresent with a lambda expression. Below, we have re-written theNullPointerDemo program using this syntax; take a look at it and then we willdiscuss it:
else{
return Optional.empty(); // send empty(null) Optional value}
System.out.println(myBank.getItem(account).getAccountName()); //compiler error
if (myBank.getItem(account).isPresent()){
// code to retrieve valid object here }
if (myBank.getItem(account).isPresent()){
// notice use of ‘get’ method to retrieve the BankAccount object inside OptionalSystem.out.println(myBank.getItem(account).get().getAccountName());
}
412 14 Exceptions

You can see that we have retrieved a BankAccount using the new version ofgetItem, and it will therefore be of type Optional<BankAccount>. We thencall the ifPresent method of Optional with the correct lambda expression forthe abstract method of the Consumer interface. The input to this method (which wehave called value) is the item held in the Optional object, which will be either aBankAccount or a null value. The ifPresent method executes the lambdaexpression only if the item held is a valid object—if it is not, it does nothing.
Thus, the program displays the account name if a valid object was retrieved,otherwise nothing is displayed.
You can see how the Optional type alerts programmers that the null valuemight be returned and ensures they unpack this value before proceeding, thusavoiding NullPointerExceptions. It also provides a variety of methods that,potentially, avoid the need for null value if checks in your code. There are avariety of other methods contained in the Optional class, which you can look upon the Oracle™ site.
14.8 Exceptions in GUI Applications
In Sect. 14.4 we showed you how the parseInt method could potentially resultin a NumberFormatException being thrown. If this were not handled at somepoint, the exception object would escape out of your program and cause the pro-gram to terminate.
However, this isn’t the first time that you used the parseIntmethod. You oftenhad to use it when implementing your JavaFX GUI applications. In such applicationsall user input would normally be retrieved as strings, and then converted to numbersby calling methods such as parseInt method and parseDouble.
NullPointerDemoWithOptionalpublic class NullPointerDemoWithOptional{
public static void main(String[] args){
// create Bank collectionBank myBank = new Bank(); // version with new getItem method// add two BankAccount objectsmyBank.addAccount("001", "Aaron");myBank.addAccount("002", "Quentin");
// request user for account numberSystem.out.print("Enter account number to search for: ");String account = EasyScanner.nextString(); // we are using our EasyScanner class here
// retrieve account name accociated with this account number using lambda, and display resultmyBank.getItem(account).ifPresent(value -> System.out.println(value.getAccountName()));
} }
myBank.getItem(account).ifPresent(value -> System.out.println(value.getAccountName()));
14.7 The Optional Class 413

At the time, you never considered handling these exceptions, and your appli-cations never seemed to terminate as a result of invalid data entry. For example, doyou remember the Hostel case study of Chaps. 11 and 12? Figure 14.4 illustratesa sample screen shot when a user enters an invalid room number.
When such an event occurred within your JavaFX application, the applicationseemed to continue operating regardless. After our discussion on exceptions thismight seem surprising as the text entered is being processed by a parseIntmethod. To remind you, here is a fragment from the addHandler method:
room number should be a whole number
Fig. 14.4 A sample screen shot from the ‘Hostel’ case study illustrating an invalid room numberhaving been entered
private void addHandler(){
String roomEntered = roomField1.getText(); // code to read room numberString nameEntered = nameField.getText();
// previous additional code here
// code to check room number, parseInt could cause an exception!if(Integer.parseInt(roomEntered)< 1 || Integer.parseInt(roomEntered)>noOfRooms){
displayArea1.setText ("There are only " + noOfRooms + " rooms");}
// code to addTenant here}
414 14 Exceptions

In fact, when an invalid number is entered as illustrated in Fig. 14.4, a Num-berFormatException occurs—but:
• you will not see details of the exception in your graphics screen since they willalways be displayed in the output window of your IDE, or, if you are runningyour program from the command line, on the black console window (which maybe hidden during the running of your application);
• exceptions do not terminate JavaFX applications; however, they may make thembehave unpredictably.
So, if you look at the console screen or output window, you will see a list ofexceptions that have been thrown during the running of your JavaFX applications—you may be surprised to see how many are actually thrown when you thought yourprogram was operating correctly.
Often, graphical programs will continue to operate normally in the face ofexceptions. To ensure this is the case you should still add exception handling codeinto your JavaFX applications. For example, we could amend the event-handlerabove as follows:
invalid room number error message displayed
Fig. 14.5 Exceptions can still be dealt with in JavaFX applications
14.8 Exceptions in GUI Applications 415

Now if we run the application again, with the same input as depicted inFig. 14.4, we get the response given in Fig. 14.5.
14.9 Using Exceptions in Your Own Classes
So far we have mainly been dealing with how to handle predefined exceptions (assummarised in Fig. 14.1) that are automatically thrown by your Java programs,such a NullPointerException being thrown when calling a method of anull value.
Sometimes, however we wish to generate an error under circumstances whenJava would not ordinarily raise an error. For example, think back to the Pay-mentList collection class from the case study in Chap. 11. Here is an outline ofthat class:
Here we have an ArrayList to hold the payments and a MAX value to recordthe maximum number of payments. There are no Java exceptions we need to beconcerned about here. But take a look at the code for the constructor. Can you see apotential problem here?
We are setting the value of MAX and this value is sent as an integer. We wouldwant this number to be a positive number, but integers in Java can be positive ornegative or zero. If a negative or zero value is sent, Java will still allow us to set
private void addHandler(){
try // place previous code in try block {
// previous add handler code here }
catch (NumberFormatException e) // catch exception and diplay error message on GUI{
displayArea1.setText("Invalid room number" + e.getMessage()+ "\nEnter whole numbers only!");
}}
import java.util.ArrayList;
public class PaymentList{
private ArrayList<Payment> pList;public final int MAX;
/** Constructor initialises the empty payment list and sets the maximum list size * @param maxIn The maximum number of payments in the list*/
public PaymentList(int maxIn){
pList = new ArrayList<>();MAX = maxIn;
}
// remaining methods go here
416 14 Exceptions

MAX to this value but doing so would create knock on logical problems in ourprogram code.
Ideally, we should avoid setting MAX to a value that is less than 1, and wouldinstead wish to report an error. We could try and use an if else statement tocheck the parameter, maxIn, and then try and report an error if need be:
How would we report back this error? One way, which we have used before,would be to return a boolean value of false to indicate failure. A generalproblem with reporting errors using boolean values is that these values can beignored. In this case we have another problem—constructors can have no returnvalue! The only way to report back errors from constructors is to throw exceptions.
14.9.1 Throwing Exceptions
We have seen circumstances where our programs automatically throw exceptions,but we have not seen examples of where we throw our own exceptions. Let’s take alook at the syntax to do this.
The first thing we need to decide is which exception to throw. We could makeuse of one of the pre-existing Java exception class. Since the error we wish to reportis a logical error we could try throwing a RuntimeException. In order to throwan exception object you must:
• write an instruction explicitly to throw the exception using a throw command;• combine this with the new command to generate an object of the appropriate
exception type by calling the given exception class’s constructor.
Below is a modified PaymentList constructor that throws aRuntimeException:
public PaymentList(int maxIn){
pList = new ArrayList<>();if (maxIn < 1) // check if parameter is not positive
{ // report error
} else
{ MAX = maxIn; // ok to set MAX
} }
public PaymentList(int maxIn){
pList = new ArrayList<>();if (maxIn < 1)
{ throw new RuntimeException( ); // force a RuntimeException to be thrown
} else
{ MAX = maxIn;
} }
14.9 Using Exceptions in Your Own Classes 417

Notice this version of the RuntimeException constructor requires noparameters:
Every Java exception class is provided with an alternative version of the con-structor that can receive a String parameter, often used to bundle informationregarding the error within the exception object.
Let’s use this alternative version of the RuntimeException constructor toprovide some useful error information:
Now let’s look at a program that makes use of this modified PaymenListconstructor, catches the RuntimeException if it is thrown and displays thisexception object (containing our error message).
First, a normal test run:
Enter size of list: 5END OF DEMO
throw new RuntimeException( ); // no parameters required here
public PaymentList(int maxIn){
pList = new ArrayList<>();if (maxIn < 1)
{ throw new RuntimeException("invalid list size set " + maxIn ); // send error info
} else
{ MAX = maxIn;
} }
RuntimeExceptionDemo
public class RuntimeExceptionDemo {
public static void main(String[] args) {
try{
System.out.print("Enter size of list: ");int size = EasyScanner.nextInt(); // we are using our EasyScanner herePaymentList p = new PaymentList(size); // can now throw RuntimeException
} catch(RuntimeException e) // catch exception from PaymentList constructor{
System.out.println(e); // display exception object} System.out.println("END OF DEMO");
} }
418 14 Exceptions

Now a test run with an invalid list size:
Enter size of list: 0java.lang.RuntimeException: invalid list size set 0END OF DEMO
Here you can see an illegal list size of zero triggers the RuntimeExceptionand displaying this exception object reveals our error information.
In the example above we had an error that made sense to our program, avoidingusing a non-positive value when setting the maximum size of our list, but we haveco-opted an existing exception name to report this error (RuntimeException).
Using a pre-existing exception type name (such as RuntimeException) toreport your own program-specific errors has a few problems. Firstly, a clause to catchthis exception will also catch any other exception of the given type. However, youmight want very different error handling code for your program specific errors.Secondly, the name of the exception type is not a good description of yourspecific error. It would be better if we could invent a new name (or names) foryour program-specific errors. For example, if you were developing a game wherepieces moved on a board you might want to have an exception calledInvalidMoveException rather than use a generic name such asRuntimeException.
Luckily, it is very simple to create your own exception classes with names ofyour choice.
14.9.2 Creating Your Own Exception Classes
You can create your own exception class by inheriting from any predefinedexception class. Generally speaking, if you wish your exception class to beunchecked then it should inherit from RuntimeException (or one of its sub-classes), whereas if you wish your exception to be checked you can inherit from thegeneral Exception class.
In the case of the PaymentList class we wish to make the exception thrown bythe constructor unchecked, as it is a logical error not an input/output error. So we willdefine our exception class by inheriting from the RuntimeException class. Wewill call this new exception class HostelException so it can be used throughoutour Hostel application if need be. Look at the code first and then we will discuss it.
HostelExceptionpublic class HostelException extends RuntimeException{
public HostelException () // constructor without parameter {
super("error in Hostel application"); }
public HostelException (String message)// constructor with parameter {
super (message); } }
14.9 Using Exceptions in Your Own Classes 419

As well as inheriting from some exception class, user-defined exception classesshould have two constructors defined within them. One should take no parametersand simply call the constructor of the superclass with a default message of yourchoosing:
The other constructor should allow a user-defined message to be supplied withthe exception object:
The PaymentList constructor can now be modified to make use of thisHostelException class as follows:
Finally, we can amend the tester so that the new HostelException is caught:
public HostelException () // constructor without parameter{
super("error in Hostel application"); // default error info}
public HostelException (String message)// constructor with parameter{
super (message); // user defined message can be provided}
public PaymentList(int maxIn){
pList = new ArrayList<>();if (maxIn < 1)
{ throw new HostelException("invalid list size set " + maxIn ); // user-defined error
} else
{ MAX = maxIn;
} }
HostelExceptionDemo
public class HostelExceptionDemo {
public static void main(String[] args) {
try{
System.out.print("Enter size of list: ");int size = EasyScanner.nextInt();PaymentList p = new PaymentList(size); // can now throw HostelException
} catch(HostelException e) // catch exception from PaymentList constructor{
System.out.println(e); // display exception object} catch (Exception e) // note general catch clause added{
System.out.println("Some unforseen error"); e.printStackTrace();
} System.out.println("END OF DEMO");
} }
420 14 Exceptions

Notice how we added a general catch clause to catch any exceptions that wemight not yet have considered. In this catch clause we have printed the stack tracein this error-handler to determine the exact cause of this unexpected error:
During testing this is always a good strategy. However, you need to ensure thatthe general catch clause is the last catch clause you specify. For example,something like the following will not compile:
The above will not compile as the first general catch clause (catchException) will catch all exception types (including HostelException). So,any catch clauses below (such as catch HostelException) will never bereached. To write unreachable code in Java causes a compiler error.
14.10 Documenting Exceptions
We finish off this chapter by looking at how to document methods that may throwexceptions, using the Javadoc style of comments discussed in Chap. 11. The@throws tag should be used to document the name of any exceptions that may bethrown by a method. Here for example, is the PaymentList constructor, docu-mented with Javadoc comments:
catch (Exception e) // catches all uncaught errors{
System.out.println("Some unforseen error"); e.printStackTrace();
}
try{
// some code here} catch (Exception e) // catches all uncaught errors{
// some code here} catch (HostelException e) // will not compile!{
// some code here}
/** Constructor initialises the empty payment list and sets the maximum list size * @param maxIn The maximum number of payments in the list* @throws HostelException If the list is sized with a non-positive value*/public PaymentList(int maxIn){
pList = new ArrayList<>();if (maxIn < 1){
throw new HostelException("invalid list size set " + maxIn);}MAX = maxIn;
}
14.9 Using Exceptions in Your Own Classes 421

Generally speaking, when documenting methods in this way, it is good practiceto document all exceptions that a method may throw. Multiple @throws tags canbe used to list multiple exceptions.
14.11 Self-test Questions
1. What is an exception?
2. Distinguish between checked and unchecked exceptions and then identify whichof the following exceptions are checked, and which are unchecked:
• FileNotFoundException;
• NegativeArraySizeException;
• NullPointerException;
• NumberFormatException;
• IOException;
• Exception;
• ArrayIndexOutOfBoundsException;
• RuntimeException.
3. Explain the following terms:
(a) claiming an exception;
(b) throwing an exception;
(c) catching an exception.
4. Look at the program below and then answer the questions that follow:
public class ExceptionsQ4 {
public static void main(String[] args){
int[] someArray = {12,9,3,11};int position = getPosition();display (someArray, position);System.out.println("End of program" );
}
static int getPosition(){
System.out.println("Enter array position to display");String positionEntered = EasyScanner.nextString(); // requires EasyScanner classreturn Integer.parseInt(positionEntered);
}
static void display (int[] arrayIn, int posIn){
System.out.println("Item at this position is: " + arrayIn[posIn]);}
}
422 14 Exceptions

(a) Will this result in any compiler errors?
(b) Which methods could throw exceptions?
(c) Identify the names of the exceptions that could be thrown and the cir-cumstances under which they could be thrown.
5. What is the purpose of a finally clause?
6. When would you use the try-with-resources construct?
7. Consider once again the PaymentList class of Chap. 11. In particular here isa reminder of its getItem method that returns a particular payment given aposition in the list:
(a) Explain the purpose of the Optional class.
(b) Re-write the getPayment method using an Optional class.
8. When would it be appropriate to define your own exception class?
14.12 Programming Exercises
1. Implement the program given in self-test question 4 above. Now:
(a) Re-write main so that it catches any exceptions it may now throw bydisplaying a message on the screen indicating the exception thrown.
(b) At the moment, the “End of program” message may not always be executed.Add an appropriate finally clause so that this message is always executedat the end of the program.
(c) Add an additional catch clause in main to catch any unaccounted-forexceptions (within this catch clause print out the stack trace of the exception).
(d) Create your own exception class InvalidPositionException (makethis an unchecked exception).
/** Reads the payment at the given position in the list* @param positionIn The logical position of the payment in the list * @return Returns the payment at the given logical position in the list* or null if no payment at that logical position*/public Payment getPayment(int positionIn){
//check for valid logical positionif (positionIn <1 || positionIn > getTotal()){
// no object found at given positionreturn null;
}else{
// take one off logical position to get ArrayList positionreturn pList.get(positionIn - 1);
}}
14.11 Self-test Questions 423

(e) Re-write the display method so that it throws theInvalidPositionException.
(f) Re-write main to take account of this amended display method.
(g) Document these exceptions using appropriate Javadoc comments.
2. The Scanner class has methods nextInt and nextDouble for reading anint and a double value from the keyboard respectively. Both of thesemethods throw an exception if an appropriate numerical value is not entered.
(a) Write a tester program to find out the name of this exception.
(b) Develop a new version of the EasyScanner class, say EasyScan-nerPlus, so that instead of throwing exceptions the methods nextInt andnextDouble repeatedlydisplay anerrormessage and allow for data re-entry.
(c) Write a tester program to test out the methods of your EasyScan-nerPlus class.
3. Look back at the time table application that you developed in programmingExercise 8 of Chap. 8. Here is a reminder of the original design for theTimeTable class:
As you can see several methods return boolean values. Some of theseboolean values were sent to indicate errors. Now modify this class to makeuse of exceptions as follows:
(a) Develop a TimeTableException class (make this an uncheckedexception).
(b) Modify the TimeTable class so that the constructor, and the methodsmakeBooking, and cancelBooking all throw a TimeTableExcep-tion if an error occurs (this would mean that the methods makeBookingand cancelBooking no longer need to return boolean values).
TimeTable
-times: Booking[][]
+TimeTable(int, int)+makeBooking(int, int, Booking) : boolean+cancelBooking(int, int) : boolean+isFree(int, int) : boolean+getBooking(int, int) : Booking+numberOfDays() : int+numberOfPeriods() : int
424 14 Exceptions

(c) The getBooking method currently returns null if either the given day orperiod number passed as parameters are invalid. Re-write this method toreturn an Optional value instead.
(d) Modify the tester that you developed for the time table application to takeaccount of the exceptions and Optional value you incorporated in parts(b) and (c) above.
4. Look back at the Hostel case study of Chaps. 11 and 12 and make use ofexceptions and Optional types where appropriate. Amend the Javadocdocumentation for this application to include information on any exceptions youmay have included.
14.12 Programming Exercises 425
15The Java Collections Framework
Outcomes:
By the end of this chapter you should be able to:
• use the ArrayList class to store a list of objects;• use the HashSet class to store a set of objects;• use the HashMap class to store objects in a map;• use the enhanced for loop and a forEach loop to scan through a collection;• use an Iterator object to scan through a collection;• create objects of your own classes, and use them in conjunction with Java’scollection classes;
• sort elements in a collection using the Comparable<T> andComparator<T> interfaces.
15.1 Introduction
An array is a very useful type in Java but it has its restrictions:
• once an array is created it must be sized, and this size is fixed;• it contains no useful pre-defined methods.
Think back to the SomeUsefulArrayMethods program of Chap. 6. As thisprogram used an array to hold a collection of elements we had to put an upper limitto the size of this collection. Sometimes, however, an upper limit is not known. Justcreating a very big array is very wasteful of memory—and what happens if eventhis very big array proves to be too small? Another problem, as seen in ourSomeUsefulArrayMethods program, was that to carry out any interestingprocessing (like searching the array) required us to write complex algorithms.
© Springer Nature Switzerland AG 2019Q. Charatan and A. Kans, Java in Two Semesters, Texts in Computer Science,https://doi.org/10.1007/978-3-319-99420-8_15
427
One solution to this problem might be to develop our own collection class thathid the array from the user and contained the code to create a reasonable sized arrayand, when the array is full, copy this array into a slightly bigger array and use thisnew array and continue doing this every time the array gets full. This collectionclass could also include a large group of useful methods to process the array (suchas searching and deleting). In order to make this collection class as useful aspossible we could incorporate generics (that we met in Chap. 13) to allow thiscollection class to hold a collection of any type. This collection class could then beused in place of an array to hold and process a collection of objects.
Luckily we do not need to go to such lengths; the Java developers have alreadydone this for us. They have developed a group of generic collection classes thatgrow as more elements are added to them, and these classes provide lots of usefulmethods. This group of collection classes are referred to as the Java CollectionsFramework (JCF). These collection classes are organized around several collec-tion interfaces that define different types of collections that we might be interestedin using. Three important interfaces from this group are:
• List;• Set;• Map.
The List and Set interfaces are themselves specialised types of the superinterface named Collection, and so share many common methods, whereas theMap interface is distinct from Collection group of interfaces and so has severalmethods that are unique to it.
As well as providing a wide group of collection interfaces, the Java CollectionsFramework also contains many classes that implement these interfaces. In thischapter we will focus on the three key interfaces named above (List, Set andMap) and some of the classes provided in the JCF which implement these inter-faces. To find out about all the interfaces and classes in the JCF you can refer to theOracle™ site.
15.2 The List Interface and the ArrayList Class
The List interface specifies the methods required to process an ordered list ofobjects. Such a list may contain duplicates. Examples of a list of objects includejobs waiting for a printer, emergency calls waiting for an ambulance and the namesof players that have won the Wimbledon tennis tournament over the last 10 years.In each case ordering is important, and repetition may also be required. We oftenthink of such a collection as a sequence of objects.
428 15 The Java Collections Framework

There are two implementations provided for the List interface in the JCF. Theyare ArrayList, and LinkedList. We have already introduced you to theArrayList in the Bank application in Chap. 8, that stored a collection ofBankAccount objects, so let’s take a closer look at the ArrayList class now.
15.2.1 Creating an ArrayList Collection Object
All classes in the JCF are in the java.util package, so to use the ArrayListclass we require the following import statement:
import java.util.ArrayList;
Like all the classes in JCF the ArrayList class is a generic collection class.This means it can be used to store objects of any type.1 Let’s use an ArrayList tostore a queue of jobs waiting for a printer, and let us represent these jobs by a seriesof Job ID Strings. The ArrayList constructor creates an empty list:
// creates an ArrayList object -'printQ'ArrayList<String> printQ = new ArrayList<> ();
Notice the use of generics to set the type of objects stored in our list. In the caseof the printQ object, we want each element within this collection to be of typeString. As mentioned in Chap. 7, type inference means that we do not need toinclude the String type in the angle brackets in the call to the constructor on theright, as the type is inferred to be String in this case.
Of course, the generics mechanism can be used to fix any object type for theelements within a collection. In Chap. 8, for example, we used an ArrayList tostore a collection of BankAccount objects in our Bank class. As anotherexample, if you wished create a list of Oblong objects you could do so as follows:
// this will make 'someOblongs' a list of Oblong objectsArrayList<Oblong> someOblongs = new ArrayList<> ();
You should be aware that the type of any object created using this genericsmechanism is now the class name plus the contained type brackets. So, for example,if we were to write a method that received a list of strings, we would specify it asfollows:
1As we mentioned in Chap. 7, generic collections cannot store primitive types like int anddouble. If primitive types are required then objects of the appropriate wrapper class (Integer,Double and so on) must be used. However, as discussed in Chap. 9, autoboxing and unboxingautomate the process of moving from a primitive type to its associated wrapper.
15.2 The List Interface and the ArrayList Class 429

// this method receives an ArrayList<String> object public void someMethod (ArrayList<String> printQIn){
// some code here}
15.2.2 The Interface Type Versus the Implementation Type
In order to create the object printQ, we have used the ArrayList class toimplement the List interface. What if, at some point, we decide to change to theLinkedList implementation? Or some other implementation that might beavailable in the future? If we did this, then all references to the type of this object(such as in the method header of the previous section) would have to be modified togive the new class name.
There is an alternative approach. It is actually considered better programmingpractice to declare collection objects to be the type of the interface (List in thiscase) rather than the type of the class that implements this collection. So this wouldbe a better way to create our printQ object:
// the type is given as 'List' not 'ArrayList' List<String> printQ = new ArrayList<> ();
Notice that the interface type still needs to be marked as being a list of Stringobjects using the generics mechanism. A method that receives a printQ objectwould now be declared as follows:
// this method receives a List<String> object public void someMethod (List<String> printQIn){
// some code here}
The advantage of this approach is that we can change our choice of imple-mentation in the future (maybe by using LinkedList or some other class thatmight be available that implements the List interface), without having to changethe type of the object (which will always remain as List). This is the approach thatwe will take.
Remember, all classes in the JCF reside in the util package, so to use theList interface in your code you now need to add an additional import statementas follows:
import java.util.ArrayList;import java.util.List;
Now, let us look at some List methods.
430 15 The Java Collections Framework

15.2.3 List Methods
The List interface defines two add methods for inserting into a list, one thatinserts the item at the end of the list and one that inserts the item at a specifiedposition in the list. Like arrays, ArrayList positions begin at zero. We wish touse the add method that adds items to the end of the list as we are modelling aqueue here. This add method requires one parameter, the object to be added intothe list:
printQ.add("myLetter.doc");printQ.add("myFoto.jpg");printQ.add("results.xls");printQ.add("chapter.doc");
Notice that, since we have marked this list as containing String objects only,an attempt to add an object of any other type will result in a compiler error:
// will not compile as 'printQ' can hold Strings only! printQ.add(new Oblong(10, 20));
All the Java collection types have a toString method defined, so we candisplay the entire list to the screen:
System.out.println(printQ); // implicitly calling the toString method
When the list is displayed, the values in the list are separated by commas andenclosed in square brackets. So this println instruction would display the fol-lowing list:
[myLetter.doc, myFoto.jpg, results.xls, chapter.doc]
As you can see, the items in the list are kept in the order in which they wereinserted using the add method above.
As we said earlier, the add method is overloaded to allow an item to be insertedinto the list at a particular position. When the item is inserted into that position, theitem previously at that particular position and all items behind it shuffle along byone place (that is they have their indices incremented by one). This add methodrequires two parameters, the position into which the object should be inserted, andthe object itself. For example, let’s insert a high priority job at the start of the queue:
printQ.add(0, "importantMemo.doc"); // inserts into front of the queue
15.2 The List Interface and the ArrayList Class 431

Notice that the index is provided first, then the object. The index must be a validindex within the current list or it may be the index of the back of the queue. Aninvalid index throws an unchecked IndexOutOfBoundsException.
Displaying this list confirms that the given job (“importantMemo.doc”) hasbeen added to the front of the queue, and all other items shuffled by one place:
[importantMemo.doc, myLetter.doc, myFoto.jpg, results.xls, chapter.doc]
If we wish to overwrite an item in the list, rather than insert a new item into thelist, we can use the set method. The set method requires two parameters, theindex of the item being overwritten and the new object to be inserted at thatposition. Let us change the name of the last job from “chapter.doc” to“newChapter.doc”. This is the fifth item in the list so its index is 4:
printQ.set(4, "newChapter.doc");
If the index used in the set method is invalid an IndexOutOf-BoundsException is thrown once again. Displaying the new list now gives usthe following:
[importantMemo.doc, myLetter.doc, myFoto.jpg, results.xls, newChapter.doc]
List provides a size method to return the number of items in the list, so wecould have renamed the last job in the queue in the following way also:
printQ.set(printQ.size()-1, "newChapter.doc"); // last position is size-1
The indexOf method returns the index of the first occurrence of a given objectwithin the list. It returns −1 if the object is not in the list. For example, thefollowing checks the index position of the job “myFoto.jpg” in the list:
int index = printQ.indexOf("myFoto.jpg"); // check index of job if (index != -1) // check object is in list{
System.out.println("myFoto.jpg is at index position: " + index); }else // when job is not in list{
System.out.println("myFoto.jpg not in list"); }
432 15 The Java Collections Framework

This would display the following from our list:
myFoto.jpg is at index position: 2
Items can be removed either by specifying an index or an object. When an itemis removed, items behind this item shuffle to the left (i.e. they have their indicesdecremented by one). As an example, let us remove the “myFoto.jpg” job. If weused its index, the following is required:
printQ.remove(2);
Once again, an IndexOutOfBoundsException would be thrown if thiswas not a valid index. This method returns the object that has been removed, whichcould be checked if necessary. Displaying the list would confirm the item hasindeed been removed:
[importantMemo.doc, myLetter.doc, results.xls, newChapter.doc]
Alternatively, we could have removed the item by referring to it directly ratherthan by its index2:
printQ.remove("myFoto.jpg");
This method returns a boolean value to confirm that the item was in the listinitially, which again could be checked if necessary.
Behind the scenes you can guess how this remove method works. It looks inthe list for the given String object (“myFoto.jpg”). It uses the equalsmethod of the String class to identify a match. Once it finds such a match itshuffles items along so there are no gaps in the list.
Of course, as we have already said, these collection classes can be used to storeobjects of any type—not just Strings. For methods like remove to workproperly, the contained object must have a properly defined equals method. Wewill return to this later in the chapter, when we look at how to use objects of ourown classes in conjunction with the classes in the JCF.
The get method allows a particular item to be retrieved from the list via itsindex position. The following displays the job at the head of the queue:
// the first item is at position 0System.out.println("First job is " + printQ.get(0));
2If there were more than one occurrence of the object, the first occurrence would be deleted.
15.2 The List Interface and the ArrayList Class 433

This would display the following:
First job is importantMemo.doc
The contains method can be used to check whether or not a particular item ispresent in the list:
if (printQ.contains("poem.doc")) // check if value is in list{
System.out.println("poem.doc is in the list"); }else{
System.out.println("poem.doc is not in the list"); }
Finally, the isEmpty method reports on whether or not the list contains anyitems:
if (printQ.isEmpty()) // returns true when list is empty{
System.out.println("Print queue is empty"); }else{
System.out.println("Print queue is not empty"); }
15.3 The Enhanced for Loop and Java Collections
In Chap. 6 we showed you how the enhanced for loop can be used to iteratethrough an entire array. The use of this loop is not restricted to arrays, it can also beused with the List (and Set) implementations provided in the JCF. For example,here an enhanced for loop is used to iterate through the printQ list to find anddisplay those jobs that end with a “.doc” extension:
for (String item: printQ) // iterate through all items in the 'printQ'list{
if(item.endsWith(".doc”)) // check extension of the job ID{
System.out.println(item); // display this item }
}
Notice that the type of each item in the printQ list is String. Within the loopwe use the String method endsWith to check if the given job ID ends withString “.doc”. Assuming we had the following printQ:
[importantMemo.doc, myLetter.doc, results.xls, newChapter.doc]
434 15 The Java Collections Framework

the enhanced for loop above would produce the following output:
importantMemo.docmyLetter.docnewChapter.doc
If we do not wish to iterate through the entire list, or if we wish to modify theitems within a list as we iterate through them, then (as we have said before) theenhanced for loop should not be used.
For example, if we wished to display the items in the printQ that are behindthe head of the queue, the enhanced for loop is not appropriate as we are notprocessing the entire printQ. Instead the following standard for loop could beused:
// remember second item in list is at index 1! for (int pos = 1; pos < printQ.size(); pos++) {
System.out.println(printQ.get(pos)); // retrieve item in printQ}
Notice how the size method is used to determine the last index in the loopheader. Within the loop, the get method is used to look up an item at the givenindex.
Again, if we assume we have the following printQ:
[importantMemo.doc, myLetter.doc, results.xls, newChapter.doc]
the for loop above would produce the following output:
myLetter.docresults.xlsnewChapter.doc
15.4 The forEach Loop
There is a very similar loop to the enhanced for loop known as the forEachloop. The forEach loop makes use of the forEach method, which its to befound in classes implementing the Collection interface (such as lists and sets).The forEach method requires an implementation of a Consumer interface,which can be provided via a lambda expression. Table 15.1 provides a reminder ofthe Consumer interface that we discussed in Chap. 13.
15.3 The Enhanced for Loop and Java Collections 435

This implementation is then applied to each element in the underlying collection.For example, lets revisit the code in Sect. 15.3 for searching through our printQlist to display document names that end with “.doc”. This time we will use a lambdaexpression and a forEach loop:
// using a forEach loop to iterate through a listprintQ.forEach(item ->
{if(item.endsWith(".doc")) // check extension of the job ID{
System.out.println(item); // display this item}
});
As you can see, we use a forEach loop by calling the forEach method onthe list object printQ. The parameter to the lambda expression is a name we giveto one value from this collection, item in this case, and to the right of the lambdaarrow we define how we process this value (using the same code we used inSect. 15.3). The forEach loop will retrieve all the items within the collection tobe processed in this way. You should note that, as with the enhanced for loop, theforEach loop should not be used to modify the underlying collection.
We will see further examples of the use of this forEach loop in this chapter.However, the forEach loop is primarily designed to be used with streams, amechanism for processing Java collections that we will cover in Chap. 22.
15.5 The Set Interface and the HashSet Class
Like List, the Set interface is a specialised version of the general Collectioninterface. The Set interface defines the methods required to process a collection ofobjects in which there is no repetition, and ordering is unimportant. Let’s considerthe following collections and consider if they are suitable for a set:
• a queue of people waiting to see a doctor;• a list of number-one records for each of the 52 weeks of a particular year;• car registration numbers allocated parking permits.
The queue of people waiting to see a doctor cannot be considered to be a set asordering is important here. Order may also be important when recording the list ofnumber-one records in a year. It would also be necessary to allow for repetition—asa record may be number-one for more than one week. So a set is not a good choice
Table 15.1 Reminder of the Consumer interface
Functional interface Abstract method name Parameter types Return type
Consumer<T> accept T void
436 15 The Java Collections Framework

for this collection. The collection of car registration numbers can be considered aset, however, as there will be no duplicates and ordering is unimportant.
Java provides three implementations of this Set interface: HashSet, Tree-Set and LinkedHashSet. Here we will look at the HashSet class. The con-structor creates an empty set. We will use the set to store a collection of vehicleregistration numbers (as Strings):
// creates an empty set of String objectsSet<String> regNums = new HashSet<>();
Again, notice that we have used the generics mechanism to indicate that this is aset of String objects, and we have given the type of this object as the interfaceSet<String>. Now let us look at some Set methods.
15.5.1 Set Methods
Once a set is created the methods specified in the Set interface can be used. Theadd method allows us to insert objects into the set, so let us add a few registrationnumbers:
regNums.add("V53PLS");regNums.add("X85ADZ");regNums.add("L22SBG");regNums.add("W79TRV");
We can display the entire set as follows:
System.out.println(regNums); // implicitly calling the toString method
The set is displayed in the same format as a list, in square brackets and separatedby commas:
[W79TRV, X85ADZ, V53PLS, L22SBG]
Notice that, unlike lists, the order in which the items are displayed is notdetermined by the order in which the items were added. Instead, the set is displayedin the order in which the items are stored internally (and over which we have nocontrol). This will not be a problem as ordering is unimportant in a set.
As with a list, the size method returns the number of items in the set:
System.out.println("Number of items in set: " + regNums.size() );
15.5 The Set Interface and the HashSet Class 437

This would print the following onto the screen:
Number of items in set: 4
If we try to add an item that is already in the set, the set remains unchanged. Letus assume the four items above have been added into the set and we now try andadd a registration number that is already in the set:
regNums.add("X85ADZ"); // this number is already in the setSystem.out.println(regNums);
When this set is displayed, “X85ADZ” appears only once:
[W79TRV, X85ADZ, V53PLS, L22SBG]
The add method returns a boolean value to indicate whether or not the givenitem was successfully added. This value can be checked if required.
boolean ok = regNums.add("X85ADZ"); // store boolean return valueif (!ok) //check if add method returned a value of false{
System.out.println("item already in the set!");}
The remove method deletes an item from the set if it is present. Again,assuming that the four items given above are in the set, we can delete one item asfollows:
regNums.remove("X85ADZ");
If we now display the set, the given registration will have been removed:
[W79TRV, V53PLS, L22SBG]
As with the add method, the remove method returns a boolean value offalse if the given item to remove was not actually in the set. The Set interfacealso includes contains and isEmpty methods that work in exactly the sameway as their List counterparts.
15.5.2 Iterating Through the Elements of a Set
Both the enhanced for loop and the forEach loop can be used to iterate throughall the elements of a set. Let us look at an example.
438 15 The Java Collections Framework

In the UK, the first letter of the registration number was at one time used todetermine the time period when the vehicle came to market. A registrationbeginning with ‘S’, for example, denoted a vehicle that came to market betweenAugust 1998 and February 1999, while a registration beginning with ‘T’ denoted avehicle that came to market between March 1999 and July 1999.
The following enhanced for loop will allow us to iterate through the collectionof registration numbers and display all registrations after ‘T’.
for (String item: regNums) // iterate through all items in 'regNums'{
if (item.charAt(0) > 'T') // check first letter of registration
{ System.out.println(item); // display this registration
} }
Here is the equivalent forEach loop:
regNums.forEach ( item ->{
if (item.charAt(0) > 'T') // check first letter of registration
{ System.out.println(item); // display this registration
} });
Again, notice that the type of every element within our regNums set isString. Within the loops we use the String method charAt to check the firstletter of registration. Assuming we have the following set of registration numbers:
[W79TRV, V53PLS, L22SBG]
the loops above would both produce the following result:
W79TRVV53PLS
Let us consider a slightly different scenario now. Instead of simply displayingregistration numbers after ‘T’, we now wish to modify the original regNums set sothat registrations prior or equal to ‘T’ are removed. We could try using an enhancedfor loop again:
// this will compile but is not safe! for (String item: regNums) // iterate through all items in 'regNums'{
if (item.charAt(0) <= 'T') // check first letter of registration{
regNums.remove(item); // remove this registration}
}
15.5 The Set Interface and the HashSet Class 439

Here we are once again iterating over the elements of the regNums set. But thistime, within the loop, we are attempting to remove the given element from the set.As we said, both the enhanced for loop and the forEach loop both should not beused to modify or remove elements from the original collection. To do so would notgive a compiler error but may lead to run-time exceptions. If we cannot use theseloops here, how else can we iterate over the elements in a set? Unlike an array,values in the set cannot be retrieved by an index value. Instead, to access the itemsin a set, the iterator method can be used to obtain an iterator object.
15.5.3 Iterator Objects
An Iterator object allows the items in a collection to be retrieved by providingthree methods defined in the Iterator interface (see Table 15.2).
To obtain an Iterator object from the regNums set, the iterator methodcould be called as follows:
// the 'iterator' method retrieves an Iterator object from a setIterator<String> elements = regNums.iterator();
Here we have called the iterator method and stored the item returned by thismethod in a variable we have called elements. The generics mechanism has beenused here to indicate that the Iterator object will be used to iterate overString objects only.
Table 15.2 Methods of the Iterator interface
Method Description Inputs Outputs
hasNext Returns true if there aremore elements in thecollection to retrieve andfalse otherwise
None An itemof typeboolean
next Retrieves one element fromthe collection
None An itemof thegivenelementtype
remove Removes from the collection None None
forEachRemaining Performs the given action foreach remaining element untilall elements have beenprocessed or the actionthrows an exception
An implementationfor the acceptmethod of theConsumer<T> interface
None
440 15 The Java Collections Framework

Once an Iterator object has been created, a while loop can be used toiterate through the collection, with the hasNext method the test of the loop. Thebody of the loop can then retrieve items with the next method and, if required,delete items with the remove method. Let us see how this would work with theregNums set.
/* an Iterator object can be used with a 'while' loop if we wish to iterate over a set and modify its contents */
// first create an Iterator object as discussed beforeIterator<String> elements = regNums.iterator();// repeatedly retrieve items as long as there are items to be retrieved while (elements.hasNext()) {
String item = elements.next(); // retrieve next element from setif (item.charAt(0) <= 'T') // check first letter of registration{
elements.remove(); // call Iterator method to remove registration } }
Within the loop we call the next method of our Iterator object to retrievethe next item within the collection. Since we have specified the Iterator objectto retrieve String objects, we know that this method will return a String. Wehave stored this String object in a variable we have called item:
// the String returned from the Iterator object is stored in a variableString item = elements.next();
It is always a good idea to store the object returned by the next method in avariable, as the next method should be called only once within the loop. Storingthe result in a variable allows us to refer to this object as many times as we like. Inthis case we refer to the object only once, in the test of the if statement:
if (item.charAt(0)<= 'T') // check the first character in this String
If the registration number needs to be removed from the set, we may do so nowsafely—by calling the remove method of our Iterator object:
elements.remove(); // call Iterator method to remove current item
The IteratorDemo class gathers this code into a complete program with afew example registration numbers.
15.5 The Set Interface and the HashSet Class 441

IteratorDemoimport java.util.Set;import java.util.HashSet;import java.util.Iterator;
public class IteratorDemo {
public static void main(String[] args) {
Set<String> regNums = new HashSet<>();regNums.add("V53PLS");regNums.add("X85ADZ");regNums.add("L22SBG");regNums.add("W79TRV");regNums.add("E16UEL");System.out.println("items before removing: " + regNums);11 etgcvg"cp"Kvgtcvqt"qdlgevIterator<String> elements = regNums.iterator();11"tgrgcvgfn{"tgvtkgxg"kvgou"cu"nqpi"cu"vjgtg"ctg"kvgou"vq"dg"tgvtkgxgf"while (elements.hasNext()) {
String item = elements.next(); 11"tgvtkgxg"pgzv"gngogpv"htqo"ugvif (item.charAt(0) <= 'T') 11"ejgem"hktuv"ngvvgt"qh"tgikuvtcvkqp{
elements.remove(); 11"ecnn"Kvgtcvqt"ogvjqf"vq"tgoqxg"tgikuvtcvkqp}
} System.out.println("items after removing: " + regNums);
} }
The program produces the expected output demonstrating the removal of one ofthe registration numbers that start with ‘T’ or earlier:
items before removing: [L22SBG, V53PLS, W79TRV, E16UEL,X85ADZ]items after removing: [V53PLS, W79TRV, X85ADZ]
An alternative approach we could have taken is to use theforEachRemaining method from Table 15.2. This allows us to specify anaction to be carried out over the remaining items in an Iterator via a lambdaexpression. As noted in Table 15.2, we provide an implementation for the Con-sumer interface to code this action. The ForEachRemainingDemo programrewrites the IteratorDemo program to illustrate the use of this method:
ForEachRemainingDemoimport java.util.HashSet;import java.util.Iterator;import java.util.Set;
public class ForEachRemainingDemo {
public static void main(String[] args) {
Set<String> regNums = new HashSet<>();regNums.add("V53PLS");regNums.add("X85ADZ");regNums.add("L22SBG");regNums.add("W79TRV");regNums.add("E16UEL");System.out.println("items before removing: " + regNums);Iterator<String> elements = regNums.iterator();11"vjg"ncodfc"gzrtguukqp"ku"crrnkgf"vq"gcej"tgockpkpi"kvgo"kp"vjg"eqnngevkqpelements.forEachRemaining ( item ->
{if(item.charAt(0) <= 'T'){
elements.remove();}
} );System.out.println(regNums);
} }
442 15 The Java Collections Framework

Effectively, behind the scenes, the forEachRemaining method repeatedlycalls the hasNext method on remaining items (in this case that is all items) andapplies the given lambda expression to an item retrieved by a next method. Theoutput will be the same as the output of the IteratorDemo before.
15.6 The Map Interface and the HashMap Class
The Map interface is not one of the interfaces that inherit from the general Col-lections interface. The Map interface is separate from this group and defines themethods required to process a collection consisting of pairs of objects. Rather thanlooking up an item via an index value, the first object of the pair is used. The firstobject in the pair is considered a key, and the second its associated value. Orderingis unimportant in maps, and keys are unique.
It is often useful to think of a map as a look-up table, with the key object the itemused to look up (access) an associated value in the table. For example, the passwordof users of a network can be looked up by entering their username. Table 15.3 givesan example of such a look-up table.
We can look up the password of a user by looking up their user name inTable 15.2. The password of lauraHaliwell, for example, is unicorn, whereas thepassword of wendyHarris is bumble. Notice that it is important we make usernamesthe key of the look-up table and not passwords. This is because usernames areunique—no two users can have the same username. However, passwords are notunique. Two or more users may have the same password. Indeed, in Table 15.2,two users (lauraHaliwell and lucyLane) do have the same password (unicorn).
Let us implement this kind of look-up table using a Map. There are threeimplementations provided for the Map interface: HashMap, TreeMap andLinkedHashMap. Here we will look at the HashMap class.
The constructor creates the empty map:
Map<String, String> users = new HashMap<>();
Table 15.3 A look-up table for users of a network
Username Password
lauraHaliwell unicorn
wendyHarris bumble
bobbyMann elephant
lucyLane unicorn
kabirMohan magic
15.5 The Set Interface and the HashSet Class 443

As before the type of the collection is given as the interface: Map. Notice that touse the generics mechanism to fix the types used in a Map object, we must providetwo types in the angle brackets. The first type will be the type of the key and thesecond the type of its associated value. In this case, both are String objects, but ingeneral each may be of any object type.
15.6.1 Map Methods
To add a user’s name and password to this map we use the put method as follows.The put method requires two parameters, the key object and the value object:
users.put("lauraHaliwell", "unicorn");
Note that the put method treats the first parameter as a key item and the secondparameter as its associated value. Really, we should be a bit more careful before weadd user IDs and passwords into this map—only user IDs that are not already takenshould be added. If we did not check this, we would end up overwriting a previoususer’s password. The containsKey method allows us to check this. This methodaccepts an object and returns true if the object is a key in the map and falseotherwise:
if (users.containsKey("lauraHaliwell")) // check if ID taken {
System.out.println("user ID already taken"); }else // ok to use this ID{
users.put("lauraHaliwell", "unicorn");}
Notice we do not need to check that the password is unique as multiple users canhave the same password. If we did require unique passwords the con-tainsValue method could be used in the same way we used the containsKeymethod above.
Later a user might wish to change his or her password. The put methodoverrides the value associated with a key if that key is already present in themap. The following changes the password associated with “lauraHaliwell” to“popcorn”:
users.put("lauraHaliwell", "popcorn");
The put method returns the value that was overwritten, or null if there was novalue before, and this can be checked if necessary.
444 15 The Java Collections Framework

Later, a user might be asked to enter his or her ID and password before beingable to access company resources. The get method can be used to check whetheror not the correct password has been entered. The get method accepts an objectand searches for that object among the keys of the map. If it is found, the associatedvalue object is returned. If it is not found the null value is returned:
System.out.print("enter user ID "); String idIn = EasyScanner.nextString(); // requires EasyScanner classSystem.out.print("enter password "); String passwordIn = EasyScanner.nextString();// requires EasyScanner class// retrieve the actual password for this userString password = users.get(idIn);// password will be 'null' if the user name was invalid if (password != null) {
if(passwordIn.equals(password))// check password is correct {
// allow access to company resources here}else // invalid password
{ System.out.println ("INVALID PASSWORD!");
}}else // no such user{
System.out.println ("INVALID USERNAME!"); }
As you can see, once the user has entered what they believe to be their usernameand password, the actual password for the given user is retrieved using the getmethod.
We know the password retrieved will be of type String as we created our Mapby specifying that both the keys and values of the Map object would be Strings.We can then check whether this password equals the password entered by callingthe equals method of the String class:
if(passwordIn.equals(password))
We have to be careful when we use the equals method to compare two objectsin the way that we have done here. In this case, we are comparing the passwordentered by the user with the password obtained by the get method. However, theget method might have returned a null value instead of a password (if the keyentered was invalid). The equals method of the String class does not returnfalse when comparing a String with a null value, instead it throws aNullPointerException. So, to avoid this exception, we must check the valuereturned by the get method is not null before we use the equals method:
// check password returned is not 'null' before calling 'equals' method if (password!= null) {
if(passwordIn.equals(password))// now it is safe to call 'equals' {
// allow access to company resources}else
{ System.out.println ("INVALID PASSWORD!")
}}
15.6 The Map Interface and the HashMap Class 445

Note that the null value is always checked with primitive comparison opera-tors (== for equality and != for inequality).
Like all the other Java collection classes, the HashMap class provides atoString method so that the items in the map can be displayed:
System.out.print(users); // implicitly calls 'toString' method
Key and value pairs are displayed in braces. Let us assume we have added twomore users: “bobbyMann” and “wendyHarris”, with passwords “elephant” and“bumble” respectively. Displaying the map would produce the following output:
{lauraHaliwell=popcorn, wendyHarris=bumble, bobbyMann=elephant}
As with a set, the order in which the items are displayed is not determined by theorder in which they were added but upon how they have been stored internally.
As with the other collections, a map provides a remove method. In the case ofmap, a key value is given to this method. If the key is present in the map both thekey and value pair are removed:
// this removes the given key and its associated valueusers.remove("lauraHaliwell");
Displaying the map now shows the user’s ID and password have been removed:
{wendyHarris=bumble, bobbyMann=elephant}
The remove method returns the value of the object that has been removed, ornull if the key was not present. This value can be checked if necessary to confirmthat the given key was in the map.
Finally, the map collection provides size and isEmpty methods that behavein exactly the same way as the size and isEmpty methods for sets and lists.
15.6.2 Iterating Through the Elements of a Map
In order to scan the items in the map, we can use any of the methods discussed sofar (the enhanced for loop, Iterators or the forEach loop).
An enhanced for loop cannot directly be used with a map as it is designed forcollections of single values such as arrays, lists and sets. A map, however, consistsof pairs of values. To use an enhanced for loop with a map we can extract the setof keys, using the keySet method:
// the keySet method returns the keys of the map as a set objectSet<String> theKeys = users.keySet();
446 15 The Java Collections Framework

Again notice that we know this set of keys returned by the keySet method willbe a set of String objects, so we mark the type of this set accordingly.
An enhanced for loop can now be used to iterate through the keys of the map;within the loop we can look up the associated password using the get method. Forexample, we might wish to display the contents of the map in our own way, ratherthan the format given to us by the toString method:
for(String username: theKeys)// iterate through the set of keys{
String password = users.get(item); // retrieve password value System.out.println(username + "\t" + password); // format output
}
This would display the map in the following table format:
lauraHaliwell popcornwendyHarris bumblebobbyMann elephant
While the enhanced for loop is restricted to iterating over single values, the-forEach loop can be used with pairs of values as well as a single value, as theforEach method is overloaded to take a BiConsumer (see Table 15.4 for areminder) as well as a Consumer implementation.
Here is the forEach implementation for displaying items in our map:
// the forEach loop can take two parameters, representing the key and value item of a map pairusers.forEach((username, password) -> System.out.println(username + "\t" + password));
You can see that the two parameters given to this forEach method representthe key and its associated value respectively. In this case the key is the usernameand its associated value is a password.
15.7 Using Your Own Classes with Java’s CollectionClasses
In the examples above, we stuck to the pre-defined String type for the type ofobjects used in the collection classes of Java. However, objects of any class can beused inside these collections—including objects of your own classes. Care needs tobe taken, however, when using your own classes. As an example, let us consider anapplication to store a collection of books that a person may own.
Table 15.4 Reminder of the BiConsumer interface
Functional interface Abstract method name Parameter types Return type
BiConsumer<T, U> accept T, U void
15.6 The Map Interface and the HashMap Class 447

15.7.1 The Book Class
Figure 15.1 gives the UML design for a Book class.This class consists of an ISBN number, a title and an author. An ISBN number is
a unique International Standard Book Number that is allocated to each new booktitle. Before we deal with a collection of books, here is the initial implementation ofthe Book class.
The ini al Book class
public class Book
{
private String isbn;
private String title;
private String author;
public Book(String isbnIn, String titleIn, String authorIn)
{
isbn = isbnIn;
title = titleIn;
author = authorIn;
}
public String getISBN()
{
return isbn;
}
public String getTitle()
{
return title;
}
public String getAuthor()
{
return author;
}
}
Book
-isbn : String -title : String-author : String
+Book(String, String, String)+getISBN() : String +getTitle() : String+getAuthor() : String
Fig. 15.1 Initial design of the Book class
448 15 The Java Collections Framework
There is nothing new here so let’s move on to see how objects of this class canbe stored in the Java collection classes. To begin with, let’s create a list to containBook objects:
// create empty list to contain Book objectsList<Book> books = new ArrayList<> ();
Note once again the use of the interface type, List, and generics to fix thecollection type to Book. Now let’s add some book objects and display the list:
// create two Book objectsBook b1 = new Book("9999999999", "Clowning Around", "Joe King"); Book b2 = new Book("2222222222", "Travel With Me", "Sandy Beach");// add Book objects to list books.add(b1);books.add(b2);System.out.println(books); // implicitly call toString method of List
As things stand this will display something like the following list on the screen:
[Book@15db9742, Book@6d06d69c]
This isn’t exactly what we require! When Java collections are displayed on thescreen by calling their toString method, each object in the collection is dis-played by calling its own toString method. As we said explained in Chap. 9,this will call the default toString method inherited from the Object class, andall this does is display information on the memory address of the object.
If you wish to use objects of your own classes as types in the Java collectionclasses, in Java’s toString method a meaningful toString method should bedefined in your class if you intend to make use of the toString method of thecollection class.
Here is one possible toString method we could provide for our Book class:
@Overridepublic String toString() {
return "(" + isbn +", " + title + ", " + author + ")";}
We create a single String by joining the ISBN, title and author Strings. Toimprove the look of this String we have separated the attributes by commas andhave enclosed it in round brackets. Notice the @Override annotation here, as weare overriding the toString method from the superclass (Object).
Now if we print out the list we get the following:
[(9999999999, Clowning Around, Joe King), (2222222222,Travel With Me, Sandy Beach)]
While you might wish to improve this String representation of a book further(maybe by adding more formatting), this is acceptable for testing purposes.
15.7 Using Your Own Classes with Java’s Collection Classes 449

15.7.2 Defining an equals Method
Another issue arises if we wish to use methods such as contains and remove.Methods such as these call the equals method of the contained object to deter-mine whether or not a given object is in the collection. The Book class does notdefine its own equals method so again the inherited equals method of theObject class is called. This method is inadequate as it simply compares thememory address of two objects rather than the attributes of two objects. Forexample, the following would display false on the screen when we would want itto display true:
// check a book that is in the list boolean check = books.contains(new Book("9999999999", "Clowning Around", "Joe King"));// display resultSystem.out.println(check);
Here, while the Book parameter has the same attribute data as one of the booksin the list, it is a new Book object stored in a different memory location and so thecontains method will return false.
To use objects of your own classes effectively, a meaningful equals methodshould be defined. One possible interpretation of two books being equal is simplythat their ISBNs are equal, so the following equals method could be added to theBook class:
@Overridepublic boolean equals (Object objIn) // equals method must have this header{
Book bookIn = (Book) objIn; // type cast to a Book // check isbn return isbn.equals(bookIn.isbn);
}
Again, we have added an @Override annotation. Notice that the equalsmethod must accept an item of type Object. The body of the method then needsto type cast this item back to the required type (Book in this case).
If you are using lists, these are the only two additional methods you need toprovide in your class. Also, if you are using objects of your own classes only asvalues of a map, then again these are the only two additional methods you need toprovide. If, however, you are using objects of your classes as keys of a map or asthe items of a set, then you need to include an additional method in your classes:hashCode.
15.7.3 Defining a hashCode Method
To understand how to define your own hashCode method you need to understandhow the HashSet and HashMap implementations work. Both of these Javaclasses have been implemented using an array. Unlike the ArrayList class
450 15 The Java Collections Framework

however (which has also been implemented using an array), the position of theitems in the HashSet and HashMap arrays is not determined by the order inwhich they were added. Instead, the position into which items are added into thesearrays is determined by their hashCode method.
ThehashCodemethod returns an integer value from an object. This integer valuedetermines where in the array the given object is stored. Objects that are equal (asdetermined by the equals method) should produce identical hashCode numbersand, ideally, objects that are not equal should return different hashCode numbers.
The reason for using hashCode numbers is that they considerably reduce thetime it takes to search a given array for a given item. If items were stored con-secutively, then a search of the array would require every item in the array beingchecked using the equals method, until a match was found. This would becomevery inefficient when the collection becomes very large. So, instead, the HashSetand HashMap classes make use of the hashCode method, so that when a search isrequired for an item, say x, that hashCode number is computed and this value isused to look up other items in the array. Then, only objects with the samehashCode number are compared to x using their equals method.
If you are using objects of your own classes, and you have not provided ahashCode method, the inherited hashCode method from the Object class iscalled. This does not behave in the way we would wish. It generates the hashCodenumber from the memory address of the object, so two “equal” objects could havedifferent hashCode values. The TestHashCode program demonstrates this.
TestHashCodepublic class TestHashCode {
public static void main (String[] args) {
// create two "equal" booksBook b1 = new Book("9999999999", "Clowning Around", "Joe King"); Book b2 = new Book("9999999999", "Clowning Around", "Joe King");// check their hashCode numbersSystem.out.println(b1.hashCode());System.out.println(b2.hashCode());
}}
When we run this program it produces the following hashCode numbers forthe two “equal” books:
10440367441826771953
As you can see, the hashCode numbers do not match—even though the objectsare “equal”. This means that if we were searching for the given book in a HashSetor in the keys of a HashMap, the book would not be found, as only objects withidentical hashCode values are checked. Also, we cannot ensure that objects in theHashSet or the keys of the HashMap will be unique, as two (or more) identicalbooks (with different hashCode values) would both be stored in the underlyingarray at different array positions.
15.7 Using Your Own Classes with Java’s Collection Classes 451

We need to define our own hashCode method for the Book class so thatobjects of this class can be used effectively with the HashSet and HashMapclasses.
Luckily, all of Java’s predefined classes (such as String) have a meaningfulhashCode method defined. These hashCode methods return equal hashCodenumbers for “equal” objects.
So one way of defining the hashCode number for an object of your classwould be to add together the hashCode numbers generated by all the attributes todetermine object equality. For Book equality we checked the ISBN only.This ISBN is a String, so all we need to do is to return the hashCode number ofthis String:
@Override// this is a suitable hashCode method for our Book classpublic int hashCode() {
// derive hash code by returning hash code of ISBN string return isbn.hashCode();
}
If you have more than one attribute that plays a role in determining objectequality, then add each such hashCode numbers (assuming the attribute is not ofprimitive type) to determine your hashCode number.
If primitive attributes also play a part in object equality, they too can simply beadded into your hashCode formula by generating an integer value from eachprimitive attribute. Here is a simple set of guidelines for generating an integer valuefrom the primitive types (although much more sophisticated algorithms exist thanthese!):
• byte, short, int, long: leave as they are;• float, double: type cast to an integer;• char: use its Unicode value;• boolean: use an if…e1se statement to allocate 1 if the attribute is true and0 if it is false.
15.7.4 The Updated Book Class
The complete code for the updated Book class is now presented below withtoString, equals and hashCode methods included:
452 15 The Java Collections Framework

The updated Book class
public class Book
{
private String isbn;
private String title;
private String author;
public Book(String isbnIn, String titleIn, String authorIn)
{
isbn = isbnIn;
title = titleIn;
author = authorIn;
}
public String getISBN()
{
return isbn;
}
public String getTitle()
{
return title;
}
public String getAuthor()
{
return author;
}
BQxgttkfg
public String toString()
{
return "(" + isbn +", " + title + ", " + author + ")";
}
BQxgttkfg
public boolean equals (Object objIn)
{
Book bookIn = (Book) objIn; 11"v{rg"ecuv"vq"c"Dqqm
// check isbn
return isbn.equals(bookIn.isbn);
}
BQxgttkfg
public int hashCode()
{
11"fgtkxg"jcuj"eqfg"d{"tgvwtpkpi"jcuj"eqfg"qh"KUDP"uvtkpi"
return isbn.hashCode();
}
}
15.8 Developing a Collection Class for Book Objects
In the previous sectionwe amended theBook class by supplying it with atoStringmethod, an equals method and a hashCode method. If you look at the docu-mentation of any class in the Java API you will see that it also possesses these threemethods. When developing classes professionally you should always include thesemethods. That way, objects of these classes can be used with any collection type.
Now we have a suitable Book class we can store objects of this class in one ofthe Java collection classes. Which collection shall we use? There is no orderingrequired on the collection of books so we do not really need a list here. We couldstore these books in a set, but since each book has a unique ISBN it makes more
15.8 Developing a Collection Class for Book Objects 453

sense to use a map and have ISBNs as the keys to the map, with Book objectsthemselves as the values of the map.
We will use this collection to help us develop our own class, Library, whichkeeps track of the books that a person may own. Figure 15.2 gives its UML design.
Notice that the keys of the map are specified to be String objects (to representISBNs), and the values of the map are specified as Book objects.
Here is the implementation of the Library class. Take a look at it and then wewill discuss it.
Library
import java.util.Map;
import java.util.HashMap;
import java.util.Set;
import java.util.HashSet;
public class Library
{
Map <String, Book> books; 11"fgenctg"ocr"eqnngevkqp
11"etgcvg"gorv{"ocr"
public Library()
{
books = new HashMap<> ();
}
11"cff"vjg"ikxgp"dqqm"kpvq"vjg"eqnngevkqp"
public boolean addBook(Book bookIn)
{
String keyIn = bookIn.getISBN(); 11"kudp"yknn"dg"mg{"qh"ocr"
if (books.containsKey(keyIn)) 11"ejgem"kh"kudp"cntgcf{"kp"wug
{
return false; 11"kpfkecvg"gttqt
}
else 11"qm"vq"cff"vjku"dqqm
{
books.put(keyIn, bookIn); 11"cff"mg{"cpf"dqqm"rckt"kpvq"ocr"
return true;
}
}
11"tgoqxg"vjg"dqqm"ykvj"vjg"ikxgp"kudp"
public boolean removeBook(String isbnIn)
{
if (books.remove(isbnIn)!= null) 11"ejgem"kh"kvgo"ycu"tgoqxgf"
{
return true;
}
else 11"yjgp"kvgo"ku"pqv"tgoqxgf
{
return false;
} }
11"tgvwtp"vjg"pwodgt"qh"dqqmu"kp"vjg"eqnngevkqppublic int getTotalNumberOfBooks()
{ return books.size();
}
11"tgvwtp"vjg"dqqm"ykvj"vjg"ikxgp"kudp"qt"pwnn"kh"pq"uwej"dqqmpublic Book getBook (String isbnIn)
{ return books.get(isbnIn);
}
11"tgvwtp"vjg"ugv"qh"dqqmu"kp"vjg"eqnngevkqppublic Set<Book> getAllBooks ()
{ Set<Book> bookSet = new HashSet<>(); 11"vq"uvqtg"vjg"ugv"qh"dqqmubooks.forEach((key,book) -> bookSet.add(book)); 11"wug"hqtGcej"nqqr"vq"cff"dqqmureturn bookSet; 11"tgvwtp"vjg"ugv"qh"dqqmu
} }
454 15 The Java Collections Framework

Most of this class should be self-explanatory. Just consider how complicatedsome of these methods would have been if we had used an array instead of a map!
We just draw your attention to the getAllBooks method. The UML diagramindicates that this method should return a set of books. An alternative approachcould have been to return the map itself, but it would be more useful for this methodto return a set of objects, as a set is easier to scan than a map. It is fine to use a set asthere is no repetition of books.
public Set<Book> getAllBooks () { // code to create this set goes here
}
There is no map method that returns the set of values in the map directly,3 so asuitable set needs to be created in this method. We begin by creating an empty set:
Set<Book> bookSet = new HashSet<>();
This set is empty initially and we must fill it with book objects. In order to accessthese values we use a forEach loop and simply add the values of the map into thisset.
Finally, we return this set of books:
return bookSet;
That completes our discussion of the Library class. We leave the task ofcreating a tester for this class to the end of chapter exercises.
Library
-books : Map<String, Book>
+Library ( )+addBook (Book) : boolean+removeBook (String) : boolean+getTotalNumberOfBooks( ) : int+getBook (String) : Book+getAllBooks( ) : Set<Book>
Fig. 15.2 UML design for the Library class
books.forEach((key,book) -> bookSet.add(book)); // use forEach loop to add books
3There are several approaches to indirectly create a set of values in a map. Here we look at just oneapproach.
15.8 Developing a Collection Class for Book Objects 455

15.9 Sorting Objects in a Collection
We have seen how we can use implementations of the List interface (such asArrayList) to create an ordered collection in our programs. Previously we haveseen how arrays can also be used to store an ordered collection. There may be timeswhen you wish to sort these collections so they are presented in a different order.For example, you may have an ordered collection of students and wish to re-orderthese students based on their student ID, or their final mark.
15.9.1 The Collections.sort and Arrays.sort Methods
Sorting a collection can involve complex algorithms. Luckily Java provides twoclasses that contain class methods to sort your ordered collections. The Col-lections class and the Arrays class both have a number of utility methods forprocessing collections in the JCF and arrays respectively. In particular, both classescontain a sort method to sort a given list or array. Both classes are in the java.util package. The StringSortDemo program below demonstrates how to usethese methods with an ordered collection of String objects. It introduces a fewnew additional concepts. Take a look at it and then we will discuss it:
StringSortDemoimport java.util.Collections;
import java.util.Arrays;
import java.util.List;
public class StringSortDemo
{
public static void main(String[] args)
{
11"etgcvg"cttc{ qh"uvtkpiu
String[] citysArray = {"London", "Birmingham", "Manchester", "Liverpool"};
11"fkurnc{"cttc{"wukpi"Cttc{u0vqUvtkpi
System.out.println("Original Array " + Arrays.toString(citysArray));
11"eqpxgtv"cttc{"vq"Nkuv"wukpi"Cttc{u0cuNkuv
List<String> citysList = Arrays.asList(citysArray);
11"fkurnc{"Nkuv
System.out.println("Original List " + citysList);
11"uqtv"cttc{"
Arrays.sort(citysArray);
11"fkurnc{"cttc{"
System.out.println("Sorted Array " + Arrays.toString(citysArray));
11"uqtv"Nkuv
Collections.sort(citysList);
11"fkurnc{"Nkuv"
System.out.println("Sorted List " + citysList);
}
}
First you can see we have gone back to using an array type to store a collectionString objects:
// create array of stringsString[] citysArray = {"London", "Birmingham", "Manchester", "Liverpool"};
456 15 The Java Collections Framework

The Arrays utility class has a toString class method that allows us toconvert an array into a String which may then be displayed on the screen:
// display array using toStringSystem.out.println("Original Array " + Arrays.toString(citysArray));
Next we use the asList method of Arrays that returns an equivalent Listobject containing the same items in the collection, in the same order—we store thisin a new List object, which we then display:
// convert array to List using asListList<String> citysList = Arrays.asList(citysArray);// display ListSystem.out.println("Original List " + citysList);
Now the really useful sort methods that re-order the given collection of stringsso they are sorted in ascending alphabetical order:
// sort array Arrays.sort(citysArray);// display array using toStringSystem.out.println("Sorted Array " + Arrays.toString(citysArray));// sort ListCollections.sort(citysList);// display List using toStringSystem.out.println("Sorted List " + citysList);
You can see that in order to sort an array we use the Arrays.sort method andto sort a List we use the Collections.sort method. Here is the output fromthis program:
Original Array [London, Birmingham, Manchester, Liverpool]Original List [London, Birmingham, Manchester, Liverpool]Sorted Array [Birmingham, Liverpool, London, Manchester]Sorted List [Birmingham, Liverpool, London, Manchester]
As expected the sort methods re-order the items in the collection so that theyare now in ascending lexicographical order. Note that the Arrays.toStringmethod returns a String representation of the array in the same format as a List(i.e. with items separated by commas and enclosed in square brackets).
For these sort methods to work the contained object needs to be derived from aclass that implements the generic Comparable<T> interface.
15.9 Sorting Objects in a Collection 457

15.9.2 The Comparable<T> Interface
The generic Comparable<T> interface consist of a single compareTo methodthat accepts an object of type T and returns an integer (see Table 15.5).
A compareTo method should return a positive integer when the first object isgreater than the second, a negative integer when it is less than the second and zerowhen the two objects are equal. As we saw in Chap. 7, the String class does havesuch a method defined and so implements the Comparable<T> interface.
But what happens if we try to sort a collection of objects that do not have acompareTo method defined? Well, the Collections.sort method wouldresult in a compiler error, whereas the Arrays.sort method would not give acompiler error but would throw an exception at runtime.
To sort ordered collections of objects derived from classes that you have definedyou will need to ensure their associated class implements the Comparable<T>interface.
As an example, let’s return to our Book class. We would be unable to use thesort methods we have met to sort lists or arrays of Book objects as the Bookclass does not implement the Comparable<T> interface. To implement thisinterface we need to define a suitable compareTo method. One way of comparingtwo Book objects might be just to compare their ISBN numbers. Since ISBNnumbers have been stored as Strings, we just need to use the compareTomethod of String and use that result as our Book compareTo result. Here is thecode:
A sortable Book class 11"vjku"encuu"ecp"dg"wugf"kp"eqplwpevkqp"ykvj"Eqnngevkqpu0uqtv"cpf"Cttc{u0uqtv
public class Book implements Comparable <Book> 11"pqvkeg"igpgtke"v{rg hkzgf"vq"Dqqm{
11cvvtkdwvgu"cpf"ogvjqfu"cu"dghqtg
11"cff"c"eqorctgVq"ogvjqf"
BQxgttkfgpublic int compareTo(Book bIn){
return isbn.compareTo(bIn.isbn); 11"eqorctg"KUDP"pwodgtu}
}
Notice how we use the generics mechanism to indicate the type of object theComparable interface will be fixed to. In this case it is set to Book as we wish tocompare two books.
Table 15.5 The Comparable<T> interface
Functional interface Abstract method name Parameter types Return type
Comparable<T> compareTo T int
458 15 The Java Collections Framework

The BookSortDemo1 program below makes use our updated Book class tosort a list of Book objects.
BookSortDemo1import java.util.Collections;import java.util.List;import java.util.ArrayList;
public class BookSortDemo1 {
public static void main(String[] args) {
11"etgcvg"vjtgg"Dqqm"qdlgevuBook b1 = new Book("9999999999", "Clowning Around", "Joe King"); Book b2 = new Book("2222222222", "Travel With Me", "Sandy Beach");Book b3 = new Book("4444444444", "Interior Design", "Anita Room");11"etgcvg"cp"gorv{"nkuv"qh"dqqmuList<Book> bookList = new ArrayList<>();11"cff"vjg"vjtgg"Dqqm"qlgevubookList.add(b1);bookList.add(b2);bookList.add(b3);11"fkurnc{"nkuv"dghqtg"cpf"chvgt"uqtvkpiSystem.out.println("***COMPARABLE DEMO***");System.out.println("\nBefore Sort\n"+bookList);Collections.sort(bookList); 11"wugu"vjg"Dqqm"eqorctgVq"ogvjqfSystem.out.println("\nAfter sort\n"+ bookList);
} }
Here is the output from this program:
***COMPARABLE DEMO***
Before Sort[(9999999999, Clowning Around, Joe King), (2222222222,Travel With Me, Sandy Beach), (4444444444, Interior Design,Anita Room)]
After sort[(2222222222, Travel With Me, Sandy Beach), (4444444444,Interior Design, Anita Room), (9999999999, Clowning Around,Joe King)]
As you can see the Book objects have been sorted on ISBN numbers.
15.9.3 The Comparator<T> Interface
The previous section demonstrated one technique for comparing objects for sortingpurposes; implement the Comparable<T> interface. This technique is fine if wealways wish to use the same criteria for sorting objects; in our case if we alwayswish to sort Book objects by their ISBN number.
But what if you wish to sort your collection by some other criteria, or multiplecriteria? For example, we may wish to sort our list of Book objects via their title, atother times we might wish to sort via the author name. The Comparable<T>
15.9 Sorting Objects in a Collection 459

interface only allows us to define a single criteria for sorting purposes. But sinceJava 8 a more flexible way of doing this with the Comparator<T> interface hasbeen introduced.
The Comparator<T> interface requires us to provide an implementation for acompare method (see Table 15.6).
The compare method accepts two objects of a given type and (as with thecompareTo method) returns a positive integer indicating the first object is greater,or a negative integer if the first object is less than the second object, or zero if bothobjects are equal.
The List interface contains a default method4 called sort that takes asingle parameter of type Comparator. Since this is a default method of Listit is available to ArrayList objects. BookSortDemo2 makes use of this sortmethod to sort the books based on author names. Take a look at it and then we willdiscuss it.
BookSortDemo2import java.util.List;import java.util.ArrayList;
public class BookSortDemo2 {
public static void main(String[] args) {
11"etgcvg"vjtgg"Dqqm"qdlgevuBook b1 = new Book("9999999999", "Clowning Around", "Joe King"); Book b2 = new Book("2222222222", "Travel With Me", "Sandy Beach");Book b3 = new Book("4444444444", "Interior Design", "Anita Room");11"etgcvg"cp"gorv{"nkuv"qh"dqqmuList<Book> bookList = new ArrayList<>();11"cff"vjg"vjtgg"Dqqm"qlgevubookList.add(b1);bookList.add(b2);bookList.add(b3);11"fkurnc{"nkuv"dghqtg"cpf"chvgt"uqtvkpiSystem.out.println("***COMPARATOR DEMO***");System.out.println("\nBefore Sort\n"+bookList);11 uqtv"nkuv"wukpi"uqtv"ogvjqf"qh"Nkuv cpf"c"Eqorctcvqt"korngogpvcvkqp"wukpi"ncodfcdqqmNkuv0uqtv*(book1,book2) -> {return book1.getAuthor().compareTo(book2.getAuthor());});System.out.println("\nAfter Author sort\n"+ bookList);
} }
The key instruction here is call to bookList.sort(). You can see that thisaccepts an implementation of a compare method. The compare method takestwo parameters representing two books that need to be compared. The given
Table 15.6 The Comparator interface
Functional interface Abstract method name Parameter types Return type
Comparator<T> compare T, T int
4Remember from Chap. 13, default methods were added in Java 8 and are fully implementedmethods within an interface.
460 15 The Java Collections Framework

lambda expression uses the author field of the two Book objects in order tocompare them (using the compareTo method of String):
// note the lambda expression to provide a Comparator implementationbookList.sort((book1,book2) -> {return book1.getAuthor().compareTo(book2.getAuthor());});
When we run this program we get the expected output:
***COMPARATOR DEMO***
Before Sort[(9999999999, Clowning Around, Joe King), (2222222222,Travel With Me, Sandy Beach), (4444444444, Interior Design,Anita Room)]
After Author sort[(4444444444, Interior Design, Anita Room), (9999999999,Clowning Around, Joe King), (2222222222, Travel With Me,Sandy Beach)]
If we wished to use another attribute for comparison, such as the title, we couldreplace the call to getAuthor with a call to getTitle (for example). In eachcase we could use the compareTo method to compare the appropriate attributewhich acts as the key to our sort.
This pattern of picking a sort key (ISBN, author, title etc.) and then comparingtwo keys using compareTo is a very common approach to implementing aComparator and a static comparing method of Comparator is providedin order to simplify this task. As mentioned in Chap. 13, since Java 8 interfaces cancontain static methods.
The comparing method is provided with an appropriate sort key via a suitablemethod (getAuthor for the author key, getTitle for the title key and so on).Behind the scenes the comparing method then compares two keys for us usingtheir compareTo method. The appropriate key can be sent to the comparingmethod via the method reference (double colon) notation we discussed in Chap. 13.BookSortDemo3 illustrates how we can sort via all three attribute keys of a book(ISBN, author and title) using this technique:
15.9 Sorting Objects in a Collection 461
BookSortDemo3
import java.util.List;import java.util.ArrayList;import java.util.Comparator;
public class BookSortDemo3 {
public static void main(String[] args) {
// create three Book objectsBook b1 = new Book("9999999999", "Clowning Around", "Joe King"); Book b2 = new Book("2222222222", "Travel With Me", "Sandy Beach");Book b3 = new Book("4444444444", "Interior Design", "Anita Room");// create an empty list of booksList<Book> bookList = new ArrayList<>();// add the three Book ojectsbookList.add(b1);bookList.add(b2);bookList.add(b3);// display list before and after sortingSystem.out.println("***COMPARATOR DEMO***");System.out.println("\nBefore Sort\n"+bookList);
// sort list using getISBN method referencebookList.sort(Comparator.comparing(Book::getISBN));System.out.println("\nAfter ISBN sort\n"+ bookList); // sort list using getAuthor method referencebookList.sort(Comparator.comparing(Book::getAuthor));System.out.println("\nAfter Author sort\n"+ bookList);// sort list using the getTitle method referencebookList.sort(Comparator.comparing(Book::getTitle));System.out.println("\nAfter Title sort\n"+ bookList);
}}
Here is the expected output:
***COMPARATOR DEMO***
Before Sort[(9999999999, Clowning Around, Joe King), (2222222222,Travel With Me, Sandy Beach), (4444444444, Interior Design,Anita Room)]
After ISBN sort[(2222222222, Travel With Me, Sandy Beach), (4444444444,Interior Design, Anita Room), (9999999999, Clowning Around,Joe King)]
After Author sort[(4444444444, Interior Design, Anita Room), (9999999999,Clowning Around, Joe King), (2222222222, Travel With Me,Sandy Beach)]
After Title sort[(9999999999, Clowning Around, Joe King), (4444444444,Interior Design, Anita Room), (2222222222, Travel With Me,Sandy Beach)]
462 15 The Java Collections Framework

The comparing method will work on numeric attributes too (such as dou-bles, ints and longs) via the compareTo method provided in the equivalentwrapper classes. However, to reduce the overhead of boxing and unboxing prim-itive values you can use specific comparing methods for these types (com-paringDouble, comparingInt, comparingLong etc.). You will see anexample of this in Chap. 22.
It is worth pointing out that you can always revert to the natural ordering keydefined in your own compareTo method by using the static naturalOrdermethod of Comparator.
We used ISBNs as our built-in comparison key when writing the compareTomethod of Book, so instead of the following line from BookDemo4:
bookList.sort(Comparator.comparing(Book::getISBN));
we could have used the naturalOrder method instead as follows:
bookList.sort(Comparator.naturalOrder());
Note that if the underlying list contains strings or numeric values only, nat-uralOrder will sort the given list in alphabetical or numerical order respectively.
To find out more about the Collections.sort, Arrays.sort and thesort method of List, as well as more about the Comparable<T> and Com-parator<T> interfaces, you can refer to the Oracle™ site.
15.10 Self-test Questions
1. Distinguish between the following types of collection in the Java CollectionsFramework:
• List;• Set;• Map.
2. Identify, with reasons, the most appropriate Java collection type to implementthe following collections:
(a) An ordered collection of patient names waiting for a doctor;(b) An unordered collection of patient names registered to a doctor;(c) An unordered collection of BankAccount objects.
15.9 Sorting Objects in a Collection 463

3. Consider the following instruction:
Map <String, Student> javaStudents = new HashMap<>();
(a) Why is the type of this object given as Map and not HashMap?(b) Assuming the object javaStudents has been created as above, why
would the following line cause a compiler error?
javaStudents.put("u0012345", "Jeet");
4. Consider again the StockItem class from the programming exercises ofChap. 8. Here is the UML diagram:
StockItem
-stockNumber : String -name : String -price : double -totalStock : int
+StockItem(String, String, double) +setPrice(double) +increaseTotalStock(int) +getStockNumber() : String +getName() : String +getTotalStock() : int +getPrice() : double +calculateTotalPrice() : double
(a) Identify the purpose of a toString method and define an appropriatetoString method for this class.
(b) Identify the purpose of an equals method and define an appropriateequals method for this class.
(c) Identify the purpose of a hashCode method and define an appropriatehashCode method for this class.
5. In Sect. 15.5 a set called regNums was created to store a collection of carregistration numbers.
(a) Write a fragment of code that makes use of an enhanced for loop to displayall registrations ending in ‘S’.
(b) Write a fragment of code that makes use of a forEach loop to display allregistrations ending in ‘S’.
(c) Write a fragment of code, which makes use of the iterator method, toremove all registration numbers ending in ‘S’.
464 15 The Java Collections Framework

6. In Chap. 8 we introduced a BankAccount class and a collection class to holdbank accounts called Bank. The Bank class was implemented using a List inthe form of an ArrayList class.
(a) If we were to change from a List to a Map, what would be the key type ofthe Map and what would be the value type?
(b) Write a fragment of code that declares a Map to hold BankAccountobjects and add two BankAccount objects into this map.
(c) Write a fragment of code that uses a forEach loop to display allBankAccount objects in the map that have a balance over 100.
7. Consider the BankAccount class from Chaps. 7 and 8 once again. Assume wehave the following array to store a collection of BankAccount objects:
BankAccount[] accountList = new BankAccount[5];
Now assume five BankAccount objects have been added into this list.
(a) What method of the Arrays class would allow you to display this array?(b) What method of the Arrays class would you allow you to create an
equivalent List from this array?(c) Assuming the array has been converted to a list, describe how the Com-
parable<T> and Comparator<T> interfaces can be used to help sortthe list, via the account number, by making use of the Collections.-sort method and the sort method of List.
15.11 Programming Exercises
1. Copy, from the accompanying website, the Book and Library classes andthen implement a tester for the Library class.
2. Make the changes to the StockItem class you considered in self-test question4 above, then:
(a) Write a tester that adds five StockItem objects into a set.(b) Modify the tester so that the set is displayed using the toString method
of Set.(c) Use the contains method of Set method to search for one of the stock
items.
15.10 Self-test Questions 465

3. Copy, from the accompanying website, the Book and BookSortDemo2classes and then:
(a) Rewrite the compareTo method (that implements the Compara-ble<Book> interface) in the Book class so the length of the title is used tocompare two books. Run the BookSortDemo4 program to test this.
(b) Modify the BookSortDemo4 program to sort the list of books based onlength of title by using both the comparing method and natu-ralOrdering methods of Comparator.
4. Write a tester program to test your answers to self-test question 7 above.
5. In this chapter we looked at an example of a printer queue. A queue is acollection where the first item added into the queue is the first item removedfrom the queue. Consequently, a queue is often referred to as a first in first out(FIFO) collection.
A stack, on the other hand, is a last in first out (LIFO) collection—much like astack of plates, where the last plate added to the stack is the first plate removedfrom the stack. The method to add an item onto a stack is often called push. Themethod to remove an item from a stack is often called pop.
Below, we give the UML design for a NameStack class, which stores a stackof names.
NameStack
-stack : List<String>
+NameStack( ) +push(String) +pop( ) : String +size( ) : int +isEmpty( ) : boolean +toString( ) : String
A description of each NameStack method is given below:
+NameStack()Initializes the stack of names to be empty.
+push(String)Adds the given name onto the top of the stack.
+pop() : StringRemoves and returns the name at the top of the stack. Throws a NameS-tackException (which will also need to be implemented) if an attempt ismade to pop an item from an empty stack.
466 15 The Java Collections Framework

+size() : intReturns the number of names in the stack.
+isEmpty() : booleanReturns true if the stack is empty and false otherwise.
+toString() : String
Returns a String representation of the stack of names.
(a) Implement the NameStack class. You will also need to implement aNameStackException class.
(b) Test the NameStack class with a suitable tester.
6. Consider an application that keeps track of the registration numbers of all carsthat have a permit to use a company car park. It also keeps track of the regis-tration numbers of the cars actually in the car park at any one time. While thereis no limit to the number of cars that can have permits to park in the car park, thecapacity of the car park is limited. Below we give the UML design for theCarRegister class:
CarRegister
-permit : Set<String> -parked : Set<String> -capacity : int
+CarRegister(int) +givePermit (String) : boolean +recordParking(String) : boolean +recordExit (String) : boolean +isParked(String) : boolean+isFull( ) : boolean +numberParked() : int +getPermit() : Set<String> +getParked() : Set<String> +getCapacity() : int
A description of each CarRegister method is given below:
+CarRegister(int)Initializes the permit and parked sets to be empty and sets the capacity ofthe car park with the given parameter. Throws a CarRegisterException(which will also need to be implemented) if the given parameter is negative.
+givePermit(String) : booleanRecords the registration of a car given a permit to park. Returns false if thecar has already been given a permit and true otherwise.
+recordParking(String) : booleanRecords the registration of a car entering the car park. Returns false if the carpark is full, or the car has no permit to enter the car park, and true otherwise.
15.11 Programming Exercises 467

+recordExit (String) : booleanRecords the registration of a car leaving the car park. Returns false if the carwas not initially registered as being parked and true otherwise.
+isParked(String) : booleanReturns true if the car with the given registration is recorded as being parkedin the car park and false otherwise.
+isFull() : boolean
Returns true if the car park is full and false otherwise.
+numberParked() : int
Returns the number of cars currently in the car park.
+getPermit() : Set<String>
Returns the set of car registrations allocated permits.
getParked() : Set<String>
Returns the set of registration numbers of cars in the car park.
+getCapacity() : int
Returns the maximum capacity of the car park.
(a) Implement the CarRegister class. You will also need to implement aCarRegisterException class.
(b) Test the CarRegister class with a suitable tester.
7. Re-write the Bank class of Chap. 8 so that it makes use of a Map instead of aList, as discussed in self-test question 6 above.
468 15 The Java Collections Framework

16Advanced JavaFX
Outcomes:
By the end of this chapter you should be able to:
• program components to respond to mouse events and key events;• explain the term property as applied to JavaFX components;• bind properties of two or more components;• use a slider to change the value of a variable;• embed images, videos and webpages in applications;• format applications by using cascading style sheets.
16.1 Introduction
In this chapter we will explore the more advanced aspects of programming withJavaFX. We will begin by looking at the ways in which applications can be pro-grammed to respond to input events such as keystrokes and mouse movements,rather than just simple mouse clicks. We will then look at the unique nature of theattributes of JavaFX classes and explain how we can add event handlers to theindividual attributes of a component, rather than to the component itself.
We will then go on to explore the way in which we can turn our programs intomultimedia applications, and finally we will introduce you to cascading style sheetsso that you can keep your formatting information separate from the rest of theprogram, and apply different “skins” to an application.
© Springer Nature Switzerland AG 2019Q. Charatan and A. Kans, Java in Two Semesters, Texts in Computer Science,https://doi.org/10.1007/978-3-319-99420-8_16
469

16.2 Input Events
In Chap. 10 we introduced you to the idea of events and event handling. The onlyevent that we came across was an ActionEvent, the event that occurs when themouse is clicked on a component. There are other events that are defined as sub-types of the Event class, the most important of which is the InputEvent. Twosubtypes of InputEvent are discussed here—MouseEvent and KeyEvent.These occur, respectively, when a mouse button is pressed or the mouse is movedor dragged, and when a key is pressed on the keyboard.
16.2.1 Mouse Events
We saw in Chaps. 10 and 13 that a JavaFX ActionEvent has only oneEventType defined (ACTION). In the case of MouseEvent, however, there area number of EventTypes, the most common of which we have summarised inTable 16.1.
As you will see in a moment, there are convenience methods for all of theseevents—and in order to demonstrate some of these, we have developed a little gamewith which you can amuse your friends. Figure 16.1 shows how it looks when itruns. We have called it—rather unimaginatively—the RedCircle game; a redcircle always moves away from the cursor so you can never click on it, despitebeing told to do so! And if in desperation you start to click the mouse, the words“Keep Trying” flash onto the screen!
Table 16.1 Types of mouse event
MOUSE_CLICKED This event occurs when the mouse has been clicked (pressed andreleased)
MOUSE_PRESSED This event occurs when the mouse button is pressed
MOUSE_RELEASED This event occurs when the mouse button is released
MOUSE_MOVED This event occurs when the mouse moves within a node and nobuttons are pressed
MOUSE_DRAGGED This event occurs when the mouse moves within a node with apressed button
MOUSE_ENTERED This event occurs when the mouse enters a node
MOUSE_EXITED This event occurs when the mouse exits a node
470 16 Advanced JavaFX

Here is the code for the class:
Fig. 16.1 The RedCircleapplication
RedCircleimport javafx.application.Application;import javafx.scene.Group;import javafx.stage.Stage;import javafx.scene.text.Text;import javafx.scene.Scene;import javafx.scene.paint.Color;import javafx.scene.shape.Circle;
public class RedCircle extends Application{
BQxgttkfgpublic void start(Stage stage){
final double WIDTH = 400;final double HEIGHT = 400;
11"ekteng"uvctvu"kp"egpvtg"qh"uetggpCircle circle = new Circle(WIDTH/2, HEIGHT/2, 20, Color.RED);
Text heading = new Text(WIDTH/2 - 50, 20, "Click on the red circle");Text message = new Text(WIDTH/2 - 40, HEIGHT - 20 , "");
Group root = new Group(heading, circle, message);Scene scene = new Scene(root, WIDTH, HEIGHT, Color.YELLOW);
1,"yjgp"vjg"oqwug"ku"oqxg"qt"ftciigf"vjg"egpvtg"qh"vjg"ekteng"kutgrqukvkqpgf"uq"vjcv"kv"ku"cnyc{u"72"rkzgnu"vq"vjg"nghv"cpf"72"rkzgnu"cdqxg"vjg"ewtuqt",1
scene.setOnMouseMoved(e -> {circle.setCenterX(e.getX()-50);circle.setCenterY(e.getY()-50);
} );
scene.setOnMouseDragged(e -> {circle.setCenterX(e.getX()-50);circle.setCenterY(e.getY()-50);
} );
16.2 Input Events 471

We have begun by declaring two constants WIDTH and HEIGHT to represent thedimensions of the scene, and then gone on to define a circle of radius 20 pixels thatwill start off at the centre of the graphic:
Next we create two instances of the Text class. The first is the heading, thesecond will hold the message that appears when the mouse button is depressed—this one starts off empty.
Next we group these three items together and add them to the scene.
Now we come to the code that allows the graphic to respond to the mouse beingmoved.
Notice that we attach this to the scene itself. We use the convenience methodsetOnMouseMoved for this purpose. The idea is that whenever the mouse movesthe circle also moves so that it is always 50 pixels above and 50 pixels to the left ofthe cursor.
So how do we find out where the cursor is? For this, we have made use of theparameter that is received by the handle method of EventHandler, to which
11"c"oguucig"ku"fkurnc{gf"yjgp"vjg"oqwug"dwvvqp"ku"fgrtguugfscene.setOnMousePressed(e -> message.setText("Keep trying!!!"));
11"vjg"oguucig"ku"dncpmgf"yjgp"vjg"oqwug"dwvvqp"ku"tgngcugfscene.setOnMouseReleased(e -> message.setText(""));
stage.setScene(scene);stage.setTitle("Red Circle");stage.show();
}
public static void main(String[] args){
launch(args);}
}
Circle circle = new Circle(WIDTH/2, HEIGHT/2, 20, Color.RED);
Text heading = new Text(WIDTH/2 - 50, 20, "Click on the red circle");Text message = new Text(WIDTH/2 - 40, HEIGHT - 20 , "");
Group root = new Group(heading, circle, message);Scene scene = new Scene(root, WIDTH, HEIGHT, Color.YELLOW);
scene.setOnMouseMoved(e -> {circle.setCenterX(e.getX()-50);circle.setCenterY(e.getY()-50);
} );
472 16 Advanced JavaFX

the lambda expression refers. This parameter, e, to the left of the arrow is of typeMouseEvent and has methods getX and getY that return the current position ofthe cursor. We use these to set the centre of the circle to the desired position.
We want exactly the same thing to happen when the mouse is dragged (that is, itis moved with the button depressed), so the setOnMouseDragged method iscoded in the same way. However, when the button is pressed, we also want themessage at the bottom of the screen to change from blank to “Keep trying!!!”, andfor this purpose we use the setOnMousePressed method of Scene.
When the button is released, the message returns to a blank message:
The final lines of code add the scene to the stage, set the title and make the stagevisible, as you have seen in other examples.
16.2.2 Key Events
The other common input event is a key event. A key event occurs whenever a key ispressed or released. One of the common applications of this event is to check if thekey pressed was the <Enter> key, which indicates that the entry is completed.
There are three common types of key event which are summarised in Table 16.2.We have developed a couple of little applications to demonstrate these. The first
one, which we have called TextConverter, allows the user to type somethinginto a text field, and each time a character is entered, the content of the text field isdisplayed below in upper case. This is shown in Fig. 16.2—you can see we haveused a similar interface to the PushMe class of Chap. 10, but this time there is nobutton, as the application responds each time a character is entered (as you will see,it actually responds when the key is released).
scene.setOnMousePressed(e -> message.setText("Keep trying!!!"));
scene.setOnMouseReleased(e -> message.setText(""));
Table 16.2 Types of key event
KEY_TYPED This event occurs when a key has been typed (pressed and released)
KEY_PRESSED This event occurs when a key has been pressed
KEY_RELEASED This event occurs when a key has been released
16.2 Input Events 473

Here is the code for the class:
Fig. 16.2 TheTextConverter application
TextConverterimport javafx.application.Application; import javafx.geometry.Pos; import javafx.scene.Scene; import javafx.scene.control.Label; import javafx.scene.control.TextField; import javafx.scene.layout.VBox; import javafx.scene.paint.Color; import javafx.scene.text.Font; import javafx.stage.Stage;
public class TextConverter extends Application {
@Override public void start(Stage stage) {
// create and configure a text field for user entry TextField textField = new TextField(); textField.setMaxWidth(250);
// create and configure a label to display the output Label label= new Label(); label.setTextFill(Color.RED); label.setFont(Font.font("Ariel", 20));
// display the contents of textField in upper case textField.setOnKeyReleased(e -> label.setText(textField.getText().toUpperCase()));
// create and configure a VBox to hold the components VBox root = new VBox(); root.setSpacing(10); root.setAlignment(Pos.CENTER);
//add the components to the VBox root.getChildren().addAll(textField, label);
// create a new scene Scene scene = new Scene(root);
//add the scene to the stage, then configure the stage and make it visible stage.setScene(scene); stage.setTitle("Text Converter"); stage.setHeight(150); stage.setWidth(350); stage.show(); }
public static void main(String[] args) { launch(args); }
}
474 16 Advanced JavaFX

The only thing we need to draw your attention to is this line:
We are using the convenience method setOnKeyReleased to program theresponse to a key stroke. The event is triggered when the key is released (asopposed to when it is pressed), and as you can see from the lambda expression, aftereach key press the entire content of the text field is copied to the label and convertedto upper case.
Our next program—the TextRepeater—is slightly different. In this appli-cation, as soon as character is typed it is echoed on the label at the bottom—however, if it is the <Enter> key that is pressed then the text field is cleared, and theentire phrase that was typed is displayed. You can see how this works in Fig. 16.3.
The code for this application appears below:
Fig. 16.3 The TextRepeater application
textField.setOnKeyReleased(e -> label.setText(textField.getText().toUpperCase()));
16.2 Input Events 475

Once again, the only thing we need to discuss is how we code the conveniencemethod, in this case setOnKeyTyped:
TextRepeaterimport javafx.application.Application; import javafx.geometry.Pos; import javafx.scene.Scene; import javafx.scene.control.Label; import javafx.scene.control.TextField; import javafx.scene.layout.VBox; import javafx.scene.paint.Color; import javafx.scene.text.Font; import javafx.stage.Stage;
public class TextRepeater extends Application {
@Override public void start(Stage stage) {
// create and configure a text field for user entry TextField textfield = new TextField(); textfield.setMaxWidth(250);
// create and configure a label to display the output Label repeatLabel= new Label(); repeatLabel.setTextFill(Color.RED); repeatLabel.setFont(Font.font("Ariel", 20));
textfield.setOnKeyTyped(e -> { if(e.getCharacter().equals("\r")) // check for the Enter key { repeatLabel.setText("You typed: " + textfield.getText()); textfield.setText(""); } else { repeatLabel.setText("Last character typed: " + e.getCharacter()); } });
// create and configure a VBox to hold our components VBox root = new VBox(); root.setSpacing(10); root.setAlignment(Pos.CENTER);
//add the components to the VBox root.getChildren().addAll(textfield, repeatLabel);
// create a new scene Scene scene = new Scene(root);
//add the scene to the stage, then configure the stage and make it visible stage.setScene(scene); stage.setTitle("Text Repeater"); stage.setHeight(150); stage.setWidth(350); stage.show(); }
public static void main(String[] args) { launch(args); }
}
476 16 Advanced JavaFX

You can see that the lambda expression deals with the possibility that the<Enter> key has been pressed. In order to do this we have made use ofthe getCharacter method of e, the KeyEvent parameter that is sent into thehandle method of EventHandler when the event concerned is a key event.After a KEY_TYPED event, the getCharacter method returns a string whichholds the value of the character returned. We have checked to see if this is thespecial character “\r” which represents the <Enter> key (Unicode 13). If it was the<Enter> key, the entire string is copied from the text field to the label (appended tothe message “You typed:”), and the text field is cleared.
If the key pressed was any other key, the character is echoed on the label, againappended to a message.
16.3 Binding Properties
When we refer to the classes in the JavaFX package, we tend not to talk about theattributes of a class, but rather its properties.
In order to understand why we do this, let’s consider the JavaFX TextFieldclass for a moment. You have seen how we use the setText and getTextmethods of this class—these methods accept and return Strings, and you wouldtherefore be forgiven for assuming that the TextField class has a text attributewhich is of type String. But you would be wrong. The attribute in question(which is inherited from a higher level class) is actually of type StringProp-erty. This class, along with many other similar classes such as DoubleProp-erty, IntegerProperty, BooleanProperty and so on, is a wrapper class—similar to classes such as Double and Integer that you came across in thefirst semester.
Methods of control classes such as TextField hide the details of its propertiesbecause they are set up to deal with the more familiar types such as String anddouble. The interesting thing about these property classes is that they have someuseful methods. Some of these methods enable you to add event handlers to aproperty rather than an object itself—you will see this in action in the next section.But two particularly interesting methods are bind and bindBidirectional.
textfield.setOnKeyTyped(e -> { if(e.getCharacter().equals("\r")) // check for the Enter key { repeatLabel.setText("You typed: " + textfield.getText()); textfield.setText(""); } else { repeatLabel.setText("Last character typed: " + e.getCharacter()); } });
16.2 Input Events 477

These allow us to bind the properties of two different objects so that they act inunison.
To demonstrate this we have created a very simple application indeed, consistingessentially of two textFields. We have bound the text property of each of thesewith the result that the bottom one is frozen, while whatever is typed in the top oneis applied immediately to the bottom one.
You can see this in Fig. 16.4.The code for this class is shown below:
Fig. 16.4 Binding properties
PropertyExampleimport javafx.application.Application;import javafx.scene.control.TextField;import javafx.scene.layout.VBox;import javafx.stage.Stage;import javafx.geometry.Pos;import javafx.scene.Scene;
public class PropertyExample extends Application{
@Overridepublic void start(Stage stage){
TextField top = new TextField();TextField bottom = new TextField();top.setMaxWidth(420);bottom.setMaxWidth(420);
// bind the text proerty of the bottom text field to that of the topbottom.textProperty().bind(top.textProperty());
VBox root = new VBox(10);root.getChildren().addAll(top, bottom);root.setAlignment(Pos.CENTER);Scene scene = new Scene(root, 480, 200);stage.setScene(scene);stage.setTitle("Property Example");stage.show();
}
public static void main(String[] args) {
launch(args);}
}
478 16 Advanced JavaFX

All that we are interested in here is the line of code that binds the properties:
You have seen previously that the getText method of TextField returns aString. However, the text property itself is retrieved by using the methodtextProperty (inherited from the parent class). This is the general pattern forproperties of JavaFX classes: for example, you will see below that a Slider classhas a property called value of type DoubleProperty; this is retrieved with thevalueProperty method.
As we have said, properties have a method called bind. We have used this inour example, calling the bind method of the text property of the bottom field.The property that is sent into this bind method—in our case the text property ofthe top field—is the one that can change and whose changes are mirrored in thebound property.
We could have replaced the above line of code with this:
Using the bindBidirectional method means that we can change eitherproperty and it is mirrored in the other one.
We could, of course, “chain” properties so that we could have three or moreproperties working in unison. This is left for you to try in the end of chapterexercises.
16.4 The Slider Class
A slider allows us to control the value of a variable by moving a sliding bar which isused to vary the value within a particular range. The application we have developedin Fig. 16.5 shows two sliders, one horizontal and one vertical. The current value ofthe movable “thumb” on each slider is displayed below the slider.
The complete code is shown below. Once you have had a look at it we will gothrough it with you.
bottom.textProperty().bind(top.textProperty());
bottom.textProperty().bindBidirectional(top.textProperty());
16.3 Binding Properties 479
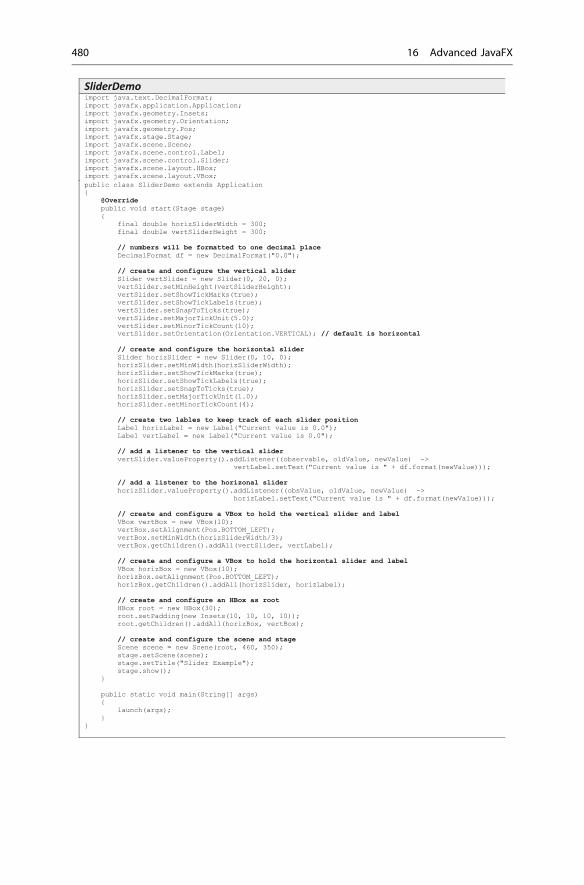
SliderDemoimport java.text.DecimalFormat;import javafx.application.Application;import javafx.geometry.Insets;import javafx.geometry.Orientation;import javafx.geometry.Pos;import javafx.stage.Stage;import javafx.scene.Scene;import javafx.scene.control.Label;import javafx.scene.control.Slider;import javafx.scene.layout.HBox;import javafx.scene.layout.VBox;public class SliderDemo extends Application{
@Overridepublic void start(Stage stage){
final double horizSliderWidth = 300;final double vertSliderHeight = 300;
// numbers will be formatted to one decimal placeDecimalFormat df = new DecimalFormat("0.0");
// create and configure the vertical sliderSlider vertSlider = new Slider(0, 20, 0);vertSlider.setMinHeight(vertSliderHeight);vertSlider.setShowTickMarks(true);vertSlider.setShowTickLabels(true);vertSlider.setSnapToTicks(true);vertSlider.setMajorTickUnit(5.0);vertSlider.setMinorTickCount(10);vertSlider.setOrientation(Orientation.VERTICAL); // default is horizontal// create and configure the horizontal sliderSlider horizSlider = new Slider(0, 10, 0);horizSlider.setMinWidth(horizSliderWidth);horizSlider.setShowTickMarks(true);horizSlider.setShowTickLabels(true);horizSlider.setSnapToTicks(true);horizSlider.setMajorTickUnit(1.0);horizSlider.setMinorTickCount(4);
// create two lables to keep track of each slider positionLabel horizLabel = new Label("Current value is 0.0");Label vertLabel = new Label("Current value is 0.0");
// add a listener to the vertical slidervertSlider.valueProperty().addListener((observable, oldValue, newValue) ->
vertLabel.setText("Current value is " + df.format(newValue)));
// add a listener to the horizonal sliderhorizSlider.valueProperty().addListener((obsValue, oldValue, newValue) ->
horizLabel.setText("Current value is " + df.format(newValue)));
// create and configure a VBox to hold the vertical slider and labelVBox vertBox = new VBox(10);vertBox.setAlignment(Pos.BOTTOM_LEFT); vertBox.setMinWidth(horizSliderWidth/3);vertBox.getChildren().addAll(vertSlider, vertLabel);
// create and configure a VBox to hold the horizontal slider and labelVBox horizBox = new VBox(10);horizBox.setAlignment(Pos.BOTTOM_LEFT);horizBox.getChildren().addAll(horizSlider, horizLabel);
// create and configure an HBox as rootHBox root = new HBox(30);root.setPadding(new Insets(10, 10, 10, 10));root.getChildren().addAll(horizBox, vertBox);
// create and configure the scene and stageScene scene = new Scene(root, 460, 350);stage.setScene(scene);stage.setTitle("Slider Example"); stage.show();
}
public static void main(String[] args){
launch(args);}
}
480 16 Advanced JavaFX
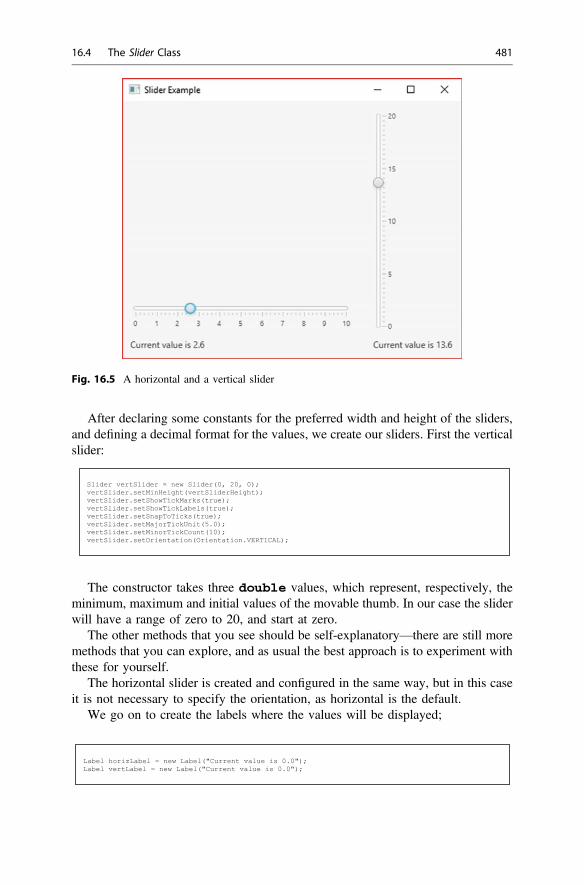
After declaring some constants for the preferred width and height of the sliders,and defining a decimal format for the values, we create our sliders. First the verticalslider:
The constructor takes three double values, which represent, respectively, theminimum, maximum and initial values of the movable thumb. In our case the sliderwill have a range of zero to 20, and start at zero.
The other methods that you see should be self-explanatory—there are still moremethods that you can explore, and as usual the best approach is to experiment withthese for yourself.
The horizontal slider is created and configured in the same way, but in this caseit is not necessary to specify the orientation, as horizontal is the default.
We go on to create the labels where the values will be displayed;
Fig. 16.5 A horizontal and a vertical slider
Slider vertSlider = new Slider(0, 20, 0);vertSlider.setMinHeight(vertSliderHeight);vertSlider.setShowTickMarks(true);vertSlider.setShowTickLabels(true);vertSlider.setSnapToTicks(true);vertSlider.setMajorTickUnit(5.0);vertSlider.setMinorTickCount(10);vertSlider.setOrientation(Orientation.VERTICAL);
Label horizLabel = new Label("Current value is 0.0");Label vertLabel = new Label("Current value is 0.0");
16.4 The Slider Class 481

Next we define what happens when the value of the slider is moved, starting withthe vertical slider. In the case of a slider we add the listener not to the slider itselfbut to one of its properties, valueProperty, which is of type DoubleProp-erty, and which holds the current position of the movable thumb:
We are not able to use a convenience method for this, but instead use theaddListener method. The kind of listener we are adding is a ChangeLis-tener, which has an abstract method named changed. You can see that we areusing a lambda expression for this purpose. The JavaFX documentation tells us thatthe changed method is specified as follows:
changed(ObservableValue<? extends T> observable, T old-Value, T newValue)
When the value of the slider position changes, the changed method is called. Itreceives three parameters. The first of these represents the current value, and is oftype ObservableValue—this is yet another wrapper class. As you can see it is ageneric class. You will notice that the method is specified using a wildcard so that itwill take objects of a particular type or subtypes of that type. In the case of a slider itwill handle values of type Double. The next two parameters are the old valuebefore it was changed, and the new value after the change.
Fortunately, in our lambda expression, we do not have to worry about specifyingthe types of the parameters, because the compiler does this for us—another exampleof the very useful ability of Java compilers to utilize type inference.
You can see that in our lambda expression we have used the new valueparameter to display the position of the slider on the correct label.
The behaviour of the horizontal slider is specified in exactly the same way.The rest of the code is all to do with placing our sliders on the scene. There is not
too much to say about this because there is nothing new here—notice however thatthe box holding the vertical slider has been specified to be one-third the width of thebox containing the horizontal slider.
16.5 Multimedia Nodes
It is very common that we want to embed such things as images or videos into ourapplications. Here we will briefly explore three classes that help us to do this—ImageView, MediaView and WebView.
vertSlider.valueProperty().addListener((observable, oldValue, newValue) ->vertLabel.setText("Current value is " + df.format(newValue)));
482 16 Advanced JavaFX

16.5.1 Embedding Images
We will begin by looking at ImageView, a class that, as its name suggests, allowsus to embed images. In Fig. 16.6 we see a very simple application in which animage is embedded into a scene graphic.
Fig. 16.6 Embedding an image
16.5 Multimedia Nodes 483

The application code below shows how we did this:
You can see that we created an object of the Image class from a file, Trees.jpg.1
In order to be able to add this image to a container, we need create an object ofthe ImageView class:
ImageView extends Node, and therefore, once we have wrapped it around animage, it can be added to a container (in this case a FlowPane) in the usual way:
Figure 16.7 shows a variation of this application.
ImageHolderimport javafx.application.Application; import javafx.geometry.Pos; import javafx.stage.Stage; import javafx.scene.Scene; import javafx.scene.image.Image; import javafx.scene.image.ImageView; import javafx.scene.layout.FlowPane;
public class ImageHolder extends Application {
@Override public void start(Stage stage) { Image image = new Image("Trees.jpg"); // create an image from a file ImageView imageView = new ImageView(image); // wrap the image in an ImageView node FlowPane root = new FlowPane(); root.setAlignment(Pos.CENTER); root.getChildren().add(imageView); // add the ImageView object to the container Scene scene = new Scene(root, 400, 600); stage.setScene(scene); stage.setTitle("Image Example");
stage.show(); }
public static void main(String[] args) { launch(args); } }
Image image = new Image("Trees.jpg");
ImageView imageView = new ImageView(image);
root.getChildren().add(imageView);
1The program needs to have access to this file when it is run—normally it would be in the samedirectory as the main class.
484 16 Advanced JavaFX

In this case, we have added our imageView object to a scroll pane, which wehave then configured with a particular width and height:
Then, instead of adding the imageView object directly to the FlowPane, wehave added the ScrollPane object instead:
We can also add images to controls such as buttons. Figure 16.8 shows animage, a simple orange square, embedded in a button. In the first version the buttonwas created without a caption, in the second with the caption “Quit”.
Once the button was created, the image was added as follows:
Fig. 16.7 Embedding animage with a scroll pane
ScrollPane scrollPane = new ScrollPane(imageView); scrollPane.setPrefViewportWidth(250);scrollPane.setPrefViewportHeight(350);
root.getChildren().add(scrollPane);
16.5 Multimedia Nodes 485

16.5.2 Embedding Videos
In the case of embedding a video there are some additional concepts that we need toshow you, but the process is similar. We create a Media object from a file fromwhich we then create a MediaPlayer object. This is then wrapped in a Med-iaView object. MediaView is an extension of Node, so can be added to acontainer. The video formats that are supported are MPEG-4 and FLV. MP3 audiois also supported.
Our application is shown in Fig. 16.9.
Fig. 16.8 Adding an imageto a button
Image image = new Image("OrangeSquare.png");ImageView imageView = new ImageView(image);button.setGraphic(imageView);
Fig. 16.9 Embedding a video
486 16 Advanced JavaFX

As you can see, we have provided options for playing the video from the start aswell as pausing and resuming. The code below shows how we have achieved this:
VideoPlayerimport java.io.File;import javafx.util.Duration;import javafx.application.Application;import javafx.geometry.Pos;import javafx.scene.Scene;import javafx.scene.control.Button;import javafx.scene.layout.HBox;import javafx.scene.layout.VBox;import javafx.scene.media.Media;import javafx.scene.media.MediaPlayer;import javafx.scene.media.MediaView;import javafx.stage.Stage;
public class VideoPlayer extends Application{
@Overridepublic void start(Stage stage){
// create a File object from the video fileFile file = new File("Trees.mp4");
// create a Media object from the File ObjectMedia media = new Media(file.toURI().toString());
// create a MediaPlayer object from the Media ObjectMediaPlayer mp = new MediaPlayer(media);
// create a MediaView object from the MediaPlayer ObjectMediaView mv = new MediaView(mp);
// create the buttonsButton playFromStartButton = new Button("Play from start");Button pauseButton = new Button("Pause");Button resumeButton = new Button("Resume");
// create and configure an HBox to hold the buttonsHBox buttonBox = new HBox(20);buttonBox.setAlignment(Pos.CENTER);buttonBox.getChildren().addAll(playFromStartButton, pauseButton, resumeButton);
// add event handlers to the buttonsplayFromStartButton.setOnAction(e -> {
mp.seek(Duration.millis(0)); mp.play();}
);
pauseButton.setOnAction(e -> mp.pause());
resumeButton.setOnAction(e-> mp.play());
// create the root container, and add it to the scene and stageVBox root = new VBox(20);root.setAlignment(Pos.CENTER);root.getChildren().addAll(mv, buttonBox);
Scene scene = new Scene(root,800,500);stage.setScene(scene);stage.setTitle("Video Example");
stage.show();
}
public static void main(String[] args){
launch(args);}
}
16.5 Multimedia Nodes 487

The Media object that we need to create requires an absolute reference to thesource file. This is referred to as a Uniform Resource Identifier (URI). In order toprovide this we need first to create an instance of the File class which is providedin the java.io package.
File has a method called toURI which retrieves the file’s URI and allows usto send a String representation to the new Media object in the following way:
Now we are able to create our MediaPlayer object and hence our Media-View object
Next we create our buttons and add them to an HBox, which will later be addedto a VBox along with the MediaView object. Having done that, we need to addevent handlers to hold the code that must be executed when the buttons are pressed.
The MediaPlayer class has a progress counter to keep track of the progress ofthe video. This value is held in an object of the Duration class, which hasmethods toMillis, toSeconds, toMinutes and toHours, which expressthe duration in milliseconds, seconds, minutes and hours respectively. It also hasstatic methods called millis and minutes, each of which accepts a doubleand returns a Duration object representing the specified number of millisecondsor minutes respectively.
MediaPlayer has a method called seek which accepts a Duration objectand moves the progress counter to the specified point. It also has a pause methodand a play method, the second of which plays the video from the point indicatedby the progress counter (so it resumes after a pause).
With this information in mind we can look at the code for the “Play from Start”button.
File file = new File("Trees.mp4");
Media media = new Media(file.toURI().toString());
MediaPlayer mp = new MediaPlayer(media);MediaView mv = new MediaView(mp);
playFromStartButton.setOnAction(e -> {mp.seek(Duration.millis(0));mp.play();
} );
488 16 Advanced JavaFX

You can see how we use the seek method to set the counter back to thebeginning, and then call the play method.
The “pause” and “resume” buttons simply invoke pause and playrespectively.
16.5.3 Embedding Web Pages
To embed a webpage we need to create a WebView object that we can add to acontainer. This class incorporates a WebEngine, which is a class that is capable ofmanaging web pages.
In Fig. 16.10 you can see our simple application. It provides a field for the userto type in the website address (the URL), and once the <Enter> key has beenpressed the web page is retrieved and displayed.
Fig. 16.10 Embedding a web page
16.5 Multimedia Nodes 489

Here is the code:
You can see that having created both the WebView and the TextField, we goon to add an event handler to the TextField in order to provide the code that willbe executed when the URL is entered:
WebBrowserimport javafx.application.Application; import javafx.geometry.Pos; import javafx.scene.Scene; import javafx.scene.control.TextField; import javafx.scene.layout.VBox; import javafx.scene.web.WebView; import javafx.stage.Stage;
public class WebBrowser extends Application {@Override
public void start(Stage stage) {
// create and configure a WebView node WebView wv = new WebView(); wv.setMaxSize(750, 700);
// create the text field where the URL will be entered TextField entry = new TextField(); entry.setMaxWidth(750);
/* define the behaviour that occurs when the URL has been entered and the Enter key has been pressed */ entry.setOnKeyTyped(e -> { String url; if(e.getCharacter().equals("\r")) { url = entry.getText(); if(!url.startsWith("http")) { url = "http://" + url; } wv.getEngine().load(url); }
});
VBox root = new VBox(20); root.setAlignment(Pos.CENTER);
root.setMaxSize(750,700); root.getChildren().addAll(entry, wv);
Scene scene = new Scene(root, 800, 750);
stage.setScene(scene); stage.setTitle("Browser example"); stage.show(); }
public static void main(String[] args) { launch(args); } }
490 16 Advanced JavaFX

After declaring a variable to hold the URL, we check to see if the <Enter> keyhas been pressed (special character “\r”). We then check to see if the string enteredstarts with “http”. This is because the method we are going to use to load the pagerequires the full URL, which includes the protocol—normally this would be “http”or “https”. Usually people leave this out went entering a URL, and let the browserdeal with it. That is what we have done here—if the protocol has not been includedwe prefix the address with “http://”.
Next we retrieve the engine from the WebView object with the getEnginemethod, and use the load method of this object to load the URL.
16.6 Cascading Style Sheets
Those of you who have had experience in website development will certainly befamiliar with cascading style sheets (CSS). These enable a webpage, written inHTML, to be free from any formatting detail. The HTML code is on the wholerestricted to providing the basic components and functionality, whereas theappearance of the page is placed in a separate file with the extension .css.
JavaFX provides a similar capability, although as we shall see the syntax isslightly different, with the properties requiring the prefix -fx-.
This topic of style sheets is in fact a vast one, and all that it is possible to do hereis to whet your appetite by explaining the basic principles, which will enable you togo on and study more detail if you are interested.
In Fig. 16.11 we have created a simple registration form (the buttons have notbeen activated), but we have left out any formatting information, so the applicationis simply formatted according to the JavaFX defaults.
entry.setOnKeyTyped(e -> { String url; if(e.getCharacter().equals("\r")) { url = entry.getText(); if(!url.startsWith("http")) { url = "http://" + url; } wv.getEngine().load(url); }
});
Fig. 16.11 An unformatted application
16.5 Multimedia Nodes 491

Take a look at the code:
As you can see, without the formatting information the code looks veryuncluttered and easy to read. This is not only something that is very useful whendeveloping and maintaining an application, but it also has other important benefits.By placing the formatting information in a separate file it means that we can providea similar look and feel—a corporate look—across different applications, by usingthe same style sheet. It also means that if we want to change the appearance of theapplication we can simply replace one style sheet with another. We often use theword skin to refer to a particular look that an application has—so to replace oneskin with another, we simply change the style sheet associated with the application.
So, we added a style sheet to the above code. The result is shown in Fig. 16.12.
CSSDemoimport javafx.application.Application;import javafx.scene.Scene;import javafx.scene.control.Button;import javafx.scene.control.Label;import javafx.scene.control.TextField;import javafx.scene.layout.HBox;import javafx.scene.layout.VBox;import javafx.stage.Stage;
public class CSSDemo extends Application { @Overridepublic void start(final Stage stage) {
HBox row1 = new HBox();HBox row2 = new HBox();HBox row3 = new HBox();
Label nameLabel = new Label("Name");TextField nameField = new TextField();
Label addressLabel = new Label("Address");TextField addressField = new TextField();
Button backButton = new Button("Back");Button saveAndContinueButton = new Button("Save and continue");Button saveAndQuitButton = new Button("Save and quit");Button quitButton = new Button("Quit");Button nextButton = new Button("Next");
row1.getChildren().addAll(nameLabel, nameField);row2.getChildren().addAll(addressLabel, addressField);row3.getChildren().addAll(backButton, saveAndContinueButton,
saveAndQuitButton, quitButton, nextButton);
VBox root = new VBox();root.getChildren().addAll(row1, row2, row3);
Scene scene = new Scene(root);stage.setScene(scene);stage.setTitle("Registration Form");stage.show();
}
public static void main(String[] args) {
launch(args);}
}
492 16 Advanced JavaFX

We called this style sheet Example.css. To load it into our application it isnecessary to add the following line of code:
The file needs to be located in the same directory as the main class.The CSS file looks like this:
Fig. 16.12 The registrationform with a style sheet
scene.getStylesheets().add("Example.css");
Example.css.root{ -fx-font-size: 16pt; -fx-font-family: "Calibri"; -fx-base: #add8e6; /* lightblue */ -fx-spacing: 20px; -fx-padding: 20px; }
.button{ -fx-text-fill: #008000; /* green */ -fx-font-size: 12pt; }
.label{ -fx-background-color: #ccccff ; -fx-min-width : 80px; -fx-min-height: 42px; -fx-font-weight: bold; -fx-padding: 4px; }
.text-field { -fx-min-width: 380px; -fx-text-fill: #1100cc; -fx-background-color: #ccffcc ; -fx-font-style: italic;
}
.button1{ -fx-text-fill: #ff00ff; /* magenta */ -fx-background-color: #ffcc99; }
#quit{ -fx-text-fill: red; -fx-background-color: #ffff00; /* yellow */ }
#row3{
-fx-spacing: 10px; -fx-border-color: #000000; /* black */ -fx-border-width: 2px; -fx-padding: 5px;
}
16.6 Cascading Style Sheets 493

The style sheet consists of a number of styles or selectors, introduced by afull-stop or a hash. These styles refer to particular components. Many style namesare provided by the system and are the same or similar to the node to which theyrefer: for example button, label and text-field (note the hyphen—style names tend tohave hyphens when they consist of two words joined together). Styles corre-sponding to classes are referred to as class styles. Styles have properties, whichrefer to the properties of the particular node. The properties are set by rules whichare placed between braces.
Let’s take a look at the first style in our style sheet:
As you can see, class styles are introduced by a full-stop. Names of properties allbegin with -fx-.
root is a style that refers to the root node in the scene, and all descendant nodeswill have this style unless these definitions are overridden.
The first two lines set the size of the font (in points), and the font family.The next line sets the base colour of the node. The colour here is expressed as a
hexadecimal number, which corresponds to the RGB values we explained inSect. 16.3. The first two digits (starting at the left) represent red, the next two greenand the final two blue. So here we have red with an intensity of 173 (AD inhexadecimal), green with 216 (D8 in hex), and blue with 230 (E6 in hex). Thisactually corresponds to the pre-defined colour lightblue, and we could haveused this constant instead. We could also have written rgb(173, 216, 230).
The last two lines set the spacing and padding, measured in pixels (px). Wecould have used cm or in (centimetres or inches), or we could have used em. Anem is the size of the font that is currently in use—so here, 1 em would represent16pt.
We go on to set the style properties for the .button class, the .label classand the .text-field class. These properties will take precedence over anyproperties set in the .root class.
After this we see the following:
.root{ -fx-font-size: 16pt; -fx-font-family: "Calibri"; -fx-base: #add8e6; /* lightblue */ -fx-spacing: 20px; -fx-padding: 20px; }
.button1{
-fx-text-fill: #ff00ff; /* magenta */-fx-background-color: #ffcc99;
}
494 16 Advanced JavaFX

What we have done here is to set the properties for our own named stylebutton1. This can then be applied to components of our choice. We set this stylespecifically for our “back” and “next” buttons. We apply this style to those com-ponents with the following code:
Finally we see two styles introduced not with a full stop, but with a hash (#):
A hash introduces a style for a particular named component. In our code we gavetwo components an id, with the setId method:
Once we have assigned an id to a node we can then set its style with the hash asshown.
Just to summarise, the additional lines of code that we needed to include in ourprogram were as follows:
As you can imagine, we have only scratched the surface of what is availablewhen using style sheets, but we hope it will be enough for you to do some addi-tional reading and experiments, and of course to check out the Oracle™ website forfurther help and information. Those of you who are interested in JavaFX stylesheets will get an opportunity to apply them as part of an end of chapter pro-gramming exercise in the advanced case study of Chap. 21.
backButton.getStyleClass().add("button1");nextButton.getStyleClass().add("button1");
#quit{
-fx-text-fill: red;-fx-background-color: #ffff00; /* yellow */
}
#row3{
-fx-spacing: 10px;-fx-border-color: #000000; /* black */-fx-border-width: 2px;-fx-padding: 5px;
}
row3.setId("row3");quitButton.setId("quit");
scene.getStylesheets().add("Example.css");backButton.getStyleClass().add("button1");nextButton.getStyleClass().add("button1");row3.setId("row3");quitButton.setId("quit");
16.6 Cascading Style Sheets 495

16.7 Self-test Questions
1. Distinguish between a MouseEvent and a KeyEvent.
2. The following application draws a small rectangle on a scene graphic.
Replace the comment in the program with some code that would allow the userto change the width and height of the rectangle by dragging the mouse. Youshould look at the RedCircle class to get some ideas for how to go about this.
3. Explain the term property in the context of JavaFX components.
4. Explain what is meant by binding properties, and describe how this could beachieved in the case of a slider.
5. Describe how different types of multi-media nodes that can be incorporated intoyour JavaFX applications.
6. Explain the reasons for using cascading style sheets to separate formattinginformation from the rest of the application.
import javafx.application.Application;import javafx.stage.Stage;import javafx.scene.Scene;import javafx.geometry.Pos;import javafx.scene.layout.VBox;import javafx.scene.paint.Color;import javafx.scene.shape.Rectangle;
public class DrawRectangle extends Application{
@Override public void start(Stage stage)
{ final double WIDTH = 400; final double HEIGHT = 400;
Rectangle rect = new Rectangle(10, 10); rect.setFill(Color.RED);
VBox root = new VBox(); root.getChildren().add(rect); root.setAlignment(Pos.TOP_LEFT);
Scene scene = new Scene(root, WIDTH, HEIGHT);
// method goes here
stage.setScene(scene); stage.setTitle("Draw Rectangle"); stage.show();
}
public static void main(String[] args){
launch(args);}
}
496 16 Advanced JavaFX

16.8 Programming Exercises
1. Implement a few of the programs that we have developed in this chapter, andexperiment with different settings in order to change some the features.
2. Adapt the PropertyExample application of Sect. 16.3 so that three or moreTextFields operate in unison.
3. Implement the program you adapted in question 2 of the self-test questions. Trythis with other shapes such as circle and ellipse.
4. In the RedCircle class of Sect. 16.2.1 we used convenience methods toprogram responses to a MOUSE_PRESSED event, a MOUSE_RELEASED event,a MOUSE_MOVED event and a MOUSE_DRAGGED event.Experiment with a the MOUSE_ENTERED and MOUSE_EXITED events. Oneidea might be to change the colour of a button when the cursor is moved over it.
5. Adapt the SliderDemo from Sect. 16.4 so that instead of printing an integervalue, it draws an expanding rectangle as the slider is moved. This is demon-strated in the following diagram:
6. Adapt the SliderDemo program so that the properties of the two sliders arebound, and when one slider moves, the other moves accordingly.
7. Design your own skin for the registration form in Sect. 16.6 by creating a newstyle sheet.
16.8 Programming Exercises 497

17JavaFX: Interacting with the User
Outcomes:
By the end of this chapter you should be able to:
• create applications that utilize pull-down menus and context menus;• create a modal dialogue by defining a secondary stage;• write applications that offer choices via combo boxes, check boxes and radio
buttons;• use a stack pane to create a card menu;• enable user interaction by using the subclasses of the Dialog class.
17.1 Introduction
One of the most common ways for an application to interact with the user is toprovide a number of choices—just as we did with the text-based menus that weintroduced you to in the first semester. With graphical applications, there are anumber of ways of doing this, and in this chapter we present you with a variety oftechniques you can use—we will show you how to create drop-down menus,pop-up menus (also called context menus), check boxes, radio buttons and comboboxes. We will also show you how to interact with the user via popup dialoguewindows.
© Springer Nature Switzerland AG 2019Q. Charatan and A. Kans, Java in Two Semesters, Texts in Computer Science,https://doi.org/10.1007/978-3-319-99420-8_17
499

17.2 Drop-Down Menus
A drop-down menu, or pull-down menu, is a very common way to offer choices tothe user of a program. In Fig. 17.1. we see a very simple example. The programdisplays a flag consisting of three horizontal stripes—the colour of each stripe canbe changed by means of the pull-down menus on the top bar.
As an example, Fig. 17.2 shows the choices offered by the first menu:
Fig. 17.1 An application with three pull-down menus
Fig. 17.2 The options on the “Top Colour” menu
500 17 JavaFX: Interacting with the User

The code for the Flag class is presented below:
public class Flag extends Application{ @Override
public void start(Stage stage){
final double WIDTH = 400;final double HEIGHT = 200;
// create and configure a menu barMenuBar bar = new MenuBar();bar.setMinHeight(25);
// create drop-down menusMenu topStripeMenu = new Menu("Top Colour");Menu middleStripeMenu = new Menu("Middle Colour");Menu bottomStripeMenu = new Menu("Bottom Colour");
// add the drop-down menus to the menu barbar.getMenus().addAll(topStripeMenu, middleStripeMenu, bottomStripeMenu);
// create menu items - two for each drop-down menuMenu red = new Menu("Red");Menu blue = new Menu("Blue");
Menu gold = new Menu("Gold");Menu orange = new Menu("Orange");
Menu green = new Menu("Green");Menu purple = new Menu("Purple");
// add menu items to drop-down menustopStripeMenu.getItems().addAll(red, blue);middleStripeMenu.getItems().addAll(gold, orange);bottomStripeMenu.getItems().addAll(green, purple);
// create the stripesRectangle topStripe = new Rectangle(WIDTH, (HEIGHT-25)/3);Rectangle middleStripe = new Rectangle(WIDTH, (HEIGHT-25)/3);Rectangle bottomStripe = new Rectangle(WIDTH, (HEIGHT-25)/3);
// set initial colourstopStripe.setFill(Color.RED);middleStripe.setFill(Color.GOLD);bottomStripe.setFill(Color.GREEN);
// define the behaviour for each menu itemred.setOnAction(e -> topStripe.setFill(Color.RED));blue.setOnAction(e -> topStripe.setFill(Color.BLUE));gold.setOnAction(e -> middleStripe.setFill(Color.GOLD));orange.setOnAction(e -> middleStripe.setFill(Color.ORANGE));green.setOnAction(e -> bottomStripe.setFill(Color.GREEN));purple.setOnAction(e -> bottomStripe.setFill(Color.PURPLE));
// create VBox to hold the menu bar and the stripesVBox root = new VBox();root.setAlignment(Pos.TOP_LEFT);root.setBackground(Background.EMPTY);root.getChildren().addAll(bar, topStripe, middleStripe, bottomStripe);
// create the scene and add the VBoxScene scene = new Scene(root, WIDTH, HEIGHT);
// confgure the stagestage.setScene(scene);stage.setTitle("Dropdown Menu Example");stage.show();
}
public static void main(String[] args){
launch(args);}
}
Flagimport javafx.application.Application;import javafx.scene.Scene;import javafx.scene.control.Menu;import javafx.scene.control.MenuBar;import javafx.scene.layout.Background;import javafx.scene.layout.VBox;import javafx.scene.paint.Color;import javafx.scene.shape.Rectangle;import javafx.stage.Stage;import javafx.geometry.Pos;
17.2 Drop-Down Menus 501

The first thing we do (after declaring constants for the width and height of thescene) is to create a menu bar:
MenuBar bar = new MenuBar();bar.setMinHeight(25);
Next we create the three menus that will appear on the bar:
Menu topStripeMenu = new Menu("Top Colour");Menu middleStripeMenu = new Menu("Middle Colour");Menu bottomStripeMenu = new Menu("Bottom Colour");
Once you have created an instance of the Menu class, this object can hold othersub-menu items or can have an event handler attached to it which will enable it torespond to a mouse click (an ActionEvent).
In this case we will add two menu items for each stripe. First we create theseitems:
Menu red = new Menu("Red");Menu blue = new Menu("Blue");
Menu gold = new Menu("Gold");Menu orange = new Menu("Orange");
Menu green = new Menu("Green");Menu purple = new Menu("Purple");
Then we add each one to the correct menu. The getItems method of the Menuclass returns a list of items—and we add our items to this list with the addAllmethod.
topStripeMenu.getItems().addAll(red, blue);middleStripeMenu.getItems().addAll(gold, orange);bottomStripeMenu.getItems().addAll(green, purple);
The next thing is to declare and configure three rectangles for our stripes:
Rectangle topStripe = new Rectangle(WIDTH, (HEIGHT-25)/3);Rectangle middleStripe = new Rectangle(WIDTH, (HEIGHT-25)/3);Rectangle bottomStripe = new Rectangle(WIDTH, (HEIGHT-25)/3);
topStripe.setFill(Color.RED);middleStripe.setFill(Color.GOLD);bottomStripe.setFill(Color.GREEN);
We have arranged it so that the height of each stripe takes up one-third of thetotal height, less the height of the menu bar.
502 17 JavaFX: Interacting with the User

Now we add the event handlers, using the convenience method setOnActionthat we have seen before:
red.setOnAction(e -> topStripe.setFill(Color.RED));blue.setOnAction(e -> topStripe.setFill(Color.BLUE));gold.setOnAction(e -> middleStripe.setFill(Color.GOLD));orange.setOnAction(e -> middleStripe.setFill(Color.ORANGE));green.setOnAction(e -> bottomStripe.setFill(Color.GREEN));purple.setOnAction(e -> bottomStripe.setFill(Color.PURPLE));
All that remains is to create and configure a VBox to which we add the menu barand the three stripes; then we add this to the scene, and finally we add the scene tothe stage as usual:
VBox root = new VBox();root.setAlignment(Pos.TOP_LEFT);root.setBackground(Background.EMPTY);root.getChildren().addAll(bar, topStripe, middleStripe, bottomStripe);
Scene scene = new Scene(root, WIDTH, HEIGHT);
stage.setScene(scene);stage.setTitle("Dropdown Menu Example");stage.show();
17.3 Context (Pop-Up) Menus
An alternative to a pull-down menu is a context menu, also referred to as a pop-upmenu. A context menu is normally not available all the time, but pops up only whenit is necessary, and then disappears. To demonstrate this we have created anapplication in which the menu is used simply to change the background colour ofthe graphic, and is invoked by pressing a button. This is demonstrated in Fig. 17.3.
Fig. 17.3 A context menu
17.2 Drop-Down Menus 503

Here is the code for the ContextMenuExample class:
ContextMenuExampleimport javafx.application.Application;import javafx.stage.Stage;import javafx.scene.Scene;import javafx.scene.paint.Color;import javafx.geometry.Pos;import javafx.geometry.Side;import javafx.geometry.Insets;import javafx.scene.control.Button;import javafx.scene.control.ContextMenu;import javafx.scene.control.Menu;import javafx.scene.layout.Background;import javafx.scene.layout.BackgroundFill;import javafx.scene.layout.CornerRadii;import javafx.scene.layout.FlowPane;
public class ContextMenuExample extends Application{
BQxgttkfgpublic void start(Stage stage){ final double WIDTH = 300;final double HEIGHT = 300;
11"etgcvg"c"hnqy"rcpg"vq"dg"wugf"cu"vjg"tqqv"pqfgFlowPane root = new FlowPane();root.setAlignment(Pos.CENTER);
11"etgcvg"c"dwvvqp"cpf"cff"kv"vq"vjg"hnqy"rcpgButton button = new Button("Select background colour");root.getChildren().add(button);
11"etgcvg"c"eqpvgzv"ogpw"ContextMenu popup = new ContextMenu();
11"fghkpg"vjg"ogpw"kvgouMenu red = new Menu("Red");Menu yellow = new Menu("Yellow");Menu green = new Menu("Green");
11"cff"vjg"ogpw"kvgou"vq"vjg"eqpvgzv"ogpwpopup.getItems().addAll(red, yellow, green);
11"cff"vjg"gxgpv"nkuvgpgtu<"vjg"dcemitqwpf"qh"vjg"rcpg"ku"ejcpigf"cpf"vjgp"vjg"ogpw"ku"enqugfred.setOnAction(e -> {
root.setBackground(new Background(new BackgroundFill(Color.RED,CornerRadii.EMPTY, Insets.EMPTY)));
popup.hide();}
);
yellow.setOnAction(e -> {root.setBackground(new Background(new BackgroundFill(Color.YELLOW,
CornerRadii.EMPTY, Insets.EMPTY)));popup.hide();
});
green.setOnAction(e -> { root.setBackground(new Background(new BackgroundFill(Color.GREEN,
CornerRadii.EMPTY, Insets.EMPTY)));popup.hide();
});
11"cff"vjg"gxgpv"nkuvgpgt"vq"vjg"dwvvqp<"vjg"ogpw"ku"ujqyp"yjgp"vjg"dwvvqp"ku"rtguugfbutton.setOnAction(e -> popup.show(root, Side.RIGHT, 10, 10));
11"eqphkiwtg"vjg"uegpg"cpf"vjg"uvcigScene scene = new Scene(root, WIDTH, HEIGHT);stage.setScene(scene);stage.setTitle("Context Menu Example");stage.show();
}
public static void main(String[] args){
launch(args);}
}
504 17 JavaFX: Interacting with the User

There is nothing very new here, and the code is mostly self-explanatory. Butnotice the code for the setOnAction method of the button:
button.setOnAction(e -> popup.show(root, Side.RIGHT, 10, 10));
The popup menu appears on the right side of the “anchor” node, offset by 10pixels to the right and 10 from the top.
There is something else to notice about the menu that appears—it isnon-modal. This means that the parent window is still accessible. This might begood for some applications, but in other applications you may want the applicationto be frozen until the context menu is hidden. In this case the menu is referred to asmodal.
If we want a modal dialogue you can achieve this by creating a secondarystage. We have done this so that the popup menu has three buttons as shown inFig. 17.4.
Fig. 17.4 A modal context menu
17.3 Context (Pop-Up) Menus 505

Here is the code:
import javafx.scene.layout.Background;import javafx.scene.layout.BackgroundFill;import javafx.scene.layout.CornerRadii;import javafx.scene.layout.FlowPane;import javafx.scene.layout.VBox;import javafx.scene.paint.Color;import javafx.stage.Modality;import javafx.stage.Stage;
public class ModalContextMenuExample extends Application{
BQxgttkfgpublic void start(Stage primaryStage){
final double WIDTH = 300;final double HEIGHT = 300;
11"etgcvg"c"hnqy"rcpg"vq"dg"wugf"cu"vjg"tqqv"pqfgFlowPane root = new FlowPane();root.setAlignment(Pos.CENTER);
11"etgcvg"c"dwvvqp"cpf"cff"kv"vq"vjg"hnqy"rcpgButton button = new Button("Select background colour");root.getChildren().add(button);
11"etgcvg"dwvvqpu"hqt"vjg"ogpw"ejqkeguButton red = new Button(" Red ");Button yellow = new Button("Yellow");Button green = new Button(" Green ");
11"etgcvg"c"XDqz"vq"jqnf"vjg"dwvvqpuVBox box = new VBox(10);box.setAlignment(Pos.CENTER); box.getChildren().addAll(red, yellow, green);
11"etgcvg"c"ugeqpfct{ uegpgScene secondaryScene = new Scene(box,200,150);
11"etgcvg"c"ugeqpfct{"uvcigStage secondaryStage = new Stage();
11"cff"vjg"ugeqpfct{ uegpg"vq"vjg"ugeqpfct{ct{"uvcigsecondaryStage.setScene(secondaryScene);
11"ugv"vjg"oqfcnkv{"qh"vjg"ugeqpfct{"uvcigsecondaryStage.initModality(Modality.APPLICATION_MODAL);
11"eqfg"vjg"dwvvqp"uq"vjcv"vjg"ugeqpfct{"uvcig"ku"ocfg"xkukdngbutton.setOnAction(e ->{ secondaryStage.setX(primaryStage.getX() + 250);
secondaryStage.setY(primaryStage.getY() + 100);secondaryStage.show();
});
11"eqfg"vjg"ogpw"kvgoured.setOnAction(e -> {
root.setBackground(new Background(new BackgroundFill(Color.RED,CornerRadii.EMPTY, Insets.EMPTY)));
secondaryStage.hide();}
);
yellow.setOnAction(e -> {root.setBackground(new Background(new BackgroundFill(Color.YELLOW,
CornerRadii.EMPTY, Insets.EMPTY)));secondaryStage.hide();}
);
green.setOnAction(e -> {root.setBackground(new Background(new BackgroundFill(Color.GREEN,
CornerRadii.EMPTY, Insets.EMPTY)));secondaryStage.hide();
});
11"etgcvg"vjg"rtkoct{"uegpg"cpf"uvcig
ModalContextMenuExampleimport javafx.application.Application;import javafx.geometry.Insets;import javafx.geometry.Pos;import javafx.scene.Scene;import javafx.scene.control.Button;
Scene primaryScene = new Scene(root, WIDTH, HEIGHT);primaryStage.setScene(primaryScene);primaryStage.setTitle("Modal Context Menu");primaryStage.show();
}
public static void main(String[] args){
launch(args);}
}
506 17 JavaFX: Interacting with the User

Much of this you will have seen before. The important thing here is how wecreate a secondary scene (which will hold a VBox containing the buttons) and asecondary stage:
Scene secondaryScene = new Scene(box,200,150);Stage secondaryStage = new Stage();secondaryStage.setScene(secondaryScene);
The Stage class has a method called initModality, which allows us tomake the stage modal with respect to the rest of the application, so that once thestage (our menu in this case) appears the application freezes until it disappears. Wedo this with the following line of code:
secondaryStage.initModality(Modality.APPLICATION_MODAL);
17.4 Combo Boxes
You will be familiar with a combo box as it is a very common way of offeringchoices. Our example is shown in Fig. 17.5.
(a) Initial view (b) Menu options
(c) Option selected
Fig. 17.5 Combo box example
17.3 Context (Pop-Up) Menus 507

Here is the code:
ComboBoxExampleimport javafx.application.Application;import javafx.geometry.Insets;import javafx.geometry.Pos;import javafx.scene.Scene;import javafx.scene.control.ComboBox;import javafx.scene.control.Label;import javafx.scene.layout.VBox;import javafx.stage.Stage;
public class ComboBoxExample extends Application{
@Overridepublic void start(Stage stage){
final double WIDTH = 400;final double HEIGHT = 150;
// declare a String type combo boxComboBox<String> box = new ComboBox<>();
// add the choices box.getItems().addAll("Small", "Medium", "Large", "Extra large");
// set the intitial textbox.setValue("Chooose your size");
Label message = new Label();
// display the user's choicebox.setOnAction(e -> message.setText("You have chosen: " + box.getValue()));
VBox root = new VBox(10);root.setPadding(new Insets(20, 20, 20, 20));root.setAlignment(Pos.TOP_CENTER);
root.getChildren().addAll(box, message);
Scene scene = new Scene(root, WIDTH, HEIGHT);stage.setScene(scene);stage.setTitle("Combo Box Example");stage.show();
}
public static void main(String[] args){
launch(args);}
}
The only new thing here is the combo box itself. The ComboBox class is ageneric class, so that the type of items held can vary—most commonly the box willhold strings, but we could just as easily have images for example. In our case we areusing strings, and the declaration is therefore as follows:
ComboBox<String> box = new ComboBox<>();
The menu items are added by using the getItems method:
box.getItems().addAll("Small", "Medium", "Large", "Extra large");
508 17 JavaFX: Interacting with the User

We want the box to start off displaying the instruction, so we use the setValuemethod for this purpose:
box.setValue("Chooose your size");
The other point to note is the use of the getValue method to retrieve thecurrent item displayed—we use this to display the choice made by the user:
box.setOnAction(e -> message.setText("You have chosen: " + box.getValue()));
17.5 Check Boxes and Radio Buttons
Check boxes are a very familiar way of offering choices. Our simple example isshown in Fig. 17.6.
You can see the code for this below. By now this should be self-explanatory—but notice that in this case we used the method isSelected to determine whetherthe box is selected or not.
Fig. 17.6 Check box example
17.4 Combo Boxes 509

CheckBoxExampleimport javafx.scene.control.Button;import javafx.application.Application;import javafx.geometry.Insets;import javafx.geometry.Pos;import javafx.scene.Scene;import javafx.scene.control.CheckBox;import javafx.scene.control.Label;import javafx.scene.layout.VBox;import javafx.stage.Stage;
public class CheckBoxExample extends Application{
@Overridepublic void start(Stage stage){
final double WIDTH = 400;final double HEIGHT = 200;
// create four check boxesCheckBox starter = new CheckBox("Starter");CheckBox mainCourse = new CheckBox("Main");CheckBox dessert = new CheckBox("Dessert");CheckBox drink = new CheckBox("Drink");
Button submitButton = new Button("Place your order");Label message = new Label();
// clicking the buttonsubmitButton.setOnAction(e -> {
String yourOrder = "Your have ordered: ";
if(!starter.isSelected()&& !mainCourse.isSelected() && !dessert.isSelected() && !drink.isSelected())
{yourOrder = "You did not select anything";
} else{
if(starter.isSelected()){
yourOrder = yourOrder + " Starter";}if(mainCourse.isSelected()){
yourOrder = yourOrder + " Main";} if(dessert.isSelected()){
yourOrder = yourOrder + " Dessert";} if(drink.isSelected()){
yourOrder = yourOrder + " Drink";}
} message.setText(yourOrder);
} );
VBox root = new VBox(10);root.setPadding(new Insets(20, 20, 20, 20));root.setAlignment(Pos.CENTER_LEFT);
root.getChildren().addAll(starter, mainCourse, dessert, drink, submitButton, message);
Scene scene = new Scene(root, WIDTH, HEIGHT);
stage.setScene(scene);stage.setTitle("Check Box Example");stage.show();
}
public static void main(String[] args){
launch(args);}
}
510 17 JavaFX: Interacting with the User

Radio buttons are very similar to check boxes, although they are roundinstead of square. They can operate in exactly the same way as check boxes, but canalso be made to operate as a group, so that only one item can be selected at a time; ifa box is selected and then the user chooses another box, the first one is cleared.
Figure 17.7 shows an example of radio buttons working independently. You cansee that it is the same as our check box example, with the check boxes replaced byradio buttons.
Fig. 17.7 Independent radio buttons
Fig. 17.8 Grouped radio buttons
17.5 Check Boxes and Radio Buttons 511

All we needed to do was to replace the declarations of the four check boxes withthe following code:
RadioButton starter = new RadioButton("Starter");RadioButton mainCourse = new RadioButton("Main");RadioButton dessert = new RadioButton("Dessert");RadioButton drink = new RadioButton("Drink");
Figure 17.8 shows an example of radio buttons acting together in a group—onlyone item can be selected.
Here is the code:
GroupedRadioBu onExampleimport javafx.application.Application;import javafx.geometry.Insets;import javafx.scene.Scene;import javafx.scene.control.Button;import javafx.scene.control.Label;import javafx.scene.control.RadioButton;import javafx.scene.layout.VBox;import javafx.stage.Stage;import javafx.geometry.Pos;import javafx.scene.control.ToggleGroup;
public class GroupedRadioButtonExample extends Application{
BQxgttkfgpublic void start(Stage stage){
final double WIDTH = 350;final double HEIGHT = 200;
11"fgenctg"vjg"tcfkq"dwvvqpuRadioButton adultSingle = new RadioButton("Adult single");RadioButton childSingle = new RadioButton("Child single");RadioButton adultReturn = new RadioButton("Adult return");RadioButton childReturn = new RadioButton("Child return");
11"cff"vjg"tcfkq"dwvvqpu"vq"c"vqiing"itqwrToggleGroup group = new ToggleGroup();group.getToggles().addAll(adultSingle, childSingle, adultReturn, childReturn);
Button submitButton = new Button("Choose your ticket");Label message = new Label();
11"enkemkpi"vjg"dwvvqpsubmitButton.setOnAction(e-> {
String yourOrder = "Your have chosen: ";if(!adultSingle.isSelected()&& !childSingle.isSelected() && !adultReturn.isSelected() && !childReturn.isSelected())
{ yourOrder = "You did not chose a ticket";
} else{
if(adultSingle.isSelected()){
yourOrder = yourOrder + " Adult Single";}else if(childSingle.isSelected()){
yourOrder = yourOrder + " Child Single";} else if(adultReturn.isSelected()) {
yourOrder = yourOrder + " Adult Return";}
512 17 JavaFX: Interacting with the User

As you can see we have declared a ToggleGroup and added our radio buttonsto it:
ToggleGroup group = new ToggleGroup();group.getToggles().addAll(adultSingle, childSingle, adultReturn, childReturn);
The buttons now act as one unit—if a button is already selected when anotherbutton is chosen, then the first button is cleared.
17.6 A Card Menu
A very familiar way of entering information into forms is via a serious of screens. Aswe mentioned in Chap. 10, one way to achieve this is via a StackPane, whichenables us to present a series of containers as if they represented a pack of cards. Thetop “cards” can be removed in order, revealing the card underneath—or we couldmove in the other direction, replacing the cards in the order they were removed.
The example shown in Fig. 17.9 represents the initial screens in a made-up game(“The Dungeons of Schpiltz”). A StackPane holds the cards, each of which is aVBox containing buttons. We have not coded the buttons, as it is just for illus-tration. On either side of the StackPane are a “Previous” button and a “Next”button.
17.5 Check Boxes and Radio Buttons 513

(c) The third screen allows the userto choose a location
(b) The second screen allows the userto choose a character
(a) The first screen allows the userto choose a level
Fig. 17.9 A card menu
514 17 JavaFX: Interacting with the User
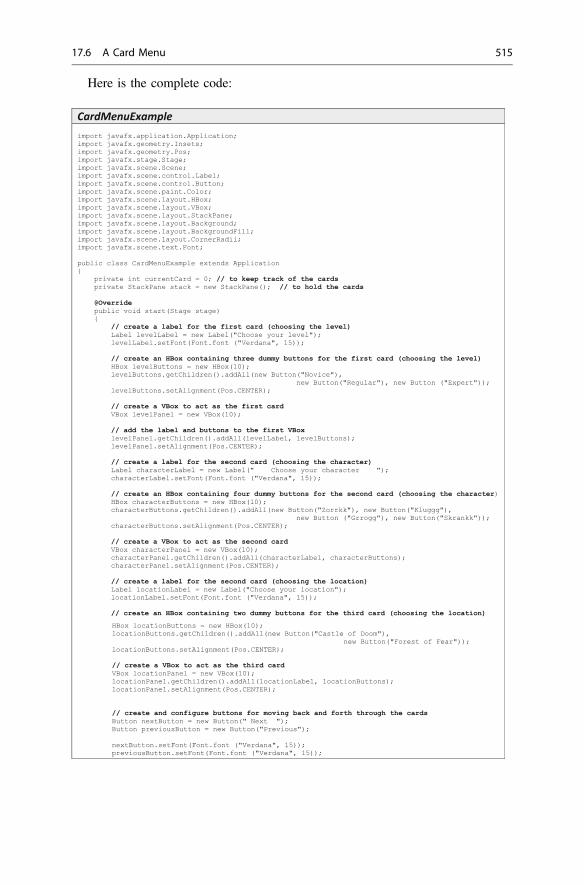
Here is the complete code:
CardMenuExampleimport javafx.application.Application;import javafx.geometry.Insets;import javafx.geometry.Pos;import javafx.stage.Stage;import javafx.scene.Scene;import javafx.scene.control.Label;import javafx.scene.control.Button;import javafx.scene.paint.Color;import javafx.scene.layout.HBox;import javafx.scene.layout.VBox;import javafx.scene.layout.StackPane;import javafx.scene.layout.Background;import javafx.scene.layout.BackgroundFill;import javafx.scene.layout.CornerRadii;import javafx.scene.text.Font;
public class CardMenuExample extends Application{
private int currentCard = 0; // to keep track of the cardsprivate StackPane stack = new StackPane(); // to hold the cards@Overridepublic void start(Stage stage){
// create a label for the first card (choosing the level)Label levelLabel = new Label("Choose your level");levelLabel.setFont(Font.font ("Verdana", 15));
// create an HBox containing three dummy buttons for the first card (choosing the level)HBox levelButtons = new HBox(10);levelButtons.getChildren().addAll(new Button("Novice"),
new Button("Regular"), new Button ("Expert"));levelButtons.setAlignment(Pos.CENTER);
// create a VBox to act as the first cardVBox levelPanel = new VBox(10);
// add the label and buttons to the first VBoxlevelPanel.getChildren().addAll(levelLabel, levelButtons);levelPanel.setAlignment(Pos.CENTER);
// create a label for the second card (choosing the character)Label characterLabel = new Label(" Choose your character ");characterLabel.setFont(Font.font ("Verdana", 15));
// create an HBox containing four dummy buttons for the second card (choosing the character) HBox characterButtons = new HBox(10);characterButtons.getChildren().addAll(new Button("Zorrkk"), new Button("Kluggg"),
new Button ("Grrogg"), new Button("Skrankk"));characterButtons.setAlignment(Pos.CENTER);
// create a VBox to act as the second cardVBox characterPanel = new VBox(10);characterPanel.getChildren().addAll(characterLabel, characterButtons);characterPanel.setAlignment(Pos.CENTER);
// create a label for the second card (choosing the location)Label locationLabel = new Label("Choose your location");locationLabel.setFont(Font.font ("Verdana", 15));
// create an HBox containing two dummy buttons for the third card (choosing the location)HBox locationButtons = new HBox(10);locationButtons.getChildren().addAll(new Button("Castle of Doom"),
new Button("Forest of Fear"));locationButtons.setAlignment(Pos.CENTER);
// create a VBox to act as the third cardVBox locationPanel = new VBox(10);locationPanel.getChildren().addAll(locationLabel, locationButtons);locationPanel.setAlignment(Pos.CENTER);
// create and configure buttons for moving back and forth through the cardsButton nextButton = new Button(" Next ");Button previousButton = new Button("Previous");
nextButton.setFont(Font.font ("Verdana", 15));previousButton.setFont(Font.font ("Verdana", 15));
17.6 A Card Menu 515

// configure the stack pane stack.setPadding(new Insets(10, 10, 10, 10));stack.setBackground(new Background(new BackgroundFill(Color.GOLD,
CornerRadii.EMPTY, Insets.EMPTY)));stack.setAlignment(Pos.CENTER);
// add the cards to the stack panestack.getChildren().addAll(levelPanel, characterPanel, locationPanel);
// show the first card and hide the other twostack.getChildren().get(0).setVisible(true);stack.getChildren().get(1).setVisible(false);stack.getChildren().get(2).setVisible(false);
// create and configure an HBoxHBox root = new HBox(20);root.setBackground(Background.EMPTY);root.setAlignment(Pos.CENTER);
// add the "previous" button, the stack of cards and the "next" button root.getChildren().addAll(previousButton, stack, nextButton);
// add event handlers to call the relevant helper methodsnextButton.setOnAction (e -> next());previousButton.setOnAction (e -> previous());
// create and configure the sceneScene scene = new Scene(root, 500, 200, Color.DARKBLUE);
// configure the stagestage.setScene(scene);stage.setTitle("The Dungeons of Schpiltz");stage.show();
}
// define the helper method for the "next" buttonprivate void next(){
if(currentCard != stack.getChildren().size()- 1) // if we are not at the last card{
currentCard++; // make the next card the current card// move through the cards: show the current card, hide the othersfor(int i = 0; i <= stack.getChildren().size()- 1; i++){
if(i == currentCard) {
stack.getChildren().get(i).setVisible(true);} else{
stack.getChildren().get(i).setVisible(false);}
} }
}
// define the helper method for the "previous" buttonprivate void previous(){
if(currentCard != 0) // if we are not at the first card{
currentCard--; // make the previous card the current card// move through the cards: show the current card, hide the othersfor(int i = 0; i <= stack.getChildren().size()- 1; i++){
if(i == currentCard) {
stack.getChildren().get(i).setVisible(true);} else {
stack.getChildren().get(i).setVisible(false);}
} }
}
public static void main(String[] args){
launch(args);}
}
516 17 JavaFX: Interacting with the User

We are using helper methods for the “Previous” button and the “Next” buttons,so we have defined a couple of attributes that can be accessed by these methods.The first is a counter that keeps track of the current card, the second is the stackpane that will hold the cards:
private int currentCard = 0;private StackPane stack = new StackPane();
The start method begins by creating the first card. First we create a labelwhich gives the instruction to the user:
Label levelLabel = new Label("Choose your level");levelLabel.setFont(Font.font ("Verdana", 15));
Next an HBox to hold three dummy buttons:
HBox levelButtons = new HBox(10);levelButtons.getChildren().addAll(new Button("Novice"),
new Button("Regular"), new Button ("Expert"));levelButtons.setAlignment(Pos.CENTER);
Finally we create a VBox to act as the first card, then add the label and the buttoncontainer to it:
VBox levelPanel = new VBox(10);levelPanel.getChildren().addAll(levelLabel, levelButtons);levelPanel.setAlignment(Pos.CENTER);
We do the same thing for the other two cards, then go on to configure the stackpane and add the three cards to it.
The items held by the stack pane are indexed from zero (in the order they wereadded), and they are retrieved with the get method of the list retrieved by thegetChildren method. Using the indices we set the initial state, with the first cardvisible and the other two invisible:
stack.getChildren().get(0).setVisible(true);stack.getChildren().get(1).setVisible(false);stack.getChildren().get(2).setVisible(false);
We go on to create and configure an HBox, to which we add the “Previous”button, the stack and the “Next” button.
17.6 A Card Menu 517

Before we finally create the scene and the stage, we add our event handlers to thetwo buttons; these call the helper methods, next and previous.
nextButton.setOnAction (e -> next());previousButton.setOnAction (e -> previous());
The code for the next method is as follows:
private void next(){
if(currentCard != stack.getChildren().size()- 1){
currentCard++;for(int i = 0; i <= stack.getChildren().size()- 1; i++){
if(i == currentCard){
stack.getChildren().get(i).setVisible(true);} else{
stack.getChildren().get(i).setVisible(false);}
} }
}
First we have checked that we are not at the last card—for this purpose we haveused the getSize method of the list of items (although we know that the index ofthe last item is 2, doing it this way would allow us to add more cards withoutchanging the code).
If we are not at the last card we increment the counter and then cycle through thecards; we set the current card to be visible, the others to be invisible.
The previous method behaves in a similar way.
17.7 The Dialog Class
JavaFX provides a very useful control class called Dialog, which has subclassescalled Alert, ChoiceDialog, TextInputDialog. These providepopup windows which allow the user to view or enter information. One of the veryuseful aspects of this is that we can begin an application by showing a popupwindow that gets some information from the user before showing the mainscene graphic.
518 17 JavaFX: Interacting with the User

The program below demonstrates how these classes work.
DialogDemoimport java.util.Optional;import javafx.application.Application;import static javafx.application.Application.launch;import javafx.geometry.Pos;import javafx.scene.Scene;import javafx.scene.control.Alert;import javafx.scene.control.Alert.AlertType;import javafx.scene.control.Button;import javafx.scene.control.ChoiceDialog;import javafx.scene.control.Label;import javafx.scene.control.TextInputDialog;import javafx.scene.layout.VBox;import javafx.scene.text.Font;import javafx.stage.Stage;
public class DialogDemo extends Application{
private String name;private String colour;
@Overridepublic void start(Stage stage){
name = getUserName(); // get the user name by calling a text input dialogLabel label1 = new Label();Label label2 = new Label();Button button1 = new Button ("Alert");Button button2 = new Button ("Choice");
button1.setOnAction(e -> showAlert()); // show an alert// call a choice dialogbutton2.setOnAction(e ->
{ colour = showChoice();label2.setText("You chose " + colour);
} );
VBox root = new VBox(10);root.setAlignment(Pos.CENTER);root.getChildren().addAll(label1, button1, button2, label2);label1.setFont(Font.font("Ariel", 20));label2.setFont(Font.font("Ariel", 20));label1.setText("Hello " + name);
Scene scene = new Scene(root);stage.setScene(scene);stage.setTitle("Demo");stage.setWidth(250);stage.setHeight(250);stage.show();
}
private String getUserName(){
TextInputDialog dialog = new TextInputDialog();dialog.setHeaderText("Enter your name");dialog.setTitle("Text Input Dialog");
Optional<String> response = dialog.showAndWait(); return response.get();
}
private void showAlert(){
Alert alert = new Alert(AlertType.INFORMATION);alert.setHeaderText("Information Alert");alert.setContentText(name + " is a cool name");alert.showAndWait();
}
private String showChoice(){
ChoiceDialog<String> choice = new ChoiceDialog<>("Red", "Yellow", "Blue");choice.setContentText("Choose colour");choice.setHeaderText("Choice dialog");
Optional<String> response = choice.showAndWait();return response.get();
}
public static void main(String[] args){
launch(args);}
}
17.7 The Dialog Class 519

As you can see, the first thing that happens, even before the scene is configuredand shown, is that a helper method getUserName is called. This causes thefollowing popup to appear as shown in Fig. 17.10.
The code for getUserName is as follows:
private String getUserName(){
TextInputDialog dialog = new TextInputDialog();dialog.setHeaderText("Enter your name");dialog.setTitle("Text Input Dialog");
Optional<String> response = dialog.showAndWait(); return response.get();
}
As you can see from the code, we create and configure a TextInputDialog,then call its showAndWait method, which does exactly what it says—shows thedialogue and waits for a value to be entered. The value entered is returned as anOptional object (as explained in Chap. 14), in this case Optional <String>.The String value is retrieved with the get method of Optional.
Once the dialogue is closed, the main graphic appears (Fig. 17.11).The two buttons are provided to demonstrate the Alert and the Choice-
Dialog classes. Pressing the “Alert” button calls another helper method, sho-wAlert, which brings up the dialogue window shown below in Fig. 17.12:
The code for showAlert is as follows:
private void showAlert(){
Alert alert = new Alert(AlertType.INFORMATION);alert.setHeaderText("Information Alert");alert.setContentText("name + " is a cool name");alert.showAndWait();
}
Fig. 17.10 A text inputdialog
520 17 JavaFX: Interacting with the User

There are a number of different types of Alert, and the particular type isprovided as a parameter to the constructor. The type that you see in Fig. 17.12 isAlertType.INFORMATION. Other types are shown in Fig. 17.13:
There is an additional constructor of Alert that enables you to choose whichbuttons you would like. It takes the following form:
Alert(Alert.AlertType alertType, String contentText,ButtonType… buttons)
Fig. 17.12 An information alert
Fig. 17.11 Dialog demo application
17.7 The Dialog Class 521

The last of these parameters, buttons, allows you to decide upon the type orbutton—or buttons—you require. So for example, the following statement:
Alert alert = new Alert(AlertType.INFORMATION, "Alert with three buttons", ButtonType.APPLY, ButtonType.OK, ButtonType.CLOSE);
would give rise to the alert shown in Fig. 17.14.The button types available are shown in Table 17.1.In order to find out which of the three buttons had been pressed you would need
to examine the return type of the showAndWait method:
Optional<ButtonType> response = alert.showAndWait();
The ButtonType could then be extracted with the get method ofOptional, and a string representing the button type could then be extracted withthe getText method of ButtonType:
String buttonPressed = response.get().getText();
Fig. 17.13 Other alert types
Fig. 17.14 A choice dialog with three buttons
522 17 JavaFX: Interacting with the User

Finally, the “choice” button in Fig. 17.11 will invoke the showChoice methodwhich brings up a choice dialog (Fig. 17.15).
Here is the code for showChoice, which by now should be self-explanatory(notice, however, that ChoiceDialog is a generic class and requires the type ofthe items to be held):
ChoiceDialog<String> choice = new ChoiceDialog<>("Red", "Yellow", "Blue");choice.setContentText("Choose colour");choice.setHeaderText("Choice dialog");
Optional<String> response = choice.showAndWait();return response.get();
Once this dialogue window is closed, the choice made is shown (Fig. 17.16).
Table 17.1 Available button types
ButtonType.APPLY
ButtonType.CLOSE
ButtonType.CANCEL
ButtonType.FINISH
ButtonType.NEXT
ButtonType.PREVIOUS
ButtonType.YES
ButtonType.NO
ButtonType.OK
Fig. 17.15 A choice dialog
17.7 The Dialog Class 523

17.8 Self-test Questions
1: (a) In the application shown below, identify the various ways that users aregiven for making choices.
(b) What alternatives could have been used for selecting the age range?
2. What is the difference between a modal and a non-modal dialogue?
3. In what circumstances might a context menu be preferable to a drop-downmenu?
Fig. 17.16 Dialog demo after the choice of colour has been made
524 17 JavaFX: Interacting with the User

4. Explain how a number of radio buttons can be made to work together.
5. The diagram below shows the choices available under the “Select a country”option of the application shown in question 1.
Referring to the above diagram, explain how you would begin a conditionalstatement that would execute some code if Bulgaria had been chosen.
17.9 Programming Exercises
1. Implement a few of the programs that we have developed in this chapter, andexperiment with different settings in order to change some the features.
2. Adapt the Hostel case study of Chaps. 11 and 12 as follows:
(a) Make use of a ComboBox to enter the month.
(b) Enable the number of rooms to be entered via a Dialog, as described inSect. 17.7.
(c) Make use of Alerts, as described in Sect. 17.7.
3. Create a graphical user interface for the Library class that we developed inChap. 15. Make use of the many JavaFX features discussed in this chapter.
4. At the end of Chap. 8 you were asked to develop a time table application. Youlater enhanced this application by making use of exceptions at the end ofChap. 14. Now develop a JavaFX GUI for this application, with the timetabledisplayed as a grid. The following is an example—you can choose your owndesign:
17.8 Self-test Questions 525
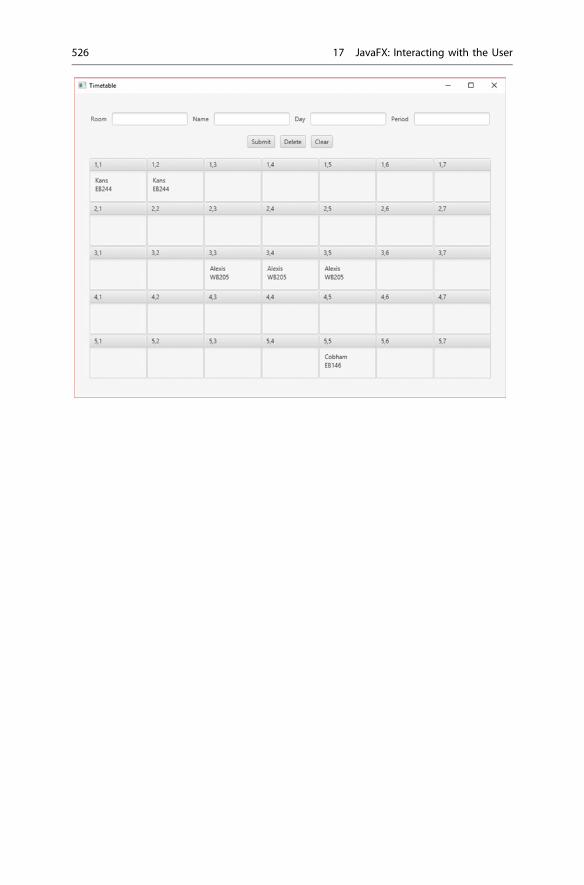
526 17 JavaFX: Interacting with the User
18Working with Files
Outcomes:
By the end of this chapter you should be able to:
• explain the principles of input and output and identify a number of differentinput and output devices;
• explain the concept of an I/O stream;• describe the basic file-handling techniques used in the Java language;• distinguish between text, binary and object encoding of data;• distinguish between serial access files and random access files;• create and access files in Java using all the above encoding and access
methods.
18.1 Introduction
When we developed our case study in Chaps. 11 and 12 it became apparent that inreality an application such as that one wouldn’t be much use unless we had someway of storing our data permanently—even when the program has been terminatedand the computer has been switched off. You will remember in those chapters,because you had not yet learnt how to do this, we provided a special class calledTenantFileHandler that enabled you to keep permanent records on disk.
Now it is time to learn how to do this yourself. As you are no doubt alreadyaware, a named block of externally stored data is called a file.
When we are taking an object-oriented approach, as we have been doing, wetend not to separate the data from the behaviour; however, when it comes to storinginformation in files then of course it is only the data that we are interested in storing.When referring to data alone it is customary to use the terms record and field.A record refers to a single data instance—for example a person, a stock-item, a
© Springer Nature Switzerland AG 2019Q. Charatan and A. Kans, Java in Two Semesters, Texts in Computer Science,https://doi.org/10.1007/978-3-319-99420-8_18
527
student and so on; a field refers to what in the object-oriented world we wouldnormally call an attribute—a name, a stock number, an exam mark etc.
In this chapter we will learn how to create files, and write information to them,and to read the information back when we need it. We start by looking at thisprocess in the overall context of input and output, or I/O as it is often called; youwill then go on to learn a number of different techniques for keeping permanentcopies of your data.
18.2 Input and Output
Any computer system must provide a means of allowing information to come infrom the outside world (input) and, once it has been processed, to be sent out again(output). The whole question of input and output, particularly where files areconcerned, can sometimes seem rather complex, especially from the point of viewof the programmer.
As with all aspects of a computer system, the processes of input and output arehandled by the computer hardware working in conjunction with the system software—that is, the operating system (Windows™, macOS™ or Linux™ for example).The particular application program that is running at the time normally deals withinput and output by communicating with the operating system, and getting it toperform these tasks in conjunction with the hardware.
All this involves some very real complexity and involves a lot of low-leveldetails that a programmer is not usually concerned with; for example, the way inwhich the system writes to external media such as disks, or the way it reconciles thedifferences between the speed of the processor with the speed of the disk-drive.
18.3 Input and Output Devices
The most common way of getting data input from the outside world is via thekeyboard; and the most common way of displaying output data is on the screen.Therefore, most systems are normally set up so that the standard input and outputdevices are the keyboard and the screen respectively. However, there are manyother devices that are concerned with input and output: magnetic, solid state andoptical disks for permanent storage of data (both local and remote); flash drives;network interface cards and modems for communicating with other computers; andprinters for producing hard copies.
We should bear in mind that the process, in one sense, is always the same, nomatter what the input or output device. All the data that is processed by thecomputer’s central processing unit in response to program instructions is stored inthe computer’s main memory or RAM (Random Access Memory). Input is thetransfer of data from some external device to main memory whereas output is the
528 18 Working with Files

transfer of data from main memory to an external device. In order for input oroutput to take place, it is necessary for a channel of communication to be estab-lished between the device and the computer’s memory. Such a channel is referred toas a stream. The operating system will have established a standard input streamand a standard output stream, which will normally be the keyboard and screenrespectively. In addition to this, there is usually a standard error stream whereerror messages can be displayed; this is normally also set to the screen. All of thesedefault settings for the standard streams can be changed either via the operatingsystem or from within the program itself.
In previous chapters you have seen that the System class has two attributescalled in and out. In addition to this, it has an additional attribute called err;these objects are already set up to provide access to the standard input, output anderror streams. The attribute in is an object of a class called InputStream. Thisclass provides some low-level methods to deal with basic input—they are low-levelbecause they deal with sequences of bytes, rather than characters. A higher-levelclass, InputStreamReader can be wrapped around this class to deal withcharacter input; InputStreamReader objects can subsequently be wrapped byanother class, BufferedReader, which handles input in the form of strings.
This rather complex way of reading from the keyboard is how things were donebefore Java 5.0 provided the Scanner class. The following program illustrateshow you would get keyboard input in this manner.
KeyboardInputimport java.io.BufferedReader;import java.io.IOException;import java.io.InputStreamReader;
public class KeyboardInput{
public static void main(String[] args) {
InputStreamReader input = new InputStreamReader(System.in); // to handle low-level detailsBufferedReader reader = new BufferedReader(input); // to handle high-level detailstry
{ System.out.print("Enter a string: ");String test = reader.readLine(); // gets a string of characters from the keyboardSystem.out.println("You entered: " + test);
}
catch(IOException e) {
e.printStackTrace(); } } }
You can see that the readLine method of BufferedReader is used to get astring of characters from the keyboard; as you would expect, the method readscharacters from the keyboard until the user presses the enter key. It throws anIOException if an error (such as a keyboard lock) occurs during the process, andthis has to be handled.
In this chapter, instead of dealing with input and output to the standard streams,we are going to be dealing with the input and output of data to external disk drivesin the form of files—but, as you will see, the principles are the same.
18.3 Input and Output Devices 529

18.4 File-Handling
The output process, which consists of transferring data from memory to a file, isusually referred to as writing; the input process, which consists of transferring datafrom a file to memory, is referred to as reading. Both of these involve somelow-level detail to do with the way in which data is stored physically on the disk.As programmers we do not want to have to worry more than is necessary about thisprocess—which, of course, will differ from one machine to the next and from oneoperating system to the next. Fortunately, Java makes it quite easy for us to dealwith these processes. As we shall see, Java provides low-level classes which createfile streams—input or output streams that handle communication between mainmemory and a named file on a disk. It also provides higher-level classes which wecan “wrap around” the low-level objects, enabling us to use methods that relatemore closely to our logical way of thinking about data. In this way we are shieldedfrom having to know too much detail about the way our particular system stores andretrieves data to or from a file.
As we shall see, this whole process enables us to read and write data in terms ofunits that we understand—for example, in the form of strings, lines of text, or basictypes such integers or characters; Java even allows us to store and retrieve wholeobjects.
18.4.1 Encoding
Java supports three different ways of encoding data—that is, representing data on adisk. These are text, binary and object.
Text encoding means that the data on the disk is stored as characters in the formused by the external system (often ASCII). Java, as we know, uses the Unicodecharacter set, so, depending on the form used by the external system, some con-version might take place in the process, but fortunately the programmer does nothave to worry about that. As an example, consider saving the number 107 to a textfile—it will be saved as the character ‘1’ in ASCII code (or whatever is used by thesystem) followed by the character ‘0’, followed by the character ‘7’. A text file istherefore readable by a text editor (such as Windows™ Notepad).
Binary encoding, on the other hand, means that the data is stored in the sameformat as the internal representation of the data used by the program to store data inmemory. So the number 107 would be saved as the binary number 1101011.A binary file could not be read properly by a text editor as we shall see in Sect. 18.6.
Finally, there is object-encoding which is a powerful mechanism provided byJava whereby a whole object can be input or output with a single command.
You are probably asking yourself which is the best method to use when you startto write applications that read and write to files. Well, if your files are going to beread and written by the same application, then it really makes very little differencehow they are encoded. Just use the method that seems the easiest for the type ofdata you are storing. However, do bear in mind that if you wanted your files to beread by a text editor then you must, of course, use the text encoding method.
530 18 Working with Files

18.4.2 Access
The final thing that you need to consider before we show you how to write files inJava is the way in which files are accessed. There are two ways in which this cantake place—serial access and random access. In the first (and more common)method, each item of data is read (or written) in turn. The operating system provideswhat is known as a file pointer, which is really just a location in memory that keepstrack of where we have got to in the process of reading or writing to a file.
Another way to access data in a file is to go directly to the record you want—thisis known as random access, and is a bit like going straight to the clip you want on aDVD; whereas serial access is like using an old fashioned video tape, where youhave to work your way through the entire tape to get to the bit you want. Javaprovides a class (RandomAccessFile) that we can use for random access. Wewill start, however, with serial access.
18.5 Reading and Writing to Text Files
In this and the following section we are going to use as an example a very simpleclass called Car; the code for this class is given below:
The Car classpublic class Car{
private String registration;private String make;private double price;
public Car(String registrationIn, String makeIn, double priceIn) {
registration = registrationIn;make = makeIn;price = priceIn;
}
public String getRegistration() {
return registration; }
public String getMake() {
return make; }
public double getPrice() {
return price; } }
The program below, TextFileTester, is a very simple menu-driven pro-gram that manipulates a list of cars, held in memory as a List; it provides thefacility to add new cars to the list, to remove cars from the list and to display thedetails of all the cars in the list. As it is a demonstration program only, we have notbothered with such things as input validation, or checking if the list is empty beforewe try to remove an item.
The difference between this and other similar programs that we have discussedbefore, is that the list is kept as a permanent record—as wementioned before, we did asimilar thing in our case study in Chap. 12, but there the process was hidden from you.
18.4 File-Handling 531

The program is designed so that reading and writing to the file takes place asfollows: when the quit option is selected, the list is written as a permanent text filecalled Cars.txt; each time the program is run, this file is read into memory.
The program is presented below; notice that we have provided two helpermethods, writeList and readList for the purpose of accessing the file; as weshall explain, the writeList method also deals with creating the file for the firsttime. Notice also that, for convenience, we are making use of the EasyScannerclass that we developed in Chap. 8.
import java.io.IOException;import java.io.PrintWriter;import java.util.ArrayList;import java.util.List;
public class TextFileTester{
public static void main(String[] args){
char choice;
11"etgcvg"cp"gorv{"nkuv"vq"jqnf"EctuList<Car> carList = new ArrayList<>();
11"tgcf"vjg"nkuv"htqo"hkng"yjgp"vjg"rtqitco"uvctvureadList(carList);
11"ogpw"qrvkqpudo{
System.out.println("\nText File Tester");System.out.println("1. Add a car");System.out.println("2. Remove a car");System.out.println("3. List all cars");System.out.println("4. Quit\n");choice = EasyScanner.nextChar();System.out.println(); switch(choice){
case '1' :addCar(carList);break;
case '2' :removeCar(carList);break;
case '3' :listAll(carList);break;
case '4' :writeList(carList); 11"ytkvg"vq"vjg"hkngbreak;
default : System.out.print("\nPlease choose a number from 1 - 4 only\n ");}
}while(choice != '4');}
11"ogvjqf"hqt"cffkpi"c"pgy"ect"vq"vjg"nkuvstatic void addCar(List<Car> carListIn){
String tempReg;String tempMake;double tempPrice;
System.out.print("Please enter the registration number: ");tempReg = EasyScanner.nextString();System.out.print("Please enter the make: ");tempMake = EasyScanner.nextString();System.out.print("Please enter the price: ");tempPrice = EasyScanner.nextDouble();carListIn.add(new Car(tempReg, tempMake, tempPrice));
}
1,"ogvjqf"hqt"tgoqxkpi"c"ect"htqo"vjg"nkuv / kp"c"tgcn"crrnkecvkqp"vjku"yqwnf"pggf"vq"kpenwfguqog"xcnkfcvkqp",1
static void removeCar(List<Car> carListIn){
int pos;System.out.print("Enter the position of the car to be removed: ");pos = EasyScanner.nextInt();carListIn.remove(pos - 1);
}
11"ogvjqf"hqt"nkuvkpi"fgvcknu"qh"cnn"ectu"kp"vjg"nkuvstatic void listAll(List<Car> carListIn)
TextFileTesterimport java.io.BufferedReader;import java.io.FileNotFoundException;import java.io.FileReader;import java.io.FileWriter;
532 18 Working with Files

}
}
11"ogvjqf"hqt"ytkvkpi"vjg"hkngstatic void writeList(List<Car> carListIn){
11"wug"vt{/ykvj/tguqwtegu"vq"gpuwtg"hkng"ku"enqugf"uchgn{try(
1,"etgcvg"c"HkngYtkvgt"qdlgev."ectHkng."vjcv"jcpfngu"vjg"nqy/ngxgn"fgvcknu"qh"ytkvkpivjg"nkuv"vq"c"hkng"yjkej"yg"jcxg"ecnngf"$Ectu0vzv$",1FileWriter carFile = new FileWriter("Cars.txt");1,"pqy"etgcvg"c"RtkpvYtkvgt"qdlgev"vq"ytcr"ctqwpf"ectHkng="vjku"cnnqyu"wu"vq"wugtjkij/ngxgn"hwpevkqpu"uwej"cu"rtkpvnp",1PrintWriter carWriter = new PrintWriter(carFile);
){
11"ytkvg"gcej"gngogpv"qh"vjg"nkuv"vq"vjg"hkngfor(Car item : carListIn){
carWriter.println(item.getRegistration());carWriter.println(item.getMake());carWriter.println(item.getPrice()); 11"rtkpvnp"ecp"ceegrv"c"fqwdng."cpf"ytkvg"kv"cu"c"uvtkpi
}}11"jcpfng"vjg"gzegrvkqp"vjtqyp"d{"vjg"HkngYtkvgt"ogvjqfucatch(IOException e){
System.out.println("There was a problem writing the file");}
}
11"ogvjqf"hqt"tgcfkpi"vjg"hkngstatic void readList(List<Car> carListIn){
String tempReg;String tempMake;String tempStringPrice;double tempDoublePrice;
11"wug"vt{/ykvj/tguqwtegu"vq"gpuwtg"hkng"ku"enqugf"uchgn{try(
1,"etgcvg"c"HkngTgcfgt"qdlgev."ectHkng."vjcv"jcpfngu"vjg"nqyngxgn"fgvcknu"qh"tgcfkpivjg"nkuv"htqo"vjg"$Ectu0vzv$"hkng",1FileReader carFile = new FileReader("Cars.txt");1,"pqy"etgcvg"c"DwhhgtgfTgcfgt"qdlgev"vq"ytcr"ctqwpf"ectHkng="vjku"cnnqyu"wu"vq"wugtjkij/ngxgn"hwpevkqpu"uwej"cu"tgcfNkpg",1BufferedReader carStream = new BufferedReader(carFile);
){
11"tgcf"vjg"hktuv"nkpg"qh"vjg"hkngtempReg = carStream.readLine();1,"tgcf"vjg"tguv"qh"vjg"hktuv"tgeqtf."vjgp"cnn"vjg"tguv"qh vjg"tgeqtfu"wpvkn"vjg"gpf"qh
vjg"hkng"ku"tgcejgf",1while(tempReg != null) 11"c"pwnn"uvtkpi"kpfkecvgu"gpf"qh"hkng{
tempMake = carStream.readLine();tempStringPrice = carStream.readLine();11"cu"vjku"ku"c"vgzv"hkng"yg"jcxg"vq"eqpxgtv"vjg"rtkeg"vq"fqwdngtempDoublePrice = Double.parseDouble(tempStringPrice);carListIn.add(new Car(tempReg, tempMake, tempDoublePrice));tempReg = carStream.readLine();
}}
11"jcpfng"vjg"gzegrvkqp"vjcv"ku"vjtqyp"d{"vjg"HkngTgcfgt"eqpuvtwevqt"kh"vjg"hkng"ku"pqv"hqwpfcatch(FileNotFoundException e){
System.out.println("\nNo file was read");}
11"jcpfng"vjg"gzegrvkqp"vjtqyp"d{"vjg"HkngTgcfgt"ogvjqfucatch(IOException e){
System.out.println("\nThere was a problem reading the file");}
}}
{for(Car item : carListIn){
System.out.println(item.getRegistration()+ " "+ item.getMake()+ " "+ item.getPrice());
It is only the writeList and readList methods that we need to analysehere—none of the other methods involves anything new. Let’s start withwriteList:
18.5 Reading and Writing to Text Files 533

// method for writing the filestatic void writeList(List<Car> carListIn)
{ // use try-with-resources to ensure file is closed safelytry(
/* create a FileWriter object, carFile, that handles the low-level details of writing the list to a file which we have called "Cars.txt" */FileWriter carFile = new FileWriter("Cars.txt");/* now create a PrintWriter object to wrap around carFile; this allows us to user high-level functions such as println */PrintWriter carWriter = new PrintWriter(carFile);
) {
// write each element of the list to the file for(Car item : carListIn)
{ carWriter.println(item.getRegistration());carWriter.println(item.getMake());carWriter.println(item.getPrice()); // println can accept a double, and write it as a string
} }
// handle the exception thrown by the FileWriter methodscatch(IOException e)
{ System.out.println("There was a problem writing the file");
} }
The first thing to notice is that we have enclosed everything in a try block. Herewe are creating our files using the try-with-resourcesmechanism that was introducedto you in Chap. 14. We use this because the file has to be closed after we finish usingit. Closing the file achieves two things. First, it ensures that a special character, theend-of-file marker,1 is written at the end of the file. This enables us to detect when theend of the file has been reached when we are reading it—more about this when weexplore the readList method. Second, closing the file means that it is no longeraccessible by the program, and is therefore not susceptible to being written to in error.
Using try-with-resources ensures that the file is always closed, no matter whatother errors or exceptions may have occurred—before the advent of try-with-re-sources we would have had to specifically close the file by calling the closemethod of PrintWriter (this would have been done in a finally clause). Asyou can see, the instructions for opening the file have been placed in the bracketsafter the try keyword. We will use try-with-resources to create and open filesthroughout this chapter.
The file is opened by using a class called FileWriter; this is one of theclasses we talked about earlier that provide the low-level communication betweenthe program and the file. By opening a file we establish a stream through which wecan output data to the file. We create a FileWriter object, carFile, giving itthe name of the file to which we want to write the data:
FileWriter carFile = new FileWriter("Cars.txt");
In this case we have called the file Cars.txt.2 Creating the new File-Writer object causes the file to be opened in output mode—meaning that it isready to receive data; if no file of this name exists then one will be created. Openingthe file in this way (in output mode) means that any data that we write to the file will
1Most systems use Unicode character 26 as the end-of-file marker.2As we have not supplied an absolute pathname, the file will be saved in the current directory.
534 18 Working with Files

wipe out what was previously there. That is what we need for this particularapplication, because we are simply going to write the entire list when the programterminates. Sometimes, however, it is necessary to open a file in append mode; inthis mode any data written to the file would be written after the existing data. To dothis we would simply have used another constructor, which takes an additional(boolean) parameter indicating whether or not we require append mode:
FileWriter carFile = new FileWriter("Cars.txt", true);
The next thing we do is create an object, carWriter, of the PrintWriterclass, sending it the carFile object as a parameter.
PrintWriter carWriter = new PrintWriter(carFile);
This object can now communicate with our file via the carFile object;PrintWriter objects have higher level methods than FileWriter objects (forexample print and println) that enable us to write whole strings like we dowhen we output to the screen.
Now we are ready to write each Car in the list to our file—we can use a forloop for this:
for(Car item : carListIn){
carWriter.println(item.getRegistration()); carWriter.println(item.getMake());
carWriter.println(item.getPrice());}
On each iteration we use the println method of our PrintWriter object,carWriter, to write the registration number, the make and the price of the car tothe file; println converts the price to a String before writing it. Notice alsothat the println method inserts a newline character at the end of the string that itprints; if we did not want the newline character to be inserted, we would use theprint method instead.
Finally we have to handle any IOExceptions that may be thrown by theFileWriter methods:
catch(IOException e){
System.out.println("There was a problem writing the file");}
In a moment we will explore the code for reading the file. But bear in mind thatif we were to run our program and add a few records, and then quit the program wewould have saved the data to a text-file called Cars.txt, so we should be able toread this file with a text editor. When we did this, we created three cars, and thenlooked inside the file using Windows™ Notepad. Figure 18.1 shows the result.
18.5 Reading and Writing to Text Files 535

As we have written each field using the println statement, each one, as youcan see, starts on a new line. If our aim were to view the file with a text editor as wehave just done, then this might not be the most suitable format—we might, forexample, have wanted to have one record per line; we could also have printed someheadings if we had wished. However, it is actually our intention to make ourprogram read the entire file into our list when the program starts—and as we shallnow see, one field per line makes reading the text file nice and easy. So let’s take alook at our readList method:
// method for reading the filestatic void readList(List<Car> carListIn)
{ String tempReg;String tempMake;String tempStringPrice;double tempDoublePrice;
// use try-with-resources to ensure file is closed safelytry(
/* create a FileReader object, carFile, that handles the lowlevel details of readingthe list from the "Cars.txt" file */FileReader carFile = new FileReader("Cars.txt");/* now create a BufferedReader object to wrap around carFile; this allows us to user high-level functions such as readLine */BufferedReader carStream = new BufferedReader(carFile);
) {
// read the first line of the file tempReg = carStream.readLine();/* read the rest of the first record, then all the rest of the records until the end of
the file is reached */while(tempReg != null) // a null string indicates end of file
{ tempMake = carStream.readLine();tempStringPrice = carStream.readLine();// as this is a text file we have to convert the price to doubletempDoublePrice = Double.parseDouble(tempStringPrice);carListIn.add(new Car(tempReg, tempMake, tempDoublePrice));tempReg = carStream.readLine();
} }
// handle the exception that is thrown by the FileReader constructor if the file is not foundcatch(FileNotFoundException e)
{ System.out.println("\nNo file was read");
}
// handle the exception thrown by the FileReader methodscatch(IOException e)
{ System.out.println("\nThere was a problem reading the file");
} }
Fig. 18.1 Viewing a text file with windows notepad
536 18 Working with Files

First, we have declared some variables to hold the value of each field as weprogressively read through the file. Remembering that this is a text file we havedeclared three Strings:
String tempReg;String tempMake;String tempStringPrice;
The last of these will have to be converted to a double before we store it in thelist so we also need a variable to hold this value once it is converted:
double tempDoublePrice;
Now, as before, we put everything into a try block, as we are going to have todeal with the exceptions that may be thrown by the various methods we will beusing. Again we are using try-with-resources, so the process of opening the file isplace in the brackets after the try. As you can see from the code, we start bycreating an object—carFile—of the class FileReader which deals with thelow-level details involved in the process of reading a file. The name of the file,Cars.txt, that we wish to read is sent in as a parameter to the constructor; thisfile is then opened in read mode.
FileReader carFile = new FileReader("Cars.txt");
Now, in order that we can use some higher-level read methods, we wrap up ourcarFile object in an object of a class called BufferedReader. We have calledthis new object carStream.
BufferedReader carStream = new BufferedReader(carFile);
Now we are going to read each field of each record in turn, so we will need somesort of loop. The only problem is to know when to stop—this is because the numberof records in the file can be different each time we run the program. There aredifferent ways in which to approach this problem. One very good way (although notthe one we have used here), if the same program is responsible for both reading andwriting the file, is simply to write the total number of records as the first item whenthe file is written. Then, when reading the file, this item is the first thing to be read—and once this number is known a for loop can be used to read the records.
However, it may well be the case that the file was written by another program(such as a text editor). In this case it is necessary to check for the end-of-file markerthat we spoke about earlier. In order to help you understand this process we areusing this method here, even though we could have used the first (and perhapssimpler) method.
18.5 Reading and Writing to Text Files 537

This is what we have to do: we have to read the first field of each record, thencheck whether that field began with the end-of-file marker. If it did, we must stopreading the file, but if it didn’t we have to carry on and read the remaining fields ofthat record. Then we start the process again for the next record.
Some pseudocode should make the process clear; we have made this pseudocodespecific to our particular example:
BEGINREAD the registration number field of the first recordLOOP while the field just read does not contain the end-of-file markerBEGIN
READ the make field of the next recordREAD the price field of the next recordCONVERT the price to a doubleCREATE a new car with details just read and add it to the list READ the registration number field of the next record
ENDEND
The code for this is shown below:
tempReg = carStream.readLine();while(tempReg != null) // a null string indicates end of file{
tempMake = carStream.readLine();tempStringPrice = carStream.readLine();tempDoublePrice = Double.parseDouble(tempStringPrice);carListIn.add (new Car(tempReg, tempMake, tempDoublePrice));tempReg = carStream.readLine();
}
Notice that we are using the readLine method of BufferedReader to readeach record. This method reads a line of text from the file; a line is consideredanything that is terminated by the newline character. The method returns that line asa String (which does not include the newline character). However, if the line readconsists of the end-of-file marker, then readLine returns a null, making it veryeasy for us to check if the end of the file has been reached. In Sect. 18.7 you will beable to contrast this method of BufferedReader with the read method, whichreads a single character only.
Finally, we must handle any exceptions that may be thrown by the methods ofFileReader; first, the constructor throws a FileNotFoundException if thefile is not found:
catch(FileNotFoundException e){
System.out.println("\nNo file was read");}
All the other methods may throw IOExceptions:
catch(IOException e){
System.out.println("\nThere was a problem reading the file");}
538 18 Working with Files

18.6 Reading and Writing to Binary Files
In many ways, it makes little difference whether we store our data in text format orbinary format; but it is, of course, important to know the sort of file that we aredealing with when we are reading it. For example, in the previous section you sawthat we needed to convert a String to a double when it came to handling theprice of a car. However, it is important for you to be familiar with the ways ofhandling both types of file, so now we will show you how to read and write data to abinary file using exactly the same example as before.
The only difference in our program will be the writeList and readListmethods. First let’s look at the code for the new writeList method:
static void writeList(List<Car> carListIn){
// use try-with-resources to ensure file is closed safelytry(
FileOutputStream carFile = new FileOutputStream("Cars.bin");DataOutputStream carWriter = new DataOutputStream(carFile);
) {
for(Car item : carListIn) {
carWriter.writeUTF(item.getRegistration());carWriter.writeUTF(item.getMake());carWriter.writeDouble(item.getPrice());
}
}
catch(IOException e) {
System.out.println("There was a problem writing the file"); }
You can see that the process is similar to the one we used to write a text file, buthere the two classes that we are using are FileOutputStream andDataOutputStream which deal with the low-level and high-level processesrespectively. The DataOutputStream class provides methods such aswriteDouble, writeInt and writeChar for writing all the basic scalartypes, as well a method called writeUTF for writing strings. UTF stands forUnicode Transformation Format, and the method is so-called because, when itwrites the string to a file, it converts the Unicode characters (which are used in Java)to the machine-specific format.
Before moving on to the readList method it is worth reminding ourselvesthat a file written in this way—that is, a binary file—cannot be read by a text editor.And to prove the point, Fig. 18.2 shows the result of trying to read such a file inWindows™ Notepad.
18.6 Reading and Writing to Binary Files 539

So now we can look at the readList method:
static void readList(List<Car> carListIn) {
String tempReg;String tempMake;double tempPrice;boolean endOfFile = false;
// use try-with-resources to ensure file is closed safelytry(
FileInputStream carFile = new FileInputStream("Cars.bin");DataInputStream carStream = new DataInputStream(carFile);
) {
while(endOfFile == false) {
try {
tempReg = carStream.readUTF();tempMake = carStream.readUTF();tempPrice = carStream.readDouble();carListIn.add(new Car(tempReg, tempMake, tempPrice));
} catch(EOFException e)
{ endOfFile = true;
} }
} catch(FileNotFoundException e)
{ System.out.println("\nThere are currently no records");
}
catch(IOException e) {
System.out.println("There was a problem reading the file"); }
}
You can see that the two classes we use for reading binary files areFileInputStream for low-level access and DataInputStream for thehigher-level functions; they have equivalent methods to those we saw previouslywhen writing to files.
The most important thing to observe in this method is the way we test whetherwe have reached the end of the file. In the case of a binary file we can do this bymaking use of the fact that the DataInputStream methods throwEOFExceptions when an end of file marker has been detected during a readoperation. So all we have to do is declare a boolean variable, endOfFile,which we initially set to false, and we use this as the termination condition in thewhile loop. Then we enclose our read operations in a try block, and, when anexception is thrown, endOfFile is set to true within the catch block, causingthe while loop to terminate.
Fig. 18.2 Trying to read a binary file with a text editor
540 18 Working with Files

18.7 Reading a Text File Character by Character
As you will have realized by now, there are many ways in which we can deal withhandling files, and the methods we choose will depend largely on what it is we wantto achieve.
In this section we will show you how to read a text file character by character—this is a useful technique if we do not know anything about the structure of the file.
We have written a JavaFX application which reads a text file, Poem.txt,character by character, and builds a string by appending each character as it is read.The process continues until the end of the file is reached, or until a stipulatednumber of characters have been read. We put this last condition in as a safeguard incase the user should try to display a very large file by mistake.
Once the reading process has finished, the string is displayed by adding it to alabel, as shown in Fig. 18.3.
Here is the code for the application:
CharacterByCharacterimport java.io.BufferedReader;import java.io.FileReader;import java.io.IOException;import javafx.application.Application;import javafx.geometry.Pos;import javafx.scene.Scene;import javafx.scene.control.Label;import javafx.scene.layout.VBox;import javafx.stage.Stage;
public class CharacterByCharacter extends Application{
private Label viewArea = new Label();
BQxgttkfgpublic void start(Stage stage){
VBox root = new VBox();root.setAlignment(Pos.CENTER);root.getChildren().add(viewArea);Scene scene = new Scene(root, 400, 100);stage.setScene(scene);stage.setTitle("Character By Character");stage.show();
readAndWrite();}private void readAndWrite()
Fig. 18.3 Reading a file character by character
18.7 Reading a Text File Character by Character 541

{11"wug"vt{/ykvj/tguqwtegu"vq"gpuwtg"hkng"ku"enqugf"uchgn{try(
FileReader testFile = new FileReader("Poem.txt");BufferedReader textStream = new BufferedReader(testFile);
){
String str = new String();final int MAX = 1000;
int ch; 11"vq"jqnf"vjg"kpvgigt"*Wpkeqfg+"xcnwg"qh"vjg"ejctcevgtchar c; 11"vq"jqnf"vjg"ejctcevgt"yjgp"v{rg"ecuv"htqo"kpvgigtint counter = 0; 11"vq"eqwpv"vjg"pwodgt"qh"ejctcevgtu"tgcf"uq"hctch = textStream.read(); 11"tgcf"vjg"hktuv"ejctcevgt"htqo"vjg"hkngc = (char) ch; 11"v{rg"ecuv"htqo"kpvgigt"vq"ejctcevgt1,"eqpvkpwg"vjtqwij"vjg"hkng"wpvkn"gkvjgt"vjg"gpf"qh"vjg"hkng"ku
tgcejgf"*kp"yjkej"ecug /3"ku"tgvwtpgf+"qt"vjg"oczkowo"pwodgt"qhejctcevgtu"uvkrwncvgf"jcxg"dggp"tgcf",1
while( ch != -1 && counter <= MAX){
counter++; 11"kpetgogpv"vjg"eqwpvgtstr = str + c;ch = textStream.read(); 11"tgcf"vjg"pgzv"ejctcevgtc = (char) ch;
}
str = str + "\n";viewArea.setText(str);
}
catch(IOException ioe){
viewArea.setText("There was a problem reading the file\n");}
}
public static void main(String[] args){
launch(args);}
}
As you can see, we have placed the functionality in a helper method, read-AndWrite. The main thing to notice here is that we are using the read method ofBufferedReader; this method reads a single character from the file and returnsan integer, the Unicode value of the character read. If the character read was theend-of-file marker then it returns −1, making it an easy matter for us to checkwhether the end of the file has been reached. In the above example, as explainedearlier, we stop reading the file if we have reached the end or if more than themaximum number of characters allowed has been read; here we have set thatmaximum to 1000. You can see that in the above method, after each read operation,we type cast the integer to a character, which we then append to the string.
18.8 Object Serialization
If you are going to be dealing with files that will be accessed only within a Javaprogram, then one of the easiest ways to do this is to make use of two classes calledObjectInputStream and ObjectOutputStream. These classes havemethods called, respectively, readObject and writeObject that enable us toread and write whole objects from and to files. The process of converting an objectinto a stream of data suitable for storage on a disk is called serialization.
Any class whose objects are to be read and written using the above methodsmust implement the interface Serializable. This is a type of interface that wehave not actually come across before—it is known as a marker and in fact contains
542 18 Working with Files

no methods. Its purpose is simply to make an “announcement” to anyone using theclass; namely that objects of this class can be read and written as whole objects. Indesigning a class we can, then, choose not to make our class Serializable—wemight want to do this for security reasons (for example, to stop whole objects beingtransportable over the Internet) or to avoid errors in a distributed environmentwhere the code for the class was not present on every machine.
In the case of our Car class, we therefore need to declare it in the following waybefore we could use it in a program that handles whole objects:
public class Car implements Serializable
The Serializable interface resides within the java.io package.Now we can re-write the writeList and readList methods of TextFi-
leTester so that we manipulate whole objects. First the writeList method:
static void writeList(List<Car> carListIn){
// use try-with-resources to ensure file is closed safelytry(
FileOutputStream carFile = new FileOutputStream("Cars.dat");ObjectOutputStream carStream = new ObjectOutputStream(carFile);
) {
for(Car item : carListIn){
carStream.writeObject(item);}
} catch(IOException e){
System.out.println("There was a problem writing the file");}
}
You can see how easy this is—you just need one line to save a whole object to afile by using the writeObject method of ObjectOutputStream.
Now the readList method:
static void readList(List<Car> carListIn){
boolean endOfFile = false;Car tempCar;
11"wug"vt{/ykvj/tguqwtegu"vq"gpuwtg"hkng"ku"enqugf"uchgn{try(
11"etgcvg"c"HkngKprwvUvtgco"qdlgev."ectHkngFileInputStream carFile = new FileInputStream("Cars.dat");11"etgcvg"cp"QdlgevKprwvUvtgco"qdlgev"vq"ytcr"ctqwpf"ectHkngObjectInputStream carStream = new ObjectInputStream(carFile);
){
11"tgcf"vjg"hktuv"*yjqng+"qdlgev"ykvj"vjg"tgcfQdlgev"ogvjqftempCar = (Car) carStream.readObject();while(endOfFile != true){
try{
carListIn.add(tempCar);// read the next (whole) objecttempCar = (Car) carStream.readObject();
}
1,"wug"vjg"hcev"vjcv"tgcfQdlgev"vjtqyu"cp"GQHGzegrvkqp"vqejgem"yjgvjgt"vjg"gpf"qh"vjg"hkng"jcu"dggp"tgcejgf",1
18.8 Object Serialization 543

catch(FileNotFoundException e){
System.out.println("\nNo file was read");}
catch(ClassNotFoundException e) 11"vjtqyp"d{"tgcfQdlgev{
System.out.println("\nTrying to read an object of an unknown class");}
catch(StreamCorruptedException e) 11"vjtqyp"d{"vjg"eqpuvtwevqt{
System.out.println("\nUnreadable file format");}
catch(IOException e){
System.out.println("There was a problem reading the file");}
catch(EOFException e){
endOfFile = true;}
}
}
Again you can see how easy this is—a whole object is read with the read-Object method.
We should draw your attention to a few of the exception handling routines wehave used here—first notice that we have once again made use of the fact thatreadObject throws an EOFException to check for the end of the file. Second,notice that readObject also throws a ClassNotFoundException, whichindicates that the object just read does not correspond to any class known to theprogram. Finally, the constructor throws a StreamCorruptedException,which indicates that the input stream given to it was not produced by anObjectOutputStream object—underlining the fact that reading and writingwhole objects are complementary techniques that are specific to Java programs.
One final thing to note—if an attribute of a Serializable class is itself anobject of another class, then that class too must be Serializable in order for usto be able to read and write whole objects as we have just done. You will probablyhave noticed that in the case of the Car class, one of its attributes is a String—fortunately the String class does indeed implement the Serializable inter-face, which is why we had no problem using it in this way in our example.
Before moving on, it is worth noting that all the Java collection classes such asHashMap and ArrayList are themselves Serializable.
18.9 Random Access Files
All the programs that we have looked at so far in this chapter have made use ofserial access. For small applications this will probably be all you need—however, ifyou were writing applications that handled very large data files it would bedesirable to use random access methods. Fortunately Java provides us with thisfacility.
544 18 Working with Files

Table 18.1 Size of the primitive types
byte 1 byte
short 2 bytes
char 2 bytes
int 4 bytes
long 8 bytes
float 4 bytes
double 8 bytes
boolean 1 bit3
The class that we need is called RandomAccessFile. This enables us to opena file for random access. Random access files can be opened in either read–writemode or read-only mode; the constructor therefore takes, in addition to the name ofthe file, an additional String parameter which can be either “rw” or “r”, indi-cating the mode in which the file is to be opened.
In addition to methods similar to those of the DataOutputStream class (suchas writeUTF, readDouble and so on), RandomAccessFile has a methodcalled seek. This takes one attribute, of type long, which indicates how manybytes to move the file-pointer before starting a read or write operation.
So now we have the question of how far to move the pointer—we need to beable to calculate the size of each record. If we are dealing only with primitive types,this is an easy matter. These types all take up a fixed amount of storage space, asshown in Table 18.1 overleaf.
The difficulty comes when a record contains Strings, as is commonly the case.The size of a String object varies according to how many characters it contains.What we have to do is to restrict the length of each string to a given amount; let’s takethe Car class as an example. The data elements of any Car object consist of twoStrings and a double. We will make the decision that the two String attributes—registration number and make—will be restricted to 10 characters only. Now, anyString variable will always take up one byte for each character, plus two extra bytes(at the beginning) to hold an integer representing the length of the String. So nowwe can calculate the maximum amount of storage space we need for a car as follows:
registration (String) 12 bytes
make (String) 12 bytes
price (double) 8 bytes
Total 32 bytes
This still leaves us with one problem—what if the length of one of the Stringattributes entered is actually less than 10? The best way to deal with this is to padthe string out with spaces so that it always contains exactly 10 characters. This
3Allow for 1 byte when calculating storage space.
18.9 Random Access Files 545

means that the size of every Car object will always be exactly 32 bytes—you willsee how we have done this when you study program below, Ran-domFileTester. This program uses a rather different approach to the one wehave used so far in this chapter. Two options (as well as a Quit option) are provided.The first, the option to add a car, simply adds the car to the end of the file. Thesecond, to display the details of a car, asks the user for the position of the car in thefile then reads this record directly from the file. You can see that there is now noneed for a List in which to store the cars.
Study the program carefully—then we will discuss it. Note that we have madeuse of our EasyScanner class here.
RandomFileTesterimport java.io.FileNotFoundException;import java.io.IOException;import java.io.RandomAccessFile;
public class RandomFileTester{
static final int CAR_SIZE = 32; 11"gcej"tgeqtf"yknn"dg"54"d{vgu
public static void main(String[] args) {
char choice;do
{ System.out.println("\nRandom File Tester");System.out.println("1. Add a car");System.out.println("2. Display a car");System.out.println("3. Quit\n");choice = EasyScanner.nextChar();System.out.println();switch(choice)
{ case '1' :addCar();
break;case '2' :displayCar();
break;case '3' :break;default : System.out.print("\nChoose 1 - 3 only please\n ");
} }while(choice != '3');
}
static void addCar() {
String tempReg;String tempMake;double tempPrice;System.out.print("Please enter the registration number: ");tempReg = EasyScanner.nextString();
if(tempReg.length() > 10) 11nkokv"vjg tgikuvtcvkqp"pwodgt"vq"32"ejctcevgtu {
System.out.print("Ten characters only - please re-enter: ");tempReg = EasyScanner.nextString();
} 11"rcf"vjg"uvtkpi"ykvj"urcegu"vq"ocmg"kv"gzcevn{"32"ejctcevgtu"nqpi"for(int i = tempReg.length() + 1 ; i <= 10 ; i++)
{ tempReg = tempReg.concat(" ");
}
11"igv"vjg"ocmg"qh"vjg"ect"htqo"vjg"wugtSystem.out.print("Please enter the make: ");tempMake = EasyScanner.nextString();
11"nkokv"vjg"ocmg"pwodgt"vq"32"ejctcevgtuif(tempMake.length() > 10)
{ System.out.print("Ten characters only - please re-enter: ");tempMake = EasyScanner.nextString();
} 11"rcf"vjg"uvtkpi"ykvj"urcegu"vq"ocmg"kv"gzcevn{"32"ejctcevgtu"nqpifor(int i = tempMake.length() + 1; i <= 10; i++)
{ tempMake = tempMake.concat(" ");
}
546 18 Working with Files

11"igv"vjg"rtkeg"qh"vjg"ect"htqo"vjg"wugt"System.out.print("Please enter the price: ");tempPrice = EasyScanner.nextDouble();
11"ytkvg"vjg"tgeqtf"vq"vjg"hkngwriteRecord(new Car(tempReg, tempMake, tempPrice));
}
static void displayCar() {
int pos;11"igv"vjg"rqukvkqp"qh"vjg"kvgo"vq"dg"tgcf"htqo"vjg"wugtSystem.out.print("Enter the car's position in the list: ");pos = EasyScanner.nextInt(); 11"tgcf"vjg"tgeqtf"tgswguvgf"htqo"hkngCar tempCar = readRecord(pos);if(tempCar != null)
{ System.out.println(tempCar.getRegistration().trim()+ " "+ tempCar.getMake().trim()+ " "+ tempCar.getPrice());
} else
{ System.out.println("Invalid postion") ;
} }
static void writeRecord(Car tempCar) {
11"wug"vt{/ykvj/tguqwtegu"vq"gpuwtg"hkng"ku"enqugf"uchgn{try(
11"qrgp"c"TcpfqoCeeguuHkng"kp"tgcf/ytkvg"oqfgRandomAccessFile carFile = new RandomAccessFile("Cars.rand", "rw");
) {
11 oqxg"vjg"rqkpvgt"vq"vjg"gpf"qh"vjg"hkngcarFile.seek(carFile.length());11"ytkvg"vjg"vjtgg"hkgnfu"qh"vjg"tgeqtf"vq"vjg"hkngcarFile.writeUTF(tempCar.getRegistration());carFile.writeUTF(tempCar.getMake());carFile.writeDouble(tempCar.getPrice());
} catch(IOException e)
{ System.out.println("There was a problem writing the file");
} }
static Car readRecord(int pos) {
String tempReg;String tempMake;double tempPrice;Car tempCar = null; 11"c"pwnn"xcnwg"ku"tgvwtpgf"kh"vjgtg"ku"c"rtqdngo"tgcfkpi"vjg"tgeqtf
11"wug"vt{/ykvj/tguqwtegu"vq"gpuwtg"hkng"ku"enqugf"uchgn{try(
11"qrgp"c"TcpfqoCeeguuHkng"kp"tgcf/qpn{"oqfgRandomAccessFile carFile = new RandomAccessFile("Cars.rand","r");
) {
11"oqxg"vjg"rqkpvgt"vq"vjg"uvctv"qh"vjg"tgswktgf"tgeqtfcarFile.seek((pos-1) * CAR_SIZE);11"tgcf"vjg"vjtgg"hkgnfu"qh"vjg"tgeqtf"htqo"vjg"hkngtempReg = carFile.readUTF();tempMake = carFile.readUTF();tempPrice = carFile.readDouble();11"wug"vjg"fcvc"lwuv"tgcf"vq"etgcvg"c"pgy"Ect"qdlgevtempCar = new Car(tempReg, tempMake, tempPrice);
} catch(FileNotFoundException e)
{ System.out.println("\nNo file was read");
}
catch(IOException e) {
System.out.println("There was a problem reading the file"); }
11"tgvwtp"vjg"tgeqtf"vjcv"ycu"tgcfreturn tempCar;
} }
18.9 Random Access Files 547

You can see that in the addCar method we have called writeRecord with aCar object as a parameter. Let’s take a closer look at the writeRecord method.First the line to open the file in read-write mode:
RandomAccessFile carFile = new RandomAccessFile("Cars.rand", "rw");
Now the instruction to move the file pointer:
carFile.seek(carFile.length());
You can see how we use the seek method to move the pointer a specificnumber of bytes; here the correct number of bytes is the size of the file (as we wantto write the new record at the end of the file), so we use the length method ofRandomAccessFile to determine this number.
Now we can move on to look at the readRecord method. You can see thatthis is called from within the displayCar method, with an integer parameter,representing the position of the required record in the file.
The file is opened in read-only mode:
RandomAccessFile carFile = new RandomAccessFile("Cars.rand","r");
Then the seek method of RandomAccessFile is invoked as follows:
carFile.seek((pos-1) * CAR_SIZE);
You can see that the number of bytes through which to move the pointer hasbeen calculated by multiplying the size of the record by one less than the position.This is because in order to read the first record we don’t move the pointer at all; inorder to read the second record we must move it 1 � 32 bytes; for the third record 2� 32 bytes; and so on.
The final thing to note about the program is that in the displayCar methodwe have used the trim method of String to get rid of the extra spaces that weused to pad out the first two fields of the record.
Here is a test run from the program (starting off with an empty file):
548 18 Working with Files

Random File Tester 1. Add a car 2. View a car 3. Quit
1
Please enter the registration number: R54 HJK Please enter the make: Vauxhall Please enter the price: 7000
Random File Tester 1. Add a car 2. View a car 3. Quit
1
Please enter the registration number: T87 EFU Please enter the make: Nissan Please enter the price: 9000
Random File Tester 1. Add a car 2. View a car 3. Quit
2
Enter the car’s position in the list: 2T87 EFU Nissan 9000.0
18.10 Self-test Questions
1. Explain the principles of input and output and identify different input and outputdevices.
2. What is meant by the term input/output stream?
3. Distinguish between text, binary and object encoding of data.
4. Explain why we have used the try-with-resources construct throughout thischapter to create and open files.
5. The TextFileTester of Sect. 18.5 is to be adapted so that the user is simplyasked to enter a number of cars, which, when that process is finished, savesthose cars to a text file. The program then terminates. The file does not have tobe read from within the program, but should be able to be read by a text editorsuch as Windows™ Notepad. The format should be as follows:
18.9 Random Access Files 549

Adapt the writeList method accordingly.
Hint: remember that a blank line is obtained by calling println with noparameters.
6. What is the difference between serial access files and random access files?
7. Explain the purpose of the Serializable interface.
8. Calculate the number of bytes required to store an object of a class, the attributesof which are declared as follows:
private int x;private char c;private String s;
You can assume that the String attribute will always consists of exactly 20characters.
18.11 Programming Exercises
You will need to have access to the Car class, the source code for which isavailable on the website. Or you can simply copy it from this chapter. The sourcecode for the programs in the chapter is also on the website.
1. Run the TextFileTester from Sect. 18.5 then adapt it so that it handlesbinary files, as described in Sect. 18.6.
550 18 Working with Files

2. Adapt the TextFileTester so that it behaves in the way described inquestion 5 of the self-test questions.
3. Implement the CharacterByCharacter program from Sect. 18.7, using atext file that you have created.
4. Adapt the TextFileTester so that it uses object encoding, as explained inSect. 18.8 (don’t forget that the Car class must implement the Serializ-able interface).
5. Adapt the Bank application of Chap. 8 so that it keeps permanent records usingtext encoding.
6. In Chap. 12 the case study made use of a file called TenantFileHandlerthat we wrote for you. This is available on the website. Study this class care-fully, so that you are sure you understand it, then modify it so that it uses:
(a) text encoding;
(b) object encoding.
7. Adapt the Library application of Chap. 15 so that it keeps permanent recordsusing object encoding.
18.11 Programming Exercises 551

19Packages
Outcomes:
By the end of this chapter you should be able to:
• identify the role of packages in organizing classes;• create and deploy their own packages in Java;• access classes residing in their own packages;• run Java applications from the command line;• deploy Java applications as JAR files;• access libraries that are not part of the standard Java framework to access data
on a remote database using the Java Database Connectivity (JDBC) andHibernate ORM technologies.
19.1 Introduction
From as early as Chap. 2 of this book you have been familiar with the idea of apackage, and have been using packages in order to access classes residing inexternal folders. In this chapter we will take a more in-depth look at Java’s packageconcept and see how you can deploy your own applications.
19.2 Understanding Packages
A package, in Java, is a named collection of related classes. You have already beenusing packages to access pre-written classes. For example, to store objects in anordered collection you made use of the ArrayList class, which resides in theutil package. To read and write to files you used classes in the io package. Toorganise the layout of your JavaFX applications you used classes such as Scene
© Springer Nature Switzerland AG 2019Q. Charatan and A. Kans, Java in Two Semesters, Texts in Computer Science,https://doi.org/10.1007/978-3-319-99420-8_19
553

and Group from the scene package. Giving meaningful names to a set of relatedclasses in this way makes it easy for programmers to locate these classes whenrequired. Packages can themselves contain other packages. For example, as well ascontaining classes for organising the layout of your JavaFX applications, the scene
Fig. 19.1 A sample of the java package hierarchy
554 19 Packages

package also contains the control package, which contains JavaFX controlclasses such as Button and Label, since this group of classes is still logicallyrelated to JavaFX’s collection of scene related files.
The package name actually corresponds to the name of the directory (or folder assome operating systems call it) in which all the given classes reside. All the coreJava packages themselves reside in a global Java directory, named simply java.This directory is not itself a package but a store for other packages. Since Java waslaunched a few additional global directories have been developed. In particular, thejavafx directory contains all the packages and classes required for JavaFXdevelopment. Figure 19.1 illustrates part of this hierarchy of packages.
As you can see from Fig. 19.1, packages contain class files (that is the compiledJava byte code), not source files (the original Java instructions). This means thelocation of the original Java source files is unimportant here. They may be in thesame directory as the class files, in another directory or, as in the case of thepredefined Java packages, they may even no longer be available.
19.3 Accessing Classes in Packages
Suppose you are writing the code for a new class. You will recall how you can giveit access to a class contained within a package. Just referencing the class won’twork. For example, let’s assume a class you are writing needs a DecimalFormatobject. The following will not compile:
public class SomeClass{
private DecimalFormat someFormatObject; // a problem here}
This won’t compile because the compiler won’t be able to find a class calledDecimalFormat. One way to tell the compiler where this class file resides is, asyou already know, to add an import statement above the class. This class is in thetext package so the following would be appropriate:
import java.text.DecimalFormat; // allows compiler to find the DecimalFormat.class filepublic class SomeClass{
private DecimalFormat someFormatObject; // now this will compile}
Can you see how the import statement matches the directory structure weillustrated in Fig. 19.1? Effectively the compiler is being told to look for theDecimalFormat class in the text directory (package), which in turn is in the javadirectory (whose location is already known to the Java run-time system). The
19.2 Understanding Packages 555

location of a file is often referred to as the path to that file. In the Windowsoperating systems this path would be expressed as follows:
java\text\
In other operating systems forward slashes may be used instead of backwardslashes. The Java import statement simply expresses this path but uses dotsinstead of backward or forward slashes.
The asterisk notation, that we also met in Chap. 2, allows you to have access toall class files in the given package. Note that there can only ever be one ‘.*’ in animport statement and the ‘.*’ must follow a package name. However, as you havealready seen in previous chapters, you can have as many import statements asyou require. Here are some examples of valid and invalid import statements:
import java.*.*; // illegal as contains more than one '.*'import java.*; // illegal as 'java' is not a packageimport java.text.*; // fine, allows access to all classes in text package import javafx.scene.control.Button; // fine, allows access to the Button class in control package
Although there is no overhead in allowing access to all files in a package via theasterisk notation, we have used the convention of explicitly listing every classimported individually in this book for the sake of clarity.
It is actually possible to access classes from within packages without the need foran import statement. To do this, references to any such classes must be appendedonto the package name itself. Returning to the DecimalFormat example, wecould have removed the import statement and referred to the package directly inthe class as follows:
public class SomeClass{
/* appending the class name onto the package name avoids the need to import the given package */
private java.text.DecimalFormat someFormatObject;}
The package plus class name is in fact the proper name for this class. Animport statement just provides us with a convenient shorthand so that we do notalways have to include the package name with the class name. As you can imagine,having to append the class name onto the package name every time we use a classfrom a package would be very cumbersome, so the import statement is prefer-able. There are times, however, when the long name is necessary.
The long class name can be useful when the class name on its own clashes withthe name of another class. For example, let us assume we have developed our ownclass called Scanner—perhaps as part of a warehouse application. Giving thisname to the class is not a great idea as there already is a Scanner class in theutil package, but it is possible to choose this name if we wish. Now, let us
556 19 Packages
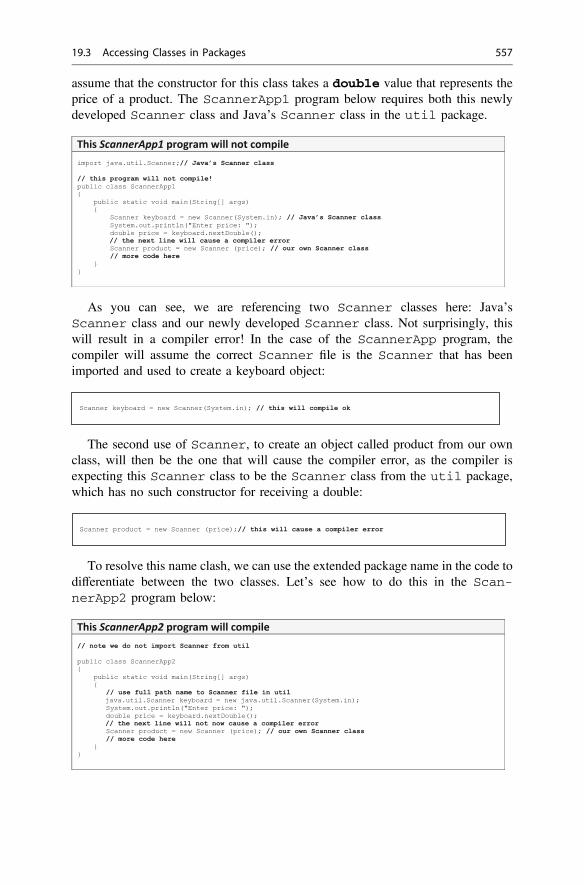
assume that the constructor for this class takes a double value that represents theprice of a product. The ScannerApp1 program below requires both this newlydeveloped Scanner class and Java’s Scanner class in the util package.
This ScannerApp1 program will not compileimport java.util.Scanner;// Java’s Scanner class// this program will not compile!public class ScannerApp1 {
public static void main(String[] args) {
Scanner keyboard = new Scanner(System.in); // Java’s Scanner classSystem.out.println("Enter price: ");double price = keyboard.nextDouble();// the next line will cause a compiler errorScanner product = new Scanner (price); // our own Scanner class// more code here
} }
As you can see, we are referencing two Scanner classes here: Java’sScanner class and our newly developed Scanner class. Not surprisingly, thiswill result in a compiler error! In the case of the ScannerApp program, thecompiler will assume the correct Scanner file is the Scanner that has beenimported and used to create a keyboard object:
Scanner keyboard = new Scanner(System.in); // this will compile ok
The second use of Scanner, to create an object called product from our ownclass, will then be the one that will cause the compiler error, as the compiler isexpecting this Scanner class to be the Scanner class from the util package,which has no such constructor for receiving a double:
Scanner product = new Scanner (price);// this will cause a compiler error
To resolve this name clash, we can use the extended package name in the code todifferentiate between the two classes. Let’s see how to do this in the Scan-nerApp2 program below:
This ScannerApp2 program will compile// note we do not import Scanner from utilpublic class ScannerApp2 {
public static void main(String[] args) {
// use full path name to Scanner file in util java.util.Scanner keyboard = new java.util.Scanner(System.in);System.out.println("Enter price: ");double price = keyboard.nextDouble();// the next line will not now cause a compiler errorScanner product = new Scanner (price); // our own Scanner class// more code here
} }
19.3 Accessing Classes in Packages 557

You can see the full path name has been used for Java’s Scanner class in thecode itself
java.util.Scanner keyboard = new java.util.Scanner(System.in);
Now we no longer have a name clash with our class and the complier canprocess references to both classes.
19.4 Developing Your Own Packages
You might be surprised to know that all the classes that you have developed so faralready reside in a single package. This may seem strange as you didn’t instruct thecompiler to add your classes to any package. In fact, what actually happens is that ifyou don’t specifically ask your classes to be put in a package, then they all getadded to some large unnamed package.
In order to locate and deploy your class files easily, and avoid any name clashesin the future, it would be a good idea to use named packages to organize yourclasses.
As an example, let’s go back to our Hostel application from Chaps. 11 and 12and create a unique package in which to put our class files—we will call thispackage hostelApp.1 To instruct the compiler that you wish to add the classesthat make up this application into a package called hostelApp, simply add thefollowing package command at the top of each of the original source files:
package hostelApp;
This line instructs the compiler that the class file created from this source filemust be put in a package called hostelApp. Here, for example, is the Paymentclass with this package line added:
package hostelApp; // add this line to the top of the source filepublic class Payment{
// as before}
11 We will stick to the standard Java convention of beginning package names with a lower-caseletter.
558 19 Packages
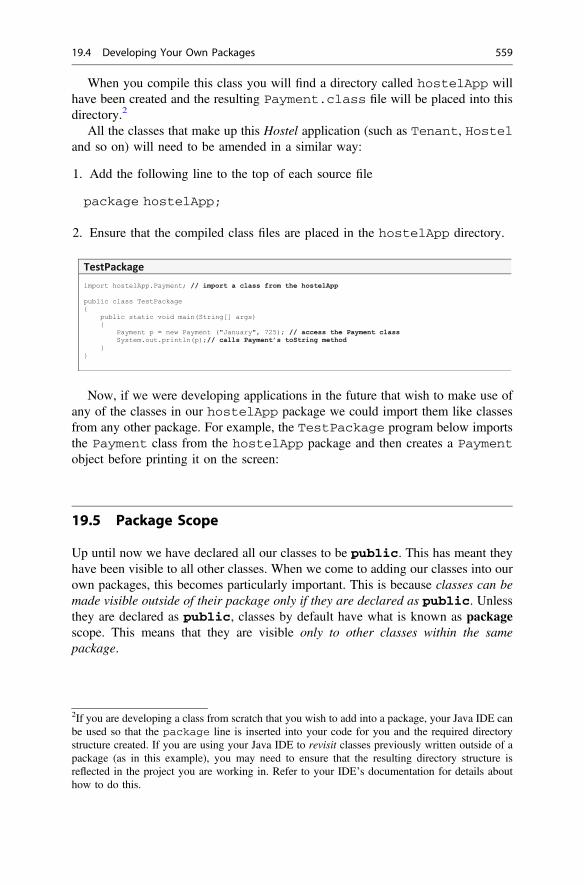
When you compile this class you will find a directory called hostelApp willhave been created and the resulting Payment.class file will be placed into thisdirectory.2
All the classes that make up this Hostel application (such as Tenant, Hosteland so on) will need to be amended in a similar way:
1. Add the following line to the top of each source file
package hostelApp;
2. Ensure that the compiled class files are placed in the hostelApp directory.
TestPackageimport hostelApp.Payment; // import a class from the hostelApppublic class TestPackage {
public static void main(String[] args) {
Payment p = new Payment ("January", 725); // access the Payment classSystem.out.println(p);// calls Payment’s toString method
} }
Now, if we were developing applications in the future that wish to make use ofany of the classes in our hostelApp package we could import them like classesfrom any other package. For example, the TestPackage program below importsthe Payment class from the hostelApp package and then creates a Paymentobject before printing it on the screen:
19.5 Package Scope
Up until now we have declared all our classes to be public. This has meant theyhave been visible to all other classes. When we come to adding our classes into ourown packages, this becomes particularly important. This is because classes can bemade visible outside of their package only if they are declared as public. Unlessthey are declared as public, classes by default have what is known as packagescope. This means that they are visible only to other classes within the samepackage.
2If you are developing a class from scratch that you wish to add into a package, your Java IDE canbe used so that the package line is inserted into your code for you and the required directorystructure created. If you are using your Java IDE to revisit classes previously written outside of apackage (as in this example), you may need to ensure that the resulting directory structure isreflected in the project you are working in. Refer to your IDE’s documentation for details abouthow to do this.
19.4 Developing Your Own Packages 559

Not all classes in the package need be declared as public. Some classes maybe part of the implementation only and the developer may not wish them to be madeavailable to the client. These classes can have package scope instead of publicscope. In this way, packages provide an extra layer of security for your classes.
In the case of our Hostel application, we might choose to make the Hostelclass public, and keep all the other files required in this application hidden withinthe package by giving them package scope. To give a class package scope, justremove the public modifier from in front of the class declaration. For example,returning to the Payment class, we can give this package scope as follows:
package hostelApp; // this class is added into the packageclass Payment // this class has package scope{
// as before}
Now, when the hostelApp package is imported into another class, this otherclass has access only to the Hostel class; not to classes like Payment which arehidden in the package with package scope. This is demonstrated in the codefragment below:
import hostelApp.*; // this imports only the public classes in the package public class SomeOtherClass {
// the next line will not compile as Payment is hidden in the hostelApp packagePayment p = new Payment("January", 725);
}
19.6 Running Applications from the Command Line
Way back in Chap. 1 we discussed the process of compiling and running Javaprograms. If you remember, we said that if you are working within a Java IDE youwill have simple icons to click in order to carry out these procedures. If, however,you are working from a command line, like a DOS prompt for example, you woulduse the javac command (followed by the name of the source file) to compile asource file and java (followed by the name of a class) to run an application.3 As asimple example, here is the very first program we showed you back in Chap. 1:
3When installing Java an environment variable called PATH should automatically have been setso the operating system can locate the necessary Java tools to compile, run and deploy Javaprograms. If this has not been done refer to your operating system’s instructions for setting thisvariable The PATH variable should point to the bin folder in your JDK folder, for example C:\ProgramFiles\Java\jdk1.8.0_121\bin.
560 19 Packages

HelloWorldpublic class HelloWorld{
public static void main(String[] args){
System.out.println ("Hello world");}
}
Notice this program was not placed in a package. Assuming you are in thedirectory containing this source code file, you can compile this class using thejavac.exe tool as follows:
javac HelloWorld.java
This will produce a Java class file (HelloWorld.class). Assuming you arenow in the directory that contains this class file you can then run this program withthe java.exe tool as follows:
java HelloWorld
As noted in Chap. 1, when running a class file you do not include the .classextension.
When you run a class that resides in a package you must amend this slightly. Asan example, let’s once again consider the Hostel application. When you run anapplication you must run the class that contains the main method. The appropriateclass in our application is the JavaFX Hostel class. Remember, we have nowadded this class to a hostelApp package:
package hostelApp; // Hostel class part of the hostelApp package// import statements herepublic class Hostel extends Application{
// as before}
If we were in the hostelApp folder that contained this class we could try runningthe Hostel class from the command line as follows:
java Hostel
Unfortunately, this won’t work as the system won’t be able to find a class of thegiven name. In order to run a class that is contained within a package you mustappend the class name onto the name of the package (with a ‘.’ symbol). You willnow need to be in the directory above the package directory. So in this case you willneed to be in the directory above the hostelApp directory. You can then run theHostel class by using the following command:
19.6 Running Applications from the Command Line 561

java hostelApp.Hostel`
If you do not wish to run the Java commands from the directories containing therelevant files you can set an environment variable called the CLASSPATH so thatit points to the relevant directory (or directories) and then run these commands fromany directory. See your operating system’s documentation for how to do this.
Before we move on, let’s just stop and have a look at the parameter that wealways give to main methods:
public static void main(String[] args)
As you know, this means that main is given an array of String objects as aparameter. How are these String objects passed on to main? Up until now wehave not discussed them at all. Well, values for these strings can be passed to mainwhen you run the given class from the command line. Often, as in our previousprogram, there is no need to pass any such strings and this array of strings iseffectively empty. Sometimes, however, it is useful to send in such parameters.They are sent to main from the command line by listing the strings, one after theother after the name of the class as follows:
java ClassName firstString secondString otherStrings
As you can see, the strings are separated by spaces. Any number of strings canbe sent in this way. For example, if a program were called ProcessNames, twonames could be sent to it as follows:
java ProcessNames Aaron Quentin
Notice that, were the strings to contain spaces, they must be enclosed in quotes:
java ProcessNames “Aaron Kans” “Quentin Charatan”
These strings will be placed into main’s array parameter (args), with the firststring being at args[0], the second at args[1] and so on. The number of stringssent to main is variable. The main method can always determine the number ofstrings sent by checking the length of the array (args.length). The Pro-cessNames class takes the array of strings and displays them on the screen.
ProcessNamespublic class ProcessNames{
public static void main(String[] args){
if (args.length != 0)// check some arguments have been sent {
// loop through all elements in the 'args' arrayfor (int i=0; i<args.length; i++){
// access individual strings in arraySystem.out.println("hello " + args[i]);
} }
}}
562 19 Packages

Notice, to keep things simple we have not added this class to a package. We canrun this program from the command line as follows:
java ProcessNames “Batman and Robin” Superman
Notice “Batman and Robin” needed to be surrounded by quotes as it hasspaces in it, whereas Superman does not. Running this program would producethe obvious result:
hello Batman and Robinhello Superman
19.7 Deploying Your Packages
A very common way of making your packages available to clients is to convertthem to JAR files. A JAR file (short for Java Archive) has the extension .jar and issimply a compressed file. Most IDEs provide a means of creating JAR files but JARfiles can also be created from the command prompt with the jar.exe tool. Thistool is provided with the JDK and also with most standard IDEs. Assuming that weare in the directory above the hostelApp package then the correct statement tocreate a suitable JAR file is:
jar cvf hostel.jar hostelApp
As you can see there are various switches that are used with the jar program.The ones used above have the following effect:
c: create a new JAR file;v: provide full (verbose) output to report on progress;f: provide a name for the JAR file.
After these switches comes the name of the output file—hostel.jar in ourcase. Finally,we must list the files we wish to be included. In the above example werequire only the package directory, hostelApp, but you may have additional fileshere such as sound and image files that are not part of the package.
If you are working in a graphics environment, and there is a JVM installed onyour computer, then it is possible to create a JAR file that will run the program bydouble-clicking on its icon. We call such a JAR file an executable JAR file.
While it is possible to use Java tools from the command line to create suchexecutable JAR files, as you could see when we showed you how to create astandard JAR file from the command line, this can be quite verbose and prone toerror. So, these days, IDEs will provide very simple tools to both create a JAR fileand to make this JAR file executable if you choose. We provide instructions on theaccompanying web-site on how to do this for a popular Java IDE.
19.6 Running Applications from the Command Line 563

19.8 Adding External Libraries
Sometimes it is necessary to use libraries that are not part of the standard Javaframework. One of the most common examples of this is in the development ofapplications that require the use of data held on a database which is stored eitherlocally or on another machine on the network. In this section we will briefly exploretwo technologies—Java Database Connectivity (JDBC) and Hibernate ORM(Object/Relational Mapping), often referred to simply as Hibernate.
It is not our intention here to give a detailed explanation of how these tech-nologies are used, but rather to give a concrete example of how it is possible to uselibraries that are not part of the Java framework. This should, however, also serve towhet the appetites of those of you who wish to learn how to access a database via aJava application.
19.8.1 Accessing Databases Using JDBC
Database manufacturers provide JDBC drivers by means of which Java programscan access their databases. A driver is a piece of software that enables communi-cation between two programs, or between a software program and a piece ofhardware, by translating the output of one program into a form understood by theother one.
In order to use a particular driver we would download it from the manufacturer’swebsite in the form of a .jar file. We would then need to ensure that theCLASSPATH points to the location of this file; this is most easily done by addingthe .jar file to the run-time or compile-time configurations within an IDE such asNetBeans™ or Eclipse™. Instructions for doing this will be found within thedocumentation for the particular IDE.
In this chapter we are going to be referring to a MySQL™ database. The driver,which is called Driver.class, is contained within the .jar file. At the time ofwriting the current version is:
mysql-connector-java-5.1.45-bin.jar
In today’s version of Java, all we have to do to make the driver accessible is toadd it to the CLASSPATH as described above. In previous versions we would haveneeded to include the following code (which, as you see, refers to the driver by itsfull path name):
try{
Class.forName("com.mysql.jdbc.Driver");}
catch(ClassNotFoundException e){ }
564 19 Packages

Java provides a package known as java.sql. This package provides themeans by which our Java programs can contain commands written in standard SQL(Structured Query Language), which is the well-established means of writingdatabase instructions. In this chapter we are not going to teach you SQL, but willassume you are familiar with some basic commands.
For our example we have set up a little database called ElectricalStore thatcontains a table called products. This table is described below (Table 19.1); it isassumed that you are familiar with relational databases and the data types available.
We have populated this database, and, in order to query it, we have developed aclass called ProductQuery. This class, once an instance of it is created, executesjust one SQL statement:
select * from products;
Those of you who are familiar with SQL will know that this query retrieves allthe fields from all the records in the products table. The information obtained isthen displayed in a text area as you can see from Fig. 19.2.
Table 19.1 The productstable
Field Data type Length
serialNumber (key field) char (25)
make char (10)
description char (25)
price decimal (10, 2)
Fig. 19.2 Displaying theinformation from theElectricalStore database
19.8 Adding External Libraries 565

Take a look at the ProductQuery application below, and then we will gothrough it with you.
ProductQueryimport java.sql.Connection;import java.sql.DriverManager;import java.sql.ResultSet;import java.sql.SQLException;import java.sql.Statement;import javafx.application.Application;import javafx.geometry.Insets;import javafx.scene.Scene;import javafx.scene.layout.HBox;import javafx.scene.layout.VBox;import javafx.scene.text.Text;import javafx.stage.Stage;
public class ProductQuery extends Application
{ public static final String URL = "jdbc:mysql://localHost/ElectricalStore?useSSL=true";public static final String USERNAME = "Kub";public static final String PASSWORD = "SydneyPaper";
@Overridepublic void start(Stage stage) {
// create VBoxes to act as display columnsVBox data1 = new VBox();VBox data2 = new VBox();VBox data3 = new VBox();VBox data4 = new VBox();
data1.getChildren().add(new Text("Serial Number\n"));data2.getChildren().add(new Text("Make\n"));data3.getChildren().add(new Text("Description\n"));data4.getChildren().add(new Text("Price\n"));
// configure the visual componentsHBox root = new HBox(10);root.setPadding(new Insets(10));root.getChildren().addAll(data1, data2, data3, data4);Scene scene = new Scene(root, 300, 150);stage.setTitle("Electrical Store");stage.setScene(scene);stage.show();
Connection con;Statement st;ResultSet result;
try{
// connect to the databasecon = DriverManager.getConnection(URL, USERNAME, PASSWORD);
// create an SQL statementst = con.createStatement();
// execute an SQL queryresult = st.executeQuery("select * from products");
while(result.next()) // move to next record{
// retrieve and display first fielddata1.getChildren().add(new Text (result.getString(1)));// retrieve and display second fielddata2.getChildren().add(new Text(result.getString(2)));// retrieve and display third fielddata3.getChildren().add(new Text(result.getString(3)));// retrieve and display fourth fielddata4.getChildren().add(new Text("£" + result.getString(4)));
}
}
catch(SQLException e) // handle the SQLException{
}
}
public static void main(String[] args){
launch(args);}
}
566 19 Packages
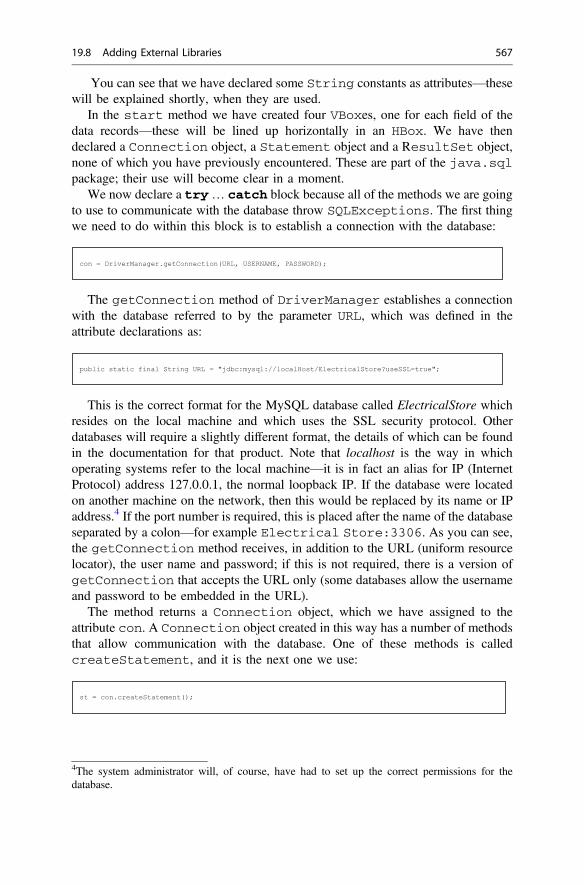
You can see that we have declared some String constants as attributes—thesewill be explained shortly, when they are used.
In the start method we have created four VBoxes, one for each field of thedata records—these will be lined up horizontally in an HBox. We have thendeclared a Connection object, a Statement object and a ResultSet object,none of which you have previously encountered. These are part of the java.sqlpackage; their use will become clear in a moment.
We now declare a try… catch block because all of the methods we are goingto use to communicate with the database throw SQLExceptions. The first thingwe need to do within this block is to establish a connection with the database:
con = DriverManager.getConnection(URL, USERNAME, PASSWORD);
The getConnection method of DriverManager establishes a connectionwith the database referred to by the parameter URL, which was defined in theattribute declarations as:
public static final String URL = "jdbc:mysql://localHost/ElectricalStore?useSSL=true";
This is the correct format for the MySQL database called ElectricalStore whichresides on the local machine and which uses the SSL security protocol. Otherdatabases will require a slightly different format, the details of which can be foundin the documentation for that product. Note that localhost is the way in whichoperating systems refer to the local machine—it is in fact an alias for IP (InternetProtocol) address 127.0.0.1, the normal loopback IP. If the database were locatedon another machine on the network, then this would be replaced by its name or IPaddress.4 If the port number is required, this is placed after the name of the databaseseparated by a colon—for example Electrical Store:3306. As you can see,the getConnection method receives, in addition to the URL (uniform resourcelocator), the user name and password; if this is not required, there is a version ofgetConnection that accepts the URL only (some databases allow the usernameand password to be embedded in the URL).
The method returns a Connection object, which we have assigned to theattribute con. A Connection object created in this way has a number of methodsthat allow communication with the database. One of these methods is calledcreateStatement, and it is the next one we use:
st = con.createStatement();
4The system administrator will, of course, have had to set up the correct permissions for thedatabase.
19.8 Adding External Libraries 567

As you saw, we previously declared a Statement object, st, and this is nowassigned the return value of the createStatement method. A Statementobject is used for executing SQL statements and returning their results; in the nextline we use its executeQuery method:
result = st.executeQuery("select * from products");
The data returned by executing the query is assigned to a ResultSet object,result. A ResultSet object holds a tabular representation of the data, and apointer is maintained to allow us to navigate through the records. The next methodmoves the pointer to the next record, returning false if there are no more records.The individual fields are returned with methods such as getString, getDou-ble and getInt. You can see how we have used these methods in the Pro-ductQuery class:
while(result.next()) // move to next record{
data1.getChildren().add(new Text(result.getString(1)));data2.getChildren().add(new Text(result.getString(2)));data3.getChildren().add(new Text(result.getString(3)));data4.getChildren().add(new Text("£" + result.getString(4)));
}
You can see that, as we are using VBoxes to display our data, we have created aText object for each string and added this to the correct VBox.
The version of getString that we have used here takes an integer repre-senting the position of the field—in our example 1 is the serialNumber, 2 is makeand so on. There is also a version of getString that accepts the name of the field.So, for example, we could have used, for the second field:
data2.getChildren().add(new Text(result.getString(make)));
Since all we are doing is displaying the data we used getString for the lastfield, even though it holds numeric data—this saved us the trouble of doing anyformatting on it. If we had wished to do any processing with this data, we couldhave used the getDouble method to retrieve it as a double rather than aString.
19.8.2 Accessing Databases Using Hibernate
Hibernate is a more recent technology than JDBC; it allows us to store and retrievewhole objects from a database.
568 19 Packages

If you create your Hibernate project within Netbeans™ you will find that thenecessary libraries will be added to the project. Otherwise you will need todownload the files from the Hibernate website. Normally this will be in the form ofa .zip file which contains a folder called required. In this folder you will find the.jar files that you will need to add to the CLASSPATH. As with the JDBCexample in the previous section, you will need to add the relevant driver to therun-time configuration. We will use the same MySQL™ database as before, so youwill need the same driver as in the previous section.
The first thing you will need to do is create a Java class for the objects that wewill be dealing with—in our case we will need a Product class:
Productpublic class Product {
private String stockNumber;private String manufacturer;private String item;private double unitPrice;
public Product(String stockNumberIn, String manufacturerIn, String itemIn, double unitPriceIn){
stockNumber = stockNumberIn;manufacturer = manufacturerIn;item = itemIn;unitPrice = unitPriceIn;
}
public Product(){
}
public String getStockNumber(){
return stockNumber;}
public void setStockNumber(String stockNumberIn) {
stockNumber = stockNumberIn;}
public String getManufacturer(){
return manufacturer;}
public void setManufacturer(String manufacturerIn){
manufacturer = manufacturerIn;}
public String getItem(){
return item;}
public void setItem(String itemIn){
item = itemIn;}
public double getUnitPrice(){
return unitPrice;}
public void setUnitPrice(double unitPriceIn){
unitPrice = unitPriceIn;}
}
19.8 Adding External Libraries 569
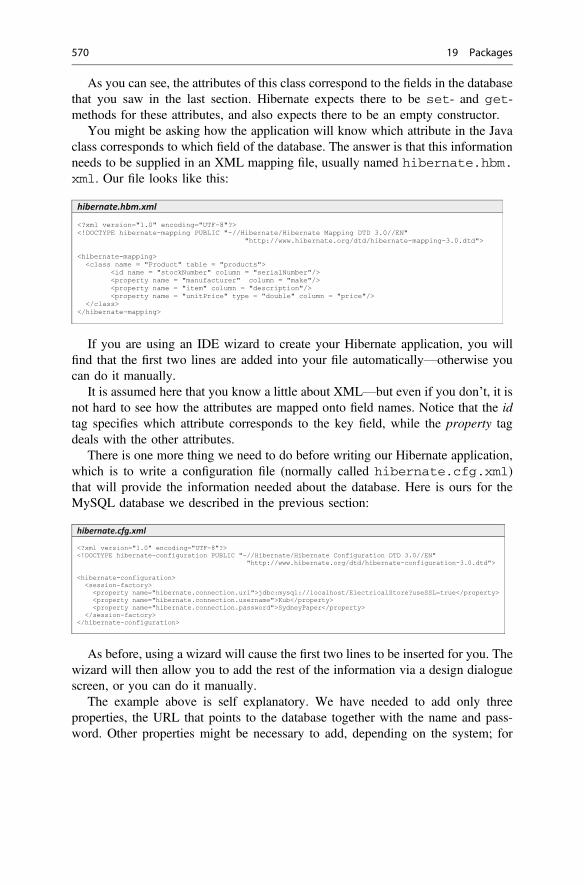
As you can see, the attributes of this class correspond to the fields in the databasethat you saw in the last section. Hibernate expects there to be set- and get-methods for these attributes, and also expects there to be an empty constructor.
You might be asking how the application will know which attribute in the Javaclass corresponds to which field of the database. The answer is that this informationneeds to be supplied in an XML mapping file, usually named hibernate.hbm.xml. Our file looks like this:
hibernate.hbm.xml
<?xml version="1.0" encoding="UTF-8"?><!DOCTYPE hibernate-mapping PUBLIC "-//Hibernate/Hibernate Mapping DTD 3.0//EN"
"http://www.hibernate.org/dtd/hibernate-mapping-3.0.dtd">
<hibernate-mapping><class name = "Product" table = "products">
<id name = "stockNumber" column = "serialNumber"/><property name = "manufacturer" column = "make"/><property name = "item" column = "description"/><property name = "unitPrice" type = "double" column = "price"/>
</class></hibernate-mapping>
If you are using an IDE wizard to create your Hibernate application, you willfind that the first two lines are added into your file automatically—otherwise youcan do it manually.
It is assumed here that you know a little about XML—but even if you don’t, it isnot hard to see how the attributes are mapped onto field names. Notice that the idtag specifies which attribute corresponds to the key field, while the property tagdeals with the other attributes.
There is one more thing we need to do before writing our Hibernate application,which is to write a configuration file (normally called hibernate.cfg.xml)that will provide the information needed about the database. Here is ours for theMySQL database we described in the previous section:
hibernate.cfg.xml
<?xml version="1.0" encoding="UTF-8"?><!DOCTYPE hibernate-configuration PUBLIC "-//Hibernate/Hibernate Configuration DTD 3.0//EN"
"http://www.hibernate.org/dtd/hibernate-configuration-3.0.dtd">
<hibernate-configuration><session-factory><property name="hibernate.connection.url">jdbc:mysql://localhost/ElectricalStore?useSSL=true</property><property name="hibernate.connection.username">Kub</property><property name="hibernate.connection.password">SydneyPaper</property>
</session-factory></hibernate-configuration>
As before, using a wizard will cause the first two lines to be inserted for you. Thewizard will then allow you to add the rest of the information via a design dialoguescreen, or you can do it manually.
The example above is self explanatory. We have needed to add only threeproperties, the URL that points to the database together with the name and pass-word. Other properties might be necessary to add, depending on the system; for
570 19 Packages

example if the specific driver name were required, that could be added (for aMySQL database) as follows:
<property name="hibernate.connection.driver_class">com.mysql.jdbc.Driver</property>
Now we come to the application itself. Our little program, which we have calledProductQuery2, will do only as much as the one in the previous section, namelyto display all the information about the current items held.
Once you have taken a look at it, we will explain what it is all about.
ProductQuery2
// accessing a database using Hibernate
import javafx.application.Application;import javafx.geometry.Insets;import javafx.scene.Scene;import javafx.scene.layout.HBox;import javafx.scene.layout.VBox;import javafx.scene.text.Text;import javafx.stage.Stage;import org.hibernate.Session;import org.hibernate.SessionFactory;import java.util.ArrayList;import org.hibernate.query.Query;import org.hibernate.boot.registry.StandardServiceRegistryBuilder;import org.hibernate.cfg.Configuration;import org.hibernate.service.ServiceRegistry;
public class ProductQuery2 extends Application {
@Overridepublic void start(Stage stage) {
// create VBoxes to act as display columnsVBox data1 = new VBox();VBox data2 = new VBox();VBox data3 = new VBox();VBox data4 = new VBox();
data1.getChildren().add(new Text("Serial Number\n"));data2.getChildren().add(new Text("Make\n"));data3.getChildren().add(new Text("Description\n"));data4.getChildren().add(new Text("Price\n"));
HBox root = new HBox(10);root.setPadding(new Insets(10));root.getChildren().addAll(data1, data2, data3, data4);
// configure the stageScene scene = new Scene(root, 300, 150);stage.setTitle("Electrical Store");stage.setScene(scene);stage.show();
// create a Configuration objectConfiguration cfg = new Configuration();
// link the configuration object to the database propertiescfg.configure("hibernate.cfg.xml");
// specify the mapping filecfg.addResource("hibernate.hbm.xml");
// create a Session object to act as an interface between the Java application and HibernateServiceRegistry serviceRegistry
= new StandardServiceRegistryBuilder().applySettings(cfg.getProperties()).build();SessionFactory sessionFactory = cfg.buildSessionFactory(serviceRegistry);Session session = sessionFactory.openSession();
// query the databaseQuery query = session.createQuery("from Product");
// create a list of products from the queryArrayList<Product> list = (ArrayList) query.list();
// display the product details for each product in the listfor(Product pr : list){
data1.getChildren().add(new Text(pr.getStockNumber()));data2.getChildren().add(new Text(pr.getManufacturer()));data3.getChildren().add(new Text(pr.getItem()));
19.8 Adding External Libraries 571

data4.getChildren().add(new Text("£" + pr.getUnitPrice()));}
// close the sessionsession.close();sessionFactory.close();StandardServiceRegistryBuilder.destroy(serviceRegistry);
}
public static void main(String[] args){
launch(args);}
}
You can see from the code that after creating and configuring the visualcomponents, the first thing we have done is to create a Configuration objectwhich read the information from the XML files we created:
Configuration cfg = new Configuration();cfg.configure("hibernate.cfg.xml");cfg.addResource("hibernate.hbm.xml");
We now use this object to create a Session object, which is the interfacebetween the Java application and the database. It is the equivalent of a JDBCConnection object. To do this you follow the rather verbose steps below:
ServiceRegistry serviceRegistry = new StandardServiceRegistryBuilder().applySettings(cfg.getProperties()).build();
SessionFactory sessionFactory = cfg.buildSessionFactory(serviceRegistry);Session session = sessionFactory.openSession();
The Session class has a number of methods, one of which is createQuery,which returns a Hibernate query. Hibernate has its own query language, HibernateQuery Language (HQL) which is similar to SQL; HQL queries are translated intoSQL in order to query the database. The only one of these we will show you here isthe “From” clause which will retrieve entire objects. You can see how it is used inour application:
Query query = session.createQuery("from Product");
The Hibernate Query class has a method called list; this returns a Listobject which we have stored as an ArrayList of Products:
ArrayList<Product> list = (ArrayList) query.list();
572 19 Packages

It is now a simple matter of scrolling through the list of products, displaying allthe fields as we do so:
for(Product pr : list){
data1.getChildren().add(new Text(pr.getStockNumber()));data2.getChildren().add(new Text(pr.getManufacturer()));data3.getChildren().add(new Text(pr.getItem()));data4.getChildren().add(new Text("£" + pr.getUnitPrice()));
}
Before the program terminates, we need to close it down properly. This involvesthree steps:
session.close();sessionFactory.close();StandardServiceRegistryBuilder.destroy(serviceRegistry);
We mentioned earlier that it is also possible to store whole objects as well as toretrieve them. If you have created a Product object, say pr, then you could storeit with the following lines of code, which should come after the routine for openinga session.
Transaction tx = session.beginTransaction();
try{
session.save(pr);tx.commit();
}
catch(Exception e) {
if(tx!=null) tx.rollback();}
finally{
session.close();sessionFactory.close();StandardServiceRegistryBuilder.destroy(serviceRegistry);
}
For a write operation such as this we need to start a transaction, which we dowith the beginTransaction method of Session. We then store our objectwith the save method of Session (this has to be in try. … catch block).Hibernate does not automatically commit the save to the database, so we need to dothis by calling the commit method of Transaction. Should there be anyproblem we have rolled back the change within the catch block. We have con-veniently placed our close routines in the finally clause.
You might be wondering which technology to use, JDBC or Hibernate. There isno rule about this, and opinions differ. However, as a general rule of thumb, if allyou want to do is to query an existing database with SQL then JDBC might besimpler. However, if your main aim to write a Java program that stores its data in adatabase then Hibernate might be the best solution.
19.8 Adding External Libraries 573

19.9 Self-test Questions
1. What role do packages have in the development of classes?
2. Identify valid and invalid import statements amongst the following list:
import java.*;
import javafx.scene.*;
import java.util.Scanner;
import javax.scene.control.Button;
import java.application.Application;
import java.text.*.*;
3. Consider the following outline of a class, used in a computer game, that makesreference to JavaFX’s Button class:
public class GameController{
private Button myButton;// more code here
}
At the moment the line referencing the Button class will not compile. Identifythree different techniques to allow this class with a Button attribute tocompile.
4. What is the purpose of the CLASSPATH environment variable?
5. You were asked to develop a time table application in programming exercise 8of Chap. 8. Later, in programming exercise 3 of Chap. 14 you were asked toenhance this application with exceptions. Finally you were asked to develop aJavaFX interface for this application in programming exercise 6 of Chap. 17.
(a) How would you place the classes that make up the time table applicationinto a package called timetableApp?
(b) What is meant by package scope and how would you give the Bookingand TimeTable classes package scope?
(c) How would you run this application from the command line?
(d) What is the purpose of a JAR file and how would you create a JAR file forthe timetableApp package form the command line?
6. Explain the fundamental differences between the JDBC and the Hibernatetechnologies in terms of their approach to accessing databases.
574 19 Packages

19.10 Programming Exercises
1. Make the changes discussed in this chapter so that the Hostel application is nowpart of a package called hostelApp.
2. Run the Hostel application from the command line.
3. Use your IDE to create an executable JAR file for your Hostel application thenrun your Hostel application by clicking this executable JAR file.
4. Make the changes to the time table application, discussed in self-test question 5above, so that the application can be run from the command line and by clickingan executable JAR file.
5. Write a program that accepts a list of names from the command line and thensorts and displays these names on the screen. Run this program from thecommand line with a variety of names.
6. There are several Java packages that we have not yet explored. Browse yourJava documentation to find out about what kind of classes these packages offer.For example, the lang package contains a class called Math, which has astatic method called random designed to generate random numbers. There isalso a random number class, Random, in the util package. Read your Javadocumentation to find out more about these random number generation tech-niques. Then write a program that generates five lottery numbers from 1 to 50using:
(a) the static random method of the Math class in the lang package;
(b) the random number class, Random, in the util package.
7. In the previous chapter we developed several programs—for example Text-FileTester—that stored and accessed data by creating files within theapplication. See if you can convert one of these programs so that the data isstored in a database to which you have access. In order to do this you will needto either have an account on a database system within your organisation, or to berunning a database server (such as a MySQL server) locally.
19.10 Programming Exercises 575

20Multi-threaded Programs
Outcomes:
By the end of this chapter you should be able to:
• explain how concurrency is achieved by means of time-slicing;• distinguish between threads and processes;• implement threads in Java;• explain the difference between asynchronous and synchronized thread
execution;• explain the terms critical section and mutual exclusion, and describe how Java
programs can be made to implement these concepts;• explain how busy waiting can be avoided in Java programs;• provide a state transition diagram to illustrate the thread life-cycle;• describe how the javafx.concurrent package is used to produce multi-
threaded JavaFX applications;• use the Task class and the Service class from the above package in JavaFX
applications;• use the above classes to create animated applications in JavaFX.
20.1 Introduction
In this chapter you are going to learn how to make a program effectively performmore than one task at the same time—this is known as multi-tasking, and Javaprovides mechanisms for achieving this within a single program.
© Springer Nature Switzerland AG 2019Q. Charatan and A. Kans, Java in Two Semesters, Texts in Computer Science,https://doi.org/10.1007/978-3-319-99420-8_20
577

20.2 Concurrent Processes
If you have been using computers for no more than a couple of decades then youwill probably think nothing of the fact that your computer can appear to be doing anumber of things at the same time. For example, a large file could be downloadingfrom the web, while you are listening to music and typing a letter into your wordprocessor. However, those of us who were using desktop computers in the 1980sdon’t take this for granted! We can remember the days of having to wait for ourdocument to be printed before we could get on with anything else—the idea of evenhaving two applications like a spreadsheet and a database loaded at the same timeon a personal computer would have been pretty exciting.
In recent years dual core and quad core computers have become available on awide scale—such computers have more than one processor, so it does not seemquite so extraordinary that they can perform more than one task at a time. However,with a quad core computer for example it is certainly possible to perform more thanfour tasks at once, and indeed multi-tasking has been possible for many years onmachines with a single processor—and at first sight this does seem ratherextraordinary. The way this is achieved is by some form of time-slicing; in otherwords the processor does a little bit of one task, then a little bit of the next and so on—and it does this so quickly it appears that it is all happening at the same time.
A running program is usually referred to as a process; two or more processes thatrun at the same time are called concurrent processes. Normally, when processes runconcurrently each has its own area in memory where its program code and data arekept, and each process’s memory space is protected from any other process. All this isdealt with by the operating system; modern operating systems such as Windows™and Unix™ have a process management component whose job it is to handle all this.
20.3 Threads
We have just introduced the idea of a number of programs—or processes—oper-ating concurrently. There are, however, times when we want a single program toperform two or more tasks at the same time. Whereas two concurrent programs areknown as processes, each separate task performed by a single program is known asa thread. A thread is often referred to as a lightweight process, because it takesless of the system’s resources to manage threads than it does to manage processes.The reason for this is that threads do not have completely separate areas of memory;they can share code and data areas. Managing threads, which also work on atime-slicing principle, is the job of the Java runtime environment working inconjunction with the operating system.
Let’s illustrate this by developing a very simple program, which continuouslydisplays the numbers from 0 to 9 in a console window as shown in Fig. 20.1.
The program will provide a simple graphical interface to start and stop thenumbers being displayed, as shown in Fig. 20.2.
578 20 Multi-threaded Programs

Fig. 20.1 Output from the simple number display application
Fig. 20.2 Interface for the simple number display application
20.3 Threads 579
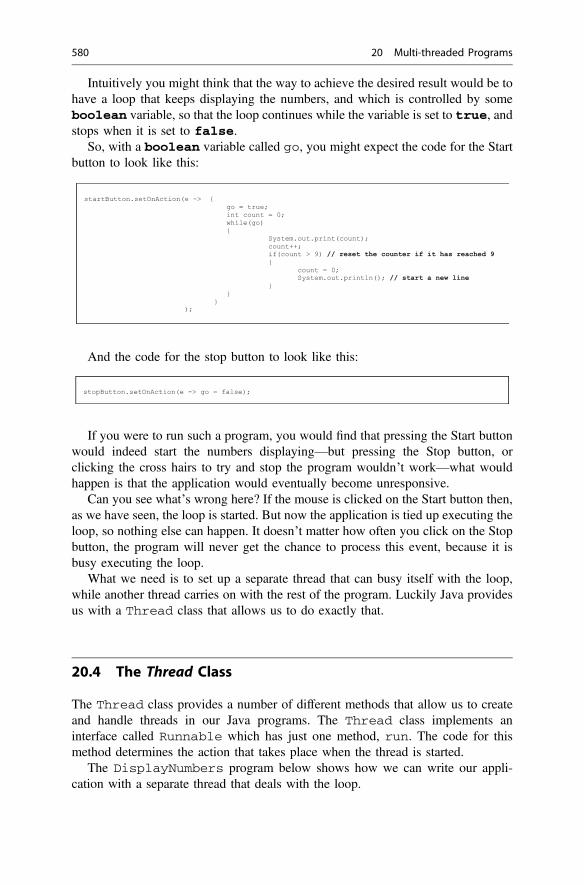
Intuitively you might think that the way to achieve the desired result would be tohave a loop that keeps displaying the numbers, and which is controlled by someboolean variable, so that the loop continues while the variable is set to true, andstops when it is set to false.
So, with a boolean variable called go, you might expect the code for the Startbutton to look like this:
And the code for the stop button to look like this:
If you were to run such a program, you would find that pressing the Start buttonwould indeed start the numbers displaying—but pressing the Stop button, orclicking the cross hairs to try and stop the program wouldn’t work—what wouldhappen is that the application would eventually become unresponsive.
Can you see what’s wrong here? If the mouse is clicked on the Start button then,as we have seen, the loop is started. But now the application is tied up executing theloop, so nothing else can happen. It doesn’t matter how often you click on the Stopbutton, the program will never get the chance to process this event, because it isbusy executing the loop.
What we need is to set up a separate thread that can busy itself with the loop,while another thread carries on with the rest of the program. Luckily Java providesus with a Thread class that allows us to do exactly that.
20.4 The Thread Class
The Thread class provides a number of different methods that allow us to createand handle threads in our Java programs. The Thread class implements aninterface called Runnable which has just one method, run. The code for thismethod determines the action that takes place when the thread is started.
The DisplayNumbers program below shows how we can write our appli-cation with a separate thread that deals with the loop.
startButton.setOnAction(e -> { go = true; int count = 0; while(go) { System.out.print(count); count++; if(count > 9) // reset the counter if it has reached 9 { count = 0; System.out.println(); // start a new line } } } );
stopButton.setOnAction(e -> go = false);
580 20 Multi-threaded Programs

Let’s take a closer look at the code for the setOnAction method of the Startbutton:
DisplayNumbersimport javafx.application.Application; import javafx.geometry.Pos; import javafx.scene.Scene; import javafx.scene.control.Button; import javafx.scene.layout.HBox; import javafx.stage.Stage;
public class DisplayNumbers extends Application { private boolean go;
@Override public void start(final Stage stage) { Button startButton = new Button("Start"); Button stopButton = new Button("Stop");
startButton.setOnAction(e -> { go = true;
// create a separate thread Thread thread1 = new Thread(()-> { int count = 0; while(go) { System.out.print(count); count++; if(count > 9) {
// reset the counter and start a new line count = 0; System.out.println(); } } }); thread1.start(); });
stopButton.setOnAction(e -> go = false);
HBox root = new HBox(10); root.setAlignment(Pos.CENTER); root.getChildren().addAll(startButton, stopButton); Scene scene = new Scene(root, 250, 100); stage.setScene(scene); stage.setTitle("Numbers"); stage.show(); }
public static void main(String[] args) { launch(args); } }
startButton.setOnAction(e -> { go = true; Thread thread1 = new Thread(()-> { int count = 0; while(go) { System.out.print(count); count++; if(count > 9) { count = 0; System.out.println(); } } }); thread1.start(); });
20.4 The Thread Class 581
After setting go to true (which we are able to do within the lambda expressionbecause go is an attribute of the class) we create a new thread. Since the Threadclass implements Runnable we need to code its run method, and since Run-nable is a functional interface, we can code its run method by using a lambdaexpression that provides the instructions for displaying the numbers. So it is nowthe responsibility of this new thread to display the numbers according to theinstructions in its run method.
Once we have done this, we start the thread by calling its start method; wedon’t call the run method directly—the start method does this for us.
Once started, the thread executes and, via time-slicing, the application thread isalso executed, so that it is possible to listen for events such as the Stop button beingpressed. As you can see, when this happens go is set to false, and when theexecution returns to our new thread the loop terminates.
The next section provides some more detail about how all this is achieved.
20.5 Thread Execution and Scheduling
As we explained earlier, concurrency, with a single processor, is achieved by someform of time-slicing. Each process or thread is given a little bit of time—referred toas a quantum—on the CPU, then the next process or thread takes its turn andso on.
Now, as you can imagine, there are some very complex issues to consider here.For example, what happens if a process that currently has the CPU cannot continuebecause it is waiting for some input, or perhaps is waiting for an external device likea printer to become available? When new processes come into existence, when dothey get their turn? Should all processes get an equal amount of time on the CPU orshould there be some way of prioritizing?
The answers to these questions are not within the domain of this book. However,it is important to understand that the responsibility for organizing all this lies withthe operating system; in the case of multi-threaded Java programs this takes place inconjunction with the JVM. Different systems use different scheduling algorithmsfor deciding the order in which concurrent threads or processes are allowed CPUtime. This is hidden from the user, and from the programmer. In the case of anapplication such as our counter program, all we can be sure about is the fact that onethread has to complete a quantum on the CPU before another thread gets its turn—we cannot, however, predict the amount of time that will be allocated to eachthread.
There is quite a simple way to illustrate this. Let’s add the following code to theinstructions for the setOnAction method of the start button:
582 20 Multi-threaded Programs

So now we have created two threads which will run concurrently: thread1 willdisplay the numbers from 0 to 9 as before, while thread2 will print the charactersfrom “A” to “J” (you can see how we have achieved this by type casting from intto char—“A” has the Unicode value of 65).
Thread thread2 = new Thread(()-> { int count = 0; while(go) { // print characters A to J System.out.print((char) (65 + count)); count++; if(count > 9) { count = 0; System.out.println(); } } });
thread2.start()
Fig. 20.3 Two threads running concurrently
20.5 Thread Execution and Scheduling 583

A typical output fragment from this program is shown in Fig. 20.3. This gives avery good illustration of how the execution switches randomly between threads,with the output switching unpredictably between numbers and letters.
20.6 Synchronizing Threads
In Sect. 20.5 we explained that under normal circumstances the behaviour of twoor more threads executing concurrently is not co-ordinated, and we are not able topredict which threads will be allocated CPU time at any given moment.Unco-ordinated behaviour like this is referred to as asynchronous behaviour.
It is, however, often the case that we require two or more concurrently executingthreads or processes to be co-ordinated—and if they were not, we could find we hadsome serious problems. There are many examples of this. One of the most commonis that of a producer–consumer relationship, whereby one process is continuallyproducing information that is required by another process. A very simple exampleof this is a program that copies a file from one place to another. One process isresponsible for reading the data, another for writing the data. Since the two pro-cesses are likely to be operating at different speeds, this would normally beimplemented by providing a buffer, that is a space in memory where the data thathas been read is queued while it waits for the write process to access it and thenremove it from the queue.
It should be fairly obvious that it could be pretty disastrous if the read processand the write process tried to access the buffer at the same time—both the data andthe indices could easily be corrupted. In a situation like this we would need to treatthe parts of the program that access the buffer as critical sections—that is, sectionsthat can be accessed only by one process at a time.
Implementing critical sections is known as mutual exclusion, and Java providesa mechanism for the implementation of mutual exclusion in multi-threaded pro-grams. In this book we are not going to go into any detail about how this isimplemented, because the whole subject of concurrent programming is a vast one,and is best left to texts that deal with that topic. What we intend to do here is simplyto explain the mechanisms that are available in Java for co-ordinating the behaviourof threads.
Java provides for the creation of a monitor, that is a mechanism by which amethod can be accessed by only one thread at a time. This entails the use of themodifier synchronized in the method header. For instance, a Buffer class inthe above example might have a read method declared as:
public synchronized Object read() { ..... }
584 20 Multi-threaded Programs
Because it is synchronized, as soon as some object invokes this method a lock isplaced on it; this means that no other object can access it until it has finishedexecuting. This can, however, cause a problem known as busy waiting. This meansthat the method that is being executed by a particular thread has to go round in aloop until some condition is met, and as a consequence the CPU time is used just tokeep the thread going round and round in this loop until it times out—not veryefficient! As an example of this, consider the read and write methods that wetalked about in the example above. The read method would not be able to placeany data in the buffer if the buffer were full—it would have to loop until some datawas removed by the write method; conversely, the write method would not beable to obtain any data if the buffer were empty—it would have to wait for theread method to place some data there.
Java provides methods to help us avoid busy waiting situations. The Objectclass has a method called wait, which suspends the execution of a thread (taking itaway from the CPU) until it receives a message from another thread telling it towake up. The object methods notify and notifyAll are used for the purposeof waking up other threads. Sensible use of these methods allow programmers toavoid busy waiting situations.
20.7 Thread States
A very useful way to summarize what you have learnt about threads is by means ofa state transition diagram. Such a diagram shows the various states that an objectcan be in, and the allowed means of getting from one state to another—the tran-sitions. The state transition diagram for a thread is shown in Fig. 20.4.
As we have said, much of the thread’s life-cycle is under the control of theoperating system and the JVM; however some transitions are also under the controlof the programmer. In Fig. 20.4 the transitions that are controlled by the operatingsystem and the JVM are italicized; those that the programmer can control are inplain font.
As you have seen, a thread is brought into existence by invoking its startmethod. At this point it goes into the ready state. This means it is waitingto be allocated time on the CPU; this decision is the responsibility of theoperating system and JVM. Once it is dispatched (that is given CPU time), it issaid to be in the running state. Once a thread is running, a number of things canhappen to it:
• It can simply timeout and go back to the ready state.• The programmer can arrange for the sleep method to be called, causing the
thread to go into the sleeping state for a given period of time. When this timeperiod has elapsed the thread wakes up and goes back to the ready state.
20.6 Synchronizing Threads 585

• The programmer can use the wait method to force the thread to go into thewaiting state until a certain condition is met. Once the condition is met, thethread will be informed of this fact by a notify or notifyAll method, andwill return to the ready state.
• A thread can become blocked; this is normally because it is waiting for someinput, or waiting for an output device to become available. The thread willreturn to the ready state when either the normal timeout period has elapsed orthe input/output operation is completed.
• When the run method finishes the thread is terminated.
Let’s look at how the programmer can influence the behaviour of a thread bycalling the sleep method. This is a static method, and calling it with the classname will cause the currently executing thread to sleep for a specified number ofmilliseconds.
If we wanted our number display program to leave an interval of one secondbetween each number being displayed we could adapt the method for the Startbutton as follows—the additional code is emboldened:
TERMINATED
SLEEPING
READY
RUNNING
WAITING
BLOCKED
dispatch
start
meout
block
meout orunblock
wait
sleep
notify notifyAll
wakeup
Fig. 20.4 The state transition diagram for a thread
586 20 Multi-threaded Programs

The sleep method throws an InterruptedException, which is achecked exception and so needs to be placed in a try … catch block as shown.
20.8 Multithreading and JavaFX
When we launch a JavaFX application the init method is called in the mainthread (or launcher thread), and then, when the start method is called, theapplication itself runs in a separate thread called the application thread, which isalso where the stop method runs.
If we want to write multi-threaded JavaFX applications, a special package—javafx.concurrent—is provided for this purpose. The package contains aninterface called Worker that creates background tasks that can communicate withthe user interface. Two classes implement this interface, Task and Service.
20.8.1 The Task Class
In our previous application we created a simple thread that only used the console foroutput, and we were able to get away with not using the special classes. But now wewill adapt that program so that the display occurs in a TextArea as shown inFig. 20.5.
We are going to use the Task class to implement this. Task is an abstract class,so we need either to use an anonymous class, or create a custom class that extendsTask, which is what we have done below:
startButton.setOnAction(e -> { go = true;
Thread thread1 = new Thread(()-> { int count = 0; while(go) { System.out.print(count);
try { Thread.sleep(1000); } catch(InterruptedException ex) { } count++; if(count > 9) { // reset the counter and start a new line count = 0; System.out.println(); } } }); thread1.start(); });
20.7 Thread States 587

Task is a generic class; its type is the return type of its abstract method,call. In our case there is no return value, so the type will be Void, as explained inChap. 13.
An application that uses our NumbersTask class will need to inform it whereto display the output. Therefore, a reference to a TextArea is sent into the class as
Fig. 20.5 The simplenumber display applicationoutputting to a text area
NumbersTaskimport javafx.scene.control.TextArea; import javafx.concurrent.Task;
public class NumbersTask extends Task<Void> { private boolean go; private TextArea display;
public NumbersTask(TextArea displayIn) { display = displayIn; }
@Override protected Void call() { go = true; int count = 0;
while(go) { display.appendText("" + count); try { Thread.sleep(100); //force the thread to sleep for 100 milliseconds } catch(InterruptedException e) { }
count++; if(count > 9) // reset the counter if it has gone over 9 { count = 0; display.appendText("\n"); // start a new line } } return null; }
public void finish() { go = false; } }
588 20 Multi-threaded Programs
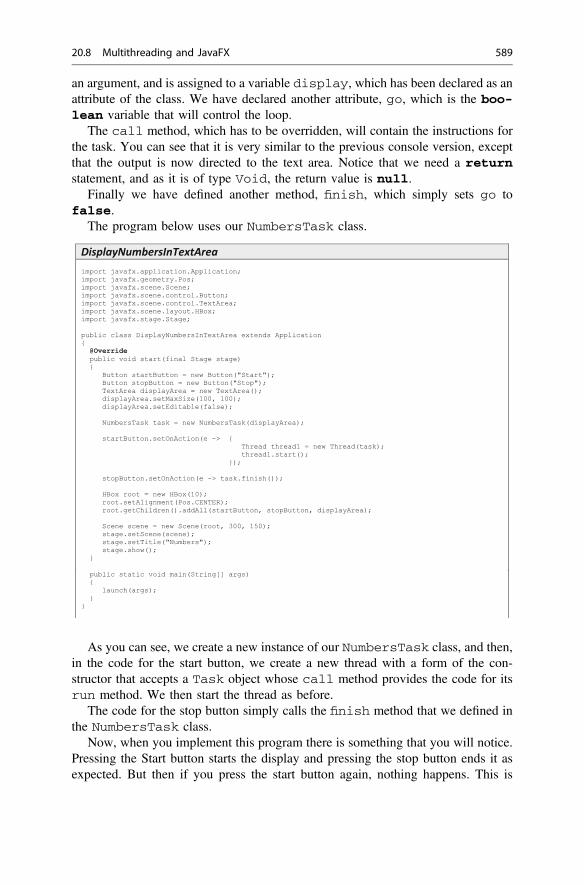
an argument, and is assigned to a variable display, which has been declared as anattribute of the class. We have declared another attribute, go, which is the boo-lean variable that will control the loop.
The call method, which has to be overridden, will contain the instructions forthe task. You can see that it is very similar to the previous console version, exceptthat the output is now directed to the text area. Notice that we need a returnstatement, and as it is of type Void, the return value is null.
Finally we have defined another method, finish, which simply sets go tofalse.
The program below uses our NumbersTask class.
As you can see, we create a new instance of our NumbersTask class, and then,in the code for the start button, we create a new thread with a form of the con-structor that accepts a Task object whose call method provides the code for itsrun method. We then start the thread as before.
The code for the stop button simply calls the finish method that we defined inthe NumbersTask class.
Now, when you implement this program there is something that you will notice.Pressing the Start button starts the display and pressing the stop button ends it asexpected. But then if you press the start button again, nothing happens. This is
DisplayNumbersInTextAreaimport javafx.application.Application; import javafx.geometry.Pos; import javafx.scene.Scene; import javafx.scene.control.Button; import javafx.scene.control.TextArea; import javafx.scene.layout.HBox; import javafx.stage.Stage;
public class DisplayNumbersInTextArea extends Application {@Override
public void start(final Stage stage) { Button startButton = new Button("Start"); Button stopButton = new Button("Stop"); TextArea displayArea = new TextArea(); displayArea.setMaxSize(100, 100); displayArea.setEditable(false);
NumbersTask task = new NumbersTask(displayArea);
startButton.setOnAction(e -> { Thread thread1 = new Thread(task); thread1.start(); });
stopButton.setOnAction(e -> task.finish());
HBox root = new HBox(10); root.setAlignment(Pos.CENTER); root.getChildren().addAll(startButton, stopButton, displayArea);
Scene scene = new Scene(root, 300, 150); stage.setScene(scene); stage.setTitle("Numbers"); stage.show(); }
public static void main(String[] args) { launch(args); } }
20.8 Multithreading and JavaFX 589

because a Task object is designed to run only once. Once it has completed its job,it doesn’t run again—for that you need to create a Service.
20.8.2 The Service Class
The Service class creates a Task object via its createTask method. When anew thread is created it calls this method to generate a task; hence a task caneffectively run an infinite amount of times.
Our NumbersService class is shown below:
In the case of a Service, the method that has to be implemented is cre-ateTask. This returns a Task object, which is specified here by overriding its
NumbersServiceimport javafx.scene.control.TextArea; import javafx.concurrent.Task; import javafx.concurrent.Service;
public class NumbersService extends Service<Void> { private TextArea display; private boolean go;
public NumbersService (TextArea displayIn) { display = displayIn; }
@Override protected Task<Void> createTask() { return new Task<Void> () {
@Override protected Void call() throws Exception { go = true; int count = 0;
while(go) { display.appendText("" + count);
try { Thread.sleep(100); //force the thread to sleep } catch(InterruptedException e) { }
count++; if(count > 9) // reset the counter { count = 0; display.appendText("\n"); } } return null; }; }; }
public void finish() { display.appendText("\n"); go = false; } }
590 20 Multi-threaded Programs

call method as before. In this case we have achieved this by means of ananonymous class. The code for the call method is the same as before.
The only other thing to mention here is that we have tidied up the output byadding a newline statement in the finish method, so that the display starts on anew line after having been stopped.
Our previous program is adapted below to make use of the NumbersServiceclass:
If you implement this program you will see that the display can be started andstopped as many times as you want.
20.8.3 Automating the ChangingFace Application
JavaFX provides some advanced and sophisticated routines for producing anima-tions, which we have not had room to cover in this text. However, because ani-mations—from the simple to the complex—consist of continuously performing atask, then some degree of threading will be required.
DisplayNumbersInTextAreaUsingServiceimport javafx.application.Application; import javafx.geometry.Pos; import javafx.scene.Scene; import javafx.scene.control.Button; import javafx.scene.control.TextArea; import javafx.scene.layout.HBox; import javafx.stage.Stage;
public class DisplayNumbersInTextAreaUsingService extends Application {
@Override public void start(final Stage stage) { Button startButton = new Button("Start"); Button stopButton = new Button("Stop"); TextArea displayArea = new TextArea(); displayArea.setMaxSize(100, 100); displayArea.setEditable(false);
NumbersService service = new NumbersService(displayArea);
startButton.setOnAction(e -> { Thread thread1 = new Thread(service.createTask()); thread1.start(); } );
stopButton.setOnAction(e -> service.finish());
HBox root = new HBox(10); root.setAlignment(Pos.CENTER); root.getChildren().addAll(startButton, stopButton, displayArea);
Scene scene = new Scene(root, 300, 150); stage.setScene(scene); stage.show(); }
public static void main(String[] args) { launch(args); }
}
20.8 Multithreading and JavaFX 591

Let’s apply this principle to our ChangingFace application from Chap. 10,and “automate” the task of changing from the smiling face to the frowning face sothat it every second it changes from one to the other as shown in Fig. 20.6.
Once again we have created a custom class as shown below:
Fig. 20.6 Automating the ChangingFace application
FaceTaskimport javafx.concurrent.Task;import javafx.scene.shape.Arc;import javafx.stage.Stage;
public class FaceTask extends Task<Void>{
private Arc arc;private Stage stage;
public FaceTask(Arc arcIn, Stage stageIn){
arc = arcIn;stage = stageIn;
}
@Overrideprotected Void call(){
while(stage.isShowing()){
arc.setLength(-180); // smiling mouthtry{
Thread.sleep(1000); //force the thread to sleep for 1 second}catch(InterruptedException e){}
arc.setLength(180); // frowning mouth
try{
Thread.sleep(1000); //force the thread to sleep for 1 second}catch(InterruptedException e){}
}return null;
}}
592 20 Multi-threaded Programs

If you recall from Chap. 10, the mouth is formed from an object of type Arc,and therefore our class requires a reference to the mouth to be sent in from the mainapplication, in order that it can make the periodic change to it. It also needs areference to the stage on which the scene graphic is placed—we will explain why itneeds this in a moment. An Arc object and a Stage object are therefore declaredas attributes of the class and these are given a value via the constructor
The call method is self-explanatory—the arc is re-drawn every second, firstclockwise and then anticlockwise so that mouth smiles and frowns repeatedly.
Because we have not provided a means to stop the thread, we want this tohappen when the stage is closed (that is, the cross-hairs have been pressed by theuser), so that the application terminates normally. To do this we have arranged forthe loop to check on each iteration that the stage is still showing—hence the needfor a reference to the stage. For this purpose we have used the isShowing methodof Stage
The following program uses our FaceTask to create the animation.
AnimatedFaceimport javafx.application.Application; import javafx.stage.Stage; import javafx.scene.text.Text; import javafx.scene.Scene; import javafx.scene.paint.Color; import javafx.scene.shape.Circle; import javafx.scene.Group; import javafx.scene.shape.Arc; import javafx.scene.shape.ArcType; import javafx.scene.text.Font;
public class AnimatedFace extends Application {
@Override public void start(final Stage stage) { Circle face = new Circle(118, 125, 80); face.setFill(Color.YELLOW); face.setStroke(Color.RED);
Circle rightEye = new Circle(80, 100, 10); rightEye.setFill(Color.YELLOW); rightEye.setStroke(Color.BLUE);
Circle leftEye = new Circle(156, 100, 10); leftEye.setFill(Color.YELLOW); leftEye.setStroke(Color.BLUE);
Arc mouth = new Arc(118, 150, 45, 35, 0, -180); mouth.setFill(Color.YELLOW); mouth.setStroke(Color.BLUE); mouth.setType(ArcType.OPEN);
Text caption = new Text(60, 240, "Animated Face"); caption.setFont(Font.font ("Verdana", 15)); caption.setFill(Color.BLUE);
Group root = new Group(face, rightEye, leftEye, mouth, caption);
Scene scene = new Scene(root, Color.YELLOW);
stage.setScene(scene); stage.setHeight(300); stage.setWidth(250); stage.setTitle("Animated Face"); stage.show();
Thread thread1 = new Thread(new FaceTask(mouth, stage)); thread1.start(); }
public static void main(String[] args) { launch(args); }
}
20.8 Multithreading and JavaFX 593

20.8.4 Running a Task in the Background
Whenever we want a task to run in the background we need to place it in a separatethread. To illustrate this we will keep it simple and use two applications that wehave already developed—our PushMe application from Chap. 10 and the Ani-matedFace that we just developed, which will continuously run in the back-ground. This is shown in Fig. 20.7.
The following program achieves this result:
Fig. 20.7 The animated face running in the background
BackgroundTaskExampleimport javafx.application.Application; import javafx.stage.Stage; import javafx.scene.text.Text; import javafx.scene.text.Font; import javafx.scene.Scene; import javafx.geometry.Pos; import javafx.scene.Group; import javafx.scene.control.Button; import javafx.scene.control.Label; import javafx.scene.control.TextField; import javafx.scene.layout.VBox; import javafx.scene.paint.Color; import javafx.scene.shape.Arc; import javafx.scene.shape.ArcType; import javafx.scene.shape.Circle;
public class BackgroundTaskExample extends Application {
BQxgttkfg" public void start(final Stage primaryStage) {
11"etgcvg"cpf"eqphkiwtg"c"vgzv"hkgnf"hqt"wugt"gpvt{" TextField pushMeTextField = new TextField(); pushMeTextField.setMaxWidth(250);
11"etgcvg"cpf"eqphkiwtg"c"ncdgn"vq"fkurnc{"vjg"qwvrwv" Label pushMeLabel= new Label(); pushMeLabel.setTextFill(Color.RED); pushMeLabel.setFont(Font.font("Ariel", 14));
11"etgcvg"cpf"eqphkiwtg"c"ncdgn"yjkej"yknn"ecwug"vjg"vgzv"vq"dg"fkurnc{gf" Button pushMeButton = new Button(); pushMeButton.setText("Type something in the box then push me"); pushMeButton.setOnAction(e -> pushMeLabel.setText("You entered: " + pushMeTextField.getText()));
11"etgcvg"cpf"eqphkiwtg"c"XDqz"vq"jqnf"qwt"eqorqpgpvu"""""""" VBox root = new VBox(); root.setSpacing(10); root.setAlignment(Pos.CENTER);
594 20 Multi-threaded Programs

It should be quite easy to see what we have done here. After creating the scenefor the PushMe class and adding it to the primary stage, we have called a helpermethod, createBackgroundTask, which creates a secondary stage on whichthe face will appear. The new thread is then created, using our custom FaceTaskclass. The secondary stage is positioned relative to the primary stage, hence theneed for a reference to the primary stage to be sent to createBackgroundTaskas an argument.
Scene scene = new Scene(root, Color.YELLOW);
11"etgcvg"cpf"eqphkiwtg"c"ugeqpfct{"uvcig" Stage secondaryStage = new Stage(); secondaryStage.setScene(scene); secondaryStage.setHeight(300); secondaryStage.setWidth(250); secondaryStage.setTitle("Animated Face");
""""""""11"rqukvkqp"vjg"ugeqpfct{"uvcig"tgncvkxg"vq"vjg"rtkoct{"uvcig" secondaryStage.setX(stageIn.getX() + 400); secondaryStage.setY(stageIn.getY());
secondaryStage.show();
""""""""11"etgcvg"c"pgy"vjtgcf" Thread thread1 = new Thread(new FaceTask(mouth, secondaryStage)); thread1.start(); }
public static void main(String[] args) { launch(args); } }
""""""""11cff"vjg"eqorqpgpvu"vq"vjg"XDqz" root.getChildren().addAll(pushMeTextField, pushMeButton, pushMeLabel);
""""""""11"etgcvg"c"pgy"uegpg" Scene scene = new Scene(root, 350, 150); primaryStage.setScene(scene);
primaryStage.setTitle("Background Task Example"); primaryStage.show(); createBackgroundTask(primaryStage); }
private void createBackgroundTask(Stage stageIn) {
11"etgcvg"cpf"eqphkiwtg"vjg"ockp"ekteng"hqt"vjg"hceg" Circle face = new Circle(118, 125, 80); // face face.setFill(Color.YELLOW); face.setStroke(Color.RED);
"11"etgcvg"cpf"eqphkiwtg"vjg"ekteng"hqt"vjg"tkijv"g{g" Circle rightEye = new Circle(80, 100, 10); rightEye.setFill(Color.YELLOW); rightEye.setStroke(Color.BLUE);
""""""""11"etgcvg"cpf"eqphkiwtg"vjg"ekteng"hqt"vjg"nghv"g{g" Circle leftEye = new Circle(156, 100, 10); leftEye.setFill(Color.YELLOW); leftEye.setStroke(Color.BLUE);
11"etgcvg"cpf"eqphkiwtg"c"uoknkpi"oqwvj" Arc mouth = new Arc(118, 150, 45, 35, 0, -180); mouth.setFill(Color.YELLOW); mouth.setStroke(Color.BLUE); mouth.setType(ArcType.OPEN);
11"etgcvg"cpf"eqphkiwtg"vjg"vgzv" Text caption = new Text(60, 240, "Animated Face"); caption.setFont(Font.font ("Verdana", 15)); caption.setFill(Color.BLUE);
Group root = new Group(face, rightEye, leftEye, mouth, caption);
20.8 Multithreading and JavaFX 595

20.8.5 Animation Using a Series of Images
Prior to the advent of digital technology, the traditional way of producing anima-tions in film was to display a continuous series of images, which, to the eye, gavethe impression of movement.
record1.jpg
record8.jpgrecord7.jpgrecord6.jpgrecord5.jpg
record4.jpgrecord3.jpgrecord2.jpg
Fig. 20.8 The images used for the record animation
Fig. 20.9 The Record application
596 20 Multi-threaded Programs

So to end this chapter, let’s have some fun and replicate that technique bydepicting an old-style vinyl record going round on a turn-table. There are eightimages involved in our animation, as shown in Fig. 20.8.
Figure 20.9 shows a snapshot of the application in action.The code for the application is presented below. You will see that we have taken
a slightly different approach here; we have not created a custom class, but insteadhave written an anonymous class to define our Task.
Recordimport javafx.application.Application;import javafx.geometry.Pos;import javafx.stage.Stage;import javafx.scene.control.Label;import javafx.scene.Scene;import javafx.scene.image.Image;import javafx.scene.image.ImageView;import javafx.scene.layout.Background;import javafx.scene.layout.VBox;import javafx.concurrent.Task;
public class Record extends Application{
// declare some constantsprivate static final int NUMBER_OF_IMAGES = 8;private static final int SLEEP_TIME = 100;
private Label label = new Label();
@Overridepublic void start (Stage stage){
VBox root = new VBox();root.setBackground(Background.EMPTY);root.setAlignment(Pos.CENTER);root.getChildren().add(label);
Scene scene = new Scene(root, 300, 300);stage.setScene(scene);stage.setTitle("Record");
stage.show(); begin(stage);
}
private void begin(Stage stageIn) // helper method{
// create an image from a file and add it to a labelImageView imageView = new ImageView();label.setGraphic(imageView);
Thread thread1 = new Thread(new Task<Void>() // anonymous class{
String imageFileName;int currentImage = 1;Image image;
@Overrideprotected Void call() {
while(stageIn.isShowing()){
// create the name of the next image to be usedimageFileName = "record" + currentImage + ".jpg";
image = new Image(imageFileName); imageView.setImage(image);
try{
Thread.sleep(SLEEP_TIME);}catch(InterruptedException e){}
currentImage++; // next imageif(currentImage == NUMBER_OF_IMAGES + 1) {
currentImage = 1;}
} return null;
}});
20.8 Multithreading and JavaFX 597

To make the code easier to read we have placed everything to do with thecreation and operation of the thread in a helper method called begin:
The method begins by creating an empty ImageView and adding it to a label.Then a new Thread is created with a Task object as its argument; in this case theTask is created and specified as an anonymous class.
The code for the call method of the Task should not be too difficult tounderstand. We have incremented a counter (currentImage) on each iteration ofthe loop, and each time the name of the image file is reset accordingly. The filename therefore changes from record1.jpg to record2.jpg and so on, untilthe final image is reached and the counter is reset to 1. On each iteration the Imageand ImageView are set to the correct image using this file name.
The speed of the rotation is set by causing the thread to sleep for a given numberof milliseconds (SLEEP_TIME). We have chosen 100 ms, but of course you canexperiment with different values.
thread1.start();}
public static void main(String[] args){
launch(args);}
}
private void begin(Stage stageIn) {
// create an image from a file and add it to a label ImageView imageView = new ImageView(); label.setGraphic(imageView);
Thread thread1 = new Thread(new Task<Void>() // anonymous class{
String imageFileName; int currentImage = 1; Image image;
@Override protected Void call()
{ while(stageIn.isShowing()) {
// create the name of the next image to be used imageFileName = "record" + currentImage + ".jpg";
image = new Image(imageFileName); imageView.setImage(image);
try{
Thread.sleep(SLEEP_TIME);}
catch(InterruptedException e){ }
currentImage++; // next image if(currentImage == NUMBER_OF_IMAGES + 1)
{ currentImage = 1;
} } return null;
} }); thread1.start();}
598 20 Multi-threaded Programs

Once again we have used the isShowing method of Stage to terminate thethread when the application is closed.
20.9 Self-test Questions
1 Explain how concurrency is achieved by means of time-slicing.
2 Distinguish between threads and processes.
3 What is the difference between asynchronous and synchronized thread execution?
4 What is meant by the terms critical section and mutual exclusion? How are Javaprograms made to implement these concepts?
5 Explain how busy waiting can be avoided in Java programs.
6 Which two classes exist in the javafx.concurrent package to supportmultithreading in JavaFX applications? What is the main difference betweenthese classes?
7 The application below has had its call method replaced by a comment.
import javafx.application.Application; import javafx.concurrent.Task; import javafx.geometry.Pos; import javafx.stage.Stage; import javafx.scene.text.Text; import javafx.scene.Scene; import javafx.scene.paint.Color; import javafx.scene.layout.Background; import javafx.scene.layout.VBox; import javafx.scene.text.Font;
public class HelloGoodbye extends Application { private Text text = new Text(60, 240, "Hello");
public void start (Stage stage) { text.setFont(Font.font ("Verdana", 25)); text.setFill(Color.BLUE); VBox root = new VBox(); root.setBackground(Background.EMPTY); root.setAlignment(Pos.CENTER); root.getChildren().add(text); Scene scene = new Scene(root, 200, 200); stage.setScene(scene); stage.setTitle("Hello-Goodbye"); stage.show(); begin(stage); }
private void begin(Stage stageIn) { Thread thread1 = new Thread(new Task<Void>() { protected Void call() {
11eqfg"iqgu"jgtg" } }); thread1.start(); }
public static void main(String[] args) { launch(args); } }
20.8 Multithreading and JavaFX 599

Replace the comment with code so that the application continuously displays thewords “Hello” and “Goodbye” as shown below, changing once a second.
20.10 Programming Exercises
1. Implement some of the programs from this chapter. The images that you needfor the Record class can be downloaded from the website. Try to design someanimations of your own.
2. Implement the application that you completed in question 7 of the self-testquestions.
3. Try making some modifications to the applications developed in Sects. 20.8.1and 20.8.2 which continuously display number sequences.
One possible modification would be to alter the NumbersTask or Num-bersService class to allow the sleep interval to be passed as a parameterwhen an object is instantiated.
Another might be to continuously display single digits in a text field (rather thana text area), and perhaps have two more threads operating at the same time, withdifferent sleep intervals. An example is shown below:
4. Make some alterations to the animated face application that we developed inSect. 20.8.3. Here are some suggestions:
(a) The sleep interval could be sent into the FaceTask as a parameter.
(b) The mouth could change colour each time it changes expression.
600 20 Multi-threaded Programs

(c) Instead of the mouth changing, one eye could wink as shown below:
You would need to modify both the FaceTask class and the Ani-matedFace class so that one eye was no longer a circle, but an arc drawnthrough 360°. Setting the y radius to zero will produce a straight line.
(d) See if you can create a face in which both the eye winks and the mouthchanges expression, but at different intervals. For this purpose you wouldneed two versions of the FaceTask class.
20.10 Programming Exercises 601

21Advanced Case Study
Outcomes:
By the end of this chapter you should be able to:
• specify system requirements by developing a use case model;• annotate a composition association on a UML diagram;• specify enumerated types in UML and implement them in Java;• develop test cases from behaviour specifications found in the use case model;• use the TabPane class to create an attractive user interface;• add tool tips to JavaFX components.
21.1 Introduction
You have covered quite a few advanced topics now in this second semester. In thischapter we are going to take stock of what you have learnt by developing anapplication that draws upon all these topics. We will make use of Java’s packagenotation for bundling together related classes; we will implement interfaces; we willcatch and throw exceptions; we will make use of the collection classes in thejava.util package and we will store objects to file. We will also make use ofmany JavaFX components to develop an attractive graphical interface.
As with the case study we presented to you in the first semester, we will discussthe development of this application from the initial stage of requirements analysis,through to final implementation and testing stages. Along the way we will look at afew new concepts.
© Springer Nature Switzerland AG 2019Q. Charatan and A. Kans, Java in Two Semesters, Texts in Computer Science,https://doi.org/10.1007/978-3-319-99420-8_21
603

21.2 System Overview
The application that we will develop will keep track of planes using a particularairport. So as not to overcomplicate things, we will make a few assumptions:
• there will be no concept of gates for arrival and departure—passengers will bemet at a runway on arrival and be sent to a runway on departure;
• planes entering airport airspace and requesting to land are either called into landon a free runway, or are told to join a queue of circling planes until a runwaybecomes available;
• once a plane departs from the airport it is removed from the system.
21.3 Requirements Analysis and Specification
Many techniques are used to determine system requirements. Among others, theseinclude interviewing the client, sending out questionnaires to the client, reviewingany documentation if a current system already exists and observing people carryingout their work. A common way to document these requirements in UML is todevelop a use case model. A use case model consists of use case diagrams andbehaviour specifications.
A use case diagram is a simple way of recording the roles of different userswithin a system and the services that they require the system to deliver. The users(people or other systems) of a system are referred to as actors in use case diagramsand are drawn as simple stick characters. The roles these actors play in the systemare used to annotate the stick character. The services they require are the so-calleduse cases. For example, in an ATM application an actor may be a customer and oneof the use cases (services) required would be to withdraw cash. A very simple usecase diagram for our application is given in Fig. 21.1.
Figure 21.1 depicts the actors in this application (air traffic controllers andinformation officers) and the services these actors require (registering a flight,listing arrivals and so on). Once a list of use cases has been identified, behaviourspecifications are used to record their required functionality. A simple way ofrecording behaviour specifications is to give a simple textual description foreach use case. Table 21.1 contains behaviour specifications for each use case givenin Fig. 21.1. Note that the descriptions are always given from the users’ pointof view.
As the system develops, the use case descriptions may be modified as detailedrequirements become uncovered. These descriptions will also be useful whentesting the final application, as we will see later.
604 21 Advanced Case Study

Fig. 21.1 A use case diagram for the airport application
Table 21.1 Behaviour specifications for the airport application
Register flight withairport
An air traffic controller registers an incoming flight with the airport bysubmitting its unique flight number, and its city of origin. If the flightnumber is already registered by the airport, the software will signal anerror to the air traffic controller
Record flight’srequest to land
An air traffic controller records an incoming flight entering airportairspace, and requesting to land, by submitting its flight number. Aslong as the plane has previously registered with the airport, the airtraffic controller is given an unoccupied runway number on which theplane will have permission to land. If all runways are occupiedhowever, this permission is denied and the air traffic controller isinformed to instruct the plane to circle the airport. If the plane has notpreviously registered with the airport, the software will signal an errorto the air traffic controller
Record flight landing An air traffic controller records a flight landing on a runway at theairport by submitting its flight number and the runway number. If theplane was not given permission to land on that runway, the softwarewill signal an error to the air traffic controller
(continued)
21.3 Requirements Analysis and Specification 605

21.4 Design
The detailed design for this application is now presented in Fig. 21.2. It introducessome new UML notation. Have a look at it and then we will discuss it.
As you can see from Fig. 21.2, an Airport class has been introduced torepresent the functionality of the system as a whole. The public methods of theAirport class correspond closely to the use cases identified during requirementsanalysis and specification. Notice we have provided two constructors. One that willallow us to create an empty Airport object and another that allows us to providea filename (as a String) and load data stored in the given file. The privatemethods of the Airport class are there simply to help implement the functionalityof the class.
The requirements made clear that there would be many planes to process in thissystem. Since the airport exists regardless of the number of planes at the airport, therelationship between the Airport and Plane class is one of containment, asindicated with a hollow diamond. It makes sense to consider the collection classesin the java.util package at this point. As we record planes in the system, andprocess these planes, we will always be using a plane’s flight number as a way ofidentifying an individual plane. A Map is the obvious collection to choose here,with flight numbers the keys of the Map and the planes associated with these flightnumbers as values of the Map.
The one drawback with a Map, however, is that it is not ordered on input. Whenconsidering which plane in a circling queue of planes to land, ordering is important,as the first to join the queue should be the first to land. So we have also introduced aList to hold the flight numbers of circling planes. Notice that the containedPlane type requires equals and hashCode methods to work effectively withthese collection classes.
Table 21.1 (continued)
Allow Passengers toboard
An air traffic controller allows passengers to board a plane currentlyoccupying a runway by submitting its flight number, and itsdestination city. If the given plane has not yet recorded landing at theairport, the software will signal an error to the air traffic controller
Record flight take off An air traffic controller records a flight taking off from the airport bysubmitting its flight number. If there are planes circling the airport,the first plane to have joined the circling queue is then givenpermission to land on that runway. If the given plane was not at theairport, the software will signal an error to the air traffic controller
List arrivals The airport information officer is given a list of planes whose status iseither due-to-land, waiting-to-land, or landed
List departures The airport information officer is given a list of planes whose status iscurrently waiting-to-depart (taking on passengers)
606 21 Advanced Case Study

The airport will also consist of a number of runways. In fact the airport cannotexist without this collection of runways. The airport is said to be composed of anumber of runways as opposed to containing a number of planes. Notice that theUML notation for composition is the same as that for containment, except that thediamond is filled rather than hollow. We use an array to hold this collection ofRunway objects.
Turning to the contained classes, the Runway class provides methods to allowfor the runway number to be retrieved, and for a runway to be booked and vacated.The Plane class also has access to a Runway object, to allow a plane to be able tobook and vacate runways. You can see that as well as each plane being associatedwith a runway, the plane also has a flight number, a city and a status associated withit. The arrows from the Plane class to the PlaneStatus and Runway classesindicate the direction of the association. In this case a Plane object can sendmessages to a Runway and PlaneStatus object, but not vice versa.
Fig. 21.2 Detailed design for the airport application
21.4 Design 607

The status of a plane is described in the PlaneStatus diagram. This diagramis the UML notation for an enumerated type, which is a type we have not metbefore.
21.5 Enumerated Types in UML
A type that consists of a few possible values, each with a meaningful name, isreferred to as an enumerated type. The status of a plane is one example of anenumerated type. This status changes depending upon the plane’s progress to andfrom the airport:
• when a plane registers with the airport, it is due to land;• when a plane arrives in the airport’s airspace, it is waiting to land (this plane
may be told to come in and land, or it may have to circle the airport until arunway becomes available);
• when a plane touches down at the airport, it has landed;• when a plane starts boarding new passengers, it is departing the airport.
You can see from the design of the system that such a type is captured in UMLby marking this type with <<enumeration>> as follows (Fig. 21.3).
We need to mark this UML diagram with <<enumeration>> so that it is notconfused with a normal UML class diagram. With a normal UML class diagram,attributes and methods are listed in the lower portion. With an enumerated typediagram, the possible values of this type are given in the lower portion of thediagram, with each value being given a meaningful name. An attribute that isallocated a PlaneStatus type, such as status in the Plane class, can haveany one of these values.
This completes our design analysis, so now let’s turn our attention to the Javaimplementation.
Fig. 21.3 The UML designof the enumeratedPlaneStatus type
608 21 Advanced Case Study

21.6 Implementation
Since we are developing an application involving several classes, it makes sense tobundle these classes together into a single package. We will call this packageairportSys. This means that all our classes will begin with the followingpackage statement:
package airportSys;
It is a good idea to hide implementation level exceptions (such as Num-berFormatException) from users of the application and, instead, alwaysthrow some general application exception. In order to be able to do this, we defineour own general AirportException class.
AirportExcep onpackage airportSys; // add to package
/*** Application Specific Exception ** @author Charatan and Kans * @version 1st August 2018 */
public class AirportException extends RuntimeException {/** * Default Constructor */
public AirportException () {
super("Error: Airport System Violation"); }
/** * Constructor that accepts an error message */
public AirportException (String msg) {
super(msg); }
}
Notice that, as with all the classes we shall develop here, we have addedJavadoc comments into the class definition. Now let’s consider the remainingclasses. First of all, we will look at the implementation of the enumeratedPlaneStatus type.
21.6.1 Implementing Enumerated Types in Java
In order to define an enumerated type such as PlaneStatus, the enum keywordis used. The PlaneStatus type can now be implemented simply as follows:
// this is how to definine an enumerated type in Javapublic enum PlaneStatus { DUE, WAITING, LANDED, DEPARTING }
21.6 Implementation 609

You can see how easy it is to define an enumerated type. When defining such atype, do not use the class keyword, use the enum keyword instead. The differentvalues for this type are then given within the braces, separated by commas.
These values create class constants, with the given names, as before. The type ofeach class constant is PlaneStatus and variables can now be declared of thistype. For example, here we declare a variable of the PlaneStatus type andassign it one of these class constant values:
PlaneStatus status; // declare PlaneStatus variablestatus = PlaneStatus.DEPARTING; // assign variable a class constant
The variable status can take no other values, apart from those defined in theenumerated PlaneStatus type. Each enumerated type you define will also havean appropriate toString method generated for it, so values can be displayed onthe screen:
System.out.println("Value = " + status);
Assuming we created this variable as above, this would display the following:
Value = DEPARTING
As well as a toString method, a few other methods are generated for you aswell, and the switch statement can be used in conjunction with enumerated typevariables. We will see examples of these features when we look at the code for theother classes in this application.
Of course, we must remember to add this PlaneStatus type into ourairportSys package:
The PlaneStatus typepackage airportSys; // add to package
/*** Enumerated plane status type. ** @author Charatan and Kans * @version 1st August 2018 */
public enum PlaneStatus {
DUE, WAITING, LANDED, DEPARTING }
610 21 Advanced Case Study

21.6.2 The Runway Class
Here is the code for the Runway class, take a look at it and then we will discuss it.
Runwaypackage airportSys; // add class to package import java.io.Serializable;
/*** This class is used to store details of a single runway. ** @author Charatan and Kans * @version 1st August 2018 */
public class Runway implements Serializable {// attributes private int number; private boolean allocated;
/** * Constructor sets the runway number * @param numberIn Used to set the runway number * @throws AirportException When the runway number is less than 1 */ public Runway (int numberIn) {
if (numberIn <1) {
throw new AirportException ("invalid runway number "+numberIn); }
number = numberIn; allocated = false; // runway vacant initially
}
/** * Returns the runway number */
public int getNumber() {
return number; }
/** * Checks if the runway has been allocated * @return Returns true if the runway has been allocated and false otherwise */
public boolean isAllocated() {
return allocated; }
/** * Records the runway as being booked */
public void book() { allocated = true; }
/** * Records the runway as being vacant */ public void vacate() {
allocated = false; }
}
There is not much that needs to be said about this class. As we may wish to saveand load objects from our system, we have to remember to indicate that this class isSerializable.
public class Runway implements Serializable
21.6 Implementation 611

Notice that we have defined this as a public class so that it is accessibleoutside of the package. We did this as a runway is a generally useful concept inmany applications; declaring this class public allows it to be re-used outside ofthe airportSys package. In fact, we have declared most of our classes publicfor this reason.
21.6.3 The Plane Class
Here is the code for the Plane class. Have a close look at it and then we willdiscuss it.
Planepackage airportSys;
import java.io.Serializable;
/*** This class stores the details of a single plane** @author Charatan and Kans * @version 2nd August 2018*/public class Plane implements Serializable{
// attributesprivate String flightNumber;private String city;private PlaneStatus status;private Runway theRunway; // to implement Runway association
// methods
/*** Constructor sets initial flight details of the plane requesting registration* * @param flightIn The flight number of the plane to register* @param cityOfOrigin The city of origin of the plane to register*/public Plane(String flightIn, String cityOfOrigin){ flightNumber = flightIn;city = cityOfOrigin;status = PlaneStatus.DUE; // initial plane status set to DUEtheRunway = null; // indicates no runway allocated
}
/*** Returns the plane's flight number*/public String getFlightNumber(){ return flightNumber;
}
/*** Returns the city associated with the flight*/public String getCity(){ return city;
}
/*** Returns the current status of the plane*/public PlaneStatus getStatus(){ return status;
}
/*** Returns the runway allocated to this plane or null if no runway allocated*/public Runway getRunway()
612 21 Advanced Case Study

{return theRunway;
}
/*** Returns the runway number allocated to this plane* @throws AirportException if no runway allocated*/public int getRunwayNumber(){ if (theRunway == null){ throw new AirportException ("flight "+flightNumber+" has not been allocated a runway");
} return theRunway.getNumber();
}
/*** Checks if the plane is allocated a runway* @return Returns true if the plane has been allocated a runway * and false otherwise*/public boolean isAllocatedARunway(){ return theRunway!=null;
}
/*** Allocates the given runway to the plane* * @throws AirportException if runway parameter is null or runway already allocated*/public void allocateRunway(Runway runwayIn)throws AirportException{ if (runwayIn == null) // check runway has been sent{ throw new AirportException ("no runway to allocate");
} if (runwayIn.isAllocated()){
throw new AirportException ("runway already allocate");} theRunway = runwayIn;theRunway.book();
}
/*** De-allocates the current runway* * @throws AirportException if no runway allocated*/public void vacateRunway() { if (theRunway==null){
throw new AirportException ("no runway allocated");} theRunway.vacate();
}
/*** Returns the String representation of the plane's status*/public String getStatusName(){
return status.toString();}
/*** Upgrades the status of the plane.*/public void upgradeStatus() { switch(status){
case DUE: status =PlaneStatus.WAITING; break;case WAITING: status =PlaneStatus.LANDED; break;case LANDED: status =PlaneStatus.DEPARTING; break;case DEPARTING: throw new AirportException("Cannot upgrade DEPARTING status");
} }
/*** Changes the city associated with the plane*/public void changeCity (String destination)
21.6 Implementation 613

{ city = destination;
}
/*** Returns a string representation of a plane */@Overridepublic String toString(){ String out = "number: "+flightNumber+ "\tcity: "+city+ "\tstatus: "+status;if (theRunway!=null)
out = out +"\trunway: "+theRunway;{
}return out;
}
/*** Checks whether the plane is equal to the given object*/@Overridepublic boolean equals(Object objIn){ if (objIn!=null)
Plane p = (Plane)objIn;return p.flightNumber.equals(flightNumber);
else
return false;
{
}
{
}}
/*** Returns a hashcode value */@Overridepublic int hashCode(){ return flightNumber.hashCode();
} }
Again, most of the points we raised with the Runway class are relevant to thisPlane class. It needs to be Serializable and it is declared public.
Since Plane objects will be used in collection classes we have provided thisclass with an equals and a hashCode method. You can see that both of thesemethods make use of the plane’s flight number.
In addition you should look at the way in which we dealt with the statusattribute. During class design we declared this attribute to be of the enumeratedPlaneStatus type, so it has been implemented as follows:
private PlaneStatus status;
We can then assign this attribute values from the enumerated PlaneStatustype. For example, in the constructor, we initialize the status of a plane to DUE:
public Plane(String flightNumberIn, String cityOfOrigin) { flightNumber = flightNumberIn; city = cityOfOrigin; status = PlaneStatus.DUE; theRunway = null; }
The getStatus method returns the value of the status attribute, so theappropriate return type is PlaneStatus:
614 21 Advanced Case Study

public PlaneStatus getStatus() { return status; }
The upgradeStatus method is interesting as it demonstrates how theswitch statement can be used with enumerated type variables such as status:
public void upgradeStatus() { switch(status) // this is an enumerated type variable { // 'case' statements can check the different enumerated values case DUE: status = PlaneStatus.WAITING; break; case WAITING: status = PlaneStatus.LANDED; break; case LANDED: status = PlaneStatus.DEPARTING; break; case DEPARTING: throw new AirportException("Cannot upgrade DEPARTING status"); } }
Here we are upgrading the status of a plane as it makes its way to, and eventuallyfrom, the airport. Notice that the value of the status attribute is checked in thecase statements, but this value is not appended onto the PlaneStatus classname. For example:
// just use a status name in ‘case’ testcase DUE: status = PlaneStatus.WAITING; break;
However, in all other circumstances, such as assigning to the status attribute,the enumerated value does have to be appended onto the PlaneStatus classname:
// use class + status name in all other circumstancescase DUE: status = PlaneStatus.WAITING; break;
You can see that we should not be upgrading the status of a plane if its currentstatus is DEPARTING, so an exception is thrown in this case:
case DEPARTING: throw new AirportException ("Cannot upgrade DEPARTING status");
Before we leave this class, also notice that by adding a runway attribute,theRunway, into the Plane class we can send messages to (access methods of) aRunway object, for example:
public void allocateRunway(Runway runwayIn) { // some code here theRunway.book(); // 'book' is a 'Runway' method }
21.6 Implementation 615

21.6.4 The Airport Class
The Airport class encapsulates the functionality of the system. It does notinclude the interface to the application. As we have done throughout this book, theinterface of an application is kept separate from its functionality. That way, we canmodify the way we choose to implement the functionality without needing tomodify the interface, and vice versa. Examine it closely, being sure to read thecomments, and then we will discuss it.
Airportpackage airportSys;
import java.util.Map; import java.util.HashMap; import java.util.List; import java.util.ArrayList; import java.util.Set; import java.util.HashSet; import java.io.IOException; import java.io.FileOutputStream; import java.io.ObjectOutputStream; import java.io.FileInputStream; import java.io.ObjectInputStream;
1,,","Encuu"vq"rtqxkfg"vjg"hwpevkqpcnkv{"qh"vjg"cktrqtv"u{uvgo"",","Bcwvjqt"Ejctcvcp"cpf"Mcpu"","Bxgtukqp"6vj"Cwiwuv"423:"",1"public class Airport {
11"cvvtkdwvgu" private Map<String, Plane> planes; 11"tgikuvgtgf"rncpgu private List<String> circlingQ; 11hnkijv"pwodgtu"qh"ektenkpi"rncpgu private Runway []runway; 11"twpyc{u"cnnqecvgf"vq"vjg"cktrqtv
11"ogvjqfu"
1,,"""","Vjku"Eqpuvtwevqt"cnnqyu"cktrqtv"fcvc"vq"dg"nqcfgf"htqo"c"hkng"""","""","Brctco" hkngpcogKp"Vjg"pcog"qh"vjg"hkng"""","Bvjtqyu""KQGzegrvkqp"kh"rtqdngou"ykvj"qrgpkpi"cpf"nqcfkpi"ikxgp"hkng"""","Bvjtqyu""EncuuPqvHqwpfGzegrvkqp"kh"qdlgevu"kp"hkng"pqv"qh"vjg"tkijv"v{rg"""",1" public Airport(String filenameIn)throws IOException, ClassNotFoundException {
load(filenameIn); }
1,,"""","Vjku"Eqpuvtwevqt"etgcvgu"cp"gorv{"eqnngevkqp"qh"rncpgu.""""","cpf"cnnqecvgu"twpyc{u"vq"vjg"cktrqtv"""","""","Brctco" pwoKp"Vjg"pwodgt"qh"twpyc{u"""","Bvjtqyu""CktrqtvGzegrvkqp"kh"pgicvkxg"twpyc{"pwodgt"wugf"""",1" public Airport (int numIn)
{ try {
11"kpvkcnkug"twpyc{u" runway = new Runway [numIn]; for (int i = 0; i<numIn; i++) { runway[i] = new Runway (i+1); }
11"kpkvkcnn{"pq"rncpgu"cnnqecvgf"vq"cktrqtv" planes = new HashMap<>(); circlingQ = new ArrayList<>(); } catch (Exception e) {
11"pqvkeg"vjtqykpi"cp"gzergvkqp"htqo"c"ecvej"encwug""" throw new AirportException("Invalid Runway Number set, application closing"); } }
1,,"""""","Tgikuvgtu"c"rncpg"ykvj"vjg"cktrqtv"""","""","Brctco"" hnkijvKp"Vjg"rncpg)u"hnkijv"pwodgt""
616 21 Advanced Case Study

""","Brctco" ekv{QhQtkikp"Vjg"rncpg)u"ekv{"qh"qtkikp"""","Bvjtqyu" CktrqtvGzegrvkqp"kh"hnkijv"pwodgt"cntgcf{"tgikuvgtgf0""""",1" public void registerFlight (String flightIn, String cityOfOrigin) { if (planes.containsKey(flightIn)) { throw new AirportException ("flight "+flightIn+" already registered"); } Plane newPlane = new Plane (flightIn, cityOfOrigin); planes.put(flightIn, newPlane); }
1,,"""""","Tgeqtfu"c"rncpg"cttkxkpi"cv"vjg"cktrqtv"""","""","Brctco"" hnkijvKp"Vjg"rncpg)u"hnkijv"pwodgt"""","Bvjtqyu" CktrqtvGzegrvkqp"kh"rncpg"pqv"rtgxkqwun{"tgikuvgtgf""""",""""""""""""qt"kh"rncpg"cntgcf{"cttkxgf"cv"cktrqtv"""",1" public int arriveAtAirport (String flightIn) { Runway vacantRunway = nextFreeRunway(); 11"igv"pgzv"htgg"twpyc{ if (vacantRunway != null) 11"ejgem"kh"twpyc{"cxckncdng { descend(flightIn, vacantRunway); 11"cnnqy"rncpg"vq"fguegpf"qp"vjku"twpyc{ return vacantRunway.getNumber(); 11"tgvwtp"dqqmgf"twpyc{"pwodgt } else 11"pq"twpyc{"cxckncdng { circle(flightIn); 11"rncpg"owuv"lqkp"ektenkpi"swgwg return 0; 11"kpfkecvgu"pq"twpyc{"cxckncdng"vq"ncpf } }
1,,""""","Tgeqtfu"c"rncpg"ncpfkpi"qp"c"twpyc{"""","""","Brctco"" hnkijvKp"Vjg"rncpg)u"hnkijv"pwodgt"""","Brctco" twpyc{PwodgtKp"Vjg"twpyc{"pwodgt"vjg"rncpg"ku"ncpfkpi"qp"""""","Bvjtqyu""CktrqtvGzegrvkqp"kh"rncpg"pqv"rtgxkqwun{"tgikuvgtgf"""""," " " " " " " " qt"kh"vjg"twpyc{"ku"pqv"cnnqecvgf"vq"vjku"rncpg"""","""" " " " " " qt"kh"rncpg"jcu"pqv"{gv"ukipcnngf"kvu"cttkxcn"cv"vjg"ckrqtv""""," " " " " " " " qt"kh"rncpg"ku"cntgcf{"tgeqtfgf"cu"jcxkpi"ncpfgf0"""",1" public void landAtAirport (String flightIn, int runwayNumberIn) { Plane thisPlane = getPlane(flightIn); 11"vjtqyu"CktrqtvGzegrvkqp"kh"pqv"tgikuvgtgf if (thisPlane.getRunwayNumber()!= runwayNumberIn) { throw new AirportException ("flight "+flightIn+" should not be on this runway"); } if (thisPlane.getStatus()== PlaneStatus.DUE) { throw new AirportException ("flight "+flightIn+" not signalled its arrival"); } if (thisPlane.getStatus().compareTo(PlaneStatus.WAITING)>0) { throw new AirportException ("flight "+flightIn+" already landed"); }
thisPlane.upgradeStatus(); 11"writcfg"uvcvwu"htqo"YCKVKPI"vq"NCPFGF }
1,,""""","Tgeqtfu"c"rncpg"dqctfkpi"hqt"vcmg"qhh"""","""","Brctco"" hnkijvKp"Vjg"rncpg)u"hnkijv"pwodgt"""","Brctco" fguvkpcvkqp"Vjg"ekv{"qh"fguvkpcvkqp"" """","Bvjtqyu""CktrqtvGzegrvkqp"""kh"rncpg"pqv"rtgxkqwun{"tgikuvgtgf""""",""""""""""""""""""""""""""""qt"kh"rncpg"pqv"{gv"tgeqtfgf"cu"ncpfgf""""",""""""""""""""""""""""""""""qt"kh"rncpg"cntgcf{"tgeqtfgf"cu"tgcf{"hqt"vcmg"qhh"""",1" public void readyForBoarding(String flightIn, String destination) { Plane thisPlane = getPlane(flightIn);11"vjtqyu"CktrqtvGzegrvkqp"kh"pqv"tgikuvgtgf if (thisPlane.getStatus().compareTo(PlaneStatus.LANDED)<0) { throw new AirportException ("flight "+flightIn+" not landed"); } if (thisPlane.getStatus()== PlaneStatus.DEPARTING) { throw new AirportException ("flight "+flightIn+" already registered to depart");
21.6 Implementation 617

} thisPlane.upgradeStatus(); 11"writcfg"uvcvwu"htqo"NCPFGF"vq"FGRCTVKPI thisPlane.changeCity(destination); 11"ejcpig"ekv{"qh"qtkikp"vq"ekv{"qh"fguvkpcvkqp }
1,,""""","Tgeqtfu"c"rncpg"vcmkpi"qhh"htqo"vjg"ckrtqtv"""","""","Brctco"" hnkijvKp"Vjg"rncpg)u"hnkijv"pwodgt"""","Bvjtqyu""CktrqtvGzegrvkqp"""""kh"rncpg"pqv"rtgxkqwun{"tgikuvgtgf""""","""""""""""""""""""""""""""""""qt"kh"rncpg"pqv"{gv"tgeqtfgf"cu"ncpfgf""""","""""""""""""""""""""""""""""""qt"kh"vjg"rncpg"pqv"rtgxkqwun{"tgeqtfgf"cu"vcmgp"qhh"""",1" public Plane takeOff (String flightIn) { leave(flightIn); 11"tgoqxg"htqo"rncpg"tgikuvgt Plane nextFlight = nextToLand(); 11"tgvwtp"pgzv"ektenkpi"rncpg"vq"ncpf if (nextFlight != null) 11"ejgem"ektenkpi"hnkijv"gzkuvu { Runway vacantRunway = nextFreeRunway(); descend(nextFlight.getFlightNumber(), vacantRunway); 11"cnnqecvg"twpyc{"vq"ektenkpi"rncpg return nextFlight; 11"ugpf"dcem"fgvcknu"qh"pgzv"rncpg"vq"ncpf } else 11"pq"ektenkpi"rncpgu { return null; } }
1,,"""","Tgvwtpu"vjg"ugv"qh"rncpgu"fwg"hqt"cttkxcn"""",1" public Set<Plane> getArrivals() { Set<Plane> planesOut = new HashSet<>(); Set<String> items = planes.keySet(); for(String thisFlight: items) { Plane thisPlane = planes.get(thisFlight); if (thisPlane.getStatus() != PlaneStatus.DEPARTING) { planesOut.add(thisPlane); 11cff"vq"ugv } } return planesOut; }
1,,"""","Tgvwtpu"vjg"ugv"qh"rncpgu"fwg"hqt"fgrctvwtg"""",1" public Set<Plane> getDepartures() { Set<Plane> planesOut = new HashSet<>(); Set<String> items = planes.keySet(); for(String thisFlight: items) { Plane thisPlane = planes.get(thisFlight); if (thisPlane.getStatus()==PlaneStatus.DEPARTING) { planesOut.add(thisPlane); 11"cff"vq"ugv } } return planesOut; }
1,,"""","Tgvwtpu"vjg"pwodgt"qh"twpyc{u"""",1" public int getNumberOfRunways() { return runway.length; } 1,,""""","Ucxgu"cktrqtv"qdlgev"vq"hkng"""","""","Brctco"" hkngKp"Vjg"pcog"qh"vjg"hkng """","Bvjtqyu""KQGzegrvkqp"kh"rtqdngou"ykvj"qrgpkpi"cpf"ucxkpi"vq"ikxgp"hkng """",1" public void save(String fileIn)throws IOException { 11"pqvkeg"vt{/ykvj/tguqwtegu"vq"gpuwtg"hkng"enqugu"uchgn{" try ( FileOutputStream fileOut = new FileOutputStream(fileIn); ObjectOutputStream objOut = new ObjectOutputStream (fileOut)) { objOut.writeObject(planes);
618 21 Advanced Case Study

objOut.writeObject(circlingQ); objOut.writeObject(runway); } } 1,,""""","Nqcfu"cktrqtv"qdlgev"htqo"hkng"""","""","Brctco"" hkngPcog"Vjg"pcog"qh"vjg"hkng"""","Bvjtqyu""KQGzegrvkqp"kh"rtqdngou"ykvj"qrgpkpi"cpf"nqcfkpi"ikxgp"hkng """","Bvjtqyu""EncuuPqvHqwpfGzegrvkqp"kh"qdlgevu"kp"hkng"pqv"qh"vjg"tkijv"v{rg """",1" public void load (String fileName) throws IOException, ClassNotFoundException { 11"pqvkeg"vt{/ykvj/tguqwtegu"vq"gpuwtg"hkng"enqugu"uchgn{" try ( FileInputStream fileInput = new FileInputStream(fileName); ObjectInputStream objInput = new ObjectInputStream (fileInput)) { planes = (Map<String, Plane>) objInput.readObject(); circlingQ = (List<String>) objInput.readObject(); runway = (Runway[])objInput.readObject(); } } 11"jgnrgt"ogvjqf"vq"hkpf"pgzv"htgg"twpyc{" private Runway nextFreeRunway() { for (Runway nextRunway : runway) { if (!nextRunway.isAllocated()) { return nextRunway; } } return null; } 1,,"""""","Tgvwtpu"vjg"tgikuvgtgf"rncpg"ykvj"vjg"ikxgp"hnkijv"pwodgt"""","""","Bvjtqyu" CktrqtvGzegrvkqp"kh"hnkijv"pwodgt"pqv"{gv"tgikuvgtgf0" """",1" private Plane getPlane(String flightIn) { if (!planes.containsKey(flightIn)) { throw new AirportException ("flight "+flightIn+" has not yet registered"); } return planes.get(flightIn); } 1,,""""","Tgeqtfu"c"rncpg"fguegpfkpi"qp"c"twpyc{"""","""","Brctco"" hnkijvKp"Vjg"rncpg)u"hnkijv"pwodgt """","Brctco" twpyc{Kp"Vjg"twpyc{"vjg"rncpg"yknn"dg"ncpfkpi"qp" " """","Bvjtqyu""CktrqtvGzegrvkqp""""kh"rncpg"pqv"rtgxkqwun{"tgikuvgtgf" """",""""""""""""""""""""""""""""""qt"kh"rncpg"cntgcf{"cttkxgf"cv"cktrqtv"""",""""""""""""""""""""""""""""""qt"kh"rncpg"cntgcf{"cnnqecvgf"c"twpyc{""""",1" private void descend (String flightIn, Runway runwayIn) { Plane thisPlane = getPlane(flightIn);// throws AirportException if not registered
if (thisPlane.getStatus().compareTo(PlaneStatus.WAITING)>0)
{throw new AirportException
("flight "+flightIn+" already at airport has status of "+thisPlane.getStatusName());}if (thisPlane.isAllocatedARunway()){
throw new AirportException ("flight "+flightIn+" has already been allocated runway "+thisPlane.getRunwayNumber());
}thisPlane.allocateRunway(runwayIn);if (thisPlane.getStatus()==PlaneStatus.DUE) 11"wrftcigf"uvcvwu"htqo"FWG"vq"YCKVKPI{
thisPlane.upgradeStatus();}
}
1,,"","Tgeqtfu"c"rncpg"lqkpkpi"vjg"rncpgu"ektenkpi"vjg"cktrqtv,,"Brctco" hnkijvKp"Vjg"rncpg)u"hnkijv"pwodgt,"Bvjtqyu CktrqtvGzegrvkqp"kh"rncpg"pqv"rtgxkqwun{"tgikuvgtgf"
21.6 Implementation 619

, qt"kh"rncpg"cntgcf{"cttkxgf,1
private void circle (String flightIn) {
Plane thisPlane = getPlane(flightIn); 11"vjtqyu"CktrqtvGzegrvkqp"kh"pqv"tgikuvgtgfif (thisPlane.getStatus()!= PlaneStatus.DUE){
throw new AirportException ("flight "+flightIn+" already at airport");}thisPlane.upgradeStatus(); 11"wrftcigf"uvcvwu"htqo"FWG"vq"YCKVKPIcirclingQ.add(flightIn);
}
1,,","Tgeqtfu"c"rncpg"vcmkpi"qhh"htqo"vjg"ckrtqtv,,"Brctco" hnkijvKp"Vjg"rncpg)u"hnkijv"pwodgt,"Bvjtqyu CktrqtvGzegrvkqp"kh"rncpg"pqv"rncpg"pqv"pqv"rtgxkqwun{"tgikuvgtgf,"""""""""""" qt"kh"rncpg pqv"{gv"tgeqtfgf"cu"ncpfgf", qt"kh"vjg"rncpg"jcu"pqv"rtgxkqwun{"dggp"tgeqtfgf"cu"tgcf{"hqt"vcmg"qhh,1
private void leave (String flightIn) {
11"igv"rncpg"cuuqekcvgf"ykvj"ikxgp"hnkijv"pwodgtPlane thisPlane = getPlane(flightIn);11 vjtqyu"CktrqtvGzegrvkqp"kh"pqv"tgikuvgtgf// throw exceptions if plane is not ready to leave airportif (thisPlane.getStatus().compareTo(PlaneStatus.LANDED)<0){
throw new AirportException ("flight "+flightIn+" not yet landed");}if (thisPlane.getStatus()==PlaneStatus.LANDED){
throw new AirportException ("flight "+flightIn+" must register to board");}11"rtqeguu"rncpg"ngcxkpi"cktrqtvthisPlane.vacateRunway(); 11"twpyc{"pqy"htggplanes.remove(flightIn); 11"tgoqxg"rncpg"htqo"nkuv
}
1,,,"Nqecvgu"pgzv"ektenkpi"rncpg"vq"ncpf,,"Btgvwtp"""" Tgvwtpu"vjg"pgzv"ektenkpi"rncpg"vq"ncpf", qt"pwnn"kh"pq"rncpgu,1
private Plane nextToLand() {
if (!circlingQ.isEmpty()) 11"ejgem"ektenkpi"rncpg"gzkuvu{
String flight = circlingQ.get(0);circlingQ.remove(flight);return getPlane(flight); 11"eqwnf"vjtqy"gzegrvkqp"qh"pqv"kp"nkuv
}else // no circling plane{
return null;}
}
}
There is not a lot that is new here, but we draw your attention to a fewimplementation issues.
First, notice we have provided two constructors, as specified in Fig. 21.2. Thefirst receives the name of a file and loads data from this given file (using theprivate load method to be found later in this Airport class); the associatedexceptions are passed on if an error occurs during this process:
public Airport(String filenameIn)throws IOException, ClassNotFoundException{ load(filenameIn); // call private method to load airport data}
The second constructor receives the number of runways associated with thisairport and initialises all data to be empty.
620 21 Advanced Case Study

public Airport (int numIn) { try {
// intialise runways runway = new Runway [numIn]; for (int i = 0; i<numIn; i++) { runway[i] = new Runway (i+1); }
// initially no planes allocated to airport planes = new HashMap<>(); circlingQ = new ArrayList<>(); } catch (Exception e) {
// notice we have thrown our user-defined exception from this catch clause throw new AirportException("Invalid Runway Number set, application closing"); } }
Within this constructor you can see that we catch a general exception, in casesomething goes wrong when allocating the array, and throw our application-specificexception when this occurs. This can be useful if we wish to suppress the name ofJava specific expectations and stick to the names of our own user-definedexceptions.
Most of the other public methods simply check for a list of exceptions, andthen upgrade the plane’s status as it makes its way to and eventually from the airport.
Here, for example, is the method that records a plane that has previously landedat the airport, being ready to board new passengers for a new destination:
/** * Records a plane boarding for take off * * @param flightIn The plane's flight number * @param destination The city of destination * @throws AirportException if plane not previously registered * or if plane not yet recorded as landed * or if plane already recorded as ready for take off */ public void readyForBoarding(String flightIn, String destination) { Plane thisPlane = getPlane(flightIn);// throws AirportException if not registered if (thisPlane.getStatus().compareTo(PlaneStatus.LANDED)<0) { throw new AirportException ("flight "+flightIn+" not landed"); } if (thisPlane.getStatus()== PlaneStatus.DEPARTING) { throw new AirportException ("flight "+flightIn+" already registered to depart"); } thisPlane.upgradeStatus(); // upgrade status from LANDED to DEPARTING thisPlane.changeCity(destination); // change city of origin to city of destination }
The first thing we need to do in this method is to check whether or not anAirportException needs to be thrown. The Javadoc comments make clearthat there are three situations in which we need to throw such an exception.
First, an exception needs to be thrown if the given flight number has not beenregistered with the airport. At some point we also need to retrieve the Plane objectfrom this flight number. Calling the helper method getPlane will do both of thesethings for us, as it throws an AirportException if the flight is not registered.
// retrieves plane or throws AirportException if flight is not registeredPlane thisPlane = getPlane(flightIn);
21.6 Implementation 621

To check for the remaining exceptions we need to check that the plane currentlyhas the appropriate status to start taking on passengers. The getStatus methodof a plane returns the status of a plane for us. We know from the previous sectionthat this method returns a value of the enumerated type PlaneStatus.
As well as having a toString method generated for you when you declare anenumerated type such as PlaneStatus, a compareTo method (to allow forcomparison of two enumerated values) is also generated. This method works inexactly the same way as the compareTo method you met when looking atString methods. That is, it returns 0 when the two values are equal, a number lessthan 0 when the first value is less than the second value and a number greater than 0when the first value is greater than the second value. One enumerated type value isconsidered less than another if it is listed before that value in the original typedefinition. So, in our example, DUE is less than WAITING, which is less thanLANDED and so on. If a plane has a status that is less than LANDED it has not yetlanded, so cannot be ready to board passengers—an AirportException isthrown:
// use 'compareTo' method to compare two status valuesif (thisPlane.getStatus().compareTo(PlaneStatus.LANDED)<0) { throw new AirportException ("flight "+flightIn+" not yet landed"); }
We also need to throw an AirportException if the plane already has astatus of BOARDING. Although the compareTo method can be used to check forequality as well, with most classes it is common to use an equals method to dothis. An equals method is generated for any enumerated type, such asPlaneStatus, that you define. However, because of the way enumerated typesare implemented in Java, the simple equality operator (==) can also be used tocheck for equality:
// equality operator can be used to check if 2 enumerated values are equalif (thisPlane.getStatus()== PlaneStatus.DEPARTING) { throw new AirportException ("flight "+flightIn+" already registered to depart"); }
Having checked for exceptions, we can now indicate that this plane is ready forboarding by upgrading its status (from LANDED to DEPARTING), and by recordingthe flights new destination city:
// we have cleared all the exceptions so we can update flight details nowthisPlane.upgradeStatus(); // upgrades status from LANDED to DEPARTINGthisPlane.changeCity(destination); // changes city to destination city
The inequality operator (!=) can be used with enumerated types, to check forinequality of two enumerated type values. An example of this can be seen in theimplementation of the arrivals method:
622 21 Advanced Case Study

/** * Returns the set of planes due for arrival */ public Set<Plane> getArrivals() { Set<Plane> planesOut = new HashSet<Plane>(); // create empty set Set<String> items = planes.keySet(); // get all flight numbers for(String thisFlight: items) // check status of all { Plane thisPlane = planes.get(thisFlight); if (thisPlane.getStatus() != PlaneStatus.DEPARTING) { planesOut.add(thisPlane); // add to set } } return planesOut; }
Here we create an empty set of planes. We then add planes into this set if they donot have a status of DEPARTING:
// use inequality operator to check if status does not equal some valueif (thisPlane.getStatus() != PlaneStatus.DEPARTING) { planesOut.add(thisPlane); }
We have used an enhanced for loop in this method, but you might considerusing a forEach loop. We leave this as end of chapter exercises for you.
Before we leave this section, let us take a look at the save and load methodsthat allow us to save and load the attributes in our application. We have threeattributes here, planes (the Map of registered planes), circlingQ (the List offlight numbers of the planes circling the airport) and runway (the array ofrunways).
Since we have declared our Plane and Runway classes to be Serializ-able, and because enumerated types such as PlaneStatus and collectionclasses such as Map and List are already Serializable, it is a simple matterto write these objects to a file, and read them from a file. Here is the save method:
/** * Saves airport object to file * * @param fileIn The name of the file * @throws IOException if problems with opening and saving to given file */ public void save(String fileIn)throws IOException {
// notice try-with-resources to ensure file closes safely try ( FileOutputStream fileOut = new FileOutputStream(fileIn); ObjectOutputStream objOut = new ObjectOutputStream (fileOut)) { objOut.writeObject(planes); objOut.writeObject(circlingQ); objOut.writeObject(runway); } }
You can see we have used a try-with-resources construct here to ensure the file isclosed once the method terminates.
21.6 Implementation 623

Here is the load method:
/** * Loads airport object from file * * @param fileName The name of the file * @throws IOException if problems with opening and loading given file * @throws ClassNotFoundException if objects in file not of the right type */ public void load (String fileName) throws IOException, ClassNotFoundException {
// notice try-with-resources to ensure file closes safely try ( FileInputStream fileInput = new FileInputStream(fileName); ObjectInputStream objInput = new ObjectInputStream (fileInput)) { planes = (Map<String, Plane>) objInput.readObject(); circlingQ = (List<String>) objInput.readObject(); runway = (Runway[])objInput.readObject(); } }
Again, we have used a try-with-resources construct to ensure our file is closedupon termination. Notice that when we load the attributes from file, we mustindicate their type. The collection class types need to be marked using the genericsmechanism:
// indicate the type of each collection using generics mechanismplanes = (Map<String, Plane>) objInput.readObject(); circlingQ = (List<String>) objInput.readObject(); runway = (Runway[])objInput.readObject();
There is nothing particularly new in the remaining methods. Take a look at thecomments provided to follow their implementation.
21.7 Testing
In Chaps. 11 and 12 we looked at the concepts of unit testing and integrationtesting. We have left unit testing to you as a practical task, but we will spend a littletime here considering integration testing. A useful technique to devise test casesduring integration testing is to review the behaviour specifications of use cases,derived during requirements analysis.
Remember, a use case describes some useful service that the system performs.The behaviour specifications capture this service from the point of view of the user.When testing the system you take the place of the user, and you should ensure thatthe behaviour specification is observed.
Often, there are several routes through a single use case. For example, whenregistering a plane, either the plane could be successfully registered, or an error isindicated. Different routes through a single use case are known as different
624 21 Advanced Case Study

scenarios. During integration you should take the place of the user and make surethat you test each scenario for each use case. Not surprisingly, this is often knownas scenario testing. As an example, reconsider the “Record flight’s request to land”use case:
An air traffic controller records an incoming flight entering airport airspace,and requesting to land at the airport, by submitting its flight number. As long as theplane has previously registered with the airport, the air traffic controller is given anunoccupied runway number on which the plane will have permission to land. If allrunways are occupied however, this permission is denied and the air traffic con-troller is informed to instruct the plane to circle the airport. If the plane has notpreviously registered with the airport an error is signalled.
From this description three scenarios can be identified:
Scenario 1An air traffic controller records an incoming plane entering airport airspace andrequesting to land at the airport, by submitting its flight number, and is given anunoccupied runway number on which the plane will have permission to land.
Scenario 2An air traffic controller records an incoming plane entering airport airspace andrequesting to land at the airport, by submitting its flight number. The air trafficcontroller is informed to instruct the plane to circle the airport as all runways areoccupied.
Scenario 3An air traffic controller records an incoming plane entering airport airspace andrequesting to land at the airport, by submitting its flight number. An error issignalled as the plane has not previously registered with the airport.
Similar scenarios can be extracted for each use case. During testing we shouldwalk through each scenario, checking whether the outcomes are as expected.
21.8 Design of the JavaFX Interface
Figure 21.4 illustrates the interface design we have chosen for the Airport appli-cation. A few new JavaFX features have been highlighted.
Apart from the features highlighted in Fig. 21.4, the remaining JavaFX com-ponents will be familiar to you. The three new JavaFX features are: a layoutcomponent known as a tabbed pane; some text that appears when you keep yourcursor over a component—known as that component’s tool tip and a Stage with
21.7 Testing 625

no icons for minimising/maximising/closing—known as an undecorated stage. Wewill return to look at tool tips and undecorated stages later in the chapter but we willlook at a tabbed pane now—it is implemented in JavaFX using a TabPane class.
21.9 The TabPane Class
The TabPane class provides a very useful JavaFX component for organizing theuser interface. You can think of a TabPane component as a collection of over-lapping tabbed “cards”, on which you place other user interface components.A particular card is revealed by clicking on its tab. This allows certain parts of theinterface to be kept hidden until required, thus reducing screen clutter.
Fig. 21.4 Some new JavaFX features in the Airport JavaFX interface
at the moment the first tab is selected
components associated with the other two tabs are kept hidden until the tabs are clicked
the first tabbed component is a VBox
these components are added to the VBox
Fig. 21.5 A TabPane allows parts of the interface to be revealed selectively
626 21 Advanced Case Study

A TabPane component can consist of any number of tabbed cards. Each card isactually a single component of your choice. If you use a container component suchas a VBox, you can effectively associate many components with a single tab (seeFig. 21.5).
We can construct a TabPane component by calling the empty constructor asfollows:
TabPane tabbedPane = new TabPane();
A TabPane can be associated with any number of individual tabbed cards. Todo this we use the Tab class for each individual tabbed card. We need three tabbedcards, one for the main screen shown in Fig. 21.5, one for the arrivals informationand one for the departures information:
Tab tab1 = new Tab("Flight Control"); // main flight control tabTab tab2 = new Tab("Flight Arrivals"); // arrivals tabTab tab3 = new Tab("Flight Departures"); // departures tab
The strings provided to the constructors are the titles displayed on each tab.We can now add tabbed components to the TabPane. When adding a tabbed
component to a TabPane, you call the getTabs method to access the link to thecollection of tabbed cards and then the tabs themselves can be set using theaddAll method:
tabbedPane.getTabs().addAll(tab1, tab2, tab3);
The order in which the tabs are given to the addAll method is the order inwhich they will appear on the screen.1 As we mentioned, each tabbed card isassociated with a single component. So to add multiple components to a tab we canuse a container such as a VBox or a HBox. For example, to create the main tabshown in Fig. 21.5, we have 3 components highlighted—a cloud image (namedimageView in the code), a label (named label in the code) and a collection ofbuttons (stored in a HBox named controls in the code). We add all three of theseto a VBox (named box in the code):
// add cloud image, label and button collection to VBoxbox.getChildren().addAll(imageView,label, controls);
1By default, the tabs you add will appear at the top left of the TabPane (as in Fig. 21.4).A setSide method can be used to choose an alternative side (the top right, the bottom, the left orthe right).
21.9 The TabPane Class 627
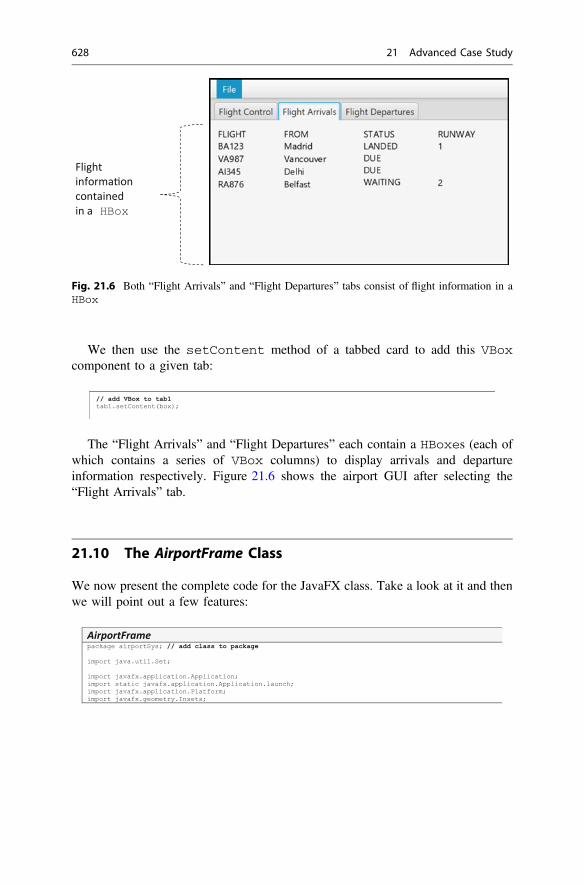
We then use the setContent method of a tabbed card to add this VBoxcomponent to a given tab:
// add VBox to tab1 tab1.setContent(box);
The “Flight Arrivals” and “Flight Departures” each contain a HBoxes (each ofwhich contains a series of VBox columns) to display arrivals and departureinformation respectively. Figure 21.6 shows the airport GUI after selecting the“Flight Arrivals” tab.
21.10 The AirportFrame Class
We now present the complete code for the JavaFX class. Take a look at it and thenwe will point out a few features:
AirportFramepackage airportSys; // add class to package
import java.util.Set;
import javafx.application.Application;import static javafx.application.Application.launch;import javafx.application.Platform;import javafx.geometry.Insets;
Flightinforma oncontainedin a HBox
Fig. 21.6 Both “Flight Arrivals” and “Flight Departures” tabs consist of flight information in aHBox
628 21 Advanced Case Study

import javafx.geometry.Pos;import javafx.scene.Scene;import javafx.scene.control.Alert;
import javafx.scene.control.Alert.AlertType;import javafx.scene.control.Button;import javafx.scene.control.ButtonType;import javafx.scene.control.Label;import javafx.scene.control.Menu;import javafx.scene.control.MenuBar;import javafx.scene.control.Tab;import javafx.scene.control.TabPane;import javafx.scene.control.TextInputDialog;import javafx.scene.image.Image;import javafx.scene.image.ImageView;import javafx.scene.layout.HBox;import javafx.stage.Stage;import javafx.scene.layout.VBox;import javafx.scene.text.Text;import javafx.scene.control.Tooltip;import javafx.scene.layout.Border;import javafx.scene.layout.BorderStroke;import javafx.scene.layout.BorderStrokeStyle;import javafx.scene.layout.BorderWidths;import javafx.scene.layout.CornerRadii;import javafx.scene.paint.Color;import javafx.stage.StageStyle;
/*** Class to provide the JavaFX interface of the airport system* * @author Charatan and Kans* @version 6th August 2018*/
public class AirportFrame extends Application{
// declare Airport object private Airport myAirport;// additional data required for the airport systemprivate int numberOfRunways ;private final String FILENAME = "airport.dat";
// create arrival and departure visual components that need global access
// arrivals information displayed in a HBoxprivate HBox arrivals = new HBox(50);// include columns for arrivals information private VBox arrivalsColumn1 = new VBox();private VBox arrivalsColumn2 = new VBox();private VBox arrivalsColumn3 = new VBox();private VBox arrivalsColumn4 = new VBox();// departures information displayed in a HBoxprivate HBox departures = new HBox(60);// include columns for departures information private VBox departuresColumn1 = new VBox();private VBox departuresColumn2 = new VBox();private VBox departuresColumn3 = new VBox();
// methods
/*** The start method to initialise the screen and the airport data** @param stage The Stage object*/
@Overridepublic void start(Stage stage) {
// check if data is to be loaded from fileAlert alert = new Alert( AlertType.INFORMATION, "Do you want to restore your data?",
ButtonType.YES, ButtonType.NO);String response = alert.showAndWait().get().getText();if (response.equals("Yes")) // load data from file{
try{
myAirport = new Airport(FILENAME); // call file loading constructorlistArrivals(); // update arrivals tablistDepartures(); // update departures tabshowInfo("Planes loaded");
}catch (Exception e) // file loading errors{
showError("File Opening error");System.exit(1); // indicates exit with error
}
21.10 The AirportFrame Class 629

} else // initialise an empty airport { numberOfRunways = getNumberOfRunways(); // request number of runways try { myAirport = new Airport (numberOfRunways); // create an empty Airport object } catch (AirportException ae) // error initialising Airport object { showError(ae.getMessage()); System.exit(1); // indicates exit with error } catch (Exception e) // in case of any unforseen error { showError(e.getMessage()); System.exit(1); // indicates exit with error } } // set up three Tab objects in a TabPane TabPane tabbedPane = new TabPane(); Tab tab1 = new Tab("Flight Control"); // main flight control tabs Tab tab2 = new Tab("Flight Arrivals"); // arrivals tab Tab tab3 = new Tab("Flight Departures"); // departures tab tabbedPane.getTabs().addAll(tab1, tab2, tab3); // ensure tabs remain open tab1.setClosable(false); tab2.setClosable(false); tab2.setClosable(false); // creat a VBox to hold all scene components VBox root = new VBox(); // set up menu bar and items MenuBar bar = new MenuBar(); bar.setMinHeight(25); Menu item = new Menu("File"); Menu saveAndContinueOption = new Menu("Back-up and continue"); Menu saveAndExitOption = new Menu("Back-up and exit"); Menu exitWithoutSavingOption = new Menu("Exit without backing-up"); item.getItems().addAll(saveAndContinueOption, saveAndExitOption, exitWithoutSavingOption); bar.getMenus().add(item); // create and customise a VBox to organise flight control screen VBox box = new VBox(); box.setPadding(new Insets(10)); box.setMinHeight(215); // add Vbox to tab1 tab1.setContent(box); box.setAlignment(Pos.BOTTOM_LEFT); // create a cloud image Image image = new Image("clouds.png"); ImageView imageView = new ImageView(image); // create an instructional label Label label = new Label("Enter an option"); // create a HBox to hold main flight control buttons HBox controls = new HBox(10); // create flight control buttons and add tooltips Button button1 = new Button("Register"); button1.setTooltip(new Tooltip("Register a flight with the airport")); Button button2 = new Button("Request to land"); button2.setTooltip(new Tooltip("Record a flight requesting to land at the airport")); Button button3 = new Button("Land"); button3.setTooltip(new Tooltip("Record a flight landing at the airport")); Button button4 = new Button("Board"); button4.setTooltip(new Tooltip("Record a landed flight ready for boarding new passengers")); Button button5 = new Button("Take off"); button5.setTooltip(new Tooltip("Record a flight leaving the airport")); // add buttons to HBox controls.getChildren().addAll(button1, button2, button3, button4, button5); // add cloud image, label and button collection to VBox box.getChildren().addAll(imageView,label, controls); try { // code button responses by calling private methods button1.setOnAction(e -> register()); button2.setOnAction(e -> requestToLand()); button3.setOnAction(e -> land()); button4.setOnAction(e -> board()); button5.setOnAction(e -> takeOff()); // code menu responses saveAndContinueOption.setOnAction(e -> save(FILENAME)); saveAndExitOption.setOnAction(e ->{ save(FILENAME); Platform.exit(); }); exitWithoutSavingOption.setOnAction(e -> exitWithoutSaving());
630 21 Advanced Case Study

}catch(Exception e) // for any unforseen errors{
showError("Invalid Operation");}
// customise look of arrivals tabarrivals.setPadding(new Insets(10));arrivals.getChildren().addAll( arrivalsColumn1, arrivalsColumn2, arrivalsColumn3,
arrivalsColumn4);tab2.setContent(arrivals);// customise look of departures tabdepartures.setPadding(new Insets(10)); departures.getChildren().addAll(departuresColumn1, departuresColumn2, departuresColumn3);tab3.setContent(departures); // customise root object and add menu and tabbed pane root.setBorder( new Border(new BorderStroke(Color.BLACK, BorderStrokeStyle.SOLID,
new CornerRadii(0), new BorderWidths(2))));root.getChildren().addAll(bar, tabbedPane);// customise frameScene scene = new Scene(root,450, 275);stage.setScene(scene);stage.setTitle("Airport System");stage.initStyle(StageStyle.UNDECORATED); // for undecorated frame
stage.show(); }
/*** Private method to request and return the number of runways*/
private int getNumberOfRunways(){
TextInputDialog dialog = new TextInputDialog();dialog.setHeaderText("Enter number of runways");dialog.setTitle("Runway Information Request");
String response = dialog.showAndWait().get();
if (!response.equals("")) // check for empty string{
return Integer.parseInt(response);}else{
return -1; // to indicate no runway set}
}
/*** Private method to register new flight with the airport*/
private void register() {
String flightNo, city;try{
TextInputDialog dialog = new TextInputDialog();dialog.setHeaderText("Enter flight number");dialog.setTitle("Registration form");flightNo = dialog.showAndWait().get();
// throws AirportException if no flight enteredcheckIfEmpty(flightNo, "No flight number entered");
dialog = new TextInputDialog();dialog.setHeaderText("Enter city of origin");dialog.setTitle("Registration form");city = dialog.showAndWait().get();
// throws AirportException if no city enteredcheckIfEmpty(city, "No city entered");
// register flight myAirport.registerFlight(flightNo, city);showInfo("confirmed:\nflight "+flightNo +" registered from "+city);
}catch(AirportException ae) // catch airport exceptions{
showError(ae.getMessage());}listArrivals(); // update arrivals tab
}
/**
21.10 The AirportFrame Class 631

* Private method to record a flight's request to land*/
private void requestToLand() {
String flightNo, message;
try{
TextInputDialog dialog = new TextInputDialog();dialog.setHeaderText("Enter flight number");dialog.setTitle("Request to land form");flightNo = dialog.showAndWait().get();
// throws AirportException if no flight enteredcheckIfEmpty(flightNo, "No flight number entered");
// record flight's request to land and get runway number int runway = myAirport.arriveAtAirport(flightNo); // check runway numberif (runway == 0){
message = "no runway available, circle the airport";}else{
message = " land on runway "+runway;}showInfo("confirmed:\nflight "+flightNo + message);
}catch(AirportException ae) // catch airport exceptions{
showError(ae.getMessage());}listArrivals(); // update arrivals tab
}
/*** Private method to record a flight landing at the airport*/
private void land(){
String flightNo, runwayIn;int runway;
try{
TextInputDialog dialog = new TextInputDialog();dialog.setHeaderText("Enter flight number");dialog.setTitle("Landing form");flightNo = dialog.showAndWait().get();
// throws AirportException if no flight enteredcheckIfEmpty(flightNo, "No flight number entered");
dialog = new TextInputDialog();dialog.setHeaderText("Enter runway number");dialog.setTitle("Landing form");runwayIn = dialog.showAndWait().get();
// throws AirportException if no runway eneteredcheckIfEmpty(flightNo, "No flight number entered");
// convert runway to an integerrunway = Integer.parseInt(runwayIn);// record flight landingmyAirport.landAtAirport(flightNo, runway);showInfo("confirmed:\nflight "+flightNo +" landed on runway "+runway);
}catch (AirportException ae) // catch airport exceptions{
showError(ae.getMessage());}listArrivals(); // update arrivals tab
}
/*** Private method to register a flight boarding passengers at the airport*/
private void board (){
String flightNo, city;
try{
TextInputDialog dialog = new TextInputDialog();dialog.setHeaderText("Fight number");dialog.setTitle("Boarding form");
632 21 Advanced Case Study

flightNo = dialog.showAndWait().get();
// throws AirportException if no flight enteredcheckIfEmpty(flightNo, "No flight number entered");
dialog = new TextInputDialog();dialog.setHeaderText("Enter destination city");dialog.setTitle("Boarding form");city = dialog.showAndWait().get();
// throws AirportException if no city enteredcheckIfEmpty(city, "No city entered");
// record flight boardingmyAirport.readyForBoarding(flightNo, city);showInfo("confirmation:\nflight "+flightNo+" boarding to "+city);
}catch (AirportException ae) // catch airport exceptions{
showError(ae.getMessage());} listArrivals(); // update arrivals tablistDepartures(); // update departures tab
}
/*** Private method to register a flight leaving the airport*/
private void takeOff (){
String flightNo;
try{
TextInputDialog dialog = new TextInputDialog();dialog.setHeaderText("Fight number");dialog.setTitle("Take off form");flightNo = dialog.showAndWait().get();
// throws AirportException if no flight enteredcheckIfEmpty(flightNo, "No flight number entered");
// record flight taking offmyAirport.takeOff(flightNo);showInfo("confirmation:\nflight "+flightNo+" Removed from system");
}catch (AirportException ae) // catch airport exceptions{
showError(ae.getMessage());} listDepartures(); // update departures tab
}
/*** Private method to update arrivals tab information*/
private void listArrivals() {
// get arrivals informationSet<Plane> arrivalsList = myAirport.getArrivals();// clear current arrivals informationarrivalsColumn1.getChildren().clear();arrivalsColumn2.getChildren().clear();arrivalsColumn3.getChildren().clear();arrivalsColumn4.getChildren().clear();arrivalsColumn1.getChildren().add(new Text("FLIGHT"));arrivalsColumn2.getChildren().add(new Text("FROM"));arrivalsColumn3.getChildren().add(new Text("STATUS"));arrivalsColumn4.getChildren().add(new Text("RUNWAY"));// re-populate arrivals informationfor (Plane thisPlane: arrivalsList){
arrivalsColumn1.getChildren().add(new Text(thisPlane.getFlightNumber()));arrivalsColumn2.getChildren().add(new Text(thisPlane.getCity()));
arrivalsColumn3.getChildren().add(new Text(thisPlane.getStatusName()));try{
// throws exception if no runway setarrivalsColumn4.getChildren().add(
new Text(Integer.toString(thisPlane.getRunwayNumber()))); }catch(Exception e) // catch exception and leave runway column blank{
arrivalsColumn4.getChildren().add(new Text(""));}
}
21.10 The AirportFrame Class 633

}
/*** Private method to update departures tab information*/
private void listDepartures() {
// get departures informationSet<Plane> departuresList = myAirport.getDepartures();// clear current departures informationdeparturesColumn1.getChildren().clear();departuresColumn2.getChildren().clear();departuresColumn3.getChildren().clear();departuresColumn1.getChildren().add(new Text("FLIGHT"));departuresColumn2.getChildren().add(new Text("TO"));departuresColumn3.getChildren().add(new Text("RUNWAY"));// re-populate departures informationfor (Plane thisPlane: departuresList){
departuresColumn1.getChildren().add(new Text(thisPlane.getFlightNumber()));departuresColumn2.getChildren().add(new Text(thisPlane.getCity()));
try{
// throws exception if no runway setdeparturesColumn3.getChildren().add(
new Text(Integer.toString(thisPlane.getRunwayNumber())));}catch(Exception e) // catch exception and leave runway column blank{
departuresColumn3.getChildren().add(new Text(""));}
} }
/*** Private method to exit application without saving data*/
private void exitWithoutSaving(){
Alert alert = new Alert( AlertType.WARNING, "Are you sure? Your work could be lost.",ButtonType.YES, ButtonType.CANCEL);
alert.setTitle("Confirmation reqired");String response = alert.showAndWait().get().getText();
if(response.equals("Yes")){
Platform.exit();}
}
/*** Private method to load airport data from a file* @param fileName The name of the file to open*/
private void open(String fileName){
try{
myAirport.load(fileName); // may throw an exceptionlistArrivals(); // update arrivals tablistDepartures(); // update departures tabshowInfo("Planes Loaded");
}catch (Exception e) // catch file related exceptions{
showError("File Opening error");System.exit(1); // indicates exit with error
}}
/*** Private method to save airport data to a file* @param fileName The name of the file to save*/
private void save(String fileName){
try{
myAirport.save(fileName); // may throw exceptionshowInfo("Planes saved");
}catch (Exception e) // catch file related exceptions{
showError("Error saving data");}
634 21 Advanced Case Study

}
/*** Private method to show an error message* @param msg The error message*/
private void showError(String msg){
Alert alert = new Alert(AlertType.ERROR);alert.setHeaderText("Airport Error Alert");alert.setContentText(msg);alert.showAndWait();
}
/*** Private method to show an information message* @param msg The information message*/
private void showInfo(String msg){
Alert alert = new Alert(AlertType.INFORMATION);alert.setHeaderText("Airport Information Alert");alert.setContentText(msg);alert.showAndWait();
}
/*** Private method to check if a string is empty* @param s The string to check* @param errorMessage The error message to include in an exception* @throws AirportException if string is empty*/
private void checkIfEmpty(String s, String errorMsg){
if (s.equals("")){
throw new AirportException (errorMsg);}
}
public static void main(String[] args){
launch(args);}
}
As you can see, although this class has more code than those we have metbefore, it follows a familiar pattern. Most of the code will therefore be familiar toyou and the Javadoc comments and additional supplementary comments shouldbe sufficient to follow what we have done here. We will just draw your attention toone or two JavaFX features that we have decided to incorporate into our imple-mentation that will be new to you and that we mentioned in the introduction.
First, we have added tool tips to our buttons. A tool tip is an informativedescription of the purpose of a GUI component. This informative description isrevealed when the user places the cursor over the component. Figure 21.7 showsthe tool tip that is revealed when the cursor is placed over the “Land” button.
Adding a tool tip to a JavaFX component is easy; just use the setTool-TipText method and provide a tool tip message as a parameter to the ToolTipclass:
Fig. 21.7 A tool tip is revealed when the mouse is placed over the “Land” button
21.10 The AirportFrame Class 635

// create a Land button Button button3 = new Button("Land"); // add a tool tip to the Land button using the setToolTip method button3.setTooltip(new Tooltip("Record a flight landing at the airport"));
We also mentioned that we have made our frame an undecorated frame. Anundecorated frame has no icons to minimise or maximise (or close) the frame. Thisensures the frame remains the same size and this cannot be altered. To do this weuse the initStyle method of our stage object and pass an enumerated typeconstant StageStyle.UNDECORATED as a parameter:
stage.initStyle(StageStyle.UNDECORATED);
Finally we draw your attention to a few things related to the functionality of thisclass.
When the application opens the user is given the option to load data from a filevia an Alert dialog (see Fig. 21.8).
If the user chooses to load data from a file, the airport interface (as given inFig. 21.5) is activated once the data is loaded. If the user chooses not to load datafrom a file, the system needs to be initialised by asking the user for the number ofrunways associated with this airport. A TextInputDialog is used for thispurpose (see Fig. 21.9).
Fig. 21.8 An Alert dialogto allow users to load datafrom a file
Fig. 21.9 ATextInputDialog toallow users to specify thenumber of runways
636 21 Advanced Case Study

Again, the airport interface (as given in Fig. 21.5) is activated once the user hasentered the number of runways. The user can then use the buttons on the flightcontrol tab to register, request to land, land, board and take off flights at the airport—with arrivals and departures information being always available in the arrivalsand departures tabs.
We have created two private methods, listArrivals andlistDepartures. These methods update the information in the arrivals anddepartures tabs respectively. Whenever the airport data is modified (i.e. when abutton is pressed in the main control tab) these methods need to be called to updatethe arrivals and departures tabs so when these tabs are revealed they always showthe current state of flights in the system.
For example, when a flight registers at the airport the arrivals tab only needs tobe updated before we exit the method. Here is the outline of the code for processingthe register button response:
/** * Private method to register new flight with the airport */ private void register() {
// code to register flight at airport here
listArrivals(); // update arrivals tab }
However, when a flight is ready for boarding, it needs to be removed from thearrivals tab and added to the departures tab, so both listArrivals andlistDepartures need to be called.
/** * Private method to register a flight boarding passengers at the airport */ private void board() {
// code to record flight as ready for boarding
listArrivals(); // update arrivals tab listDepartures(); // update departures tab
}
When a flight takes off from the airport, it only needs to be removed from thedepartures tab:
/*** Private method to record a flight leaving the airport*/private void takeOff() {
// code to record flight leaving the airport
listDepartures(); // update departures tab only }
Finally, the user can use the file menu to back-up the data to a file and continuewith the application, to back-up data to a file and exit the application or simply exitthe application without backing up the data (see Fig. 21.10).
21.10 The AirportFrame Class 637

21.11 Self-test Questions
1. In Sect. 21.6 we developed scenarios for the use case “Register flight arrival”.Develop scenarios for all the other use cases in Table 21.1.
2. What is the difference between containment and composition in UML?
3. Consider an enumerated type, Light. This type can have one of three values:RED, AMBER and GREEN. It will be used to display a message to students,indicating whether or not a lecturer is available to be seen.
(a) Specify this type in UML.(b) Implement this type in Java.(c) Declare a Light variable, doorLight;(d) Write a switch statement that checks doorLight and displays “I am
away” when doorLight is RED, “I am busy” when doorLight isAMBER and “I am free” when doorLight is GREEN.
4. Identify the benefits offered by the TabPane component.
5. How can the tool tip “This button stops the game” be added to a Button calledstop?
6. Develop test plans for the Runway, Plane, Airport and AirportFrameclasses.
Fig. 21.10 Menu options to allow users to back-up data and exit the application as required
638 21 Advanced Case Study

21.12 Programming Exercises
Copy, from the accompanying web-site, the classes that make up the airportapplication and then tackle the following exercises:
1. Develop toString methods for the Runway, Plane and Airport classesand then develop testers for these classes.
2. Run and test the classes in the airport application by making use of your testingprograms of programming exercise 1 above and following your test plans youdevised in self-test question 6.
3. Make any further enhancements that you wish to the airport application. Forexample, you may wish to consider
(a) adding a fourth “Help” tab that displays text describing how to use theairport application;
(b) rather than use an enhanced for loop in the getArrivals andgetDepartures methods of the Airport class make use of forEachloops;
(c) instead of a TextInputDialog to enter the runway number in the landmethod of the AirportFrame class, use a ChoiceDialog with a list ofrunways pre-populated in a drop-down box;
(d) identify methods, such as nextFreeRunway and nextToLand in theAirport class, that could return null values and then modify the code inthe airport application to make use of the Optional type to avoidreturning these null values;
(e) design your own skin for the AirportFrame by creating a cascadingstyle sheet.
4. Create an executable JAR file to run the airport application.
21.12 Programming Exercises 639

22The Stream API
Outcomes:
By the end of this chapter you should be able to:
• explain the term stream in the context of the java stream API;• identify the advantages of stream processing over iteration;• describe the three stages involved in processing a stream;• explain what is meant by lazy evaluation;• create streams from scratch, from collections and from files;• use a variety of intermediate methods to process streams;• use appropriate methods to terminate streams;• explain the difference between stateless and stateful operations;• explain how streams can be created in parallel mode;• identify the possible pitfalls with parallel stream processing and explain how to
avoid them.
22.1 Introduction
In Chap. 15 you studied collections, and learnt how to process collections byiterating through the list in order to sort, select and retrieve items. Now, there isnothing wrong with that way of doing things. However, when it comes to pro-cessing large volumes of data, iterating through all the items can be rather a slowprocess, and is not necessarily the most efficient way of doing things.
For this reason, Java 8 came packaged with a new API, the stream API, to befound in java.util. This API provides classes—in particular the Streamclass—that enable us to process collections by making use of the multi-taskingabilities of modern machines. Methods of the Stream class allow this processingto take place behind the scenes, without having to trouble the programmer.
© Springer Nature Switzerland AG 2019Q. Charatan and A. Kans, Java in Two Semesters, Texts in Computer Science,https://doi.org/10.1007/978-3-319-99420-8_22
641

In Java, a stream (not to be confused with the input-output streams discussed inChap. 18) is a collection of items that is created in memory, and which ceases toexist once the processing is completed.
There are three stages to processing a stream—these are described below:
Stage 1We create a stream either from scratch, or from an existing collection.
Stage 2We specify intermediate operations. These operations transform the initial streaminto other streams. This is done in one or more steps.
Stage 3We apply a terminal operation, which produces a result. The terminal operationforces the execution of the preceding operations—once the terminal operation hasbeen applied the stream can no longer be used. Attempting to do so will cause anexception at runtime.
One important aspect of stream processing that we should point out is that theintermediate operations are not executed until the terminal operation is invoked.Each intermediate operation creates a new stream and this stream is stored alongwith the function provided. These streams accumulate as the pipeline is traversed,and once the terminal operation is called each function is performed one by one.This is referred to as lazy evaluation.
Before taking a look at some concrete examples, there is one other importantaspect of streams that we should mention at this juncture. Programming streams isall about what is to be done rather than how it is to be done. Do you remember inChap. 19 that we showed you how to communicate with a remote database via ajava program? We showed you there how to embed SQL (Structured QueryLanguage) code into our java applications. In SQL we have statements that looklike this:
select serialNumber from Products where make = ‘Acme’;
This would display all the serial numbers of products in a table which aremanufactured by “Acme”.
Now, even if you know nothing about SQL, it should be apparent that thisinstruction simply states what we want to achieve, and says nothing about how it isto be achieved—a similar statement in Java, working for example on anArrayList, would require us to write a loop for iterating through all the ele-ments. SQL is a fourth generation language—also called a declarative language—which means that we are able simply to state the result we require, rather than tellthe computer how to do it.
Streams in Java do the same thing. They remove from the programmer theburden of writing the code for iteration and selection and concentrate instead onwhat the code is required to achieve.
So now let’s look at some examples.
642 22 The Stream API

22.2 Streams Versus Iterations: Example Program
To understand how all this works we will study a simple example of two programswhich analyse a collection of objects—the first one uses the methods of the collectionclasses that we are familiar with, and the second one uses streams. Our collection willconsist of objects from the Product class that we developed in Chap. 19. This classis reproduced below—you will notice that in this version we have overridden thetoStringmethod in order to make it easy to display the full details of each product.
Productpublic class Product { private String stockNumber; private String manufacturer; private String item; private double unitPrice;
public Product(String stockNumberIn, String manufacturerIn, String itemIn, double unitPriceIn) { stockNumber = stockNumberIn; manufacturer = manufacturerIn; item = itemIn; unitPrice = unitPriceIn; }
public Product() {
}
public String getStockNumber() { return stockNumber; }
public void setStockNumber(String stockNumberIn) { stockNumber = stockNumberIn; }
public String getManufacturer() { return manufacturer; }
public void setManufacturer(String manufacturerIn) { manufacturer = manufacturerIn; }
public String getItem() { return item; }
public void setItem(String itemIn) { item = itemIn; }
public double getUnitPrice() { return unitPrice; }
public void setUnitPrice(double unitPriceIn) { unitPrice = unitPriceIn; }
""""BQxgttkfg" public String toString() { return stockNumber + " " + manufacturer + " " + item + " " + unitPrice; } }
22.2 Streams Versus Iterations: Example Program 643

So our first program will add a few products to a list, then—in the way we areused to—iterate through the list to display all the products; it will then repeat thisprocess, but this time filter the products to exclude the more expensive items (thosecosting 170 or more). Finally it will display the number of items that remain.
QueryWithoutUsingStreamsimport java.util.ArrayList;import java.util.List;
public class QueryWithoutUsingStreams{
public static void main(String[] args){
List<Product> productList = new ArrayList<>(); // create a list of productsint count = 0;
// add four products to the listproductList.add(new Product("1076543", "Acme", "Vacuum Cleaner", 180.11));productList.add(new Product("3756354", "Nadir", "Washing Machine", 178.97));productList.add(new Product("1234567", "Zenith", "Fridge", 151.98));productList.add(new Product("7876161", "Zenith", "Tumble Drier", 159.99));
System.out.println("ALL ITEMS");
// display all itemsfor(Product pr : productList){
System.out.println(pr);}
System.out.println();
System.out.println("ITEMS COSTING LESS THAN 170");
// display items costing less than 170for(Product pr : productList){
if(pr.getUnitPrice() < 170){
System.out.println(pr);count++;
}}
System.out.println();System.out.println("There are " + count + " items costing less then 170");
}}
The output from this program is, as expected:
ALL ITEMSAcme Vacuum Cleaner 180.11Nadir Washing Machine 178.97Zenith Fridge 151.98Zenith Tumble Drier 159.99
ITEMS COSTING LESS THAN 170Zenith Fridge 151.98Zenith Tumble Drier 159.99
There are 2 items costing less then 170
644 22 The Stream API

Now let’s see how we do exactly the same thing using streams:
QueryUsingStreamsimport java.util.ArrayList; import java.util.List;
public class QueryUsingStreams { public static void main(String[] args) { List<Product> productList = new ArrayList<>(); // create a list of products // add four products to the list productList.add(new Product("1076543", "Acme", "Vacuum Cleaner", 180.11)); productList.add(new Product("3756354", "Nadir", "Washing Machine", 178.97)); productList.add(new Product("1234567", "Zenith", "Fridge", 151.98)); productList.add(new Product("7876161", "Zenith", "Tumble Drier", 159.99));
// display all items System.out.println("ALL ITEMS"); productList.stream().forEach(pr -> System.out.println(pr));
System.out.println();
// filter the list and display items costing less than 170 System.out.println("ITEMS UNDER 170"); productList.stream().filter(pr -> pr.getUnitPrice() < 170).forEach(pr -> System.out.println(pr));
// count items costing less than 170 long count = productList.stream().filter(pr -> pr.getUnitPrice() < 170).count();
System.out.println(); System.out.println("There are " + count + " items costing less then 170"); } }
Let’s start by looking at the line of code that displays all the items:
productList.stream().forEach(pr -> System.out.println(pr));
This starts to give you an idea of how we pipeline the stream operations. Herewe have begun the process (stage 1) by creating a steam with the stream methodwhich is provided as part of the Collection interface implemented byArrayList (as explained in Chap. 15). In this case, all we want to do is displaythe entire list, so there are no intermediate operations (stage 2) and we proceeddirectly to termination (stage 3). The termination operation we use here isforEach, which performs the required action for each item in the list. You wereintroduced to the forEach method in Chap. 15 when it was used directly with theJava collection types, but it is also available to Java streams—more detail aboutforEach in the sections that follow.
We should point out here that the above line of code could have utilized thedouble colon notation that we introduced in Chap. 13. So we could have written:
productList.stream().forEach(System.out::println);
In the programs that follow we will use this notation where possible.
22.2 Streams Versus Iterations: Example Program 645

Now let’s look at the way we have filtered our results to display only itemscosting under 170:
productList.stream().filter(pr -> pr.getUnitPrice() < 170).forEach(pr -> System.out.println(pr));
Here you see the use of an intermediate operation which uses the filtermethod. You can see how we send in the criteria on which to filter the items as alambda expression—again, more about this in the following sections. You shouldnote that any intermediate method, such as filter, returns another stream; thisstream is again terminated with the forEach method.
Finally we have used the following line of code to count the filtered stream:
long count = productList.stream().filter(pr -> pr.getUnitPrice() < 170).count();
The count method, which is again a termination method, returns a long,which we use to display the number of items in the resulting stream, which in thiscase will consist of items costing under 170.
22.3 Creating Streams
In the previous section we created our stream from an existing ArrayList, usingthe stream method. It is also possible to create a stream from scratch as in thefollowing example:
StreamFromValuesimport java.util.stream.Stream;
public class StreamFromValues { public static void main(String[] args) { // create stream from values Stream<String> colours = Stream.of("Purple", "Blue", "Red", "Yellow", "Green");
// filter the list and display strings of length 5 or more colours.filter(c -> c.length() >= 5).forEach(System.out::println); } }
Here we have created a named Stream object (holding Strings) and used thestatic Stream method called of to create the stream from a list of values.
646 22 The Stream API

We have filtered the stream to contain only strings consisting of five charactersor more, se we get the following output:
PurpleYellowGreen
It is also possible to create a stream from an array, by using the static streammethod of the Arrays class that resides in java.util:
StreamFromArray
import java.util.Arrays; import java.util.stream.Stream;
public class StreamFromArray { public static void main(String[] args) {
// create an array of Products Product[] productList = { new Product("1076543", "Acme", "Vacuum Cleaner", 180.11), new Product("3756354", "Nadir", "Washing Machine", 178.97), new Product("1234567", "Zenith", "Fridge", 151.98) };
// create a stream from the array Stream<Product> products = Arrays.stream(productList);
products.forEach(System.out::println); } }
If you want to create an empty stream (of Strings, for example), you can do soas follows:
Stream<String> s = Stream.empty();
A stream can also be created from a file, with the help of the Files class whichresides in java.nio.files. We will demonstrate this with the file Poem.txt,which we used in Chap. 17, and which contains the following text:
The moving finger writes and having writMoves on; nor all thy piety nor witShall lure it back to cancel half a line,Nor all thy tears wash out a word of it.
22.3 Creating Streams 647

In the program below, the static lines method of Files is used to convert thetext to a stream of Strings, each one being a line of text in the file.
StreamFromFileimport java.io.IOException; import java.nio.file.Files; import java.nio.file.Paths; import java.util.stream.Stream;
class StreamFromFile { public static void main(String[] args) { Stream<String> fileStream = Stream.empty(); // create empty stream try { fileStream = Files.lines(Paths.get("Poem.txt")); // file in current directory }
catch (IOException ex) { }
fileStream.forEach(System.out::println); } }
Notice that lines requires an object of type Path. To create this object, wehave used the get method of Paths (also found in java.nio.file)—thismethod creates a Path object by joining together the strings that are sent in asparameters.1 We have sent in only the file name, so the program will look in thecurrent directory.
The output is as follows:
The moving finger writes and having writMoves on; nor all thy piety nor witShall lure it back to cancel half a line,Nor all thy tears wash out a word of it.
22.4 Intermediate Operations
Intermediate operations transform one stream to another stream. So far the onlyintermediate method we have encountered is filter, which selects which itemswill be included in the new stream, based on the criteria sent into the method.Intermediate methods make use of a couple of the “out of the box” interfaces thatwe encountered in Chap. 13. We remind you of these below in Table 22.1
Table 22.1 Reminder of the Predicate and Function interfaces
Functional Interface Abstract method name Parameter types Return type
Predicate <T> test T boolean
Function <T, R> apply T R
1More detail about the Paths class and Path interface can be found on the Oracle™ website.
648 22 The Stream API

The filter method requires a Predicate—its abstract method, test, willexpect to receive an object of the type of item held (Product or String in ourprevious examples) and return a boolean, so we send in the appropriate lambdaexpression as we have done in the examples you have seen: filter(pr -> pr.getUnitPrice() < 170
and
filter(c -> c.length() >= 5)
Next we introduce three other intermediate methods: distinct, sorted, andmap. The program below creates a stream, then pipelines these three methods aswell as the filter method before terminating the stream with the forEachmethod.
IntermediateExamplesimport java.util.stream.Stream;
public class IntermediateExamples { public static void main(String[] args) { Stream<String> colours = Stream.of("Purple", "Blue", "Red", "Yellow", "Green", "Yellow", "Purple", "Orange", "Black");
colours.filter(c -> c.length() > 4).distinct().sorted().map(c -> c.substring(0, 2)) .forEach(System.out::println);
} }
You can see that we have, in this case, created a stream containing duplicates. Thedistinct method, which does not require any parameters, simply transforms thestream into a new stream with the duplicates removed. The sorted method, alsorequiring no parameters, as its name suggests, produces a stream sorted on “natural”order (for example numerical or alphabetical order). The map method expects anitem of type Function, and transforms each element to another element accordingto the lambda expression sent into its apply method. In our example, each string isconverted to a string containing only the first two characters of the original.
The output from this program is:
BlGrOrPuYe
Next we will look at the flatMap method. This method again accepts afunction, but will produce a stream with the original contents broken downaccording to the criteria we specify in the lambda expression. We will demonstratethis by making use of the stream that we created from a file in our
22.4 Intermediate Operations 649

StreamFromFile program above. The resulting stream contained four lines oftext. In the program that follows we will break this down to a stream consisting ofthe individual words (that is, the elements that are separated by a space).
FlatMapExampleimport java.io.IOException; import java.nio.file.Files; import java.nio.file.Paths; import java.util.Arrays; import java.util.stream.Stream;
public class FlatMapExample { public static void main(String[] args) { Stream<String> fileStream = Stream.empty(); // create empty stream try { fileStream = Files.lines(Paths.get("Poem.txt")); // file in current directory }
catch (IOException ex) { }
// create a stream of individual words fileStream.flatMap(s -> Arrays.stream(s.split(" "))).forEach(System.out::println); } }
Like map, flatMap receives a function, but in this case the type received bythe function’s apply method is restricted to a Stream type by the use of an upperbound (as explained in Chap. 13). In our example the split method of String isemployed to transform the original stream to another stream broken into the indi-vidual words contained in each line. The output from this program is:
ThemovingfingerwritesandhavingwritMoveson;norallthypietynorwitShalllureitbackto
650 22 The Stream API

cancelhalfaline,Norallthytearswashoutawordofit.
Finally we can look at three more operations, the limit operation, the skipoperation and the peek operation. The limit method takes an integer—n forexample—and transforms the original stream into a stream containing only the firstn items. So, for example, in our IntermediateExamples program above wecould add a limit operation into the pipeline as follows:
colours.filter(c -> c.length() > 4).distinct().sorted() .map(c -> c.substring(0, 2)).limit(2).forEach(System.out::println);
In this case the final output would be:
BlGr
Theskip operation does the opposite of limit, and discards the first n elements.So replacing limit(2) with skip(2) in the pipeline above would gives us:
OrPuYe
The peek method is very useful for debugging—it enables us to look into thestream at a given point, but unlike forEach it does not terminate the stream.
For example, in the following line of theQueryUsingStreams example above:
long count = productList.stream().filter(pr - > pr.getUnit-Price() < 170).count();
we could have added a peek method as follows:
long count = productList.stream(). peek(s -> System.out.println(s)). filter(pr -> pr.getUnitPrice() < 170).count();
This would print all the items in the stream so far.
22.4 Intermediate Operations 651

22.5 Operations for Terminating Streams
So far we have encountered two terminal operations, count and forEach.As we have seen, the count method does not require any arguments and simply
returns a long, representing the number of elements in the stream.The forEach method receives a Consumer type as its argument (reminder in
Table 22.2). The accept method of Consumer receives an item of the type heldby the stream—the lambda expression then defines how that item will be processed.All that the lambda expressions in the above examples have done is to display eachitem on the screen.
22.5.1 More Examples
Now we can explore some other terminal methods. The following programdemonstrates a few of these:
TerminalExamplesimport java.util.Comparator; import java.util.Optional; import java.util.stream.Stream;
public class TerminalExamples { public static void main(String[] args) {
// find the maximum of a stream of integers Optional<Integer> maximumInt = Stream.of(1, 2, 3, 11, 7, 8, 10).max(Comparator.naturalOrder()); System.out.println("The maximum integer is " + maximumInt.get());
// find the "minimum" of a stream of strings Optional<String> minimumString = Stream.of("banana", "apple", "apple", "orange").min(Comparator.naturalOrder()); System.out.println("The first string alphabetically is " + minimumString.get());
// find cheapest product from a stream of products Optional<Product> cheapestProduct = Stream.of( new Product("1076543", "Acme", "Vacuum Cleaner", 180.11), new Product("3756354", "Nadir", "Washing Machine", 178.97), new Product("1234567", "Zenith", "Fridge", 151.98), new Product("7643210", "Wizz", "Dish Washer", 219.99) ).min(Comparator.comparingDouble(Product::getUnitPrice)); System.out.println("The cheapest product is " + cheapestProduct.get());
// find the first in the list in a stream of doubles Optional<Double> firstDouble = Stream.of(1.6, 2.7, 6.8).findFirst(); System.out.println("The first double in the list is " + firstDouble.get());
// find the sum of a stream of integers Optional<Integer> sumOfIntegers = Stream.of(1, 2, 3, 4, 5).reduce((x, y) -> x + y); System.out.println("The sum of the integers is " + sumOfIntegers.get());
// find if a specific item is in the stream boolean appleExists = Stream.of("banana", "pear", "apple", "orange").anyMatch(s -> s.equals("apple")); if(appleExists) { System.out.println("apple is in the list"); }
} }
Table 22.2 Reminder of the consumer interface
Functional Interface Abstract method name Parameter types Return type
Consumer<T> accept T void
652 22 The Stream API

The first three examples in this program use the max and min functions, whichdo as their names suggest. They both return items of type Optional, and thenative type is extracted with the get method. They both require a Comparatorobject as an argument (Comparators were introduced in Chap. 15). The first twostreams in our example contain Integers and Strings respectively, and themethod can therefore receive a Comparator.naturalOrder() argument, asin the first example:
Optional<Integer> maximumInt = Stream.of(1, 2, 3, 11, 7, 8, 10).max(Comparator.naturalOrder());
In the third example the stream holds items of our own Product class, and wewant to know the cheapest. We therefore have to consider the unitPrice attri-bute, which is of type double, so we use the comparingDouble method ofComparator with the correct lambda expression:
Optional<Product> cheapestProduct = Stream.of( new Product("1076543", "Acme", "Vacuum Cleaner", 180.11), new Product("3756354", "Nadir", "Washing Machine", 178.97), new Product("1234567", "Zenith", "Fridge", 151.98), new Product("7643210", "Wizz", "Dish Washer", 219.99) ).min(Comparator.comparingDouble(Product::getUnitPrice));
The next example in our program demonstrates the findFirst method, which,as you might expect, finds the first item in the stream:
Optional<Double> firstDouble = Stream.of(1.6, 2.7, 6.8).findFirst();
In addition to findFirst there is also a findAny method, which returns arandom item in the stream.
The next example makes use of the reduce method.
Optional<Integer> sumOfIntegers = Stream.of(1, 2, 3, 4, 5).reduce((x, y) -> x + y);
The reduce method performs operations on the elements according to thepattern defined in the lambda expression. In this example, the method returns thesum of the elements. It returns an item of type Optional, because there is novalid result if the stream is empty.
If you want to avoid using Optional, there is another version of reduce thatyou can use. In our case it would look like this:
int sumOfIntegers = Stream.of(1, 2, 3, 4, 5).reduce(0, (x, y) -> x + y);
22.5 Operations for Terminating Streams 653

The first parameter is referred to as an identity. It is defined like this:
identity + x = x
In the case of integer addition, the appropriate identity is zero. This is added tothe total—the result is unaffected by adding zero, but if the stream is empty, there isnonetheless a valid result.
If, for example, we were concatenating a stream of strings, we would use “” asour identity.
The final method that we demonstrate in our program is anyMatch:
boolean appleExists = Stream.of("banana", "pear", "apple", "orange").anyMatch(s -> s.equals("apple"));
It determines if any item in the stream matches the value defined by the lambdaexpression—in this case it checks to see it the word “apple” is in the stream.anyMatch returns a boolean value.
There are two operations similar to anyMatch. allMatch determines if allthe elements are of a particular value, while noneMatch does the opposite toanyMatch.
The output from our program is:
The maximum integer is 11The first string alphabetically is appleThe cheapest product is 1234567 Zenith Fridge 151.98The first double in the list is 1.6The sum of the integers is 15apple is in the list
22.5.2 Collecting Results
As you have already found out, once we terminate a stream, the stream is no longeravailable. But it is very likely that we might want to save the results of processing astream for later use and for this purpose a special terminal method, collect, isavailable.
In the program that follows we have created a stream of country names from anArrayList, then we have sorted the stream, and collected the results into a newList.
654 22 The Stream API

CollectionExampleimport java.util.ArrayList; import java.util.List; import java.util.stream.Collectors; import java.util.stream.Stream;
public class CollectionExample { public static void main(String[] args) { // create an ArrayList of strings List<String> countryList = new ArrayList<>();
countryList.add("Germany"); countryList.add("France"); countryList.add("Nigeria"); countryList.add("Canada"); countryList.add("India");
// create a stream from the ArrayList Stream<String> countryStream = countryList.stream();
// sort the stream data and save the result in a new ArrayList List<String> sortedList = countryStream.sorted().collect(Collectors.toList());
// display the sorted list for(String item : sortedList) { System.out.println(item); } } }
The line of code that we are interested in is this one:
List<String> sortedList = countryStream.sorted().collect(Collectors.toList());
We are using the collect method of Stream to collect our items and placethem into a list. The version of collect that we are using here requires an objectof type Collector. Java provides a Collectors class that has static methodsthat generate Collector objects. Here we are using the toList object to createa list.
If we had wanted a set then we would have used toSet as follows:
Set<String> sortedList = countryStream.sorted().collect(Collectors.toSet());
It is also possible to collect the data into a map, using the toMap method. Thismethod requires two functions (sent in as lambda expressions) which define the keyand the value of the map. In our example, if we required each element of the map tocomprise the initial letter and name of each country, we would do the following:
Map<Character, String> map = countryStream.sorted().collect(Collectors.toMap(s -> s.charAt(0), s -> s));
22.5 Operations for Terminating Streams 655

22.6 Concatenating Streams
Combining two streams of the same type is easy. The Stream class has a staticmethod called concat, so to join, for example, two streams of Strings—stream1 and stream2—we simply do the following:
Stream<String> combined = Stream.concat(stream1, stream2);
22.7 Infinite Streams
The idea of creating an infinite object might seem rather an alien concept to aprogrammer—but it is quite possible to create an infinite stream of items andtruncate the stream to, say, the first one hundred elements. This is possible because,as we explained in Sect. 22.1, the stream operations don’t come into effect until theterminal operation is encountered, so the stream is created only with the finitenumber of elements that are required.
Some examples will make this clear. The program below shows three exampleswhich we will discuss once you have had a look at it.
InfiniteStreamsimport java.util.stream.Stream;
public class InfiniteStreams { public static void main(String[] args) { // an infinite stream of strings Stream<String> echo = Stream.generate(() -> "Hello world"); echo.limit(10).forEach(s -> System.out.println(s));
// an infinite stream of random numbers Stream<Double> randomNumbers = Stream.generate(() -> Math.random()); randomNumbers.limit(10).forEach(System.out::println);
// an infinite sequence of integers Stream<Integer> sequence = Stream.iterate(1, n -> n+2); sequence.limit(5).forEach(System.out::println); } }
There are two static methods of Stream which we can use to create infinitestreams: generate and iterate. They make use, respectively, of the Sup-plier and UnaryOperator generic interfaces that you learnt about in Chap. 13,and which are reproduced for you here in Table 22.3 as a reminder.
Table 22.3 Reminder of the Supplier and unaryoperator interfaces
Functional Interface Abstract method name Parameter types Return type
Supplier<T> get none T
UnaryOperator<T> apply T T
656 22 The Stream API
The first two examples in the program above make use of the generatemethod. As it requires a Supplier as argument, the lambda expression requiresno input, and simply outputs what is to be repeated in the stream. The first examplecreates a stream of Strings (“Hello world”), which is then limited to the first 10items; so the final result is that “Hello world” is displayed ten times:
Stream<String> echo = Stream.generate(() -> "Hello world"); echo.limit(10).forEach(System.out::println);
The second example is similar, but makes use of the random method of theMath class so that 10 random numbers are displayed.
Stream<Double> randomNumbers = Stream.generate(() -> Math.random()); randomNumbers.limit(10).forEach(System.out::println);
The final example uses the iterate method:
Stream<Integer> sequence = Stream.iterate(1, n -> n+2); sequence.limit(5).forEach(System.out::println);
The iterate method receives two arguments. The first, which is of the sametype as the stream items, is referred to as a seed; the second is a UnaryOperator.The lambda expression for the UnaryOperator defines the operation that is totake place on the seed and then on each subsequent item. In our example we startoff with 1 (the seed), then continuously add 2. In this case we have limited thefinal stream to the first 5 items, with the result that the numbers 1, 3, 5, 7, 9 aredisplayed.
22.8 Stateless and Stateful Operations
Certain stream operations, when executed, examine individual items in the streamand perform an action on the item without having to worry about any of the othermembers of the stream. Take for example the filter operation. When making thedecision about whether to include a particular item in the new stream, it is notnecessary to think about the other items—for example, if the filter method has toinclude only strings that have more than five characters, the string “yellow” isalways going to be included, irrespective of what else is in the stream.
22.7 Infinite Streams 657

Compare this to a method like sorted. In this case the position of an itemdepends upon the other items in the stream, so that the method has got to in someway remember the items that have already been processed.
Operations like filter that do not have to remember what has gone before arecalled stateless operations; in contrast, methods like sorted are referred to asstateful. The following intermediate operations are stateful:
distinctsortedlimitskip
The others are all stateless.
22.9 Parallelism
As we explained in the introduction, stream processing makes use of themulti-tasking and multi-processing capabilities of the system as a whole, and thatthis goes on behind the scenes. It is important to emphasise here that multi-taskingapplies to the internal execution of the individual operations; the operations in thepipeline are, under normal circumstances, executed in sequence. This is important,because without careful thought, allowing operations to be carried out in randomorder could lead to very different results from the ones intended. Consider, forexample, a stream of strings consisting of the words foot, feet, feet, folder, foot,feeling. Now imagine carrying out two operations on these—a distinct oper-ation, and a map operation that reduces each item to its first two characters. Itshould be easy to see that carrying out these operations in different orders willproduce two different results.
It is nonetheless possible to have streams in which the intermediate operationsare parallelized. This is done either by creating a parallel stream with the par-allelStream operation of Collection:
Stream<Product> para = productList.parallelStream();
or by converting an existing sequential stream to parallel mode with the parallelmethod of Stream:
Stream<Product> para = sequentialStream.parallel();
658 22 The Stream API

It should, however, be evident from the above discussion that extreme careshould be exercised when using parallel streams. Firstly all the operations should bestateless. Secondly they must be able to be executed in arbitrary order.
22.10 Self-test Questions
1. What are the advantages of using streams to process collections, compared toiteration?
2. Describe the three stages involved in processing a stream.
3. Explain what is meant by lazy evaluation.
4. What is the difference between stateless and stateful operations? Give examplesof both.
5. Why is it necessary to exercise caution when it comes to processing streams inparallel mode? What steps should be taken to avoid problems?
6. Explain why the following lines in a program would create a problem atruntime:
Stream<String> colours = Stream.of("Purple", "Blue", "Red", "Yellow", "Green", "Yellow", "Purple", "Black");
colours.filter(c -> c.length() > 4).distinct().sorted().forEach(System.out::println); colours.filter(c -> c.length() > 4).distinct().sorted().count();
22.11 Programming Exercises
1. Implement some of the programs from this chapter, and experiment with usingdifferent stream methods.
2. Write a short program the uses the skip method and the limit method toextract a substream from a stream, from a start position to an end position.
3. Use the iterate method of Stream to display the first 5 square numbers.
4. In Sect. 8.8.1 of Chap. 8 we developed a Bank class. Take a look at thefollowing methods and see if you can rewrite them so that they use streamprocessing instead of iteration:
22.9 Parallelism 659

(a) The getItem method
You will need to filter the stream so that it contains one item, and collect the newstream into a list. As a BankAccount has to be returned, you will have toreturn the first (and only) item in the list. Also, bear in mind that a null valueneeds to be returned if the requested account does not exist.
(b) The removeAccount method
In this case, you need to filter out the item in question. As you have to save theresulting stream to the original list, which is an ArrayList, and the toListmethod simply returns a List, you will need to type cast. Again you will haveto figure out a way of reporting on whether or not the particular account numberexists.
5. Look at the case study from the previous chapter. Try rewriting some or all ofthe methods in that case study that made use of iteration so that they make use ofstream processing instead.
660 22 The Stream API

23Working with Sockets
Outcomes:
By the end of this chapter you should be able to:
• explain the terms client, server, host and port;• describe the client–server model;• explain the function of a socket;• distinguish between the Java Socket and ServerSocket classes and
explain their function;• write a simple client–server application using sockets;• write a server application that supports multiple clients;• write multi-threaded client–server applications;• create client and server applications that utilise a JavaFX interface.
23.1 Introduction
In this chapter we are going to explore the way in which Java can be used to writeprograms that communicate over a network. We should say from the outset thathere we are dealing only with communication over a local area network (LAN).Communication over wide networks, and in particular the Internet, involve issuesthat are beyond the scope of this text. In particular, communication over the Internetis now fraught with security issues, and we are not able to address such concernshere. In previous editions of this book, we covered applets, which are java programsthat run in a browser. We are no longer going to deal with applets as browsers haveby and large stopped supporting them because of the enormous security questionsthat they can pose.
© Springer Nature Switzerland AG 2019Q. Charatan and A. Kans, Java in Two Semesters, Texts in Computer Science,https://doi.org/10.1007/978-3-319-99420-8_23
661

Network programs rely very much on the concept of a client and a server.A server program provides some sort of service for other programs—clients—normally located on a different machine. The service it provides could be one ofmany things—it could send some files to the client; it could send web pages to theclient; it could read some data from the local machine and send that across, maybehaving done some processing first; it could perform a complex calculation; it couldprint some material on a local printer. The possibilities are endless.
It should be noted that the distinction between a client and server can becomeblurred: a program acting as a client in one situation could also act as a server inanother, and vice versa. It is also important to note that it is often the case that amachine, rather than a program, is referred to as a server. This usually happenswhen a machine is dedicated to running a particular server program—typically a fileserver—and does very little else. Strictly speaking we should refer to the machineon which a server runs as the host.
In general, communication between a client and a server could be over a localarea network, a wide area network, or over the Internet. Server programs that offer aservice via the Internet have to obey a particular set of rules or protocols to ensurethat the client and server are “speaking the same language”. Common examples areFile Transfer Protocol (FTP) for servers that send files, and Hypertext TransferProtocol (HTTP) for services that send web pages to a client.
However, as we have stated above, here we will be dealing here only with localarea networks which communicate by implementing sockets—special programsthat allow data to pass between two applications running on different computers.
23.2 Sockets
In Chap. 18 you were introduced to the idea of a stream—a channel of commu-nication between the computer’s main memory and some external device such as adisk (not to be confused with streams for processing collections, that we covered inChap. 22). In that chapter you were shown how Java provides high-level classesthat hide the programmer from the low-level details of how data is stored on a diskor other device. Just as the external storage of data is a complicated business, so toois the transmission of data across a network.
A socket is a software mechanism that is able to hide the programmer from thedetail of how data is actually transmitted, in a not dissimilar way to that in whichthe high-level file handling classes protect the programmer from the details ofexternal storage. Sockets were originally developed for the Unix™ operating sys-tem and they enabled the programmer to treat a network connection as just anotherstream to which data can be written, and from which it can be read. Sockets havesince been developed for other operating systems such as Windows™, and fortu-nately for Java.
662 23 Working with Sockets

In order to understand sockets it is also necessary to understand the concept of aport. A machine on a network is referred to by its IP (Internet Protocol) address.However, any particular host can perform a number of different functions, andtherefore needs to be able to distinguish between different types of request, such asemail requests, file transfer requests, requests for web pages and so on. This isaccomplished by assigning each type of request a special number known as a port.Many port numbers are now internationally recognized, and so all computers willagree on their meaning. For example, a request on port 80 will always be expectedto be an HTTP request; port 21 is for FTP (File Transfer Protocol) requests. A clientprogram can therefore assume that server programs will be using these ports forthose particular services.
All sockets must be capable of doing the following:
• connect to a remote machine;• send data;• receive data;• close a connection.
A socket which is to be used for a server must additionally be able to:
• bind to a port (that is to associate the server with a port number);• listen for incoming data;• accept connections from a remote server on the bound port.
The Java Socket class has methods that correspond to the first four of theabove; the ServerSocket class provides methods for the last three.
23.3 A Simple Server Application
The server we are going to build is going to offer a very simple service to a client; itwill wait to receive two integers, and then it will send back the sum of those twointegers. Clearly this would not in reality be a very useful server—a real-worldserver would be offering a far more complex service—perhaps performing somevery complicated processing, or retrieving data from a database running on the samemachine, or maybe printing on a printer local to the server. However, our simpleaddition server demonstrates the principles of a client–server protocol very nicely.
A program such as this would typically be launched from a command line, orperhaps launched as a service on startup—many services run in the background,and it is often the case that the user has little awareness of their existence. In orderto monitor the behaviour of our server we have organised it so that it reports itsbehaviour to a console.
The AdditionServer class is presented below—have a look at it and thenwe’ll take you through it.
23.2 Sockets 663
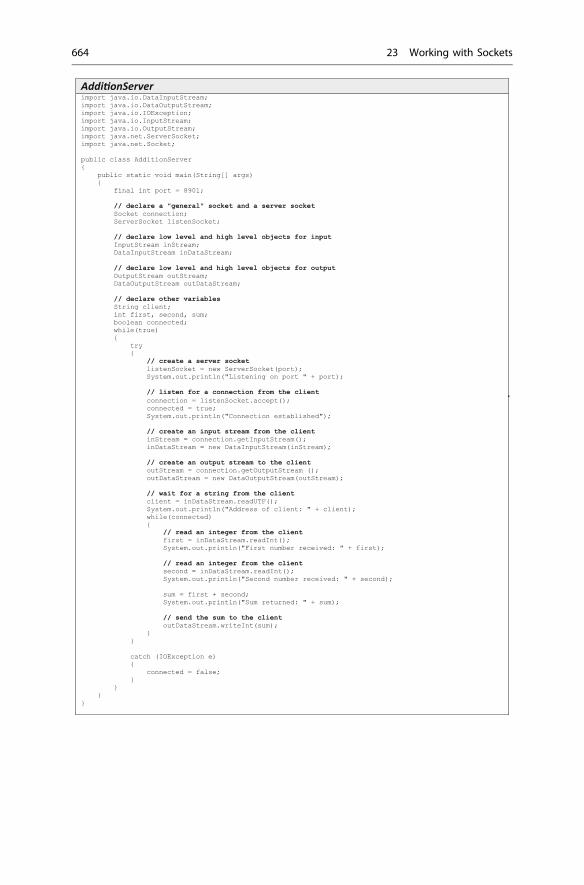
Addi onServerimport java.io.DataInputStream;import java.io.DataOutputStream;import java.io.IOException;import java.io.InputStream;import java.io.OutputStream;import java.net.ServerSocket;import java.net.Socket;
public class AdditionServer{
public static void main(String[] args){
final int port = 8901;
// declare a "general" socket and a server socketSocket connection;ServerSocket listenSocket;
// declare low level and high level objects for inputInputStream inStream;DataInputStream inDataStream;
// declare low level and high level objects for outputOutputStream outStream;DataOutputStream outDataStream;
// declare other variablesString client;int first, second, sum;boolean connected;while(true){
try{
// create a server socketlistenSocket = new ServerSocket(port);System.out.println("Listening on port " + port);
// listen for a connection from the clientconnection = listenSocket.accept();connected = true;System.out.println("Connection established");
// create an input stream from the clientinStream = connection.getInputStream();inDataStream = new DataInputStream(inStream);
// create an output stream to the clientoutStream = connection.getOutputStream ();outDataStream = new DataOutputStream(outStream);
// wait for a string from the clientclient = inDataStream.readUTF();System.out.println("Address of client: " + client);while(connected){
// read an integer from the clientfirst = inDataStream.readInt();System.out.println("First number received: " + first);
// read an integer from the clientsecond = inDataStream.readInt();System.out.println("Second number received: " + second);
sum = first + second;System.out.println("Sum returned: " + sum);
// send the sum to the clientoutDataStream.writeInt(sum);
} }
catch (IOException e){
connected = false;}
}}
}
664 23 Working with Sockets

For convenience we have hard-coded the port number (8901) into the programand have declared a constant for this purpose; the client will need to be made awareof this port number.
Having declared this constant, we have gone on to declare a number of variables:
The first two variables are, respectively, a Socket and a ServerSocket. Asthis is a server application it requires both the general functionality of the Socketclass and the specialist functionality of the ServerSocket class.
Next we declare the objects that we will need to establish an input stream withthe client. We have come across the classes InputStream and DataInput-Stream before, in Chap. 18. The former allows communication at a low level inthe form of bytes; the latter allows the high-level communication in the form ofstrings, integers, characters and so on with which we are familiar.
After this we declare objects of OutputStream and DataOutputStreamthat we will need to establish the output stream. Finally we make some otherdeclarations that we will need later on.
Now we start an infinite loop. The idea is that the server will accept a connectionrequest from a client, and when that client is finished making requests it will beready to receive connections from other clients; this will continue until the server isterminated. If the server was called from the command line, then closing theconsole window will terminate it—if you are working in an IDE, you will have toterminate the process via the IDE interface when you no longer require it.
From now everything is placed in a try block because the constructor of theServerSocket class, and its accept method both throw IOExceptions.
The first instruction in the try block looks like this:
We are creating a new ServerSocket object and binding it to a particularport.
In order to get the server to listen for a client requesting a connection on thatport, we call the accept method of the ServerSocket class; we also place amessage in the console to tell us that the server is listening for a request:
Socket connection;ServerSocket listenSocket;
InputStream inStream;DataInputStream inDataStream;
OutputStream outStream;DataOutputStream outDataStream;
String client;int first, second, sum;boolean connected;
listenSocket = new ServerSocket(port);
23.3 A Simple Server Application 665

The accept method returns an object of the Socket class, which we assign tothe connection variable that we declared earlier.
Once the connection is established we set the boolean variable, connected,to true and display a message:
The next thing we do is call the getInputStream method of the Socketobject, connection. This returns an object of the InputStream class, thusproviding a stream from client to server. We then wrap this low-level Input-Stream object with a high-level DataInputStream object, in the same wayas we did when handling files in Chap. 18:
We then create an output stream in the same way:
As you will see shortly, we have designed our client to send its IP address to theserver once it is connected. So our next instructions to the server are to wait toreceive a string on the input stream, and then to display a message on the console.
Once a connection has been established we want the server to perform theaddition calculation for the client as many times as the client requires. Thus weprovide a while loop that continues until the connection is lost:
System.out.println("Listening on port " + port);connection = listenSocket.accept();
connected = true;System.out.println("Connection established");
inStream = connection.getInputStream();inDataStream = new DataInputStream(inStream);
OutputStream outStream;DataOutputStream outDataStream;
client = inDataStream.readUTF();System.out.println("Address of client: " + client);
666 23 Working with Sockets

You can see that we read two integers from the input stream, displaying themeach time on the console. We then calculate and display the sum, which we sendback to the client on the output stream.
The accept method of ServerSocket throws an IOException when theconnection is lost. Therefore we have coded the catch block so that the connectedvariable that controls the inner while loop is set to false, so that when the clientcloses the connection the server will no longer expect to receive integers, but willreturn to the top of the outer while loop, and wait for another connection request:
In a moment we will show you how to create a client program that requests a
service from our server. But before we do that, take a look at Fig. 23.1, whichshows the result of a typical session from the point of view of the server, running in
while(connected){
// read an integer from the clientfirst = inDataStream.readInt();System.out.println("First number received: " + first);
// read an integer from the clientsecond = inDataStream.readInt();System.out.println("Second number received: " + second);
sum = first + second;System.out.println("Sum returned: " + sum);
// send the sum to the clientoutDataStream.writeInt(sum);
}
catch (IOException e){
connected = false;}
Fig. 23.1 A typical session for the addition server
23.3 A Simple Server Application 667

a console. The server listens on port 8901; a client connects, requests two calcu-lations and ends the session; the server waits for another connection; another clientconnects, requests one calculation and then ends the session, and the server onceagain waits for another client to connect.
23.4 A Simple Client Application
The client application will utilize a JavaFX interface as shown in Fig. 23.2.Figure 23.2 should give you an idea of how the operation of the client will work.
Once the address and port number of the remote host are known, the connection isestablished. Then the user is free to enter numbers and press the button to send thesenumbers to the server and display the result. The middle text box is used to displaymessages regarding the connection.
Fig. 23.2 The addition client
668 23 Working with Sockets

Here is the code for the AdditionClient:
Addi onClientimport java.io.InputStream;import java.io.DataInputStream;import java.io.OutputStream;import java.io.DataOutputStream;import java.io.IOException;import java.net.Socket;import java.net.UnknownHostException;import java.util.Optional;import javafx.application.Application;import javafx.geometry.Pos;import javafx.scene.Scene;import javafx.scene.control.Button;import javafx.scene.control.Label;import javafx.scene.control.TextField;import javafx.scene.control.TextInputDialog;import javafx.scene.layout.HBox;import javafx.scene.layout.VBox;import javafx.stage.Stage;
public class AdditionClient extends Application{
private String remoteHost;private int port;
// declare low level and high level objects for inputprivate InputStream inStream;private DataInputStream inDataStream;
// declare low level and high level objects for outputprivate OutputStream outStream ;private DataOutputStream outDataStream;
// declare a socketprivate Socket connection;
@Overridepublic void start(Stage stage){
getInfo(); // call the method that gets the information about the server
// declare visual components TextField msg = new TextField();
TextField firstNumber = new TextField();Label plus = new Label("+");TextField secondNumber = new TextField();
Label equals = new Label("=");Label sum = new Label();
Button calculateButton = new Button("Press to see the sum of the two numbers");
// configure the scenemsg.setMaxWidth(150);firstNumber.setMaxWidth(30);secondNumber.setMaxWidth(30);
HBox hBox = new HBox(10);hBox.setAlignment(Pos.CENTER);hBox.getChildren().addAll(firstNumber, plus, secondNumber, equals, sum);VBox root = new VBox(10);
root.setAlignment(Pos.CENTER);root.getChildren().addAll(hBox, msg, calculateButton);
Scene scene = new Scene(root, 400, 300);stage.setScene(scene);stage.setTitle("Addition Client");
// show the stagestage.show();
try{
23.4 A Simple Client Application 669

We have declared a number of attributes, the first of which will hold values forthe address of the remote host and the port number, and the remaining attributes areconcerned with input and output streams, and the socket:
// attempt to create a connection to the serverconnection = new Socket(remoteHost, port);msg.setText("Connection established");
// create an input stream from the serverinStream = connection.getInputStream();inDataStream = new DataInputStream(inStream);
// create an output stream to the serveroutStream = connection.getOutputStream();outDataStream = new DataOutputStream(outStream);
// send the host IP to the serveroutDataStream.writeUTF(connection.getLocalAddress().getHostAddress());
}
catch (UnknownHostException e){
msg.setText("Unknown host");}
catch (IOException ie){
msg.setText("Network Exception");}
// specifiy the behaviour of the calculate buttoncalculateButton.setOnAction(e ->
{try{
// send the two integers to the server outDataStream.writeInt(Integer.parseInt(firstNumber.getText()));outDataStream.writeInt(Integer.parseInt(secondNumber.getText()));
// read and display the result sent back from the serverint result = inDataStream.readInt();sum.setText("" + result);
} catch(IOException ie){}
} );
}
private void getInfo(){
Optional<String> response;
// use the TextInputDialog class to allow the user to enter the host addressTextInputDialog addressDialog = new TextInputDialog();addressDialog.setHeaderText("Enter remote host");addressDialog.setTitle("Addition Client");
response = addressDialog.showAndWait();remoteHost = response.get();
// use the TextInputDialog class to allow the user to enter port numberTextInputDialog portDialog = new TextInputDialog();portDialog.setHeaderText("Enter port number");portDialog.setTitle("Addition Client");
response = portDialog.showAndWait();port = Integer.valueOf(response.get());
}
public static void main(String[] args){
launch(args);}
}
670 23 Working with Sockets

The first thing that we do inside the start method is to call a helper methodgetInfo. This will prompt the user to enter the address of the host machine onwhich the server is running, and the port number; the user of course must be awareof this information in order for the client to make the connection. So let’s begin bybriefly looking at the getInfo method:
Here we are using the TextInput Dialog class that we introduced inChap. 17 to get the host address and then to get the port number, as shown inFig. 23.3.
private String remoteHost;private int port;
private InputStream inStream;private DataInputStream inDataStream;
private OutputStream outStream ;private DataOutputStream outDataStream;
private Socket connection;
private void getInfo(){
Optional<String> response;
// use the TextInputDialog class to allow the user to enter the host addressTextInputDialog addressDialog = new TextInputDialog();addressDialog.setHeaderText("Enter remote host");addressDialog.setTitle("Addition Client");
response = addressDialog.showAndWait();remoteHost = response.get();
// use the TextInputDialog class to allow the user to enter port numberTextInputDialog portDialog = new TextInputDialog();portDialog.setHeaderText("Enter port number");portDialog.setTitle("Addition Client");
response = portDialog.showAndWait();port = Integer.valueOf(response.get());
}
Fig. 23.3 Getting the remote host and port number from the user
23.4 A Simple Client Application 671

Having called getInfo we go on to declare and configure the visual elements.Once we have shown the stage, we attempt to make the connection:
The code must be placed within a try block. This is necessary because theconstructor of the Socket class potentially throws two exceptions. As you can seeit is called with two arguments, the name or IP address of the host machine (aString) and the port number (an int).
Creating a new Socket in this way transmits a message requesting a responsefrom the remote machine specified, listening on the port in question. If the con-nection is established, and no exception is therefore thrown, the constructor goes onto display the message “Connection established” in the message area, and then toinitialize the input and output streams. It finishes with this instruction:
You will recall that we programmed the server so that the first thing it did afterthe connection was established was to wait for a string from the client. Here you cansee how the client sends its address to the server on the output stream. It calls thegetLocalAddress method of the Socket class. This returns an object of theInetAddress class. The InetAddress class holds a representation of an IPaddress and enables us to obtain the host name, or the IP address (as a String),with the methods getHostName and getHostAddress respectively.
try{
// attempt to create a connection to the serverconnection = new Socket(remoteHost, port);msg.setText("Connection established");
// create an input stream from the serverinStream = connection.getInputStream();inDataStream = new DataInputStream(inStream);
// create an output stream to the serveroutStream = connection.getOutputStream();outDataStream = new DataOutputStream(outStream);
// send the host IP to the serveroutDataStream.writeUTF(connection.getLocalAddress().getHostAddress());
}
catch(UnknownHostException e){
msg.setText("Unknown host");}
catch(IOException ie){
msg.setText("Network Exception");}
outDataStream.writeUTF(connection.getLocalAddress().getHostAddress());
672 23 Working with Sockets

Now we have to catch the exceptions that can be thrown by the constructor. Asyou can see there are two catch blocks. The first handles anUnknownHostException which will be thrown if the host we are trying toconnect to is unknown. As you can see from the code, an appropriate message isplaced in the message area.
If there is another network error (perhaps no server is running on the specifiedhost), then an IOException is thrown and the message “Network Exception” isdisplayed.
Finally we need to provide the code that determines what happens when wepress the button that gets the server to perform the addition for us:
This is pretty straightforward: we send the two numbers to the server and readthe response. We enclose everything in a try…catch block so that the excep-tions thrown by the readInt and writeInt methods are handled.
The socket example here is clearly rather elementary. Java provides a very widerange of possibilities for communication via sockets, for example secure socketsand sockets for multicasting. This is beyond the scope of this book, but it is hopedthat we have given you a flavour for what is available so that those of you who wantto develop your skills in this area are able to move forward. To help you do that weare going to provide two more examples. Firstly we will show you how to extendour addition server so that it accepts multiple clients at the same time. Secondly weare going to develop a rather more complex example, namely a chat application.
23.5 Connections from Multiple Clients
In our previous example the server could accept connections from only one client ata time; it wasn’t able to listen for other connections until the first connection haddisconnected. If we want the server to accept multiple connections at the same time,then each connection has to run in its own thread.
calculateButton.setOnAction(e ->{
try{
// send the two integers to the server outDataStream.writeInt(Integer.parseInt(firstNumber.getText()));outDataStream.writeInt(Integer.parseInt(secondNumber.getText()));
// read and display the result sent back from the serverint result = inDataStream.readInt();sum.setText("" + result);
} catch(IOException ie){}
} );
23.4 A Simple Client Application 673

We are going to create a class that extends Thread which we will callAdditionServerThread. But in order to understand the logic, let’s first lookat the new version of the addition server (AdditionServerMultiple) whichis going to use this class:
The logic is quite straightforward. Once the new ServerSocket is created weenter an infinite loop that continuously listens for connections. Once a connection ismade, a new thread is created and started; a reference to the socket is sent as anargument. In this way, the server is able to support multiple connections on thesame port.
Now we can think about the AdditionServerThread class. All the func-tionality that we previously saw in the AdditionServer will be placed in therun method of this class. There will also be one extra feature: each client thatconnects will generate its own id, an integer based on the number of connectionsthat have been made so far. The server will be able to report in the console whichclient is making a particular request for an addition calculation. To illustrate this, asample session is shown in Fig. 23.4.
Addi onServerMul pleimport java.io.IOException;import java.net.ServerSocket;import java.net.Socket;
public class AdditionServerMultiple{
public static void main(String[] args){
final int port = 8901;AdditionServerThread thread;Socket socket;
System.out.println("Listening for connections on port: " + port);try{
ServerSocket listenSocket = new ServerSocket(port);
while(true) // continuously listen for connections{
socket = listenSocket.accept();thread = new AdditionServerThread(socket);thread.start();
} }
catch(IOException e){}
} }
674 23 Working with Sockets

So let’s take a look at the AdditionServerThread class:
Fig. 23.4 The addition server making connections with multiple clients and responding torequests
Addi onServerThreadimport java.io.DataInputStream;import java.io.DataOutputStream;import java.io.IOException;import java.io.InputStream;import java.io.OutputStream;import java.net.Socket;
public class AdditionServerThread extends Thread{
private int id;private static int totalConnections;private final int port = 8901;
// declare a "general" socket private final Socket connection;
// declare low level and high level objects for inputprivate InputStream inStream;private DataInputStream inDataStream;
// declare low level and high level objects for outputprivate OutputStream outStream;DataOutputStream outDataStream;
// declare other variablesprivate String client;private int first, second, sum;private boolean connected;
public AdditionServerThread(Socket socketIn){
connection = socketIn;}
@Overridepublic void run(){
try{
connected = true;System.out.println("Connection established");
23.5 Connections from Multiple Clients 675

As we have said, the functionality now resides in the run method. There isnothing very new here, except for the fact that an id is assigned to the new con-nection, and this value is reported whenever this thread requests a calculation. Youwill see that a static attribute, totalConnections, has been declared, andwithin the run method this attribute is incremented each time a new connection ismade. The current value is then assigned to the id of this connection.
You should also note that the socket on which the client is connected is receivedas a parameter and assigned in the constructor.
23.6 A Client–Server Chat Application
The final application that we are going to develop is a chat application. Figure 23.5shows the sort of thing we are talking about.
The first thing to point out is that the only difference between the client and theserver is the fact that initially the server waits for the client to initiate a connection—once the connection is established the behaviour is the same.
totalConnections++; // increase the total number of connectionsid = totalConnections; // assign an id
// create an input stream from the clientinStream = connection.getInputStream();inDataStream = new DataInputStream(inStream);
// create an output stream to the clientoutStream = connection.getOutputStream ();outDataStream = new DataOutputStream(outStream);
// wait for a string from the clientclient = inDataStream.readUTF();System.out.println("Address of client: " + client);
while(connected){
// read an integer from the clientfirst = inDataStream.readInt();System.out.println("First number received from connection " + id + ": " + first);
// read an integer from the clientsecond = inDataStream.readInt();System.out.println("Second number received from connection " + id + ": " + second);
sum = first + second;System.out.println("Sum returned to connection " + id + ": " + sum);
// send the sum to the clientoutDataStream.writeInt(sum);
} }
catch(IOException e){
connected = false;}
}}
676 23 Working with Sockets

Both the client and the server have to be able to listen for connections, and at thesame time be capable of sending messages entered by the user. They will thereforeneed to be multi-threaded. The main thread will allow the user to enter messageswhich it will send to the remote program. The other thread will listen for messagesfrom the remote application and display them in the text area.
When the thread is created it will need to receive a reference to the text areawhere the messages are to be displayed, and a reference to the socket connection. Itwill need to create an input stream which must be associated with this connection.We will be building JavaFX applications, so the threads will require the creation ofTasks. The call method of each task will be written so that the thread contin-uously waits for messages on the input stream and then displays them in the textarea. Both the client and the server classes will need to create an object of thisthread and start the thread running.
We have designed our application so that rather than having a button that has tobe pressed, the message is sent and echoed in the text area when the <Enter> key ispressed. As you will see in a moment, in order to achieve this the class must providecode for the setOnKeyReleased method of TextField. This method willcheck whether the <Enter> key was pressed.
We’ll begin by looking at the code for the server:
Fig. 23.5 A client–server chat application
ChatServerimport java.io.DataOutputStream;import java.io.IOException;import java.io.OutputStream;
23.6 A Client–Server Chat Application 677

import java.net.ServerSocket;import java.net.Socket;import java.util.Optional;import javafx.application.Application;import javafx.geometry.Pos;import javafx.scene.Scene;import javafx.scene.control.Alert;import javafx.scene.control.Alert.AlertType;import javafx.scene.control.TextArea;import javafx.scene.control.TextField;import javafx.scene.control.TextInputDialog;import javafx.scene.layout.VBox;import javafx.stage.Stage;
public class ChatServer extends Application{
// declare and initialise the text display areaprivate TextArea textWindow = new TextArea();
private OutputStream outStream; // for low level outputprivate DataOutputStream outDataStream; // for high level output
private ListenerTask listener; // required for the server thread
private final int port = 8901;private String name;
@Overridepublic void start(Stage stage){
getInfo(); // call method that gets user namestartServerThread(); // start the sever thread
TextField inputWindow = new TextField();
// configure the behaviour of the input windowinputWindow.setOnKeyReleased(e ->
{String text;
if(e.getCode().getName().equals("Enter")) // if the <Enter> key was pressed{
text = "<" + name + "> " + inputWindow.getText() + "\n";textWindow.appendText(text); // echo the textinputWindow.setText(""); // clear the input window
try{
outDataStream.writeUTF(text); // transmit the text}
catch(IOException ie){}
} }
);
// configure the visual componentstextWindow.setEditable(false);textWindow.setWrapText(true);VBox root = new VBox();root.setAlignment(Pos.CENTER);root.getChildren().addAll(textWindow, inputWindow);Scene scene = new Scene(root, 500, 300); stage.setScene(scene);stage.setTitle(name);stage.show();
}
private void startServerThread(){
Socket connection; // declare a "general" socketServerSocket listenSocket; // declare a server socket
try
678 23 Working with Sockets

We start by declaring the attributes:
{// create a server socketlistenSocket = new ServerSocket(port);
// listen for a connection from the clientconnection = listenSocket.accept();
// create an output stream to the connectionoutStream = connection.getOutputStream ();outDataStream = new DataOutputStream(outStream );
// create a thread to listen for messageslistener = new ListenerTask(textWindow, connection);
Thread thread = new Thread(listener);thread.start(); // start the thread
}catch (IOException e) {
textWindow.setText("An error has occured");}
}
// method to get information from userprivate void getInfo(){
Optional<String> response;
// get user nameTextInputDialog textDialog = new TextInputDialog();textDialog.setHeaderText("Enter user name");textDialog.setTitle("Chat Server");response = textDialog.showAndWait();name = response.get();
// provide information to the user before starting the server threadAlert alert = new Alert(AlertType.INFORMATION);alert.setTitle("Chat Server");alert.setHeaderText
("Press OK to start server. The dialogue window will appear when a client connects.");alert.showAndWait();
}
@Overridepublic void stop()
{ System.exit(0); // terminate application when the window is closed
}
public static void main(String[] args) {
launch(args); }
}
private TextArea textWindow = new TextArea();
private OutputStream outStream; private DataOutputStream outDataStream;
private ListenerTask listener;
private final int port = 8901;private String name;
23.6 A Client–Server Chat Application 679

We have declared and initialised a TextArea object, which is where themessages will be displayed. This needs to be an attribute of the class because it willlater be passed to the task that listens for and displays the client messages.
Next we have declared a variable of type ListenerTask. This is the task thatis required for the thread that listens for messages from the remote application, inthis case the client; as you will see later the client will also make use of this class inorder that it can receive messages from the server. You will see the code for theListenerTask in a moment.
Next we declare a constant for the port number, which, for convenience, we havehard-coded, and finally we have declared a variable to hold the user name.
Now for the start method. We begin by calling a helper method, getInfo,which will prompt the user to enter a chat name; this uses the TextInputDialogclass in the same way as you saw in the addition server example. Once the name isentered, we go on to create an information alert, in the way that we explained inChap. 17:
This causes the following dialogue to appear (Fig. 23.6).Once the user has acknowledged the message by pressing the OK button, a
helper method, startServerThead is called. As we shall see in a moment, thismethod begins by waiting for a connection, and for this reason it is important thatwe call this method before showing the scene graphic. In a JavaFX application,once the stage is shown, any routine that effectively runs in the background shouldbe placed in a separate thread. To avoid having to create an additional thread forthis purpose we have waited for the connection to be established before creating andshowing the scene graphic.
Alert alert = new Alert(AlertType.INFORMATION);alert.setTitle("Chat Server");alert.setHeaderText ("Press OK to start server. The dialogue window will appear when a client connects.");
Fig. 23.6 An information alert for the chat server
680 23 Working with Sockets

So let’s now take a closer look at the startServerThread method.There is nothing here that is particularly new—you have already seen how we
create a server socket and listen for a connection; and you have seen how weassociate a data stream with that connection. Notice, however, the last three lines ofthe try block. Here we create an instance of ListenerTask, which we need inorder to create the thread that will listen for remote messages. Notice that we send areference to the text window and a reference to the connection. We then go on tocreate and start the thread.
Once the client has connected, the application goes on to deal with declaring andconfiguring the visual components before finally showing the scene graphic. Weshould draw your attention to the code for specifying the behaviour of the inputwindow when the user types a message:
Each time a key is pressed and then released we check whether the key releasedwas the <Enter> key by invoking the getCode method of KeyEvent. Thisreturns a KeyCode object; the name of the key is then retrieved using the
private void startServerThread(){
Socket connection;ServerSocket listenSocket;
try{
listenSocket = new ServerSocket(port);connection = listenSocket.accept();
outStream = connection.getOutputStream ();outDataStream = new DataOutputStream(outStream );
listener = new ListenerTask(textWindow, connection);
Thread thread = new Thread(listener);thread.start();
}
catch (IOException e){
textWindow.setText("An error has occured");}
}
inputWindow.setOnKeyReleased(e ->{
String text;
if(e.getCode().getName().equals("Enter")){
text = "<" + name + "> " + inputWindow.getText() + "\n";textWindow.appendText(text);inputWindow.setText("");
try{
outDataStream.writeUTF(text);}
catch(IOException ie){}
} }
);
23.6 A Client–Server Chat Application 681

getName method of KeyCode. If the key pressed was the <Enter> key then astring is created from the user name (in angle brackets) plus the text entered,followed by a newline character (‘\n’). This string is then appended to the text area,and the input window is blanked, ready for more input. As well as echoing theuser’s message on the server screen it must, of course be transmitted to the clientvia the output stream.
We want the program to terminate when the window is closed, and in this casewe have done this by implementing the stop method of the JavaFX application:
The instruction System.exit(0) will terminate the system normally.Now let’s look at the code for the ListenerTask class, which forms the basis
of the thread that handles messages from the remote user:
public void stop(){
System.exit(0);}
ListenerTaskimport java.io.DataInputStream;import java.io.IOException;import java.io.InputStream;import java.net.Socket;import javafx.concurrent.Task;import javafx.scene.control.TextArea;
public class ListenerTask extends Task{
private InputStream inputStream; // for low level inputprivate DataInputStream dataInputStream; // for high level inputprivate TextArea window; // a reference to the text area where the message will be displayedprivate Socket connection; // a reference to the connection
// constructor receives references to the text area and the connectionpublic ListenerTask(TextArea windowIn, Socket connectionIn){
window = windowIn;connection = connectionIn;
try{
// create an input stream from the remote machineinputStream = connection.getInputStream(); dataInputStream = new DataInputStream(inputStream);
}
catch(IOException e){ }
}
@Overrideprotected Void call() {
String msg;while(true){
try{
msg = dataInputStream.readUTF(); // read the incoming messagewindow.appendText(msg); // display the message
}
catch(IOException e){ }
} }
}
682 23 Working with Sockets

As you can see, the attribute declarations include references to the objects thatwill be needed for the input stream, as well as a reference to a TextArea and aSocket. The constructor receives a TextArea object and a Socket object, andthese are assigned to the relevant attributes. A ListenerTask object willtherefore have access to the text window and the connection associated with theparent object. The constructor then goes on to establish the input stream:
Now the call method:
You can see that once the corresponding thread is started, an infinite loop isimplemented so that it continuously reads messages from the data stream, and thendisplays the message in the text area associated with the server or client programthat created the thread.
public ListenerTask(TextArea windowIn, Socket connectionIn){
window = windowIn;connection = connectionIn;
try{
inputStream = connection.getInputStream(); dataInputStream = new DataInputStream(inputStream);
}
catch(IOException e){}
}
protected Void call() {
String msg;while(true){
try{
msg = dataInputStream.readUTF(); window.appendText(msg);
}
catch(IOException e){ }
} }
23.6 A Client–Server Chat Application 683

Now we can look at the client application:
ChatClient
import java.io.DataOutputStream;import java.io.IOException;import java.io.OutputStream;import java.net.Socket;import java.net.UnknownHostException;import java.util.Optional;import javafx.application.Application;import javafx.geometry.Pos;import javafx.scene.Scene;import javafx.scene.control.TextField;import javafx.scene.control.TextArea;import javafx.scene.control.TextInputDialog;import javafx.scene.layout.VBox;import javafx.stage.Stage;
public class ChatClient extends Application{
// declare and initialize the text display areaprivate TextArea textWindow = new TextArea();
private OutputStream outStream; // for low level outputprivate DataOutputStream outDataStream; // for high level output
private ListenerTask listener; // required for the cleint thread
private int port; // to hold the port number of the serverprivate String remoteMachine; // to hold the name chosen by the user
private String name;
@Overridepublic void start(Stage stage){
getInfo(); // call method that gets user name and server detailsstartClientThread(); // start the client thread
TextField inputWindow = new TextField();
// configure the behaviour of the input windowinputWindow.setOnKeyReleased(e ->
{String text;
if(e.getCode().getName().equals("Enter")) // if the <Enter> key was pressed{
text = "<" + name + "> " + inputWindow.getText() + "\n";textWindow.appendText(text); // echo the textinputWindow.setText(""); // clear the input window
try{
outDataStream.writeUTF(text); // transmit the text} catch(IOException ie){}
} }
);
// configure the visual componentstextWindow.setWrapText(true);textWindow.setEditable(false);VBox root = new VBox();root.setAlignment(Pos.CENTER);root.getChildren().addAll(textWindow, inputWindow);Scene scene = new Scene(root, 500, 300);stage.setScene(scene);stage.setTitle(name);stage.show();
684 23 Working with Sockets

As you can see there is not a great deal of difference between the client and theserver. The only significant differences are:
• The client needs to know the address of the host that is running the server, sothere is an additional attribute, a string, to hold this address; the port attributeis not assigned a value when it is declared, but instead is given a value by the
}
private void startClientThread(){
Socket connection; // declare a "general" socket
try{
// create a connection to the serverconnection = new Socket(remoteMachine, port);
// create output stream to the connectionoutStream = connection.getOutputStream();outDataStream = new DataOutputStream (outStream);
// create a thread to listen for messageslistener = new ListenerTask(textWindow, connection);Thread thread = new Thread(listener);thread.start(); // start the thread
}
catch(UnknownHostException e){
textWindow.setText("Unknown host");}
catch (IOException e){
textWindow.setText("An error has occured");}
}
// method to get information from user private void getInfo(){
Optional<String> response;
// get address of host TextInputDialog textDialog1 = new TextInputDialog();textDialog1.setHeaderText("Enter remote host");textDialog1.setTitle("Chat Client");response = textDialog1.showAndWait();remoteMachine = response.get();
// get port numberTextInputDialog textDialog2 = new TextInputDialog();textDialog2.setHeaderText("Enter port number");textDialog2.setTitle("Chat Client");response = textDialog2.showAndWait();port = Integer.valueOf(response.get());
// get user nameTextInputDialog textDialog3 = new TextInputDialog();textDialog3.setHeaderText("Enter user name");textDialog3.setTitle("Chat Client");response = textDialog3.showAndWait();name = response.get();
}
@Overridepublic void stop() {
System.exit(0); // terminate application when the window is closed }
public static void main(String[] args){
launch(args);}
}
23.6 A Client–Server Chat Application 685

user. Thus, in addition to asking the user to choose a name, the getInfomethod now also requests information about the host machine and the portnumber on which the server is listening.
• In the startClientThread method there is no need for a Server-Socket; instead the socket is created by establishing the connection with theremote machine:
You are now in a position to test out our chat application—you will need to knowthe name or local IP address of the machine running the server. If you don’t haveaccess to two machines, then you can run both programs on the same machine—although this rather takes away the point! In the end of chapter exercises you aregiven some help with how to do this.
23.7 Self-test Questions
1. Explain what is meant by each of the following terms:
(a) client;(b) server;(c) host;(d) port;(e) socket.
2. Explain the principles of client–server architecture, and describe how this isimplemented in Java.
3. Which functions are provided by the Java Socket class?
4. Which additional functions are provided by the Java ServerSocket class?
23.8 Programming Exercises
1. Implement the AdditionServer and AdditionClient programs fromthis chapter. If you have more than one computer running on the same networkyou can run these programs on different machines. The client will need to besupplied with either the name or the local IP address of the host machine.
connection = new Socket(remoteMachine, port);
686 23 Working with Sockets

If both client and server are running on the same machine, you can use “lo-calhost” as the name, or you can use the IP address 127.0.0.1, which referencesthe local machine.
2. Implement the version of the addition server that accepts multiple clients, andtest this out by connecting a number of clients. These can be on the samemachine as the server, on remote machines, or a combination.
3. Implement and test out the chat application from this chapter. Again you can runboth client and server on the same machine, but it is, of course, more fun to runthem from different computers. Just a note, that if you are running them on thesame machine, the applications will appear on top of one another, so you willneed to move one out of the way to see the other one.
4. Write a server application that tells jokes to the client, and lets the clientrespond. A good example would be a classic “Knock Knock” joke. The clientwould receive the message “Knock Knock” from the server, and would beexpected to reply “Who’s there?” and so on.You might be able to think of variations to this program. You could adapt it, forexample, so that the a different joke is told each time a client connects (that is, ifyou actually know that many “Knock Knock” jokes!). Or perhaps a series ofjokes could be told. You might also want to try allowing multiple clients toconnect.
5 Try to devise a two- (or even more) player game that could be played across anetwork. An example might be noughts-and-crosses. The best approach wouldbe to create a server that can deal with multiple connections—take a look atSect. 23.5 to help with ideas for implementation.
23.8 Programming Exercises 687

24Java in Context
Objectives:
By the end of this chapter you should be able to:
• provide a brief history of the development of the Java language;• identify the potential problems with pointers, multiple inheritance and aliases;• develop clone methods and copy constructors to avoid the problem of aliases;• identify immutable objects;• explain the benefits of Java’s garbage collector.
24.1 Introduction
Originally named Oak, Java was developed in 1991 by Sun Microsystems. The Javatechnology was later acquired by OracleTM. Originally, the intention was to useJava to program consumer devices such as video recorders, mobile phones andtelevisions. The expectation was that these devices would soon need to commu-nicate with each other. As it turned out, however, this concept didn’t take off untillater. Instead, it was the growth of the Internet through the World Wide Web thatwas to be the real launch pad for the language.
The Java technology was acquired by OracleTM in 2010, but the originalmotivation behind its development explains many of its characteristics. In partic-ular, the size and reliability of the language became very important.
© Springer Nature Switzerland AG 2019Q. Charatan and A. Kans, Java in Two Semesters, Texts in Computer Science,https://doi.org/10.1007/978-3-319-99420-8_24
689

24.2 Language Size
Generally, the processor power of a system controlling a consumer device is verysmall compared with that of a PC; so the language used to develop such systemsshould be fairly compact. Consequently, the Java language is relatively small andcompact when compared with other traditional languages. At the time Java wasbeing developed, C++ was a very popular programming language. For this reasonthe developers of Java decided to stick to conventional C++ syntax as much aspossible. Consequently Java syntax is very similar to C++ syntax.
Just because the Java language is relatively small, however, does not mean that itis not as powerful as some other languages. Instead, the Java developers werecareful to remove certain language features that they felt led to common programerrors. These include the ability for a programmer to create pointers and the abilityfor a programmer to develop multiple inheritance hierarchies.
24.2.1 Pointers
A pointer, in programming terms, is a variable containing an address in memory. Ofcourse Java programmers can do something very similar to this—they can createreferences. Figure 24.1 repeats an example we showed you in Chap. 7.
In Fig. 24.1, the variable myOblong contains a reference (address in memory)of an Oblong object. The difference between a reference and a pointer is that theprogrammer does not have control over which address in memory is used—thesystem takes care of this. Of course, internally, the system creates a pointer andcontrols its location. In a language like C++ the programmer can directly
Oblong myOblong;
myOblong = new Oblong(7.5, 12.5);
Computer Memory Java Instructions
myOblong(location of
object is stored here)
This is the space for the new
Oblong object
Fig. 24.1 An object variable in Java contains a reference to the object data
690 24 Java in Context

manipulate this pointer (move it along and back in memory). This was seen asgiving the programmer greater control. However, if this ability is abused, criticalareas of memory can easily be corrupted. For this reason the Java languagedevelopers did not allow users to manipulate pointers directly.
24.2.2 Multiple Inheritance
Inheritance is an important feature of object-oriented languages. Manyobject-oriented languages, such as C++ and Eiffel, allow an extended form ofinheritance known as multiple inheritance. When programming in Java, a classcan only ever inherit from at most one superclass. Multiple inheritance allows aclass to inherit from more than one superclass (see Figs. 24.2 and 24.3).
Fig. 24.2 Singleinheritance
Fig. 24.3 Multipleinheritance
24.2 Language Size 691

As discussed in Chap. 13, multiple inheritance can lead to a variety of problems.The Java developers decided not to allow multiple inheritance for two reasons:
• it is very rarely required;• it can lead to very complicated inheritance trees, which in turn lead to pro-
gramming errors.
As an example of multiple inheritance, consider a football club with variousemployees. Figure 24.4 illustrates an inheritance structure that might be arrived at.
Here, a PlayerManager inherits from both Player and Manager, both ofwhich in turn inherit from Employee! As you can see this is starting to get a littlemessy. Things become even more complicated when we consider method over-riding. If both Player and Manager have a method called payBonus, whichmethod should be called for PlayerManager—or should it be overridden? Thisis sometimes referred to as the diamond problem given the diamond like shape ofthe problematic design (as illustrated in Fig. 24.4).
Although Java disallows multiple inheritance it does offer a type of multipleinheritance—interfaces. As we have seen in previous chapters, a class can inheritfrom only one base class in Java but can implement many interfaces. Up to Java 8this meant that the diamond problem could not arise as interfaces could containabstract methods only.
Fig. 24.4 A combinationof single and multipleinheritance
692 24 Java in Context

Since Java 8, however, interfaces can contain default methods. As discussedin Chap. 13, default methods are regular methods that contain an implemen-tation and reside in interfaces. These methods are automatically inherited by classesthat implement these interfaces.
You might think that this could potentially lead to the diamond problem onceagain if we implement two or more interfaces that contain default methods withthe same name. For example, let us look at the outline of a PlayerInterfacethat contains a default payBonus method:
You can see how we add a default method into an interface. We use thekeyword default and provide an implementation. In our implementation we havegiven a player a bonus of 1000. It is assumed all default methods are public,so we do not need to add this scope. Now consider a ManagerInterface thatalso contains a default payBonus method:
You can see a manager has been given a bonus of 2000. Now, consider thefollowing PlayerManager class that attempts to implement both of theseinterfaces:
If all we include in this PlayerManager class are implementations for theabstract methods contained in both the given interfaces this class will notcompile. The reason for this is to avoid the diamond problem, as it would not beclear which version of payBonus to inherit. To resolve this Java insists that weoverride the payBonus method with an implementation of our own. Here is onepossible solution:
public interface PlayerInterface{
// other regular abstract methods can be included here// a default method has an implementationdefault double payBonus(){
return 1000;}
}
public interface ManagerInterface{
// other regular abstract methods can be included here// this default method has the same name as the default method in the PlayerInterface default double payBonus(){
return 2000;}
}
public class PlayerManager implements PlayerInterface, ManagerInterface{
// implement abstract methods of PlayerInterface and ManagerInterface}
24.2 Language Size 693

In this case we have given a player manager a bonus of 3000. Note whenoverriding the payBonus method we must mark this as a public (unlike de-fault methods in interfaces which are always assumed to be public but notnecessarily marked as public).
Now we have overridden the payBonus method there is no conflict to resolveand the given class will compile. We can use either (or both) of the inheritedpayBonus implementations when overriding these methods. We do so by makingusing the super keyword along with the interface name. For example, we mightgenerate a player manager bonus by adding together the player bonus and themanager bonus as follows:
24.3 Language Reliability
The Java language developers placed a lot of emphasis on ensuring that programsdeveloped in Java would be reliable. One way in which they did this was to providethe extensive exception handling techniques that we covered in Chap. 14. Anotherway reliability was improved was to remove the ability for programmers to directlymanipulate pointers as we discussed earlier in this chapter. Errors arising frompointer manipulation in other languages are very common. A related problem,however, is still prevalent in Java but can be avoided to a large extent. This is theproblem of aliasing.
public class PlayerManager implements PlayerInterface, ManagerInterface{
// implement abstract methods of PlayerInterface and ManagerInterface@Overridepublic double payBonus(){
return 3000;}
}
public class PlayerManager implements PlayerInterface, ManagerInterface{
// implement abstract methods of PlayerInterface and ManagerInterface@Overridepublic double payBonus(){
// we can access the inherited payBonus methods when overriding these methods return PlayerInterface.super.payBonus()+ ManagerInterface.super.payBonus();
}}
694 24 Java in Context

24.3.1 Aliasing
Aliasing occurs when the same memory location is accessed by variables withdifferent names. As an example, we could create an object, obj1, of the Oblongclass as follows:
We could then declare a new variable, obj2, which could reference the sameobject:
Here obj2 is simply a different name for obj1—in other words an alias. Theeffect of creating an alias is illustrated in Fig. 24.5.
In practice a programmer would normally create an alias only with good reason.For example, let us assume we have an array of BankAccount objects calledaccountList and we wish to overwrite one BankAccount in the list with theadjacent BankAccount. We are able to make good use of aliasing by assigning anobject reference to a different object with a statement like:
accountList[i] = accountList[i+1];
After this instruction, accountList[i] is pointing to the same object asaccountList[i+1]. In this case that was the intention. However, a potentialproblem with a language that allows aliasing is that it could lead to errors arisinginadvertently. Consider for example a Customer class that keeps track of just twobank accounts. Here is the outline of that class:
Oblong obj1 = new Oblong (10, 20);
Oblong obj2 = obj1;
obj1 attributes of object stored here
obj2
Oblong obj1 = new Oblong(10, 20);
Oblong obj2 = obj1;
Computer Memory Java Instructions
Fig. 24.5 Copying an object reference creates an alias
24.3 Language Reliability 695
Consider the methods getFirstAccount and getSecondAccount. Ineach case we have sent back a reference to a private attribute, which is itself anobject. We did this to allow users of this class to interrogate details about the twobank accounts, with statements such as:
Let us assume that this produced the following output:
balance of first account = 250.0
This is fine, but the tempAccount object, that we have just created, is now analias for the private BankAccount object in the Customer class. It can beused to manipulate this private BankAccount object without going throughany Customer methods. To demonstrate this let us withdraw money from thealias:
Now let us go back and examine the bank account in the Customer class:
In this case we have retrieved the first bank account, and its balance in oneinstruction. We then display this balance, giving the following output:
balance of first account = 150.0
public class Customer{
// two private attributes to hold bank account details private BankAccount account1; private BankAccount account2;
// more code here// two access methods public BankAccount getFirstAccount()
{ return account1;
}
public BankAccount getSecondAccount() {
return account2; } }
BankAccount tempAccount = someCustomer.getFirstAccount();System.out.println("balance of first account = "+tempAccount.getBalance());
tempAccount.withdraw(100); // withdraw 100 from alias
double balance = someCustomer.getFirstAccount().getBalance();System.out.println("balance of first account = " + balance);
696 24 Java in Context

The balance of this internal account has been reduced by 100 without theCustomer class having any control over this! From this example you can see howdangerous aliases can be.
There are a few examples in this book where we have returned references toprivate objects, but we have been careful not to take advantage of this bymanipulating private attributes in this way. However, the important point is thatthey could be manipulated in that way. In order to make classes extra secure (forexample, in the development of critical systems), aliasing should be avoided.
The problem of aliases arises when a copy of an object’s data is required butinstead a copy of the object’s reference is returned. These two types of copies aresometime referred to as deep copy (for a copy of an object’s data) and shallow copy(for a copy of an object’s reference). By sending back a shallow copy, the originalobject can be manipulated, whereas a deep copy would not cause any harm to theoriginal object.
In order to provide such a deep copy, a class should define a method that returnsan exact copy of the object data. Such a method exists in the Object class, but thisshould be overridden in any user-defined class. The method is called clone. Wewant to send back copies of BankAccount objects, so we need to include aclone method in the original BankAccount class.
24.3.2 Overriding the clone Method
You have seen examples of overriding Object methods before. In Chap. 15, forinstance, we overrode the toString and hashCode methods in the Objectclass. There is one important difference, however, between the clone method andother Object methods such as hashCode and toString. The clone methodis declared as protected in the Object class, whereas methods such ashashCode and toString are declared as public.
Methods which are protected can only be called from within the samepackage (Object is in the java.lang package), or within subclasses. Methodswhich are protected are not part of the external interface of a class.
So if we wish to provide a clone method for any class, we are forced tooverride the clone method from Object. When we override this method wemust make it public and not protected. When overriding methods you areable to give them wider access modifiers but not less—so a protected methodcan be overridden to be public, but not vice versa. The return type of the clonemethod is always Object:
@Override// clone methods you write must have this interface public Object clone() // must be a public method{
// code goes here}
24.3 Language Reliability 697

There were sound security reasons for the Java developers forcing you tooverride the clone method if you wish objects of your classes to be cloned, ratherthan allow objects of all classes to use the clone method in the Object class;because you might be developing a class in which you did not want objects of thatclass to be cloned.
However, we do want to provide the original BankAccount class with aclone method. Such a method would allow the Customer class to send backclones of BankAccount objects, rather than aliases as it is currently doing. Hereis the outline of the BankAccount class with one possible implementation of sucha method:
Notice that in order to set the balance of the copied bank account we havedirectly accessed the private balance attribute of the copy:
This is perfectly legal as we are in a BankAccount class, so all Bank-Account objects created within this class can access their private attributes.Now, whenever we need to copy a BankAccount object we just call the clonemethod. For example:
The clone method sends back an exact copy of the original account, not a copyof the reference (see Fig. 24.6).
Now, whatever we do to the copied object will leave the original object unaf-fected, and vice versa.
public class BankAccount{
// private attributes as before private String accountNumber; private String accountName; private double balance;
// previous methods go here// now provide a clone method public Object clone(){
// call contsructor to create a new object identical to this object BankAccount copyOfThisAccount = new BankAccount (accountNumber, accountName);/* after this the balance of the two bank accounts might not be the same,
so copy the balance as well */copyOfThisAccount.balance = balance;// finally, send back this copy return copyOfThisAccount;
} }
copyOfThisAccount.balance = balance;
// create the original object BankAccount ourAccount = new BankAccount ("98765432", "Charatan and Kans");// now make a copy using the clone method, notice a type cast is required BankAccount tempAccount = (BankAccount) ourAccount.clone();// other instructions here
698 24 Java in Context

In a similar way, we can ensure that classes that contain BankAccount objectsdo not inadvertently send back references (and hence aliases) to these objects:
Now, referrring to our earlier example, the problem is removed because of theuse of the clone method in the Customer class, as illustrated in the fragmentbelow:
ourAccount attributes of object stored here
tempAccount attributes of object stored here
BankAccount ourAccount =
new BankAccount
(“98765432”, “Charatan and Kans”);
BankAccount tempAccount = (BankAccount) ourAccount.clone();
Computer Memory Java Instructions
Fig. 24.6 The clone method creates a copy of an object
public class Customer{
// as before here// next two methods now send back clones, not aliases public BankAccount getFirstAccount(){
return (BankAccount)account1.clone();}
public BankAccount getSecondAccount(){
return (BankAccount)account2.clone();}
}
Customer someCustomer = new Customer();
// some code to update someCutomer here
/* now a temporary variable is created to read details of first account but this is not an alias it is a clone */BankAccount tempAccount = someCustomer.getFirstaccount();System.out.println("balance of first account = " + tempAccount.getBalance();// assume the balance is displayed as 500 temp.withdraw(100); /* because temp is a clone the private BankAccount attribute
account1 is unaffected */System.out.println("balance of first account = " + someCustomer.getFirstAccount().getBalance());// the balance of the customer's first account will be still be 500
24.3 Language Reliability 699

24.3.3 Immutable Objects
We said that methods that return references to objects actually create aliases andthat this can be dangerous. However, these aliases are not always dangerous.Consider the following features of the original BankAccount class:
In this case the getAccountNumber method returns a reference to a pri-vate String object (accountNumber). This is an alias for the privateString attribute. However, this alias causes no harm as there are no Stringmethods that allow a String object to be altered. So, this alias cannot be used toalter the private String object.
Objects which have no methods to alter their state are known as immutableobjects. String objects are immutable objects. Objects of classes that youdevelop may also be immutable depending on the methods you have provided. Ifsuch objects are immutable, you do not have to worry about creating aliases of theseobjects and do not need to provide them with clone methods. For example, let’sgo back to the Library application (consisting of a collection of Book objects)that we developed in Chap. 15. Rather than showing you the code, Fig. 24.7 showsyou the UML design for the Library and Book classes.
As you can see, the Library class contains a collection of Book objects.These Book objects are part of the private books attribute in the Libraryclass. However the getBook method returns a reference to one of these Bookobjects and so sends back an alias. This is not a problem, however, because if youlook at the design of the Book class the only methods provided are get methods.
public class BankAccount{
private String accountNumber;
// other attributes and methods herepublic String getAccountNumber(){
return accountNumber;}
}
Book
-isbn : String -author : String- tle : String
+Book(String, String, String)+getISBN() : String +getAuthor() : String+getTitle() : String
Library-books : Map<String, Book>
+Library ( )+addBook (Book) : boolean+removeBook (String) : boolean+getTotalNumberOfBooks( ) : int+getBook (String) : Book+getAllBooks( ) : Set<Book>
*
Fig. 24.7 Design for the Library application
700 24 Java in Context

In other words, there are no Book methods that can alter the attributes of the Bookobject once the Book object has been created. A Book object is an immutableobject.
24.3.4 Using the clone Method of the Object Class
Although the clone method in the Object class is not made available as part ofyour class’s external interface, it can be used within classes that you develop. Inparticular, you might wish to use it within a clone method that you write yourself,as it does carry out the task of copying an object for you—albeit with somerestrictions.
The clone method from the Object class copies the memory contents allo-cated to the object attributes. This is sometimes referred to as a bit-wise copy. Thismeans that it makes exact copies of attributes that are of primitive type, and itmakes copies of references for attributes that are objects. Of course, a copy of areference gives you an alias—but if the object in question is immutable, this is not aproblem. This means that:
• if a class’s attributes are all of primitive type, then make your clone methodjust call the clone method of Object;
• if a class’s attributes include objects, and these objects are all immutable, thenagain make your clone method just call the clone method of Object;
• if a class’s attributes include any objects which are not immutable, then youcannot rely upon the clone method of Object to make a sensible copy and soyou must write your own instructions for providing a clone.
Bearing these points in mind, let us revisit the clone method for our Bank-Account class.
To make a copy of a BankAccount object we need a new bank account withan identical account number, name and balance. The balance attribute is of typedouble, so a bit-wise copy would be fine here. The account name and number areboth String objects; since strings are immutable a bit-wise copy is fine here also.This means the entire object can be safely copied using the clone method of
public class BankAccount{
// attributes private String accountNumber; private String accountName; private double balance;
public Object clone(){
// code goes here}
// other code here}
24.3 Language Reliability 701
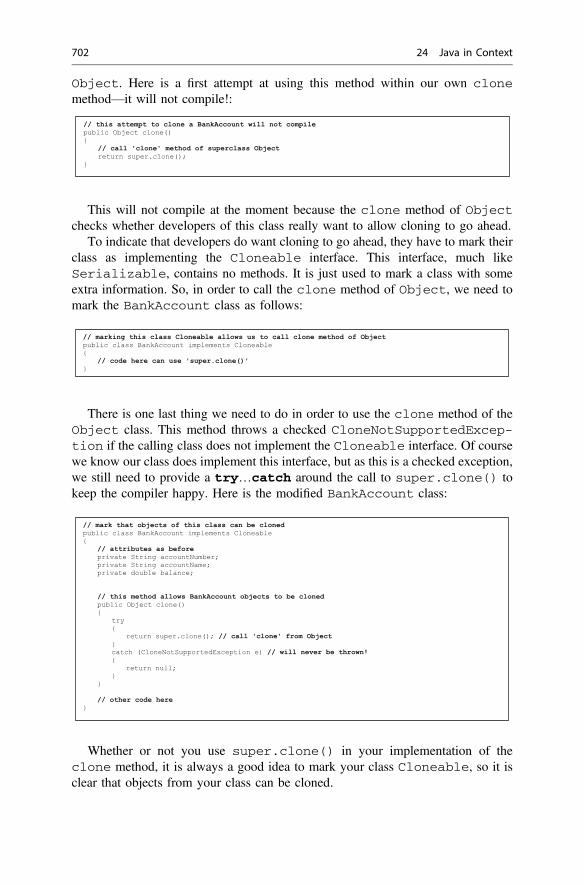
Object. Here is a first attempt at using this method within our own clonemethod—it will not compile!:
This will not compile at the moment because the clone method of Objectchecks whether developers of this class really want to allow cloning to go ahead.
To indicate that developers do want cloning to go ahead, they have to mark theirclass as implementing the Cloneable interface. This interface, much likeSerializable, contains no methods. It is just used to mark a class with someextra information. So, in order to call the clone method of Object, we need tomark the BankAccount class as follows:
There is one last thing we need to do in order to use the clone method of theObject class. This method throws a checked CloneNotSupportedExcep-tion if the calling class does not implement the Cloneable interface. Of coursewe know our class does implement this interface, but as this is a checked exception,we still need to provide a try…catch around the call to super.clone() tokeep the compiler happy. Here is the modified BankAccount class:
Whether or not you use super.clone() in your implementation of theclone method, it is always a good idea to mark your class Cloneable, so it isclear that objects from your class can be cloned.
// this attempt to clone a BankAccount will not compile public Object clone(){
// call 'clone' method of superclass Object return super.clone();
}
// marking this class Cloneable allows us to call clone method of Object public class BankAccount implements Cloneable{
// code here can use 'super.clone()'}
// mark that objects of this class can be cloned public class BankAccount implements Cloneable{
// attributes as before private String accountNumber; private String accountName; private double balance;
// this method allows BankAccount objects to be cloned public Object clone()
{ try
{ return super.clone(); // call 'clone' from Object
} catch (CloneNotSupportedException e) // will never be thrown!
{ return null;
} }
// other code here}
702 24 Java in Context

24.3.5 Copy Constructors
The previous sections demonstrated how clone methods can be used to avoidaliases by providing exact (deep copies) of an object. But, as you could see,implementing clone methods can be a little tricky and using clone methodsrequires type-casting. A popular alternative to this approach is to provide copyconstructors instead. Copy constructors provide a way of creating an exact copy ofan object from an object sent as a parameter to a constructor. Languages like C++automatically provide copy constructors, but in Java we have to implement themourselves. Doing so is fairly straightforward. Let’s return to the original Bank-Account class and assume we have not included a clone method. Instead wewill provide an additional copy constructor that receives a BankAccount objectas a parameter and copies this parameter’s attributes to make a new exact copy.Here is the outline of the class:
You can see that, as well as the original constructor, we have provided a copyconstructor that receives a BankAccount object and makes an exact copy bycopying across every attribute value of the parameter object:
The CopyConstructorDemo program below demonstrates how easy to is touse a copy constructor to create copies of objects. Note we are assuming atoString method has been included in the BankAccount class for ease oftesting:
{ 11"qtkikpcn"cvvtkdwvgu"jgtg
11"vjg"qtkikpcn"eqpuvtwevqtpublic BankAccount(String numberIn, String nameIn){
accountNumber = numberIn;accountName = nameIn;balance = 0;
}
11"vjg"eqr{"eqpuvtwevqtrwdnke"DcpmCeeqwpv*DcpmCeeqwpv"ceeKp+}"
ceeqwpvPwodgt"?"ceeKp0ceeqwpvPwodgt=ceeqwpvPcog"?"ceeKp0ceeqwpvPcog=dcncpeg"?"ceeKp0dcncpeg=
Ä"
11"qtkikpcn"ogvjqfu"jgtg"rnwu"c"vqUvtkpi"ogvjqf
}
public class BankAccount
// the copy constructorpublic BankAccount(BankAccount accIn){
accountNumber = accIn.accountNumber; // copy account numberaccountName = accIn.accountName; // copy account namebalance = accIn.balance; // copy account balance
}
24.3 Language Reliability 703
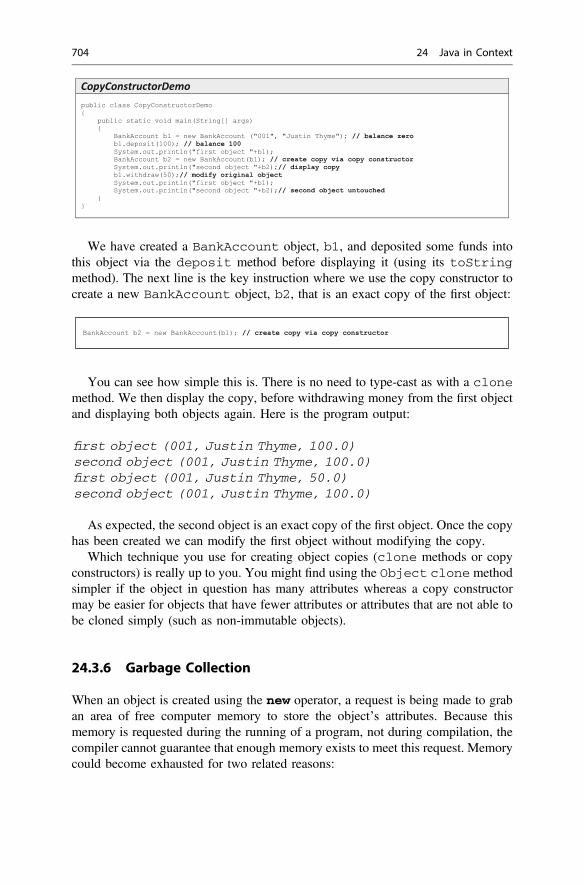
We have created a BankAccount object, b1, and deposited some funds intothis object via the deposit method before displaying it (using its toStringmethod). The next line is the key instruction where we use the copy constructor tocreate a new BankAccount object, b2, that is an exact copy of the first object:
You can see how simple this is. There is no need to type-cast as with a clonemethod. We then display the copy, before withdrawing money from the first objectand displaying both objects again. Here is the program output:
first object (001, Justin Thyme, 100.0)second object (001, Justin Thyme, 100.0)first object (001, Justin Thyme, 50.0)second object (001, Justin Thyme, 100.0)
As expected, the second object is an exact copy of the first object. Once the copyhas been created we can modify the first object without modifying the copy.
Which technique you use for creating object copies (clone methods or copyconstructors) is really up to you. You might find using the Object clone methodsimpler if the object in question has many attributes whereas a copy constructormay be easier for objects that have fewer attributes or attributes that are not able tobe cloned simply (such as non-immutable objects).
24.3.6 Garbage Collection
When an object is created using the new operator, a request is being made to graban area of free computer memory to store the object’s attributes. Because thismemory is requested during the running of a program, not during compilation, thecompiler cannot guarantee that enough memory exists to meet this request. Memorycould become exhausted for two related reasons:
CopyConstructorDemopublic class CopyConstructorDemo{
public static void main(String[] args) {
BankAccount b1 = new BankAccount ("001", "Justin Thyme"); // balance zerob1.deposit(100); // balance 100System.out.println("first object "+b1); BankAccount b2 = new BankAccount(b1); // create copy via copy constructorSystem.out.println("second object "+b2);// display copyb1.withdraw(50);// modify original objectSystem.out.println("first object "+b1);System.out.println("second object "+b2);// second object untouched
} }
BankAccount b2 = new BankAccount(b1); // create copy via copy constructor
704 24 Java in Context

• continual requests to grab memory are made when no more free memory exists;• memory that is no longer needed is not released back to the system.
These problems are common to all programming languages and the danger ofmemory exhaustion is a real one for large programs, or programs running in a smallmemory space. Java allows both of the reasons listed above to be dealt witheffectively and thus ensures that programs do not crash unexpectedly.
First, exception-handling techniques can be used to monitor for memoryexhaustion and code can be written to ensure the program terminates gracefully.More importantly, Java has a built-in garbage collection facility to release unusedmemory. This is a facility that regularly trawls through memory looking for loca-tions used by the program, freeing any locations that are no longer in use.
For example consider the program below.
Here, a new object is created each time we go around the loop. The memoryused for the previous object is no longer required. In a language like C++ thememory occupied by old objects would not be destroyed unless the programmeradded instructions to do so. So if the programmer forgot to do this, and thishappened on a large scale in your C++ program, the available memory space couldeasily be exhausted. The Java system, however, regularly checks for such unusedobjects in memory and destroys them.
Although automatic garbage collection does make extra demands on the system(slowing it down while it takes place), this extra demand is considered by many tobe worthwhile by removing a heavy burden on programmers. Nowadays manyprogramming languages, such as C# and Python, also include a garbage collectionfacility.
Testerimport java.util.Scanner;
public class Tester{
public static void main(String[] args) {
char ans;Scanner keyboard = new Scanner (System.in);Oblong object; // reference to object created here do
{ System.out.print("Enter length: "); double length = keyboard.nextDouble();System.out.print("Enter height: "); double height = keyboard.nextDouble();// new object created each time we go around the loop object = new Oblong(length, height);System.out.println("area = "+ object.calculateArea());System.out.println("perimeter = "+ object.calculatePerimeter());System.out.print("Do you want another go? "); ans = keyboard.next().charAt(0);
} while (ans == 'y' || ans == 'Y'); } }
24.3 Language Reliability 705

24.4 The Role of Java
While Java began life as a language aimed primarily at programming consumerdevices, it has evolved into a sophisticated application programming language;competing with languages such as C++, Python and C#, to develop a wide range ofapplications. The security and reliability offered by the language has allowed theuse of Java to be spread from desktop applications to network systems, web-basedapplications, set-top boxes, smart cards, computer games, smart phones and manymore. To see an example of the enormous range of applications powered by Javavisit the OracleTM site at: http://go.java.
Table 24.1 gives the TIOBE programming community index of the ten mostpopular programming languages for August 2018.1
You can see that Java is at the top of this table, as it was last year. In fact it hasbeen top of this index for many years.
24.5 What Next?
This chapter marks the end of our Java coverage for your second semester inprogramming. Although you have covered a lot of material, there is still more thatyou can explore. For example, we looked at how packages can be used to organiseand distribute our Java applications in Chap. 19. The Java Programming ModuleSystem (JPMS) was introduced with the release of Java 9 and provides an evenhigher level of organisation to group together a collection of packages. We lookedat Java applications that run over a local network in Chap. 23, but Java is also used
Table 24.1 TIOBE programming community index
Position Aug 2018 Position Aug 2017 Programming language
1 1 Java
2 2 C
3 3 C++
4 5 Python
5 6 Visual Basic.NET
6 4 C#
7 7 PHP
8 8 JavaScript
9 – SQL
10 14 Assembly Language
1The TIOBE index is a respected measure of the popularity of a programming language. Fordetails of the table itself and of how it was compiled go to https://www.tiobe.com/tiobe-index/.
706 24 Java in Context

for the development of large distributed enterprise systems over wide area networksas well as cloud-based systems. We have also had a thorough look at JavaFXthroughout this text but there is still much more you can find out about, includingFXML—a Java FX tailored XML language developed by OracleTM. The goodnews is that you are now well placed to explore all these areas as well as manymore. In the meantime, don’t forget you can get further information on the Javalanguage at the OracleTM website https://www.oracle.com/java/.
Now that you have completed two semesters of programming we are prettycertain that you will have come to realize what an exciting and rewarding anactivity it can be. So whether you are going on to a career in software engineering,or some other field in computing—or even if you are just going to enjoy pro-gramming for its own sake, we wish you the very best of luck for the future.
24.6 Self-test Questions
1. Distinguish between a pointer and a reference.
2. What does the term multiple inheritance mean and why does Java disallow it?
3. How do you implement a class that inherits two interfaces, both with adefault method with the same name?
4. Consider the following class:
(a) Explain why Critical objects are not immutable.
(b) Write fragments of code to create Critical objects and demonstrate theproblem of aliases.
(c) Develop a clone method in the Critical class (make use of the clonemethod of Object here).
(d) Write fragments of code to demonstrate the use of this clone method.
(e) What is the purpose of a copy constructor?(f) Develop a copy constructor for the Critical class.
(g) Write fragments of code to demonstrate the use of this copy constructor.
public class Critical{
private int value;
public Critical (int valueIn) {
value = valueIn; }
public void setValue(int valueIn) {
value = valueIn; }
public int getValue () {
return value; } }
24.5 What Next? 707

5. Look back at the classes from the two case studies of Chaps. 11, 12 and 21.
(a) Which methods in these classes return aliases?
(b) Which aliases could be dangerous?
(c) How can these aliases be avoided?
6. What are the advantages and disadvantages of a garbage collection facility in aprogramming language?
24.7 Programming Exercises
1. Implement the Critical class of self-test question 4 and then write a testerprogram to demonstrate the problem of aliases.
2. Amend the Critical class by adding a clone method as discussed inself-test question 4(c) and then amend the tester program you developed in theprevious programming exercise to demonstrate the use of this clone method.
3. Amend the Critical class further by adding the copy constructor discussedin self-test question 4(e) and then amend the tester program you developed inthe previous programming exercise to demonstrate the use of this copyconstructor.
4. Implement the changes you identified in self-test question 5, in order to removethe aliases that might have been present in the classes from the two case studies.
5. Review all the classes that you have developed so far and identify any problemswith aliases. Use the techniques discussed in this chapter to avoid these aliases.
708 24 Java in Context

Index
0–92D shapes, 281
Aabstract
class, 250, 254, 255, 261, 359, 587method, 253, 254, 268, 359, 360, 361, 369,
370, 371, 374, 378, 383, 385, 412, 413,436, 447, 458, 460, 482, 588, 649, 652,656, 692, 693, 694
Abstract Windows Toolkit (AWT), 266actors - use case model, 604actual parameters, 95, 101, 110, 116aggregation, 211, 310airport case study, see case study, airportAlert class, 518, 520algorithms
scheduling, 582aliasing, 694, 695, 697animations, 591, 593, 596, 597, 600anonymous class, 357, 364–368, 378, 391,
587, 591, 597, 598API, see Application Programming Interfaceappend mode - files, 535Application Programming Interface (API), 369,
453, 641applications
deploying, 563JavaFX, 267–269, 302, 310, 336, 337,
413–415, 496, 541, 553, 554, 577, 587,599, 677, 680, 682
running from command line, 268, 415, 553,560, 561, 575
application software, 3, 4, 16arithmetic operators, 25, 26array(s)
accessing elements, 119, 124, 126, 187, 394creating, 120, 148, 149, 186
elements, 120–122, 124–126, 137, 139,142, 185, 210, 232
index, 125–127, 137, 139, 143, 150, 154,186, 395
length attribute, 151, 156, 198, 200–202maximum, 122, 139, 140of objects, 163, 185, 186, 191returning from a method, 134membership, 141passing as parameters, 101, 129, 131ragged, 119, 155, 156, 160, 162search, 142, 143, 451sort, 457, 458, 463summation, 141two-dimensional, 119, 148–151, 153, 155,
156, 160, 232varargs, 131–134, 138, 159, 161
ArrayIndexOutOfBoundsException,394, 395, 405, 422
ArrayList class, 188, 193, 211, 315, 317,553, 376, 427–430, 450, 465
Arrays class, 456, 465, 647assignment, 23–28, 34, 46, 103, 124–126, 200asynchronous threads, 577, 599attributes
class, 109, 165, 224, 227, 236, 237, 328,376, 477, 570, 608, 701
length, 151, 156, 198, 199, 201, 202, 241private, 195, 262, 697, 698protected, 238, 262public, 195, 238, 262, 315static, 206, 676
autoboxing, 259AWT, see Abstract Windows Toolkit
Bbase class, 237, 394, 692behaviour specifications, 603–605, 624
© Springer Nature Switzerland AG 2019Q. Charatan and A. Kans, Java in Two Semesters, Texts in Computer Science,https://doi.org/10.1007/978-3-319-99420-8
709

BiConsumer interface, 447BiFunction interface, 378binary encoding, 530binary files – reading and writing, 539, 540BinaryOperator interface, 378BiPredicate interface, 378boolean type, 20, 122BorderPane class, 292, 293, 303BorderStroke class, 289, 294, 344, 346,
629, 631BorderStrokeStyle class, 289, 294,
344, 346, 629, 631BorderWidths class, 289, 294, 344, 346,
629, 631bounded type parameters, 379break statement, 56–59, 61, 65, 84–86BufferedReader class, 529, 537, 538, 542bugs, see errorsbusy waiting, 577, 585, 599byte type, 20
CC ++, 4, 164, 208, 690, 691, 703, 705, 706C# (C Sharp), 705, 706calling method, 100, 105, 191, 312, 401, 413card menu, 499, 513Cascading Style Sheets (CSS), 469, 491, 496,
639case statement, 55–58, 113, 115, 615case study
airport, 605student hostel, 308, 334–336, 350, 354
catch, 393, 401–406, 408, 421, 423, 540,573, 667, 673
catching an exception, 401, 422char type, 22, 23Character class, 362check boxes, 267, 282, 499, 509, 511, 512checked exceptions, 395, 422ChoiceDialog class, 518, 520, 523, 639claiming an exception, 397, 398, 422class(es)
anonymous, 357, 364–368, 378, 391, 587,591, 597, 598
attributes, 109, 165, 200, 203, 236–238,312, 339, 469, 529, 550, 570, 593, 701
abstract, 235, 250, 251, 254, 255, 261, 359collection, see collection classesfinal, 257inheritance extending with, 236, 246, 251,
260, 357, 359, 691inner, 364, 391
methods, 116, 117, 170, 205, 208, 229,238, 374, 396, 399, 402, 411, 412, 456,457
class method, 205, 208, 229, 238, 396, 411,412, 456, 457
classpath, 562, 564, 569, 574client-server model, 661, 676clone method, 689, 697–704, 707, 708Cloneable interface, 702code layout, 319collection classes
generic, 188, 378, 383Collection interface, 428, 435, 436, 645combo boxes, 499, 507context menu, 499, 503–506, 524Color class, 272, 296colours
creating, 646command line running applications from, 268,
415, 553, 560–563, 574, 575comments
Javadoc, 14, 307, 310, 313, 317, 318, 330,332, 334, 421, 424, 609, 621, 635
Comparable interface, 458–460, 463, 465,466
Comparator interface, 460, 461, 463, 465comparison operators, 46, 446compiling programs, 4composition, 211, 603, 607, 638compound containers, 301concatenation operator, 15, 30concatenating streams, 656concurrent processes, 578constants, creating, 25constructor
copy, 689, 703, 704, 707, 708default, 200, 201user defined, 200, 237
containment, 606, 607, 638context menus, 499, 503, 505, 524continue (key word), 86, 401convenience method, 279, 384, 470, 472, 475,
476, 482, 497, 503Consumer interface, 413, 435, 436, 442, 652CornerRadii class, 344, 515, 516, 635creating streams, 646critical sections, 584CSS, see Cascading Stye Sheets
Ddata types, 19–21, 163, 223, 565database, 353, 553, 564, 565, 567–575, 578,
642, 663
710 Index

DataInputStream class, 540, 664–666,669, 676, 682
DataOutputStream class, 539, 545, 664,677, 685
DecimalFormat class, 297, 301, 344, 555declaring variables, 21, 35decrement operator, 29default methods, 360, 361, 693, 694deploying applications, 563derived class, 237design
case study airport, 607, 625, 639case study student hostel, 309, 310, 335,
336program, 35
Dialog class, 348, 499, 518, 520, 523, 671,680
diamond problem, 692, 693Driver class, 564DriverManager class, 567double colon operator, 374documentation, 317, 318, 330, 425, 453, 482,
562, 564, 567, 575, 604dot operator, 169, 172, 186double type, 21, 23, 24, 179Double class, 287do…while loop, 79–84, 90driver(s)
JDBC, 564drop-down menus, 499, 500
Eembedding
images, 483videos, 486webpages, 469
embedded software, 4, 5, 16encapsulation, 169, 195–197, 224, 238encoding files, 527, 530enum, 609, 610enumerated types
implementing in Java, 603, 609, 622using with switch statements, 610, 615
enhanced for loop, 119, 138, 139, 141, 143,158, 187, 190, 316, 331, 427, 434–436,438–440, 446, 447, 464, 623, 639
environment variable, 562, 574equals method
defining, 450String class, 433, 445Object class, 450
errorscompile-time errors, 564runtime errors, 564, 569
event-handlingkey events, 477mouse events, 470
exception(s)catching, 401, 403, 422checked, 393, 395, 398, 422, 587, 622, 702claiming, 397, 398, 422documenting, 421, 422exception classes creating, 419exception class hierarchy, 395in JavaFX applications, 415handling, 393, 395, 414, 544, 694, 705IOException, 394NullPointerException, 408, 445RuntimeException, 398, 400, 417–419throwing, 394, 401, 417, 422, 424unchecked, 393, 395, 422–424
executable JAR files, 563expressions, 26, 27, 29, 30, 105, 106, 279, 280,
341, 357, 358, 368–371, 374, 387, 652,655
extending classes with inheritance, 236, 357
Ffields data, 570files
access, 527, 545, 550append mode, 535binary, 530, 539, 540, 550closing, 403, 534encoding, 530, 549executable JAR, 563, 575, 639file-handling, 527, 530file pointers, 531, 545, 548object serialization, 542random access, 527, 531, 544, 550serial access, 527, 531, 550streams, 530text, 7, 530–532, 535, 536, 539, 541, 549,
551final
class, 257method, 257, 654variable, 25
final operations-streams, 656, 657finally, 403–408, 423, 534, 573File class, 488file pointers, 531, 545, 548File Transfer Protocol (FTP), 662, 663FileInputStream class, 540FileReader class, 537FileWriter class, 534float type, 21Float class, 380, 389
Index 711

FlowPane class, 292, 303, 485fonts
creating, 274, 295for loop
enhanced, 119, 137–139, 141, 143, 158,187, 190, 316, 331, 427, 434–436, 438,439, 446, 447, 464, 623, 639
forEach loop/method, 427, 435, 436,438–440, 446, 447, 455, 464, 465, 623,639, 645, 646, 649, 652
formattingnumbers, 297
Function interface, 648functional interfaces, 383, 387FXML, 707
Ggarbage collection, 704, 705, 708generics
out of the box interfaces, 378upper bound, 357, 379, 389wild card, 357, 382, 389, 482
generic collection classes, 428Graphical User Interfaces (GUIs)
design, 304, 334, 336exceptions, 525
GridPane class, 290, 291, 303GUIs, see Graphical User Interfaces
HhashCode method, 450–453, 464, 606, 614,
697HashMap class, 427, 443, 446, 451, 452HashSet class, 427, 436, 437Hbox class, 267, 278, 279, 288, 289, 292, 303heavyweight components - user interface, 266host - network programming, 353hostel case study, see case study student hostelHTML, see Hypertext Markup LanguageHypertext Markup Language (HTML), 317,
318, 491Hypertext Transfer Protocol (HTTP), 662
IIDE, see integrated development environmentif statement, 41, 43–45, 47–49, 51, 55, 59, 60,
68, 72, 73, 87, 126, 140, 176, 216, 248,393, 410, 441
if…else statementnested, 41, 53, 55
Image class, 484ImageView class, 484immutable objects, 689, 700, 701, 704
import statement, 32, 411, 429, 430, 555,556, 574
increment operator, 29indentation, 319infinite streams, 656InetAddress class, 672information hiding, 196inheritance
defining, 236extending classes with, 236, 357implementing, 237, 361, 363
init method, 587initializing
attributes, 208variables, 24, 103, 208
inner class, 357, 364, 391input
devices, 527, 528from keyboard, 32, 33stream, 527, 529, 544, 664–667, 669, 676,
677, 682, 683validation, 65, 77–79, 92, 154, 287, 350,
531input events
key events, 469, 473, 477mouse events, 469, 470
InputStream class, 396, 666InputStreamReader class, 529instantiation, 167int type, 20, 21, 23, 24Integer class, 259, 288, 344, 397integrated development environment (IDE), 6,
16integration testing, 307, 308, 320, 354, 624io package, 399, 553interface
abstract methods, 359–361, 692default methods, 360, 361, 693, 694functional, 369, 371, 374, 378, 383, 384,
387, 436, 458, 460, 582, 649, 652, 656out of the box, 378, 648static methods, 360, 378, 461
intermediate operations - streams, 642, 648,658
Internet Protocol (IP) address, 567, 663is-a-kind-of relationship, 237, 257iteration
do...while loop, 65, 66, 79–84, 90, 92enhanced for loop, 119, 138, 139, 141,
143, 158, 187, 190, 316, 331, 427,434–436, 438–440, 446, 447, 464, 623,639
712 Index

for loop, 65–73, 76, 77, 80, 84, 85, 90–92,119, 120, 126–128, 137, 138, 141, 143,150, 155, 158, 435, 537
forEach loop, 427, 435, 436, 438, 440,446, 447, 455, 464, 465, 623, 639, 646,649, 652
vs streams, 643while loop, 65, 66, 77–80, 83, 84, 90, 92,
115, 154, 192, 441, 540, 666, 667Iterator interface, 440Iterator objects, 427, 440, 441
JJava Archive (JAR) files
executable, 563, 575, 639Java API, see Application Programming
InterfaceJava byte code, 5, 8, 16, 555Java Collections Framework (JCF), 428, 463Java Database Connectivity (JDBC), 553, 564Java Development Kit (JDK), 6, 165, 317Javadoc
@author tag, 317, 318@param tag, 318, 330@return tag, 318@throws tag, 421, 422, 611, 614, 620,
635, 639@version tag, 317, 318, 344, 609–611,
614, 620, 635JavaFX
containers, 265init method, 587Scene class, 274Stage class, 271, 507start method, 268, 271, 274, 301,
336–340, 517, 567, 582, 585, 587, 671,680
stop method, 268, 587, 682Java Runtime Environment (JRE), 6, 578Java Virtual Machine (JVM), 5, 16JVM, see Java Virtual Machine
Llambda expressions, 265, 279, 280, 284, 287,
341, 358, 368–371, 373–375, 378, 379,384, 387, 389, 391, 412, 413, 435, 436,442, 443, 461, 473, 475, 477, 482, 582,646, 649, 652–655, 657
layout policiesBorderLayout, 292FlowLayout, 292
lazy evaluation, 641, 642, 659length attribute–arrays, 151, 156, 198,
200–202
lightweight components, 266lightweight process, 578List interface, 383, 428–431, 456, 460logical operators, 51, 52loops
do…while loop, 65, 66, 79–84, 90, 92enhanced for loop, 119, 138, 139, 141,
143, 158, 187, 190, 316, 331, 427,434–436, 438–440, 446, 447, 464, 623,639
for loop, 65–73, 76, 77, 80, 84, 85, 90–92,119, 120, 126–128, 137, 138, 141, 143,150, 155, 158, 435, 439, 446, 535
picking the right loop, 83while loop, 65, 66, 77–80, 83, 84, 90, 92,
115, 154, 192, 441, 540, 666, 667
Mmain method, 12, 29, 35, 36, 41, 95, 97–99,
103, 107, 112, 116, 117, 129, 133, 136,161, 162, 165, 172, 185, 197, 207, 208,215, 253, 268–270, 274, 311, 337, 374,399, 402, 561, 562
Map interface, 383, 428, 443math package, 380, 575MediaPlayer class, 488menu-driven programs, 112, 117, 219, 258,
264, 531menus
popup, 505pull-down, 499, 500, 503
methodabstract, 253, 254, 268, 359–361, 369–371,
374, 378, 383–385, 412, 413, 482, 588,649, 692, 693
actual parameters, 95, 101, 110, 116calling, 95, 98, 100, 105, 132, 165, 191,
227, 278, 312, 401, 413, 416, 621, 680class, 205, 208, 229, 238, 396, 411, 412,
456, 457constructor, 167declaring and defining, 96formal parameters, 95, 100, 101, 103, 107,
108, 202header, 13, 97, 134, 224, 371, 397, 398,
400, 402, 403, 430, 584helper, 212, 268, 348, 382, 383, 517, 518,
520, 532, 542, 595, 598, 621, 671, 680overloading, 109, 110, 116, 235, 245, 249,
261, 385, 390overriding, 235, 245, 246, 248, 249, 261,
385, 390, 692, 694, 697return value, 102, 103, 129, 186, 318
method references, 374, 461, 462
Index 713

modal dialogues, 499, 505modifier, 205, 235, 257, 261, 263, 560, 584,
697modulus operator, 26, 27, 72, 105multiple inheritance
diamond problem, 692, 693multitasking, 577, 578, 641, 658mutual exclusion threads, 584MySQL™ database, 564, 569
NNested statements, 53, 55Netbeans™, 7, 8, 564, 569network programming
client-server architecture, 686remote databases, 642
non-modal dialogues, 524null value, 171, 213, 216, 232, 316, 379,
408–410, 412, 413, 416, 445, 446, 660number formatting, 297
Oobject encoding, 527, 549, 551Object class, 235, 257, 258, 262, 449–451,
585, 697, 698, 701, 702ObjectInputStream class, 542object-orientation
benefits of, 223, 235object-oriented programming languages, 236,
358ObjectOutputStream class, 542–544object serialization, 542operators
arithmetic, 25concatenation, 3, 15, 30increment/decrement, 29logical, 51, 52overloading, 385, 390
Optional class, 393, 410–413, 423OracleTM, 707out of the box interfaces, see genericsoutput
devices, 527, 528, 549stream, 529, 530, 549, 642, 665–667, 670,
672, 682to file, 337, 534, 563to screen, 9, 14, 15, 528, 535
overloading method, 109, 110, 116, 235, 245,249, 261, 385, 390
overriding method, 697
Ppackage(s)
accessing, 555
Java API, 369deploying, 563developing, 558, 559, 609hierarchy, 554, 555scope, 559, 560, 574
parallelism - streams, 658parameters
actual, 95, 101, 110, 116arrays, 129, 134, 189formal, 95, 100–103, 107, 108, 110, 116,
202objects, 195, 209, 482, 562varargs, 131–134, 138
parameterized types, 376platform independence, 5pointers, 293, 531, 545, 548, 689–691, 694polymorphic types, 357, 385polymorphism, 95, 110, 116, 245, 246, 357,
385, 386, 390popup menus, 505Predicate interface, 378, 648PrintWriter class, 535primitive types, 19–21, 30, 176, 185, 190, 191,
259, 376, 452, 545private, 195, 197, 200, 204, 205, 212, 215,
238, 239, 246, 247, 262, 337, 338, 341,606, 620, 637, 696–698, 700
processes concurrent, 578, 582producer–consumer relationship, 584program design, 35, 311programming languages, 3–5, 20, 110, 163,
223, 236, 358, 705, 706protected, 238, 239, 246, 262, 697pseudocode, 19, 35, 37, 38, 43, 78, 95, 104,
140, 141, 143, 308, 316, 331, 335,341–344, 354, 538
public, 11–13, 195, 197, 200, 201, 205, 238,262, 315, 328, 559, 560, 606, 612, 614,621, 693, 694, 697
pull-down menus, 499, 500
Qquantum, 582
Rradio buttons, 499, 509, 511–513, 525random access files, 527, 544, 545, 550record data, 567reference, 121, 122, 130, 138, 167, 168, 171,
185–187, 205, 210, 211, 255, 256, 336,374, 375, 379, 408, 430, 488, 556, 558,574, 588, 593, 595, 674, 677, 681, 683,687, 690, 695–701, 707
repetition, see iteration
714 Index

ResultSet class, 567, 568Runnable interface, 383, 580, 582run-time error, 564
Sscalar types, see primitive typesScanner class, 19, 31, 32, 165, 168, 169,
175, 179, 209, 395, 396, 424, 529,556–558
scenario testing, 625scheduling algorithms, 582scheduling thread, 582scope, see variable scopeScrollPane class, 485selection, 41–43, 49, 54, 59, 65, 67, 106, 338,
642sequence, 12, 41, 42, 50, 59, 65, 173, 269, 428,
529, 600, 658serial access files, 527, 531, 550Serializable interface, 543, 544, 550, 551serialization object, 542ServerSocket class, 661, 663, 665Service class, 577, 590Set interface, 428, 436–438short type, 20sleep method, 585–587sliders, 479, 481, 482, 497sockets, 661–663, 673Socket class, 663, 665, 666, 672, 686software
application software, 3, 4, 16embedded software, 4, 16systems software, 3, 4, 16, 528
sort methodsin the Arrays class, 456in the Collections class, 456
source code, 3–5, 7, 16, 230, 550, 561specification, 227, 307, 349, 603, 604, 606,
624SQL, see Structured Query Languagesql package, 567StackPane, 291, 303, 513standard error stream, 529standard input stream, 529standard output stream, 529stateful operations - streams, 641, 657, 659stateless operations - streams, 658state transition diagram threads, 577, 585static attribute, 206, 207, 676static, 11, 13, 97, 100, 195, 205–209, 269,
328, 336, 360, 361, 378, 461, 463, 488,575, 586, 656, 676
static method, 360, 461
streamscollecting results, 654concatenating, 654, 656creating, 645, 646infinite, 656intermediate operations, 642, 645, 648, 658parallelism, 658terminating operations, 652vs iteration, 643
Stream API, 641stream - files, 530string(s)
comparing, 176, 445methods, 163, 174, 176using with switch statements, 610
String class, 163, 172–174, 176, 177, 385,433, 445, 458, 544
Structured Query Language (SQL), 565, 568,572, 573, 642, 706
student hostel case study, see case studysubclass, 237–240, 246, 249, 254, 256, 257,
359, 361, 385, 386, 395, 398, 400SunTM, 6super, 239, 244, 694supplier interface, 378superclass, 237–239, 244, 248, 249, 251, 254,
257, 359, 380, 386, 420, 449, 691system software, 3, 4, 16, 528Swing, 266, 292switch statement
with enumerated types, 610, 615, 622with strings, 174
synchronizing threads, 584syntax, 5, 17, 32, 35, 77, 79, 131, 132, 161,
274, 357, 369, 372, 401, 403, 412, 417,491, 690
TTabPane class, 603, 626Task class, 577, 587termination operations - streams, 645testing, 217, 223, 253, 258, 308, 310–312, 317,
320, 321, 328, 330, 335, 350, 354, 357,421, 449, 603, 604, 624, 625, 639
test log, 307, 321, 323, 324, 328, 334, 350, 354text encoding, 530, 551text files, 531text formatting, 539TextInputDialog class, 348, 669, 671,
680this, 135, 136, 170Thread class, 580, 582threads
Index 715

asynchronous, 577, 599execution, 577, 582, 584, 585, 599lightweight process, 578mutual exclusion, 577, 584scheduling, 582states, 585state transition diagram, 577, 585synchronizing, 584
throwing exceptions, 401, 417, 424throw command, 393, 417throws clause, 393, 398time-slicing, 577, 578, 582, 599tool tips GUI, 635toString method, 258, 311–313, 316, 317,
321, 324, 328, 334, 403, 431, 446, 447,449, 453, 457, 464, 465, 610, 622, 643,703, 704
try…catch block, 401, 567try-with-resources construct, 393, 423, 549,
623, 624two-dimensional arrays
creating, 148initializing, 149ragged, 155
txt package, 297, 344, 555type casting, 242, 244, 583type inference, 189, 370, 377, 429, 482
UUML, see Unified Modeling LanguageUnaryoperator interface, 656unboxing, 259, 463unchecked exceptions, 395, 422Unicode, 20, 122, 178, 208, 396, 452, 477,
530, 539, 542, 583Unified Modeling Language (UML), 195–197,
199–202, 206, 211, 212, 223, 224, 228,
230, 231, 235, 237, 239, 246, 247, 260,261, 307, 308, 310, 328, 330, 331, 334,336, 357, 360, 386, 448, 454, 455, 464,466, 467, 603, 604, 606–608, 638, 700
unit testing, 307, 308, 311, 320, 624upper bound, see genericsuse-case model, 603, 604user-defined constructor, 237user interface, 9, 285, 304, 335, 353, 525, 587,
603, 626util package, 31, 47, 429, 430, 456, 553,
556, 557, 575, 606
Vvalidation
input, 65, 77, 78, 92, 153, 154, 287, 350,531
varargs, 131–134, 138, 159, 161variable(s)
declaring, 21, 23, 33, 35, 100, 119, 167,205
environment, 562, 574local, 107, 108, 114, 200, 208, 244, 364,
371scope, 107
Vbox class, 267, 278, 279, 284, 288, 289, 292,295, 299, 340, 503, 513, 568, 627, 628
WWebView class, 482, 489–491wild card, see genericswhile loop, 79–83, 90wrapper classes, 190, 259, 287, 376, 389, 463
XXML, 570, 572, 707
716 Index